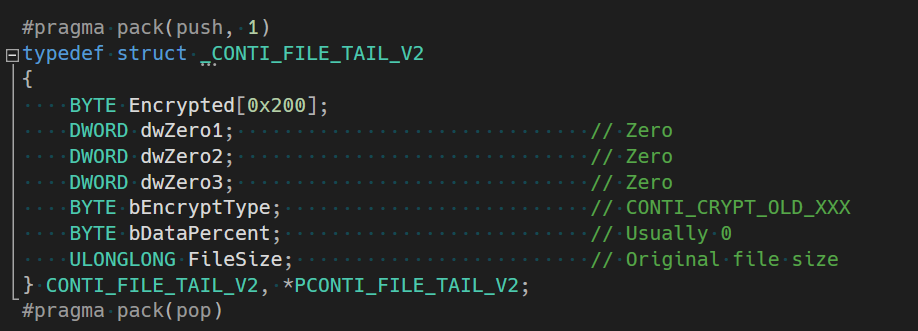
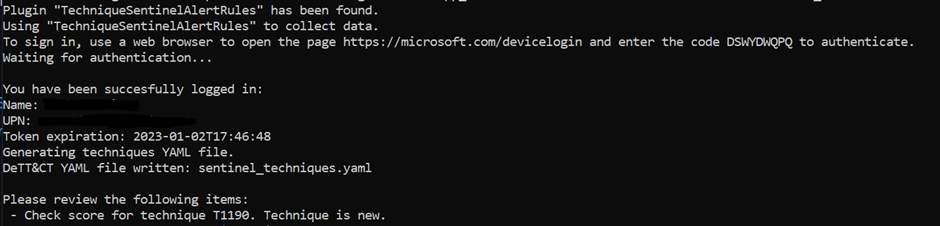
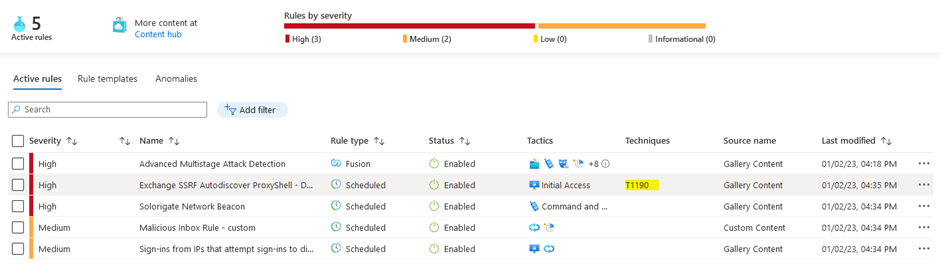
Emulation with Qiling
Qiling is an emulation framework that builds upon the Unicorn emulator by providing higher level functionality such as support for dynamic library loading, syscall interception and more.
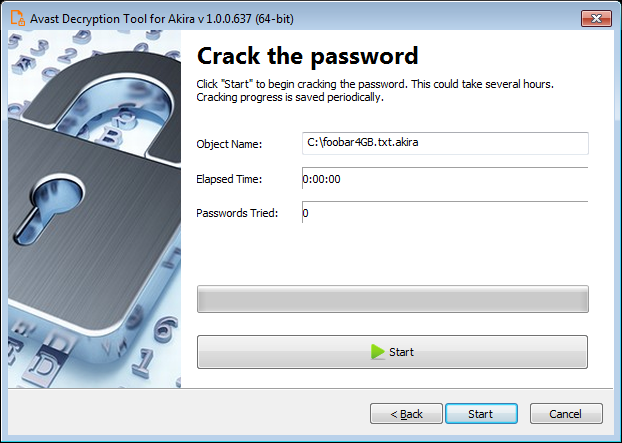
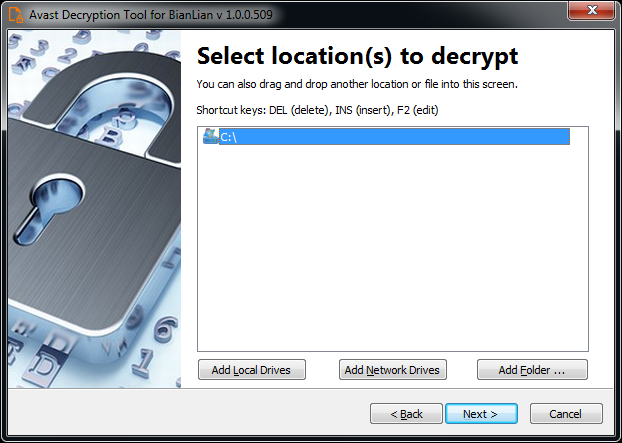
In this Labs post, we are going to look into Qiling and how it can be used to emulate a HTTP server binary from a router. The target chosen for this research was the NEXXT Polaris 150 travel router.

The firmware was unpacked with binwalk which found a root filesystem containing lots of MIPS binaries.

HTTPD Startup
Before attempting to emulate the HTTP server, it was required to build a basic understanding of how the device initialises. A quick check of the unpacked rcS startup script (under /etc_ro) contained a helpful comment:
#!/bin/sh

... snip ...

# netctrl : system main process,
# all others will be invoked by it.
netctrl &

... snip ...
Simple enough. The helpful comment states that netctrl will spawn every other process, which should include the HTTP server. Loading netctrl into Ghidra confirmed this. A call to getCfmValue() is made just before httpd is launched via doSystem().

netctrl doesn’t do much more than launching programs via doSystem().
Having a quick look at httpd (spawned by netctrl) in Ghidra shows that it is a dynamically linked MIPS binary that uses pthreads.
![]()
Emulation Journey
When emulating a dynamically linked Linux ELF binary, Qiling requires a root filesystem and the binary itself. The filesystem is managed in a similar way to a chroot environment, therefore the binary will only have access to the provided filesystem and not the host filesystem (although this can be configured if necessary).
Since binwalk extracted the root filesystem from the firmware already, the root filesystem can simply be passed to Qiling. The code below does just that and then proceeds to run the /bin/httpd binary.
from qiling import Qiling
from qiling.const import *

def main():
  rootfs_path = "_US_Polaris150_V1.0.0.30_EN_NEX01.bin.extracted/_40.extracted/_3E5000.extracted/cpio-root"
  ql = Qiling([rootfs_path + "/bin/httpd"], rootfs_path, multithread=True, verbose=QL_VERBOSE.DEBUG)
  ql.run()

if __name__ == "__main__":
  main()
Passing multithread=True explicitly instructs Qiling to enable threading support for emulated binaries that use multiple threads, which is required in this case as httpd is using pthreads.
Starting off with verbose=QL_VERBOSE.DEBUG gives a better understanding of how the binary operates as all syscalls (and arguments) are logged.
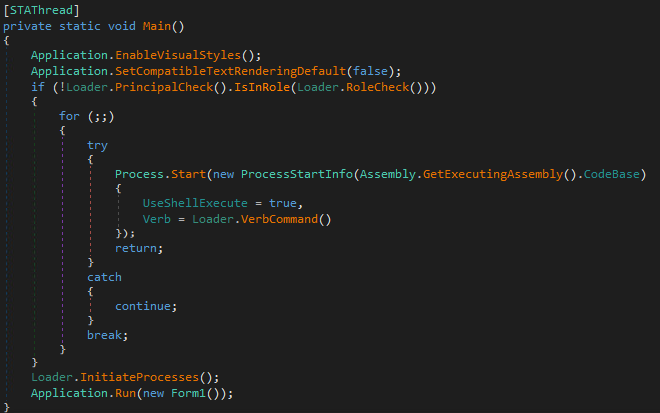
Running this code presents an issue. Nothing printed to stdout by httpd is shown in the terminal. The very first line of code in the httpd main function uses puts() to print a banner, yet this output cannot be seen.
![]()
This is where Qiling hooks can be very useful. Instead of calling the real puts() function inside of the extracted libc a hook can be used to override the puts() implementation and call a custom Python implementation instead. This is achieved using the set_api() function Qiling provides, as show in the code snippet below.
def puts_hook(ql: Qiling):
params = ql.os.resolve_fcall_params({'s': STRING})
ql.log.warning(f"puts_hook: {params['s']}")
return 0

def main():

  ... snip ...

  ql.os.set_api("puts", puts_hook, QL_INTERCEPT.CALL)

  ... snip ...
Every call to puts() is now hooked and will call the Python puts_hook() instead. The hook resolves the string argument passed to puts() and then logs it to the terminal. Since QL_INTERCEPT.CALL is used as the last argument to set_api() then only the hook is called and not the real puts() function. Hooks can also be configured to not override the real function by using QL_INTERCEPT.ENTER / QL_INTERCEPT.EXIT instead.
Running the binary again shows the expected output:

Now the server is running but no ports are open. A simple way to diagnose this is to change the verbosity level in the Qiling constructor to verbose=QL_VERBOSE.DISASM which will disassemble every instruction as its ran.

Emulation hangs on the instruction located at 0x0044a8dc. Navigating to this offset in Ghidra shows a thunk that is calling pthread_create() via the global offset table.

The first cross reference to the thunk comes from the __upgrade() function which is only triggered when a firmware upgrade is requested through the web UI. The second reference comes from the InitWanStatisticTask() function which is always called from the httpd main function. This is likely where the emulation is hanging.
This function doesn’t appear to be critical for the operation of the HTTP server so doesn’t necessarily need to be executed.
There’s a few ways to tackle this:
- Hook and override
pthread_create()orInitWanStatisticTask() - Patch the jump to
pthread_create()with a NOP
To demonstrate the patching capabilities of Qiling the second option was chosen. The jump to pthread_create() happens at 0x00439f3c inside the InitWanStatisticTask() function.
![]()
To generate the machine code that represents a MIPS NOP instruction, the Python bindings for the Keystone framework can be used. The NOP bytes can be then written to the emulator memory using the patch() function, as shown below.
def main():

  ... snip ...

  ks = Ks(KS_ARCH_MIPS, KS_MODE_MIPS32)
  nop, _ = ks.asm("NOP")
  ql.patch(0x00439f3c, bytes(nop))

  ... snip ...
The emulator doesn’t hang anymore but instead prints an error. httpd attempts to open /var/run/goahead.pid but the file doesn’t exist.

Looking at the extracted root filesystem, the /var/run/ directory doesn’t exist. Creating the run directory and an empty goahead.pid file inside the extracted root filesystem gets past this error.

Emulation now errors when httpd tries to open /dev/nvram to retrieve the configured LAN IP address.

Searching for the error string initWebs: cannot find lanIpAddr in NVRAM in httpd highlights the following code:

getCfmValue() is called with two arguments. The first being the NVRAM key to retrieve, and the second being a fixed size out buffer to save the NVRAM value into.
The getCfmValue() function is a wrapper around the nvram_bufget() function from /lib/libnvram-0.9.28.so. Having a closer look at nvram_bufget() shows how /dev/nvram is accessed using ioctl() calls.

Qiling offers a few options to emulate the NVRAM access:
- Emulate the
/dev/nvramfile usingadd_fs_mapper() - Hook
ioctl()calls and match on the arguments passed - Hook the
getCfmValue()function at offset0x0044a910
The last option is the most direct and easiest to implement using Qiling hooks. This time the hook_address() function needs to be used which only hooks a specific address and not a function (unlike the previously used set_api() function).
This means that the hook handler will be called at the target address and then execution will continue as normal, so to skip over the getCfmValue() function implementation the hook must manually set the program counter to the end of the function by writing to ql.arch.regs.arch_pc.
The body of the handler resolves the NVRAM key and the pointer to the NVRAM value out buffer. A check is made for the key lanIpAddr and if it matches then the string 192.168.1.1 is written to the out buffer.
def getCfmValue_hook(ql: Qiling):
  params = ql.os.resolve_fcall_params(
    {
      'key': STRING,
      'out_buf': POINTER
    }
  )

  nvram_key = params["key"]
  nvram_value = ""
  if nvram_key == "lanIpAddr":
    nvram_value = "192.168.1.1"

  ql.log.warning(f"===> getCfmValue_hook: {nvram_key} -> {nvram_value}")

  # save the fake NVRAM value into the out parameter
  ql.mem.string(params["out_buf"], nvram_value)

  # force return from getCfmValue
  ql.arch.regs.arch_pc = 0x0044a92c

def main():

  ... snip ...

  ql.hook_address(getCfmValue_hook, 0x0044a910)

  ... snip ...
httpd now runs for a few seconds then crashes with a [Errno 11] Resource temporarily unavailable. The error message is from Qiling and related to the ql_syscall_recv() handler which is responsible for emulating the recv() syscall.
![]()
Error number 11 translates to EWOULDBLOCK / EAGAIN which is triggered when a read is attempted on a non-blocking socket but there is no data available, therefore the read would be blocked. To configure non-blocking mode the fcntl() syscall is generally used, which sets the O_NONBLOCK flag on the socket. Looking for cross references to this syscall highlighted the following function at 0x004107c8:

socketSetBlock() takes a socket file descriptor and a boolean to disable non-blocking mode on the file descriptor. The current file descriptor flags are retrieved at line 17 or 24 and the O_NONBLOCK flags is set / cleared at line 20 or 27. Finally, the new flags value is set for the socket at line 30 with a call to fcntl().
This function is an ideal candidate for hooking to ensure that O_NONBLOCK is never enabled. By hooking socketSetBlock() and always forcing the disable_non_block argument to be any non-zero value should make the function always disable O_NONBLOCK.
Inside the socketSetBlock_hook the disable_non_block argument is set to 1 by directly modifying the value inside the a1 register:
def socketSetBlock_hook(ql: Qiling):
    ql.log.warning("===> socketSetBlock_hook: disabling O_NONBLOCK")
    # force disable_non_block
    ql.arch.regs.a1 = 1

def main():
    ... snip ...
    ql.hook_address(socketSetBlock_hook, 0x004107c8)
    ... snip ...
If this helper function didn’t exist then the fcntl() syscall would need to be hooked using the set_syscall() function from Qiling.
Running the emulator again opens up port 8080! Navigating to localhost:8080 in a web browser loads a partially rendered login page and then the emulator crashes.

The logs show an Invalid memory write inside a specific thread. There aren’t many details to go off.

Since this error originates from the main thread and the emulated binary is effectively single threaded (after the NOP patch) the multithread argument passed to the Qiling constructor was changed to False.
![]()
Restarting the emulation and reloading the login page worked without crashing!

NVRAM stores the password which is retrieved using the previously hooked getCfmValue() function. After returning a fake password from getCfmValue_hook() the device can be logged into.
def getCfmValue_hook(ql: Qiling):
    ... snip ...
    elif nvram_key == "Password":
        nvram_value = "password"
    ... snip ...
Logging in causes the emulator to crash once again. This time, /proc/net/arp is expected to exist but the root filesystem doesn’t contain it.

Simply creating this file in the root filesystem fixes this issue.

After re-running the emulation everything seems to be working. The webpages can be navigated to without the emulator crashing! To make the pages fully functional required NVRAM values must exist which is an easy fix using the getCfmValue_hook.

Conclusion
Hopefully this Labs post gave a useful insight into some of the capabilities of Qiling. Qiling has many more features not covered here, including support for emulating bare metal binaries, GDB server integration, snapshots, fuzzing, code coverage and much more.
Finally, a few things to note:
- Multithreading support isn’t perfect
- More often than not `Qiling1 will fail to handle multiple threads correctly
- Privileged ports are remapped to the
original port + 8000unless the emulation is ran as a privileged user - Reducing the verbosity with the
verboseparameter can significantly speed up execution Qilingdocumentation is often missing or outdated
The full code used throughout this article can be found below:
from qiling.os.const import *
from qiling.os.posix.syscall import *
from keystone import *


def puts_hook(ql: Qiling):
    params = ql.os.resolve_fcall_params({'s': STRING})
    ql.log.warning(f"===> puts_hook: {params['s']}")
    return 0


def getCfmValue_hook(ql: Qiling):
    params = ql.os.resolve_fcall_params(
        {
            'key': STRING,
            'out_buf': POINTER
        }
    )

    nvram_key = params["key"]
    nvram_value = ""
    if nvram_key == "lanIpAddr":
        nvram_value = "192.168.1.1"
    elif nvram_key == "wanIpAddr":
        nvram_value = "1.2.3.4"
    elif nvram_key == "workMode":
        nvram_value = "router"
    elif nvram_key == "Login":
        nvram_value = "admin"
    elif nvram_key == "Password":
        nvram_value = "password"

    ql.log.warning(f"===> getCfmValue_hook: {nvram_key} -> {nvram_value}")

    # save the fake NVRAM value into the out parameter
    ql.mem.string(params["out_buf"], nvram_value)
    # force return from getCfmValue
    ql.arch.regs.arch_pc = 0x0044a92c


def socketSetBlock_hook(ql: Qiling):
    ql.log.warning(f"===> socketSetBlock_hook: disabling O_NONBLOCK")
    # force disable_non_block
    ql.arch.regs.a1 = 1


def main():
    rootfs_path = "_US_Polaris150_V1.0.0.30_EN_NEX01.bin.extracted/_40.extracted/_3E5000.extracted/cpio-root"
    ql = Qiling([rootfs_path + "/bin/httpd"], rootfs_path, multithread=False, verbose=QL_VERBOSE.DEBUG)

    ql.os.set_api("puts", puts_hook, QL_INTERCEPT.CALL)

    # patch pthread_create() call in `InitWanStatisticTask`
    ks = Ks(KS_ARCH_MIPS, KS_MODE_MIPS32)
    nop, _ = ks.asm("NOP")
    ql.patch(0x00439f3c, bytes(nop))

    ql.hook_address(getCfmValue_hook, 0x0044a910)
    ql.hook_address(socketSetBlock_hook, 0x004107c8)

    ql.run()


if __name__ == "__main__":
    main()
The post Emulation with Qiling appeared first on LRQA Nettitude Labs.