Top things that you might not be doing (yet) in Entra Conditional Access – Advanced Edition

Introduction
In the first post of the top things that you might not be doing (yet) in Entra Conditional Access, we focused on basic but essential security controls that I recommend you checking out if you do not have them implemented already. In this second part, we’ll go over more advanced security controls within Conditional Access that, in my experience, are frequently overlooked in environments during security assessments. However, they can help you better safeguarding your identities.
Similar to my previous blog post, the list of controls provided here is not exhaustive. The relevance of each control may vary depending on your specific environment. Moreover, you should not rely on those only, but instead investigate whether they would bring any value in your environment. I also encourage you to check out other Conditional Access controls available to make sure your identities are correctly protected.
This article focusses on features that are available in Entra ID Premium P1 and P2 licenses. Therefore, if none of those licenses are available, check my previous blog post on how to protect identities in Entra ID Free: https://blog.nviso.eu/2023/05/02/enforce-zero-trust-in-microsoft-365-part-1-setting-the-basics/. Note that other licenses could also be required depending on the control.
Additionally, should you need any introduction to what Entra Conditional Access is and which security controls are available, feel free to have a look at this post: https://blog.nviso.eu/2023/05/24/enforce-zero-trust-in-microsoft-365-part-3-introduction-to-conditional-access/.
Finally, if you have missed part 1, feel free to check it out: https://blog.nviso.eu/2024/02/27/top-things-that-you-might-not-be-doing-yet-in-entra-conditional-access/.
Entra Conditional Access security controls
Make sure all Operating Systems are covered in your current Conditional Access design
License requirement: Entra ID Premium P1
When performing Entra Conditional Access assessments, we usually see policies to enforce controls on Windows, and sometimes Android and iOS devices. However, other platforms such as MacOS, Windows Phone, and Linux are sometimes forgotten. This can represent a significant gap in your overall security defense as access from those platforms is not restricted by default. You could use all the Conditional Access policy features, but if you do not include them, all your effort will be in vain.
Indeed, it is well known from attackers that “nonstandard” platforms are sometimes forgotten in Conditional Access. By trying to access your environment using them, they might be able to simply bypass your Conditional Access (CA) policies. It is therefore necessary to make sure that your security controls are applied across all operating systems.
The next points will shed some light on controls that you can implement to support all platforms.
Don’t be afraid of blocking access, but only in a considered and reasonable way 
License requirement: Entra ID Premium P1
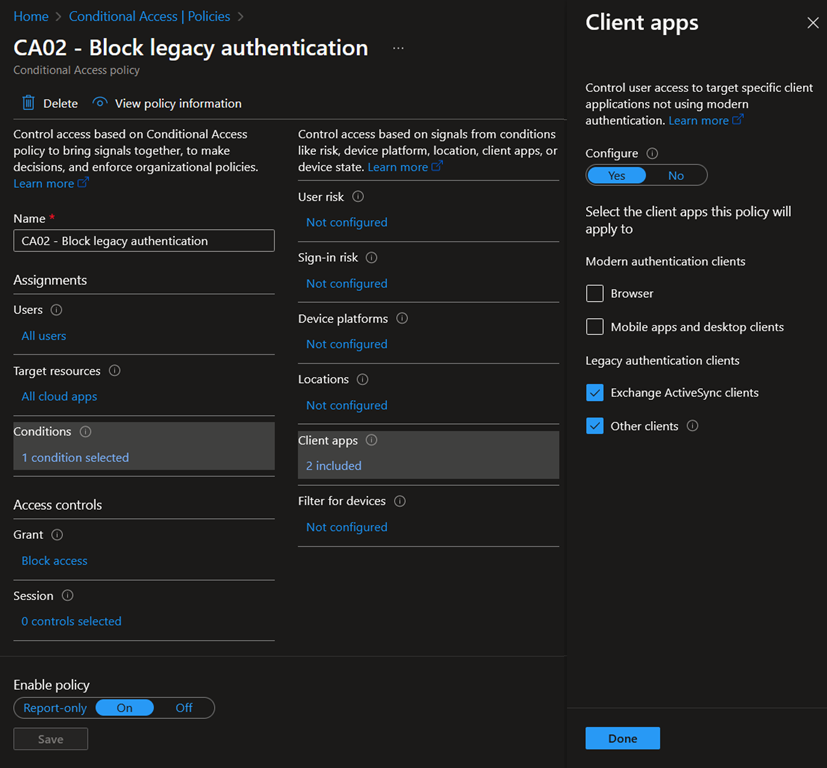
Based on our numerous assessments over the years, we have observed that ‘Block’ policies are typically not implemented in Conditional Access. While those policies can definitely have an adverse impact on your organization and end users, specific actions, device platforms, or client applications (see part 1), should be blocked.
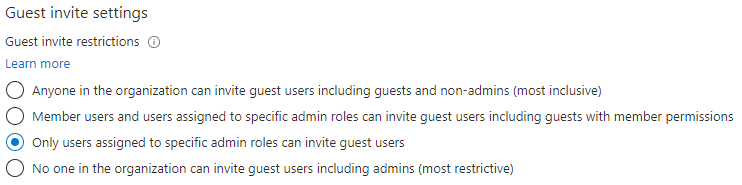
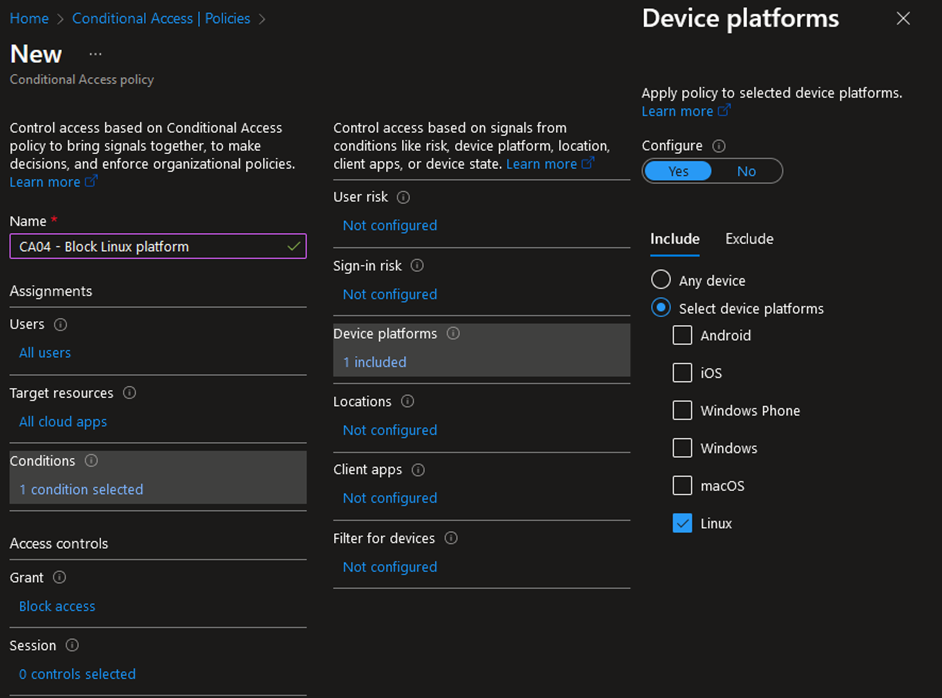
For example, if you do not support Linux in your environment, why not simply block it? Moreover, if Linux is only required for some users, Conditional Access allows you to be very granular by targeting users, devices, locations, etc. Therefore, platforms can be blocked for most use cases, and you can still allow specific flows based on your requirements. This principle can be extended to (guest) user access to applications. Should guest users have access to all your applications? No? Then, block it. Such control effectively decreases the overall attack surface of your environment.
I highly recommend you giving a thought to ‘Block’ policies. Moreover, they could be extended to many other scenarios on top of the device platforms and (guest) user access to cloud apps.
Before moving on to the next point, I want to highlight that such policies can be very powerful. So powerful that they could lock you out of your own environment. To avoid that, please, always exclude emergency / break-the-glass accounts. In addition, never rollout Conditional Access policies in production before proper testing. The report-only policy mode can be of great help for that. Moreover, the What If tool is also a very good tool that you should be using to assess the correctness of your policies. Once the potential impact and the policy configuration have been carefully reviewed, gradually roll out policies by waves over a period of a few weeks with different pilot groups.
Use App Protection Policies to reduce the risk of mobile devices
License requirement: Entra ID Premium P1 and Microsoft Intune
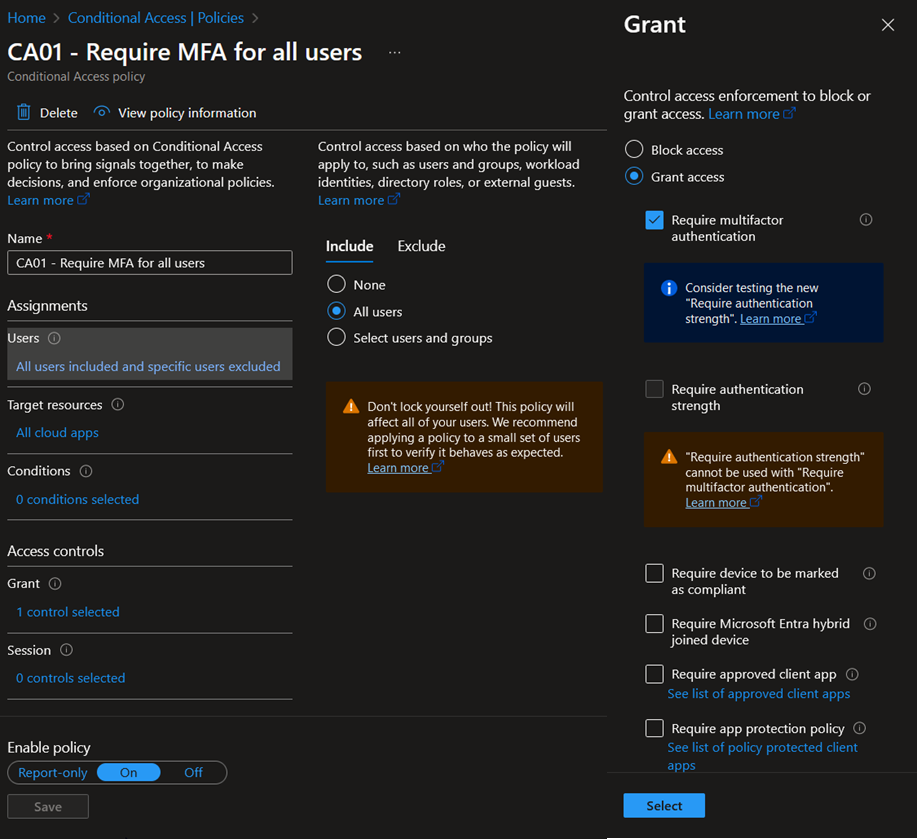
If access from mobile devices, i.e., Android and iOS, is required for end user productivity for example, App Protection Policies (APPs) can help you preventing data loss on devices that you may not fully manage. Note that App Protection Policies are also now available for Windows devices but are still in preview at the time of writing (beginning of March 2024).
In short, App Protection Policies are a set of rules that ensures that data access through mobile apps is secure and managed appropriately, even on personal devices. APPs can enforce the use of Microsoft-managed applications, such as Microsoft apps, enforce data encryption, require authentication, restrict actions between managed and unmanaged applications, wipe the data from managed applications, etc.
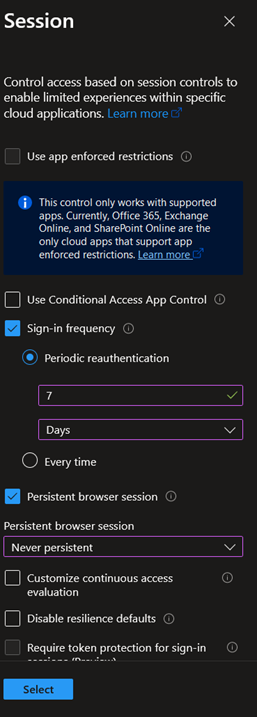
For that purpose, the following Grant control can be configured:
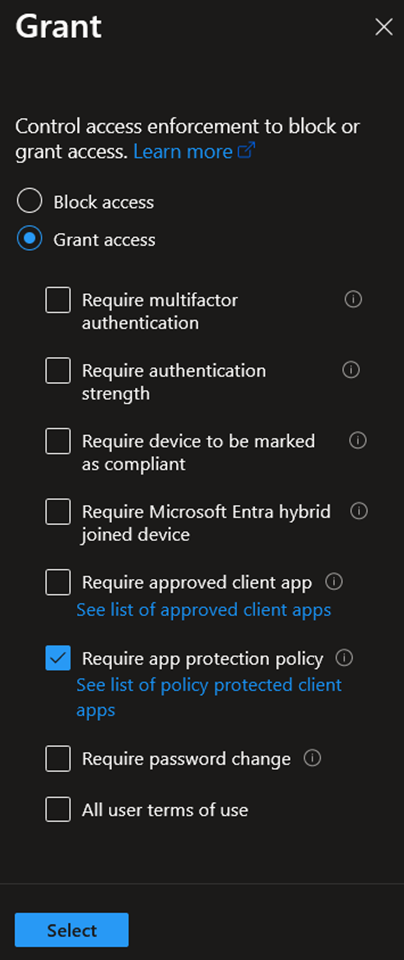
Of course, to be effective, App Protection Policies should be created in Intune and assigned to users. Because of that, Microsoft Intune licenses are required for users in scope of that control.
Moreover, together with the Exchange Online and SharePoint Online app enforced restrictions capabilities, you can allow, restrict, or block access from third-party browsers on unmanaged devices.
Require Authentication Strengths instead of standard multi-factor authentication
License requirement: Entra ID Premium P1
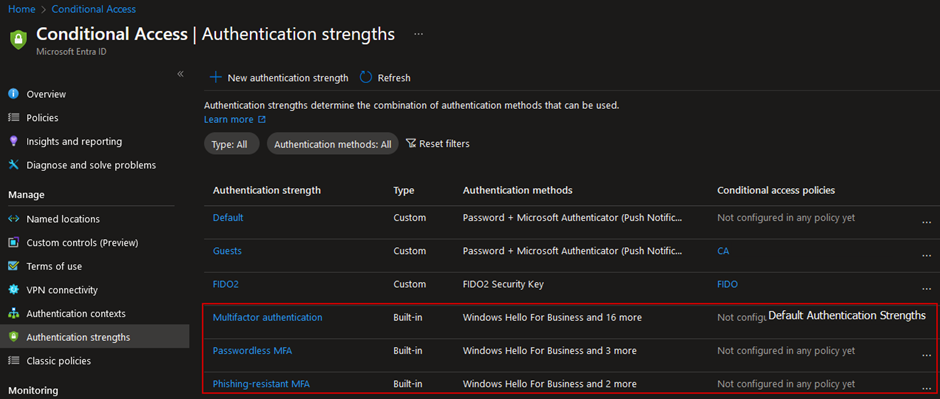
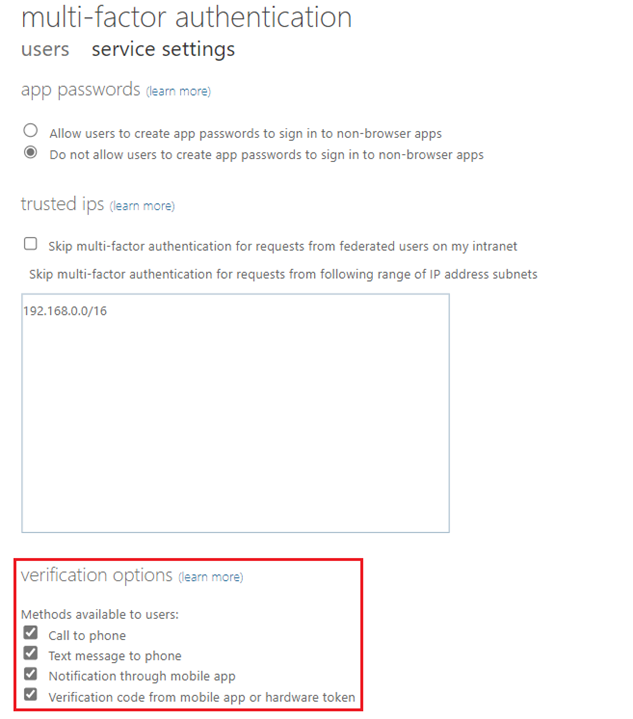
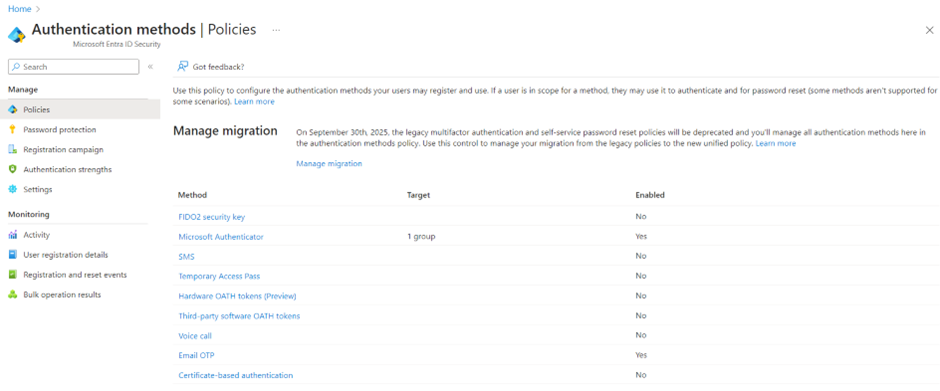
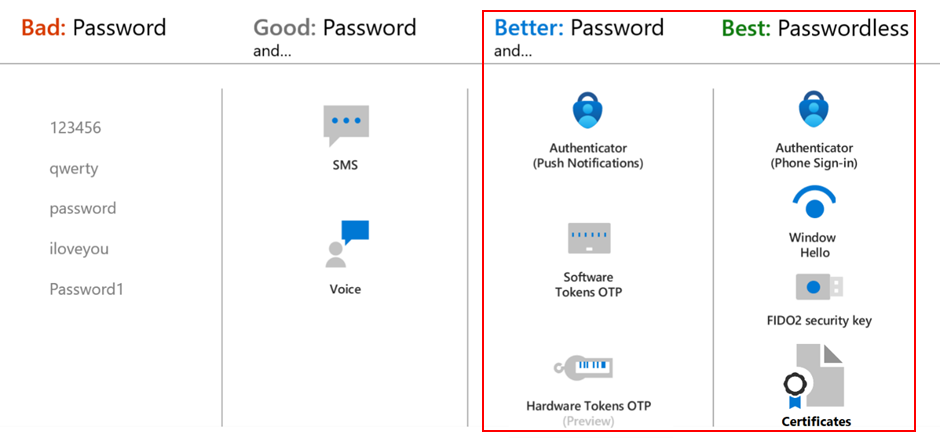
Authentication Strength policies in Entra Identity Conditional Access enable administrators to mandate certain authentication methods, such as FIDO2 Security Keys, Windows Hello, Microsoft Authenticator, and passwordless authentication. Please note that the authentication methods available to users will be determined by either the new authentication method policies or the legacy MFA policy.
By configuring Authentication Strengths policies and integrating them in Conditional Access policies, you can further restrict (external) user access to sensitive applications or content in your organization. Built-in policies are also available by default:
One common use case for Authentication Strength policies is to ensure that user accounts with privileged access are protected by requiring phishing-resistant MFA authentication, thus restricting access to authorized users only. In Conditional Access, this goal can be achieved through multiple methods:
- Secure Privileged Identity Management role activation with Conditional Access policies (see next point for more details);
- Include privileged Entra ID roles in Conditional Access, by selecting directory roles in the policy assignments;
- Integrate protected actions into Conditional Access policies to enforce step-up authentication when users perform specific privileged and high-impact actions (see next point for more details).
Other use cases include enforcing stricter authentication requirements when connecting from outside a trusted location, when a user is flagged with a risk in Identity Protection, or when accessing sensitive documents in SharePoint Online.
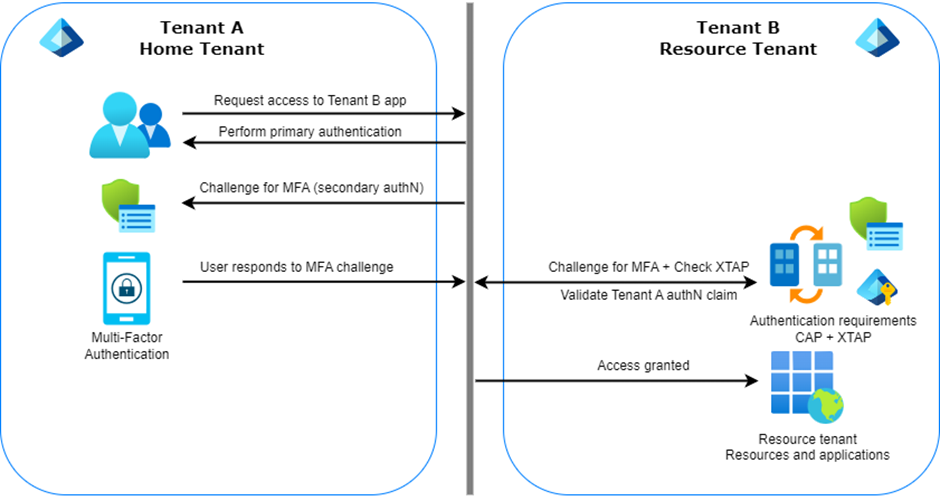
Finally, as mentioned above, external users (only those authenticating with Microsoft Entra ID, at the time of writing) can be required to satisfy Authentication Strengths policies. The behavior will depend on the status of the cross-tenant access settings, as explained in my previous blog post.
Use Authentication Context to protect specific actions and applications
License requirement: Entra ID Premium P1
Authentication Contexts in Conditional Access allow to extend the locations or actions covered by Conditional Access policies. Indeed, they can be associated with applications, SharePoint Online sites or documents, or even specific privileged and high impact actions in Entra ID.
Before diving into how they can be used, we will quickly go over how they can be created. Authentication Context is a feature of Microsoft Entra Conditional Access and can therefore be managed from the Conditional Access service. Before being able to use them, they need to be created and published to applications:

Once they have been created and published, we can use them in Conditional Access policies. Let’s take a closer look at the different scenarios described above:
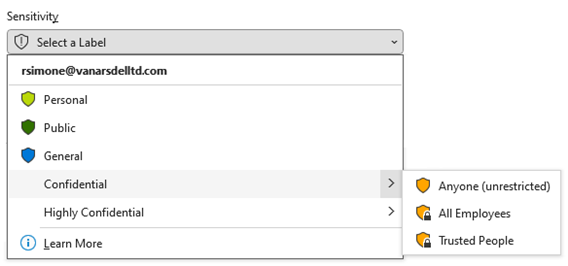
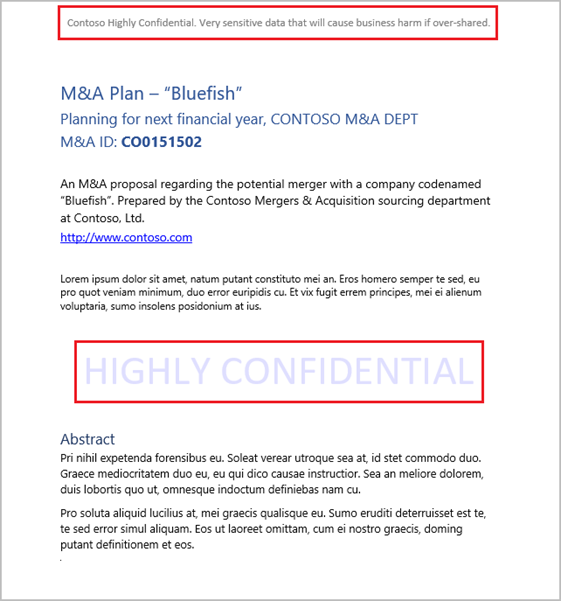
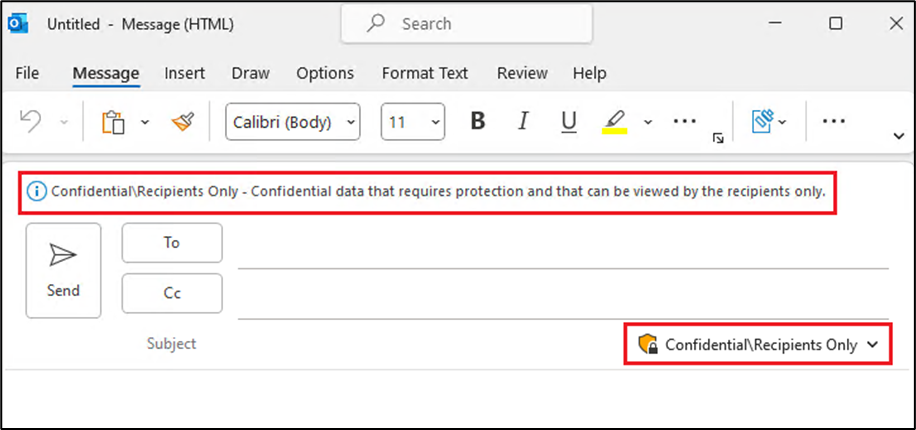
- Integrate Authentication Contexts in Sensitivity Labels to require step-up authentication or enforce restrictions when accessing sensitive content:
In this first example, the Super-Secret sensitivity label has been configured to require step-up authentication when accessing documents with that label assigned:

If we configure the below CA policy with the target resource set to the ‘Sensitive documents’ Authentication Context, users will have to satisfy the phishing-resistant MFA requirements, unless it has already been satisfied, when accessing documents labeled with the Super-Secret label:

- Integrate Authentication Context with Privileged Identity Management roles to enforce additional restrictions on role activation (PIM requires Entra Premium P2 licenses):
Role settings in Entra Privileged Identity Management can be changed to require Authentication Context on role activation. That way, administrators can ensure that high privileged roles are protected against abuse and only available to authorized users themselves:
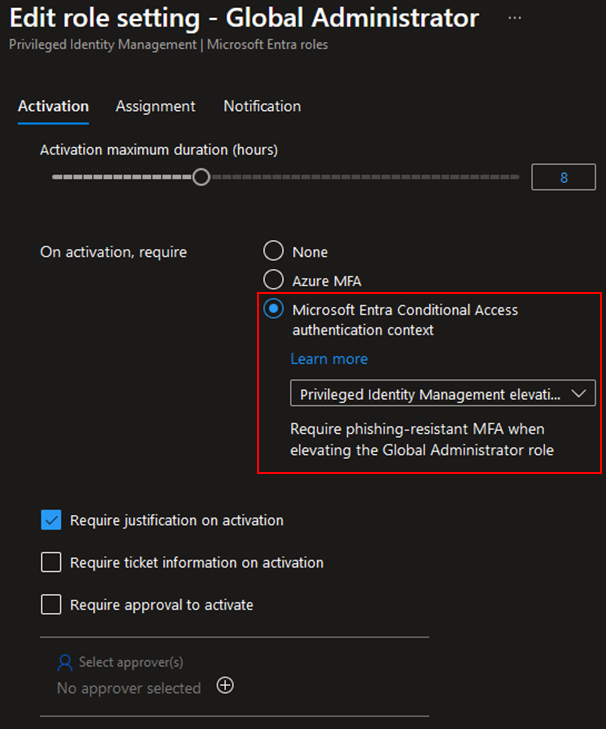
When such control is configured in PIM, users will not be prompted to perform MFA twice if the specified MFA requirement has been previously met during the sign-in process. On the other hand, they will be prompted with MFA if it hasn’t been met before.
Similar to the previous point, the same principle applies to the creation of the Conditional Access policy. The custom PIM Authentication Context should be set as the target resource, and the conditions and access controls configured to meet your security requirements.
Important note: when changing the configuration of high privileged roles, which allow to modify the configuration of Microsoft Entra PIM, make sure you are not locking yourself out of the environment by having at least one active assignment configured.
- Integrate Entra ID Protected Actions with Conditional Access policies:
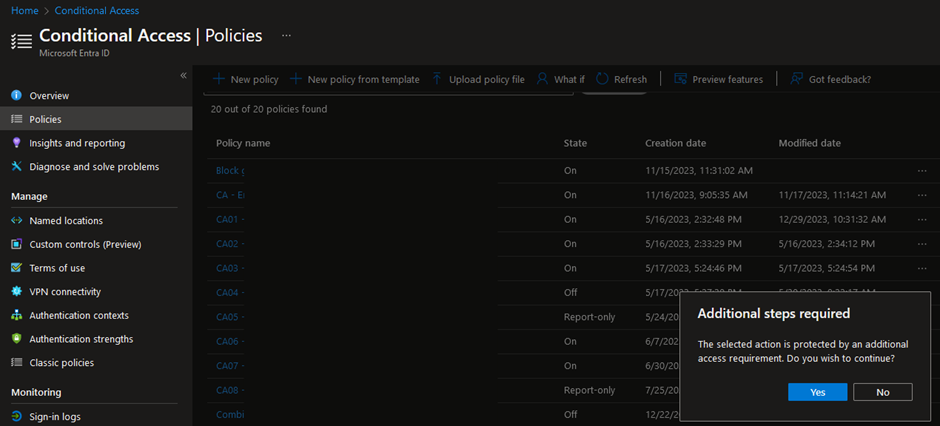
Finally, by integrating Entra Identity Protected Actions with Conditional Access, administrators can introduce an extra layer of security when users attempt specific actions, such as modifying Conditional Access policies. Once again, make sure you are not locking yourself out here.
With Protected Actions, you can require strong authentication, enforce a shorter session timeout or filter for specific devices. To create a Protected Action, administrators first need to create an Authentication Context, which will then be assigned to a set of actions in the ‘Entra ID Roles and administrators’-page:
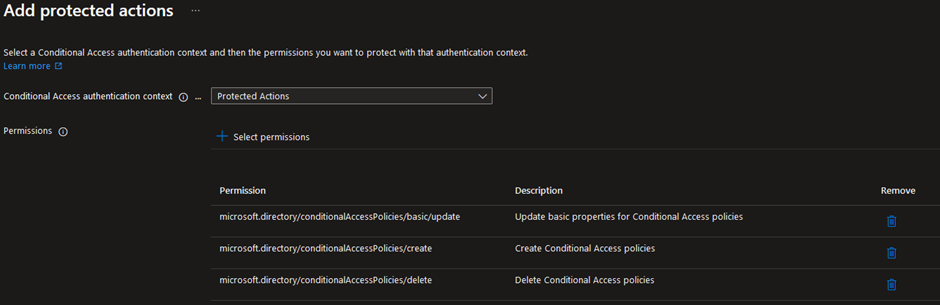
In this example, the ‘Protected Actions’ Authentication Context has been linked to permissions that allow updating, creating, and deleting Entra Conditional Access policies.
Then, in a Conditional Access policy, set the target resource to the ‘Protection Actions’ Authentication Context and define the conditions as well as the access controls.
Once in effect, administrators will be required to meet the configured authentication requirements and/or conditions each time they attempt to modify Conditional Access policies:
Use Device Filters in Conditional Access policies conditions
License requirement: Entra ID Premium P1
Last but not least, the ‘Filter for devices’-condition in Entra Conditional Access is a powerful tool that can be used for multiple purposes. Indeed, by using this condition, it is possible to target specific devices based on their ID, name, Ownership, compliance or join state, model, operating system, custom attributes, etc.
Besides the common scenarios of using the device filter condition to target compliant, non-compliant, registered, or joined devices, it can be used to restrict or block access based on more advanced conditions. For instance, you might require that only devices with certain operating system versions, specific device IDs, or device names that follow a particular pattern are allowed to access specific applications. Custom attributes can also be useful for more granularity, if needed.
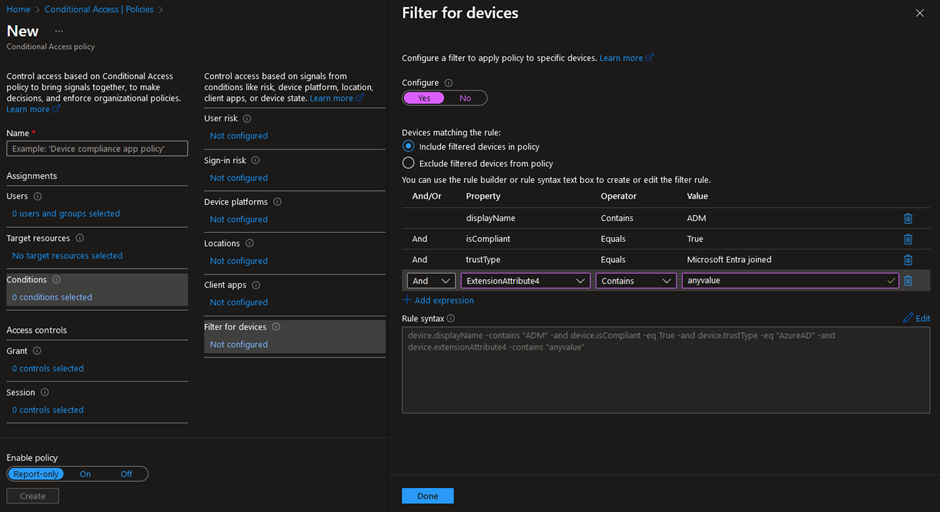
The following filter will target devices meeting the following criteria:
- The display name of the device should contain ‘ADM’;
- The device should be seen as compliant, in Microsoft Intune, for instance;
- The device state should be Microsoft Entra joined;
- And the ExtensionAttribute4 should contain ‘anyvalue’. Extension Attributes for Entra ID registered devices can be added and customized using the Microsoft Graph REST API.
More information about the different operators and properties can be found in the ‘Resources’-section below.
Bonus: Restrict authentication flows
License requirement: Entra ID Premium P1
The ability to restrict authentication flows in Microsoft Entra Conditional Access, which is still in preview, has been introduced end of February (when I was writing this blog post). I included it to make sure that you are aware of this new feature. However, I do not recommend implementing it in production before it is released in General Availability (at least without proper investigation and testing!).
This functionality has been introduced as a new condition in Microsoft Entra Conditional Access policies and allows to restrict device code flow and authentication transfer.
Firstly, the device code flow has been introduced to facilitate user sign-in on input-constrained devices, referred to as ‘device A.’ With this flow, users can authenticate on ‘device A’ by using a secondary device, referred to as ‘device B.’ They do this by visiting the URL: https://login.microsoftonline.com/common/oauth2/deviceauth. Once the user successfully signs in on ‘device B,’ ‘device A’ will receive the necessary access and refresh tokens.
The flow can be represented as follows:

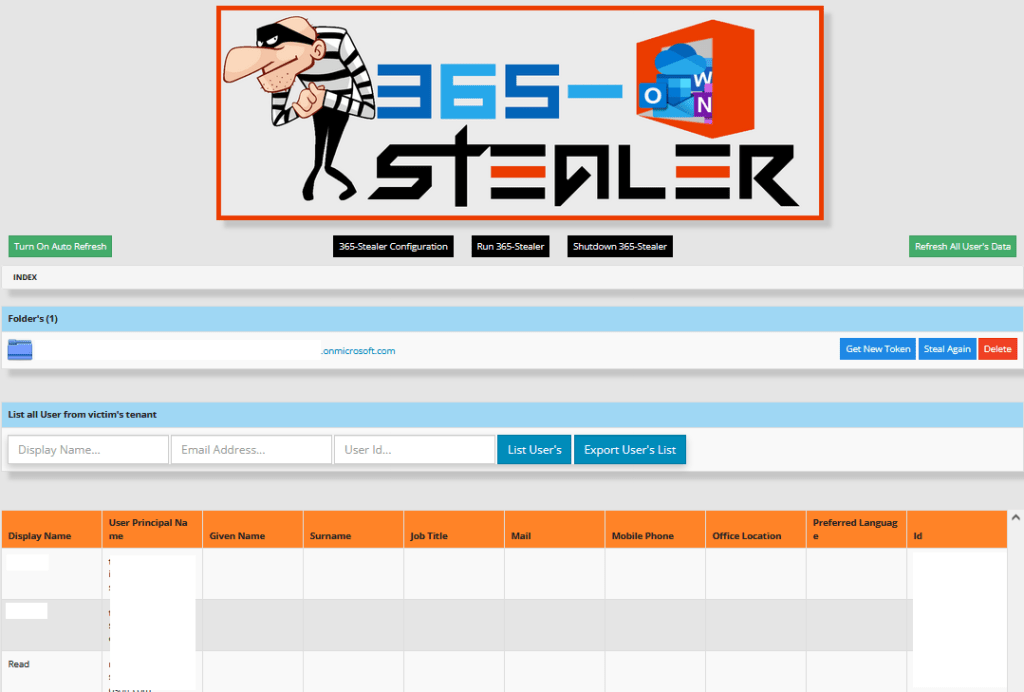
However, this functionality has been, and still is, abused by attackers attempting to trick users into entering the device code and their credentials.
Therefore, Conditional Access policies could now be used to block device code flow, or restrict it to managed devices only. This measure helps ensure that phishing attempts are unlikely to succeed unless the attackers possess a managed device.

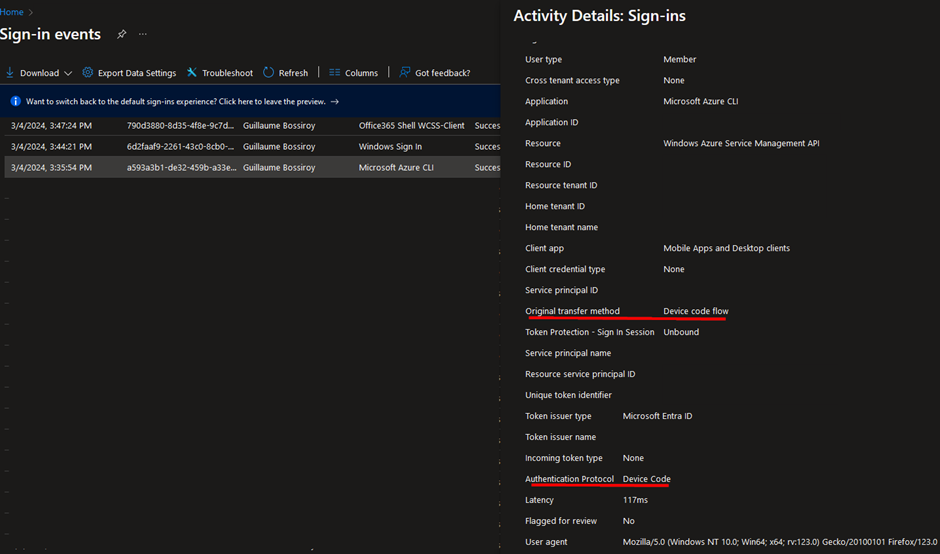
Moreover, device code flow authentication attempts are visible in the Entra ID Sign-in Logs:

Secondly, authentication transfer enables users to transfer their authenticated state from one device to another, for instance, by scanning a QR code with their mobile phone from a desktop application. This functionality allows to reduce the number of times users have to authenticate across the different platforms. However, by doing so, users aren’t required to perform MFA again on their mobile phone if they have already performed MFA on their laptop.
Like device code flow authentication, authentication transfer can be blocked using a Conditional Access policy. To do so, simply select ‘Authentication transfer’ under Transfer methods.
Finally, authentication transfer can also be detected in the Entra ID Sign-in logs. Indeed, ‘QR code’ is set as the authentication method in the authentication details.
Evaluate Conditional Access policies
License requirement: Entra ID Premium P1
As a final note, I wanted to highlight the What If tool in Entra Conditional Access. It allows administrators to understand the result of the CA policies in their environment. For that purpose, administrators can select target users, applications, any available conditions, etc., to make sure that existing CA policies have the expected behavior. It also helps troubleshooting the configuration by gaining visibility into the policies that apply to users under specific conditions. The What If tool can be accessed in Entra ID > Conditional Access > Policies:

Moreover, the DCToolbox PowerShell module, which is an amazing toolbox for various Microsoft 365 security tasks, developed by Daniel Chronlund, also allows you to evaluate your current Conditional Access policies for a specific scenario. For that purpose, you can use the Invoke-DCConditionalAccessSimulation function and the tool will fetch all existing CA policies and evaluates them against the scenario that you have provided as arguments. You can find the DCToolbox PowerShell module on GitHub here: https://github.com/DanielChronlund/DCToolbox.
I highly recommend using one of these tools to evaluate your newly created or existing Conditional Access policies. Also note that proper testing and validation with different pilot phases and progressive rollouts is essential to avoid impacting end users when creating new policies.
Finally, as a general best practice, Conditional Access policies, and potential exceptions, should be properly documented. For that purpose, the DCToolbox tool allows you to export the current configuration of your Conditional Access policies in an Excel file, for example.
Conclusion
In this second blog post about Entra Conditional Access settings and configurations, we went over important principles that might help you increase the overall security posture of your environment. As for the first part, the settings and configuration items that I have highlighted could be considered when designing or reviewing your Entra Conditional Access implementation. This list is non-exhaustive and has been made based on my experience reviewing and implementing Conditional Access policies in different environments. Also, it is important to rigorously evaluate any policies before rolling them out in production and to make sure that other controls have also been properly configured in your cloud environment. Conditional Access policies are a great way to safeguard your identities and critical resources, but are not the only layer of defense that you should be relying on.
At NVISO, we have built an expertise reviewing cloud environments and have designed and implemented Entra Conditional Access on numerous occasions. If you want to know more about how we can help you in the journey of building or strengthening your Conditional Access setup, among others, feel free to connect on LinkedIn or visit our website at https://www.nviso.eu.
Resources
You can contact me on LinkedIn should you have any questions or remarks. My contact details can be found below.
Additionally, if you want to get a deeper understanding of some of the topics discussed in the blog post, all the resources that I have used can be found below:
- Conditional Access: Block access: https://learn.microsoft.com/en-us/entra/identity/conditional-access/howto-conditional-access-policy-block-access
- Common Conditional Access policy: Require approved client apps or app protection policy: https://learn.microsoft.com/en-us/entra/identity/conditional-access/howto-policy-approved-app-or-app-protection
- App Protection Policies overview: https://learn.microsoft.com/en-us/mem/intune/apps/app-protection-policy
- App Protection Policy settings for Windows: https://learn.microsoft.com/en-us/mem/intune/apps/app-protection-policy-settings-windows
- Manage authentication methods for Microsoft Entra ID: https://learn.microsoft.com/en-us/entra/identity/authentication/concept-authentication-methods-manage
- What are protected actions in Microsoft Entra ID: https://learn.microsoft.com/en-us/entra/identity/role-based-access-control/protected-actions-overview
- Add, test, or remove protected actions in Microsoft Entra ID: https://learn.microsoft.com/en-us/entra/identity/role-based-access-control/protected-actions-add
- Conditional Access: Filter for devices: https://learn.microsoft.com/en-us/entra/identity/conditional-access/concept-condition-filters-for-devices
About the author

Guillaume Bossiroy
Guillaume is a Senior Security Consultant in the Cloud Security Team. His main focus is on Microsoft Azure and Microsoft 365 security where he has gained extensive knowledge during many engagements, from designing and implementing Entra ID Conditional Access policies to deploying Microsoft 365 Defender security products.
Additionally, Guillaume is also interested into DevSecOps and has obtained the GIAC Cloud Security Automation (GCSA) certification.


 for Data Security Platforms | Microsoft Security Blog


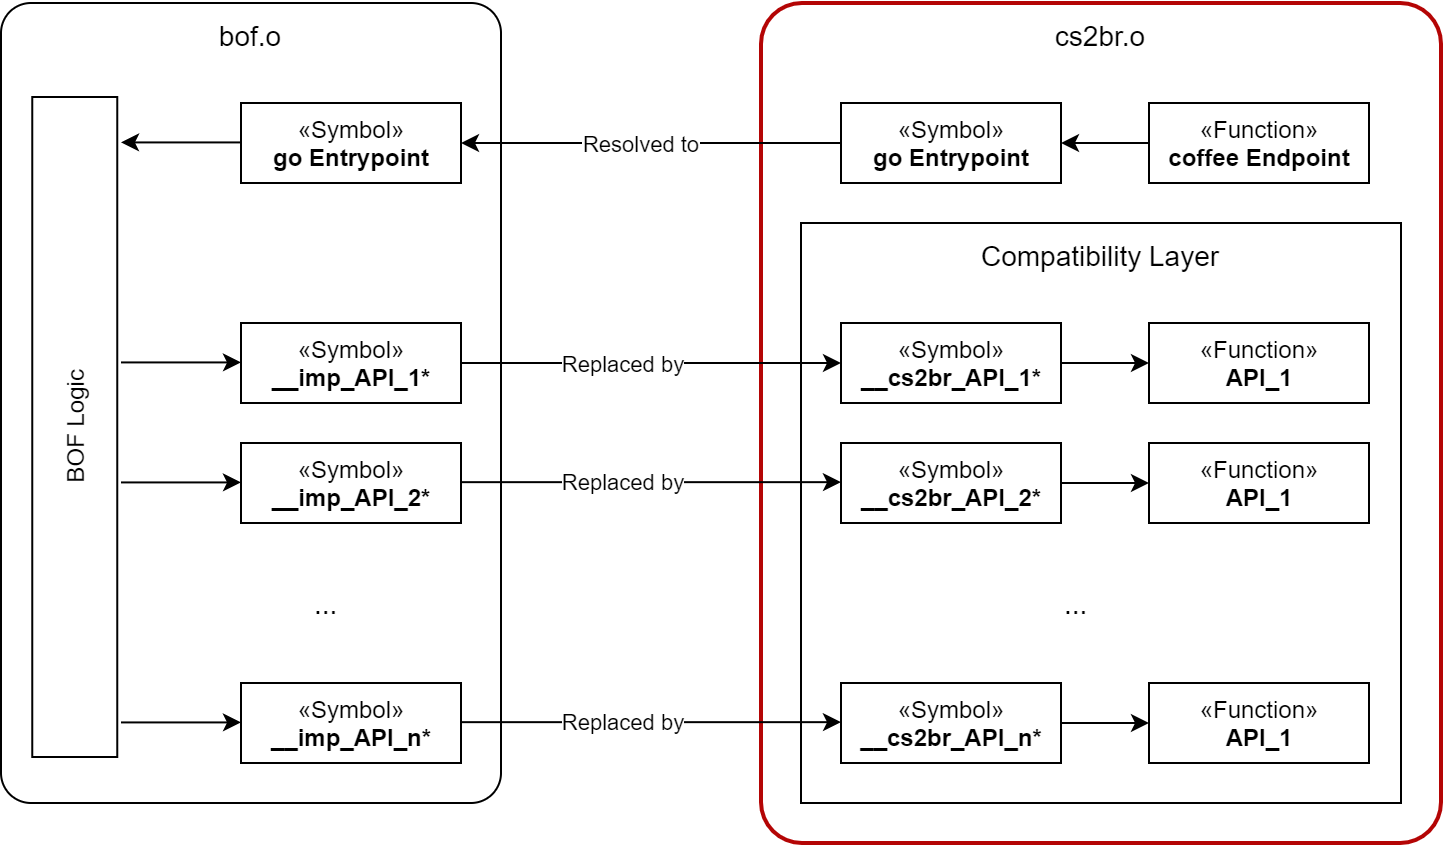


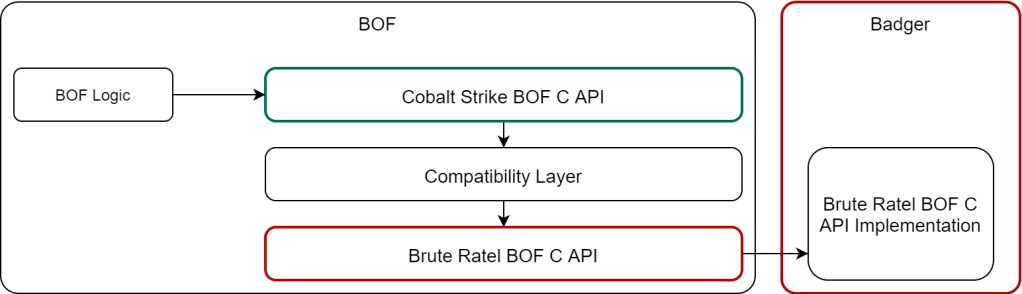

 Doesn’t touch the original BOF’s logic
 Requires (somewhat) elaborate compatibility implementation