While I one day wish to make it to the RSA Conference in person, I’ve never had the pleasure of making the trek to San Francisco for one of the largest security conferences in the U.S.
Instead, I had to watch from afar and catch up on the internet every day like the common folk. This at least gives me the advantage of not having my day totally slip away from me on the conference floor, so at least I felt like I didn’t miss much in the way of talks, announcements and buzz. So, I wanted to use this space to recap what I felt like the top stories and trends were coming out of RSA last week.
Here’s a rundown of some things you may have missed if you weren’t able to stay on top of the things coming out of the conference.
AI is the talk of the town
This is unsurprising given how every other tech-focused conference and talk has gone since the start of the year, but everyone had something to say about AI at RSA.
AI and its associated tools were part of all sorts ofproduct announcements (either to be used as a marketing buzzword or something that is truly adding to the security landscape).
Cisco’s own Jeetu Patel gave a keynote on how Cisco Secure is using AI in its newly announced Hypershield product. In the talk, he argued that AI needs to be used natively on networking infrastructure and not as a “bolt-on” to compete with attackers.
U.S. Secretary of State Anthony Blinken was the headliner of the week, delivering a talk outlining the U.S.’ global cybersecurity policies. He spent a decent chunk of his half hour in the spotlight also talking about AI, in which he warned that the U.S. needed to maintain its edge when it comes to AI and quantum computing — and that losing that race to a geopolitical rival (like China) would have devastating consequences to our national security and economy.
Individual talks ran the gamut from “AI is the best thing ever for security!” to “Oh boy AI is going to ruin everything.” The reality of how this trend shakes out, like most things, is likely going to be somewhere in between those two schools of thought.
An IBM study released at RSA highlighted how headstrong many executives can be when embracing AI. They found that security is generally an afterthought when creating generative AI models and tools, with only 24 percent of responding C-suite executives saying they have a security component built into their most recent GenAI project.
Vendors vow to build security into product designs
Sixty-eight new tech companies signed onto a pledge from the U.S. Cybersecurity and Infrastructure Security Agency, vowing to build security into their products from earliest stages of the design process.
The list of signees now includes Cisco, Microsoft, Google, Amazon Web Services and IBM, among other large tech companies. The pledge states that the signees will work over the next 12 months to build new security safeguards for their products, including increasing the use of multi-factor authentication (MFA) and reducing the presence of default passwords.
However, there’s looming speculation about how enforceable the Secure By Design pledge is and what the potential downside here is for any company that doesn’t live up to these promises.
It can be difficult to detect when users are looking at a digitally manipulated image or video unless they’re educated on common red flags to look for, or if they’re particularly knowledgeable on the subject in question. They’re getting so good now that even targets’ parents are falling for fake videos of their loved ones.
Some potential solutions discussed at RSA include digital “watermarks” in things like virtual meetings and video recordings with immutable metadata.
A deep fake-detecting startup was also named RSA’s “Most Innovative Startup 2024” for its multi-modal software that can detect and alert users of AI-generated and manipulated content. McAfee also has its own Deepfake Detector that it says, “utilizes advanced AI detection models to identify AI-generated audio within videos, helping people understand their digital world and assess the authenticity of content.”
Whether these technologies can keep up with the pace that attackers are developing this technology and deploying it on such a wide scale, remains to be seen.
The one big thing
Microsoft disclosed a zero-day vulnerability that could lead to an adversary gaining SYSTEM-level privileges as part of its monthly security update. After a hefty Microsoft Patch Tuesday in April, this month’s security update from the company only included one critical vulnerability across its massive suite of products and services. In all, May’s slate of vulnerabilities disclosed by Microsoft included 59 total CVEs, most of which are of “important” severity. There is only one moderate-severity vulnerability.
Why do I care?
The lone critical security issue is CVE-2024-30044, a remote code execution vulnerability in SharePoint Server. An authenticated attacker who obtains Site Owner permissions or higher could exploit this vulnerability by uploading a specially crafted file to the targeted SharePoint Server. Then, they must craft specialized API requests to trigger the deserialization of that file’s parameters, potentially leading to remote code execution in the context of the SharePoint Server. The aforementioned zero-day vulnerability, CVE-2024-30051, could allow an attacker to gain SYSTEM-level privileges, which could have devastating impacts if they were to carry out other attacks or exploit additional vulnerabilities.
So now what?
A complete list of all the other vulnerabilities Microsoft disclosed this month is available on its update page. In response to these vulnerability disclosures, Talos is releasing a new Snort rule set that detects attempts to exploit some of them. Please note that additional rules may be released at a future date and current rules are subject to change pending additional information. Cisco Security Firewall customers should use the latest update to their ruleset by updating their SRU. Open-source Snort Subscriber Rule Set customers can stay up to date by downloading the latest rule pack available for purchase on Snort.org. The rules included in this release that protect against the exploitation of many of these vulnerabilities are 63419, 63420, 63422 - 63432, 63444 and 63445. There are also Snort 3 rules 300906 - 300912.
Top security headlines of the week
A massive network intrusion is disrupting dozens of hospitals across the U.S., even forcing some of them to reroute ambulances late last week. Ascension Healthcare Network said it first detected the activity on May 8 and then had to revert to manual systems. The disruption caused some appointments to have to be canceled or rescheduled and kept patients from visiting MyChart, an online portal for medical records. Doctors also had to start taking pen-and-paper records for patients. Ascension operates more than 140 hospitals in 19 states across the U.S. and works with more than 8,500 medical providers. The company has yet to say if the disruption was the result of a ransomware attack or some sort of other targeted cyber attack, though there was no timeline for restoring services as of earlier this week. Earlier this year, a ransomware attack on Change Healthcare disrupted health care systems nationwide, pausing many payments providers were expected to receive. UnitedHealth Group Inc., the parent company of Change, told a Congressional panel recently that it paid a requested ransom of $22 million in Bitcoin to the attackers. (CPO Magazine, The Associated Press)
Google and Apple are rolling out new alerts to their mobile operating systems that warn users of potentially unwanted devices tracking their locations. The new features specifically target Bluetooth Low Energy (LE)-enabled accessories that are small enough to often be unknowingly tracking their specific location, such as an Apple AirTag. Android and iOS users will now receive the alert when such a device, when it's been separated from the owner’s smartphone, is moving with them still. This alert is meant to prevent adversaries or anyone with malicious intentions from unknowingly tracking targets’ locations. The two companies proposed these new rules for tracking devices a year ago, and other manufacturers of these devices have agreed to add this alert feature to their products going forward. “This cross-platform collaboration — also an industry first, involving community and industry input — offers instructions and best practices for manufacturers, should they choose to build unwanted tracking alert capabilities into their products,” Apple said in its announcement of the rollout. (Security Week, Apple)
The popular Christie’s online art marketplace was still down as of Wednesday afternoon after a suspected cyber attack. The site, known for having many high-profile and wealthy clients, was planning on selling artwork worth at least $578 million this week. Christie’s said it first detected the technology security incident on Thursday but has yet to comment on if it was any sort of targeted cyber attack or data breach. There was also no information on whether client or user data was potentially at risk. Current items for sale included a Vincent van Gogh painting and a collection of rare watches, some owned by Formula 1 star Michael Schumacher. Potential buyers could instead place bids in person or over the phone. (Wall Street Journal, BBC)
Gergana Karadzhova-Dangela from Cisco Talos Incident Response will participate in a panel on “Using ECSF to Reduce the Cybersecurity Workforce and Skills Gap in the EU.” Karadzhova-Dangela participated in the creation of the EU cybersecurity framework, and will discuss how Cisco has used it for several of its internal initiatives as a way to recruit and hire new talent.
Gergana Karadzhova-Dangela from Cisco Talos Incident Response will highlight the primordial importance of actionable incident response documentation for the overall response readiness of an organization. During this talk, she will share commonly observed mistakes when writing IR documentation and ways to avoid them. She will draw on her experiences as a responder who works with customers during proactive activities and actual cybersecurity breaches.
Most prevalent malware files from Talos telemetry over the past week
Finding novel and unique vulnerabilities often requires the development of unique tools that are best suited for the task. Platforms and hardware that target software run on usually dictate tools and techniques that can be used. This is especially true for parts of the macOS operating system and kernel due to its close-sourced nature and lack of tools that support advanced debugging, introspection or instrumentation.
Compared to fuzzing for software vulnerabilities on Linux, where most of the code is open-source, targeting anything on macOS presents a few difficulties. Things are closed-source, so we can’t use compile-time instrumentation. While Dynamic Binary instrumentation tools like Dynamorio and TinyInst work on macOS, they cannot be used to instrument kernel components.
There are also hardware considerations – with few exceptions, macOS only runs on Apple hardware. Yes, it can be virtualized, but that has its drawbacks. What this means in practice is that we cannot use our commodity off-the-shelf servers to test macOS code. And fuzzing on laptops isn’t exactly effective.
A while ago, we embarked upon a project that would alleviate most of these issues, and we are making the code available today.
Using a snapshot-based approach enables us to target closed-source code without custom harnesses precisely. Researchers can obtain full instrumentation and code coverage by executing tests in an emulator, which enables us to perform tests on our existing hardware. While this approach is limited to testing macOS running on Intel hardware, most of the code is still shared between Intel and ARM versions.
Previously in snapshot fuzzing
The simplest way to fuzz a target application is to run it in a loop while changing the inputs. The obvious downside is that you lose time on application initialization, boilerplate code and less CPU time spent on executing the relevant part of the code.
The approach in snapshot-based fuzzing is to define a point in process execution to inject the fuzzing test case (at an entry point of an important function). Then, you interrupt the program at a given point (via breakpoint or other means) and take a snapshot. The snapshot includes all of the virtual memory being used, and the CPU or other process state required to restore and resume process execution. Then, you insert the fuzzing test case by modifying the memory and resume execution.
When the execution reaches a predefined sink (end of function, error state, etc.) you stop the program, discard and replace the state with the previously saved one.
The benefit of this is that you only pay the penalty of restoring the process to its previous state, you don’t create it from scratch. Additionally, suppose you can rely on OS or CPU mechanisms such as CopyOnWrite, page-dirty tracking and on-demand paging. In that case, the operation of restoring the process can be very fast and have little impact on overall fuzzing speed.
Cory Duplantis championed our previous attempts at utilizing snapshot-based fuzzing in his work on Barbervisor, abare metal hypervisor developed to support high-performance snapshot fuzzing.
It involved acquiring a snapshot of a full (Virtual Box-based) VM and then transplanting it into Barbervisor where it could be executed. It relied on Intel CPU features to enable high performance by only restoring modified memory pages.
While this showed great potential and gave us a glimpse into the potential utility of snapshot-based fuzzing, it had a few downsides. A similar approach, built on top of KVM and with numerous improvements, was implemented in Snapchange and released by AWS Labs.
Snapshot fuzzing building blocks
Around the time Talos published Barbervisor, Axel Souchet published his WTF project, which takes a different approach. It trades performance to have a clean development environment by relying on existing tooling. It uses Hyper-V to run virtual machines that are to be snapshotted, then uses kd (Windows kernel debugger) to perform the snapshot, which saves the state in a Windows memory dump file format, which is optimized for loading. WTF is written in C++, which means it can benefit from the plethora of existing support libraries such as custom mutators or fuzz generators.
It has multiple possible execution backends, but the most fully featured one is based on Bochs, an x86 emulator, which provides a complete instrumentation framework. The user will likely see a dip in performance – it’s slower than native execution – but it can be run on any platform that Bochs runs on (Linux and Windows, virtualized or otherwise) with no special hardware requirements.
The biggest downside is that it was mainly designed to target Windows virtual machines and targets running on Windows.
When modifying WTF to support fuzzing macOS targets, we need to take care of a few mechanisms that aren’t supported out of the box. Split into pre-fuzzing and fuzzing stages, those include:
A mechanism to debug the OS and process that is to be fuzzed – this is necessary to precisely choose the point of snapshotting.
A mechanism to acquire a copy of physical memory – necessary to transplant the execution into the emulator.
CPU state snapshotting – this has to include all the Control Registers, all the MSRs and other CPU-specific registers that aren’t general-purpose registers.
In the fuzzing stage, on the other hand, we need:
A mechanism to restore the acquired memory pages – this has to be custom for our environment.
A way to catch crashes as crashing/faulting mechanisms on Windows and macOS, which differ greatly.
CPU state, memory modification and coverage analysis will also require adjustments.
Debugging
For targeting the macOS kernel, we’d want to take a snapshot of an actual, physical, machine. That would give us the most accurate attack surface with all the kernel extensions that require special hardware being loaded and set up. There is a significant attack surface reduction in virtualized macOS.
However, debugging physical Mac machines is cumbersome. It requires at least one more machine and special network adapters, and the debug mechanism isn’t perfect for our goal (relies on non-maskable interrupts instead of breakpoints and doesn’t fully stop the kernel from executing code).
Debugging a virtual machine is somewhat easier. VMWare Fusion contains a gdbserver stub that doesn’t care about the underlying operating system. We can also piggyback on VMWare’s snapshotting feature.
The first option enables it, and the second tells gdb stub to use software, as opposed to hardware breakpoints. Hardware breakpoints aren’t supported in Fusion.
Attaching to a VM for debugging relies on GDB’s remote protocol:
$ lldb
(lldb) gdb-remote 8864
Kernel UUID: 3C587984-4004-3C76-8ADF-997822977184
Load Address: 0xffffff8000210000
...
kernel was compiled with optimization - stepping may behave oddly; variables may not be available.
Process 1 stopped
* thread #1, stop reason = signal SIGTRAP
    frame #0: 0xffffff80003d2eba kernel`machine_idle at pmCPU.c:181:3 [opt]
Target 0: (kernel) stopped.
(lldb)
Snapshot acquisition
The second major requirement for snapshot fuzzing is, well, snapshotting. We can piggyback on VMWare Fusion for this, as well.
The usual way to use VMWare’s snapshotting is to either suspend a VM or make an exact copy of the state you can revert to. This is almost exactly what we want to do.
We can set a breakpoint using the debugger and wait for it to be reached. At this point, the whole virtual machine execution is paused. Then, we can take a snapshot of the machine state paused at precisely the instruction we want. There is no need to time anything or inject sentinel instruction. Since we are debugging the VM, we control it fully. A slightly more difficult part is figuring out how to use this snapshot. To reuse them, we needed to figure out the file formats VMware Fusion stores the snapshots in.
Fusion’s snapshots consist of two separate files: a vmem file that holds a memory state and a vmsn file that holds the device state, which includes the CPU, all the controllers, busses, pci, disks, etc. – everything that’s needed to restore the VM.
As far as the memory dump goes, the vmem file is a linear dump of all of the VM’s RAM. If the VM has 2GB of RAM, the vmem file will be a 2GB byte-for-byte copy of the RAM’s contents. This is a physical memory layout because we are dealing with virtual machines and no parsing is required. Instead, we just need a loader.
The machine state file, on the other hand, uses a fairly complex, undocumented format that contains a lot of irrelevant information. We only care about the CPU state, as we won’t be trying to restore a complete VM, just enough to run a fair bit of code. While undocumented, it has been mostly reverse-engineered for the Volatility project. By extending Volatility, we can get a CPU state dump in the format usable by WhatTheFuzz.
Snapshot loading into WTF
With both file formats figured out, we can return to WTF to modify it accordingly. The most important modification we need to make is to the physical memory loader.
WTF uses Windows’ dmp file format, so we need our own handler. Since our memory dump file is just a direct one-to-one copy of physical RAM, mapping it into memory and then mapping the pages is very straightforward, as you can see in the following excerpt:
bool BuildPhysmemRawDump(){
  //vmware snapshot is just a raw linear dump of physical memory, with some gaps
  //just fill up a structure for all the pages with appropriate physmem file offsets
  //assuming physmem dump file is from a vm with 4gb of ram
  uint8_t *base = (uint8_t *)FileMap_.ViewBase();
  for(uint64_t i  = 0;i < 786432; i++ ){ //that many pages, first 3gb
    uint64_t offset = i*4096;
    Physmem_.try_emplace(offset, (uint8_t *)base+offset);
  }
  //there's a gap in VMWare's memory dump from 3 to 4gb, last 1gb is mapped above 4gb
  for(uint64_t i  = 0;i < 262144; i++ ){
    uint64_t offset = (i+786432)*4096;
  Physmem_.try_emplace(i*4096+4294967296, (uint8_t *)base+offset);
  }
  return true;
}
We just need to fake the structures with appropriate offsets.
Catching crashes
The last piece of the puzzle is how to catch crashes. In WTF, and our modification of it, this is as simple as setting a breakpoint at an appropriate place. On Windows, hooking nt!KeBugCheck2 is the perfect place, we just need a similar thing in the macOS kernel.
The kernel panics, exceptions, faults and similar on macOS go through a complicated call stack that ultimately culminates in a complete OS crash and reboot.
Depending on what type of crash we are trying to catch and the type of kernel we are running, we can put a breakpoint on exception_triage function, which is in the execution path between a fault happening and the machine panicking or rebooting:
With that out of the way, we have all the pieces of the puzzle necessary to fuzz a macOS kernel target.
Case study: IPv6 stack
MacOS’ IPv6 stack would be a good example to illustrate how the complete scheme works. This is a simple but interesting entry point into some complex code. Attack surface that is composed of a complex set of protocols, is reachable over the network and is stateful. It would be difficult to fuzz with traditional fuzzers because network fuzzing is slow, and we wouldn’t have coverage. Additionally, this part of the macOS kernel is open-source, making it easy to see if things work as intended. First thing, we’ll need to prepare the target virtual machine.
VM preparation
This will assume a few things:
The host machine is a MacBook running macOS 12 Monterey.
VMWare fusion as a virtualization platform
Guest VM running macOS 12 Monterey with the following specs:
SIP turned off.
2 or 4 GB of RAM (4 is better, but snapshots are bigger).
One CPU/Core as multithreading just complicates things.
Since we are going to be debugging on the VM, it's prudent to disable SIP before doing anything else.
We'll use VMWare's GDB stub to debug the VM instead of Apple’s KDP because it interferes less with the running VM. The VM doesn't and cannot know that it is enabled.
Enabling it is as simple as editing a VM's .vmx file. Locate it in the VM package and add the following lines to the end:
To make debugging, and our lives, easier, we'll want to change some macOS boot options. Since we've disabled SIP, this should be doable from a regular (elevated) terminal:
Disable watchdog via debug=0x100, this will prevent the VM from automatically rebooting in case of a kernel panic.
keepsyms=1, in conjunction with the previous one, prints out the symbols during a kernel panic.
Setting up a KASAN build of the macOS kernel would be a crucial step for actual fuzzing, but not strictly necessary for testing purposes.
Target function
Our fuzzing target is function ip6_input which is the entry point for parsing incoming IPv6 packets.
void
ip6_input(struct mbuf *m)
{
	struct ip6_hdr *ip6;
	int off = sizeof(struct ip6_hdr), nest;
	u_int32_t plen;
	u_int32_t rtalert = ~0;
It has a single parameter that contains a mbuf that holds the actual packet data. This is the data we want to mutate and modify to fuzz ipv6_input.
Mbuf structures are a standard structure in XNU and are essentially a linked list of buffers that contain data. We need to find where the actual packet data is (mh_data) and mutate it before resuming execution.
struct m_hdr {
    struct mbuf 	*mh_next;       /* next buffer in chain */
    struct mbuf 	*mh_nextpkt;    /* next chain in queue/record */
    caddr_t     	mh_data;        /* location of data */
    int32_t     	mh_len;         /* amount of data in this mbuf */
    u_int16_t   	mh_type;        /* type of data in this mbuf */
    u_int16_t   	mh_flags;       /* flags; see below */

}
This means that we will have to, in the WTF fuzzing harness, dereference a pointer to get to the actual packet data.
Snapshotting
To create a snapshot, we use the debugger to set a breakpoint at ip6_input function. This is where we want to start our fuzzing.
Process 1 stopped
* thread #2, name = '0xffffff96db894540', queue = 'cpu-0', stop reason = signal SIGTRAP
    frame #0: 0xffffff80003d2eba kernel`machine_idle at pmCPU.c:181:3 [opt]
Target 0: (kernel) stopped.
(lldb) breakpoint set -n ip6_input
Breakpoint 1: where = kernel`ip6_input + 44 at ip6_input.c:779:6, address = 0xffffff800078b54c
(lldb) c
Process 1 resuming
(lldb)
Then, we need to provoke the VM to reach that breakpoint. We can either wait until the VM receives an IPv6 packet, or we can do it manually. To send the actual packet, we prefer using `ping6` because it doesn’t send any SYN/ACKs and allows us to easily control packet size and contents.:
The above simply sends a controlled ICMPv6 ping packet that is as large as possible and padded with 0x41 bytes. We send the packet to the en0 interface – sending to the localhost shortcuts the call stack and packet processing are different. This should give us a nice packet in memory, mostly full of AAAs that we can mutate and fuzz.
When the ping6 command is executed, the VM will receive the IPv6 packet and start parsing it, which will immediately reach our breakpoint.
Process 1 stopped
* thread #3, name = '0xffffff96dbacd540', queue = 'cpu-0', stop reason = breakpoint 1.1
	frame #0: 0xffffff800078b54c kernel`ip6_input(m=0xffffff904e51b000) at ip6_input.c:779:6 [opt]
Target 0: (kernel) stopped.
(lldb)
The VM is now paused and we have the address of our mbuf that contains the packet which we can fuzz. Fusion's gdb stub seems to be buggy, though, and it leaves that int 3 in place. If we were to take a snapshot now, the first instruction we execute would be that int3, which would immediately break our fuzzing. We need to explicitly disable the breakpoint before taking the snapshot:
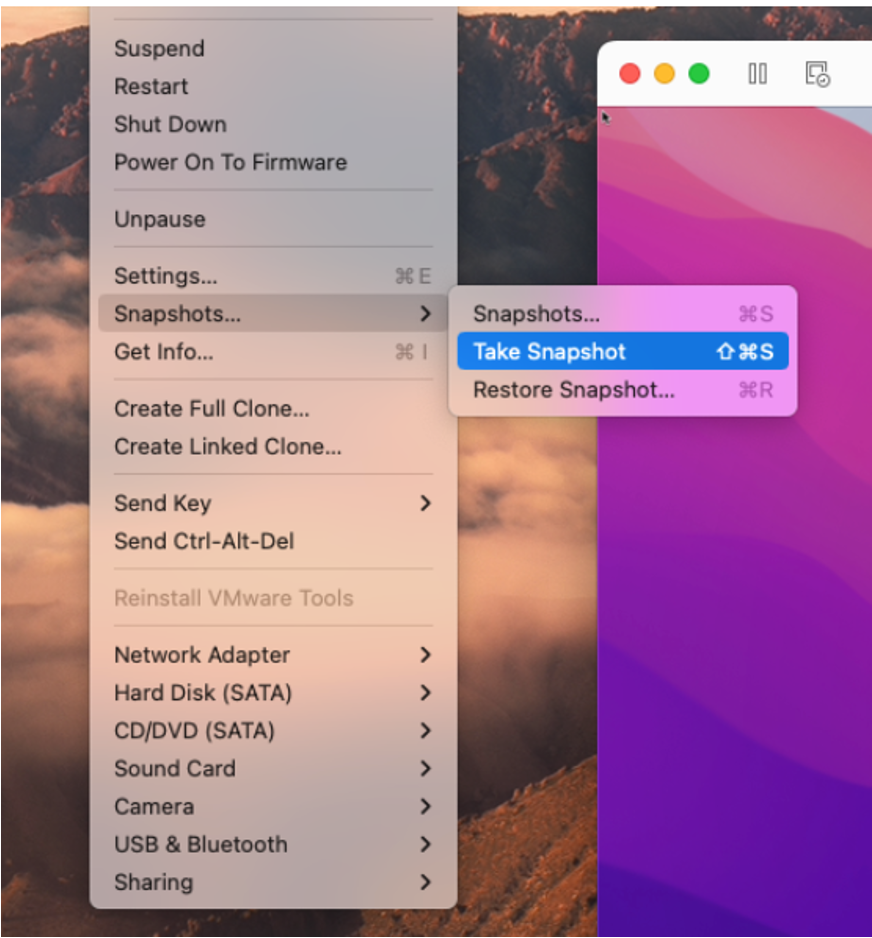
Now, we should be in a good place to take our snapshot before something goes wrong. To do that, we simply need to use Fusion's "Snapshot" menu while the VM is stuck on a breakpoint.
VM snapshot state
As mentioned previously, the .vmsn file contains a virtual machine state. The file format is partially documented and we can use a modified version of Volatility (a patch is available in the repository).
Simply execute Volatility like so, making sure to point it at the correct `vmsn` file:
Notice that the above output contains all the same register content as our debugger shows but also contains MSRs, control registers, gdtr and others. This is all we need to be able to start running the snapshot under WTF.
Fuzzing harness and fixups
Our fuzzing harness needs to do a couple of things:
Set a few meaningful breakpoints.
A breakpoint on target function return so we know where to stop fuzzing.
A breakpoint on the kernel exception handler so we can catch crashes.
Other handy breakpoints that would patch things, or stop the test case if it reaches a certain state.
For every test case, find a proper place in memory, write it there, and adjust the size.
All WTF fuzzers need to implement at least two methods:
The above code sets up a breakpoint at the desired address, which executes the anonymous handler function when hit. This handler then stops the execution with Ok_t() type, which signifies the non-crashing end of the test case.
Next, we'll want to catch actual exceptions, crashes and panics. Whenever an exception happens in the macOS kernel, the function exception_triage` is called. Regardless if this was caused by something else or by an actual crash, if this function is called, we may as well stop test case execution.
We need to get the address of exception_triage first:
(lldb)  p exception_triage
(kern_return_t (*)(exception_type_t, mach_exception_data_t, mach_msg_type_number_t)) $4 = 0xffffff8000283cb0 (kernel`exception_triage at exception.c:671)
(lldb)
Now, we just need to add a breakpoint at 0xffffff8000283cb0:
This breakpoint is slightly more complicated as we want to gather some information at the time of the crash. When the breakpoint is hit, we want to get a couple of registers that contain information about the exception context we use to form a filename for the saved test case. This helps differentiate unique crashes.
Finally, since this is a crashing test case, the execution is stopped with Crash_t() which saves the crashing test case.
With that, the basic Init function is complete.
InsertTestcase
The function InsertTestcase is what inserts the mutated data into the target's memory before resuming execution. This is where you would sanitize any necessary input and figure out where you want to put your mutated data in memory.
Our target function's signature is ip6_input(struct mbuf *), so the mbuf struct will hold the actual data. We can use lldb at our first breakpoint to figure out where the data is:
At the start of ip6_input function, inspecting m_hdr of the first parameter shows us that it has 40 bytes of data at 0xffffff904e51b0d8 which looks like a standard ipv6 header. Additionally, grabbing mh_next and inspecting it shows that it contains data at 0xffffff904e373000 of size 1,024, which consists of ICMP6 data and our AAAAs.
To properly fuzz all IPv6 protocols, we'll mutate the IPv6 header and encapsulated packet. We'll need to separately copy 40 bytes over to the first mbuf and the rest over to the second mbuf.
For the second mbuf (the ICMPv6 packet), we need to write our mutated data at 0xffffff904e373000. This is fairly straightforward, as we don't need to read or dereference registers or deal with offsets:
bool InsertTestcase(const uint8_t *Buffer, const size_t BufferSize) {
if (BufferSize < 40) return true; // mutated data too short

  Gva_t ipv6_header = Gva_t(0xffffff904e51b0d8);
  if(!g_Backend->VirtWriteDirty(ipv6_header,Buffer,40)){
	DebugPrint("VirtWriteDirtys failed\n");
  }

  Gva_t icmp6_data = Gva_t(0xffffff904e373000);
  if(!g_Backend->VirtWriteDirty(icmp6_data,Buffer+40,BufferSize-40)){
	DebugPrint("VirtWriteDirtys failed\n");
  }

  return true;
}
We could also update the mbuf size, but we'll limit the mutated test case size instead. And that's it – our fuzzing harness is pretty much ready.
Everything together
Every WTF fuzzer needs to have a state directory and three things in it:
Mem.dmp: A full dump of RAM.
Regs.json: A JSON file describing CPU state.
Symbol-store.json: Not really required, can be empty, but we can populate it with addresses of known symbols, so we can use those instead of hardcoded addresses in the fuzzer.
Next, copy the snapshot's .vmm file over to your fuzzing machine and rename it to mem.dmp. Write the VM state that we got from volatility into a file called regs.json.
With the state set up, we can make a test run. Compile the fuzzer and test it like so:
c:\work\codes\wtf\targets\ipv6_input>..\..\src\build\wtf.exe run --backend=bochscpu --name IPv6_Input --state state --input inputs\ipv6 --trace-type 1 --trace-path .
The debugger instance is loaded with 0 items
load raw mem dump1
Done
Setting debug register status to zero.
Setting debug register status to zero.
Segment with selector 0 has invalid attributes.
Segment with selector 0 has invalid attributes.
Segment with selector 8 has invalid attributes.
Segment with selector 0 has invalid attributes.
Segment with selector 10 has invalid attributes.
Segment with selector 0 has invalid attributes.
Trace file .\ipv6.trace
Running inputs\ipv6
--------------------------------------------------
Run stats:
Instructions executed: 13001 (4961 unique)
      	Dirty pages: 229376 bytes (0 MB)
  	Memory accesses: 46135 bytes (0 MB)
#1 cov: 4961 exec/s: infm lastcov: 0.0s crash: 0 timeout: 0 cr3: 0 uptime: 0.0s

c:\work\codes\wtf\targets\ipv6_input>
In the above, we run WTF in run mode with tracing enabled. We want it to run the fuzzer with specified input and save a RIP trace file that we can then examine. As we can see from the output, the fuzzer run was completed successfully. The total number of instructions was 13,001 (4,961 of which were unique) and most notably, the run was completed without a crash or a timeout.
Analyzing coverage and symbolizing
WTF's symbolizer relies on the fact that the targets it runs are on Windows and that it generally has PDBs. Emulating that completely would be too much work, so I've opted to instead do some LLDB scripting and symbolization.
First, we need LLDB to dump out all known symbols and their addresses. That's fairly straightforward with the script supplied in the repository. The script will parse the output of image dump symtab command and perform some additional querying to resolve the most symbols. The result is a symbol-store.json file that looks something like this:
The trace file we obtained from the fuzzer is just a text file containing addresses of executed instructions. Supporting tools include a symbolize.py script which uses a previously generated symbol store to symbolize a trace. Running it on ipv6.trace would result in a symbolized trace:
The complete trace is longer, but at the end, can easily see that the retq instruction was reached if we compared the function offsets.
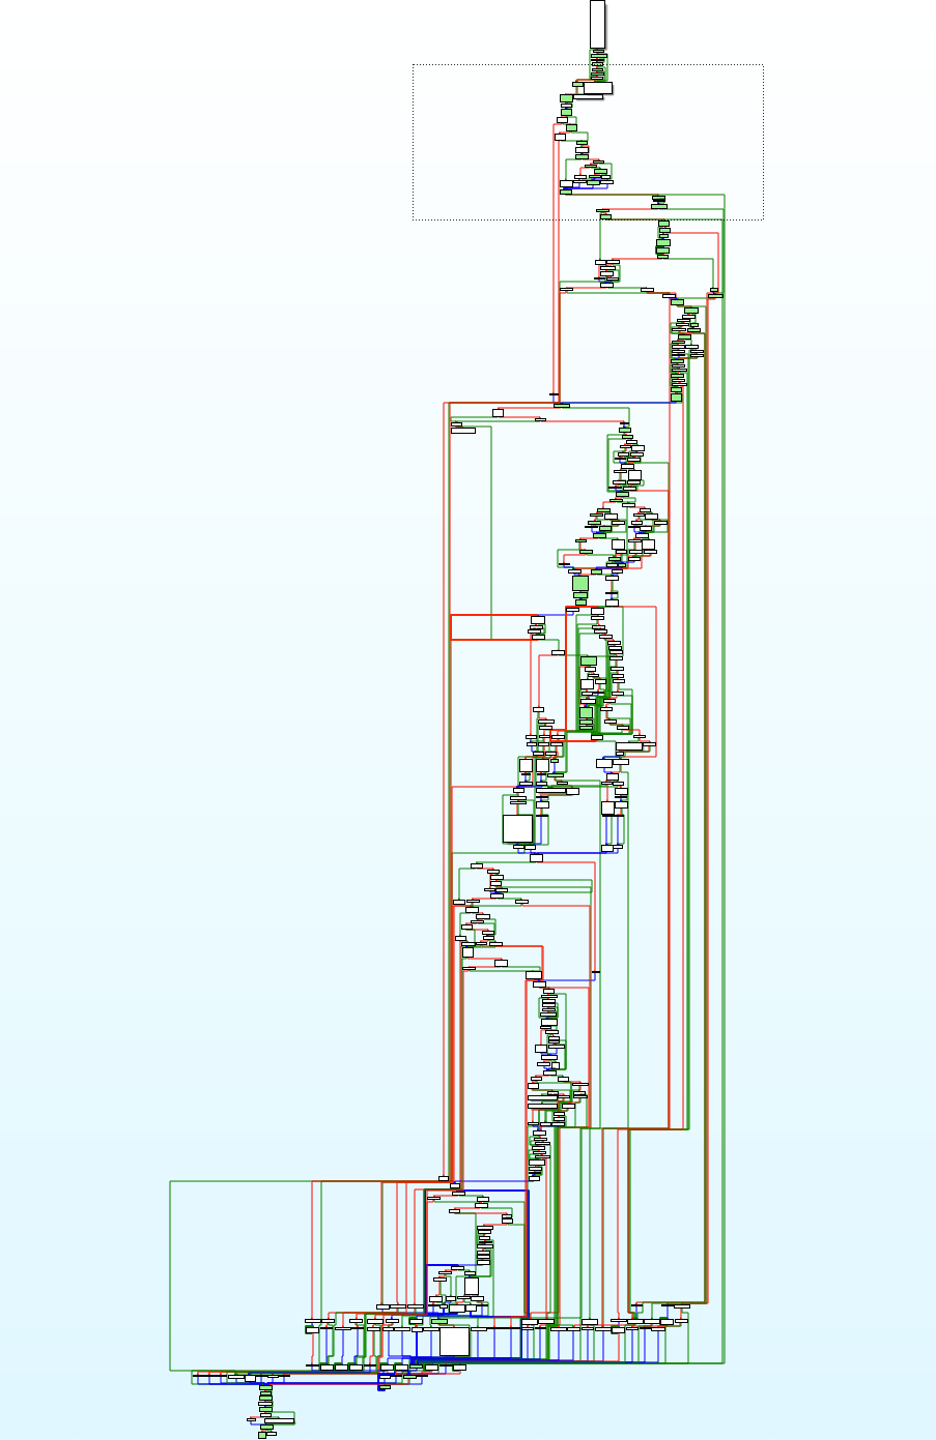
Trace files are also compatible with Ida Lighthouse, so we can just load them into it to get a visual coverage overview:
Green nodes have been hit.
Avoiding checksum problems
Even without manual coverage analysis, with IPv6 as a target, it would be quickly apparent that a feedback-driven fuzzer isn’t getting very far. This is due to various checksums that are present in higher-level protocol packets, for example, TCP packet checksums. Randomly mutated data would invalidate the checksum and the packet would be rejected early.
There are two options to deal with this issue: We can fix the checksum after mutating the data, or leverage instrumentation to NOP out the code that performs the check. This is easily achieved by setting yet another breakpoint in the fuzzing harness that will simply modify the return value of the checksum check:
Now that we know that things work, we can start fuzzing. In one terminal, we start the server:
c:\work\codes\wtf\targets\ipv6_input>..\..\src\build\wtf.exe master --max_len=1064 --runs=1000000000 --target .
Seeded with 3801664353568777264
Iterating through the corpus..
Sorting through the 1 entries..
Running server on tcp://localhost:31337..

And in another, the actual fuzzing node:

c:\work\codes\wtf\targets\ipv6_input> ..\..\src\build\wtf.exe fuzz --backend=bochscpu --name IPv6_Input  --limit 5000000

The debugger instance is loaded with 0 items
load raw mem dump1
Done
Setting debug register status to zero.
Setting debug register status to zero.
Segment with selector 0 has invalid attributes.
Segment with selector 0 has invalid attributes.
Segment with selector 8 has invalid attributes.
Segment with selector 0 has invalid attributes.
Segment with selector 10 has invalid attributes.
Segment with selector 0 has invalid attributes.
Dialing to tcp://localhost:31337/..
You should quickly see in the server window that coverage increases and that new test cases are being found and saved:
Likewise, the fuzzing node will show its progress:
The debugger instance is loaded with 0 items
load raw mem dump1
Done
Setting debug register status to zero.
Setting debug register status to zero.
Segment with selector 0 has invalid attributes.
Segment with selector 0 has invalid attributes.
Segment with selector 8 has invalid attributes.
Segment with selector 0 has invalid attributes.
Segment with selector 10 has invalid attributes.
Segment with selector 0 has invalid attributes.
Dialing to tcp://localhost:31337/..
#10437 cov: 9778 exec/s: 1.0k lastcov: 0.0s crash: 0 timeout: 0 cr3: 0 uptime: 10.0s
#20682 cov: 9781 exec/s: 1.0k lastcov: 3.0s crash: 0 timeout: 0 cr3: 0 uptime: 20.0s
#31402 cov: 9781 exec/s: 1.0k lastcov: 13.0s crash: 0 timeout: 0 cr3: 0 uptime: 30.0s
#42667 cov: 9781 exec/s: 1.1k lastcov: 23.0s crash: 0 timeout: 0 cr3: 0 uptime: 40.0s
#53698 cov: 9781 exec/s: 1.1k lastcov: 33.0s crash: 0 timeout: 0 cr3: 0 uptime: 50.0s
#64867 cov: 9781 exec/s: 1.1k lastcov: 43.0s crash: 0 timeout: 0 cr3: 0 uptime: 60.0s
#75446 cov: 9781 exec/s: 1.1k lastcov: 53.0s crash: 0 timeout: 0 cr3: 0 uptime: 1.2min
#84790 cov: 10497 exec/s: 1.1k lastcov: 0.0s crash: 0 timeout: 0 cr3: 0 uptime: 1.3min
#95497 cov: 11704 exec/s: 1.1k lastcov: 0.0s crash: 0 timeout: 0 cr3: 0 uptime: 1.5min
#105469 cov: 11761 exec/s: 1.1k lastcov: 4.0s crash: 0 timeout: 0 cr3: 0 uptime: 1.7min
Conclusion
Building this snapshot fuzzing environment on top of WTF provides several benefits. It enables us to perform precisely targeted fuzz testing of, otherwise, hard-to-pinpoint chunks of macOS kernel. We can perform the actual testing on commodity CPUs, which enables us to use our existing computer resources instead of being limited to a few cores. Additionally, although emulated execution speed is fairly slow, we can leverage Bosch to perform more complex instrumentation. Patches to Volatility and WTF projects, as well as additional support tooling, is available in our GitHub repository.
After a relatively hefty Microsoft Patch Tuesday in April, this month’s security update from the company only included one critical vulnerability across its massive suite of products and services.
In all, May’s slate of vulnerabilities disclosed by Microsoft included 59 total CVEs, most of which are considered to be of “important” severity. There is only one moderate-severity vulnerability.
The lone critical security issue is CVE-2024-30044, a remote code execution vulnerability in SharePoint Server. An authenticated attacker who obtains Site Owner permissions or higher could exploit this vulnerability by uploading a specially crafted file to the targeted SharePoint Server. Then, they must craft specialized API requests to trigger the deserialization of that file’s parameters, potentially leading to remote code execution in the context of the SharePoint Server.
The Windows Mobile Broadband Driver also contains multiple remote code execution vulnerabilities:
However, to successfully exploit this issue, an adversary would need to physically connect a compromised USB device to the victim's machine.
Microsoft also disclosed a zero-day vulnerability in the Windows DWM Core Library, CVE-2024-30051. Desktop Window Manager (DWM) is a Windows operating system service that enables visual effects on the desktop and manages things like transitions between windows.
An adversary could exploit CVE-2024-30051 to gain SYSTEM-level privileges.
This vulnerability is classified as having a “low” level of attack complexity, and exploitation of this vulnerability has already been detected in the wild.
One other issue, CVE-2024-30046, has already been disclosed prior to Patch Tuesday, but has not yet been exploited in the wild. This is a denial-of-service vulnerability in ASP.NET, a web application framework commonly used in Windows.
Microsoft considers this vulnerability “less likely” to be exploited, as successful exploitation would require an adversary to spend a significant amount of time repeating exploitation attempts by sending constant or intermittent data to the targeted machine.
A complete list of all the other vulnerabilities Microsoft disclosed this month is available on its update page.
In response to these vulnerability disclosures, Talos is releasing a new Snort rule set that detects attempts to exploit some of them. Please note that additional rules may be released at a future date and current rules are subject to change pending additional information. Cisco Security Firewall customers should use the latest update to their ruleset by updating their SRU. Open-source Snort Subscriber Rule Set customers can stay up to date by downloading the latest rule pack available for purchase on Snort.org.
The rules included in this release that protect against the exploitation of many of these vulnerabilities are 63419, 63420, 63422 - 63432, 63444 and 63445. There are also Snort 3 rules 300906 - 300912.
Cisco Talos is delighted to share updates about our ongoing partnership with the U.S. Cybersecurity and Infrastructure Security Agency (CISA) to combat cybersecurity threats facing civil society organizations.
Talos has partnered with CISA on several initiatives through the Joint Cyber Defense Collaborative (JCDC), including sharing intelligence on strategic threats of interest.
Adversaries are leveraging advancements in technology and the interconnectedness of the world’s networks to undermine democratic values and interests by targeting high-risk communities within civil society. According to CISA, these communities include activists, journalists, academics and organizations engaged in advocacy and humanitarian causes. Consequently, the U.S. government has elevated efforts in recent years to counter cyber threats that have placed the democratic freedoms of organizations and individuals at heightened risk.
The JCDC’s High-Risk Community Protection (HRCP) initiative is one such measure that brings together government, technology companies, and civil society organizations to strengthen the security of entities at heightened risk of cyber threat targeting and transnational repression.
The HRCP initiative’s outputs — including a threat mitigation guide for civil society, operational best practices, and online resources for communities at risk — aim to counter the threats posed by state-sponsored advanced persistent threats (APTs) and, increasingly, private-sector offensive actors (PSOA).
Our ongoing partnership with CISA and contributions to the JCDC’s HRCP initiative are consistent with Cisco’s security mission to protect data, systems, and networks, and uphold and respect the human rights of all.
Spyware threats persist despite government and private sector measures
As we’ve written about, the use of commercially available spyware to target high-profile or at-risk individuals and organizations is a global problem. This software can often track targets’ exact location, steal their messages and personal information, or even listen in on phone calls. Private companies, commonly referred to as “PSOAs” or “cyber mercenaries,” have monetized the development of these offensive tools, selling their spyware to any government willing to pay regardless of the buyer's intended use.
Commercial spyware tools can threaten democratic values by enabling governments to conduct covert surveillance on citizens, undermining privacy rights and freedom of expression. Lacking any international laws or norms around the use of commercial spyware, this surveillance can lead to the suppression of dissent, erosion of trust in democratic institutions, and consolidation of power in the hands of authoritarian governments.
The U.S. and its partners have taken steps to curb the proliferation of these dangerous tools. These include executive orders banning the use of certain spyware by U.S. government agencies, export restrictions and sanctions on companies or individuals involved in the development and sale of spyware (such as the recent sanctioning of members of the Intellexa Commercial Spyware Consortium), and diplomatic efforts with international partners and allies to pressure countries that harbor or support such firms.
Private industry has also played a substantial role in countering this threat, including by publishing research and publicly attributing PSOAs and countries involved in digital repression. Some companies have also developed countersurveillance technologies (such as Apple’s Lockdown Mode) to protect high-risk users and have initiated legal challenges through lawsuits against PSOAs alleging privacy violations. In March 2023, Cisco proudly became principal co-author of the Cybersecurity Tech Accord principles limiting offensive operations in cyberspace, joining several technology partners in calling for industry-wide principles to counter PSOAs.
Talos intelligence fuels HRCP threat mitigation guide for civil society
Talos has tracked the evolution of the commercial spyware industry and APT targeting of high-risk industries, placing us in a strong position to contribute our knowledge to the HRCP effort. Our research on two key threat actors — the Intellexa Commercial Spyware Consortium and the China state-sponsored Mustang Panda group — informed the HRCP guide’s overview of tactics commonly used against high-risk communities.
Talos has closely monitored threats stemming from the Intellexa Consortium, an umbrella group of organizations and individuals that offer commercial spyware tools to global customers, including authoritarian governments. In May 2023, we conducted a technical analysis of Intellaxa’s flagship PREDATOR spyware which was initially developed by a PSOA known as Cytrox. Our research specifically looked at two components of Intellexa's mobile spyware suite known as “ALIEN” and “PREDATOR,” which compose the backbone of the organization’s implant.
Our findings included an in-depth walkthrough of the infection chain, including the implant’s various information-stealing capabilities and evasion techniques. Over time, we learned more about Intellexa’s inner workings, including their spyware development timelines, product offerings, operating paradigms and procedures.
Our research on Mustang Panda also contributed to the mitigation guide by illustrating how government-sponsored threat actors have targeted civil society organizations with their own signature tools and techniques. This APT is heavily focused on political espionage and has targeted non-governmental organizations (NGOs), religious institutions, think tanks, and activist groups worldwide. Mustang Panda commonly sends spear phishing emails using enticing lures to gain access to victim networks and install custom implants, such as PlugX, that enable device control and user monitoring. The group has continuously evolved its delivery mechanisms and payloads to ensure long-term uninterrupted access, underscoring the threat posed to civil society and others.
What is next for this growing threat?
Threat actors with ties to Russia, China, and Iran have primarily been responsible for this heightened threat activity, according to industry reporting. But the threat is not limited to them. Last year, a U.K. National Cyber Security Centre (NCSC) estimate found that at least 80 countries have purchased commercial spyware, highlighting how the proliferation of these tools enables even more actors to join the playing field.
Yet we are staying ahead of the game. Talos researchers are continuously identifying the latest trends in threat actor targeting which include not only the use of commercial spyware but other tools and techniques identified in the HRCP guide, such as spear phishing and trojanized applications. Our intelligence powers Cisco’s security portfolio, ensuring customer safety.
Talos created a reporting resource where individuals or organizations suspected of being infected with commercial spyware can contact Talos’ research team ([email protected]) to assist in furthering the community’s knowledge of these threats.
We are determined to continue our work with CISA, other agencies, and industry leaders, leveraging the power of partnerships to protect Cisco customers and strengthen community resilience against common adversaries.