Many forensic artifacts can be looked at from many different angles. A few years ago I proposed a concept of filighting that tried to solve a problem of finding unusual, orphaned and potentially malicious files dropped inside directories that contain … Continue reading →
Preventable breaches are a common problem. According to research by Nagomi, a leader in the nascent field of automated security control assessment, 80% of breached organizations already had a tool in place that could have prevented it.
One solution is to maximize the use of security tools they already have. Many enterprises grapple with ineffective and reactive security operations, worsened by using multiple disparate security products. Tools are purchased but not fully deployed, ROI is never realized and teams are stuck in a constant state of reacting to alerts rather than making progress.
“I don’t need more tools … I need to find a way to deploy the tools I already have more effectively,” one CISO told Nagomi. “This is why I don’t sleep at night … I have no way of knowing my security stack’s effectiveness.”
Facing increasingly fast and stealthy threat actors, CISOs need to know their security investments are effective against evolving threats. This is where Nagomi adds tremendous value. And with support from the CrowdStrike Falcon Fund, they are changing the way security teams balance risk and defense.
Falcon Fund Invests in Nagomi
Falcon Fund has invested in Nagomi to help organizations boost the effectiveness of their existing security tools. Falcon Fund, an investment fund managed by CrowdStrike in partnership with Accel, is focused on global, cross-stage investments in companies that provide differentiated capabilities to joint customers.
Nagomi, formerly known as Vena Security and founded in January 2023, offers a proactive defense platform that enables customers to better use their security stacks to defend against current and emerging threats in the wild. Nagomi transforms fragmented best-of-breed solutions into best-of-suite security for customers by providing end-to-end visibility of defense capabilities mapped against MITRE ATT&CK®. With this information, security teams can prioritize the most urgent risks based on their unique threat profile and get prescriptive remediation plans to reduce threat exposure.
Nagomi is quickly innovating to deliver a threat-centered, data-driven and actionable approach to cybersecurity — one that enables customers to provide high-level security maturity metrics to executives while showing security practitioners exactly how to reduce risk, fix misconfigurations and make strategic decisions with business context.
Nagomi’s early success proves the value of its proactive approach to security. Within six months of launching, Nagomi was successfully deployed by Fortune 500 customers and has seen significant adoption in some of the world’s most complex security environments.
How the Integration Works
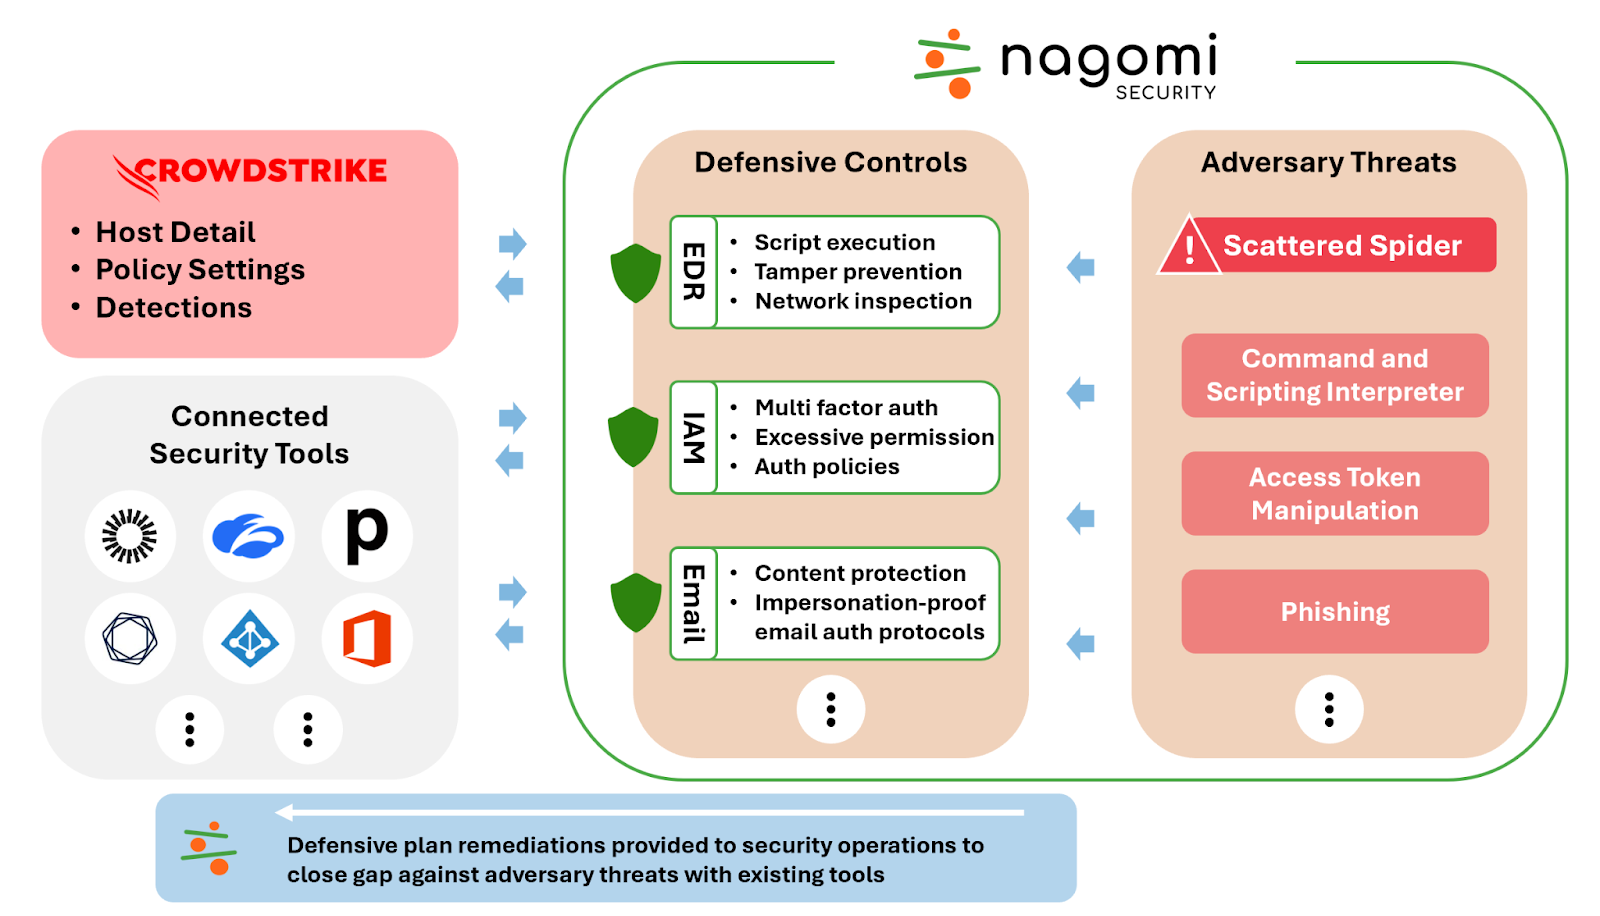
Nagomi helps CrowdStrike customers get the most from their CrowdStrike Falcon® deployment by monitoring for configuration gaps and testing for attacks across their IT infrastructure as well as other security tools. Nagomi’s proactive defense platform uses CrowdStrike’s modern cloud architecture to ingest detections, host details and policy settings to map the deployment of CrowdStrike Falcon sensors. Nagomi then tests adversary tactics, techniques and procedures (TTPs) against the mapped deployment to recommend configuration policy changes.
The integration provides CrowdStrike customers with:
Proactive risk management: Continuously analyze threats and corresponding defenses to identify gaps and remediation opportunities to prevent exploitation.
Actionable defense plans: Pinpoint risk and modify configuration settings based on vulnerability to adversary TTPs.
Clear communication: Share the current state of risk with peers and leadership using evidence-based data that considers business limitations and constraints.
The Trail of Bits cryptography team is pleased to announce the open-sourcing of our pure Rust and Go implementations of Leighton-Micali Hash-Based Signatures (LMS), a well-studied NIST-standardized post-quantum digital signature algorithm. If you or your organization are looking to transition to post-quantum support for digital signatures, both of these implementations have been engineered and reviewed by several of our cryptographers, so please give them a try!
For the Rust codebase, we’ve worked with the RustCrypto team to integrate our implementation into the RustCrypto/signatures repository so that it can immediately be used with their ecosystem once the crate is published.
Our Go implementation was funded by Hewlett Packard Enterprise (HPE), as part of a larger post-quantum readiness effort within the Sigstore ecosystem. We’d like to thank HPE and Tim Pletcher in particular for supporting and collaborating on this high-impact work!
LMS: A stateful post-quantum signature scheme
LMS is a stateful hash-based signature scheme that was standardized in 2019 with RFC 8554 and subsequently adopted into the federal information processing standards in 2020. These algorithms are carefully designed to resist quantum computer attacks, which could threaten conventional algebraic signature schemes like RSA and ECDSA. Unlike other post-quantum signature designs, LMS was standardized before NIST’s large post-quantum cryptography standardization program was completed. LMS has been studied for years and its security bounds are well understood, so it was not surprising that these schemes were selected and standardized in a relatively short time frame (at least compared to the other standards).
Like other post-quantum signature schemes, LMS is a hash-based scheme, relying only on the security of a collision-resistant hash function such as SHA256. Hash-based signature schemes have much longer signatures than lattice-based signature schemes, which were recently standardized by NIST, but they are simpler to implement and require fewer novel cryptographic assumptions. This is the primary reason we chose to develop hash-based signatures first.
Unlike any signature algorithm in common usage today, LMS is a stateful scheme. The signer must track how many messages have been signed with a key, incrementing the counter with each new signature. If the private key is used more than once with the same counter value, an attacker can combine the two signatures to forge signatures on new messages. This is analogous to a nonce-reuse attack in encryption schemes like AES-GCM.
If it’s not immediately obvious, requiring this state also severely limits these schemes’ usability and security. For instance, this makes storing your private key (and its state) to some sort of persisted storage (which is usually typical for secret keys) incredibly risky, as this introduces the possibility of an old state being reused, especially for multi-threaded applications. This is why NIST makes the following warning in their standard:
Stateful hash-based signature schemes are secure against the development of quantum computers, but they are not suitable for general use because their security depends on careful state management. They are most appropriate for applications in which the use of the private key may be carefully controlled and where there is a need to transition to a post-quantum secure digital signature scheme before the post-quantum cryptography standardization process has completed.
The main benefit of a stateful algorithm like LMS over a stateless hash-based signature like SLH-DSA (SPHINCS+) is significantly shorter signature sizes: a signature with LMS is around 4KB, while a signature with SLH-DSA at a similar security level is closer to 40KB. The downside is that stateful schemes like LMS cannot easily be plugged into existing applications. Managing the private state in a signature scheme makes integration into higher-level applications complex and prone to subtle and dangerous security flaws. However, a carefully managed environment for code signing is an excellent place to test stateful post quantum signatures in the real world, and we feel that Sigstore effectively meets the NIST requirement.
RustCrypto implementation
Our Rust implementation is no-std capable and does not require heap allocations, in addition to being fully compatible with the currently available digest and signature crates. In particular, we implement the SignerMut and Verifier traits on private and public keys, respectively.
The goal of our work is to provide a more strongly typed alternative to the pre-existing implementation while also not over-allocating memory. While ArrayVec is a suitable alternative to the headaches caused by generics and GenericArray, at the cost of slightly higher memory requirements in certain cases of signatures, it does introduce an additional crate dependency that did not previously exist, which we wanted to avoid. Currently, in our implementation, both signatures and keys must know their LMS parameters before being able to deserialize and verify signatures. This should be sufficient for most use cases, but if unknown parameters must be used, it is not too difficult to hack together an enum that covers all potential algorithm types and uses the correct TryFrom implementation once the algorithm type is parsed.
Go implementation
Our Go implementation, on the other hand, is less picky. We were asked to build an LMS implementation for Sigstore, which is a more controlled environment and does not have the same restrictions that the general RustCrypto implementation assumes. Because of this, our implementation uses some small heap allocations to keep track of some variable length data, such as the number of hashes in a private key. Go is a less-clever language than Rust, which means we cannot really parameterize it over the various LMS modes, so some additional work needs to be done at a few call sites to re-specify the LMS parameters.
More post-quantum engineering is coming soon!
Like the rest of the world, we are still in the early days of post-quantum cryptography development and deployment. We’re always exploring opportunities to help teams adopt more secure cryptography, with or without the threat of quantum computers in the mix.
Our cryptography team is currently working on another post-quantum standard in Rust, so look out for another open-source codebase soon! If your team needs a post-quantum cryptography (or any other cryptographic library that is not widely supported in the open-source community) module tailored to your exact needs, contact us!
Our team is well-equipped to design and build a codebase incorporating all of your design requirements, with ownership transferred over to you at the end of the project. We will even perform an internal code audit of the same quality we give standard secure code reviews. Get in touch with our sales team to start your next project with Trail of Bits.
The Cyber Security Awareness Framework (CSAF) is a structured approach aimed at enhancing Cybersecurity" title="Cybersecurity">cybersecurity awareness and understanding among individuals, organizations, and communities. It provides guidance for the development of effective Cybersecurity" title="Cybersecurity">cybersecurity awareness programs, covering key areas such as assessing awareness needs, creating educational m aterials, conducting training and simulations, implementing communication campaigns, and measuring awareness levels. By adopting this framework, organizations can foster a robust security culture, enhance their ability to detect and respond to cyber threats, and mitigate the risks associated with attacks and security breaches.
Excel is the emperor of automation. Not the SOAR type, but the local one – yours. Why? Its formulas and VBA capabilities can turn many awfully mundane tasks into plenty of automation opportunities… For instance… certain programming tasks. The case/switch … Continue reading →
This is a short blog post about an issue I encountered during some development work on my OleViewDotNet tool and how I resolved it. It might help others if they come across a similar problem, although I'm not sure if I took the best approach.
OleViewDotNet has the ability to parse the internal COM structures in a process and show important information such as the list of current IPIDs exported by the process and the access security descriptor.
To achieve this task we need access to the symbols of the COMBASE DLL so that we can resolve various root pointers to hash tables and other runtime artifacts. The majority of the code to parse the process information is in the COMProcessParser class, which uses the DBGHELP library to resolve symbols to an address. My code also supports a mechanism to cache the resolved pointers into a text file which can be subsequently used on other systems with the same COMBASE DLL rather than needing to pull down a 30+ MiB symbol file.
This works fine on Windows 11 x64, but I noticed that I would get incorrect results on ARM64. In the past I've encountered similar issues that have been down to changes in the internal structures used during parsing. Microsoft provides private symbols for COMBASE so its pretty easy to check if the structures were different between x64 and ARM64 versions of Windows 11. They were no differences that I could see. In any case, I noticed this also impacted trivial values, for example the symbol gSecDesc contains a pointer to the COM access security descriptor. However, when reading that pointer it was always NULL even though it should have been initialized.
To add the my confusion when I checked the symbol in WinDBG it showed the pointer was correctly initialized. However, if I did a search for the expected symbol using the x command in WinDBG I found something interesting:
We can see from the output that there's two symbols for gSecDesc, not one. The first one has a NULL value while the second has the initialized value. When I checked what address my symbol resolver was returning it was the first one, where as WinDBG knew better and would return the second. What on earth is going on?
This is an artifact of a new feature in Windows 11 on ARM64 to simplify the emulation of x64 executables, ARM64X. This is a clever (or terrible) trick to avoid needing separate ARM64 and x64 binaries on the system. Instead both ARM64 and x64 compatible code, referred to as ARM64EC (Emulation Compatible), are merged into a single system binary. Presumably in some cases this means that global data structures need to be duplicated, once for the ARM64 code, and once for the ARM64EC code. In this case it doesn't seem like there should be two separate global data values as a pointer is a pointer, but I suppose there might be edge cases where that isn't true and it's simpler to just duplicate the values to avoid conflicts. The details are pretty interesting and there's a few places where this has been reverse engineered, I'd at least recommend this blog post.
My code is using the SymFromName API to query the symbol address, and this would just return the first symbol it finds which in this case was the ARM64EC one which wasn't initialized in an ARM64 process. I don't know if this is a bug in DBGHELP, perhaps it should try and return the symbol which matches the binary's machine type, or perhaps I'm holding it wrong. Regardless, I needed a way of getting the correct symbol, but after going through the DBGHELP library there was no obvious way of disambiguating the two. However, clearly WinDBG can do it, so there must be a way.
After a bit of hunting around I found that the Debug Interface Access (DIA) library has an IDiaSymbol::get_machineType method which returns the machine type for the symbol, either ARM64 (0xAA64) or ARM64EC (0xA641). Unfortunately I'd intentionally used DBGHELP as it's installed by default on Windows where as DIA needs to be installed separately. There didn't seem to be an equivalent in the DBGHELP library.
Fortunately after poking around the DBGHELP library looking for a solution an opportunity presented itself. Internally in DBGHELP (at least recent versions) it uses a private copy of the DIA library. That in itself wouldn't be that helpful, except the library exports a couple of private APIs that allow a caller to query the current DIA state. For example, there's the SymGetDiaSession API which returns an instance of the IDiaSession interface. From that interface you can query for an instance of the IDiaSymbol interface and then query the machine type. I'm not sure how compatible the version of DIA inside DBGHELP is relative to the publicly released version, but it's compatible enough for my purposes.
Update 2024/04/26: it was pointed out to me that the machine type is present in the SYMBOL_INFO::Reserved[1] field so you don't need to do this whole approach with the DIA interface. The point still stands that you need to enumerate the symbols on ARM64 platforms as there could be multiple ones and you still need to check the machine type.
To resolve this issue the code in OleViewDotNet takes the following steps on ARM64 systems:
Instead of calling SymFromName the code enumerate all symbols for a name.
The SymGetDiaSession is called to get an instance of the IDiaSession interface.
The IDiaSession::findSymbolByVA method is called to get an instance the IDiaSymbol interface for the symbol.
The IDiaSymbol::get_machineType method is called to get the machine type for the symbol.
The symbol is filtered based on the context, e.g. if parsing an ARM64 process it uses the ARM64 symbol.
This is much more complicated that I think it needs to be, but I've yet to find an alternative approach. Ideally the SYMBOL_INFO structure in DBGHELP should contain a machine type field, but I guess it's hard to change the interface now. The relatively simple code to do the machine type query is here. If anyone has found a better way of doing it with just the public interface to DBGHELP I'd appreciate the information :)
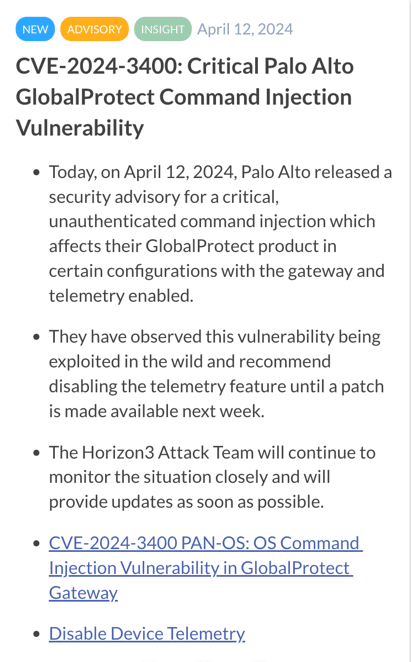
On April 12 (and then updated again on April 20), Palo Alto Networks released an advisory about a vulnerability in the PAN-OS® software that runs Palo Alto Networks® Next-Generation Firewalls (NGFWs). In the advisory it said, “A command injection as a result of arbitrary file creation vulnerability in the GlobalProtect feature of Palo Alto Networks PAN-OS software for specific PAN-OS versions and distinct feature configurations may enable an unauthenticated attacker to execute arbitrary code with root privileges on the firewall.”
A vulnerability that allows for the execution of arbitrary code with root privileges would be deemed critical since it would effectively allow an attacker to gain control over a device, and in this case, Palo Alto NGFWs running the vulnerable PAN-OS.
According to Shadowserver, there are several thousand internet-accessible Palo Alto Networks firewalls potentially affected by the vulnerability. Palo Alto Cloud NGFW, Panorama appliances, and Prisma Access are not impacted by this vulnerability.
Horizon3.ai’s Rapid Response Advisory
On April 12 at 8:55AM EDT, Horizon3.ai sent all customers the beamer notification below via the NodeZero portal warning of the vulnerability, the fact it had been observed being exploited in the wild, saying that the Horizon3 Attack Team would continue to monitor the situation closely, and would provide updates as soon as possible.
Rapid Response Customer Notification #1
Horizon3.ai Announces Rapid Response New Attack Content
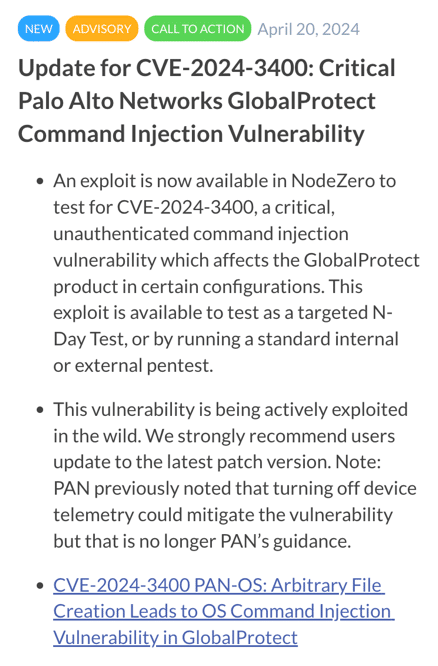
On Saturday, April 20 at 7:20 PM EDT, Horizon3.ai sent all customers the beamer notification below about NodeZero now having an exploit available so organizations can test for ‘exploitability’ of the vulnerability in their environments.
Rapid Response Customer Notification #2
NodeZero N-Day Test Available for CVE-2024-3400
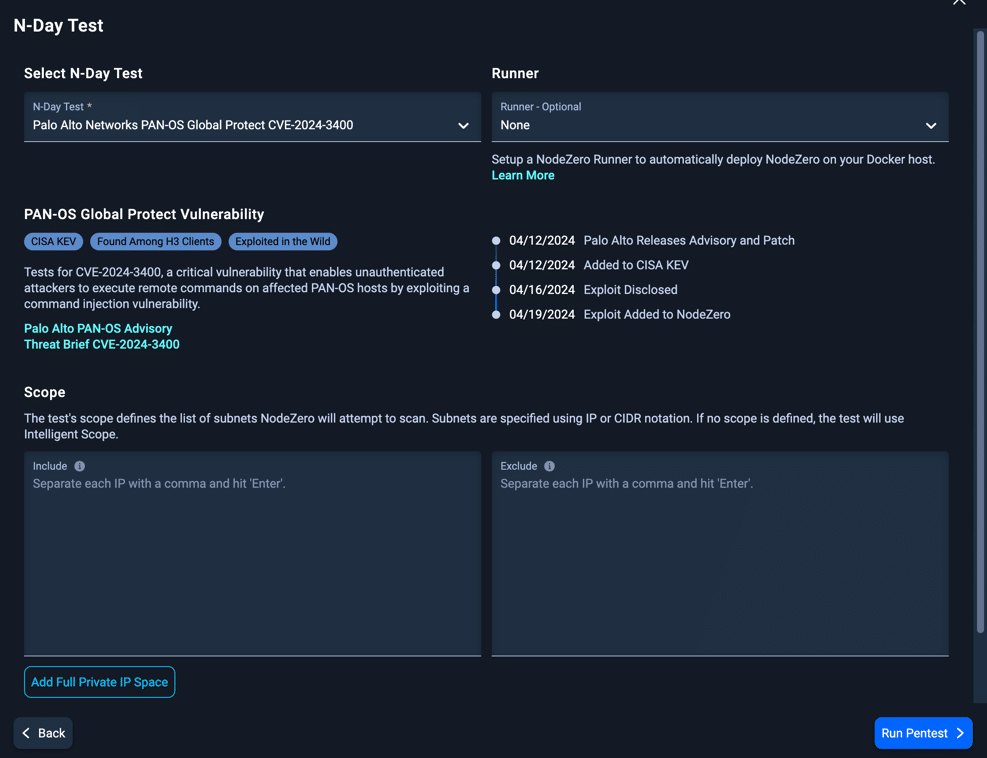
The exploit developed by Horizon3.ai’s attack team is available on NodeZero to run as a targeted N-Day Test (or by running a standard internal or external pentest) using the configuration screen as shown below. Organizations can quickly determine if they are at risk of exploitation due to the known vulnerability – prior to patching their Palo Alto NGFWs. Organizations can also rerun the test after patching to verify the vulnerability is no longer exploitable in their environments.
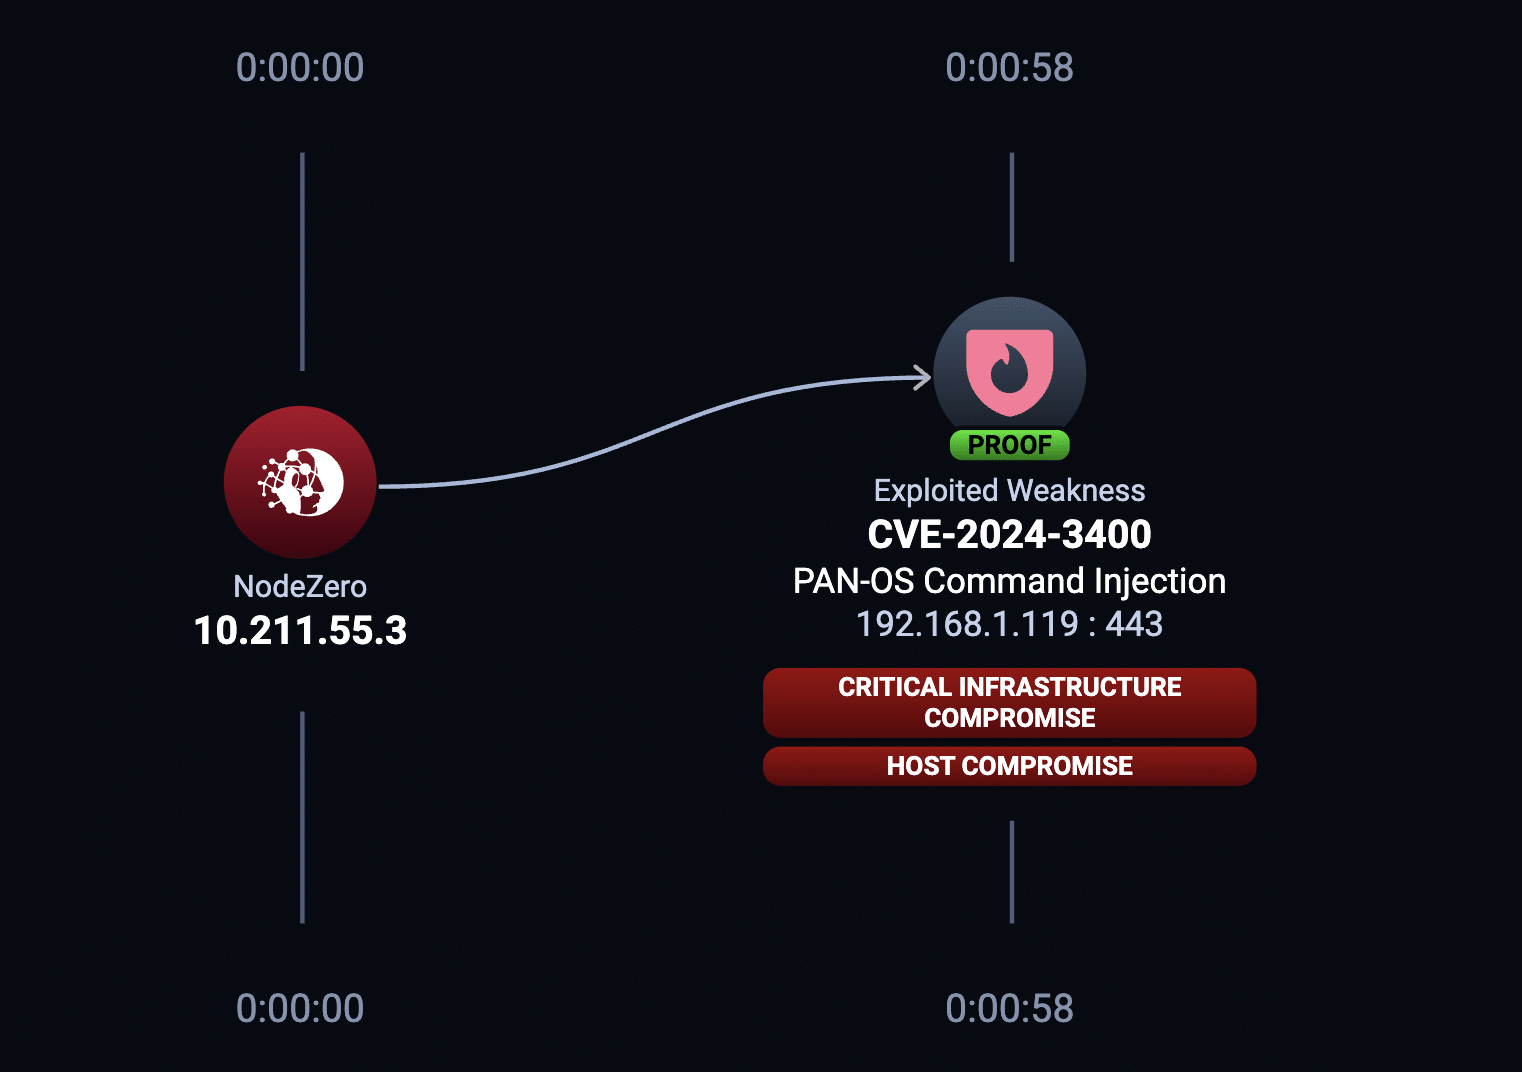
NodeZero Example Attack Path for CVE-2024-3400
Organizations who launch the above N-Day test would see something similar to the attack path below if their Palo Alto NGFWs were vulnerable to exploitation by NodeZero.
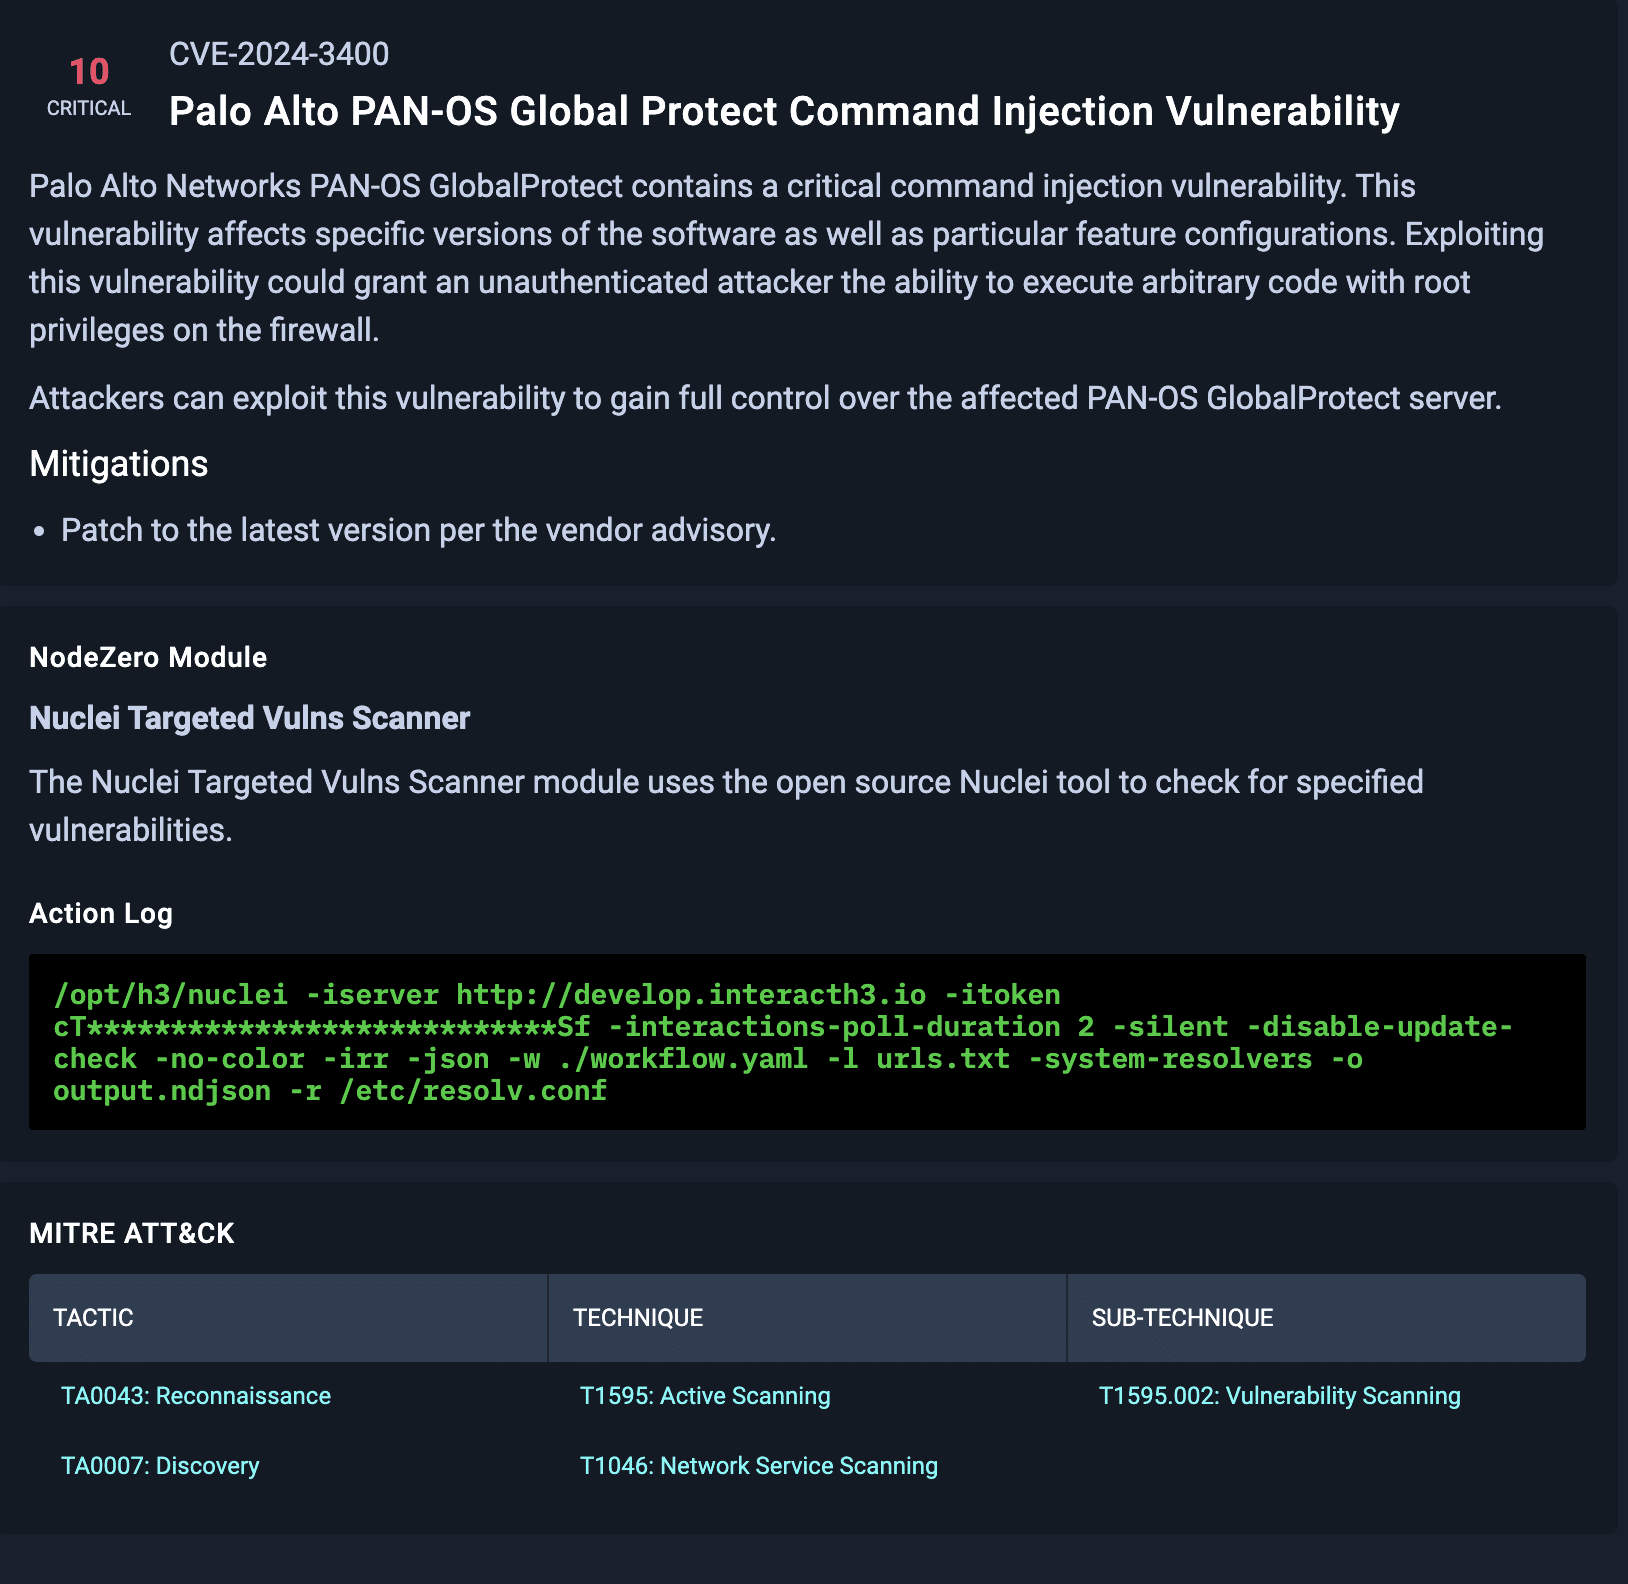
NodeZero Vulnerability Narrative and Mitigations Guidance
Below is a screenshot from NodeZero providing a short narrative about the vulnerability, mitigations, the NodeZero module used in the test, the action log, and the MITRE ATT&CK tactic.
Example Proofs of Exploitability
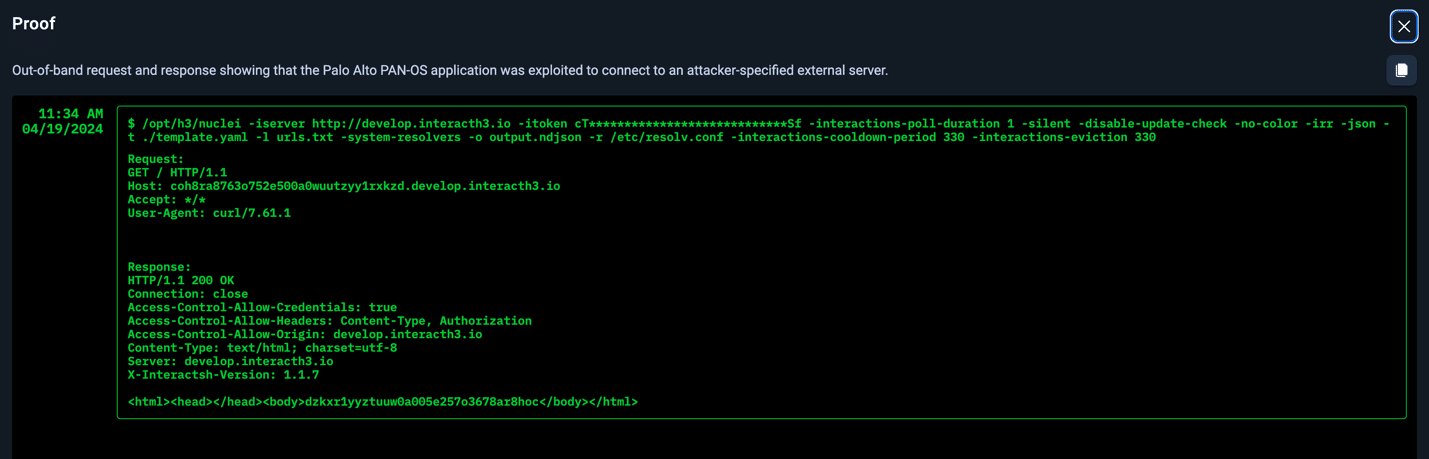
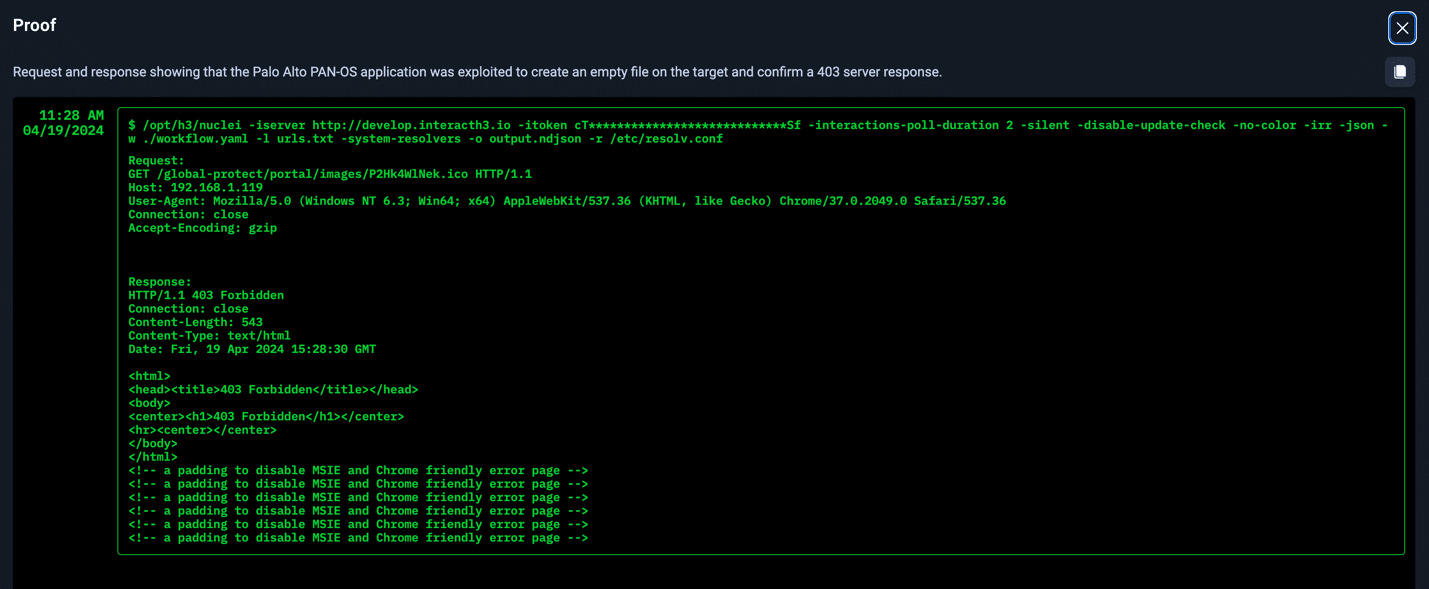
Not only does NodeZero provide an attack path, but it also lists impacts and weaknesses. Even more important, NodeZero provides proof of exploitability. Seeing this proof allows security teams to fully understand their risk, and in this case, highlights two examples of post exploitation outcomes. In both of these cases below, arbitrary code execution with root privileges was completely possible.
Proof #1: PAN-OS application exploited to connect to attacker-specified external server
Proof #: PAN-OS application was exploited to create an empty file on the target and confirm a 403 server response
More About the Vulnerability
CVE-2024-3400 was published on the National Vulnerability Database (NVD) on April 12. Palo Alto then updated their Advisory on April 20. Palo Alto previously noted that turning off device telemetry could mitigate the vulnerability, but that is no longer their guidance. Device telemetry does not need to be enabled for PAN-OS NGFWs to be exposed to attacks related to this vulnerability.
Affected Versions of PAN-OS
PAN-OS (10.2, 11.0, 11.1) with GlobalProtect Gateway or Portal enabled are affected. Palo Alto strongly advises customers to immediately upgrade to a fixed version of PAN-OS to protect their devices even when workarounds and mitigations have been applied.
Severity of the Vulnerability
NVD Analysts, who use publicly available information to associate vector strings and CVSS scores, assigned this vulnerability the Base Score of 10.0 Critical. Attackers being able to execute arbitrary code with root privileges via command injection is a worse-case scenario.
Exploitability (Current Scope of the Attack)
According to Unit 42, Palo Alto Networks is aware of an increasing number of attacks that leverage the exploitation of this vulnerability. Proof of concepts for this vulnerability have been publicly disclosed by third parties. Here is one example.
Added to CISA Known Exploited Vulnerabilities (KEV) Catalog
CVE-2024-3400 was added to the KEV on April 12 since the vulnerability was observed being exploited in the wild.
Conclusion
Horizon3.ai’s attack team’s rapid response to this critical vulnerability demonstrates the value the team provides in the context of advising our customers, researching the vulnerability, rapidly developing an exploit, making the exploit available on NodeZero, and proving the exploit works.
Today, customers of Horizon3.ai are actively testing their internal and external environments with NodeZero to determine their risk exposure, quickly remediating those risks, and verifying they are no longer exploitable to this known vulnerability.
Vulnerabilities like this represent a critical security risk and organizations must immediately patch their PAN-OS software to mitigate the possibility of exploitation, especially if the software is exposed to the internet with the GlobalProtect feature enabled.
Successful exploitation of this vulnerability could allow an attacker to read from the Experion controllers or SMSC S300. This exploit could be used to read files from the controller that may expose limited information from the device.
Successful exploitation of this vulnerability could allow an attacker to modify files on Experion controllers or SMSC S300. This exploit could be used to write a file that may result in unexpected behavior based on configuration changes or updating of files that could result in subsequent execution of a malicious application if triggered.
We at IncludeSec sometimes have the need to develop fuzzing harnesses for our clients as part of our security assessment and pentesting work. Using fuzzing in an assessment methodology can uncover vulnerabilities in modern and complex software during security assessments by providing a faster way to submit highly structured inputs to the applications. This technique is usually applied when a more comprehensive effort beyond manual and traditional automated testing are requested by our clients to provide an additional analysis to uncover more esoteric vulnerabilities.
Introduction
Coverage-guided fuzzing is a useful capability in advanced fuzzers (AFL, libFuzzer, Fuzzilli, and others). This capability permits the fuzzer to acknowledge if an input can discover new edges or branches in the binary execution paths. An edge links two branches in a control flow graph (CFG). For instance, if a logical condition involves an if-else statement, there would be two edges, one for the if and the other for the else statement. It is a significant part of the fuzzing process, helping determine if the target program’s executable code is effectively covered by the fuzzer.
A guided fuzzing process usually utilizes a coverage-guided fuzzing (CGF) technique, employing very basic instrumentation to collect data needed to identify if a new edge or coverage block is hit during the execution of a fuzz test case. The instrumentation is code added during the compilation process, utilized for a number of reasons, including software debugging which is how we will use it in this post.
However, CGF instrumentation techniques can be extended, such as by adding new metrics, as demonstrated in this paper [1], where the authors consider not only the edge count but when there is a security impact too. Generally, extending instrumentation is useful to retrieve more information from the target programs.
In this post, we modify the Fuzzilli patch for the software JerryScript. JerryScript has a known and publicly available vulnerability/exploit, that we can use to show how extending Fuzzilli’s instrumentation could be helpful for more easily identifying vulnerabilities and providing more useful feedback to the fuzzer for further testing. Our aim is to demonstrate how we can modify the instrumentation and extract useful data for the fuzzing process.
Fuzzing is the process of submitting random inputs to trigger an unexpected behavior from the application. In recent approaches, the fuzzers consider various aspects of the target application for generating inputs, including the seeds – sources for generating the inputs. Since modern software has complex structures, we can not reach satisfactory results using simple inputs. In other words, by not affecting most of the target program it will be difficult to discover new vulnerabilities.
The diagram below shows an essential structure for a fuzzer with mutation strategy and code coverage capability.
Seeds are selected;
The mutation process takes the seeds to originate inputs for the execution;
The execution happens;
A vulnerability can occur or;
The input hits a new edge in the target application; the fuzzer keeps mutating the same seed or;
The input does not hit new edges, and the fuzzer selects a new seed for mutation.
The code coverage is helpful to identify if the input can reach different parts of the target program by pointing to the fuzzer that a new edge or block was found during the execution.
CLANG
Clang [Clang] is a compiler for the C, C++, Objective-C, and Objective-C++ programming languages. It is part of the LLVM project and offers advantages over traditional compilers like GCC (GNU Compiler Collection), including more expressive diagnostics, faster compilation times, and extensive analysis support.
One significant tool within the Clang compiler is the sanitizer. Sanitizers are security libraries or tools that can detect bugs and vulnerabilities automatically by instrumenting the code. The compiler checks the compiled code for security implications when the sanitizer is enabled.
There are a few types of sanitizers in this context:
AddressSanitizer (ASAN): This tool detects memory errors, including vulnerabilities like buffer overflows, use-after-free, double-free, and memory leaks.
UndefinedBehaviorSanitizer (UBSAN): Identifies undefined behavior in C/C++ code such as integer overflow, division by zero, null pointer dereferences, and others.
MemorySanitizer (MSAN): Detected uninitialized memory reads in C/C++ programs that can lead to unpredictable behavior.
ThreadSanitizer (TSAN): Detects uninitialized data races and deadlocks in multithreads C/C++ applications.
LeakSanitizer (LSAN): This sanitizer is integrated with AddressSanitizer and helps detect memory leaks, ensuring that all allocated memory is being freed.
The LLVM documentation (SanitizerCoverage — Clang 19.0.0git documentation (llvm.org)) provides a few examples of what to do with the tool. The shell snippet below shows the command line for the compilation using the ASAN option to trace the program counter.
“LLVM has a simple code coverage instrumentation built in (SanitizerCoverage). It inserts calls to user-defined functions on function-, basic-block-, and edge- levels. Default implementations of those callbacks are provided and implement simple coverage reporting and visualization, however if you need just coverage visualization you may want to use SourceBasedCodeCoverage instead.”
For example, code coverage in Fuzzilli (googleprojectzero/fuzzilli: A JavaScript Engine Fuzzer (github.com)), Google’s state-of-the-art JavaScript engine fuzzer, utilizes simple instrumentation to respond to Fuzzilli’s process, as demonstrated in the code snippet below.
The function __sanitizer_cov_trace_pc_guard() will consistently execute when a new edge is found, so no condition is necessary to interpret the new edge discovery. Then, the function changes a bit in the shared bitmap __shmem->edges to 1 (bitwise OR), and then Fuzzilli analyzes the bitmap after execution.
Other tools, like LLVM-COV (llvm-cov – emit coverage information — LLVM 19.0.0git documentation), capture code coverage information statically, providing a human-readable document after execution; however, fuzzers need to be efficient, and reading documents in the disk would affect the performance.
Getting More Information
We can modify Fuzzilli’s instrumentation and observe other resources that __sanitizer_cov_trace_pc_guard() can bring to the code coverage. The code snippet below demonstrates the Fuzzilli instrumentation with a few tweaks.
We already know that the function __sanitizer_cov_trace_pc_guard() is executed every time the instrumented program hits a new edge. In this case, we are utilizing the function __builtin_return_address() to collect the return addresses from every new edge hit in the target program. Now, the pointer PC has the return address information. We can utilize the __sanitizer_symbolize_pc() function to correlate the address to the symbols, providing more information about the source code file used during the execution.
Most fuzzers use only the edge information to guide the fuzzing process. However, as we will demonstrate in the next section, using the sanitizer interface can provide compelling information for security assessments.
Lab Exercise
In our laboratory, we will utilize another JavaScript engine. In this case, an old version of JerryScript JavaScript engine to create an environment.
Operating System (OS): Ubuntu 22.04
Target Program: JerryScript
Vulnerability: CVE-2023-36109
Setting Up the Environment
You can build JerryScript using the following instructions.
The instrumented file is jerry-main/main-fuzzilli.c, provided by the Fuzzilli’s patch. It comes with the necessary to work with simple code coverage capabilities. Still, we want more, so we can use the same lines we demonstrated in the previous section to update the function __sanitizer_cov_trace_pc_guard() before the compilation. Also, adding the following header to jerry-main/main-fuzzilli.c file:
#include <sanitizer/common_interface_defs.h>
The file header describes the __sanitizer_symbolize_pc() function, which will be needed in our implementation. We will modify the function in the jerry-main/main-fuzzilli.c file.
We now change the compilation configuration and disable the strip. The symbols are only needed to identify the possible vulnerable functions for our demonstration.
In the root folder CMakeLists.txt file
# Strip binary
if(ENABLE_STRIP AND NOT CMAKE_BUILD_TYPE STREQUAL "Debug")
  jerry_add_link_flags(-g)
endif()
It defaults with the -s option; change to -g to keep the symbols. Make sure that jerry-main/CMakeLists.txt contains the main-fuzzilli.c file, and then we are ready to compile. We can then build it using the Fuzzilli instructions.
The instrumented binary will be the build/bin/jerry file.
Execution
Let’s start by disabling ASLR (Address Space Layout Randomization).
$ echo 0 | sudo tee /proc/sys/kernel/randomize_va_space
After testing, we can re-enable the ASLR by setting the value to 2.
$ echo 2 | sudo tee /proc/sys/kernel/randomize_va_space
We want to track the address to the source code file, and disabling the ASLR will help us stay aware during the analysis and not affect our results. The ASLR will not impact our lab, but keeping the addresses fixed during the fuzzing process will be fundamental.
Now, we can execute JerryScript using the PoC file for the vulnerability CVE-2023-36109 (Limesss/CVE-2023-36109: a poc for cve-2023-36109 (github.com)), as an argument to trigger the vulnerability. As described in the vulnerability description, the vulnerable function is at ecma_stringbuilder_append_raw in jerry-core/ecma/base/ecma-helpers-string.c, highlighted in the command snippet below.
$ ./build/bin/jerry ./poc.js
[...]
guard: 0x55e17d12ac88 7bb PC 0x55e17d07ac6b in ecma_string_get_ascii_size ecma-helpers-string.c
guard: 0x55e17d12ac84 7ba PC 0x55e17d07acfe in ecma_string_get_ascii_size ecma-helpers-string.c
guard: 0x55e17d12ac94 7be PC 0x55e17d07ad46 in ecma_string_get_size (/jerryscript/build/bin/jerry+0x44d46) (BuildId: 9588e1efabff4190fd492d05d3710c7810323407)
guard: 0x55e17d12e87c 16b8 PC 0x55e17d09dfe1 in ecma_regexp_replace_helper (/jerryscript/build/bin/jerry+0x67fe1) (BuildId: 9588e1efabff4190fd492d05d3710c7810323407)
guard: 0x55e17d12ae04 81a PC 0x55e17d07bb64 in ecma_stringbuilder_append_raw (/jerryscript/build/bin/jerry+0x45b64) (BuildId: 9588e1efabff4190fd492d05d3710c7810323407)
guard: 0x55e17d12e890 16bd PC 0x55e17d09e053 in ecma_regexp_replace_helper (/jerryscript/build/bin/jerry+0x68053) (BuildId: 9588e1efabff4190fd492d05d3710c7810323407)
guard: 0x55e17d12e8b8 16c7 PC 0x55e17d09e0f1 in ecma_regexp_replace_helper (/jerryscript/build/bin/jerry+0x680f1) (BuildId: 9588e1efabff4190fd492d05d3710c7810323407)
guard: 0x55e17d133508 29db PC 0x55e17d0cc292 in ecma_builtin_replace_substitute (/jerryscript/build/bin/jerry+0x96292) (BuildId: 9588e1efabff4190fd492d05d3710c7810323407)
guard: 0x55e17d133528 29e3 PC 0x55e17d0cc5bd in ecma_builtin_replace_substitute (/jerryscript/build/bin/jerry+0x965bd) (BuildId: 9588e1efabff4190fd492d05d3710c7810323407)
guard: 0x55e17d12f078 18b7 PC 0x55e17d040a78 in jmem_heap_realloc_block (/jerryscript/build/bin/jerry+0xaa78) (BuildId: 9588e1efabff4190fd492d05d3710c7810323407)
guard: 0x55e17d12f088 18bb PC 0x55e17d040ab4 in jmem_heap_realloc_block (/jerryscript/build/bin/jerry+0xaab4) (BuildId: 9588e1efabff4190fd492d05d3710c7810323407)
guard: 0x55e17d12f08c 18bc PC 0x55e17d040c26 in jmem_heap_realloc_block (/jerryscript/build/bin/jerry+0xac26) (BuildId: 9588e1efabff4190fd492d05d3710c7810323407)
guard: 0x55e17d12f094 18be PC 0x55e17d040ca3 in jmem_heap_realloc_block (/jerryscript/build/bin/jerry+0xaca3) (BuildId: 9588e1efabff4190fd492d05d3710c7810323407)
UndefinedBehaviorSanitizer:DEADLYSIGNAL
==27636==ERROR: UndefinedBehaviorSanitizer: SEGV on unknown address 0x55e27da7950c (pc 0x7fe341fa092b bp 0x000000000000 sp 0x7ffc77634f18 T27636)
==27636==The signal is caused by a READ memory access.
    #0 0x7fe341fa092b  string/../sysdeps/x86_64/multiarch/memmove-vec-unaligned-erms.S:513
    #1 0x55e17d0cc3bb in ecma_builtin_replace_substitute (/jerryscript/build/bin/jerry+0x963bb) (BuildId: 9588e1efabff4190fd492d05d3710c7810323407)
    #2 0x55e17d09e103 in ecma_regexp_replace_helper (/jerryscript/build/bin/jerry+0x68103) (BuildId: 9588e1efabff4190fd492d05d3710c7810323407)
    #3 0x55e17d084a23 in ecma_builtin_dispatch_call (/jerryscript/build/bin/jerry+0x4ea23) (BuildId: 9588e1efabff4190fd492d05d3710c7810323407)
    #4 0x55e17d090ddc in ecma_op_function_call_native ecma-function-object.c
    #5 0x55e17d0909c1 in ecma_op_function_call (/jerryscript/build/bin/jerry+0x5a9c1) (BuildId: 9588e1efabff4190fd492d05d3710c7810323407)
    #6 0x55e17d0d4743 in ecma_builtin_string_prototype_object_replace_helper ecma-builtin-string-prototype.c
    #7 0x55e17d084a23 in ecma_builtin_dispatch_call (/jerryscript/build/bin/jerry+0x4ea23) (BuildId: 9588e1efabff4190fd492d05d3710c7810323407)
    #8 0x55e17d090ddc in ecma_op_function_call_native ecma-function-object.c
    #9 0x55e17d0909c1 in ecma_op_function_call (/jerryscript/build/bin/jerry+0x5a9c1) (BuildId: 9588e1efabff4190fd492d05d3710c7810323407)
    #10 0x55e17d0b929f in vm_execute (/jerryscript/build/bin/jerry+0x8329f) (BuildId: 9588e1efabff4190fd492d05d3710c7810323407)
    #11 0x55e17d0b8d4a in vm_run (/jerryscript/build/bin/jerry+0x82d4a) (BuildId: 9588e1efabff4190fd492d05d3710c7810323407)
    #12 0x55e17d0b8dd0 in vm_run_global (/jerryscript/build/bin/jerry+0x82dd0) (BuildId: 9588e1efabff4190fd492d05d3710c7810323407)
    #13 0x55e17d06d4a5 in jerry_run (/jerryscript/build/bin/jerry+0x374a5) (BuildId: 9588e1efabff4190fd492d05d3710c7810323407)
    #14 0x55e17d069e32 in main (/jerryscript/build/bin/jerry+0x33e32) (BuildId: 9588e1efabff4190fd492d05d3710c7810323407)
    #15 0x7fe341e29d8f in __libc_start_call_main csu/../sysdeps/nptl/libc_start_call_main.h:58:16
    #16 0x7fe341e29e3f in __libc_start_main csu/../csu/libc-start.c:392:3
    #17 0x55e17d0412d4 in _start (/jerryscript/build/bin/jerry+0xb2d4) (BuildId: 9588e1efabff4190fd492d05d3710c7810323407)
UndefinedBehaviorSanitizer can not provide additional info.
SUMMARY: UndefinedBehaviorSanitizer: SEGV string/../sysdeps/x86_64/multiarch/memmove-vec-unaligned-erms.S:513
==27636==ABORTING
Using this technique, we could identify the root cause of the vulnerability in the function ecma_stringbuilder_append_raw() address in the stack trace.
However, if we rely only on the sanitizer to check the stack trace, we won’t be able to see the vulnerable function name in our output:
$ ./build/bin/jerry ./poc.js
[COV] no shared memory bitmap available, skipping
[COV] edge counters initialized. Shared memory: (null) with 14587 edges
UndefinedBehaviorSanitizer:DEADLYSIGNAL
==54331==ERROR: UndefinedBehaviorSanitizer: SEGV on unknown address 0x5622ae01350c (pc 0x7fc1925a092b bp 0x000000000000 sp 0x7ffed516b838 T54331)
==54331==The signal is caused by a READ memory access.
    #0 0x7fc1925a092b  string/../sysdeps/x86_64/multiarch/memmove-vec-unaligned-erms.S:513
    #1 0x5621ad66636b in ecma_builtin_replace_substitute (/jerryscript/build/bin/jerry+0x9636b) (BuildId: 15a3c1cd9721e9f1b4e15fade2028ddca6dc542a)
    #2 0x5621ad6380b3 in ecma_regexp_replace_helper (/jerryscript/build/bin/jerry+0x680b3) (BuildId: 15a3c1cd9721e9f1b4e15fade2028ddca6dc542a)
    #3 0x5621ad61e9d3 in ecma_builtin_dispatch_call (/jerryscript/build/bin/jerry+0x4e9d3) (BuildId: 15a3c1cd9721e9f1b4e15fade2028ddca6dc542a)
    #4 0x5621ad62ad8c in ecma_op_function_call_native ecma-function-object.c
    #5 0x5621ad62a971 in ecma_op_function_call (/jerryscript/build/bin/jerry+0x5a971) (BuildId: 15a3c1cd9721e9f1b4e15fade2028ddca6dc542a)
    #6 0x5621ad66e6f3 in ecma_builtin_string_prototype_object_replace_helper ecma-builtin-string-prototype.c
    #7 0x5621ad61e9d3 in ecma_builtin_dispatch_call (/jerryscript/build/bin/jerry+0x4e9d3) (BuildId: 15a3c1cd9721e9f1b4e15fade2028ddca6dc542a)
    #8 0x5621ad62ad8c in ecma_op_function_call_native ecma-function-object.c
    #9 0x5621ad62a971 in ecma_op_function_call (/jerryscript/build/bin/jerry+0x5a971) (BuildId: 15a3c1cd9721e9f1b4e15fade2028ddca6dc542a)
    #10 0x5621ad65324f in vm_execute (/jerryscript/build/bin/jerry+0x8324f) (BuildId: 15a3c1cd9721e9f1b4e15fade2028ddca6dc542a)
    #11 0x5621ad652cfa in vm_run (/jerryscript/build/bin/jerry+0x82cfa) (BuildId: 15a3c1cd9721e9f1b4e15fade2028ddca6dc542a)
    #12 0x5621ad652d80 in vm_run_global (/jerryscript/build/bin/jerry+0x82d80) (BuildId: 15a3c1cd9721e9f1b4e15fade2028ddca6dc542a)
    #13 0x5621ad607455 in jerry_run (/jerryscript/build/bin/jerry+0x37455) (BuildId: 15a3c1cd9721e9f1b4e15fade2028ddca6dc542a)
    #14 0x5621ad603e32 in main (/jerryscript/build/bin/jerry+0x33e32) (BuildId: 15a3c1cd9721e9f1b4e15fade2028ddca6dc542a)
    #15 0x7fc192429d8f in __libc_start_call_main csu/../sysdeps/nptl/libc_start_call_main.h:58:16
    #16 0x7fc192429e3f in __libc_start_main csu/../csu/libc-start.c:392:3
    #17 0x5621ad5db2d4 in _start (/jerryscript/build/bin/jerry+0xb2d4) (BuildId: 15a3c1cd9721e9f1b4e15fade2028ddca6dc542a)

UndefinedBehaviorSanitizer can not provide additional info.
SUMMARY: UndefinedBehaviorSanitizer: SEGV string/../sysdeps/x86_64/multiarch/memmove-vec-unaligned-erms.S:513
==54331==ABORTING
This behavior happens because the vulnerability occurs far from the last execution in the program. Usually, the primary action would be debugging to identify the address of the vulnerable function in memory.
Additional Considerations
The vulnerable address or address space could be used as a guide during fuzzing. We can then compare the PC to the specific address space and instruct the fuzzer to focus on a path by mutating the same input in an attempt to cause other vulnerabilities in the same function or file. For example, we can also feed data related to historical vulnerability identification, correlate dangerous files to their address space in a specific project and include them into the instrumentation, and give feedback to the fuzzer to achieve a more focused fuzzing campaign.
We do not necessarily need to use __sanitizer_symbolize_pc for the fuzzing process; this is done only to demonstrate the function and file utilized by each address. Our methodology would only require void *PC = __builtin_return_address(0). The PC will point to the current PC address in the execution, which is the only information needed for the comparison and guiding process.
As we demonstrated above, we can retrieve more information about the stack trace and identify vulnerable execution paths. So, let’s look at Fuzzilli’s basic algorithm, described in their NDSS paper.
In line 12, it is defined that if a new edge is found, the JavaScript code is converted back to its Intermediate Language (IL) (line 13), and the input is added to the corpus for further mutations in line 14.
What can we change to improve the algorithm? Since we have more information about historical vulnerability identification and stack traces, I think that’s a good exercise for the readers.
Conclusion
We demonstrated that we can track the real-time stack trace of a target program by extending Fuzzilli’s instrumentation. By having better visibility into the return address information and its associated source code files, it’s easier to supply the fuzzer with additional paths that can produce interesting results.
Ultimately, this instrumentation technique can be applied to any fuzzer that can take advantage of code coverage capabilities. We intend to use this modified instrumentation output technique in a part 2 blog post at a later date, showing how it can be used to direct the fuzzer to potentially interesting execution paths.
I wrote last week about the problems arising from the massive backlog of vulnerabilities at the U.S. National Vulnerability Database.
Thousands of CVEs are still without analysis data, and the once-reliable database of every single vulnerability that’s disclosed and/or patched is now so far behind, it could take up to 100 days for the National Institute of Standards and Technology (NIST) to catch up, and that would be assuming no new vulnerabilities are disclosed during that period.
While the U.S. government and NIST try to sort out a potential solution, and hopefully await more funding and restructuring, NIST says it’s hoping to launch a consortium to help either rebuild the NVD or create a replacement.
Other security experts have floated the idea of other companies or organizations creating a brand-new solution of their own. The main problem with that is, what’s in it for them?
What works about the NVD is that it’s funded by the U.S. government, so the money is always coming in to help fund the workforce and at least gives MITRE and the other private companies who contribute to the NVD motivation to keep working on it.
To start up a whole new database of *every* CVE out there would take countless man-hours, and then what at the end? Would the company or person(s) who created it start charging for access?
Several open-source solutions haveman-hours popped up over the past few weeks, such as “NVD Data Overrides,” which “is meant to provide additional data that is currently missing from NVD.” However, these types of volunteer projects still can’t assign CVSS scores, because only the NVD is authorized to hand out official NVD CVSS scores.
This brings up another problem for private companies that may want to develop a solution: Do they want to play referee?
Sometimes, when there’s a disagreement on how severe a vulnerability is and what severity score to assign it, the NVD will weigh in and provide their own, independently calculated CVSS score. Who really wants to be the “bad guy” to get between a massive tech company like Microsoft or Apple and a security researcher saying a vulnerability is a 9.5 out of 10 CVSS?
I absolutely give major credit to any volunteers or open-source developers who are working on their own solutions for essentially nothing — but how long can we expect them to keep maintaining these databases?
Unfortunately, I don’t have a great answer for this, either. I’m far from an expert on vulnerability management, nor do I have any connections to the federal government. But I do feel the onus is on the government to come up with a solution, and potentially provide incentives for companies and researchers to participate in this new proposed consortium because I don’t see the incentives there for the private sector to come up with their own solution.
The one big thing
ArcaneDoor is a new campaign that is the latest example of state-sponsored actors targeting perimeter network devices from multiple vendors. Talos and Cisco PSIRT recently identified a previously unknown actor, now tracked as UAT4356 by Talos and STORM-1849 by the Microsoft Threat Intelligence Center. This actor utilized bespoke tooling that demonstrated a clear focus on espionage and an in-depth knowledge of the devices that they targeted, hallmarks of a sophisticated state-sponsored actor. UAT4356 deployed two backdoors as components of this campaign, “Line Runner” and “Line Dancer,” which were used collectively to conduct malicious actions on-target, which included configuration modification, reconnaissance, network traffic capture/exfiltration and potentially lateral movement.
Why do I care?
Gaining a foothold on these devices allows an actor to directly pivot into an organization, reroute or modify traffic and monitor network communications. In the past two years, we have seen a dramatic and sustained increase in the targeting of these devices in areas such as telecommunications providers and energy sector organizations — critical infrastructure entities that are likely strategic targets of interest for many foreign governments. As a critical path for data into and out of the network, these devices need to be routinely and promptly patched; using up-to-date hardware and software versions and configurations; and be closely monitored from a security perspective.
So now what?
There are some known indicators of compromise that customers can look for if they suspect they may have been targeted in this campaign. First, organizations should look for any flows to/from ASA devices to any of the IP addresses present in the IOC list provided at the bottom of this blog. This is one indication that further investigation is necessary. Potential targets can also follow the steps detailed in the Cisco ASA Forensic Investigation Procedures for First Responders. When following these procedures, first responders should NOT attempt to collect a core dump or reboot the device if they believe that the device has been compromised, based on the lina memory region output. Talos also released some Snort signatures to detect the activity on the wire including access attempts. Snort Signatures 63139, 62949 and 45575 have been released to detect the implants or associated behaviors.
Top security headlines of the week
A previously known Windows print spooler bug is still being actively exploited, according to Microsoft. The company’s threat research team recently disclosed that APT28, a well-known Russian state-sponsored actor, is exploiting the vulnerability to deliver a previously unknown malware called “GooseEgg.” Microsoft disclosed and patched CVE-2022-38028 in October 2022, but APT28 may have been exploiting it as far back as 2020. The actor’s exploitation involved modifying a JavaScript constraints file in the printer spooler and executing it with SYSTEM-level permissions. The new research prompted the U.S. Cybersecurity and Infrastructure Security Agency (CISA) to add CVE-2022-38028 to its Known Exploited Vulnerabilities (KEV) catalog. If installed, GooseEgg can load other applications with System-level permissions and allow the adversary to execute remote code on the targeted device or deploy other backdoors. Another set of print spooler vulnerabilities, called PrintNightmare, made headlines in July 2021, though no one reported active exploitation of that vulnerability at the time. (SC Magazine, Security Week)
A new investigation revealed how members of the group Scattered Spider are partnering with Russian state-sponsored actors to carry out ransomware attacks. Scattered Spider is made up of younger individuals based out of the U.S., U.K. and Canada. They are primarily English speakers who have been blamed for several notable ransomware attacks, including one against MGM Casinos that disrupted operations at several casinos and hotels last year. The group specializes in social engineering, more recently using LinkedIn to steal employee information and use that to infiltrate corporate networks. Members, some as young as teenagers, are connecting over the dark web and online forums like Discord and use their advanced knowledge of Western civilization to provide crucial details to Russian actors. The “60 Minutes” investigation also included new details about The Community (aka “The Comm,” the online collection of hackers who like to brag about their recent cybercrimes, often through Telegram. (CBS News)
The U.S. government has re-upped a law that expands government surveillance by opening the door for private companies to partner with the government on these types of activities. The controversial Foreign Intelligence Surveillance Act (FISA) was re-approved just hours after it lapsed. The White House and proponents in U.S. Congress argued that the powers granted in Section 702 of the FISA helps prevent the spread of terrorism and cyber attacks and that any lapse in those powers would harm the government’s ability to gather crucial intelligence. However, privacy advocates say that the FISA is an overreach, and provides too much power for private companies to potentially spy on consumers. The bill also includes a new definition of “electronic communications service provider,” which could allow the U.S. government to force Big Tech companies and telecommunications providers to hand over users’ data if requested. (NBC News, TechCrunch)
Over the past year, we’ve observed a substantial uptick in attacks by YoroTrooper, a relatively nascent espionage-oriented threat actor operating against the Commonwealth of Independent Countries (CIS) since at least 2022. Asheer Malhotra's presentation at CARO 2024 will provide an overview of their various campaigns detailing the commodity and custom-built malware employed by the actor, their discovery and evolution in tactics. He will present a timeline of successful intrusions carried out by YoroTrooper targeting high-value individuals associated with CIS government agencies over the last two years.
Infosec and Cyber Work Hacks podcast want to help you pass the CCNA exam! So, for today’s hack, let’s talk boot camps. The CCNA is an intimidating exam, especially if you’re trying to go it alone, just you and your self-study book. That’s why I’d like to introduce you to Infosec’s CCNA boot camp instructor, Wilfredo Lanz! He will explain what the Infosec 5-day CCNA boot camp is like, the learning and memorizing strategies you’ll employ and how boot camp training can help you pass on the first try. Lanz helps his students with every networking question, and students who commit to those five intensive days will see significant results.
0:00 - What is a CCNA boot camp like? 1:40 - Boot camp training versus university 6:37 - Do I need to bring anything to CCNA boot camp? 7:23 - Take CCNA exam after boot camp 8:25 - Advice for taking a CCNA boot camp 9:46 - Outro
About Infosec Infosec’s mission is to put people at the center of cybersecurity. We help IT and security professionals advance their careers with skills development and certifications while empowering all employees with security awareness and phishing training to stay cyber-safe at work and home. More than 70% of the Fortune 500 have relied on Infosec Skills to develop their security talent, and more than 5 million learners worldwide are more cyber-resilient from Infosec IQ’s security awareness training. Learn more at infosecinstitute.com.
December 2023 Windows Updates brought a patch for CVE-2023-35628,
a memory corruption vulnerability that could potentially lead to remote code execution when an application on user's computer tried to access a URL provided by an attacker.
Security researcher Ben Barnea of Akamai, who found this vulnerability and reported it to Microsoft, wrote a detailed article and published a simple and effective POC.
These allowed us to reproduce the issue and create a micropatch for
affected legacy Windows systems, which are no longer receiving security
updates from Microsoft.
The Vulnerability
The vulnerability resides inside the CrackUrlFile function in iertutil.dll. In July 2023, Microsoft added some code to this function that introduced the vulnerability, whereby a heap free operation is made on an invalid pointer when the provided URL is properly formatted as described in Ben's article.
CrackUrlFile is a fairly generic function and can be used by various processes and applications. Ben demonstrated the vulnerability with a simple .lnk file, which immediately crashes Windows Explorer when the directory with such file is displayed to the user. His article also mentions a possibility of triggering the vulnerability through an email message shown in Outlook, and Microsoft's advisory adds an Instant Messenger message as a possible attack vector.
Our Micropatch
We patched this issue in the same way Microsoft did, by replacing the flawed code that changed the pointer to the URL with corrected code that doesn't.
Let's see our patch in action. The video below first shows an empty Windows Event Log and a malicious .lnk file in the Downloads folder pointing to file://./UNC/C:/Akamai.com/file.wav. (Note that displaying this .lnk file does not crash Windows Explorer because 0patch is enabled and the vulnerability already patched by it.)
Then, 0patch is disabled, which un-applies all 0patch micropatches from running processes, including the micropatch for CVE-2023-35628 from explorer.exe process. Opening the Downloads folder leads to immediate crashing of explorer.exe without any other user interaction as the process tries to determine an icon for the .lnk file, leading to the "malicious" URL being processed by vulnerable CrackUrlFile function.
Finally, 0patch is re-enabled, and the malicious .lnk file is unable to crash Windows Explorer because the vulnerability was removed from the process.
Micropatch Availability
Micropatches were written for the following security-adopted versions of Windows with all available Windows Updates installed:
Windows 11 v21H2 - fully updated
Windows Server 2012 R2 - fully updated with no ESU
Our patches only cover Windows 11 21H2 and Windows Server 2012 R2, as other systems either received official patches in December 2023 or don't even have the vulnerability that was only introduced in July of 2023. Even though Microsoft also listed Windows Server 2012 as affected, we couldn't reproduce the issue on this system, and could find no traces of vulnerable code there either.
Micropatches have already been distributed to, and applied on, all
online 0patch Agents in PRO or Enterprise accounts (unless Enterprise group settings prevent that).
Vulnerabilities like these get discovered on a regular basis, and
attackers know about them all. If you're using Windows that aren't
receiving official security updates anymore, 0patch will make sure these
vulnerabilities won't be exploited on your computers - and you won't
even have to know or care about these things.
If you're new to 0patch, create a free account
in 0patch Central, then install and register 0patch Agent from 0patch.com, and email [email protected] for a trial. Everything else will happen automatically. No computer reboot will be needed.
We would like to thank Ben Barnea of Akamai for sharing their analysis and POC, which made it possible for us to create a
micropatch for this issue.
To learn more about 0patch, please visit our Help Center.
Business email compromise (BEC) was the top threat observed by Cisco Talos Incident Response (Talos IR) in the first quarter of 2024, accounting for nearly half of engagements, which is more than double what was observed in the previous quarter.
The most observed means of gaining initial access was the use of compromised credentials on valid accounts, which accounted for 29 percent of engagements. The high number of BEC attacks likely played a significant role in valid accounts being the top attack vector this quarter. Weaknesses involving multi-factor authentication (MFA) were observed within nearly half of engagements this quarter, with the top observed weakness being users accepting unauthorized push notifications, occurring within 25 percent of engagements.
There was a slight decrease in ransomware this quarter, accounting for 17 percent of engagements. Talos IR responded to new variants of Phobos and Akira ransomware for the first time this quarter.
Manufacturing was the most targeted vertical this quarter, closely followed by education, a continuation from Q4 2024 where manufacturing and education were also two of the most targeted verticals. There was a 20 percent increase in manufacturing engagements from the previous quarter.
The manufacturing sector faces unique challenges due to its inherently low tolerance for operational downtime. This quarter, Talos IR observed a wide range of threat activity targeting manufacturing organizations including financially motivated attacks, such as BEC and ransomware, and some brute force activity targeting virtual private network (VPN) infrastructure. The use of compromised credentials on valid accounts was the top observed attack vector within attacks targeting the manufacturing sector this quarter, which represents a change from the previous quarter when the top attack vector observed in these types of engagements was exploiting vulnerabilities in public-facing applications.
Watch discussion on the report's biggest trends
Surge in BEC
Within BEC attacks, adversaries will send phishing emails appearing to be from a known or reputable source making a valid request, such as updating payroll direct deposit information. BEC attacks can have many motivations, often financially driven, aimed at tricking organizations into transferring funds or sensitive information to malicious actors.
BEC offers adversaries the advantage of impersonating trusted contacts to facilitate internal spearphishing attacks that can bypass traditional external defenses and increase the likelihood of deception, widespread malware infections and data theft.
In one engagement, adversaries performed a password-spraying attack and MFA exhaustion attacks against several employee accounts. There was a lack of proper MFA implementation across all the impacted accounts, leading to the adversaries gaining access to at least two accounts using single-factor authentication. The organization detected and disrupted the attack before adversaries could further their access or perform additional post-compromise activities.
In another cluster of activity, several employees received spear-phishing emails that contained links that, when clicked, led to a redirection chain of web pages ultimately landing on a legitimate single sign-on (SSO) prompt that was pre-populated with each victim’s email address. The attack was unsuccessful because none of the employees interacted with the email, which was likely due to multiple red flags. For example, the email was unexpected and sent from an external email address, and there was small text within the email that referred to the email as a fax, which was all indicators of a phishing attempt.
Ransomware trends
Ransomware accounted for 17 percent of engagements this quarter, an 11 percent decrease from the previous quarter. Talos IR observed new variants of Akira and Phobos ransomware for the first time this quarter.
Akira
Talos IR responded to an Akira ransomware attack for the first time this quarter in an engagement where affiliates deployed the latest ESXi version, “Akira_v2,” as well as a Windows-based variant of Akira named “Megazord.” These new Akira variants are written in the Rust programming language, which is a notable change from the previously used C++ and Crypto++ programming languages.
Talos IR could not determine how initial access was gained, which is common because ransomware attacks often involve multi-stage attack strategies that add additional complexity during the investigation process. Once inside the network, the adversaries began collecting credentials from the memory of the Local Security Authority Subsystem Service (LSASS) and the New Technology Directory Services Directory Information Tree (NTDS.dit) database, where Active Directory data is stored, and leveraged Remote Desktop Protocol (RDP) for lateral movement. Prior to encryption, Megazord ransomware began executing several commands to disable tools and impair defenses, including “net stop” and “taskkill.” Akira_v2 appended the file extension “.akiranew” during encryption, while Megazord ransomware appended the file extension “.powerranges”.
First discovered in early 2023, Akira operates as a ransomware-as-a-service (RaaS) model and employs a double extortion scheme that involves exfiltrating data before encryption. Akira affiliates are known to heavily target small- to medium-sized businesses within several verticals primarily located within the U.S. but have targeted organizations within the U.K., Canada, Iceland, Australia and South Korea. Akira affiliates are notorious for leveraging compromised credentials and exploiting vulnerabilities as a means of gaining initial access, such as the SQL injection vulnerability, tracked as CVE-2021-27876, affecting certain versions of Zoho ManageEngine ADSelfService Plus, and the vulnerability, tracked as CVE-2023-27532, affecting certain versions of Veeam’s Backup & Replication (VBS) software.
Phobos
Talos IR has previously observed variants of Phobos ransomware, such as “Faust,” but this quarter, Talos IR responded to an engagement with the “BackMyData” variant of Phobos ransomware. The adversaries leveraged Mimikatz to dump credentials from Active Directory. The adversary also installed several tools in the NirSoft product suite designed to recover passwords, such as PasswordFox and ChromePass, for additional credential enumeration.
The adversaries used PsExec to access the domain controller before setting a registry key to permit remote desktop connections. Shortly after, the adversaries also modified the firewall to allow remote desktop connections using the Windows scripting utility, netsh. The remote access tool AnyDesk was downloaded to enable remote access as a means of persistence in the environment. Talos IR assessed with high confidence that Windows Secure Copy (WinSCP) and Secure Shell (SSH) were likely used to exfiltrate staged data. Adversaries also relied on PsExec to execute commands, such as deleting volume shadow copies, as a precursor to deploying the ransomware executable. After encryption, the ransomware appended the file extension “.fastbackdata”.
A notable finding was the persistent use of the “Users/[username]/Music” directory as a staging area for data exfiltration to host malicious scripts, tools and malware, a common technique used by numerous ransomware affiliates to evade detection and remain persistent in the environment. Talos IR also identified a digitally signed executable, “HRSword,” developed by Beijing Huorong Network Technology. It is a tool the affiliate used during the attack for potential secure file deletion and as a defensive measure to disable endpoint protection tools, which Phobos affiliates were previously using, according to public reporting.
Phobos ransomware first emerged in late 2018 and shared many similarities with the Crysis and Dharma ransomware families. Unlike other ransomware families, there are many variants of Phobos ransomware, such as Eking, Eight, Elbie, Devos and Faust. There is little information known about the business model leveraged by the Phobos ransomware operation. In November 2023, Cisco Talos analyzed over a thousand samples of Phobos ransomware to learn more about the affiliate structure and activity, which revealed that Phobos may operate a RaaS model due to the hundreds of contact emails and IDs associated with Phobos campaigns, indicating the malware has a dispersed affiliate base. Talos assessed with moderate confidence that the Phobos ransomware operation is actively managed by a central authority, as there is only one private key capable of decryption in all observed campaigns.
Other observed threats
Talos IR responded to an attack where adversaries were attempting to brute force several Cisco Adaptive Security Appliances (ASAs). Although the adversaries were unsuccessful in their attack, this activity is in line with the recently observed trend affecting VPN services.
Cisco Talos has recently seen an increase in malicious activity targeting VPN services, web application authentication interfaces, and Secure Shell (SSH) globally. Since at least March 18, Cisco has observed scanning and brute force activity sourcing from The Onion Router (TOR) exit nodes and other anonymous tunnels and proxies.
Depending on the target environment, a successful attack could result in unauthorized access to a target network, possibly leading to account lockouts and denial-of-service (DoS) conditions. The brute force attempts include a combination of generic usernames and valid usernames unique to specific organizations. The activity seems indiscriminate and has been observed across multiple industry verticals and geographic regions.
Initial vectors
The most observed means of gaining initial access was the use of compromised credentials on valid accounts, accounting for 29 percent of engagements, a continuation of a trend from the previous quarter when valid accounts were also a top attack vector.
Security weaknesses
For the first time, users accepting unauthorized MFA push notifications was the top observed security weakness, accounting for 25 percent of engagements this quarter. The lack of proper MFA implementation closely followed, accounting for 21 percent of engagements, a 44 percent decrease from the previous quarter.
Users must have a clear understanding of the appropriate business response protocols when their devices are overwhelmed with an excessive volume of push notifications. Talos IR recommends organizations educate their employees about the specific channels and points of contact for reporting these incidents. Prompt and accurate reporting enables security teams to quickly identify the nature of the issue and implement the necessary measures to address the situation effectively. Organizations should also consider implementing number-matching in MFA applications to provide an additional layer of security to prevent users from accepting malicious MFA push notifications.
Talos IR recommends implementing MFA on all critical services including all remote access and identity access management (IAM) services. MFA will be the most effective method for the prevention of remote-based compromises. It also prevents lateral movement by requiring all administrative users to provide a second form of authentication. Organizations can set up alerting for single-factor authentication to quickly identify potential gaps.
Top observed MITRE ATT&CK techniques
The table below represents the MITRE ATT&CK techniques observed in this quarter’s IR engagements and includes relevant examples and the number of times seen. Given that some techniques can fall under multiple tactics, we grouped them under the most relevant tactic based on the way they were leveraged. Please note, this is not an exhaustive list.
Key findings from the MITRE ATT&CK framework include:
Remote access software, such as SplashTop and AnyDesk, were used in 17 percent of engagements this quarter, a 20 percent decrease from the previous quarter.
The use of email hiding rules was the top observed defense evasion technique, accounting for 21 percent of engagements this quarter.
Scheduled tasks were leveraged by adversaries the most this quarter for persistence, accounting for 17 percent of engagements this quarter, a 33 percent increase from the previous quarter.
The abuse of remote services, such as RDP, SSH, SMB and WinRM, more than doubled this quarter compared to the previous quarter, accounting for nearly 60 percent of engagements.
Espionage is a network packet sniffer that intercepts large amounts of data being passed through an interface. The tool allows users to to run normal and verbose traffic analysis that shows a live feed of traffic, revealing packet direction, protocols, flags, etc. Espionage can also spoof ARP so, all data sent by the target gets redirected through the attacker (MiTM). Espionage supports IPv4, TCP/UDP, ICMP, and HTTP. Espionag e was written in Python 3.8 but it also supports version 3.6. This is the first version of the tool so please contact the developer if you want to help contribute and add more to Espionage. Note: This is not a Scapy wrapper, scapylib only assists with HTTP requests and ARP.
sudo python3 espionage.py --normal --iface wlan0 -f capture_output.pcap Command 1 will execute a clean packet sniff and save the output to the pcap file provided. Replace wlan0 with whatever your network interface is.
sudo python3 espionage.py --verbose --iface wlan0 -f capture_output.pcap Command 2 will execute a more detailed (verbose) packet sniff and save the output to the pcap file provided.
sudo python3 espionage.py --normal --iface wlan0 Command 3 will still execute a clean packet sniff however, it will not save the data to a pcap file. Saving the sniff is recommended.
sudo python3 espionage.py --verbose --httpraw --iface wlan0 Command 4 will execute a verbose packet sniff and will also show raw http/tcp packet data in bytes.
sudo python3 espionage.py --target <target-ip-address> --iface wlan0 Command 5 will ARP spoof the target ip address and all data being sent will be routed back to the attackers machine (you/localhost).
sudo python3 espionage.py --iface wlan0 --onlyhttp Command 6 will only display sniffed packets on port 80 utilizing the HTTP protocol.
sudo python3 espionage.py --iface wlan0 --onlyhttpsecure Command 7 will only display sniffed packets on port 443 utilizing the HTTPS (secured) protocol.
sudo python3 espionage.py --iface wlan0 --urlonly Command 8 will only sniff and return sniffed urls visited by the victum. (works best with sslstrip).
Press Ctrl+C in-order to stop the packet interception and write the output to file.
optional arguments: -h, --help show this help message and exit --version returns the packet sniffers version. -n, --normal executes a cleaner interception, less sophisticated. -v, --verbose (recommended) executes a more in-depth packet interception/sniff. -url, --urlonly only sniffs visited urls using http/https. -o, --onlyhttp sniffs only tcp/http data, returns urls visited. -ohs, --onlyhttpsecure sniffs only https data, (port 443). -hr, --httpraw displays raw packet data (byte order) recieved or sent on port 80.
(Recommended) arguments for data output (.pcap): -f FILENAME, --filename FILENAME name of file to store the output (make extension '.pcap').
The developer of this program, Josh Schiavone, written the following code for educational and ethical purposes only. The data sniffed/intercepted is not to be used for malicous intent. Josh Schiavone is not responsible or liable for misuse of this penetration testing tool. May God bless you all.
This blog is part of a series written by various Dutch cyber security firms that have collaborated on the Cactus ransomware group, which exploits Qlik Sense servers for initial access. To view all of them please check the central blog by Dutch special interest group Cyberveilig Nederland [1]
The effectiveness of the public-private partnership called Melissa [2] is increasingly evident. The Melissa partnership, which includes Fox-IT, has identified overlap in a specific ransomware tactic. Multiple partners, sharing information from incident response engagements for their clients, found that the Cactus ransomware group uses a particular method for initial access. Following that discovery, NCC Group’s Fox-IT developed a fingerprinting technique to identify which systems around the world are vulnerable to this method of initial access or, even more critically, are already compromised.
Qlik Sense vulnerabilities
Qlik Sense, a popular data visualisation and business intelligence tool, has recently become a focal point in cybersecurity discussions. This tool, designed to aid businesses in data analysis, has been identified as a key entry point for cyberattacks by the Cactus ransomware group.
The Cactus ransomware campaign
Since November 2023, the Cactus ransomware group has been actively targeting vulnerable Qlik Sense servers. These attacks are not just about exploiting software vulnerabilities; they also involve a psychological component where Cactus misleads its victims with fabricated stories about the breach. This likely is part of their strategy to obscure their actual method of entry, thus complicating mitigation and response efforts for the affected organizations.
For those looking for in-depth coverage of these exploits, the Arctic Wolf blog [3] provides detailed insights into the specific vulnerabilities being exploited, notably CVE-2023-41266, CVE-2023-41265 also known as ZeroQlik, and potentially CVE-2023-48365 also known as DoubleQlik.
Threat statistics and collaborative action
The scope of this threat is significant. In total, we identified 5205 Qlik Sense servers, 3143 servers seem to be vulnerable to the exploits used by the Cactus group. This is based on the initial scan on 17 April 2024. Closer to home in the Netherlands, we’ve identified 241 vulnerable systems, fortunately most don’t seem to have been compromised. However, 6 Dutch systems weren’t so lucky and have already fallen victim to the Cactus group. It’s crucial to understand that “already compromised” can mean that either the ransomware has been deployed and the initial access artifacts left behind were not removed, or the system remains compromised and is potentially poised for a future ransomware attack.
Since 17 April 2024, the DIVD (Dutch Institute for Vulnerability Disclosure) and the governmental bodies NCSC (Nationaal Cyber Security Centrum) and DTC (Digital Trust Center) have teamed up to globally inform (potential) victims of cyberattacks resembling those from the Cactus ransomware group. This collaborative effort has enabled them to reach out to affected organisations worldwide, sharing crucial information to help prevent further damage where possible.
Identifying vulnerable Qlik Sense servers
Expanding on Praetorian’s thorough vulnerability research on the ZeroQlik and DoubleQlik vulnerabilities [4,5], we found a method to identify the version of a Qlik Sense server by retrieving a file called product-info.json from the server. While we acknowledge the existence of Nuclei templates for the vulnerability checks, using the server version allows for a more reliable evaluation of potential vulnerability status, e.g. whether it’s patched or end of support.
This JSON file contains the release label and version numbers by which we can identify the exact version that this Qlik Sense server is running.
Figure 1: Qlik Sense product-info.json file containing version information
Keep in mind that although Qlik Sense servers are assigned version numbers, the vendor typically refers to advisories and updates by their release label, such as “February 2022 Patch 3”.
The following cURL command can be used to retrieve the product-info.json file from a Qlik server:
Note that we specify ?.ttf at the end of the URL to let the Qlik proxy server think that we are requesting a .ttf file, as font files can be accessed unauthenticated. Also, we set the Host header to localhost or else the server will return 400 - Bad Request - Qlik Sense, with the message The http request header is incorrect.
Retrieving this file with the ?.ttf extension trick has been fixed in the patch that addresses CVE-2023-48365 and you will always get a 302 Authenticate at this location response:
> GET /resources/autogenerated/product-info.json?.ttf HTTP/1.1
> Host: localhost
> Accept: */*
>
< HTTP/1.1 302 Authenticate at this location
< Cache-Control: no-cache, no-store, must-revalidate
< Location: https://localhost/internal_forms_authentication/?targetId=2aa7575d-3234-4980-956c-2c6929c57b71
< Content-Length: 0
<
Nevertheless, this is still a good way to determine the state of a Qlik instance, because if it redirects using 302 Authenticate at this location it is likely that the server is not vulnerable to CVE-2023-48365.
An example response from a vulnerable server would return the JSON file:
We utilised Censys and Google BigQuery [6] to compile a list of potential Qlik Sense servers accessible on the internet and conducted a version scan against them. Subsequently, we extracted the Qlik release label from the JSON response to assess vulnerability to CVE-2023-48365.
Our vulnerability assessment for DoubleQlik / CVE-2023-48365 operated on the following criteria:
The release label corresponds to vulnerability statuses outlined in the original ZeroQlik and DoubleQlik vendor advisories [7,8].
The release label is designated as End of Support (EOS) by the vendor [9], such as “February 2019 Patch 5”.
We consider a server non-vulnerable if:
The release label date is post-November 2023, as the advisory states that “November 2023” is not affected.
The server responded with HTTP/1.1 302 Authenticate at this location.
Any other responses were disregarded as invalid Qlik server instances.
As of 17 April 2024, and as stated in the introduction of this blog, we have detected 5205 Qlik Servers on the Internet. Among them, 3143 servers are still at risk of DoubleQlik, indicating that 60% of all Qlik Servers online remain vulnerable.
Figure 2: Qlik Sense patch status for DoubleQlik CVE-2023-48365
The majority of vulnerable Qlik servers reside in the United States (396), trailed by Italy (280), Brazil (244), the Netherlands (241), and Germany (175).
Figure 3: Top 20 countries with servers vulnerable to DoubleQlik CVE-2023-48365
Identifying compromised Qlik Sense servers
Based on insights gathered from the Arctic Wolf blog and our own incident response engagements where the Cactus ransomware was observed, it’s evident that the Cactus ransomware group continues to redirect the output of executed commands to a True Type font file named qle.ttf, likely abbreviated for “qlik exploit”.
Below are a few examples of executed commands and their output redirection by the Cactus ransomware group:
In addition to the qle.ttf file, we have also observed instances where qle.woff was used:
Figure 4: Directory listing with exploitation artefacts left by Cactus ransomware group
It’s important to note that these font files are not part of a default Qlik Sense server installation.
We discovered that files with a font file extension such as .ttf and .woff can be accessed without any authentication, regardless of whether the server is patched. This likely explains why the Cactus ransomware group opted to store command output in font files within the fonts directory, which in turn, also serves as a useful indicator of compromise.
Our scan for both font files, found a total of 122 servers with the indicator of compromise. The United States ranked highest in exploited servers with 49 online instances carrying the indicator of compromise, followed by Spain (13), Italy (11), the United Kingdom (8), Germany (7), and then Ireland and the Netherlands (6).
Figure 5: Top 20 countries with known compromised Qlik Sense servers
Out of the 122 compromised servers, 46 were not vulnerable anymore.
When the indicator of compromise artefact is present on a remote Qlik Sense server, it can imply various scenarios. Firstly, it may suggest that remote code execution was carried out on the server, followed by subsequent patching to address the vulnerability (if the server is not vulnerable anymore). Alternatively, its presence could signify a leftover artefact from a previous security incident or unauthorised access.
While the root cause for the presence of these files is hard to determine from the outside it still is a reliable indicator of compromise.
Responsible disclosure by the DIVD We shared our fingerprints and scan data with the Dutch Institute of Vulnerability Disclosure (DIVD), who then proceeded to issue responsible disclosure notifications to the administrators of the Qlik Sense servers.
Call to action
Ensure the security of your Qlik Sense installations by checking your current version. If your software is still supported, apply the latest patches immediately. For systems that are at the end of support, consider upgrading or replacing them to maintain robust security.
Additionally, to enhance your defences, it’s recommended to avoid exposing these services to the entire internet. Implement IP whitelisting if public access is necessary, or better yet, make them accessible only through secure remote working solutions.
If you discover you’ve been running a vulnerable version, it’s crucial to contact your (external) security experts for a thorough check-up to confirm that no breaches have occurred. Taking these steps will help safeguard your data and infrastructure from potential threats.
October 2022 Windows Update brought fixes for two interesting vulnerabilities, CVE-2022-38034 and CVE-2022-38045. They allowed a remote attacker to access various "local-only" RPC functions in Windows Workstation and Windows Server services respectively, bypassing these services' RPC security callbacks. These vulnerabilities were found by Ben Barnea and Stiv Kupchik of Akamai who published a detailed article and provided a proof-of-concept tool.
We missed this publication back in 2022 (probably being busy patching some other vulnerabilities), but once we found it we confirmed that some of the legacy Windows versions that we had security-adopted were affected and decided to provide patches for them.
The Vulnerability
The vulnerability stems from the fact that older Windows systems, but also current Windows systems with less than 3.5GB of RAM, pack two or more services into the same svchost.exe process. Apparently this can be a problem; in our case, it enables both Workstation and Server Service - which normally don't accept authentication requests - to accept authentication requests when bundled up with another service that does. When that happens, the previously (remotely) inaccessible functions from these services become remotely accessible because successful authentication gets cached and is subsequently looked up without additional security checks.
Microsoft's Patch
Microsoft's patch effectively disabled said caching for both services. Patched versions of wkssvc.dll and srvsvc.dll contain updated flags that are passed to the
RpcServerRegisterIfEx function when these service are initialized. The flags
that were previously 0x11 (RPC_IF_ALLOW_CALLBACKS_WITH_NO_AUTH |
RPC_IF_AUTOLISTEN) have been replaced with 0x91
(RPC_IF_ALLOW_CALLBACKS_WITH_NO_AUTH | RPC_IF_AUTOLISTEN |
RPC_IF_SEC_CACHE_PER_PROC).
Our Micropatch
We could patch these vulnerabilities in wkssvc.dll and srvsvc.dll in exactly the same way Microsoft did, but that would require users to restart Workstation and Server services for the modified flags to kick in. (Remember that Windows updates make you restart the computer anyway, but we have higher standards than that and want our patches to come in effect without a restart.)
Therefore, we decided to place our patches in rpcrt4.dll, which gets loaded in all RPC server processes and manages the cache and security callbacks for every Windows RPC interface. Our patch sits in the RPC_INTERFACE::DoSyncSecurityCallback function that processes the cached values and decides whether to call the security callback or use the cached result. It first checks if it's running in the Workstation or Server Service process, and if so, simply forces the security callback.
call MODNAME1 db __utf16__('wkssvc.dll'),0,0 ;load "wkssvc.dll" string MODNAME1: pop rcx ;pop the string into the first arg sub rsp, 0x20 ;create the shadowspace call PIT_GetModuleHandleW ;call GetModuleHandleW to check if wkssvc.dll is ;loaded in the current process add rsp, 0x20 ;delete the shadowspace cmp rax, 0x0 ;check if the call succeeded jne PIT_0x4e0b4 ;if success, we are in the Workstation Service process, ;so we block security callback caching by simulating ;the caching flag being disabled call MODNAME2 db __utf16__('srvsvc.dll'),0,0 ;load "srvsvc.dll" string MODNAME2: pop rcx ;pop the string into the first arg sub rsp, 0x20 ;create the shadowspace call PIT_GetModuleHandleW ;call GetModuleHandleW to check if srvsvc.dll is ;loaded in the current process add rsp, 0x20 ;delete the shadowspace cmp rax, 0x0 ;check if the call succeeded jne PIT_0x4e0b4 ;if success, we are in the Server Service process, ;so we block security callback caching by simulating ;the caching flag being disabled code_end patchlet_end
While working on this patch we noticed that the Workstation Service security callback behaved differently on different Windows versions. On Windows 10 and later, the security callback blocks functions with numbers ("opnums") between 8 and 11 from being executed remotely, which is exactly what CVE-2022-38034 bypasses. However, on older Windows versions like Windows 7 up to ESU 2 (2nd year of Extended Security Updates), these functions are not blocked from remote access at all. For our CVE-2022-38034 patch to even make sense on these older versions of Windows, we therefore first needed to add the missing security callback checks to wkssvc.dll.
We were curious about the origin of these security checks and did some digging across different wkssvc.dll versions. We found they were added to the Workstation Service some time before April 2021 on Windows 10, and sometime after January 2022 on Windows 7, but we were unable to find any CVE references associated with them. Our best guess is that they were added silently, first on Windows 10 and almost a year later also on Windows 7.
Our patch for this CVE-less vulnerability behaves the same as Microsoft's. First, we get the caller's binding data, then we check the opnum of the called function and determine whether the user is local or not. If the called opnum is between 8 and 11 and the caller is not local, we fail the call with "access denied" error.
Micropatch Availability
Micropatches were written for the following security-adopted versions of Windows with all available Windows Updates installed:
Windows 10 v2004 - fully updated
Windows 10 v1909 - fully updated
Windows 10 v1809 - fully updated
Windows 10 v1803 - fully updated
Windows 7 - fully updated with no ESU, ESU 1 or ESU 2
Windows Server 2008 R2 - fully updated with no ESU, ESU 1 or ESU 2
Micropatches have already been distributed to, and applied on, all
online 0patch Agents in PRO or Enterprise accounts (unless Enterprise group settings prevent that).
Vulnerabilities like these get discovered on a regular basis, and
attackers know about them all. If you're using Windows that aren't
receiving official security updates anymore, 0patch will make sure these
vulnerabilities won't be exploited on your computers - and you won't
even have to know or care about these things.
If you're new to 0patch, create a free account
in 0patch Central, then install and register 0patch Agent from 0patch.com, and email [email protected] for a trial. Everything else will happen automatically. No computer reboot will be needed.
We would like to thankBen Barnea and Stiv Kupchik of Akamai for sharing their analysis and proof-of-concept, which made it possible for us to create
micropatches for these issues.
To learn more about 0patch, please visit our Help Center.
*Updated 2024-04-25 16:57 GMT with minor wording corrections regarding the targeting of other vendors.
ArcaneDoor is a campaign that is the latest example of state-sponsored actors targeting perimeter network devices from multiple vendors. Coveted by these actors, perimeter network devices are the perfect intrusion point for espionage-focused campaigns. As a critical path for data into and out of the network, these devices need to be routinely and promptly patched; using up-to-date hardware and software versions and configurations; and be closely monitored from a security perspective. Gaining a foothold on these devices allows an actor to directly pivot into an organization, reroute or modify traffic and monitor network communications. In the past two years, we have seen a dramatic and sustained increase in the targeting of these devices in areas such as telecommunications providers and energy sector organizations — critical infrastructure entities that are likely strategic targets of interest for many foreign governments.
Cisco’s position as a leading global network infrastructure vendor gives Talos’ Intelligence and Interdiction team immense visibility into the general state of network hygiene. This also gives us uniquely positioned investigative capability into attacks of this nature. Early in 2024, a vigilant customer reached out to both Cisco’s Product Security Incident Response Team (PSIRT) and Cisco Talos to discuss security concerns with their Cisco Adaptive Security Appliances (ASA). PSIRT and Talos came together to launch an investigation to assist the customer. During that investigation, which eventually included several external intelligence partners and spanned several months, we identified a previously unknown actor now tracked as UAT4356 by Talos and STORM-1849 by the Microsoft Threat Intelligence Center. This actor utilized bespoke tooling that demonstrated a clear focus on espionage and an in-depth knowledge of the devices that they targeted, hallmarks of a sophisticated state-sponsored actor.
UAT4356 deployed two backdoors as components of this campaign, “Line Runner” and “Line Dancer,” which were used collectively to conduct malicious actions on-target, which included configuration modification, reconnaissance, network traffic capture/exfiltration and potentially lateral movement.
Critical Fixes Available
Working with victims and intelligence partners, Cisco uncovered a sophisticated attack chain that was used to implant custom malware and execute commands across a small set of customers. While we have been unable to identify the initial attack vector, we have identified two vulnerabilities (CVE-2024-20353 and CVE-2024-20359), which we detail below. Customers are strongly advised to follow the guidance published in the security advisories discussed below.
Further, network telemetry and information from intelligence partners indicate the actor is interested in — and potentially attacking — Microsoft Exchange servers and network devices from other vendors. Regardless of your network equipment provider, now is the time to ensure that the devices are properly patched, logging to a central, secure location, and are configured to have strong, multi-factor authentication (MFA). Additional recommendations specific to Cisco are available here.
Timeline
Cisco was initially alerted to suspicious activity on an ASA device in early 2024. The investigation that followed identified additional victims, all of which involved government networks globally. During the investigation, we identified actor-controlled infrastructure dating back to early November 2023, with most activity taking place between December 2023 and early January 2024. Further, we have identified evidence that suggests this capability was being tested and developed as early as July 2023.
Cisco has identified two vulnerabilities that were abused in this campaign (CVE-2024-20353 and CVE-2024-20359). Patches for these vulnerabilities are detailed in the Cisco Security Advisories released today.
Initial Access
We have not determined the initial access vector used in this campaign. We have not identified evidence of pre-authentication exploitation to date. Our investigation is ongoing, and we will provide updates, if necessary, in the security advisories or on this blog.
Line Dancer: In-Memory Implant Technical Details
The malware implant has a couple of key components. The first is a memory-only implant, called “Line Dancer.” This implant is a memory-resident shellcode interpreter that enables adversaries to upload and execute arbitrary shellcode payloads.
On a compromised ASA, the attackers submit shellcode via the host-scan-reply field, which is then parsed by the Line Dancer implant. Note that the use of this field does not indicate the exploitation of CVE-2018-0101 which was NOT used as a component of this campaign. The host-scan-reply field, typically used in later parts of the SSL VPN session establishment process, is processed by ASA devices configured for SSL VPN, IPsec IKEv2 VPN with “client-services" or HTTPS management access. The actor overrides the pointer to the default host-scan-reply code to instead point to the Line Dancer shellcode interpreter. This allows the actor to use POST requests to interact with the device without having to authenticate and interact directly through any traditional management interfaces.
Line Dancer is used to execute commands on the compromised device. During our investigation, Talos was able to observe the threat actors using the Line Dancer malware implant to:
Disable syslog.
Run and exfiltrate the command show configuration.
Create and exfiltrate packet captures.
Execute CLI commands present in shellcode; this includes configuration mode commands and the ability to save them to memory (write mem).
Hook the crash dump process, which forces the device to skip the crash dump generation and jump directly to a device reboot. This is designed to evade forensic analysis, as the crash dump would contain evidence of compromise and provide additional forensic details to investigators.
Hook the AAA (Authentication, Authorization and Accounting) function to allow for a magic number authentication capability. When the attacker attempts to connect to the device using this magic number, they are able to establish a remote access VPN tunnel bypassing the configured AAA mechanisms. As an alternate form of access, a P12 blob is generated along with an associated certificate and exfiltrated to the actor along with a certificate-based tunnel configuration.
Host-Scan-Reply hook overview
In the Line Dancer implant’s process memory, we found a function (detailed below) that checks if a 32-byte token matches a pattern. If so, it base64-decodes the payload, copies it into the attacker's writable and executable memory region, and then calls the newly decoded function. Either way, it ends by calling processHostScanReply().
The function processHostScanReply() is normally accessed through a function pointer in the elementArray table, associated with the string host-scan-reply. In the captured memory, the entry that should point to processHostScanReply()now instead points to the attacker's function that decodes and runs its payload. Since this change is in the data section of memory, it doesn't show up in hashes/dumps of text.
The attacker function that decodes and runs its payload has the following decompilation:
Line Runner: Persistence Mechanism
The threat actor maintains persistence utilizing a second, but persistent, backdoor called “Line Runner” on the compromised ASA device using functionality related to a legacy capability that allowed for the pre-loading of VPN clients and plugins on the device. At boot, the ASA is designed to look for the presence of a file on disk0: matching the Lua regular expression:
^client_bundle[%w_-]*%.zip$
If the file exists, it will unzip it and execute the script csco_config.lua. Once processed, the ZIP file is deleted. This is assigned CVE-2024-20359 and more details are available in this Cisco Security Advisory.
In at least one case, there is another vulnerability, CVE-2024-20353, that was abused by the actor to facilitate this process. The attackers were able to leverage this vulnerability to cause the target ASA device to reboot, triggering the unzipping and installing the second component of the threat actor’s malware implant, Line Runner.
The threat actor’s ZIP file has the following files:
The scripts in the zip file allow the threat actor to maintain a persistent HTTP-based Lua backdoor to the ASA, which survives across reboots and upgrades. Line Runner was observed being used by UAT4356 to retrieve information that was staged through the use of Line Dancer.
csco_config.lua
The csco_config.lua file is run at boot and makes the following modifications to the system:
• Create disk0:/csco_config/97/webcontent/ if it doesn't already exist • Create disk0:/csco_config/97/webcontent/1515480F4B538B669648B17C02337098 from hash.txt • Append index.txt to disk0:/csco_config/97/webcontent/index_bp.ini and put the result in disk0:/csco_config/97/webcontent/index.ini • Move the original client_bundle.zip file to /run/lock/subsys/krbkdc6 • Prepend umtfc.txt to /etc/init.d/umountfs • Copy stgvdr.txt to /asa/scripts/lina_cs • Backup /asa/scripts/lina_exe_cs.sh to /asa/scripts/lina_exe_cs_bp.sh • Replace /asa/scripts/lina_exe_cs.sh with laecsnw.txt • Copy csco_config2.lua over csco_config.lua • Disable the importPlugin function for the next call only
csco_config2.lua
The csco_config2.lua file cleans up the modifications made by csco_config.lua (above) and removes itself.
hash.txt
Used as content for disk0:/csco_config/97/webcontent/1515480F4B538B669648B17C02337098.
Intercepts HTTP requests to the ASA. The threat actor’s code looks for an HTTP request with a set of 32-character parameters that are victim-dependent. If they match, then the payload contained within one of these parameters is written to a Lua script and executed. This is the backdoor’s command and control mechanism.
index.txt
Adds webContent information so hash.txt is processed.
laecsnw.txt
Temporarily replaces /asa/scripts/lina_exe_cs.sh.
Executes /asa/scripts/lina_cs as a background process (see below). Removes itself. Then restore the backup /asa/scripts/lina_exe_cs_bp.sh.
stgvdr.txt
Runs as /asa/scripts/lina_cs.
After sleeping for 30 seconds, sets expected owner and times on /etc/init.d/umountfs. Removes the hash API endpoint, the index.ini, and either restores the backup index.ini or removes the webcontent directory entirely. Finally, removes itself.
umtfc.txt
Prepended to /etc/init.d/unmountfs.
The unmountfs script is called at shutdown to unmount the filesystems. The threat actor’s modifications perform the following functionality:
• If disk0:/csco_config/97/webcontent/1515480F4B538B669648B17C02337098 exists, it removes it and index.ini. • Copy /run/lock/subsys/krbkdc6 to disk0:client_bundle_install.zip
This sets up the zipfile to be executed at the next boot, maintaining persistence.
Forensic Recovery and Identification of Line Runner
To identify the presence of Line Runner on an ASA, the following methods can be used. Note also that the device should be upgraded to a fixed version as identified in the first method.
Method 1:
After updating the device to a software release that contains the fix for CVE-2024-20359, a review of the contents of disk0: should be conducted. If a new file (e.g., “client_bundle_install.zip” or any other unusual .zip file) appears on disk0: following the update, this suggests that Line Runner was present on the device in question. Note that because the updated software is not vulnerable to CVE-2024-20359, Line Runner will no longer be active on the device.
Method 2:
To detect (and remove) Line Runner, the following series of commands will create an innocuous file with a .zip extension. Note that it will not create a valid zip file, but the file will still be read by the ASA at reboot. Upon execution of the following commands, if a new .zip file appears on disk0: following the reload, this suggests that Line Runner was present on the device in question. Deletion of the “client_bundle_install.zip” file will remove Line Runner. Note that the malicious ZIP containing the Line Runner functionality could have other names that fit the naming pattern outlined previously.
If you discover a newly created .zip file, copy that file off the device using the copy command and contact [email protected] referencing CVE-2024-20359. Include the outputs of the dir disk0: and show version commands from the device and the .zip file extracted from the device.
Anti-Forensics/Anti-Analysis Capabilities
UAT4356 took clear and deliberate steps to attempt to prevent forensic capture of malicious artifacts. This tradecraft suggests a thorough understanding of the ASA itself and of the forensic actions commonly performed by Cisco for network device integrity validation. Additional steps were taken on a case-by-case basis to hide actions being taken on the device. These steps included hooking the AAA (Authentication, Authorization and Accounting) function of the device to allow the actor to bypass normal AAA operations. We also identified some instances where UAT4356 disabled logging to perform operations on or from the ASA and not have those operations or actions logged.
Line Dancer appears to have been intentionally placed into a difficult-to-reach region of memory. In addition, it hooks into functions such as the core dump function, which is commonly used to collect information for debugging and forensic purposes, which were made in memory such that this function simply jumped to a reboot. This means that on reboot, Line Dancer itself would no longer be present and none of the collections present in the core dump function would have been executed, all resulting in a complete loss of debug information and memory-based forensic artifacts.
Attribution
As a part of our ongoing investigation, we have also conducted analysis on possible attribution of this activity. Our attribution assessment is based on the victimology, the significant level of tradecraft employed in terms of capability development and anti-forensic measures, and the identification and subsequent chaining together of 0-day vulnerabilities. For these reasons, we assess with high confidence that these actions were performed by a state-sponsored actor.
Recommendations
There are some known indicators of compromise that customers can look for if they suspect they may have been targeted in this campaign. First, organizations should look for any flows to/from ASA devices to any of the IP addresses present in the IOC list provided at the bottom of this blog. This is one indication that further investigation is necessary.
Additionally, organizations can issue the command show memory region | include lina to identify another indicator of compromise. If the output indicates more than one executable memory region (memory regions having r-xp permissions, see output examples), especially if one of these memory sections is exactly 0x1000 bytes, then this is a sign of potential tampering.
Output of the ‘show memory region’ command for a compromised device (top) vs. a clean device (bottom).
Note that the earlier provided steps to identify the presence of Line Runner can still be followed even in the absence of more than one executable memory region as we have seen cases where Line Runner was present without Line Dancer being present. We still recommend following the steps to upgrade to a patched version even if customers believe that their device has not been compromised.
Next, follow the steps detailed in the Cisco ASA Forensic Investigation Procedures for First Responders. When following these procedures first responders should NOT attempt to collect a core dump (Step 5) or reboot the device if they believe that the device has been compromised, based on the lina memory region output. The previous steps up to and including a collection of the memory text section should be followed. In addition, we have released some Snort signatures to detect the activity on the wire including access attempts. Signatures 63139, 62949, and 45575 have been released to detect the implants or associated behaviors. Please note that the device must be set up to decrypt TLS for these signatures to be effective.
‘Line Dancer’ – In-Memory Only Shellcode Interpreter Interaction – 3:45575
Note that this signature was originally built to detect an unrelated CVE but it also detects Line Dancer interaction
If your organization does find connections to the provided actor IPs and the crash dump functionality has been altered, please open a case with Cisco TAC.
UAT4356 Infrastructure
Key components of the actor-controlled infrastructure used for this operation had an interesting overlap of SSL certificates which match the below pattern while also appearing as an ASA, during the same period, to external scanning engines such as Shodan and Censys as reported by the CPE data on the same port as the noted SSL certificate. The SSL certificate information suggests that the infrastructure is making use of an OpenConnect VPN Server (https://ocserv.openconnect-vpn.net) through which the actor appeared to be conducting actions on target.
Cisco Secure Firewall (formerly Next-Generation Firewall and Firepower NGFW) appliances such as Threat Defense Virtual, Adaptive Security Appliance and Meraki MX can detect malicious activity associated with this threat.
Umbrella, Cisco's secure internet gateway (SIG) blocks devices from connecting to malicious IPs. Sign up for a free trial of Umbrella here.
Additional protections with context to your specific environment and threat data are available from the Firewall Management Center.
Open-source Snort Subscriber Rule Set customers can stay up to date by downloading the latest rule pack available for purchase on Snort.org. Snort SIDs for this threat are 45575, 62949 and 63139.
There are several known indicators of compromise that defenders can look for when assessing whether their ASA device has been compromised as a result of this attack, as outlined earlier in this post. For example, if any gaps in logging or any recent unexpected reboots are observed, this should be treated as suspicious activity that warrants further investigation. Also, below is a list of IP addresses we identified as having been used by UAT4356. Please note that some of these IPs are part of publicly known anonymization infrastructure and not directly controlled by the attackers themselves. If your organization does find connections to the provided actor IPs and the crash dump functionality has been altered, please open a case with Cisco TAC.
TL;DR (really?): Members of Distributed COM Users or Performance Log Users Groups can trigger from remote and relay the authentication of users connected on the target server, including Domain Controllers. #SilverPotato
Remember my previous article? My insatiable curiosity led me to explore the default DCOM permissions on Domain Controllers during a quiet evening…
Using some custom Powershell scripts, I produced an Excel sheet with all the information I needed.
You can’t imagine the shock I felt when I discovered these two Application Id’s
The first one, sppui with ID: {0868DC9B-D9A2-4f64-9362-133CEA201299}, seemed very interesting because it was impersonating the Interactive user. Combined with the permissions granted to Everyone for activating this application from remote, this could potentially lead to some unexpected privilege escalation, don’t you think?
The output of the DCOMCNFG tool confirmed my analysis:
But wait, this does not mean Everyone can activate this DCOM Application remotely. We have to look also at the default limits for Everyone:
Everyone can only activate and launch locally… but… there are these two interesting groups, Distributed COM Users and Performance Log Users who can launch and activate the application remotely:
Combined with Everyone’s permission this sounds really interesting! But before going further, what is this application sspui?
With the magic Oleview tool, we can get much more information:
This app has the following CLSID F87B28F1-DA9A-4F35-8EC0-800EFCF26B83 – SPPUIObjectInteractiveClass, and runs as a Local Server :
slui.exe is related to the License Activation Service and exposes some interfaces:
At first glance, the methods implemented seem not very interesting from an Attacker perspective.
However, we have this DCOM object running in the context of the interactive user, accessible remotely by members of these two groups. So, why not attempt coercing authentication using our *potato exploit? If successful, we could intercept the authentication of the user connected to the Domain Controller, who should theoretically be a Domain Admin, correct ?
This is very similar to what I did in ADCCoercePotato, except for the fact that we may need to implement also the cross-session activation if we want to specify a specific session ID where the user is logged in.
I won’t go too much into the details; @splinter_code and I have discussed this argument so many times
The key point is that there are two authentication processes: the first occurs during the oxid resolve call, while the second takes place when the victim attempts to contact the malicious endpoint.
First AUTH
I obviously tried the first one, and without too much effort, was able to trigger and intercept the NTLM authentication of a Domain Admin connected to the target Domain Controller.
For testing purposes, I impersonated my user “simple”, a regular domain user and member of the “Performance Log Users” domain group:
I used my new “SilverPotato” tool, a modified version of ADCSCoercePotato:
In this case, with -m, I specified the IP address of the target domain controller, and with -k, the IP of the Linux box where the socat redirector and ntlmrelayx were running:
And yes, it worked! I got the authentication of Administrator connected on the first session (I did not specify the session ID).
I decided to relay the authentication to the SMB service of the ADCS server (but it’s just an example…), which by default has no signing enabled, and dumped the local SAM database:
With the NT hash of the local Administrator, I could access the ADCS Server via Pass The Hash, backup the Private/Public key of the CA, and the get CRL configuration.
Side note:Of course, there are other methods to achieve remote code execution on the target server. For instance, I utilized ntlmrelay to copy my malicious wbemcomn.dll file with a reverse shell into the c:\windows\system32\wbem directory. This file was subsequently loaded under different conditions, granting me a shell with SYSTEM, Network Service, or logged-in User privileges
After this, with ForgeCert tool, I was able to request a certificate on behalf Domain Administrator with the backup file of the CA.
Finally, request a TGT with Rubeus and logon to the Domain Controller as Administrator
second auth
Afterward, I attempted to exploit the second authentication, which is more or less what we implemented in our RemotePotato0.
However, to my surprise, the resulting impersonation level in this case was limited to Identify, which is useless against SMB or HTTP, and unusable against LDAP/LDAPS because of the sign flag…
Otherwise, it could have presented a great opportunity to use Kerberos relay instead of NTLM, given that the Service Principal Name (SPN) was within the attacker’s control.
kerberos relay in first auth?
In theory, you could specify the Service Principal Name (SPN) in the first call in the security bindings strings of the “dualstring” array of the Marshalled Interface Pointer:
typedef struct tagSECURITYBINDING
{
    unsigned short    wAuthnSvc;     // Must not be 0
    unsigned short    wAuthzSvc;     // Must not be 0
    unsigned short    aPrincName;    // NULL terminated
} SECURITYBINDING
I specified the SPN with the -y switch:
But my tests were unsuccessful, I always got back the SPN: RPCSS/IP in the NTLM3 message:
A few days ago, James Forshaw pointed out to me the potential for Kerberos relay via OXID resolving, by exploiting the marshaled target info trick detailed in his post under the “Marshaled Target Information SPN” section.
I attempted some tests but quickly gave up, using the excuse that I’m just too lazy .. so I’ll leave it up to you!
conclusion
At this point, I know I have to answer the fateful question: Did you report this to MSRC?
Obviously, yes! I’ll spare you the disclosure timeline. In short, MSRC confirmed the vulnerability and initially marked it as a critical fix. However, about a month later, they downgraded it to moderate severity. Their final verdict was: After careful investigation, this case has been assessed as moderate severity and does not meet MSRC’s bar for immediate servicing.
So, I feel free to publish this finding
I’m not going to release the source code for now, but crafting your own should be a breeze, wouldn’t you agree?
This “vulnerability” has been probably around for years, and it’s surprising that nobody has made it public.
So how dangerous is it?
Hard to say, especially since membership in groups like “Distributed COM Users” and “Performance Log Users” isn’t exactly commonplace, especially domain-wide. Also, the “Distributed COM Users” group is sometimes considered a tier 0 asset
But think about it: the ability to coerce and relay the (NTLM) authentication of highly privileged accounts from remote, is incredibly risky. It’s another valid reason to include privileged accounts in the Protected Users group!
Another point to consider is that this method applies to the local “Distributed COM Users” and “Performance Log Users” groups too. So, it really depends on who is logged into the server at the time…
I would recommend carefully reviewing the memberships of these and until MS won’t fix this vulnerability, definitely consider these groups tier 0!
What’s next after SilverPotato? Well, there’s another interesting one, but this was classified as an Important Privilege Escalation so I have to wait for the fix…
Last but not least, as usual, thanks to James Forshaw @tiraniddo and Antonio Cocomazzi @splinter_code for their precious help.
Generalmente questo genere di articoli cominciano dicendo: “da piccolo ero solito smontare e rimontare cose..” mentre la verità è che a me non interessavano. In realtà, ero più interessato ai misteri del mondo “reale“, quello tangibile, come la natura, gli amici, il calcio. Mi piaceva giocare all’aria aperta, a pallone e correre con le moto. […]
Free to use IOC feed for various tools/malware. It started out for just C2 tools but has morphed into tracking infostealers and botnets as well. It uses shodan.io/">Shodan searches to collect the IPs. The most recent collection is always stored in data; the IPs are broken down by tool and there is an all.txt.
The feed should update daily. Actively working on making the backend more reliable
Honorable Mentions
Many of the Shodan queries have been sourced from other CTI researchers:
I encourage opening an issue/PR if you know of any additional Shodan searches for identifying adversary infrastructure. I will not set any hard guidelines around what can be submitted, just know, fidelity is paramount (high true/false positive ratio is the focus).
Specially crafted Javascript inside an HTML page can trigger a type confusion
bug in Microsoft Edge that allows accessing a C++ object as if it was a BSTR
string. This can result in information disclosure, such as allowing an attacker
to determine the value of pointers to other objects and/or functions. This
information can be used to bypass ASLR mitigations. It may also be possible to
modify arbitrary memory and achieve remote code execution, but this was not
investigated.
A specially crafted style sheet inside an HTML page can trigger a NULL pointer
dereference in Microsoft Internet Explorer 10 and 11. The pointer in question
is assumed to point to a function, and the code attempts to use it to execute
this function, which normally leads to an access violation when attempting to
execute unmapped memory at address 0. In some cases, Control Flow Guard
(CFG) will attempt to check if the address is a valid indirect call target.
Because of the way CFG is implemented, this can lead to a read access
violation in unmapped memory at a seemingly arbitrary address.
A specially crafted Javascript inside an HTML page can trigger a use-after-free
bug in Tree::ANode::IsInTree or a breakpoint in
Abandonment::InduceAbandonment in Microsoft Edge. The use-after-free bug is
mitigated by MemGC: if MemGC is enabled (which it is by default) the memory
is never freed. This effectively prevents exploitation of the issue. The
Abandonment appears to be triggered by a stack exhaustion bug; the Javascript
creates a loop where an event handler triggers a new event, which in turn
triggers the event handler, etc.. This consumes a stack space until there is no
more stack available. Edge does appear to be able to handle such a situation
gracefully under certain conditions, but not all. It is easy to avoid those
conditions to force triggering the Abandonment.
The interesting thing is that this indicates that the assumption that "hitting
Abandonment means a bug is not a security issue" may not be correct in all
cases.
A specially crafted Javascript inside an HTML page can trigger a use-after-free
bug in the CTreePosGap::PartitionPointers function of edgehtml.dll in
Microsoft Edge. This use-after-free bug is mitigated by MemGC by default:
with MemGC enabled the memory is never actually freed. This mitigation is
considered sufficient to make this a non-security issue as explained by
Microsoft SWIAT in their blog post Triaging the exploitability of IE/Edge
crashes.
Since this is not considered a security issue, I have the opportunity to share
details about the issue with you before the issue has been fixed. And since
Microsoft are unlikely to provide a fix for this issue on short notice, you
should be able to reproduce this issue for some time after publication of this
post. I will try to explain how I analyzed this issue using BugId and
EdgeDbg, so that you can reproduce what I did and see for yourself.
While working independently has many advantages, it does have one major
drawback: no one to bounce ideas off or help you solve problems. So, in order to
address this, I am now looking for opportunities to work closer with other
researchers again.