Whenever a “new” DLL hijacking / planting trick is posted on Twitter, it generates a lot of comments. “It’s not a vulnerability!” or “There is a lot of hijackable DLLs on Windows…” are the most common reactions. Though, people often don’t really speak about the same thing, hence the overall confusion which leads us nowhere. I don’t pretend to know the ultimate truth but I felt the need to write this post in order to hopefully clarify some points.
Introduction
Whenever I write about something that involves DLL hijacking (e.g.: NetMan DLL Hijacking), I assume that it’s common knowledge and that we are all on the same page. It turns out that it’s a big mistake, for multiple reasons! First, DLL hijacking is just a core concept and, in practice, there are some variants. Therefore, whether you are a pentester, a security researcher or a system administrator, your own conception of it may differ from someone else’s. And then, there is this recurring debate: is it a vulnerability? Before giving a factual answer to this question, I’ll first remind what DLL hijacking is about. Then I’ll illustrate two of its variants with real-life examples, depending on what you are trying to achieve. Finally, I’ll try to give some insight into how you can lower the risk of DLL hijacking.
DLL Hijacking: What are we talking about?
Dynamically compiled Win32 executables use functions which are exported by built-in or third-party Dynamic Link Libraries (DLL). There are two main ways to achieve this:
-
At link time - When the program is compiled, an import table is written into the headers of the Portable Executable (PE). To put it simple, it keeps track of which function needs to be imported from which DLL. Therefore, whenever the program is executed, the linker knows what to do and loads all the required libraries transparently on your behalf.
-
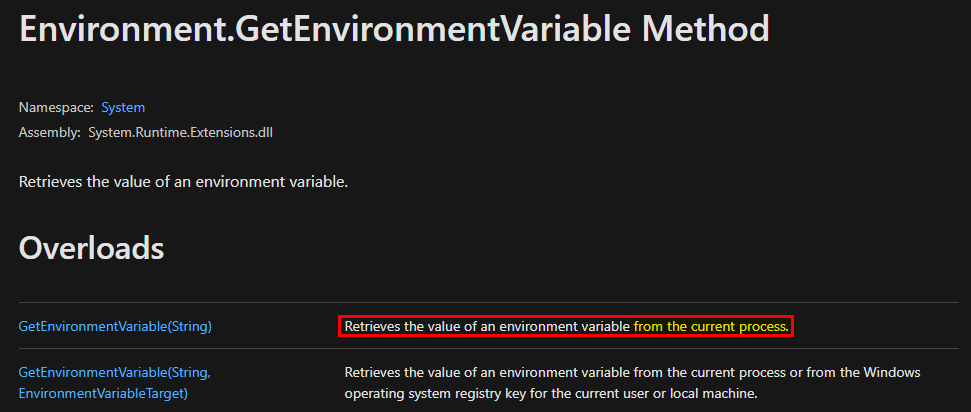
At runtime - Sometimes, you need to or want to import a library at runtime. At this point, the linker has already done its part of the job, so if you want to do so you’ll have to take care of a few things yourself. In particular, you can call
LoadLibrary() or LoadLibraryEx() from the Windows API.
Note: in this post, I’ll consider only Win32 applications. Although they use the same extension, DLLs in the context of .NET applications have a completely different meaning so I won’t talk about them here. I don’t want to add to the confusion.
According to the documentation, the prototype of these two functions is as follows:
HMODULE LoadLibrary(LPCSTR lpLibFileName);
HMODULE LoadLibraryEx(LPCSTR lpLibFileName, HANDLE hFile, DWORD dwFlags);
The main argument - lpLibFileName - is the path of the library file you want to load. Though, evaluating the full path of the file at runtime requires some work that we are not always willing to do, especially when the system can retrieve this path by itself. For example, instead of writing LoadLibrary("C:\Windows\System32\mylib.dll"), you could just write LoadLibrary("mylib.dll") and thus let the system find the DLL. This approach makes a lot of sense for third-party applications because they don’t necessarily know this path beforehand.
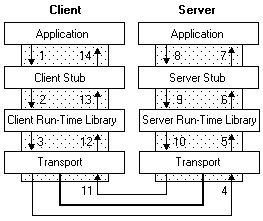
But then, if you don’t specify the full path of the library you want to load, how does the system know where to find it? The answer is simple, it uses a predefined search order, which is illustrated on the following diagram.
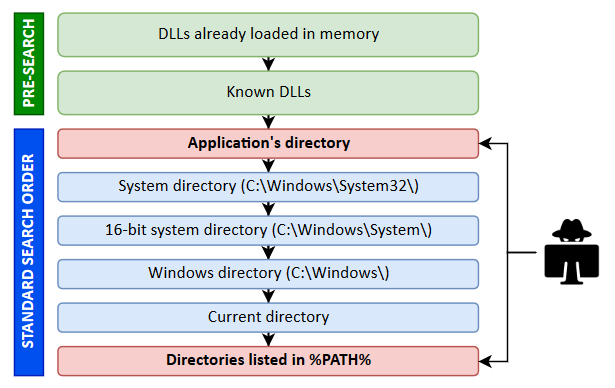
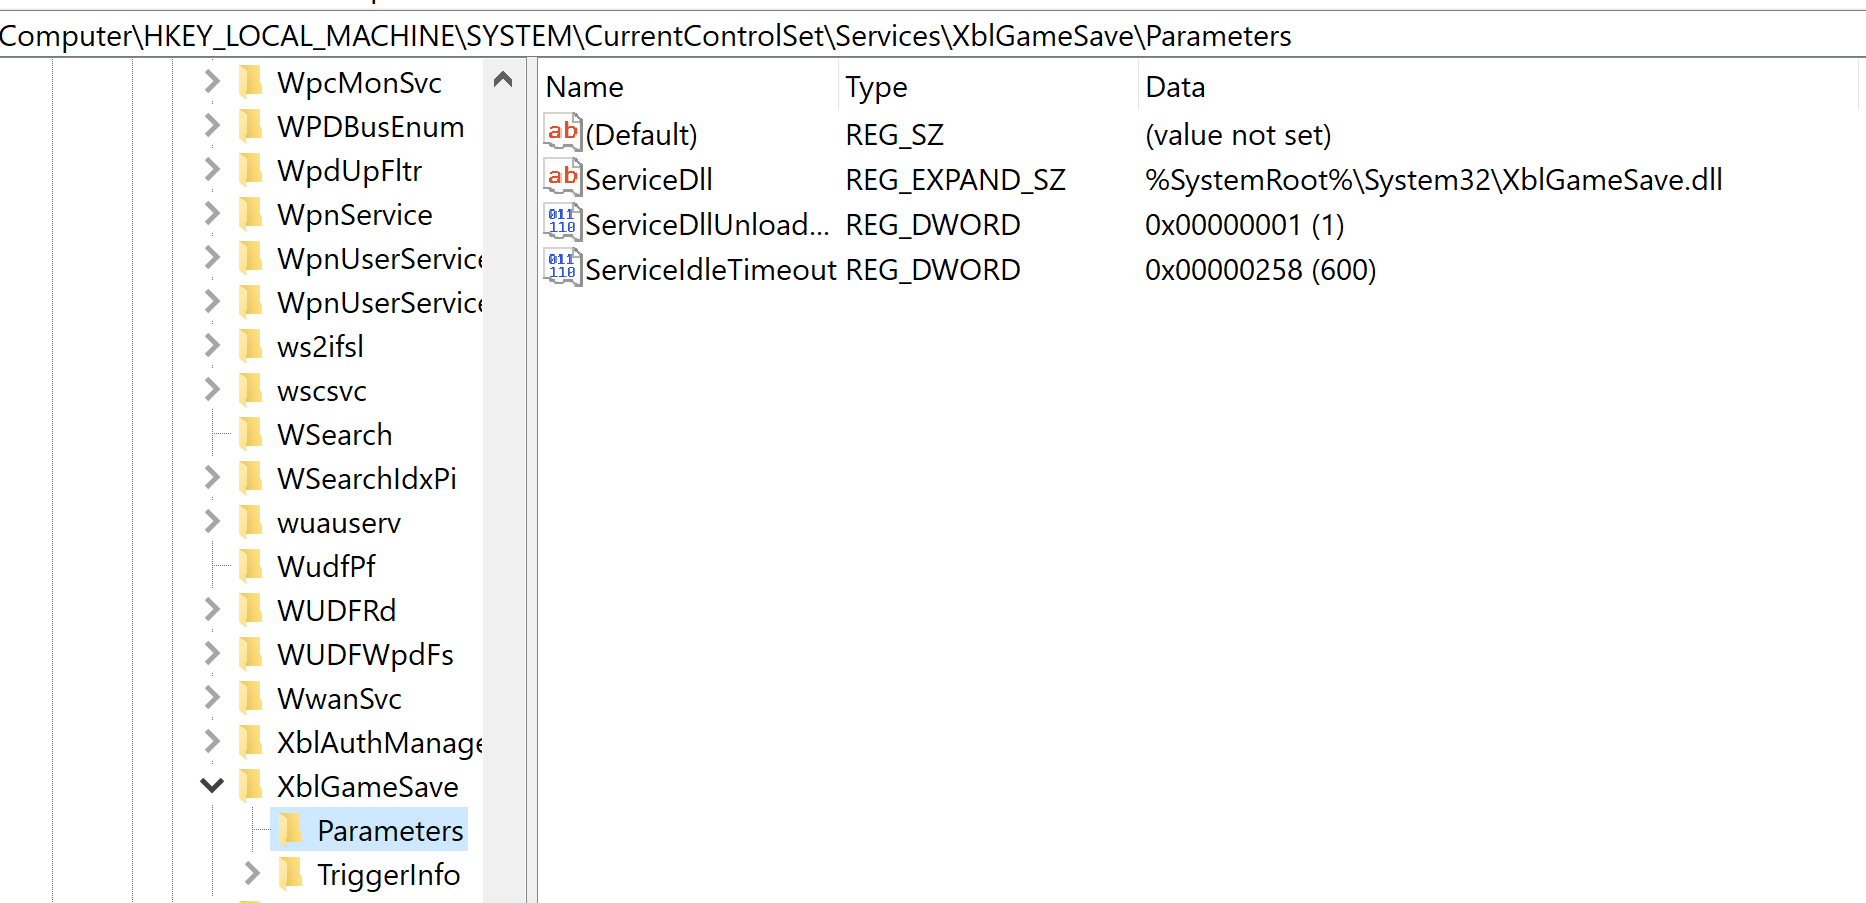
The locations in the “pre-search” are highlighted in green because they are safe (from a privilege escalation perspective). If the name of the DLL doesn’t correspond to a DLL which is already loaded in memory or if it’s not a known DLL, the actual search begins. The program will first try to load it from the application’s directory. If it succeeds, the search stops there otherwise it continues with the C:\Windows\System32 folder and so on…
Note: in this context, the term “Known DLL” has a very specific meaning. These DLLs are listed in the HKLM\SYSTEM\CurrentControlSet\Control\Session Manager\KnownDLLs registry key and are guaranteed to be loaded from the System folder.
I won’t bore you with the theory. Rather, I’ll illustrate this search order with some examples based on the following source code. The following program uses the first command line argument as the name of a library to load with LoadLibrary().
HMODULE hModule = LoadLibrary(argv[1]);
if (hModule) {
    wprintf(L"LoadLibrary() OK\n");
    FreeLibrary(hModule);
} else {
    wprintf(L"LoadLibrary() KO - Error: %d\n", GetLastError());
}
Scenario 1: loading a DLL which exists in the application’s directory.

The program finds the DLL in its directory C:\MyCustomApp, that’s the first location in the search order so the library is loaded successfully. Everything is fine. :ok_hand:
Scenario 2: loading a Windows DLL, dbghelp.dll for example.
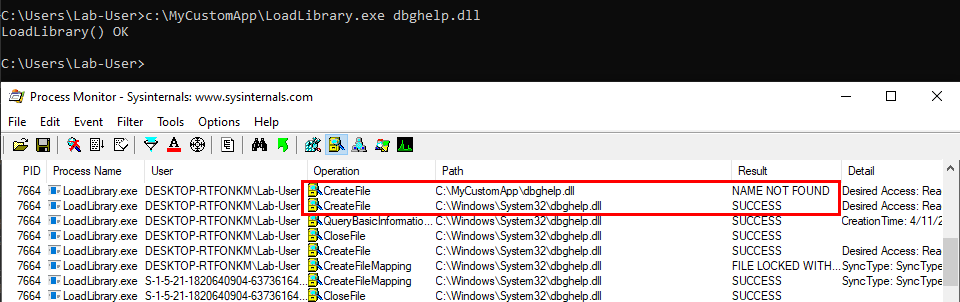
The program first tries to load the DLL from C:\MyCustomApp, the application’s directory, and doesn’t find it there. Therefore, it tries to load it from the system directory C:\Windows\System32, where this library is actually located.
We can see a potential issue here. What if the C:\MyCustomApp directory is configured with incorrect permissions and allows any user to add files? You guessed it, a malicious version of the DLL could be planted in this directory, allowing a local attacker to execute arbitrary code in the context of any other user who would run this application. Although that’s DLL search order hijacking, this first variant is also sometimes rightly or wrongly called DLL Sideloading. It’s mostly used by malwares but it can also be used for privilege escalation (see my article about DLL Proxying).
Note: in theory DLL Sideloading has a specific meaning. According to MITRE: “Side-loading vulnerabilities specifically occur when Windows Side-by-Side (WinSxS) manifests are not explicit enough about characteristics of the DLL to be loaded. Adversaries may take advantage of a legitimate program that is vulnerable to side-loading to load a malicious DLL.”
Scenario 3: loading a nonexistent DLL
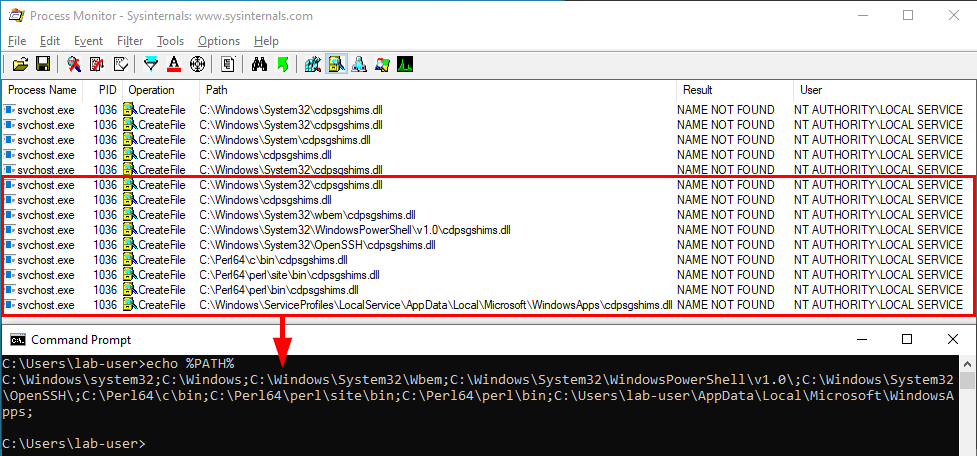
If the target DLL doesn’t exist, the program continues its search in the other Windows directories. If it can’t find it there, it tries to load it from the current directory. If it still can’t find it, it eventually searches for it in all the directories that are listed in the %PATH% environment variable.
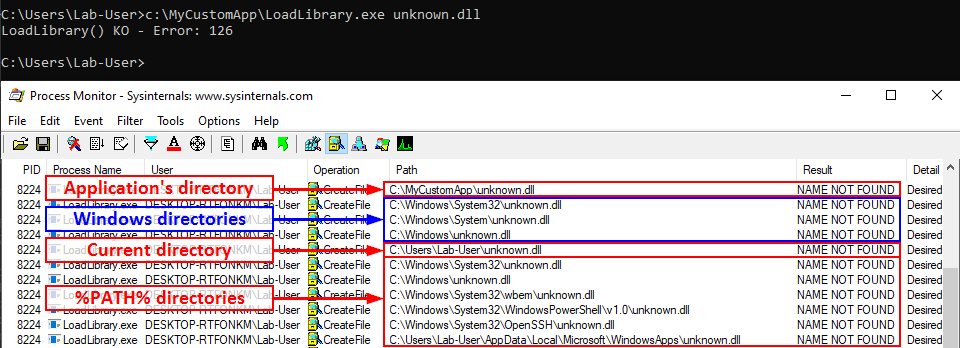
We can see that a lot of DLL hijacking opportunities arise there. If any of the %PATH% directories is writable, then a malicious version of the DLL could be planted and would be loaded by the application whenever it’s executed. This is another variant which is sometimes called Ghost DLL injection or Phantom DLL hijacking.
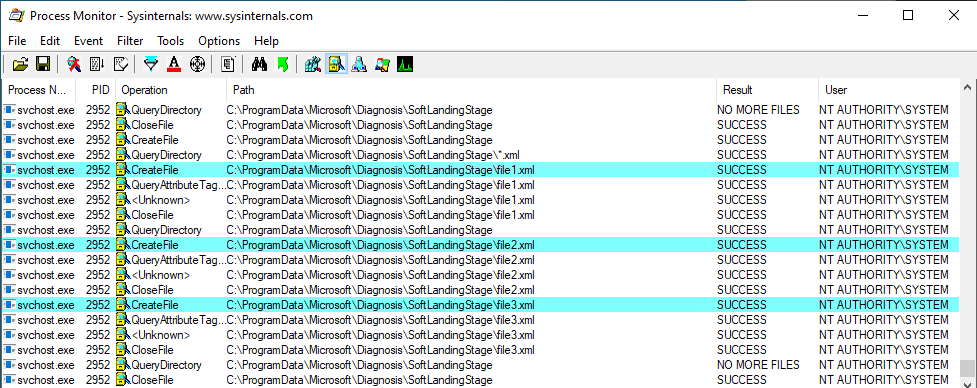
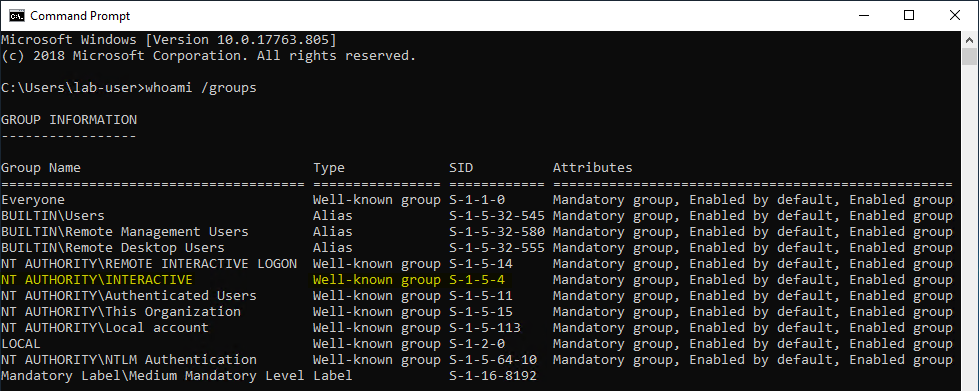
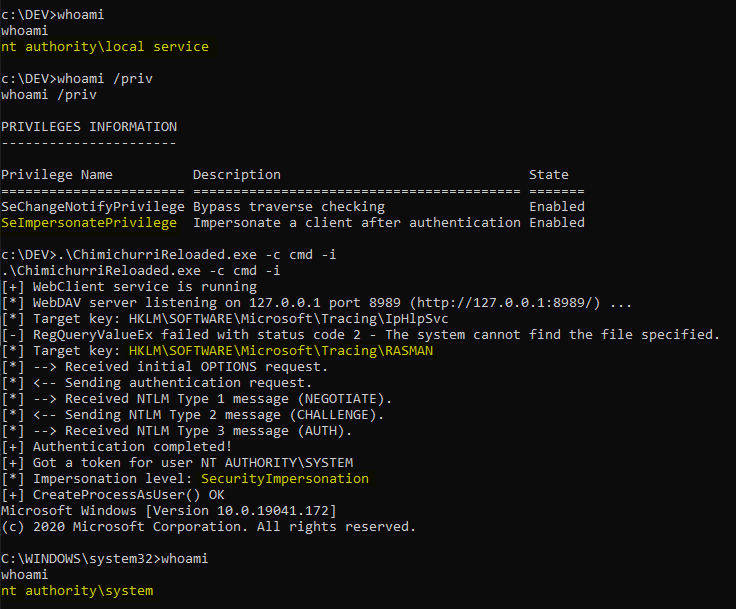
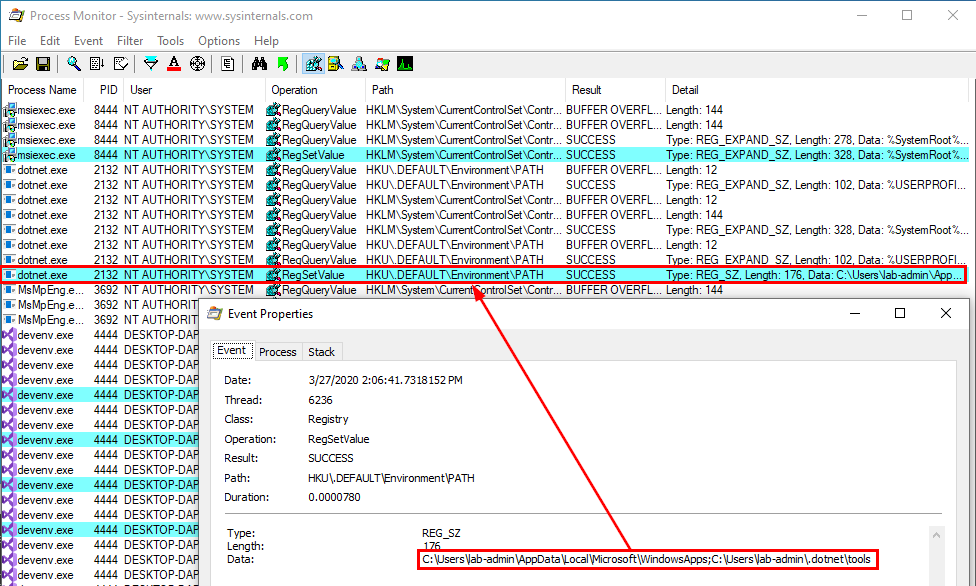
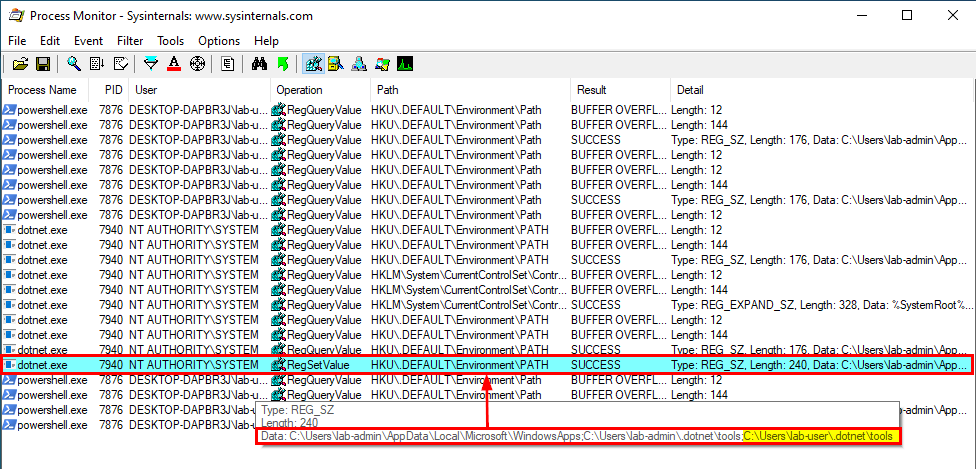
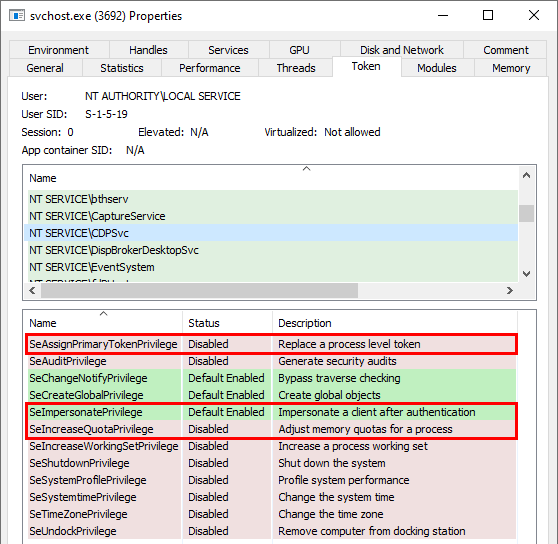
Scenario 4: loading a nonexistent DLL as NT AUTHORITY\SYSTEM
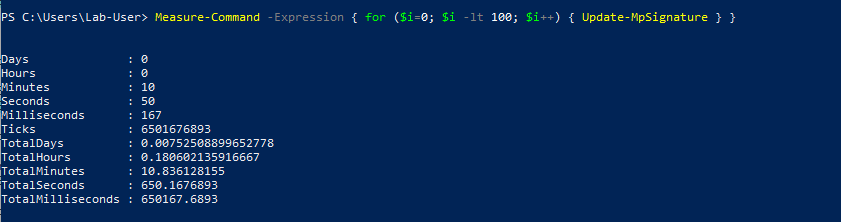
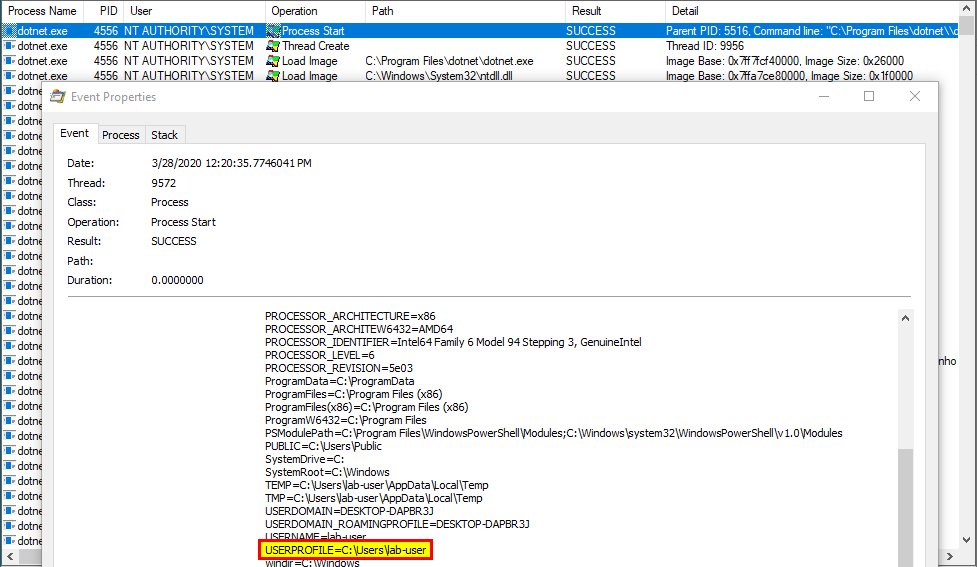
With this last scenario, we are slowly but surely approaching the objective. In the previous examples, I ran the executable as a low-privileged user so that’s not representative of a privilege escalation scenario. Let’s remediate this and run the last command as NT AUTHORITY\SYSTEM this time.
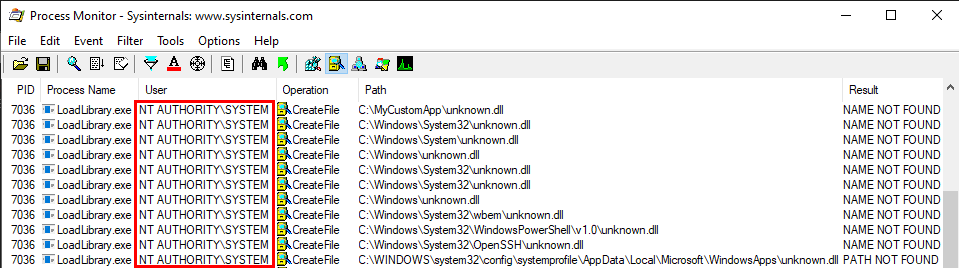
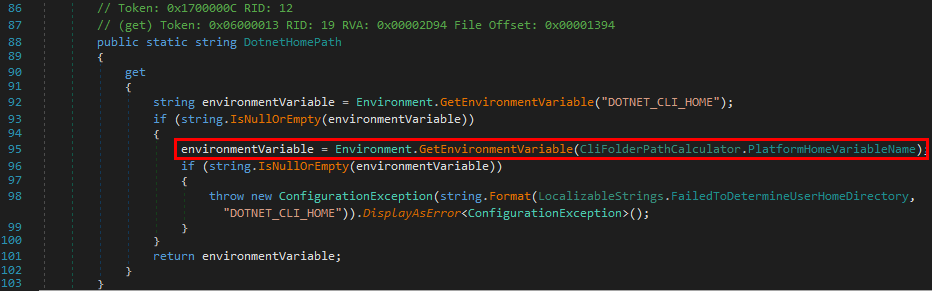
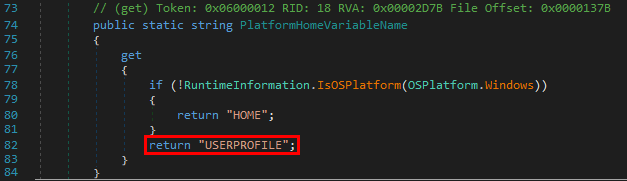
The exact same search order applies to NT AUTHORITY\SYSTEM as well and that’s completely normal. There is a slight difference though. The last directory in the search is different. With the low-privileged user it was C:\Users\Lab-User\AppData\Local\Microsoft\WindowsApps whereas it’s now C:\WINDOWS\system32\config\systemprofile\AppData\Local\Microsoft\WindowsApps. This difference is due to a per-user path that was added starting with Windows 10: %USERPROFILE%\AppData\Local\Microsoft\WindowsApps, where %USERPROFILE% resolves to the path of the user’s home folder.
Anyway, by default, all these folders are configured with proper permissions. So, low-privileged users wouldn’t be able to plant a malicious DLL, preventing them from hijacking the execution flow of a service running as NT AUTHORITY\SYSTEM for example. With this demonstration, I hope that it’s now clear why DLL hijacking is not a vulnerability.
OK, if DLL hijacking isn’t a vulnerability, why all this fuss? :confused:
Well, as I said before, DLL hijacking is just a core concept, an exploitation technique if you will. It’s just a means to an end. The end goal is either local privilege escalation or persistence (or even AV evasion) in most cases. Though, the means may differ a lot depending on your perspective. Based on my own experience, I know that this perspective generally differs between pentesters and security researchers, hence the potential confusion. So, I’ll highlight two real-life examples in the next parts.
DLL Hijacking From a Security Researcher’s Perspective
First of all, as a Windows bug hunter, if you want to find privilege escalation vulnerabilities on the operating system itself, you’ll often want to start from a blank page, with a clean installation of Windows. The objective is to prevent side-effects that could be caused by the installation of third-party applications. That’s already a big difference between a researcher and a pentester.
Previously, I said that a default installation of Windows is not vulnerable to DLL hijacking because all the directories that are used in the DLL search are configured with proper permissions so, how this technique can still be useful?
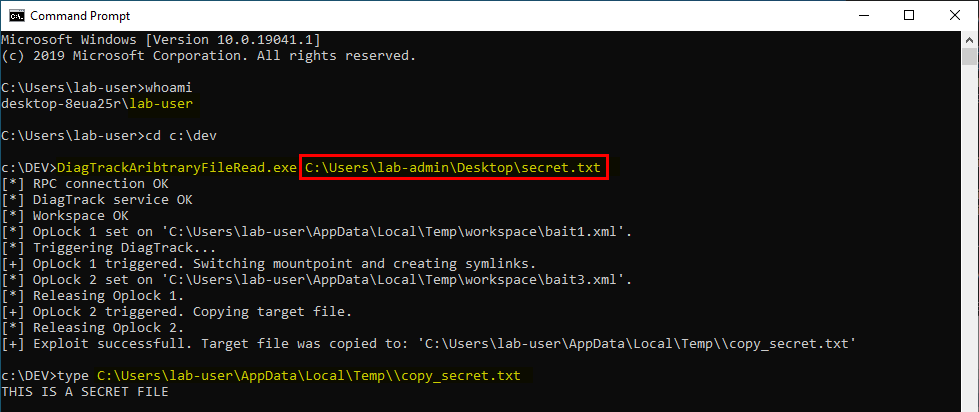
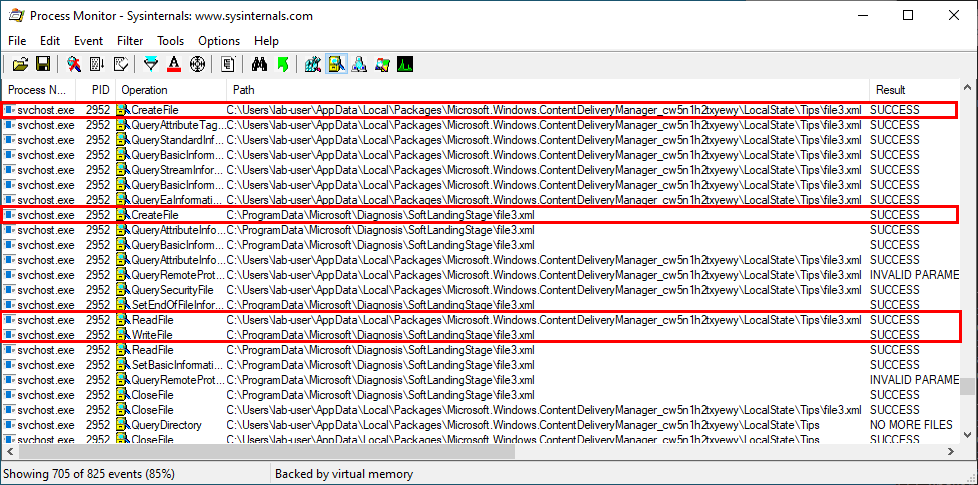
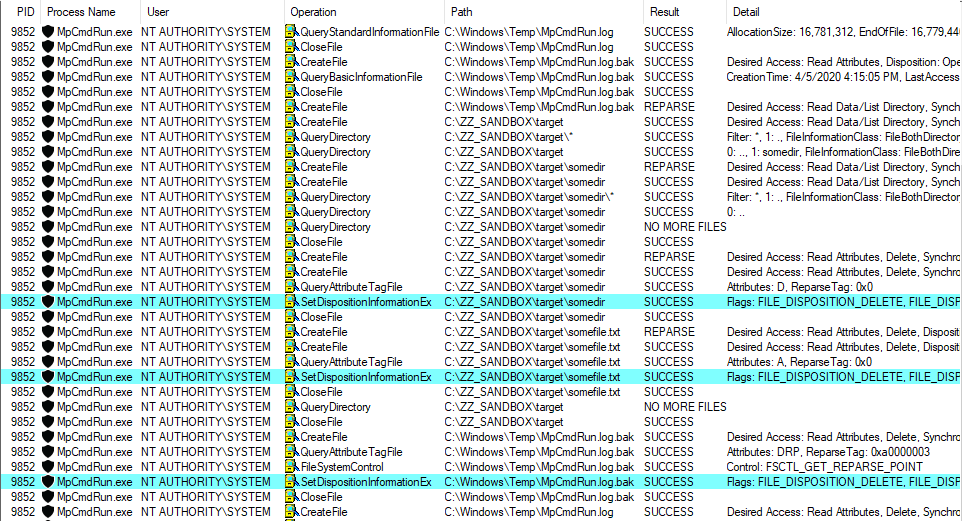
It turns out this technique comes in very handy when it comes to privileged file operations abuse for example, especially arbitrary file write. Let’s say that you found a vulnerability in a service that allows you to move any file you own to any location on the filesystem in the context of NT AUTHORITY\SYSTEM. That’s cool but that’s somewhat limited. What you really want to achieve is arbitrary code execution as NT AUTHORITY\SYSTEM. At this point, DLL hijacking is the missing piece that completes the puzzle.
An arbitrary file write vulnerability opens up many opportunities for DLL hijacking because you are not limited to the %PATH% directories (scenario #3), you could also consider hijacking a DLL in an application’s directory (scenario #2) or even in C:\Winows\System32 if it doesn’t exist there. Both DLL Sideloading and Phantom DLL Hijacking techniques can then be used.
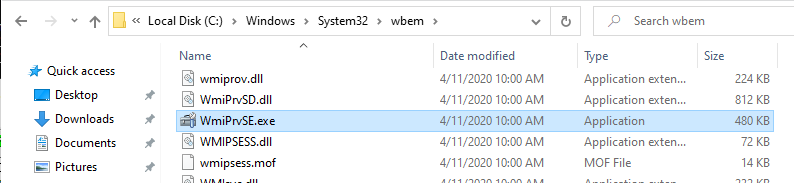
If you search for DLL Sideloading opportunities using Process Monitor on a default installation of Windows, you’ll find a lot of them. Typically, any program which is not installed in C:\Windows\System32 and tries to load a DLL from this folder without specifying its full path will fall into this category.
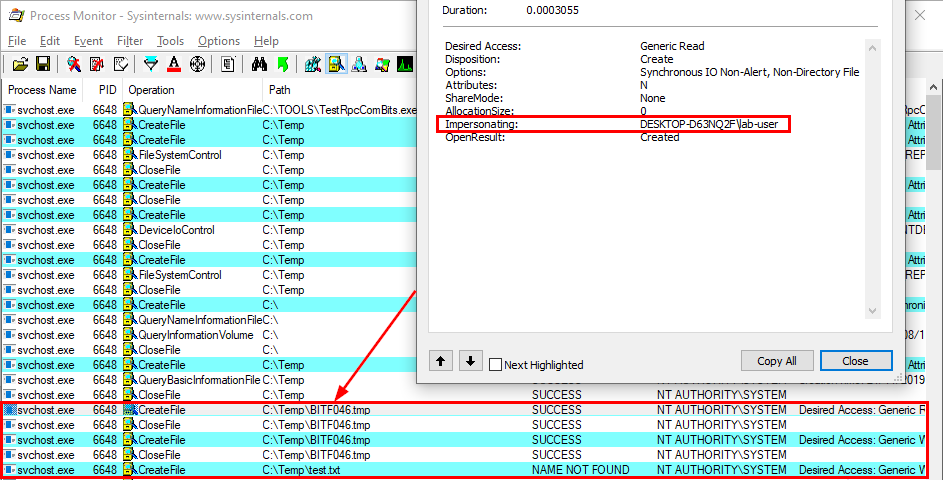
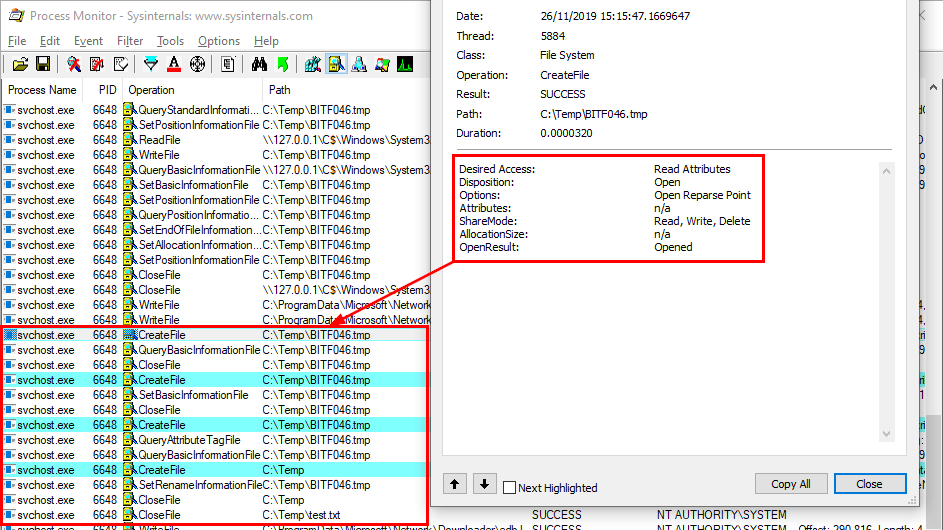
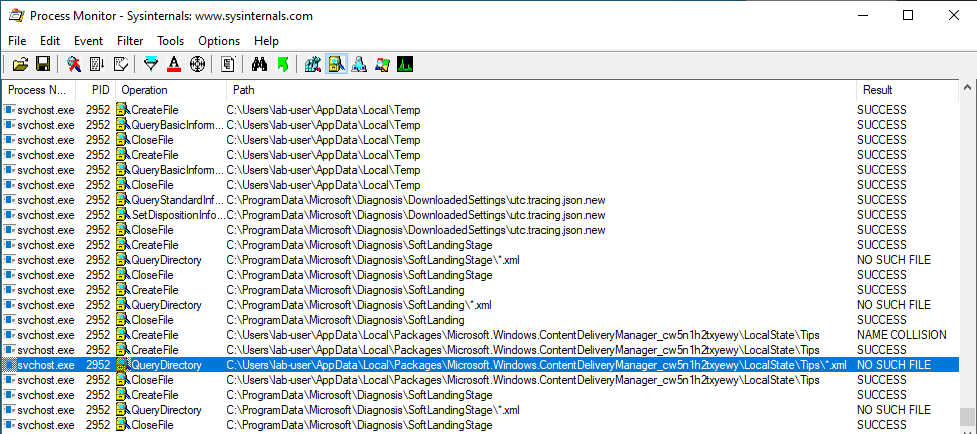
Enough with the theory, let’s take a real-life example! On the below screenshot, you can see that the WMI service loads the wbemcomn.dll library on startup:
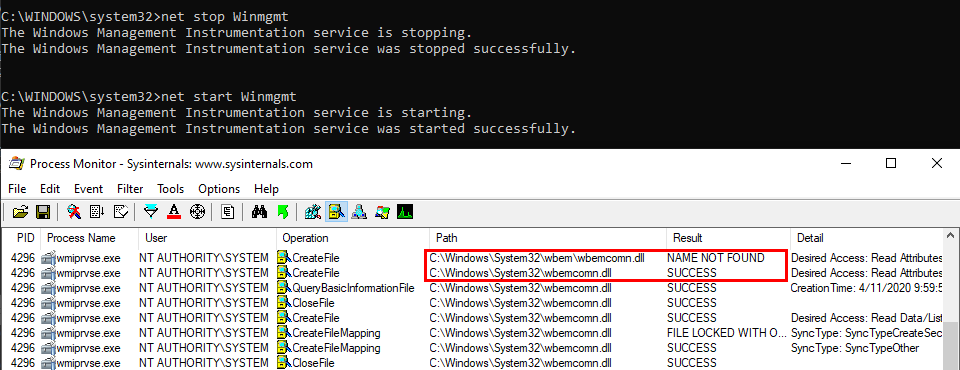
The first result is NAME NOT FOUND. That’s totally normal because wbemcomn.dll is a system library, its actual location is C:\Windows\System32\wbemcomn.dll. Though wmiprvse.exe tries to load it from C:\Windows\System32\wbem because this is the directory where it is installed.
Therefore, provided that you found an arbitary file write vulnerability, you could plant a malicious version of wbemcomn.dll in C:\Windows\System32\wbem. After a machine reboot, your DLL would be loaded by the service as NT AUTHORITY\SYSTEM. Though in practice you wouldn’t rely on this particular DLL hijacking opportunity in your exploit for two major reasons:
-
A reboot is required - Let’s say you found a vulnerability that allows you to move a file to an arbitrary location as SYSTEM. Ending you exploit chain with a machine reboot after having successfully planted your DLL would be a shame. You’d rather search for a DLL hijacking you can trigger on demand as a normal user.
-
Denial of Service - Let’s say that you finally decided to plant your DLL in the
wbem folder because you didn’t find a better candidate. After a machine reboot, your DLL is properly loaded by the service and you get your arbitary code execution as SYSTEM. That’s cool but what about the service? Congratulations, you’ve just crashed it because it wasn’t able to import its required dependencies. Again that’s a shame. One could argue that you could craft a Proxy DLL in order to address this issue. Though in practice this would add to your exploit development workload so you want to avoid that as far as possible
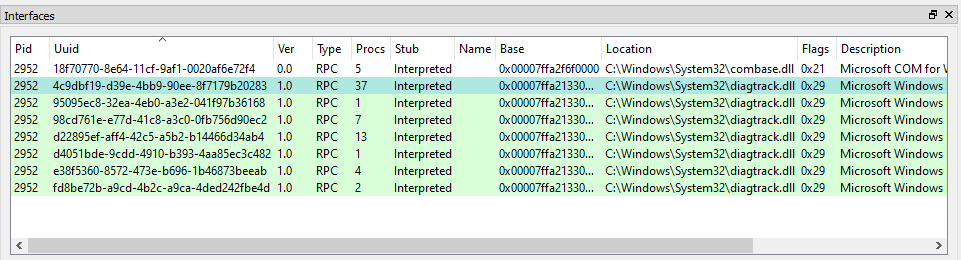
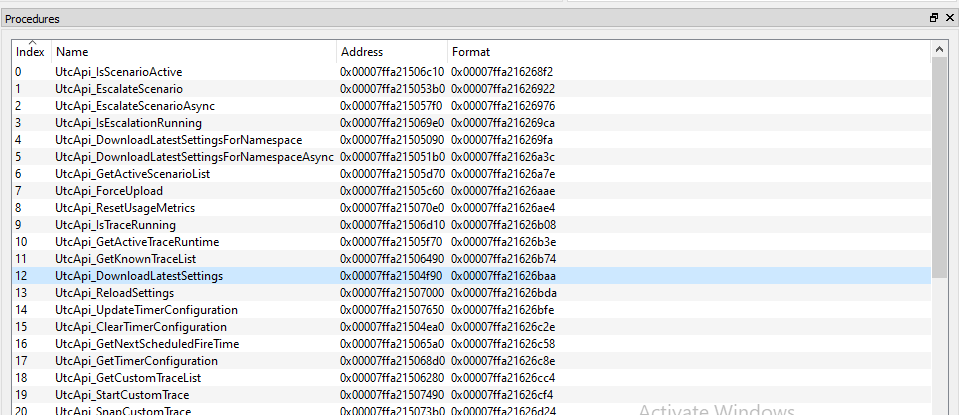
This is only one example of DLL Sideloading. There is a ton of similar opportunities on a default installation of Windows. That’s why, security researchers often say that DLL hijacking on Windows is very common and widespread. From their perspective, they think of DLL hijacking in its entirety. However, with the two previous points in mind, you can see that it’s not that simple in the end. Although DLL hijacking is widespread, finding the perfect candidate for your exploit can easily become a headache. That’s why exploits such as the DiagHub technique by James Forshaw are very interesting. This specific technique is now patched but it met all the criteria back then:
- It could be triggered by a normal user through RPC and you could even choose the name of the DLL you wanted to load. As long as it was in the
System32 folder, it would be loaded by the service.
- You could safely execute your own code without risking a service crash.
- On top of that, you didn’t have to write your code in
DllMain().
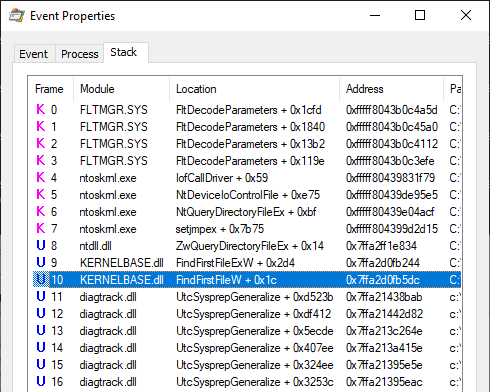
Microsoft finally prevented this exploit by enforcing code signing. In other words, only Microsoft-signed libraries can now be loaded using this trick. Later on, I found another technique that is not as good as this one but still meets almost all of the above criteria - Weaponizing Privileged File Writes with the USO Service, but I digress…
That’s it for DLL hijacking in the context of Windows security research. What about pentesters now?
DLL Hijacking From a Pentester’s Perspective
In the context of a pentest, the initial conditions are usually very different. You are given an environment to compromise and you have to adpat based on what you find along the way. Finding a 0-day vulnerability or leveraging the last privilege escalation exploit that was released publicly is usually the option of last resort. The first things you’re looking for are system misconfigurations. Based on my own experience, I’d say that it probably represents 80% of the job.
Security issues caused by misconfigurations are common in corporate environments. That is to some extent quite understandable because installing an operating system without any additional software is pretty useless. And sometimes, these third-party applications introduce vulnerabilities either because they are not installed correctly or they are themselves vulnerable.
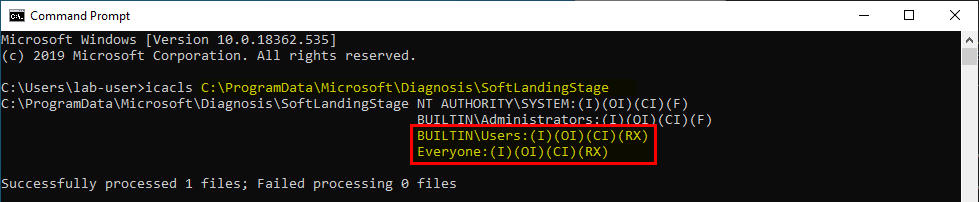
Based on what I explained previously, I’ll discuss the two most common DLL hijacking scenarios you’ll face. Now for the setup, here is a common mistake I see very often in corporate environments: a third-party application is installed at the root of the main partition (C:\) or is installed on a seperate partition (D:\ for example).

If you don’t already know that, folders that are created at the root of a partition are granted permissive rights. They allow any “Authenticated User” to create files and folders in them. These permissions are then inherited by subdirectories by default. Therefore, if the program installer doesn’t take care of that or if the administrator doesn’t check them, there is a high chance that the application’s folder is vulnerable.
With this in mind, here are the two most common scenarios you’ll face:
- The program installer created a service which runs as
NT AUTHORITY\SYSTEM and executes a program from this directory. In this example, we consider that the permissions of the executable itself are properly configured though. In this case, there is a high chance that it is vulnerable to DLL Sideloading. A local attacker could plant a Windows DLL that is used by this service in the application’s folder.
- The program installer added the application’s directory to the system’s
%PATH%. This case is a bit different. You could still use DLL Sideloading in order to execute code in the context of any other user who would run this application but you could also achieve privilege escalation to SYSTEM. What you need in this case is Ghost DLL Hijacking because, as I explained before, a nonexistent DLL lookup will ultimately end up in the %PATH% directories.
From my experience, this second scenario is by far the most common one. So, assuming that you find yourself in such situation, what would you need? Well, you’d need to find a privileged process that tries to load a DLL from this unsecure folder. The most common place to look for this kind of opportunity is Windows services.
But then, what are the criteria for finding the perfect candidate? They can be summarized in these three points:
- It tries to load a nonexistent DLL without specifying its full path.
- It doesn’t use a safe DLL search order.
- It runs as
NT AUTHORITY\SYSTEM. Actually it’s not strictly required but I will consider only this case for simplicity. This particular subject will be discussed in an upcoming article. :wink:
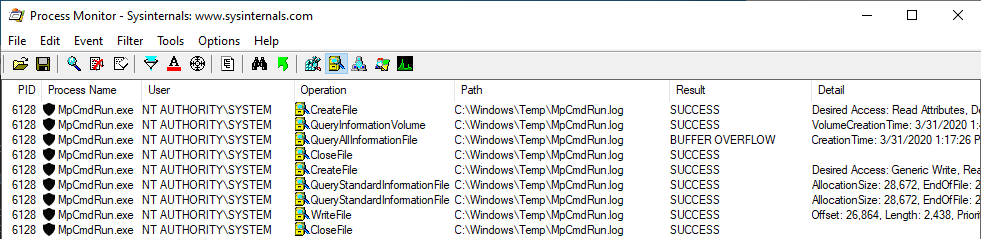
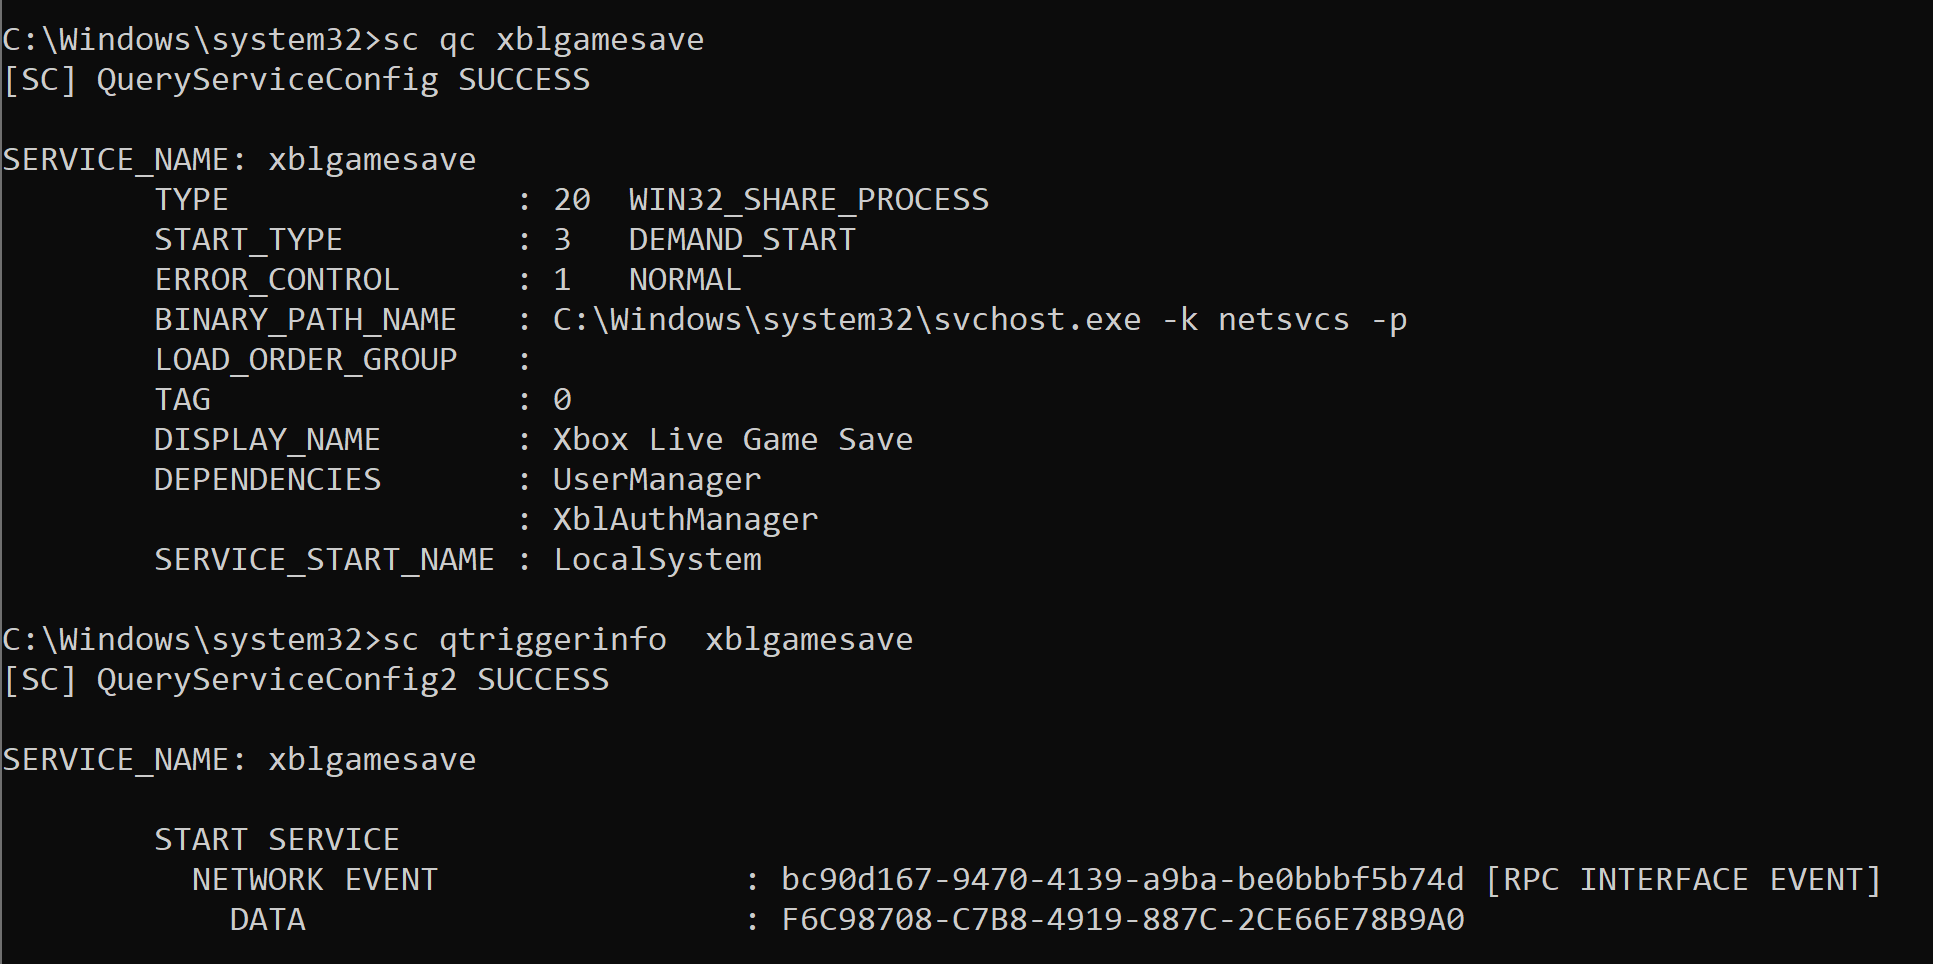
On Windows 10 (workstation), services that match these criteria have almost disappeared. Therefore, I often say that DLL hijacking isn’t that common nowadays on Windows 10. That’s because when I think of it I refer to missing DLLs which are loaded from the %PATH% directories by services running as highly privileged account, which is only one variant of DLL hijacking. Nevertheless there are still a few of these services. One of them is the Task Scheduler, as explained in this blog post. This service tries to load the missing WptsExtensions.dll DLL upon startup.
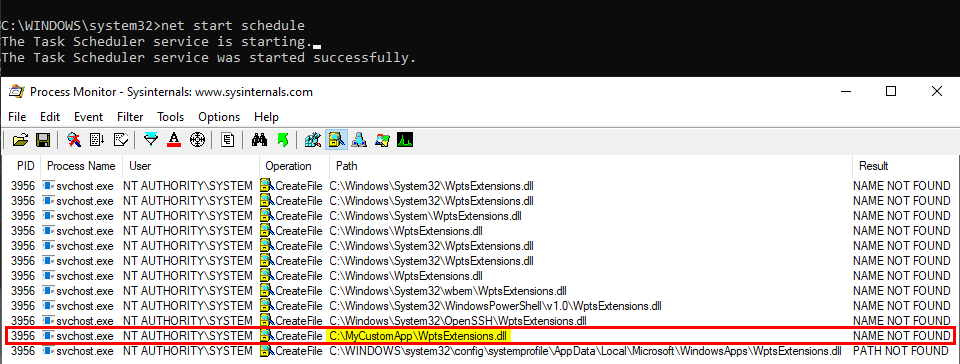
As you can see on the above screenshot, the service tried to load this DLL from C:\MyCustomApp because this directory was added to the system’s %PATH%. Since this directory is configured with weak permissions, any local user can therefore plant a malicious version of this DLL and thus execute code in the context of this service after a machine reboot.
Note: once again, the %PATH% is an environment variable so it varies depending on the user profile. As a consequence, the %PATH% of the NT AUTHORITY\SYSTEM account is often different from the %PATH% of a typical user account.
Though, you have to be very careful with this particular DLL hijacking if you want to exploit it during a pentest. Indeed, when this DLL is loaded by the service, it’s not freed so you won’t be able to remove the file. One solution is to stop the service as soon as you get your SYSTEM shell, then remove the file and finally start the service again.
Note: starting/stopping the Task Scheduler service requires SYSTEM privileges.
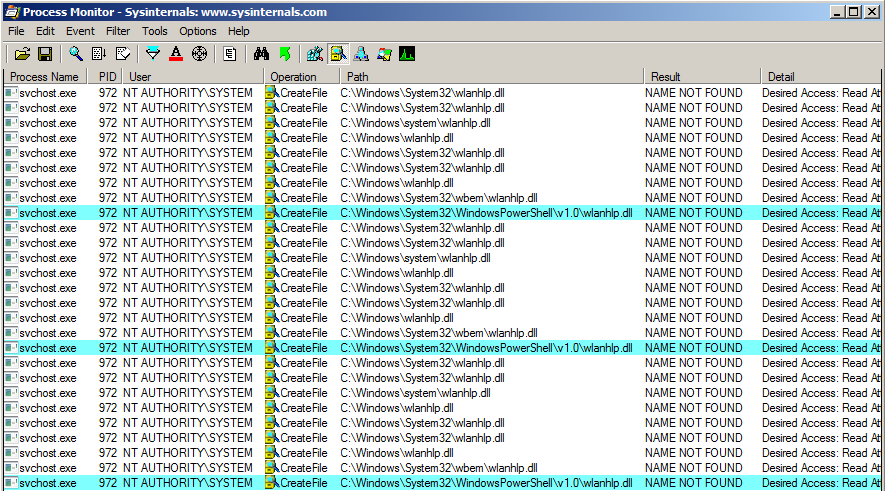
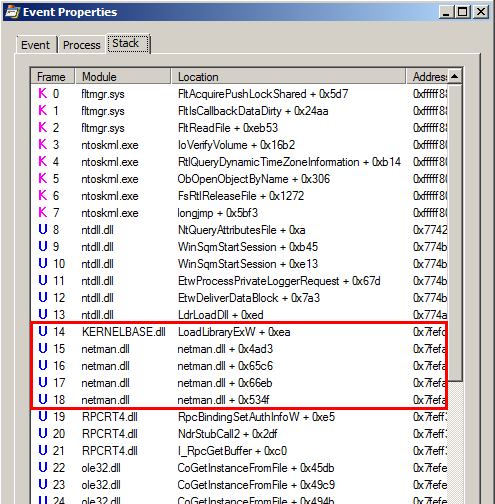
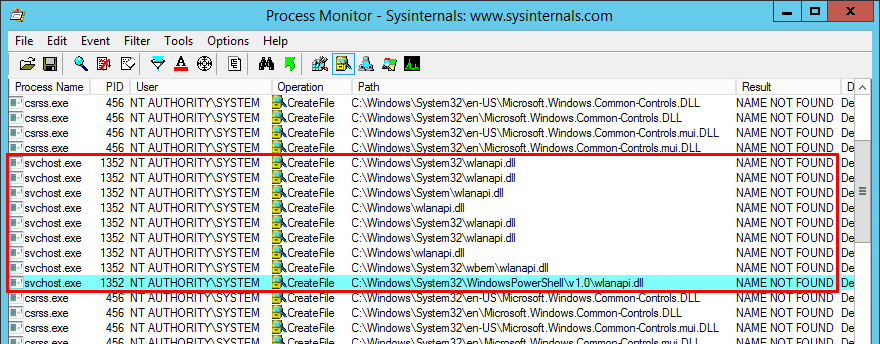
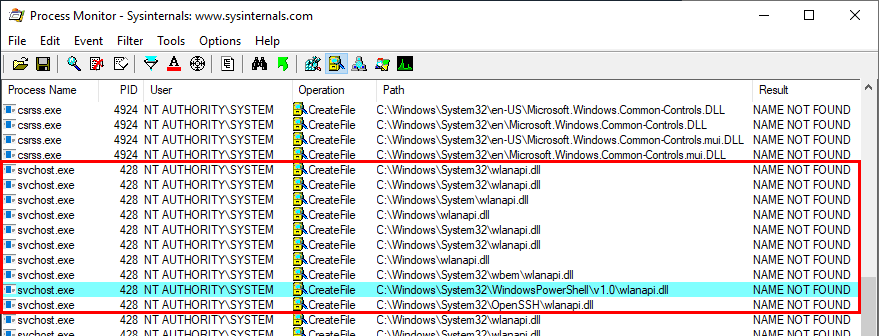
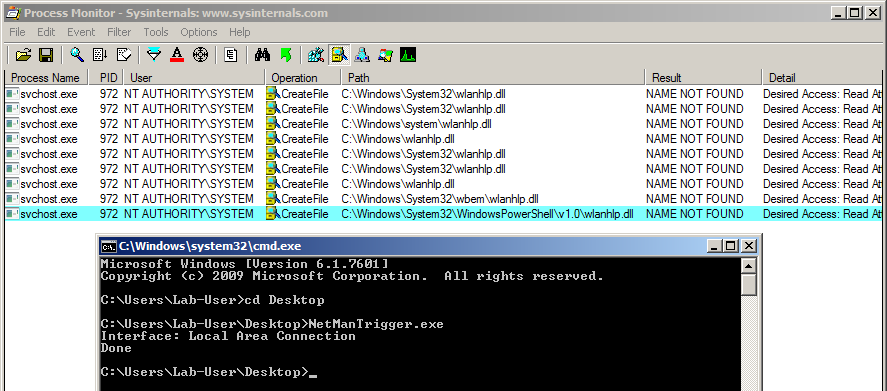
This example applies to Windows 10 workstation but what about Windows servers? Well I won’t discuss this here because I already did that in my previous post: Windows Server 2008R2-2019 NetMan DLL Hijacking. On all versions of Windows Server, starting with 2008 R2, the NetMan service is prone to DLL hijacking in the %PATH% directories because of the missing WLAN API. So, if you find yourself in the situation I just described, you could trigger this service in order to load your malicious DLL as SYSTEM, very convenient.
How to prevent DLL Hijacking?
Hopefully, I made it clear that, whatever the situation, DLL hijacking isn’t a vulnerability. It’s just an exploitation technique for getting code execution in the context of an application or a service for example. An exploitation technique on its own is useless though, what you need is a vulnerability such as weak folder permissions or a privileged file operation abuse.
-
Weak folder permissions - This issue can be caused by the installation of a third-party application. The installer should take care of that but that’s not always the case so system administrators should pay extra attention to this issue.
-
Privileged file operation abuse - This issue is due to a flaw in the design of the application. In this case, developpers should review the code in order to prevent such operation on files and folders that can be controlled by normal users or implement impersonation when possible.
Now, let’s say that the permissions of the application’s folder are properly set and that your code is clean, but you want to go the extra mile. There are still a few things you can do in order to reduce the risk of DLL hijacking in the %PATH% directories.
You’ve probably noticed that I used the simple LoadLibrary() function in my example but I didn’t say anything about the second option: LoadLibraryEx(). As a reminder, here is its prototype:
HMODULE LoadLibraryEx(LPCSTR lpLibFileName, HANDLE hFile, DWORD dwFlags);
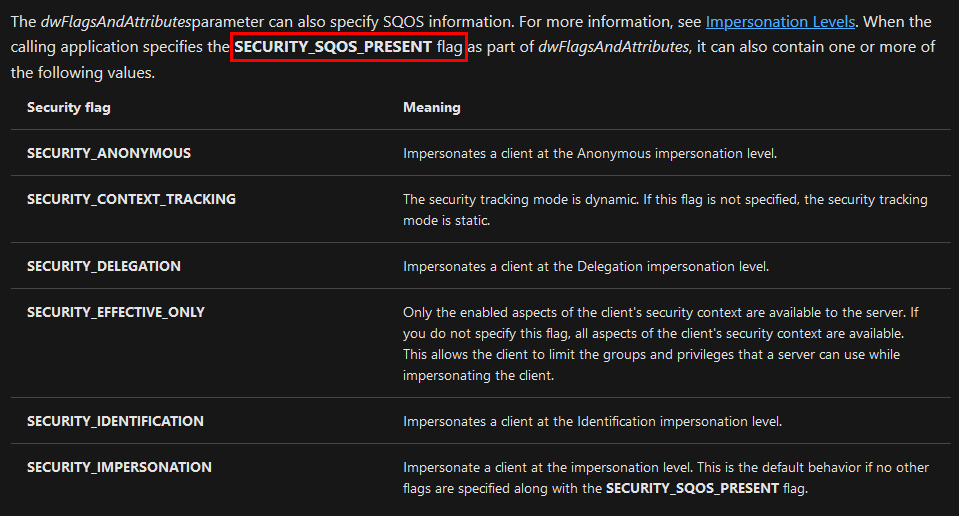
The first parameter is still the name (or the path) of the DLL but there are two other arguments. According to the documentation, the second one - hFile - is reserved and should be set to NULL. The third argument, however, allows you to specify some flags that will affect the behavior of the function. In our case, the three most interesting flags are:
-
LOAD_LIBRARY_SEARCH_APPLICATION_DIR - If this value is used, the application’s installation directory is searched for the DLL and its dependencies. Directories in the standard search path are not searched.
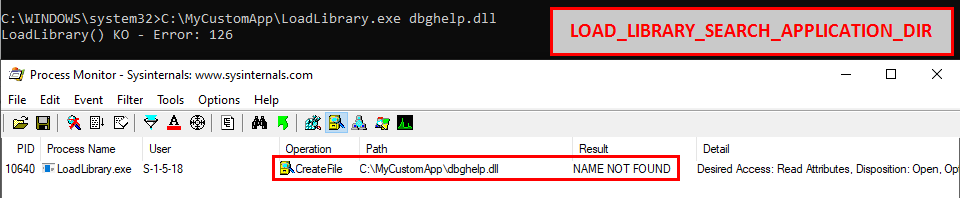
Indeed, if this flag is used, the search is limited to C:\MyCustomApp.
-
LOAD_LIBRARY_SEARCH_SYSTEM32 - If this value is used, %windows%\system32 is searched for the DLL and its dependencies. Directories in the standard search path are not searched.

Indeed, if this flag is used, the search is limited to C:\Windows\System32.
-
LOAD_LIBRARY_SEARCH_USER_DIRS - If this value is used, directories added using the AddDllDirectory() or the SetDllDirectory() function are searched for the DLL and its dependencies.
Enough with the theory, let’s check a real-life example. :slightly_smiling_face:
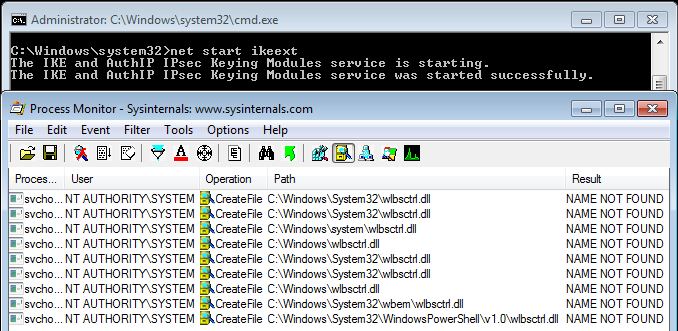
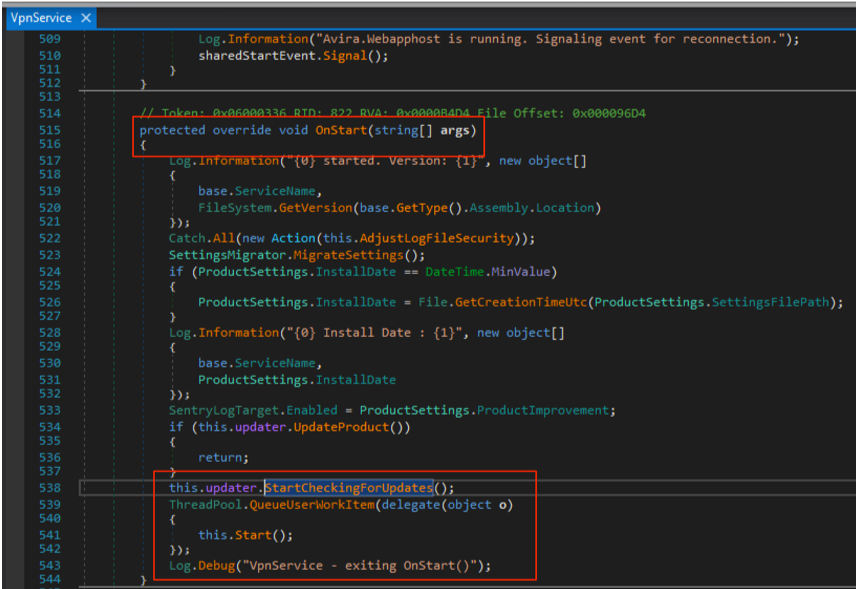
You probably know or you’ve probably heard about the IKEEXT DLL hijacking, that was originally published here in 2012 as far as I can tell. Starting with Windows Vista and up to Windows 8, the IKEEXT service loaded the missing wlbsctrl.dll library upon startup without specifying its full path and without using a safe DLL search order. Here is what it looked like back then:
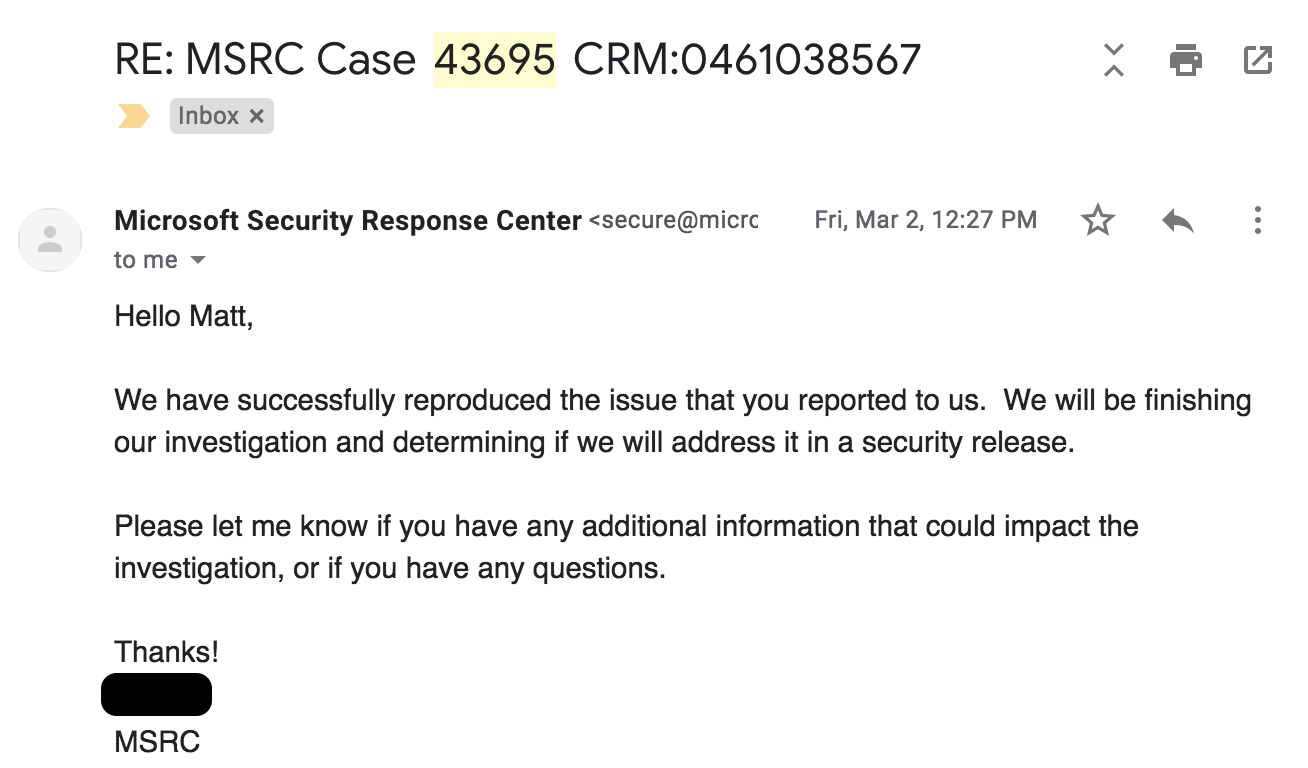
Of course, the researcher who initially reported this to Microsoft was given the same usual answer:
Microsoft has thoroughly investigated the claim and found that this is not a product vulnerability. In the scenario in question, the default security configuration of the system has been weakened by a third-party application. Customers who are concerned with this situation can remove the directory in question from PATH or restrict access to the third-party’s application directory to better protect themselves against these scenarios.
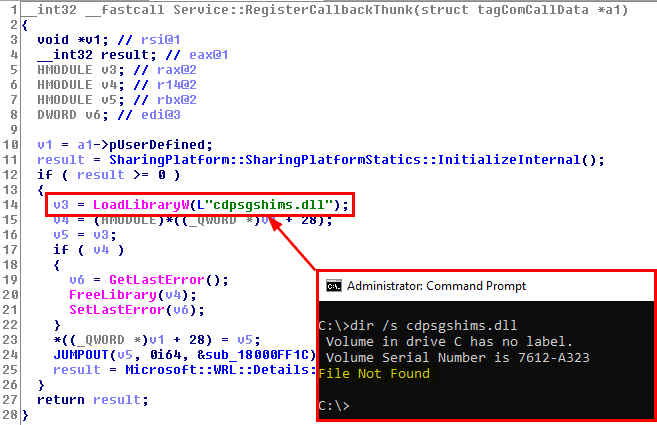
This is the official answer but then, starting with Windows 8.1, this DLL hijacking magically disappeared. Have you ever wondered how and why? Well, let me tell you that IKEEXT still tries to load this missing DLL, even in the latest version of Windows 10. But why don’t we talk about it anymore? First things first, here is what it looks like now on Windows 10:

See? The service tries to load the DLL from C:\Windows\System32, doesn’t find it and then stops. Do you recognize this behavior? :smirk: At this point, and based on what I’ve explained so far, you probably see where I’m going with this.
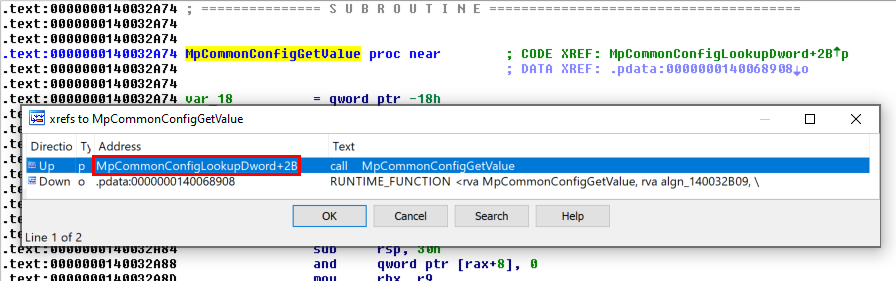
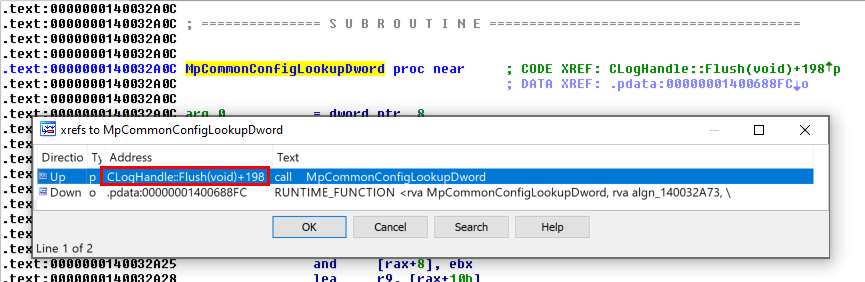
Let’s take a look at the two versions of the ikeext.dll file…
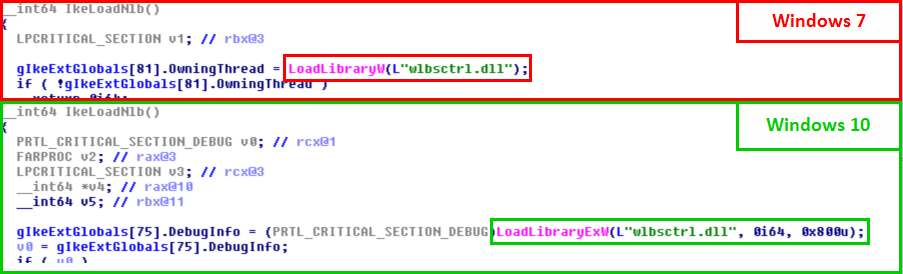
Of course, there is nothing magical about this. It turns out that Microsoft just silently patched this particular DLL hijacking by modifying the code of ikeext.dll. LoadLibraryEx() is now called instead of LoadLibrary() with the flag LOAD_LIBRARY_SEARCH_SYSTEM32, thus restricting the search to %windir%\System32.
LoadLibraryW(L"wlbsctrl.dll");                                          // Windows 7
LoadLibraryExW(L"wlbsctrl.dll", NULL, LOAD_LIBRARY_SEARCH_SYSTEM32);    // Windows 10
What is the cost of this change: one line of code, yes ONLY ONE LINE OF CODE!!! :expressionless:
With that in mind, I want you to think about a particular communication from Microsoft Security Response Center (MSRC). In a blog post, entitled Triaging a DLL planting vulnerability, they explicitly define what is considered a vulnerability and what is not:
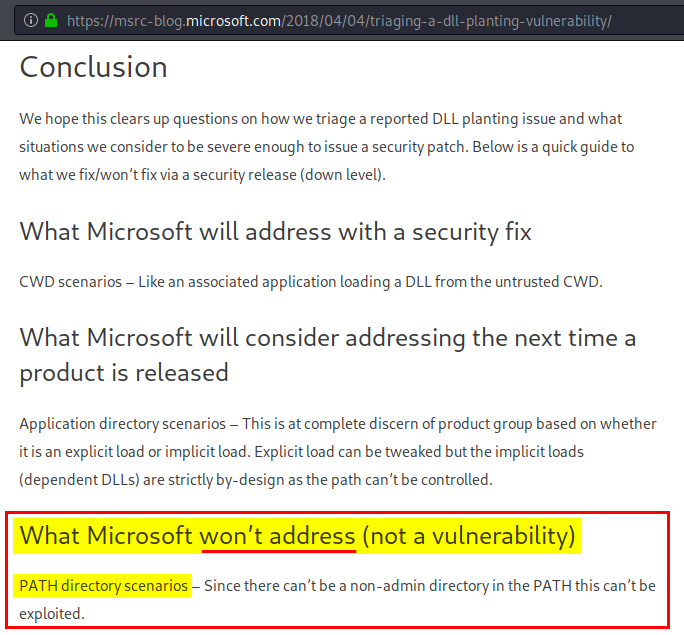
Did you read that? Microsoft won’t address DLL hijacking scenarios involving %PATH% directories. I’ll let you draw your own conclusions from this… :roll_eyes:
Conclusion
In the end, DLL hijacking (in the %PATH% directories) is not a vulnerability. It’s what Microsoft keeps replying over and over again to people who report them. OK, we get that and now what?
In this post, I discussed two versions of this problem:
-
DLL sideloading - If the permissions of an application’s folder are not properly configured, that’s the responsibility of this application only and, most of the time, the impact is limited to this application. So, there’s nothing special to say about it.
-
DLL hijacking in the
%PATH% directories - Again, if the permissions of an application’s folder are not properly configured, that’s the responsibility of this application. However, if it adds itself to the system’s %PATH%, that’s another story. In this case, the entire system is put at risk. Any Windows service that attempts to load a missing DLL without using a secure DLL search order can then be leveraged for privilege escalation. Is this a normal situation? I don’t think so.
When you know that this second scenario can easily be prevented simply by changing one line of code, I find it really hard to accept Microsoft’s answer to this issue. It’s even harder to accept considering that they patch them silently in the end. Unfortunately, I know that there are some people who keep relaying Microsoft’s argument blindly. The problem is that this leads us nowhere. Do we want to improve security or do we just want to spend our time figuring out who’s responsible for what?
In my opinion, a honest and constructive reply to people who report these issues would be something like: “Thank you for your report, we don’t consider this a critical or important security issue but we will address this in a future public release”. Perhaps I’m a bit naive and my point of view is biased because I don’t have the big picture. I don’t know. Anyway, I’ll conclude this post with an approximate translation of a quote from a French humorist: “If you’re absolutely one hundred percent sure about something, there’s a high chance you are wrong.”
Links & Resources


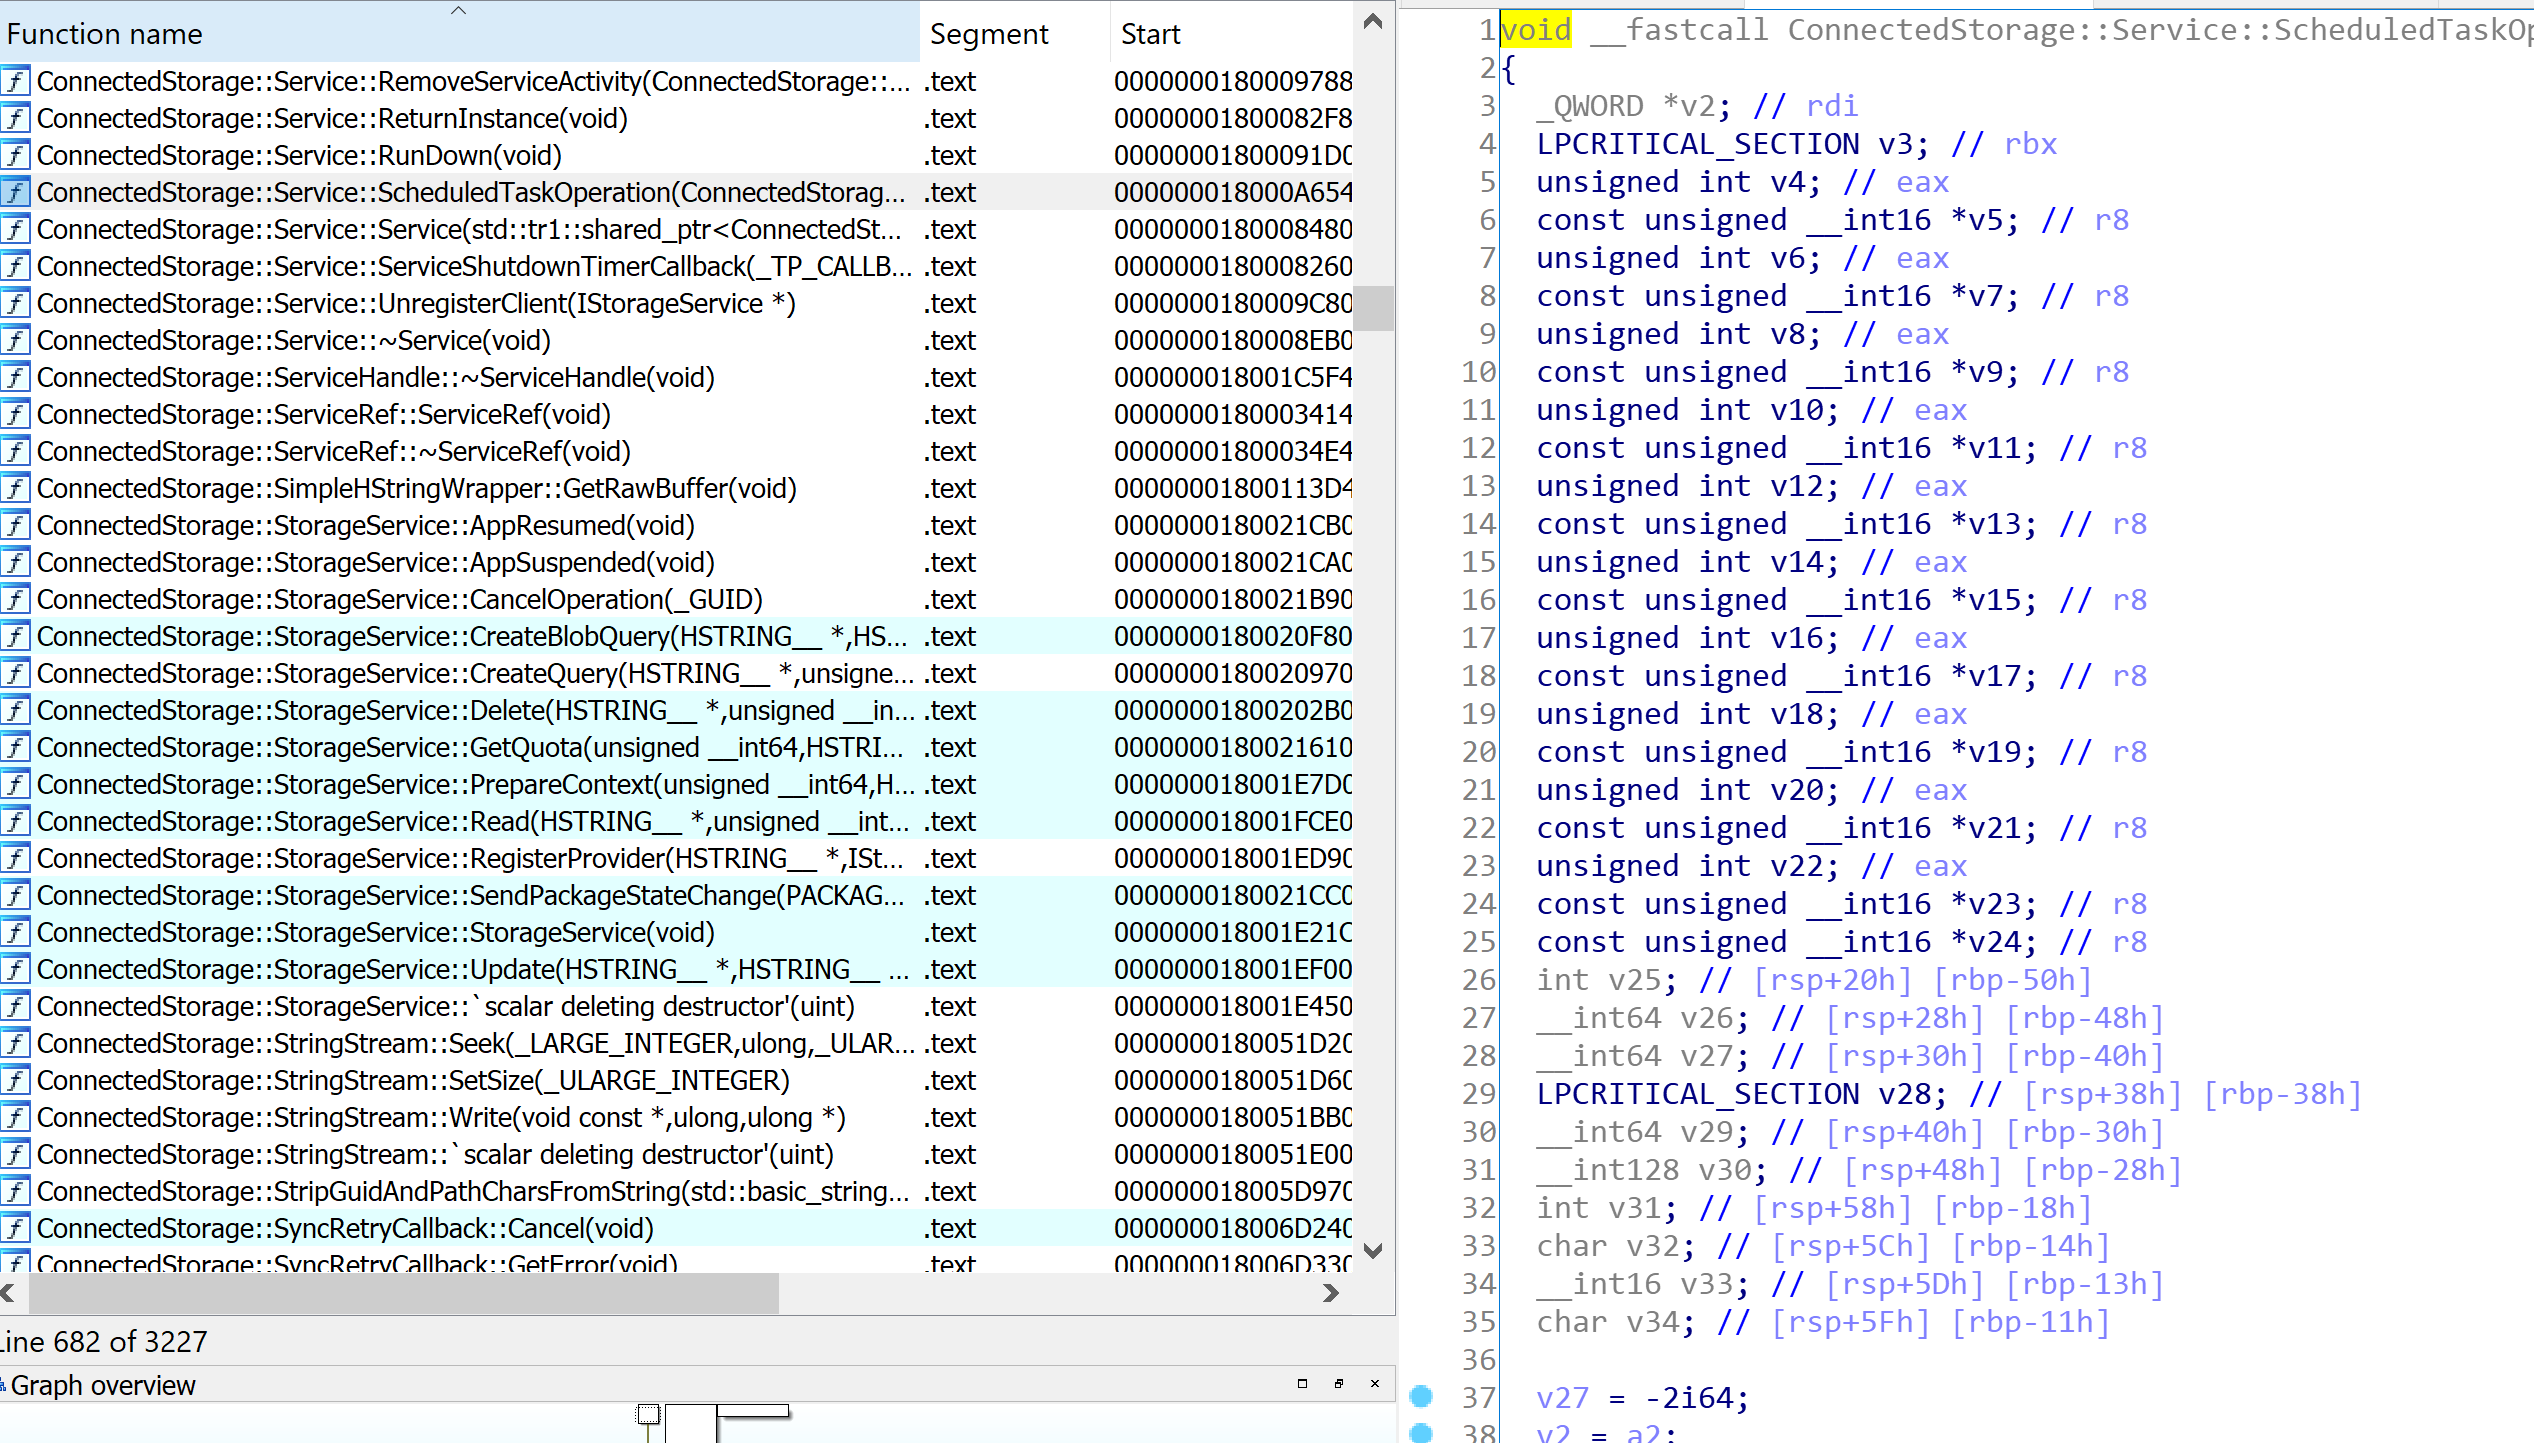
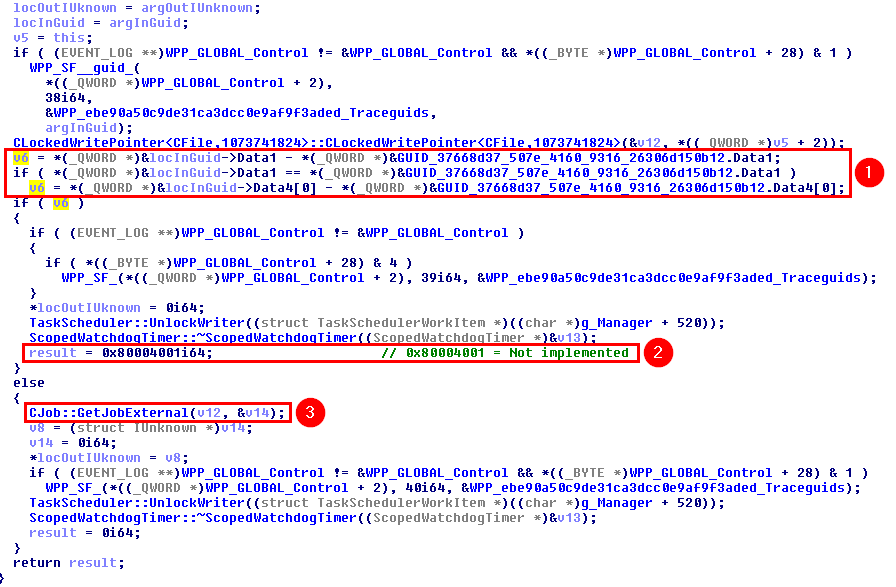
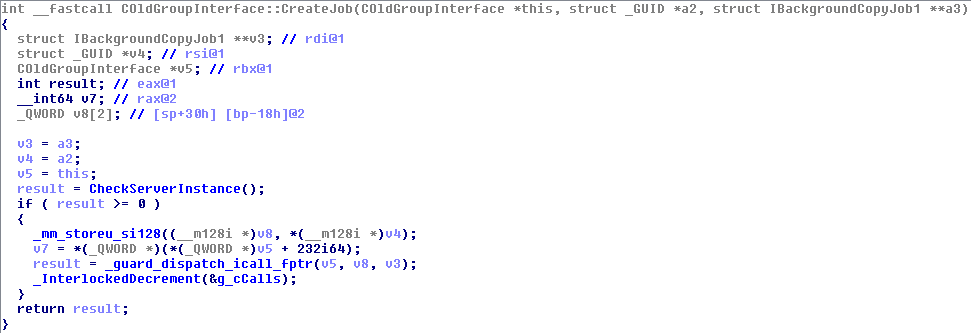
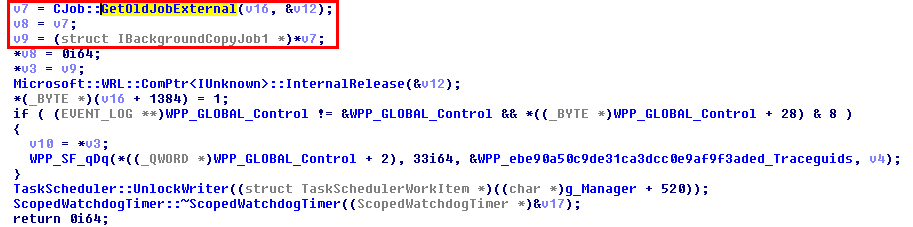
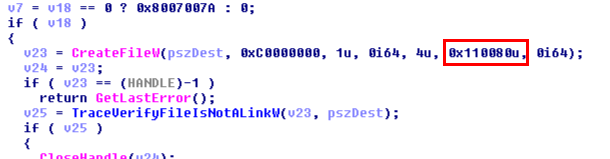
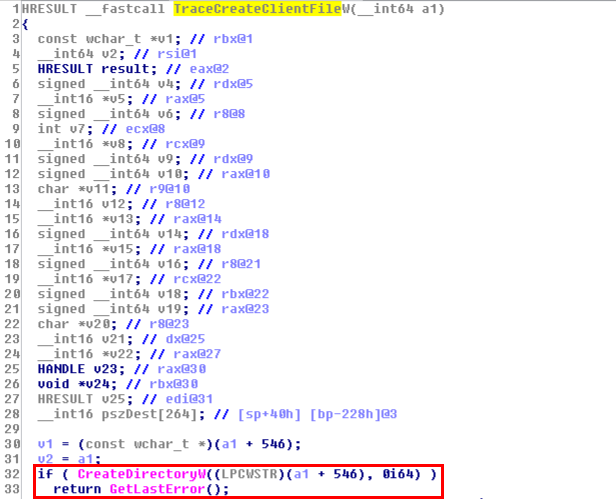
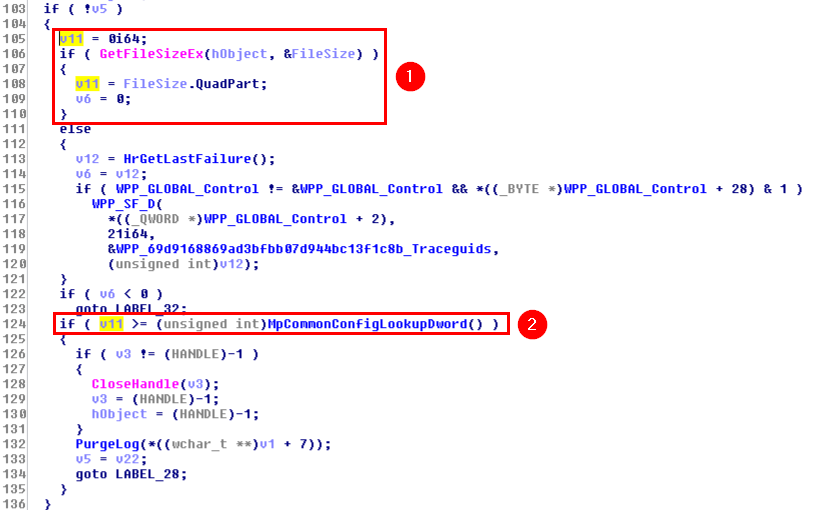
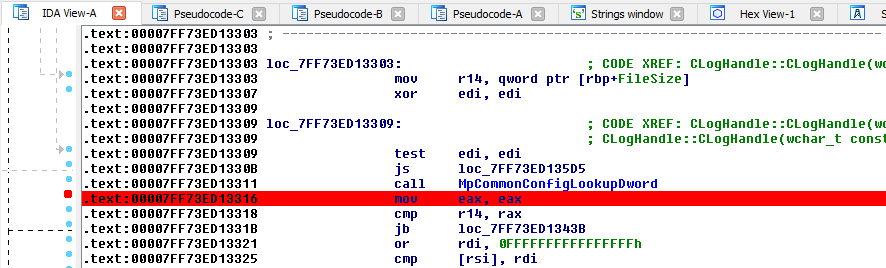
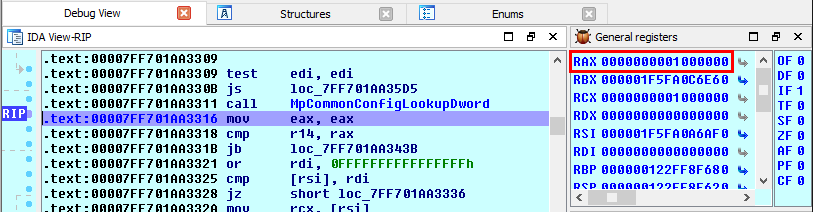
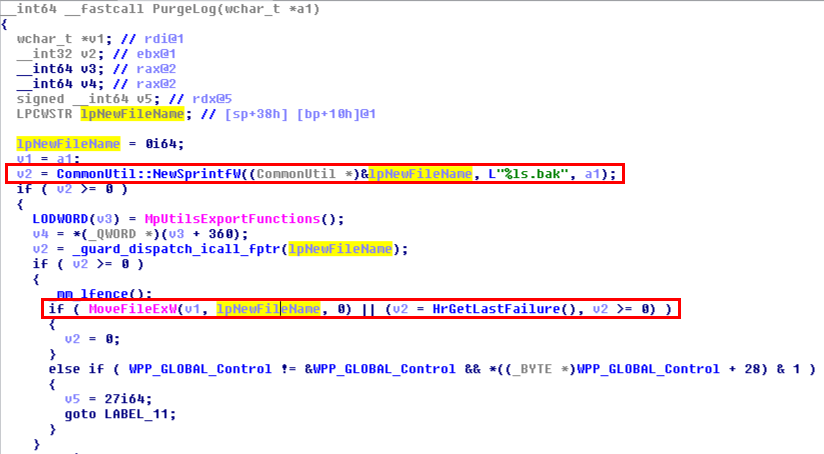
 This was the pseudo-C code generated by IDA, and in short, as far as I understood (I’m not that good in reversing): if input parameter was not NULL (a2), the Windows API