Normal view

There are new articles available, click to refresh the page.
Before yesterdayTyranid's Lair

Windows Code Injection: Bypassing CIG Through KnownDlls

By: tiraniddo
11 August 2019 at 00:20
TL;DR; This blog post describes a technique to inject a DLL into a process using only Duplicate Handle process access (caveats apply) which will also bypass Code Integrity Guard.

I've been attending Blackhat USA 2019 and watched a presentation by Amit Klein and Itzik Kotler on Windows Process Injection techniques. While I didn't learn anything new from the presentation that you couldn't from just reading Hexacorn's blog it was interesting to see them document what techniques worked against Code Integrity Guard (CIG) and what did not. CIG if you don't know, is Microsoft's term for blocking non-MS signed DLLs from being loaded into a process. If CIG is enabled on a process then you can load an arbitrary DLL not signed by Microsoft, instead you'll have to do some sort of shellcode or ROP.

During the presentation I was waiting for the punchline of a technique which bypasses CIG to load an arbitrary DLL, but it never arrived. I'm guessing the researchers don't bother to read my blog posts *sigh*, such as this one on injecting code into a Protected Processes though abusing the KnownDll mechanism. This would also work to bypass CIG if injecting from an external process not under CIG (or Device Guard). All the ways of hijacking the Known DLL loader that I've documented rely on knowing the location of Known DLL handle in NTDLL's data section. That's useful when you have little control over the target process and only an arbitrary read/write primitive. For user-mode code injection you're likely to be able to do anything to the process.

Writing a new handle value does have draw backs if you're thinking about it from a generic code injection perspective. Firstly the location of the handle can (and does) change depending on the version of NTDLL and secondly if you access and write memory of another process you might as well call your binary malware.exe. Of course writing to memory is not the only way to hijack Known DLLs, you can achieve the same thing with only Duplicate Handle access on the process, which is probably slightly less suspicious.

How can we do this without modifying the handle value? There's 3 key observations we can make that only require Duplicate Handle access:
  1. We can find the existing handle value of the KnownDlls directory by duplicating handles from a process to another and querying for the name.
  2. We can close a handle in another process by specifying DUPLICATE_CLOSE_SOURCE to DuplicateHandle.
  3. The kernel's handle allocator will reuse the handle values so we can replace the original handle with a different object through brute force.
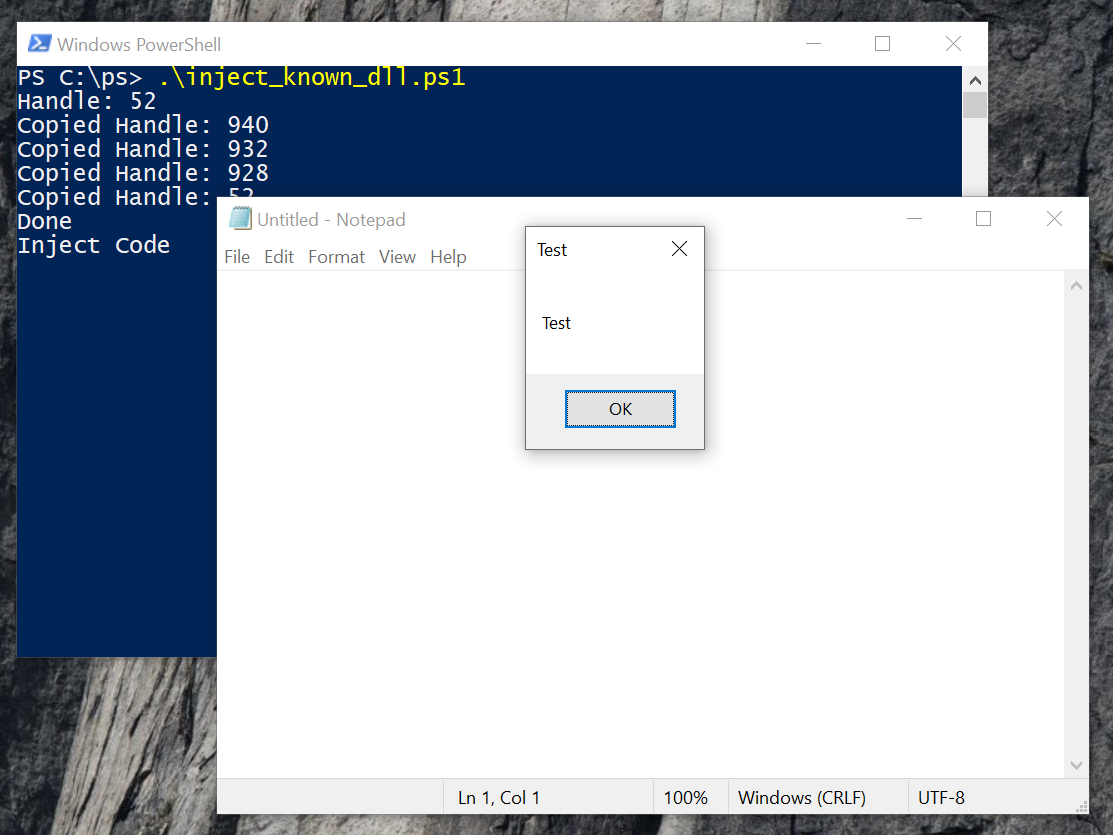
Let's go through how this works in practice. I'm going to show some snippets of PowerShell which use my NtObjectManager module. I'm not going to provide a full end-to-end proof-of-concept however for various reasons.

Step 1: Bring up a process to inject into, the Known DLLs handle is created during the initial loader process before the process entry point is called, so the process must run at least that long. Once we know the Process ID of the process to inject into we can dump all handles in the process and look for anything with the NT type of Directory. Each directory handle can then be duplicated into the current process and inspected. If the name of the directory is "\KnownDlls" we've found our target. In PowerShell we can use my Get-NtHandle cmdlet to dump the handle table, this doesn't require opening the process itself. To get the name we only need PROCESS_DUP_HANDLE access to the target. Here's a basic PS function to get the handle value:

$id = $(Get-Process notepad).Id
$hs = Get-NtHandle -ProcessId $id -ObjectTypes Directory
foreach($h in $hs) {
  if ($h.Name -eq '\KnownDlls') {
    $handle = $h.Handle
    break
  }
}

Step 2: Create an empty object directory and insert into it a named image section object. The name of the section needs to match the name of the system32 DLL we want to hijack. The file backing the section is obviously the DLL you want loaded into the process. Again some code, assuming you've already created the directory 

$dir = New-NtDirectory
$sect = Use-NtObject($f = Get-NtFile -Path "\??\c:\dir\fake.dll") {
        New-NtSection -File $f -SectionAttributes Image `
          -Root $dir -Path "blah.dll" -Protection Execute
    }
}

Step 3: Close the original Known DLLs handle. Again this only needs Duplicate Handle access. At this point you probably also want to suspend the process to ensure something doesn't execute and allocate the handle over the top of your now closed handle. Of course if you suspend the process you'll need a bit more access.

$proc = Get-NtProcess -ProcessId $id -Access DupHandle
Copy-NtObject -SourceHandle $handle -SourceProcess $proc `
                                    -CloseSource

Step 4: Repeatedly duplicate the fake Known DLLs directory you created in step 2 until you get the same handle value as you identified in step 1. If the process is suspended this shouldn't take more than a few tries at worst.

$i = 0
while($i -lt 1000) {
   $h = Copy-NtObject -DestinationProcess $proc -Object $dir
   if ($h -eq $Handle) {
       break
   }
   $i++
}

Step 5: Everything is now setup. The final step is you'll need to get a new library loaded from system32 inside the process. There's a number of possible techniques for this. You could go old-skool and create a new thread in process calling LoadLibrary. Or you could identify a DLL which you know the process will load in response to a UI or RPC action. For example opening a file in Notepad will spawn the explorer open dialog which pulls in ALOT of new DLLs. Be creative, at least if you don't want to open the process with anything above Duplicate Handle access.


The question you might be asking is, "Do any AV/Host Detection tools catch this trick?". Honestly I don't know, nor do I care. However it has some things going for it:

  • It doesn't requiring reading or writing memory from the target process.
  • Inline hooks on LoadLibrary/LdrLoadDll will just see loading a system32 DLL unless they also then query for the mapped file name after the operation has completed.
  • It bypasses CIG, so anyone thinking that'll prevent injection will be surprised.
You could probably make it even more convert, but I'm not going to do so. As I've noted before I'm also not going to write a proof-of-concept or write a tool to do this, you can do it yourself.


Digging into the WSL P9 File System

By: Unknown
12 July 2019 at 15:23
Windows 10 version 1903 is upon us, which gives me a good reason to go looking at what new features have been added I can find bugs in. As it's clear people seem to appreciate fluff rather than in-depth technical analysis I thought I'd provide a overview of my process I undertook to look at one new feature, the P9 file system added for the Windows Subsystem for Linux (WSL). The aim is to show my approach to analyzing a feature with the minimum amount of reverse engineering, ideally with no disassembly.

Background

When WSL was first introduced it had a pretty poor story for interoperability between the Linux instance and the host Windows environment. In the early versions the only, officially supported, way to interop was through DrvFS which allows you to mount local Windows drives into the Linux environment. This story has changed over time such as adding support to start Windows executables from Linux and better NTFS case-sensitivity support (which I blogged about already).

But one fairly large pain point remained, accessing Linux files from Windows applications. You could do it, the files are stored inside the distro's package directory (%LOCALAPPDATA%\Packages\DISTRO\LocalState\rootfs), so you could open them directly. However WSL relies on various tricks to deal with the mismatch between Windows and Unix-style filesystem semantics, such as storing the UID/GID and file permission bits in extended attributes. Modifying these files using an unenlightened Windows application could result in corruption of the file state which in the worse case could break the distro.

With the release of 1903 the WSL team (if such a thing exists) looks to be trying to solve this problem once and for all. This blog introduced the new feature, accessing Linux files via a UNC path. I felt this warranted at least a small amount of investigation to see how it works and whether there's any quick wins or low-hanging fruit.

Understanding the Feature

The first thing I needed was to setup a x64 version of 1903 in a Hyper-V VM. I then made the following changes, which I would always do regardless of what I end up using the VM for:
  • Disabled SecureBoot for the VM.
  • Enabled kernel debugging through BCDEDIT. Note that I tend to be paranoid enough to disable NICs in the VM (and my success of setting up alternative debug transports is mixed) so I resort to serial debugging over a named pipe. Note that for Gen 2 Hyper-V VMs you can't add a serial port from the UI, instead you need use the Set-VMComPort PowerShell cmdlet.
  • Install my tooling, such as NtObjectManager and SysInternals suite, especially Process Monitor.
  • Enabled the Windows Subsystem for Linux feature.
  • Install a distro of choice from the Windows Store. Debian is the most lightweight, but any will do for our purposes. Note that you don't need to login to the Store to get the distro, though the app will do its best to convince you otherwise. Don't listen to its lies.
With a VM in hand we can now start the investigation. The first thing I do is take any official information at face value and use that to narrow the scope. For example reading the official blog post I could determine the following:
  • The feature uses the Plan 9 Filesystem Protocol to access files.
  • The files are accessed via the UNC path \\WSL$\DISTRO but only when the distro is running.
  • The P9 server is hosted in the init process when the distro starts.
  • The P9 server uses UNIX sockets for communication.
Based on those observations the first thing I want to do is try and find how the UNC path is implemented. The rationale for starting at the UNC path is simple, that's the only externally observable feature described in the blog post. Everything else, such as the use of P9 or UNIX sockets could be incorrect. I'm not expecting the blog post to outright lie about the implementation, but there's sometimes more important details to get right than others. It's worth noting here that you should increase your skepticism of a feature's technical description the older the blog post is as things can and will change.

If we can find how the UNC path is implemented that should also lead us to whether P9 is used as well as what transport the feature is using. An important question is whether these files are really accessed via the UNC path, which would imply kernel support, or is it only in Explorer? This is important to allow us to track down where the implementation lies. For example it's possible that if the feature only works in Explorer it could be implemented as a shell extension, similar to how MTP/PTP is supported.

To determine whether its a kernel driver or a shell extension it's as simple as opening the UNC path using the lowest possible function, which in this case means calling a system call. Invoking a system call will also eliminate the chance the WSL UNC path is implemented using some new feature added to the Win32 APIs. As my NtObjectManager module directly calls the NtOpenFile system call we can use that to do the test. I ran the following PowerShell command to check on the result:

$f = Get-NtFile \??\UNC\wsl$\Debian\bin\bash

This command successfully opens the BASH executable file. This is a clear indication that we now need to look at the kernel to find the driver responsible for implementing the UNC path. This is commonly implemented by writing a Network Mini-Redirector which handles a lot of the setup with the Multiple UNC Provider (MUP) and the IO Manager.

At this point the assumption would be the mini-redirector would be implemented in the LXCORE system driver which implements the rest of WSL. However a quick check of the imports with the DUMPBIN tool, shows the driver doesn't import anything from RDBSS which would be crucial for the implementation of a mini-redirector. 

To find the actual driver name I'll go for the simplest, brute force approach, just list all drivers which import RDBSS and see if any are obvious candidates based on name. You could achieve this in one of many ways, for example you could implement a PE file parser and check the imports, you could script DUMPBIN, or you could just GREP (well FINDSTR) for RSBSS, which is what I'll do. I ran the following:

c:\> findstr /I /M rdbss c:\windows\system32\drivers\*.sys
c:\windows\system32\drivers\csc.sys
c:\windows\system32\drivers\mrxdav.sys
c:\windows\system32\drivers\mrxsmb.sys
c:\windows\system32\drivers\mrxsmb20.sys
c:\windows\system32\drivers\p9rdr.sys
c:\windows\system32\drivers\rdbss.sys
c:\windows\system32\drivers\rdpdr.sys

In the FINDSTR command I just list all drivers which contain the case insensitive string RDBSS and print out the filename only (unless you enjoy terminal beeps). The result of this process is a clear candidate P9RDR. This also likely confirms the use of the P9 protocol, though of course we should never jump the gun on this. 

We could throw the driver into a disassembler at this point and start RE, but I don't want to go there just yet. Instead, in the spirit of laziness I'll throw the driver into STRINGS and get out all printable debug string information, of which there's likely to be some. I typically use the SysInternals STRINGS rather than the BINUTILS one, just as I usually always have it installed on any test system and it handles Unicode and ANSI strings with no additional argument. Below is some of the output from the tool:

c:\> strings c:\Windows\system32\drivers\p9rdr.sys
...
\Device\P9Rdr
P9: Invalid buffer for P9RDR_ADD_CONNECTION_TARGET_INPUT.
P9: Invalid share name in P9RDR_ADD_CONNECTION_TARGET_INPUT.
P9: Invalid AF_UNIX path in P9RDR_ADD_CONNECTION_TARGET_INPUT.
P9: Invalid share name in P9RDR_REMOVE_CONNECTION_TARGET_INPUT.
...
\wsl$

We can see a few things here, firstly we can see the WSL$ prefix, this is a good indication that we're in the right place. Second we can see a device name which gives us a good indication that there's expected to be communication from user-mode to kernel mode to configure the device. And finally we can see the string "AF_UNIX" which ties in nicely with our expectation that Unix Sockets are being used.

One this which is missing from the STRINGS output is any indication of the Unix socket file name being used. Unix sockets can be used in an "abstract" fashion, however typically you access the socket through a file path on disk. It's most likely that a file is how the driver and communicates with the socket (I don't even know if Windows supports the "abstract" socket names). Therefore if it is indeed using a file it's not a fixed filename. The kernel has support for a socket library so again maybe this would be the place we could go disassembling, but instead we'll just do some dynamic analysis using PROCMON.

In order to open a socket from a file there must be some attempt to call the IO Manager to open it, this in turn would likely be detectable using PROCMON's filter driver. We can therefore make the following assumptions:

  • The file open can be detected in PROCMON.
  • The socket file will be opened in the context of the first process to open the UNC path.
  • The open request will have the P9RDR driver on the call stack.
The first assumption is a general problem with PROCMON. There are ways of opening files, such as inside another filter driver which cannot be detected by PROCMON as it never receives the request. However we'll assume that is can be detected, of course if we don't find it we might have to resort to disassembly or kernel debugging after all. 

The second assumption is based on the fact the WSL distribution isn't always running, therefore any Unix socket file would only be opened on demand, and for reasons of laziness is likely to be in the same process that first makes the request. It could push the request to a background thread, but it seems unlikely. By making this assumption we can filter PROCMON to only show open file requests from a known process.

The final assumption is there to filter down all possible open file requests to the ones we care about. As the driver is a mini-redirector the call chain is likely to be IO Manager to MUP to RDBSS to P9RDR to UNIX SOCKET. Therefore we only care about anything which goes through the driver of interest. This assumption is more important if assumption 2 is false as it might mean that we couldn't filter to a specific process, but we'll go with it anyway on the basis that it's useful technique to learn.

Based on the assumptions we can set PROCMON's filters for a specific process (we'll use PowerShell again) and filter for all CreateFile operations. The Windows kernel doesn't specifically differentiate between open and create calls (open is a specific case of create) so PROCMON doesn't either.

PROCMON Filter View showing filtering on powershell process name and CreateFile operation.

What about the call stack? As far as I can tell you can't filter on the call stack directly, instead we'll do something else. But first gather a trace of a PowerShell session where you execute the Get-NtFile command show earlier in this blog post. Now we want to save the trace as an XML file. Why an XML file? First, the XML format is easy to access, unlike the native PML format. However, the real answer is shown in the following screenshot.

PROCMON Save Dialog showing options for XML output including stack traces.

The screenshot shows the options for exporting to XML. It allows us to save the call stacks for all trace events. It will even resolve symbols, however as we're only interested in the module on the stack not the name we can select to include the stack trace, but not symbol resolving. With an exported trace we can now filter the calls based using a simple XPath expression. The following is a simple PowerShell script to run the XPath query.

$xml = [xml]$(Get-Content "LogFile.XML")
$xml.SelectNodes("//event[stack/frame[contains(path, 'p9rdr')]]/Path[text()]")

The script is pretty simple, if you "cast" a text file to an XML object (using [xml]) PowerShell will create an XML DOM Document from the text. With the Document object we can now call SelectNodes with an appropriate XPath. In this case we just want to select all Path of all events which have a stack trace frame containing the P9RDR module. Running this script against the capture results in one hit:

%LOCALAPPDATA%\Packages\DISTRO\LocalState\fsserver

DISTRO is the name of the Store package you installed the distro from, for example Debian is installed into TheDebianProject.DebianGNULinux_76v4gfsz19hv4. With a file name of fsserver it seems pretty clear what the file is for, but just to check lets open the event back in PROCMON and look at the call stack.

PROCMON call stack opening fsserver showing AFUNIX driver and P9RDR.

I've highlighted areas of interest, at the top there's the calls through the AFUNIX driver, which demonstrates that the file is being opened due a UNIX socket connection being made. At the bottom we can see a list of calls in the P9RDR driver. As symbol resolving is enabled we can use the symbol information to target specific areas of the driver for reverse engineering. Also now we know the path we can put this back into PROCMON as a filter and from that we can confirm that it's the init process which is responsible for setting up the file server.

In conclusion we can at least confirm a few things which we didn't know before.
  • The handling of the UNC paths is handled entirely in kernel mode via a mini-redirector. This makes the file system more interesting from a security perspective as it's parsing arbitrary user data in the kernel.
  • The file system uses UNIX sockets for communication, this is handled by the kernel driver and the main init process.
  • The socket protocol is presumably P9 based on the driver name, however we've not actually confirmed that to be true.
There's of course still things we'd want to know:
  • How is the UNC mappings configured? Via the device driver?
  • Is the protocol actually P9, if so what information is being passed across?
  • How well "fuzzed" are the protocol parsers.
  • Does this file system have any other interesting behaviors.
Some of those things will have to wait for another blog post.


ProcessDebugObjectHandle Anti-Anti-Debug Trick

By: tiraniddo
17 April 2019 at 23:22
During my implementation of NT Debug Object support in NtObjectManager (see a related blog here) I added support to open the debug object for a process by using the ProcessDebugObjectHandle process information class. This immediately struck me as something which could be used for anti-debugging, so I did a few searches and sure enough I was right, it's already documented (for example this link).

With that out of the way I went back to doing whatever it was I should have really been doing. Well not really, instead I considered how you could bypass this anti-debug check. This information was harder to find, and typically you just hook NtQueryInformationProcess and change the return values. I wanted to do something more sneaky, so I looked at various examples to see how the check is done. In pretty much all cases the implementation is:

BOOL IsProcessBeingDebugged() { HANDLE hDebugObject; NTSTATUS status = NtQueryInformationProcess(GetCurrentProcess(), ProcessDebugObjectHandle, hDebugObject, sizeof(hDebugObject), NULL); if (NT_SUCCESS(status) && hDebugObject) { return TRUE; } return FALSE;}

The code checks if the query is successful and then whether a valid debug object handle has been returned, returning TRUE if that's the case. This would indicate the process is being debugged. If the an error occurs or the debug object handle is NULL, then it indicates the process is not being debugged.

To progress I'd now analyse the logic and find the failure conditions for the detection, fortunately the code isn't very big. We want the function to return FALSE even though the debugger is attached, this means we need to either:

  • Make the query return an error code even though a debugger is attached, or...
  • Let the query succeed but return a NULL handle.
We've reached the limit with what we can do staring at the anti-debug code. We'll dig into the other side, the kernel implementation of the information class. It boils down to a single function:

NTSTATUS DbgkOpenProcessDebugPort(PEPROCESS Process, PHANDLE DebugObject) { if (!Process->DebugPort) return STATUS_PORT_NOT_SET; if (PsTestProtectedProcessIncompatibility(Process, KeGetCurrentProcess())) { return STATUS_PROCESS_IS_PROTECTED; } return ObOpenObjectByPointer(Process->DebugObject, MAXIMUM_ALLOWED, DbgkDebugObjectType, UserMode, DebugObject); 
} 


There are three failure cases in this code:

  1. If there's no debug port attached then return STATUS_PORT_NOT_SET.
  2. If the process holding the debug port is at a higher protection level return STATUS_PROCESS_IS_PROTECTED.
  3. Finally open a handle to the debug object and return the status code from the open operation.
For our purposes case 1 is a non-starter as it means the process is not being debugged. Case 2 is interesting but as the Process object parameter (which comes from the handle passed in the query) will be the same as KeGetCurrentProcess that'd never fail. We're therefore all in on case 3. It turns out that the debug objects, like many kernel objects are securable resources. We can confirm that by using NtObjectManager by querying for the DebugObject type and checking its SecurityRequired flag.

PowerShell executing "Get-NtType DebugObject | Select SecurityRequired" and returning True.

If SecurityRequired is true then it means the object must have a security descriptor whether it has a name or not. Therefore we can cause the call to ObOpenObjectByPointer to fail by setting a security descriptor which prevents the process using the anti-debug check opening the debug object and therefore returning FALSE from the check.

To test that we need a debugger and a debuggee. As I do my best to avoid writing new C++ code I converted the anti-debug code to C# using my NtApiDotNet library:


using (var result = NtProcess.Current.OpenDebugObject(false)) { if (result.IsSuccess) { Console.ForegroundColor = ConsoleColor.Red; Console.WriteLine("[ERROR] We're being Debugged, stahp!"); } else { Console.ForegroundColor = ConsoleColor.Green; Console.WriteLine("[SUCCESS] Go ahead, we're cool!"); }}

I don't bother to check for a NULL handle as the kernel code indicates that can't happen, either you get an error, or you get a valid handle. Anyway it doesn't need to be robust, ..., for me ;-)

For the debugger, again we can write it in C#:

Win32ProcessConfig config = new Win32ProcessConfig();config.ApplicationName = @"Path\To\Debuggee.exe";config.CommandLine = "debuggee";config.CreationFlags = CreateProcessFlags.DebugProcess; using (var p = Win32Process.CreateProcess(config)){ using (var dbg = p.Process.OpenDebugObject()) { SecurityDescriptor sd = new SecurityDescriptor(""); dbg.SetSecurityDescriptor(sd, SecurityInformation.Dacl); while (true) { var e = dbg.WaitForDebugEvent(); e.Continue(); if (e is ExitProcessDebugEvent) { break; } } }}

This code is pretty simple, we create the debuggee process with the DebugProcess flag. When CreateProcess is called the APIs will create a new debug object and attach it to the new process. We can then open the debug object and set an appropriate security descriptor to block the open call in the debuggee. Finally we can just poll the debug object which resumes the target, looping until completion.

What can we set as the security descriptor? The obvious choice would be to set an empty DACL which blocks all access. This is distinct from a NULL DACL which allows anyone access. We can specify an empty DACL in SDDL format using "D:". If you test with an empty DACL the debuggee can still open the debug object, this is because the kernel specified MAXIMUM_ALLOWED, as the current user is the owner of the object this allows for READ_CONTROL and WRITE_DAC access to be granted. If we're an administrator we can change the owner field (or by using a WontFix bug) however instead we'll just specify the OWNER_RIGHTS SID with no access. This will block all access to the owner. The SDDL for that is "D:(A;;0;;;OW)".

If you put this all together yourself you'll find it works as expected. We've successfully circumvented the anti-debug check. Of course this anti-debug technique is unlikely to be used in isolation, so it's not likely to be of much real use.


The anti-debug author is trying to model one state variable, whether a process is being debugged, by observing the state of something else, the success or failure from opening the debug object port. You might assume that as the anti-debug check is directly interacting with a debug artefact then there's a direct connection between the two states. However as I've shown that's not the case as there's multiple ways the failure case can manifest. The code could be corrected to check explicitly for STATUS_PORT_NOT_SET and only then indicate the process is not being debugged. Of course this behavior is not documented anywhere, and even it was could be subject to change.

The problem with the anti-debug code is not that you can set a security descriptor on the debug object and get it to fail but the code itself does take into accurately take into account the thing its trying to check. This problem demonstrates the fundamental difficulty in writing secure code, specifically:

Any non-trivial program has a state space too large to accurately model in finite time which leads to unexpected or undefined behavior.

Or put another way:

The time constrained programmer writes what works in testing, not what is correct.

While bypassing anti-debug is hardly a major security issue (well unless you write DRM code), the process I followed here is pretty much the same for any of my bugs. I thought it'd be interesting to see my approach to these sorts of problems.
❌
❌