Normal view

There are new articles available, click to refresh the page.
Before yesterdayVulnerabily Research

VBScript CRegExp::Execute use of uninitialized memory

5 April 2023 at 19:10

(MS14-080 and MS14-084, CVE-2014-6363)

A specially crafted script can cause the VBScript engine to access data before initializing it. An attacker that is able to run such a script in any application that embeds the VBScript engine may be able to control execution flow and execute arbitrary code. This includes all versions of Microsoft Internet Explorer.

MSIE 10&11 BuildAnimation NULL pointer dereference

12 November 2020 at 12:00

A specially crafted style sheet inside an HTML page can trigger a NULL pointer dereference in Microsoft Internet Explorer 10 and 11. The pointer in question is assumed to point to a function, and the code attempts to use it to execute this function, which normally leads to an access violation when attempting to execute unmapped memory at address 0. In some cases, Control Flow Guard (CFG) will attempt to check if the address is a valid indirect call target. Because of the way CFG is implemented, this can lead to a read access violation in unmapped memory at a seemingly arbitrary address.

MSIE 9 MSHTML CPtsTextParaclient::CountApes out-of-bounds read

5 April 2023 at 19:10

(The fix and CVE number for this bug are not known)

A specially crafted web-page can cause Microsoft Internet Explorer 9 to access data before the start of a memory block. An attack that is able to control what is stored before this memory block may be able to disclose information from memory or execute arbitrary code.

MSIE 11 MSHTML CView::CalculateImageImmunity use-after-free

5 April 2023 at 19:10

(The fix and CVE number for this bug are not known)

A specially crafted web-page can cause Microsoft Internet Explorer 11 to free a memory block that contains information about an image. The code continues to use the data in freed memory block immediately after freeing it. It does not appear that there is enough time between the free and reuse to exploit this issue.

Heap spraying high addresses in 32-bit Chrome/Firefox on 64-bit Windows

12 November 2020 at 12:00

In my previous blog post I wrote about "magic values" that were originally chosen to help mitigate exploitation of memory corruption flaws and how this mitigation could potentially be bypassed on 64-bit Operating Systems, specifically Windows. In this blog post, I will explain how to create a heap spray (of sorts) that can be used to allocate memory in the relevant address space range and fill it with arbitrary data for use in exploiting such a vulnerability.

Magic values in 32-bit processes and 64-bit OS-es

12 November 2020 at 12:00

Software components such as memory managers often use magic values to mark memory as having a certain state. These magic values have often (but not always) been chosen to coincide with addresses that fall outside of the user-land address space on 32-bit versions of the Operating System. This ensures that if a vulnerability in the software allows an attacker to get the code to use such a value as a pointer, this results in an access violation. However, on 64-bit architectures the entire 32-bit address space can be used for user-land allocations, allowing an attacker to allocate memory at all the addresses commonly used as magic values and exploit such a vulnerability.

VBScript RegExpComp::PnodeParse out-of-bounds read

5 April 2023 at 19:10

(The fix and CVE number for this bug are not known)

A specially crafted script can cause the VBScript engine to read data beyond a memory block for use as a regular expression. An attacker that is able to run such a script in any application that embeds the VBScript engine may be able to disclose information stored after this memory block. This includes all versions of Microsoft Internet Explorer.

MS Edge CTreePosGap::PartitionPointers use-after-free (MemGC)

5 April 2023 at 19:10

A specially crafted Javascript inside an HTML page can trigger a use-after-free bug in the CTreePosGap::PartitionPointers function of edgehtml.dll in Microsoft Edge. This use-after-free bug is mitigated by MemGC by default: with MemGC enabled the memory is never actually freed. This mitigation is considered sufficient to make this a non-security issue as explained by Microsoft SWIAT in their blog post Triaging the exploitability of IE/Edge crashes.

Since this is not considered a security issue, I have the opportunity to share details about the issue with you before the issue has been fixed. And since Microsoft are unlikely to provide a fix for this issue on short notice, you should be able to reproduce this issue for some time after publication of this post. I will try to explain how I analyzed this issue using BugId and EdgeDbg, so that you can reproduce what I did and see for yourself.

MSIE 9-11 MSHTML PROPERTYDESC::HandleStyleComponentProperty out-of-bounds read

5 April 2023 at 19:10

(MS16-104, CVE-2016-3324)

A specially crafted web-page can cause Microsoft Internet Explorer 9-11 to assume a CSS value stored as a string can only be "true" or "false". To determine which of these two values it is, the code checks if the fifth character is an 'e' or a '\0'. An attacker that is able to set it to a smaller string can cause the code to read data out-of-bounds and is able to determine if a WCHAR value stored behind that string is '\0' or not.

MS Edge CDOMTextNode::get_data type confusion

5 April 2023 at 19:10

(MS16-002, CVE-2016-0003)

Specially crafted Javascript inside an HTML page can trigger a type confusion bug in Microsoft Edge that allows accessing a C++ object as if it was a BSTR string. This can result in information disclosure, such as allowing an attacker to determine the value of pointers to other objects and/or functions. This information can be used to bypass ASLR mitigations. It may also be possible to modify arbitrary memory and achieve remote code execution, but this was not investigated.

MS Edge Tree::ANode::IsInTree use-after-free (MemGC) & Abandonment

5 April 2023 at 19:10

A specially crafted Javascript inside an HTML page can trigger a use-after-free bug in Tree::ANode::IsInTree or a breakpoint in Abandonment::InduceAbandonment in Microsoft Edge. The use-after-free bug is mitigated by MemGC: if MemGC is enabled (which it is by default) the memory is never freed. This effectively prevents exploitation of the issue. The Abandonment appears to be triggered by a stack exhaustion bug; the Javascript creates a loop where an event handler triggers a new event, which in turn triggers the event handler, etc.. This consumes a stack space until there is no more stack available. Edge does appear to be able to handle such a situation gracefully under certain conditions, but not all. It is easy to avoid those conditions to force triggering the Abandonment.

The interesting thing is that this indicates that the assumption that "hitting Abandonment means a bug is not a security issue" may not be correct in all cases.

MSIE 11 garbage collector attribute type confusion

5 April 2023 at 19:10

(MS16-063, CVE-2016-0199)

With MS16-063 Microsoft has patched CVE-2016-0199: a memory corruption bug in the garbage collector of the JavaScript engine used in Internet Explorer 11. By exploiting this vulnerability, a website can causes this garbage collector to handle some data in memory as if it was an object, when in fact it contains data for another type of value, such as a string or number. The garbage collector code will use this data as a virtual function table (vftable) in order to make a virtual function call. An attacker has enough control over this data to allow execution of arbitrary code.

McAfee COVID-19 Report Reveals Pandemic Threat Evolution

22 July 2020 at 04:01

The McAfee Advanced Threat Research team today published the McAfee® Labs COVID-19 Threats Report, July 2020.

In this “Special Edition” threat report, we delve deep into the COVID-19 related attacks observed by our McAfee Advanced Threats Research and McAfee Labs teams in the first quarter of 2020 and the early months of the pandemic.

What started as a trickle of phishing campaigns and the occasional malicious app quickly turned to thousands of malicious URLs and more-than-capable threat actors leveraging our thirst for more information as an entry mechanism into systems across the world.

Thus far, the dominant themes of the 2020 threat landscape have been cybercriminal’s quick adaptation to exploit the pandemic and the considerable impact cyberattacks have had. For example, many ransomware attacks have escalated into data breaches as cybercriminals up the ante by leaking sensitive, often regulated, data, regardless of whether victims have paid the ransom.

Some of the other significant threat findings in our COVID-19 report include:

  • Average of 375 threats per minute in Q1 2020
  • Nearly 47% of all publicly disclosed security incidents took place in the United States
  • New PowerShell Malware increased drastically
  • Disclosed incidents largely targeted Public, Individual, and Education sectors

In a first, we also have made available a COVID-19 dashboard to complement this threat report and extend its impact beyond the publication date. Timeliness is a challenge for publishing any threat report, but through the development of MVISION Insights our threat reports will include a link to another live dashboard tracking the world’s top threats. We will also make available the IOCs, Yara rules, and mapping to the MITRE ATT&CK framework as part of our continuing commitment to sharing our actionable intelligence. I hope these McAfee resources will be useful to you, the reader.

As we head into the second half of the year, we must consider how the threat landscape has changed when we address and define each attack. Simply assigning a technical descriptor or reverting to the same attack classifications fail to communicate the impact such campaigns have on the broader society.

All too often, we are called into investigations where businesses have been halted, or victims have lost considerable sums of money. While we all have had to contend with pandemic lockdown, criminals of all manner of capability have had a field day.

We hope you enjoy these new threat report approaches, and moreover we would appreciate you sharing these findings far and wide. These tools and insights could be the difference between a business remaining operational or having to shut its doors at a time when we have enough challenges to contend with.


The post McAfee COVID-19 Report Reveals Pandemic Threat Evolution appeared first on McAfee Blog.

Hunting for Blues – the WSL Plan 9 Protocol BSOD

23 July 2020 at 14:53

Windows Subsystem for Linux Plan 9 Protocol Research Overview

This is the final blog in the McAfee research series trilogy on the Windows Subsystem for Linux (WSL) implementation – see The Twin Journey (part 1) and Knock, Knock–Who’s There (part 2). The previous research discussed file evasion attacks when the Microsoft P9 server can be hijacked with a malicious P9 (Plan 9 File System Protocol) server. Since Windows 10 version 1903, it is possible to access Linux files from Windows by using the P9 protocol. The Windows 10 operating system comes with the P9 server as part of the WSL install so that it can communicate with a Linux filesystem. In this research we explore the P9 protocol implementation within the Windows kernel and whether we could execute code in it from a malicious P9 server. We created a malicious P9 server by hijacking the Microsoft P9 server and replacing it with code we can control.

In a typical attack scenario, we discovered that if WSL is enabled on Windows 10, then a non-privileged local attacker can hijack the WSL P9 communication channel to cause a local Denial of Service (DoS) or Blue Screen of Death (BSOD) in the Windows kernel. It is not possible to achieve escalation of privilege (EoP) within the Windows kernel due to this vulnerability; the BSOD appears to be as designed by Microsoft within their legitimate fail flow, if malformed P9 server communication packets are received by the Windows kernel. A non-privileged user should not be able to BSOD the Windows kernel, from a local or remote perspective. If WSL is not enabled (disabled by default on Windows 10), the attack can still be executed but requires the attacker to be a privileged user to enable WSL as a pre-requisite.

There have recently been some critical, wormable protocol vulnerabilities within the RDP and SMB protocols in the form of Bluekeep and SMBGhost. Remotely exploitable vulnerabilities are very high risk if they are wormable as they can spread across systems without any user interaction. Local vulnerabilities are lower risk since an attacker must first have a presence on the system; in this case they must have a malicious P9 server executing. The P9 protocol implementation runs locally within the Windows kernel so the objective, as with most local vulnerability hunting, is to find a vulnerability that allows an escalation of privilege (EoP).

In this blog we do a deep dive into the protocol implementation and vulnerability hunting process. There is no risk to WSL users from this research, which has been shared with and validated by Microsoft. We hope this research will help improve understanding of the WSL P9 communications stack and that additional research would be more fruitful further up the stack.

There have been some exploits on WSL such as here and here but there appears to be no documented research of the P9 protocol implementation other than this.

P9 Protocol Overview

The Plan 9 File System Protocol server allows a client to navigate its file system to create, remove, read and write files. The client sends requests (T-messages) to the server and the server responds with R-messages. The P9 protocol has a header consisting of size, type and tag fields which is followed by a message type field depending on the request from the client. The R-message type sent by the server must match the T-message type initiated from the client. The maximum connection size for the data transfer is decided by the client during connection setup; in our analysis below, it is 0x10000 bytes.

P9 protocol header followed by message type union (we have only included the subset of P9 message types which are of interest for vulnerability research):

struct P9Packet {

u32                         size;

u8                           type;

u16                         tag;

union {

struct p9_rversion rversion;

struct p9_rread rread;

struct p9_rreaddir rreaddir;

struct p9_rwalk rwalk;

} u

} P9Packet

The P9 T-message and corresponding R-message numbers for the types we are interested in (the R-message is always T-message+1):

enum p9_msg_t {

P9_TREADDIR = 40,

P9_RREADDIR = 41,

P9_TVERSION = 100,

P9_RVERSION = 101,

P9_TWALK = 110,

P9_RWALK = 111,

P9_TREAD = 116,

P9_RREAD = 117,

}

At the message type layer, which follows the P9 protocol header, you can see the fields, which are of variable size, highlighted below:

struct p9_rwalk {

u16 nwqid;

struct p9_qid wqids[P9_MAXWELEM];

}


struct p9_rread {

u32 count;

u8 *data;

}


struct p9_rreaddir {

u32 count;

u8 *data;

}


struct p9_rversion {

u32 msize;

struct p9_str version;

}


struct p9_str {

u16 len;

char *str;

}

Based on the packet structure of the P9 protocol we need to hunt for message type confusion and memory corruption vulnerabilities such as out of bounds read/write.

So, what will a packet structure look like in memory? Figure 1 shows the protocol header and message type memory layout from WinDbg. The message size (msize) is negotiated to 0x10000 and the version string is “9P2000.W”.

Figure 1. P9 packet for rversion message type

Windows WSL P9 Communication Stack and Data Structures

Figure 2. Windows Plan 9 File System Protocol Implementation within WSL

The p9rdr.sys network mini-redirector driver registers the “\\Device\\P9Rdr” device with the Redirected Drive Buffering Subsystem (RDBSS) using the RxRegisterMinirdr API as part of the p9rdr DriverEntry routine. During this registration, the following P9 APIs or driver routines are exposed to the RDBSS:

P9NotImplemented

P9Start

P9Stop

P9DevFcbXXXControlFile

P9CreateSrvCall

P9CreateVNetRoot

P9ExtractNetRootName

P9FinalizeSrvCall

P9FinalizeVNetRoot

P9Create

P9CheckForCollapsibleOpen

P9CleanupFobx

P9CloseSrvOpen

P9ForceClosed

P9ExtendFile

P9Flush

P9QueryDirectoryInfo

P9QueryVolumeInfo

P9QueryFileInfo

P9SetFileInfo

P9IsValidDirectory

P9Read

P9Write

The p9rdr driver is not directly accessible from user mode using the DeviceIoControl API and all calls must go through the RDBSS.

As seen in Figure 2, when a user navigates to the WSL share at “\\wsl$” from Explorer, the RDBSS driver calls into the P9 driver through the previously registered APIs.

DIOD is a file server implementation, that we modified to be a “malicious” P9 server, where we claim the “fsserver” socket name prior to the Windows OS in a form of squatting attack. Once we replaced the Microsoft P9 server with the DIOD server, we modified the “np_req_respond” function (explained in the fuzzing constraints section) so that we could control P9 packets to send malicious responses to the Windows kernel. Our malicious P9 server and socket hijacking have been explained in detail here.

So now we know how data travels from Explorer to the P9 driver but how does the P9 driver communicate with the malicious P9 server? They communicate over AF_UNIX sockets.

There are two important data structures used for controlling data flow within the P9 driver called P9Client and P9Exchange.

The P9Client and P9Exchange data structures, when reverse engineered to the fields relevant to this research, look like the following (fields not relevant to this analysis have been labelled as UINT64 for alignment):

typedef struct P9Client {
PVOID * WskTransport_vftable
PVOID * GlobalDevice
UNINT64 RunRef
WskSocket *WskData
UINT64
UINT64
UINT_PTR
PVOID *MidExchangeMgr_vftable
PRDBSS_DEVICE_OBJECT *RDBSS
UINT64
PVOID **WskTransport_vftable
PVOID **MidExchangeMgr_vftable
P9Packet *P9PacketStart
UINT64 MaxConnectionSize
UINT64 Rmessage_size
P9Packet *P9PacketEnd
UINT_PTR
UINT64
UINT64
UINT_PTR
UINT64
UINT64
PVOID * Session_ReconnectCallback
PVOID ** WskTransport_vftable
UINT64
UINT_PTR
UINT_PTR
UINT64
UINT_PTR
UINT64
UINT64
UINT64
} P9Client

P9Client data structure memory layout in WinDbg:

typedef struct P9Exchange {
UINT64
UINT64
P9Client *P9Client
UINT64 Tmessage_type
UINT64
UINT_PTR
PVOID *Lambda_PTR1
PVOID *Lambda_PTR2
PRX_CONTEXT *RxContextUINT64 Tmessage_size
UINT64
UINT64
UINT64
UINT64
UINT64
UINT64
} P9Exchange

The P9Exchange data structure layout in WinDbg:

To communicate with the P9 server, the P9 driver creates an I/O request packet (IRP) to receive data from the Winsock Kernel (WSK). An important point to note is that the Memory Descriptor List (MDL) used to hold the data passed between the P9 server and Windows kernel P9 client is 0x10000 bytes (the max connection size mentioned earlier).

virtual long WskTransport::Receive(){

UNINT64 MaxConnectionSize = 0x10000;

P9_IRP_OBJECT = RxCeAllocateIrpWithMDL(2, 0, 0i64);

P9_MDL = IoAllocateMdl(P9Client->P9PacketStart, MaxConnectionSize, 0, 0, 0i64);
void MmBuildMdlForNonPagedPool(P9_MDL);
P9_IRP_OBJECT->IoStackLocation->Parameters->MDL = &P9_MDL;

P9_IRP_OBJECT->IoStackLocation->Parameters->P9Client = &P9Client;

P9_IRP_OBJECT->IoStackLocation->Parameters->DataPath = &P9Client::ReceiveCallback;
P9_IRP_OBJECT->IoStackLocation->CompletionRoutine = p9fs::WskTransport::SendReceiveComplete
WskProAPIReceive (*WskSocket, *P9_MDL, 0, *P9_IRP_OBJECT);
}

The MDL is mapped to the P9PacketStart field address within the P9Client data structure.

On IRP completion, the WskTransport::SendReceiveComplete completion routine is called to retrieve the P9Client structure from the IRP to process the P9 packet response from the server:

int static WskTransport::SendreceiveComplete(IRP *P9_IRP_OBJECT){

P9Client = &P9_IRP_OBJECT->IoStackLocation->Parameters->P9Client;

P9Client::ReceiveCallback(P9Client* P9Client);

}

The P9Client data structure is used within an IRP to receive the R-message data but what is the purpose of the P9Exchange data structure?

  1. When the P9 driver sends a T-message to the server, it must create an exchange so that it can track the state between the message type sent (T-message) and that returned by the server (R-Message).
  2. It contains lambda functions to execute on the specific message type. The Tmessage_type field within the P9Exchange data structure ensures that the server can only send R-messages to the same T-message type it received from the P9 driver.
  3. PRX_CONTEXT * RxContext structure is used to transfer data between Explorer and the p9rdr driver via the RDBSS driver.

The flow of a WALK T-message can be seen below:

Within the P9Client::CreateExchange function, the MidExchangeManager::RegisterExchange is responsible for registering the P9Exchange data structure with the RDBSS using a multiplex ID (MID) to distinguish between concurrent server and client requests.

MidExchangeManager::RegisterExchange (*P9Client, *P9Exchange){

NTSTATUS RxAssociateContextWithMid (PRX_MID_ATLAS P9Client->RDBSS, PVOID P9Exchange, PUSHORT NewMid);

}

The important fields within the P9Client and P9Exchange data structures which we will discuss further during the analysis:

  1. PClient->MaxConnectionSize – set at the start of the connection and cannot be controlled by an attacker
  2. P9Client->P9PacketStart – points to P9 packet received and can be fully controlled by an attacker
  3. P9Client->Rmessage_size –can be fully controlled by an attacker
  4. P9Exchange->Tmessage_type – set during T-message creation and cannot be controlled by an attacker
  5. P9Exchange->RxContext – used to pass data from P9 driver through the RDBSS to Explorer

Now that we know how the protocol works within the Windows kernel, the next stage is vulnerability hunting.

Windows Kernel P9 Server Vulnerability Hunting

P9 Packet Processing Logic

From a vulnerability perspective we want to audit the Windows kernel logic within p9rdr.sys, responsible for parsing traffic from the malicious P9 server. Figure 3 shows the source of the P9 packet and the sink, or where the packet processing completes within the p9rdr driver.

Figure 3. Windows Kernel Processing layers for the P9 protocol malicious server response parsing

Now that we have identified the code for parsing the P9 protocol message types of interest we need to audit the code for message type confusion and memory corruption vulnerabilities such as out of bounds read/write and overflows.

Fuzzing constraints

There were a number of constraints which made deploying automated fuzzing logic difficult:

  1. The R-message type sent from the malicious P9 server must match the T-message type sent by the Windows kernel
  2. Timeouts in higher layers of the WSL stack

The above challenges could, however, be overcome but since the protocol is relatively simple we decided to focus on reversing the processing logic validation. To verify the processing logic validation, we created some manual fuzzing capability within the malicious P9 server to test the variable length packet field boundaries identified from the protocol overview.

Below is an example RREAD R-message type which sends a malicious P9 packet in response to an RREAD T-message where we control the count and data variable length fields.

srv.c

void

np_req_respond(Npreq *req, Npfcall *rc)

{

NP_ASSERT (rc != NULL);

xpthread_mutex_lock(&req->lock);


u32 count = 0xFFFFFFFF;

Npfcall *fake_rc;

u8 *data = malloc(0xFFF0);

memset(data, “A”, 0xFFF0);


if (!(fake_rc = np_alloc_rread1(count)))

return NULL;

if (fake_rc->u.rread.data)

memmove(fake_rc->u.rread.data, data, count);


if(rc->type == 0x75){

fprintf (stderr, “RREAD Packet Reply”);

req->rcall = fake_rc;

}

else{

req->rcall =rc;

}

if (req->state == REQ_NORMAL) {

np_set_tag(req->rcall, req->tag);

np_conn_respond(req);

}

xpthread_mutex_unlock(&req->lock);

}

Validation Checks

The data passed to the P9 driver is contained within a connection memory allocation of 0x10000 bytes (P9Client->P9PacketStart) and most of the processing is done within this memory allocation, with two exceptions where memmove is called within the P9Client::FillData and P9Client::Lambda_2275 functions (discussed below).

A message-type confusion attack is not possible since the P9Exchange data structure tracks the R-message to its corresponding T-message type.

In addition, the P9 driver uses a span reader to process message type fields of static length. The P9Exchange structure stores the message type which is used to determine the number of fields within a message during processing.

While we can control the P9 packet size we cannot control the P9Client->MaxConnectionSize which means messages greater than or equal to 0x10000 will be dropped.

All variable size field checks within the message type layer of the protocol are checked against the P9Packet size field ensuring that a malicious field will not result in out of bounds read or write access outside of the 0x10000 connection memory allocation.

The processing logic functions identified previously were reverse engineered to understand the validation on the protocol’s fields, with specific focus on the variable length fields within message types rversion, rwalk and rread.

By importing the P9Client and P9Exchange data structures into IDA Pro, the reverse engineering process relatively straight forward to understand the packet validation logic. The functions below have been reversed to the level required for understanding the validation and are not representative of the entire function code base.

P9Client::ReceiveCallback validates that the Rmessage_size does not exceed the max connection size of 0x10000

void P9Client::ReceiveCallback ( P9Client *P9Client){
struct p9packet;uint64 MaxConnectionSize;uint64 Rmessage_size;MaxConnectionSize = P9Client-> MaxConnectionSize;
Rmessage_size = P9Client->Rmessage_size;if(MaxConnectionSize) {
P9Packet = (struct p9packet *) P9Client-> P9PacketStart;if (MaxConnectionSize < 0 || !P9Packet) terminate(P9Packet);}if (Rmessage_size >=0 && P9Client->MaxConnectionSize >= Rmessage_size)
{
P9Client::HandleReply (*P9Client)
} else{

terminate(P9Packet);

}

P9Client::HandleReply – there are multiple local DoS here which result in a Blue Screen Of Death (BSOD) depending on the size of P9Client->Rmessage_size and P9Client->P9PacketEnd->size, e.g. when P9Client->P9PacketEnd->size is zero terminate() is called which is BSOD.

void P9Client::HandleReply(P9Client *P9Client){

uint64 P9PacketHeaderSize = 7;

uint64 Rmessage_size = P9Client->Rmessage_size;

if (Rmessage_size >=7){
while(1){

P9PacketEnd = P9Client->P9PacketEnd;

if(!P9PacketEnd) break;

uint64 P9PacketSize = P9Client->P9PacketEnd->size;
if (P9PacketSize > P9Client->MaxConnectionSize); HandleIoError();

if (Rmessage_size < P9PacketSize); P9Client::FillData();

if(Rmessage_size < 4) terminate(); // checking a P9 header size field exists in packet

if(Rmessage_size > 5) fastfail(); // checking a P9 header type field exists in packet

int message_type = P9PacketEnd->type;

if(Rmessage_size < 7) fastfail(); // checking a P9 header tag field exists in packet

uint64 tag = P9PacketEnd->tag;

uint64 P9message_size = P9PacketSize – P9PacketHeaderSize; //getting size of message

if (Rmessage_size – 7 < 0) terminate(); // checking message layer exists after P9 header

if (Rmessage_size – 7 < P9message_size); terminate();  //BSOD here as when set P9PacketSize = 0 then subtracting 7 wraps around so P9message_size becomes greater than Rmessage_size.

void P9Client::ProcessReply(P9Client *P9Client, Rmessage_type, tag, &P9message_size);

}

}

else {

P9Client::FillData();

}

P9Client::FillData – we cannot reach this function with a large Rmessage_size to force an out of bounds write.

int P9Client::FillData (P9Client *P9Client){
uint64 Rmessage_size = P9Client-> Rmessage_size;uint_ptr P9PacketEnd = P9Client->P9PacketEnd;
uint_ptr P9PacketStart = P9Client->P9PacketStart;if (P9PacketEnd != P9PacketStart) {
memmove (P9PacketStart, P9PacketEnd, Rmessage_size);
}

ProcessReply checks the R-message type with that from the T-message within the P9Exchange data structure.

void P9Client::ProcessReply(P9Client *P9Client, Rmessage_type, tag, &P9message_size){
P9Exchange *P9Exchange = MidExchangeManager::FindAndRemove(*P9Client, &P9Exchange);if (P9Packet->tag > 0) {
int message_type_size = GetMessageSize (P9Exchange->Tmessage_type);
if (P9message_size >= message_type_size) {int rmessage_type = P9Exchange->MessageType;int rmessage_type = rmessage_type +1;}
if(rmessage_type > 72){
Switch (MessageType){
case 100:
P9Client::ProcessVersionReply(P9Client *P9Client, P9Exchange, &P9message_size);
case 110:
P9Client::ProcessWalkreply(Rmessage_type, P9Exchange, &P9message_size);}
}else {
P9Client::ProcessReadReply(rmessage_type, P9Exchange, &P9message_size);
}}

During the P9Client::ProcessReply function it calls MidExchangeManager::FindAndRemove to fetch the P9Exchange data structure associated with the R-messages corresponding T-message.

MidExchangeManager::FindAndRemove (*P9Client, &P9Exchange){

NTSTATUS RxMapAndDissociateMidFromContext(PRX_MID_ATLAS P9Client->RDBSS_RxContext, USHORT Mid, &P9Exchange);

}

ProcessVersionReply checks the version sent by Client “P92000.L” which is 8 characters and checks the same length on return so the rversionlen does not affect the tryString function.

void P9Client::ProcessVersionReply (*P9Client, *P9Exchange, & P9message_size) {

char * rversion;
int rversionlen = 0;

rversion = P9Client->P9PacketStart.u.rversion->version->str;

rversionlen = P9Client->P9PacketStart.u.rversion->version->len;

tryString (messagesize, &rversion)

strcmp (Tversion, Rversion);
}

ProcessWalkReply checks that the total number of rwalk structures does not exceed the P9message_size

void P9Client::ProcessWalkReply(rmessage_type, *P9Exchange, &P9message_size){

uint16 nwqid = p9packet.rwalk.nwqid;

uint64 rwalkpacket_size = &P9message_size – 2; // 2 bytes of rwalk header for nwqid field

unit_ptr rwalkpacketstart = &P9Client->P9PacketStart.u.rwalk->wqids;
uint64 error_code = 0x0C0000186;
uint64 rwalk_message_size = nwqid * 13; // 0xd is size of an rwalk struct

if (rwalk_message_size <= P9message_size) {

P9Exchange->Lambda_8972 (int, nwqid, &rwalk_message_size, P9Exchange-> RxContext, & rwalkpacketstart); // Lambda_8972 is Lambda_PTR1 for rwalk message type

} else {

P9Exchange->P9Client::SyncContextErrorCallback (error_code, P9Exchange-> RxContext) // SyncContextErrorCallback is Lambda_PTR2 for rwalk message type

}
}

ProcessReadReply checks the size of the count field does not exceed 0x8000 and writes it into an MDL within P9Exchange-> RxContext to pass back up the RDBSS stack to view file contents within Explorer.

void P9Client::ProcessReadReply (rmessage_type, *P9Exchange, &P9message_size){
unint64 count = P9Client->P9PacketStart.u.rread->count;
P9Exchange->Lambda_2275 (count, P9Exchange-> RxContext, &P9message_size);}


Lambda_2275 (count, P9Exchange-> RxContext, &P9message_size) {

uint64 maxsize = P9Exchange-> RxContext+offset; //max_size = 0x8000

unint64 MDL = P9Exchange-> RxContext+offset;

if (count > maxsize) terminate();

memmove (&MDL, P9Client->P9PacketStart.u.rread->data, count);

}

Conclusion

Through this research, we discovered a local Denial of Service (DoS) within the Windows kernel implementation of the P9 protocol. As explained, the vulnerability cannot be exploited to gain code execution within the Windows kernel so there is no risk to users from this specific vulnerability. As a pre-requisite to malicious P9 server attacks, an attacker must hijack the P9 server socket “fsserver”. Therefore, we can mitigate this attack by detecting and preventing hijacking of the socket “fsserver”. McAfee MVISION Endpoint and EDR can detect and prevent coverage against P9 server socket “fsserver” hijacking which you can read more about here.

We hope this research provides insights into the following:

  1. The vulnerability hunting process for new features such as the WSL P9 protocol on the Windows 10 OS
  2. Provide support for future research higher up the WSL communications stack which increases in complexity due to the implementation of a virtual Linux file system on Windows
  3. The value of McAfee Advanced Threat Research (ATR) working closely with our product and innovation teams to provide protection for our customers

Finally, a special thanks to Leandro Costantino and Cedric Cochin for their initial Windows 10 WSL P9 server research.

The post Hunting for Blues – the WSL Plan 9 Protocol BSOD appeared first on McAfee Blog.

Six Hundred Million Reasons to Celebrate: No More Ransom Turns FOUR!!

27 July 2020 at 17:05

Happy Birthday! Today we mark the fourth anniversary of the NoMoreRansom initiative with over 4.2 million visitors, from 188 countries, stopping an estimated $632 million in ransom demands from ending up in criminals’ pockets. It would be fair to say that the initiative, which started in a small meeting room in the Hague, has been integral for so many in the perpetual fight against cybercriminals.

Powered by the contributions of its 163 partners the portal, which is available in 36 languages, has added 28 tools in the past year and can now decrypt 140 different types of ransomware infection. To think, just four years ago we started with only a handful of decryptors and partners. That speaks volumes to the commitment by all members to collaborate and work together to give victims a third option; #DontPay.

All this hard work took place in an ever-changing cybercriminal landscape; during those four years ransomware criminals shifted their tactics from “spray and pay”, mostly aimed at consumers, to highly organized crime groups actively seeking to paralyze complete organizations and extort them for astronomical amounts of money.

These challenges have not discouraged NoMoreRansom and its partners; on the contrary, having a strong public private partnership between Law Enforcement and the Private sector has proven essential in several (ongoing) investigations. Without a doubt, we will be the first to admit that fighting ransomware has not been easy but that should not stop us from doing things that are hard.

We are delighted to continue supporting this initiative and play our part in fighting this global problem. However, we have to stress that the fight against ransomware is far from over, in fact we need more collaborative initiatives to combat the rise in malicious activity.  Also, there are still many individuals and organizations that do not even know about NoMoreRansom. Even within the information security industry there are those who have not heard about the availability of free decryption tools.

Please share the message: #DontPay #NoMoreRansom

The post Six Hundred Million Reasons to Celebrate: No More Ransom Turns FOUR!! appeared first on McAfee Blog.

McAfee Defender’s Blog: Operation North Star Campaign

30 July 2020 at 04:01

Building Adaptable Security Architecture Against the Operation North Star Campaign

Operation North Star Overview

Over the last few months, we have seen attackers take advantage of the pandemic as a cover to launch cyberattacks. One such example is a campaign that McAfee Advanced Threat Research (ATR) observed as an increase in malicious cyber activity targeting the Aerospace & Defense industry. In this campaign McAfee ATR discovered a series of malicious documents containing job postings taken from leading defense contractors to be used as lures, in a very targeted fashion. This type of campaign has appeared before, in 2017 and 2019 using similar techniques, but the 2020 campaign has some distinct differences in implants, infrastructure and spear phishing lures. For a more detailed analysis of this campaign please see the McAfee ATR blog.

This blog is focused on how to build an adaptable security architecture to increase your resilience against these types of attacks and specifically, how McAfee’s portfolio delivers the capability to prevent, detect and respond against the tactics and techniques used in the Operation North Star campaign.

Gathering Intelligence on Operation North Star

As always, building adaptable defensive architecture starts with intelligence. In most organizations, the Security Operations team is responsible for threat intelligence analysis, as well as threat and incident response. McAfee Insights is a great tool for the threat intel analyst and threat responder. The Insights Dashboard identifies prevalence and severity of emerging threats across the globe which enables the Security Operations Center (SOC) to prioritize threat response actions and gather relevant cyber threat intelligence (CTI) associated with the threat, in this case the Operation North Star campaign. The CTI is provided in the form of technical Indicators of Compromise (IOCs) as well as MITRE ATT&CK framework tactics and techniques. As a threat intel analyst or responder, you can drill down to gather more specific information on Operation North Star, such as prevalence and links to other sources of information. You can further drill down to gather more specific actionable intelligence such as indicators of compromise and tactics/techniques aligned to the MITRE ATT&CK framework.

From the McAfee ATR blog, you can see that Operation North Star leverages tactics and techniques common to other APT campaigns, such as spear phishing for Initial Access, exploited system tools and signed binaries, modification of Registry Keys/Startup folder for persistence and encoded traffic for command and control.

Defensive Architecture Overview

Today’s digital enterprise is a hybrid environment of on-premise systems and cloud services with multiple entry points for attacks like Operation North Star. The work from home operating model forced by COVID-19 has only expanded the attack surface and increased risk for successful spear phishing attacks if organizations did not adapt their security posture and increase training for remote workers. Mitigating the risk of attacks like Operation North Star requires a security architecture with the right controls at the device, on the network and in security operations (sec ops). The Center for Internet Security (CIS) Top 20 Cyber Security Controls provides a good guide to build that architecture. The following outlines the key security controls needed at each layer of the architecture to protect your enterprise against Operation North Star tactics and techniques.

Initial Access Stage Defensive Overview

According to Threat Intelligence and Research, the initial access is performed either through vulnerability exploitation or spear phishing attachments. As attackers can quickly change spear phishing attachments or link locations, it is important to have layered defenses that include user awareness training and response procedures, intelligence and behavior-based malware defenses on email systems, web proxy and endpoint systems, and finally sec ops playbooks for early detection and response against suspicious email attachments or other phishing techniques The following chart summarizes the controls expected to have the most effect against initial stage techniques and the McAfee solutions to implement those controls where possible.

MITRE Tactic MITRE Techniques CSC Controls McAfee Capability
Initial Access Spear Phishing Attachments (T1566.001) CSC 7 – Email and Web Browser Protection

CSC 8 – Malware Defenses

CSC 17 – User Awareness

Endpoint Security Platform 10.7, Threat Prevention, Adaptive Threat Protection,

Web Gateway (MWG), Advanced Threat Defense, Web Gateway Cloud Service (WGCS)

Initial Access Spear Phishing Link (T1566.002) CSC 7 – Email and Web Browser Protection

CSC 8 – Malware Defenses

CSC 17 – User Awareness

Endpoint Security Platform 10.7, Threat Prevention, Adaptive Threat Protection,

Web Gateway (MWG), Advanced Threat Defense, Web Gateway Cloud Service (WGCS)

Initial Access Spear Phishing (T1566.003) Service CSC 7 – Email and Web Browser Protection

CSC 8 – Malware Defenses

CSC 17 – User Awareness

Endpoint Security Platform 10.7, Threat Prevention, Adaptive Threat Protection,

Web Gateway (MWG), Advanced Threat Defense, Web Gateway Cloud Service (WGCS)

For additional information on how McAfee can protect against suspicious email attachments, review this additional blog post.

https://www.mcafee.com/blogs/other-blogs/mcafee-labs/mcafee-protects-against-suspicious-email-attachments/

Exploitation Stage Defensive Overview

The exploitation stage is where the attacker gains access to the target system. Protection against Operation North Star at this stage is heavily dependent on adaptable anti-malware on both end user devices and servers, restriction of application execution, and security operations tools like endpoint detection and response sensors.

McAfee Endpoint Security 10.7 provides a defense in depth capability including signatures and threat intelligence to cover known bad indicators or programs, as well as machine-learning and behavior-based protection to reduce the attack surface against Operation North Star and detect new exploitation attack techniques. This attack leverages weaponized documents with links to external template files on a remote server. McAfee Threat Prevention and Adaptive Threat Protection modules protect against these techniques.

Additionally, MVISION EDR provides proactive detection capability on Execution and Defensive Evasion techniques identified in the exploit stage analysis. Please read further to see MVISION EDR in action against Operation North Star.

The following chart summarizes the critical security controls expected to have the most effect against exploitation stage techniques and the McAfee solutions to implement those controls where possible.

MITRE Tactic MITRE Techniques CSC Controls McAfee Portfolio Mitigation
Execution User Execution (T1204) CSC 5 Secure Configuration

CSC 8 Malware Defenses

CSC 17 Security Awareness

Endpoint Security Platform 10.7, Threat Prevention, Adaptive Threat Protection, Application Control (MAC), Web Gateway and Network Security Platform
Execution Command and Scripting Interpreter (T1059)


CSC 5 Secure Configuration

CSC 8 Malware Defenses

Endpoint Security Platform 10.7, Threat Prevention, Adaptive Threat Protection, Application Control (MAC), MVISION EDR
Execution Shared Modules (T1129) CSC 5 Secure Configuration

CSC 8 Malware Defenses

Endpoint Security Platform 10.7, Threat Prevention, Adaptive Threat Protection, Application Control (MAC)
Persistence Boot or Autologon Execution (T1547) CSC 5 Secure Configuration

CSC 8 Malware Defenses

Endpoint Security Platform 10.7 Threat Prevention, MVISION EDR
Defensive Evasion Template Injection (T1221) CSC 5 Secure Configuration

CSC 8 Malware Defenses

Endpoint Security Platform 10.7, Threat Prevention, Adaptive Threat Protection, MVISION EDR
Defensive Evasion Signed Binary Proxy Execution (T1218) CSC 4 Control Admin Privileges

CSC 5 Secure Configuration

CSC 8 Malware Defenses

Endpoint Security Platform 10.7, Threat Prevention, Adaptive Threat Protection, Application Control, MVISION EDR
Defensive Evasion Deobfuscate/Decode Files or Information (T1027)


CSC 5 Secure Configuration

CSC 8 Malware Defenses

Endpoint Security Platform 10.7, Threat Prevention, Adaptive Threat Protection, MVISION EDR

For more information on how McAfee Endpoint Security 10.7 can prevent some of the techniques used in the Operation North Star exploit stage, review this additional blog post.

https://www.mcafee.com/blogs/other-blogs/mcafee-labs/mcafee-amsi-integration-protects-against-malicious-scripts/

Impact Stage Defensive Overview

The impact stage is where the attacker encrypts the target system, data and perhaps moves laterally to other systems on the network. Protection at this stage is heavily dependent on adaptable anti-malware on both end user devices and servers, network controls and security operation’s capability to monitor logs for anomalies in privileged access or network traffic. The following chart summarizes the controls expected to have the most effect against impact stage techniques and the McAfee solutions to implement those controls where possible.

MITRE Tactic MITRE Techniques CSC Controls McAfee Portfolio Mitigation
Discovery Account Discovery (T1087) CSC 4 Control Use of Admin Privileges

CSC 5 Secure Configuration

CSC 6 Log Analysis

MVISION EDR, MVISION Cloud, Cloud Workload Protection
Discovery System Information Discovery (T1082) CSC 4 Control Use of Admin Privileges

CSC 5 Secure Configuration

CSC 6 Log Analysis

MVISION EDR, MVISION Cloud, Cloud Workload Protection
Discovery System Owner/User Discovery (T1033) CSC 4 Control Use of Admin Privileges

CSC 5 Secure Configuration

CSC 6 Log Analysis

MVISION EDR, MVISION Cloud, Cloud Workload Protection
Command and Control Encrypted Channel (T1573) CSC 8 Malware Defenses

CSC 12 Boundary Defenses

Web Gateway, Network Security Platform

Hunting for Operation North Star Indicators

As a threat intel analyst or hunter, you might want to quickly scan your systems for any indicators you received on Operation North Star. Of course, you can do that manually by downloading a list of indicators and searching with available tools. However, if you have MVISION EDR and Insights, you can do that right from the console, saving precious time. Hunting the attacker can be a game of inches so every second counts. Of course, if you found infected systems or systems with indicators, you can take action to contain and start an investigation for incident response immediately from the MVISION EDR console.

Proactively Detecting Operation North Star Techniques

Many of the exploit stage techniques in this attack use legitimate Windows processes and applications to either exploit or avoid detection. We demonstrated above how the Endpoint Protection Platform can disrupt the weaponized documents but, by using MVISION EDR, you can get more visibility. As security analysts, we want to focus on suspicious techniques used by winword.exe as this attack leverages weaponized documents. On MVISION EDR we got the first threat detection on the monitoring dashboard for WINWORD.EXE at a Medium Risk.

The dashboard also provides a detailed look at the process activity which, in this case, is the attempt to perform the template injection.


We also received 2 alerts due to the rundll32 usage:

1)            Loaded non-common file with specified parameters via rundll32 utility

2)            Suspicious process would have been cleaned by Endpoint Protection (in observe mode)

Monitoring or Reporting on Operation North Star Events

Events from McAfee Endpoint Protection and Web Gateway play a key role in Lazarus incident and threat response. McAfee ePO centralizes event collection from all managed endpoint systems. As a threat responder, you may want to create a dashboard for Lazarus-related threat events to understand current exposure. Here is a list (not exhaustive) of Lazarus-related threat events as reported by McAfee Endpoint Protection Platform (Threat Prevention module), with On-Access Scan and Global Threat Intelligence enabled, and McAfee Web Gateway with Global Threat Intelligence enabled as well.

McAfee Endpoint Threat Prevention Events
Generic Trojan.dz Generic Dropper.aou
RDN/Generic PWS.y W97M/Downloader.cxz
Trojan-FRVP!2373982CDABA Trojan-FRVP!AF83AD63D2E3
Generic Dropper.aou W97M/Downloader.bjp
Trojan-FSGY!3C6009D4D7B2 W97M/MacroLess.y
Trojan-FRVP!CEE70135CBB1 Artemis!9FD35BAD075C
W97M/Downloader.cxu RDN/Generic.dx
Trojan-FRVP!63178C414AF9 Artemis!0493F4062899
Exploit-cve2017-0199.ch Artemis!25B37C971FD7


McAfee Web Gateway Events
Generic Trojan.dz W97M/Downloader.cxz
RDN/Generic PWS.y BehavesLike.Downloader.dc
Trojan-FRVP!2373982CDABA W97M/MacroLess.y
Trojan-FSGY!3C6009D4D7B2 BehavesLike.Win32.Dropper.hc
BehavesLike.Downloader.dc Artemis
BehavesLike.Downloader.tc

Summary

To defeat targeted threat campaigns, defenders must collaborate internally and externally to build an adaptive security architecture which will make it harder for threat actors to succeed and build resilience in the business. This blog highlights how to use McAfee’s security solutions to prevent, detect and respond to Operation North Star and attackers using similar techniques.

McAfee ATR is actively monitoring this campaign and will continue to update McAfee Insights and its social networking channels with new and current information. Want to stay ahead of the adversaries? Check out McAfee Insights for more information.

The post McAfee Defender’s Blog: Operation North Star Campaign appeared first on McAfee Blog.

Operation (노스 스타) North Star A Job Offer That’s Too Good to be True?

30 July 2020 at 04:14

Executive Summary

We are in the midst of an economic slump [1], with more candidates than there are jobs, something that has been leveraged by malicious actors to lure unwitting victims into opening documents laden with malware. While the prevalence of attacks during this unprecedented time has been largely carried out by low-level fraudsters, the more capable threat actors have also used this crisis as an opportunity to hide in plain sight.

One such example is a campaign that McAfee Advanced Threat Research (ATR) observed as an increase in malicious cyber activity targeting the Aerospace & Defense industry. In this 2020 campaign McAfee ATR discovered a series of malicious documents containing job postings taken from leading defense contractors to be used as lures, in a very targeted fashion. These malicious documents were intended to be sent to victims in order to install a data gathering implant. The victimology of these campaigns is not clear at this time, however based on the job descriptions, they appear to be targeting people with skills and experience relating to the content in the lure documents. The campaign appears to be similar to activity reported elsewhere by the industry, however upon further analysis the implants and lure documents in this campaign are distinctly different [2], thus we can conclude this research is part of a different activity set. This campaign is utilizing compromised infrastructure from multiple European countries to host its command and control infrastructure and distribute implants to the victims it targets.

This type of campaign has appeared before in 2017 and 2019 using similar methods with the goal of gathering intelligence surrounding key military and defense technologies [3]. The 2017 campaign also used lure documents with job postings from leading defense contractors; this operation was targeting individuals employed by defense contractors used in the lures. Based on some of the insight gained from spear phishing emails, the mission of that campaign was to gather data around certain projects being developed by their employers.

The Techniques, Tactics and Procedures (TTPs) of the 2020 activity are very similar to those previous campaigns operating under the same modus operandi that we observed in 2017 and 2019. From our analysis, this appears a continuation of the 2019 campaign, given numerous similarities observed. These similarities are present in both the Visual Basic code used to execute the implant and some of the core functionality that exists between the 2019 and 2020 implants.

Thus, the indicators from the 2020 campaign point to previous activity from 2017 and 2019 that was previously attributed to the threat actor group known as Hidden Cobra [4]. Hidden Cobra is an umbrella term used to refer to threat groups attributed to North Korea by the U.S Government [1]. Hidden Cobra consists of threat activity from groups the industry labels as Lazarus, Kimsuky, KONNI and APT37. The cyber offensive programs attributed to these groups, targeting organizations around the world, have been documented for years. Their goals have ranged from gathering data around military technologies to crypto currency theft from leading exchanges.

Our analysis indicates that one of the purposes of the activity in 2020 was to install data gathering implants on victims’ machines. These DLL implants were intended to gather basic information from the victims’ machines with the purpose of victim identification. The data collected from the target machine could be useful in classifying the value of the target. McAfee ATR noticed several different types of implants were used by the adversary in the 2020 campaigns.

These campaigns impact the security of South Korea and foreign nations with malicious cyber campaigns. In this blog McAfee ATR analyzes multiple campaigns conducted in the first part of 2020.

Finally, we see the adversary expanding the false job recruitment campaign to other sectors outside of defense and aerospace, such as a document masquerading as a finance position for a leading animation studio.

In this blog we will cover:

Target of Interest – Defense & Aerospace Campaign

This is not the first time that we have observed threat actors using the defense and aerospace industry as lures in malicious documents. In 2017 and 2019, there were efforts to send malicious documents to targets that contained job postings for positions at leading defense contractors3

The objective of these campaigns was to gather information on specific programs and technologies. Like the 2017 campaign, the 2020 campaign also utilized legitimate job postings from several leading defense and aerospace organizations. In the 2020 campaign that McAfee ATR observed, some of the same defense contractors from the 2017 operation were again used as lures in malicious documents.

This new activity noted in 2020 uses similar Techniques, Tactics and Procedures (TTPs) to those seen in a 2017 campaign that targeted individuals in the Defense Industrial Base (DIB). The 2017 activity was included in an indictment by the US government and attributed to the Hidden Cobra threat group4

Attack Overview


Phase One: Initial Contact

This recent campaign used malicious documents to install malware on the targeted system using a template injection attack. This technique allows a weaponized document to download an external Word template containing macros that will be executed. This is a known trick used to bypass static malicious document analysis, as well as detection, as the macros are embedded in the downloaded template.

Further, these malicious Word documents contained content related to legitimate jobs at these leading defense contractors. All three organizations have active defense contracts of varying size and scope with the US government.

The timeline for these documents, that were sent to an unknown number of targets, ran between 31 March and 18 May 2020.

Document creation timeline

Malign documents were the main entry point for introducing malicious code into the victim’s environment. These documents contained job descriptions from defense, aerospace and other sectors as a lure. The objective would be to send these documents to a victim’s email with the intention they open, view and ultimately execute the payload.

As we mentioned, the adversary used a technique called template injection. When a document contains the .docx extension, in our case, it means that we are dealing with the Open Office XML standard. A .docx file is a zip file containing multiple parts. Using the template injection technique, the adversary puts a link towards the template file in one of the .XML files, for example the link is in settings.xml.rels while the external oleobject load is in document.xml.rels. The link will load a template file (DOTM) from a remote server. This is a clever technique we observe being used by multiple adversaries [5] and is intended to make a document appear to be clean initially, only to subsequently load malware. Some of these template files are renamed as JPEG files when hosted on a remote server to avoid any suspicion and bypass detection. These template files contain Visual Basic macro code, that will load a DLL implant onto the victim’s system. Current McAfee technologies currently protect against this threat.

We mentioned earlier that docx files (like xlsx and pptx) are part of the OOXML standard. The document defining this standard[6], describes the syntax and values that can be used as an  example. An interesting file to look at is the ‘settings.xml’ file that can be discovered in the ‘Word’ container of the docx zip file. This file contains settings with regards to language, markup and more. First, we extracted all the data from the settings.xml files and started to compare. All the documents below contained the same language values:

w:val=”en-US”
w:eastAsia=”ko-KR”

The XML file ends with a GUID value that starts with the value “w15”.

Example: w15:val=”{932E534D-8C12-4996-B261-816995D50C69}”/></w:settings>

According to the Microsoft documentation, w15 defines the PersistentDocumentId Class. When the object is serialized out as xml, its qualified name is w15:docId. The 128-bit GUID is set as an ST_Guid attribute which, according to the Microsoft documentation, refers to a unique token. The used class generates a GUID for use as the DocID and generates the associated key. The client stores the GUID in that structure and persists in the doc file. If, for example, we would create a document and would “Save As”, the w15:docId GUID would persist across to the newly created document. What would that mean for our list above? Documents with the same GUID value need to be placed in chronological order and then we can state the earliest document is the root for the rest, for example:

What we can say from above table is that ‘_IFG_536R.docx” was the first document we observed and that later documents with the same docID value were created from the same base document.

To add to this assertion; in the settings.xml file the value “rsid” (Revision Identifier for Style Definition) can be found. According to Microsoft’s documentation: “This element specifies a unique four-digit number which shall be used to determine the editing session in which this style definition was last modified. This value shall follow this following constraint: All document elements which specify the same rsid* values shall correspond to changes made during the same editing session. An editing session is defined as the period of editing which takes place between any two subsequent save actions.”

Let’s start with the rsid element values from “*_IFG_536R.docx”:

And compare with the rsid element values from “*_PMS.docx”:

The rsid elements are identical for the first four editing sessions for both documents. This indicates that these documents, although they are now separate, originated from the same document.

Digging into more values and metadata (we are aware they can be manipulated), we created the following overview in chronological order based on the creation date:

When we zoom in on the DocID “932E534d(..) we read the value of a template file in the XML code: “Single spaced (blank).dotx” – this template name seems to be used by multiple “Author” names. The revision number indicates the possible changes in the document.

Note: the documents in the table with “No DocID” were the “dotm” files containing the macros/payload.

All files were created with Word 2016 and had both the English and Korean languages installed. This analysis into the metadata indicates that there is a high confidence that the malicious documents were created from a common root document.

Document Templates

There were several documents flagged as non-malicious discovered during our investigation. At first glance they did not seem important or related at all, but deeper investigation revealed how they were connected. These documents played a role in building the final malicious documents that ultimately got sent to the victims. Further analysis of these documents, based on metadata information, indicated that they contained relationships to the primary documents created by the adversary.

Two PDF files (***_SPE_LEOS and ***_HPC_SE) with aerospace & defense industry themed images, created via the Microsoft Print to PDF service, were submitted along with ***_ECS_EPM.docx. The naming convention of these PDF files was very similar to the malicious documents used. The name includes abbreviations for positions at the defense contractor much like the malicious documents. The Microsoft Print to PDF service enables content from a Microsoft Word document be printed to PDF directly. In this case these two PDF files were generated from an original Microsoft Word document with the author ‘HOME’. The author ‘HOME’ appeared in multiple malicious documents containing job descriptions related to aerospace, defense and the entertainment industry. The PDFs were discovered in an archive file indicating that LinkedIn may have been a possible vector utilized by the adversaries to target victims. This is a similar vector as to what has been observed in a campaign reported by industry[7], however as mentioned earlier the research covered in this blog is part of a different activity set.

Metadata from PDF file submitted with ***_ECS_EPM.docx in archive with context fake LinkedIn

Visual Basic Macro Code

Digging into the remote template files reveals some additional insight concerning the structure of the macro code. The second stage remote document template files contain Visual Basic macro code designed to extract a double base64 encoded DLL implant. The content is all encoded in UserForm1 in the remote DOTM file that is extracted by the macro code.

Macro code (17.dotm) for extracting embedded DLL

Further, the code will also extract the embedded decoy document (a clean document containing the job description) to display to the victim.

Code (17.dotm) to extract clean decoy document

Macro code (******_dds_log.jpg) executed upon auto execution

Phase Two: Dropping Malicious DLLs

The adversary used malicious DLL files, delivered through stage 2 malicious documents, to spy on targets. Those malicious documents were designed to drop DLL implants on the victim’s machine to collect initial intelligence. In this campaign the adversary was utilizing patched SQL Lite DLLs to gather basic information from its targets. These DLLs were modified to include malicious code to be executed on the victim’s machine when they’re invoked under certain circumstances. The purpose of these DLLs is/was to gather machine information from infected victims that could be used to further identify more interesting targets.

The first stage document sent to targeted victims contained an embedded link that downloaded the remote document template.

Embedded link contained within Word/_rels/settings.xml.rels

The DOTM (Office template filetype) files are responsible for loading the patched DLLs onto the victim’s machine to collect and gather data. These DOTM files are created with DLL files  encoded directly into the structure of the file. These DOTM files exist on remote servers compromised by the adversary; the first stage document contains an embedded link that refers to the location of this file. When the victim opens the document, the remote DOTM file that contains a Visual Basic macro code to load malicious DLLs, is loaded. Based on our analysis, these DLLs were first seen on 20 April 2020 and, to our knowledge based on age and prevalence data, these implants have been customized for this attack.

The workflow of the attack can be represented by the following image:

To identify the malicious DLLs that will load or download the final implant, we extracted from the Office files found in the triage phase, the following DLL files:

SHA256 Original File name Compile Date
bff4d04caeaf8472283906765df34421d657bd631f5562c902e82a3a0177d114


wsuser.db 4/24/2020
b76b6bbda8703fa801898f843692ec1968e4b0c90dfae9764404c1a54abf650b


unknown 4/24/2020
37a3c01bb5eaf7ecbcfbfde1aab848956d782bb84445384c961edebe8d0e9969


onenote.db 4/01/2020
48b8486979973656a15ca902b7bb973ee5cde9a59e2f3da53c86102d48d7dad8 onenote.db 4/01/2020
 bff4d04caeaf8472283906765df34421d657bd631f5562c902e82a3a0177d114


wsuser.db 4/24/2020

These DLL files are patched versions from goodware libraries, like the SQLITE library found in our analysis, and are loaded via a VBScript contained within the DOTM files that loads a double Base64 encoded DLL as described in this analysis. The DLL is encoded in UserForm1 (contained within the Microsoft Word macro) and the primary macro code is responsible for extracting and decoded the DLL implant.

DOTM Document Structure

Implant DLLs encoded in UserForm1

From our analysis, we could verify how the DLLs used in the third stage were legitimate software with a malicious implant inside that would be enabled every time a specific function was called with a set of parameters.

Analyzing the sample statically, it was possible to extract the legitimate software used to store the implant, for example, one of the DLL files extracted from the DOTM files was a patched SQLITE library. If we compare the original library within the extracted DLL, we can spot lot of similarities across the two samples:

Legitimate library to the left, malicious library to the right

As mentioned, the patched DLL and the original SQLITE library share a lot of code:

Both DLLs share a lot of code internally

The first DLL stage needs certain parameters in order to be enabled and launched in the system. The macro code of the Office files we analyzed, contained part of these parameters:

Information found in the pcode of the document

The data found in the VBA macro had the following details:

  • 32-bit keys that mimic a Windows SID
    • The first parameter belongs to the decryption key used to start the malicious activity.
    • This could be chosen by the author to make the value more realistic
  • Campaign ID

DLL Workflow

The analysis of the DLL extracted from the ‘docm’ files (the 2nd stage of the infection) revealed  the existence of two types of operation for these DLLs:

DLL direct execution:

  • The DLL unpacks a new payload in the system.

Drive-by DLLs:

  • The DLL downloads a new DLL implant from a remote server delivering an additional DLL payload into the system.

For both methods, the implant starts collecting the target information and then contacts the command and control (C2) server

We focused our analysis into the DLLs files that are unpacked into the system.

Implant Analysis

The DLL implant will be executed after the user interacts by opening the Office file. As we explained, the p-code of the VBA macro contains parts of the parameters needed to execute the implant into the system.

The new DLL implant file will be unpacked (depending of the campaign ID) inside a folder inside the AppData folder of the user in execution:

C:\Users\user\AppData\Local\Microsoft\Notice\wsdts.db

The DLL file, must be launched with 5 different parameters if we want to observe the malicious connection within the C2 domain; in our analysis we observed how the DLL was launched with the following command line:

C:\Windows\System32\rundll32.exe “C:\Users\user\AppData\Local\Microsoft\Notice\wsdts.db”, sqlite3_steps S-6-81-3811-75432205-060098-6872 0 0 61 1

The required parameters to launch the malicious implant are:

Parameter number Description
1 Decryption key
2 Unused value, hardcoded in the DLL
3 Unused value, hardcoded in the DLL
4 Campaign identifier
5 Unused value, hardcoded in the DLL


As we explained, the implants are patched SQLITE files and that is why we could find additional functions that are used to launch the malicious implant, executing the binary with certain parameters. It is necessary to use a specific export ‘sqlite3_steps’ plus the parameters mentioned before.

Analyzing the code statically we could observe that the payload only checks 2 of these 5 parameters but all of them must be present in order to execute the implant:

sqlite malicious function

Phase Three: Network Evasion Techniques

Attackers are always trying to remain undetected in their intrusions which is why it is common to observe techniques such as mimicking the same User-Agent that is present in the system, in order to remain under the radar. Using the same User-Agent string from the victim’s web browser configurations, for example, will help avoid network-based detection systems from flagging outgoing traffic as suspicious. In this case, we observed how, through the use of the Windows API ObtainUserAgentString, the attacker obtained the User-Agent and used the value to connect to the command and control server:

If the implant cannot detect the User-Agent in the system, it will use the default Mozilla User-Agent instead:

Running the sample dynamically and intercepting the TLS traffic, we could see the connection to the command and control server:

Unfortunately, during our analysis, the C2 was not active which limited our ability for further analysis.

The data sent to the C2 channel contains the following information:

Parameter Description
C2 C2 configured for that campaign
ned Campaign identifier
key 1 AES key used to communicate with the C2
key 2 AES key used to communicate with the C2
sample identifier Sample identifier sent to the C2 server
gl Size value sent to the C2 server
hl Unknown parameter always set to 0

We could find at least 5 different campaign IDs in our analysis, which suggests that the analysis in this document is merely the tip of the iceberg:

Dotx file Campaign ID
61.dotm 0
17.dotm 17
43.dotm 43
83878C91171338902E0FE0FB97A8C47A.dotm 204
******_dds_log 100

Phase Four: Persistence

In our analysis we could observe how the adversary ensures persistence by delivering an LNK file into the startup folder

The value of this persistent LNK file is hardcoded inside every sample:

Dynamically, and through the Windows APIs NtCreateFile and NtWriteFile, the LNK is written in the startup folder. The LNK file contains the path to execute the DLL file with the required parameters.

Additional Lures: Relationship to 2020 Diplomatic and Political Campaign

Further investigation into the 2020 campaign activity revealed additional links indicating the adversary was using domestic South Korean politics as lures. The adversary created several documents in the Korean language using the same techniques as the ones seen in the defense industry lures. One notable document, with the title US-ROK Relations and Diplomatic Security in both Korean and English, appeared on 6 April 2020 with the document author JangSY.

US-ROK Relation and Diplomatic Security

The document was hosted on the file sharing site hxxps://web.opendrive.com/api/v1/download/file.json/MzBfMjA1Njc0ODhf?inline=0 and contained an embedded link referring to a remote DOTM file hosted on another file sharing site (od.lk). The BASE64 coded value MzBfMjA1Njc0ODhf is a unique identifier for the user associated with the file sharing platform od.lk.

A related document discovered with the title test.docx indicated that the adversary began testing these documents in early April 2020. This document contained the same content as the above but was designed to test the downloading of the remote template file by hosting it on a private IP address. The document that utilized pubmaterial.dotm for its remote template also made requests to the URL hxxp://saemaeul.mireene.com/skin/visit/basic/.

This domain (saemaeul.mireene.com) is connected to numerous other Korean language malicious documents that also appeared in 2020 including documents related to political or diplomatic relations. One such document (81249fe1b8869241374966335fd912c3e0e64827) was using the 21st National Assembly Election as part of the title, potentially indicating those interested in politics in South Korea were a target. For example, another document (16d421807502a0b2429160e0bd960fa57f37efc4) used the name of an individual, director Jae-chun Lee. It also shared the same metadata.

The original author of these documents was listed as Seong Jin Lee according to the embedded metadata information. However, the last modification author (Robot Karll) used by the adversary during document template creation is unique to this set of malicious documents. Further, these documents contain political lures pertaining to South Korean domestic policy that suggests that the targets of these documents also spoke Korean.

Relationship to 2019 Falsified Job Recruitment Campaign

A short-lived campaign from 2019 using India’s aerospace industry as a lure used what appears to be very similar methods to this latest campaign using the defense industry in 2020. Some of the TTPs from the 2020 campaign match that of the operation in late 2019. The activity from 2019 has also been attributed to Hidden Cobra by industry reporting.

The campaign from October 2019 also used aerospace and defense as a lure, using copies of legitimate jobs just like we observed with the 2020 campaign. However, this campaign was isolated to the Indian defense sector and from our knowledge did not expand beyond this. This document also contained a job posting for a leading aeronautics company in India; this company is focused on aerospace and defense systems. This targeting aligns with the 2020 operation and our analysis reveals that the DLLs used in this campaign were also modified SQL Lite DLLs.

Based on our analysis, several variants of the implant were created in the October 2019 timeframe, indicating the possibility of additional malicious documents.

Sha1 Compile Date File Name
f3847f5de342632f8f9e2901f16b7127472493ae 10/12/2019 MFC_dll.DLL
659c854bbdefe692ee8c52761e7a8c7ee35aa56c 10/12/2019 MFC_dll.DLL
35577959f79966b01f520e2f0283969155b8f8d7 10/12/2019 MFC_dll.DLL
975ae81997e6cd8c8a3901308d33c868f23e638f 10/12/2019 MFC_dll.DLL


One notable difference with the 2019 campaign is the main malicious document contained the implant payload, unlike the 2020 campaign that relied on the Microsoft Office remote template injection technique. Even though the technique is different, we did observe likenesses as we began to dissect the remote template document. There are some key similarities within the VBA code embedded in the documents. Below we see the 2019 (left) and 2020 (right) side-by-side comparison of two essential functions, that closely match each other, within the VBA code that extracts/drops/executes the payload.

VBA code of 13c47e19182454efa60890656244ee11c76b4904 (left) and acefc63a2ddbbf24157fc102c6a11d6f27cc777d (right)

The VBA macro drops the first payload of thumbnail.db at the filepath, which resembles the filepath used in 2020.

The VB code also passes the decryption key over to the DLL payload, thumbnail.db. Below you can see the code within thumbnail.db accepting those parameters.

Unpacked thumbnail.db bff1d06b9ef381166de55959d73ff93b

What is interesting is the structure in which this information is being passed over. This 2019 sample is identical to what we documented within the 2020 campaign.

Another resemblance discovered was the position of the .dll implant existing in the exact same location for both 2019 and 2020 samples; “o” field under “UserForms1”.

“o” field of 13c47e19182454efa60890656244ee11c76b4904

All 2020 .dotm IoCs contain the same .dll implant within the “o” field under “UserForms1”, however, to not overwhelm this write-up with separate screenshots, only one sample is depicted below. Here you can see the parallel between both 2019 and 2020 “o” sections.

“o” field of acefc63a2ddbbf24157fc102c6a11d6f27cc777d

Another similarity is the encoding of double base64, though in the spirit of competing hypothesis, we did want to note that other adversaries may also use this type of encoding. However, when you couple these similarities with the same lure of an Indian defense contractor, the pendulum starts to lean more to one side of a possible common author between both campaigns. This may indicate another technique being added to the adversary’s arsenal of attack vectors.

One method to keep the campaign dynamic and more difficult to detect is hosting implant code remotely. There is one disadvantage of embedding an implant within a document sent to a victim; the implant code could be detected before the document even reaches the victim’s inbox. Hosting it remotely enables the implant to be easily switched out with new capabilities without running the risk of the document being classified as malicious.

**-HAL-MANAGER.doc UserForm1 with double base64 encoded DLL

17.DOTM UserForm1 with double base64 encoded DLL from ******_DSS_SE.docx

According to a code similarity analysis, the implant embedded in **-HAL-Manager.doc contains some similarities to the implants from the 2020 campaign. However, we believe that the implant utilized in the 2019 campaign associated with **-Hal-Manager.doc may be another component. First, besides the evident similarities in the Visual Basic macro code and the method for encoding (double base64) there are some functional level similarities. The DLL file is run in a way with similar parameters.

DLL execution code **-Hal-Manager.doc implant

DLL execution code 2020 implant

Campaign Context: Victimology

The victimology is not exactly known due to the lack of spear phishing emails uncovered; however, we can obtain some insight from the analysis of telemetry information and lure document context. The lure documents contained job descriptions for engineering and project management positions in relationship to active defense contracts. The individuals receiving these documents in a targeted spear phishing campaign were likely to have an interest in the content within these lure documents, as we have observed in previous campaigns, as well as some knowledge or relationship to the defense industry.

Infrastructure Insights

Our analysis of the 2019 and 2020 campaigns reveals some interesting insight into the command and control infrastructure behind them, including domains hosted in Italy and the United States. During our investigation we observed a pattern of using legitimate domains to host command and control code. This is beneficial to the adversary as most organizations do not block trusted websites, which allows for the potential bypass of security controls. The adversary took the effort to compromise the domains prior to launching the actual campaign. Further, both 2019 and 2020 job recruitment campaigns shared the same command and control server hosted at elite4print.com.

The domain mireene.com with its various sub-domains have been used by Hidden Cobra in 2020. The domains identified to be used in various operations in 2020 falling under the domain mireene.com are:

  • saemaeul.mireene.com
  • orblog.mireene.com
  • sgmedia.mireene.com
  • vnext.mireene.com
  • nhpurumy.mireene.com
  • jmable.mireene.com
  • jmdesign.mireene.com
  • all200.mireene.com

Some of these campaigns use similar methods as the 2020 defense industry campaign:

  • Malicious document with the title European External Action Service [8]
  • Document with Korean language title 비건 미국무부 부장관 서신doc (U.S. Department of State Secretary of State Correspondence 20200302.doc).

Techniques, Tactics and Procedures (TTPS)

The TTPs of this campaign align with those of previous Hidden Cobra operations from 2017 using the same defense contractors as lures. The 2017 campaign also utilized malicious Microsoft Word documents containing job postings relating to certain technologies such as job descriptions for engineering and project management positions involving aerospace and military surveillance programs. These job descriptions are legitimate and taken directly from the defense contractor’s website. The exploitation method used in this campaign relies upon a remote Office template injection method, a technique that we have seen state actors use recently.

However, it is not uncommon to use tools such as EvilClippy to manipulate the behavior of Microsoft Office documents. For example, threat actors can use pre-built kits to manipulate clean documents and embed malicious elements; this saves time and effort. This method will generate a consistent format that can be used throughout campaigns. As a result, we have observed a consistency with how some of the malicious elements are embedded into the documents (i.e. double base64 encoded payload). Further mapping these techniques across the MITRE ATT&CK framework enables us to visualize different techniques the adversary used to exploit their victims.

MITRE ATT&CK mapping for malicious documents

These Microsoft Office templates are hosted on a command and control server and the downloaded link is embedded in the first stage malicious document.

The job postings from these lure documents are positions for work with specific US defense programs and groups:

  • F-22 Fighter Jet Program
  • Defense, Space and Security (DSS)
  • Photovoltaics for space solar cells
  • Aeronautics Integrated Fighter Group
  • Military aircraft modernization programs

Like previous operations, the adversary is using these lures to target individuals, likely posing as a recruiter or someone involved in recruitment. Some of the job postings we have observed:

  • Senior Design Engineer
  • System Engineer

Professional networks such as LinkedIn could be a place used to deliver these types of job descriptions.

Defensive Architecture Recommendations

Defeating the tactics, techniques and procedures utilized in this campaign requires a defense in depth security architecture that can prevent or detect the attack in the early stages. The key controls in this case would include the following:

  1. Threat Intelligence Research and Response Program. Its critical to keep up with the latest Adversary Campaigns targeting your specific vertical. A robust threat response process can then ensure that controls are adaptable to the TTPs and, in this case, create heightened awareness
  2. Security Awareness and Readiness Program. The attackers leveraged spear-phishing with well-crafted lures that would be very difficult to detect initially by protective technology. Well-trained and ready users, informed with the latest threat intelligence on adversary activity, are the first line of defense.
  3. End User Device Security. Adaptable endpoint security is critical to stopping this type of attack early, especially for users working from home and not behind the enterprise web proxy or other layered defensive capability. Stopping or detecting the first two stages of infection requires an endpoint security capability of identifying file-less malware, particularly malicious Office documents and persistence techniques that leverage start-up folder modification.
  4. Web Proxy. A secure web gateway is an essential part of enterprise security architecture and, in this scenario, can restrict access to malicious web sites and block access to the command and control sites.
  5. Sec Ops – Endpoint Detection and Response (EDR) can be used to detect techniques most likely in stages 1, 2 or 4. Additionally, EDR can be used to search for the initial documents and other indicators provided through threat analysis.

For further information on how McAfee Endpoint Protection and EDR can prevent or detect some of the techniques used in this campaign, especially use of malicious Office documents, please refer to these previous blogs and webinar:

https://www.mcafee.com/blogs/other-blogs/mcafee-labs/ens-10-7-rolls-back-the-curtain-on-ransomware/
https://www.mcafee.com/blogs/other-blogs/mcafee-labs/how-to-use-mcafee-atp-to-protect-against-emotet-lemonduck-and-powerminer/
https://www.mcafee.com/enterprise/en-us/forms/gated-form.html?docID=video-6157567326001

Indicators of Compromise

SHA256 File Name
322aa22163954ff3ff017014e357b756942a2a762f1c55455c83fd594e844fdd ******_DSS_SE.docx


a3eca35d14b0e020444186a5faaba5997994a47af08580521f808b1bb83d6063 ******_PMS.docx


d1e2a9367338d185ef477acc4d91ad45f5e6a7d11936c3eb4be463ae0b119185 ***_JD_2020.docx
ecbe46ca324096fd5e35729f39fa3bda9226bbefd6286d53e61b1be56a36de5b ***_2020_JD_SDE.docx
40fbac7a241bea412734134394ca81c0090698cf0689f2b67c54aa66b7e04670 83878C91171338902E0FE0FB97A8C47A.dotm
6a3446b8a47f0ab4f536015218b22653fff8b18c595fbc5b0c09d857eba7c7a1 ******_AERO_GS.docx
df5536c254a5d9ac626dbff7525de8301729807433d377db807ce3d8bc7c3ffe **_IFG_536R.docx
1b0c82e71a53300c969da61b085c8ce623202722cf3fa2d79160dac16642303f 43.dotm
d7ef8935437d61c975feb2bd826d018373df099047c33ad7305585774a272625 17.dotm
49724ee7a6baf421ac5a2a3c93d32e796e2a33d7d75bbfc02239fc9f4e3a41e0 Senior_Design_Engineer.docx


66e5371c3da7dc9a80fb4c0fabfa23a30d82650c434eec86a95b6e239eccab88 61.dotm
7933716892e0d6053057f5f2df0ccadf5b06dc739fea79ee533dd0cec98ca971 ******_spectrolab.docx
43b6b0af744124da5147aba81a98bc7188718d5d205acf929affab016407d592 ***_ECS_EPM.docx
70f66e3131cfbda4d2b82ce9325fed79e1b3c7186bdbb5478f8cbd49b965a120 ******_dds_log.jpg
adcdbec0b92da0a39377f5ab95ffe9b6da9682faaa210abcaaa5bd51c827a9e1 21 국회의원 선거 관련.docx
dbbdcc944c4bf4baea92d1c1108e055a7ba119e97ed97f7459278f1491721d02 외교문서 관련(이재춘국장).docx


URLs
hxxps://www.anca-aste.it/uploads/form/02E319AF73A33547343B71D5CB1064BC.dotm
hxxp://www.elite4print.com/admin/order/batchPdfs.asp
hxxps://www.sanlorenzoyacht.com/newsl/uploads/docs/43.dotm
hxxps://www.astedams.it/uploads/template/17.dotm
hxxps://www.sanlorenzoyacht.com/newsl/uploads/docs/1.dotm
hxxps://www.anca-aste.it/uploads/form/******_jd_t034519.jpg
hxxp://saemaeul.mireene.com/skin/board/basic/bin
hxxp://saemaeul.mireene.com/skin/visit/basic/log
hxxps://web.opendrive.com/api/v1/download/file.json/MzBfMjA1Njc0ODhf?inline=0
hxxps://od.lk/d/MzBfMjA1Njc0ODdf/pubmaterial.dotm
hxxps://www.ne-ba.org/files/gallery/images/83878C91171338902E0FE0FB97A8C47A.dotm

Conclusion

In summary, ATR has been tracking a targeted campaign focusing on the aerospace and defense industries using false job descriptions. This campaign looks very similar, based on shared TTPs, with a campaign that occurred in 2017 that also targeted some of the same industry. This campaign began early April 2020 with the latest activity in mid-June. The campaign’s objective is to collect information from individuals connected to the industries in the job descriptions.

Additionally, our forensic research into the malicious documents show they were created by the same adversary, using Korean and English language systems. Further, discovery of legitimate template files used to build these documents also sheds light on some of the initial research put into the development of this campaign. While McAfee ATR has observed these techniques before, in previous campaigns in 2017 and 2019 using the same TTPs, we can conclude there has been an increase in activity in 2020.

McAfee detects these threats as

  • Trojan-FRVP!2373982CDABA
  • Generic Dropper.aou
  • Trojan-FSGY!3C6009D4D7B2
  • Trojan-FRVP!CEE70135CBB1
  • W97M/Downloader.cxu
  • Trojan-FRVP!63178C414AF9
  • Exploit-cve2017-0199.ch
  • Trojan-FRVP!AF83AD63D2E3
  • RDN/Generic Downloader.x
  • W97M/Downloader.bjp
  • W97M/MacroLess.y

NSP customers will have new signatures added to the “HTTP: Microsoft Office OLE Arbitrary Code Execution Vulnerability (CVE-2017-0199)” attack name. The updated attack is part of our latest NSP sigset release: sigset 10.8.11.9 released on 28th July 2020.The KB details can be found here: KB55446

[1] https://www.bbc.co.uk/news/business-53026175

[2] https://www.welivesecurity.com/2020/06/17/operation-interception-aerospace-military-companies-cyberspies/

[3] https://www.justice.gov/opa/pr/north-korean-regime-backed-programmer-charged-conspiracy-conduct-multiple-cyber-attacks-and

[4] https://www.justice.gov/opa/pr/north-korean-regime-backed-programmer-charged-conspiracy-conduct-multiple-cyber-attacks-and

5 https://www.us-cert.gov/northkorea

[5] https://www.virustotal.com/gui/file/4a08c391f91cc72de7a78b5fd5e7f74adfecd77075e191685311fa598e07d806/detection – Gamaredon Group

[6] https://docs.microsoft.com/en-us/openspecs/office_standards/ms-docx/550efe71-4f40-4438-ac89-23ec1c1d2182

[7] https://www.welivesecurity.com/2020/06/17/operation-interception-aerospace-military-companies-cyberspies/

[8] https://otx.alienvault.com/pulse/5e8619b52e480b485e58259a

The post Operation (노스 스타) North Star A Job Offer That’s Too Good to be True? appeared first on McAfee Blog.

McAfee Defender’s Blog: NetWalker

3 August 2020 at 14:00

Building Adaptable Security Architecture Against NetWalker

NetWalker Overview

The NetWalker ransomware, initially known as Mailto, was first detected in August 2019. Since then, new variants were discovered throughout 2019 and the beginning of 2020, with a strong uptick noticed in March of this year. NetWalker has noticeably evolved to a more stable and robust ransomware-as-a-service (RaaS) model, and McAfee research suggests that the malware operators are targeting and attracting a broader range of technically advanced and enterprising criminal affiliates. McAfee Advanced Threat Research (ATR) discovered a large sum of bitcoins linked to NetWalker which suggest its extortion efforts are effective and that many victims have had no option other than to succumb to its criminal demands. For more details on NetWalker, see the McAfee ATR blog here.

We do not want you to be one of those victims, so this blog is focused on how to build an adaptable security architecture to defeat this threat and, specifically, how McAfee’s portfolio delivers the capability to prevent, detect and respond to NetWalker ransomware.

Gathering Intelligence on NetWalker

As always, building adaptable defensive architecture starts with intelligence. In most organizations, the Security Operations team is responsible for threat intelligence analysis, as well as threat and incident response. The Preview of McAfee MVISION Insights is a sneak peek of some of MVISION Insights capabilities for the threat intel analyst and threat responder. The preview identifies the prevalence and severity of select top emerging threats across the globe which enables the Security Operations Center (SOC) to prioritize threat response actions and gather relevant cyber threat intelligence (CTI) associated with the threat, in this case NetWalker ransomware. The CTI is provided in the form of technical Indicators of Compromise (IOCs) as well as MITRE ATT&CK framework tactics and techniques.

As a threat intel analyst or responder, you can drill down to gather more specific information on NetWalker, such as prevalence and links to other sources of information.

As a threat intel analyst or responder, you can further drill down to gather more specific actionable intelligence on NetWalker, such as indicators of compromise and tactics/techniques aligned to the MITRE ATT&CK framework.

From MVISION Insights preview, you can see that NetWalker leverages tactics and techniques common to other ransomware attacks, such as spear phishing attachments for Initial Access, use of PowerShell for deployment, modification of Registry Keys/Startup folder for persistence and encryption of files for impact of course.

Defensive Architecture Overview

Today’s digital enterprise is a hybrid environment of on-premise systems and cloud services with multiple entry points for attacks like NetWalker. The work from home operating model forced by COVID-19 has only expanded the attack surface and increased the risk for successful ransomware attack if organizations did not adapt their security posture. Mitigating the risk of attacks like NetWalker requires a security architecture with the right controls at the device, on the network and in security operations (sec ops). The Center for Internet Security (CIS) Top 20 Cyber Security Controls provides a good guide to build that architecture. For ransomware, and NetWalker in particular, the controls must be layered throughout the enterprise. The following outlines the key security controls needed at each layer of the architecture to protect your enterprise against ransomware.

To assess your capability against NetWalker, you must match your existing controls against the attack stages we learned from the Preview of MVISION Insights. For detailed analysis on the NetWalker ransomware attack, see McAfee ATR’s blog but, for simplicity, we matched the attack stages to the MITRE ATT&CK Framework below.

Initial Access Stage Defensive Overview

According to Threat Intelligence and Research, the initial access is performed either through vulnerability exploitation or spear phishing attachments. The following chart summarizes the controls expected to have the most effect against initial stage techniques and the McAfee solutions to implement those controls where possible.

MITRE Tactic MITRE Techniques CSC Controls McAfee Capability
Initial Access Exploit Public-Facing Applications (T1190)

Tomcat, Web Logic

CSC 2 Inventory of Software Assets

CSC 3 Continuous Vulnerability Assessment

CSC 5 Secure Configuration of hardware and software

CSC 9 Limitation of Network Ports and Protocols

CSC 12 Boundary Defense

CSC 18 Application Software Security

Endpoint Security Platform 10.7, Threat Prevention, Application Control (MAC)

Network Security Platform (NSP)

Initial Access Spear Phishing Attachments (T1566.001) CSC 7 – Email and Web Browser Protection

CSC 8 – Malware Defenses

Endpoint Security Platform 10.7, Threat Prevention, Adaptive Threat Protection,

Web Gateway (MWG), Advanced Threat Defense, Web Gateway Cloud Service (WGCS)

Initial Access Valid Accounts (T1078) RDP Compromised CSC 5 Secure Configuration of hardware and software

CSC 9 Limitation of Network Ports and Protocols

CSC 12 Boundary Defense

Endpoint Security Platform 10.7, Threat Prevention

As attackers can quickly change spear phishing attachments, it is important to have adaptable defenses that include user awareness training and response procedures, behavior-based malware defenses on email systems, web access and endpoint systems, and finally sec ops playbooks for early detection and response against suspicious email attachments or other phishing techniques. For more information on how McAfee can protect against suspicious email attachments, review this additional blog post.

Using valid accounts and protocols, such as for Remote Desktop Protocol, is an attack technique we have seen rise during the initial COVID-19 period. To further understand how McAfee defends against RDP as an initial access vector, as well as how the attackers are using it to deploy ransomware, please see our previous posts.

https://www.mcafee.com/blogs/other-blogs/mcafee-labs/rdp-security-explained/

https://www.mcafee.com/blogs/other-blogs/mcafee-labs/cybercriminals-actively-exploiting-rdp-to-target-remote-organizations/

https://www.mcafee.com/blogs/other-blogs/mcafee-labs/ens-10-7-rolls-back-the-curtain-on-ransomware/

Exploitation Stage Defensive Overview

The exploitation stage is where the attacker gains access to the target system. Protection at this stage is heavily dependent on system vulnerability management, adaptable anti-malware on both end user devices and servers and security operations tools like endpoint detection and response sensors.

McAfee Endpoint Security 10.7 provides a defense in depth capability including signatures and threat intelligence to cover known bad indicators or programs.

Additionally, machine-learning and behavior-based protection reduces the attack surface against NetWalker and detects new exploitation attack techniques.

For more information on how McAfee Endpoint Security 10.7 can prevent or identify the techniques used in NetWalker, review these additional blog posts.

https://www.mcafee.com/blogs/other-blogs/mcafee-labs/ens-10-7-rolls-back-the-curtain-on-ransomware/

https://www.mcafee.com/blogs/other-blogs/mcafee-labs/mcafee-amsi-integration-protects-against-malicious-scripts/

https://www.mcafee.com/blogs/other-blogs/mcafee-labs/how-to-use-mcafee-atp-to-protect-against-emotet-lemonduck-and-powerminer/

The following chart summarizes the critical security controls expected to have the most effect against exploitation stage techniques and the McAfee solutions to implement those controls where possible.

MITRE Tactic MITRE Techniques CSC Controls McAfee Portfolio Mitigation
Execution PowerShell (T1059.001) PowerShell Script CSC 5 Secure Configuration

CSC 8 Malware Defenses

Endpoint Security Platform 10.7, Threat Prevention, Adaptive Threat Protection, Application Control (MAC), MVISION EDR
Execution Service Execution (T1569.002) PS Exec CSC 5 Secure Configuration

CSC 8 Malware Defenses

Endpoint Security Platform 10.7, Threat Prevention, Adaptive Threat Protection, Application Control (MAC), MVISION EDR
Execution Command and Scripting Interpreter (T1059.003)

Windows Command Shell

CSC 5 Secure Configuration

CSC 8 Malware Defenses

Endpoint Security Platform 10.7, Threat Prevention, Adaptive Threat Protection, Application Control (MAC), MVISION EDR
Execution Native API (T1106) Use Windows API functions to inject DLL CSC 5 Secure Configuration

CSC 8 Malware Defenses

Endpoint Security Platform 10.7, Threat Prevention, Adaptive Threat Protection, Application Control (MAC), MVISION EDR
Execution Windows Management Instrumentation ((T1047) CSC 4 Controlled Use of Admin Privileges

CSC 5 Secure Configuration

CSC 9 Limitation of Network Ports and Protocols

CSC 8 Malware Defenses

Endpoint Security Platform 10.7, Threat Prevention, Adaptive Threat Protection, Application Control (MAC), MVISION EDR
Persistence Registry Key – Place Value on Run Once Key (T1060) CSC 5 Secure Configuration

CSC 8 Malware Defenses

Endpoint Security Platform 10.7 Threat Prevention
Persistence Modify Registry key – Create own key (T1112) CSC 5 Secure Configuration

CSC 8 Malware Defenses

Endpoint Security Platform 10.7 Threat Prevention
Privilege Escalation Exploitation for Privilege Exploitation ((T1068) CVE-2020-0796 CSC 3 Vulnerability Management

CSC 5 Secure Configuration

CSC 8 Malware Defenses

CSC 12 Boundary Defenses

Network Security Platform (CVE-2020-0796)
Privilege Escalation Exploitation for Privilege Exploitation ((T1068) CVE-2019-1458 CSC 3 Vulnerability Management

CSC 5 Secure Configuration

CSC 8 Malware Defenses

CSC 12 Boundary Defenses

Network Security Platform (CVE-2019-1458); Endpoint Security Platform 10.7 (CVE-2019-1458) Threat Prevention, Application Control (MAC)
Privilege Escalation Exploitation for Privilege Exploitation ((T1068) CVE-2017-0213 CSC 3 Vulnerability Management

CSC 5 Secure Configuration

CSC 8 Malware Defenses

CSC 12 Boundary Defenses

Network Security Platform (CVE-2017-0213); Endpoint Security Platform 10.7 (CVE-2017-0213) Threat Prevention, Application Control (MAC)
Privilege Escalation Exploitation for Privilege Exploitation ((T1068) CVE-2015-1701 CSC 3 Vulnerability Management

CSC 5 Secure Configuration

CSC 8 Malware Defenses

CSC 12 Boundary Defenses

Network Security Platform (CVE-2015-1701); Endpoint Security Platform 10.7, Threat Prevention, Application Control (MAC)
Privilege Escalation Process Injection: Reflective DLL (T1055) CSC 5 Secure Configuration

CSC 8 Malware Defenses

Endpoint Security Platform 10.7, Threat Prevention, Adaptive Threat Protection, MVISION EDR
Defensive Evasion Disabling Security Tools (T1562.001) ESET, Trend Micro, MS CSC 5 Secure Configuration

CSC 8 Malware Defenses

Defensive Evasion Process Injection: Reflective DLL (T1055) CSC 5 Secure Configuration

CSC 8 Malware Defenses

Endpoint Security Platform 10.7, Threat Prevention, Adaptive Threat Protection, MVISION EDR
Defensive Evasion Deobfuscate/Decode Files or Information (T1140)


CSC 5 Secure Configuration

CSC 8 Malware Defenses

Endpoint Security Platform 10.7, Threat Prevention, Adaptive Threat Protection, MVISION EDR
Defensive Evasion Obfuscated Files or Information (T1027): PowerShell Script uses Base64 and hexadecimal encoding and XOR-encryption


CSC 5 Secure Configuration

CSC 8 Malware Defenses

CSC 12 Boundary Defenses

Endpoint Security Platform 10.7, Threat Prevention, Adaptive Threat Protection, MVISION EDR
Credential Access Credential Dumping (T1003) Mimikatz, Mimidogz, Mimikittenz, Pwdump, LaZagne, Windows Credentials CSC 4 Controlled Use of Admin Privileges

CSC 5 Secure Configuration

CSC 8 Malware Defenses

Endpoint Security Platform 10.7, Threat Prevention, Adaptive Threat Protection, Application Control (MAC), MVISION EDR
Credential Access Brute Force (T1110) NL Brute CSC 4 Controlled use of admin privileges

CSC 16 Account Monitoring

Enterprise Security Manager – Log Analysis


Impact Stage Defensive Overview

The impact stage is where the attacker encrypts the target system, data and perhaps moves laterally to other systems on the network. Protection at this stage is heavily dependent on adaptable anti-malware on both end user devices and servers, network controls and security operation’s capability to monitor logs for anomalies in privileged access or network traffic. The following chart summarizes the controls expected to have the most effect against impact stage techniques and the McAfee solutions to implement those controls where possible.

MITRE Tactic MITRE Techniques CSC Controls McAfee Portfolio Mitigation
Discovery Network Service Scanning (T1046)

Network Scanner

CSC 5 Secure Configuration

CSC 8 Malware Defenses

CSC 12 Boundary Defenses

Endpoint Security Platform 10.7, Threat Prevention, Application Control (MAC), Network Security Platform
Lateral Movement Third Party Software (T1072)

TeamViewer, Anydesk

CSC 5 Secure Configuration

CSC 8 Malware Defenses

CSC 12 Boundary Defenses

Endpoint Security Platform 10.7, Threat Prevention, Network Security Platform
Lateral Movement Service Execution (T1035) PS Exec CSC 5 Secure Configuration

CSC 8 Malware Defenses

CSC 12 Boundary Defenses

Endpoint Security Platform 10.7, Threat Prevention, MVISION EDR
Collection Data from Information Repositories (T1213) CSC 4 Control Admin Privileges

CSC 5 Secure Configuration

CSC 6 Log Analysis

Enterprise Security Manger – Log Collection and Analysis
Collection Data from local system (T1005) CSC 4 Control Admin Privileges

CSC 5 Secure Configuration

CSC 6 Log Analysis

Endpoint Security Platform 10.7, Threat Prevention, MVISION EDR
Collection Data from network shared drive (T1039) CSC 4 Control Admin Privileges

CSC 5 Secure Configuration

CSC 6 Log Analysis

Endpoint Security Platform 10.7, Threat Prevention, MVISION EDR
Command and Control Ingress Tool Transfer (T1105) CSC 8 Malware Defenses

CSC 12 Boundary Defenses

Web Gateway, Network Security Platform
Impact Data Encrypted (T1486) Netwalker Ransomeware CSC 5 Secure Configuration

CSC 8 Malware Defenses

Endpoint Security Platform 10.7, Threat Prevention, Adaptive Threat Protection, MVISION EDR, Web Gateway
Impact Inhibit System Recovery (T1490) Shadow CSC 5 Secure Configuration

CSC 8 Malware Defenses

Endpoint Security Platform 10.7, Threat Prevention, Adaptive Threat Protection, MVISION EDR, Web Gateway


Hunting for NetWalker Indicators

As a threat intel analyst or hunter, you might want to quickly scan your systems for any of NetWalker indicators. Of course, you can do that manually by downloading a list of indicators and searching with available tools. However, if you have MVISION EDR, you will be able to that search right from Insights, saving precious time. Hunting the attacker can be a game of inches so every second counts. Of course, if you found infected systems or systems with indicators, you can take action to contain and start an investigation for incident response immediately from the MVISION EDR console.

Proactively Detecting NetWalker Techniques

Many of the exploit stage techniques in this attack use legitimate Windows tools or valid accounts to either exploit, avoid detection or move laterally. These techniques are not easily prevented but can be detected using MVISION EDR. As security analysts, we want to focus on suspicious techniques, such as PowerShell, used to download files…

or execute scripts…

or evade defenses…

Monitoring or Reporting on NetWalker Events

Events from McAfee Endpoint Protection and Web Gateway play a key role in NetWalker incident and threat response. McAfee ePO centralizes event collection from all managed endpoint systems. As a threat responder, you may want to create a dashboard for NetWalker-related threat events to understand current exposure. Here is a list (not exhaustive) of NetWalker-related threat events as reported by Endpoint Protection Platform Threat Prevention Module and McAfee Web Gateway.

McAfee Endpoint Threat Prevention Events
Ransom-NetW!AB8D59ABA3DC GenericRXKU-HO!E33E060DA1A5 PS/Netwalker.a Ransom-NetW!1B6A2BFA39BC
Artemis!2F96F8098A29 GenericRXKD-DA!645C720FF0EB GenericRXKD-DA!4E59FBA21C5E Ransom-NetW!A9E395E478D0
Ransom-NetW!A0BC1AFED896 PS/Netwalker.c Artemis!F5C877335920 GenericRXKD-DA!B862EBC24355
Artemis!2F96F8098A29 GenericRXKD-DA!63EB7712D7C9 RDN/Ransom GenericRXKD-DA!F0CC568491CD
Artemis!0FF0D5085F7E GenericRXKD-DA!9172586C2F87 RDN/Generic.dx Ransom-NetW!BFF6F7B3A7DB
Ransom-NetW!7B77B436360A GenericRXKD-DA!BC75859695F6 GenericRXKD-DA!FCEDEA8111AB GenericRXKD-DA!5ABF6ED342FD
PS/Netwalker.d GenericRXKD-DA!C0DDA75C6EAE GenericRXKD-DA!ADDC865F6169 GenericRXKD-DA!DBDD7A1F53AA
Artemis!1527DAF8626C GenericRXKD-DA!608AC26EA80C Ransom-NetW!3A601EE68000 GenericRXKD-DA!8102821249E1
Ransom-NetW!2E2F5FE8ABA4 GenericRXKD-DA!F957F19CD9D7 GenericRXKD-DA!3F3CC36F4298 GenericRXKD-DA!9001DFA8D69D
PS/Agent.bu GenericRXKD-DA!5F55AC3DD189 GenericRXKD-DA!18C32583A6FE GenericRXKD-DA!01F703234047
Ransom-NetW!62C71449FBAA GenericRXKD-DA!6A64553DA499 GenericRXKD-DA!0CBA10DF0C89 Artemis!50C6B1B805EC
PS/Netwalker.b GenericRXKD-DA!59B00F607A75 Artemis!BC96C744BD66 GenericRXKD-DA!DE0B8566636D
Ransom-NetW!8E310318B1B5 GenericRXKD-DA!0537D845BA09 GenericRXKU-HO!DE61B852CADA GenericRXKD-DA!B4F8572D4500
PS/Netwalker.c GenericRXKD-DA!D09CFDA29F17 PS/Agent.bx GenericRXKD-DA!0FF5949ED496
GenericRXKD-DA!2B0384BE06D2 GenericRXKD-DA!5CE75526A25C GenericRXKD-DA!BDC345B7BCEC Ransom-CWall!993B73D6490B
GenericRXKD-DA!0E611C6FA27A GenericRXKU-HO!961942A472C2 Ransom-NetW!291E1CE9CD3E Ransom-Mailto!D60D91C24570
PS/Agent.bu GenericRXKU-HO!997F0EC7FCFA PS/Agent.bx Ransom-CWall!3D6203DF53FC
Ransom-Netwalker Ransom-NetW!BDE3EC20E9F8 Generic .kk
GenericRXKU-HO!1DB8C7DEA2F7 GenericRXKD-DA!DD4F9213BA67 GenericRXKD-DA!729928E6FD6A
GenericRXKU-HO!9FB87AC9C00E GenericRXKU-HO!187417F65AFB PS/Netwalker.b


McAfee Web Gateway Events
RDN/Ransom BehavesLike.Win32.RansomCWall.mh
BehavesLike.Win32.Generic.kh Ransom-NetW!1B6A2BFA39BC
BehavesLike.Win32.MultiPlug.kh Ransom:Win32/NetWalker.H!rsm
BehavesLike.Win32.Generic.qh BehavesLike.Win32.Trojan.kh
GenericRXKD-DA!DD4F9213BA67 BehavesLike.Win32.Ipamor.kh
BehavesLike.Win64.Trojan.nh BehavesLike.Win32.Generic.cz
RDN/Generic.dx BehavesLike.Win32.RansomCWall.mm
BehavesLike.Win64.BadFile.nh BehavesLike.Win32.Generic.dm


Summary

Ransomware has evolved into a lucrative business for threat actors, from underground forums selling ransomware, to offering services such as support portals to guide victims through acquiring crypto currency for payment, to the negotiation of the ransom. However, just as attackers work together, defenders must collaborate internally and externally to build an adaptive security architecture which will make it harder for threat actors to succeed and build resilience in the business. This blog highlights how to use McAfee’s security solutions to prevent, detect and respond to NetWalker and attackers using similar techniques.

McAfee ATR is actively monitoring ransomware threats and will continue to update McAfee MVISION Insights and its social networking channels with new and current information. Want to stay ahead of the adversaries? Check out McAfee MVISION Insights for more information.

The post McAfee Defender’s Blog: NetWalker appeared first on McAfee Blog.

Take a “NetWalk” on the Wild Side

How to check for viruses

Executive Summary

The NetWalker ransomware, initially known as Mailto, was first detected in August 2019. Since then, new variants were discovered throughout 2019 and the beginning of 2020, with a strong uptick noticed in March of this year.

NetWalker has noticeably evolved to a more stable and robust ransomware-as-a-service (RaaS) model, and our research suggests that the malware operators are targeting and attracting a broader range of technically advanced and enterprising criminal affiliates.

McAfee Advanced Threat Research (ATR) discovered a large sum of bitcoins linked to NetWalker which suggest its extortion efforts are effective and that many victims have had no option other than to succumb to its criminal demands.

We approached our investigation of NetWalker with some possible ideas about the threat actor behind it, only to later disprove our own hypothesis. We believe the inclusion of our thinking, and the means with which we debunked our own theory, highlight the importance of thorough research and we welcome further discussion on this topic. We believe it starts valuable discussions and helps avoid duplicate research efforts by others. We also encourage our peers in the industry to share information with us in case you have more evidence.

McAfee protects its customers against the malware covered in this blog in all its products, including personal antivirus, endpoint and gateway. To learn more about how McAfee products can defend against these types of attacks, visit our blog on Building Adaptable Security Architecture Against NetWalker.

Check out McAfee Insights to stay on top of NetWalker’s latest developments and intelligence on other cyber threats, all curated by the McAfee ATR team. Not only that, Insights will also help you prioritize threats, predict if your countermeasures will work and prescribe corrective actions.

Introduction

Since 2019, NetWalker ransomware has reached a vast number of different targets, mostly based in western European countries and the US. Since the end of 2019, the NetWalker gang has indicated a preference for larger organisations rather than individuals. During the COVID-19 pandemic, the adversaries behind NetWalker clearly stated that hospitals will not be targeted; whether they keep to their word remains to be seen.

The ransomware appends a random extension to infected files and uses Salsa20 encryption. It uses some tricks to avoid detection, such as a new defence evasion technique, known as reflective DLL loading, to inject a DLL from memory.

The NetWalker collective, much like those behind Maze, REvil and other ransomware, threatens to publish victims’ data if ransoms are not paid.

As mentioned earlier, NetWalker RaaS prioritizes quality over quantity and is looking for people who are Russian-speaking and have experience with large networks. People who already have a foothold in a potential victim’s network and can exfiltrate data with ease are especially sought after. This is not surprising, considering that publishing a victims’ data is part of NetWalker’s model.

The following sections are dedicated to introducing the NetWalker malware and displaying the telemetry status before moving on to the technical malware analysis of the ransomware’s behaviour. We will explain how the decryptor works and show some interactions between NetWalker’s operators and their victims. After this, we discuss the changes in modus operandi since September 2019, especially regarding payment behaviour. Then we show our attempts, unfruitful as they were, at discovering a link between NetWalker and previous, seemingly unrelated ransomware variants. Finally, we deliver an overview of IOCs related to NetWalker and its MITRE ATT&CK techniques.

Telemetry

Using McAfee’s billion Insights sensors, we can show the global prevalence of the NetWalker ransomware.

Figure 1. McAfee MVISION Insights shows global prevalence of the NetWalker ransomware

Technical Analysis

Ransom note (pre-March 2020)

Before March 2020, the NetWalker ransom note indicated how to contact the adversary directly using anonymous email account services with random names (such as [email protected] and [email protected]):

Figure 2. Example of ransom note prior to March 2020

Ransom Note (Post-March 2020)

On 12 March 2020, a researcher shared a screenshot of a new NetWalker ransom note in a tweet and we can see that the attackers have changed the contact method significantly. Email communication has been dropped completely with victims now required to make contact through the NetWalker Tor interface where, after submitting their user key, they will then be redirected to a chat with NetWalker technical support. This change in contact method coincides with underground forum postings where NetWalker revealed it was opening its RaaS up for new affiliates. The Tor page was not the only noticeable change we will highlight in this blog.

Figure 3. Example of ransom note after March 2020

NetWalker Analysis

Figure 4. NetWalker behavior

NetWalker Resource Analysis (Pre-March 2020)

The NetWalker malware uses a custom resource type (1337 or 31337) containing its entire configuration. This file is extracted to memory and decrypted using the RC4 algorithm with a hard-coded key in the resource.

Before 12 March 2020, NetWalker used the email contact process between its support operation and the victims to proceed with payment and send the decryption program. To do this, NetWalker used its configuration file in the resource to set its encryption mode, the name of the ransom note, etc., and email contacts.

Name wwllww.exe
Size 96256 bytes
File-Type EXE
SHA 256 58e923ff158fb5aecd293b7a0e0d305296110b83c6e270786edcc4fea1c8404c
Compile time 6 December 2019

Figure 5. NetWalker resource from wwllww.exe

Once decrypted, the configuration file reveals several parameters, allowing us to understand how it works (how it constitutes the ransom note, the number of threads allocated for encryption, etc.):

mpk Public key
mode Encryption mode
thr Allocated threads for encryption process
spsz Encryption chunk
namesz Name length
idsz  ID length
crmask .mailto[email].{ID}
mail Contact mail
lfile Ransom Note name
lend B64 encoded ransom note
white Encryption whitelist
kill Processes, tasks, service names to terminate
unlocker Decryption exclusion list

NetWalker Resource Analysis (Post-March 2020)

When Netwalker changed its contact mode and switched from email to the submission of the user key directly on the web portal of the group’s blog, the configuration file in the resource also changed.  We found changes in the configuration file, such as the disappearance of the contact “mail” and “crmask” fields (previously set as [email protected],[email protected], etc., and .mailto[email].{ID}). This field was replaced by “onion1” and “onion2”, and these fields are set with the NetWalker blog URL/payment page (hxxp://rnfdsgm<snip>drqqd.onion/). We also noticed that the NetWalker developers complemented their “unlocker” field with some specific values (e.g. “psexec.exe, system, forti*.exe, fmon.exe*, etc”).

Name cnt.ex
Size 70656 bytes
File-Type EXE
SHA 256 26dfa8512e892dc8397c4ccbbe10efbcf85029bc2ad7b6b6fe17d26f946a01bb
Compile time 2 May 2020

Figure 6. NetWalker resource from cnt.ex

Usually, attackers use RC_DATA or a malicious BITMAP. The latter can, for example, be a regular Bitmap (open matrix image format used by Windows) that can be used by malware to execute code or as a payload dropper. The image’s pixels are an actual binary representation of the payload. This process can be summarized as Exe -> Resources -> BMP with embedded data in pixels fetched and decrypted by, e.g. a DLL -> Payload), etc. However, in this case, they use this special custom type to increase obfuscation. The NetWalker developers chose custom types by using 1337 or 31337 structs, so the resource format does not change. However, as we said, several values have changed or been replaced:

mpk Public Key
mode Encryption mode
spsz Encryption chunk
thr Allocated threads for encryption process
namesz Name length
idsz ID length
lfile Ransom Note name
onion1 Blog URL 1
onion 2 Blog URL 2
white Encryption whitelist
kill Processes, tasks, service names to terminate
net Network resources encryption
unlocker Decryption exclusion list
lend B64 encoded ransom note


NetWalker Executable Analysis (Post-March 2020)

The malware sample used for this blog post has the same information:

Name c21ecd18f0bbb28112240013ad42dad5c01d20927791239ada5b

61e1c6f5f010

Size 70656 bytes
File-Type EXE
SHA 256 c21ecd18f0bbb28112240013ad42dad5c01d20927791239ada5b

61e1c6f5f010

Compile time 2 May 2020

The unpacked malware is a binary file of 32 bits that can be found as an EXE file.

Figure 7. Information sample of the malware

The malware’s first action is to combine all the required functions it needs into one large function, combining the modules already loaded in Windows with additional DLLs as described below.

Instead of searching for the function in the usual way, the malware makes a CRC32 hash of the name of each function and compares with hardcoded values. Additionally, instead of using the function “GetProcAddress”, the malware uses the Process Environment Block (PEB) to make analysis harder.

Figure 8. Get the module accessing the PEB and using a CRC32

If the module cannot be discovered, it will load with “LdrLoadDll”, a native function of Windows, to try avoiding hooks in the usual functions, e.g. “LoadLibraryW”:

Figure 9. Load library using LdrLoadDll

Figure 10. Get functions from module, e.g. using a CRC32 hash

If the malware fails to get a function, it will go to a “sleep” call and terminate itself.

Later, the malware extracts the configuration file from a resource with a custom type and a custom name using the functions “FindResourceA”, “LockResource”, “LoadResource” and “SizeOfResource”. The file extracted in memory is decrypted using the RC4 algorithm with a hardcoded key in the resource.

The struct of the resource is:

  • 4 bytes -> The size of the hardcoded key to decrypt the configuration file.
  • Variable size -> the hardcoded key to decrypt the configuration file.
  • Variable size -> the configuration file encrypted.

The malware reads the first 4 bytes and reserves memory with the size of the password and reserves memory of the resource minus 4 bytes and the size of the password. Finally, it decrypts the configuration file:

Figure 11. Get configuration file and decrypt it

If the malware fails to get the configuration file, it will terminate itself.

After getting the configuration file, the malware will parse it and save the fields in memory and write in the registry information to encrypt the files in the machine. The malware will try first to write in the registry-hive “HKEY_LOCAL_MACHINE” but if it cannot create it, it will use the registry-hive “HKEY_CURRENT_USER”:

Figure 12. Write in the registry

After the writing in the registry has been completed, it will get some privileges using a token as SE_DEBUG_PRIVILEGE and SE_IMPERSONATE_PRIVILEGE:

Figure 13. Get some special privileges in the token

Later, the malware creates three threads, one to get information about the machine, such as the operating system version, one to get processes and the last one to get services in the system.

After this step, it will get the system directory and use “VSSadmin” to delete the Volume Shadow copies of the system. Volume Shadow copies can contain copies of the encrypted files and would be an option to restore from if no backup exists.

Figure 14. Delete the shadow volumes

Later, the malware will enumerate the logical units, prepare the new extension for the future encrypted files, based on the size that is defined in the ransomware config with a random extension, and encrypt all files in the fixed type units and remote units with the new extension.

Figure 15. Crypt the files

After all these steps have been completed, it will create the ransom note on the desktop using the functions “SHGetFolderPathlW” and “CreateFileW”. Subsequently, it will write the ransom note from the memory into a new file with the function “WriteFile”. The malware will create the ransom note in the root folder (for example “c:\”) of each logical unit. Next, it will launch “notepad.exe” with an argument to the ransom note file to show the user what happened on the system:

Figure 16. Creation of the ransom note in the desktop and root units

Finally, after the encryption of the files and creation of the ransom note, the malware creates a bat file in the %temp% folder of the machine with a temporary name and writes the content to destroy itself using the program “taskkill”. The batch script will delete the malware sample with its path using the command “del” and finally delete the bat file with the command “del %0%”. Of course, as the malware uses the “del” command without destroying itself before the deletion, it can be recovered with some forensic tools with luck (the same can also be said for the bat file).

This way the malware tries to remove itself from the machine to avoid being detected and analyzed by security researchers:

Figure 17. Get Temp path and make a temporary file as a bat and launch it

Finally, the malware will finish with “ExitProcess”.

Decryptor

When a NetWalker victim goes through technical support (see an example of this below) and pays the ransom demanded by the group they will be able to download the decryptor to clean up their environment.

Figure 18. Conversation with NetWalker operators

The download is done directly from the NetWalker Tor site, where the payment page switches to a download page certifying that the payment was made and received:

Figure 19. Decryptor download

The decryptor is delivered in a zip archive containing the decryptor executable and a note explaining how to run the program correctly:

Figure 20. Decryptor delivery

The program launches a graphical interface allowing the user to decipher their workstation automatically or manually:

Figure 21. Decryptor execution

At the end of the decryption process, the program indicates the number of decrypted files, deletes the ransom note if the user has checked that option, and terminates, leaving the user to resume their work peacefully:

Figure 22. Decryptor has finished the decryption process

The decryptor program appears unique and is linked to one victim specifically. In our example, it only decrypts the files belonging to the victim who made the payment from the user key specified in the ransom note.

Underground Advertising

In March 2020, the moniker Bugatti began actively advertising the NetWalker Ransomware-as-a-Service on two popular underground fora. Bugatti seems to have joined the underground scene in February 2020 but claims to have been active with NetWalker ransomware since September 2019. We have seen NetWalker activity before March but there has been a noticeable uptick in larger victims since their advertisement. For a relatively new ransomware it has been well received and respected among other cybercriminals as compared to, for instance, Nemty ransomware. The strength of NetWalker’s reputation is such that our current hypothesis is that the individual behind Bugatti is most likely a well-respected and experienced cybercriminal, even though it is a new moniker.

Figure 23. Bugatti advertising NetWalker on an underground forum

Bugatti provides regular updates on the improvements in the ransomware, such as the popular Invoke-ReflectivePEInjection method, also commonly used by Sodinokibi. In addition to the improvements in the ransomware, open slots for new affiliates are advertised. Bugatti strongly emphasized that they are primarily looking for experienced affiliates that focus on compromising the complete networks of organizations as opposed to end users. NetWalker is clearly following in the footsteps of its illustrious targeted ransomware peers like Sodinokibi, Maze and Ryuk.

One forum message in particular caught our attention as it included screenshots of several partial bitcoin addresses and USD amounts. This was most likely done to showcase the financial success of the ransomware. We have seen a similar posting in the past with the influential Sodinokibi affiliate Lalartu, so we decided to follow the money once more.

Figure 24. Bugatti is looking for advanced affiliates and shows samples of BTC payments

With the help of CipherTrace software we were able to find the complete BTC addresses from the screenshot and investigate the ledger further:

Screenshot 1

3JHTYZhRmMcq7WCKRzFN98vWvAZk792w9J

Screenshot 2

39aovzbz5rGoQdKjDm6JiybkSu1uGdVJ2V

Screenshot 3

39NRnZtgACDVhhmc7RwmvH9ZDUKTNwwaeB

Screenshot 4

3L4AW5kHnUCZBBjg2j1LBFCUN1RsHPLxCs

Following the Money

In the transactions mentioned in the underground forum post, the ransom amount payed by the victims is presumably shown. Since the bitcoin blockchain is a publicly accessible ledger, we can follow the money and see where the ransomware actors are transferring it to. In the case of the four posted transactions above, the full amount payed by the victim was transferred to two addresses (these addresses begin with bc1q98 and 1DgLhG respectively). It is safe to say that these two bitcoin addresses are under control of the NetWalker actors. We then proceeded on to analyze all incoming transactions to these two addresses and we were able to make the following observations:

  • The first incoming transaction occurs on 1 March 2020.
  • On 30 March 2020 the first incoming transaction appears where the amount is split between 4 different bitcoin addresses. A split like this is typically seen in Ransomware-as-a-Service, where the ransom payment is split between the RaaS operators and the affiliate who caused the infection. In this first transaction, the split is 80%, 10% and two 5% portions. This split matches the advertisement on the underground forum (80% – 20%).
  • The two 5% portions of the ransom payments that are split, seem to be consistently transferred to the two bitcoin addresses we revealed earlier (bc1q98 and 1DgLhG).
  • While the beneficiaries of the 5% cuts remain the same, the beneficiary of the 10% cut seems to change over time. Based on the forum post we assume these addresses also belong to the NetWalker actors.
  • Payments to the bc1q98 and 1DgLhG addresses that are not being split continue up until the end of May. Possibly the initial NetWalker operators added a RaaS operation, while continuing to cause NetWalker infections themselves.
  • While analyzing the bitcoin addresses that received 80% or more of the transaction amount, we noticed that there are some addresses that receive payments multiple times. A possible explanation could be that the address is configured as payout addresses for a certain campaign or affiliate. We identified 30 unique bitcoin addresses that seem to be the beneficiary of this larger portion of the ransom transaction. Some of these only received one payment but there are several that received multiple payments.
  • In the two addresses uncovered by tracing the transactions a total of 641 bitcoin is held on 27 July 2020. Which at the current market value of bitcoin is worth well over 7 million USD.

Amounts Extorted

Working under the hypothesis that all the incoming transactions are ransomware payments; we can make the following observations:

  • We found 23 transactions where the ransom payments were not split up and the beneficiaries are the two bitcoin addresses found by following the transactions mentioned in the underground forum post. The total amount of bitcoin extorted this way between 1 March 2020 and 27 July 2020 is 677 BTC. Additionally, the amount received from remaining transactions following the Ransomware-as-a-Service scheme by these addresses between 1 March 2020 and 27 July 2020 is 188 BTC.
  • In the transactions that are split, the largest amount (usually 80% to 90% of the total transaction value) is presumably transferred to the affiliate that caused the infection. When we summed up these largest portions, we saw a total of 1723 BTC being transferred to affiliates.
  • The total amount of extorted bitcoin that has been uncovered by tracing transactions to these NetWalker related addresses is 2795 BTC between 1 March 2020 and 27 July 2020. By using historic bitcoin to USD exchange rates, we estimate a total of 25 million USD was extorted with these NetWalker related transactions.

Even though we do not have complete visibility into the BTC flow before NetWalker started ramping up, one thing is certain, this quarter alone it has been highly successful at extorting organisations for large amounts of money. All this at a time when many sectors are struggling because people are sheltering in place and governments are trying to keep businesses from going bankrupt. NetWalker is making millions off the backs of legitimate companies.

Figure 25. Overview of uncovered bitcoin transactions, highlighting the two identified actor addresses.

Observed Changes

While talking about the impact of NetWalker with our partners, we learned that the change in modus operandi not only affected the way the actors communicate with their victims. When there was a change from email communication to a dedicated Tor hidden service, the actors also moved away from using legacy bitcoin addresses to SegWit addresses. The benefits of using the newer SegWit addresses include faster transaction time and lower transaction cost. The NetWalker advertisement on the underground forum mentions instant and fully automatic payments around the time of this observed change. This makes us believe the ransomware actors were professionalizing their operation just before expanding to the Ransomware-as-a-Service model.

Comparison with Previous Ransomware

Given the sudden appearance of NetWalker ransomware and the associated threat actor, it suggests that some prior knowledge on ransomware development or underground presence had to be in place. Armed with this hypothesis, we searched for possible links to underground actors and other ransomware strains that might fit the bill. We came across one threat actor offering ransomware that caught our attention. It was the use of the name NetWalker, in combination with a strong ransomware connection, that sparked our interest.

Some years ago, a threat actor using the moniker Eriknetwalker was advertising ransomware on several underground forums. We found posts from 2016 and the latest public activity was around June 2019, several months before NetWalker ransomware made its appearance.

Figure 26. Eriknetwalker began advertising their ransomware in 2016 (Google-translated from Russian)

Based on our underground research, we linked the moniker Eriknetwalker to the development and/or distribution of Amnesia, Bomber and Scarab ransomware. Eriknetwalker stopped advertising ransomware around June 2019. Therefore, we decided to perform a comparative analysis between the different ransomware strains linked to Eriknetwalker and some of the earliest versions of NetWalker we could find.

The goal of this comparative analysis was to identify whether there was an overlap between source codes. Such overlap could suggest a stronger link between the current NetWalker version and the other ransomware versions from Eriknetwalker, possibly even explaining the name overlap.

To execute the analysis, we used several tools one of which was the binary visualization tool Veles, which dynamically translates binary information into an abstract visualization that allows us to identify and compare patterns.

The different types of ransomware we began analyzing were the variants of Amnesia, Scarab, and NetWalker.

Figure 27. Flat visualization of binary data of the different ransomware variants

Figure 28. 3D visualization of binary data of the different ransomware variants

Visualizing data in such a manner is a way to use the human brain to quickly identify patterns and be able to draw comparisons between objects. In our case, we see that, based on the binary data visualized in Figures 27 and 28, the ransomware binaries do yield differences that we cannot ignore.

Figure 29. Comparison of source code results

Figure 29 shows the results of a source code similarity analysis led on the different variants of ransomware named in the figure itself. Interesting enough, Scarab and Amnesia show a higher overlap with Buran and Zeppelin than the early NetWalker samples. The percentages shown are the amount of code that is similar between two variants.

As illustrated in the overview, the September 2019 NetWalker version has a different codebase from the ErikNetWalker-linked ransomware variants. This finding disproves our earlier hypothesis that NetWalker is linked to the older Amnesia variants based on code overlap.

Often, research teams do not publish their results when it disproves their own hypothesis. However, for the sake of transparency, we decided to include our research efforts.

YARA Rules

We uploaded a YARA rule to detect almost all the samples observed in the wild to date.

Indicators of Compromise

During our investigation we have observed numerous IoCs linked to NetWalker ransomware. To obtain them please visit our McAfee ATR GitHub site, or get the latest NetWalker IoCs and intelligence on many other threats with McAfee Insights.

MITRE ATT&CK Techniques

The below techniques were based on our research and complemented with research from industry peers.

  • Initial Access
    • Exploit Public-Facing Application (T1190) : Exploit Tomcat, Exploit WebLogic
    • Spear phishing Attachment (T1566.001): Phishing email
    • Valid Accounts (T1078): RDP compromised
  • Execution
    • PowerShell (T1059.001): PowerShell Script
    • Command and Scripting Interpreter: Windows Command Shell (003)
    • Service Execution (T1569.002): PsExec
    • Native API (T1106): Use Windows API functions to inject DLL
    • Windows Management Instrumentation (T1047)
  • Persistence
    • Registry Run Key (T1547.001): Place a value on RunOnce key
    • Modify Registry key (T1112): Create its own registry key in \SOFTWARE\<uniquename>
  • Privilege Escalation
    • Exploitation for Privilege Escalation (T1068): CVE-2020-0796, CVE-2019-1458, CVE-2017-0213, CVE-2015-1701
    • Process Injection (T1055.001): Reflective DLL Injection
  • Defense Evasion
    • Disabling Security Tools (T1562.001): ESET AV Remover, Trend Micro’s Security Agent Uninstall Tool, Microsoft Security Client Uninstall
    • Process Injection (T1055.001): Reflective DLL Injection
    • Deobfuscate/Decode Files or Information (T1140)
    • Obfuscated Files or Information (T1027): PowerShell Script uses Base64 and hexadecimal encoding and XOR-encryption
  • Credential Access
    • Credential Dumping (T1003): Mimikatz, Mimidogz, Mimikittenz, Windows Credentials Editor, Pwdump, LaZagne
    • Brute Force (T1110.001): NLBrute
  • Discovery
    • Network Service Scanning (T1046): SoftPerfect Network Scanner
    • Security Software Discovery (T1518.001)
    • System Information Discovery (T1082)
  • Lateral Movement
    • Third-Party Software (T1072): TeamViewer, Anydesk
    • Service Execution (T 1569.002): PsExec
    • Lateral Tool Transfer (T1570)
  • Collection
    • Data from information repositories (T1213)
    • Data from local system (T1005)
    • Data from network shared drive (T1039)
  • Command and Control
    • Ingress Tool Transfer (T1105)
  • Impact
    • Data Encrypted (T1486): NetWalker Ransomware
    • Inhibit System Recovery (T1490): Shadow Copies Deleted
    • Service Stop (T1489)

Conclusion

Ransomware has evolved into a lucrative business for threat actors, from underground forums selling ransomware, to offering services such as support portals to guide victims through acquiring crypto currency for payment, to the negotiation of the ransom. McAfee’s Advanced Threat Research team has analysed the NetWalker ransomware and have been following its evolution from the initial sighting of the Mailto ransomware to its redevelopment into the NetWalker ransomware. The recent shift to a business-centric model of Ransomware-as-a-Service is a clear sign that it is stepping up, so it seems that the NetWalker group is following in the footsteps of REvil and other successful RaaS groups. The ransomware developers have proven the ability to refocus and capitalize on current world events and develop lures to help ensure the effectiveness of the ransomware, which has allowed them to become selective of their affiliates by limiting access to the ransomware to only those with vetted access to large organizations. As development of the ransomware continues, we have witnessed recent shifts in activity that closely follow in the footsteps of other ransomware developments, including threatening victims with the release of confidential information if the ransom is not met.

McAfee ATR is actively monitoring ransomware threats and will continue to update McAfee MVISION Insights and its social networking channels with new and current information. MVISION Insights is the only proactive endpoint security solution that simultaneously prioritizes and predicts threats that matter to our customers while offering prescriptive guidance on what to do in their local environment. Want to stay ahead of the adversaries? Check out McAfee MVISION Insights for more information. If you want to experience some of the MVISION Insights capabilities, go the Preview of MVISION Insights where you can select the top threat information that is available.

Authored by: Thibault Seret, Valentine Mairet, Jeffrey Sman, Alfred Alvarado, Tim Hux, Alexandre Mundo, John Fokker, Marc Rivero Lopez and Thomas Roccia.

The post Take a “NetWalk” on the Wild Side appeared first on McAfee Blog.

Ripple20 Critical Vulnerabilities – Detection Logic and Signatures

5 August 2020 at 13:00

This document has been prepared by McAfee Advanced Threat Research in collaboration with JSOF who discovered and responsibly disclosed the vulnerabilities. It is intended to serve as a joint research effort to produce valuable insights for network administrators and security personnel, looking to further understand these vulnerabilities to defend against exploitation. The signatures produced here should be thoroughly considered and vetted in staging environments prior to being used in production and may benefit from specific tuning to the target deployment. There are technical limitations to this work, including the fact that more complex methods of detection might be required to detect these vulnerabilities. For example, multiple layers of encapsulation may obfuscate the exploitation of the flaws and increase the difficulty of detection.

We have also provided packet captures taken from the vulnerability Proof-of-Concepts as artifacts for testing and deployment of either the signatures below or customized signatures based on the detection logic. Signatures and Lua Scripts are located on ATR’s Github page, as well as inline and in the appendix of this document respectively.

As of this morning (August 5th), JSOF has presented additional technical detail and exploitation analysis at BlackHat 2020, on the two most critical vulnerabilities in DNS.

The information provided herein is subject to change without notice, and is provided “AS IS”, with all faults, without guarantee or warranty as to the accuracy or applicability of the information to any specific situation or circumstance and for use at your own risk. Additionally, we cannot guarantee any performance or efficacy benchmarks for any of the signatures.

Integer Overflow in tfDnsExpLabelLength Leading to Heap Overflow and RCE

CVE: CVE-2020-11901 (Variant 1)
CVSS: 9
Protocol(s): DNS over UDP (and likely DNS over TCP)
Port(s): 53

Vulnerability description:
In the Treck stack, DNS names are calculated via the function tfDnsExpLabelLength. A bug exists in this function where the computation is performed using an unsigned short, making it possible to overflow the computed value with a specially constructed DNS response packet. Since tfDnsExpLabelLength computes the full length of a DNS name after it is decompressed, it is possible to induce an overflow using a DNS packet far smaller than 216 bytes. In some code paths, tfGetRawBuffer is called shortly after tfDnsExpLabelLength, allocating a buffer on the heap where the DNS name will be stored using the size computed by tfDnsExpLabelLength, thus leading to a heap overflow and potential RCE.

While newer versions of the Treck stack will stop copying the DNS name into the buffer as soon as a character that isn’t alphanumeric or a hyphen is reached, older versions do not have this restriction and further use predictable transaction IDs for DNS queries, making this vulnerability easier to exploit.

Limitations or special considerations for detection:
Ideally, detection logic for this vulnerability would involve independently computing the uncompressed length of all DNS names contained within incoming DNS responses. Unfortunately, this may be computationally expensive for a device to perform for every incoming DNS response, especially since each one may contain many DNS names. Instead, we must rely on a combination of heuristics.

Furthermore, it is currently unclear whether exercising this vulnerability is possible when using EDNS(0) or DNS over TCP. We recommend assuming it is possible for the purposes of implementing detection logic.  During our testing, an inconsistency in how Suricata handled DNS over TCP was discovered – in some cases it was correctly identified as DNS traffic and in other cases, it was not. Consequently, two rules have been created to determine the size of DNS over TCP traffic. The second rule uses the TCP primitive instead of the DNS primitive; however, the second rule will only be evaluated if not flagged by the first rule.

Because the Suricata rule in dns_invalid_size.rules uses the DNS responses’ EDNS UDP length, which may be controlled by the attacker, a second upper limit of 4096 bytes is enforced.

Recommended detection criteria:

  • The device must be capable of processing DNS traffic and matching responses to their corresponding requests.
  • The device must be capable of identifying individual DNS names within individual DNS packets.
  • The device should flag any DNS responses whose size exceeds what is “expected”. The expected size depends on the type of DNS packet sent:
      • For DNS over TCP, the size should not exceed the value specified in the first two bytes of the TCP payload.
      • For DNS over UDP with EDNS(0), the size should not exceed the value negotiated in the request, which is specified in the CLASS field of the OPT RR, if present.
      • For DNS over UDP without EDNS(0), the size should not exceed 512 bytes.
      • These are all checked in dns_invalid_size.rules, which invokes either dns_size.lua or dns_tcp_size.lua for the logic.
  • The device should flag DNS responses containing DNS names exceeding 255 bytes (prior to decompression).
      • This is checked in dns_invalid_name.rules, which invokes dns_invalid_name.lua for the logic.
  • The device should flag DNS responses containing DNS names comprised of characters besides a-z, A-Z, 0-9, “-”, “_”, and “*”.
      • This is also checked in dns_invalid_name.rules, which invokes dns_invalid_name.lua for the logic.
  • The device should flag DNS responses containing a large number of DNS compression pointers, particularly pointers one after the other. The specific tolerance will depend on the network.
      • The device should count all labels starting with the bits 0b10, 0b01, or 0b11 against this pointer total, as vulnerable versions of the Treck stack (incorrectly) classify all labels where the first two bits aren’t 0b00 as compression pointers. In the Lua script, we treat any value above 63 (0x3F) as a pointer for this reason, as any value in that range will have at least one of these bits set.
      • The specific thresholds were set to 40 total pointers in a single DNS packet or 4 consecutive pointers for our implementation of this rule. These values were chosen since they did not seem to trigger any false positives in a very large test PCAP but should be altered as needed to suit typical traffic for the network the rule will be deployed on. The test for consecutive pointers is especially useful since each domain name should only ever have one pointer (at the very end), meaning we should never be seeing many pointers in a row in normal traffic.
      • This is implemented in dns_heap_overflow_variant_1.lua, which is invoked by dns_heap_overflow.rules.
  • Implementation of the detection logic above has been split up amongst several Suricata rule files since only the pointer counting logic is specific to this vulnerability. Detection of exploits leveraging this vulnerability are enhanced with the addition of the DNS layer size check, domain name compressed length check, and domain name character check implemented in the other rules, but these are considered to be “helper” signatures and flagging one of these does not necessarily indicate an exploitation attempt for this specific vulnerability.

False positive conditions (signatures detecting non-malicious traffic):
Networks expecting non-malicious traffic containing DNS names using non-alphanumeric characters or an abnormally large number of DNS compression pointers may generate false positives. Unfortunately, checking for pointers in only the domain name fields is insufficient, as a malicious packet could use a compression pointer that points to an arbitrary offset within said packet, so our rule instead checks every byte of the DNS layer. Consequently, Treck’s overly liberal classification of DNS compression pointers means that our rule will often misclassify unrelated bytes in the DNS payload as pointers.

In our testing, we ran into false positives with domain names containing spaces or things like “https://”. Per the RFCs, characters such as “:” and “/” should not be present in domain names but may show up from time to time in real, non-malicious traffic. The list of acceptable characters should be expanded as needed for the targeted network to avoid excessive false positives. That being said, keeping the list of acceptable characters as small as possible will make it more difficult to sneak in shellcode to leverage one of the Ripple20 DNS vulnerabilities.

False positives on the DNS size rules may occur when DNS over TCP is used if Suricata does not properly classify the packet as a DNS packet – something that has occurred multiple times during our testing. This would cause the second size check to occur, which assumes that all traffic over port 53 is DNS traffic and processes the payload accordingly. As a result, any non-DNS traffic on TCP port 53 may cause false positives in this specific case. It is recommended the port number in the rule be adjusted for any network where a different protocol is expected over port 53.

Fragmentation of DNS traffic over TCP may also introduce false positives. If the streams are not properly reconstructed at the time the rules execute on the DNS payload, byte offsets utilized in the attached Lua scripts could analyze incorrect data. Fragmentation in DNS response packets is not common on a standard network unless MTU values have been set particularly low. Each rule should be evaluated independently prior to use in production based on specific network requirements and conditions.

False negative conditions (signatures failing to detect vulnerability/exploitation):
False negatives are more likely as this detection logic relies on heuristics due to computation of the uncompressed DNS name length being too computationally expensive. Carefully constructed malicious packets may be able to circumvent the suggested pointer limitations and still trigger the vulnerability.

Signature(s):
dns_invalid_size.rules:

alert dns any any ‑> any any (msg:"DNS packet too large"; flow:to_client; flowbits:set,flagged; lua:dns_size.lua; sid:2020119014; rev:1;)
Lua script (dns_size.lua) can be found in Appendix A

alert tcp any 53 -> any any (msg:"DNS over TCP packet too large"; flow:to_client,no_frag; flowbits:isnotset,flagged; lua:dns_tcp_size.lua; sid:2020119015; rev:1;)
Lua script (dns_tcp_size.lua) can be found in Appendix A

dns_invalid_name.rules:

alert dns any any -> any any (flow:to_client; msg:"DNS response contains invalid domain name"; lua:dns_invalid_name.lua; sid:2020119013; rev:1;)
Lua script (dns_invalid_name.lua) can be found in Appendix A

dns_heap_overflow.rules:

# Variant 1
alert dns any any -> any any (flow:to_client; msg:"Potential DNS heap overflow exploit (CVE-2020-11901)"; lua:dns_heap_overflow_variant_1.lua; sid:2020119011; rev:1;)
Lua script (dns_heap_overflow_variant_1.lua) can be found in Appendix A

RDATA Length Mismatch in DNS CNAME Records Causes Heap Overflow

CVE: CVE-2020-11901 (Variant 2)
CVSS: 9
Protocol(s): DNS/UDP (and likely DNS/TCP)
Port(s): 53

Vulnerability description:
In some versions of the Treck stack, a vulnerability exists in the way the stack processes DNS responses containing CNAME records. In such records, the length of the buffer allocated to store the DNS name is taken from the RDLENGTH field, while the data written is the full, decompressed domain name, terminating only at a null byte. As a result, if the size of the decompressed domain name specified in RDATA exceeds the provided RDLENGTH in a CNAME record, the excess is written past the end of the allocated buffer, resulting in a heap overflow and potential RCE.

Limitations or special considerations for detection:
Although exploitation of this vulnerability has been confirmed using malicious DNS over UDP packets, it has not been tested using DNS over TCP and it is unclear if such packets would exercise the same vulnerable code path. Until this can be confirmed, detection logic should assume both vectors are vulnerable.

Recommended detection criteria:

  • The device must be capable of processing incoming DNS responses.
  • The device must be capable of identifying CNAME records within DNS responses
  • The device should flag all DNS responses where the actual size of the RDATA field for a CNAME record exceeds the value specified in the same record’s RDLENGTH field.
      • In this case, the “actual size” corresponds to how vulnerable versions of the Treck stack compute the RDATA length, which involves adding up the size of every label until either null byte, a DNS compression pointer, or the end of the payload is encountered. The Treck stack will follow and decompress the pointer that terminates the domain name, if present, but the script does not as this computation is simply too expensive, as mentioned previously.

False positive conditions (signatures detecting non-malicious traffic):
False positives should be unlikely, but possible in scenarios where network devices send non-malicious traffic where RDLENGTH is not equal to the size of RDATA, thereby breaking RFC 1035.

False negative conditions (signatures failing to detect vulnerability/exploitation):
Since the detection logic does not perform decompression when computing the “actual size” of RDATA, it will fail to detect malicious packets that contain domain names whose length only exceeds RDLENGTH after decompression. Unfortunately, coverage for this case is non-trivial as such packets are actually RFC-compliant. According to RFC 1035, section 4.1.4:

If a domain name is contained in a part of the message subject to a length field (such as the RDATA section of an RR), and compression is used, the length of the compressed name is used in the length calculation, rather than the length of the expanded name.

Besides the computational overhead, enforcing such a check would likely result in very high false positive rates.

Signature(s):
dns_heap_overflow.rules:

# Variant 2
alert dns any any -> any any (flow:to_client; msg:"Potential DNS heap overflow exploit (CVE-2020-11901)"; lua:dns_heap_overflow_variant_2.lua; sid:2020119012; rev:1;)
Lua script (dns_heap_overflow_variant_2.lua) can be found in Appendix A

Write Out-of-Bounds Using Routing Header Type 0

CVE: CVE-2020-11897
CVSS: 10
Protocol(s): IPv6
Port(s): N/A

Vulnerability description:
When processing IPv6 incoming packets, an inconsistency parsing the IPv6 routing header can be triggered where the header length is checked against the total packet and not against the fragment length. This means that if we send fragmented packets with the overall size greater than or equal to the specified routing header length, then we process the routing header under the assumption that we have enough bytes in our current fragment (where we have enough bytes in the overall reassembled packet only). Thus, using routing header type 0 (RH0) we can force read and write into out-of-bounds memory location.

There is also a secondary side effect where we can get an info leak in a source IPv6 address in an ICMP parameter returned from the device.

Limitations or special considerations for detection:
The RFC for RH0 defines the length field as equal to “two times the number of addresses in the header.”  For example, if the routing header length is six, then there are three IPv6 addresses expected in the header. Upon reconstruction of the fragmented packets, the reported number of addresses is filled with data from the fragments that follow. This creates “invalid” IPv6 addresses in the header and potentially malforms the next layer of the packet. During exploitation, it would also be likely for the next layer of the packet to be malformed. Although ICMP can be used to perform an information leak, it is possible for the next layer to be any type and therefore vary in length. Verification of the length of this layer could therefore be very expensive and non-deterministic.

Recommended detection criteria:

  • The device must be capable of processing fragmented IPv6 traffic
  • The device should inspect fragmented packets containing Routing Header type 0 (RH0). If a RH0 IPv6 packet is fragmented, then the vulnerability is likely being exploited
  • If the length of the IPv6 layer of a packet fragment containing the RH0 header is less than the length reported in the routing header, then the vulnerability is likely being exploited
  • Upon reconstruction of the fragmented packets, if the header of the layer following IPv6 is malformed, the vulnerability may be being exploited

Notes:
The routing header type 0 was deprecated in IPv6 traffic in RFC 5095 as of December 2007. As a result, it may be feasible simply to detect packets using this criterion. False positives may be possible in this scenario for legacy devices or platforms. Suricata already provides a default rule for this scenario which has been added below. According to the RFC, routers are not supposed to fragment IPv6 packets and must support an MTU of 1280, which would always contain all of the RH0 header, unless an unusual amount of header extensions or an unusually large header is used. If this is followed, then a packet using the RH0 header should never be fragmented across the RH0 extension header bounds and any RH0 packet fragmented in this manner should be treated as potentially malicious. Treating any fragmented RH0 packet as potentially malicious may be sufficient. Furthermore, treating any fragmented RH0 packet with fragments size below a threshold as well as IPv6 packets with multiple extension headers or an unusually large header above a threshold may provide high accuracy detection.

False positive conditions (signatures detecting non-malicious traffic):
If all detection criteria outlined above are used, false positives should be minimal since the reported length of a packet should match its actual length and the next header should never contain malformed data.  If only routing header type 0 is checked, false positives are more likely to occur.  In the additional provided rule, false positives should be minimal since RH0 is deprecated and the ICMP header should never have invalid checksums or unknown codes.

False negative conditions (signatures failing to detect vulnerability/exploitation):
False negatives may occur if the signature is developed overly specific to the layer following IPv6, for example, ICMP.  An attacker could potentially leverage another layer and still exploit the vulnerability without the information leak; however, this would still trigger the default RH0 rule. In the second rule below, false negatives are likely to occur if:

  • An attacker uses a non-ICMP layer following the IPv6 layer
  • A valid ICMP code is used
  • The checksum is valid, and the payload is less than or equal to 5 bytes (this value can be tuned in the signature)

Signature(s):
Ipv6_rh0.rules:

alert ipv6 any any -> any any (msg:"SURICATA RH Type 0"; decode-event:ipv6.rh_type_0; classtype:protocol-command-decode; sid:2200093; rev:2;)

alert ipv6 any any -> any any (msg:"IPv6 RH0 Treck CVE-2020-11897"; decode-event:ipv6.rh_type_0; decode-event:icmpv6.unknown_code; icmpv6-csum:invalid; dsize:>5; sid:2020118971; rev:1;)

IPv4/UDP Tunneling Remote Code Execution

CVE: CVE-2020-11896
CVSS: 10.0
Protocol(s): IPv4/UDP
Port(s): Any

Vulnerability description:
The Treck TCP/IP stack does not properly handle incoming IPv4-in-IPv4 packets with fragmented payload data. This could lead to remote code execution when sending multiple specially crafted tunneled UDP packets to a vulnerable host.

The vulnerability is a result of an incorrect trimming operation when the advertised total IP length (in the packet header) is strictly less than the data available. When sending tunneled IPv4 packets using multiple fragments with a small total IP length value, the TCP/IP stack would execute the trimming operation. This leads to a heap overflow situation when the packet is copied to a destination packet allocated based on the smaller length. When the tunneled IPv4 packets are UDP packets sent to a listening port, there’s a possibility to trigger this exploit if the UDP receive queue is non-empty. This can result in an exploitable heap overflow situation, leading to remote code execution in the context in which the Treck TCP/IP stack runs.

Recommended detection criteria:
In order to detect an ongoing attack, the following conditions should be met if encapsulation can be unpacked:

  • The UDP receive queue must be non-empty
  • Incoming UDP packets must be fragmented
      • Flag MF = 1 with any offset, or
      • Flag MF = 0 with non-zero offset
  • Fragmented packets must have encapsulated IPv4 packet (upon assembly)
    protocol = 0x4 (IPIP)
  • Encapsulated IPv4 packet must be split across 2 packet fragments.
  • Reassembled (inner-most) IPv4 packet has incorrect data length stored in IP header.

The fourth condition above is required to activate the code-path which is vulnerable, as it spreads the data to be copied across multiple in-memory buffers. The final detection step is the source of the buffer overflow, as such, triggering on this may be sufficient.

Depending on the limitations of the network inspection device in question, a looser condition could be used, though it may be more prone to false positives.

In order to detect an ongoing attack if encapsulation cannot be unpacked:

  • The UDP receive queue must be non-empty
  • Incoming UDP packets must be fragmented
      • Flag MF = 1 with any value in offset field, or
      • Flag MF = 0 with any non-zero value in offset field
  • Final fragment has total fragment length longer than offset field.

The final condition shown above is not something that should be seen in a normal network.

Fragmentation, when it occurs, is the result of data overflowing the MTU of a given packet type. This indicates the final fragment should be no larger than any other fragment – and in practice would likely be smaller. The inverse, where the final fragment is somehow larger than previous fragments, indicates that the fragmentation is not the result of MTU overflow, but instead something else. In this case, malicious intent.

As network monitors in common usage are likely to have the ability to unpack encapsulation, only that ruleset is provided.

Limitations or special considerations for detection:
The Treck stack supports (at least) two levels of tunneling. Each tunnel level can be IPv4-in-IPv4, IPv6-in-IPv4, or IPv4-in-IPv6. The above logic is specific to the IPv4-in-IPv4, single level of tunneling case. In cases of deeper nesting, either a recursive check or a full unwrapping of all tunneling layers will be necessary.

False positive conditions (signatures detecting non-malicious traffic):
False positives should be minimal if all detection criteria outlined above are used in the case where the tunneling can be unpacked. In the case where tunneling cannot be unpacked, this is unlikely to trigger many false positives in the presence of standards compliant applications. Fragmentation as seen here is simply not common.

False negative conditions (signatures failing to detect vulnerability/exploitation):
False negatives could occur with deeper levels of nesting, or nesting of IPv6.

Signature(s):
ipv4_tunneling.rules:

alert ip any any -> any any (msg:"IPv4 TUNNELING EXPLOIT (CVE‑2020‑11896)"; ip_proto:4; lua:tunnel_length_check.lua; sid:2020118961; rev:1;)
Lua script (tunnel_length_check.Lua) can be found in Appendix A

Appendix A

Appendix A contains Lua scripts that are required for usage with corresponding Suricata signatures. These scripts are also located on McAfee ATR’s GitHub.

dns_tcp_size.lua: 

dns_size.lua: 

dns_invalid_name.lua:


dns_heap_overflow_variant_1.lua:

dns_heap_overflow_variant_2.lua:

tunnel_length_check.lua:

The post Ripple20 Critical Vulnerabilities – Detection Logic and Signatures appeared first on McAfee Blog.

Dopple-ganging up on Facial Recognition Systems

5 August 2020 at 16:01

Co-authored with Jesse Chick, OSU Senior and Former McAfee Intern, Primary Researcher.

Special thanks to Dr. Catherine Huang, McAfee Advanced Analytics Team
Special thanks to Kyle Baldes, Former McAfee Intern

“Face” the Facts

There are 7.6 Billion people in the world. That’s a huge number! In fact, if we all stood shoulder to shoulder on the equator, the number of people in the world would wrap around the earth over 86 times! That’s just the number of living people today; even adding in the history of all people for all time, you will never find two identical human faces. In fact, in even some of the most similar faces recorded (not including twins) it is quite easy to discern multiple differences. This seems almost impossible; it’s just a face, right? Two eyes, a nose, a mouth, ears, eyebrows and potentially other facial hair. Surely, we would have run into identical unrelated humans by this point. Turns out, there’s SO much more to the human face than this which can be more subtle than we often consider; forehead size, shape of the jaw, position of the ears, structure of the nose, and thousands more extremely minute details.

You may be questioning the significance of this detail as it relates to McAfee, or vulnerability research. Today, we’ll explore some work undertaken by McAfee Advanced Threat Research (ATR) in the context of data science and security; specifically, we looked at facial recognition systems and whether they were more, or less susceptible to error than we as human beings.

Look carefully at the four images below; can you spot which of these is fake and which are real?

StyleGAN images

The answer may surprise you; all four images are completely fake – they are 100% computer-generated, and not just parts of different people creativally superimposed. An expert system known as StyleGAN generated each of these, and millions more, with varying degrees of photorealism, from scratch.

This impressive technology is equal parts revolutions in data science and emerging technology that can compute faster and cheaper at a scale we’ve never seen before. It is enabling impressive innovations in data science and image generation or recognition, and can be done in real time or near real time. Some of the most practical applications for this are in the field of facial recognition; simply put, the ability for a computer system to determine whether two images or other media represent the same person or not. The earliest computer facial recognition technology dates back to the 1960s, but until recently, has either been cost-ineffective, false positive or false negative prone, or too slow and inefficient for the intended purpose.

The advancements in technology and breakthroughs in Artificial Intelligence and Machine Learning have enabled several novel applications for facial recognition. First and foremost, it can be used as a highly reliable authentication mechanism; an outstanding example of this is the iPhone. Beginning with the iPhone X in 2017, facial recognition was the new de facto standard for authenticating a user to their mobile device. While Apple uses advanced features such as depth to map the target face, many other mobile devices have implemented more standard methods based on the features of the target face itself; things we as humans see as well, including placement of eyes, width of the nose, and other features that in combination can accurately identify a single user. More simplistic and standard methods such as these may inherently suffer from security limitations relative to more advanced capabilities, such as the 3D camera capture. In a way, this is the whole point; the added complexity of depth information is what makes pixel-manipulation attacks impossible.

Another emerging use case for facial recognition systems is for law enforcement. In 2019, the Metropolitan Police in London announced the rollout of a network of cameras designed to aid police in automating the identification of criminals or missing persons. While widely controversial, the UK is not alone in this initiative; other major cities have piloted or implemented variants of facial recognition with or without the general population’s consent. In China, many of the trains and bus systems leverage facial recognition to identify and authenticate passengers as they board or unboard. Shopping centers and schools across the country are increasingly deploying similar technology.

More recently, in light of racial profiling and racial bias demonstrated repeatedly in facial recognition AI, IBM announced that it would eliminate its facial recognition programs given the way it could be used in law enforcement. Since then, many other major players in the facial recognition business have suspended or eliminated their facial recognition programs. This may be at least partially based on a high profile “false positive” case in which authorities errantly based an arrest of an individual on an incorrect facial recognition match of a black man named Robert Williams. The case is known as the country’s first wrongful arrest directly resulting from facial recognition technology.

Facial recognition has some obvious benefits of course, and this recent article details the use of facial recognition technology in China to track down and reunite a family many years after an abduction. Despite this, it remains a highly polarizing issue with significant privacy concerns, and may require significant further development to reduce some of the inherent flaws.

Live Facial Recognition for Passport Validation

Our next use case for facial recognition may hit closer to home than you realize. Multiple airports, including many in the United States, have deployed facial recognition systems to aid or replace human interaction for passport and identity verification. In fact, I was able to experience one of these myself in the Atlanta airport in 2019. It was far from ready, but travellers can expect to see continued rollouts of this across the country. In fact, based on the global impact COVID-19 has had on travel and sanitization, we are observing an unprecedented rush to implement touchless solutions such as biometrics. This is of course being done from a responsibility standpoint, but also from an airlines and airport profitability perspective. If these two entities can’t convince travelers that their travel experience is low-risk, many voluntary travelers will opt to wait until this assurance is more solid. This article expands on the impact Coronavirus is having on the fledgling market use of passport facial recognition, providing specific insight into Delta and United Airlines’ rapid expansion of the tech into new airports immediately, and further testing and integration in many countries around the world. While this push may result in less physical contact and fewer infections, it may also have the side-effect of exponentially increasing the attack surface of a new target.

The concept of passport control via facial recognition is quite simple. A camera takes a live video and/or photos of your face, and a verification service compares it to an already-existing photo of you, collected earlier. This could be from a passport or a number of other sources such as the Department of Homeland Security database. The “live” photo is most likely processed into a similar format (image size, type of image) as the target photo, and compared. If it matches, the passport holder is authenticated. If not, an alternate source will be checked by a human operator, including boarding passes and forms of ID.

As vulnerability researchers, we need to be able to look at how things work; both the intended method of operation as well as any oversights. As we reflected on this growing technology and the extremely critical decisions it enabled, we considered whether flaws in the underlying system could be leveraged to bypass the target facial recognition systems. More specifically, we wanted to know if we could create “adversarial images” in a passport-style format, that would be incorrectly classified as a targeted individual. (As an aside, we performed related attacks in both digital and physical mediums against image recognition systems, including research we released on the MobilEye camera deployed in certain Tesla vehicles.)

The conceptual attack scenario here is simple. We’ll refer to our attacker as Subject A, and he is on the “no-fly” list – if a live photo or video of him matches a stored passport image, he’ll immediately be refused boarding and flagged, likely for arrest. We’ll assume he’s never submitted a passport photo. Subject A (AKA Jesse), is working together with Subject B (AKA Steve), the accomplice, who is helping him to bypass this system. Jesse is an expert in model hacking and generates a fake image of Steve through a system he builds (much more on this to come). The image has to look like Steve when it’s submitted to the government, but needs to verify Jesse as the same person as the adversarial fake “Steve” in the passport photo. As long as a passport photo system classifies a live photo of Jesse as the target fake image, he’ll be able to bypass the facial recognition.

If this sounds far-fetched to you, it doesn’t to the German government. Recent policy in Germany included verbiage to explicitly disallow morphed or computer-generated combined photos. While the techniques discussed in this link are closely related to this, the approach, techniques and artifacts created in our work vary widely. For example, the concepts of face morphing in general are not novel ideas anymore; yet in our research, we use a more advanced, deep learning-based morphing approach, which is categorically different from the more primitive “weighted averaging” face morphing approach.

Over the course of 6 months, McAfee ATR researcher and intern Jesse Chick studied state-of-the-art machine learning algorithms, read and adopted industry papers, and worked closely with McAfee’s Advanced Analytics team to develop a novel approach to defeating facial recognition systems. To date, the research has progressed through white box and gray box attacks with high levels of success – we hope to inspire or collaborate with other researchers on black box attacks and demonstrate these findings against real world targets such as passport verification systems with the hopes of improving them.

The Method to the Madness

The term GAN is an increasingly-recognized acronym in the data science field. It stands for Generative Adversarial Network and represents a novel concept using one or more “generators” working in tandem with one or more “discriminators.” While this isn’t a data science paper and I won’t go into great detail on GAN, it will be beneficial to understand the concept at a high level. You can think of GAN as a combination of an art critic and an art forger. An art critic must be capable of determining whether a piece of art is real or forged, and of what quality the art is. The forger of course, is simply trying to create fake art that looks as much like the original as possible, to fool the critic. Over time, the forger may outwit the critic, and at other times the opposite may hold true, yet ultimately, over the long run, they will force each other to improve and adapt their methods. In this scenario, the forger is the “generator” and the art critic is the “discriminator.” This concept is analogous to GAN in that the generator and discriminator are both working together and also opposing each other – as the generator creates an image of a face, for example, the discriminator determines whether the image generated actually looks like a face, or if it looks like something else. It rejects the output if it is not satisfied, and the process starts over. This is repeated in the training phase for as long of a time as it takes for the discriminator to be convinced that the generator’s product is high enough quality to “meet the bar.”

One such implementation we saw earlier, StyleGAN, uses these exact properties to generate the photorealistic faces shown above. In fact, the research team tested StyleGAN, but determined it was not aligned with the task we set out to achieve: generating photorealistic faces, but also being able to easily implement an additional step in face verification. More specifically, its sophisticated and niche architecture would have been highly difficult to harness successfully for our purpose of clever face-morphing. For this reason, we opted to go with a relatively new but powerful GAN framework known as CycleGAN.

CycleGAN

CycleGAN is a GAN framework that was released in a paper in 2017. It represents a GAN methodology that uses two generators and two discriminators, and in its most basic sense, is responsible for translating one image to another through the use of GAN.

Image of zebras translated to horses via CycleGAN

There are some subtle but powerful details related to the CycleGAN infrastructure. We won’t go into depth on these, but one important concept is that CycleGAN uses higher level features to translate between images. Instead of taking random “noise” or “pixels” in the way StyleGAN translates into images, this model uses more significant features of the image for translation (shape of head, eye placement, body size, etc…). This works very well for human faces, despite the paper not specifically calling out human facial translation as a strength.

Face Net and InceptionResnetV1

While CycleGAN is an novel use of the GAN model, in and of itself it has been used for image to image translation numerous times. Our facial recognition application facilitated the need for an extension of this single model, with an image verification system. This is where FaceNet came into play. The team realized that not only would our model need to accurately create adversarial images that were photorealistic, it would also need to be verified as the original subject. More on this shortly. FaceNet is a face recognition architecture that was developed by Google in 2015, and was and perhaps still is considered state of the art in its ability to accurately classify faces. It uses a concept called facial embeddings to determine mathematical distances between two faces in a dimension. For the programmers or math experts, 512 dimensional space is used, to be precise, and each embedding is a 512 dimensional list or vector. To the lay person, the less similar the high level facial features are, the further apart the facial embeddings are. Conversely, the more similar the facial features, the closer together these faces are plotted. This concept is ideal for our use of facial recognition, given FaceNet operates against high level features of the face versus individual pixels, for example. This is a central concept and a key differentiator between our research and “shallow”adversarial image creation a la more traditionally used FGSM, JSMA, etc. Creating an attack that operates at the level of human-understandable features is where this research breaks new ground.

One of the top reasons for FaceNet’s popularity is that is uses a pre-trained model with a data set trained on hundreds of millions of facial images. This training was performed using a well-known academic/industry-standard dataset, and these results are readily available  for comparison. Furthermore, it achieved very high published accuracy (99.63%) when used on a set of 13,000 random face images from a benchmark set of data known as LFW (Labeled Faces in the Wild). In our own in-house evaluation testing, our accuracy results were closer to 95%.

Ultimately, given our need to start with a white box to understand the architecture, the solution we chose was a combination of CycleGAN and an open source FaceNet variant architecture known as InceptionResnet version 1. The ResNet family of deep neural networks uses learned filters, known as convolutions, to extract high-level information from visual data. In other words, the role of deep learning in face recognition is to transform an abstract feature from the image domain, i.e. a subject’s identity, into a domain of vectors (AKA embeddings) such that they can be reasoned about mathematically. The “distance” between the outputs of two images depicting the same subject should be mapped to a similar region in the output space, and two very different regions for input depicting different subjects. It should be noted that the success or failure of our attack is contingent on its ability to manipulate the distance between these face embeddings. To be clear, FaceNet is the pipeline consisting of data pre-processing, Inception ResNet V1, and data separation via a learned distance threshold.

Training

Whoever has the most data wins. This truism is especially relevant in the context of machine learning. We knew we would need a large enough data set to accurately train the attack generation model, but we guessed that it would be smaller than many other use cases. This is because given our goal was simply to take two people, subject A (Jesse) and subject B (Steve) below and minimize the “distance” between the two face embeddings produced when inputted into FaceNet, while preserving a misclassification in either direction. In other words, Jesse needed to look like Jesse in his passport photo, and yet be classified as Steve, and vice versa. We’ll describe facial embeddings and visualizations in detail shortly.

The training was done on a set of 1500 images of each of us, captured from live video as stills. We provided multiple expressions and facial gestures that would enrich the training data and accurately represent someone attempting to take a valid passport photo.

The research team then integrated the CycleGAN + FaceNet architecture and began to train the model.

As you can see from the images below, the initial output from the generator is very rough – these certainly look like human beings (sort of), but they’re not easily identifiable and of course have extremely obvious perturbations, otherwise known as “artifacts.”

However, as we progress through training over dozens of cycles, or epochs, a few things are becoming more visually apparent. The faces begin to clean up some of the abnormalities while simultaneously blending features of both subject A and subject B. The (somewhat frightening) results look something like this:

Progressing even further in the training epochs, and the discriminator is starting to become more satisfied with the generator’s output. Yes, we’ve got some detail to clean up, but the image is starting to look much more like subject B.

A couple hundred training epochs in, and we are producing candidates that would meet the bar for this application; they would pass as valid passport photos.

Fake image of Subject B

Remember, that with each iteration through this training process, the results are systematically fed into the facial recognition neural network and classified as Subject A or Subject B. This is essential as any photo that doesn’t “properly misclassify” as the other, doesn’t meet one of the primary objectives and must be rejected. It is also a novel approach as there are very few research projects which combine a GAN and an additional neural network in a cohesive and iterative approach like this.

We can see visually above that the faces being generated at this point are becoming real enough to convince human beings that they are not computer-generated. At the same time, let’s look behind the curtain and see some facial embedding visualizations which may help clarify how this is actually working.

To further understand facial embeddings, we can use the following images to visualize the concept. First, we have the images used for both training and generation of images. In other words, it contains real images from our data set and fake (adversarial) generated images as shown below:

Model Images (Training – Real_A & Real_B) – Generated (Fake_B & Fake_A)

This set of images is just one epoch of the model in action – given the highly realistic fake images generated here, it is not surprisingly a later epoch in the model evaluation.

To view these images as mathematical embeddings, we can use a visualization representing them on a multidimensional plane, which can be rotated to show the distance between them. It’s much easier to see that this model represents a cluster of “Real A” and “Fake B” on one side, and a separate cluster of “Real B” and “Fake A” on the other. This is the ideal attack scenario as it clearly shows how the model will confuse the fake image of the accomplice with the real image of the attacker, our ultimate test.

White Box and Gray Box Application

With much of machine learning, the model must be both effectively trained as well as able to reproduce and replicate results in future applications. For example, consider a food image classifier; its job being to correctly identify and label the type of food it sees in an image. It must have a massive training set so that it recognizes that a French Fry is different than a crab leg, but it also must be able to reproduce that classification on images of food it’s never seen before with a very high accuracy. Our model is somewhat different in that it is trained specifically on two people only (the adversary and the accomplice), and its job is done ahead of time during training. In other words, once we’ve generated a photorealistic image of the attacker that is classified as the accomplice, the model’s job is done. One important caveat is that it must work reliably to both correctly identify people and differentiate people, much like facial recognition would operate in the real world.

The theory behind this is based on the concept of transferability; if the models and features chosen in the development phase (called white box, with full access to the code and knowledge of the internal state of the model and pre-trained parameters) are similar enough to the real-world model and features (black box, no access to code or classifier) an attack will reliably transfer – even if the underlying model architecture is vastly different. This is truly an incredible concept for many people, as it seems like an attacker would need to understand every feature, every line of code, every input and output, to predict how a model will classify “adversarial input.” After all, that’s how classical software security works for the most part. By either directly reading or reverse engineering a piece of code, an attacker can figure out the precise input to trigger a bug. With model hacking (often called adversarial machine learning), we can develop attacks in a lab and transfer them to black box systems. This work, however, will take us through white box and gray box attacks, with possible future work focusing on black box attacks against facial recognition.

As mentioned earlier, a white box attack is one that is developed with full access to the underlying model – either because the researcher developed the model, or they are using an open source architecture. In our case, we did both to identify the ideal combination discussed above, integrating CycleGAN with various open source facial recognition models. The real Google FaceNet is proprietary, but it has been effectively reproduced by researchers as open source frameworks that achieve very similar results, hence our use of Inception Resnet v1. We call these versions of the model “gray box” because they are somewhere in the middle of white box and black box.

To take the concepts above from theory to the real world, we need to implement a physical system that emulates a passport scanner. Without access to the actual target system, we’ll simply use an RGB camera, such as the external one you might see on desktops in a home or office. The underlying camera is likely quite similar to the technology used by a passport photo camera. There’s some guesswork needed to determine what the passport camera is doing, so we take some educated liberties. The first thing to do is programmatically capture every individual frame from the live video and save them in memory for the duration of their use. After that, we apply some image transformations, scaling them to a smaller size and appropriate resolution of a passport-style photo. Finally, we pass each frame to the underlying pretrained model we built and ask it to determine whether the face it is analyzing is Subject A (the attacker), or Subject B (the accomplice). The model has been trained on enough images and variations of both that even changes in posture, position, hair style and more will still cause a misclassification. It’s worth noting that in this attack method, the attacker and accomplice are working together and would likely attempt to look as similar as possible to the original images in the data set the model is trained, as it would increase the overall misclassification confidence.

The Demos

The following demo videos demonstrate this attack using our gray box model. Let’s introduce the 3 players in these videos. In all three, Steve is the attacker now, Sam is our random test person, and Jesse is our accomplice. The first will show the positive test.

Positive Test:

This uses a real, non-generated image on the right side of the screen of Steve (now acting as our attacker). Our random test person (Sam), first stands in front of the live “passport verification camera” and is compared against the real image of Steve. They should of course be classified as different. Now Steve stands in front of the camera and the model correctly identifies him against his picture, taken from the original and unaltered data set. This proves the system can correctly identify Steve as himself.

Negative Test:

Next is the negative test, where the system tests Sam against a real photo of Jesse. He is correctly classified as different, as expected. Then Steve stands in front of the system and confirms the negative test as well, showing that the model correctly differentiates people in non-adversarial conditions.

Adversarial Test:

Finally, in the third video, Sam is evaluated against an adversarial, or fake image of Jesse, generated by our model. Since Sam was not part of the CycleGAN training set designed to cause misclassification, he is correctly shown as different again. Lastly, our attacker Steve stands in front of the live camera and is correctly misclassified as Jesse (now the accomplice). Because the model was trained for either Jesse or Steve to be the adversarial image, in this case we chose Jesse as the fake/adversarial image.

If a passport-scanner were to replace a human being completely in this scenario, it would believe it had just correctly validated that the attacker was the same person stored in the passport database as the accomplice. Given the accomplice is not on a no-fly list and does not have any other restrictions, the attacker can bypass this essential verification step and board the plane. It’s worth noting that a human being would likely spot the difference between the accomplice and attacker, but this research is based off of the inherent risks associated with reliance on AI and ML alone, without providing defense-in-depth or external validation, such as a human being to validate.

Positive Test Video – Confirming Ability to Recognize a Person as Himself

Negative Test Video – Confirming Ability to Tell People Apart

Adversarial Test Video – Confirming Ability to Misclassify with Adversarial Image

What Have we Learned?

Biometrics are an increasingly relied-upon technology to authenticate or verify individuals and are effectively replacing password and other potentially unreliable authentication methods in many cases. However, the reliance on automated systems and machine learning without considering the inherent security flaws present in the mysterious internal mechanics of face-recognition models could provide cyber criminals unique capabilities to bypass critical systems such as automated passport enforcement. To our knowledge, our approach to this research represents the first-of-its-kind application of model hacking and facial recognition. By leveraging the power of data science and security research, we look to work closely with vendors and implementors of these critical systems to design security from the ground up, closing the gaps that weaken these systems. As a call to action, we look to the community for a standard by which can reason formally about the reliability of machine learning systems in the presence of adversarial samples. Such standards exist in many verticals of computer security, including cryptography, protocols, wireless radio frequency and many more. If we are going to continue to hand off critical tasks like authentication to a black box, we had better have a framework for determining acceptable bounds for its resiliency and performance under adverse conditions.

For more information on research efforts by McAfee Advanced Threat Research, please follow our blog or visit our website.

The post Dopple-ganging up on Facial Recognition Systems appeared first on McAfee Blog.

Call an Exorcist! My Robot’s Possessed!

6 August 2020 at 04:01

Overview

As part of our continued goal of helping developers provide safer products for businesses and consumers, we here at McAfee Advanced Threat Research (ATR) recently investigated temi, a teleconference robot produced by Robotemi Global Ltd. Our research led us to discover four separate vulnerabilities in the temi robot, which this paper will describe in great detail. These include:

  1. CVE-2020-16170 – Use of Hard-Coded Credentials
  2. CVE-2020-16168 – Origin Validation Error
  3. CVE-2020-16167 – Missing Authentication for Critical Function
  4. CVE-2020-16169 – Authentication Bypass Using an Alternate Path of Channel

Together, these vulnerabilities could be used by a malicious actor to spy on temi’s video calls, intercept calls intended for another user, and even remotely operate temi – all with zero authentication.

Per McAfee’s vulnerability disclosure policy, we reported our findings to Robotemi Global Ltd. on March 5, 2020. Shortly thereafter, they responded and began an ongoing dialogue with ATR while they worked to adopt the mitigations we outlined in our disclosure report. As of July 15, 2020, these vulnerabilities have been successfully patched – mitigated in version 120 of the temi’s Robox OS and all versions after 1.3.7931 of the temi Android app. We commend Robotemi for their prompt response and willingness to collaborate throughout this process. We’d go so far as to say this has been one of the most responsive, proactive, and efficient vendors McAfee has had the pleasure of working with.

This paper is intended as a long-form technical analysis of the vulnerability discovery process, the exploits made possible by the vulns, and the potential impact such exploits may have. Those interested in a higher-level, less technical overview of these findings should refer to our summary blog post here.

Contents

Overview
Contents
What is temi
Normal Operation of temi
Initial Recon
Port Scanning
Capturing Traffic
Getting a Shell
Finding temi’s Code
Reversing the Code for Video Calls
Brute-Forcing the Channel Name as an Attack Vector
Exploring MQTT Attack Vectors
Overview
Modifying the temi Phone App
The Relationship Between Robot IDs and MQTT Topics
How are MQTT Call Invite Messages Published?
Intercepting Calls
Problem: temi Won’t Answer My Calls
Solution: Become an OWNER
Adding an OWNER: Phone App’s Perspective
Adding an OWNER: temi’s Perspective
Detour: Sneaking Onto temi’s Contact List
Gaining OWNER Privileges
Refining the Exploits
Impact
Conclusion

What is temi?

Robots.

The final frontier.

For an Android tablet ‘brain’ sitting atop a 4-foot-tall robot, temi packs a lot of sensors into a small form factor. These include 360° LIDAR, three different cameras, five proximity sensors, and even an Inertial Measurement Unit  (IMU) sensor, which is a sort of accelerometer + gyroscope + magnetometer all-in-one. All these work together to give temi something close to the ability to move autonomously through a space while avoiding any obstacles. If it weren’t for the nefarious forces of stairs and curbs, temi would be unstoppable.

Robotemi markets its robot as being used primarily for teleconferencing. Articles linked from the temi website describe the robot’s applications in various industries: Connected Living recently partnered with temi for use in elder care, the Kellog’s café in NYC adopted temi to “enhance the retail experience”, and corporate staffing company Collabera uses temi to “improve cross-office communication.” Despite its slogan of “personal robot”, it appears that temi is designed for both consumer and enterprise applications, and it’s the latter that really got us at McAfee Advanced Threat Research interested in it as a research target. Its growing presence in the medical space, which temi’s creators have accommodated by stepping up production to 1,000 units a month, is especially interesting given the greatly increased demand for remote doctor’s visits. What would a compromised temi mean for its users, whether it be the mother out on business, or the patient being diagnosed via robotic proxy? We placed our preorder and set out to find out.

Normal Operation of temi

Once it finally arrived, we got to setting it up the way any user might: we unboxed it, plugged in its charging dock, and connected it to WiFi. Normal operation of the temi robot is done through the use of its smart phone app, and at first startup temi prompted us to scan a QR code with the app. The phone used to scan the QR code becomes temi’s “admin”, allowing you to control the robot remotely by simply calling it. Temi can have many contacts outside of its singular admin, and becoming a contact is fairly straightforward. Whenever you launch the temi phone app, it scans your phone’s contacts and automatically adds any numbers that have been registered with the temi app to the app’s contact list. If any of those contacts happens to be a temi admin, you can call their temi simply by clicking that contact, as shown in Figure 1.

Figure 1: Selecting a contact from the temi phone app

In this way, users of the phone app besides temi’s admin can still call a temi robot using this method. Since initiating a call with a temi allows you to remotely operate it in addition to seeing through its camera and hearing through its microphone, giving anyone the ability to call your temi could prove… problematic. Temi’s creators address this exact issue on their FAQ page, as shown in Figure 2.

Figure 2: “Can anyone connect to my temi?”, from the temi’s FAQ page

The first line here is a bit misleading, since adding a temi’s admin as a phone contact seems to be sufficient to call that temi – the admin does not need to also have you added as a phone contact for this to work. That being said, this doesn’t mean that just anyone can start controlling your temi; “physical permission on the robot side” is required for calls made by users that aren’t temi’s admin or explicitly authorized by said admin. In practice, this corresponds to a call notification on the temi’s screen that the user can either answer or decline. In other words, it’s no more or less “secure” than receiving cold calls on your cell phone.

As for the last line, which refers to an admin’s ability to grant certain users the option to “hop in” to the robot, this is also done through the phone app by simply selecting the “Invite New Member” option from the temi’s contact entry in the app, and then selecting one or more users from the app’s contact list to “invite”, as shown in Figure 3.

Figure 3: How to grant users special permissions from the phone app

Once a call has been established between the robot and a phone user, which either party may initiate, the phone user can do things like manually drive the robot around, add, remove, and navigate to saved locations, patrol between saved locations, control its volume, and more.

Figure 4: Driving the temi using the phone app

Due to the level of control afforded to temi’s callers, the calling functionality quickly became a priority during our investigation of the temi robot.

Initial Recon

Port Scanning

While a robot was certainly a bit different from our typical targets, we began our reconnaissance with methods that have stood the test of time: port scans, packet captures, and a local shell.

Figure 5: Running Nmap on the temi

An Nmap scan revealed only one open port: TCP port 4443. Immediately we knew that Nmap’s classification of this port being used for Pharos, a “secure office printing solution for your business”, was almost certainly wrong. Instead, it was likely that this port was being used for TLS communication as an alternative to the standard 443. While good to know, this didn’t tell us much about the type of traffic temi expected on this port, or even what service(s) was handling that traffic, so we moved on.

Capturing Traffic

Next on our checklist was to obtain some captures of the robot’s network traffic, focusing on traffic generated during boot, during an update, and during a video call.

Traffic captured when temi was booting up but otherwise idling showed three unique external IP addresses being accessed: 98.137.246.7, 54.85.186.18, and 34.206.180.208.

Running nslookup on these IPs revealed that the first pointed to some Yahoo! media server, likely used for its news app, while the other two appeared to be AWS instances.

Figure 6: Running nslookup on IPs accessed by temi

As for the data being sent/received, there wasn’t much to look at. The Yahoo! address was being accessed via HTTP (port 80), but the TCP packets had no payload. As for the AWS addresses, these were being accessed via TLS (port 443) and the data was encrypted.

For updates, temi accessed “temi-ota-updates.s3-accelerate.amazonaws.com”, which was almost certainly a custom AWS instance set up by the folks at Robotemi. As with the other traffic to AWS, the updates were being encrypted.

Getting a Shell

In order to prod deeper, we needed a local shell on our temi. Fortunately, wireless connections via Android Debug Bridge, or ADB, could be enabled through temi’s settings from its touchscreen. Better still, the shell provided through ADB had root privileges, although the device itself was not “rooted”. This was likely done to help facilitate “temi Developers”, since the temi website has an entire portal dedicated to helping users develop custom apps for their robot.

Unfortunately, the default shell granted via ADB was fairly stripped down, and each reboot would mean having to manually reopen temi’s ADB port from its touchscreen before being able to connect to it again. Furthermore, this method required the temi software to be running in order to access our shell, which would leave us without recourse if our prodding somehow bricked that software. This was far from ideal.

While commands like adb push made moving custom ARM binaries for bash, busybox, and ssh onto temi fairly trivial, getting anything to run on boot proved more challenging. For starters, temi did not have the standard /etc/init.d/ directory. Additionally, the primary scripts that would run on boot, like /init.rc, would be loaded directly from the boot image, meaning any edits made to them would not persist across reboots. This was likely by design as part of Android’s SELinux security model – we would have to be a little more creative if we wanted to convince temi to start an SSH server on boot.

Digging through the contents of /init.rc, however, gave us a clue:

Figure 7: Interesting entry in /init.rc

For those unfamiliar with Android’s Init language,

“The init language is used in plain text files that take the .rc file extension. There are typically multiple of these in multiple locations on the system, described below.
/init.rc is the primary .rc file and is loaded by the init executable at the beginning of its execution. It is responsible for the initial set up of the system.” – Android docs.

The entry shown in Figure 7, one of the hundreds contained in temi’s init.rc, tells the system to launch the service “flash_recovery” during boot with the argument “/system/bin/install-recovery.sh”. The “class main” is just a label used to group entries together, and “oneshot” just means “do not restart the service when it exits.” This entry stood out to us because it was invoking a script located in /system/bin/, which was not loaded from the boot image, meaning any changes should stick. While the /system partition is read-only by default, our root privileges made it trivial to temporarily remount /system as read-write in order to add the following line to the end: “/system/bin/sshd”. With that, we had a reliable means of getting a root shell on our temi to explore further.

Finding temi’s Code

The first thing we did with our newfound freedom was run netstat:

Figure 8: Running netstat

It appeared that most networking, including the open port 4443 we found using Nmap earlier, was being handled by “com.roboteam.teamy.usa”. Based on the name alone, this was likely the main temi software running on the robot. Additionally, the name looked more like the name of an Android package than a native binary. We confirmed this by running:

Figure 9: Trying to find the binary for com.roboteam.teamy.usa in /proc

app_process32 (or app_process64, depending on architecture), is the binary used by Android for running Android apps, meaning we were looking for an APK, not an ELF. Under this assumption, we instead tried to find the code for this process using Android’s pm command:

Figure 10: Looking for the APK for “com.roboteam.teamy.usa”

Sure enough, we had our APK.

Typically, every installed app on Android has a corresponding data directory, and we were able to find the one for this package under /data/data/com.roboteam.teamy.usa:

Figure 11: data directory for “com.roboteam.teamy.usa”

The lib/ directory contained native code used by the package:

Figure 12: native code used by “com.roboteam.teamy.usa”

After looking into several of these libraries, libagora-rtc-sdk-jni.so in particular stood out to us since it was part of Agora, a platform that provides SDKs for voice, video, and Real-Time-Messaging (RTM) services. It was likely that temi was using Agora to implement its video calling functionality – the functionality we were most interested in.

By looking at this binary’s strings, we were also able to determine that temi was using version 2.3.1 of the Agora Video SDK:

Figure 13: Finding the Agora SDK version using strings

Of course, we were equally interested in the code for the temi phone app, which we obtained through the use of APK Extractor and ADB. We were also curious to see if the Android phone app used the same version of the Agora SDK, which we checked by comparing their MD5 hashes:

Figure 14: Comparing MD5 hashes for libagora between temi robot and temi phone app

Sure enough, they were the identical.

Reversing the Code for Video Calls

The next step was to begin reversing these apps in order to better understand how they worked. We decided to start by looking at the phone app’s code, since it was easier to test the behavior of the phone app compared to the robot.

In order to decompile and analyze the APK, we used JADX. Although there are many Java decompilers out there that work on Android code, JADX stood out to us due to its various features:

  • It can open APK files directly (will convert .dex to .jar and merge multiple .dex files automatically)
  • It handles modern Java features like nested classes and inline lambda functions better than most other decompilers
  • For any class being viewed, you can click on the “smali” tab to see the smali code
  • It displays line numbers synchronized with the corresponding .line directives in the bytecode, making it easier to map decompiled Java code back to the original bytecode
  • You can right-click on any method, member, or class to see its usage or declaration

The temi Android phone app, like most non-trivial Android apps, was massive. Instead of groping in the dark and hoping to stumble upon some interesting code, we decided to take a more targeted approach. From the outset, we knew that our focus was on temi’s calling functionality since this would provide the greatest impact for any attacker. We also now knew that temi was using the Agora SDK to implement this calling functionality. After looking through Agora’s Java API Reference for Android (v2.3.1), we decided that the function joinChannel() would be a good place to start our investigation:

Figure 15: Agora’s documentation for joinChannel()

By opening libagora-rtc-sdk-jni.so in IDA and looking at its exports, we were able to find a function called nativeJoinChannel() at the offset 0xD4484:

Figure 16: Some of libagora’s exports

Using JADX’s search feature, we found a function with the same name in the decompiled code, located on line 960 in the class RtcEngineImpl:

Figure 17: Native Agora methods in RtcEngineImpl

From here, we began the tedious process of working backwards to trace the call chain for video calls all the way to their entry points. We did this by looking for the method that invoked nativeJoinChannel(), then looking for the method that invoked that method, and so on. The return on investment for our tireless efforts was the following:


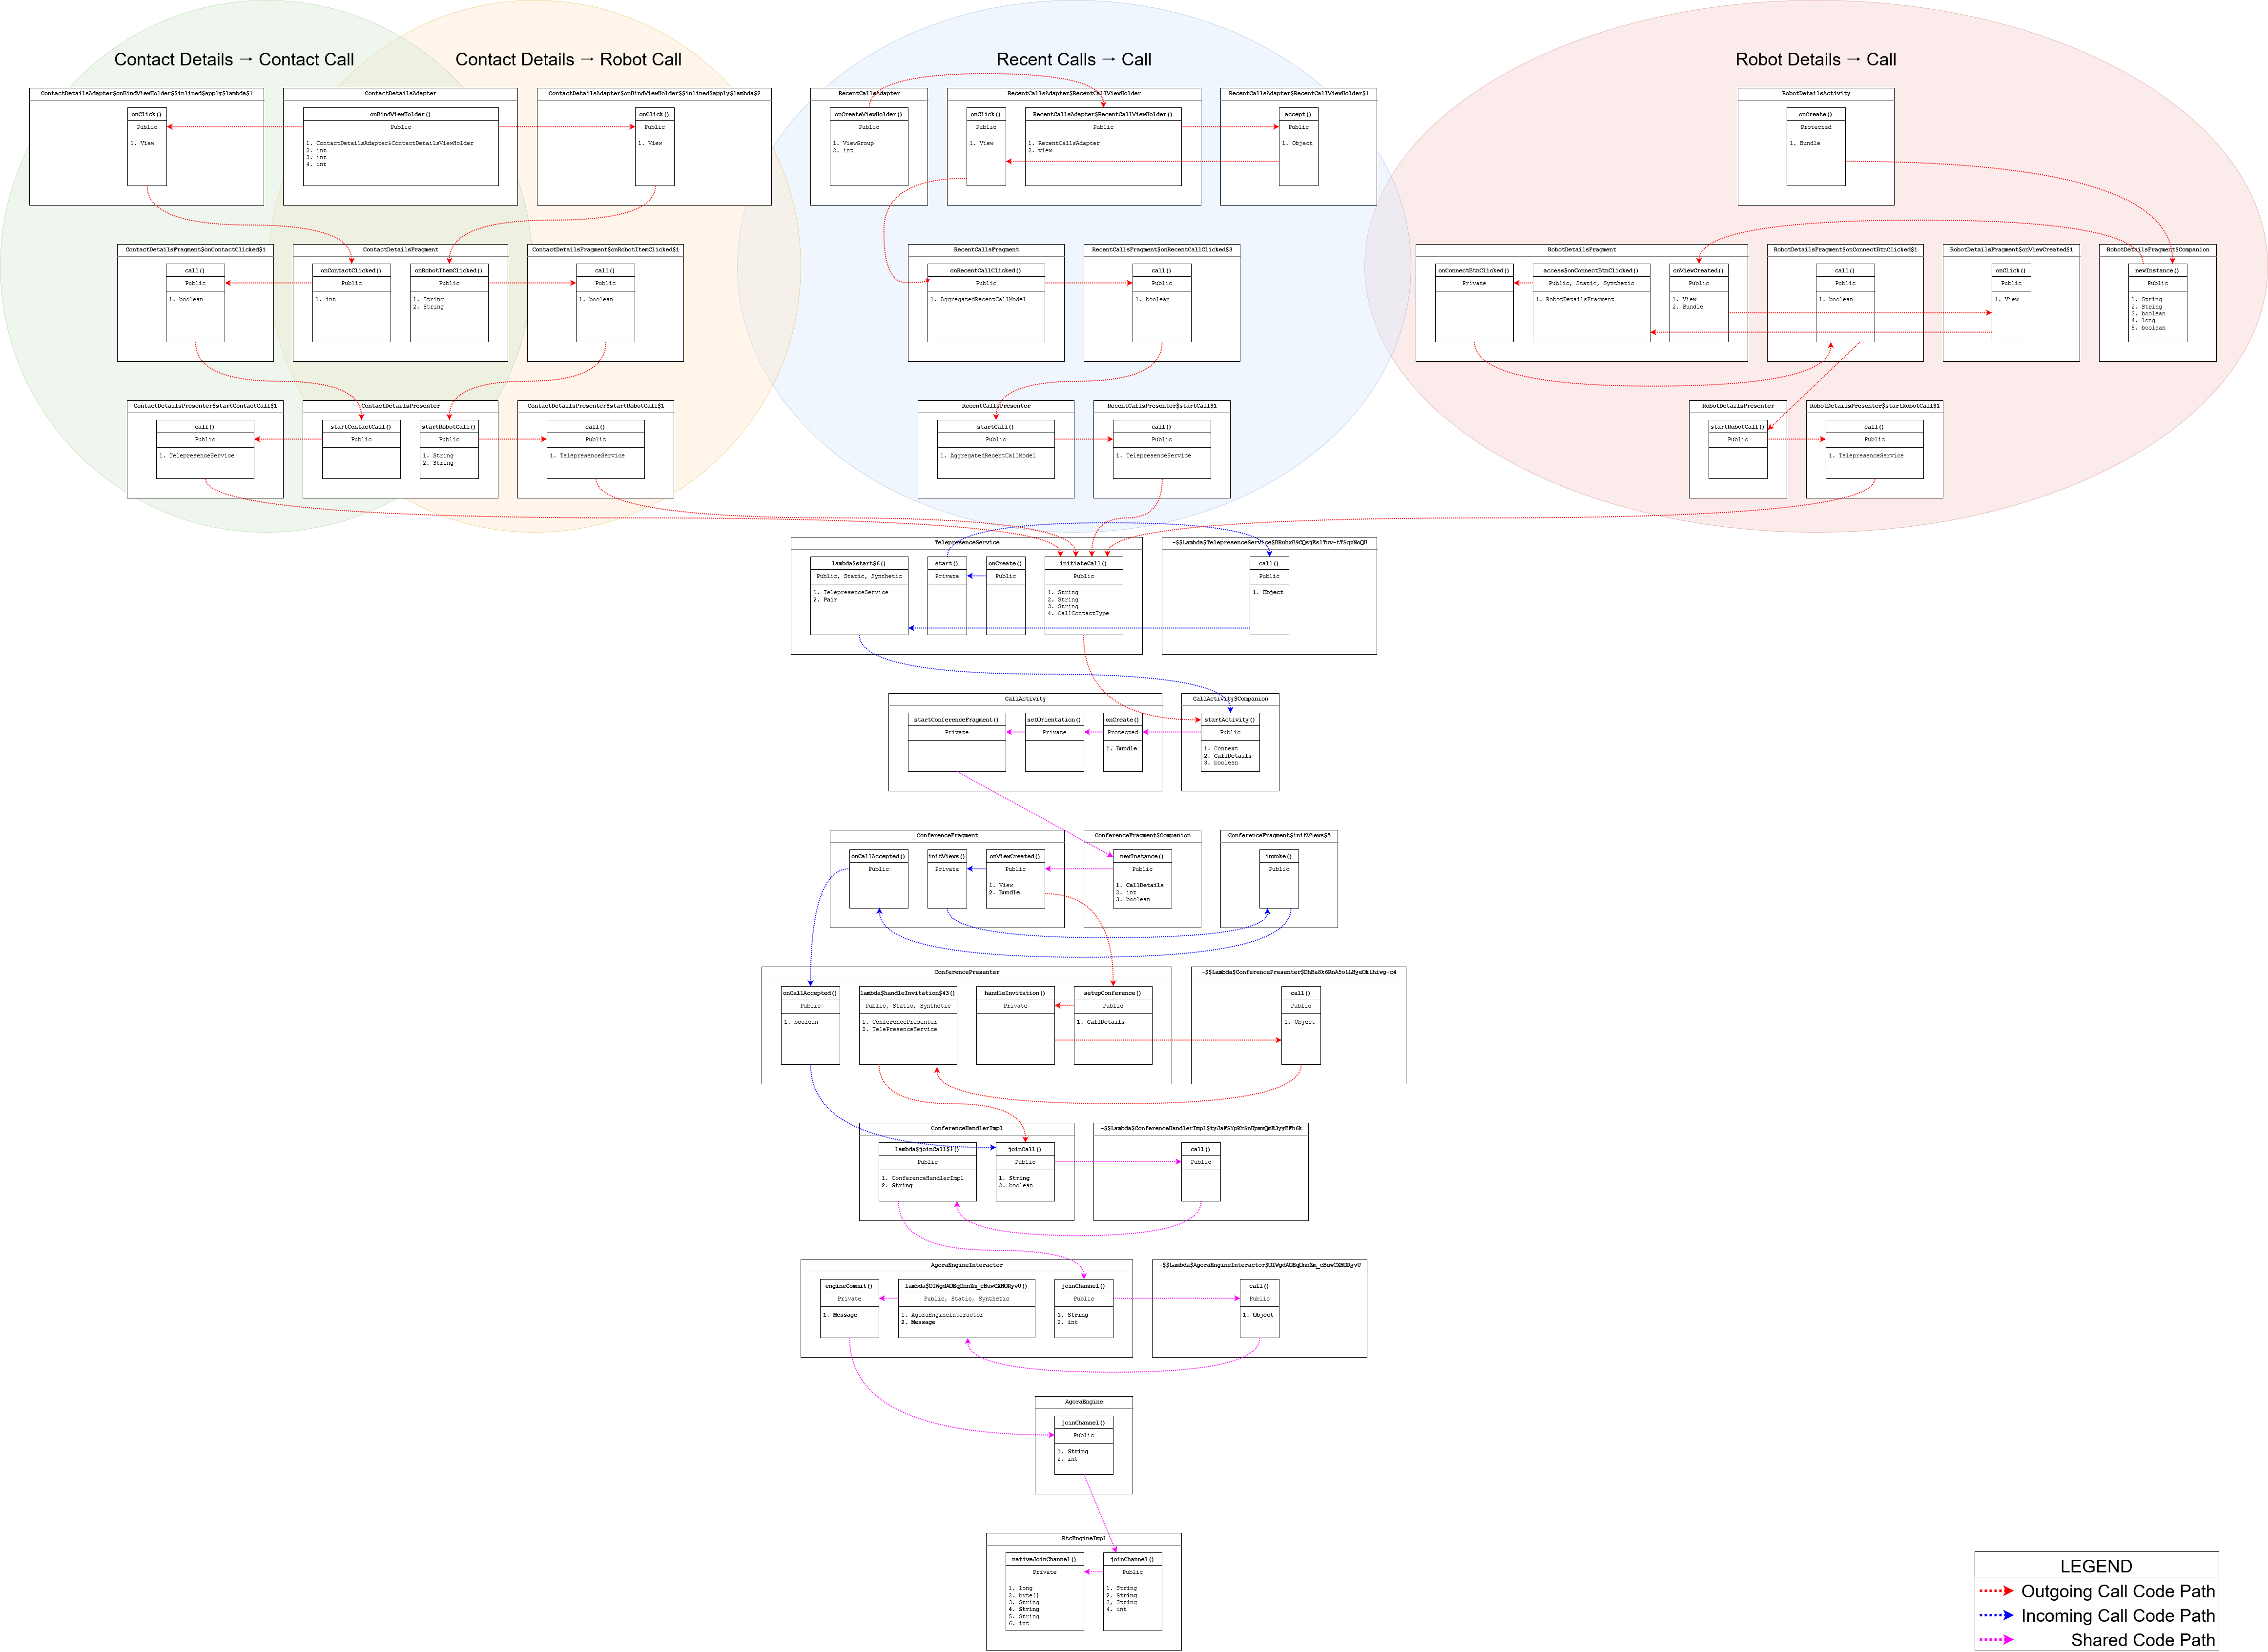
Figure 18: Code flow diagram for the various ways of making video calls using the temi phone app

At a high level, the code for outgoing calls has four entry-points, and these map 1-to-1 with the four ways of initiating a call from the temi phone app:

  1. Select a contact and hit “Call”. This will call that contact’s phone directly, not their temi. This corresponds to the “Contact Details → Contact Call” code path outlined in the graph (green region).
  2. Select a contact and, if they have a temi robot, hit “Connect”. This will call their temi and corresponds to the “Contact Details → Robot Call” code path outlined in the graph (orange region).
  3. Go to the app’s “Recents” tab and select one of the contacts/robots you have recently called or have called you. This will call that contact or robot and corresponds to the “Recent Calls → Call” code path outlined in the graph (blue region).
  4. If you are an admin, select your temi from beneath the “My temi” heading on the “Contacts” tab and hit the “Connect” button from the following screen, also known as the Robot Details screen. This will call your temi and corresponds to the “Robot Details → Call” code path outlined in the graph (red region).

The classes and methods contained within the colored regions handle rendering the screens from which calls can be initiated and the binding of these buttons to the code that actually handles calling. No matter the entry point, all outgoing calls converge at TelepresenceService.initiateCall(), so it’s worth taking a closer look at this method:

Figure 19: TelepresenceService.initiateCall()

And here are the four ways it is invoked:

Contact Details → Contact Call

Figure 20: Invoking initiateCall() from Contact Details → Contact Call

Contact Details → Robot Call

Figure 21: Invoking initiateCall() from Contact Details → Robot Call

Recent Calls → Call

Figure 22: Invoking initiateCall() from Recent Calls → Call

Robot Details → Call

Figure 23: Invoking initiateCall() from Robot Details → Call

The first parameter is an ID used to identify the callee. For temi robots, this appears to be something called a “robot ID”, whereas for contacts it is obtained via a call to getContactId(). Interestingly, for recent calls, which can be either a contact or a robot, the ID is obtained via a call to getMd5PhoneNumber(), which is a bit strange since temi does not (as far as we can tell) have a phone number. We will expand on this later.

The second parameter is a string denoting the caller’s type. Since we were looking at exclusively phone app code here, we assumed that “typeUser” denotes a caller using the phone app.

The third parameter is the callee’s display name – straightforward enough.

The fourth and final parameter is of a custom enum type that denotes the callee’s type. If calling a temi, its type is CallContactType.TEMI_CALL; otherwise, it’s CallContactType.CONTACT_CALL. Note that for the Recent Calls entry point, this value is obtained dynamically, which makes sense since this path handles calls to both contacts and temis.

It’s also worth noting that initiateCall() invokes InvitationManager.createInvitation() in order to create an Invitation object which represents the “call invitation” to be sent to the callee:

Figure 24: InvitationManager.createInvitation()

From there, as seen on line 223 of Figure 19, initiateCall() passes the result of Utils.getRandomSessionId() as the first parameter to createInvitation(), which becomes the sessionId:

Figure 25: Utils.getRandomSessionId()

All this is doing is randomly generating an integer between 100,000 and 999,999, inclusive. In other words, the sessionId is always a positive, six-digit decimal number.

By tracing this value all the way down the call chain to Agora’s nativeJoinChannel(), we discovered that this sessionId becomes the “channelName” parameter described in Figure 15 – the unique identifier for the chatroom for that particular call.  The propagation of this channel name can be seen in Figure 18; the bolded parameter in each method call contains the channel name.

Brute-Forcing the Channel Name as an Attack Vector

So why were we so interested in the Agora channel name? Well, if we look back at Figure 15, we can see that it is one of only two fields needed to join a channel since the third and fourth fields are labeled optional. The only other required field is the “token”, but looking closer at the documentation reveals that “in most circumstances, the static App ID suffices”, and in those cases the token “is optional and can be set as null”:

Figure 26: Agora documentation for joinChannel’s “token” parameter

Our next question was, does temi use a token or does it use a static App ID? We quickly answered that question by looking at how the temi phone app was calling joinChannel():

Figure 27: Agora’s joinChannel() API function being called from AgoraEngine.joinChannel()

Sure enough, the token parameter is being set to null.

This was starting to look promising – if the static App ID and channel name are all that’s needed to join an Agora video call and we already knew that temi’s channel names are restricted to six-digit values, then it might be plausible to join existing temi calls through brute force means. All we would need is this “App ID”.

Looking back at the Agora docs, we looked for which API functions actually use this App Id. As it turned out, there was only one: RtcEngine.create().

Figure 28: Agora documentation for RtcEngine.create()

Put briefly, the App ID is a static value issued to developers that is unique to each project and is used as a sort of namespace, segregating different users of Agora’s servers. This ensures that temi users can only use Agora to call other temi users. Since any temi phone app user should be able to call any temi (or other user), there should be a single App ID shared by all temi robots. We decided to take a look at how temi’s code was invoking RtcEngine.create() to see if we could track down the App ID:

Figure 29: AgoraEngine.ensureRtcEngineReadyLock()

Well, that’s not good.

In our view, this was already a vulnerability, denoted by CVE-2020-16170 and having a CVSS score of 8.2. A dedicated attacker would have no problem iterating over all 900,000 possible channel names. Worse yet, doing so would let the attacker “spray and pray”, allowing them to connect to any ongoing temi call without needing to know anything about their victims.

While we certainly couldn’t test such an exploit against a production server, we did decide to test whether an attacker could join an existing temi call knowing only the App ID and channel name in advance. To facilitate this, we used an Android phone to call our temi, making sure to run logcat on the phone before the call started. Doing so, we were able to capture the invitation message containing the channel name (labeled “sessionId”) as it was being sent to the OkHttp client, which then logged it:

Figure 30: Finding the channel name for the call using logcat

Using the hardcoded App ID and the channel name obtained from the logs we were able to successfully join an ongoing call and get both audio and video from at least one of the other callers, proving that this is a viable attack vector.

Although exploitation of this vulnerability utilizes Agora’s video calling API, its existence is a result of temi’s specific implementation of the SDK. While the decision to hardcode temi’s Agora App ID into the phone app is the root cause of this vulnerability, its impact could also have been substantially mitigated by utilizing a token or by allowing a broader range of channel names. Either of these would have rendered the brute-force attack vector incredibly difficult, if not impossible.

Exploring MQTT Attack Vectors

Overview

Outside of a brute-force method involving joining existing temi calls by trying every possible channel ID, it would be useful to have a more targeted attack vector. Moreover, while joining a call using the brute-force method would let an attacker spy on users, it would not grant them control of the robot itself – we wanted a method that would let us do both. Fortunately, this level of control is already available during normal operation of the temi robot + phone app.

Although temi uses Agora to facilitate video calls, notifying users of incoming calls, through ringing or otherwise, is not a feature implemented by Agora. In the case of temi, this functionality is implemented using MQTT. MQTT is a publish/subscribe (pub/sub) connectivity protocol designed for “machine-to-machine (M2M)/Internet of Things” communication. In it, communications are categorized into “topics” and clients can either “subscribe” to these topics to receive all their related messages, “publish” their own messages to these topics, or both. These topics are structured into a hierarchy delineated in a manner very similar to UNIX-style filesystem naming schemes, with a forward slash (“/”) separating different topic “levels”. Communication between clients is facilitated via a system known as a “broker“, usually implemented as a remote server, which handles establishing and closing connections, message delivery, and client authentication.

Unfortunately, there were several hurdles we would need to overcome in order to leverage temi’s calling functionality as an unauthorized “attacker”.

Firstly, a targeted attack method requires, at a minimum, a reliable way of uniquely identifying the target. In other words, if you are interested in hacking Bob’s temi, you need a way to pick out Bob’s temi from every other temi. A softer but equally important requirement is that this identifier must be one that an attacker could plausibly obtain. The more difficult the identifier is to obtain, the more contrived and unrealistic any attack vectors that rely on this identifier become. As an example, a name or phone number might be a plausible identifier; a social security number, less so.

Reversing temi’s MQTT implementation in its phone app code had revealed a promising potential identifier. We discovered that each robot has its own MQTT topics that it listens on, which are identified using its MQTT client ID, otherwise known as its robot ID. The robot ID for a temi can be easily obtained through normal operation of the phone app by simply adding one of its users as a phone contact, a method we had described previously. This is because the temi phone app allows the user to call any temi registered to a phone number in the user’s contacts list, which requires that temi’s robot ID. If the phone app already has access to this information locally, then it should be hypothetically possible to pull this information from the app.

Second, we needed a way to communicate with temi. If calling is facilitated through the publishing of MQTT messages to certain topics, we needed to find a way to publish our own messages to these same topics. On that note, if all MQTT messages must first pass through the broker, we needed a way to trick the broker into thinking we were a trusted MQTT client and bypass any authentication that might be in place.

One way to overcome this hurdle would be to alter the existing temi phone app. Modifying third party Android apps is a well-known process and would let us leverage the code already present for sending MQTT messages instead of writing this code from scratch. Furthermore, since the phone app requires nothing more than the phone number of one of temi’s users in order to call it (and thus, publish MQTT messages on its topics), this means that the phone app must have a way of authenticating with the broker. If we could send custom MQTT messages to arbitrary topics from the context of a “trusted” phone app, then we likely wouldn’t need to worry about authentication.

This left us with our third and final hurdle: privilege escalation. Although cold calling a temi robot is not difficult to achieve, it does not grant us the ability to remotely operate the robot on its own. This is because calling temi in this way causes it to ring and requires the call to be accepted on temi’s end via its touchscreen. Only temi’s admin, the user who registered it via QR code scan, and privileged users manually selected by this admin may directly control temi without any user interaction on the other end. Thus, we needed to find a way to escalate our privilege so that temi would pick up our calls automatically.

If MQTT is the primary means of communication between temi and its phone app users, and admins can manage the privilege levels of users directly from the phone app, it stands to reason that privilege management is likely performed through MQTT. Thus, if we could alter the phone app to spoof a privilege escalation MQTT message, we could overcome this hurdle, as well.

Modifying the temi Phone App

Since our entire plan hinged on us being able to alter the bytecode of the phone app without either breaking the app or preventing it from authenticating with the various remote servers it communicates with, we decided to first confirm that this was even possible. To accomplish this, we used a combination of ADB, Apktool, Keytool, and Jarsigner.

We began by unpacking the APK file for the temi phone app using Apktool:

Figure 31: Unpacking the temi phone app

Next, we searched the unpacked APK for the file or code we wanted to modify. For our proof-of-concept, we decided to simply change the label for the “Call” button, since it would be immediately obvious whether or not it worked. In many Android apps, the strings used for buttons are typically not hardcoded and are instead loaded from a resource file. In this case, they were loaded from the file res/values/strings.xml:

Figure 32: Searching for the call button label in strings.xml

It looked like line 108 contained the label we wanted to change. We simply replaced “Call” with “PWN” and saved our changes.

Note: For less trivial modifications, like the ones we would need to make later, this process would naturally be more involved. Since even the most sophisticated Java decompilers are unable to produce code that will actually compile for non-trivial apps, meaningful modifications usually mean having to read and modify smali, the assembler for Android’s Dalvik bytecode. That being said, we found that the best approach to making meaningful changes to a complex app like temi’s is to read Java, write smali. By this, we mean that it’s better to do your reversing on decompiled Java code and only look at the nigh-hieroglyphic smali code once you know exactly what changes you want to make and what class to make it in.

Once our modification had been made, we used Apktool again to repack the APK:

Figure 33: Repacking our modified app

Our next step was to sign the modified APK. This is because Android refuses to install any unsigned APKs, even through ADB. First, we generated a key using Keytool:

Figure 34: Generating the key we will use to sign the modified app

and then we used our key to sign the APK using Jarsigner:

Figure 35: Signing the modified app

Finally, we installed the modified APK onto an Android phone using ADB:

Figure 36: Installing the modified app

After launching the app and selecting one of our contacts, we were greeted with a pleasant sight:

Figure 37: Testing the modified app

Furthermore, the change we made did not seem to impact the app’s functionality; we could still make and receive calls, add contacts, etc.

In our view, this was a vulnerability, later denoted by CVE-2020-16168 and having a CVSS score of 6.5. An altered and potentially malicious app could still access the various cloud resources and user information made available to the temi app because no integrity checks were performed by either the app or the remote servers to ensure that the app had not been modified. As we’ll demonstrate later, the presence of this vulnerability made various other attack vectors possible.

The Relationship Between Robot IDs and MQTT Topics

In the overview section, we made the claim that “each robot has its own MQTT topics that it listens on, which are identified using temi’s MQTT client ID, otherwise known as its robot ID.” Here we will outline how we came to this conclusion and the specific format of a few of the topics that temi and its phone app subscribe/publish to.

Since we knew that temi uses MQTT to handle calling notifications, a natural place to start our investigation was the code used by the phone app to initiate calls. Moving down the call chain, we saw that the robot ID was being passed to the sendInitInvitation() method of the TelepresenceService class:

Figure 38: InvitationManagerImpl.sendInitInvitation()

Here, the robot ID is used in two different places. On line 82, an MqttDelegateApi.Topic object is created with the name “users/<ROBOT_ID>/status”, implying that each robot has its own MQTT topic category for its status and the robot ID itself is used to uniquely identify these topics. Next, on line 87, we see one of many RxJava functions (the others have been omitted) with the robot ID passed as a parameter to it. This function’s only purpose is to call InvitationManagerImpl.sendInviteMsg(), passing along the Invitation and the robot ID as its arguments:

Figure 39: InvitationManagerImpl.sendInviteMsg()

This function is of particular interest because we see the construction of another MQTT topic name on line 332, this time taking the form “client/<ROBOT_ID>/invite”. Presumably, this is the topic format used when publishing call invitations to specific temi robots (and, likely, phone contacts).

Additionally, the anonymous function executed via doOnSuccess() uses MqttManager.publish() (line 359) to actually publish the call invitation on the callee’s call invite topic. This information would become useful when we later tried to send custom MQTT messages to our temi in order to facilitate privilege escalation.

How are MQTT Call Invite Messages Published?

If we were to publish our own MQTT messages, we would need a robust understanding of the code used by the temi phone app to publish arbitrary MQTT messages, which appears to be this MqttManagerImpl.publish() method.

To determine what was actually being passed to publish(), we needed to go through what each of the RxJava functions in InvitationManagerImpl.sendInviteMsg() was doing. Referring back to Figure 39:

  • On lines 331-339, Single.zip() is called, which simply creates a Pair from the MQTT topic string (“client/<ROBOT_ID>/invite”) and the Invitation object.
  • On lines 340-355, Single.flatMap() is called, which adds a timestamp to the Invitation object inside the Pair.
  • Presuming successful execution of the previous flatMap() call, Single.doOnSuccess() is called on lines 356-372. As mentioned previously, this is where the call to MqttManagerImpl.publish() occurs. Since this doOnSuccess() operates on the value returned by the previous call to flatMap(), the arguments being passed to publish() are:
Argument Description
(String) pair.first The MQTT topic string
new Gson().toJson((Invitation) pair.second) The Invitation object as JSON
0 The integer “0”
false The boolean “false”


While it was obvious that the first argument is the MQTT topic the message is being published on and the second argument is the message itself, it was not immediately obvious what the third and fourth arguments were for. Digging down into the source code of the MQTT package being used (org.eclipse.paho.client.mqttv3) revealed their purpose:

Figure 40: MqttAsyncClient.publish()

After passing through a couple MqttManagerImpl methods, the four arguments listed above become the first four arguments passed to this internal publish() method. The JSON string (second argument), is converted from a string to a byte array in the interim; the rest of the arguments are unchanged.

Knowing this, it was clear that the second argument is indeed the MQTT message, the third argument is the QoS, and the fourth argument is a flag that specifies whether or not the message should be retained. A QoS value of “0” means that the message will be delivered to clients subscribed to the topic at most once. A retained flag of “false” means that new subscribers to the topic will not receive the most recent published message upon subscription.

Intercepting Calls

As we’ve already established, every temi robot has a unique MQTT client ID and many of the topics it subscribes to contain this ID to indicate that they are intended for that specific robot. If users of the temi phone app can receive calls in addition to making them, it stands to reason that they must also have a unique MQTT client ID – a robot ID equivalent. If there was an easy way to discover the client ID of another phone app user, it might be possible to subscribe to their topics and thus receive calls intended for them, making it worthy of investigation.

If we refer back to Figure 22, we saw that if a call is initiated from the Recent Calls screen, a method called getMd5PhoneNumber() is used to obtain the client ID of the callee. While a temi doesn’t have a phone number to speak of, we began to suspect that the client ID for users of the temi phone app might just be an MD5 hash of their phone number.

Although we could have followed the code in order to track down exactly where this value comes from, we thought it might be easier to simply verify our suspicions. To do this, we first took the MD5 hash of the temi admin’s phone number and then performed a string search for this hash in every temi-related file we had access to.

Figure 41: The Google Voice number used to register with temi

Figure 42: Taking the MD5 hash of the phone number

Sure enough, this hash appeared in two places. First, it appeared in the primary SQLite 3 database file for the temi app running on the robot itself. More specifically, it appears in the “RecentCallModel” table under the “userId” column for the table’s only entry. Based on the table’s name and sole entry, this is almost certainly used to store temi’s recent calls, as its admin was the only user it had called at this point.

Figure 43: The matching string in temi’s RecentCallModel table, part of its SQLite 3 Database

The second match was in the log output we saved after running logcat on our temi earlier, the same log output seen in Figure 30:

Figure 44: Matching strings in the logcat output recorded earlier

This log output appears to conclusively confirm our suspicions. With what we knew now, these log messages appeared to be JSON data being sent to/received from the MQTT broker. Moreover, the “topic” string in the first result exactly matched the MQTT topic format string found on line 82 of Figure 38. The only difference is that in that case, the string between “users/” and “/status” was the robot ID; here, it was an MD5 hash of the user’s phone number.

Since we now knew that

  1. temi robots and phone app users received calls on the topic “client/<CLIENT_ID>/invite”, where “<CLIENT_ID>” is the MQTT client ID of the callee,
  2. the MQTT client ID for phone app users was simply an MD5 hash of the phone number used to register with the app, and
  3. we could alter the existing phone app,

it stood to reason that we could modify the app to subscribe to another user’s call invite topic in order to intercept calls intended for that user as long as we knew the user’s phone number. In theory, this would allow an attacker to effectively impersonate another user and spy on them by intercepting their calls. The question then became: What code needs to be modified in order to get this to happen? Well, we’re looking at a situation where temi initiates a call with its admin and an attacker attempts to intercept that call. In the case of calls initiated by the phone app, we discovered that call invitations are sent via InvitationManagerImpl.sendInviteMsg(), which publishes the call invite message on the topic “client/<ROBOT ID>/invite”. We suspected a similar approach was being used when a call is initiated from a temi to a phone user and decided to investigate to confirm.

Luckily for us, the exact same InvitationManagerImpl.sendInviteMsg() method could be found in the temi robot’s code, and it even seemed to function identically. Thus, it was probably safe to assume that the robot initiates calls with phone users in the same way: by publishing a call invitation to the topic “client/<CLIENT ID>/invite”, CLIENT_ID being the MQTT client ID of the callee.

If the caller publishes their call invites to a certain MQTT topic, it follows that the callee must subscribe to that same topic to receive the invite. Now that we knew the format of the call invite topic, the next step was to track down the code used by the Android app to subscribe to this topic so we could alter it to subscribe to the temi admin’s topic instead.

Performing a string search for this pattern in the decompiled phone app’s code produced three unique results:

Figure 45: Searching for “client/.+/invite”

The second result we recognized as being part of the code used to generate an outgoing call invitation. Thus, we were only interested in the first and third results.

We began by looking at the first result, found on line 170 of InvitationManagerImpl.java:

Figure 46: InvitationManagerImpl.sendInviteAbortMsg()

This reference is part of the method InvitationManagerImpl.sendInvitationAbortMsg(). Since we were interested in the code that subscribes to the call invite topic and not the code that publishes messages to it, we moved on.

The third result was found on line 523 of MqttManagerImpl.java:

Figure 47: MqttManagerImpl.buildInviteTopic()

This didn’t tell us anything about how the generated topic is used, so we took a step back and looked at what code invokes this method:

Figure 48: MqttManagerImpl.lambda$initMqttClient$13()

The call to buildInviteTopic() can be seen on line 408. There’s a lot going on in this method, but at a high level it appears that it is responsible for setting the callback functions for the MqttManager, which are being defined inline. More specifically, the invite topic string generated by buildInviteTopic() is used in the connectComplete() callback function, where it is passed as the first parameter to MqttManagerImpl.subscribe().

As expected, MqttManager’s subscribe() method is used to a subscribe to a particular MQTT topic, with the first parameter being the topic string:

Figure 49: MqttMangerImpl.subscribe()

Thus, it appeared that we had found the code being used to subscribe to the call invite MQTT topic. Based on these findings, we decided the simplest approach would be to change the call to MqttManagerImpl.subscribe() on line 408 of Figure 48 – instead of passing it the topic string returned by MqttManagerImpl.buildInviteTopic(), we would instead hard-code it to pass the temi admin’s call invite MQTT topic string.

Using this approach, we were able to construct a modified temi phone app that would receive all calls intended for another user, as shown in the following video:

Here, the vulnerability was the lack of any authentication when publishing or subscribing to arbitrary topics, denoted by CVE-2020-16167 and having a CVSS score of 8.6. At a minimum, a check should have been made to ensure that clients cannot subscribe to another client’s topics.

Problem: temi Won’t Answer My Calls

Our next goal was to gain the ability initiate a call with a temi and have it automatically answer. As mentioned previously, this capability is typically reserved for the temi’s admin and users explicitly authorized by the admin. Thus, if an attacker wishes to spy on a temi user, they would need to trick temi into thinking the call is originating from one of these authorized users.

With no other leads, we began searching through the robot’s codebase for keywords related to user permissions, ownership, admin, etc. until we found a very promising enum class:

Figure 50: Class used for delineating the various roles held by temi’s users

This enum is used in com.roboteam.teamy.users.User, the class used to store information about individual temi users, with User.role being an object of the Role enum class:

Figure 51: Class used to describe individual temi users/contacts

Going back to Figure 50, if we assume that Role.ADMIN refers to the user that originally registered temi and that Role.CONTACT refers to a normal user, then Role.OWNER likely refers to a user that has been authorized to “hop in” to the robot by the admin. To verify this, we looked for places in the code where this enum is used. There are 59 unique references to the Role class, but we’ll only be looking at the pertinent ones here.

The first reference we’ll be looking at appears on lines 351 and 357 of ConferencePresenter.handleViewForCallTypes():

Figure 52: ConferencePresenter.handleViewForCallTypes()

On line 351, a string comparison is performed between this.resourcesLoader.getString(R.string.privacy_support_support_caller_name) and this.callerDisplayName; if the two match, a new User is created with a role of CONTACT. So just what is this string that the ‘if’ statement is checking against? We decided to take a look at where this constant is defined:

Figure 53: Searching for “privacy_support_support_caller_name”

Taken together, this means that if the caller’s display name is exactly “Support”, a new User is created with CONTACT privileges. This check likely exists in the event that a member of temi’s support staff calls a user. While this was certainly interesting, it is a niche scenario.

What happens if the caller’s name is not “Support”? In that case, the else statement on line 352 is hit, which simply sets user to the result of getUserbyPeerId():

Figure 54: ConferencePresenter.getUserByPeerId()

This method tries to obtain the User associated with the current caller by performing a lookup in temi’s UsersRepository using the caller’s MQTT client ID. If the lookup succeeds, the found User is returned; if it fails, a new User is created with Role.CONTACT privileges.

As mentioned previously, Figure 52 contains two references to the Role class. Let’s now look at the second reference, found on line 357. Here, the role of the user is checked. If they are either an ADMIN or an OWNER, temi:

  • waits 1.5 seconds (line 362)
  • checks if the call hasn’t already ended (line 365)
  • if it hasn’t, answers the incoming call (line 370)

Otherwise, the function returns after setting the app’s view for an incoming call.

Solution: Become an OWNER

To recap what we’ve learned thus far:

  • The role of ADMIN appears to be reserved for the user that originally registers temi via QR code scan.
  • If the user calling temi is not recognized, a new User object is created for them with CONTACT privileges.
  • If the user calling temi is recognized, their role is checked:
    • If they are a CONTACT, temi waits for the call to be answered via touchscreen.
    • If they are either an ADMIN or an OWNER, temi answers the call automatically. This is the behavior we want.

Scanning the temi’s QR code for the purposes of registration is only possible when temi is first powered on or after performing a factory reset. Thus, the attacker cannot realistically make themselves an ADMIN. And since CONTACT privileges are insufficient to get temi to pick up automatically, our best bet was to figure out how to obtain the role of OWNER.

Adding an OWNER: Phone App’s Perspective

Although we knew that it was possible to promote a user to an OWNER using the phone app and we suspected that was achieved via MQTT, we still weren’t sure of what goes on “under the hood” to make that happen.

After some searching, we found that AddOwnersPresenter.addOwners() is called whenever an admin selects one or more users to be granted OWNER privileges:

Figure 55: AddOwnersPresenter.addOwners(), trimmed

Here, selectedIds refers to the MQTT client IDs of the users selected to be promoted and robotId refers to the MQTT client ID of the temi robot this method is granting permissions for.

The majority of this method’s body has been trimmed because we’re really only concerned with what’s happening on lines 104-106, which seems to handle sending the request to add an OWNER – the rest of the method is dedicated to logging and updating local databases to reflect the new OWNERs.

This request is sent by first fetching the unique private key used to identify this app’s instance (line 101), and then creating a new AddRemoveOwnersRequest using the selectedIds, robotId, and this private key:

Figure 56: AddRemoveOwnersRequest

The constructor for AddRemoveOwnersRequest creates a timestamp for the request, then creates a new AddOwnersRequestRequest, which contains the body of the request, and finally uses the passed in privateKey in order generate a signature for the AddOwnersRequestRequest. In other words, AddRemoveOwnersRequest is nothing more than a wrapper for the real request and is used to store its signature.

We decided to look at this AddOwnersRequestRequest object next. While the ownerIds, robotId, and timestamp members were mostly self-explanatory, source and type were less so. Looking back at line 8, we saw that source was being set to a hardcoded value of “ADMIN”, which seemed to imply that this was the origin of the request. Looking back at line 6, we saw that type is simply the passed in OwnersRequestType enum (in our case, OWNERS_ADD_TYPE) converted to a string. This enum, defined near the bottom of the class, can take on two values: OWNERS_ADD_TYPE and OWNERS_REMOVE_TYPE. This implied that this same structure was recycled for requests meant to demote OWNERs back to CONTACTs.

Thus, we determined that AddRemoveOwnersRequests had the following structure:

Figure 57: Anatomy of an AddRemoveOwnersRequest

Now that we knew the structure of these requests, we next wanted to know how they were being sent and where. To this end, we decided to look at OwnersApi.addOwners(), which, according to Figure 55, is actually sending the AddRemoveOwnersRequest.

Figure 58: OwnersApi.addOwners()

The body of this method didn’t tell us much, but the imports for the OwnersApi class gave us a clue: this was using the Retrofit 2 HTTP Client for Android, which is typically used to send HTTP requests to a REST API. According to this Retrofit tutorial, the @POST annotation “indicates that we want to execute a POST request when this method is called” and “the argument value for the @POST annotation is the endpoint.” The @Body annotation, on the other hand, indicates that we want the AddRemoveOwnersRequest to serve as the body of the POST request.

Okay, so this method is simply sending the request to add an OWNER via POST to some REST server at the endpoint “ownership/admin/add/owners”. Our next question became: Where is this REST server located?

Part 5 of that same Retrofit tutorial told us that the getClient() method is typically used to obtain/create a Retrofit instance, and the only argument it takes is a string containing the URL for the REST server. Searching for “getClient()” in the phone app’s code led us to ApiClient.getClient():

Figure 59: ApiClient.getClient()

Working backwards from this method, we were able to track down the server’s URL:

Figure 60: URLs for the MQTT broker and REST server

This URL confirmed that the recipient of this request was not the temi robot and it was not being sent via MQTT, contrary to our initial assumptions. This begged the question: If the phone app wasn’t sending these requests to temi, how was temi being notified of any updates to the privileges of its users? We hypothesized that this REST server was simply a middleman whose job was to authenticate all requests to add/remove OWNERs by checking the request’s signature against the admin’s public key that was saved during temi’s initial registration process. This extra level of authentication made sense since privilege management was a particularly sensitive functionality. Presumably, this same REST server would then forward the request to the robot if it determined that the request’s signature was valid.

We took some time trying to send these requests from a user that wasn’t temi’s admin, but they failed, lending some credence to our theory. This was looking like a dead end.

Adding an OWNER: temi’s Perspective

Well, if we couldn’t successfully spoof the request the phone app sends to the REST server, perhaps we could instead spoof the request the server sends to temi, bypassing the authentication mechanism altogether. We started looking for the code temi used to handle these requests.

Searching specifically for “Role.OWNER” in the temi’s decompiled code led us to OwnersController$getUsersRepository$2.apply():

Figure 61: OwnersController$getUsersRepository$2.apply()

Starting with OwnersController$getUsersRepository$2, we moved up the call chain in an attempt to discover how temi processes requests to add OWNERs. More concretely, this was accomplished through a liberal use of the “Find Usage” feature in JADX, which can be done by simply right-clicking virtually any symbol. Although convenient, “Find Usage” would often fail when the method in question was not invoked directly, such as when an implementation of an abstract class/interface served as the middleman. In such cases, we would perform a string search for instances where the method was invoked in the smali code. To help separate invocations from declarations, we took advantage of the smali syntax for method calls, which consisted of the name of the class the method belonged to, followed by a right arrow (->), followed by the method’s signature.

As an example, “Find Usage” failed for the accept() method of the class UsersAdminTopicListener$listenToUserAdminTopic$1, so to find where it’s invoked, we ran:

Figure 62: Searching for UsersAdminTopicListener$listenToUserAdminTopic$1.accept() in the smali code

For especially indirect invocations, like dependency injection, more creative means had to be used, but a combination of “Find Usage” and string searches such as these got us 99% of the way there.

Using this approach, we found that the mechanism begins with the UsersAdminTopicListener class, which, as the name suggests, handles listening on temi’s “users admin” topic. Moving down the call chain from here, we found out how messages received on this topic are processed by temi and ultimately used to alter the Role, or privilege level, of certain contacts. Based on our earlier analysis, it was likely that the REST server would forward the request sent by the phone app to this MQTT topic.

We found that the bulk of the work is performed by a method called listenToUserAdminTopic():

Figure 63: UsersAdminTopicListener.listenToUserAdminTopic()

This function does several things. First, on line 50, it creates a Flowable object by calling UsersAdminTopicListener.getOwnerRequestFlowable(). Next, on lines 51-56, it subscribes to this Flowable and for each emitted OwnersRequest, it calls OwnersController.handle$app_usaDemoRelease() upon success or simply logs upon failure.

We decided to first look at the code for getOwnerRequestFlowable():

Figure 64: UsersAdminTopicListener.getOwnerRequestFlowable()

  • It begins by first converting an Observable obtained via mqttPipeline.observe() into a Flowable.
  • Next, it throws out all emitted MqttMessages whose topic doesn’t match the regex “users/.+/admin” via RxJava’s filter() method.
  • RxJava’s map() method is then used convert the body of the MqttMessage from JSON to an object of the OwnersMessage
  • Finally, map() is used a second time to extract and return the OwnersRequest from each OwnersMessage.

At this point, we decided it would be useful to understand the structure of OwnersRequests and OwnersMessages, since these seem to be key to temi’s privilege management mechanisms:

Figure 65: Anatomy of an OwnersMessage

Put briefly, each OwnersMessage is nothing more than a wrapper for an OwnersRequest, which consists of ownerIds, a list of the MQTT client IDs of the users whose privileges are being modified, and type, which indicates whether the request is trying to promote a CONTACT to an OWNER (OWNERS_ADD) or demote an OWNER back to a CONTACT (OWNERS_REMOVE).

Comparing this to Figure 57, an OwnersMessage appears to be an AddRemoveOwnersRequest without the signature. Similarly, an OwnersRequest appears to be a stripped-down AddOwnersRequestRequest, with the robotId, source, and timestamp omitted. This meshes well with our earlier hypothesis that the REST server’s job is to authenticate and forward AddRemoveOwnersRequests to the temi robot. The signature, timestamp, and source would be omitted since they’ve already been verified by the server; the robotId, while needed by the server to know where to forward the request, becomes redundant once the request reaches temi.

Our next step was to figure out what handle$app_usaDemoRelease() does. Since it’s quite the rabbit hole, however, we will summarize its effects in lieu of venturing down it:

  1. It queries the Users table in temi’s local database for all users with IDs matching any of the ones in the OwnersRequest’s ownerIds
  2. It replaces the Role for each of these users with one corresponding to the OwnersRequest’s type: OWNERS_ADD→ OWNER, OWNERS_REMOVE → CONTACT.
  3. It updates temi’s Users table with the updated user information.

This was promising, since it meant that we could potentially trick temi into promoting an arbitrary user/contact to an OWNER simply by crafting a custom OwnersRequest and publishing it on temi’s “users/<ROBOT_ID>/admin” topic, thereby bypassing the authentication server entirely.

Unfortunately, part 1 above reveals a potential obstacle for this plan: since temi will only process OwnersRequests for users already present in its local Users table, we must first add ourselves to this table for this strategy to succeed. Recalling our earlier analysis of how temi handles unrecognized callers, one way of accomplishing this was to simply cold call temi, which would cause it to automatically add the caller to its contacts list. This was far from ideal, however, since cold calling  temi without already having the role of OWNER or ADMIN would cause it to ring and display the caller’s username on its screen, potentially alerting temi’s users that something weird is going on.

Detour: Sneaking Onto temi’s Contact List

Before continuing on, we decided to take a brief detour to find a better way for an attacker to add themselves to temi’s contact list.

From our prior investigation into how temi implements its various privilege levels through the use of Roles, we discovered that temi uses the User class to define its various users. Thus, it follows that any code used to add a new user to temi’s local contact list would first create a new User object, so that’s exactly what we searched for.

Figure 66: Searching temi’s code for “new User(“, trimmed

Figure 66 shows the result that we followed up on, the others have been omitted. The name of the containing class, SyncContactsController, sounded promising on its own since syncing contacts from temi’s ADMIN would likely involve adding new contacts without needing to start a call, which was exactly what we were trying to do.

Using largely the same strategy we employed for tracing the code flow for adding OWNERs (JADX’s “Find Usage” feature + grepping the smali code), we were able to trace the code flow all the way back to the app’s entry point. With a more holistic understanding of the mechanism used to sync contacts, we realized that the process is ultimately kicked off by SyncContactsTopicListener.subscribeMqttPipeline():

Figure 67: SyncContactsTopicListener.subscribeMqttPipeline()

The first thing this method does is take this.mqttPipeline and turns it first into an Observable (using MqttPipeline.observe()) and then into a Flowable (using RxJavaInterop.toV2Flowable()), as seen on lines 29 and 30.

Essentially, this.mqttPipeline acts as a relay. Incoming MQTT messages are pushed to the relay using its push() method, which it then relays to all its observers.

The output of this relay is then filtered on lines 31-38 to only return MQTT messages received on topics matching the regex “synccontacts/.+”. Based on the other MQTT topic strings we’ve seen up to this point –

  • “users/<CLIENT_ID>/status”
  • “users/<CLIENT_ID>/admin”
  • “client/<CLIENT_ID>/invite”

– we were fairly certain temi’s client ID goes after the forward slash. Thus, temi appeared to be listening on the MQTT topic “synccontacts/<CLIENT_ID>” for messages regarding contact synchronization.

On lines 39-43, the now-filtered MQTT messages emitted by the relay are passed to a call to RxJava’s map() function, which converts each incoming MQTT message from JSON to an object of the SyncContactsMessage class. We quickly determined that SyncContactsMessages had the following structure:


Figure 68: Anatomy of a SyncContactsMessage

Put briefly, each SyncContactsMessage consisted of a senderClientId, a string holding the MQTT client ID of the request’s sender, and contacts, a list of ContactEntry objects. Each ContactEntry object in the list corresponded to a contact to be synced to temi’s contact list, containing both their clientId and their name.

Finally, on lines 45-49, SyncContactsController.save() would be called on each SyncContactsMessage spit out by the prior call to map():

Figure 69: SyncContactsController.save()

This method is doing a lot, but we’ll focus on only the most pertinent side-effects:

  • On lines 53-62, all messages where the senderClientId does not match the temi admin’s client ID are discarded. This will become important later.
  • On lines 63-75, the list of contacts is extracted from the SyncContactsMessage and is used to build a list of User objects – one per contact. The Users produced by this method are initialized in the following manner:
Member Assigned Value
User.id ContactEntry.clientId
User.name ContactEntry.name
User.picUrl “”
User.role Role.CONTACT
User.userId SyncContactsMessage.senderClientId


  • On lines 81-85, our newly-minted list of User objects is passed to insertOrUpdateContact(). This method writes the list of Users to the Users table in temi’s SQLite 3 database, completely overwriting temi’s old contacts list in the process.

So now that we knew how an ADMIN’s contacts are synced to their temi, how could we leverage that knowledge to add ourselves to temi’s contact list in a discrete fashion? Well, if we could publish a message to temi’s synccontacts MQTT topic, we could add ourselves as a contact. Although temi does perform a check to make sure that the sender of the message is its ADMIN, it makes the mistake of trusting that the contents of the message accurately reflect the actual sender. In theory, there’s nothing stopping us from publishing a SyncContactsMessage from one client ID and setting the senderClientId field in the message to a completely different ID – the ADMIN’s client ID, for example.

Based on our understanding of how the temi robot parses MQTT requests to sync contacts, we crafted a JSON message that should decode into a valid SyncContactsMessage object and would add our “attack” phone to temi’s contacts:

Figure 70: Our custom SyncContactsMessage in JSON format

This message was crafted using the following rationale:

  1. Objects in JSON are indicated via curly braces ({}). Since the entire message contents are being converted into a single SyncContactsMessageobject, it follows that the contents should be contained within a pair of curly braces, representing the SyncContactsMessage object itself.
  2. A SyncContactsMessagecontains a senderClientId, a string indicating the client ID of the “sender” of the message. Thus, we added an element to our object with the key “senderClientId” and the string “060f62296e1ab8d0272b623f2f08f915” – the client ID of the temi’s admin – as its value.
  3. A SyncContactsMessagealso contains contacts, a list of ContactEntry Thus, we added an element with the key “contacts” and a new list as its value. In JSON, lists are indicated via square brackets ([]).
  4. In our case, the contacts list contains only a single ContactEntry – one corresponding to the “attack” phone, so we added a single pair of curly braces to the list to indicate the contents of this single ContactEntry.
  5. Each ContactEntry contains a clientId. Thus, we added an element to the object with the key “clientId” and the string “fe5d7af42433f0b6fb6875b6d640931b” – the client ID of the “attack” phone – as its value.
  6. Each ContactEntry also contains a name. Thus, we added a second element to the object with the key “name” and the string “Test” as its value. This simply represents the display name for the contact, so we could set it to basically whatever we liked.
  7. As for spacing and newlines, we referred to the Gson User Guide, since that’s the library temi was using to perform JSON serialization/deserialization. The guide states:

“The default JSON output that is provided by Gson is a compact JSON format. This means that there will not be any whitespace in the output JSON structure. Therefore, there will be no whitespace between field names and its value, object fields, and objects within arrays in the JSON output.”

As a result, whitespace and newlines have been omitted.

Now that we understood where to publish the request and what the request should look like, the next step was figuring out how to alter the temi phone app to send this request. Since we were aiming for a simple proof-of-concept, we prioritized ease and speed of implementation over robustness or elegance when considering which code to change. To this end, it made sense to leverage the code already present in the app that was dedicated to publishing MQTT messages since it would minimize the amount of code we needed to change and thus reduce the risk of introducing unintended bugs into our altered app – an ever-present risk when directly modifying an app’s bytecode. While the phone app publishes many MQTT messages to various topics during its runtime, we decided to try using the phone app’s video calling functionality. This had the obvious advantage of giving us clear control over when and how often the MQTT message is published, since calls are always initiated by hitting the “Connect” or “Call” buttons. Ultimately, we decided to leverage InvitationManagerImpl.sendInviteMsg() for this purpose. If we refer back to Figure 39 and our section “How are MQTT Call Invite Messages Published?”, the reason for this becomes apparent: sendInviteMsg() has a direct interface to MqttManagerImpl.publish(), the underlying method temi uses to publish arbitrary MQTT messages, while still being specific to the call chain for outgoing video calls. This meant that it would only get executed unless when we manually initiated a call from the app.

Running our altered app resulted in our attack phone being added to temi’s contact list, as shown in the following video:

Gaining OWNER Privileges

All that was left was for us to craft and publish a custom OwnersMessage in order to gain OWNER privileges on our temi. As before, we began by crafting the JSON for the message itself:

Figure 71: Our custom OwnersMessage in JSON format

This message was crafted using the following rationale:

  1. Since the entire message contents are being converted into a single OwnersMessage object, it follows that the contents should be contained within a pair of curly braces, representing the OwnersMessage object itself.
  2. An OwnersMessage contains a request, an object of the OwnersRequest class, and nothing else. Thus, we added an element with the key “request” and a new object as its value. The contents of this inner object will become our OwnersRequest.
  3. An OwnersRequest contains a type, an enum specifying the type of request. In our case we want to add an OWNER, so we added an element with the key “type” and the string “OWNERS_ADD” as its value. As for why we’re expressing this enum value as a string, it’s because this article shows that Gson’s default behavior is to express enum values as strings corresponding to the name of the enum value.
  4. An OwnersRequest also contains ownerIds, a list of strings enumerating the temi contacts the request should apply to. In our case, the list contains only a single ID – the ID of the “attack” phone, which is just the MD5 hash of its phone number.
  5. As before, spaces and newlines have been omitted, per the Gson User Guide.

Fortunately, we were able to leverage the code modifications we used to publish our SyncContactsMessage, since the only things changing were the MQTT topic we’re publishing to and the contents of the message.

Our full test consisted of running our first modified app in order to add ourselves to temi’s contact list, followed by our second modified app in order to perform privilege escalation, as shown in the following video:

The call appeared to be fully functional, and we were able to drive temi around, navigate to its saved locations, and receive its audio/video feeds. All an attacker needed to make this possible was the phone number of one of temi’s contacts.

This authentication bypass was the final and most impactful vulnerability we discovered in the temi robot, denoted by CVE-2020-16169 and having a CVSS score of 9.4. To better understand how this an auth bypass, let’s compare temi’s privilege management during normal operation:

Figure 72: temi’s privilege management during normal operation

to how it looks using our modified app:

Figure 73: temi’s privilege management with auth bypass

As you can see, although authentication is in place for adding OWNERs, it can be circumvented entirely by simply spoofing the MQTT message temi expects to receive from the REST server post-authentication.

Refining the Exploits

Once our exploits had the capabilities we initially set out to obtain, we got to work refining them. We created a single modified app that combined all of the MQTT attack vectors we previously outlined: it could intercept calls and send both MQTT messages necessary to obtain OWNER privileges, all with a single button press. Furthermore, we added some additional logic to automatically extract the client IDs required by our custom MQTT messages from the app’s contact list, meaning our app would work on any temi robot. To see all these features in action, please refer to the video below:

Impact

At this point it would be prudent to take a step back, review the combined capabilities of the exploits we’ve outlined, and consider what impact these might have in a real-world setting.

At the time of discovery, the vulnerabilities in the temi robot meant that an attacker could join any ongoing temi call simply by using a custom Agora app initialized with temi’s hardcoded App ID and iterating over all 900,000 possible channel names – certainly feasible with modern computing power. This becomes more plausible if one considers that our testing revealed that joining a temi call this way does not notify either of the existing call participants that another user is present, since the apps were only designed with 1-on-1 calling in mind. The fact that the attacker needs no information on the victims makes this attack vector worrisome, but it also means that the attacker has no control over who he or she spies on using this method. Realistically, a malicious actor might use this exploit as a means of reconnaissance – by collecting data on arbitrary temi users, they could follow up on the more “promising” ones later with one of the targeted attack vectors. Given temi’s limited adoption by consumers but ramping adoption in industries such as healthcare, the odds are in the attacker’s favor that they stumble upon sensitive information.

Furthermore, if an attacker has a specific victim in mind, they could leverage the lack of per-topic authentication in temi’s MQTT implementation in order to intercept calls between a user and their temi. The plausibility of this particular attack vector is difficult to evaluate. On the one hand, the only information the attacker needs is the victim’s phone number, and telemarketers consistently remind us that this is a very low bar. On the other hand, this exploit’s behavior during our testing proved somewhat inconsistent. At times, the user running the exploit could listen in on the call as a third party with the call participants being none the wiser. At other times, the user running the exploit would disconnect the original caller and take their place. It is easy to imagine scenarios where both of these outcomes are desirable to a malicious actor, and neither bodes well for the privacy of the user being targeted. It is also important to note that although we focused on using this vulnerability to intercept calls, it can also be used to intercept all sorts of notifications intended for another user: contacts being added, when temi goes online/offline, its current location, etc. While less flashy than intercepting a call, this approach is more discreet and might allow a dedicated attacker to learn a user’s routine, only showing their hand to listen in when it would be most impactful.

Of the possible attack vectors, we believe that the ability to call and control a temi remotely, leveraging the authentication bypass present in temi’s privilege management mechanism, is the most impactful. The bar for this attack vector is arguably even lower than the previous, as the attacker would only need the phone number of any of temi’s contacts – it need not be its admin. In our testing, none of the steps involved in leveraging this exploit notify temi’s admin in any way that something is amiss; they are not notified that the attacker has added themselves to the robot’s contact list nor that they have gained raised privileges. Since this method does not cause temi to ring, an observer would have to see the attacker move temi or have a good look at its touchscreen during the attack to know something nefarious was going on. This level of control and subtlety becomes especially problematic when we consider some of temi’s applications in industry. In April of this year, Robotemi Global Ltd. stepped up production to 1,000 units per month in response to Israel’s Ministries of Defense and Health choosing temi to assist with patients in their COVID-19 wards. In South Korea, temi sees use in both public places and nursing homes, helping to facilitate social distancing. Besides the obvious impact of compromising patients’ sensitive medical information during remote doctor’s visits, the ability to have eyes and ears into a hospital is worrying in its own right. It isn’t difficult to imagine what a malicious agent might do with an overheard network password, access code to a sensitive area, or the location and condition of a person of interest.

Conclusion

The findings outlined in this paper highlight the importance of secure coding practices and security auditing for cutting edge technologies, particularly in the IoT space. When an IoT camera evolves into one that can also drive around your home or business and even assist medical patients, the need to properly secure who can access it only becomes more important. While history has demonstrated that any sufficiently complex software is bound to have vulnerabilities, there are many steps we can take to substantially raise the bar for bad actors. In our view, these responsibilities are shared between vendors, consumers, and the security industry as a whole.

First and foremost, vendors can ensure they are employing proper security hygiene when designing products. Often, best practices consist not of novel, out-of-the-box thinking, but rather adopting time-tested guidelines like the principle of least privilege. In the case of temi, application of this principle likely would have addressed CVE-2020-16167, which allows clients to subscribe/publish to topics they have no business accessing. Considerations for security should also extend beyond the development phase, with third-party security auditing being a powerful tool that allows vendors to discover and patch vulnerabilities before the bad guys get ahold of them. Taking vulnerability disclosure seriously and cooperating with the bodies that report them can often net similar benefits, and this is an area Robotemi excelled in.

Consumers of these technologies, at either the individual or enterprise level, also share some of the responsibility. Companies should ideally vet all technologies before widespread adoption, particularly if these technologies have access to customer information. It goes without saying that greater risk warrants greater scrutiny. Individuals, while typically having fewer resources, can also take certain precautions. Placing IoT devices on a VLAN, a virtually segregated subnetwork, reduces the risk that a vulnerability in one device will compromise your entire network. Staying up to date on important vulnerabilities can also help inform consumers’ purchasing decisions, although the presence of vulnerabilities is often less illuminating than if/how a company chooses to address them.

Finally, we in the security industry also have an obligation towards moving the needle in the realm of security, one that we hope research such as this embodies. One of our goals here at McAfee ATR is to identify and illuminate a broad spectrum of threats in today’s complex and constantly evolving landscape. While we take seriously our obligation to inform vendors of our findings in a timely and responsible fashion, it is only through cooperation that the best results are possible. Our partnership with Robotemi on addressing these vulnerabilities was a perfect example of this. They responded quickly to our private disclosure report, outlined to us their plans for mitigations and an associated timeline, and maintained a dialogue with us throughout the whole process. We even received feedback that they have further emphasized security in their products by approaching all development discussions with a security-first mindset as a result of this disclosure. The ultimate result is a product that is more secure for all who use it.

The post Call an Exorcist! My Robot’s Possessed! appeared first on McAfee Blog.

Robot Character Analysis Reveals Trust Issues

6 August 2020 at 04:01

Retired Marine fighter pilot and Top Gun instructor Dave Berke said “Every single thing you do in your life, every decision you make, is an OODA Loop.” OODA Loop? Observe–Orient–Decide–Act, the “OODA Loop” was originally developed by United States Air Force Colonel John Boyd and outlines that fundamentally all actions are first based on observations.  If you can’t first observe you are at a serious disadvantage. This can be applied at every scale from planning a large-scale military invasion, to changing lanes on a highway or even down to the split-second decision of picking up a glass of water off a table. But it all starts with observation.

If observation or information about what’s around us is so important, then it’s no surprise that tools and devices that can provide us information not only increase our success but also make us feel more comfortable. The personal robot called temi, is such a device. With 1,000 new devices being created a month, temi can help us see a loved one in the hospital through teleconferencing, escort us to the ballroom in the hotel we are staying at or help a doctor virtually visit with a patient. In fact, across Israel, temi was recently selected as the de facto robotics platform for hospital telepresence. Temi can allow us to observe and interact remotely; all while influencing what we decide to do next with the information we have learned.

But what are the risks associated with tools that help provide greater information into our OODA Loop? How could someone with malicious intent use tools like temi to improve their OODA Loop, furthering their ability to cause harm? Could someone control temi without the owner’s permission? What if someone could turn on the camera and microphone and see the robot’s surroundings while listening to your medical diagnosis or treatment plan? What if someone could “check in on your kids” and map out your house without your permission? These are the type of questions that McAfee Advanced Threat Research (ATR) aims to answer when we see a product like temi. We look at technologies and the wealth of information they provide through the lens of an attacker; with the goal of making your experience a safer one. So, it is no surprise that our team decided to take a deeper look into temi when it was first released.

On day one, like a kid during Christmas, we unboxed our shiny new temi with a sense of joy and excitement. Like your average user, we set it up following the included directions, had it follow us around dressed up as a ghost for Halloween, marked key locations, made video calls and were amazed at just how cool this robot was! Maybe a little less like your average user, we also captured all the network traffic while temi showed off and did a firmware update. We also looked at what open network ports temi exposed, decompiled the Android application, activated android debugger (adb) and installed a ssh server, just to be safe.  Basically, we treated temi like your child’s first date in high school – we did a background check and used proper intimidation techniques before we allowed temi to go on a date.

Over the next several months, we really dug into what we learned from our “first date” with temi. What we discovered, not unlike some of my first high school dates, is temi had some trust issues. This is not a good report card considering some of temi’s primary functions. For the ability to make video calls and to remotely control temi securely, it’s important to keep information used to connect to a call secret and secured. Since temi had some flaws doing so, the team turned its attention to the question of whether these “character flaws” could be exploited.

It turned out with only a few modifications to the original temi Android application, we could intercept phone calls intended for another user. With a few more modifications, temi began to trust us (the attacker) to navigate it around and activate the camera and microphone. Additionally, we discovered the only knowledge an attacker would need to know about the victim is their phone number. Yes, the same number you can’t figure out how tele-markers got ahold of was the information a malicious actor would need to access your temi completely remotely without your knowledge or consent.

For an attacker, temi’s security flaws allows them to feed vital information into their OODA Loop. Consider a hospital that keeps a very tight and well-run information security program. From the outside they are almost impossible to steal information from. The vulnerabilities discovered in temi now provide them a way to gather information about the internal operations of the business without needing to crack the well implemented business network or physical security. With the phone number of anyone who has called a temi recently, an attacker could observe what room number and condition a hospitalized member of congress is in. Temi could watch the security guard type in the building alarm code. Temi could observe the dog pictures on the nurse’s desk labeled with its cute name and birthday, that just happens to also be part of their password. This information can be invaluable to an attacker’s OODA loop and the potentially malicious decisions they make. Temi was a challenging target to compromise, but the nature of the flaws discovered highlight the importance of this research and the value of vendors to provide fast and effective mitigations, as was the case here.

For those who enjoy punishing themselves with an excessive amount of technical detail of these vulnerabilities, we have a special treat for you in our highly technical paper on this research here. This dives into the vulnerability discovery and exploitation process from start to finish in intricate detail.

In keeping with our responsible disclosure program, we reached out to temi as soon as we confirmed that the vulnerabilities we discovered were exploitable. Temi was very receptive, grateful, and had a strong desire to improve the security of temi. Over the next several weeks, we worked closely with their team to develop a more robust solution for temi. For each vulnerability, we provided temi with two mitigations strategies; a band aid and a cure. It is common for vendors to only implement the band aid or quick fix solution. To their credit, temi took on the challenge of implementing the more effective solution or the cure for all findings. Once in place, we were able to test and confirm that all the vulnerabilities reported were effectively mitigated. It is always exciting to see the positive impact security research can have when responsible disclosure is valued by vendor and researchers alike. The following demo video is a light-hearted way to show the true possible impact of the remote accessibility component of this research, had these been found by adversaries instead of responsibly disclosed by McAfee ATR and fixed by temi.

So, what is the larger lesson here? I would venture to guess that I wouldn’t be the first to conclude that Colonel John Boyd was a smart man and his theory of the OODA Loop is not only effective but also strengthens a process – in this case, vulnerability mitigation. For our research, this applies directly to a personal robot assistant which is currently being used worldwide, across a wide range of industries, and currently producing nearly 1,000 new units a month. McAfee’s ATR team observed a new impactful technology emerging into the market. Due to our previous experiences and technical expertise we were well oriented in a position where we decided to take further action and investigate. Temi observed the value in collaboration, oriented themselves in a position where they could decide to take action in making a tool used for observation a more secure product.

The post Robot Character Analysis Reveals Trust Issues appeared first on McAfee Blog.

Vulnerability Discovery in Open Source Libraries Part 1: Tools of the Trade

12 August 2020 at 15:59

Executive Summary

Open source has become the foundation for modern software development. Vendors use open source software to stay competitive and improve the speed, quality, and cost of the development process. At the same time, it is critical to maintain and audit open source libraries used in products as they can expose a significant volume of risk.

The responsibility of auditing code for potential security risks lies with the organization using it. We have seen one of the highest impact vulnerabilities originate with open source software in the past. The famous Equifax data breach was due to a vulnerability in open source component Apache Struts, widely used in mainstream web frameworks. Furthermore, the 2020 Open Source Security Risk and Analysis report states that out of the applications audited in 2019, 99% of codebases contained open source components and 75% of codebases contained vulnerabilities, with 49% of codebases containing high risk vulnerabilities.

Graphics libraries have a rich history of vulnerabilities and the volume of exploitable issues are especially magnified when the code base is relatively older and has not been recompiled recently. It turns out that graphics libraries on Linux are widely used in many applications but are not sufficiently audited and tested for security issues. This eventually became a driving force for us to test multiple vector graphics and GDI libraries on Linux, one of which was libEMF, a Linux C++ library written for a similar purpose and used in multiple graphics tools that support graphics conversion into other vector formats. We tested this library for several days and found multiple vulnerabilities, ranging from multiple denial-of-service issues, integer overflow, out-of-bounds memory access, use-after-free conditions, and uninitialized memory use.

All the vulnerabilities were locally exploitable. We reported them to the code’s maintainer, leading to two new versions of the library being released in a matter of weeks. This reflects McAfee’s commitment to protecting its customers from upcoming security threats, including defending them against those found in open source software. Through collaboration with McAfee researchers, all issues in this library were fixed in a timely manner.

In this blog we will emphasize why it is critical to audit the third-party code we often use in our products and outline general practices for security researchers to test it for security issues.

Introduction

Fuzzing is an extremely popular technique used by security researchers to discover potential zero-day vulnerabilities in open, as well as closed source software. Accepted as a fundamental process in product testing, it is employed by many organizations to discover vulnerabilities earlier in the product development lifecycle. At the same time, it is substantially overlooked. A well designed fuzzer typically comprises of a set of tools to make the fuzzing process relatively more efficient and fast enough to discover exploitable bugs in a short period, helping developers patch them early.

Several of the fuzzers available today help researchers guide the fuzzing process by measuring code coverage, by using static or dynamic code instrumentation techniques. This eventually results in more efficient and relevant inputs to the target software, exercising more code paths, leading to more vulnerabilities discovered in the target. Modern fuzzing frameworks also come with feedback-driven channels for maximizing the code coverage of the target software, by learning the input format along the way and comparing the code coverage of the input via feedback mechanisms, resulting in more efficient mutated inputs. Some of the state-of-the-art fuzzing frameworks available are American Fuzzy Lop (AFL), LibFuzzer and HongFuzz.

Fuzzers like AFL on Linux come with compiler wrappers (afl-gcc, afl-clang, etc.). With the assembly parsing module afl-as, AFL parses the generated assembly code to add compile-time instrumentation, helping in visualizing the code coverage. Additionally, modern compilers come with sanitizer modules like Address Sanitizers (ASAN), Memory Sanitizers (MSAN), Leak Sanitizers (LSAN), Thread Sanitizers (TSAN), etc., which can further increase the fuzzer’s bug finding abilities. Below highlights the variety of memory corruption bugs that can be discovered by sanitizers when used with fuzzers.

ASAN MSAN UBSAN TSAN LSAN
Use After Free Vulnerabilities Uninitialized Memory Reads Null Pointer Dereferences Race Conditions Run Time Memory Leak Detection
Heap Buffer Overflow   Signed Integer Overflows  
Stack Buffer Overflow Typecast Overflows
Initialization Order Bugs Divide by Zero Errors
Memory Leaks
Out of Bounds Access


One of the McAfee Vulnerability Research Team goals is to fuzz multiple open and closed source libraries and report vulnerabilities to the vendors before they are exploited. Over the next few sections of this blog, we aim to highlight the vulnerabilities we discovered and reported while researching one open source library, LibEMF (ECMA-234 Metafile Library).

Using American Fuzzy Lop (AFL)

Much of the technical detail and working of this state-of-the-art feedback-driven fuzzer is available in its documentation. While AFL has many use cases, its most common is to fuzz programs written in C / C++ since they are susceptible to widely exploited memory corruption bugs, and that is where AFL and its mutation strategies are extremely useful. AFL gave rise to several forks like AFLSmart , AFLFast and Python AFL, differing in their mutation strategies and extensions to increase performance. Eventually, AFL was also imported to the Windows platform, WinAFL, using a dynamic instrumentation approach predominantly for closed source binary fuzzing.

The fuzzing process primarily comprises the following tasks:

Fuzzing libEMF (ECMA-234 Metafile Library) with AFL

LibEMF (Enhanced Metafile Library) is an EMF parsing library written in C/C++ and provides a drawing toolkit based on ECMA-234. The purpose of this library is to create vector graphic files. Documentation of this library is available here and is maintained by the developer.

We chose to fuzz this LibEMF with AFL fuzzer because of its compile time instrumentation capabilities and good mutation strategies as mentioned earlier. We have the source code compiled in hardened mode, which will add code hardening options while invoking the downstream compiler, which helps with discovering memory corruption bugs.

Compiling the Source

To use the code instrumentation capabilities of AFL, we must compile the source code with the AFL compiler wrapper afl-gcc/afl-g++ and, with an additional address sanitizer flag enabled, use the following command:

./configure CXX=afl-g++ CFLAGS=”-fsanitize=address -ggdb” CXXFLAGS=”-fsanitize=address -ggdb” LDFLAGS=”-fsanitize=address”

Below is a snapshot of the compilation process showing how the instrumentation is added to the code:

Pwntools python package comes with a good utility script, checksec, that can examine the binary security properties. Executing checksec over the library confirms the code is now ASAN instrumented. This will allow us to discover non-crashing memory access bugs as well:

Test harness is a program that will use the APIs from the library to parse the file given to the program as the command line argument. AFL will use this harness to pass its mutated files as an argument to this program, resulting in several executions per second. While writing the harness, it is extremely important to release the resources before returning to avoid excessive usage which can eventually crash the system. Our harness for parsing EMF files using APIs from the libEMF library is shown here:

AFL will also track the code coverage with every input that it passes to the program and, if the mutations result in new program states, it will add the test case to the queue. We compiled our test harness using the following command:

afl-g++ -o playemffile playemffile.c -g -O2 -D_FORTIFY_SOURCE=0 -fsanitize=address -I /usr/local/include/libEMF/ -L/usr/local/lib/libEMF -lEMF

Collecting Test Cases

While a fuzzer can learn and generate the input format even from an empty seed file, gathering the intial corpus of input files is a significant step in an effective fuzzing process and can save huge amounts of CPU cycles. Depending upon the popularity of the file format, crawling the web and downloading the initial set of input files is one of the most intuitive approaches. In this case, it is not a bad idea to manually construct the input files with a variety of EMF record structures, using vector graphic file generation libraries or Windows GDI APIs. Pyemf is one such available library with Python bindings which can be used to generate EMF files. Below shows example code of generating an EMF file with an EMR_EXTEXTOUTW record using Windows APIs. Constructing these files with the different EMR records will ensure functionally different input files, exercising different record handlers in the code.

Running the Fuzzer

Running the fuzzer is just running the afl-fuzz command with the parameters as shown below. We would need to provide the input corpus of EMF files ( -i EMFs/ ) , output directory ( -o output/ ) and the path to the harness binary with @@, meaning the fuzzer will pass the file as an argument to the binary. We also need to use -m none since the ASAN instrumented binary needs a huge amount of memory.

afl-fuzz -m none -i EMFs/ -o output/ — /home/targets/libemf-1.0.11/tests/playemffile @@

However, we can make multiple tweaks to the running AFL instance to increase the number of executions per second. AFL provides a persistent mode which is in-memory fuzzing. This avoids forking a new process on every run, resulting in increased speed. We can also run multiple AFL instances, one on every core, to increase the speed. Beyond this, AFL also provides a file size minimization tool that can be used to minimize the test case size. We applied some of these optimization tricks and, as we can see below, there is a dramatic increase in the execution speed reaching ~500 executions per second.

After about 3 days of fuzzing this library, we had more than 200 unique crashes, and when we triaged them we noticed 5 unique crashes. We reported these crashes to the developer of the library along with MITRE, and after being acknowledged, CVE-2020-11863, CVE-2020-11864, CVE-2020-11865, CVE-2020-11866 and CVE-2020-13999 were assigned to these vulnerabilities. Below we discuss our findings for some of these vulnerabilities.

CVE-2020-11865 – Out of Bounds Memory Access While Enumerating the EMF Stock Objects

While triaging one of the crashes produced by the fuzzer, we saw SIGSEGV (memory access violation) for one of the EMF files given as an input. When the binary is compiled with the debugging symbols enabled, ASAN uses LLVM Symbolizer to produce the symbolized stack traces. As shown below, ASAN outputs the stack trace which helps in digging into this crash further.

Looking at the crash point in the disassembly clearly indicates the out of bounds memory access in GLOBALOBJECTS::find function.

Further analyzing this crash, it turned out that the vulnerability was in accessing of the global object vector which had pointers to stock objects. Stock objects are primarily logical graphics objects that can be used in graphics operations. Each of the stock objects used to perform graphical operations have their higher order bit set, as shown below from the MS documentation. During the metafile processing, the index of the relevant stock object can be determined by masking the higher order bit and then using that index to access the pointer to the stock object. Metafile processing code tries to retrieve the pointer from the global object vector by attempting to access the index after masking the higher order bit, as seen just above the crash point instruction, but does not check the size of the global object vector before accessing the index, leading to out of bounds vector access while processing a crafted EMF file.

Shown below is the vulnerable and fixed code where the vector size check was added:

CVE-2020-13999 – Signed Integer Overflow While Processing EMR_SCALEVIEWPORTEX Record

Another crash in the code that we triaged turned out to be a signed integer overflow condition while processing an EMR_SCALEVIEWPORTEXT record in the metafile. This record specifies the viewport in the current device context and is calculated by computing ratios. An EMR_SCALEVIEWPORTEXTEX record looks like this, as per the record specification. A new viewport is calculated as shown below:

As part of AFL’s binary mutation strategy, it applies a deterministic approach where certain hardcoded sets of integers replace the existing data. Some of these are MAX_INT, MAX_INT-1, MIN_INT, etc., which increases the likelihood of triggering edge conditions while the application processes binary data. One such mutation done by AFL in the EMF record structure is shown below:

This resulted in the following crash while performing the division operation.

Below we see how this condition, eventually leading to a denial-of-service, was fixed by adding division overflow checks in the code:

CVE-2020-11864 – Memory Leaks While Processing Multiple Metafile Records

Leak Sanitizer (LSAN) is yet another important tool which is integrated with the ASAN and can be used to detect runtime memory leaks. LSAN can also be used in standalone mode without ASAN. While triaging generated crashes, we noticed several memory leaks while processing multiple EMF record structures. One of them is as shown below while processing the EXTTEXTOUTA metafile record, which was later fixed in the code by releasing the memory buffer when there are exceptions reading the corrupted metafiles.

Apparently, memory leaks can lead to excessive resource usage in the system when the memory is not freed after it is no longer needed. This eventually leads to the denial-of-service. We found memory leak issues while libEMF processed several such metafile records. The same nature of fix, releasing the memory buffer, was applied to all the vulnerable processing code:

Additionally, we also reported multiple use-after-free conditions and denial-of-service issues which were eventually fixed in the newer version of the library released here.

Conclusion

Fuzzing is an important process and fundamental to testing the quality of a software product. The process becomes critical, especially when using third-party libraries in a product which may come with exploitable vulnerabilities. Auditing them for security issues is crucial. We believe the vulnerabilities that we reported are just the tip of the iceberg. There are several legacy libraries which likely require a thorough audit. Our research continues with several other similar Windows and Linux libraries and we will continue to report vulnerabilities through our coordinated disclosure process. We believe this also highlights that it is critical to maintain a good level of collaboration between vulnerability researchers and the open source community to have these issues reported and fixed in a timely fashion. Additionally, modern compilers come with multiple code instrumentation tools which can help detect a variety of memory corruption bugs when used early in the development cycle. Using these tools is recommended when auditing code for security vulnerabilities.

The post Vulnerability Discovery in Open Source Libraries Part 1: Tools of the Trade appeared first on McAfee Blog.

On Drovorub: Linux Kernel Security Best Practices

Intro

In a U.S. government cyber security advisory released today, the National Security Agency and Federal Bureau of Investigation warn of a previously undisclosed piece of Linux rootkit malware called Drovorub and attribute the threat to malicious actor APT28. The report is incredibly detailed and proposes several complementary detection techniques to effectively identify Drovorub malware activity. A multitude of investigative methods are suggested given that the common issue with rootkits is that large scale detection on a host can be a real challenge. The NSA and FBI have been explicit in their report that systems with a kernel version of 3.7 or lower are most susceptible to Drovorub malware due to the absence of adequate kernel signing enforcement.

Keeping a system updated and fully protected isn’t specific to Windows-based environments. Linux based systems are widespread within many enterprise organizations, requiring the same maintenance as any modern operating system. Linux offers a robust, secure computing platform which can meet many needs. As in most cases, proper configuration is key to the security of the platform.

For specific McAfee technology protections against Drovorub please visit the dedicated Drovorub KB article here.

In addition to the guidance provided in the  U.S. government report and our product specific knowledge base article, McAfee encourages organizations to take note of and apply the following best practices (where possible) for rootkit detection and kernel security.

Scanning for Rootkits

Just like a malware scanner, a rootkit scanner can scan low level processes to determine if any malicious code is loaded at bootup. For example, below are examples of software that can be used for general rootkit detection:

  • Chrootkit – A rootkit scanner for Linux to discover hard to find rootkits
  • Rkhunter – A rootkit scanner for Linux to discover backdoors and possible local exploits.

In this specific Drovorub case the advice is given to forensically analyze a machine’s memory with tools like Volatility. Using the Volatility plugin “Linux_Psxview” presence of the Drovorub client can be detected even though it doesn’t show up in the normal PSlist.

Linux Kernel hardening

Today’s advisory suggests that organizations enable UEFI Secure Boot in “full” or “thorough” mode on x86-64 systems. UEFI Secure Boot requires cryptographically signed firmware and kernels. Because no unsigned drivers can be loaded for hardware, this action will decrease the attack surface by making it more difficult for an attacker to insert a malicious kernel module into the system and for unsigned rootkits to remain persistent after reboot.

Organizations should take note, however, that Secure Boot is not integrated in all Linux distros. There are also some challenges with enabling Secure Boot. Often it requires manual intervention any time a kernel or module is upgraded or may prevent some products from loading. This knowledge base article from VMWare discusses ways to address these Secure Boot issues

Securing the kernel

There are several steps organizations can take to secure the Linux kernel and take advantage of the features that are provided. We will highlight some of the best-practices that can be used and applied. Please apply these within a test-environment before applying them in production.

Kernel module signing

Since Linux 3.7, the kernel has supported digital signatures on loadable kernel modules. This facility can be enabled in the kernel with settings in CONFIG_MODULE_SIG. These options can require valid signatures; enable automatic module signing during the kernel build phase; and specify which hash algorithm to use. Additionally, local or remote keys can be used. By requiring valid digital signatures, only known valid modules can be loaded, decreasing your system’s attack surface.

Module loading rules

Only known modules should be loadable. Limited module support can be enabled by default, disallowing kernel module loading and specifying which modules are exempt from the ban. The following command can be used to disable the loading:

sysctl kernel.modules_disabled=1

Some modules required for system operation may normally be loaded during system operation and not at boot.  To ensure these modules are available, they must be loaded at startup prior to when loading is disabled. To load these modules, list them in a file located in /etc/modules-load.d.

Disabling modules completely

Depending on the system in question, disabling all non-necessary hardware in the kernel configuration and building all required driver code directly into the kernel rather than using modules could allow for completely disabling loadable kernel module support. For special use systems, this may be a viable option. By disallowing modules entirely, your system’s attack surface can be drastically reduced.

Fully disabling kernel module support might only be possible for special purpose systems with a known usage pattern. General purpose, user-facing machines will likely need module support to support user access patterns.

Using Linux kernel Lockdown

The lockdown patches have been merged into the kernel since version 5.4. Even if Secure Boot is enabled, if not prevented, the root could still modify the kernel and, for example, apply a hot-patch and create a persistent process.  Lockdown was developed to provide a policy to prevent the root from modifying the kernel code. Lockdown has two modes: “integrity” and “confidentiality”. The community generally advises organizations to consider the “integrity” mode and use “confidentiality” mode for special systems.

Harden sysctl.conf

The sysctl.conf file is the main kernel parameter configuration point for a Linux system. By using secure defaults, the whole system will benefit from a more secure foundation. Example options include disabling IPv6 if not in use, ignoring network broadcast packets, enabling ASLR, and activating DEP/NX. (https://www.cyberciti.biz/faq/linux-kernel-etcsysctl-conf-security-hardening/)

Enable SELinux or AppArmor

Modern Linux systems include the security enhancement systems of AppArmor or SELinux depending on the distribution. These allow for granular access control with security policies. SElinux is installed and enabled by default on CentOS and RedHat Enterprise Linux operating systems, while AppArmor is installed and enabled by default on Ubuntu and SuSE Linux Enterprise systems.

What we often observe is that people will decide to disable these security enhancement systems as soon as they run into an issue since they is easy to disable with root privileges. But taking the time to learn how to allow services and fix issues is very important to provide an additional layer of security on a Linux system.

AppArmor is a Linux kernel security module that provides capabilities similar to SELinux. While SELinux operates on files (specifically inodes) and requires filesystem support, AppArmor works on paths, while being file system agnostic. Considered by many to be easier to use, it is mostly transparent to regular users. While SELinux can be (potentially) more secure, the complexity of the system has many users preferring AppArmor.

Among the mainline Enterprise-level Linux distributions, RedHat embraces SELinux, while SuSE Enterprise embraces (and owns the trademark to) AppArmor. Canonical is a significant contributor to AppArmor as well, and supports it by default in Ubuntu.

Additional Linux System hardening

In light of today’s advisory, we have focused mostly on securing the Linux Kernel in this article. However, there are many best practices to secure Linux (or nearly any modern operating system), including:

  • Removal of unused software
  • Disabling unused services
  • Enabling auditing
  • Controlling API access
  • Limiting root account usage
  • Incorporating a least-privilege policy as much as possible
  • Backing up your system
  • Increasing ASLR entropy via sysctl to make reliable exploitation more difficult, by increasing the number of locations libraries that could be stored in memory.

Detailed hardening and securing guides for Linux distributions can be downloaded from:

https://www.cisecurity.org/cybersecurity-best-practices/

Conclusion

Linux Kernel and System hardening may prove to hold a learning curve for organizations and administrators more familiar with the configuration and use of Windows operating systems. However, given the information provided in the NSA-FBI publication and the adaptation of Linux-based malware by threat actors overall, we advise organizations remain vigilant, harden Linux systems as much as possible, and deploy adequate security products.

For specific McAfee technology protections against Drovorub please visit the dedicated Drovorub KB article here.


The post On Drovorub: Linux Kernel Security Best Practices appeared first on McAfee Blog.

Vulnerability Discovery in Open Source Libraries: Analyzing CVE-2020-11863

1 September 2020 at 16:09

Open Source projects are the building blocks of any software development process. As we indicated in our previous blog, as more and more products use open source code, the increase in the overall attack surface is inevitable, especially when open source code is not audited before use. Hence it is recommended to thoroughly test it for potential vulnerabilities and collaborate with developers to fix them, eventually mitigating the attacks. We also indicated that we were researching graphics libraries in Windows and Linux, reporting multiple vulnerabilities in Windows GDI as well as Linux vector graphics library libEMF. We are still auditing many other Linux graphics libraries since these are legacy code and have not been strictly tested before.

In part 1 of this blog series, we described in detail the significance of open source research, by outlining the vulnerabilities we reported in the libEMF library. We also highlighted the importance of compiling the code with memory sanitizers and how it can help detect a variety of memory corruption bugs. In summary, the Address Sanitizer (ASAN) intercepts the memory allocation / deallocation functions like malloc () / free() and fills out the memory with the respective fill bytes (malloc_fill_byte / free_fill_byte). It also monitors the read and write to these memory locations, helping detect erroneous access during run time.

In this blog, we provide a more detailed analysis for one of the reported vulnerabilities, CVE-2020-11863, which was due to the use of uninitialized memory. This vulnerability is related to CVE-2020-11865, a global object vector out of bounds memory access in the GlobalObject::Find() function in libEMF. However, the crash call stack turned out to be different, which is why we decided to examine this further and produce this deep dive blog.

The information provided by the ASAN was sufficient to reproduce the vulnerability crash outside of the fuzzer. From the ASAN information, the vulnerability appeared to be a null pointer dereference, but this was not the actual root cause, as we will discuss below.

Looking at the call stack, it appears that the application crashed while dynamically casting the object, for which there could be multiple reasons. Out of those possible reasons that seem likely, either the application attempted to access the non-existent virtual table pointer, or the object address returned from the function was a wild address accessed when the application crashed. Getting more context about this crash, we came across an interesting register value while debugging. Below shows the crash point in the disassembly indicating the non-existent memory access.

If we look at the state of the registers at the crash point, it is particularly interesting to note that the register rdi has an unusual value of 0xbebebebebebebebe. We wanted to dig a little deeper to check out how this value got into the register, resulting in the wild memory access. Since we had the source of the library, we could check right away what this register meant in terms of accessing the objects in memory.

Referring to the Address Sanitizer documentation, it turns out that the ASAN writes 0xbe to the newly allocated memory by default, essentially meaning this 64-bit value was written but the memory was not initialized. The ASAN calls this as the malloc_fill_byte. It also does the same by filling the memory with the free_fill_byte when it is freed. This eventually helps identify memory access errors.

This nature of the ASAN can also be verified in the libsanitizer source here. Below is an excerpt from the source file.

Looking at the stack trace at the crash point as shown below, the crash occurred in the SelectObject() function. This part of the code is responsible for processing the EMR_SELECTOBJECT record structure of the Enhanced Meta File (EMF) file and the graphics object handle passed to the function is 0x80000018. We want to investigate the flow of the code to check if this is something which comes directly from the input EMF file and can be controlled by an attacker.

In the SelectObject() function, while processing the EMR_SELECTOBJECT record structure, the handle to the GDI object is passed to GlobalObjects.find() as shown in the above code snippet, which in turn accesses the global stock object vector by masking the higher order bit from the GDI object handle and converting it into the index, eventually returning the stock object reference from the object vector using the converted index number. Stock object enumeration specifies the indexes of predefined logical graphics objects that can be used in graphics operations documented in the MS documentation. For instance, if the object handle is 0x8000018, this will be ANDed with 0x7FFFFFFF, resulting in 0x18, which will be used as the index to the global stock object vector. This stock object reference is then dynamically cast into the graphics object, following which EMF::GRAPHICSOBJECT member function getType ( ) is called to determine the type of the graphics object and then, later in this function, it is again cast into an appropriate graphics object (BRUSH, PEN, FONT, PALETTE, EXTPEN), as shown in the below code snippet.

EMF::GRAPHICSOBJECT is the class derived from EMF::OBJECT and the inheritance diagram of the EMF::OBJECT class is as shown below.

However, as mentioned earlier, we were interested in knowing if the object handle, passed as an argument to the SelectObject function, can controlled by an attacker. To be able to get context on this, let us look at the format of the EMR_SELECTOBJECT record as shown below.

As we notice here, ihObject is the 4-byte unsigned integer specifying the index to the stock object enumeration. In this case the stock object references are maintained in the global objects vector. Here, the object handle of 0x80000018 implies that index 0x18 will be used to access the global stock object vector. If, during this time, the length of the object vector is less then 0x18 and the length check is not done prior to accessing the object vector, it will result in out of bounds memory access.

Below is the visual representation of processing the EMR_SELECTOBJECT metafile record.

While debugging this issue, we enable a break point at GlobalObjects.find () and continue until we have object handle 0x80000018; essentially, we reach the point where the above highlighted EMR_SELECTOBJECT record is being processed. As shown below, the object handle is converted into the index (0x18 = 24) to access the object vector of size (0x16 = 22), resulting into out of bounds access, which we reported as CVE-2020-11865.

Further stepping into the code, it enters the STL vector library stl_vector.h which implements the dynamic expansion of the std::vectors. Since the objects vector at this point of time has only 22 elements, the STL vector will expand the vector to the size indicated by the parameter highlighted, accessing the vector by passed index, and will return the value at that object reference, as shown in the below code snippet, which comes out to be 0xbebebebebebebebe as filled by the ASAN.


The code uses the std:allocator to manage the vector memory primarily used for memory allocation and deallocation. On further analysis, it turns out that the value returned, 0xbebebebebebebebe in this case, is the virtual pointer of the non-existent stock object, which is dereferenced during dynamic casting, resulting in a crash.

As mentioned in our earlier blog, the fixes to the library have been released in a subsequent version, available here.

Conclusion

While using third party code in products certainly saves time and increases development speed, it potentially comes with an increase in the volume of vulnerabilities, especially when the code remains unaudited and integrated into products without any testing. It is extremely critical to perform fuzz testing of the open source libraries used, which can help in discovering vulnerabilities earlier in the development cycle and provides an opportunity to fix them before the product is shipped, consequently mitigating attacks. However, as we emphasized in our previous blog, it is critical to strengthen the collaboration between vulnerability researchers and the open source community to continue responsible disclosures, allowing the maintainers of the code to address them in a timely fashion.

The post Vulnerability Discovery in Open Source Libraries: Analyzing CVE-2020-11863 appeared first on McAfee Blog.

❌
❌