A Privacy Manager is responsible for the development, creation, maintenance and enforcement of the privacy policies and procedures of an organization. They ensure compliance with all privacy-related laws and regulations. The Privacy Manager takes an active lead role when a privacy incident or data breach occurs and will start the investigation. They will then monitor, track and resolve any privacy issues. The Privacy Manager builds a strategic and comprehensive privacy program for their organization that minimizes risk and ensures the confidentiality of protected information.
Advanced knowledge of privacy law and data protection is critical to success in this role.
0:00 - Working as a privacy manager 0:40 - What does a privacy manager do? 3:02 - Experience a privacy manager needs 5:15 - Is college necessary for a privacy manager? 8:05 - Skills needed to be a privacy manager 10:30 - What tools does a privacy manager use? 11:15 - Where do privacy managers work? 12:15 - Roles privacy managers can move to 13:30 - How do I get started becoming a privacy manager?
About Infosec Infosec believes knowledge is power when fighting cybercrime. We help IT and security professionals advance their careers with skills development and certifications while empowering all employees with security awareness and privacy training to stay cyber-safe at work and home. It’s our mission to equip all organizations and individuals with the know-how and confidence to outsmart cybercrime. Learn more at infosecinstitute.com.
One day, I was trying to bypass an EDR and I noticed something interesting.
The EDR I was trying to bypass wasn’t hooking the DLL in their code with jmp instruction like other EDRs in user-land.
In this case, it was hooking directly the Import Address Table. This technique makes the usual move like live-patching, or erasing the loaded DLL with one freshly loaded from disk useless.
I had to unhook the Import Address Table of my process.
Today on Cyber Work Ché Wijesinghe of Cape Privacy talks about the safe and ethical collection of user data when creating machine learning or predictive models. When your bank is weighing whether to give you a loan, they can make a better choice the more info they know about you. But how secure is that contextual data? Hint: not as secure as Wijesinghe would like!
0:00 - Machine learning and data collection 2:37 - Getting started in cybersecurity 3:15 - Being drawn to big data 4:35 - What data is driving decision-making? 9:04 - How is data collection regulated? 15:02 - Closing the encryption gap 16:50 - Careers in data privacy 19:07 - Where can you move from data privacy? 21:20 - Ethics of data collection 23:25 - Learn more about Wijesinghe 23:55 - Outro
About Infosec Infosec believes knowledge is power when fighting cybercrime. We help IT and security professionals advance their careers with skills development and certifications while empowering all employees with security awareness and privacy training to stay cyber-safe at work and home. It’s our mission to equip all organizations and individuals with the know-how and confidence to outsmart cybercrime. Learn more at infosecinstitute.com.
The difficult relationship between nihilism, cybersecurity professionals and Being-A-Dick behaviour -
Disclaimer: if you are looking for a strictly technical article, the ones I usually write, you will be disappointed. This blogpost is mainly my two cents on the way we, cybersecurity professionals, usually deal with situations, organizations and people, both techies and non-techies. Introduction A few days ago, I was...
Diana Kelley returns to the show to discuss her work as a board member of the Cyber Future Foundation and the goings-on at this year’s Cyber Talent Week. Whether you’re a cybersecurity hiring manager who doesn’t know why you’re not getting the applicants you want, a candidate who hears the profession has 0% unemployment but still can’t seem to get a callback or anyone in between, DO. NOT. MISS. THIS. EPISODE. This is one for the books, folks.
0:00 - Cybersecurity hiring and job searching 4:30 - Diana Kelley of Cyber Future Foundation 9:00 - Cyber Future Foundation talent week 13:58 - Reexamining cybersecurity job descriptions 21:52 - Cybersecurity hiring manager and applicant training 27:10 - Strategies to bring in diverse talent from other industries 33:06 - Narrowing your cybersecurity job pursuit 39:37 - Using different educations in cybersecurity roles 41:32 - Implementing an educational pipeline 44:40 - Hiring based on strong skills from other trades 48:22 - Cybersecurity apprenticeships 53:22 - Fostering cybersecurity community value 59:09 - Diana Kelley's future projects 1:00:30 - Outro
The approach to this challenge was completely different from the past two months, as the vulnerable component was on the backend, forcing us to approach it as a black box scenario. The page presents a simple submittable get form providing the open and payload parameters. To reach that from the UI, a user has to […]
Introduction Github project: https://github.com/kiks7/KRWX During the last few months/year I was studying and approaching the Kernel Exploitation subject and during this journey I developed few tools that assissted me (and currently assist) on better understanding specific topics. Today I want to release my favourine one: KRWX (Kernel Read Write Execute). It is a simple LKM […]
Introduction I was searching for a vulnerability that permitted me to practise what I’ve learned in the last period on Linux Kernel Exploitation with a “real-life” scenario. Since I had a week to dedicate my time in Hacktive Security to deepen a specific argument, I decided to search for a public vulnerability without a public […]
Secure coders are responsible for developing and writing secure code in a way that protects against security vulnerabilities like bugs, defects and logic flaws. They take proactive steps to introduce secure coding methodologies before the application or software is introduced into a production environment, often following recommendations from the Open Web Application Security Project (OWASP) Foundation.
0:00 - Intro 0:25 - What does a secure coder do? 5:48 - How do you become a secure coder? 9:46 - What skills do secure coders need? 12:28 - What tools do secure coders use? 17:08 - What roles can secure coders transition into? 19:50 - What to do right now to become a secure coder
About Infosec Infosec believes knowledge is power when fighting cybercrime. We help IT and security professionals advance their careers with skills development and certifications while empowering all employees with security awareness and privacy training to stay cyber-safe at work and home. It’s our mission to equip all organizations and individuals with the know-how and confidence to outsmart cybercrime. Learn more at infosecinstitute.com.
On today's episode, we're breaking down phrases you've heard a million times: “security is everyone’s job,” “humans are the weakest link in the security chain,” “it’s not if you get breached, but when.” Returning guest Alyssa Miller drills into these comforting nostrums and explains why, even when they’re used for well-intended purposes, they often act to limit the conversation and the options, rather than address the hard work needed to overcome these evergreen problems. You’re not going to want to miss this one, folks! It’s all that, plus a little bit of book talk, today on Cyber Work!
0:00 - Intro 1:38 - Alyssa's tweet that inspired this episode 4:00 - Why you need to read the Cybersecurity Career Guide 9:10 - Cybersecurity platitudes and clichés 11:30 - Cliché 1: "It's not if you get breached, but when" 18:44 - Cliché 2:"Just patch your shit" 24:58 - Cliché 3: "Users are the weakest link" 32:34 - Cliché 4: "Security is everyone's job" 35:52 - Cliché 5: What is a "quality gate"? 44:14 - Cliché 6: "You just need passion to get hired" 48:14 - How to write a better cybersecurity job description 50:15 - Business value of diversity and inclusion 52:52 - Building a security champions program 55:12 - Where can you connect with Alyssa Miller? 56:44 - Outro
About Infosec Infosec believes knowledge is power when fighting cybercrime. We help IT and security professionals advance their careers with skills development and certifications while empowering all employees with security awareness and privacy training to stay cyber-safe at work and home. It’s our mission to equip all organizations and individuals with the know-how and confidence to outsmart cybercrime. Learn more at infosecinstitute.com.
Reading Time: 11minutes The analysed sample is a malware employed by the Threat Actor known as Ragnarok. The ransomware is responsible for files’ encryption and it is typically executed, by the actors themselves, on the compromised machines. The name of the analysed executable is xs_high.exe, but others have been found used by the same ransomware family (such as […]
Reading Time: 5minutes NVIDIA GeForce Experience (GFE) v.<= 3.21 is affected by an Arbitrary File Write vulnerability in the GameStream/ShadowPlay plugins, where log files are created using NT AUTHORITY\SYSTEM level permissions, which lead to Command Execution and Elevation of Privileges (EoP). NVIDIA Security Bulletin – April 2021 NVIDIA Acknowledgements Page Introduction Some time ago I was looking for […]
Reading Time: 11minutes At the beginning of the month, Sentinel One disclosed five high severity vulnerabilities in Dell’s firmware update driver.As the described vulnerability appeared not too complicated to exploit, a lot of fellow security researchers started weaponizing it. I was one of, if not the first tweeting about weaponizing it into a _SEP_TOKEN_PRIVILEGES overwrite exploit, and with […]
Reading Time: 8minutes Last week SentinelOne disclosed a "high severity" flaw in HP, Samsung, and Xerox printer's drivers (CVE-2021-3438); the blog post highlighted a vulnerable strncpy operation with a user-controllable size parameter but it did not explain the reverse engineering nor the exploitation phase of the issue. With this blog post, I would like to analyse the vulnerability […]
Reading Time: 5minutes It’s no secret that, since the beginning of the year, I’ve spent a good amount of time learning how to fuzz different Windows software, triaging crashes, filling CVE forms, writing harnesses and custom tools to aid in the process.Today I would like to sneak peek into my high-level process of designing a Homemade Fuzzing Platform, […]
Reading Time: 7minutes Crucial Ballistix MOD Utility is a software product that can be used to customize and control gaming systems, specifically LED colours and patterns, memory, temperature, and overclock.During my vulnerability research, I’ve discovered that this software utilizes a driver, MODAPI.sys, containing multiple vulnerabilities and allowing an attacker to achieve local privilege escalation from a low privileged […]
Reading Time: 5minutes As part of Yarix's continuous security research journey, during this year I’ve spent a good amount of time reverse-engineering Windows drivers and exploiting kernel-mode related vulnerabilities. While in the past there were (as far as I know), at least two good IDA plugins aiding in the reverse engineering process: DriverBuddy of NCC Group. win_driver_plugin of […]
Reading Time: 2minutes This blog post serves as an advisory for a couple MSI’s products that are affected by multiple high-severity vulnerabilities in the driver components they are shipped with. All the vulnerabilities are triggered by sending specific IOCTL requests and will allow to: Directly interact with physical memory via the MmMapIoSpace function call, mapping physical memory into […]
Reading Time: 7minutes In this writeup we present the analysis and exploitation of a VBScript command injection vulnerability we stumbled upon during a penetration test on a .NET web application. What makes this vulnerability stand out is the fact that at first glance it could be mistaken for a common SQL injection. After a few exploitation attempts, we […]
Today's episode is all about email fraud. John Wilson, head of the cyber intelligence division at Agari by HelpSystems, discusses Business Email Compromise (BEC), spearphishing, whaling, romance fraud and more. If you can name it, John’s studied it. And he's likely collected intel that’s managed to freeze cybercriminals’ assets — and even put them away. He gives career tips and advice for engaging in threat research at all levels, we discuss the pyrrhic victory that is the modern spam filter, and John tells me why BEC fraud hunters’ best asset is a degree in psychology! All that and loads more, today on Cyber Work!
0:00 - Free cybersecurity training resources 0:58 - Overview of today's episode 1:58 - Who is John Wilson? 3:02 - Getting into cybersecurity 4:58 - How spam has evolved over the years 8:12 - Why pursue a career in fraud? 11:10 - 3 primary vectors for email attacks 15:20 - Is BEC ever an insider threat? 16:16 - Is education making a difference on BEC attacks? 20:55 - Tracking down BEC actors and recovering assets 23:50 - Two angles to preventing BEC attacks 29:12 - Careers related to BEC and phishing prevention 34:42 - How to gain cybersecurity experience and get hired 37:25 - Agari and email fraud protection 42:16 - Outro
About Infosec Infosec believes knowledge is power when fighting cybercrime. We help IT and security professionals advance their careers with skills development and certifications while empowering all employees with security awareness and privacy training to stay cyber-safe at work and home. It’s our mission to equip all organizations and individuals with the know-how and confidence to outsmart cybercrime. Learn more at infosecinstitute.com.
The badges for OFFZONE 2022 will be just as memorable as previous years. We promise to deliver a sleek design with plenty of interactive features.
Let’s briefly recount the evolution of the OFFZONE badge. At the last conference, we made it in the form of an interactive printed circuit board (PCB) designed as a 3.5-inch floppy disk. The board could be accessorized: participants could attach a display, IR receiver, and other interesting things right at the soldering zone at the venue.
Starting from 2020, we’ve been postponing OFFZONE, so the 2020 badge design has never taken flight 😔
Internals of the OFFZONE 2022 badge
This year, we decided to split the traditional badge functionality: now the conference badge will operate as a wallet for your Offcoins, the currency used at the event, while the tasks will be moved to a separate device. But this doesn’t mean that the badge is now plain vanilla. Its main features in 2022 are customization and the creation of add-ons with unique designs. This could have become reality back in 2020, but, alas… no need to spell it out for you here, right?
Every add-on starts with a connector. This is a four-pin plug that makes the thing connectable to the badge’s main board. And because we’re using a connector, there will be no need for any soldering. The main board will have at least 2 slots for add-ons, which can be hand made by any participant. When creating them, you will have to adhere to some technical limitations, which we will tell you further down the line.
An add-on doesn’t have to necessarily have a full-fledged circuit of microcontrollers, transistors, and other crafty electrical modules. If you’re not really into the intricacies of circuitry, you can get by with a couple of LEDs and an unusual form of your textolite board. Even with this simplistic design approach, you can still have your jolt of fun!
How to create an add-on
Here’s your step-by-step guide to designing your own add-on.
0. Read the requirements:
Maximum dimensions: 5 cm x 5 cm
Connector location: at the bottom and approximately in the center of your add-on
Maximum power consumption of the add-on electrical circuit: 100 mA
Solder mask colors: green, red, yellow, blue, black, or white
Screen print colors: red, yellow, blue, black, or white
Power supply for your electrical circuit: 3.3 V
Connection interface: I2C
PCB topology: single or double-sided, one conducting layer per side
PCB input data format: Gerber
For convenience, our colleagues abroad have standardized the add-on pinout and size. All this was jokingly called a “shitty connector.” It hurts to look at these specs, but anyway it has all the data you need to design your own add-on.
1. Come up with an idea. Your idea can be anything: a meme character, your personal symbol, a company’s logo, or even a cat’s nose. At its simplest, you can get away with just a ready image, preferably in a vector SVG or DXF format, and import it into the PCB design software. You may be better off if you use black-and-white images for import. Also, we advise you the graphics editor Inkscape to prepare your images for import.
Here’re some add-ons from DEF CON to inspire you:
2. Think of extra features if you need them
3. Choose your development toolset. At this stage, decide which computer-aided design (CAD) system you’re going to use. There’re tons of PCB layout software out there for all tastes and colors. Here’re the most popular and accessible tools: KiCAD, EasyEDA, DipTrace, and CircuitStudio. KiCAD is open-source and free to use. The other three are commercial products whose trial versions offer enough functionality to create your own add-on.
It’s difficult to give advice on the choice of any particular CAD system. Each has its pros and cons, so just play around with the options.
4. Learn the basic CAD features. All CADs have a fair number of tutorials with examples of use. Also, they all have a similar development pipeline: once you get the hang of a CAD system, you won’t have much trouble learning another one.
We would recommend that you practice PCB design as follows:
Use basic components to build a simple electrical circuit made up of a couple of LEDs.
Fill out the rules to check the topology.
Experiment with different options for solder masks, metallization, and screen printing in your PCB editor.
Try to import images to the board.
Figure out the mechanism for creating polygons and layout verification.
Lay out your first PCB.
5. Design your add-on board. If you’re already experienced in PCB development or have confident CAD skills, you can move on to laying out your add-on.
6. Export your files into Gerber, the manufacturing format.
After you’ve laid out the add-on board, you will need to perform a simple yet important step — export the printed circuit board project into Gerber files. This should render a group of files that is a layer-by-layer description of your board.
7. Choose your production method:factory or toner transfer.
There’re quite a few Chinese factories out there: PCBWay, JLCPCB, ALLPCB, etc. As an upside, this gives cheap and quality results, as a downside, your PCB will take some time to arrive, as it will have quite the distance to travel. That’s why you might want to consider a local manufacturer.
The other, hardcore option is to create the add-on by yourself using the toner transfer or photoresist method. It’s hard, pricey and time-consuming, but captivating!
Here’re some boards made using toner transfer:
8. Order your PCB from a factory or make your own using toner transfer.
By now, you should have settled on the production method. Are you going with factory? Great, now you have to place your order. Typically, that includes filling out a form on the manufacturer’s website, uploading your Gerber files, and making the payment.
However, if you’ve chosen the path of a true samurai and decided to make the add-on board yourself, it’s time to stock up on the necessary materials and get to work. There’re tons of instructions and recommendations on the web for PCB etching, so you won’t get lost.
9. Stock up on cocoa and patience. At this point, there will be some PCB magic going on in the factory (if you chose contract manufacturing) or in your kitchen (if you opted for toner transfer).
10. Profit!
By this stage, you should have received your PCB from the manufacturer or completed your own. Well done! Examine the result carefully.
In case something didn’t work out or doesn’t match your original idea, panic not. Developing any PCB, or electronics in general, is a process of iterations, and an add-on is no exception. Fix the errors and repeat the order or manufacturing step. If you’ve reached this stage, you already know how to design a PCB.
And if you were able to achieve the desired result in the first attempt, congrats!
11. Come around to OFFZONE 2022 and show off your PCB.
Keep in mind that the third international conference on practical cybersecurity OFFZONE will be held on August 25–26. It will bring together security specialists, developers, engineers, researchers, lecturers, and students from dozens of countries. It focuses only on technical content dedicated to current industry trends. To learn how to participate, visit the event’s website.
Today on the Cyber Work Podcast, Mark Kapczynski of OneRep reminds us of an awful truth most people either don’t know or don’t like to think about. Your personal information — your address, your phone number, your age — all of these things are on the public internet! Mark talks about OneRep’s mission to scrub personal information from these sites, suggests changes that could help prevent this problem, and shares ways you could base a career in this fight for data privacy and autonomy. All that and a detour into grade-school home computer shenanigans on today's episode.
0:00 - Free cybersecurity training resources 0:56 - Overview of today's episode 1:50 - Who is Mark Kapczynski? 2:44 - Data breaches are a way of life 3:36 - Getting started in IT and cybersecurity 5:41 - Helping the film industry go digital 7:31 - Transitioning industries from paper to digital 9:53 - What types of personal data are on the internet? 12:40 - How people search sites sell PII and make money 14:50 - How to get personal information removed from sites 18:07 - What type of services does OneRep offer? 19:19 - How is public personal data used in cybercrime? 23:01 - How can consumers limit personal data exposure? 26:38 - Regulatory changes needed to protect personal data 29:00 - Who owns your personal data? 30:55 - Web 3.0, smart contracts and other tech needed 33:58 - Jobs and careers related to data privacy 36:38 - Every professional needs to understand data 39:50 - What makes a data professional's resume stand out? 41:50 - What is OneRep? 44:30 - Outro
About Infosec Infosec believes knowledge is power when fighting cybercrime. We help IT and security professionals advance their careers with skills development and certifications while empowering all employees with security awareness and privacy training to stay cyber-safe at work and home. It’s our mission to equip all organizations and individuals with the know-how and confidence to outsmart cybercrime. Learn more at infosecinstitute.com.
Tl;DrThe Engintron plugin for CPanel presents a default configuration which could expose applications to account takeover and / or sensitive data exposure due to cache poisoning attacks. Whenever a client sends a request to a web server, the received response is processed and served by the back-end service each time. In case of an high […]
There are more than four ways to mask data, but these are the main ones to focus on in this post.
Lossless Compression
Encryption
Steganography
Shuffling
If we want to detect a compressed or encrypted stream of bytes but can’t rely on a file header for a signature, the best way is by using something like a Chi-Square test. The more uniform the data is, the more likely it is to be compressed or encrypted.
Steganography is better at masking. Some image formats already use lossless compression to reduce the size of files. The PNG format, for example, uses Zlib, and the high compression ratio will result in the file having a high amount of entropy. The GIF format also uses LZW as its compression method but is limited to 256 colours, which results in losing information during the encoding process. Of course, you have the option of parsing GIFs manually, but PNG is probably easier to work with in most image encoding libraries.
Involutions
In mathematics, an involution, or an involutory function, is a function that is its own inverse; For the following instructions, I’m merely using this word to describe what they do in practice. Executed once will mask data, and executing again will unmask. These are very common but also very weak when used alone.
The circular shift and byte swapping operations are much closer to a permutation. They could also be used on large arrays in addition to the shuffling.
Random Shuffling
Let’s imagine you want to shuffle a deck of cards for an online poker game. The shuffling algorithm must be unbiased, and the results can’t be predictable before a game begins. Many who have asked for such an algorithm know of the Fisher-Yates shuffle. It’s an algorithm for generating a random permutation of a finite sequence. It was proposed by Ronald Fisher and Frank Yates in their book Statistical Tables for Biological, Agricultural and Medical Research published in 1939. Richard Durstenfeld modified the algorithm in 1964, and Donald E. Knuth popularised it in his 1968 book The Art of Computer Programming, hence why some refer to it as the Knuth Shuffle.
The following code in C illustrates how one might shuffle a byte array. Here, we’re using the current time as a seed to initialise the PRNG, which wouldn’t be recommended for a poker game.
Obtaining a unique sequence of numbers to shuffle the array is problematic. Most software will use a pseudorandom number generator (PRNG). However, knowing how to generate the same sequence of numbers used to shuffle a deck of cards allows us to determine where every card is and even reverse the process. But that’s precisely what makes Fisher-Yates useful for masking. We want to unshuffle our masked data later; it’s just that rand() isn’t suitable. We need something else.
Keyed/Seeded/Deterministic Shuffling
Apart from rand() being weak for shuffling, unshuffling the array would require starting with the last number returned by it. rand() doesn’t support this type of random access, therefore our unshuffling algorithm would be required to generate the exact same sequence of numbers and store each one in memory before starting to unshuffle. We need a function that can produce deterministic values based on a seed or key. Seeded or keyed shuffling and unshuffling is really what we need.
A PRNG is also a Deterministic Random Bit Generator (DRBG). The DRBG/PRNG-generated sequence is not truly random because an initial value, called the PRNG’s seed (which may include truly random values), entirely determines the output bits generated by it. Therefore, we can replace rand() with a stream cipher like RC4, ChaCha, or a block cipher like AES in Counter (CTR) mode and generate deterministic values.
NIST has defined how to construct a DRBG from CTR mode in SP 800-90Ar1, but it’s unnecessary to use this for masking. Rather than implement a DRBG, we just need to encrypt the range index using a secret key and then derive an unbiased number within that range from the ciphertext. The following code tries to demonstrate how it might be done in practice.
#ifdefined(_WIN64)//// SPECK128-256//#define WORDLEN 64#define PRNG_MAX_INT (INT64_MAX + 1)#define ENCRYPT_KEY_LEN 32#define ENCRYPT_BLOCK_LEN 16#define R(v,n)(((v)>>(n))|((v)<<(64-(n))))typedefunsignedlonglong W;void
encrypt(void*mk,void*p){
W k[4],*x=(W*)p,i,t;for(i=0; i<4; i++) k[i]=((W*)mk)[i];for(i=0; i<34; i++){
x[1]=(R(x[1],8)+ x[0])^ k[0],
x[0]= R(x[0],61)^ x[1],
k[1]=(R(k[1],8)+ k[0])^ i,
k[0]= R(k[0],61)^ k[1];
t = k[1], k[1]= k[2], k[2]= k[3], k[3]= t;}}#else//// SPECK64-128//#define WORDLEN 32#define PRNG_MAX_INT (INT32_MAX + 1)#define ENCRYPT_KEY_LEN 16#define ENCRYPT_BLOCK_LEN 8#define R(v,n)(((v)>>(n))|((v)<<(32-(n))))typedefunsignedint W;void
encrypt(void* mk,void* p){
W k[4],*x=(W*)p,i,t;for(i=0; i<4; i++) k[i]=((W*)mk)[i];for(i=0; i<27; i++){
x[0]=(R(x[0],8)+ x[1])^ k[0],
x[1]= R(x[1],29)^ x[0],
t = k[3],
k[3]=(R(k[1],8)+ k[0])^ i,
k[0]= R(k[0],29)^ k[3],
k[1]= k[2], k[2]=t;}}#endif
W
prng_word(void*key, W max){
W r, x[2], ctr =1, d =((-max)/max)+1;if(d ==0)return0;for(;;){
x[0]=max;
x[1]= ctr++;
encrypt(key, x);
r = x[0]/ d;if(r <max)return r;}}void
shuffle(void*seed,void*inbuf,size_t inlen){
uint8_t *in =(uint8_t*)inbuf;for(size_t i = inlen -1; i >0; i--){
uint32_t j = prng_word(seed,(i +1));
uint8_t t = in[i];
in[i]= in[j];
in[j]= t;}}void
unshuffle(void*seed,void*inbuf,size_t inlen){
uint8_t *in =(uint8_t*)inbuf;for(size_t i =0; i < inlen; i++){
uint32_t j = prng_word(seed,(i +1));
uint8_t t = in[i];
in[i]= in[j];
in[j]= t;}}
There are times when elements of the array will remain in the same position after shuffling. This typically happens with small arrays. In that case, something else is required for masking. Now, if you know of a way to fix that, feel free to leave a comment or drop me an email.
Summary
Shuffling doesn’t provide any confidentiality for the masked data like encryption does and doesn’t reduce its size like compression does. However, shuffling a large enough array using a secure cipher and secret key to generate a sequence of numbers can probably make it difficult to recover the original data without the key used to initialise the PRNG. That seems helpful in masking data and better than an XOR. But of course, something like this is in no way intended or implied to be a suitable replacement for encryption and shouldn’t be used for any critical information!
On today's episode, our old pal John Wagnon, Infosec Skills author and keeper of the secrets of OWASP, joins me to talk about the big changes in the OWASP Top 10 that happened at the end of 2021, his own class teaching the Top 10, and some job tips, study hints and career pivots for people interested in these vulnerabilities. Find out why access managers are going to rule the world someday!
0:00 - Free cybersecurity training resources 0:56 - Overview of today's episode 1:43 - Who is John Wagnon? 2:50 - Working in cybersecurity and teaching OWASP 4:18 - What is the OWASP Top 10? 7:51 - How did the OWASP Top 10 change in 2021? 15:48 - Why do these security issues never go away? 19:06 - Cybersecurity roles using the OWASP Top 10 23:43 - What's covered in John's OWASP Top 10 courses? 26:42 - How to get hands-on cybersecurity experience 30:24 - Vulnerability-related cybersecurity career paths 34:16 - What is John working on with Infosec and Fortinet? 35:37 - Using your career as a learning opportunity 37:16 - Learn more about John Wagnon and OWASP 38:30 - Outro
About Infosec Infosec believes knowledge is power when fighting cybercrime. We help IT and security professionals advance their careers with skills development and certifications while empowering all employees with security awareness and privacy training to stay cyber-safe at work and home. It’s our mission to equip all organizations and individuals with the know-how and confidence to outsmart cybercrime. Learn more at infosecinstitute.com.
Last year, Cyber Work Live brought you into the world of cybersecurity project management — with tips for acquiring your skills, improving your resume and getting your foot in the door. But what does the day-to-day work of cybersecurity project managers look like?
Jackie Olshack and Ginny Morton return to answer that question. They’ll also share experiences they’ve gained while working on some of their biggest projects!
0:00 - Intro 0:50 - Who is Jackie Olshack? 1:24 - Who is Ginny Morton? 2:52 - Can non-technical PMs move into the tech space? 8:50 - Best way to manage projects with limited resources 13:30 - What certificates are needed for project management jobs? 18:52 - How do you kick off a cybersecurity project? 28:41 - How do you keep the project on schedule? 34:15 - Tips for networking in remote working situations 36:55 - Dealing with slowdowns and delays in projects 43:35 - Importance of a supportive environment in projects 47:40 - Dealing with delays from other teams in projects 50:35 - Tips for managing multiple projects at once 55:35 - How can teams support their project manager 56:35 - Transitioning into a cybersecurity career 59:00 - Outro and Infosec Skills giveaway
About Infosec Infosec believes knowledge is power when fighting cybercrime. We help IT and security professionals advance their careers with skills development and certifications while empowering all employees with security awareness and privacy training to stay cyber-safe at work and home. It’s our mission to equip all organizations and individuals with the know-how and confidence to outsmart cybercrime. Learn more at infosecinstitute.com.
This blog is about the SYLK file format, a file format from the 1980s that is still supported by the most recent MS Office versions. As it turns out, this file format is a very good candidate for creating weaponized documents that can be used by attackers to establish an initial foothold. In our presentation at DerbyCon 8 we already demonstrated some of the powers of SYLK.
In this blog post we will dive into additional details of this file format. We also provide recommendations for mitigations against weaponized SYLK files.
Introduction
SYLK stands for SYmbolic LinK, a file format that was introduced in the 1980s. Commonly, SYLK files have the file extension .slk. SYLK is a file format which uses only displayable ANSI characters and it was created to exchange data between applications (such as spreadsheets and databases).
The file format is hardly used nowadays and documentation on it is scarce. Wikipedia has limited details on SYLK. Probably the best documentation available is the file sylksum.doc, authored by Microsoft and last updated in 1986 (!). We have hosted a copy of this file here. The File Formats Handbook by Gunter Born describes additional details on SYLK (it’s a 1995 book, second hand copies available on Amazon).
Despite being an ancient file format, the file extension .slk is still mapped by default to Excel on the most recent MS Office versions (confirmed on 2010, 2013 and 2016).
We are not the first offensive security researchers to look into the SYLK file format. Previously, Matt Nelson has demonstrated how DDE attacks can be combined with SYLK. This method has been weaponized in various malware samples that were observed in the wild, such as this one and this one.
In this blog post we will demonstrate that the power of SYLK goes beyond DDE attacks. In particular, malicious macros can be embedded in this file type as well.
No protected mode
There is one important reason why the SYLK format is appealing to attackers: the Protected View sandbox does not apply to this file format. This means that if a weaponized SYLK file is delivered via email or web and the Mark-of-the-Web flag is applied, the target user is not bothered with this warning message.
In addition, SYLK files with the .slk extension have the following characteristics.
Altogether, this makes SYLK a good candidate for weaponization.
XLM macros in SYLK
This unanswered question on an Excel forum caught our eye. Would it be possible to embed macros in SYLK? Simply trying to save an Excel file with a VBA project to SYLK did not work: a warning message was displayed that the macro project would be lost in this file format. Repeating this attempt with Excel 4.0 / XLM macros didn’t work either.
After studying the scarce documentation that is available on SYLK and after countless hours of experiments, we finally achieved our goal: macros can be embedded in the SYLK file format.
Open notepad, paste the following text and save it to a file with the .slk extension:
ID;P
O;E
NN;NAuto_open;ER101C1
C;X1;Y101;EEXEC("CALC.EXE")
C;X1;Y102;EHALT()
E
Double click the file to open it in Excel. Click “Enable Content” to enable macros and calculator will pop.
Let’s dive into how this works. Each line of a SYLK input file must be no longer than 260 characters (otherwise Excel will display an error message and will not parse that line). Every line consists of one or more records marked with semicolons:
The first line with the “ID” and “P” records is a marker that indicates this file is a SYLK file.
The second line with the “O” record sets options for this document. “E” marks that it is a macro-enabled document.
The third line has a names record “NN”. We set the name “Auto_open” for the cell at row 101, column 1 (“ER101C1”).
The fourth and fifth lines define cell content (“C”). “X” and “Y” records mark row and columns (e.g. row 1, column 101 in the first “C” line). Record “E” defines an expression value for this cell, in our case two Excel 4.0 macro functions.
The last line holds the end of file record (“E”).
In short, this basic SYLK file example defines a cell named Auto_open that executes the EXEC() and HALT() Excel 4.0 macro functions (so this is not VBA!). If you target Excel in a different language, beware of localized Auto_open event names. For example, in Dutch this has to be renamed to “Auto_openen”.
Process injection with SYLK
Now that we can embed macros in SYLK, we can do much more than simply popping calculator. In our previous blog post on Excel 4.0 / XLM macros, we have already demonstrated the power of this macro type. The following proof of concept demonstrates shellcode injection using macros in SYLK:
Create shellcode without null bytes. Example with msfvenom: msfvenom -c messageBox -a x86 --platform windows -p windows/messagebox TEXT="Hello from shellcode!" -b "\x00" -f raw > messagebox.bin
Create a SYLK file that embeds and loads the shellcode: python shellcode_to_sylk.py messagebox.bin > file.slk
Based on proof of concept code that we shared with MDSec in an early stage of our research, Dominic Chell has also embedded process injection using SYLK payloads in his SharpShooter tool.
Disguising SYLK as CSV
An interesting feature is that SYLK files can be disguised as other Excel file types, including the comma-seperated values (CSV) type. Upon parsing of a file with the .csv extension, Excel will automatically detect if the file is a SYLK file when the file starts with the header “ID;P” which is typical for SYLK. If this is the case, the following dialogue will be presented to the user:
If the user clicks “Yes”, the file will be opened as a SYLK file instead of CSV. So, with one additional warning message we can embed a malicious macro in a text-based file with the .csv extension.
Abusing SYLK on Mac
The SYLK file format is also supported on MS Office for Mac. The .slk extension maps to Excel for Mac by default and Excel 4.0 / XLM macros are supported as well, rendering this file format a very good candidate for weaponization on Mac.
Things get even more interesting when a target uses an outdated version of MS Office for Mac. MS Office 2011 for Mac contains a vulnerability where no warning message is displayed before macro execution in SYLK files. My colleague Pieter has previously blogged about this. Since Microsoft does no longer support this version of MS Office, this vulnerability will not be fixed. Unfortunately, we still spot Mac users with this outdated MS Office version from time to time.
SYLK and antivirus
In theory, SYLK files are easy to scan for a security product since the file format is very simple. However, in practice, it appears that many antivirus products do not particularly bother about this file format. In our experience, detection signatures and heuristics for malicious SYLK files by most antivirus products are quite poor.
We hope that this blog post contributes to a better understanding of the dangers of SYLK files and that antivirus vendors will act upon this. With an increase of malicious SYLK samples in the wild there is definitely a motivation to do so.
Also, it should be noted that the Antimalware Scan Interface (AMSI) does not catch macros in SYLK. As the AMSI engine for macros only hooks into VBA, it is blind to Excel 4.0 / XLM based macros.
Mitigation
The best way to mitigate abuse is to completely block SYLK files in MS Office, which can be achieved through File Block settings in the MS Office Trust Center settings.
This GUI can be a bit confusing. A checkbox under “Open” means that a blocking action is defined for that filetype. So a checkbox under “Dif and Sylk Files” and selecting “Do not open selected file types” is what you need to configure in order to block opening of SYLK files.
The relevant policy can be configured under Microsoft Excel 2016\Excel Options\Security\Trust Center\File Block Settings.
Set “Dif and Sylk” to “Enabled: Open/Save blocked, use open policy” to prevent users from opening SYLK files in MS Office.
Another opportunity for mitigation is that macros in a SYLK document do adhere to macro security settings configured in MS Office. While completely disabling macros is not a viable option in many organisations, the following good practices can reduce the risk posed by malicious macros in SYLK and other MS Office file formats:
MS Office 2013 and 2016 have a feature to block macros in files that are downloaded from the internet. Set a DWORD value for blockcontentexecutionfrominternet to “1” under HKEY_CURRENT_USER\Software\Microsoft\Office\16.0\Word\Security. This setting can also be managed via GPO. Enable the setting “Block macros from running in Office files from the Internet” which can be found under Microsoft Excel 2016\Excel Options\Security\Trust Center.
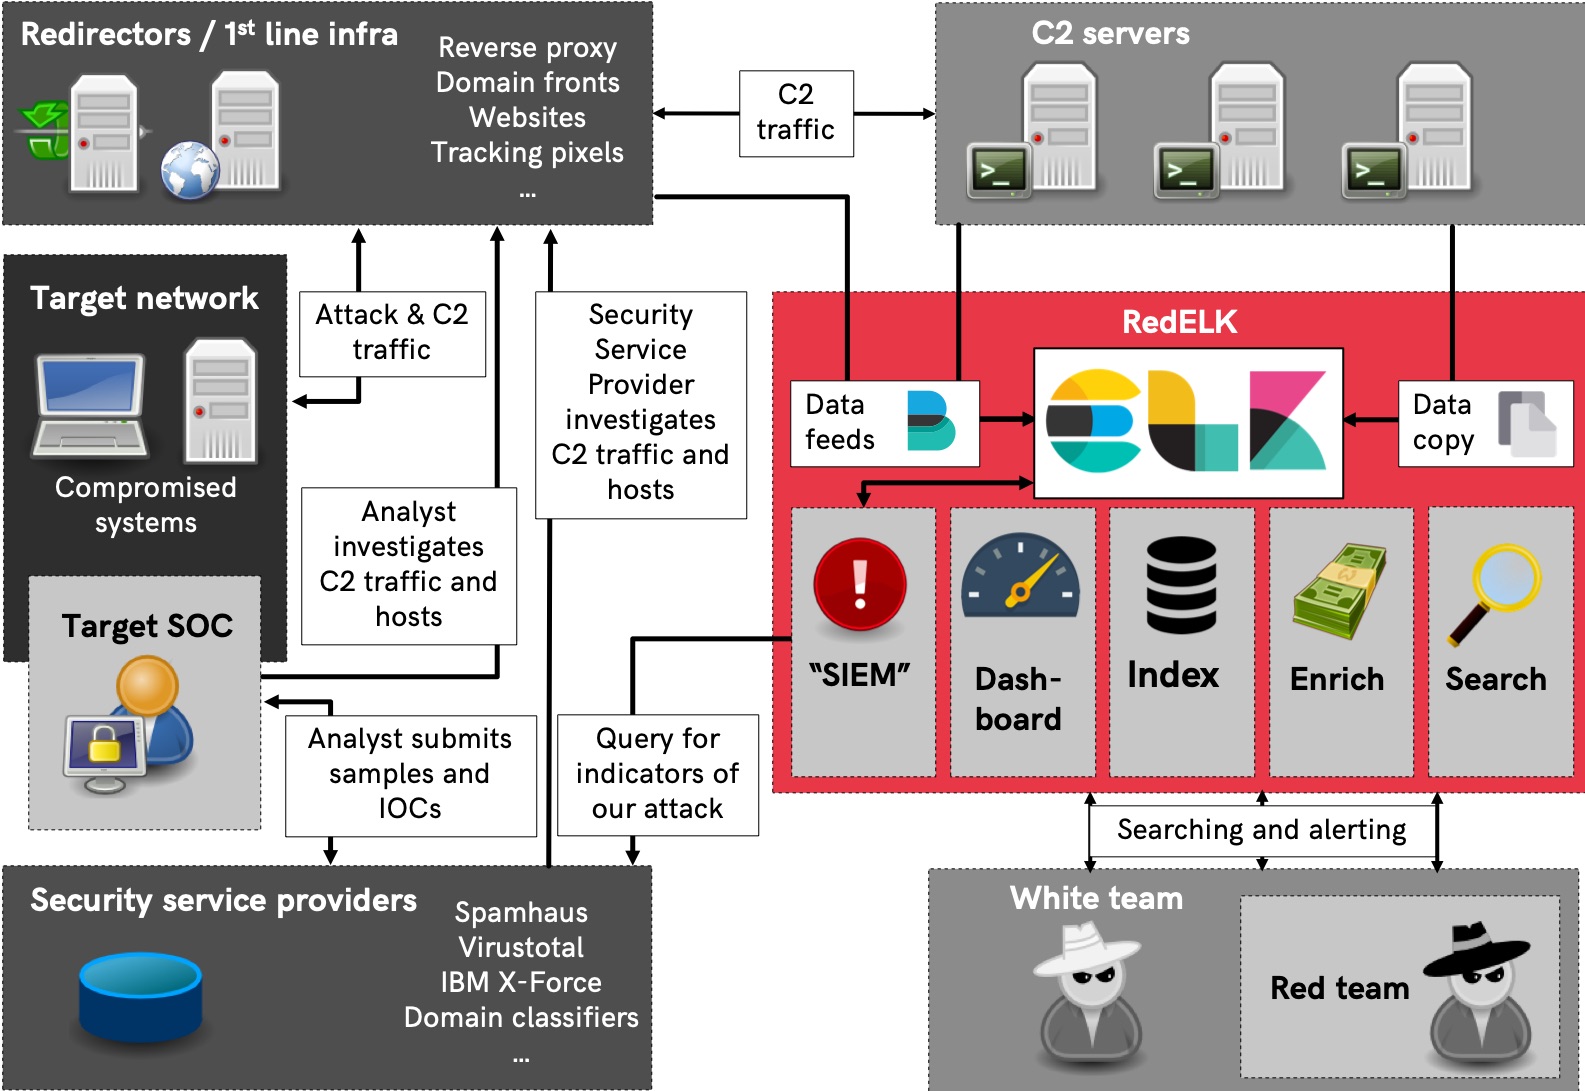
This is part 2 of a multipart blog series on RedELK: Outflank’s open sourced tooling that acts as a red team’s SIEM and also helps with overall improved oversight during red team operations.
In part 1 of this blog series I have discussed the core concepts of RedELK and why you should want something like this. In this blog post I will walk you through integrating RedELK into your red teaming infrastructure. In future parts I will explain the core functionality of RedELK, and on the alarming of detection by blue teams.
In this blog I use the 1.0.1 release of RedELK . You can get it here.
Core concepts of RedELK
RedELK should be regarded as an addition to your red teaming infrastructure. Your operation will continue without RedELK. However, you will soon experience that an ops without RedELK feels like working partly blind.
There are a few core concepts that help you better understand how RedELK works and that help you with an easy deployment:
A separate RedELK instance is intended per engagement. It is not recommended to mix operational data from multiple engagements into the same RedELK server.
Each RedELK installation consists of the following three components:
RedELK server;
redir package installed on each of your redirectors;
teamserver package installed on each of your C2 servers.
RedELK allows you to define different attack scenario names within a single engagement. This is useful for multi-scenario engagements such as TIBER, e.g. scen1, scen2 and scenX. You could also use this to differentiate between different campaigns or otherwise differentiate between multiple goals for the same client, e.g. phisrun1, longhaul, shorthaul4, etc.
Hopefully you already have the good practice of deploying new infrastructures per red team engagement. You should treat the RedELK server in the same way: install freshly at new engagements. Upgrading or re-installation of RedELK is not supported.
A RedELK server is of high confidentiality as it stores all operational data as well as all traffic data. You may want to position this in a secured network segment.
Inbound traffic to a RedELK server is limited to HTTP for the Kibana web interface and TLS-encrypted filebeat->logstash traffic from your redirectors and C2 team servers. A RedELK server initiates outbound rsync traffic to your c2 team servers and HTTP(S) to online security vendor such as Virus Total, abuse.ch, malwaredomains.com, Greynoise, etc.
The performance impact on your redirectors and C2 team servers is very limited: it is only filebeat that is installed on both, and a little cron script to copy logs to a central directory on the C2 team servers. A RedELK server requires beefy hardware. It runs the full Elastic stack, and over time will contain a reasonable amount of data. A dual core CPU and 8GB RAM is recommended.
Redirectors serve as anonymization layer in red team operations. However, in the case of RedELK their purpose is extended to also serve as a logging layer. This means it is recommended to point your Domain Fronting/CDN endpoints to a redirector that you fully control and where you have the RedELK redir package installed. If you point directly to your C2 team server, you miss the traffic data.
The picture below shows a better overview of how the different components interact and how the data flows to and from the RedELK server.
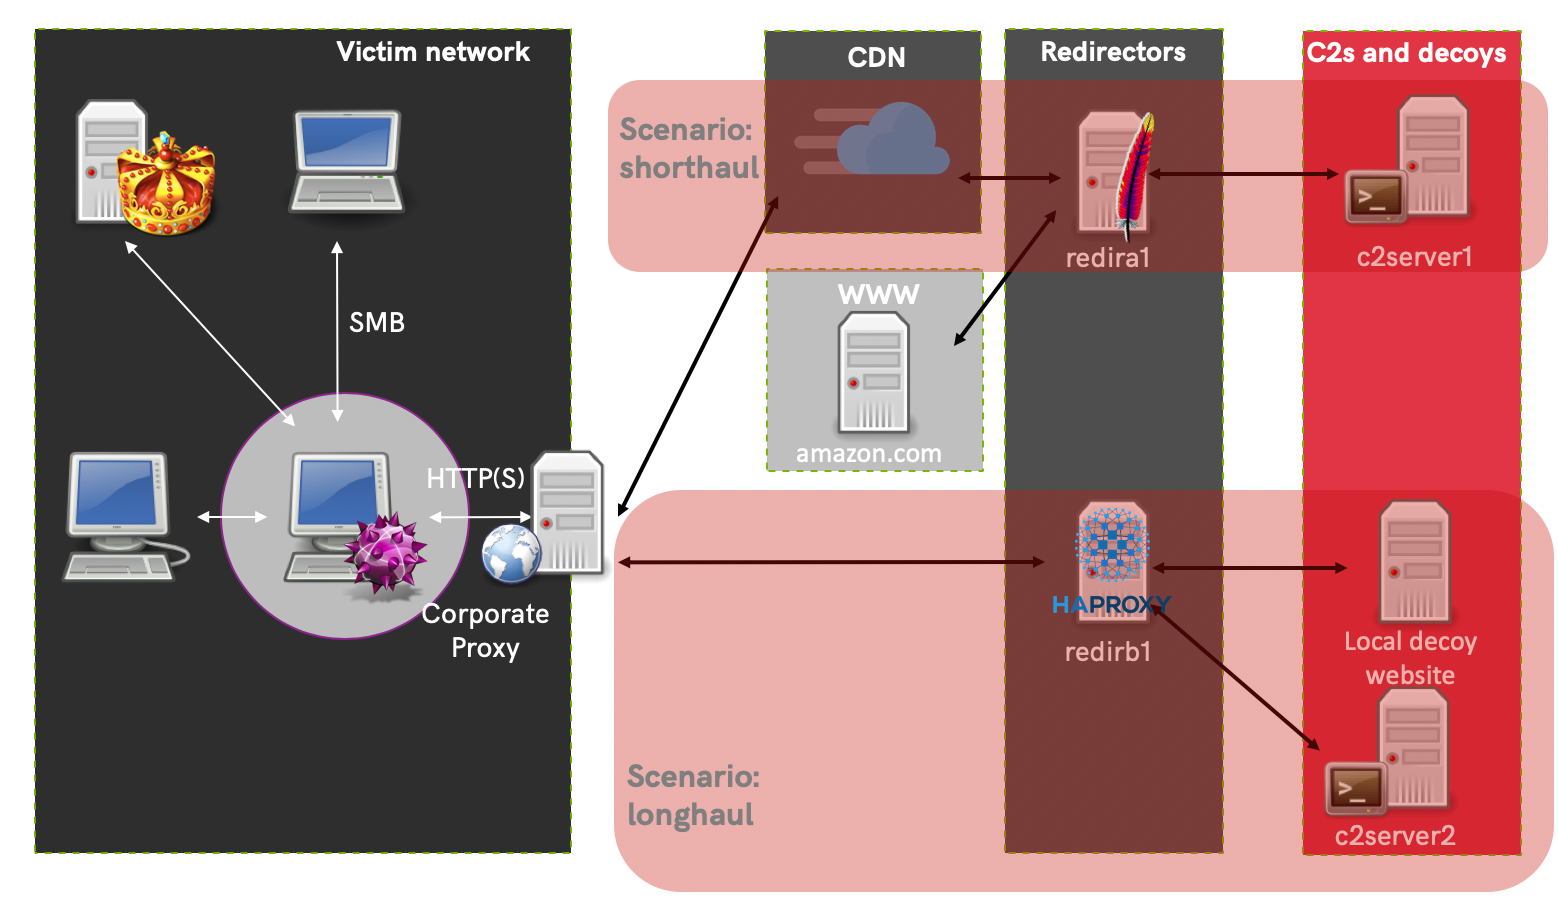
Lab network setup
For this demo, I have setup a lab with the following characteristics:
Target network with multiple machines.
Two attack scenarios, one for shorthaul and the other for longhaul.
Two Cobalt Strike Team servers, each for different purpose
Two redirectors, one running Apache, the other running HAProxy.
The Apache redirector is reachable via a Domain Fronting setup using Azure CDN. It sends its C2 traffic to a dedicated C2 server. Decoy traffic is sent to amazon.com
The HAProxy redirector sends C2 traffic to a different C2 server. Decoy traffic is sent to a decoy website we setup ourselves.
A general overview of the test lab setup can be seen in the picture below. Note that the RedELK server is not included in this overview:
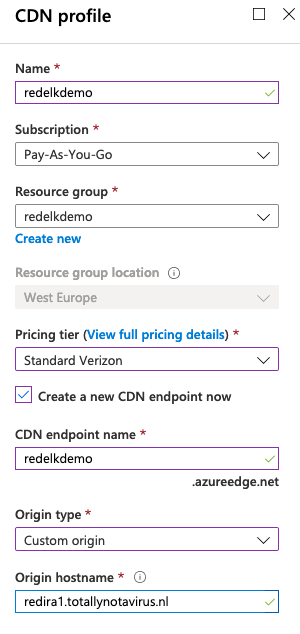
Naming RedELK has a few requirements to the naming of objects. These are explained indetail on the wiki. In this demo lab I use the following names:
Attackscenario: shorthaul
CDN entry DNS name: ajax.microsoft.com
CDN endpoint name: redelkdemo.azureedge.net
CDN origin hostname: redira1.totallynotavirus.nl
Apache redir DNS name: redira1.totallynotavirus.nl
Apache redir FileBeatID: redira1
Apache redir frontend name: http-AzureDF
Apache redir C2 backend name: c2-c2server1
Apache redir decoy backend name: decoy-amazon
C2 server DNS name: c2server1.totallynotavirus.nl
C2 server FileBeatID: c2server1
Attackscenario: longhaul
HAProxy redir DNS name: redirb1.totallynotavirus.nl
RedELK server DNS name: redelk.totallynotavirus.nl
The CDN configuration is shown below. Don’t forget to set the caching behavior to ‘Bypass Cache’ within the Caching Rules rules of the endpoint. There are several blog posts explaining how to do this, including this great post by @rvrsh3ll.
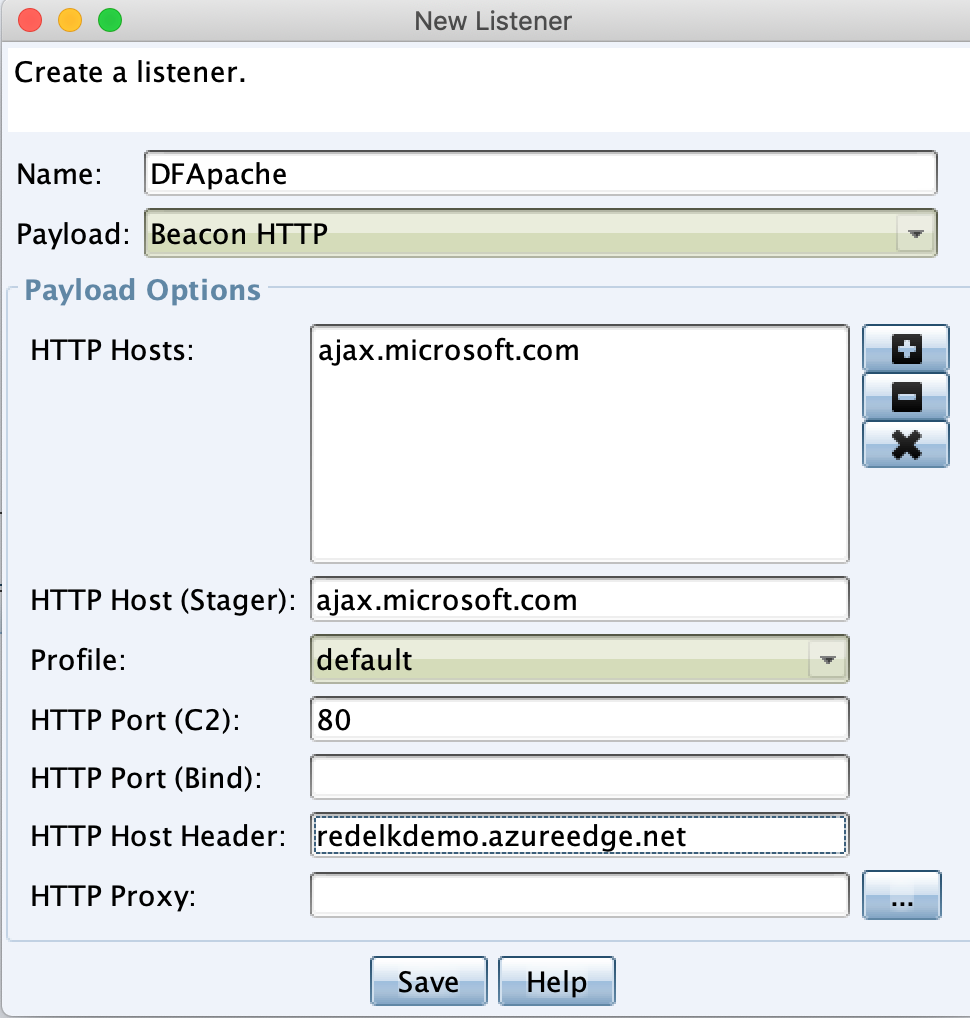
Each Cobalt Strike server requires two things: the Mallable profile, and the listener setup. The Mallable profile I’ve used in this example is based on the same that ships with RedELK, and can be found here. Note that this profile requires you to insert the host header of your Domain Fronting CDN endpoint name. If you don’t want domain fronting you can remove the Host Header Host directive.
Mallable profile using the CDN setup
The important things with listener setup is to use a HTTP Host that is frontable, and to use the hostname of the CDN endpoint in the Host Header field.
The example above is for the CDN redir-teamserver setup. I have configured the other Cobalt Strike teamserver with a rather basic HTTP listener setup.
With the test lab setup explained, let’s focus on the RedELK specific installation.
Initial installation
First, download RedELK and extract the package. Check with version you get, there may be newer versions available:
curl -L https://codeload.github.com/outflanknl/RedELK/tar.gz/1.0.1 -o redelk_v1.0.1.tgz
tar zxvf redelk_v1.0.1.tgz
Before we can run the installers on the different systems we need to:
Generate TLS certificates used for the secured traffic between filebeat on redirectors/c2 team servers and the RedELK server
Generate three installation packages for redirectors, c2 team servers and for the RedELK server.
Both steps are done with the initial-setup.sh script. You can run this initial setup on the RedELK server, but it is also tested macOS clients.
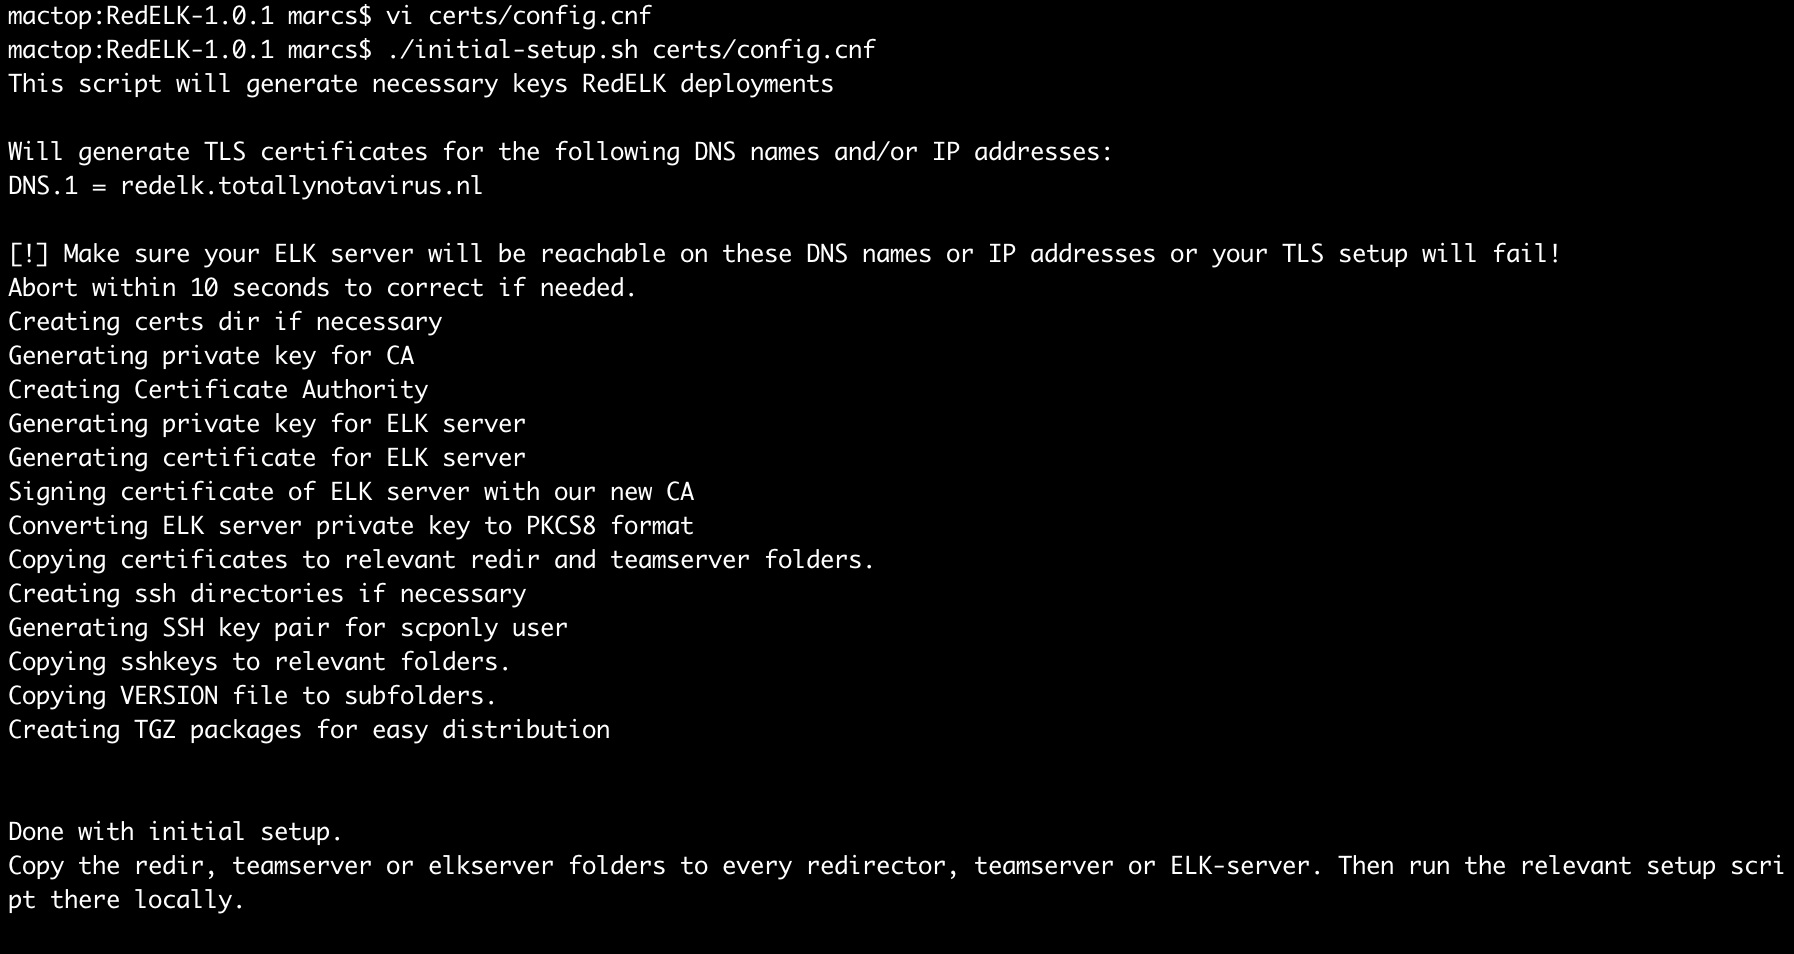
Important note: Make sure to edit the details of the TLS Certificate Authority in the certs/config.cfg file prior to running the script. Make sure to not make typos here: TLS is non-forgiving, resulting in blocked data flows to your RedELK server. Troubleshooting is difficult, so pay attention while performing this step.
In this case I’ve configured the TLS config file to use redelk.totallynotavirus.nl as DNS.1, and I’ve removed the DNS.2 and IP.1 lines. After editing the TLS config file, run the installer:
./initial-setup.sh certs/config.cnf
Output should look like:
Installation on redirector
In this demo setup I have created two redirectors, one running Apache (used via the CDN), the other running HAProxy for the direct HTTP communication. Both redirectors need the redirs.tgz package generated in the previous step. So copy them over to the remote systems.
Before we can run the installers on the redirectors we need to configure Apache and HAProxy to be more verbose in their logging. This requires a modified config. Luckily RedELK ships with example configs for these extra logging directives, and can be found here. Let’s walk through the required steps.
Redirector setup
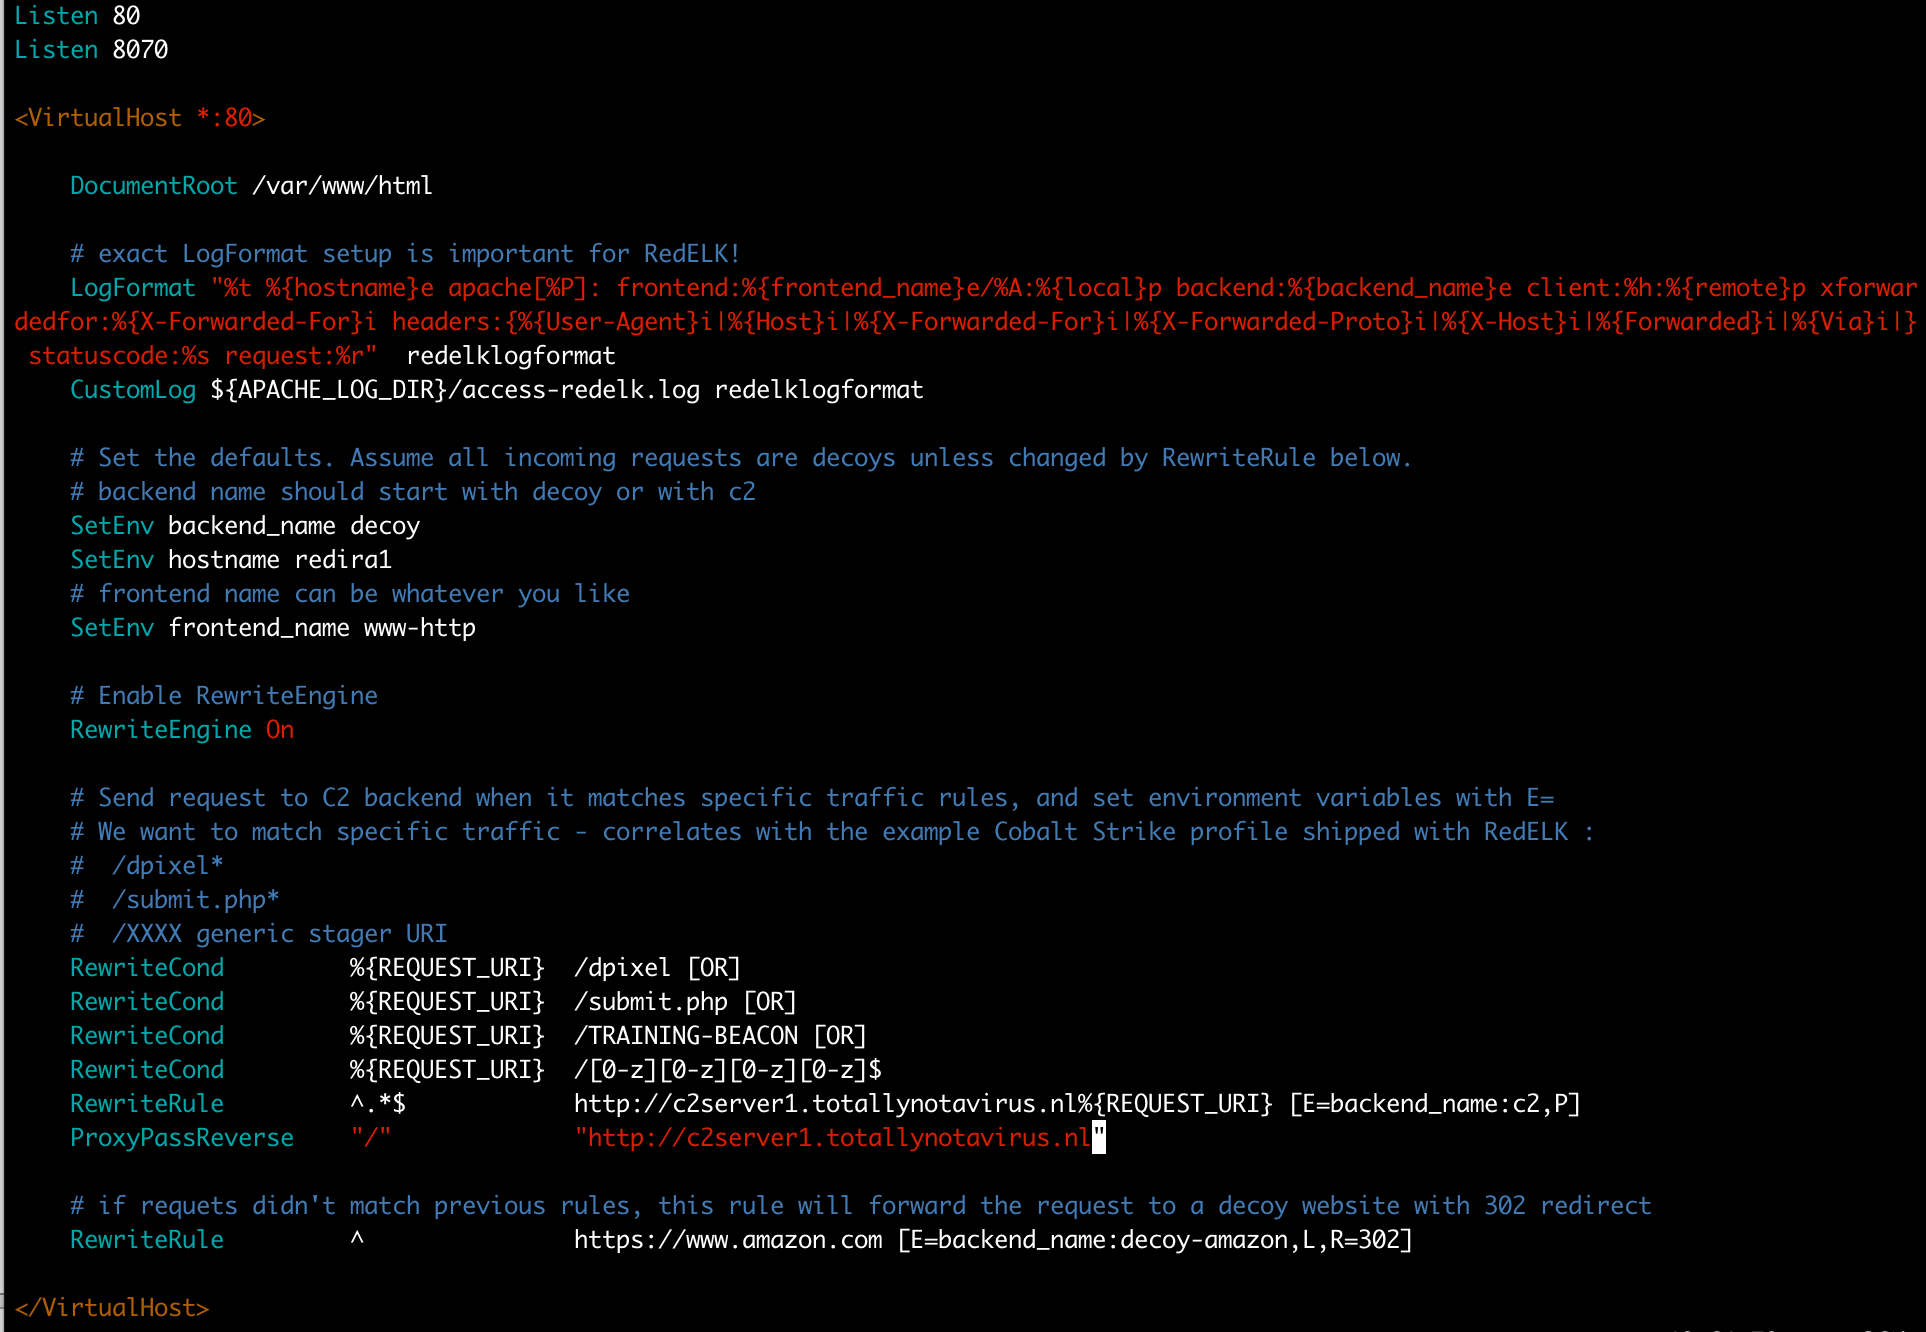
I will start with the Apache one. We need to enable required Apache modules, make a new site, configure the new site according to the Cobalt Strike profile and according to the RedELK logging requirements. This can be done as following:
Now open Apache config file, change the two occurrences of $$IP_OF_YOUR_C2SERVER to your C2 team server’s address (in my case c2server1.totallynotavirus.nl), define a friendly hostname (in my case redira1) and make sure to configure an informative name for the frontend (in my case www-http) and for the backends (in my case decoy and c2). See example in screenshot below.
Enable the site and start apache:
a2ensite redelkdemo.conf
service apache2 restart
As traffic hits your redirector the log file /var/log/access-redelk.log should be filled.
Now it is time to run the RedELK redir installer. Copy the redirs.tgz package from the initial setup step over to your redirector. Extract the tgz file and run the following command:
The installer should exit without errors, and filebeat should be started. Note that the filebeat log file will report errors as the RedELK server isn’t configured yet so the incoming Filebeat traffic is not acknowledged.
The setup of the HAproxy redirector is largely similar. You can find an example config here. The RedELK installer command I ran is:
The installation on the Cobalt Strike C2 teamservers is rather straight forward. Copy the teamservers.tgz package to the teamserver and run the installer using:
Important note: you want to keep the $ScenarioName the same as used during installation on the redirector. If you’ve failed to do so, or want to rename the scenarioname or the host at a later moment, just edit the fields in the /etc/filebeat/filebeat.yml file.
The installation on the other c2 team server is roughly the same, of course using FilebeatID c2server2 and scenario name longhaul.
Installation on RedELK server
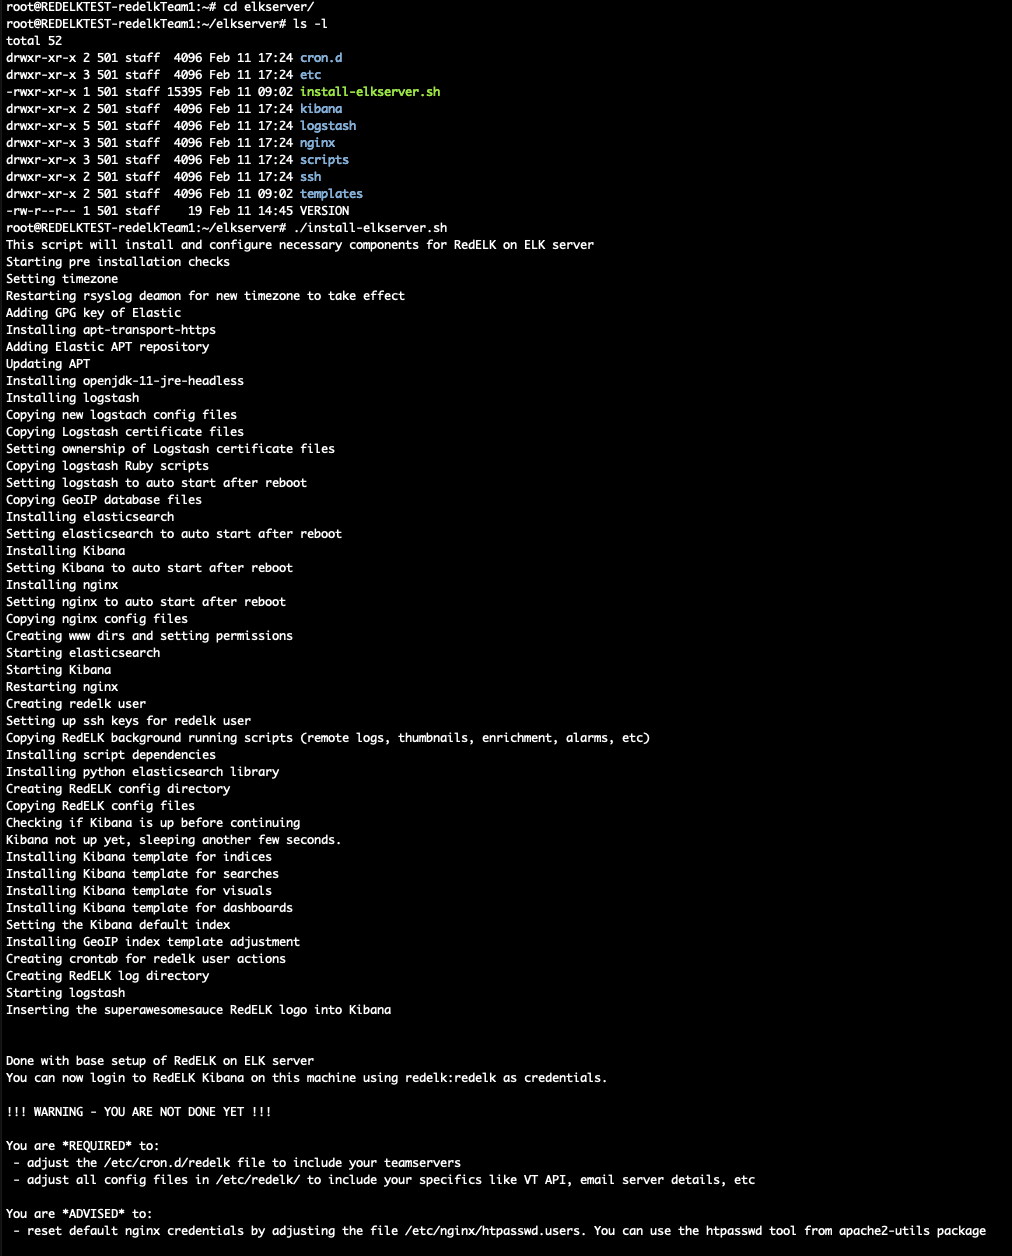
The installation on the RedELK server requires no parameters. Just copy and extract the elkserver.tgz file, and run:
./install-elkserver.sh
You should see something like this.
As the installer tells you, there are a few mandatory things left to do:
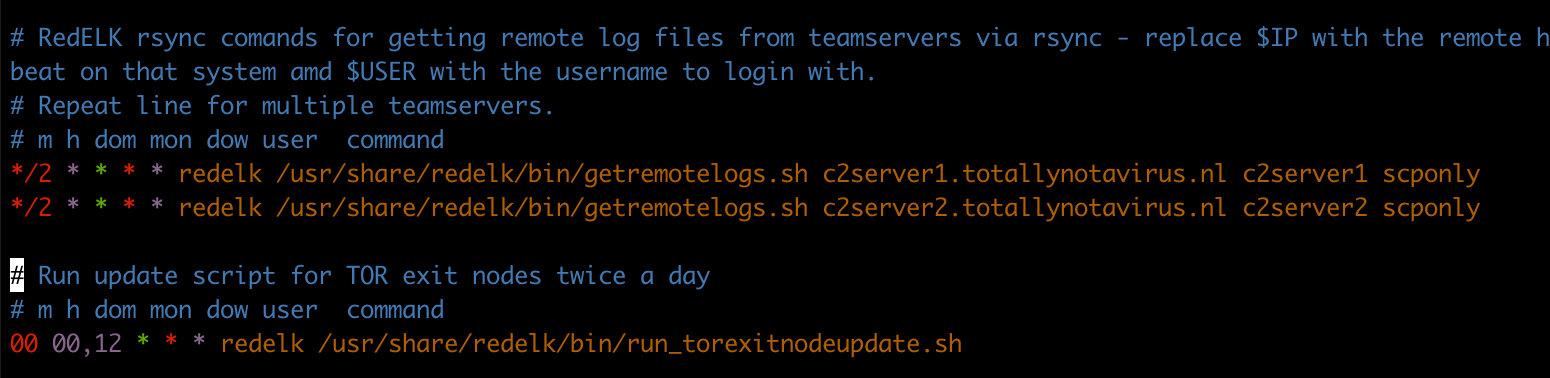
edit the configuration /etc/cron.d/redelk. This is required to rsync the Cobalt Strike logs, screenshots, downloaded files, etc to the local RedELK server. This *greatly* enhances ease of use during the ops.
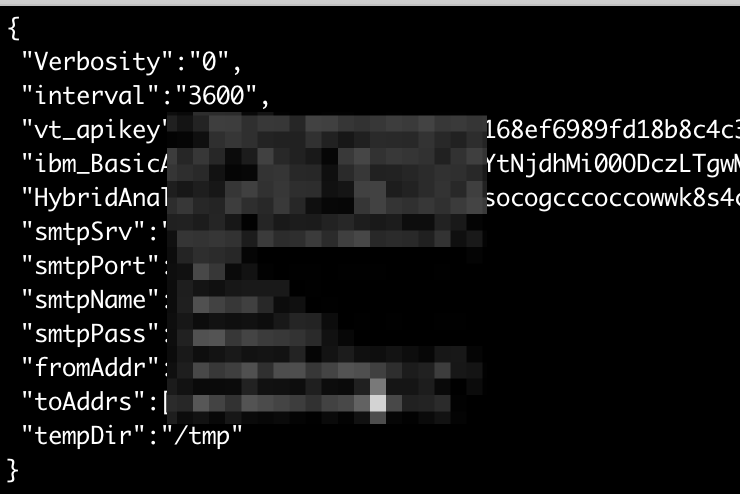
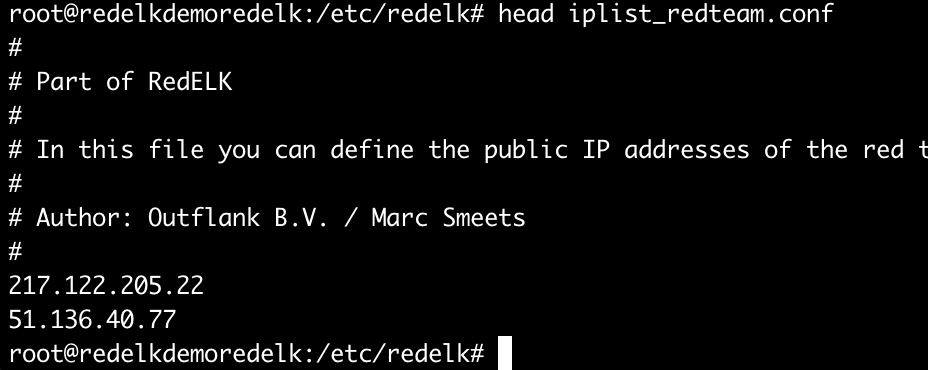
edit the configuration files in /etc/redelk/. I recommend at least the alarm.json.conf if you want alarms, and iplist_redteam.conf to define what external IP addresses are used for testing purposes and you naturally don’t want alarms on. But please check out all the details as also described at the RedELK wiki
See below screenshots for the edits in my example.
Contents of /etc/cron.d/redelk
Masked contents of /etc/redelk/alarm.json.conf
Contents of /etc/redelk/iplist_redteam.conf
Test the access
Browse to the HTTP port of the RedELK server. Login with your own creds, or use the default redelk:redelk. As soon as data is flowing you should find data in the indices.
Do you see data? Great! In the next blog post I will walk you through the specifics.
Troubleshooting
Still no data there? Here are some troubleshooting tips.
Did any of the installer packages report any error? If so, check the local installer log file.
Did you use the correct name for the TLS setup in the initial-setup.sh script?
Did you point filebeat to the correct DNS name or IP address? Check /etc/filebeat/filebeat.yml for the value of hosts. The value should match to something listed as DNS or IP in the TLS config file for the initial-setup.sh.
Is Filebeat correctly sending data? Check /var/log/filebeat/filebeat on redirs and teamservers. Sadly, the exact error messages are cryptic at best. In our experience, most often it comes down to a TLS-DNS-certificate mismatch.
Is Logstash on the redelk server reporting errors in /var/log/logstash/logstash-plain.log?
Are there any beacons running, and/or is there traffic flowing to your infra? If not, well, RedELK doesn’t have any data if there is no data
“It is not DNS. It can’t be DNS. Ah crap, it was DNS.” Make sure the DNS records are correctly configured.